
Ask AI
— answers from the official manualAnswers from the official manual.
Common questions
Common Questions
10 totalHow do I properly clean the pressure cooker after use?
Unplug and allow the unit to cool down before cleaning. Use a soft damp cloth to wipe the base unit; avoid immersing it in water or any other liquid. Wash the removable cooking pot with hot soapy water using a sponge or brush, then rinse and dry thoroughly.
What should I do if the silicone sealing ring is cracked or broken?
Do not use the pressure cooker if the silicone sealing ring is cracked or damaged. Contact Customer Services to replace it with a new sealing ring and assemble on aluminum inner plate correctly.
How do I remove the lid safely after cooking?
Wait until pressure has been released before attempting to open the lid by rotating clockwise until the UNLOCK position. Ensure steam is directed away from you when removing the lid.
What are the safety rules I should follow while using the pressure cooker?
Ensure the unit is used on a stable, level surface out of reach of children. Do not obstruct the pressure release valve and ensure it is not clogged before use.
How long should I wait before releasing the lid after cooking?
Allow the unit to remain on WARM function for natural pressure release, which can take from 12 minutes to 30 minutes depending on liquid inside. Only proceed with QUICK RELEASE method if cooking food like soups and stocks where quick release is safe.
How do I set the delay function?
Press the DELAY TIMER button to choose a time up to 2 hours before your desired start of cooking. Then select the appropriate food type and adjust the cooking time using the +/- buttons.
Full Manual
28 pages
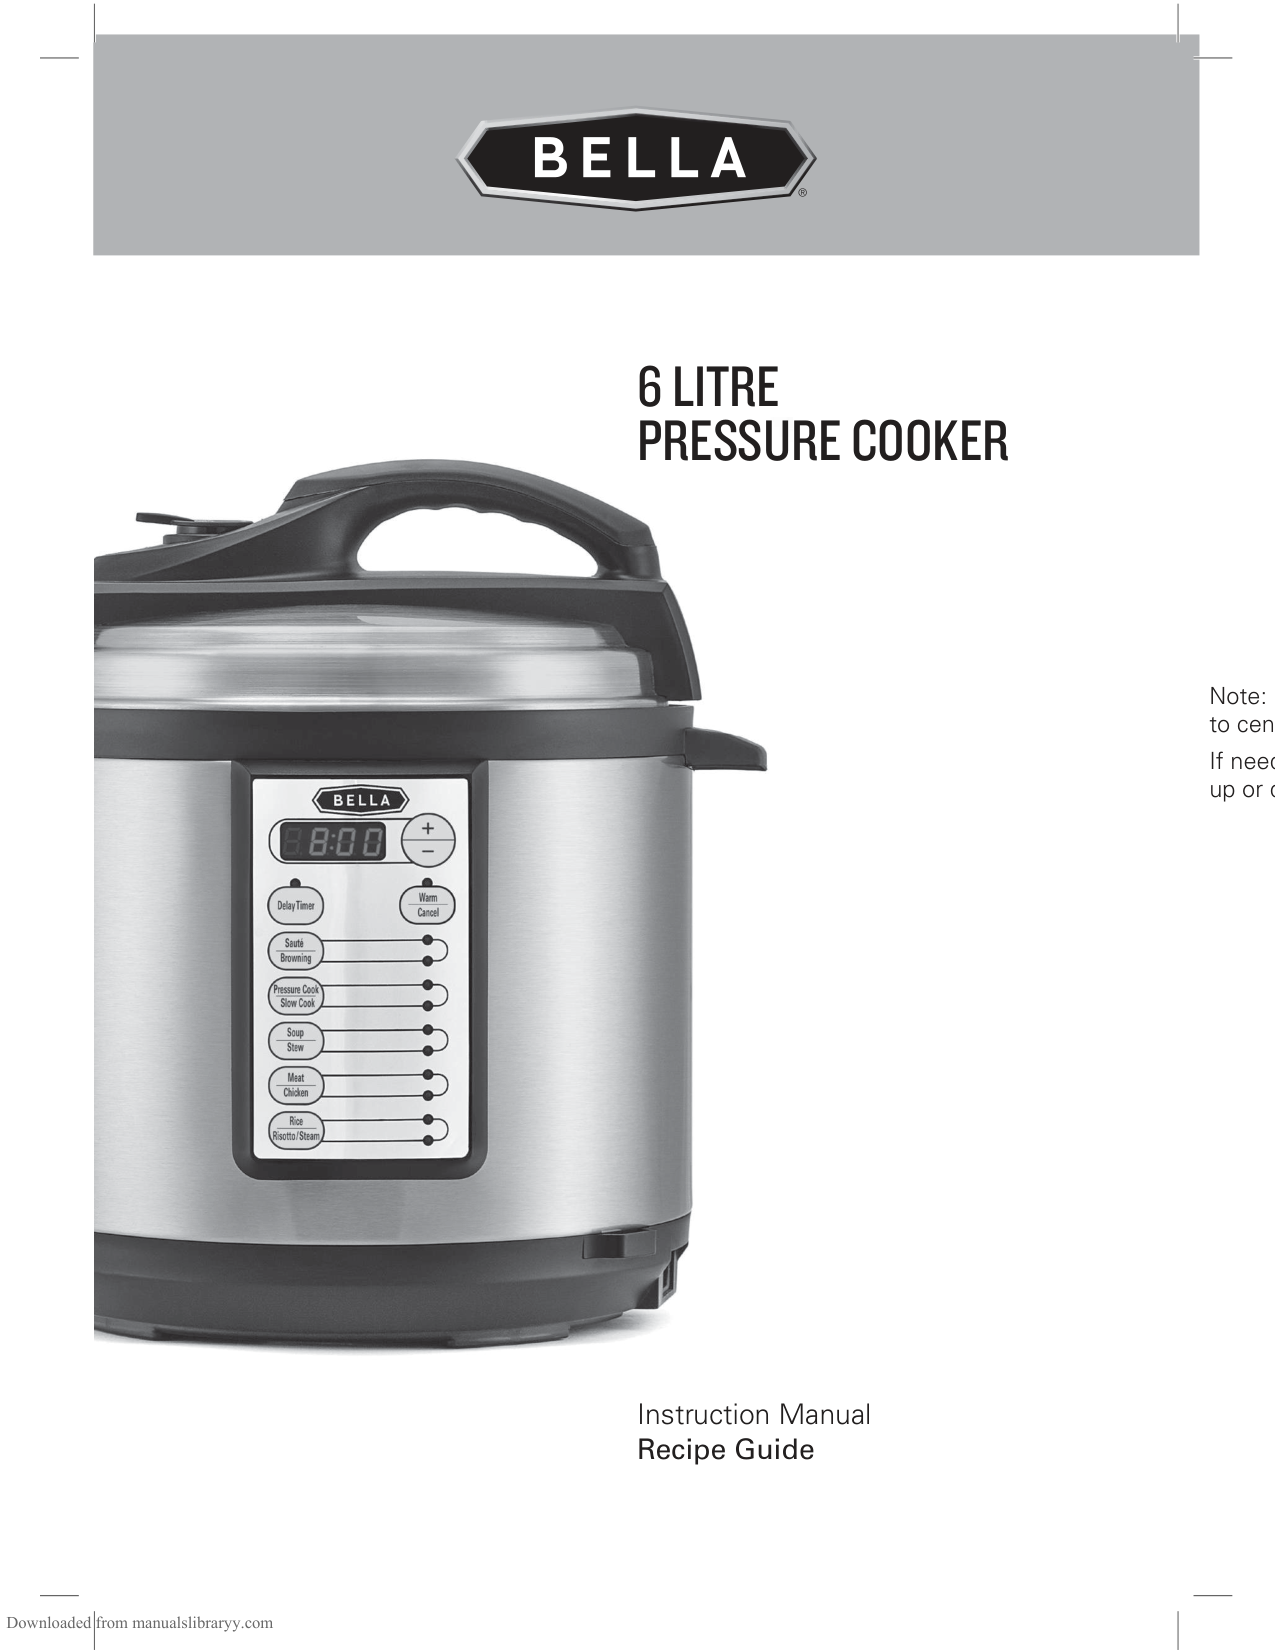
6 LITRE PRESSURE COOKER

##### Instruction Manual Recipe Guide
Note: Keep text aligned left, to center of page.
If needed text can be move up or down
######## Table of Contents
Product Safety .................................................................................................................................................2-3 Electrical Safety .............................................................................................................................................. 3-4 Features ........................................................................................................................................................... 5-6 Introduction to Pressure Cooking ....................................................................................................................7 Before First Use ..................................................................................................................................................7 Using Your Pressure Cooker ..........................................................................................................................7-8 The Delay Function .............................................................................................................................................9 Warm/Cancel Functions .....................................................................................................................................9 To Remove the Lid ..............................................................................................................................................9 One Touch Digital Functions ......................................................................................................................10-11 Cooking Times .............................................................................................................................................12-13 Hints and Tips for Pressure Cooking ........................................................................................................13-14 Care and Cleaning ............................................................................................................................................14 Storing Instructions ..........................................................................................................................................14 Servicing ............................................................................................................................................................14 Guarantee ..........................................................................................................................................................15 Recipes ..........................................................................................................................................................16-25
######## INTRODUCTION
Thank you for purchasing this product. You may already be familiar with using a similar product, but do please take the time to read these instructions – they have been written to ensure you get the very best from your purchase.
Safety is Important To ensure your safety and the safety of others, please ensure you read the Product Safety and Electrical Safety information before you operate this product. Please pay particular attention to any warnings and cautions contained within these instructions. Keep these instructions in a safe place for future reference.
What can you expect from the Bella Pressure Cooker? This fantastic unit is one pot cooking and it saves time by cooking up to 70% faster than conventional cooking. At the touch of a button you can create delicious meals in a fraction of the time than on the stove top or in a slow cooker. The pre-programmed settings mean that you simply select a function and away you go, you don’t have to worry about pressure levels as the unit does it all for you. Instead of using lots of pots and pans, all the preparation is carried out in one pot, you can brown meat and caramalise vegetables, it’s not only easier but saves on washing up!
########## Due to our policy of continuous improvement, the actual product may differ slightly from the one illustrated in this booklet.
PRODUCT SAFETY

Read this manual thoroughly before first use, even if you are familiar with this type of product. The safety precautions enclosed herein reduce the risk of fire, electric shock and injury when correctly adhered to. Keep the manual in a safe place for future reference. If applicable, pass these instructions on to the next owner of the appliance.
Always follow basic safety precautions and accident prevention measures when using an electrical appliance, including the following:
####### WARNING: TO REDUCE THE RISK OF FIRE, ELECTRICAL SHOCK, OR INJURY: READ ALL INSTRUCTIONS CAREFULLY BEFORE USING YOUR APPLIANCE.
Do not use the appliance for other than its intended use, this is for HOUSEHOLD USE ONLY.
ELECTRICAL SAFETY WARNINGS!
Before switching on, make sure that the voltage of your electricity supply is the same as that indicated on the product rating plate. Connecting it to any other power source may cause damage.
This product may be fitted with a non-rewireable plug. If it is necessary to change the fuse in the plug, the fuse cover must be refitted. If the fuse cover becomes lost or damaged, the plug must not be used until a suitable replacement is obtained. If the plug has to be changed because it is not suitable for your socket, or due to damage, it should be cut off and a replacement fitted, following the wiring instructions shown. The old plug must be disposed of safely because inserting it into a 13 amp socket could cause an electrical hazard.
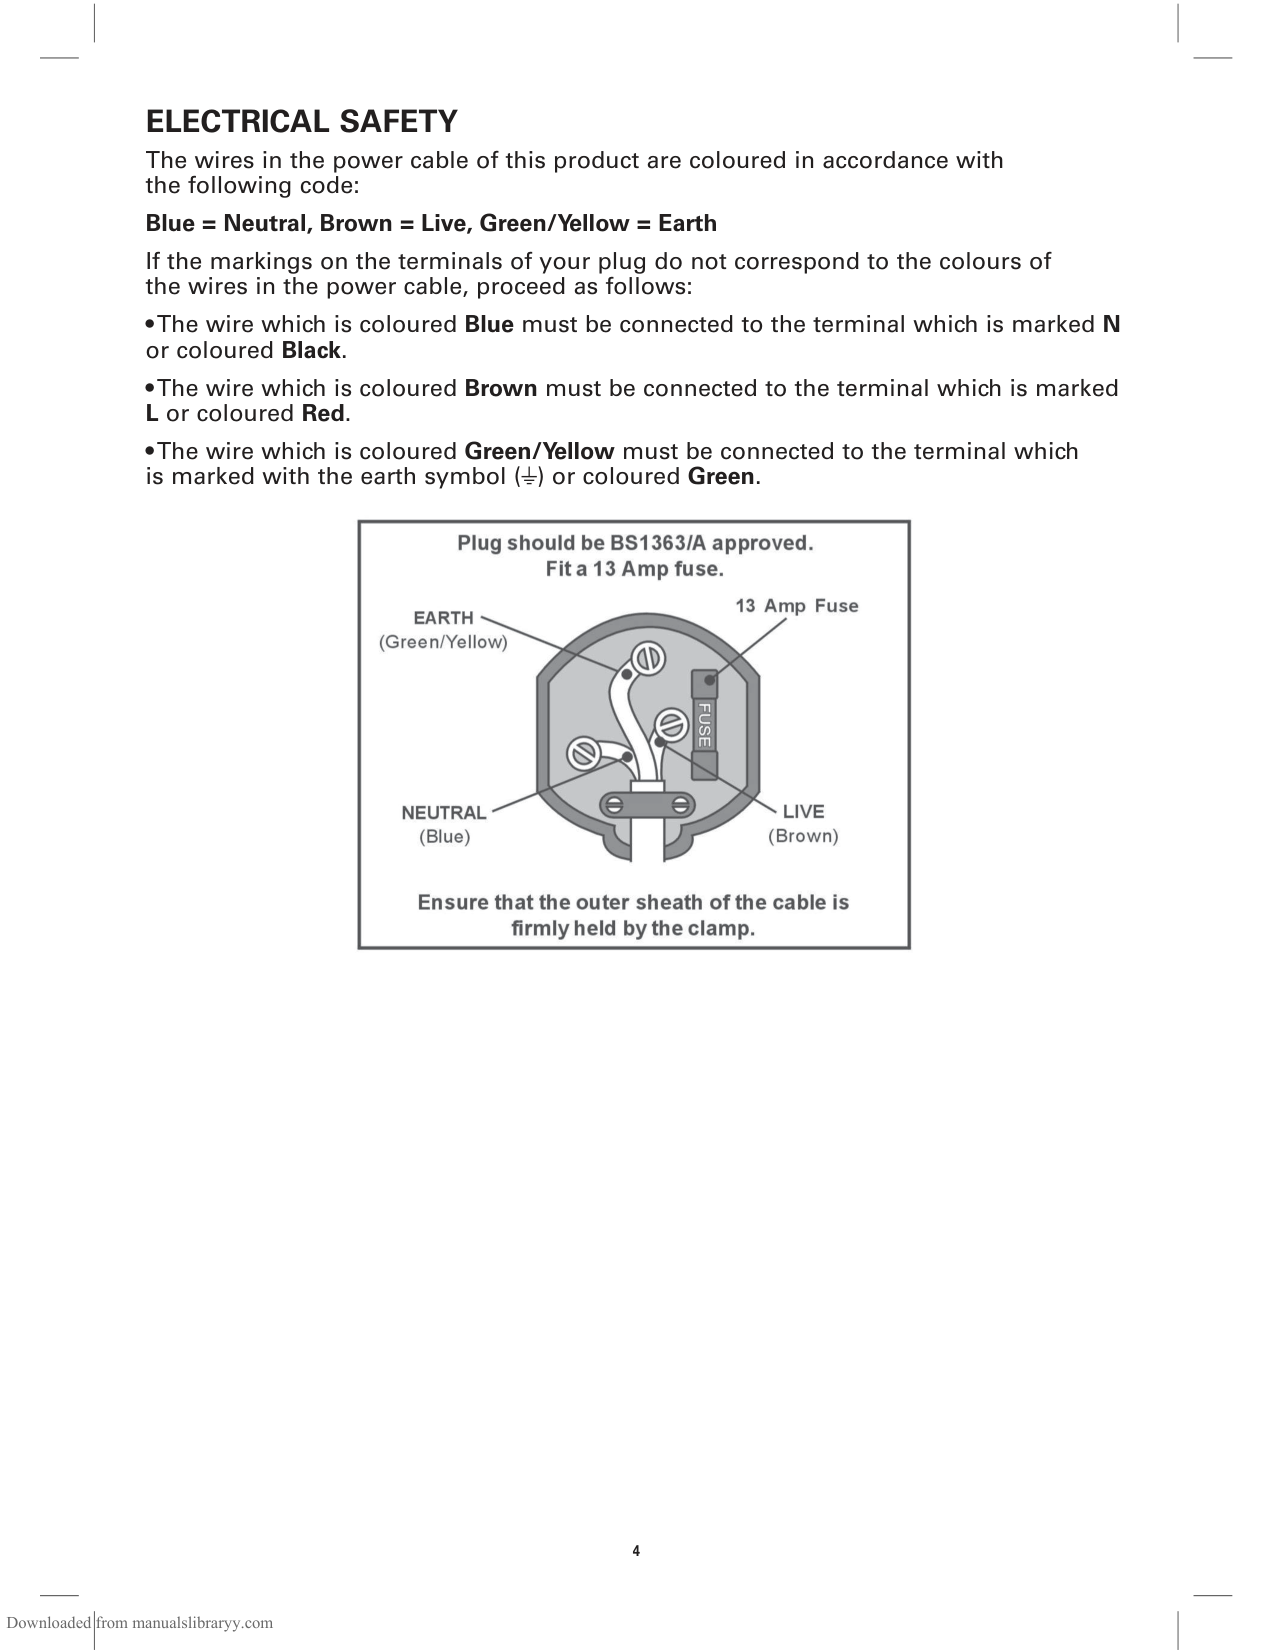
ELECTRICAL SAFETY
The wires in the power cable of this product are coloured in accordance with the following code:
####### Blue = Neutral, Brown = Live, Green/Yellow = Earth
If the markings on the terminals of your plug do not correspond to the colours of the wires in the power cable, proceed as follows:

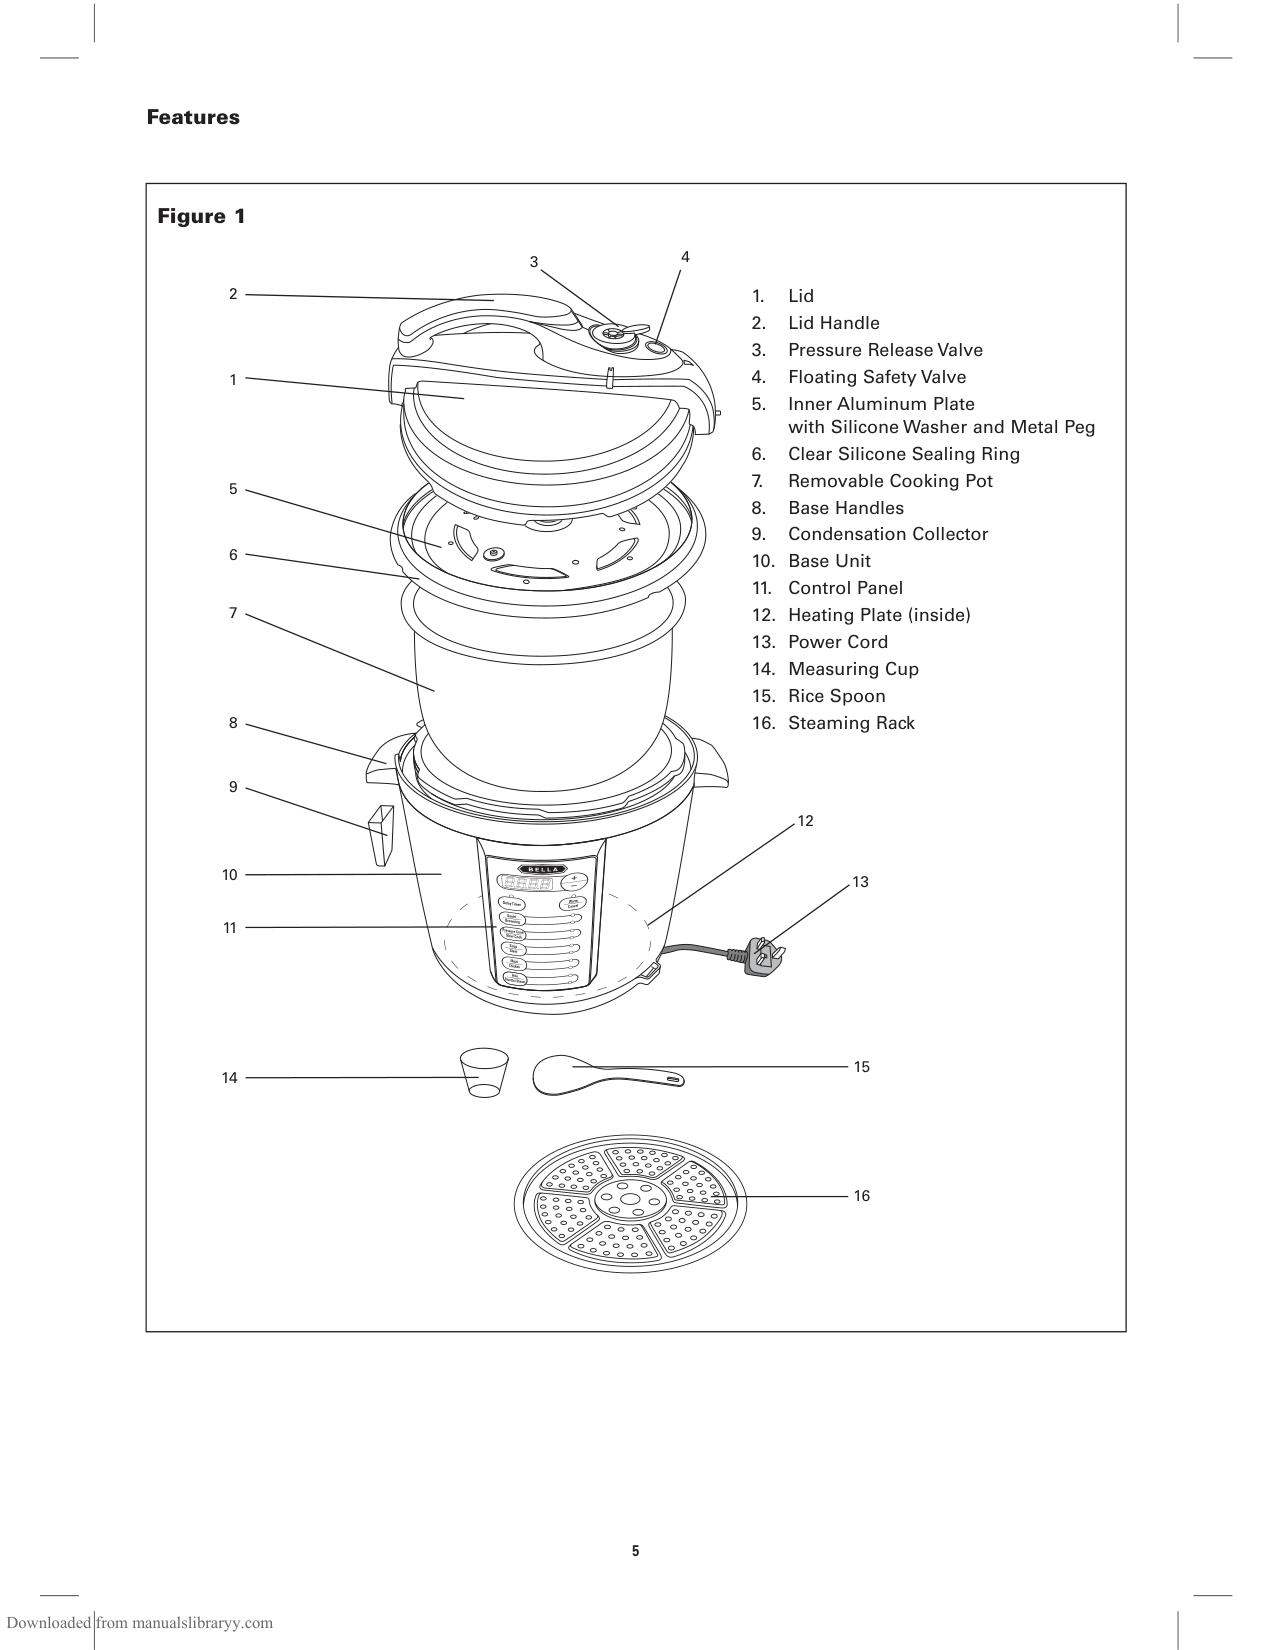
######## Features
|Figure 1
2 1. Lid
2. Lid Handle
3. Pressure Release Valve
4. Floating Safety Valve
5. Inner Aluminum Plate with Silicone Washer and Metal Peg
6. Clear Silicone Sealing Ring
7. Removable Cooking Pot
8. Base Handles
9. Condensation Collector
10. Base Unit
11. Control Panel
12. Heating Plate (inside)
13. Power Cord
14. Measuring Cup
15. Rice Spoon
16. Steaming Rack
43
1
5
6
7
8
9
10
12
13
16
15
11
14| |---|
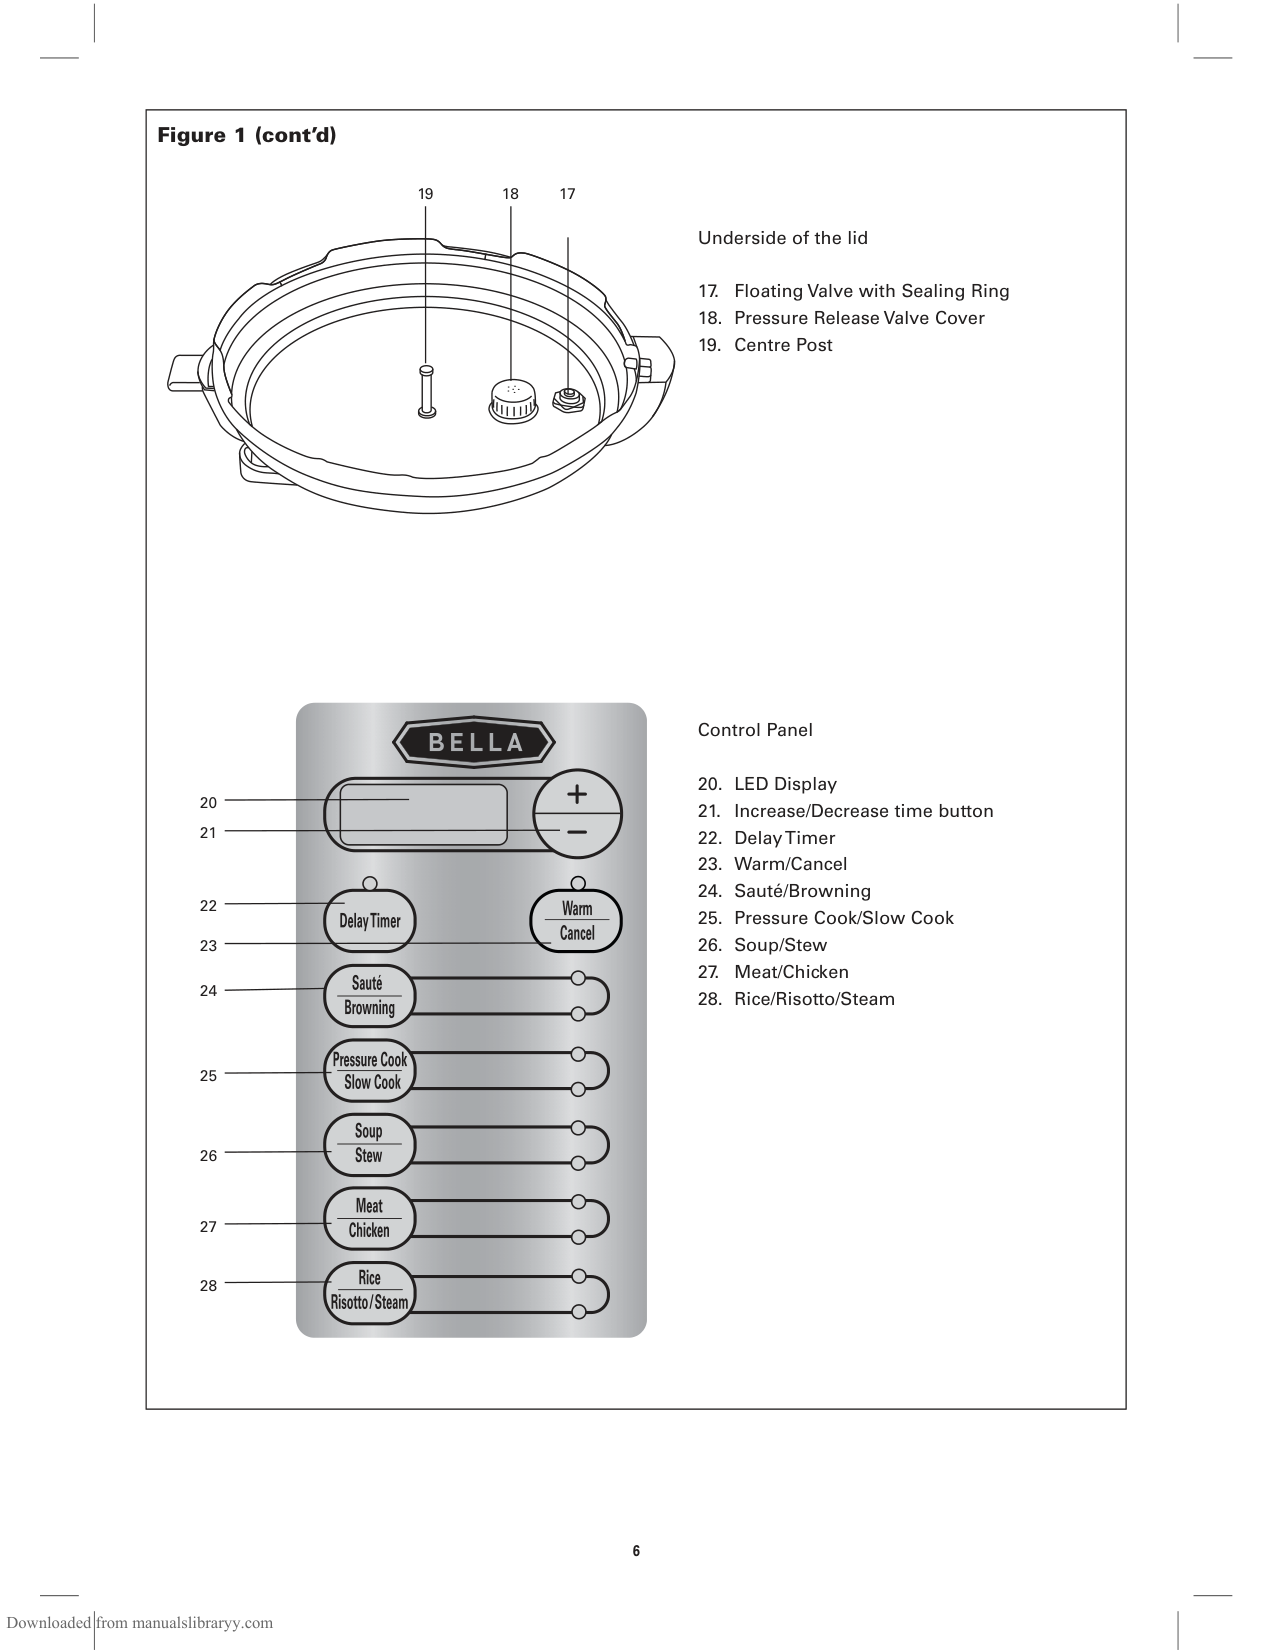
|Control Panel
20. LED Display
21. Increase/Decrease time button
22. Delay Timer
23. Warm/Cancel
24. Sauté/Browning
25. Pressure Cook/Slow Cook
26. Soup/Stew
27. Meat/Chicken
28. Rice/Risotto/Steam
Underside of the lid
17. Floating Valve with Sealing Ring
18. Pressure Release Valve Cover
19. Centre Post
20
19 18 17
21
22
24
25
26
27
28
23
Figure 1 (cont’d)| |---|
Introduction to Pressure Cooking Discover the secrets of pressure cooking with this wonderful pressure cooker that will help you cook faster, healthier and tastier meals with unbelievable speed and ease. This pressure cooker offers 11 cooking settings with the touch of a button. Slow cook all day long or whip up a quick delicious meal, this pressure cooker is the perfect sous-chef. No more tough cuts of meat that take hours to cook, only delicious succulent meat with the nutrients and flavours locked in. Before First Use
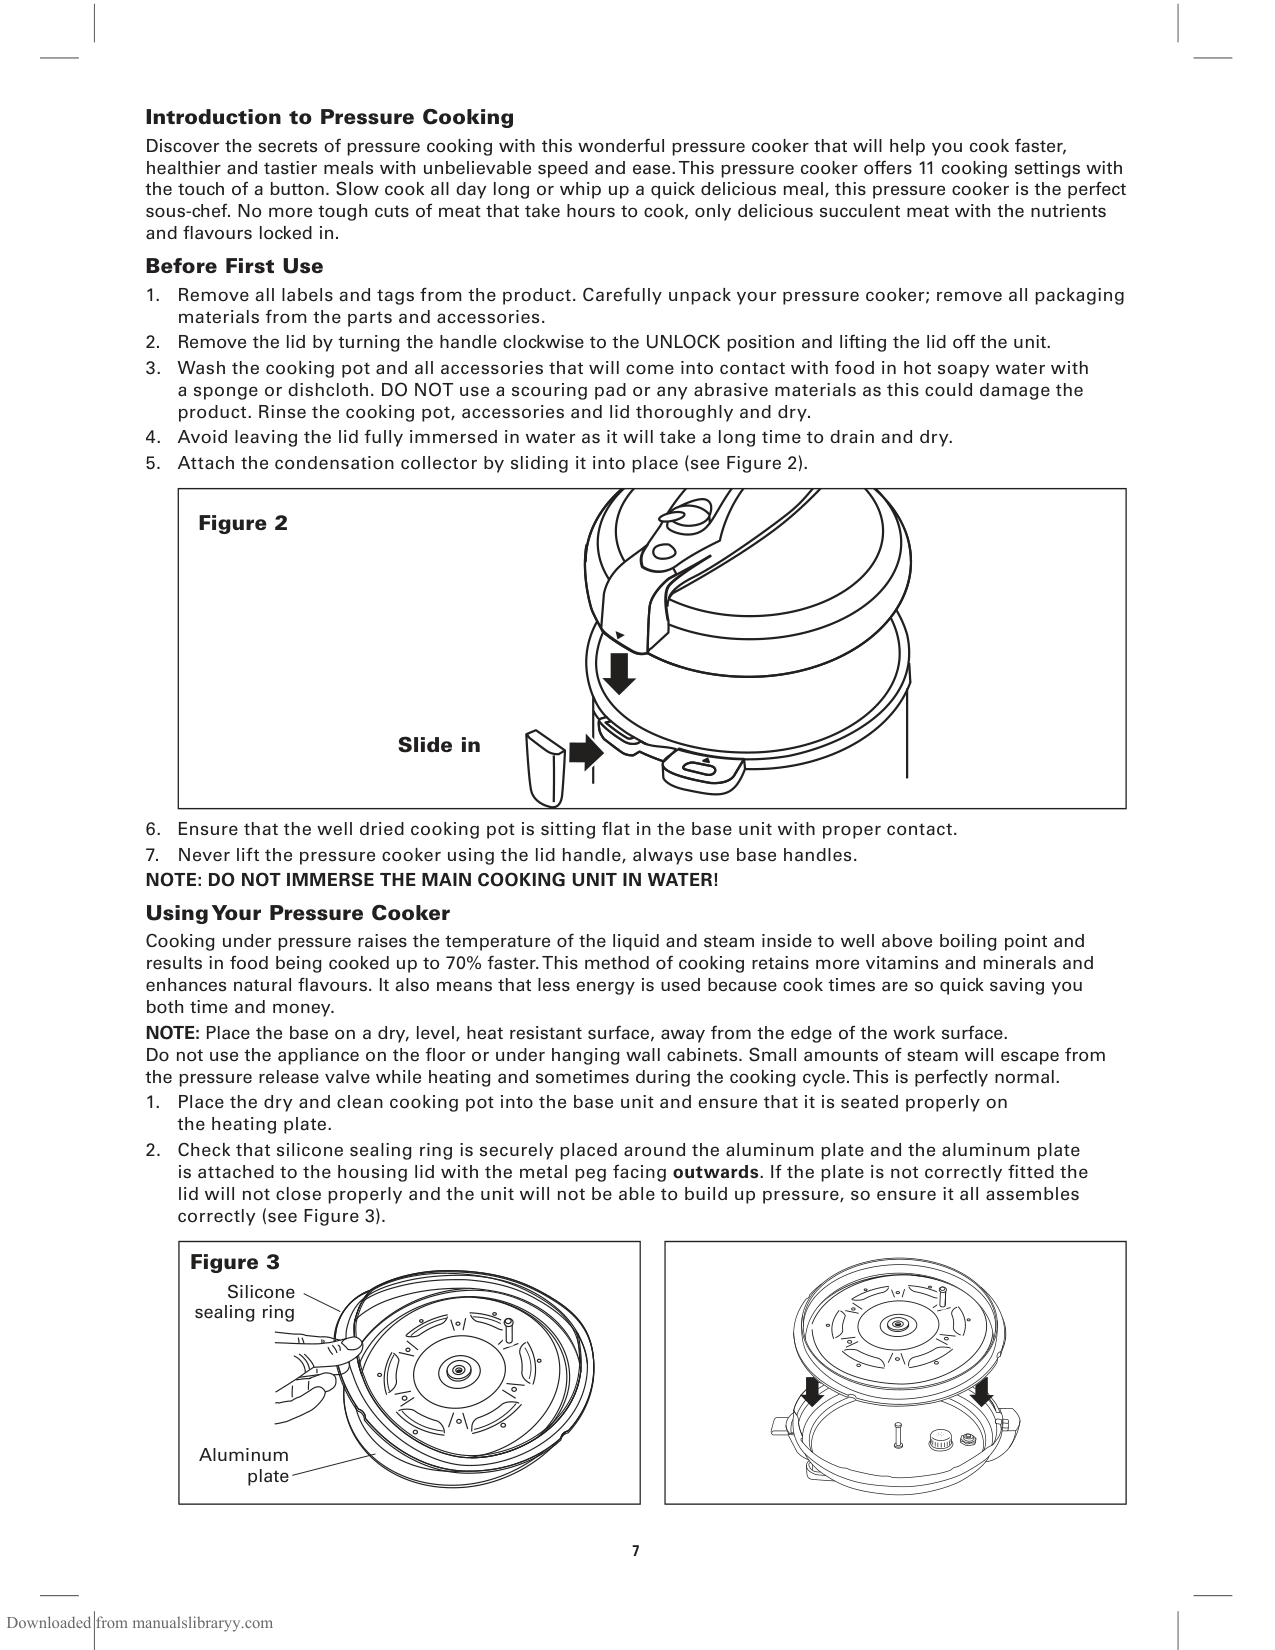
|Slide in
Figure 2| |---|
Using Your Pressure Cooker Cooking under pressure raises the temperature of the liquid and steam inside to well above boiling point and results in food being cooked up to 70% faster. This method of cooking retains more vitamins and minerals and enhances natural flavours. It also means that less energy is used because cook times are so quick saving you both time and money. NOTE: Place the base on a dry, level, heat resistant surface, away from the edge of the work surface. Do not use the appliance on the floor or under hanging wall cabinets. Small amounts of steam will escape from the pressure release valve while heating and sometimes during the cooking cycle. This is perfectly normal.
|Silicone sealing ring
Aluminum plate
Figure 3| |---|
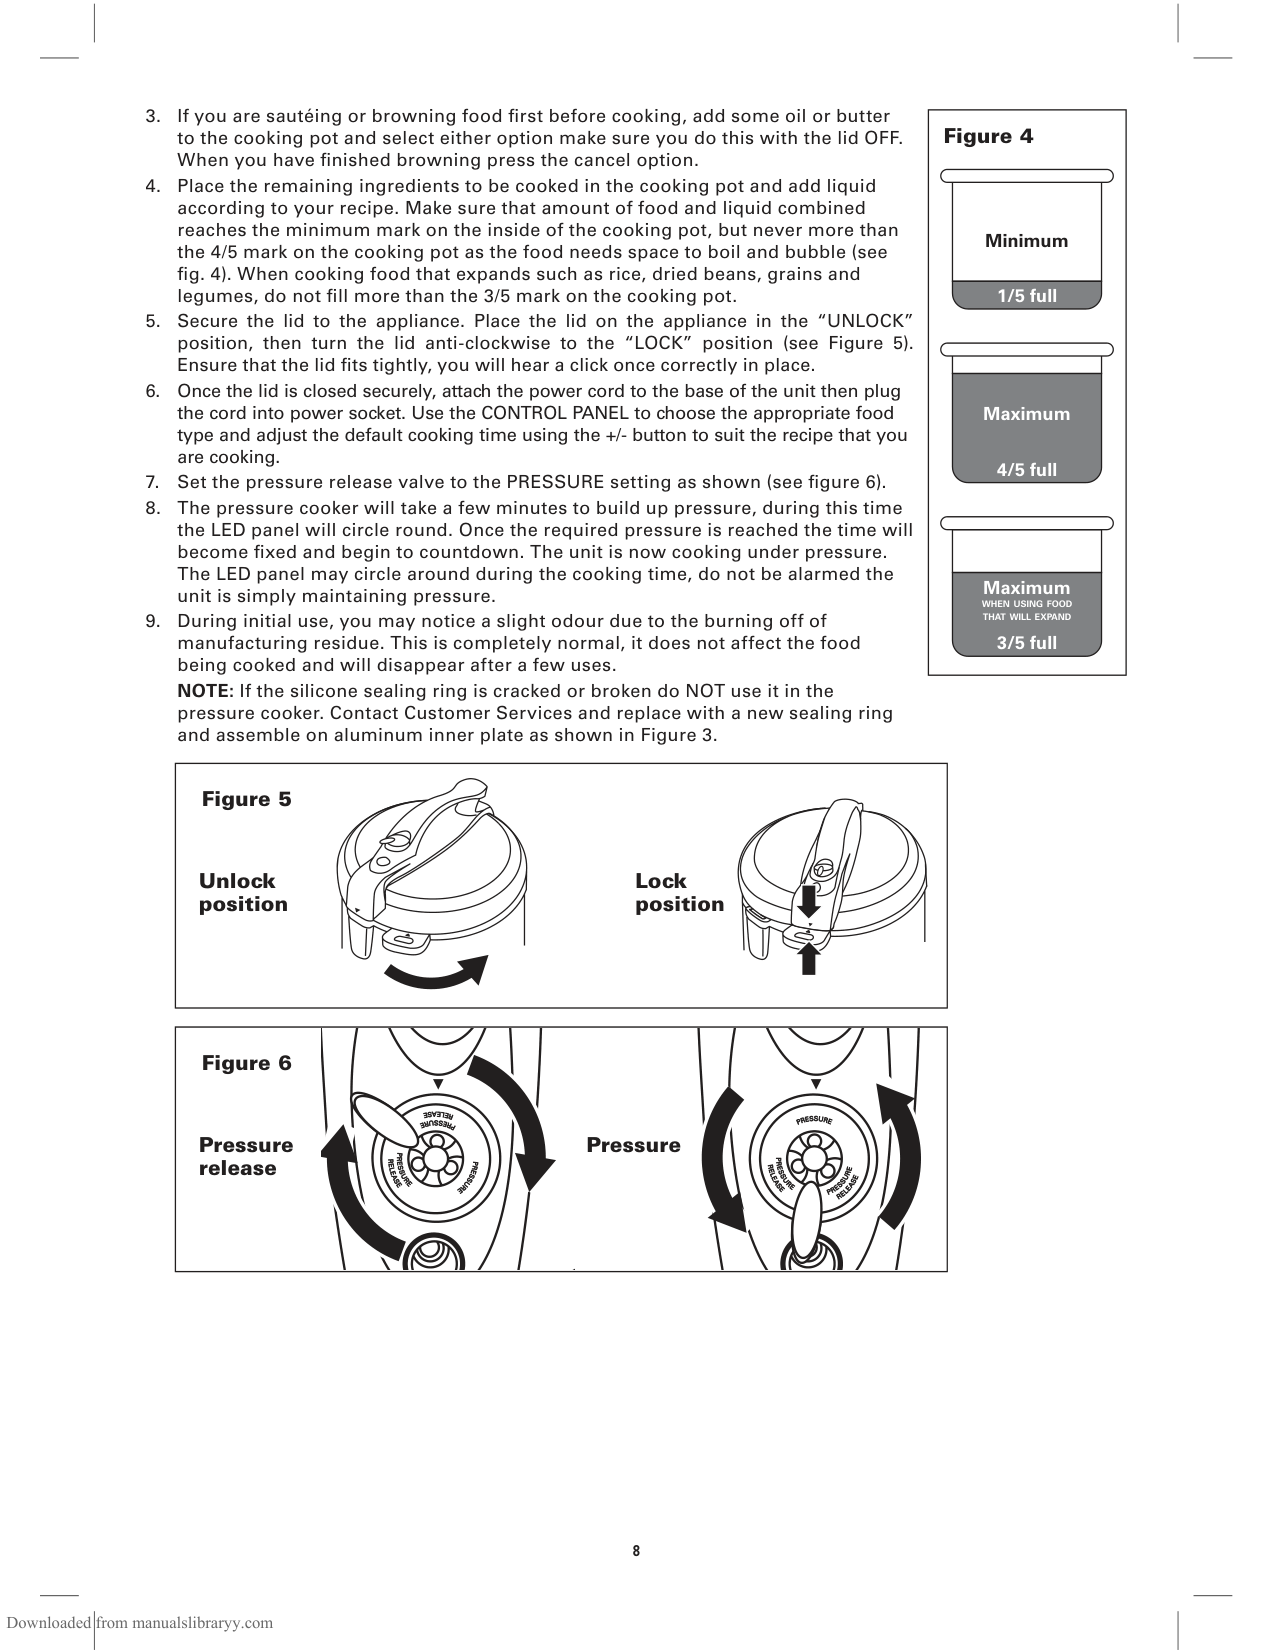
|Figure 4
| |Minimum| | |---|---|---| | | | |
1/5 full
| | | | |---|---|---| | |Maximum| |
4/5 full
3/5 full
Maximum
WHEN USING FOOD THAT WILL EXPAND| |---|
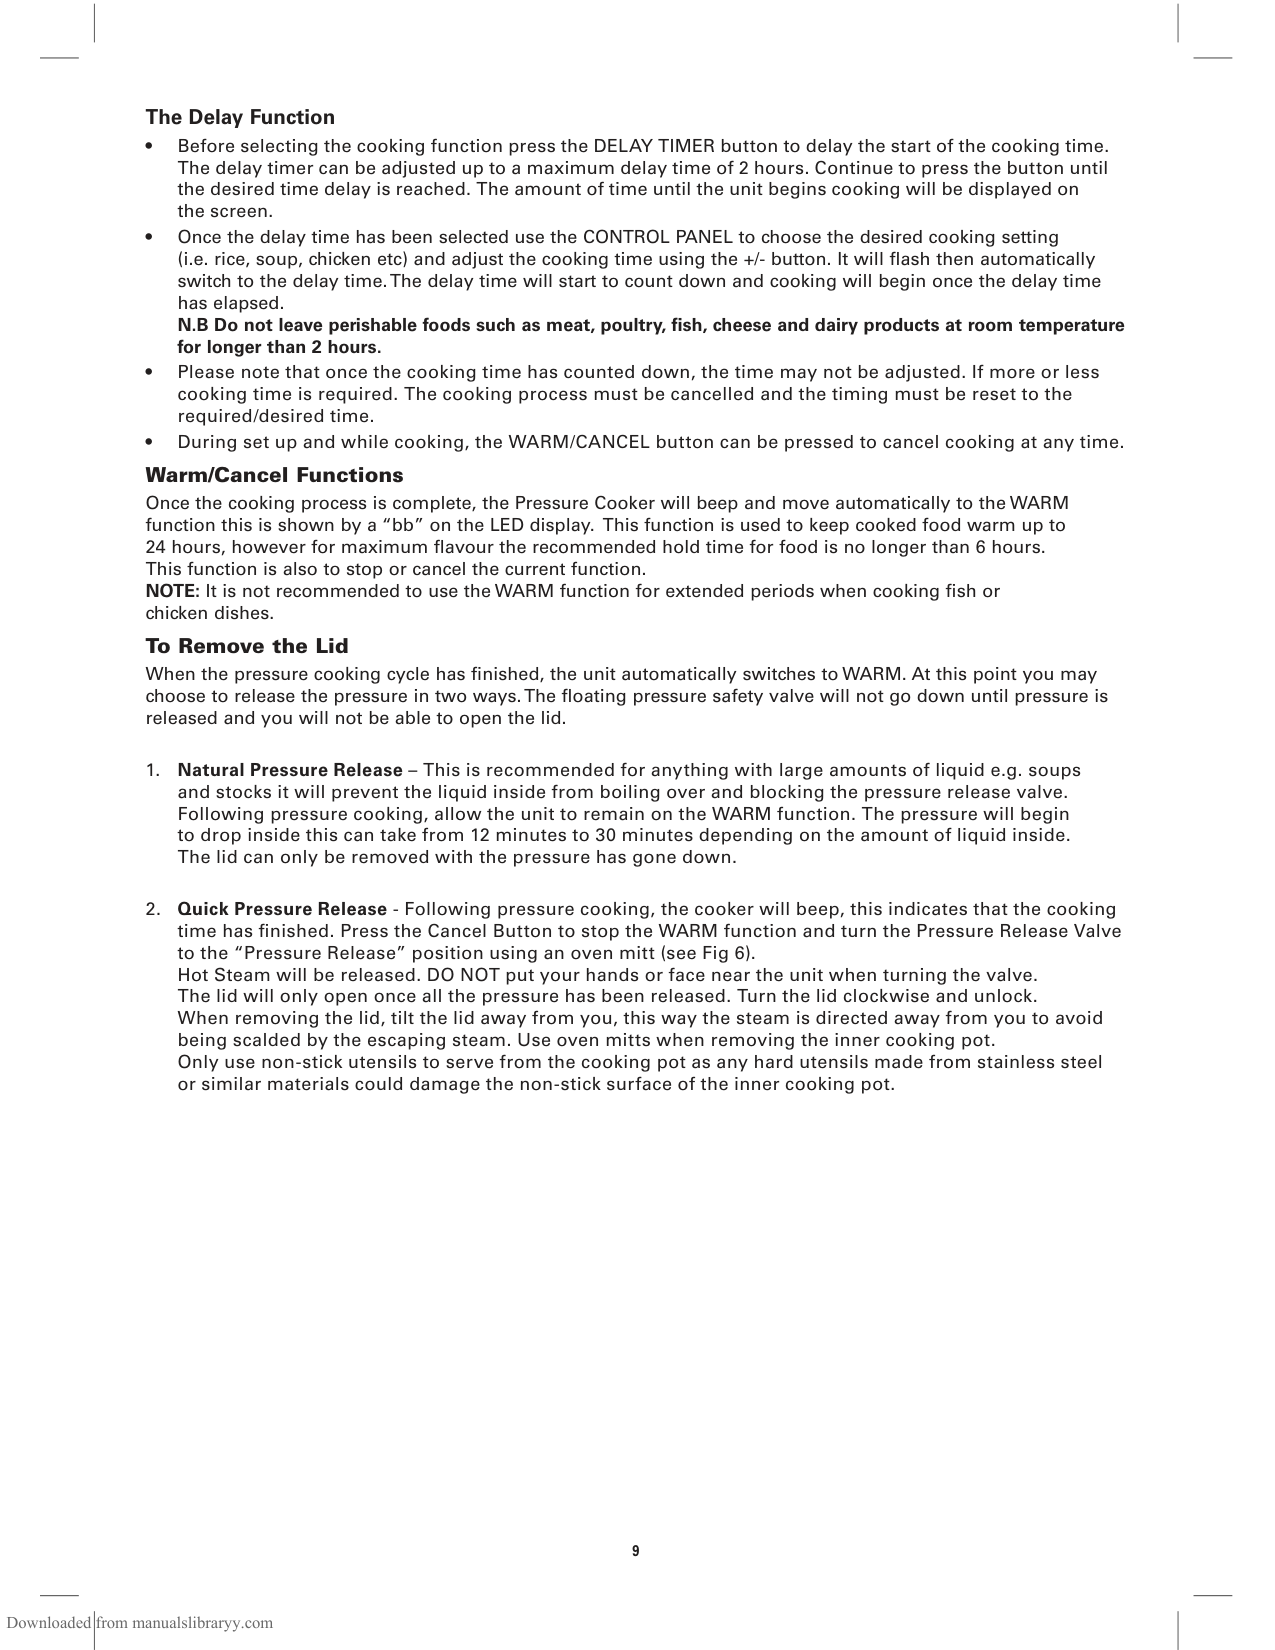
|Figure 5
Unlock position
Lock position| |---|
|Figure 6
Pressure release
Pressure| |---|
######## The Delay Function
Warm/Cancel Functions Once the cooking process is complete, the Pressure Cooker will beep and move automatically to the WARM function this is shown by a “bb” on the LED display. This function is used to keep cooked food warm up to 24 hours, however for maximum flavour the recommended hold time for food is no longer than 6 hours. This function is also to stop or cancel the current function. NOTE: It is not recommended to use the WARM function for extended periods when cooking fish or chicken dishes. To Remove the Lid
When the pressure cooking cycle has finished, the unit automatically switches to WARM. At this point you may choose to release the pressure in two ways. The floating pressure safety valve will not go down until pressure is released and you will not be able to open the lid.
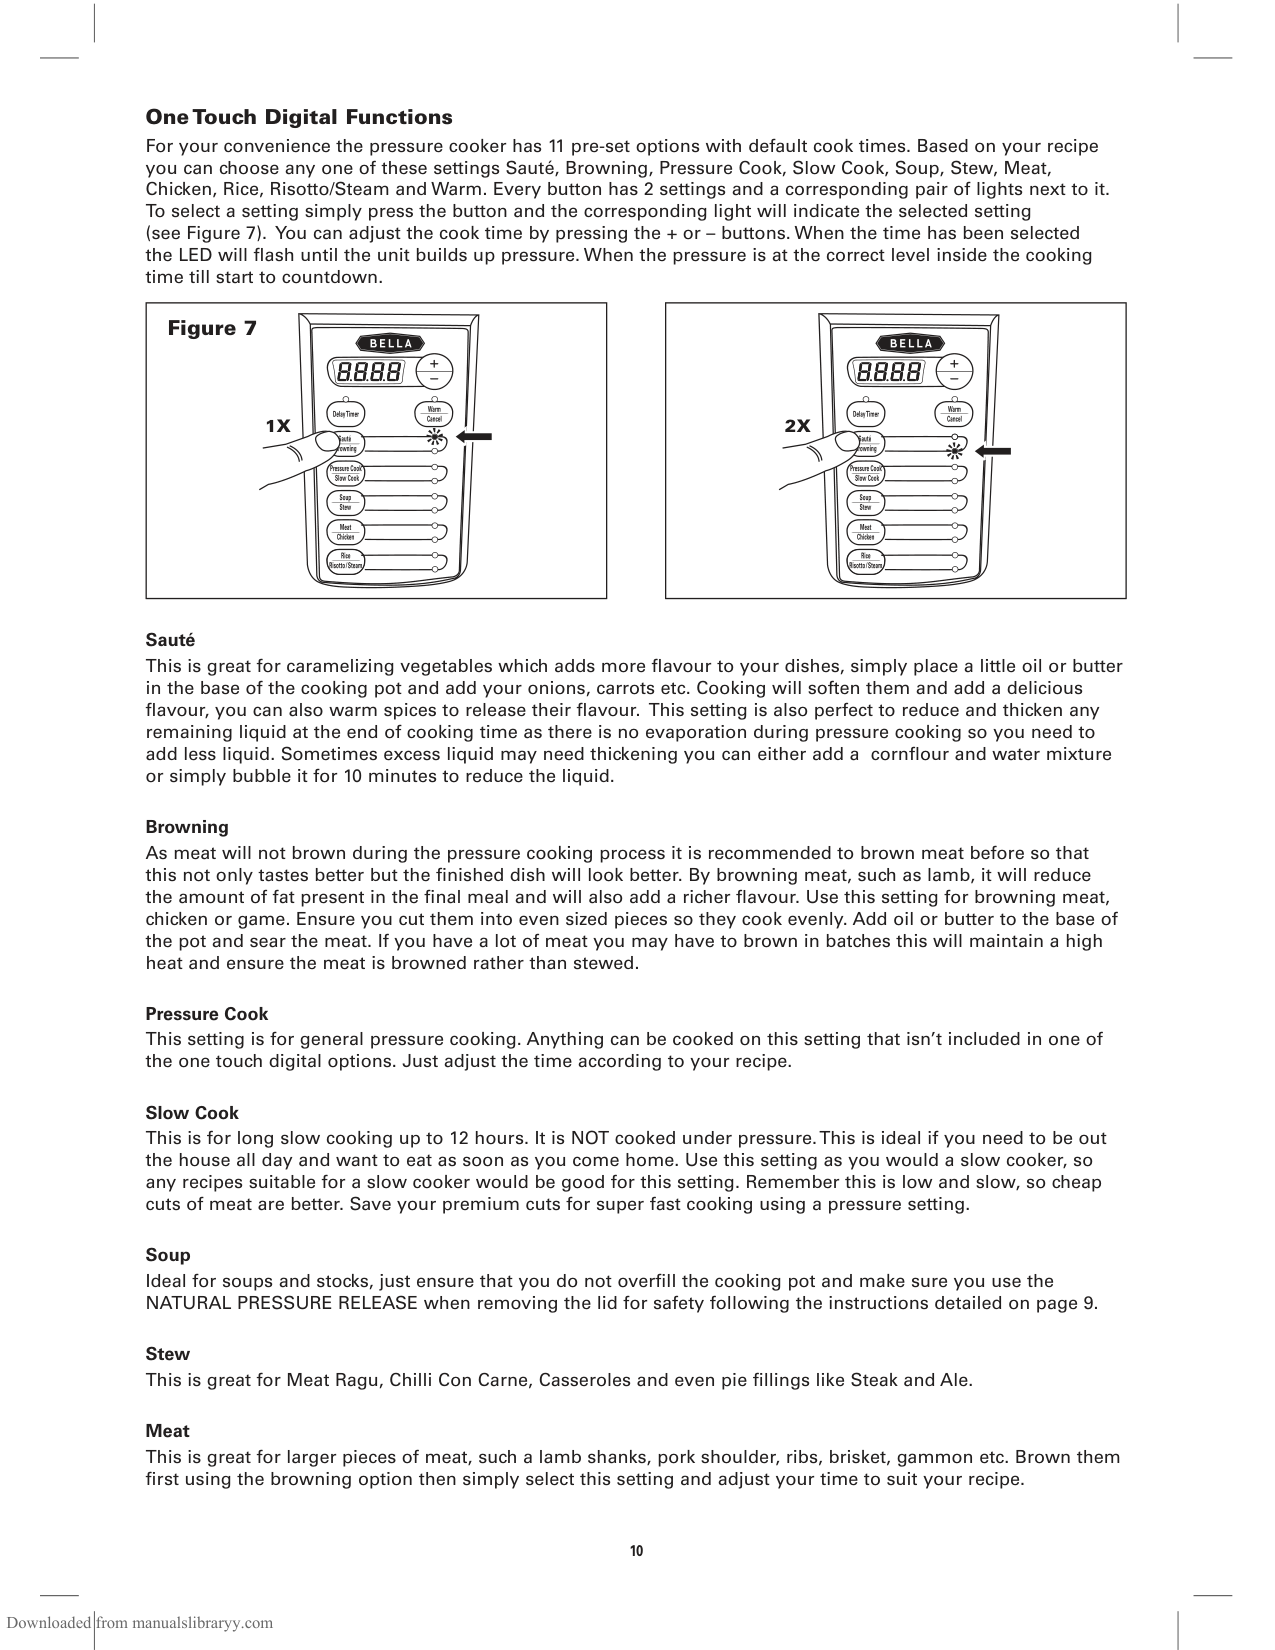
One Touch Digital Functions For your convenience the pressure cooker has 11 pre-set options with default cook times. Based on your recipe you can choose any one of these settings Sauté, Browning, Pressure Cook, Slow Cook, Soup, Stew, Meat, Chicken, Rice, Risotto/Steam and Warm. Every button has 2 settings and a corresponding pair of lights next to it. To select a setting simply press the button and the corresponding light will indicate the selected setting (see Figure 7). You can adjust the cook time by pressing the + or – buttons. When the time has been selected the LED will flash until the unit builds up pressure. When the pressure is at the correct level inside the cooking time till start to countdown.
|1X
Figure 7| |---|
|2X| |---|
Sauté This is great for caramelizing vegetables which adds more flavour to your dishes, simply place a little oil or butter in the base of the cooking pot and add your onions, carrots etc. Cooking will soften them and add a delicious flavour, you can also warm spices to release their flavour. This setting is also perfect to reduce and thicken any remaining liquid at the end of cooking time as there is no evaporation during pressure cooking so you need to add less liquid. Sometimes excess liquid may need thickening you can either add a cornflour and water mixture or simply bubble it for 10 minutes to reduce the liquid.
Browning As meat will not brown during the pressure cooking process it is recommended to brown meat before so that this not only tastes better but the finished dish will look better. By browning meat, such as lamb, it will reduce the amount of fat present in the final meal and will also add a richer flavour. Use this setting for browning meat, chicken or game. Ensure you cut them into even sized pieces so they cook evenly. Add oil or butter to the base of the pot and sear the meat. If you have a lot of meat you may have to brown in batches this will maintain a high heat and ensure the meat is browned rather than stewed.
Pressure Cook This setting is for general pressure cooking. Anything can be cooked on this setting that isn’t included in one of the one touch digital options. Just adjust the time according to your recipe.
Slow Cook This is for long slow cooking up to 12 hours. It is NOT cooked under pressure. This is ideal if you need to be out the house all day and want to eat as soon as you come home. Use this setting as you would a slow cooker, so any recipes suitable for a slow cooker would be good for this setting. Remember this is low and slow, so cheap cuts of meat are better. Save your premium cuts for super fast cooking using a pressure setting.
Soup Ideal for soups and stocks, just ensure that you do not overfill the cooking pot and make sure you use the NATURAL PRESSURE RELEASE when removing the lid for safety following the instructions detailed on page 9.
Stew This is great for Meat Ragu, Chilli Con Carne, Casseroles and even pie fillings like Steak and Ale.
Meat This is great for larger pieces of meat, such a lamb shanks, pork shoulder, ribs, brisket, gammon etc. Brown them first using the browning option then simply select this setting and adjust your time to suit your recipe.
Chicken This setting is great for cooking a whole chicken for a delicious pot roast, then pop it under a pre-heated grill to crisp up the skin if you prefer it golden. You can also cook chicken legs, thighs, drumsticks and fillets.
Rice Cook perfect fluffy rice on this setting. You can add spices or herbs during cooking and add salt if required. Also a drizzle of oil helps to reduce the foam (see Hints and Tips for cooking guidelines).
Risotto/Steam Make delicious creamy risotto on this setting in a fraction of the time without the need to keep stirring. Simply sauté the grains of rice in some butter or oil until they turn opaque then add the liquid.
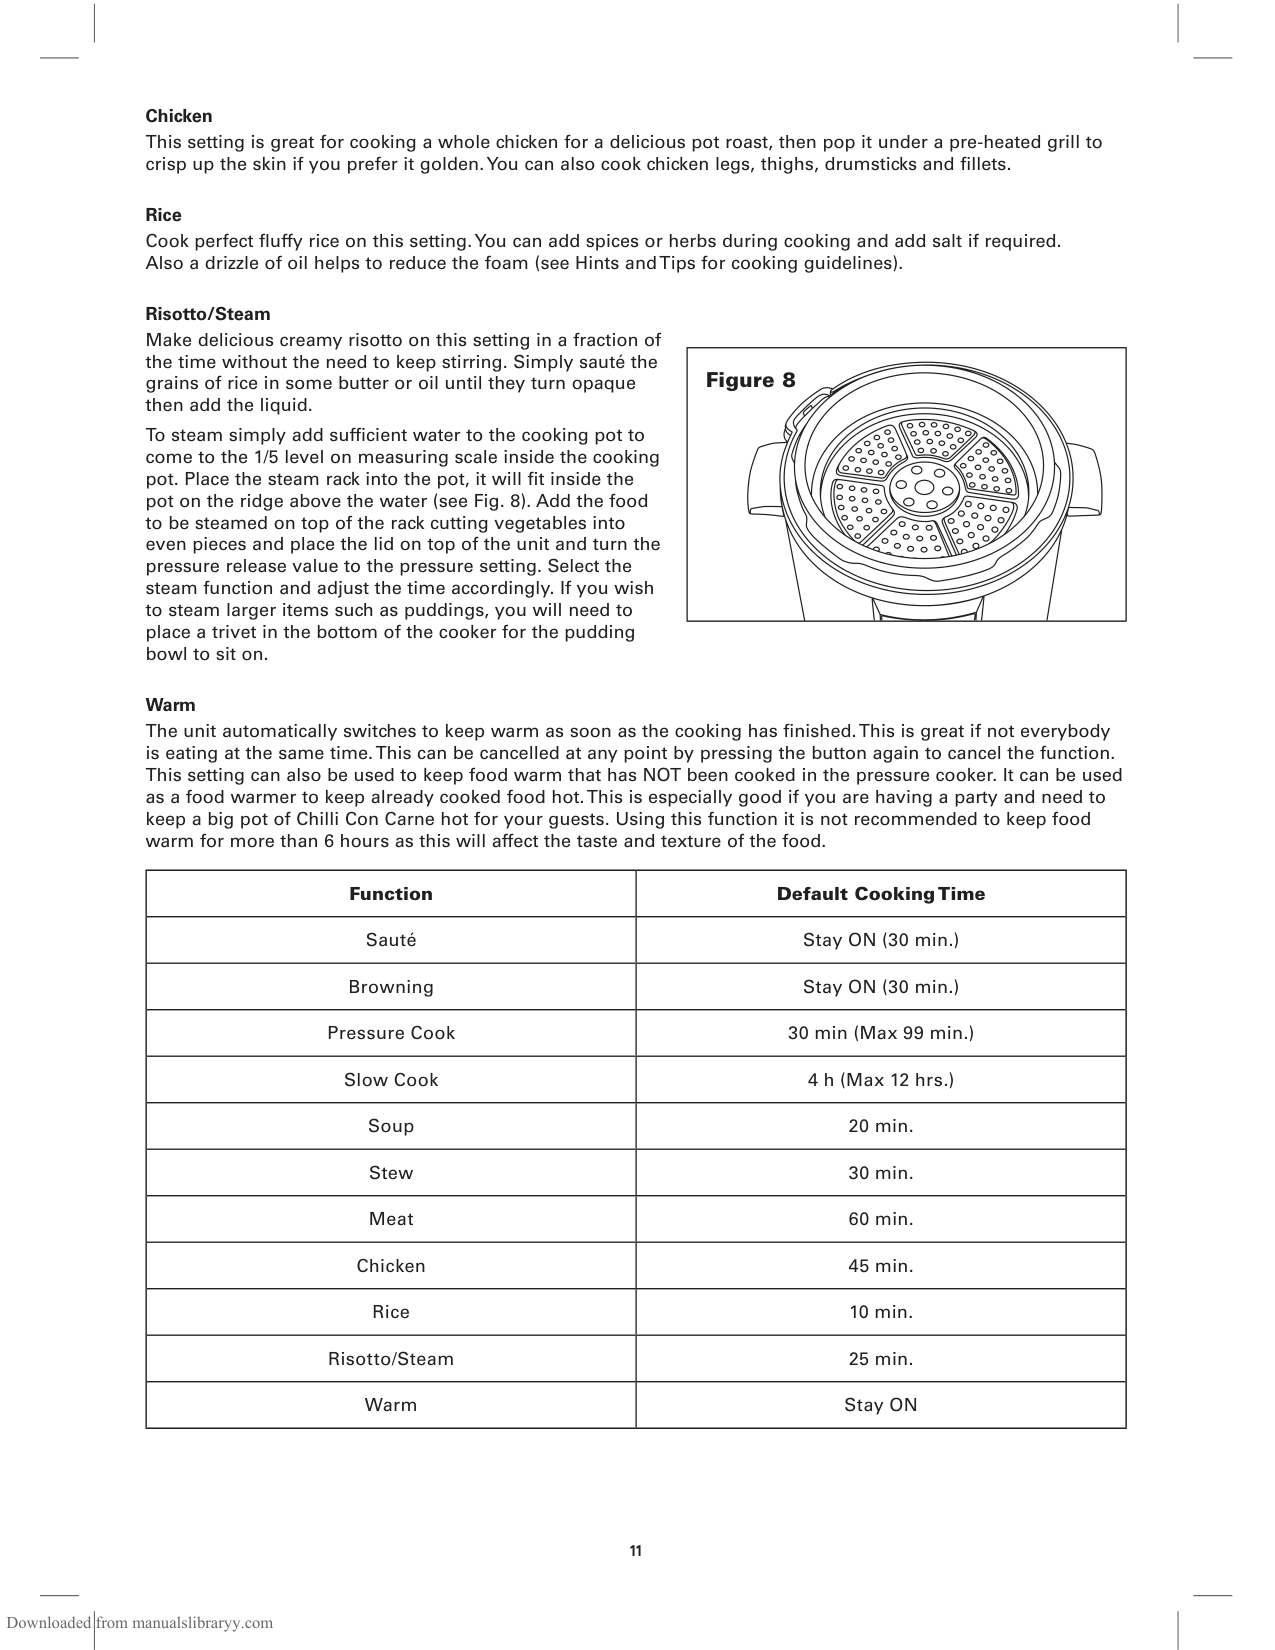
To steam simply add sufficient water to the cooking pot to come to the 1/5 level on measuring scale inside the cooking pot. Place the steam rack into the pot, it will fit inside the pot on the ridge above the water (see Fig. 8). Add the food to be steamed on top of the rack cutting vegetables into even pieces and place the lid on top of the unit and turn the pressure release value to the pressure setting. Select the steam function and adjust the time accordingly. If you wish to steam larger items such as puddings, you will need to place a trivet in the bottom of the cooker for the pudding bowl to sit on.
|Figure 8| |---|
Warm The unit automatically switches to keep warm as soon as the cooking has finished. This is great if not everybody is eating at the same time. This can be cancelled at any point by pressing the button again to cancel the function. This setting can also be used to keep food warm that has NOT been cooked in the pressure cooker. It can be used as a food warmer to keep already cooked food hot. This is especially good if you are having a party and need to keep a big pot of Chilli Con Carne hot for your guests. Using this function it is not recommended to keep food warm for more than 6 hours as this will affect the taste and texture of the food.
|Function|Default Cooking Time| |---|---| |Sauté|Stay ON (30 min.)| |Browning|Stay ON (30 min.)| |Pressure Cook|30 min (Max 99 min.)| |Slow Cook|4 h (Max 12 hrs.)| |Soup|20 min.| |Stew|30 min.| |Meat|60 min.| |Chicken|45 min.| |Rice|10 min.| |Risotto/Steam|25 min.| |Warm|Stay ON|
######## Cooking Times
########## Cooking Rice
White rice (Basmati, Long Grain) takes 3 minutes to cook and uses the fully absorption method. The rice will be slightly sticker than rice cooked on the stove top. Use the marking on the pot as a guide i.e 2, 4, 6 cups. Fill the water in the pot FIRST to the level required and then add the corresponding cup of rice.
|Level on cooking pot|Cups of rice|Oil tbsp. quantity|Yield (cups) when cooked| |---|---|---|---|
|2|2|1|6| |4|4|1|12| |6|6|2|18| |8|8|2|24|
Set the time to 3 minutes and use the NATURAL PRESSURE RELEASE METHOD. During this time the rice will absorb the steam and will be dry not wet. Cooking wholegrain/brown rice is very different. It needs to be cooked in lots of water and then drained. Only cook a maximum of 2 CUPS grain/brown rice in 6.5 cups of water.
|Rice type|Cooking time| |---|---| |Aborio/ Paella|Sauté rice in butter/oil until opaque. Add liquid. Cook for 6-8 minutes. Use the Quick Release.| |Brown Rice|Cook under pressure for 10 minutes. Use Natural Pressure Release for at least 10 minutes then quick release.| |Wild Rice|Cook under pressure for 20 minutes. Use Natural Pressure Release for at least 10 minutes then quick release.|
Cooking Vegetables When steaming vegetables, chop them up into even size pieces so they cook evenly. Remember most vegetables take a few minutes to cook. Add boiling water to the pot this will bring the unit up to pressure much quicker. Always use the quick steam release to avoid overcooking.
########## Vegetables Cooking Times
|Artichokes 4 medium/large|7 to 9 minutes| |---|---| |Asparagus whole|1 minutes| |Beans, Green cut into 2-inch lengths|1 to 2 minutes| |Beans, runner cut into 1- inch slices|2 minutes| |Beetroot , medium-large|24 to 26 minutes| |Broccoli, cut into large florets|2 to 3 minutes|
|Cauliflower, cut into large florets|2 to 3 minutes| |Carrots, cut into 2-inch lengths|8 minutes| |Carrots, ½-inch slices|2 to 3 minutes| |Corn on the cob, 2 ears|4 minutes| |Courgette, cut into ½-inch slices|1 to 3 minutes| |Greens, cabbage, kale, cut into 1-inch strips|1-2 minutes| |Onions, baby peeled|2 to 4 minutes| |Parsnips, peeled, cut into 2-inch pieces|3 to 4 minutes| |Parsnips, ½-inch slices|1 to 2 minutes| |Potatoes White, medium quartered|5 to 7 minutes| |Potatoes Sweet, 2-inch cubes|5 to 6 minutes| |Squash Butternut, peeled & sliced|3 to 4 minutes|
Cooking Meat and Poultry
|Food|Cooking Time (in minutes)| |---|---| |Chicken Whole 1.5kg Breast fillets Thigh and leg bone in Thigh boneless|25-30 6-8 15 10| |Beef Brisket Oxtail Shin Stewing Steak Mince|55 40-45 40-50 15 10-15| |Lamb Leg Shanks Shoulder, cubed Stewing, cubed|35-40 60 25 15| |Pork Chops Shoulder Leg, cubed|10 (brown first) 60-70 30|
######## Hints and Tips for Pressure Cooking
|Beef|Lamb|Pork|Chicken| |---|---|---|---| |Shin, Chuck and Blade (Braising Steak) Brisket, Silverside and Oxtail.|Shanks, Shoulder, Breast, Scrag and Middle neck.|Diced leg, Shoulder, Spare ribs and Belly.|Drumsticks, Thighs on the bone or Fillets and Legs.|
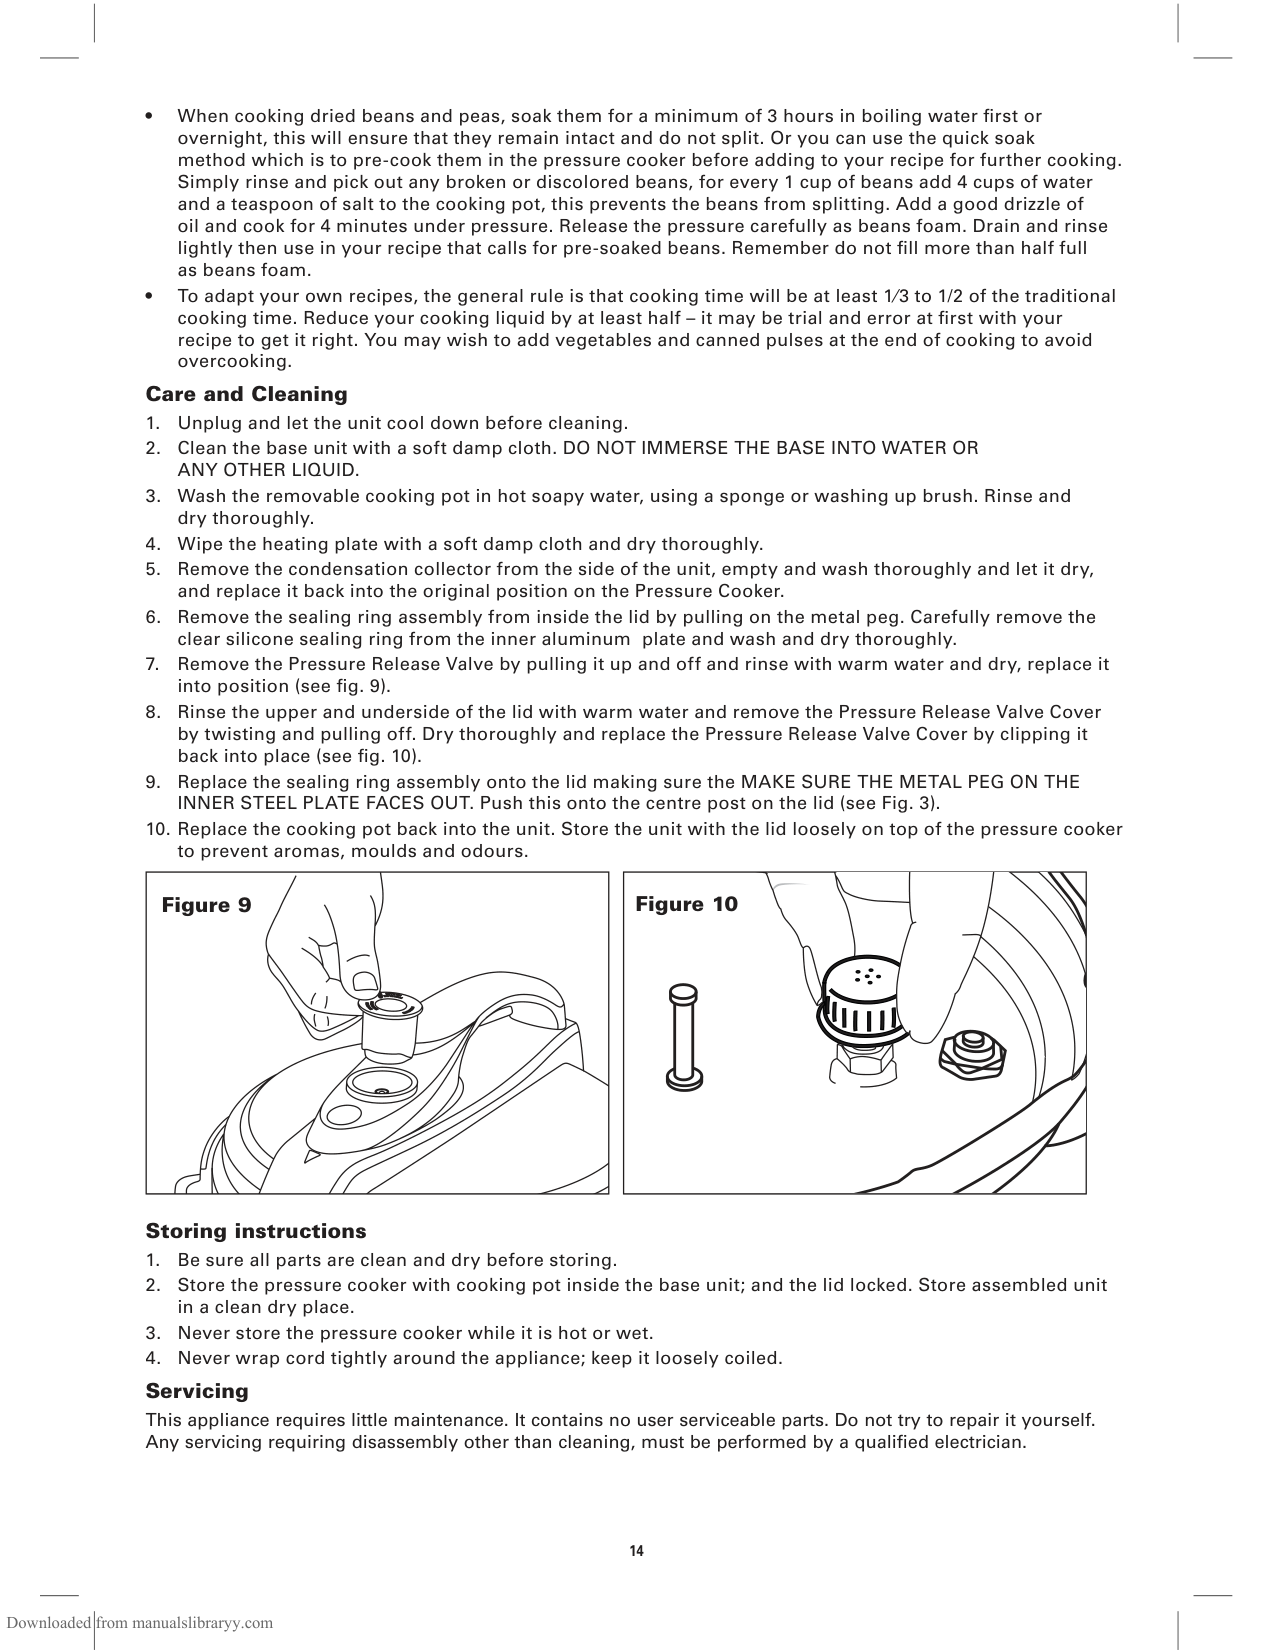
######## Care and Cleaning
|Figure 9| |---|
|Figure 10| |---|
######## Storing instructions
Servicing This appliance requires little maintenance. It contains no user serviceable parts. Do not try to repair it yourself. Any servicing requiring disassembly other than cleaning, must be performed by a qualified electrician.
GUARANTEE
This product is guaranteed for twelve months from the date of original purchase. Any defect that arises due to faulty materials or workmanship will either be replaced or refunded where possible during this period by the dealer from whom you purchased the unit.
The following conditions apply:
DISPOSAL INFORMATION
Waste electrical products should not be disposed of with household waste. Please recycle where facilities exist. Check with your local authority for recycling advice.
For technical queries, please contact: MPL Home Ltd, IMEX, 575 - 599 Maxted Road, Hemel Hempstead, Herts, HP2 7DX
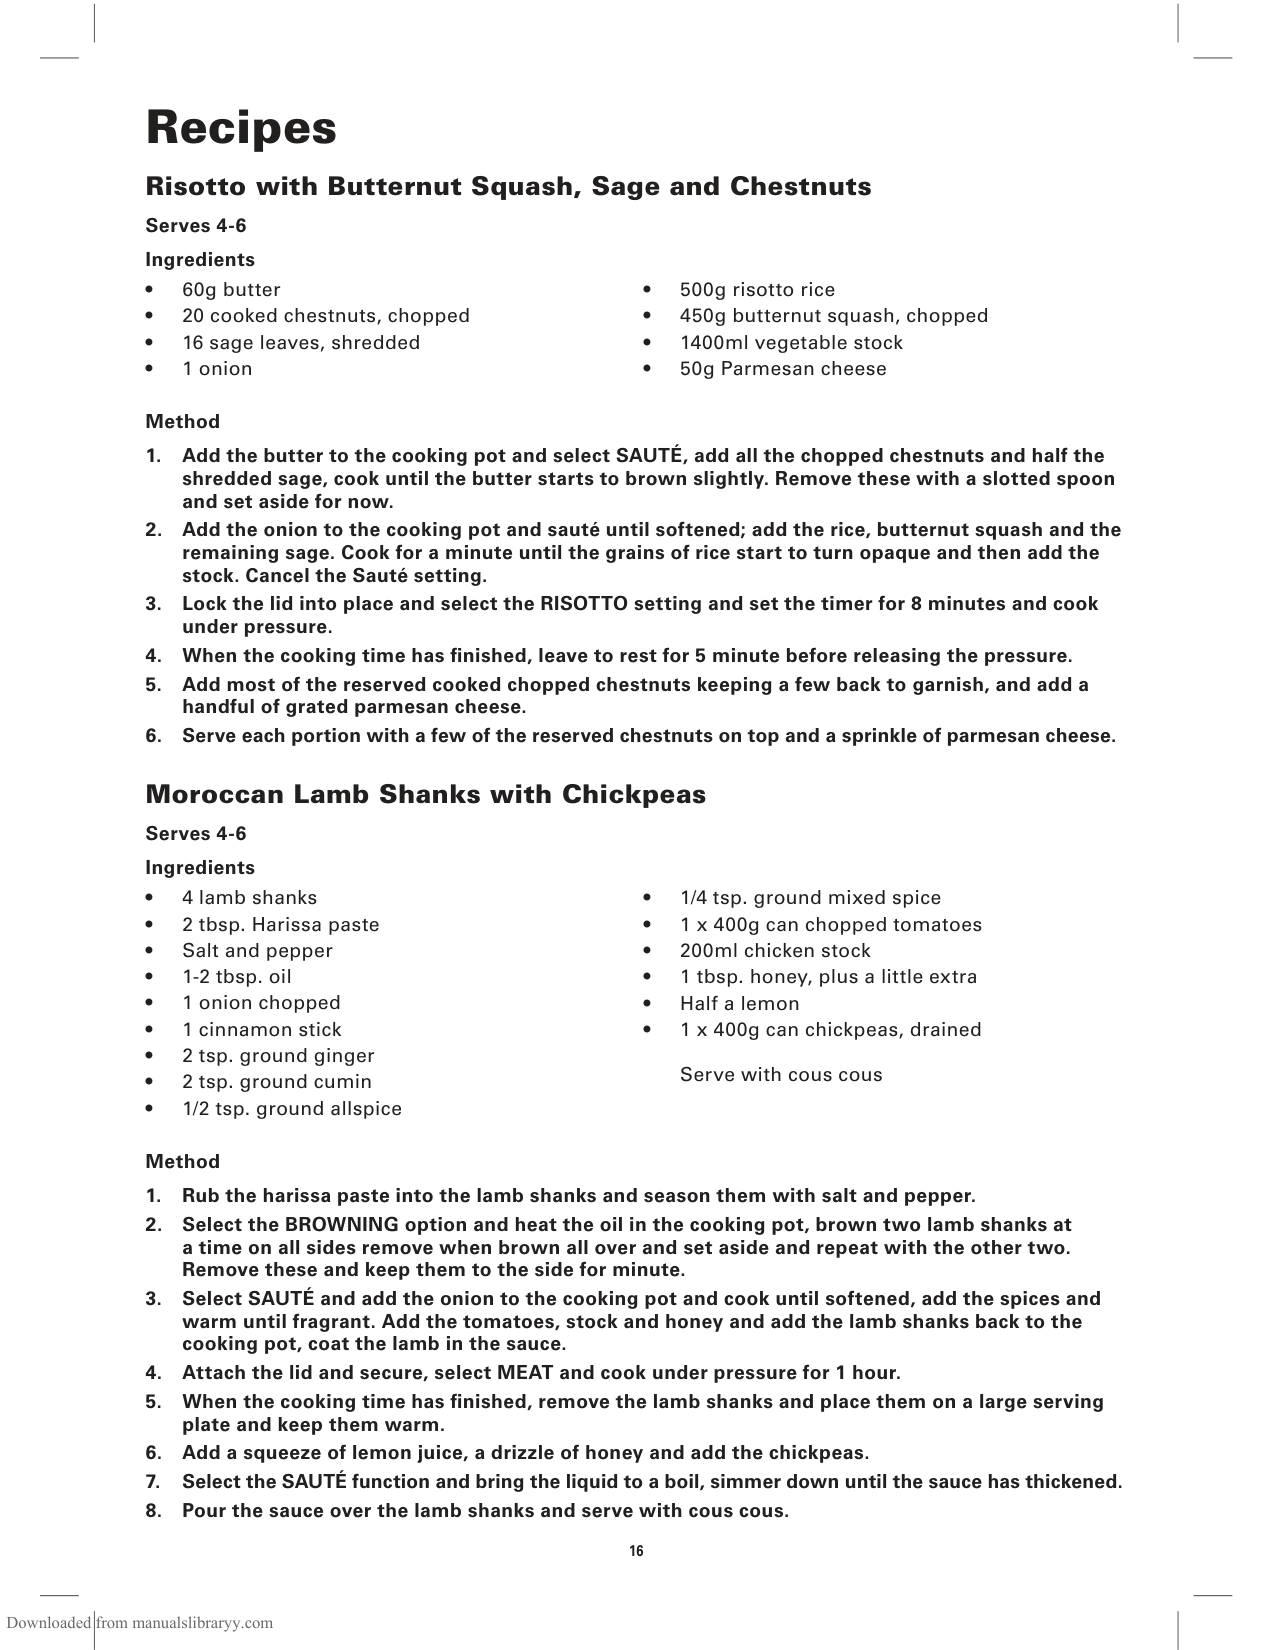
###### Risotto with Butternut Squash, Sage and Chestnuts Serves 4-6 Ingredients
Method
###### Moroccan Lamb Shanks with Chickpeas Serves 4-6 Ingredients
Method
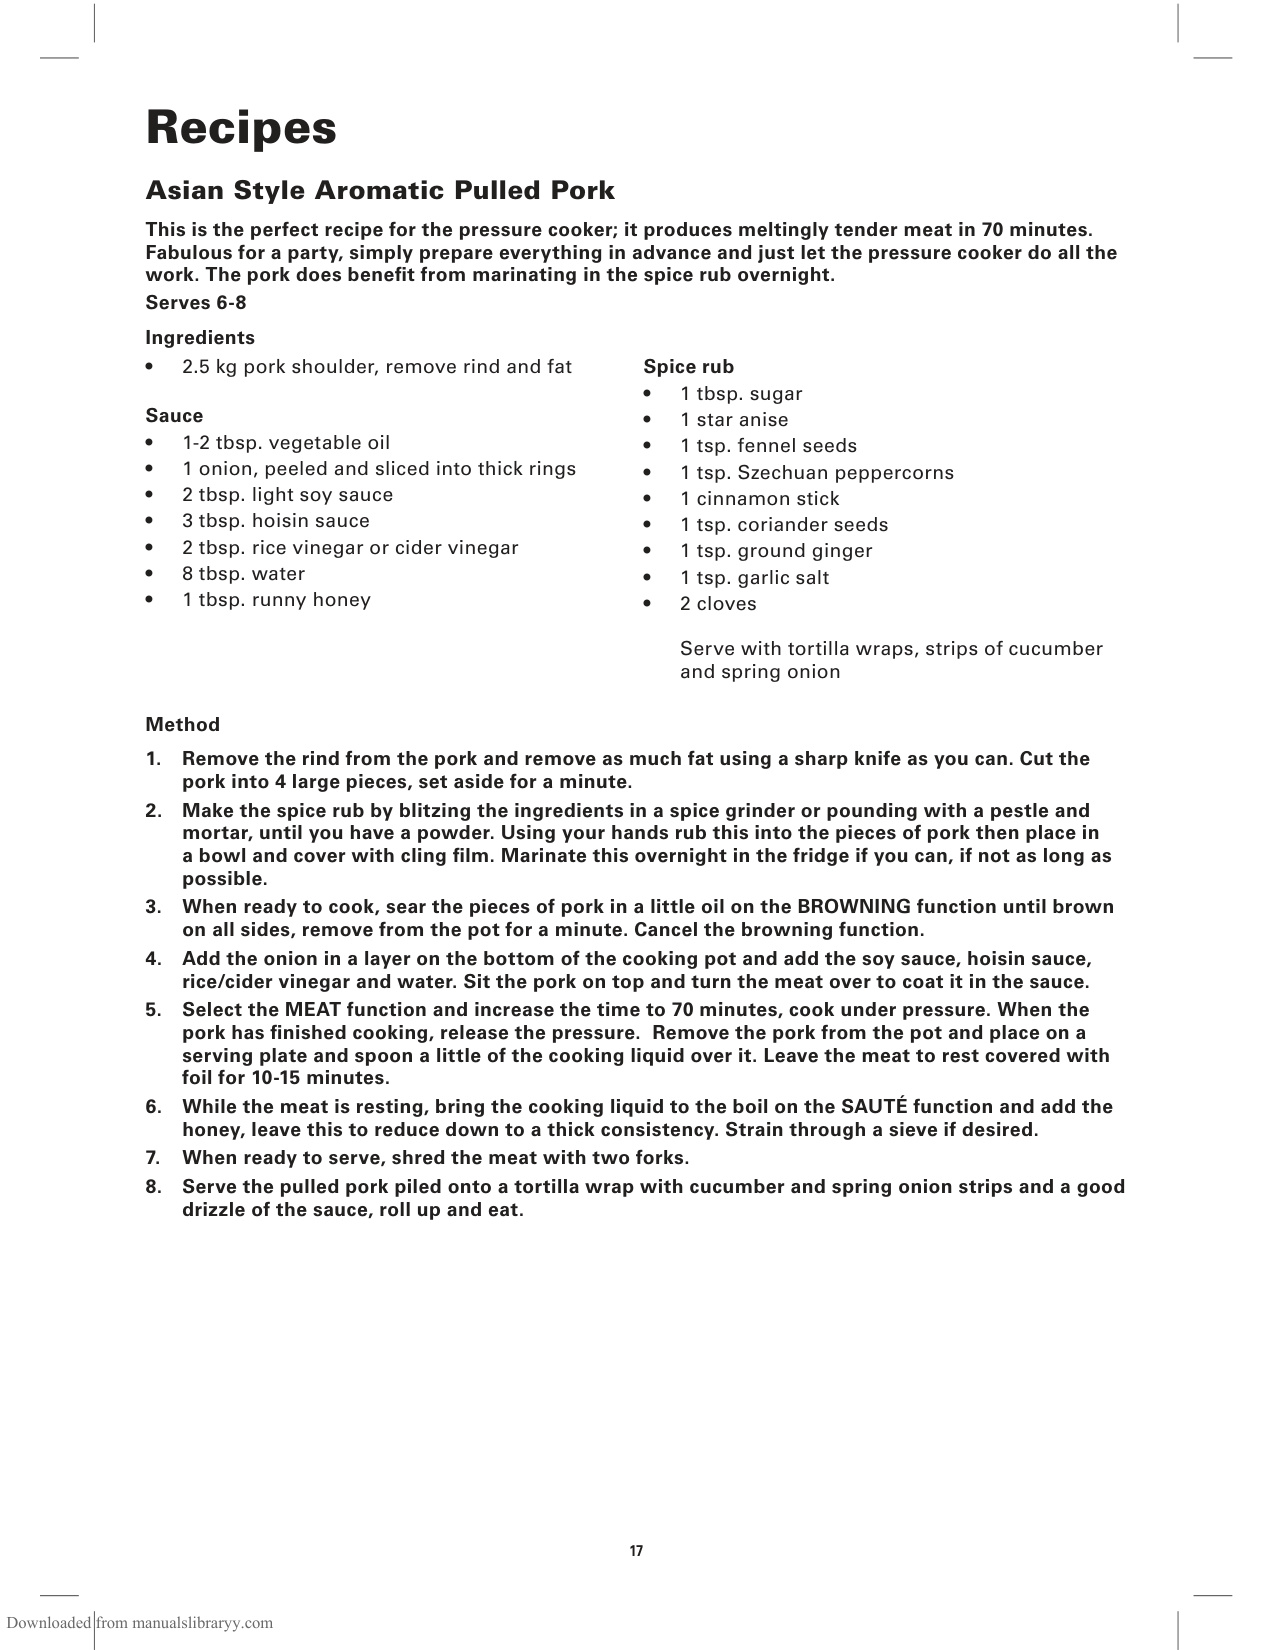
Asian Style Aromatic Pulled Pork This is the perfect recipe for the pressure cooker; it produces meltingly tender meat in 70 minutes. Fabulous for a party, simply prepare everything in advance and just let the pressure cooker do all the work. The pork does benefit from marinating in the spice rub overnight. Serves 6-8 Ingredients
Sauce
Serve with tortilla wraps, strips of cucumber and spring onion
Method
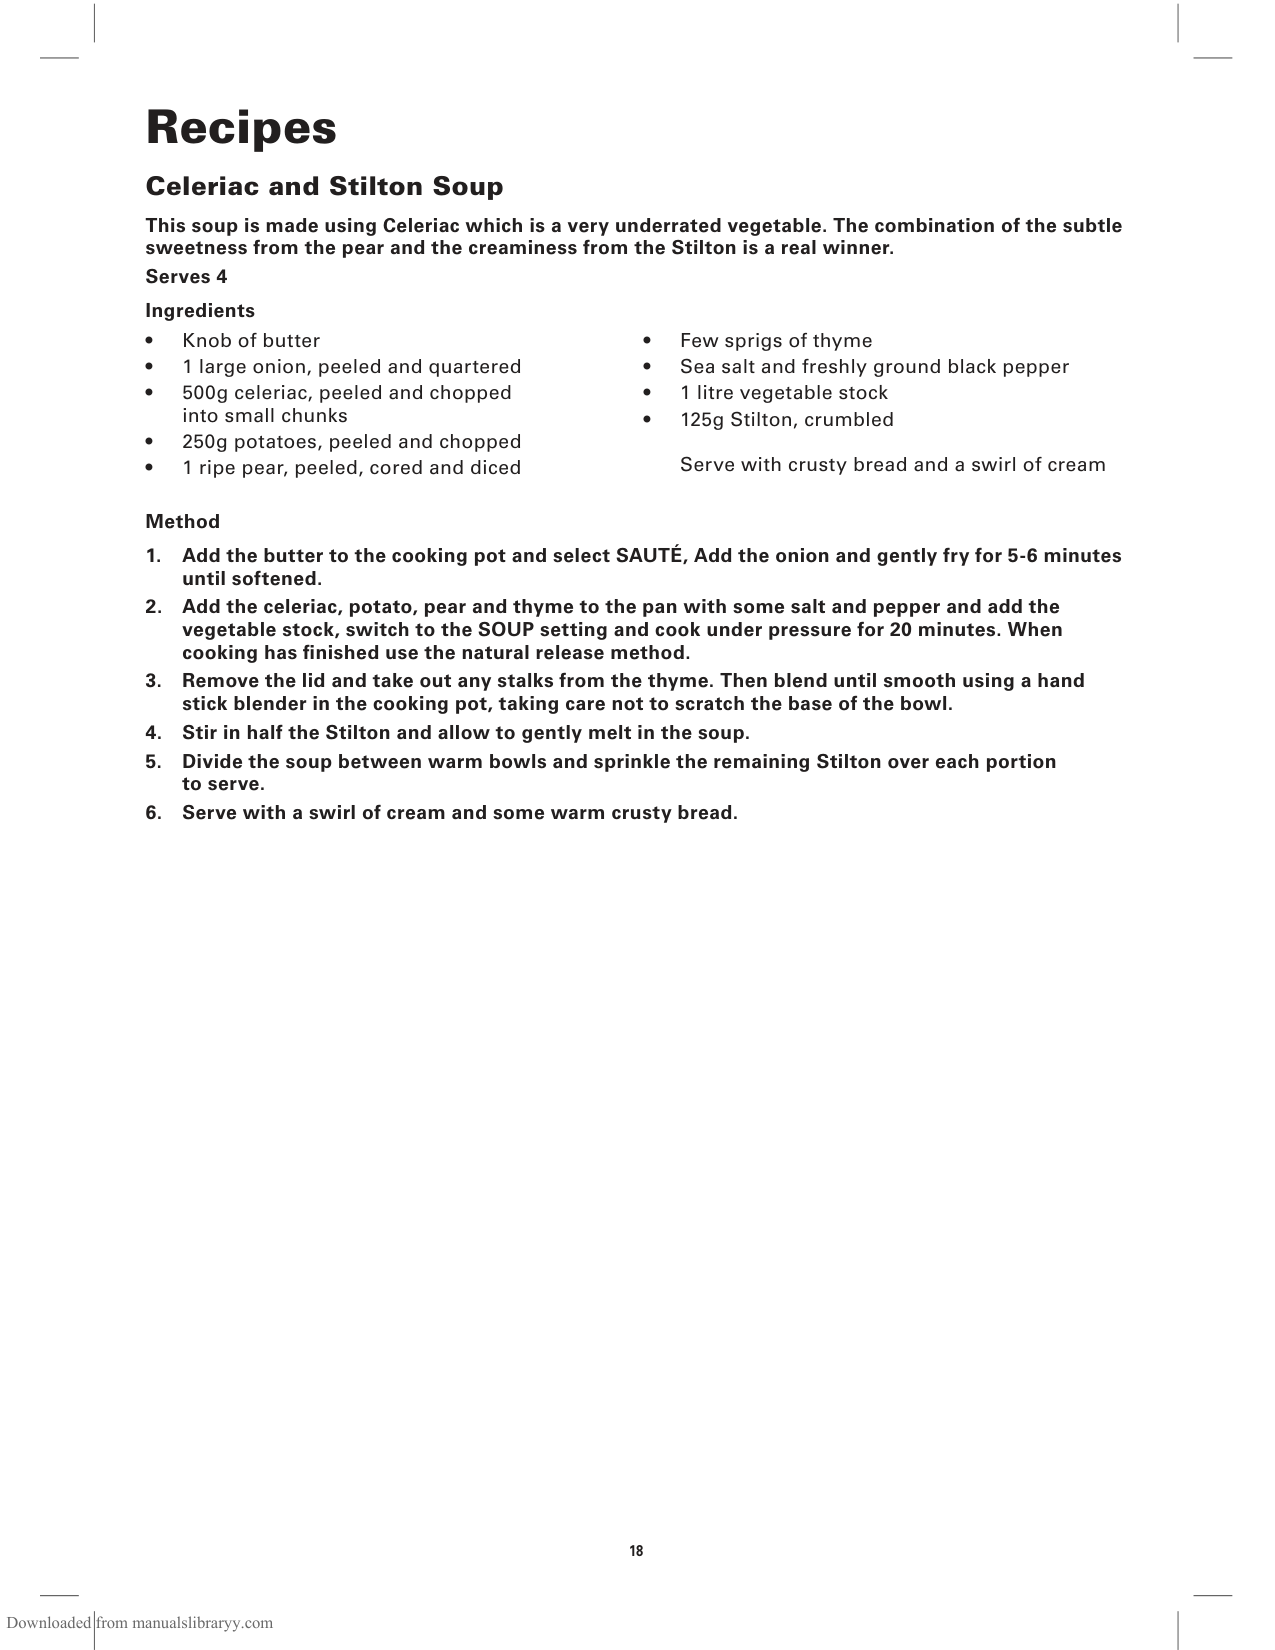
Celeriac and Stilton Soup This soup is made using Celeriac which is a very underrated vegetable. The combination of the subtle sweetness from the pear and the creaminess from the Stilton is a real winner. Serves 4 Ingredients
Method
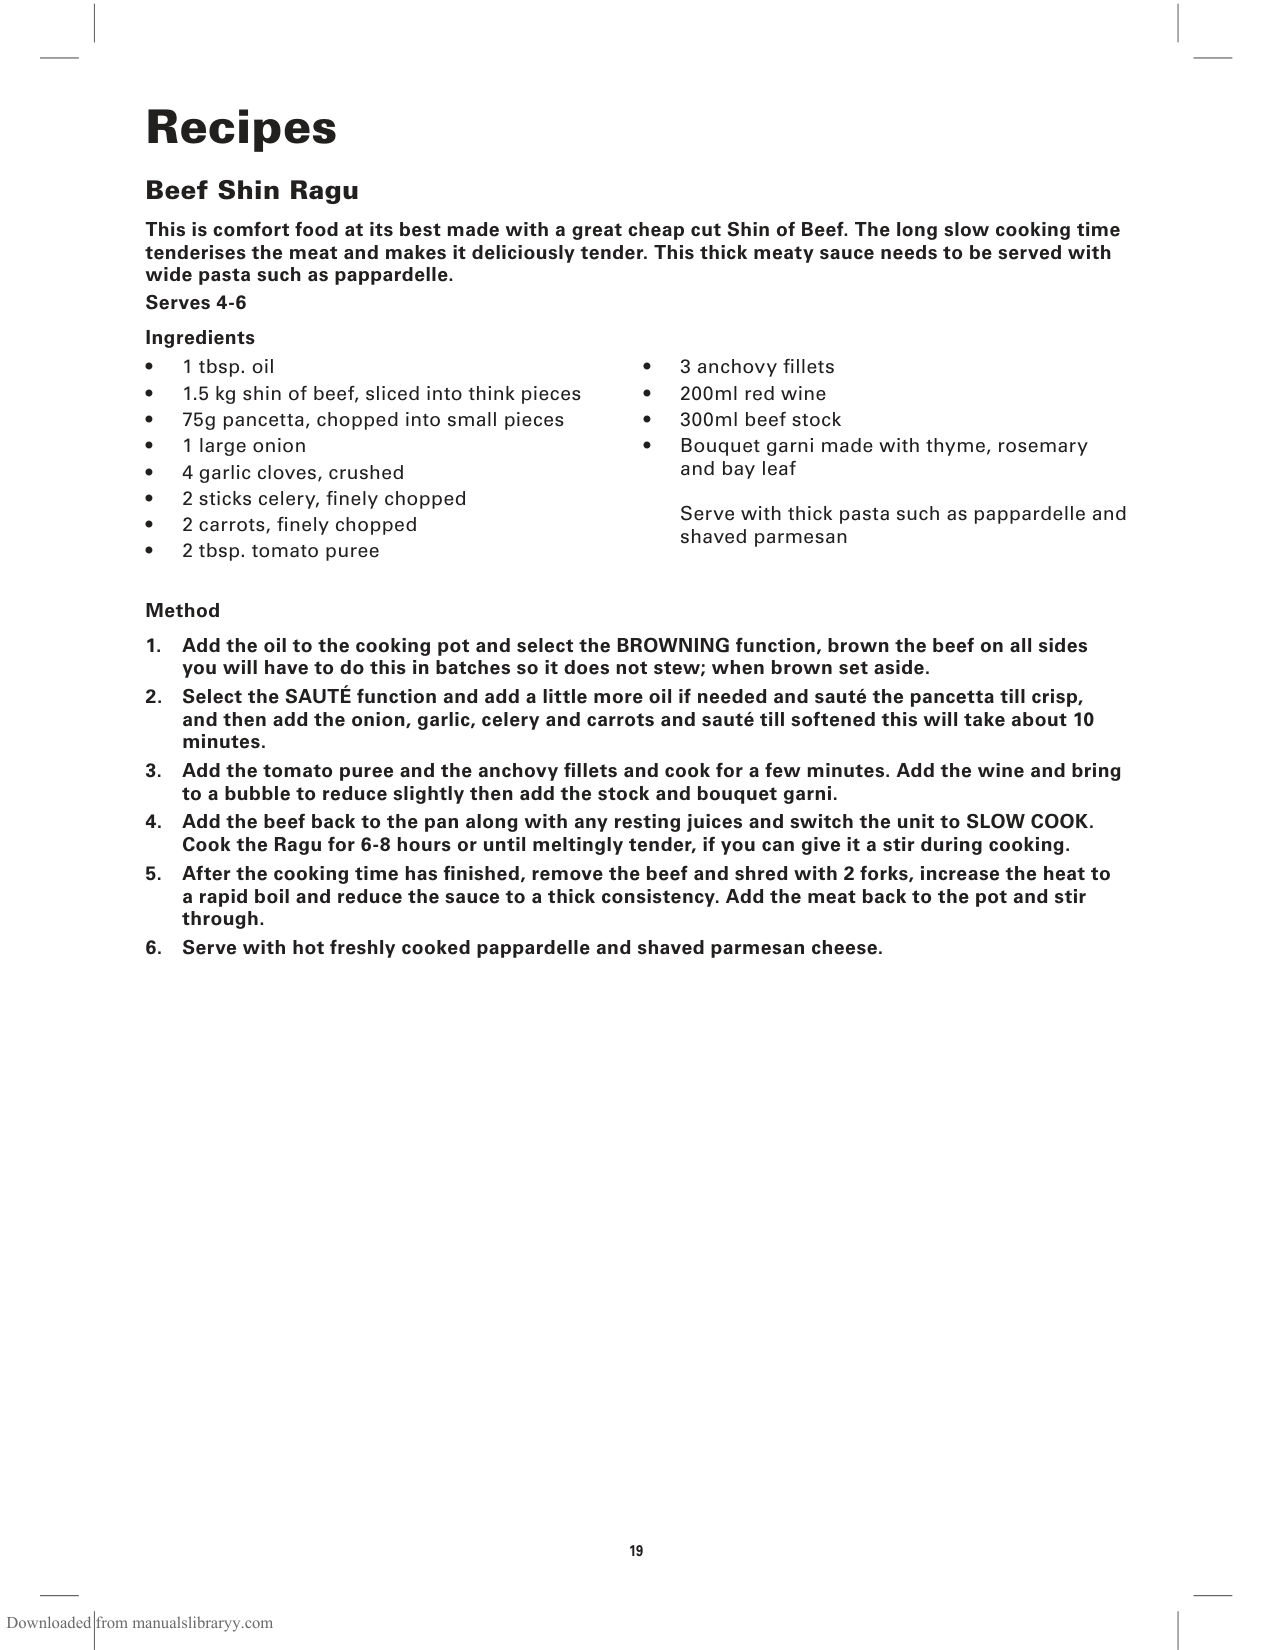
Beef Shin Ragu This is comfort food at its best made with a great cheap cut Shin of Beef. The long slow cooking time tenderises the meat and makes it deliciously tender. This thick meaty sauce needs to be served with wide pasta such as pappardelle. Serves 4-6 Ingredients
Serve with thick pasta such as pappardelle and shaved parmesan
Method
Pot Roast Chicken with Rosemary and Garlic This is one pot cooking at its best. This recipe cooks a whole chicken in 30 minutes; this means that you can have a mid-week roast in no time at all! Serves 4-6 people depending on how hungry you are! Ingredients
Serve with a selection of vegetables or a simple salad.
Method
Chicken with Chorizo
This dish is a delicious combination of chicken with smoky chorizo; make sure you have lots of crusty bread to mop up the rich sauce.

Serves 4-6 Ingredients
Method
South Indian Vegetable Curry with Paneer
This curry is lightly spiced and lovely and fragrant, the addition of Paneer gives the curry more body, serve it with warm naan bread to soak up the sauce.
Serves 4-5 Ingredients

Serve with warm naan bread, basmati rice and lemon wedges
Method
Hearty Winter Soup with Ham Hock
This soup is delicious in the cold winter months and is substantial enough for a main meal. It is thick and wholesome with exceptionally tender meat.
Serves 6 Ingredients
Method
Perfect Mash Potato
This has got to be one of the best ways to cook potatoes; steaming retains all the nutrients and keeps them dry which makes fantastic creamy mash potato.
Serves 4 Ingredients
Method
Boston Style Baked Beans
This is a fantastic side dish perfect with sausages and mashed potato or a perfect side dish for a gang when having a BBQ!
Serves 6-8 Ingredients
For the Sauce

Method
www.bellahousewares.co.uk
facebook.com/BellaLifeUK
twitter.com/BellaLifeUK
pinterest.com/bellalifeuk/
instagram.com/bellalifeuk
#### #mybellalifeuk
MPL Home Ltd, HP2 7DX

SZ-312824