
Ask AI
— answers from the official manualAnswers from the official manual.
Common questions
Common Questions
10 totalHow do I factory reset the AC2P Portable Power Station?
Press and hold the POWER Button for about 10 seconds until the LED flashes red to clear all settings and reset the device to factory defaults. You will need to re-pair all connected devices after the reset.
What do I do if my SoC drops below 5%?
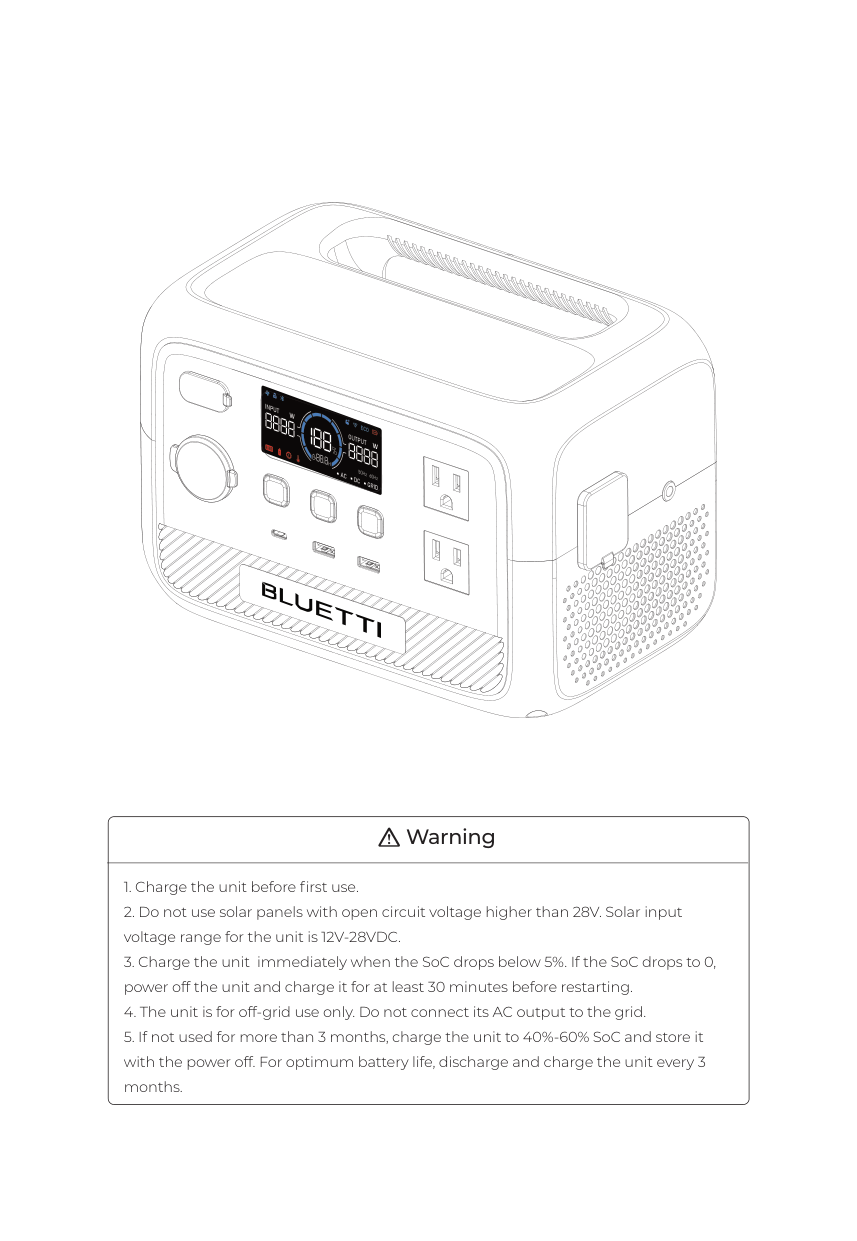
Charge the unit immediately when the State of Charge (SoC) drops below 5%. If it drops to 0%, shut down the unit, and charge within 48 hours in an ambient temperature range of 5°C to 35°C.
What is the maximum charging power for AC2P?
The maximum charging power for AC2P is 270W. It can reach 80% charge in 45 minutes with Turbo Charging mode under ideal conditions.
How do I switch between ECO Mode and Power Lifting Mode?
In Setting Mode, press the DC Power Button to navigate until you see the relevant icon flashing. Then press the AC Power Button to toggle between modes.
What is the recommended storage condition for AC2P when not in use?
Charge the unit to 40%-60% SoC before storing. Disconnect all electrical connections from it and store it in a cool, dry place within the temperature range of -20°C to 40°C.
How do I enable Solar Charging mode?
Connect solar panels with an open circuit voltage range of 12V-28V and a maximum power output of 200W to the AC2P via the solar charging cable. Ensure proper panel orientation for optimal performance.
Full Manual
28 pages

AC2P Portable Power Station
User Manual V1.0
Please read this manual carefully before use and keep it for future reference.
######## Warning
##### Thank You!
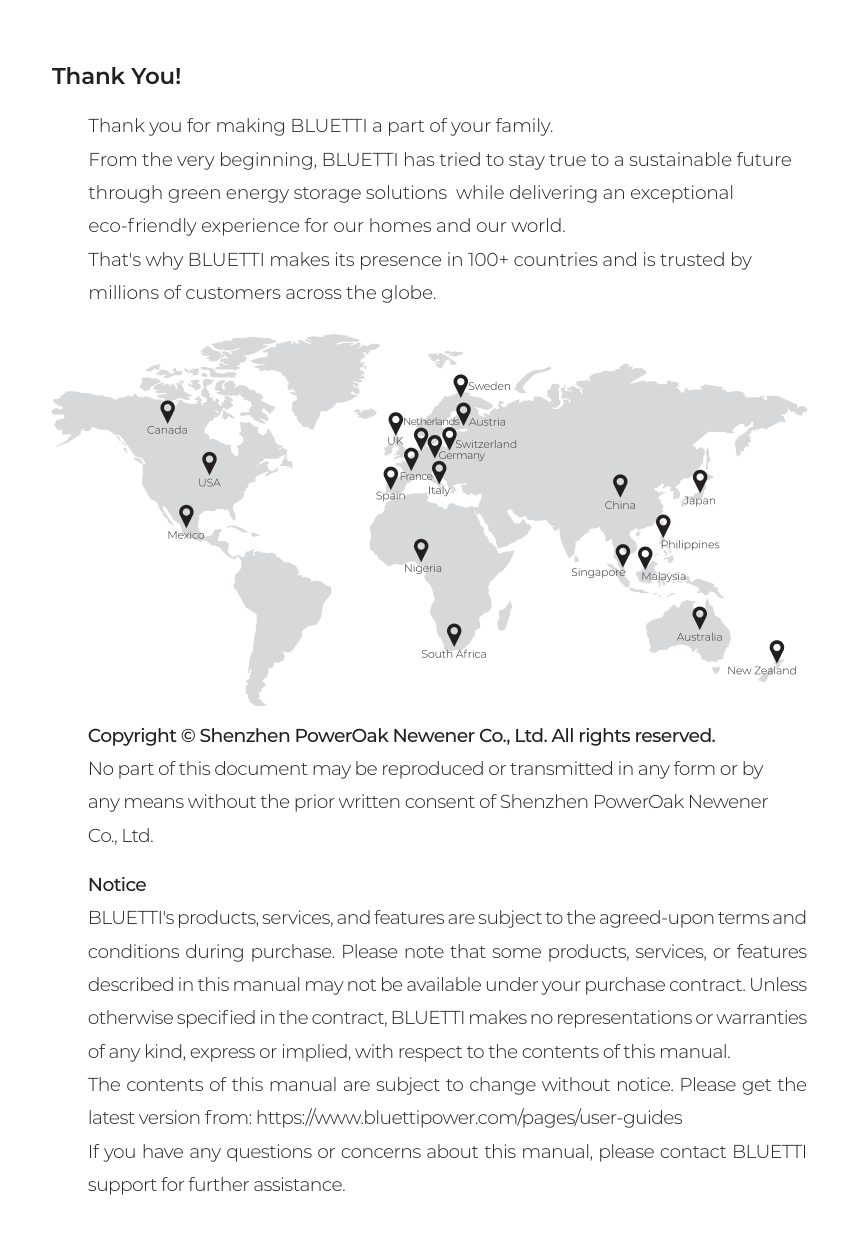
Thank you for making BLUETTI a part of your family. From the very beginning, BLUETTI has tried to stay true to a sustainable future through green energy storage solutions while delivering an exceptional eco-friendly experience for our homes and our world. That's why BLUETTI makes its presence in 100+ countries and is trusted by millions of customers across the globe.
Netherlands
Germany
France
Copyright © Shenzhen PowerOak Newener Co., Ltd. All rights reserved. No part of this document may be reproduced or transmitted in any form or by any means without the prior written consent of Shenzhen PowerOak Newener Co., Ltd.
Notice BLUETTI's products, services, and features are subject to the agreed-upon terms and conditions during purchase. Please note that some products, services, or features described in this manual may not be available under your purchase contract. Unless otherwise specified in the contract, BLUETTI makes no representations or warranties of any kind, express or implied, with respect to the contents of this manual. The contents of this manual are subject to change without notice. Please get the latest version from: https://www.bluettipower.com/pages/user-guides If you have any questions or concerns about this manual, please contact BLUETTI support for further assistance.
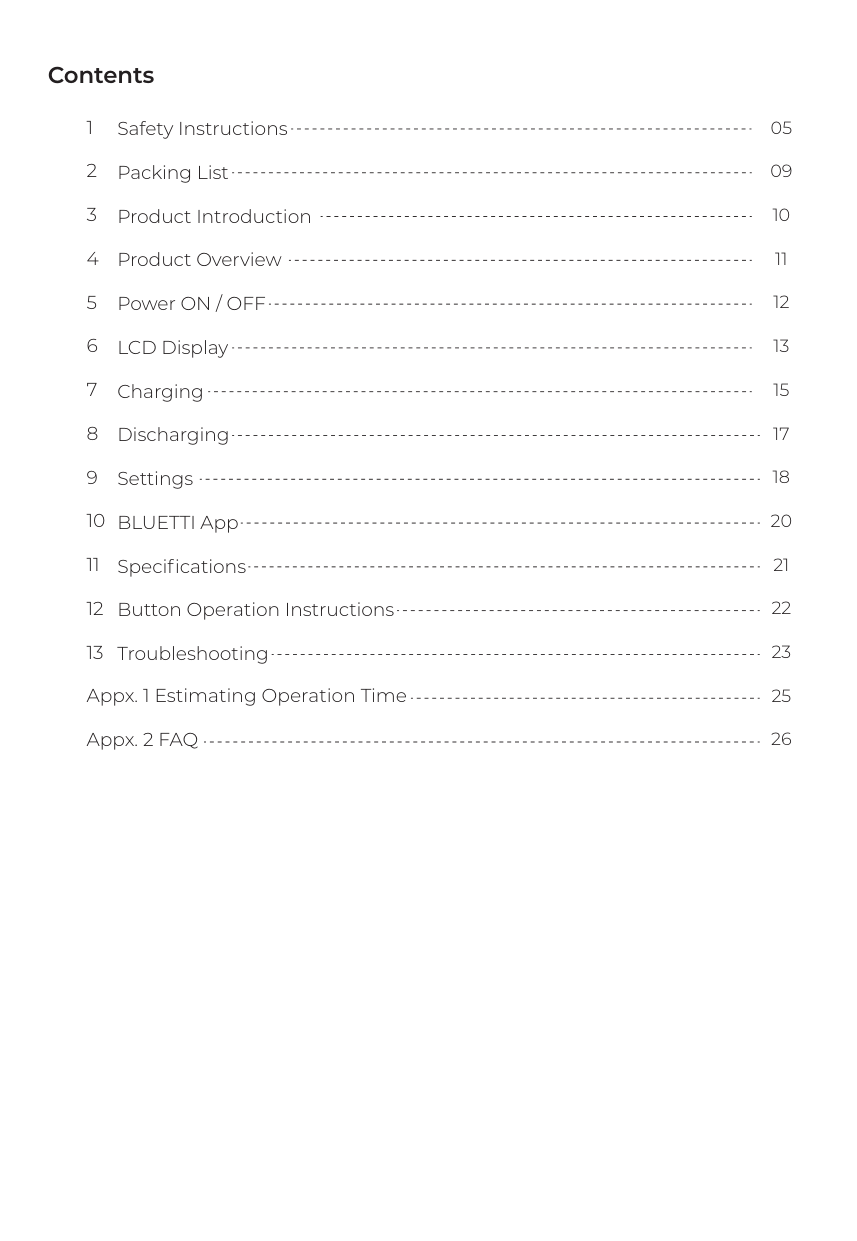
##### Contents
Safety Instructions Packing List Product Introduction Product Overview Power ON / OFF LCD Display Charging Discharging Settings BLUETTI App Specifications Button Operation Instructions Troubleshooting
05
###### 1. Safety Instructions
Read this manual for instructions on the proper use and safety information for the product. The safety instructions provided herein are for illustrative purposes that include but are not limited to those listed in this manual. Actual operation shall comply with all applicable safety standards. If you have any questions, feel free to contact BLUETTI support or your local BLUETTI dealers.
BLUETTI shall not be liable for damages resulting from the following circumstances:
IMPORTANT SAFETY INSTRUCTIONS
WARNING: When using this product, basic precautions should always be followed, including the following:
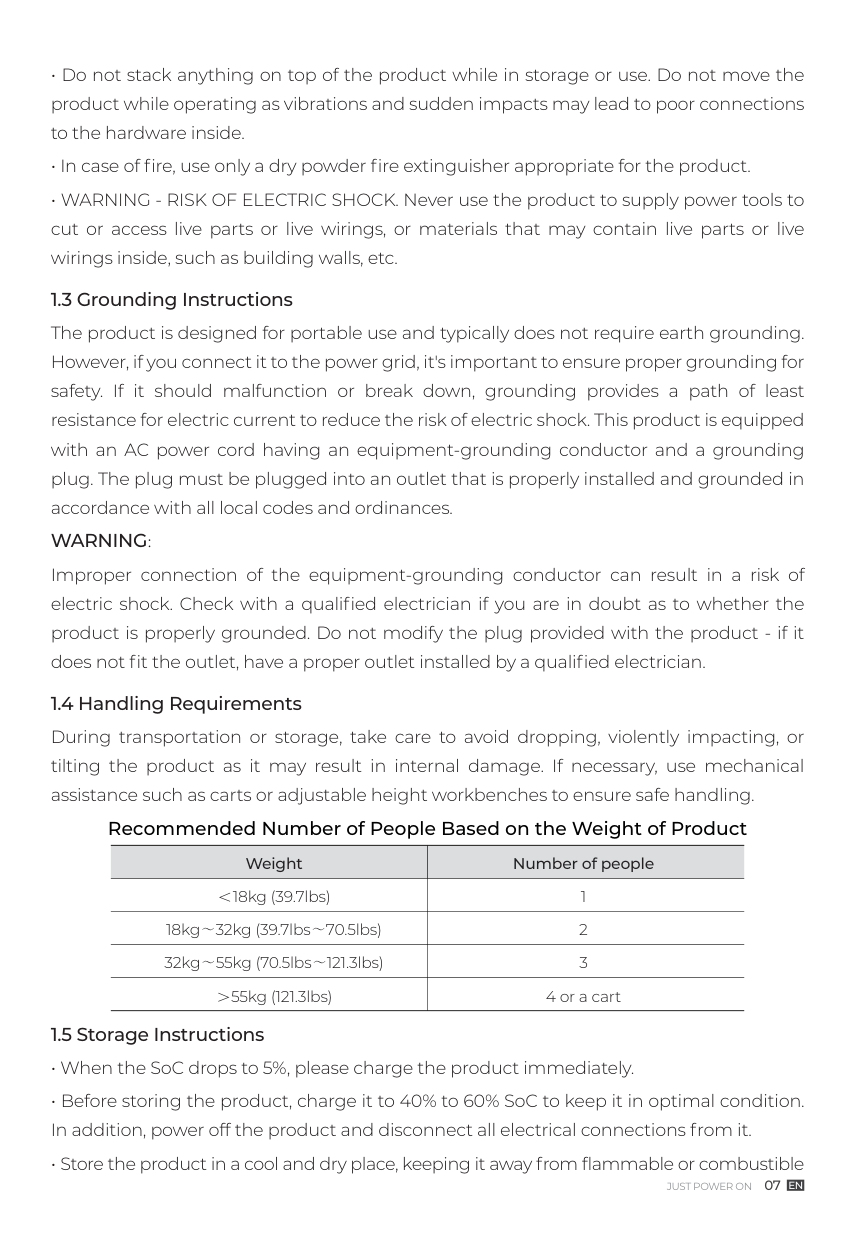
Recommended Number of People Based on the Weight of Product
|Weight|Number of people| |---|---| |<18kg (39.7lbs)|1| |18kg~32kg (39.7lbs~70.5lbs)|2| |32kg~55kg (70.5lbs~121.3lbs)|3| |>55kg (121.3lbs)|4 or a cart|
SAVE THESE INSTRUCTIONS
BLUETTI shall not be liable for any equipment damage caused by the violation of the above instructions.
###### 2. Packing List
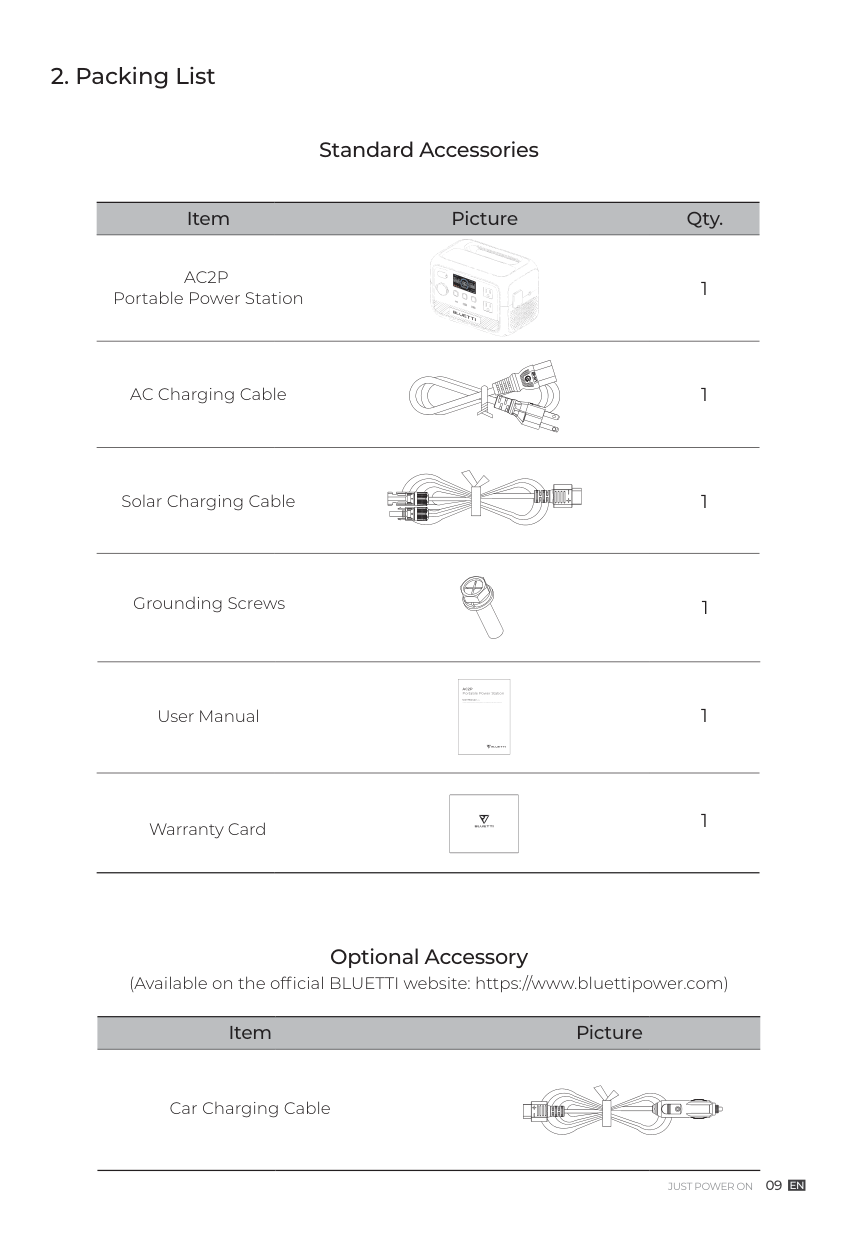
######## Standard Accessories
######### Item Picture Qty.
AC2P Portable Power Station
1
1
AC Charging Cable
Solar Charging Cable
| | | |---|---| | | | | | |
| | | | | | |---|---|---|---|---|
| | | |---|---| | | |
1
1Grounding Screws
|AC2P Portable Power Station
User Manual| |---|
User Manual 1
| | |---|
1 Warranty Card
Optional Accessory (Available on the official BLUETTI website: https://www.bluettipower.com)
Item Picture
Car Charging Cable
| | | |---|---| | | |
| | | |---|---| | | |
###### 3. Product Introduction
Introducing the BLUETTI AC2P, your perfect partner for lightweight and minimalist travel. With its 230.4Wh capacity and 300W output, it effortlessly charges smartphones, cameras, lights, laptops, drones, and more. Pair it with solar panels to extend its usage time, ensuring you stay powered up throughout your trip.
But it's not just for travel - it's also ideal for gatherings at home. Power your favorite devices, whether it's music speakers, ambient lighting, or other entertainment gadgets, to create an unforgettable delightful atmosphere. Get ready to experience the true potential of portable power with the AC2P!
########## Danger:
Do not connect the AC output of AC2P to the grid.
###### 4. Product Overview
21
3 54 6
7
11 10
8
9
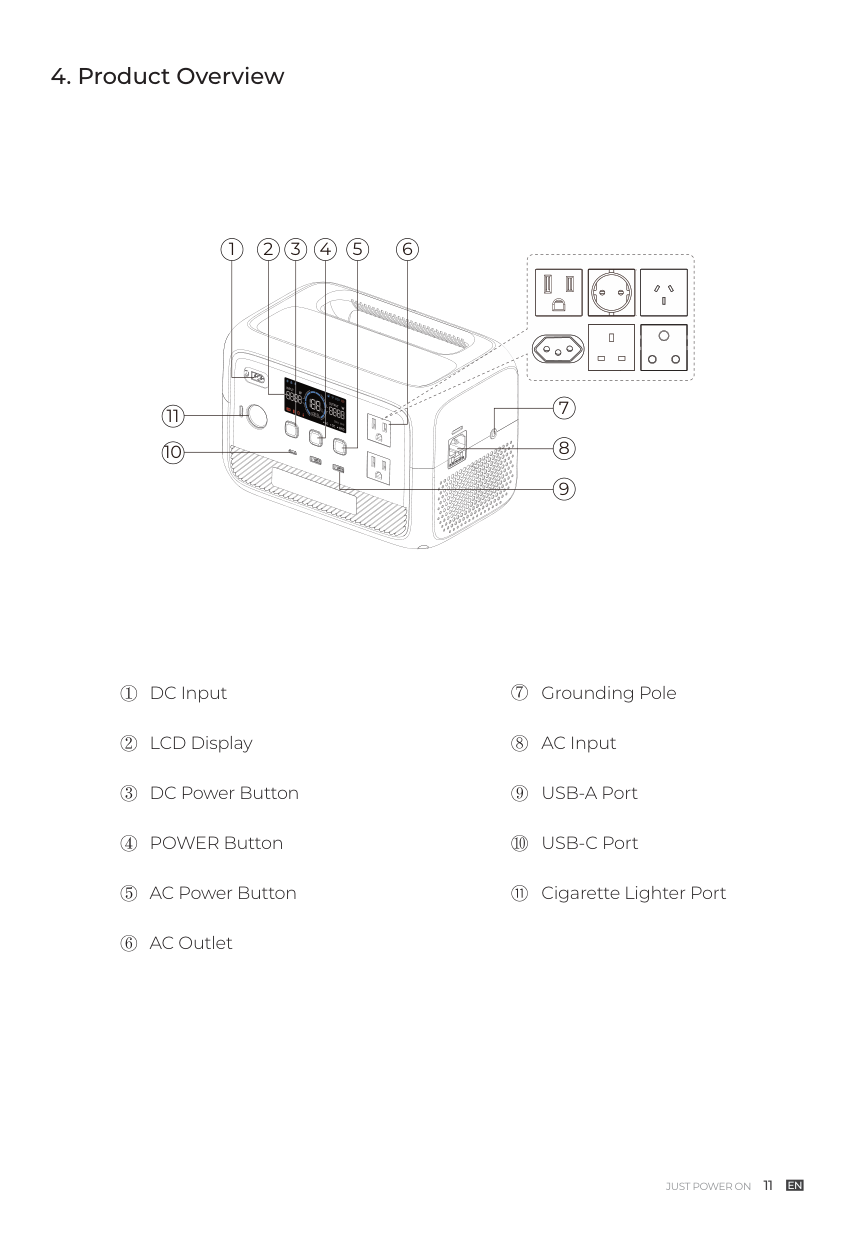
DC Input
LCD Display
DC Power Button
POWER Button
AC Power Button
AC Outlet
Grounding Pole
AC Input
USB-A Port
USB-C Port
Cigarette Lighter Port
###### 5. Power ON / OFF
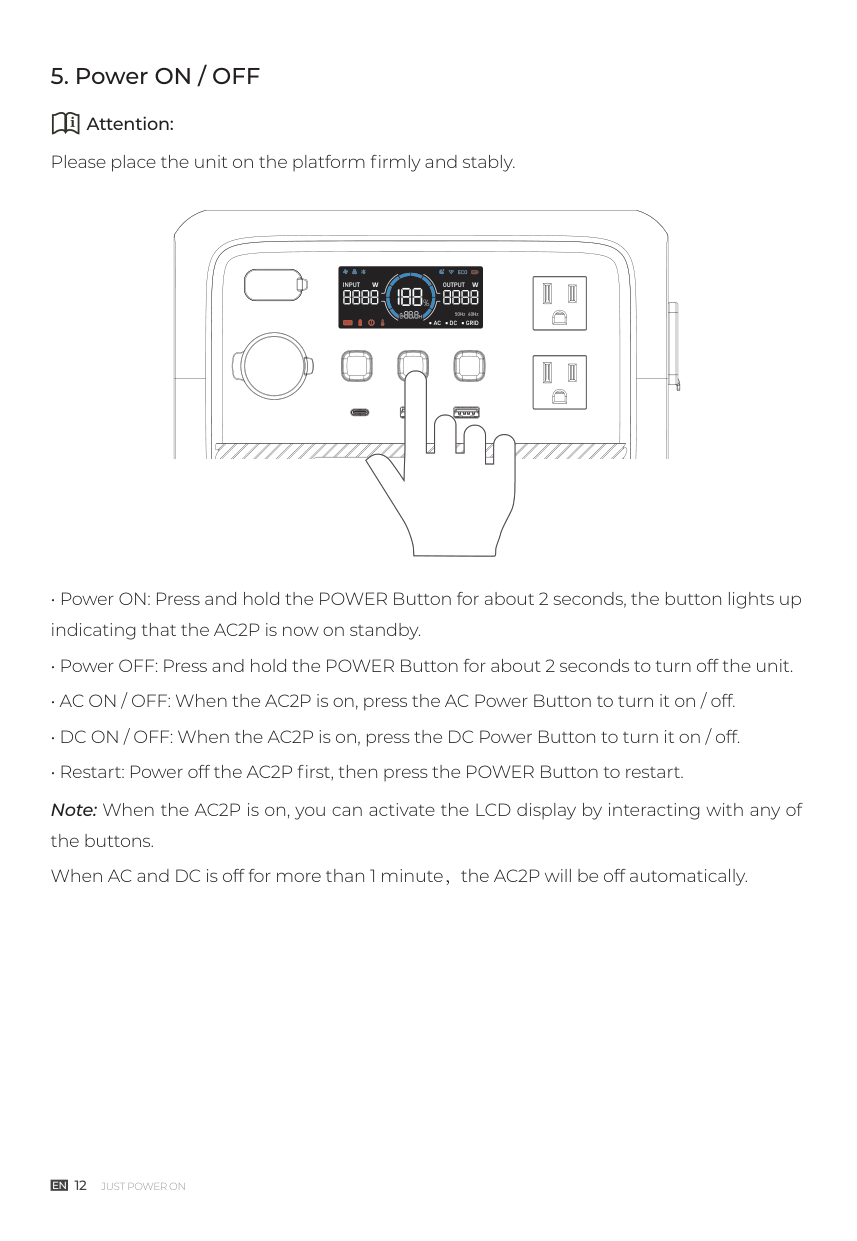
########## Attention:
Please place the unit on the platform firmly and stably.
| | |---| | |
###### 6. LCD Display
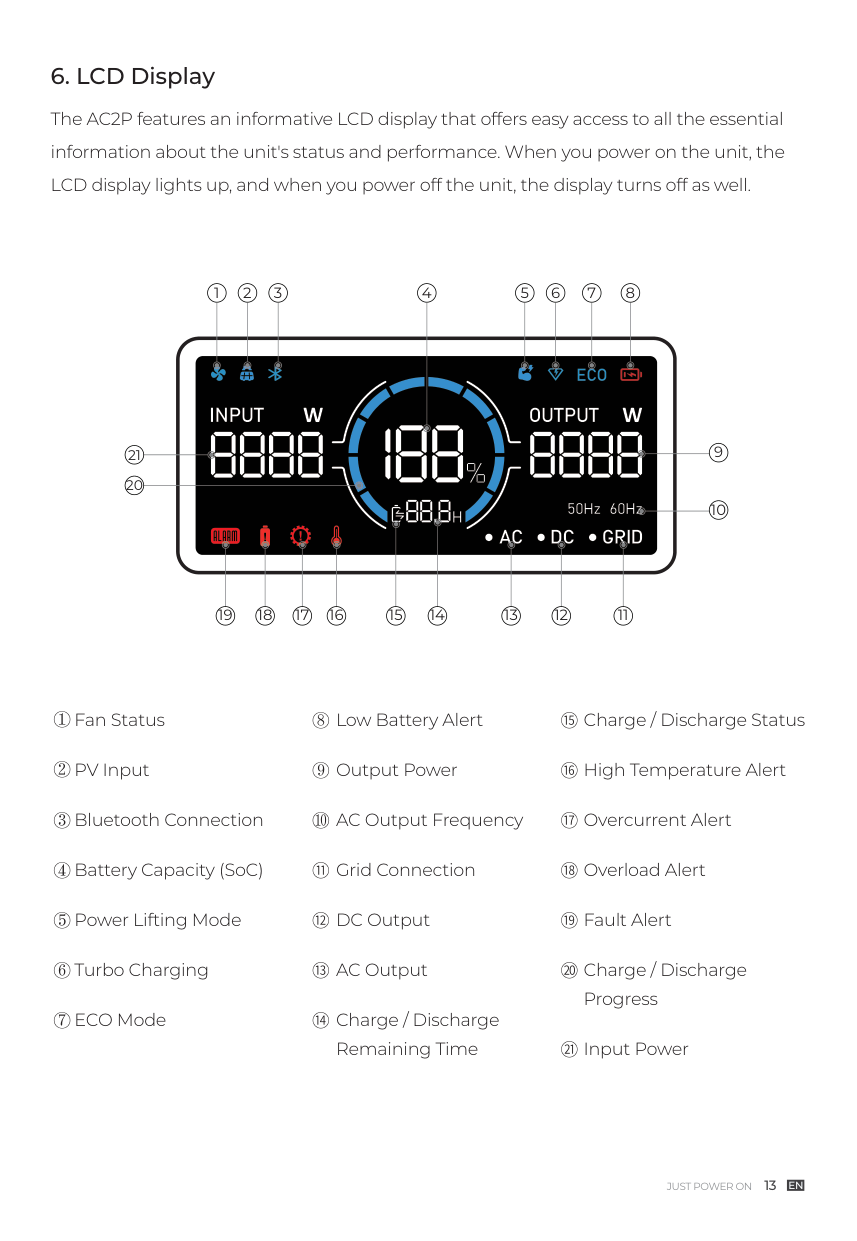
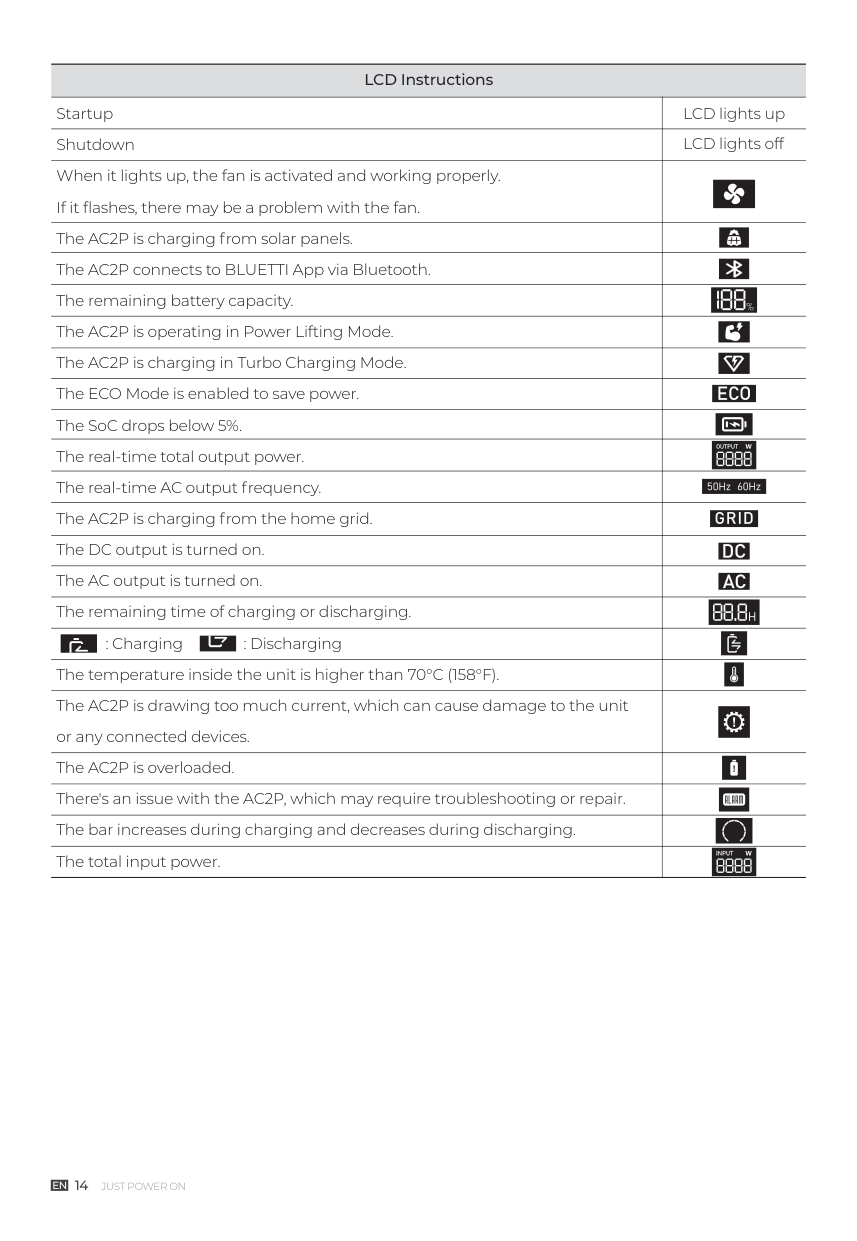
The AC2P features an informative LCD display that offers easy access to all the essential information about the unit's status and performance. When you power on the unit, the LCD display lights up, and when you power off the unit, the display turns off as well.
1 2 3 4 5 6 7 8
21 20
111213141516171819
Fan Status
PV Input
Bluetooth Connection
Battery Capacity (SoC)
Power Lifting Mode
Turbo Charging
ECO Mode
Low Battery Alert
Output Power
AC Output Frequency
Grid Connection
DC Output
AC Output
Charge / Discharge Remaining Time
Charge / Discharge Status
High Temperature Alert
Overcurrent Alert
Overload Alert
Fault Alert
Charge / Discharge Progress
Input Power
########### LCD Instructions
|Startup|LCD lights up| |---|---| |Shutdown|LCD lights off| |When it lights up, the fan is activated and working properly. If it flashes, there may be a problem with the fan.| | |The AC2P is charging from solar panels.| | |The AC2P connects to BLUETTI App via Bluetooth.| | |The remaining battery capacity.| | |The AC2P is operating in Power Lifting Mode.| | |The AC2P is charging in Turbo Charging Mode.| | |The ECO Mode is enabled to save power.| | |The SoC drops below 5%.| | |The real-time total output power.| | |The real-time AC output frequency.| | |The AC2P is charging from the home grid.| | |The DC output is turned on.| |
|The AC output is turned on.| | |The remaining time of charging or discharging.| | |: Charging : Discharging| | |The temperature inside the unit is higher than 70°C (158°F).| | |The AC2P is drawing too much current, which can cause damage to the unit or any connected devices.| | |The AC2P is overloaded.| | |There's an issue with the AC2P, which may require troubleshooting or repair.| | |The bar increases during charging and decreases during discharging.| | |The total input power.| |
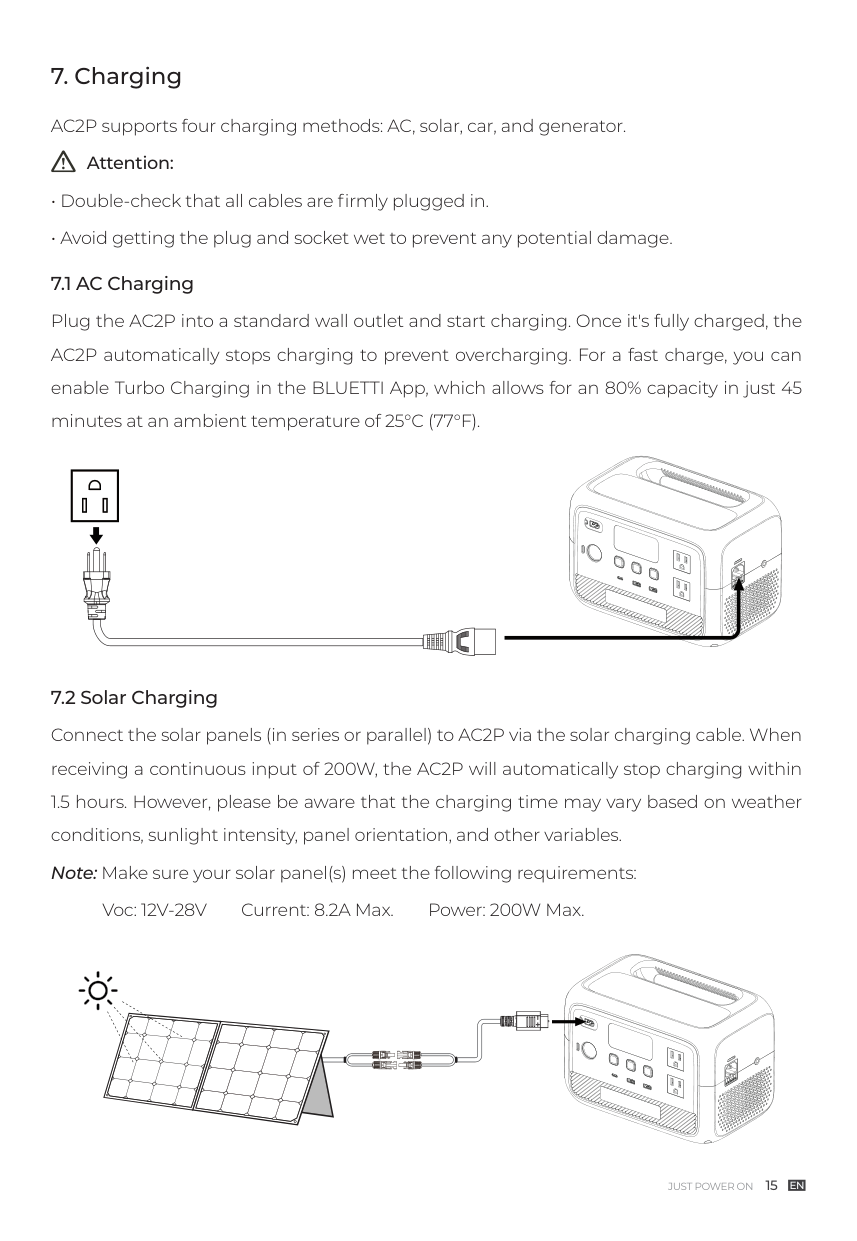
###### 7. Charging
AC2P supports four charging methods: AC, solar, car, and generator.
########## Attention:
| | | | |
|---|---|---|---| | | | | |
Voc: 12V-28V Current: 8.2A Max. Power: 200W Max.
| | | |---|---| | | | | | |
| | | |---|---| | | |
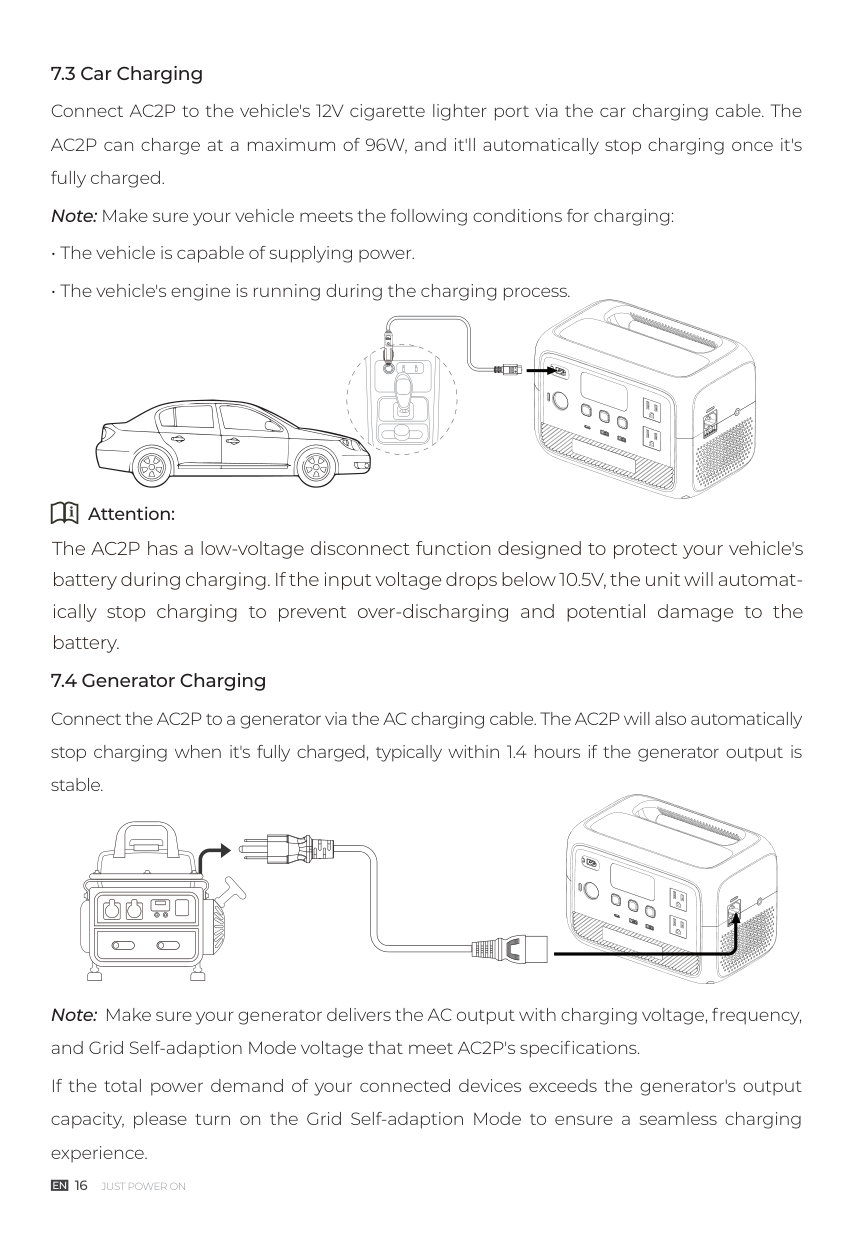
Note: Make sure your generator delivers the AC output with charging voltage, frequency, and Grid Self-adaption Mode voltage that meet AC2P's specifications.
If the total power demand of your connected devices exceeds the generator's output capacity, please turn on the Grid Self-adaption Mode to ensure a seamless charging experience.
| | | | |---|---|---| | | | |
| | | |---|---| | | |
| | | |---|---| | | | | | |
Attention:
The AC2P has a low-voltage disconnect function designed to protect your vehicle's battery during charging. If the input voltage drops below 10.5V, the unit will automatically stop charging to prevent over-discharging and potential damage to the battery.
| | | |---|---|
| | |
| | | |---|---| | | | | | | | | |
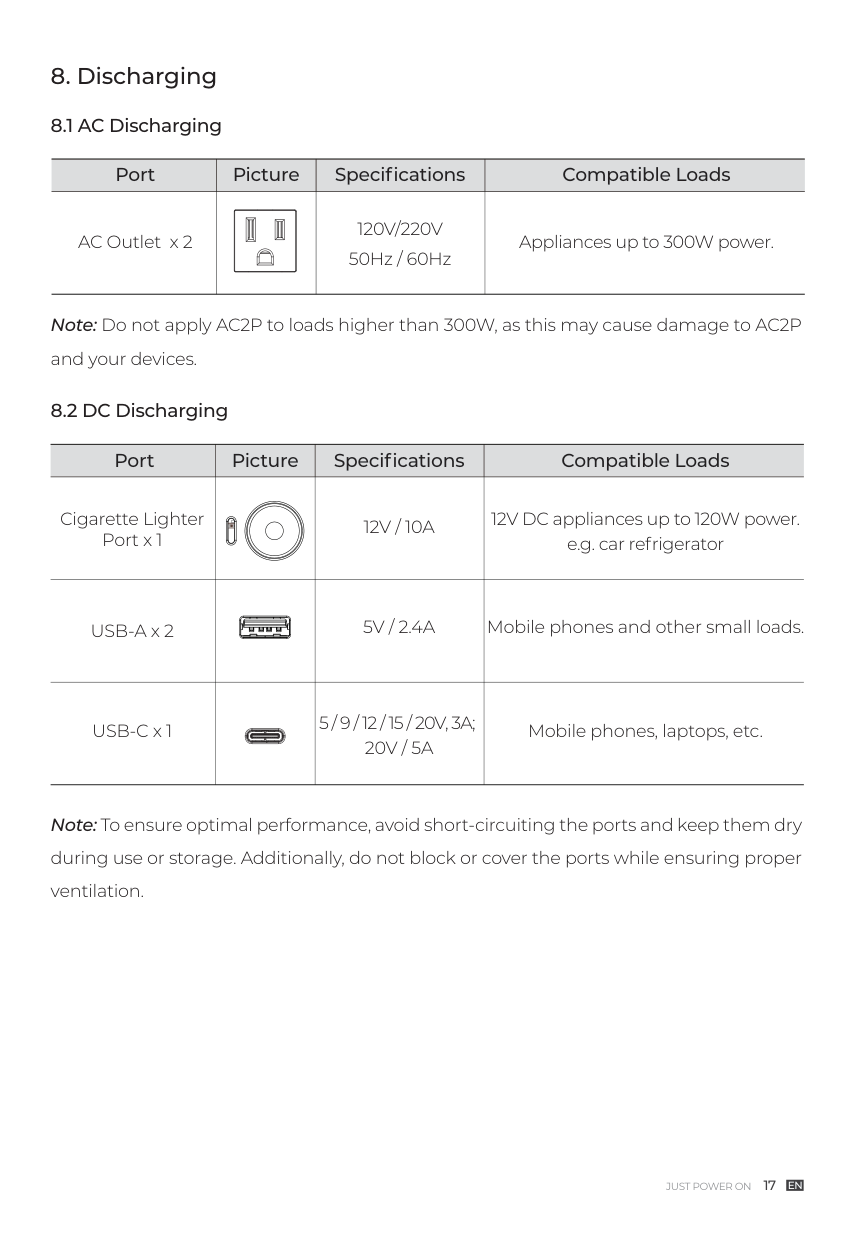
###### 8. Discharging
Note: To ensure optimal performance, avoid short-circuiting the ports and keep them dry during use or storage. Additionally, do not block or cover the ports while ensuring proper ventilation.
Note: Do not apply AC2P to loads higher than 300W, as this may cause damage to AC2P and your devices.
|Port|Picture|Specifications|Compatible Loads| |---|---|---|---| |AC Outlet x 2|| | |---| |120V/220V 50Hz / 60Hz|Appliances up to 300W power.|
|Port|Picture|Specifications|Compatible Loads| |---|---|---|---| |Cigarette Lighter Port x 1| |12V / 10A|12V DC appliances up to 120W power. e.g. car refrigerator| |USB-A x 2| |5V / 2.4A|Mobile phones and other small loads.| |USB-C x 1| |5 / 9 / 12 / 15 / 20V, 3A; 20V / 5A|Mobile phones, laptops, etc.|
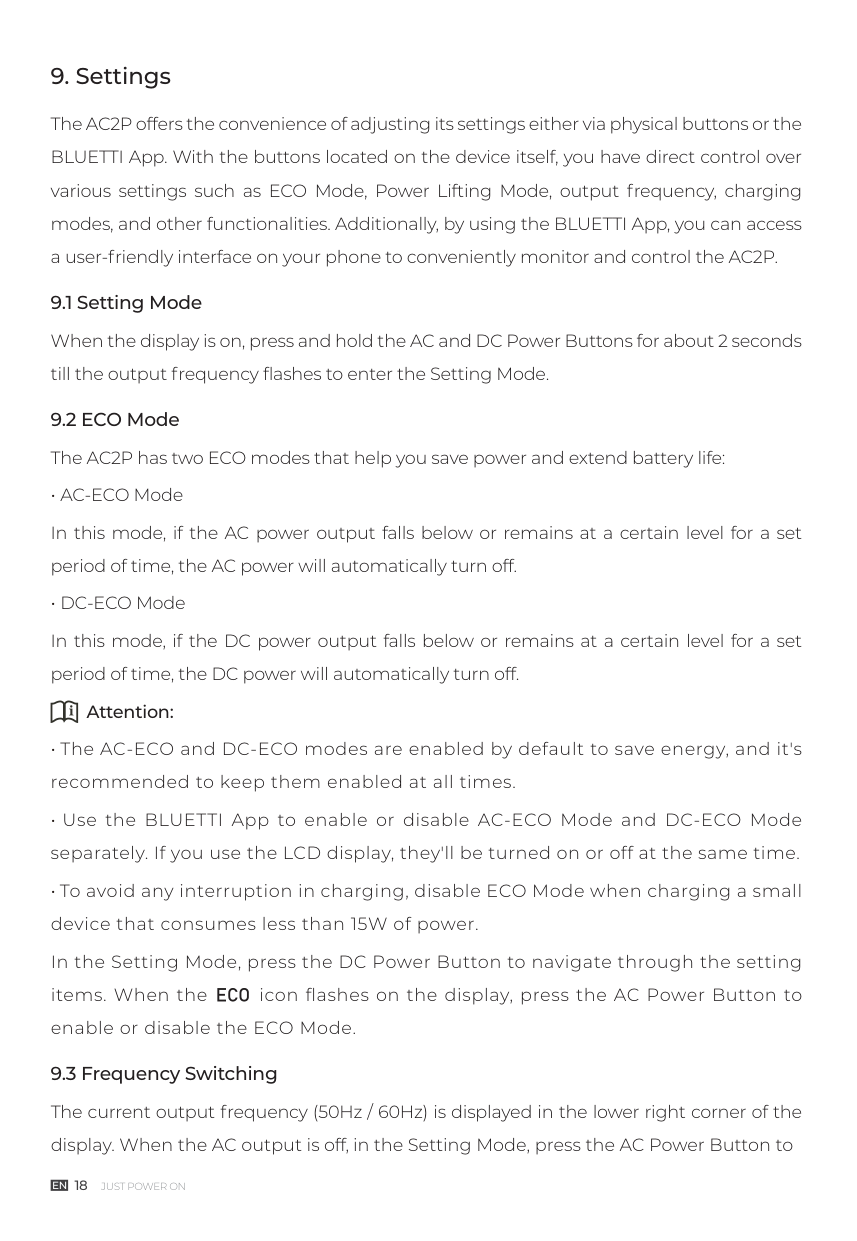
###### 9. Settings
The AC2P offers the convenience of adjusting its settings either via physical buttons or the BLUETTI App. With the buttons located on the device itself, you have direct control over various settings such as ECO Mode, Power Lifting Mode, output frequency, charging modes, and other functionalities. Additionally, by using the BLUETTI App, you can access a user-friendly interface on your phone to conveniently monitor and control the AC2P.
Attention:
switch the frequency options based on your requirements.
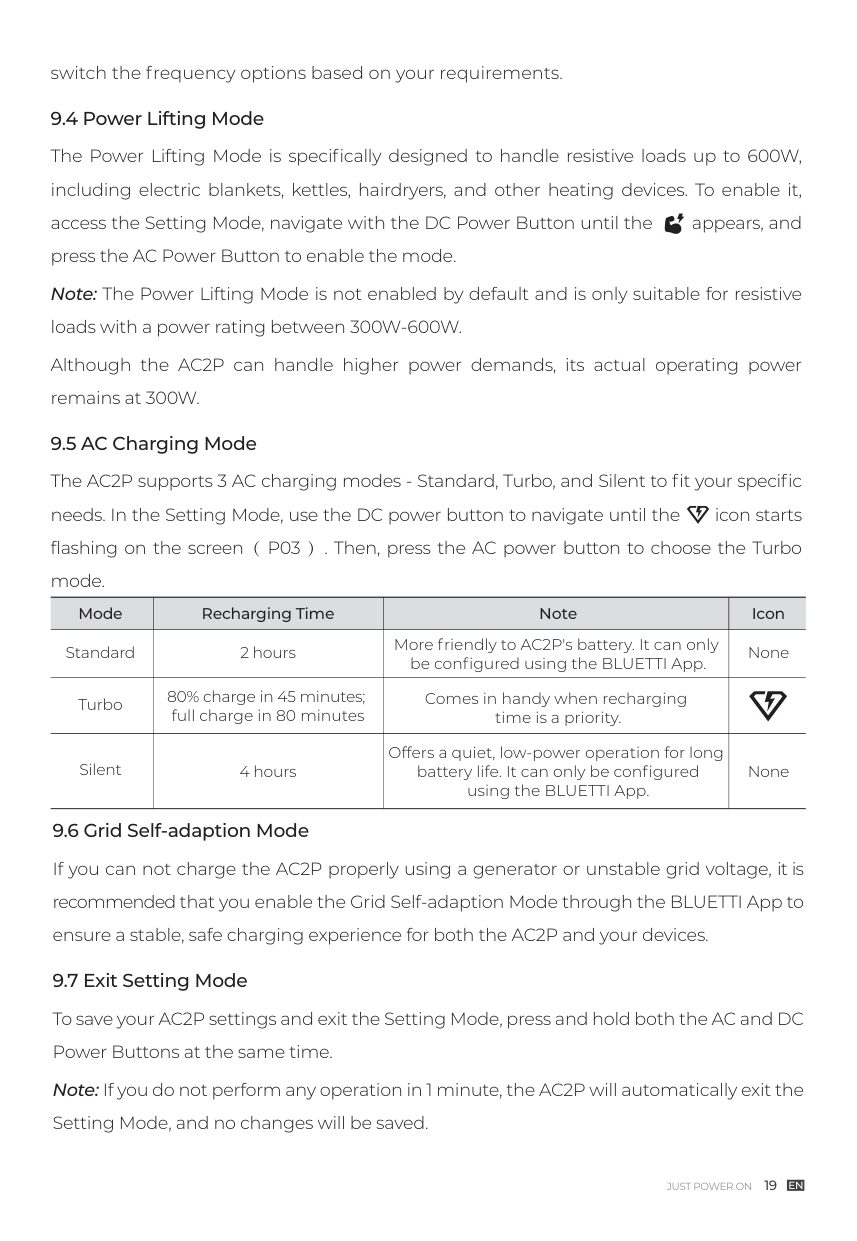
|Mode|Recharging Time|Note|Icon| |---|---|---|---| |Standard|2 hours|More friendly to AC2P's battery It can only be configured using the BLUETTI App.|None| |Turbo|80% charge in 45 minutes; full charge in 80 minutes|Comes in handy when recharging time is a priority.| | |Silent|4 hours|Offers a quiet, low-power operation for long battery life. It can only be configured using the BLUETTI App.|None|
###### 10. BLUETTI App
Scan the QR code below or search "BLUETTI" in the App Store or Google Play to download the BLUETTI App.

For more details, please refer to BLUETTI APP INSTRUCTIONS.
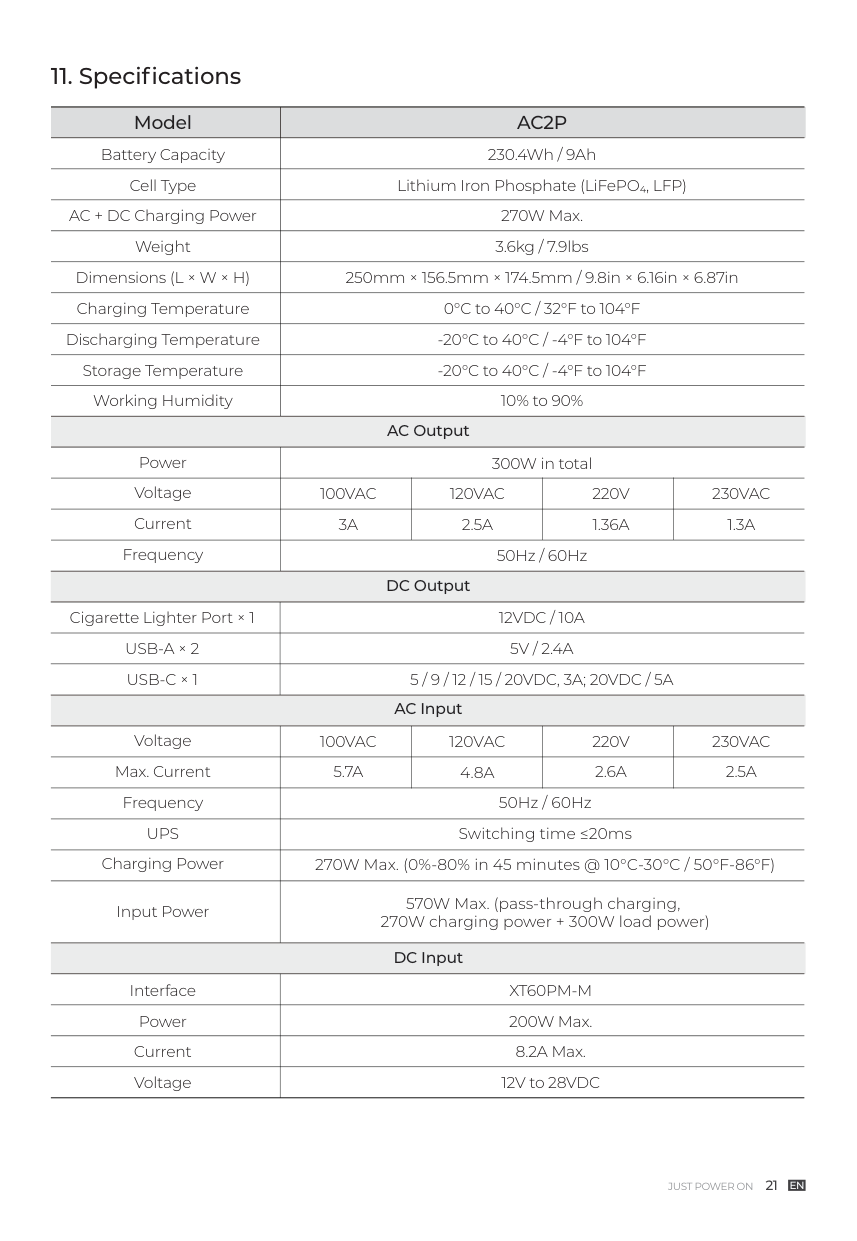
###### 11. Specifications
|Model|AC2P| |---|---| |Battery Capacity|230.4Wh / 9Ah| |Cell Type|Lithium Iron Phosphate (LiFePO , LFP)| |AC + DC Charging Power|270W Max.| |Weight|3.6kg / 7.9lbs| |Dimensions (L × W × H)|250mm × 156.5mm × 174.5mm / 9.8in × 6.16in × 6.87in| |Charging Temperature|0°C to 40°C / 32°F to 104°F| |Discharging Temperature|-20°C to 40°C / -4°F to 104°F| |Storage Temperature|-20°C to 40°C / -4°F to 104°F| |Working Humidity|10% to 90%|
AC Output
|Power|300W in total|300W in total|300W in total|300W in total| |---|---|---|---|---| |Voltage|100VAC|120VAC|220V|230VAC| |Current|3A|2.5A|1.36A|1.3A| |Frequency|50Hz / 60Hz|50Hz / 60Hz|50Hz / 60Hz|50Hz / 60Hz|
DC Output
|Cigarette Lighter Port × 1|12VDC / 10A| |---|---| |USB-A × 2|5V / 2.4A| |USB-C × 1|5 / 9 / 12 / 15 / 20VDC, 3A; 20VDC / 5A|
AC Input
|Voltage|100VAC|120VAC|220V|230VAC| |---|---|---|---|---| |Max. Current|5.7A|4.8A|2.6A|2.5A| |Frequency|50Hz / 60Hz|50Hz / 60Hz|50Hz / 60Hz|50Hz / 60Hz| |UPS|Switching time ≤20ms|Switching time ≤20ms|Switching time ≤20ms|Switching time ≤20ms| |Charging Power|270W Max. (0%-80% in 45 minutes @ 10°C-30°C / 50°F-86°F)|270W Max. (0%-80% in 45 minutes @ 10°C-30°C / 50°F-86°F)|270W Max. (0%-80% in 45 minutes @ 10°C-30°C / 50°F-86°F)|270W Max. (0%-80% in 45 minutes @ 10°C-30°C / 50°F-86°F)| |Input Power|570W Max. (pass-through charging, 270W charging power + 300W load power)|570W Max. (pass-through charging, 270W charging power + 300W load power)|570W Max. (pass-through charging, 270W charging power + 300W load power)|570W Max. (pass-through charging, 270W charging power + 300W load power)|
DC Input
|Interface|XT60PM-M| |---|---| |Power|200W Max.| |Current|8.2A Max.| |Voltage|12V to 28VDC|
###### 12. Button Operation Instructions
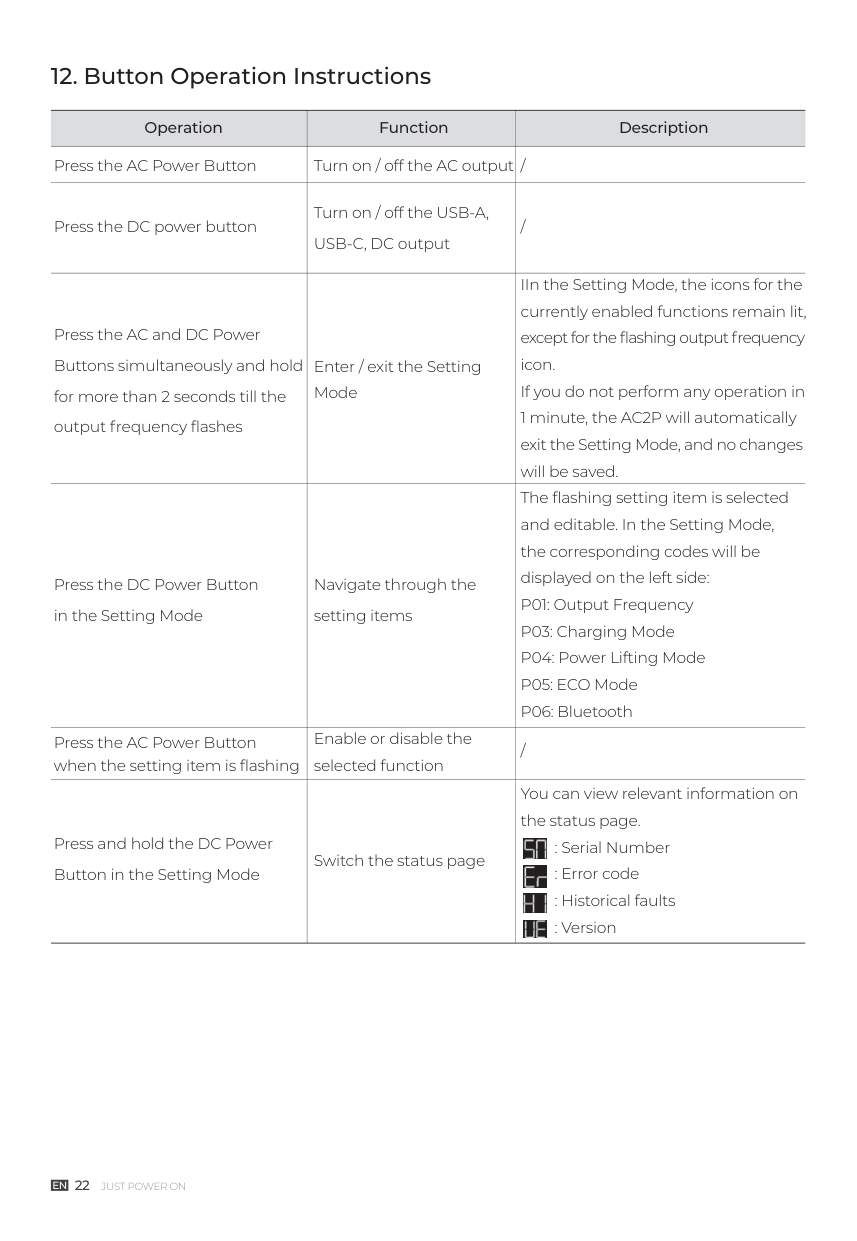
|Operation|Function|Description| |---|---|---| |Press the AC Power Button|Turn on / off the AC output|/| |Press the DC power button|Turn on / off the USB-A, USB-C, DC output|/| |Press the AC and DC Power Buttons simultaneously and hold for more than 2 seconds till the output frequency flashes|Enter / exit the Setting Mode|IIn the Setting Mode, the icons for the currently enabled functions remain lit, except for the flashing output frequency icon. If you do not perform any operation in 1 minute, the AC2P will automatically exit the Setting Mode, and no changes will be saved.| |Press the DC Power Button in the Setting Mode|Navigate through the setting items|The flashing setting item is selected and editable. In the Setting Mode, the corresponding codes will be displayed on the left side: P01: Output Frequency
P03: Charging Mode
P04: Power Lifting Mode
P05: ECO Mode
P06: Bluetooth
| |Press the AC Power Button when the setting item is flashing|Enable or disable the selected function|/| |Press and hold the DC Power Button in the Setting Mode|Switch the status page|You can view relevant information on the status page.
: Serial Number : Error code : Historical faults : Version


|
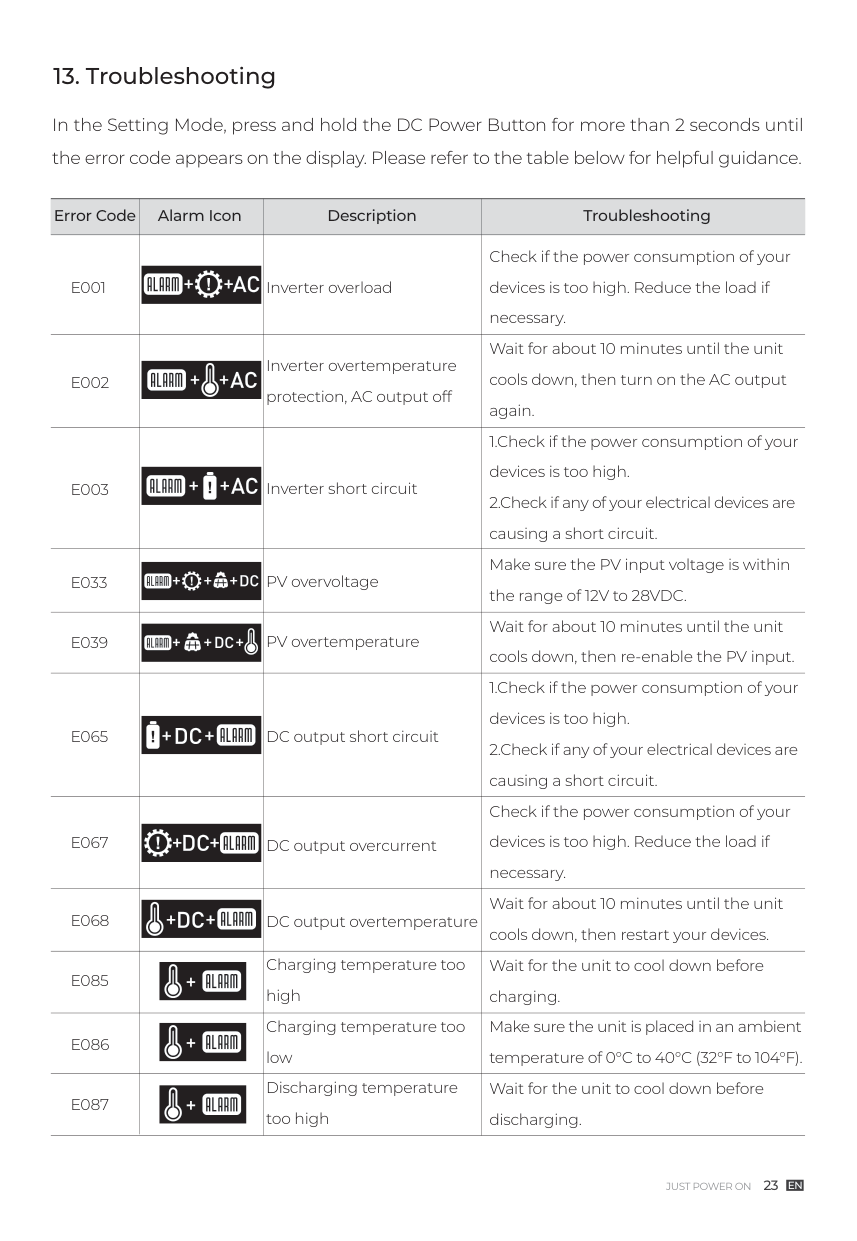
###### 13. Troubleshooting
In the Setting Mode, press and hold the DC Power Button for more than 2 seconds until the error code appears on the display. Please refer to the table below for helpful guidance.
########### Alarm Icon
Error Code Description
########### Troubleshooting
E033
E039
Inverter overload
Inverter overtemperature protection, AC output off
Inverter short circuit
PV overvoltage
PV overtemperature
Check if the power consumption of your devices is too high. Reduce the load if necessary. Wait for about 10 minutes until the unit cools down, then turn on the AC output again.

E065
DC output short circuit
DC output overcurrent
DC output overtemperature
Charging temperature too high Charging temperature too low Discharging temperature too high
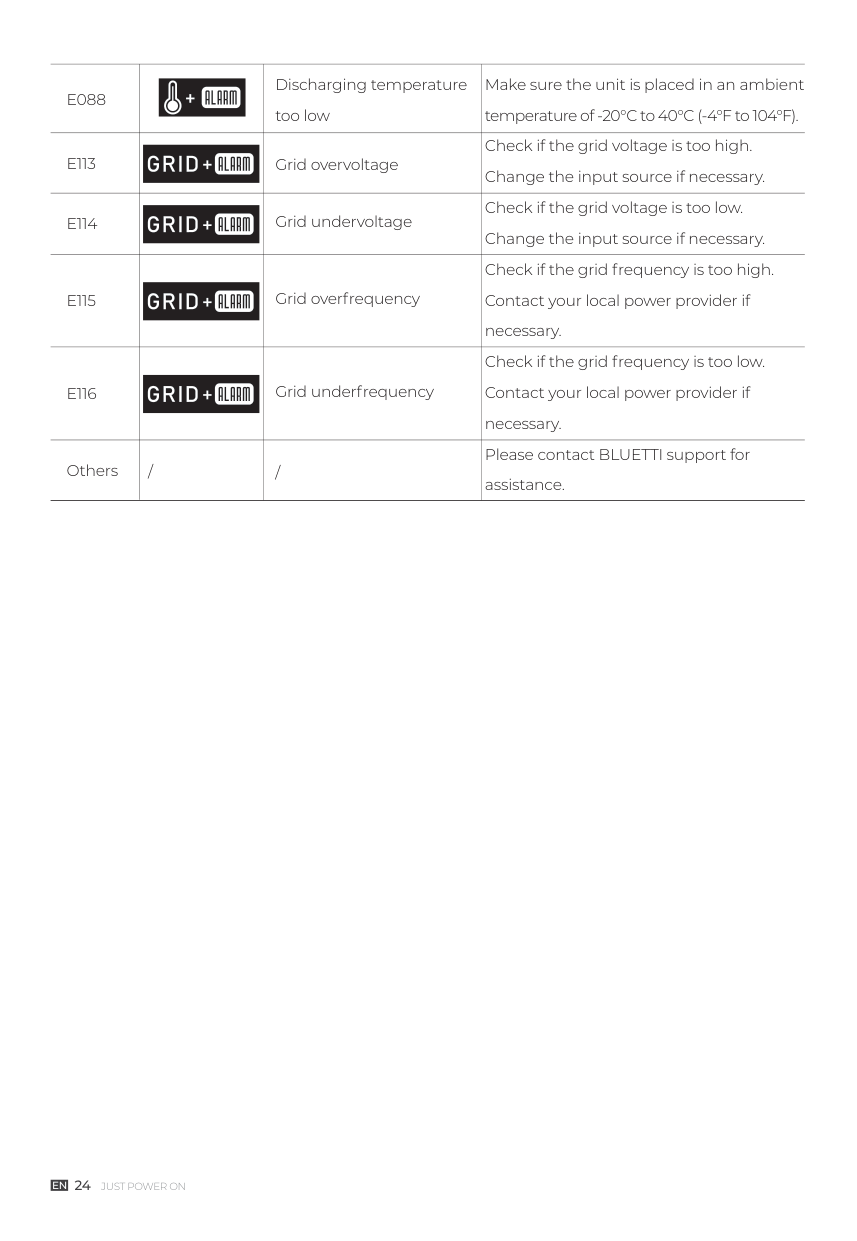
|E088| |Discharging temperature too low|Make sure the unit is placed in an ambient temperature of -20°C to 40°C (-4°F to 104°F).| |---|---|---|---| |E113| |Grid overvoltage|Check if the grid voltage is too high. Change the input source if necessary.| |E114| |Grid undervoltage|Check if the grid voltage is too low. Change the input source if necessary.| |E115| |Grid overfrequency|Check if the grid frequency is too high. Contact your local power provider if necessary.| |E116| |Grid underfrequency|Check if the grid frequency is too low. Contact your local power provider if necessary.|

|Others|/|/|Please contact BLUETTI support for assistance.|
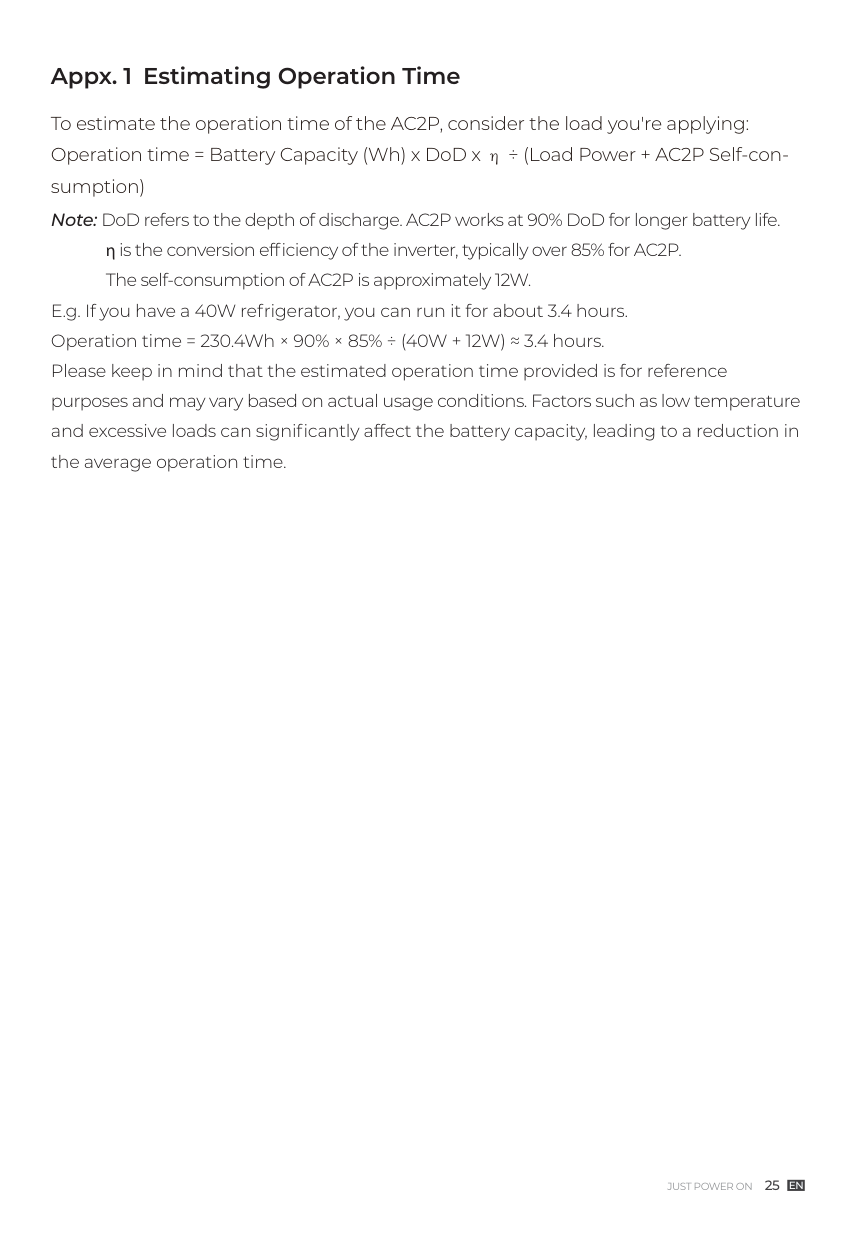
##### Appx. 1 Estimating Operation Time
To estimate the operation time of the AC2P, consider the load you're applying: Operation time = Battery Capacity (Wh) x DoD x η ÷ (Load Power + AC2P Self-consumption) Note: DoD refers to the depth of discharge. AC2P works at 90% DoD for longer battery life.
η is the conversion efficiency of the inverter, typically over 85% for AC2P. The self-consumption of AC2P is approximately 12W.
E.g. If you have a 40W refrigerator, you can run it for about 3.4 hours. Operation time = 230.4Wh × 90% × 85% ÷ (40W + 12W) ≈ 3.4 hours. Please keep in mind that the estimated operation time provided is for reference purposes and may vary based on actual usage conditions. Factors such as low temperature and excessive loads can significantly affect the battery capacity, leading to a reduction in the average operation time.
##### Appx. 2 FAQ
How do I know whether my devices will work well with this product? Please evaluate the total constant load of your devices. If it doesn't exceed the Max. output power of AC2P (300W), you can use this power station to run your devices. Note: Some devices with built-in motors or compressors may start at 2-4 times the rated power, which can easily overload the AC2P. Can I use third-party solar panels to charge this product? Yes, you can. However, make sure your solar panels have an open circuit voltage of 12V-28V and are equipped with MC4 connectors. It's also important not to mix different types of solar panels. Can it charge and discharge at the same time? Yes. It supports pass-through charging. The AC2P comes with the premium LiFePO battery and proprietary Battery Management System to ensure that it can charge and discharge at the same time. Why is the charging power often too low? AC2P has a built-in intelligent BMS that automatically adjusts the charging power in response to the battery temperature and SoC, thus protecting the battery and extending its service life.
####### For more information, please visit:
Web: https://www.bluettipower.com
@ BLUETTI Support @ BLUETTI Official
@bluetti.inc@ bluetti_inc @bluetti_official service@ bluettipower.com
SHENZHEN POWEROAK NEWENER CO., LTD. Add: F19, BLD No.1, Kaidaer, Tongsha Rd No.168, Xili Street, Nanshan, Shenzhen, China
Customer Service Email: sale@bluettipower.com service@bluettipower.com

Certificate
Inspector:
#### QC:
P/N:17.0303.0725-00A0