
Braun Irt6520 Thermoscan Infrared Ear Thermometer
Ask AI
— answers from the official manualAnswers from the official manual.
Common questions
Common Questions
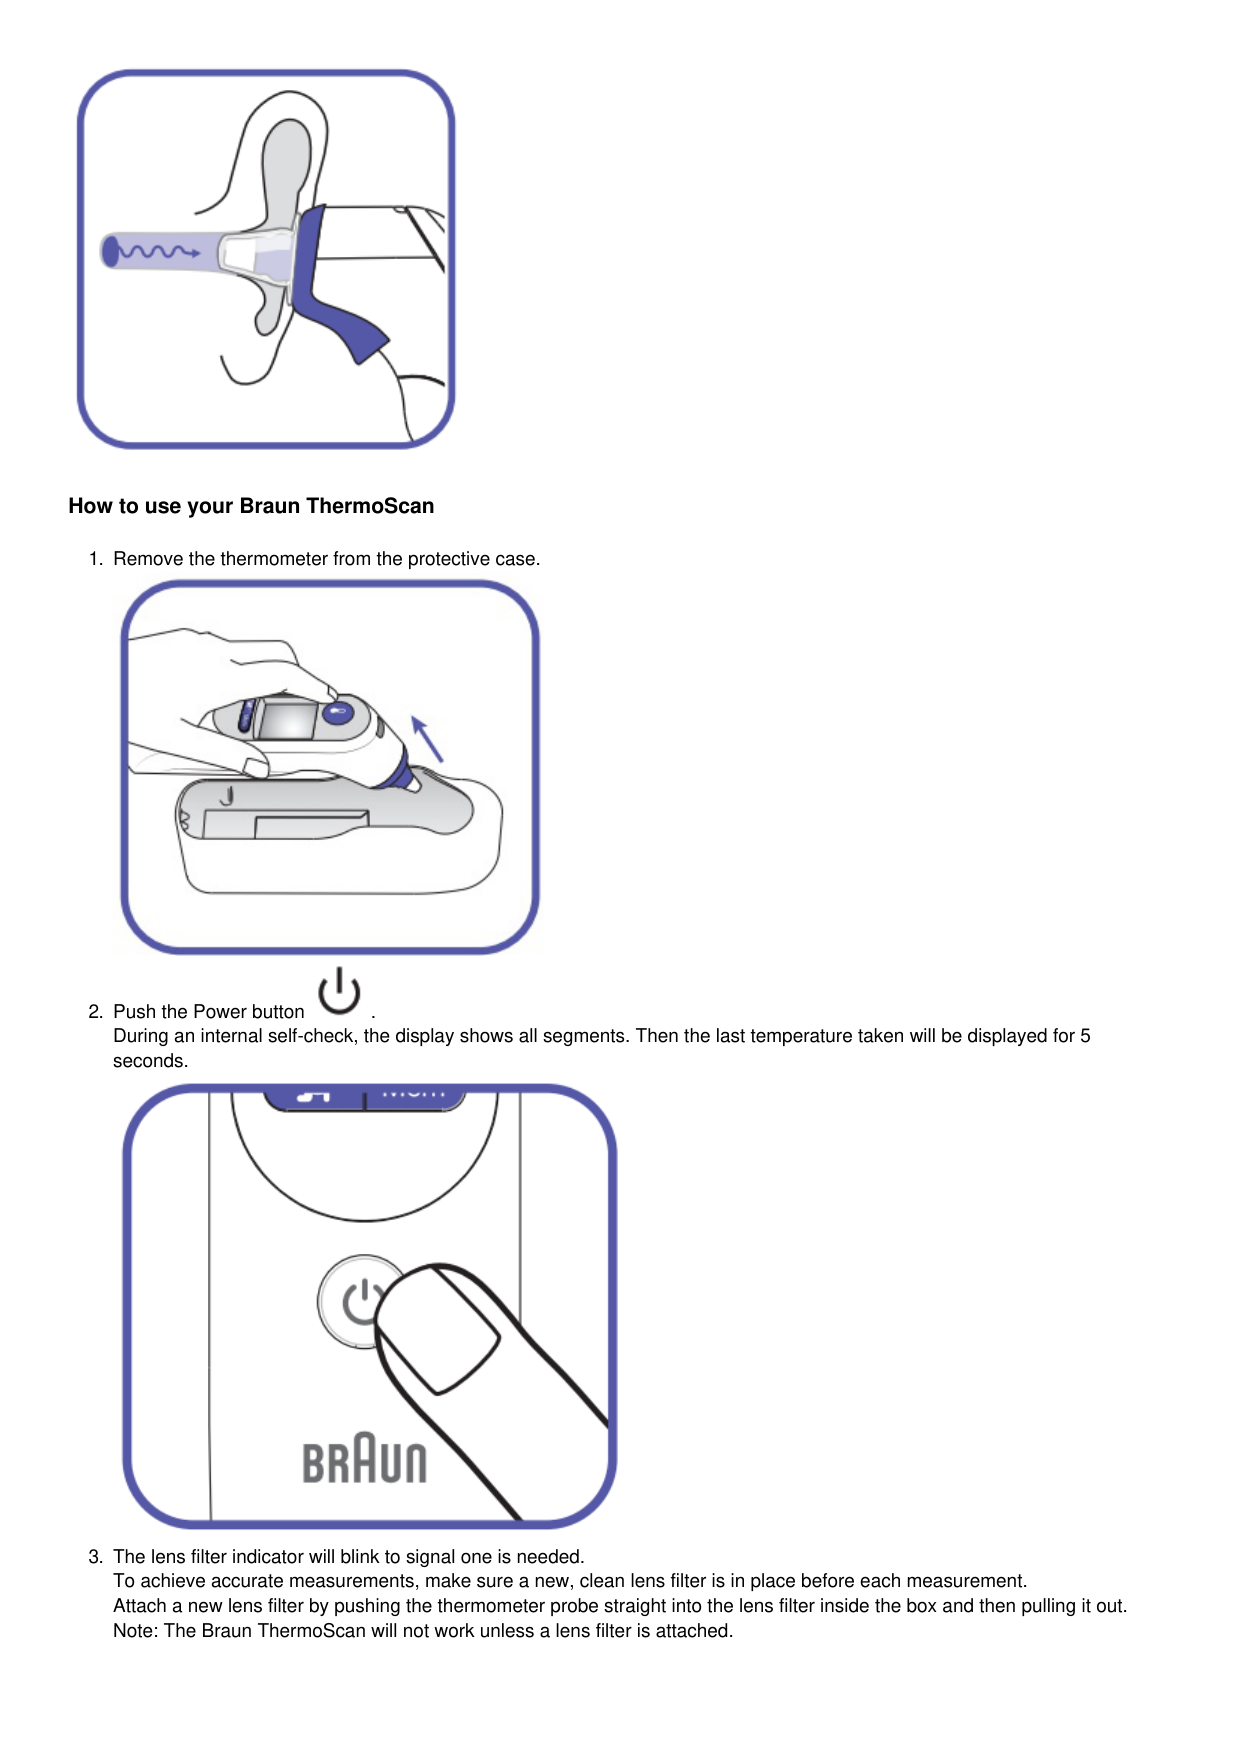
10 totalHow do I replace the batteries in my Braun IRT6520?
Open the battery compartment and remove the old batteries. Insert new AA (LR 06) batteries with correct polarity. Close the battery door to secure them. (Page 11)
What should I do if a lens filter is not attached?
Attach a new, clean lens filter before taking any temperature measurements as it ensures accurate readings and hygiene (Pages 6, 4).
What does the POS error message indicate on my Braun IRT6520?
This indicates that the thermometer probe was not correctly positioned in the ear. Ensure proper placement and take a new measurement after using a clean lens filter.
Can I change the temperature scale from Celsius to Fahrenheit on my Braun IRT6520?
Press and hold the Power button for about three seconds until °C / SET / °F appears, then release when °F is displayed. The thermometer will switch to Fahrenheit.
How do I clean the lens filter if it gets dirty?
If used without a lens filter, clean it gently with a cotton swab or cloth moistened with alcohol. Allow it to dry thoroughly before using.
What is the AgeSmart color-coded display and how does it work?
AgeSmart uses a set of age ranges which changes the background light to green, yellow, or red. This helps users interpret temperature readings as no fever, moderate fever, or high fever based on the individual's age.
Full Manual
15 pages
Manuals+ User Manuals Simplified.

BRAUN IRT6520 ThermoScan Infrared Ear Thermometer Instructions

Home » Braun » BRAUN IRT6520 ThermoScan Infrared Ear Thermometer Instructions

ThermoScan Infrared Ear Thermometer IRT6520 IRT6520B

Certain trademarks are used under license from The Procter & Gamble Company or its affiliates. © 2021 All rights reserved.

0297
Patents www.kaz.com/patents/braun
P/N: A002208R1 02FEB21
Braun ThermoScan Infrared Ear Thermometer Indications for use The Braun ThermoScan Infrared Ear Thermometer is indicated for the intermittent measurement and monitoring of human body temperature by consumers in a home use environment.
Contents [ hide
IRT6520 / IRT6520B
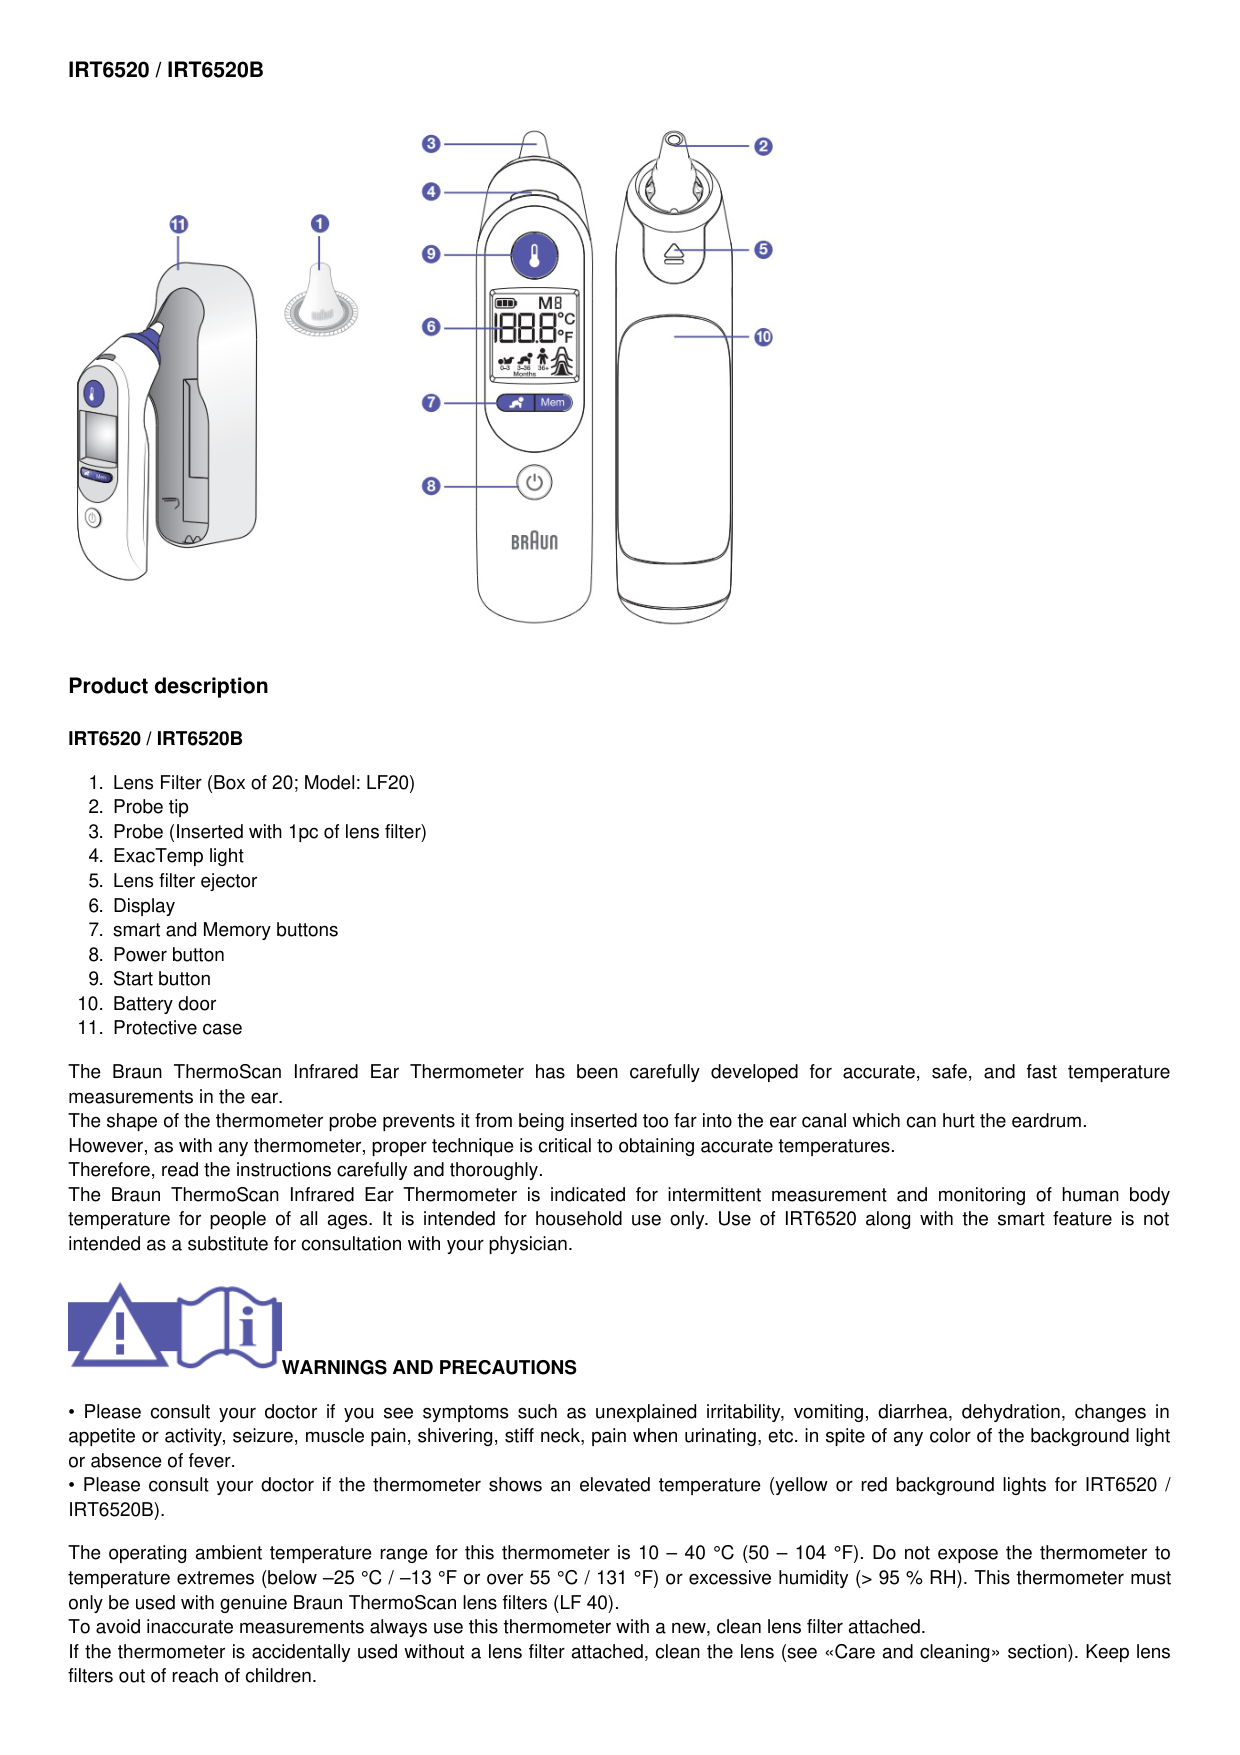

Product description
IRT6520 / IRT6520B
The Braun ThermoScan Infrared Ear Thermometer has been carefully developed for accurate, safe, and fast temperature measurements in the ear. The shape of the thermometer probe prevents it from being inserted too far into the ear canal which can hurt the eardrum. However, as with any thermometer, proper technique is critical to obtaining accurate temperatures. Therefore, read the instructions carefully and thoroughly. The Braun ThermoScan Infrared Ear Thermometer is indicated for intermittent measurement and monitoring of human body temperature for people of all ages. It is intended for household use only. Use of IRT6520 along with the smart feature is not intended as a substitute for consultation with your physician.

WARNINGS AND PRECAUTIONS
The operating ambient temperature range for this thermometer is 10 – 40 °C (50 – 104 °F). Do not expose the thermometer to temperature extremes (below –25 °C / –13 °F or over 55 °C / 131 °F) or excessive humidity (> 95 % RH). This thermometer must only be used with genuine Braun ThermoScan lens filters (LF 40). To avoid inaccurate measurements always use this thermometer with a new, clean lens filter attached. If the thermometer is accidentally used without a lens filter attached, clean the lens (see «Care and cleaning» section). Keep lens filters out of reach of children.
This thermometer is intended for household use only. This product is not intended to diagnose any disease but is a useful screening tool for temperature. Use of this thermometer is not intended as a substitute for consultation with your physician. The smart feature is not intended for pre-term babies or small-for-gestational-age babies. The smart feature is not intended to interpret hypothermic temperatures. Do not allow children to take their temperatures unattended. Do not modify this equipment without the authorization of the manufacturer. Parents/guardians should call the pediatrician upon noticing any unusual sign(s) or symptom(s). For example, a child who exhibits irritability, vomiting, diarrhea, dehydration, seizure, changes in appetite or activity, even in the absence of fever, or who exhibits a low temperature, may still need to receive medical attention. Children who are on antibiotics, analgesics, or antipyretics should not be assessed solely on temperature readings to determine the severity of their illness. Temperature elevation as indicated by AgeSmart may signal a serious illness, especially in adults who are old, frail, have a weakened immune system, or neonates and infants. Please seek professional advice immediately when there is a temperature elevation and if you are taking the temperature on:
Neonates and infants under 3 months (consult your physician immediately if the temperature exceeds 37.4 °C or 99.4 °F)
Patients over 60 years of age
Patients having diabetes mellitus or a weakened immune system (e.g. HIV positive, cancer chemotherapy, chronic steroid treatment, splenectomy)
Patients who are bedridden (e.g. nursing home patient, stroke, chronic illness, recovering from surgery)
A transplant patient (e.g. liver, heart, lung, kidney) Fever may be blunted or even absent in elderly patients. This thermometer contains small parts that can be swallowed or produce a choking hazard to children. Always keep the thermometer out of children’s reach.
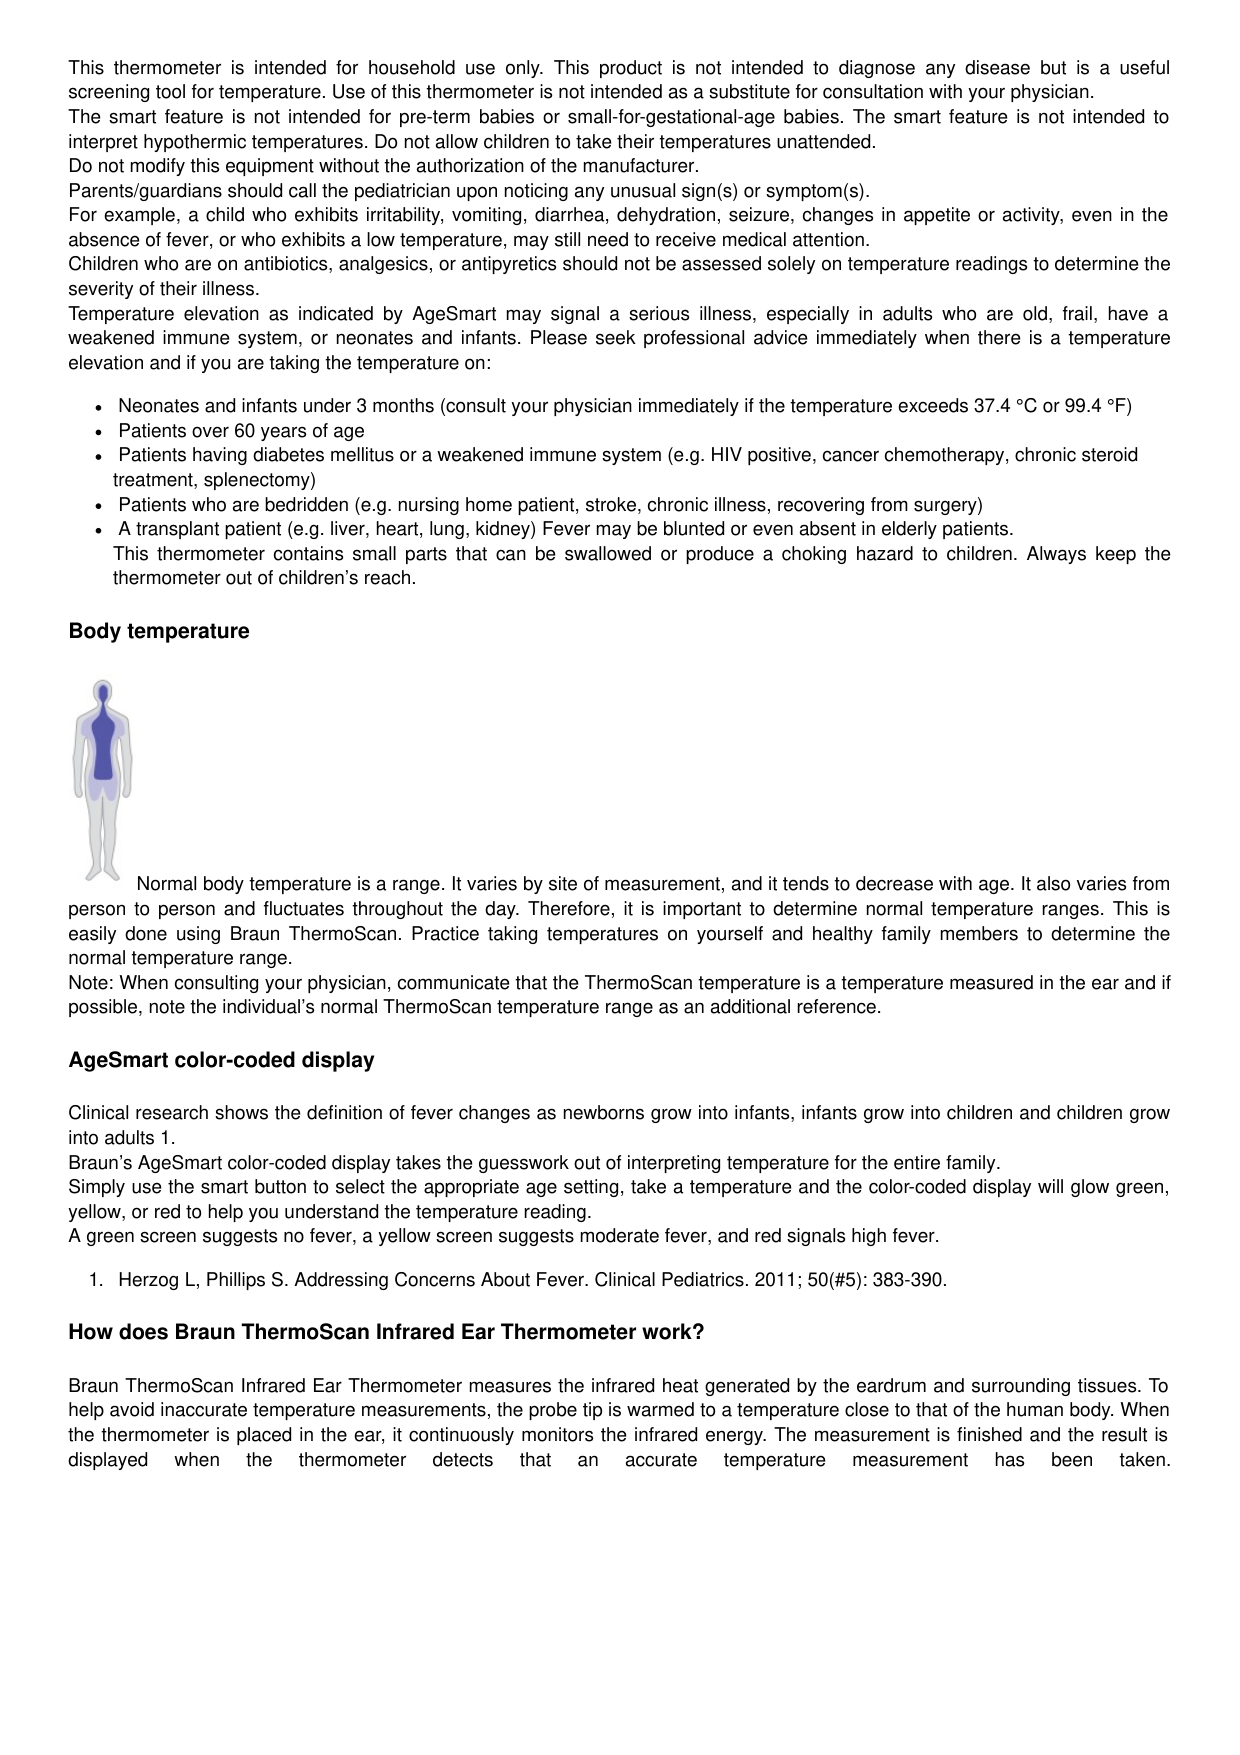
Body temperature

Normal body temperature is a range. It varies by site of measurement, and it tends to decrease with age. It also varies from person to person and fluctuates throughout the day. Therefore, it is important to determine normal temperature ranges. This is easily done using Braun ThermoScan. Practice taking temperatures on yourself and healthy family members to determine the normal temperature range. Note: When consulting your physician, communicate that the ThermoScan temperature is a temperature measured in the ear and if possible, note the individual’s normal ThermoScan temperature range as an additional reference.
AgeSmart color-coded display
Clinical research shows the definition of fever changes as newborns grow into infants, infants grow into children and children grow into adults 1. Braun’s AgeSmart color-coded display takes the guesswork out of interpreting temperature for the entire family. Simply use the smart button to select the appropriate age setting, take a temperature and the color-coded display will glow green, yellow, or red to help you understand the temperature reading. A green screen suggests no fever, a yellow screen suggests moderate fever, and red signals high fever.
How does Braun ThermoScan Infrared Ear Thermometer work?
Braun ThermoScan Infrared Ear Thermometer measures the infrared heat generated by the eardrum and surrounding tissues. To help avoid inaccurate temperature measurements, the probe tip is warmed to a temperature close to that of the human body. When the thermometer is placed in the ear, it continuously monitors the infrared energy. The measurement is finished and the result is displayed when the thermometer detects that an accurate temperature measurement has been taken.

How to use your Braun ThermoScan


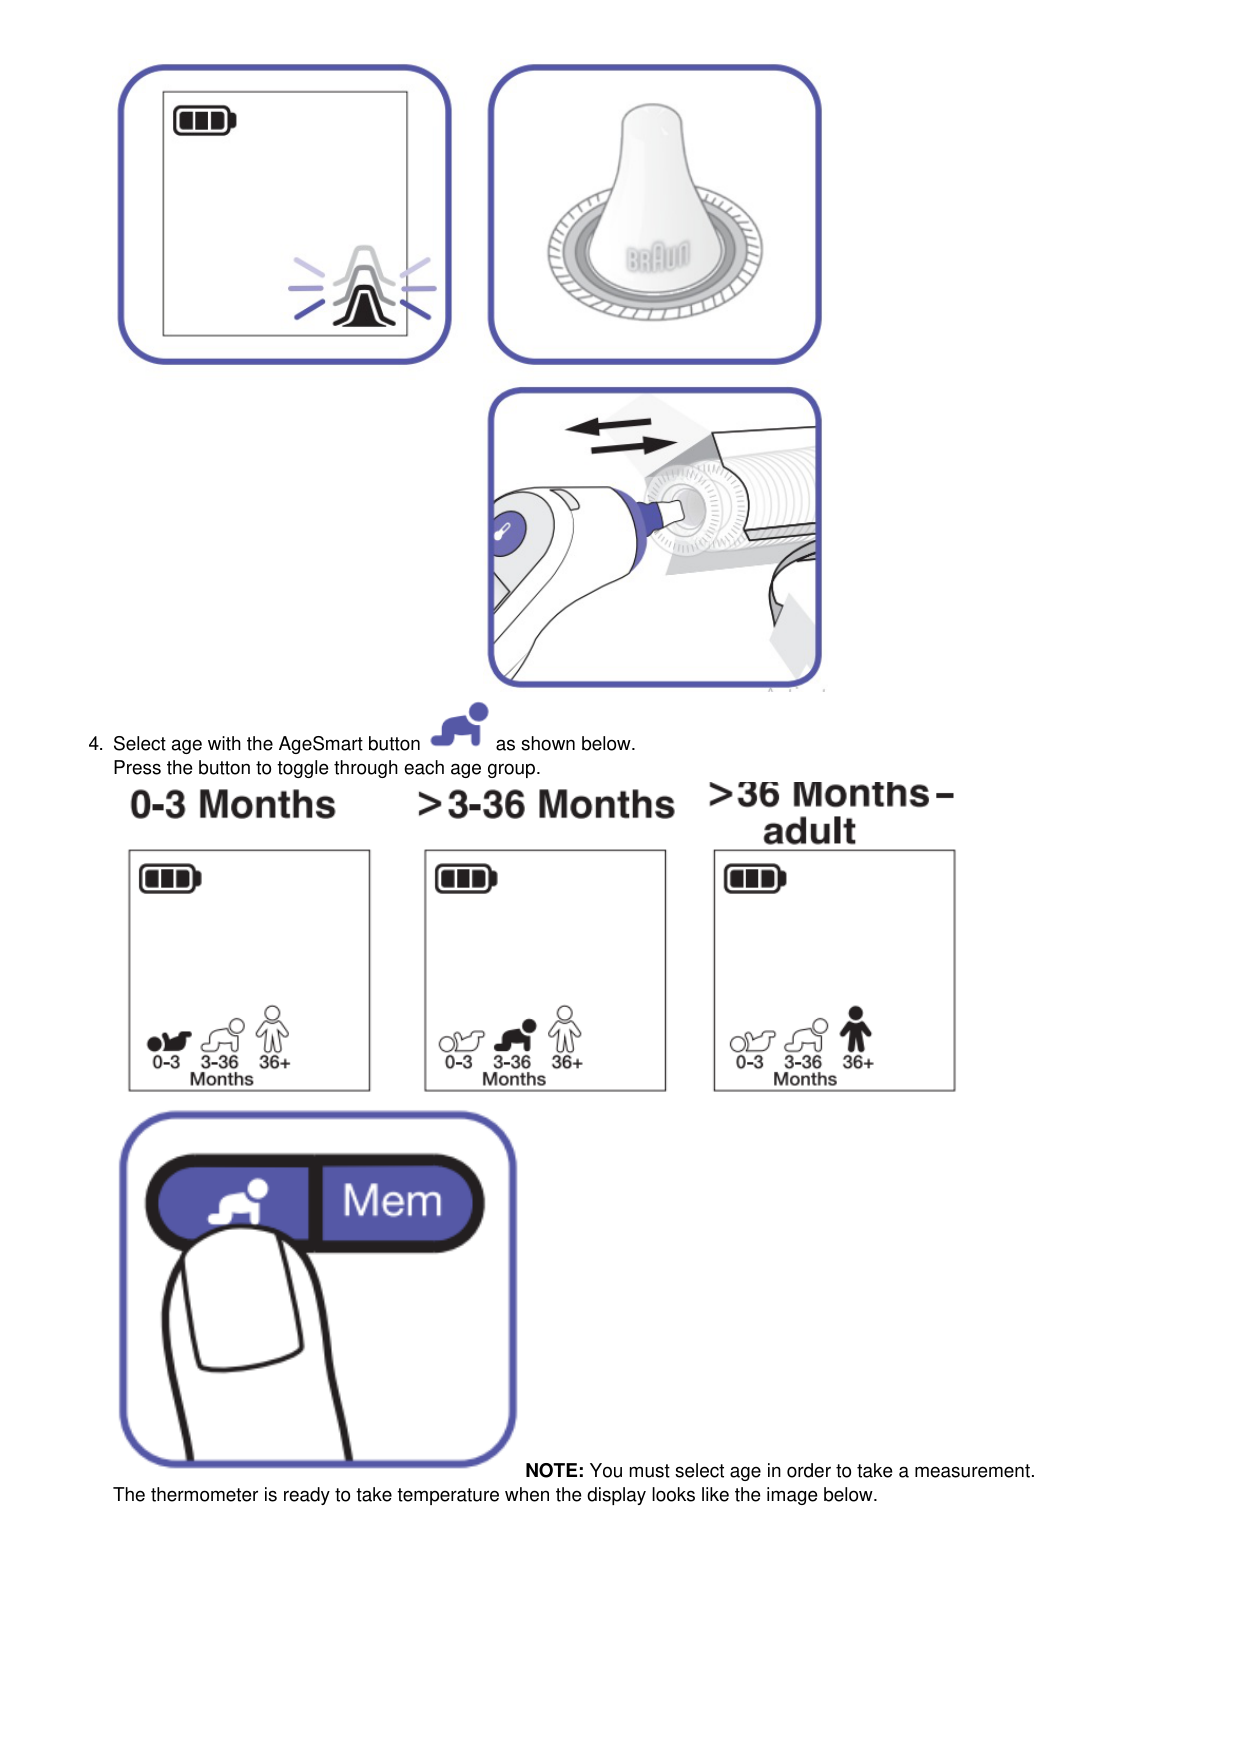


NOTE: You must select age in order to take a measurement. The thermometer is ready to take temperature when the display looks like the image below.


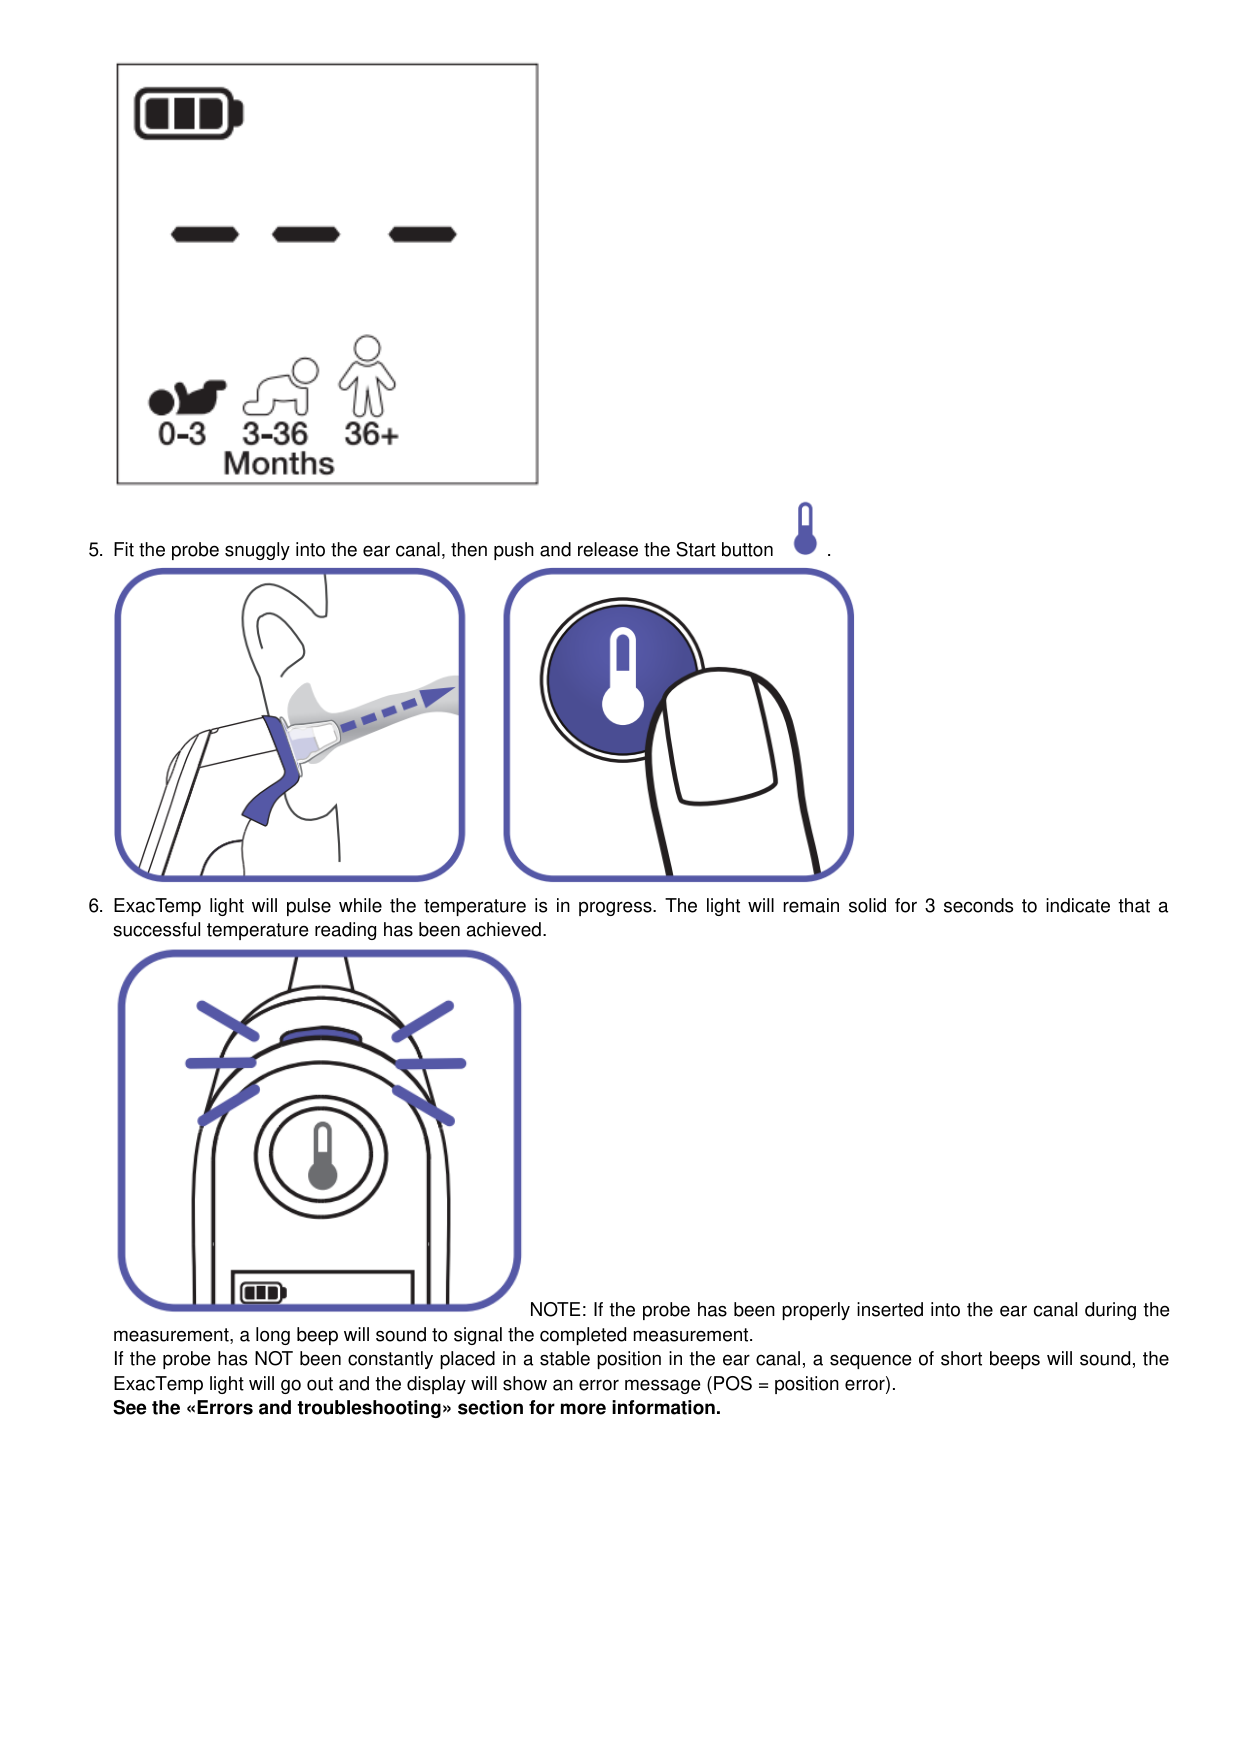

NOTE: If the probe has been properly inserted into the ear canal during the measurement, a long beep will sound to signal the completed measurement. If the probe has NOT been constantly placed in a stable position in the ear canal, a sequence of short beeps will sound, the ExacTemp light will go out and the display will show an error message (POS = position error). See the «Errors and troubleshooting» section for more information.


Age range
Green Normal temperature
Yellow Moderate fever
Red High fever
0-3 Months
≥35.8 – ≤37.4 °C (≥96.4 – ≤99.4 °F)
>37.4 °C (>99.4 °F)
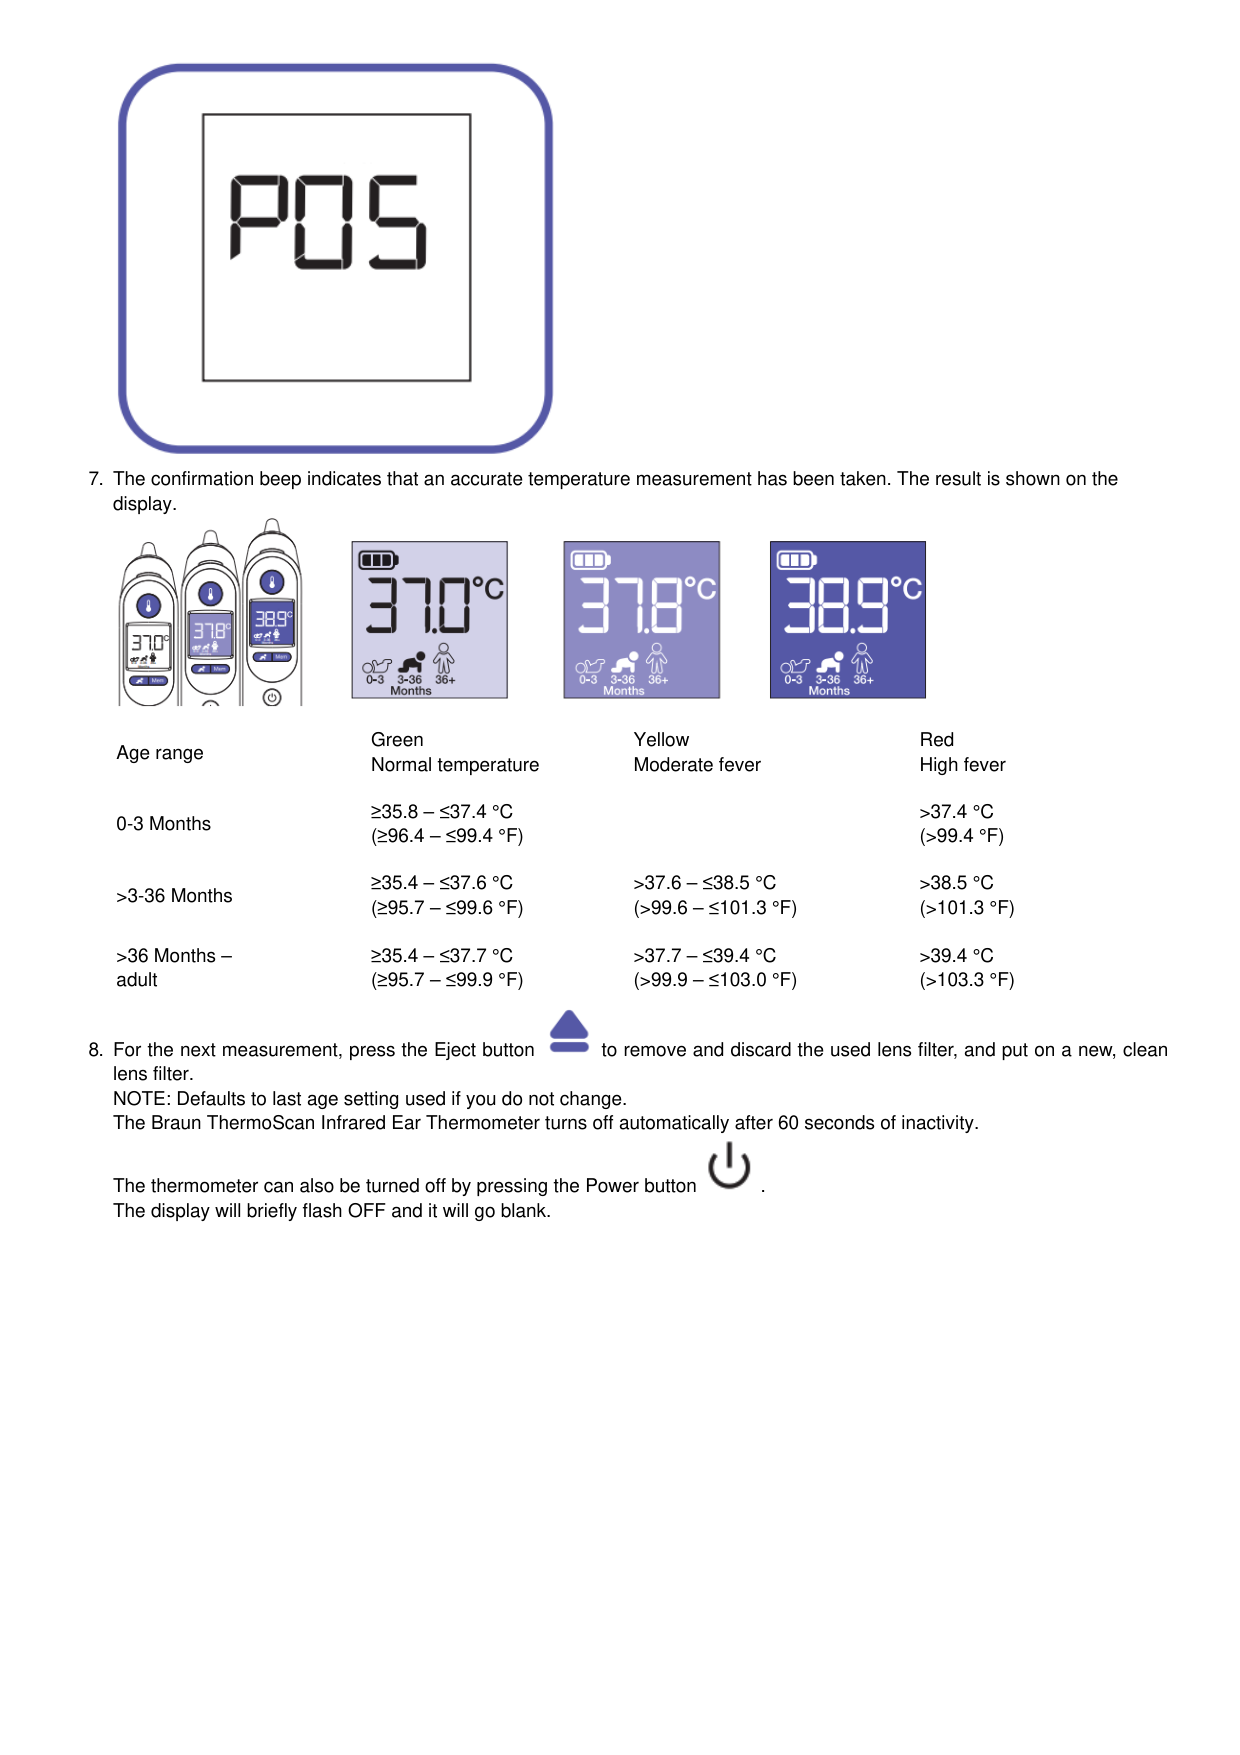
>3-36 Months
≥35.4 – ≤37.6 °C (≥95.7 – ≤99.6 °F)
>37.6 – ≤38.5 °C (>99.6 – ≤101.3 °F)
>38.5 °C (>101.3 °F)
>36 Months – adult
≥35.4 – ≤37.7 °C (≥95.7 – ≤99.9 °F)
>37.7 – ≤39.4 °C (>99.9 – ≤103.0 °F)
>39.4 °C (>103.3 °F)


The thermometer can also be turned off by pressing the Power button . The display will briefly flash OFF and it will go blank.
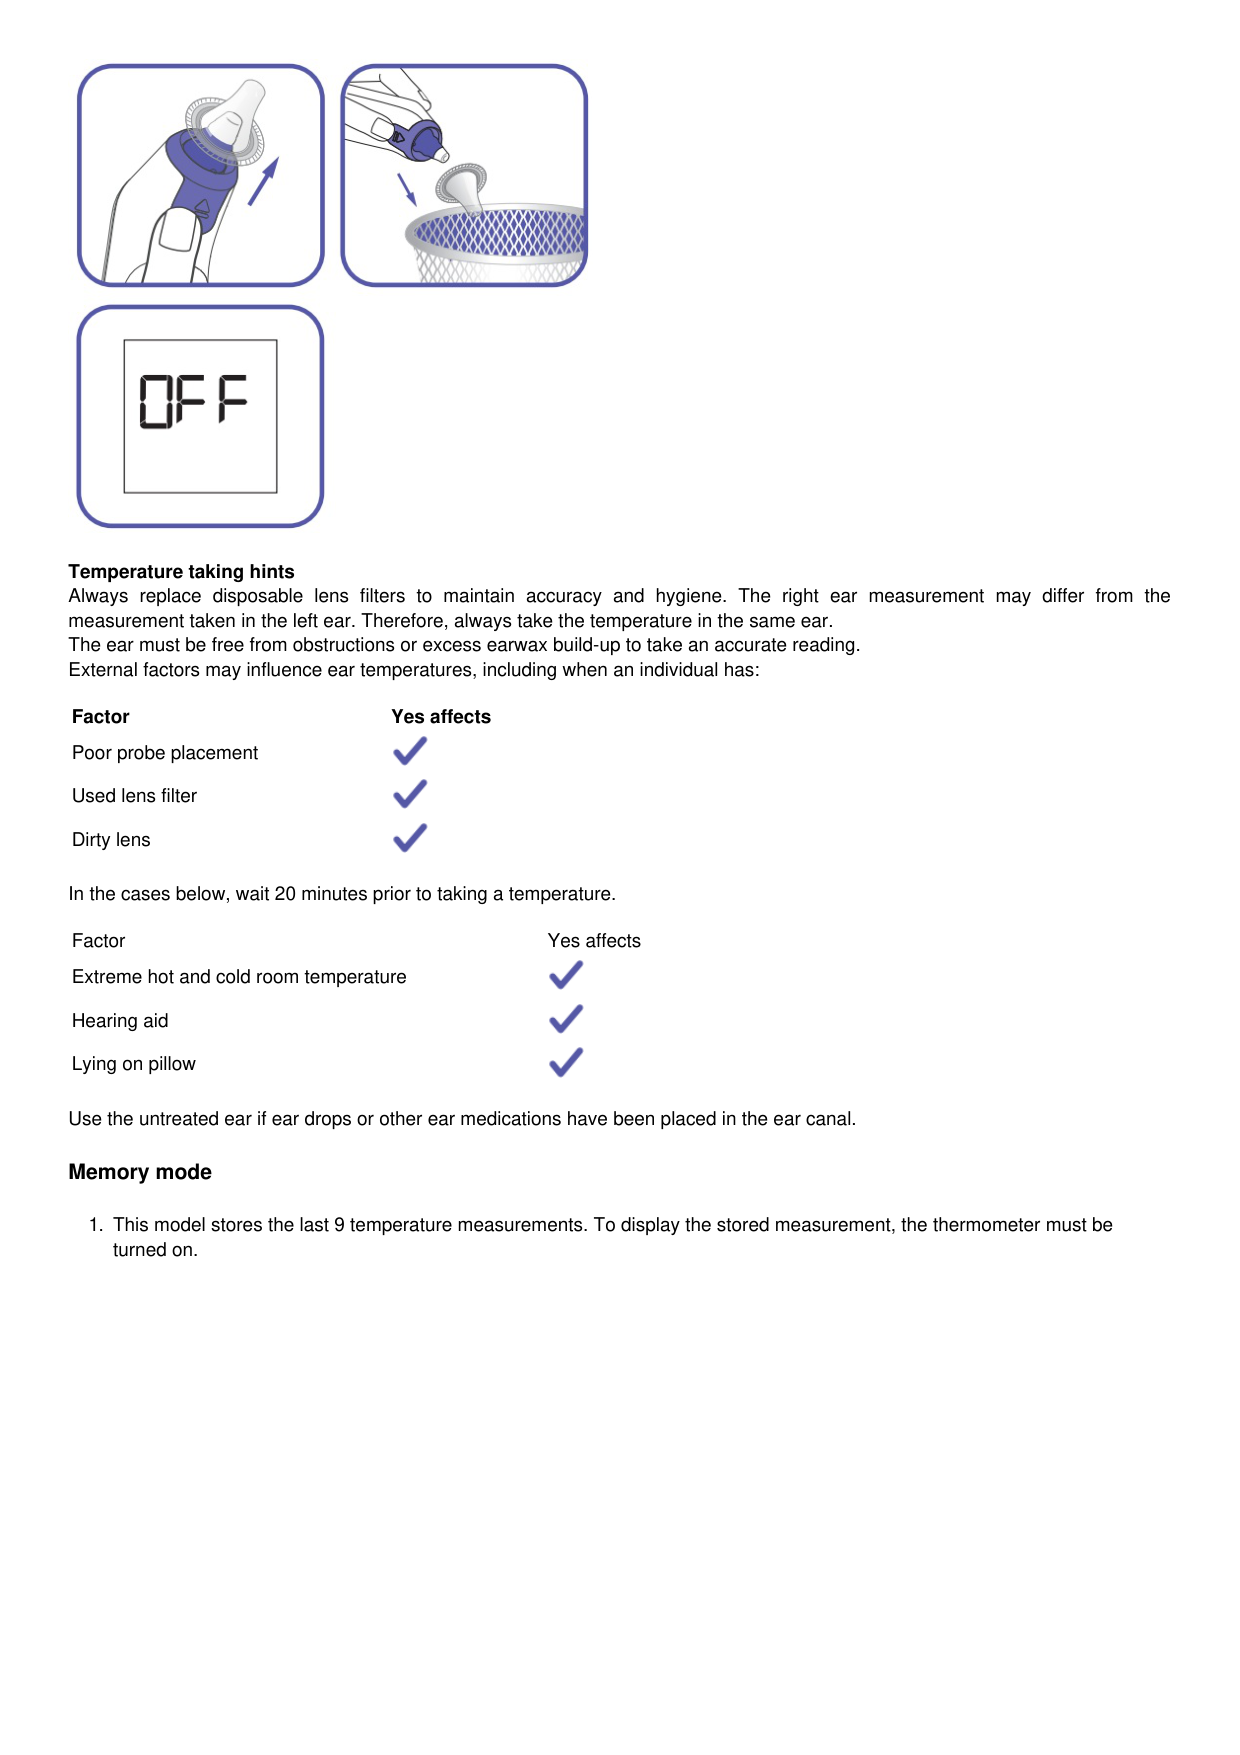

Temperature taking hints Always replace disposable lens filters to maintain accuracy and hygiene. The right ear measurement may differ from the measurement taken in the left ear. Therefore, always take the temperature in the same ear. The ear must be free from obstructions or excess earwax build-up to take an accurate reading. External factors may influence ear temperatures, including when an individual has:
Factor Yes affects Poor probe placement Used lens filter Dirty lens In the cases below, wait 20 minutes prior to taking a temperature. Factor Yes affects Extreme hot and cold room temperature Hearing aid Lying on pillow Use the untreated ear if ear drops or other ear medications have been placed in the ear canal. Memory mode


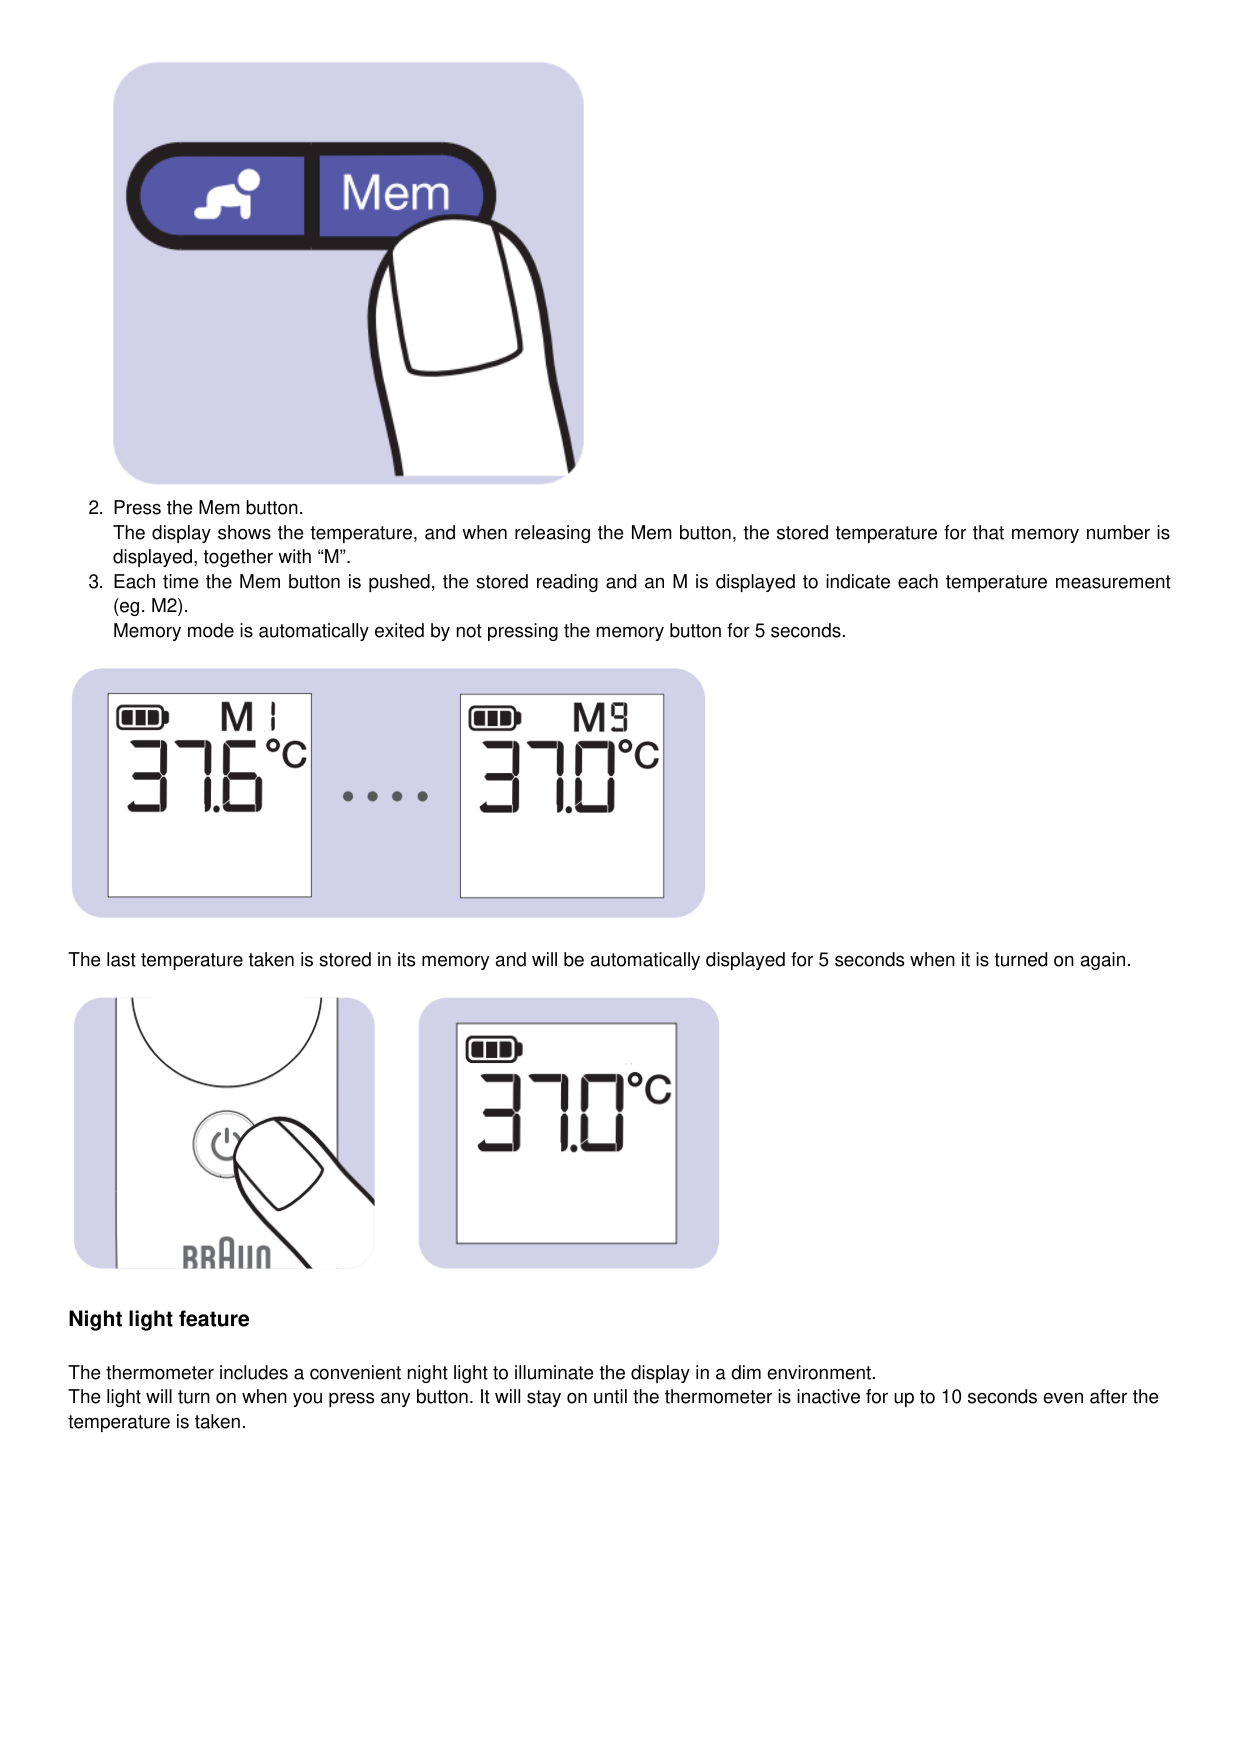

The last temperature taken is stored in its memory and will be automatically displayed for 5 seconds when it is turned on again.

Night light feature
The thermometer includes a convenient night light to illuminate the display in a dim environment. The light will turn on when you press any button. It will stay on until the thermometer is inactive for up to 10 seconds even after the temperature is taken.

Changing the temperature scale
This thermometer is shipped with the Celsius (°C) temperature scale activated. If you wish to switch to Fahrenheit (°F) and/or back from Fahrenheit to Celsius, proceed as follows:

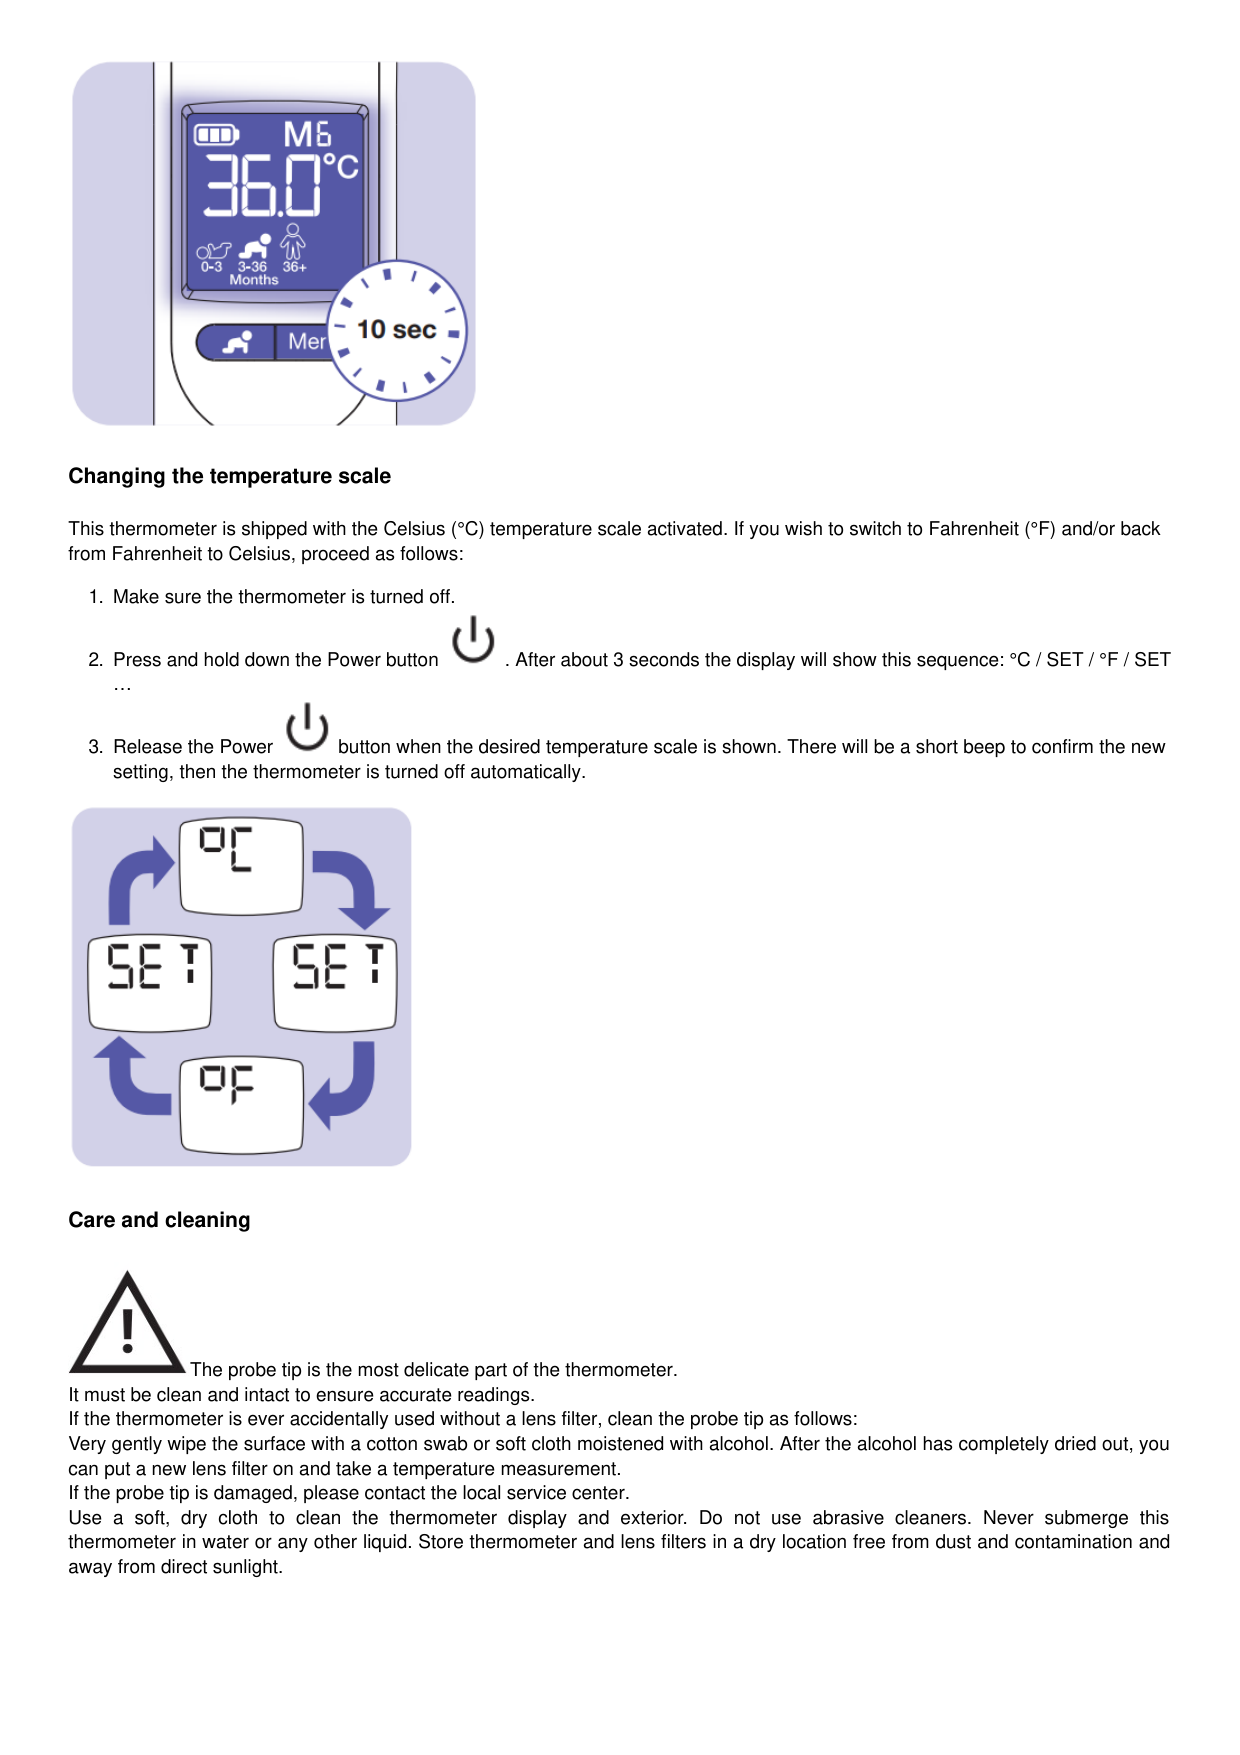


Care and cleaning

The probe tip is the most delicate part of the thermometer. It must be clean and intact to ensure accurate readings. If the thermometer is ever accidentally used without a lens filter, clean the probe tip as follows: Very gently wipe the surface with a cotton swab or soft cloth moistened with alcohol. After the alcohol has completely dried out, you can put a new lens filter on and take a temperature measurement. If the probe tip is damaged, please contact the local service center. Use a soft, dry cloth to clean the thermometer display and exterior. Do not use abrasive cleaners. Never submerge this thermometer in water or any other liquid. Store thermometer and lens filters in a dry location free from dust and contamination and away from direct sunlight.

Replacing the batteries
The thermometer is supplied with two 1.5 V type AA (LR 06) batteries.


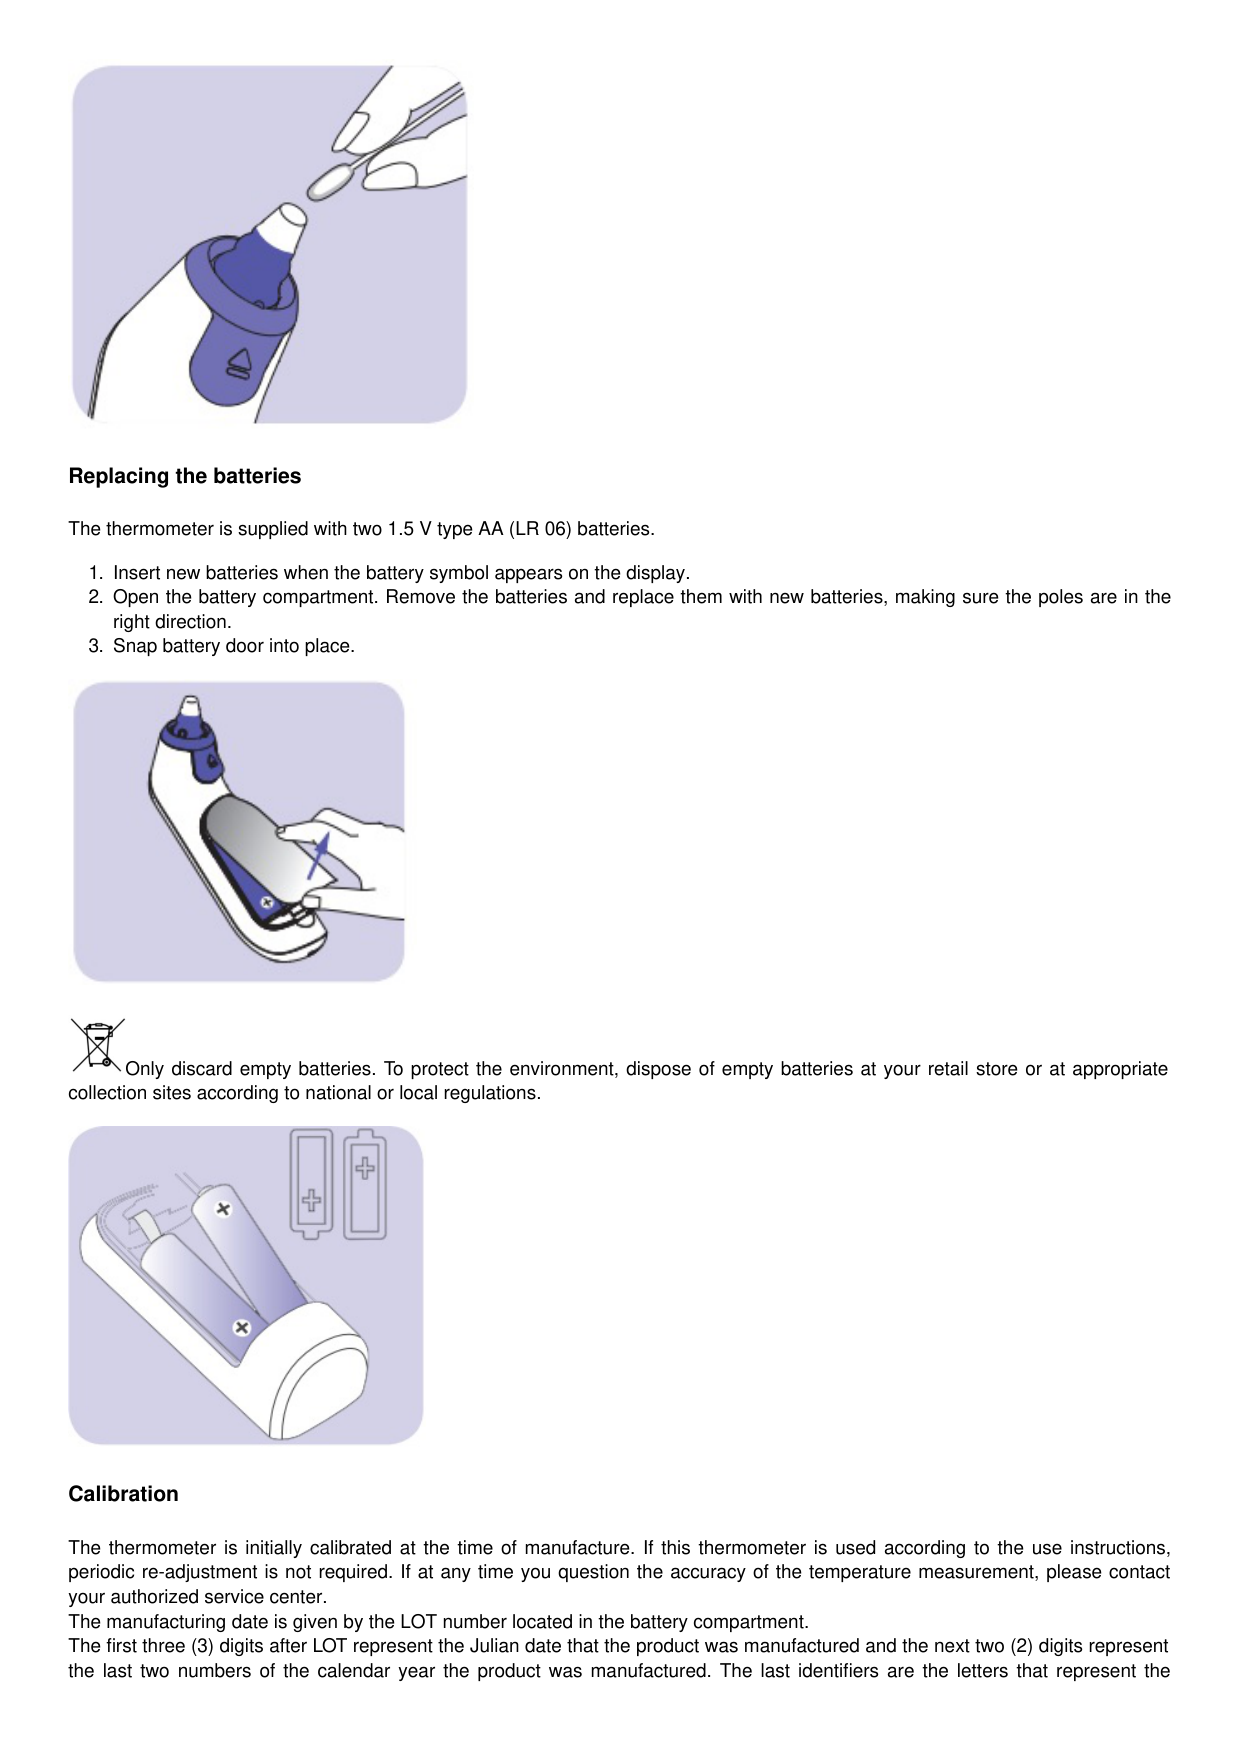
Only discard empty batteries. To protect the environment, dispose of empty batteries at your retail store or at appropriate collection sites according to national or local regulations.

Calibration
The thermometer is initially calibrated at the time of manufacture. If this thermometer is used according to the use instructions, periodic re-adjustment is not required. If at any time you question the accuracy of the temperature measurement, please contact your authorized service center. The manufacturing date is given by the LOT number located in the battery compartment. The first three (3) digits after LOT represent the Julian date that the product was manufactured and the next two (2) digits represent the last two numbers of the calendar year the product was manufactured. The last identifiers are the letters that represent the
manufacturer. An example: LOT 11614K, this product has been manufactured on the 116th day of the year 2014.
Errors and troubleshooting
Error Message Situation Solution

No lens filter is attached. Attach a new, clean lens filter.


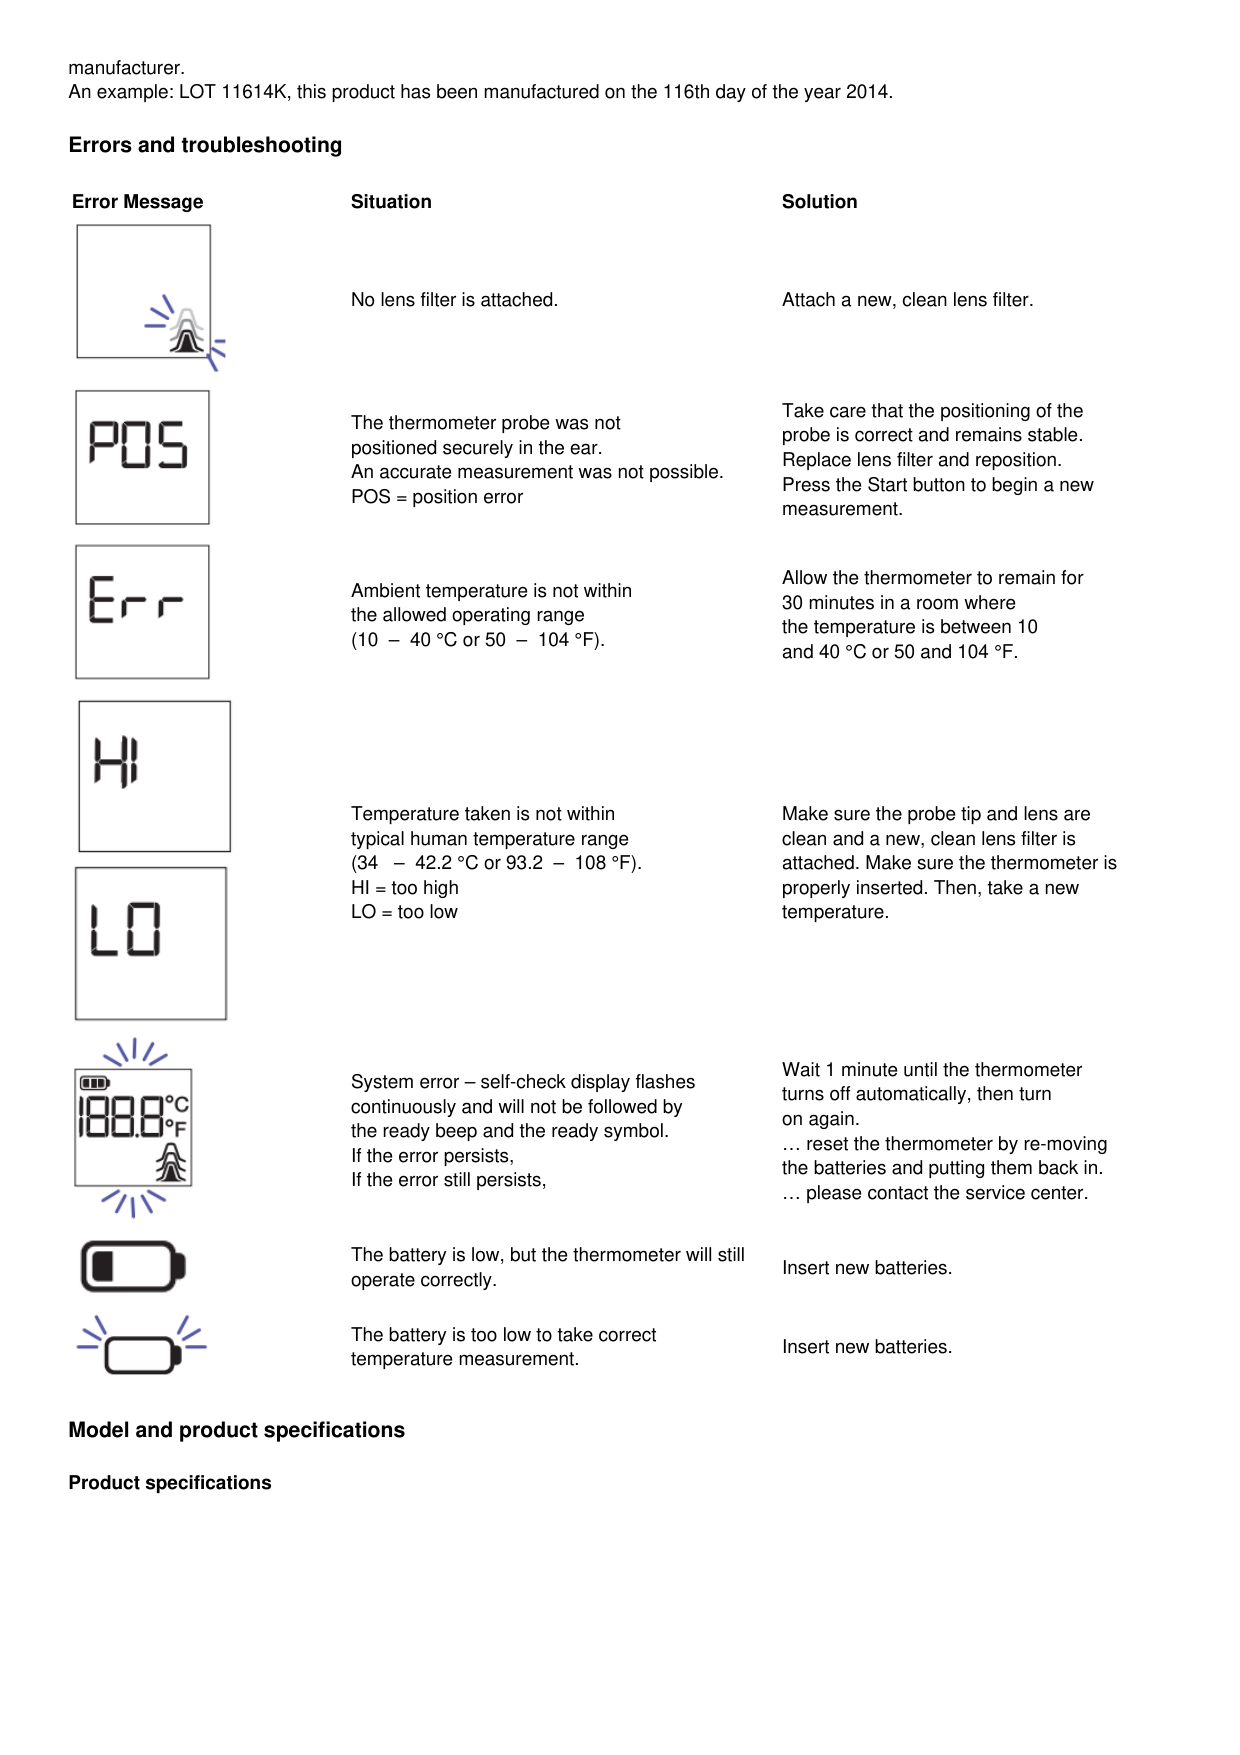

The thermometer probe was not positioned securely in the ear. An accurate measurement was not possible. POS = position error
Take care that the positioning of the probe is correct and remains stable. Replace lens filter and reposition. Press the Start button to begin a new measurement.
Ambient temperature is not within the allowed operating range (10 – 40 °C or 50 – 104 °F).
Allow the thermometer to remain for 30 minutes in a room where the temperature is between 10 and 40 °C or 50 and 104 °F.
Temperature taken is not within typical human temperature range (34 – 42.2 °C or 93.2 – 108 °F). HI = too high LO = too low
Make sure the probe tip and lens are clean and a new, clean lens filter is attached. Make sure the thermometer is properly inserted. Then, take a new temperature.


System error – self-check display flashes continuously and will not be followed by the ready beep and the ready symbol. If the error persists, If the error still persists,
Wait 1 minute until the thermometer turns off automatically, then turn on again. … reset the thermometer by re-moving the batteries and putting them back in. … please contact the service center.
The battery is low, but the thermometer will still operate correctly.

Insert new batteries.
The battery is too low to take correct temperature measurement.
Insert new batteries.
Model and product specifications
Product specifications
ThermoScan I RT6520B
Product ThermoScan I RT6520
Temperature measurement within seconds
■ ■ Temperature range °C 34 – 42.2 34 – 42.2 Temperature range °F 93.2 -108.0 93.2 -108.0 AgeSmart ■ ■ ExacTemp technology ■ ■ Feedback system ■ ■ Ready beep ■ ■ Small, soft tip ■ ■ Flexible tip ■ ■ Memory storage capacity 9 9 Auto-off after 60 sec. 60 sec. Easy-to-read LCD display ■ ■ Lens filter detector ■ ■ Lens filter ejector ■ ■ Protective case with lens filter storage ■ ■ Batteries included ■ ■ 21 lens filter included ■ ■ Color Blue Black Operating ambient temperature range: 10 – 40 °C (50 – 104 °F) Storage temperature range: -25 – 55 °C (-13 – 131 °F) Operating and storage relative humidity: 10 – 95 %RH (non condensing) Display resolution: 0.1 °C or °F Accuracy for displayed temperature range Maximum Laboratory Error 35 °C – 42 °C (95 °F – 107.6 °F): ± 0.2 °C (± 0.4 °F) outside this range: ± 0.3 °C (± 0.5 °F) Clinical repeatability: ± 0.2 °C (± 0.4 °F)
Weight:
ThermoScan Infrared Ear Thermometer – 66.9g Protective case – 43.7g Battery – 46.4g
Battery life: 2 years / 350 measurements Service life: 5 years
Manufactured by KeyTronic Corporation (Address: Tomas Becket #2220 Parque Ind. Gema, Plant 3 Juarez, Chihuahua C.P. 32380 México) for Kaz Europe Sàrl (Address: Place Chauderon 18, CH-1003 Lausanne, Switzerland)
File Downloads

BRAUN Instructions IRT6520, IRT6520B, ThermoScan, Infrared Ear Thermometer
Download [optimized] Download
References

Home - Helen of Troy