
Ask AI
— answers from the official manualAnswers from the official manual.
Common questions
Common Questions
10 totalHow do I assemble the Cajun Injector Electric Smoker?
To assemble, first lay the smoker on its side to access the bottom and attach the wheels using four screws each. Then, adjust and tighten the front legs for balance. Next, install the handle from the back of the appliance by screwing it into place in two holes on the front door. After that, slide the wood pellet tray into supports inside and set the drip pan below the tray. Finally, secure the water pan above the support shafts and adjust any racks accordingly before attaching the wood pellet chute cap securely to finish assembly.
What are the safety guidelines when operating the Cajun Injector Electric Smoker?
The smoker must be placed on a level, stable surface outdoors and away from flammable materials or enclosed spaces. Ensure it is not exposed to rain or water, and maintain dry surfaces around the electrical components. Use children supervision near the appliance, do not move it while in use, and allow it to cool before cleaning or storing.
How should I clean the Cajun Injector Electric Smoker after each use?
After unplugging and allowing the smoker to cool completely, wipe down external surfaces with a damp cloth. For grills, drip pan, and water pan, wash them in warm soapy water, rinse thoroughly and dry well. Clean the wood pellet tray before every use to prevent ash buildup.
What steps should I follow for initial curing of my new Cajun Injector Electric Smoker?
The smoker should be washed inside with a wet towel, then wiped down with vegetable spray or olive oil. Heat the smoker to 225°F (108°C), add 1/4 cup wood pellets and let it smoke for two hours before use.
How do I set up the temperature control on my Cajun Injector Electric Smoker?
Press the ON button to power on. Then press the TEMP button; the LED will blink and you can adjust the desired temperature by pressing repeatedly.
What should I do if my Cajun Injector Electric Smoker shows an error message?
Turn off the smoker, unplug it, wait ten seconds then plug back in and turn it on again to reset. Follow this sequence: OFF -> UNPLUG -> WAIT TEN SECONDS -> PLUG IN -> POWER ON.
Show 4 more questions
Full Manual
35 pages

Cajun Injector®
#### Electric Smoker
Owner’s Manual Assembly, Care, and Safety Instructions
Tool needed for assembly: Phillips Head Screwdriver

WARNING: CARBON MONOXIDE HAZARD BURNING WOOD GIVES OFF CARBON MONOXIDE. THIS CAN CAUSE DEATH.
Warnings & Safety Concerns: Read and follow the warnings and instructions in this manual carefully before and during the use of the smok-
######### IMPORTANT SAFETY INSTRUCTIONS AND WARNINGS READ ALL INSTRUCTIONS THOROUGHLY BEFORE USE:
This manual contains important information that is necessary for safe and proper• use of this appliance. Read and follow the warnings and instructions carefully before and during the use•
of the smoker. For future reference, keep this manual.• Burning wood gives off carbon monoxide. This can cause death.• Never burn wood chips or pellets inside your home, vehicle, tent, garage, or any•
other enclosed areas. This appliance is for outdoor use only. Never operate in an enclosed area.• The unit must be on the ground. Never place unit on tables or counters.• Do not plug in the Cajun Injector Electric Smoker until it is completely assembled•
and ready to use. Only use an approved, grounded electrical outlet.• Never use during an electrical storm.• Never expose the Cajun Injector Electric Smoker to rain or water.• Do not immerse cord, plug or control panel in water or any liquid. This could•

cause electric shock.
Always keep children and pets away from electric smoker. Never allow children• to operate the electric smoker. When children and pets are in the area of an elec tric smoker, close supervision is an absolute necessity.
Never operate this appliance after it has malfunctioned or damage has occurred• to the unit. Contact Bruce Foods Corporation’s customer service department for assistance at 1-800-229-9082.
Never allow any other activities in the vicinity of the electric smoker during or after•
use. Make sure the unit has cooled before storing or cleaning. Always keep a fire extinguisher handy when operating the electric smoker.• Use caution when using an extension cord as this increases the risk of entangle•
ment and tripping. A faulty or weak extension cord may cause loss of heating ef ficiency or electric shock.
Do not allow the electrical cord to hang carelessly or touch hot surfaces.• Never put this appliance on or near a gas, or electric burner, or in a heated oven.• Never operate any electrical appliance with a damaged plug or cord.• Never use this electric smoker as a heater. (Refer to Carbon Monoxide Warning)• Electric Smoker should only be used on a level, stable surface. This will prevent•
tipping over causing potential personal injury or property damage. The electric smoker is hot while in use and for a period of time afterwards. Always• use caution near hot surfaces. Use of alcohol, prescription or non-prescription drugs may impair one’s ability to• assemble or operate electric smoker properly.
######### IMPORTANT SAFETY INSTRUCTIONS AND WARNINGS (Continued)
Do not bump or impact electric smoker.• Do not move the appliance when in use. Always allow the electric smoker to•
cool completely before storing or moving.

Carefully remove food from electric smoker. All of the surfaces are hot and• could cause burns. Always use protective gloves along with long, sturdycooking tools.
Extreme caution must be used when moving an appliance containing hot oil• or other hot liquids. Never cover cooking racks with metal foil. The foil will trap heat, causing se• vere damage to the electric smoker. The drip tray is only for the bottom of the electric smoker. Never put drip tray• on cooking racks. This could cause damage to the electric smoker. Always use caution when adding wood pellets or chips once the smoker is in• operation. The tray is always hot when electric smoker is in use. To disconnect the electric smoker, turn control panel off then remove plug• from outlet. Unplug from outlet when not in use and prior to cleaning. Allow unit to cool•
completely before adding or removing grates, tray or water bowl. Dispose of cold ashes by placing them in aluminum foil.• Do not store electric smoker with hot ashes inside unit. Store only when all•
surfaces are cold, cleaned and ashes have been removed. Accessory attachments not supplied by Cajun Injector are not recommended• and may cause injury. Never use electric smoker for anything other than its intended purpose. This• unit is not for commercial use. Always use the electric smoker in accordance with all applicable local, state• and federal fire codes.
########### SAVE THESE INSTRUCTIONS FOR FUTURE REFERENCES.
Combustion of by-product produced when using this product contains chemicals known to the State of California to cause birth defects and other reproductive harm or cancer.
########## PARTS LIST
|ES11 - SIDE ACCESS WOOD PELLET CHUTE CAP (1)| |---|
|ES4 - HANDLE (1)| |---|
ES8 - LARGE COOKING RACKS (4)

|ES5 - HANDLE SCREWS (2)| |---|
|ES3 - WHEEL SCREWS (8)| |---|
ES10 - WATER PAN
ES2 - WHEELS (2)
ES6 - WOOD PELLET TRAY
ES9 - SMALL COOKING RACK (1)
ES7 - DRIP PAN
ES1 - FRONT LEGS (2)

FOR MISSING PARTS, CALL BRUCE FOODS CORPORATION’S CUSTOMER SERVICE DEPARTMENT AT 1-800-229-9082
############### Tools needed: Phillips Head Screwdriver
####################### Step 1 – Secure Base
Gently lay smoker on its side, revealing the bot-• tom of the appliance for easy assembly.
Align the four holes of a wheel to the four holes• on the back corner of the bottom of the smoker. Using four of the provided screws, install the wheel to the base by fastening each screw into a hole. (Repeat this step to secure the second wheel to the opposite back corner of the smoker).
Insert each of the legs into one of the holes• on the front corners of the appliance and rotate clockwise to secure the legs. The height may be adjusted by loosening and tightening the legs. WARNING: Check for proper balance to prevent movement while in use.
Return smoker to upright position to continue• with assembly.
####################### Step 2 – Install Handle
Remove handle and two screws from the back of• the appliance.
Align handle with the two screw holes on the• front of the smokers’ door. Install the handle by fastening a screw into each hole.
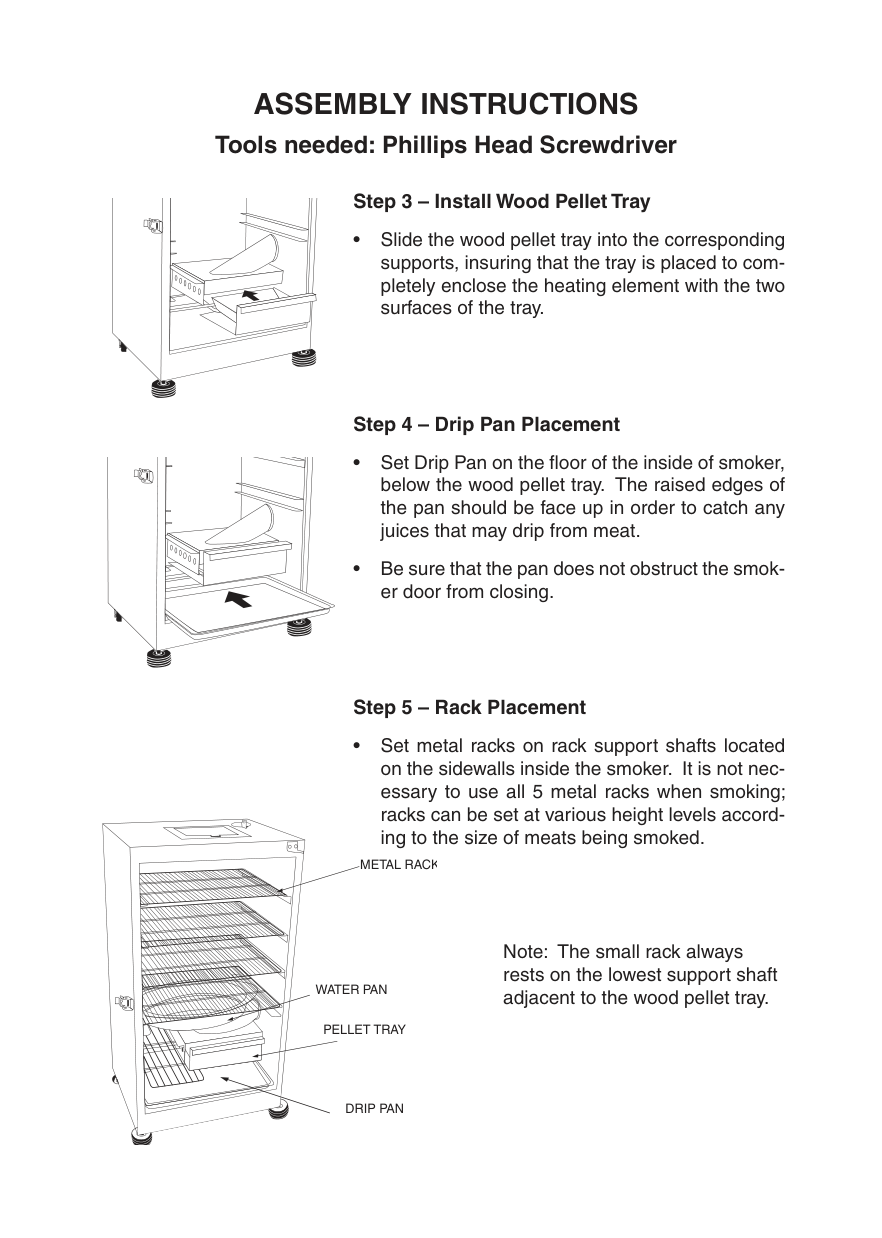
#################### Step 3 – Install Wood Pellet Tray
Slide the wood pellet tray into the corresponding• supports, insuring that the tray is placed to completely enclose the heating element with the two surfaces of the tray.
#################### Step 4 – Drip Pan Placement
Set Drip Pan on the floor of the inside of smoker,• below the wood pellet tray. The raised edges of the pan should be face up in order to catch any juices that may drip from meat.
Be sure that the pan does not obstruct the smok-• er door from closing.
#################### Step 5 – Rack Placement
Set metal racks on rack support shafts located• on the sidewalls inside the smoker. It is not necessary to use all 5 metal racks when smoking; racks can be set at various height levels according to the size of meats being smoked.

METAL RACK
Note: The small rack always rests on the lowest support shaft adjacent to the wood pellet tray.
WATER PAN
PELLET TRAY
DRIP PAN
above the wood pellet chute and below the supports for the fourth rack.
WATER PAN
PELLET TRAY
DRIP PAN

wood pellet chute cap (located on the exterior side of the smoker) is securely screwed in place.
######## Please see curing instructions prior to use.
Smoker Curing Procedures Remove all the racks from the protective wrapping and wash in warm soapy1.
water and rinse well. Dry and put aside. With a wet towel, wipe the inside of your smoker to remove any residue.2. Once the inside is dry, use some vegetable spray or olive oil spray on a dry3.
towel and wipe the inside walls liberally.
Heat the smoker to 225˚F.4. Place 1/4 cup Wood Pellets into the wood pellet chute, and ensure that no pellets remain in chute after loading. Smoke for two hours.
Congratulations. Your smoker is ready for use.5.
|Cajun Injector® Wood Pellet Choices|Cajun Injector® Wood Pellet Choices|Cajun Injector® Wood Pellet Choices|Cajun Injector® Wood Pellet Choices|Cajun Injector® Wood Pellet Choices|Cajun Injector® Wood Pellet Choices|Cajun Injector® Wood Pellet Choices| |---|---|---|---|---|---|---| |Wood Flavor|Poultry|Fish|Ham|Beef|Pork|Lamb| |Hickory Strong, pungent, smokysweet bacon like flavor|•| |•|•|•| | |Apple Light fruity smoke, gives a slightly sweet taste|•|•| | |•| | |Oak Clean, assertive smoke flavor|•| |•|•|•| | |Mesquite Bold, hearty, smoker flavor, slightly sweet unique flavor|•| | |•| |•| |Pecan Subtle yet rich flavor|•|•| | |•| |
################# How to use wood pellet chute
When smoker reaches desired temperature, pour 1/2 bottle (1.5oz.) of Cajun• Injector Flavored Wood Pellets, or 1/4 cup of your favorite wood chips, into chute. Replace cap securely over wood pellet chute.
If using wood chips, follow instructions on wood chip packaging prior to placing•
chips into the smoker. Never use more than 1.5 oz. of wood pellets, or 1/4 cup of wood chips, at a time.• Add more pellets or chips as needed.•
Adding wood pellets during smoking process Caution: Keep smoker door closed when adding wood pellets or chips. Note: Wood pellet chute will be hot even if handle is not. Add wood pellets or chips to the smoker by repeating the process mentioned•
above. Temperature may spike briefly after wood is added. It will stabilize after a short• time. Do not adjust.
######################## WHEN DOOR IS OPENED A FLARE UP MAY OCCUR. SHOULD WOOD PELLETS FLARE UP, IMMEDIATELY CLOSE DOOR, WAIT FOR WOOD CHIPS TO BURN DOWN THEN OPEN THE DOOR AGAIN. DO NOT SPRAY WITH WATER.
########## 24-Hour Pop-Up Digital Display
The display panel can be exposed by firmly pressing the button located in front of display panel. Display panel will open and rotate upwards.
#################### Control panel operating instructions It is not necessary to pre-heat this unit.
Setting the Temperature: Push ON button.• Push TEMP button; LED display•
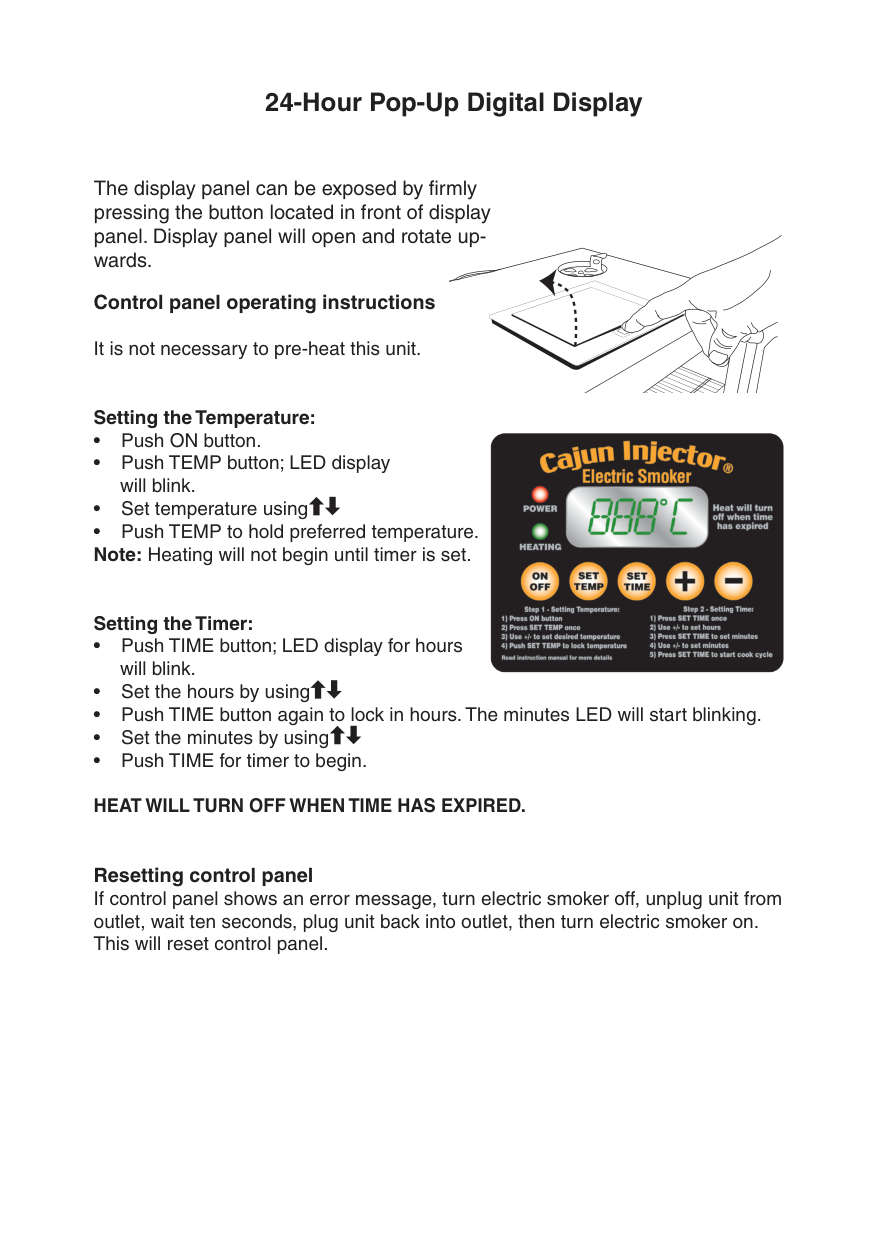

will blink. Set temperature using• Push TEMP to hold preferred temperature.• Note: Heating will not begin until timer is set.
Setting the Timer: Push TIME button; LED display for hours•
will blink. Set the hours by using• Push TIME button again to lock in hours. The minutes LED will start blinking.• Set the minutes by using• Push TIME for timer to begin.•
###################### HEAT WILL TURN OFF WHEN TIME HAS EXPIRED.
Resetting control panel If control panel shows an error message, turn electric smoker off, unplug unit from outlet, wait ten seconds, plug unit back into outlet, then turn electric smoker on. This will reset control panel.
################## Using Your Smoker
Temperature cannot be set above 275˚F (135˚C). This smoker is designed for• low temperature (200˚F – 225˚F) slow cooking. It is not intended to be used as an oven.
Wood pellet feeder must be completely sealed on the outside of the smoker,• and wood pellet tray must be in place while cooking. Improper loading may cause wood pellets to catch fire.
Wood pellets are essential to generate smoke and give the meat a pleasant• smoky flavor. Moderation in the use of wood pellets is advised. Too much smoke will give meats smoked an unpleasant creosote flavor. While learning to smoke, it is better to underestimate the amount of smoke required.
Your smoker will produce an abundance of smoke. This is normal.• Over time, discoloration on the interior surface of the smoker will occur.•
This is normal. Periodically check grease trap, and empty when necessary.•
Smoker door should stay closed throughout the cooking process. Open the• door only when truly required. Once open, close your smoker door as soon as possible. Leaving the door open for an extended period of time will result in the rapid loss of heat and may cause smoking wood pellets to catch fire.
Cleaning Your Smoker Always unplug smoker and allow ample time to cool before cleaning and•
storing. For cooking racks, water pan, and drip pan, use a mild dish soap. Rinse• soapy residue off well and dry thoroughly. Clean wood pellet tray and wood pellet feeder before every use to remove• residual ash buildup.
For exterior and interior of smoker, wipe down with a damp cloth (soap or• chemicals should not be used). Be sure to clean the door seal and inside seam. Dry thoroughly prior to storage.
Do not use any type of steam dishwashing detergent for cleaning smoker and• smoker parts.
############# An Introduction to Your New Smoker and The Smoking Process
This pamphlet will assist anyone with limited knowledge of how to smoke foods. Also, to obtain excellent results while enjoying your new smoker, and while learning the basics of smoking, the traditional form of slow cook barbecue. We present the basics to assist you in getting started, while achieving great results the very first time as you gain experience cooking with your new smoker.
Over time, experience will allow you to adapt the smoking process to your preferences, and how to use your digital electric smoker. You will learn the “how to” with terrific results. Ultimately, practice and patience are necessary as smoking is more an “art” than a science; and nothing beats your own expertise and experience in personalizing the smoking process using your new electric smoker.
Barbecue: The Basics There are three variables that occur in all forms of barbecue – Heat, Smoke, and Time. The interaction of these three elements determines the barbecuing process one will utilize. Many grill masters will tell you that true barbecue must be “low” and “slow” (heat and time) so that smoke has time to enhance the flavor naturally while tenderizing the meat. Grilling, on the other hand, is a hot and fast cooking technique that occurs directly over the heat source. Indirect heat is similar to roasting, and is recommended when grilling larger pieces of meat with the grill cover down and the meat placed so as to avoid the direct heat source. When you grill steaks and hamburgers with direct heat, the cook time is often too short to infuse the meat with any smoky flavor.
Meat Smoking: The process of meat smoking is done at a lower temperature than grilling. Yet, the goal remains to cook the meat to its normal “safe temperature” but over a longer period of time, and at a lower temperature so that the meat has limited opportunity to become damaged or “overdone” when smoking at the lower temperature.
Although curing and smoking meats is an ancient form of food preservation. Today smoking is primarily utilized to enhance flavor and tenderize cuts of meat that often cook best with the low heat, slow cook method. The ability to control both time and temperature digitally with your new electric smoker takes all of the tedious steps out of the smoking process. Moreover, you will learn that the amount of “smoke” required during the process is far less than one might expect. Often, the best part of the process is to keep the door to the smoker latched and do nothing. Continually opening the smoker is completely unnecessary. Once every hour or two over a long smoker process should be more than enough. Smoke emanating from your smoker for hours and hours will probably produce a creosote flavor so strong as to be inedible.
############# Preparation of Your Smoker
################ Preparation of Meats for Smoking
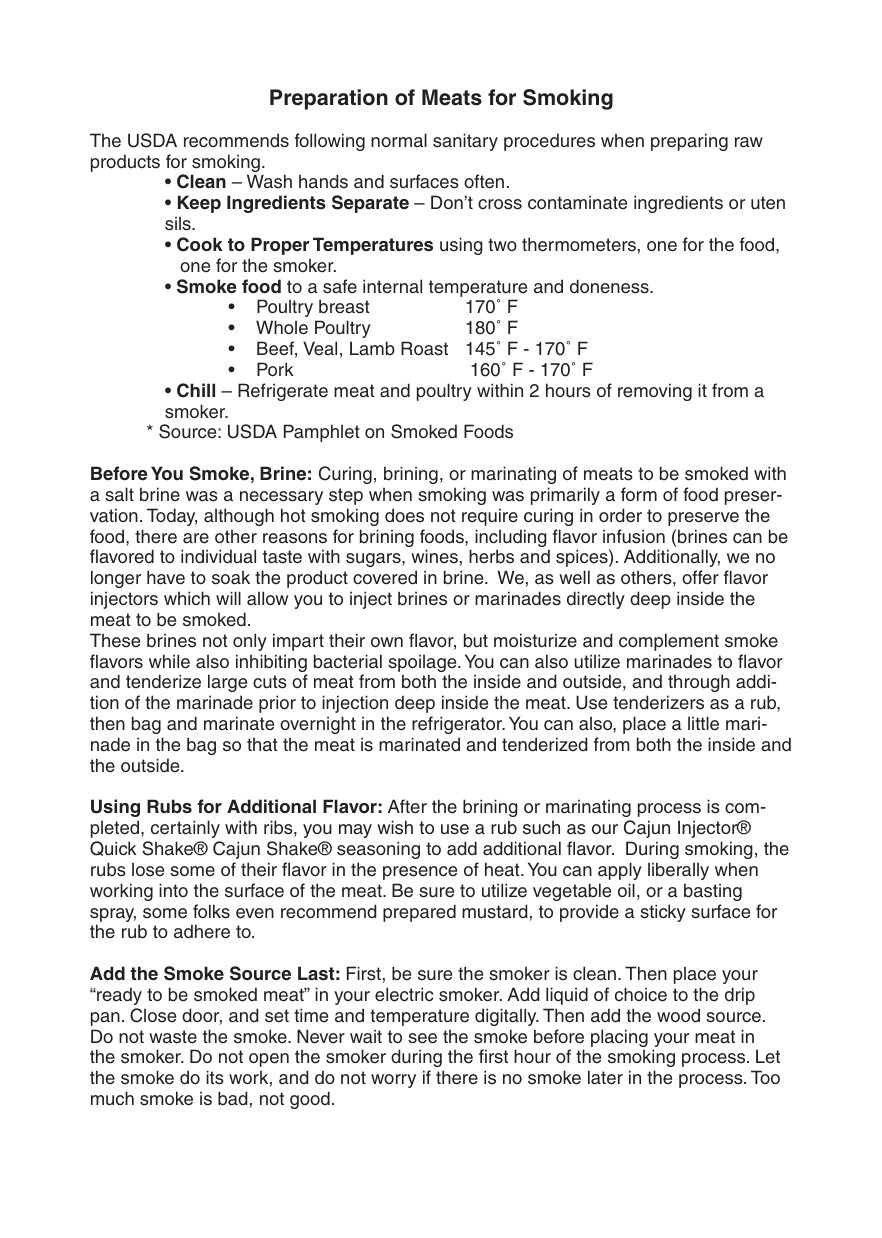
The USDA recommends following normal sanitary procedures when preparing raw products for smoking.

Before You Smoke, Brine: Curing, brining, or marinating of meats to be smoked with a salt brine was a necessary step when smoking was primarily a form of food preservation. Today, although hot smoking does not require curing in order to preserve the food, there are other reasons for brining foods, including flavor infusion (brines can be flavored to individual taste with sugars, wines, herbs and spices). Additionally, we no longer have to soak the product covered in brine. We, as well as others, offer flavor injectors which will allow you to inject brines or marinades directly deep inside the meat to be smoked. These brines not only impart their own flavor, but moisturize and complement smoke flavors while also inhibiting bacterial spoilage. You can also utilize marinades to flavor and tenderize large cuts of meat from both the inside and outside, and through addition of the marinade prior to injection deep inside the meat. Use tenderizers as a rub, then bag and marinate overnight in the refrigerator. You can also, place a little marinade in the bag so that the meat is marinated and tenderized from both the inside and the outside.
Using Rubs for Additional Flavor: After the brining or marinating process is completed, certainly with ribs, you may wish to use a rub such as our Cajun Injector® Quick Shake® Cajun Shake® seasoning to add additional flavor. During smoking, the rubs lose some of their flavor in the presence of heat. You can apply liberally when working into the surface of the meat. Be sure to utilize vegetable oil, or a basting spray, some folks even recommend prepared mustard, to provide a sticky surface for the rub to adhere to.
Add the Smoke Source Last: First, be sure the smoker is clean. Then place your “ready to be smoked meat” in your electric smoker. Add liquid of choice to the drip pan. Close door, and set time and temperature digitally. Then add the wood source. Do not waste the smoke. Never wait to see the smoke before placing your meat in the smoker. Do not open the smoker during the first hour of the smoking process. Let the smoke do its work, and do not worry if there is no smoke later in the process. Too much smoke is bad, not good.
############# Types of Smoking
Dry Smoking: Dry smoking uses indirect heating with a low smoldering heat source to slowly cook foods while infusing a smoke flavor.
Wet Smoking: Wet smoking or water smoking is more often employed when smoking. A pan of water, fruit juices, wine, or other liquids are used to maintain moisture and tenderness throughout the smoking process.
Cold Smoking: Cold Smoking is the process of smoking food usually at tempera-
tures below 100˚ F, or below a temperature that burns or liquefies fat. Foods for cold smoking would usually be cured first – smoked bacon, hams, and smoked fish.
Hot Smoking: Hot Smoking is the process of smoking food at the same time as it
is cooked. It is the form of cooking this booklet references. Foods for hot smoking would normally be eaten soon after they are prepared. Hot smoked foods may be cured (brined) or marinated, or basted. Additionally, rubs may be used to tenderize or enhance flavor as well as to moisturize and complement smoky flavors.
True Barbecue Starts with the Smoke: Modern Smoking has evolved from ancient processes of preserving food. Today smoking is truly about flavoring and tenderizing some of the tougher cuts of meat that don’t cook well using other cooking methods into wonderfully flavored meals. What you smoke is mostly a matter of taste; but the most popular smoked items include ribs, brisket, and pork shoulder. Most forms of wild game as well as poultry and fowl produce excellent results when slow smoked. Dried jerky also benefits immensely from the Hot Smoking process.
############ Injectable Marinade Concepts and Utilization Techniques
Injectable marinades and brines possess the same characteristics as their counterparts except that they do not require product soaking in order to impart flavor; moisturize, and tenderize. Unlike marinade soaking methodologies that only penetrate about a 1/4 inch into meat surfaces, require long soak times, and contaminate expensive marinades, flavor injection infuses blended flavors deep inside the meat. Conceptually the flavor injection concept makes good sense: instant flavor, yet no waiting, no waste as marinade is injected, and no fats are required in the marinades to protect the meat surface during soaking time. Rubs, seasonings, and sauces are used to flavor the surface of the meat.
As with many culinary skills, proper technique when “flavor injecting” will result in superior results. The flavoring should be spread uniformly throughout the meat with as few punctures of the meat as possible. The flavor injector is a syringe with a needle attached to a plunger which allows the user to inject the flavoring deep into the meat.
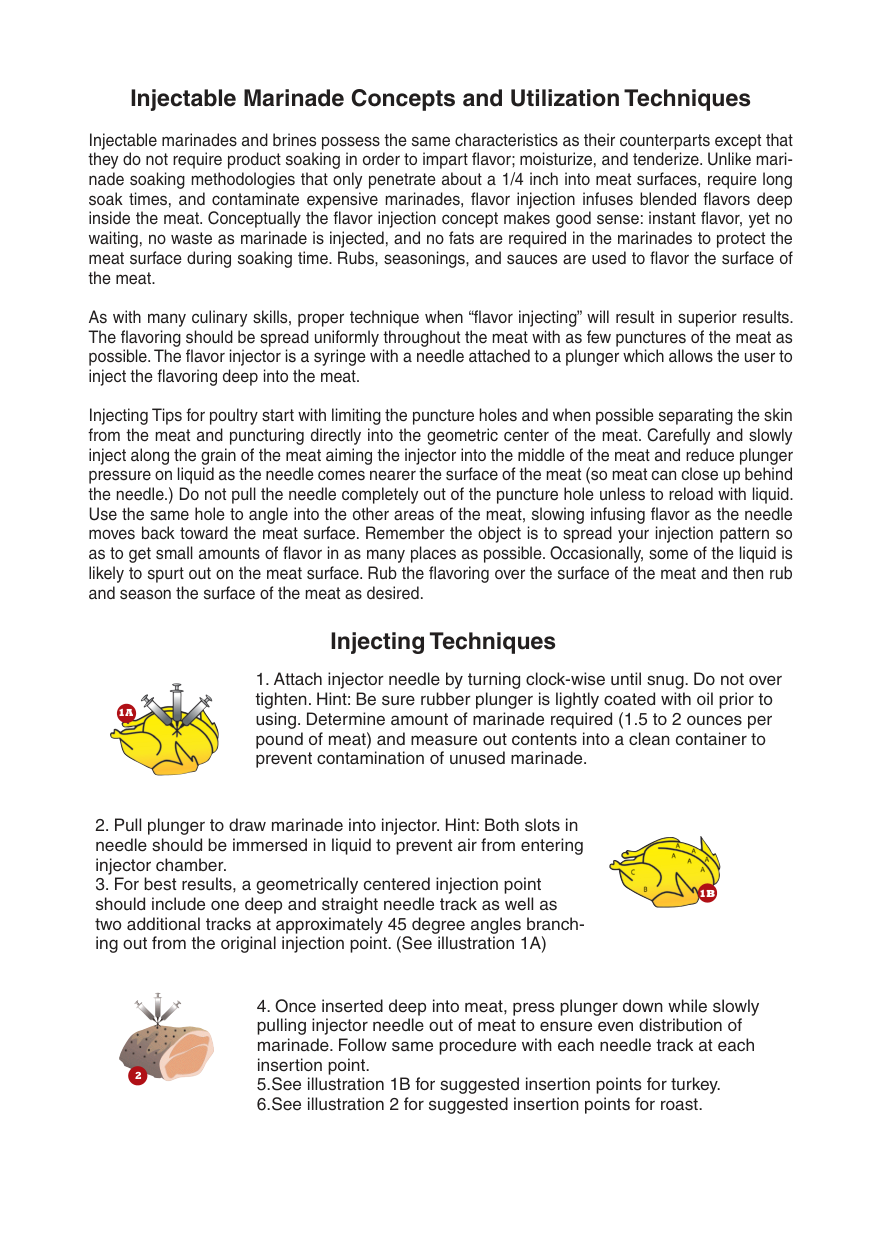
Injecting Tips for poultry start with limiting the puncture holes and when possible separating the skin from the meat and puncturing directly into the geometric center of the meat. Carefully and slowly inject along the grain of the meat aiming the injector into the middle of the meat and reduce plunger pressure on liquid as the needle comes nearer the surface of the meat (so meat can close up behind the needle.) Do not pull the needle completely out of the puncture hole unless to reload with liquid. Use the same hole to angle into the other areas of the meat, slowing infusing flavor as the needle moves back toward the meat surface. Remember the object is to spread your injection pattern so as to get small amounts of flavor in as many places as possible. Occasionally, some of the liquid is likely to spurt out on the meat surface. Rub the flavoring over the surface of the meat and then rub and season the surface of the meat as desired.

1A
############ Injecting Techniques


1B

2
##### Smoked Turkey
Prep. Time: 20 minutes Cook Time: 30 – 40 Minutes Per lb. at 225˚F;
longer if lower temperature is utilized.
Selection: We find whether frying or smoking your turkey, smaller birds work best as this avoids under cooking deep inside and overcooking the outside. We recommend a 12-14 lb. turkey.
##################### Ingredients:
Butter Recipe Marinade 1/4 cup Vegetable oil
Cajun Injector® Quick Shake® Cajun Shake® seasoning (to taste)
Method: Allow turkey to thaw in refrigerator according to manufacturer’s directions. Once thawed, remove from packaging, remove the neck, giblets, etc. from the cavity and rinse the turkey with water and pat dry. Inject the turkey with 1.5 ounces of Cajun Injector Creole Butter Recipe Marinade or Brining Solution per pound of bird. Tie turkey legs together and brush with vegetable oil. Sprinkle liberally with Cajun Injector Quick Shake Cajun Shake seasoning. Set the Cajun Injector smoker temperature to 225˚F and allow for 35-40 minutes per pound of smoking time or until a minimum internal cooking temperature of 175˚F registers on a thermometer in the turkey’s thigh (don’t let thermometer touch the bone.). Note that dark meat takes longer to cook than White Meat. Pour the apple juice into the pan and place the turkey in the smoker. Place 1/4 cup Oak or Pecan Wood Pellets into the wood pellet chute, and ensure that no pellets remain in chute after loading. Once the pellets start to smoke, commence timing the smoking process. After the first hour, check the wings and leg segments. If any parts are browning too quickly, cover them with aluminum foil.
Smoked turkey has a different color than baked turkey (it often looks pinker.) This is normal, and is caused by the turkey meat’s reaction to the smoke. As long as the turkey registers an internal temperature of 165˚F in the breast and 175˚F in the thigh your turkey is done and completely safe to eat.
##### Basil - Wrapped Smoked Corn on the Cob
##################### Prep Time: 10 minutes
##################### Ingredients:
4 tbsps. Butter, melted
Cajun Injector® Quick Shake® Cajun Shake® Seasoning 24 Fresh basil leaves 1/2 cup Water 1/4 cup Oak or Pecan Wood Pellets
Method: Set the smoker temperature to 225˚F. Place corn on foil and brush generously with melted butter. Sprinkle with Cajun Injector Quick Shake Cajun Shake seasoning. Place basil leaves evenly around corn. Carefully close foil around cobs. Place corn on rack in the Cajun Injector Electric Smoker. Pour 1/2 cup of water into drip pan in smoker. Place 1/4 cup Oak or Pecan Wood Pellets into wood pellet chute, and ensure that no pellets remain in chute after loading. Smoke for 1-1/2 - 2 hours.
##### Smoked Shrimp Kabobs
Prep Time: 15 minutes Cook Time: 15-20 minutes Yield: 4-6 servings
##################### Ingredients:
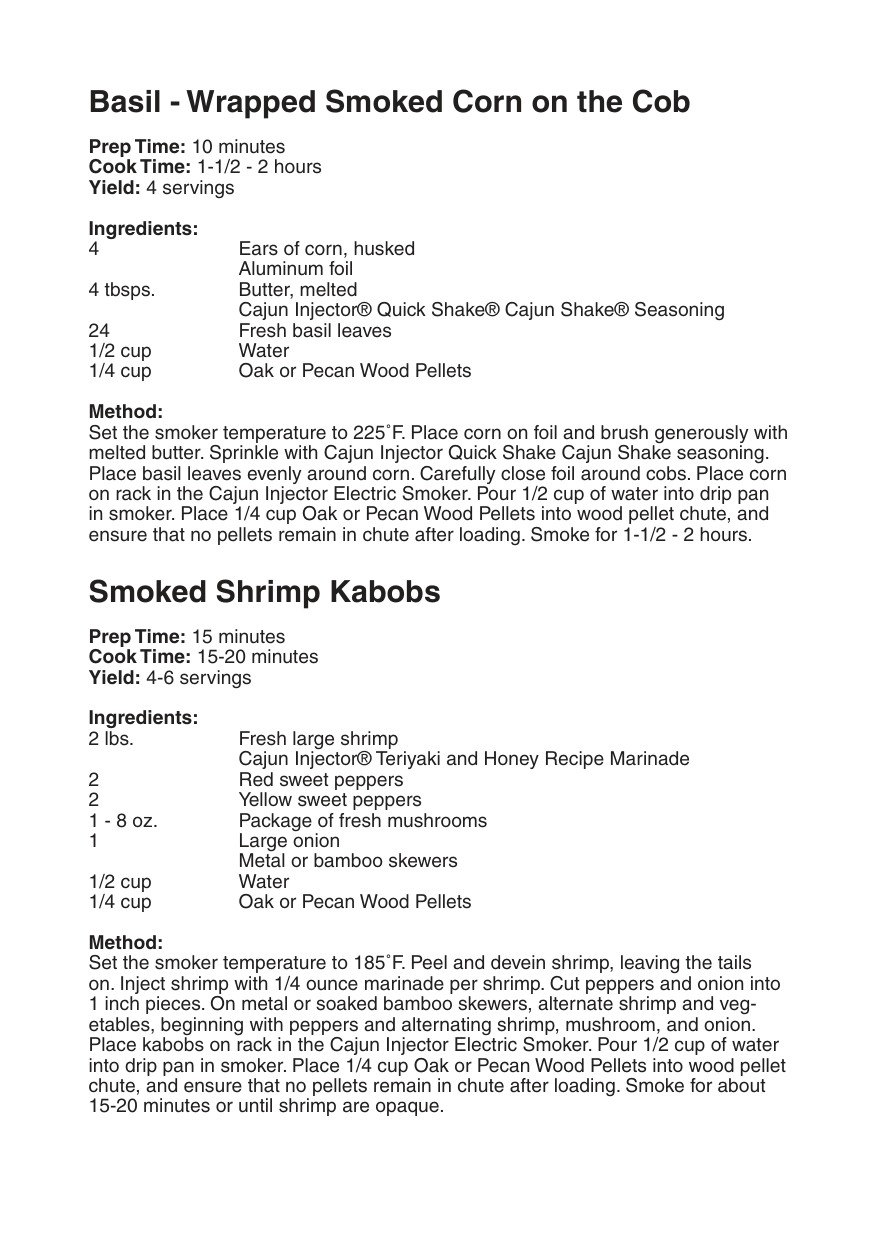
Metal or bamboo skewers 1/2 cup Water 1/4 cup Oak or Pecan Wood Pellets
Method: Set the smoker temperature to 185˚F. Peel and devein shrimp, leaving the tails on. Inject shrimp with 1/4 ounce marinade per shrimp. Cut peppers and onion into
##### Cajun Injector® Smoked Venison Roast Prep Time: 10 minutes Cook Time: 4-5 hours Yield: 4-6 servings
Ingredients: 1 Cajun Injector® Smoker Kit containing:
1 (16) ounce jar Cajun Injector Smoking Brine 1 (16) ounce jar Cajun Injector Basting Spray 1 (16) ounce jar Cajun Injector BBQ Finishing Sauce 1 (3) ounce pecan smoker pellets 1 (3) ounce oak smoker pellets
1 - 4 lb. Venison Roast
Method: Set the smoker temperature to 225° F. Once smoker is ready, inject 2 ounces per pound of the smoking brine throughout the roast. Next, season the outside liberally with the Cajun Injector Quick Shake Cajun Shake seasoning. Place the roast on a rack in the Cajun Injector Electric Smoker. Spray with basting spray and pour apple juice into drip pan in smoker. Place 1/4 cup Oak or Pecan Wood Pellets into wood pellet chute, and ensure that no pellets remain in chute after loading. Let the roast smoke for about 4-5 hours at 225° F. Use the basting spray again about 2 hours into the smoking process. After four hours check internal temperature of the roast, it should be near 165° F. When internal temperature is 165° F pull the roast off the smoker and apply the BBQ finishing sauce. Allow to rest for 15 minutes before carving.
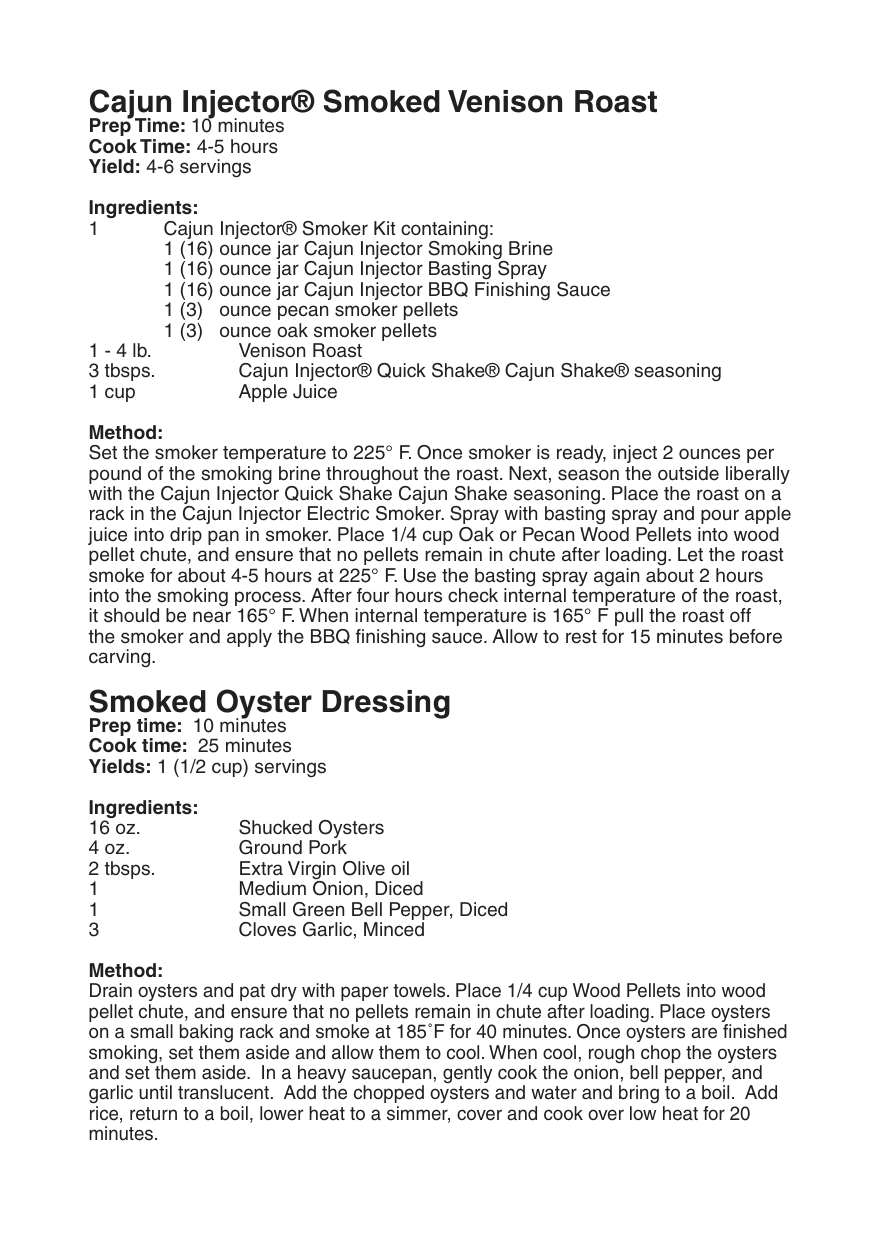
Smoked Oyster Dressing Prep time: 10 minutes Cook time: 25 minutes Yields: 1 (1/2 cup) servings
Ingredients: 16 oz. Shucked Oysters 4 oz. Ground Pork
Method: Drain oysters and pat dry with paper towels. Place 1/4 cup Wood Pellets into wood pellet chute, and ensure that no pellets remain in chute after loading. Place oysters on a small baking rack and smoke at 185˚F for 40 minutes. Once oysters are finished smoking, set them aside and allow them to cool. When cool, rough chop the oysters and set them aside. In a heavy saucepan, gently cook the onion, bell pepper, and garlic until translucent. Add the chopped oysters and water and bring to a boil. Add rice, return to a boil, lower heat to a simmer, cover and cook over low heat for 20 minutes.
##### Cajun Injector® Smoked Caribou Roast
Prep Time: 10 minutes Cook Time: 4-5 hours Yield: 4-6 servings
Ingredients: 1 Cajun Injector® Smoker Kit containing:
1 (16) ounce jar Cajun Injector Smoking Brine 1 (16) ounce jar Cajun Injector Basting Spray 1 (16) ounce jar Cajun Injector BBQ Finishing Sauce 1 (3) ounce pecan smoker pellets 1 (3) ounce oak smoker pellets
1 4-6 lb. Caribou Roast
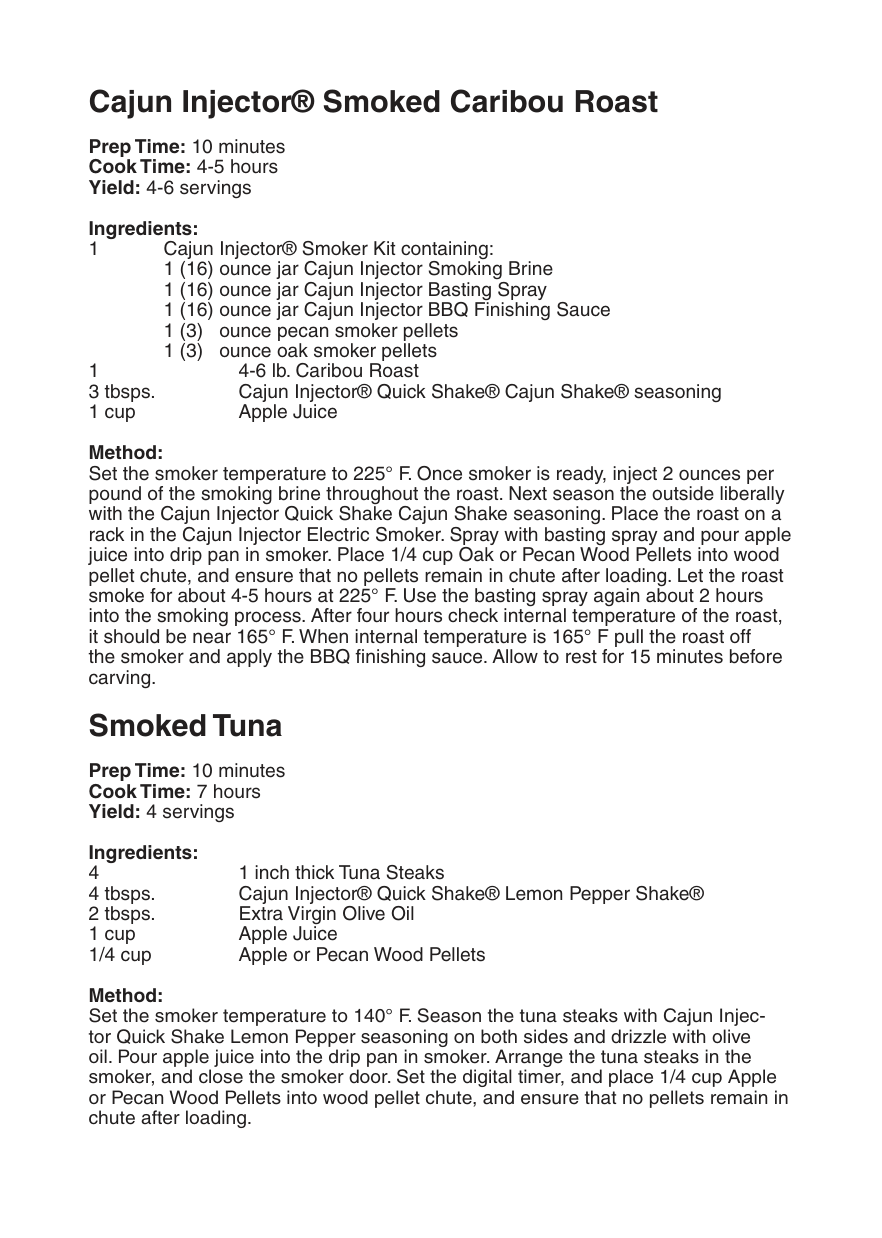
Method: Set the smoker temperature to 225° F. Once smoker is ready, inject 2 ounces per pound of the smoking brine throughout the roast. Next season the outside liberally with the Cajun Injector Quick Shake Cajun Shake seasoning. Place the roast on a rack in the Cajun Injector Electric Smoker. Spray with basting spray and pour apple juice into drip pan in smoker. Place 1/4 cup Oak or Pecan Wood Pellets into wood pellet chute, and ensure that no pellets remain in chute after loading. Let the roast smoke for about 4-5 hours at 225° F. Use the basting spray again about 2 hours into the smoking process. After four hours check internal temperature of the roast, it should be near 165° F. When internal temperature is 165° F pull the roast off the smoker and apply the BBQ finishing sauce. Allow to rest for 15 minutes before carving.
Smoked Tuna
Prep Time: 10 minutes Cook Time: 7 hours Yield: 4 servings
Ingredients: 4 1 inch thick Tuna Steaks 4 tbsps. Cajun Injector® Quick Shake® Lemon Pepper Shake®
Method: Set the smoker temperature to 140° F. Season the tuna steaks with Cajun Injector Quick Shake Lemon Pepper seasoning on both sides and drizzle with olive oil. Pour apple juice into the drip pan in smoker. Arrange the tuna steaks in the smoker, and close the smoker door. Set the digital timer, and place 1/4 cup Apple or Pecan Wood Pellets into wood pellet chute, and ensure that no pellets remain in chute after loading.
##### Cajun Injector® Smoked Pork Tenderloin
##################### Prep Time: 10 minutes
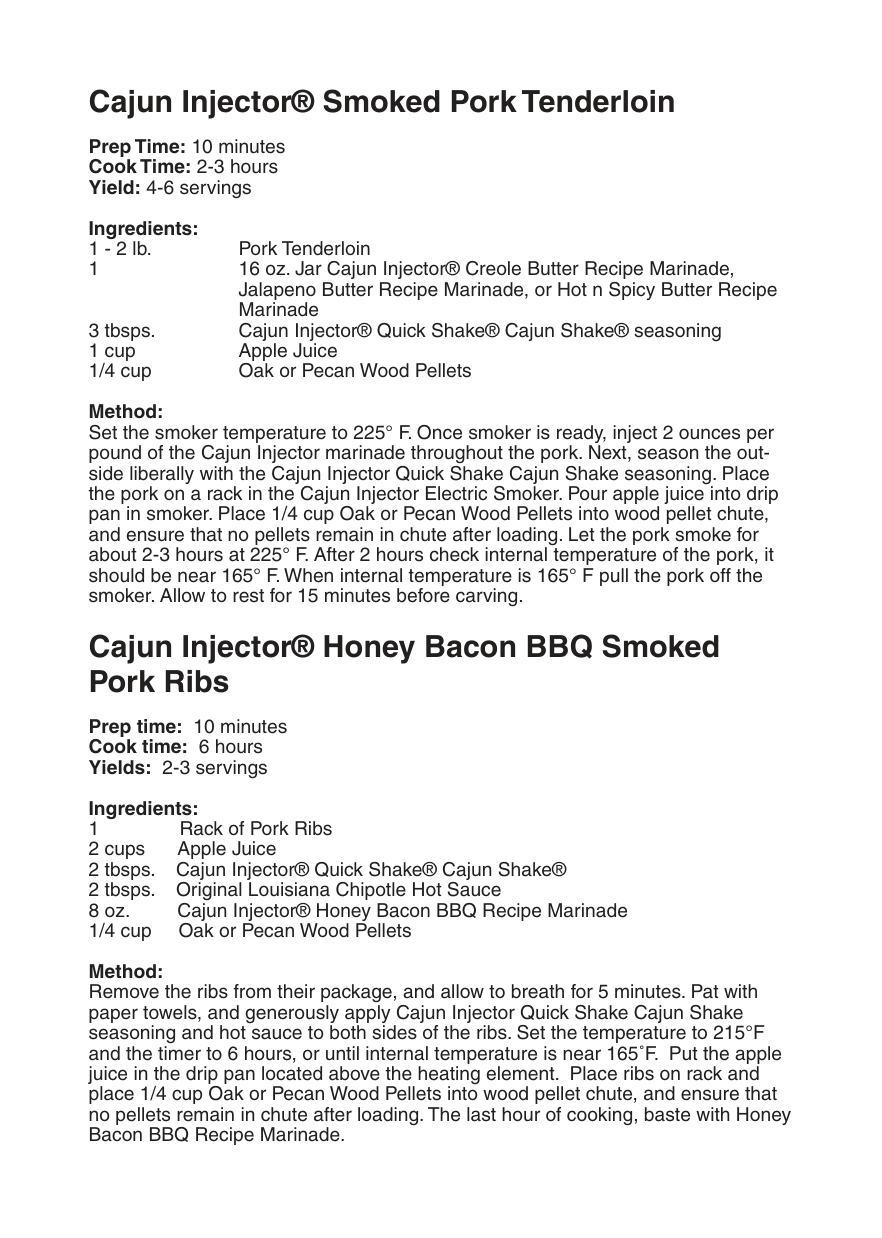
Ingredients: 1 - 2 lb. Pork Tenderloin
3 tbsps. Cajun Injector® Quick Shake® Cajun Shake® seasoning
Method: Set the smoker temperature to 225° F. Once smoker is ready, inject 2 ounces per pound of the Cajun Injector marinade throughout the pork. Next, season the outside liberally with the Cajun Injector Quick Shake Cajun Shake seasoning. Place the pork on a rack in the Cajun Injector Electric Smoker. Pour apple juice into drip pan in smoker. Place 1/4 cup Oak or Pecan Wood Pellets into wood pellet chute, and ensure that no pellets remain in chute after loading. Let the pork smoke for
Cajun Injector® Honey Bacon BBQ Smoked Pork Ribs Prep time: 10 minutes
Method: Remove the ribs from their package, and allow to breath for 5 minutes. Pat with paper towels, and generously apply Cajun Injector Quick Shake Cajun Shake seasoning and hot sauce to both sides of the ribs. Set the temperature to 215°F and the timer to 6 hours, or until internal temperature is near 165˚F. Put the apple juice in the drip pan located above the heating element. Place ribs on rack and place 1/4 cup Oak or Pecan Wood Pellets into wood pellet chute, and ensure that no pellets remain in chute after loading. The last hour of cooking, baste with Honey Bacon BBQ Recipe Marinade.
##### Cajun Injector® Smoked Pork Butt
Prep Time: 10 minutes Cook Time: 4-5 hours Yield: 4-6 servings
Ingredients: 1 7-8 lb. Fresh Pork Butt 1 16 oz. Jar Cajun Injector® Hot n Spicy Butter Recipe Marinade, Creole Butter Recipe
Marinade, or Jalapeno Butter Recipe Marinade 6 tbsps. Cajun Injector® Quick Shake® Cajun Shake® seasoning 1 cup Apple Juice 1/4 cup Oak or Pecan Wood Pellets
Method: Set the smoker temperature to 225° F. Once smoker is ready, inject 2 ounces per pound of the Cajun Injector marinade throughout the pork butt. Next, season the outside liberally with the Cajun Injector Quick Shake Cajun Shake seasoning. Place the pork butt on a rack in the Cajun Injector Electric Smoker. Pour apple juice into drip pan in smoker. Place 1/4 cup Oak or Pecan Wood Pellets into wood pellet chute, and ensure that no pellets remain in chute after loading. Let the pork butt smoke for about 4-5 hours at 225° F. After four hours, check internal temperature of the pork butt. It should be near 165° F. When internal temperature is at 165° F pull the pork butt off the smoker. Allow to rest for 15 minutes before carving.
###### Cajun Injector® Butter Flavored Smoked Chicken
Prep Time: 15 minutes Cook Time: 4-5 hours Yield: 4-6 servings
Ingredients: 1 Chicken (3-4 lb. average)
Cajun Injector® Jalapeno Butter Recipe Marinade, Hot n Spicy Butter Recipe Marinade, or Creole Butter Recipe Marinade (2 oz. per lb.)
Cajun Injector® Quick Shake® Cajun Shake® seasoning 1/4 cup Oak or Pecan Wood Pellets Method: Preheat smoker to 225˚F and set timer for 4 hours. Remove chicken from packaging and discard the neck and giblets from the cavity. Pat chicken dry with paper towels. Measure out 2 oz. of Cajun Injector marinade per pound of chicken (For example:
##### Cajun Injector® Smoked Pork Loin
##################### Prep Time: 10 minutes
Ingredients: 1 3 - 4 lb. Pork Loin 1 16 oz. Jar Cajun Injector® Hot n Spicy Butter Recipe Marinade, Creole Butter Recipe
Marinade, or Jalapeno Butter Recipe Marinade 6 tbsps. Cajun Injector® Quick Shake® Cajun Shake® seasoning 1 cup Apple Juice 1/4 cup Oak or Pecan Wood Pellets
Method: Set the smoker temperature to 225° F. Once smoker is ready, inject 2 ounces per pound of the Cajun Injector marinade throughout the pork. Next season the outside liberally with the Cajun Injector Quick Shake Cajun Shake seasoning. Place the pork on a rack in the Cajun Injector Electric Smoker. Pour apple juice into drip pan in smoker. Place 1/4 cup Oak or Pecan Wood Pellets into wood pellet chute, and ensure that no pellets remain in chute after loading. Let the pork smoke for

##### Cajun Injector® Hickory Smoked Brisket
##################### Prep time: 20 minutes
Ingredients: 1 (12 lb.) Brisket, Trimmed 12 oz. Cajun injector® Hickory BBQ Recipe Marinade
Cajun Injector® Quick Shake® Cajun Shake® seasoning (to taste) 1/4 cup Oak or Pecan Wood Pellets Method: Trim any excess fat from the brisket, but taking care not to remove all of it. Inject the brisket with the Cajun Injector Hickory BBQ Recipe Marinade using 2 ounces per pound. Generously season the brisket with Cajun Injector Quick Shake Cajun Shake seasoning, and rub to insure even distribution. Pour remaining marinade over brisket. Set the temperature setting to 225°F and the timer for 7 hours. Place meat on the rack in the Cajun Injector Smoker. Place 1/4 cup Oak or Pecan Wood Pellets into wood pellet chute, and ensure that no pellets remain in chute after loading. Experiment with different techniques such as dry smoking and using our basting sauce to “mop” the brisket during the last hour of cooking, or wet smoking with apple juice in the pan.
Cajun Injector®
Fumeur Électrique
Manuel d’utilisation Assemblage, soin, instructions et directives de sécurité
Outil nécéssaire pour l’assemblage : Tournevis cruciforme


AVERTISSEMENT : RISQUE D’OXYDE DE CARBONE LE BOIS BRÛLANT DÉGAGE DE L’OXYDE DE CARBONE POUVANT CAUSER LA MORT.
Avertissements et directives de sécurité : Lire et suivre attentivement les avertissements et les instructions dans ce manuel avant et pendant l’utilisation du fumeur.
AVERTISSEMENTS ET DIRECTIVES IMPORTANTES DE SECURITE
LIRE ATTENTIVEMENT TOUTES LES INSTRUCTIONS AVANT L'UTILIZATION DE L'APPAREIL :
Ce manuel contient d’ importantes informations qui sont nécessaires pour• l’usage sans danger et approprié de cet appareil. Lire et suivre attentivement tous les avertissements et les instructions avant et•
pendant l’utilisation du fumeur. Pour futures références, conserver ce manuel après l’avoir lu.• Le bois brûlant dégage de l’oxyde de carbone ce qui peut causer la mort.• Ne jamais brûler les morceaux ou granulés de bois à l’intérieur de votre mai•
son, dans votre véhicule, dans votre tente, garage, ou tout aure endroit fermé. Cet appareil est pour l’usage extérieur seulement. Ne jamais faire fonctionner•
dans un local fermé. L’unité doit être au sol. Ne jamais placer l’unité sur une table ou comptoir.• Ne pas brancher le fumeur électrique Cajun Injector® avant qu’il soit complète•
ment assemblé et prêt à l’emploie. Employer seulement une prise électrique approuvée et avec prise de terre.• Ne jamais employer pendant un orage électrique.• Ne jamais exposer le fumeur électrique Cajun Injector® à la pluie et à l’eau.• N’immerger pas le fil, la prise ou le panneau de commande dans l’eau ou dans•
aucun liquide. Ceci pourrait causer un court circuit.
Garder toujours les enfants et les animaux familiers hors de portée du fumeur• électrique. Ne jamais permettre aux enfants d’actionner le fumeur électrique. Quand les enfants et les animaux familiers sont dans le secteur du fumeur électrique, la surveillance étroite est une nécessité absolue.
Ne jamais utilisé cet appareil après qu’il ait mal fonctionné ou qu’il ait été en• dommagé. Entrer en contact avec le service clientèle de Bruce Foods Corpora tion et pour recevoir de l’aide appeler le 1-800-229-9082.
Ne jamais permettre aucune autre activité à proximité du fumeur pendant ou• après son utilisation. S’assurer que l'appareil est bien refroidit avant le stockage ou le nettoyage.
Maintenir toujours un extincteur à portée de main lorsque vous utilisez le fu• meur électrique.
Faire attention quand vous utlisez une rallonge électrique au risque de prendre• le pieds dans le fil ce qui pourrait entraîner une chute. Une rallonge électrique défectueuse peut causer la perte d’éfficacité de chauffage ou un court circuit.
Ne pas laisser le fil électrique pendre négligemment ou toucher des surfaces• chaudes. Ne jamais mettre cet appareil sur le dessus ou proche d’une plaque électrique•
ou brûleur à gaz ou gazinière. Ne jamais utiliser tout appareil électrique avec une prise ou fil endommagé.• Ne jamais employer ce fumeur électrique comme réchauffeur. (Se référer à•
l’avertissement au sujet de l'oxyde de carbone) Le fumeur électrique doit seulement être employé sur une surface à niveau et• stable afin d’éviter tous risques corporels et tous dégats matériels potentiels.
Le fumeur électrique est chaud et le restera pendant un moment après son• utilisation. Faire toujours attention près ou en contact avec des surfaces chau des.
La consommation d’alcool, de médicaments ou de drogues avec ou sans ordon• nance peut altérer votre capacité d’assembler ou d’utiliser le fumeur électrique correctement.
######### INSTRUCTIONS, AVERTISSEMENTS ET DIRECTIVES DE SECURITE IMPORTANTES
(Suite) Ne pas cogner ou frapper le fumeur électrique.• Ne pas déplacer l’appareil lorsqu'il est en service. Permettez toujours au•
fumeur électrique de se refroidir complètement avant le rangement ou le déplacement.
Enlever soigneusement la nourriture du fumeur électrique. Toutes les sur• faces sont chaudes et pourraient causer des brûlures. Employer toujours des gants protecteurs et des outils de cuisine solides et avec un long man che.
Extrême précautions doivent être employées lorsque vous bouger un appa• reil contenant de l'huile chaude ou tous autres liquides chauds.
Ne jamais couvrir les grilles de cuisson avec du papier alluminium. Le pa• pier alluminium retient la chaleur, pouvant endommager sérieusement le fumeur électri-que.
Le plateau d’égouttement est seulement pour le fond du fumeur électrique.• Ne jamais mettre le plateau d’égouttement sur les grilles de cuisson. Ceci peut en-dommager le fumeur électrique.
Faire toujours attention quand vous ajoutez les granulés ou morceaux de• bois une fois que le fumeur est en marche. Le plateau est tou jours chaud quand le fumeur électrique est en service.
Pour déconnecter le fumeur électrique, fermer le paneau de contrôle et• enlever la prise de courant.
Déconnecter le fil du fumeur électrique quand vous ne l’utilisez pas ou• avant de le nettoyer. Assurez-vous que le fumeur soit complètement refroidit avant que vous ajoutiez ou retiriez les grilles, plateaux ou le bol d’eau. Se débarrasser des cendres froides en les plaçant dans du papier d’alumi•
nium.
Ne pas ranger le fumeur électrique avec les cendres chaudes à l’intérieur• de l’appareil. Ranger seulement quand toutes les surfaces sont froides, nettoyées et que toutes les cendres ont été enlevées.
L'utilisation d'attachements et accessoires non fournis par Cajun Injector®• ne sont pas recommandés et peuvent causer des dommages. Ne jamais utiliser le fumeur électrique pour un but qui n’est pas prévu pour• son utilisation. Cet appareil n’est pas conçu pour l’usage commercial.
################### La Combustion de sous-produits manufacturés pendant l'utilisation de ce produit contient des produits chimiques connus par l'état de la Californie pour causer des malformations à la naissance et autres effets négatifs sur la reproduction ou cancer.
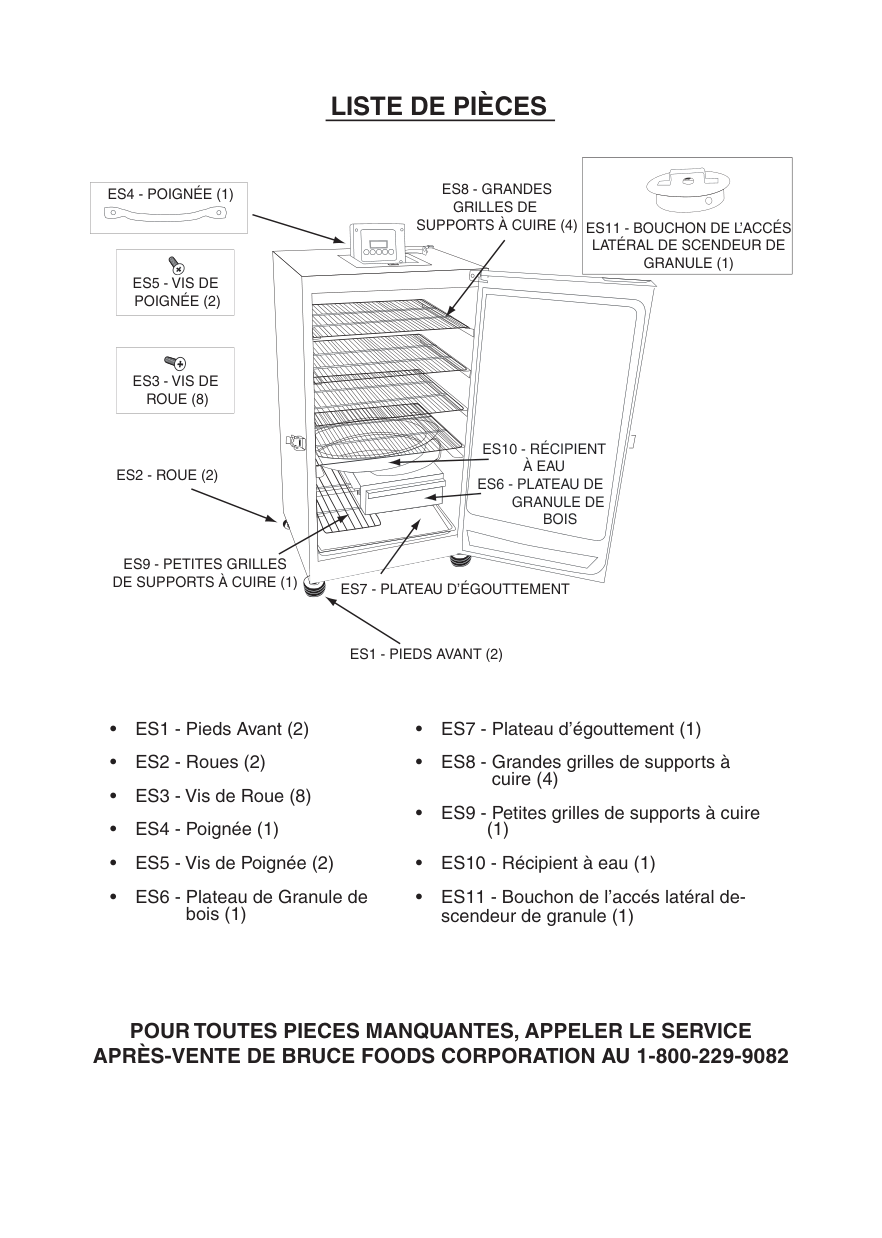
########## LISTE DE PIÈCES
|ES11 - BOUCHON DE L’ACCÉS LATÉRAL DE SCENDEUR DE GRANULE (1)| |---|
ES8 - GRANDES GRILLES DE SUPPORTS À CUIRE (4)
|ES4 - POIGNÉE (1)| |---|
|ES5 - VIS DE POIGNÉE (2)| |---|
|ES3 - VIS DE ROUE (8)| |---|
ES10 - RÉCIPIENT À EAU
ES2 - ROUE (2)
ES6 - PLATEAU DE
GRANULE DE BOIS
ES9 - PETITES GRILLES DE SUPPORTS À CUIRE (1)
ES7 - PLATEAU D’ÉGOUTTEMENT
ES1 - PIEDS AVANT (2)
(1)
POUR TOUTES PIECES MANQUANTES, APPELER LE SERVICE APRÈS-VENTE DE BRUCE FOODS CORPORATION AU 1-800-229-9082
############## Outils nécessaire: Tournevis cruciforme
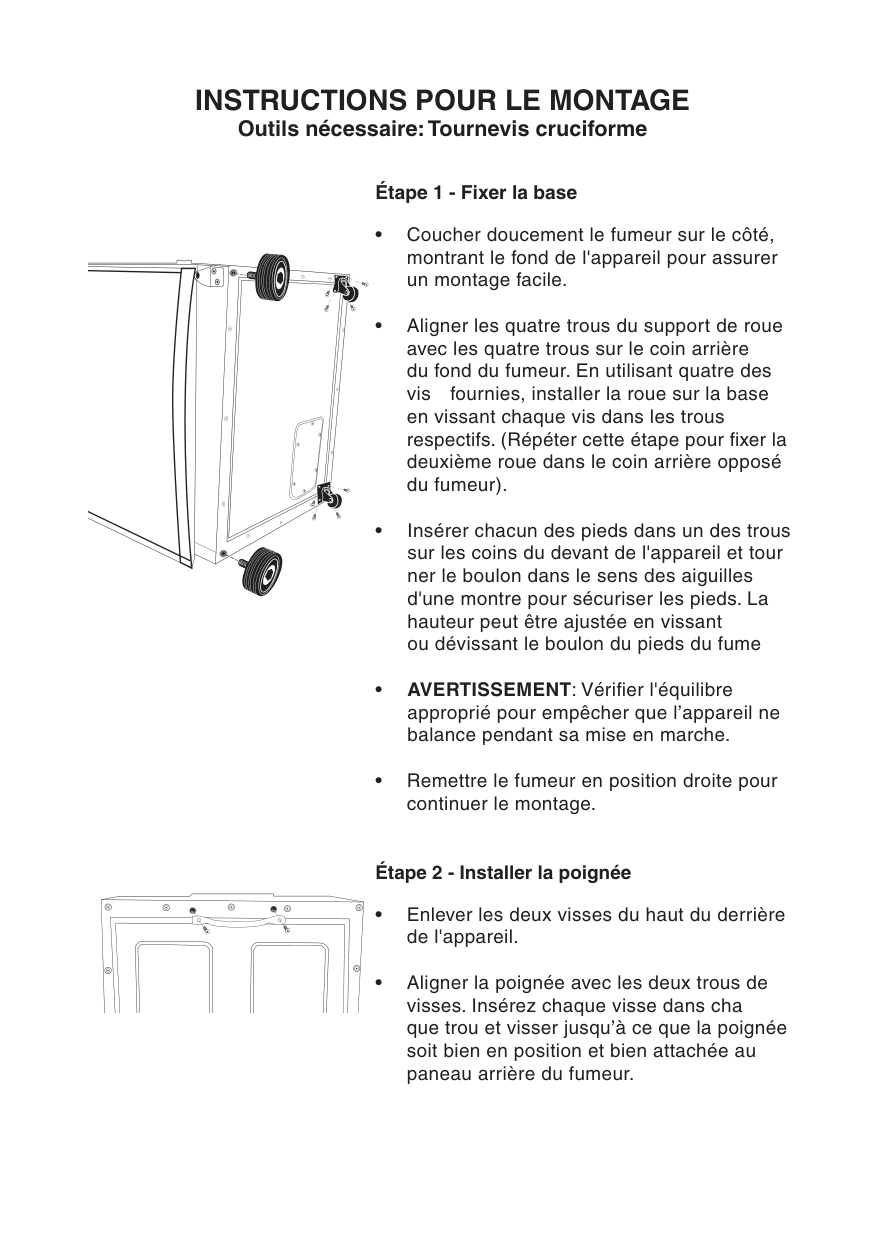
##################### Étape 1 - Fixer la base
Coucher doucement le fumeur sur le côté,• montrant le fond de l'appareil pour assurer un montage facile.
Aligner les quatre trous du support de roue• avec les quatre trous sur le coin arrière du fond du fumeur. En utilisant quatre des vis fournies, installer la roue sur la base en vissant chaque vis dans les trous respectifs. (Répéter cette étape pour fixer la deuxième roue dans le coin arrière opposé du fumeur).
Insérer chacun des pieds dans un des trous• sur les coins du devant de l'appareil et tour ner le boulon dans le sens des aiguilles d'une montre pour sécuriser les pieds. La hauteur peut être ajustée en vissant ou dévissant le boulon du pieds du fume
• AVERTISSEMENT: Vérifier l'équilibre approprié pour empêcher que l’appareil ne balance pendant sa mise en marche.
Remettre le fumeur en position droite pour• continuer le montage.
####################### Étape 2 - Installer la poignée
Enlever les deux visses du haut du derrière• de l'appareil.
Aligner la poignée avec les deux trous de• visses. Insérez chaque visse dans cha que trou et visser jusqu’à ce que la poignée soit bien en position et bien attachée au paneau arrière du fumeur.
############## Outils requis: Tournevis cruciforme
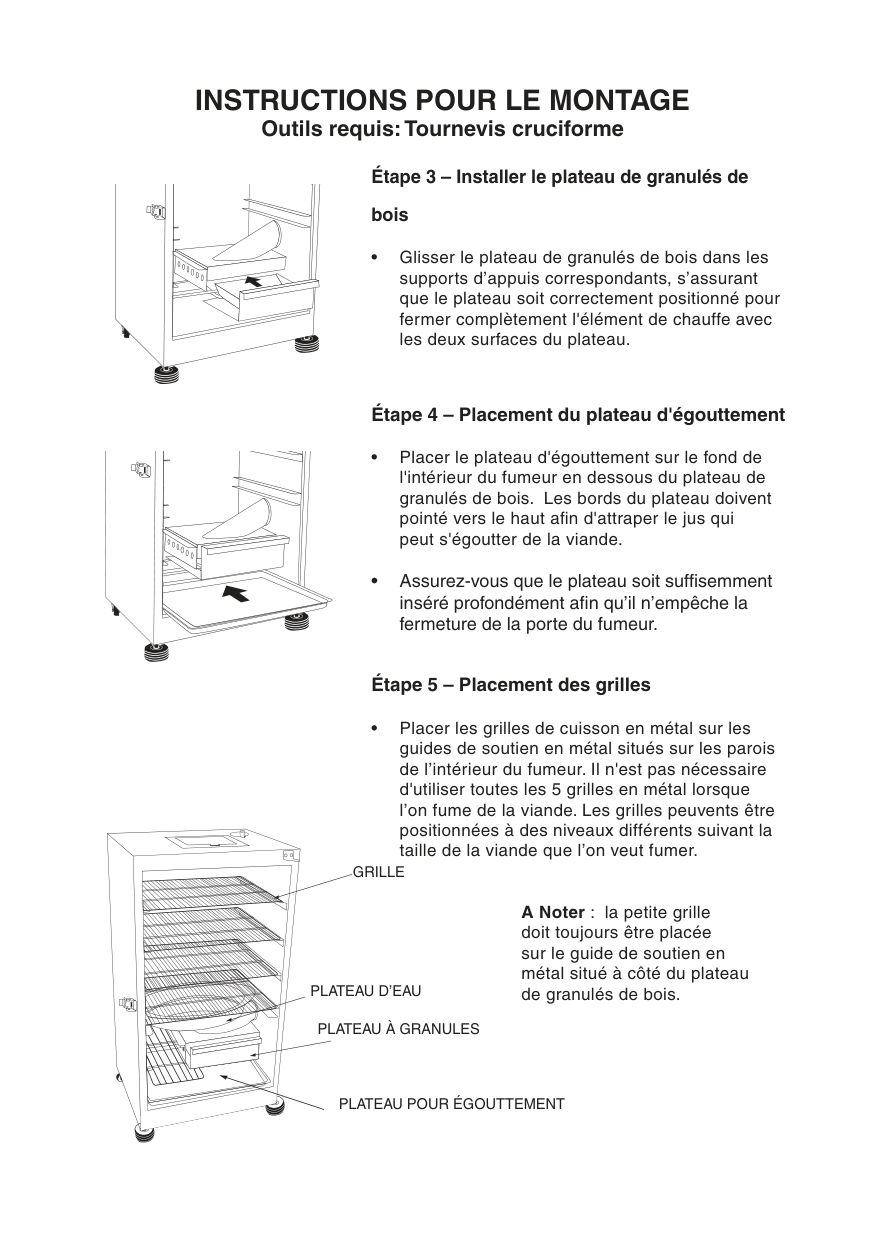
######################### Étape 3 – Installer le plateau de granulés debois
Glisser le plateau de granulés de bois dans les• supports d’appuis correspondants, s’assurant que le plateau soit correctement positionné pour fermer complètement l'élément de chauffe avec les deux surfaces du plateau.
######################### Étape 4 – Placement du plateau d'égouttement
Placer le plateau d'égouttement sur le fond de• l'intérieur du fumeur en dessous du plateau de granulés de bois. Les bords du plateau doivent pointé vers le haut afin d'attraper le jus qui peut s'égoutter de la viande.
Assurez-vous que le plateau soit suffisemment• inséré profondément afin qu’il n’empêche la fermeture de la porte du fumeur.
######################### Étape 5 – Placement des grilles
Placer les grilles de cuisson en métal sur les• guides de soutien en métal situés sur les parois de l’intérieur du fumeur. Il n'est pas nécessaire d'utiliser toutes les 5 grilles en métal lorsque l’on fume de la viande. Les grilles peuvents être positionnées à des niveaux différents suivant la taille de la viande que l’on veut fumer.
GRILLE

A Noter : la petite grille doit toujours être placée sur le guide de soutien en métal situé à côté du plateau de granulés de bois.
PLATEAU D’EAU
PLATEAU À GRANULES
PLATEAU POUR ÉGOUTTEMENT
Outils requis: Tournevis cruciforme
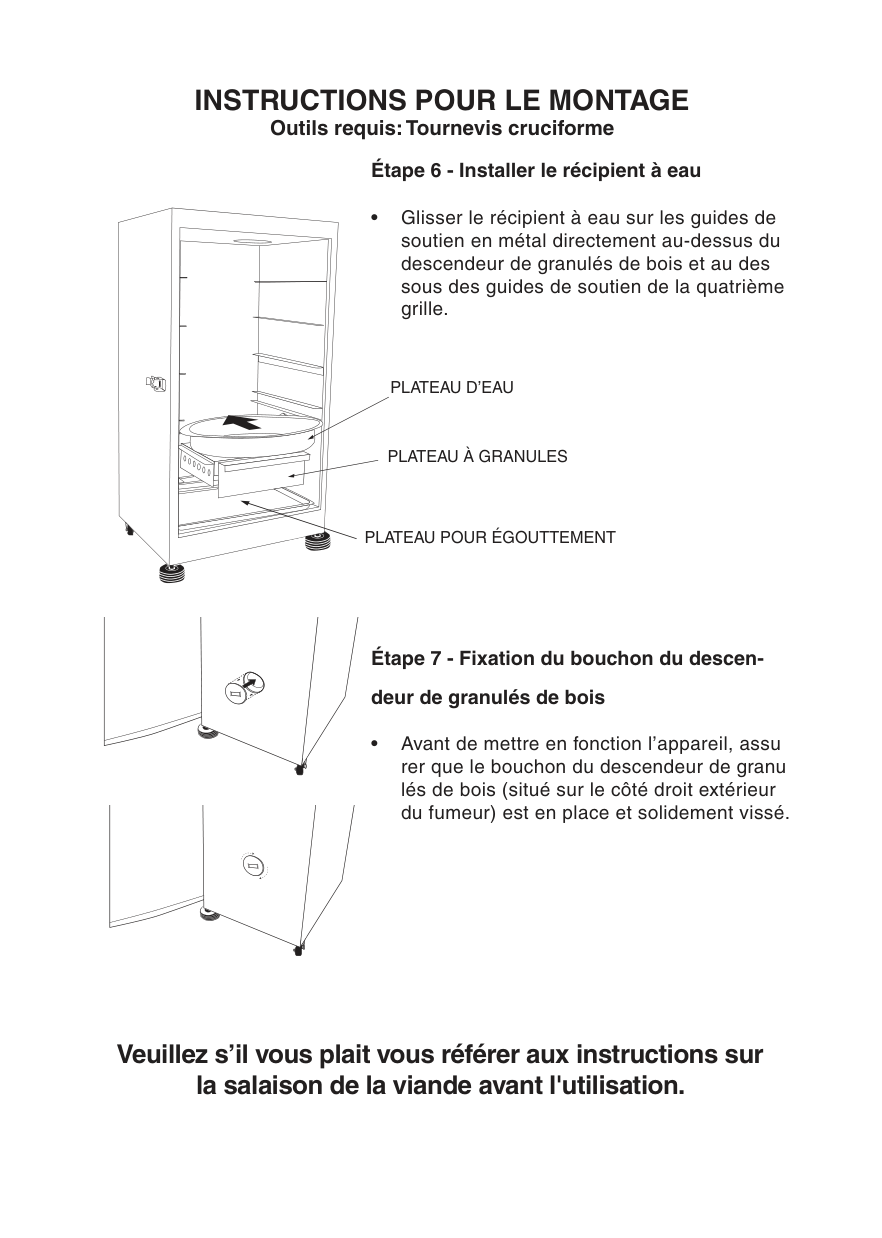
#################### Étape 6 - Installer le récipient à eau
Glisser le récipient à eau sur les guides de• soutien en métal directement au-dessus du descendeur de granulés de bois et au des sous des guides de soutien de la quatrième grille.
PLATEAU D’EAU
PLATEAU À GRANULES
PLATEAU POUR ÉGOUTTEMENT
#################### Étape 7 - Fixation du bouchon du descen-deur de granulés de bois

Avant de mettre en fonction l’appareil, assu• rer que le bouchon du descendeur de granu lés de bois (situé sur le côté droit extérieur du fumeur) est en place et solidement vissé.
Veuillez s’il vous plait vous référer aux instructions sur la salaison de la viande avant l'utilisation.
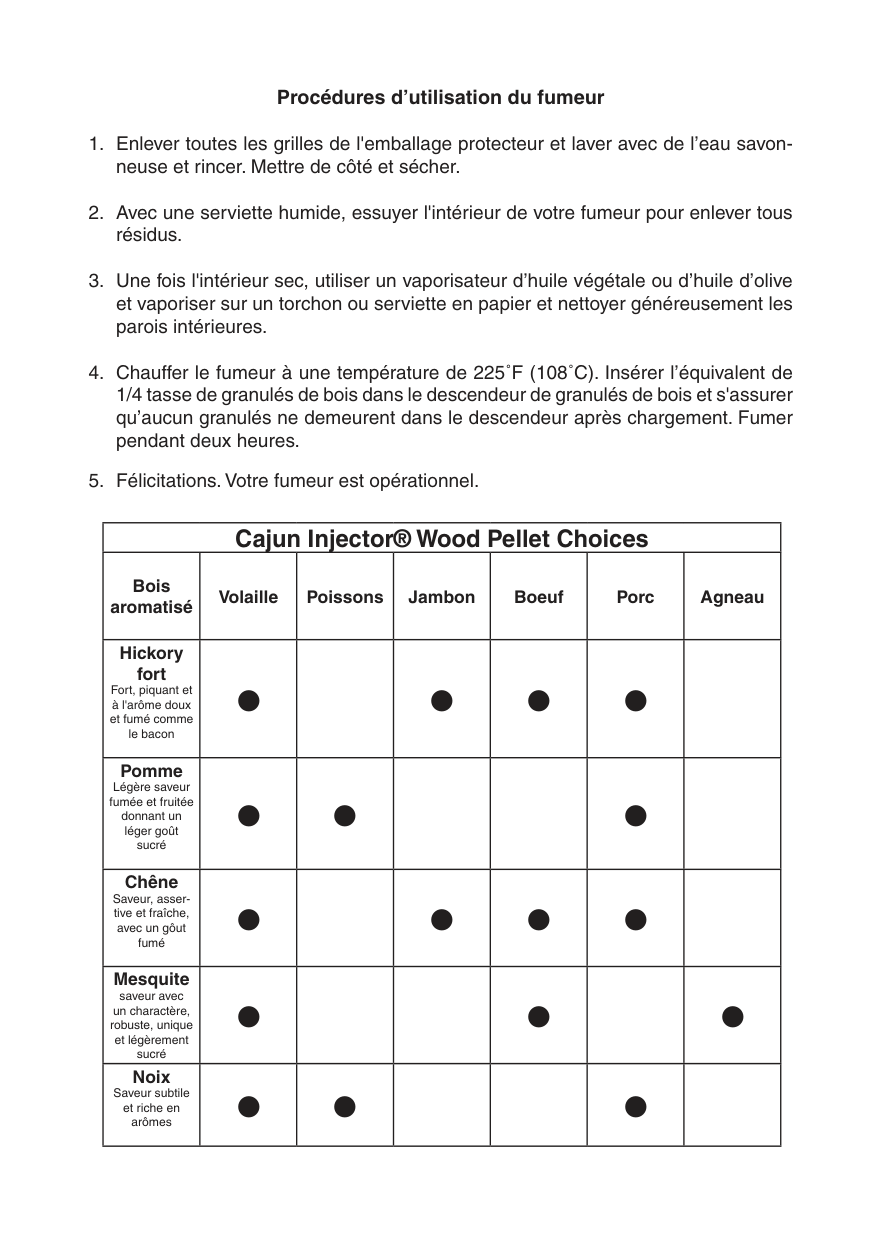
Procédures d’utilisation du fumeur Enlever toutes les grilles de l'emballage protecteur et laver avec de l’eau savon-1.
neuse et rincer. Mettre de côté et sécher. Avec une serviette humide, essuyer l'intérieur de votre fumeur pour enlever tous2. résidus.
Une fois l'intérieur sec, utiliser un vaporisateur d’huile végétale ou d’huile d’olive3. et vaporiser sur un torchon ou serviette en papier et nettoyer généreusement les parois intérieures.
Chauffer le fumeur à une température de 225˚F (108˚C). Insérer l’équivalent de4. 1/4 tasse de granulés de bois dans le descendeur de granulés de bois et s'assurer qu’aucun granulés ne demeurent dans le descendeur après chargement. Fumer pendant deux heures.
Félicitations. Votre fumeur est opérationnel.5.
|Cajun Injector® Wood Pellet Choices|Cajun Injector® Wood Pellet Choices|Cajun Injector® Wood Pellet Choices|Cajun Injector® Wood Pellet Choices|Cajun Injector® Wood Pellet Choices|Cajun Injector® Wood Pellet Choices|Cajun Injector® Wood Pellet Choices| |---|---|---|---|---|---|---| |Bois aromatisé|Volaille|Poissons|Jambon|Boeuf|Porc|Agneau| |Hickory fort Fort, piquant et à l'arôme doux et fumé comme le bacon|•| |•|•|•| | |Pomme Légère saveur fumée et fruitée donnant un léger goût sucré|•|•| | |•| | |Chêne Saveur, assertive et fraîche, avec un gôut fumé|•| |•|•|•| | |Mesquite saveur avec un charactère, robuste, unique et légèrement sucré|•| | |•| |•| |Noix Saveur subtile et riche en arômes|•|•| | |•| |

################# Comment utiliser le descendeur de granulés de bois
Quand le fumeur atteint la température désirée, verser 1/2 bouteille de 1.5oz.• (42 g) de granulés de bois aromatisés Cajun Injector® ou 1/4 tasse de vos granulés de bois préférés dans le descendeur. Placer le bouchon fermement au-dessus du descendeur granulés de bois.
Si vous utilisez des morceaux de bois, suivre les instructions sur le paquet• d’emballage avant de placer les morceaux de bois dans le fumeur.
Ne jamais employer plus de 1.5oz. (42 g) de granulés de bois, ou de 1/4 tasse• de morceaux de bois à la fois.
Ajouter plus de granulés ou de morceaux de bois suivant le besoin.•
################# Ajouter les granulés de bois pendant le fumage
Attention : Maintenir la porte du fumeur fermée lorsque vous ajoutez les granulés ou les morceaux de bois.
A Noter : Le descendeur de granulés de bois sera chaud même si au touché la poignée ne l’est pas. Ajouter les granulés ou les morceaux de bois au fumeur en répétant le proces-•
sus mentionné ci-dessus. La température peut monter rapidement juste après avoir ajouter le bois. La• tempérarture se stabilisera après un court moment. Ne tenter pas de l’ ajuster.
######################## QUAND LA PORTE EST OUVERTE UN EMBRASEMENT PEUT SE PRODUIRE. SI LES GRANULES DE BOIS S’EMBRASENT, FERMER LA PORTE IMMÉDIATEMENT. ATTENDRE QUE LES MORCEAUX DE BOIS SE SOIENT CONSUMMER AVANT DE RE-OUVRIR LA PORTE. NE PAS ASPERGER AVEC DE L'EAU.
########### Affichage numerique Automatique de 24 heures

Le panneau d’affichage numérique peut être ouvert en appuyant fermement sur le bouton situé devant le panneau d’affichage. Le panneau d’affichage s’ouvrira et se mettra en position verticale.
######################### Consignes d’utilisation du panneau de commande
Il n’est pas nécessaire de préchauffer cet appareil.

Réglage de la température : Pousser le bouton « ON » (Marche).• Pousser le bouton « TEMP » (Température);•
Affichage par LED clignotera. Régler la température en• Appuyant sur « TEMP » (Température)•
pour maintenir la température désirée A Noter : Le chauffage ne commencera pas avant que la minuterie soit réglée.
Réglage de la minuterie : Pousser le bouton « TIME « (Temps); Affichage par LED•
afficant les heures clignotera. Régler les heures en• Poussant le bouton « TIME » (Temps) de nouveau pour verrouiller les heu•
res. Les minutes LED commenceront à clignoter. Régler les minutes en• Poussant « TIME » (temps) pour commencer.•
########################## LA CHALEUR S’ARRÊTERA QUAND LE TEMPS A EXPIRÉ
Reréglage du panneau de contrôle Si le panneau de contrôle montre un message d’erreur, arrêter le fumeur électrique, débrancher la prise de courant, attendre dix secondes, rebrancher l’appareil en rebranchant la prise de courant, ensuite mettre en marche le fumeur électrique. Félicitations vous avez accompli la réinitialisation de votre appareil
#################### Utilisation de votre fumeur
La température ne peut pas être réglée au-dessus de 275˚F (135˚C). Ce• fumeur est conçu pour chauffer à basse température de 200˚F - 225˚F (93˚C – 107˚C) à cuisson lente. Il n’est pas conçu pour être utilisé comme four.
Le descendeur de granulés de bois doit être complètement scellé à l’exté•
rieur du fumeur et le plateau de granulés de bois doit être bien en place pendant la cuisson. Le chargement incorrect peut entraîner l’embrasage des granulés de bois.
Les granulés de bois sont essentiels pour produire de la fumée et pour• donner à la viande un plaisant goût de fumé. Il est conseillé d’utiliser avec modération les granulés de bois. Trop de fumée peut donner à des viandes fumées une saveur désagréable de créosote. Tout en apprenant à fumer, il vaut mieux au départ sous-estimer la quantité de fumée demandée.
Il est tout à fait normal que votre fumeur produise une quantité importante• de fumée.
Il est également normal qu’avec le temps une discoloration des parois de• votre fumeur de produise.
Vérifier périodiquement la trappe de graisse de votre fumeur et vider la si• nécéssaire.
La porte du fumeur doit rester fermée durant tout le procédé de cuisson.• Ouvrez la porte seulement si c’est absolument nécéssaire. Une fois ouvert, fermer la porte du fumeur dès que possible. Laisser la porte ouverte pen dant une période prolongée peut entraîner la perte rapide de chaleur et peut causer l’embrasement des granulés de bois.
#################### Nettoyage de votre fumeur
Toujours débrancher le fumeur et prévoir suffisemment de temps pour re• froidir l’appareil avant de le nettoyer et de le ranger.
Pour nettoyer les grilles, le récipient d’eau et le plateau d’égouttement, utili• ser un savon doux pour la vaisselle. Rincer le restant des résidus savon neux et sécher entièrement.
Avant chaque utilisation nettoyer le plateau de granulés de bois et le• descendeur de granulés en enlevant tous résidus de cendre.
Pour nettoyer l’extérieur et l’intérieur du fumeur, essuyer avec un chiffon• humide (ne pas utiliser du savon ou des produits chimiques). Ne pas oublier de nettoyer le joint intérieur et le joint de la porte. Sécher complètement avant de ranger.
N'utilisez aucun types de détergents pour nettoyage à la vapeur lorsque• vous nettoyez le fumeur et ses accessoires.