
Ask AI
— answers from the official manualAnswers from the official manual.
Common questions
Common Questions
10 totalHow do I recognize the left and right hearing aids?
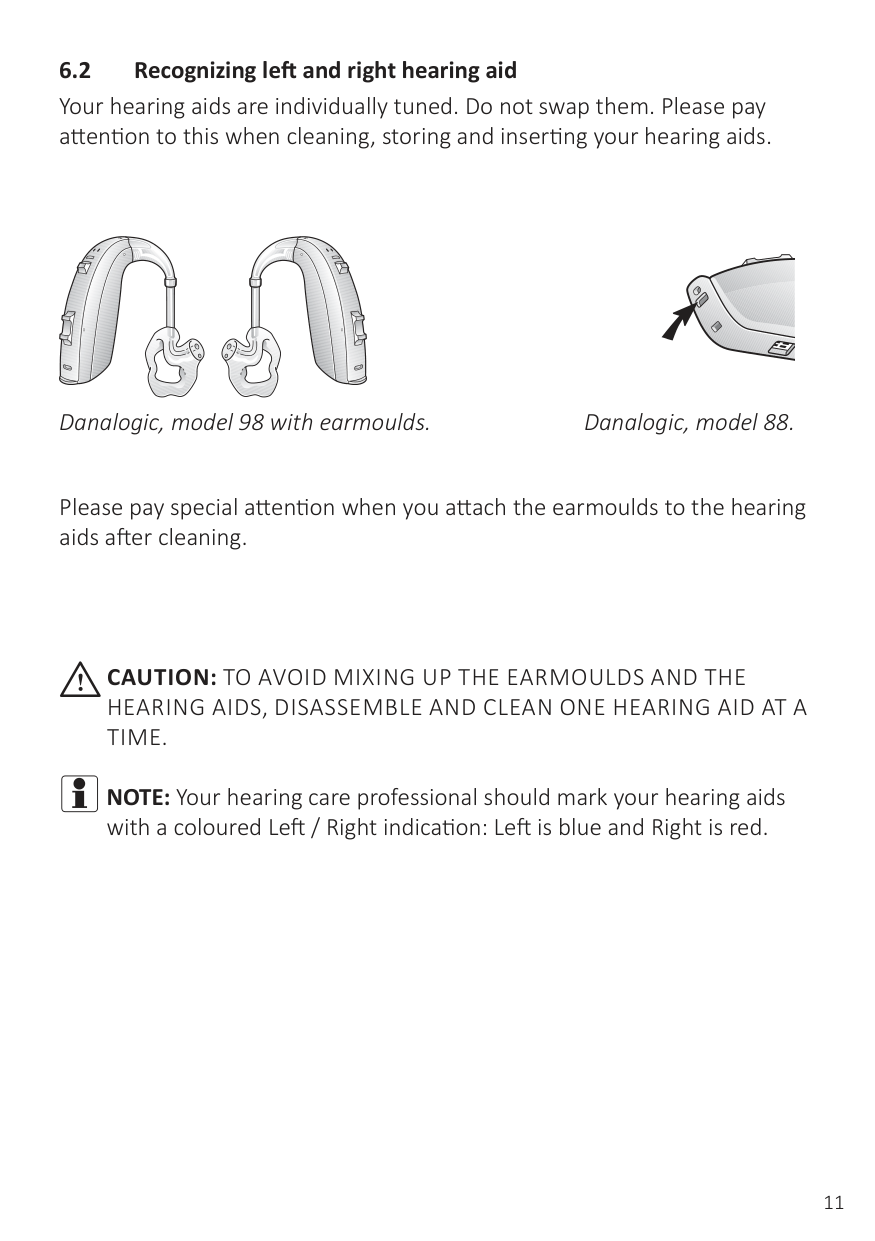
Each hearing aid is individually tuned. Ensure they are not swapped; your hearing care professional may mark them with a colored indication: Left is blue, Right is red.
What steps should I follow to insert and remove the earmould?
To insert an earmould, hold it between your thumb and finger, position it in your ear canal with a gentle twisting movement, place it behind your ear fold of skin, move it up and down gently, then secure the hearing aid firmly behind the ear. To remove it, lift the hearing aid from behind the ear, grip the earmould, twist and pull to remove.
How do I connect a DAI boot accessory to my hearing aids?
Align the DAI click-on adapter with the groove above the battery door, move it in the direction of the battery door gently, and click the adapter onto the hearing aid.
How do I charge my hearing aids?
The Ambio models come with batteries that should not be recharged. Ensure to replace them when they run low or if you are storing your hearing aids for an extended period of time.
How do I clean the thin tube and domes of my hearing aid?
Unscrew the thin tube from the hearing aids, use a damp cloth to wipe down the tubing, dome, and earpiece, and insert the cleaning wire opposite the dome to remove any moisture or debris.
What should I do if my hearing aid is whistling?
Ensure your earmould or dome is inserted correctly, reduce the volume settings if necessary, and replace or see a professional about any clogged or broken tubing.
Full Manual
60 pages
danalogic Ambio
User guide
Behind-The-Ear hearing aids
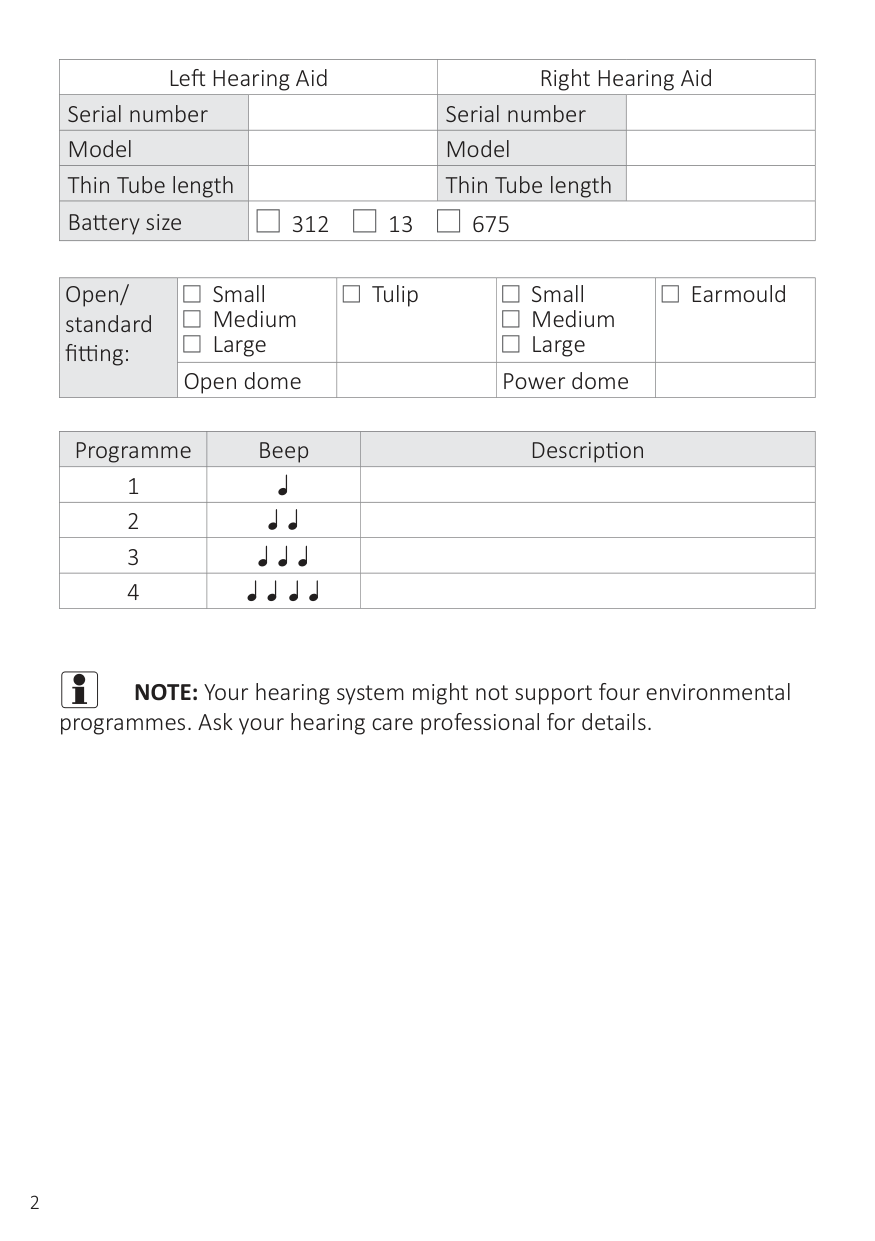
|Left Hearing Aid|Left Hearing Aid|Right Hearing Aid|Right Hearing Aid| |---|---|---|---| |Serial number| |Serial number| | |Model| |Model| | |Thin Tube length| |Thin Tube length| | |Battery size|| | |---|
312
| | |---|
13
| | |---|
675|| | |---|
312
| | |---|
13
| | |---|
675|| | |---|
312
| | |---|
13
| | |---|
675|
|Open/ standard fitting:|| | |---|
Small Medium Large
| | |---|
| | |---| || | |---|
Tulip|| | |---|
Small Medium Large
| | |---|
| | |---| || | |---|
Earmould| |---|---|---|---|---|
|Open/ standard fitting:|Open dome| |Power dome| |
|Programme|Beep|Description| |---|---|---| |1| | | |2| | | |3| | | |4| | |
i NOTE:Your hearing system might not support four environmental
programmes. Ask your hearing care professional for details.
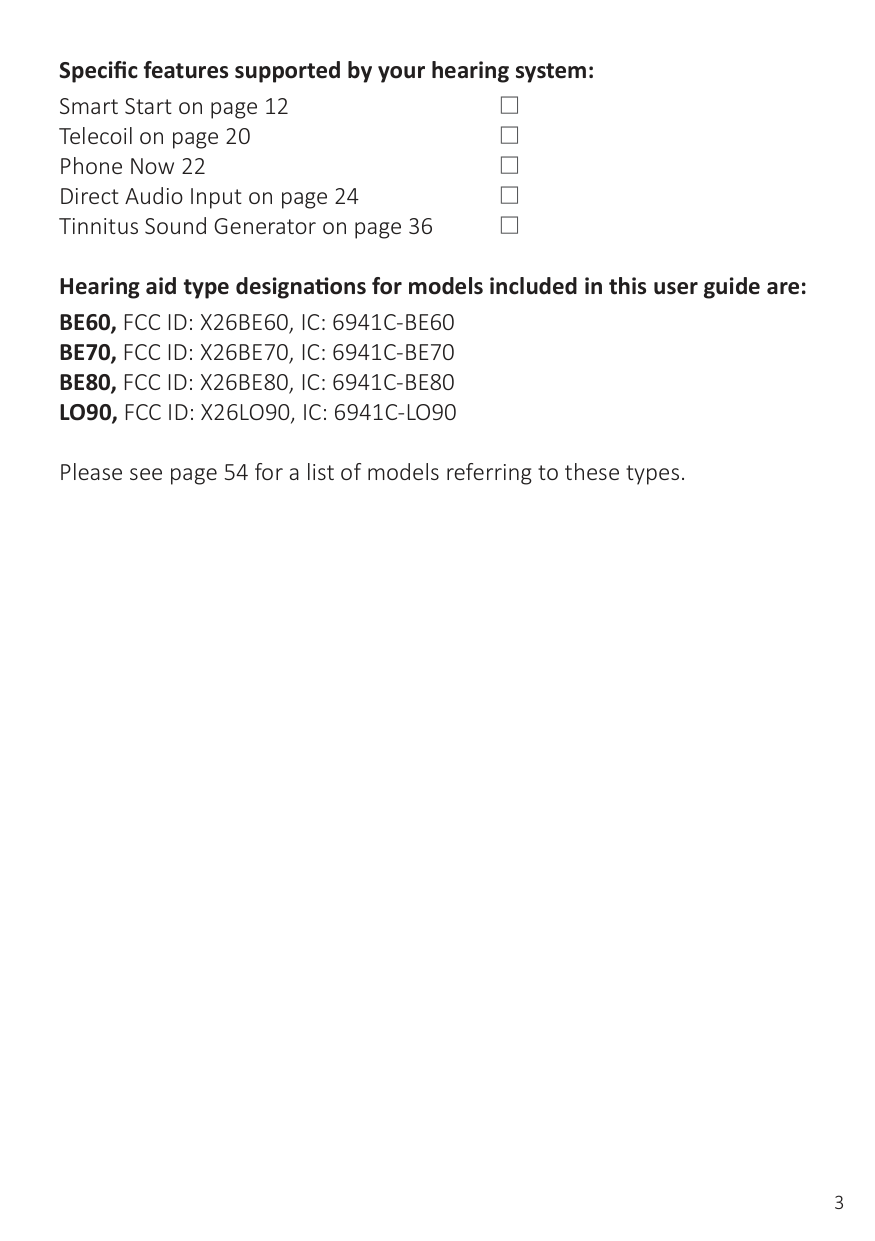
Specific features supported by your hearing system: Smart Start on page 12 Telecoil on page 20 Phone Now 22 Direct Audio Input on page 24 Tinnitus Sound Generator on page 36
| | |---|
| | |---|

| | |---|
| | |---|
| | |---|
Hearing aid type designations for models included in this user guide are:
BE60, FCC ID: X26BE60, IC: 6941C-BE60 BE70, FCC ID: X26BE70, IC: 6941C-BE70 BE80, FCC ID: X26BE80, IC: 6941C-BE80 LO90, FCC ID: X26LO90, IC: 6941C-LO90
Please see page 54 for a list of models referring to these types.
Please read this manual carefully in order to wholly benefit from the use of your hearing aids. With proper care, maintenance, and usage, your hearing aids will aid you in better communication for many years.
Ask your hearing care professional if you have any questions.
You will enjoy more benefits from your hearing aids by taking the following actions:
It may take as long as several months for your brain to get used to all the “new” sounds around you. Following these suggestions will give your brain time to learn how to interpret amplification and increase the benefits you get from using hearing aids.
4 iHearing aid expectations
A hearing aid will not restore normal hearing and will not prevent or improve a hearing impairment resulting from organic conditions. Consistent use of the hearing aid is recommended. In most cases, infrequent use does not permit you to attain full benefit from it.
The use of a hearing aid is only part of hearing rehabilitation and may need to be supplemented by auditory training and instructions in lip-reading.
#### 5 Contents
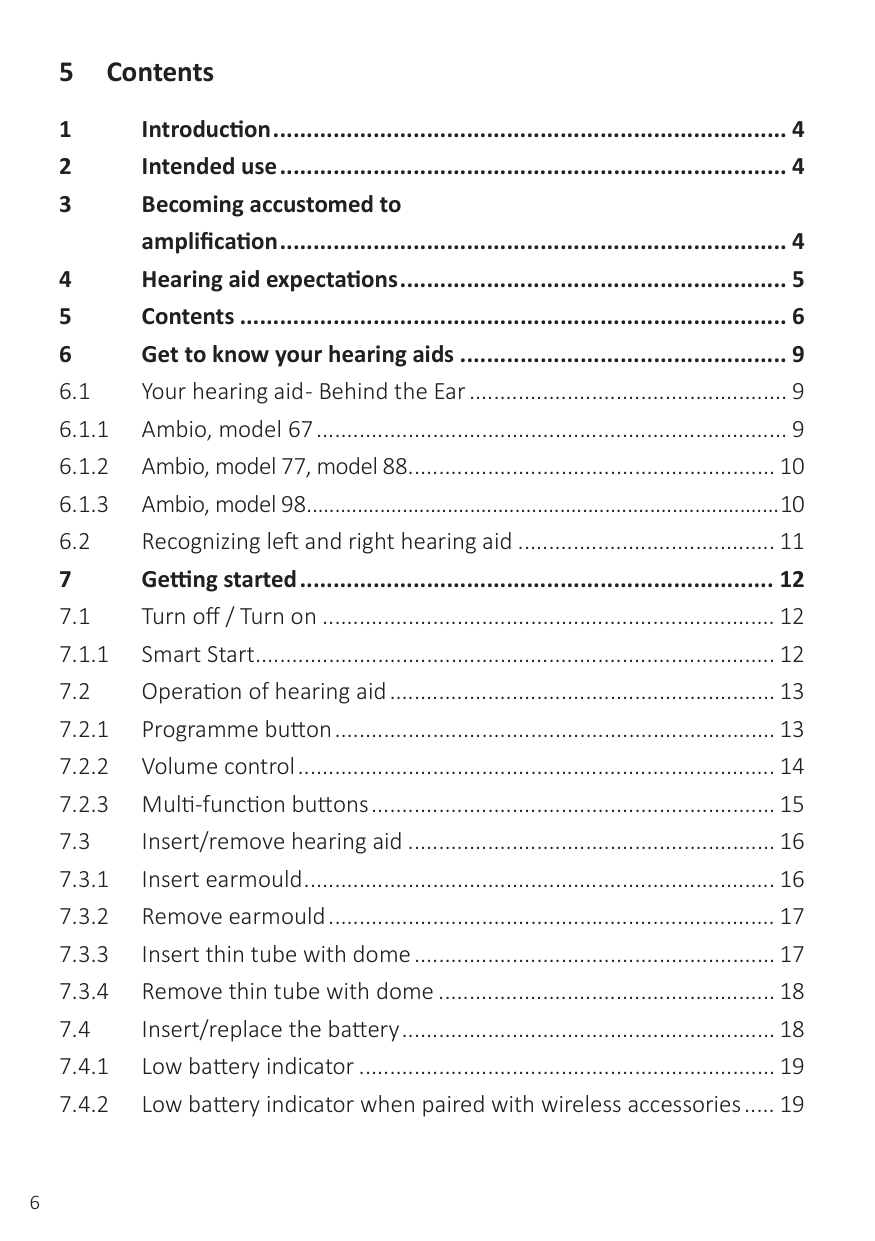
7.2 Operation of hearing aid ............................................................... 13
7.3 Insert/remove hearing aid ............................................................ 16
7.4 Insert/replace the battery ............................................................. 18
9 How to change domes ............................................................ 27
9.2 Tulip domes ................................................................................... 28 10 Battery door lock ................................................................... 29 10.1 Ambio, model 77 ........................................................................... 29
11 Daily maintenance ................................................................. 31
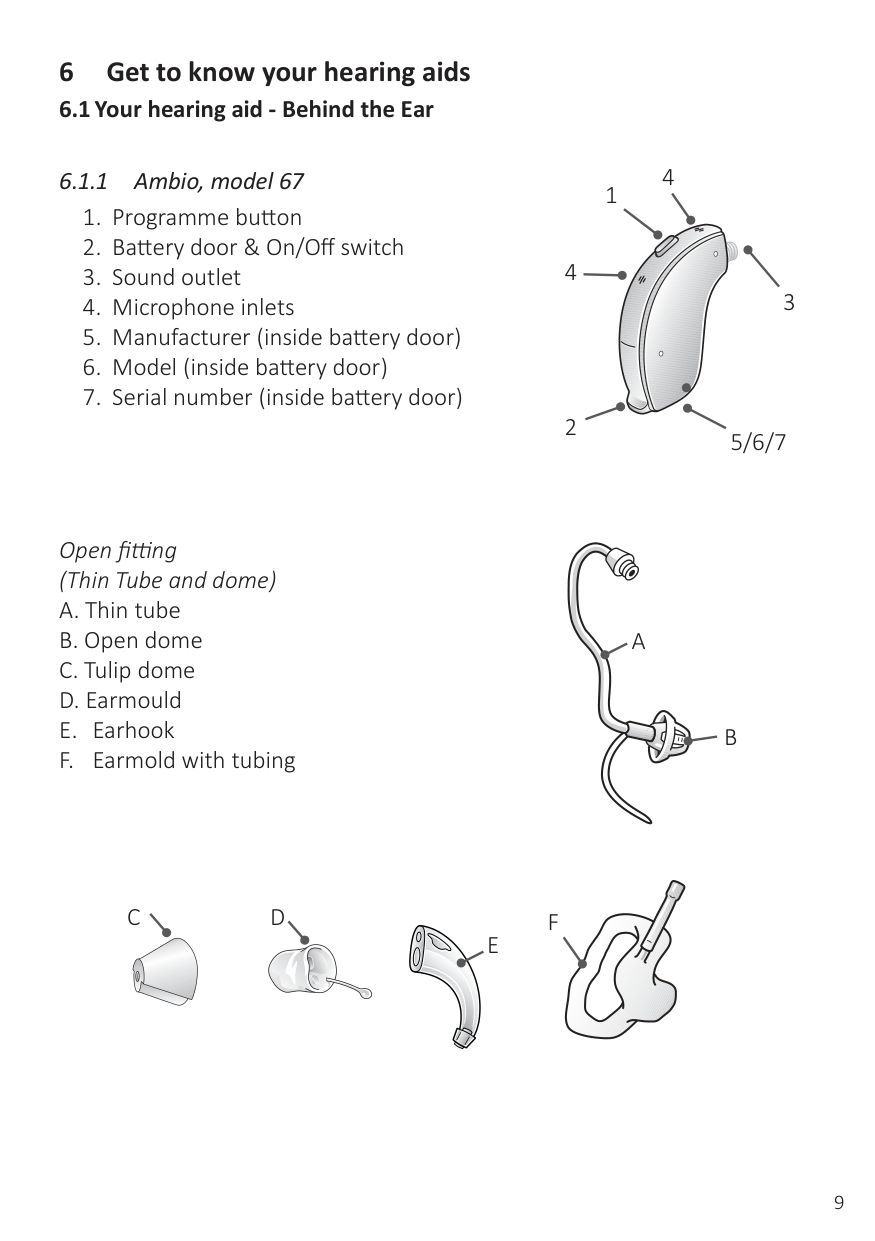
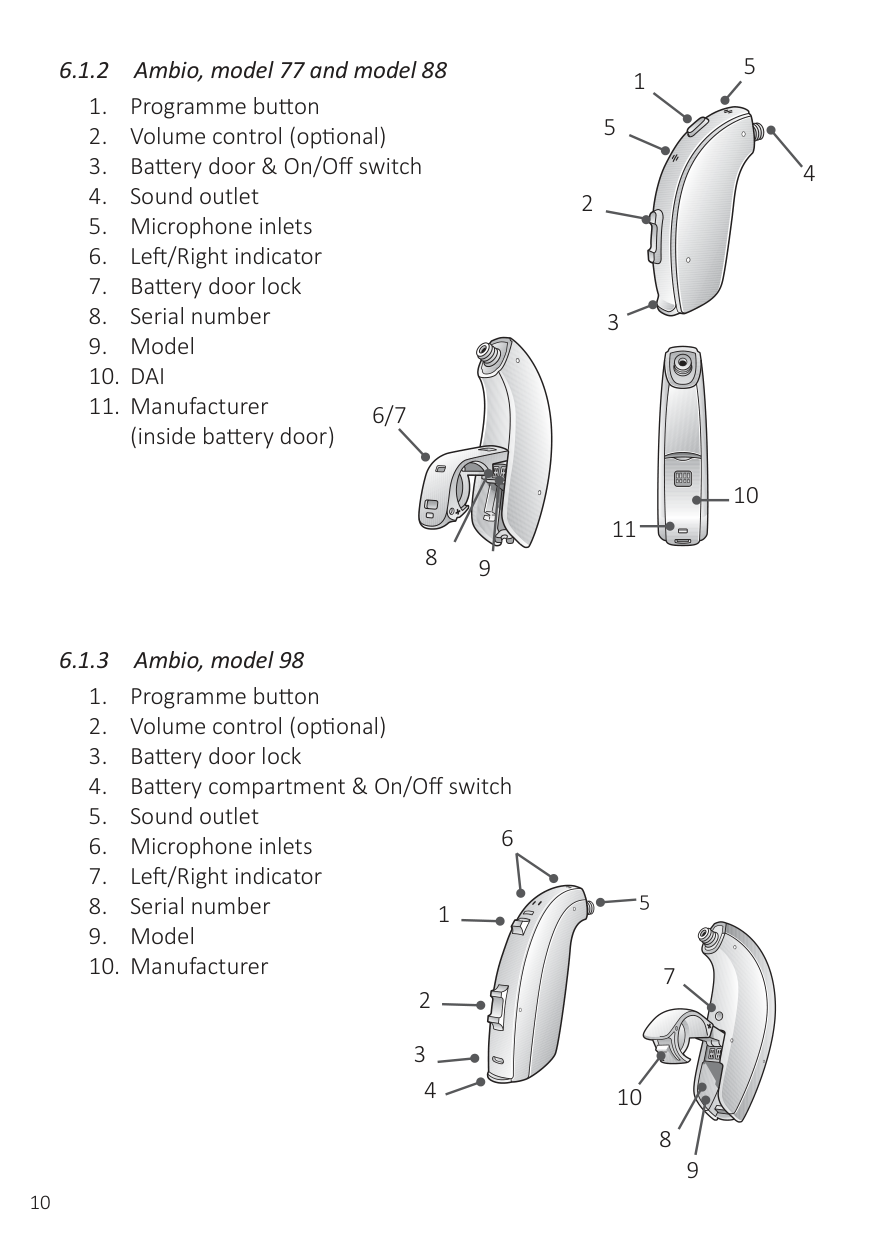
#### 6 Get to know your hearing aids
###### 6.1 Your hearing aid - Behind the Ear
4
1
4
3
2
5/6/7
Open fitting (Thin Tube and dome)
A
B
DC
E
F
1 5
5
4
6/7
10 11
8 9
5
6
4
7
10
8
9
Danalogic, model 98 with earmoulds. Danalogic, model 88.
Please pay special attention when you attach the earmoulds to the hearing aids after cleaning.
iCAUTION:TO AVOID MIXING UP THE EARMOULDS AND THE HEARING AIDS, DISASSEMBLE AND CLEAN ONE HEARING AID AT A TIME.
iNOTE:Your hearing care professional should mark your hearing aids
with a coloured Left / Right indication: Left is blue and Right is red.
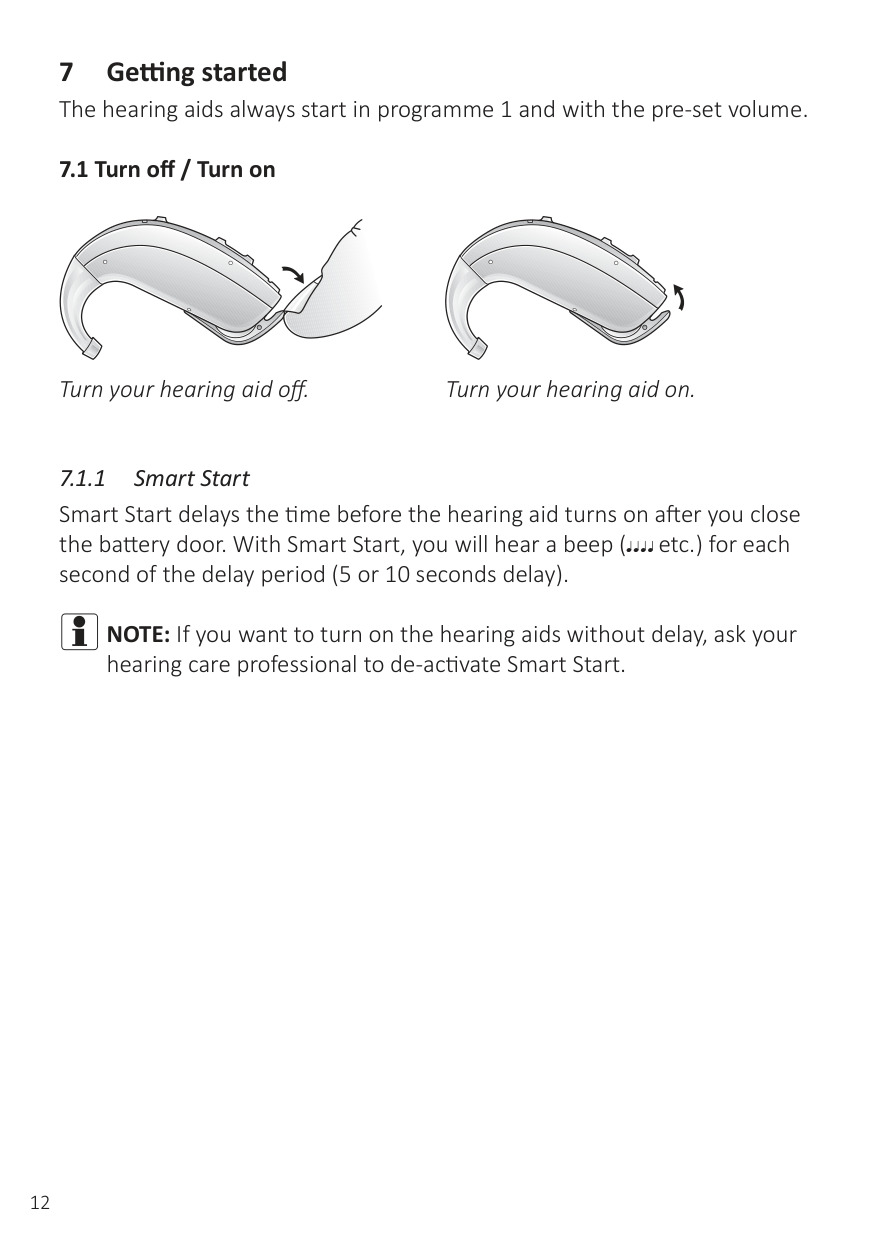
###### 7.1 Turn off / Turn on
Turn your hearing aid off. Turn your hearing aid on.
iNOTE:If you want to turn on the hearing aids without delay, ask your
hearing care professional to de-activate Smart Start.
| | |---|
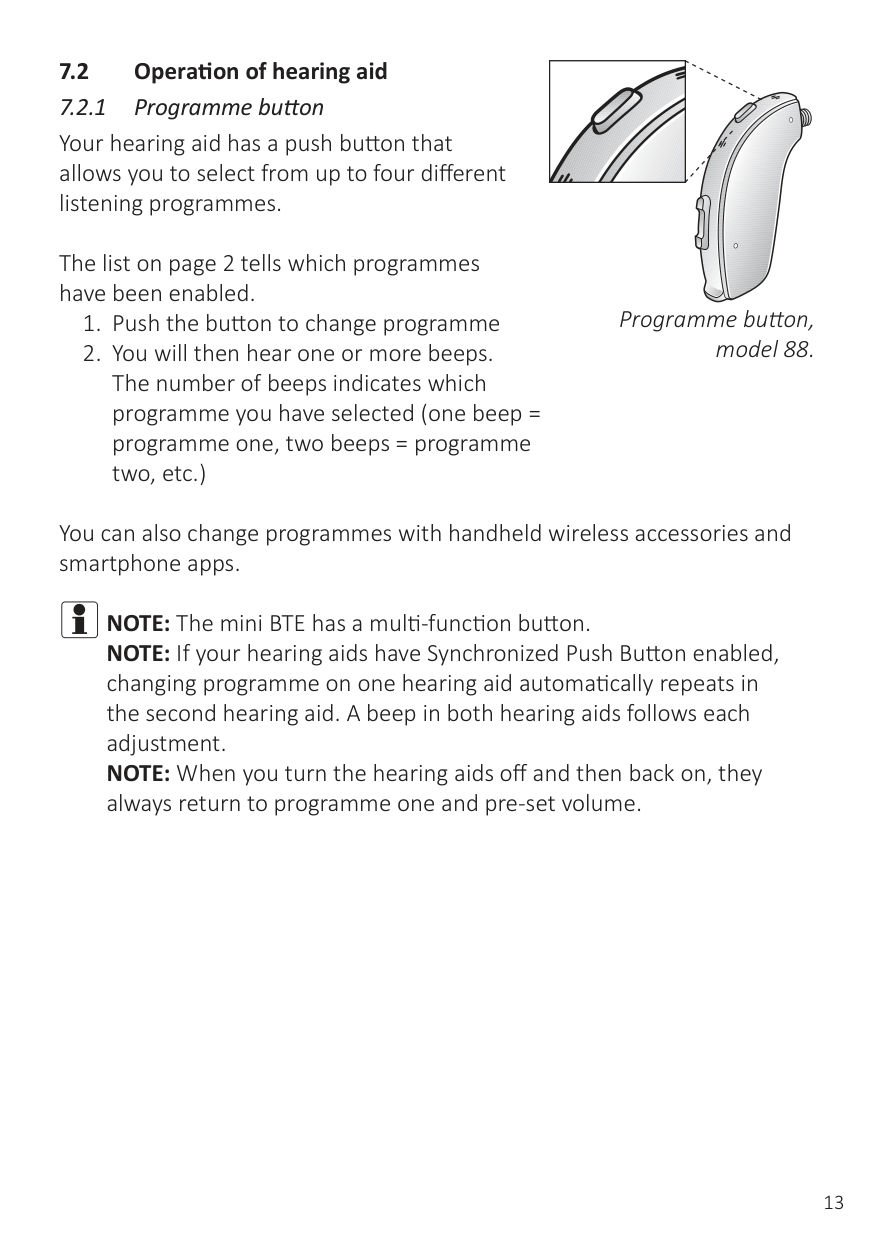
###### 7.2 Operation of hearing aid
The list on page 2 tells which programmes have been enabled.
Programme button, model 88.
You can also change programmes with handheld wireless accessories and smartphone apps.
iNOTE:The mini BTE has a multi-function button. NOTE: If your hearing aids have Synchronized Push Button enabled, changing programme on one hearing aid automatically repeats in the second hearing aid. A beep in both hearing aids follows each adjustment. NOTE: When you turn the hearing aids off and then back on, they always return to programme one and pre-set volume.
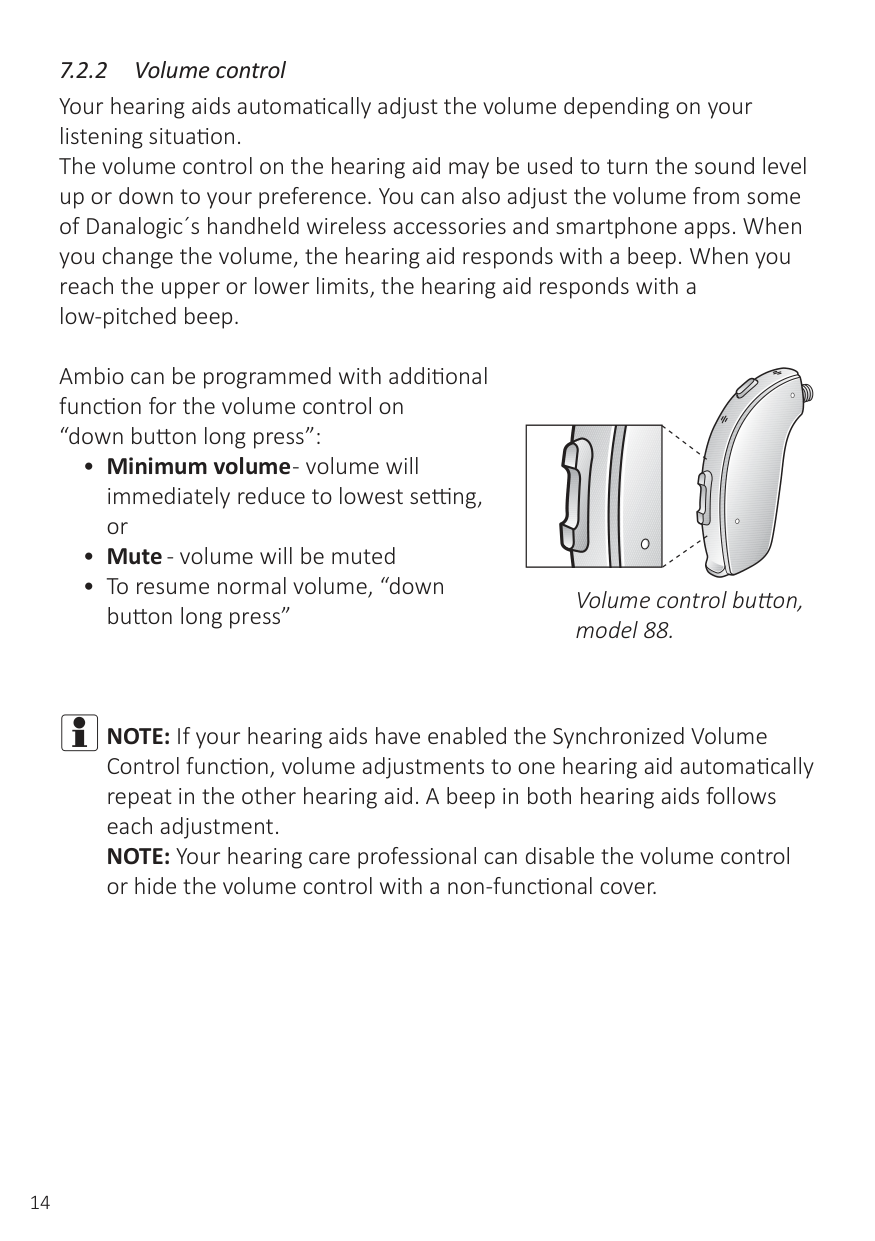
Ambio can be programmed with additional function for the volume control on “down button long press”:
| |
|---|
Volume control button, model 88.
iNOTE:If your hearing aids have enabled the Synchronized Volume Control function, volume adjustments to one hearing aid automatically repeat in the other hearing aid. A beep in both hearing aids follows each adjustment. NOTE: Your hearing care professional can disable the volume control or hide the volume control with a non-functional cover.
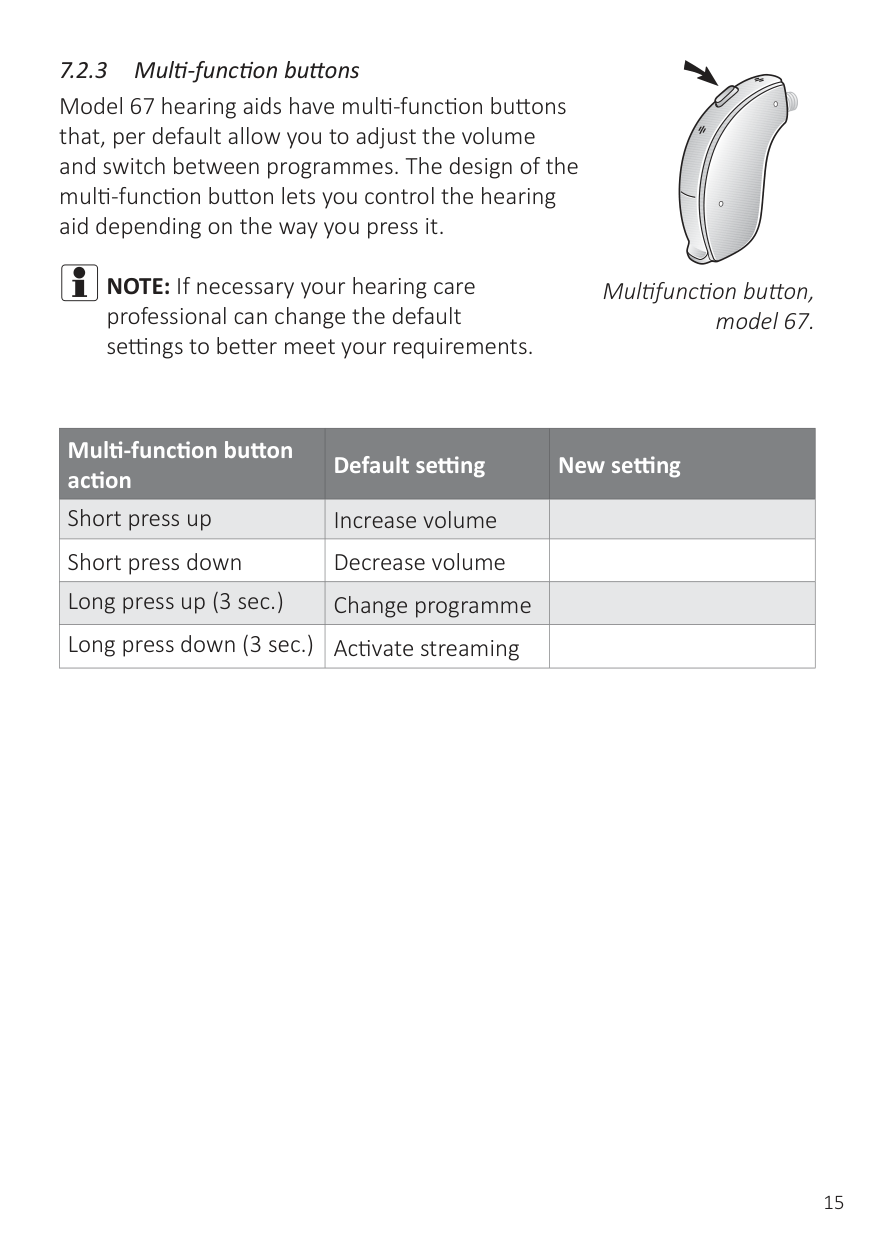
iNOTE:If necessary your hearing care professional can change the default settings to better meet your requirements.
Multifunction button, model 67.
|Multi-function button action|Default setting|New setting| |---|---|---| |Short press up|Increase volume| | |Short press down|Decrease volume| | |Long press up (3 sec.)|Change programme| | |Long press down (3 sec.)|Activate streaming| |
| | |---|
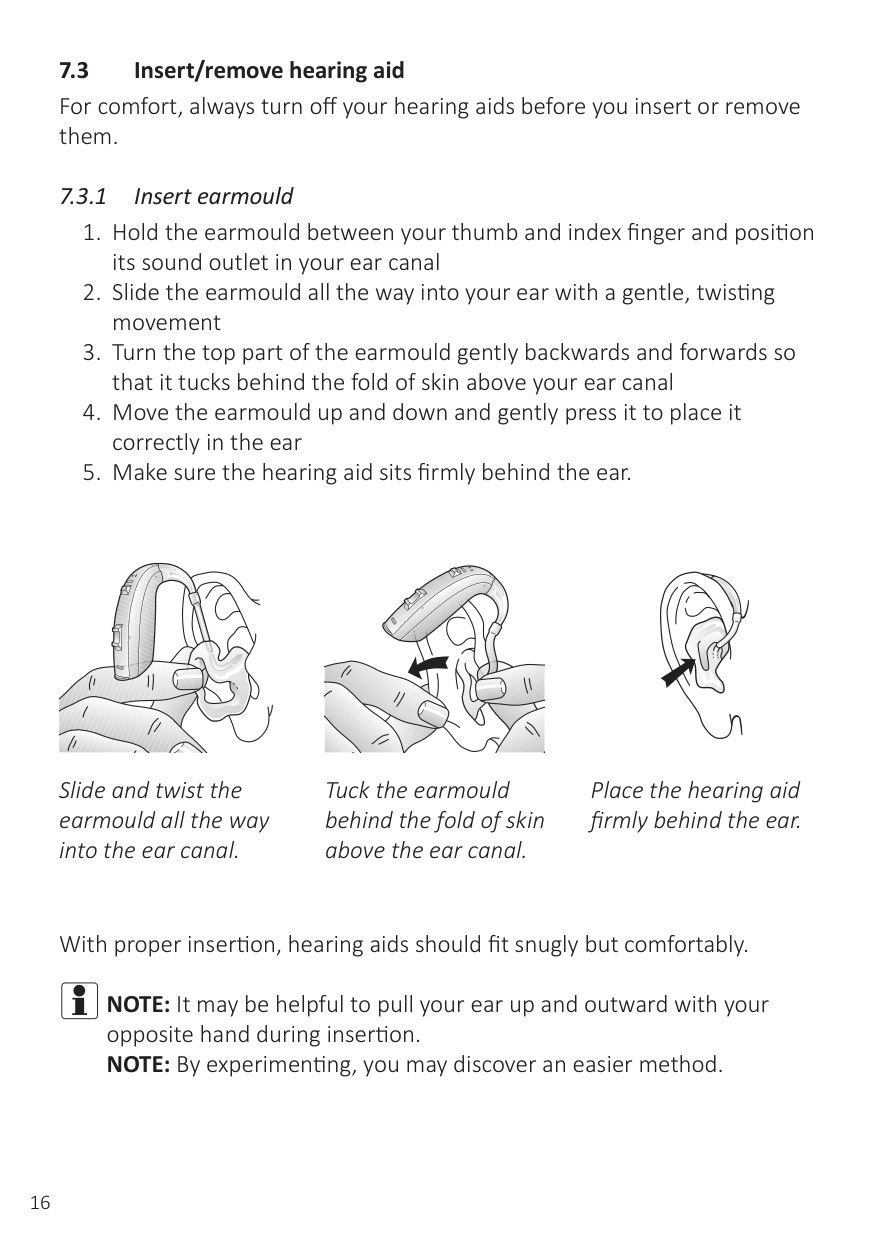
Slide and twist the earmould all the way into the ear canal.
| | |---|
Tuck the earmould behind the fold of skin above the ear canal.
| | |---|
Place the hearing aid firmly behind the ear.
With proper insertion, hearing aids should fit snugly but comfortably.
iNOTE:It may be helpful to pull your ear up and outward with your opposite hand during insertion. NOTE: By experimenting, you may discover an easier method.
iCAUTION: NEVER ATTEMPT TO MODIFY THE SHAPE OF THE
HEARING AID, EARMOULDS, OR TUBING YOURSELF.
iCAUTION: NEVER ATTEMPT TO MODIFY THE SHAPE OF THE
HEARING AID, EARMOULDS, OR TUBING YOURSELF.
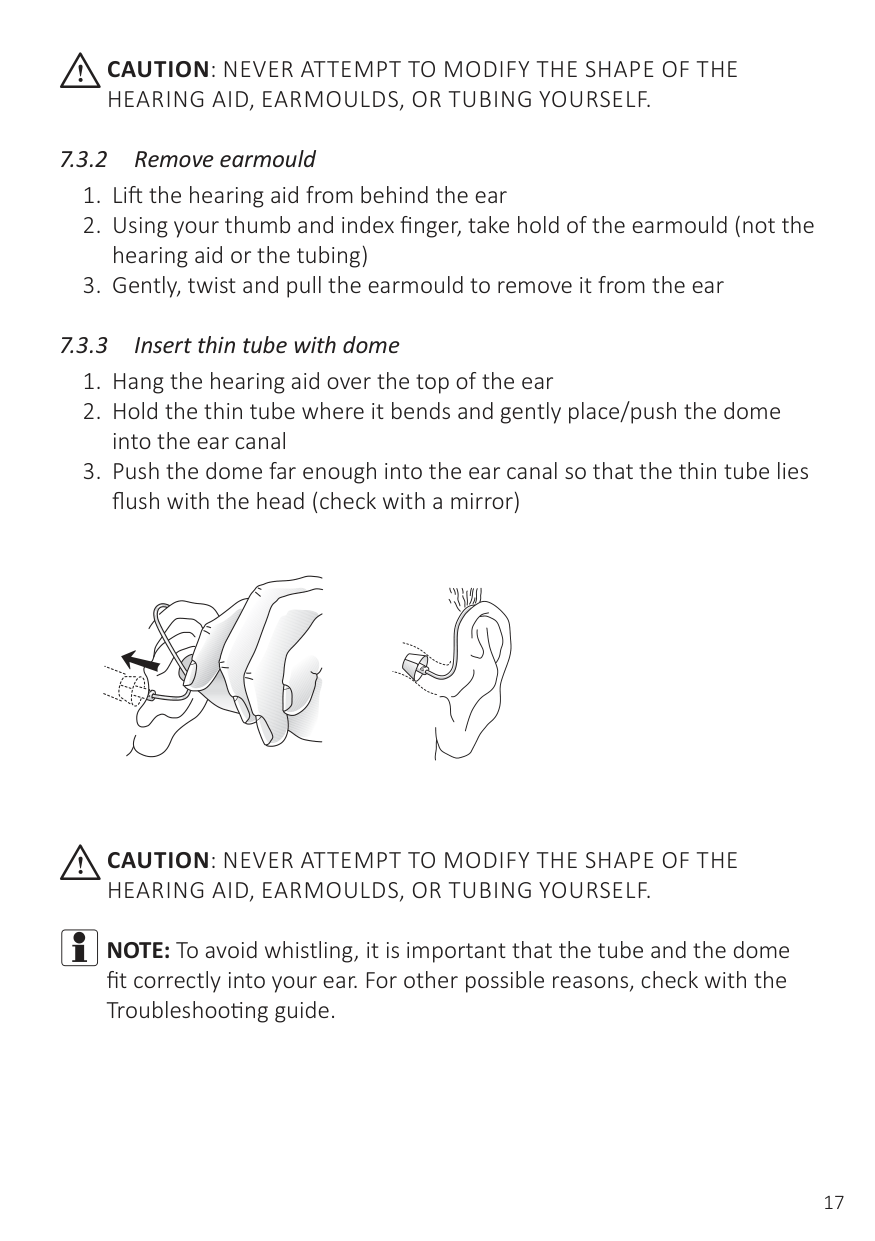
iNOTE:To avoid whistling, it is important that the tube and the dome fit correctly into your ear. For other possible reasons, check with the Troubleshooting guide.
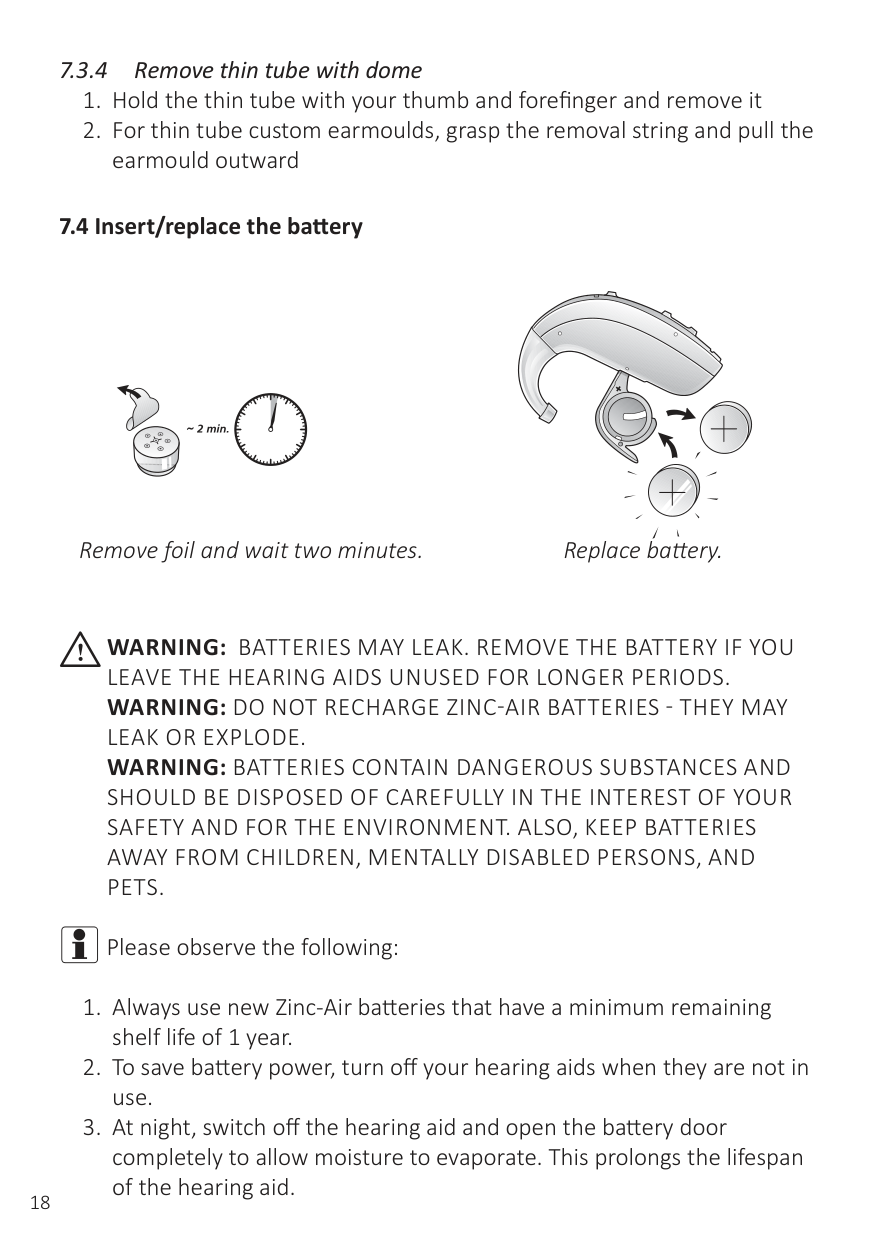
###### 7.4 Insert/replace the battery
Remove foil and wait two minutes. Replace battery.
iWARNING: BATTERIES MAY LEAK. REMOVE THE BATTERY IF YOU LEAVE THE HEARING AIDS UNUSED FOR LONGER PERIODS. WARNING: DO NOT RECHARGE ZINC-AIR BATTERIES - THEY MAY LEAK OR EXPLODE. WARNING: BATTERIES CONTAIN DANGEROUS SUBSTANCES AND SHOULD BE DISPOSED OF CAREFULLY IN THE INTEREST OF YOUR SAFETY AND FOR THE ENVIRONMENT. ALSO, KEEP BATTERIES AWAY FROM CHILDREN, MENTALLY DISABLED PERSONS, AND PETS.
iPlease observe the following:
iNOTE:Keep spare batteries on hand.
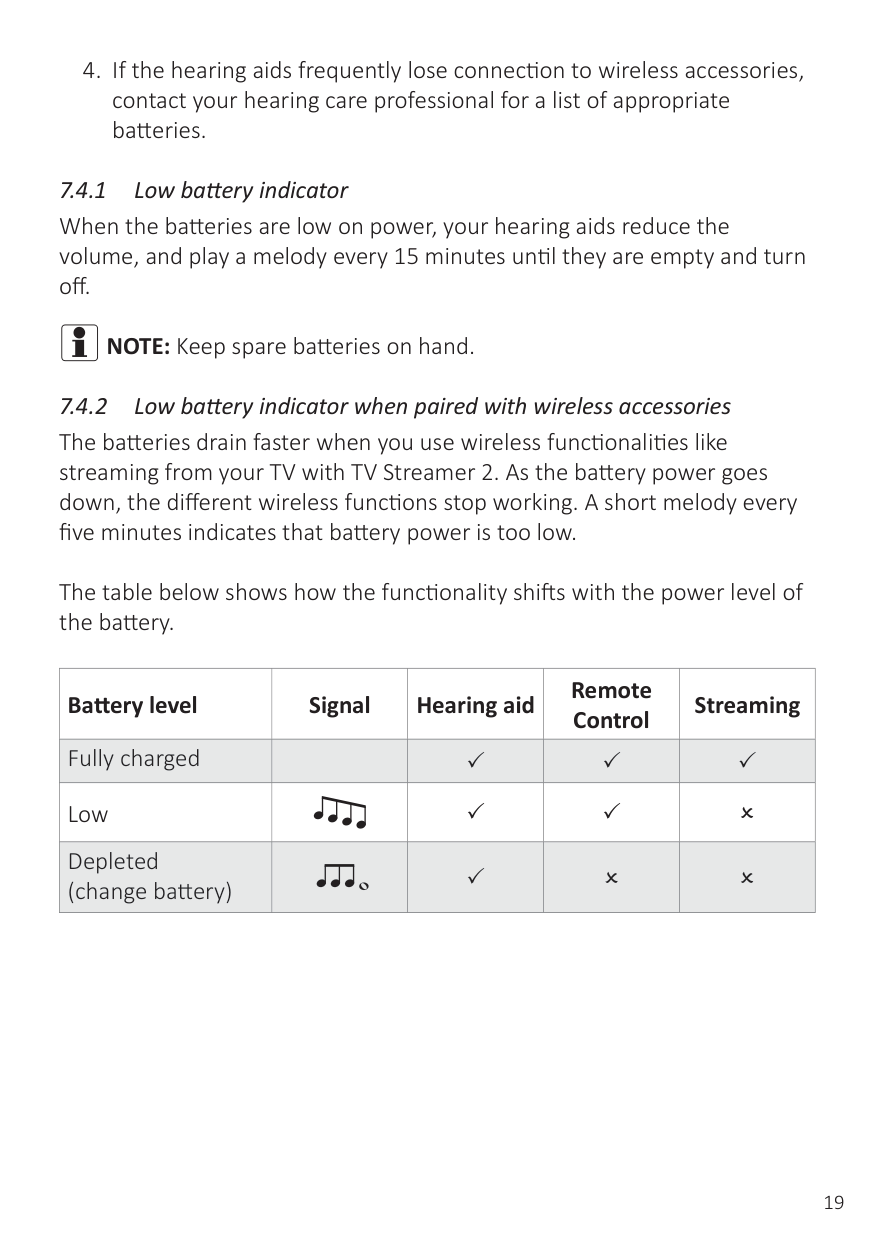
The table below shows how the functionality shifts with the power level of the battery.
|Battery level|Signal|Hearing aid|Remote Control|Streaming| |---|---|---|---|---| |Fully charged| |P|P|P| |Low| |P|P|O|
|Depleted (change battery)| |P|O|O|
iNOTE:Depending on your individual needs, your hearing care
professional may activate a programme specifically for telephone use.
When you switch on the Telecoil programme, your hearing aids pick up signals from the hearing loop or HAC telephone.
Your hearing care professional can activate the Telecoil programme.
iNOTE:The telecoil cannot work without a hearing loop (aka induction-loop) or a HAC telephone. NOTE: If you are having trouble hearing with the hearing loop, ask you hearing care professional to adjust the programme.
NOTE: If there is no sound from the hearing aids in a hearing loop system and an active Telecoil programme, the hearing loop system may not be turned on or is not operating correctly. NOTE: The sound from the hearing loop and the hearing aids’ microphones can be mixed to your preference - either during the fitting session or via your smartphone app or your Remote Control 2.
i NOTE:If the phone has a poor telecoil signal, use the microphone programme. To avoid whistling, do not hold the handset too tightly against your ear. NOTE: Ask your hearing care professional to enable the Telecoil programme in your hearing aids. NOTE: If you see a “M3”, “M4”, “T3”, or “T4” on the box, then the smartphone is HAC compliant. NOTE: If you find it difficult to obtain a good result while using your smartphone, your hearing care professional will be able to give you advice on available wireless accessories to enhance listening capabilities.

i NOTE:Ask your smartphone dealer or hearing care professional for
advice regarding HAC smartphones.
i NOTE:Ask your hearing care professional to enable Phone Now as
one of your programmes.
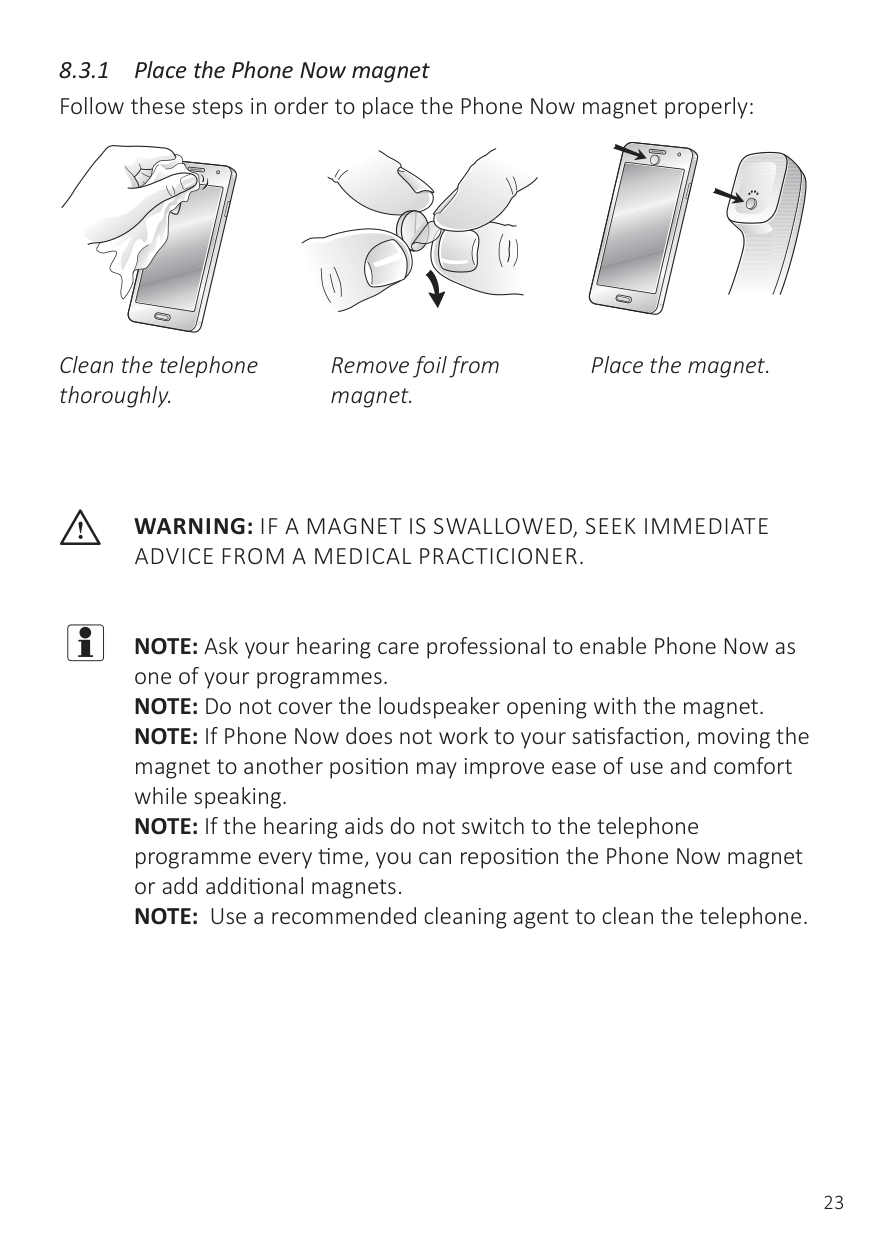
Clean the telephone thoroughly.
Remove foil from magnet.
Place the magnet.
i WARNING:IF A MAGNET IS SWALLOWED, SEEK IMMEDIATE
ADVICE FROM A MEDICAL PRACTICIONER.
i NOTE:Ask your hearing care professional to enable Phone Now as one of your programmes. NOTE: Do not cover the loudspeaker opening with the magnet. NOTE: If Phone Now does not work to your satisfaction, moving the magnet to another position may improve ease of use and comfort while speaking. NOTE: If the hearing aids do not switch to the telephone programme every time, you can reposition the Phone Now magnet or add additional magnets. NOTE: Use a recommended cleaning agent to clean the telephone.
iNOTE:You may need to move the telephone receiver slightly to find the best position for reliable Phone Now activation and good hearing on the telephone. NOTE: If your hearing aids have enabled Comfort Phone functionality, the hearing aid on the non-phone ear automatically attenuates.
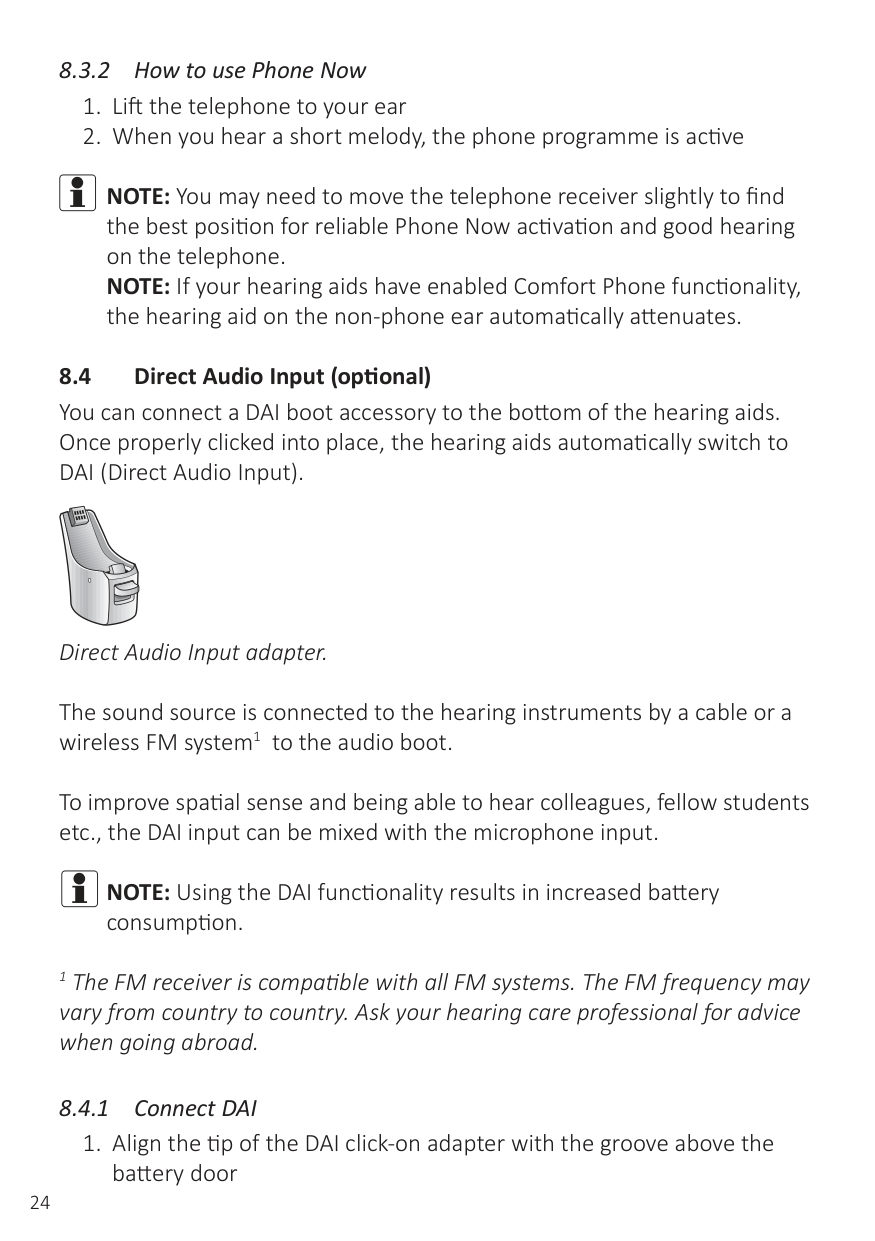
Direct Audio Input adapter.
The sound source is connected to the hearing instruments by a cable or a wireless FM system1 to the audio boot.
To improve spatial sense and being able to hear colleagues, fellow students etc., the DAI input can be mixed with the microphone input.
iNOTE:Using the DAI functionality results in increased battery
consumption.
1 The FM receiver is compatible with all FM systems. The FM frequency may vary from country to country. Ask your hearing care professional for advice when going abroad.
Attaching the DAI click-on adapter to Ambio, mode 88.
Remove the DAI click-on adapter from Danalogic Ambio, model 88.
Battery door with integrated DAI on Danalogic Ambio, model 98.
Select the DAI programme either via the programme button or via one of our wireless accessories.
iNOTE:Not all models support the integrated battery door solution. Ask your hearing care professional for more information. NOTE: Using the DAI functionality results in increased battery consumption.
8.5 iFlight mode (optional)
WARNING: WHEN BOARDING A FLIGHT OR ENTERING AN AREA WHERE RF TRANSMITTERS ARE PROHIBITED, WIRELESS FUNCTIONALITY MUST BE DEACTIVATED.
Follow these steps to turn on Flight mode:
Follow these steps to de-activate Flight mode:
iNOTE:Both hearing aids must be set in Flight mode - even with synchronization enabled. NOTE: It is important to wait an additional 15 seconds after wireless function resumes before opening and closing the battery door again for any reason. Flight mode will resume if you open and close the battery door during this 15-second window.
###### 8.6 Using hearing aids with smartphone apps
The app must only be used with hearing aids for which they are intended, and manufacturer takes no responsibility if the app is used with other hearing aids.
Use with smartphone apps:
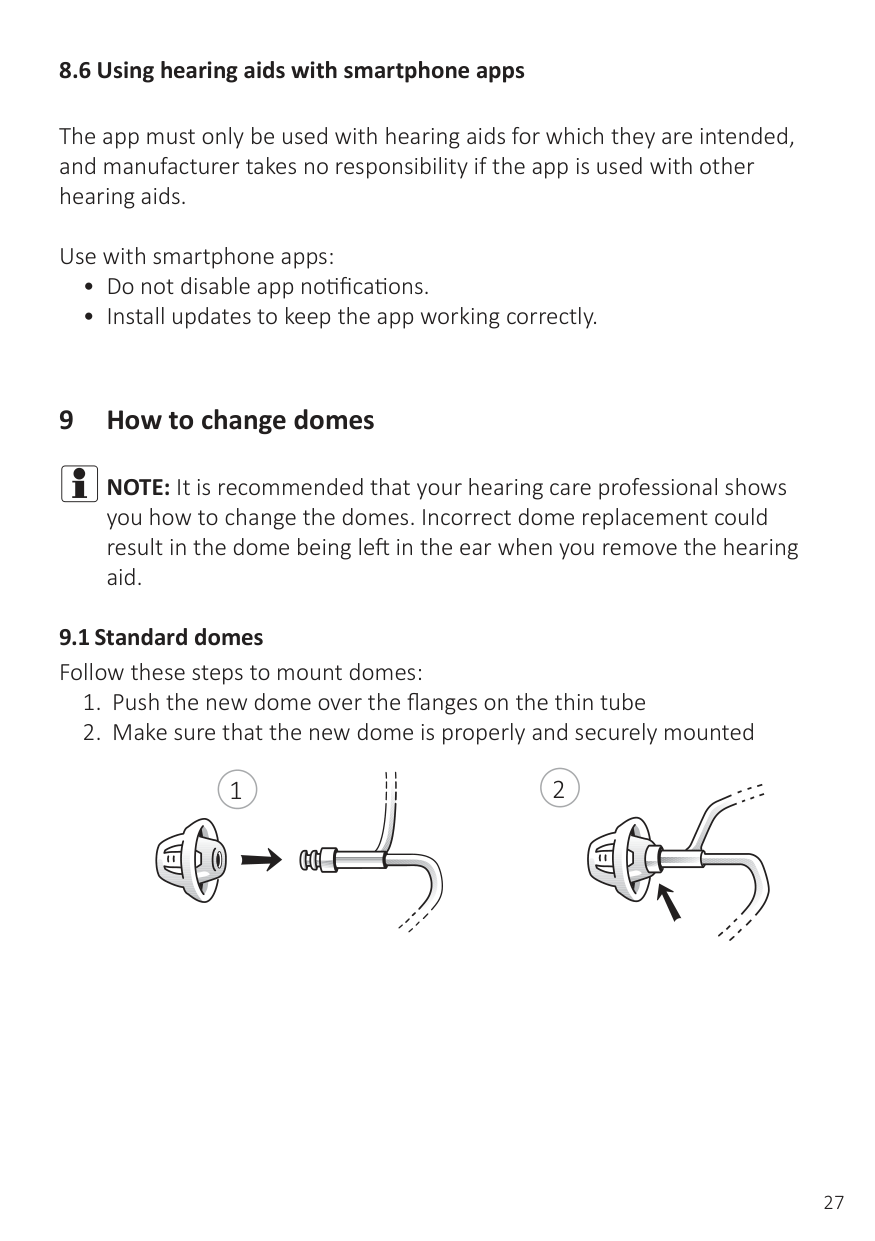
#### 9 How to change domes
iNOTE:It is recommended that your hearing care professional shows you how to change the domes. Incorrect dome replacement could result in the dome being left in the ear when you remove the hearing aid.
21
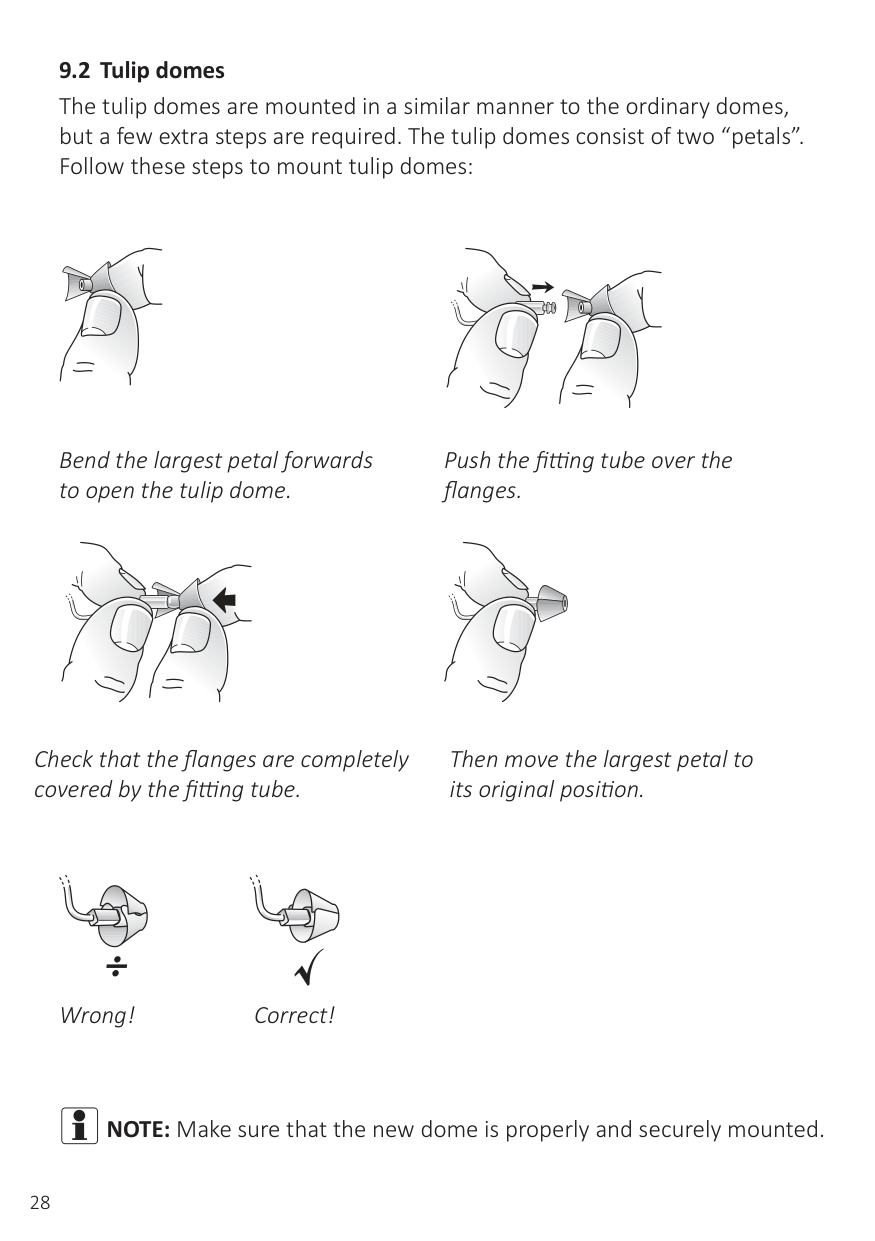
Bend the largest petal forwards to open the tulip dome.
Push the fitting tube over the flanges.
Check that the flanges are completely covered by the fitting tube.
Then move the largest petal to its original position.
Wrong! Correct!
iNOTE:Make sure that the new dome is properly and securely mounted.
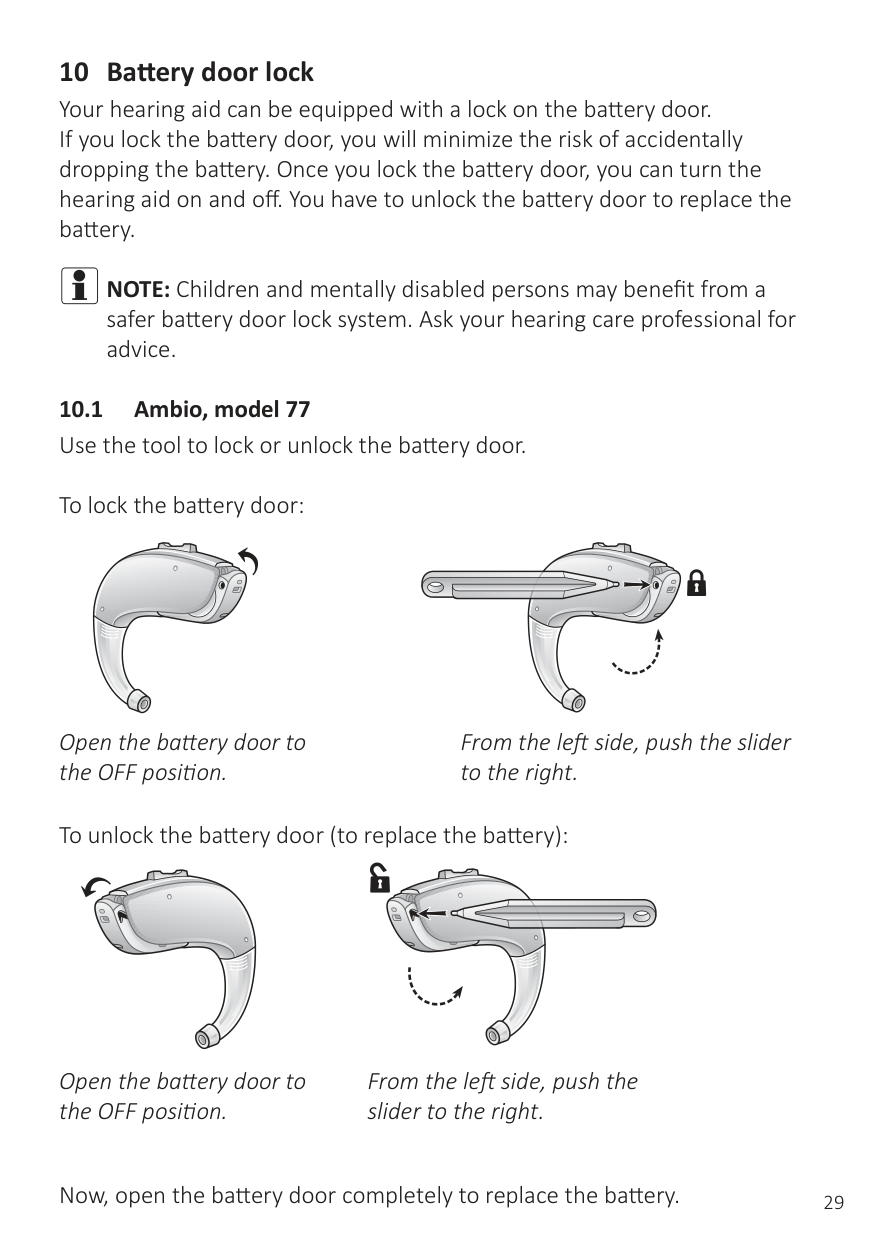
iNOTE:Children and mentally disabled persons may benefit from a safer battery door lock system. Ask your hearing care professional for advice.
Open the battery door to the OFF position.
From the left side, push the slider to the right.
To unlock the battery door (to replace the battery):
Open the battery door to the OFF position.
From the left side, push the slider to the right.
Now, open the battery door completely to replace the battery.
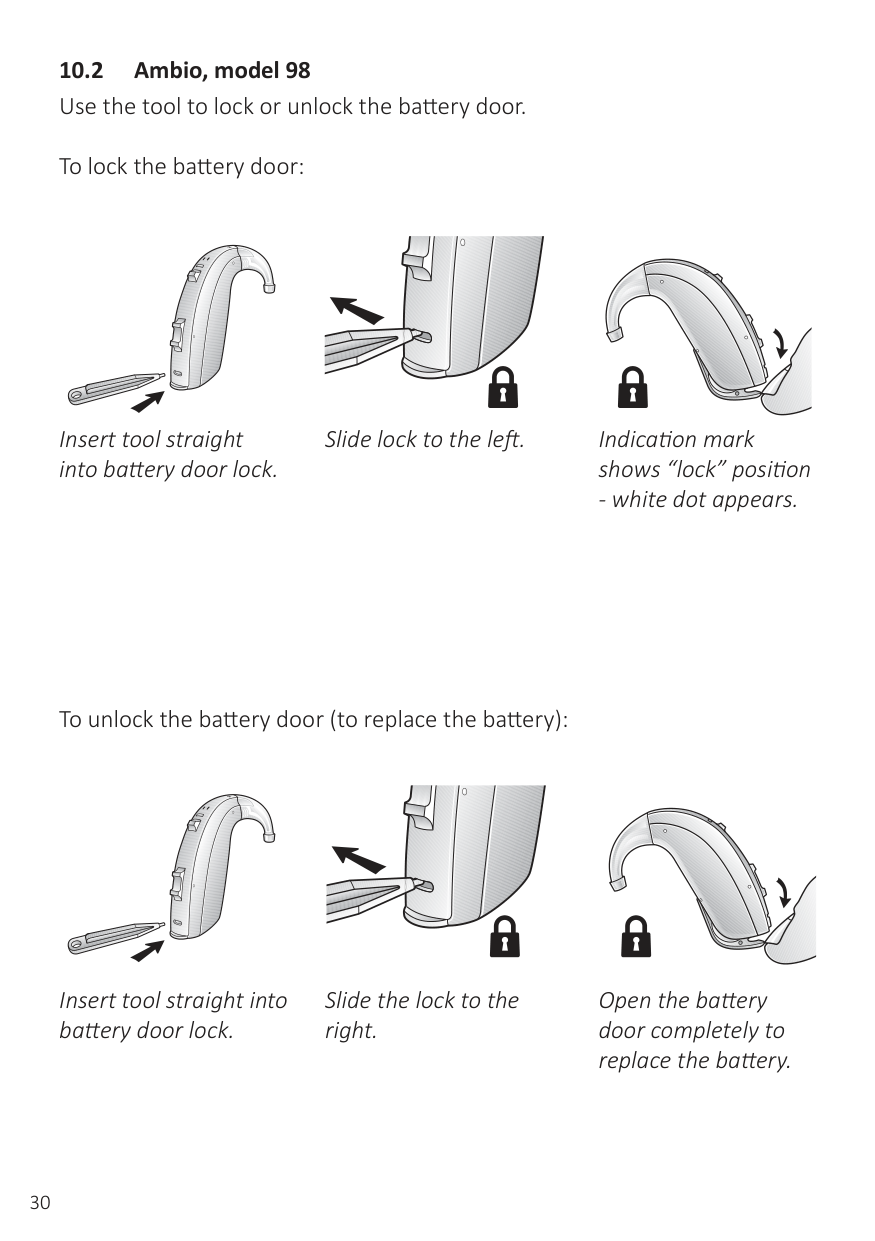
| | |---|
Insert tool straight into battery door lock.
| | |---|
Slide lock to the left. Indication mark shows “lock” position
To unlock the battery door (to replace the battery):
| |
|---|
Insert tool straight into battery door lock.
Slide the lock to the right.
| | |---|
Open the battery door completely to replace the battery.
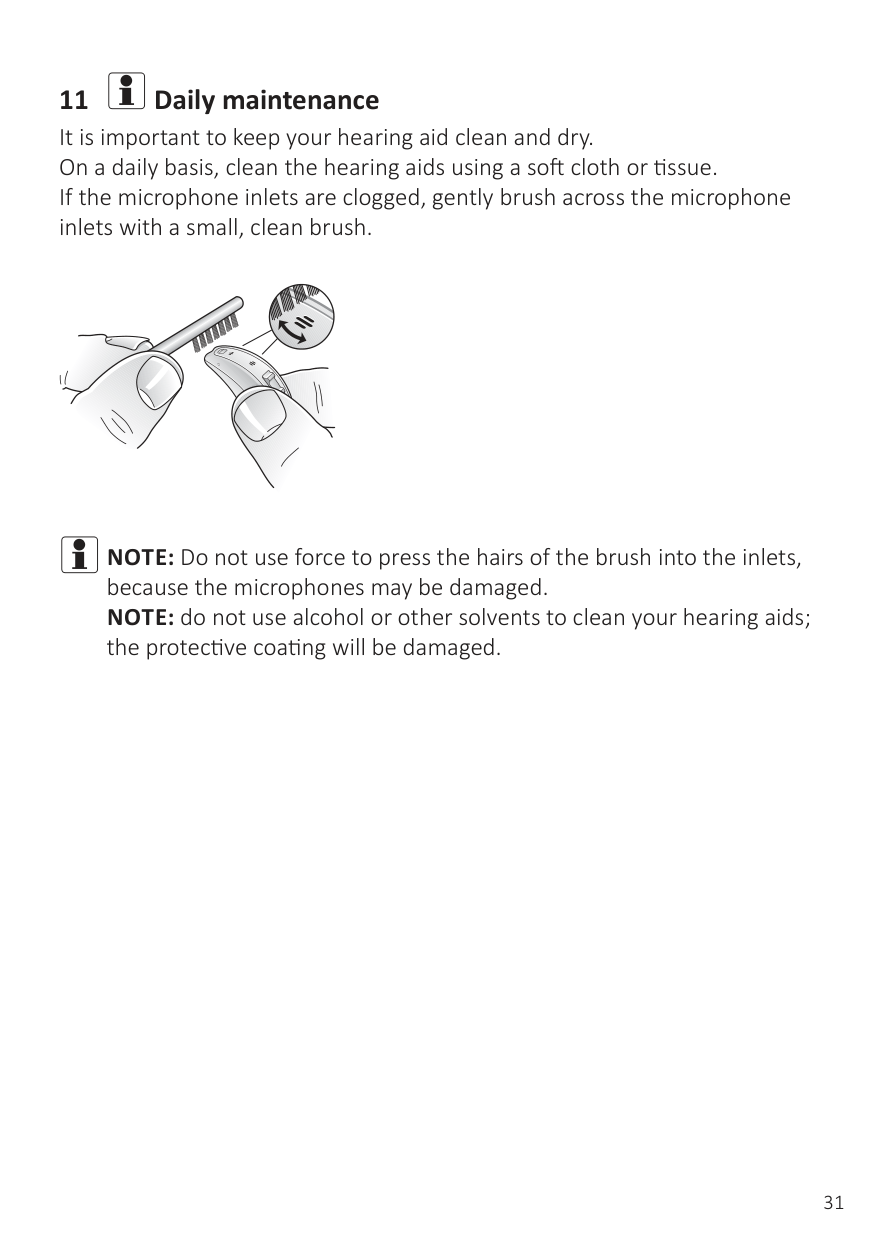
11 iDaily maintenance
It is important to keep your hearing aid clean and dry. On a daily basis, clean the hearing aids using a soft cloth or tissue. If the microphone inlets are clogged, gently brush across the microphone inlets with a small, clean brush.
iNOTE:Do not use force to press the hairs of the brush into the inlets, because the microphones may be damaged. NOTE: do not use alcohol or other solvents to clean your hearing aids; the protective coating will be damaged.
iNOTE:Do not use the wire loop to clean the microphone openings. iNOTE:If the microphone openings clog up, visit your hearing care
professional.
2
3
1
| | |---|
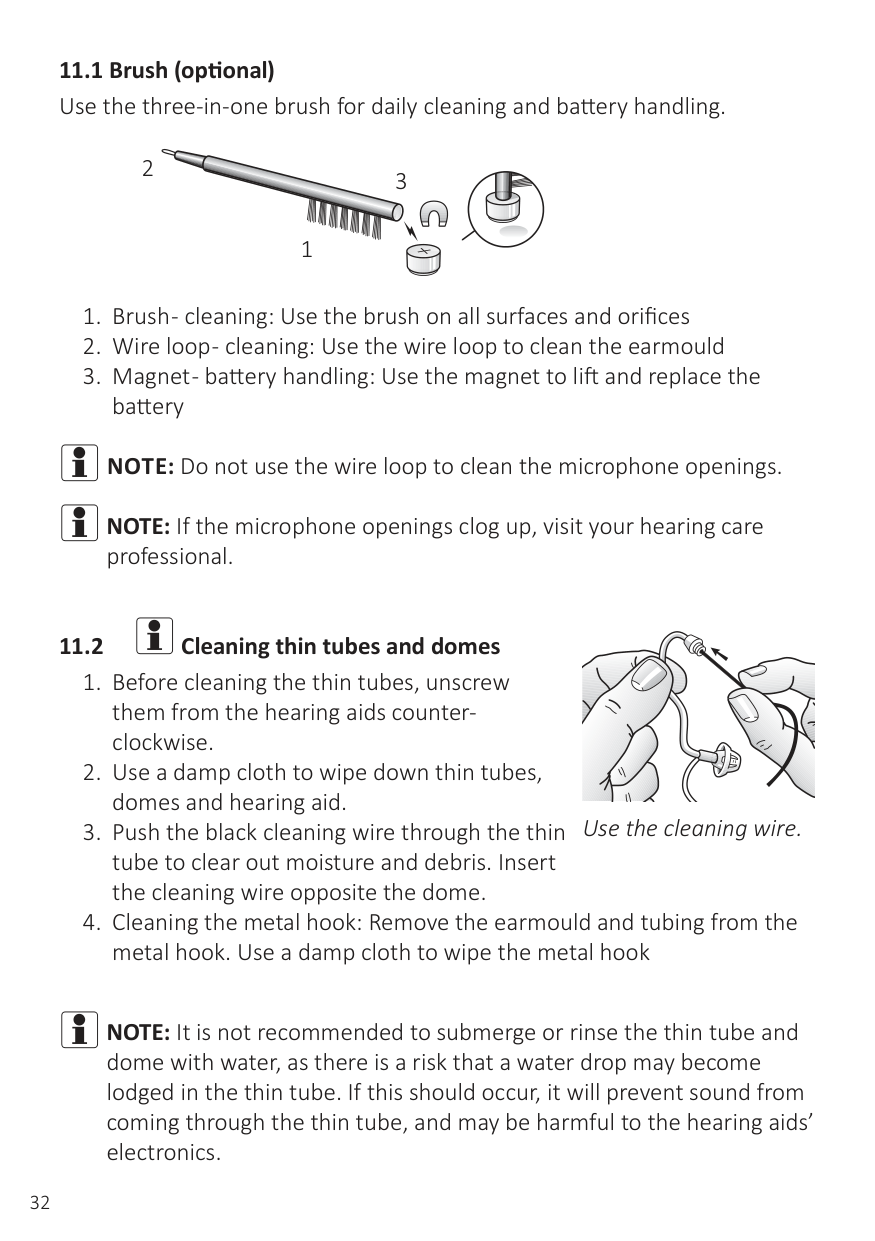
Use the cleaning wire.
iNOTE:It is not recommended to submerge or rinse the thin tube and dome with water, as there is a risk that a water drop may become lodged in the thin tube. If this should occur, it will prevent sound from coming through the thin tube, and may be harmful to the hearing aids’ electronics.
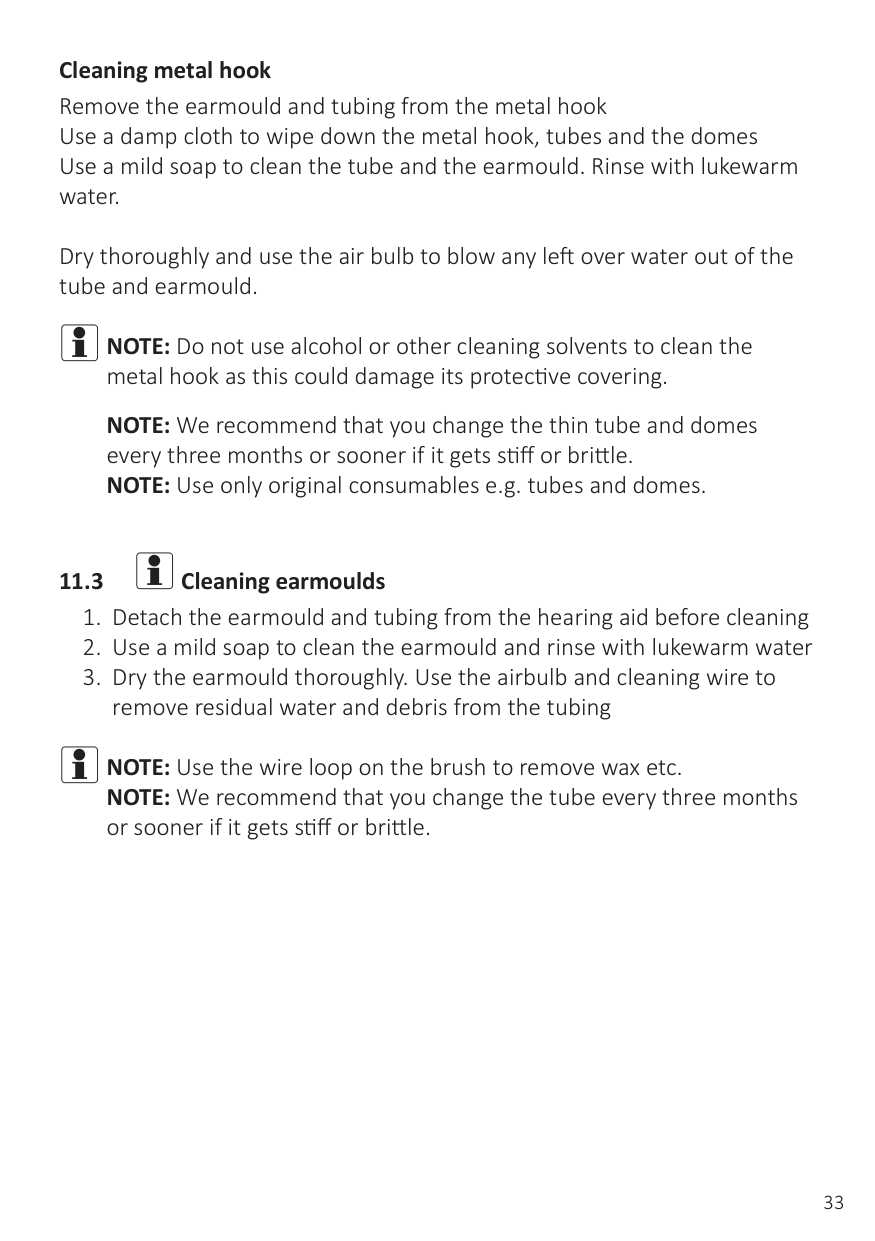
Cleaning metal hook Remove the earmould and tubing from the metal hook Use a damp cloth to wipe down the metal hook, tubes and the domes Use a mild soap to clean the tube and the earmould. Rinse with lukewarm water.
Dry thoroughly and use the air bulb to blow any left over water out of the tube and earmould.
iNOTE:Do not use alcohol or other cleaning solvents to clean the
metal hook as this could damage its protective covering.
NOTE: We recommend that you change the thin tube and domes every three months or sooner if it gets stiff or brittle. NOTE: Use only original consumables e.g. tubes and domes.
11.3 iCleaning earmoulds
remove residual water and debris from the tubing
iNOTE:Use the wire loop on the brush to remove wax etc. NOTE: We recommend that you change the tube every three months or sooner if it gets stiff or brittle.
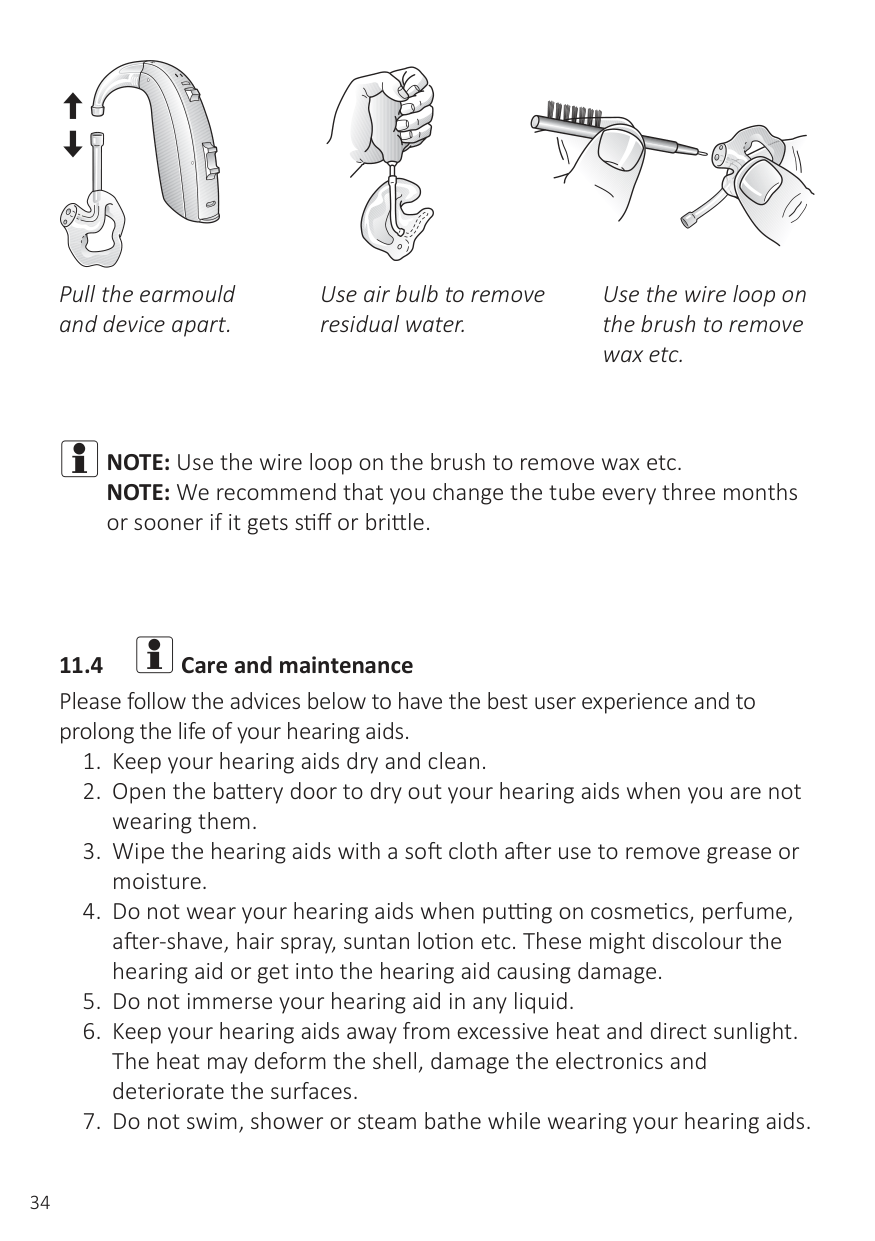
Pull the earmould and device apart.
Use air bulb to remove residual water.
Use the wire loop on the brush to remove wax etc.
iNOTE:Use the wire loop on the brush to remove wax etc. NOTE: We recommend that you change the tube every three months or sooner if it gets stiff or brittle.
11.4 iCare and maintenance
Please follow the advices below to have the best user experience and to prolong the life of your hearing aids.
TV Streamer 2 allows you to stream the audio from TV sets and virtually any other audio source to your hearing aids at a volume level that suits you. Remote Control 2 allows you to adjust the volume or mute your hearing aids, change programmes, and see all your settings at a glance on its crystal clear display. Phone Clip+ streams phone conversations and stereo sound directly to both hearing aids, and it doubles as a simple remote control. Micro Mic is a body worn microphone for your friend or colleague. It significantly improves speech understanding in noisy situations. Multi Mic works like the Micro Mic but doubles as a table microphone. Connects with loop and FM systems1, and has a mini-jack input for streaming audio from a computer or music player.
iNOTE:Ask your hearing care professional for more information on the range of wireless accessories. NOTE: For use of wireless functionality only use manufacturers
wireless accessories. For further guidance regarding e.g. pairing, please refer to the user guide of the relevant wireless accessory.
#### 13 Tinnitus Sound Generator module
The TSG can generate sounds adjusted to the specific therapeutic needs and your personal preference as determined by your doctor, audiologist, or hearing care professional.
Depending on the selected hearing aid programme and the environment you are in, you will sometimes hear the therapeutic sound resembling a continuous or fluctuating noise.
Your doctor, audiologist or hearing care professional can modulate the generated noise with the purpose of making it more pleasant. The noise can then resemble, for example, crashing waves on a shore.
Modulation level and speed can also be configured to your likes and needs. An additional feature can be enabled by your hearing care professional that allows you to select predefined sounds that simulate sounds from nature, such as breaking waves or running water.
If you have two wireless hearing aids that support ear-to-ear synchronization this functionality can be enabled by your hearing care professional. This will cause the Tinnitus Sound Generator to synchronize the sound in both hearing aids.
If your tinnitus troubles you only in quiet environments, your doctor, audiologist or hearing care professional can set the TSG module so that it becomes audible exclusively in such surroundings. The overall sound level can be adjusted via an optional volume control. Your doctor, audiologist or hearing care professional will review with you the need for having such a control.
For hearing aids where ear to ear synchronization is enabled, your hearing care professional can also enable environmental monitoring synchronization so that the TSG noise level is automatically adjusted simultaneously in both hearing aids dependent on the background sound level. Additionally, if the hearing aid has a volume control, then the background noise level monitored by the hearing aid and the volume control can be used simultaneously to adjust the generated noise level in both hearing aids.
To assist habituation to tinnitus, this needs to be audible. The ideal level of the TSG module, therefore, should be set so that it starts to blend with the tinnitus, and so that you can hear both your tinnitus as well as the sound used.
In a majority of instances, the TSG module can also be set to mask the tinnitus sound, so to provide temporary relief by introducing a more pleasant and controllable sound source.
However, the volume control provides the ability to adjust the volume, or amount of stimulus, to the liking of the user.
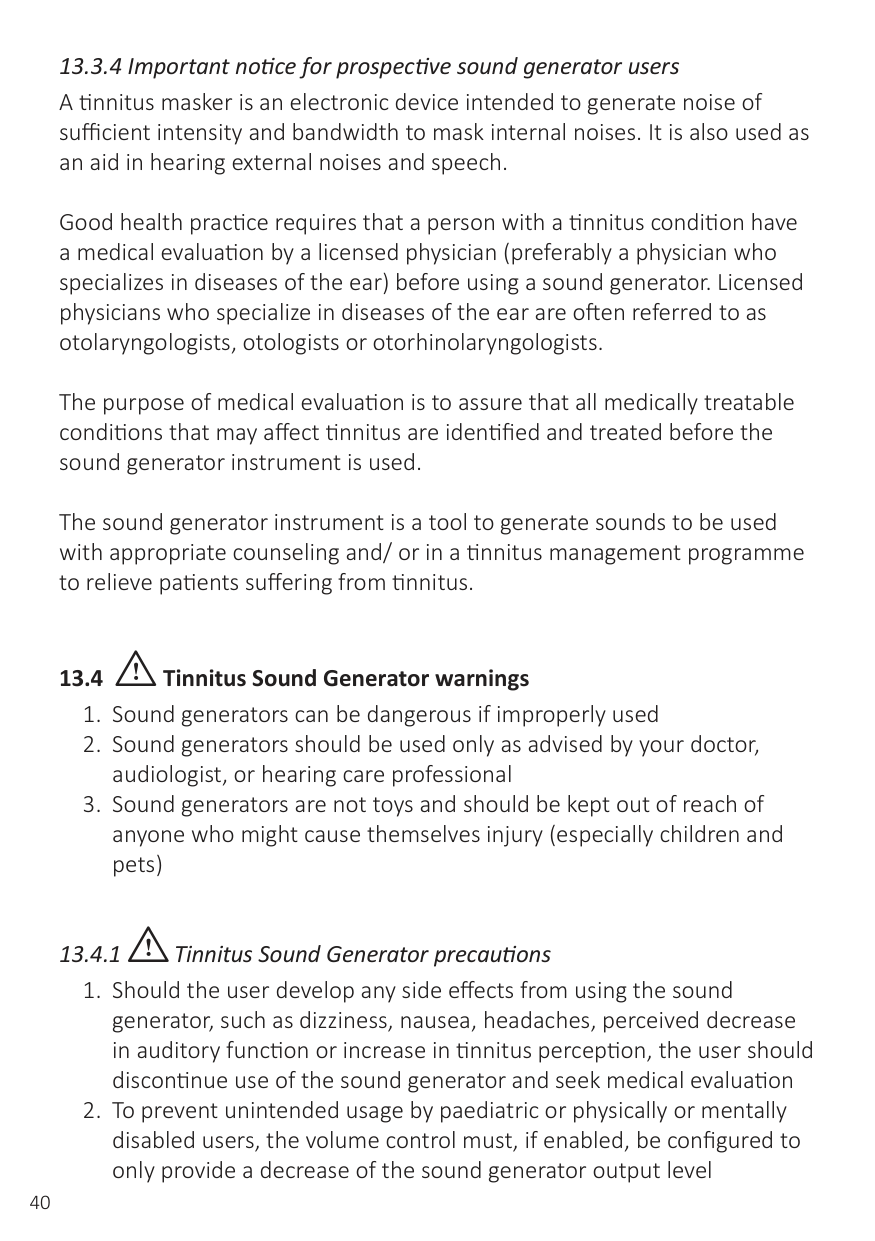
The volume control is an optional feature in the TSG module used for adjusting the sound generator output level. To prevent unintended usage by pediatric or physically or mentally challenged users, the volume control must, if enabled, be configured to only provide a decrease of the sound generator output level.
iNOTE:To use smartphone apps, the hearing aid must be connected
with the smartphone or mobile device.
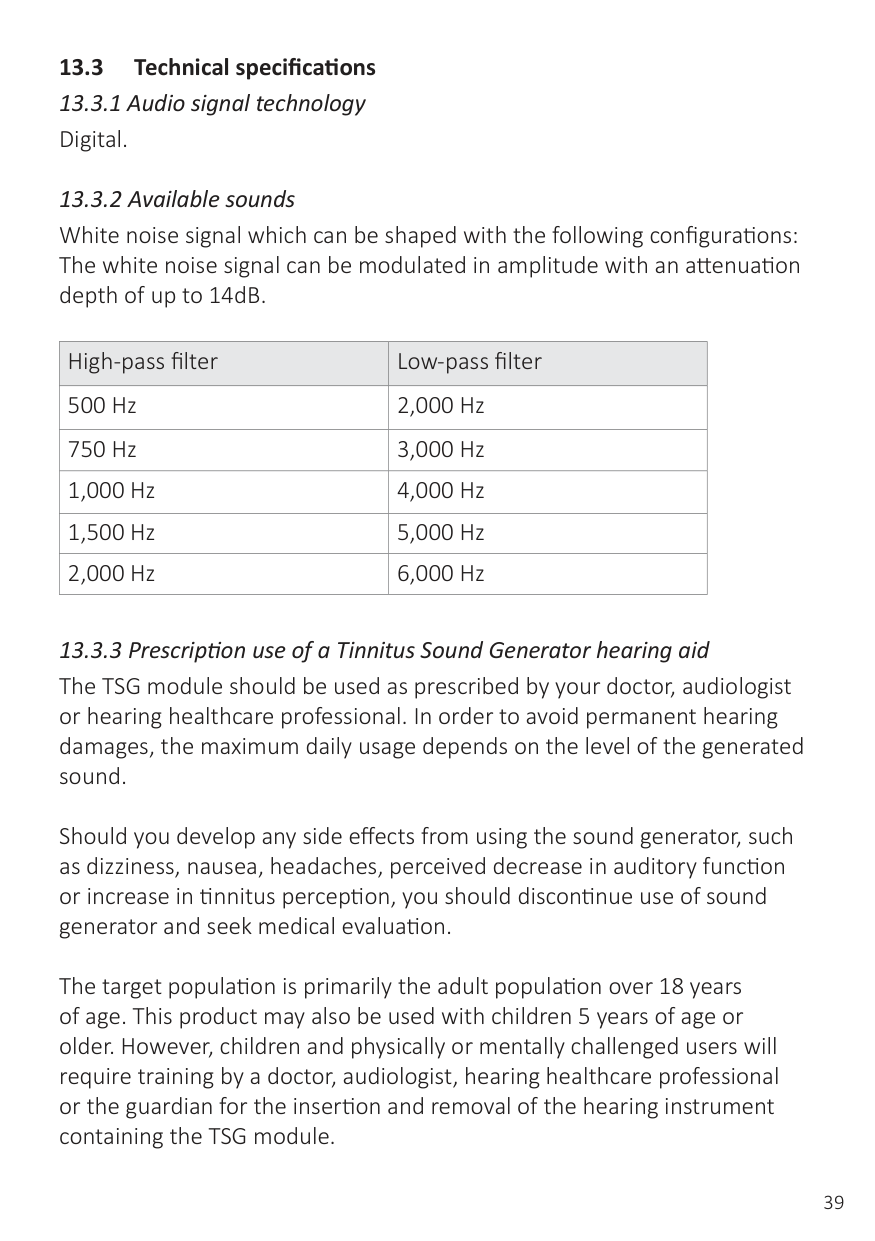
###### 13.3 Technical specifications
|High-pass filter|Low-pass filter| |---|---| |500 Hz|2,000 Hz| |750 Hz|3,000 Hz| |1,000 Hz|4,000 Hz| |1,500 Hz|5,000 Hz| |2,000 Hz|6,000 Hz|
Should you develop any side effects from using the sound generator, such as dizziness, nausea, headaches, perceived decrease in auditory function or increase in tinnitus perception, you should discontinue use of sound generator and seek medical evaluation.
The target population is primarily the adult population over 18 years of age. This product may also be used with children 5 years of age or older. However, children and physically or mentally challenged users will require training by a doctor, audiologist, hearing healthcare professional or the guardian for the insertion and removal of the hearing instrument containing the TSG module.
Good health practice requires that a person with a tinnitus condition have a medical evaluation by a licensed physician (preferably a physician who specializes in diseases of the ear) before using a sound generator. Licensed physicians who specialize in diseases of the ear are often referred to as otolaryngologists, otologists or otorhinolaryngologists.
The purpose of medical evaluation is to assure that all medically treatable conditions that may affect tinnitus are identified and treated before the sound generator instrument is used.
The sound generator instrument is a tool to generate sounds to be used with appropriate counseling and/ or in a tinnitus management programme to relieve patients suffering from tinnitus.
13.4 iTinnitus Sound Generator warnings
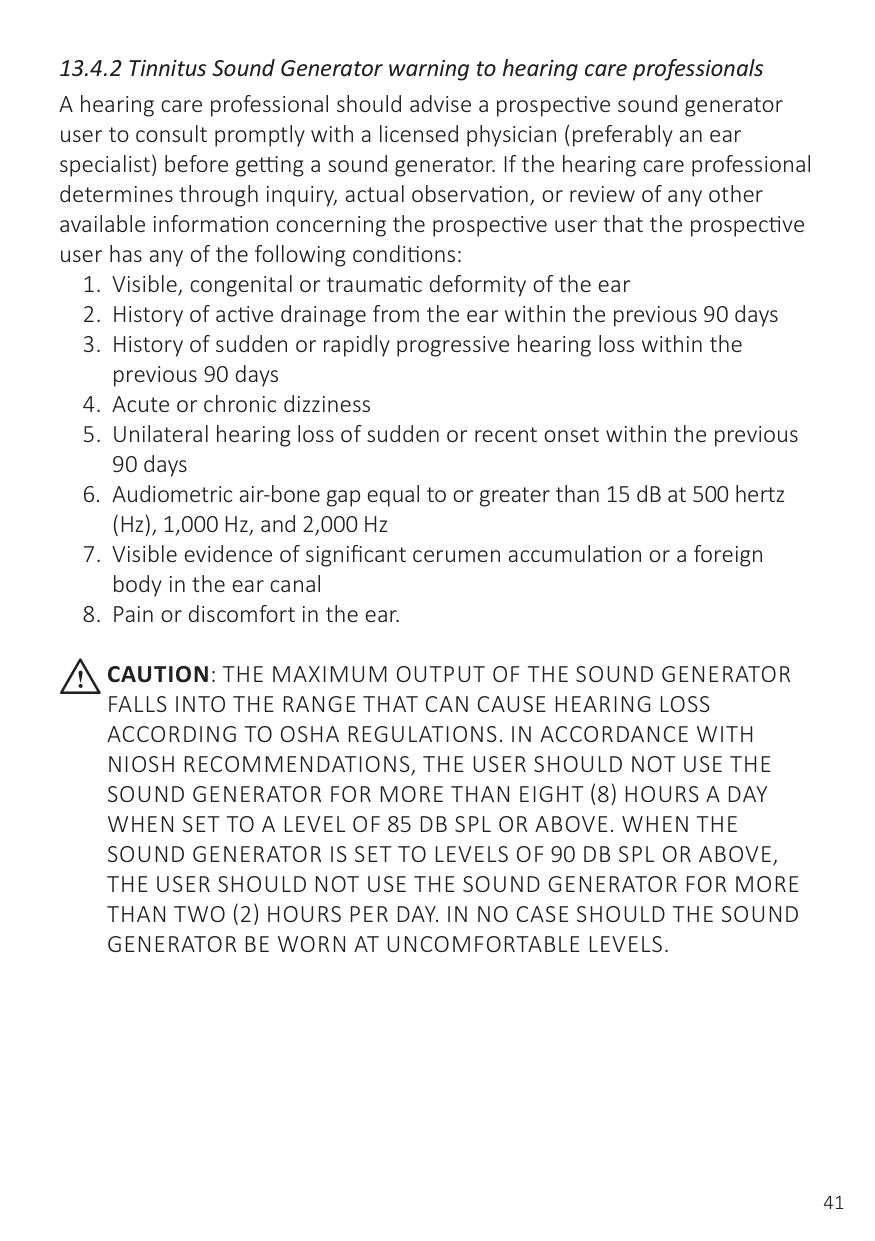
13.4.2 Tinnitus Sound Generator warning to hearing care professionals A hearing care professional should advise a prospective sound generator user to consult promptly with a licensed physician (preferably an ear specialist) before getting a sound generator. If the hearing care professional determines through inquiry, actual observation, or review of any other available information concerning the prospective user that the prospective user has any of the following conditions:
iCAUTION: THE MAXIMUM OUTPUT OF THE SOUND GENERATOR FALLS INTO THE RANGE THAT CAN CAUSE HEARING LOSS ACCORDING TO OSHA REGULATIONS. IN ACCORDANCE WITH NIOSH RECOMMENDATIONS, THE USER SHOULD NOT USE THE SOUND GENERATOR FOR MORE THAN EIGHT (8) HOURS A DAY WHEN SET TO A LEVEL OF 85 DB SPL OR ABOVE. WHEN THE SOUND GENERATOR IS SET TO LEVELS OF 90 DB SPL OR ABOVE, THE USER SHOULD NOT USE THE SOUND GENERATOR FOR MORE THAN TWO (2) HOURS PER DAY. IN NO CASE SHOULD THE SOUND GENERATOR BE WORN AT UNCOMFORTABLE LEVELS.
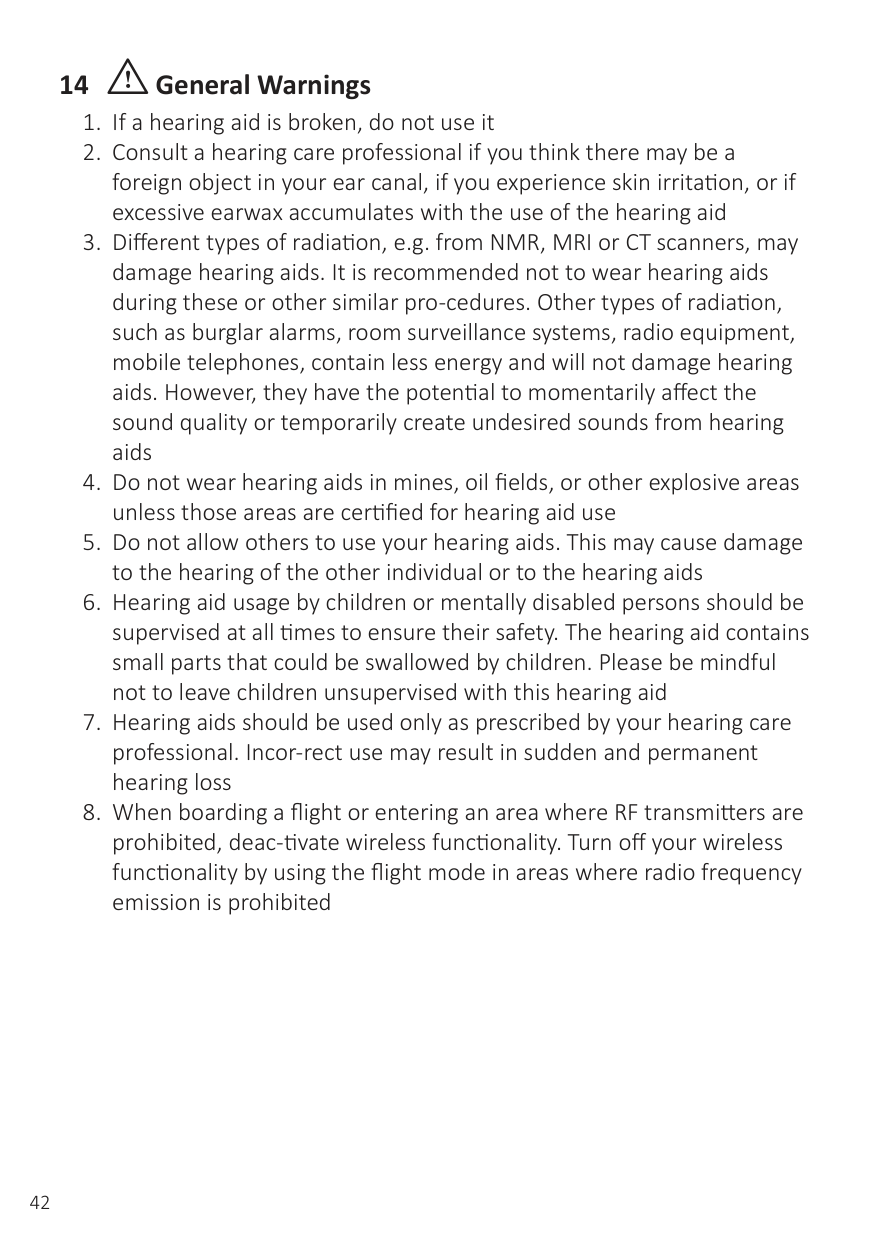
14 iGeneral Warnings
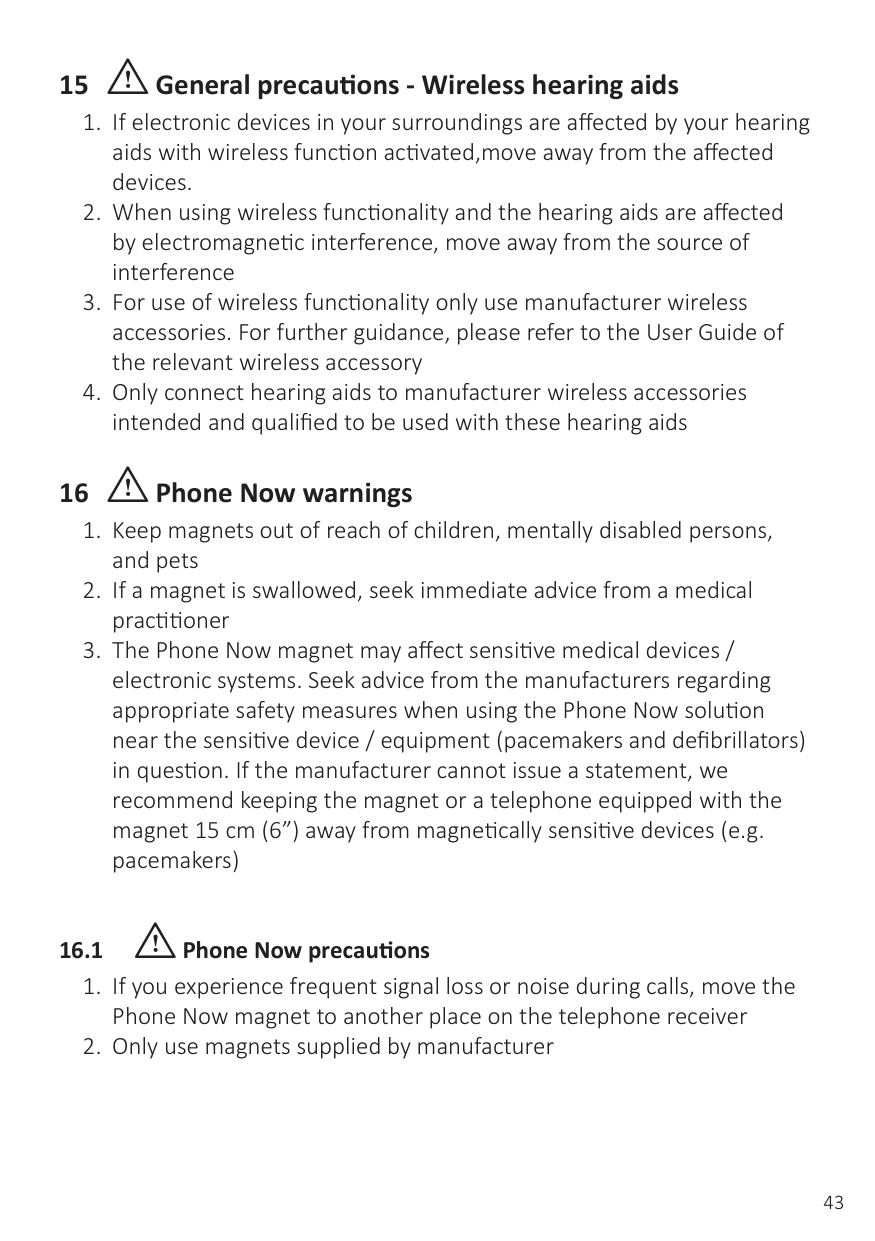
15 iGeneral precautions - Wireless hearing aids
16 iPhone Now warnings
16.1 iPhone Now precautions
17 iBattery warnings
Batteries contain dangerous substances and should be disposed of carefully in the interest of your safety and for the environment. Please note:
18 iIntended use of smartphone apps
The app must only be used with Danalogic hearing aids for which they are intended, and manufacturer takes no responsibility if the app is used with other hearing aids.
19 iImportant points for FM
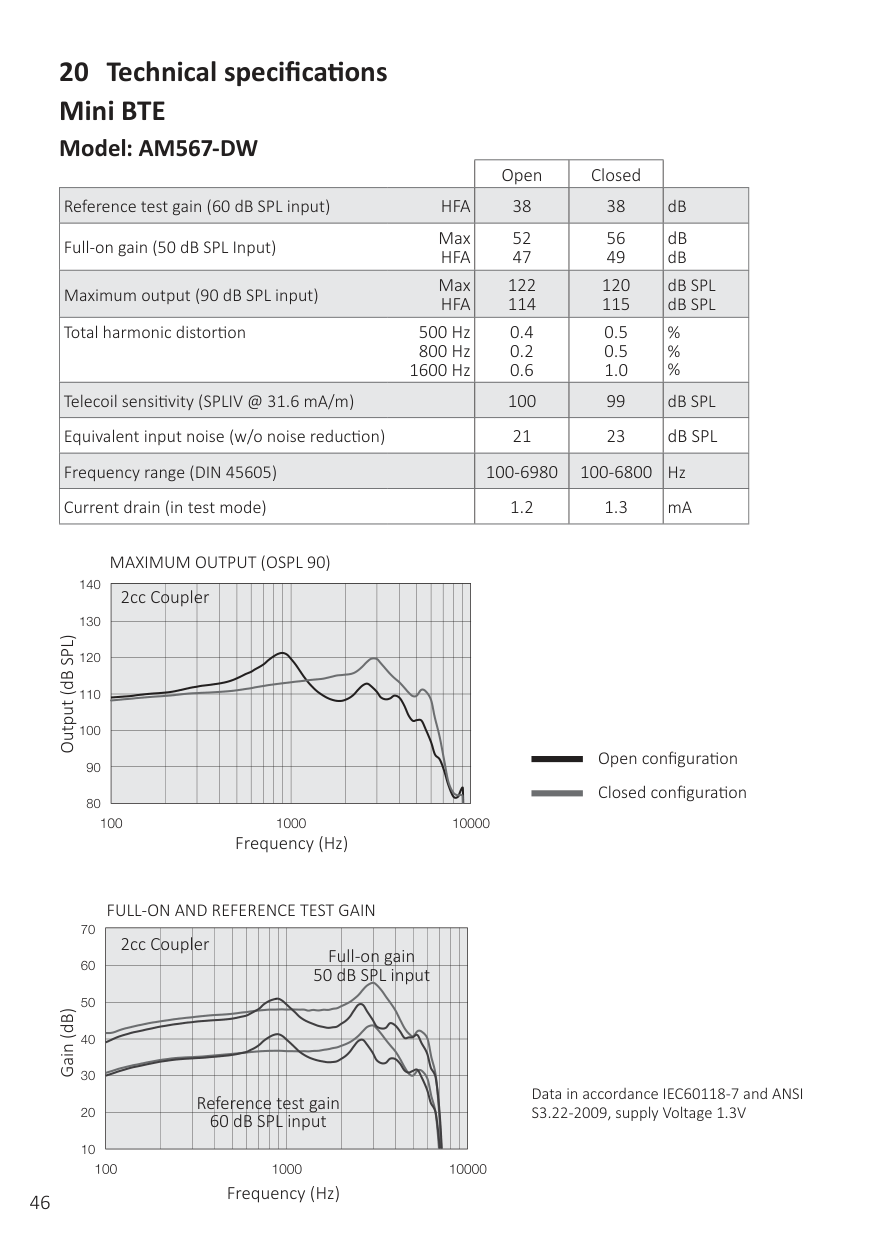
#### 20 Technical specificationsMini BTEModel: AM567-DW
| |Open|Closed| | |---|---|---|---|
|Reference test gain (60 dB SPL input) HFA|38|38|dB| |Full-on gain (50 dB SPL Input) Max HFA|52 47|56 49|dB dB| |Maximum output (90 dB SPL input) Max HFA|122 114|120 115|dB SPL dB SPL| |Total harmonic distortion 500 Hz 800 Hz 1600 Hz|0.4 0.2 0.6|0.5 0.5 1.0|% % %| |Telecoil sensitivity (SPLIV @ 31.6 mA/m)|100|99|dB SPL| |Equivalent input noise (w/o noise reduction)|21|23|dB SPL| |Frequency range (DIN 45605)|100-6980|100-6800|Hz| |Current drain (in test mode)|1.2|1.3|mA|
MAXIMUM OUTPUT (OSPL 90)
140
|2cc C|upl|r| | | | | | | | | | | | | | | | |---|---|---|---|---|---|---|---|---|---|---|---|---|---|---|---|---|---| | | | | | | | | | | | | | | | | | | | | | | | | | | | | | | | | | | | | | | | | | | | | | | | | | | | | | | | | | | | | | | | | | | | | | | | | | | | | | | | | | | | | | | | | | | | | | | |
130
Output (dB SPL)
120
110
100
90
80
Frequency (Hz)
Open configuration
Closed configuration
70
60
50
Gain (dB)
40
30
20
10
FULL-ON AND REFERENCE TEST GAIN
|2cc|oup|er| | | | | | |F|ll-o|g|i| | | | | | |---|---|---|---|---|---|---|---|---|---|---|---|---|---|---|---|---|---| | | | | | | | |-| |50|B S|L i|p|u| | | | | | | | | | | | | | | | | | | | | | | | | | | | | | | | | | | | | | | | | | | | | |R|fe|e|c|e| |e|st gain| | | | | | | | | | | |6|0|d| |P|L| |input| | | | | | | | |
Data in accordance IEC60118-7 and ANSI S3.22-2009, supply Voltage 1.3V
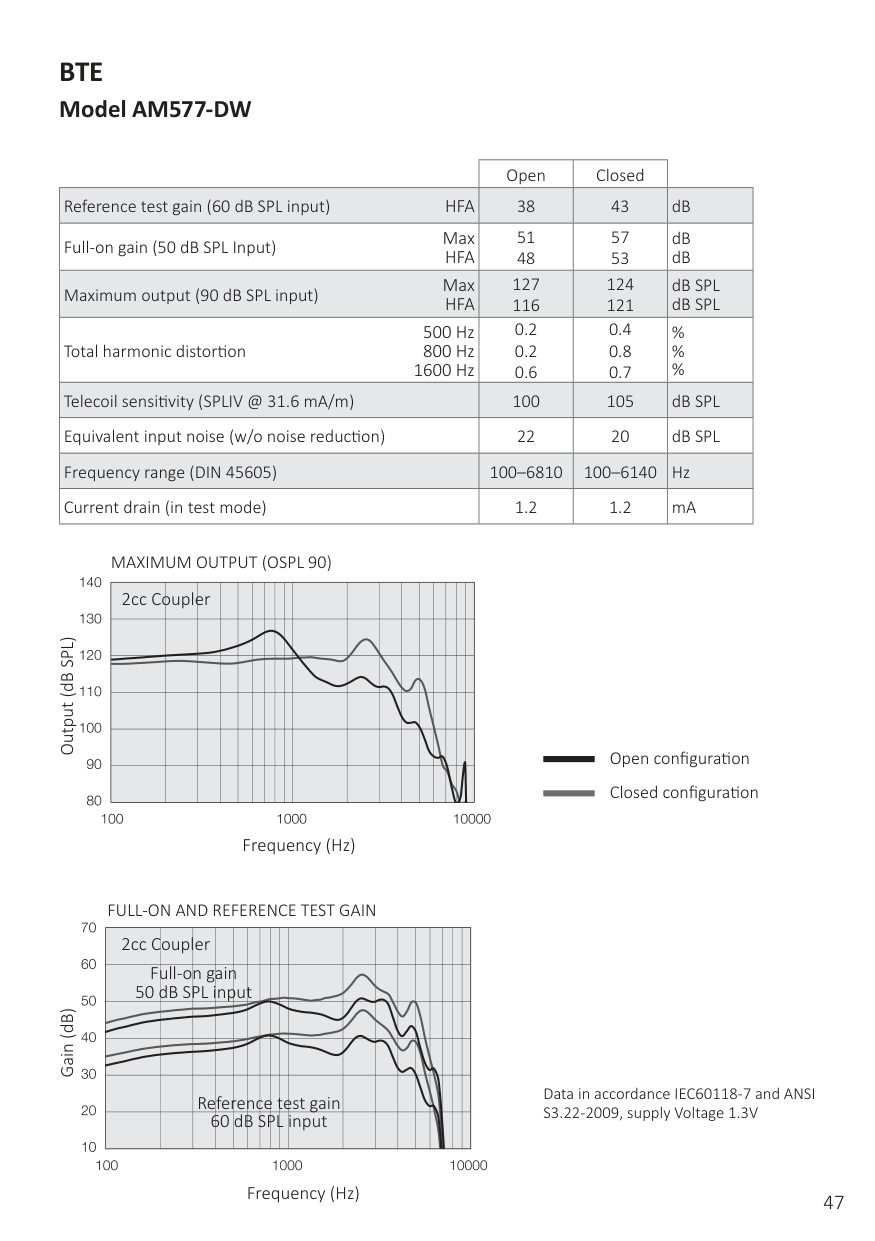
#### BTE Model AM577-DW
| |Open|Closed| |
|---|---|---|---| |Reference test gain (60 dB SPL input) HFA|38|43|dB| |Full-on gain (50 dB SPL Input) Max HFA|51 48|57 53|dB dB| |Maximum output (90 dB SPL input) Max HFA|127 116|124 121|dB SPL dB SPL| |Total harmonic distortion
500 Hz 800 Hz
1600 Hz|0.2 0.2 0.6|0.4 0.8 0.7|% % %| |Telecoil sensitivity (SPLIV @ 31.6 mA/m)|100|105|dB SPL| |Equivalent input noise (w/o noise reduction)|22|20|dB SPL| |Frequency range (DIN 45605)|100–6810|100–6140|Hz| |Current drain (in test mode)|1.2|1.2|mA|
MAXIMUM OUTPUT (OSPL 90)
|2cc C|upl|r| | | | | | | | | | | | | | | | |---|---|---|---|---|---|---|---|---|---|---|---|---|---|---|---|---|---| | | | | | | | | | | | | | | | | | | | | | | | | | | | | | | | | | | | | | | | | | | | | | | | | | | | | | | | | | | | | | | | | | | | | | | | | | | | | | | | | | | | | | | | | | | | | | | |
Output (dB SPL)
Open configuration
Closed configuration
Frequency (Hz)
FULL-ON AND REFERENCE TEST GAIN
|2cc|oup|er| | | | | | | | | | | | | | | | |---|---|---|---|---|---|---|---|---|---|---|---|---|---|---|---|---|---| |F 50|ll-o B S|g L|i n|u| | | | | | | | | | | | | | | | | | | | | | | | | | | | | | | | | | | | | | | | | | | | | | | | | | | | | | |R|fe|e|c|e| |e|st gain| | | | | | | | | | | |6|0|d| |P|L| |nput| | | | | | | | |
Gain (dB)
Data in accordance IEC60118-7 and ANSI S3.22-2009, supply Voltage 1.3V
#### Power BTE Model AM588-DW
| |Plastic hook|Metal hook| | |---|---|---|---| |Reference test gain (60 dB SPL input) HFA|51|52|dB|
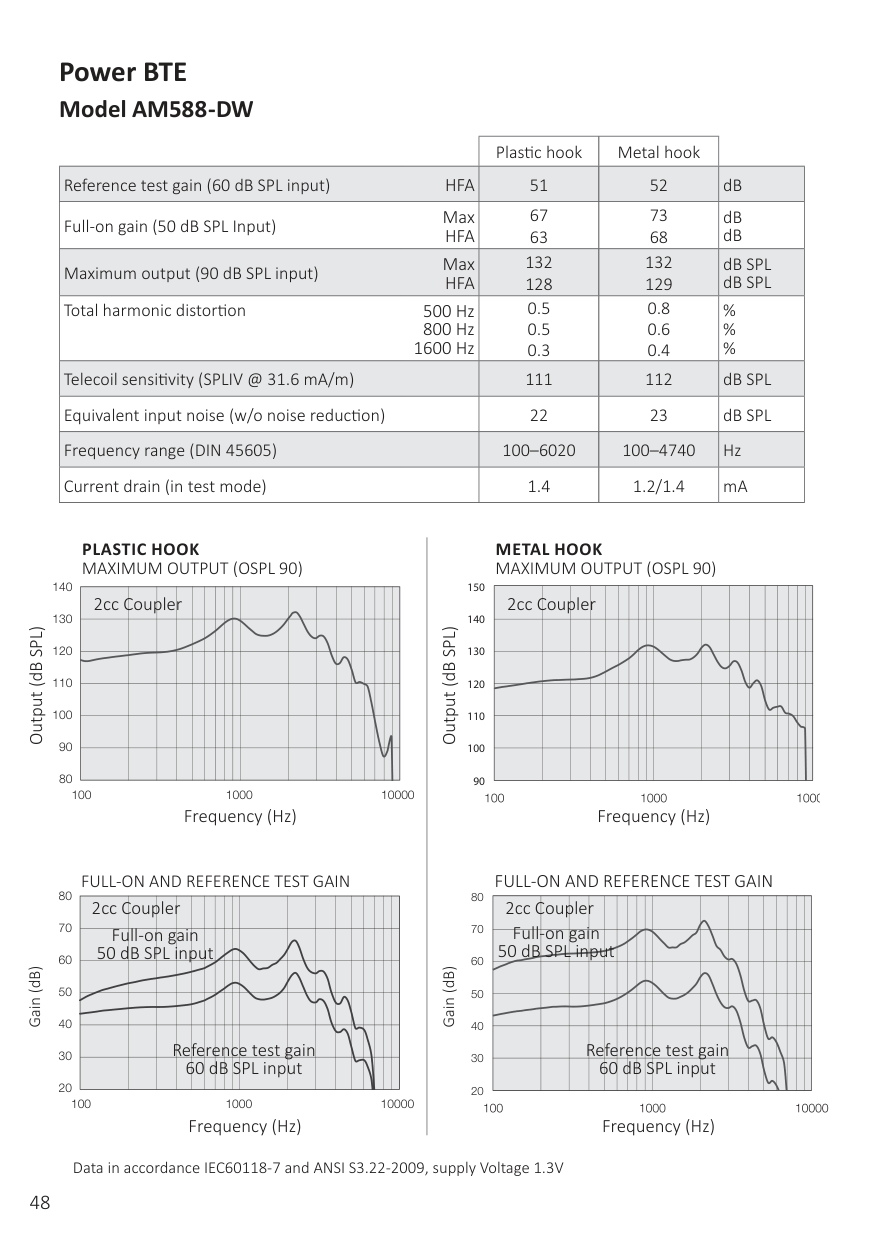
|Full-on gain (50 dB SPL Input) Max HFA|67 63|73 68|dB dB| |Maximum output (90 dB SPL input) Max HFA|132 128|132 129|dB SPL dB SPL| |Total harmonic distortion 500 Hz 800 Hz 1600 Hz|0.5 0.5 0.3|0.8 0.6 0.4|% % %| |Telecoil sensitivity (SPLIV @ 31.6 mA/m)|111|112|dB SPL| |Equivalent input noise (w/o noise reduction)|22|23|dB SPL| |Frequency range (DIN 45605)|100–6020|100–4740|Hz| |Current drain (in test mode)|1.4|1.2/1.4|mA|
PLASTIC HOOK MAXIMUM OUTPUT (OSPL 90)
METAL HOOK MAXIMUM OUTPUT (OSPL 90)
140
150
|2cc|ou|le| | | | | | | | | | | | | | | | |---|---|---|---|---|---|---|---|---|---|---|---|---|---|---|---|---|---| | | | | | | | | | | | | | | | | | | | | | | | | | | | | | | | | | | | | | | | | | | | | | | | | | | | | | | | | | | | | | | | | | | | | | | | | | | | | | | | | | | | | | | | | | | | | | | |
|2cc|ou|le| | | | | | | | | | | | | | | | |---|---|---|---|---|---|---|---|---|---|---|---|---|---|---|---|---|---| | | | | | | | | | | | | | | | | | | | | | | | | | | | | | | | | | | | | | | | | | | | | | | | | | | | | | | | | | | | | | | | | | | | | | | | | | | | | | | | | | | | | | | | | | | | | | | |
130
140
Output (dB SPL)
Output (dB SPL)
120
130
110
120
100
110
90
100
80
90
100 1000 10000
Frequency (Hz) Frequency (Hz)
FULL-ON AND REFERENCE TEST GAIN FULL-ON AND REFERENCE TEST GAIN
80
80
|2cc|ou|le| | | | | | | | | | | | | | | | |---|---|---|---|---|---|---|---|---|---|---|---|---|---|---|---|---|---|
|Full 50 dB|on SP|a i|n p|t| | | | | | | | | | | | | | | | | | | | | | | | | | | | | | | | | | | | | | | | | | | | | | | | | | | | | | |R|e|f|r|n|c|e|test|ai| | | | | | | | | | | |6|0| |B| |S|PL inp|t| | | | | | | |
|2cc|ou|le| | | | | | | | | | | | | | | | |---|---|---|---|---|---|---|---|---|---|---|---|---|---|---|---|---|---| |F 50|ll-o B S|L|ai n|u|t| | | | | | | | | | | | | | | | | | | | | | | | | | | | | | | | | | | | | | | | | | | | | | | | | | | | | |R|e|e|r|n|c|e|test|ain| | | | | | | | | | | |6|0| |B| |S|PL inp|t| | | | | | | |
70
70
60
60
Gain (dB)
Gain (dB)
50
50
40
40
30
30
20
20
100 1000 10000
Frequency (Hz) Frequency (Hz)
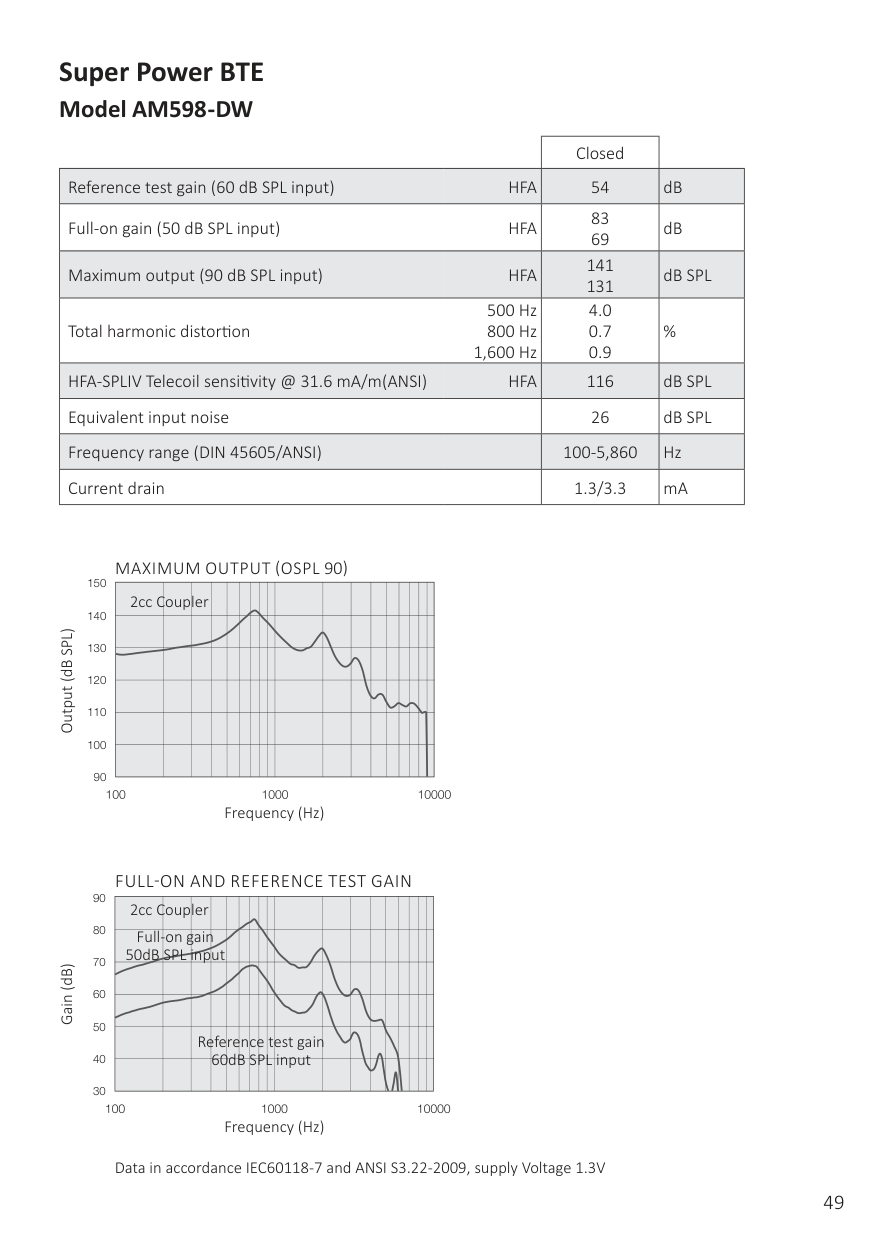
#### Super Power BTE Model AM598-DW
| |Closed| | |---|---|---| |Reference test gain (60 dB SPL input) HFA|54|dB| |Full-on gain (50 dB SPL input) HFA|83 69|dB| |Maximum output (90 dB SPL input) HFA|141 131|dB SPL| |Total harmonic distortion
500 Hz 800 Hz
1,600 Hz|4.0 0.7 0.9|%| |HFA-SPLIV Telecoil sensitivity @ 31.6 mA/m(ANSI) HFA|116|dB SPL| |Equivalent input noise|26|dB SPL| |Frequency range (DIN 45605/ANSI)|100-5,860|Hz| |Current drain|1.3/3.3|mA|
Output (dB SPL)
######### MAXIMUM OUTPUT (OSPL 90)
150
|2cc|oup|er| | | | | | | | | | | | | | | | |---|---|---|---|---|---|---|---|---|---|---|---|---|---|---|---|---|---| | | | | | | | | | | | | | | | | | | | | | | | | | | | | | | | | | | | | | | | | | | | | | | | | | | | | | | | | | | | | | | | | | | | | | | | | | | | | | | | | | | | | | | | | | | | | | | |
140
130
120
110
100
90
Frequency (Hz)
######## FULL-ON AND REFERENCE TEST GAIN
90
|2cc|oup|er| | | | | | | | | | | | | | | | |---|---|---|---|---|---|---|---|---|---|---|---|---|---|---|---|---|---| |Full 50dB|on SPL|ai n|ut| | | | | | | | | | | | | | | | | | | | | | | | | | | | | | | | | | | | | | | | | | | | | | | | | | | | |
| | |R|f|r|n|e| |t|st gai| | | | | | | | | | | | |6|d| |P|L| |input| | | | | | | | |
80
70
Frequency (Hz) Gain (dB)
60
50
40
30
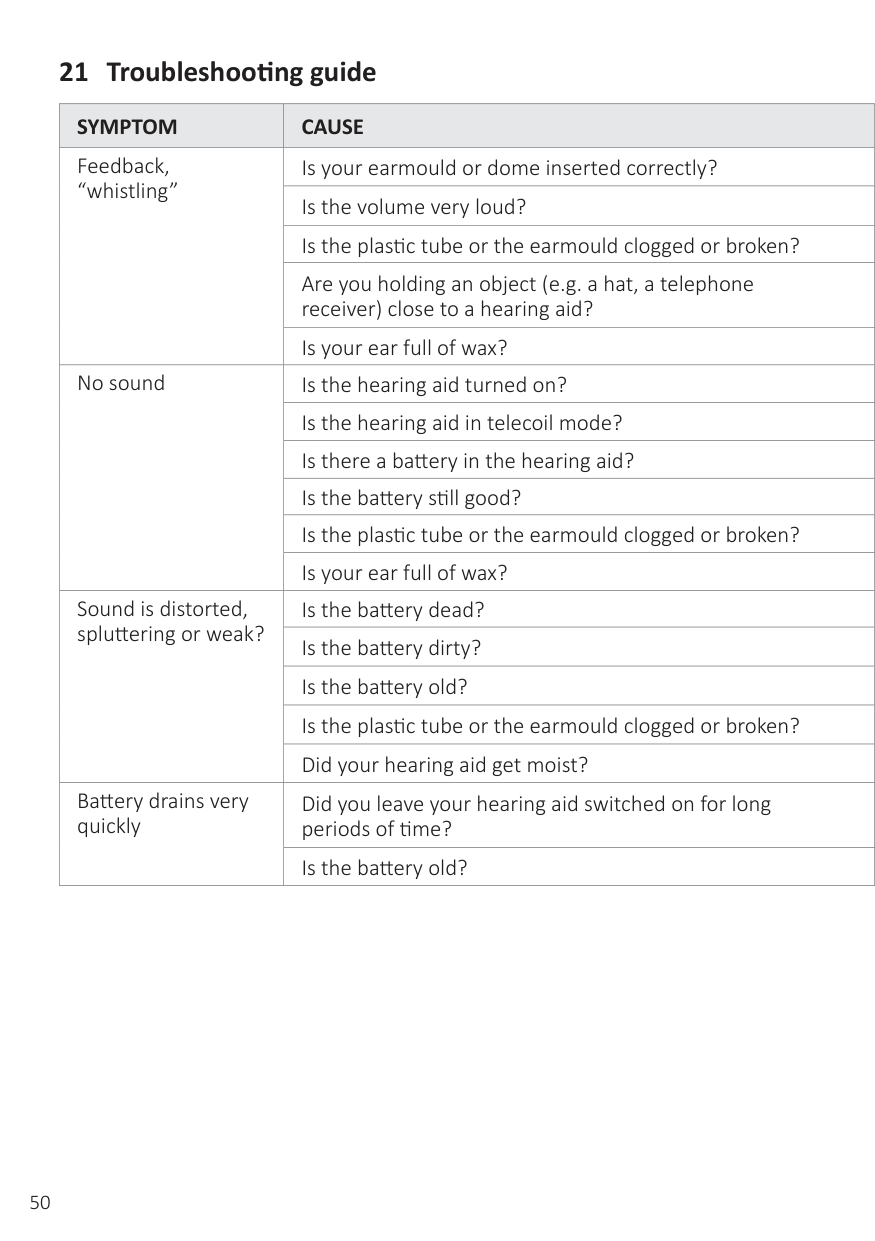
#### 21 Troubleshooting guide
|SYMPTOM|CAUSE| | |---|---|---| |Feedback, “whistling”|Is your earmould or dome inserted correctly?| | |Feedback, “whistling”|Is the volume very loud?| | |Feedback, “whistling”|Is the plastic tube or the earmould clogged or broken?| |
|Feedback, “whistling”|Are you holding an object (e.g. a hat, a telephone receiver) close to a hearing aid?| | |Feedback, “whistling”|Is your ear full of wax?| | |No sound|Is the hearing aid turned on?| | |No sound|Is the hearing aid in telecoil mode?| | |No sound|Is there a battery in the hearing aid?| | |No sound|Is the battery still good?| | |No sound|Is the plastic tube or the earmould clogged or broken?| | |No sound|Is your ear full of wax?| | |Sound is distorted, spluttering or weak?|Is the battery dead?| | |Sound is distorted, spluttering or weak?|Is the battery dirty?| | |Sound is distorted, spluttering or weak?|Is the battery old?| | |Sound is distorted, spluttering or weak?|Is the plastic tube or the earmould clogged or broken?| | |Sound is distorted, spluttering or weak?|Did your hearing aid get moist?| | |Battery drains very quickly|Did you leave your hearing aid switched on for long periods of time?| | |Battery drains very quickly|Is the battery old?| |
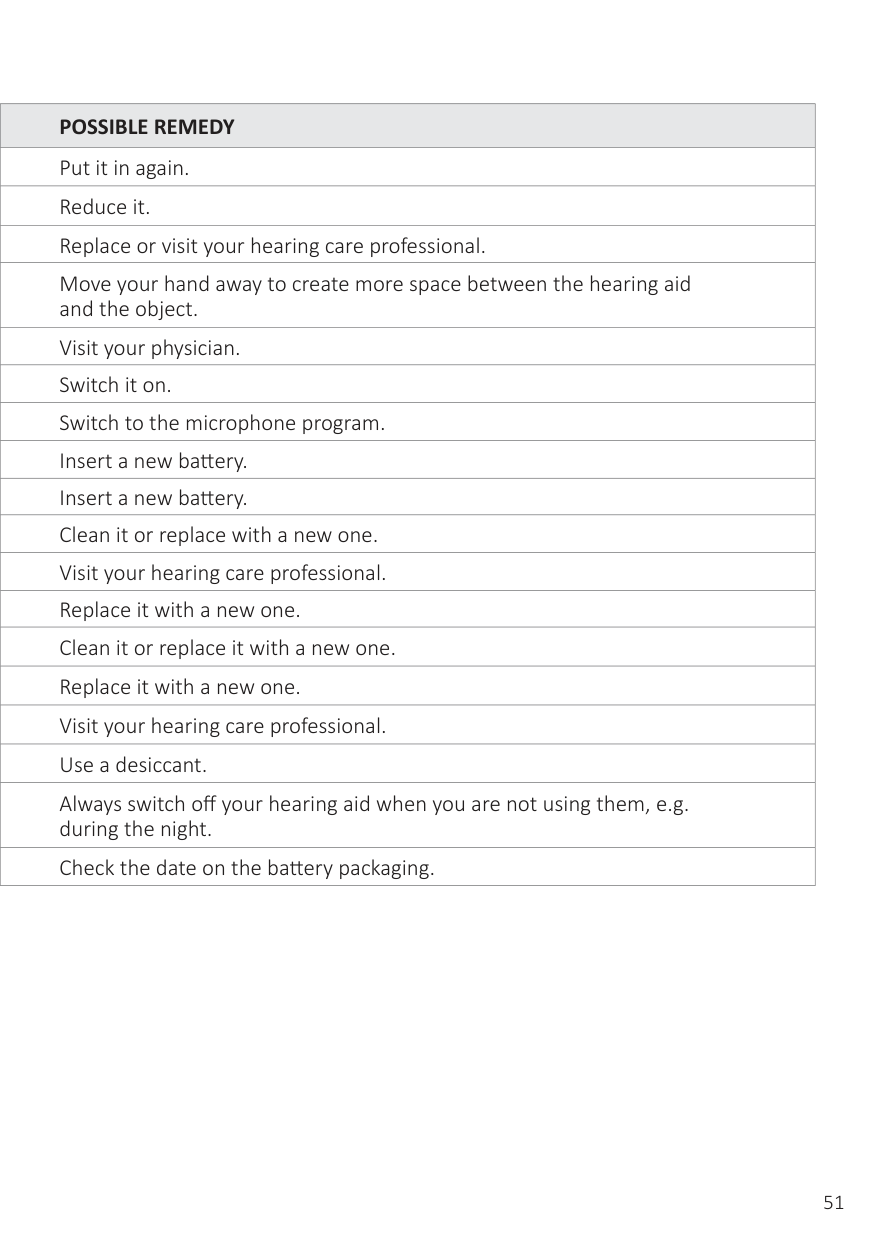
| |POSSIBLE REMEDY| |---|---| | |Put it in again.| | |Reduce it.| | |Replace or visit your hearing care professional.| | |Move your hand away to create more space between the hearing aid and the object.| | |Visit your physician.| | |Switch it on.|
| |Switch to the microphone program.| | |Insert a new battery.| | |Insert a new battery.| | |Clean it or replace with a new one.| | |Visit your hearing care professional.| | |Replace it with a new one.| | |Clean it or replace it with a new one.| | |Replace it with a new one.| | |Visit your hearing care professional.| | |Use a desiccant.| | |Always switch off your hearing aid when you are not using them, e.g. during the night.| | |Check the date on the battery packaging.|
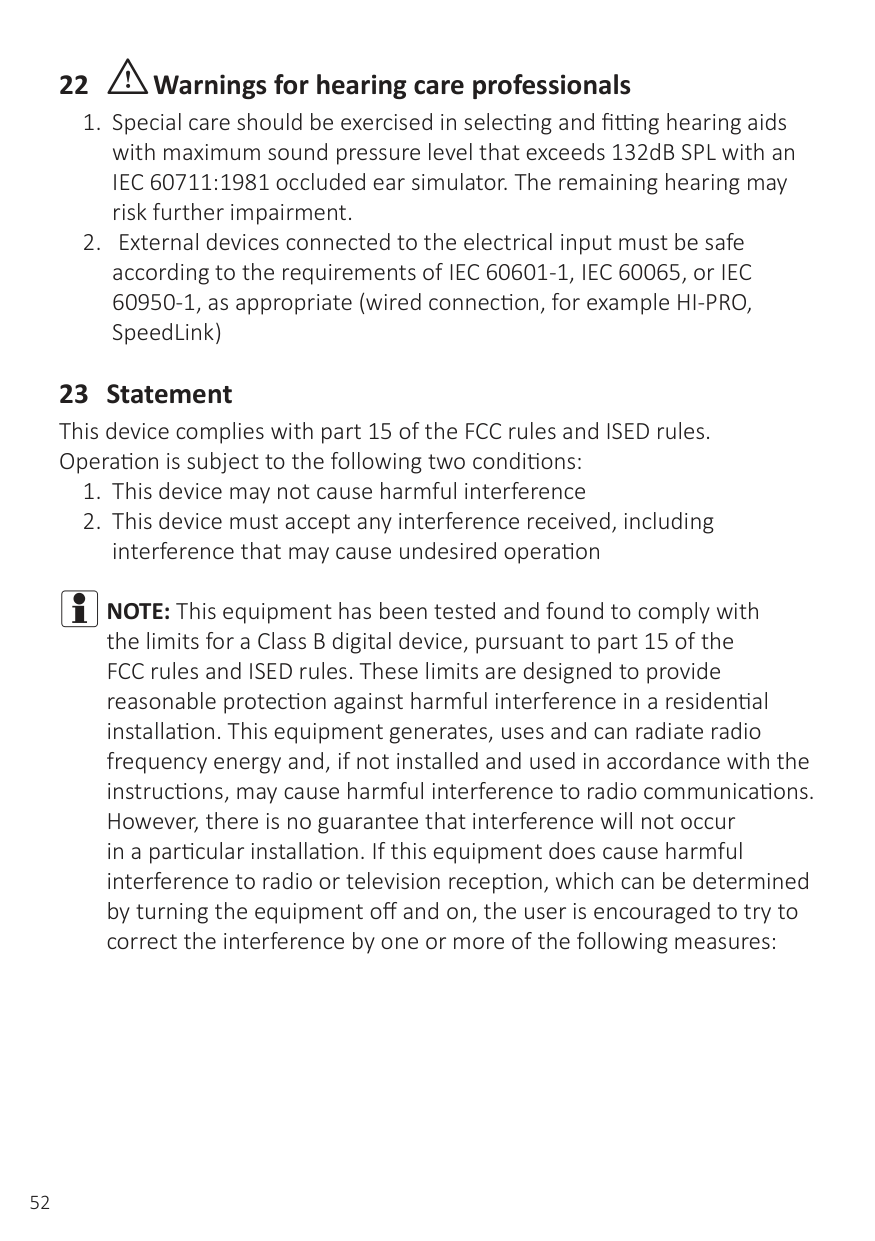
22 iWarnings for hearing care professionals
##### 23 StatementThis device complies with part 15 of the FCC rules and ISED rules.Operation is subject to the following two conditions:

iNOTE:This equipment has been tested and found to comply with the limits for a Class B digital device, pursuant to part 15 of the FCC rules and ISED rules. These limits are designed to provide reasonable protection against harmful interference in a residential installation. This equipment generates, uses and can radiate radio frequency energy and, if not installed and used in accordance with the instructions, may cause harmful interference to radio communications. However, there is no guarantee that interference will not occur in a particular installation. If this equipment does cause harmful interference to radio or television reception, which can be determined by turning the equipment off and on, the user is encouraged to try to correct the interference by one or more of the following measures:
The products are in compliance with the following regulatory requirements:
This device operates in the frequency range of 2.4 GHz - 2.48 GHz. This device includes an RF transmitter that operates in the range of 2.4 GHz
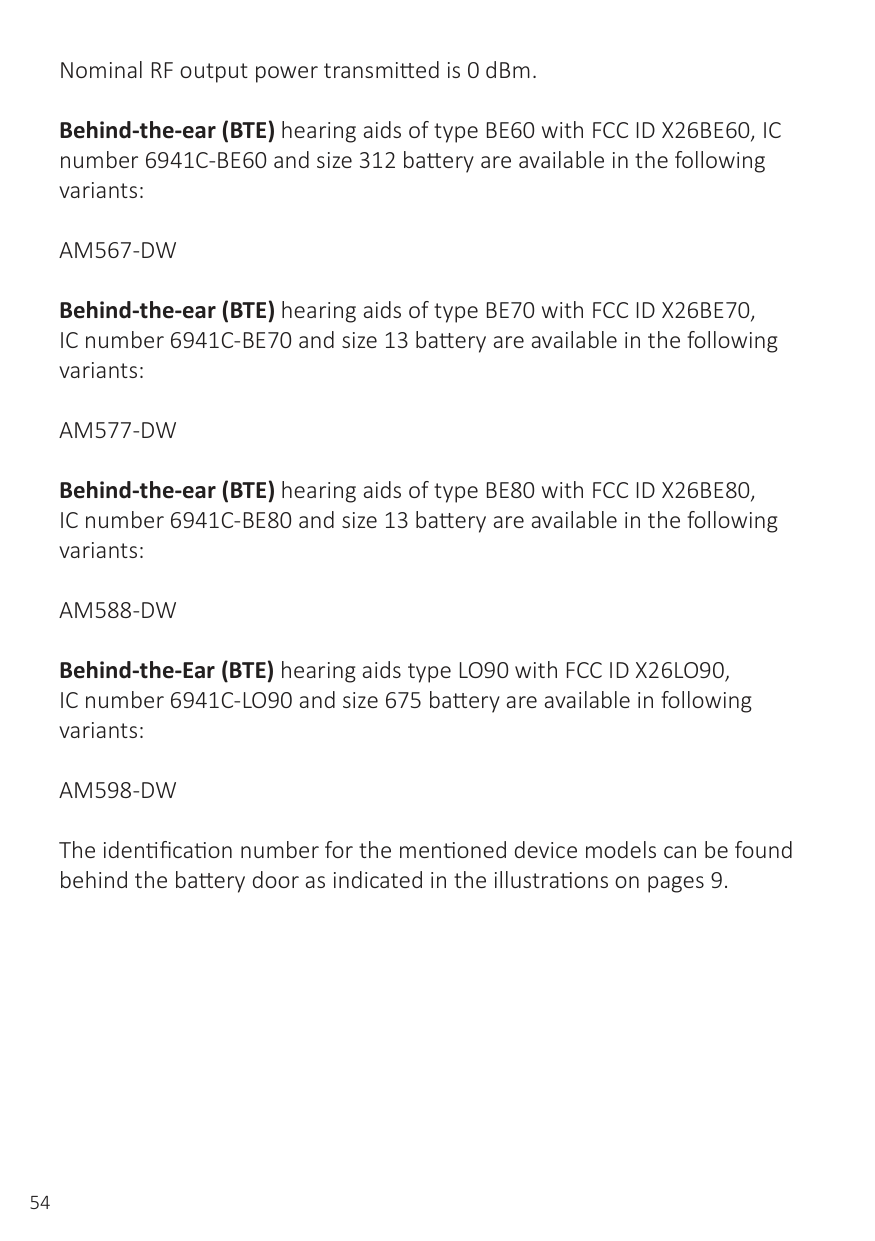
Nominal RF output power transmitted is 0 dBm. Behind-the-ear (BTE) hearing aids of type BE60 with FCC ID X26BE60, IC number 6941C-BE60 and size 312 battery are available in the following variants: AM567-DW Behind-the-ear (BTE) hearing aids of type BE70 with FCC ID X26BE70, IC number 6941C-BE70 and size 13 battery are available in the following variants: AM577-DW Behind-the-ear (BTE) hearing aids of type BE80 with FCC ID X26BE80, IC number 6941C-BE80 and size 13 battery are available in the following variants: AM588-DW Behind-the-Ear (BTE) hearing aids type LO90 with FCC ID X26LO90, IC number 6941C-LO90 and size 675 battery are available in following variants: AM598-DW The identification number for the mentioned device models can be found behind the battery door as indicated in the illustrations on pages 9.

For hearing aids that require service, please contact your hearing care professional for assistance. Hearing aids that malfunction must be repaired by a qualified technician. Do not attempt to open the case of hearing aids, as this will invalidate the warranty.
During transport or storage, the temperature should not exceed the limit values of -20°C (-4°F) to 60°C (140°F) and relative humidity of 90% RH, non-condensing (for limited time). The air pressure between 500 hPa and 1,100 hPa is appropriate.
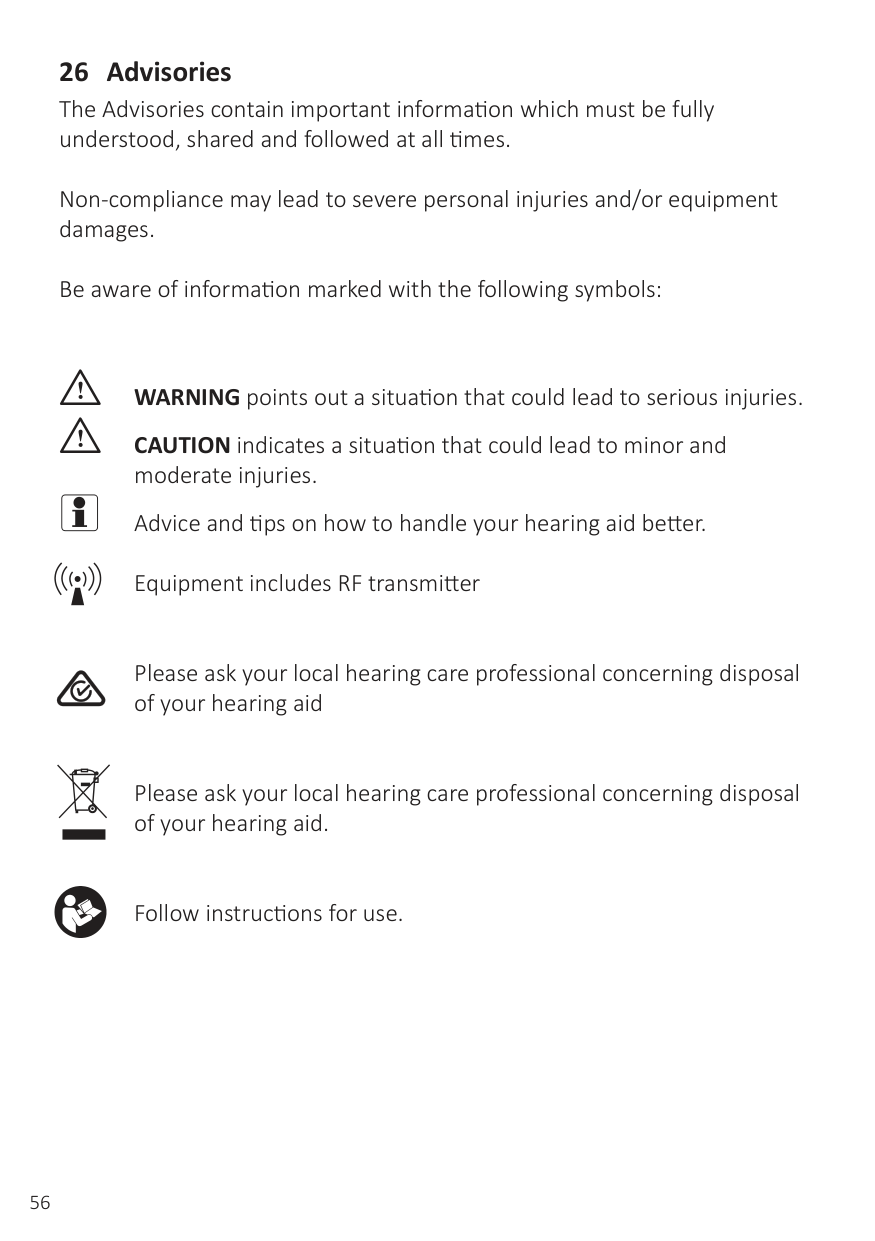
Non-compliance may lead to severe personal injuries and/or equipment damages.
Be aware of information marked with the following symbols:
i WARNINGpoints out a situation that could lead to serious injuries. i CAUTIONindicates a situation that could lead to minor and
moderate injuries.
i Advice and tips on how to handle your hearing aid better.
Equipment includes RF transmitter

Please ask your local hearing care professional concerning disposal of your hearing aid
Please ask your local hearing care professional concerning disposal of your hearing aid.
Follow instructions for use.
THIS SOFTWARE IS PROVIDED BY THE COPYRIGHT HOLDERS AND CONTRIBUTORS “AS IS” AND ANY EXPRESS OR IMPLIED WARRANTIES, INCLUDING, BUT NOT LIMITED TO, THE IMPLIED WARRANTIES OF MERCHANTABILITY AND FITNESS FOR A PARTICULAR PURPOSE ARE DISCLAIMED. IN NO EVENT SHALL THE COPYRIGHT HOLDER OR CONTRIBUTORS BE LIABLE FOR ANY DIRECT, INDIRECT, INCIDENTAL, SPECIAL, EXEMPLARY, OR CONSEQUENTIAL DAMAGES (INCLUDING, BUT NOT LIMITED TO, PROCUREMENT OF SUBSTITUTE GOODS OR SERVICES; LOSS OF USE,
DATA, OR PROFITS; OR BUSINESS INTERRUPTION) HOWEVER CAUSED AND ON ANY THEORY OF LIABILITY, WHETHER IN CONTRACT, STRICT LIABILITY, OR TORT (INCLUDING NEGLIGENCE OR OTHERWISE) ARISING IN ANY WAY OUT OF THE USE OF THIS SOFTWARE, EVEN IF ADVISED OF THE POSSIBILITY OF SUCH DAMAGE.
© 2018 GN Hearing A/S. All rights reserved.
400745000GB-22.03-Rev.E
Manufacturer according to EU Medical Device Directive 93/42/EEC:
GN Hearing A/S Lautrupbjerg 7 DK-2750 Ballerup Denmark Tel.: +45 4575 1111 gnhearing.com
CVR no. 55082715
United Kingdom GN Hearing UK Ltd. Unit 13 Talisman Business Centre Bicester OX26 6HR United Kingdom Tel.: +44 1869 352 800 resound.com
Any issues relating to the EU Medical Device Directive 93/42/EEC or EU Radio Equipment Directive 2014/53/EU should be directed to GN Hearing A/S.