
Ask AI
— answers from the official manualAnswers from the official manual.
Common questions
Common Questions
27 totalHow do I secure my infant properly in the Simple Sway Swing?
Always secure your infant in the restraint system provided and use the slide adjusters at the shoulder and waist to get a snug fit around your infant after fastening the buckles. Make sure the harness straps go into the slot that is even with or slightly above the shoulders, and avoid twisting the straps. Never leave your infant unattended in the swing.
What batteries does the Simple Sway Swing require and how do I install them?
The swing requires four D (LR20-1.5V) cell batteries, which are not included. Open the battery compartment lid by inserting a screwdriver into the coin slot, insert the four batteries, and check that they are put in correctly—your swing will not run if the batteries are inserted backwards. The recommended type is alkaline disposables, and you should never mix battery types.
Why won't my swing operate?
There are several possible causes: no batteries in the swing, dead batteries, speed setting too low, batteries inserted backwards (check the '+' and '-' markings), corrosion on battery terminals (rotate batteries in place or clean with sandpaper if severe), the baby grabbing swing legs, or the swing may need to be pushed to start. Check each of these issues in order.
How do I turn the swing on and off?
To turn the swing on, rotate the speed dial clockwise and lightly push the swing to get it started. Observe the swinging motion for a minute as it takes time for the swing to adjust to a setting. To turn the swing off, turn the dial counter-clockwise until it clicks into the 'OFF' position.
What is the weight limit for the Simple Sway Swing?
Discontinue use of the swing when the infant reaches 30 pounds (13.6 kg) or when the infant attempts to climb out. The swing is not designed to be used beyond this weight limit.
How do I clean the seat cover and frame?
To clean the seat cover, refer to the care tag on your seat pad for washing instructions—use no bleach. To clean the frame, use only household soap and warm water with no bleach or detergent. Avoid excessive exposure to sun or heat as it could cause fading or warping of parts.
Show 21 more questions
What does the Low Battery Alert indicate?
Can I use the swing near water or in wet areas?
How do I change the harness strap slots?
What should I do if my seat doesn't swing very high?
What batteries does the Graco Simple Sway Swing require?
What should I do if batteries are left in the swing unused for extended periods?
Can I leave my baby unattended in the swing?
At what weight should I stop using the swing?
How do I properly secure my baby in the swing?
Can I use an extension cord with the AC adapter?
What should I do if batteries are leaking?
How do I properly secure my infant in the swing?
Can I carry the swing while my baby is in it?
Can I use this swing near water or in a bathroom?
What is the strangulation hazard warning about?
How often should I remove and replace the batteries if I'm not using the swing?
Can the swing be used near water or in wet areas?
What should I do if the AC adapter has been damaged or exposed to liquid?
Is adult assembly required for this product?
What is the strangulation hazard warning for this product?
What batteries does the Simple Sway Swing use?
Full Manual
23 pages

Owner'S Manual
Simple Sway™ ©2014 Graco PD283831B 9/14
2 Failure to follow these warnings and the assembly instructions could result in serious injury or death.
• Please Save Owner’S
Manual For Future Use.
• This Product Requires
ADULT ASSEMBLY. Follow assembly instructions carefully. If you experience any difficulties, please contact the Customer Service Department.• To Prevent Serious
Injury Or Death From
Infants Falling Or
Being Strangled In
Straps:
Strangulation Hazard:
• Do Not Use This
PRODUCT if it is damaged or broken.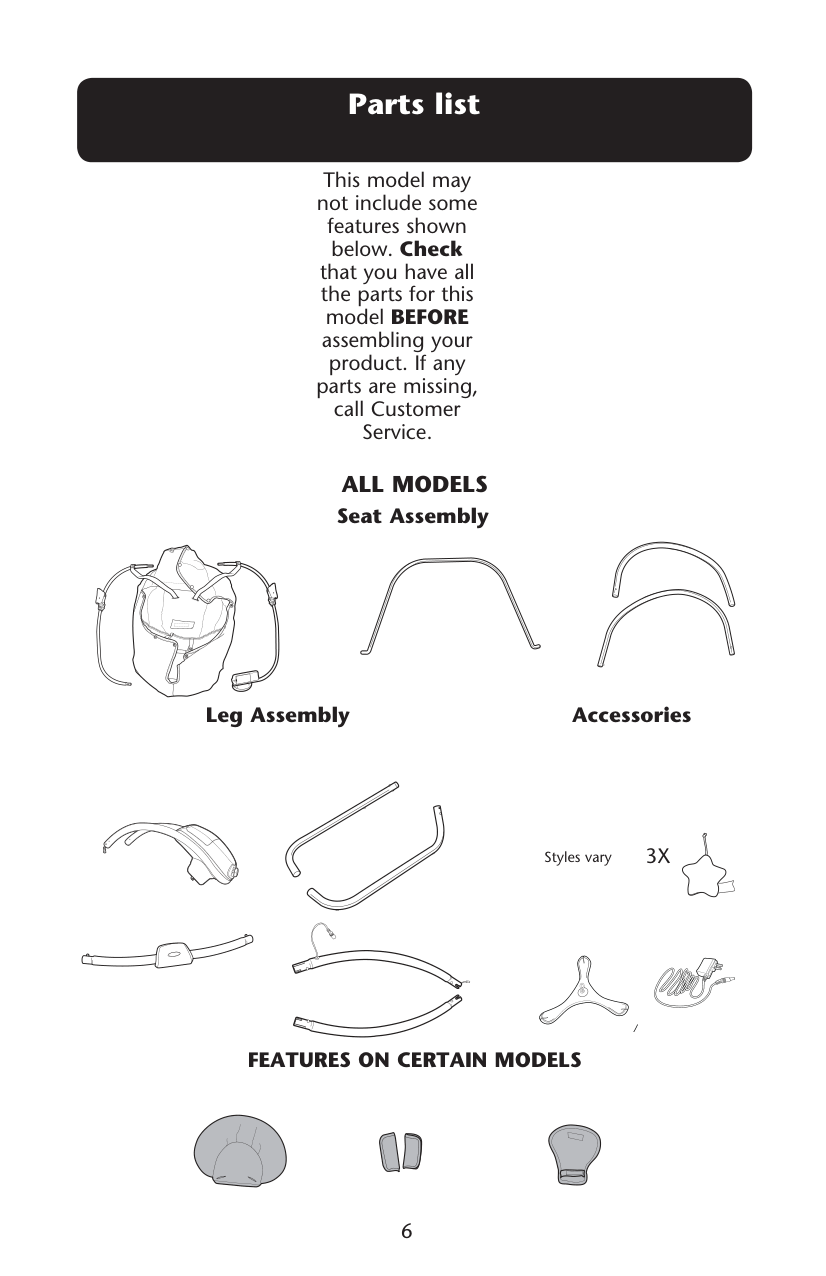
6 Parts list This model may not include some features shown below. Check that you have all the parts for this model BEFORE assembling your product. If any parts are missing, call Customer Service.
All Models
Features On Certain Models
Styles vary3X
Seat Assembly Leg Assembly Accessories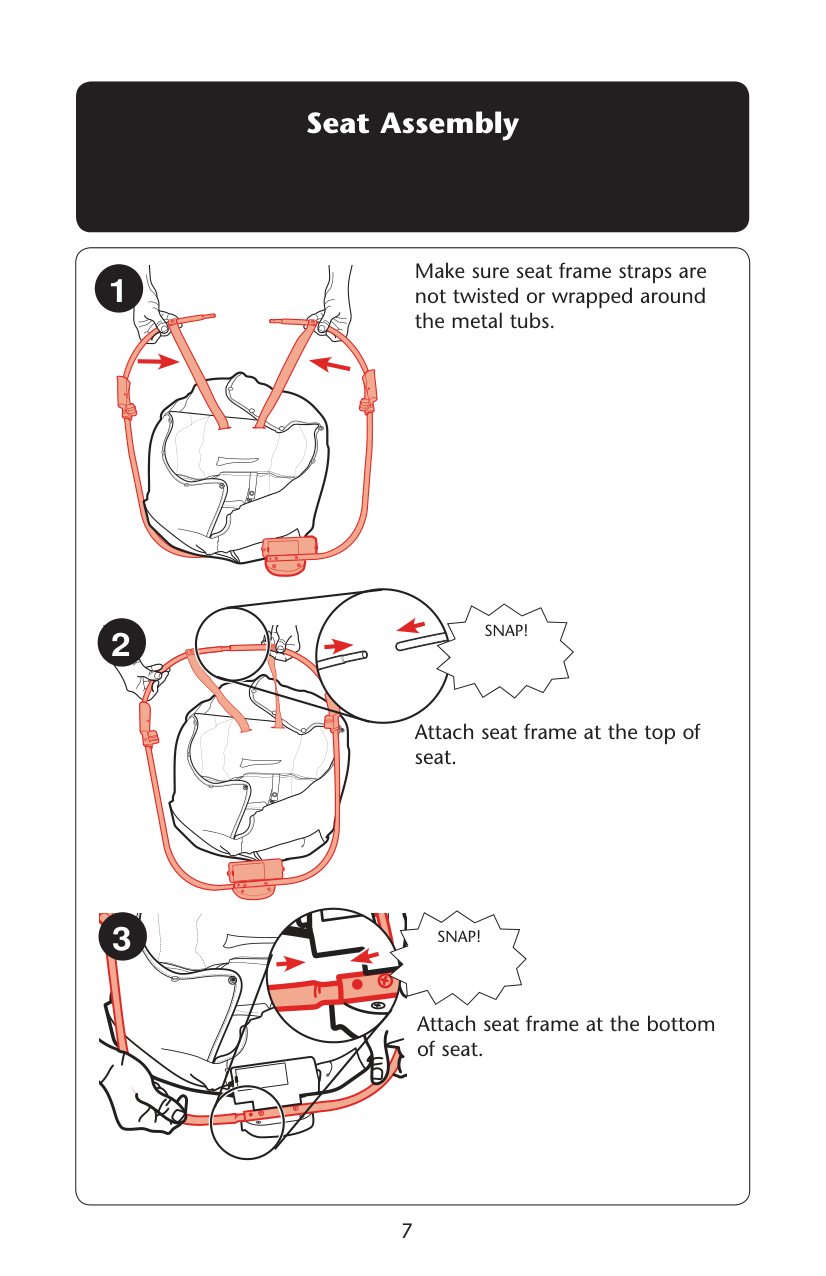
7 Seat Assembly 1 Make sure seat frame straps are not twisted or wrapped around the metal tubs.
Snap!
Attach seat frame at the bottom of seat.Snap!
2 3 Attach seat frame at the top of seat.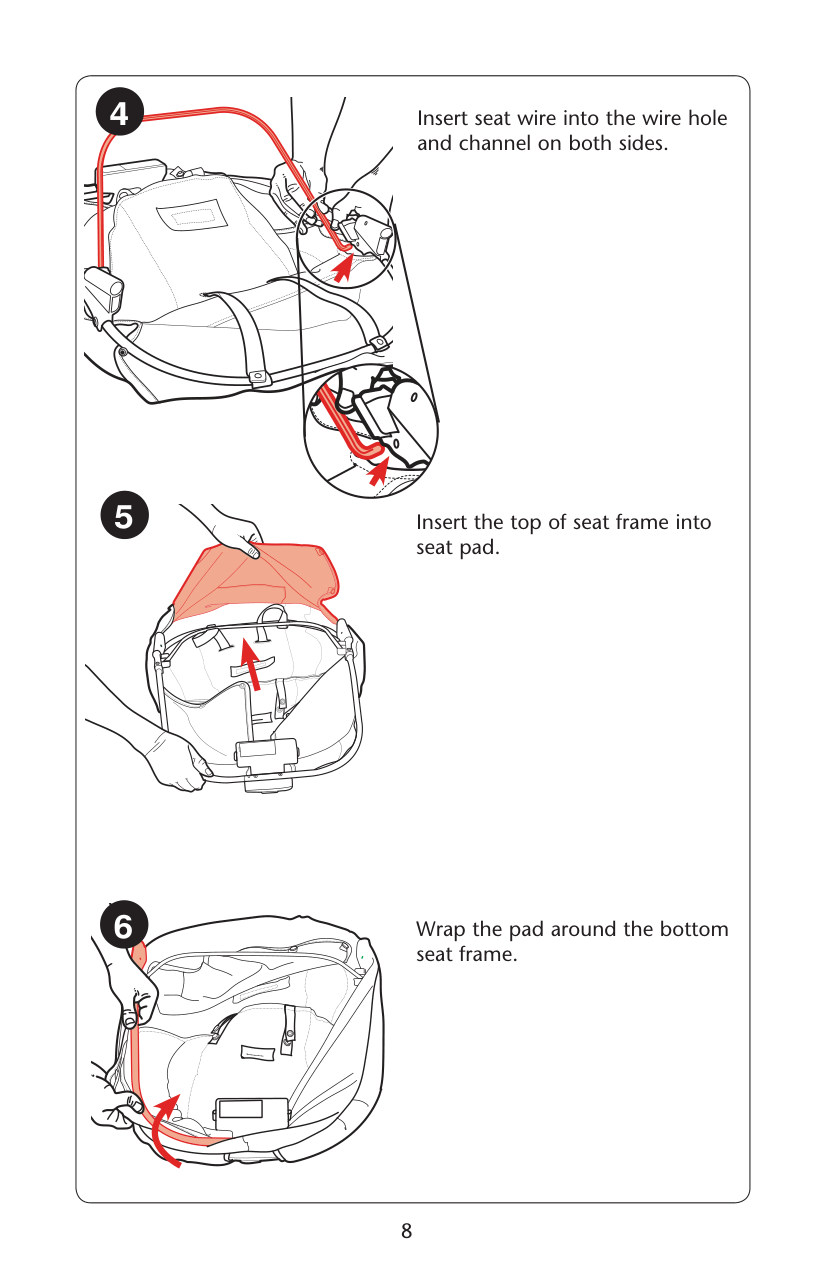
8 4 Insert seat wire into the wire hole and channel on both sides. 5 Insert the top of seat frame into seat pad. Wrap the pad around the bottom seat frame. 6
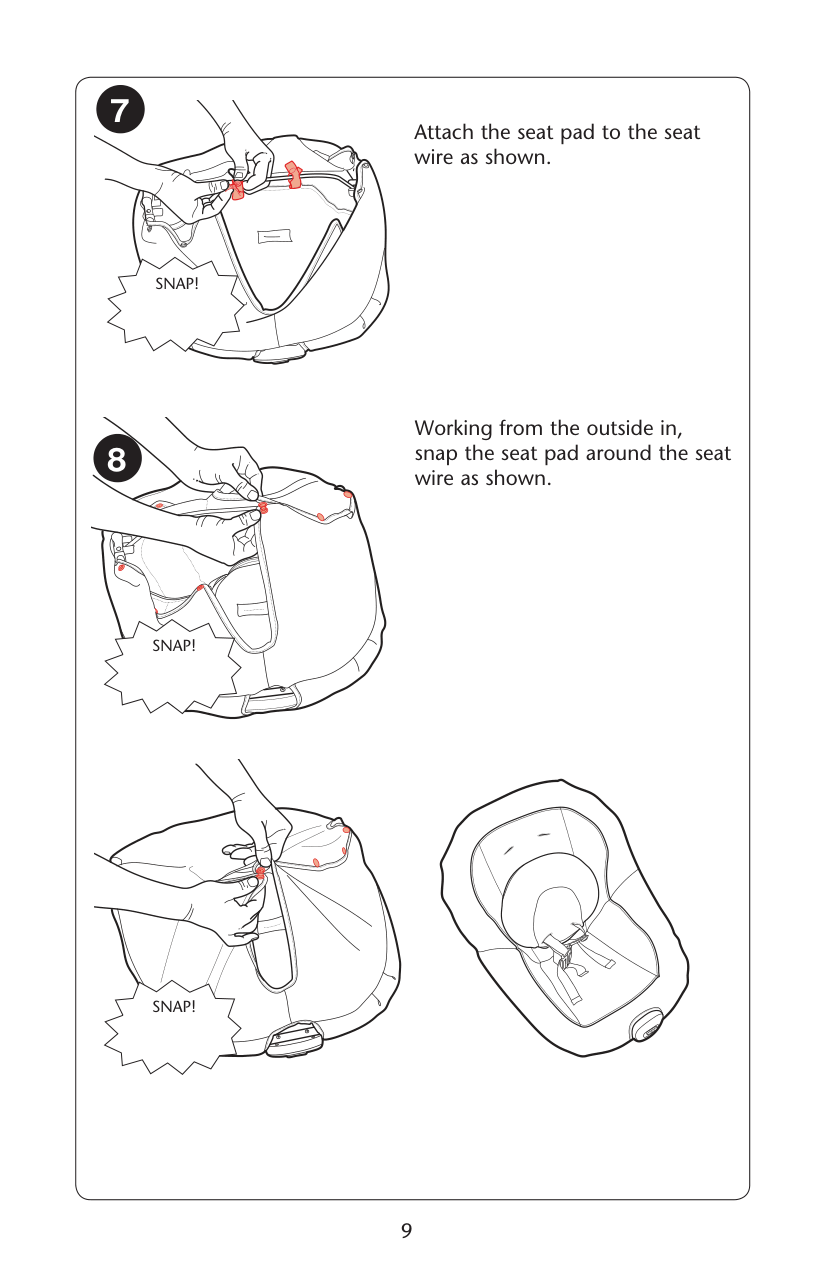
9 8 Working from the outside in, snap the seat pad around the seat wire as shown. 7 Attach the seat pad to the seat wire as shown.
Snap!
Snap!
Snap!
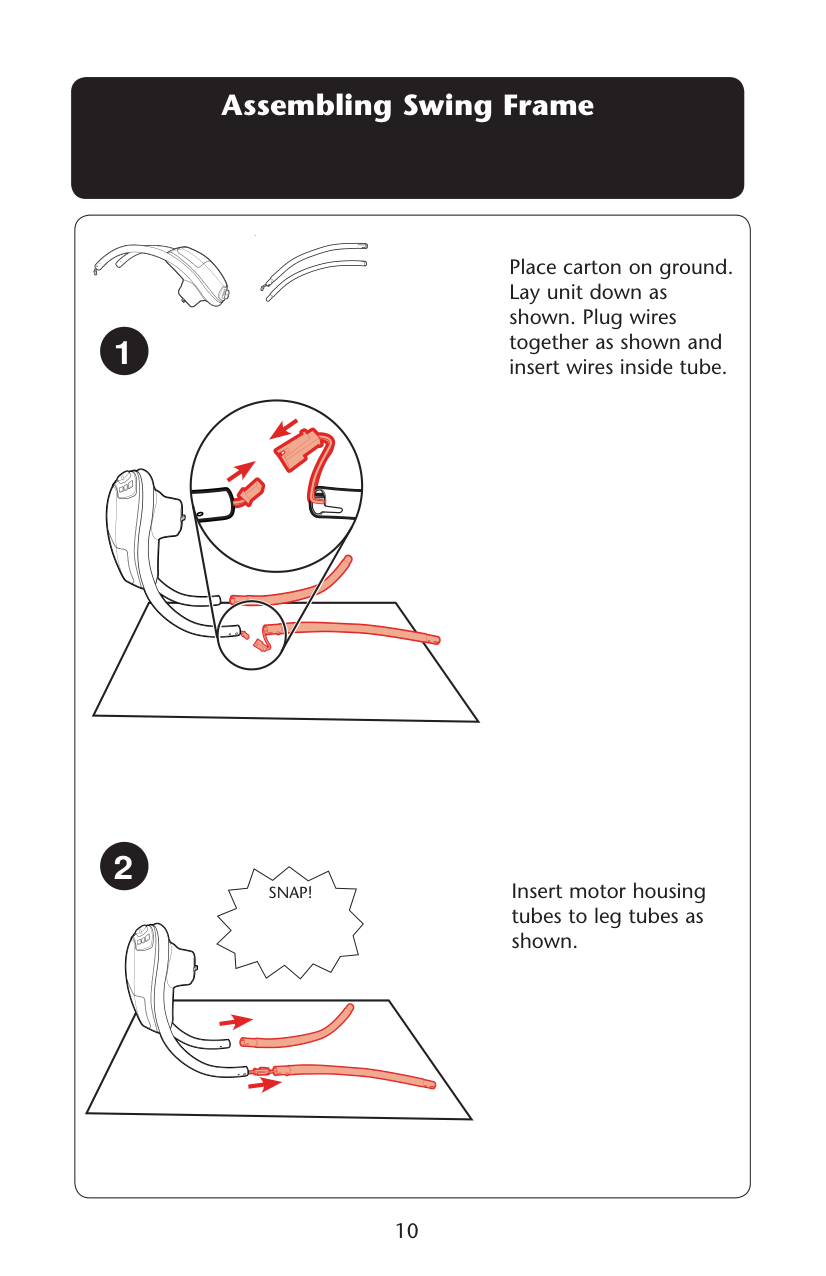
10 2 Insert motor housing tubes to leg tubes as shown. Assembling Swing Frame 1 Place carton on ground. Lay unit down as shown. Plug wires together as shown and insert wires inside tube.
Snap!
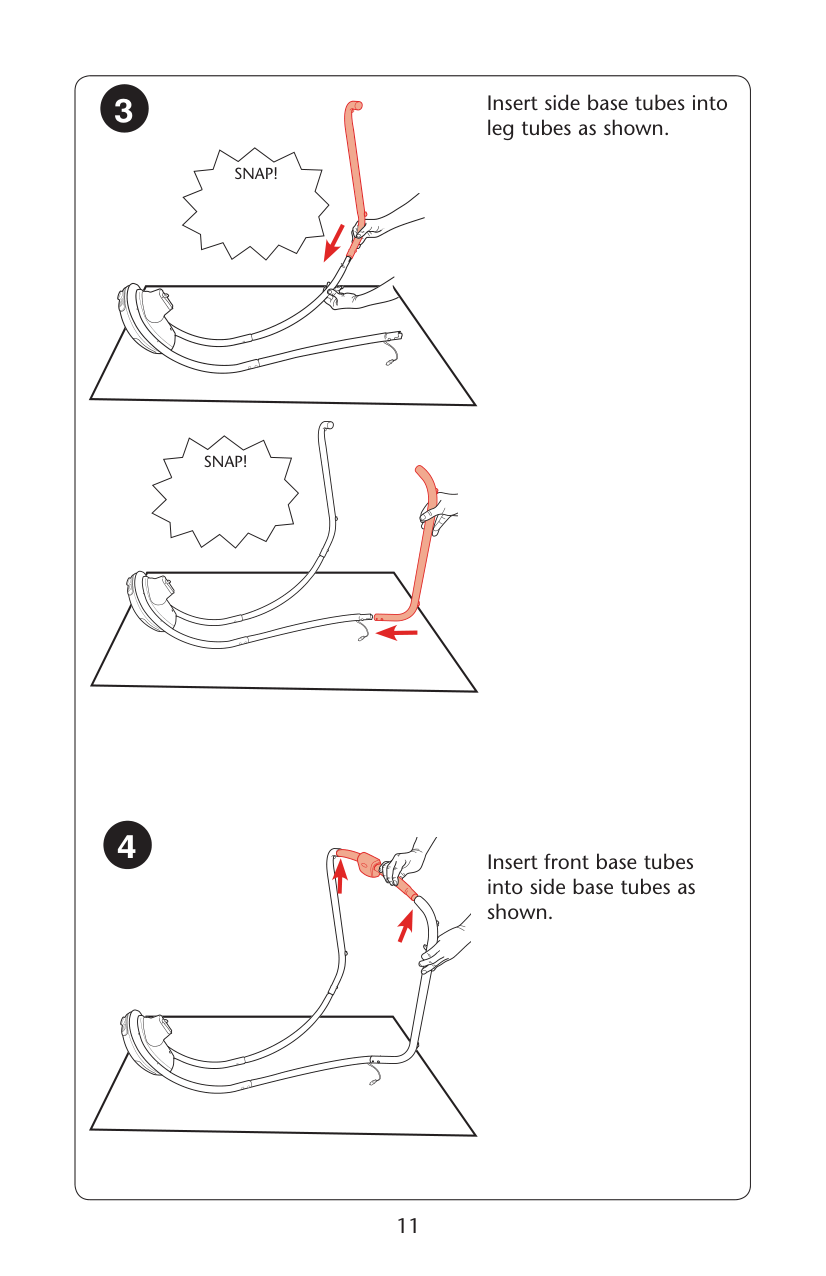
11 Insert side base tubes into leg tubes as shown.
Snap!
4 Insert front base tubes into side base tubes as shown. 3Snap!
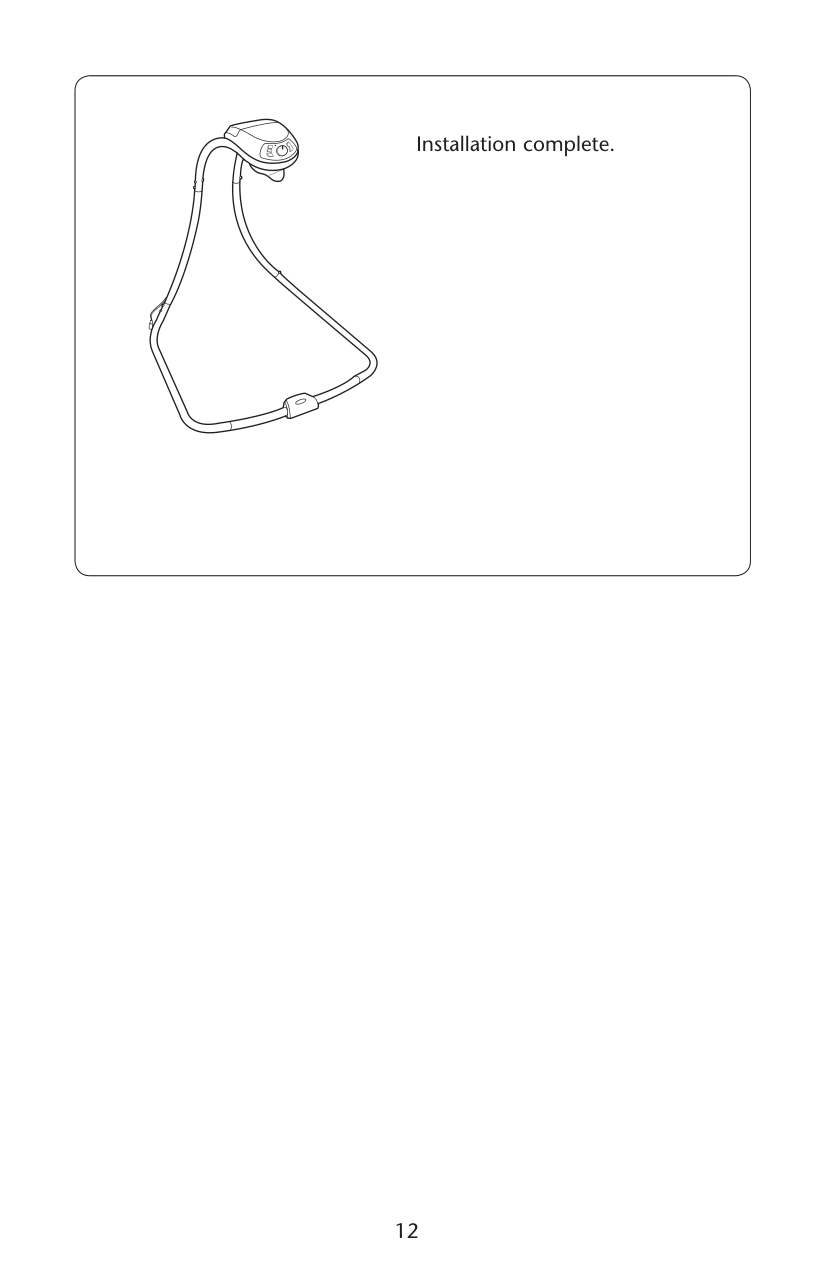
12 Installation complete.
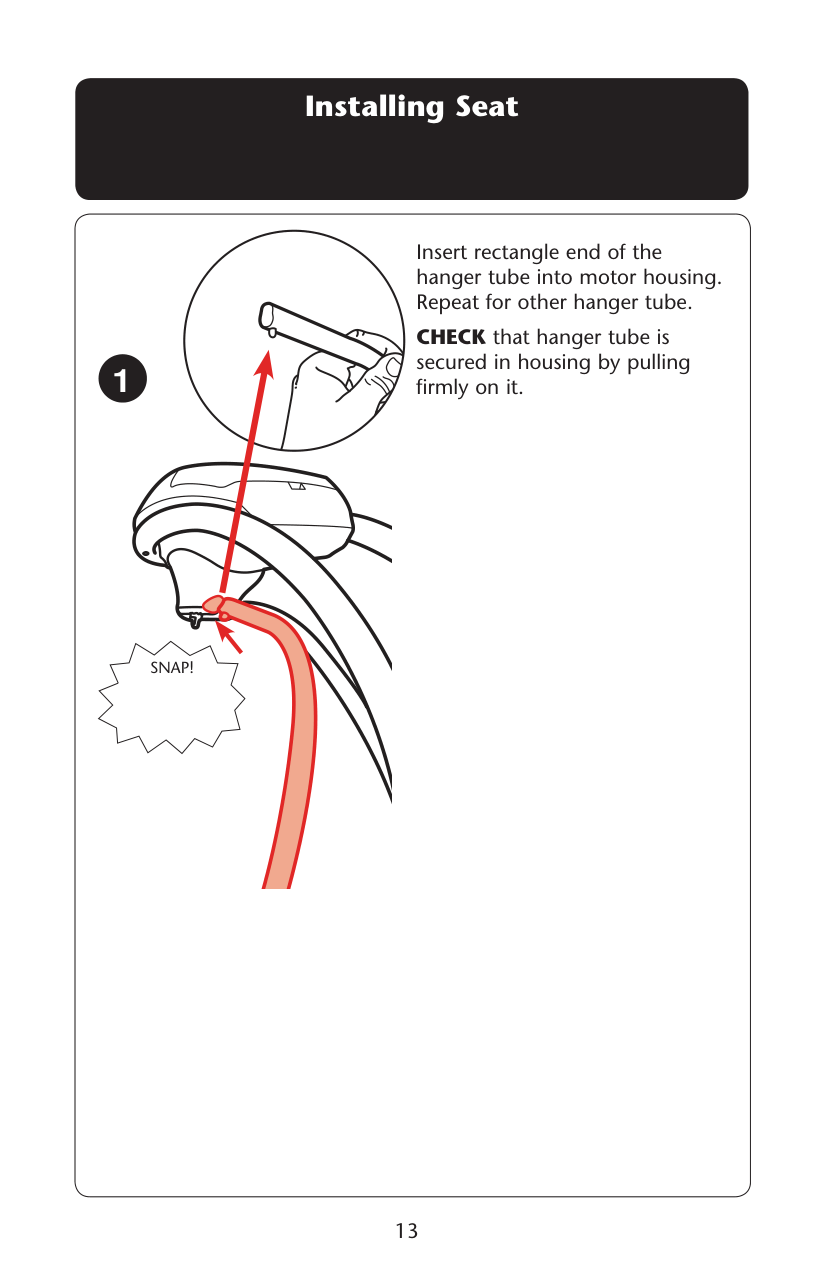
13 Installing Seat Insert rectangle end of the hanger tube into motor housing. Repeat for other hanger tube. CHECK that hanger tube is secured in housing by pulling firmly on it.
Snap!
1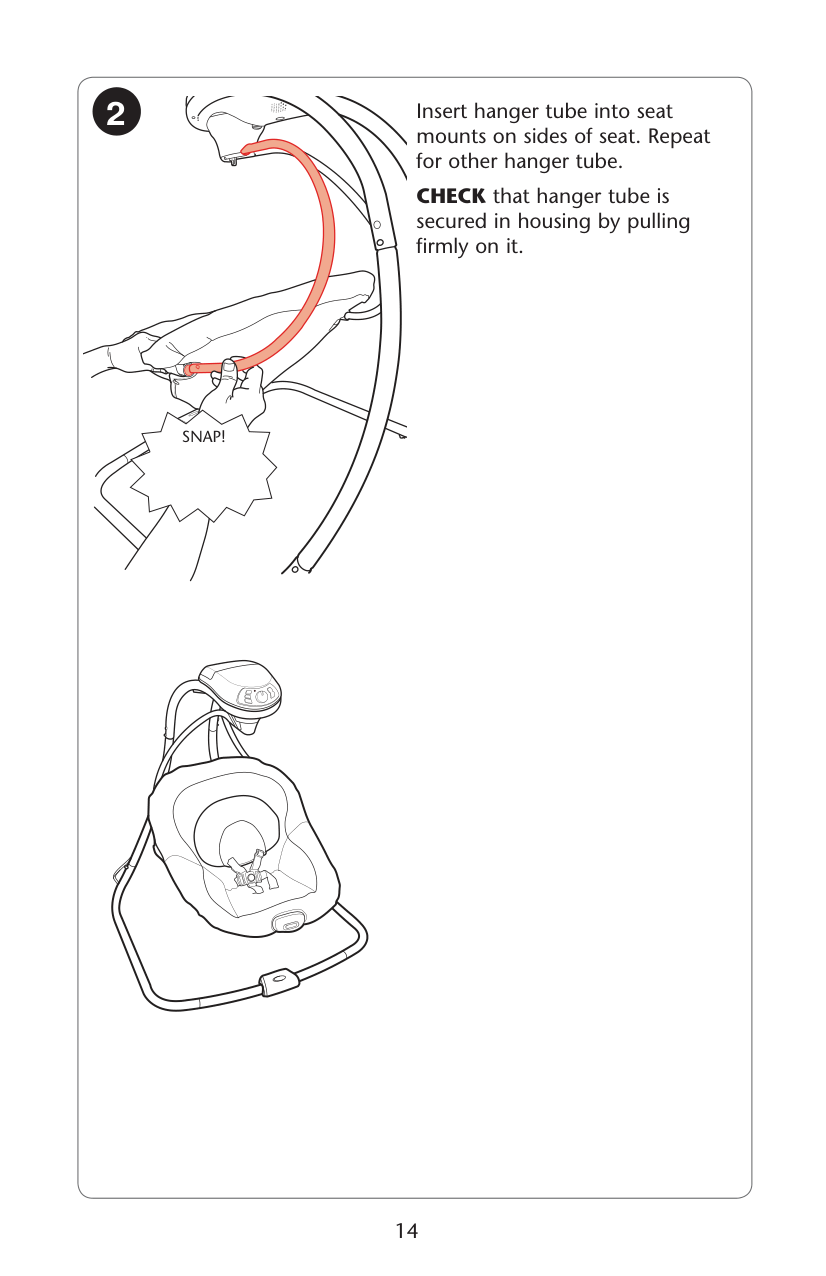
14
Snap!
Insert hanger tube into seat mounts on sides of seat. Repeat for other hanger tube. CHECK that hanger tube is secured in housing by pulling firmly on it. 2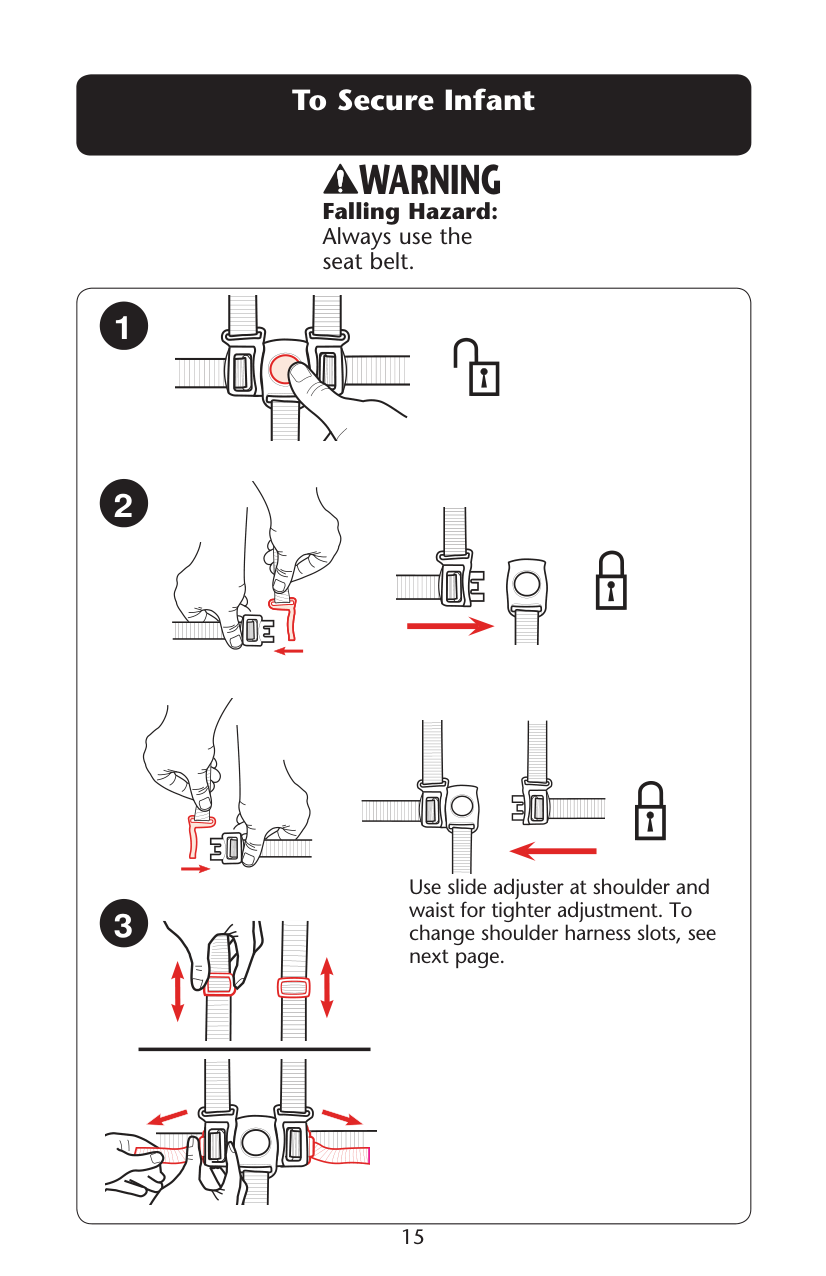
15
Warning
Falling Hazard: Always use the seat belt. To Secure Infant Use slide adjuster at shoulder and waist for tighter adjustment. To change shoulder harness slots, see next page. 1 2 3
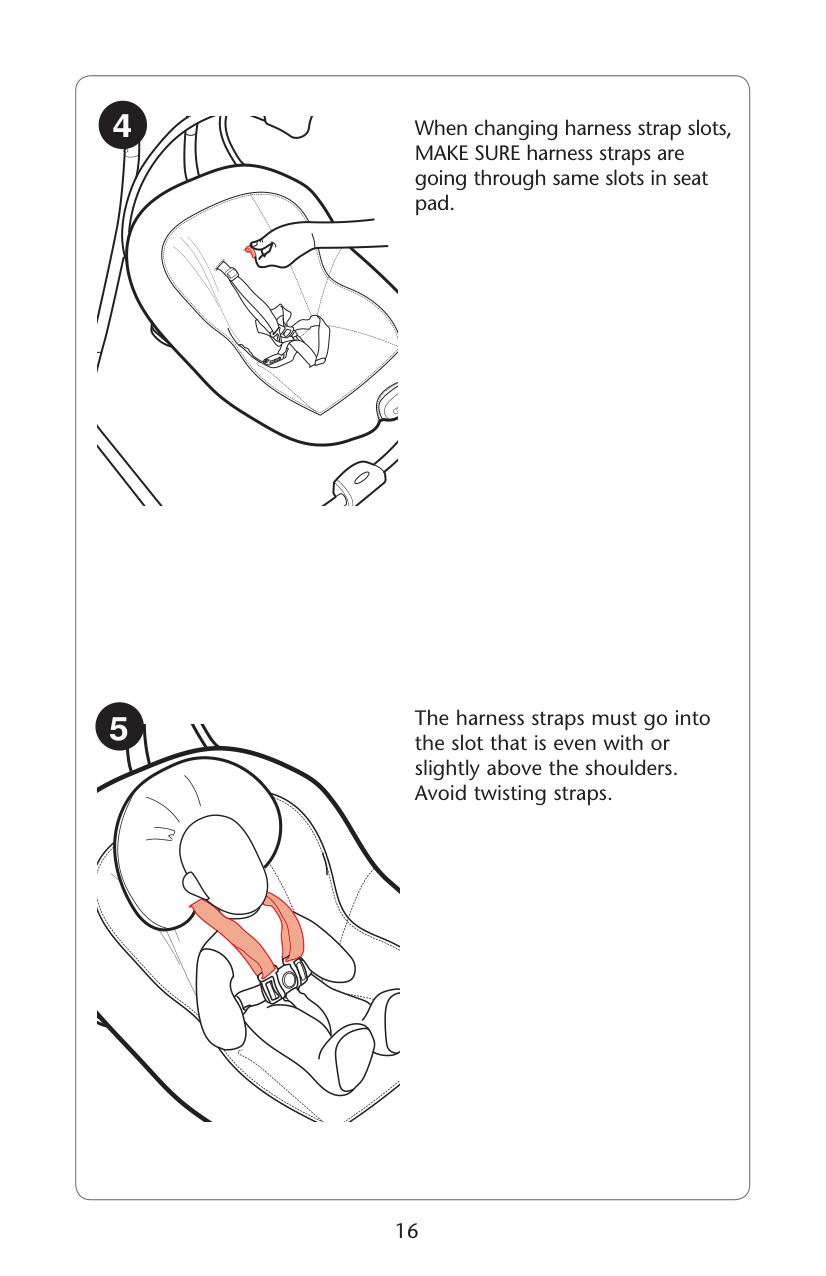
16 4 The harness straps must go into the slot that is even with or slightly above the shoulders. Avoid twisting straps. When changing harness strap slots, MAKE SURE harness straps are going through same slots in seat pad. 5
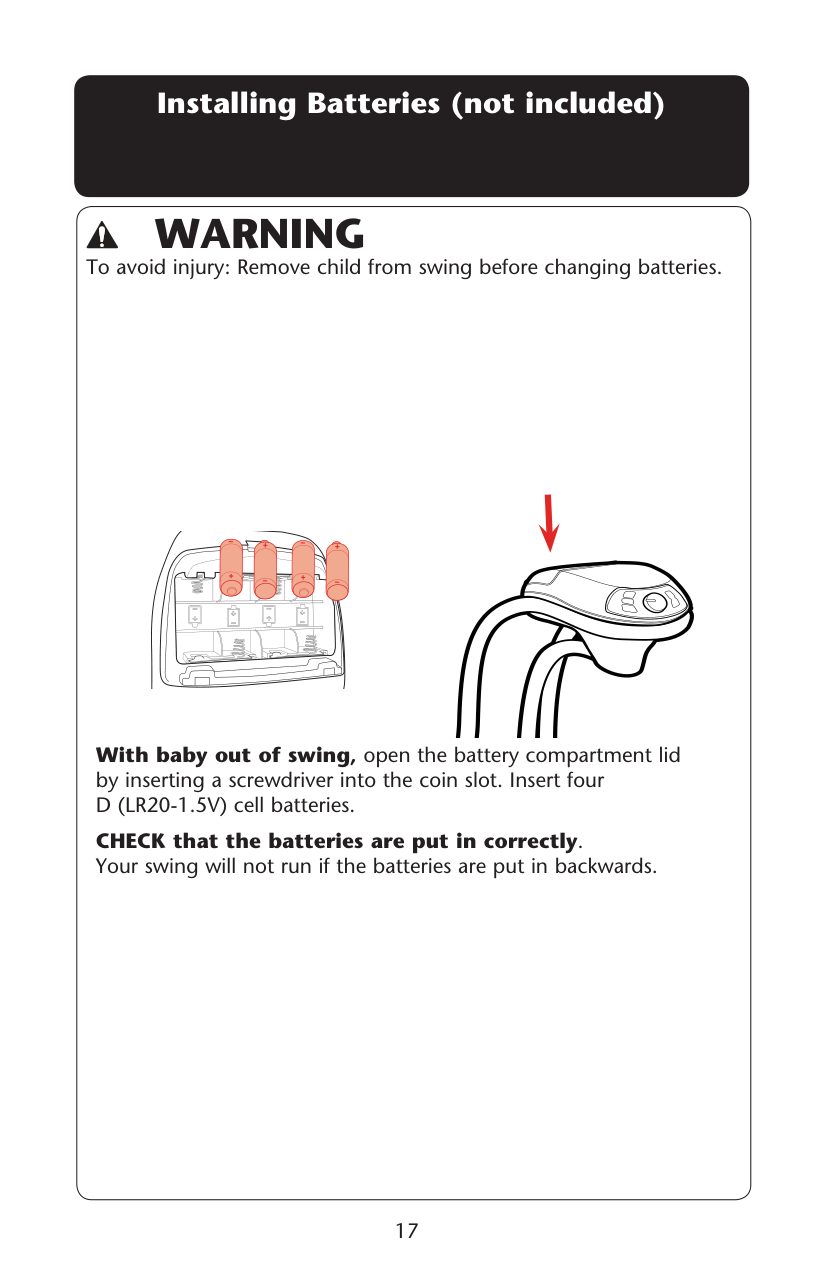
17 Installing Batteries (not included) With baby out of swing, open the battery compartment lid by inserting a screwdriver into the coin slot. Insert four D (LR20-1.5V) cell batteries. CHECK that the batteries are put in correctly. Your swing will not run if the batteries are put in backwards.
• Warning
To avoid injury: Remove child from swing before changing batteries.
18 For Safe Battery Use Keep the batteries out of children’s reach. Any battery may leak battery acid if mixed with a different battery type, if inserted incorrectly (put in backwards) or if all batteries are not replaced or recharged at the same time. Do not mix old and new batteries. Do not mix alkaline, standard (carbon-zinc) or rechargeable (nickel-cadmium) batteries. Any battery may leak battery acid or explode if disposed of in fire or an attempt is made to charge a battery not intended to be recharged. Never recharge a cell of one type in a recharger made for a cell of another type. Discard leaky batteries immediately. Leaky batteries can cause skin burns or other personal injury. When discarding batteries, be sure to dispose of them in the proper manner, according to your state and local regulations. Always remove batteries if the product is not going to be used for a month or more. Batteries left in the unit may leak and cause damage. Recommended type batteries—alkaline disposables, size D (LR20-1.5V). NEVER mix battery types. Change batteries when product ceases to operate satisfactorily.
19 WARNING Changes or modifications to this unit not expressly approved by the party responsible for compliance could void the user authority to operate the equipment. NOTE: This equipment has been tested and found to comply with the limits for a Class B digital device, pursuant to Part 15 of the FCC Rules. These limits are designed to provide reasonable protection against harmful interference in a residential installation. This equipment generates, uses and can radiate radio frequency energy and, if not installed and used in accordance with the instructions, may cause harmful interference to radio communications. However, there is no guarantee that interference will not occur in a particular installation. If this equipment does cause harmful interference to radio or television reception, which can be determined by turning the equipment off and on, the user is encouraged to try to correct the interference by one or more of the following measures:
(B).
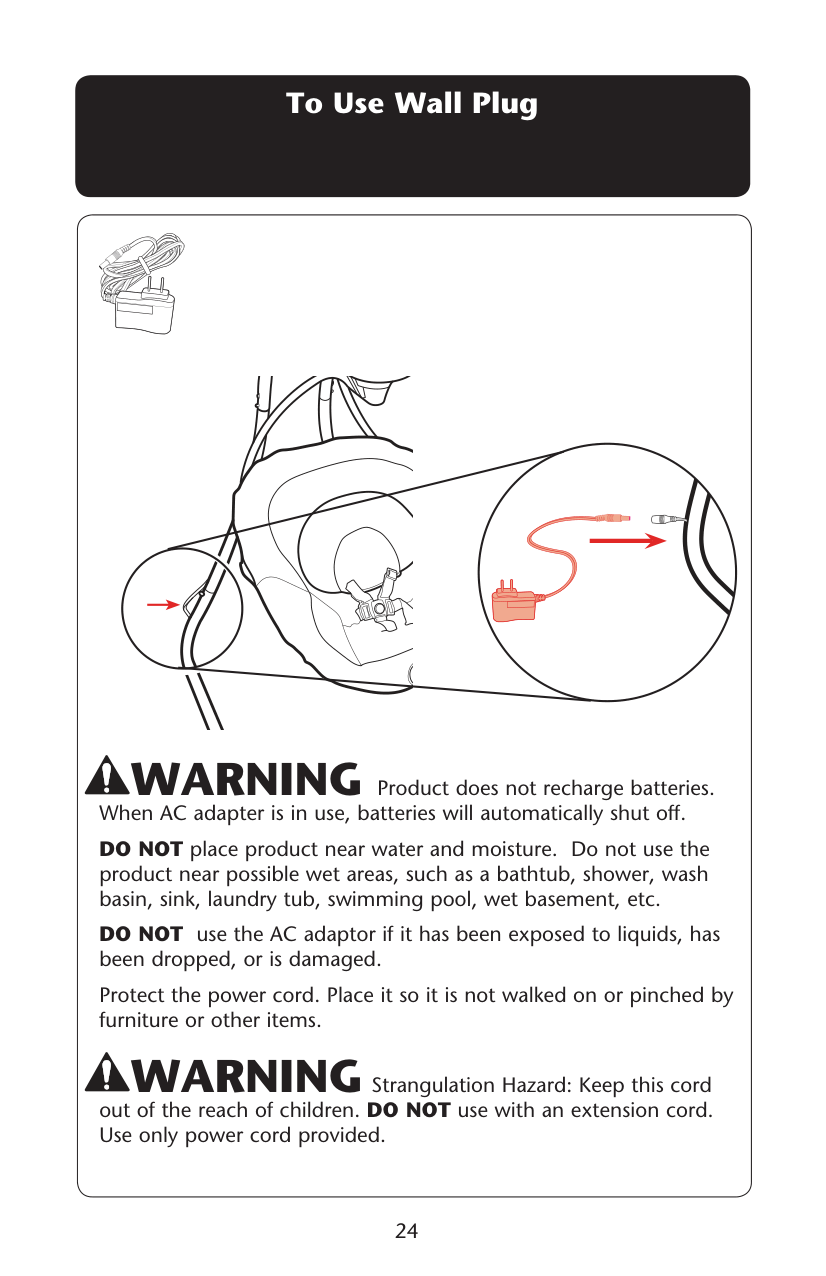
24 WARNING Product does not recharge batteries. When AC adapter is in use, batteries will automatically shut off. DO NOT place product near water and moisture. Do not use the product near possible wet areas, such as a bathtub, shower, wash basin, sink, laundry tub, swimming pool, wet basement, etc. DO NOT use the AC adaptor if it has been exposed to liquids, has been dropped, or is damaged. Protect the power cord. Place it so it is not walked on or pinched by furniture or other items. WARNING Strangulation Hazard: Keep this cord out of the reach of children. DO NOT use with an extension cord. Use only power cord provided. To Use Wall Plug
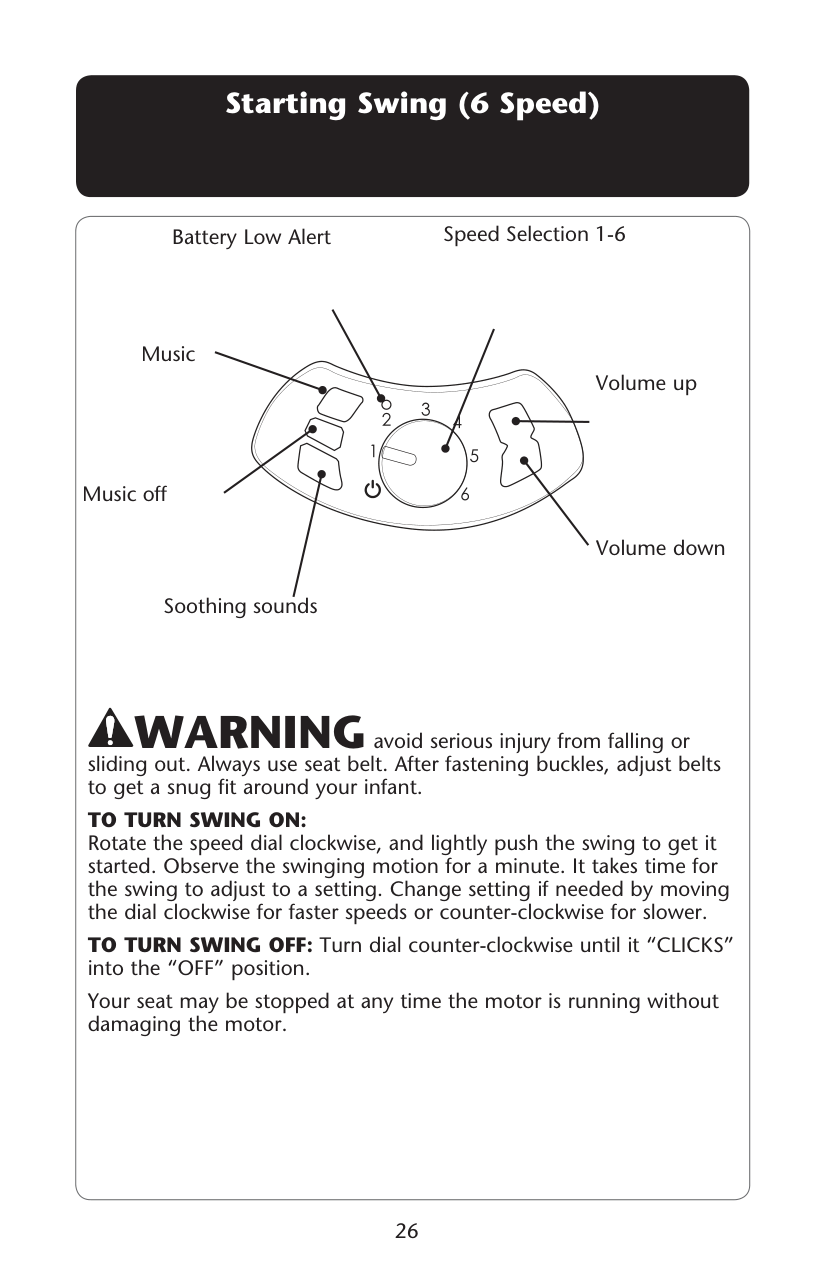
26 Starting Swing (6 Speed) WARNING avoid serious injury from falling or sliding out. Always use seat belt. After fastening buckles, adjust belts to get a snug fit around your infant.
To Turn Swing On:
Rotate the speed dial clockwise, and lightly push the swing to get it started. Observe the swinging motion for a minute. It takes time for the swing to adjust to a setting. Change setting if needed by moving the dial clockwise for faster speeds or counter-clockwise for slower. TO TURN SWING OFF: Turn dial counter-clockwise until it “CLICKS” into the “OFF” position. Your seat may be stopped at any time the motor is running without damaging the motor. Music Soothing sounds Speed Selection 1-6 Volume up Volume down Battery Low Alert Music off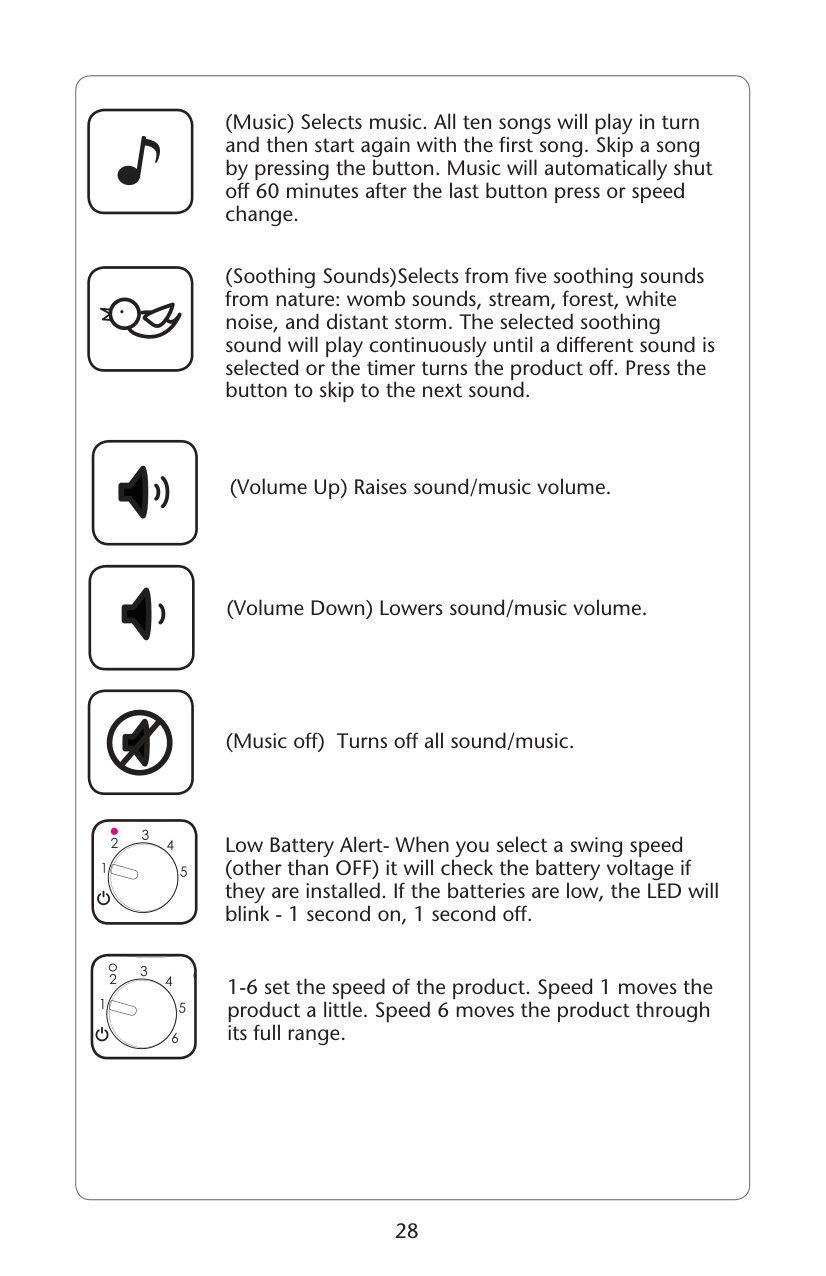
28 (Music) Selects music. All ten songs will play in turn and then start again with the fi rst song. Skip a song by pressing the button. Music will automatically shut off 60 minutes after the last button press or speed change. (Soothing Sounds)Selects from fi ve soothing sounds from nature: womb sounds, stream, forest, white noise, and distant storm. The selected soothing sound will play continuously until a different sound is selected or the timer turns the product off. Press the button to skip to the next sound. (Volume Down) Lowers sound/music volume. (Music off) Turns off all sound/music. 1-6 set the speed of the product. Speed 1 moves the product a little. Speed 6 moves the product through its full range. (Volume Up) Raises sound/music volume. Low Battery Alert- When you select a swing speed (other than OFF) it will check the battery voltage if they are installed. If the batteries are low, the LED will blink - 1 second on, 1 second off.
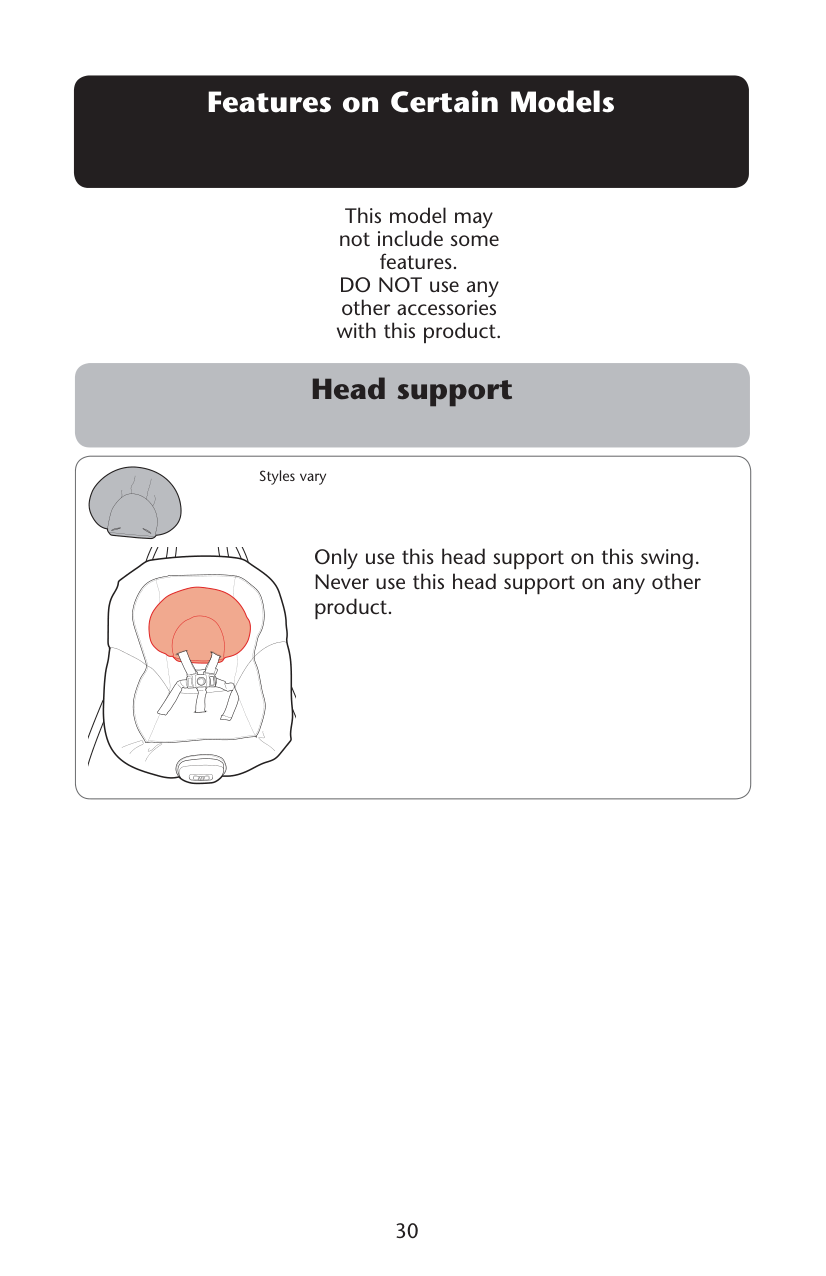
30 Head support Only use this head support on this swing. Never use this head support on any other product. Styles vary Features on Certain Models This model may not include some features. DO NOT use any other accessories with this product.
31
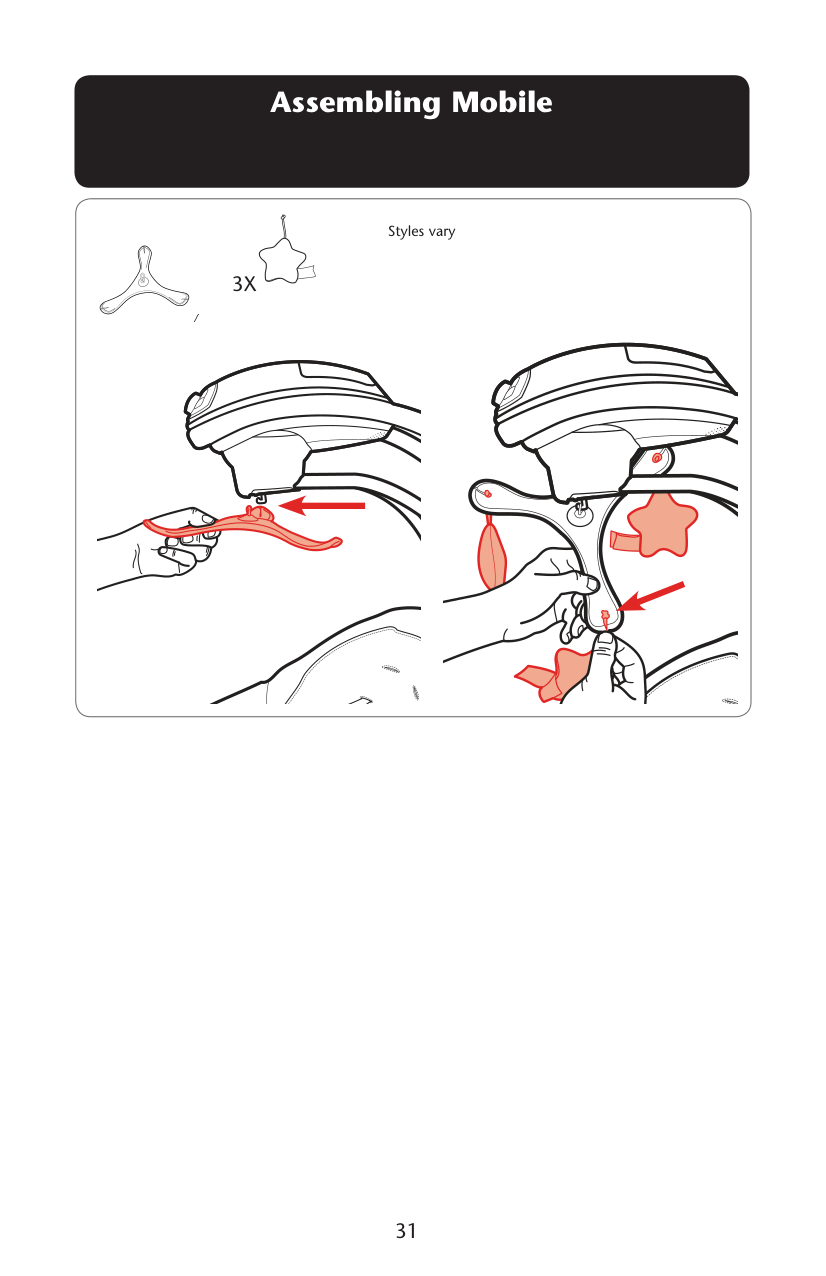
3X
Assembling Mobile Styles vary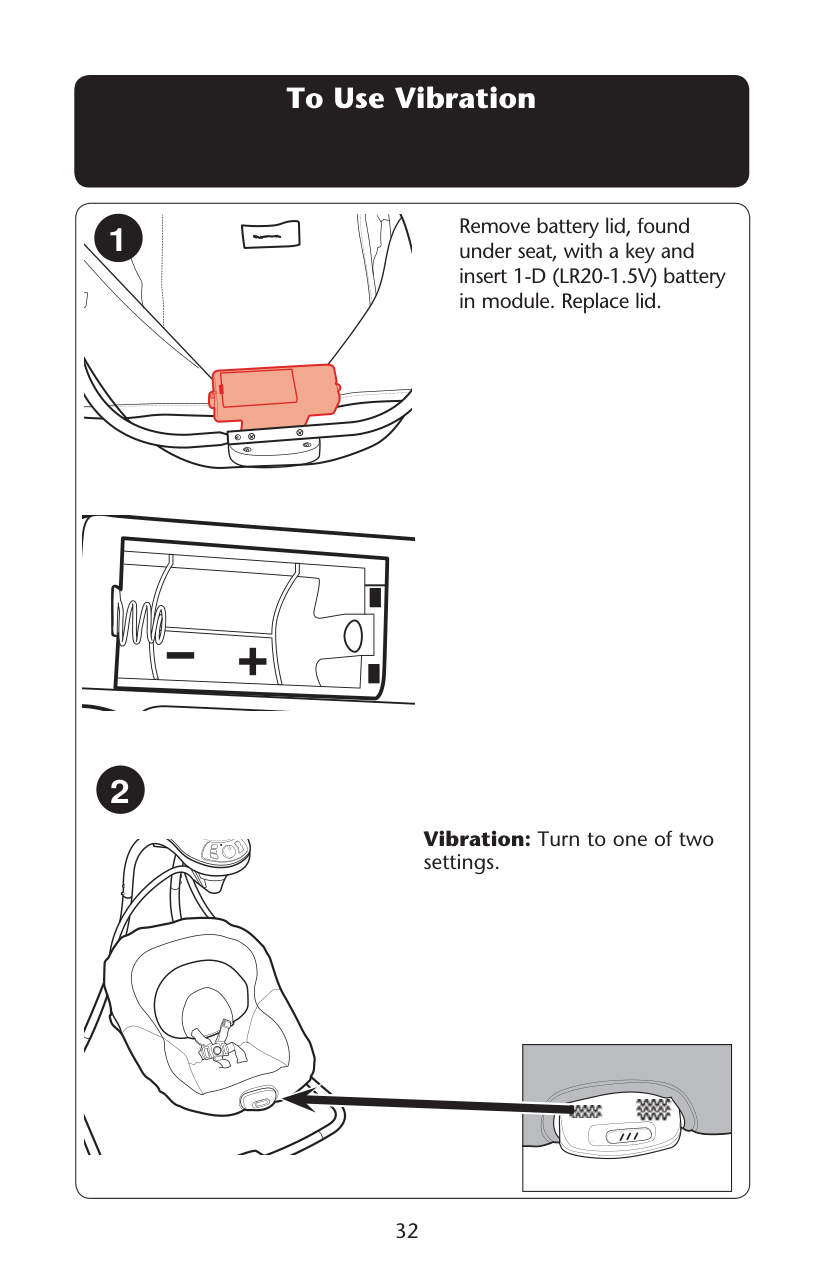
32 2 1 To Use Vibration Remove battery lid, found under seat, with a key and insert 1-D (LR20-1.5V) battery in module. Replace lid. Vibration: Turn to one of two settings.
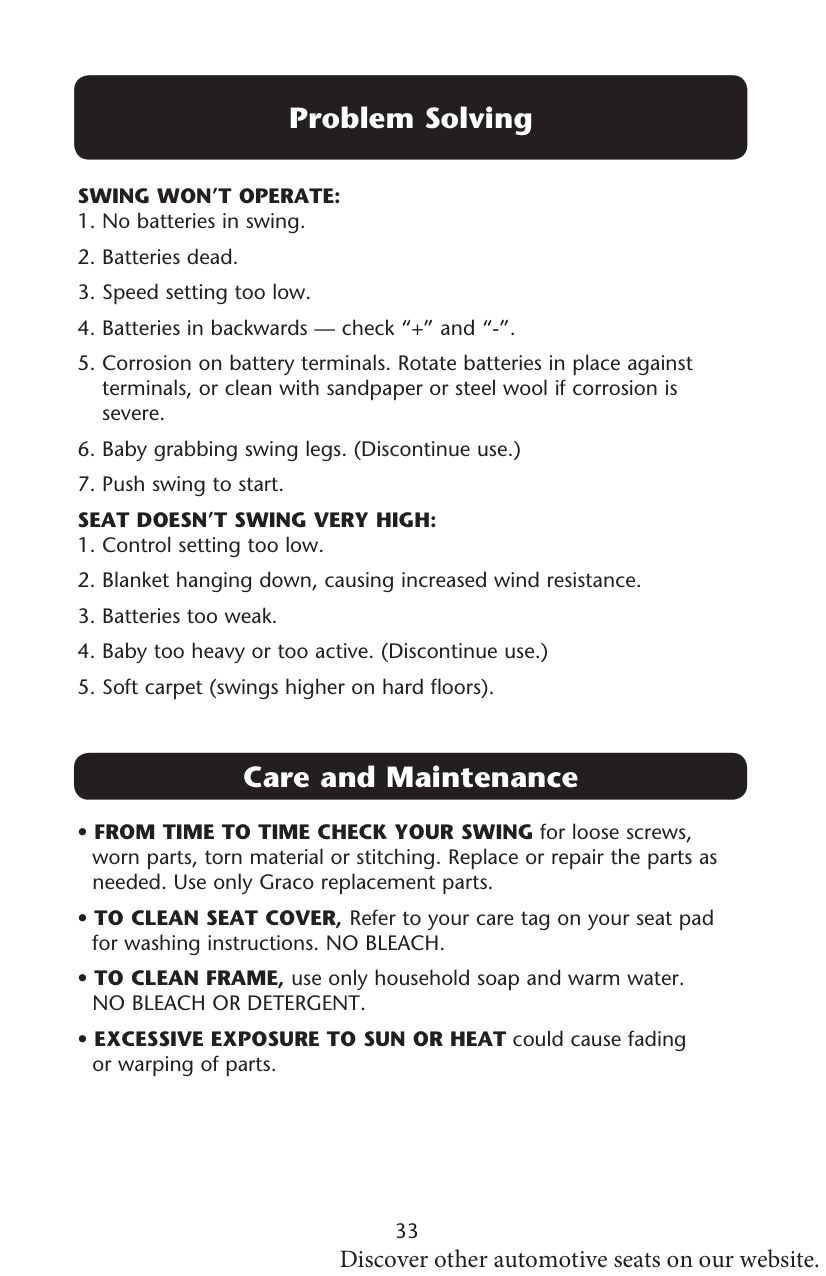
33 Problem Solving