
Ask AI
— answers from the official manualAnswers from the official manual.
Common questions
Common Questions
20 totalWhat type of batteries does the YAP1F remote controller require and how do I replace them?
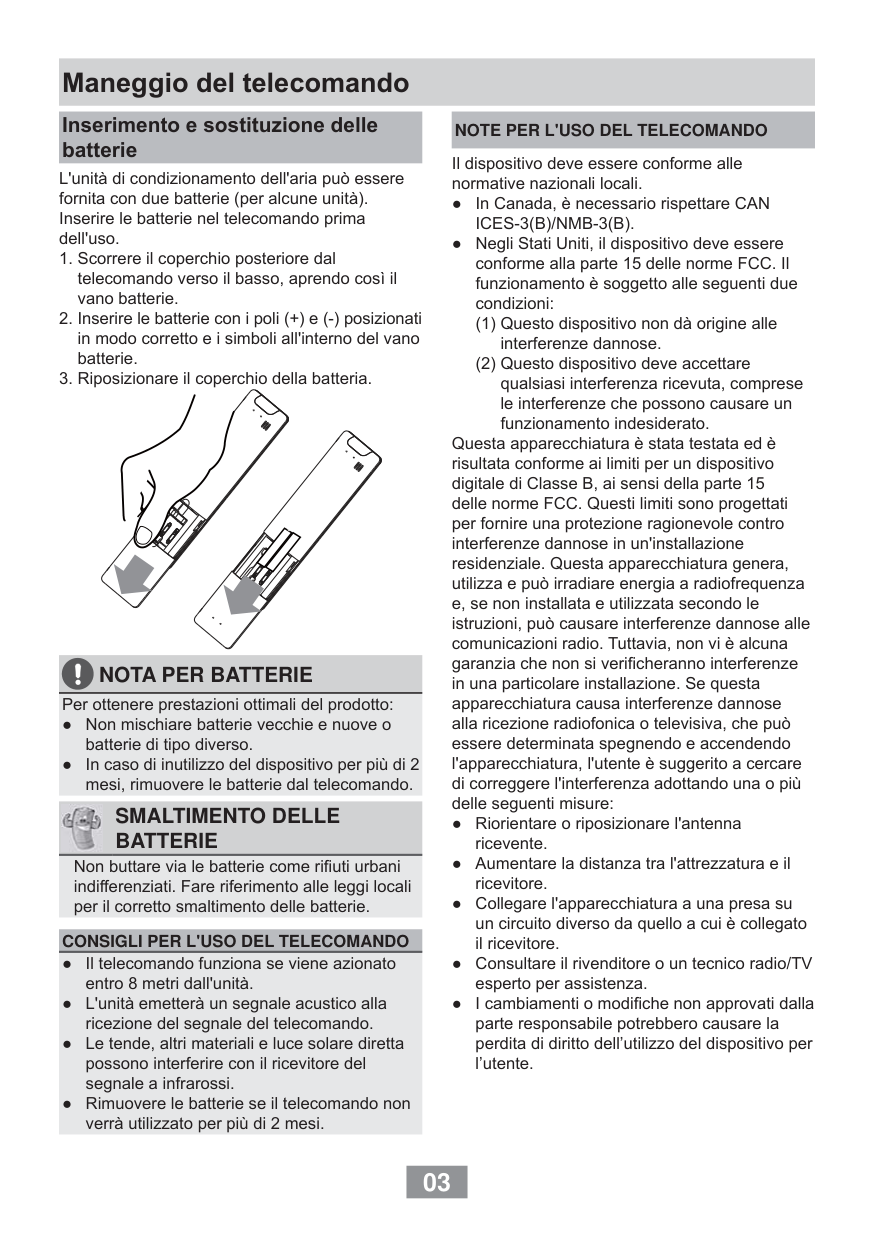
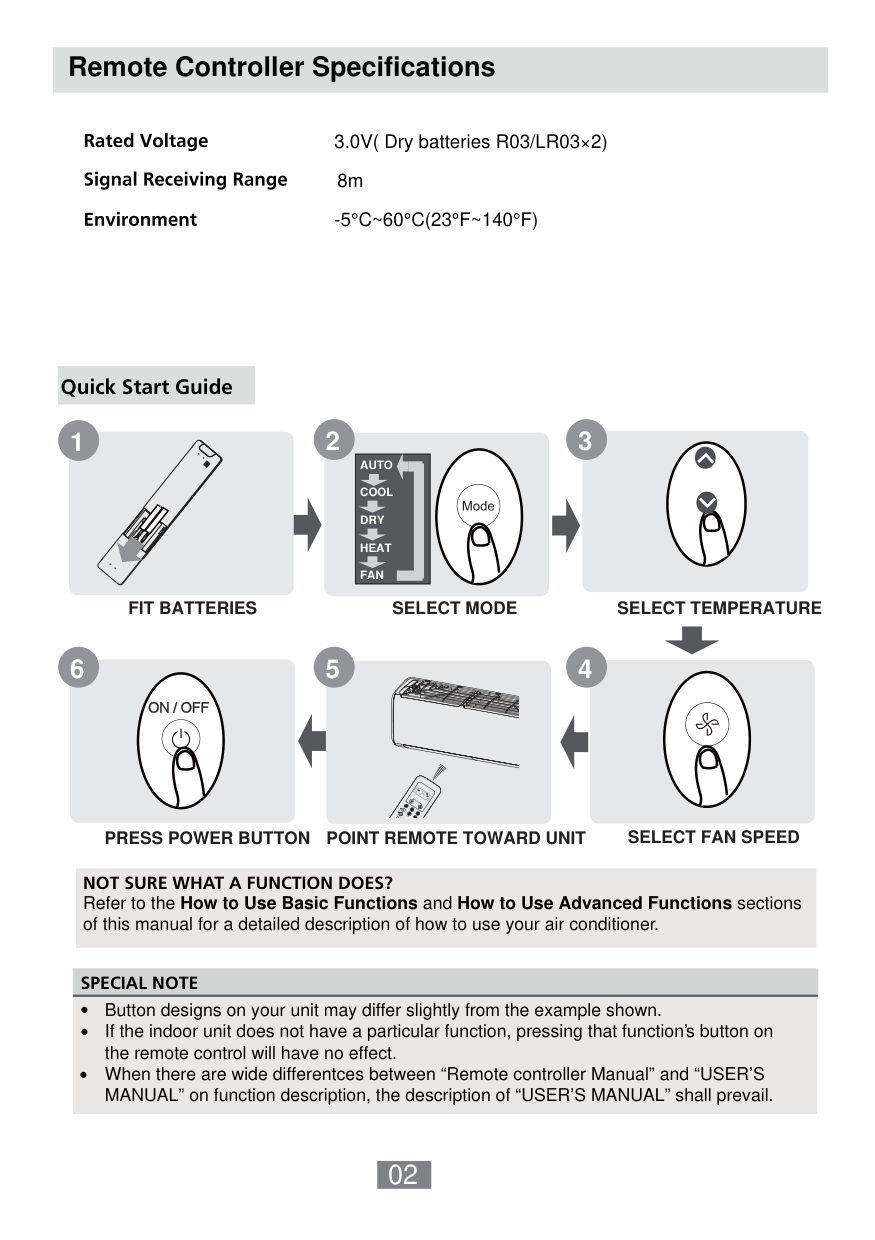
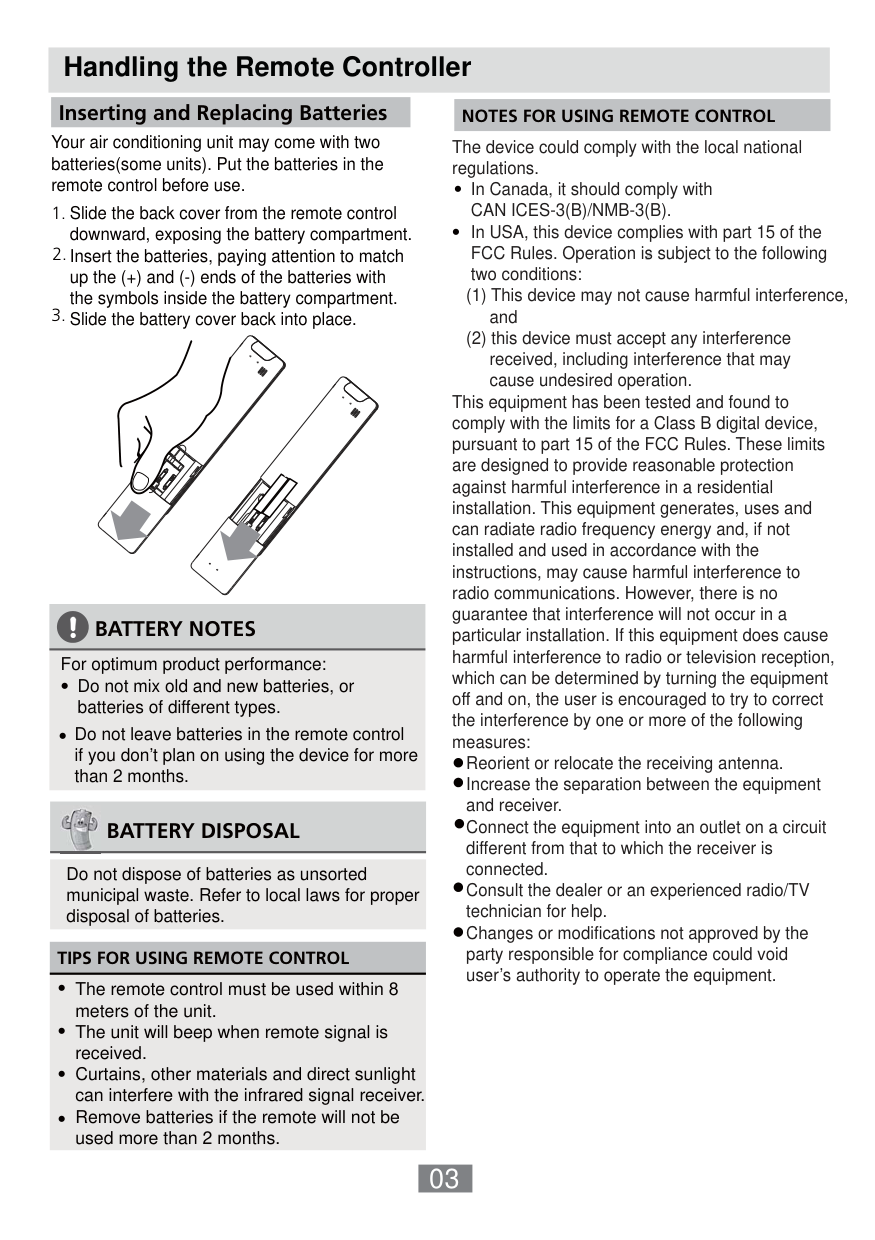
The YAP1F remote controller requires two 7# (AAA 1.5V) dry batteries. To replace them, lift the cover along the direction of the arrow, take out the old batteries, insert the new ones ensuring correct + and - polarity, then reinstall the cover. When replacing batteries, do not use old or different types of batteries as this may cause malfunction. (Page 7)
What should I do first when using the YAP1F remote controller for the very first time?
When using the remote controller for the first time or after replacing batteries, you must set the system clock to the current time. Press the CLOCK button until the time blinks, press the up or down button to adjust the time, then press CLOCK again to confirm. (Page 2)
What is the temperature range I can set on the YAP1F remote controller?
The settable temperature range is from 16°C to 30°C. Press the up button to increase the temperature and the down button to decrease it. Note that under auto mode, manual temperature adjustment is not needed. (Page 3)
How do I activate the child lock on the YAP1F remote controller to prevent accidental button presses?
Press the up and down buttons simultaneously to lock all buttons on the remote controller, and the lock icon will be displayed. Press the same combination again to unlock the buttons. If buttons are locked, the lock icon will blink 3 times when any button is pressed and the operation will be invalid. (Page 6)
What does the X-FAN function do and when can it be used?
The X-FAN function blows away water on the evaporator after the unit is turned off in order to avoid mildew. It can only be activated in cool or dry mode by pressing the X-FAN button. When the icon is displayed, X-FAN is on; when it is not displayed, X-FAN is off. (Page 4-5)
My YAP1F remote controller is not working properly — what troubleshooting steps should I take?
If the remote controller does not operate normally, remove the batteries and reinsert them after 30 seconds. If it still cannot operate properly, replace the batteries entirely. Also ensure you do not mix old or different types of batteries, as this may cause malfunction. (Page 8)
Show 14 more questions
What is the I FEEL function and how does it work?
How do I set a timer to automatically turn the unit off at a specific time?
How do I switch the temperature display between Celsius and Fahrenheit on the YAP1F?
What is the Absence function and when should I use it?
How do I adjust fan speed using the remote controller?
How do I set wind swing settings on the remote controller?
How do I set turbo mode on the remote controller?
How do I set energy-saving mode on the remote controller for cooling?
How can I use absence function during heating?
What should I do if my remote controller isn't working properly?
How do I set child lock on my remote controller?
How do I set the time on the remote controller?
What operation modes are available on the remote controller?
How do I set the temperature using the remote controller?
Full Manual
26 pages

User’s Manual of Remote Controller
#### Owner's Manual Air Conditioners
Thank you for choosing Air Conditioners, please read this owner’s manual carefully before operation and retain it for future reference.If you have lost the Owner’s Manual, please contact the local agent or visit www.gree.com or sent email to global@gree.com.cn or electronic version.
GREE reserves the right to interpret this manual which will be subject to any change due to product improvement without further notice.
GREE Electric Appliances, Inc. of Zhuhai reserves the final right to interpret this manual.
Preface
For correct installation and operation, please read all instructions carefully. Before reading the instructions, please be aware of the following items:
carefully.
capacity of outdoor units. Otherwise, poor effect of cooling or heating may result.
as possible and provide the following information:
In order to prevent units from being damaged or operating normally because of improper disassembly, please do not disassemble the unit by yourself. If you need to disassemble and check units, please contact our service center. We will send specialists to guide the disassembly.
reasons, these graphics are subject to change by manufacturer without prior notice.
Contents
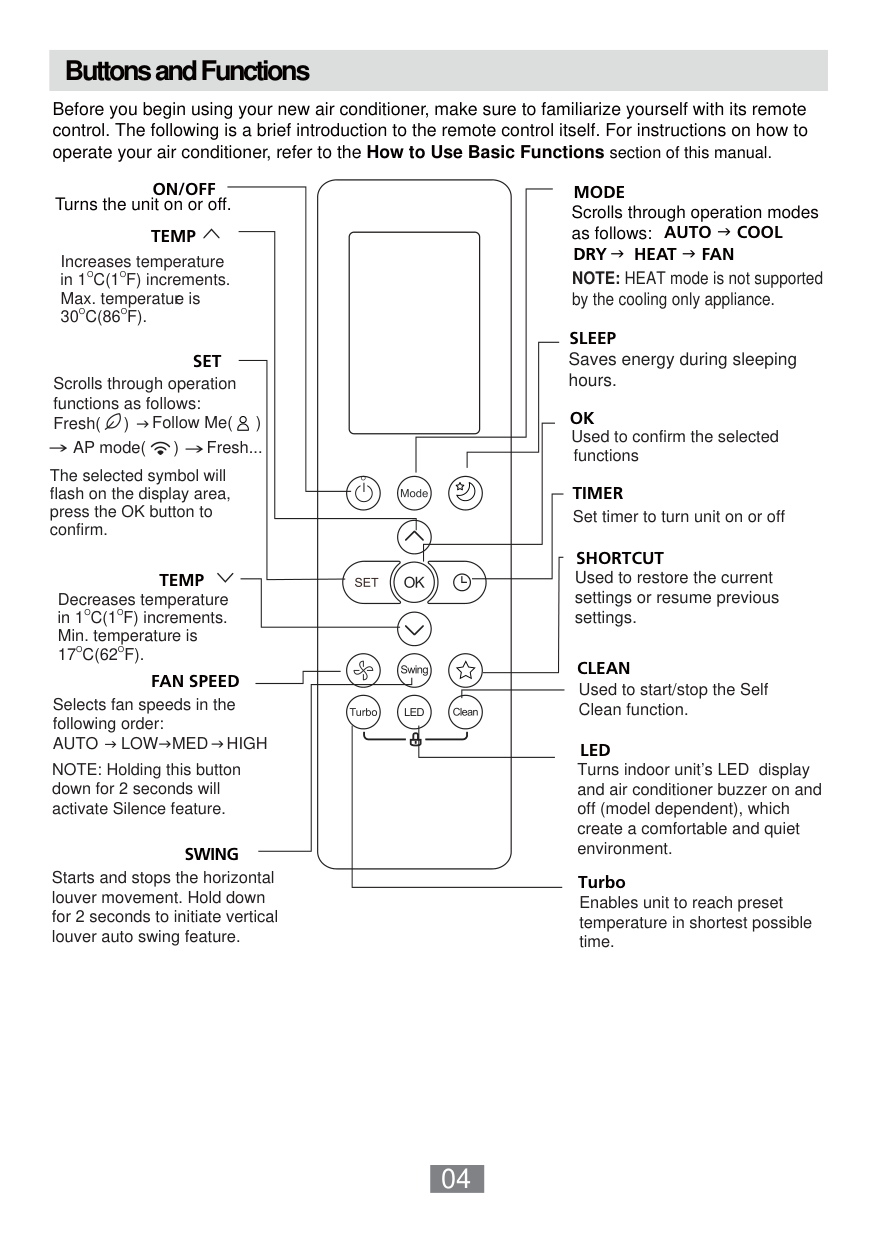
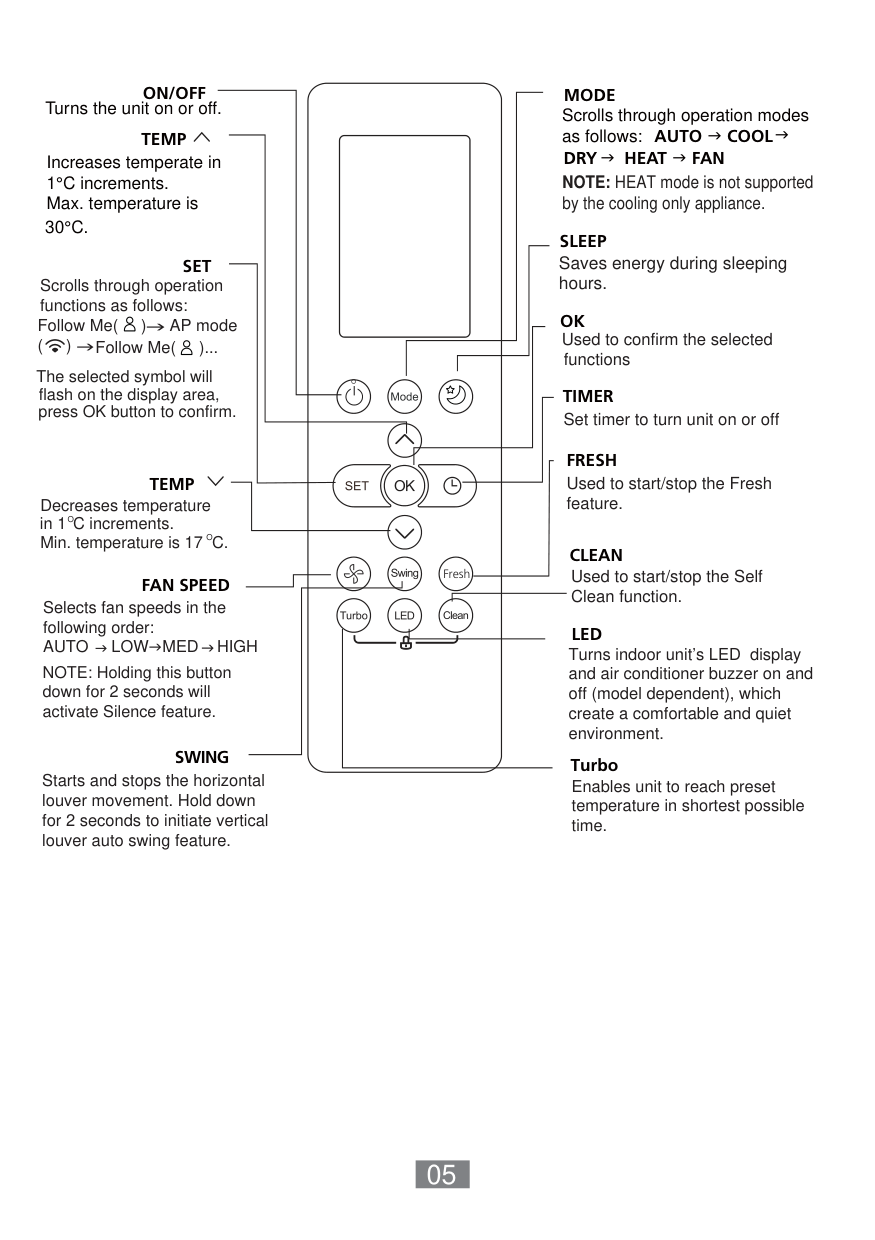
1 Remote Controller YAP1F

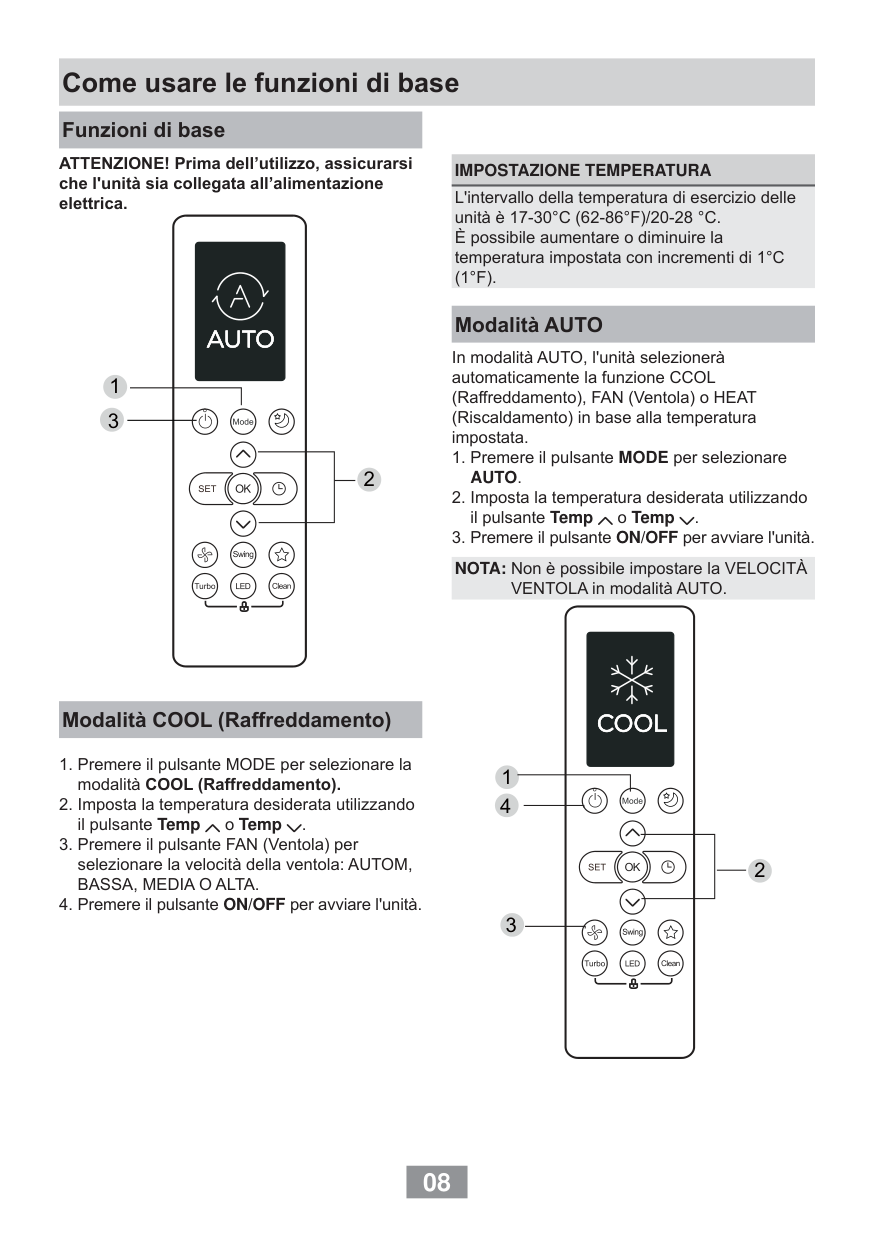
|No.|Button name|Function| |---|---|---| |1|ON/OFF|Turn on or turn off the unit| |2|TURBO|Set turbo function| |3|MODE|Set operation mode| |4||Set up&down swing status| |5|I FEEL|Set I FEEL function| |6|TEMP|Switch temperature displaying type on the unit’s display| |7||Set health function and air function| |8|LIGHT|Set light function| |9|X-FAN|Set X-FAN function| |10|SLEEP|Set sleep function| |11|CLOCK|Set clock of the system| |12|TOFF|Set timer off function| |13|TON|Set timer on function| |14||Set left&right swing status| |15|FAN|Set fan speed| |16|
/|Set temperature and time|
1.2 Preparation before operation
When using the remote controller for the first time or after replacing the batteries, please set the time of the system according to current time in the following steps:


1.3 Introduction of operation function
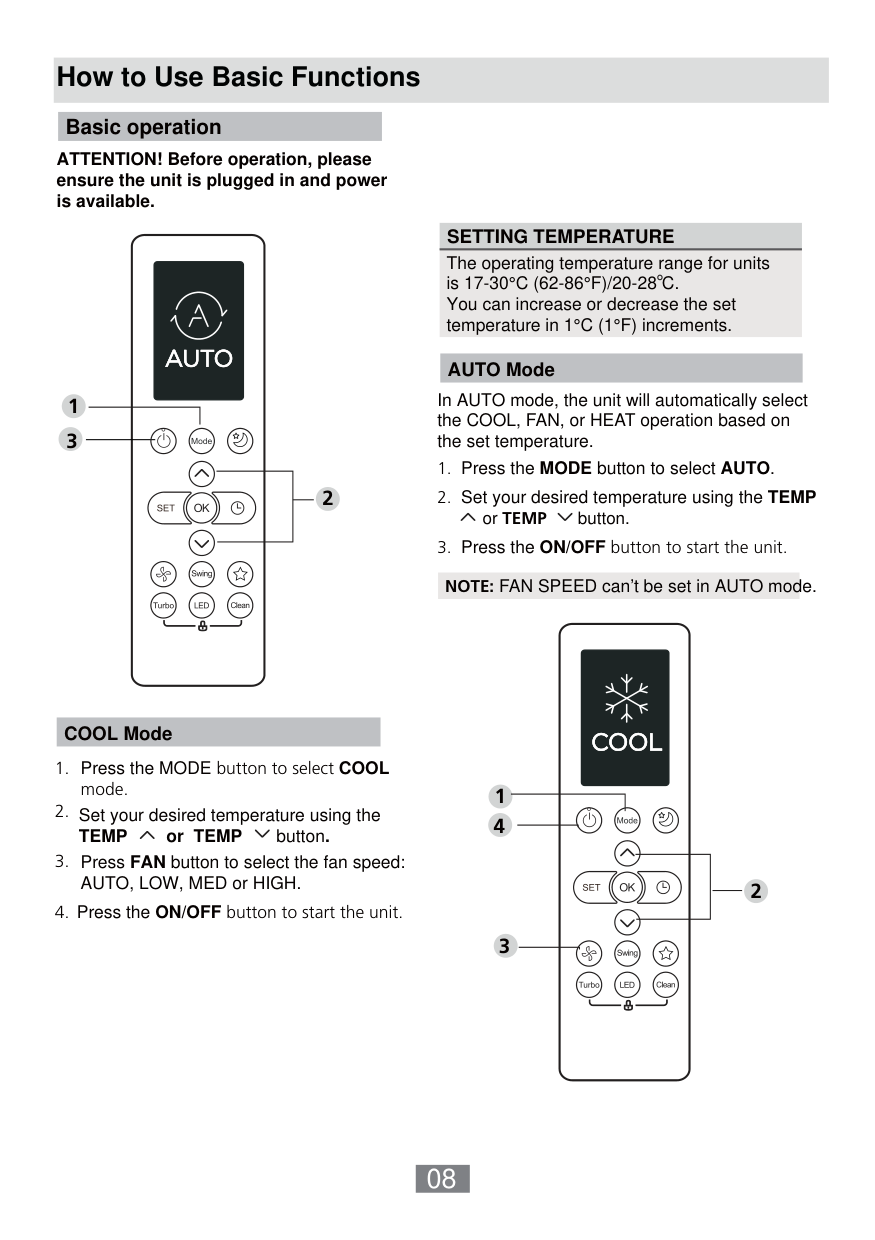
(1). Selecting operation mode
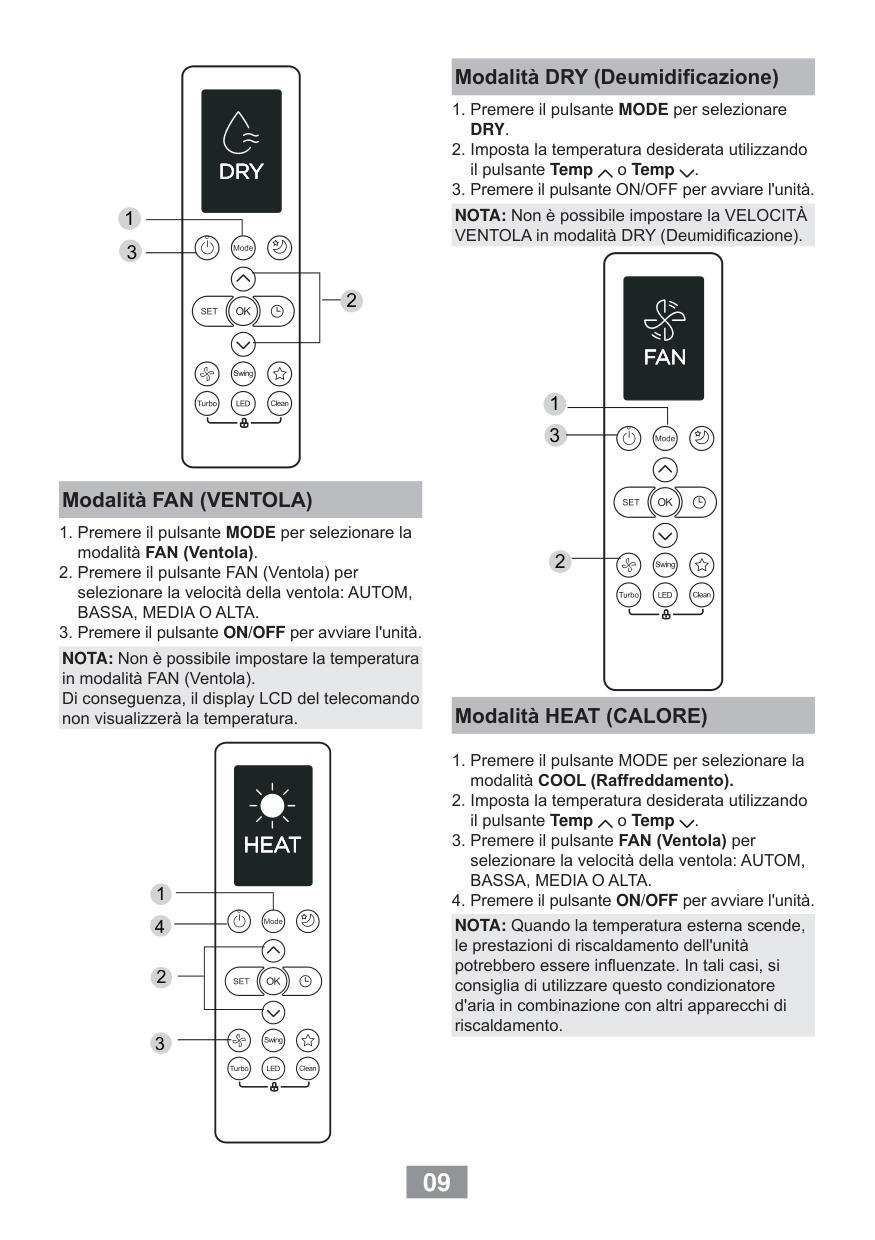
In unit on status, press MODE button to select operation mode in following sequence:

(2). Setting temperature


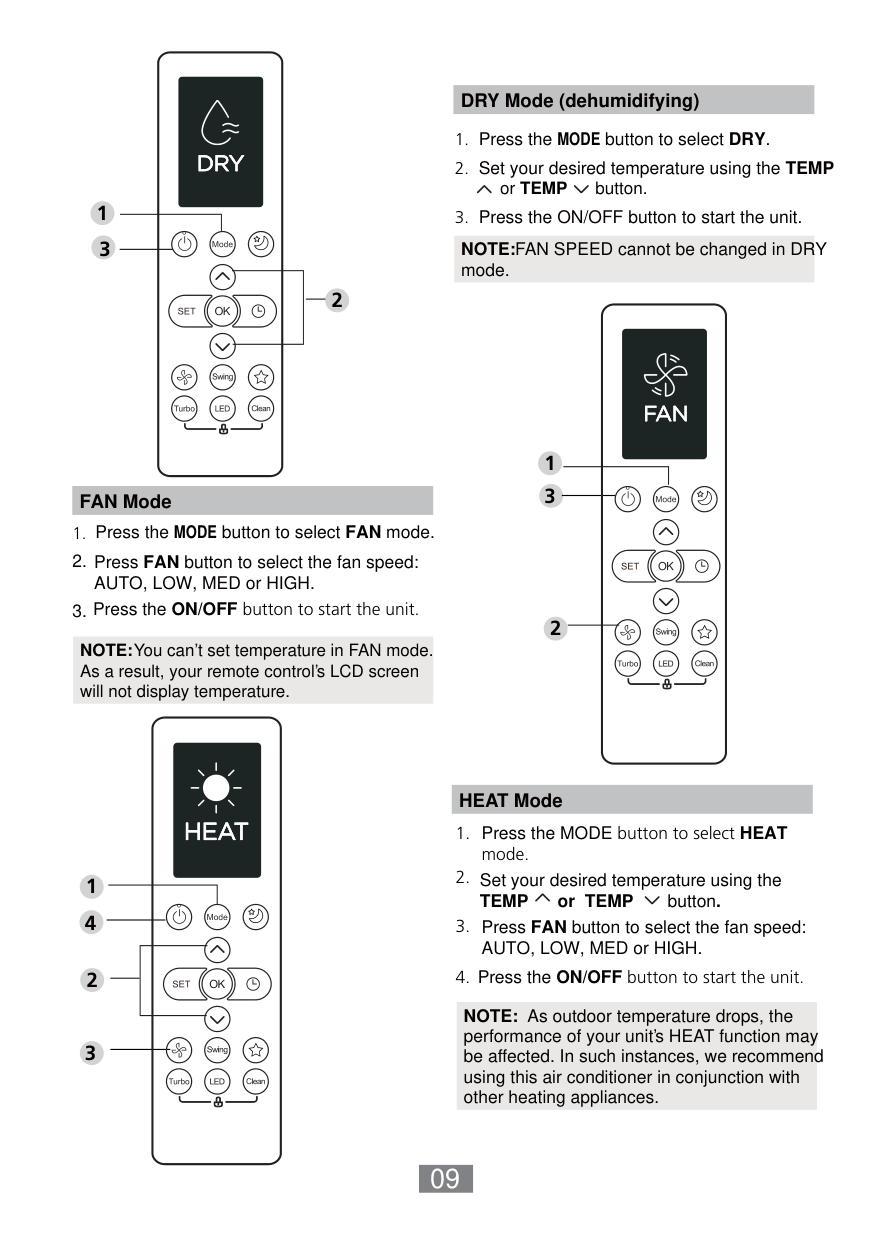
In unit on status, press button to increase setting temperature and press button to decrease setting temperature. The range of temperature is from 16℃ to 30℃. Note: Under auto mode, manual adjustment of temperature is not needed.
(3). Adjusting fan speed In unit on status, press FAN button to adjust fan speed in following sequence:

###### Notes:
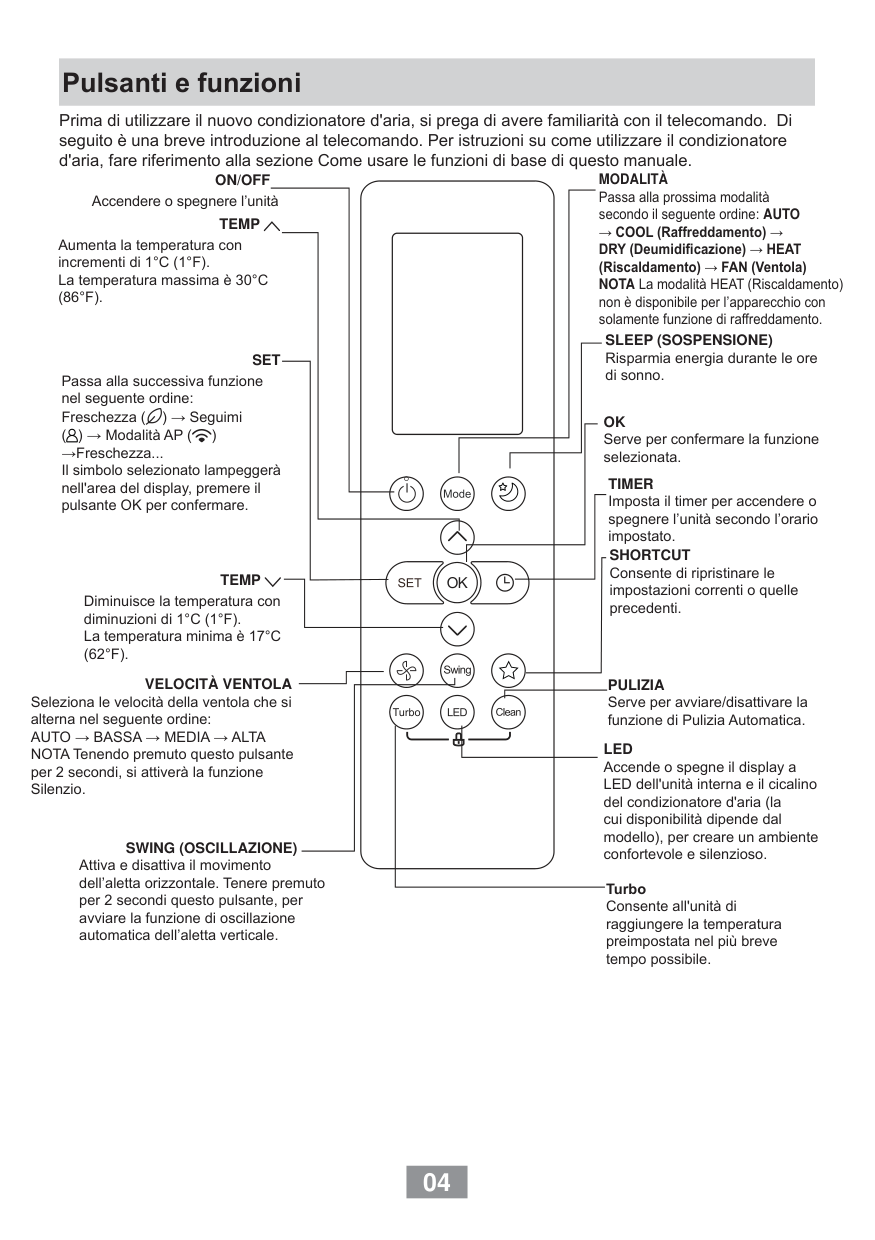
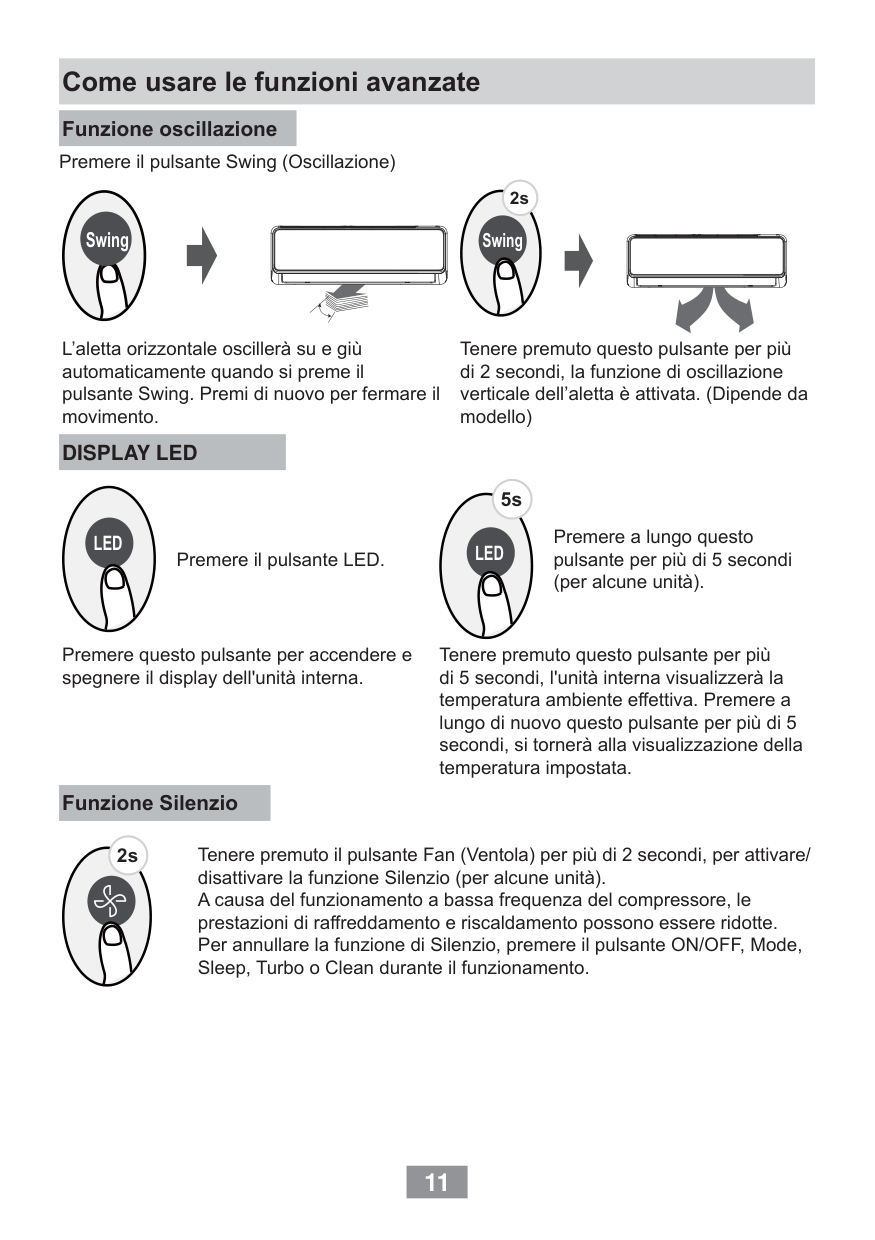
(4). Setting swing function Setting left&right swing


Note: operate continuously left&right swing in 2 seconds, swing states will change according to above-mentioned order, or switch closed state and state.

Setting up&down swing


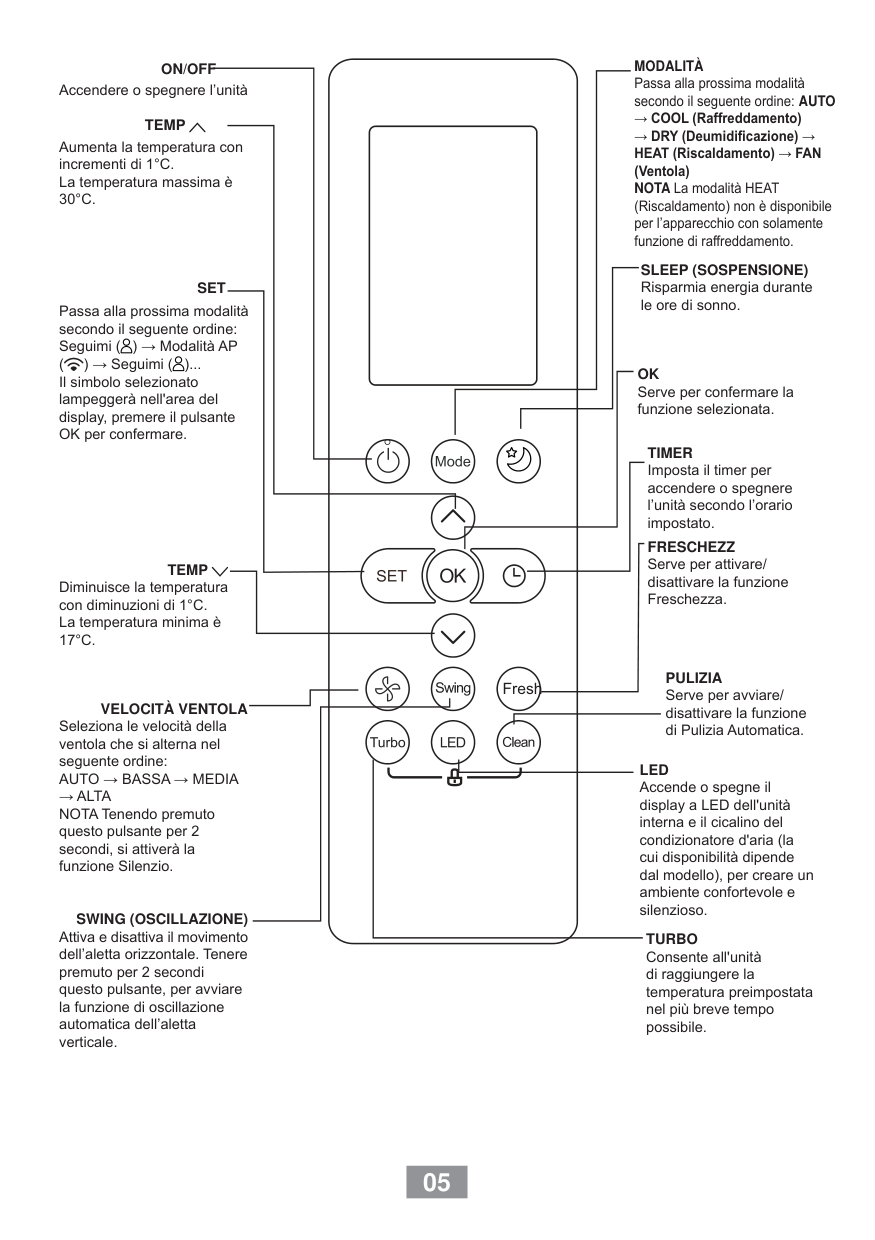
Note: operate continuously left&right swing in 2 seconds, swing states will change according to above-mentioned order, or switch closed state and state;

(5). Setting turbo function Under cool or heat mode, press TURBO button to set turbo function. When is displayed, turbo function is on. When is not displayed, turbo function is off. When turbo function is on, the unit operates in super high speed to achieve quick


cooling or heating. When turbo function is off, the unit operates in setting fan speed.
(6). Setting light function
The light on the receiver light board will display present operation status. If you want to turn off the light, please press LIGHT button. Press this button again to turn on the light.
(7). Viewing ambient temperature
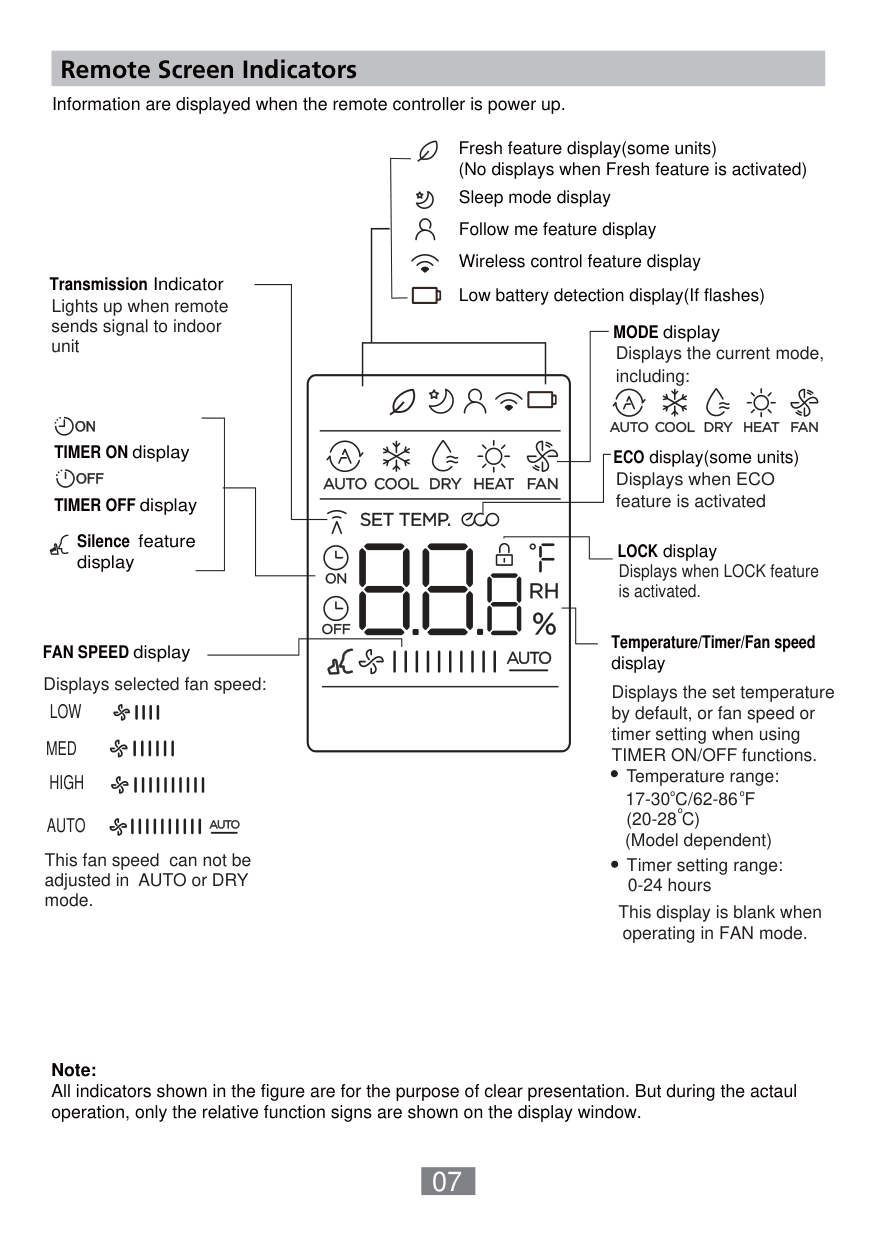
In unit on status, receiver light board or wired controller is defaulted to display setting temperature. Press TEMP button to view indoor or outdoor ambient temperature.
When is displayed, it means the displayed temperature is setting temperature. When is displayed, it means the displayed temperature is indoor ambient

temperature.

When is displayed, it means the displayed temperature is outdoor ambient temperature. Note: setting temperature is always displayed in Remote Controller.
(8). Setting X-FAN function In cool or dry mode, press X-FAN button to set X-FAN function. When is displayed, X-FAN function is on. When is not displayed, X-FAN function is off. When X-FAN function is on, the water on the evaporator will be blown away until
turning off the unit to avoid mildew. (9). Setting health function In unit on status, press button to set health function. When is displayed, health function is on. When is not displayed, health function is off. Health function is available when the unit is equipped with anion generator. When
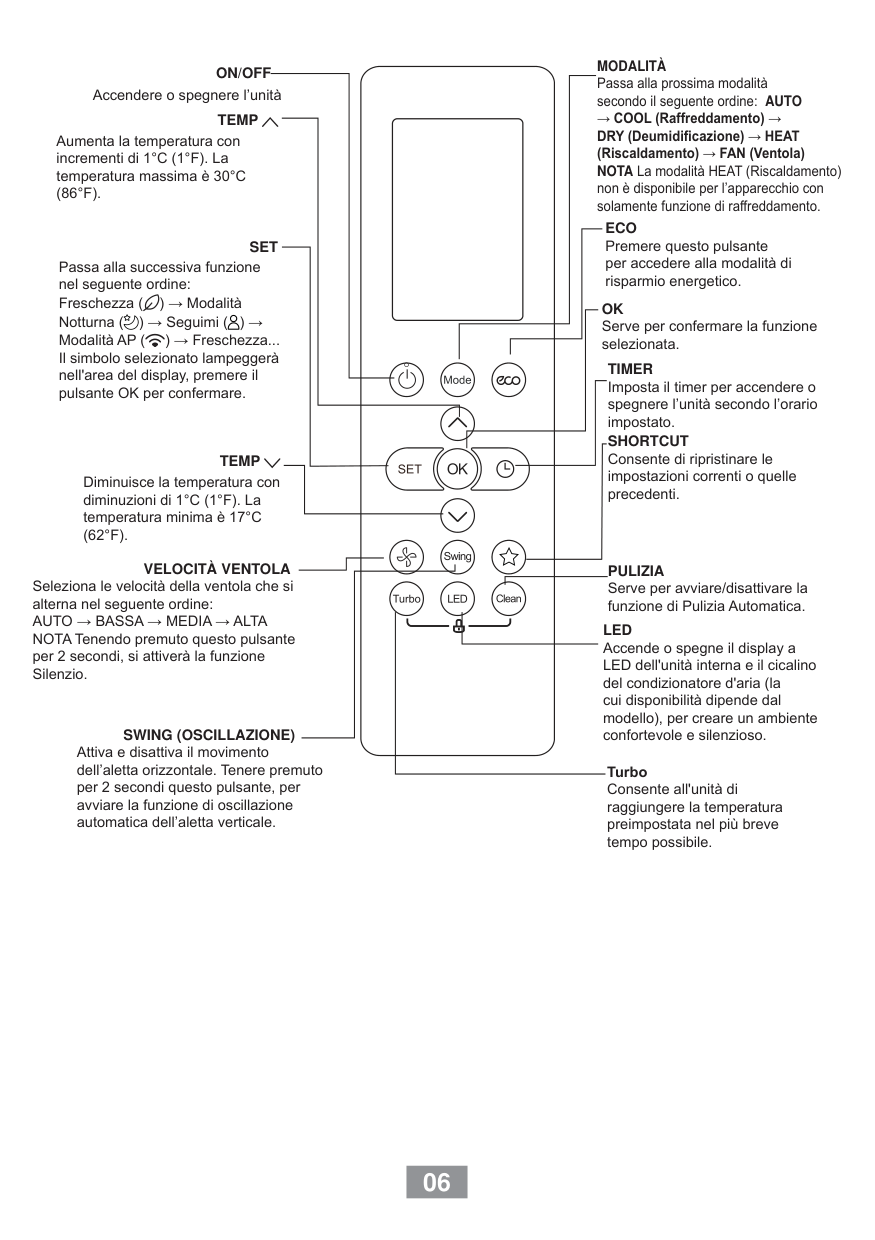

health function is on, the anion generator will start operation, adsorbing the dusts and
killing the bacteria in the room. (10). Setting air function Press button until is displayed, then air function is turned on. Press button until is disappeared, then air function is turned off. When the indoor unit is connected with fresh air valve, air function setting can


control the connection of fresh air valve, which can control the fresh air volume and improve the air quality inside the room.
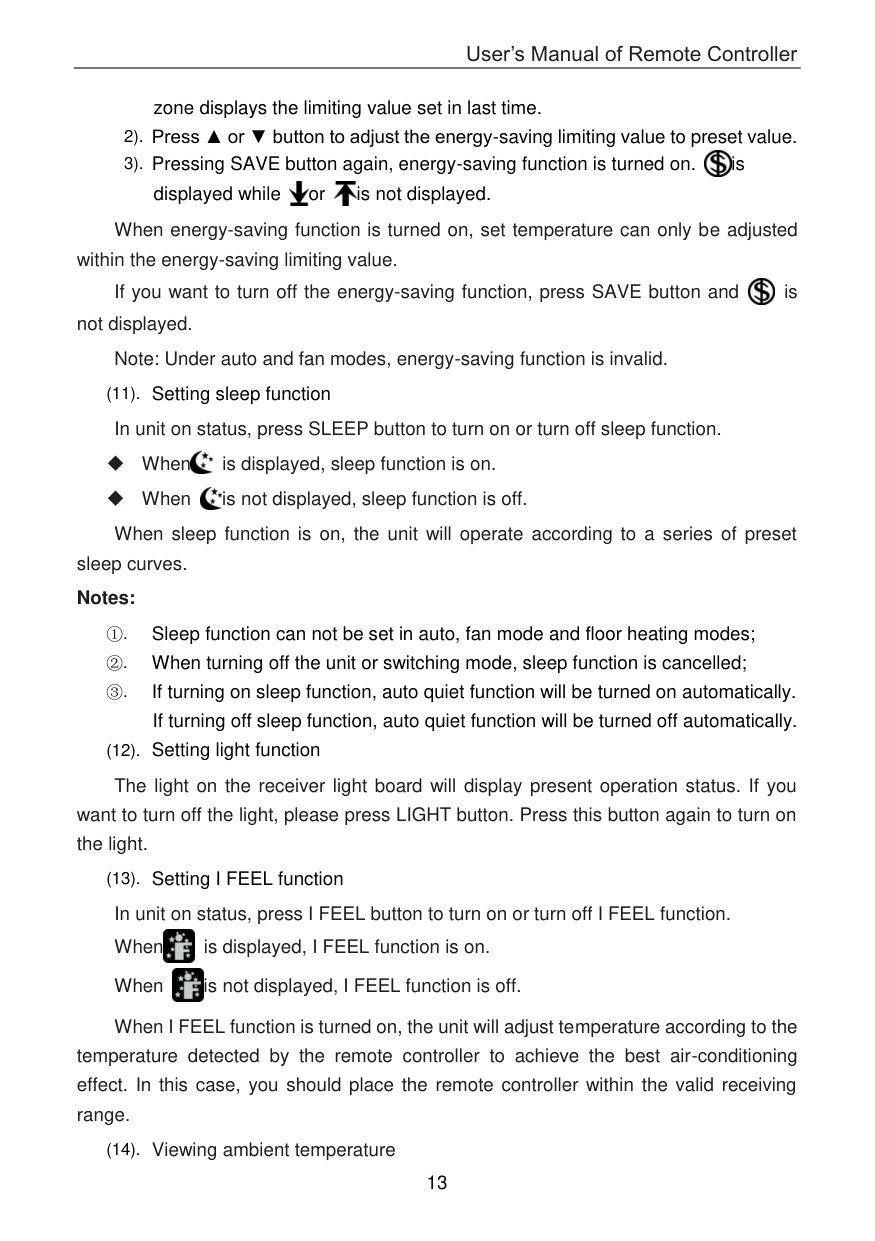
(11). Setting sleep function In unit on status, press SLEEP button to turn on or turn off sleep function.
When is displayed, sleep function is on.
When is not displayed, sleep function is off. Notes:
(12). Setting I FEEL function In unit on status, press I FEEL button to turn on or turn off I FEEL function. When is displayed, I FEEL function is on. When is not displayed, I FEEL function is off.


When I FEEL function is turned on, the unit will adjust temperature according to the temperature detected by the remote controller to achieve the best air-conditioning effect. In this case, you should place the remote controller within the valid receiving range.
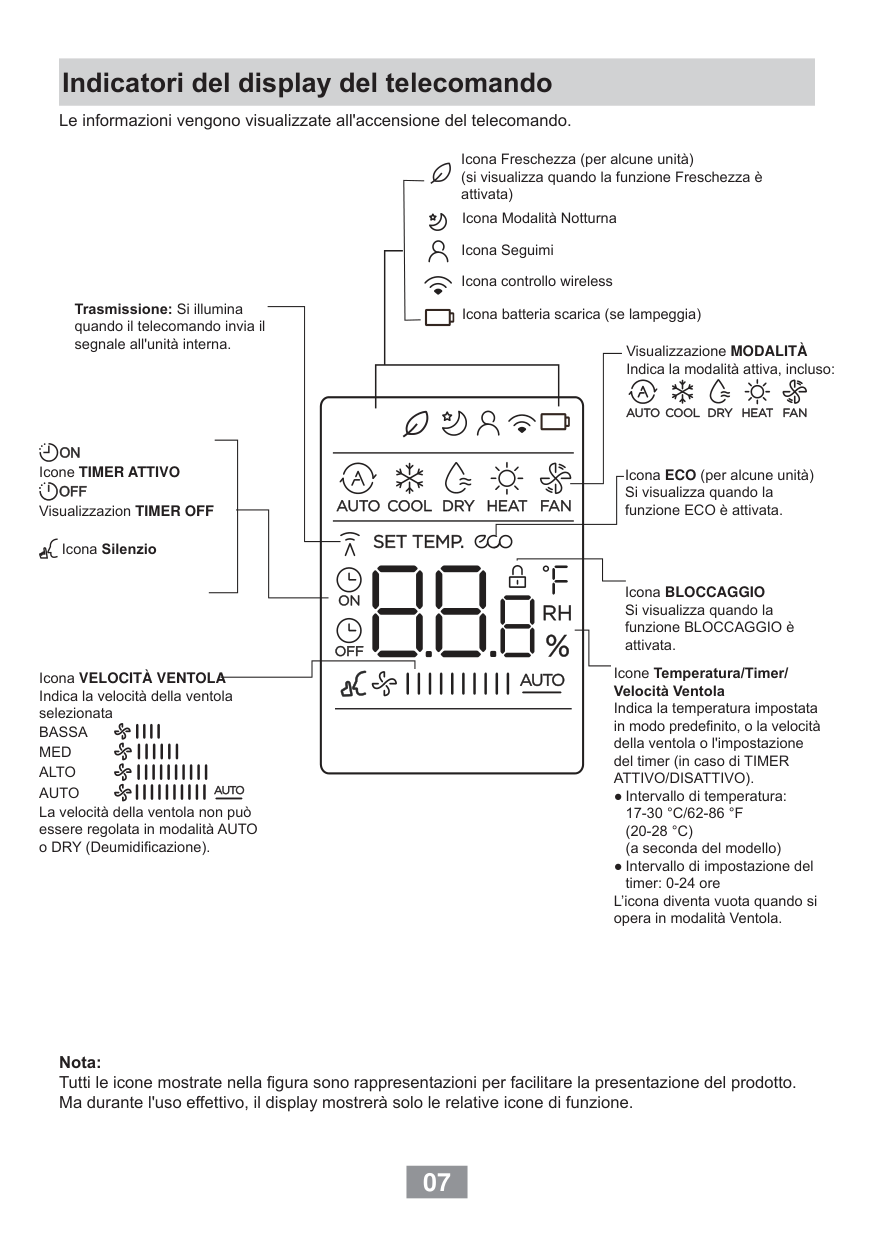
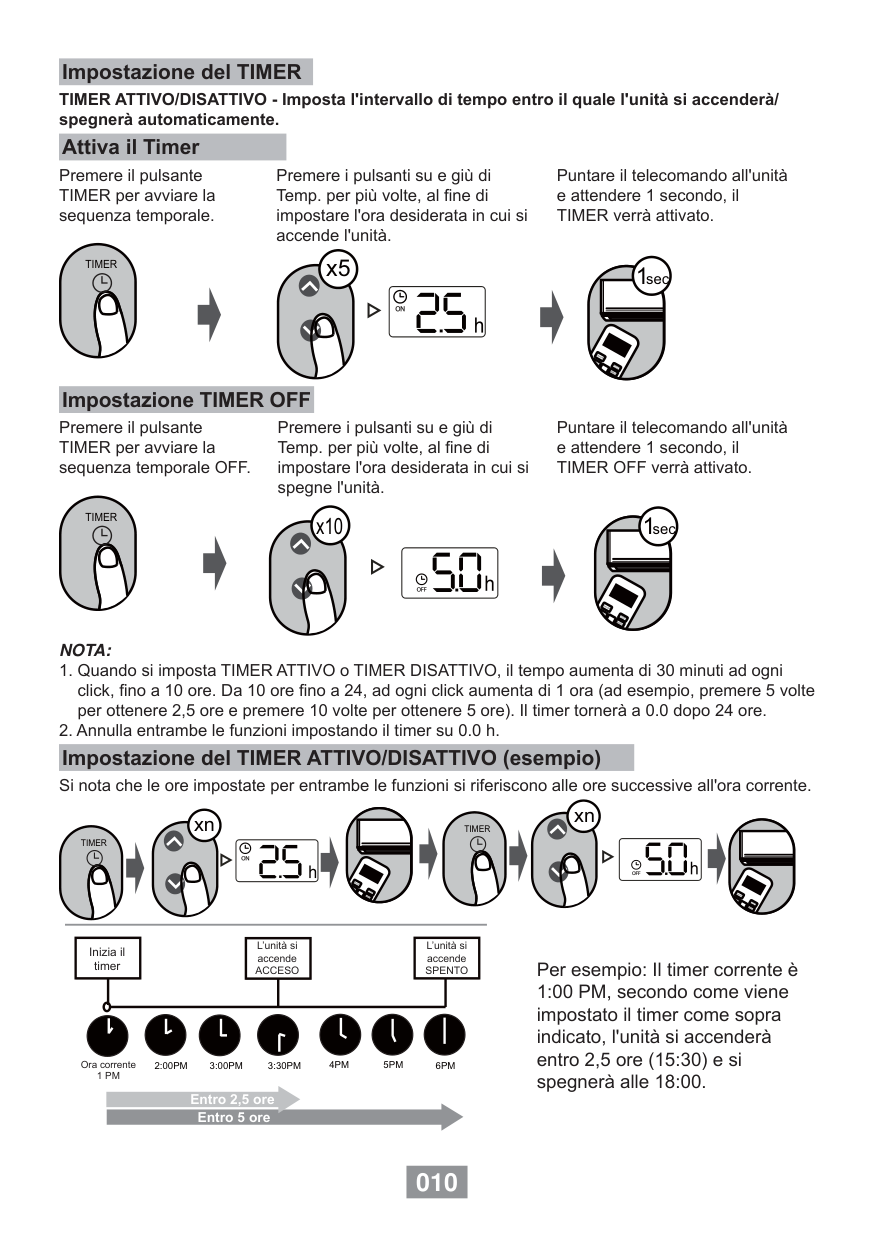
(13). Setting timer
You can set the operation time of unit as you need. You can also set timer on and timer off in combination.
Before setting, check if the time of the system is the same as the current time. If not, please set the time according to current time.
1). Setting timer off


1.4 Introduction of special functions
(1). Setting child lock


Press and button simultaneously to lock the buttons on remote controller and is displayed.


Press and button simultaneously again to unlock the buttons on remote controller and is not displayed.

If the buttons are locked, blinks 3 times when pressing the button and any operation on the button is invalid.
(2). Switching temperature scale
In unit off status, press MODE button and button simultaneously to switch temperature scale between ℃ and ℉. (3). Setting energy-saving function

In unit on status and under cool mode, press CLOCK and TEMP button simultaneously to enter energy-saving mode.
When is displayed, energy-saving function is on.
When is not displayed, energy-saving function is off. If you want to turn off the energy-saving function, press CLOCK and TEMP button
and is not displayed. Note: energy-saving function is only available in cooling mode and it will be exited when switching mode or setting sleep function.
(4). Absence function In unit on status and under heat mode, press CLOCK and TEMP button
simultaneously to enter absence function. Temperature displaying zone displays 8 and is displayed.

Press CLOCK and TEMP button simultaneously again to exit absence function. Temperature displaying zone resumes previous display and is not displayed.
In winter, absence function can keep the indoor ambient temperature above 0℃ to avoid freezing. Note: Absence function is only available in heating mode and it will be exited when switching mode or setting sleep function.
1.5 Replacing batteries in remote controller and notes

Fig.1 Fig.2 Notes:

2 Remote Controller YV1L1

Button name and function introduction
|No.|Button name|Function| |---|---|---| |1|ON/OFF|Turn on or turn off the unit| |2|FAN|Set fan speed| |3|▲/▼|Set temperature and time| |4|MODE|Set operation mode| |5||Set quiet function| |6||Set health function and air function| |7||Set left&right swing status|
|8||Set up&down swing status| |---|---|---| |9|X-FAN|Set X-FAN function| |10|TIMER ON|Set timer on function| |11|TIMER OFF|Set timer off function| |12|SAVE|Set energy-saving function| |13|SLEEP|Set sleep function| |14|LIGHT|Set light function| |15|CLOCK|Set clock of the system| |16|I FEEL|Set I FEEL function| |17|TEMP|Switch temperature displaying type on the unit’s display|
2.1 Preparation before operation
When using the remote controller for the first time or after replacing the batteries, please set the time of the system according to current time in the following steps:

2.2 Introduction of operation function
(1). Selecting operation mode
In unit on status, press MODE button to select operation mode in following sequence:

Floor heating, quick heating and heat supply modes are valid only with specialized remote controller.
If change to specialized remote controller, press MODE button and TEMP button simultaneously, and then will blink for three times.

If change to normal remote controller, press MODE button and TEMP button

simultaneously, and then will blink for three times.
(2). Setting temperature
In unit on status, press ▲ button to increase set temperature and press ▼ button to decrease setting temperature.
Note: Under auto mode and when absence function is on, temperature adjustment is invalid.
(3). Adjusting fan speed In unit on status, press FAN button to adjust fan speed in following sequence:


When is set, the whole unit operates in super high speed to achieve quick cooling or heating. Notes:
(4). Setting swing function Setting left&right swing


In unit off status, press ▲ button and button to switch between simple swing mode and fixed-angle swing mode. on the remote controller will be blinking for 2 seconds during switching.

Setting up&down swing


In unit off status, press ▲ button and button to switch between simple swing mode and fixed-angle swing mode. on the remote controller will be blinking for 2 seconds during switching.

(5). Setting quiet function In unit on status, press button to adjust quiet status in following sequence:


: auto quiet function is on; : quiet function is on.
When quiet function is set, fan speed of indoor unit will be decreased to the lowest speed in order to reduce the noise of indoor unit. Notes:

(6). Setting health function In unit on status, press button to turn on or turn off health function.

Health function is available when the unit is equipped with anion generator. When health function is on, the anion generator will start operation, adsorbing the dusts and killing the bacteria in the room. (7). Setting air function
Turning on air function:


Press button until is disappeared, then air function is turned off.
When the indoor unit is connected with fresh air valve, air function setting can control the connection of fresh air valve, which can control the fresh air volume and improve the air quality inside the room.
(8). Setting X-FAN function In unit on status, press X-FAN button to turn on or turn off X-FAN function. When is displayed, X-FAN function is on. When is not displayed, X-FAN function is off. When X-FAN function is on, the water on the evaporator will be blown away after


turning off the unit to avoid mildew.
(9). Setting timer
You can set the operation time of unit as you need. You can also set timer on and timer off in combination.
Before setting, check if the time of the system is the same as the current time. If not, please set the time according to current time.
Setting timer off
Press TIMER OFF button again to cancel timer and OFF is not displayed.
Setting timer on
Press TIMER ON button again to cancel timer and ON is not displayed.
(10). Setting energy-saving function
If you want to turn on energy-saving function:


When energy-saving function is turned on, set temperature can only be adjusted within the energy-saving limiting value.

If you want to turn off the energy-saving function, press SAVE button and is not displayed.
Note: Under auto and fan modes, energy-saving function is invalid.
(11). Setting sleep function In unit on status, press SLEEP button to turn on or turn off sleep function.
When is displayed, sleep function is on.
When is not displayed, sleep function is off.
When sleep function is on, the unit will operate according to a series of preset sleep curves. Notes:
(12). Setting light function
The light on the receiver light board will display present operation status. If you want to turn off the light, please press LIGHT button. Press this button again to turn on the light.
(13). Setting I FEEL function In unit on status, press I FEEL button to turn on or turn off I FEEL function. When is displayed, I FEEL function is on. When is not displayed, I FEEL function is off.


When I FEEL function is turned on, the unit will adjust temperature according to the temperature detected by the remote controller to achieve the best air-conditioning effect. In this case, you should place the remote controller within the valid receiving range.
(14). Viewing ambient temperature
In unit on status, receiver light board or wired controller is defaulted to display set temperature. Press TEMP button to view indoor or outdoor ambient temperature.
When is displayed, it means the displayed temperature is indoor ambient temperature.
When is displayed, it means the displayed temperature is outdoor ambient temperature.
Ambient temperature displaying will be exited after 5s and then set temperature will be displayed.
2.3 Introduction of special functions


low-temperature dehumidifying function and set temperature is displayed as 12℃. If low-temperature dehumidifying function has been set, press ▲ button to exit low-temperature dehumidifying function and set temperature is displayed as 16℃.
Note: If energy-saving function is turned on, low-temperature dehumidifying function is invalid.
(3). Absence function
Note: Absence function is only available in heating mode and it will be exited when switching mode.
After finishing setting, “UC” is displayed on receiver light board for 5 seconds and “MASTER” icon is displayed on wired controller.
In unit off status, press MODE button and ▼ button simultaneously to switch temperature scale between ℃ and ℉.
2.4 Basic operation instructions
2.5 Replacing batteries in remote controller and notes

Fig.3 Fig.4 Notes:

3 Remote Controller YAD1F

|No.|Button name|Function| |---|---|---| |1|ON/OFF|Turn on or turn off the unit| |2|FAN|Set fan speed| |3|▲/▼|Set temperature and time| |4|COOL|Set cooling function| |5|HEAT|Set heating function| |6|SWING|Set swing status| |7|TURBO|Set turbo function|
|No.|Button name|Function| |---|---|---| |1|MODE|Set operation mode| |2|TIMER ON|Set timer on function| |3|TIMER OFF|Set timer off function| |4|LIGHT|Set light function| |5|I FEEL|Set I FEEL function| |6|X-FAN|Set X-FAN function| |7|TEMP|Switch temperature displaying type on the unit’s display| |8|HEALTH|Set health function| |9|CLOCK|Set clock of the system| |10|SLEEP|Set sleep function|
When using the remote controller for the first time or after replacing the batteries, please set the time of the system according to current time in the following steps:

3.4 Introduction of operation functions
(1). Selecting operation mode
In unit on status, press MODE button to select operation mode in following sequence:

(2). Setting temperature
In unit on status, press ▲ button to increase set temperature and press ▼ button to decrease setting temperature.
Note: Under auto mode, manual adjustment of temperature is not needed.


Note: Under dry mode, fan speed is low and can not be adjusted.

When is displayed, turbo function is on. When is not displayed, turbo function is off.
When turbo function is on, the unit operates in super high speed to achieve quick cooling or heating. When turbo function is off, the unit operates in set fan speed.
(6). Setting light function
The light on the receiver light board will display present operation status. If you want to turn off the light, please press LIGHT button. Press this button again to turn on the light.
(7). Viewing ambient temperature
In unit on status, receiver light board or wired controller is defaulted to display setting temperature. Press TEMP button to view indoor or outdoor ambient temperature.

is displayed, it means the displayed temperature is indoor ambient temperature.
When is displayed, it means the displayed temperature is outdoor ambient temperature.
Ambient temperature displaying will be exited after 5s and then set temperature will be displayed.
(8). Setting X-FAN function In cool or dry mode, press X-FAN button to set X-FAN function. When is displayed, X-FAN function is on. When is not displayed, X-FAN function is off. When X-FAN function is on, the water on the evaporator will be blown away after
turning off the unit to avoid mildew. (9). Setting health function In unit on status, press HEALTH button to set health function. When is displayed, health function is on. When is not displayed, health function is off. Health function is available when the unit is equipped with anion generator. When
health function is on, the anion generator will start operation, adsorbing the dusts and killing the bacteria in the room.
(10). Setting sleep function In unit on status, press SLEEP button to turn on or turn off sleep function. When sleep function is on, the unit will operate according to a series of preset
sleep curves.
Sleep function can not be set in fan mode and auto mode. After entering sleep mode, auto quiet function will be turned on automatically. You can also choose different quiet statuses or turning off quiet function.
(11). Setting I FEEL function
In unit on status, press I FEEL button to turn on or turn off I FEEL function. When is displayed, I FEEL function is on. When is not displayed, I FEEL function is off.


When I FEEL function is turned on, the unit will adjust temperature according to the temperature detected by the remote controller to achieve the best air-conditioning effect. In this case, you should place the remote controller within the valid receiving range.
(12). Setting timer
You can set the operation time of unit as you need. You can also set timer on and timer off in combination.
Before setting, check if the time of the system is the same as the current time. If not, please set the time according to current time.
1). Setting timer off
Press TIMER OFF button again to cancel timer and OFF is not displayed. 2). Setting timer on
Press TIMER ON button again to cancel timer and ON is not displayed.
3.5 Introduction of special functions Setting child lock
(1). Setting child lock
Press ▲ and ▼ button simultaneously to lock the buttons on remote controller and is displayed.

Press ▲ and ▼ button simultaneously again to unlock the buttons on remote controller and is not displayed.

If the buttons are locked, blinks 3 times when pressing the button and any
operation on the button is invalid.
(2). Absence function
Press CLOCK and TEMP button simultaneously to enter absence function. Temperature displaying zone displays 8 and is displayed.

Press CLOCK and TEMP button simultaneously again to exit absence function. Temperature displaying zone resumes previous display and is not displayed.

In winter, absence function can keep the indoor ambient temperature above 0℃ to avoid freezing. Note: Absence function is only available in heating mode and it will be exited when switching mode.
(3). Setting of master mode indoor unit In fan mode, set master mode indoor unit through ▲ and ▼ button:
After finishing setting, “UC” is displayed on receiver light board for 5 seconds and “MASTER” icon is displayed on wired controller.
(4). Switching temperature scale
In unit off status, press MODE button and ▼ button simultaneously to switch temperature scale between ℃ and ℉.
3.6 Replacing batteries in remote controller and notes

Fig.5 Fig.6
###### Notes:

######## GREE ELECTRIC APPLIANCES, INC. OF ZHUHAI
Add: West Jinji Rd, Qianshan, Zhuhai, Guangdong, China, 519070 Tel: (+86-756) 8522218 Fax: (+86-756) 8669426 E-mail: gree@gree.com.cn www.gree.com
