
Ask AI
— answers from the official manualAnswers from the official manual.
Common questions
Common Questions
9 totalHow do I set up the water inlet hose properly?
To connect the water inlet hose, ensure a seal washer is seated at the joint of the inlet hose. Then connect it to both the faucet and the machine's water inlet valve securely. Run water through both the faucet and hose before installation to clear any particles that may clog the inlet valve screen.
What should I do if my washing machine doesn't take in water during the rinse cycle?
Check the drain hose for blockages or ensure it is not hung up over 0.9 meters. Open and close the wash lid to restart the drainage process. If issues persist, consult professional help (Page 18).
Where should I place the washing machine for best stability?
Place the washing machine on a firm and level surface at least 5 cm away from any walls. Use adjustable feet to stabilize it, ensuring no vibration during operation by adjusting the height as needed.
How often should I clean the filter in the inlet valve?
Clean the filter in the inlet valve regularly to prevent clogs. Detach the hose and remove the valve filter, then clean it with a brush before reassembling (Page 15).
What does error code E3 indicate?
Error code E3 means there is an imbalance issue between the tub and cabinet during spinning, likely due to unevenly distributed clothing. Open the lid, rearrange clothes evenly inside, then close it and continue (Page 19).
What should I do if there's no indicator light and the machine isn't working?
Check that the plug is properly connected to the socket and that the switch is activated. If these are fine, contact an authorized technician as the issue might be a dead socket or broken fuse (Page 18).
Full Manual
20 pages
SHOP EASY. SAVE MONEY.
#### USER'S MANUAL Washing Machine EP24896
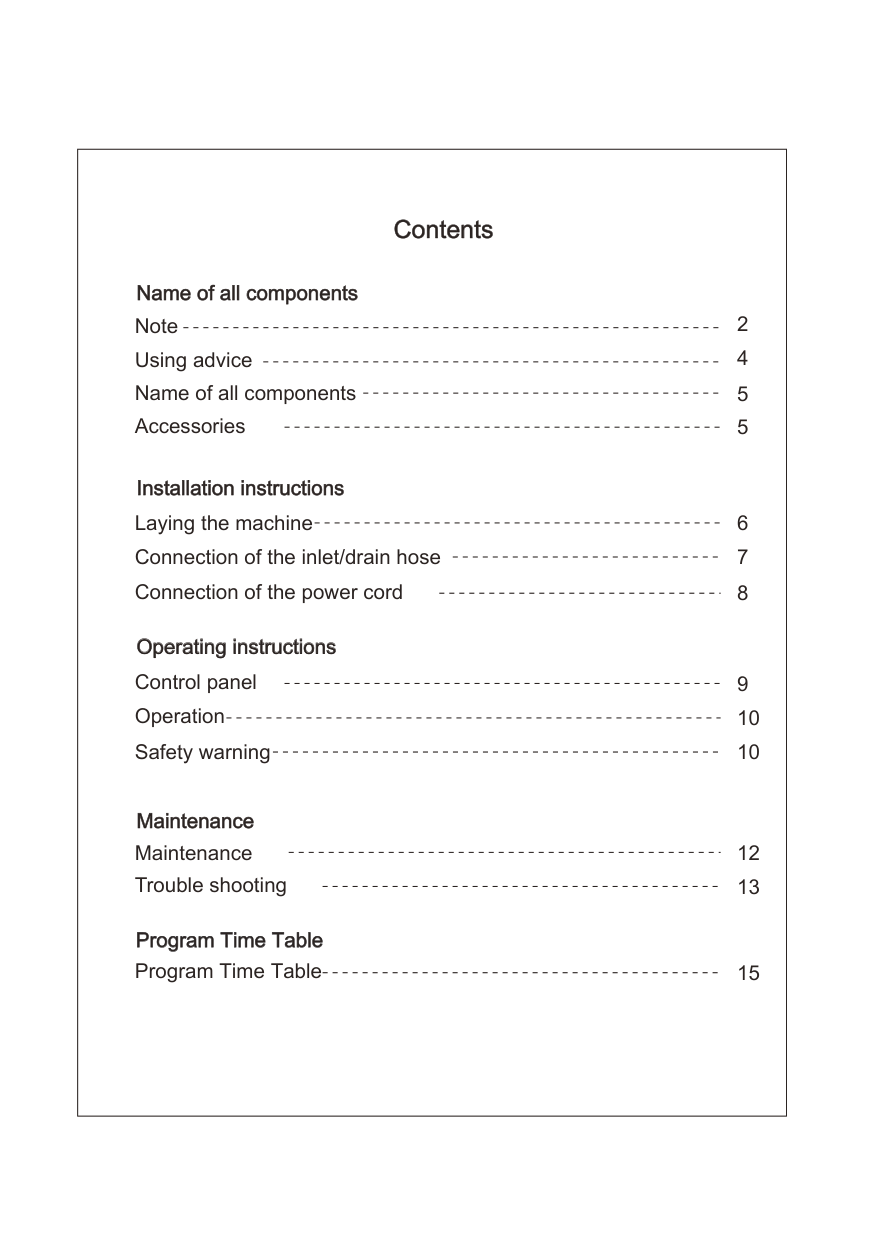
|Contents
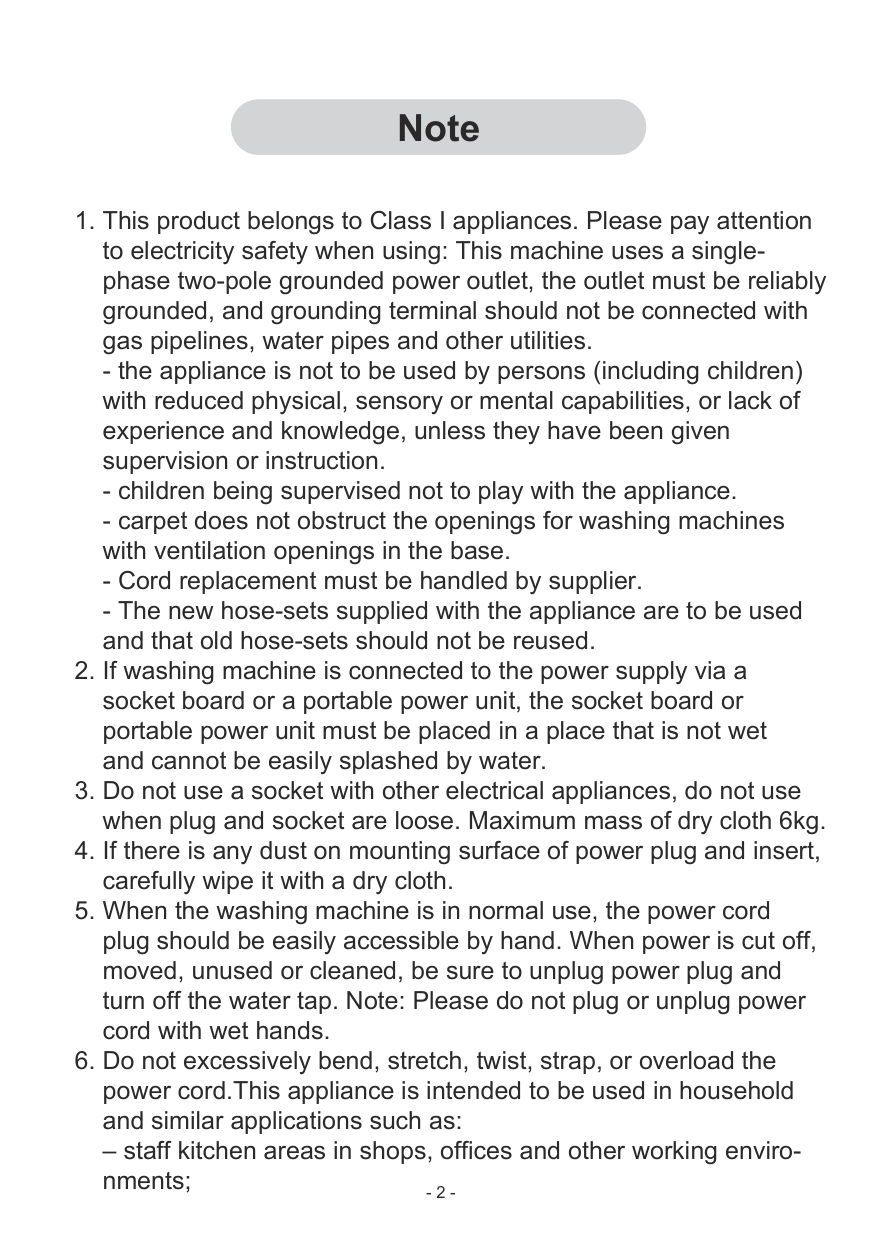
Note
Name of all components Accessories
Laying the machine Connection of the inlet/drain hose Connection of the power cord
Operation Safety warning
Maintenance Trouble shooting
2 Using advice 4
5
5
Control panel 9
6
7
8
10 10
12
13
Program Time Table 15
Name of all components
Installation instructions
Operating instructions
Maintenance
Program Time Table
| |---|
Note
Using advice
-grade water level, so as not to splash during the washing process.
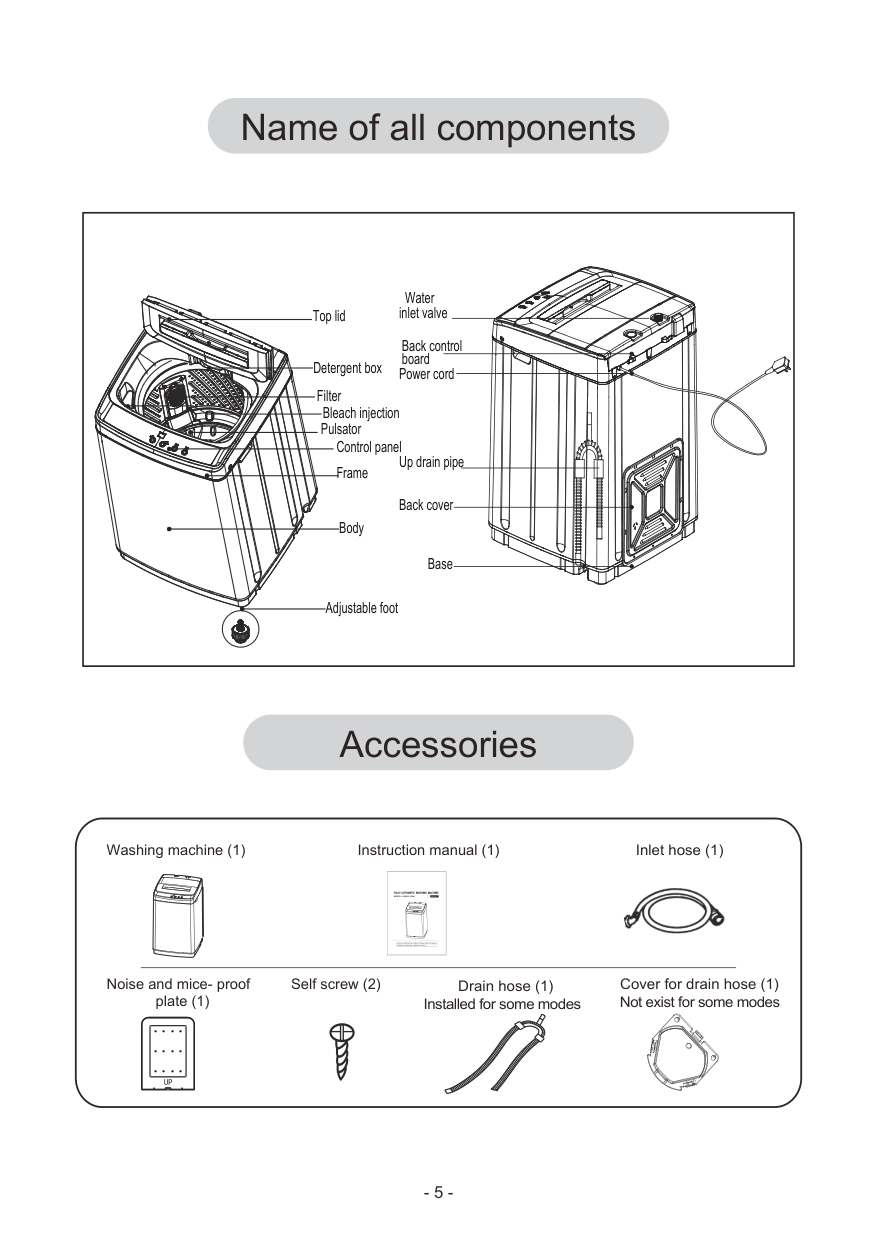
Name of all components
|Back control board
Back cover
Power cord
Up drain pipe
Body
Base
Pulsator Control panel Frame
Top lid
Detergent box Filter Bleach injection
Water inlet valve
Adjustable foot| |---|
Accessories
Instruction manual (1) Inlet hose (1)Washing machine (1)
|MODEL: XQB50-1699J
| |---|

Cover for drain hose (1)Noise and mice- proof plate (1)
Self screw (2)
Drain hose (1) Installed for some modes
Not exist for some modes
UP
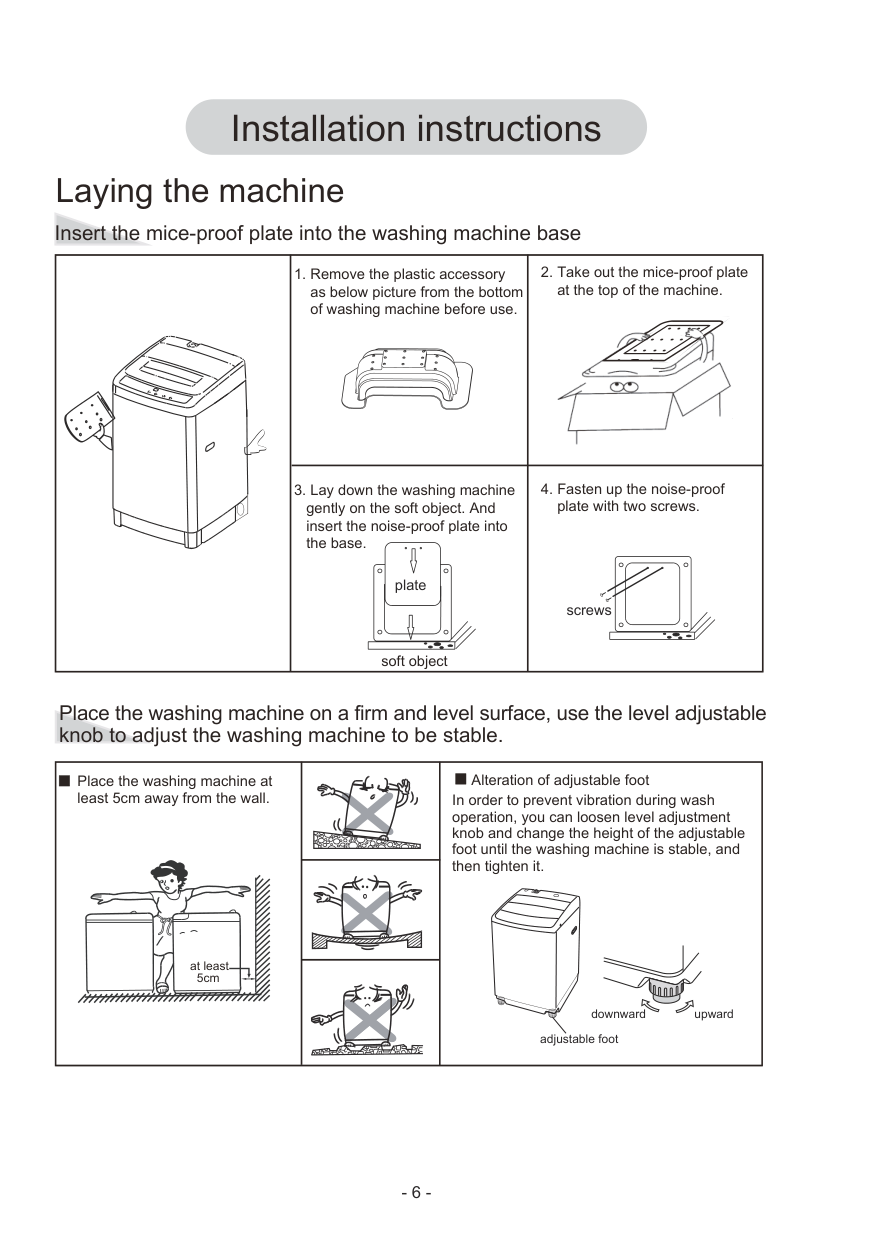
Laying the machine
Insert the mice-proof plate into the washing machine base
| |1. Remove the plastic accessory as below picture from the bottom of washing machine before use.|2. Take out the mice-proof plate at the top of the machine.
| |---|---|---| | |3. Lay down the washing machine gently on the soft object. And insert the noise-proof plate into the base.
soft object
plate|4. Fasten up the noise-proof plate with two screws.
screws|
Place the washing machine on a firm and level surface, use the level adjustable knob to adjust the washing machine to be stable.
|Place the washing machine at least 5cm away from the wall.
at least 5cm| |Alteration of adjustable foot In order to prevent vibration during wash operation, you can loosen level adjustment knob and change the height of the adjustable foot until the washing machine is stable, and then tighten it.
adjustable foot
downward upward
| |---|---|---| |Place the washing machine at least 5cm away from the wall.
at least 5cm| |Alteration of adjustable foot In order to prevent vibration during wash operation, you can loosen level adjustment knob and change the height of the adjustable foot until the washing machine is stable, and then tighten it.
adjustable foot
downward upward
|
|Place the washing machine at least 5cm away from the wall.
at least 5cm| |Alteration of adjustable foot In order to prevent vibration during wash operation, you can loosen level adjustment knob and change the height of the adjustable foot until the washing machine is stable, and then tighten it.
adjustable foot
downward upward
|
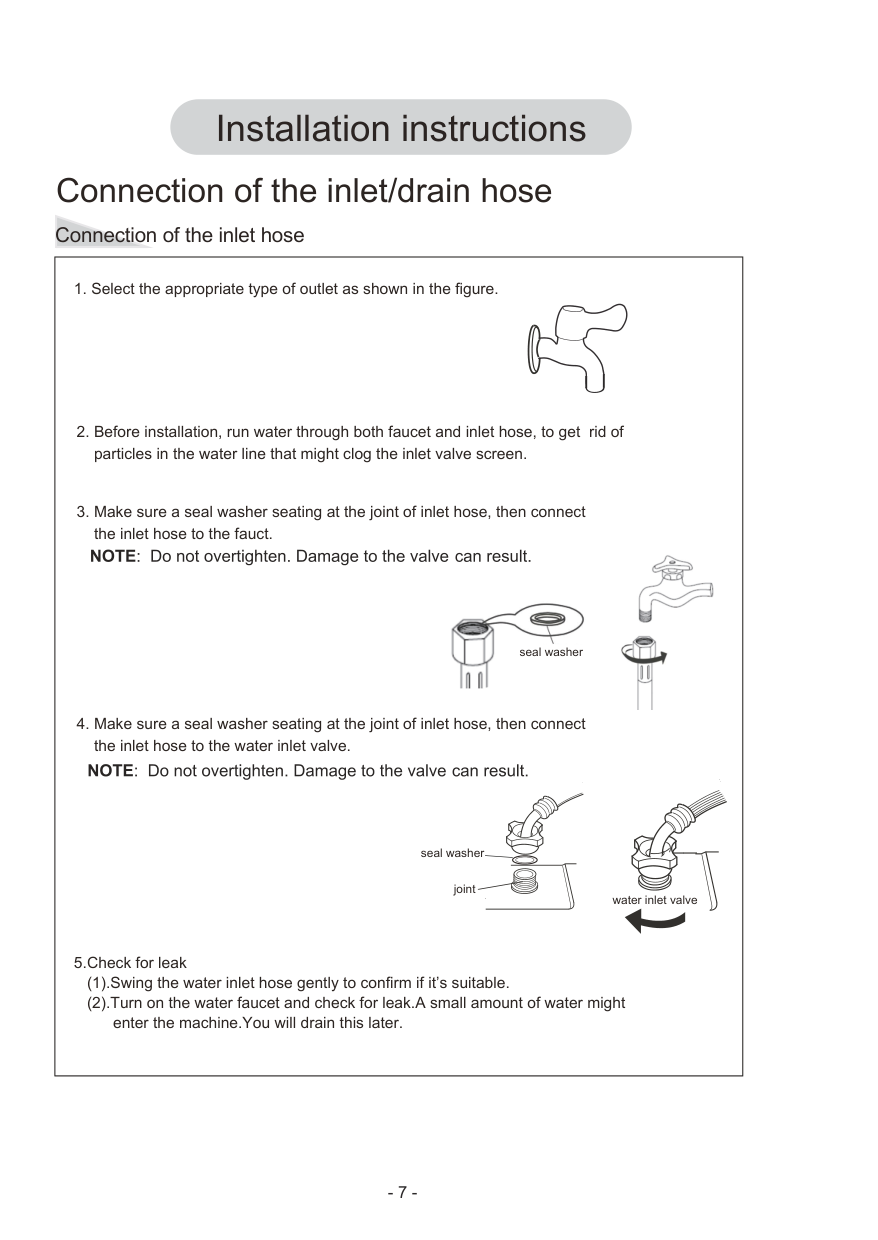
Connection of the inlet/drain hose
Connection of the inlet hose
|1. Select the appropriate type of outlet as shown in the figure.
5.Check for leak
(1).Swing the water inlet hose gently to confirm if it’s suitable.
(2).Turn on the water faucet and check for leak.A small amount of water might enter the machine.You will drain this later.
2. Before installation, run water through both faucet and inlet hose, to get rid of particles in the water line that might clog the inlet valve screen.
3. Make sure a seal washer seating at the joint of inlet hose, then connect the inlet hose to the fauct.


seal washer
4. Make sure a seal washer seating at the joint of inlet hose, then connect the inlet hose to the water inlet valve.
seal washer
joint
water inlet valve
| |---|
Connection of the drain hose (some modes have been connected)
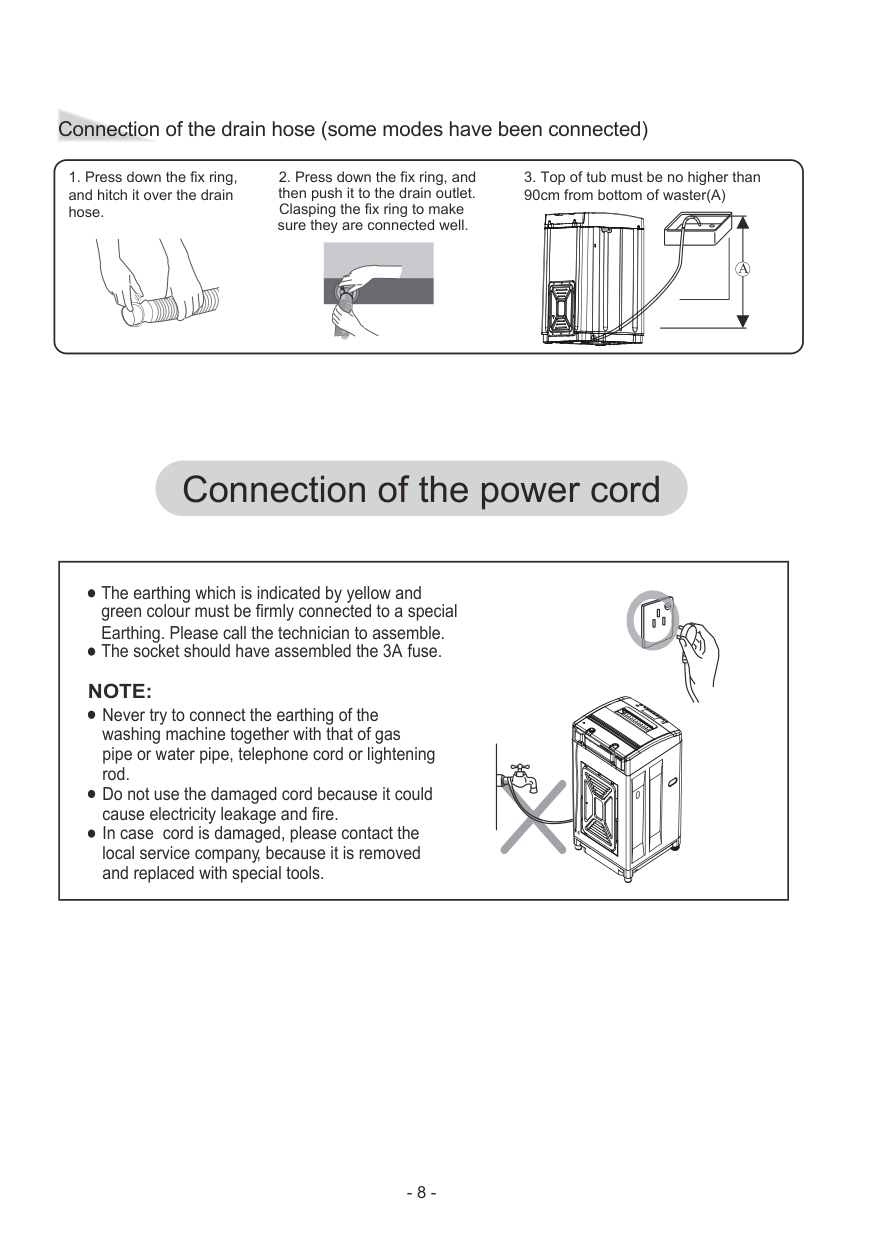
then push it to the drain outlet. Clasping the fix ring to make sure they are connected well.
A
| | | |---|---| | | |
Connection of the power cord
|
The earthing which is indicated by yellow and green colour must be firmly connected to a special
Earthing. Please call the technician to assemble. The socket should have assembled the 3A fuse.
Never try to connect the earthing of the washing machine together with that of gas pipe or water pipe, telephone cord or lightening rod. Do not use the damaged cord because it could cause electricity leakage and fire. In case cord is damaged, please contact the local service company, because it is removed and replaced with special tools.
NOTE:

| |---|
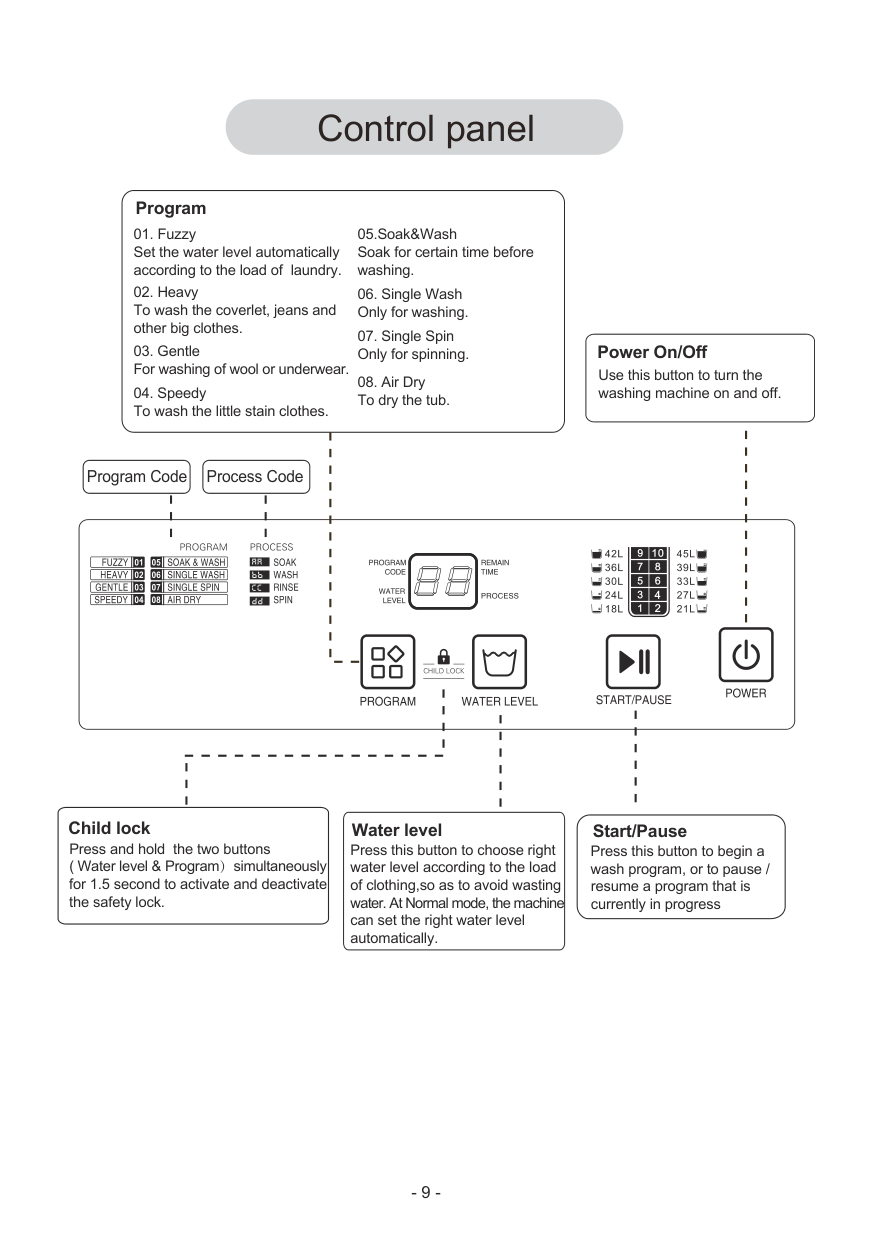
Control panel
Program
05.Soak&Wash Soak for certain time before washing.
Use this button to turn the washing machine on and off.
Program Code
Process Code
Power On/Off
Child lock Water level Start/Pause
Press and hold the two buttons ( Water level & Program)simultaneously for 1.5 second to activate and deactivate the safety lock.
Press this button to choose right water level according to the load of clothing,so as to avoid wasting water. At Normal mode, the machine can set the right water level automatically.
Press this button to begin a wash program, or to pause / resume a program that is currently in progress
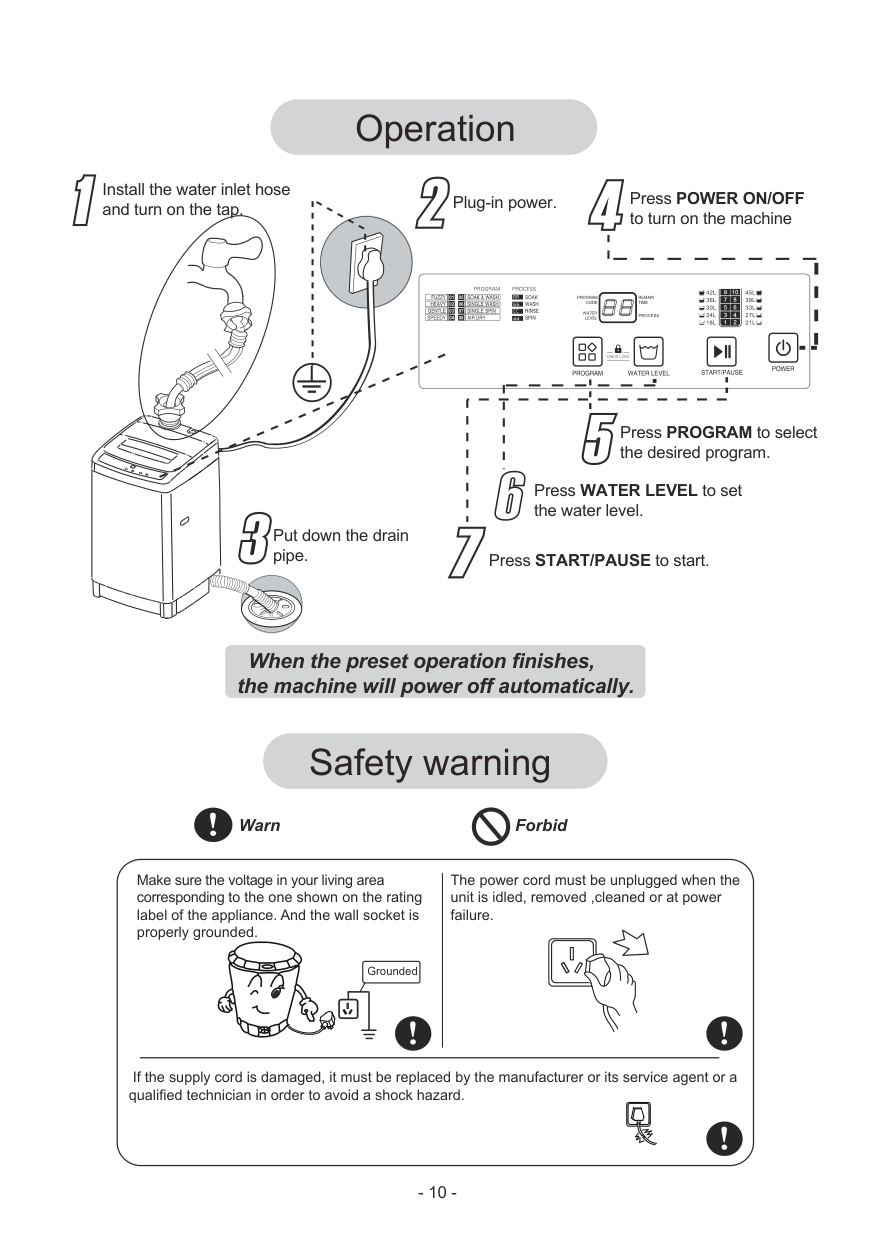
Operation
Install the water inlet hose and turn on the tap. Plug-in power. Press POWER ON/OFF
to turn on the machine
Press PROGRAM to select the desired program.
Press WATER LEVEL to set the water level.
Put down the drain pipe.
Press START/PAUSE to start.
##### When the preset operation finishes, the machine will power off automatically.
Safety warning
######## Warn Forbid
Make sure the voltage in your living area corresponding to the one shown on the rating label of the appliance. And the wall socket is properly grounded.
Grounded
The power cord must be unplugged when the unit is idled, removed ,cleaned or at power failure.
If the supply cord is damaged, it must be replaced by the manufacturer or its service agent or a qualified technician in order to avoid a shock hazard.
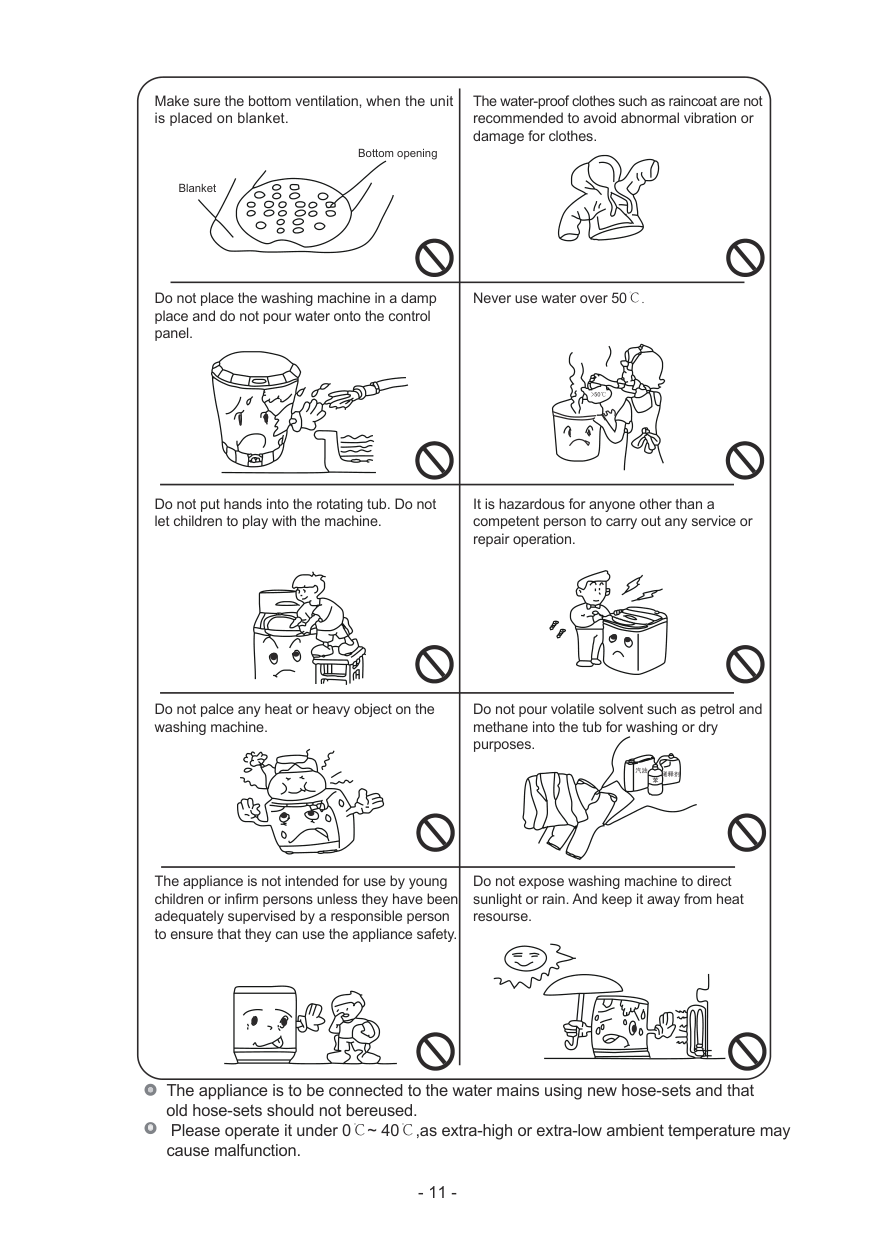
Make sure the bottom ventilation, when the unit is placed on blanket.
Bottom opening
The water-proof clothes such as raincoat are not recommended to avoid abnormal vibration or damage for clothes.
Blanket
Do not place the washing machine in a damp place and do not pour water onto the control panel.
Never use water over 50℃.
Do not put hands into the rotating tub. Do not let children to play with the machine.
It is hazardous for anyone other than a competent person to carry out any service or repair operation.
Do not palce any heat or heavy object on the washing machine.
Do not pour volatile solvent such as petrol and methane into the tub for washing or dry purposes.
The appliance is not intended for use by young children or infirm persons unless they have been adequately supervised by a responsible person to ensure that they can use the appliance safety.
Do not expose washing machine to direct sunlight or rain. And keep it away from heat resourse.
The appliance is to be connected to the water mains using new hose-sets and that old hose-sets should not bereused.
Please operate it under 0℃~ 40℃,as extra-high or extra-low ambient temperature may cause malfunction.
Maintenance
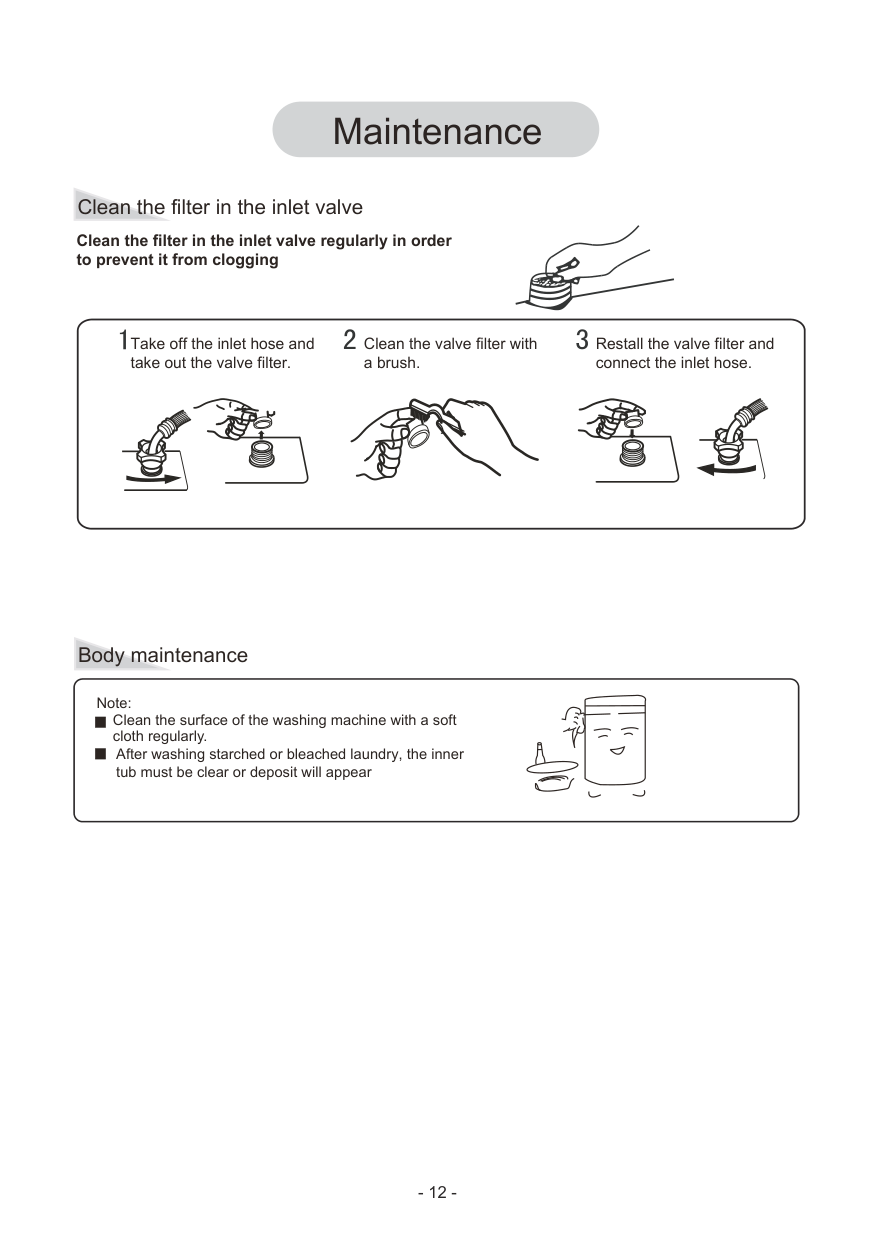
Clean the filter in the inlet valve
Clean the filter in the inlet valve regularly in order to prevent it from clogging
Take off the inlet hose and take out the valve filter.
Clean the valve filter with a brush.
Restall the valve filter and connect the inlet hose.
Body maintenance

Note: Clean the surface of the washing machine with a soft cloth regularly.
After washing starched or bleached laundry, the inner tub must be clear or deposit will appear
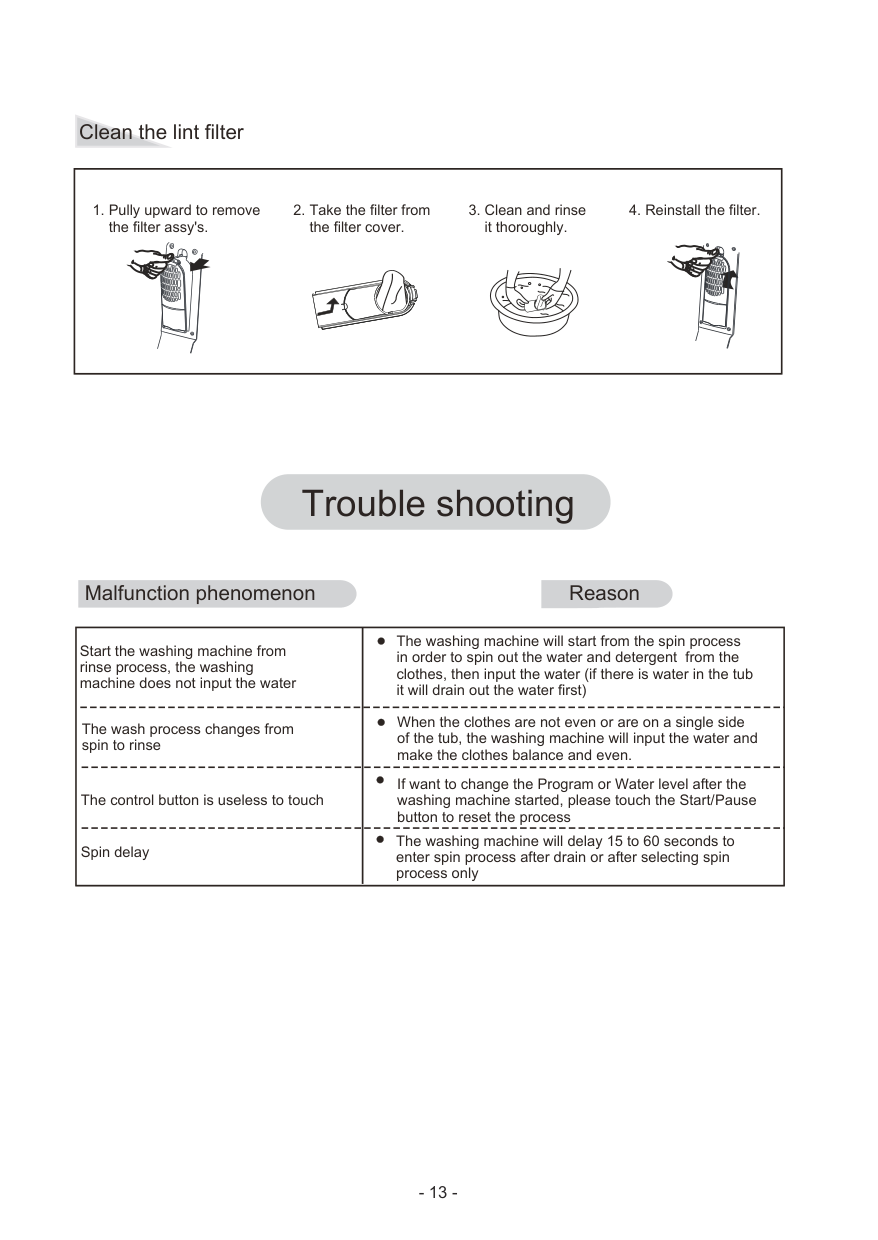
Clean the lint filter
|1. Pully upward to remove the filter assy's.
2. Take the filter from the filter cover.
3. Clean and rinse it thoroughly.
4. Reinstall the filter.| |---|
Trouble shooting
Malfunction phenomenon
Start the washing machine from rinse process, the washing machine does not input the water

The wash process changes from spin to rinse
The control button is useless to touch
Spin delay
Reason
The washing machine will start from the spin process in order to spin out the water and detergent from the clothes, then input the water (if there is water in the tub it will drain out the water first)
When the clothes are not even or are on a single side of the tub, the washing machine will input the water and make the clothes balance and even.
If want to change the Program or Water level after the washing machine started, please touch the Start/Pause button to reset the process

The washing machine will delay 15 to 60 seconds to enter spin process after drain or after selecting spin process only
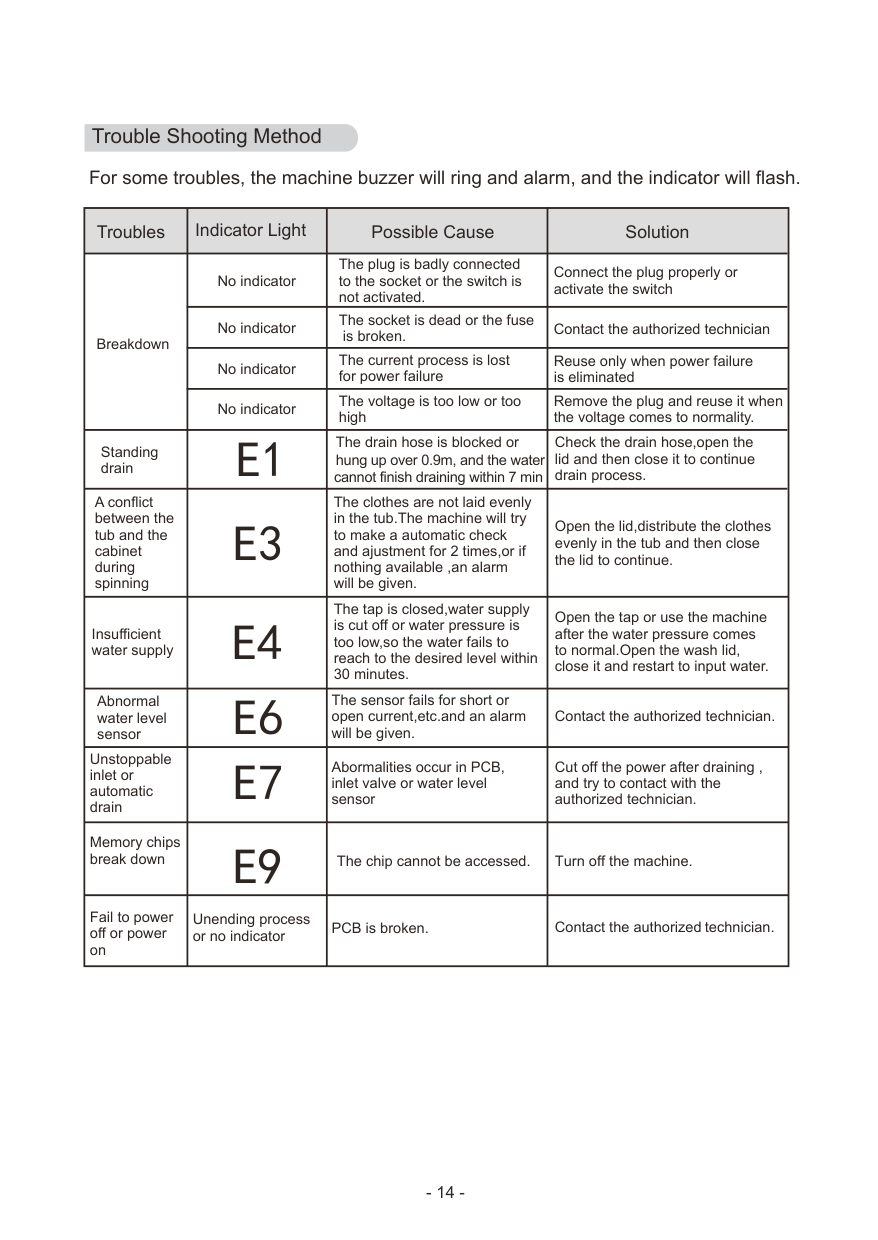
###### Trouble Shooting Method For some troubles, the machine buzzer will ring and alarm, and the indicator will flash.
|Troubles|Indicator Light|Possible Cause|Solution| |---|---|---|---| |Breakdown|No indicator|The plug is badly connected to the socket or the switch is not activated.|Connect the plug properly or activate the switch| |Breakdown|No indicator|The socket is dead or the fuse is broken.|Contact the authorized technician| |Breakdown|No indicator|The current process is lost for power failure|Reuse only when power failure is eliminated| |Breakdown|No indicator|The voltage is too low or too high|Remove the plug and reuse it when the voltage comes to normality.| |Standing drain|E1|The drain hose is blocked or hung up over 0.9m, and the water cannot finish draining within 7 min|Check the drain hose,open the lid and then close it to continue drain process.| |A conflict between the tub and the cabinet during spinning|E3|The clothes are not laid evenly in the tub.The machine will try to make a automatic check and ajustment for 2 times,or if nothing available ,an alarm will be given.|Open the lid,distribute the clothes evenly in the tub and then close the lid to continue.| |Insufficient water supply|E4|The tap is closed,water supply is cut off or water pressure is too low,so the water fails to reach to the desired level within 30 minutes.|Open the tap or use the machine after the water pressure comes to normal.Open the wash lid, close it and restart to input water.| |Abnormal water level sensor|E6|The sensor fails for short or open current,etc.and an alarm will be given.|Contact the authorized technician.| |Unstoppable inlet or automatic drain|E7|Abormalities occur in PCB, inlet valve or water level sensor|Cut off the power after draining , and try to contact with the authorized technician.|

|Memory chips break down|E9|The chip cannot be accessed.|Turn off the machine.| |Fail to power off or power on|Unending process or no indicator|PCB is broken.|Contact the authorized technician.|
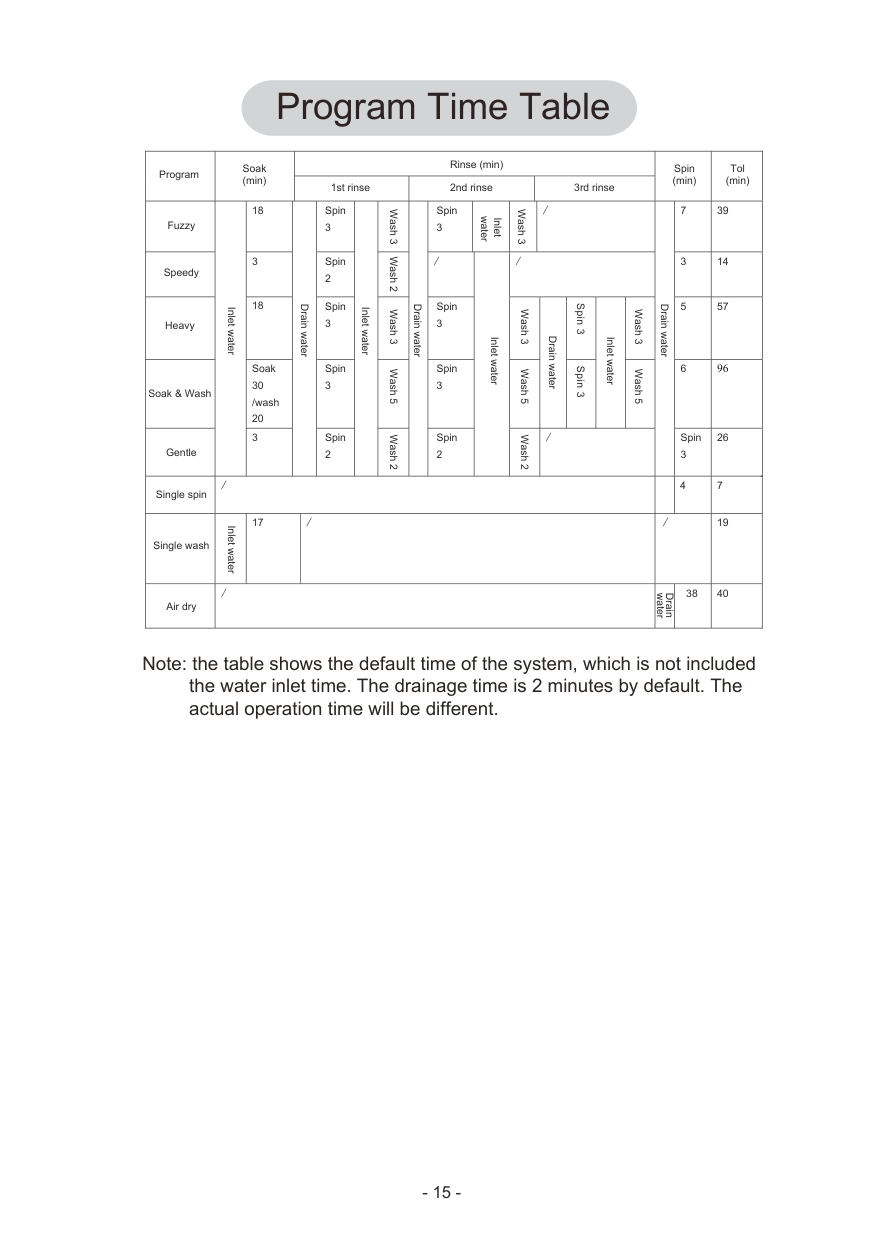
Program Time Table
|Program|Soak (min)|Soak (min)|Rinse (min)|Rinse (min)|Rinse (min)|Rinse (min)|Rinse (min)|Rinse (min)|Rinse (min)|Rinse (min)|Rinse (min)|Rinse (min)|Rinse (min)|Rinse (min)|Rinse (min)|Rinse (min)|Spin (min)|Spin (min)|Tol (min)| |---|---|---|---|---|---|---|---|---|---|---|---|---|---|---|---|---|---|---|---| |Program|Soak (min)|Soak (min)|1st rinse|1st rinse|1st rinse|1st rinse|1st rinse|2nd rinse|2nd rinse|2nd rinse|2nd rinse|3rd rinse|3rd rinse|3rd rinse|3rd rinse|3rd rinse|Spin (min)|Spin (min)|Tol (min)| |Fuzzy|Inlet water|18|Drain water|Drain water|Spin 3|Inlet water|Wash 3|Drain water|Spin 3|Inlet water|Wash 3|/|/|/|/|/|Drain water|7|39| |Speedy|Inlet water|3|Drain water|Drain water|Spin 2|Inlet water|Wash 2|Drain water|/|Inlet water|/|/|/|/|/|/|Drain water|3|14| |Heavy|Inlet water|18|Drain water|Drain water|Spin 3|Inlet water|Wash 3|Drain water|Spin 3|Inlet water|Wash 3|Wash 3|Drain water|Spin 3|Inlet water|Wash 3|Drain water|5|57| |Soak & Wash|Inlet water|Soak 30 /wash 20|Drain water|Drain water|Spin 3|Inlet water|Wash 5|Drain water|Spin 3|Inlet water|Wash 5|Wash 5|Drain water|Spin 3|Inlet water|Wash 5|Drain water|6|96| |Gentle|Inlet water|3|Drain water|Drain water|Spin 2|Inlet water|Wash 2|Drain water|Spin 2|Inlet water|Wash 2|Wash 2|/|/|/|/|Drain water|Spin 3|26| |Single spin|/|/|/|/|/|/|/|/|/|/|/|/|/|/|/|/| |4|7| |Single wash|Inlet water|17|17| | | | | | | | | | | | | |/|/|19| |Air dry| | | | | | | | | | | | | | | | |Drain water|38|40|
Note: the table shows the default time of the system, which is not included the water inlet time. The drainage time is 2 minutes by default. The actual operation time will be different.
