
Ask AI
— answers from the official manualAnswers from the official manual.
Common questions
Common Questions
9 totalHow do I install and pair a Bluetooth device for the first time?
For the first time pairing with a mobile device, activate the BT function on your phone and search for 'BALI.' Once found, enter '0000' as confirmation. The connection is successful when you see an icon appear at the top of your screen.
What steps should I take if the remote control isn't working?
Check that batteries are correctly installed and not depleted, point the remote control towards the IR sensor of the unit when using it, and ensure no obstacles exist between them.
How do I set up the video input for an external camera?
Connect the video cable from your rear view camera to the 'CAM IN' port on the unit. The display will show the camera feed when you engage reverse gear.
Why are there black and white or moving images?
Ensure the video output system is correctly set for NTSC, PAL, depending on your region setting in the player’s configurations.
How do I adjust the volume through the touchscreen interface?
Access the main menu icon and navigate to the 'Volume Adjustments' option. Use either sliders or control buttons (‘+’ and ‘-’) on both the front panel and the screen.
Why am I unable to hear sound but see images?
Check the audio connection between your device (e.g., CD player) and unit's input, ensure connectors are undamaged, set correct Audio settings in unit menus, confirm volume level is not zero or muted.
Full Manual
20 pages
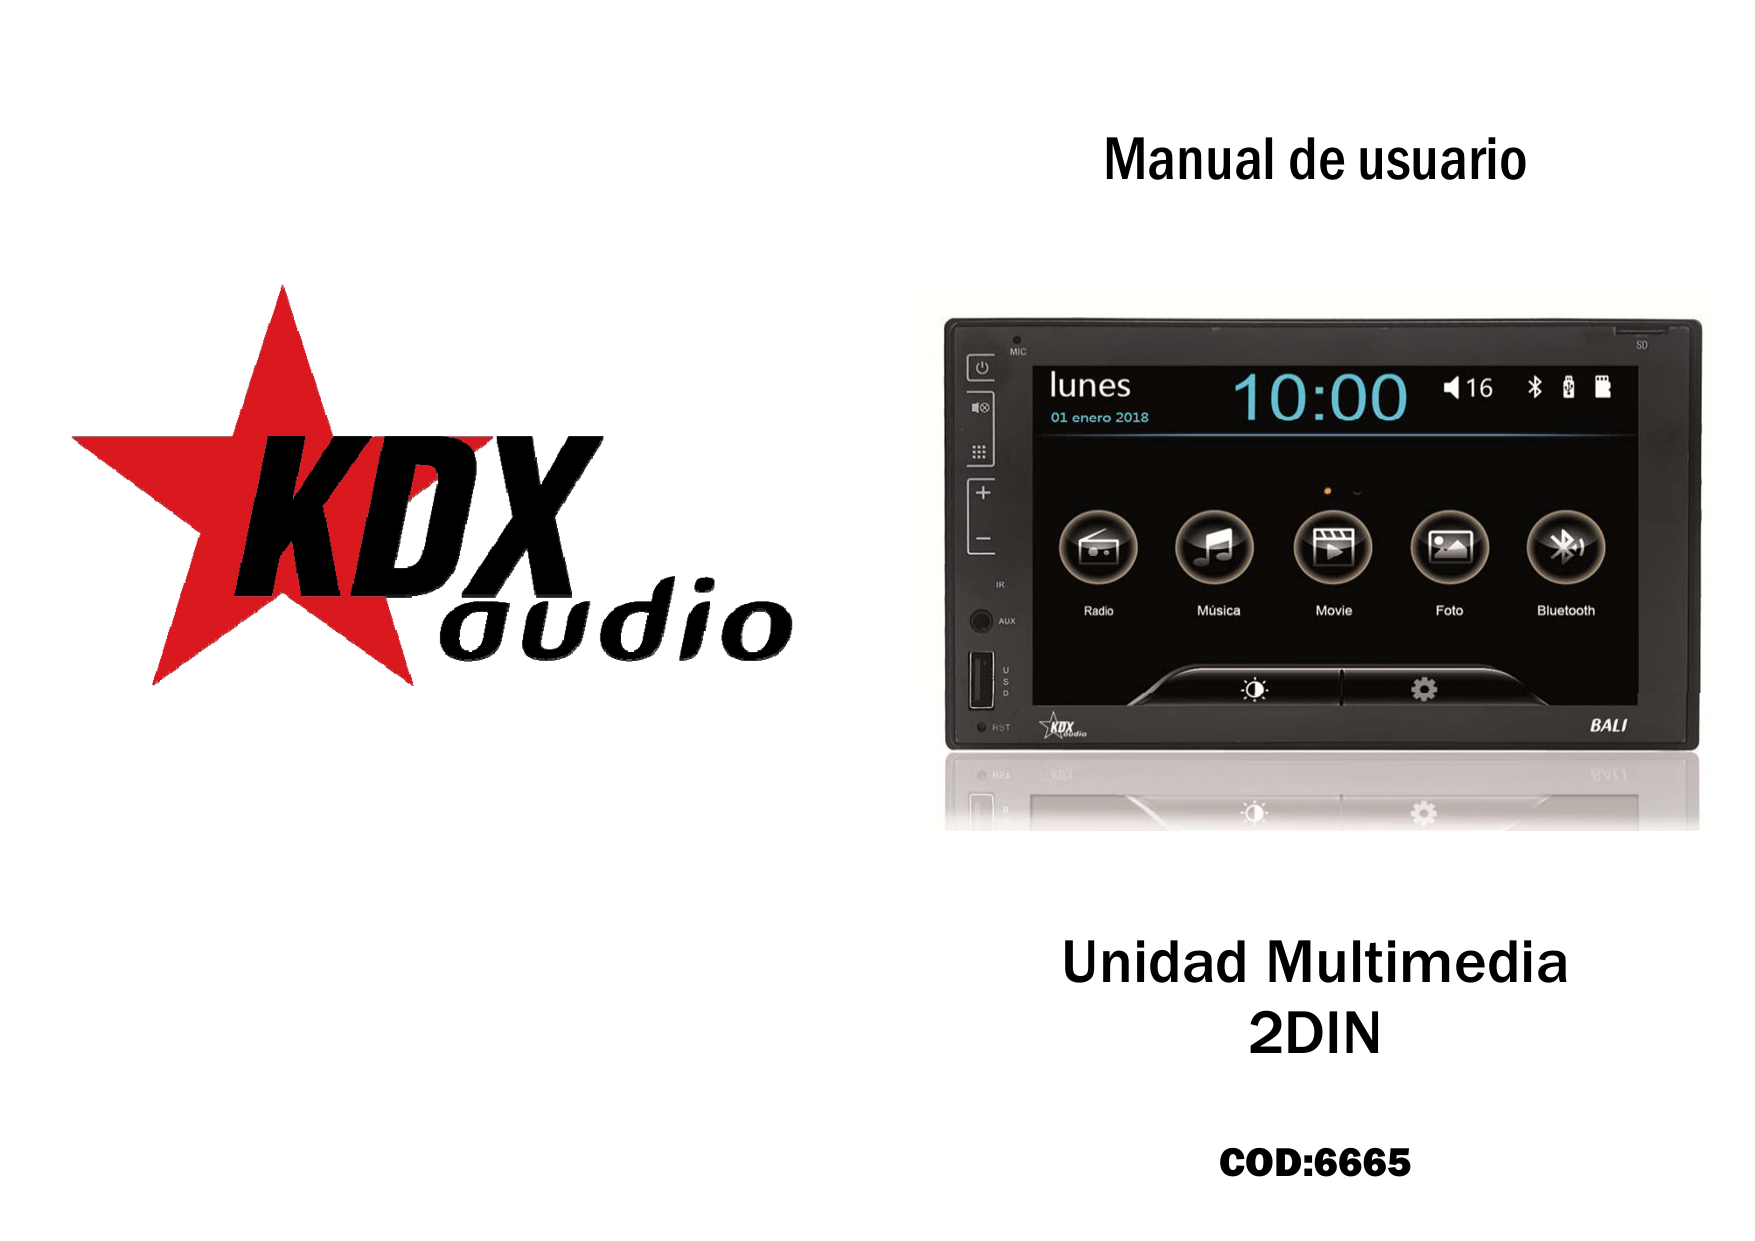


Manual de usuario


Unidad Multimedia
COD:6665
TABLA DE CONTENIDO MANUAL USUARIO ESPAÑOL
ENGLISH USER’S MANUAL__________________________________ 23
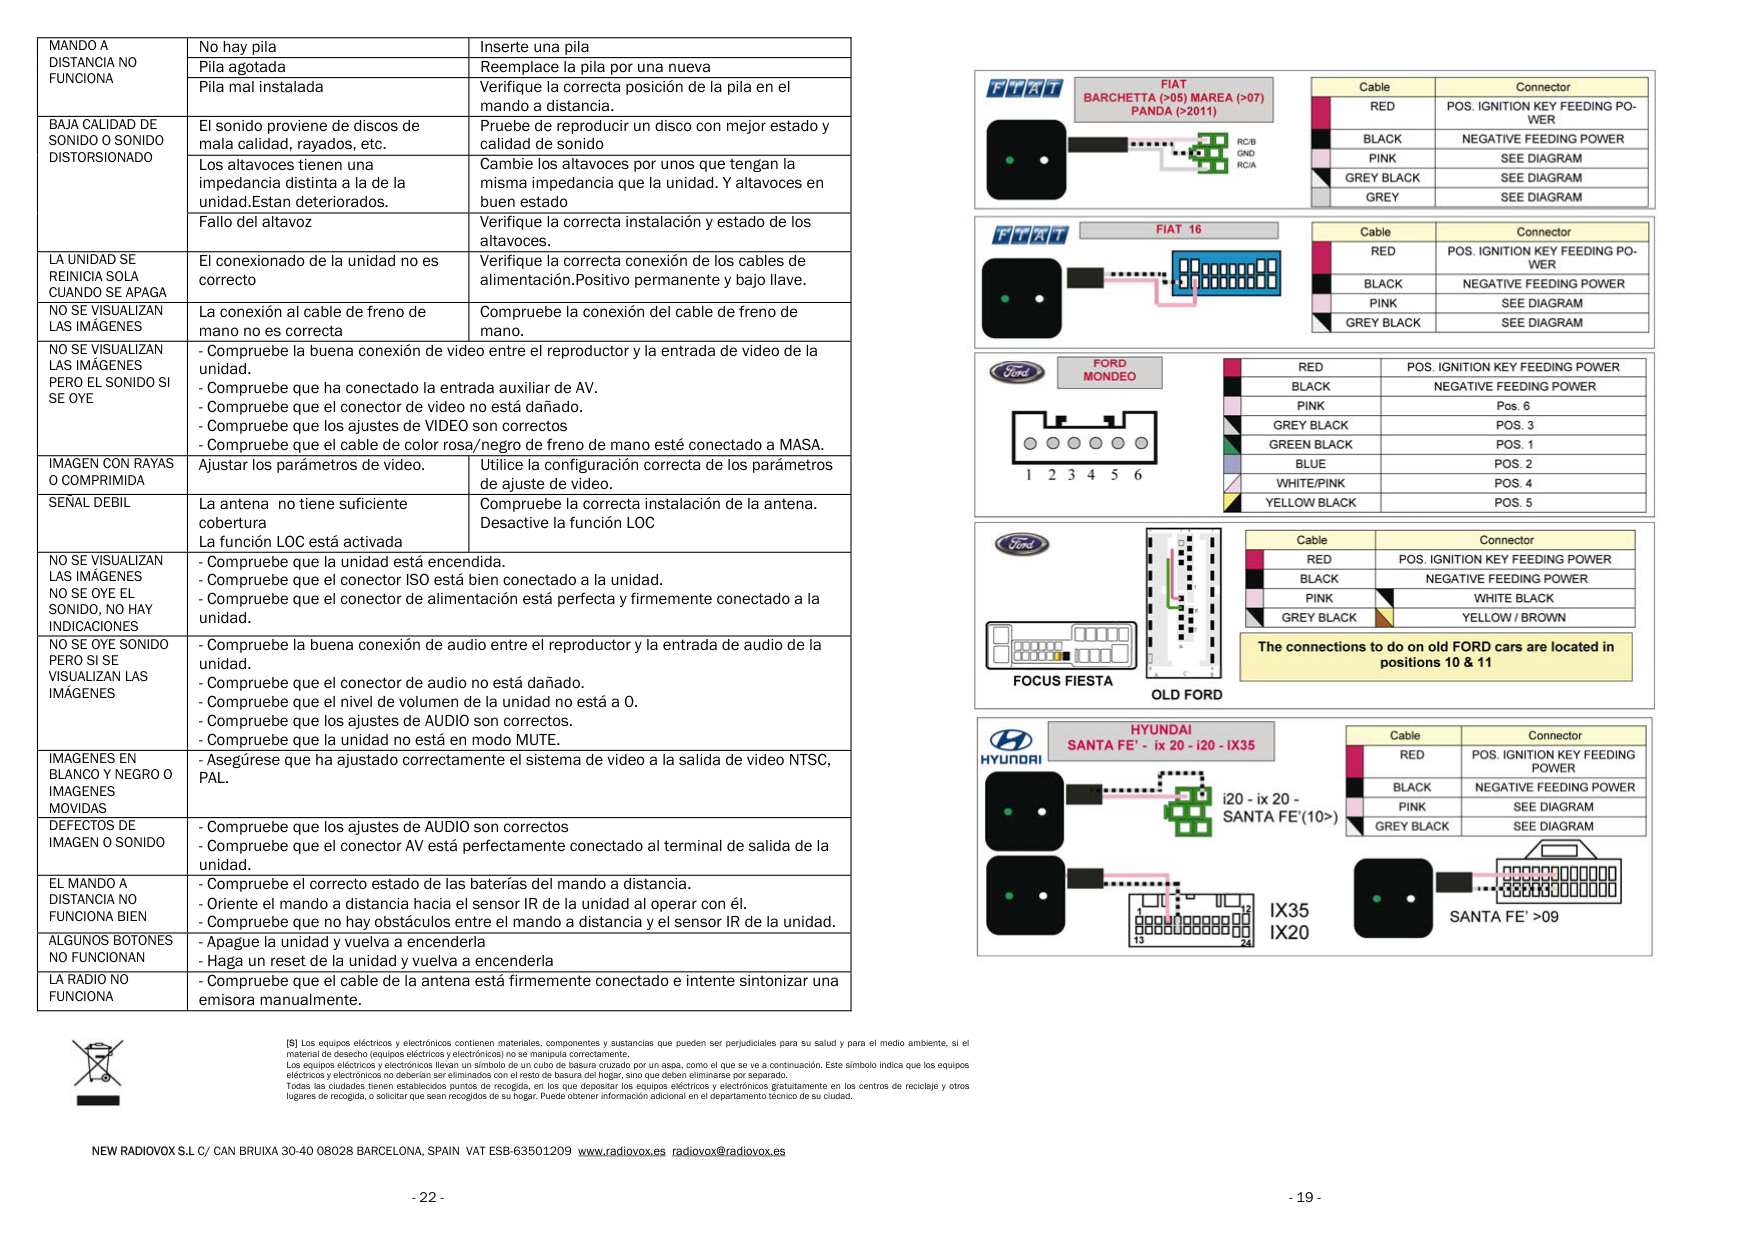
|THE IMAGES ARE NOT DISPLAYED BUT THE SOUND IS OK|- Check the good video connection between the player and the video input of the unit.
- Check that you have connected the auxiliary AV input.
- Check that the video connector is not damaged.
- Check that the VIDEO settings are correct
- Check that the pink / black parking
|- Check the good video connection between the player and the video input of the unit.
- Check that you have connected the auxiliary AV input.
- Check that the video connector is not damaged.
- Check that the VIDEO settings are correct
- Check that the pink / black parking
| |---|---|---| |IMAGE WITH STRIPES OR COMPRESSION|Adjust the video parameters.|Use the correct configuration of the video adjustment| |WEAK SIGNAL|The antenna does not have enough coverage The LOC function is activated| | |THE IMAGES ARE NOT DISPLAYED NO SOUND IS HEARD, NO INDICATIONS|- Check that the unit is on.
- Check that the ISO connector is properly connected to the unit.
- Check that the power connector is perfectly and firmly connected to the unit.
|- Check that the unit is on.
- Check that the ISO connector is properly connected to the unit.
- Check that the power connector is perfectly and firmly connected to the unit.
| |YOU CAN NOT HEAR SOUND BUT IF THE IMAGES ARE DISPLAYED|- Check the good audio connection between the player and the audio input of the unit.
- Check that the audio connector is not damaged.
- Check that the volume level of the unit is not 0.
- Check that the AUDIO settings are correct.
- Check that the unit is not in MUTE mode.
|- Check the good audio connection between the player and the audio input of the unit.
- Check that the audio connector is not damaged.
- Check that the volume level of the unit is not 0.
- Check that the AUDIO settings are correct.
- Check that the unit is not in MUTE mode.
| |BLACK AND WHITE IMAGES OR MOVED PICTURES|- Make sure you have correctly set the video system to the NTSC, PAL video output.|- Make sure you have correctly set the video system to the NTSC, PAL video output.| |PICTURE OR SOUND DEFECTS|- Check that the AUDIO settings are correct
- Check that the AV connector is perfectly connected to the output terminal of the unit.
|- Check that the AUDIO settings are correct
- Check that the AV connector is perfectly connected to the output terminal of the unit.
| |THE REMOTE CONTROL DOES NOT WORK WELL|- Check the correct condition of the batteries of the remote control.
- Point the remote control at the IR sensor of the unit when operating with it.
- Check that there are no obstacles between the remote control and the IR sensor of the unit.
|- Check the correct condition of the batteries of the remote control.
- Point the remote control at the IR sensor of the unit when operating with it.
- Check that there are no obstacles between the remote control and the IR sensor of the unit.
| |SOME BUTTONS DO NOT WORK|- Turn the unit off and then on again
- Reset the unit and turn it on again
|- Turn the unit off and then on again
- Reset the unit and turn it on again
| |THE RADIO DOES NOT WORK|- Check that the antenna cable is firmly connected and try tuning a station manually.|- Check that the antenna cable is firmly connected and try tuning a station manually.|

[E] This symbol on the product or on its packaging indicates that this product must not be disposed of with your other household wa your responsibility to dispose of your waste equipment by handing it over to a designated collection point for the recycling of electronic equipment. The separate collecti ensure that it is recycled in a manner that protects human health and the environment. For more information about where you can equipment for recycling, please contact your local city office, your household waste disposal service or the shop where you pur
NEW RADIOVOX S.L C/ CAN BRUIXA 30-40 08028 BARCELONA, SPAIN VAT ESB-63501209 www.radiovox.es

A horizontal bar will appear for a few seconds and you can adjust the volume by sliding your finger across the bar.
You can also adjust the volume by pressing the “+” and “-” buttons on the front panel of the unit.


VOLUME ADJUSTMENTS
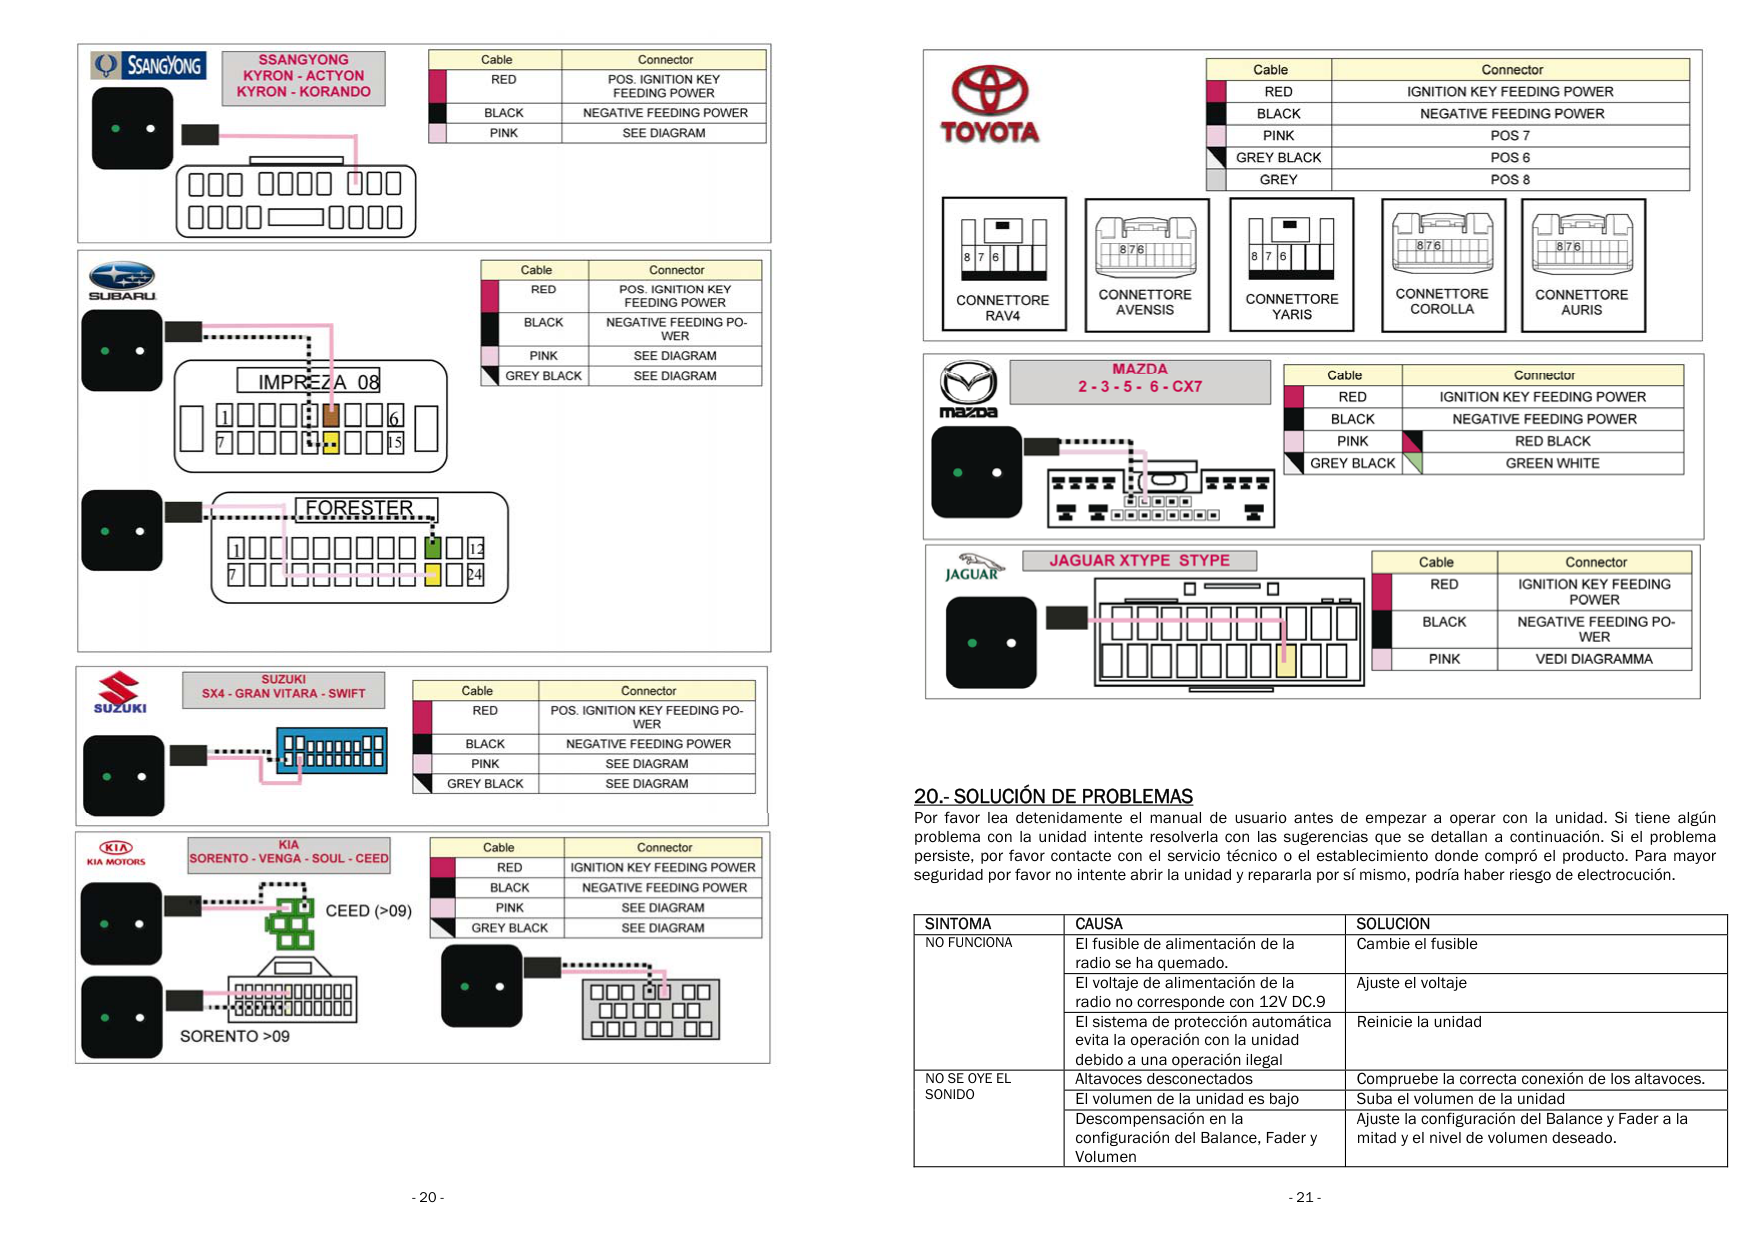
|SYMPTOM|CAUSE|SOLUTION| |---|---|---| |IT DOES NOT WORK|The radio's power fuse has burned. Replace the fuse|Replace the fuse| |IT DOES NOT WORK|The power supply voltage of the radio does not correspond to 12V DC.9|Adjust the voltage| |IT DOES NOT WORK|Automatic protection system prevents operation with the unit due to illegal operation|Restart the unit| |CAN NOT HEAR THE SOUND|Restart the unit|Check the correct connection of the speakers.| |CAN NOT HEAR THE SOUND|The volume of the unit is low|Increase the volume of the unit|
|CAN NOT HEAR THE SOUND|Decompensation in the Balance, Fader and Volume adjustments|Adjust the Balance and Fader settings to half and the desired volume level.| |REMOTE CONTROL DOES NOT WORK
|No battery|Insert a battery| |REMOTE CONTROL DOES NOT WORK
|Empty battery|Replace the battery with a new one| |REMOTE CONTROL DOES NOT WORK
|Badly installed battery|Check the correct position of the battery in the remote control.| |LOW QUALITY OF SOUND OR DISTORTED SOUND|The speakers have a different impedance than the unit. They are deteriorated.|Replace the speakers with ones that have the same impedance as the unit and have good condition| |LOW QUALITY OF SOUND OR DISTORTED SOUND|Speaker fail|Check the correct installation and condition of the speakers.| |THE UNIT RESETS WHEN IT IS TURNED OFF|The connection of the unit is not correct|Verify the correct connection of the power cables..Positive permanente and under key| |THE IMAGES ARE NOT DISPLAYED|The connection to the parking brake cable is not correct|Check the connection of the parking brake cable.|
1.- ANTES DE OPERAR CON LA UNIDAD
INSTALACION DE LA UNIDAD
SEGURIDAD
LIMPIEZA
TEMPERATURA
USO DE LA UNIDAD
3.- ESPECIFICACIONES
ESPECIFICACIONES GENERALES FORMATO 2DIN PANEL FRONTAL FIJO ALIMENTACION UNIDAD 11~14V DC NEGATIVO A MASA SISTEMA OPERATIVO C200S TDA IC TDA7388 POTENCIA SALIDA RMS 4x22W POTENCIA MAXIMA SALIDA 4x52W CONSUMO MAX.10A DIMENSIONES UNIDAD 178 x 100 x 130mm profundidad DIMENSIONES PANEL FRONTAL 170 x 96 TEMPERATURA DE TRABAJO -20 ~ +80º C INTERFACE MANDOS AL VOLANTE PARA VEHICULOS RESISTIVOS
PANEL TRASERO 1 ENTRADA DE ANTENA AM/FM 1 ENTRADA PARA MICROFONO EXTERNO
BLUETOOTH BLUETOOTH MANOS LIBRES STREAM DE AUDIO MEDIANTE PERFIL A2DP* VOLCADO DE AGENDA ACTUALIZACION AUTOMÁTICA DE LOS CONTACTOS
AJUSTES MENU OSD EN 18 IDIOMAS INCLUIDO ESPAÑOL ILUMINACION PANEL FRONTAL VARICOLOR 6 FONDOS DE PANTALLA DISPONIBLES
PANEL FRONTAL TAMAÑO PANTALLA 6.2” PANEL TACTIL CAPACITATIVO RESOLUCION 800x480 PIXELS, RATIO 4:3, 16:9 PUERTO USB 2.0, CARGA 2A
LECTOR TARJETA Micro SD PARA MULTIMEDIA ENTRADA AUXILIAR AUDIO JACK 3.5mm MICRÓFONO INCORPORADO SENSOR IR PARA MANDO A DISTANCIA CONTROL DE VOLUMEN ENCENDIODO/APAGADO MUTE MENU PRINCIPAL
SINTONIZADOR MULTIFRECUENCIA, INCLUIDA FRECUENCIA EUROPEA SINTONIZADOR AM/FM 30 PRESINTONIAS RDS SINTONIZADOR MANUAL Y ELECTRÓNICO FUNCIONES TA/AF/PTY/LOCAL STEREO/MONO SWITCH 7 PRE-EQUALIZACIONES
INFORMACION DE REPRODUCCION JPG, BMP, MP3, WMA, GIF, PNG, WMV, MP4, MKV, AVI, MOV, TS, ASF, OGG, FLAC, APE, AAC, AC3, ATRA, DTS BUSQUEDA DE ARCHIVOS POR NOMBRE, PISTA Y CARPETA
MIRROLINK BIDIRECCIONAL PARA SISTEMA OPERATIVO ANDROID UNIDIRECCIONAL PARA SISTEMA OPERATIVO iOS
4.- INSTALACION DE LA UNIDAD
Antes de empezar a instalar la unidad y para prevenir cortocircuitos, asegúrese de desconectar el terminal de la batería.

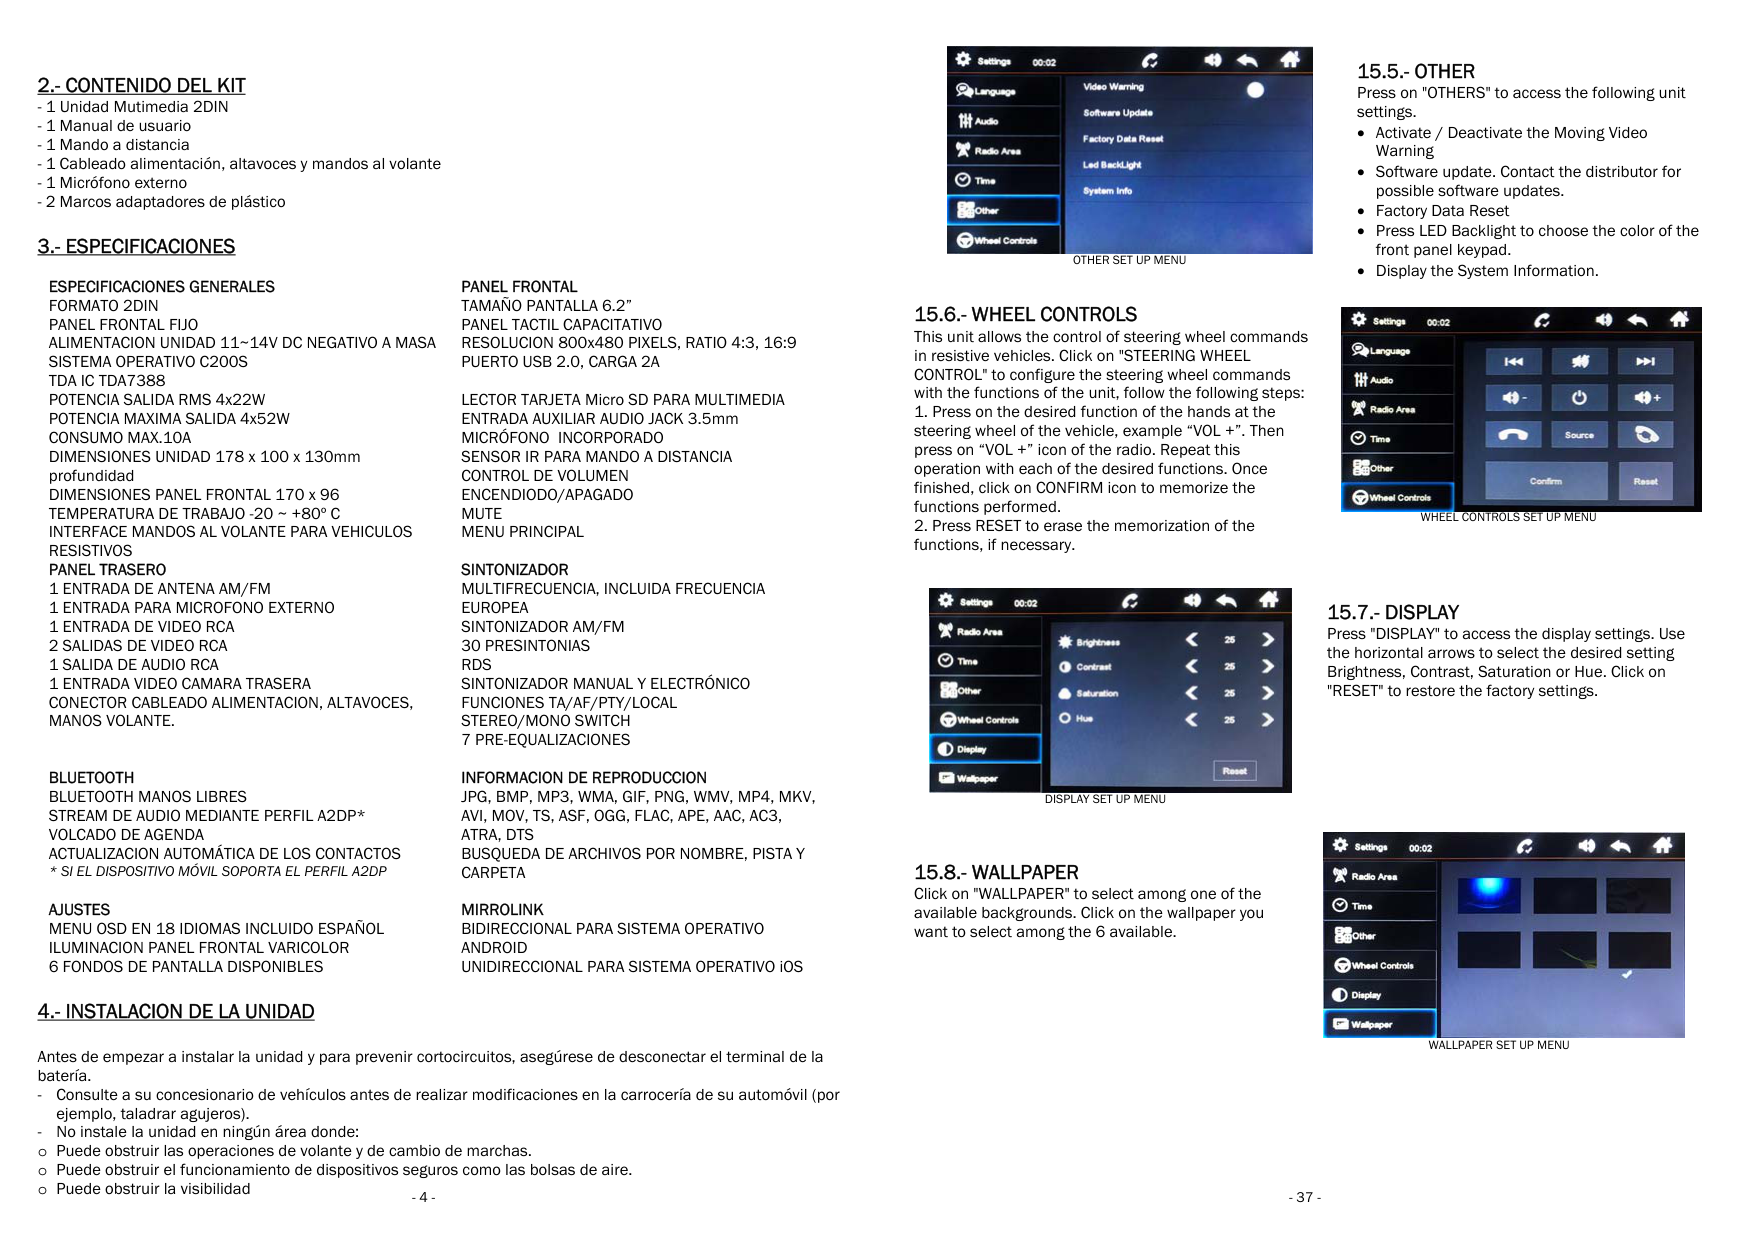
OTHER SET UP MENU
15.6.- WHEEL CONTROLS This unit allows the control of steering wheel commands in resistive vehicles. Click on "STEERING WHEEL CONTROL" to configure the steering wheel commands with the functions of the unit, follow the following steps:

DISPLAY SET UP MENU
15.8.- WALLPAPER
Click on "WALLPAPER" to select among one of the available backgrounds. Click on the wallpaper you want to select among the 6 available.
15.- UNITS SET UP Press the main menu icon of the unit to access the settings of the unit.

15.1.-LANGUAGE Press on "LANGUAGE" and select the desired language

AUDIO SET UP MENU

LANGUAGE SET UP MENU
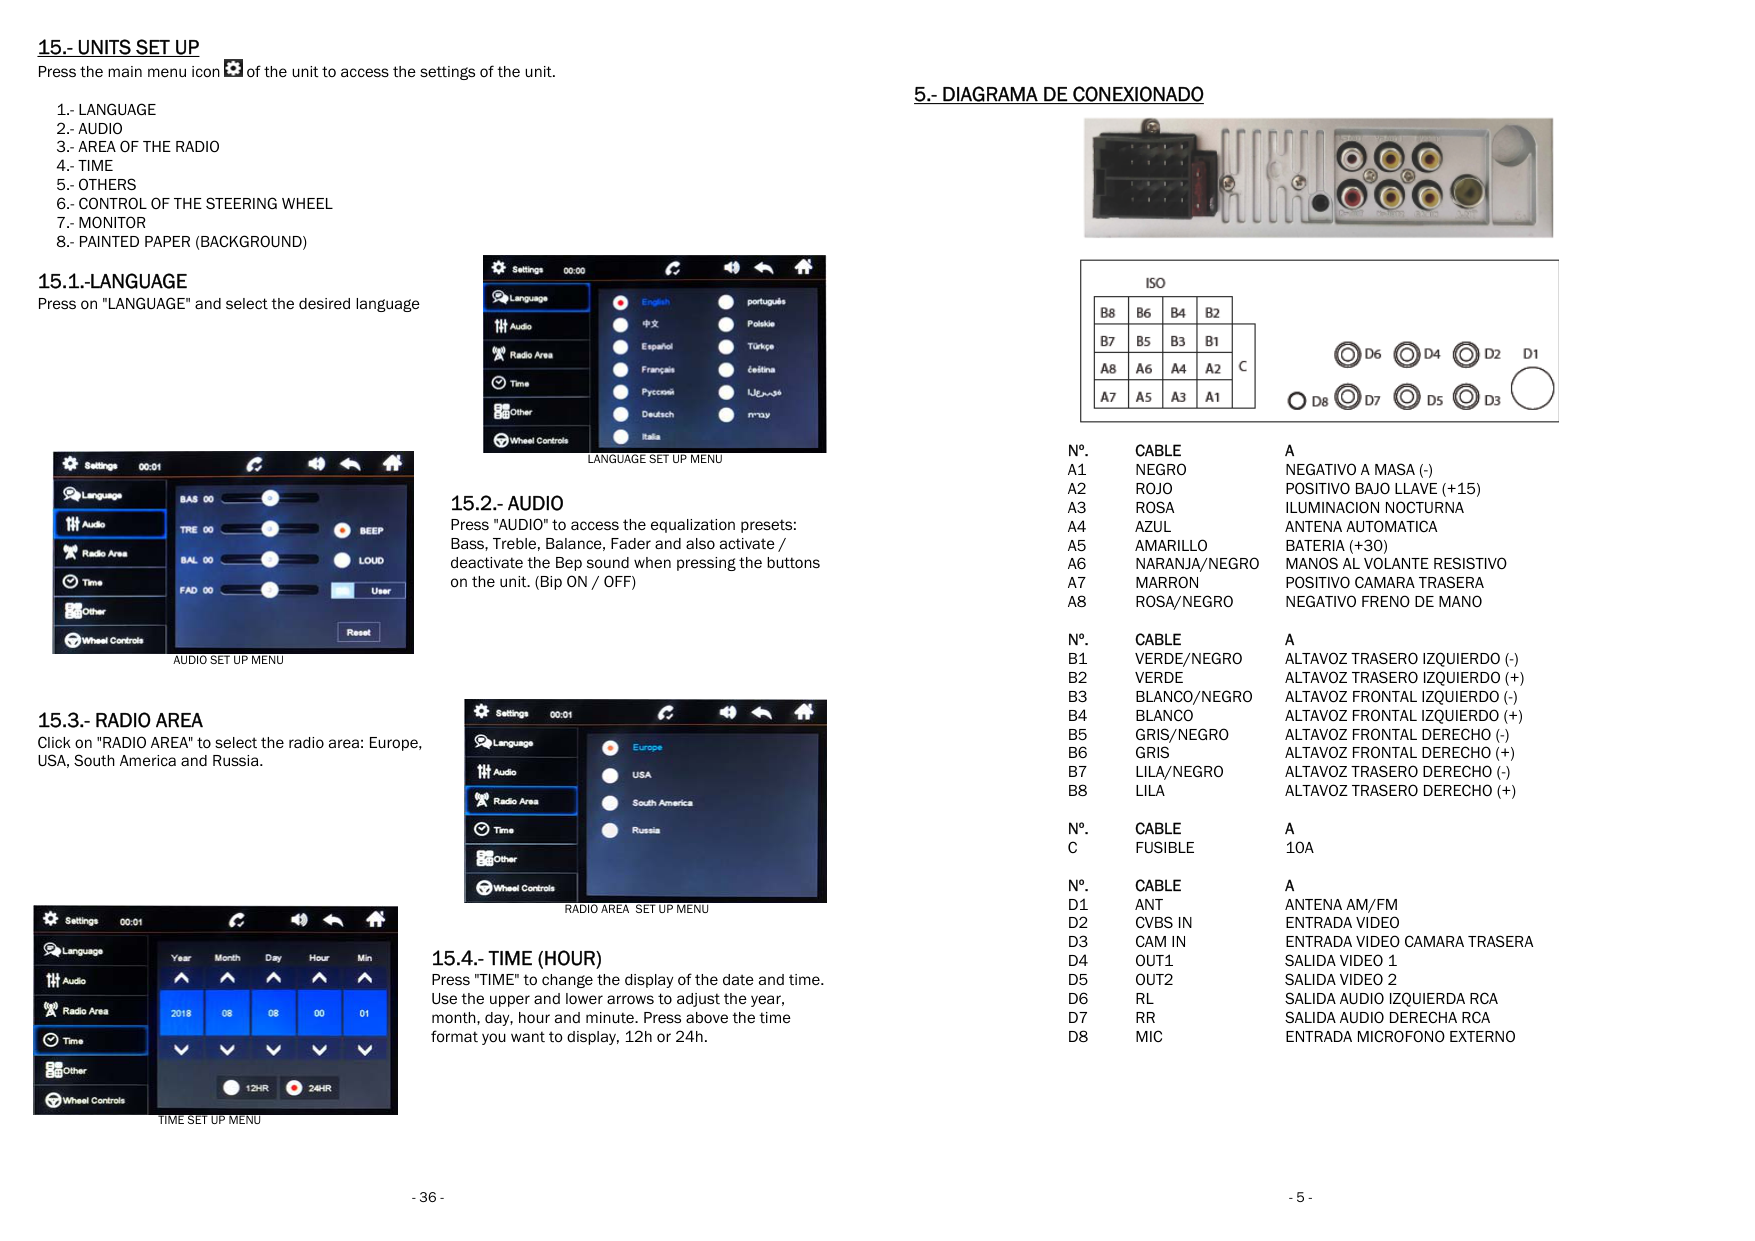
15.2.- AUDIO Press "AUDIO" to access the equalization presets: Bass, Treble, Balance, Fader and also activate / deactivate the Bep sound when pressing the buttons on the unit. (Bip ON / OFF)

15.3.- RADIO AREA Click on "RADIO AREA" to select the radio area: Europe, USA, South America and Russia.
RADIO AREA SET UP MENU

15.4.- TIME (HOUR) Press "TIME" to change the display of the date and time. Use the upper and lower arrows to adjust the year, month, day, hour and minute. Press above the time format you want to display, 12h or 24h.
TIME SET UP MENU
5.- DIAGRAMA DE CONEXIONADO

Nº. CABLE A
Nº. CABLE A C FUSIBLE 10A
Nº. CABLE A D1 ANT ANTENA AM/FM D2 CVBS IN ENTRADA VIDEO D3 CAM IN ENTRADA VIDEO CAMARA TRASERA D4 OUT1 SALIDA VIDEO 1 D5 OUT2 SALIDA VIDEO 2 D6 RL SALIDA AUDIO IZQUIERDA RCA D7 RR SALIDA AUDIO DERECHA RCA D8 MIC ENTRADA MICROFONO EXTERNO


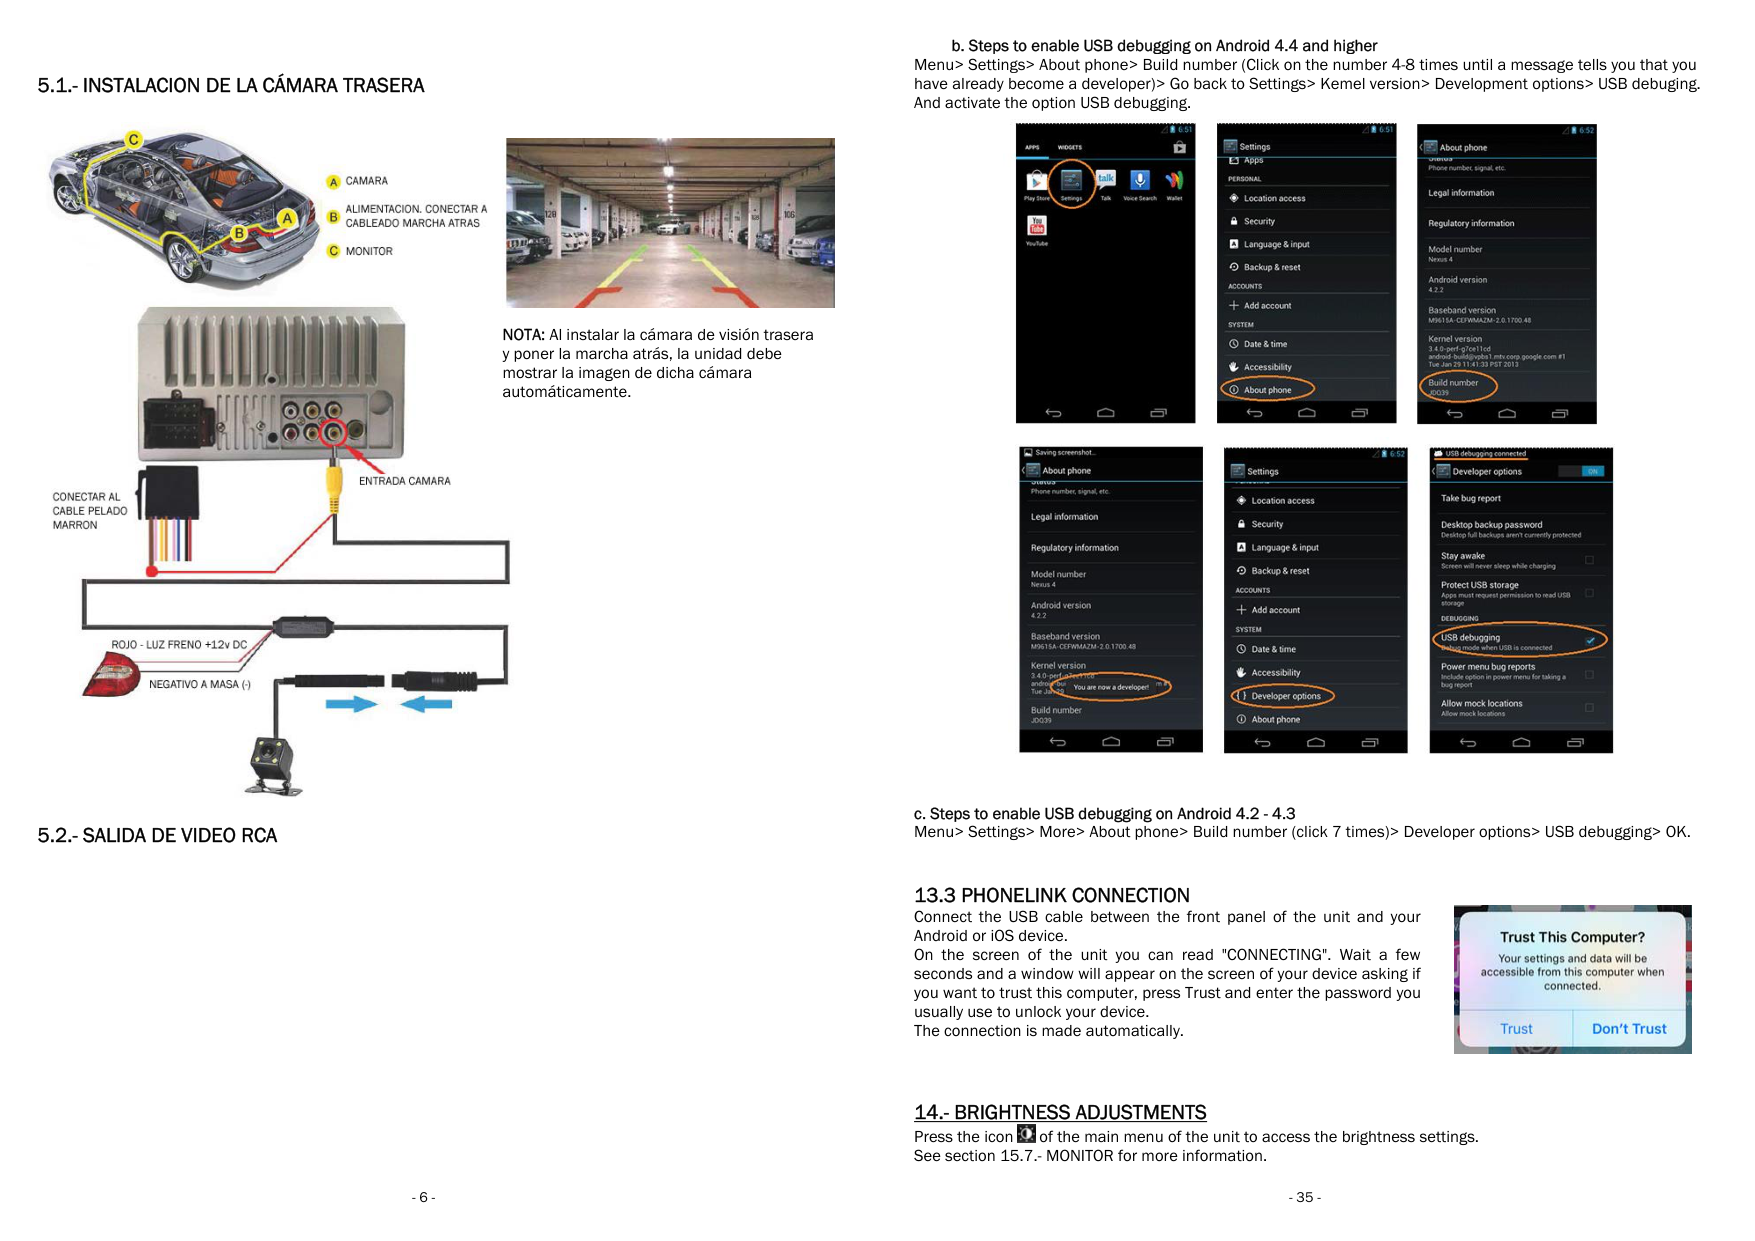
NOTA: Al instalar la cámara de visión trasera y poner la marcha atrás, la unidad debe mostrar la imagen de dicha cámara automáticamente.
5.2.- SALIDA DE VIDEO RCA
b. Steps to enable USB debugging on Android 4.4 and higher Menu> Settings> About phone> Build number (Click on th have already become a developer)> Go back to Setting And activate the option USB debugging.


c. Steps to enable USB debugging on Android 4.2 - 4.3 Menu> Settings> More> About phone> Build number (cli


A2DP BLUETOOTH MENU
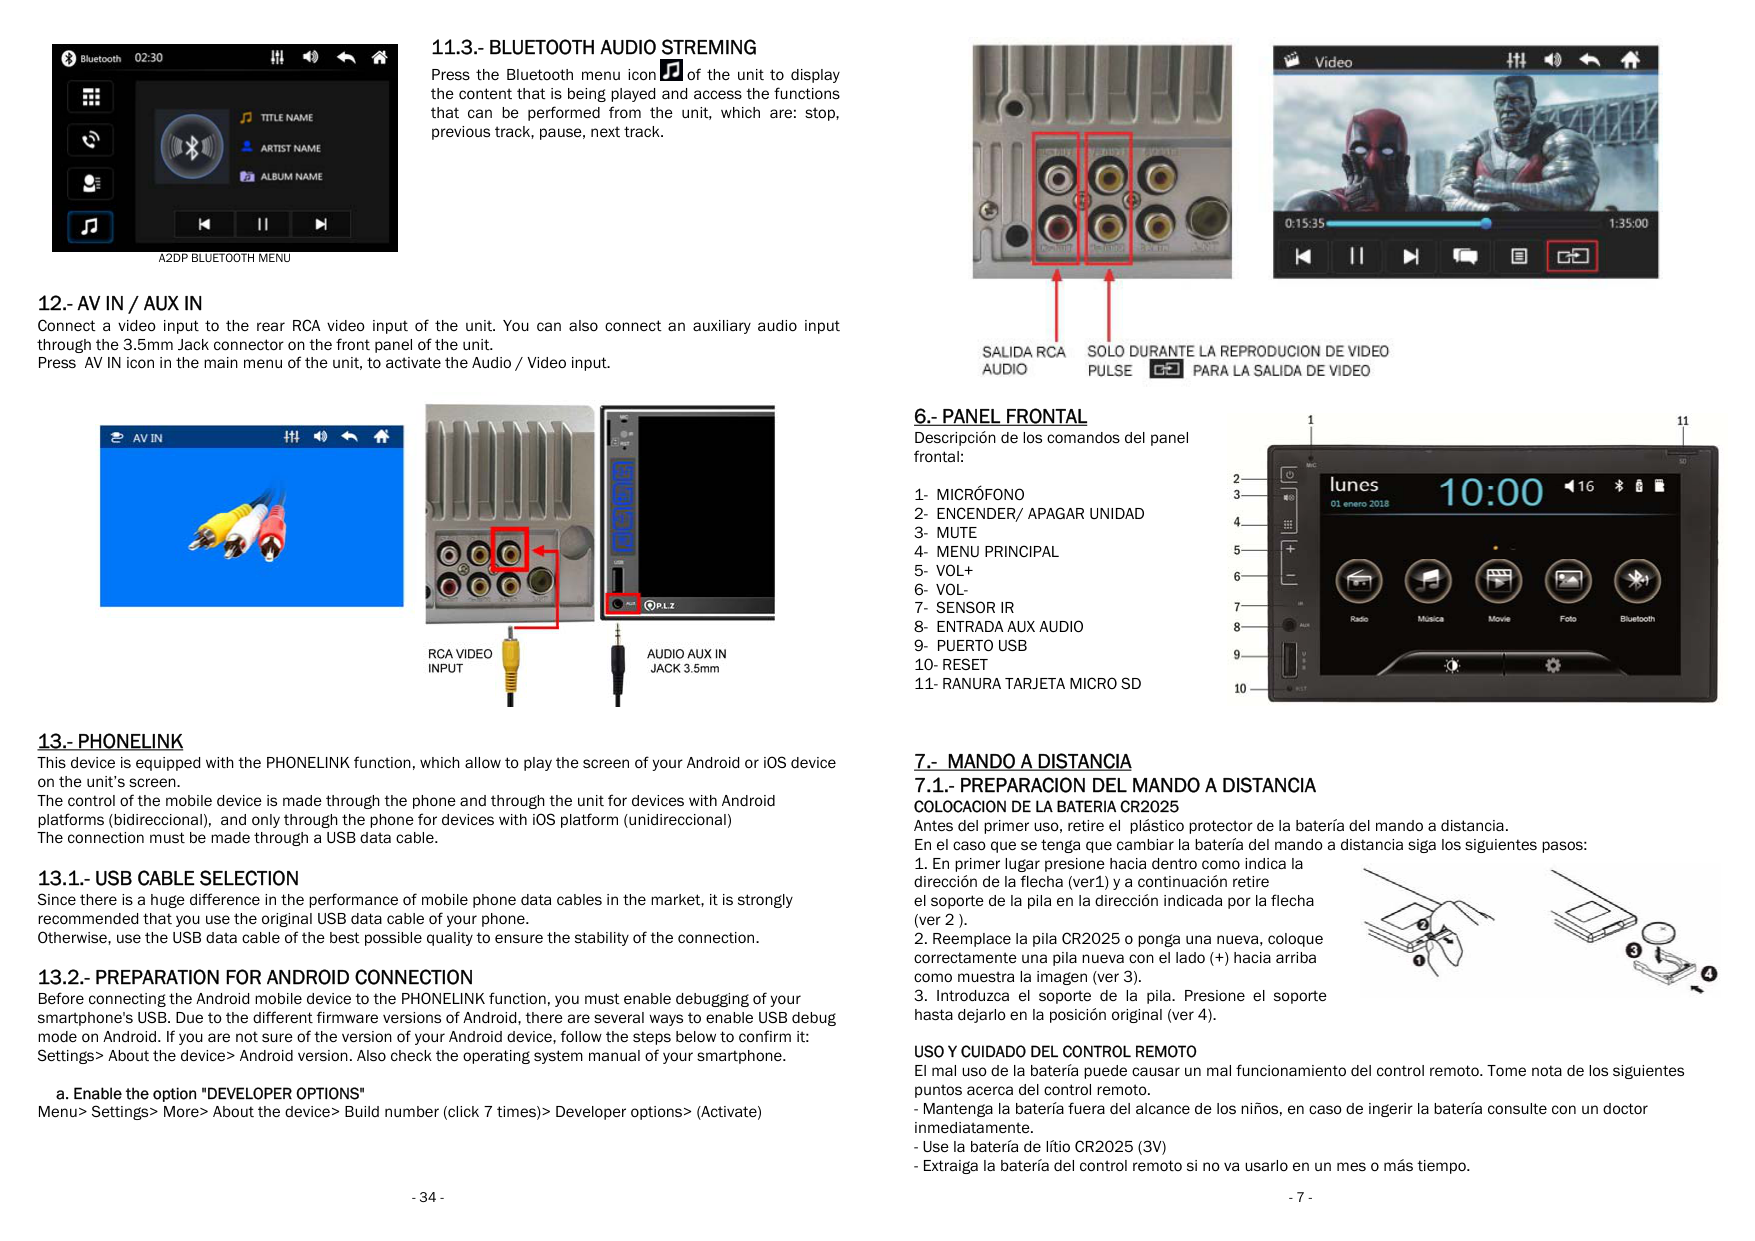
11.3.- BLUETOOTH AUDIO STREMING

Press the Bluetooth menu icon of the unit to display the content that is being played and access the functions that can be performed from the unit, which are: stop, previous track, pause, next track.


a. Enable the option "DEVELOPER OPTIONS"
Menu> Settings> More> About the device> Build number (click 7 times)> Developer options> (Activate)


USO Y CUIDADO DEL CONTROL REMOTO El mal uso de la batería puede causar un mal funcionamiento del control remoto. Tome nota de los siguientes puntos acerca del control remoto.

|Nº|SIMBOLO|OPERACIÓN & CONTROL| |---|---|---| |1|MODE|Pulse para cambiar el modo de la unidad en la siguiente secuencia:RADIO>USB >SD >AV IN>BT| |2||Pulse para encender/ apagar la unidad.| |3|BAND|Pulse para cambiar la banda de la radio en la siguiente secuencia: FM1 > FM2 > FM3 > AM1 > AM2| |4|SEL|Pulse para acceder a los ajustes de Treble/Bass/Balance/Fader/Loudness| |5| |• En modo USB/SD, pulse para ir a la pista o capítulo anterior.
• En modo radio, pulse para saltar automáticamente a la emisora anterior con buena señal. Mantenga pulsado para ir a las emisoras anteriores manualmente.
| |6|EQ|Pulse para acceder a los ajustes de ecualización.| |7|2/INT|• En modo radio, pulse para escuchar la emisora presintonizada en tecla numérica 2 o mantener pulsado para grabar presintonía.
• En modo reproducción, pulse INT lee los primeros segundos de cada pista.
| |8|1/
|• En modo radio, pulse para escuchar la emisora presintonizada en tecla numérica 1 o mantener pulsado para grabar presintonía.
• En modo reproducción pulsa para pausar/reanudar la reproducción.
| |9|4/RDM|• En modo radio, pulse para escuchar la emisora presintonizada en tecla numérica 4 o mantener pulsado para grabar presintonía.
• En modo reproducción, pulse para escuchar archivos de modo aleatorio.
| |10|6/+10|• En modo radio, pulse para escuchar la emisora presintonizada en tecla numérica 6 o mantener pulsado para grabar presintonía.
• En modo reproducción, pulse para saltar 10 pistas o capítulos.
| |11|5/-10|• En modo radio, pulse para escuchar la emisora presintonizada en tecla numérica 5 o mantener pulsado para grabar presintonía.
• En modo reproducción, pulse para retroceder 10 pistas o capítulos
| |12|3/RPT|• En modo radio, pulse para escuchar la emisora presintonizada en tecla numérica 3 o mantener pulsado para grabar presintonía.
• En modo reproducción, pulse para repetir la reproducción.
| |13|DISP|Pulse DISP para encender/apagar pantalla.| |14|VOL-|Pulse VOL- para bajar el volumen.| |15| |• En modo USB/SD, pulse para ir a la pista o capítulo siguiente.
• En modo radio, pulse para saltar automáticamente a la siguiente emisora con buena señal. Mantenga pulsado para ir a las siguientes emisoras manualmente.
|
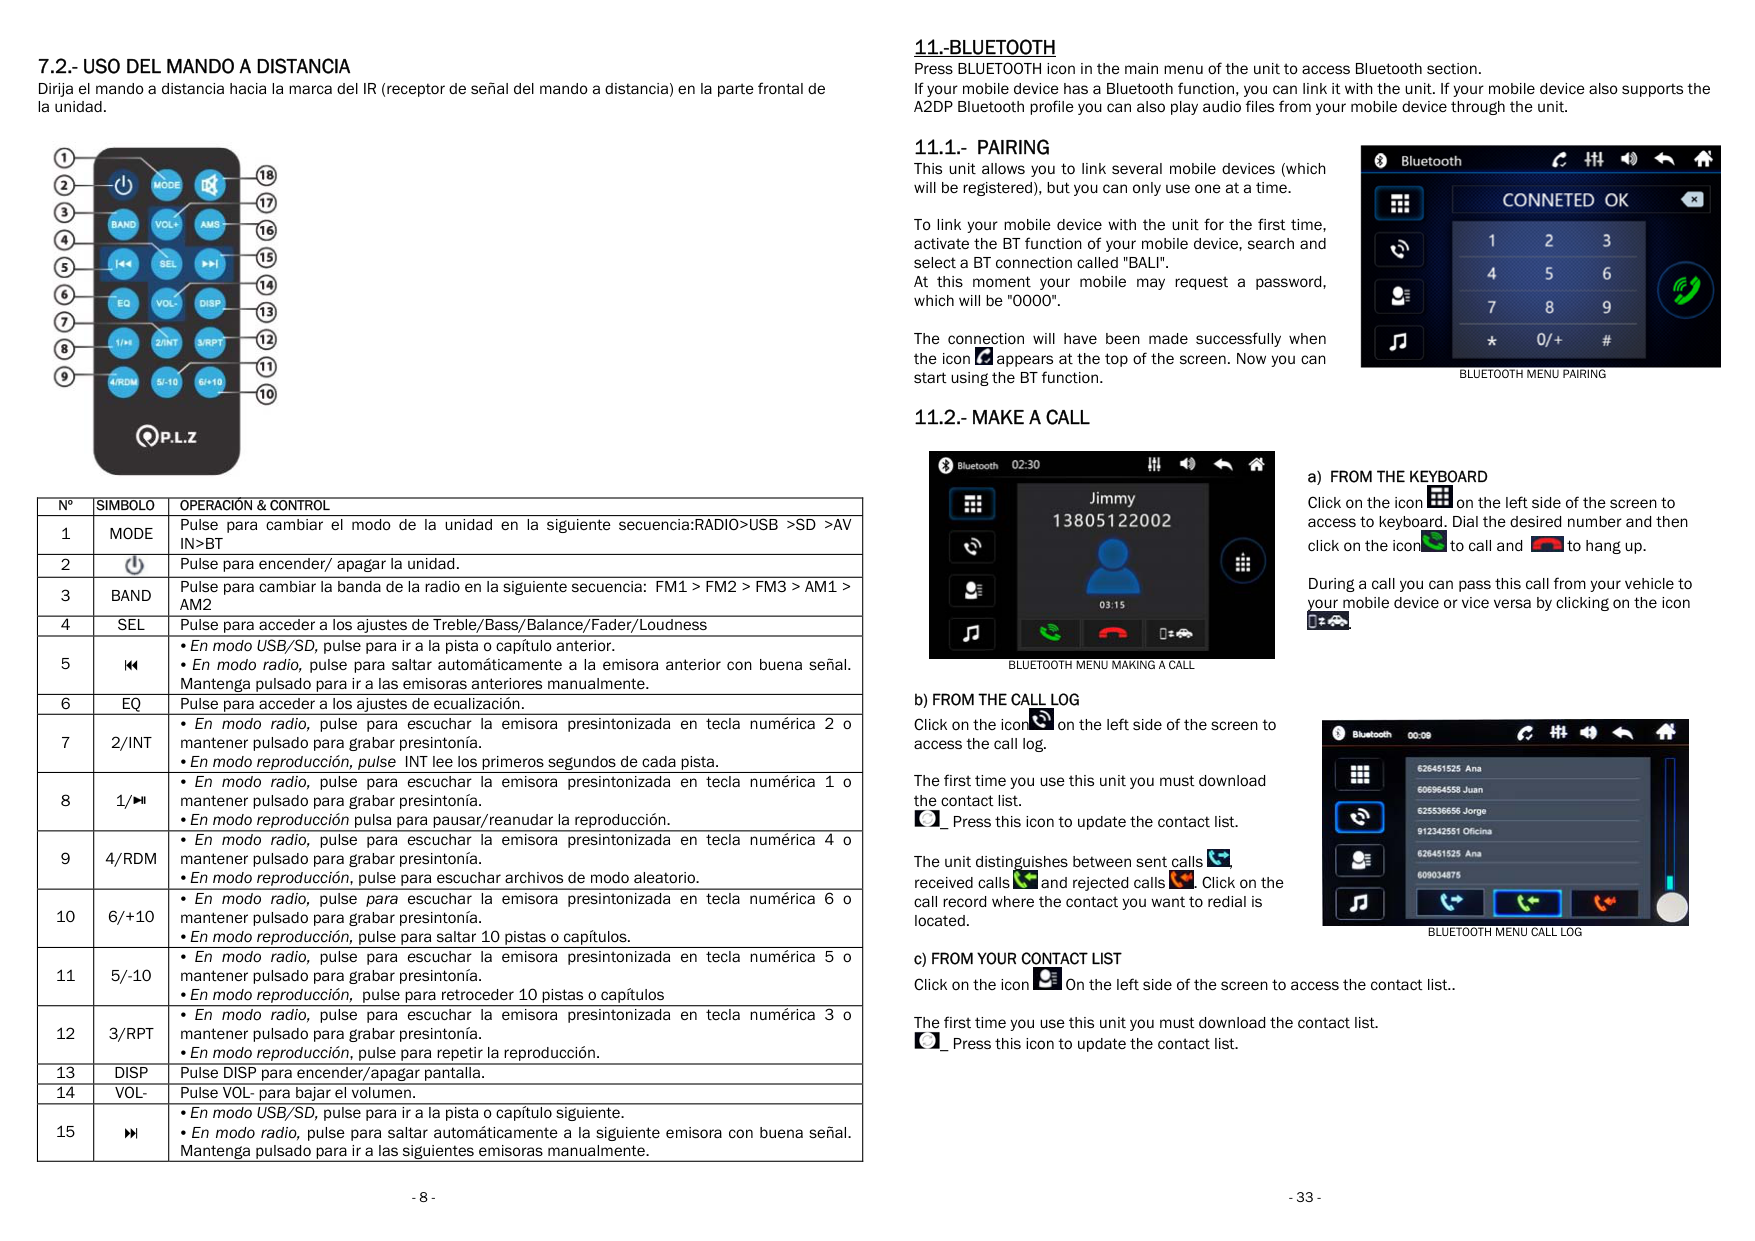
11.-BLUETOOTH Press BLUETOOTH icon in the main menu of the unit to access Bluetooth section. If your mobile device has a Bluetooth function, you can link A2DP Bluetooth profile you can also play audio fi
To link your mobile device with the unit for the first time, activate the BT function of your mobile device, search and select a BT connection called "BALI". At this moment your mobile may request a password, which will be "0000".
The connection will have been made successfully when the icon appears at the top of the screen. Now you can start using the BT function.


BLUETOOTH MENU MAKING A CALL

The first time you use this unit you must download the contact list.

_ Press this icon to update the contact list.
The unit distinguishes between sent calls , received calls and rejected calls . Click on the call record where the contact you want to redial is located.


The first time you use this unit you must download the contact list. _ Press this icon to update the contact list.

The TA function is only operative in the FM band.


MUSIC INTERFACE VIDEO INTERFACE PHOTO INTERFACE

_ If you press BACKSPACE in any of the interfaces, you can view the content of the USB device or SD card and view said content classified by Music, Video or Photo.
10.1.- MUSIC INTERFACE
. PREVIOUS TRACK Press this button to skip to the previous track. Press and hold to fast-reverse the file being played.

. PLAY/PAUSE Press this button to pause or resume playback in progress


. NEXT TRACK Press this button to skip to the next track. Press and hold to fast-forward the file being played.

Press this button to play the files randomly.
. RANDOM / PLAYBACK

. REPEAT Press this button to repeat playback.

10.2.- VIDEO INTERFACE
. PREVIOUS TRACK Press this button to skip to the previous track. Press and hold to fast-reverse the file being played.

. PLAY/PAUSE Press this button to pause or resume playback in progress


. NEXT TRACK Press this button to skip to the next track. Press and hold to fast-forward the file being played.

. LANGUAGE In video mode, press this button to select the audio language.

. SUBTITTLES In video mode, press this button to select the subtitle language (function only available if the disc allows it)

. VIDEO SWITCH Press this button to activate the video output and connect to an external screen, through the RCA video outputs.

10.3.- PHOTO INTERFACE
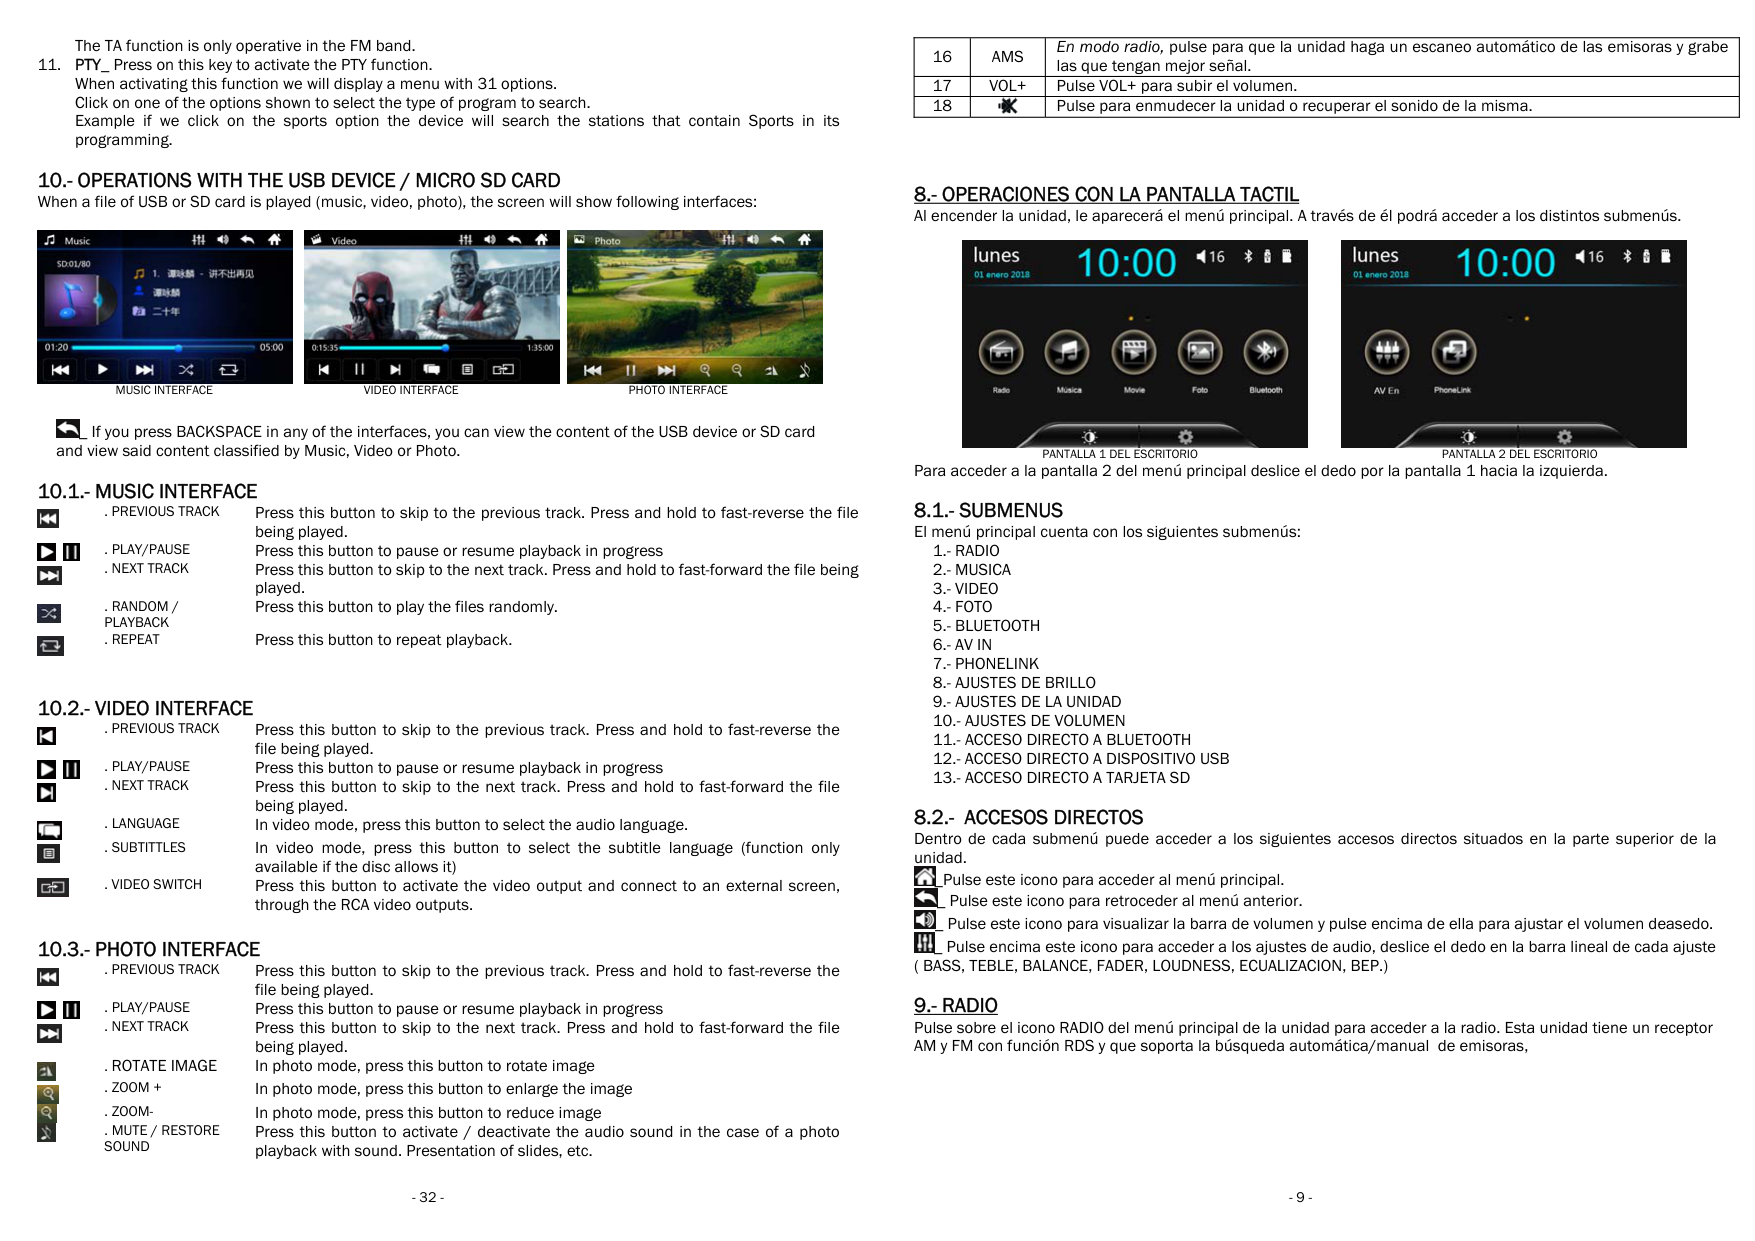
. PREVIOUS TRACK Press this button to skip to the previous track. Press and hold to fast-reverse the file being played.

. PLAY/PAUSE Press this button to pause or resume playback in progress


. NEXT TRACK Press this button to skip to the next track. Press and hold to fast-forward the file being played.

. ROTATE IMAGE In photo mode, press this button to rotate image

. ZOOM + In photo mode, press this button to enlarge the image

. ZOOM- In photo mode, press this button to reduce image

Press this button to activate / deactivate the audio sound in the case of a photo playback with sound. Presentation of slides, etc.
. MUTE / RESTORE SOUND

|16|AMS|En modo radio, pulse para que la unidad haga un escaneo automático de las emisoras y grabe las que tengan mejor señal.| |---|---|---| |17|VOL+|Pulse VOL+ para subir el volumen.| |18||Pulse para enmudecer la unidad o recuperar el sonido de la misma.|

PANTALLA 1 DEL ESCRITORIO
Para acceder a la pantalla 2 del menú principal desl

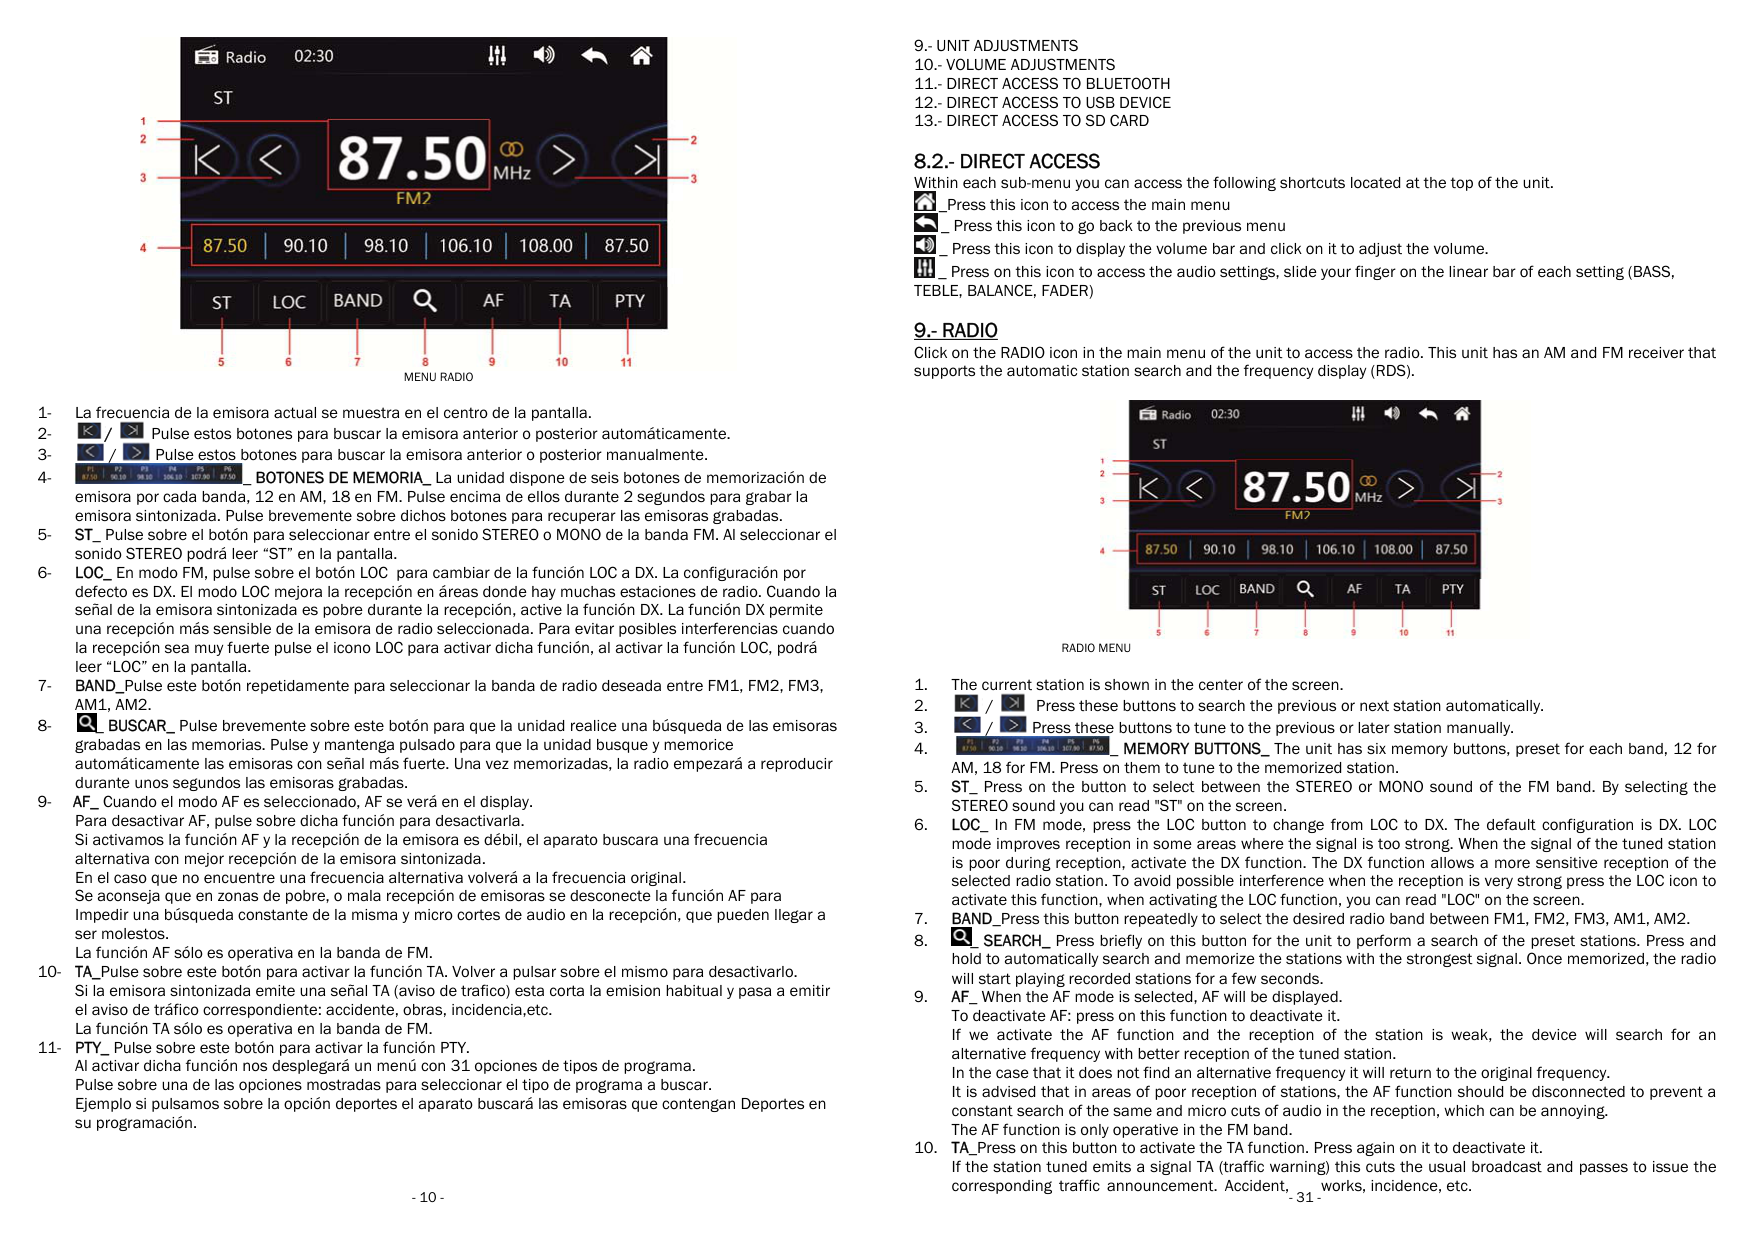
_Pulse este icono para acceder al menú principal. _ Pulse este icono para retroceder al menú anterior. _ Pulse este icono para visualizar la barra de volumen y _ Pulse encima este icono para acceder a los ajustes de audi ( BASS, TEBLE, BALANCE, FADER, LOUDNESS, ECUALIZACION, BEP.)


MENU RADIO


_Press this icon to access the main menu _ Press this icon to go back to the previous menu _ Press this icon to display the volume bar and click on it to adjust the volume. _ Press on this icon to access the audio settings, slide


TEBLE, BALANCE, FADER)


RADIO MENU


HOMEPAGE 1 HOMEPAGE2 To access screen 2 of the main menu, slide your finger across screen 1 to the left. 8.1.- SUBMENUS The home page has the following submenus:
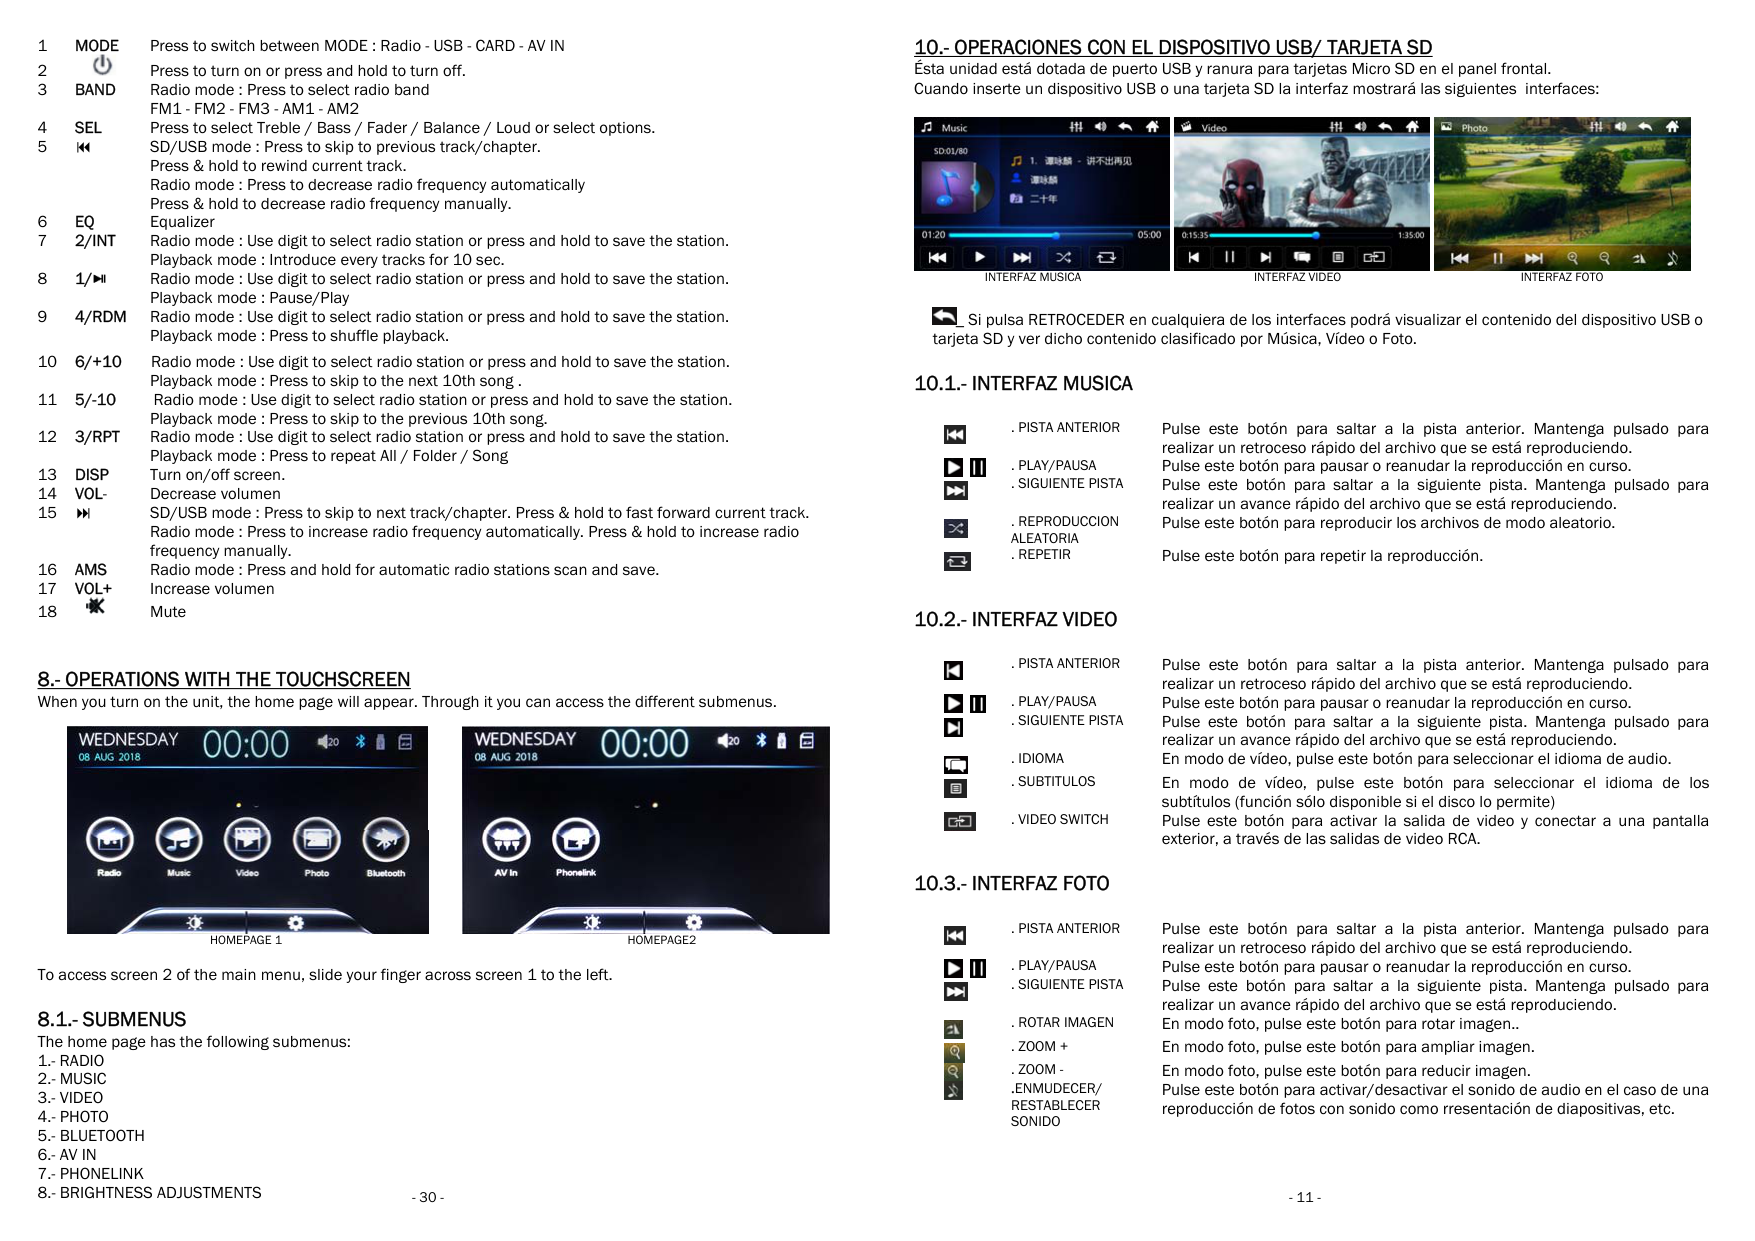
10.- OPERACIONES CON EL DISPOSITIVO USB/ TARJETA SD Ésta unidad está dotada de puerto USB y ranura para tarjetas Micro SD en el panel frontal. Cuando inserte un dispositivo USB o una tarjeta SD la interfaz mostrará las siguientes interfaces:


INTERFAZ MUSICA INTERFAZ VIDEO INTERFAZ FOTO

_ Si pulsa RETROCEDER en cualquiera de los interfaces tarjeta SD y ver dicho contenido clasificado por Música, Vídeo o Foto.
10.1.- INTERFAZ MUSICA


. PISTA ANTERIOR Pulse este botón para saltar a la pista anterior. Mantenga pulsado para realizar un retroceso rápido del archivo que se está reproduciendo.
. PLAY/PAUSA Pulse este botón para pausar o re
. SIGUIENTE PISTA Pulse este botón para saltar a la siguiente pista. Mantenga pulsado para realizar un avance rápido del archivo que se está reproduciendo.
Pulse este botón para reproducir los archivos de modo aleatorio.
. REPRODUCCION ALEATORIA
. REPETIR Pulse este botón para repetir la reproducción.
10.2.- INTERFAZ VIDEO


. PISTA ANTERIOR Pulse este botón para saltar a la pista anterior. Mantenga pulsado para realizar un retroceso rápido del archivo que se está reproduciendo.
. PLAY/PAUSA Pulse este botón para pausar o re
. SIGUIENTE PISTA Pulse este botón para saltar a la siguiente pista. Mantenga pulsado para realizar un avance rápido del archivo que se está reproduciendo.
. IDIOMA En modo de vídeo, pulse este botón para seleccionar el idioma de audio.
. SUBTITULOS En modo de vídeo, pulse este botón para seleccionar el idioma de los subtítulos (función sólo dispon
. VIDEO SWITCH Pulse este botón para activar la salida de video y conectar a una pantalla exterior, a través de las salidas de video RCA.
10.3.- INTERFAZ FOTO


. PISTA ANTERIOR Pulse este botón para saltar a la pista anterior. Mantenga pulsado para realizar un retroceso rápido del archivo que se está reproduciendo.
. PLAY/PAUSA Pulse este botón para pausar o re
. SIGUIENTE PISTA Pulse este botón para saltar a la siguiente pista. Mantenga pulsado para realizar un avance rápido del archivo que se está reproduciendo.
. ROTAR IMAGEN En modo foto, pulse este botón para rotar imagen..
. ZOOM + En modo foto, pulse este botón para ampliar imagen.
. ZOOM - En modo foto, pulse este botón para reducir imagen.
Pulse este botón para activar/desactivar el sonido de audio en el caso de una reproducción de fotos con sonido como rresentación de diapositivas, etc.
.ENMUDECER/ RESTABLECER SONIDO
Para enlazar su dispositivo móvil con la unidad por primera vez, active la función BT de su dispositivo móvil y busque y seleccione una conexión BT llamada “BALI”. En este momento puede que su móvil le solicite un password, que será “0000”. La conexión se habrá realizado con éxito cuando en la parte superior de la pantalla aparezca el icono . Es ahora cuando puede empezar a utilizar la función BT.


MENU BLUETOOTH TECLADO NUMERICO

a) DESDE TECLADO NUMERICO


Pulse sobre el icono en la parte izquierda de la pantalla para acceder al teclado numérico. Marque el número deseado y a continuación pulse sobre el icono

para llamar y para colgar.

Durante una llamada puede pasar dicha llamada de su vehículo a su dispositivo móvil o al revés pulsando el icono

MENU BLUETOOTH LLAMADA EN CURSO

La primera vez que use ésta unidad deberá descargar la agenda de contactos, la operación puede tardar unos minutos.

_ Pulse este icono para actualizar la agenda de contactos. La unidad distingue entre llamadas enviadas ,

llamadas recibidas y rechazadas . Pulse encima el registro de llamadas donde se ubica el contacto que desee rellamar.


MENU BLUETOOTH REGISTRO LLAMADAS

Pulse sobre el icono en la parte izquierda de la pantalla para acceder a la agenda de contactos. La primera vez que use ésta unidad deberá descargar la agenda de contactos.

_ Pulse este icono para actualizar la agenda de contactos, la operación puede tardar unos minutos.
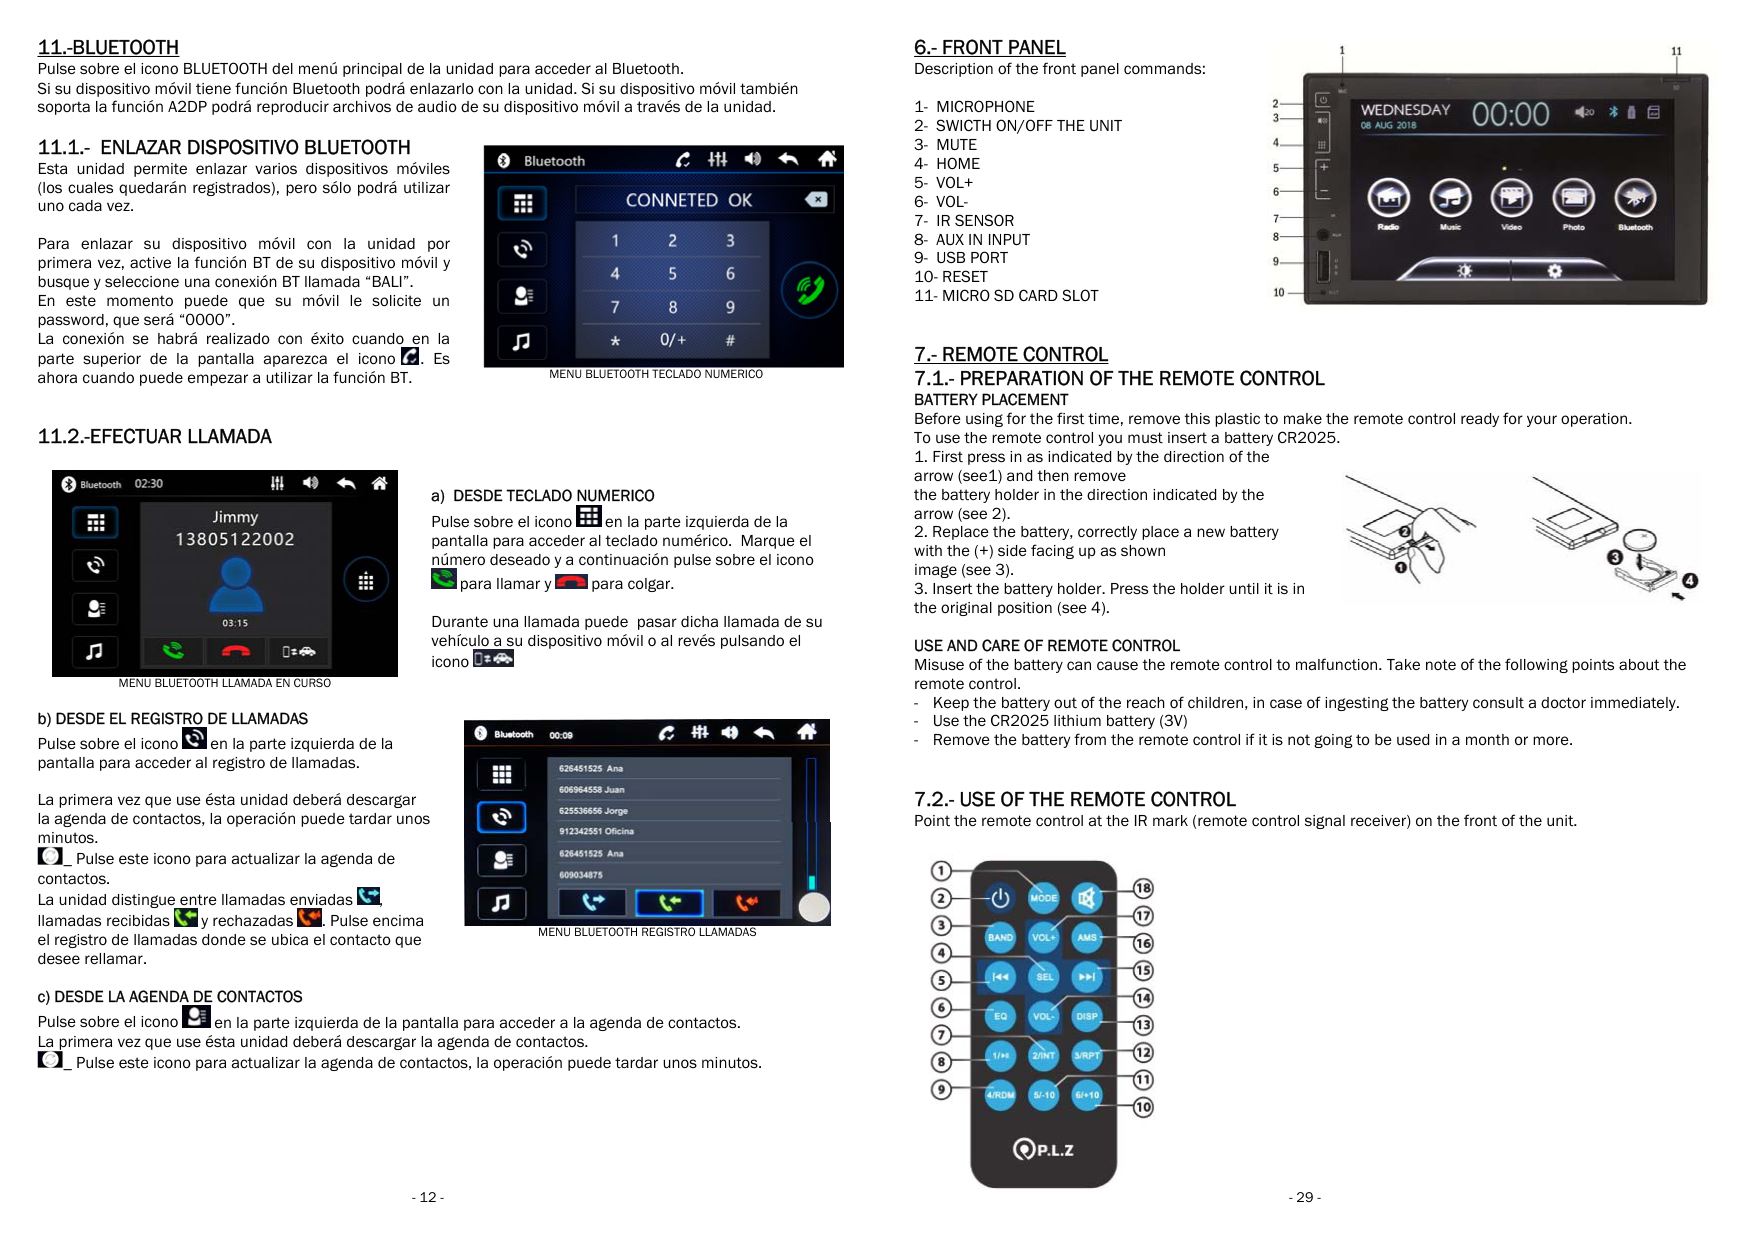
USE AND CARE OF REMOTE CONTROL Misuse of the battery can cause the remote control to malfunction. Take note of the following points about the remote control.

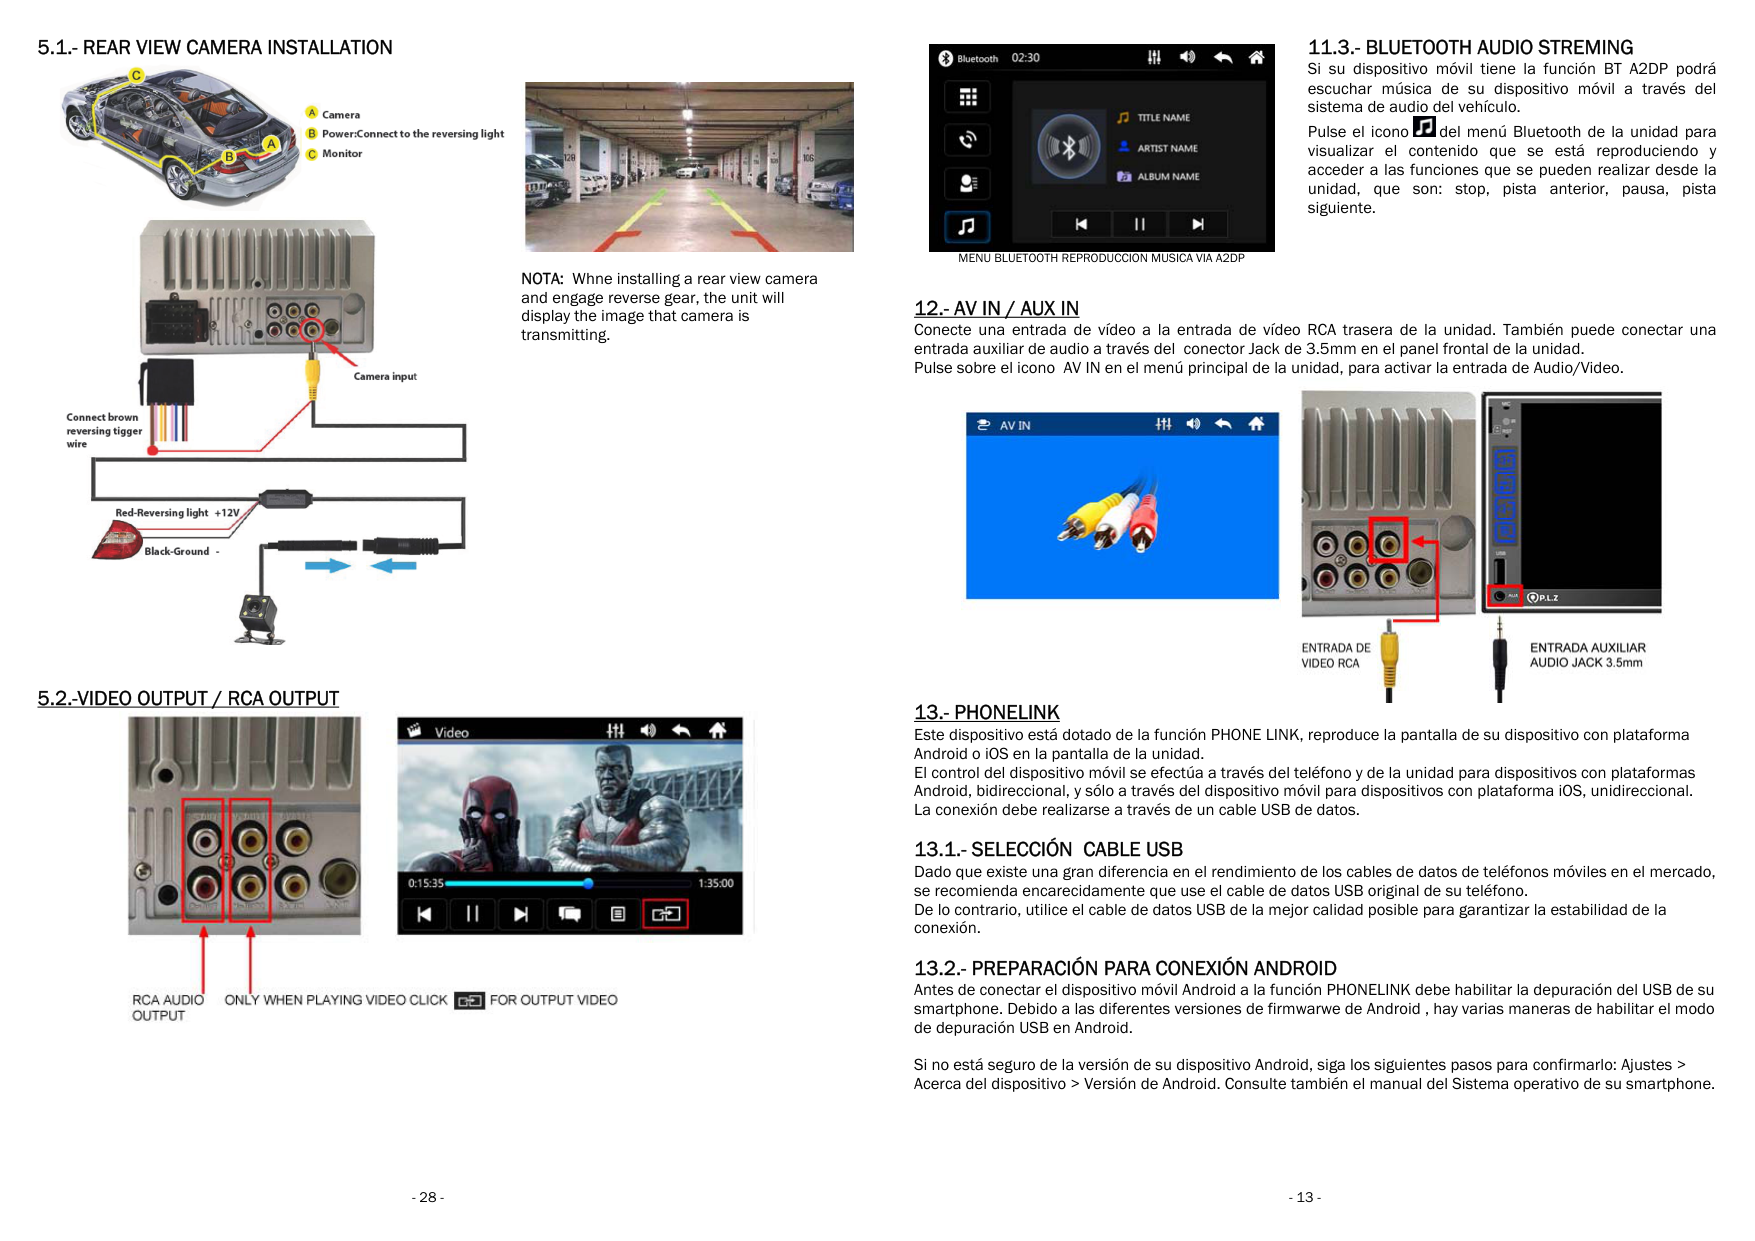
5.1.- REAR VIEW CAMERA INSTALLATION


NOTA: Whne installing a rear view camera and engage reverse gear, the unit will display the image that camera is transmitting.
5.2.-VIDEO OUTPUT / RCA OUTPUT


MENU BLUETOOTH REPRODUCCION MUSICA VIA A2DP


Si no está seguro de la versión de su dispositivo Andr Acerca del dispositivo > Versión de Android. Consulte también el manual de

DEPURACIÓN USB ANDROID 4.4 Y SUPERIOR


5.- CONNECTION DIAGRAM

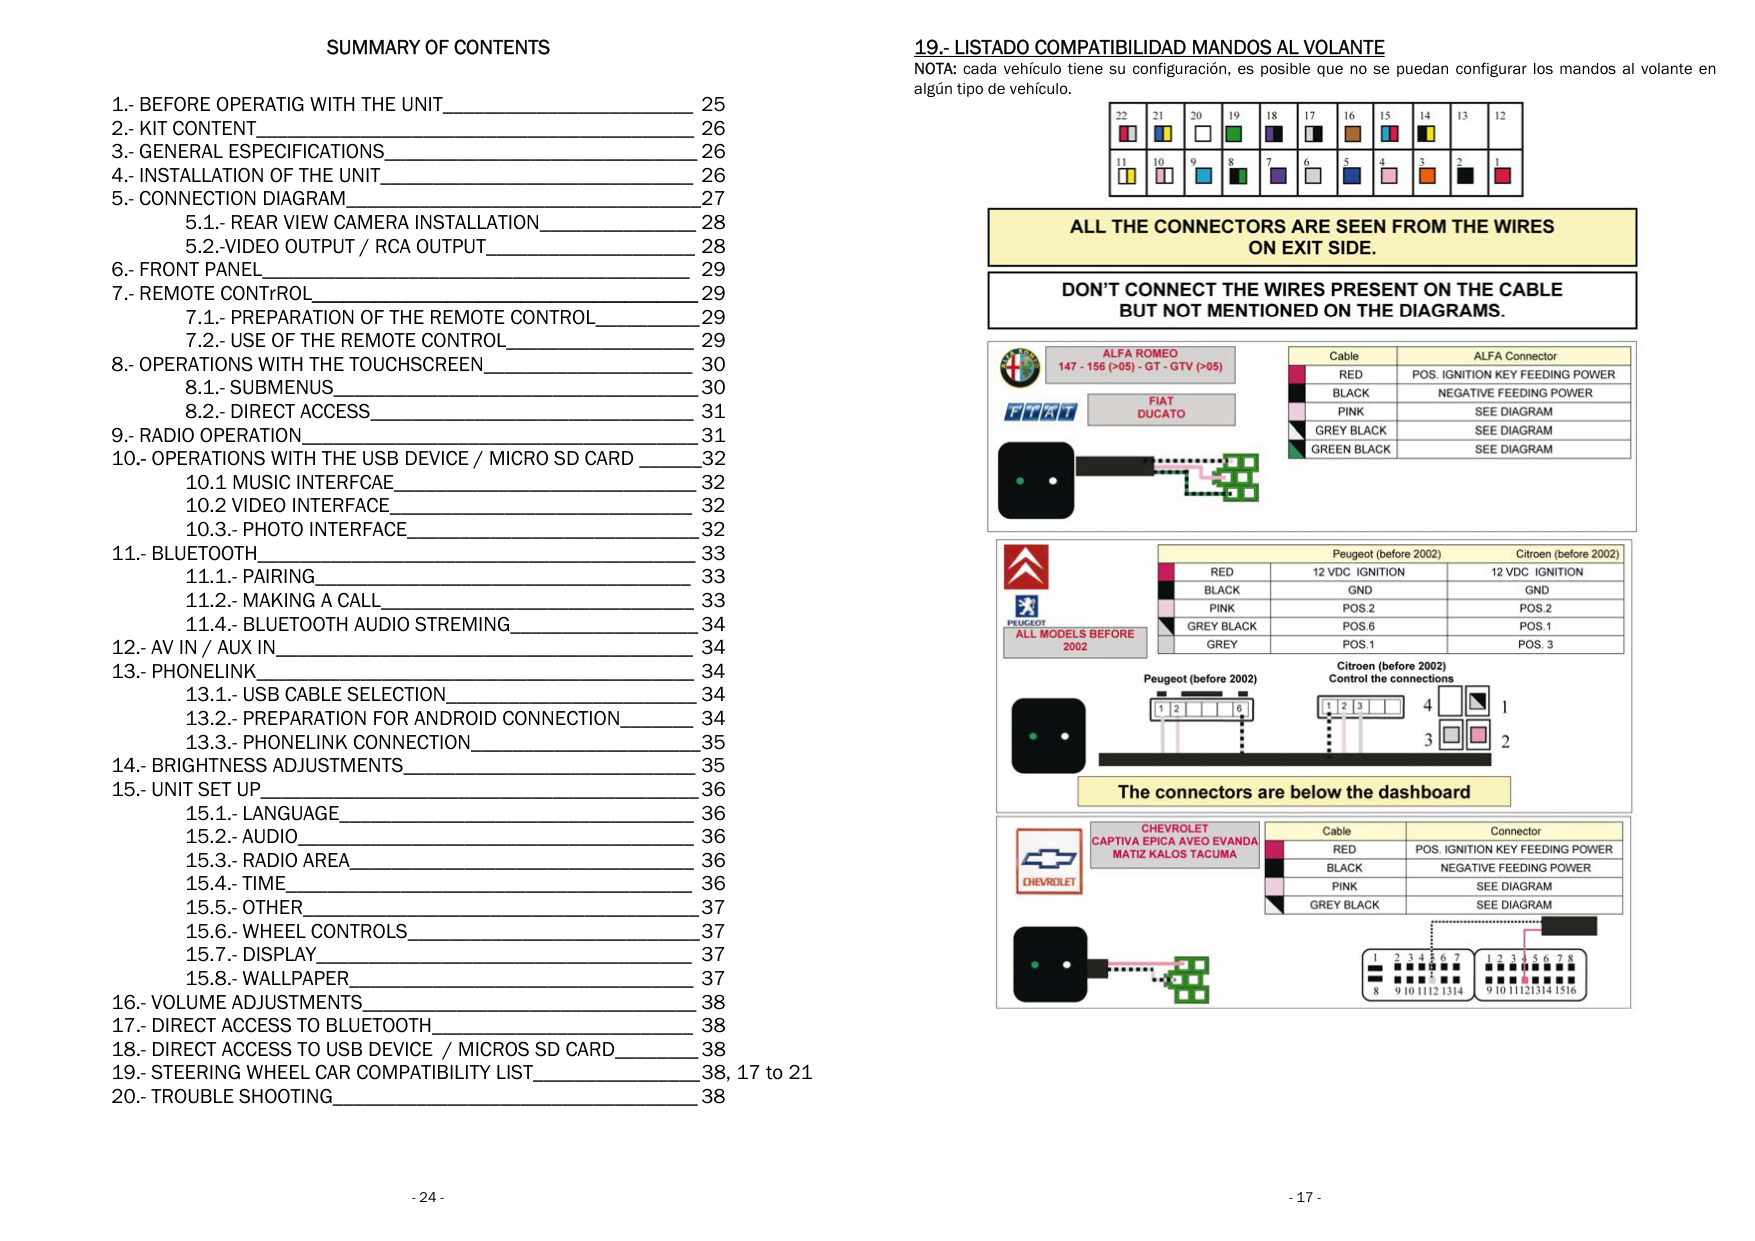
|NO.|WIRE| | |---|---|---| |A1|BLACK|GND battery (-)| |A2|RED|ACC switch control (+15)| |A3|PINK| | |A4|BLUE| | |A5|YELLOW| | |A6|ORANGE / BLACK| | |A7|BROWN|Rear view camera| |A8|PINK / BLACK|Parking brake|
|NO.|WIRE| | |---|---|---| |B1|GREEN / BLACK| | |B2|GREEN| | |B3|WHITE / BLACK| | |B4|WHITE|Left front speaker(+)| |B5|GREY / BLACK| | |B6|GREY| | |B7|PURPLE / BLACK| | |B8|PURPLE| |
|NO.|WIRE| | |---|---|---| |D1|ANT| | |D2|CVBS IN|Video input| |D3|CAM IN| | |D4|OUT1| | |D5|OUT2| | |D6|RL| | |D7|RR| | |D8|MIC|MIC in|
|NO.|WIRE| | |---|---|---| |C|FUSE| |
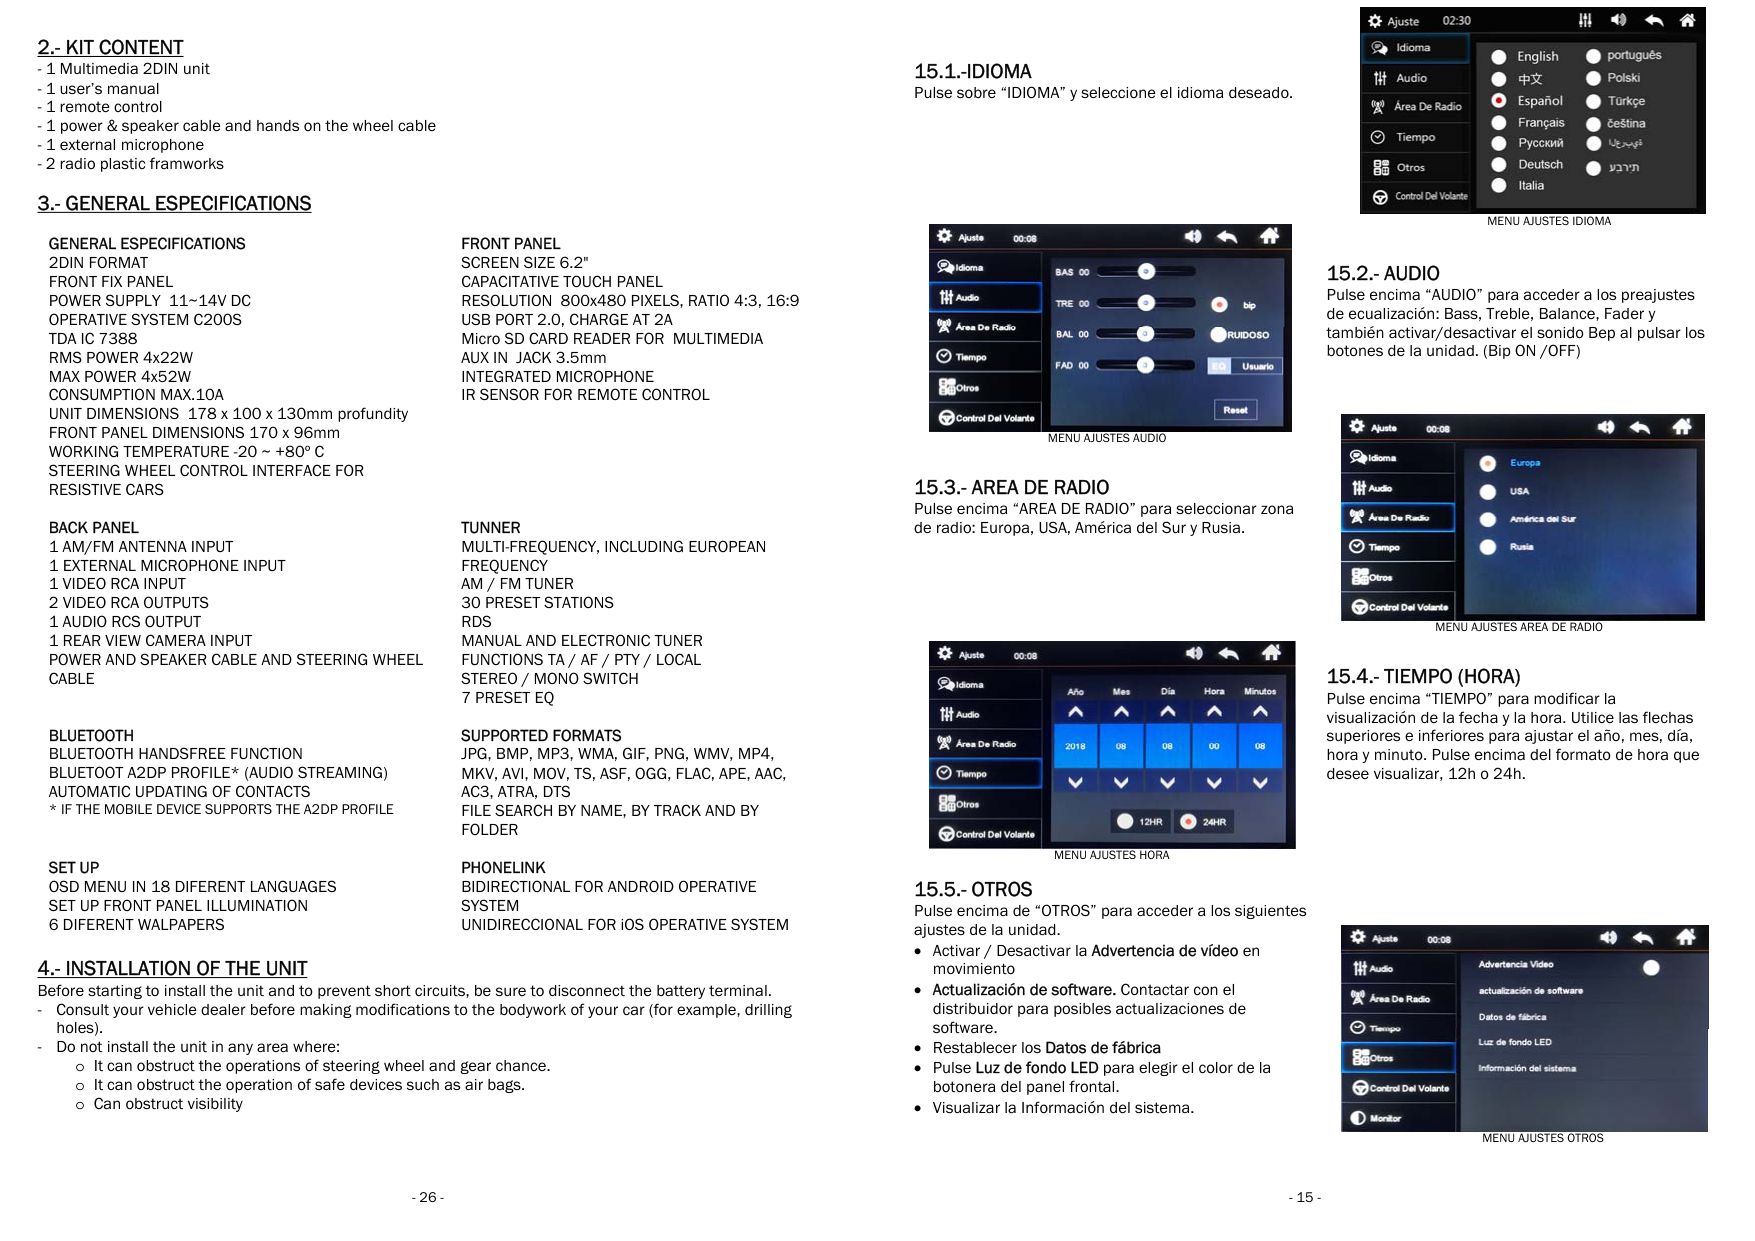
2.- KIT CONTENT
3.- GENERAL ESPECIFICATIONS
GENERAL ESPECIFICATIONS 2DIN FORMAT FRONT FIX PANEL POWER SUPPLY 11~14V DC OPERATIVE SYSTEM C200S TDA IC 7388 RMS POWER 4x22W MAX POWER 4x52W CONSUMPTION MAX.10A UNIT DIMENSIONS 178 x 100 x 130mm profundity FRONT PANEL DIMENSIONS 170 x 96mm WORKING TEMPERATURE -20 ~ +80º C STEERING WHEEL CONTROL INTERFACE FOR RESISTIVE CARS
BACK PANEL 1 AM/FM ANTENNA INPUT 1 EXTERNAL MICROPHONE INPUT
BLUETOOTH BLUETOOTH HANDSFREE FUNCTION BLUETOOT A2DP PROFILE* (AUDIO STREAMING) AUTOMATIC UPDATING OF CONTACTS
SET UP OSD MENU IN 18 DIFERENT LANGUAGES SET UP FRONT PANEL ILLUMINATION 6 DIFERENT WALPAPERS
FRONT PANEL SCREEN SIZE 6.2" CAPACITATIVE TOUCH PANEL RESOLUTION 800x480 PIXELS, RATIO 4:3, 16:9 USB PORT 2.0, CHARGE AT 2A Micro SD CARD READER FOR MULTIMEDIA AUX IN JACK 3.5mm INTEGRATED MICROPHONE IR SENSOR FOR REMOTE CONTROL
TUNNER MULTI-FREQUENCY, INCLUDING EUROPEAN FREQUENCY AM / FM TUNER 30 PRESET STATIONS RDS MANUAL AND ELECTRONIC TUNER FUNCTIONS TA / AF / PTY / LOCAL STEREO / MONO SWITCH 7 PRESET EQ
SUPPORTED FORMATS JPG, BMP, MP3, WMA, GIF, PNG, WMV, MP4, MKV, AVI, MOV, TS, ASF, OGG, FLAC, APE, AAC, AC3, ATRA, DTS FILE SEARCH BY NAME, BY TRACK AND BY FOLDER
PHONELINK BIDIRECTIONAL FOR ANDROID OPERATIVE SYSTEM UNIDIRECCIONAL FOR iOS OPERATIVE SYSTEM
4.- INSTALLATION OF THE UNITBefore starting to install the unit and to prevent short circuits, be sure to disconnect the battery terminal.
15.1.-IDIOMA Pulse sobre “IDIOMA” y seleccione el idioma deseado.


MENU AJUSTES AUDIO
15.3.- AREA DE RADIO Pulse encima “AREA DE RADIO” para seleccionar zona de radio: Europa, USA, América del Sur y Rusia.


MENU AJUSTES HORA
15.5.- OTROS Pulse encima de “OTROS” para acceder a los siguientes ajustes de la unidad.


MENU AJUSTES CONTROL DEL VOLANTE
15.6.- CONTROL DEL VOLANTE Ésta unidad permite el control de los comandos del volante en vehículos resistivos. Pulse encima “CONTROL DE VOLANTE” para configurar los comandos del volante con las funciones de la unidad siga los siguientes pasos:

15.8.- PAPEL PINTADO (FONDO DE PANTALLA)
Pulse encima “PAPEL PINTADO” para seleccionar entre uno de los fondos disponibles. Pulse encima el fondo de pantalla que desee seleccionar entre los 6 disponibles.

Aparecerá una barra horizontal durante unos segundos y podrá ajustar el volumen deslizando el dedo a través de dicha barra.
También puede ajustar el volumen pulsando los botones “+” y “-” del panel frontal de la unidad.


MENU AJUSTES MONITOR


MENU AJUSTES PAPEL PINTADO


MENU AJUSTES DE VOLUMEN


1.- BEFORE OPERATIG WITH THE UNIT
INSTALLATION OF THE UNIT
SECURITY
CLEANING
TEMPERATURE
USE OF THE UNIT
SUMMARY OF CONTENTS
1.- BEFORE OPERATIG WITH THE UNIT________________________ 25 2.- KIT CONTENT__________________________________________ 26 3.- GENERAL ESPECIFICATIONS______________________________ 26 4.- INSTALLATION OF THE UNIT______________________________ 26 5.- CONNECTION DIAGRAM__________________________________ 27
5.1.- REAR VIEW CAMERA INSTALLATION_______________ 28 5.2.-VIDEO OUTPUT / RCA OUTPUT____________________ 28
6.- FRONT PANEL_________________________________________ 29 7.- REMOTE CONTrROL_____________________________________29
7.1.- PREPARATION OF THE REMOTE CONTROL__________ 29 7.2.- USE OF THE REMOTE CONTROL__________________ 29
11.- BLUETOOTH__________________________________________ 33
12.- AV IN / AUX IN________________________________________ 34 13.- PHONELINK__________________________________________ 34
13.1.- USB CABLE SELECTION________________________ 34 13.2.- PREPARATION FOR ANDROID CONNECTION_______ 34 13.3.- PHONELINK CONNECTION______________________ 35
14.- BRIGHTNESS ADJUSTMENTS____________________________ 35 15.- UNIT SET UP__________________________________________ 36
15.1.- LANGUAGE__________________________________ 36 15.2.- AUDIO______________________________________ 36 15.3.- RADIO AREA_________________________________ 36 15.4.- TIME_______________________________________ 36 15.5.- OTHER______________________________________ 37 15.6.- WHEEL CONTROLS____________________________ 37 15.7.- DISPLAY____________________________________ 37 15.8.- WALLPAPER_________________________________ 37
16.- VOLUME ADJUSTMENTS________________________________ 38 17.- DIRECT ACCESS TO BLUETOOTH_________________________ 38 18.- DIRECT ACCESS TO USB DEVICE / MICROS SD CARD________ 38 19.- STEERING WHEEL CAR COMPATIBILITY LIST________________ 38, 17 to 21 20.- TROUBLE SHOOTING___________________________________ 38
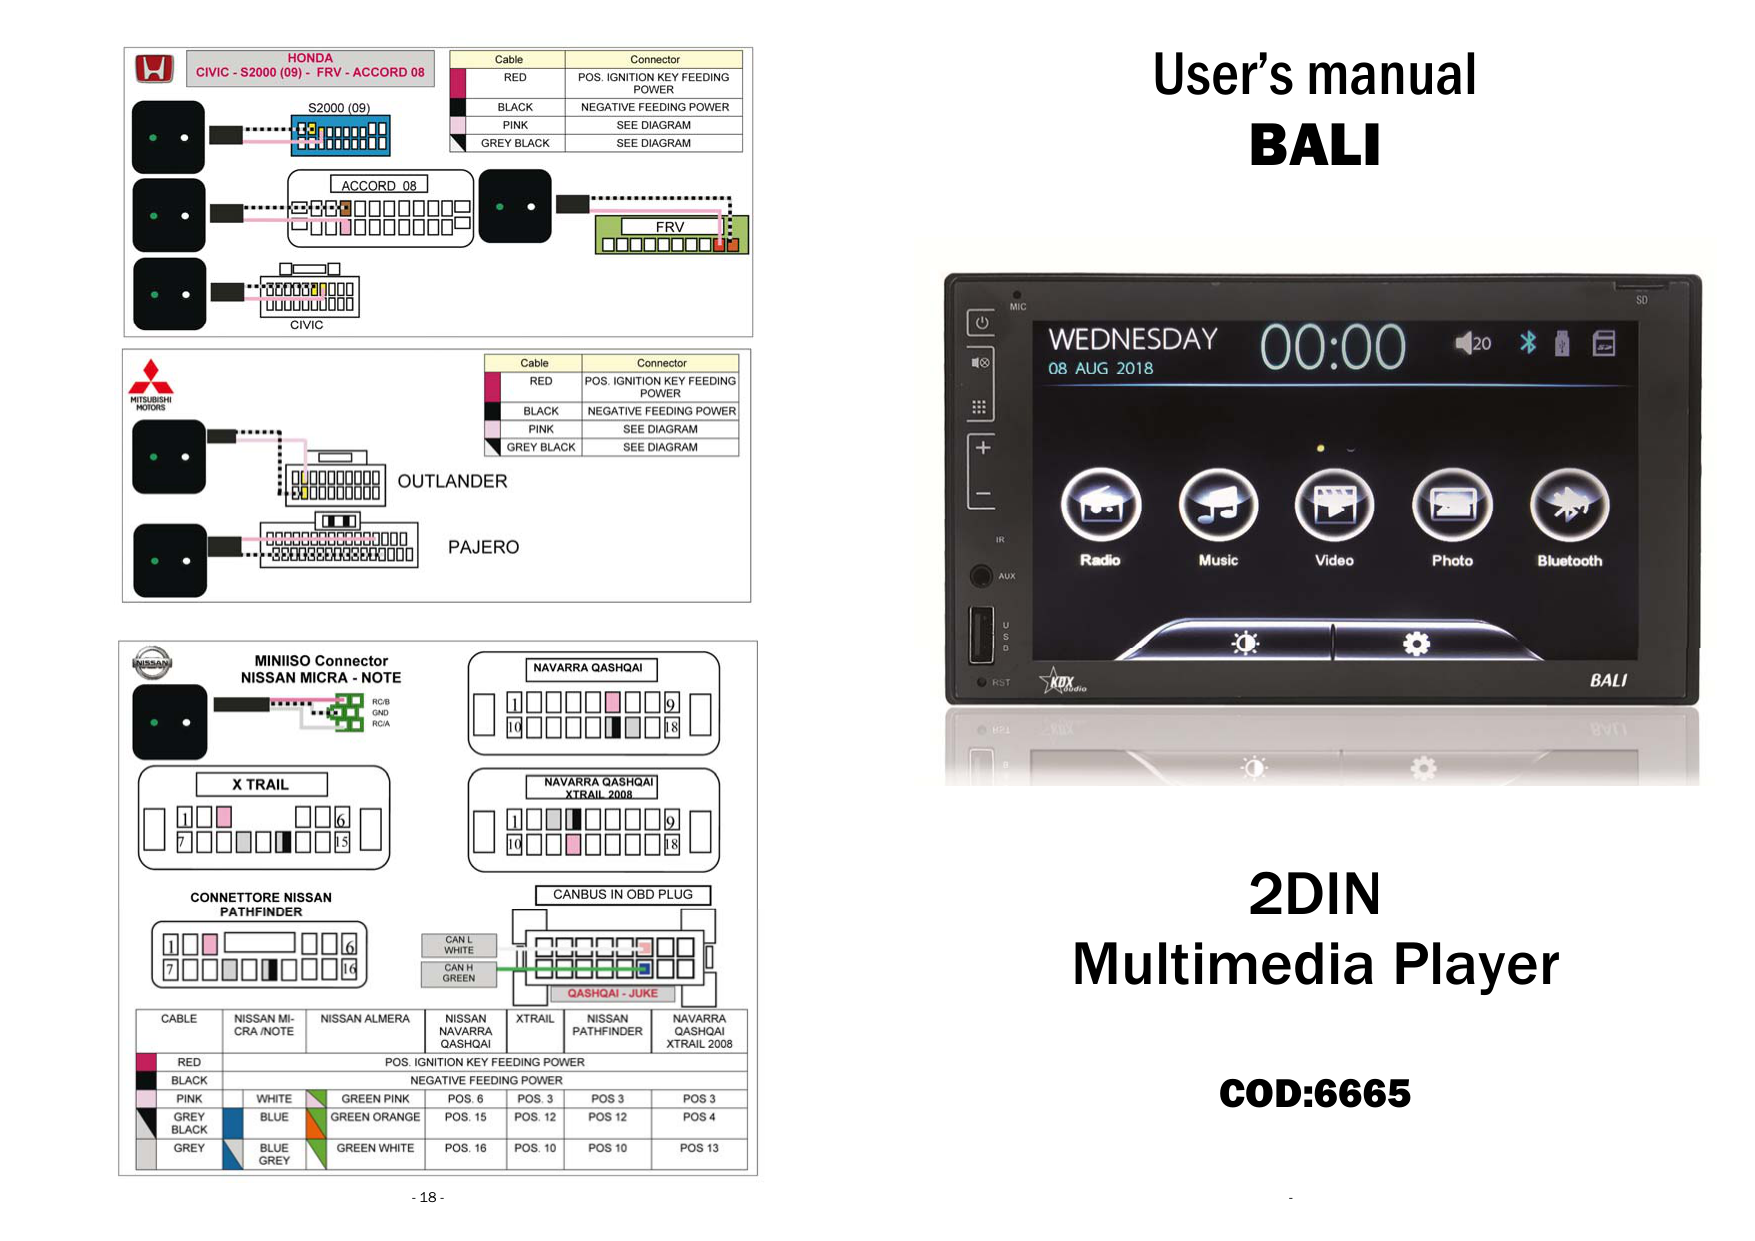
19.- LISTADO COMPATIBILIDAD MANDOS AL VOLANTE NOTA: cada vehículo tiene su configuración, es posible qu algún tipo de vehículo.


User’s manual


Multimedia Player
COD:6665
|MANDO A DISTANCIA NO FUNCIONA|No hay pila|Inserte una pila| |---|---|---| |MANDO A DISTANCIA NO FUNCIONA|Pila agotada|Reemplace la pila por una nueva| |MANDO A DISTANCIA NO FUNCIONA|Pila mal instalada|Verifique la correcta posición de la pila en el mando a distancia.| |BAJA CALIDAD DE SONIDO O SONIDO DISTORSIONADO|El sonido proviene de discos de mala calidad, rayados, etc.|Pruebe de reproducir un disco con mejor estado y calidad de sonido| |BAJA CALIDAD DE SONIDO O SONIDO DISTORSIONADO|Los altavoces tienen una impedancia distinta a la de la unidad.Estan deteriorados.|Cambie los altavoces por unos que tengan la misma impedancia que la unidad. Y altavoces en buen estado| |BAJA CALIDAD DE SONIDO O SONIDO DISTORSIONADO|Fallo del altavoz|Verifique la correcta instalación y estado de los altavoces.| |LA UNIDAD SE REINICIA SOLA CUANDO SE APAGA|El conexionado de la unidad no es correcto|Verifique la correcta conexión de los cables de alimentación.Positivo permanente y bajo llave.| |NO SE VISUALIZAN LAS IMÁGENES|La conexión al cable de freno de mano no es correcta|Compruebe la conexión del cable de freno de mano.| |NO SE VISUALIZAN LAS IMÁGENES PERO EL SONIDO SI SE OYE|- Compruebe la buena conexión de video entre el reproductor y la entrada de video de la unidad.
- Compruebe que ha conectado la entrada auxiliar de AV.
- Compruebe que el conector de video no está dañado.
- Compruebe que los ajustes de VIDEO son correctos
- Compruebe que el cable de color rosa/negro de freno de mano esté conectado a MASA.
|- Compruebe la buena conexión de video entre el reproductor y la entrada de video de la unidad.
- Compruebe que ha conectado la entrada auxiliar de AV.
- Compruebe que el conector de video no está dañado.
- Compruebe que los ajustes de VIDEO son correctos
- Compruebe que el cable de color rosa/negro de freno de mano esté conectado a MASA.
| |IMAGEN CON RAYAS O COMPRIMIDA|Ajustar los parámetros de video.|Utilice la configuración correcta de los parámetros de ajuste de video.| |SEÑAL DEBIL|La antena no tiene suficiente cobertura La función LOC está activada|Compruebe la correcta instalación de la antena. Desactive la función LOC| |NO SE VISUALIZAN LAS IMÁGENES NO SE OYE EL SONIDO, NO HAY INDICACIONES|- Compruebe que la unidad está encendida.
- Compruebe que el conector ISO está bien conectado a la unidad.
- Compruebe que el conector de alimentación está perfecta y firmemente conectado a la unidad.
|- Compruebe que la unidad está encendida.
- Compruebe que el conector ISO está bien conectado a la unidad.
- Compruebe que el conector de alimentación está perfecta y firmemente conectado a la unidad.
| |NO SE OYE SONIDO PERO SI SE VISUALIZAN LAS IMÁGENES|- Compruebe la buena conexión de audio entre el reproductor y la entrada de audio de la unidad.
- Compruebe que el conector de audio no está dañado.
- Compruebe que el nivel de volumen de la unidad no está a 0.
- Compruebe que los ajustes de AUDIO son correctos.
- Compruebe que la unidad no está en modo MUTE.
|- Compruebe la buena conexión de audio entre el reproductor y la entrada de audio de la unidad.
- Compruebe que el conector de audio no está dañado.
- Compruebe que el nivel de volumen de la unidad no está a 0.
- Compruebe que los ajustes de AUDIO son correctos.
- Compruebe que la unidad no está en modo MUTE.
| |IMAGENES EN BLANCO Y NEGRO O IMAGENES MOVIDAS|- Asegúrese que ha ajustado correctamente el sistema de video a la salida de video NTSC, PAL.|- Asegúrese que ha ajustado correctamente el sistema de video a la salida de video NTSC, PAL.| |DEFECTOS DE IMAGEN O SONIDO|- Compruebe que los ajustes de AUDIO son correctos
- Compruebe que el conector AV está perfectamente conectado al terminal de salida de la unidad.
|- Compruebe que los ajustes de AUDIO son correctos
- Compruebe que el conector AV está perfectamente conectado al terminal de salida de la unidad.
| |EL MANDO A DISTANCIA NO FUNCIONA BIEN|- Compruebe el correcto estado de las baterías del mando a distancia.
- Oriente el mando a distancia hacia el sensor IR de la unidad al operar con él.
- Compruebe que no hay obstáculos entre el mando a distancia y el sensor IR de la unidad.
|- Compruebe el correcto estado de las baterías del mando a distancia.
- Oriente el mando a distancia hacia el sensor IR de la unidad al operar con él.
- Compruebe que no hay obstáculos entre el mando a distancia y el sensor IR de la unidad.
| |ALGUNOS BOTONES NO FUNCIONAN|- Apague la unidad y vuelva a encenderla
- Haga un reset de la unidad y vuelva a encenderla
|- Apague la unidad y vuelva a encenderla
- Haga un reset de la unidad y vuelva a encenderla
| |LA RADIO NO FUNCIONA|- Compruebe que el cable de la antena está firmemente conectado e intente sintonizar una emisora manualmente.|- Compruebe que el cable de la antena está firmemente conectado e intente sintonizar una emisora manualmente.|


[S] Los equipos eléctricos y electrónicos contienen materiales, componentes y sustancias que pueden ser perjudiciales para su salud y para el medio ambiente, si el material de desecho (equipos eléctricos y electrónicos) no se manipula correctamente. Los equipos eléctricos y electrónicos llevan un símbolo de un cubo de basura cruzado por un aspa, como el que se ve a continuación. Este símbolo indica que los equipos eléctricos y electrónicos no deberían ser eliminados con el resto de basura del hogar, sino que deben eliminarse por separado. Todas las ciudades tienen establecidos puntos de recogida, en los que depositar los equipos eléctricos y electrónicos gratuitamente en los centros de reciclaje y otros lugares de recogida, o solicitar que sean recogidos de su hogar. Puede obtener información adicional en el departamento técnico de su ciudad.
NEW RADIOVOX S.L C/ CAN BRUIXA 30-40 08028 BARCELONA, SPAIN VAT ESB-63501209 www.radiovox.es radiovox@radiovox.es


20.- SOLUCIÓN DE PROBLEMAS Por favor lea detenidamente el manual de usuario antes de empezar a operar con la unidad. Si tiene algún problema con la unidad intente resolverla con las suge persiste, por favor contacte con el servicio técnico o el seguridad por favor no intente abrir la unidad y repararla po
|SINTOMA|CAUSA|SOLUCION| |---|---|---| |NO FUNCIONA
|El fusible de alimentación de la radio se ha quemado.| | |NO FUNCIONA
|El voltaje de alimentación de la radio no corresponde con 12V DC.9| | |NO FUNCIONA
|El sistema de protección automática evita la operación con la unidad debido a una operación ilegal| | |NO SE OYE EL SONIDO|Altavoces desconectados|Compruebe la correcta conexión de los altavoces.| |NO SE OYE EL SONIDO|El volumen de la unidad es bajo|Suba el volumen de la unidad| |NO SE OYE EL SONIDO|Descompensación en la configuración del Balance, Fader y Volumen| |