
Ask AI
— answers from the official manualAnswers from the official manual.
Common questions
Common Questions
9 totalHow do I set the start time on an Orbit 27894 timer?
To set the start time, turn the dial to [START TIME], use the [+] or [-] buttons to select your desired start time. The display will show how many minutes until that time (e.g., S TART 30 M)
How do I manually water with an Orbit 27894 timer?
To initiate manual watering, turn the dial to [AUTO], press [MANUAL]. Display will show ABC and ALL. After a few seconds or pressing [ENTER] again, the timer will begin manual watering for all stations using programmed run times.
How do I set rain delay on an Orbit 27894 timer?
To set a rain delay, turn dial to [AUTO], press the [RAIN DELAY] button for 24 hours mode. Use [+/-] buttons for longer delays like 48 or 72 hours then wait 10 seconds and selected rain delay will begin.
How do I change the date setting on an Orbit 27894 timer?
Turn dial to [SET DATE], Y/M/D positions appear blinking, use [+/-] buttons to set year/month/day and press enter after each.
What is a station on my Orbit 27894 timer?
A station refers to an area that will be watered by each valve controlled independently by the timer and configured with specific run times.
How do I connect a rain sensor to my Orbit 27894 timer?
Connect the rain sensor wires to the yellow terminals marked “Sensor” and place the sensor on/off switch in the ‘on’ position.
Full Manual
32 pages
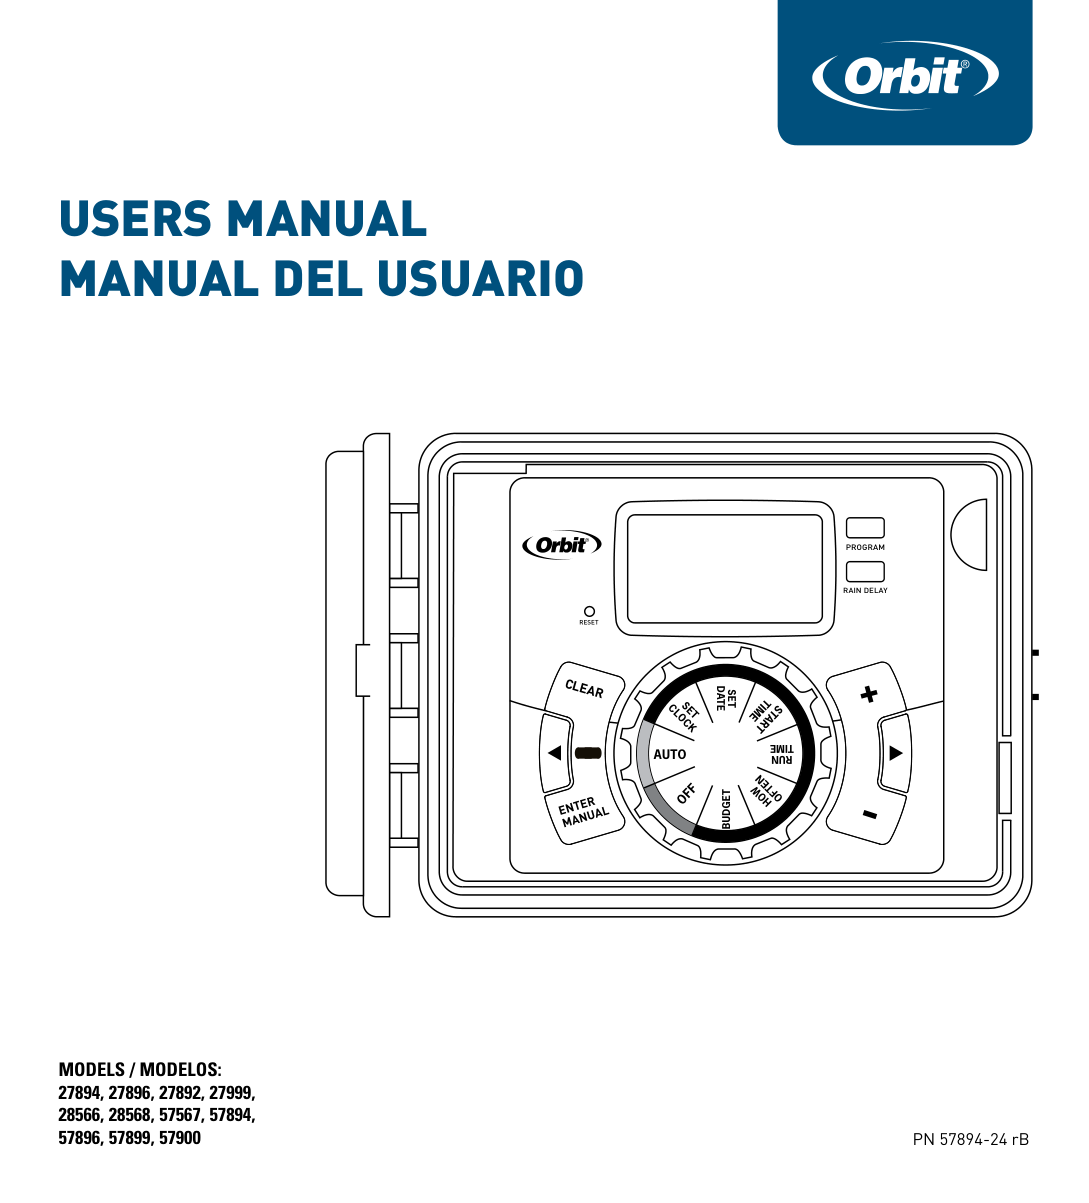
Users ManUal ManUal del UsUario
Models / Modelos: 27894, 27896, 27892, 27999, 28566, 28568, 57567, 57894, 57896, 57899, 57900
########### PROGRAM
RAIN DELAY
RESET
SET DATE
TIME
SET CLOCK
START
TIME
####### AUTO
RUN
OFTEN
OFF
HOW
BUDGET
PN 57894-24 rB
##### ENGLISH
Congratulations on selecting your new Orbit timer! With Orbit’s exclusive Easy-Set Logic®, simple programming and setup are combined with the latest timer technology and versatility.
Your new timer provides convenience and flexibility, letting you run a fully automatic, a semi-automatic, or a manual watering program for all your watering needs. Although this timer is so easy to program that you likely will not need instructions, we recommend that you read this manual fully before installation so that you understand all of the advanced features.
Table of Contents

Section 1: Get to know your timer
Lock and latch Weather Resistant Cover Dial Digital Display Battery Compartment
Swing Door panelF
A
E
B
############ PROGRAM
D
RAIN DELAY
RESET
F
SET DATE
TIME
SET CLOCK
START
C
TIME
######## AUTO
RUN
OFTEN
OFF
HOW
BUDGET
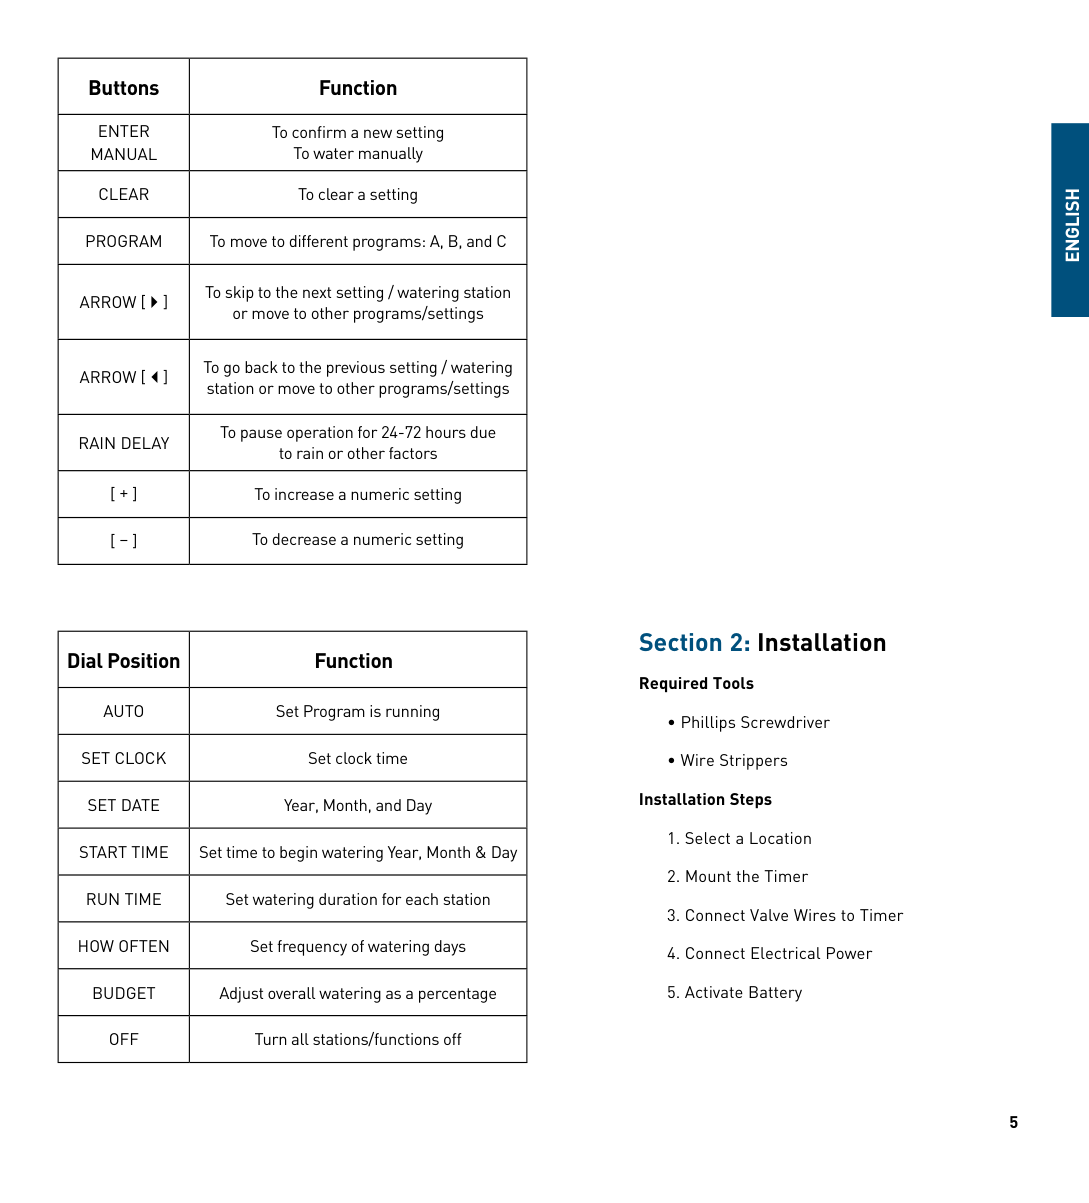
|Buttons|Function| |---|---| |ENTER MANUAL|To confirm a new setting To water manually| |CLEAR|To clear a setting| |PROGRAM|To move to different programs: A, B, and C| |ARROW [ ]|To skip to the next setting / watering station or move to other programs/settings| |ARROW [ ]|To go back to the previous setting / watering station or move to other programs/settings| |RAIN DELAY|To pause operation for 24-72 hours due to rain or other factors| |[ + ]|To increase a numeric setting| |[ – ]|To decrease a numeric setting|
|Dial Position|Function| |---|---| |AUTO|Set Program is running| |SET CLOCk|Set clock time| |SET DATE|Year, Month, and Day|

|START TIME|Set time to begin watering Year, Month & Day| |RUN TIME|Set watering duration for each station| |hOW OFTEN|Set frequency of watering days| |BUDGET|Adjust overall watering as a percentage| |OFF|Turn all stations/functions off|
##### ENGLISH
Section 2: Installation
###### Required Tools
###### Installation Steps
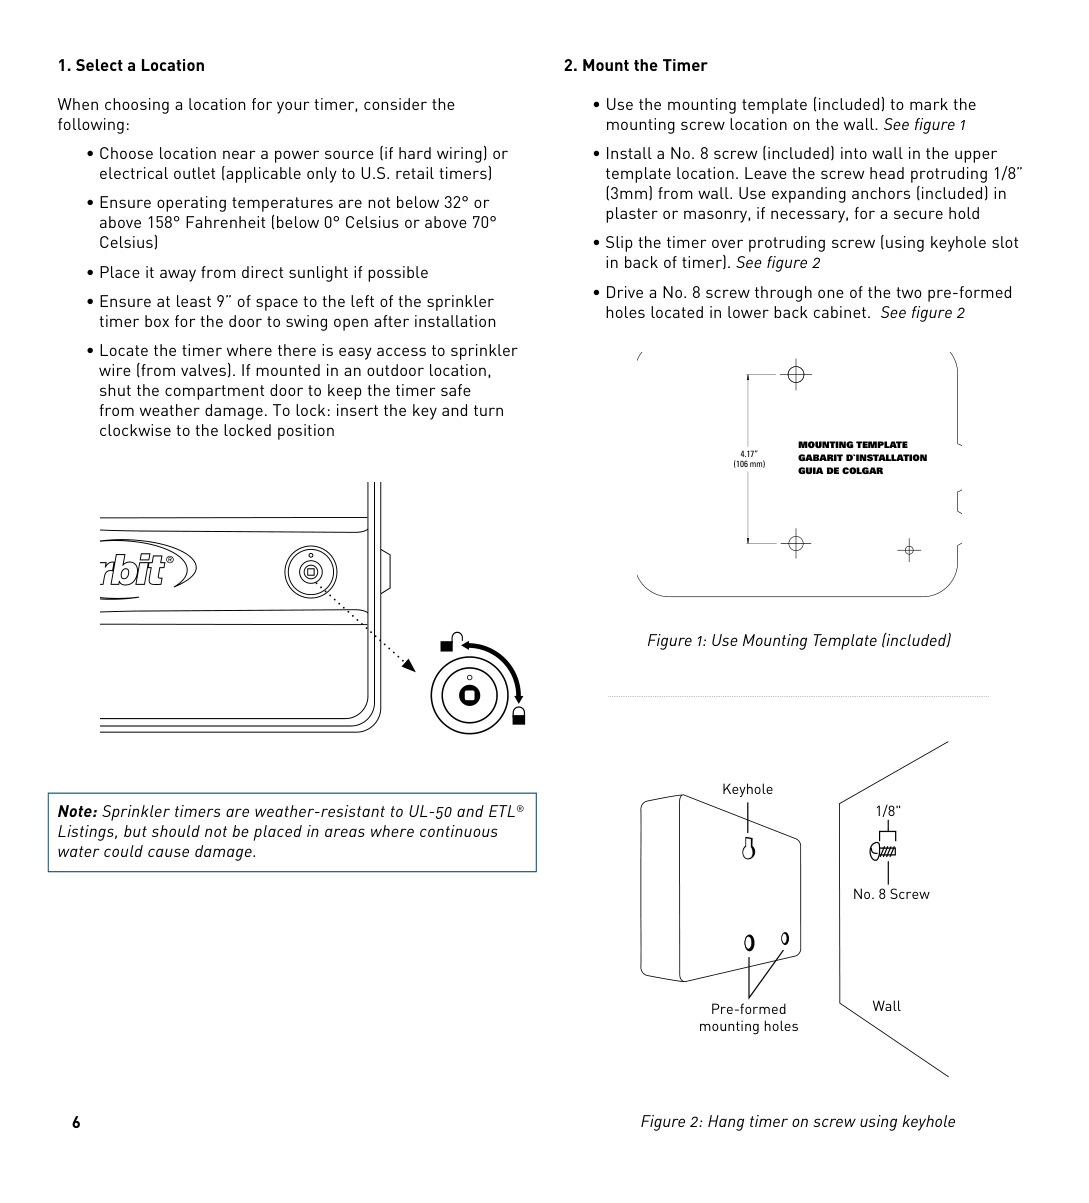
###### 1. Select a Location
When choosing a location for your timer, consider the following:
|Note: Sprinkler timers are weather-resistant to UL-50 and ETL® Listings, but should not be placed in areas where continuous water could cause damage.| |---|
###### 2. Mount the Timer
########## MOUNTING TEMPLATE GABARIT D`INSTALLATION GUIA DE COLGAR
4.17” (106 mm)
Figure 1: Use Mounting Template (included)
Keyhole
1/8"
| | | |---|---| | | |
No. 8 Screw
Wall
Pre-formed mounting holes
Figure 2: Hang timer on screw using keyhole
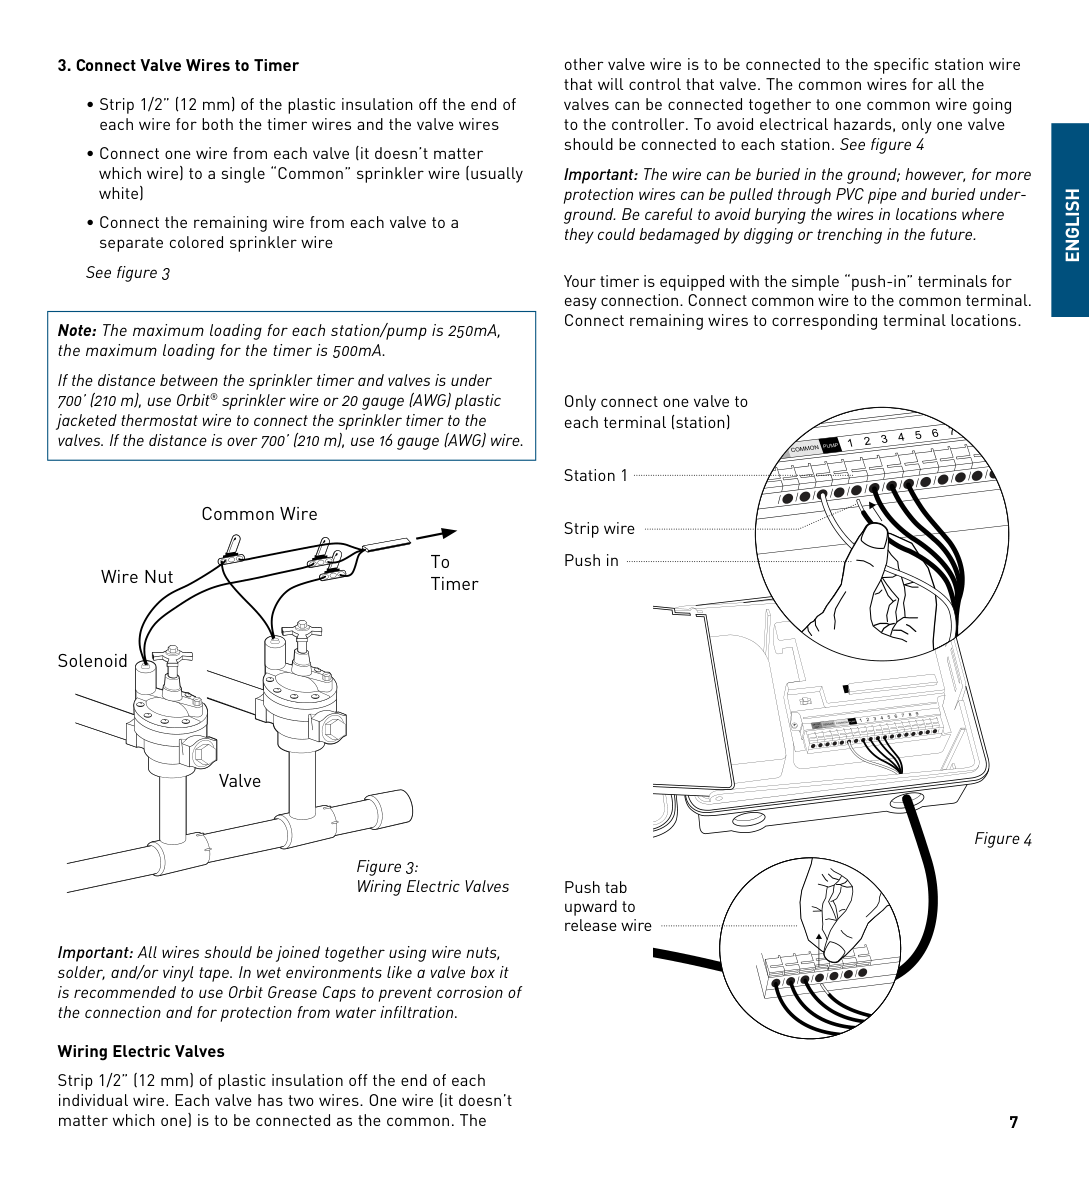
###### 3. Connect Valve Wires to Timer
See figure 3
|Note: The maximum loading for each station/pump is 250mA, the maximum loading for the timer is 500mA. If the distance between the sprinkler timer and valves is under 700’ (210 m), use Orbit® sprinkler wire or 20 gauge (AWG) plastic jacketed thermostat wire to connect the sprinkler timer to the valves. If the distance is over 700’ (210 m), use 16 gauge (AWG) wire.|
|---|
Common Wire
To TimerWire Nut
Solenoid
Valve
Figure 3: Wiring Electric Valves
Important: All wires should be joined together using wire nuts, solder, and/or vinyl tape. In wet environments like a valve box it is recommended to use Orbit Grease Caps to prevent corrosion of the connection and for protection from water infiltration.
###### Wiring Electric Valves
Strip 1/2” (12 mm) of plastic insulation off the end of each individual wire. Each valve has two wires. One wire (it doesn’t matter which one) is to be connected as the common. The
other valve wire is to be connected to the specific station wire that will control that valve. The common wires for all the valves can be connected together to one common wire going to the controller. To avoid electrical hazards, only one valve should be connected to each station. See figure 4
Important: The wire can be buried in the ground; however, for more protection wires can be pulled through PVC pipe and buried underground. Be careful to avoid burying the wires in locations where they could bedamaged by digging or trenching in the future.
Your timer is equipped with the simple “push-in” terminals for easy connection. Connect common wire to the common terminal. Connect remaining wires to corresponding terminal locations.
##### ENGLISH
Only connect one valve to each terminal (station)
Station 1
Strip wire Push in
Push tab upward to release wire
Figure 4
###### 4. Connect Electrical Power
Indoor Locations – Insert the power cord into an 110V electrical outlet.
Outdoor Locations – If a covered Ground Fault Interrupter (GFI) outlet is available, insert the power cord into the 110 volt outlet. If no outlet is available, the timer must have the wiring permanently installed (*see figure 5)
conduit and electrical fittings be used to connect exterior wallmounted equipment to AC power. Please check local codes. Any permanent connection should be made by a licensed electrical contractor in accordance with the requirements of the National Electrical Code and other state and local codes.
This sprinkler timer has two holes at the bottom for wire access. Use a 1/2” Nipple to connect the sprinkler timer to a standard electrical junction box. Both connector and junction box must be UL Listed or equivalent or comply with IEC or EN standards or equivalent.
The wire can be buried in the ground; however, for more protection wires should be pulled through electrical conduit and buried underground. Be careful to avoid burying the wires in locations where they could be damaged by digging or trenching in the future.
Caution: Do not connect the sprinkler timer to one phase of a three phase power system used by a pump or other electrical equipment.
| | | |---|---|
| | | | |---|---|---|
| | | | |---|---|---|
1/2" Connector
Junction Box
3 Wire Connectors
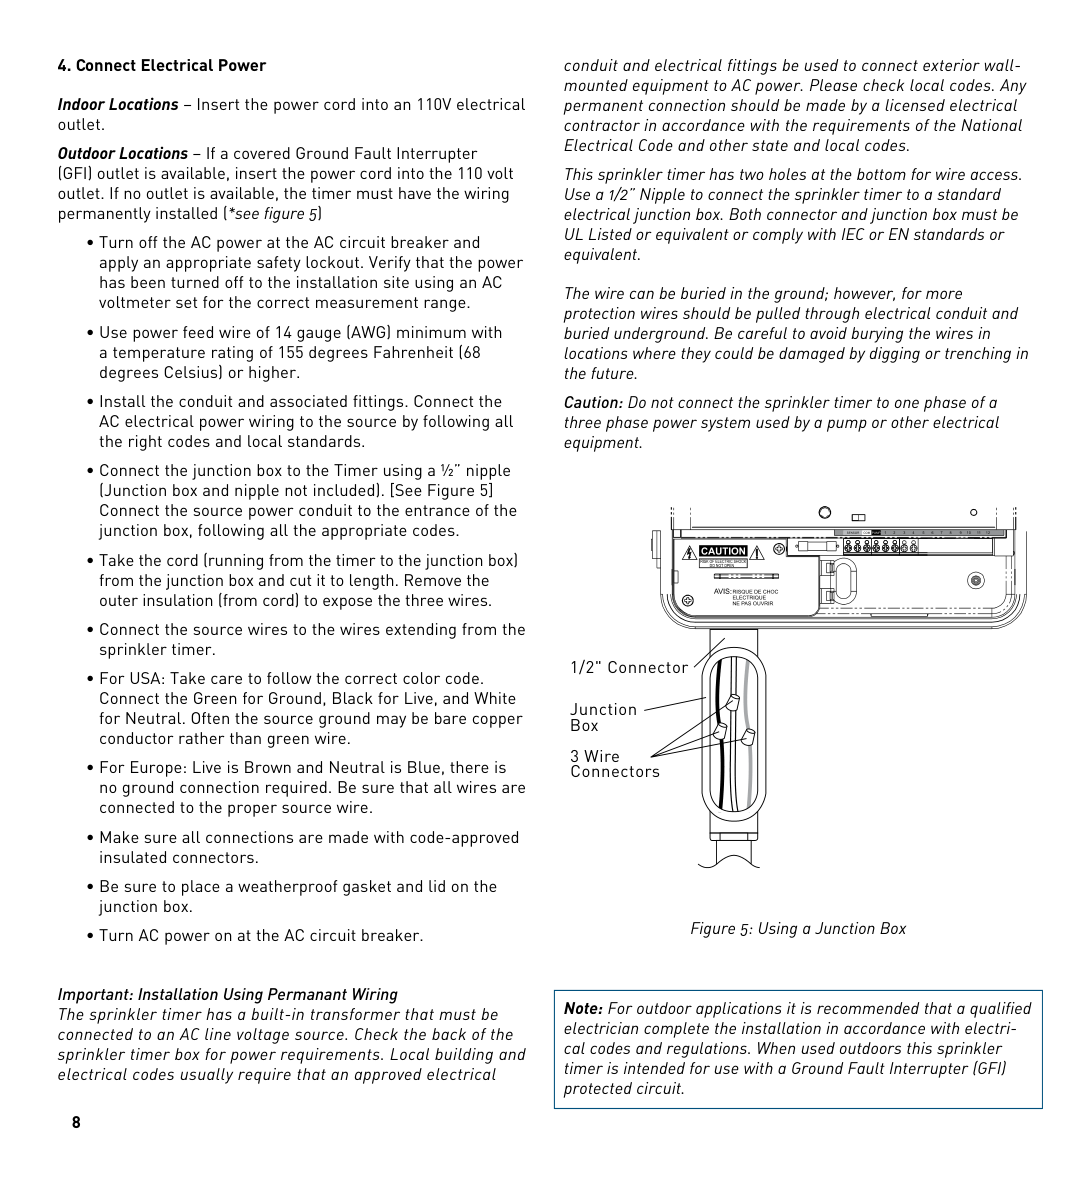
Figure 5: Using a Junction Box
Important: Installation Using Permanant Wiring The sprinkler timer has a built-in transformer that must be connected to an AC line voltage source. Check the back of the sprinkler timer box for power requirements. Local building and electrical codes usually require that an approved electrical
|Note: For outdoor applications it is recommended that a qualified electrician complete the installation in accordance with electrical codes and regulations. When used outdoors this sprinkler timer is intended for use with a Ground Fault Interrupter (GFI) protected circuit.| |---|
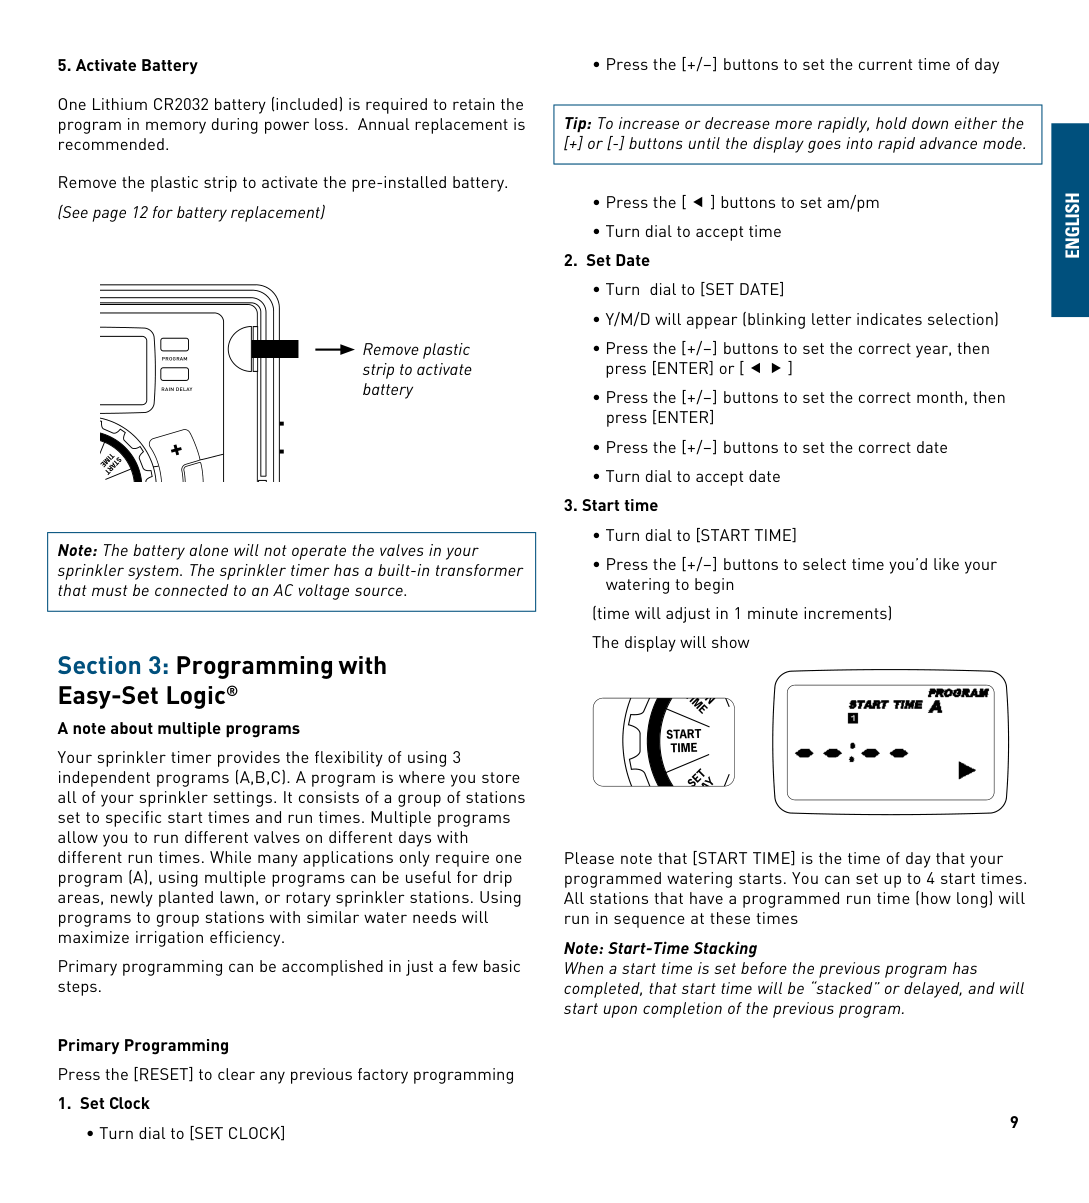
###### 5. Activate Battery
One Lithium CR2032 battery (included) is required to retain the program in memory during power loss. Annual replacement is recommended.
Remove the plastic strip to activate the pre-installed battery. (See page 12 for battery replacement)
Remove plastic strip to activate battery
PROGRAM
RAIN DELAY
TIME
S TART
BUDGET
Note: The battery alone will not operate the valves in your sprinkler system. The sprinkler timer has a built-in transformer that must be connected to an AC voltage source.
Section 3: Programming withEasy-Set Logic®
###### A note about multiple programs
Your sprinkler timer provides the flexibility of using 3 independent programs (A,B,C). A program is where you store all of your sprinkler settings. It consists of a group of stations set to specific start times and run times. Multiple programs allow you to run different valves on different days with different run times. While many applications only require one program (A), using multiple programs can be useful for drip areas, newly planted lawn, or rotary sprinkler stations. Using programs to group stations with similar water needs will maximize irrigation efficiency.
Primary programming can be accomplished in just a few basic steps.
Primary Programming Press the [RESET] to clear any previous factory programming
###### 1. Set Clock
• Turn dial to [SET CLOCK]
|Tip: To increase or decrease more rapidly, hold down either the [+] or [-] buttons until the display goes into rapid advance mode.| |---|
###### 2. Set Date
###### 3. Start time
(time will adjust in 1 minute increments) The display will show

Please note that [START TIME] is the time of day that your programmed watering starts. You can set up to 4 start times. All stations that have a programmed run time (how long) will run in sequence at these times
Note: Start-Time Stacking When a start time is set before the previous program has completed, that start time will be “stacked” or delayed, and will start upon completion of the previous program.
###### 9
##### eNGlIsH
Example: Bill just planted new grass seed and wants to water three times per day. he sets START TIME 1 for 5am, START TIME 2 for 12pm, and START TIME 3 for 5 pm.
he also sets hOW OFTEN to INT (interval) EVERY 1 DAYS (see section 3, hOW OFTEN).
In AUTO mode the system will water 3 times per day. Once Bill’s sod is established he can CLEAR start times 2 and 3 and return to watering just once per day.
###### 4. Run Time
• Turn the dial to [RUN TIME]

STATION is the area that will be watered by each valve. On this screen the RUN TIME or duration for each station is set.
###### 5. How Often
• Turn the dial to [hOW OFTEN] - this screen allows you to set how often to water.
There are 3 options provided:

###### Days of the Week

###### Intervals
Example: An interval of 1 will water every day; an interval of 3 will water every 3rd day, etc.
###### Odd or Even Days
Example: Odd: 1st, 3rd, 5th, etc. Example: Even: 2nd, 4th, 6th, etc.
Turn the dial to [AUTO] and that’s it! You have programmed your timer!
Turn dial to [AUTO] to activate your program
|Note: If your program is lost, the factory installed fail-safe program will turn on each station every day for 10 minutes
Note: Your prior programming will not be disturbed unless altered. Always be aware of the program you are in (A, B, or C) when you are making changes.| |---|
###### Reviewing and Changing Your Program
If you want to review or change the start times, run times, or how ofthen to water, simply follow the directions again for that option. After reviewing or changing a watering schedule, remember to turn the dial back to [AUTO] for automatic operation.
Section 4: Additional Features
###### Rain Delay
[RAIN DELAY] allows you to delay your sprinkler timer from watering for a set period of time. Delay settings are 24, 48, and 72 hours.

###### Water Budgeting
Water Budgeting is a simple way to adjust your watering duration to match seasonal watering needs. Water Budgeting works by increasing or decreasing watering duration for all stations in each program. Press the [PROGRAM] button to select the program you wish to budget.
Adjustment range is from 10% to 200% by increments of 10%. The default value is 100%. The budgeting will remain on the adjusted range until you change it.
To set budgeting:
• Turn dial to [BUDGETING]

Example: Bill’s watering duration is set at 60 minutes however; it is the spring time so he wants to water half as long so he sets his budgeting to 50%, his timer will now water for 30 minutes.
###### Manual Watering
Your timer has the ability to allow you to manually water without disturbing the preset program.
|Note: If the run times have not been set, the timer will not initiate manual watering and the screen will return to the current time.| |---|

##### ENGLISH
Example: To manually water on station 3 for five minutes, press the [MANUAL] button then press the [ ] buttons until you see station 3; using the [+/–] buttons, set duration to five minutes; press [ENTER].
|Note: After the [MANUAL] button has been pushed, if a selection is not made within 5 seconds all stations and programs will begin watering using the programmed RUN TIMES. If no RUN TIMES have been set, nothing will happen and the display will return to the time of day.| |---|
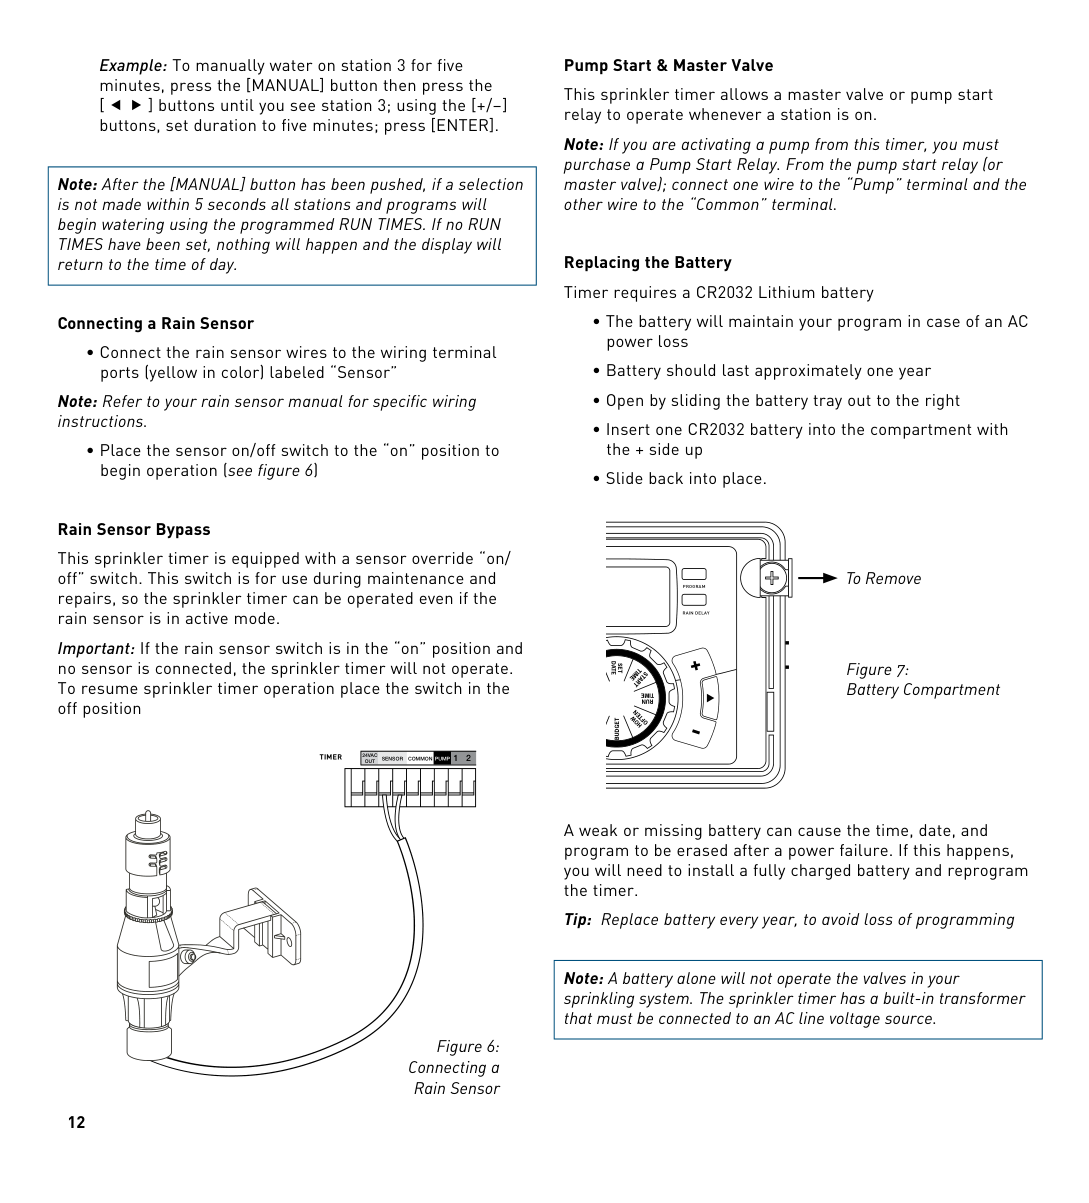
###### Connecting a Rain Sensor
• Connect the rain sensor wires to the wiring terminal ports (yellow in color) labeled “Sensor”
Note: Refer to your rain sensor manual for specific wiring instructions.
• Place the sensor on/off switch to the “on” position to begin operation (see figure 6)
###### Pump Start & Master Valve
This sprinkler timer allows a master valve or pump start relay to operate whenever a station is on.
Note: If you are activating a pump from this timer, you must purchase a Pump Start Relay. From the pump start relay (or master valve); connect one wire to the “Pump” terminal and the other wire to the “Common” terminal.
Replacing the Battery Timer requires a CR2032 Lithium battery
###### Rain Sensor Bypass
This sprinkler timer is equipped with a sensor override “on/ off” switch. This switch is for use during maintenance and repairs, so the sprinkler timer can be operated even if the rain sensor is in active mode.
To Remove
PROGRAM
RAIN DELAY
Important: If the rain sensor switch is in the “on” position and no sensor is connected, the sprinkler timer will not operate. To resume sprinkler timer operation place the switch in the off position
Figure 7: Battery Compartment
SET DATE
TIME
S TART
TIME
RUN
N
OFTE
HOW
BUDGET
OUT 12TIMER
24VAC
SENSOR COMMON PUMP
A weak or missing battery can cause the time, date, and program to be erased after a power failure. If this happens, you will need to install a fully charged battery and reprogram the timer.
Tip: Replace battery every year, to avoid loss of programming
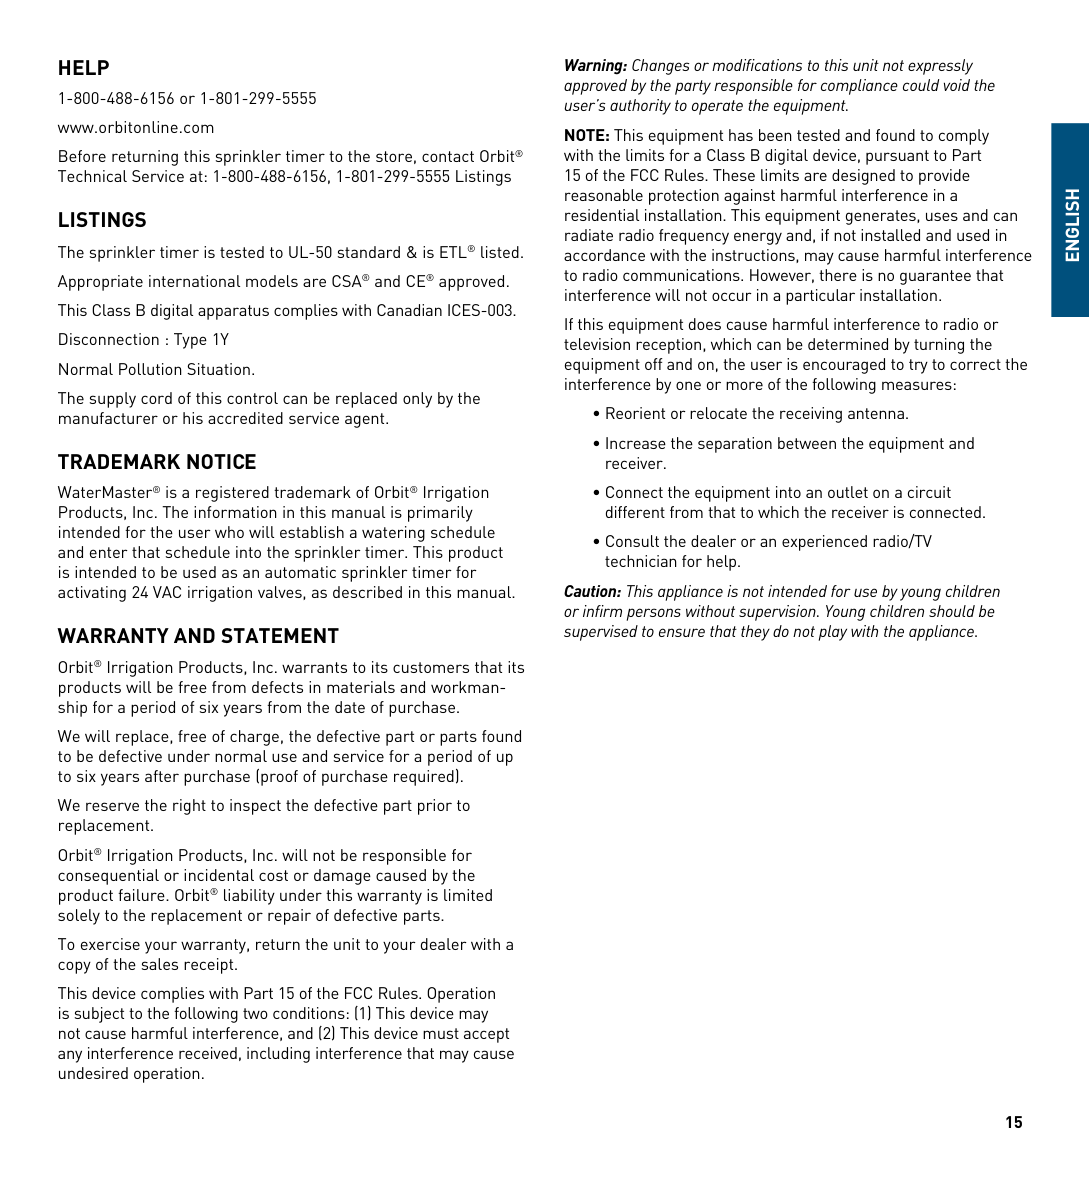
|Note: A battery alone will not operate the valves in your sprinkling system. The sprinkler timer has a built-in transformer that must be connected to an AC line voltage source.| |---|
Figure 6: Connecting a
Rain Sensor
Section 5: Reference
|TERM|DEFINITION| |---|---| |START TIME|The time the program begins watering the first programmed station.| |VALVE|Supplies water to a specific station or area. The opening and closing of the valve is accomplished through electrical current supplied by the sprinkler timer.| |MASTER VALVE|Typically located at the main water source. Turns on and off water for the entire irrigation system when not in use.| |MULTIPLE START TIMES|A controller feature that allows a program to be operated multiple times on the same watering day.| |OVERLAPPING PROGRAMS|When a “Start Time” is set for a program before the previous program has completed.| |PROGRAM (A, B, OR C)|Individual programs as set by the user. Each program operates independently. If one program overlaps the other the programs will be “stacked.” After the first program finishes the next program will begin.| |RAIN DELAY|A feature that postpones the running of a scheduled watering program for a specific duration.| |SOLENOID|The electrical part on an irrigation valve that opens and closes the valve.| |SPRINkLER TIMER|A device which instructs the station valves to operate.| |STATION|A grouping of sprinklers operated by a single valve which is controlled by the timer.| |WATERING BUDGETING|Adjusts your overall watering program as a percentage of total watering duration.|
ENGLISH
Troubleshooting
|PROBLEM|POSSIBLE CAuSE| |---|---| |One or more valves do not turn on|1. Faulty solenoid connection| |One or more valves do not turn on|2. Wire damaged or severed| |One or more valves do not turn on|3. Flow control stem screwed down, shutting valve off| |One or more valves do not turn on|4. Programming is incorrect| |Stations turn on when they are not supposed to|1. Water pressure is too high| |Stations turn on when they are not supposed to|2. More than one start time is programmed| |Stations turn on when they are not supposed to|3. AM/PM is incorrect| |One station is stuck on and will not shut off|1. Faulty valve| |One station is stuck on and will not shut off|2. Particles of dirt or debris stuck in valve| |One station is stuck on and will not shut off|3. Valve diaphragm faulty|

|All valves do not turn on|1. Transformer defective or not connected| |All valves do not turn on|2. Programming is incorrect| |Timer will not power up|1. Transformer not plugged into a working outlet| |Valves continue to turn on and off when they are not programmed|1. More than one start time is programmed with overlapping schedules| |Valves continue to turn on and off when they are not programmed|2. Excessive pressure|
HELP 1-800-488-6156 or 1-801-299-5555 www.orbitonline.com Before returning this sprinkler timer to the store, contact Orbit® Technical Service at: 1-800-488-6156, 1-801-299-5555 Listings
LISTINGS The sprinkler timer is tested to UL-50 standard & is ETL® listed. Appropriate international models are CSA® and CE® approved. This Class B digital apparatus complies with Canadian ICES-003. Disconnection : Type 1Y Normal Pollution Situation. The supply cord of this control can be replaced only by the manufacturer or his accredited service agent.
#### TRADEMARk NOTICE
WaterMaster® is a registered trademark of Orbit® Irrigation Products, Inc. The information in this manual is primarily intended for the user who will establish a watering schedule and enter that schedule into the sprinkler timer. This product is intended to be used as an automatic sprinkler timer for activating 24 VAC irrigation valves, as described in this manual.
#### WARRANTY AND STATEMENT
Orbit® Irrigation Products, Inc. warrants to its customers that its products will be free from defects in materials and workmanship for a period of six years from the date of purchase.
We will replace, free of charge, the defective part or parts found to be defective under normal use and service for a period of up to six years after purchase (proof of purchase required).
We reserve the right to inspect the defective part prior to replacement.
Orbit® Irrigation Products, Inc. will not be responsible for consequential or incidental cost or damage caused by the product failure. Orbit® liability under this warranty is limited solely to the replacement or repair of defective parts.
To exercise your warranty, return the unit to your dealer with a copy of the sales receipt.
This device complies with Part 15 of the FCC Rules. Operation is subject to the following two conditions: (1) This device may not cause harmful interference, and (2) This device must accept any interference received, including interference that may cause undesired operation.
Warning: Changes or modifications to this unit not expressly approved by the party responsible for compliance could void the user’s authority to operate the equipment.
NOTE: This equipment has been tested and found to comply with the limits for a Class B digital device, pursuant to Part 15 of the FCC Rules. These limits are designed to provide reasonable protection against harmful interference in a residential installation. This equipment generates, uses and can radiate radio frequency energy and, if not installed and used in accordance with the instructions, may cause harmful interference to radio communications. however, there is no guarantee that interference will not occur in a particular installation.
If this equipment does cause harmful interference to radio or television reception, which can be determined by turning the equipment off and on, the user is encouraged to try to correct the interference by one or more of the following measures:

Caution: This appliance is not intended for use by young children or infirm persons without supervision. Young children should be supervised to ensure that they do not play with the appliance.
ENGLISH
##### ESPAñOL
Felicitaciones por seleccionar su temporizador Orbit®. Con el exclusivo EasySet Logic® de Orbit®, la programación y configuración simples se combinan con lo último en tecnología y versatilidad en temporizadores.
Su nuevo temporizador brinda conveniencia y flexibilidad, lo que le permite ejecutar un programa de riego completamente automático, semiautomático o manual para todas sus necesidades de riego. Aunque este temporizador es tan fácil de programar que probablemente no necesitará instrucciones, le recomendamos leer este manual completo antes de la instalación, de manera que comprenda todas las características avanzadas.
Índice
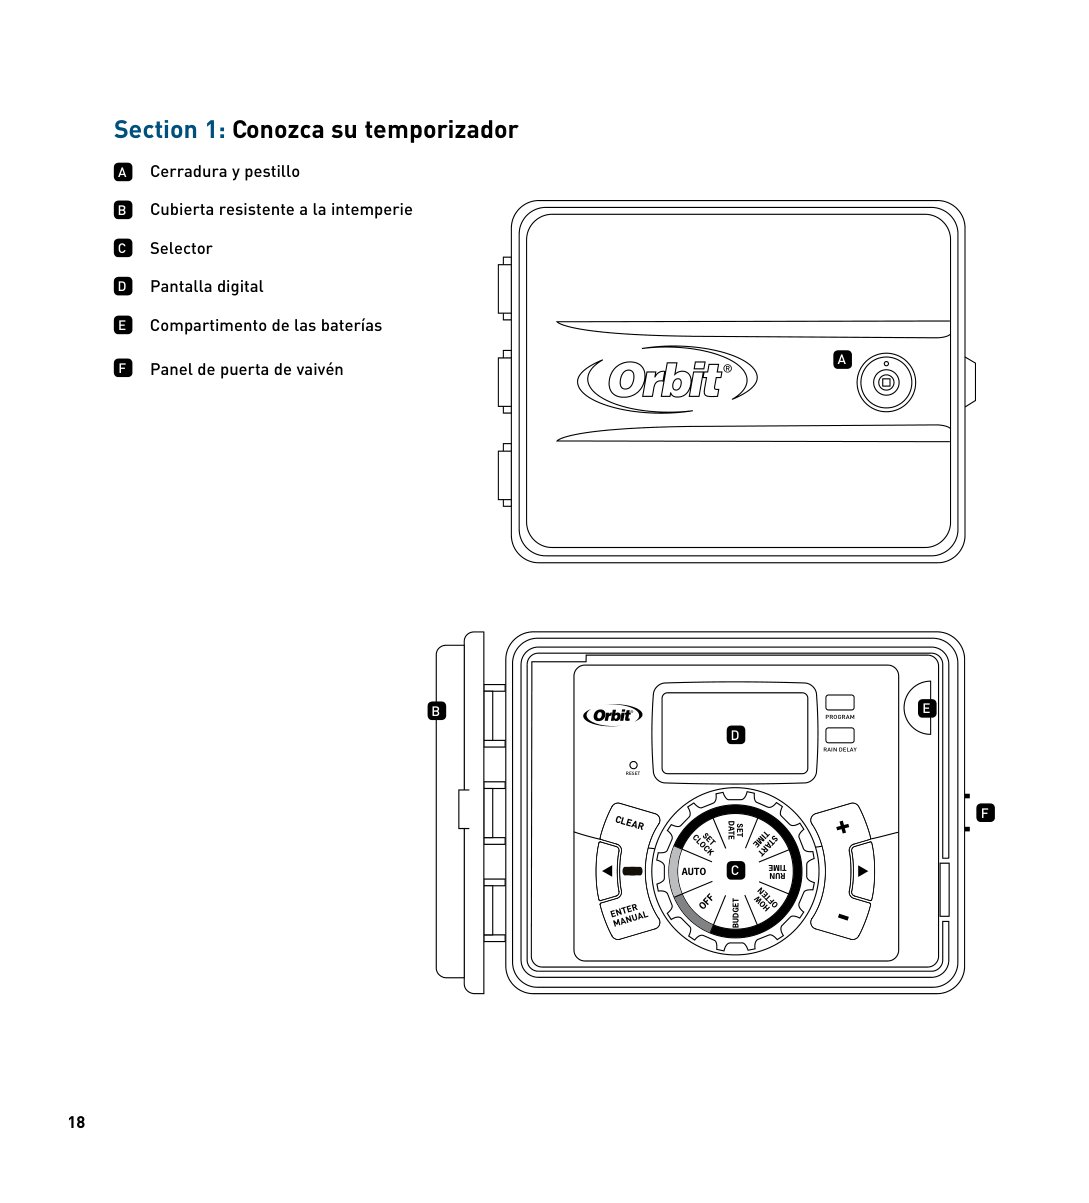
Section 1: Conozca su temporizador
A
B
C
D
E
Cerradura y pestillo Cubierta resistente a la intemperie Selector Pantalla digital Compartimento de las baterías
Panel de puerta de vaivénF
A
E
B
############ PROGRAM
D
RAIN DELAY
RESET
F
SET DATE
TIME
SET CLOCK
START
C
TIME
######## AUTO
RUN
OFTEN
OFF
HOW
BUDGET
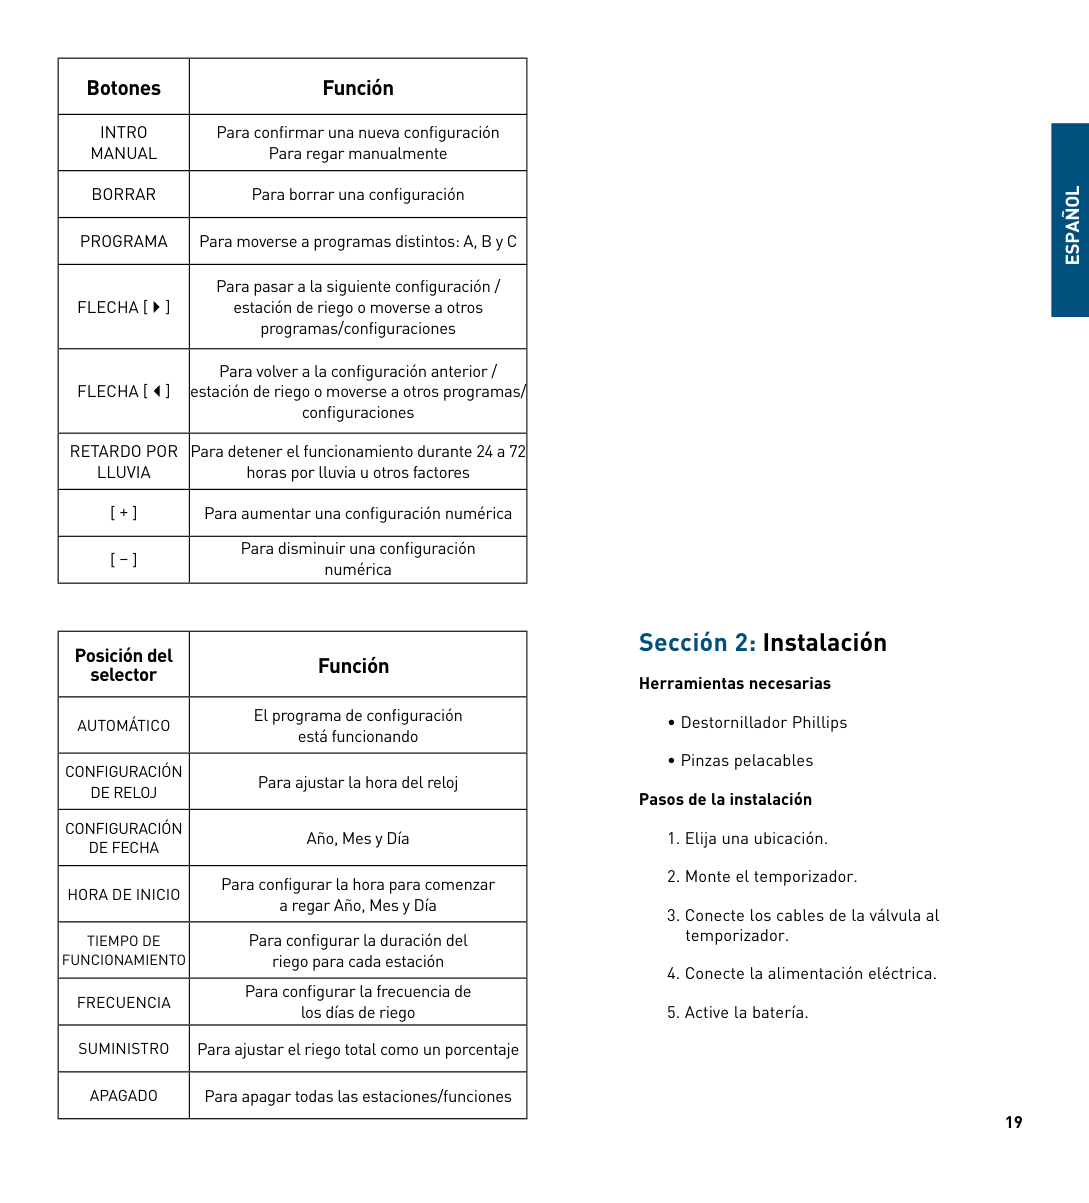
|Botones|Función| |---|---| |INTRO MANUAL|Para confirmar una nueva configuración Para regar manualmente| |BORRAR|Para borrar una configuración| |PROGRAMA|Para moverse a programas distintos: A, B y C| |FLEChA [ ]|Para pasar a la siguiente configuración / estación de riego o moverse a otros programas/configuraciones| |FLEChA [ ]|Para volver a la configuración anterior / estación de riego o moverse a otros programas/ configuraciones|
|RETARDO POR LLUVIA|Para detener el funcionamiento durante 24 a 72 horas por lluvia u otros factores| |[ + ]|Para aumentar una configuración numérica| |[ – ]|Para disminuir una configuración numérica|
|Posición del selector|Función| |---|---| |AUTOMÁTICO|El programa de configuración está funcionando| |CONFIGURACIÓN DE RELOJ|Para ajustar la hora del reloj| |CONFIGURACIÓN DE FEChA|Año, Mes y Día| |hORA DE INICIO|Para configurar la hora para comenzar a regar Año, Mes y Día| |TIEMPO DE FUNCIONAMIENTO|Para configurar la duración del riego para cada estación| |FRECUENCIA|Para configurar la frecuencia de los días de riego| |SUMINISTRO|Para ajustar el riego total como un porcentaje| |APAGADO|Para apagar todas las estaciones/funciones|
##### ESPAñOL
Sección 2: Instalación
###### Herramientas necesarias
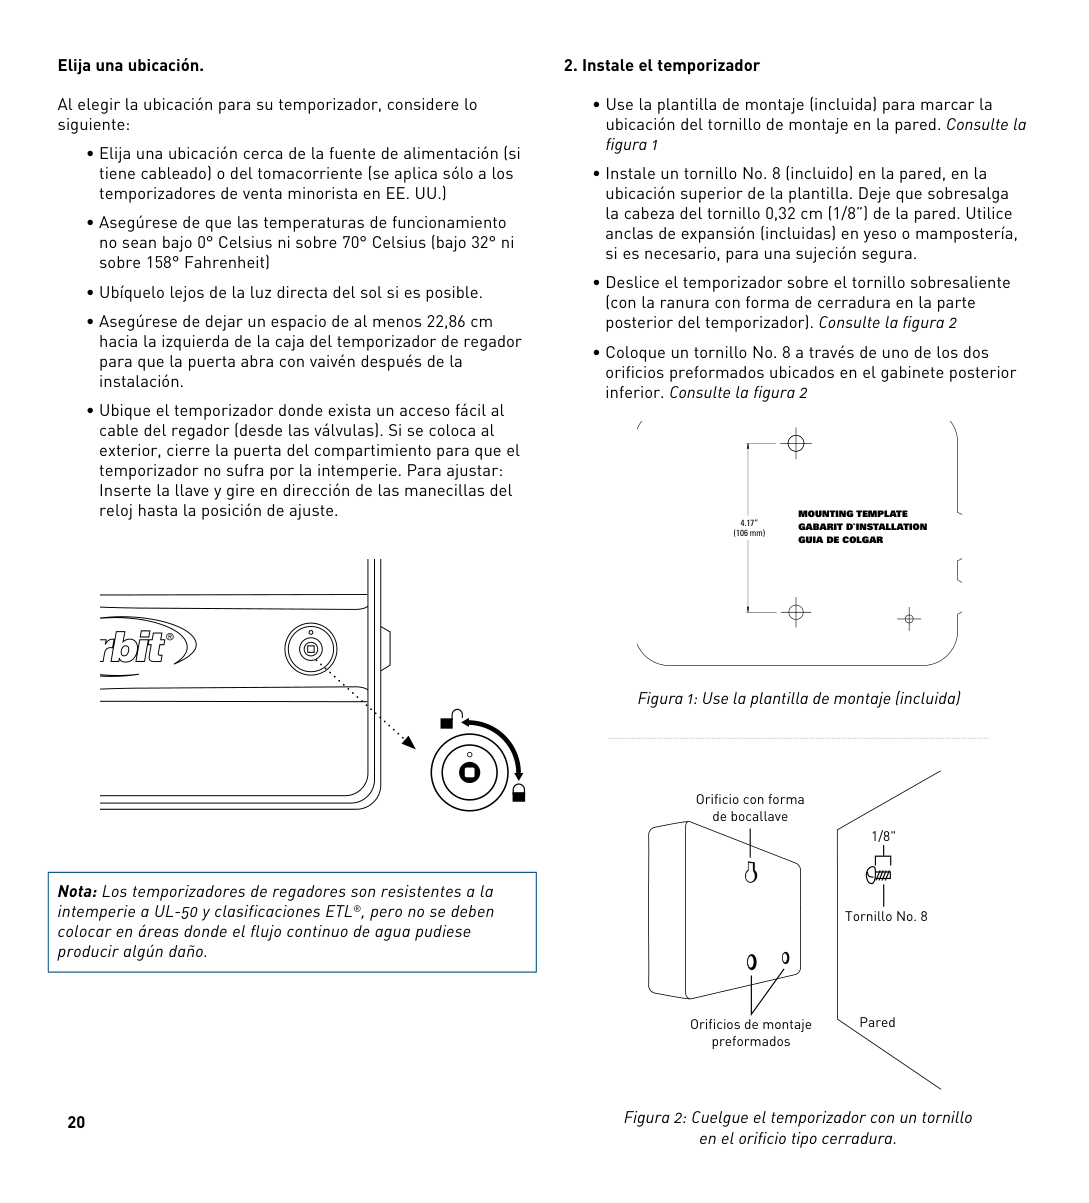
Elija una ubicación.
Al elegir la ubicación para su temporizador, considere lo siguiente:
|Nota: Los temporizadores de regadores son resistentes a la intemperie a UL-50 y clasificaciones ETL®, pero no se deben colocar en áreas donde el flujo continuo de agua pudiese producir algún daño.| |---|
20
###### 2. Instale el temporizador
########## MOUNTING TEMPLATE GABARIT D`INSTALLATION GUIA DE COLGAR
4.17” (106 mm)
Figura 1: Use la plantilla de montaje (incluida)
Orificio con forma de bocallave
1/8"
| | | |---|---| | | |
Tornillo No. 8
Pared
Orificios de montaje preformados
Figura 2: Cuelgue el temporizador con un tornillo en el orificio tipo cerradura.
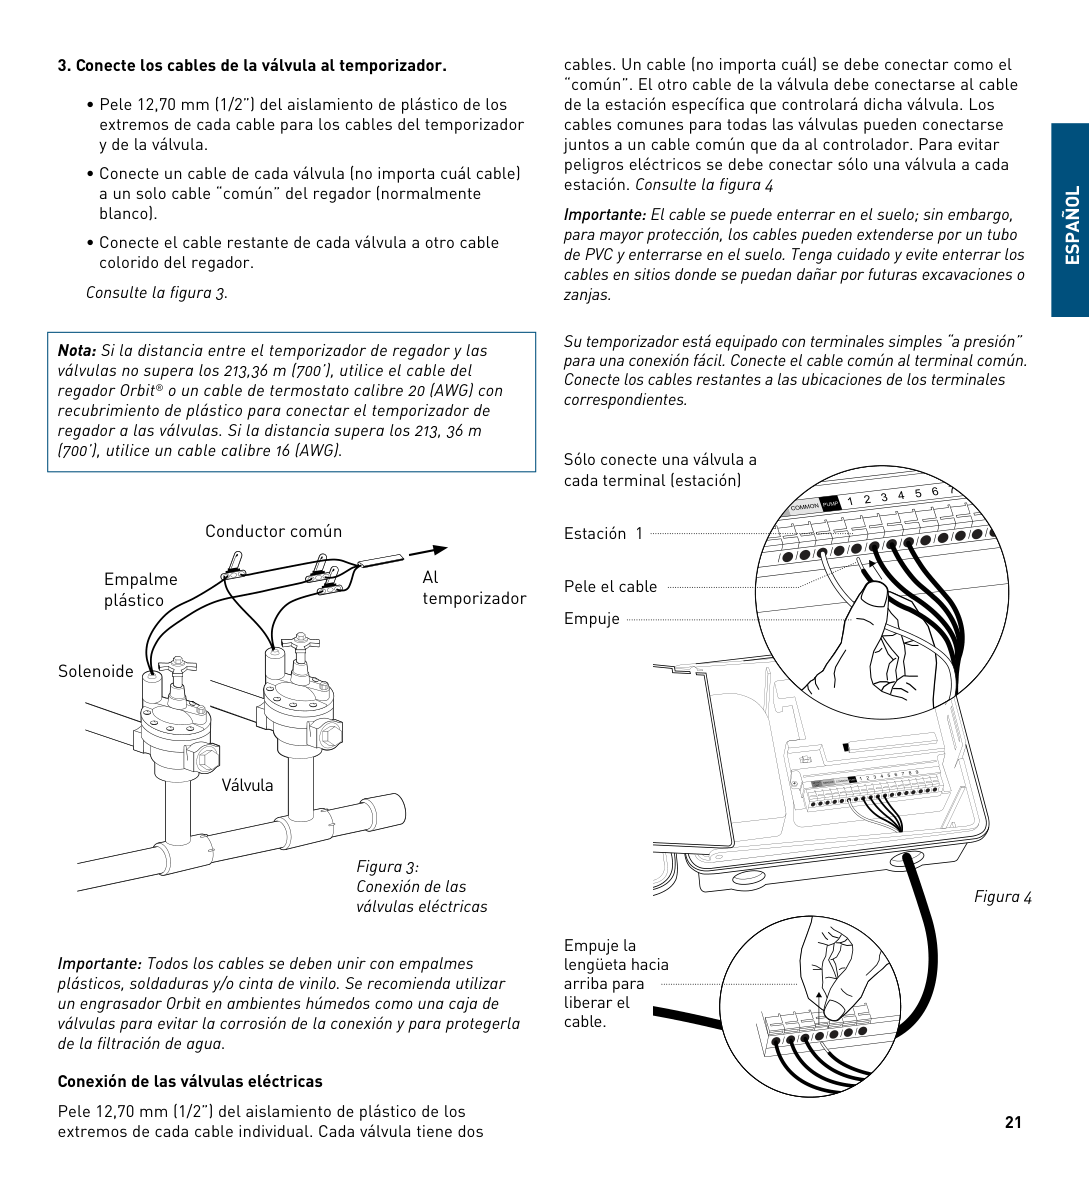
Consulte la figura 3.
|Nota: Si la distancia entre el temporizador de regador y las válvulas no supera los 213,36 m (700’), utilice el cable del regador Orbit® o un cable de termostato calibre 20 (AWG) con recubrimiento de plástico para conectar el temporizador de regador a las válvulas. Si la distancia supera los 213, 36 m (700’), utilice un cable calibre 16 (AWG).| |---|
cables. Un cable (no importa cuál) se debe conectar como el “común”. El otro cable de la válvula debe conectarse al cable de la estación específica que controlará dicha válvula. Los cables comunes para todas las válvulas pueden conectarse juntos a un cable común que da al controlador. Para evitar peligros eléctricos se debe conectar sólo una válvula a cada estación. Consulte la figura 4
Importante: El cable se puede enterrar en el suelo; sin embargo, para mayor protección, los cables pueden extenderse por un tubo de PVC y enterrarse en el suelo. Tenga cuidado y evite enterrar los cables en sitios donde se puedan dañar por futuras excavaciones o zanjas.
Su temporizador está equipado con terminales simples “a presión” para una conexión fácil. Conecte el cable común al terminal común. Conecte los cables restantes a las ubicaciones de los terminales correspondientes.
##### ESPAñOL
Sólo conecte una válvula a cada terminal (estación)
Conductor común
Al temporizador
Empalme plástico
Solenoide
Válvula
Figura 3: Conexión de las válvulas eléctricas
Importante: Todos los cables se deben unir con empalmes plásticos, soldaduras y/o cinta de vinilo. Se recomienda utilizar un engrasador Orbit en ambientes húmedos como una caja de válvulas para evitar la corrosión de la conexión y para protegerla de la filtración de agua.
###### Conexión de las válvulas eléctricas
Pele 12,70 mm (1/2”) del aislamiento de plástico de los extremos de cada cable individual. Cada válvula tiene dos
Estación 1
Pele el cable Empuje
Empuje la lengüeta hacia arriba para liberar el cable.
Figura 4
21
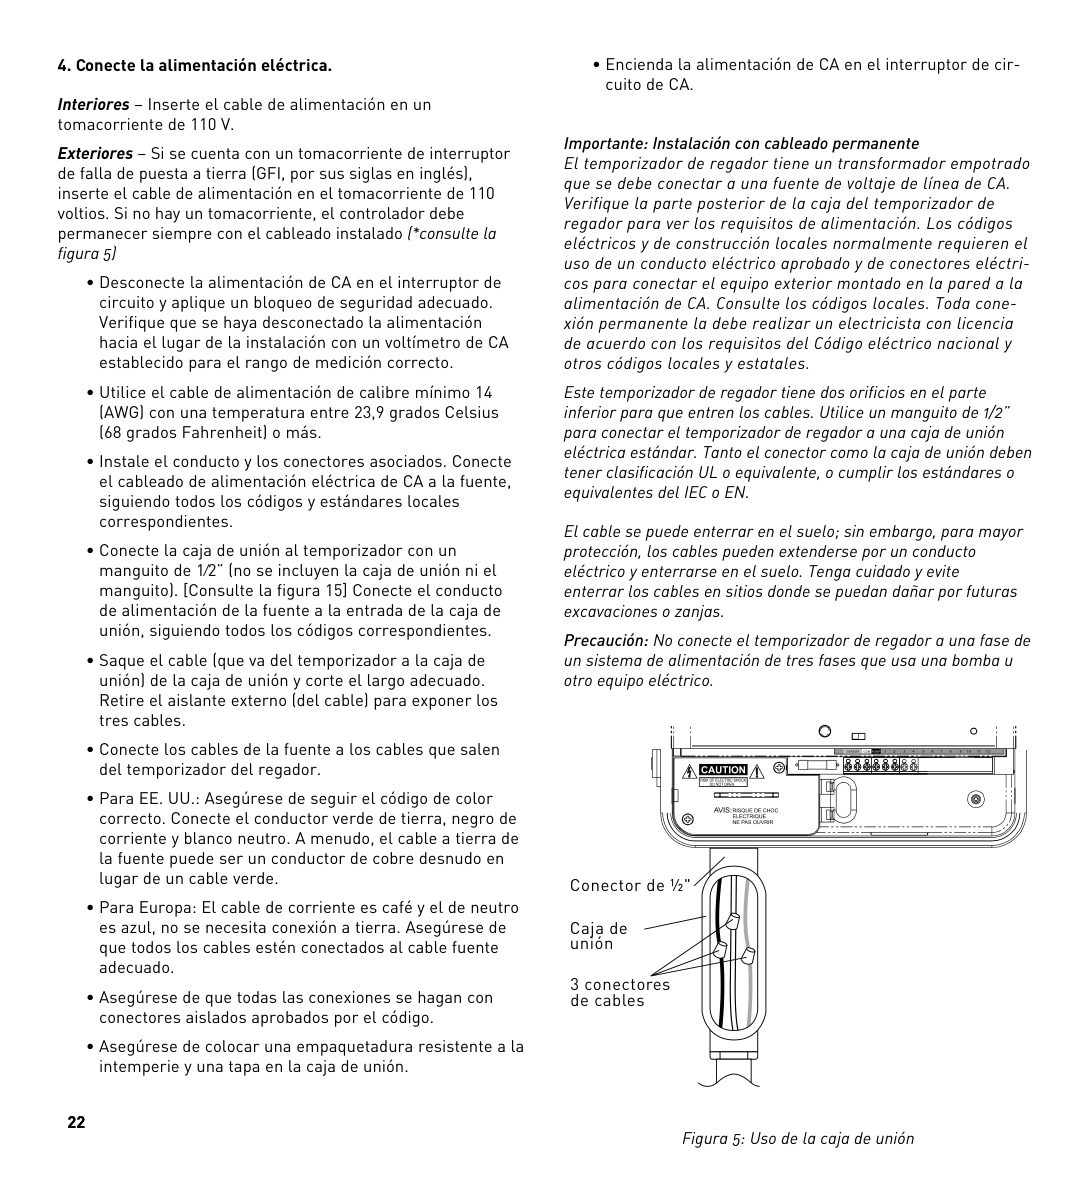
Interiores – Inserte el cable de alimentación en un tomacorriente de 110 V.
Exteriores – Si se cuenta con un tomacorriente de interruptor de falla de puesta a tierra (GFI, por sus siglas en inglés), inserte el cable de alimentación en el tomacorriente de 110 voltios. Si no hay un tomacorriente, el controlador debe permanecer siempre con el cableado instalado (*consulte la figura 5)
22
• Encienda la alimentación de CA en el interruptor de circuito de CA.
Importante: Instalación con cableado permanente El temporizador de regador tiene un transformador empotrado que se debe conectar a una fuente de voltaje de línea de CA. Verifique la parte posterior de la caja del temporizador de regador para ver los requisitos de alimentación. Los códigos eléctricos y de construcción locales normalmente requieren el uso de un conducto eléctrico aprobado y de conectores eléctricos para conectar el equipo exterior montado en la pared a la alimentación de CA. Consulte los códigos locales. Toda conexión permanente la debe realizar un electricista con licencia de acuerdo con los requisitos del Código eléctrico nacional y otros códigos locales y estatales.
Este temporizador de regador tiene dos orificios en el parte inferior para que entren los cables. Utilice un manguito de 1/2” para conectar el temporizador de regador a una caja de unión eléctrica estándar. Tanto el conector como la caja de unión deben tener clasificación UL o equivalente, o cumplir los estándares o equivalentes del IEC o EN.
El cable se puede enterrar en el suelo; sin embargo, para mayor protección, los cables pueden extenderse por un conducto eléctrico y enterrarse en el suelo. Tenga cuidado y evite enterrar los cables en sitios donde se puedan dañar por futuras excavaciones o zanjas.
Precaución: No conecte el temporizador de regador a una fase de un sistema de alimentación de tres fases que usa una bomba u otro equipo eléctrico.
| | | |---|---|
| | | | |---|---|---|
| | | | |---|---|---|
Conector de ½"
Caja de unión
3 conectores de cables
Figura 5: Uso de la caja de unión
|Nota: Se recomienda que un electricista calificado realice la instalación para aplicaciones en el exterior, de acuerdo con las regulaciones y los códigos eléctricos. Cuando se utiliza en exteriores, este temporizador de regador se debe utilizar con un circuito protegido de interruptor de falla a tierra (GFI).| |---|
###### 5. Active la batería
Se requiere una batería de litio CR2032 (incluida) para mantener el programa en la memoria durante cortes de electricidad. Se recomienda su reemplazo cada año.
Retire la cinta plástica para activar la batería preinstalada. (Consulte la página 12 para leer sobre el reemplazo de batería)
Retire la cinta plástica para activar la batería.
PROGRAM
RAIN DELAY
TIME
S TART
BUDGET
Nota: La batería sola no hará funcionar las válvulas de su sistema de riego. El temporizador de regador tiene un transformador empotrado que se debe conectar a una fuente de voltaje de CA.
Sección 3: Programación conEasy-Set Logic®
una nota sobre programas múltiples. Su temporizador de regador brinda la flexibilidad de utilizar
necesidades de riego similares maximizará la eficiencia de la irrigación.
La programación primaria se puede lograr con sólo unos pasos básicos.
###### Programación primaria
Presione [RESET] para borrar toda programación previa de fábrica.
###### 1. Configuración de reloj
|Sugerencia: Para aumentar o disminuir más rápidamente, mantenga presionados los botones [+] o [-] hasta que la pantalla cambie a modo de avance rápido.| |---|
###### 2. Configuración de fecha
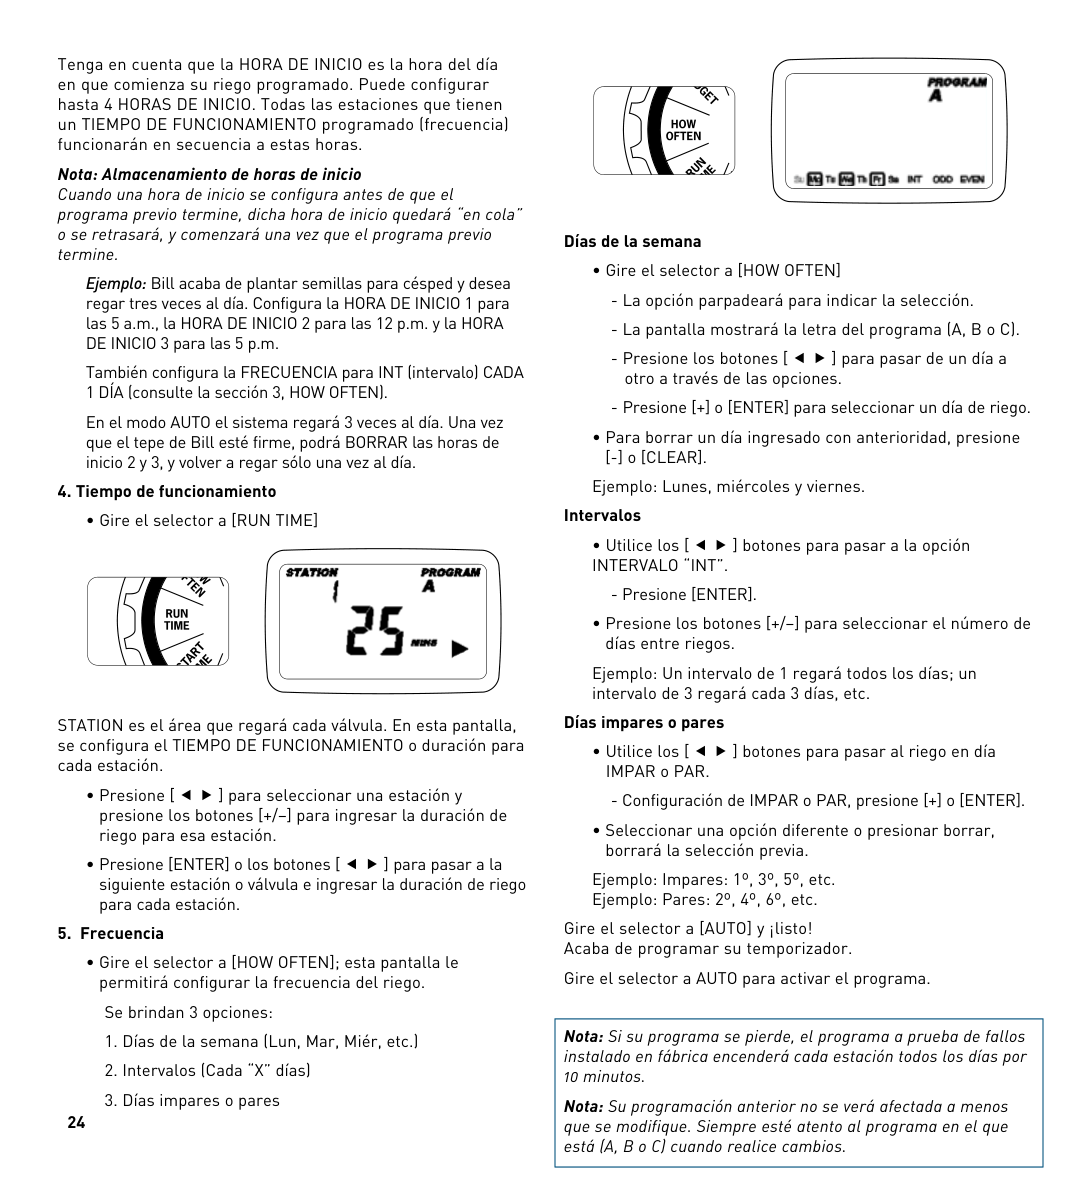
###### 3. Hora de inicio
(La hora se ajustará en incrementos de 1 minutos). La pantalla mostrará

##### ESPAñOL
Tenga en cuenta que la hORA DE INICIO es la hora del día en que comienza su riego programado. Puede configurar hasta 4 hORAS DE INICIO. Todas las estaciones que tienen un TIEMPO DE FUNCIONAMIENTO programado (frecuencia) funcionarán en secuencia a estas horas. Nota: Almacenamiento de horas de inicio Cuando una hora de inicio se configura antes de que el programa previo termine, dicha hora de inicio quedará “en cola” o se retrasará, y comenzará una vez que el programa previo termine.
Ejemplo: Bill acaba de plantar semillas para césped y desea regar tres veces al día. Configura la hORA DE INICIO 1 para las 5 a.m., la hORA DE INICIO 2 para las 12 p.m. y la hORA DE INICIO 3 para las 5 p.m.
También configura la FRECUENCIA para INT (intervalo) CADA 1 DÍA (consulte la sección 3, hOW OFTEN).
En el modo AUTO el sistema regará 3 veces al día. Una vez que el tepe de Bill esté firme, podrá BORRAR las horas de inicio 2 y 3, y volver a regar sólo una vez al día.
###### 4. Tiempo de funcionamiento
• Gire el selector a [RUN TIME]

STATION es el área que regará cada válvula. En esta pantalla, se configura el TIEMPO DE FUNCIONAMIENTO o duración para cada estación.
###### 5. Frecuencia
• Gire el selector a [hOW OFTEN]; esta pantalla le permitirá configurar la frecuencia del riego.
Se brindan 3 opciones:

###### Días de la semana
Ejemplo: Lunes, miércoles y viernes. Intervalos
Ejemplo: Un intervalo de 1 regará todos los días; un intervalo de 3 regará cada 3 días, etc.
###### Días impares o pares
Ejemplo: Impares: 1º, 3º, 5º, etc. Ejemplo: Pares: 2º, 4º, 6º, etc.
Gire el selector a [AUTO] y ¡listo! Acaba de programar su temporizador.

Gire el selector a AUTO para activar el programa.
|Nota: Si su programa se pierde, el programa a prueba de fallos instalado en fábrica encenderá cada estación todos los días por 10 minutos.
Nota: Su programación anterior no se verá afectada a menos que se modifique. Siempre esté atento al programa en el que está (A, B o C) cuando realice cambios.| |---|
###### Revisión y cambio de su programa
Si desea revisar o cambiar las horas de inicio, los tiempos de funcionamiento o la frecuencia de riego, simplemente siga las instrucciones nuevamente para esa opción. Recuerde girar el selector de vuelta a AUTO después de revisar o cambiar un plan de riego para el funcionamiento automático.
Sección 4: Características adicionales
###### Retardo por lluvia
El retardo por lluvia le permite retardar el temporizador de regador para que no riegue durante un período de tiempo establecido. Las configuraciones de retardo son 24, 48 y 72 horas.

###### Suministro de agua
El suministro de agua es una forma simple de ajustar la duración del riego a fin de satisfacer las necesidades de riego estacional. El suministro de agua funciona aumentando o disminuyendo la duración del riego para todas las estaciones en cada programa. Presione el botón PROGRAM para seleccionar el programa que desea suministrar.
El rango de ajuste va de 10% a 200%, en incrementos de 10%. El valor predeterminado es de 100%. El SUMINISTRO permanecerá en el rango ajustado hasta que lo cambie.
Configurar el suministro:

##### ESPAñOL
Ejemplo: La duración del riego de Bill es de 60 minutos; sin embargo, es primavera, por lo que desea regar la mitad del tiempo y configura el SUMINISTRO al 50%, el temporizador ahora regará durante 30 minutos.
###### Riego manual
Su temporizador tiene la capacidad de permitirle regar sin interrumpir el programa actual.

|Nota: Si no se han configurado los TIEMPOS DE FUNCIONAMIENTO, el temporizador no iniciará el riego manual y la pantalla volverá a la hora actual.| |---|
25
Ejemplo: Para regar manualmente en la estación 3 durante cinco minutos, presione el botón [MANUAL] y luego presione los botones hasta que vea la estación 3; usando los botones [+/–], configure la duración en cinco minutos; presione [ENTER]).
|Nota: Después de que se ha presionado el botón MANUAL, si no se realiza una selección dentro de 5 segundos, todas las estaciones y programas comenzarán el riego usando los TIEMPOS DE FUNCIONAMIENTO programados. Si no se han configurado TIEMPOS DE FUNCIONAMIENTO, no sucederá nada y la pantalla volverá a la hora del día.| |---|
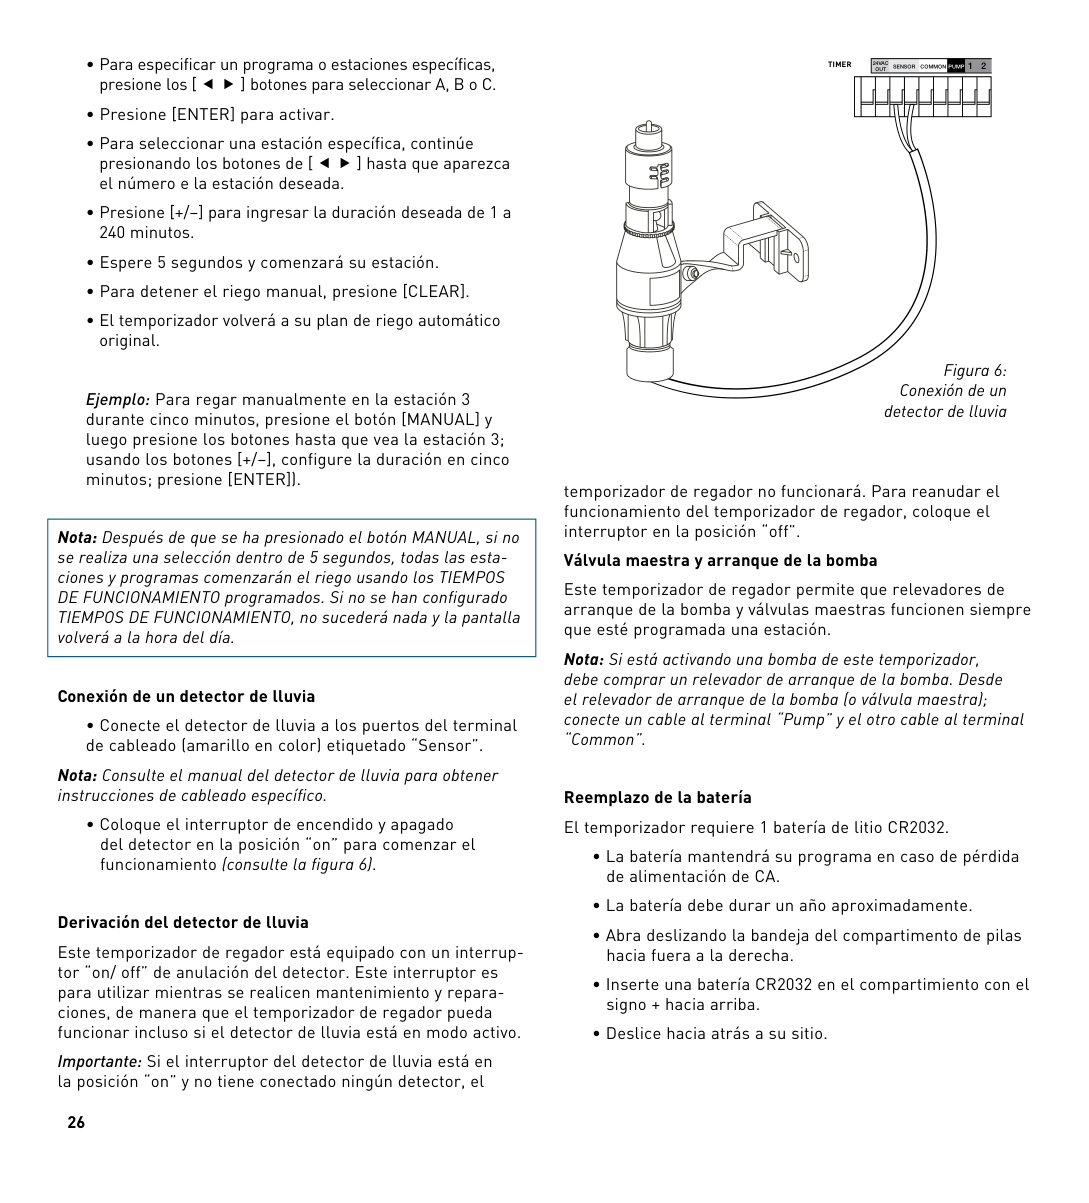
###### Conexión de un detector de lluvia
• Conecte el detector de lluvia a los puertos del terminal de cableado (amarillo en color) etiquetado “Sensor”.
Nota: Consulte el manual del detector de lluvia para obtener instrucciones de cableado específico.
• Coloque el interruptor de encendido y apagado del detector en la posición “on” para comenzar el funcionamiento (consulte la figura 6).
###### Derivación del detector de lluvia
Este temporizador de regador está equipado con un interruptor “on/ off” de anulación del detector. Este interruptor es para utilizar mientras se realicen mantenimiento y reparaciones, de manera que el temporizador de regador pueda funcionar incluso si el detector de lluvia está en modo activo.
Importante: Si el interruptor del detector de lluvia está en la posición “on” y no tiene conectado ningún detector, el
######### OUT 12TIMER
24VAC
SENSOR COMMON PUMP
| | | | | | | | | | | |---|---|---|---|---|---|---|---|---|---| | | | | | | | | | | |
Figura 6: Conexión de un
detector de lluvia
temporizador de regador no funcionará. Para reanudar el funcionamiento del temporizador de regador, coloque el interruptor en la posición “off”.
###### Válvula maestra y arranque de la bomba
Este temporizador de regador permite que relevadores de arranque de la bomba y válvulas maestras funcionen siempre que esté programada una estación.
Nota: Si está activando una bomba de este temporizador, debe comprar un relevador de arranque de la bomba. Desde el relevador de arranque de la bomba (o válvula maestra); conecte un cable al terminal “Pump” y el otro cable al terminal “Common”.
Reemplazo de la batería El temporizador requiere 1 batería de litio CR2032.
Retirar
PROGRAM
RAIN DELAY
Figura 7: Compartimento de las baterías
SET DATE
TIME
S TART
TIME
RUN
N
OFTE
HOW
BUDGET
Una batería descargada o la ausencia de baterías puede borrar la hora, la fecha y el programa tras un corte de energía. Si esto sucede, tendrá que instalar una batería completamente cargada y reprogramar el temporizador.
Sugerencia: Reemplace la batería todos los años para evitar perder la programación.
|Nota: Una batería sola no hará funcionar las válvulas de su sistema de riego. El temporizador de regador tiene un transformador empotrado que se debe conectar a una fuente de voltaje de línea de CA.| |---|
##### ESPAñOL
Sección 5: Referencia
|TÉRMINO|DEFINICIÓN|

|---|---| |hORA DE INICIO|La hora en que el programa comienza el riego la primera estación programada.| |VÁLVULA|Suministra agua a una estación o área específicos. La abertura y el cierre de la válvula se realizan con la corriente eléctrica que suministra el temporizador de regador.| |VÁLVULA MAESTRA|Suele ubicarse en la fuente de agua principal. Abre y cierra el agua para todo el sistema de irrigación cuando no está en uso.| |hORAS DE INICIO MÚLTIPLES|Una característica de control que permite que un programa funcione a múltiples horas en el mismo día de riego.| |PROGRAMAS SUPERPUESTOS|Cuando se configura una “hora de inicio” para un programa antes de que el programa previo haya terminado.| |PROGRAMA (A, B O C)|Programas individuales configurados por el usuario. Cada programa funciona de forma independiente. Si un programa se superpone al otro, los programas quedarán “en cola”. Después de que termine el primer programa comenzará el programa siguiente.| |RETARDO POR LLUVIA|Una característica que pospone el funcionamiento de un programa de riego programado para una duración específica.| |SOLENOIDE|La parte eléctrica en una válvula de irrigación que abre y cierra la válvula.| |TEMPORIZADOR DE REGADOR|Un dispositivo que les ordena a las válvulas de la estación que funcionen.| |ESTACIÓN|Un grupo de regadores que funcionan con una sola válvula controlada por el temporizador.| |SUMINISTRO PARA RIEGO|Ajusta su programa de riego general como un porcentaje de la duración total de riego.|
Solución de problemas
|PROBLEMA|CAuSA POSIBLE| |---|---| |Una o más válvulas no encienden.|1. La conexión del solenoide no es la correcta.| |Una o más válvulas no encienden.|2. El cable está dañado o cortado.| |Una o más válvulas no encienden.|3. Vástago de control de flujo hacia abajo, válvula cerrada.| |Una o más válvulas no encienden.|4. La programación es incorrecta.| |Las estaciones se encienden cuando no deben hacerlo.|1. La presión del agua es demasiado alta.| |Las estaciones se encienden cuando no deben hacerlo.|2. Se ha programado más de una hora de inicio.| |Las estaciones se encienden cuando no deben hacerlo.|3. A.M./P.M. es incorrecto.| |Una estación permanece activa y no se apaga.|1. Válvula defectuosa.| |Una estación permanece activa y no se apaga.|2. Partículas de suciedad o desechos atascados en la válvula.| |Una estación permanece activa y no se apaga.|3. Diafragma de la válvula defectuoso.| |Ninguna de las válvulas enciende.|1. Transformador defectuoso o desconectado.| |Ninguna de las válvulas enciende.|2. La programación es incorrecta.| |El temporizador no se enciende.|1. El transformador no está conectado a un tomacorriente en funcionamiento.| |Las válvulas siguen encendiéndose y apagándose cuando no están programadas para hacerlo.|1. hay más de una hora de inicio programada con planes superpuestos.| |Las válvulas siguen encendiéndose y apagándose cuando no están programadas para hacerlo.|2. Presión excesiva.|
ESPAñOL
AYuDA 1-800-488-6156 or 1-801-299-5555 www.orbitonline.com Antes de devolver este temporizador de regador a la tienda, póngase en contacto con el Servicio técnico de Orbit® al: 1-800-488-6156, 1-801-299-5555 Listings
#### CLASIFICACIONES

El temporizador de regador ha sido probado para el estándar UL-50 y está clasificado por ETL®.
Los modelos internacionales apropiados están aprobados por CSA® y CE®.
Este instrumento digital clase B cumple con el ICES-003 de Canadá.
Desconexión: Tipo 1Y Situación de contaminación normal. El cable del suministro de este control lo puede reemplazar sólo el fabricante o su agente de servicio acreditado.
#### AVISO DE LA MARCA
WaterMaster® es una marca registrada de Orbit® Irrigation Products, Inc. La información de este manual está pensada para el usuario que establecerá un plan de riego y que ingresará dicho plan en el temporizador de regador. Este producto está pensado para ser utilizado como un temporizador de regador automático para la activación de válvulas de irrigación de 24-V CA como se describe en este manual.
#### GARANTÍA Y DECLARACIÓN
Orbit® Irrigation Products Inc. garantiza a sus clientes que sus productos estarán libres de defectos en los materiales y en la fabricación durante un período de seis años a partir de la fecha de compra.
Reemplazaremos, sin cargos, la o las piezas defectuosas o las piezas que se consideren defectuosas bajo un uso y servicio normales por un período de hasta seis años después de la compra (se exige comprobante de compra).
Nos reservamos el derecho de inspeccionar la pieza defectuosa antes de su reemplazo.
Orbit® Irrigation Products Inc. no será responsable de costos ni daños indirectos o incidentales causados por la falla del producto. La responsabilidad de Orbit® bajo esta garantía se limita solamente al reemplazo o la reparación de las piezas defectuosas.
Para utilizar su garantía, regrese la unidad al distribuidor con una copia del recibo de venta.
Este dispositivo cumple con la Sección 15 de las reglas de la FCC. El funcionamiento está sujeto a las siguientes dos condiciones:
Advertencia: Los cambios o las modificaciones a esta unidad que no estén expresamente aprobadas por la parte responsable del cumplimiento podrían anular la autorización del usuario para utilizar el equipo.
NOTA: Este equipo ha sido probado y se ha verificado que cumple los límites para un dispositivo digital Clase B, conforme a la Sección 15 de las reglas de la FCC. Estos límites están diseñados para proporcionar protección razonable contra interferencia perjudicial en una instalación residencial. Este equipo genera, utiliza y puede irradiar energía de radiofrecuencia y, si no se instala y usa de acuerdo con las instrucciones, puede causar interferencia perjudicial a las comunicaciones de radio. Sin embargo, no se garantiza que no se producirán interferencias en una instalación en particular.
Si este equipo genera interferencia perjudicial a la recepción de radio o televisión, lo que se puede determinar apagando y encendiendo el equipo, se recomienda al usuario que intente corregir la interferencia con una o más de las siguientes medidas:
Precaución: Este electrodoméstico no está pensado para ser uti-
lizado por niños pequeños o por personas enfermas sin supervisión. Se debe supervisar a los niños pequeños para asegurarse de que no jueguen con el electrodoméstico.