
Ask AI
— answers from the official manualAnswers from the official manual.
Common questions
Common Questions
10 totalHow do I set up the antenna barrier for my Race Result Rr10 Reader?
Ensure that the cable bridge is used and placed such that athletes are forced to go over it with no way around. Spectators should be kept at least 1 meter/4 ft away from both sides of the cable bridge. Use barriers like metal fences, cones, or barrier tape to prevent unwanted intrusions and correct detection of transponders (page 4).
What is required during rain conditions when using a Race Result Rr10 Reader?
During rainfall, ensure the lid of the decoder box is closed and locked securely. Cables should be positioned to lead through gaps between the lid and base (page 5).
How can I manually re-establish a connection if it has been interrupted during my Race Result Rr10 Reader event?
You may directly log into the decoder via its IP address in your web browser, download stored detection files as needed and then read these detections back into the Transponder Module (page 9).
What are the steps for connecting the decoder in my Race Result Rr10 Reader setup?
Connect all 8 coaxial cables from the antenna to the corresponding ports on the back of the decoder. Avoid positioning other cables over or under these connections, and ensure proper electrical connectivity (page 5).
How do I manage IP configuration for connecting my Race Result Rr10 Reader to a computer?
Assign static IP addresses to both the race|result System and your computer within the same subnet (e.g., Timing System: 192.168.1.201, Computer: 192.168.1.101) for direct Ethernet connection without DHCP (page 6).
How do I start and stop a race using the Race Result Rr10 Reader?
In Simple Mode, select the contest from the box above the Start button in the Transponder Module. Press Start when the starting gun fires to begin recording detections; press Stop once all participants have finished (page 7).
Show 4 more questions
What should I do if a correct detection is ignored during my race using Race Result Rr10 Reader?
How can I prevent unwanted detections or false positives from occurring with my Race Result Rr10 Reader?
What should I do if I lose connection between my laptop and Race Result Rr10 Reader during an event?
How do I reset the Race Result Rr10 Reader to factory settings?
Full Manual
9 pages


This manual serves as a short introduction to using the race|result System. It is designed both for users who have experience working with transponder systems and individuals who have never used electronic time keeping before.
TABLE OF CONTENTS
1. INTRODUCTION
Thank you for using the race|result System to time your race. We assume that you have been working with the race|result software for some weeks now and that you have already set up your event. Now, it is a few days before the race, you have received the rental system today and want to try it out to familiarize yourself with the system.
The following chapters will describe how to set up and how to connect to the system. It will also present some case studies for standard types of events. If, however, your event is very special you will have to dive deeper into the software using the Advanced Users Guide.
For the success of your race, it is very important that you read this manual carefully and that you do what is said here. The software is flexible enough to time any race in the world (even those that have not been invented yet), but this implies that there are a lot of settings. Important: Do not touch anything you do not understand. Do not think your event is extraordinary complex. 95% of all events can be timed with standard configuration or just a few tweaks.
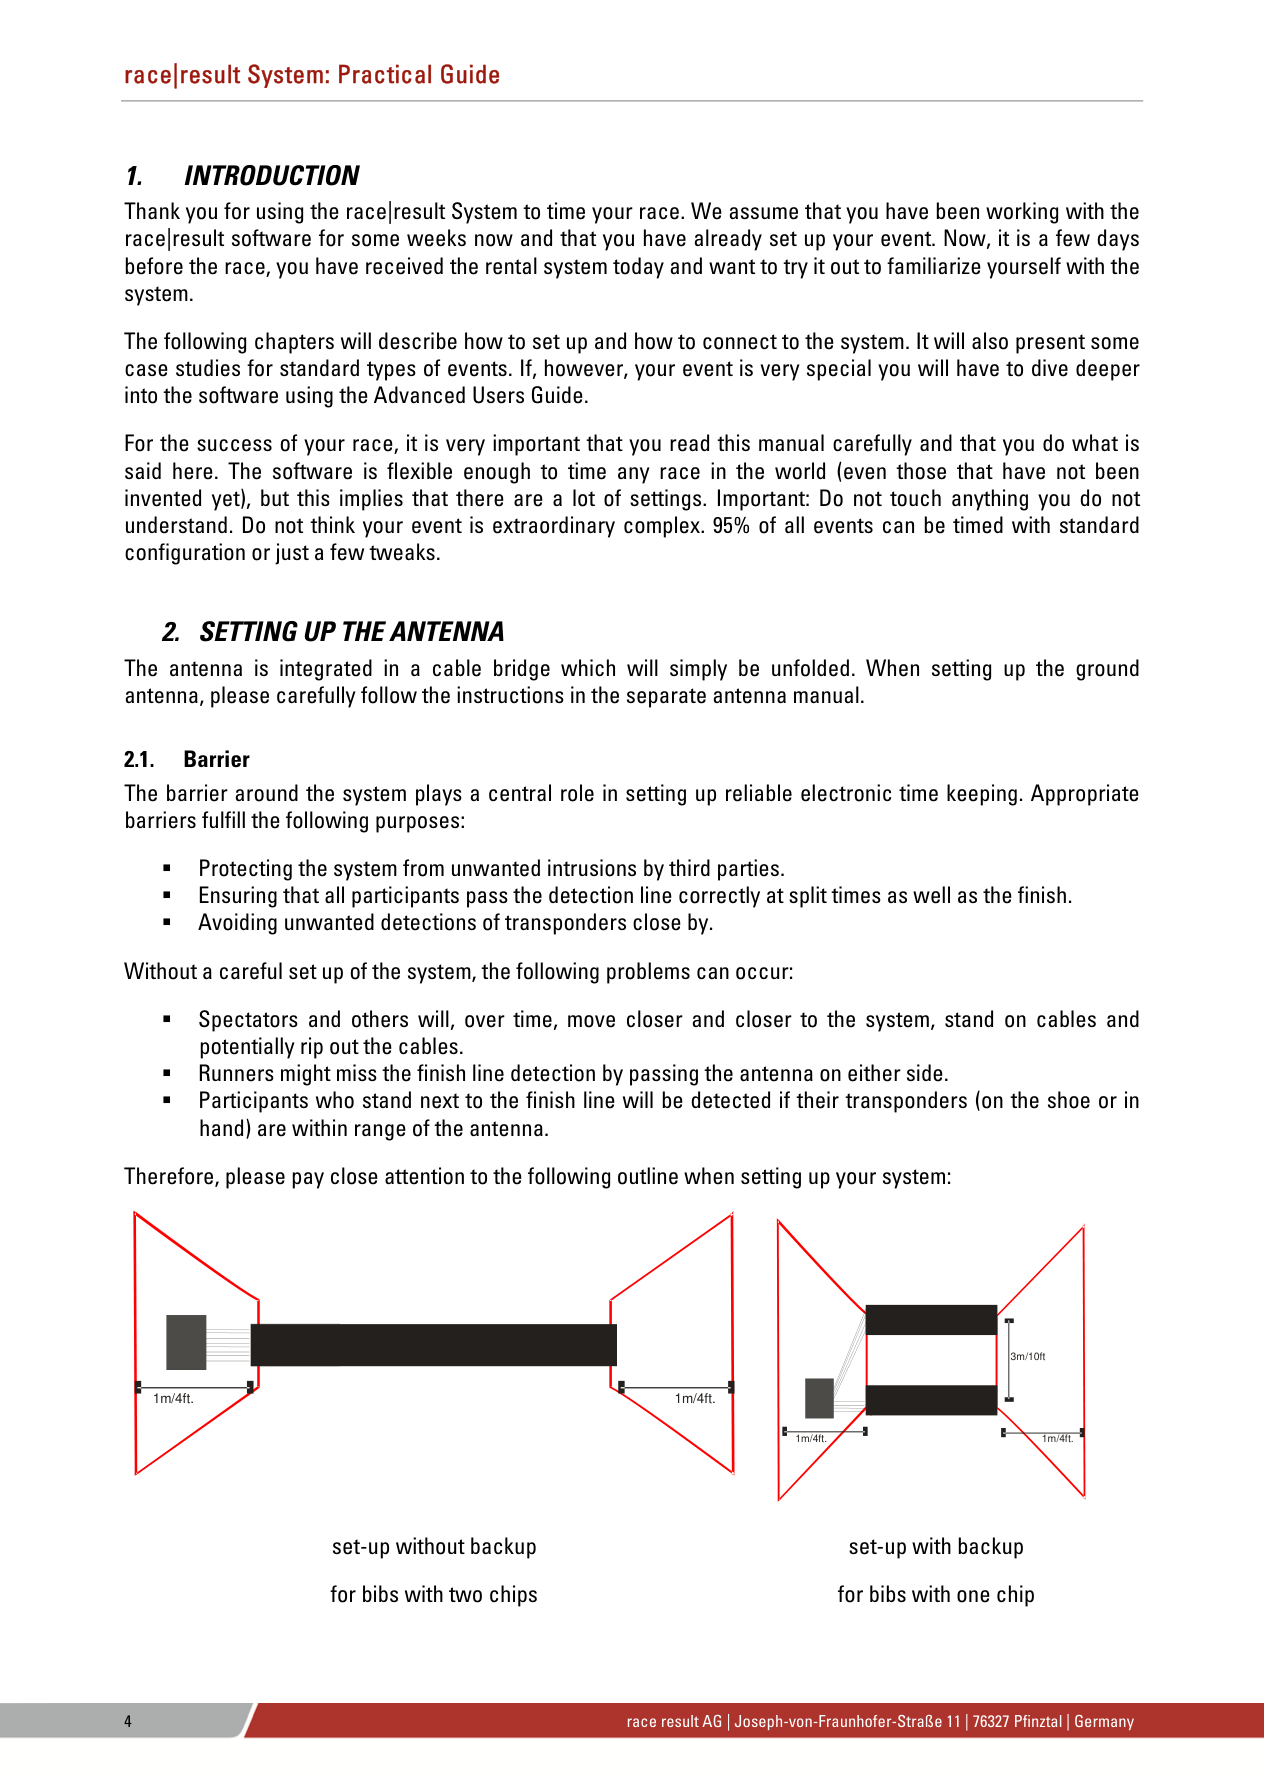
#### 2.1. Barrier
The barrier around the system plays a central role in setting up reliable electronic time keeping. Appropriate barriers fulfill the following purposes:
Protecting the system from unwanted intrusions by third parties. Ensuring that all participants pass the detection line correctly at split times as well as the finish. Avoiding unwanted detections of transponders close by.
Without a careful set up of the system, the following problems can occur:
Spectators and others will, over time, move closer and closer to the system, stand on cables and potentially rip out the cables. Runners might miss the finish line detection by passing the antenna on either side. Participants who stand next to the finish line will be detected if their transponders (on the shoe or in hand) are within range of the antenna.
Therefore, please pay close attention to the following outline when setting up your system:
| | | |---|---| | | | | | |
| | | |---|---| | | | | | | | | | | | |
| | | | | | | | | | | |
1m/4ft.1m/4ft.
3m/10ft
| | | |---|---| | | | | | | | | | | | |
1m/4ft.1m/4ft.
set-up without backup set-up with backup for bibs with two chips for bibs with one chip
Athletes should be forced to go over the cable bridge and should have no way around it. On the left and on the right side, spectators should be kept at least 1 meter/4 ft. away from the cable bridge. The electric field of the cable bridge spreads out in a cone shaped angle, i.e. the higher a transponder is, the farther away it can be detected from the cable bridge. Consequently, other participants standing close to the system with their race pack in hand may trigger detections if the barrier does not create a large enough distance between spectators and the system. As a barrier you may use metal fences, cones, barrier tape, etc.
2.2. Backup-Line Note that when using bibs with one chip only, a backup line should be place around 3 meter/10 ft. after the finish line.
3. CONNECTING THE DECODER
Place the decoder next to the cable bridge and connect all 8 coaxial cables to the 8 connecting ports on the back of the decoder. Every cable can be connected to any plug; you do not have to follow a certain order. Avoid putting other cables (e.g. electricity) over or under the coaxial cables.
Besides the connections for the antenna, the decoder has the following ports:
Power: The rechargeable internal battery of the decoder lasts for max. 6-8 hours and serves primarily as a backup function in case of power outages. The decoder should always be connected over a cable supporting 110-240V / 50/60Hz. As an alternative, you can also use the included cable to connect the decoder to an external battery or a cigarette lighter of a car.
Data: The detections can be read through an Ethernet connection.
Via the USB port, the detections can be saved on a USB stick.
Audio: The decoder contains an internal beeper, which will give an acoustic signal for every detection. Alternatively, you can connect an external speaker or headphones. The internal beeper will then be deactivated.

When operating the system during hot temperatures (>25°C / 80°F) and located in direct sun light, the lid should not be closed. Otherwise, the system may perform a temperature triggered emergency shutdown.

During rain, the lid of the decoder has to be closed and locked. Therefore, all cables have to be led through the gap between box and lid on the side.
4. STARTING THE SYSTEM
After connecting the antennas, the decoder can be powered on by briefly pressing the “ON”-button. The booting process will begin. In order to turn off the decoder, push and hold the “OFF”-button for approximately 8 seconds.
After booting, the decoder will be in Test Mode. As long as transponders are within range of the antenna, you should hear a constant beeping. This allows you to check if the antenna is connected properly and that it detects everywhere. The detections in Test Mode will not be saved and cannot be read out.
You will notice that the transponders can be detected at a large distance from the antenna. Similarly, the decoder may beep during the race before the athlete has passed the antenna. However, this does not imply imprecise time keeping: after the first detection of the chip (beep) it will be read many times and in the end the time with the highest signal strength (right above the antenna) will be saved.
5. CONNECTING TO THE SYSTEM
#### 5.1. Setting Up Your Computer
Usually, the race|result System will be read out in real-time while athletes pass the cable bridge. Therefore, a laptop should be positioned within reach of the system in the following way:
There should be an unobstructed view of the finish line. The laptop should be located behind the finish line so that the bib numbers can still be read after the athlete has passed the finish line. It should be possible to quickly access the decoder. There should be protection from direct sunlight and rain. Preferably, use a laptop (instead of a desktop computer) to be safe in case of possible power outages.
#### 5.2. Managing IP Configuration
The Ethernet connection is the recommended connection type to read out live data from the system during the race. The system can be connected directly to a computer using a standard patch cable or cross-over cable, or be integrated in a local network using a switch or router.
Please consider the following basics:
Each device in an Ethernet network has an address, called “IP address”. Each device in a network needs to have a unique address. Do not use the same IP address twice. An IP address consists of 4 number blocks (each having a value between 0 and 255) separated by a period, e.g. 192.168.1.100 In local networks, IP addresses usually start with 192.168. (this is a reserved address space not used in the Internet). When two devices in a local network (e.g. computer and timing system) want to communicate with each other, they need to be in the same subnet, i.e. they need to have the same first three blocks of the IP address (but different fourth block!), e.g. Timing System: 192.168.1.201
The IP address of the race|result System will be shown in the display. If it does not show an address, make sure DHCP is turned off (menu -> Network settings) and set a static IP address in the same subnet as your computer.
#### 5.3. Starting the Transponder Module
Under these preconditions, the Transponder Module can be used to read out the decoder. It can be found in your Windows Start menu after installing the race|result software.
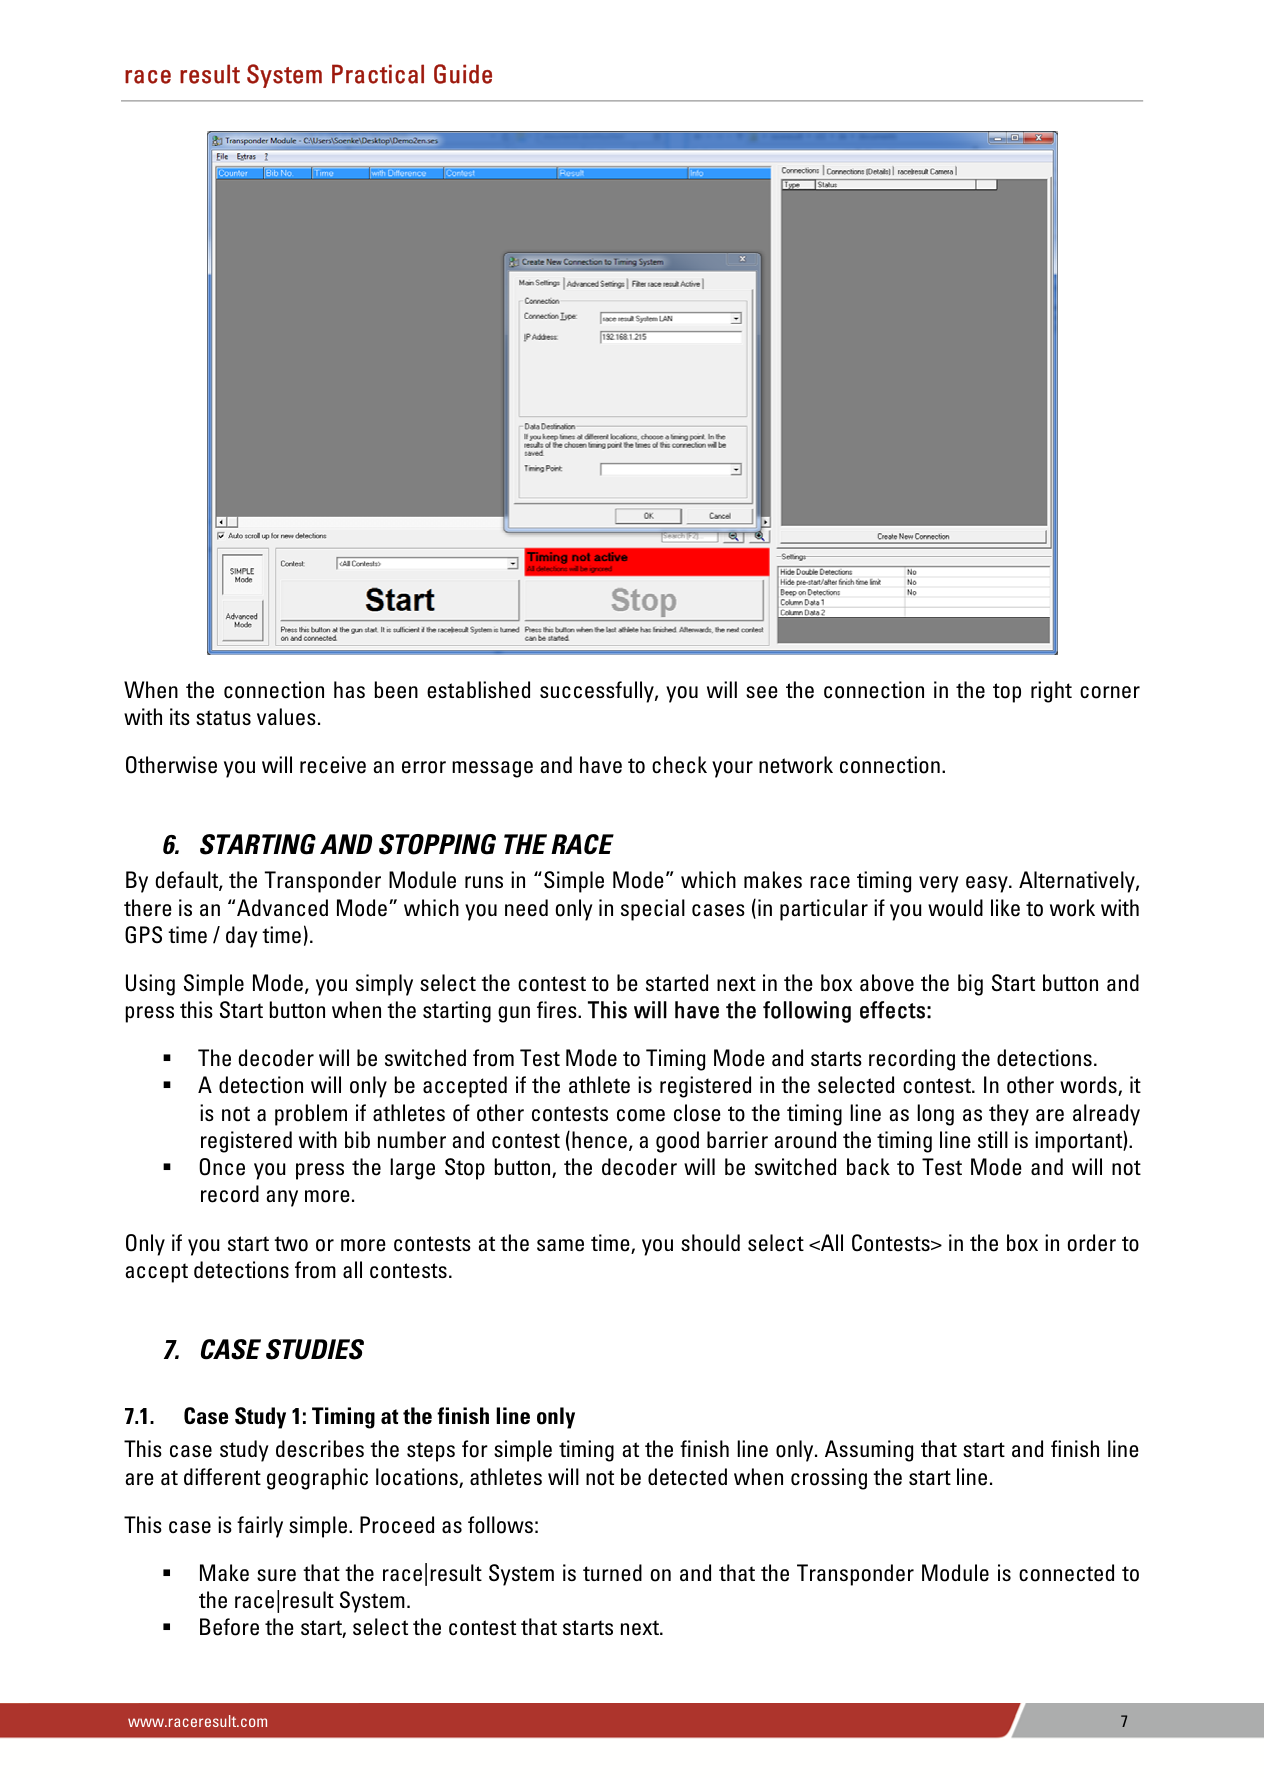
Start the Transponder Module and open your event file via the File menu. Once the event file has been opened, a new window pops up to create the connection to the race|result System. Choose “race|result System” as Connection Type, enter the IP address of the decoder and click OK.


When the connection has been established successfully, you will see the connection in the top right corner with its status values.
Otherwise you will receive an error message and have to check your network connection.
6. STARTING AND STOPPING THE RACE
By default, the Transponder Module runs in “Simple Mode” which makes race timing very easy. Alternatively, there is an “Advanced Mode” which you need only in special cases (in particular if you would like to work with GPS time / day time).
Using Simple Mode, you simply select the contest to be started next in the box above the big Start button and press this Start button when the starting gun fires. This will have the following effects:
The decoder will be switched from Test Mode to Timing Mode and starts recording the detections. A detection will only be accepted if the athlete is registered in the selected contest. In other words, it is not a problem if athletes of other contests come close to the timing line as long as they are already registered with bib number and contest (hence, a good barrier around the timing line still is important). Once you press the large Stop button, the decoder will be switched back to Test Mode and will not record any more.
Only if you start two or more contests at the same time, you should select
7. CASE STUDIES
#### 7.1. Case Study 1: Timing at the finish line only
This case study describes the steps for simple timing at the finish line only. Assuming that start and finish line are at different geographic locations, athletes will not be detected when crossing the start line.
This case is fairly simple. Proceed as follows:
Make sure that the race|result System is turned on and that the Transponder Module is connected to the race|result System. Before the start, select the contest that starts next.
At the gun shot, press the Start button (in Transponder Module) Double check that the decoder is running in Timing Mode and that the time is running (in the connection settings in the top right corner or directly at the decoder box). When the last athlete has reached the finish, press the Stop button (in Transponder Module).
At any time during the race, you can access the real time results in race|result 11, e.g. in the Output Window.
#### 7.2. Case Study 2: Net Timing
In this case, both start time and finish time will be recorded. Then, the net time can be calculated using start and finish time.
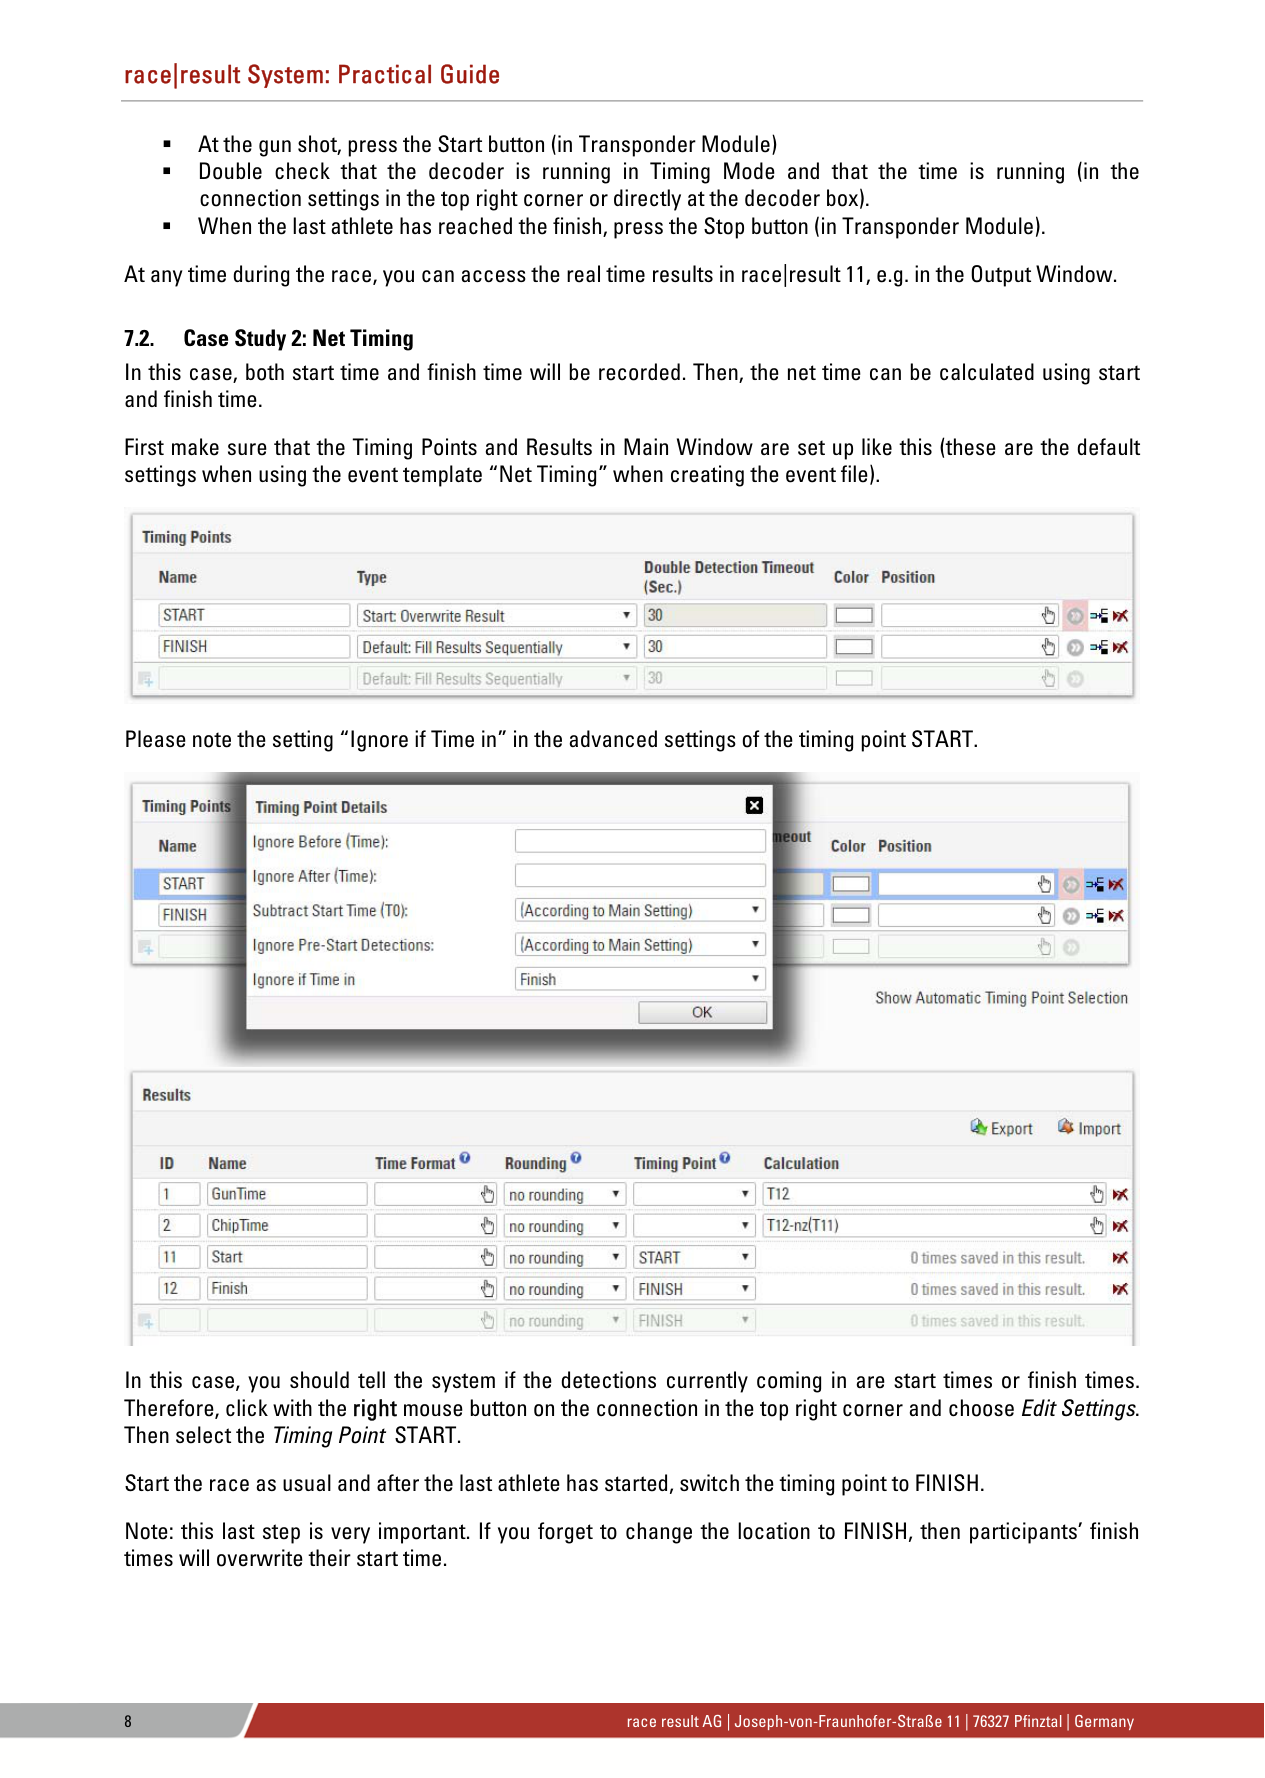
First make sure that the Timing Points and Results in Main Window are set up like this (these are the default settings when using the event template “Net Timing” when creating the event file).

Please note the setting “Ignore if Time in” in the advanced settings of the timing point START.


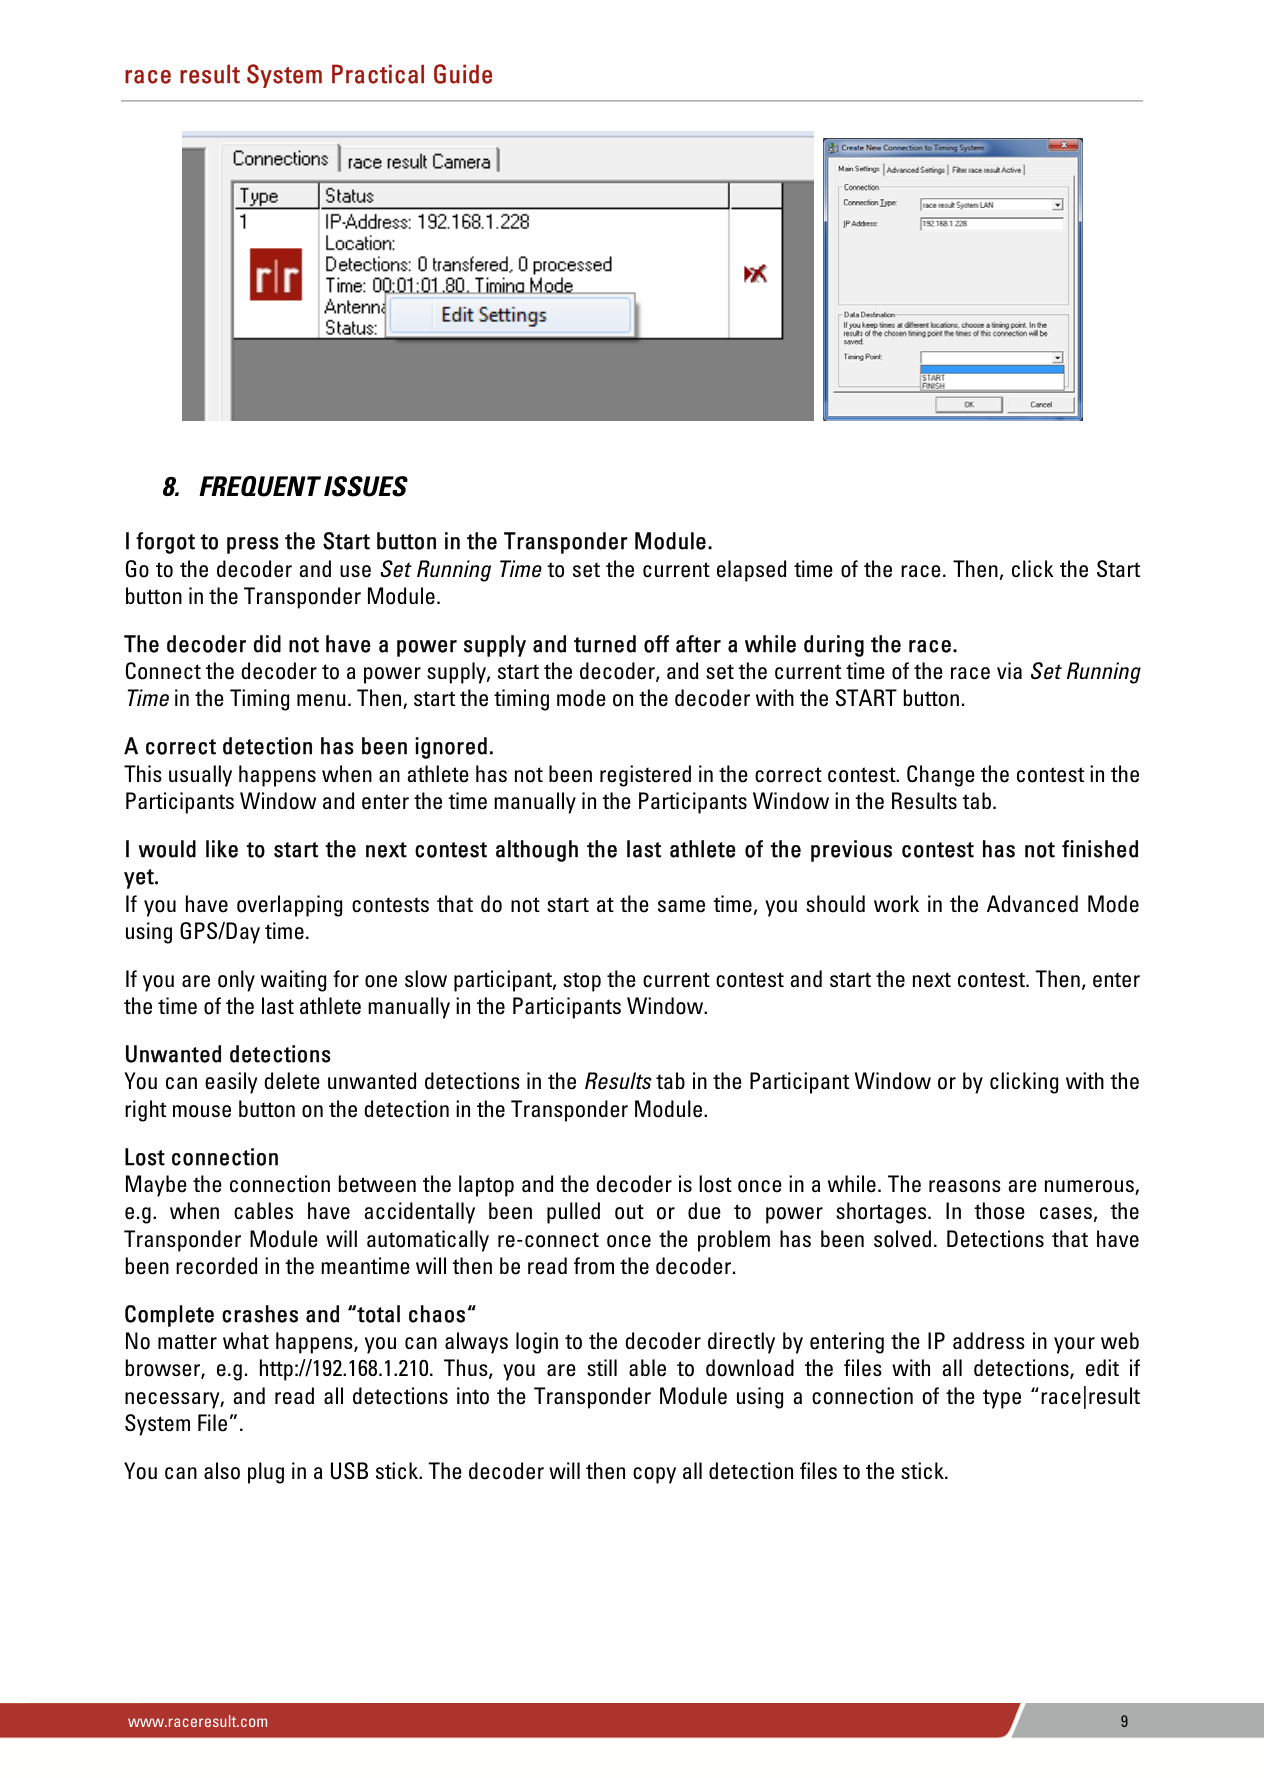
In this case, you should tell the system if the detections currently coming in are start times or finish times. Therefore, click with the right mouse button on the connection in the top right corner and choose Edit Settings. Then select the Timing Point START.
Start the race as usual and after the last athlete has started, switch the timing point to FINISH. Note: this last step is very important. If you forget to change the location to FINISH, then participants’ finish times will overwrite their start time.


8. FREQUENT ISSUES
I forgot to press the Start button in the Transponder Module. Go to the decoder and use Set Running Time to set the current elapsed time of the race. Then, click the Start button in the Transponder Module.
The decoder did not have a power supply and turned off after a while during the race. Connect the decoder to a power supply, start the decoder, and set the current time of the race via Set Running Time in the Timing menu. Then, start the timing mode on the decoder with the START button.
A correct detection has been ignored. This usually happens when an athlete has not been registered in the correct contest. Change the contest in the Participants Window and enter the time manually in the Participants Window in the Results tab.
I would like to start the next contest although the last athlete of the previous contest has not finished yet. If you have overlapping contests that do not start at the same time, you should work in the Advanced Mode using GPS/Day time.
If you are only waiting for one slow participant, stop the current contest and start the next contest. Then, enter the time of the last athlete manually in the Participants Window.
Unwanted detections You can easily delete unwanted detections in the Results tab in the Participant Window or by clicking with the right mouse button on the detection in the Transponder Module.
#### Lost connection
Maybe the connection between the laptop and the decoder is lost once in a while. The reasons are numerous, e.g. when cables have accidentally been pulled out or due to power shortages. In those cases, the Transponder Module will automatically re-connect once the problem has been solved. Detections that have been recorded in the meantime will then be read from the decoder.
#### Complete crashes and “total chaos“
No matter what happens, you can always login to the decoder directly by entering the IP address in your web browser, e.g. http://192.168.1.210. Thus, you are still able to download the files with all detections, edit if necessary, and read all detections into the Transponder Module using a connection of the type “race|result System File”.
You can also plug in a USB stick. The decoder will then copy all detection files to the stick.