
Ask AI
— answers from the official manualAnswers from the official manual.
Common questions
Common Questions
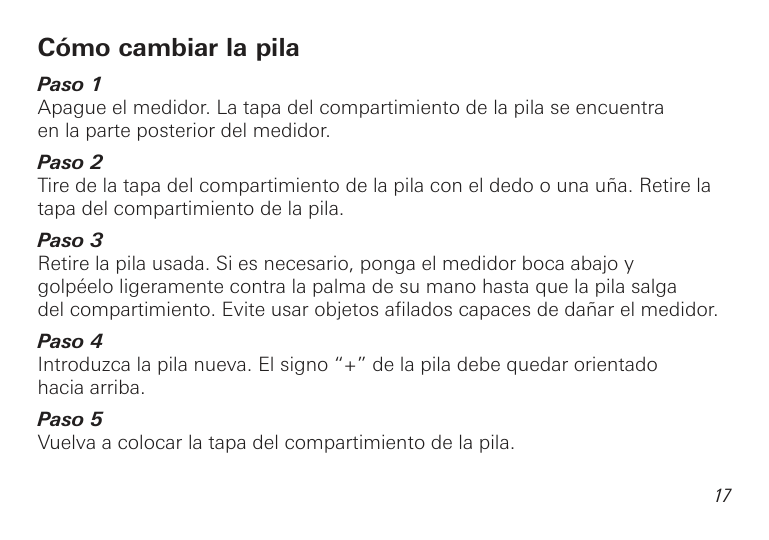
10 totalHow do I change the battery in my Relion Prime?
To change the battery, turn off the meter and pull up on the battery cover with your finger or fingernail to remove it. Take out the old battery and insert a new CR2032 battery with the '+' side facing upward. Replace the battery cover. If the process takes longer than 30 seconds, you may need to reset the time and date (pages 18-21).
How do I set up my Relion Prime meter for the first use?
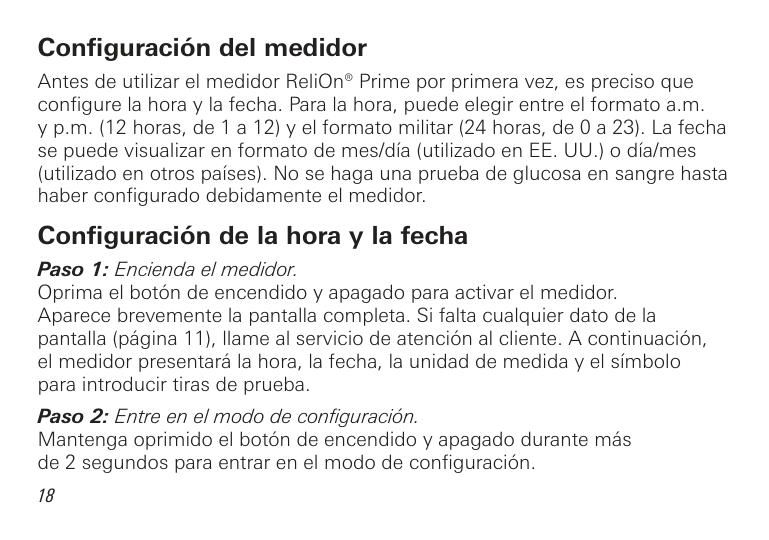
Before using your Relion Prime for the first time, you must set the time and date. Press the On/Off button to turn on the meter. Then press and hold the On/Off button for over two seconds to enter setup mode (page 18). Follow the steps to configure the time and date format as per your preference.
What is an error code E00 on my Relion Prime meter?
An E00 error code indicates that the battery has been replaced. Check if the time and date settings are correct (page 54). If they need adjustment, follow the instructions starting from page 18.
How do I clean my Relion Prime meter?
Clean the external surface of your ReliOn® Prime Blood Glucose Meter with a damp cloth only. Ensure no blood, control solution, or water gets inside the meter as it could cause damage (page 64).
How do I perform an alternate site test?
Choose a soft fleshy area on your palm away from visible veins and moles. Clean the chosen area with warm soapy water or alcohol wipes, ensuring it's completely dry before lancing the skin (pages 32-36).
How often should I use control solution?
It is recommended to use Control Solution when you open a new bottle of test strips, whenever suspecting that your meter or test strips may not be functioning properly, if results seem abnormally high or low, and each time the batteries are changed (pages 39-40).
Full Manual
140 pages
########### Blood Glucose Monitoring System

83-04758A
User Instruction
Manual
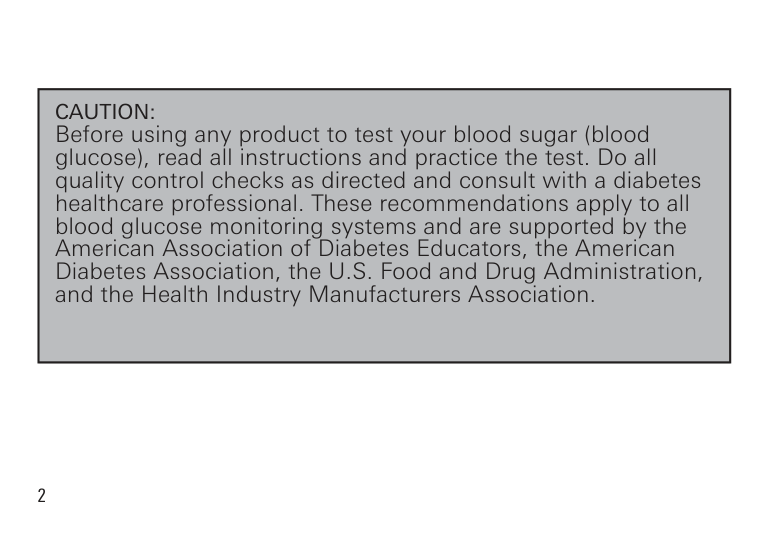
|CAUTION: Before using any product to test your blood sugar (blood glucose), read all instructions and practice the test. Do all quality control checks as directed and consult with a diabetes healthcare professional. These recommendations apply to all blood glucose monitoring systems and are supported by the American Association of Diabetes Educators, the American Diabetes Association, the U.S. Food and Drug Administration, and the Health Industry Manufacturers Association.|
|---|
|TABLE OF CONTENTS| |---|
Introduction . . . . . . . . . . . . . . . . . . . . . . . . . . . . . . . . . . . . . . . . . . . 6 Intended Use . . . . . . . . . . . . . . . . . . . . . . . . . . . . . . . . . . . . . . . 7 Important Information . . . . . . . . . . . . . . . . . . . . . . . . . . . . . . . . . 8
The ReliOn® Prime System . . . . . . . . . . . . . . . . . . . . . . . . . . . . . . . . 9 Understanding the ReliOn® Prime Blood Glucose Meter . . . . . . . . 10
Explanation of the Full Display Screen . . . . . . . . . . . . . . . . . . . 11 ReliOn® Prime Test Strips . . . . . . . . . . . . . . . . . . . . . . . . . . . . . . . . 12 Testing with ReliOn® Prime test strips . . . . . . . . . . . . . . . . . . . . . . . 13
Important Test Strip Information . . . . . . . . . . . . . . . . . . . . . . . . 14 Changing the Battery . . . . . . . . . . . . . . . . . . . . . . . . . . . . . . . . 15 Meter Set Up . . . . . . . . . . . . . . . . . . . . . . . . . . . . . . . . . . . . . . . 18 Setting the Time and Date . . . . . . . . . . . . . . . . . . . . . . . . . . . . 18
Blood Glucose Testing . . . . . . . . . . . . . . . . . . . . . . . . . . . . . . . . . . . 22 ReliOn® Lancing Device . . . . . . . . . . . . . . . . . . . . . . . . . . . . . . . 22 Obtaining a Drop of Blood . . . . . . . . . . . . . . . . . . . . . . . . . . . . 25
Performing a Blood Glucose Test . . . . . . . . . . . . . . . . . . . . . . . . . . 27
Alternate Site Testing (AST) . . . . . . . . . . . . . . . . . . . . . . . . . . . . . . . 31 Important Information About AST . . . . . . . . . . . . . . . . . . . . . . . 31 Preparing to Test Your Blood Glucose From an Alternate Site . . . . . . . 33 Performing a Blood Glucose Test From an Alternate Site . . . . . 34
Using Control Solution . . . . . . . . . . . . . . . . . . . . . . . . . . . . . . . . . . 39 Recommended Use of Control Solution . . . . . . . . . . . . . . . . . . 40 Performing a Control Solution Test . . . . . . . . . . . . . . . . . . . . . . 41 Comparing Control Solution Results . . . . . . . . . . . . . . . . . . . . . 45
Downloading Test Results to a Computer . . . . . . . . . . . . . . . . . . . . 46 Understanding Test Results . . . . . . . . . . . . . . . . . . . . . . . . . . . . . . . 47
Comparing Meter and Laboratory Results . . . . . . . . . . . . . . . 47 Expected Blood Glucose Readings . . . . . . . . . . . . . . . . . . . . . 50 High Blood Glucose Readings . . . . . . . . . . . . . . . . . . . . . . . . . 50 Low Blood Glucose Readings . . . . . . . . . . . . . . . . . . . . . . . . . 51 Diabetes Findings . . . . . . . . . . . . . . . . . . . . . . . . . . . . . . . . . . 51
Meter Memory . . . . . . . . . . . . . . . . . . . . . . . . . . . . . . . . . . . . . . . . 54
Marking Results in the Memory . . . . . . . . . . . . . . . . . . . . . . . . 54 Marking Control Solution Tests . . . . . . . . . . . . . . . . . . . . . . . . . 54 Marking Other Results. . . . . . . . . . . . . . . . . . . . . . . . . . . . . . . . 55 Recalling Results . . . . . . . . . . . . . . . . . . . . . . . . . . . . . . . . . . . . 55
Display Screen Images . . . . . . . . . . . . . . . . . . . . . . . . . . . . . . . . . . 59 Caring For Your ReliOn® Prime Blood Glucose Meter . . . . . . . . . . . 64
Cleaning the Meter . . . . . . . . . . . . . . . . . . . . . . . . . . . . . . . . . . 64 Storage. . . . . . . . . . . . . . . . . . . . . . . . . . . . . . . . . . . . . . . . . . . . 64
Specifications . . . . . . . . . . . . . . . . . . . . . . . . . . . . . . . . . . . . . . . . . 66 Warnings, Precautions, and Limitations . . . . . . . . . . . . . . . . . . . . . 67 Warranty. . . . . . . . . . . . . . . . . . . . . . . . . . . . . . . . . . . . . . . . . . . . . . 69
|INTRODUCTION| |---|
Thank you for choosing the ReliOn® Prime Blood Glucose Monitoring System. Frequent blood glucose testing is important. It tells you how your diabetes is affected by factors such as medication, diet, exercise, and stress management. Blood glucose test results can also tell you if your diabetes is changing in ways that affect your treatment plan. Always consult your diabetes healthcare professional before making any changes. All of the information needed to use the ReliOn® Prime System is included in this manual. Please read it thoroughly before using the system. If you have any questions, call Customer Service at 855.776.0662. Contact your healthcare professional with questions if you are unable to reach Customer Service.
6
Intended Use
The ReliOn® Prime Blood Glucose Monitoring System is intended for the quantitative measurement of glucose in fresh capillary whole blood samples drawn from the fingertips or palm. Testing is done outside the body (In Vitro Diagnostic Use). It is indicated for use at home (over the counter [OTC]) by persons with diabetes, or in clinical settings by healthcare professionals, as an aid to monitor the effectiveness of diabetes control. It is not intended for the diagnosis of or screening for Diabetes Mellitus, and is not intended for use on neonates.
Important Information
|THE ReliOn® Prime SYSTEM| |---|

|UNDERSTANDING THE ReliOn® Prime BLOOD GLUCOSE METER| |---|

################ Front
################ Back
Data Connection
Port
Back Button
Display Screen
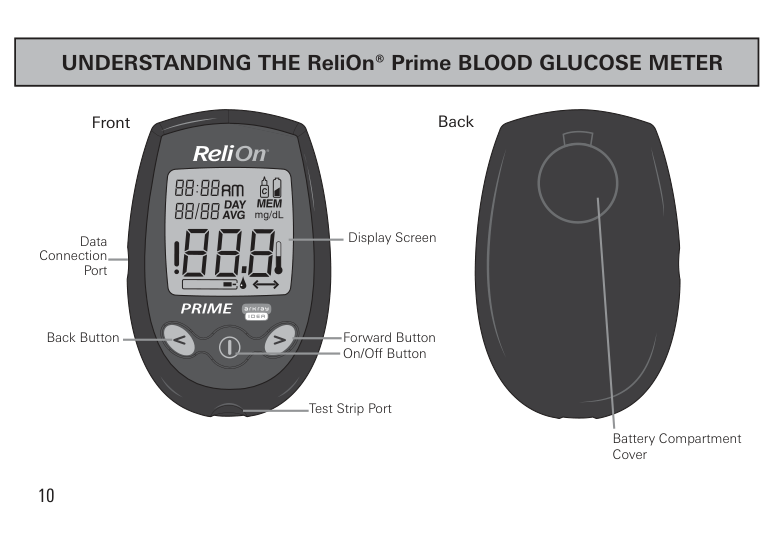
Forward Button
On/Off Button
Test Strip Port
Battery Compartment Cover
Explanation of the Full Display Screen
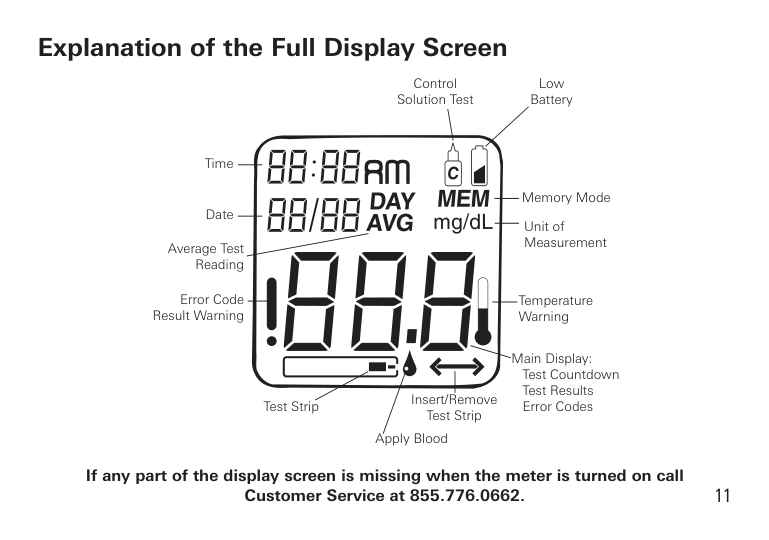
Control Solution Test
Low Battery
Time
Memory Mode
Date
Unit of Measurement
Average Test Reading
Error Code Result Warning
Temperature Warning
Main Display: Test Countdown Test Results Error Codes
Insert/Remove Test Strip
Test Strip
Apply Blood
############### If any part of the display screen is missing when the meter is turned on call Customer Service at 855.776.0662.
11
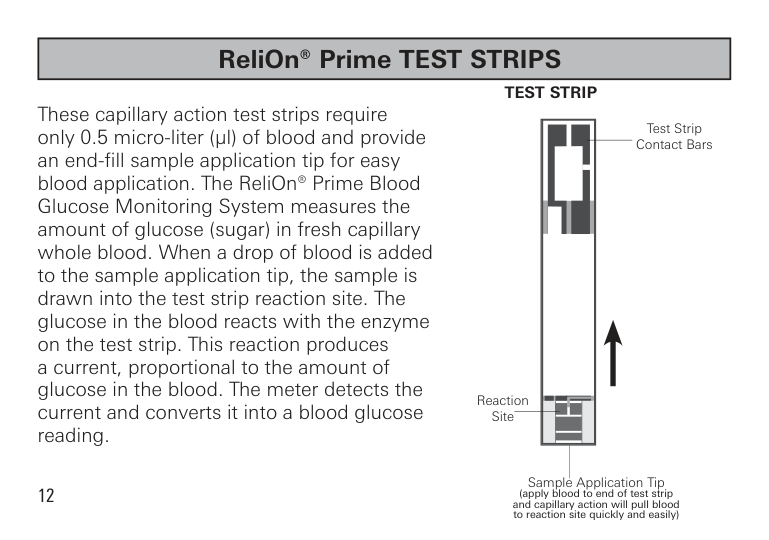
|ReliOn® Prime TEST STRIPS| |---|
############### TEST STRIP
These capillary action test strips require only 0.5 micro-liter (µl) of blood and provide an end-fill sample application tip for easy blood application. The ReliOn® Prime Blood Glucose Monitoring System measures the amount of glucose (sugar) in fresh capillary whole blood. When a drop of blood is added to the sample application tip, the sample is drawn into the test strip reaction site. The glucose in the blood reacts with the enzyme on the test strip. This reaction produces a current, proportional to the amount of glucose in the blood. The meter detects the current and converts it into a blood glucose reading.
| | | | |---|---|---| | | | | | | | | | | | | | | | |

Test Strip Contact Bars
Reaction Site
Sample Application Tip (apply blood to end of test strip and capillary action will pull blood to reaction site quickly and easily)
12
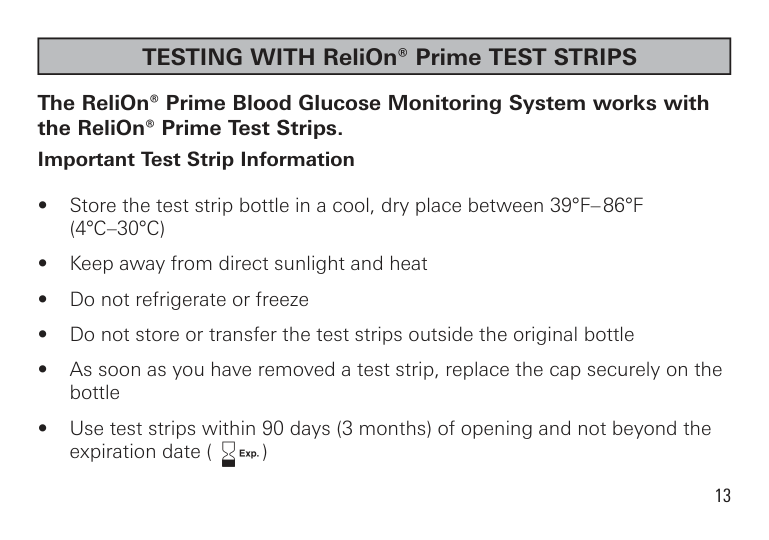
|TESTING WITH ReliOn® Prime TEST STRIPS|
|---|
The ReliOn® Prime Blood Glucose Monitoring System works with the ReliOn® Prime Test Strips.
####### Important Test Strip Information
| | |---|

13

Important Test Strip Information
Changing the Battery The ReliOn® Prime Blood Glucose Meter has a CR2032 battery installed.
|Note: Changing the battery should only take a few seconds. If the battery is changed within 30 seconds, the meter memory is not affected. You will not lose any past test results and the settings are not affected.
However, if it takes longer than 30 seconds to change the battery, or if the battery is dead before changing it, the time and date settings may need to be reset.
The first time the meter is turned on after changing the battery, you may see a display screen message (E00). This means you should check that the time and date are correct. (See pages 18-21 for detailed instructions on changing the time and date).| |---|
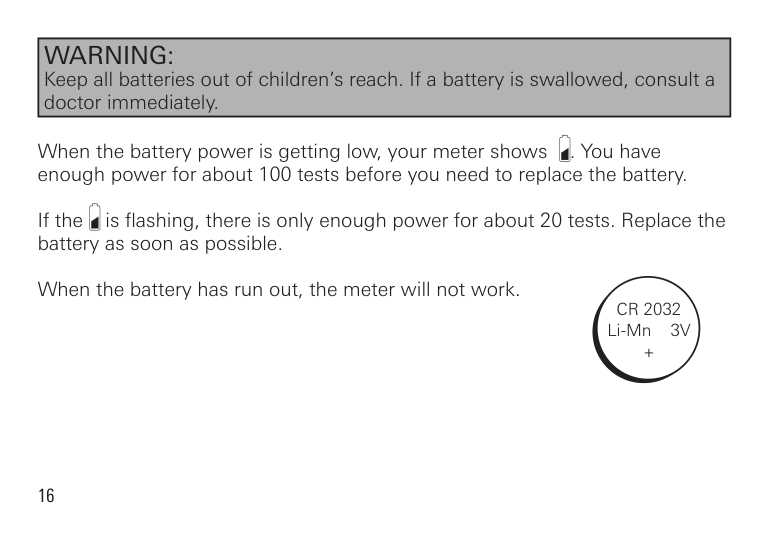
|WARNING: Keep all batteries out of children’s reach. If a battery is swallowed, consult a doctor immediately.| |---|
When the battery power is getting low, your meter shows . You have enough power for about 100 tests before you need to replace the battery.
If the is flashing, there is only enough power for about 20 tests. Replace the battery as soon as possible.
When the battery has run out, the meter will not work.
CR 2032 Li-Mn 3V +
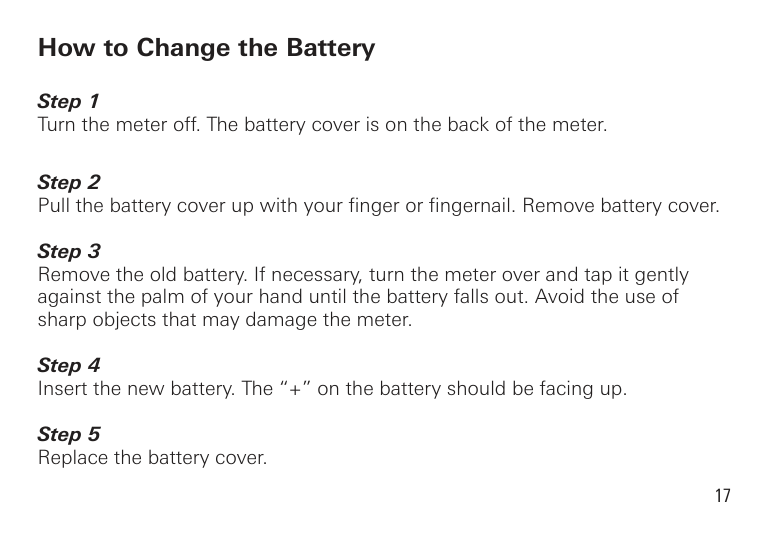
How to Change the Battery
Meter Set Up
Before using the ReliOn® Prime Meter for the first time, you must set the time and date. You can choose between the 12-hour format (1-12 o’clock with am or pm) and the Military 24-hour format (0-23). The date format can either be displayed as month/day (U.S.A. format) or day/month (International format). Do not perform a blood glucose test until you have set the meter correctly.
Setting the Time and Date
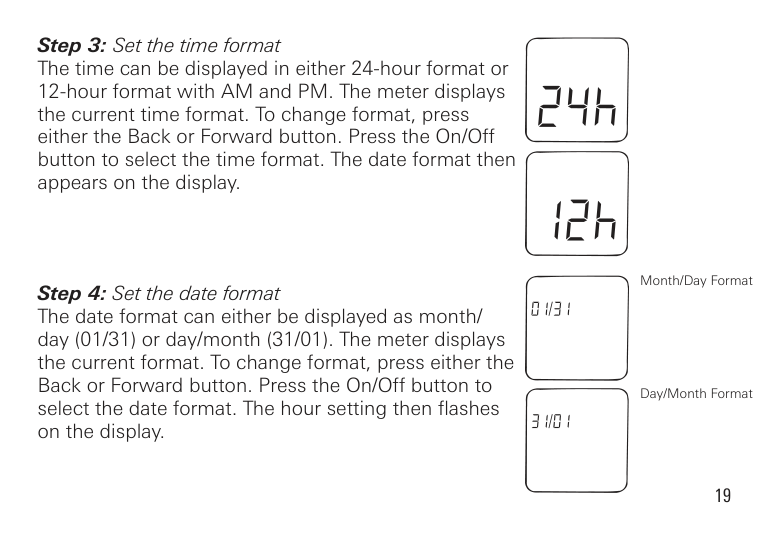
Month/Day Format
Day/Month Format
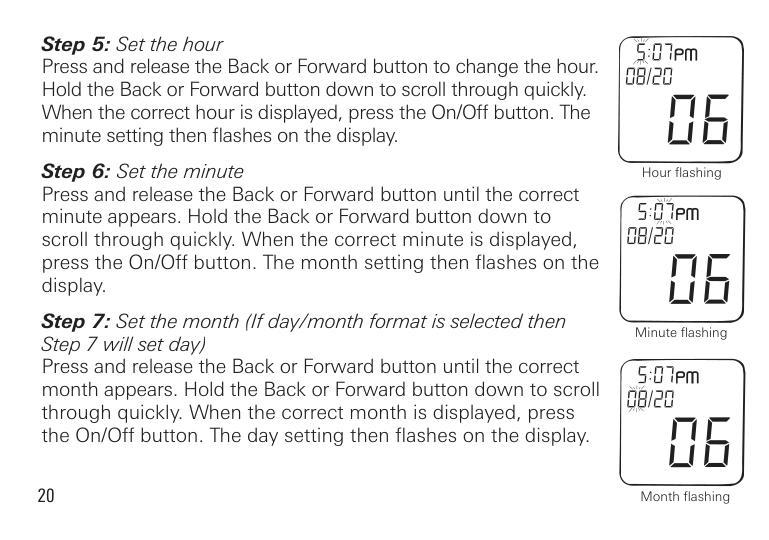
Hour flashing
Minute flashing
20
Month flashing
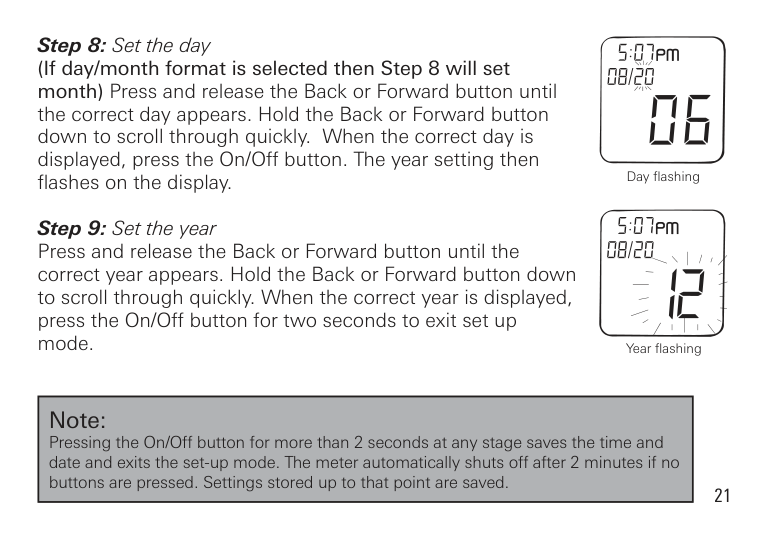
Day flashing
Year flashing
|Note: Pressing the On/Off button for more than 2 seconds at any stage saves the time and date and exits the set-up mode. The meter automatically shuts off after 2 minutes if no buttons are pressed. Settings stored up to that point are saved.| |---|
|BLOOD GLUCOSE TESTING| |---|

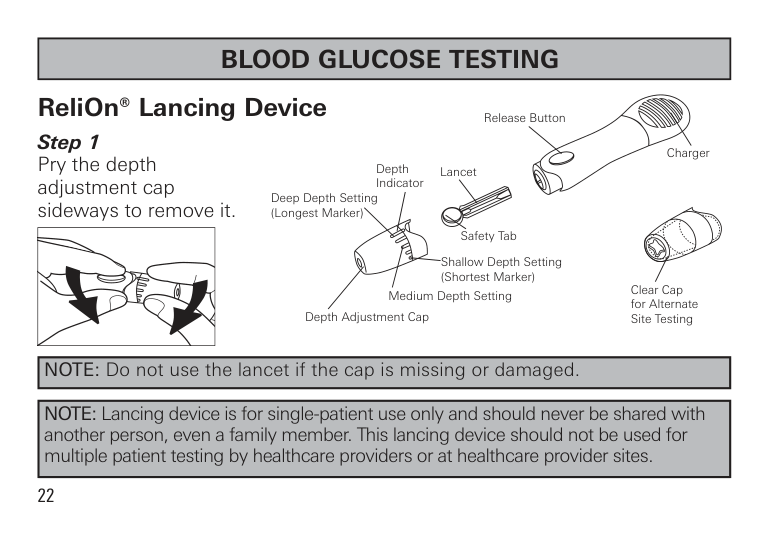
ReliOn® Lancing Device
Release Button
Charger Lancet

Depth Indicator
Deep Depth Setting (Longest Marker)
Safety Tab
Shallow Depth Setting (Shortest Marker)
Clear Cap for Alternate Site Testing
Medium Depth Setting Depth Adjustment Cap
|NOTE: Do not use the lancet if the cap is missing or damaged.| |---|
|NOTE: Lancing device is for single-patient use only and should never be shared with another person, even a family member. This lancing device should not be used for multiple patient testing by healthcare providers or at healthcare provider sites.| |---|
| | |---|
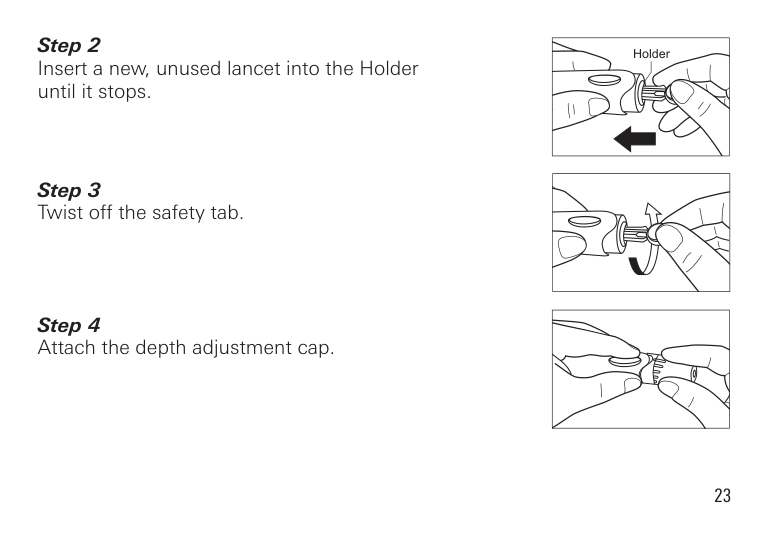
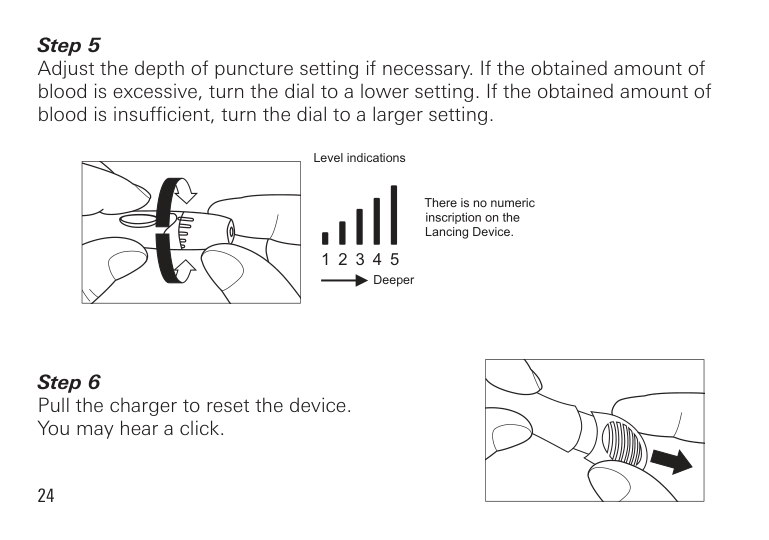
Adjust the depth of puncture setting if necessary. If the obtained amount of blood is excessive, turn the dial to a lower setting. If the obtained amount of blood is insufficient, turn the dial to a larger setting.
Level indications
Lancing Device.
1 2 3 4 5
Deeper
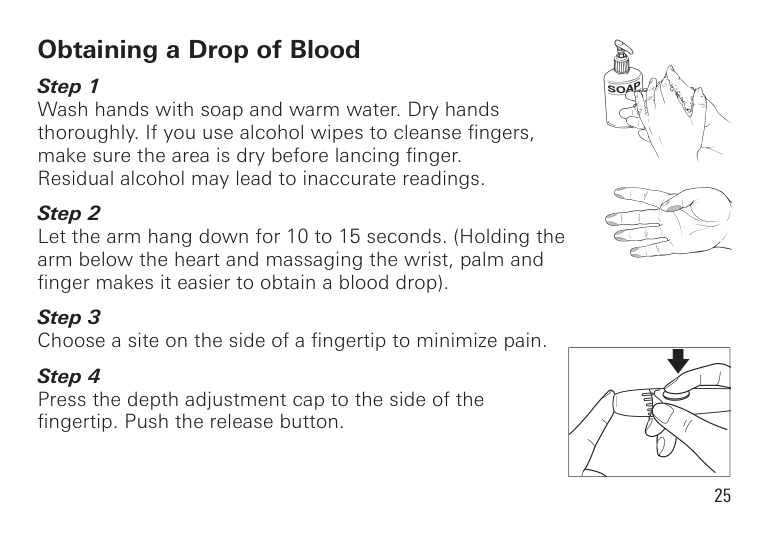
Obtaining a Drop of Blood
| | |---|
Set aside the Lancing Device and wait a few seconds for a blood drop to form. Keeping the hand warm, lowering the hand to waist level and gently massaging your wrist, palm or the base of the finger helps the flow of blood. Use a different site each time you test to help prevent soreness and calluses.
|PERFORMING A BLOOD GLUCOSE TEST| |---|
|Note: For Instructions on Alternate Site Testing, refer to pages 31-38.| |---|
Test Strip Port
Contact Bars
Reaction Site
Sample Application Tip
When the test strip is inserted, the meter turns on automatically. If any part of the display screen is missing (see page 11), call Customer Service.
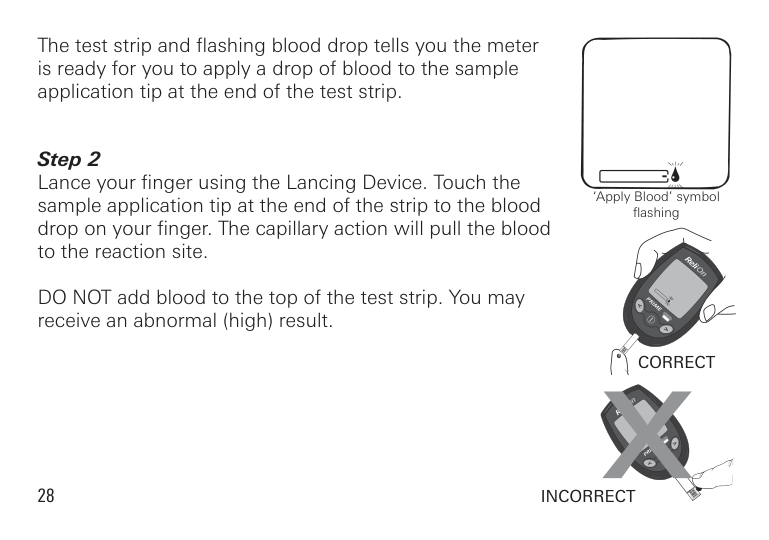
The test strip and flashing blood drop tells you the meter is ready for you to apply a drop of blood to the sample application tip at the end of the test strip.
DO NOT add blood to the top of the test strip. You may receive an abnormal (high) result.
‘Apply Blood’ symbol flashing
CORRECT
28
INCORRECT
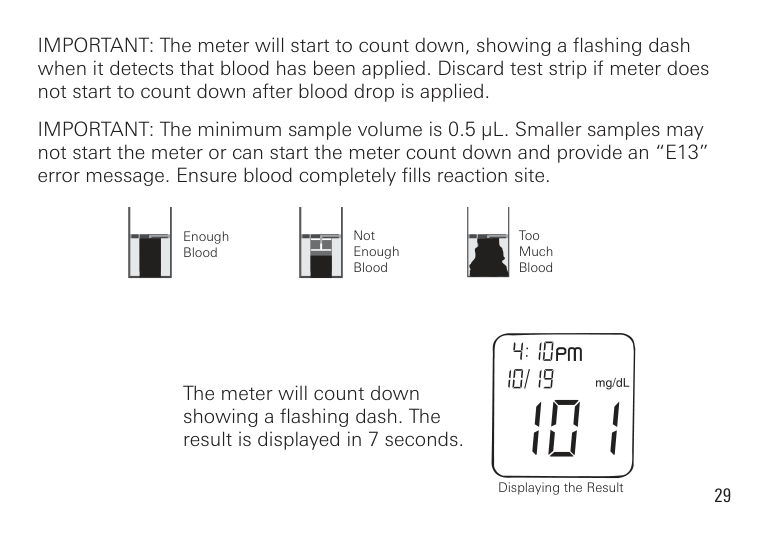
IMPORTANT: The meter will start to count down, showing a flashing dash when it detects that blood has been applied. Discard test strip if meter does not start to count down after blood drop is applied.
IMPORTANT: The minimum sample volume is 0.5 µL. Smaller samples may not start the meter or can start the meter count down and provide an “E13” error message. Ensure blood completely fills reaction site.
Not Enough Blood
Too Much Blood
Enough Blood
The meter will count down showing a flashing dash. The result is displayed in 7 seconds.
Displaying the Result
|ALTERNATE SITE TESTING (AST)| |---|
Important Information About AST
Sites other than your fingertip may have fewer nerve endings so obtaining a blood sample from these sites may be less painful. The technique for alternate site testing is different from fingertip testing. Blood glucose results from sites other than your fingertip could be significantly different due to blood glucose levels changing rapidly after a meal, insulin, or exercise.
Consult with your diabetes healthcare professional prior to testing from a site other than your fingertips.
Results obtained from sites other than the fingertip may differ significantly as is the case with all blood glucose monitoring systems. Rapidly changing results are likely to occur after eating. Insulin dosing and physical activity are shown in the fingertip more quickly than in alternate sites.
On average, blood taken from the palm may give results as much as 5% higher than blood taken from the fingertip.
Consider Alternate Site Testing When:
####### Use Fingertip When Testing:
Ask your diabetes healthcare professional about recommended testing procedures before operating machinery or driving a car, as fingertip testing is usually the preferred method of testing under these circumstances.
If bruising occurs, you may choose to lance a fingertip instead.
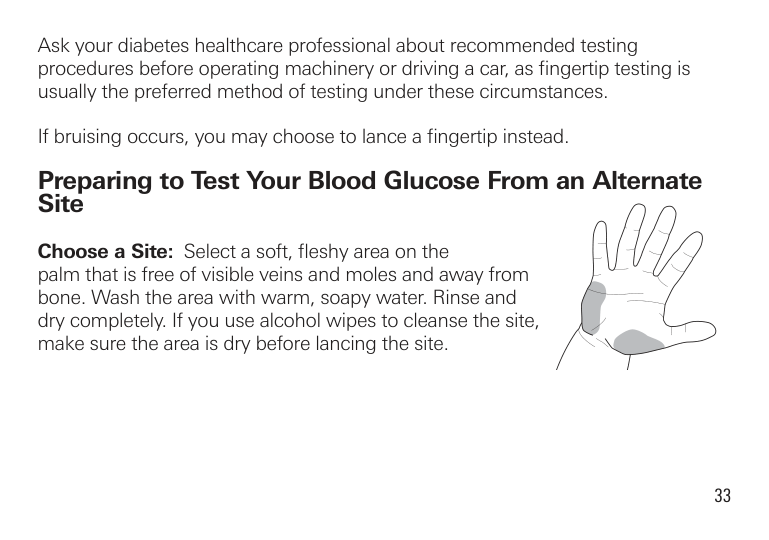
Preparing to Test Your Blood Glucose From an Alternate Site
Choose a Site: Select a soft, fleshy area on the palm that is free of visible veins and moles and away from bone. Wash the area with warm, soapy water. Rinse and dry completely. If you use alcohol wipes to cleanse the site, make sure the area is dry before lancing the site.
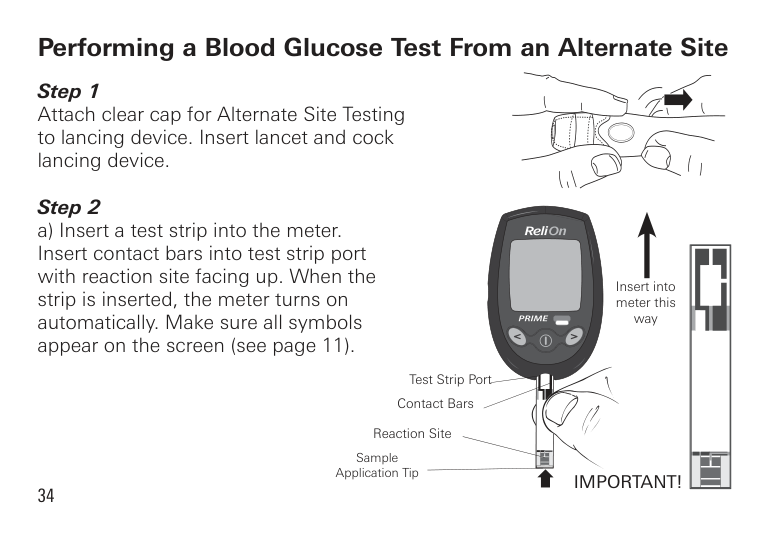
Performing a Blood Glucose Test From an Alternate Site Step 1 Attach clear cap for Alternate Site Testing to lancing device. Insert lancet and cock lancing device.
####### Step 2
Insert into meter this way
Test Strip Port
Contact Bars

Reaction Site
Sample Application Tip
IMPORTANT!
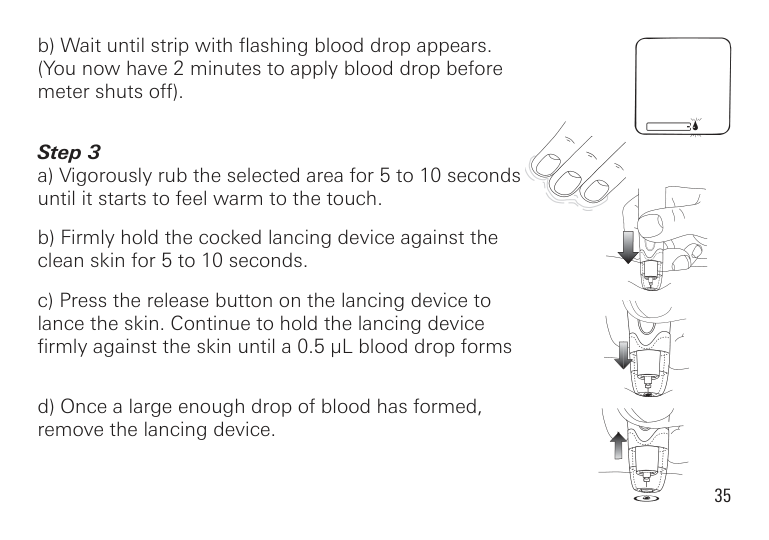
####### Step 3
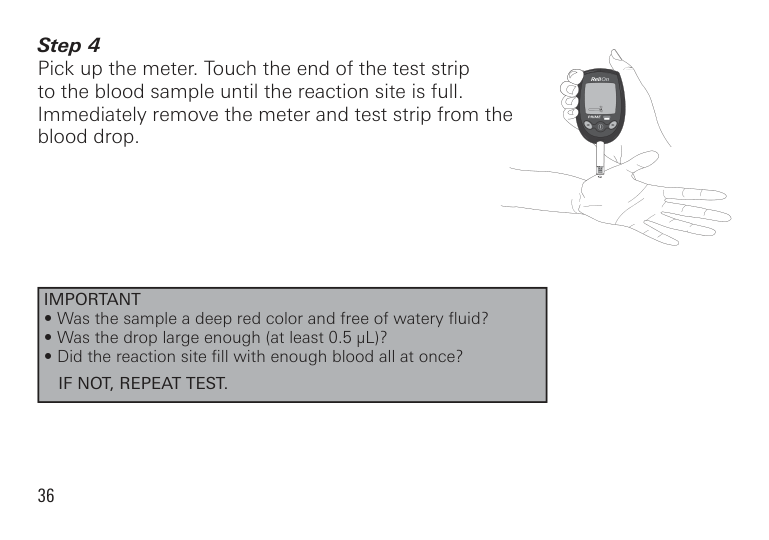
Pick up the meter. Touch the end of the test strip to the blood sample until the reaction site is full. Immediately remove the meter and test strip from the blood drop.
|IMPORTANT
• Was the sample a deep red color and free of watery fluid?
• Was the drop large enough (at least 0.5 µL)?
• Did the reaction site fill with enough blood all at once? IF NOT, REPEAT TEST.
| |---|
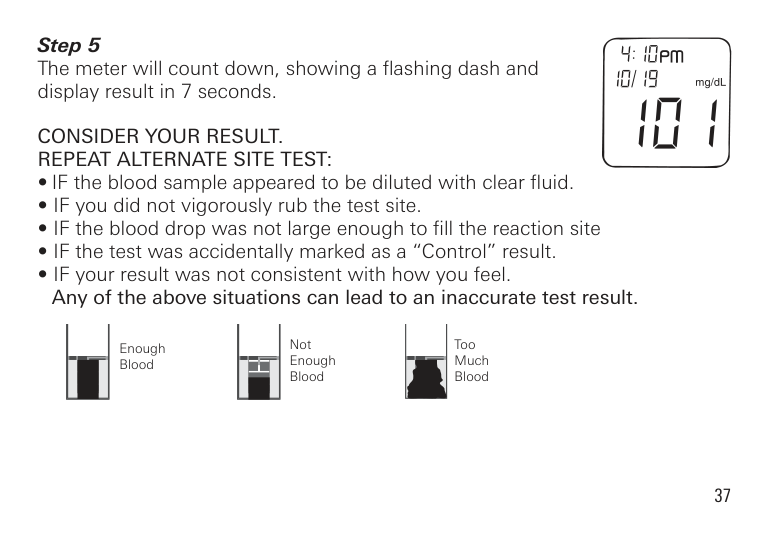
The meter will count down, showing a flashing dash and display result in 7 seconds.
CONSIDER YOUR RESULT. REPEAT ALTERNATE SITE TEST:
Not Enough Blood
Too Much Blood
Enough Blood
If the repeated alternate site result is still not consistent with how you feel, confirm your blood glucose level with fingertip testing.
|USING CONTROL SOLUTION| |---|
Use Control Solution to check that the meter and test strips are working correctly. It is important that you carry out this simple check regularly.
Control Solution contains a known amount of glucose that reacts with the ReliOn® Prime Test Strip. Control Solutions are available in two levels - Normal and High.
Compare the control solution test results with the range printed on the test strip bottle label.
To order control solution, call ReliOn® at 855.776.0662.
It is recommended to use Control Solution:
Performing a Control Solution Test
| | |---|
Before performing a control solution test, always check the expiration date ( ) of the control solution. Do not use control solution if it is past the expiration date or if the solution has not been stored correctly. When you open a new bottle of control solution, always write the date of opening on the control solution label. As soon as you have used the control solution, put the cap back on the bottle. Always use the control solution within 90 days (3 months) of first opening.


| | | |---|---|

The full screen appears briefly. If any part of the display screen is missing (see page 11), call Customer Service. The screen then displays the test strip symbol and flashing blood drop.
Test Strip Port
Contact Bars
Reaction Site
Sample Application Tip

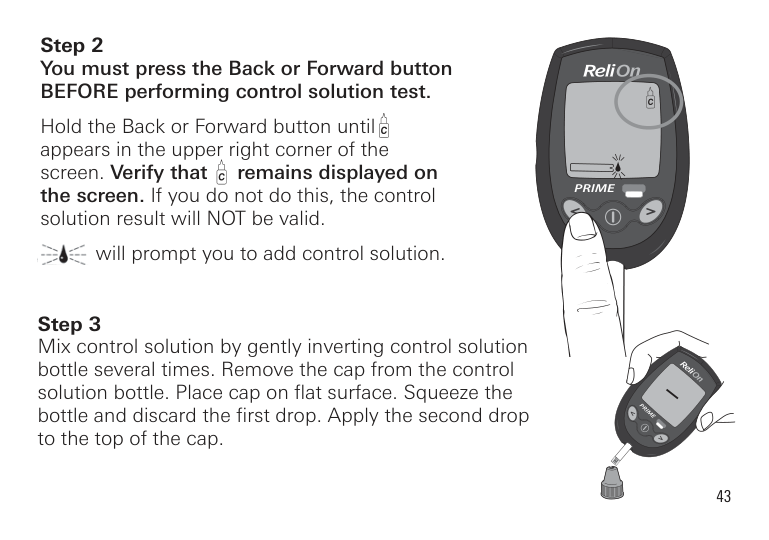
######## Step 2You must press the Back or Forward buttonBEFORE performing control solution test.
Hold the Back or Forward button until appears in the upper right corner of the screen. Verify that remains displayed on the screen. If you do not do this, the control solution result will NOT be valid.
will prompt you to add control solution.
########## Step 3Mix control solution by gently inverting control solutionbottle several times. Remove the cap from the controlsolution bottle. Place cap on flat surface. Squeeze thebottle and discard the first drop. Apply the second dropto the top of the cap.
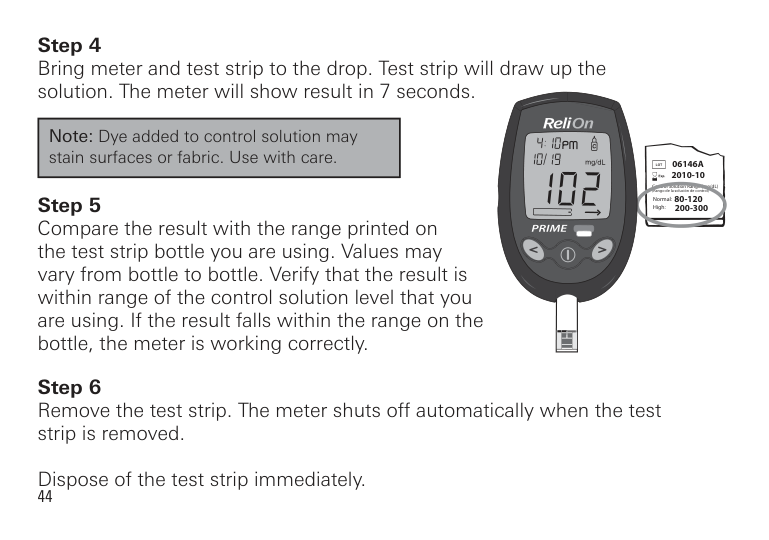
|Note: Dye added to control solution may stain surfaces or fabric. Use with care.| |---|
06146A 2010-10
Control Solution Range (mg/dL) (Rango de la solución de control)
80-120 200-300
Normal: High:
Comparing Control Solution Results
If the result is outside the range printed on the test strip bottle, repeat the test. One or more of the following may have caused an out-of-range result:
Repeat the test, carefully following instructions, using control solution mode with new control solution or a new test strip, as appropriate. Compare the result with the range printed on the test strip bottle you are using.
|Note:
If your control solution result continues to fall outside the required range, the system may not be working correctly. DO NOT USE the system to test your blood. If you are unable to resolve the problem, call Customer Service at 855.776.0662.| |---|
|DOWNLOADING TEST RESULTS TO A COMPUTER| |---|
We offer diabetes management software to help you download your test results to a computer. For more information on Diabetes Management Software, call Customer Service at 855.776.0662.
|UNDERSTANDING TEST RESULTS| |---|
|NOTE: The ReliOn® Prime Meter is designed to give results at temperatures between 41°F - 113°F (5°C - 45°C) and relative humidity (non-condensing) of 20–80%.| |---|
Comparing Meter and Laboratory Results
Your ReliOn® Prime Blood Glucose Meter is referenced to fresh plasma blood measurement. This was performed in a clinical laboratory with glucose standard calibration to the NIST (National Institute of Science and Technology, Gaithersburg, MD, USA). The results you get from your meter may differ from the tightly controlled clinical laboratory result. This is due to normal variation. To make an accurate comparison between the meter and laboratory results, follow the guidelines below.
Before You Compare Perform a control solution test to make sure your meter and test strips are working correctly. Wait at least 2 hours after a meal or drink (other than water) before doing comparison blood tests. Fasting is essential if venous blood is required for the reference analyzer.
When at the Laboratory The capillary samples for both tests must be taken and tested within 15 minutes of each other. The sample must be collected with anticoagulant appropriate to the laboratory analyzer. The recommended technique should be followed. Analysis should be performed following the manufacturer’s guidelines.
ALWAYS wash hands in warm, soapy water. Rinse and dry them thoroughly before testing.
ALWAYS use fresh capillary whole blood on meter tests.
You may still experience a difference from the laboratory result because blood glucose levels can change over short periods. This can be for a variety of reasons, such as food, exercise, medication, hematocrit, stress, or loss of body fluids.
Data analysis should be performed using a clinically acceptable method.
Circulating blood glucose fluctuates naturally over time. Test results can vary over time and can be affected by several factors. Some of these include, but are not limited to, the following: (1) time of day the test was performed; (2) food eaten; (3) activities performed; (4) insulin and other medications taken. If your result does not seem correct after testing your blood, repeat the test. If abnormally high or low readings persist, contact your healthcare professional.
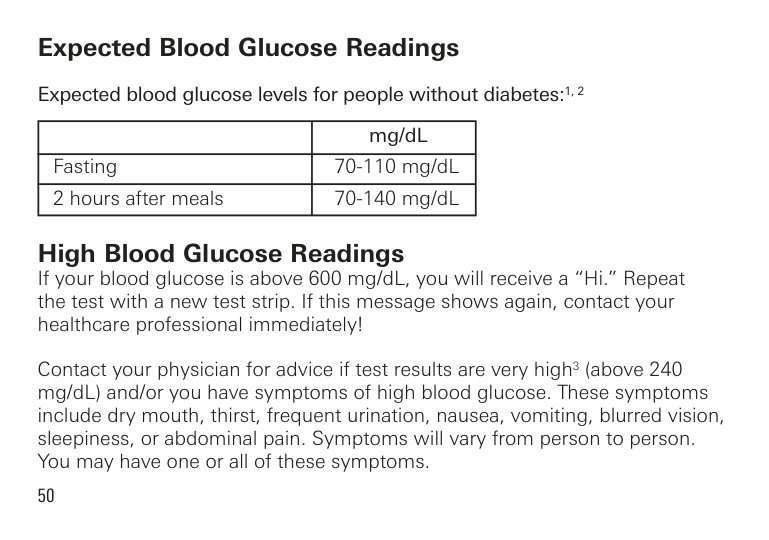
Expected Blood Glucose Readings Expected blood glucose levels for people without diabetes:1, 2
| |mg/dL| |---|---| |Fasting|70-110 mg/dL|
|2 hours after meals|70-140 mg/dL|
High Blood Glucose Readings If your blood glucose is above 600 mg/dL, you will receive a “Hi.” Repeat the test with a new test strip. If this message shows again, contact your healthcare professional immediately!
Contact your physician for advice if test results are very high3 (above 240 mg/dL) and/or you have symptoms of high blood glucose. These symptoms include dry mouth, thirst, frequent urination, nausea, vomiting, blurred vision, sleepiness, or abdominal pain. Symptoms will vary from person to person. You may have one or all of these symptoms.
Low Blood Glucose Readings If your blood glucose is below 20 mg/dL, you will receive a “Lo.” Repeat the test with a new test strip. If this message shows again, contact your healthcare professional immediately!
Contact your physician for advice if test results are very low4(below 70 mg/ dL) and/or you have symptoms of low blood glucose. Symptoms of low blood glucose include sweating, shakiness, trembling, blurred vision, hunger, headache, confusion, rapid heartbeat, or tingling or numbness around the mouth or fingertips. Symptoms will vary from person to person. You may have one or all of these symptoms.
Diabetes Findings In 1993, the National Institute of Health concluded an extensive long-term study of people with Type 1 diabetes. This study, called the Diabetes Control and Complications Trial (DCCT), found that by keeping your blood glucose close to the levels of people without diabetes you can reduce the risk of complications involving the eyes, kidneys, and nervous system by approximately 60%5.
What This Means for You Frequent blood glucose testing is the best means you have for keeping track of how well you are doing with the factors that affect your diabetes-medication, diet, exercise, and stress management. Blood glucose test results can also tell you whether your diabetes is changing in ways that might require an adjustment to your treatment plan. Always consult your healthcare professional before making any changes in managing your diabetes.
Frequency of Testing How often you need to test your blood glucose will vary according to your age, the type of diabetes you have, the medications you are taking, and your physical and emotional health. Your healthcare professional will guide you. After deciding when and how often you should test, it is important that you make testing part of your routine.
Recommendations for better diabetes control
################# References
|METER MEMORY| |---|
Marking Results in the Memory You can mark results in the meter memory in two ways.
Marking Control Solution Tests You must mark results with the control bottle symbol . Insert test strip into the meter. Hold the Back or Forward button until appears in the upper right corner of the screen. Do this BEFORE performing a control solution test. If you do not mark control solution tests before applying control solution to the test strip, the results may not be accurate and control solution test results will be included in your test result averages.
The meter does not use results marked when it calculates the 14- and 30-day average. This ensures that your 14- and 30-day average includes only results from testing your own blood.
To mark a result , press the Back or Forward button BEFORE testing with control solution. (See page 41 for detailed instructions on testing with control solution).


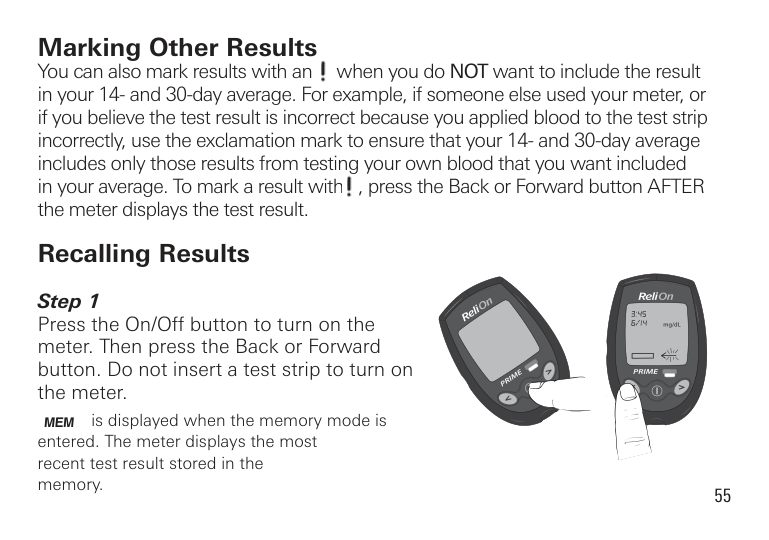
Marking Other Results You can also mark results with an when you do NOT want to include the result in your 14- and 30-day average. For example, if someone else used your meter, or if you believe the test result is incorrect because you applied blood to the test strip incorrectly, use the exclamation mark to ensure that your 14- and 30-day average includes only those results from testing your own blood that you want included in your average. To mark a result with , press the Back or Forward button AFTER the meter displays the test result.
Recalling Results
mg/dL
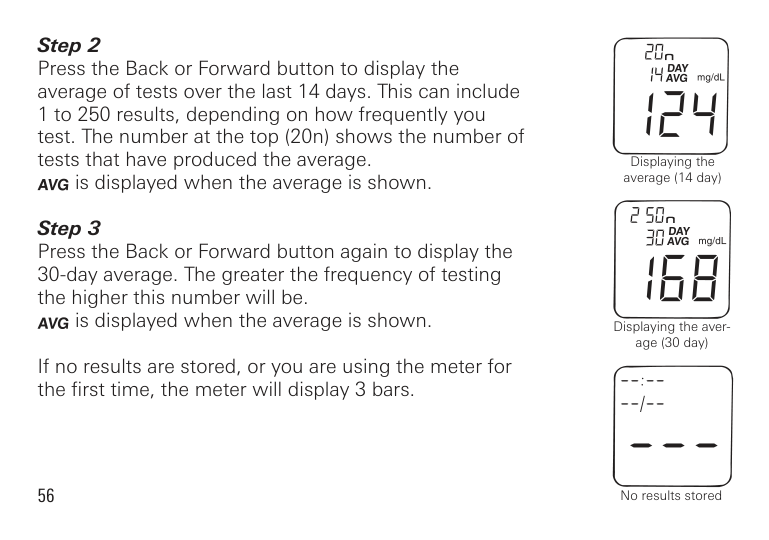
is displayed when the memory mode is entered. The meter displays the most recent test result stored in the memory.

is displayed when the average is shown.
is displayed when the average is shown.
If no results are stored, or you are using the meter for the first time, the meter will display 3 bars.
56
Displaying the average (14 day)
Displaying the average (30 day)
No results stored
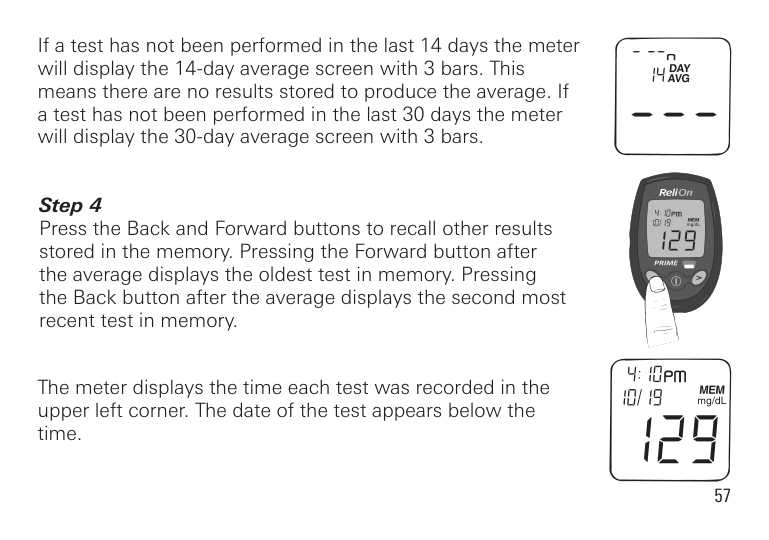
If a test has not been performed in the last 14 days the meter will display the 14-day average screen with 3 bars. This means there are no results stored to produce the average. If a test has not been performed in the last 30 days the meter will display the 30-day average screen with 3 bars.
The meter displays the time each test was recorded in the upper left corner. The date of the test appears below the time.

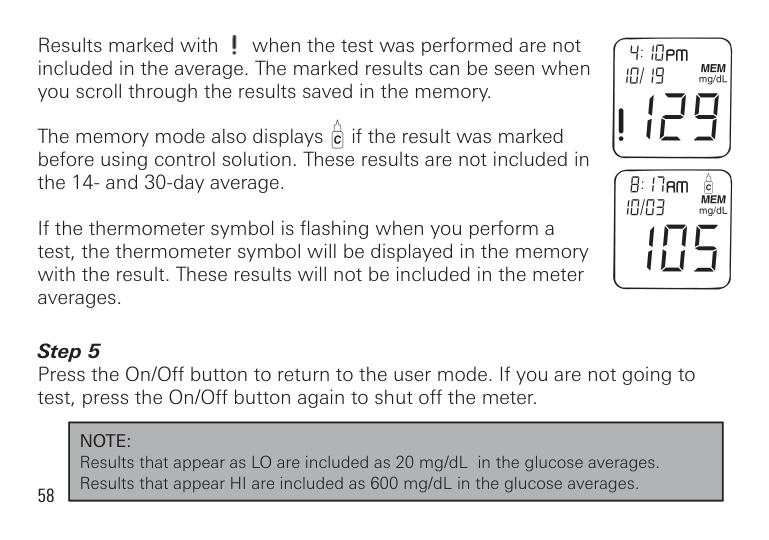
Results marked with when the test was performed are not included in the average. The marked results can be seen when you scroll through the results saved in the memory.
The memory mode also displays if the result was marked before using control solution. These results are not included in the 14- and 30-day average.
If the thermometer symbol is flashing when you perform a test, the thermometer symbol will be displayed in the memory with the result. These results will not be included in the meter averages.
|NOTE: Results that appear as LO are included as 20 mg/dL in the glucose averages. Results that appear HI are included as 600 mg/dL in the glucose averages.| |---|

|DISPLAY SCREEN MESSAGES| |---|
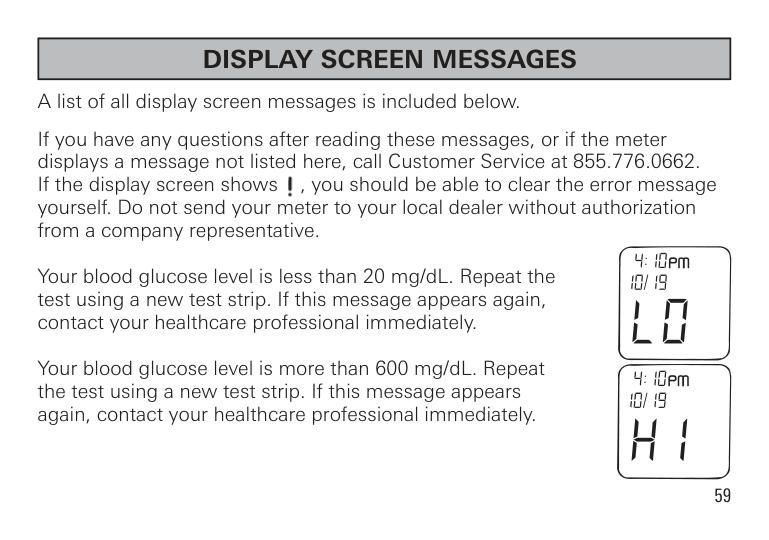
A list of all display screen messages is included below. If you have any questions after reading these messages, or if the meter displays a message not listed here, call Customer Service at 855.776.0662. If the display screen shows , you should be able to clear the error message yourself. Do not send your meter to your local dealer without authorization from a company representative. Your blood glucose level is less than 20 mg/dL. Repeat the test using a new test strip. If this message appears again, contact your healthcare professional immediately. Your blood glucose level is more than 600 mg/dL. Repeat the test using a new test strip. If this message appears again, contact your healthcare professional immediately.
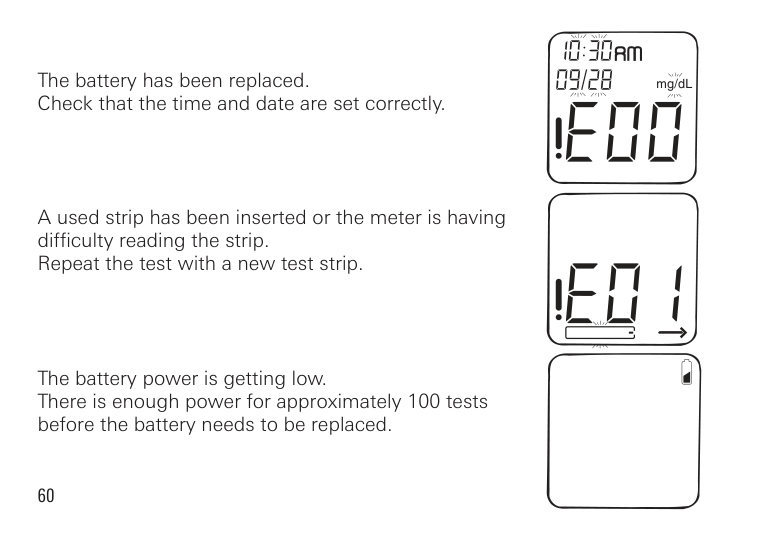
The battery has been replaced. Check that the time and date are set correctly.
A used strip has been inserted or the meter is having difficulty reading the strip. Repeat the test with a new test strip.
The battery power is getting low. There is enough power for approximately 100 tests before the battery needs to be replaced.
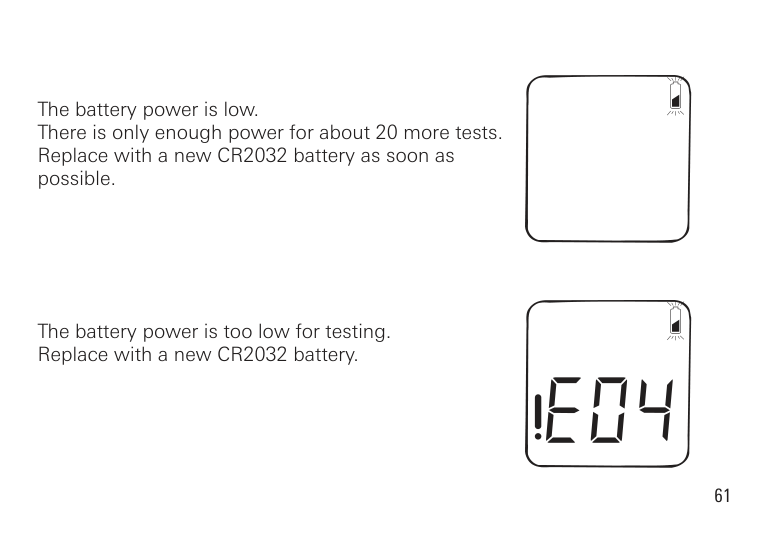
The battery power is low. There is only enough power for about 20 more tests. Replace with a new CR2032 battery as soon as possible.
The battery power is too low for testing. Replace with a new CR2032 battery.
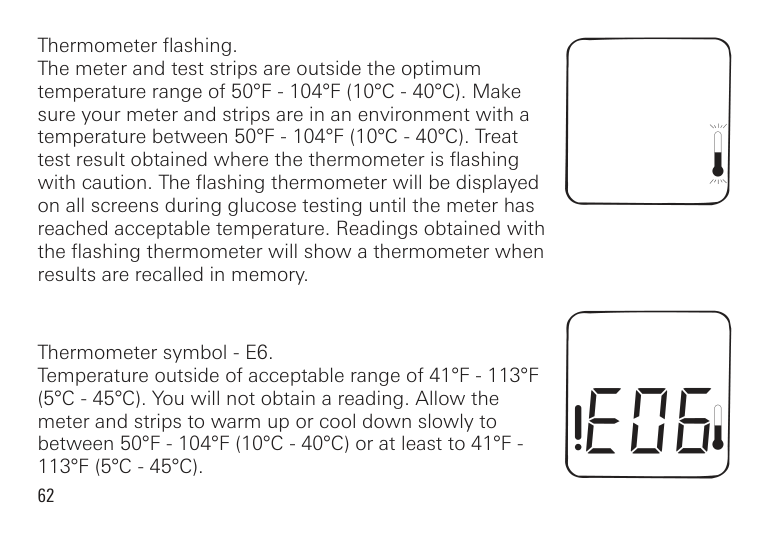
Thermometer flashing. The meter and test strips are outside the optimum temperature range of 50°F - 104°F (10°C - 40°C). Make sure your meter and strips are in an environment with a temperature between 50°F - 104°F (10°C - 40°C). Treat test result obtained where the thermometer is flashing with caution. The flashing thermometer will be displayed on all screens during glucose testing until the meter has reached acceptable temperature. Readings obtained with the flashing thermometer will show a thermometer when results are recalled in memory.
Thermometer symbol - E6. Temperature outside of acceptable range of 41°F - 113°F (5°C - 45°C). You will not obtain a reading. Allow the meter and strips to warm up or cool down slowly to between 50°F - 104°F (10°C - 40°C) or at least to 41°F 113°F (5°C - 45°C).
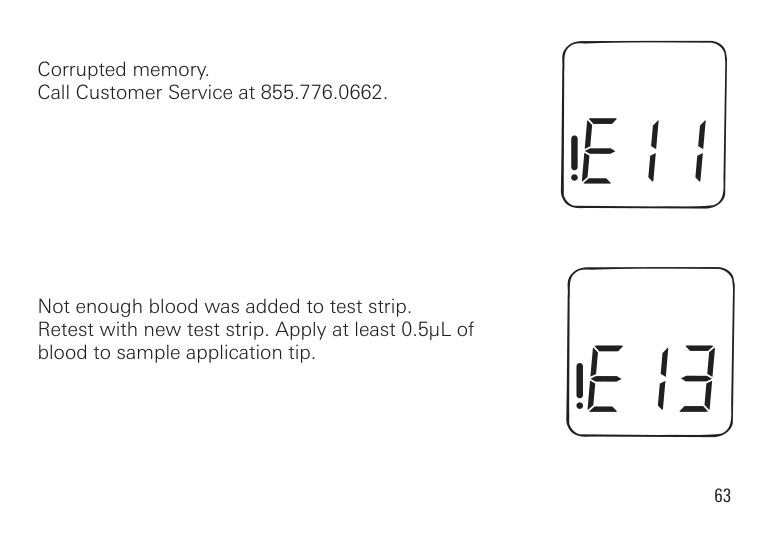
Corrupted memory. Call Customer Service at 855.776.0662.
Not enough blood was added to test strip. Retest with new test strip. Apply at least 0.5µL of blood to sample application tip.
|CARING FOR YOUR ReliOn® Prime BLOOD GLUCOSE METER| |---|
Cleaning the Meter The ReliOn® Prime Blood Glucose Meter is a precise instrument. Please handle it with care. Clean the outside of the meter with a damp cloth only. Dirt, dust, blood, control solution, or water entering the meter could cause damage. Your ReliOn® Prime Blood Glucose Meter should not need decontamination as no blood or control solution should come into contact with the meter if the instructions are followed correctly.
Storage The ReliOn® Prime Blood Glucose Meter is designed to be stored within a 32°F - 122°F (0°C - 50°C) temperature range.
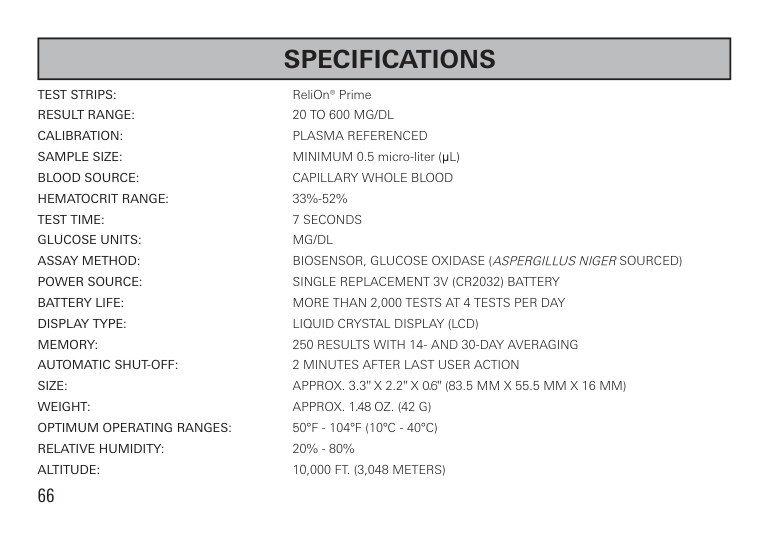
TEST STRIPS: ReliOn® Prime RESULT RANGE: 20 TO 600 MG/DL CALIBRATION: PLASMA REFERENCED SAMPLE SIzE: MINIMUM 0.5 micro-liter (µL) BLOOD SOURCE: CAPILLARY WHOLE BLOOD HEMATOCRIT RANGE: 33%-52% TEST TIME: 7 SECONDS GLUCOSE UNITS: MG/DL ASSAY METHOD: BIOSENSOR, GLUCOSE OxIDASE (ASPERGILLUSNIGERSOURCED) POWER SOURCE: SINGLE REPLACEMENT 3V (CR2032) BATTERY BATTERY LIFE: MORE THAN 2,000 TESTS AT 4 TESTS PER DAY DISPLAY TYPE: LIqUID CRYSTAL DISPLAY (LCD) MEMORY: 250 RESULTS WITH 14- AND 30-DAY AVERAGING AUTOMATIC SHUT-OFF: 2 MINUTES AFTER LAST USER ACTION SIzE: APPROx. 3.3" x 2.2" x 0.6" (83.5 MM x 55.5 MM x 16 MM) WEIGHT: APPROx. 1.48 Oz. (42 G) OPTIMUM OPERATING RANGES: 50°F - 104°F (10°C - 40°C) RELATIvE HUMIDITY: 20% - 80% ALTITUDE: 10,000 FT. (3,048 METERS)
IMPORTANT: Low or high blood glucose readings can indicate a potentially serious medical condition. If your blood glucose reading is unusually low or high, or you do not feel the way your readings indicate, repeat the test using a new strip. If your result is still not consistent with your symptoms or if your blood glucose result is less than 60 mg/dL or higher than 240 mg/dL, contact your diabetes healthcare professional for advice.
You are a valued ReliOn® customer of. It is important to us that you are completely satisfied with your Blood Glucose Meter.
ReliOn® warrants that your Meter will be free from defects in materials and workmanship for a period of five years from the date of the original purchase. If during this time the meter does not work properly because of a defect in materials or workmanship, ReliOn® agrees to replace or repair, free of charge any and all parts proven to be defective and subject to warranty.
This warranty is in lieu of all other warranties, expressed or implied, including any implied warranty of merchantability or fitness for any purpose, other than stated herein.
This warranty does not apply to the performance of the ReliOn® Prime meter that has been damaged by accident or has been altered, misused, tampered with, or abused in any way. This warranty only applies to the original purchaser of the meter and/or its agents.
RETURNS You must contact Customer Service at 855.776.0662 before returning your meter. You will be instructed how to return the meter. Returned meters without this authorization will not be accepted.
Distributed by:
Wal-Mart Stores, Inc. Bentonville, AR 72716 855.776.0662
©2013 Wal-Mart Stores, Inc.
P/N 7957-02 Rev 5/13
Sistema de monitoreo de glucosa en sangre
Manual de instrucciones
para el usuario

83-04758A
|CUIDADO: Antes de usar cualquier producto para hacerse un análisis de az car en sangre (glucosa en sangre, o glucemia), lea todas las instrucciones y practique la prueba. Lleve a cabo todas las verificaciones de control de calidad seg n las indicaciones y consulte con un profesional de atención diabetol gica. Estas recomendaciones se aplican a todos los sistemas de monitoreo de glucosa en sangre y cuentan con el respaldo de las siguientes organizaciones: American Association of Diabetes Educators (Asociaci n Americana de Educadores en Diabetes), American Diabetes Association (Asociaci n Americana de la Diabetes), U.S. Food and Drug Administration (Administraci n de Alimentos y Medicamentos de EE. UU.) y Health Industry Manufacturers Association (Asociaci n de Fabricantes de Productos para la Salud).| |---|
|ÍNDICE| |---|
Introducci n . . . . . . . . . . . . . . . . . . . . . . . . . . . . . . . . . . . . . . . . . . . 6 Uso previsto . . . . . . . . . . . . . . . . . . . . . . . . . . . . . . . . . . . . . . . . 7 Informaci n importante . . . . . . . . . . . . . . . . . . . . . . . . . . . . . . . 8
El sistema ReliOn® Prime . . . . . . . . . . . . . . . . . . . . . . . . . . . . . . . . . 9 Descripci n del medidor de glucosa en sangre ReliOn® Prime . . . 10
Explicaci n de la pantalla completa . . . . . . . . . . . . . . . . . . . . . 11 Tiras de prueba ReliOn® Prime . . . . . . . . . . . . . . . . . . . . . . . . . . . . 12 Realizaci n de pruebas con las tiras ReliOn® Prime . . . . . . . . . . . . 13
Informaci n importante sobre las tiras de prueba . . . . . . . . . . 14 Reemplazo de las pilas . . . . . . . . . . . . . . . . . . . . . . . . . . . . . . . 15 Configuraci n del medidor . . . . . . . . . . . . . . . . . . . . . . . . . . . . 18 Configuraci n de la hora y la fecha . . . . . . . . . . . . . . . . . . . . . 18
Prueba de glucosa en sangre . . . . . . . . . . . . . . . . . . . . . . . . . . . . . 22 El dispositivo de punci n ReliOn® . . . . . . . . . . . . . . . . . . . . . . 22 Obtenci n de una gota de sangre . . . . . . . . . . . . . . . . . . . . . . 25
Realizaci n de una prueba de glucosa en sangre . . . . . . . . . . . . . 27
Pruebas con sangre extra da de lugares alternativos . . . . . . . . . . . 31 Informaci n importante sobre las pruebas realizadas con sangre extra da de lugares alternativos . . . . . . . . . . . . . . . 31 Preparativos para la prueba de glucosa en sangre
Uso de la soluci n de control . . . . . . . . . . . . . . . . . . . . . . . . . . . . . 39 Uso recomendado de la soluci n de control . . . . . . . . . . . . . . 40 Realizaci n de una prueba con soluci n de control . . . . . . . . . 41 Comparaci n de los resultados obtenidos con la solución de control . . . . . . . . . . . . . . . . . . . . . . . . . . . . 45 Descarga de los resultados de prueba en una computadora . . . . . 46 Interpretaci n de los resultados de la prueba . . . . . . . . . . . . . . . . 47
Comparaci n de resultados del medidor con los de laboratorio . . . . . . . . . . . . . . . . . . . . . . . . . . . . . . . . . 47 Lecturas esperadas de glucosa en sangre . . . . . . . . . . . . . . . . 50 Lecturas altas de glucosa en sangre . . . . . . . . . . . . . . . . . . . . 50
Lecturas ba as de glucosa en sangre . . . . . . . . . . . . . . . . . . . . 51 Hallazgos sobre la diabetes . . . . . . . . . . . . . . . . . . . . . . . . . . . 51

Memoria del medidor . . . . . . . . . . . . . . . . . . . . . . . . . . . . . . . . . . . 54 Marcado de los resultados en la memoria . . . . . . . . . . . . . . . . 54 Marcado de pruebas con la soluci n de control . . . . . . . . . . . 54 Marcado de otros resultados . . . . . . . . . . . . . . . . . . . . . . . . . . 55 Visualizaci n de resultados almacenados . . . . . . . . . . . . . . . . 55
Mensa es visualizados en la pantalla . . . . . . . . . . . . . . . . . . . . . . . 59 Cuidado del medidor de glucosa en sangre ReliOn® Prime . . . . . . 64
Limpieza del medidor . . . . . . . . . . . . . . . . . . . . . . . . . . . . . . . . 64 Almacenamiento . . . . . . . . . . . . . . . . . . . . . . . . . . . . . . . . . . . 64
Caracter sticas t cnicas . . . . . . . . . . . . . . . . . . . . . . . . . . . . . . . . . 66 Advertencias, precauciones y limitaciones . . . . . . . . . . . . . . . . . . 67 Garant a . . . . . . . . . . . . . . . . . . . . . . . . . . . . . . . . . . . . . . . . . . . . . . 69
|INTRODUCCIÓN| |---|
Gracias por haber elegido el sistema de monitoreo de glucosa en sangre ReliOn® Prime. Es importante realizar pruebas frecuentes de glucosa en sangre porque le indican c mo se ve afectada su diabetes por ciertos factores como los medicamentos, la dieta, el e ercicio y el control del estr s. Los resultados de las pruebas de glucosa en sangre tambi n pueden advertirle de cualquier cambio en su diabetes que podr a afectar su plan terap utico. Consulte siempre a su profesional de atención diabetológica antes de hacer algún cambio. Este manual contiene toda la informaci n necesaria para utilizar el sistema ReliOn® Prime; s rvase leerlo detenidamente antes de usar el sistema. Si tiene preguntas, llame al servicio de atenci n al cliente al 855.776.0662. Si no logra comunicarse con el departamento de atenci n al cliente, diri a sus preguntas a su profesional de la salud.
Uso previsto
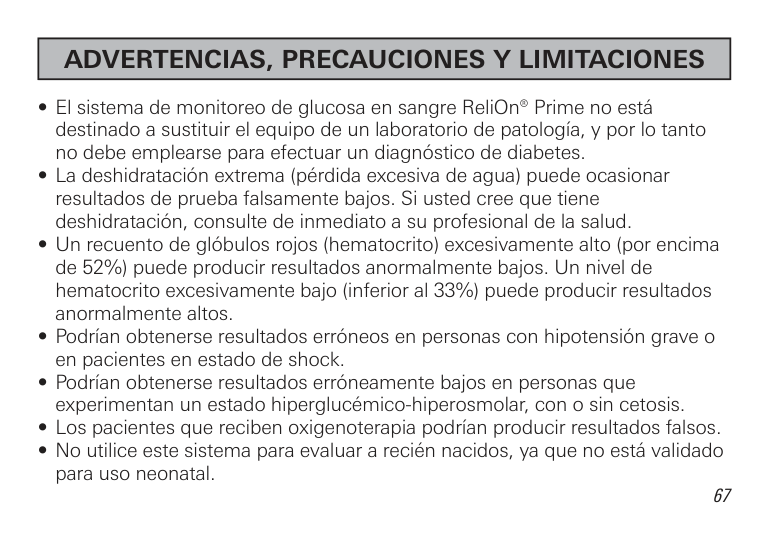
El sistema de monitoreo de glucosa en sangre ReliOn® Prime est dise ado para determinar cuantitativamente la glucosa en muestras de sangre entera capilar reci n obtenida de las yemas de los dedos o la palma de la mano. La prueba se efect a fuera del cuerpo (es decir, el sistema es para diagn stico in vitro). El medidor est indicado para uso domiciliario (sin necesidad de prescripci n facultativa) por parte de personas diab ticas o en entornos cl nicos por parte de profesionales de la salud, como auxiliar para evaluar la eficacia del control de la diabetes. No est destinado a emplearse para el diagn stico o la detecci n de diabetes mellitus, ni tampoco para uso en reci n nacidos.
Información importante
|EL SISTEMA ReliOn® Prime| |---|
El sistema ReliOn® Prime consta
|DESCRIPCIÓN DEL MEDIDOR DE GLUCOSA EN SANGRE ReliOn® Prime| |---|
################ Cara anterior
################ Cara posterior
Orificio para la conexi n de datos
Botón de retroceso
Pantalla
Botón de avance
Botón de encendido y apagado

Orificio de inserción de tiras de prueba
Tapa del compartimiento de la pila
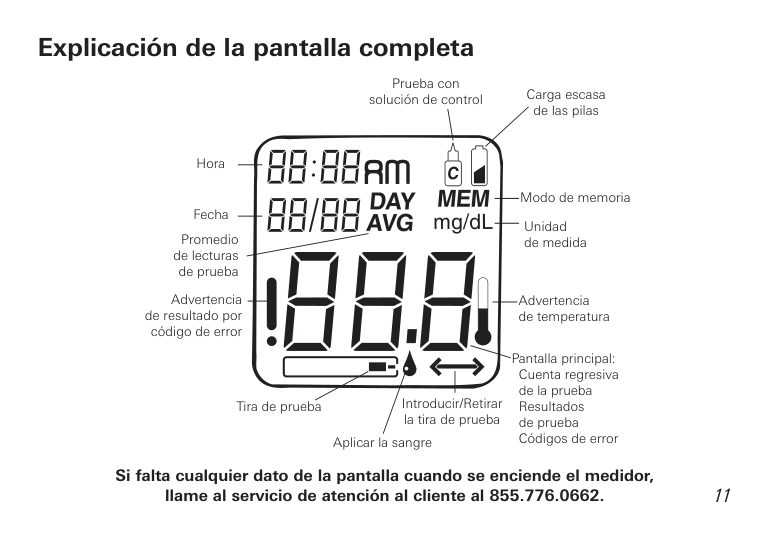
Explicación de la pantalla completa
Prueba con soluci n de control Carga escasa de las pilas
Hora
Modo de memoria
Fecha Promedio
Unidad de medida
de lecturas de prueba
Advertencia de resultado por
Advertencia de temperatura
c digo de error
Pantalla principal: Cuenta regresiva de la prueba Resultados de prueba C digos de error
Introducir/Retirar la tira de prueba
Tira de prueba
Aplicar la sangre
############### Si falta cualquier dato de la pantalla cuando se enciende el medidor, llame al servicio de atención al cliente al 855.776.0662.
11
|TIRAS DE PRUEBA ReliOn® Prime| |---|
############### TIRA DE PRUEBA
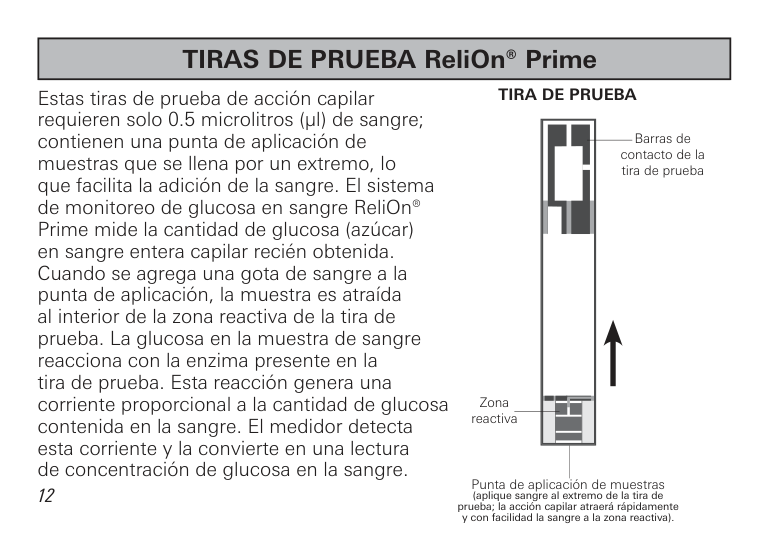
Estas tiras de prueba de acci n capilar requieren solo 0.5 microlitros (µl) de sangre; contienen una punta de aplicación de muestras que se llena por un extremo, lo que facilita la adici n de la sangre. El sistema de monitoreo de glucosa en sangre ReliOn® Prime mide la cantidad de glucosa (az car) en sangre entera capilar reci n obtenida. Cuando se agrega una gota de sangre a la punta de aplicaci n, la muestra es atra da al interior de la zona reactiva de la tira de prueba. La glucosa en la muestra de sangre reacciona con la enzima presente en la tira de prueba. Esta reacci n genera una corriente proporcional a la cantidad de glucosa contenida en la sangre. El medidor detecta esta corriente y la convierte en una lectura de concentraci n de glucosa en la sangre.
| | | | |---|---|---| | | | | | | | | | | | | | | | |
Barras de contacto de la tira de prueba
Zona reactiva
Punta de aplicaci n de muestras (aplique sangre al extremo de la tira de prueba; la acción capilar atraerá rápidamente y con facilidad la sangre a la zona reactiva).
12
|REALIZACIÓN DE PRUEBAS CON LAS TIRAS ReliOn® Prime| |---|
El sistema de monitoreo de glucosa en sangre ReliOn® Prime funciona con las tiras de prueba ReliOn® Prime.
####### Información importante sobre las tiras de prueba
| | |---|
de vencimiento (
).

13

Información importante sobre las tiras de prueba
Reemplazo de las pilas El medidor de glucosa en sangre ReliOn® Prime tiene instalada una pila CR2032.
|Nota: El proceso de cambiar la pila debe llevar solo unos segundos. Si la pila se cambia en un plazo de 30 segundos, la memoria del medidor no se ver afectada. No se pierde ning n resultado de pruebas anteriores ni se alteran los a ustes.
Sin embargo, si el proceso de cambiar la pila tarda m s de 30 segundos, o si la pila est completamente descargada antes de cambiarla, puede que sea necesario reconfigurar la fecha y la hora.
La primera vez que se enciende el medidor despu s de cambiada la pila, podr a aparecer un mensa e en la pantalla (E00). Esto significa que usted debe comprobar si la fecha y la hora est n correctas. (En las p ginas 18-21 encontrar instrucciones detalladas sobre c mo cambiar la fecha y la hora).| |---|
|ADVERTENCIA: Mantenga todas las pilas fuera del alcance de los ni os. Si alguien se traga una pila, consulte con un m dico inmediatamente.| |---|
Cuando comienza a descargarse la pila, el medidor muestra . En este momento queda carga suficiente como para efectuar unas 100 pruebas antes de que sea necesario cambiar la pila.
Si el icono destella, significa que solo hay suficiente carga como para efectuar 20 pruebas. Cambie la pila lo antes posible.
CR 2032 Li-Mn 3V +
El medidor no funcionar si la pila est agotada.
Cómo cambiar la pila
Configuración del medidor
Antes de utilizar el medidor ReliOn® Prime por primera vez, es preciso que configure la hora y la fecha. Para la hora, puede elegir entre el formato a.m. y p.m. (12 horas, de 1 a 12) y el formato militar (24 horas, de 0 a 23). La fecha se puede visualizar en formato de mes/d a (utilizado en EE. UU.) o d a/mes (utilizado en otros pa ses). No se haga una prueba de glucosa en sangre hasta haber configurado debidamente el medidor.
Configuración de la hora y la fecha
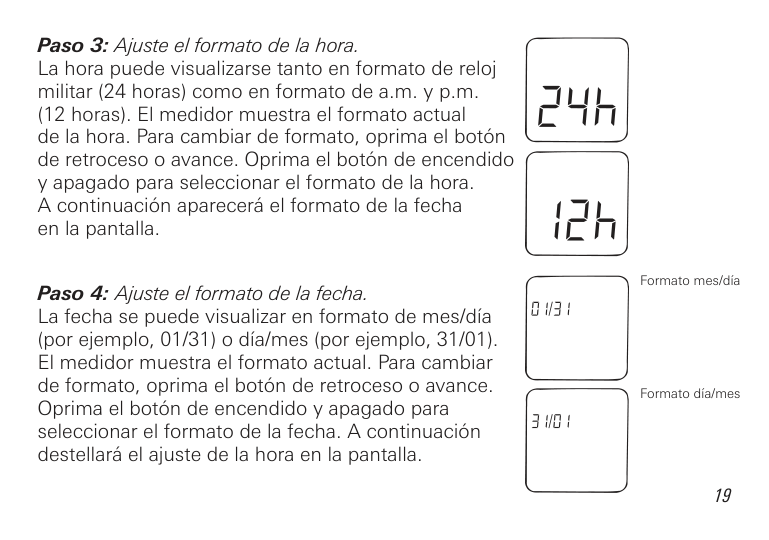
Formato mes/d a
Formato d a/mes
20
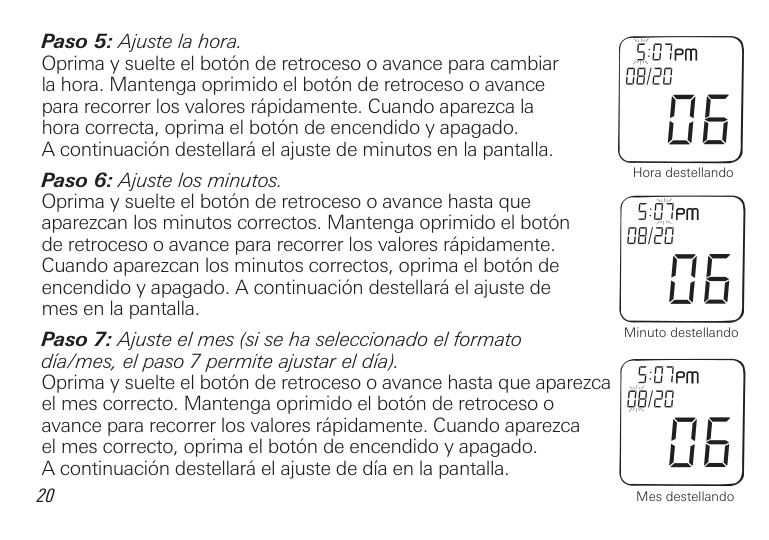
Hora destellando
Minuto destellando
Mes destellando
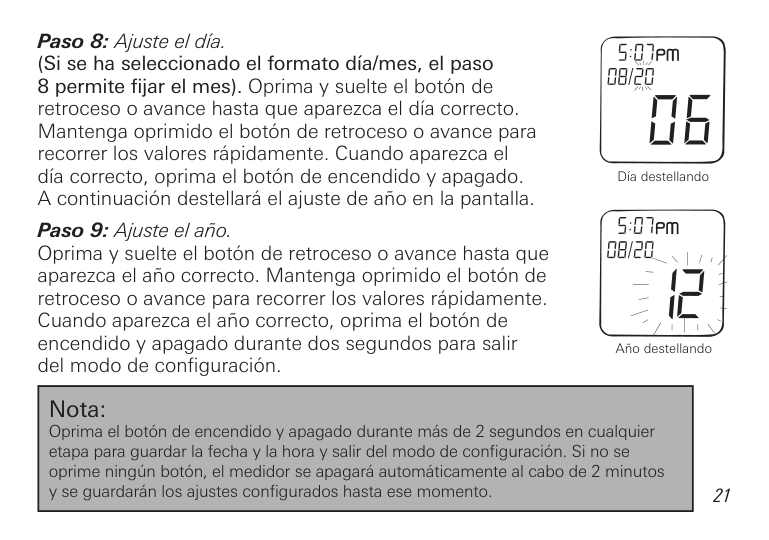
######### Paso 8: Ajuste el día.(Si se ha seleccionado el formato día/mes, el paso
8 permite fijar el mes). Oprima y suelte el bot n de retroceso o avance hasta que aparezca el d a correcto. Mantenga oprimido el bot n de retroceso o avance para recorrer los valores r pidamente. Cuando aparezca el d a correcto, oprima el bot n de encendido y apagado. A continuaci n destellar el a uste de a o en la pantalla.
D a destellando
########## Paso 9: Ajuste el año.Oprima y suelte el bot n de retroceso o avance hasta queaparezca el a o correcto. Mantenga oprimido el bot n deretroceso o avance para recorrer los valores r pidamente.Cuando aparezca el a o correcto, oprima el bot n deencendido y apagado durante dos segundos para salirdel modo de configuraci n.
A o destellando
|Nota: Oprima el bot n de encendido y apagado durante m s de 2 segundos en cualquier etapa para guardar la fecha y la hora y salir del modo de configuraci n. Si no se oprime ning n bot n, el medidor se apagar autom ticamente al cabo de 2 minutos y se guardar n los a ustes configurados hasta ese momento.| |---|
|PRUEBA DE GLUCOSA EN SANGRE| |---|
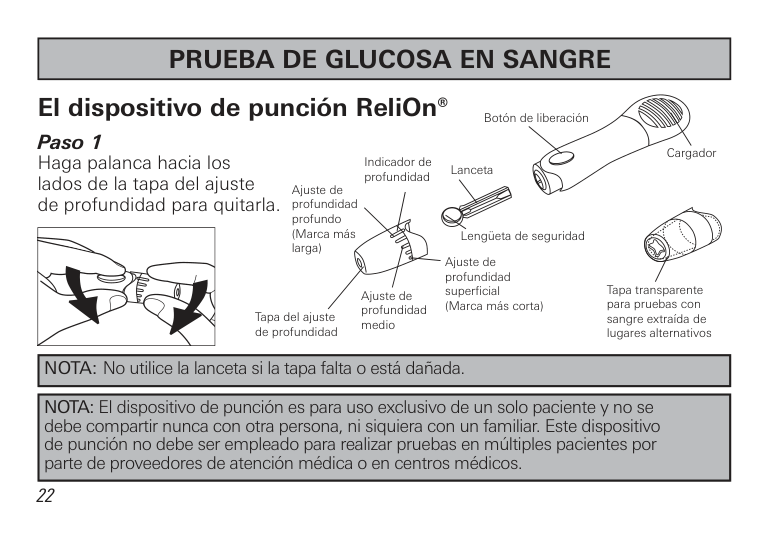
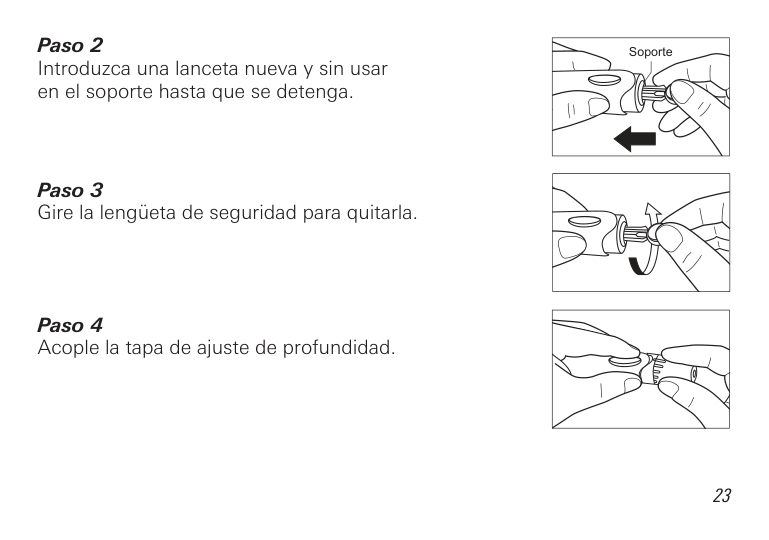
El dispositivo de punción ReliOn® Paso 1 Haga palanca hacia los lados de la tapa del a uste de profundidad para quitarla.
Botón de liberación
Cargador Lanceta
Indicador de profundidad
Ajuste de profundidad profundo (Marca m s larga)
Leng eta de seguridad
Ajuste de profundidad superficial (Marca m s corta)
Tapa transparente para pruebas con sangre extra da de lugares alternativos
Ajuste de profundidad medio
Tapa del ajuste de profundidad
|NOTA: No utilice la lanceta si la tapa falta o est da ada.|
|---|
|NOTA: El dispositivo de punci n es para uso exclusivo de un solo paciente y no se debe compartir nunca con otra persona, ni siquiera con un familiar. Este dispositivo de punci n no debe ser empleado para realizar pruebas en m ltiples pacientes por parte de proveedores de atenci n m dica o en centros m dicos.| |---|
Paso 2 Introduzca una lanceta nueva y sin usar en el soporte hasta que se detenga.
| | |---|
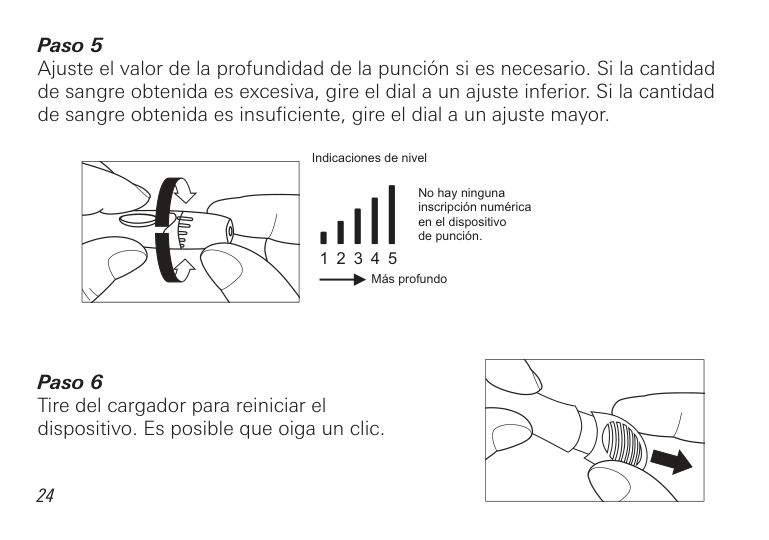
A uste el valor de la profundidad de la punci n si es necesario. Si la cantidad de sangre obtenida es excesiva, gire el dial a un a uste inferior. Si la cantidad de sangre obtenida es insuficiente, gire el dial a un a uste mayor.
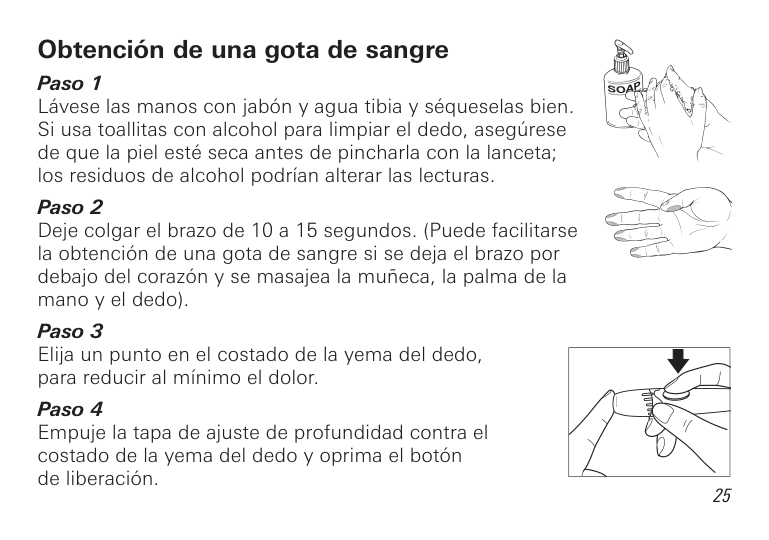
Obtención de una gota de sangre
| | |---|
Retire el dispositivo de punci n y espere unos segundos para que se forme una gota de sangre. Para facilitar el flu o de sangre, mantenga caliente la mano, ba e la mano a la altura de la cadera y masa ese suavemente la mu eca, la palma de la mano o la base del dedo. Para evitar dolores y la formaci n de callos, haga la prueba en un sitio diferente cada vez.
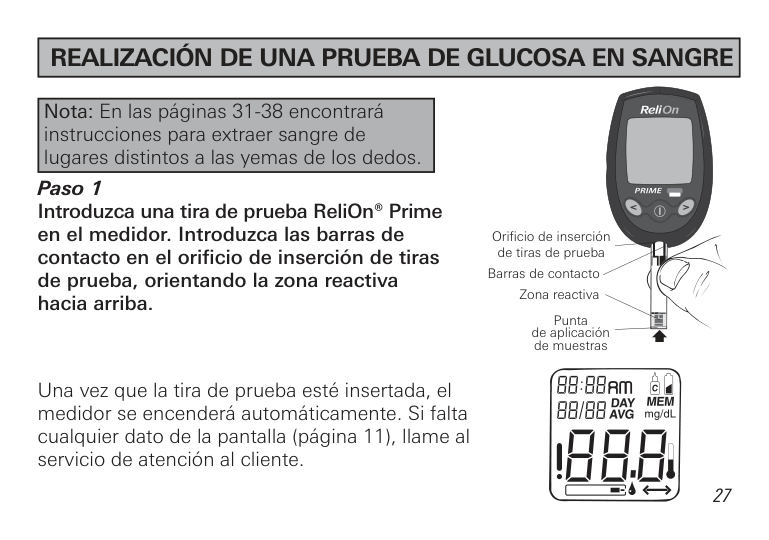
|REALIZACIÓN DE UNA PRUEBA DE GLUCOSA EN SANGRE| |---|
|Nota: En las p ginas 31-38 encontrar instrucciones para extraer sangre de lugares distintos a las yemas de los dedos.| |---|
Orificio de inserci n de tiras de prueba
Barras de contacto
Zona reactiva
hacia arriba.
Punta de aplicaci n de muestras
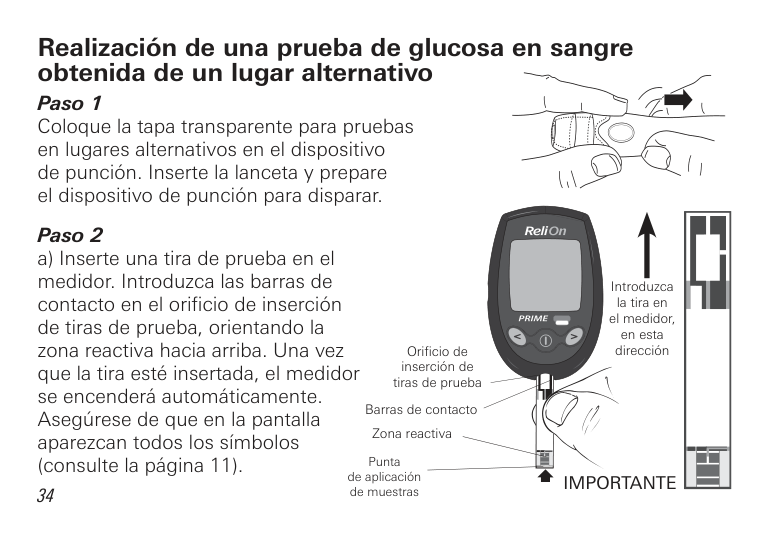
Una vez que la tira de prueba est insertada, el medidor se encender autom ticamente. Si falta cualquier dato de la pantalla (p gina 11), llame al servicio de atención al cliente.
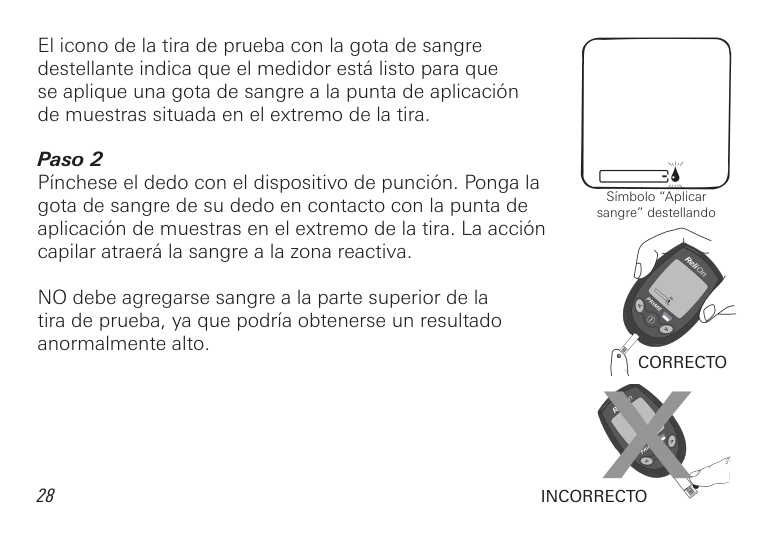
El icono de la tira de prueba con la gota de sangre destellante indica que el medidor est listo para que se aplique una gota de sangre a la punta de aplicaci n de muestras situada en el extremo de la tira.
NO debe agregarse sangre a la parte superior de la tira de prueba, ya que podr a obtenerse un resultado anormalmente alto.
S mbolo “Aplicar sangre” destellando
CORRECTO
28
INCORRECTO
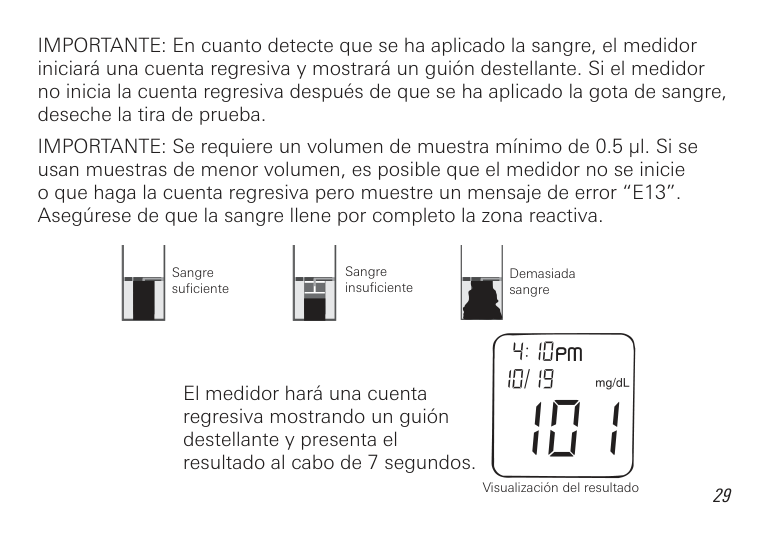
IMPORTANTE: En cuanto detecte que se ha aplicado la sangre, el medidor iniciar una cuenta regresiva y mostrar un gui n destellante. Si el medidor no inicia la cuenta regresiva despu s de que se ha aplicado la gota de sangre, deseche la tira de prueba.
IMPORTANTE: Se requiere un volumen de muestra m nimo de 0.5 µl. Si se usan muestras de menor volumen, es posible que el medidor no se inicie o que haga la cuenta regresiva pero muestre un mensa e de error “E13”. Aseg rese de que la sangre llene por completo la zona reactiva.
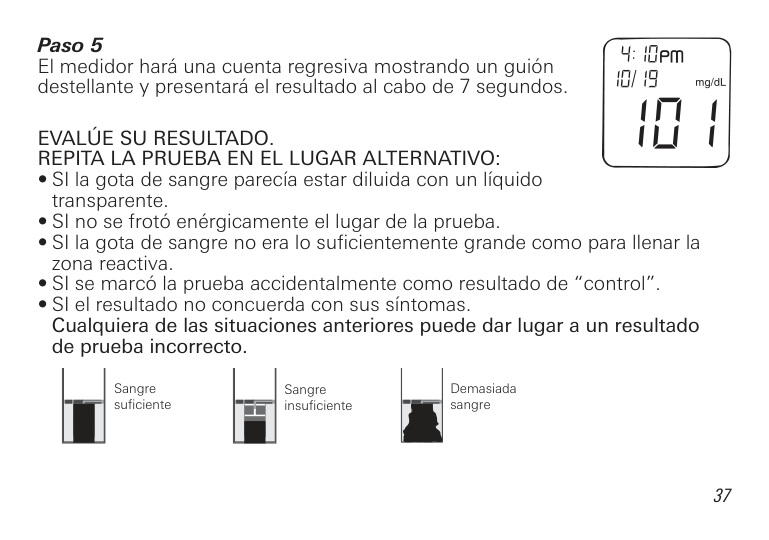
Sangre insuficiente
Sangre suficiente
Demasiada sangre
El medidor har una cuenta regresiva mostrando un gui n destellante y presenta el resultado al cabo de 7 segundos.
Visualizaci n del resultado
|PRUEBAS CON SANGRE EXTRAÍDA DE LUGARES ALTERNATIVOS| |---|
###### Información importante sobre las pruebas realizadas con sangre extraída de lugares alternativos
Ciertas partes del cuerpo tienen menos terminaciones nerviosas que las yemas de los dedos, por lo cual obtener una muestra de sangre de esos lugares podr a causar menos dolor. Para extraer sangre de lugares distintos de las yemas de los dedos debe emplearse una t cnica diferente. Adem s, los resultados de glucosa en sangre obtenida de lugares diferentes de las yemas de los dedos podr an ser considerablemente distintos, debido a los cambios r pidos que sufren los niveles de glucosa despu s de las comidas, la administraci n de insulina o el e ercicio.
Consulte con su profesional de atenci n diabetol gica antes de hacerse pruebas con sangre extra da de lugares diferentes de las yemas de los dedos.
Igual que en el caso de todos los sistemas de monitoreo de glucosa en sangre, los resultados obtenidos con sangre extra da de lugares distintos de las yemas de los dedos podr an mostrar diferencias considerables. Es probable que los resultados cambien r pidamente despu s de las comidas; los efectos de la administraci n de insulina y la actividad f sica se manifiestan en las yemas de los dedos con m s rapidez que en los lugares alternativos.
En promedio, la sangre extra da de la palma de la mano puede dar resultados hasta un 5% superiores a los de la sangre procedente de la yema de un dedo.
Considere la posibilidad de hacerse pruebas con sangre obtenida de lugares alternativos cuando:
####### Hágase pruebas con sangre obtenida de las yemas de los dedos:
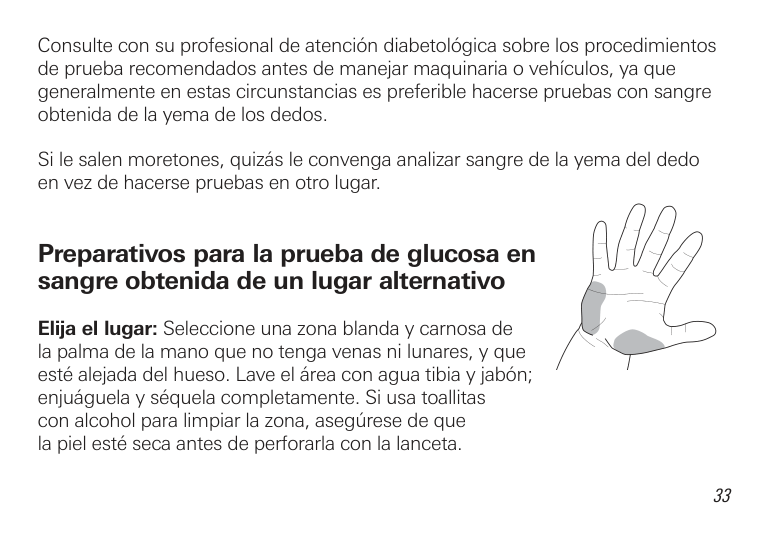
Consulte con su profesional de atenci n diabetol gica sobre los procedimientos de prueba recomendados antes de mane ar maquinaria o veh culos, ya que generalmente en estas circunstancias es preferible hacerse pruebas con sangre obtenida de la yema de los dedos.
Si le salen moretones, quiz s le convenga analizar sangre de la yema del dedo en vez de hacerse pruebas en otro lugar.
Preparativos para la prueba de glucosa en sangre obtenida de un lugar alternativo
Elija el lugar: Seleccione una zona blanda y carnosa de la palma de la mano que no tenga venas ni lunares, y que est ale ada del hueso. Lave el rea con agua tibia y ab n; en u guela y s quela completamente. Si usa toallitas con alcohol para limpiar la zona, aseg rese de que la piel est seca antes de perforarla con la lanceta.
Realización de una prueba de glucosa en sangre obtenida de un lugar alternativo Paso 1 Coloque la tapa transparente para pruebas en lugares alternativos en el dispositivo de punci n. Inserte la lanceta y prepare el dispositivo de punci n para disparar.
Orificio de inserción de tiras de prueba
Barras de contacto
Zona reactiva
Punta de aplicaci n de muestras
Introduzca la tira en el medidor, en esta dirección
IMPORTANTE
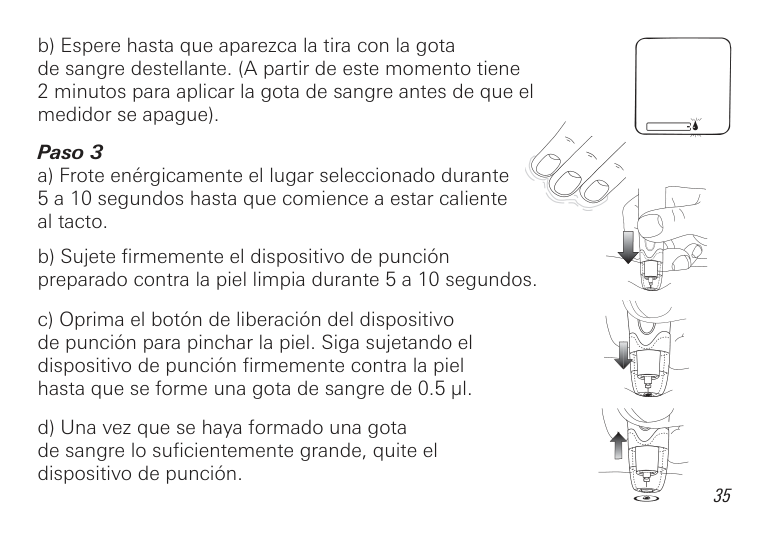
b) Espere hasta que aparezca la tira con la gota de sangre destellante. (A partir de este momento tiene
####### Paso 3
5 a 10 segundos hasta que comience a estar caliente al tacto.
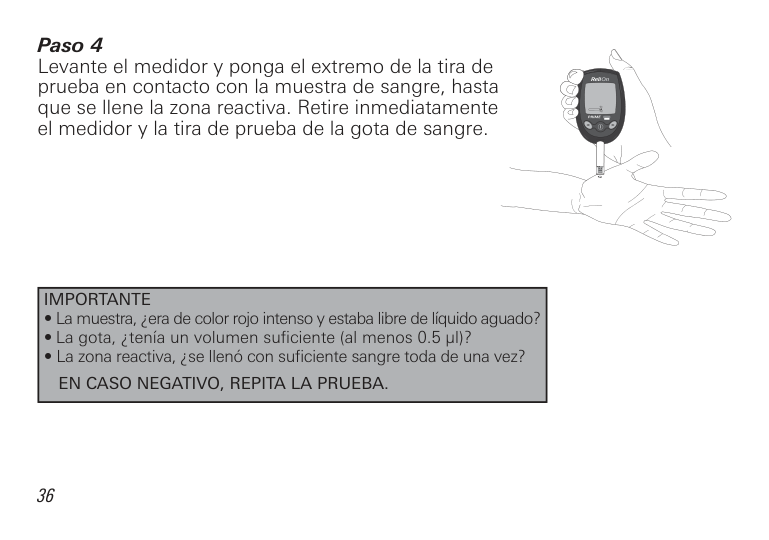
Levante el medidor y ponga el extremo de la tira de prueba en contacto con la muestra de sangre, hasta que se llene la zona reactiva. Retire inmediatamente el medidor y la tira de prueba de la gota de sangre.
|IMPORTANTE
• La muestra, era de color ro o intenso y estaba libre de l quido aguado?
• La gota, ten a un volumen suficiente (al menos 0.5 l)?
• La zona reactiva, se llen con suficiente sangre toda de una vez? EN CASO NEGATIVO, REPITA LA PRUEBA.
| |---|
El medidor har una cuenta regresiva mostrando un gui n destellante y presentar el resultado al cabo de 7 segundos.
EVALÚE SU RESULTADO. REPITA LA PRUEBA EN EL LUGAR ALTERNATIVO:
Demasiada sangre
Sangre suficiente
Sangre insuficiente
Si el resultado repetido en el lugar alternativo sigue sin concordar con sus s ntomas, confirme su nivel de glucosa haci ndose una prueba con sangre de la yema de un dedo.
|USO DE LA SOLUCIÓN DE CONTROL| |---|
Utilice la soluci n de control para comprobar que el medidor y las tiras de prueba est n funcionando correctamente. Es importante llevar a cabo esta sencilla verificaci n con regularidad.
La soluci n de control contiene una cantidad conocida de glucosa que reacciona con las tiras de prueba ReliOn® Prime. Las soluciones de control est n disponibles en dos niveles: normal y alto.
Compare los resultados obtenidos con soluci n de control con el intervalo impreso en la etiqueta del frasco de tiras de prueba.
Para hacer un pedido de soluci n de control, llame a ReliOn® al 855.776.0662.
Se recomienda que use la solución de control:
Realización de una prueba con solución de control
| | |---|
Antes de efectuar una prueba con soluci n de control, revise siempre la fecha de vencimiento (
) que aparece en la etiqueta del frasco. No utilice soluci n de control vencida o que haya sido mal almacenada. Cuando abra un frasco nuevo de soluci n de control, anote siempre la fecha de apertura en su etiqueta. Tape el frasco tan pronto haya terminado de usar la soluci n de control. Utilice la soluci n de control dentro de los 90 d as (3 meses) subsiguientes a su apertura inicial.


| | | |---|---|

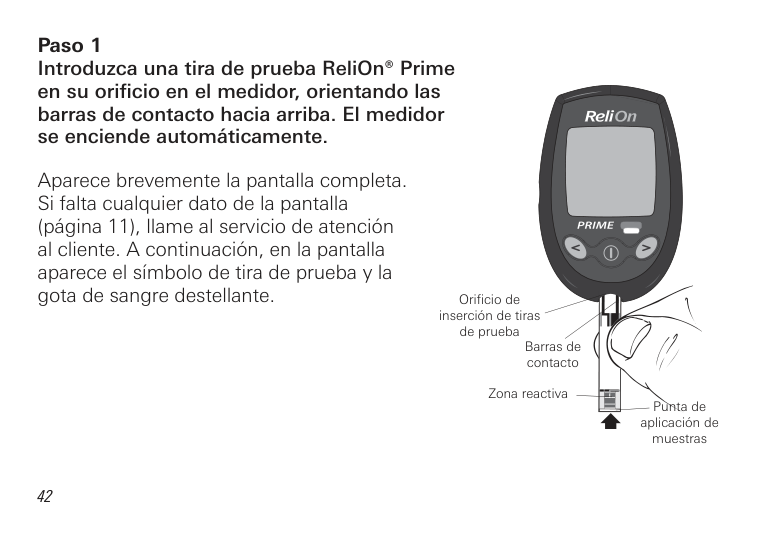
Aparece brevemente la pantalla completa. Si falta cualquier dato de la pantalla (p gina 11), llame al servicio de atenci n al cliente. A continuaci n, en la pantalla aparece el s mbolo de tira de prueba y la gota de sangre destellante.
Orificio de inserción de tiras de prueba
Barras de contacto
Zona reactiva
Punta de aplicación de muestras


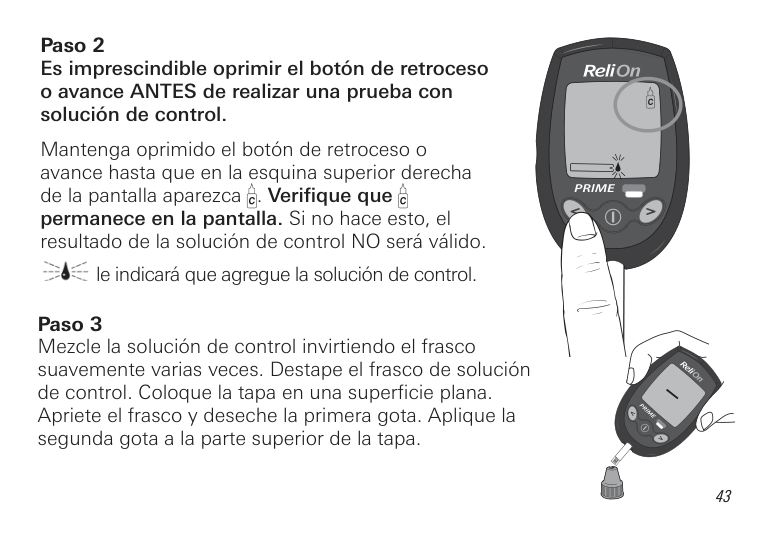
######## Paso 2Es imprescindible oprimir el botón de retrocesoo avance ANTES de realizar una prueba consolución de control.
Mantenga oprimido el bot n de retroceso o avance hasta que en la esquina superior derecha de la pantalla aparezca . Verifique que permanece en la pantalla. Si no hace esto, el resultado de la soluci n de control NO ser v lido.
le indicar que agregue la soluci n de control.
########## Paso 3Mezcle la soluci n de control invirtiendo el frascosuavemente varias veces. Destape el frasco de soluci nde control. Coloque la tapa en una superficie plana.Apriete el frasco y deseche la primera gota. Aplique lasegunda gota a la parte superior de la tapa.
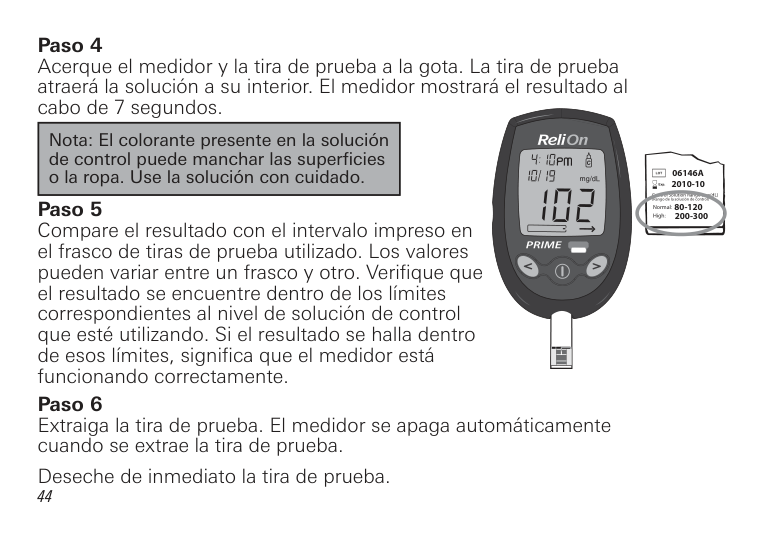
|Nota: El colorante presente en la solución de control puede manchar las superficies o la ropa. Use la solución con cuidado.| |---|
06146A 2010-10
Control Solution Range (mg/dL) (Rango de la solución de control)
80-120 200-300
Normal: High:
Comparación de los resultados obtenidos con la solución de control
Si el resultado sobrepasa el intervalo impreso en el frasco de tiras utilizado, repita la prueba. Uno o m s de los factores siguientes pueden producir resultados fuera de los l mites:
Repita la prueba con cuidado, siguiendo las instrucciones al pie de la letra; ponga el medidor en modo de soluci n de control, y utilice soluci n de control fresca o una nueva tira (seg n corresponda). Compare el resultado con el intervalo impreso en el frasco de tiras de prueba utilizado.
|Nota: Si el resultado de la soluci n de control sigue sobrepasando los l mites requeridos, significa que posiblemente el sistema no est funcionando como debe. NO UTILICE el sistema para analizarse la sangre. Si no logra resolver el problema, llame al servicio de atención al cliente al 855.776.0662.| |---|
|DESCARGA DE LOS RESULTADOS DE PRUEBA EN UNA COMPUTADORA| |---|
Ponemos a su disposici n software para mane o de la diabetes que le permitir descargar sus resultados de prueba en una computadora. Para obtener m s informaci n sobre el software para mane o de la diabetes, llame al servicio de atención al cliente al 855.776.0662.
|INTERPRETACIÓN DE LOS RESULTADOS DE PRUEBA|
|---|
|NOTA: El medidor ReliOn® Prime est dise ado para producir resultados a temperaturas entre 41 – 113 °F (5 – 45 °C) y humedades relativas entre 20 – 80% (sin condensaci n).| |---|
Comparación de resultados del medidor con los de laboratorio
El medidor de glucosa en sangre ReliOn® Prime hace referencia a valores de glucosa en sangre con plasma reci n obtenida. La calibraci n se realiz en un laboratorio cl nico con un patr n est ndar de glucosa NIST (National Institute of Science and Technology, Gaithersburg, MD, EE. UU.). Los resultados del medidor podr an diferir de los obtenidos en un laboratorio cl nico rigurosamente controlado a causa de variaciones normales. Para hacer una comparaci n precisa entre los resultados del medidor y los de laboratorio, siga las pautas indicadas a continuaci n.
Antes de comparar Realice una prueba con soluci n de control para asegurarse de que tanto el medidor como las tiras est n funcionando debidamente. Antes de hacer pruebas de comparaci n con sangre, espere al menos 2 horas despu s de haber comido o bebido cualquier cosa que no sea agua. Es esencial ayunar si el analizador de referencia requiere sangre venosa.
En el laboratorio Las muestras capilares para ambas pruebas deben obtenerse y analizarse en un intervalo de 15 minutos. La muestra se debe recolectar con el anticoagulante apropiado para el analizador de laboratorio. Debe practicarse la t cnica recomendada. Los an lisis se realizar n conforme a las pautas del fabricante.
Lávese SIEMPRE las manos con agua tibia y ab n. En u gueselas y s queselas a fondo antes de hacer la prueba.
Utilice SIEMPRE sangre entera capilar reci n obtenida para las pruebas con el medidor.
A pesar de seguir estas pautas, quiz s note diferencias respecto al resultado del laboratorio porque los niveles de glucosa en sangre pueden variar en poco tiempo. Estas variaciones pueden deberse a m ltiples razones, tales como el consumo de alimentos, el e ercicio, los medicamentos tomados, el valor del hematocrito, el estr s y la p rdida de l quidos corporales.
El an lisis de los datos debe realizarse utilizando un m todo cl nicamente aceptable.
La cantidad de glucosa que circula en la sangre fluct a de forma natural con el tiempo. Esto hace que los resultados de prueba tambi n puedan variar. Los resultados pueden verse afectados por varios factores, entre otros: (1) la hora del d a a la que se efectu la prueba; (2) los alimentos consumidos;
(3) las actividades realizadas; (4) la insulina y los dem s medicamentos tomados. Si su resultado de la prueba de sangre no parece ser correcto, repita el an lisis. Si sigue obteniendo lecturas anormalmente altas o ba as, comun quese con su profesional de la salud.
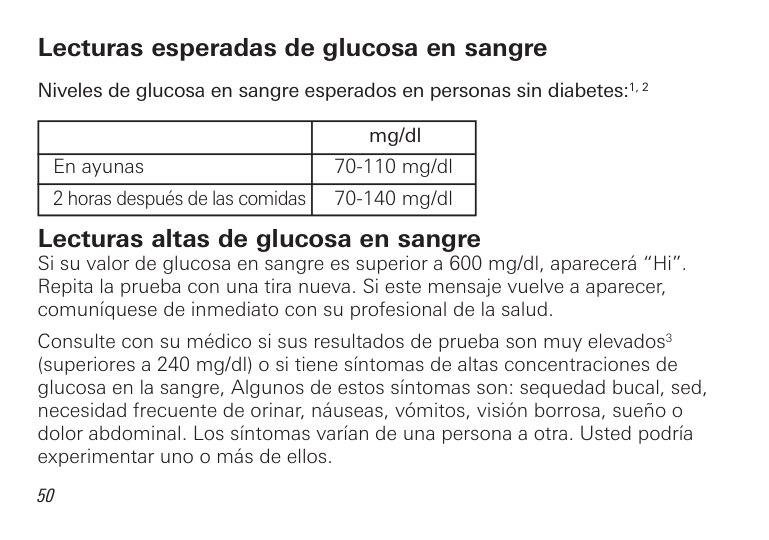
Lecturas esperadas de glucosa en sangre Niveles de glucosa en sangre esperados en personas sin diabetes:1, 2
| |mg/dl| |---|---| |En ayunas|70-110 mg/dl| |2 horas despu s de las comidas|70-140 mg/dl|
Lecturas altas de glucosa en sangre Si su valor de glucosa en sangre es superior a 600 mg/dl, aparecer “Hi”. Repita la prueba con una tira nueva. Si este mensa e vuelve a aparecer, comun quese de inmediato con su profesional de la salud.
Consulte con su m dico si sus resultados de prueba son muy elevados3 (superiores a 240 mg/dl) o si tiene s ntomas de altas concentraciones de glucosa en la sangre, Algunos de estos s ntomas son: sequedad bucal, sed, necesidad frecuente de orinar, n useas, v mitos, visi n borrosa, sue o o dolor abdominal. Los s ntomas var an de una persona a otra. Usted podr a experimentar uno o m s de ellos.
Lecturas bajas de glucosa en sangre
Si su valor de glucosa en sangre es inferior a 20 mg/dl, aparecer “Lo”. Repita la prueba con una tira nueva. Si este mensa e vuelve a aparecer, comun quese de inmediato con su profesional de la salud.
Consulte con su m dico si sus resultados de prueba son muy ba os4 (inferiores a 70 mg/dl) o usted tiene s ntomas de ba as concentraciones de glucosa en la sangre. Algunos de estos s ntomas son: transpiraci n, agitaci n, temblores, visi n borrosa, hambre, dolor de cabeza, confusi n, ritmo card aco acelerado, y hormigueo o entumecimiento alrededor de la boca o las yemas de los dedos. Los s ntomas var an de una persona a otra. Usted podr a experimentar uno o m s de ellos.
Hallazgos sobre la diabetes En 1993, los Institutos Nacionales de Salud (National Institutes of Health) concluyeron un estudio a largo plazo de personas con diabetes tipo 1. En este estudio, denominado Ensayo de Control y Complicaciones de la Diabetes (Diabetes Control and Complications Trial, o DCCT), se encontr que si las personas diab ticas mantienen sus niveles de glucosa en sangre cerca de los valores caracter sticos de personas sin diabetes, es posible reducir el riesgo de complicaciones que afectan a los o os, los ri ones y el sistema nervioso en un 60%5.
Lo que esto significa para usted Hacerse pruebas frecuentes de glucosa en sangre es la me or manera de comprobar el efecto de los factores que influyen en la diabetes: medicamentos, dieta, e ercicio y control del estr s. Adem s, los resultados de las pruebas de glucosa en sangre pueden advertirle de cualquier cambio en su diabetes que podr a requerir un a uste de su plan terap utico. Consulte siempre a su profesional de la salud antes de hacer alg n cambio en su plan de mane o de la diabetes.
Frecuencia de las pruebas La frecuencia de sus pruebas de glucosa en sangre depender de su edad, el tipo de diabetes que usted tiene, los medicamentos que toma y su salud f sica y emocional. Su profesional de la salud puede guiarlo. Despu s de decidir cu ndo y con qu frecuencia debe hacerse pruebas, es importante que usted incorpore este proceso en su rutina cotidiana.
Recomendaciones para mejorar el control de la diabetes
################# Bibliografía
1 “Definition and diagnosis of diabetes mellitus and intermediate hyperglycaemia” World Health Organization, 2006 2 Diabetes Care, vol. 33 Enero;1 S82-86, 2010 3 Krall, L.P. and Beaser R.S.: Joslin Diabetes Manual. Filadelfia: Lea and Fibiger (1989), 261–263. 4 Kahn, R. and Weir, G.: Joslin’s Diabetes Mellitus. Filadelfia: Lea and Fibiger (1994), 489. 5 Declaraci n de posici n de la Asociaci n Americana de la Diabetes sobre el ensayo Diabetes Control and Complications Trial (1993).
|MEMORIA DEL MEDIDOR| |---|
Marcado de los resultados en la memoria Los resultados almacenados en la memoria del medidor se pueden marcar de dos maneras.
Marcado de pruebas con la solución de control Es preciso que marque los resultados obtenidos con el s mbolo del frasco de control . Inserte la tira de prueba en el medidor. Mantenga oprimido el botón de retroceso o avance hasta que en la esquina superior derecha de la pantalla aparezca . Haga esto ANTES de realizar una prueba con soluci n de control. Si no marca las pruebas de control antes de aplicar la soluci n de control a la tira de prueba, los resultados podr an estar incorrectos y se incluir n en el c lculo de los promedios.
El medidor no utilizar los resultados marcados al calcular el promedio de 14 d as y 30 d as. Esto garantiza que los promedios de 14 d as y 30 d as incluyan solo los resultados de los an lisis de sangre.
Para marcar un resultado , oprima el bot n de retroceso o avance ANTES de analizar con soluci n de control. (En la p gina 41 encontrar instrucciones detalladas sobre la realizaci n de pruebas con soluci n de control).


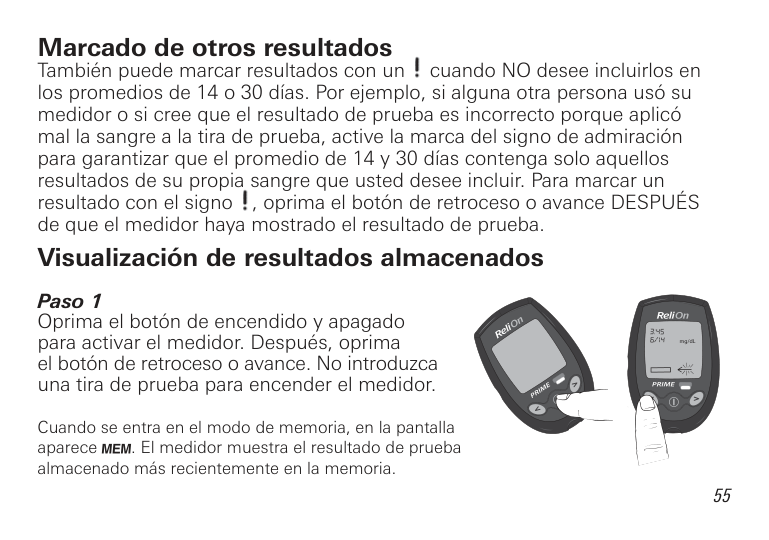
Marcado de otros resultados Tambi n puede marcar resultados con un cuando NO desee incluirlos en los promedios de 14 o 30 d as. Por e emplo, si alguna otra persona us su medidor o si cree que el resultado de prueba es incorrecto porque aplic mal la sangre a la tira de prueba, active la marca del signo de admiraci n para garantizar que el promedio de 14 y 30 d as contenga solo aquellos resultados de su propia sangre que usted desee incluir. Para marcar un resultado con el signo , oprima el bot n de retroceso o avance DESPU S de que el medidor haya mostrado el resultado de prueba. Visualización de resultados almacenados
mg/dL
Cuando se entra en el modo de memoria, en la pantalla aparece . El medidor muestra el resultado de prueba almacenado m s recientemente en la memoria.
Si no hay resultados almacenados, o sta es la primera vez que usted usa el medidor, en la pantalla aparecerán tres barras.
56
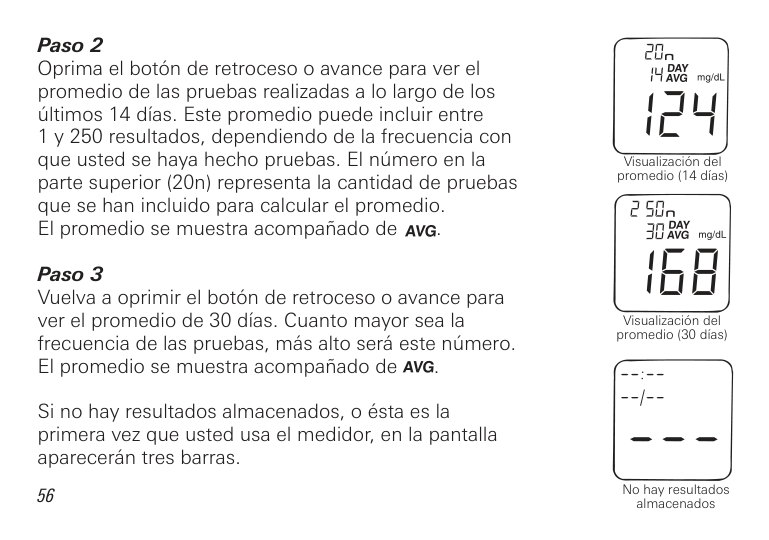
Visualizaci n del promedio (14 d as)
Visualizaci n del promedio (30 d as)
No hay resultados almacenados
Si no se ha realizado ninguna prueba en los ltimos 14 d as, el medidor mostrar la pantalla de promedio de 14 d as con tres barras. Esto significa que no hay ning n resultado almacenado para producir el promedio. Si no se ha realizado ninguna prueba en los ltimos 30 d as, el medidor mostrar la pantalla de promedio de 30 d as con tres barras.
El medidor muestra la hora de registro de cada prueba en la esquina superior izquierda, y la fecha de la prueba deba o de la hora.

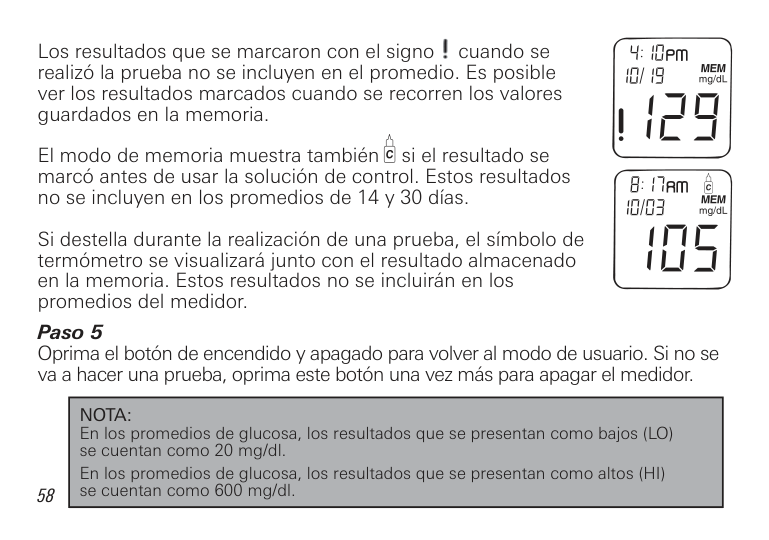
Los resultados que se marcaron con el signo cuando se realiz la prueba no se incluyen en el promedio. Es posible ver los resultados marcados cuando se recorren los valores guardados en la memoria.
El modo de memoria muestra tambi n si el resultado se marc antes de usar la soluci n de control. Estos resultados no se incluyen en los promedios de 14 y 30 d as.
Si destella durante la realizaci n de una prueba, el s mbolo de term metro se visualizar unto con el resultado almacenado en la memoria. Estos resultados no se incluir n en los promedios del medidor.
|NOTA: En los promedios de glucosa, los resultados que se presentan como ba os (LO) se cuentan como 20 mg/dl. En los promedios de glucosa, los resultados que se presentan como altos (HI) se cuentan como 600 mg/dl.| |---|

|MENSAJES VISUALIZADOS EN LA PANTALLA| |---|
A continuaci n se presenta una lista de todos los mensa es que pueden aparecer en la pantalla.
Si tiene preguntas despu s de leer estos mensa es, o si el medidor muestra un mensa e que no se describe aqu , llame al servicio de atenci n al cliente al 855.776.0662. Si en la pantalla aparece , significa que el usuario mismo puede borrar el mensa e de error. No env e su medidor a un distribuidor local sin antes haber obtenido la autorizaci n de un representante de la compa a.
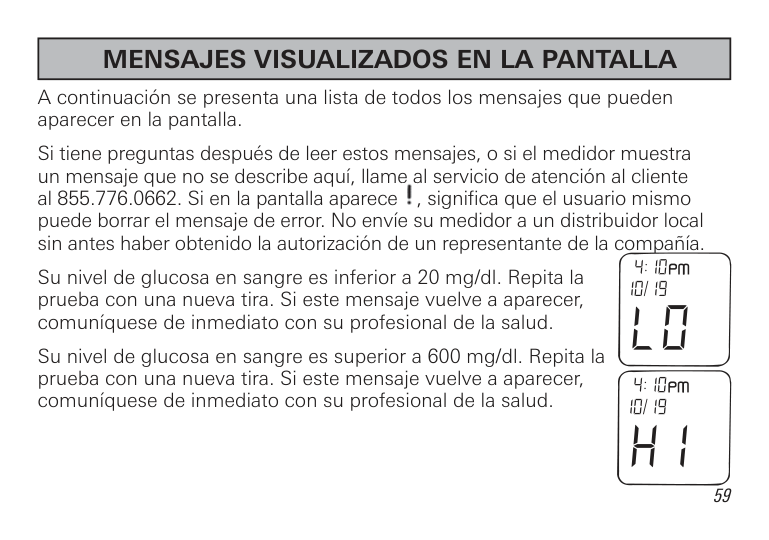
Su nivel de glucosa en sangre es inferior a 20 mg/dl. Repita la prueba con una nueva tira. Si este mensa e vuelve a aparecer, comun quese de inmediato con su profesional de la salud.
Su nivel de glucosa en sangre es superior a 600 mg/dl. Repita la prueba con una nueva tira. Si este mensa e vuelve a aparecer, comun quese de inmediato con su profesional de la salud.
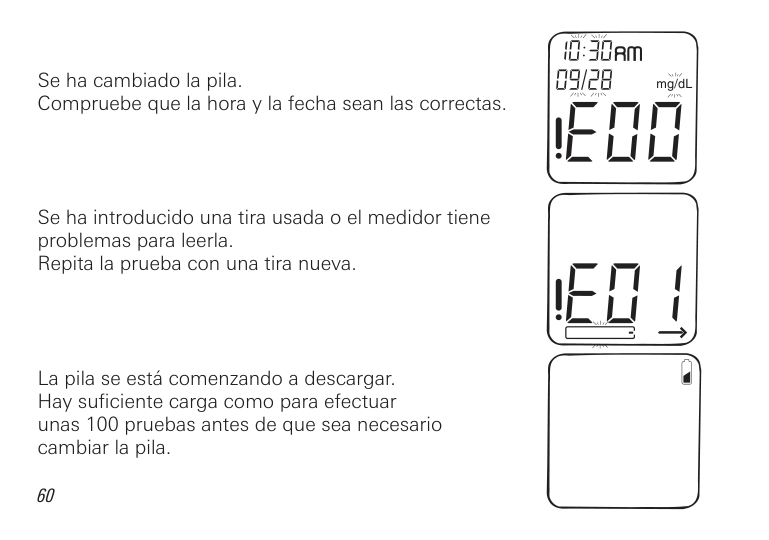
Se ha cambiado la pila. Compruebe que la hora y la fecha sean las correctas.
Se ha introducido una tira usada o el medidor tiene problemas para leerla. Repita la prueba con una tira nueva.
La pila se est comenzando a descargar. Hay suficiente carga como para efectuar unas 100 pruebas antes de que sea necesario cambiar la pila.
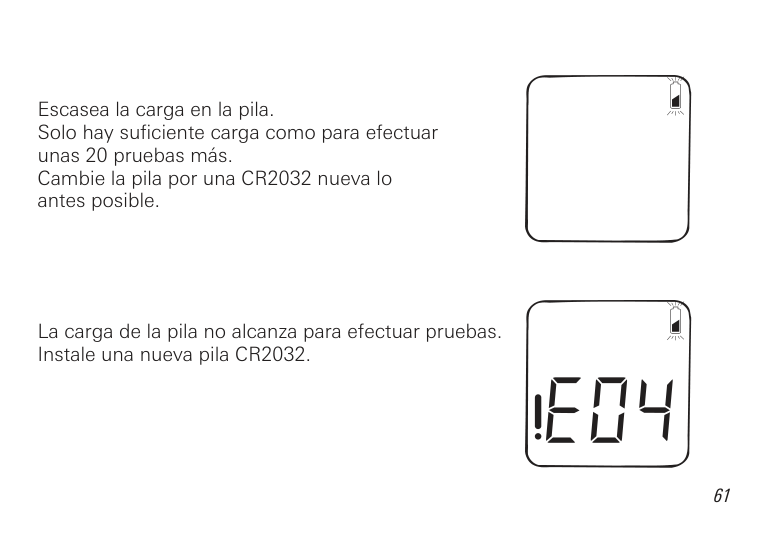
Escasea la carga en la pila. Solo hay suficiente carga como para efectuar unas 20 pruebas m s. Cambie la pila por una CR2032 nueva lo antes posible.
La carga de la pila no alcanza para efectuar pruebas. Instale una nueva pila CR2032.
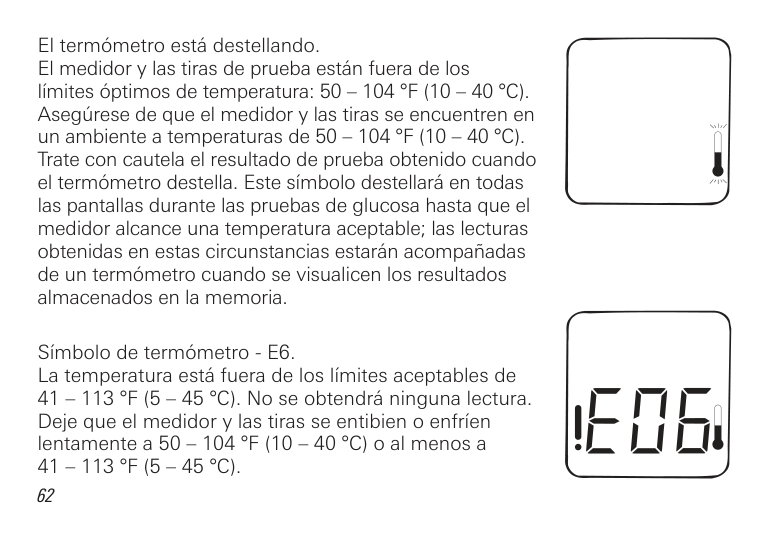
El term metro est destellando. El medidor y las tiras de prueba est n fuera de los l mites ptimos de temperatura: 50 – 104 °F (10 – 40 °C). Aseg rese de que el medidor y las tiras se encuentren en un ambiente a temperaturas de 50 – 104 °F (10 – 40 °C). Trate con cautela el resultado de prueba obtenido cuando el term metro destella. Este s mbolo destellar en todas las pantallas durante las pruebas de glucosa hasta que el medidor alcance una temperatura aceptable; las lecturas obtenidas en estas circunstancias estar n acompa adas de un term metro cuando se visualicen los resultados almacenados en la memoria.
S mbolo de term metro - E6. La temperatura est fuera de los l mites aceptables de 41 – 113 °F (5 – 45 °C). No se obtendr ninguna lectura. De e que el medidor y las tiras se entibien o enfr en lentamente a 50 – 104 °F (10 – 40 °C) o al menos a 41 – 113 °F (5 – 45 °C).
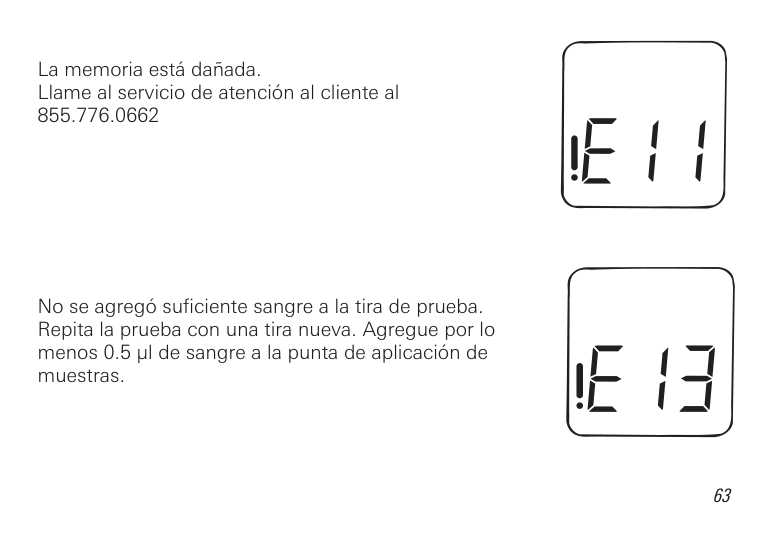
La memoria est da ada. Llame al servicio de atenci n al cliente al 855.776.0662
No se agreg suficiente sangre a la tira de prueba. Repita la prueba con una tira nueva. Agregue por lo menos 0.5 µl de sangre a la punta de aplicaci n de muestras.
|CUIDADO DEL MEDIDOR DE GLUCOSA EN SANGRE ReliOn® Prime.| |---|
Limpieza del medidor El medidor de glucosa en sangre ReliOn® Prime es un instrumento preciso que debe mane arse con sumo cuidado. Limpie el exterior del medidor nicamente con un pa o h medo; la suciedad, el polvo, la sangre, la soluci n de control y el agua pueden averiarlo. El medidor de glucosa en sangre ReliOn® Prime no deber a requerir una descontaminaci n, ya que no entrar en contacto con sangre ni soluci n de control si se siguen las instrucciones correctamente.
Almacenamiento El medidor de glucosa en sangre ReliOn® Prime est dise ado para ser almacenado a temperaturas de 32 – 122 °F (0 – 50 °C).
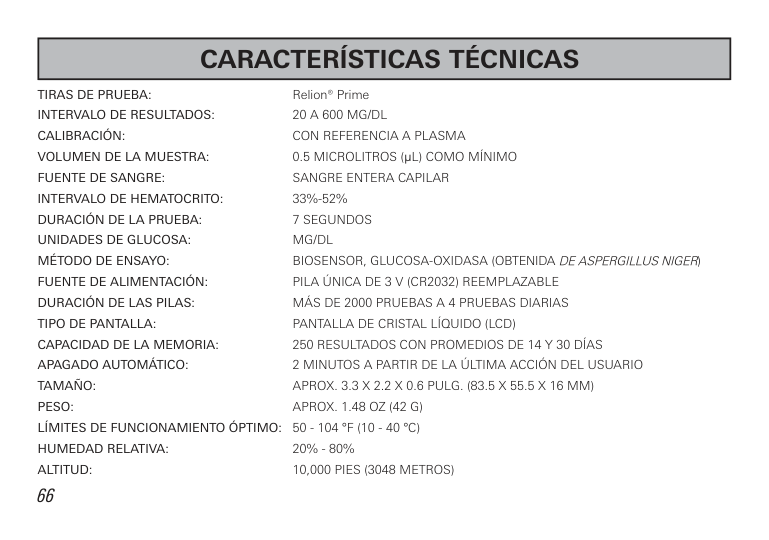
TIRAS DE PRUEBA: Relion® Prime INTERVALO DE RESULTADOS: 20 A 600 MG/DL CALIBRACIÓN: CON REFERENCIA A PLASMA VOLUMEN DE LA MUESTRA: 0.5 MICROLITROS (µL) COMO M NIMO FUENTE DE SANGRE: SANGRE ENTERA CAPILAR INTERVALO DE HEMATOCRITO: 33%-52% DURACIÓN DE LA PRUEBA: 7 SEGUNDOS UNIDADES DE GLUCOSA: MG/DL MÉTODO DE ENSAYO: BIOSENSOR, GLUCOSA-OxIDASA (OBTENIDA DE ASPERGILLUS NIGER) FUENTE DE ALIMENTACIÓN: PILA NICA DE 3 V (CR2032) REEMPLA ABLE DURACIÓN DE LAS PILAS: M S DE 2000 PRUEBAS A 4 PRUEBAS DIARIAS TIPO DE PANTALLA: PANTALLA DE CRISTAL L UIDO (LCD) CAPACIDAD DE LA MEMORIA: 250 RESULTADOS CON PROMEDIOS DE 14 Y 30 D AS APAGADO AUTOMÁTICO: 2 MINUTOS A PARTIR DE LA LTIMA ACCI N DEL USUARIO TAMAÑO: APROx. 3.3 x 2.2 x 0.6 PULG. (83.5 x 55.5 x 16 MM) PESO: APROx. 1.48 O (42 G) LÍMITES DE FUNCIONAMIENTO ÓPTIMO: 50 - 104 °F (10 - 40 °C) HUMEDAD RELATIVA: 20% - 80% ALTITUD: 10,000 PIES (3048 METROS)
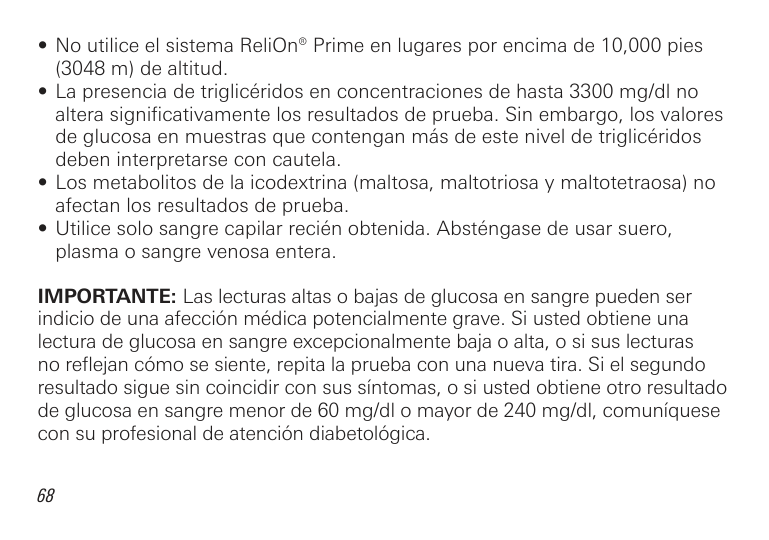
IMPORTANTE: Las lecturas altas o ba as de glucosa en sangre pueden ser indicio de una afecci n m dica potencialmente grave. Si usted obtiene una lectura de glucosa en sangre excepcionalmente ba a o alta, o si sus lecturas no refle an c mo se siente, repita la prueba con una nueva tira. Si el segundo resultado sigue sin coincidir con sus s ntomas, o si usted obtiene otro resultado de glucosa en sangre menor de 60 mg/dl o mayor de 240 mg/dl, comun quese con su profesional de atenci n diabetol gica.
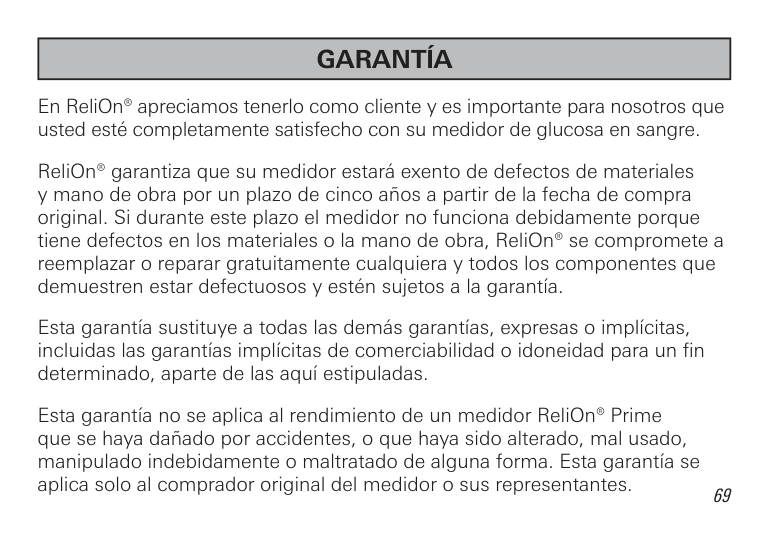
En ReliOn® apreciamos tenerlo como cliente y es importante para nosotros que usted est completamente satisfecho con su medidor de glucosa en sangre.
ReliOn® garantiza que su medidor estar exento de defectos de materiales y mano de obra por un plazo de cinco a os a partir de la fecha de compra original. Si durante este plazo el medidor no funciona debidamente porque tiene defectos en los materiales o la mano de obra, ReliOn® se compromete a reemplazar o reparar gratuitamente cualquiera y todos los componentes que demuestren estar defectuosos y est n su etos a la garant a.
Esta garant a sustituye a todas las dem s garant as, expresas o impl citas, incluidas las garant as impl citas de comerciabilidad o idoneidad para un fin determinado, aparte de las aqu estipuladas.
Esta garant a no se aplica al rendimiento de un medidor ReliOn® Prime que se haya da ado por accidentes, o que haya sido alterado, mal usado, manipulado indebidamente o maltratado de alguna forma. Esta garant a se aplica solo al comprador original del medidor o sus representantes.
DEVOLUCIONES Antes de devolver el medidor, es preciso que llame al servicio de atenci n al cliente al 855.776.0662 Se le indicar c mo proceder para devolver el medidor. No se aceptar ning n medidor devuelto sin autorizaci n.
Distributed by:
Wal-Mart Stores, Inc. Bentonville, AR 72716 855.776.0662
2013 Wal-Mart Stores, Inc.
N.o de ref. 7957-02 Rev. 5/13