
Ask AI
— answers from the official manualAnswers from the official manual.
Common questions
Common Questions
28 totalWhat should I do if my RT628 radio does not turn on?
Ensure that the device is turned off first, then press and hold the Power/On-Off button until the LCD display activates and shows the current channel. If it still doesn’t work, check battery installation and connections.
How do I enable VOX (voice-activated) mode on the RT628?
Press the Menu button four times until the (⚙️) symbol and a blinking "1" appear on the LCD. Press the Up button (▲) to set VOX sensitivity to the highest level (3), then press PTT to confirm. The (⚡) symbol will display continuously when VOX is active. Note that VOX operation is not recommended in loud or windy environments.
How do I turn on the Retevis RT628?
Press and hold the Power/On-Off button until the LCD display activates and the current channel is shown. A beep will confirm the device is on.
How do I change channels on the RT628?
Press the Menu button once so the current channel number blinks on the LCD. Press the Up (▲) or Down (▼) buttons to select the desired channel (1-8), then press the PTT button to confirm the setting.
How do I insert batteries into the RT628?
Slide the battery compartment cover downwards, insert the rechargeable batteries according to the indicated orientation, and close the battery compartment cover. Ensure correct polarity to avoid damaging the batteries and device.
How do I adjust the volume on the RT628?
Press the Up button (▲) to increase the volume or the Down button (▼) to decrease it. The volume level is indicated by vertical bars on the LCD display.
Show 22 more questions
How do I use the CTCSS sub-channel function on the RT628?
How do I transmit a message on the RT628?
How do I check the battery level on the RT628?
How do I change the channel on my Retevis RT628 radio?
How can I set up CTCSS sub-channel and DCS code on my RT628?
How do I set up dual channel monitoring mode?
How do I set up the VOX (voice activated) sensitivity?
How do I set the volume on my Retevis RT628S?
How do I set the CTCSS/DCS code?
What happens if I exceed the transmission limit?
How do I enter Safe Mode?
What is the Scan feature used for?
What does the battery indicator display mean?
What is the call alert function?
What is the range of the Retevis RT628?
How can I change the power level setting?
How do I monitor other channels without speaking?
How do I set up Dual Standby Channels?
What safety measures should I follow while using this device?
How do I reset the device to factory defaults?
How do I configure Key Lock?
What is the VOX function and how do I turn it on?
Full Manual
13 pages

Two Way Radio
RT628S
User Manual EN(01~12)
Key Functions
11
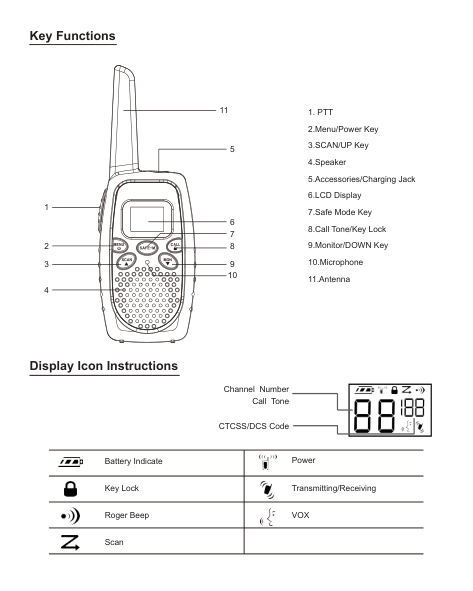
Display Icon Instructions
Channel Number Call Tone
CTCSS/DCS Code

|
Battery Indicate|
Power| |---|---| |
Key Lock|
Transmitting/Receiving| |
Roger Beep|
VOX| |
Scan| |
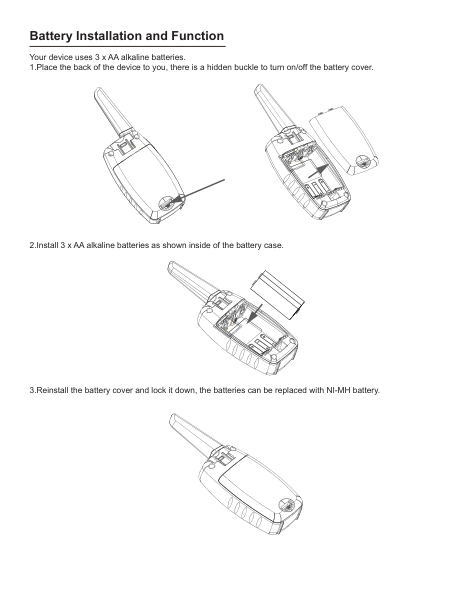
Battery Installation and Function Your device uses 3 x AA alkaline batteries.
| | | |---|---| | | |
| | | |---|---| | | |
Battery Power Measurement The battery capacity is full, the battery power is high . When the battery displays 1 grid, the device is in low battery mode and makes a low battery warning in the form of the prompt.
Note: Take out the battery from the radio to save it. The battery may become corrosion by the time and do the forever damage to your device.
Turn ON/OFF the Device After installing the batteries, the device is turned on and has a prompt. LCD display will briefly display all function icons, then it will display the available channel and CTCSS/DCS. Press the Power key, the radio is turned off.
Set Volume
Communication When communicating, all the devices of the group set the same channel number and CTCSS/DCS code; When you start to communicate, please keep 2-3inch between the device and the mouth. Press the PTT key to talk. When you finish talking, release the PTT key. (Press the key to transmit, release the key to receive).
Featured Function CTCSS/DCS Code The distribution of the CTCSS/DCS code can decrease the interference between radios, but radios can’t communicate with each other with different CTCSS/DCS codes. To ensure your private communication, each channel has 0-121 CTCSS/DCS codes to be set.
##### TOT
To prevent accidental transmission or occupying channel for a long time, if you press the PTT key to continuously transmit for 60s, the device will make a continuous warning tone and stop transmitting.
##### Key Lock

To prevent accidentally changing the setting of the radio, press the CALL/Key Lock for 3s or until the key lock icon is displayed. At this time, you can turn on/off the radio, adjust the volume, receive, transmit, transmit call
tone and monitor channel. But other functions are locked. To unlock the device, press the CALL/Key Lock for 3s or until the key lock icon is not displayed.
Scan Channel Use scan to monitor the reeving of the channel or find the people who accidentally change the channel in your group. Press the SCAN key for 3s and the scan icon appears, the radio starts to scan. When detecting the channel activities, you can hear the receiving. To answer, press the PTT key in 5s and the channel will be confirmed.
Enter the Scan Again If the scan stops on the unwanted channel, shortly press the SCAN key, the scan restores and enters next effective channel scan.
Set and Send Call Tone Your device can send different call tones to other devices in your group to remind the people you want to communicate. Set Call Tone
Send to call tone other devices, the device needs to set the same channel and CTCSS/DCS codes as yours, then press the call tone key to call.
Note: the call tone is set to 0, all call tones are ineffective. VOX Function The VOX function allows the user to start transmitting towards the microphone without pressing the PTT key.
|L3 = High sensitivity|

|---| |L2 = Middle sensitivity| |L1 = Low sensitivity| |L0 = Turn off the VOX function|
##### Set Dual Standby Channel
Check Channel Before Transmitting Your device has 21 channels and they display with the cyclic method. To achieve uninterrupted communication, please don’t communicate on the channel if other people are communicating on that channel. To check channel activities before communication, long press the MON/DOWN key, the channel can be used if you listen to the white noise.
##### Set Squelch Level
##### Set Transmitting Power
Set Safe Mode Press the SAFE-M key for 3s until the SF icon appears, the device enters the safe mode. Press the SAFE-M key for 3s again, the device exits the safe mode. Note: in the safe mode, other function can’t be used except the PTT function and volume adjustment.
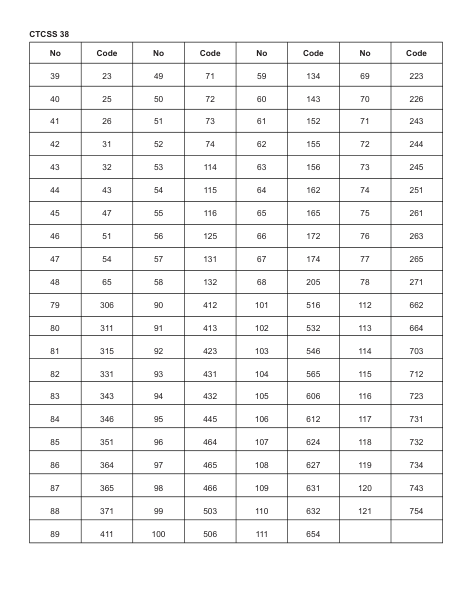
##### CTCSS 38
|No|Code|No|Code|No|Code|No|Code| |---|---|---|---|---|---|---|---| |39|23|49|71|59|134|69|223| |40|25|50|72|60|143|70|226| |41|26|51|73|61|152|71|243| |42|31|52|74|62|155|72|244| |43|32|53|114|63|156|73|245| |44|43|54|115|64|162|74|251| |45|47|55|116|65|165|75|261| |46|51|56|125|66|172|76|263| |47|54|57|131|67|174|77|265| |48|65|58|132|68|205|78|271| |79|306|90|412|101|516|112|662| |80|311|91|413|102|532|113|664| |81|315|92|423|103|546|114|703| |82|331|93|431|104|565|115|712| |83|343|94|432|105|606|116|723| |84|346|95|445|106|612|117|731| |85|351|96|464|107|624|118|732|
|86|364|97|465|108|627|119|734| |87|365|98|466|109|631|120|743| |88|371|99|503|110|632|121|754| |89|411|100|506|111|654| | |
Electromagnetic Interference/Compatibility NOTE: Nearly every electronic device is susceptible to electromagnetic interference (EMI) if inadequately shielded, designed, or otherwise configured for electromagnetic compatibility.
##### Avoid Choking Hazard
Small Parts. Not for children under 3 years.
##### Turn off your radio power in the following conditions:

##### Protect your hearing:
WARNING
WARNING
Avoid Burns
Antennas
Forbid
WARNING
Safety Operation
WARNING
Approved Accessories
WARNING
|For downloading further resources: Brochures, Software/Firmware, Manual etc, Pls contact your direct reseller first OR go to website retevis.com and check “support” in the each product link to download it.| |---|
C
u
a
g
ht
s
n
e
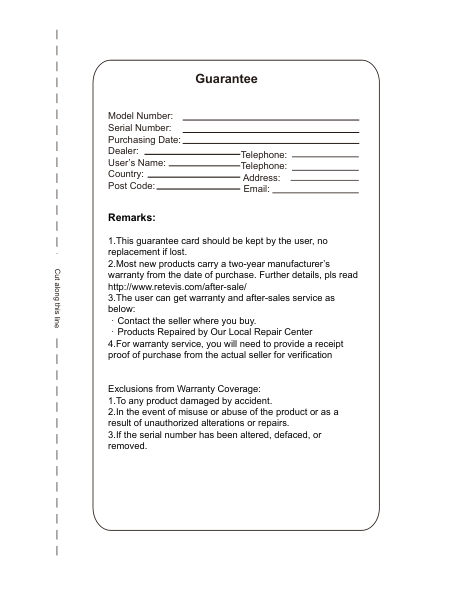
Guarantee
Model Number: Serial Number: Purchasing Date: Dealer: User’s Name: Country: Post Code:
Telephone: Telephone:
Address: Email:

#### Remarks:
Exclusions from Warranty Coverage:
Any Changes or modifications not expressly approved by the party responsible for compliance could void the user's authority to operate the equipment.
This device complies with part 15 of the FCC Rules. Operation is subject to the following two conditions: (1) This device may not cause harmful interference, and (2) this device must accept any interference received, including interference that may cause undesired operation.
Note: This equipment has been tested and found to comply with the limits for a Class B digital device, pursuant to part 15 of the FCC Rules. These limits are designed to provide reasonable protection against harmful interference in a residential installation. This equipment generates, uses and can radiate radio frequency energy and, if not installed and used in accordance with the instructions, may cause harmful interference to radio communications. However, there is no guarantee that interference will not occur in a particular installation. If this equipment does cause harmful interference to radio or television reception, which can be determined by turning the equipment off and on, the user is encouraged to try to correct the interference by one or more of the following measures:
—Reorient or relocate the receiving antenna.
—Increase the separation between the equipment and receiver.
—Connect the equipment into an outlet on a circuit different from that to which the receiver is connected.

—Consult the dealer or an experienced radio/TV technician for help.
FCC/ISEDC RF Exposure Requirements: For body-worn operation, this radio has been tested and meets the FCC/ISEDC RF exposure guidelines when used with accessories supplied or designated for this product. Use of other accessories may not ensure compliance with FCC/ISEDC RF exposure guidelines. Normal Position Hold the transmitter approximately 25 mm from your face and speak in a normal voice, with the antenna pointed up and away.
FCC/ISEDC exigences d'exposition aux RF: Pour une utilisation sur le corps, cette radio a été testée et est conforme aux directives FCC /ISEDC sur l'exposition aux RF lorsqu'elle est utilisée avec les accessoires fournis ou spécifiés avec ce produit. L'utilisation d'autres accessoires peut ne pas garantir la conformité aux directives de la FCC/ISEDC sur l'exposition aux RF. Position normale Tenez l'émetteur à environ 25 mm de votre visage et parlez d'une voix normale, avec l'antenne pointée vers le haut et éloignée.
This device complies with Innovation, Science, and Economic Development Canad licence-exempt RSS standard(s). Operation is subject to the following two conditions:
Le présent appareil est conforme aux CNR d' Innovation, Sciences et Développement économique Canada applicables aux appareils radio exempts de licence. L'exploitation est autorisée aux deux conditions suivantes :
Transmit no more than the rated duty factor of 50% of the time. To transmit (talk), push the Push-To-Talk (PTT) button.
To receive calls, release the PTT button. Transmitting 50 % of the time, or less, is important because this radio gener ates measurable RF energy exposure only when transmitting (in terms of measuring for standards compliance).
Facteur de cycle nominal ne dépassant pas 50% du temps de transmission. Pour envoyer (appel), appuyez sur le bouton Push to talk (PTT). Pour répondre à un appel, relâchez le bouton PTT. Il est important d'émettre 50% ou moins du temps, car une telle radio ne produit une exposition mesurable à l'énergie RF (en termes de mesure de la conformité aux normes) que lorsqu'elle émet.

###### MADE IN CHINA