
Ask AI
— answers from the official manualAnswers from the official manual.
Common questions
Common Questions
20 totalHow do I activate the Control Lock to prevent accidental setting changes?
Press and hold the Door Alarm button for 3 seconds to activate Control Lock, which disables the main panel and turns on the Lock indicator. To deactivate, press and hold the button again for more than 3 seconds. Note that Control Lock will automatically reactivate if no button is pressed within 1 minute after deactivation. (Page 54)
How long should I wait before loading food into the refrigerator after installation?
Allow the appliance to stand for 2 to 3 hours before loading foods after installation and turning it on. After plugging in, set the temperature to the coldest setting and wait about an hour until the freezer is slightly chilled and the motor runs smoothly. Then wait until the refrigerator reaches the set temperature before use. (Page 13, 46)
What should I do if the door alarm keeps sounding?
The door alarm sounds if the door is left open for more than 2 minutes, and the alarm indicator will blink. You can toggle the alarm on and off by pressing the Door Alarm button. If the door is left open for 5 minutes, internal lights will also blink to alert hearing-impaired users, which is normal behavior. (Page 54)
What FlexZone™ modes are available and what temperatures do they maintain?
The FlexZone™ offers four modes: Wine (approximately 5 °C), Deli (approximately 3 °C), Beverage (approximately 1 °C), and Meat (approximately -1 °C). The default mode is Deli. Note that most fruits and leafy vegetables should not be stored in the FlexZone™ as they may suffer cold-temperature damage, and glass bottles should not be stored in Beverage or Meat mode. (Page 51)
What should I do if the Auto Water Fill indicator is blinking?
A blinking Auto Water Fill indicator signals a leak, which may be caused by an overflowing water tank or a water-line or water-level sensor failure. Open the rubber cap to drain the water, and the indicator should stop blinking and turn solid once draining is complete, then close the rubber cap. If the indicator continues to blink after draining, there may be a system failure and you should contact a local Samsung service center. (Page 50, 61)
How do I properly prepare the ice maker when first setting up the refrigerator?
Let the refrigerator operate for at least 24 hours first to ensure optimal performance. Then dispense the first 4 to 6 ice cubes into a glass, wait another 8 hours and dispense another 4 to 6 cubes, then wait 16 more hours before dispensing the first full glass of ice. After a power failure, empty the ice bucket so it can refill with fresh, loose ice cubes. (Page 63)
Show 14 more questions
What clearances are required when installing the refrigerator?
What precautions should I take when moving my refrigerator?
Why does my fridge emit a burning smell or smoke?
What is the proper water pressure needed for my ice maker to work?
How do I clean the rear of my refrigerator safely?
How do I adjust the door gaps and height properly?
How do I level my refrigerator?
What safety steps are required when removing fridge doors for installation?
How do I remove the FlexZone™ basket?
What water pressure is required for the ice maker and water dispenser to work properly?
What are the recommended temperature settings for the fridge and freezer?
How do I reset the water filter indicator after replacing the filter?
How do I properly dispose of the refrigerant in my Samsung Rf28r7351sg?
How do I attach fridge handles correctly?
Full Manual
176 pages

Refrigerator User manual Free Standing Appliance Untitled-5 1 2021-06-22 5:15:39

English 2 Contents Contents Safety information 3 What you need to know about the safety instructions 3 Important safety symbols and precautions: 4 Important safety precautions 5 Severe warning signs for transportation and site 9 Critical installation warnings 9 Installation cautions 13 Critical usage warnings 13 Usage cautions 19 Cleaning cautions 21 Critical disposal warnings 24 Additional tips for proper usage 25 Instructions about the WEEE 26 Installation 27 Refrigerator at a glance 27 Step-by-step installation 30 Operations 47 Main panel 47 SmartThings 55 Dispenser panel 58 Special features 59 Maintenance 65 Handling and care 65 Cleaning 72 Replacement 73 Troubleshooting 75 General 75 Do you hear abnormal sounds from the refrigerator? 79 SmartThings 81 Open Source Announcement 82 Untitled-5 2 2021-06-22 5:15:39
English 3 Safety information Before using your new Samsung Refrigerator, please read this manual thoroughly to ensure that you know how to operate the features and functions that your new appliance offers safely and efficiently. What you need to know about the safety instructions
Safety information English 4 Safety information
Warning
Hazards or unsafe practices that may result in severe personal injury, property damage, and/or death.Caution
Hazards or unsafe practices that may result in severe personal injury and/or property damage.Note
Useful information that helps users understand or benefit from the refrigerator. Untitled-5 4 2021-06-22 5:15:39
English 5 Safety information These warning signs are here to prevent injury to you and others. Please follow them carefully. After reading this section, keep it in a safe place for future reference. Important safety precautions Warning; Risk of fire / flammable materials
Warning
Safety information English 6 Safety information
English 7 Safety information
Safety information English 8 Safety information
English 9 Safety information Severe warning signs for transportation and site
Warning
Warning
Safety information English 10 Safety information
English 11 Safety information
Safety information English 12 Safety information
English 13 Safety information
Caution
Warning

Safety information English 14 Safety information
English 15 Safety information
Safety information English 16 Safety information
English 17 Safety information
Safety information English 18 Safety information
English 19 Safety information Usage cautions
Caution
Safety information English 20 Safety information
English 21 Safety information
Caution
Safety information English 22 Safety information
English 23 Safety information
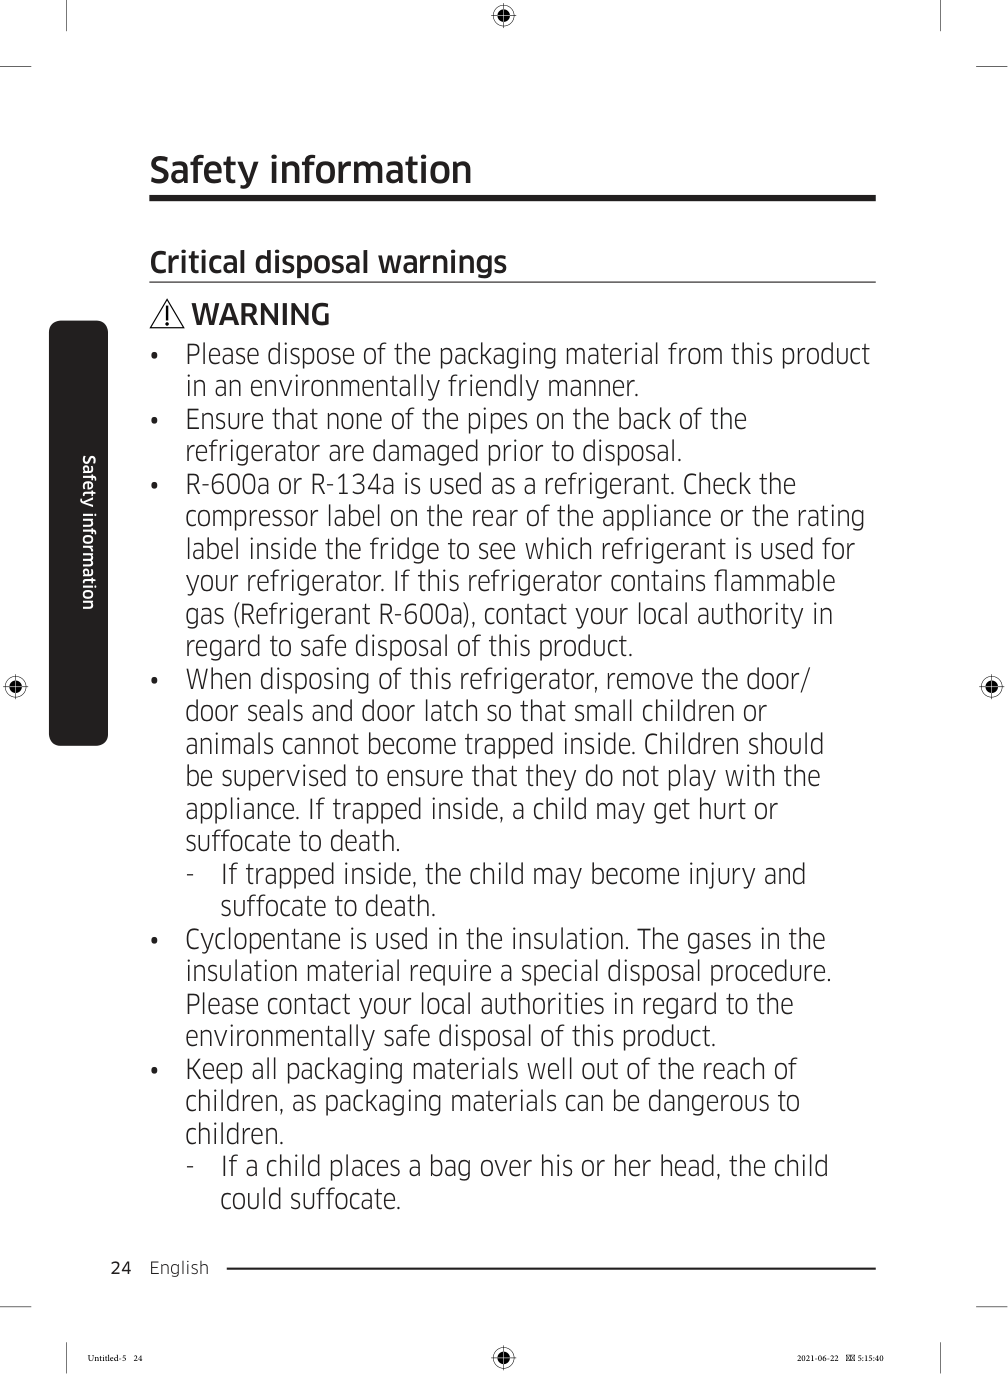
Safety information English 24 Safety information Critical disposal warnings
Warning
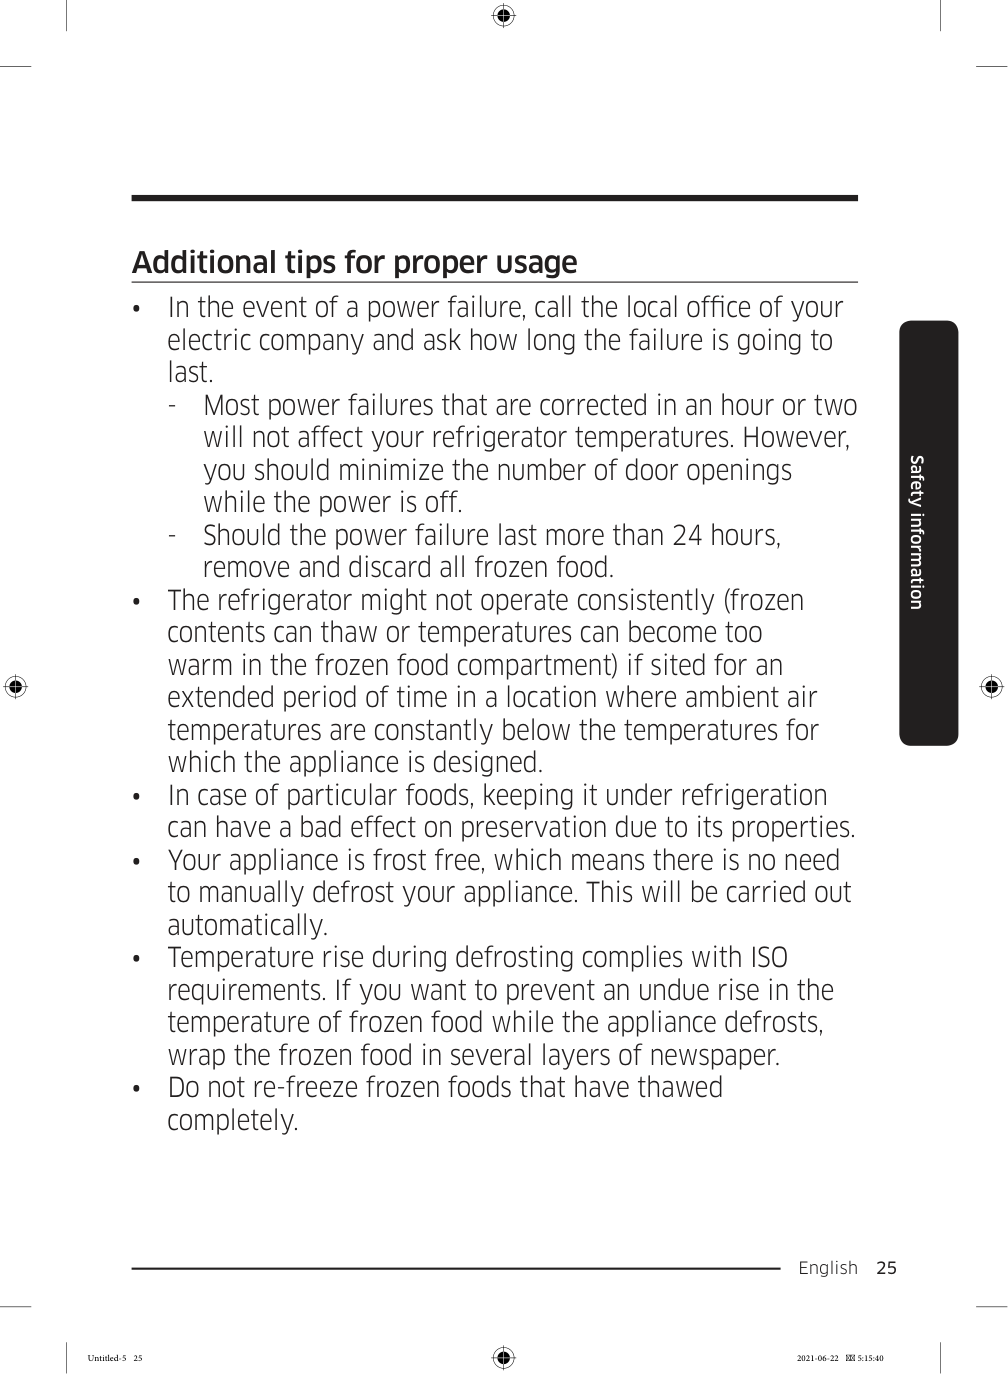
English 25 Safety information Additional tips for proper usage
Safety information English 26 Safety information
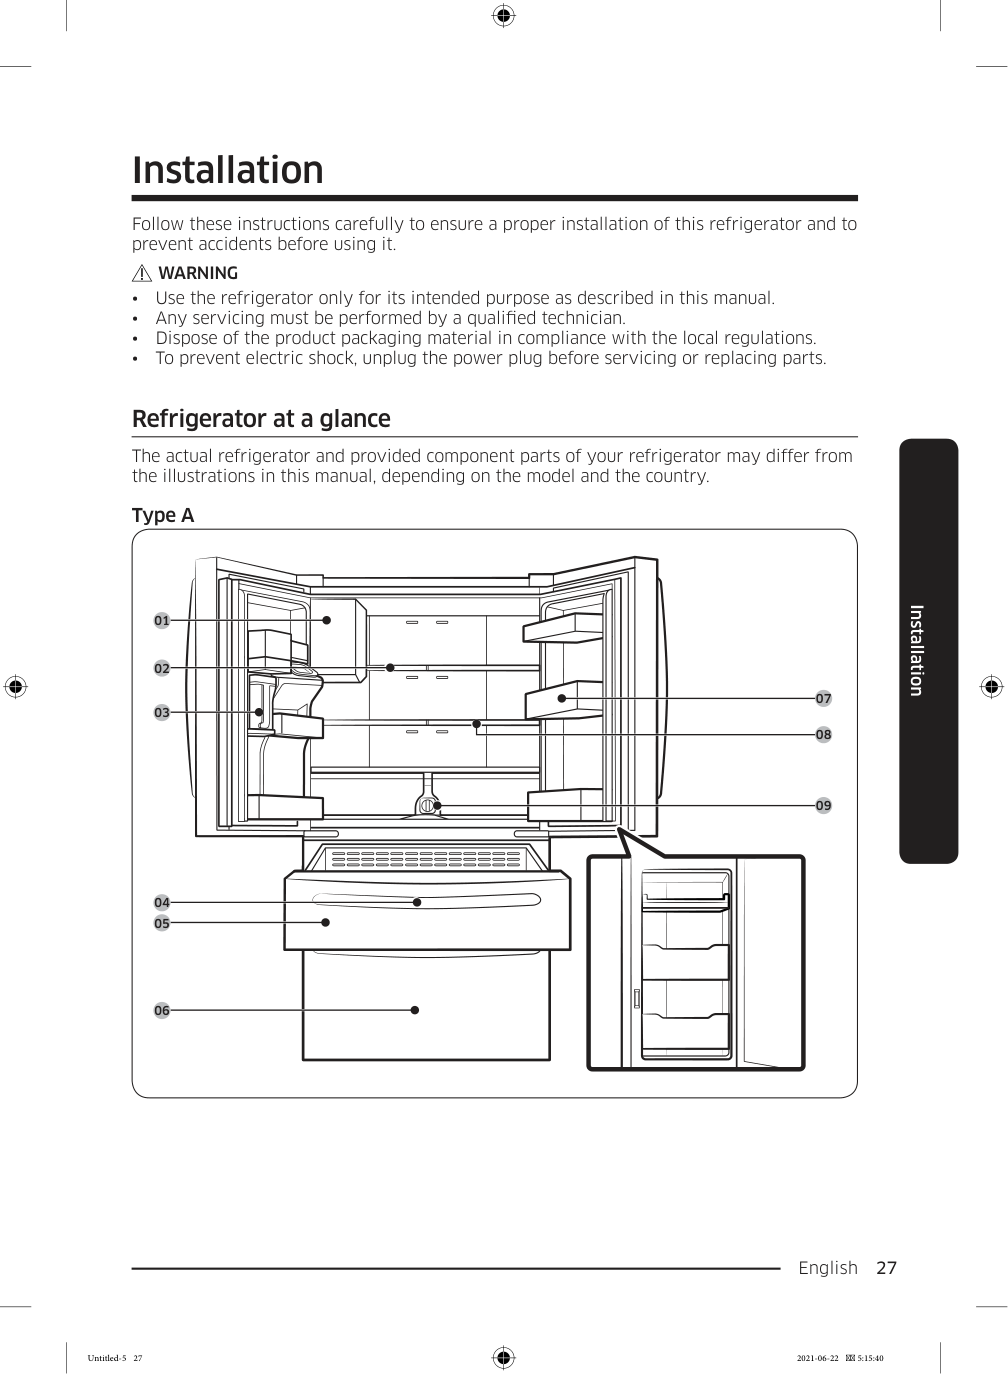
English 27 Installation Follow these instructions carefully to ensure a proper installation of this refrigerator and to prevent accidents before using it.
Warning
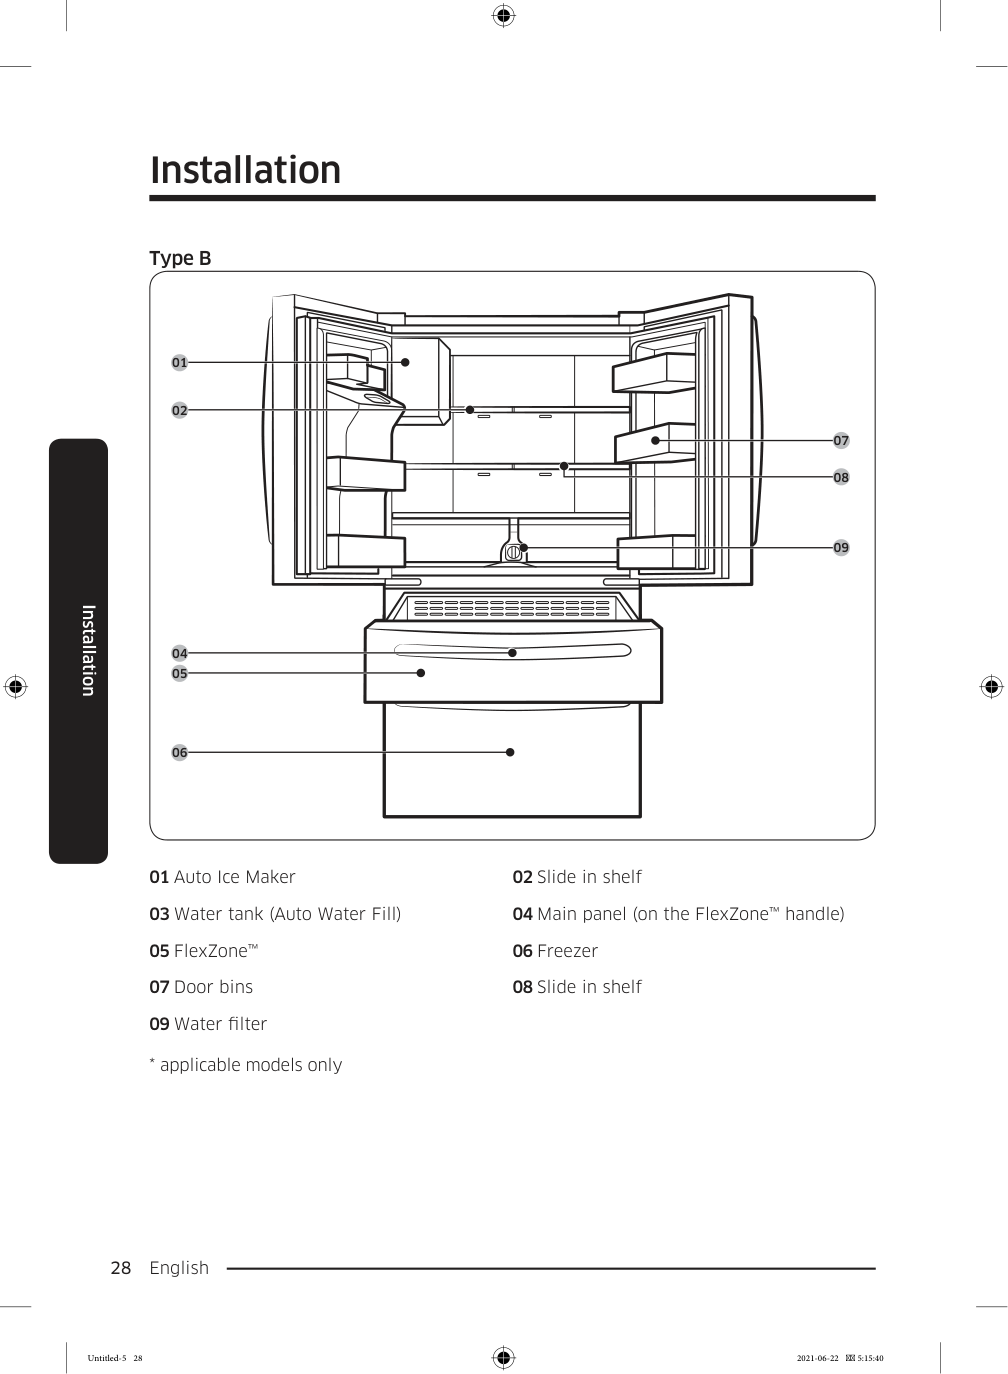
Installation English 28 Installation Type B 01 02 05 04 06 08 09 07 01 Auto Ice Maker 02 Slide in shelf 03 Water tank (Auto Water Fill) 04 Main panel (on the FlexZone™ handle) 05 FlexZone™ 06 Freezer 07 Door bins 08 Slide in shelf 09 Water filter
English 29 Installation
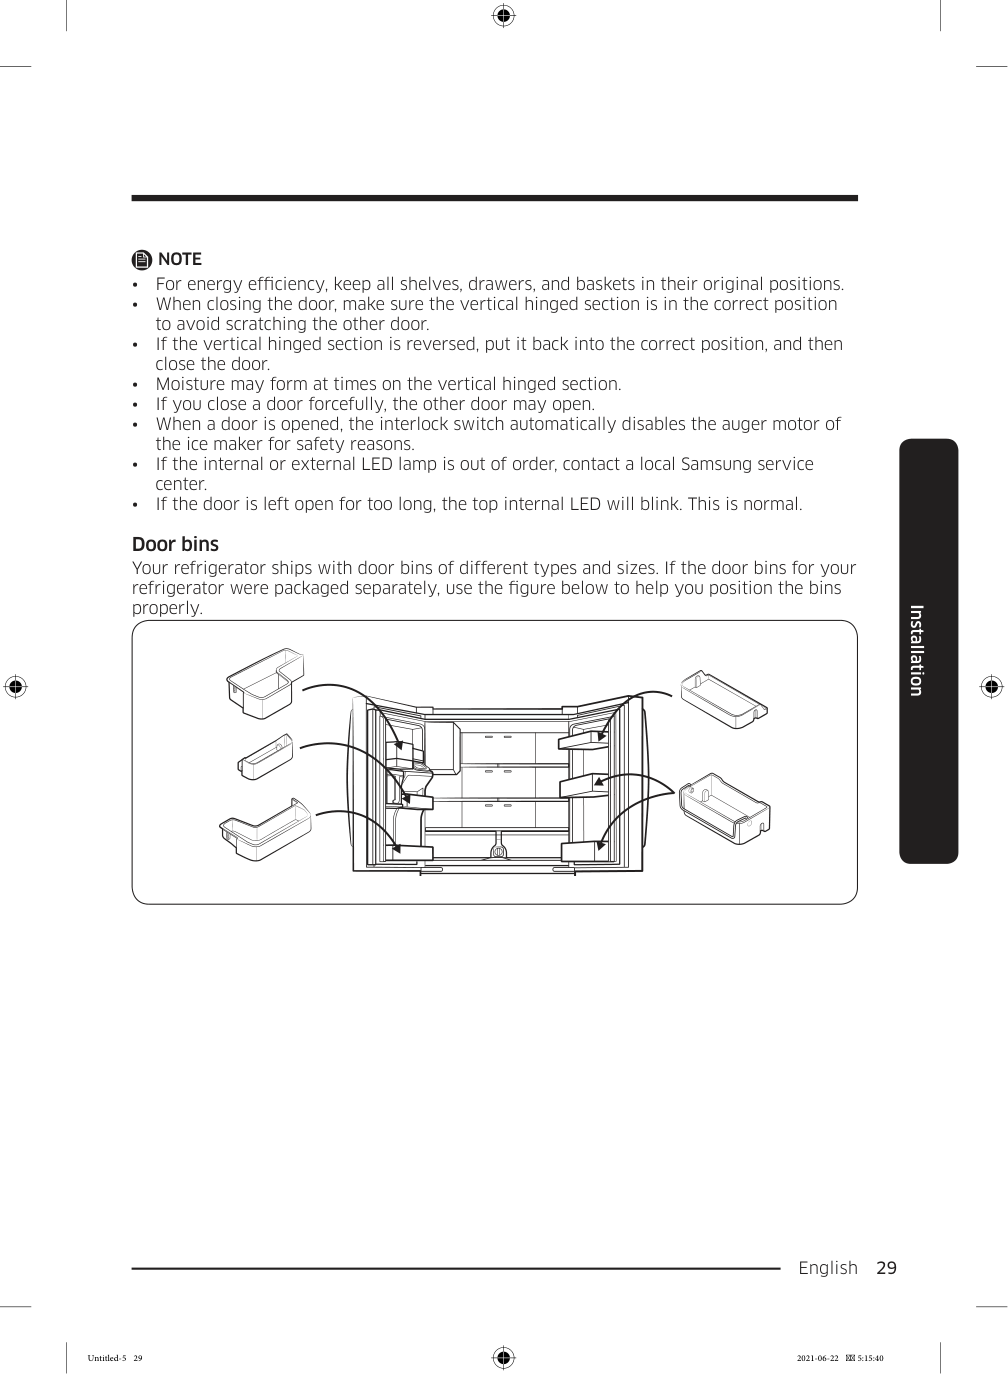
Note
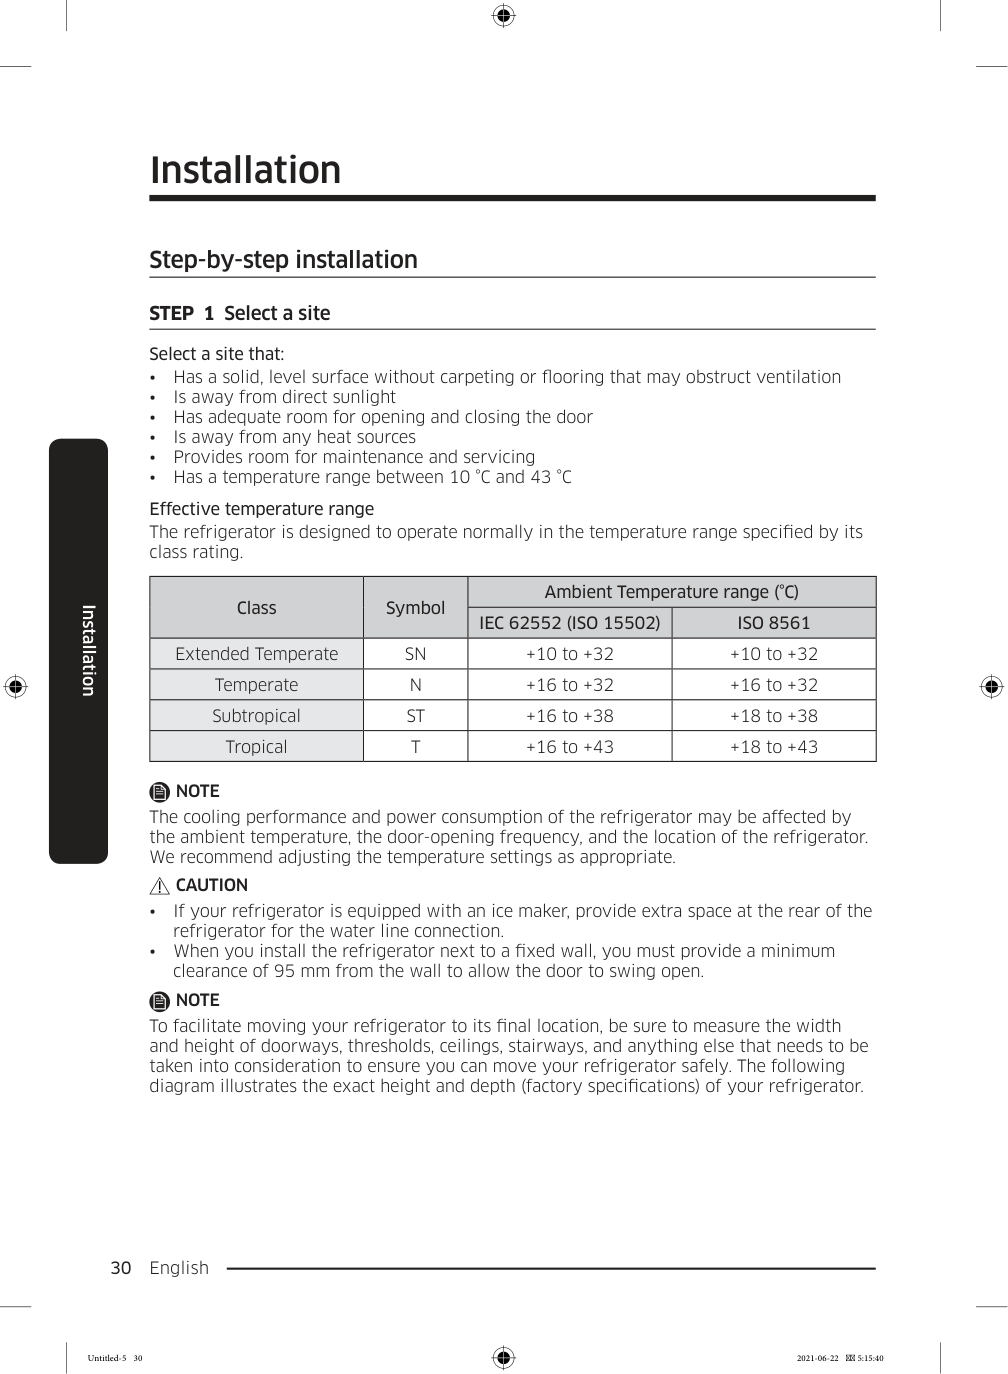
Installation English 30 Installation Step-by-step installation STEP 1 Select a site Select a site that:
Iec 62552 (Iso 15502)
Iso 8561
Extended TemperateSn
+10 to +32 +10 to +32 TemperateN
+16 to +32 +16 to +32 SubtropicalSt
+16 to +38 +18 to +38 TropicalT
+16 to +43 +18 to +43Note
The cooling performance and power consumption of the refrigerator may be affected by the ambient temperature, the door-opening frequency, and the location of the refrigerator. We recommend adjusting the temperature settings as appropriate.Caution
Note
To facilitate moving your refrigerator to its final location, be sure to measure the width and height of doorways, thresholds, ceilings, stairways, and anything else that needs to be taken into consideration to ensure you can move your refrigerator safely. The following diagram illustrates the exact height and depth (factory specifications) of your refrigerator. Untitled-5 30 2021-06-22 5:15:40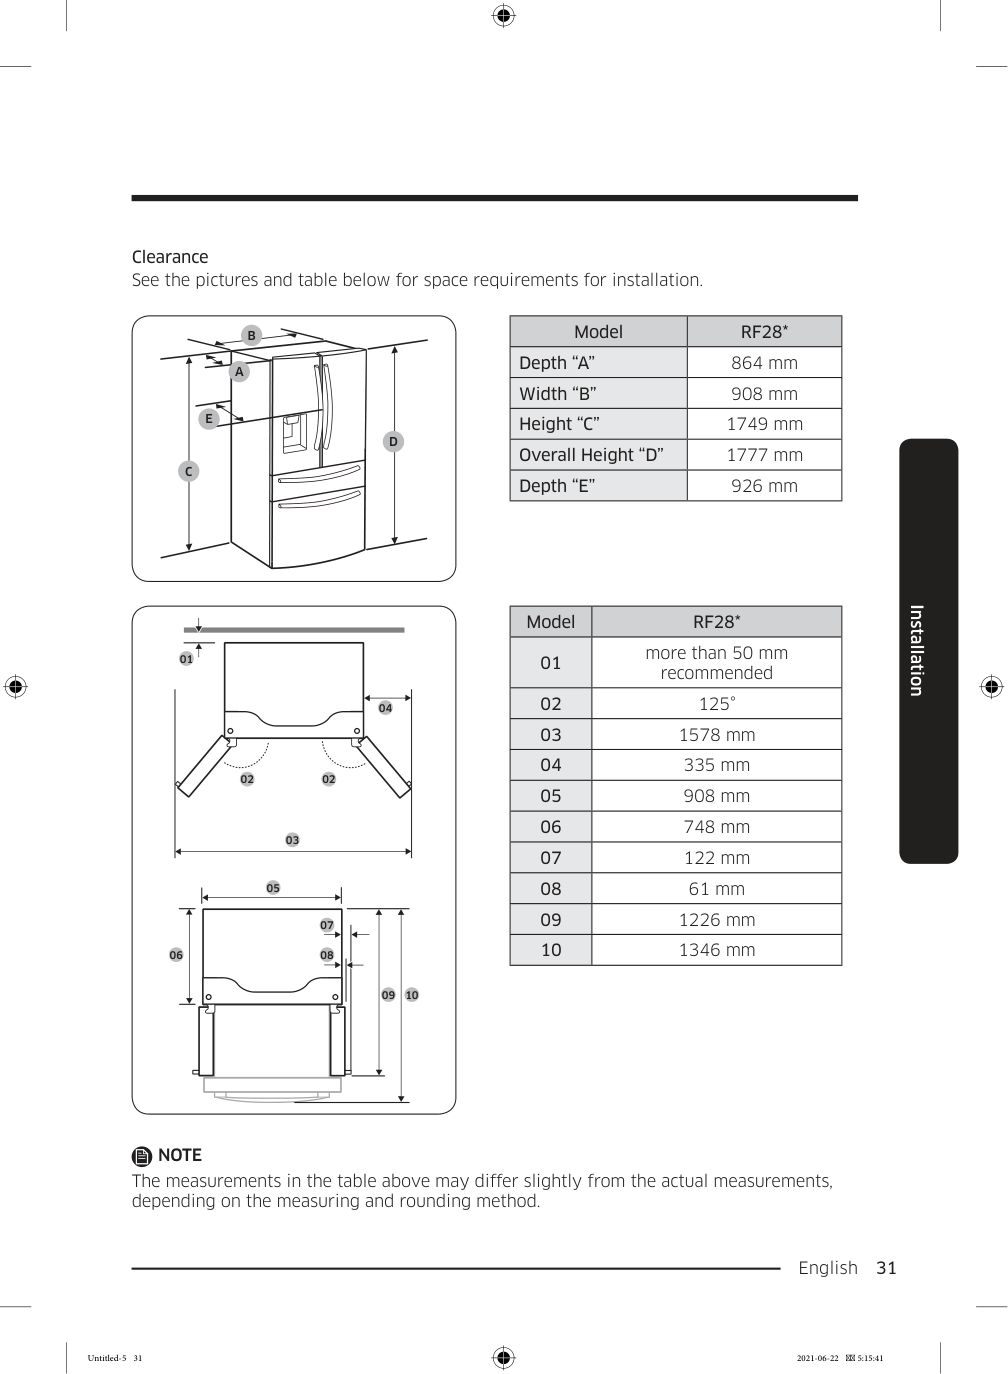
English 31 Installation Clearance See the pictures and table below for space requirements for installation.
C
D
E
B
A
ModelRf28*
Depth “A” 864 mm Width “B” 908 mm Height “C” 1749 mm Overall Height “D” 1777 mm Depth “E” 926 mm 01 02 02 04 03 05 06 09 10 07 08 ModelRf28*
01 more than 50 mm recommended 02 125° 03 1578 mm 04 335 mm 05 908 mm 06 748 mm 07 122 mm 08 61 mm 09 1226 mm 10 1346 mmNote
The measurements in the table above may differ slightly from the actual measurements, depending on the measuring and rounding method. Untitled-5 31 2021-06-22 5:15:41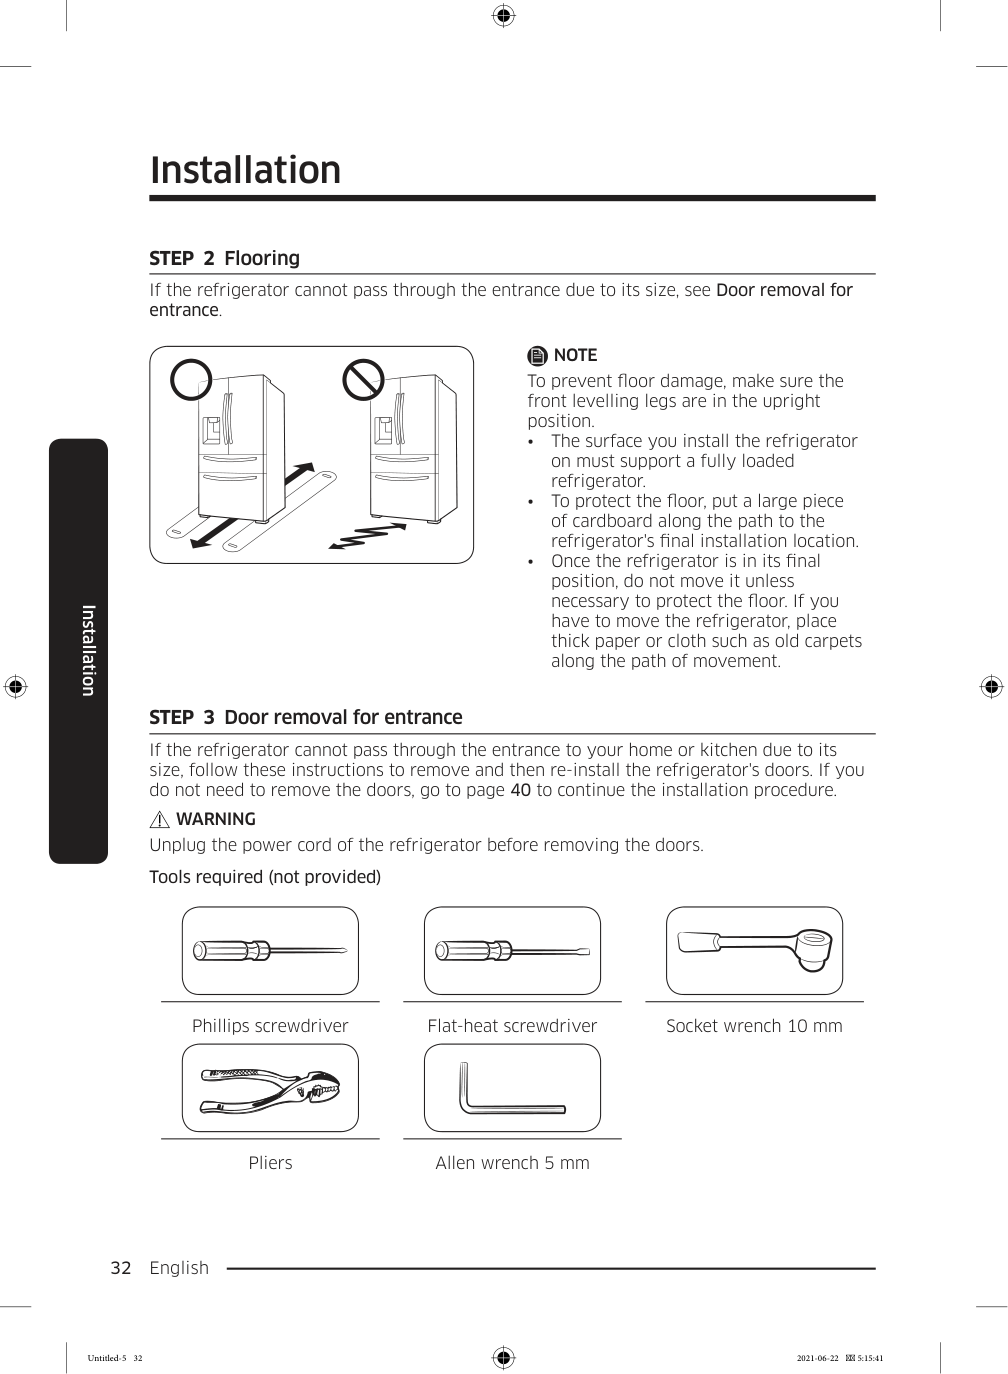
Installation English 32 Installation STEP 2 Flooring If the refrigerator cannot pass through the entrance due to its size, see Door removal for entrance.
Note
To prevent floor damage, make sure the front levelling legs are in the upright position.Warning
Unplug the power cord of the refrigerator before removing the doors. Tools required (not provided) Phillips screwdriver Flat-heat screwdriver Socket wrench 10 mm Pliers Allen wrench 5 mm Untitled-5 32 2021-06-22 5:15:41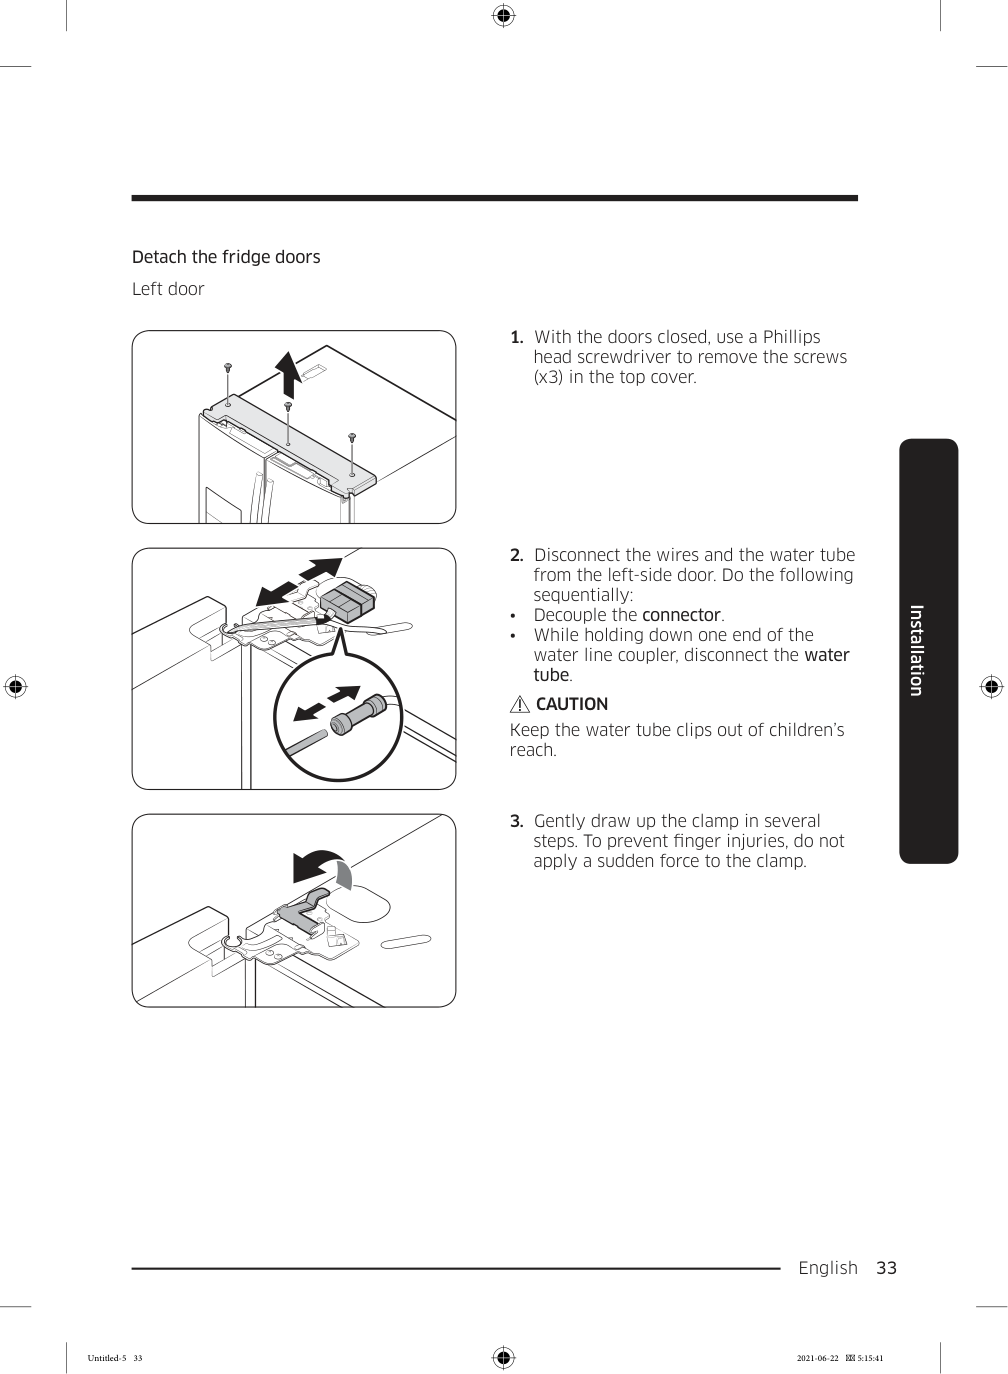
English 33 Installation Detach the fridge doors Left door
Caution
Keep the water tube clips out of children’s reach.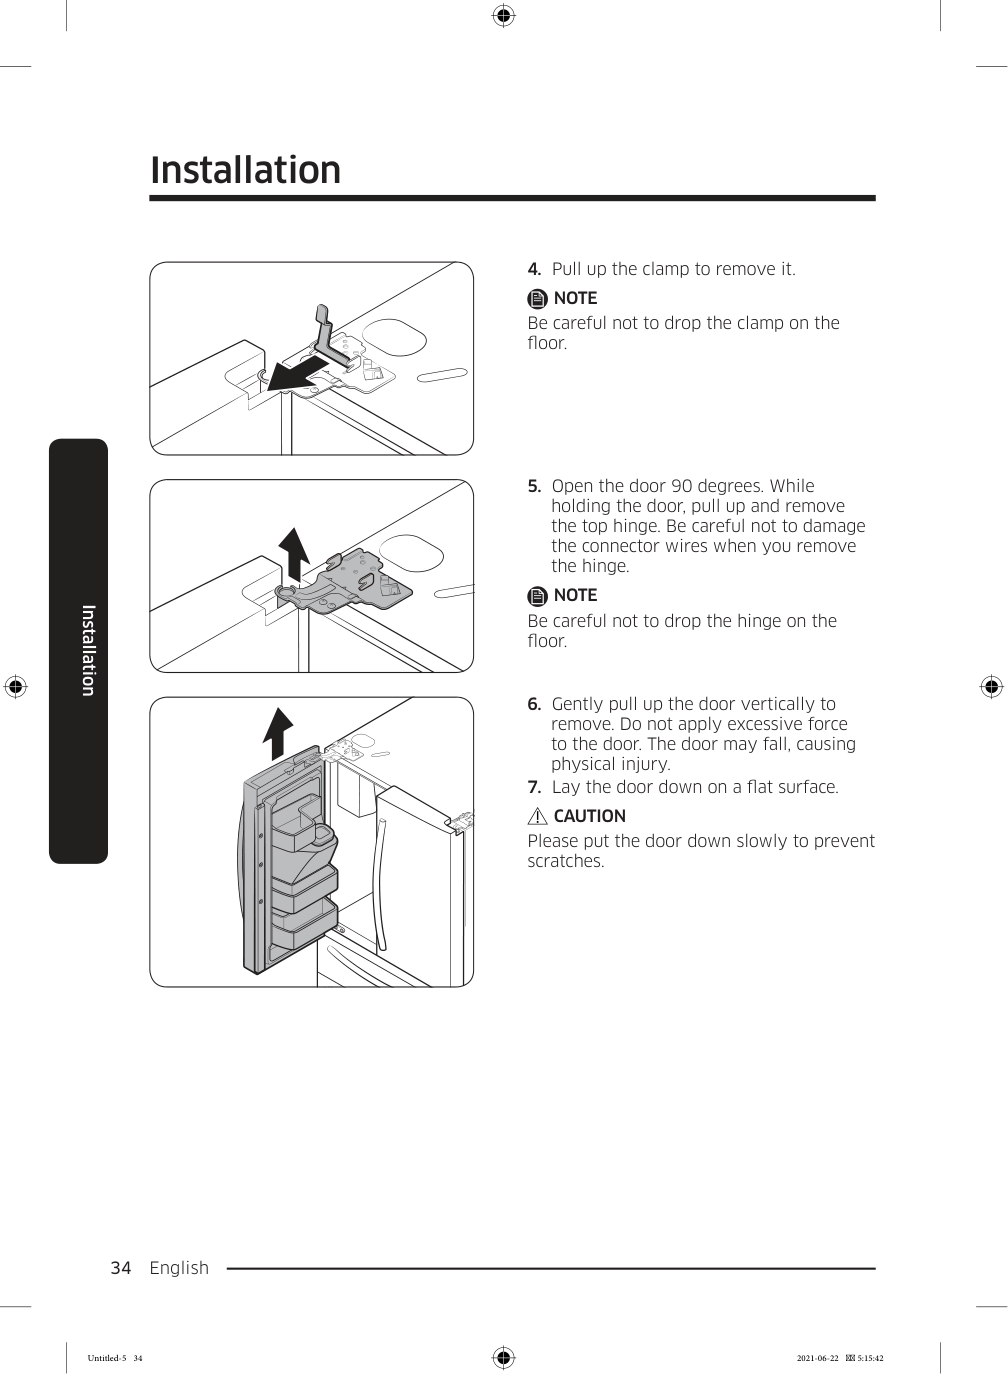
Installation English 34 Installation
Note
Be careful not to drop the clamp on the floor.Note
Be careful not to drop the hinge on the floor.Caution
Please put the door down slowly to prevent scratches. Untitled-5 34 2021-06-22 5:15:42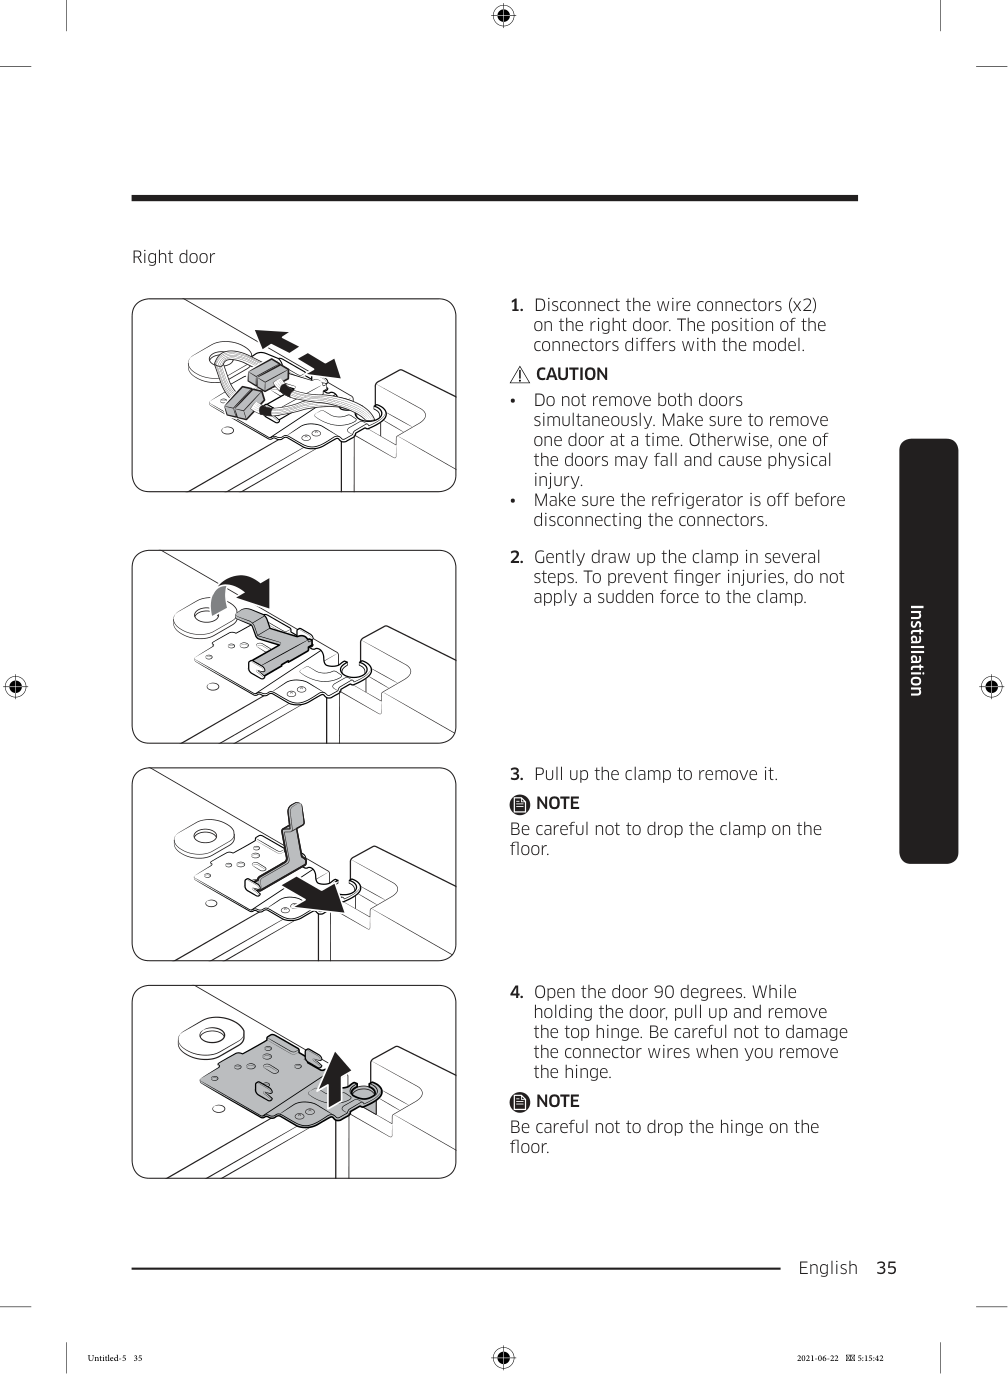
English 35 Installation Right door
Caution
Note
Be careful not to drop the clamp on the floor.Note
Be careful not to drop the hinge on the floor. Untitled-5 35 2021-06-22 5:15:42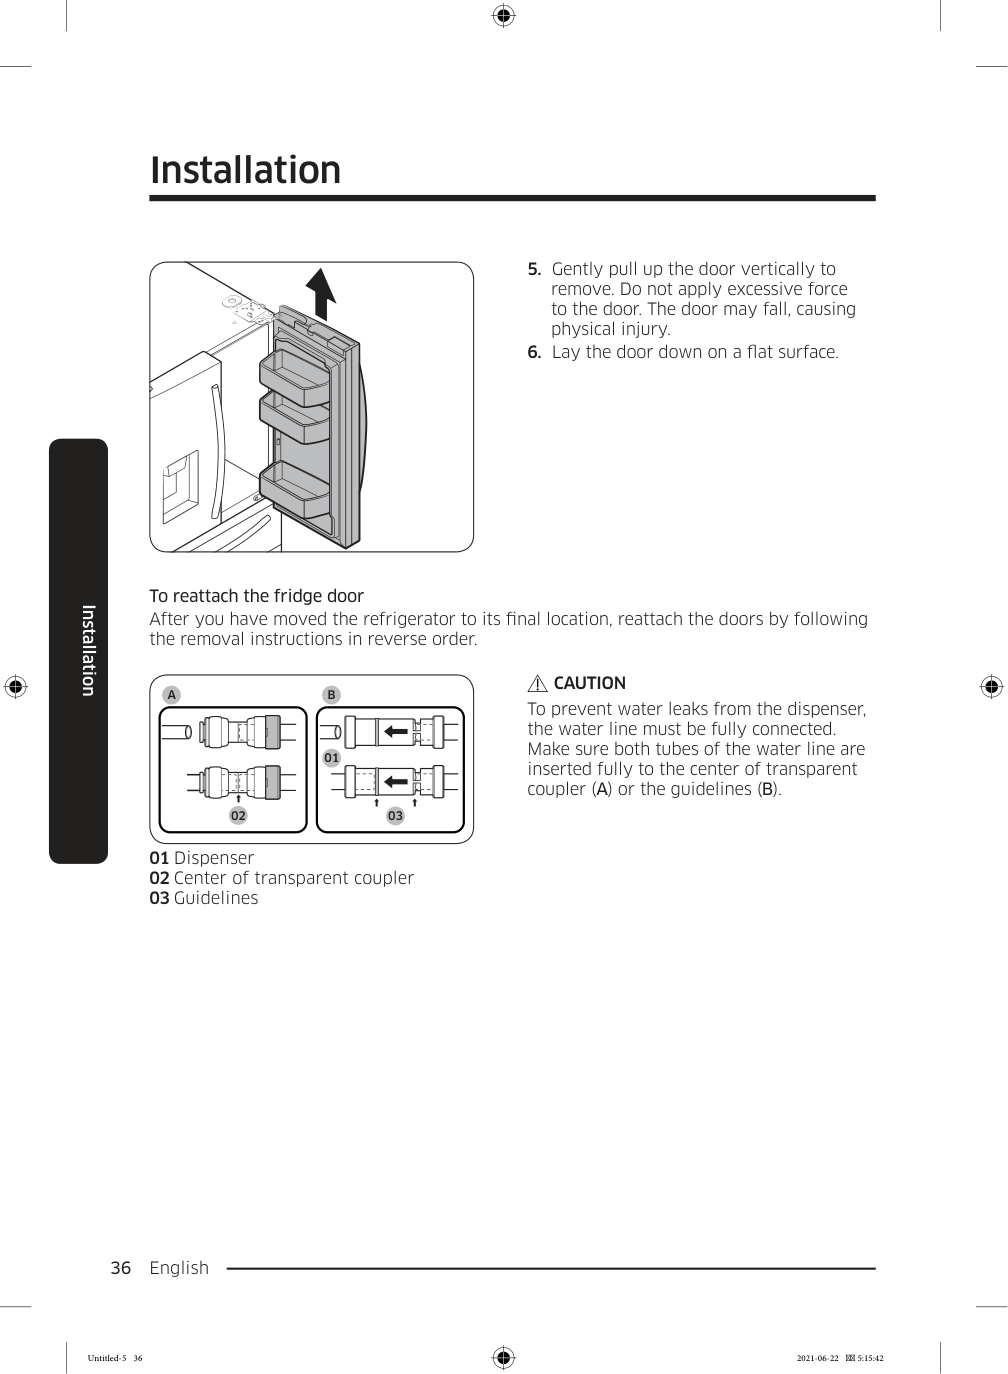
Installation English 36 Installation
A
01 02 03B
01 Dispenser 02 Center of transparent coupler 03 GuidelinesCaution
To prevent water leaks from the dispenser, the water line must be fully connected. Make sure both tubes of the water line are inserted fully to the center of transparent coupler (A) or the guidelines (B). Untitled-5 36 2021-06-22 5:15:42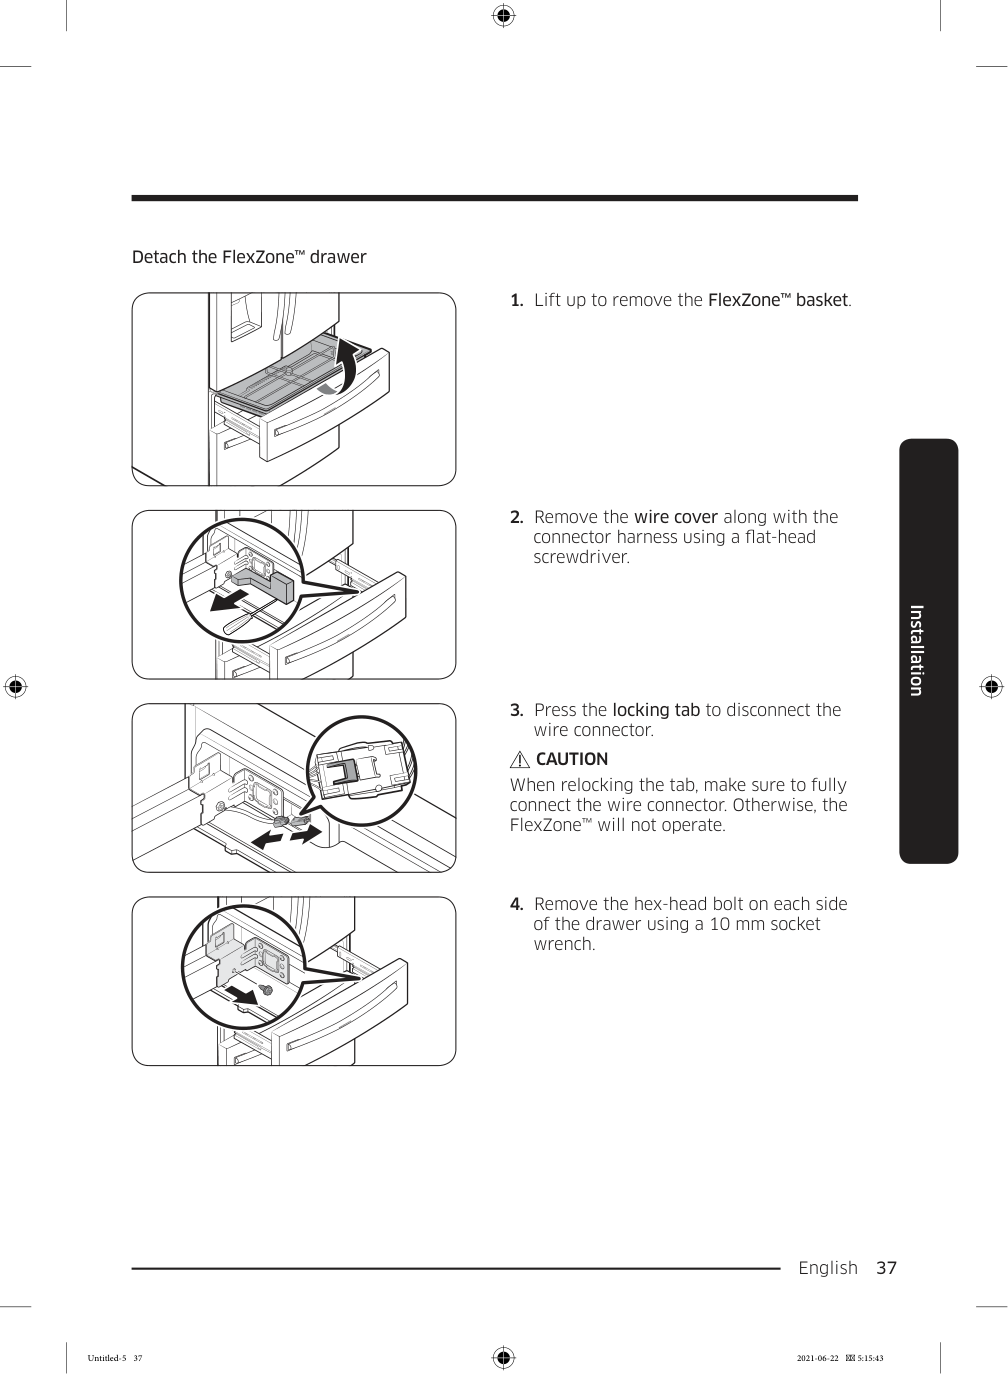
English 37 Installation Detach the FlexZone™ drawer
Caution
When relocking the tab, make sure to fully connect the wire connector. Otherwise, the FlexZone™ will not operate.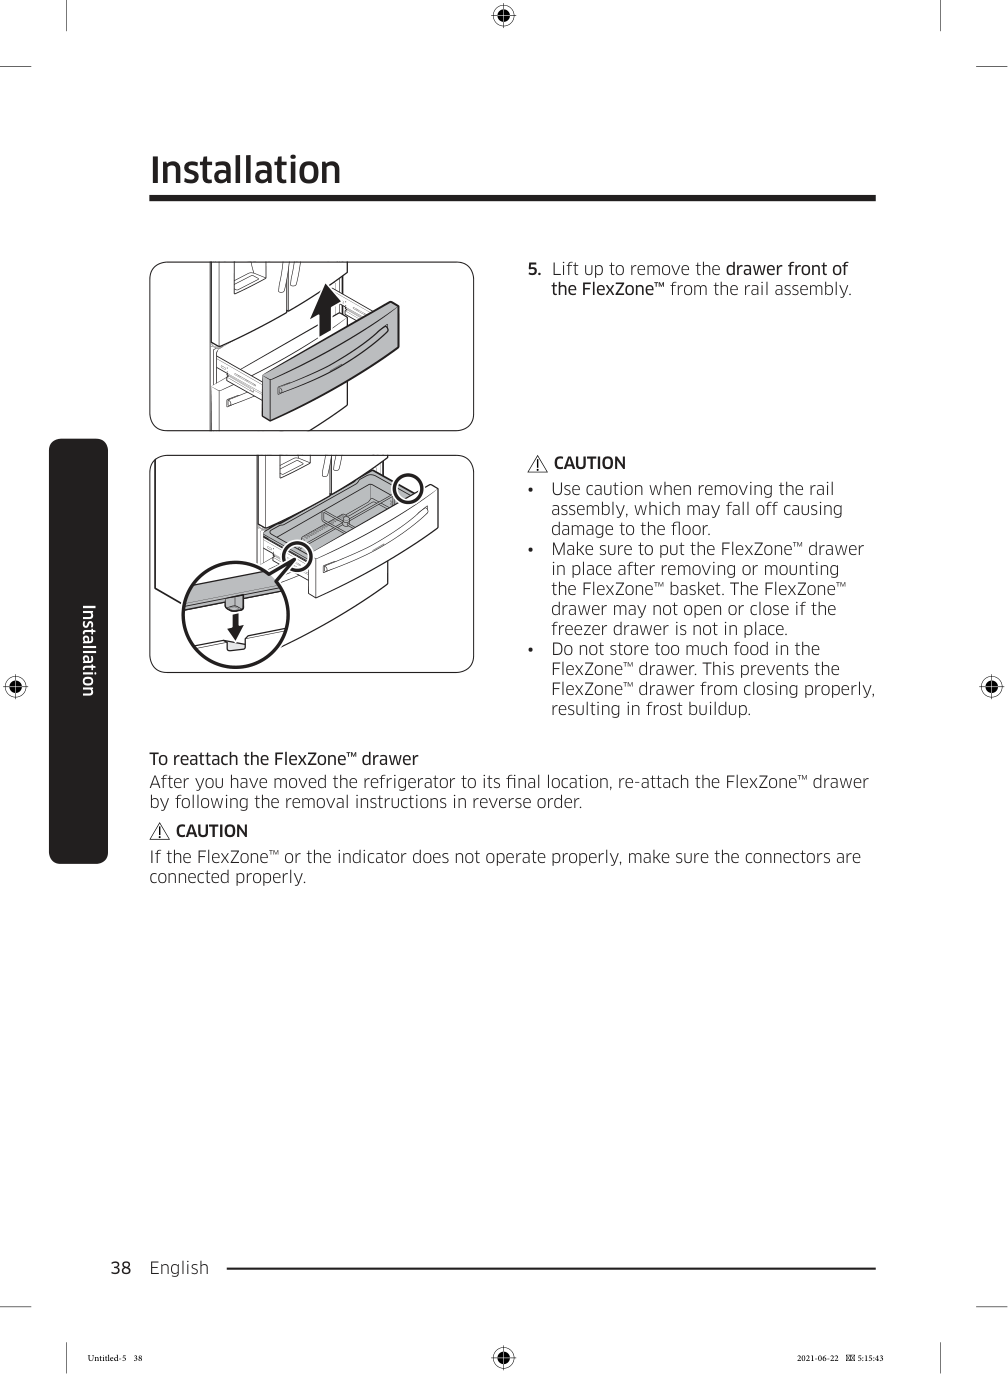
Installation English 38 Installation
Caution
Caution
If the FlexZone™ or the indicator does not operate properly, make sure the connectors are connected properly. Untitled-5 38 2021-06-22 5:15:43
English 39 Installation To detach the freezer drawer
Installation English 40 Installation
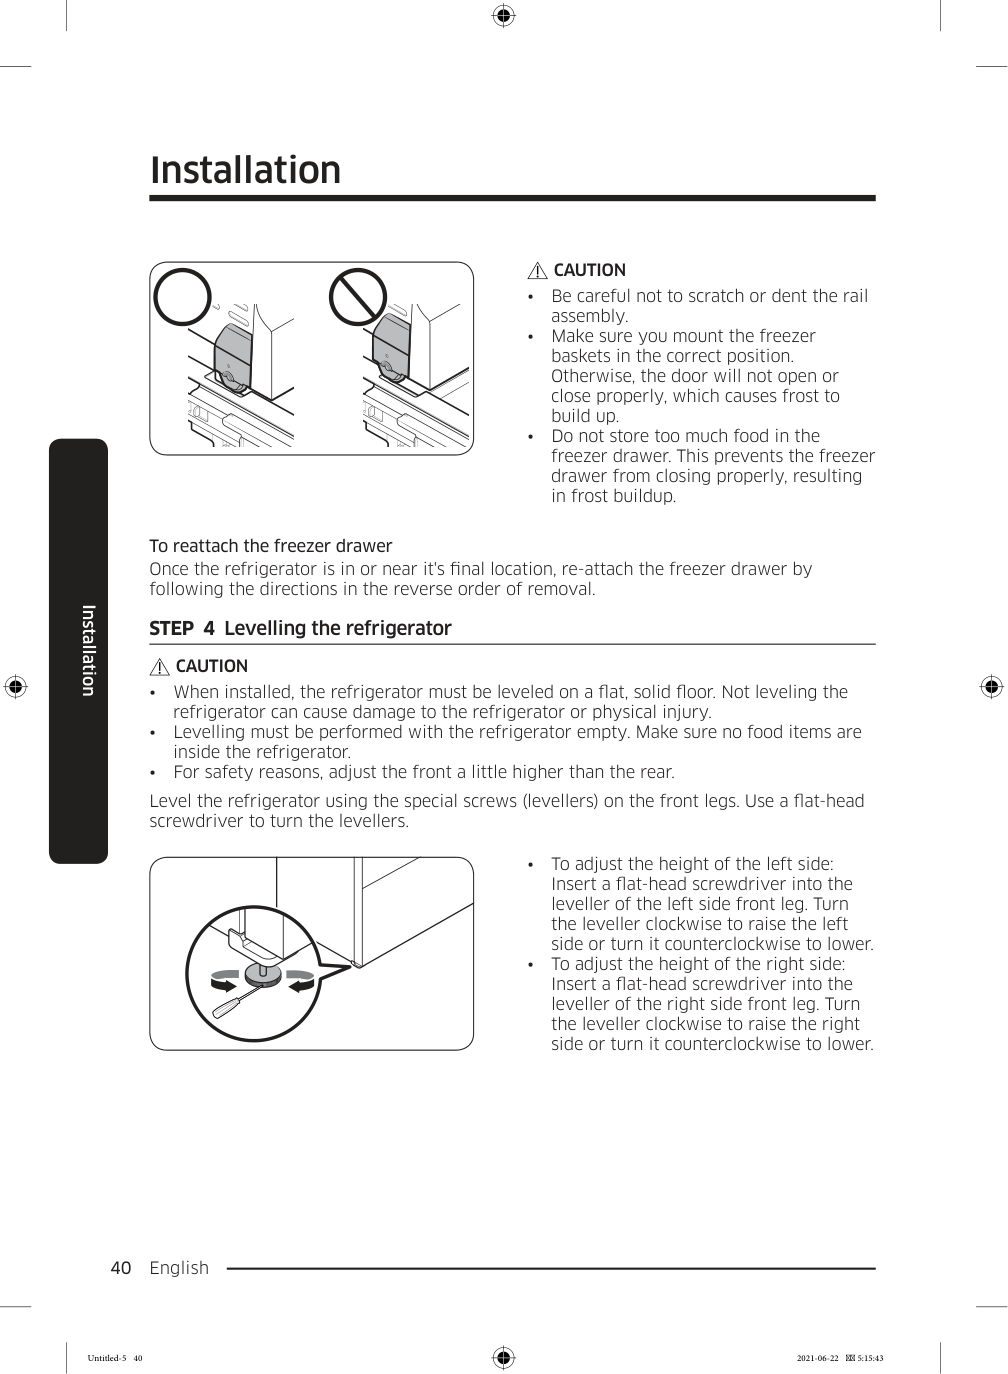
Caution
Caution
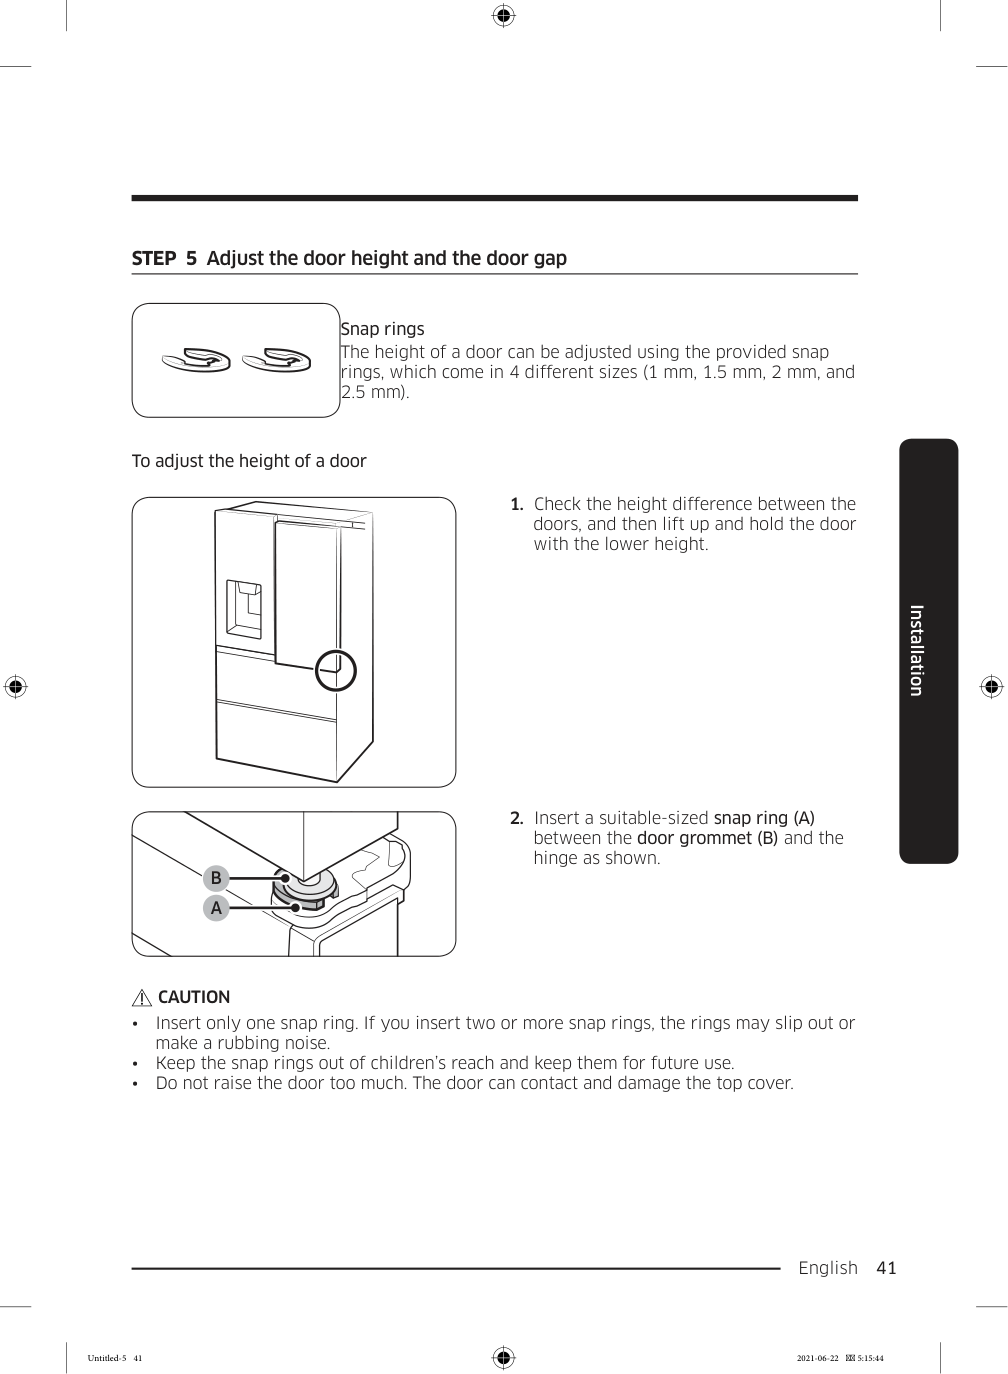
English 41 Installation STEP 5 Adjust the door height and the door gap Snap rings The height of a door can be adjusted using the provided snap rings, which come in 4 different sizes (1 mm, 1.5 mm, 2 mm, and 2.5 mm). To adjust the height of a door
Caution
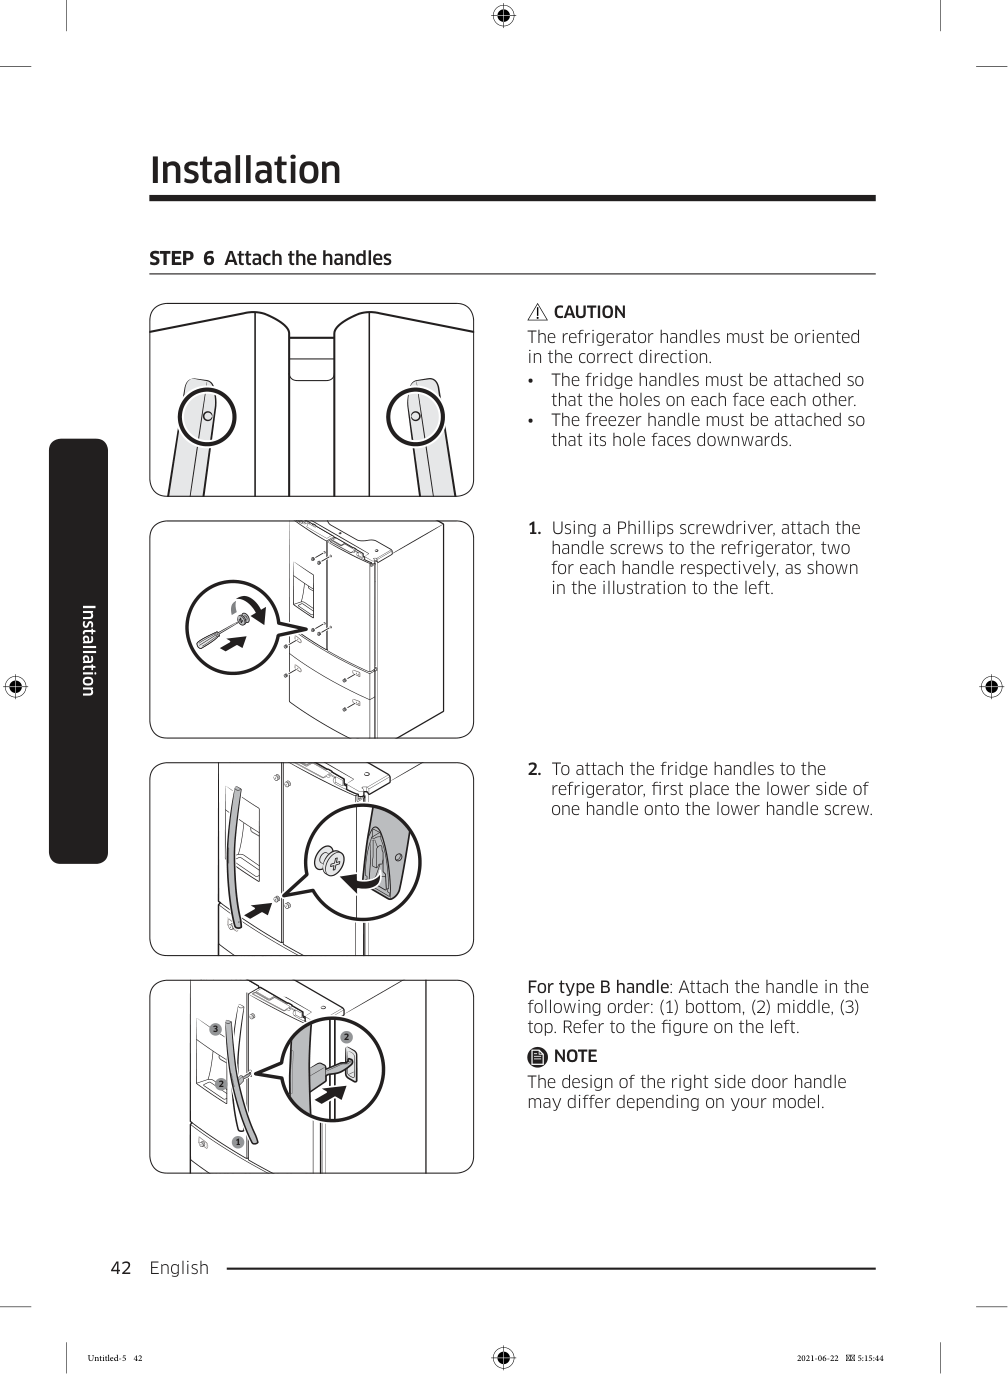
Installation English 42 Installation STEP 6 Attach the handles
Caution
The refrigerator handles must be oriented in the correct direction.Note
The design of the right side door handle may differ depending on your model. Untitled-5 42 2021-06-22 5:15:44
English 43 Installation
Installation English 44 Installation
Caution
Caution
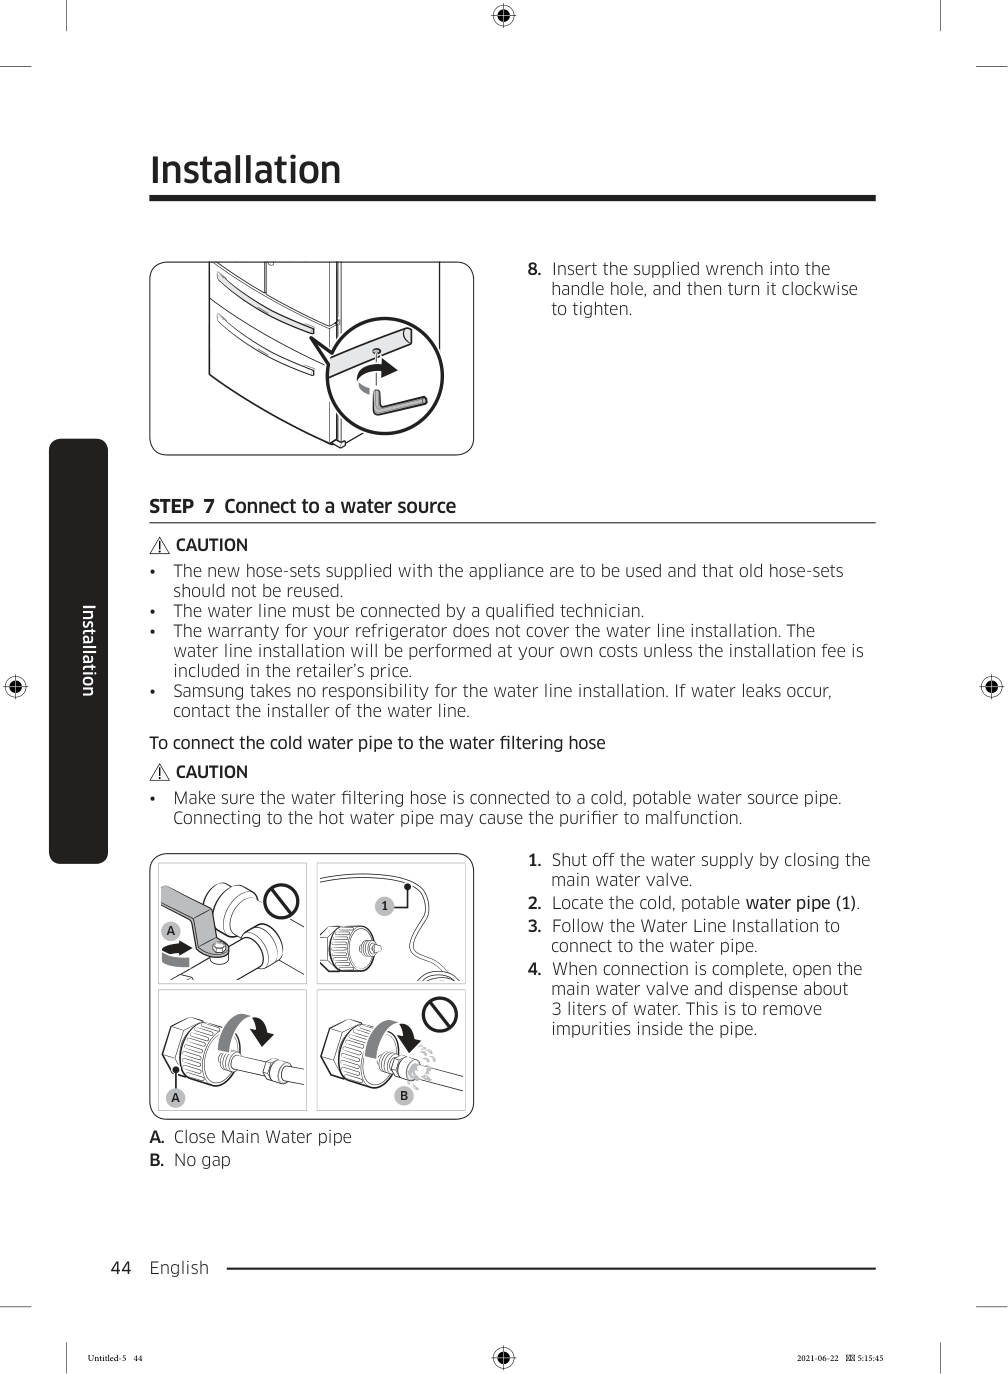
A
B
A
A. Close Main Water pipe B. No gap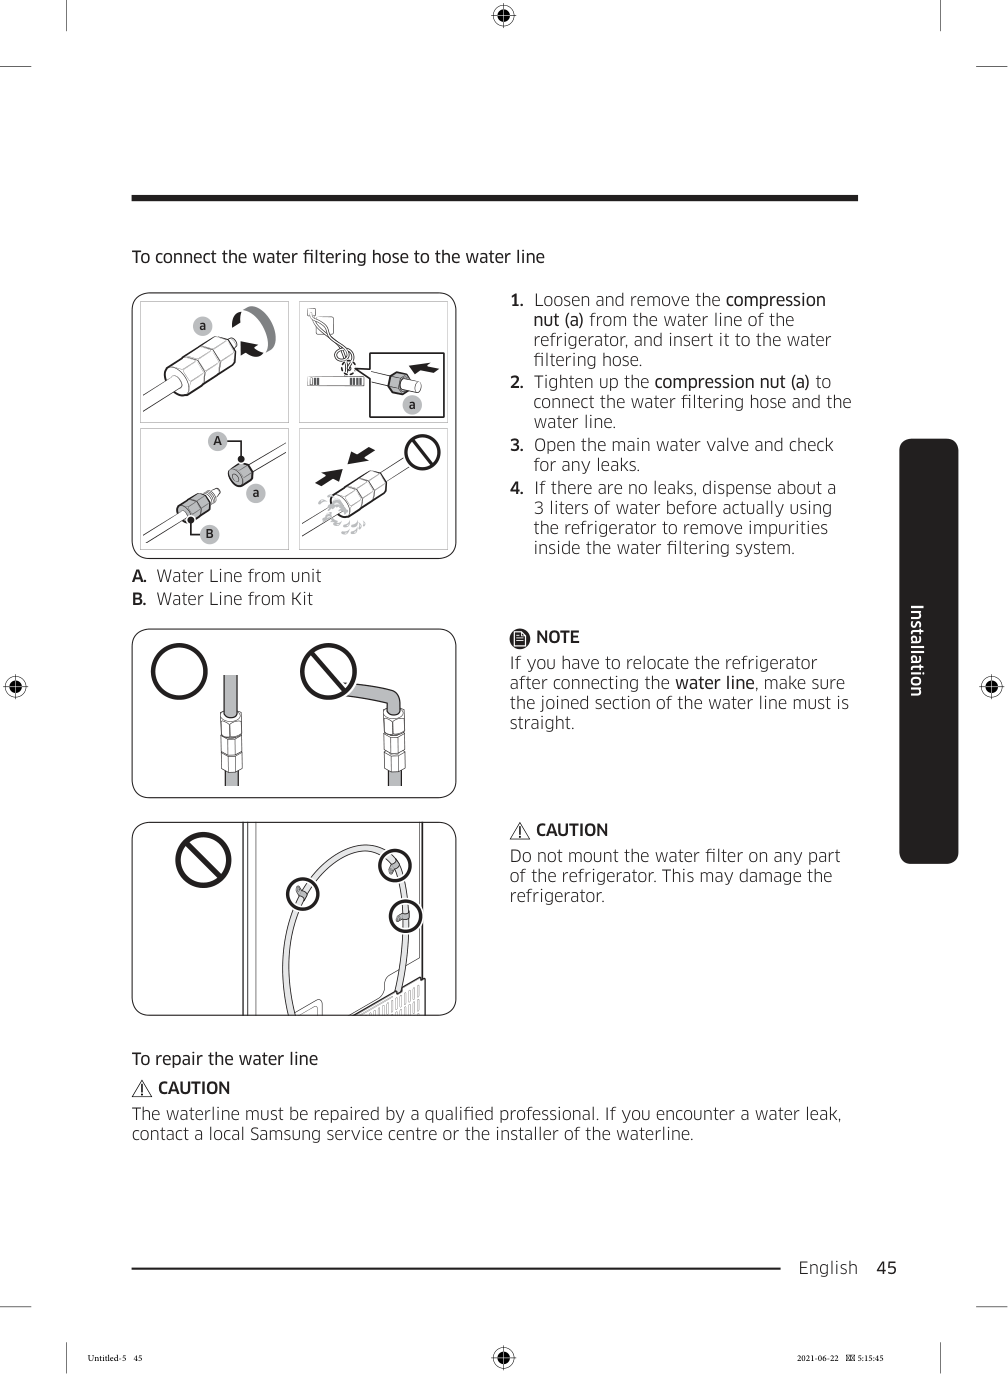
English 45 Installation To connect the water filtering hose to the water line Remove cap a a
A
B
a A. Water Line from unit B. Water Line from KitNote
If you have to relocate the refrigerator after connecting the water line, make sure the joined section of the water line must is straight.Caution
Do not mount the water filter on any part of the refrigerator. This may damage the refrigerator. To repair the water lineCaution
The waterline must be repaired by a qualified professional. If you encounter a water leak, contact a local Samsung service centre or the installer of the waterline. Untitled-5 45 2021-06-22 5:15:45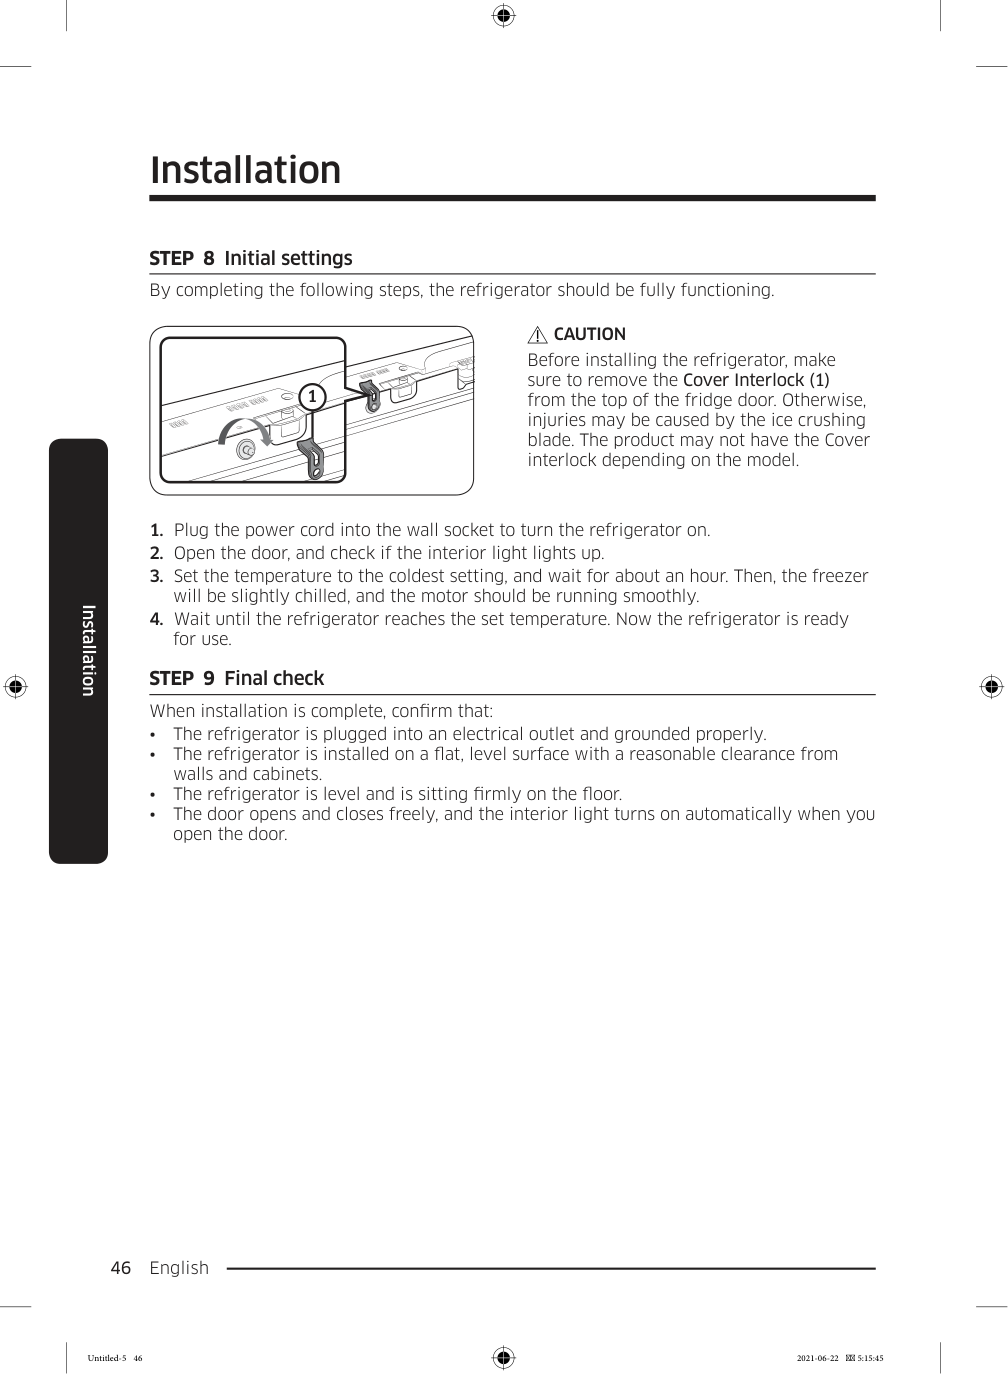
Installation English 46 Installation STEP 8 Initial settings By completing the following steps, the refrigerator should be fully functioning. 1
Caution
Before installing the refrigerator, make sure to remove the Cover Interlock (1) from the top of the fridge door. Otherwise, injuries may be caused by the ice crushing blade. The product may not have the Cover interlock depending on the model.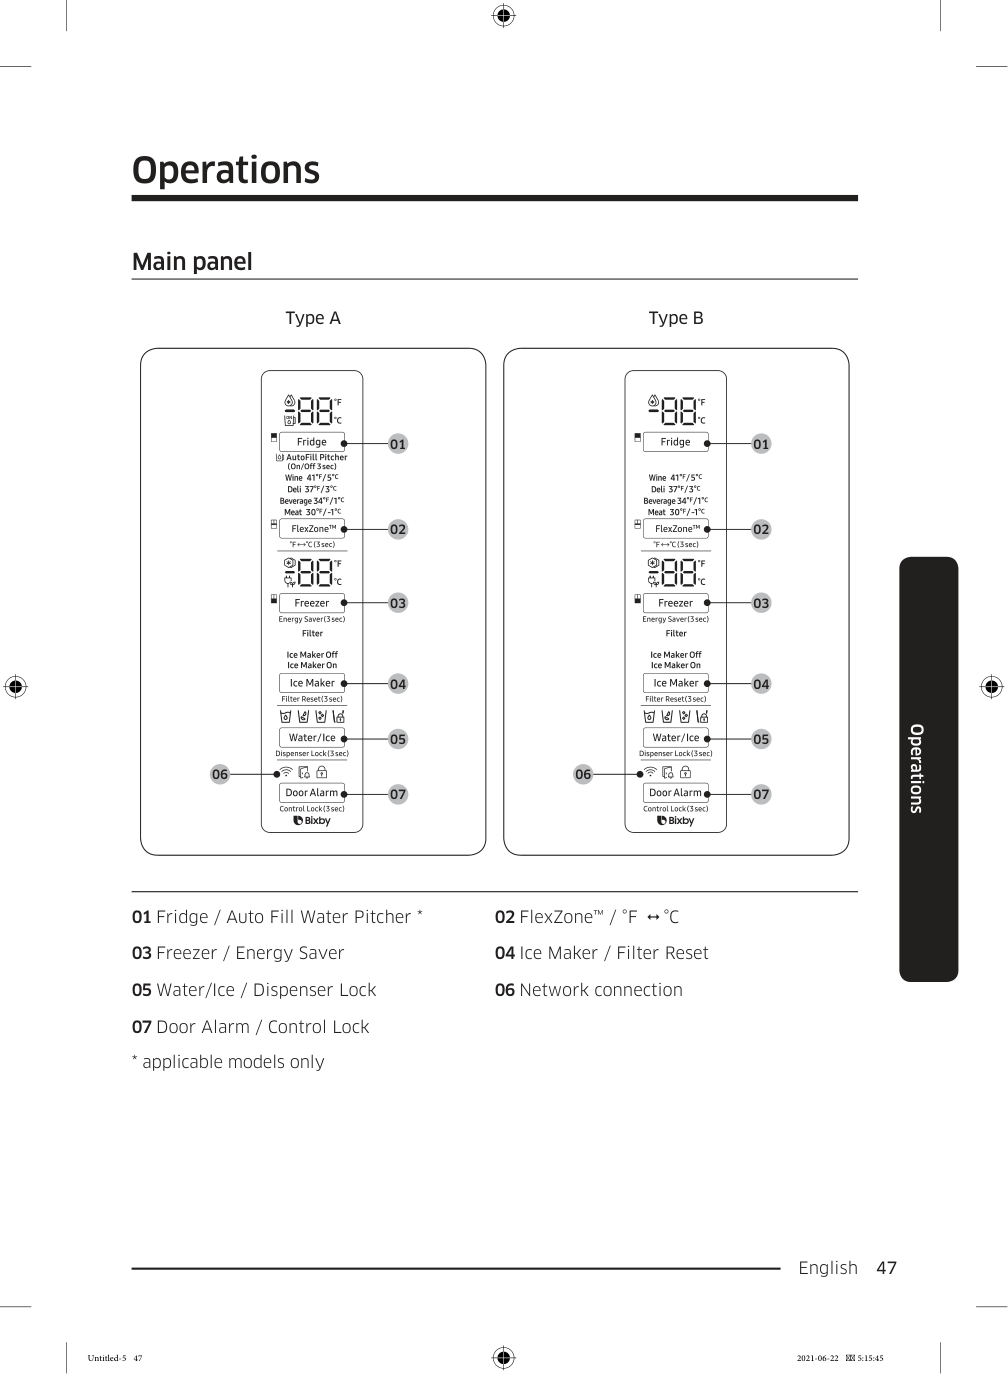
English 47 Operations Main panel Type A Type B 01 02 03 04 05 07 06 01 02 03 04 05 07 06 01 Fridge / Auto Fill Water Pitcher * 02 FlexZone™ / °F °C 03 Freezer / Energy Saver 04 Ice Maker / Filter Reset 05 Water/Ice / Dispenser Lock 06 Network connection 07 Door Alarm / Control Lock
Operations English 48 Operations
Note
English 49 Operations 01 Fridge / Auto Fill Water Pitcher (3 sec) Fridge You can use the Fridge button to set the fridge temperature or to activate Power Cool.
Note
Using Power Cool increases power consumption. Make sure you turn it off manually if you no longer need it, and then select the desired refrigerator temperature. Untitled-5 49 2021-06-22 5:15:46
Operations English 50 Operations Auto Fill Water Pitcher If the Lock indicator ( ) is off, press and hold Fridge for 3 seconds to turn Auto Fill Water Pitcher on. Then, open the left door of the fridge and insert the water tank. Close the door and the water tank starts to fill with water up to the preset level. If the Lock Indicator ( ) is on, indicating Control Lock is active, press and hold Door Alarm for 3 seconds to deactivate Control Lock. When the Lock indicator goes out, immediately press and hold Fridge for 3 seconds to turn Auto Fill Water Pitcher on. Then, open the left door of the fridge and insert the water tank. Close the door and the water tank starts to fill with water up to the preset level.
Note
When you turn off Control Lock, you must press and hold Fridge within one minute or the Control Lock function will automatically reactivate. You cannot turn the Auto Fill Water Pitcher function on if Control Lock is active. For more information on Control Lock, see page 54. To turn the function off, press and hold Fridge again for 3 seconds.Note
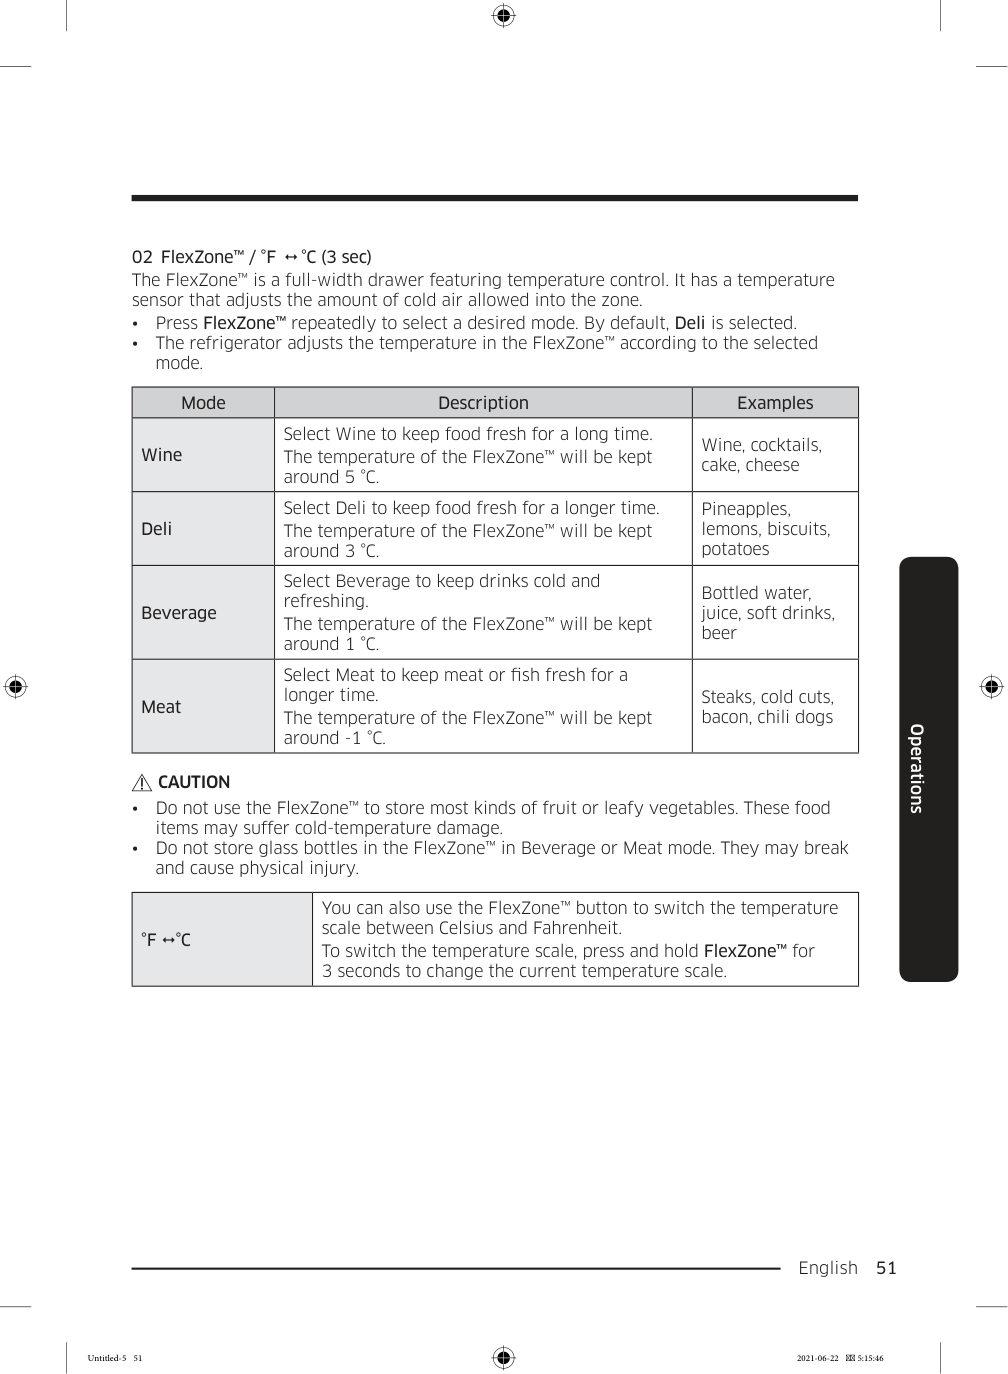
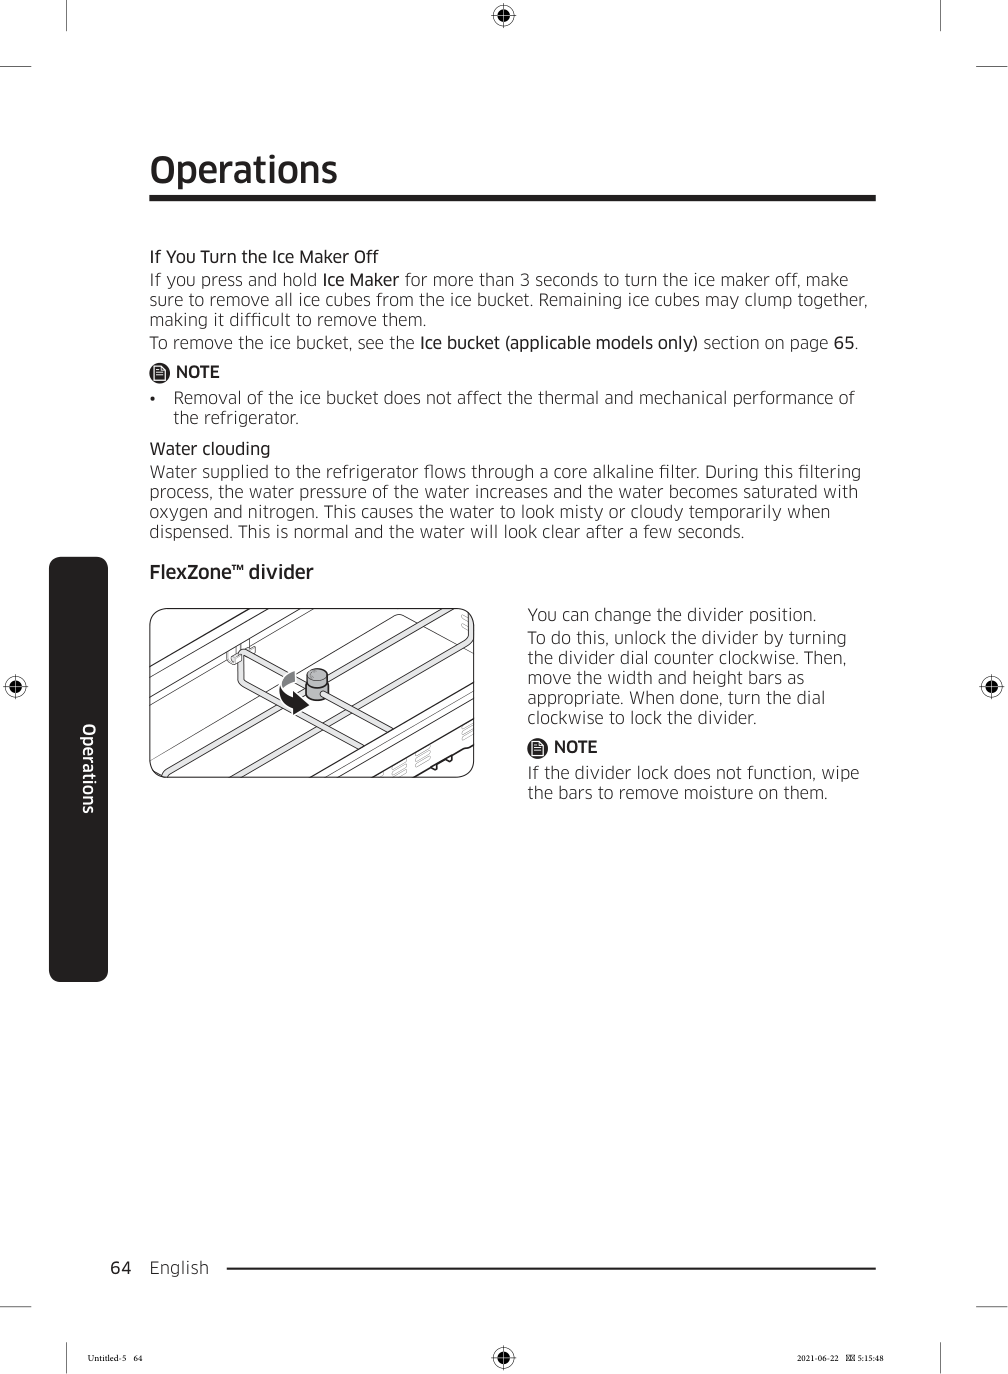
English 51 Operations 02 FlexZone™ / °F °C (3 sec) The FlexZone™ is a full-width drawer featuring temperature control. It has a temperature sensor that adjusts the amount of cold air allowed into the zone.
Caution
°F °C
You can also use the FlexZone™ button to switch the temperature scale between Celsius and Fahrenheit. To switch the temperature scale, press and hold FlexZone™ for 3 seconds to change the current temperature scale. Untitled-5 51 2021-06-22 5:15:46
Operations English 52 Operations 03 Freezer / Energy Saver (3 sec) Freezer You can use the Freezer button to set the freezer temperature or to activate Power Freeze.
Note
Using Power Freeze increases power consumption. Make sure you turn it off manually if you no longer need it, and then select the desired freezer temperature. Energy Saver Press Freezer for 3 seconds to set/clear the Energy Saver function.Note
If condensation or water drops form on or around the doors, turn Energy Saver mode off. 04 Ice Maker / Filter Reset (3 sec) Ice Maker Press Ice Maker to turn the ice maker on or off. The ice maker has 2 indicators ( / ) to indicate its operating status.Note
If the ice maker is turned off, it will turn on if you press and hold the ice lever for more than 5 seconds. Untitled-5 52 2021-06-22 5:15:46
English 53 Operations Filter Reset After about 6 months (and typically, about 300 gallons (1200 L) of water), the Filter indicator blinks red for several seconds when you open the door, reminding you that the filter needs to be replaced. When this happens, replace the filter, and then press and hold Filter Reset for 3 seconds. The filter lifecycle will be reset and the Filter indicator turns off.
Note
Note
Operations English 54 Operations 07 Door Alarm / Control Lock (3 sec) Door Alarm If the door is left open for more than 2 minutes, an alarm will sound and the alarm indicator will blink. You can toggle the alarm on and off by pressing Door Alarm. The alarm is enabled by factory default. If the door is left open for 5 minutes, internal lights (in the fridge, FlexZone™, and freezer) will blink for 10 seconds and then turn on. The whole process will be repeated every minute for 5 minutes. This is to alert hearing-impaired users that a door is open. Note that this function is normal. Control Lock To prevent accidental setting changes, press and hold Door Alarm for 3 seconds. The main panel will be disabled and the Lock indicator ( ) will turn on. When Control Lock is on, the indicator blinks if any button on the main panel is pressed. If you press and hold the button again for more than 3 seconds, Control Lock will be deactivated. However, Control Lock will be reactivated if no button is pressed within 1 minute.
Note
Control Lock on the main panel does not affect the dispenser. The dispenser operates independently and so does the dispenser lever. To lock the dispenser and the dispenser lever, use the Dispenser Lock function. Untitled-5 54 2021-06-22 5:15:46
English 55 Operations SmartThings Installation Visit the Google Play Store, Galaxy Apps, or Apple App Store and search for “SmartThings”. Download and install the SmartThings app provided by Samsung Electronics to your smart device.
Note

Operations English 56 Operations Samsung account You are required to register your Samsung account to use the app. If you don’t have a Samsung account, follow the app’s onscreen instructions to create a free Samsung account. Getting started Turn on the device you want to connect, open the SmartThings app on your phone, and then follow the instructions below. If a pop-up appears saying that a new device has been found, tap ADD NOW. If a pop-up doesn't appear, tap the + button, and then select the device you want to connect from the list of available devices. If your device isn't in the list of available devices, tap Supported Devices, select the device type (Refrigerator), and then select the specific device model. Follow the instructions in the app to set up your device. Once setup is complete, your refrigerator will appear as a "card" on your Devices screen. Refrigerator app Integrated control You can monitor and control your refrigerator at home and on the go.
Note
Some options or settings of the refrigerator may not be available for remote control. Untitled-5 56 2021-06-22 5:15:46
English 57 Operations Category Item Description Monitoring Fridge temperature Displays the desired temperature setting of the fridge. Freezer temperature Displays the current temperature of the freezer. FlexZone™ settings Displays the settings of the FlexZone™. Diagnosis Detects abnormal operations of the refrigerator. Energy monitoring Checks the accumulated power consumption of the refrigerator for the last 180 days. Functions Ice making You can turn the ice making function on or off, and check the current settings of the function. You can also check the status and progress of ice making. Power Cool You can turn Power Cool on or off, and check the current settings. Power Freeze You can turn Power Freeze on or off, and check the current settings. Fridge temperature You can set the desired temperature of the fridge. Freezer temperature You can set the desired temperature of the freezer. FlexZone™ settings You can set the desired FlexZone™ mode. Alarms Abnormally high temperature This alarm is triggered when the fridge, the freezer, or the FlexZone™ has abnormally high temperatures. Door opening This alarm is triggered if the fridge door, the freezer drawer, or the FlexZone™ drawer is open for a specific time. Auto Water Fill overflowing If the Auto Water Fill function senses an overflow, it triggers this alarm to let you know the status of the overflow. Water filter replacement This alarm reminds you that the water filter must be replaced. Untitled-5 57 2021-06-22 5:15:46

Operations English 58 Operations Dispenser panel 01 02 03 01 Water / Lock 02 Cubed Ice 03 Crushed Ice 01 Water / Lock (3 sec) Water To dispense chilled water, press Water. The corresponding indicator turns on. Lock (Dispenser panel / Dispenser lever) To prevent the use of the dispenser panel buttons and the dispenser lever, press and hold Water for more than 3 seconds. If you press and hold the button again for more than 3 seconds, the dispenser lock will be deactivated. When dispenser lock is on, the indicator blinks if any button on the dispenser panel is pressed or the dispenser lever is pressed.
Note
The Lock on the dispenser panel does not affect the controls on the main panel. To lock the main panel, use the Control Lock function on the main panel. 02 Cubed Ice Cubed Ice Press Cubed Ice to dispense cubed ice. The corresponding indicator turns on. 03 Crushed Ice Crushed Ice Press Crushed Ice to dispense crushed ice. The corresponding indicator turns on. Untitled-5 58 2021-06-22 5:15:47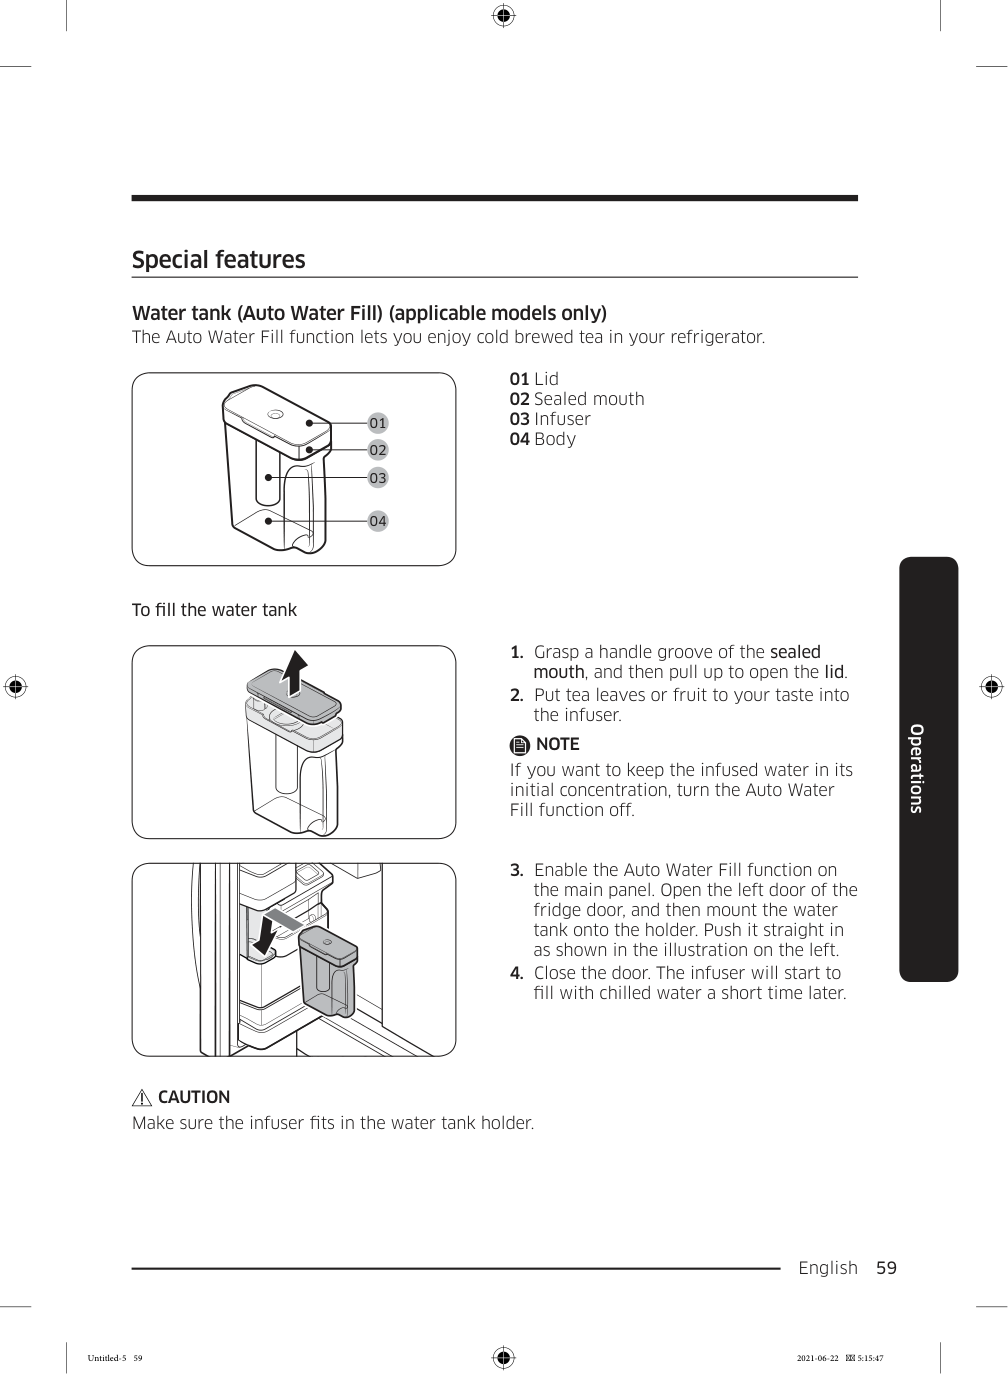
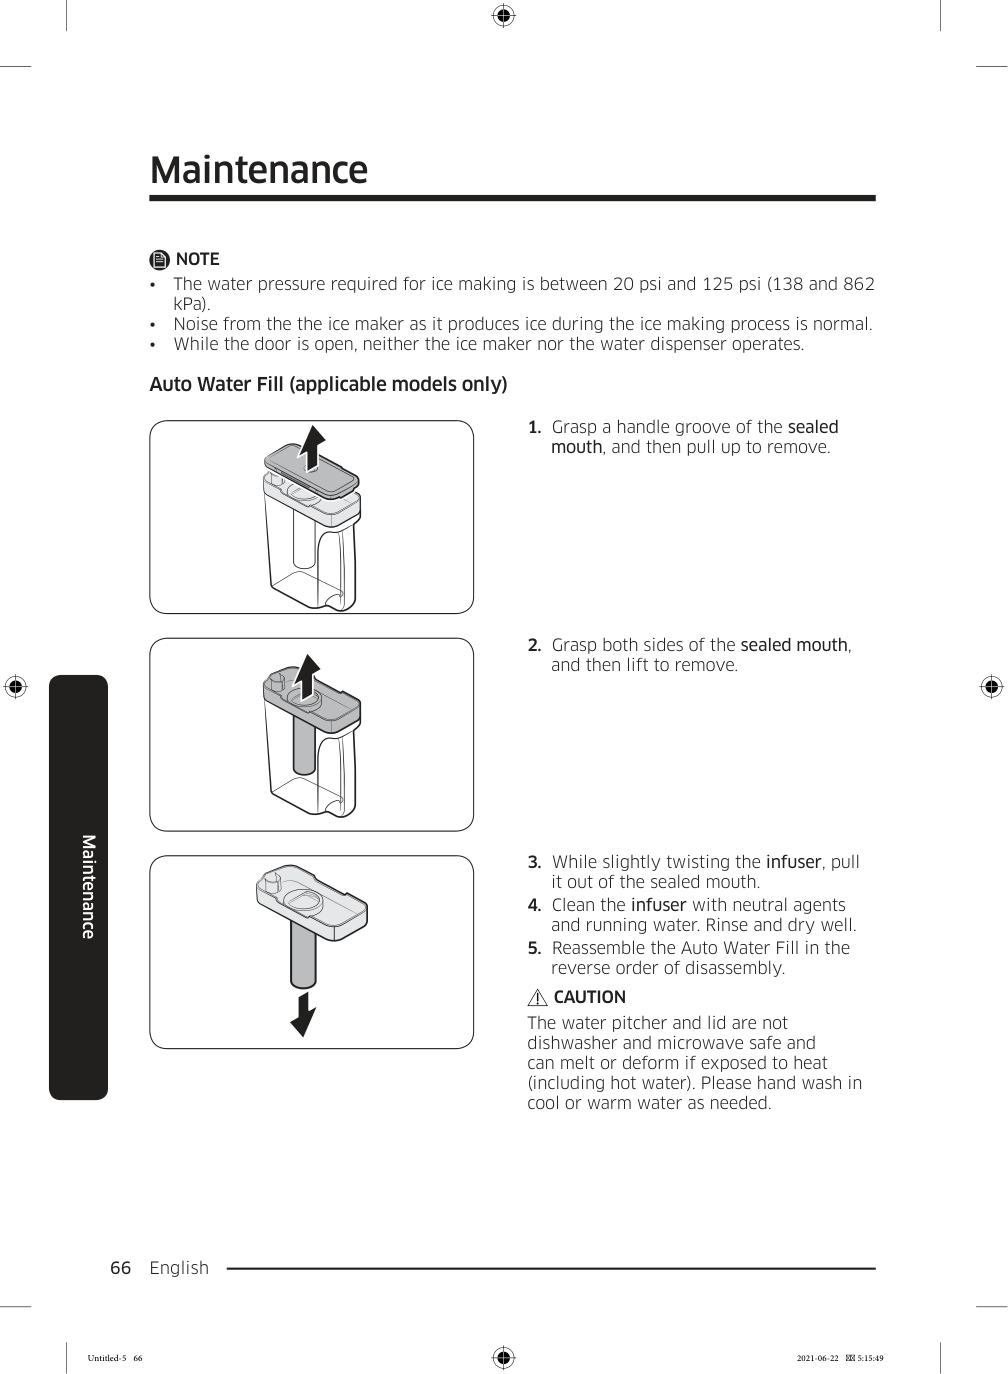
English 59 Operations Special features Water tank (Auto Water Fill) (applicable models only) The Auto Water Fill function lets you enjoy cold brewed tea in your refrigerator. 01 02 03 04 01 Lid 02 Sealed mouth 03 Infuser 04 Body To fill the water tank
Note
If you want to keep the infused water in its initial concentration, turn the Auto Water Fill function off.Caution
Make sure the infuser fits in the water tank holder. Untitled-5 59 2021-06-22 5:15:47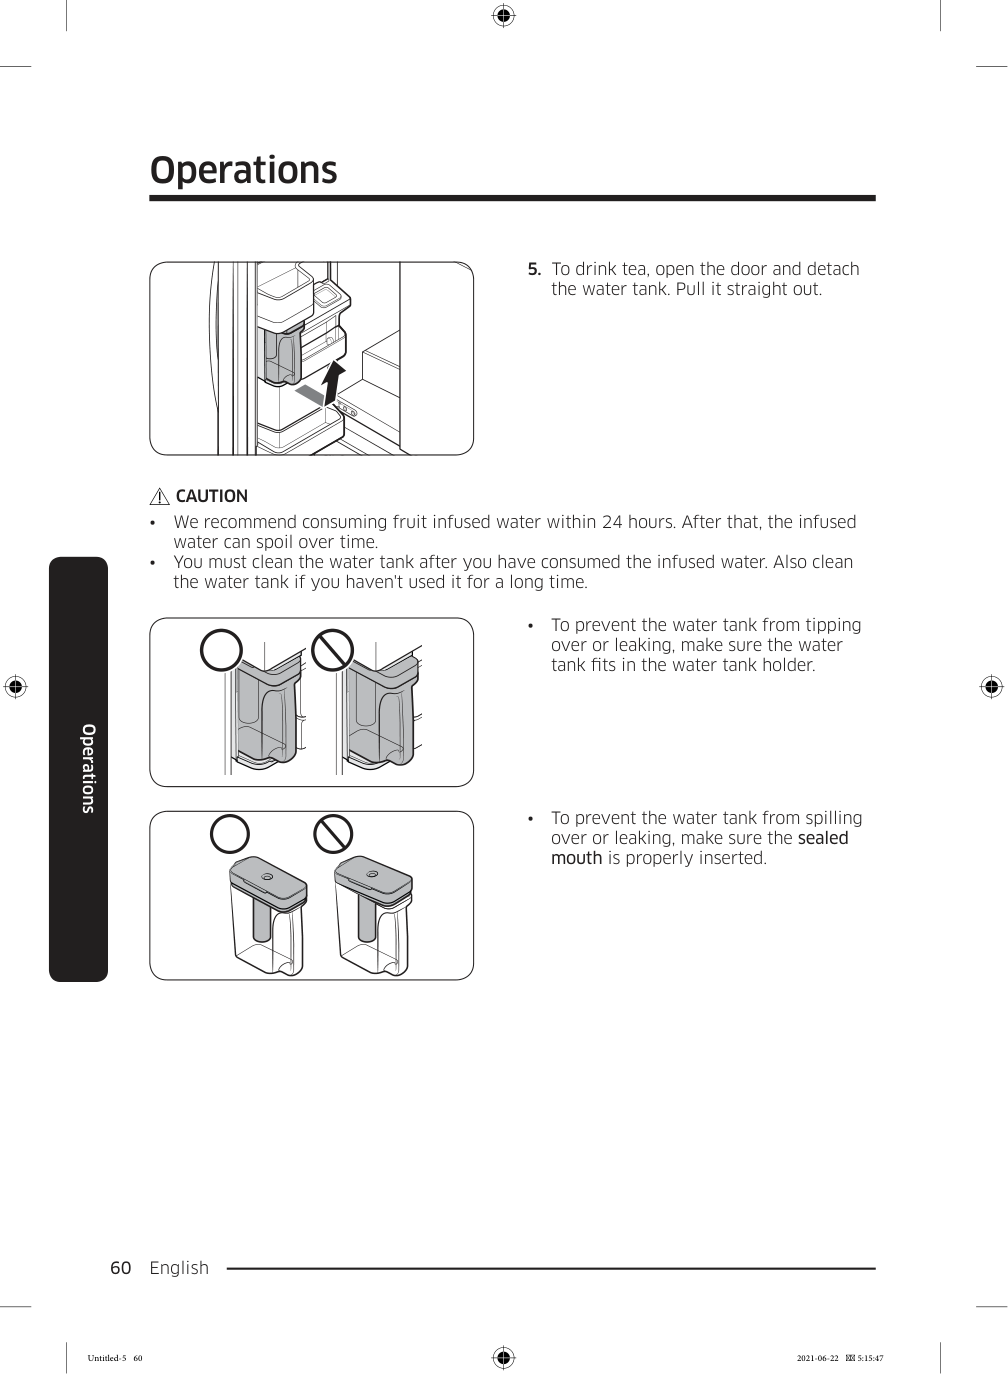
Operations English 60 Operations
Caution
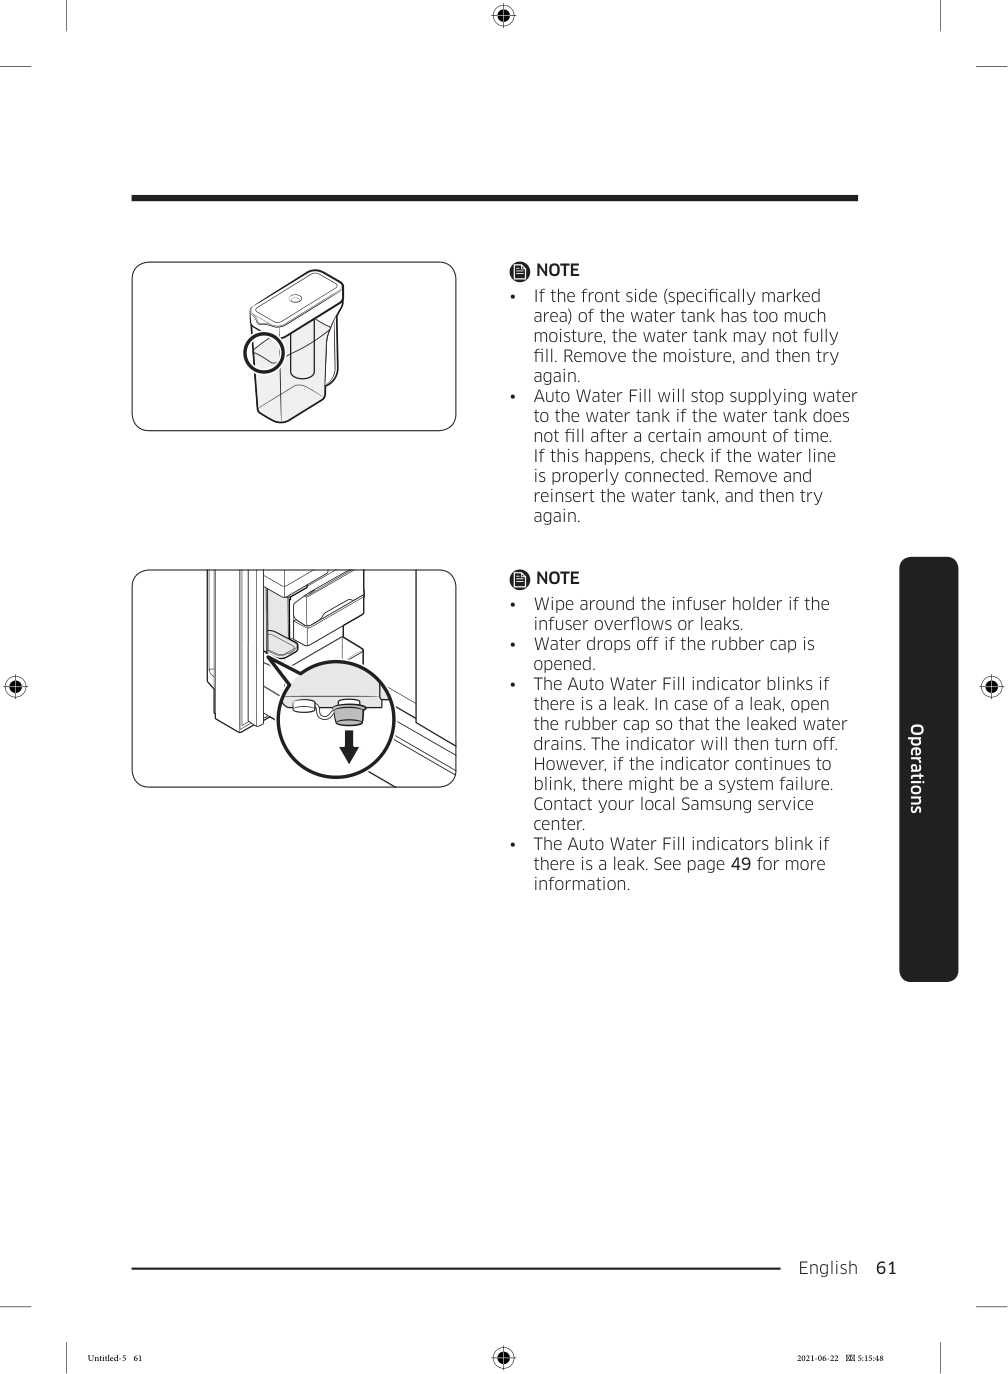
English 61 Operations
Note
Note
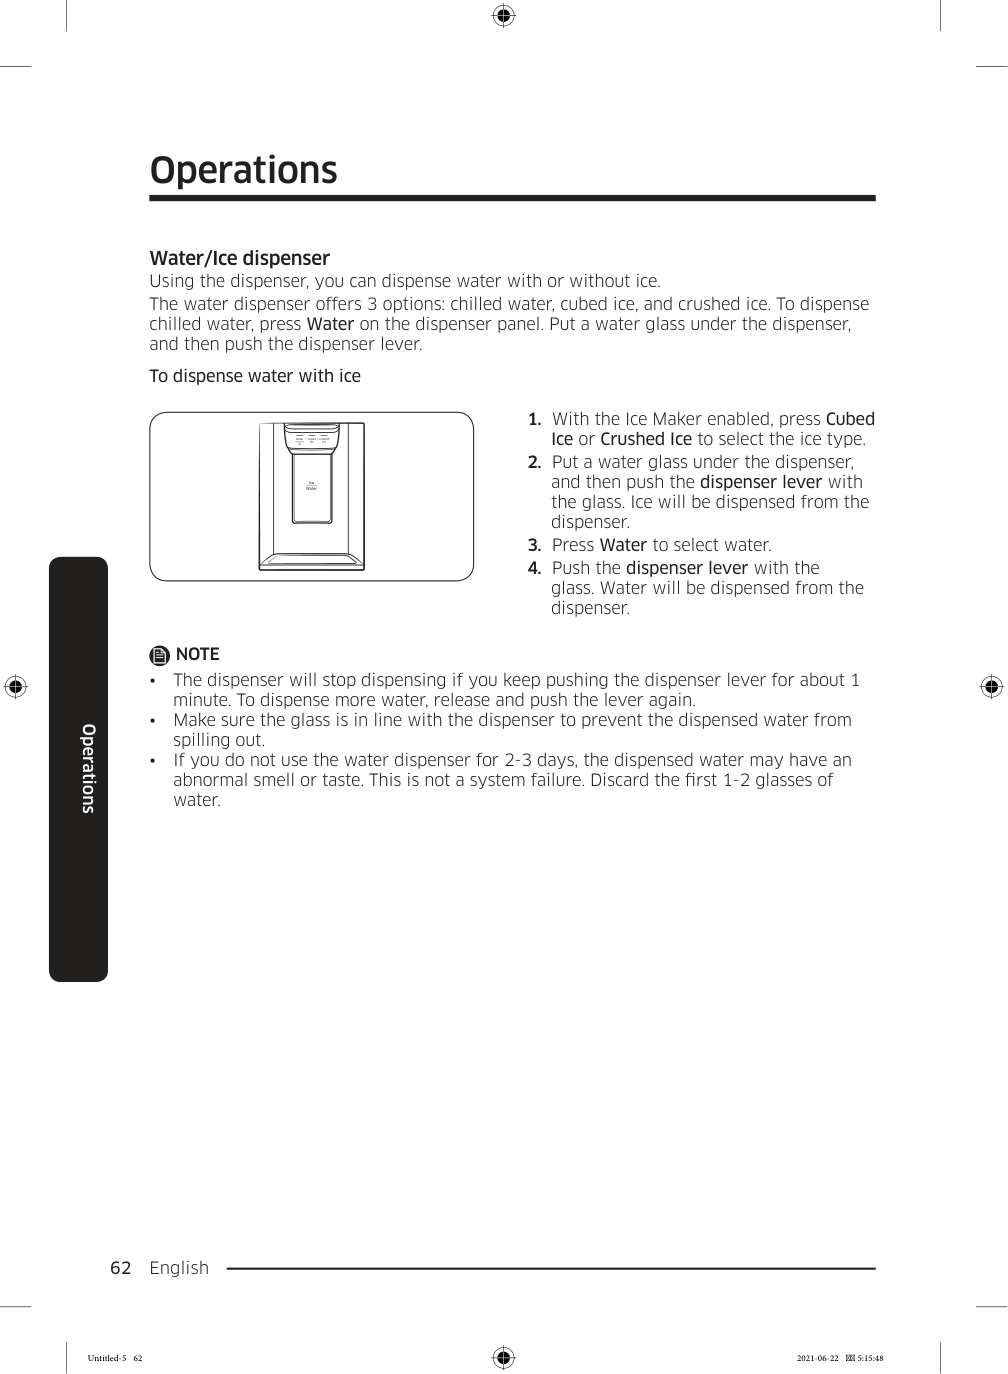
Operations English 62 Operations Water/Ice dispenser Using the dispenser, you can dispense water with or without ice. The water dispenser offers 3 options: chilled water, cubed ice, and crushed ice. To dispense chilled water, press Water on the dispenser panel. Put a water glass under the dispenser, and then push the dispenser lever. To dispense water with ice
Note
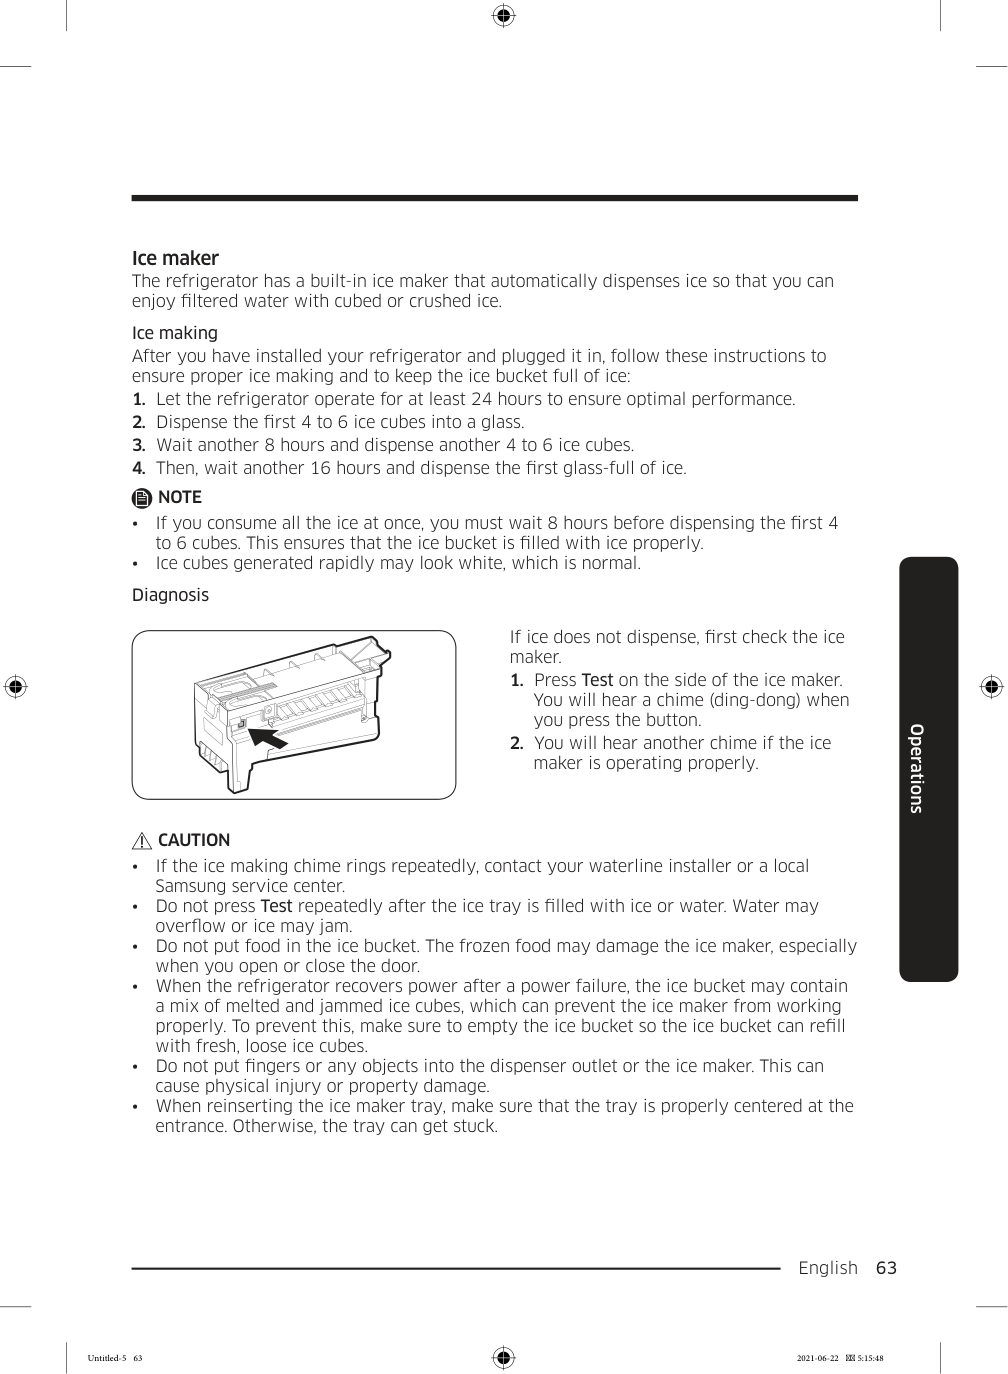
English 63 Operations Ice maker The refrigerator has a built-in ice maker that automatically dispenses ice so that you can enjoy filtered water with cubed or crushed ice. Ice making After you have installed your refrigerator and plugged it in, follow these instructions to ensure proper ice making and to keep the ice bucket full of ice:
Note
Caution
Operations English 64 Operations If You Turn the Ice Maker Off If you press and hold Ice Maker for more than 3 seconds to turn the ice maker off, make sure to remove all ice cubes from the ice bucket. Remaining ice cubes may clump together, making it difficult to remove them. To remove the ice bucket, see the Ice bucket (applicable models only) section on page 65.
Note
Note
If the divider lock does not function, wipe the bars to remove moisture on them. Untitled-5 64 2021-06-22 5:15:48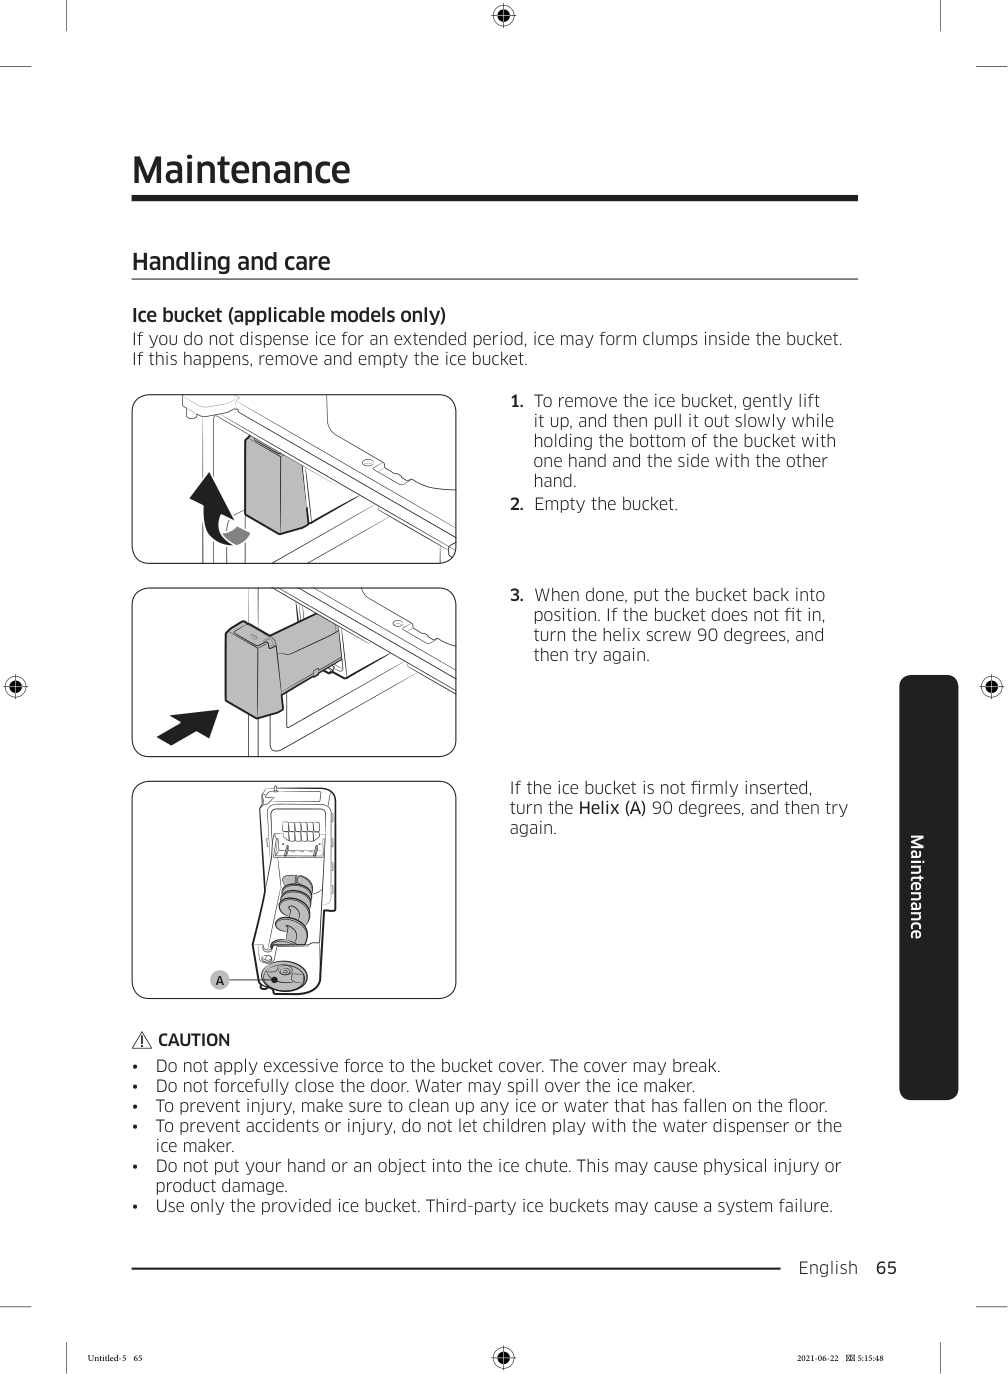
English 65 Maintenance Handling and care Ice bucket (applicable models only) If you do not dispense ice for an extended period, ice may form clumps inside the bucket. If this happens, remove and empty the ice bucket.
A
If the ice bucket is not firmly inserted, turn the Helix (A) 90 degrees, and then try again.Caution
Maintenance English 66 Maintenance
Note
Caution
The water pitcher and lid are not dishwasher and microwave safe and can melt or deform if exposed to heat (including hot water). Please hand wash in cool or warm water as needed. Untitled-5 66 2021-06-22 5:15:49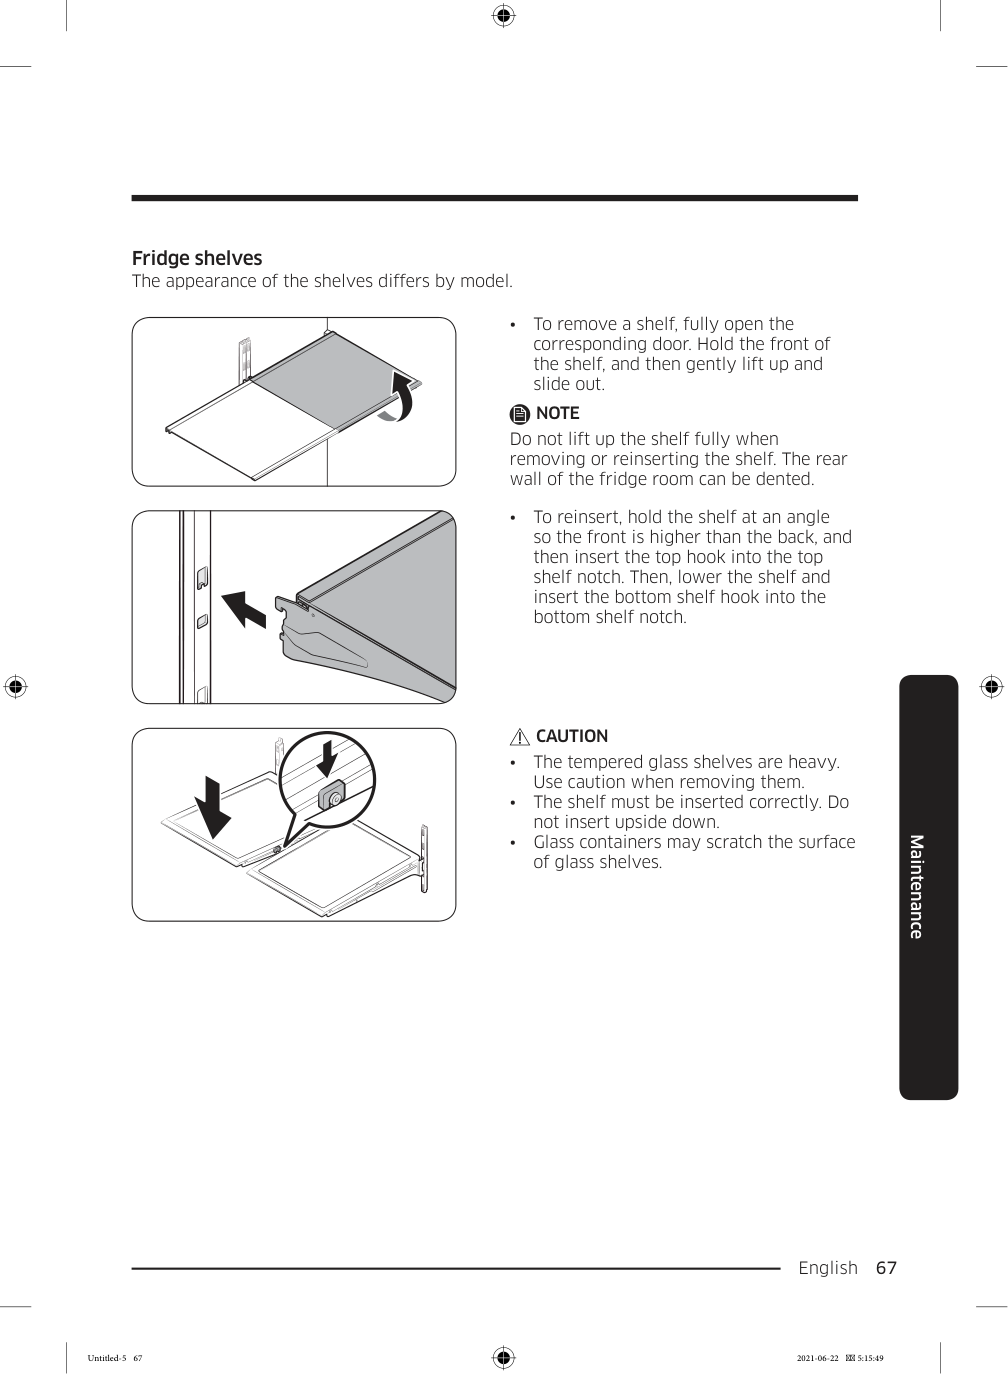
English 67 Maintenance Fridge shelves The appearance of the shelves differs by model.
Note
Do not lift up the shelf fully when removing or reinserting the shelf. The rear wall of the fridge room can be dented.Caution
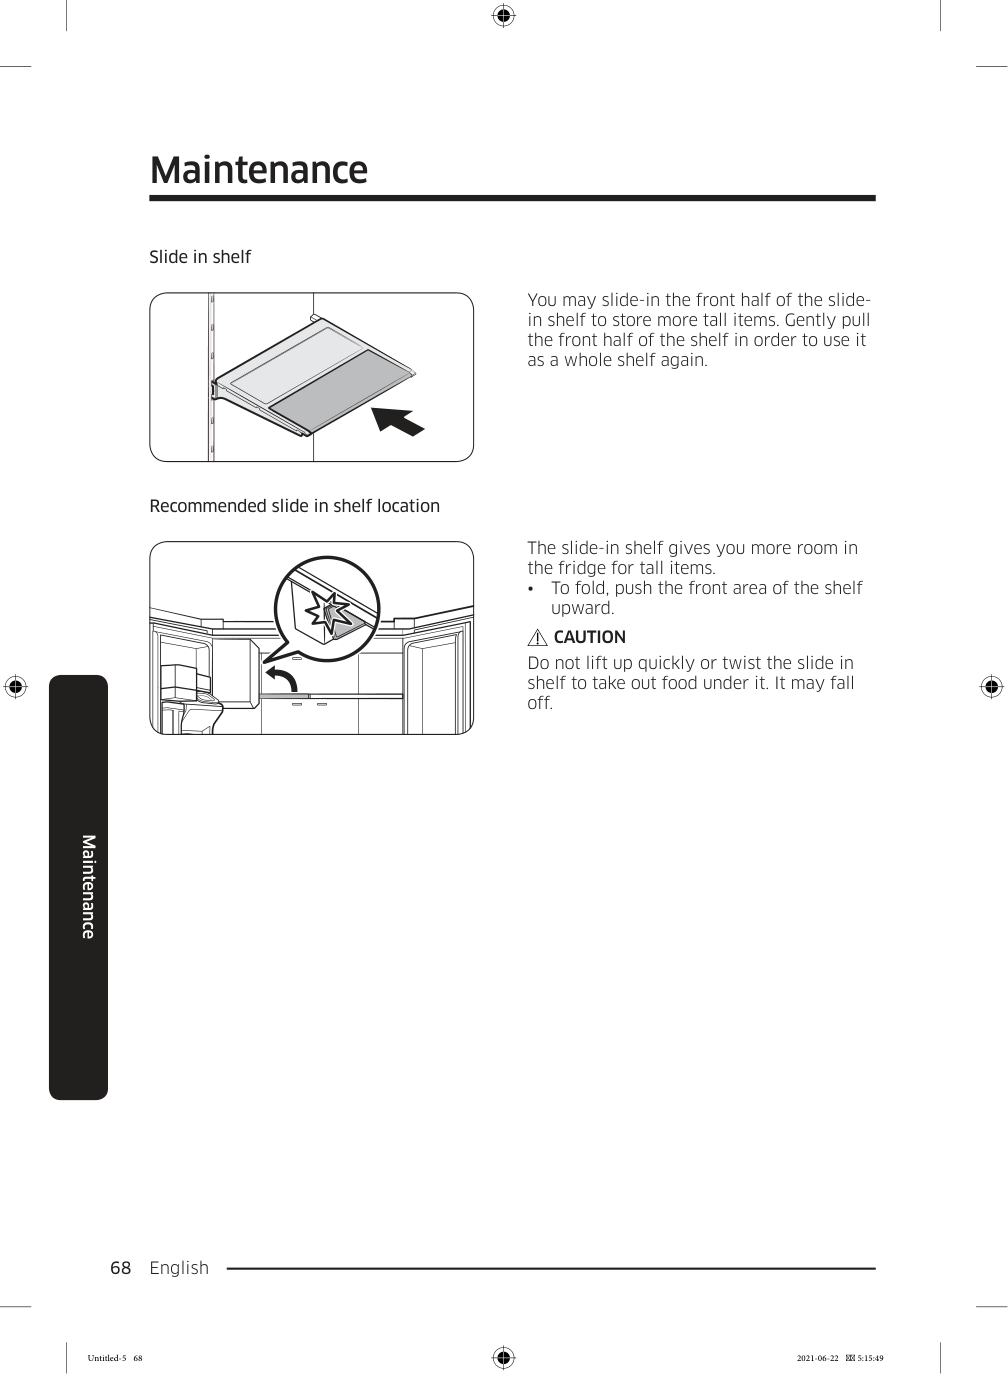
Maintenance English 68 Maintenance Slide in shelf You may slide-in the front half of the slide- in shelf to store more tall items. Gently pull the front half of the shelf in order to use it as a whole shelf again. Recommended slide in shelf location The slide-in shelf gives you more room in the fridge for tall items.
Caution
Do not lift up quickly or twist the slide in shelf to take out food under it. It may fall off. Untitled-5 68 2021-06-22 5:15:49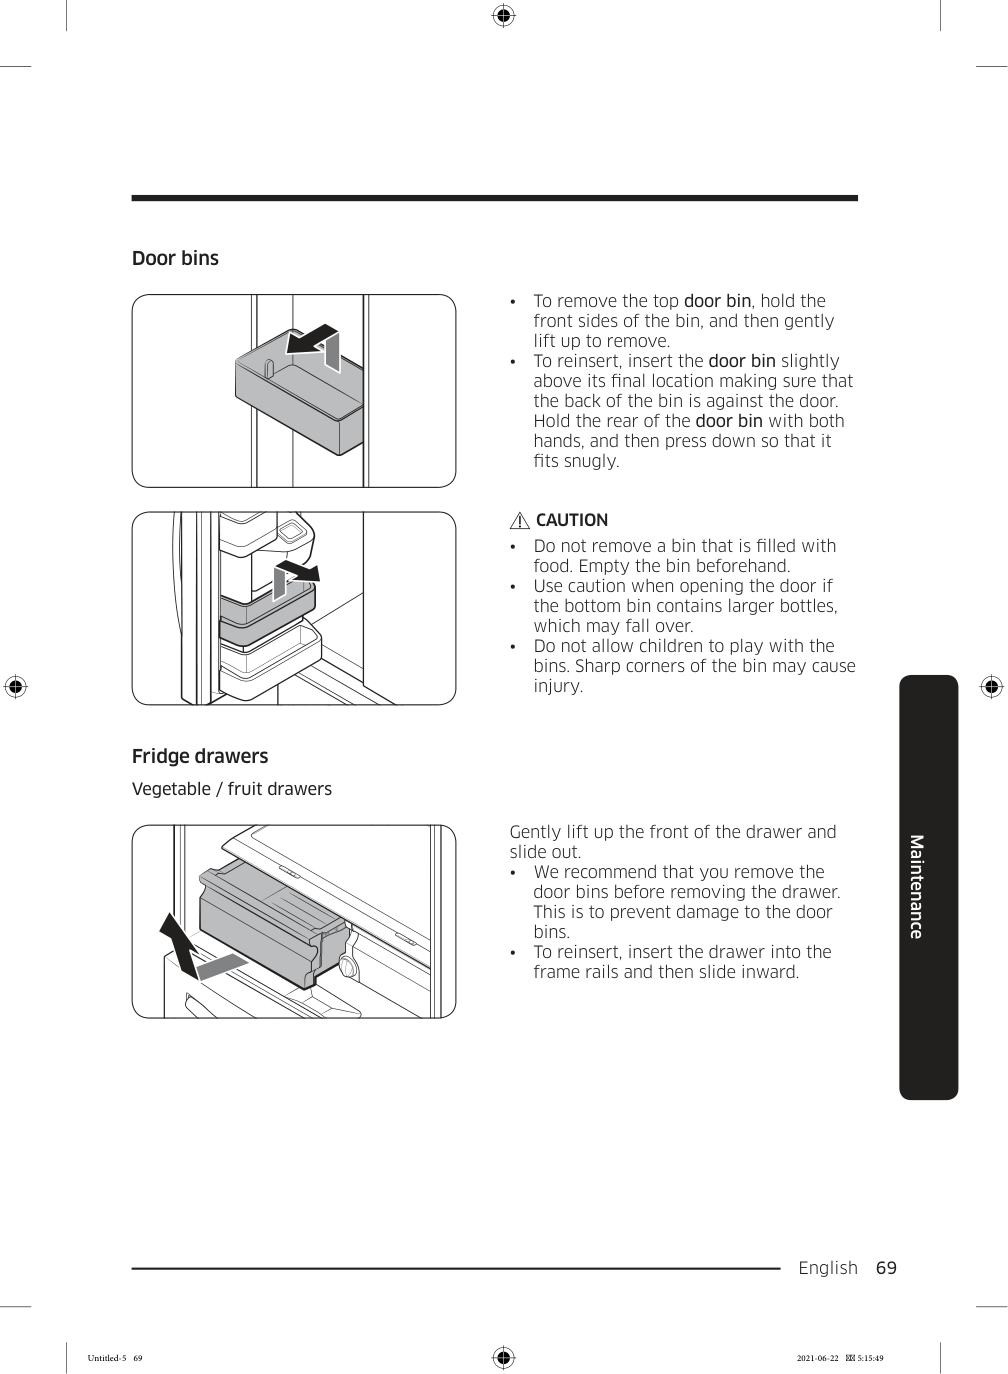
English 69 Maintenance Door bins
Caution
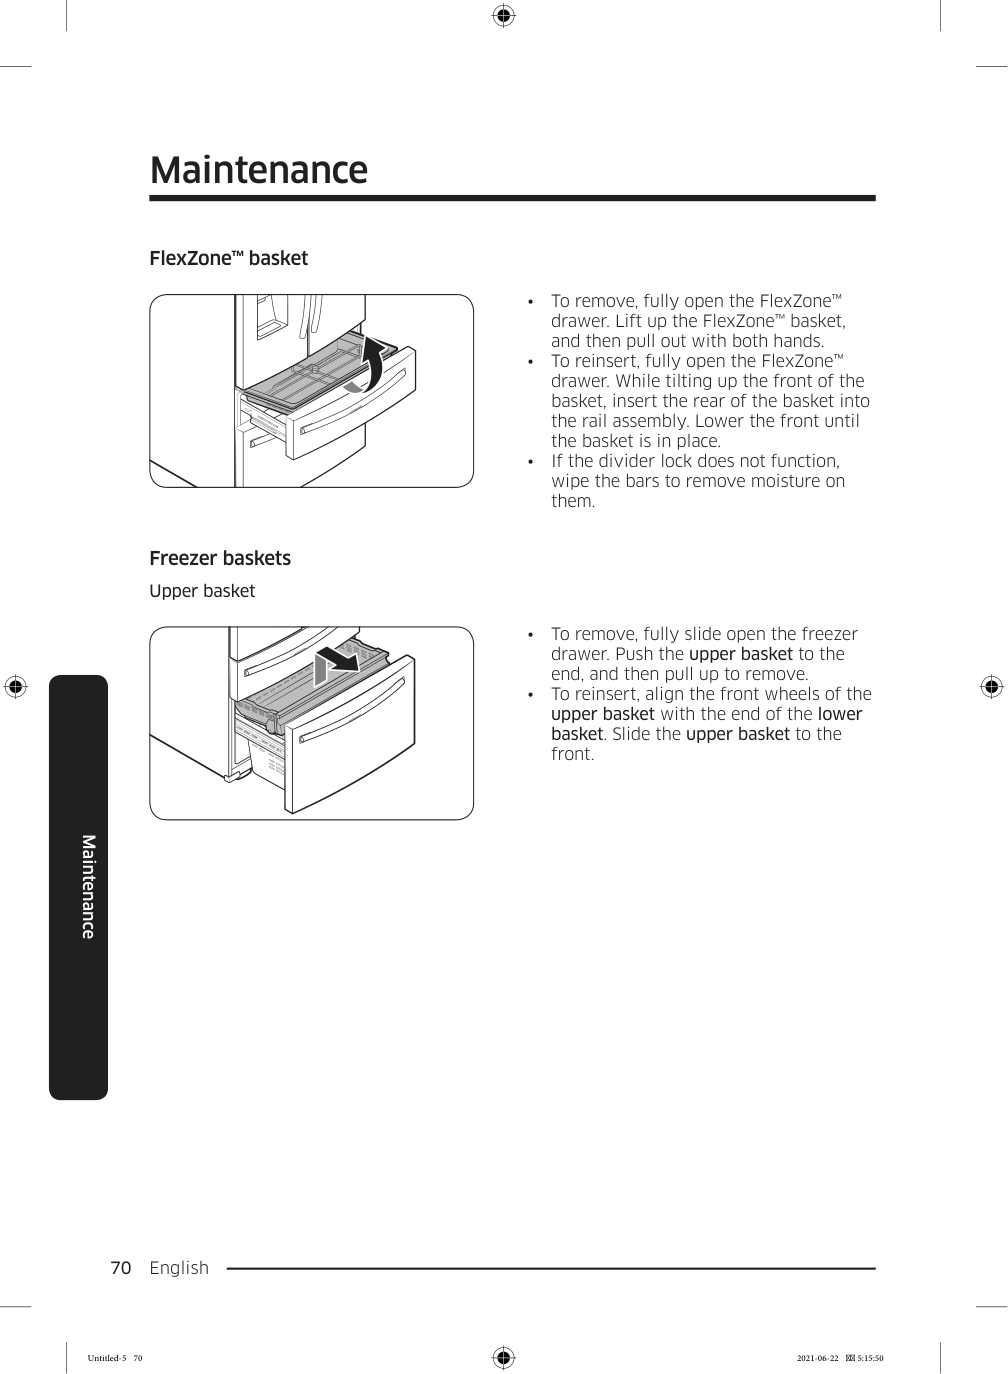
Maintenance English 70 Maintenance FlexZone™ basket
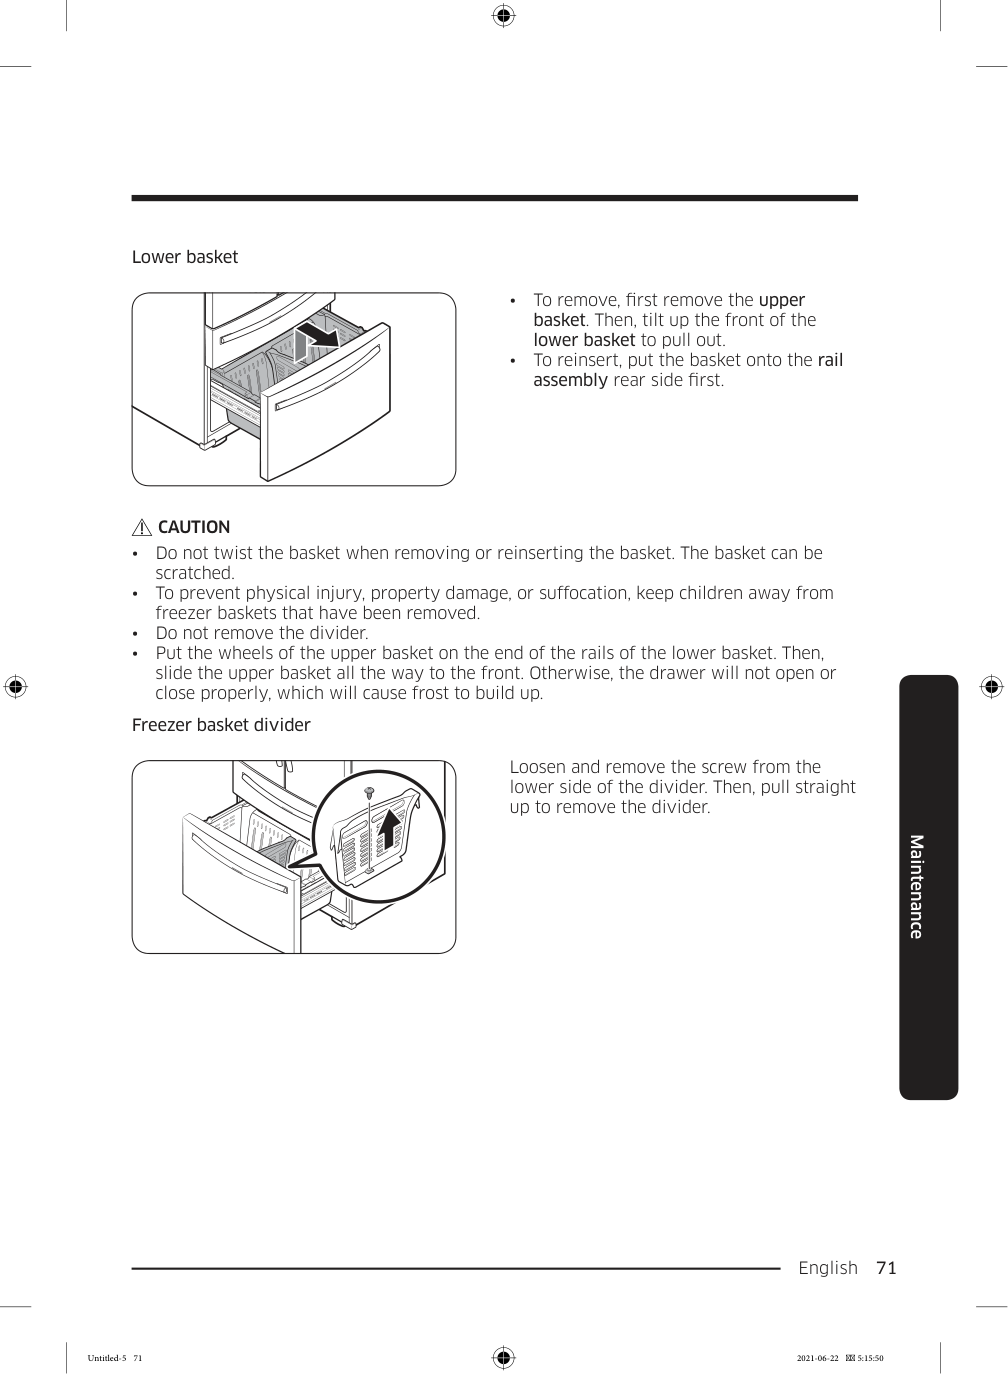
English 71 Maintenance Lower basket
Caution
Maintenance English 72 Maintenance Cleaning Interior and exterior
Warning
Caution
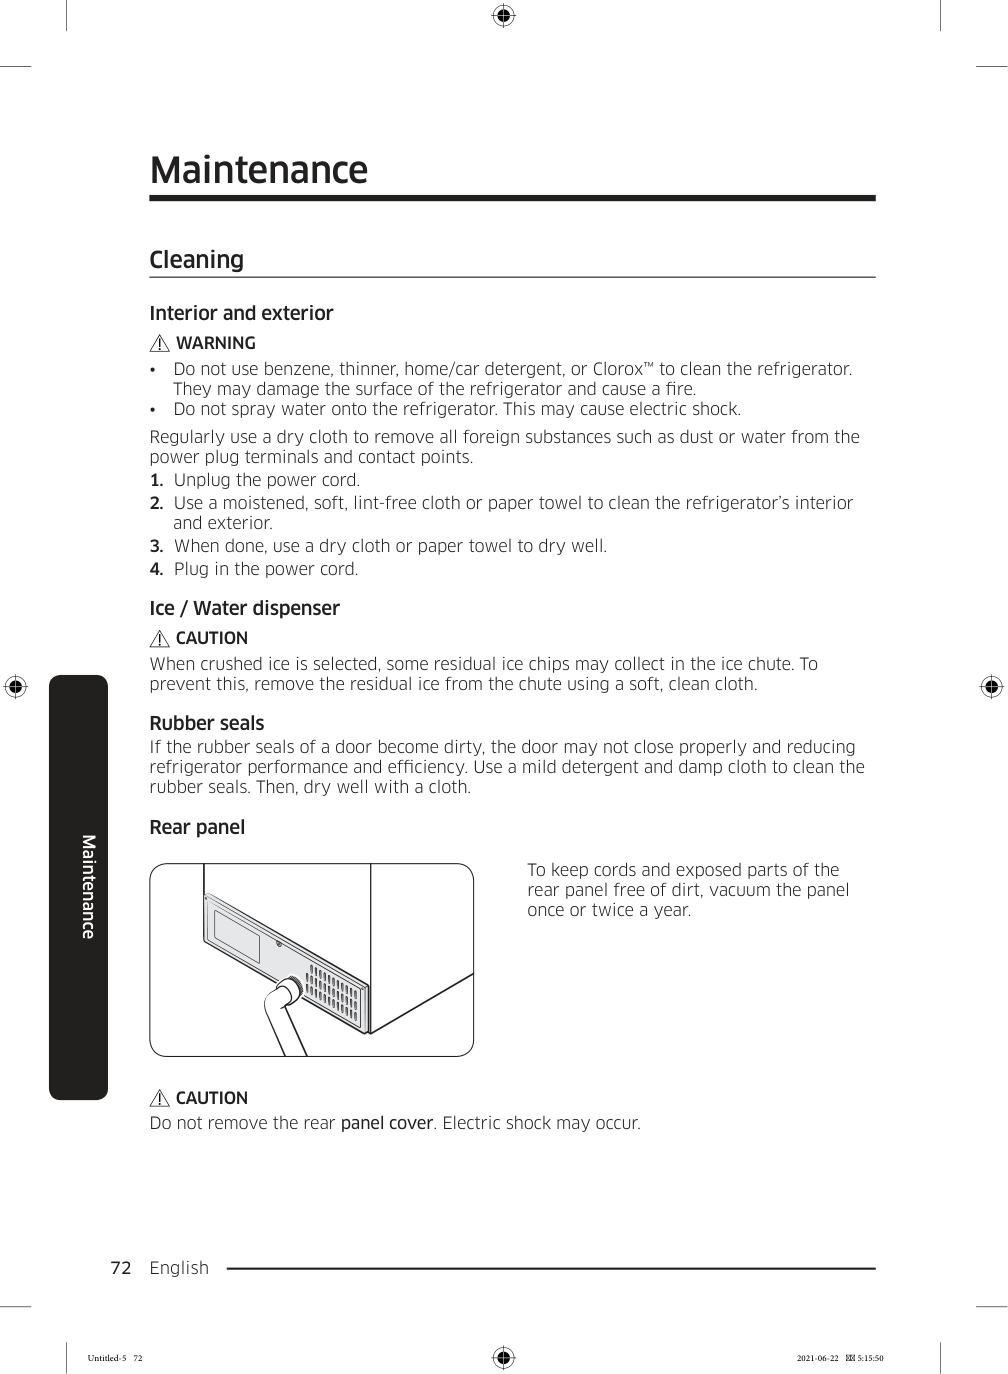
When crushed ice is selected, some residual ice chips may collect in the ice chute. To prevent this, remove the residual ice from the chute using a soft, clean cloth. Rubber seals If the rubber seals of a door become dirty, the door may not close properly and reducing refrigerator performance and efficiency. Use a mild detergent and damp cloth to clean the rubber seals. Then, dry well with a cloth. Rear panel To keep cords and exposed parts of the rear panel free of dirt, vacuum the panel once or twice a year.Caution
Do not remove the rear panel cover. Electric shock may occur. Untitled-5 72 2021-06-22 5:15:50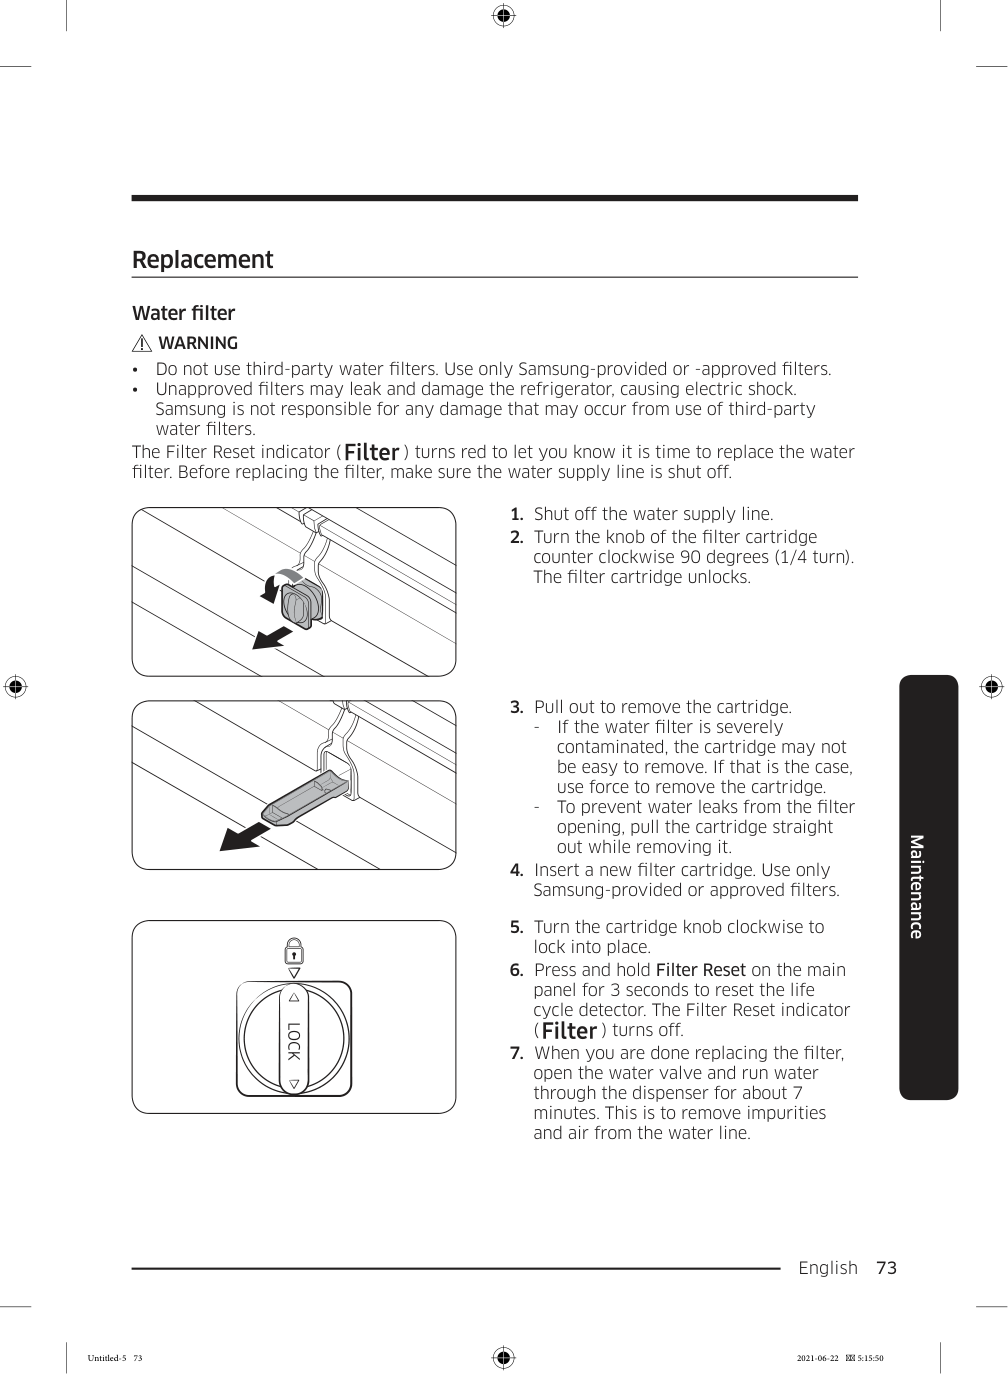
English 73 Maintenance Replacement Water filter
Warning
Maintenance English 74 Maintenance
Note
Warning
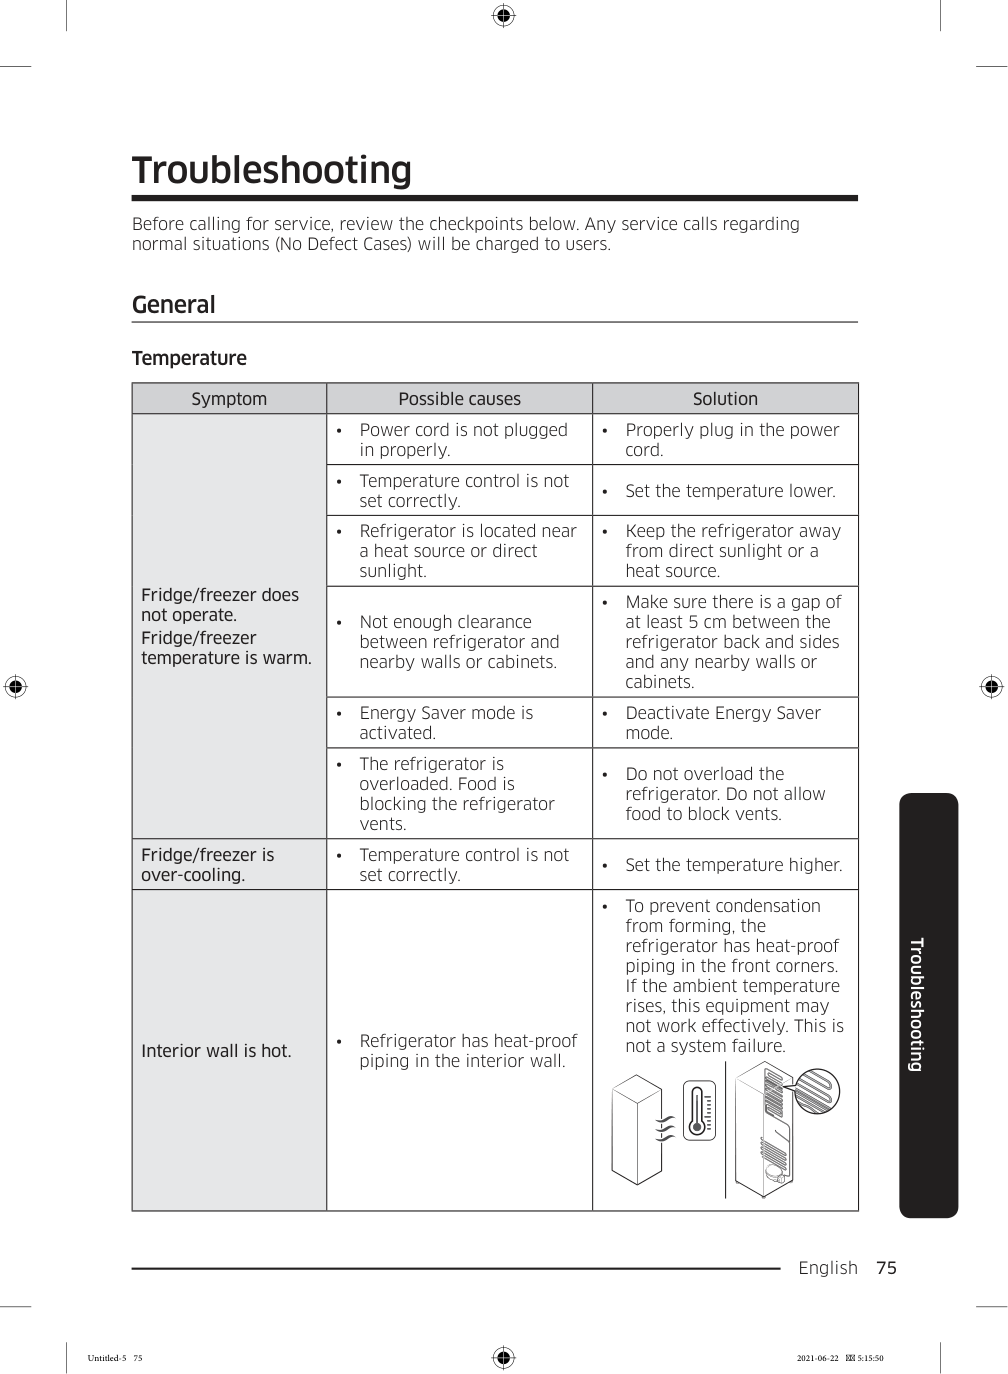
English 75 Troubleshooting Before calling for service, review the checkpoints below. Any service calls regarding normal situations (No Defect Cases) will be charged to users. General Temperature Symptom Possible causes Solution Fridge/freezer does not operate. Fridge/freezer temperature is warm.
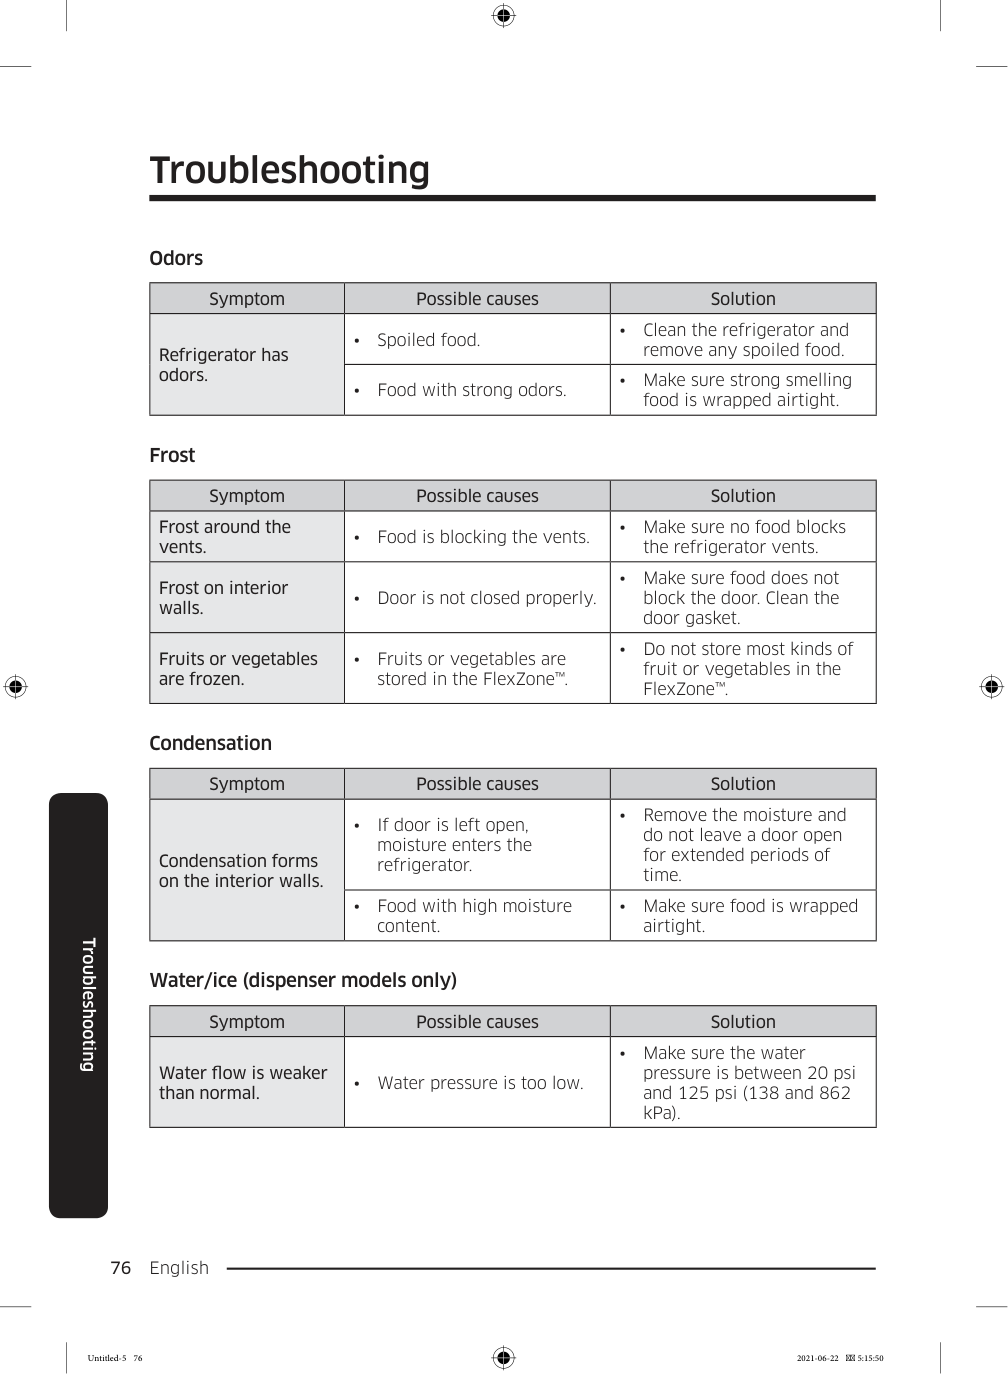
Troubleshooting English 76 Troubleshooting Odors Symptom Possible causes Solution Refrigerator has odors.
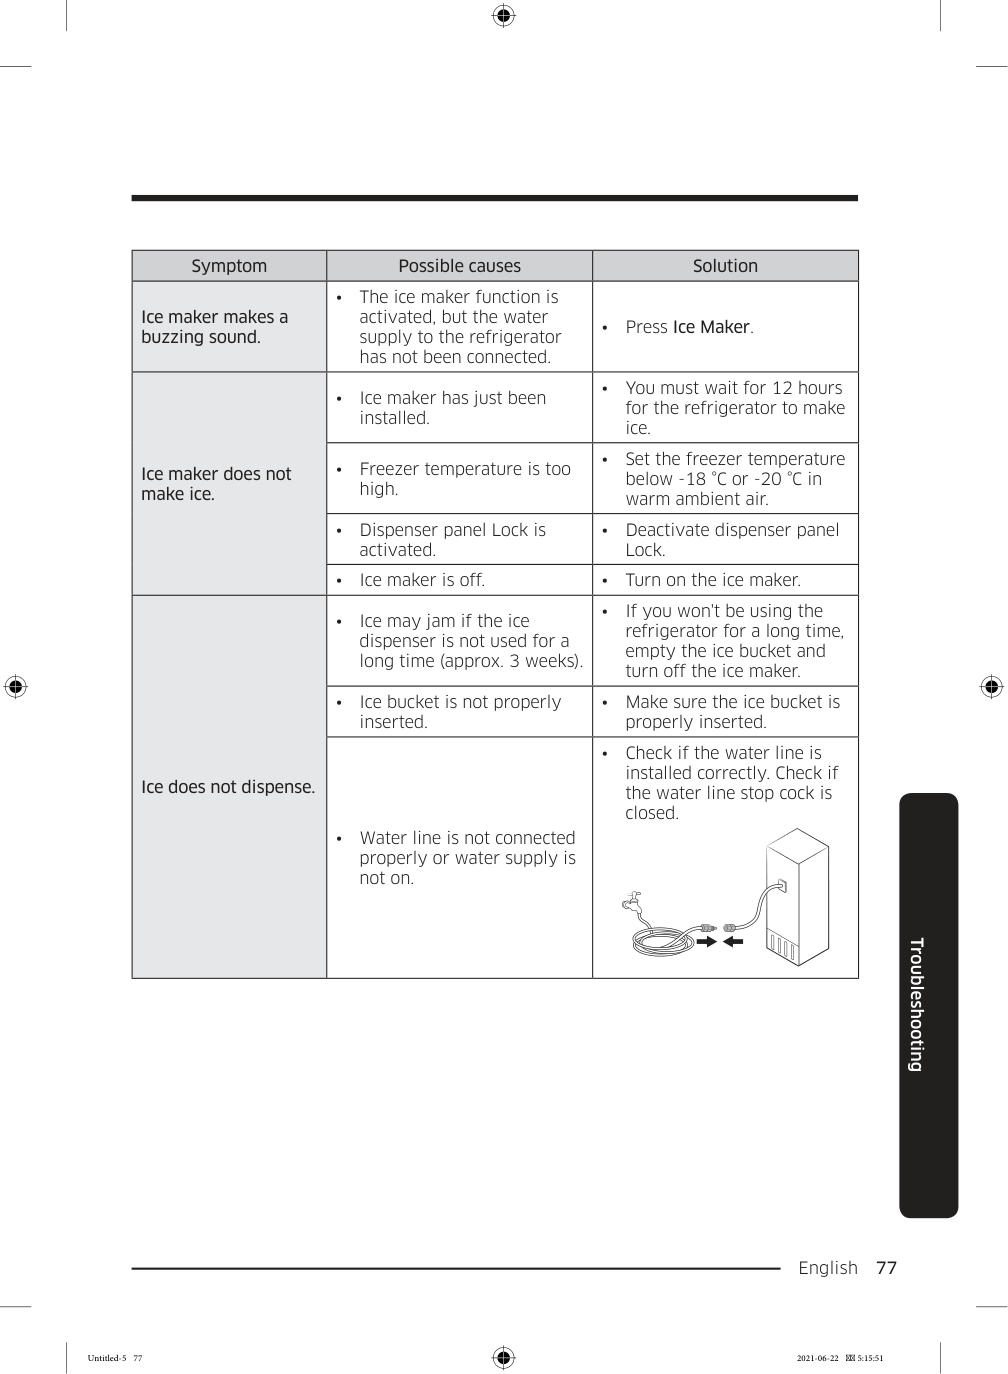
English 77 Troubleshooting Symptom Possible causes Solution Ice maker makes a buzzing sound.
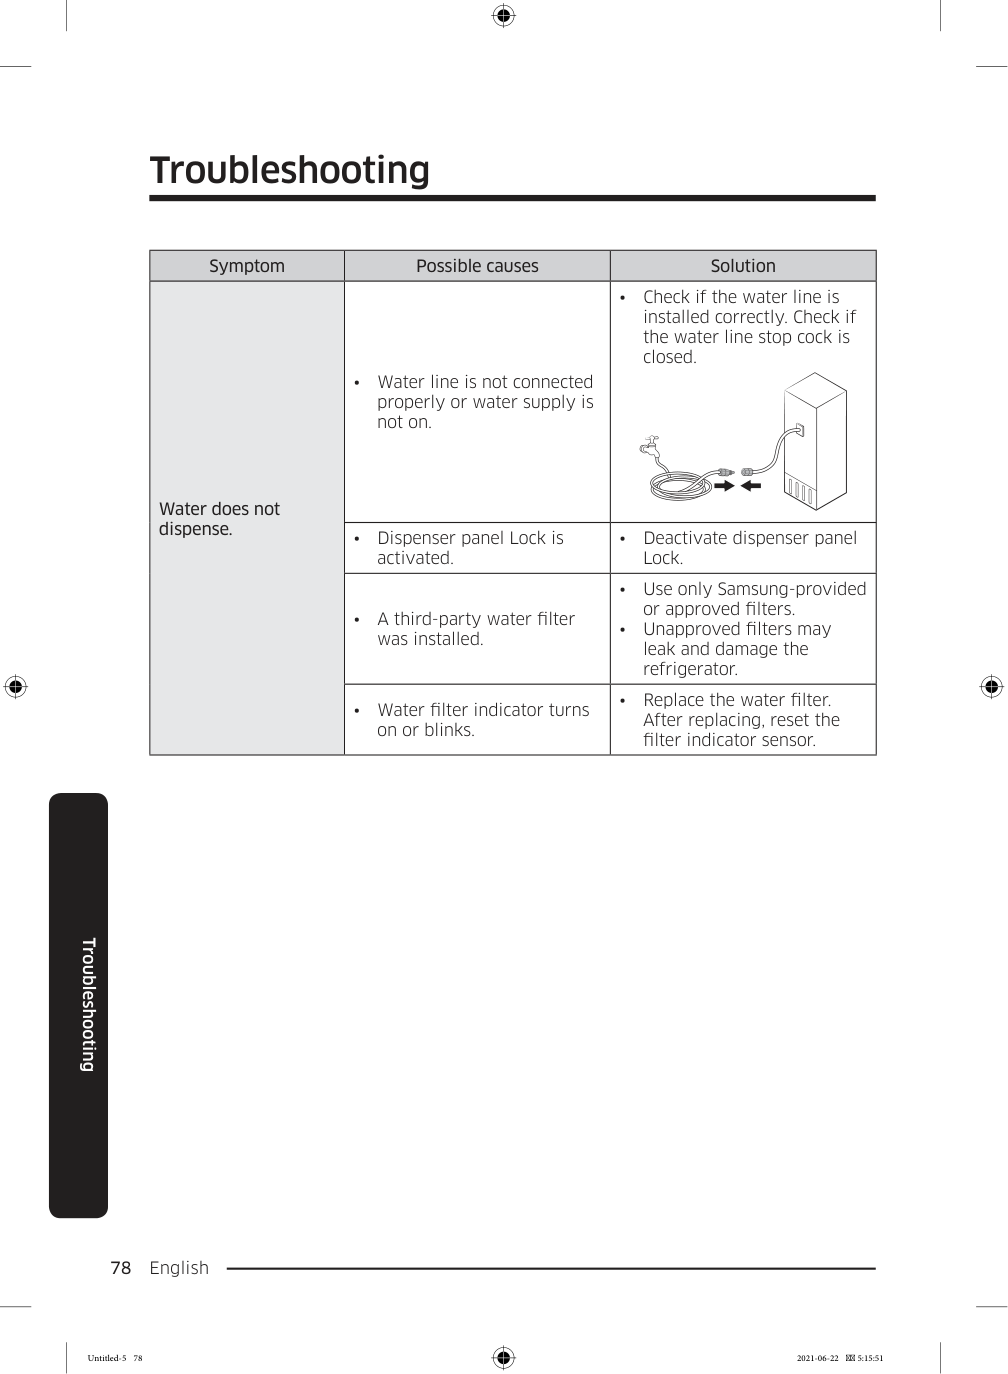
Troubleshooting English 78 Troubleshooting Symptom Possible causes Solution Water does not dispense.
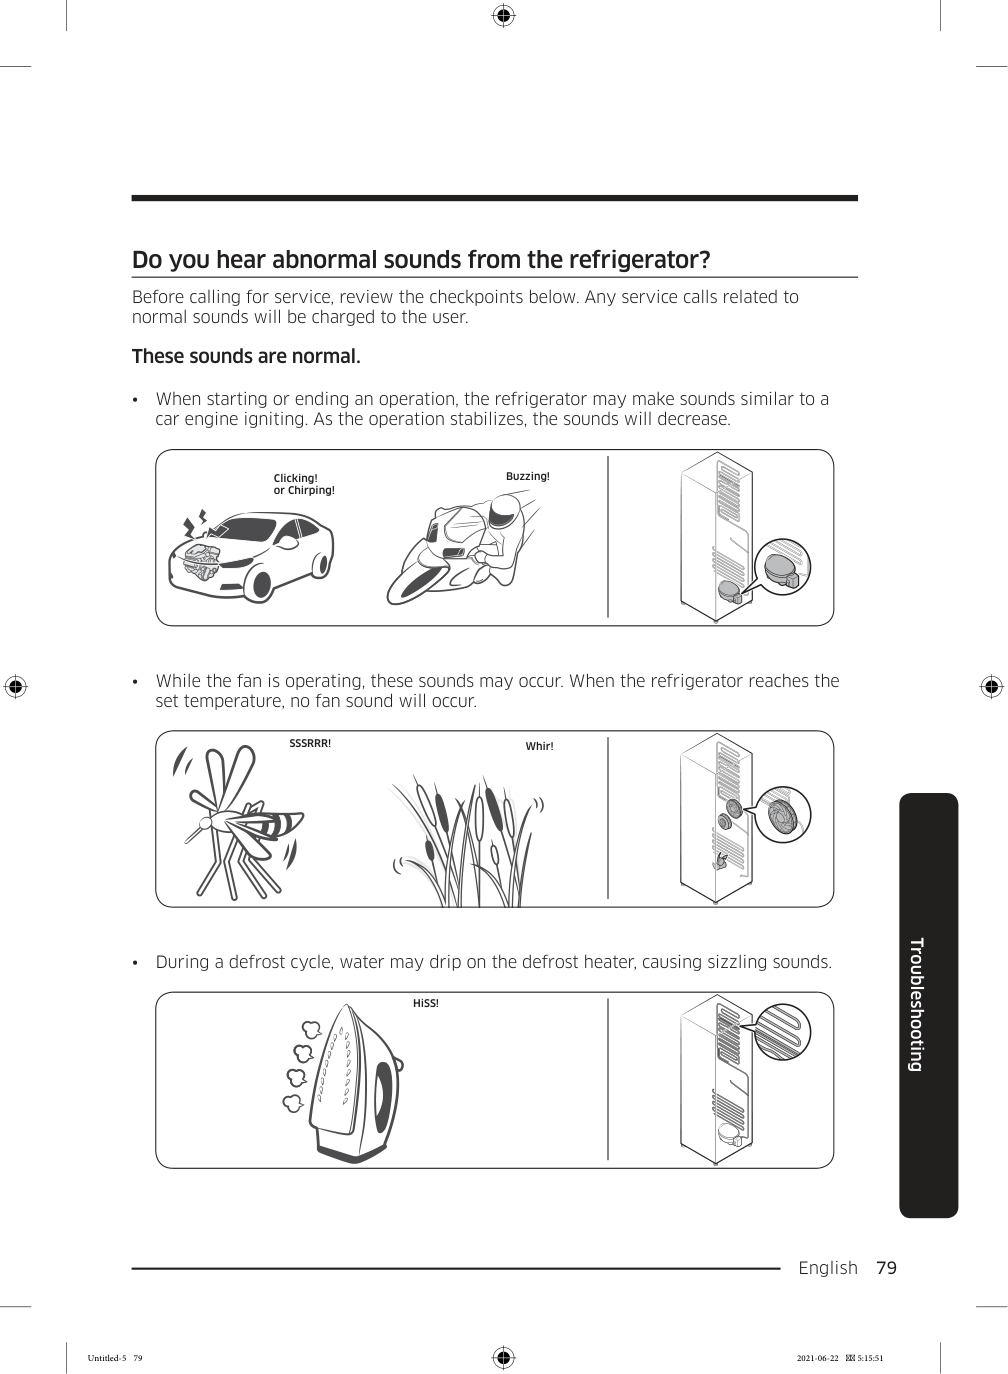
English 79 Troubleshooting Do you hear abnormal sounds from the refrigerator? Before calling for service, review the checkpoints below. Any service calls related to normal sounds will be charged to the user. These sounds are normal.
Sssrrr!
Whir!
Troubleshooting English 80 Troubleshooting
English 81 Troubleshooting SmartThings Symptom Action Could not find “SmartThings” in the app market.
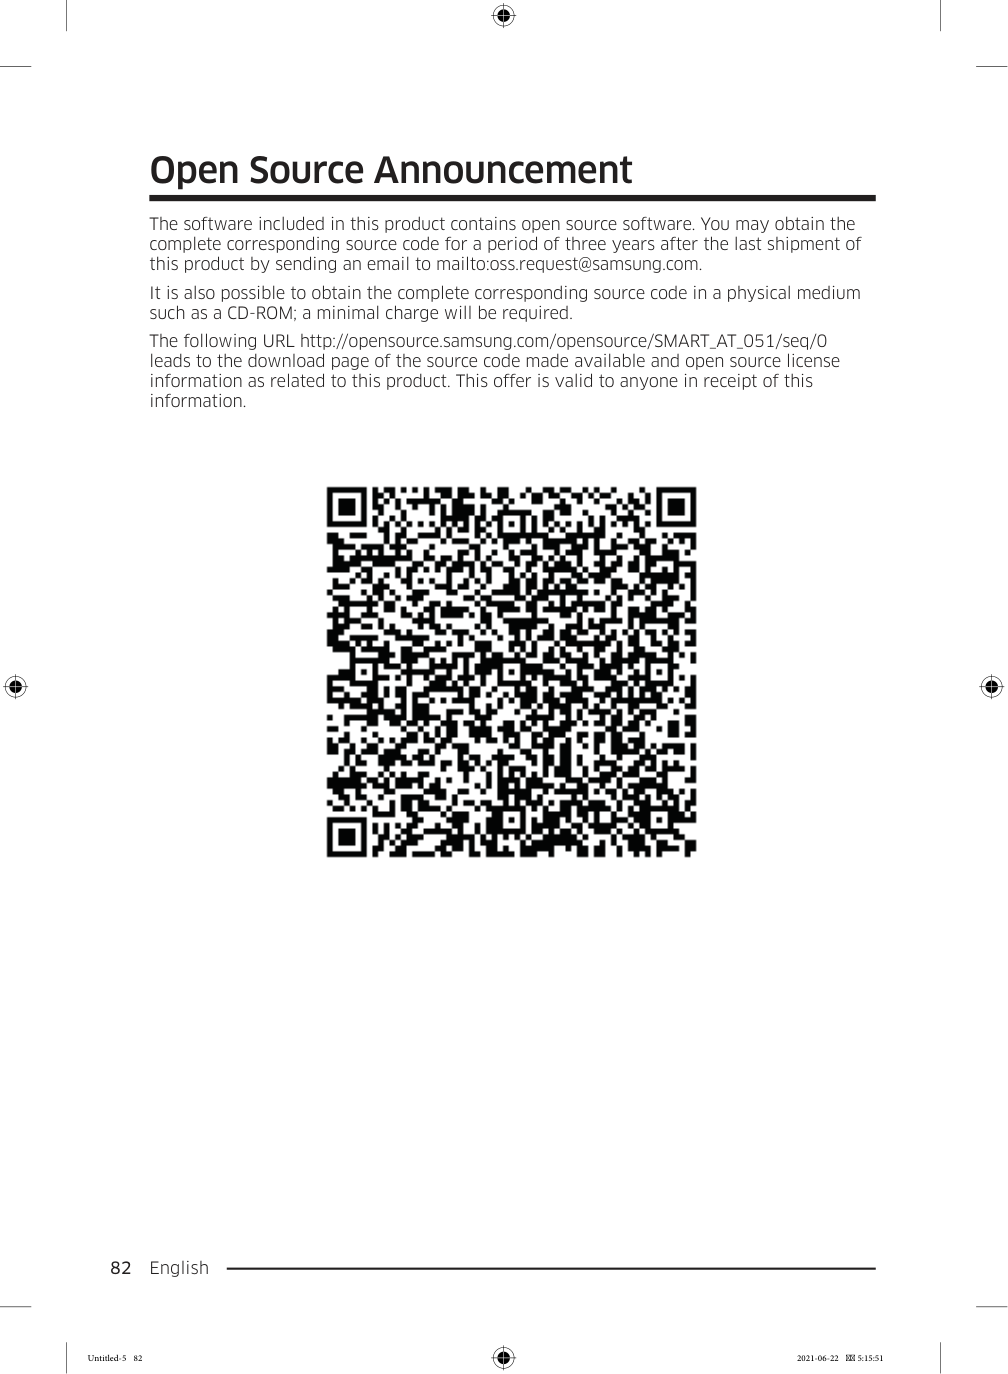
English 82 Open Source Announcement The software included in this product contains open source software. You may obtain the complete corresponding source code for a period of three years after the last shipment of this product by sending an email to mailto:oss.request@samsung.com. It is also possible to obtain the complete corresponding source code in a physical medium such as a CD-ROM; a minimal charge will be required. The following URL http://opensource.samsung.com/opensource/SMART_AT_051/seq/0 leads to the download page of the source code made available and open source license information as related to this product. This offer is valid to anyone in receipt of this information. Untitled-5 82 2021-06-22 5:15:51

Memo Untitled-5 83 2021-06-22 5:15:51
Contact SAMSUNG WORLD WIDE If you have any questions or comments relating to Samsung products, please contact the SAMSUNG Customer Care Center. Country Contact Center Web Site
Costa Rica
00-800-1-Samsung (726-7864)
www.samsung.com/latin/support (Spanish) www.samsung.com/latin_en/support (English)Dominican
Republic
1-800-751-2676 www.samsung.com/latin/support (Spanish) www.samsung.com/latin_en/support (English)Ecuador
1-800-Samsun (72-6786)
www.samsung.com/latin/support (Spanish) www.samsung.com/latin_en/support (English)El Salvador
8000-Samsung (726-7864)
www.samsung.com/latin/support (Spanish) www.samsung.com/latin_en/support (English)Guatemala
1-800-299-0033 www.samsung.com/latin/support (Spanish) www.samsung.com/latin_en/support (English)Honduras
800-2791-9111 www.samsung.com/latin/support (Spanish) www.samsung.com/latin_en/support (English)Jamaica
1-800-Samsung (726-7864)
www.samsung.com/latin_en/support (English)Nicaragua
001-800-5077267 www.samsung.com/latin/support (Spanish) www.samsung.com/latin_en/support (English)Panama
800-0101 www.samsung.com/latin/support (Spanish) www.samsung.com/latin_en/support (English)Puerto Rico
1-800-682-3180 www.samsung.com/latin/support (Spanish) www.samsung.com/latin_en/support (English)Trinidad &
Tobago
1-800-Samsung(726-7864)
www.samsung.com/latin/support (Spanish) www.samsung.com/latin_en/support (English)Venezuela
0-800-100-5303 www.samsung.com/latin/support (Spanish) www.samsung.com/latin_en/support (English)Da68-03833B-02
Untitled-5 84 2021-06-22 5:15:51
Refrigerador Manual del usuario Electrodoméstico independiente Untitled-6 1 2021-06-22 5:18:35
Español 2 Contenido Contenido Información sobre seguridad 3 Qué debe saber sobre las instrucciones de seguridad 3 Símbolos y advertencias de seguridad importantes: 4 Precauciones importantes de seguridad 5 Señales de advertencia importantes para el transporte y el emplazamiento 10 Advertencias muy importantes para la instalación 11 Precauciones para la instalación 14 Advertencias muy importantes para el uso 15 Precauciones de uso 21 Precauciones para la limpieza 24 Advertencias muy importantes para la eliminación de residuos 27 Recomendaciones adicionales para el uso adecuado 28 Instrucciones acerca de WEEE 29 Instalación 30 Descripción breve del refrigerador 30 Instalación paso a paso 33 Funcionamiento 51 Panel principal 51 SmartThings 60 Panel del dispensador 63 Funciones especiales 64 Mantenimiento 70 Manipulación y cuidado 70 Limpieza 77 Reemplazo 78 Solución de problemas 80 General 80 ¿Se oyen ruidos anómalos procedentes del refrigerador? 85 SmartThings 87 Open Source Announcement 88 Untitled-6 2 2021-06-22 5:18:35
Español 3 Información sobre seguridad Antes de utilizar su nuevo refrigerador Samsung, lea detenidamente este manual a fin de aprender a usar las funciones que ofrece de manera segura y eficiente. Qué debe saber sobre las instrucciones de seguridad
Información sobre seguridad Español 4 Información sobre seguridad
Español 5 Información sobre seguridad
Advertencia
Riesgos o prácticas inseguras que pueden causar graves lesiones personales, daños a la propiedad y/o incluso la muerte.Precaución
Riesgos o prácticas inseguras que pueden causar lesiones personales leves y/o daños materiales.Nota
Información útil que ayuda a los usuarios a comprender u obtener beneficios del refrigerador. Estas señales de advertencia se incluyen aquí para evitar que usted o terceros sufran lesiones. Sígalas atentamente. Después de leer esta sección, consérvela en un lugar seguro para referencia futura. Precauciones importantes de seguridad Advertencia: riesgo de incendio/materiales inflamablesAdvertencia
Información sobre seguridad Español 6 Información sobre seguridad
Español 7 Información sobre seguridad No deje que los niños jueguen con el electrodoméstico. Los niños no deben efectuar tareas de limpieza ni de mantenimiento sin vigilancia.
Información sobre seguridad Español 8 Información sobre seguridad
Español 9 Información sobre seguridad
Información sobre seguridad Español 10 Información sobre seguridad Señales de advertencia importantes para el transporte y el emplazamiento
Advertencia
Español 11 Información sobre seguridad Advertencias muy importantes para la instalación
Advertencia

Información sobre seguridad Español 12 Información sobre seguridad
Español 13 Información sobre seguridad
Información sobre seguridad Español 14 Información sobre seguridad
Precaución
Español 15 Información sobre seguridad
Advertencia
Información sobre seguridad Español 16 Información sobre seguridad
Español 17 Información sobre seguridad
Información sobre seguridad Español 18 Información sobre seguridad
Español 19 Información sobre seguridad
Información sobre seguridad Español 20 Información sobre seguridad
Español 21 Información sobre seguridad Precauciones de uso
Precaución
Información sobre seguridad Español 22 Información sobre seguridad
Español 23 Información sobre seguridad
Información sobre seguridad Español 24 Información sobre seguridad
Precaución
Español 25 Información sobre seguridad
Información sobre seguridad Español 26 Información sobre seguridad
Español 27 Información sobre seguridad Advertencias muy importantes para la eliminación de residuos
Advertencia
Información sobre seguridad Español 28 Información sobre seguridad

Español 29 Información sobre seguridad
Español 30 Instalación Siga las instrucciones cuidadosamente a fin de garantizar la instalación adecuada del refrigerador y de evitar accidentes antes de utilizarlo.
Advertencia
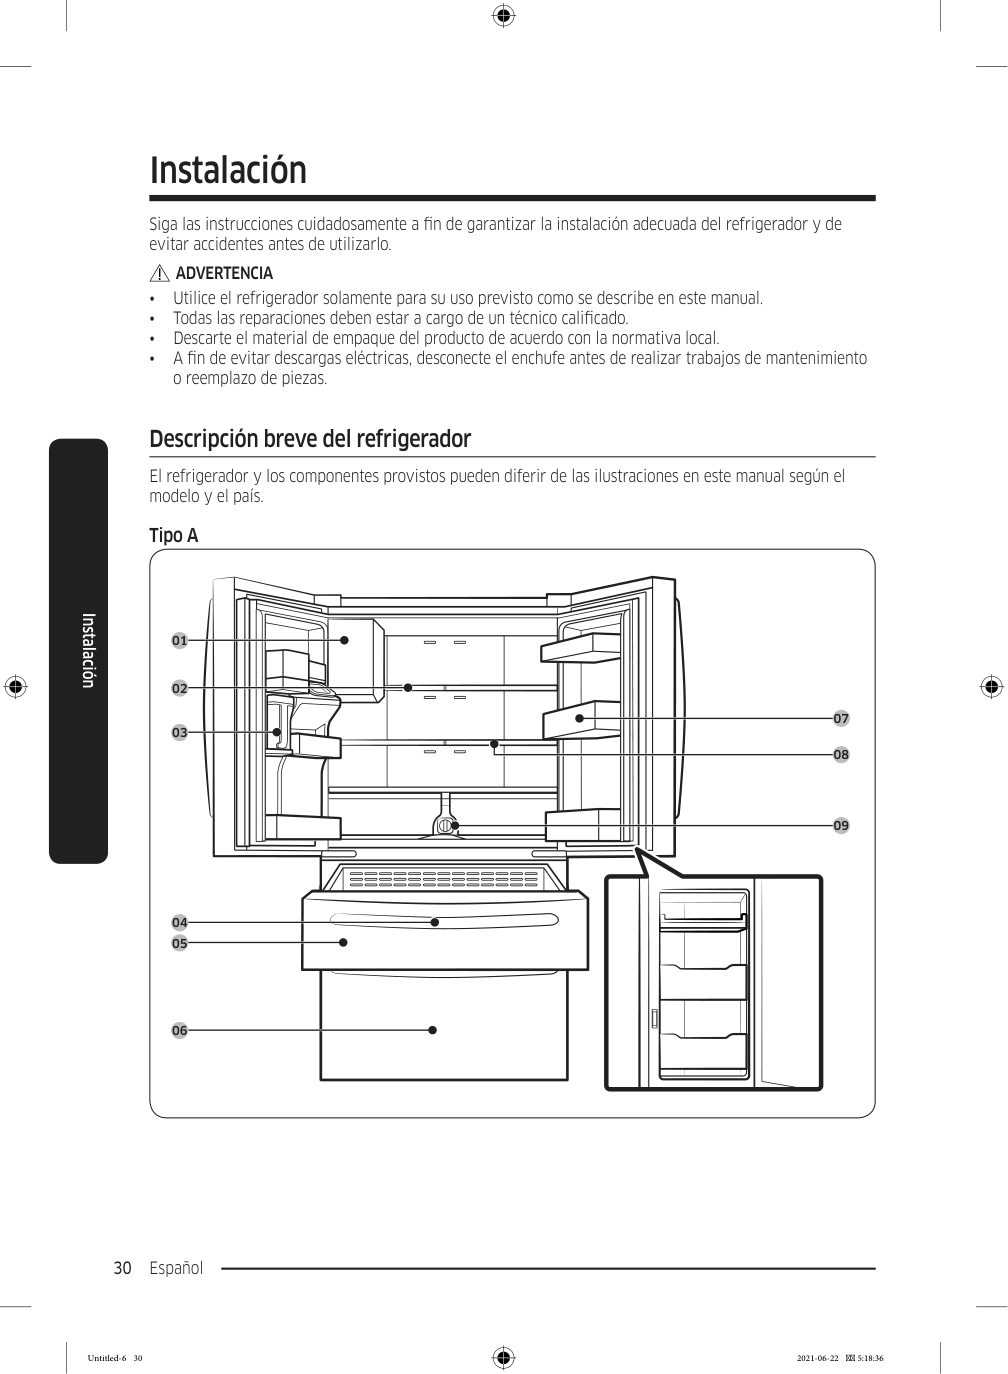
• Utilice el refrigerador solamente para su uso previsto como se describe en este manual. • Todas las reparaciones deben estar a cargo de un técnico calificado. • Descarte el material de empaque del producto de acuerdo con la normativa local. • A fin de evitar descargas eléctricas, desconecte el enchufe antes de realizar trabajos de mantenimiento o reemplazo de piezas. Descripción breve del refrigerador El refrigerador y los componentes provistos pueden diferir de las ilustraciones en este manual según el modelo y el país. Tipo A 01 02 03 05 04 06 08 09 07 Instalación Untitled-6 30 2021-06-22 5:18:36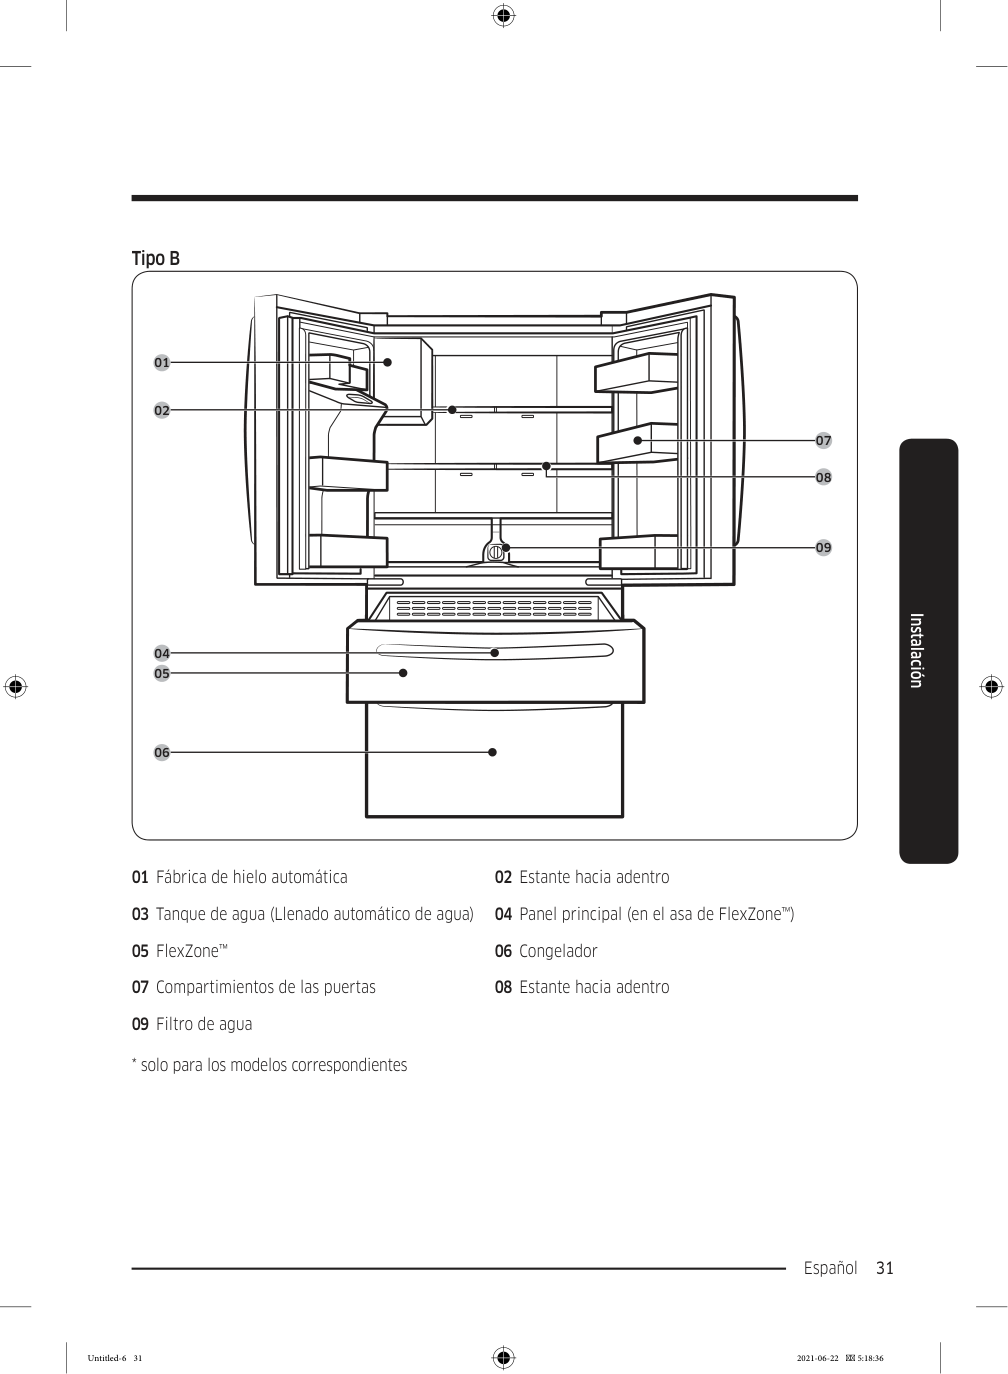
Español 31 Instalación Tipo B 01 02 05 04 06 08 09 07 01 Fábrica de hielo automática 02 Estante hacia adentro 03 Tanque de agua (Llenado automático de agua) 04 Panel principal (en el asa de FlexZone™) 05 FlexZone™ 06 Congelador 07 Compartimientos de las puertas 08 Estante hacia adentro 09 Filtro de agua
Instalación Español 32 Instalación
Nota
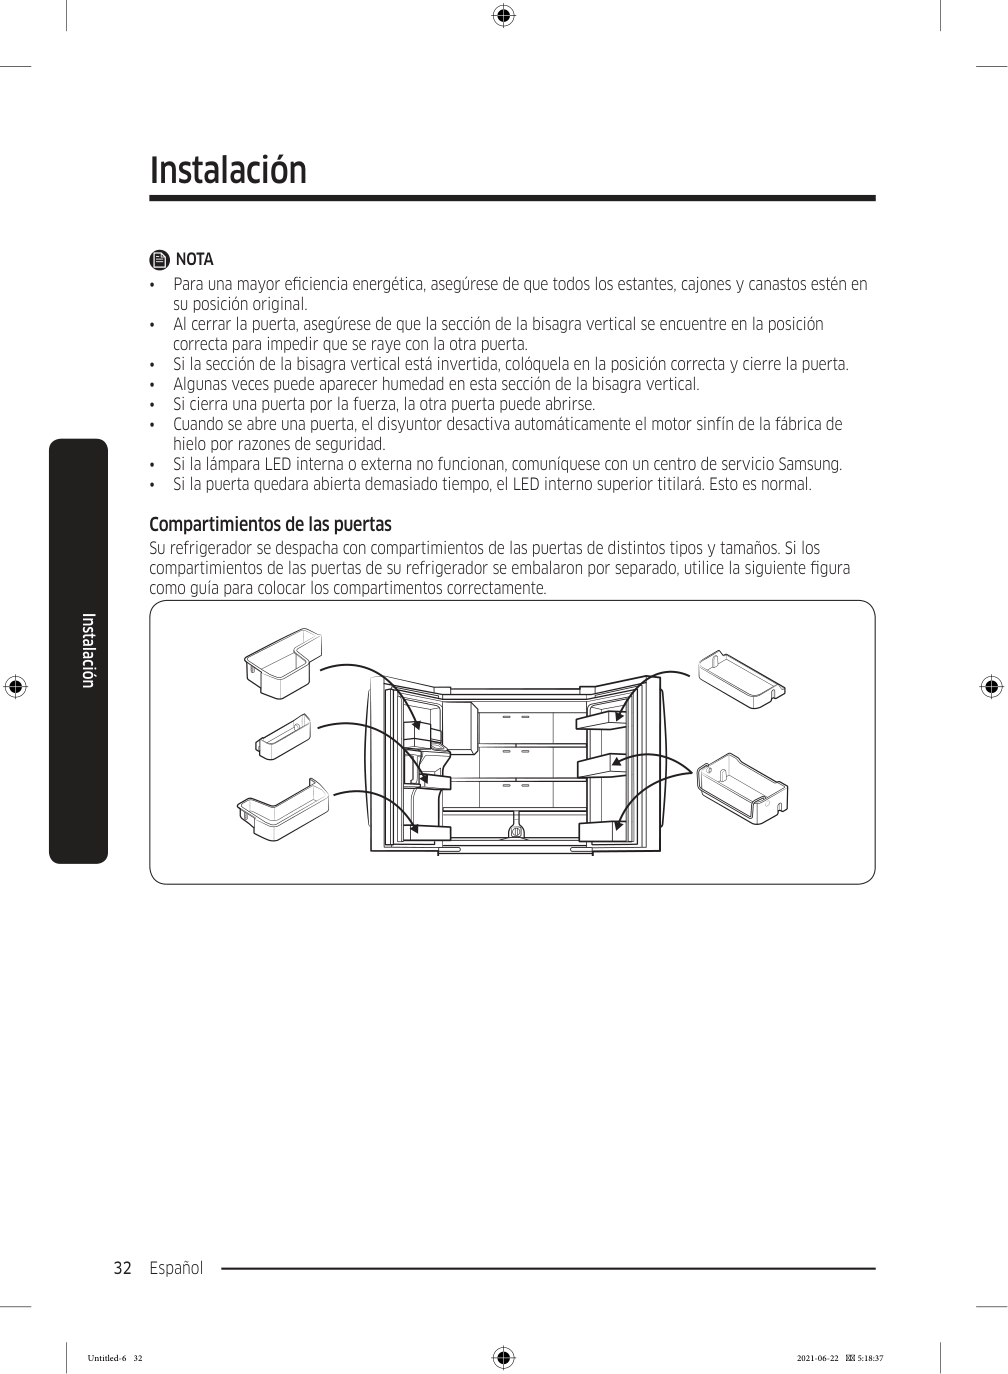
• Para una mayor eficiencia energética, asegúrese de que todos los estantes, cajones y canastos estén en su posición original. • Al cerrar la puerta, asegúrese de que la sección de la bisagra vertical se encuentre en la posición correcta para impedir que se raye con la otra puerta. • Si la sección de la bisagra vertical está invertida, colóquela en la posición correcta y cierre la puerta. • Algunas veces puede aparecer humedad en esta sección de la bisagra vertical. • Si cierra una puerta por la fuerza, la otra puerta puede abrirse. • Cuando se abre una puerta, el disyuntor desactiva automáticamente el motor sinfín de la fábrica de hielo por razones de seguridad. • Si la lámpara LED interna o externa no funcionan, comuníquese con un centro de servicio Samsung. • Si la puerta quedara abierta demasiado tiempo, el LED interno superior titilará. Esto es normal. Compartimientos de las puertas Su refrigerador se despacha con compartimientos de las puertas de distintos tipos y tamaños. Si los compartimientos de las puertas de su refrigerador se embalaron por separado, utilice la siguiente figura como guía para colocar los compartimentos correctamente. Untitled-6 32 2021-06-22 5:18:37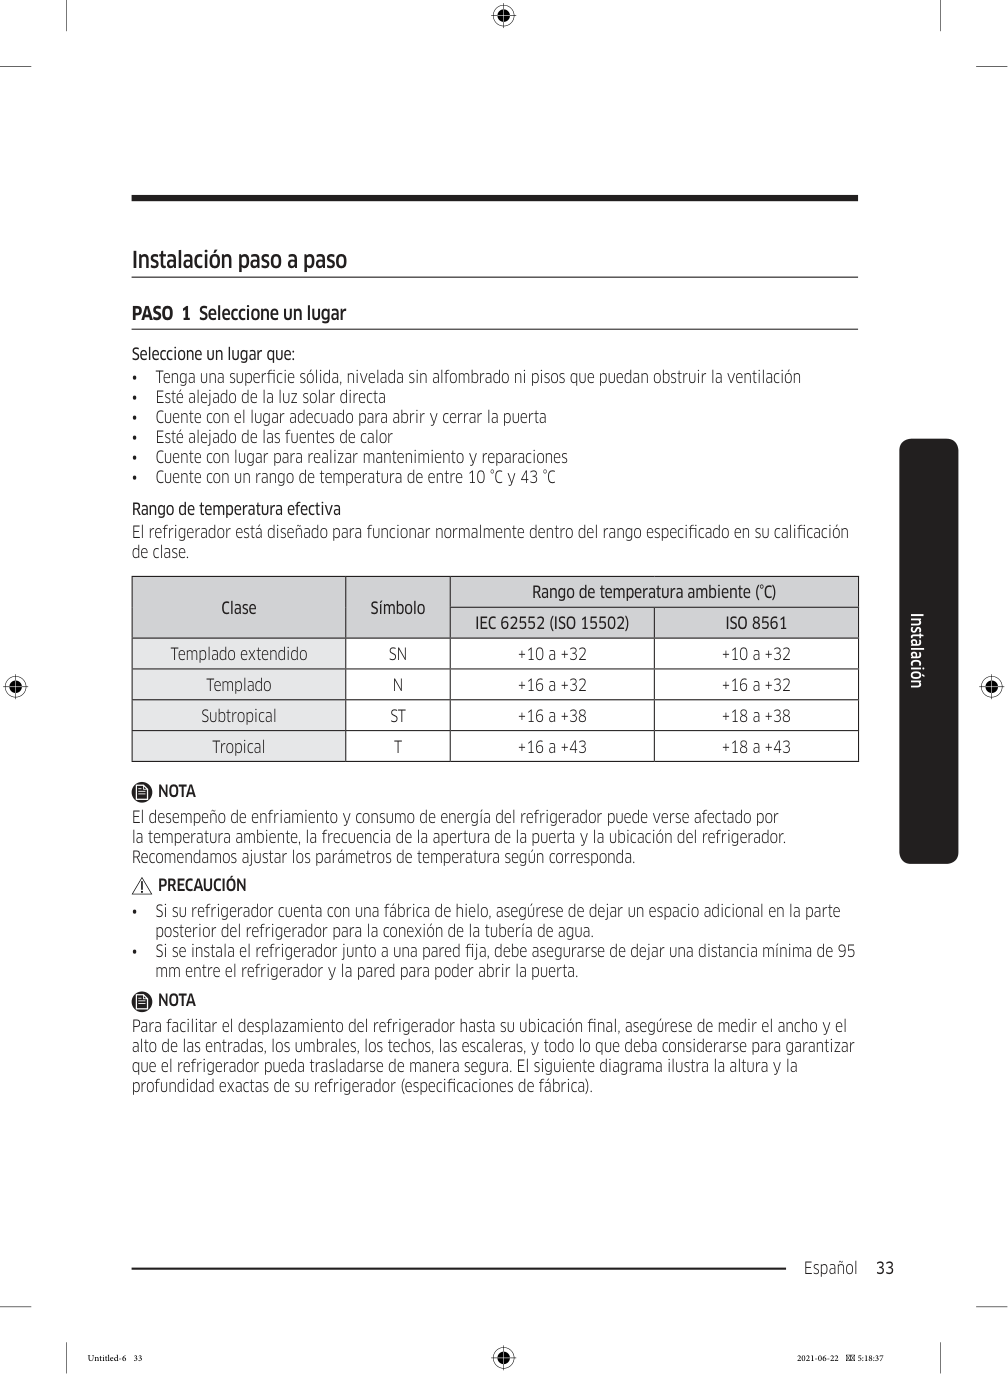
Español 33 Instalación Instalación paso a paso PASO 1 Seleccione un lugar Seleccione un lugar que: • Tenga una superficie sólida, nivelada sin alfombrado ni pisos que puedan obstruir la ventilación • Esté alejado de la luz solar directa • Cuente con el lugar adecuado para abrir y cerrar la puerta • Esté alejado de las fuentes de calor • Cuente con lugar para realizar mantenimiento y reparaciones • Cuente con un rango de temperatura de entre 10 °C y 43 °C Rango de temperatura efectiva El refrigerador está diseñado para funcionar normalmente dentro del rango especificado en su calificación de clase. Clase Símbolo Rango de temperatura ambiente (°C)
Iec 62552 (Iso 15502)
Iso 8561
Templado extendidoSn
+10 a +32 +10 a +32 TempladoN
+16 a +32 +16 a +32 SubtropicalSt
+16 a +38 +18 a +38 TropicalT
+16 a +43 +18 a +43Nota
El desempeño de enfriamiento y consumo de energía del refrigerador puede verse afectado por la temperatura ambiente, la frecuencia de la apertura de la puerta y la ubicación del refrigerador. Recomendamos ajustar los parámetros de temperatura según corresponda.Precaución
• Si su refrigerador cuenta con una fábrica de hielo, asegúrese de dejar un espacio adicional en la parte posterior del refrigerador para la conexión de la tubería de agua. • Si se instala el refrigerador junto a una pared fija, debe asegurarse de dejar una distancia mínima de 95 mm entre el refrigerador y la pared para poder abrir la puerta.Nota
Para facilitar el desplazamiento del refrigerador hasta su ubicación final, asegúrese de medir el ancho y el alto de las entradas, los umbrales, los techos, las escaleras, y todo lo que deba considerarse para garantizar que el refrigerador pueda trasladarse de manera segura. El siguiente diagrama ilustra la altura y la profundidad exactas de su refrigerador (especificaciones de fábrica). Untitled-6 33 2021-06-22 5:18:37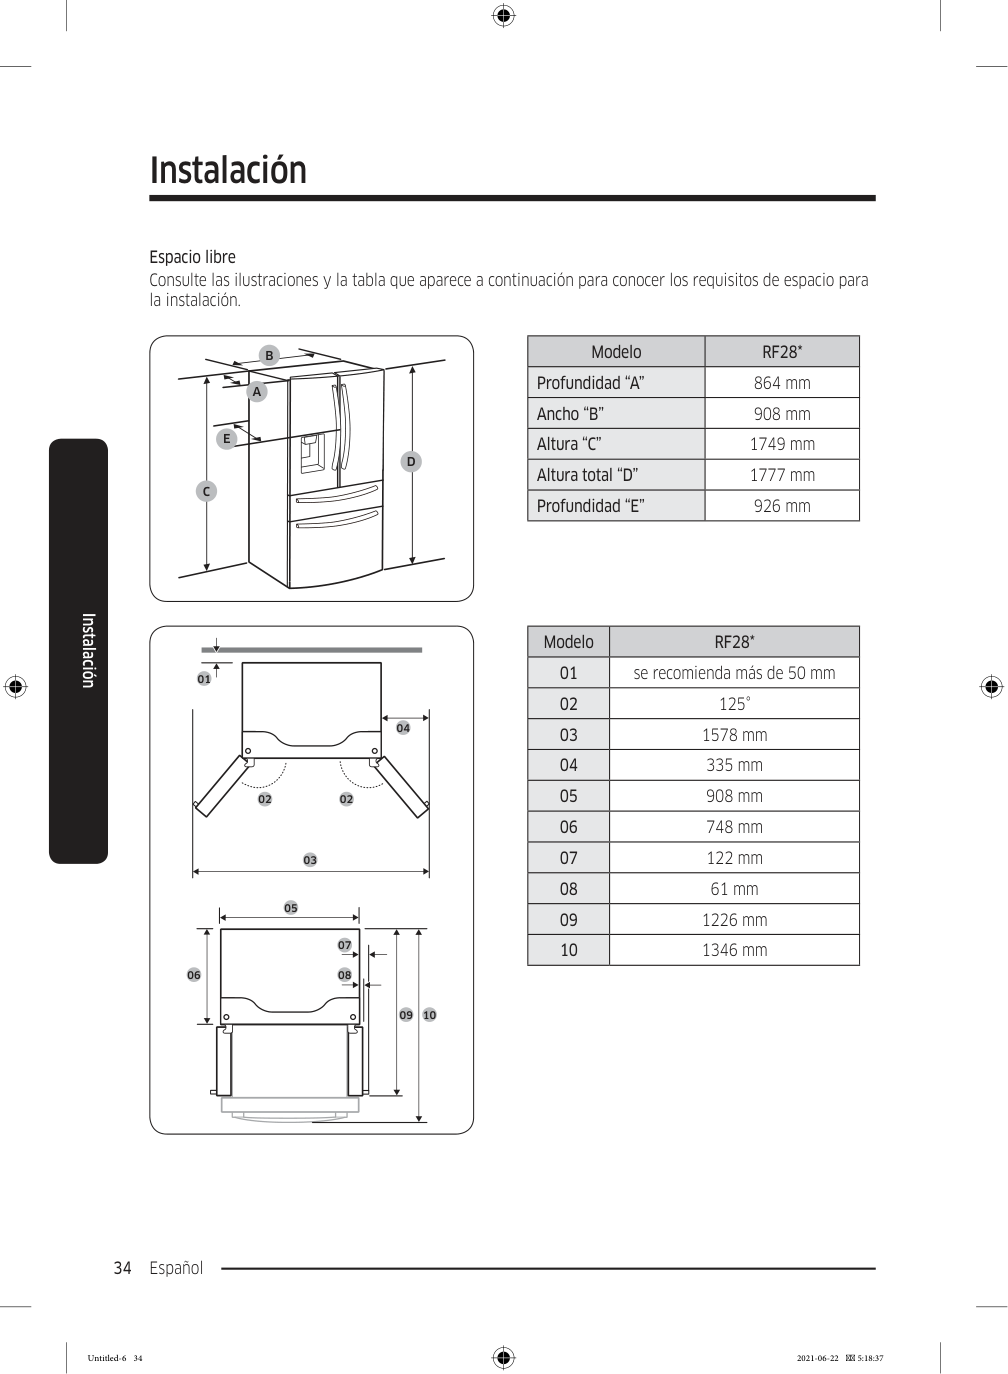
Instalación Español 34 Instalación Espacio libre Consulte las ilustraciones y la tabla que aparece a continuación para conocer los requisitos de espacio para la instalación.
C
D
E
B
A
ModeloRf28*
Profundidad “A” 864 mm Ancho “B” 908 mm Altura “C” 1749 mm Altura total “D” 1777 mm Profundidad “E” 926 mm 01 02 02 04 03 05 06 09 10 07 08 ModeloRf28*
01 se recomienda más de 50 mm 02 125° 03 1578 mm 04 335 mm 05 908 mm 06 748 mm 07 122 mm 08 61 mm 09 1226 mm 10 1346 mm Untitled-6 34 2021-06-22 5:18:37
Español 35 Instalación
Nota
Las medidas de la tabla anterior pueden variar ligeramente de las medidas reales según el método de medición y redondeo. PASO 2 Piso Si el refrigerador no pasa por la puerta por su tamaño, consulte Extracción de la puerta para la entrada.Nota
Para evitar que se dañe el piso, asegúrese de que las patas de nivelación delanteras estén en posición vertical. • La superficie sobre la que se instalará el refrigerador debe soportar un refrigerador completamente cargado. • A fin de proteger el piso, coloque un trozo de cartón por el recorrido del refrigerador hasta su ubicación final. • Una vez que el refrigerador esté en su posición final, no lo mueva a menos que sea necesario a fin de proteger el piso. Si debe hacerlo, utilice un papel grueso o tela, como una alfombra vieja, en el recorrido por el que se lo desplazará. Untitled-6 35 2021-06-22 5:18:37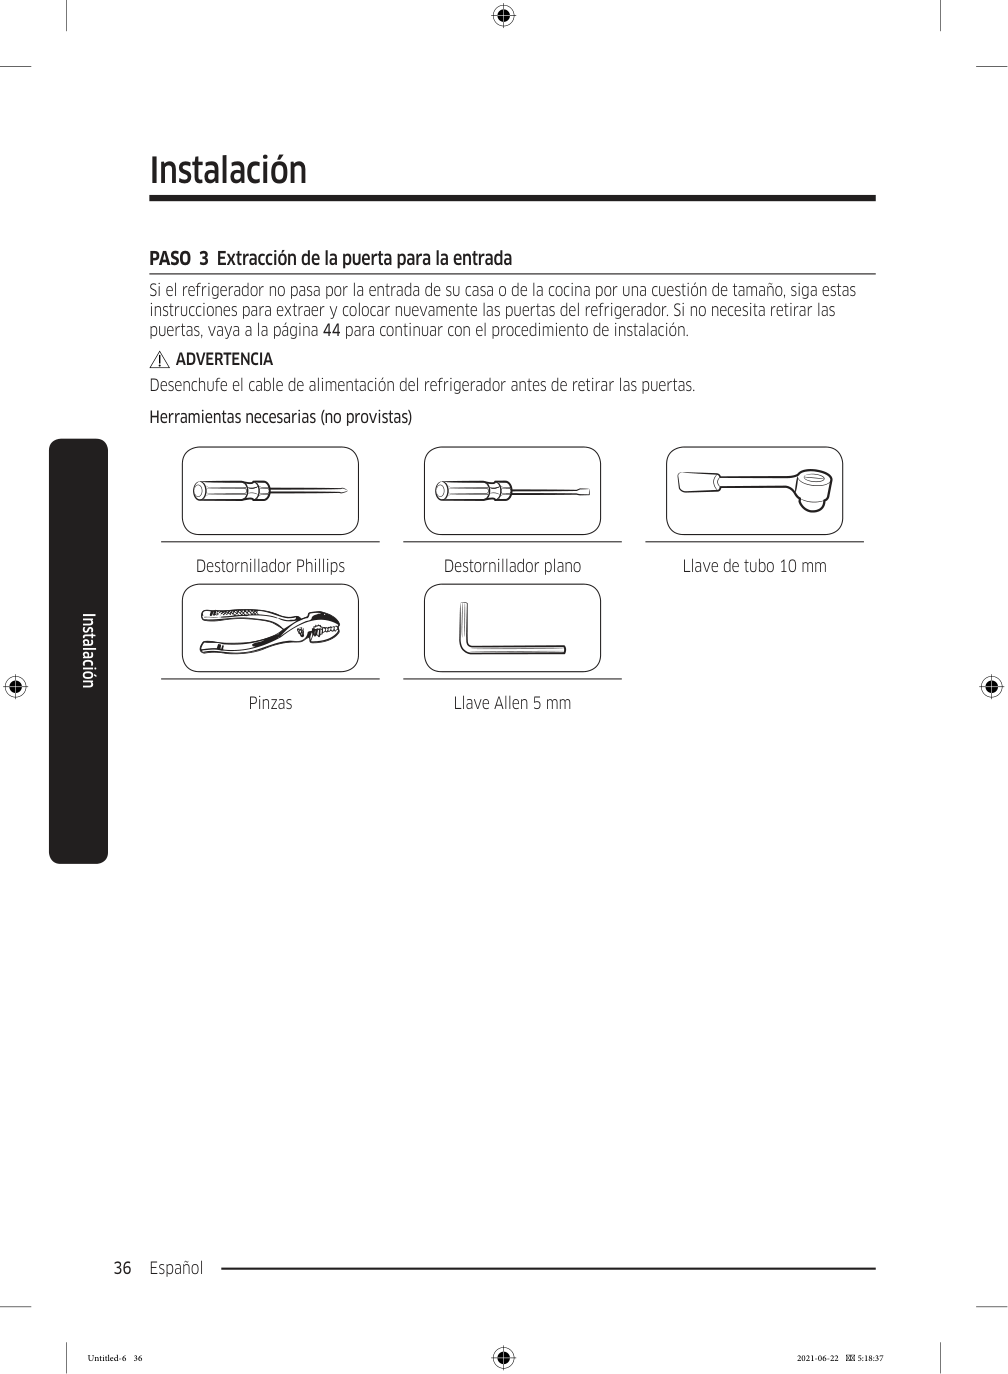
Instalación Español 36 Instalación PASO 3 Extracción de la puerta para la entrada Si el refrigerador no pasa por la entrada de su casa o de la cocina por una cuestión de tamaño, siga estas instrucciones para extraer y colocar nuevamente las puertas del refrigerador. Si no necesita retirar las puertas, vaya a la página 44 para continuar con el procedimiento de instalación.
Advertencia
Desenchufe el cable de alimentación del refrigerador antes de retirar las puertas. Herramientas necesarias (no provistas) Destornillador Phillips Destornillador plano Llave de tubo 10 mm Pinzas Llave Allen 5 mm Untitled-6 36 2021-06-22 5:18:37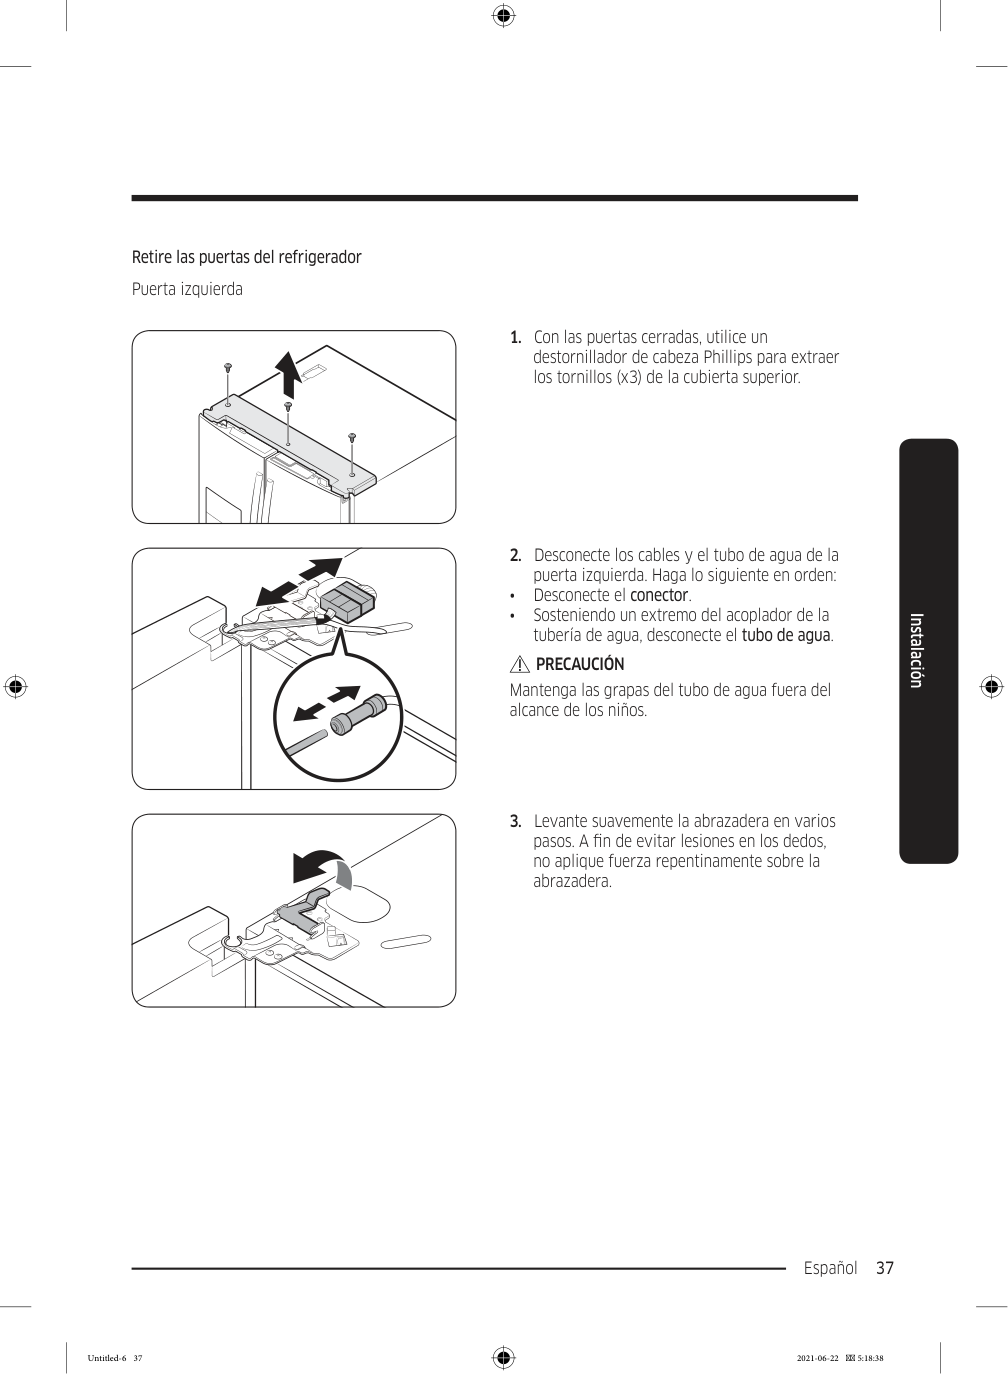
Español 37 Instalación Retire las puertas del refrigerador Puerta izquierda
Precaución
Mantenga las grapas del tubo de agua fuera del alcance de los niños.
Instalación Español 38 Instalación
Nota
Tenga cuidado de no dejar caer la abrazadera.Nota
Tenga cuidado de no dejar caer la bisagra.Precaución
Coloque la puerta lentamente para evitar rayones. Untitled-6 38 2021-06-22 5:18:38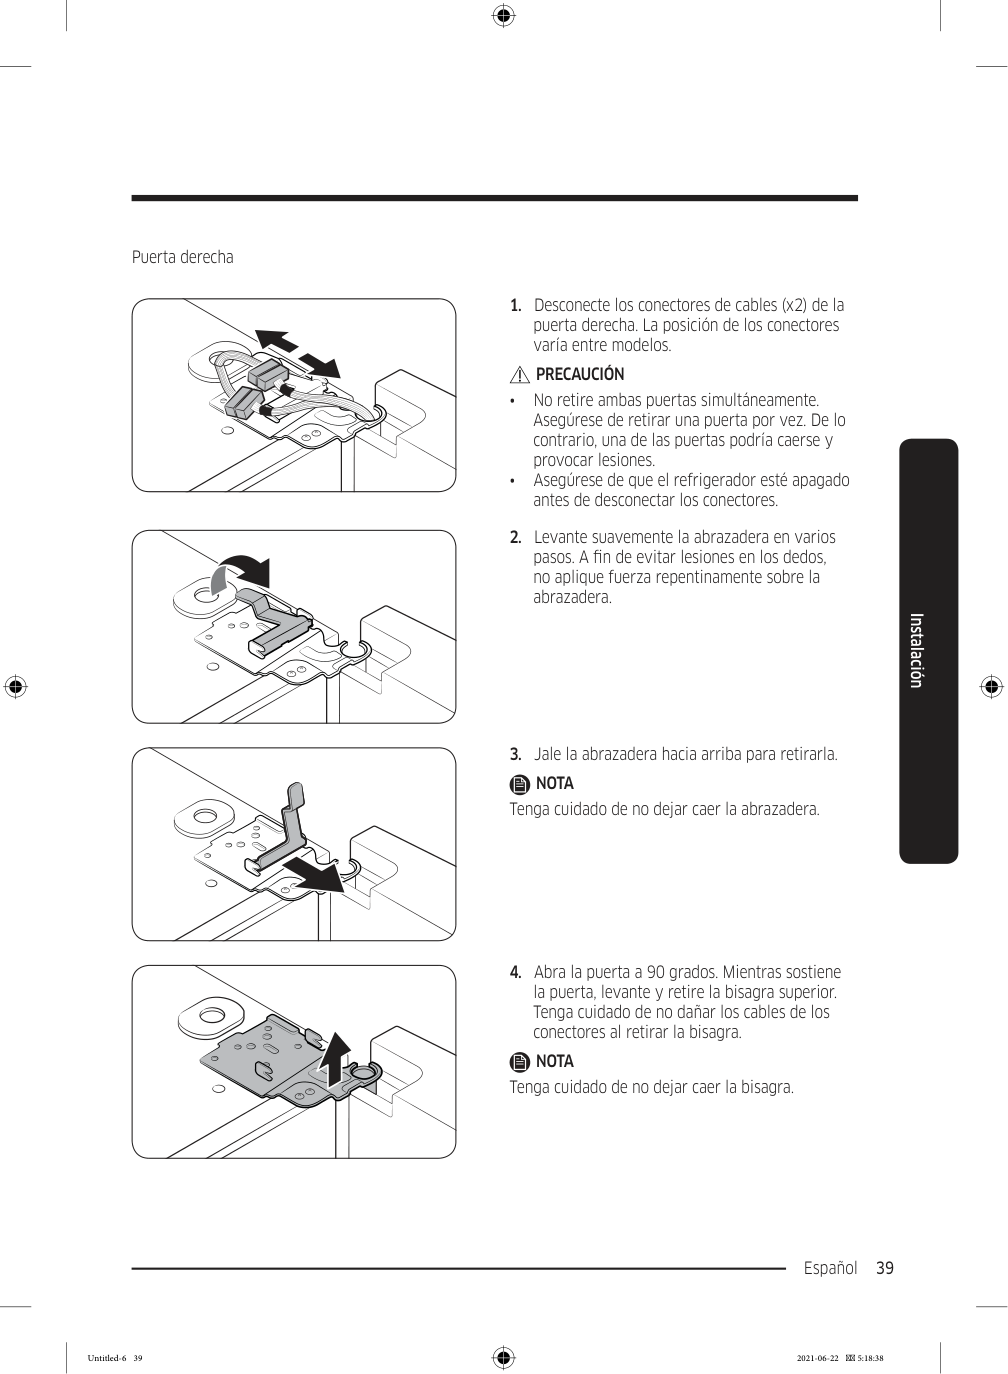
Español 39 Instalación Puerta derecha
Precaución
• No retire ambas puertas simultáneamente. Asegúrese de retirar una puerta por vez. De lo contrario, una de las puertas podría caerse y provocar lesiones. • Asegúrese de que el refrigerador esté apagado antes de desconectar los conectores.Nota
Tenga cuidado de no dejar caer la abrazadera.Nota
Tenga cuidado de no dejar caer la bisagra. Untitled-6 39 2021-06-22 5:18:38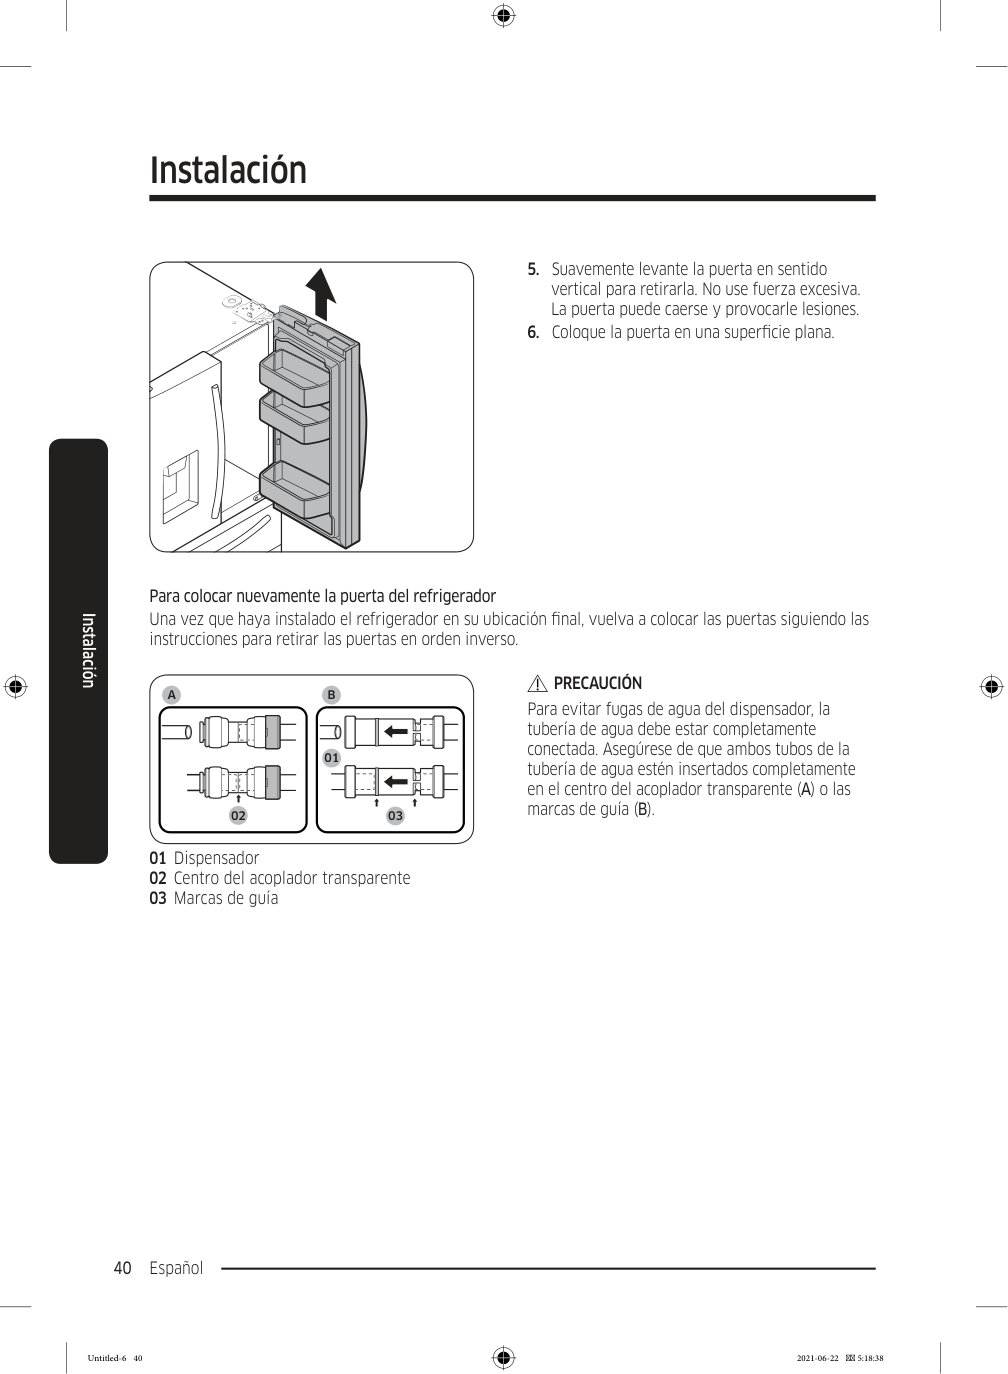
Instalación Español 40 Instalación
A
01 02 03B
01 Dispensador 02 Centro del acoplador transparente 03 Marcas de guíaPrecaución
Para evitar fugas de agua del dispensador, la tubería de agua debe estar completamente conectada. Asegúrese de que ambos tubos de la tubería de agua estén insertados completamente en el centro del acoplador transparente (A) o las marcas de guía (B). Untitled-6 40 2021-06-22 5:18:38
Español 41 Instalación Retire el cajón FlexZone™
Precaución
Cuando vuelva a bloquear la pestaña, asegúrese de conectar completamente el conector del cable. De lo contrario, la FlexZone™ no funcionará.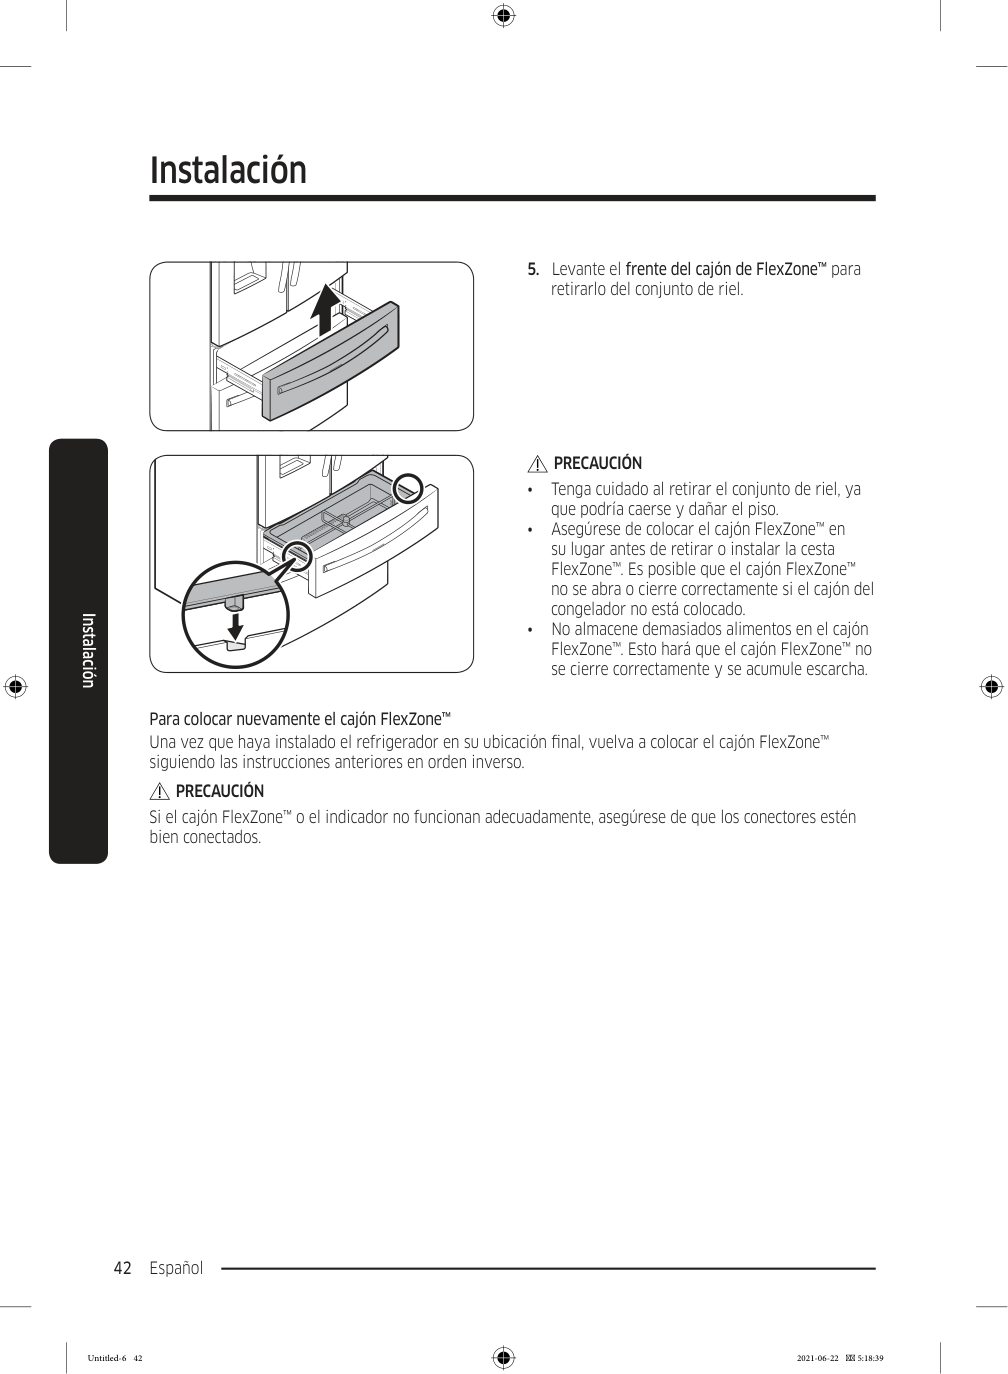
Instalación Español 42 Instalación
Precaución
• Tenga cuidado al retirar el conjunto de riel, ya que podría caerse y dañar el piso. • Asegúrese de colocar el cajón FlexZone™ en su lugar antes de retirar o instalar la cesta FlexZone™. Es posible que el cajón FlexZone™ no se abra o cierre correctamente si el cajón del congelador no está colocado. • No almacene demasiados alimentos en el cajón FlexZone™. Esto hará que el cajón FlexZone™ no se cierre correctamente y se acumule escarcha. Para colocar nuevamente el cajón FlexZone™ Una vez que haya instalado el refrigerador en su ubicación final, vuelva a colocar el cajón FlexZone™ siguiendo las instrucciones anteriores en orden inverso.Precaución
Si el cajón FlexZone™ o el indicador no funcionan adecuadamente, asegúrese de que los conectores estén bien conectados. Untitled-6 42 2021-06-22 5:18:39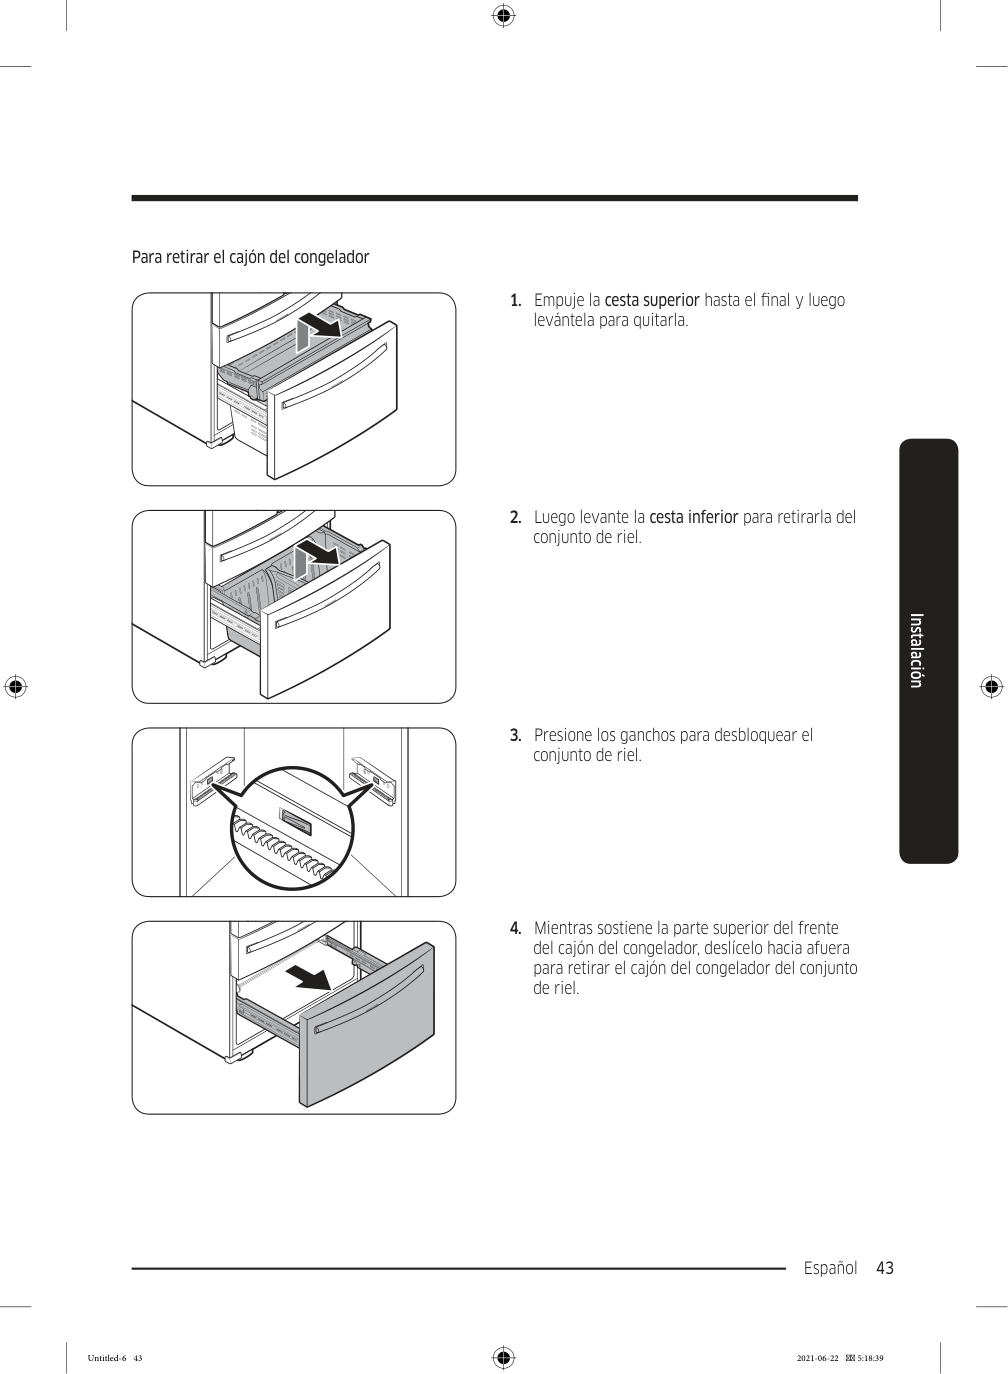
Español 43 Instalación Para retirar el cajón del congelador
Instalación Español 44 Instalación
Precaución
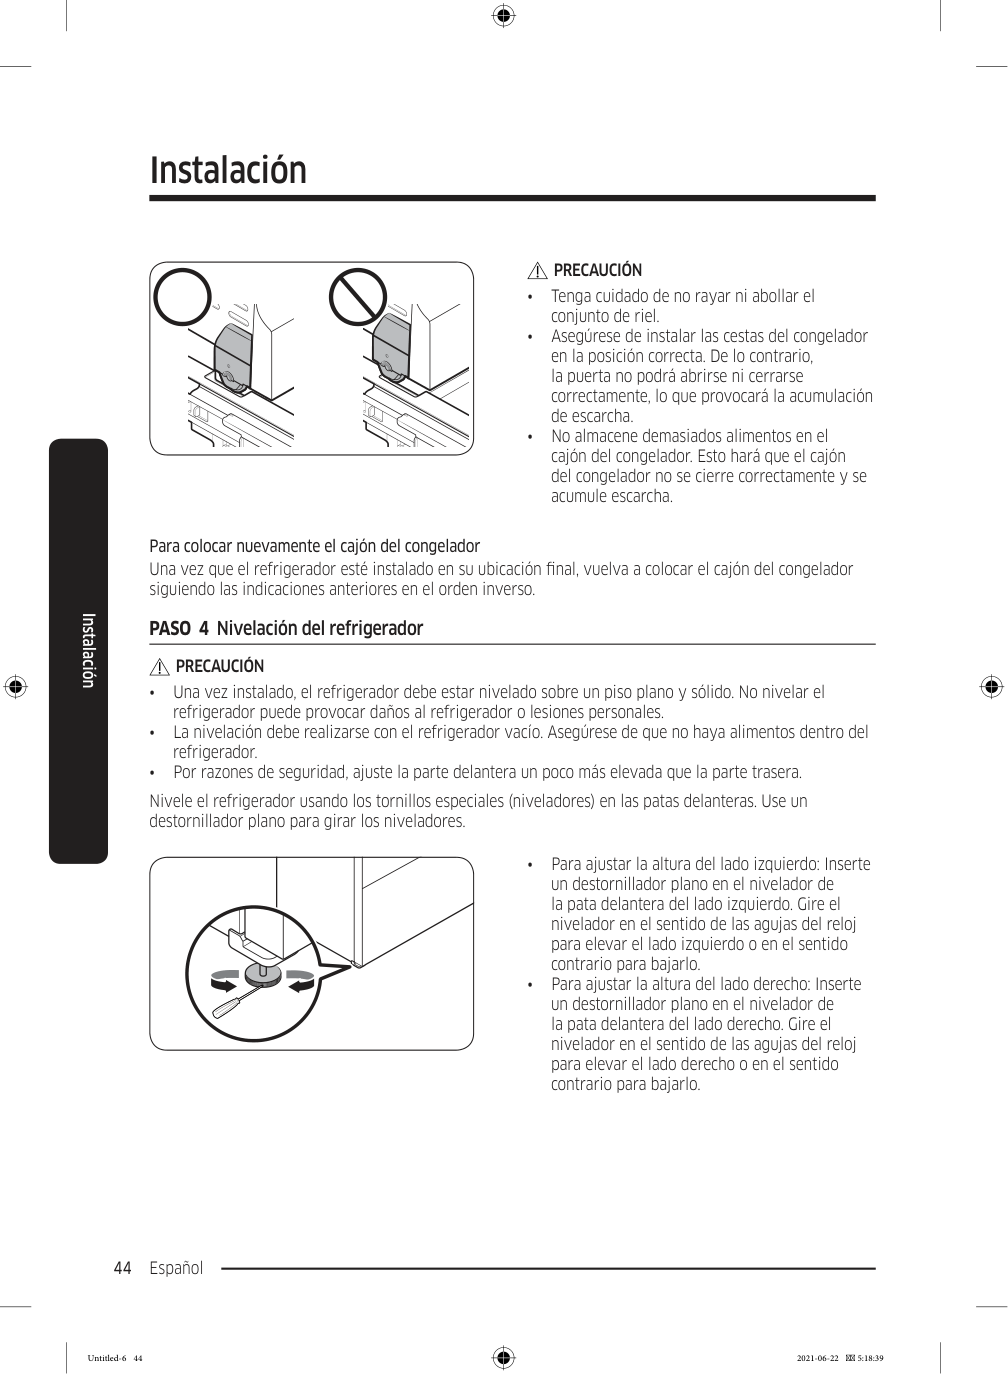
• Tenga cuidado de no rayar ni abollar el conjunto de riel. • Asegúrese de instalar las cestas del congelador en la posición correcta. De lo contrario, la puerta no podrá abrirse ni cerrarse correctamente, lo que provocará la acumulación de escarcha. • No almacene demasiados alimentos en el cajón del congelador. Esto hará que el cajón del congelador no se cierre correctamente y se acumule escarcha. Para colocar nuevamente el cajón del congelador Una vez que el refrigerador esté instalado en su ubicación final, vuelva a colocar el cajón del congelador siguiendo las indicaciones anteriores en el orden inverso. PASO 4 Nivelación del refrigeradorPrecaución
• Una vez instalado, el refrigerador debe estar nivelado sobre un piso plano y sólido. No nivelar el refrigerador puede provocar daños al refrigerador o lesiones personales. • La nivelación debe realizarse con el refrigerador vacío. Asegúrese de que no haya alimentos dentro del refrigerador. • Por razones de seguridad, ajuste la parte delantera un poco más elevada que la parte trasera. Nivele el refrigerador usando los tornillos especiales (niveladores) en las patas delanteras. Use un destornillador plano para girar los niveladores. • Para ajustar la altura del lado izquierdo: Inserte un destornillador plano en el nivelador de la pata delantera del lado izquierdo. Gire el nivelador en el sentido de las agujas del reloj para elevar el lado izquierdo o en el sentido contrario para bajarlo. • Para ajustar la altura del lado derecho: Inserte un destornillador plano en el nivelador de la pata delantera del lado derecho. Gire el nivelador en el sentido de las agujas del reloj para elevar el lado derecho o en el sentido contrario para bajarlo. Untitled-6 44 2021-06-22 5:18:39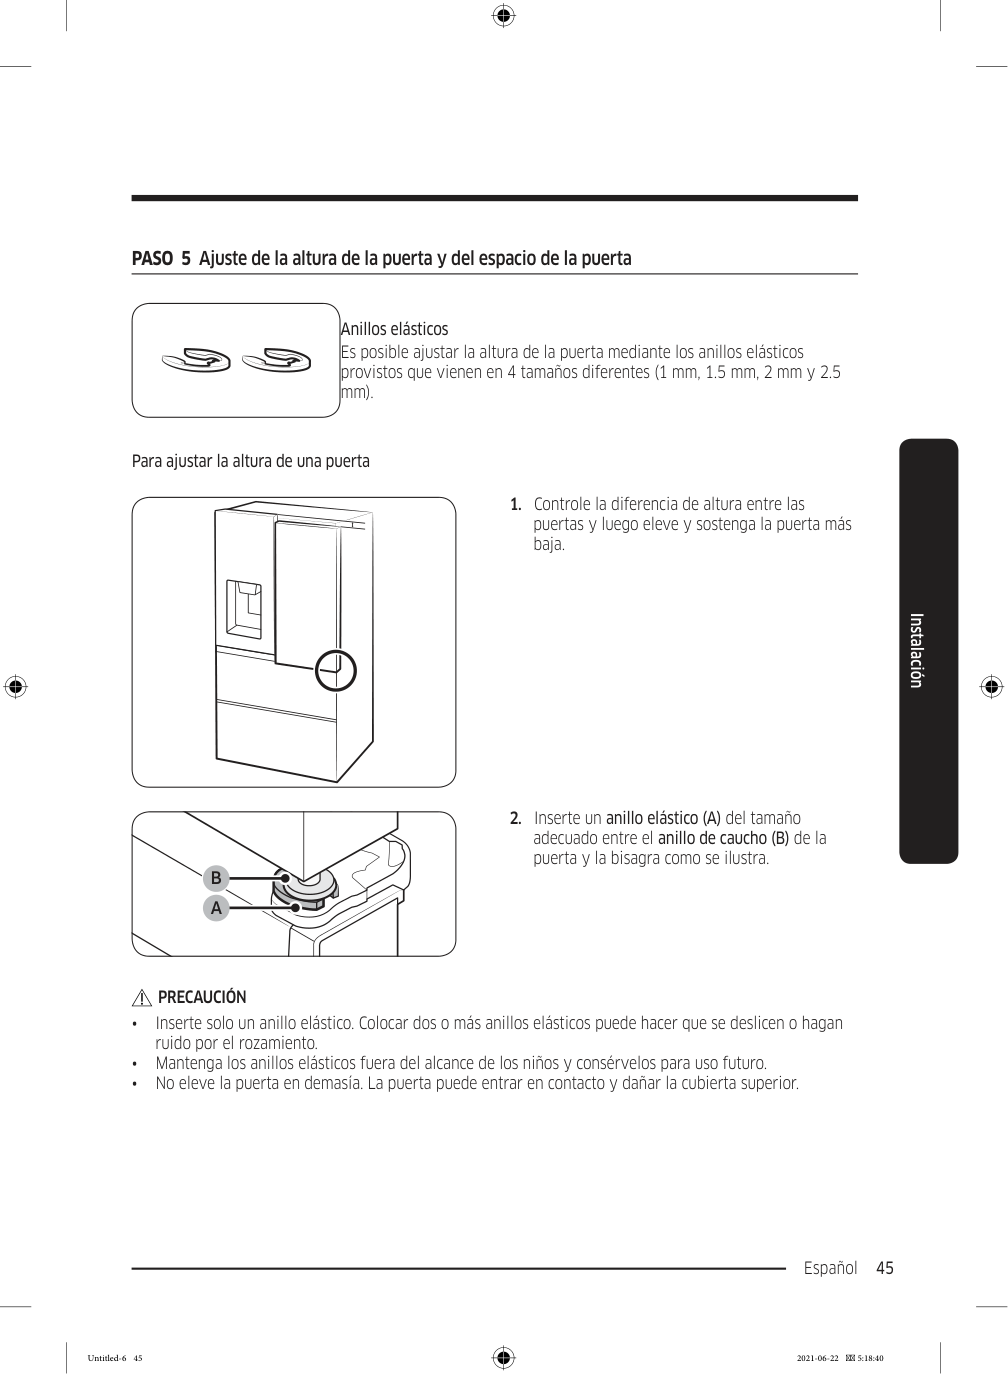
Español 45 Instalación PASO 5 Ajuste de la altura de la puerta y del espacio de la puerta Anillos elásticos Es posible ajustar la altura de la puerta mediante los anillos elásticos provistos que vienen en 4 tamaños diferentes (1 mm, 1.5 mm, 2 mm y 2.5 mm). Para ajustar la altura de una puerta
Precaución
• Inserte solo un anillo elástico. Colocar dos o más anillos elásticos puede hacer que se deslicen o hagan ruido por el rozamiento. • Mantenga los anillos elásticos fuera del alcance de los niños y consérvelos para uso futuro. • No eleve la puerta en demasía. La puerta puede entrar en contacto y dañar la cubierta superior. Untitled-6 45 2021-06-22 5:18:40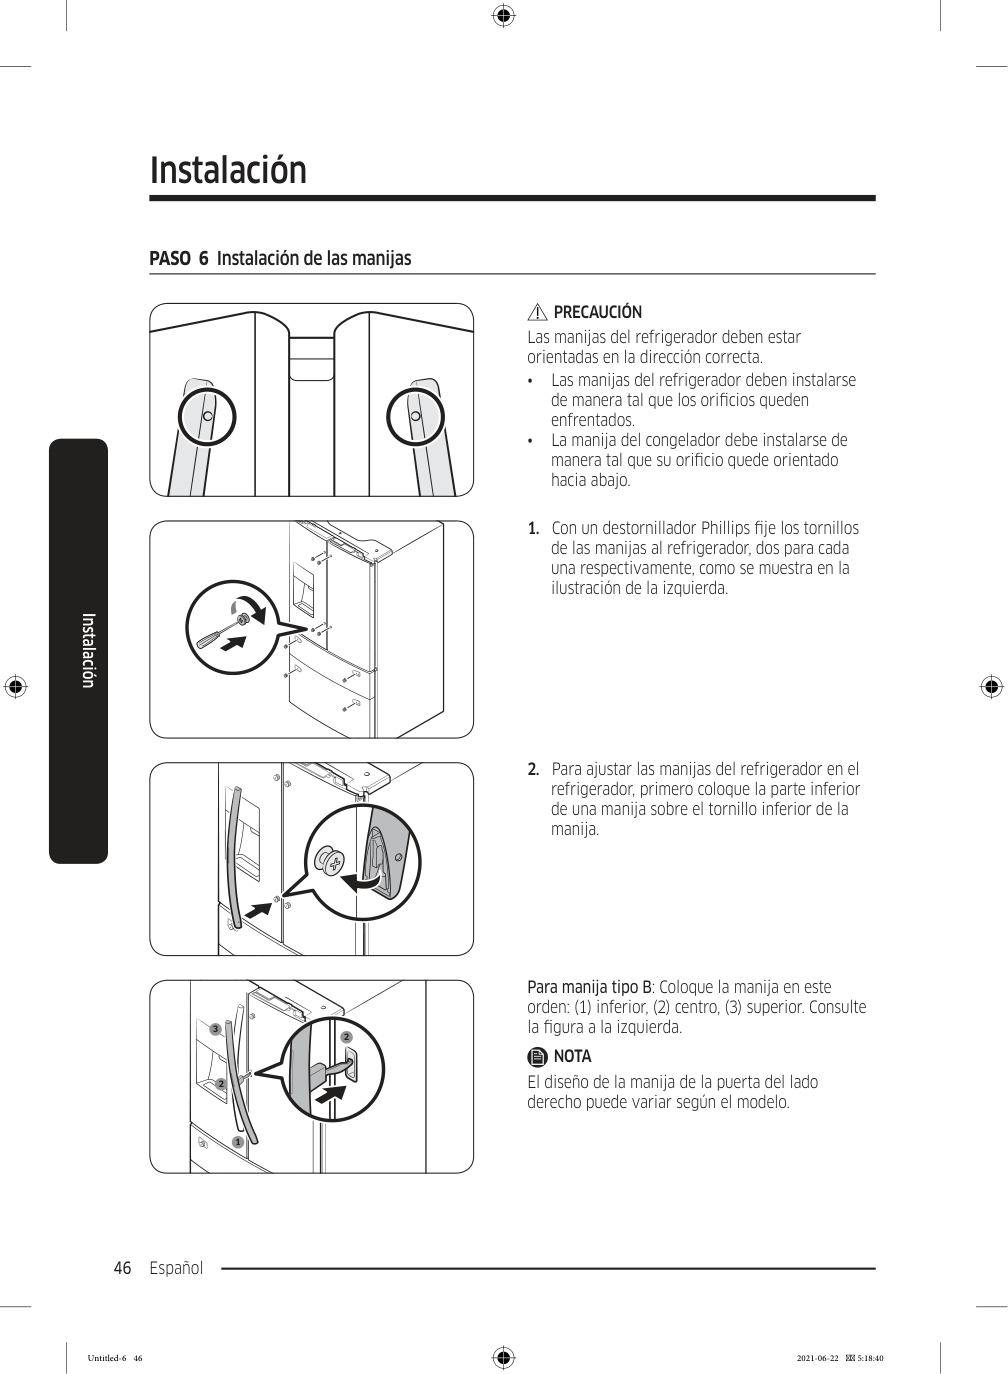
Instalación Español 46 Instalación PASO 6 Instalación de las manijas
Precaución
Las manijas del refrigerador deben estar orientadas en la dirección correcta. • Las manijas del refrigerador deben instalarse de manera tal que los orificios queden enfrentados. • La manija del congelador debe instalarse de manera tal que su orificio quede orientado hacia abajo.Nota
El diseño de la manija de la puerta del lado derecho puede variar según el modelo. Untitled-6 46 2021-06-22 5:18:40
Español 47 Instalación
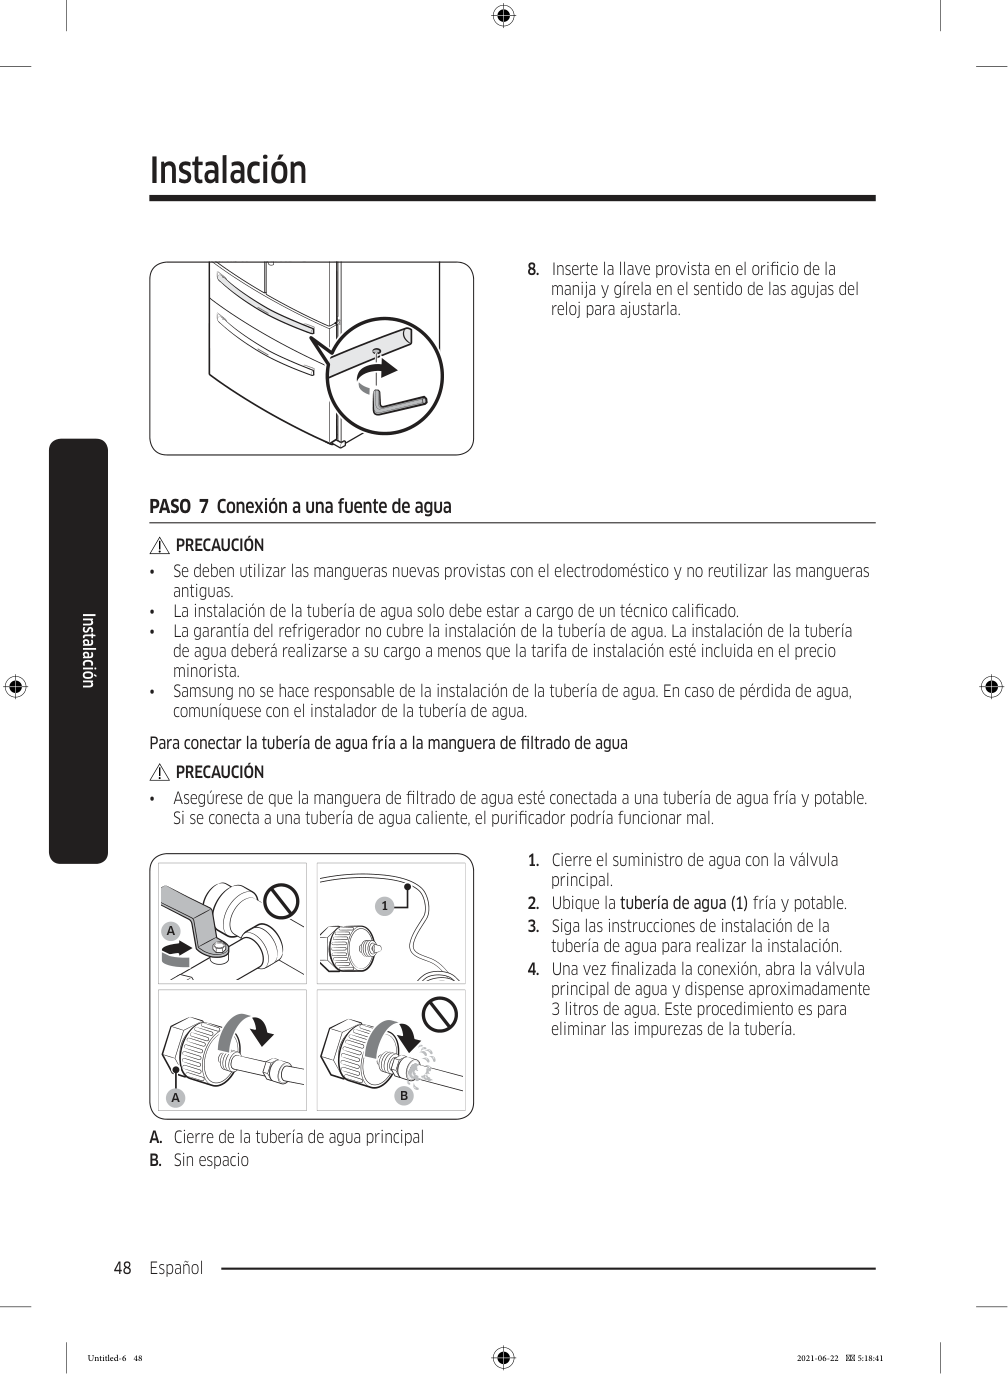
Instalación Español 48 Instalación
Precaución
• Se deben utilizar las mangueras nuevas provistas con el electrodoméstico y no reutilizar las mangueras antiguas. • La instalación de la tubería de agua solo debe estar a cargo de un técnico calificado. • La garantía del refrigerador no cubre la instalación de la tubería de agua. La instalación de la tubería de agua deberá realizarse a su cargo a menos que la tarifa de instalación esté incluida en el precio minorista. • Samsung no se hace responsable de la instalación de la tubería de agua. En caso de pérdida de agua, comuníquese con el instalador de la tubería de agua. Para conectar la tubería de agua fría a la manguera de filtrado de aguaPrecaución
• Asegúrese de que la manguera de filtrado de agua esté conectada a una tubería de agua fría y potable. Si se conecta a una tubería de agua caliente, el purificador podría funcionar mal. 1A
B
A
A. Cierre de la tubería de agua principal B. Sin espacio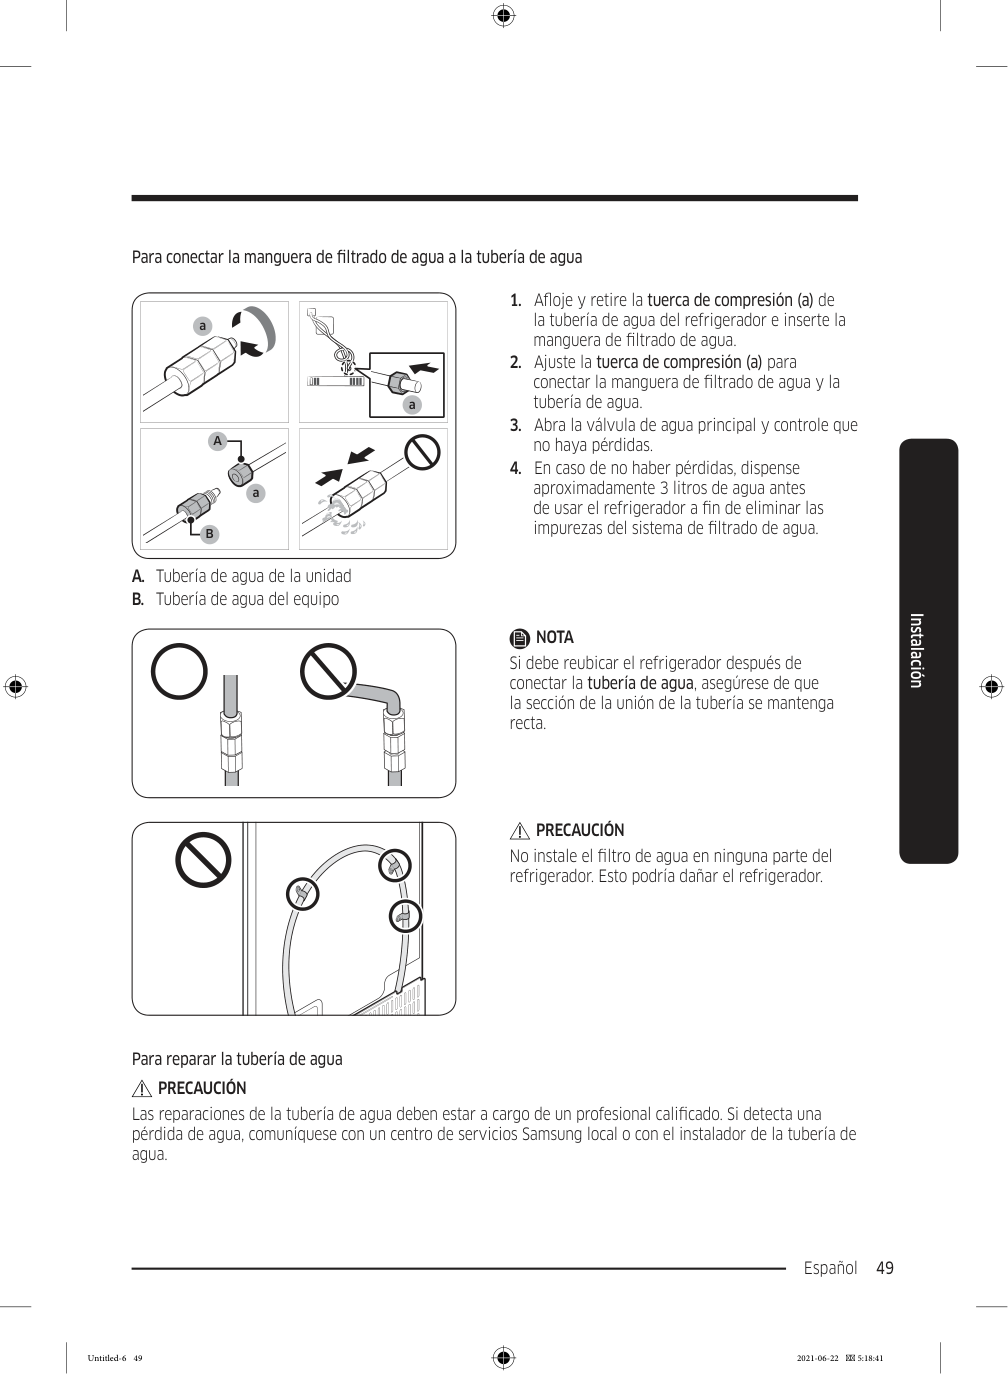
Español 49 Instalación Para conectar la manguera de filtrado de agua a la tubería de agua Remove cap a a
A
B
a A. Tubería de agua de la unidad B. Tubería de agua del equipoNota
Si debe reubicar el refrigerador después de conectar la tubería de agua, asegúrese de que la sección de la unión de la tubería se mantenga recta.Precaución
No instale el filtro de agua en ninguna parte del refrigerador. Esto podría dañar el refrigerador. Para reparar la tubería de aguaPrecaución
Las reparaciones de la tubería de agua deben estar a cargo de un profesional calificado. Si detecta una pérdida de agua, comuníquese con un centro de servicios Samsung local o con el instalador de la tubería de agua. Untitled-6 49 2021-06-22 5:18:41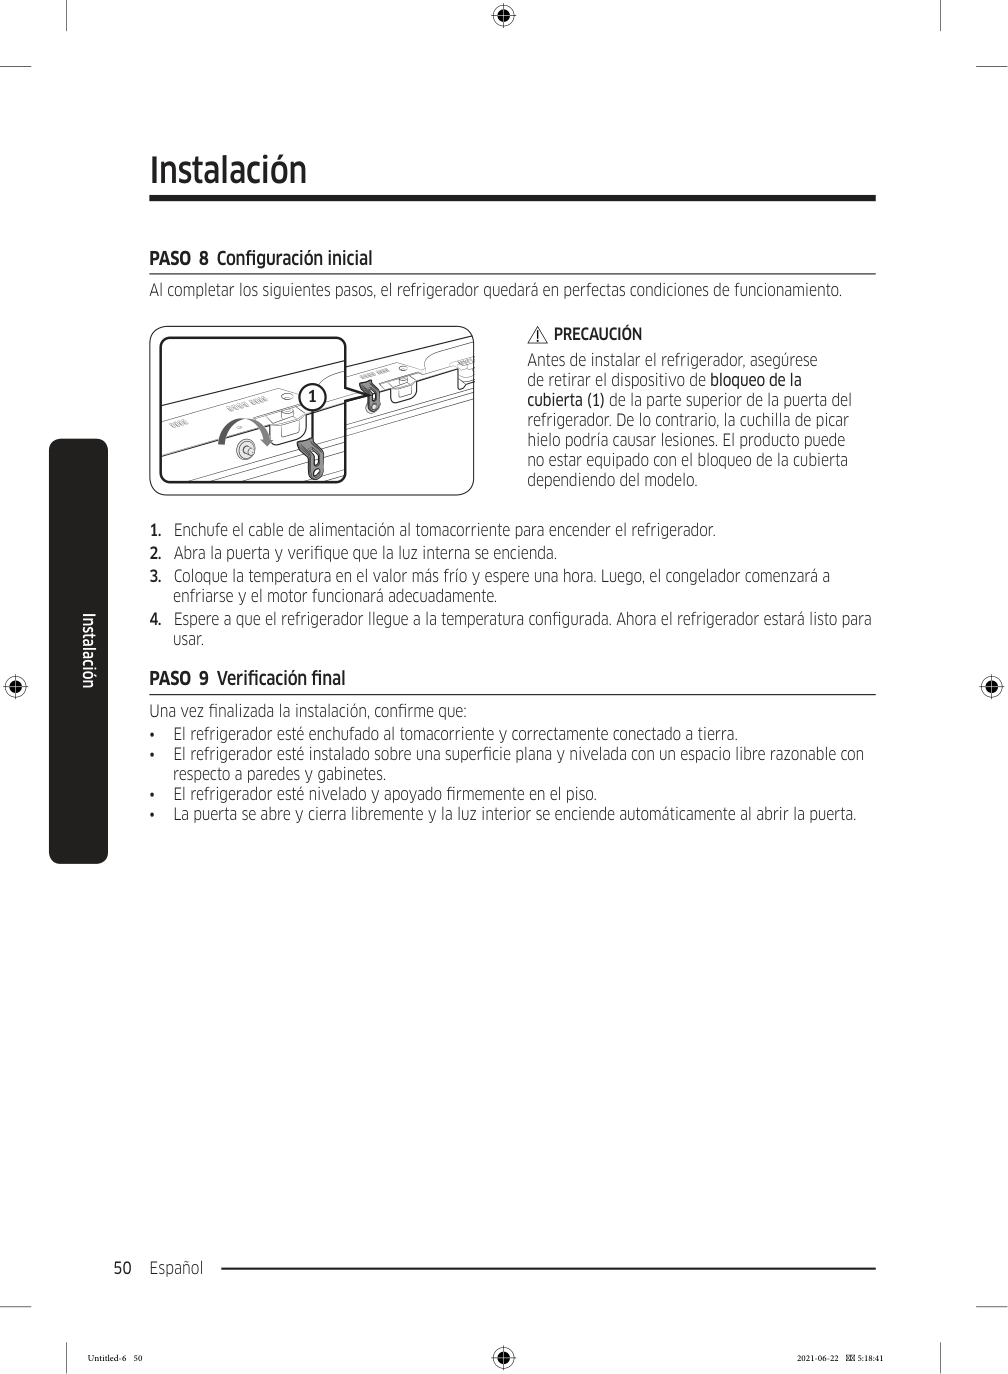
Instalación Español 50 Instalación PASO 8 Configuración inicial Al completar los siguientes pasos, el refrigerador quedará en perfectas condiciones de funcionamiento. 1
Precaución
Antes de instalar el refrigerador, asegúrese de retirar el dispositivo de bloqueo de la cubierta (1) de la parte superior de la puerta del refrigerador. De lo contrario, la cuchilla de picar hielo podría causar lesiones. El producto puede no estar equipado con el bloqueo de la cubierta dependiendo del modelo.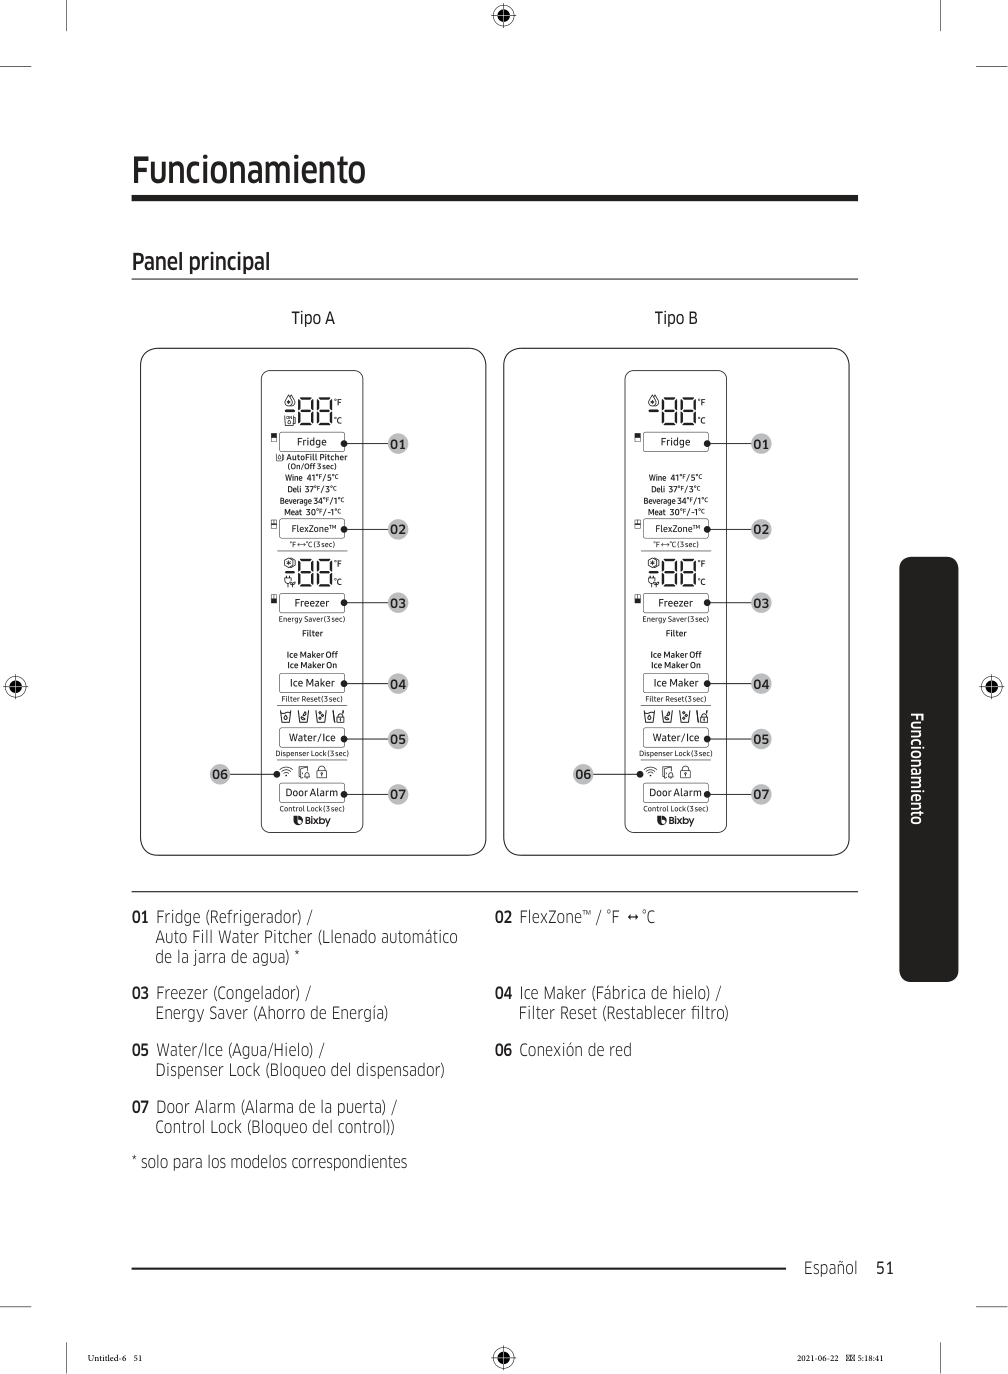
Español 51 Funcionamiento Panel principal Tipo A Tipo B 01 02 03 04 05 07 06 01 02 03 04 05 07 06 01 Fridge (Refrigerador) / Auto Fill Water Pitcher (Llenado automático de la jarra de agua) * 02 FlexZone™ / °F °C 03 Freezer (Congelador) / Energy Saver (Ahorro de Energía) 04 Ice Maker (Fábrica de hielo) / Filter Reset (Restablecer filtro) 05 Water/Ice (Agua/Hielo) / Dispenser Lock (Bloqueo del dispensador) 06 Conexión de red 07 Door Alarm (Alarma de la puerta) / Control Lock (Bloqueo del control))
Funcionamiento Español 52 Funcionamiento
Nota
• Cuando cambia la temperatura del panel, este muestra la temperatura actual dentro del refrigerador hasta que se alcanza la temperatura que ha configurado. Luego el panel muestra la nueva temperatura configurada. Tenga en cuenta que el refrigerador necesita un tiempo para alcanzar la nueva temperatura. Esto es normal. Durante este tiempo, no es necesario restablecer la temperatura. • A fin de garantizar un desempeño óptimo, recomendamos configurar la temperatura en -19 °C para el congelador y 3 °C para el refrigerador. • La temperatura del refrigerador puede aumentar si abre la puerta con frecuencia o si se coloca una gran cantidad de alimentos dentro de este. Si esto ocurriera, el visor de temperatura parpadeará hasta que el refrigerador regrese al ajuste de temperatura especificado. • Si se produce un error de comunicación entre el visor de temperatura y el regulador principal, es posible que el parpadeo continúe durante un período prolongado. Comuníquese con un centro de servicios Samsung local para recibir asistencia técnica. • El visor del panel principal solo se enciende si la puerta está abierta, y se apaga cuando la puerta se cierra. • Si activa el Bloqueo del control en el panel principal, este se bloquea automáticamente después de 1 minuto de inactividad. • Bixby es una plataforma de inteligencia de Samsung que le permite controlar el producto con su voz. Para usar la función de comando de voz, debe conectar el producto con la aplicación SmartThings en su teléfono. Con los productos que no reconocen la voz directamente desde el producto, puede usar Bixby en su teléfono inteligente para controlar algunas de las funciones del producto luego de conectar la aplicación. Untitled-6 52 2021-06-22 5:18:41
Español 53 Funcionamiento 01 Refrigerador / Llenado automático de la jarra de agua (3 segundos) Fridge (Refrigerador) Puede usar el botón Fridge (Refrigerador) para configurar la temperatura del refrigerador o activar Refrigeración rápida. • Presione Fridge (Refrigerador) varias veces para seleccionar una temperatura deseada entre 1 °C y 7 °C.
Nota
Utilizar Refrigeración rápida aumenta el consumo energético. Asegúrese de desactivar dicha función en forma manual si ya no la necesita y luego seleccione la temperatura deseada del refrigerador. Untitled-6 53 2021-06-22 5:18:41
Funcionamiento Español 54 Funcionamiento Auto Fill Water Pitcher (Llenado automático de la jarra de agua) Si el indicador de bloqueo ( ) está apagado, mantenga presionado Fridge (Refrigerador) durante 3 segundos para encender Llenado automático de la jarra de agua. Luego, abra la puerta izquierda del refrigerador e inserte el tanque de agua. Cierre la puerta y el tanque de agua comenzará a llenarse de agua hasta el nivel configurado. Si el indicador de bloqueo ( ) está encendido indicando que Bloqueo del control está activo, mantenga presionado Door Alarm (Alarma de la puerta) durante 3 segundos para desactivar Bloqueo del control. Cuando se apaga el indicador de bloqueo, mantenga presionado Fridge (Refrigerador) durante 3 segundos para encender Llenado automático de la jarra de agua. Luego, abra la puerta izquierda del refrigerador e inserte el tanque de agua. Cierre la puerta y el tanque de agua comenzará a llenarse de agua hasta el nivel configurado.
Nota
Cuando se desactiva Bloqueo del control, debe mantener presionado Fridge (Refrigerador) durante un minuto o la función Bloqueo del control volverá a activarse automáticamente. No puede encender la función Llenado automático de la jarra de agua si está activo Bloqueo del control. Para obtener más información acerca de Bloqueo del control, consulte la página 59. Para desactivar la función, vuelva a mantener Fridge (Refrigerador) presionado durante 3 segundos.Nota
• De manera predeterminada, Llenado automático de la jarra de agua está desactivado. Active esta función luego de haber instalado la tubería de agua. • Si abre la puerta o empuja la palanca del dispensador, esta función se detiene temporariamente. • En caso de fuga, los indicadores de Llenado automático de la jarra de agua titilan. Esto puede suceder si el tanque de agua desborda o el sensor del nivel de agua o tubería de agua falla. En ese caso, siga estos pasos. a. Abra la tapa de goma y drene el agua. b. Al finalizar el drenaje, los indicadores dejan de parpadear y quedan fijos. c. Cierre la tapa de goma. • Si los indicadores siguen parpadeando, es posible que se trate de una falla del sistema. Comuníquese con un centro de servicio local. Untitled-6 54 2021-06-22 5:18:41
Español 55 Funcionamiento 02 FlexZone™ / °F °C (3 segundos) El FlexZone™ es un cajón de ancho completo con control de temperatura. Cuenta con un sensor de temperatura que regula la cantidad de aire frío permitido en este cajón. • Presione FlexZone™ para seleccionar el modo deseado. La opción predeterminada es Deli (Charcutería). • El refrigerador regula la temperatura en el FlexZone™ de acuerdo con el modo seleccionado. Modo Descripción Ejemplos Wine (Vino) Seleccione Vino para mantener los alimentos frescos durante mucho tiempo. La temperatura del FlexZone™ se mantendrá alrededor de
5 °C.
Vino, cócteles, pasteles, quesos Deli (Charcutería) Seleccione Charcutería para mantener los alimentos frescos durante mucho más tiempo. La temperatura del FlexZone™ se mantendrá alrededor de3 °C.
Piñas, limones, galletas, papas Beverage (Bebida) Seleccione Bebida para mantener las bebidas frías y para conservar su sabor. La temperatura del FlexZone™ se mantendrá alrededor de1 °C.
Agua embotellada, jugo, refrescos, cerveza Meat (Carne) Seleccione Carne para mantener la carne o el pescado fresco durante mucho más tiempo. La temperatura del FlexZone™ se mantendrá alrededor de-1 °C.
Bistecs, fiambres, tocino, perros calientesPrecaución
• No utilice el FlexZone™ para almacenar casi ningún tipo de frutas o vegetales de hoja. Es posible que la temperatura fría dañe estos alimentos. • No almacene botellas de vidrio en el FlexZone™ en modo Bebida o Carne. Estas pueden romperse y causar lesiones.°F °C
También puede utilizar el botón FlexZone™ para modificar la escala de temperatura de Celsius a Fahrenheit. Para cambiar la escala de temperatura, mantenga presionado FlexZone™ durante 3 segundos para modificar la escala de temperatura actual. Untitled-6 55 2021-06-22 5:18:41
Funcionamiento Español 56 Funcionamiento 03 Congelador / Ahorro de Energía (3 segundos) Freezer (Congelador) Puede usar el botón Freezer (Congelador) para configurar la temperatura del congelador o activar Congelación rápida. • Presione Freezer (Congelador) varias veces para seleccionar una temperatura deseada entre -15 °C y -23 °C.
Nota
Utilizar Congelación rápida aumenta el consumo energético. Asegúrese de desactivar dicha función en forma manual si ya no la necesita y luego seleccione la temperatura deseada del congelador. Energy Saver (Ahorro de Energía) Presione Freezer (Congelador) durante 3 segundos para activar/borrar la función Ahorro de Energía.Nota
Si hay condensación o se forman gotas de agua en o alrededor de las puertas, apague el modo de Ahorro de Energía. Untitled-6 56 2021-06-22 5:18:42
Español 57 Funcionamiento 04 Fabricación de hielo / Restablecer filtro (3 segundos) Ice Maker (Fábrica de hielo) Presione Ice Maker (Fábrica de hielo) para encender o apagar la fábrica de hielo. La fábrica de hielo tiene 2 indicadores ( / ) para indicar el estado de operación. • Cuando la fábrica de hielo está en funcionamiento, se enciende el indicador ( ). • Cuando la fábrica de hielo está apagada, se enciende el indicador ( ). En este caso, la fabricación de hielo se desactiva incluso si presiona los botones Cubed (Hielo en cubos) o Crushed Ice (Hielo triturado) en el panel del dispensador. Para activar la fabricación de hielo, primero deberá encender la fábrica de hielo.
Nota
Si la fábrica de hielo está apagada, se encenderá si mantiene presionada la palanca de hielo durante más de 5 segundos. Filter Reset (Restablecer filtro) Después de aproximadamente 6 meses (y por lo general, aproximadamente 300 galones [1200 L] de agua), el indicador de filtro parpadea en rojo durante varios segundos cuando abre la puerta para recordarle que debe cambiarlo. Cuando esto ocurre, reemplace el filtro y luego mantenga presionado Filter Reset (Restablecer filtro) por 3 segundos. La vida útil del filtro se restablecerá y el indicador de filtro se apaga.Nota
• Algunas regiones cuentan con cantidades relativamente elevadas de cal en el agua. Esto puede reducir la vida útil del filtro. Es dichas áreas, deberá reemplazar el filtro de agua con mayor frecuencia que la especificada anteriormente. • Si el agua no se dispensa adecuadamente, es probable que el filtro de agua esté obturado. Reemplace el filtro de agua. Untitled-6 57 2021-06-22 5:18:42
Funcionamiento Español 58 Funcionamiento 05 Agua/Hielo / Bloqueo del dispensador (3 segundos) Water/Ice (Agua/Hielo) Puede servir agua fría, hielo en cubos o triturado. Para servir, presione Water/ Ice (Agua/Hielo). Se enciende el indicador correspondiente. Dispenser Lock (Bloqueo del dispensador) (Panel del dispensador/ Palanca del dispensador) Para impedir el uso de los botones del panel del dispensador y de la palanca del dispensador, mantenga presionado Water/Ice (Agua/Hielo) durante más de 3 segundos. Si mantiene presionado el botón durante más de 3 segundos nuevamente, el bloqueo del dispensador se desactivará.
Nota
• El Dispenser Lock (Bloqueo del dispensador) en el panel del dispensador no afecta los controles del panel principal. Para bloquear el panel principal, utilice la función Bloqueo del control en el panel principal. • Si presiona Water/Ice (Agua/ Hielo) durante 3 segundos cuando el bloqueo de control y el bloqueo del dispensador se encuentran activos, desactivará ambos bloqueos. 06 Conexión de red Puede controlar y supervisar su refrigerador mediante la aplicación SmartThings. Para obtener más información, consulte la sección SmartThings. Untitled-6 58 2021-06-22 5:18:42
Español 59 Funcionamiento 07 Alarma de la puerta/ Bloqueo de control (3 segundos) Door Alarm (Alarma de la puerta) Si la puerta queda abierta durante más de 2 minutos, se activará la alarma y el indicador de la alama parpadeará. Puede activar y desactivar la alarma presionando Door Alarm (Alarma de la puerta). La alarma está activada como valor de fábrica. Si la puerta quedara abierta durante 5 minutos, las luces interiores (en el refrigerador, FlexZone™ y congelador) titilarán durante 10 y se encenderán. El proceso completo se repetirá cada minuto durante 5 minutos. Su función es alertar a los usuarios con discapacidad auditiva de que la puerta está abierta. Tenga en cuenta que esta función es normal. Control Lock (Bloqueo del control) A fin de evitar el cambio accidental de los valores, mantenga presionado Door Alarm (Alarma de la puerta) por 3 segundos. El panel principal se desactivará y el indicador Bloqueo ( ) se encenderá. Cuando Bloqueo del control está activado, el indicador parpadea si se presiona cualquier botón del panel principal. Si mantiene presionado el botón durante más de 3 segundos nuevamente, Bloqueo del control se desactivará. No obstante, si no se toca ningún botón durante un minuto, Bloqueo del control volverá a activarse.
Nota
El Bloqueo del dispensador en el panel principal no afecta al dispensador. El dispensador funciona de manera independiente, al igual que la palanca del dispensador. Para bloquear el dispensador y la palanca del dispensador, utilice la funciónBloqueo del dispensador. Untitled-6 59 2021-06-22 5:18:42
Funcionamiento Español 60 Funcionamiento SmartThings Instalación Visite Google Play Store, Galaxy Apps o Apple App Store y busque “SmartThings”. Descargue e instale la aplicación SmartThings provista por Samsung Electronics en su dispositivo inteligente.
Nota
• La aplicación SmartThings está diseñada para Android 6.0 (Marshmallow) o posterior, iOS 10.0 o posterior, iPhone 6 o posterior, y está optimizada para teléfonos inteligentes Samsung (series Galaxy S y Galaxy Note). • Para obtener un desempeño mejorado, la aplicación SmartThings estará sujeta a cambios sin previo aviso o a la interrupción del soporte según la política del fabricante. • Los sistemas de encriptación recomendados incluyen WPA/TKIP y WPA2/AES. No se admiten protocolos de autenticación Wi-Fi más nuevos o no estándar. • Las redes inalámbricas pueden verse afectadas por los entornos de comunicación inalámbrica circundantes. • Si su proveedor de servicios de Internet ha registrado la dirección MAC de su computadora o módem para identificación, su Samsung Smart Refrigerator puede dar error al conectarse a Internet. SI esto ocurre, comuníquese con su proveedor de servicios de Internet para recibir asistencia técnica. • La configuración de firewall de su sistema de red puede impedir que su Samsung Smart Refrigerator acceda a Internet. Comuníquese con su proveedor de servicios de Internet para recibir asistencia técnica. Si el síntoma persiste, comuníquese con un centro de servicios Samsung local o el minorista. • Para configurar el punto de acceso (PA) inalámbrico, consulte el manual de usuario del PA (enrutador). • Los Samsung Smart Refrigerators son compatibles con Wi-Fi 2.4 GHz con los protocolos IEEE 802.11 b/g/n y Soft-AP. (Se recomienda IEEE 802.11 n.) • Los enrutadores Wi-Fi no autorizados pueden no conectarse con los Samsung Smart Refrigerators correspondientes. Untitled-6 60 2021-06-22 5:18:42
Español 61 Funcionamiento Cuenta Samsung Debe registrar su cuenta Samsung para utilizar la aplicación. Si no tiene una cuenta Samsung, siga las aplicaciones en pantalla de la aplicación para crear una cuenta Samsung. Cómo comenzar Encienda el dispositivo que desea conectar, abra la aplicación SmartThings en su teléfono y siga las instrucciones que figuran a continuación. Si aparece un mensaje emergente que indica que se encontró un nuevo dispositivo, toque ADD NOW
(Agregar Ahora).
Si no aparece el mensaje, toque el botón + y, en la lista de dispositivos disponibles, seleccione el dispositivo que desea conectar. Si su dispositivo no se encuentra en la lista de dispositivos disponibles, toque Supported Devices (Dispositivos admitidos), seleccione el tipo de dispositivo (Refrigerador) y luego el modelo del dispositivo específico. Siga las instrucciones de la aplicación para configurar el dispositivo. Una vez completada la configuración, el refrigerador aparecerá como una "ficha" en la pantalla Devices (Dispositivos). Aplicación del refrigerador Control integrado Puede supervisar y controlar su refrigerador en su casa y desde cualquier otro lugar. • Toque el icono del refrigerador en el panel de SmartThings o toque el icono de Dispositivos en la parte inferior del panel, y luego toque la "ficha" del refrigerador para abrir la página correspondiente. • Controle el estado de operación o las notificaciones de su refrigerador y luego modifique las opciones o parámetros si fuera necesario.Nota
Algunas opciones o paréntesis del refrigerador pueden no estar disponibles para el control remoto. Untitled-6 61 2021-06-22 5:18:42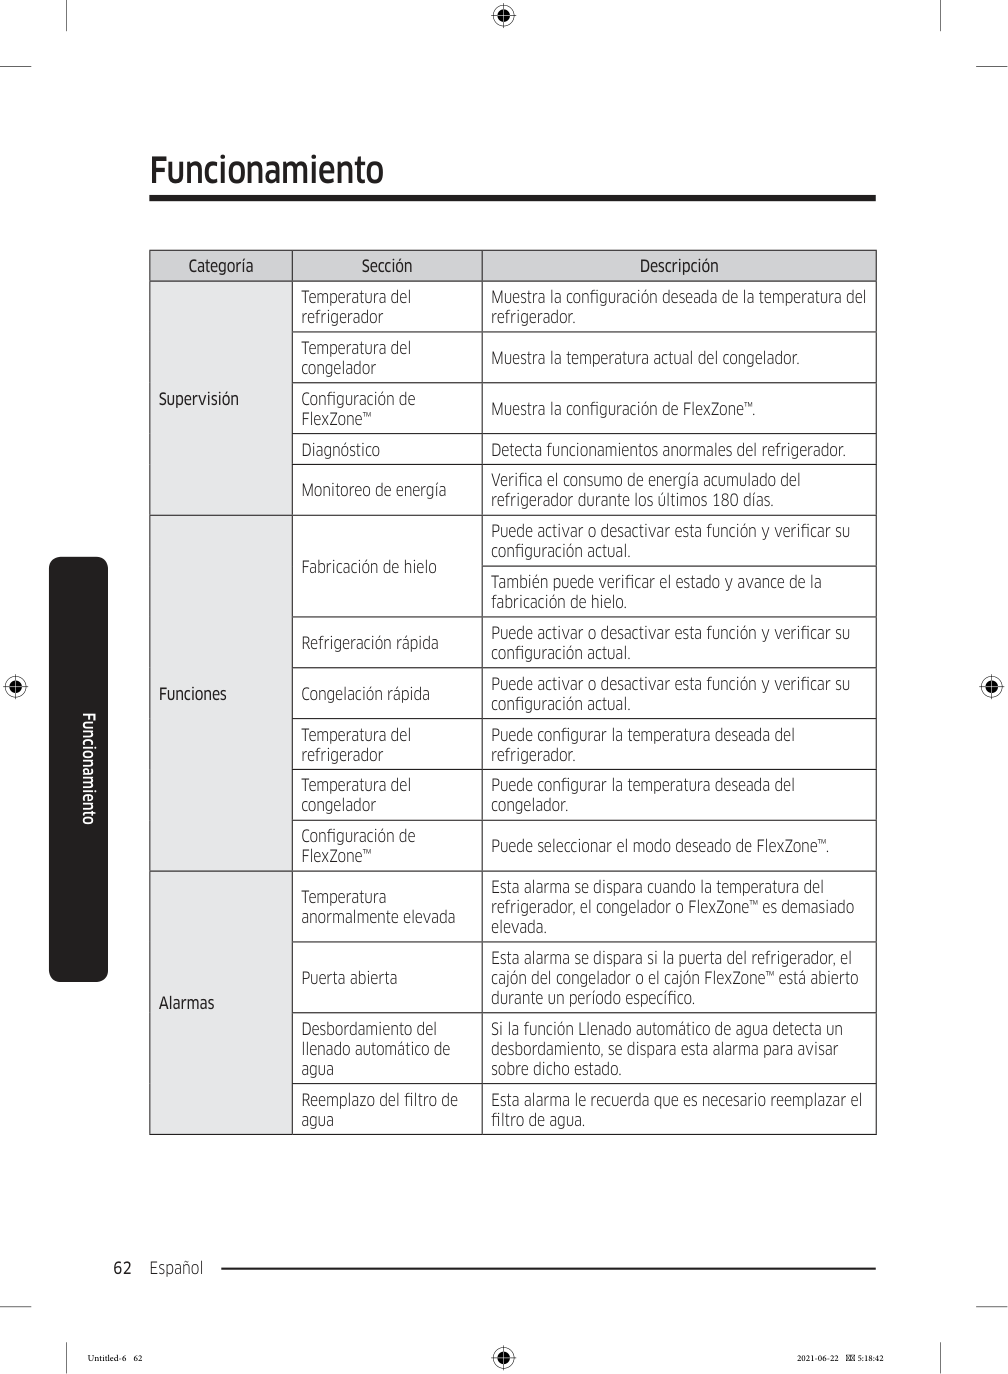
Funcionamiento Español 62 Funcionamiento Categoría Sección Descripción Supervisión Temperatura del refrigerador Muestra la configuración deseada de la temperatura del refrigerador. Temperatura del congelador Muestra la temperatura actual del congelador. Configuración de FlexZone™ Muestra la configuración de FlexZone™. Diagnóstico Detecta funcionamientos anormales del refrigerador. Monitoreo de energía Verifica el consumo de energía acumulado del refrigerador durante los últimos 180 días. Funciones Fabricación de hielo Puede activar o desactivar esta función y verificar su configuración actual. También puede verificar el estado y avance de la fabricación de hielo. Refrigeración rápida Puede activar o desactivar esta función y verificar su configuración actual. Congelación rápida Puede activar o desactivar esta función y verificar su configuración actual. Temperatura del refrigerador Puede configurar la temperatura deseada del refrigerador. Temperatura del congelador Puede configurar la temperatura deseada del congelador. Configuración de FlexZone™ Puede seleccionar el modo deseado de FlexZone™. Alarmas Temperatura anormalmente elevada Esta alarma se dispara cuando la temperatura del refrigerador, el congelador o FlexZone™ es demasiado elevada. Puerta abierta Esta alarma se dispara si la puerta del refrigerador, el cajón del congelador o el cajón FlexZone™ está abierto durante un período específico. Desbordamiento del llenado automático de agua Si la función Llenado automático de agua detecta un desbordamiento, se dispara esta alarma para avisar sobre dicho estado. Reemplazo del filtro de agua Esta alarma le recuerda que es necesario reemplazar el filtro de agua. Untitled-6 62 2021-06-22 5:18:42
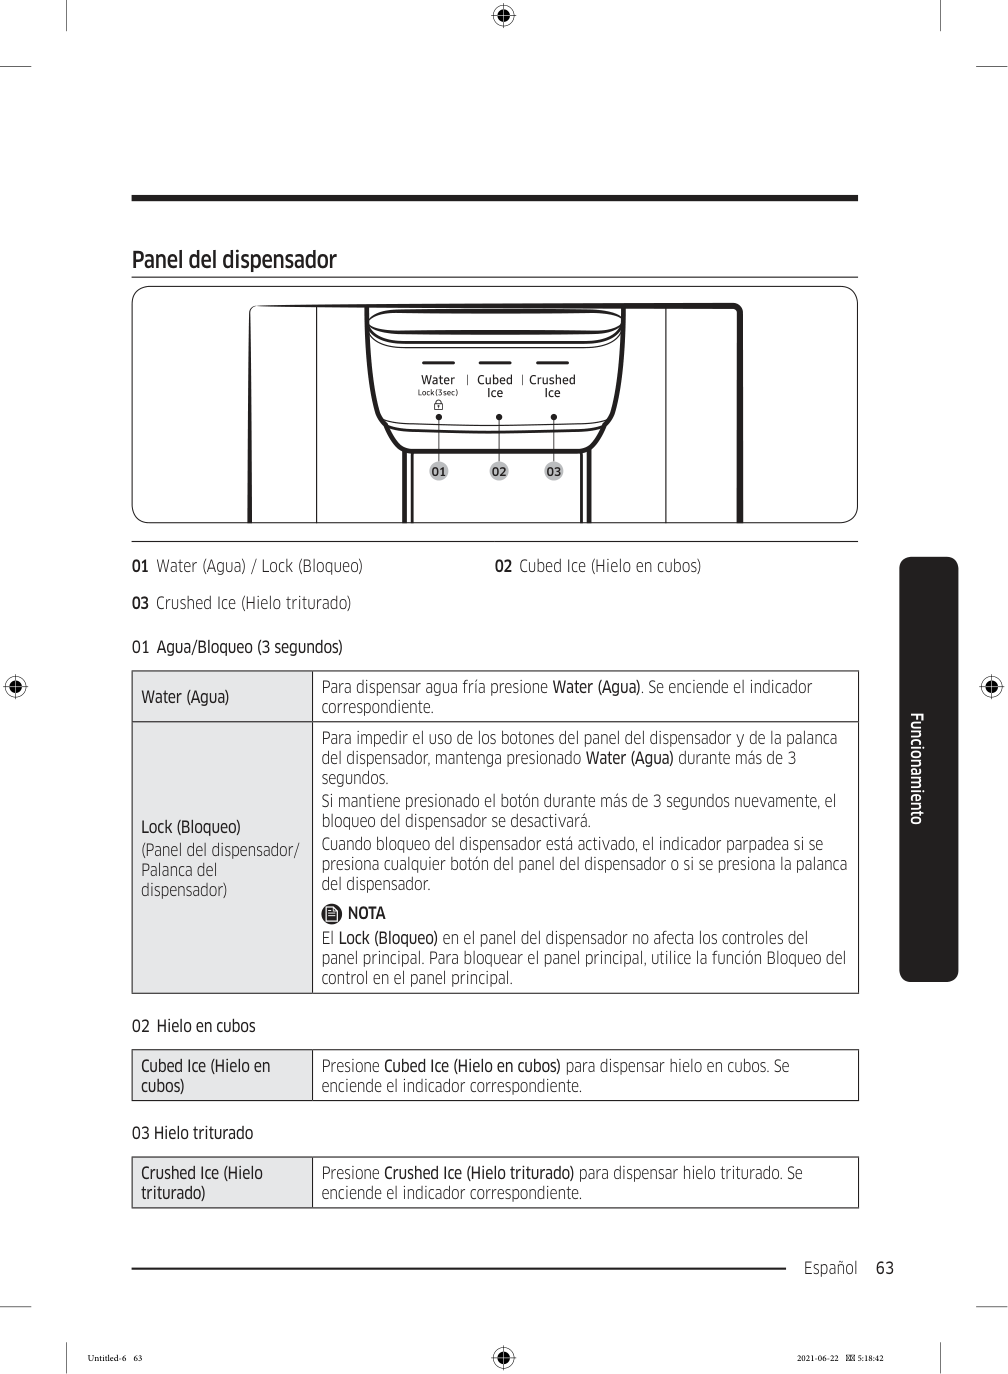
Español 63 Funcionamiento Panel del dispensador 01 02 03 01 Water (Agua) / Lock (Bloqueo) 02 Cubed Ice (Hielo en cubos) 03 Crushed Ice (Hielo triturado) 01 Agua/Bloqueo (3 segundos) Water (Agua) Para dispensar agua fría presione Water (Agua). Se enciende el indicador correspondiente. Lock (Bloqueo) (Panel del dispensador/ Palanca del dispensador) Para impedir el uso de los botones del panel del dispensador y de la palanca del dispensador, mantenga presionado Water (Agua) durante más de 3 segundos. Si mantiene presionado el botón durante más de 3 segundos nuevamente, el bloqueo del dispensador se desactivará. Cuando bloqueo del dispensador está activado, el indicador parpadea si se presiona cualquier botón del panel del dispensador o si se presiona la palanca del dispensador.
Nota
El Lock (Bloqueo) en el panel del dispensador no afecta los controles del panel principal. Para bloquear el panel principal, utilice la función Bloqueo del control en el panel principal. 02 Hielo en cubos Cubed Ice (Hielo en cubos) Presione Cubed Ice (Hielo en cubos) para dispensar hielo en cubos. Se enciende el indicador correspondiente. 03 Hielo triturado Crushed Ice (Hielo triturado) Presione Crushed Ice (Hielo triturado) para dispensar hielo triturado. Se enciende el indicador correspondiente. Untitled-6 63 2021-06-22 5:18:42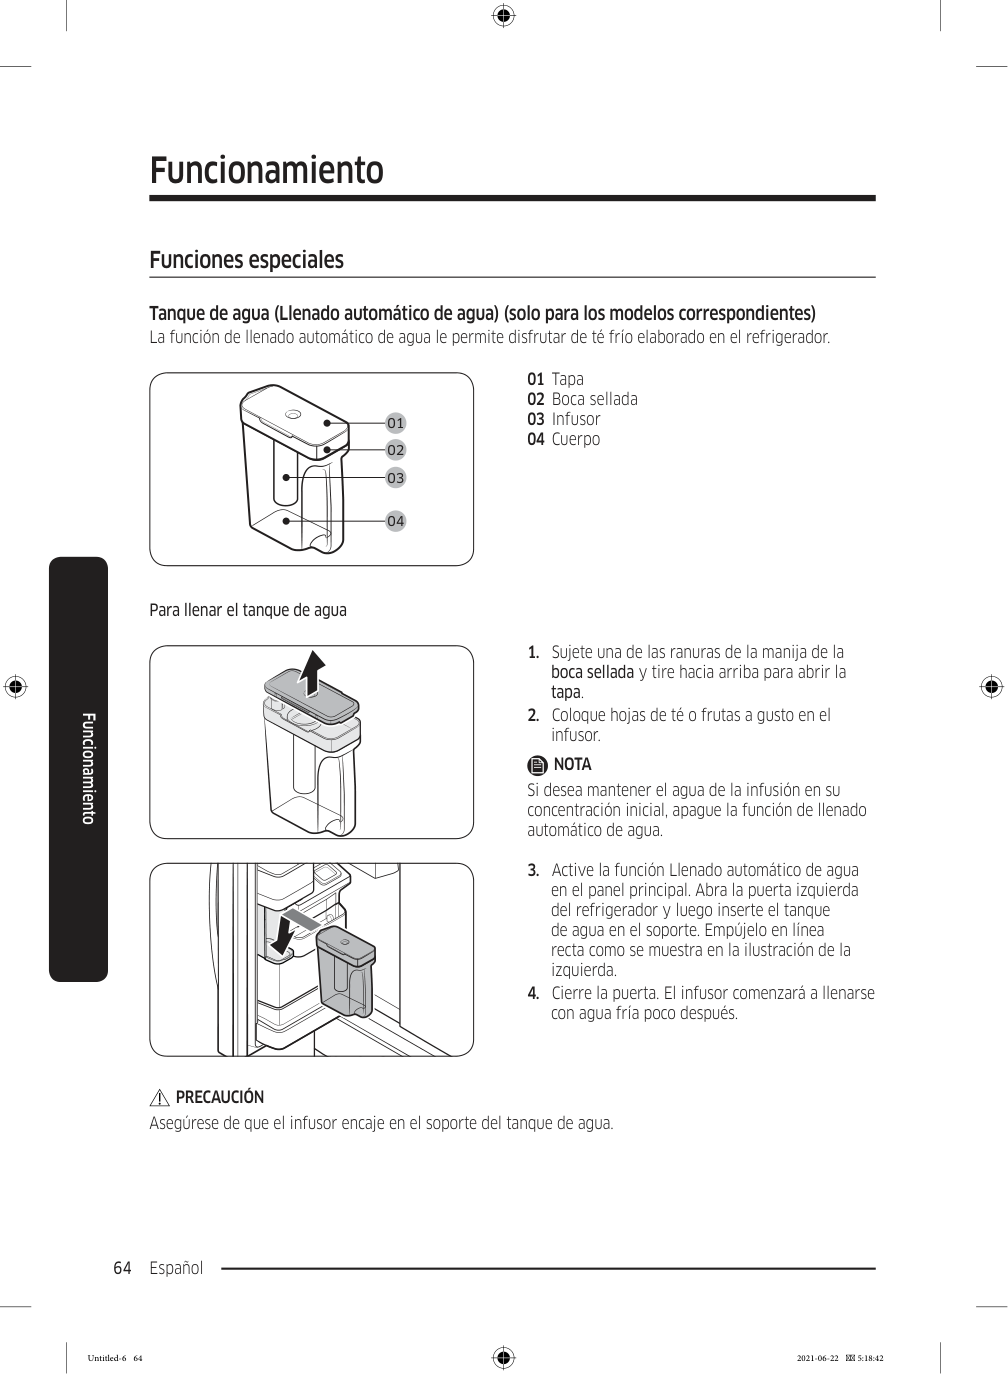
Funcionamiento Español 64 Funcionamiento Funciones especiales Tanque de agua (Llenado automático de agua) (solo para los modelos correspondientes) La función de llenado automático de agua le permite disfrutar de té frío elaborado en el refrigerador. 01 02 03 04 01 Tapa 02 Boca sellada 03 Infusor 04 Cuerpo Para llenar el tanque de agua
Nota
Si desea mantener el agua de la infusión en su concentración inicial, apague la función de llenado automático de agua.Precaución
Asegúrese de que el infusor encaje en el soporte del tanque de agua. Untitled-6 64 2021-06-22 5:18:42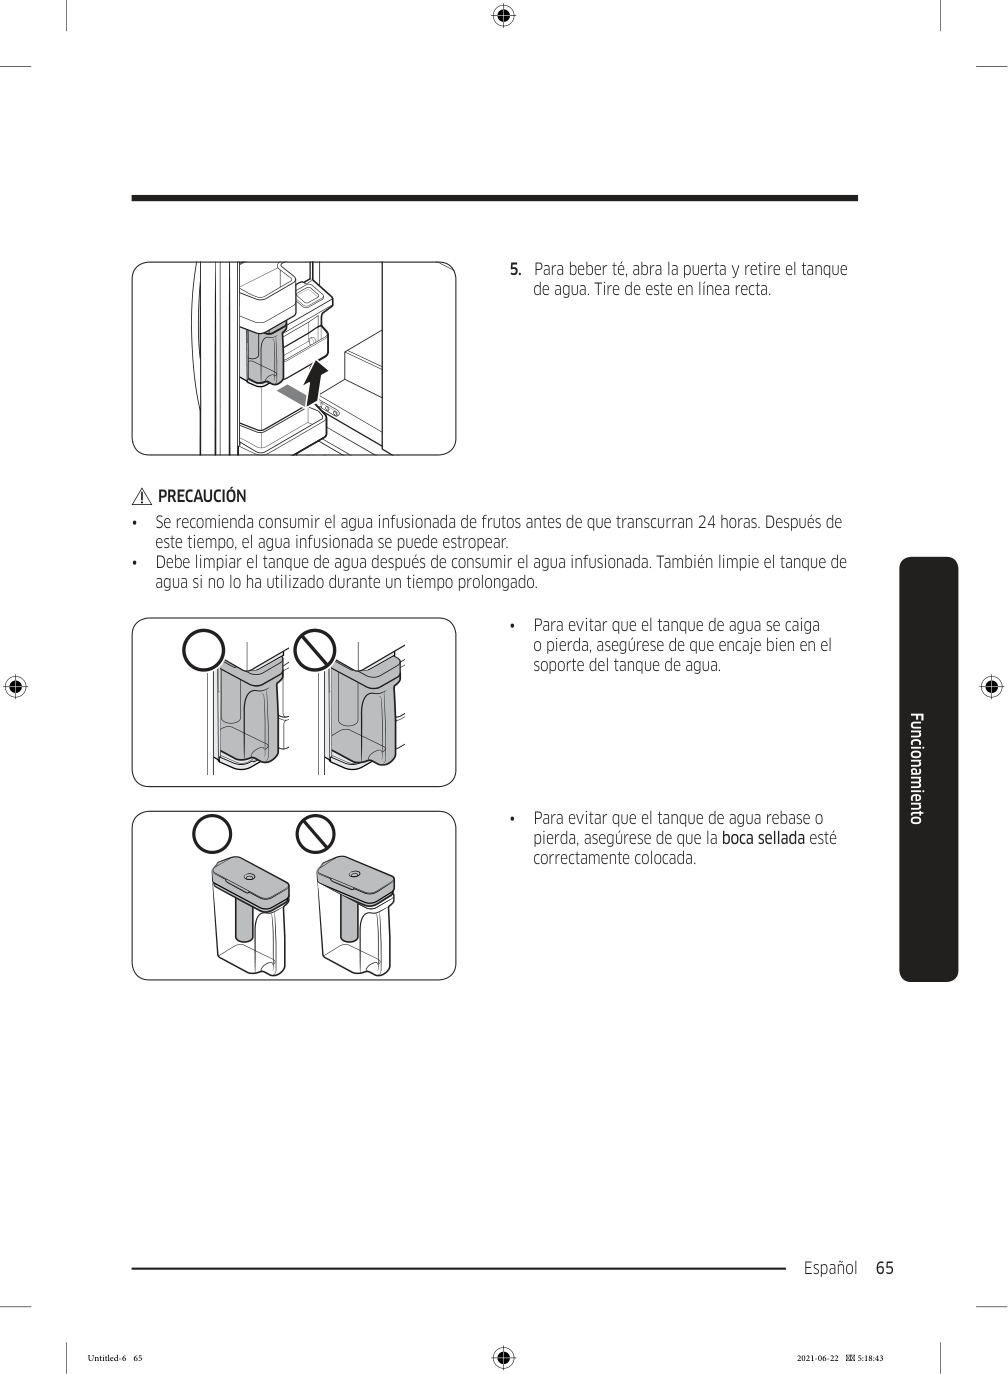
Español 65 Funcionamiento
Precaución
• Se recomienda consumir el agua infusionada de frutos antes de que transcurran 24 horas. Después de este tiempo, el agua infusionada se puede estropear. • Debe limpiar el tanque de agua después de consumir el agua infusionada. También limpie el tanque de agua si no lo ha utilizado durante un tiempo prolongado. • Para evitar que el tanque de agua se caiga o pierda, asegúrese de que encaje bien en el soporte del tanque de agua. • Para evitar que el tanque de agua rebase o pierda, asegúrese de que la boca sellada esté correctamente colocada. Untitled-6 65 2021-06-22 5:18:43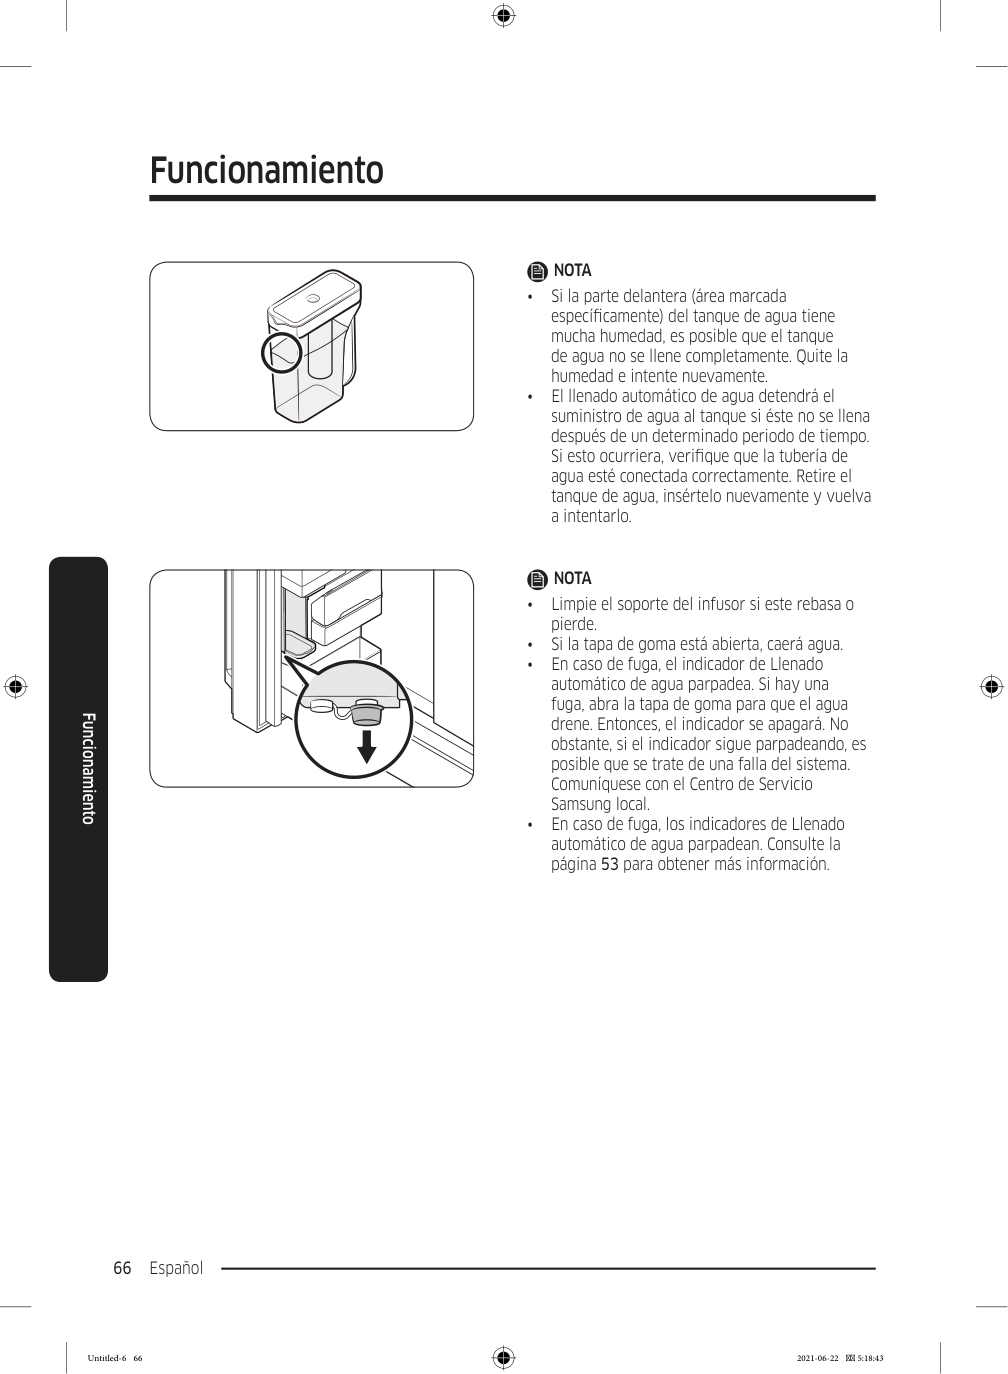
Funcionamiento Español 66 Funcionamiento
Nota
• Si la parte delantera (área marcada específicamente) del tanque de agua tiene mucha humedad, es posible que el tanque de agua no se llene completamente. Quite la humedad e intente nuevamente. • El llenado automático de agua detendrá el suministro de agua al tanque si éste no se llena después de un determinado periodo de tiempo. Si esto ocurriera, verifique que la tubería de agua esté conectada correctamente. Retire el tanque de agua, insértelo nuevamente y vuelva a intentarlo.Nota
• Limpie el soporte del infusor si este rebasa o pierde. • Si la tapa de goma está abierta, caerá agua. • En caso de fuga, el indicador de Llenado automático de agua parpadea. Si hay una fuga, abra la tapa de goma para que el agua drene. Entonces, el indicador se apagará. No obstante, si el indicador sigue parpadeando, es posible que se trate de una falla del sistema. Comuníquese con el Centro de Servicio Samsung local. • En caso de fuga, los indicadores de Llenado automático de agua parpadean. Consulte la página 53 para obtener más información. Untitled-6 66 2021-06-22 5:18:43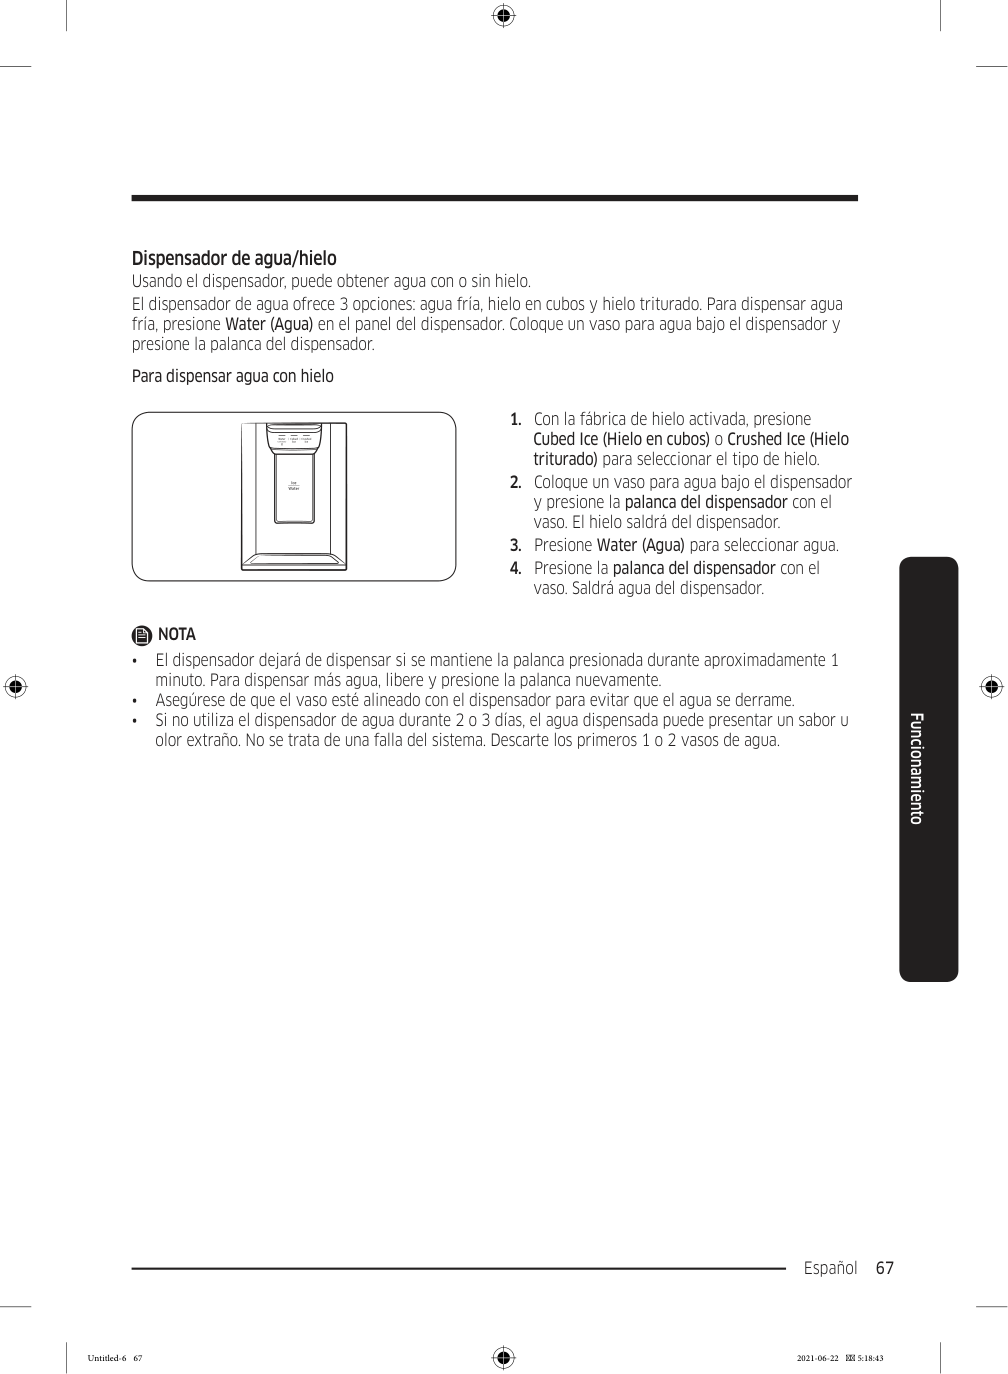
Español 67 Funcionamiento Dispensador de agua/hielo Usando el dispensador, puede obtener agua con o sin hielo. El dispensador de agua ofrece 3 opciones: agua fría, hielo en cubos y hielo triturado. Para dispensar agua fría, presione Water (Agua) en el panel del dispensador. Coloque un vaso para agua bajo el dispensador y presione la palanca del dispensador. Para dispensar agua con hielo
Nota
• El dispensador dejará de dispensar si se mantiene la palanca presionada durante aproximadamente 1 minuto. Para dispensar más agua, libere y presione la palanca nuevamente. • Asegúrese de que el vaso esté alineado con el dispensador para evitar que el agua se derrame. • Si no utiliza el dispensador de agua durante 2 o 3 días, el agua dispensada puede presentar un sabor u olor extraño. No se trata de una falla del sistema. Descarte los primeros 1 o 2 vasos de agua. Untitled-6 67 2021-06-22 5:18:43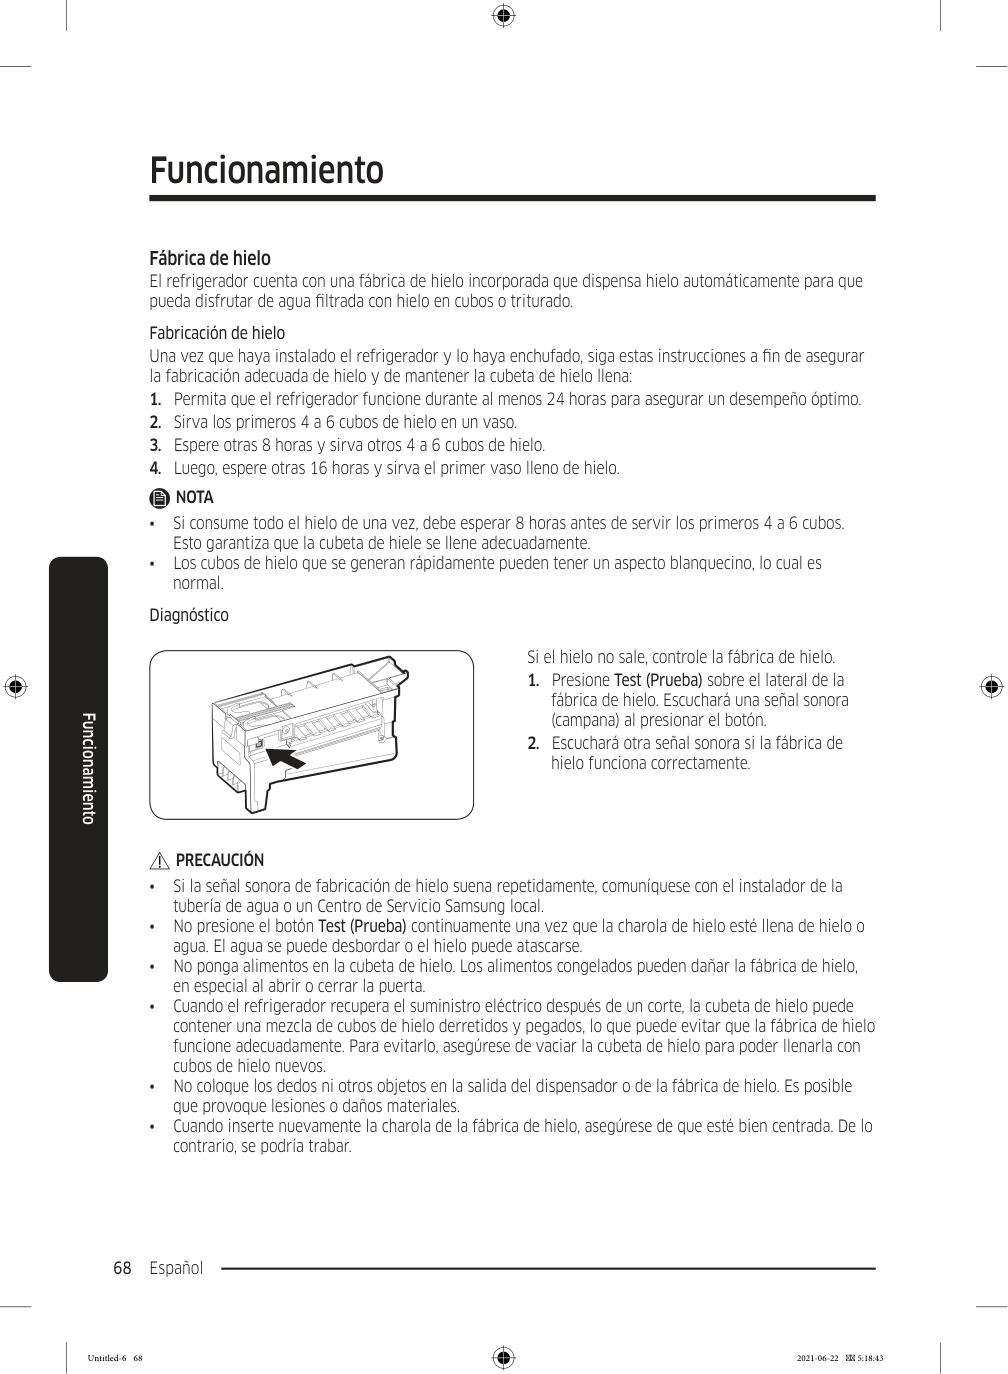
Funcionamiento Español 68 Funcionamiento Fábrica de hielo El refrigerador cuenta con una fábrica de hielo incorporada que dispensa hielo automáticamente para que pueda disfrutar de agua filtrada con hielo en cubos o triturado. Fabricación de hielo Una vez que haya instalado el refrigerador y lo haya enchufado, siga estas instrucciones a fin de asegurar la fabricación adecuada de hielo y de mantener la cubeta de hielo llena:
Nota
• Si consume todo el hielo de una vez, debe esperar 8 horas antes de servir los primeros 4 a 6 cubos. Esto garantiza que la cubeta de hiele se llene adecuadamente. • Los cubos de hielo que se generan rápidamente pueden tener un aspecto blanquecino, lo cual es normal. Diagnóstico Si el hielo no sale, controle la fábrica de hielo.Precaución
• Si la señal sonora de fabricación de hielo suena repetidamente, comuníquese con el instalador de la tubería de agua o un Centro de Servicio Samsung local. • No presione el botón Test (Prueba) continuamente una vez que la charola de hielo esté llena de hielo o agua. El agua se puede desbordar o el hielo puede atascarse. • No ponga alimentos en la cubeta de hielo. Los alimentos congelados pueden dañar la fábrica de hielo, en especial al abrir o cerrar la puerta. • Cuando el refrigerador recupera el suministro eléctrico después de un corte, la cubeta de hielo puede contener una mezcla de cubos de hielo derretidos y pegados, lo que puede evitar que la fábrica de hielo funcione adecuadamente. Para evitarlo, asegúrese de vaciar la cubeta de hielo para poder llenarla con cubos de hielo nuevos. • No coloque los dedos ni otros objetos en la salida del dispensador o de la fábrica de hielo. Es posible que provoque lesiones o daños materiales. • Cuando inserte nuevamente la charola de la fábrica de hielo, asegúrese de que esté bien centrada. De lo contrario, se podría trabar. Untitled-6 68 2021-06-22 5:18:43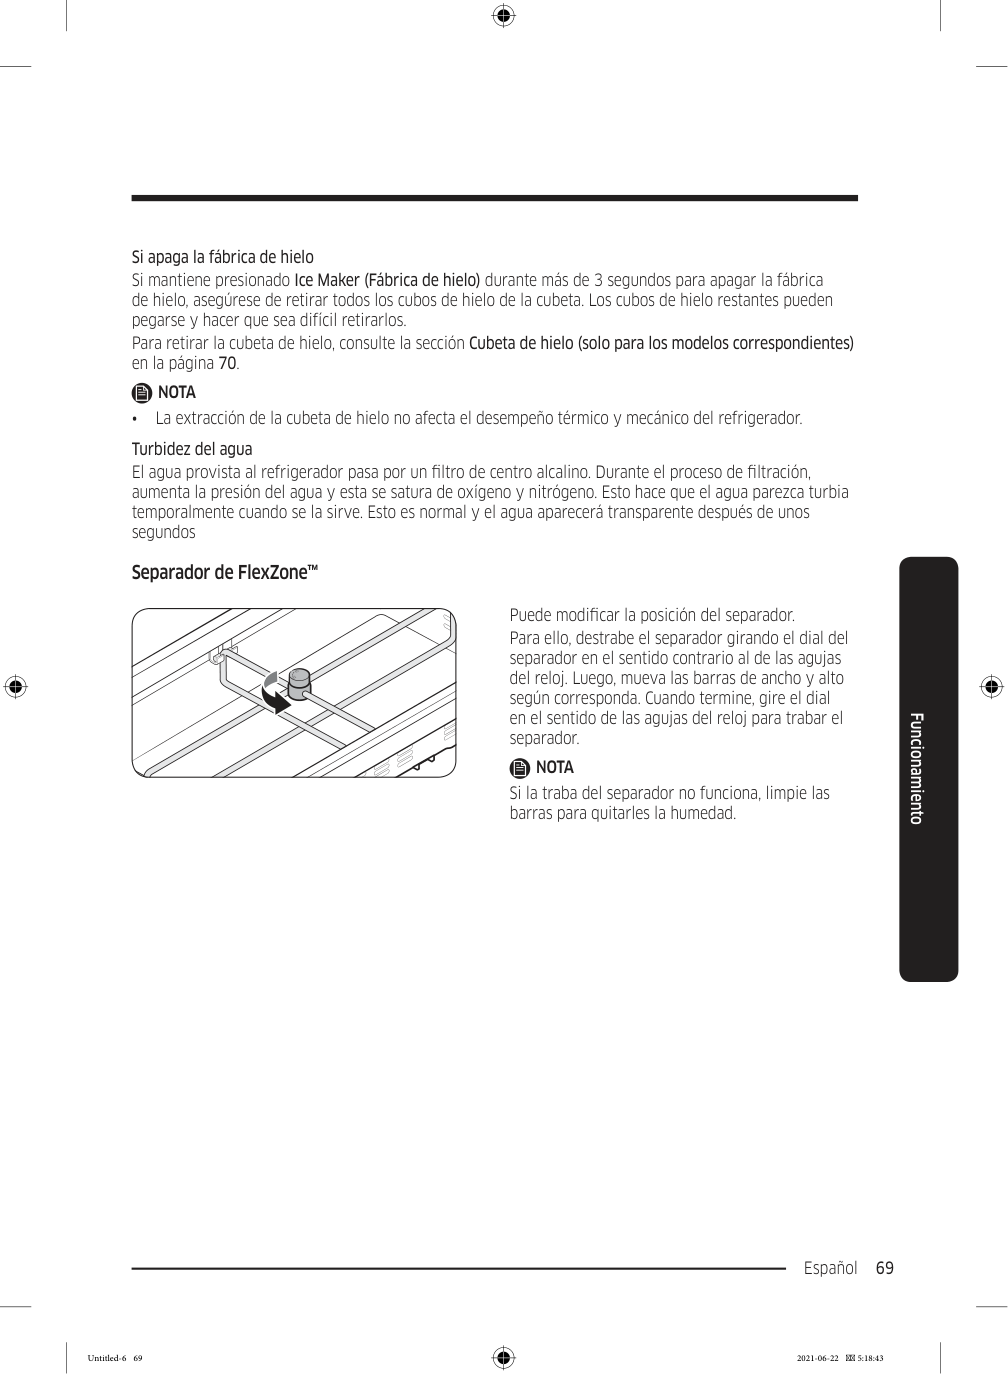
Español 69 Funcionamiento Si apaga la fábrica de hielo Si mantiene presionado Ice Maker (Fábrica de hielo) durante más de 3 segundos para apagar la fábrica de hielo, asegúrese de retirar todos los cubos de hielo de la cubeta. Los cubos de hielo restantes pueden pegarse y hacer que sea difícil retirarlos. Para retirar la cubeta de hielo, consulte la sección Cubeta de hielo (solo para los modelos correspondientes) en la página 70.
Nota
• La extracción de la cubeta de hielo no afecta el desempeño térmico y mecánico del refrigerador. Turbidez del agua El agua provista al refrigerador pasa por un filtro de centro alcalino. Durante el proceso de filtración, aumenta la presión del agua y esta se satura de oxígeno y nitrógeno. Esto hace que el agua parezca turbia temporalmente cuando se la sirve. Esto es normal y el agua aparecerá transparente después de unos segundos Separador de FlexZone™ Puede modificar la posición del separador. Para ello, destrabe el separador girando el dial del separador en el sentido contrario al de las agujas del reloj. Luego, mueva las barras de ancho y alto según corresponda. Cuando termine, gire el dial en el sentido de las agujas del reloj para trabar el separador.Nota
Si la traba del separador no funciona, limpie las barras para quitarles la humedad. Untitled-6 69 2021-06-22 5:18:43
Español 70 Mantenimiento Manipulación y cuidado Cubeta de hielo (solo para los modelos correspondientes) Si no sirve hielo durante un período prolongado, el hielo puede apelmazarse en la cubeta. Si esto ocurriera, retire y vacíe la cubeta de la fábrica de hielo.
A
Si la cubeta de hielo no estuviera bien insertada, gire la Hélice (A) 90 grados e inténtelo nuevamente.Precaución
• No use fuerza excesiva sobre cubierta de la cubeta. La cubierta puede romperse. • No cierre la puerta por la fuerza. Puede derramarse agua sobre la fábrica de hielo. • Para evitar lesiones, asegúrese de limpiar el hielo o el agua que pueda haber caído en el suelo. • A fin de evitar lesiones o accidentes, no permita que los niños jueguen con el dispensador de agua ni la fábrica de hielo. • No coloque la mano o ni ningún objeto en el conducto de hielo. Es posible que provoque lesiones o daños materiales. Mantenimiento Untitled-6 70 2021-06-22 5:18:43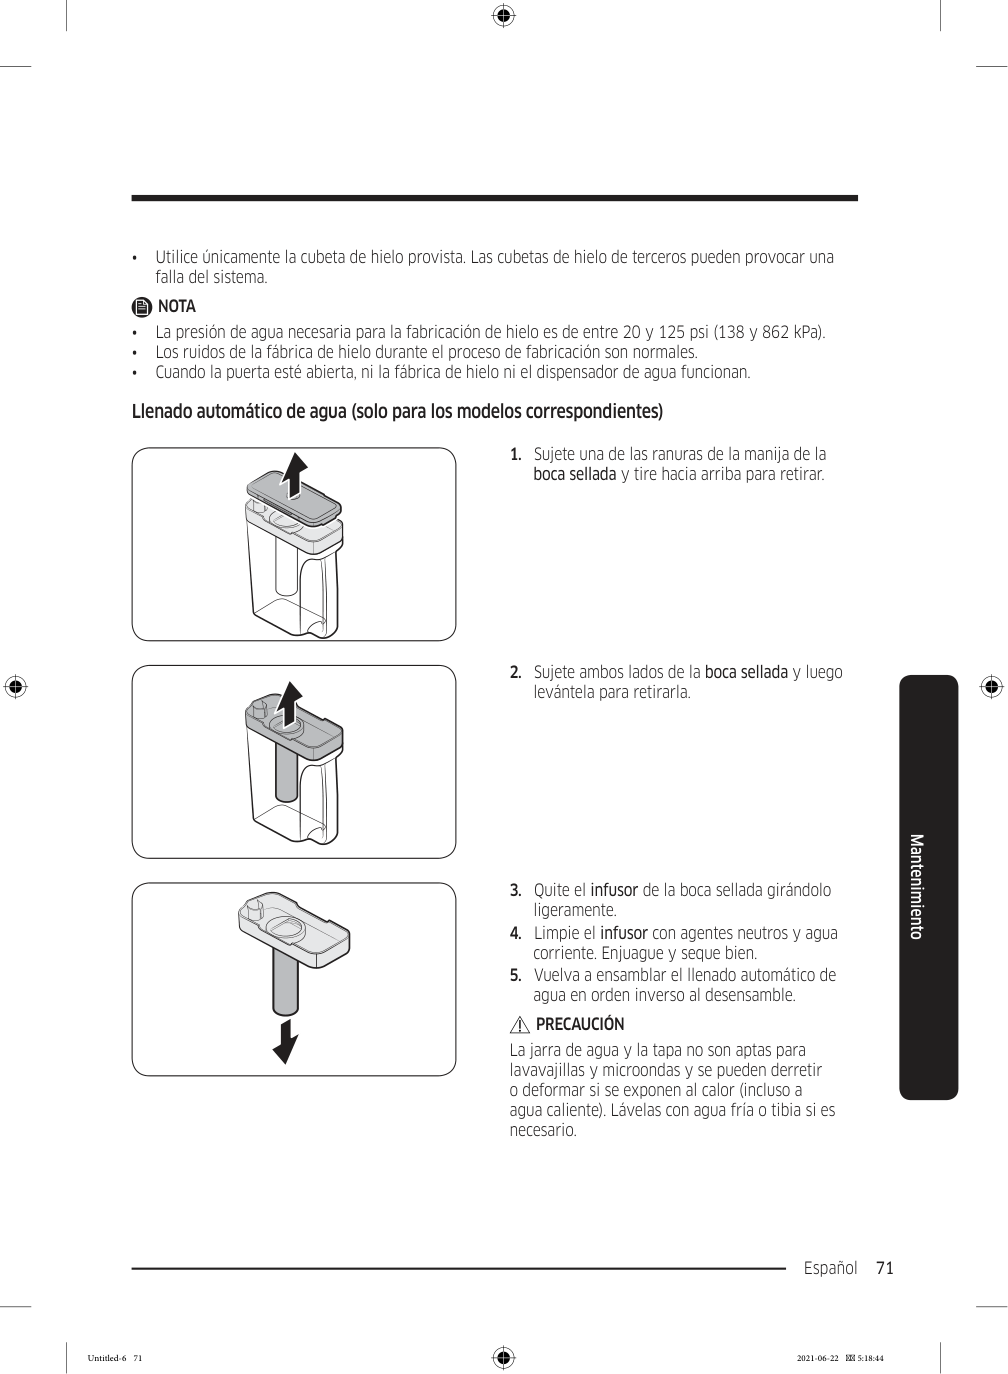
Español 71 Mantenimiento • Utilice únicamente la cubeta de hielo provista. Las cubetas de hielo de terceros pueden provocar una falla del sistema.
Nota
• La presión de agua necesaria para la fabricación de hielo es de entre 20 y 125 psi (138 y 862 kPa). • Los ruidos de la fábrica de hielo durante el proceso de fabricación son normales. • Cuando la puerta esté abierta, ni la fábrica de hielo ni el dispensador de agua funcionan. Llenado automático de agua (solo para los modelos correspondientes)Precaución
La jarra de agua y la tapa no son aptas para lavavajillas y microondas y se pueden derretir o deformar si se exponen al calor (incluso a agua caliente). Lávelas con agua fría o tibia si es necesario. Untitled-6 71 2021-06-22 5:18:44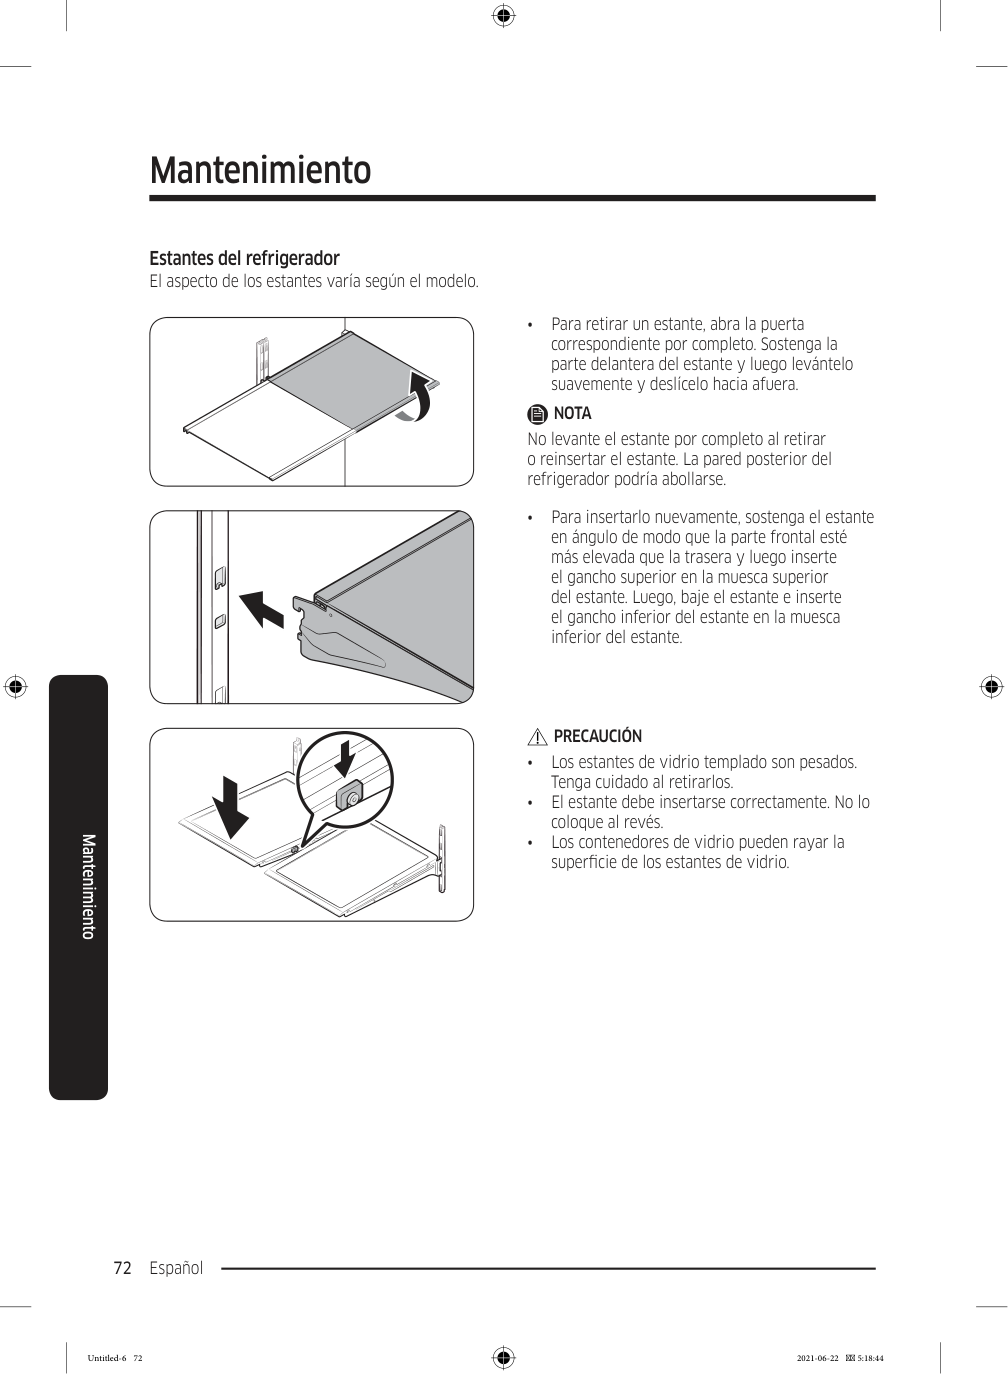
Mantenimiento Español 72 Mantenimiento Estantes del refrigerador El aspecto de los estantes varía según el modelo. • Para retirar un estante, abra la puerta correspondiente por completo. Sostenga la parte delantera del estante y luego levántelo suavemente y deslícelo hacia afuera.
Nota
No levante el estante por completo al retirar o reinsertar el estante. La pared posterior del refrigerador podría abollarse. • Para insertarlo nuevamente, sostenga el estante en ángulo de modo que la parte frontal esté más elevada que la trasera y luego inserte el gancho superior en la muesca superior del estante. Luego, baje el estante e inserte el gancho inferior del estante en la muesca inferior del estante.Precaución
• Los estantes de vidrio templado son pesados. Tenga cuidado al retirarlos. • El estante debe insertarse correctamente. No lo coloque al revés. • Los contenedores de vidrio pueden rayar la superficie de los estantes de vidrio. Untitled-6 72 2021-06-22 5:18:44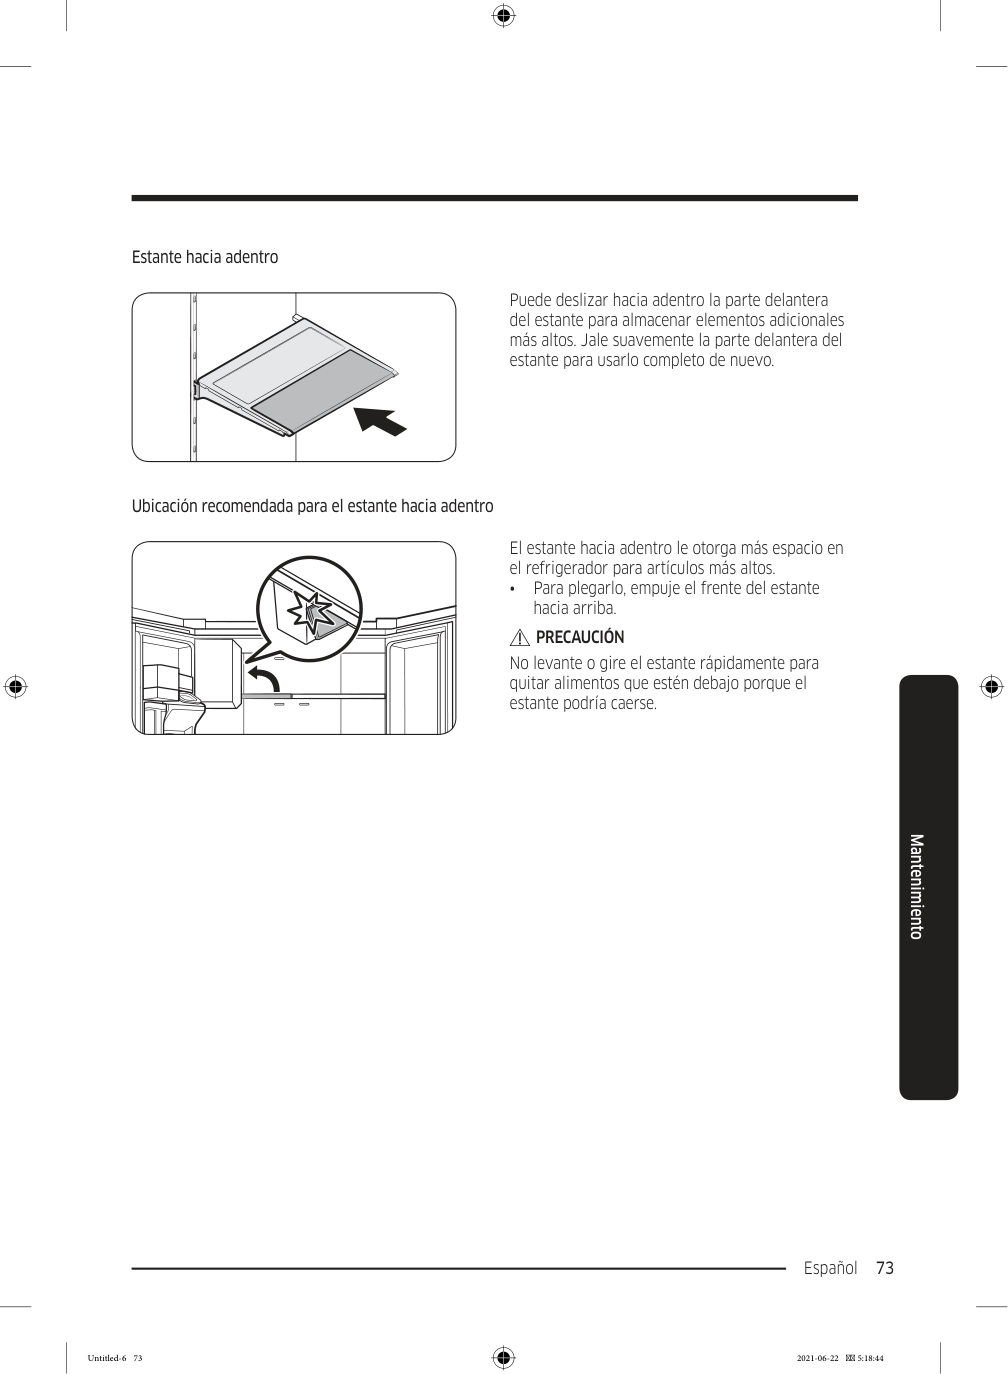
Español 73 Mantenimiento Estante hacia adentro Puede deslizar hacia adentro la parte delantera del estante para almacenar elementos adicionales más altos. Jale suavemente la parte delantera del estante para usarlo completo de nuevo. Ubicación recomendada para el estante hacia adentro El estante hacia adentro le otorga más espacio en el refrigerador para artículos más altos. • Para plegarlo, empuje el frente del estante hacia arriba.
Precaución
No levante o gire el estante rápidamente para quitar alimentos que estén debajo porque el estante podría caerse. Untitled-6 73 2021-06-22 5:18:44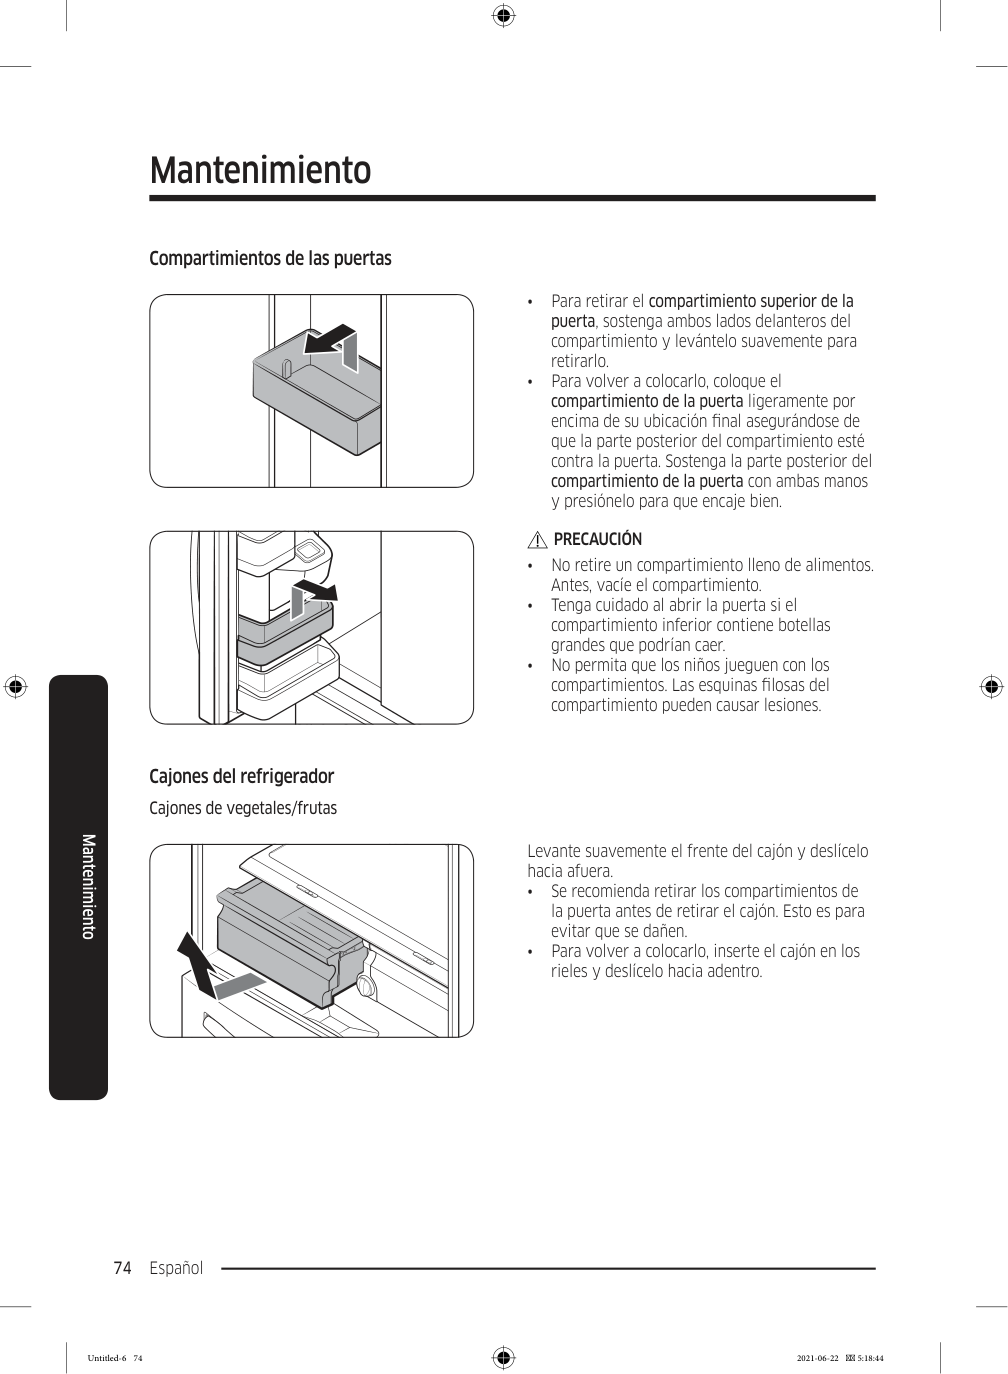
Mantenimiento Español 74 Mantenimiento Compartimientos de las puertas • Para retirar el compartimiento superior de la puerta, sostenga ambos lados delanteros del compartimiento y levántelo suavemente para retirarlo. • Para volver a colocarlo, coloque el compartimiento de la puerta ligeramente por encima de su ubicación final asegurándose de que la parte posterior del compartimiento esté contra la puerta. Sostenga la parte posterior del compartimiento de la puerta con ambas manos y presiónelo para que encaje bien.
Precaución
• No retire un compartimiento lleno de alimentos. Antes, vacíe el compartimiento. • Tenga cuidado al abrir la puerta si el compartimiento inferior contiene botellas grandes que podrían caer. • No permita que los niños jueguen con los compartimientos. Las esquinas filosas del compartimiento pueden causar lesiones. Cajones del refrigerador Cajones de vegetales/frutas Levante suavemente el frente del cajón y deslícelo hacia afuera. • Se recomienda retirar los compartimientos de la puerta antes de retirar el cajón. Esto es para evitar que se dañen. • Para volver a colocarlo, inserte el cajón en los rieles y deslícelo hacia adentro. Untitled-6 74 2021-06-22 5:18:44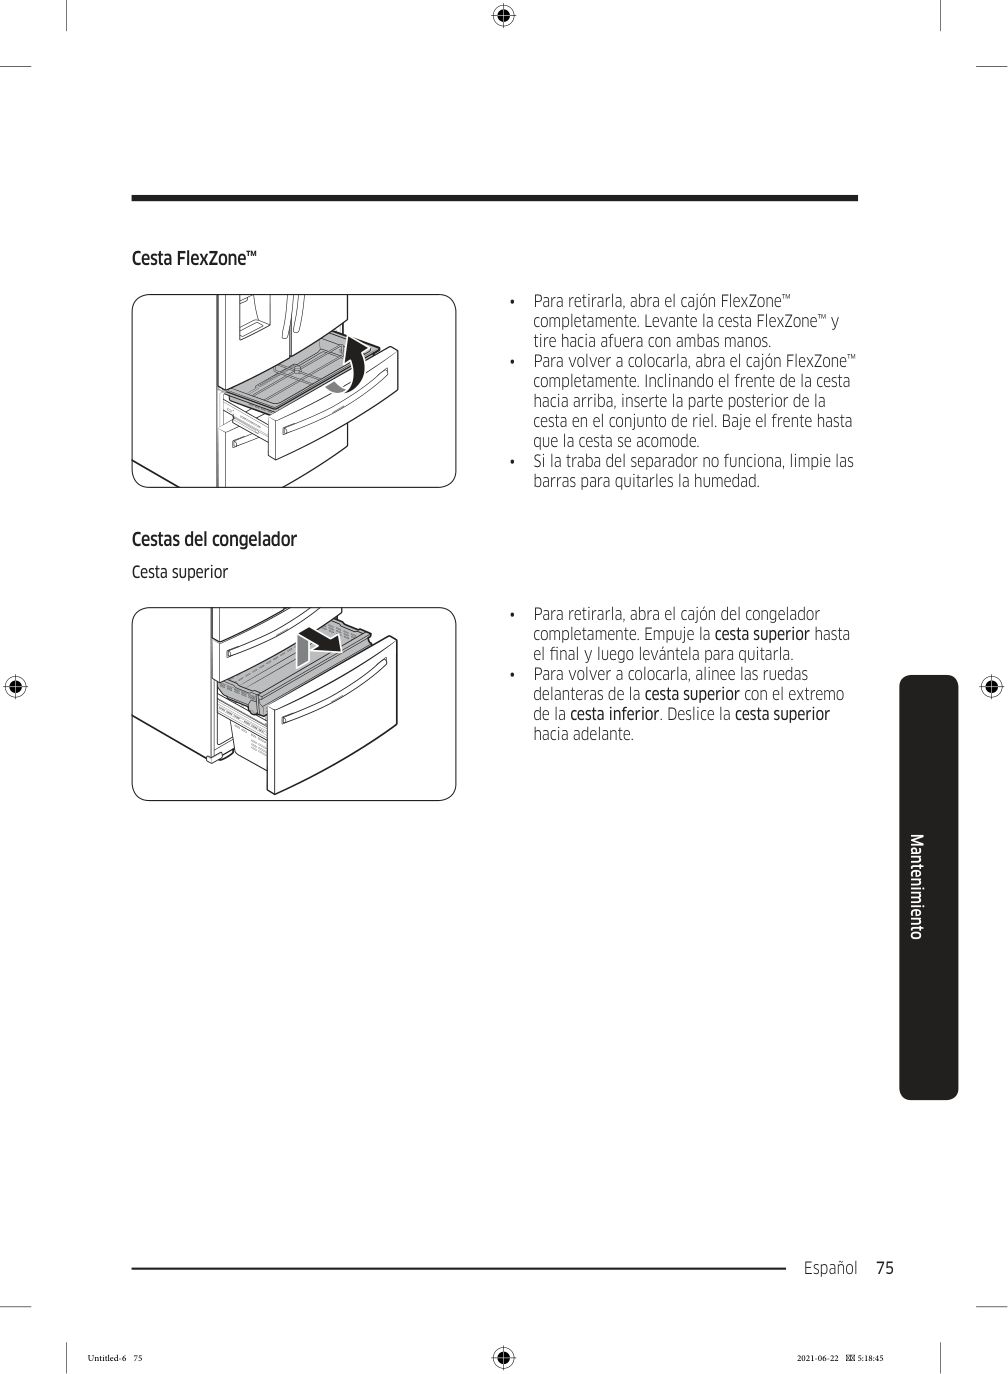
Español 75 Mantenimiento Cesta FlexZone™ • Para retirarla, abra el cajón FlexZone™ completamente. Levante la cesta FlexZone™ y tire hacia afuera con ambas manos. • Para volver a colocarla, abra el cajón FlexZone™ completamente. Inclinando el frente de la cesta hacia arriba, inserte la parte posterior de la cesta en el conjunto de riel. Baje el frente hasta que la cesta se acomode. • Si la traba del separador no funciona, limpie las barras para quitarles la humedad. Cestas del congelador Cesta superior • Para retirarla, abra el cajón del congelador completamente. Empuje la cesta superior hasta el final y luego levántela para quitarla. • Para volver a colocarla, alinee las ruedas delanteras de la cesta superior con el extremo de la cesta inferior. Deslice la cesta superior hacia adelante. Untitled-6 75 2021-06-22 5:18:45
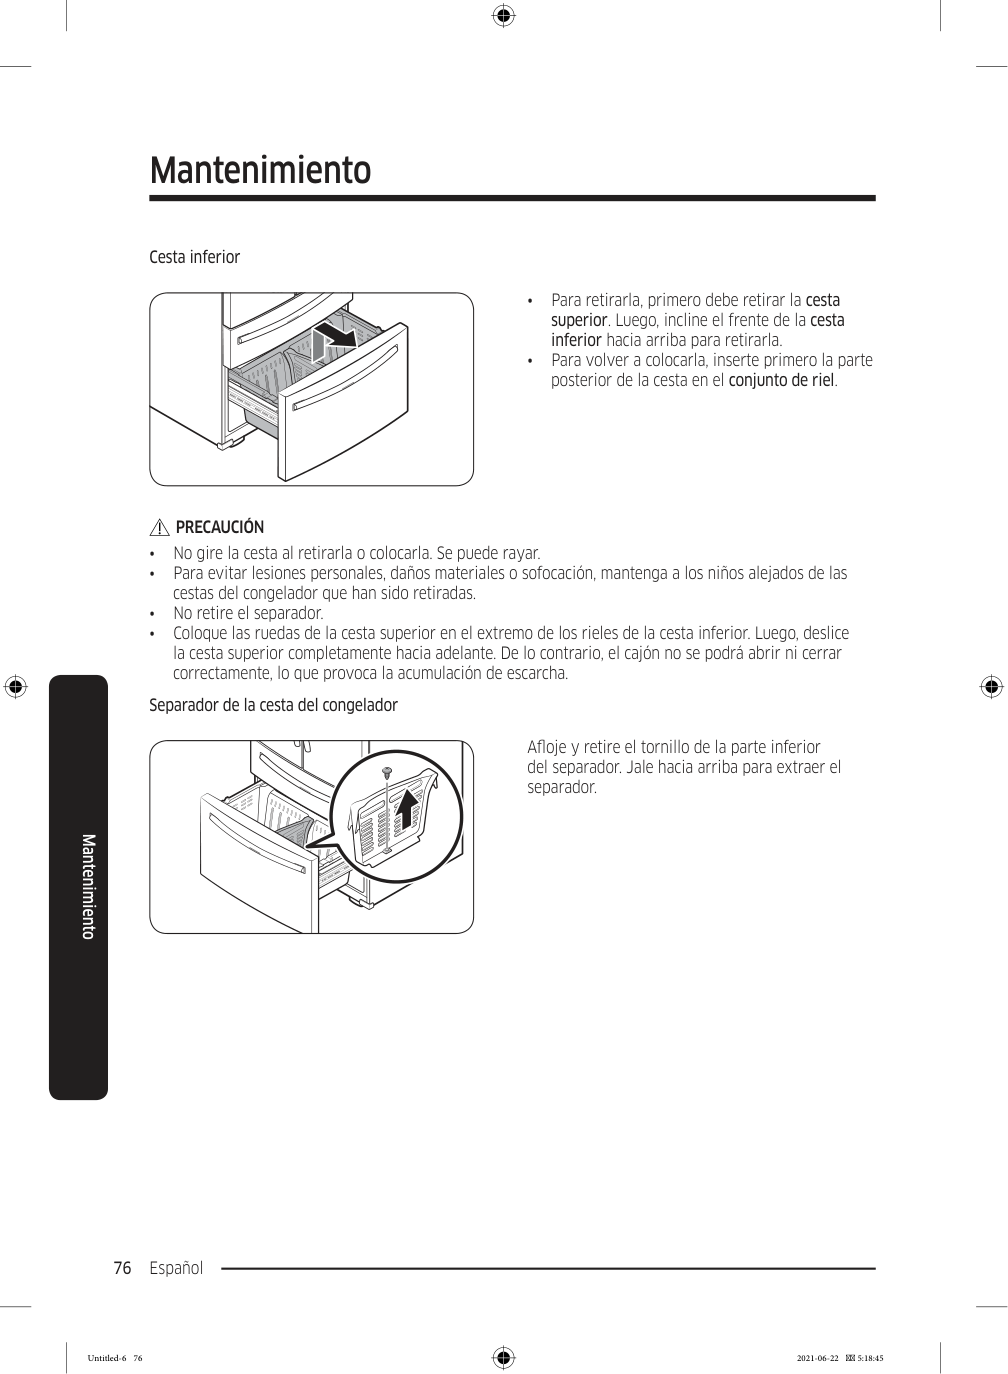
Mantenimiento Español 76 Mantenimiento Cesta inferior • Para retirarla, primero debe retirar la cesta superior. Luego, incline el frente de la cesta inferior hacia arriba para retirarla. • Para volver a colocarla, inserte primero la parte posterior de la cesta en el conjunto de riel.
Precaución
• No gire la cesta al retirarla o colocarla. Se puede rayar. • Para evitar lesiones personales, daños materiales o sofocación, mantenga a los niños alejados de las cestas del congelador que han sido retiradas. • No retire el separador. • Coloque las ruedas de la cesta superior en el extremo de los rieles de la cesta inferior. Luego, deslice la cesta superior completamente hacia adelante. De lo contrario, el cajón no se podrá abrir ni cerrar correctamente, lo que provoca la acumulación de escarcha. Separador de la cesta del congelador Afloje y retire el tornillo de la parte inferior del separador. Jale hacia arriba para extraer el separador. Untitled-6 76 2021-06-22 5:18:45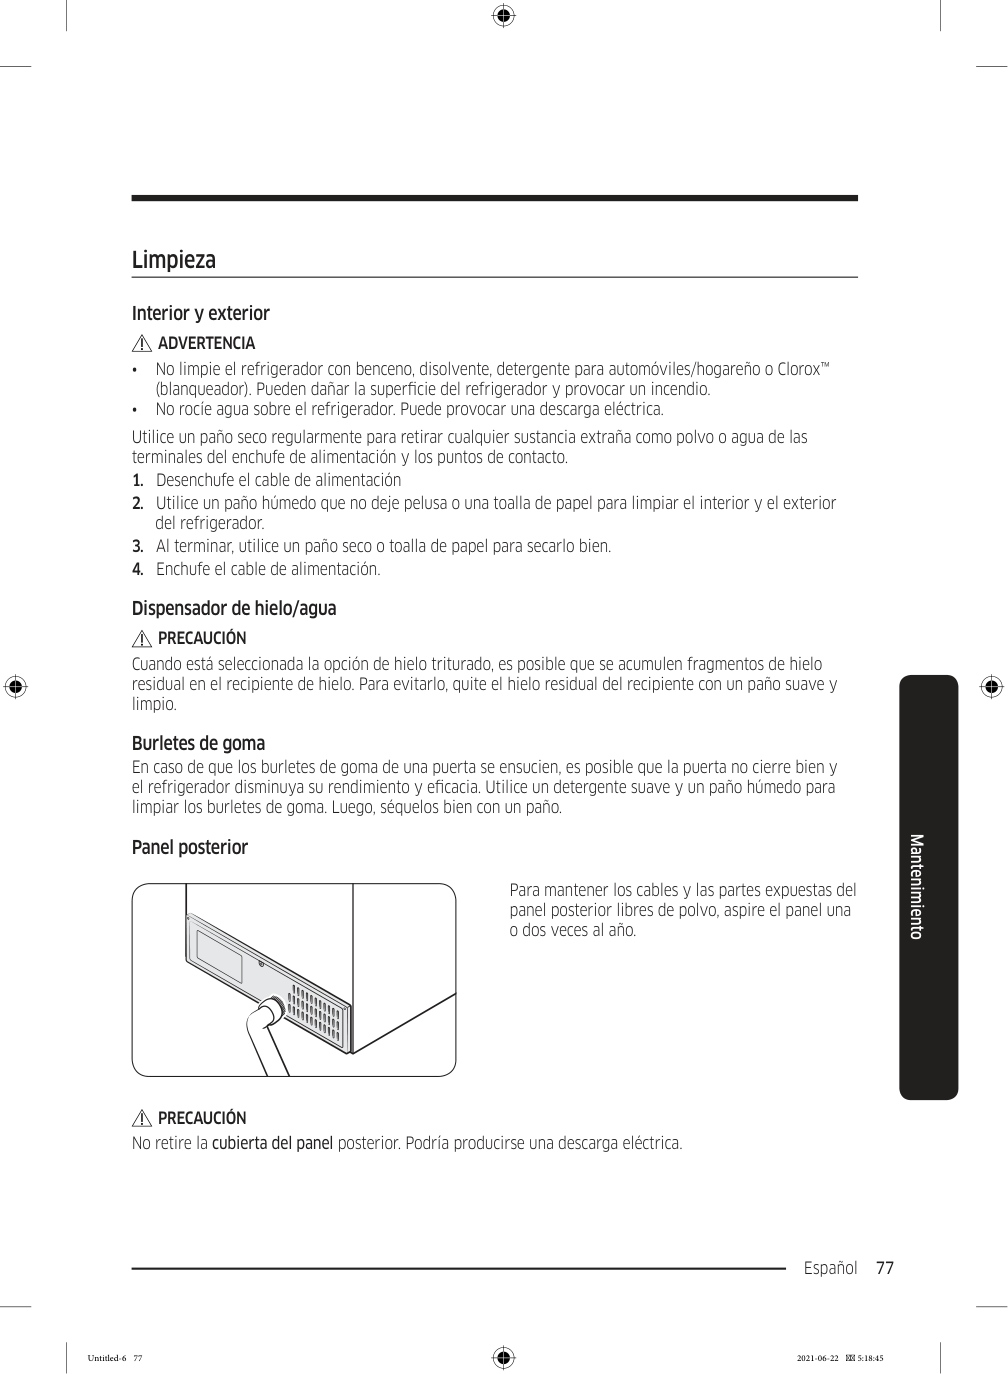
Español 77 Mantenimiento Limpieza Interior y exterior
Advertencia
• No limpie el refrigerador con benceno, disolvente, detergente para automóviles/hogareño o Clorox™ (blanqueador). Pueden dañar la superficie del refrigerador y provocar un incendio. • No rocíe agua sobre el refrigerador. Puede provocar una descarga eléctrica. Utilice un paño seco regularmente para retirar cualquier sustancia extraña como polvo o agua de las terminales del enchufe de alimentación y los puntos de contacto.Precaución
Cuando está seleccionada la opción de hielo triturado, es posible que se acumulen fragmentos de hielo residual en el recipiente de hielo. Para evitarlo, quite el hielo residual del recipiente con un paño suave y limpio. Burletes de goma En caso de que los burletes de goma de una puerta se ensucien, es posible que la puerta no cierre bien y el refrigerador disminuya su rendimiento y eficacia. Utilice un detergente suave y un paño húmedo para limpiar los burletes de goma. Luego, séquelos bien con un paño. Panel posterior Para mantener los cables y las partes expuestas del panel posterior libres de polvo, aspire el panel una o dos veces al año.Precaución
No retire la cubierta del panel posterior. Podría producirse una descarga eléctrica. Untitled-6 77 2021-06-22 5:18:45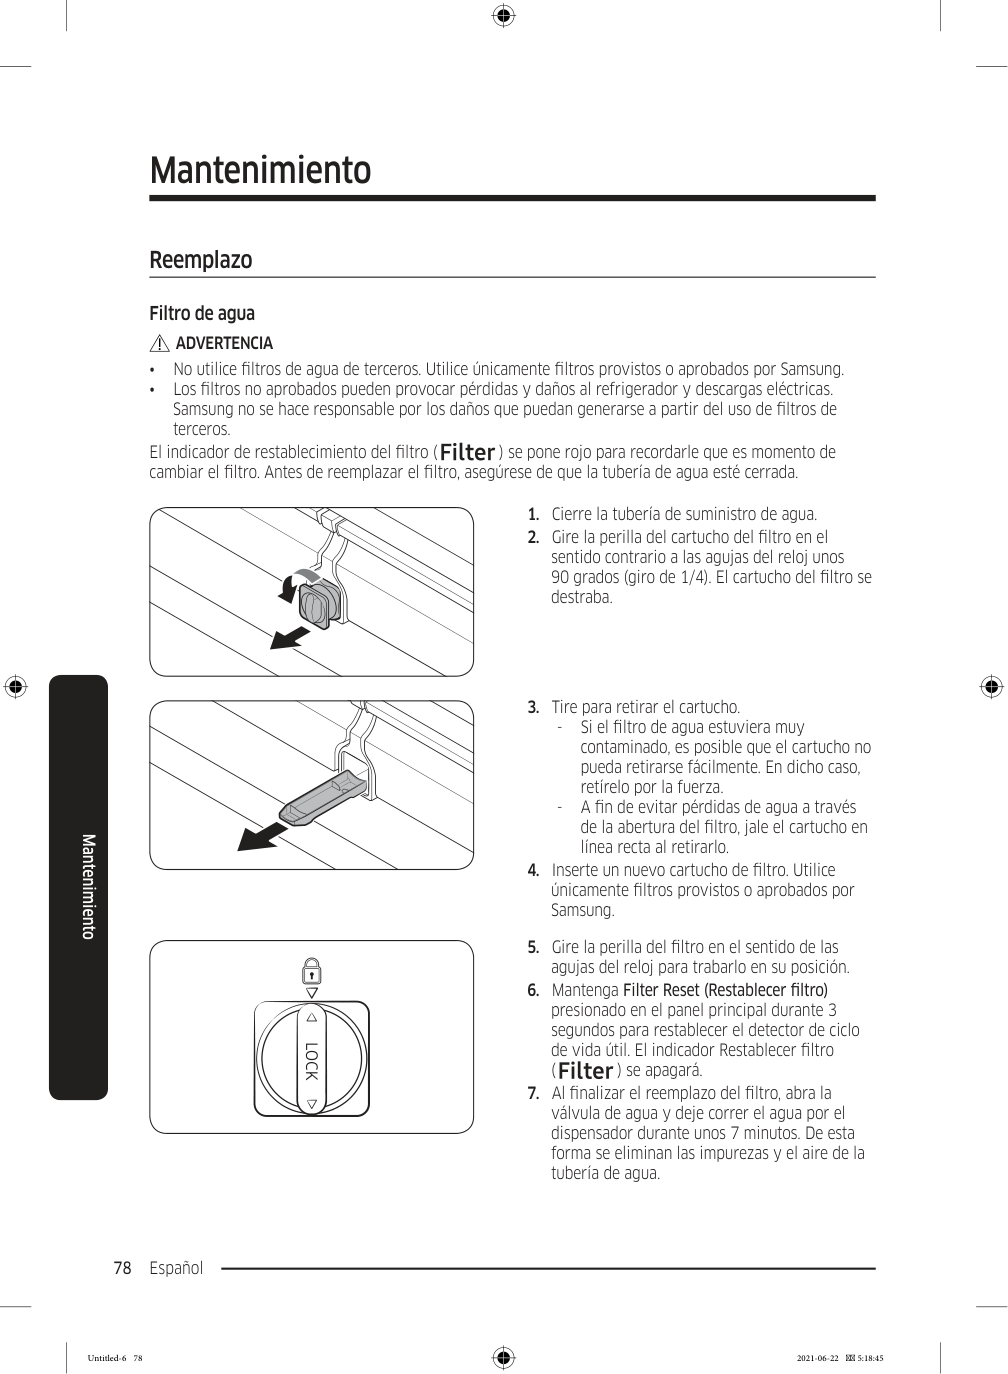
Mantenimiento Español 78 Mantenimiento Reemplazo Filtro de agua
Advertencia
• No utilice filtros de agua de terceros. Utilice únicamente filtros provistos o aprobados por Samsung. • Los filtros no aprobados pueden provocar pérdidas y daños al refrigerador y descargas eléctricas. Samsung no se hace responsable por los daños que puedan generarse a partir del uso de filtros de terceros. El indicador de restablecimiento del filtro ( ) se pone rojo para recordarle que es momento de cambiar el filtro. Antes de reemplazar el filtro, asegúrese de que la tubería de agua esté cerrada.
Español 79 Mantenimiento
Nota
• Los filtros nuevos pueden hacer que brote agua del dispensador brevemente. Esto se debe al ingreso de aire en la tubería de agua. • El proceso de reemplazo puede hacer que el dispensador de agua gotee por un período breve. Si gotea, simplemente limpie el agua del piso con una toalla seca. Sistema de filtración por ósmosis inversa La presión de agua del sistema de suministro hacia un sistema de filtrado por ósmosis inversa debe ser de entre 35 y 120 psi (241 y 827 kPa). La presión de agua del sistema de filtración de agua por ósmosis inversa a la tubería de agua fría del refrigerador debe ser de al menos 40 psi (276 kPa). Si la presión de agua estuviera por debajo de estas especificaciones: • Verifique si el filtro de sedimentos en el sistema de ósmosis inversa está bloqueado. Reemplace el filtro si fuera necesario. • Llene nuevamente de agua el tanque de agua el sistema de ósmosis inversa. • Si el refrigerador cuenta con un filtro de agua, es posible que la presión de agua disminuya aún más al usarlo con un sistema de ósmosis inversa. Retire el filtro de agua. Para obtener más información sobre el mantenimiento, comuníquese con un plomero profesional. Pedir un filtro nuevo. Para comprar un nuevo filtro de agua, comuníquese con un centro de servicios Samsung local o visite www. samsungparts.com en Internet. Lámparas de LED Para reemplazar las lámparas del refrigerador, comuníquese con un centro de servicios Samsung local.Advertencia
• El usuario no debe reemplazar las lámparas. No intente reemplazar la lámpara usted mismo. Puede provocar una descarga eléctrica. Untitled-6 79 2021-06-22 5:18:45
Español 80 Solución de problemas Antes de solicitar servicio técnico revise los siguientes puntos de verificación. En el caso de solicitudes de servicio para situaciones normales (cuando no existe ningún defecto), se exigirá un cargo a los usuarios. General Temperatura Síntoma Causas posibles Solución El refrigerador/ congelador no funciona. La temperatura del refrigerador/congelador es elevada. • El cable de alimentación no está conectado correctamente. • Enchufe correctamente el cable de alimentación. • El control de temperatura no está configurado correctamente. • Baje la temperatura. • El refrigerador está ubicado cerca de una fuente de calor o expuesto a la luz solar directa. • Mantenga el refrigerador alejado de la luz solar directa o de las fuentes de calor. • No hay espacio suficiente entre el refrigerador y las paredes y gabinetes cercanos. • Asegúrese de que haya un espacio mínimo de 5 cm entre la parte posterior y los lados del refrigerador y las paredes o gabinetes cercanos. • El modo Ahorro de Energía está activado. • Desactive el modo Ahorro de Energía. • El refrigerador está demasiado lleno. Los alimentos bloquean las rejillas de ventilación del refrigerador. • No sobrecargue el refrigerador. Evite que los alimentos bloqueen la ventilación. El refrigerador/ congelador enfría demasiado. • El control de temperatura no está configurado correctamente. • Eleve la temperatura. Solución de problemas Untitled-6 80 2021-06-22 5:18:45
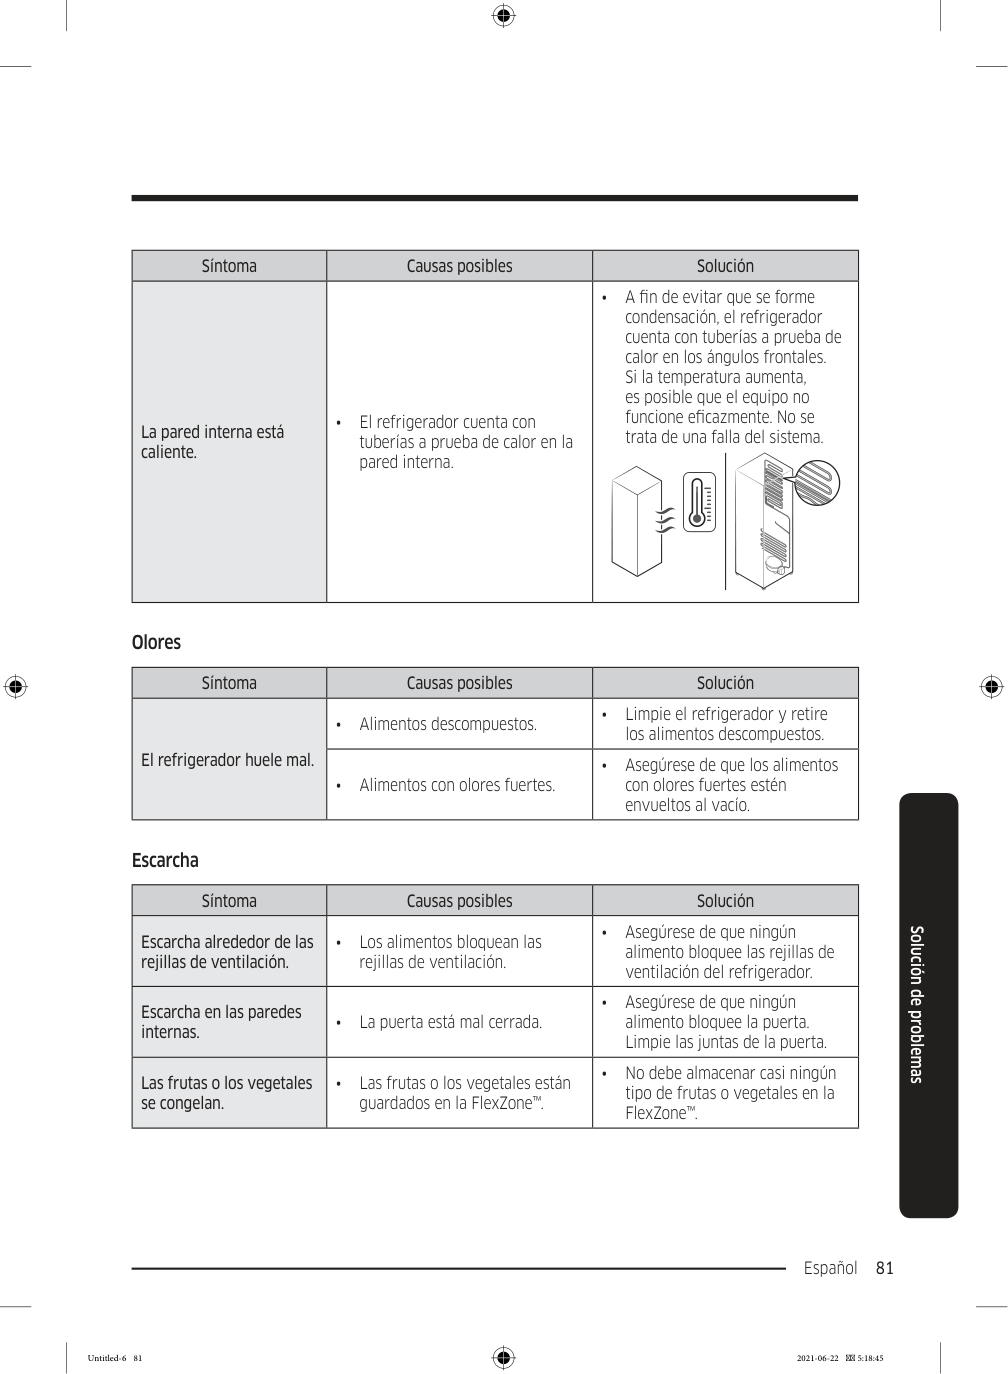
Español 81 Solución de problemas Síntoma Causas posibles Solución La pared interna está caliente. • El refrigerador cuenta con tuberías a prueba de calor en la pared interna. • A fin de evitar que se forme condensación, el refrigerador cuenta con tuberías a prueba de calor en los ángulos frontales. Si la temperatura aumenta, es posible que el equipo no funcione eficazmente. No se trata de una falla del sistema. Olores Síntoma Causas posibles Solución El refrigerador huele mal. • Alimentos descompuestos. • Limpie el refrigerador y retire los alimentos descompuestos. • Alimentos con olores fuertes. • Asegúrese de que los alimentos con olores fuertes estén envueltos al vacío. Escarcha Síntoma Causas posibles Solución Escarcha alrededor de las rejillas de ventilación. • Los alimentos bloquean las rejillas de ventilación. • Asegúrese de que ningún alimento bloquee las rejillas de ventilación del refrigerador. Escarcha en las paredes internas. • La puerta está mal cerrada. • Asegúrese de que ningún alimento bloquee la puerta. Limpie las juntas de la puerta. Las frutas o los vegetales se congelan. • Las frutas o los vegetales están guardados en la FlexZone™. • No debe almacenar casi ningún tipo de frutas o vegetales en la FlexZone™. Untitled-6 81 2021-06-22 5:18:45
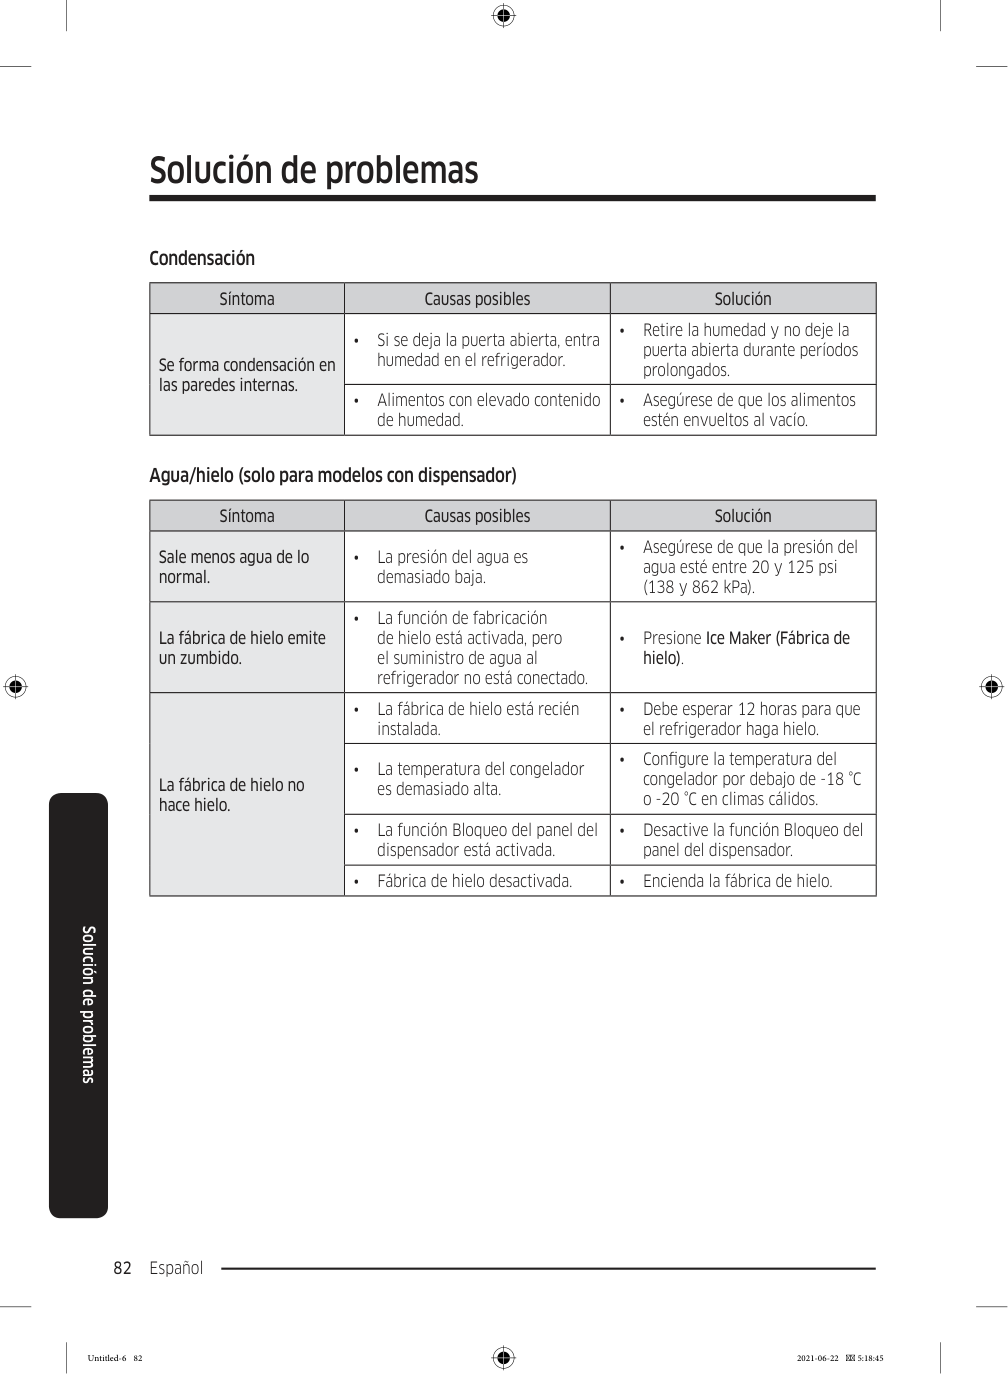
Solución de problemas Español 82 Solución de problemas Condensación Síntoma Causas posibles Solución Se forma condensación en las paredes internas. • Si se deja la puerta abierta, entra humedad en el refrigerador. • Retire la humedad y no deje la puerta abierta durante períodos prolongados. • Alimentos con elevado contenido de humedad. • Asegúrese de que los alimentos estén envueltos al vacío. Agua/hielo (solo para modelos con dispensador) Síntoma Causas posibles Solución Sale menos agua de lo normal. • La presión del agua es demasiado baja. • Asegúrese de que la presión del agua esté entre 20 y 125 psi (138 y 862 kPa). La fábrica de hielo emite un zumbido. • La función de fabricación de hielo está activada, pero el suministro de agua al refrigerador no está conectado. • Presione Ice Maker (Fábrica de hielo). La fábrica de hielo no hace hielo. • La fábrica de hielo está recién instalada. • Debe esperar 12 horas para que el refrigerador haga hielo. • La temperatura del congelador es demasiado alta. • Configure la temperatura del congelador por debajo de -18 °C o -20 °C en climas cálidos. • La función Bloqueo del panel del dispensador está activada. • Desactive la función Bloqueo del panel del dispensador. • Fábrica de hielo desactivada. • Encienda la fábrica de hielo. Untitled-6 82 2021-06-22 5:18:45
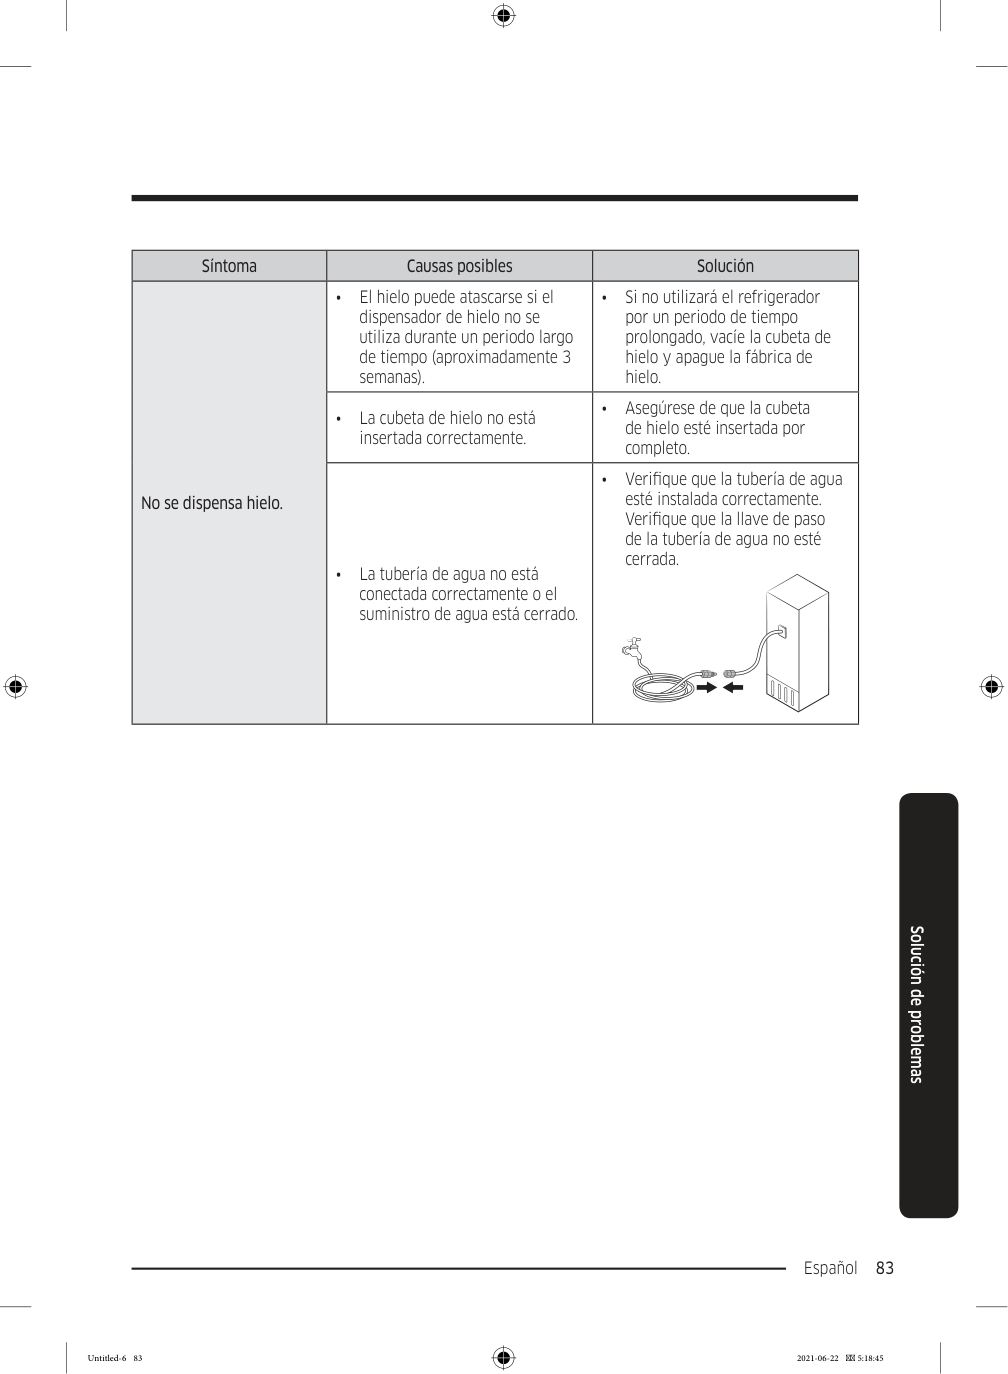
Español 83 Solución de problemas Síntoma Causas posibles Solución No se dispensa hielo. • El hielo puede atascarse si el dispensador de hielo no se utiliza durante un periodo largo de tiempo (aproximadamente 3 semanas). • Si no utilizará el refrigerador por un periodo de tiempo prolongado, vacíe la cubeta de hielo y apague la fábrica de hielo. • La cubeta de hielo no está insertada correctamente. • Asegúrese de que la cubeta de hielo esté insertada por completo. • La tubería de agua no está conectada correctamente o el suministro de agua está cerrado. • Verifique que la tubería de agua esté instalada correctamente. Verifique que la llave de paso de la tubería de agua no esté cerrada. Untitled-6 83 2021-06-22 5:18:45
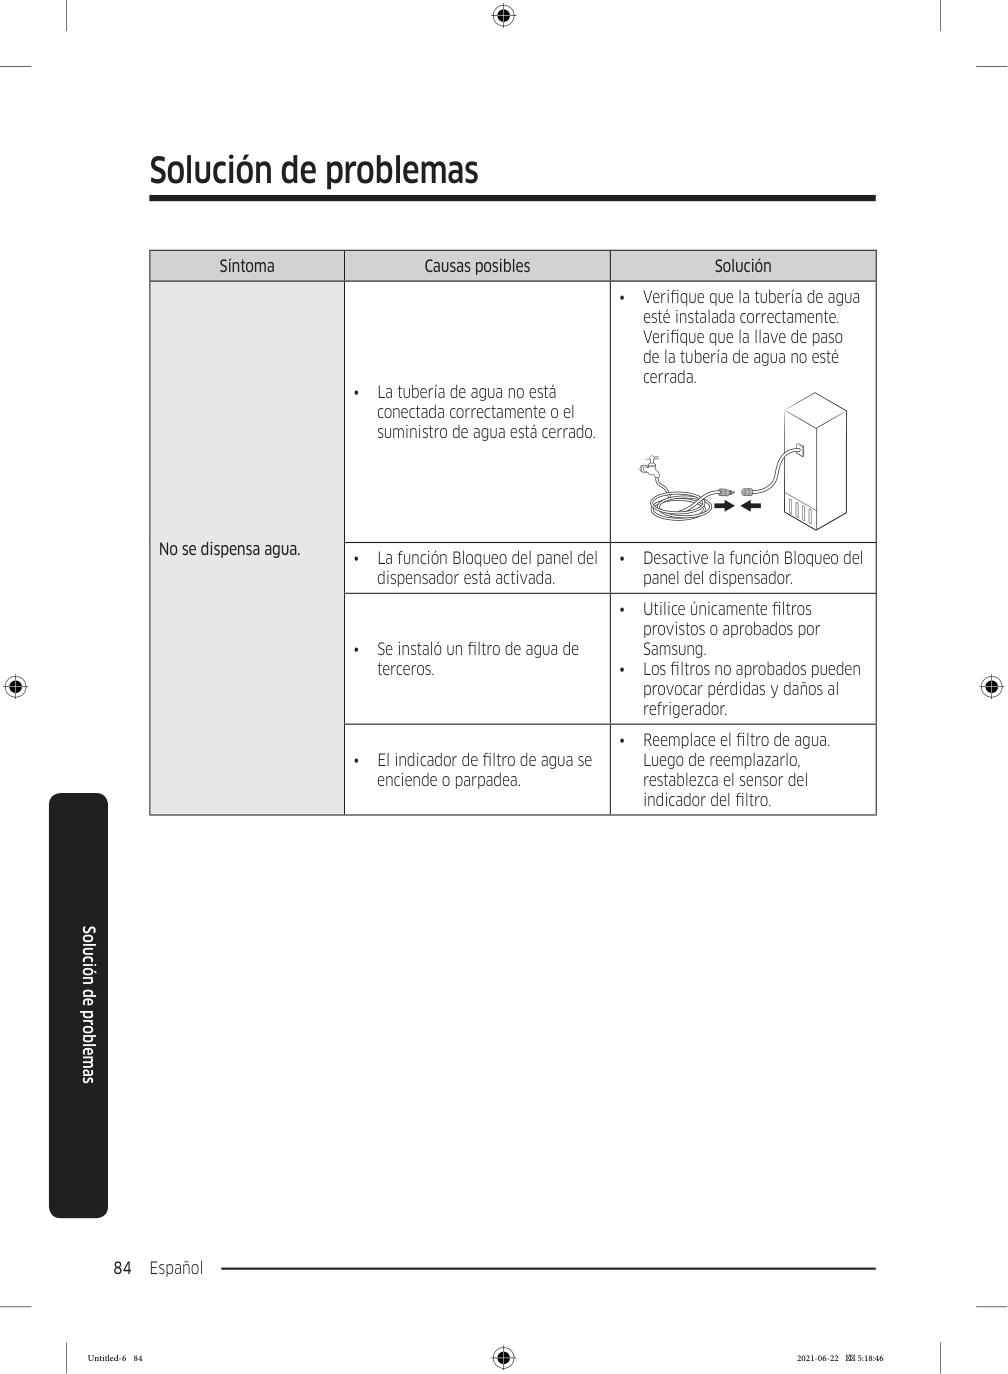
Solución de problemas Español 84 Solución de problemas Síntoma Causas posibles Solución No se dispensa agua. • La tubería de agua no está conectada correctamente o el suministro de agua está cerrado. • Verifique que la tubería de agua esté instalada correctamente. Verifique que la llave de paso de la tubería de agua no esté cerrada. • La función Bloqueo del panel del dispensador está activada. • Desactive la función Bloqueo del panel del dispensador. • Se instaló un filtro de agua de terceros. • Utilice únicamente filtros provistos o aprobados por Samsung. • Los filtros no aprobados pueden provocar pérdidas y daños al refrigerador. • El indicador de filtro de agua se enciende o parpadea. • Reemplace el filtro de agua. Luego de reemplazarlo, restablezca el sensor del indicador del filtro. Untitled-6 84 2021-06-22 5:18:46
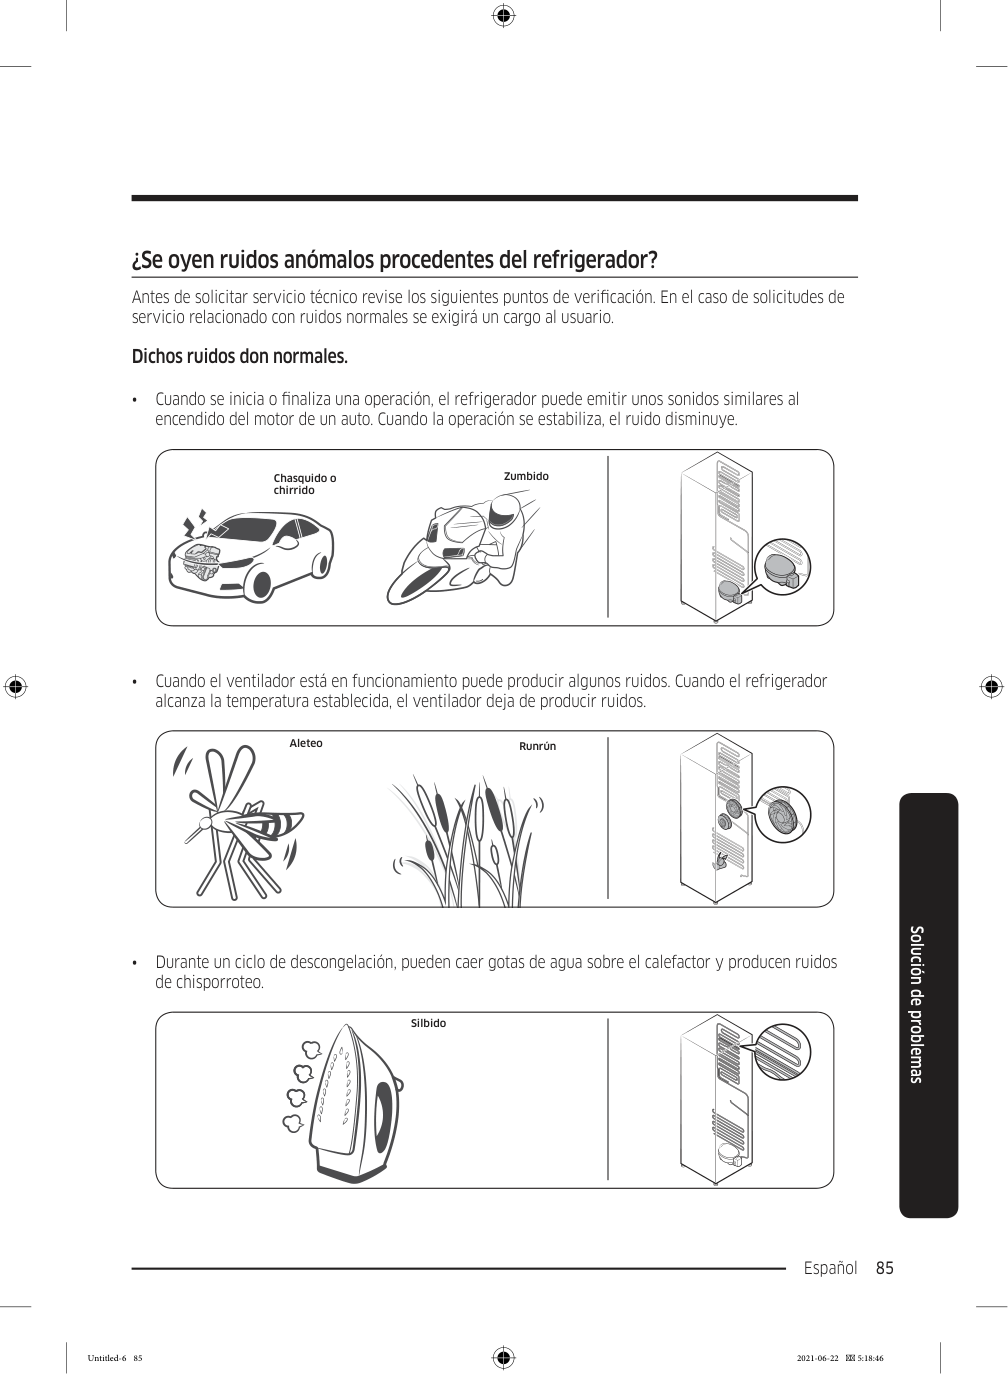
Español 85 Solución de problemas ¿Se oyen ruidos anómalos procedentes del refrigerador? Antes de solicitar servicio técnico revise los siguientes puntos de verificación. En el caso de solicitudes de servicio relacionado con ruidos normales se exigirá un cargo al usuario. Dichos ruidos don normales. • Cuando se inicia o finaliza una operación, el refrigerador puede emitir unos sonidos similares al encendido del motor de un auto. Cuando la operación se estabiliza, el ruido disminuye. Chasquido o chirrido Zumbido • Cuando el ventilador está en funcionamiento puede producir algunos ruidos. Cuando el refrigerador alcanza la temperatura establecida, el ventilador deja de producir ruidos. Aleteo Runrún • Durante un ciclo de descongelación, pueden caer gotas de agua sobre el calefactor y producen ruidos de chisporroteo. Silbido Untitled-6 85 2021-06-22 5:18:46

Solución de problemas Español 86 Solución de problemas • Cuando el refrigerador enfría o congela, el gas refrigerante circula por las tuberías selladas y produce ruidos de burbujas. Burbujeo • Cuando la temperatura del refrigerador aumenta o disminuye, las partes plásticas se contraen y se expanden y producen ruidos de golpeteo. Dichos ruidos se producen durante el ciclo de descongelación o cuando las piezas electrónicas están funcionando. Crujido • Para modelos con fábrica de hielo: Cuando la válvula de agua se abre para llenar la fábrica de hielo, pueden emitirse unos zumbidos. • Debido a la ecualización de la presión cuando se abre y cierra la puerta, pueden producirse sonidos silbantes. Untitled-6 86 2021-06-22 5:18:46
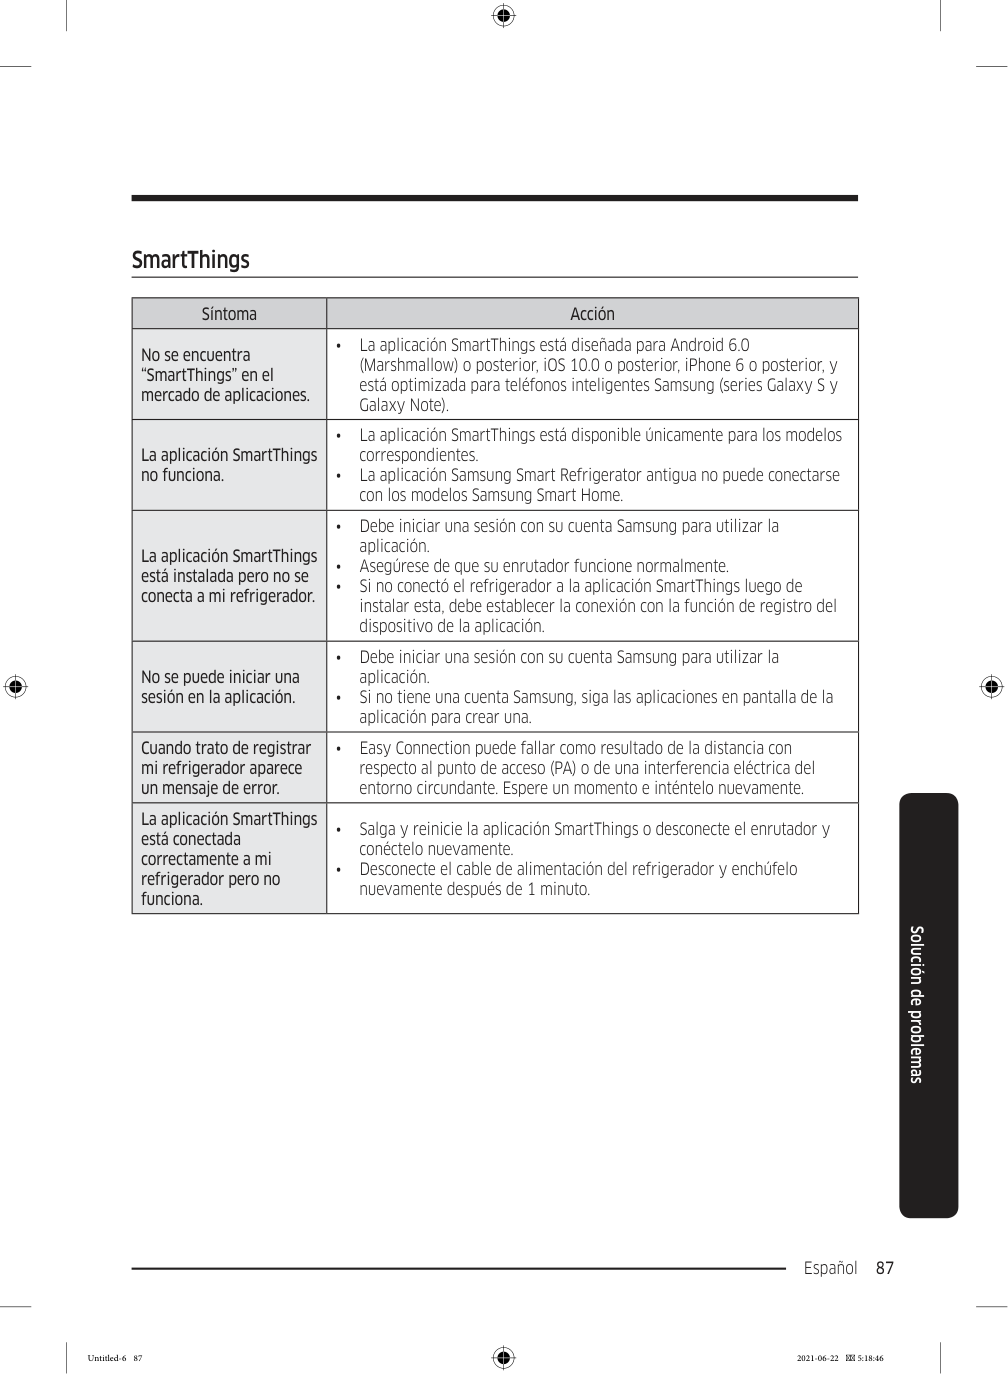
Español 87 Solución de problemas SmartThings Síntoma Acción No se encuentra “SmartThings” en el mercado de aplicaciones. • La aplicación SmartThings está diseñada para Android 6.0 (Marshmallow) o posterior, iOS 10.0 o posterior, iPhone 6 o posterior, y está optimizada para teléfonos inteligentes Samsung (series Galaxy S y Galaxy Note). La aplicación SmartThings no funciona. • La aplicación SmartThings está disponible únicamente para los modelos correspondientes. • La aplicación Samsung Smart Refrigerator antigua no puede conectarse con los modelos Samsung Smart Home. La aplicación SmartThings está instalada pero no se conecta a mi refrigerador. • Debe iniciar una sesión con su cuenta Samsung para utilizar la aplicación. • Asegúrese de que su enrutador funcione normalmente. • Si no conectó el refrigerador a la aplicación SmartThings luego de instalar esta, debe establecer la conexión con la función de registro del dispositivo de la aplicación. No se puede iniciar una sesión en la aplicación. • Debe iniciar una sesión con su cuenta Samsung para utilizar la aplicación. • Si no tiene una cuenta Samsung, siga las aplicaciones en pantalla de la aplicación para crear una. Cuando trato de registrar mi refrigerador aparece un mensaje de error. • Easy Connection puede fallar como resultado de la distancia con respecto al punto de acceso (PA) o de una interferencia eléctrica del entorno circundante. Espere un momento e inténtelo nuevamente. La aplicación SmartThings está conectada correctamente a mi refrigerador pero no funciona. • Salga y reinicie la aplicación SmartThings o desconecte el enrutador y conéctelo nuevamente. • Desconecte el cable de alimentación del refrigerador y enchúfelo nuevamente después de 1 minuto. Untitled-6 87 2021-06-22 5:18:46
Español 88 Open Source Announcement The software included in this product contains open source software. You may obtain the complete corresponding source code for a period of three years after the last shipment of this product by sending an email to mailto:oss.request@samsung.com. It is also possible to obtain the complete corresponding source code in a physical medium such as a CD- ROM; a minimal charge will be required. The following URL http://opensource.samsung.com/opensource/SMART_AT_051/seq/0 leads to the download page of the source code made available and open source license information as related to this product. This offer is valid to anyone in receipt of this information. Untitled-6 88 2021-06-22 5:18:46

Notas Untitled-6 89 2021-06-22 5:18:46

Notas Untitled-6 90 2021-06-22 5:18:46

Notas Untitled-6 91 2021-06-22 5:18:46
Contacte a SAMSUNG WORLD WIDE Si tiene preguntas o comentarios relacionados con los productos Samsung, póngase en contacto con el Servicio de Atención al Cliente de SAMSUNG. País Centro de contacto Sitio web