
Ask AI
— answers from the official manualAnswers from the official manual.
Common questions
Common Questions
10 totalWhat error codes can appear on the GlucoRx HCT & Ketone TD-4279, and what do they mean?
The meter displays several error codes: E-b (batteries too low), E-C (wrong code strip or coding error), E-2 (expired code strip), E-U (used test strip inserted), E-t (temperature outside operating range), E-0/E-A/E-E (meter problem), and E-F (test strip removed during countdown or insufficient blood volume). For E-t, move the meter and test strip to within the operating range of 10°C to 40°C (50°F to 104°F) before retesting. If any error persists, contact GlucoRx Customer care on 01483 755133. (Page 29)
How do I set up the meter for the first time, including date, time, and alarms?
With the meter off and no test strip inserted, press the S (SET) button to enter setting mode. You will be guided through setting the year, month, and day, then time format (12h or 24h), then the hour and minute, then the buzzer on/off, up to four reminder alarms, and finally the backlight on/off — pressing M to adjust values and S to confirm each step. If the meter is idle for 3 minutes during setup, it will switch off automatically. (Page 13)
How do I replace the batteries in the TD-4279 meter?
Make sure the meter is turned off, then press the edge of the battery cover and lift it up to remove it. Remove the old batteries and insert two fresh 1.5V AAA size alkaline batteries, then close the battery cover — if inserted correctly, the meter will emit a beep. Replacing the batteries does not affect test results stored in the memory. (Page 24)
How do I calibrate the meter for β-Ketone testing?
You must calibrate the meter each time you begin a new vial of β-Ketone test strips by inserting the code strip while the meter is off and waiting for the code number to appear on the display. Ensure the code number on the display matches the number on your individual foil packet, then remove the code strip — the display will show 'OK' to confirm coding is complete. If the codes do not match, repeat the calibration procedure, and if the problem persists contact GlucoRx Customer care on 01483 755133. (Page 15)
How do I perform a blood glucose test with the TD-4279?
Insert a glucose test strip to turn on the meter and wait for the display to show the blood drop and 'GLU' symbols, then select your measuring mode (Gen, AC, or PC) by pressing M. Lance your fingertip, wipe away the first drop of blood, and gently apply a second drop of at least 1.0 microliter (μL) to the absorbent hole of the test strip at a tilted angle until the confirmation window is completely filled. Do not remove your finger until you hear a beep, then read your result after the meter counts down to 0. (Pages 19–20)
When should I perform a control solution test on my meter?
You should perform a control test when you first receive the meter, at least once a week for routine checks, when you begin using a new vial or foil packet of test strips, if you suspect the meter or strips are not working properly, if results are inconsistent with how you feel, when practising the testing process, or if you have dropped or may have damaged your meter. The control test range printed on the test strip vial is for control testing only and is not a recommended range for your actual blood glucose or ketone level. (Page 16)
Show 4 more questions
Full Manual
32 pages
3 Dear GlucoRx HCT & Ketone TD-4279 System Owner: Thank you for purchasing the GlucoRx HCT & Ketone Blood Glucose Monitoring System. This manual provides important information to help you to use the system properly. Before using this product, please read the following contents thoroughly and carefully. The System measures both blood glucose and β-ketone. Regular monitoring of your blood glucose and β-ketone levels can help you and your doctor gain better control of your diabetes. Due to its compact size and easy operation, you can use the GlucoRx HCT & Ketone Blood Glucose Monitoring System to easily monitor your blood glucose and β-ketone levels by yourself anywhere, any time. If you have other questions regarding this product, please contact GlucoRx Customer care on 01483 755133. Intended Use This system is intended for use outside the body (in vitro diagnostic use) by people with diabetes at home as an aid to monitoring the effectiveness of diabetes control. It is intended to be used for the quantitative measurement of glucose (sugar) in fresh whole blood samples from the finger, and to measure β-hydroxybutyrate (ketone) in fresh whole blood samples from the finger and palm. It should not be used for the diagnosis of or screening for diabetes mellitus. The test for haematocrit (HCT) as part of the system, is intended for use in the in vitro quantification of packed red blood cell volume fraction in capillary whole blood as an aid in monitoring the status of total volume of red blood cells. The test reading of haematocrit (HCT) is used only to determine whether the blood test sample is within the acceptable range of blood glucose system. It should not be used for the diagnosis of anaemia or erythrocytosis. Version 2.0 2015/09 311-4279300-006
4
Important Safty Instructions
Read Before Use
The data measured is for reference only. Always consult your doctor to
have the results interpreted.
The β-ketone test strip must not be used for the testing of newborns.
instructions thoroughly and practice the test. Carry out all the quality
control checks as directed.
Small items such as the battery cover, batteries, test strips, lancets
and vial caps are choking hazards.
materials are present (synthetic clothing, carpets etc.) may cause
damaging static discharges that may cause erroneous results.
electromagnetic radiation, as these may interfere with accurate
operation.
01483 755133.
Keep These Instructions In A Safe Place
5
Before You Begin
09Important Information 09
Contents of System 10
Meter Overview 11
Display Screen 12
Test Strip 12
Setting The Meter
13The Three Measuring Modes
14Before Testing
15Calibration 15
How to Code Your Meter (for β-Ketone Test) 15
Checking the Code Number 15
Control Testing 16
Performing a Control Test 17
Testing With Blood Sample
18Preparing the Lancing Device for Blood Testing 18
Preparing the Puncture Site 18
Performing a Blood Glucose or β-Ketone Test 19
Alternative Site Testing (for β-Ketone Test) 21
Meter Memory
22Reviewing Test Results of Blood Glucose or β-Ketone 22
Reviewing Blood Glucose Day Average Results 22
Downloading Results Onto A Computer
23Maintenance
24Battery 24
Caring for Your Meter 25
Caring for Your Test Strips 25
Caring for Your Carry Case 26
Important Control Solution Information 27
Table Of Contents

6
System Troubleshooting
28Result Readings 28
Error Messages 29
Troubleshooting 30
Detailed Information
31Symbol Information
32Specifications
33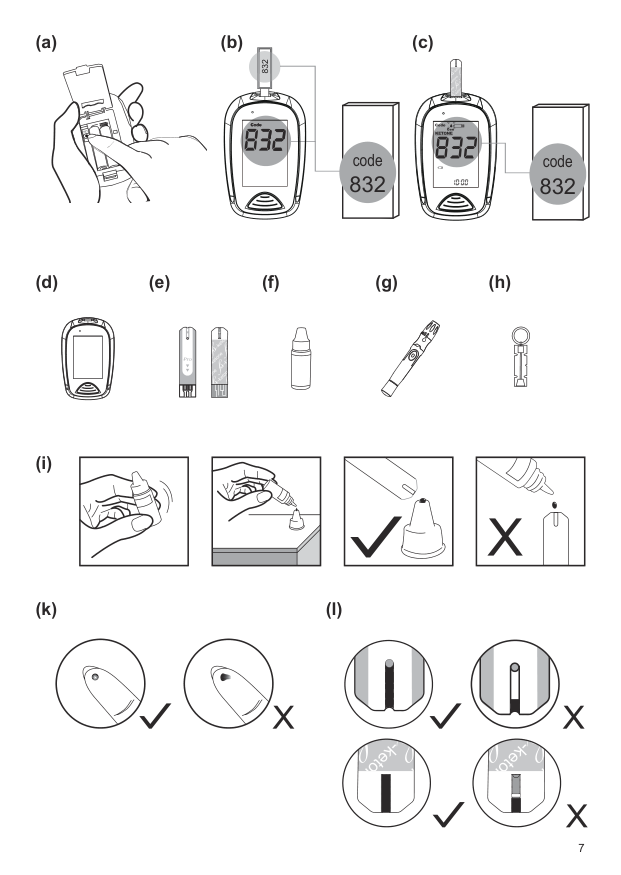
7 (e) (f) (g) (h) (d) (i) (k) (l) (a) (b) (c)
Set
832 code 832 code 832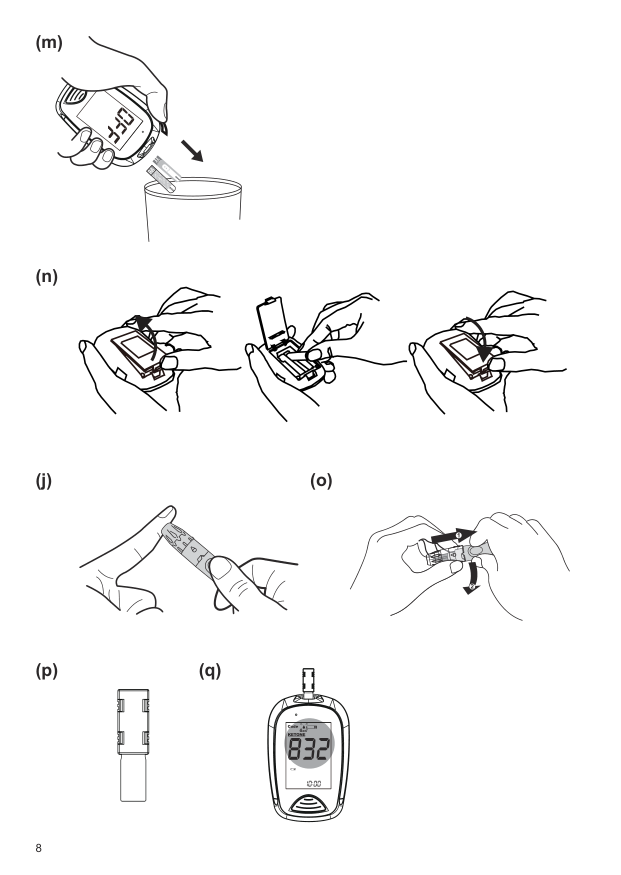
8 (n) (m) (j) (p) (o) (q) 1 2
9
Before You Begin
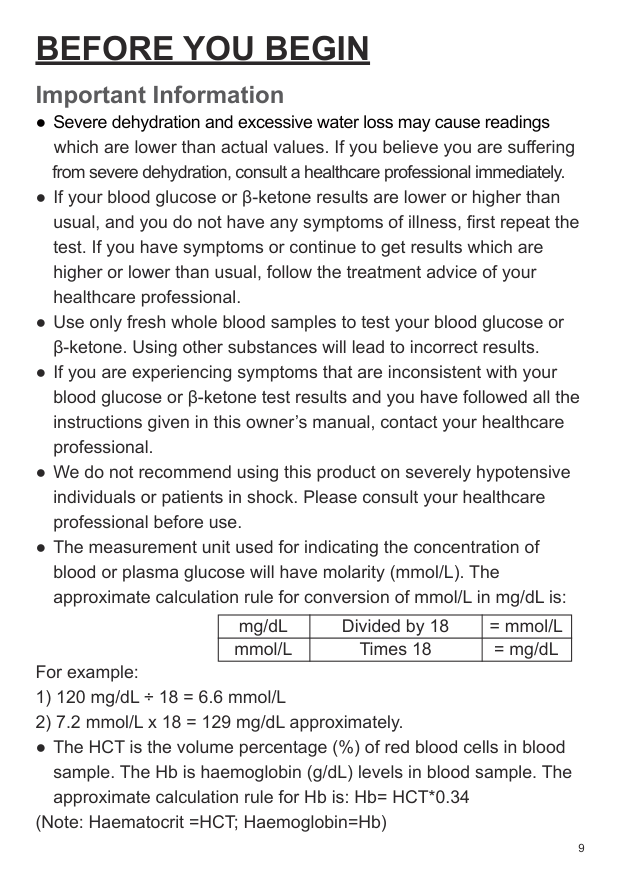
Important Information ● Severe dehydration and excessive water loss may cause readings which are lower than actual values. If you believe you are suffering from severe dehydration, consult a healthcare professional immediately. ● If your blood glucose or β-ketone results are lower or higher than usual, and you do not have any symptoms of illness, first repeat the test. If you have symptoms or continue to get results which are higher or lower than usual, follow the treatment advice of yourhealthcare professional. ● Use only fresh whole blood samples to test your blood glucose or β-ketone. Using other substances will lead to incorrect results. ● If you are experiencing symptoms that are inconsistent with your blood glucose or β-ketone test results and you have followed all the instructions given in this owner’s manual, contact your healthcare professional. ● We do not recommend using this product on severely hypotensive individuals or patients in shock. Please consult your healthcare professional before use. ● The measurement unit used for indicating the concentration of blood or plasma glucose will have molarity (mmol/L). The
approximate calculation rule for conversion of mmol/L in mg/dL is: For example: 1) 120 mg/dL ÷ 18 = 6.6 mmol/L 2) 7.2 mmol/L x 18 = 129 mg/dL approximately. ● The HCT is the volume percentage (%) of red blood cells in blood sample. The Hb is haemoglobin (g/dL) levels in blood sample. The approximate calculation rule for Hb is: Hb= HCT*0.34 (Note: Haematocrit =HCT; Haemoglobin=Hb) mg/dL mmol/L Divided by 18 Times 18 = mmol/L = mg/dL
10 Contents of System Your new GlucoRx HCT & Ketone TD-4279 System kit includes:
Note:
If any items are missing from your kit or opened prior to use, please contact GlucoRx Customer care on 01483 755133.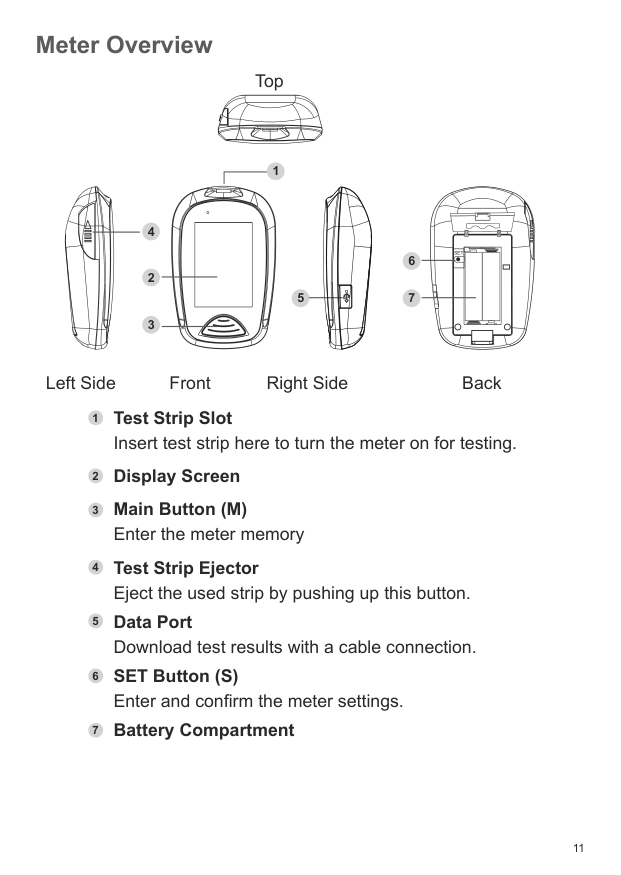
11 Meter Overview Front Top Right Side Left Side Back 1
Set
2 6 7 4 3 5 Test Strip Slot Insert test strip here to turn the meter on for testing. Display Screen Main Button (M) Enter the meter memory Test Strip Ejector Eject the used strip by pushing up this button. Data Port Download test results with a cable connection. SET Button (S) Enter and confirm the meter settings. Battery Compartment 1 2 3 5 4 6 7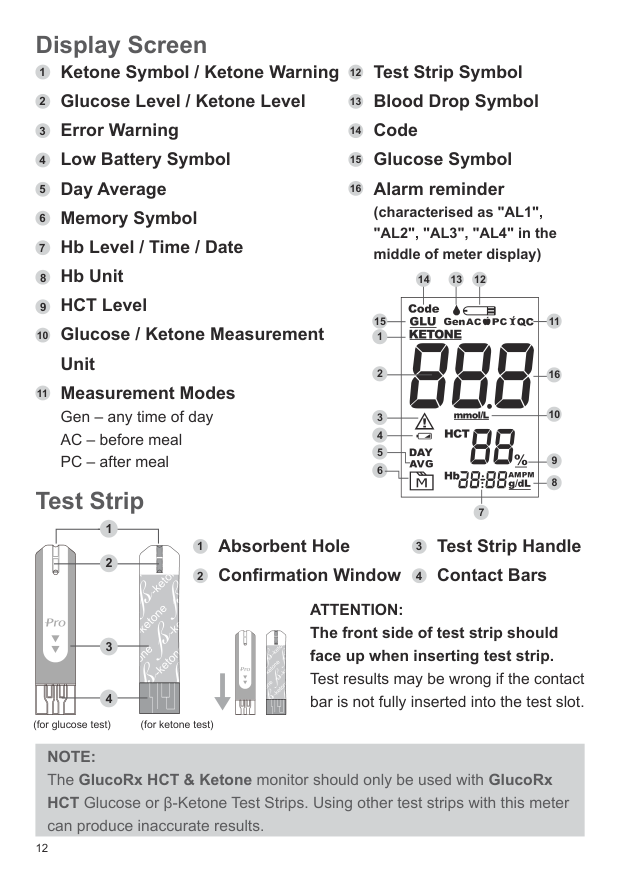
12 Display Screen Ketone Symbol / Ketone Warning Glucose Level / Ketone Level Error Warning Low Battery Symbol Day Average Memory Symbol Hb Level / Time / Date Hb Unit HCT Level Glucose / Ketone Measurement Unit Measurement Modes Gen – any time of day AC – before meal PC – after meal 1 2 3 4 5 6 7 9 8 10 Test Strip Symbol Blood Drop Symbol Code Glucose Symbol Alarm reminder 13 12 14 15 16 11
Attention:
The front side of test strip should face up when inserting test strip. Test results may be wrong if the contact bar is not fully inserted into the test slot.Note:
The GlucoRx HCT & Ketone monitor should only be used with GlucoRx HCT Glucose or β-Ketone Test Strips. Using other test strips with this meter can produce inaccurate results. Test Strip 1 Absorbent Hole Confirmation Window 1 2 Test Strip Handle Contact Bars 3 4 3 4 (for glucose test) (for ketone test) 2 14 13 12 1 15 3 7 2 4 5 6 8 11 9 10 16 (characterised as "AL1", "AL2", "AL3", "AL4" in the middle of meter display)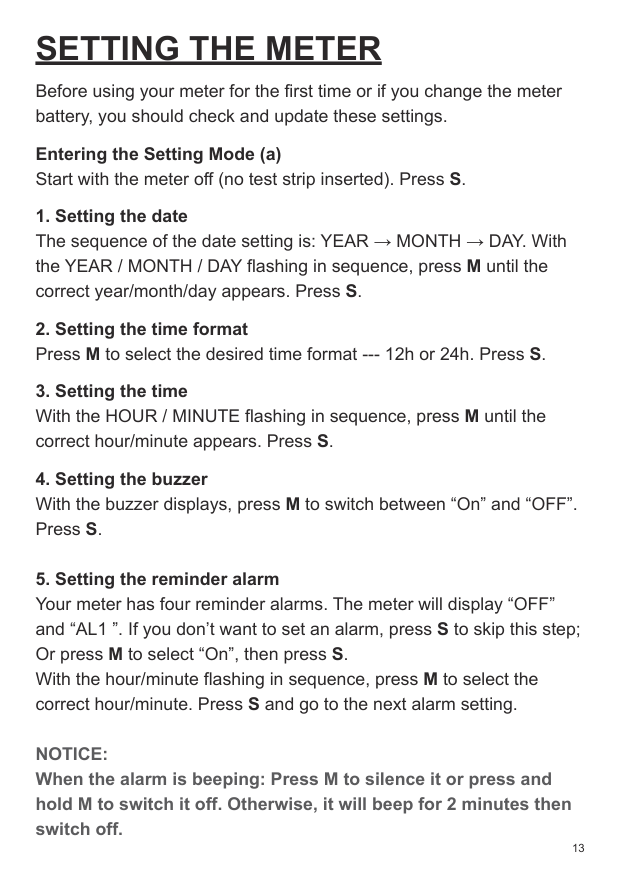
13
Setting The Meter
Before using your meter for the first time or if you change the meter battery, you should check and update these settings. Entering the Setting Mode (a) Start with the meter off (no test strip inserted). Press S.Notice:
When the alarm is beeping: Press M to silence it or press and hold M to switch it off. Otherwise, it will beep for 2 minutes then switch off.
14
The Three Measuring Modes
This meter provides you with three modes for measuring; General, AC, and PC. You can switch between each mode by:Note:
off automatically.
15
Before Testing
Calibration You must calibrate the meter every time you begin to use a new vial of β-Ketone test strips by setting the meter with the correct code. Test results may be inaccurate if the code number displayed on the monitor does not match the number printed on your individual foil packet. How to Code Your Meter (for β-Ketone test)(b)Notice:
Make sure the code number on display, and individual foil packet are the same. The code strip should be within the expiry date, otherwise an error message may appear.Notice:
The codes used in this manual are examples only; your meter may display a different ketone code.
16 Control Testing Our Glucose Control Solution contains a known amount of glucose that reacts with the glucose test strips and is used to ensure your meter and glucose test strips are working together correctly. Do a control test when: ● you first receive the meter, ● at least once a week to routinely check your meter and test strips, ● you begin using a new vial or new individual foil packet of test strips, ● you suspect your meter or test strips are not working properly, ● your blood glucose or ketone test results are not consistent with how you feel, or if you think the results are not accurate, ● practicing the testing process, or ● you have dropped or think you may have damaged your meter. Test strips (e), control solution (f), lancing device (g) or sterile lancets (h) may not be included in the kit (please check the contents in your product box). They can be obtained separately from GlucoRx Customer care (telephone 01483 755133). Please make sure you have all items needed for a blood glucose or ketone test beforehand. Performing a Control Solution Test To perform a control solution test, you will need: (d), (e), (f) or (p).
Warning:
17 For Blood Glucose Control Test
Notice:
To avoid contaminating the control solution, do not directly apply control solution onto a strip. For ß-ketone Control TestNote:
18
Warning:
To reduce the chance of infection:Testing With Blood Sample
19 ● Fingertip testing (j) Press the lancing device’s tip firmly against the lower side of your fingertip. Press the release button to prick your finger; a click indicates that the puncture is complete. ● Blood from site other than the fingertip (o) (for β-ketone test) Replace the lancing device cap with the clear cap for AST. Pull the cocking control back until it clicks. When lancing the palm, avoid lancing the areas with obvious veins because of excessive bleeding.
Note:
same spot may cause soreness and calluses.
β-ketone test).
contain tissue fluid, which may affect the test result. Performing a Blood Glucose or β-Ketone Test To perform a blood glucose or β-ketone test, you will need: (d), (e), (g) and (h).
20
Warning:
The used lancet and test strip may be biohazardous. Please discard them carefully according to your local regulations.Note:
begins to count down. NEVER try to add more blood to the test strip after the drop of blood has moved away. Discard the used test strip and retest with a new one.
health care professional or GlucoRx Customer care on 01483 755133 for assistance.
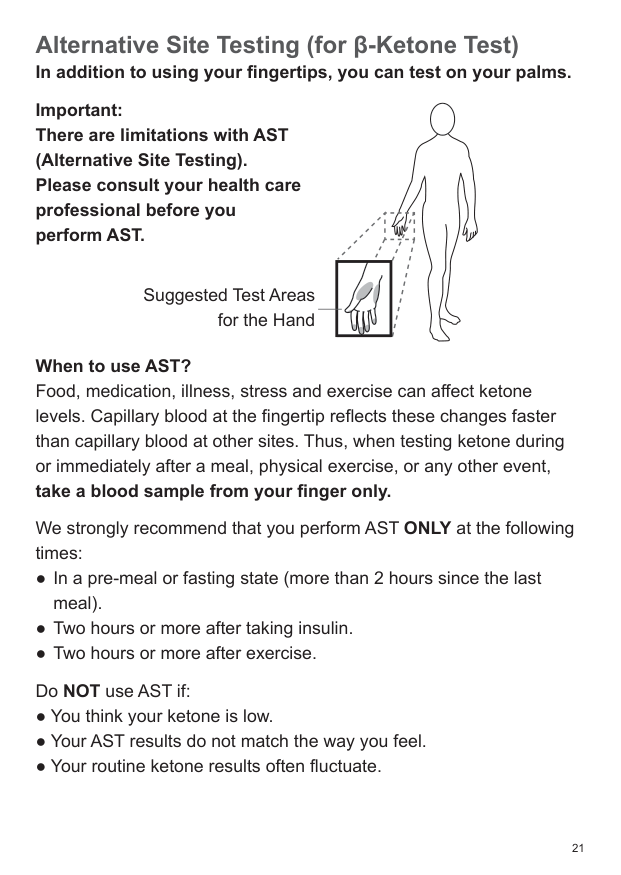
21 Alternative Site Testing (for β-Ketone Test) In addition to using your fingertips, you can test on your palms. Important: There are limitations with AST (Alternative Site Testing). Please consult your health care professional before you perform AST. Suggested Test Areas for the Hand When to use AST? Food, medication, illness, stress and exercise can affect ketone levels. Capillary blood at the fingertip reflects these changes faster than capillary blood at other sites. Thus, when testing ketone during or immediately after a meal, physical exercise, or any other event, take a blood sample from your finger only. We strongly recommend that you perform AST ONLY at the following times: ● In a pre-meal or fasting state (more than 2 hours since the last meal). ● Two hours or more after taking insulin. ● Two hours or more after exercise. Do NOT use AST if: ● You think your ketone is low. ● Your AST results do not match the way you feel. ● Your routine ketone results often fluctuate.
22
Meter Memory
This meter stores the 1000 most recent blood glucose test results along with respective HCT/Hb values, dates and times or β-ketone test results along with respective dates and times in its memory. To enter the meter memory, start with the meter switched off. Reviewing Test ResultsNote:
automatically.
23
Downloading Results Onto
A Computer
Data Transmission Via Cable You can use your meter with a USB cable and the GlucoRx Healthcare Software System to view test results with HCT/Hb levels on your personal computer. To learn more about the GlucoRx Healthcare Software System or to obtain a USB cable separately, please contact GlucoRx Customer care on 01483 755133 for assistance.Note:
While the meter is connected to the PC, it is unable to perform a blood glucose or β-ketone test.
24
Maintenance
Battery Your meter comes with two 1.5V AAA size alkaline batteries. Low Battery Signal The meter will display one of the messages below to alert you when the meter power is getting low.Note:
memory.
children. If swallowed, promptly seek medical assistance.
batteries if you are not going to use the device for an extended period (i.e., 3 months or more).
regulations.
25 Caring for Your Meter Cleaning ● To clean the meter exterior, wipe it with a disinfecting wipe
(Example:Micro-Kill Plus™) to clean exposed surfaces thoroughly and remove any visible dirt, blood or any other body fluid with the wipe. Then dry the device with a soft, dry and clean cloth. Do NOT rinse the meter with water. ● Do NOT use organic solvents to clean the meter. Meter Storage ● Storage conditions: -20°C to 60°C (-4°F to 140°F), below 95% relative humidity. ● Always store or transport the meter in its original storage case. ● Avoid dropping and heavy impact. ● Avoid direct sunlight and high humidity. Meter Disposal A used meter should be treated as contaminated and may carry a risk of infection during measurement. The batteries in this used meter should be removed and the meter should be disposed in accordance with local regulations. The meter falls outside the scope of the European Directive 2002/96/ EC-Directive on waste electrical and electronic equipment (WEEE). Caring for Your Test Strips ● Storage conditions: 2°C to 32°C (35.6°F to 89.6°F) for glucose test strip and 2°C to 30°C (35.6°F to 86°F) for β-ketone test strip, below 85% relative humidity. Do NOT freeze. ● Store your blood glucose test strips in their original vial only. Do not transfer to another container. ● Store test strip packages in a cool dry place. Keep away from direct sunlight and heat. ● After removing a glucose test strip from its vial, immediately close the vial cap tightly.
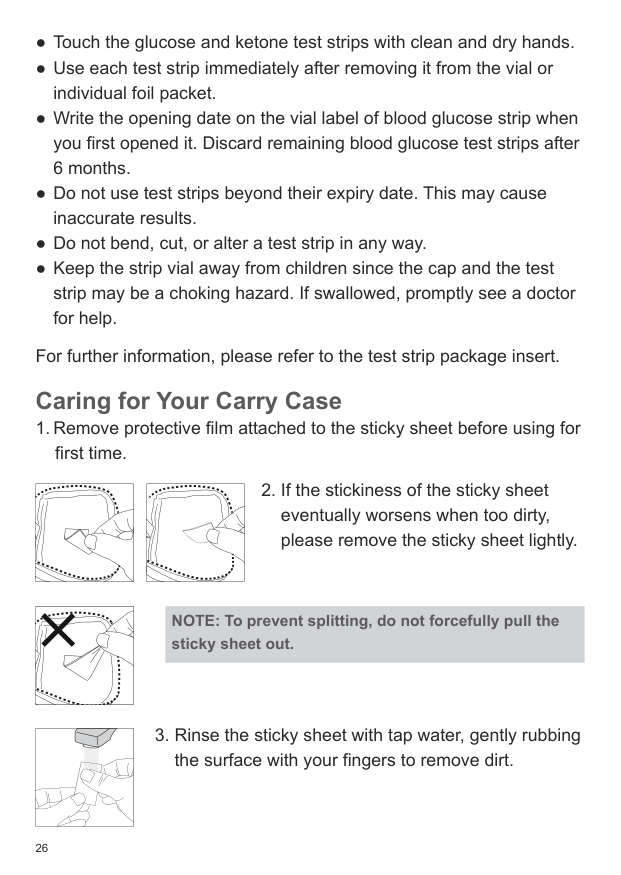
26 Caring for Your Carry Case

27
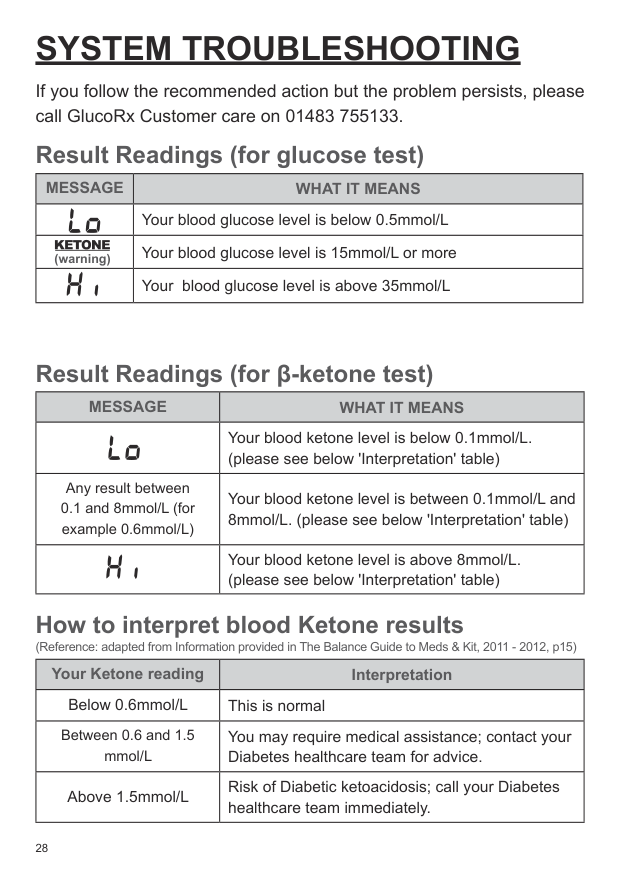
28 Result Readings (for glucose test) Result Readings (for β-ketone test)
System Troubleshooting
If you follow the recommended action but the problem persists, please call GlucoRx Customer care on 01483 755133.Message
What It Means
Your blood glucose level is below 0.5mmol/L Your blood glucose level is 15mmol/L or more Your blood glucose level is above 35mmol/LMessage
What It Means
Your blood ketone level is below 0.1mmol/L. (please see below 'Interpretation' table) Any result between 0.1 and 8mmol/L (for example 0.6mmol/L) Your blood ketone level is between 0.1mmol/L and 8mmol/L. (please see below 'Interpretation' table) Your blood ketone level is above 8mmol/L. (please see below 'Interpretation' table) (warning) How to interpret blood Ketone results Your Ketone reading Interpretation Below 0.6mmol/L This is normal Between 0.6 and 1.5 mmol/L You may require medical assistance; contact your Diabetes healthcare team for advice. Above 1.5mmol/L Risk of Diabetic ketoacidosis; call your Diabetes healthcare team immediately. (Reference: adapted from Information provided in The Balance Guide to Meds & Kit, 2011 - 2012, p15)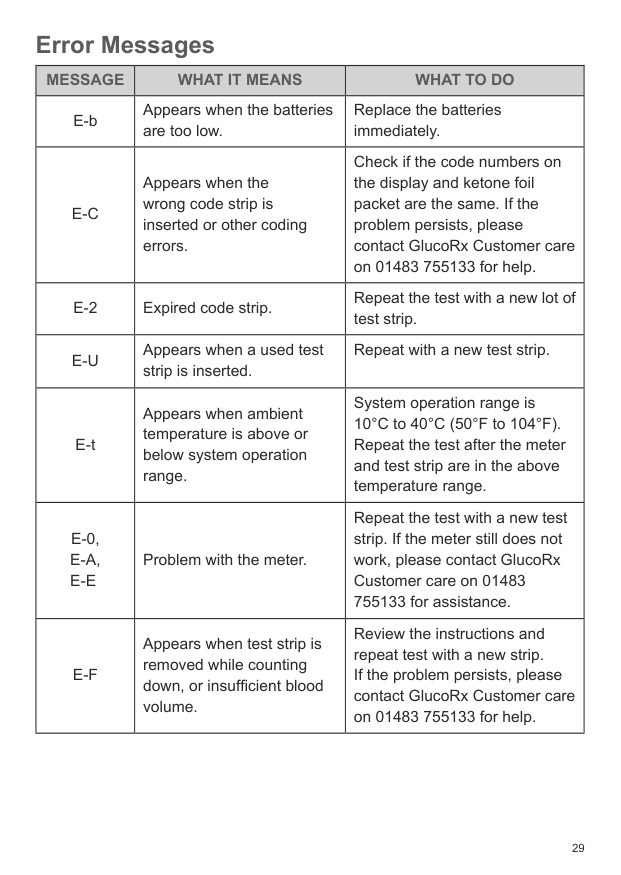
29 Error Messages
Message
What It Means
What To Do
E-b Appears when the batteries are too low. Replace the batteries immediately.E-C
Appears when the wrong code strip is inserted or other coding errors. Check if the code numbers on the display and ketone foil packet are the same. If the problem persists, please contact GlucoRx Customer care on 01483 755133 for help.E-2
Expired code strip. Repeat the test with a new lot of test strip.E-U
Appears when a used test strip is inserted. Repeat with a new test strip. E-t Appears when ambient temperature is above or below system operation range. System operation range is 10°C to 40°C (50°F to 104°F). Repeat the test after the meter and test strip are in the above temperature range.E-0,
E-A,
E-E.
Problem with the meter. Repeat the test with a new test strip. If the meter still does not work, please contact GlucoRx Customer care on 01483 755133 for assistance.E-F
Appears when test strip is removed while counting down, or insufficient blood volume. Review the instructions and repeat test with a new strip. If the problem persists, please contact GlucoRx Customer care on 01483 755133 for help.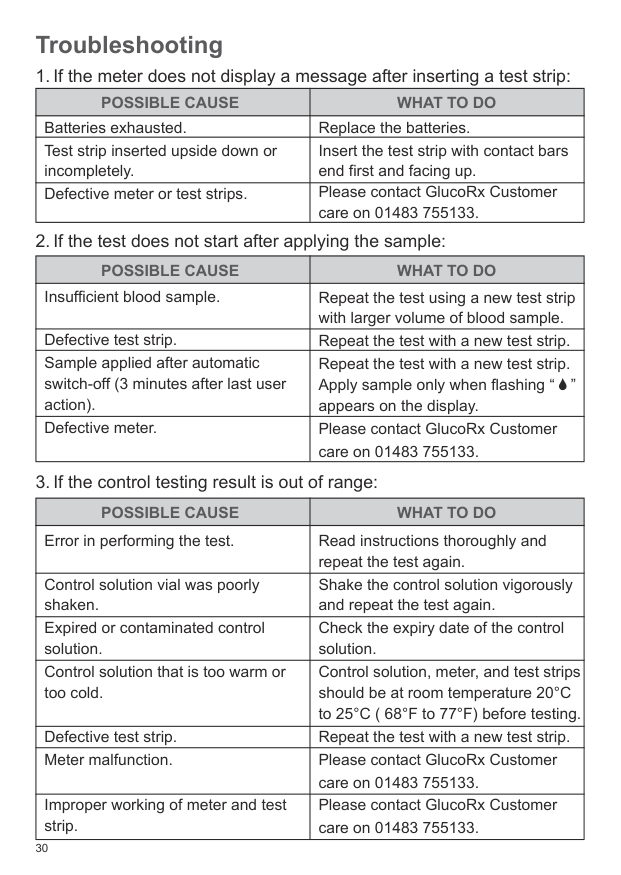
30
Possible Cause
What To Do
Batteries exhausted. Test strip inserted upside down or incompletely. Defective meter or test strips. Replace the batteries. Insert the test strip with contact bars end first and facing up. Please contact GlucoRx Customer care on 01483 755133.Possible Cause
What To Do
Insufficient blood sample. Defective test strip. Sample applied after automatic switch-off (3 minutes after last user action). Defective meter. Repeat the test using a new test strip with larger volume of blood sample. Repeat the test with a new test strip. Repeat the test with a new test strip. Apply sample only when flashing “ ” appears on the display. Please contact GlucoRx Customer care on 01483 755133. TroubleshootingPossible Cause
What To Do
Error in performing the test. Control solution vial was poorly shaken. Expired or contaminated control solution. Control solution that is too warm or too cold. Defective test strip. Meter malfunction. Improper working of meter and test strip. Read instructions thoroughly and repeat the test again. Shake the control solution vigorously and repeat the test again. Check the expiry date of the control solution. Control solution, meter, and test strips should be at room temperature 20°C to 25°C ( 68°F to 77°F) before testing. Repeat the test with a new test strip. Please contact GlucoRx Customer care on 01483 755133. Please contact GlucoRx Customer care on 01483 755133.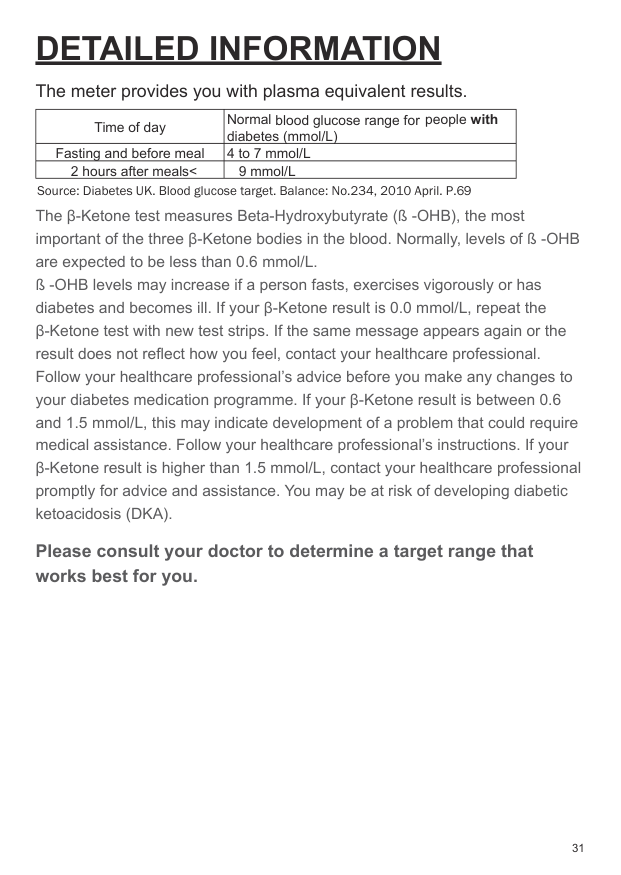
31 The β-Ketone test measures Beta-Hydroxybutyrate (ß -OHB), the most important of the three β-Ketone bodies in the blood. Normally, levels of ß -OHB are expected to be less than 0.6 mmol/L. ß -OHB levels may increase if a person fasts, exercises vigorously or has diabetes and becomes ill. If your β-Ketone result is 0.0 mmol/L, repeat the β-Ketone test with new test strips. If the same message appears again or the result does not reflect how you feel, contact your healthcare professional. Follow your healthcare professional’s advice before you make any changes to your diabetes medication programme. If your β-Ketone result is between 0.6 and 1.5 mmol/L, this may indicate development of a problem that could require medical assistance. Follow your healthcare professional’s instructions. If your β-Ketone result is higher than 1.5 mmol/L, contact your healthcare professional promptly for advice and assistance. You may be at risk of developing diabetic ketoacidosis (DKA). Please consult your doctor to determine a target range that works best for you.
Detailed Information
The meter provides you with plasma equivalent results. Source: Diabetes UK. Blood glucose target. Balance: No.234, 2010 April. P.69 Time of day Normal blood glucose range for people with diabetes (mmol/L) Fasting and before meal 4 to 7 mmol/L 2 hours after meals< 9 mmol/L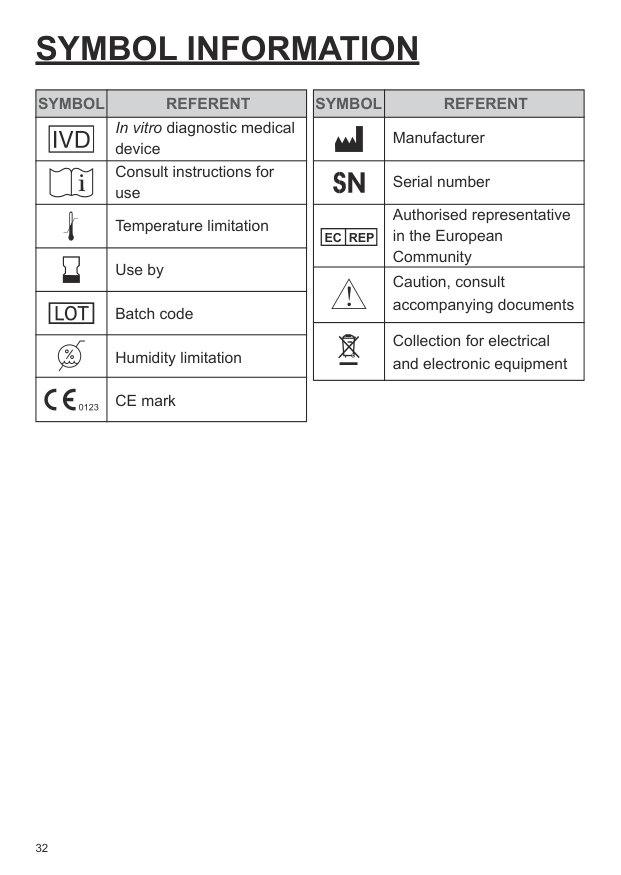
32
Symbol Information
Symbol
Referent
Referent
In vitro diagnostic medical device Consult instructions for use Temperature limitation Use by Batch code Humidity limitation CE markSymbol
Manufacturer Serial number Authorised representative in the European CommunityEc Rep
Caution, consult accompanying documents Collection for electrical and electronic equipment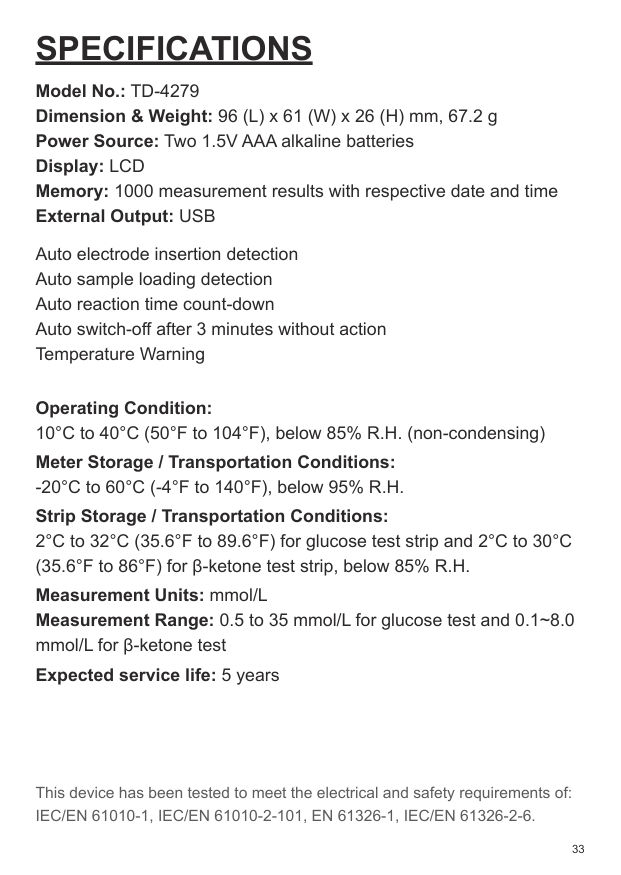
Note
This device has been tested to meet the electrical and safety requirements of:Iec/En 61010-1, Iec/En 61010-2-101, En 61326-1, Iec/En 61326-2-6.
Specifications
Model No.: TD-4279 Dimension & Weight: 96 (L) x 61 (W) x 26 (H) mm, 67.2 g Power Source: Two 1.5V AAA alkaline batteries Display: LCD Memory: 1000 measurement results with respective date and time External Output: USB Auto electrode insertion detection Auto sample loading detection Auto reaction time count-down Auto switch-off after 3 minutes without action Temperature Warning Operating Condition: 10°C to 40°C (50°F to 104°F), below 85% R.H. (non-condensing) Meter Storage / Transportation Conditions: -20°C to 60°C (-4°F to 140°F), below 95% R.H. Strip Storage / Transportation Conditions: 2°C to 32°C (35.6°F to 89.6°F) for glucose test strip and 2°C to 30°C (35.6°F to 86°F) for β-ketone test strip, below 85% R.H. Measurement Units: mmol/L Measurement Range: 0.5 to 35 mmol/L for glucose test and 0.1~8.0 mmol/L for β-ketone test Expected service life: 5 years 33
For self-testing TaiDoc Technology Corporation B1-7F., No. 127, Wugong 2nd Rd., Wugu Dist., New Taipei City 248, Taiwan (R.O.C.) www.taidoc.com Distributed by GlucoRx Ltd. 4 Wintonlea, Monument Way West, Woking, Surrey, GU21 5EN, UK Website: www.glucorx.co.uk Customer care number: 01483 755133 MedNet GmbH Borkstraβe 10, 48163 Münster, Germany