Waterdrop G2P600 Reverse Osmosis System
Ask AI
— answers from the official manualAnswers from the official manual.
Common questions
Common Questions
10 totalHow do I replace the filters in my Waterdrop G2p600 RO system?
To replace filters, first twist off the old filter counterclockwise. Insert the new filter into its corresponding hole with the arrow aligned to the empty circle before rotating it clockwise by 90 degrees for proper installation (Page 13). Afterward, reset the filter life indicator and flush the system as recommended.
How do I reset the filter life indicator after a replacement?
Press the Filter Life Reset button for five seconds until you hear a beep. Then, select the correct filter to reset and press again for another five seconds (Page 13). Release when you hear confirmation beeps.
What should I do if my RO faucet produces no water?
If there's no output from your RO faucet, check these items: replace any expired filters by verifying filter life indicators, ensure the feed water adapter and supply valve are open, confirm adequate water pressure between 14.5-87 PSI and verify tubing is not crimped or leaking (Page 23).
How do I remove a filter from my Waterdrop G2p600 RO system?
To remove a filter, twist it counterclockwise. For the CF filter, hold it with one hand while rotating with another to prevent dropping (Page 13).
What are the specifications of the Waterdrop G2p600 RO system?
The specs include a size of 17.3” * 5.9” * 14.0”, feed water pressure range from 14.5-87 psi, temperature between 41-100 °F, municipal tap water requirement, and max daily production rate at 400 GPD (Page 6).
How often should I replace the pre-sediment and carbon block filter in my system?
The Pre-sediment and Carbon Block Filter has a lifespan of 12 months or 1,100 gallons. Replace it when the indicator changes to purple and beeps twice (Page 9).
Full Manual
24 pages

Find the installation video

####### Search “Waterdrop G2 undersink RO installation” on
#### Register 1-year manufacturer warranty*
####### Visit warranty.waterdropfilter.com and enter the product serial number:
Any questions, please contact us by Phone: 1-888-352-3558 Mon-Fri 8:00 AM-5:00 PM (PST) or by Email: service@waterdropfilter.com
This device complies with part 15 of the FCC Rules. Operation is subject to the following two conditions: (1) This device may not cause harmful interference, and (2) this device must accept any interference received, including interference that may cause undesired operation. Any Changes or modifications not expressly approved by the party responsible for compliance could void the user's authority to operate the equipment.
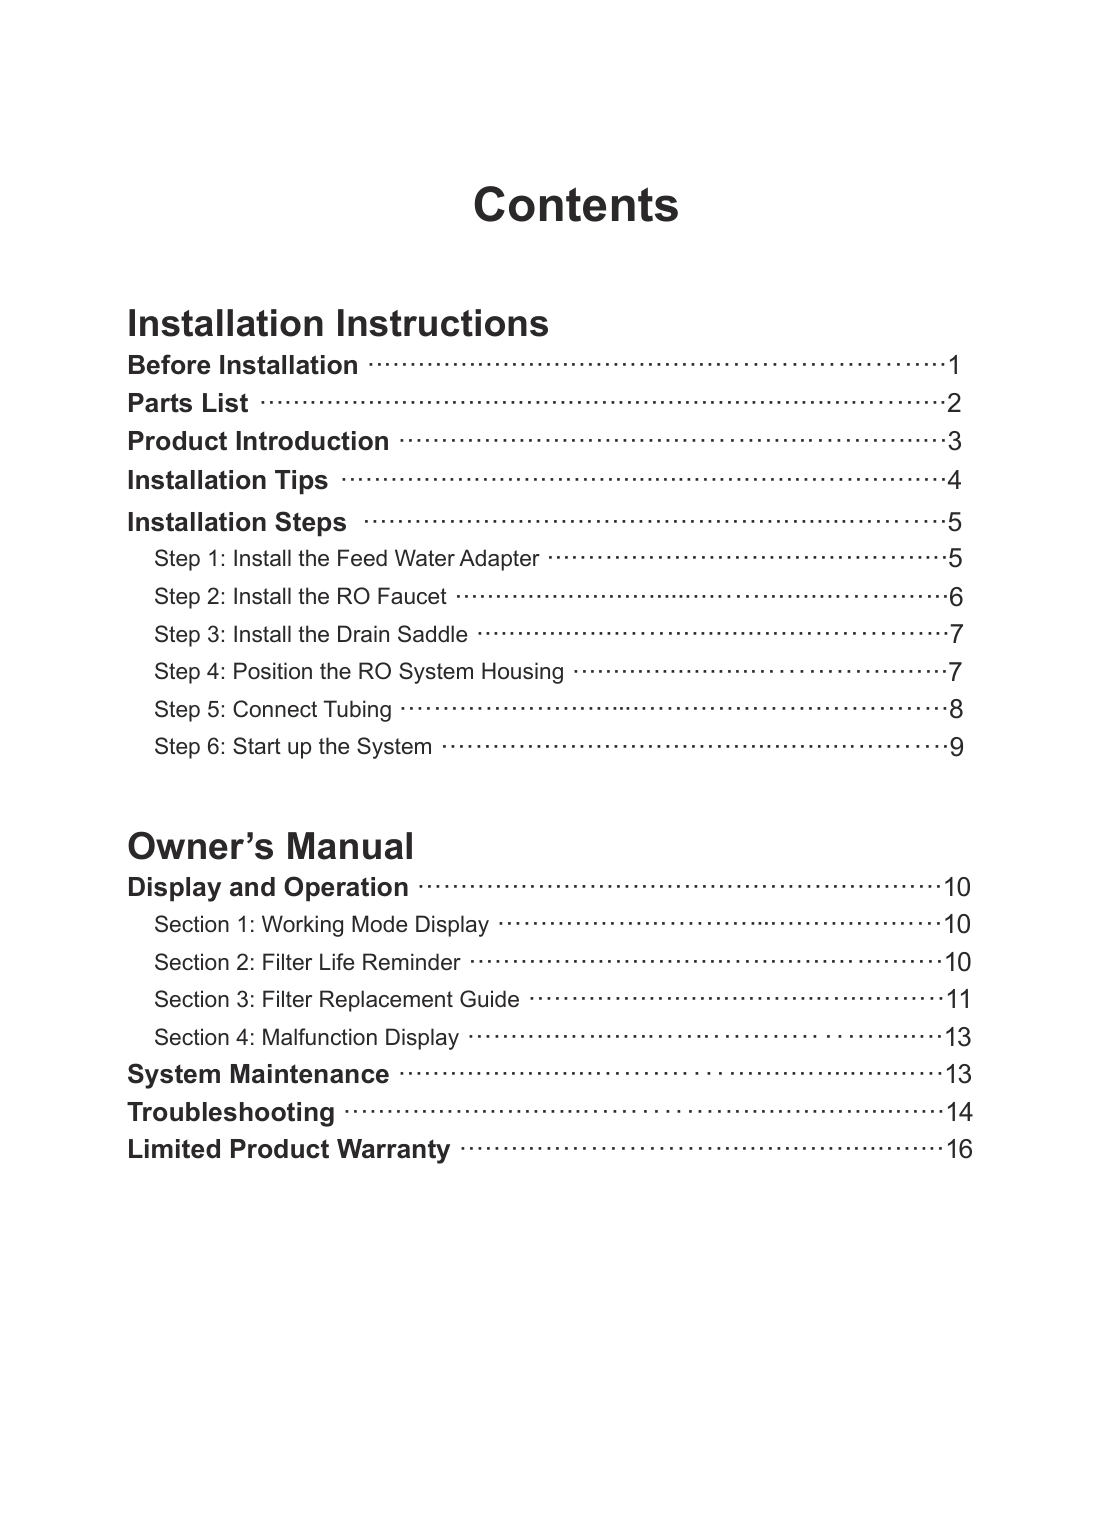
Contents
#### Installation Instructions
Before Installation ··································································1 Parts List ··················································································2 Product Introduction ·······························································3 Installation Tips ·········································································4 Installation Steps ····································································5

#### Owner’s Manual
Display and Operation ·····························································10
System Maintenance ·····························································13 Troubleshooting ····································································14 Limited Product Warranty ·······················································16
Installation Instructions
#### Before Installation
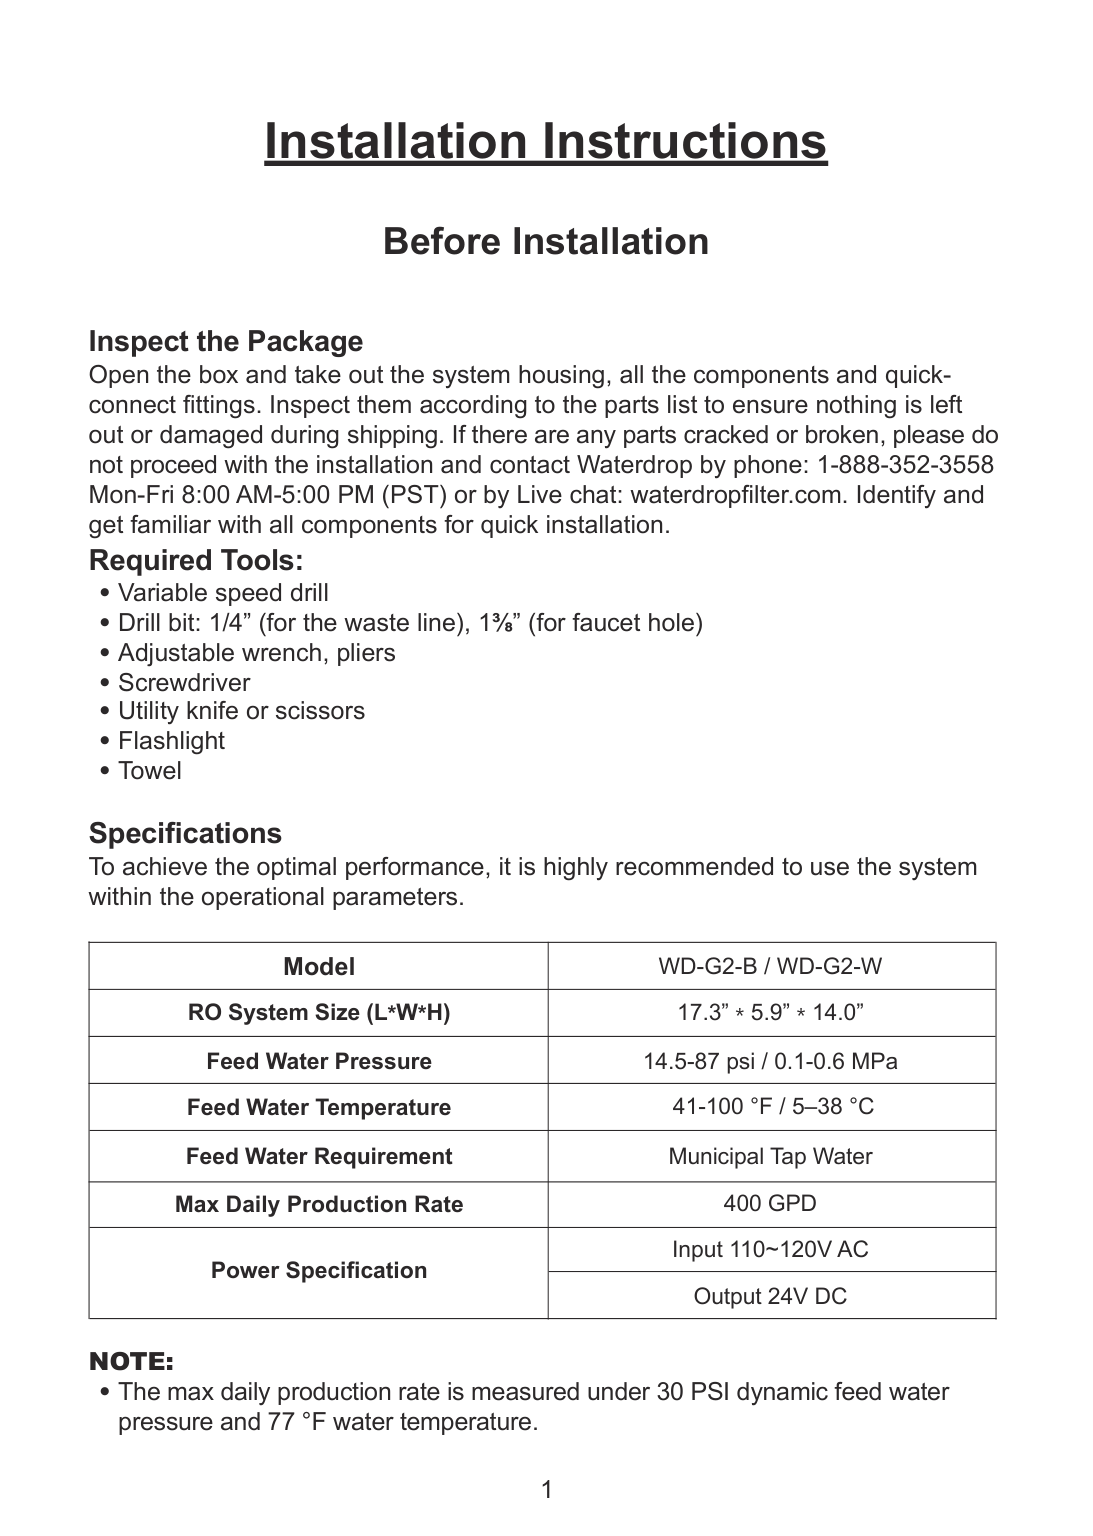
Inspect the Package Open the box and take out the system housing, all the components and quickconnect fittings. Inspect them according to the parts list to ensure nothing is left out or damaged during shipping. If there are any parts cracked or broken, please do not proceed with the installation and contact Waterdrop by phone: 1-888-352-3558 Mon-Fri 8:00 AM-5:00 PM (PST) or by Live chat: waterdropfilter.com. Identify and get familiar with all components for quick installation.
###### Required Tools:
Specifications To achieve the optimal performance, it is highly recommended to use the system within the operational parameters.
|Model|WD-G2-B / WD-G2-W| |---|---| |RO System Size (L*W*H)|17.3” * 5.9” * 14.0”| |Feed Water Pressure|14.5-87 psi / 0.1-0.6 MPa| |Feed Water Temperature|41-100 °F / 5–38 °C| |Feed Water Requirement|Municipal Tap Water| |Max Daily Production Rate|400 GPD| |Power Specification|Input 110~120V AC| |Power Specification|Output 24V DC|
######## NOTE:

• The max daily production rate is measured under 30 PSI dynamic feed water
pressure and 77 °F water temperature.
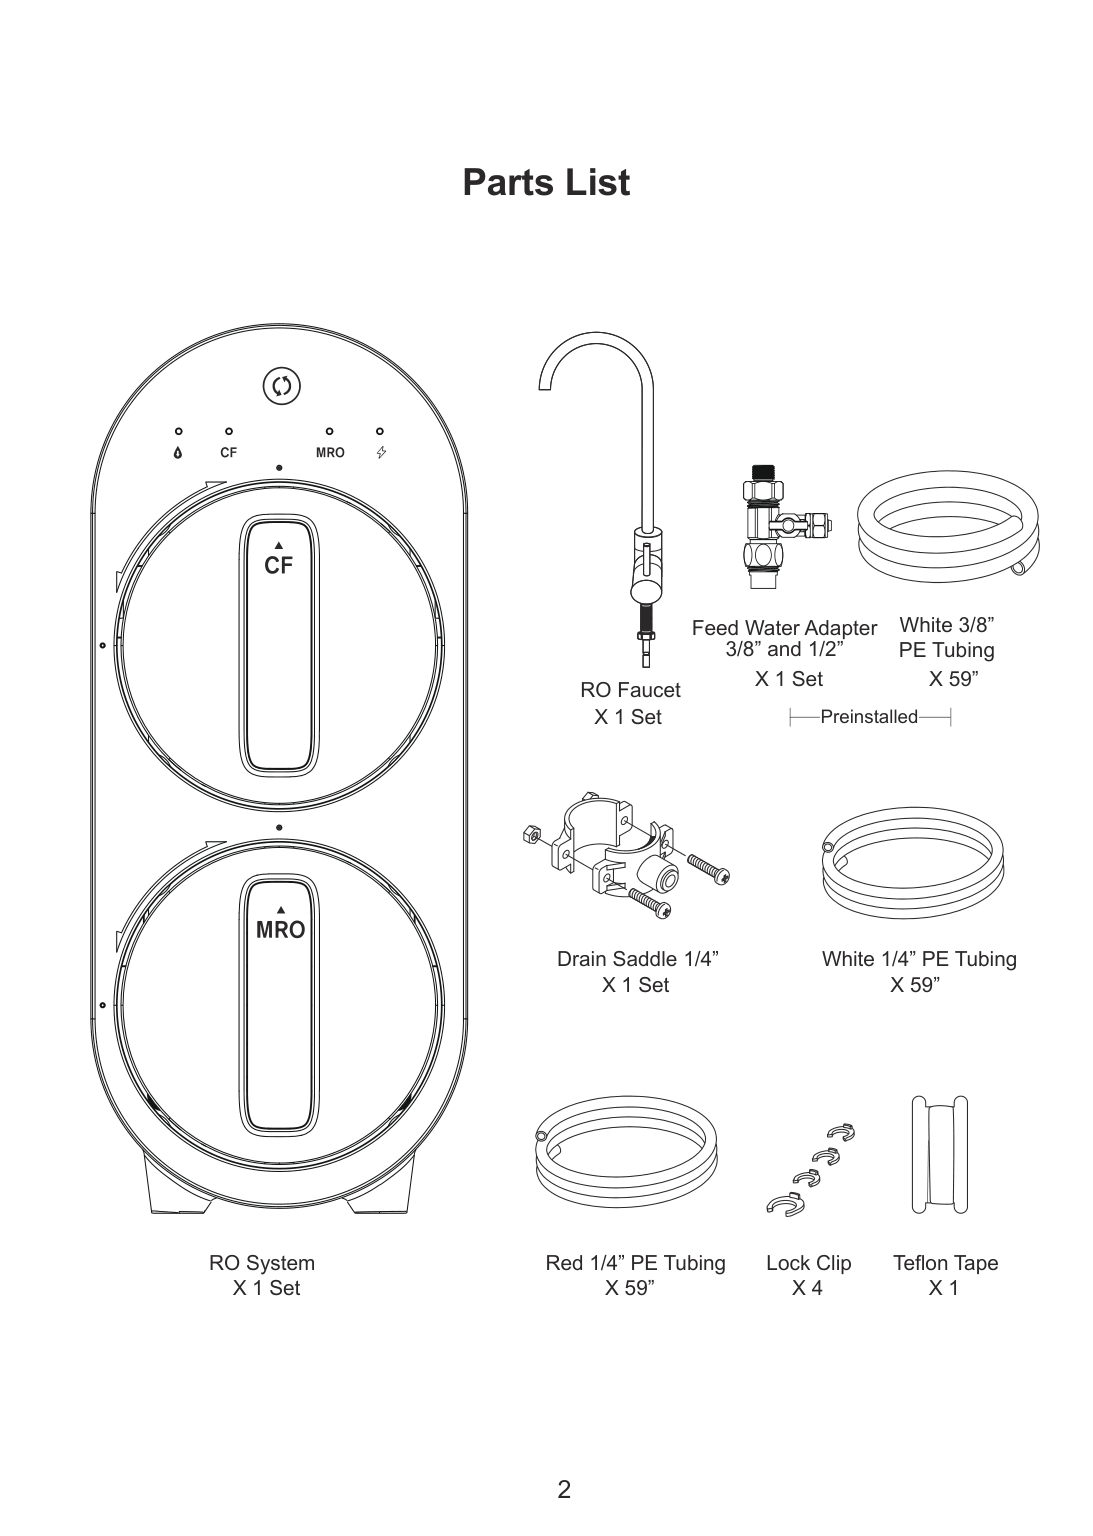
#### Parts List
RO Faucet X 1 Set
Feed Water Adapter 3/8” and 1/2”
X 1 Set
White 3/8” PE Tubing
X 59”
Preinstalled
White 1/4” PE TubingDrain Saddle 1/4”
X 1 Set
X 59”
Lock Clip X 1 Set
Teflon TapeRed 1/4” PE Tubing
RO System
X 59”
X 4
X 1
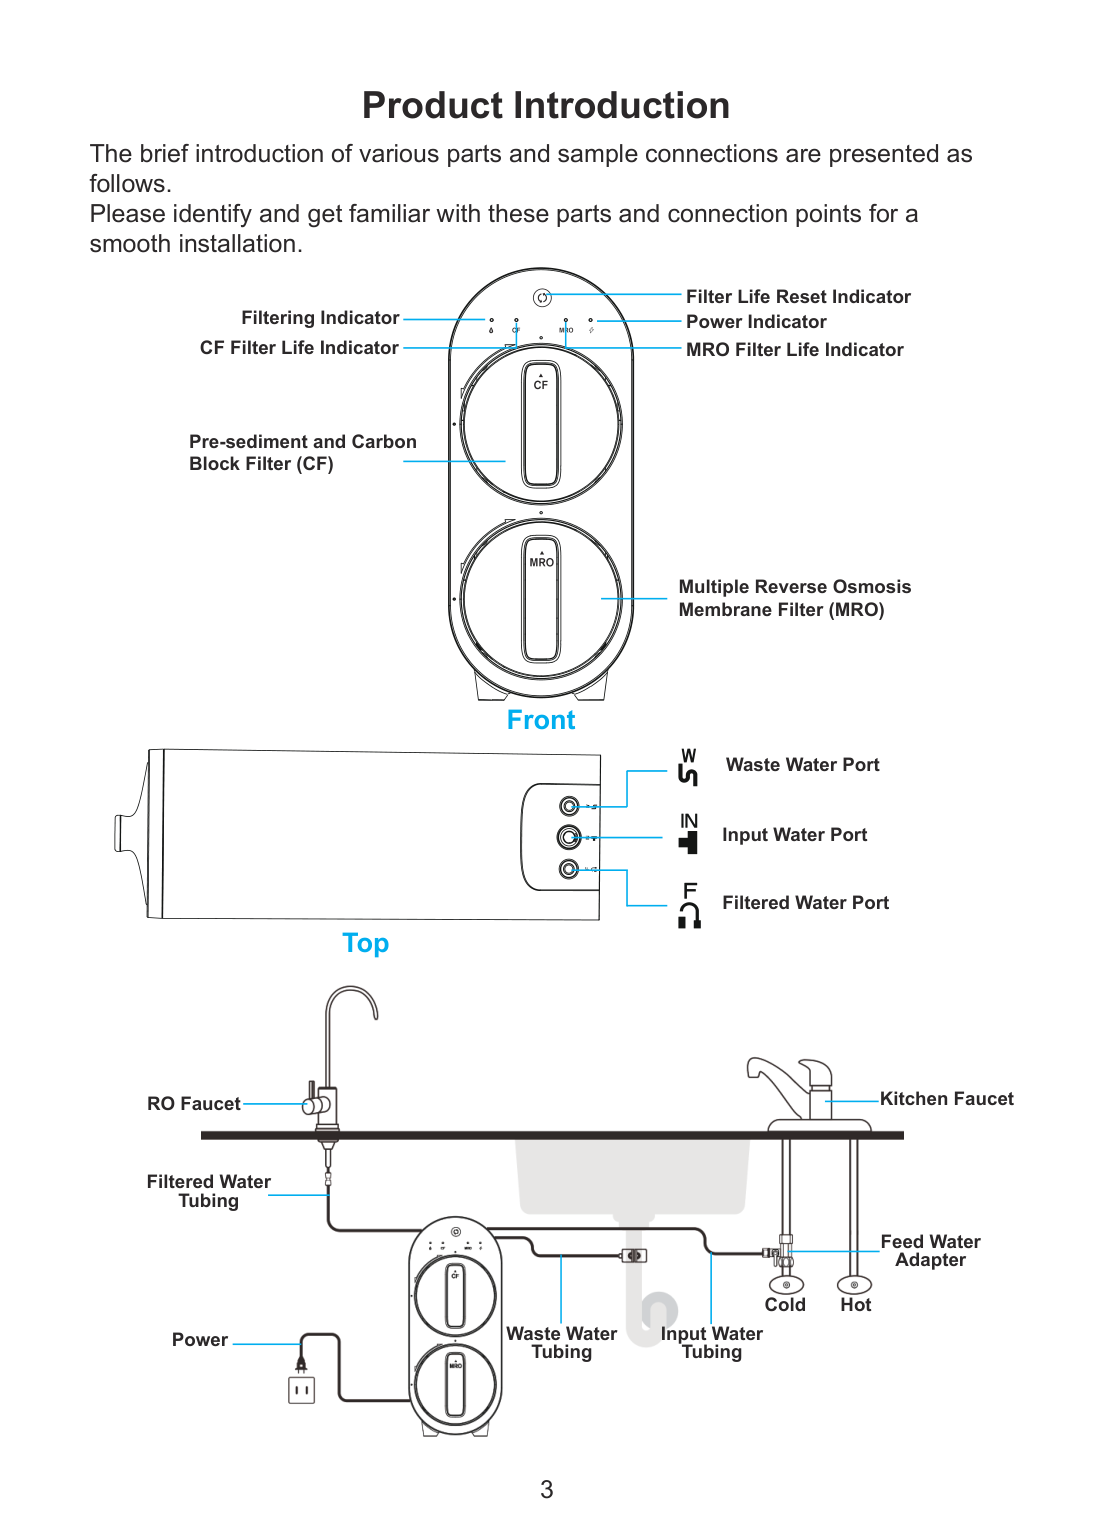
#### Product Introduction
The brief introduction of various parts and sample connections are presented as follows. Please identify and get familiar with these parts and connection points for a smooth installation.
Filter Life Reset Indicator
Power IndicatorFiltering Indicator MRO Filter Life IndicatorCF Filter Life Indicator
| | | |---|---| | | |
| | | |---|---| | | |
Pre-sediment and Carbon Block Filter (CF)
Multiple Reverse Osmosis Membrane Filter (MRO)
Front
Waste Water Port
Input Water Port
Top
Filtered Water Port

Kitchen Faucet
RO Faucet
Filtered Water Tubing
Feed Water Adapter
Cold Hot Waste Water Tubing
Input Water Tubing
Power
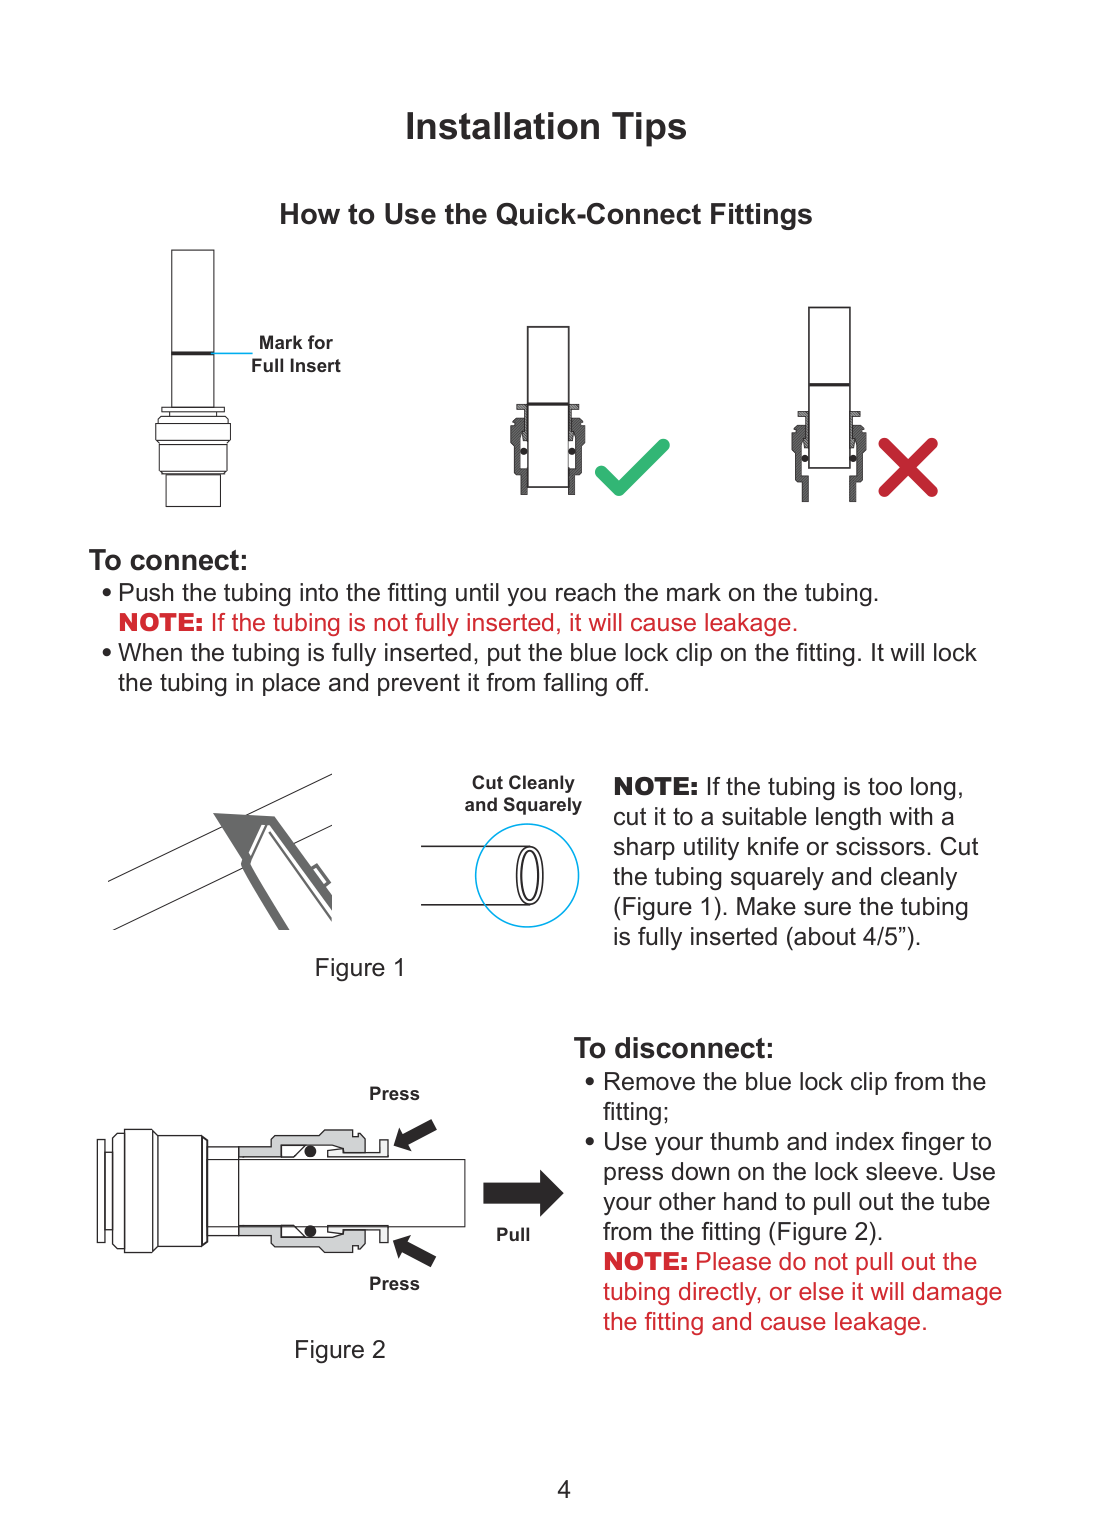
#### Installation Tips
How to Use the Quick-Connect Fittings
Mark for Full Insert
| | |---| | |
| | |---| | |
To connect:
Press
Press
Cut Cleanly and Squarely
NOTE: If the tubing is too long, cut it to a suitable length with a sharp utility knife or scissors. Cut the tubing squarely and cleanly (Figure 1). Make sure the tubing is fully inserted (about 4/5”).
Pull
###### To disconnect:
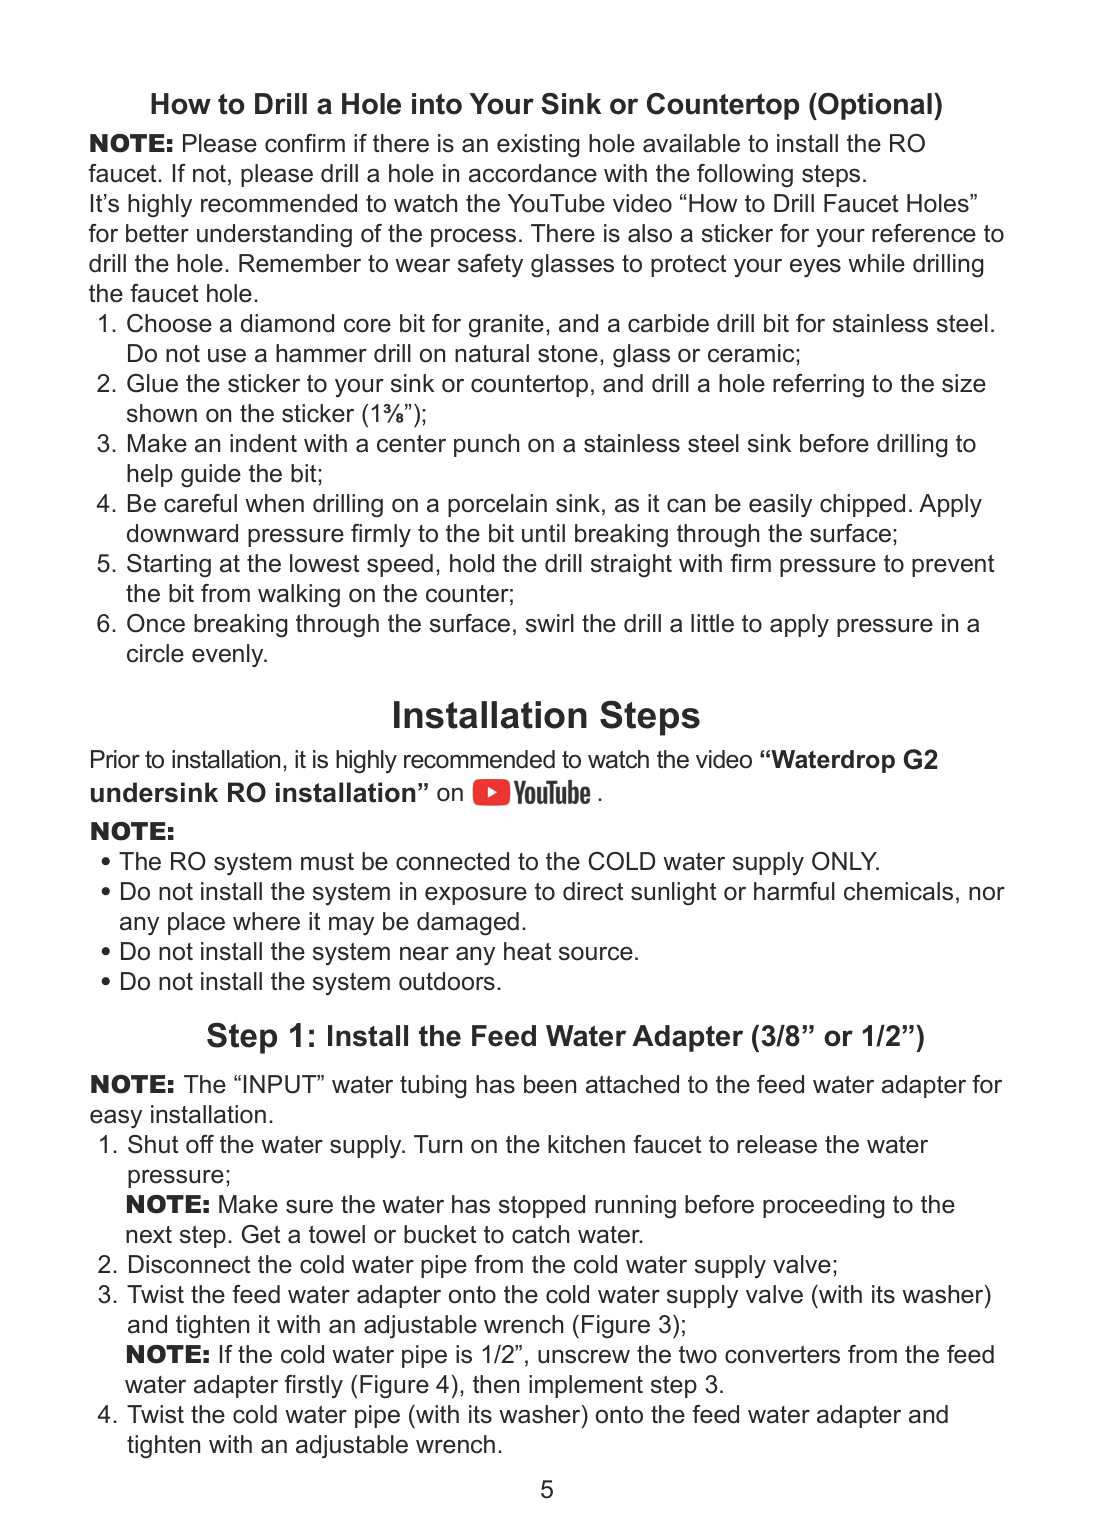
How to Drill a Hole into Your Sink or Countertop (Optional) NOTE: Please confirm if there is an existing hole available to install the RO faucet. If not, please drill a hole in accordance with the following steps. It’s highly recommended to watch the YouTube video “How to Drill Faucet Holes” for better understanding of the process. There is also a sticker for your reference to drill the hole. Remember to wear safety glasses to protect your eyes while drilling the faucet hole.
#### Installation Steps
Prior to installation, it is highly recommended to watch the video “Waterdrop G2 undersink RO installation” on .

######## NOTE:
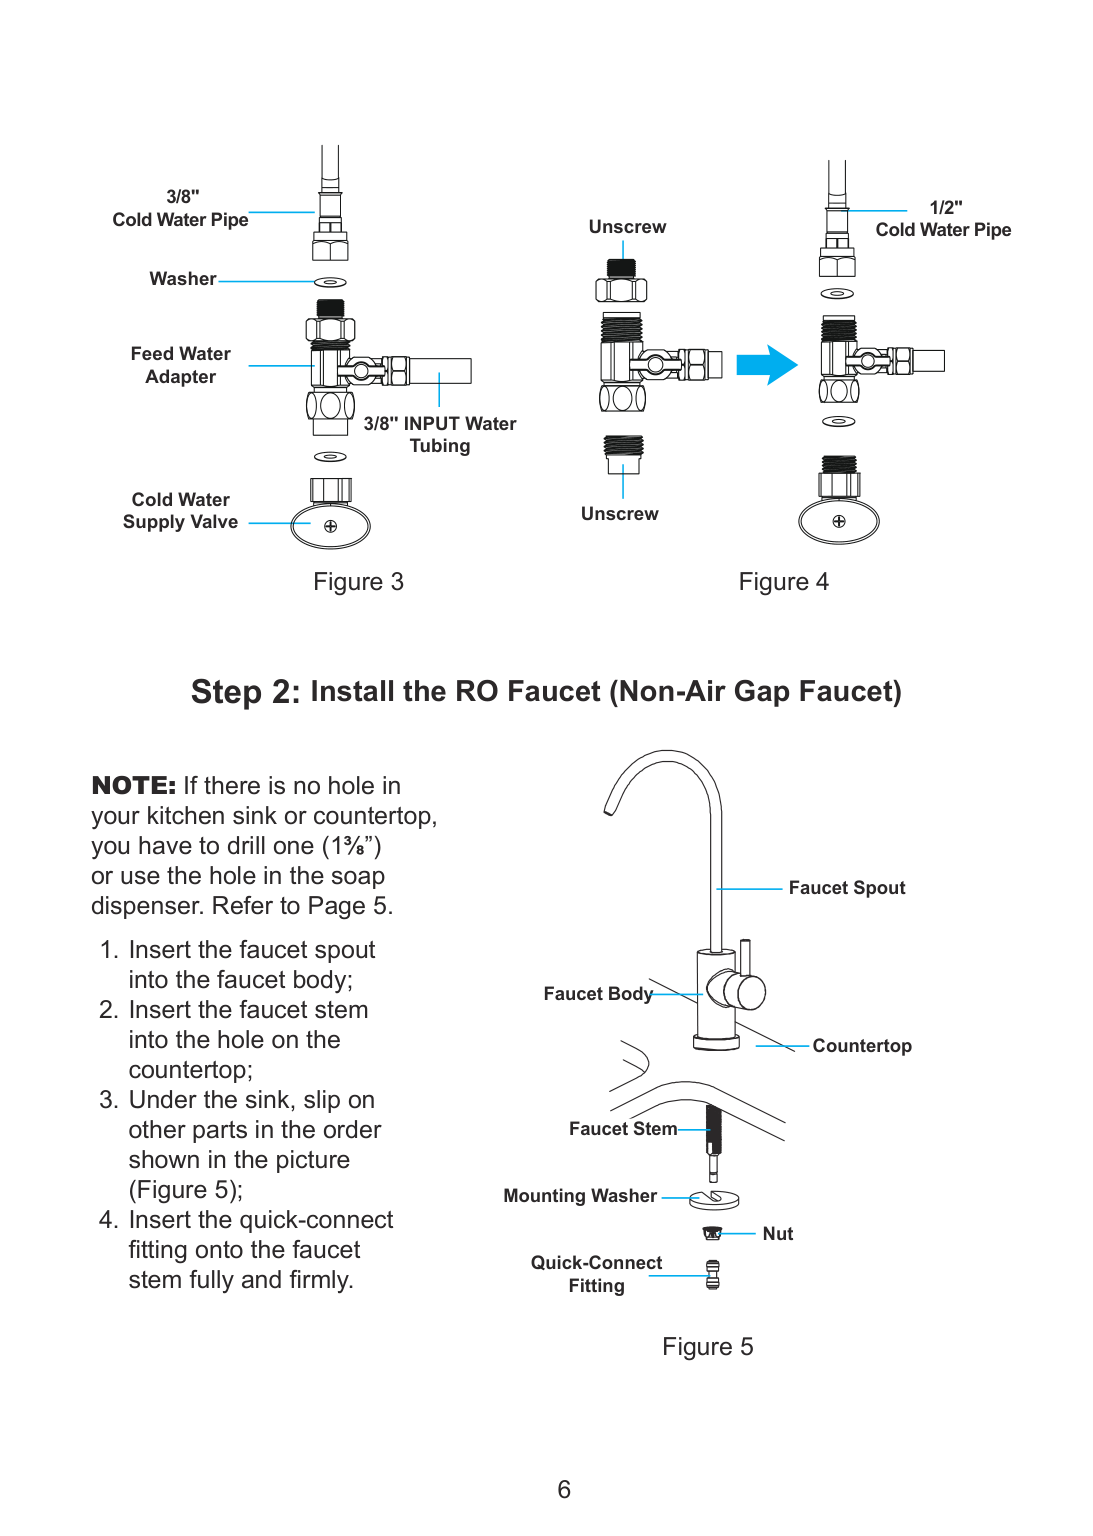
##### Step 1: Install the Feed Water Adapter (3/8” or 1/2”)
NOTE: The “INPUT” water tubing has been attached to the feed water adapter for easy installation.
3/8" Cold Water Pipe
Washer
Feed Water Adapter
Cold Water Supply Valve
| | | | | |---|---|---|---| | | | | | | | | | | | | | | | | | | | |
Unscrew
1/2" Cold Water Pipe
3/8'' INPUT Water Tubing
| | | | | |---|---|---|---|
Unscrew
Figure 3 Figure 4
##### Step 2: Install the RO Faucet (Non-Air Gap Faucet)
NOTE: If there is no hole in your kitchen sink or countertop, you have to drill one (1⅜”) or use the hole in the soap dispenser. Refer to Page 5.
Faucet Spout
Faucet Body
Countertop
Faucet Stem
Mounting Washer
Quick-Connect Fitting
| | | |---|---| | | | | | |
Nut
Figure 5
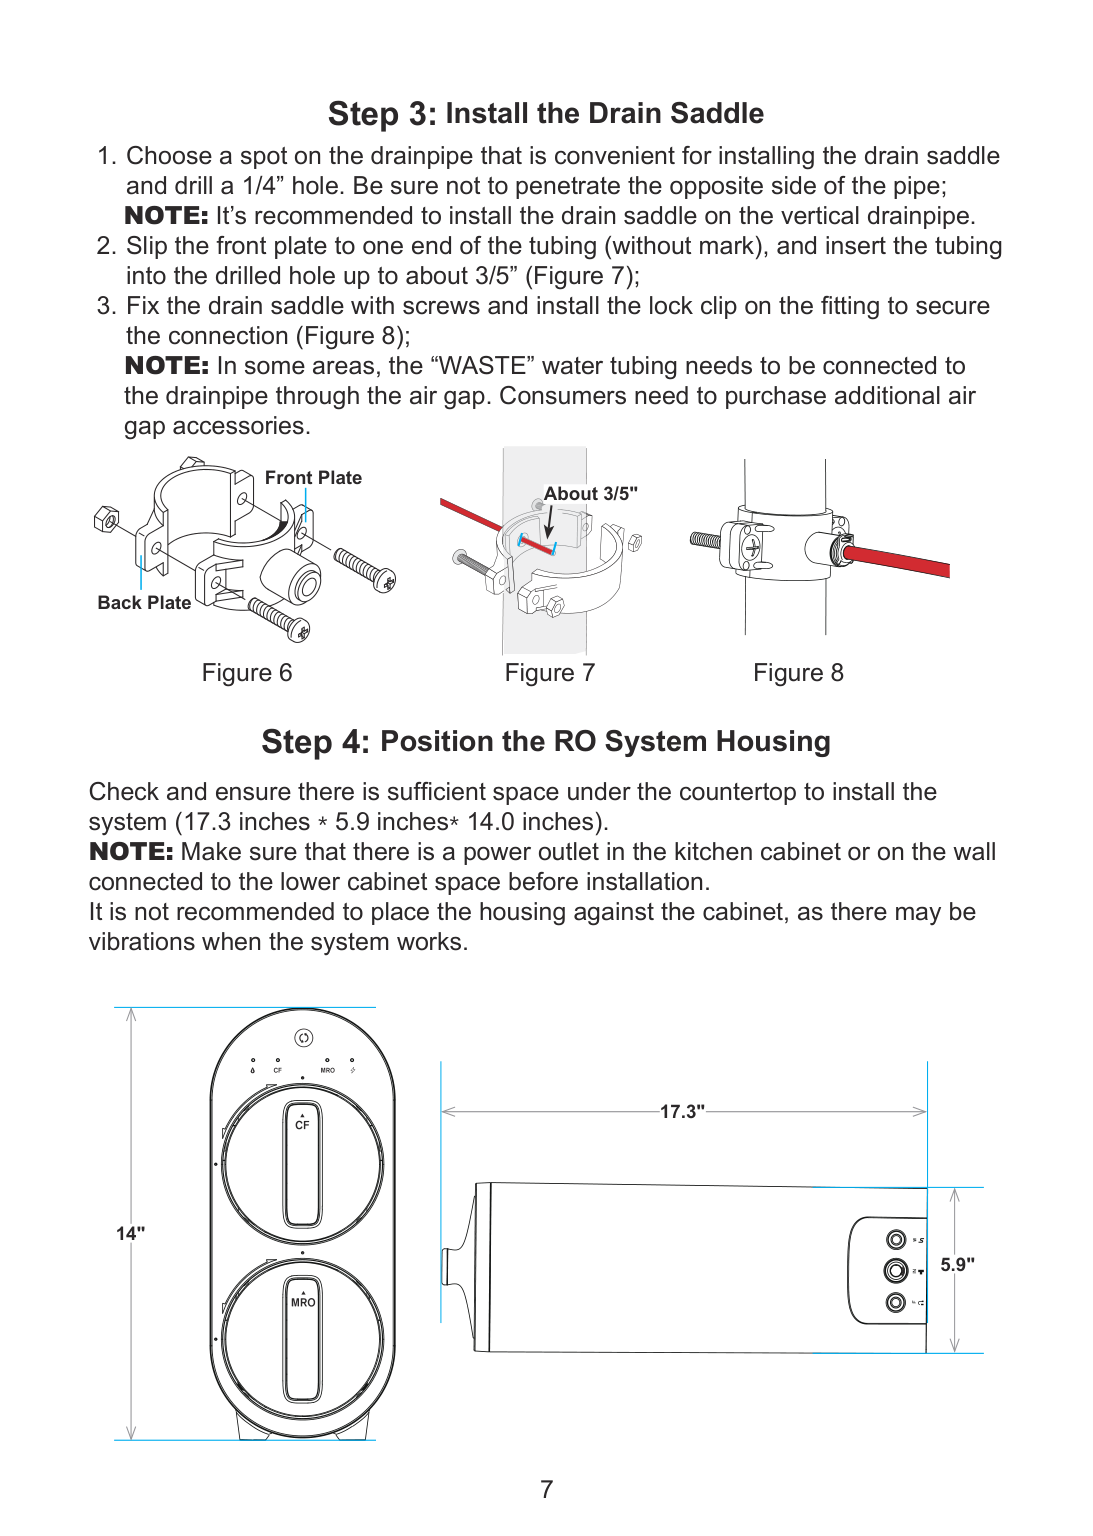
##### Step 3: Install the Drain Saddle
Front Plate
About 3/5"
| | | |---|---| | | |
Back Plate
Figure 6 Figure 7 Figure 8
##### Step 4: Position the RO System Housing
Check and ensure there is sufficient space under the countertop to install the system (17.3 inches * 5.9 inches* 14.0 inches). NOTE: Make sure that there is a power outlet in the kitchen cabinet or on the wall connected to the lower cabinet space before installation. It is not recommended to place the housing against the cabinet, as there may be vibrations when the system works.
14"
17.3"
5.9"
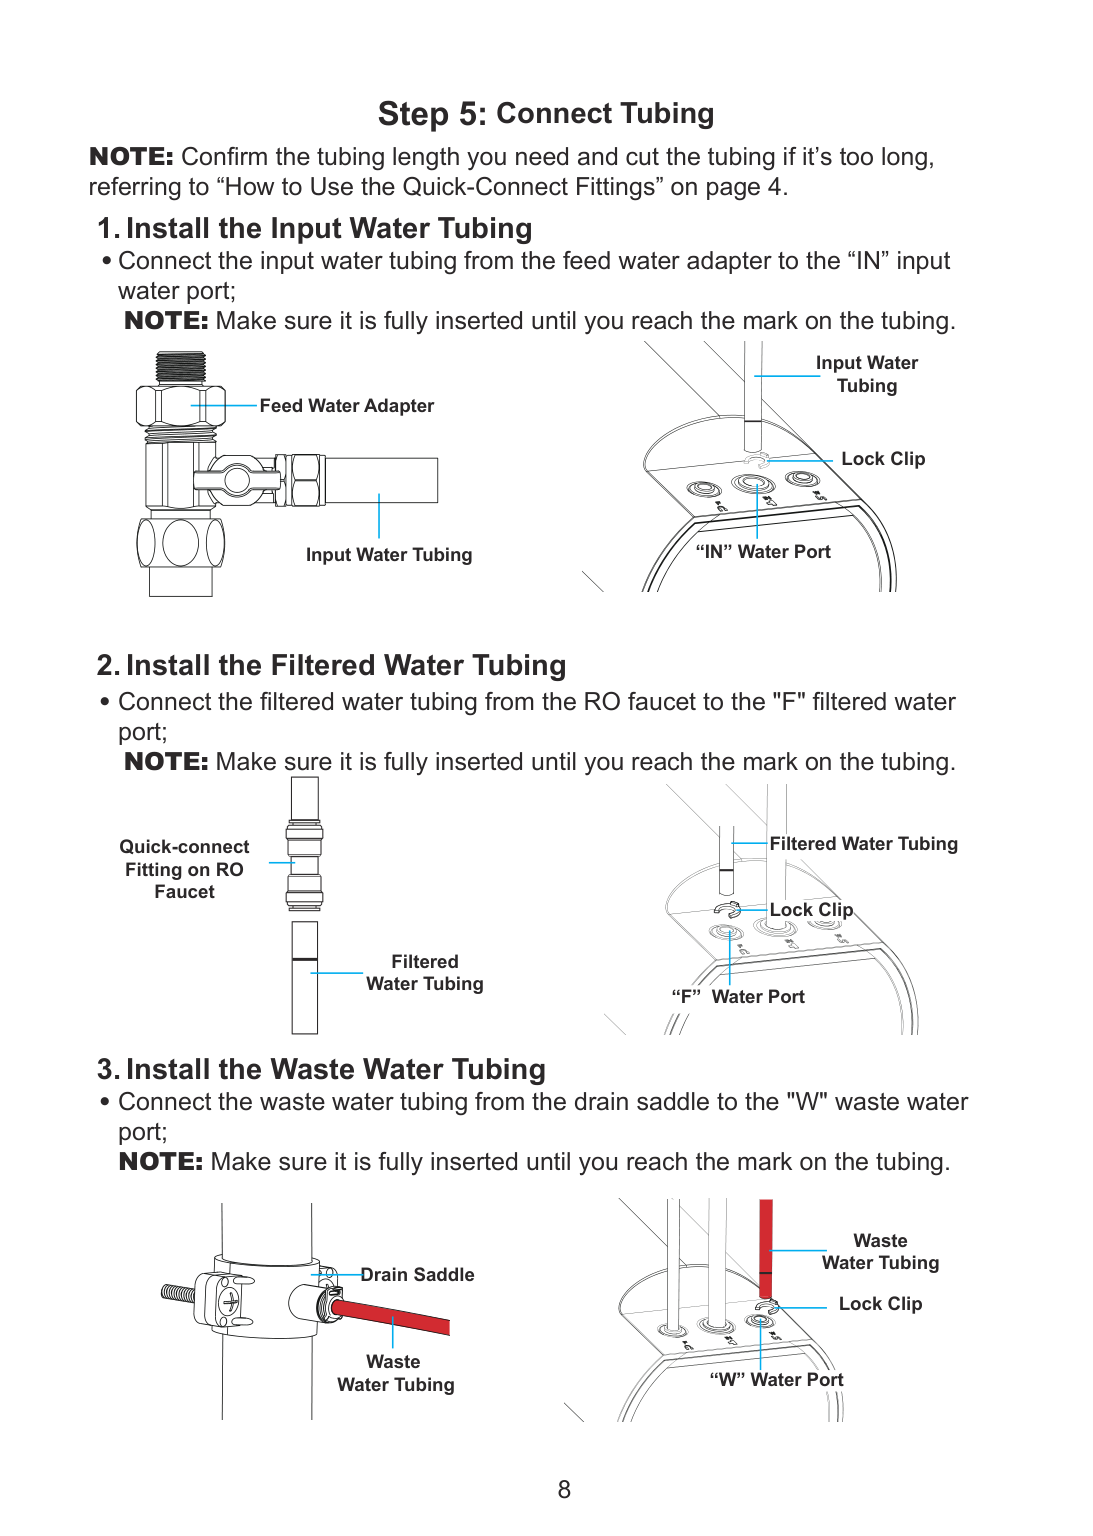
##### Step 5: Connect Tubing
NOTE: Confirm the tubing length you need and cut the tubing if it’s too long, referring to “How to Use the Quick-Connect Fittings” on page 4.
###### 1. Install the Input Water Tubing
• Connect the input water tubing from the feed water adapter to the “IN” input
water port;
NOTE: Make sure it is fully inserted until you reach the mark on the tubing.
Input Water Tubing
| | | | | |---|---|---|---| | | | | |
Feed Water Adapter
Lock Clip
| | | |---|---| | | |
| | | | | | |---|---|---|---|---| | | | | | |
“IN” Water Port
Input Water Tubing
###### 2. Install the Filtered Water Tubing
• Connect the filtered water tubing from the RO faucet to the "F" filtered water
port;
NOTE: Make sure it is fully inserted until you reach the mark on the tubing.
Filtered Water Tubing
Quick-connect Fitting on RO Faucet
| | | |---|---| | | | | | | | | |
Lock Clip
Filtered Water Tubing
“F” Water Port
###### 3. Install the Waste Water Tubing
• Connect the waste water tubing from the drain saddle to the "W" waste water port; NOTE: Make sure it is fully inserted until you reach the mark on the tubing.
| | | |---|---| | | | | | |
Waste Water Tubing
Drain Saddle
| | | |---|---| | | |
Lock Clip
Waste Water Tubing “W” Water Port
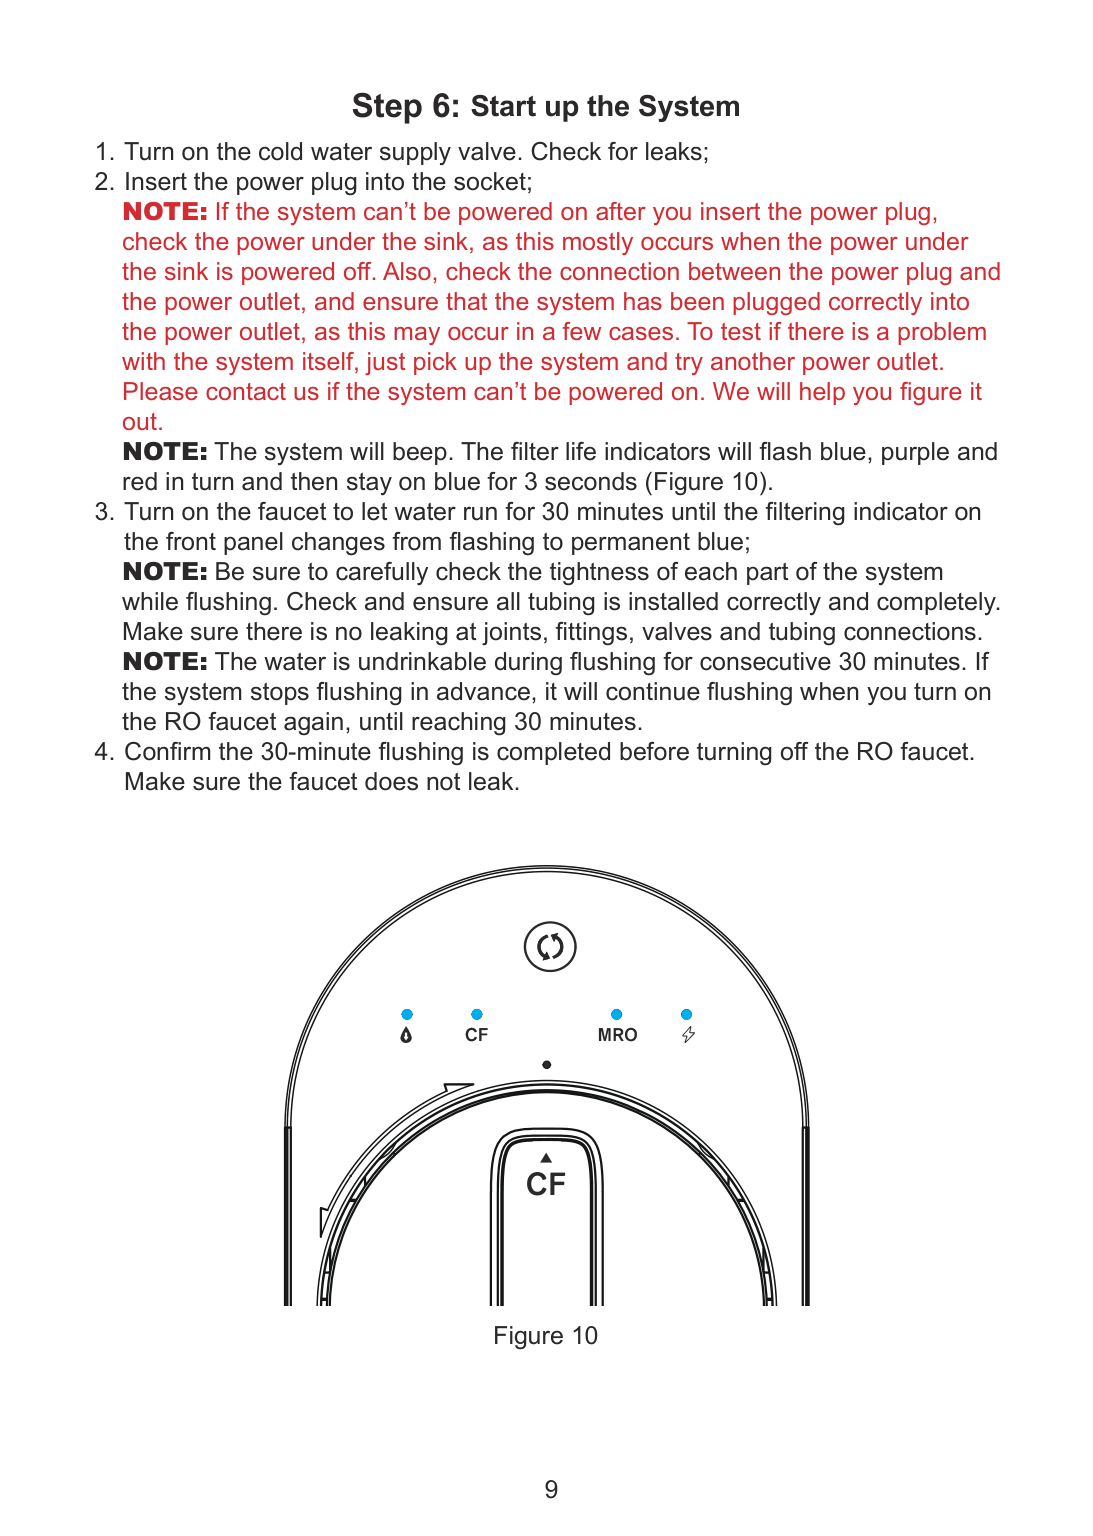
##### Step 6: Start up the System
Figure 10
Owner’s Manual Display and Operation
##### Section 1: Working Mode Display
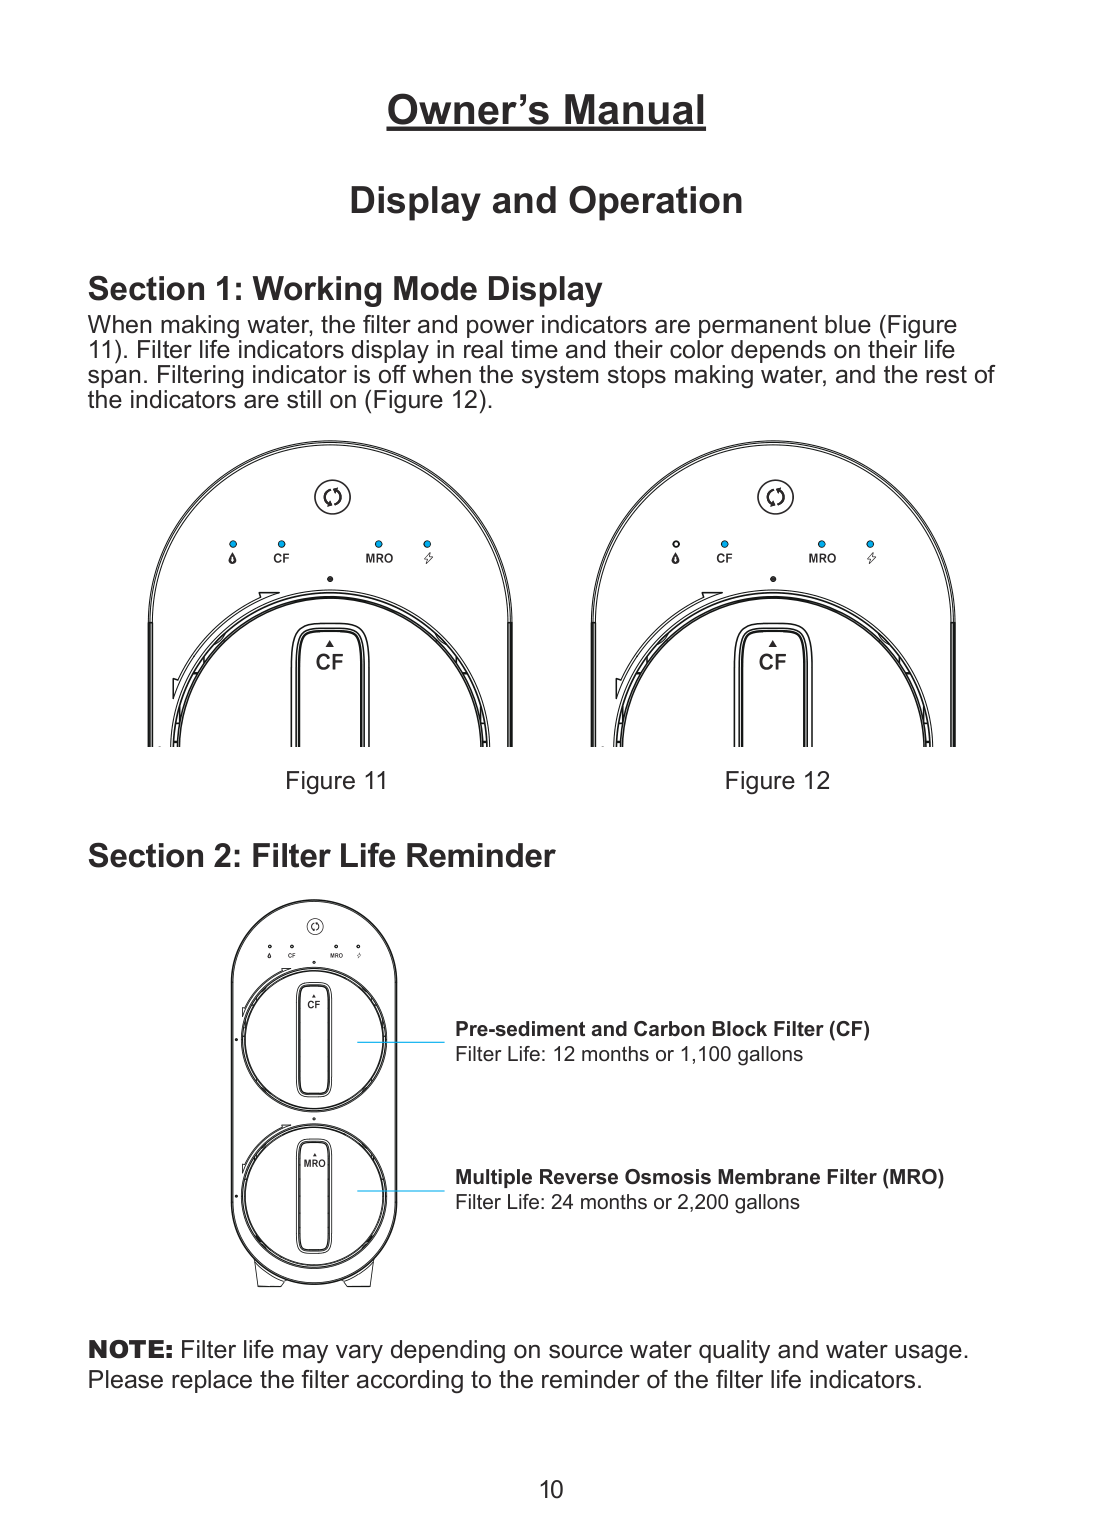
When making water, the filter and power indicators are permanent blue (Figure 11). Filter life indicators display in real time and their color depends on their life span. Filtering indicator is off when the system stops making water, and the rest of the indicators are still on (Figure 12).
Figure 11 Figure 12
##### Section 2: Filter Life Reminder
| | | |---|---| | | | | | |
Pre-sediment and Carbon Block Filter (CF)
Filter Life: 12 months or 1,100 gallons
Multiple Reverse Osmosis Membrane Filter (MRO)
Filter Life: 24 months or 2,200 gallons
########## NOTE: Filter life may vary depending on source water quality and water usage. Please replace the filter according to the reminder of the filter life indicators.
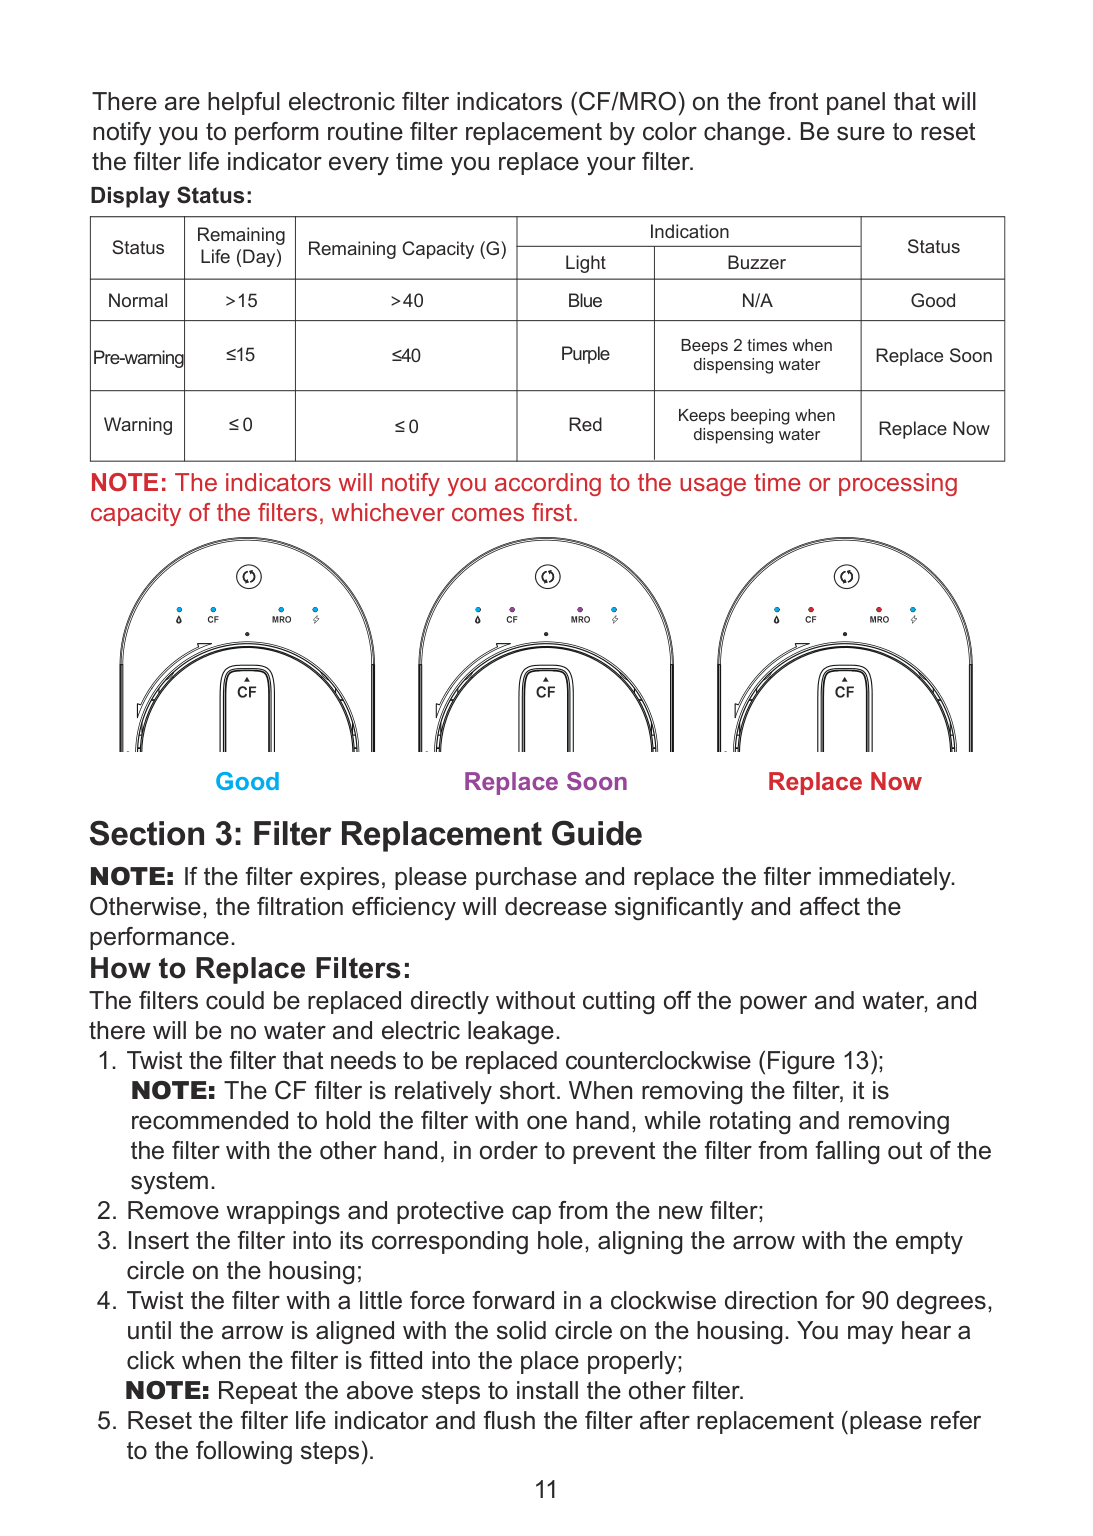
There are helpful electronic filter indicators (CF/MRO) on the front panel that will notify you to perform routine filter replacement by color change. Be sure to reset the filter life indicator every time you replace your filter.
########### Display Status:
|Status|Remaining Life (Day)|Remaining Capacity (G)|Indication|Indication|Status| |---|---|---|---|---|---| |Status|Remaining Life (Day)|Remaining Capacity (G)|Light|Buzzer|Status| |Normal|>15|>40|Blue|N/A|Good| |Pre-warning|≤15|≤40|Purple|Beeps 2 times when dispensing water|Replace Soon| |Warning|≤ 0|≤ 0|Red|Keeps beeping when dispensing water|Replace Now|
NOTE: The indicators will notify you according to the usage time or processing capacity of the filters, whichever comes first.
######### Good Replace Soon Replace Now
##### Section 3: Filter Replacement Guide
NOTE: If the filter expires, please purchase and replace the filter immediately. Otherwise, the filtration efficiency will decrease significantly and affect the performance. How to Replace Filters: The filters could be replaced directly without cutting off the power and water, and there will be no water and electric leakage.
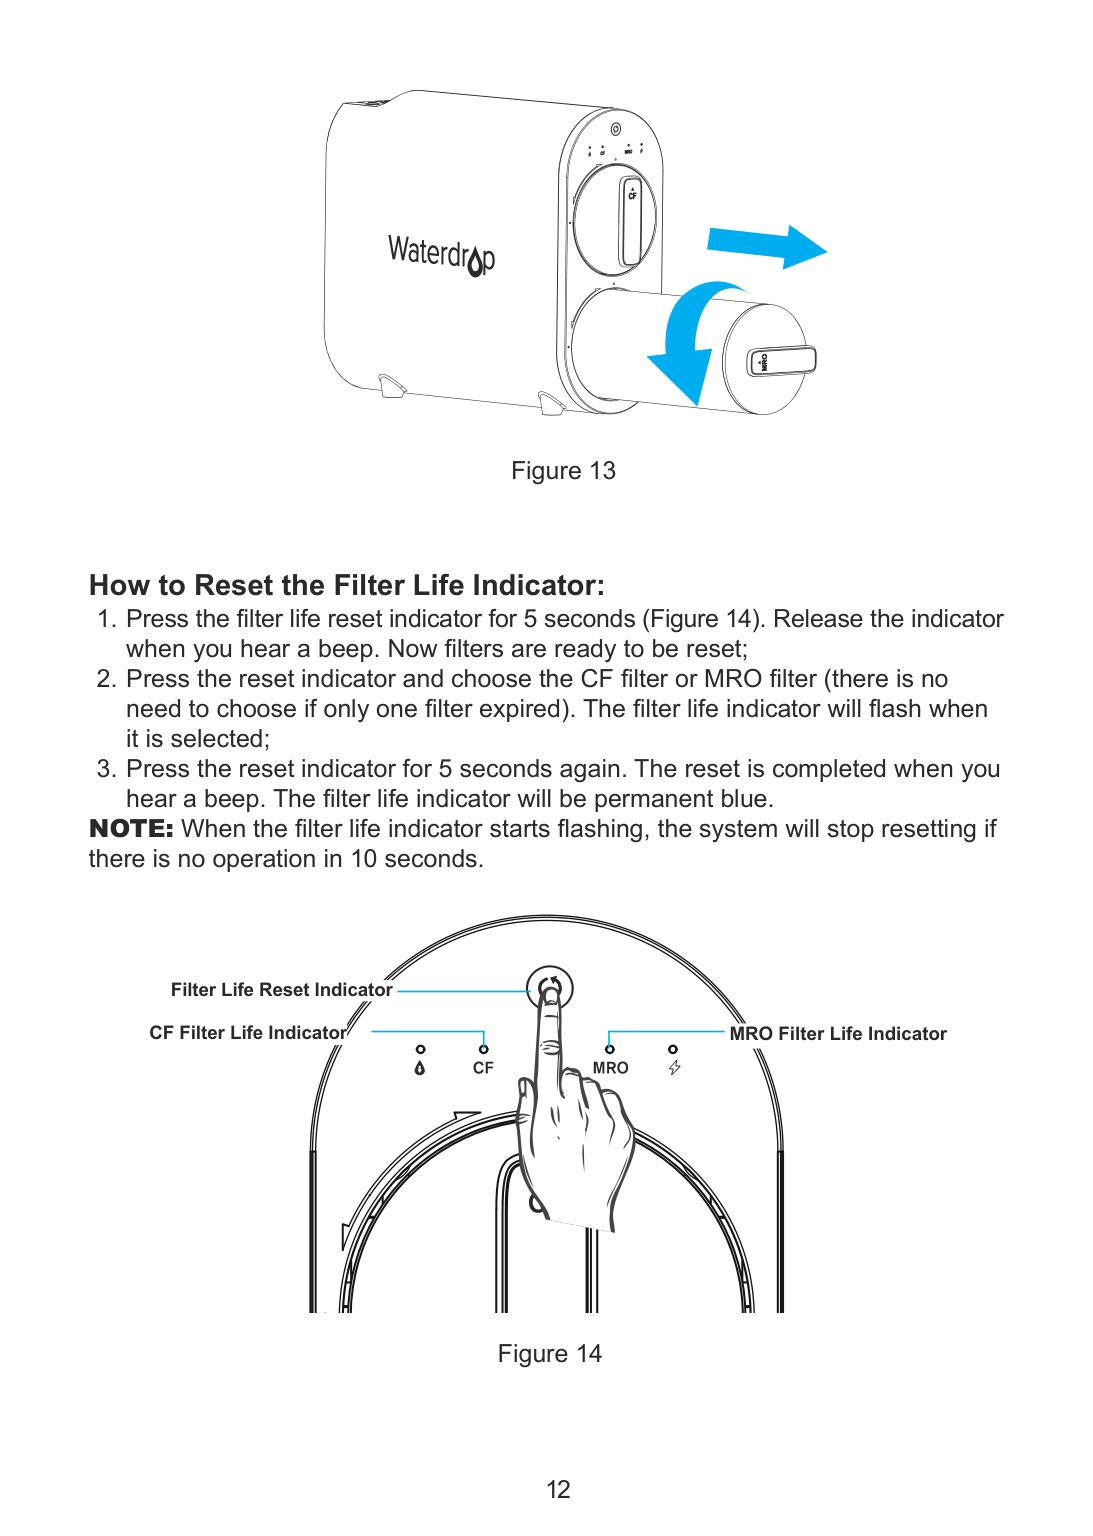
###### How to Reset the Filter Life Indicator:
NOTE: When the filter life indicator starts flashing, the system will stop resetting if there is no operation in 10 seconds.
Filter Life Reset Indicator
MRO Filter Life IndicatorCF Filter Life Indicator
How to Flush the Filter After Replacement: For the CF filter: Turn on the RO faucet to flush for 5 minutes; For the MRO membrane filter: Turn on the RO faucet to flush for 30 minutes. NOTE: Turn on the faucet to flush for 30 minutes if replacing the CF filter and MRO membrane filter at the same time.
##### Section 4: Malfunction Display
Overworked Reminder: When the system continuously makes water for more than 30 minutes, the overworked reminder will be executed and the buzzer will beep for 3 minutes. The system stops making water when working for over 33 minutes, and the filtering indicator and power indicator are off. Meanwhile, the CF and MRO filter life indicators flash red. The system needs to be powered on again to recover itself. Starting and Stopping Frequently Reminder: The RO system will perform a starting and stopping frequently reminder when the booster pump is frequently started and stopped in 20 minutes. The system will stop making water, while the filtering indicator and power indicator are off and the CF and MRO filter life indicators flash purple. The system needs to be powered on again to recover itself.
#### System Maintenance
#### Troubleshooting
###### •If the System Cannot Be Powered on After You Insert the PowerPlug
a. Check the power under the sink, as this mostly occurs when the power under the sink is powered off. Also, check the connection between the power plug and the power outlet, and ensure that the system has been plugged correctly into the power outlet, as this may occur in a few cases. To test if there is a problem with the system itself, just pick up the system and try another power outlet. Please contact us if the system can’t be powered on. We will help you figure it out.
###### • No Output Water from RO Faucet

###### • Low Water Flow at RO Faucet
sure the filters are well installed.
•High TDS in Filtered Water The system will provide a 90%+ TDS rejection rate (tested under standard laboratory conditions) when working properly. If the TDS reading is high, the following are possible causes:
###### •Filtered Water from the RO Faucet Tastes Like Tap Water

###### •Booster Pump Overworked Reminder
Buzzer keeps beeping for 3 minutes and then the filter life indicators on the front panel flash red.
a. The system is not positioned in a flat area. Make sure the system is placed smoothly without shaking. b. The system is placed against the cabinet. Do not place the system against the cabinet. The system may vibrate when it works.
c. The water pressure is instable. Check and confirm the water pressure is between 14.5 PSI and 87 PSI. The sound will decrease when the water pressure becomes stable.
#### Limited Product Warranty
The warranty of our product covers defects in materials and workmanship from the original date of purchase. During the warranty period, we will replace or repair any part which is deemed to be defective, if the product has not been subjected to tampering, alteration, lack of regular maintenance or improper use after delivery. The cost of repair or replacement under those excluded circumstances shall be borne by the consumer. This limited warranty does not cover the following items: filters and all other parts or components that require regular replacement as a result of ordinary usage. This limited warranty only applies if the system is installed, used, and maintained in compliance with all instructions and requirements enclosed with the system. This limited warranty shall only be valid if:
Any information or suggestion with respect to our product concerning applications, specifications or standards is provided solely for your convenience. The quality of water supplies may vary seasonably or over a period of time. Your water usage may vary as well. The manufacturer shall assume no liability for the determination of the proper equipment necessary to meet your requirements, and we do not authorize others to assume such obligation on our behalf. You must verify and test the suitability of any information with respect to the product for your specific application.
This limited warranty shall be void if:
Our sole obligation under this warranty shall be repair or replacement of a nonconforming product or parts of this product, or at our option, return of the product and a refund of the purchase price. Our obligation does not include the cost of transportation. We are not responsible for damage in transit, and claim that such damage should be presented to the carrier by the customer.
The warranties set forth herein are the only warranties made by us with respect to the product. We make no warranties, expressed or implied, including, but not limited to, any warranties of fitness or merchantability, except as expressly set forth above.
NOTE: In case some states do not allow limitations on how long an implied warranty lasts, you may choose to return the system. If you choose to keep it, you agree that the above limitations still apply to you.
Warranty Registration Please visit our website www.waterdropfilter.com and go to the “Warranty Registration” tab to register your product for the warranty.
We offer a 30-day money back guarantee, a 1-year manufacturer warranty, and lifetime tech support for all our products. Please be sure to fill in the order information upon registration of your system. For any questions and concerns about the product, please feel free to call or email us. Your satisfaction is our top priority!
If you are happy with our products and service, please share with your friends or share on Amazon. We would greatly appreciate your voice and support. Thank you!
How to Contact Us Tel: 1-888-352-3558 Mon-Fri 8:00 AM-5:00 PM (PST) Email: service@waterdropfilter.com
