
Ask AI
— answers from the official manualAnswers from the official manual.
Common questions
Common Questions
9 totalHow do I reset the bench to its default position after folding it for storage?
To return the Warrior Ultimate Multifunction Bench from its stored position back to normal use, start with the bench in ab board position and remove any leg attachment. Next, refit pull pin (T-6) to top of front leg and reposition support tube (E-1) into required adjustment hole before inserting locking pin (T-21). Finally, secure the handwheel (B-2) and bolt (T-7), lifting rear upholstery as necessary.
What is a recommended weight range to start my workout?
Start with weights you can perform 12 repetitions without struggle. Gradually increase the weight once correct technique becomes easier to maintain.
How do I adjust the incline/decline of the bench?
To adjust the incline, lift rear upholstery slightly and remove locking pin (T-21) followed by support tube (E-1). Refit the support tube into the required adjustment hole in main upright before lowering the rear upholstery back onto the support tube. Ensure the seat base is raised for flat positions and lowered elsewhere.
Is the Warrior Ultimate Multifunction Bench suitable for use by children?
No, this product is not designed or intended for children’s use under any circumstances as a toy. It should be kept in an area where minors are supervised and prevented from using it.
How often should I check the bench for maintenance?
The equipment should be regularly examined at least once per week, including checking all nuts, bolts, moving parts, and bushings. Ensure that all fixings are tight before each use.
What materials are needed for a complete assembly?
The contents include two spanners (13 & 17mm), one Allen key (6mm) along with various nuts, bolts, washers and other connecting parts detailed from page 5 onwards.
Full Manual
20 pages
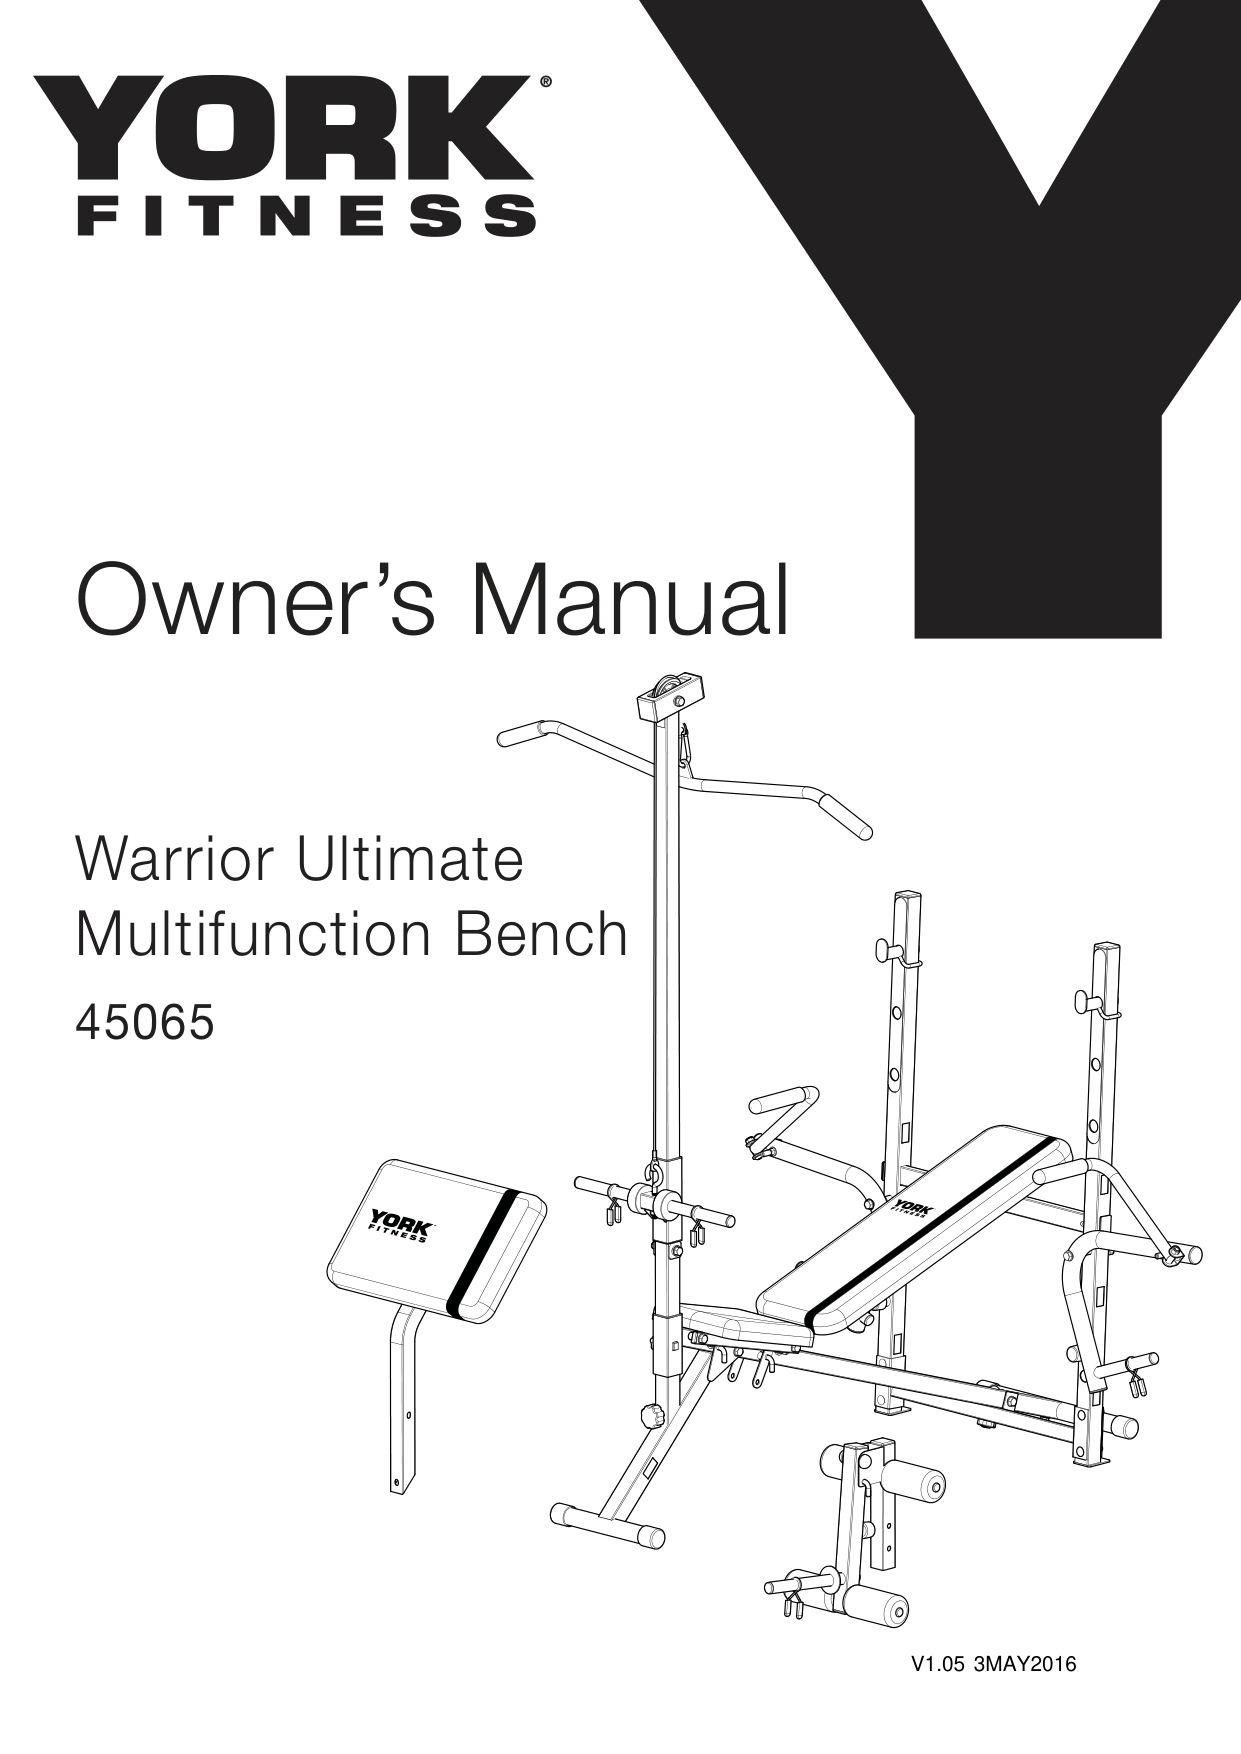
Owner’s Manual
Warrior Ultimate Multifunction Bench 45065
3MAY2016V1.05
Table of contents
##### Congratulations on purchasing your exercise equipment from
You have chosen a high quality, safe and innovative piece of equipment as your training partner and we are certain it will keep you motivated on the way to achieving your personal fitness goals.
Please take the time to read this owner’s manual as it will help you to get the most out of your new exercise equipment.
For more information visit www.yorkfitness.com
##### CONTENTS
Safety information 03
Customer support 04
Assembly instructions 05
User instructions 10
Fitness guide 12
Exploded drawing 14
Part list 15
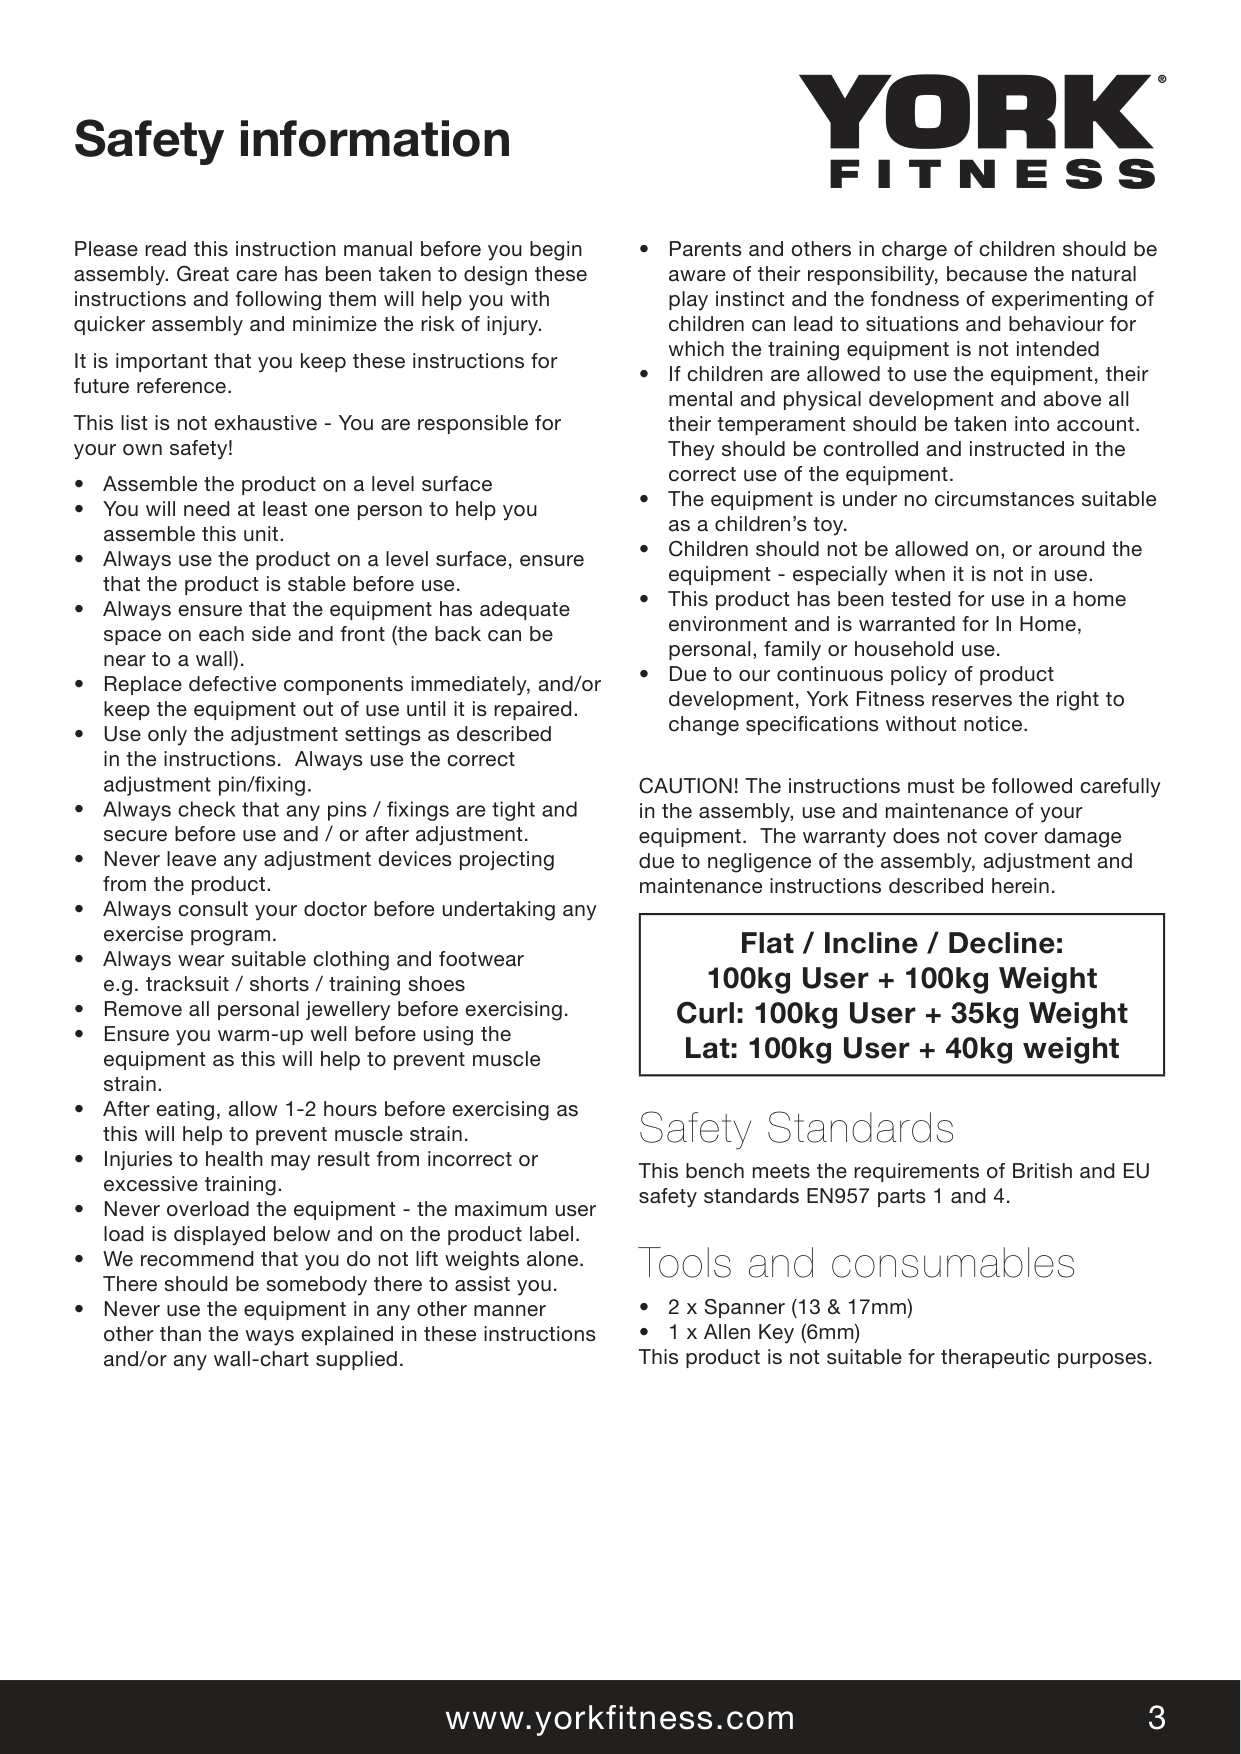
Safety information
Please read this instruction manual before you begin assembly. Great care has been taken to design these instructions and following them will help you with quicker assembly and minimize the risk of injury.
It is important that you keep these instructions for future reference.
This list is not exhaustive - You are responsible for your own safety!
•
secure before use and / or after adjustment.
CAUTION! The instructions must be followed carefully in the assembly, use and maintenance of your equipment. The warranty does not cover damage due to negligence of the assembly, adjustment and maintenance instructions described herein.
|Flat / Incline / Decline: 100kg User + 100kg Weight Curl: 100kg User + 35kg Weight Lat: 100kg User + 40kg weight| |---|
#### Safety Standards
This bench meets the requirements of British and EU safety standards EN957 parts 1 and 4.
#### Tools and consumables
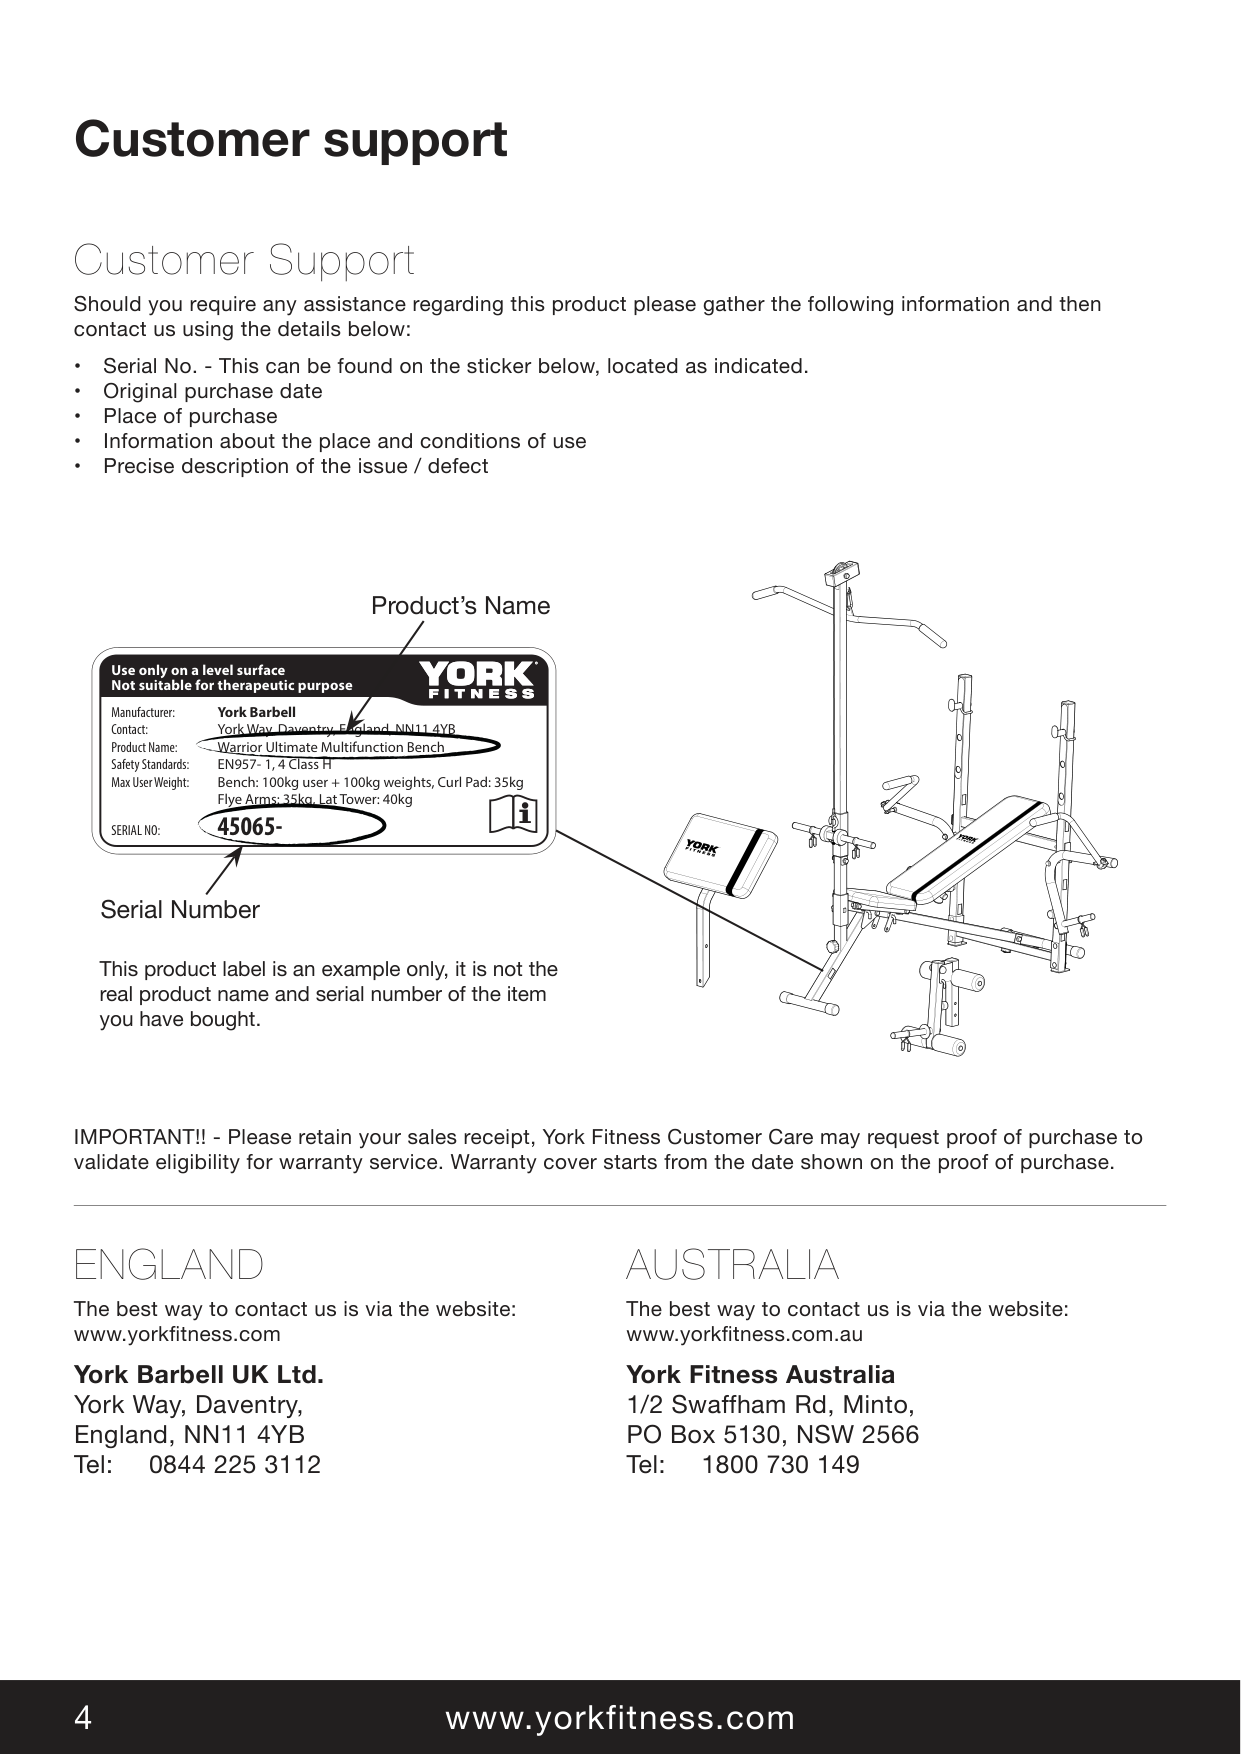
Customer support
##### Customer Support
Should you require any assistance regarding this product please gather the following information and then contact us using the details below:
Product’s Name
########### Use only on a level surface Not suitable for therapeutic purpose
Manufacturer: York Barbell Contact: York Way, Daventry, England, NN11 4YB Product Name: Warrior Ultimate Multifunction Bench Safety Standards: EN957- 1, 4 Class H Max User Weight: Bench: 100kg user + 100kg weights, Curl Pad: 35kg Flye Arms: 35kg, Lat Tower: 40kg
SERIAL NO: 45065-
Serial Number
This product label is an example only, it is not the real product name and serial number of the item you have bought.
IMPORTANT!! - Please retain your sales receipt, York Fitness Customer Care may request proof of purchase to validate eligibility for warranty service. Warranty cover starts from the date shown on the proof of purchase.
##### ENGLAND
The best way to contact us is via the website: www.yorkfitness.com
######## York Barbell UK Ltd.
York Way, Daventry, England, NN11 4YB Tel: 0844 225 3112
##### AUSTRALIA
The best way to contact us is via the website: www.yorkfitness.com.au
######## York Fitness Australia
1/2 Swaffham Rd, Minto, PO Box 5130, NSW 2566 Tel: 1800 730 149
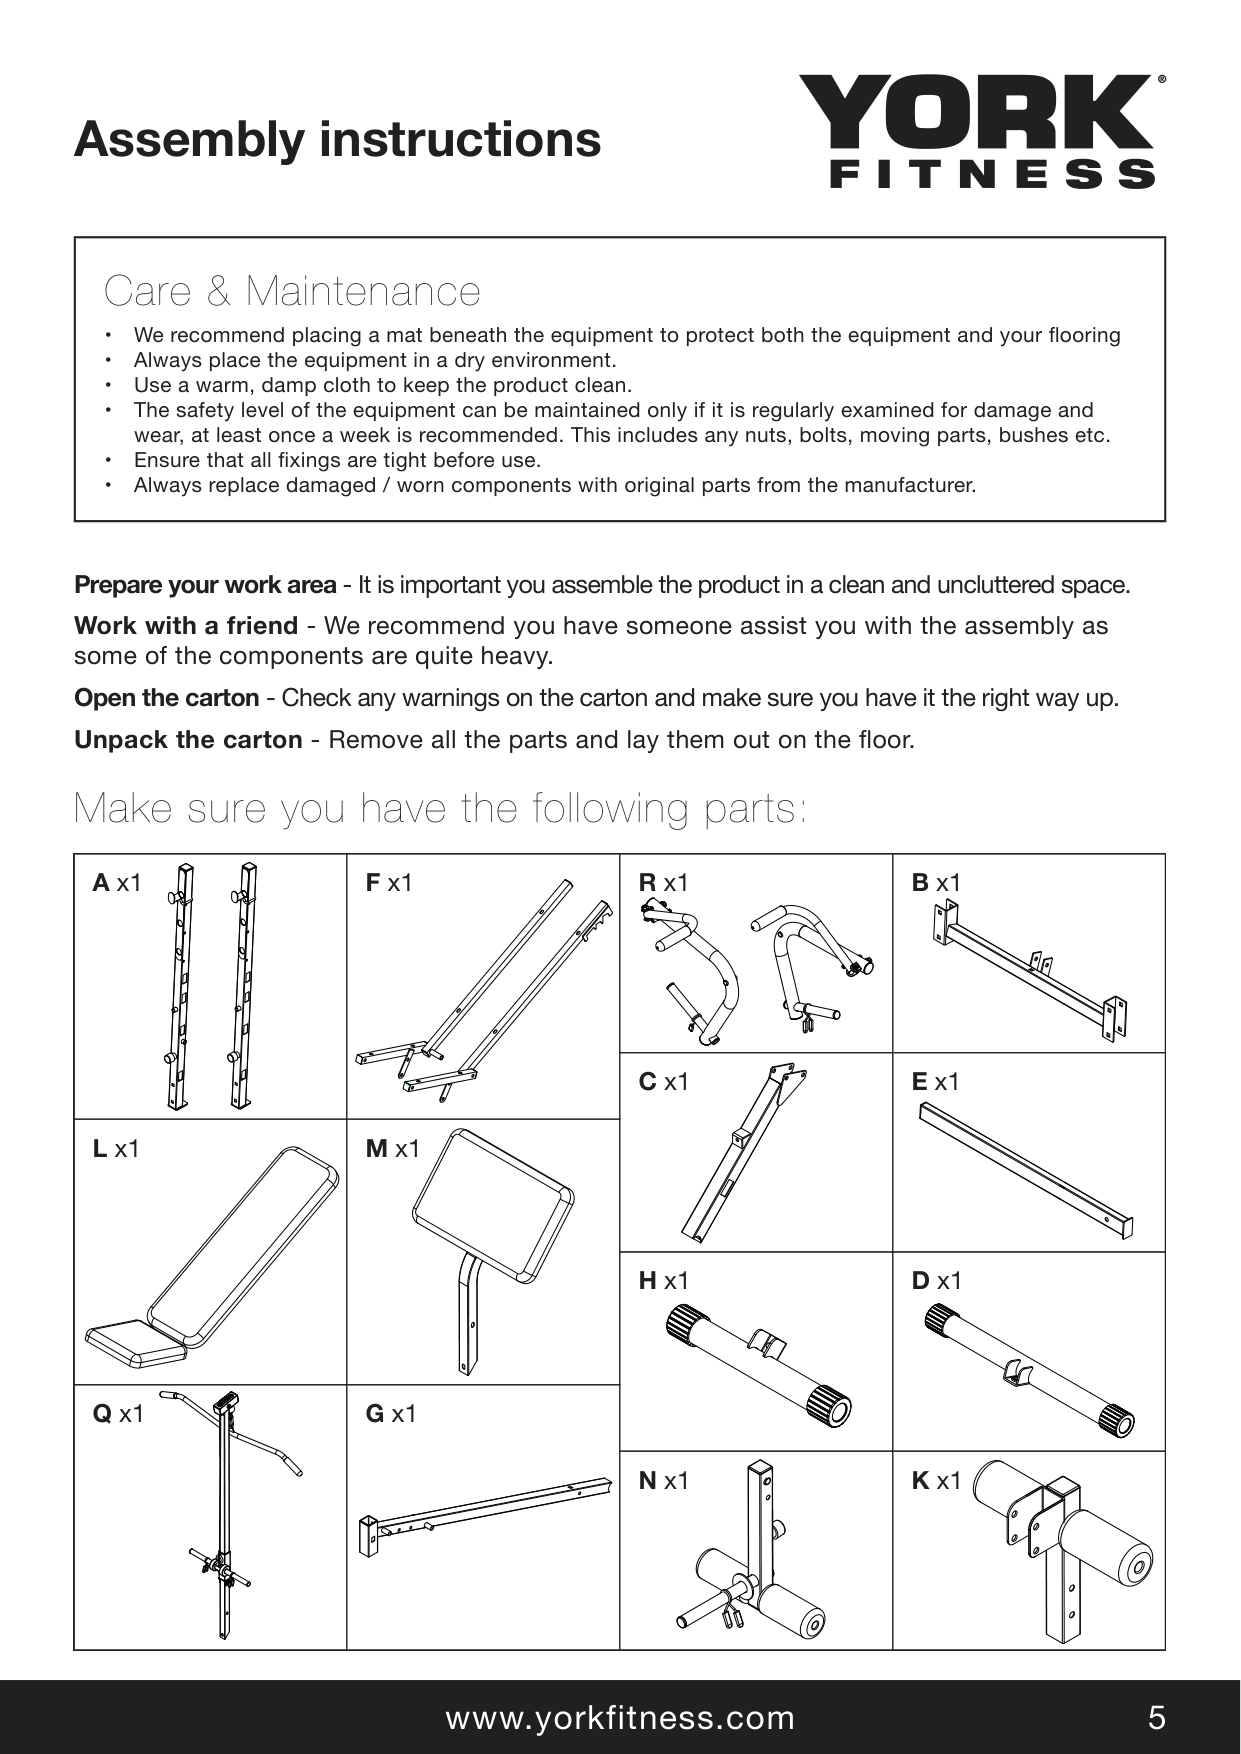
|Care & Maintenance
• We recommend placing a mat beneath the equipment to protect both the equipment and your flooring
• Always place the equipment in a dry environment.
• Use a warm, damp cloth to keep the product clean.
• The safety level of the equipment can be maintained only if it is regularly examined for damage and wear, at least once a week is recommended. This includes any nuts, bolts, moving parts, bushes etc.
• Ensure that all fixings are tight before use.
• Always replace damaged / worn components with original parts from the manufacturer.
| |---|
Prepare your work area - It is important you assemble the product in a clean and uncluttered space. Work with a friend - We recommend you have someone assist you with the assembly as some of the components are quite heavy. Open the carton - Check any warnings on the carton and make sure you have it the right way up. Unpack the carton - Remove all the parts and lay them out on the floor.
##### Make sure you have the following parts:
|A x1|F x1|R x1|B x1| |---|---|---|---| |A x1|F x1|C x1|E x1| |L x1|M x1|C x1|E x1| |L x1|M x1|H x1|D x1| |Q x1|G x1|H x1|D x1| |Q x1|G x1|N x1|K x1|
||T-7 x 1
T-6 x 1
Tools
T-1 x 2
T-3 x 2
T-5 x 2
T-2 x 2
T-4 x 5
B-2 x 1| |---|
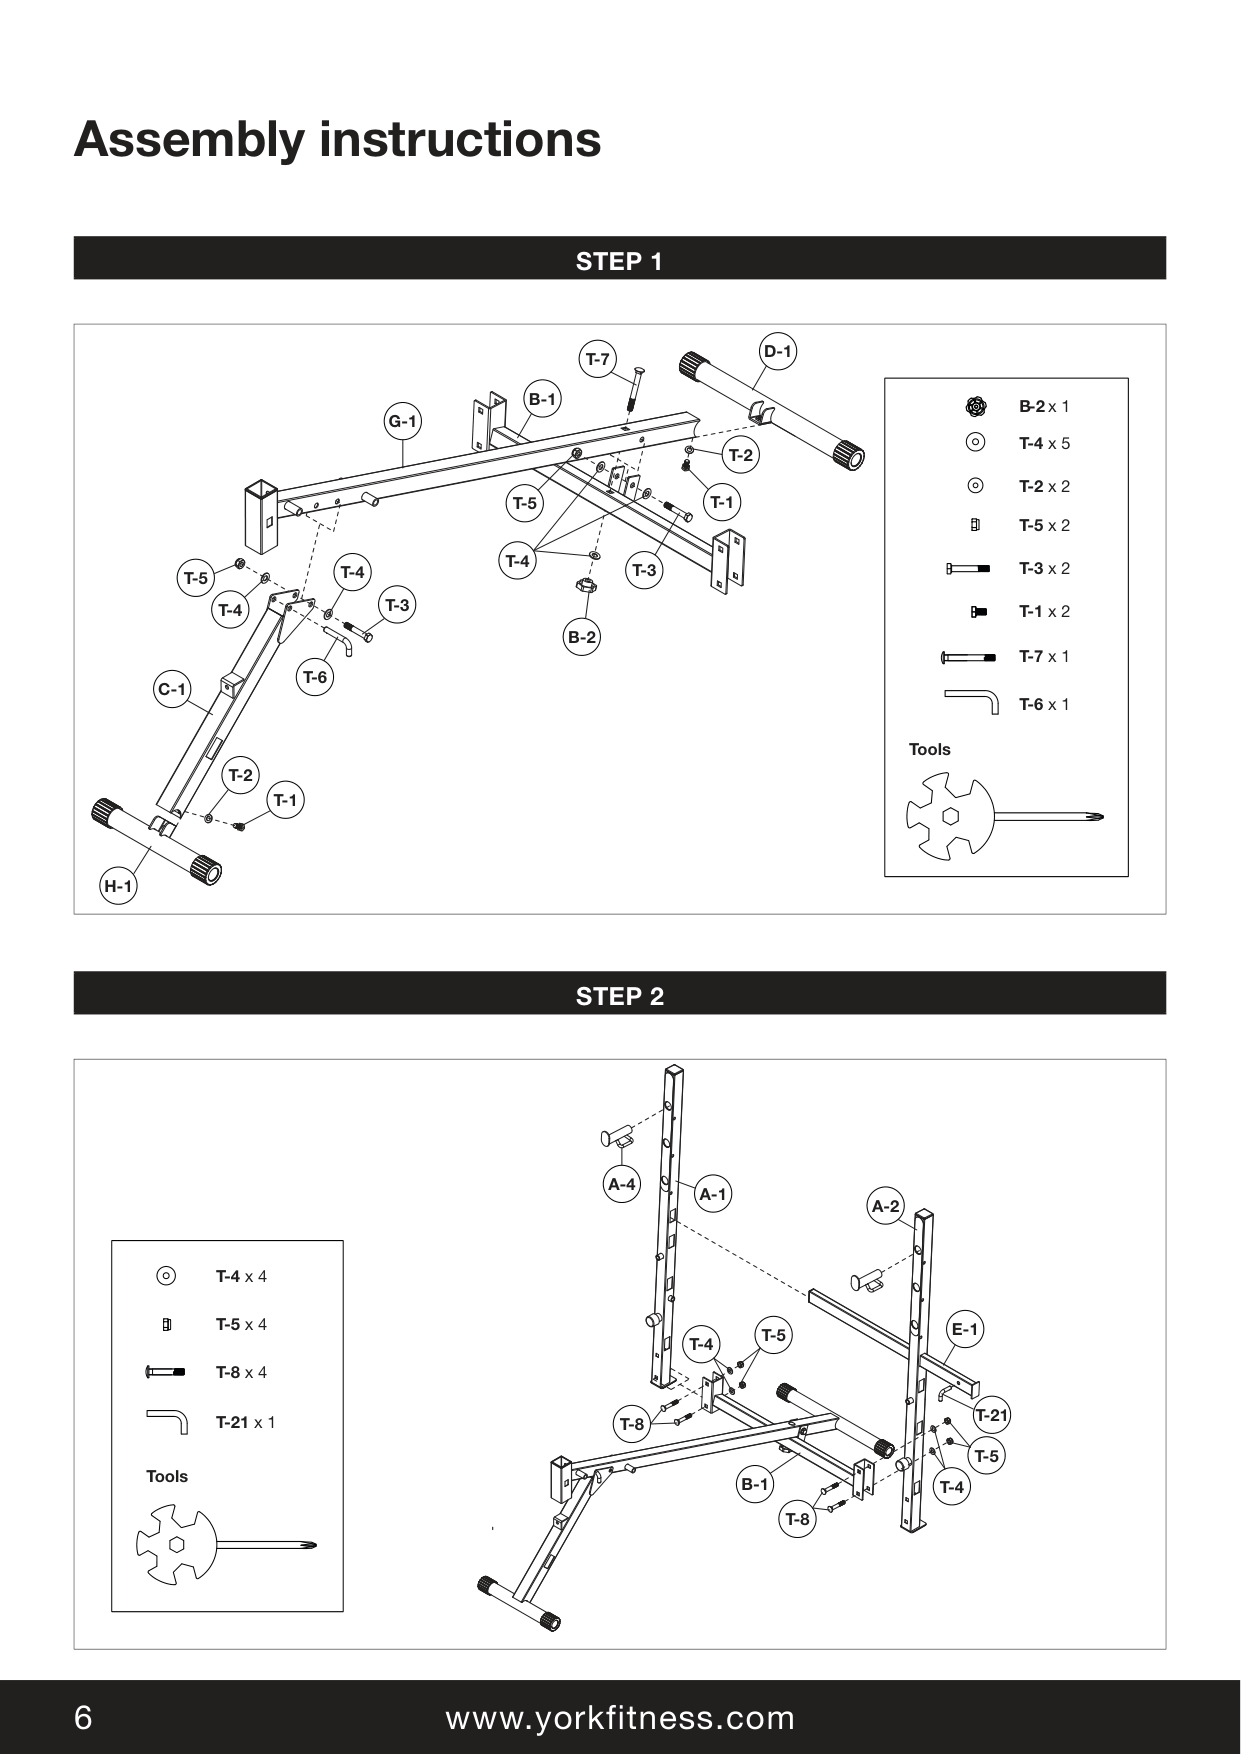
D-1T-7
T-2
T-1
T-3
B-2
T-4
T-5
B-1 G-1
T-5
T-4
T-4
T-3
T-6 C-1
T-1
H-1
T-2| |---|
|STEP 2| |---|
||T-8 x 4
T-5 x 4
T-4 x 4
Tools
T-21 x 1| |---|
A-1
T-8
T-4
T-5
A-2
E-1
T-21
T-4
T-5
T-8
B-1
A-4
| |---|
||T-10 x 8
T-5 x 2
T-2 x 8
T-4 x 4
T-11 x 1
T-9 x 2
Tools| |---|
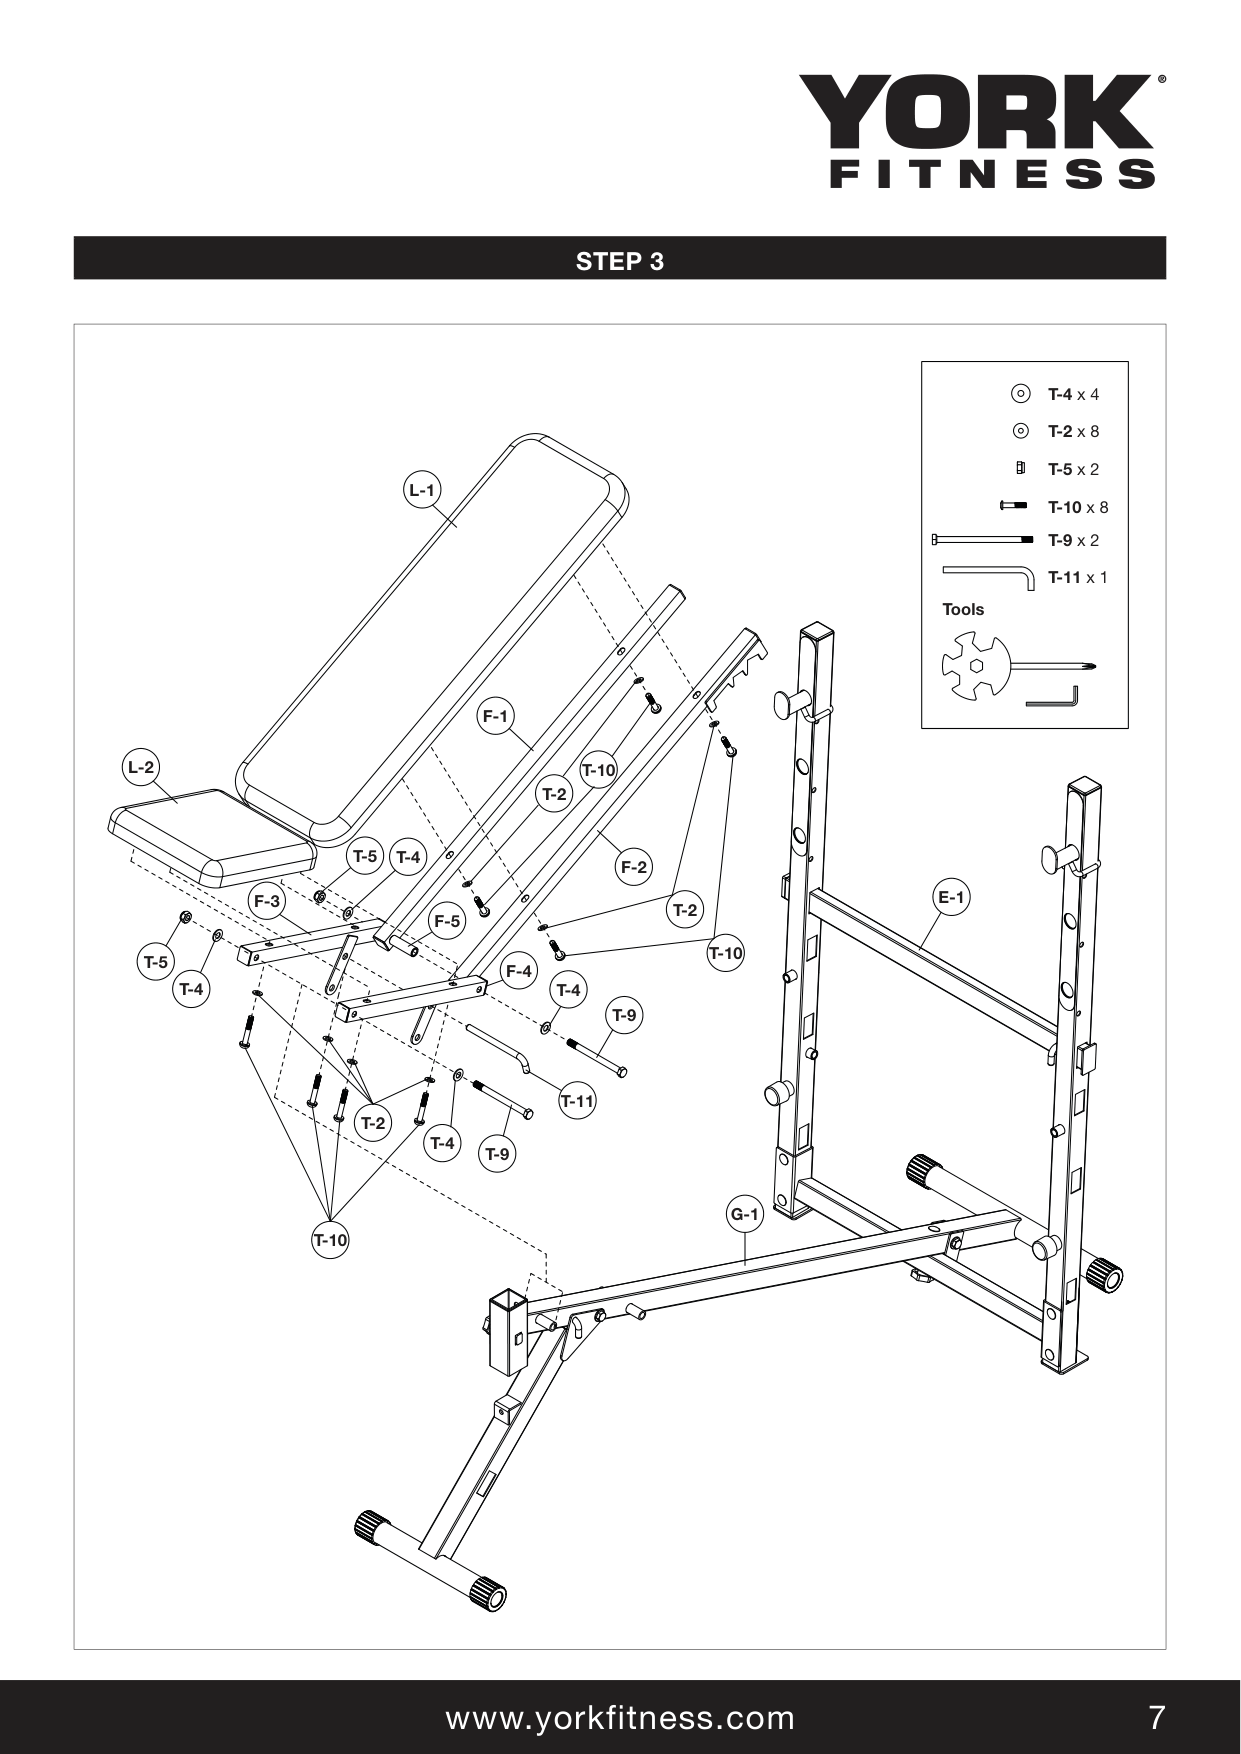
L-2
L-1
F-1
F-2
T-10
E-1
G-1
T-11
T-9
T-2
T-10
T-2
T-4
T-9
F-4
F-5
T-4
F-3
T-5
T-4
T-5
T-4
T-2
T-10
| |---|
||T-4 x 2
T-5 x 1
T-12 x 1
T-6 x 1
Tools| |---|
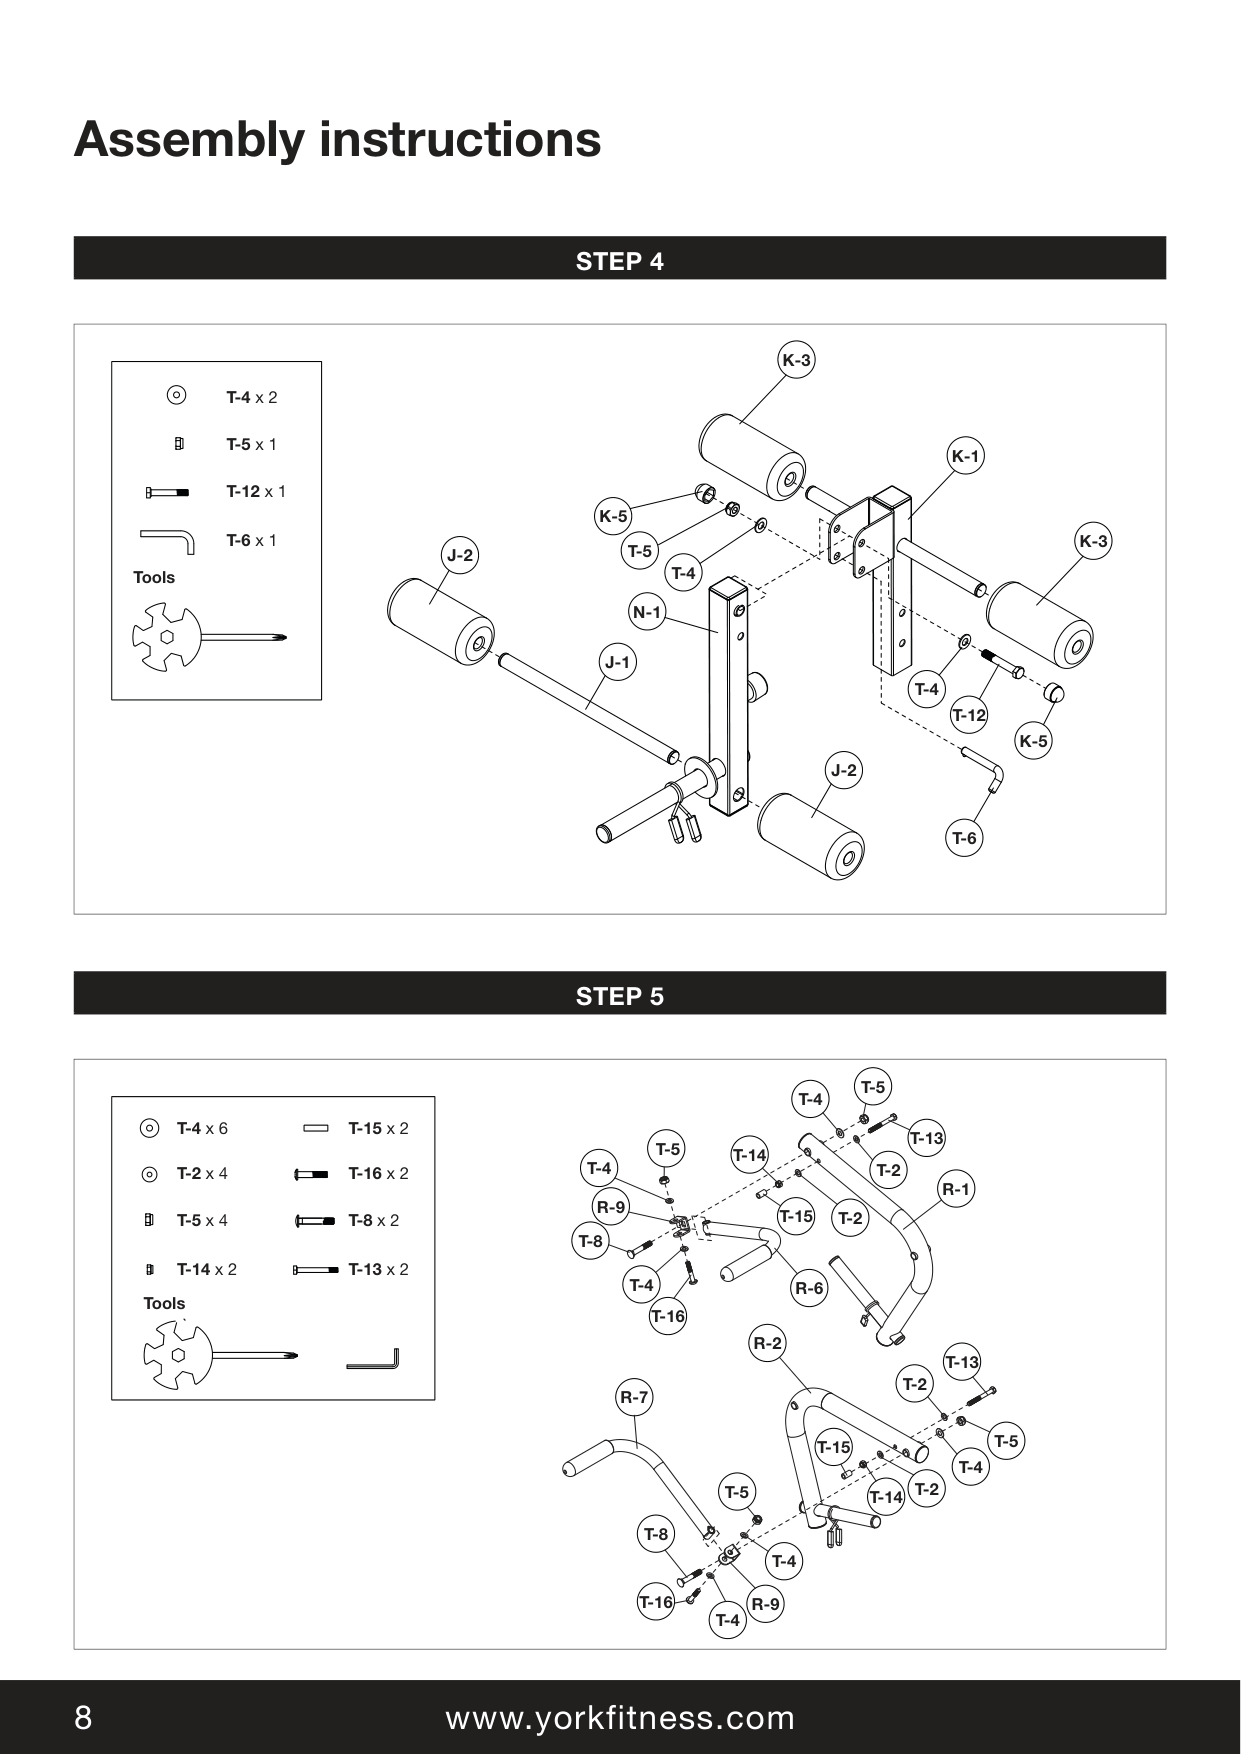
J-2
K-5
K-3
K-1
T-4
T-12
K-5
T-6
T-5
T-4 N-1
J-1
J-2
K-3
| |---|
|STEP 5| |---|
||T-5 x 4
Tools
T-2 x 4
T-4 x 6
T-14 x 2
T-8 x 2
T-16 x 2
T-15 x 2
T-13 x 2| |---|
T-8
T-16
T-4
R-9
T-4
T-15
T-14 T-2
T-5
T-2
T-13
R-2
R-7
R-6
T-2
T-14
T-5
T-2
T-13
R-1
T-4
T-15
T-16
T-4
T-8
R-9
T-4
T-5
T-4 T-5
| |---|
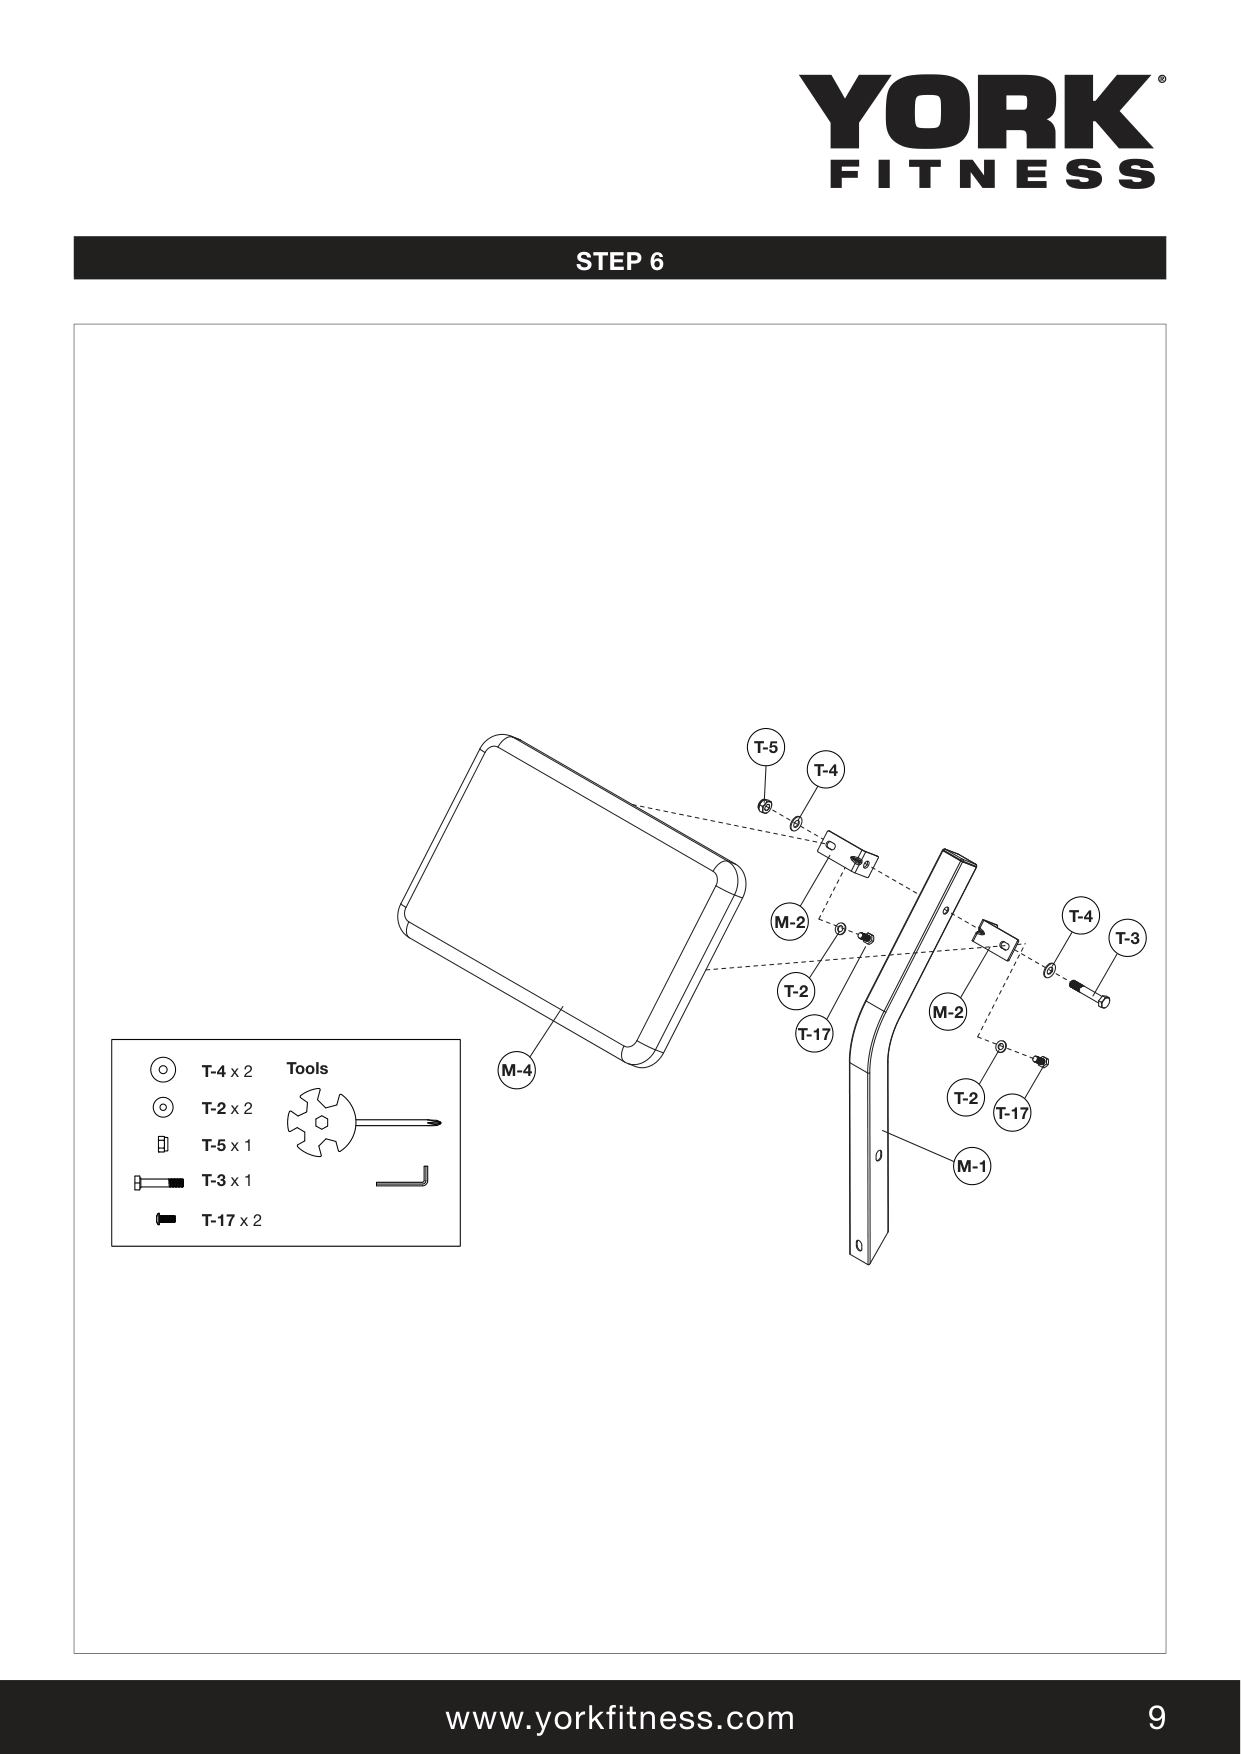
||ToolsT-4x 2
T-2 x 2 T-5 x 1
T-3 x 1 T-17 x 2
| |---|
T-5
T-4
T-4
T-3
M-2
T-2
T-17
M-1
M-4
M-2
T-2
T-17
| |---|
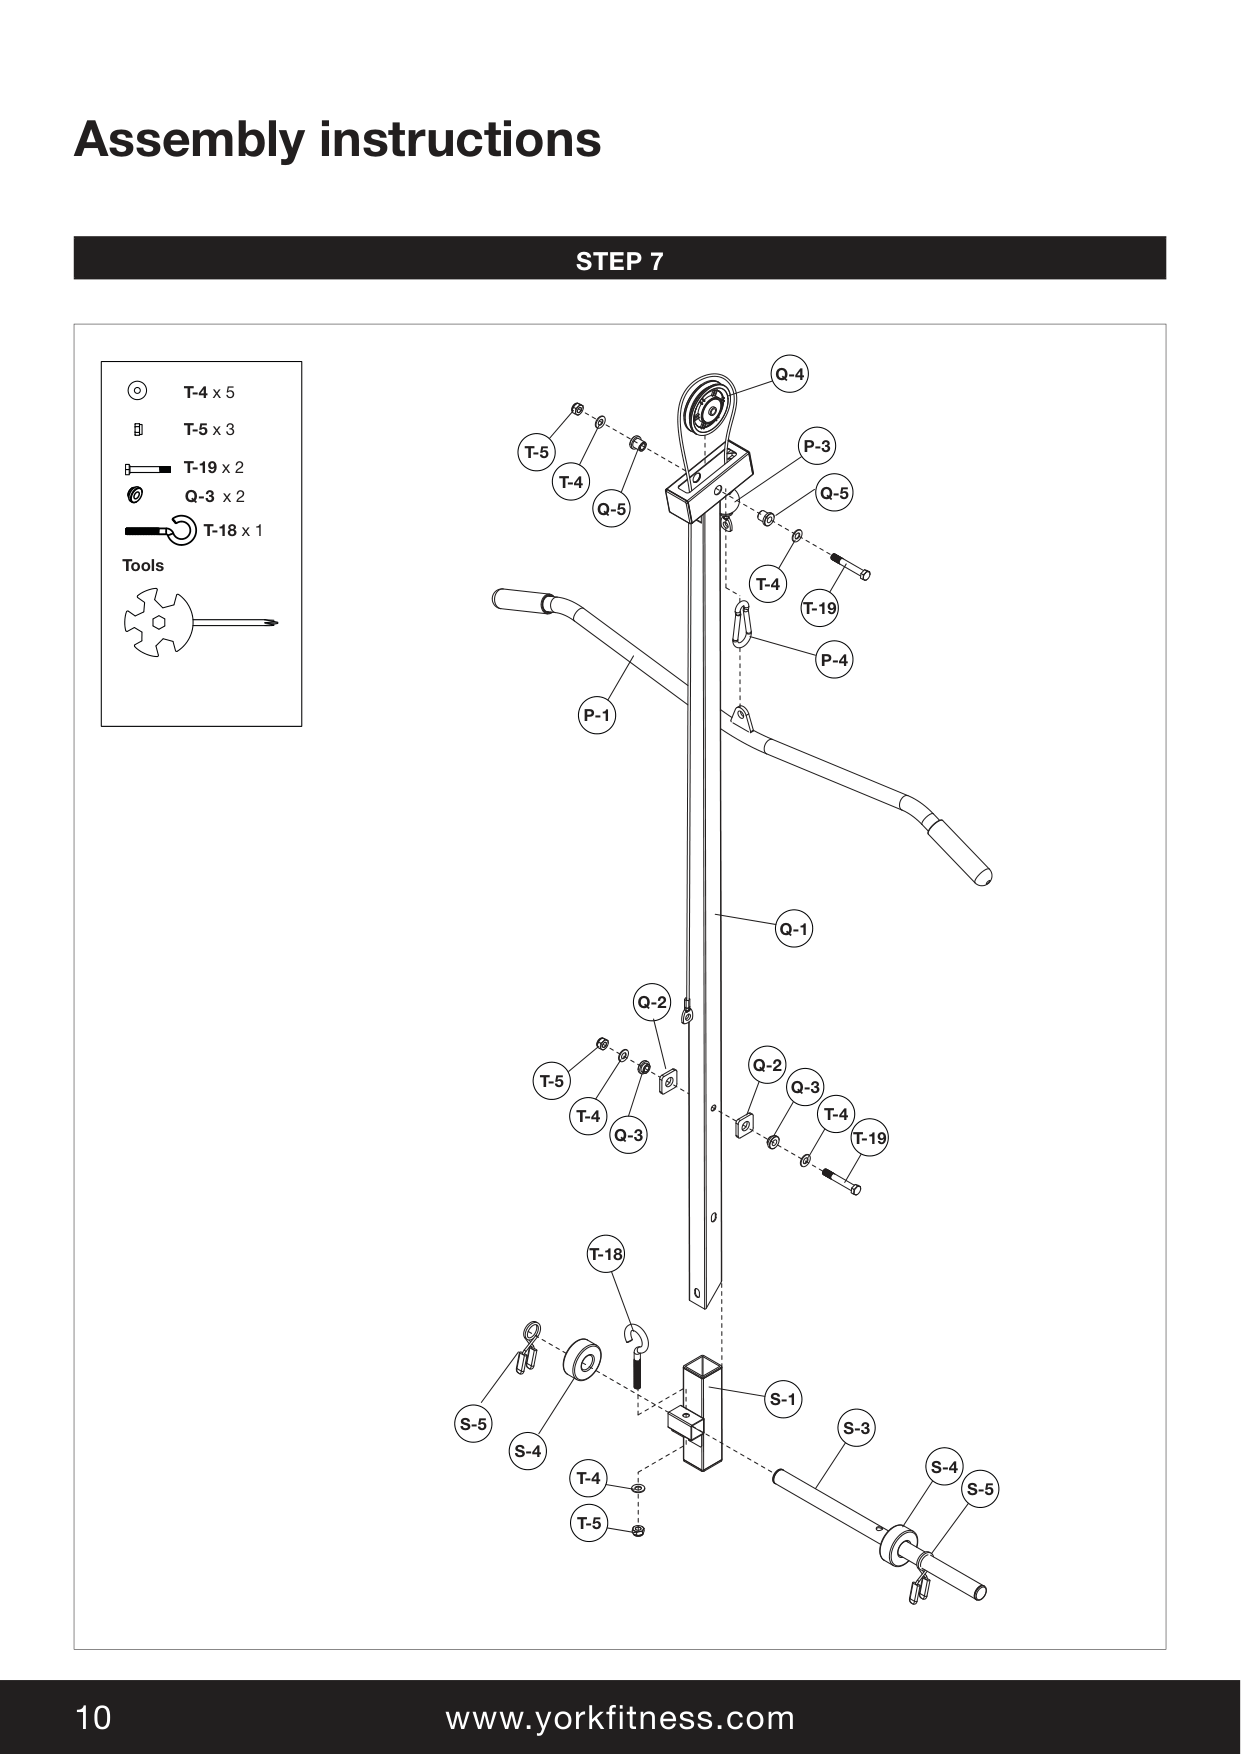
||T-19 x 2
T-5 x 3
T-4 x 5
Tools
Q - 3 x 2 T-18 x 1| |---|
T-5
T-4
Q-5
Q-4
P-3
T-4
T-19
P-4
P-1
Q-1
T-19
T-18
T-4
Q-3
Q-3
S-1
T-4
T-5
S-3
S-4
S-5
T-4
T-5
Q-2
Q-5
Q-2
S-5
S-4
| |---|
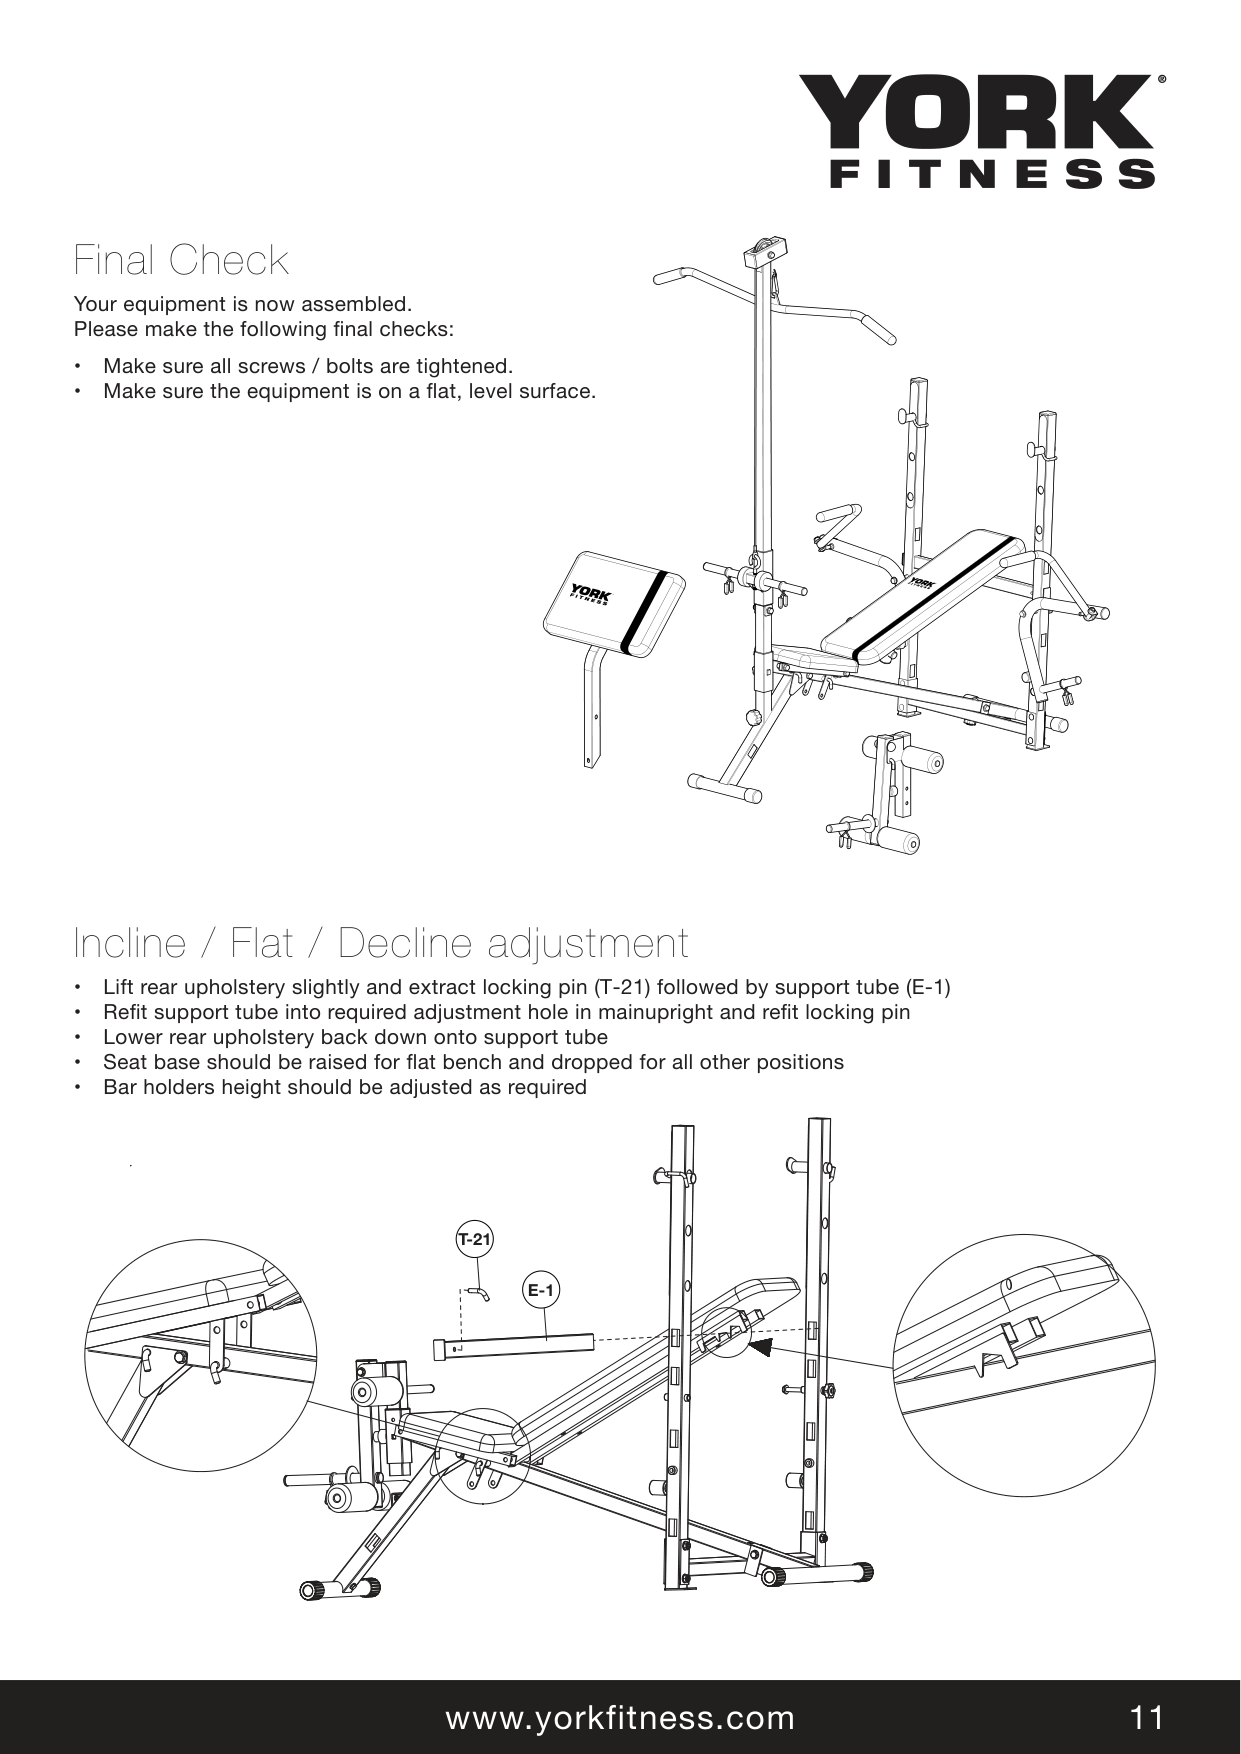
##### Final Check
Your equipment is now assembled. Please make the following final checks:
Incline / Flat / Decline adjustment
T-21
E-1
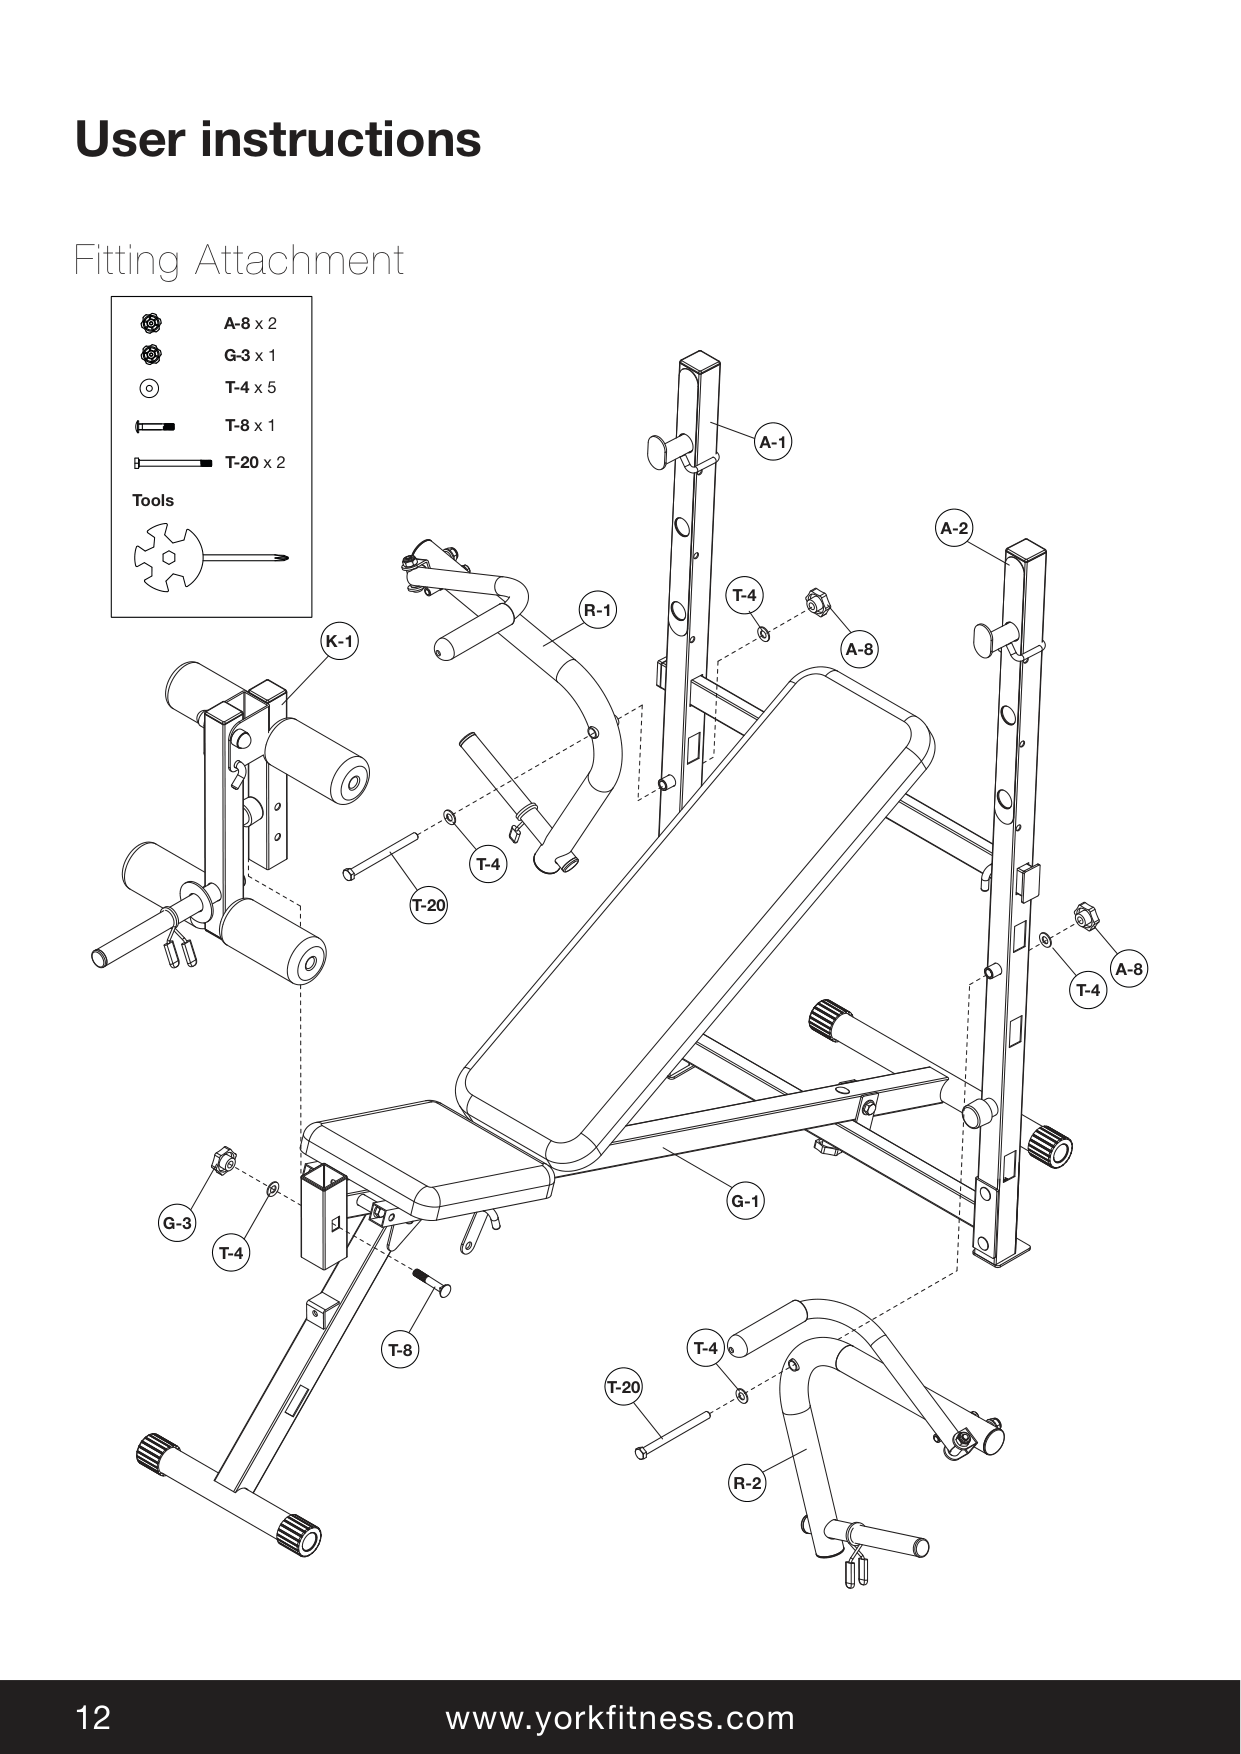
#### Fitting Attachment
|T-20 x 2
T-8 x 1
T-4 x 5
Tools
A-8 x 2 G-3 x 1
| |---|
K-1
R-1
A-1
T-4
A-8
A-2
T-20
T-4
A-8
T-4
G-3
T-4
T-8
G-1
T-20
T-4
R-2
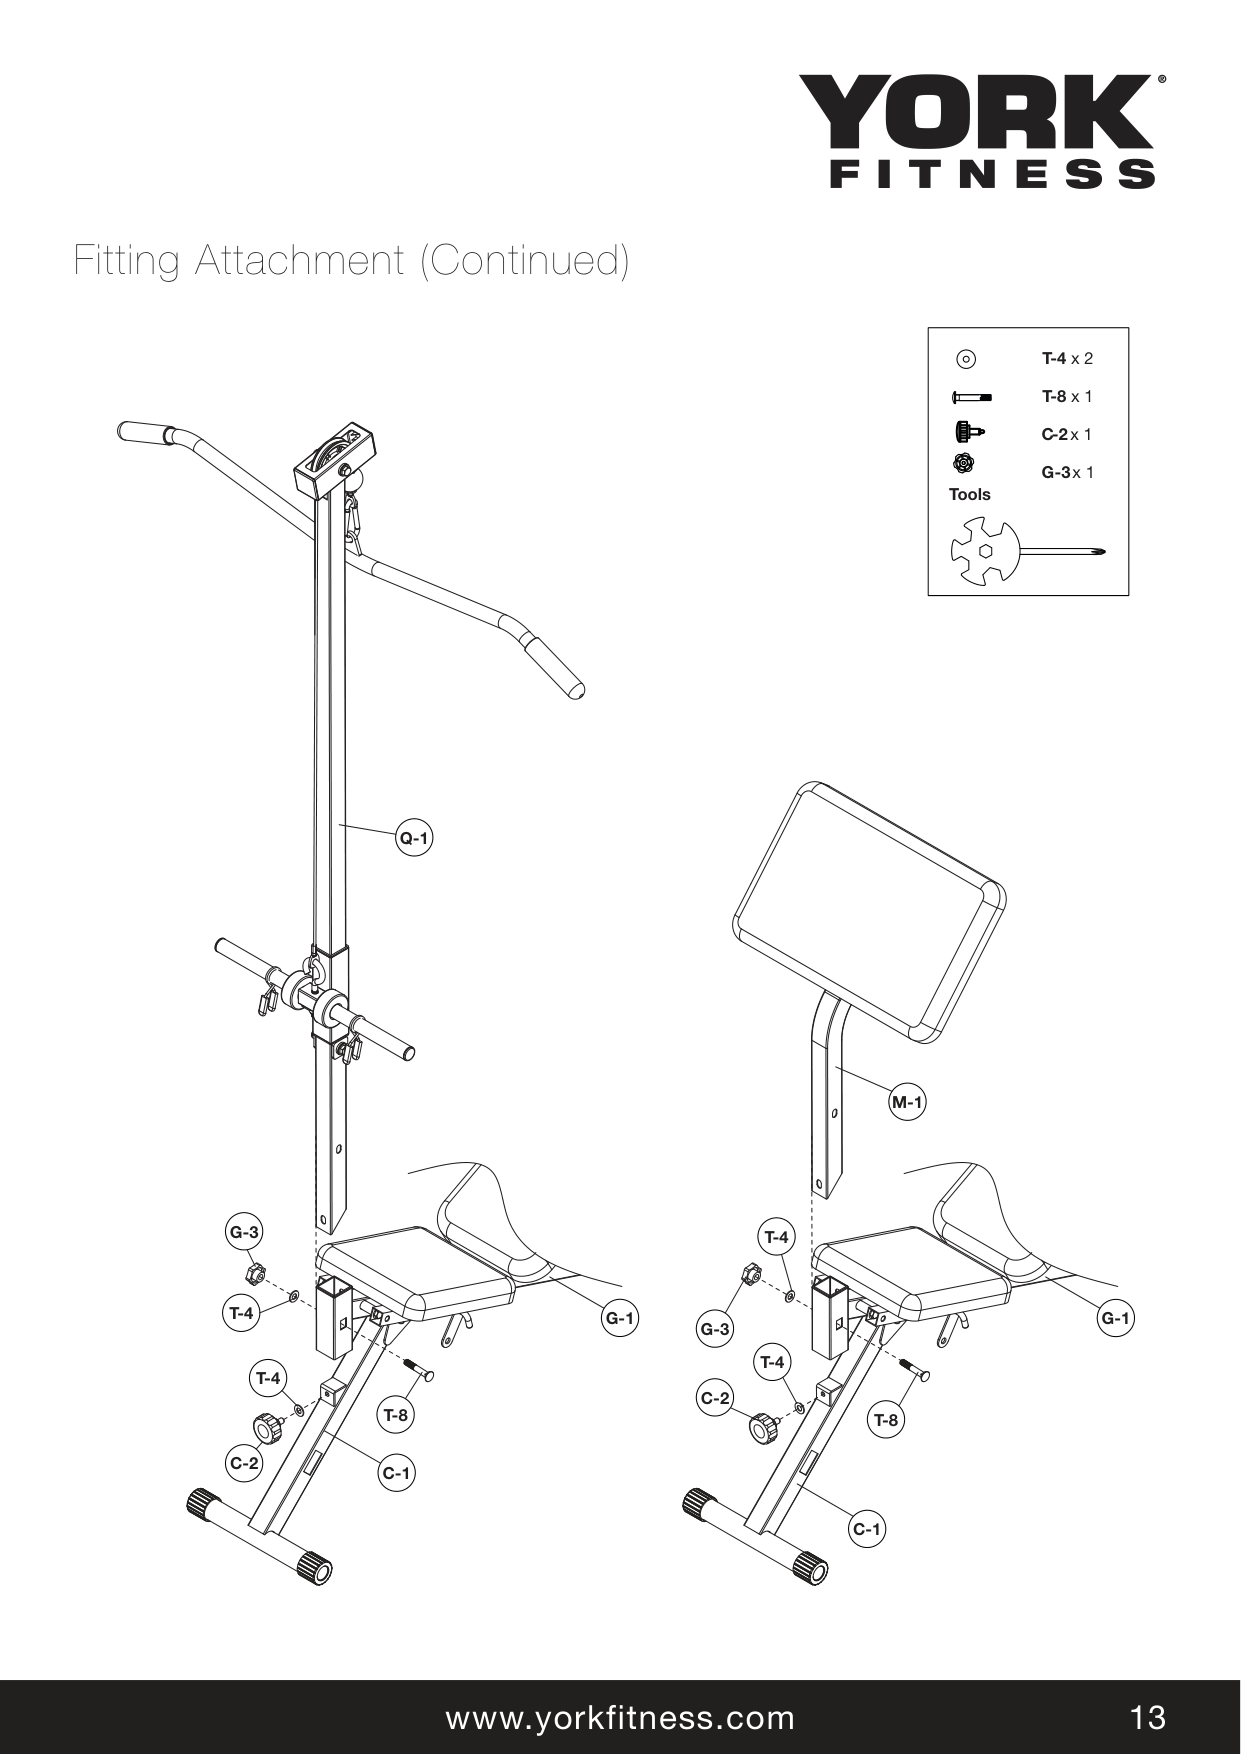
#### Fitting Attachment (Continued)
|T-8 x 1
T-4 x 2
Tools
G-3x 1
C-2x 1| |---|
Q-1
G-3
T-4
T-4
C-2
T-8
C-1
M-1
G-1
T-4
G-3
C-2
T-4
T-8
C-1
G-1
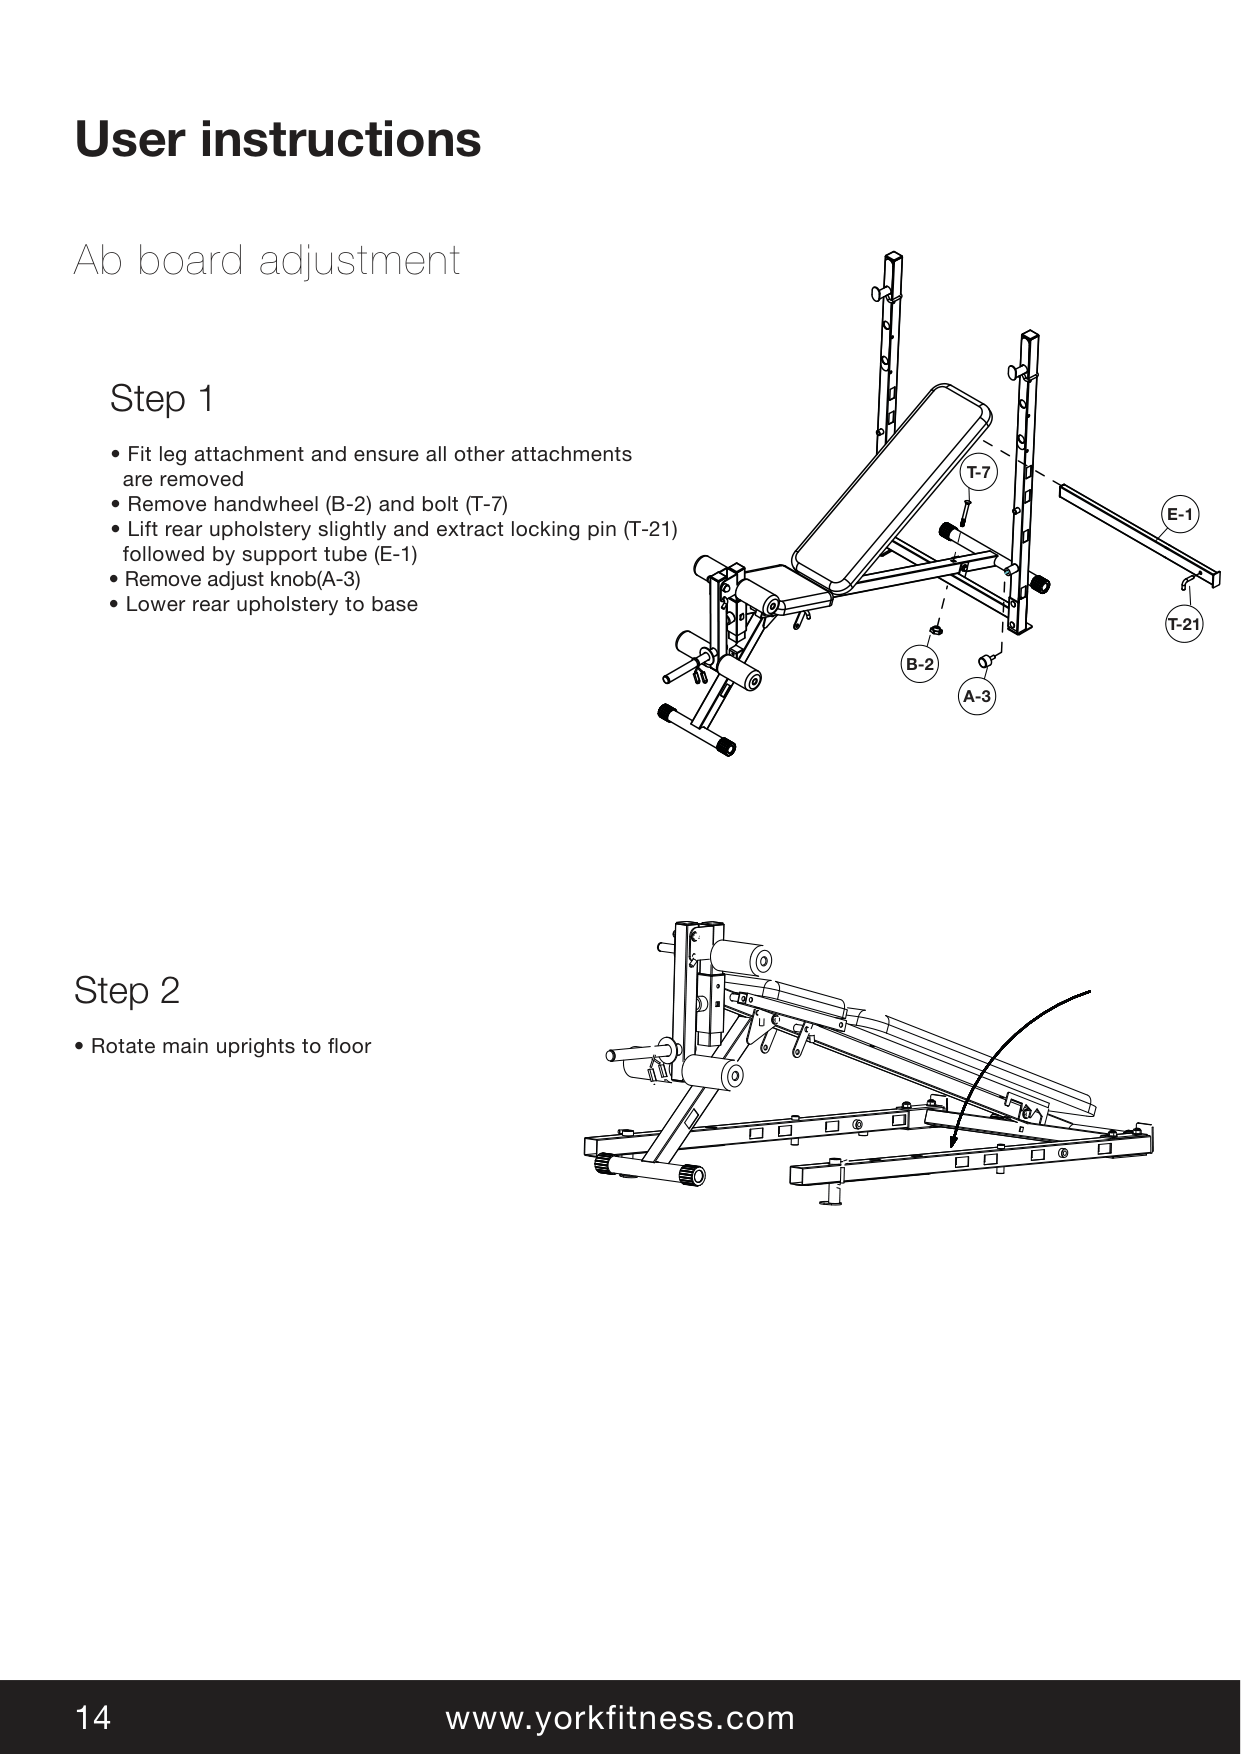
#### Ab board adjustment
• Rotate main uprights to floor
T-7
E-1
T-21
B-2
########## A-3
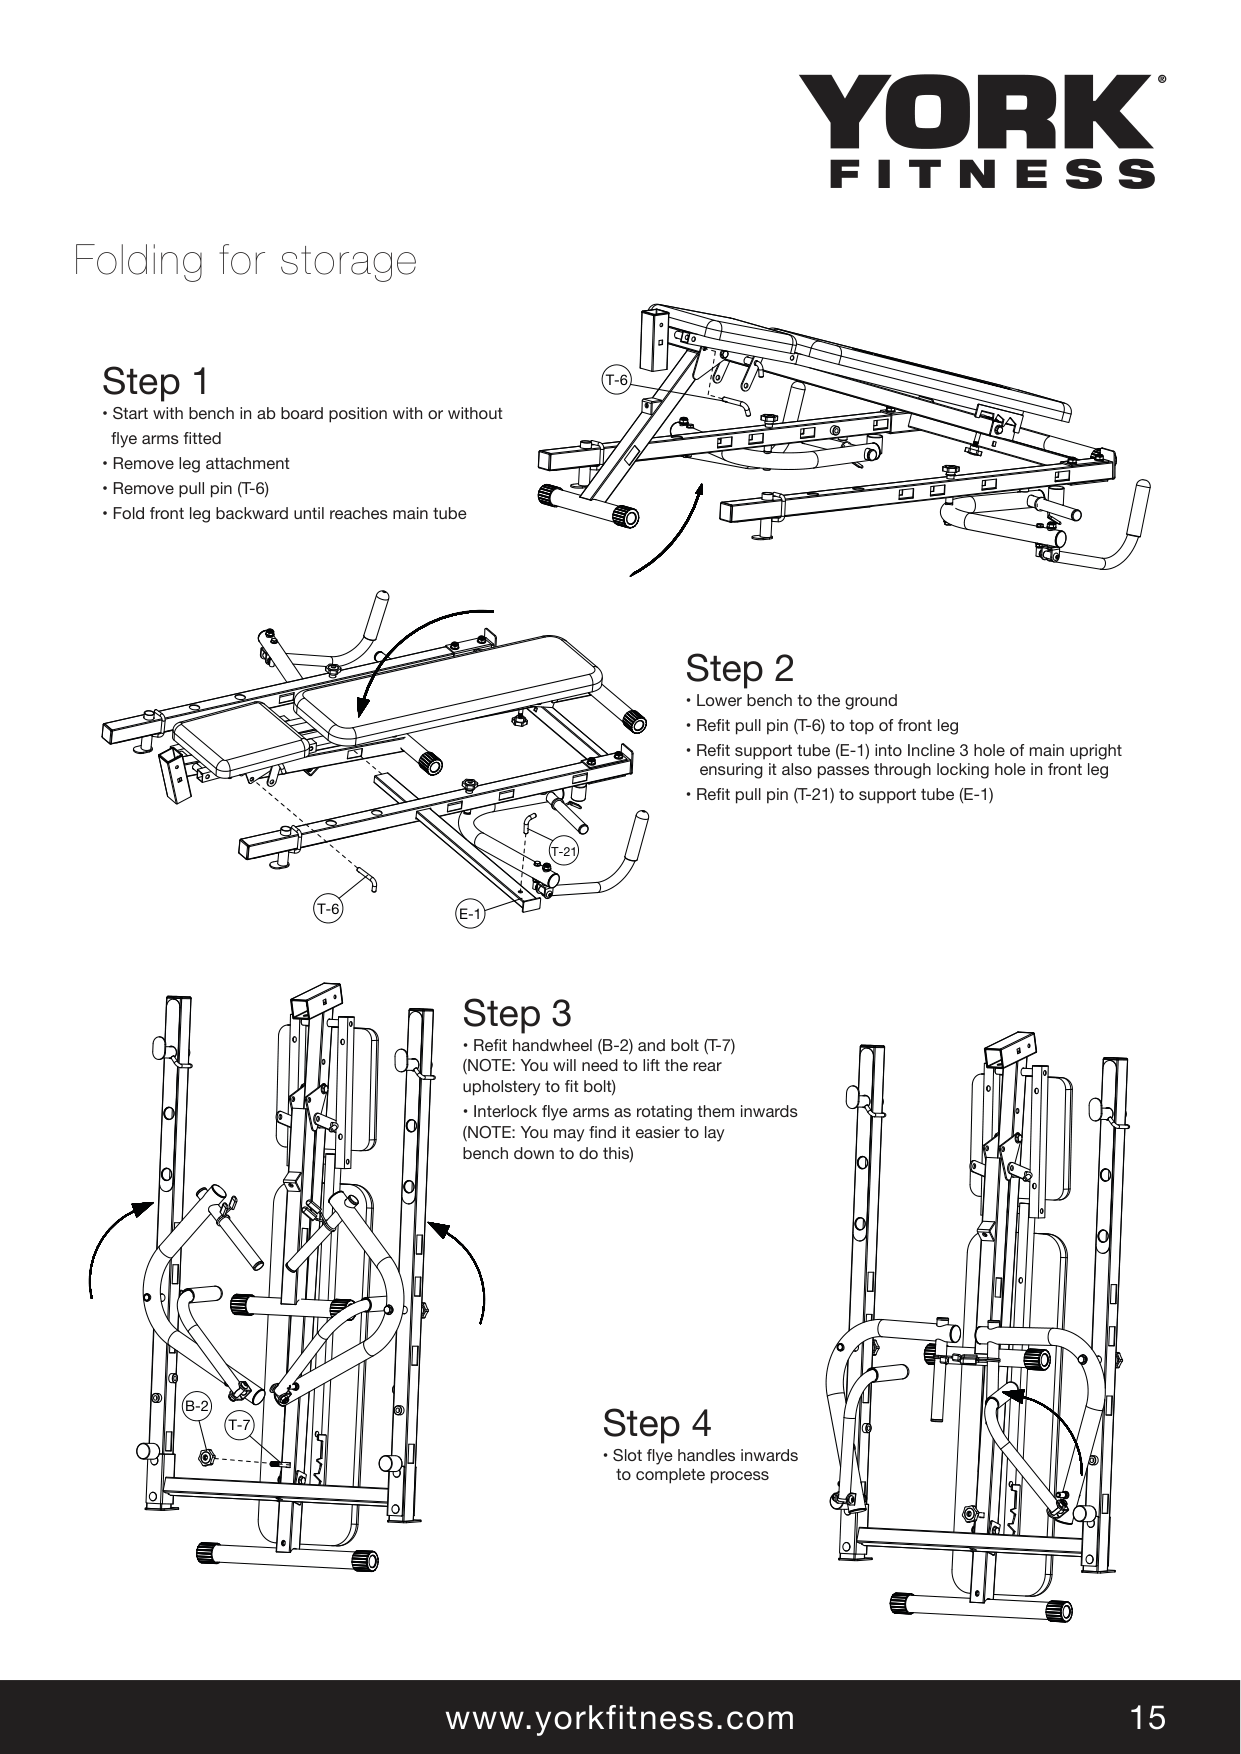
##### Folding for storage
###### Step 1
T-6
T-6
E-1
T-21
###### Step 2
###### Step 3
B-2
T-7
###### Step 4
• Slot flye handles inwards to complete process
Fitness guide
Starting Your Workout
Begin each workout with a Warm Up session - a few minutes of stretching to help prevent strains, pulls and cramps.
Finishing Your Workout
End each work-out with a warm down session – the purpose of this is to lower your heart rate slightly and to prevent strains, pulls and cramps.
Correct Exercising Form
##### Choosing Your Weights
Start with a weight you can perform 12 repetitions without crossing the line from ‘challenged’ to ‘struggle’. If you cannot maintain correct technique, the weight is too heavy!
Gradually increase the weight as you become stronger and more practiced.
##### Training for increased muscle size
Training for shape/definition
######### Please see the accompanying wall chart for guidelines on how to perform specific exercises...
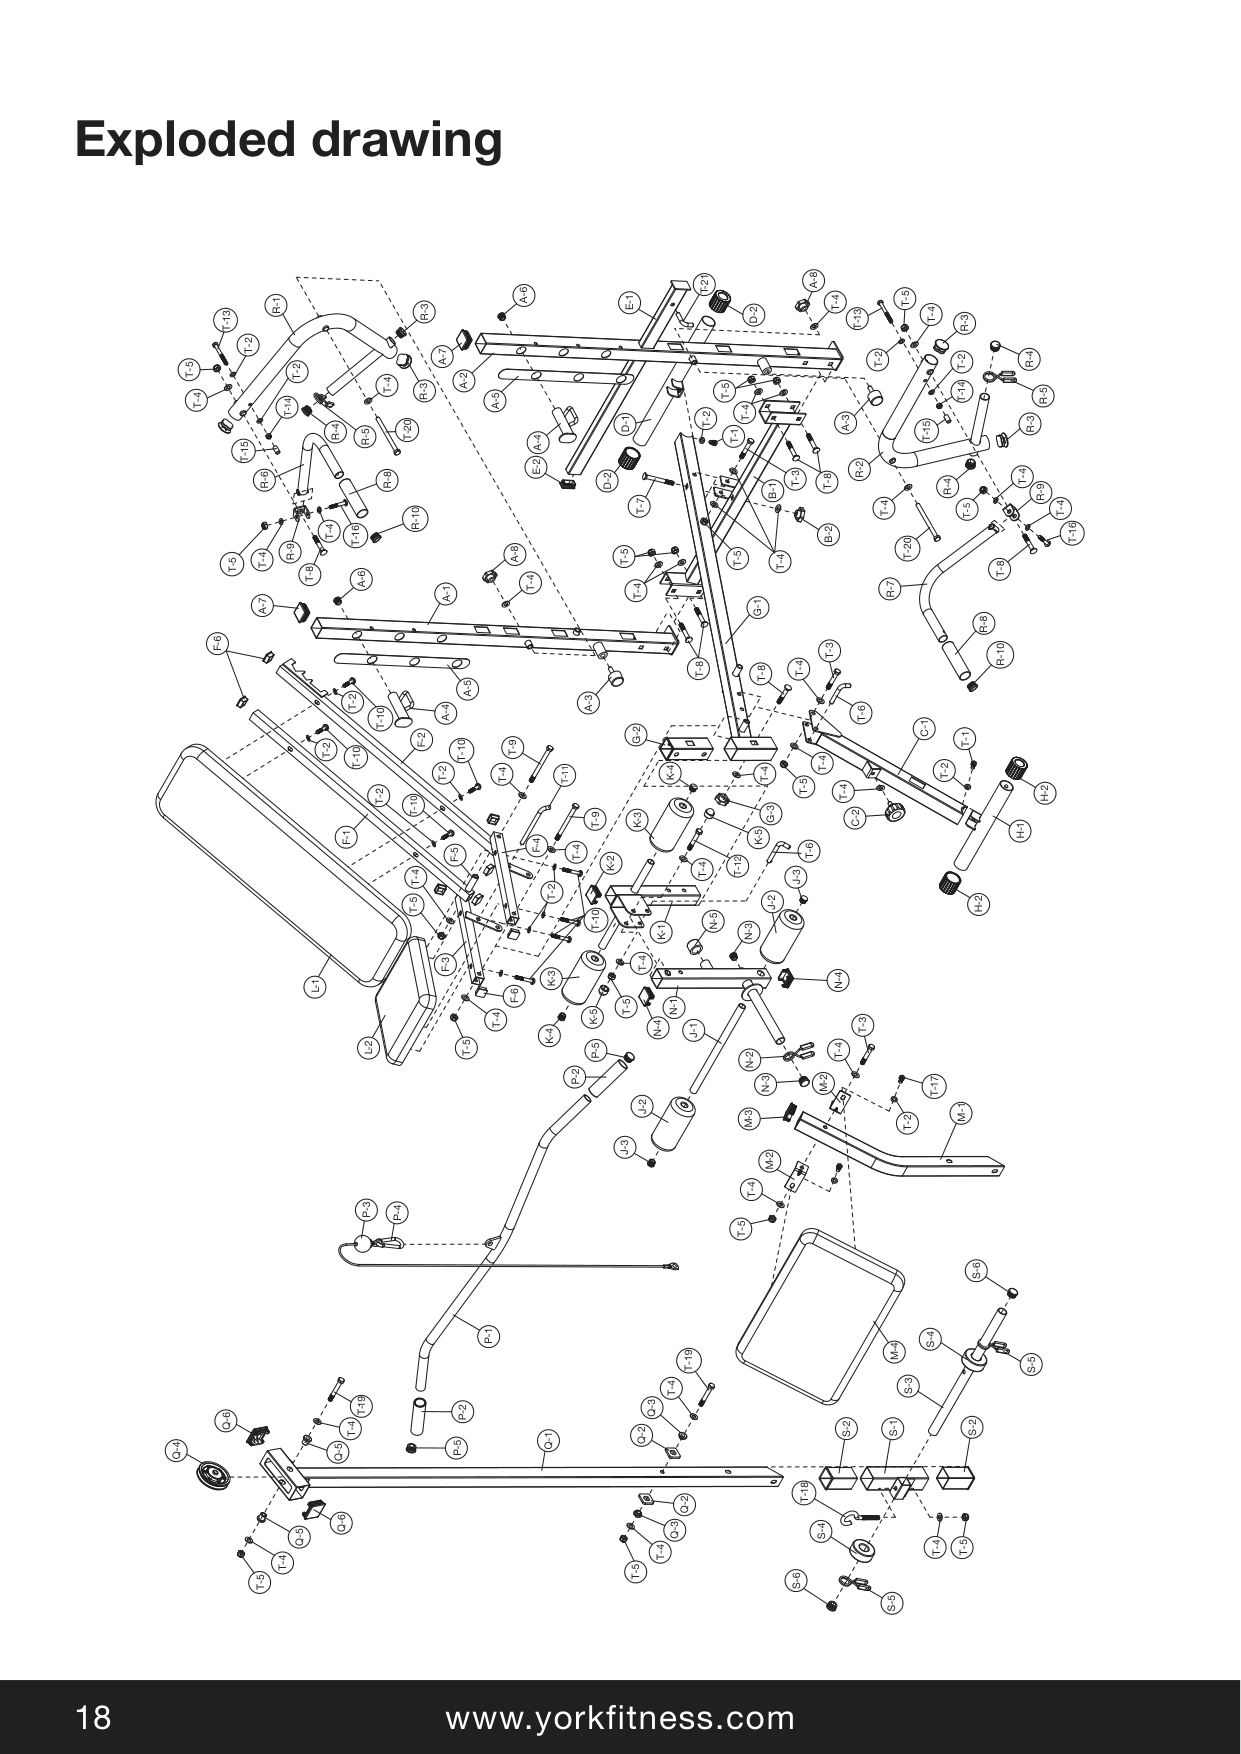
Exploded drawing
T-5
T-4
R-1
R-3R-3
T-13
T-2
A-7
T-2
A-2
T-4
T-14
T-20
T-16 R-4
R-5
T-15
R-6
R-8
R-10
T-4
R-9
T-4
T-5
T-8
A-6
A-1
A-7
F-6
T-2
T-2T-10 T-2T-10
F-1
A-5
A-4
F-2
T-10 T-2
T-10
T-5T-4
F-5
L-1
-3
L-2
T-5
P-3
P-4
A-8
T-21
A-6
T-5
T-4
D-2
D-2
H-1
H-2
H-2
T-4
T-13
R-3
T-2
T-2
T-14
T-5
A-5
T-4
T-2 T-8
A-3
T-15
T-5T-1
A-4
E-2
R-2
T-3 T-4
T-8
R-4
B-1
T-7
T-4
T- 5
B-2
T-20
A-8
T-8
T-4
R-7
G-1
R-8
T-4T-5
R-10
T-8T-4
A-3
T-6
C-1
G-2
T-1 T-2
T-9
K-4
T-11
T-4
T-4 M-2
G-3
C-2
T-9
K-3
K-5
F-4 F-6
T-6
T-4
K-2
T-12
T-4
J-3
T-2
J-2
T-10
N-5
N-3
K-1
T-4
K-3K-4
N-4
N-1
T-5
K-5
T-4
T-3
N-4
J-1
T-4
P-5
N-2
P-2
N-3
T-17
J-2 J-3
M-1
M-3
T-2
M-2
R-3R-4
R-5
T-4
R-9
T-4
T-16
T-4
T-5

S-6
Q-4
Q-6
T-19
T-4
Q-5
T-5
Q-5
T-4
Q-6
P-1
P-2 P-5
Q-1
Q-2 T-4
T-19
T-5
Q-3
T-4
M - 4
S-2
S-1
S-5
S-5
S-4 S-3
S-4
T-5
T-4
S-2
Part List
|YORK REF.|REF.|DESCRIPTION|QTY.| |---|---|---|---| |45065-001|A|VERTICAL POST SET| | |45065-002|A-1|RIGHT VERTICAL POST COMBINATION|1| |45065-003|A-2|LEF VERTICAL POST COMBINATION|1| |45065-004|A-3|ADJUST KNOB (Ø35*60*M10*20)|2| |45065-005|A-4|SUPPORT TUBE COMBINATION|2| |45065-006|A-5|CUSHION 1 (430*24*0.8)|2| |45065-007|A-6|CIRCLE CAP (Ø25*1.5)|2| |45065-008|A-7|SQUARE CAP (40X40X1.5)|2| |45065-009|A-8|PLUM KNOB (M10)|2| |45065-010|B|DOWN SUPPPORT SET| | |45065-011|B-1|DOWN SUPPPORT COMBINATION|1| |45065-012|B-2|PLUM KNOB (M10)|1| |45065-013|C|FRONT SUPPORT TUBE| | |45065-014|C-1|FRONT SUPPORT TUBE COMBINATION|1| |45065-015|C-2|SCREW (Ø51*47*M10*15)|1| |45065-016|D|REAR BOTTOM TUBE SET| | |45065-017|D-1|REAR BOTTOM TUBE|1| |45065-018|D-2|TAPER CAP (Ø38*1.5)|2| |45065-019|E|UP SUPPPORT SET| | |45065-020|E-1|UP SUPPPORT COMBINATION|1|

|45065-021|E-2|SQUARE CAP (40X20X2)|1| |45065-022|F|BACK TUBE SET| | |45065-023|F-1|BACK TUBE|1| |45065-024|F-2|LEFT BACK TUBE COMBINATION|1| |45065-025|F-3|RIGHT SEAT TUBE COMBINATION|1| |45065-026|F-4|LEFT SEAT TUBE COMBINATION|1| |45065-027|F-5|BACK CONNECTING TUBE|1| |45065-028|F-6|SQUARE CAP (25*25*1.5)|8| |45065-029|G|MAIN SET| | |45065-030|G-1|MAIN|1| |45065-031|G-2|BUSHING (42*42*1.5*130)|1| |45065-032|G-3|PLUM KNOB (M10)|1| |45065-033|H|FRONT BOTTOM TUBE SET| | |45065-034|H-1|FRONT BOTTOM TUBE|1| |45065-035|H-2|TAPER CAP|2| |45065-036|J|FOAM GRIP TUBE SET| | |45065-037|J-1|FOAM GRIP TUBE (Ø19*2 * 320 )|1| |45065-038|J-2|FOAM GRIP (Ø70*Ø17*140)|2| |45065-039|J-3|CIRCLE CAP (Ø19*1.5)|2| |45065-040|K|ADJUSTING BRACKET SET| | |45065-041|K-1|ADJUSTING BRACKET|1| |45065-042|K-2|SQUARE CAP (38*38*1.5)|1| |45065-043|K-3|FOAM GRIP (Ø70*Ø17*140)|2| |45065-044|K-4|CIRCLE CAP (Ø19*1.5)|2| |45065-045|K-5|END CAP (S17)|2| |45065-046|L|PAD SET| | |45065-047|L-1|BACK PAD (T40*800*250)|1| |45065-048|L-2|SEAT PAD (T40*270*250)|1| |45065-049|M|BRACKET TUBE SET| | |45065-050|M-1|BRACKET TUBE (38*38*2*625)|1| |45065-051|M-2|CONNECTING BOARD 1 (102*32*3)|2| |45065-052|M-3|SQUARE CAP (38*38*1.5)|1| |45065-053|M-4|GUARD PAD (T40*480*305)|1| |45065-054|N|SWING TUBE SET| | |45065-055|N-1|SWING TUBE|1| |45065-056|N-2|LOCK SPRING WASHER (Ø25*1.5)|1|
|YORK REF.|REF.|DESCRIPTION|QTY.| |---|---|---|---| |45065-057|N-3|CIRCLE CAP 2 (Ø25*1.5)|2| |45065-058|N-4|SQUARE CAP (38*38*1.5)|1| |45065-059|N-5|BUSHING (Ø25*1.5)|1| |45065-060|P|LONG PULL SET| | |45065-061|P-1|LONG PULL|1|

|45065-062|P-2|FOAM GRIP (Ø30*Ø23*115)|2| |45065-063|P-3|ROPE (1250)|1| |45065-064|P-4|HOOK (Ø7)|1| |45065-065|P-5|CIRCLE CAP (Ø25*1.5)|2| |45065-066|Q|PULL TUBE SET| | |45065-067|Q-1|PULL TUBE|1| |45065-068|Q-2|CONNECTING BOARD 1 (34*34*5)|2| |45065-069|Q-3|BUSHING 1 (Ø22*Ø10.2*9)|2| |45065-070|Q-4|ROLLER|1| |45065-071|Q-5|BUSHING (Ø22*Ø10.2*19)|2| |45065-072|Q-6|SQUARE CAP (50*50*1.5)|2| |45065-073|R|SWING ARM SET| | |45065-074|R-1|RIGHT SWING ARM SET|1| |45065-075|R-2|LEFT SWING ARM SET|1| |45065-076|R-3|CIRCLE CAP 1 (Ø38*1.5)|4| |45065-077|R-4|CIRCLE CAP 2 (Ø25*1.5)|4| |45065-078|R-5|LOCK SPRING WASHER (Ø25*1.5)|2| |45065-079|R-6|RIGHT PULL BAR|1| |45065-080|R-7|LEFT PULL BAR|1| |45065-081|R-8|FOAM GRIP (Ø30*Ø23*115)|2| |45065-082|R-9|U WASHER (92*25*3)|2| |45065-083|R-10|CIRCLE CAP (Ø25*1.5)|2| |45065-084|S|DRAW TUBE SET| | |45065-085|S-1|DRAW TUBE|1| |45065-086|S-2|BUSHING 1 (42*42*1.5*80)|2| |45065-087|S-3|SHORT PULL BAR (Ø25*2*455)|1| |45065-088|S-4|CUSHION (Ø75*Ø26*12)|2| |45065-089|S-5|LOCK SPRING WASHER (Ø25*1.5)|2| |45065-090|S-6|CIRCLE CAP 4 (Ø25*1.5)|2| |45065-091|T|HARDWARE SET| | |45065-092|T-1|HEX BOLT (M8*15)|2| |45065-093|T-2|FLAT WASHER (D8.5*Ø16*1.5)|16| |45065-094|T-3|HEX BOLT (M10*60)|3| |45065-095|T-4|FLAT WASHER (D10.5*Ø21*1.5)|33| |45065-096|T-5|NYLON NUT (M10)|19| |45065-097|T-6|MARBLE BOLT (Ø10*95)|2| |45065-098|T-7|CARRIAGE BOLT (M10*85)|1| |45065-099|T-8|CARRIAGE BOLT (M10*60)|7| |45065-100|T-9|HEX BOLT (M10*170)|2| |45065-101|T-10|CROSS PAD HEAD SCREW (M8*40)|8| |45065-102|T-11|MARBLE BOLT 1 (Ø10*155)|1| |45065-103|T-12|HEX BOLT (M10*65)|1| |45065-104|T-13|HEX BOLT (M8*70)|2| |45065-105|T-14|NYLON NUT (M8)|2| |45065-106|T-15|BUSHING (Ø11.5*20*M8)|2| |45065-107|T-16|CROSS PAD HEAD SCREW (M10*45)|2| |45065-108|T-17|HEX BOLT (M8*20)|2| |45065-109|T-18|HOOK (Ø10*180)|1| |45065-110|T-19|HEX BOLT (M10*70)|2| |45065-111|T-20|HEX BOLT (M10*125)|2| |45065-112|T-21|MARBLE BOLT 1 (Ø10*67)|1|
####### www.yorkfitness.com