
Apple Set UP Icloud Drive ON Iphone Apple Support
Ask AI
— answers from the official manualAnswers from the official manual.
Common questions
Common Questions
8 totalWhat services can I activate with iCloud on my Mac?
The options available under iCloud System Preferences include Mail, Contacts, Calendars & Tasks (combined), Safari bookmarks and tabs, Notes, Photo Stream, Documents and Data, Find My iPhone, and Back to My Mac.
How do I create a new Apple ID specifically for iCloud?
Navigate to Settings > iCloud > Get a Free Apple ID. Alternatively, on your Mac, choose System Preferences > iCloud and click 'Create an Apple ID'. Fill in the required information including location, date of birth, names, email address (you can get a free iCloud address), password, security question and answer.
What steps are needed to set up iCloud on Windows?
First, install the iCloud Control Panel from support.apple.com/kb/DL1455. Launch the control panel, sign in with your Apple ID and password. Then choose which iCloud features you want to activate such as Mail, Contacts, Calendars & Tasks, Bookmarks, Photo Stream.
Do I need Outlook installed on Windows to use iCloud Calendar?
To sync calendars and tasks with Outlook on a PC running Windows Vista or later, you must have Microsoft Office including Outlook locally installed. If using Click To Run installation for Outlook, this won't work with iCloud.
What happens when I turn off an app in iCloud?
When turning off an app like Mail, Contacts, or Calendars via the iCloud interface on your iOS device or Mac, you are given options to keep the data locally on that device only or keep it solely on iCloud for access from other devices.
How do I set up Photo Stream in iCloud?
For your Mac, enable Photo Stream via a checkbox within iCloud settings. For iOS devices, go to Settings > iCloud and tap on Photo Stream to set it up for uploading photos you take directly to iCloud.
Full Manual
18 pages
Chapter 1
Getting Started with iCloud
In This Chapter
▶ Understanding iCloud
▶ Creating an iCloud account
▶ Signing in with an existing Apple ID
▶ Turning iCloud Services on and off
▶ Setting up iCloud in Windows
In the simplest of terms, iCloud, a free Apple service that’s
built-in to both the iOS and Mac operating systems, allows you to share data and documents between iOS devices, or between iOS devices and a Mac or PC. If you have an iPhone, iPad, or iPod touch running iOS 5 or later; and a computer running OS X Lion 10.7.2 or later, or Windows Vista or later with Outlook 2007 or 2010 and the iCloud Control Panel installed, you can use iCloud.
Often, when you hear terms like sharing, synching, and remote storage, however, suspicion arises. Questions start popping into your head: Where is my data really going? Who can see it? Will I lose it? Just what exactly is stored? This chapter aims to answer those questions and show you how to set up iCloud to work to your best advantage.
Although iCloud is easy to use and mostly transparent after you have it up and running, there are a few variations in the setup that depend on the type of devices you use, the type of Apple ID you have, and how you want to use iCloud.
Understanding iCloud
Here are a couple of things you should know about what iCloud does and doesn’t do:
✓ Provides backup protection: Use iCloud to back up your iOS devices instead of using iTunes. The backup file is stored remotely on iCloud instead of on your computer.
✓ Allows you to work on multiple iOS devices: Upload documents from your computer and then access them from your other devices. Having said that, you can’t back up your computer to iCloud.
✓ Automatically syncs your data: iCloud syncs data, such as address books and calendars, between devices. A useful feature (that can, admittedly, be a little complicated) is that you can choose to sync some things on one device and others on another.
The best part about iCloud synching is that it’s automatic, which means when you make a change on one device, the information is shared to your other iCloudenabled devices immediately:
Unlike remote storage services (such as SugarSync or Dropbox), where you can store whatever kind of documents you want, Documents in the cloud stores and syncs only those documents created with iCloud-enabled apps. You have 5GB of free storage with your iCloud account and can purchase additional storage, which is explained in Chapter 6.
The following apps are iCloud-enabled:
✓ Contacts
✓ Mail accounts and messages
✓ Messages
✓ Notes
✓ Reminders
✓ Calendars
✓ Safari bookmarks and tabs (and Internet Explorer
bookmarks)
✓ Photos, when Photo Stream is activated
✓ iWorks suite: Pages, Keynote, and Numbers
✓ Find My iPhone (works for iPad and iPod touch) and Find
My Mac
✓ Find My Friends
✓ Back to My Mac (gives you remote access to your Mac)
Third-party developers can, and probably will, build iCloudsupport into apps sold at the App Store so that data associated with those apps can be pushed to all your devices via iCloud and documents created in those apps can be stored in iCloud and accessed from all your devices. Go to www.dummies.com/ go/inaday/icloudanditunesmatch to see a list of iCloudenabled third-party apps.
Your data is available on all devices continuously and in real time as long as you have an Internet connection. Synchronization allows you to begin an activity on one device
and continue it on another. For example, you can begin a conversation in Messages on your Mac and then continue it on your iPhone later. Or, you can outline presentation ideas in Keynote on your iPad and then fine-tune it on the larger screen and more robust version of Keynote on your Mac.
Your data is physically stored on Apple’s iCloud server (somewhere in North Carolina) that can be decrypted by Apple if requested by a governing body that can legally make such a request. If you have highly sensitive information that could put you, or your company, at risk, iCloud might not be for you. If you’re worried about sharing too much information, use iCloud only for sharing music on iTunes and banal items, like grocery lists.
As for losing your data, iCloud helps you avoid that painful scenario. You do want to pay attention if you turn iCloud off for specific apps, and I talk about that in Chapter 2.
Creating an iCloud Account
To create an iCloud account, you need an Apple ID and password. You have to create an iCloud account but once and then use the same Apple ID and password to activate iCloud for each of your devices. You have two options:
✓ Create a new Apple ID and password.
✓ Use your existing Apple ID.
If yourApple ID uses an e-mail address format, such as lilypond429@gmail.com or babsboyd@me.com, you can use that for your iCloud account and skip ahead to the section “Signing In with an Existing Apple ID.”
However, if your Apple ID is a name — say, LilyPond — you can’t use it for iCloud, and you have to create a new Apple ID that works with iCloud. Apple doesn’t offer a way to change your existing Apple ID or merge two Apple IDs. You use the iCloud account for iCloud operations and the other Apple ID for operations associated with it, such as purchases at the iTunes Store.
If you do end up with multiple Apple IDs, you can associate them all with your Mac by going to ➪System Preferences➪ Users and Groups. Click Change (next to Apple ID) and then click the Add (+) button. Type the Apple ID and password for the account that you want to add. That way when you sign in to iCloud or the iTunes Store, your Mac is recognized by the associated account.
You can create your iCloud account and Apple ID from your iOS device or from your Mac as follows:
✓ On your Mac, choose ➪System Preferences, click the iCloud icon in the Internet & Wireless section, and then click Create an Apple ID.
✓ On your iOS device (connected to Wi-Fi), choose

Settings➪iCloud, and then tap Get a Free Apple ID.
If you’re using an iOS device and a computer with Windows, create the Apple ID on the iOS device and then go to the section “Setting up iCloud in Windows” to finish setting up iCloud on Windows.
At this point, whichever way you choose to create an Apple ID, the information you need to provide is the same although the order in which it’s requested and the appearance of the screens change slightly:
✓ Location: Apple uses this information to present you with the correct localized Terms and Conditions and to activate the Find My Device service.
✓ Date of birth: Apple uses this to determine appropriate services and retrieve your password if you forget it.
✓ First and last name: Fill in your first and last name.
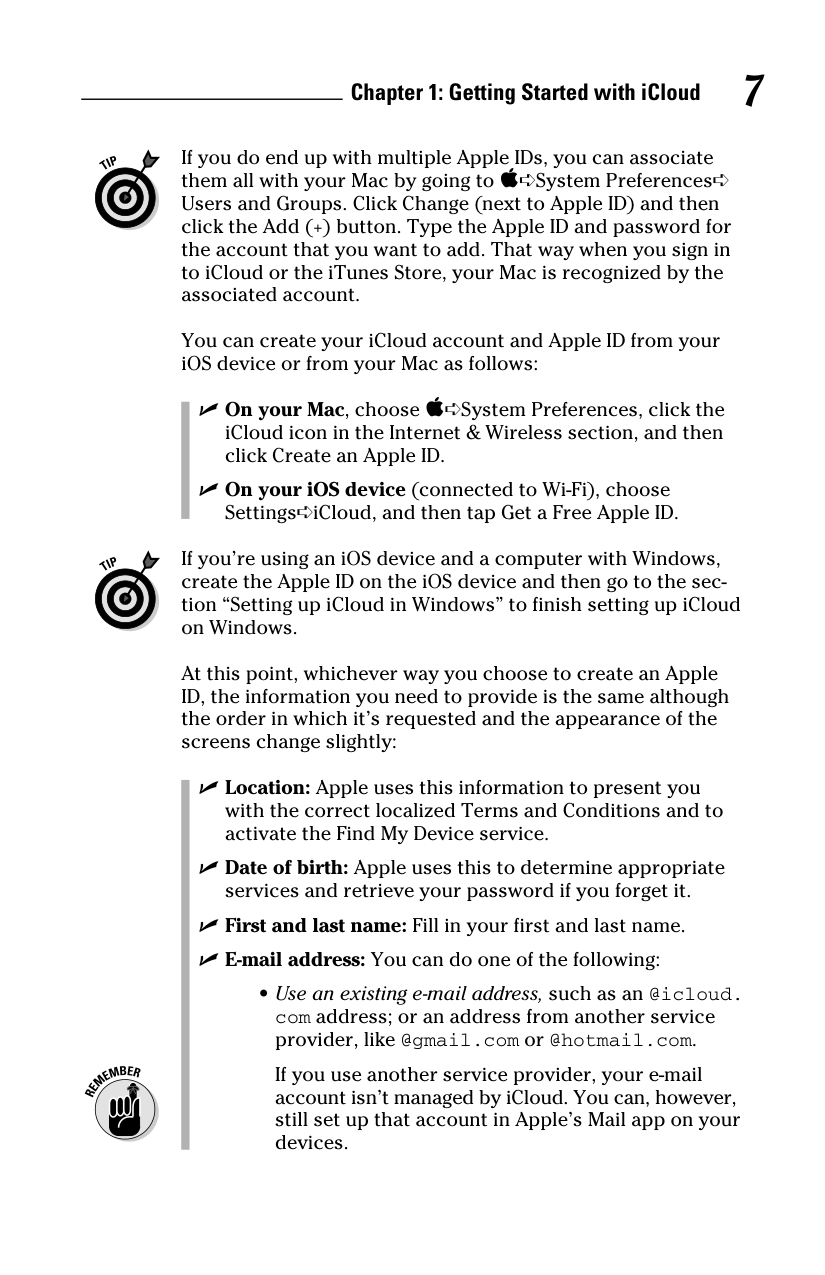
✓ E-mail address: You can do one of the following:
If you use another service provider, your e-mail account isn’t managed by iCloud. You can, however, still set up that account in Apple’s Mail app on your devices.
The choices appear as in Figure 1-1, depending on your device.
|| |---|
If you have an @me.com or @mac.com e-mail address, you received a message from Apple in September 2012 that an @icloud.com address had been created for you with the same suffix as your @me.com or @mail.com account. The same password works with both accounts. Use the @icloud.com address to set up iCloud.
✓ Password: The password must be at least eight characters and include at least one number, one uppercase letter, and one lowercase letter: for example, jofLY135. It may also include punctuation, but not spaces.
✓ Security question and answer: This question-and-answer pair is used to authenticate your request for a lost or forgotten password.
✓ E-mail updates: On your iOS device, set whether you want e-mail from Apple about news, software updates, and products. You can choose On or Off.
After filling in this information and then tapping Next (iOS) or clicking Continue (Mac), click or tap Agree on the Terms and Conditions screen. You are asked to click or tap Agree again to confirm.
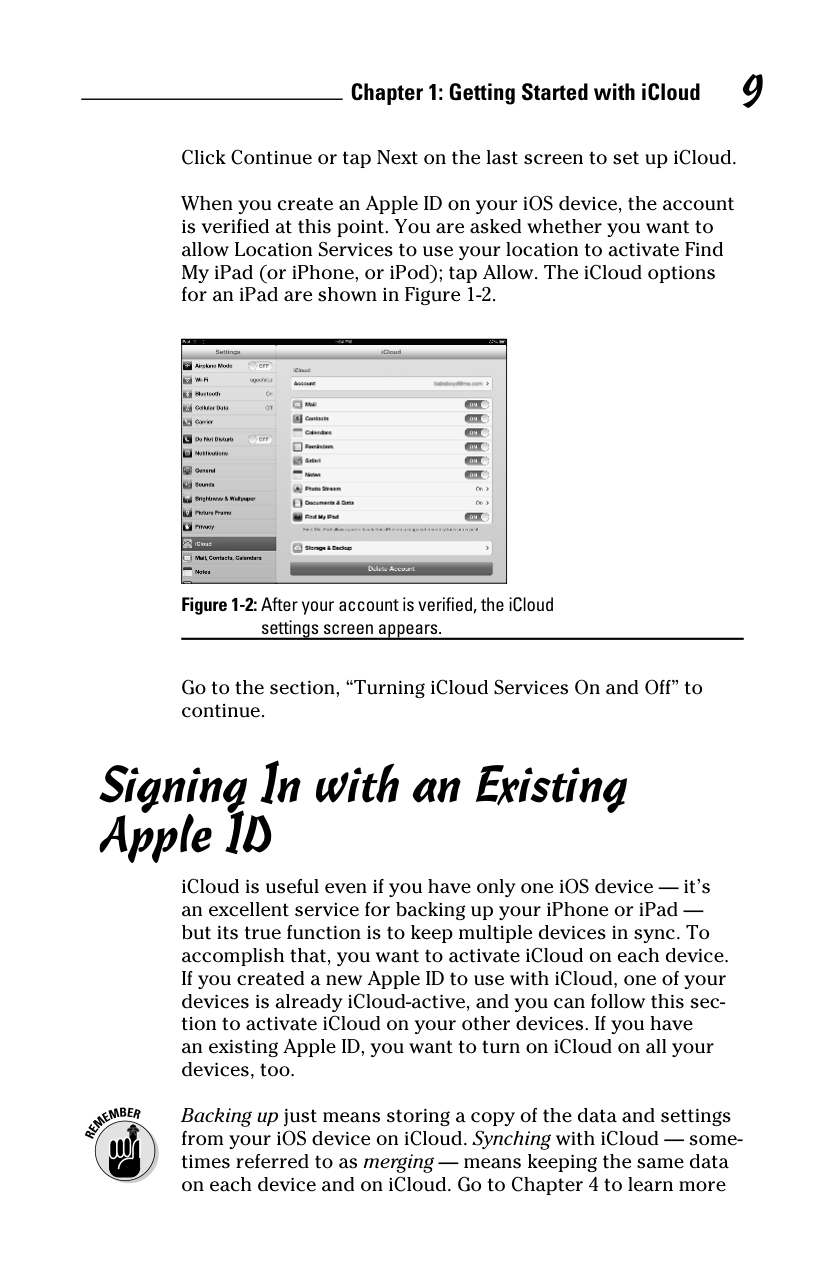
Click Continue or tap Next on the last screen to set up iCloud. When you create an Apple ID on your iOS device, the account is verified at this point. You are asked whether you want to allow Location Services to use your location to activate Find My iPad (or iPhone, or iPod); tap Allow. The iCloud options for an iPad are shown in Figure 1-2.
|| |---|
Go to the section, “Turning iCloud Services On and Off” to continue.
Signing In with an Existing Apple ID
iCloud is useful even if you have only one iOS device — it’s an excellent service for backing up your iPhone or iPad but its true function is to keep multiple devices in sync. To accomplish that, you want to activate iCloud on each device. If you created a new Apple ID to use with iCloud, one of your devices is already iCloud-active, and you can follow this section to activate iCloud on your other devices. If you have an existing Apple ID, you want to turn on iCloud on all your devices, too.
Backing up just means storing a copy of the data and settings from your iOS device on iCloud. Synching with iCloud — sometimes referred to as merging — means keeping the same data on each device and on iCloud. Go to Chapter 4 to learn more
about using iCloud to back up and restore data from your iOS devices.
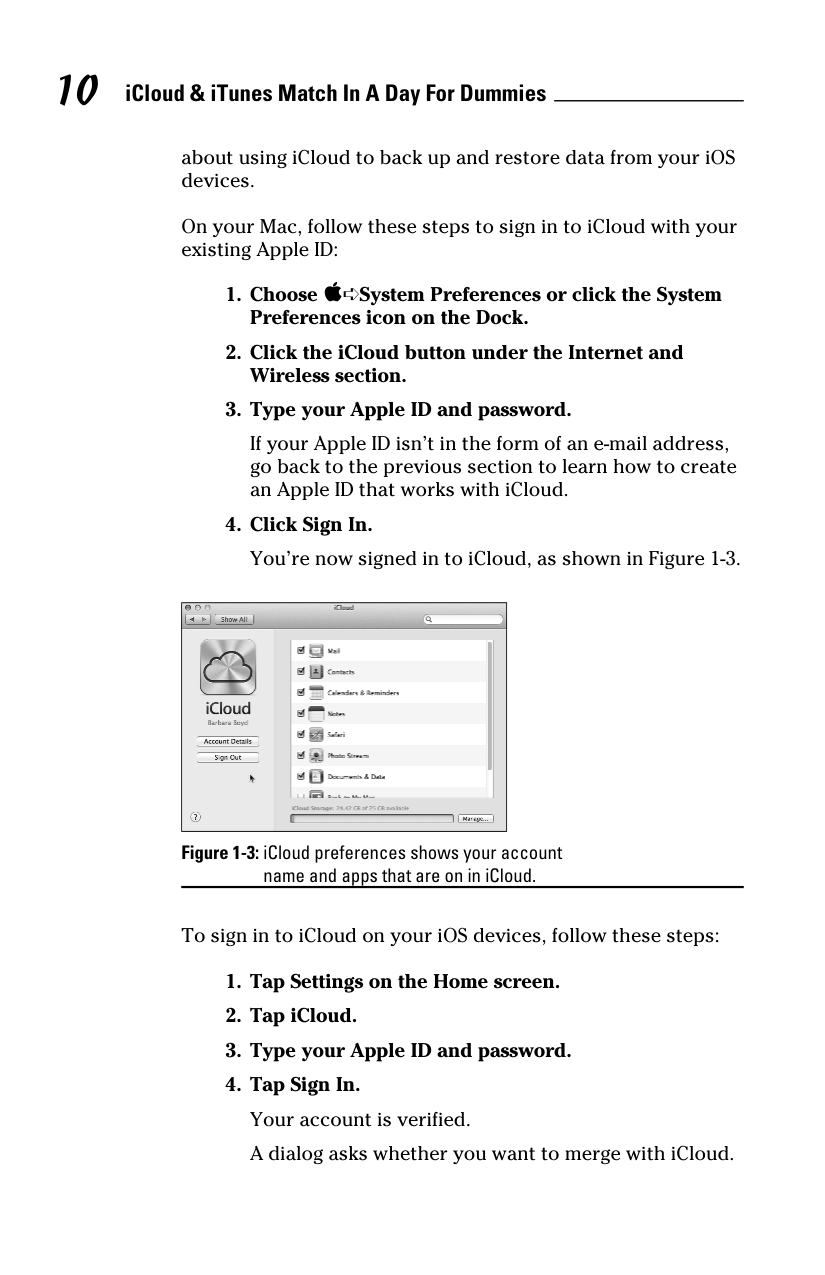
On your Mac, follow these steps to sign in to iCloud with your existing Apple ID:

If your Apple ID isn’t in the form of an e-mail address, go back to the previous section to learn how to create an Apple ID that works with iCloud.
|| |---|
Figure 1-3: Cloud preferences shows your account
name and apps that are on in iCloud.
To sign in to iCloud on your iOS devices, follow these steps:
A dialog asks whether you want to allow iCloud to use the location of your device so the Find My iOS device (iPhone, iPad, or iPod touch) can be enabled.
##### 5. Tap Allow.
Turning iCloud Services On and Off
iCloud comprises many information management apps (including Mail, Calendars, Contacts, Notes, and Reminders) as well as media management apps (such as iTunes and Photo Stream). When you first sign in to iCloud, the screen looks like Figure 1-2 on your iOS device or Figure 1-3 on your Mac. You can choose which apps to use with iCloud.
Even if you chose Merge during the sign-in on your iOS device, you can change those settings by following these steps.
If the iCloud preferences aren’t open, do the following:
✓ On your Mac: Choose ➪System Preferences, and then
click the iCloud icon in the Internet and Wireless section.
✓ On your iOS device: Tap Settings on the Home screen,
and then tap iCloud.
You can turn apps on or off by selecting the check box or tapping the On/Off toggle switch next to each one. This is what each one manages:
✓ Mail: Refers to iCloud Mail, which uses an @icloud.com account. Turn this on, and your account information and messages for that account appears in the Mail app on your iOS device. From a Mac, you can access Mail on the
iCloud.com website or set up an account in the Mail app on your Mac.
✓ Contacts: The contacts in Contacts on your Mac or iOS device remain on your device, but a copy is uploaded and stored in iCloud. Any time a change is made on any device, the change is uploaded to iCloud and downloaded to all the other devices, keeping everything nicely in sync. You can access Contacts on the iCloud.com website, too.
✓ Calendars and Reminders: These apps are listed together in iCloud System Preferences on your Mac but are two separate items in iCloud Settings on iOS devices. As with Contacts, the events and reminders you put on the Calendar and Reminders app remain on your device but are also uploaded and stored in iCloud. Changes made on one device are reflected on all the other devices. You find the Calendar and Reminders apps on the iCloud.com website, too.
✓ Safari: Bookmarks and tabs (web pages that are open simultaneously) are shared between all devices that have Safari turned on in iCloud. Personally, I keep Safari turned off on my Mac because I have a slew of bookmarks organized by project that I don’t want to use on either my iPhone or iPad. I do, however, have this option turned on for those two devices so the bookmarks I use are shared between them. If you switch between your devices frequently, you might appreciate the iCloud Tabs feature so that websites you open on one device are open on the other device as well.
✓ Notes: Notes that you compose or edit on one device are uploaded to iCloud and synched to your other devices. If you have Notes on another service, such as Yahoo! or Gmail, you see both listed under Accounts on your devices. On a Mac running OS X Mountain Lion, your Notes sync with the Notes app. If you use Windows, you can access Notes on the iCloud.com website.
Notes, along with Mail, Contacts, Calendar, and Reminders, is covered in Chapter 3.
✓ Photo Stream: On your Mac, Photo Stream is just a check box. When it’s on, photos you transfer from a digital camera to your Mac are uploaded to iCloud, and the most recent 1,000 are pushed to the Photo Stream album on your iOS devices. They remain in Photo Stream for 30
days, giving you time to save any you want to keep in the Camera Roll album on your iOS device.
On your iOS device, tap the Photo Stream field, and a new screen opens where you can then tap Photo Stream On. Any photos that you take with your iOS device are uploaded to iCloud and downloaded to your other devices: as many as 1,000 on your iOS devices and all of them are pushed to the Photo Stream album on your Mac. Again, they remain in iCloud for 30 days, giving you time to save them to iPhoto or Aperture.
Create Shared Photo Streams and invite people to view specific photos or albums.
Photo Stream is explained in more detail in Chapter 2.
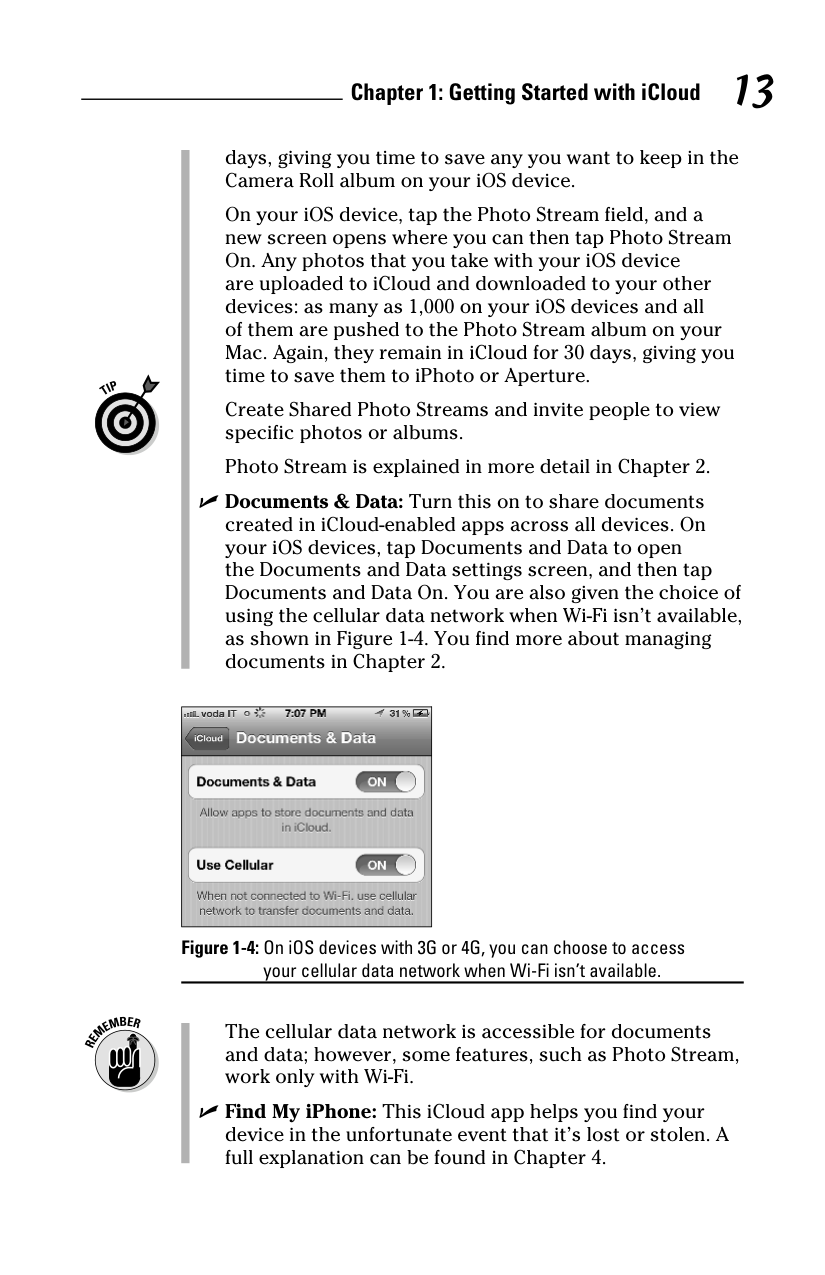
✓ Documents & Data: Turn this on to share documents created in iCloud-enabled apps across all devices. On your iOS devices, tap Documents and Data to open the Documents and Data settings screen, and then tap Documents and Data On. You are also given the choice of using the cellular data network when Wi-Fi isn’t available, as shown in Figure 1-4. You find more about managing documents in Chapter 2.
|| |---|

The cellular data network is accessible for documents and data; however, some features, such as Photo Stream, work only with Wi-Fi.
✓ Find My iPhone: This iCloud app helps you find your device in the unfortunate event that it’s lost or stolen. A full explanation can be found in Chapter 4.
✓ Back to My Mac: This iCloud app allows you to remotely view and access your Mac from another Mac. I explain how to use this app in Chapter 4.
To change which apps you use with iCloud — say, you don’t want to sync your music with iTunes but prefer to use iCloud, or you want to use your iPad only for entertainment and eliminate Mail and Calendars — use the previous steps for each device to turn off whichever service you don’t want to use.
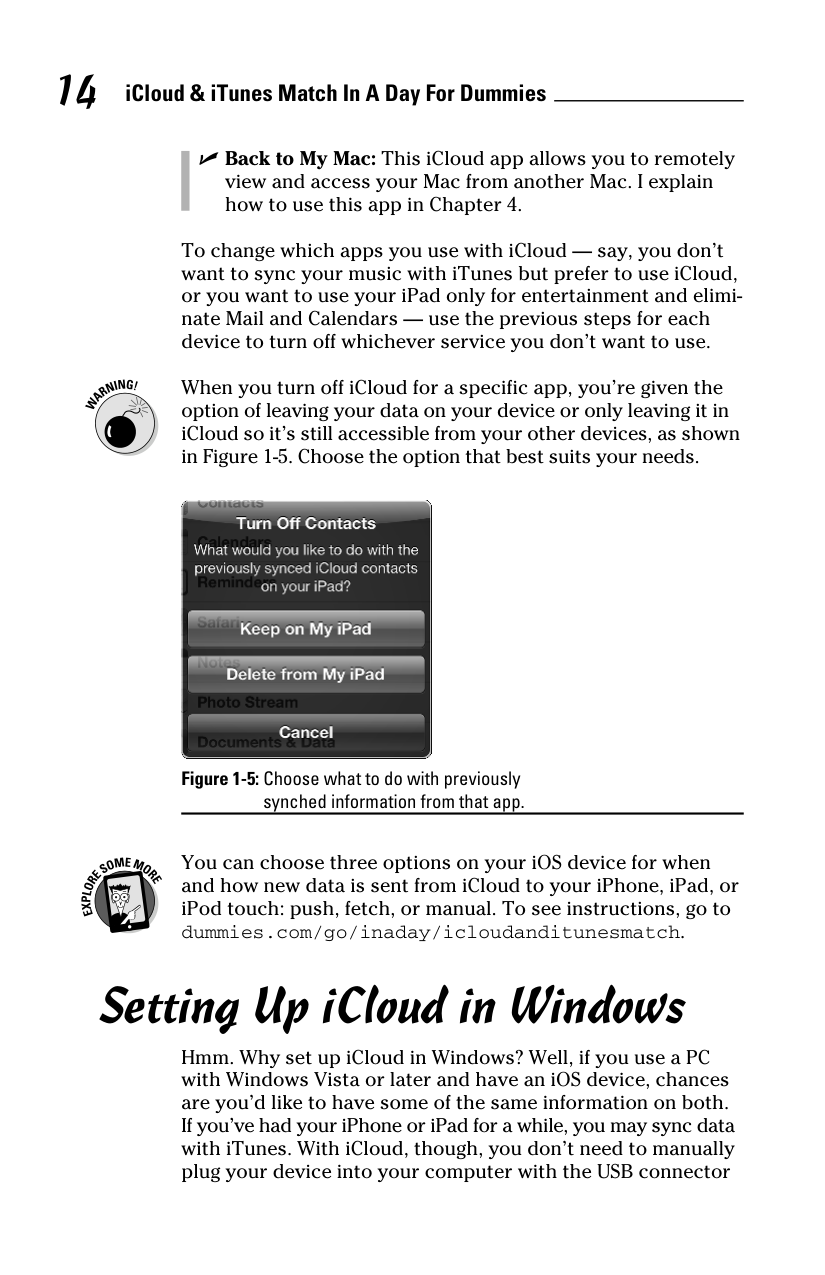
When you turn off iCloud for a specific app, you’re given the option of leaving your data on your device or only leaving it in iCloud so it’s still accessible from your other devices, as shown in Figure 1-5. Choose the option that best suits your needs.

You can choose three options on your iOS device for when and how new data is sent from iCloud to your iPhone, iPad, or iPod touch: push, fetch, or manual. To see instructions, go to dummies.com/go/inaday/icloudanditunesmatch.
Setting Up iCloud in Windows
Hmm. Why set up iCloud in Windows? Well, if you use a PC with Windows Vista or later and have an iOS device, chances are you’d like to have some of the same information on both. If you’ve had your iPhone or iPad for a while, you may sync data with iTunes. With iCloud, though, you don’t need to manually plug your device into your computer with the USB connector
cable: You can set up iCloud on both devices and have your calendars, contacts, and mail sync automatically.
First, make sure your PC meets the requirements for using iCloud. You need the following:
✓ OS: Microsoft Windows Vista or later
✓ Browser: Safari 5.1.1 (for Windows) or later or Internet Explorer 8 or later (to sync Bookmarks and access the iCloud.com website)
✓ Mail client: Microsoft Office with Outlook 2007. Better yet, use Outlook 2010 (to sync contacts, calendar, and task information); 64-bit Outlook works if you install the 64-bit version of iTunes. I used Outlook 2010 for this book.
✓ Optional: iTunes for Windows to sync Outlook Notes and
use other iTunes-related features, such as synching music.
iCloud requires a full version of Microsoft Office and Outlook 2010 locally installed on the hard drive of the computer you use with it. If Outlook 2010 was installed as Click to Run, iCloud won’t work.
The next thing to do is download the iCloud for Windows Control Panel. Go to support.apple.com/kb/DL1455 (or go to www.apple.com/icloud and follow the How to Set Up link), and then run the installer program to install the iCloud for Windows Control Panel on your computer.
When you install the iCloud Control Panel, Apple Software Update appears. (Choose Start➪All Programs➪Apple Software Update.) This program checks in with Apple at the interval you specify — daily, weekly, or monthly — to look for a newer version of the iCloud Control Panel. Apple Software Update also checks for updates to any other Apple applications installed on your computer, including iTunes, Safari, and QuickTime Player. A message prompts you to install new software when it’s available.
Now you’re ready to actually sign in to iCloud from your computer. Choose Start➪Control Panel➪iCloud to launch iCloud, and the iCloud sign in window appears. Type your Apple ID and password, and then click the Sign In button.
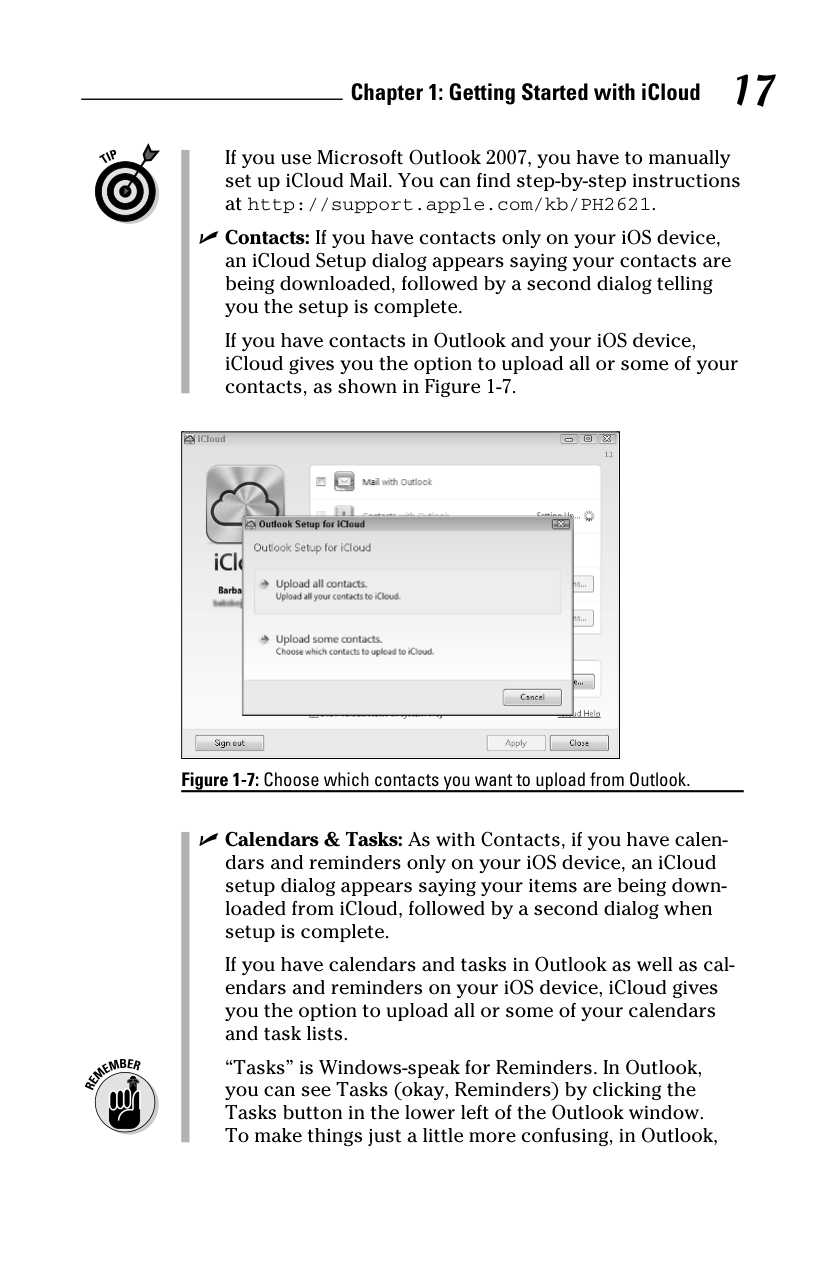
For easy access, add the Control Panel to your desktop or taskbar.
After you sign in to iCloud, the iCloud Control Panel appears, as shown in Figure 1-6. You sign in the first time only.
|| |---|
The iCloud Control Panel displays the iCloud sync choices you can activate by selecting the check box next to each choice as listed here. Mail, Contacts, and Calendars & Tasks are combined and require you to have Microsoft Outlook installed on your Windows computer.
✓ Mail, Contacts, Calendars, & Tasks with Outlook
✓ Bookmarks with Internet Explorer (or Safari for Windows)
✓ Photo Stream

Select the Show iCloud Status in Notification Area check box to add that icon Notification Area for easier iCloud Control Panel access.
Depending on which choices you select, one or more dialogs appear when you click the Apply button, as follows:
✓ Mail: The iCloud Control Panel works behind the scenes to automatically add and configure your iCloud e-mail account in Outlook; the next time you launch Outlook, a dialog appears prompting you for your iCloud mail account password.
If you use Microsoft Outlook 2007, you have to manually set up iCloud Mail. You can find step-by-step instructions at http://support.apple.com/kb/PH2621.
✓ Contacts: If you have contacts only on your iOS device, an iCloud Setup dialog appears saying your contacts are being downloaded, followed by a second dialog telling you the setup is complete.
If you have contacts in Outlook and your iOS device, iCloud gives you the option to upload all or some of your contacts, as shown in Figure 1-7.
|| |---|
✓ Calendars & Tasks: As with Contacts, if you have calendars and reminders only on your iOS device, an iCloud setup dialog appears saying your items are being downloaded from iCloud, followed by a second dialog when setup is complete.
If you have calendars and tasks in Outlook as well as calendars and reminders on your iOS device, iCloud gives you the option to upload all or some of your calendars and task lists.
“Tasks” is Windows-speak for Reminders. In Outlook, you can see Tasks (okay, Reminders) by clicking the Tasks button in the lower left of the Outlook window. To make things just a little more confusing, in Outlook,
alarms and alerts are called Reminders, so when you see “Reminder,” it means an alert or alarm that can be set for an event in Calendar or iCloud Reminder (an Outlook Task). Got that?
If you see this message — Restart Outlook with Mail Enabled Before Turning on Calendars & Tasks. — you do not have an e-mail account set up in Outlook. To correct the situation, launch Outlook and add an e-mail account. Select Quit Outlook, and return to the iCloud Control Panel, which informs you that Outlook Contacts and Calendars & Tasks are now configured to work with iCloud.
The message does not mean you must turn on iCloud Mail. You do not have to turn on the iCloud Mail option (which syncs only your iCloud mail), but you must have at least one e-mail account set up in Outlook if you want to use the Calendar & Tasks sync option. It can be Gmail, Hotmail, Yahoo!, or whatever your service provider is.
✓ Bookmarks: When you select this check box, a dialog
appears, asking whether you want to merge your bookmarks with iCloud. Click Merge to accept the option, or Cancel if you don’t want to merge your bookmarks.
Clicking the Bookmark Options button displays the Use iCloud Bookmarks With dialog; click Internet Explorer or Safari to select the web browser bookmarks you want to sync with iCloud.
Choosing Merge syncs all your existing Internet Explorer (or Safari for Windows, if you have that installed) bookmarks with your iCloud bookmarks. If you don’t want to merge or sync all your existing computer bookmarks with your iCloud bookmarks, open Internet Explorer (or Safari, if that’s the web browser you’re using) and delete any, or all, existing bookmarks. Return to the iCloud Control Panel, select the check box for Bookmarks, and then click Merge to have iCloud add your iCloud bookmarks to your web browser.
If you want to use Safari as your web browser, go to www. apple.com/safari to download and install Safari for Windows.

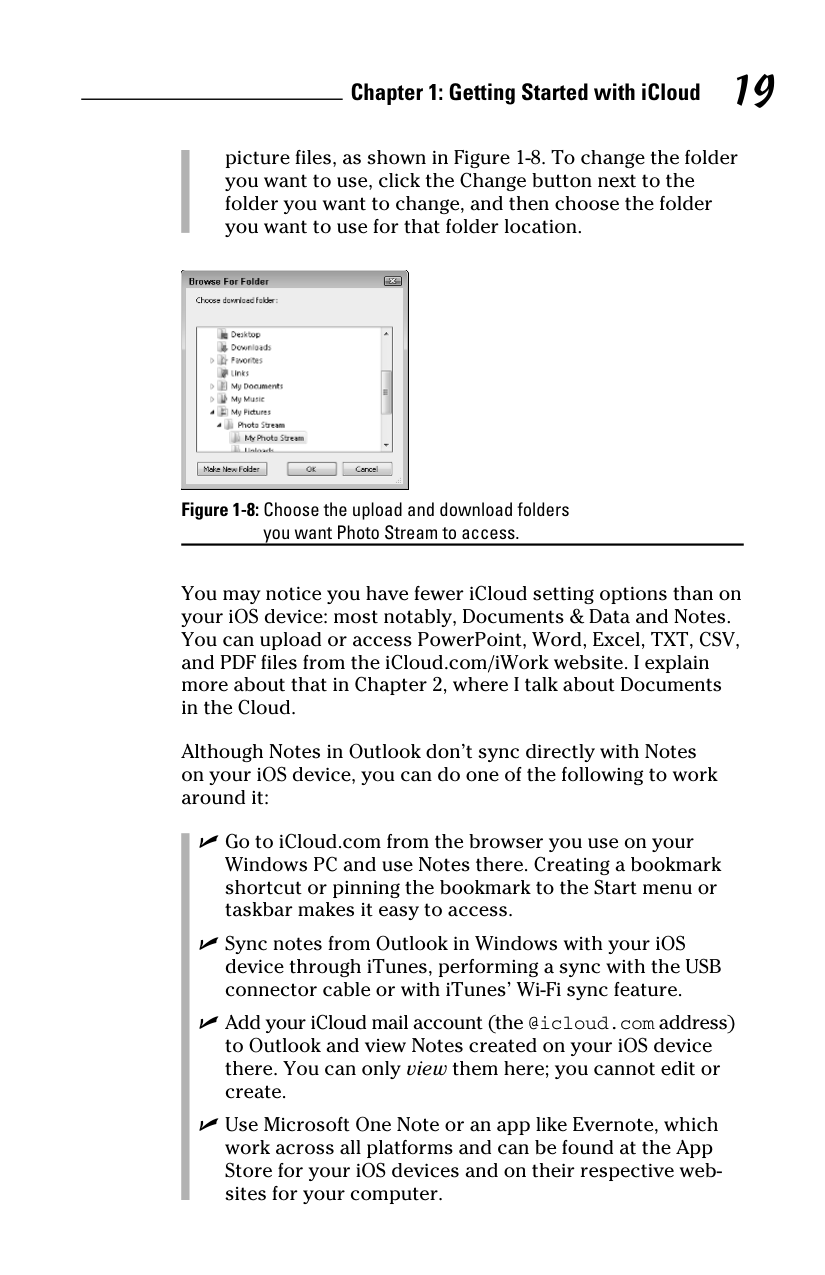
✓ Photo Stream: Click the Photo Stream Options button to display the Upload and Download folder locations on your computer where you’ll find those Photo Stream
picture files, as shown in Figure 1-8. To change the folder you want to use, click the Change button next to the folder you want to change, and then choose the folder you want to use for that folder location.

You may notice you have fewer iCloud setting options than on your iOS device: most notably, Documents & Data and Notes. You can upload or access PowerPoint, Word, Excel, TXT, CSV, and PDF files from the iCloud.com/iWork website. I explain more about that in Chapter 2, where I talk about Documents in the Cloud.
Although Notes in Outlook don’t sync directly with Notes on your iOS device, you can do one of the following to work around it:
✓ Go to iCloud.com from the browser you use on your
Windows PC and use Notes there. Creating a bookmark shortcut or pinning the bookmark to the Start menu or taskbar makes it easy to access.
✓ Sync notes from Outlook in Windows with your iOS device through iTunes, performing a sync with the USB connector cable or with iTunes’ Wi-Fi sync feature.
✓ Add your iCloud mail account (the @icloud.com address) to Outlook and view Notes created on your iOS device there. You can only view them here; you cannot edit or create.
✓ Use Microsoft One Note or an app like Evernote, which work across all platforms and can be found at the App Store for your iOS devices and on their respective websites for your computer.