
Apple iPhone iCloud Photos Storage Service
Ask AI
— answers from the official manualAnswers from the official manual.
Common questions
Common Questions
33 totalWhat happens to my photos when I enable iCloud Photos?
When iCloud Photos is enabled, your photos are synced to iCloud. If 'Optimize iPhone Storage' is also enabled, full-resolution versions are stored in iCloud while space-saving versions remain on your device.
Is the 'Optimize iPhone Storage' feature turned on by default?
Yes, the 'Optimize iPhone Storage' feature is turned on by default on iPhones.
How do I enable iCloud Photos on my iPhone?
To enable iCloud Photos, go to Settings > [your name] > iCloud > Photos and turn on iCloud Photos. The Apple Support page 'Access and view iCloud Photos on your iPhone, iPad, or iPot touch' provides detailed step-by-step instructions for this process.
How long does it take to sync photos to iCloud after enabling Photo Library?
Syncing takes time depending on your photo library size and internet speed; once enabled, all photos from your Photos library are backed up to iCloud at full resolution. (Page 6)
How can I access my iCloud albums on a Windows PC?
You need to download and install the iCloud app for Windows to view, manage, and synchronize iCloud photos between your PC and iOS devices. (Page 8)
How do I create shared photo albums through iCloud Photo Library?
To create a new album, go to Settings > [Your Name] > iCloud > Photos and turn on the toggle for iCloud Photo Sharing. Once enabled, tap Start Sharing in Photos app's Shared section and add photos or videos. (Page 9)
Show 27 more questions
Can I convert private shared albums into public websites?
How do I download specific photos from iCloud to my Mac or PC?
How can I delete multiple photos from iCloud on my iPhone?
What happens after deleting a photo from iCloud?
How do I restore my iCloud Photo Library after turning it off?
What is the 'Optimize iPhone Storage' feature and how does it work?
How do I enable 'Optimize iPhone Storage' on my iPhone?
How do I disable the 'Optimize iPhone Storage' option?
Where are my full-resolution photos stored when 'Optimize iPhone Storage' is enabled?
Can I access and view my iCloud Photos on my iPad or iPod touch?
Where can I find more help if I have questions about using iCloud Photos?
How do I enable iCloud Photo Library on my iPhone?
What are my options when enabling iCloud Photo Library?
What is 'Optimize iPhone Storage' and is it enabled by default?
How do I disable the Optimize iPhone Storage feature?
Where are my full-resolution photos stored when Optimize iPhone Storage is on?
Can I use iCloud Photos on my iPad or iPod touch?
What happens to my photos when I enable Optimize iPhone Storage?
Can I access my iCloud Photos without the Optimize iPhone Storage feature?
Will disabling Optimize iPhone Storage affect my iCloud Photos?
What is iCloud Photos and how does it help with iPhone storage?
Is 'Optimize iPhone Storage' enabled by default?
Can I access iCloud Photos on devices other than iPhone?
What format are photos stored in when using iCloud Photos?
How do I enable iCloud Photos on my device?
Are the space-saving versions on my iPhone full quality?
Can I choose which photos are stored in iCloud versus on my iPhone?
Full Manual
16 pages


#####

The iCloud Photos Master Guide: Everything You Need to Know for Photo Management
Written by Akshata Shanbhag Published June 2018. Read the original article here: https://www.makeuseof.com/tag/icloud-photos-guide/ This ebook is the intellectual property of MakeUseOf. It must only be published in its original form. Using parts or republishing altered parts of this ebook is prohibited without permission from MakeUseOf.com.
Table of contents

How to Upload Photos to iCloud 4
High Resolution vs. Low Resolution Photos 5 What Happens After You Enable iCloud Photo Library 6 An Alternative to iCloud Photos 7 How to Access iCloud Photos 8 How to Share Photos on iCloud 9
The Ins and Outs of Shared Albums 10
How to Download Photos from iCloud 11 On a Mac 11 From iCloud.com 12 On an iPhone/iPad 13 On a Windows PC 13
How to Delete Photos from iCloud 13 Turn Off iCloud Photo Library 15 Take Your Photos to the Cloud 16

Apple’s cloud-synced photo management system for your Mac and iPhone, iCloud Photo Library, provides powerful tools for your pictures. We’ve already outlined a few important traits of iCloud Photo Library. Now it’s time to dig deeper into that system.

Let’s take a closer look at the key routines you need to manage your photos and videoswith iCloud. Mainly, we’ll cover how to:
Before we get started, ensure that you have your photos backed up and ready to restorein case something goes wrong.
How to Upload Photos to iCloud

To back up photos to iCloud, you have to enable the cloud sync feature for the Photos app first. You can do this by turning on iCloud Photo Library on each of your Apple devices:


iCloud Photo Library uses your iCloud storage for backing up photos, which means you have a limit of 5GB unless you upgrade to a higher storage plan.
To check if the free plan is enough for your current photo management needs, you need to know the size of your photo library. You can find it at/Home/Pictures. Right-click on the Photos Library icon and choose Get Info in the context menu to see how much storage space your photos and videos take up.
In any case, it’s best to de-clutter your albums before you upload photos to iCloud. Then you can use the spare iCloud storage for other purposes.
#### High Resolution vs. Low Resolution Photos

While you’re enabling cloud sync as described above, you can choose between two options:

Of course, you don’t have to pick the same option on all devices. You can keep originals on your Mac and use low-resolution versions on your iPhone, for instance.
On a Mac, you’ll find the Optimize option not only in the settings of the Photos app, but also under About This Mac > Storage > Manage > Photos. It shows up as Optimize Photo Library.
Keep in mind that you can also upload photos to iCloud directly on the web at iCloud’s Photos page. Click on the Upload photos button in the toolbar to select media for uploading. Drag and drop also works. Photos you upload in this fashion won’t show up on devices where you have turned off iCloud Photo Library.

What Happens After You Enable iCloud Photo Library
Once you turn on iCloud Photo Library, every photo and video from your Photos library gets backed up to iCloud at full resolution. Yes, that includes everything from JPG, PNG, and GIF images to 4K videos and Live Photos. There’s no option for selective syncing.
The actual sync process takes quite a bit of time, depending on the size of your photo library and your internet speed.
On your Mac, you can upload more photos to iCloud by dragging and dropping them onto the app. This works only if you have enabled the following setting: Photos > Preferences > General > Importing > Copy items to the Photos library.
If you haven’t, the app treats the photos you dropped into it as referenced files. In other words, Photos catalogs the images, but doesn’t add them to your Photos Library. As a result, it doesn’t upload them to iCloud either. You can copy referenced files to your library with the menu option File > Consolidate.


On your iPhone, all photos and videos you capture or import to your Camera Roll sync to iCloud automatically. Screenshots also count.
The best part about iCloud sync is that your iCloud Photo Library backs up your picture edits to the cloud! You can edit photos as well as restore their original versions from any device, anytime. If you have used iTunes on your Mac to sync photos to your iPhone, you’ll lose them from your phone when you enable iCloud Photo Library on it. But they’ll stay put on your Mac. Once you enable cloud sync on your Mac, the photos will back up to iCloud and reappear on your phone.

An Alternative to iCloud Photos

Let’s say your photo library is tiny or you don’t want to back up your photos to iCloud. In that case you might want to pick the My Photo Stream option instead of iCloud Photo Library. This feature syncs 1,000 of your most recent photos (or 30 days’ worth) across your Apple devices wirelessly. It doesn’t work with videos. And photos uploaded to My Photo Stream don’t count toward your iCloud storage. If you have enabled iCloud Photo Library, the status of My Photo Stream is irrelevant.
How to Access iCloud Photos


You can view all your iCloud photos and videos in the Photos app on all your Apple devices. What’s more, you can also access them on the web at icloud.com. To do so, you’ll need to log in with your Apple ID and open the Photos app on the page.
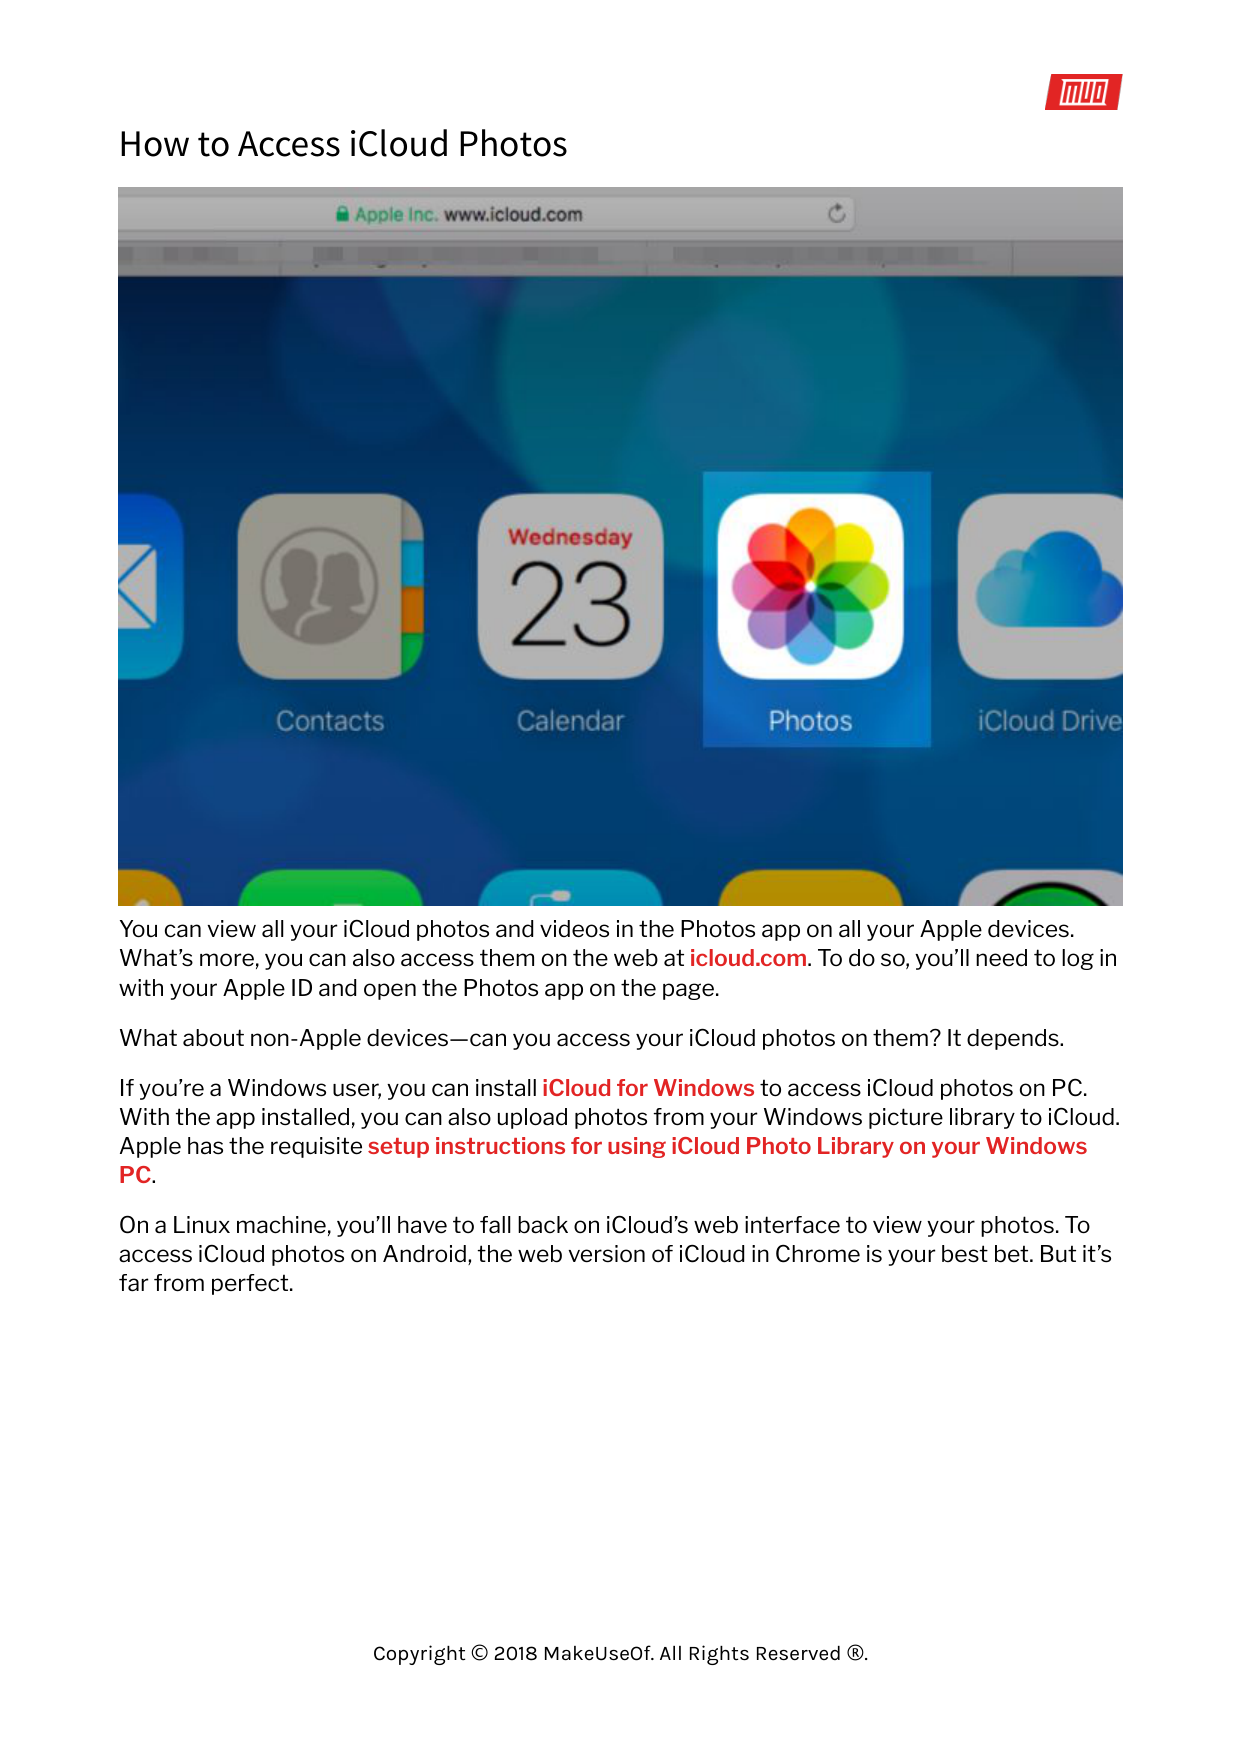
What about non-Apple devices—can you access your iCloud photos on them? It depends. If you’re a Windows user, you can install iCloud for Windows to access iCloud photos on PC. With the app installed, you can also upload photos from your Windows picture library to iCloud. Apple has the requisite setup instructions for using iCloud Photo Library on your Windows PC.
On a Linux machine, you’ll have to fall back on iCloud’s web interface to view your photos. To access iCloud photos on Android, the web version of iCloud in Chrome is your best bet. But it’s far from perfect.
How to Share Photos on iCloud


Before you can start sharing photos and videos with others, you’ll need to enable the iCloud Photo Sharing feature. Let’s see how to do that:
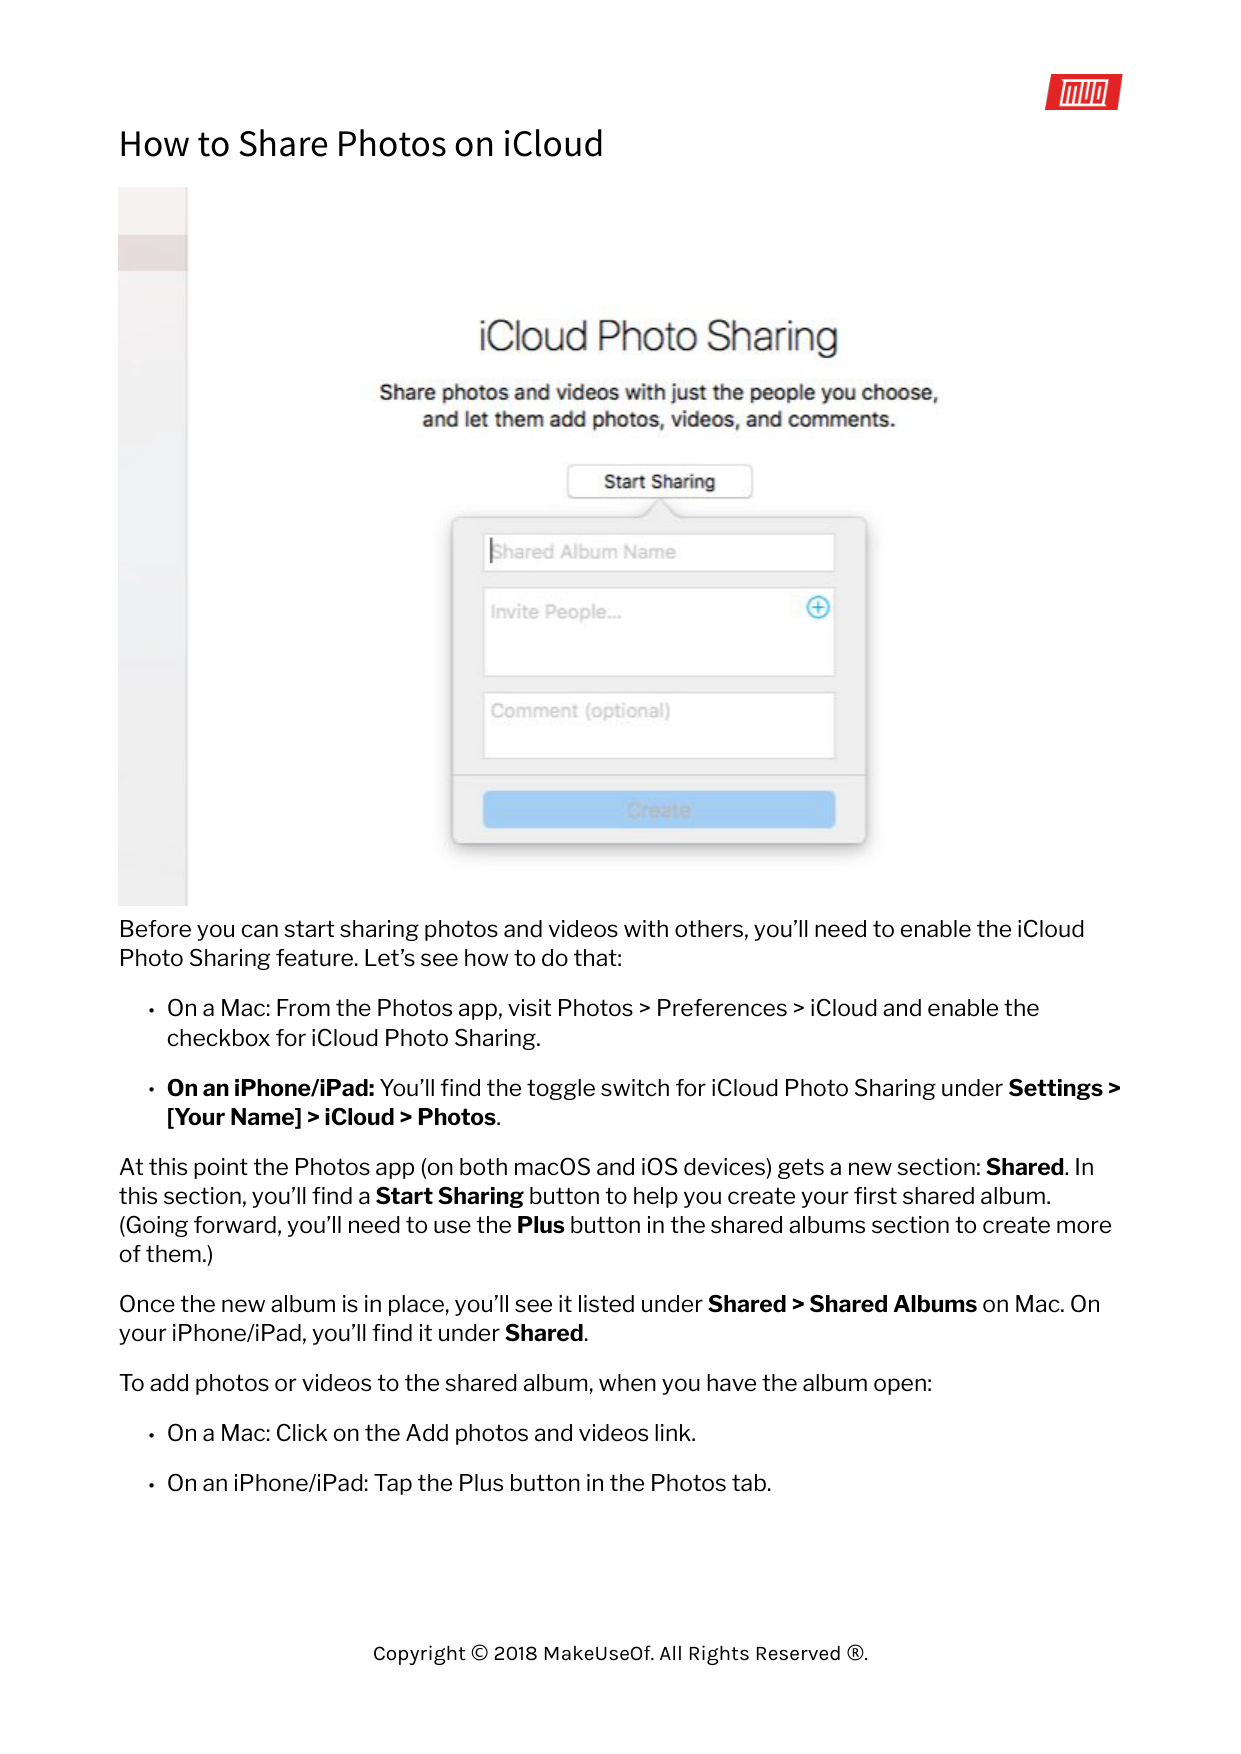
At this point the Photos app (on both macOS and iOS devices) gets a new section: Shared. In this section, you’ll find a Start Sharing button to help you create your first shared album. (Going forward, you’ll need to use the Plus button in the shared albums section to create more of them.)
Once the new album is in place, you’ll see it listed under Shared > Shared Albums on Mac. On your iPhone/iPad, you’ll find it under Shared.
To add photos or videos to the shared album, when you have the album open:

That’s not the only way to add media to a shared album. Here’s the alternative method for Mac:
This iOS version of this method is almost identical.
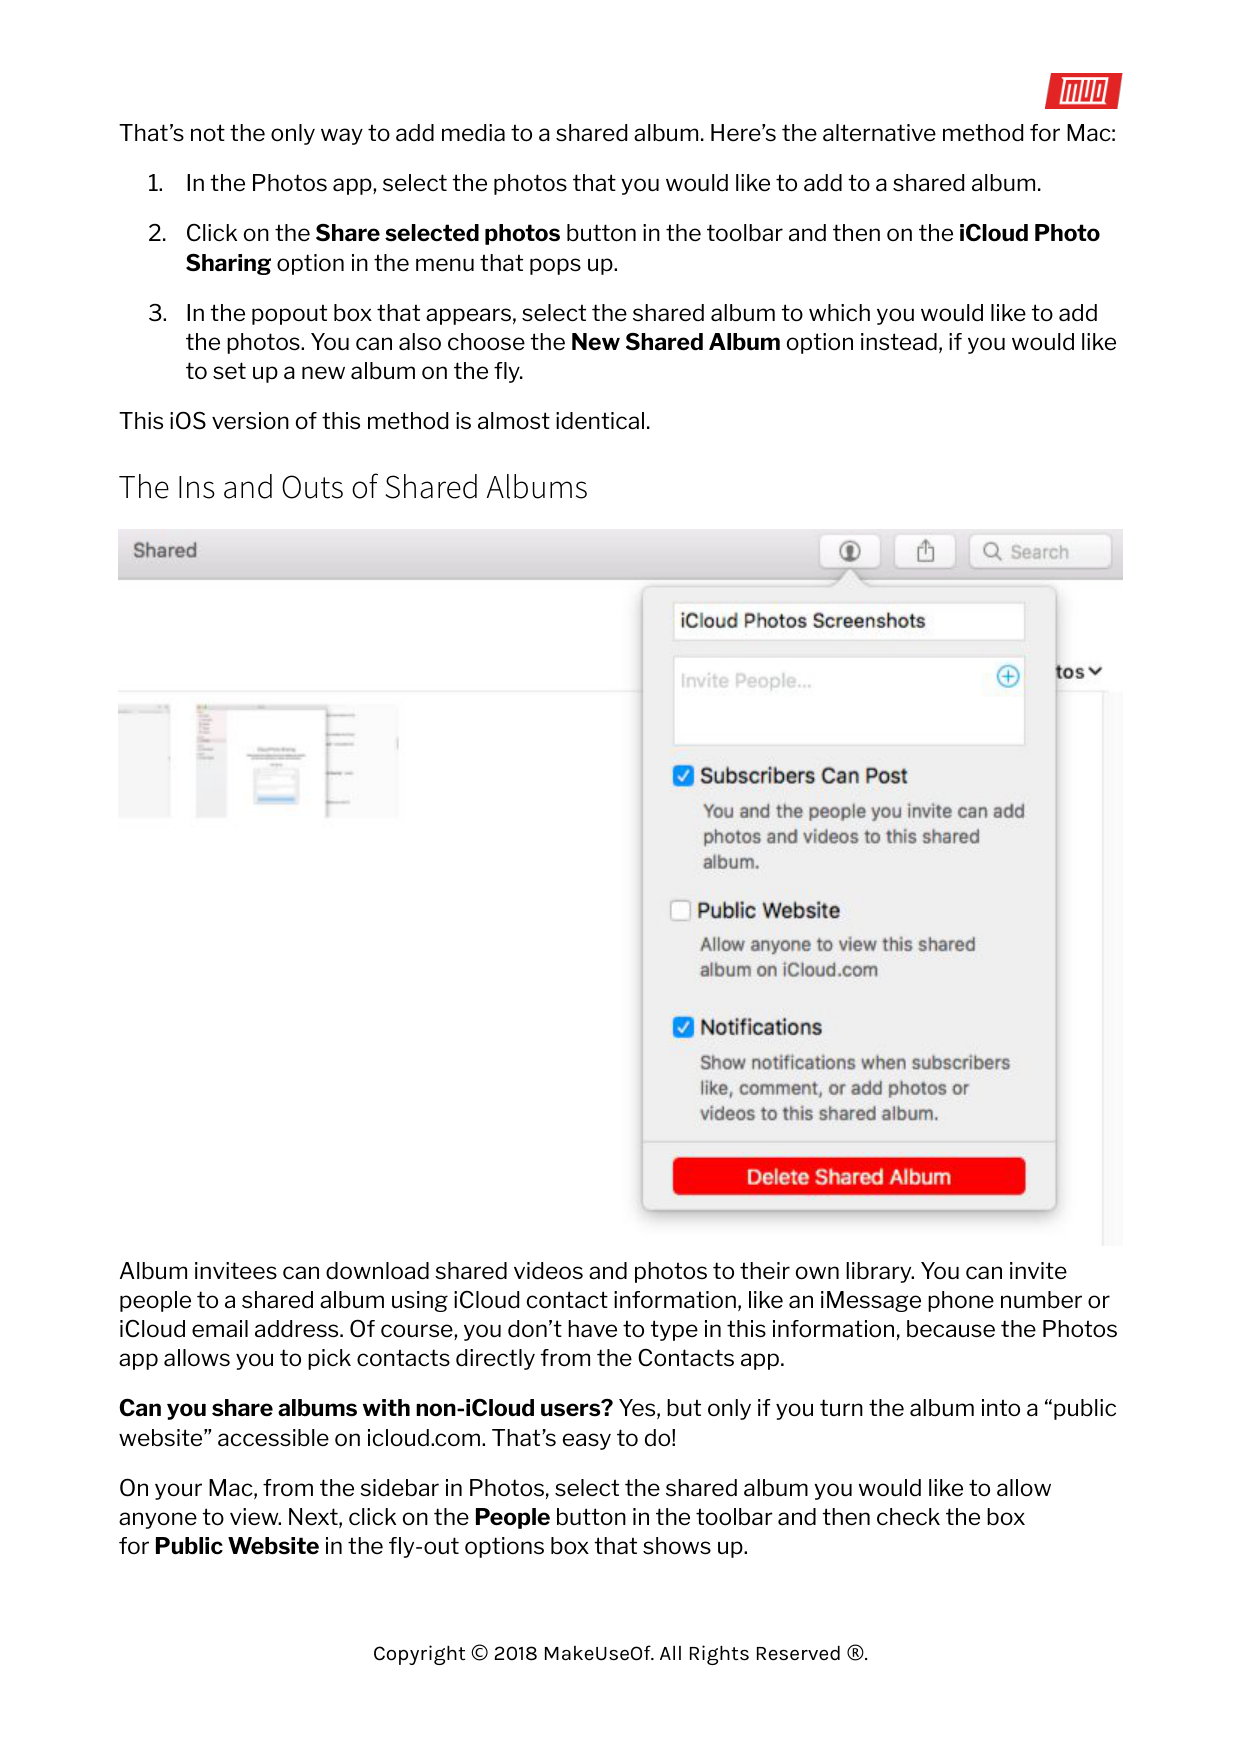
#### The Ins and Outs of Shared Albums

Album invitees can download shared videos and photos to their own library. You can invite people to a shared album using iCloud contact information, like an iMessage phone number or iCloud email address. Of course, you don’t have to type in this information, because the Photos app allows you to pick contacts directly from the Contacts app.
Can you share albums with non-iCloud users? Yes, but only if you turn the album into a “public website” accessible on icloud.com. That’s easy to do! On your Mac, from the sidebar in Photos, select the shared album you would like to allow anyone to view. Next, click on the People button in the toolbar and then check the box for Public Website in the fly-out options box that shows up.

On iOS devices, you’ll find the Public Website option under the album’s People tab. By default, album subscribers can add photos and videos to the shared album. Also, you’ll receive notifications when there’s any activity on one of your shared albums. You can tweak these settings from the same location where you enable the Public Websitesetting. If you have set up Family Sharing, look for the Family album in the Shared section. That’s where you can share and view photos limited to your Family Sharing circle of members. Can’t see your shared albums listed on iCloud.com? Don’t worry; that’s how it’s supposed to work. Shared albums are viewable via their unique web addresses, but not from your iCloud account itself.
How to Download Photos from iCloud
Let’s say you want to save your photos and videos from iCloud to an external hard drive. Or you might be thinking of using Google Photos or another backup service. In such cases you’ll need to know how to get your hands on your iCloud photos first.
#### On a Mac
macOS stores your Photos in a low-key Finder folder, which means you can copy them directly from this location. They’re sorted into date-based folders and subfolders, which may not be ideal for backups.
A better way to download photos on Mac is via the Photos app. Open it, select the photos you want to save, and drag them out to a Finder folder of your choice.
You can also use the menu option File > Export > Export [X] Photos. This allows you to choose a file format for download. If you’re happy to download them as is, click on File > Export > Export Unmodified Original for [X] Photos.
To select a bunch of photos at once, select the first one in the set and Shift-click on the last one in the set. You can Cmd-click on stray photos to grab them one at a time. If you would like to select all the photos in an album, hit Cmd + A.

#### From iCloud.com


Select a bunch of photos and click on the Download selected items toolbar button. Want to download optimized images (including edits) instead of the unmodified originals? Hover over the toolbar button instead of clicking on it. Then, click on the tiny down arrow that appears and select the Most Compatible option before you download.
Unfortunately, the shortcuts Shift-click and Cmd + A won’t work on iCloud.com. Only Cmdclicking works for multiple selections, which is why the iCloud method becomes tedious when you have many photos to download.
Here’s a somewhat quirky workaround for this problem. Click on Photos in the sidebar to sort photos by date. Hover on a photo in any set and click on the Plus button that shows up on the far right. Doing so selects all photos in that set. Of course, this alternative is still cumbersome, if only less so.


On an iPhone/iPad

Select Download and Keep Originals under Settings > [Your Name] > iCloud > Photos. Eventually your photo library will get the full-resolution versions of all photos. You can copy them to your Mac using iTunes or straightaway to an external hard drive using the Image Capture app on macOS.
If you always want to transfer originals, you’ll need to make a small tweak first. Visit Settings > Photos > Transfer to Mac or PC on your iPhone and switch from Automatic to Keep Originals.
You can also save photos to the Files app on your phone. To do that, first select the photos you want to save and tap the Share button in the toolbar. Then swipe through the bottom row of icons and choose Save to Files within it.
#### On a Windows PC
The method to download photos from iCloud to your Windows PC is similar to that for Mac. But here, you’ll have to Ctrl-click instead of Cmd-click to select multiple photos.
Of course, if you have the iCloud app for Windows installed, you can download all photos and videos at once. To get started, navigate to iCloud Photos in File Explorer and click on Download photos and videos. You’ll also find an Upload photos and videos link there if you want to move photos to the cloud.
How to Delete Photos from iCloud


#####
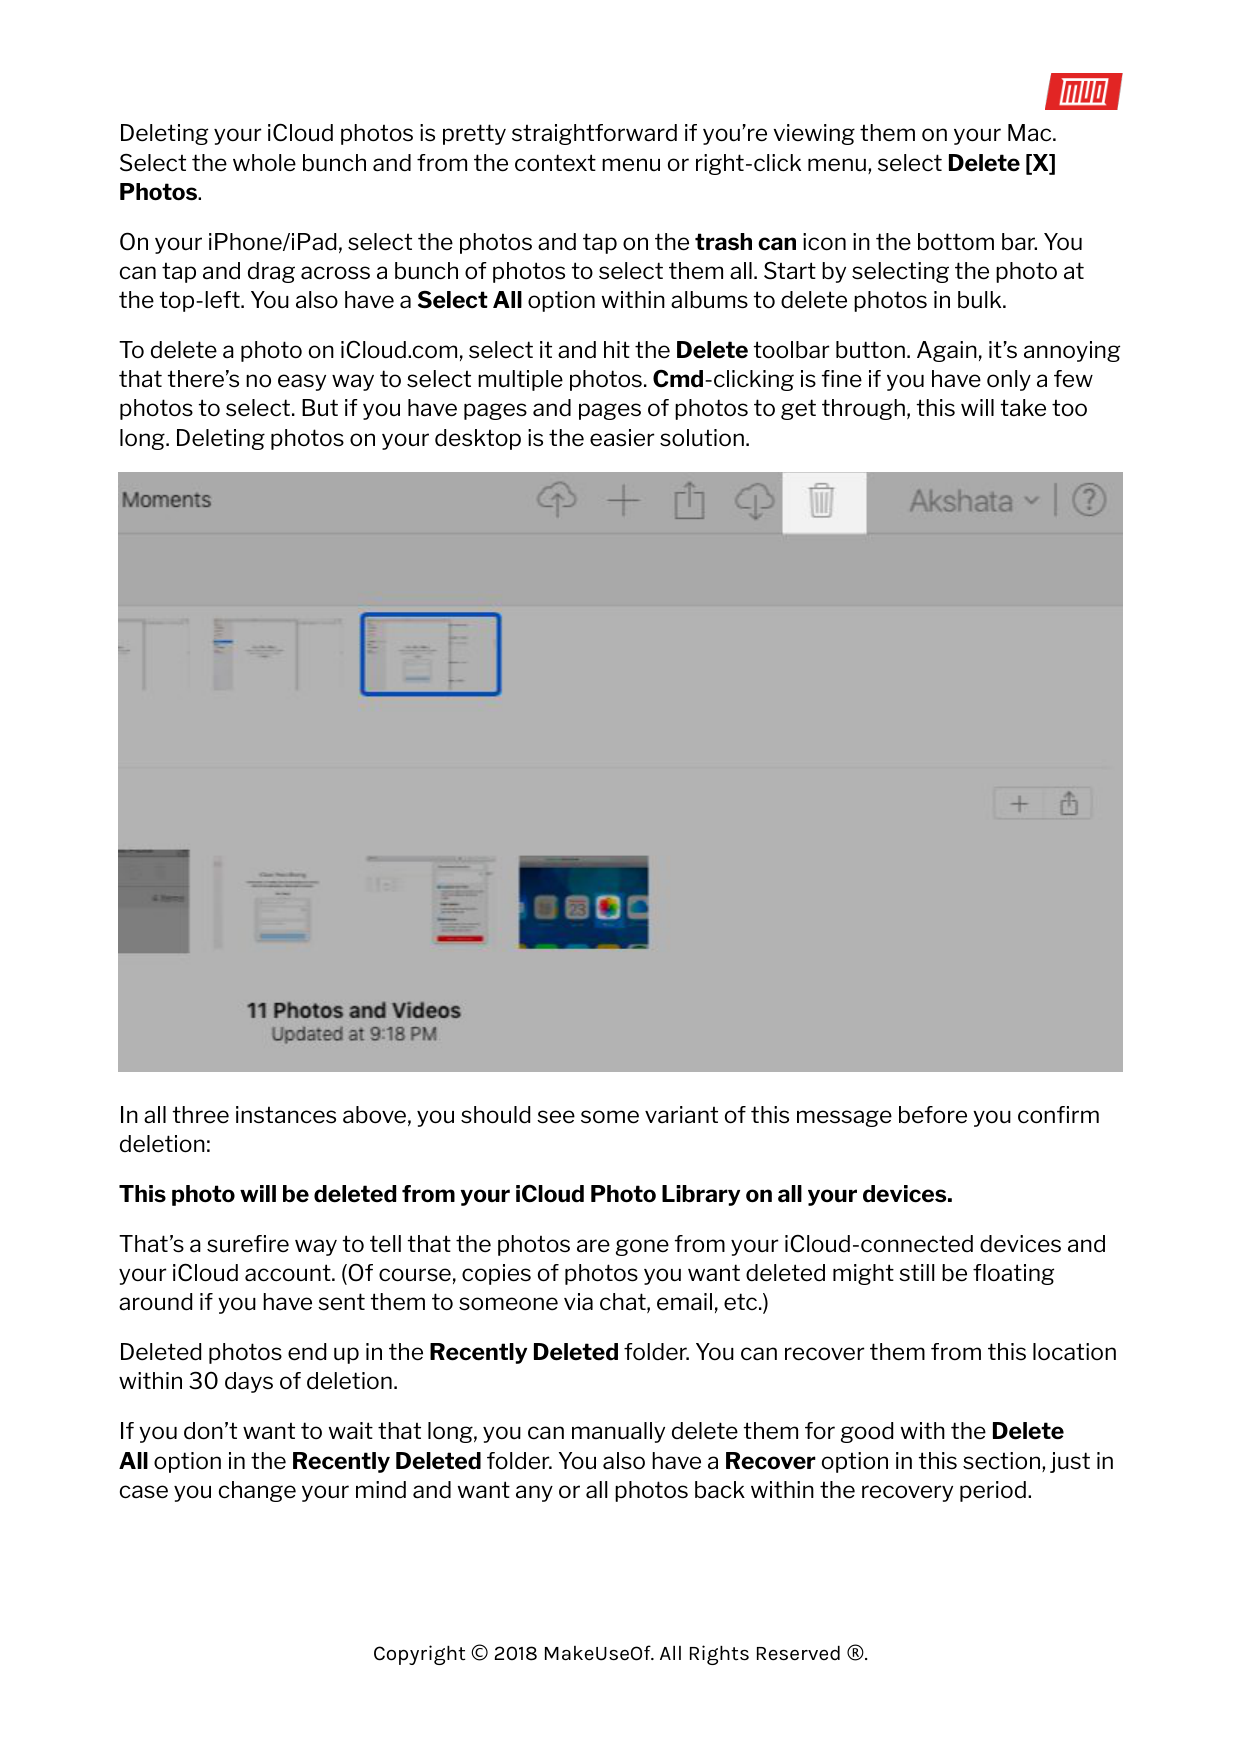
Deleting your iCloud photos is pretty straightforward if you’re viewing them on your Mac. Select the whole bunch and from the context menu or right-click menu, select Delete [X] Photos.
On your iPhone/iPad, select the photos and tap on the trash can icon in the bottom bar. You can tap and drag across a bunch of photos to select them all. Start by selecting the photo at the top-left. You also have a Select All option within albums to delete photos in bulk.
To delete a photo on iCloud.com, select it and hit the Delete toolbar button. Again, it’s annoying that there’s no easy way to select multiple photos. Cmd-clicking is fine if you have only a few photos to select. But if you have pages and pages of photos to get through, this will take too long. Deleting photos on your desktop is the easier solution.

In all three instances above, you should see some variant of this message before you confirm deletion:
###### This photo will be deleted from your iCloud Photo Library on all your devices.
That’s a surefire way to tell that the photos are gone from your iCloud-connected devices and your iCloud account. (Of course, copies of photos you want deleted might still be floating around if you have sent them to someone via chat, email, etc.)
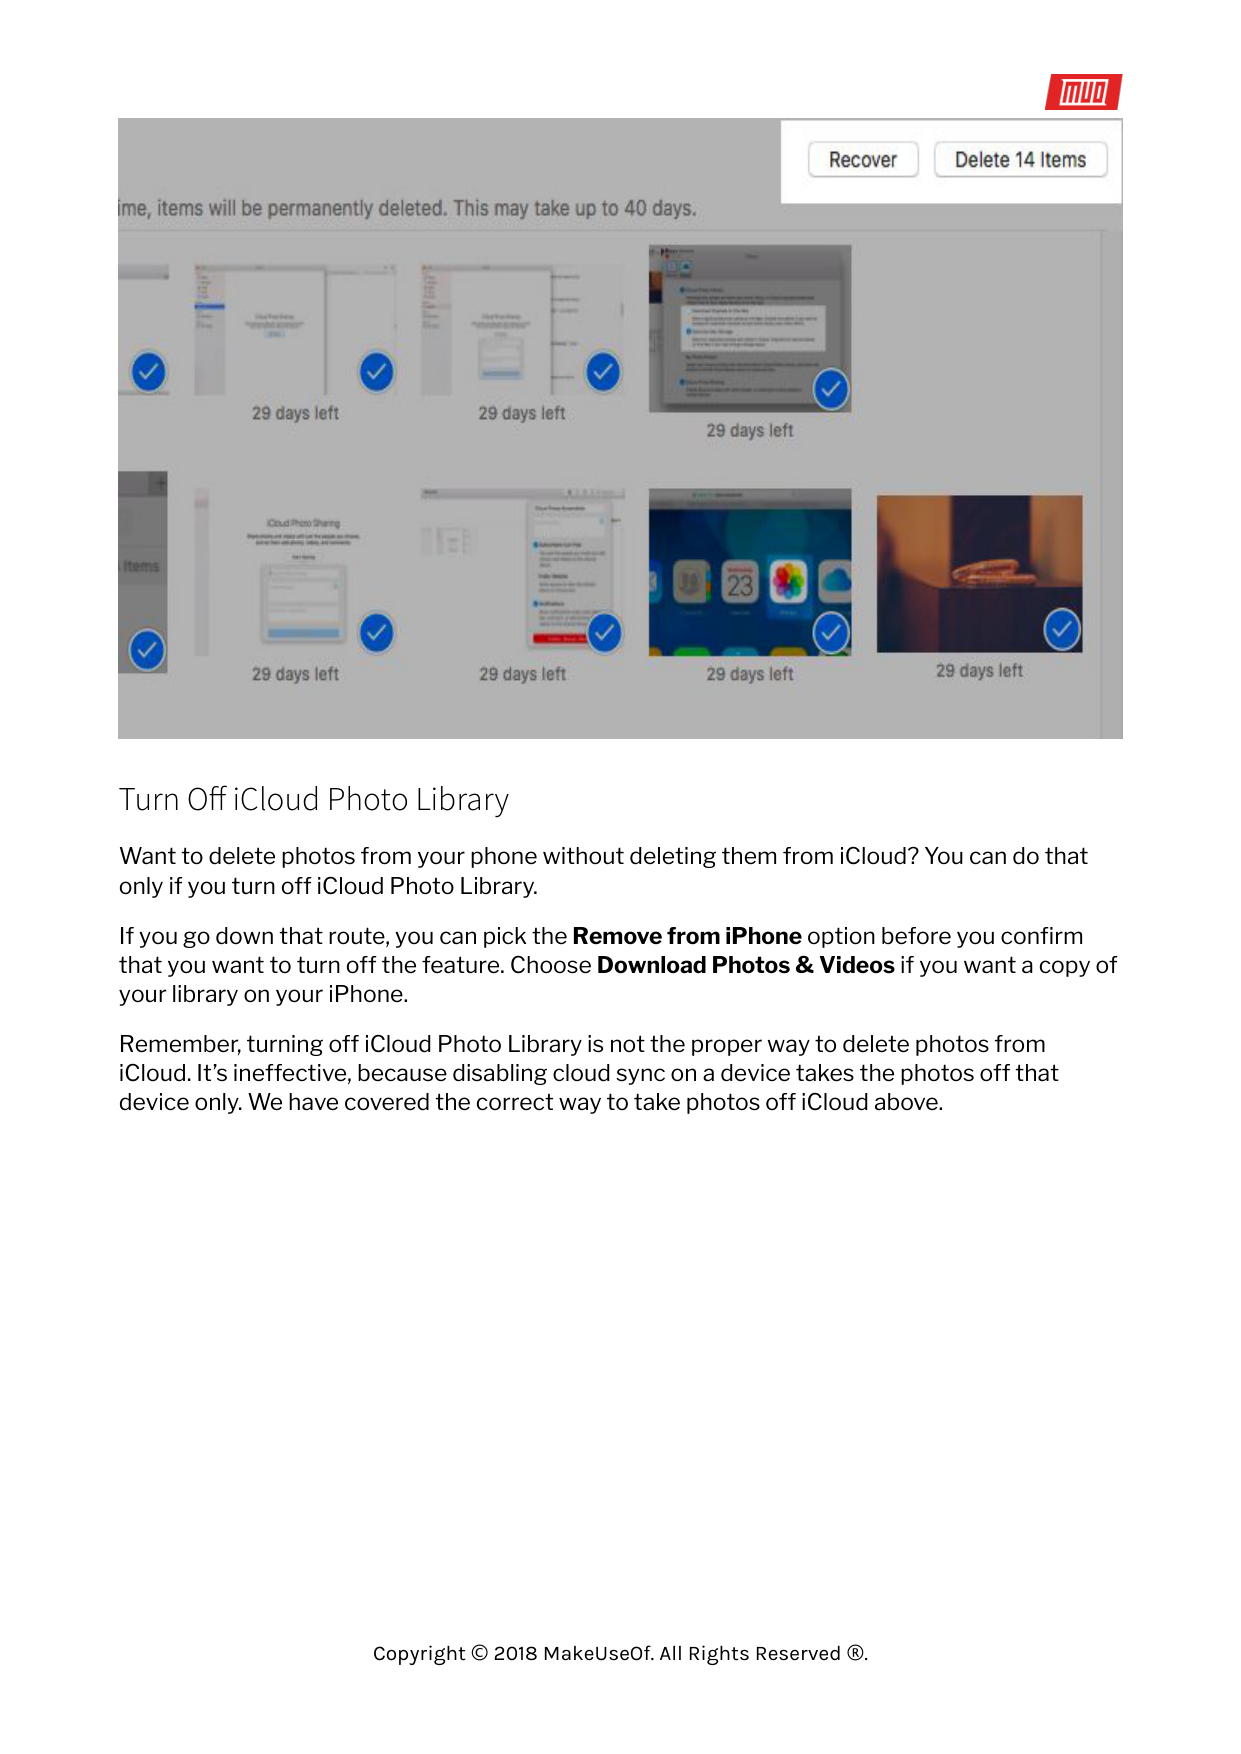
Deleted photos end up in the Recently Deleted folder. You can recover them from this location within 30 days of deletion.
If you don’t want to wait that long, you can manually delete them for good with the Delete All option in the Recently Deleted folder. You also have a Recover option in this section, just in case you change your mind and want any or all photos back within the recovery period.


#### Turn Off iCloud Photo Library

Want to delete photos from your phone without deleting them from iCloud? You can do that only if you turn off iCloud Photo Library.
If you go down that route, you can pick the Remove from iPhone option before you confirm that you want to turn off the feature. Choose Download Photos & Videos if you want a copy of your library on your iPhone.
Remember, turning off iCloud Photo Library is not the proper way to delete photos from iCloud. It’s ineffective, because disabling cloud sync on a device takes the photos off that device only. We have covered the correct way to take photos off iCloud above.
Take Your Photos to the Cloud

While Apple Photos works from the get-go, it can take a while to understand the intricacies of iCloud Photo Library. iCloud sync issues can trip you up, and you should know how to fix common iCloud problems. Make sure to read Apple’s detailed prompts every step of the way to understand what’s going on and avoid media mishaps.
Read more stories like this at
