
Ask AI
— answers from the official manualAnswers from the official manual.
Common questions
Common Questions
14 totalHow do I download and register for the Tuya Smart app?
You can download the Tuya Smart app by searching for 'Tuya Smart' in your app store or by scanning the QR code provided in the manual. To register, open the app, tap Sign Up, agree to the User Agreement and Privacy Policy, then enter your mobile phone number or email address and tap Get Verification Code. After entering the verification code, set your password and tap Done. (Page 5-6)
How do I reset my Tuya Smart app password if I forget it?
On the Log In page, tap Forgot Password and enter your registered mobile phone number or email address, then tap Get Verification Code. After entering the verification code, enter a new password and tap Done — you will then be automatically logged in. Note that if your account is registered with a mobile phone number, the country or region selected must match the one used during registration. (Page 8-9)
What Wi-Fi frequency band is required to add devices to the Tuya Smart app?
Devices must be connected to a 2.4 GHz Wi-Fi network when pairing. This applies to manually added Wi-Fi devices, Zigbee gateway setup, and the Auto Scan function — all require a 2.4 GHz Wi-Fi network. Dual-band networks that support both 2.4 GHz and 5 GHz can use AP mode for device pairing. (Pages 20, 33, 44)
What is the difference between EZ mode and AP mode when adding Wi-Fi devices?
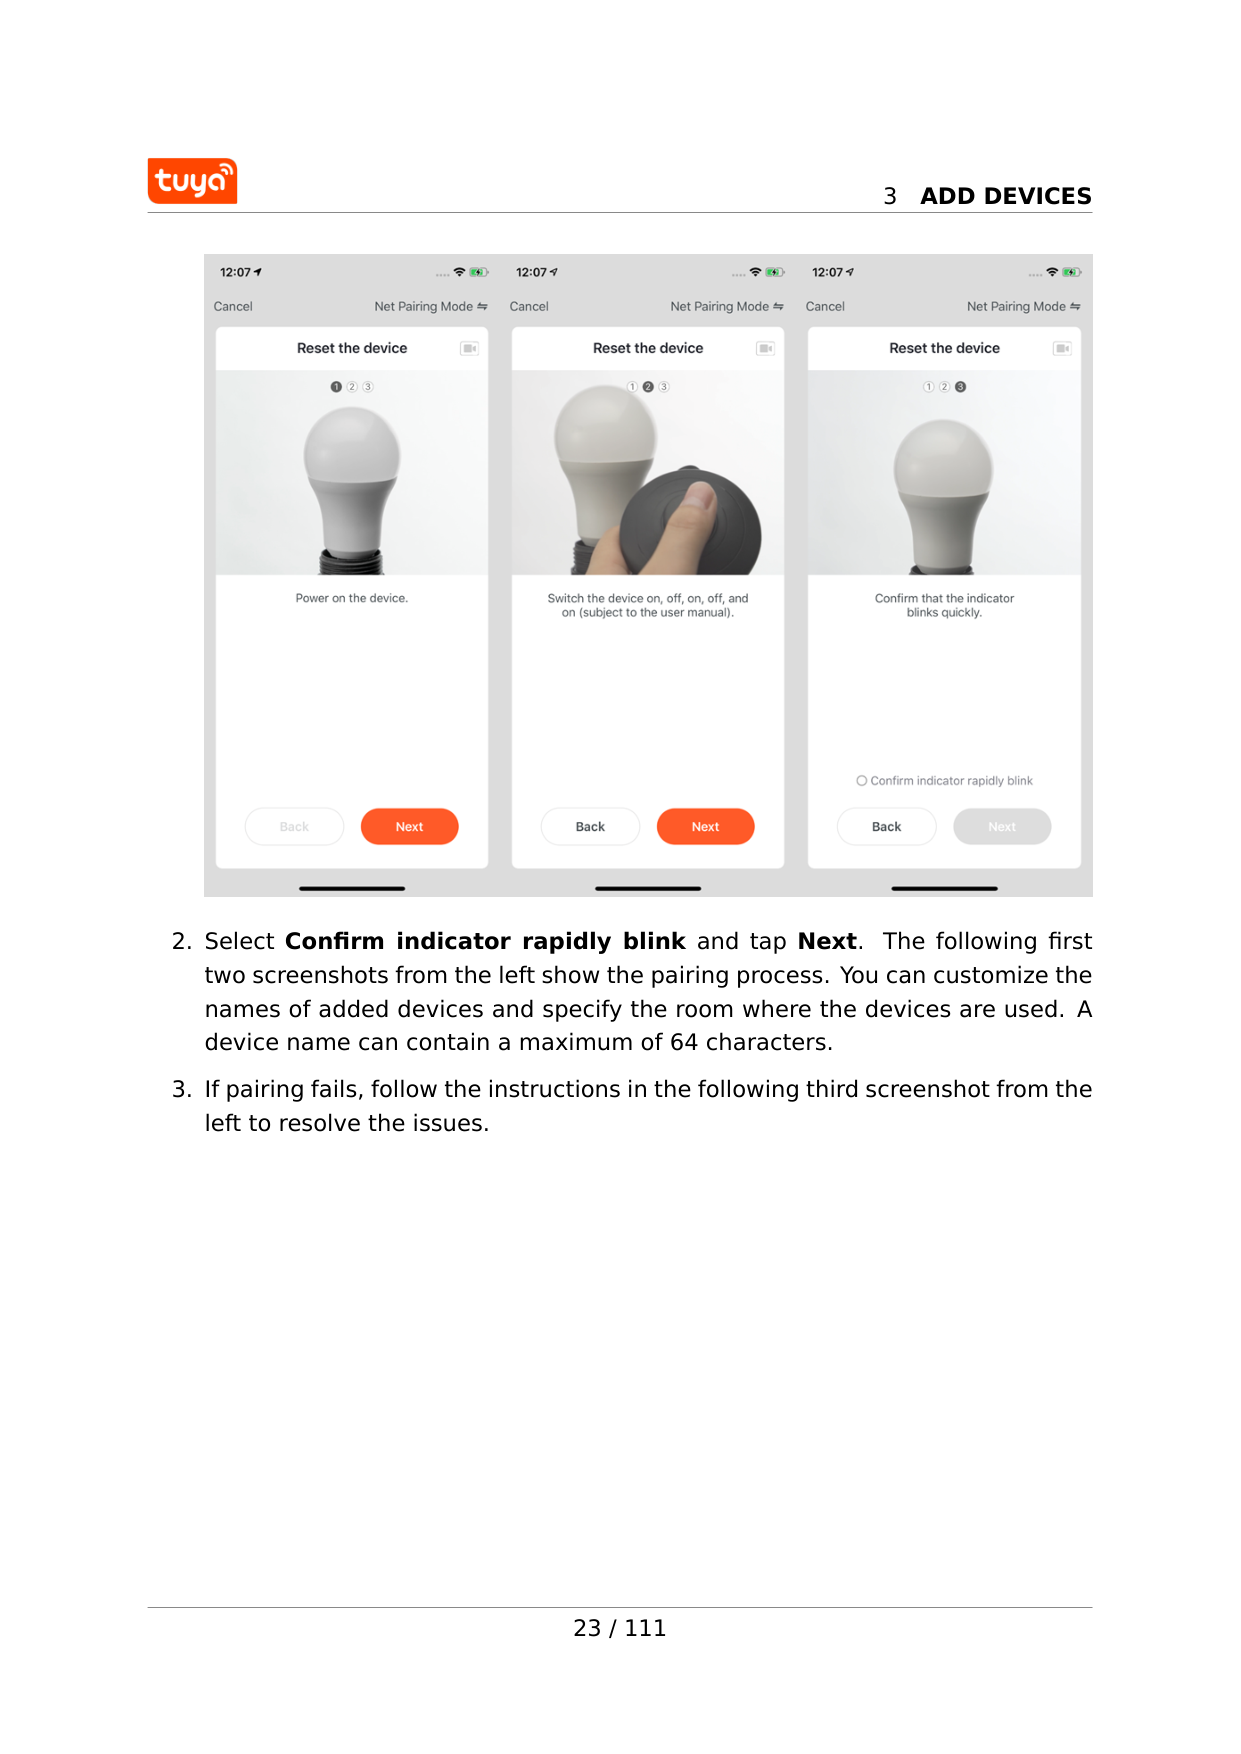
EZ mode is the default pairing mode and requires the device indicator to blink quickly, while AP mode is the compatible mode used for dual-band networks supporting both 2.4 GHz and 5 GHz, and requires the indicator to blink slowly. In AP mode, you must connect your mobile phone to the Wi-Fi hotspot starting with 'SmartLife' before pairing. You can switch between the two modes by tapping Net Pairing Mode in the top right corner. (Pages 22-25)
How do I add a Zigbee device to the Tuya Smart app?
You must add a Zigbee gateway before adding any Zigbee devices. Power on the gateway, connect it to a router using a network cable, and ensure your mobile phone is on the same LAN connected to a 2.4 GHz Wi-Fi network. Once the gateway is added, go to the gateway page, tap Add Subdevice, and follow the same steps used for adding Wi-Fi or Bluetooth devices. (Pages 33-35)
How do I share a device with another user in the Tuya Smart app?
Tap Share Device on the device management page, then tap Add Sharing and enter the account (email or mobile phone number) of the person you want to share with, and tap Done. Note that you can only share devices with users who have Tuya Smart app accounts in the same country as your account. To stop sharing, press and hold the account name and tap Delete (Android), or swipe left and tap Delete (iOS). (Page 65)
Show 8 more questions
How do I set up an automation scene in the Tuya Smart app?
How do I delete my Tuya Smart app account?
How do I set up a do-not-disturb schedule for device notifications?
What happens to my devices and scenes if I remove a device from the Tuya Smart app?
How do I change the device icon or name?
How do I add a new home member through Tuya Smart?
What are the steps to manually add Wi-Fi devices with EZ Mode?
How do I manage a control panel of a smart device?
Full Manual
114 pages
User Manual (v3.23.5) Version: 20210709 Online Version
Contents Contents 1 Get started 2 1.1 Download Tuya Smart app . . . . . . . . . . . . . . . . . . . . . . 2 1.2 Registration, login, and password reset . . . . . . . . . . . . . . 3 1.3 Log in with your app account or a third-party account . . . . . . 4 1.4 Change account . . . . . . . . . . . . . . . . . . . . . . . . . . . . 7 1.5 Reset password . . . . . . . . . . . . . . . . . . . . . . . . . . . . 8 1.6 Enter experience mode . . . . . . . . . . . . . . . . . . . . . . . . 10 2 Use app 12 2.1 Manage home and home members . . . . . . . . . . . . . . . . . 12 2.2 Use voice assistant . . . . . . . . . . . . . . . . . . . . . . . . . . 16 2.3 View environment information . . . . . . . . . . . . . . . . . . . 18 3 Add devices 20 3.1 Manually add Wi-Fi devices . . . . . . . . . . . . . . . . . . . . . 20 3.2 Manually add Wi-Fi devices in EZ mode . . . . . . . . . . . . . . 22 3.3 Manually add Wi-Fi devices in AP mode . . . . . . . . . . . . . . 24 3.4 Manually add Wi-Fi+Bluetooth dual-mode devices . . . . . . . . 28 3.5 Manually add Zigbee devices . . . . . . . . . . . . . . . . . . . . 33 3.6 Manually add IP cameras (IPCs) in QR code pairing mode . . . . 37 3.7 Add devices in auto scan mode . . . . . . . . . . . . . . . . . . . 40 3.8 Scan QR codes or enter device IDs to add NB-IoT products . . . 45 3.9 Add devices by scanning QR codes . . . . . . . . . . . . . . . . . 46 3.10Add devices in Pegasus pairing mode . . . . . . . . . . . . . . . 48 3.11Grant autostart and battery usage permissions to the app . . . 48 4 Manage device list and room list 50 4.1 View devices . . . . . . . . . . . . . . . . . . . . . . . . . . . . . . 50 4.2 Manage devices and rooms . . . . . . . . . . . . . . . . . . . . . 51 4.3 Quickly use common functions . . . . . . . . . . . . . . . . . . . 55 5 Control devices 60 5.1 Use control panels . . . . . . . . . . . . . . . . . . . . . . . . . . 60 5.2 Manage devices . . . . . . . . . . . . . . . . . . . . . . . . . . . . 63 i
Contents 5.3 Automatically update firmware . . . . . . . . . . . . . . . . . . . 64 5.4 Network Switching function . . . . . . . . . . . . . . . . . . . . . 65 5.5 Share devices . . . . . . . . . . . . . . . . . . . . . . . . . . . . . 65 5.6 Group control . . . . . . . . . . . . . . . . . . . . . . . . . . . . . 66 6 Automation and tap-to-run 69 6.1 Automation . . . . . . . . . . . . . . . . . . . . . . . . . . . . . . . 69 6.2 Add automation scenes . . . . . . . . . . . . . . . . . . . . . . . . 70 6.3 Select sunrise/sunset condition . . . . . . . . . . . . . . . . . . . 73 6.4 Select leave/arrive condition . . . . . . . . . . . . . . . . . . . . . 75 6.5 Create scenes from templates . . . . . . . . . . . . . . . . . . . . 76 6.6 Add tasks . . . . . . . . . . . . . . . . . . . . . . . . . . . . . . . . 77 6.7 Set effective period . . . . . . . . . . . . . . . . . . . . . . . . . . 78 6.8 Create automation scene . . . . . . . . . . . . . . . . . . . . . . . 79 6.9 Select notification methods . . . . . . . . . . . . . . . . . . . . . 82 6.10Tap-to-Run . . . . . . . . . . . . . . . . . . . . . . . . . . . . . . . 83 6.11Local gateway support for tap-to-run scenes . . . . . . . . . . . 85 6.12Zigbee gateway linkage data backup and recovery . . . . . . . . 85 6.13Add, modify, and delete scenes . . . . . . . . . . . . . . . . . . . 85 6.14Add tap-to-run scenes to Siri . . . . . . . . . . . . . . . . . . . . 87 6.15View scene logs . . . . . . . . . . . . . . . . . . . . . . . . . . . . 88 6.16Run scene tasks in a LAN . . . . . . . . . . . . . . . . . . . . . . . 89 7 Home 90 8 Me 92 8.1 Third-party integration . . . . . . . . . . . . . . . . . . . . . . . . 94 8.2 Message center . . . . . . . . . . . . . . . . . . . . . . . . . . . . 95 8.3 Notification settings . . . . . . . . . . . . . . . . . . . . . . . . . 96 8.4 FAQ & feedback . . . . . . . . . . . . . . . . . . . . . . . . . . . . 99 8.5 Featured . . . . . . . . . . . . . . . . . . . . . . . . . . . . . . . . 101 8.6 HomeKit information . . . . . . . . . . . . . . . . . . . . . . . . . 103 8.7 Watch . . . . . . . . . . . . . . . . . . . . . . . . . . . . . . . . . . 105 8.8 About . . . . . . . . . . . . . . . . . . . . . . . . . . . . . . . . . . 106 8.9 Account . . . . . . . . . . . . . . . . . . . . . . . . . . . . . . . . . 107 8.10Delete account . . . . . . . . . . . . . . . . . . . . . . . . . . . . . 108 8.11Pattern lock . . . . . . . . . . . . . . . . . . . . . . . . . . . . . . 110 9 Previous version 111 ii
Contents You can also download and refer to the previous app version. 1 / 111
1
Get Started
1 Get started 1.1 Download Tuya Smart app You can download the Tuya Smart app by searching for Tuya Smart in your app store or by scanning the following QR code. {width=100%} 2 / 111
1
Get Started
1.2 Registration, login, and password reset
1
Get Started
before registration.
1
Get Started

1
Get Started
6 / 111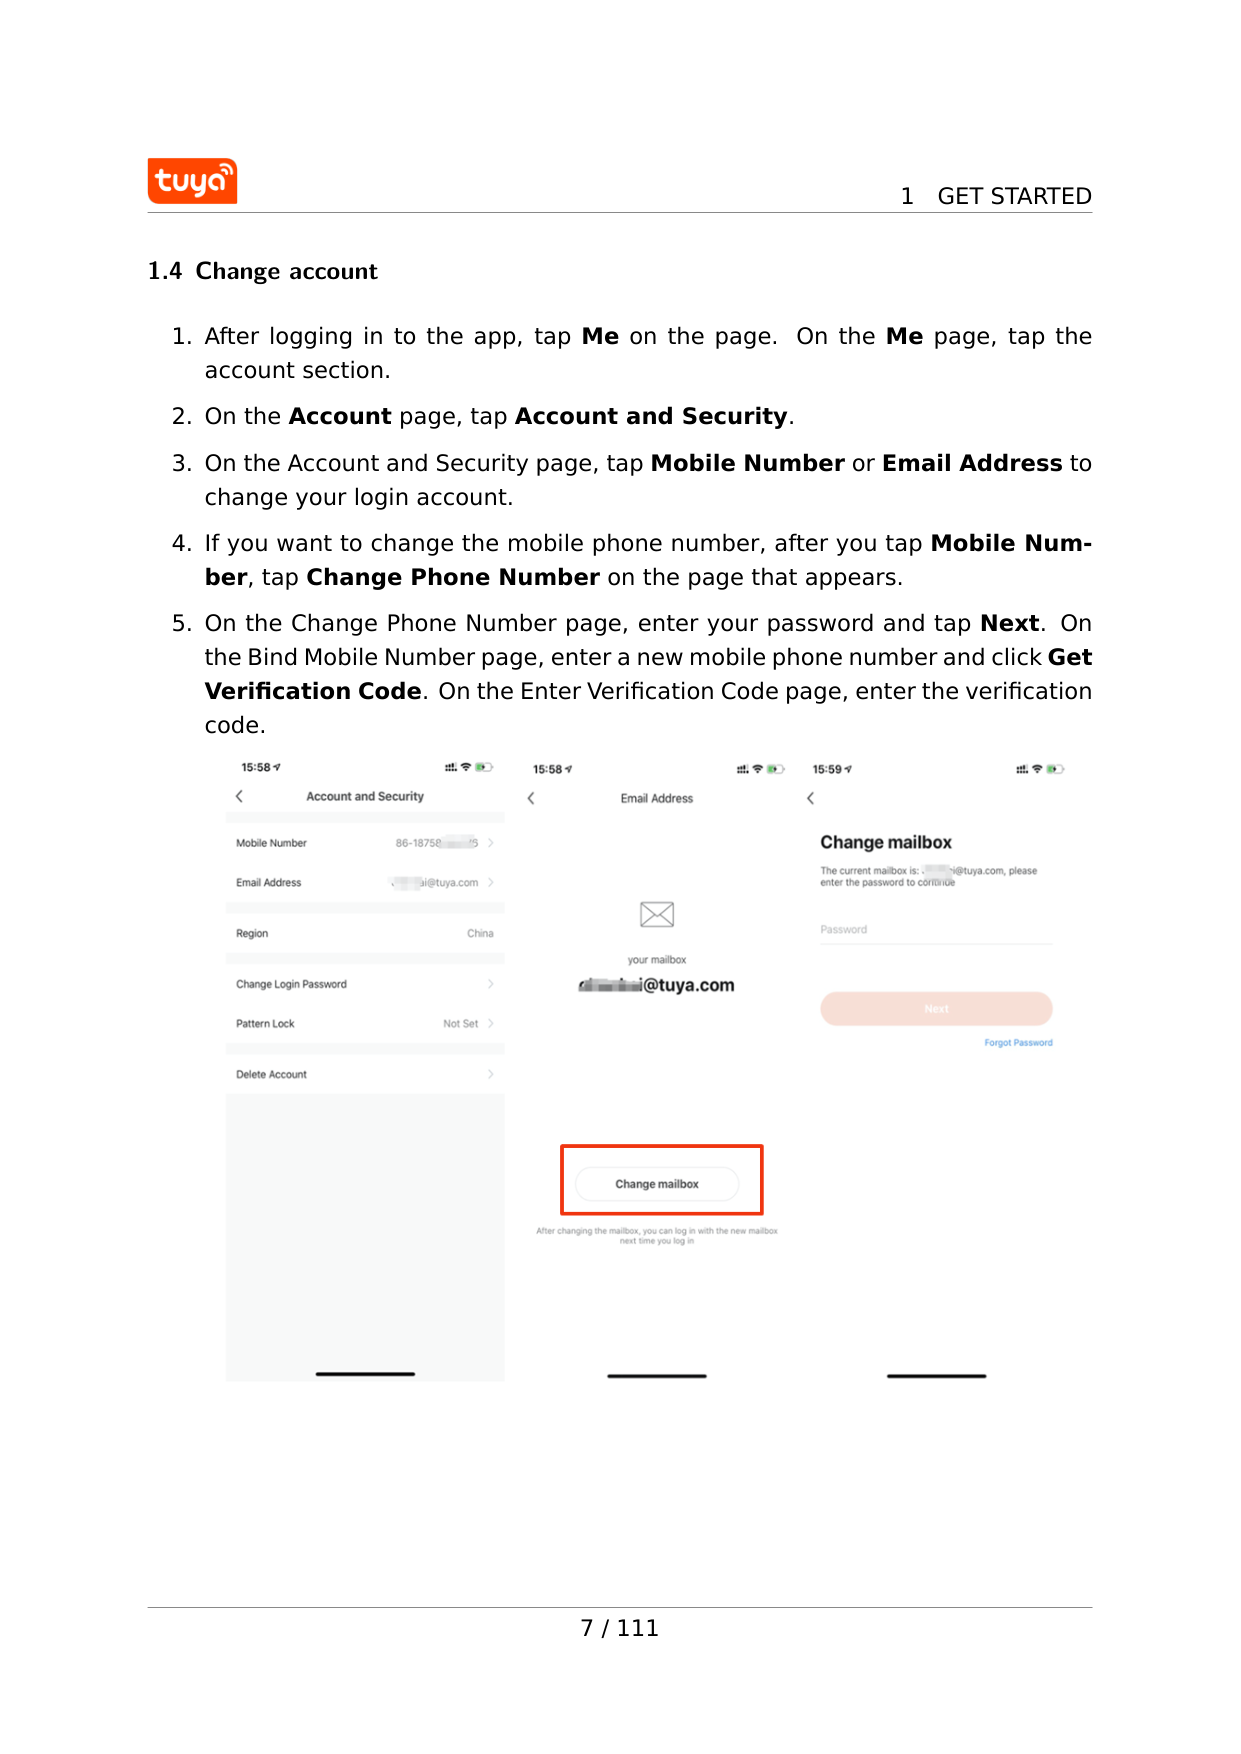
1
Get Started
1.4 Change account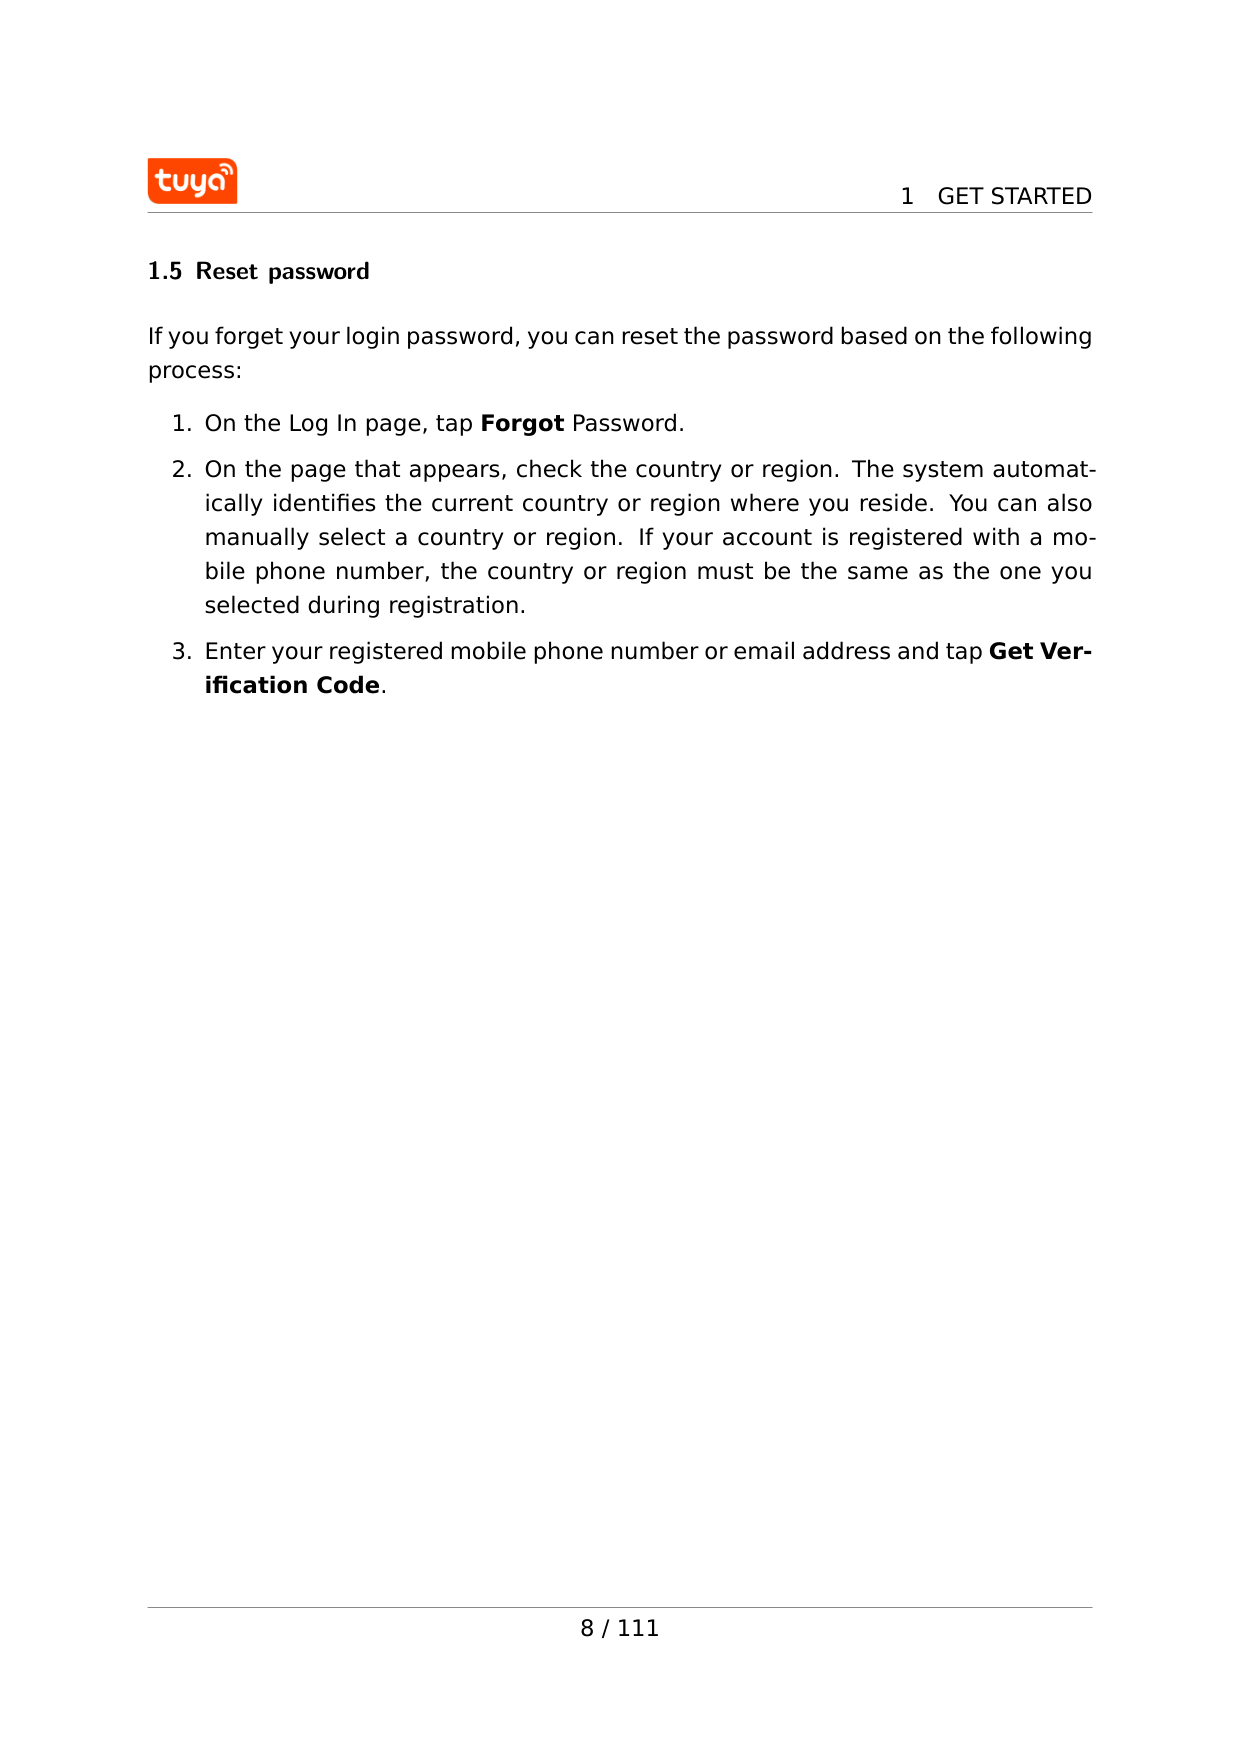
1
Get Started
1.5 Reset password If you forget your login password, you can reset the password based on the following process: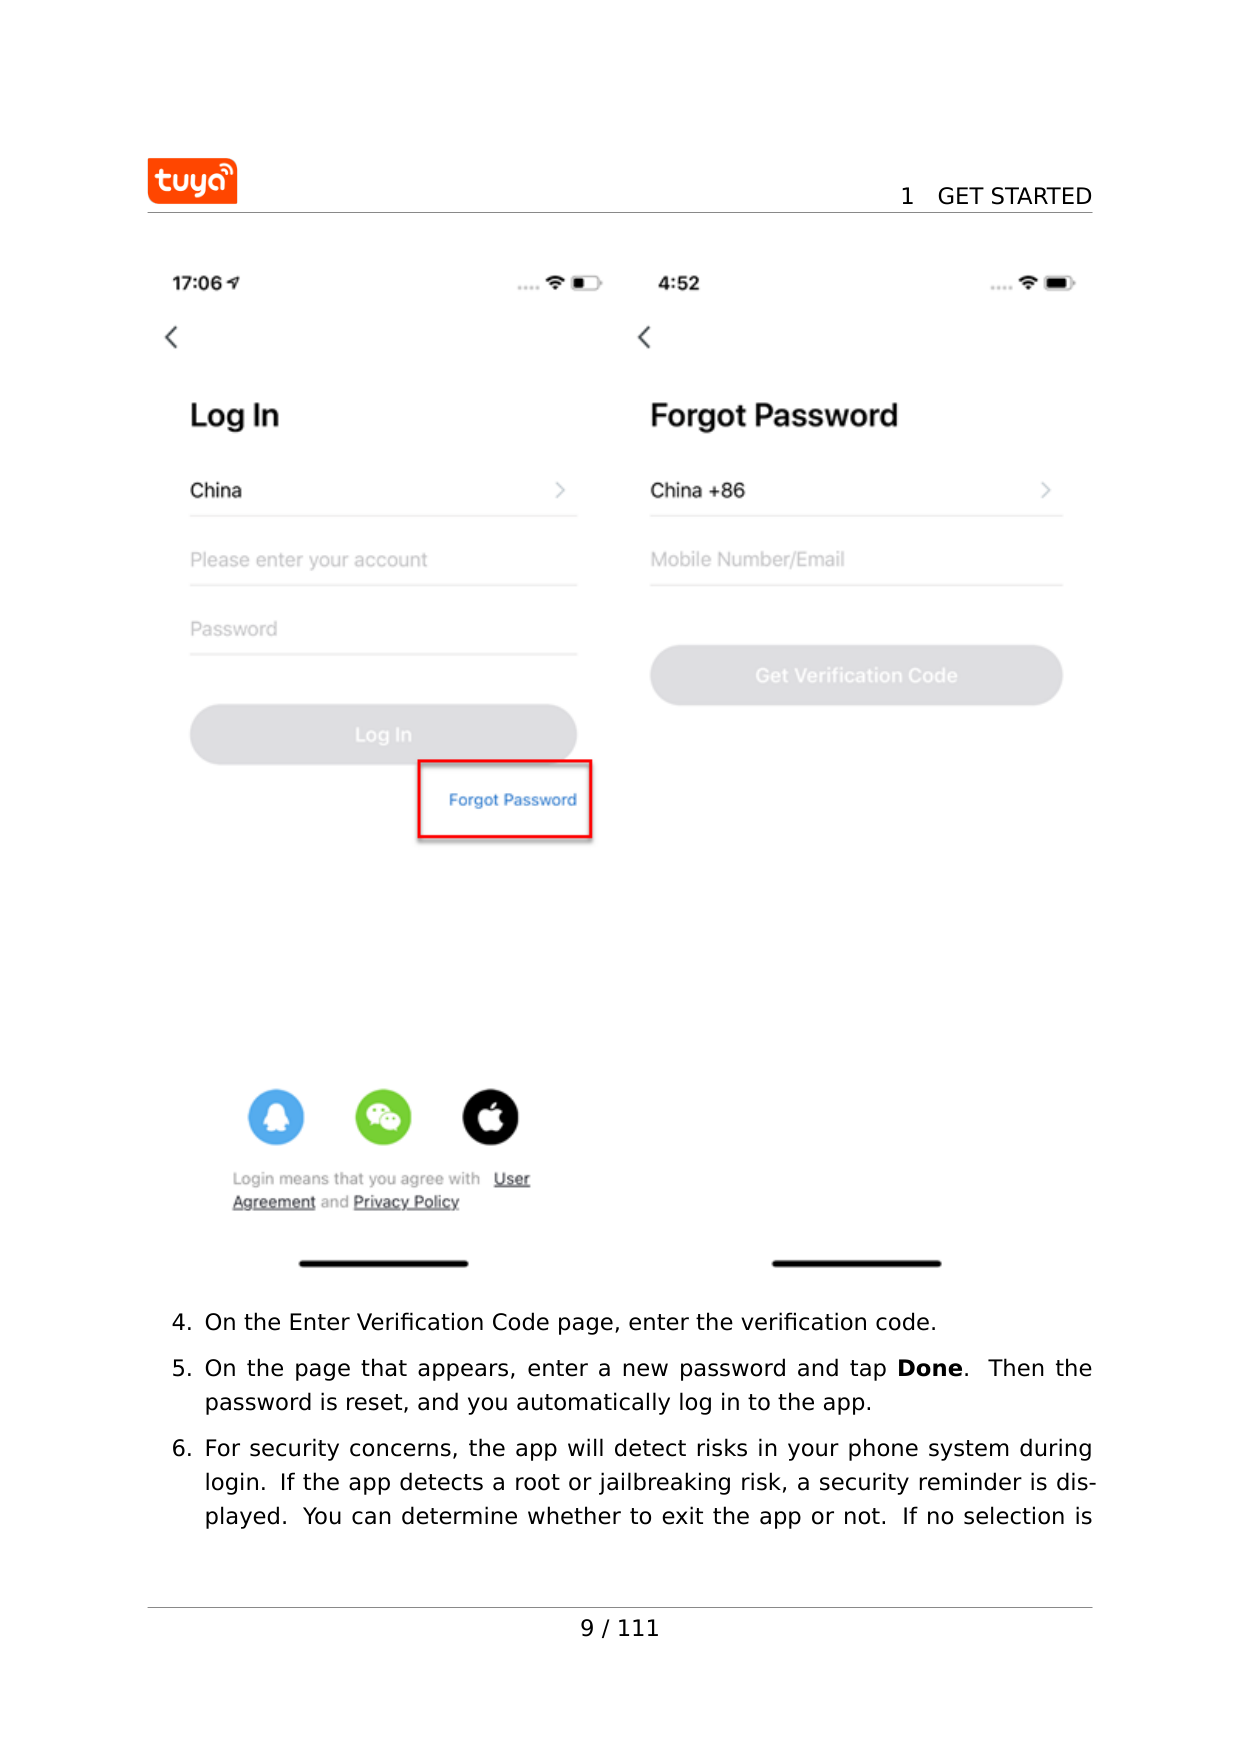
1
Get Started
1
Get Started
made, the app will automatically exit. 1.6 Enter experience mode
1
Get Started
2
Use App
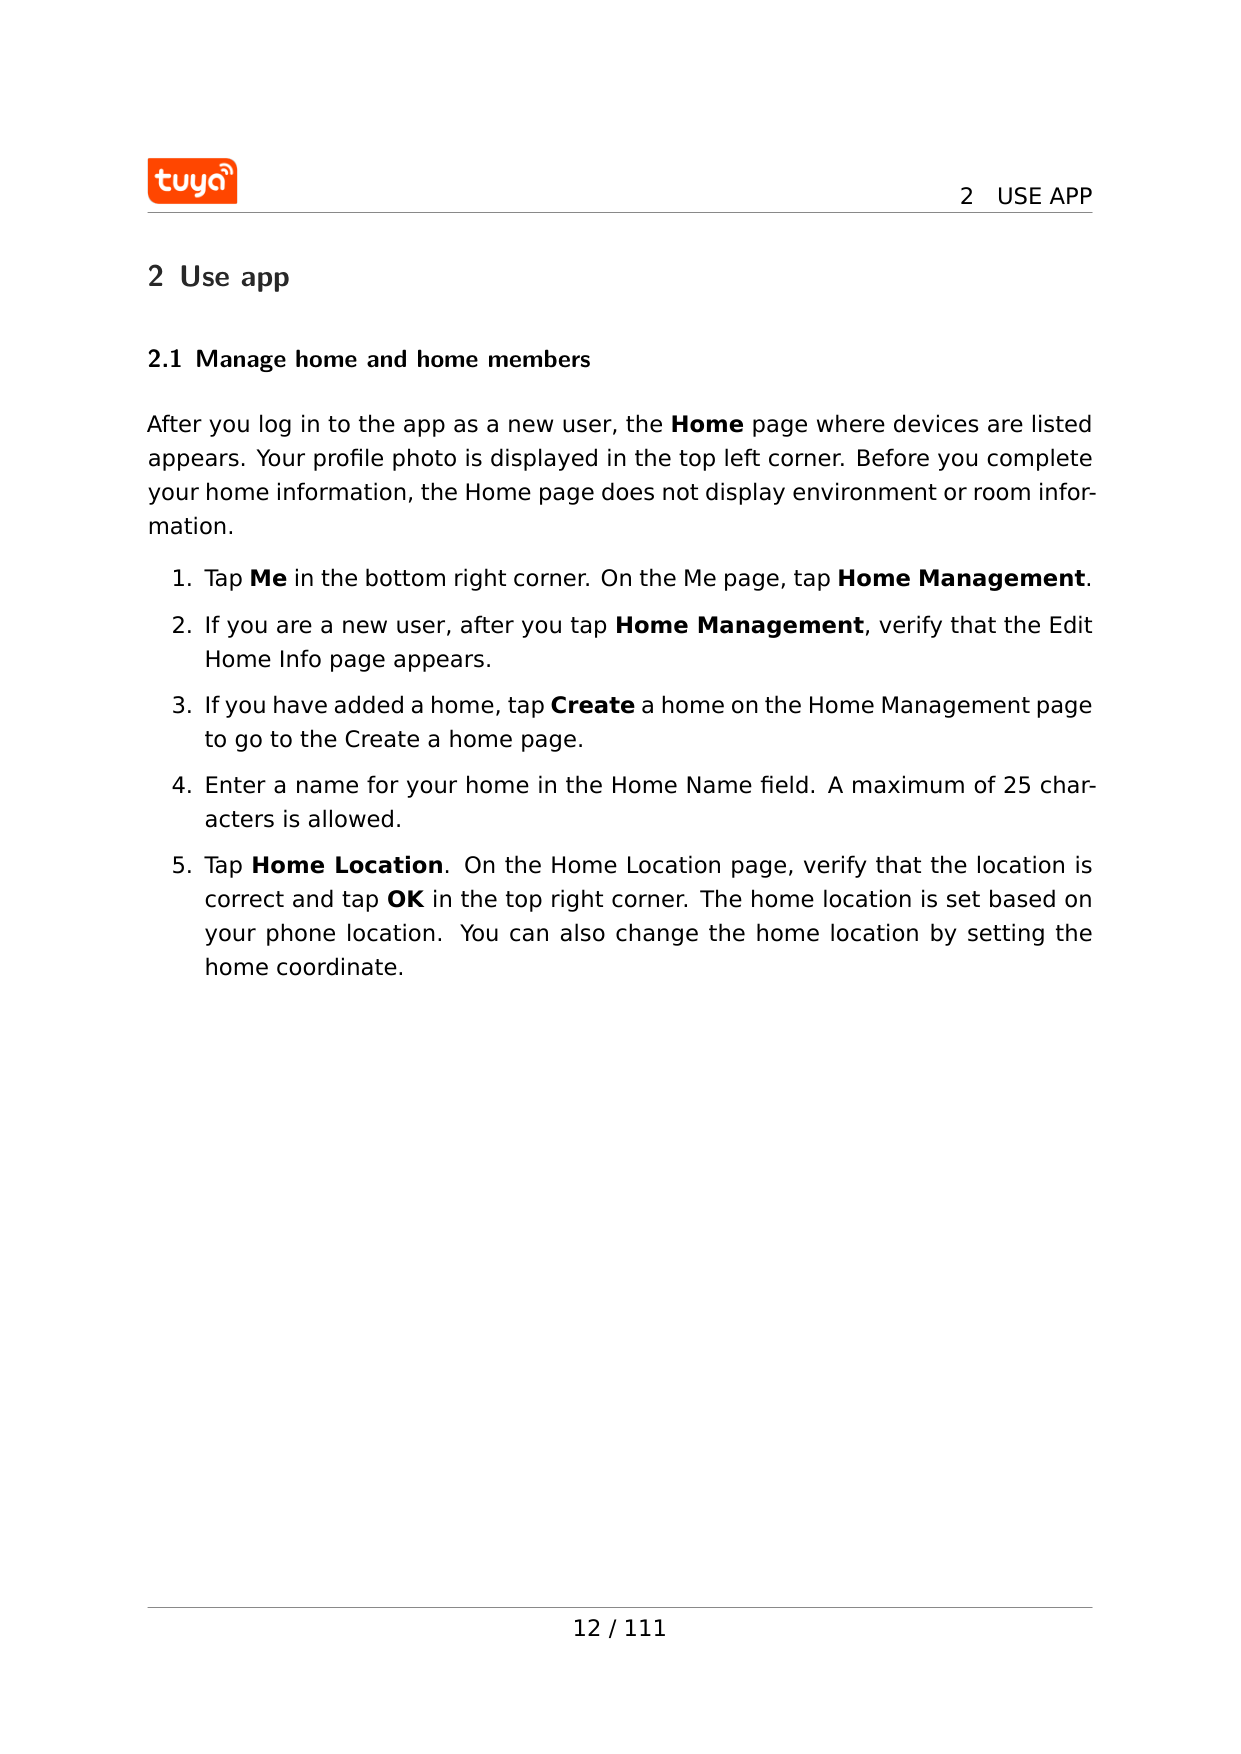
2 Use app 2.1 Manage home and home members After you log in to the app as a new user, the Home page where devices are listed appears. Your profile photo is displayed in the top left corner. Before you complete your home information, the Home page does not display environment or room infor- mation.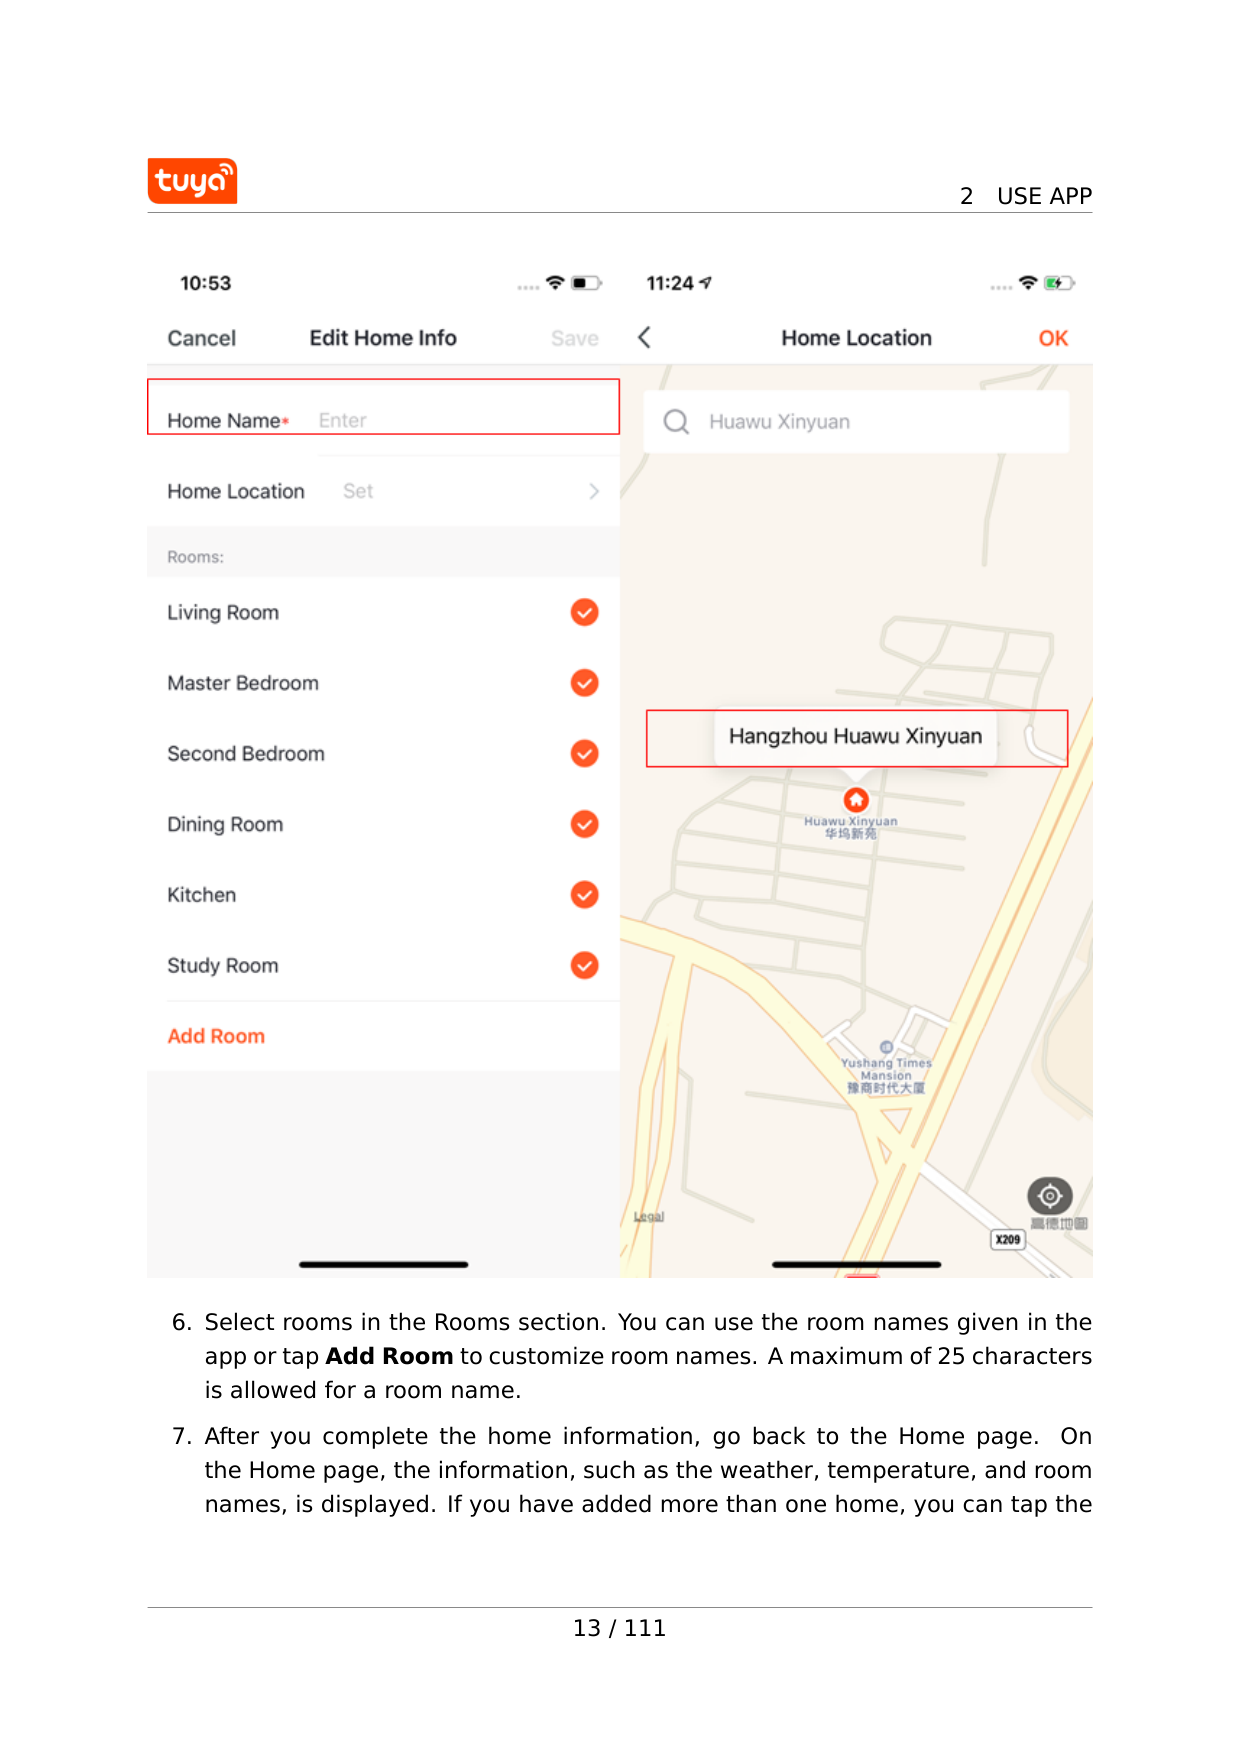
2
Use App
2
Use App
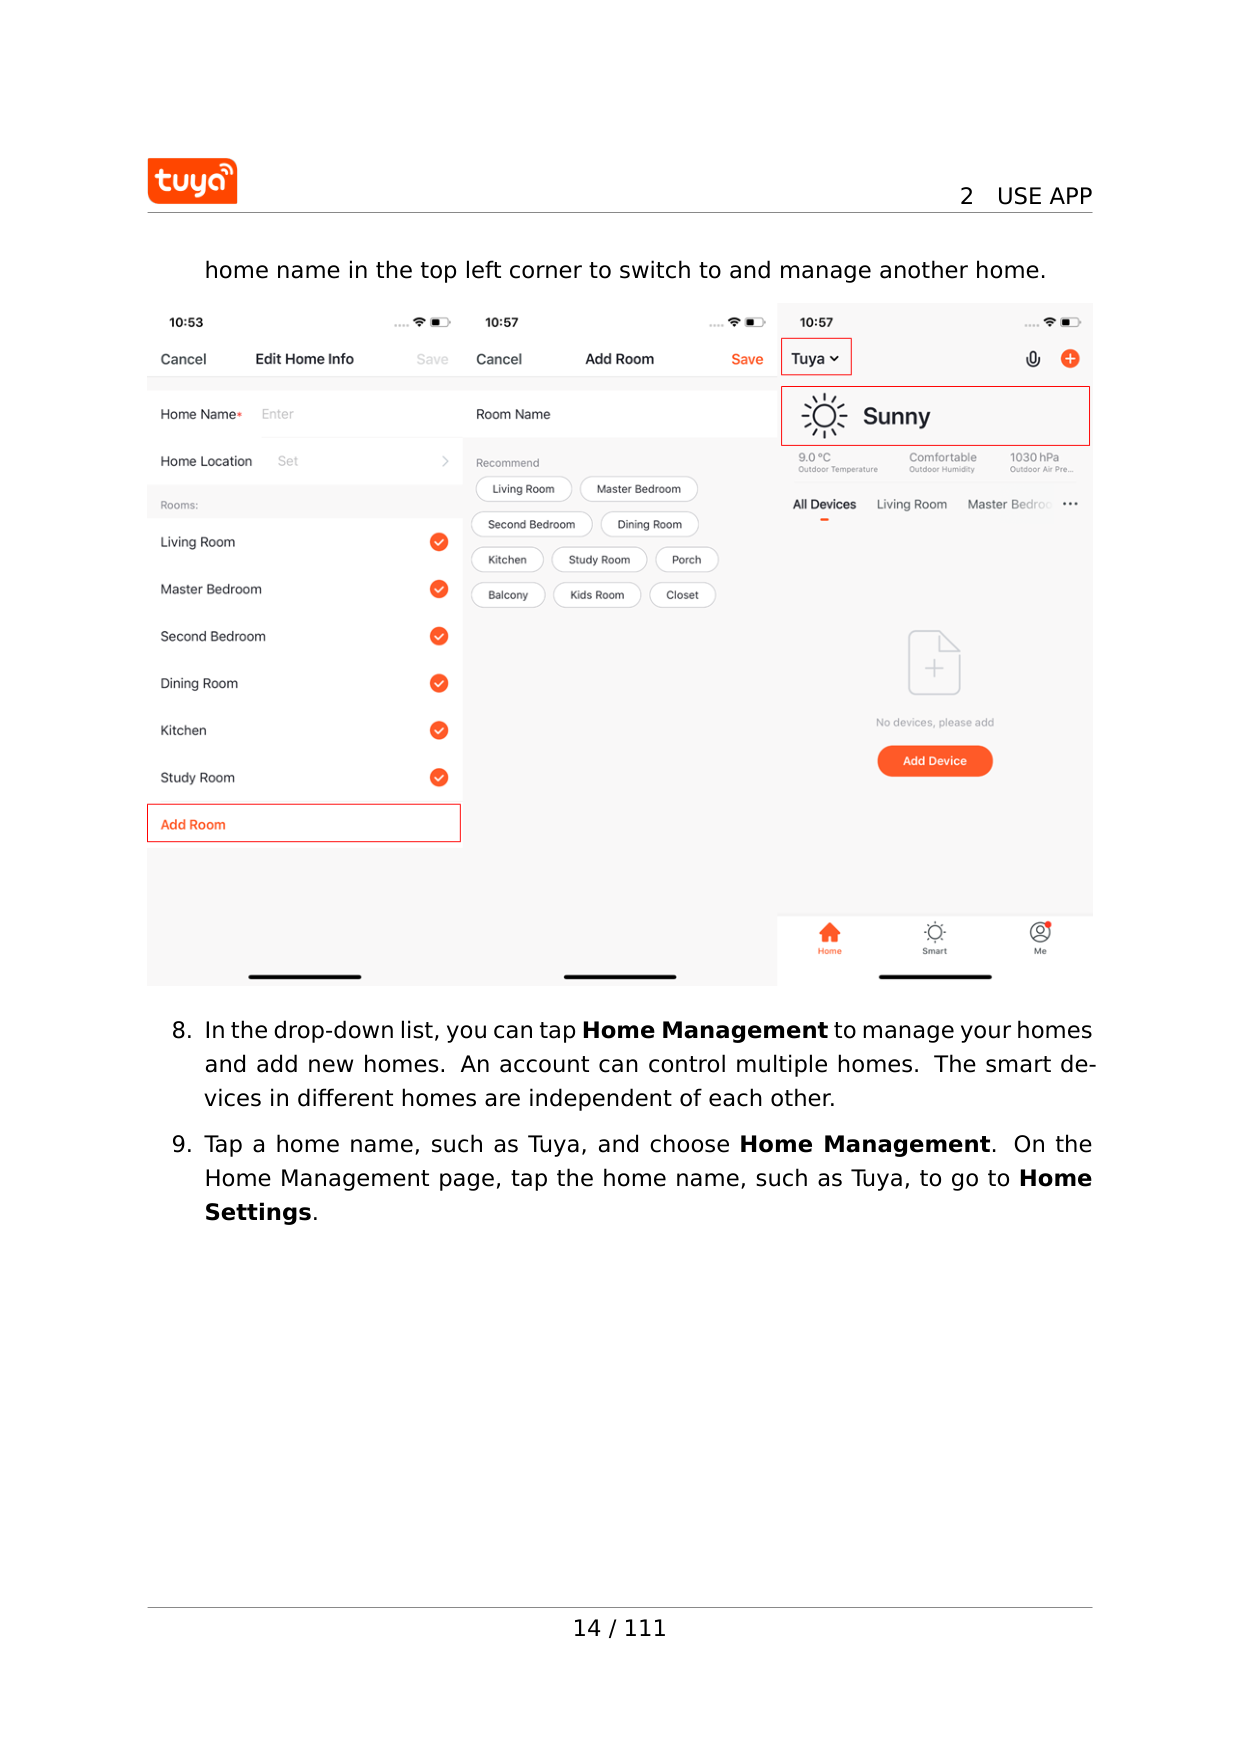
home name in the top left corner to switch to and manage another home.
2
Use App
2
Use App
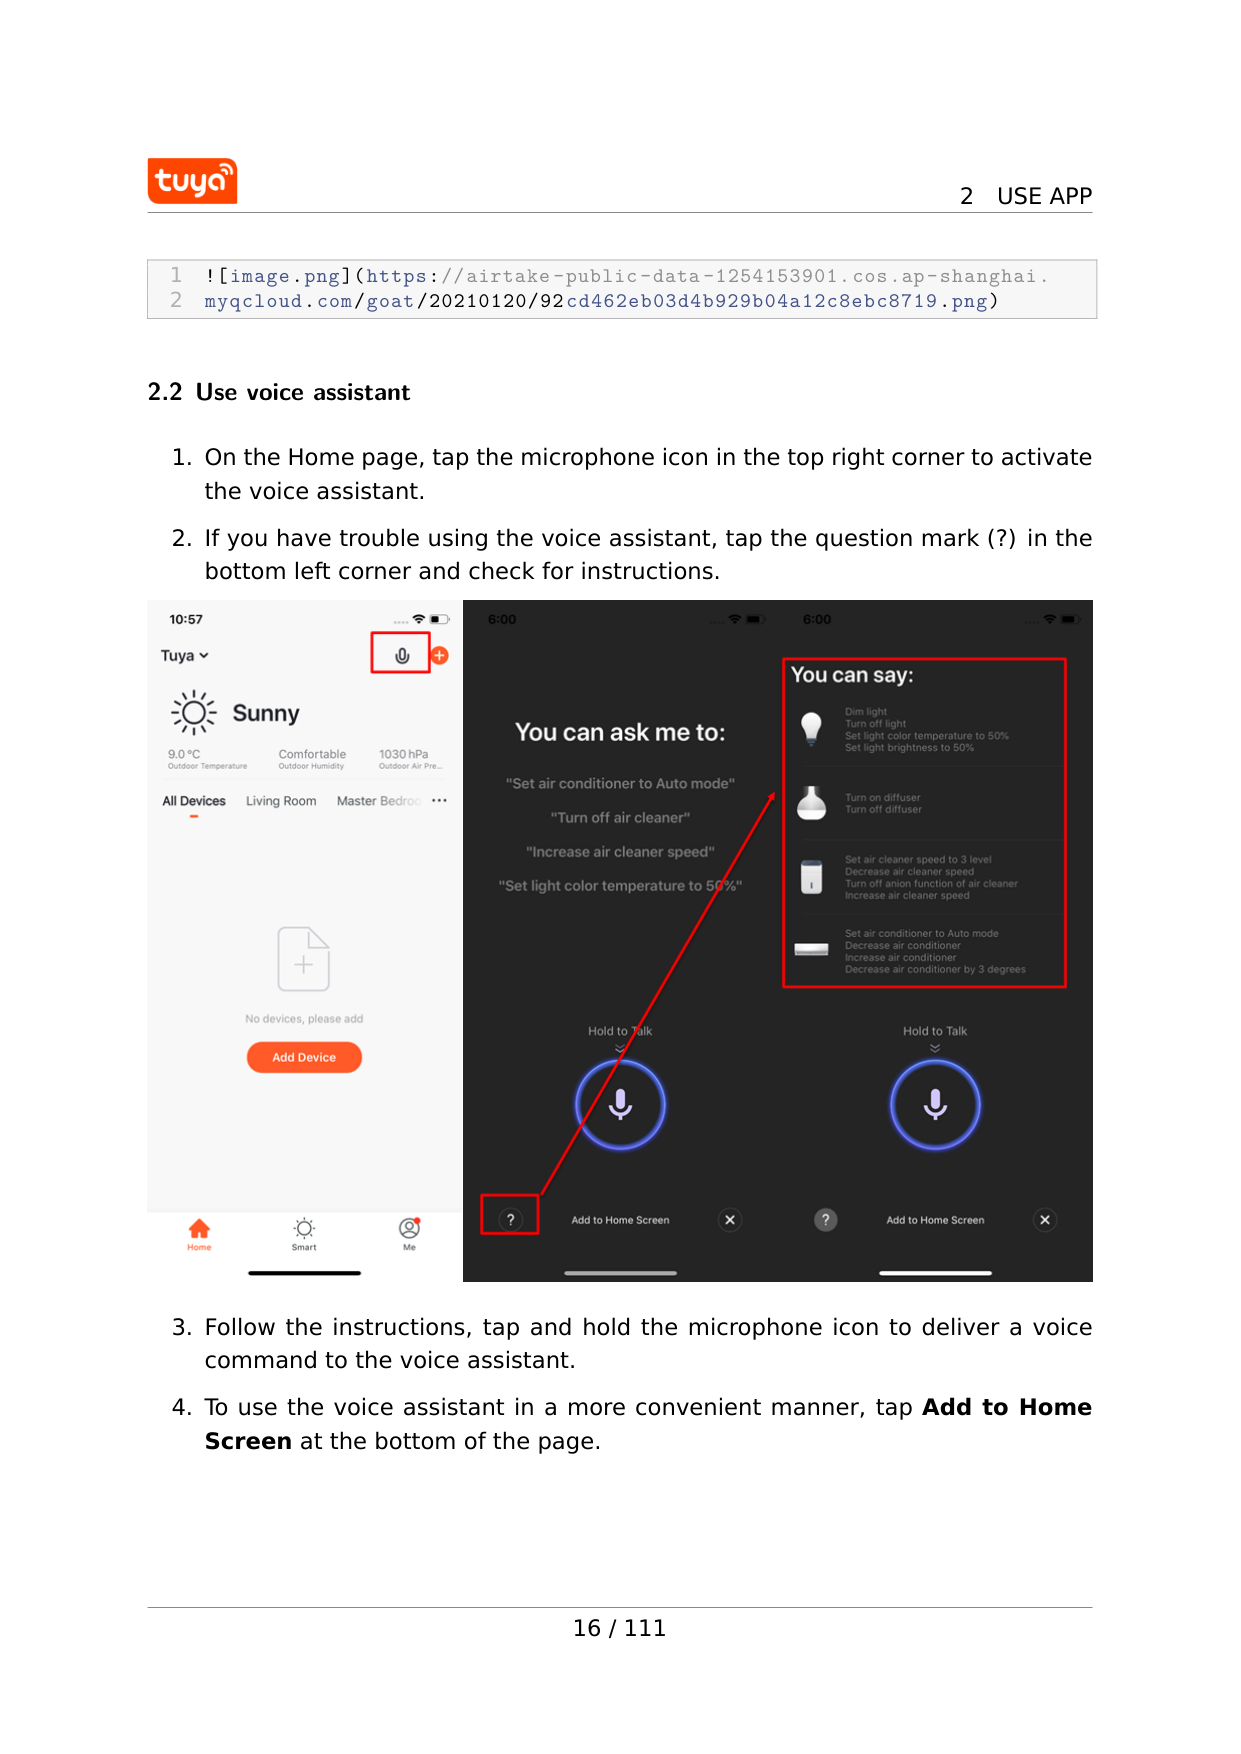
1  2.2 Use voice assistant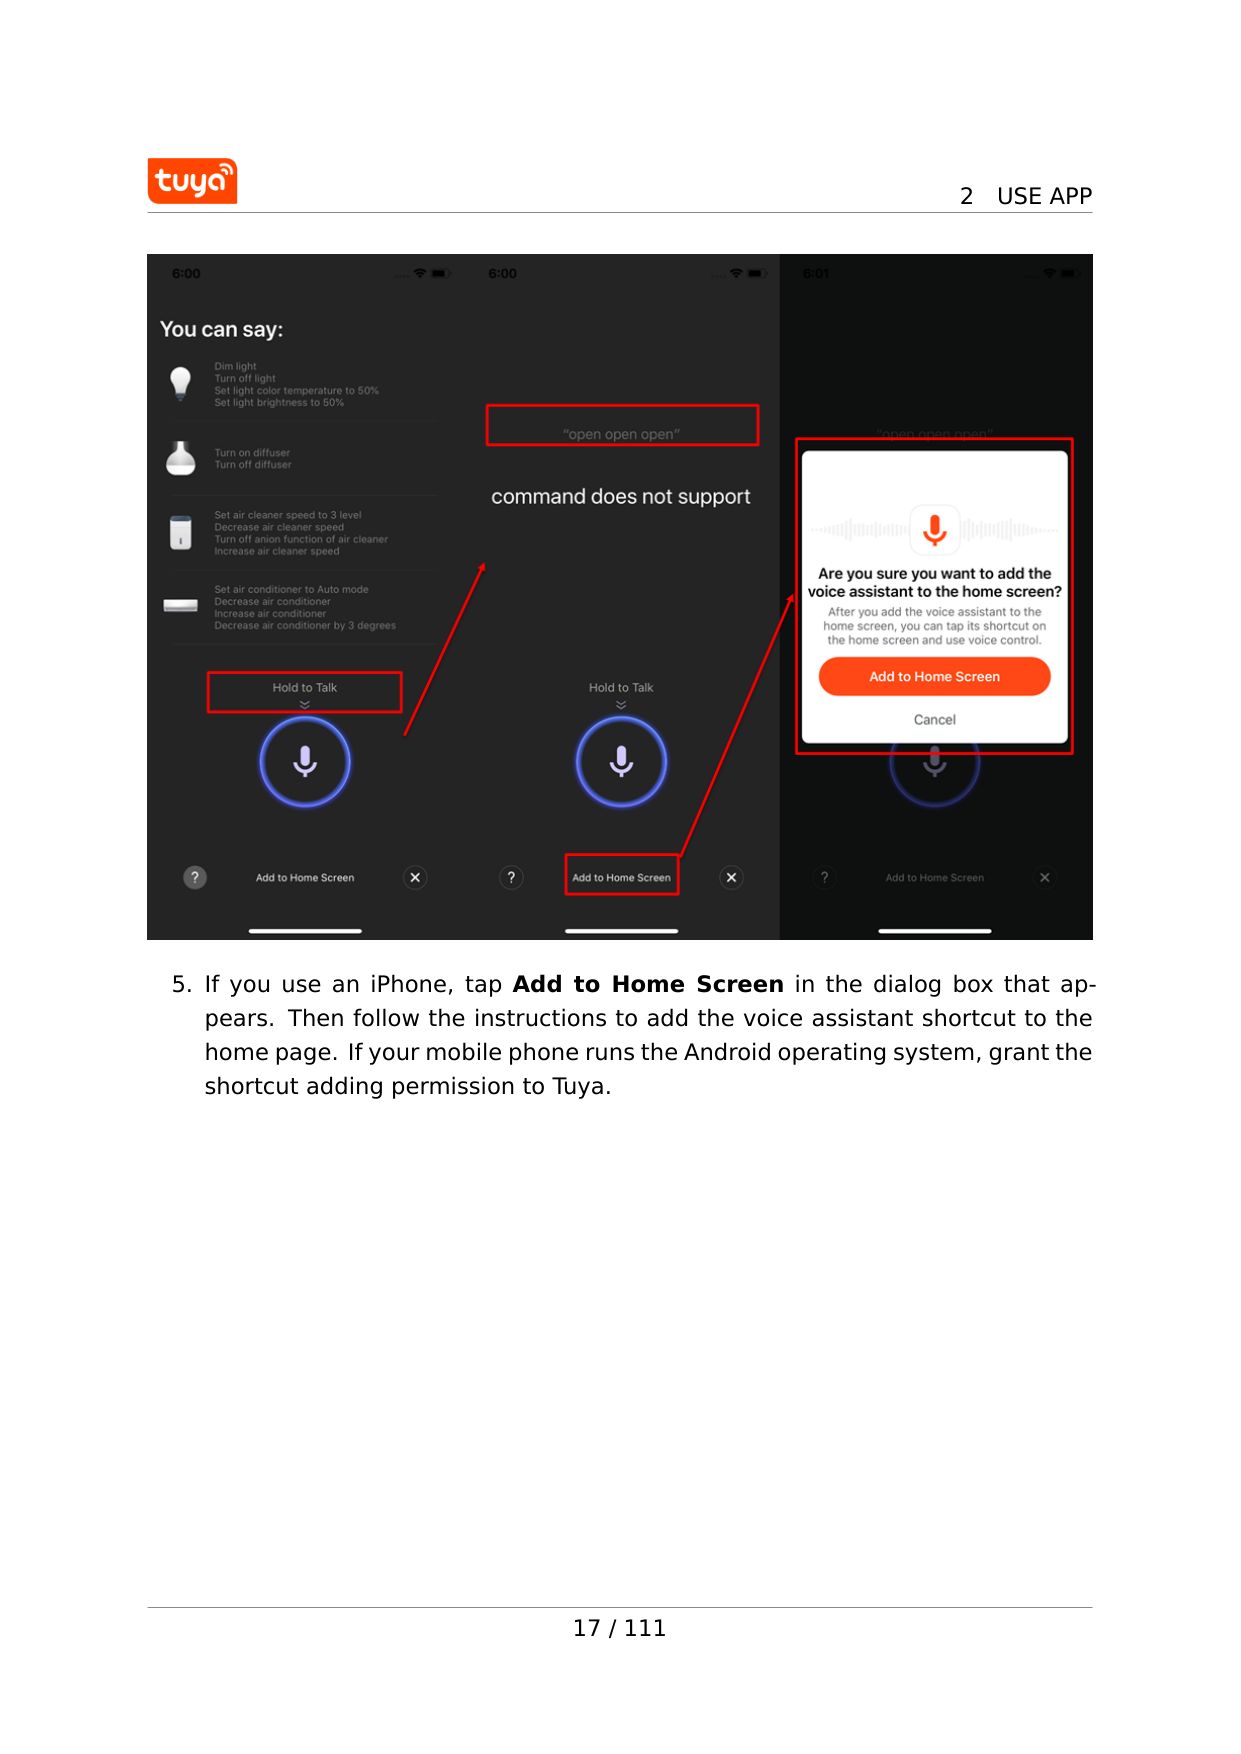
2
Use App
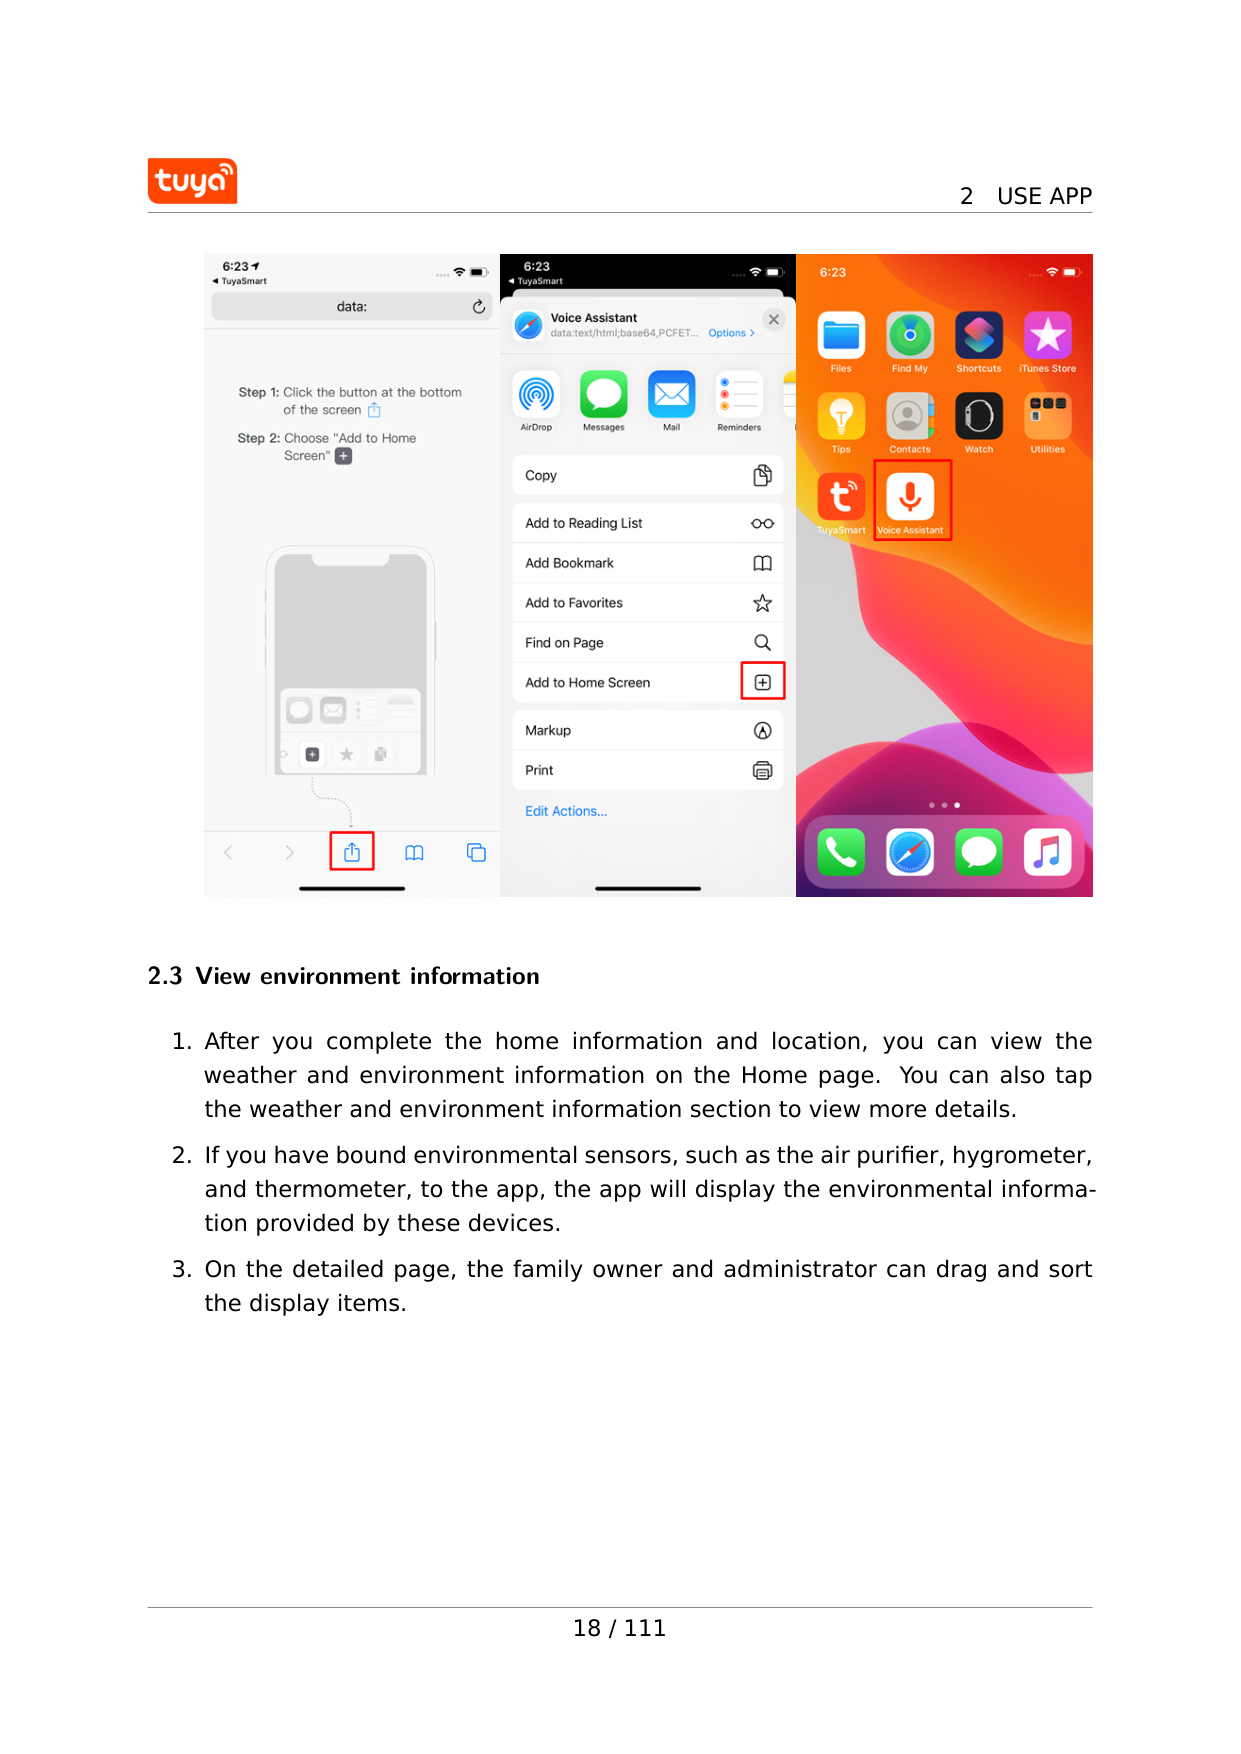
2
Use App
2.3 View environment information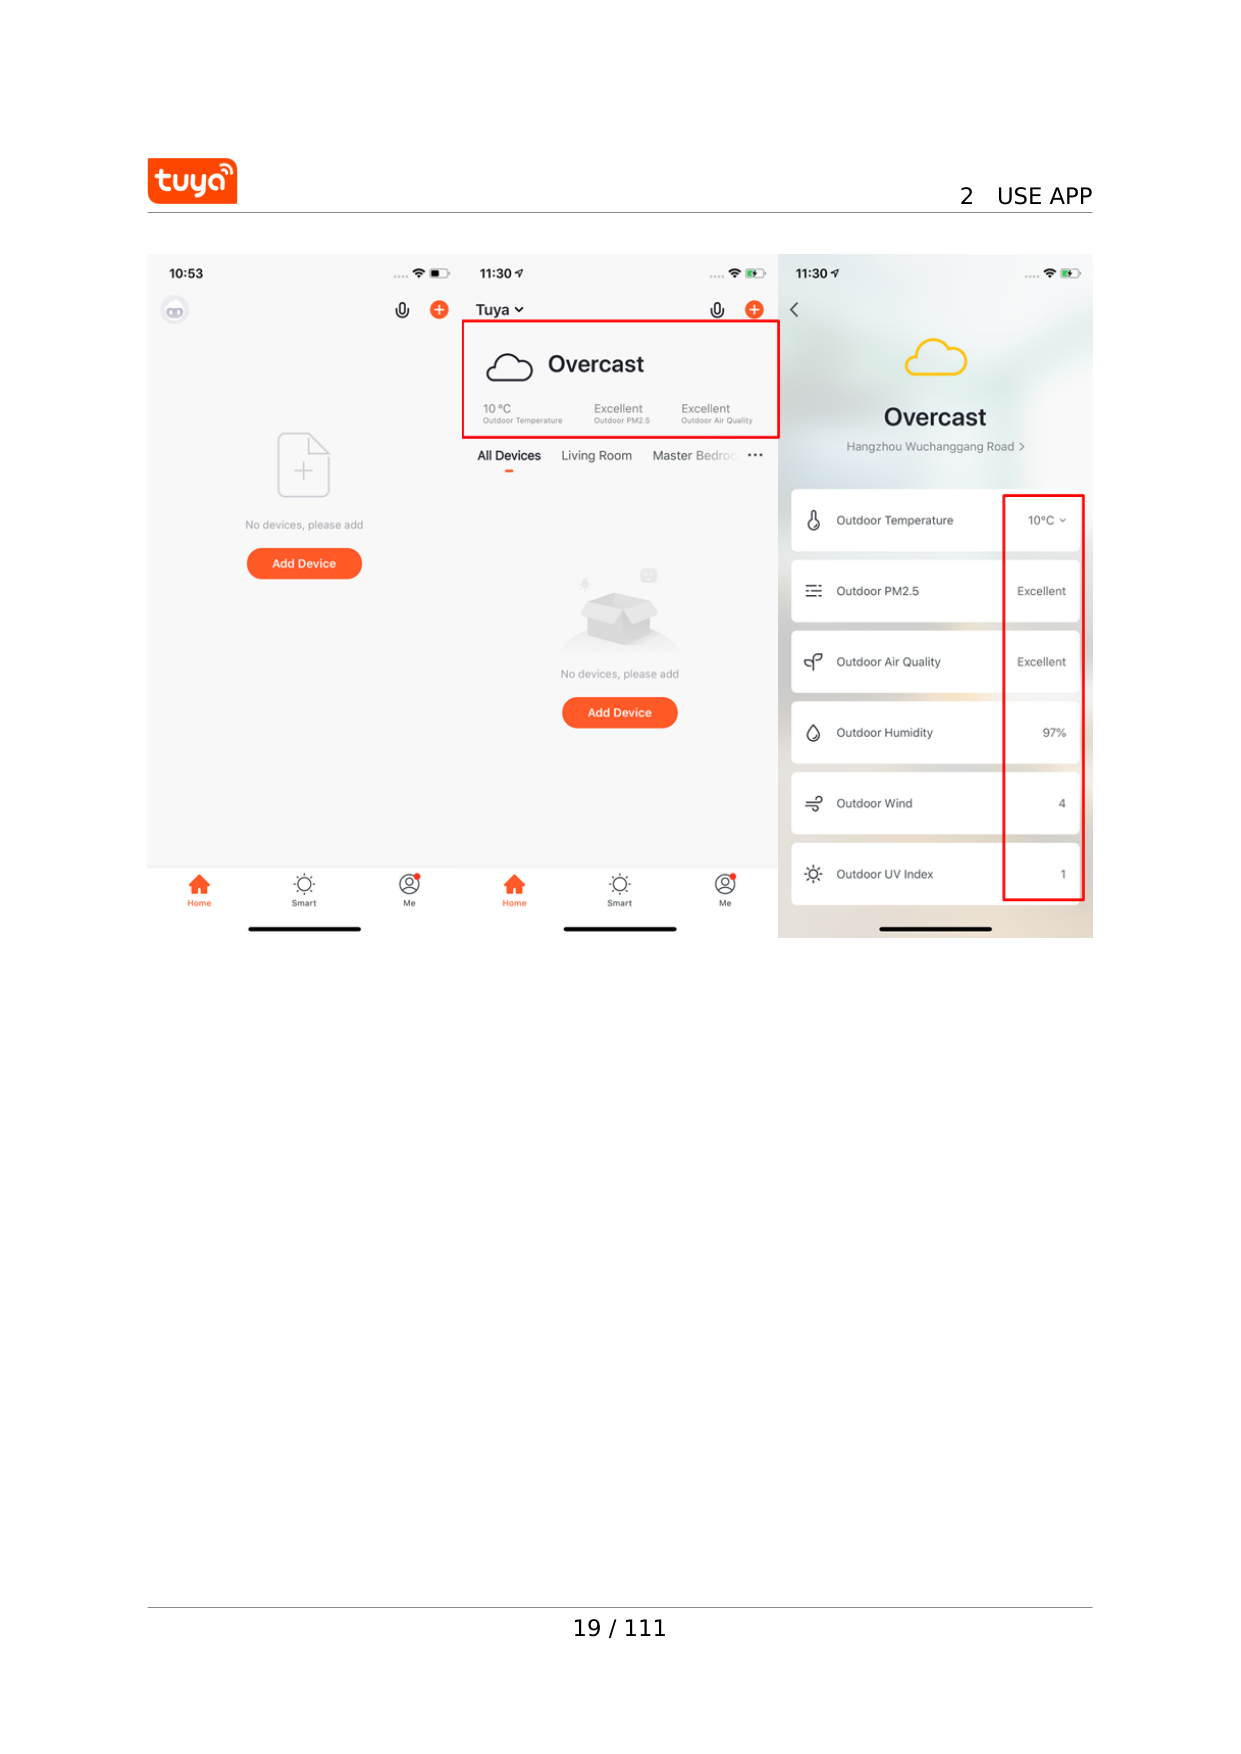
2
Use App
19 / 111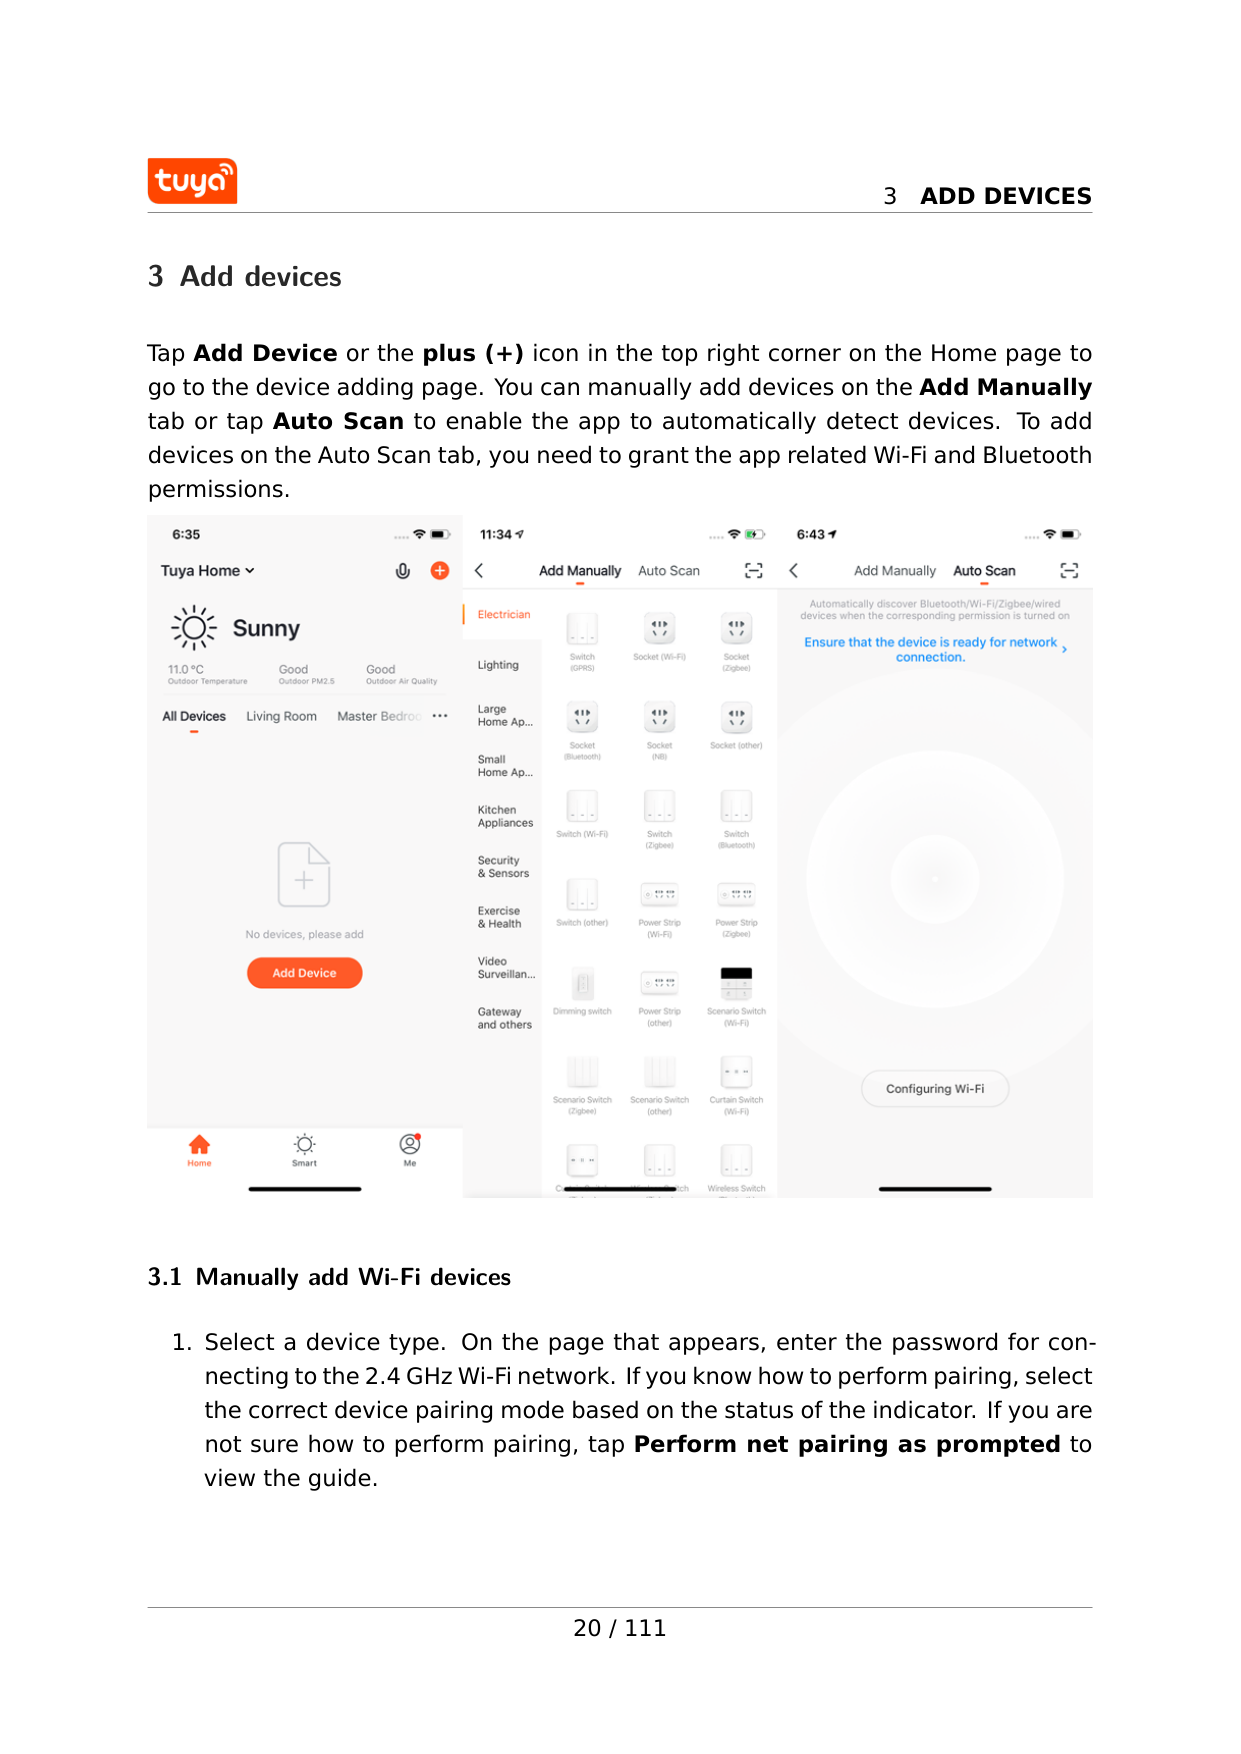
3
Add Devices
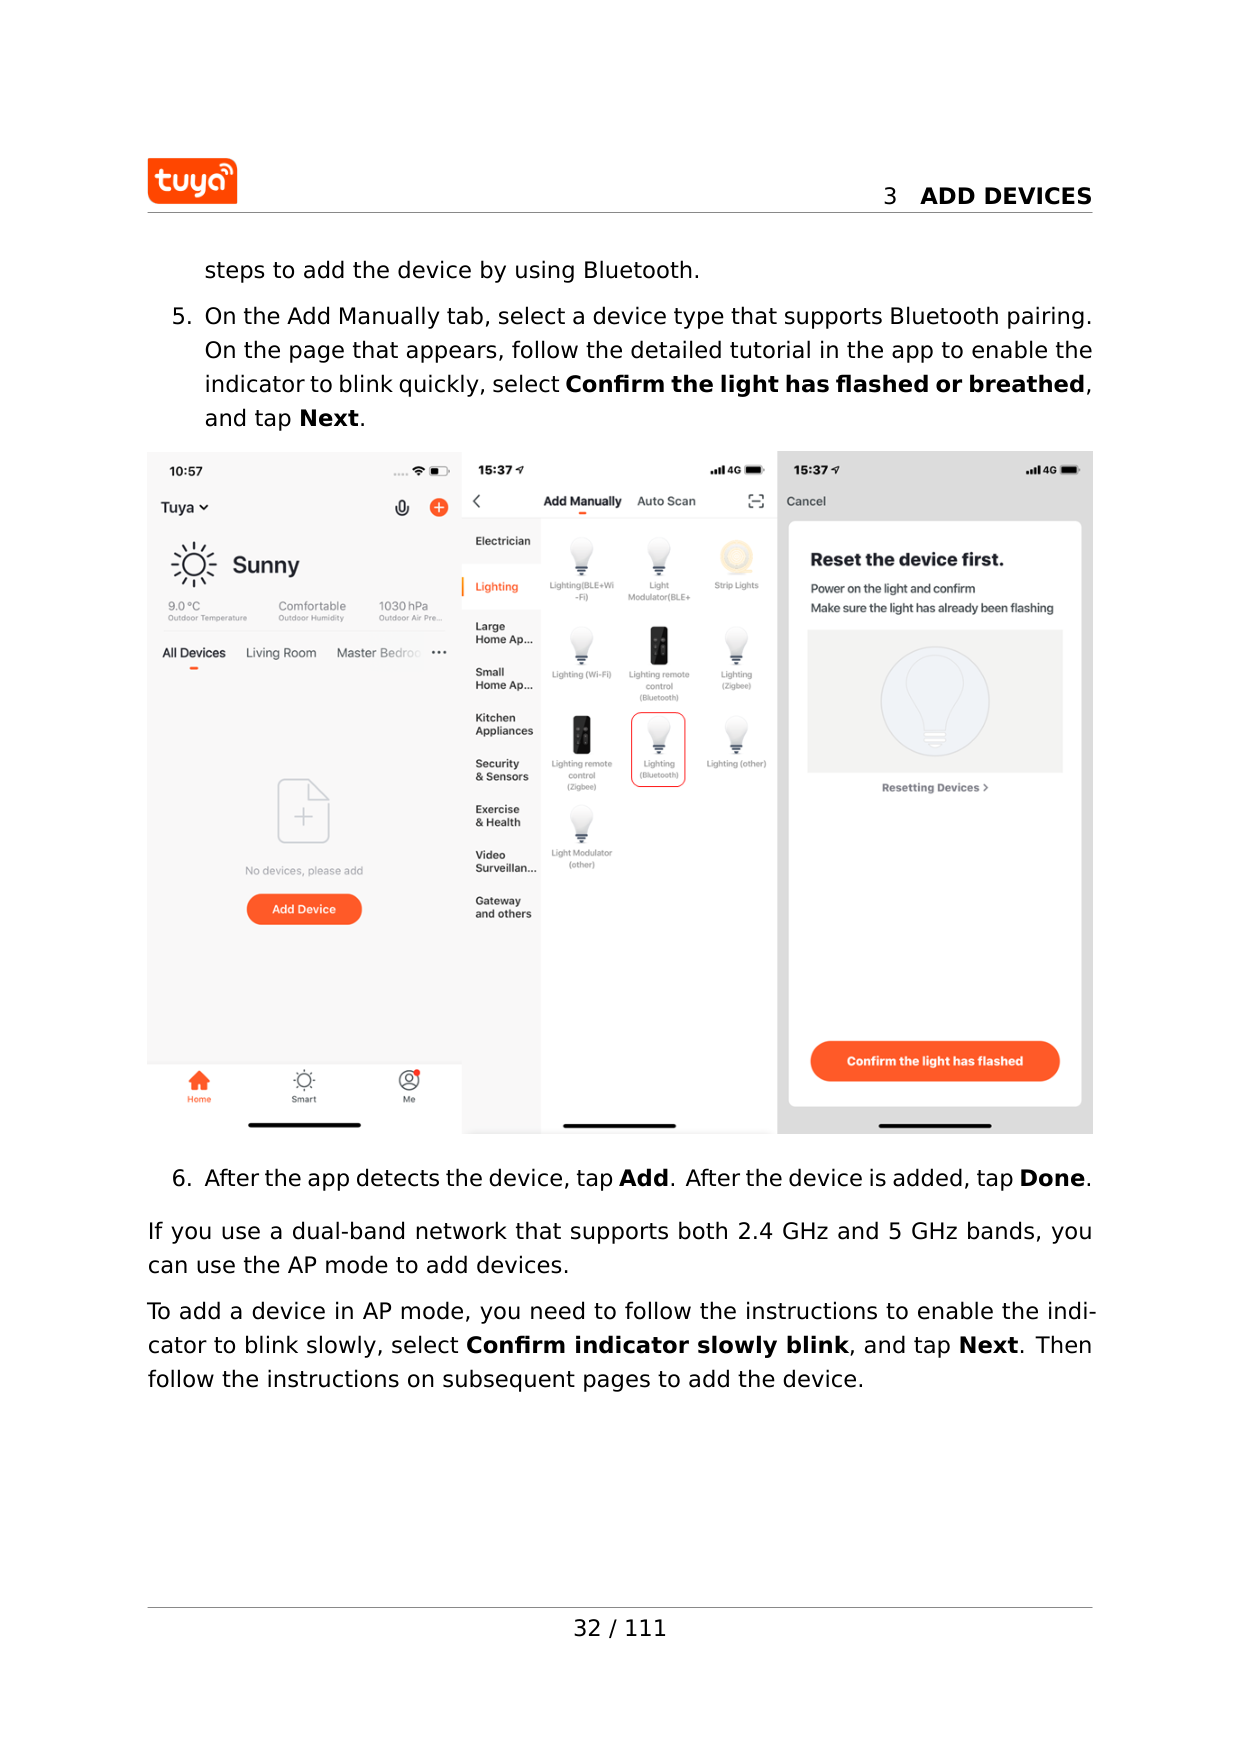
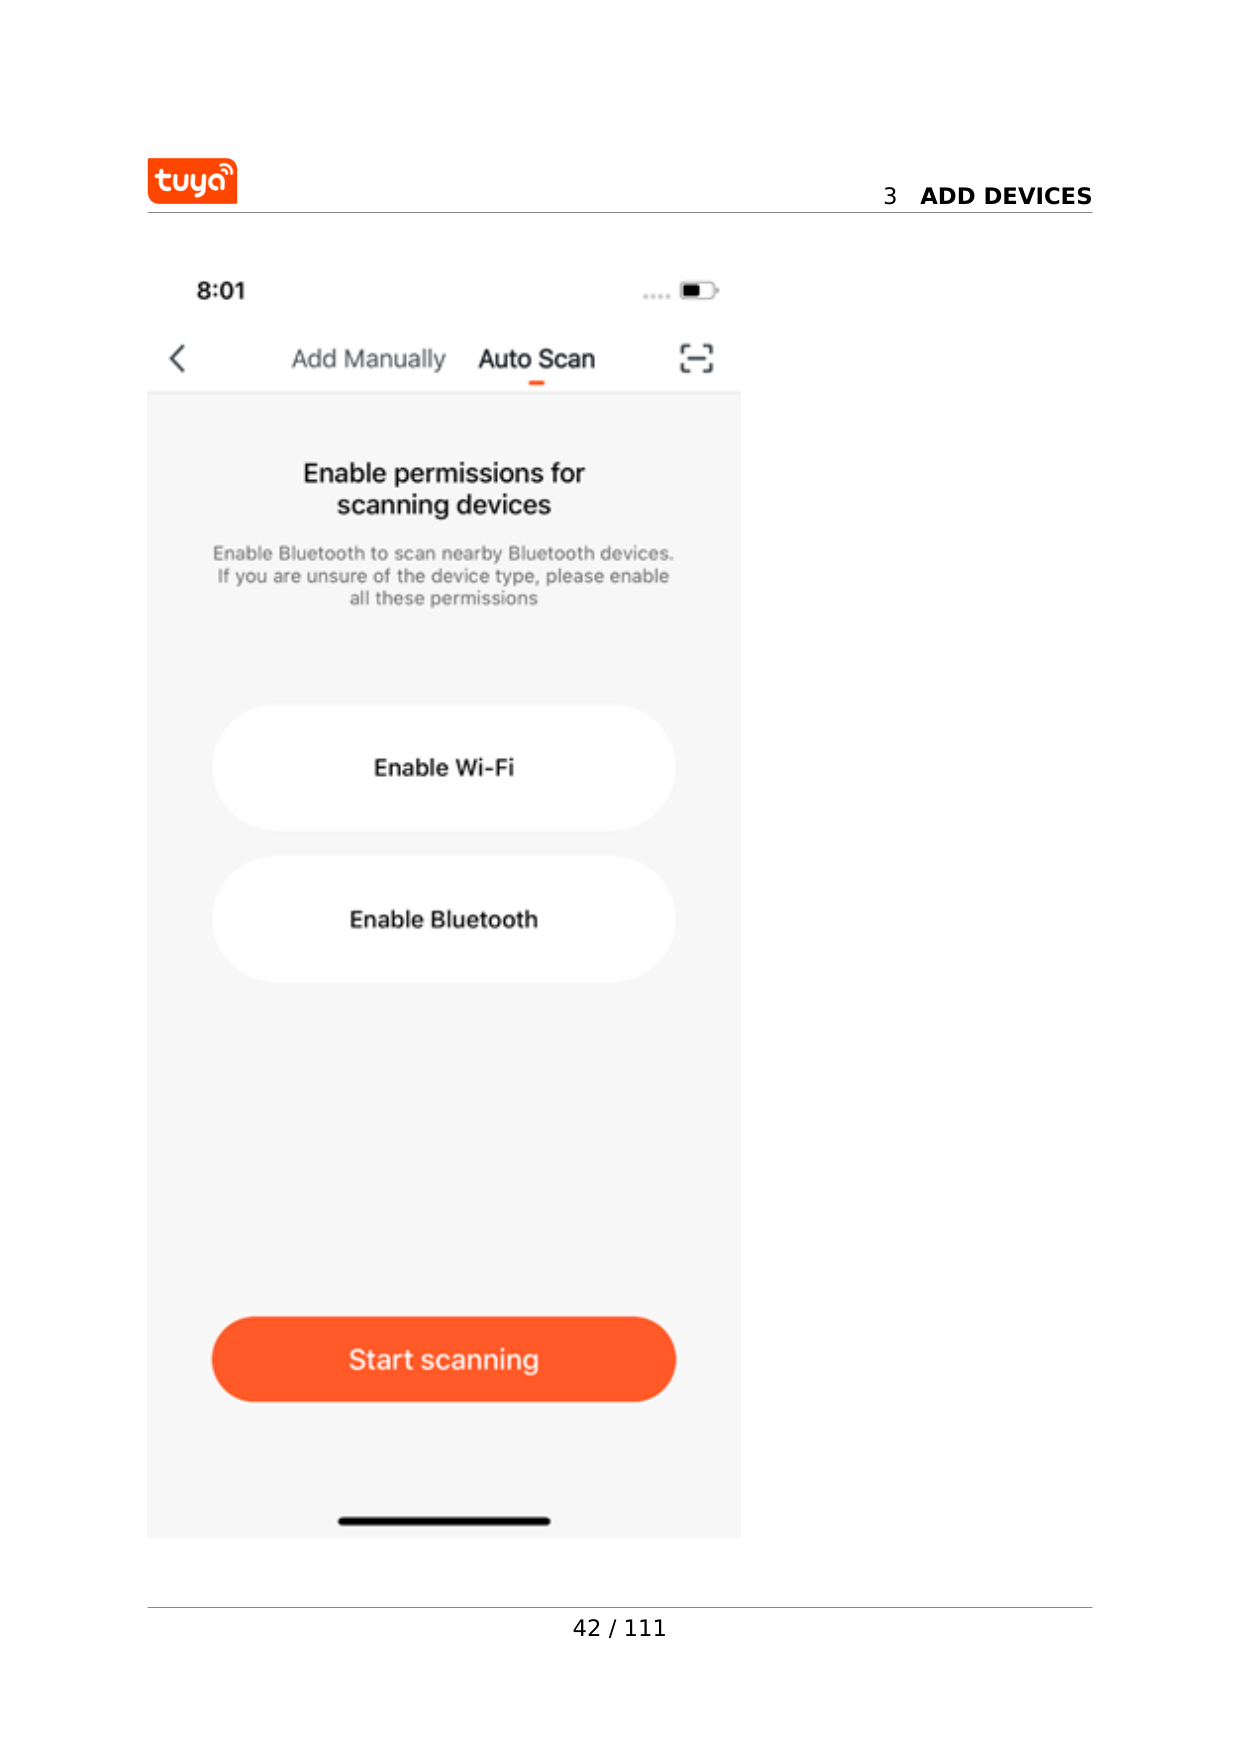
3 Add devices Tap Add Device or the plus (+) icon in the top right corner on the Home page to go to the device adding page. You can manually add devices on the Add Manually tab or tap Auto Scan to enable the app to automatically detect devices. To add devices on the Auto Scan tab, you need to grant the app related Wi-Fi and Bluetooth permissions. 3.1 Manually add Wi-Fi devices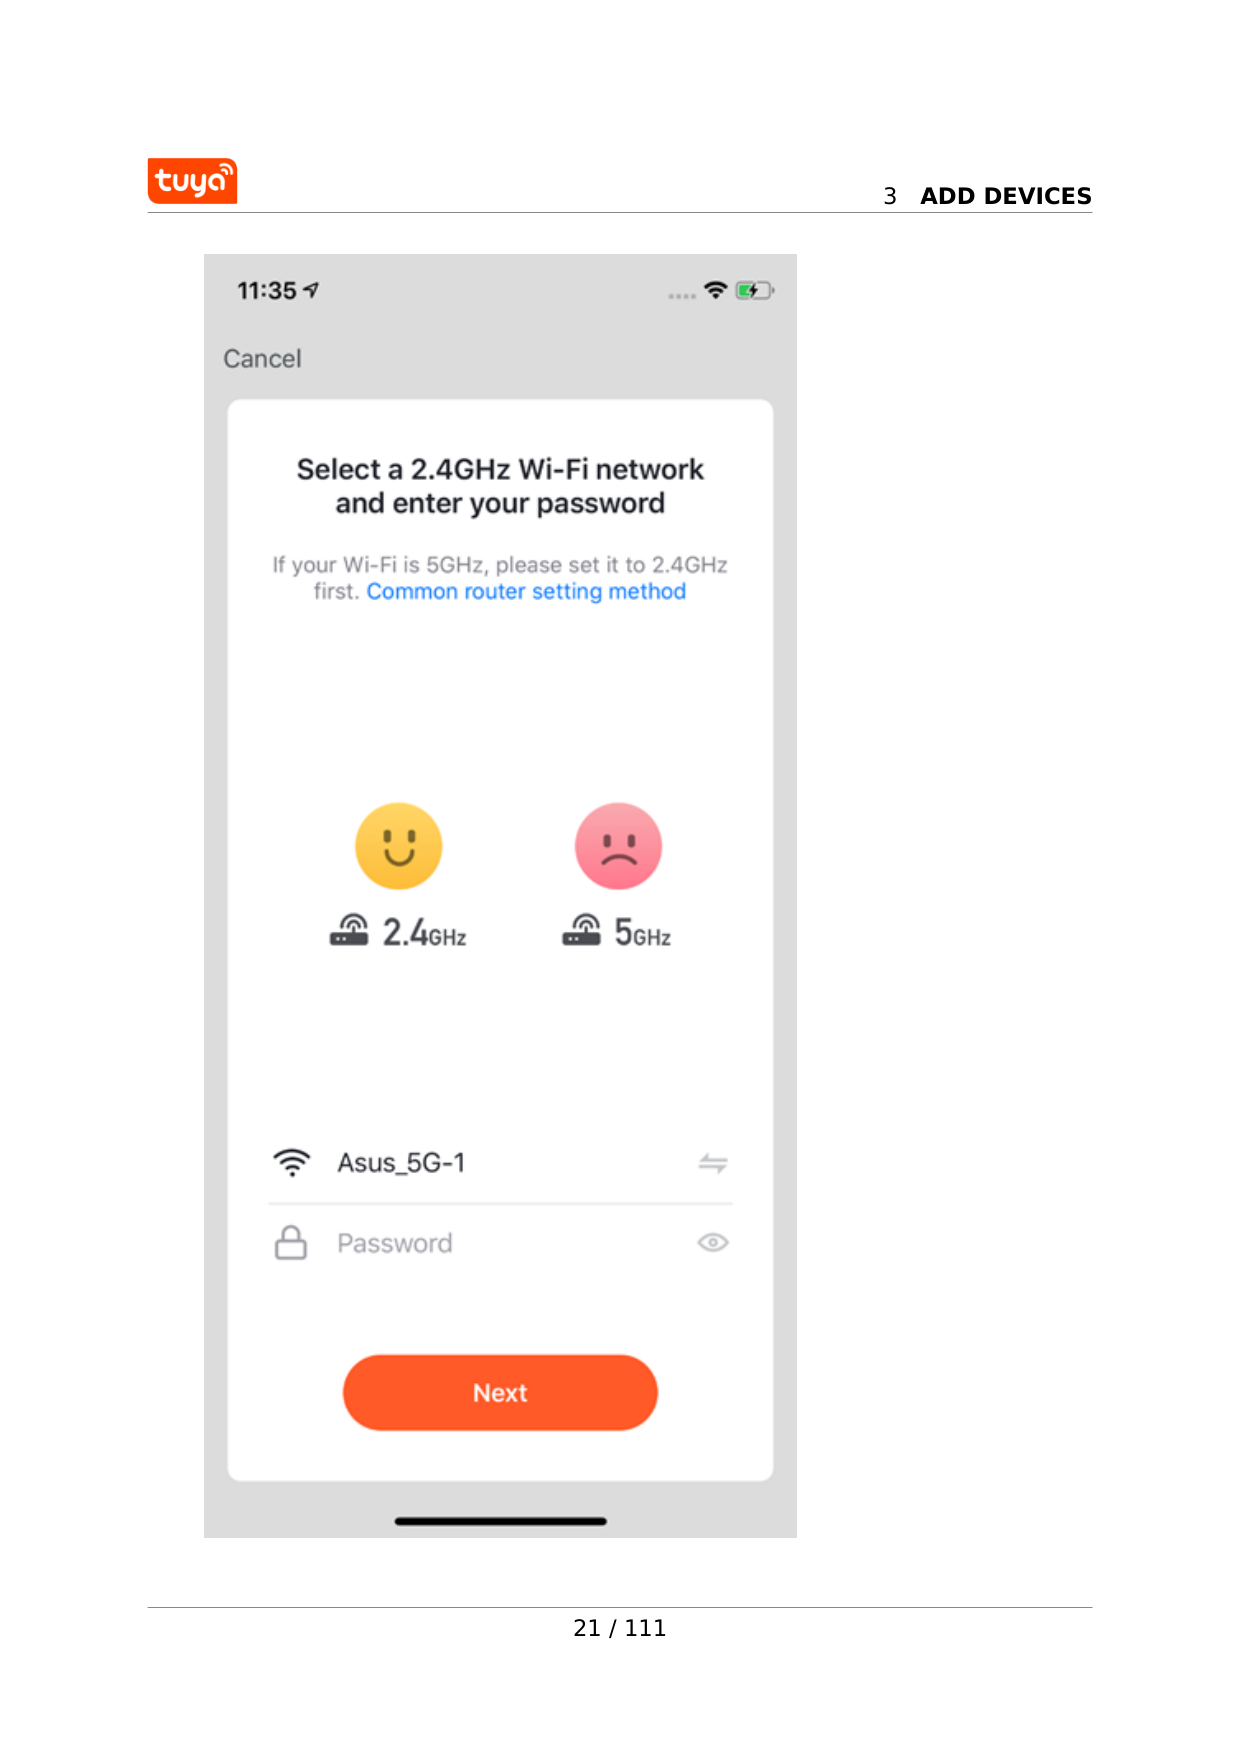
3
Add Devices
21 / 111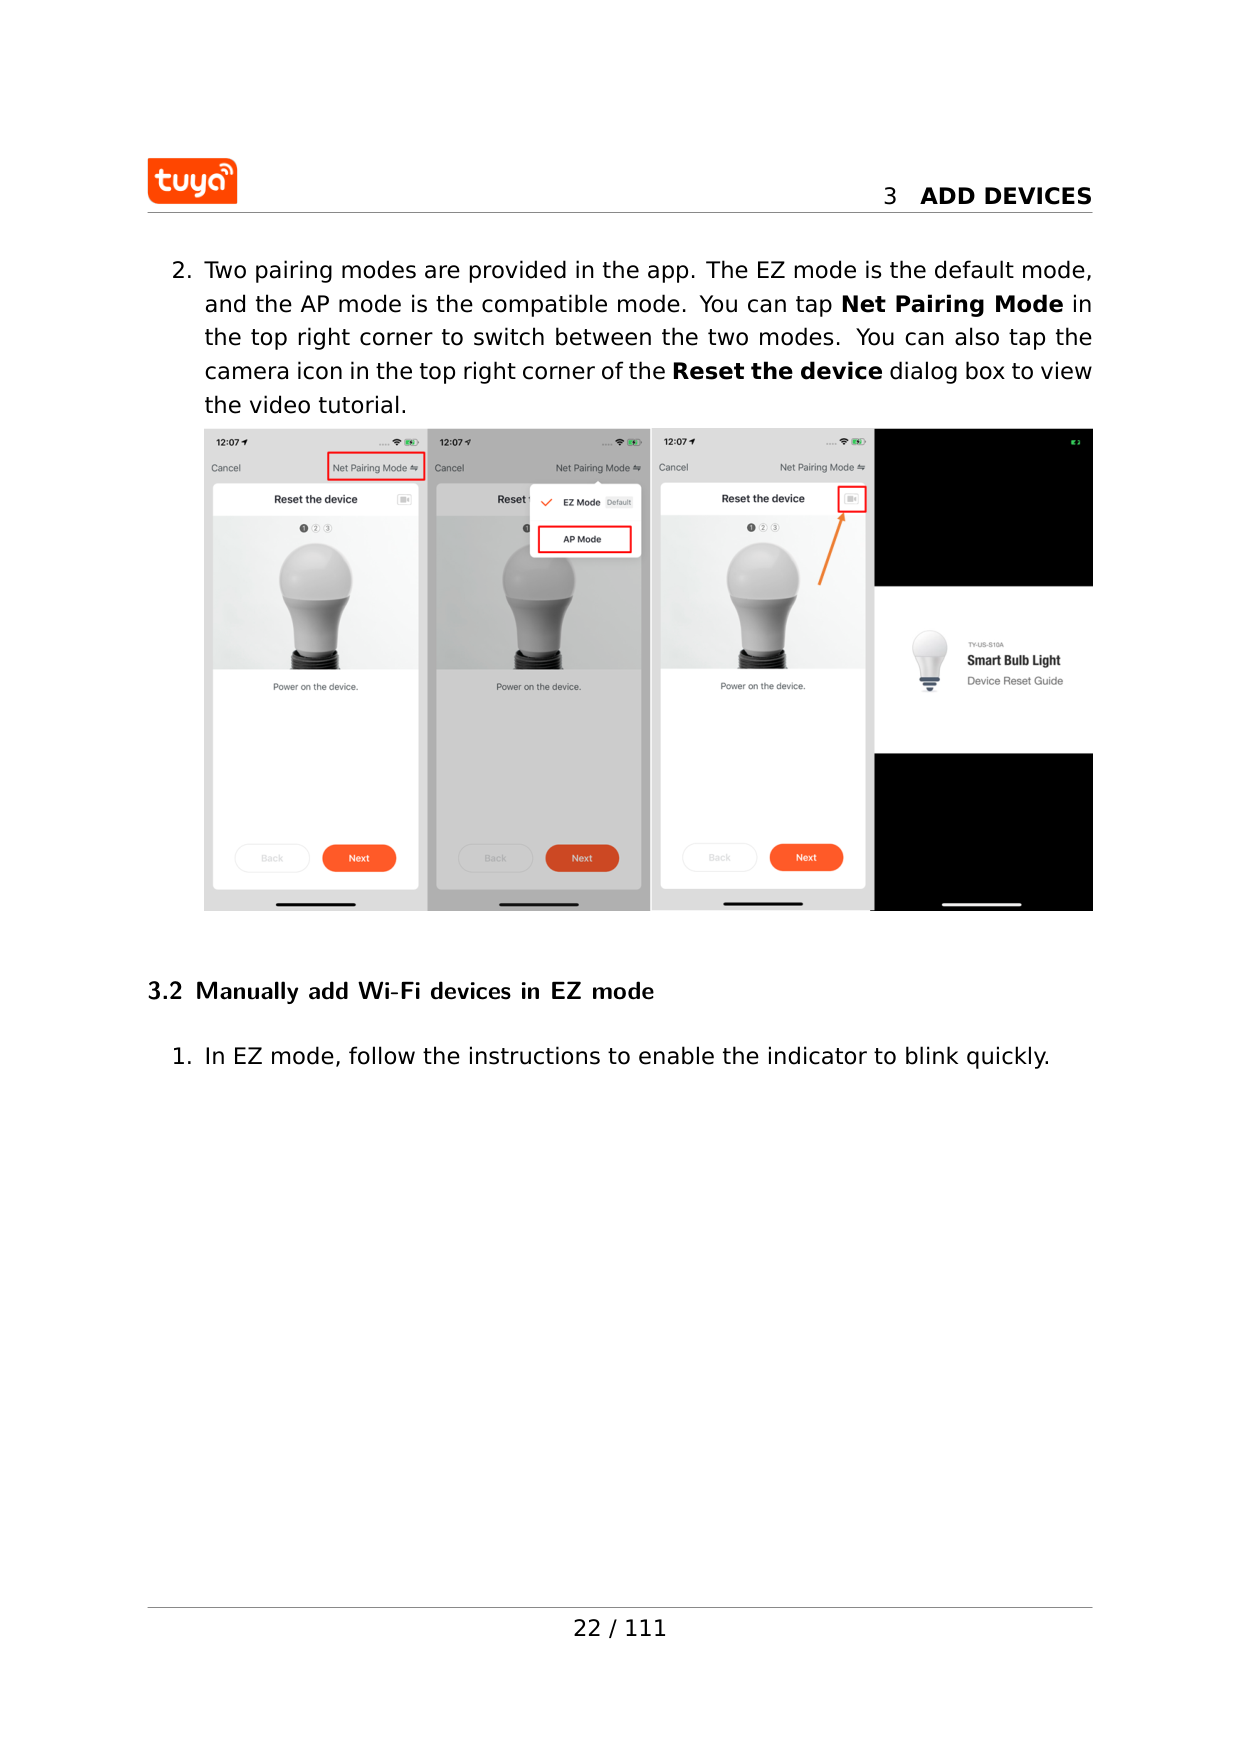
3
Add Devices
3
Add Devices
3
Add Devices
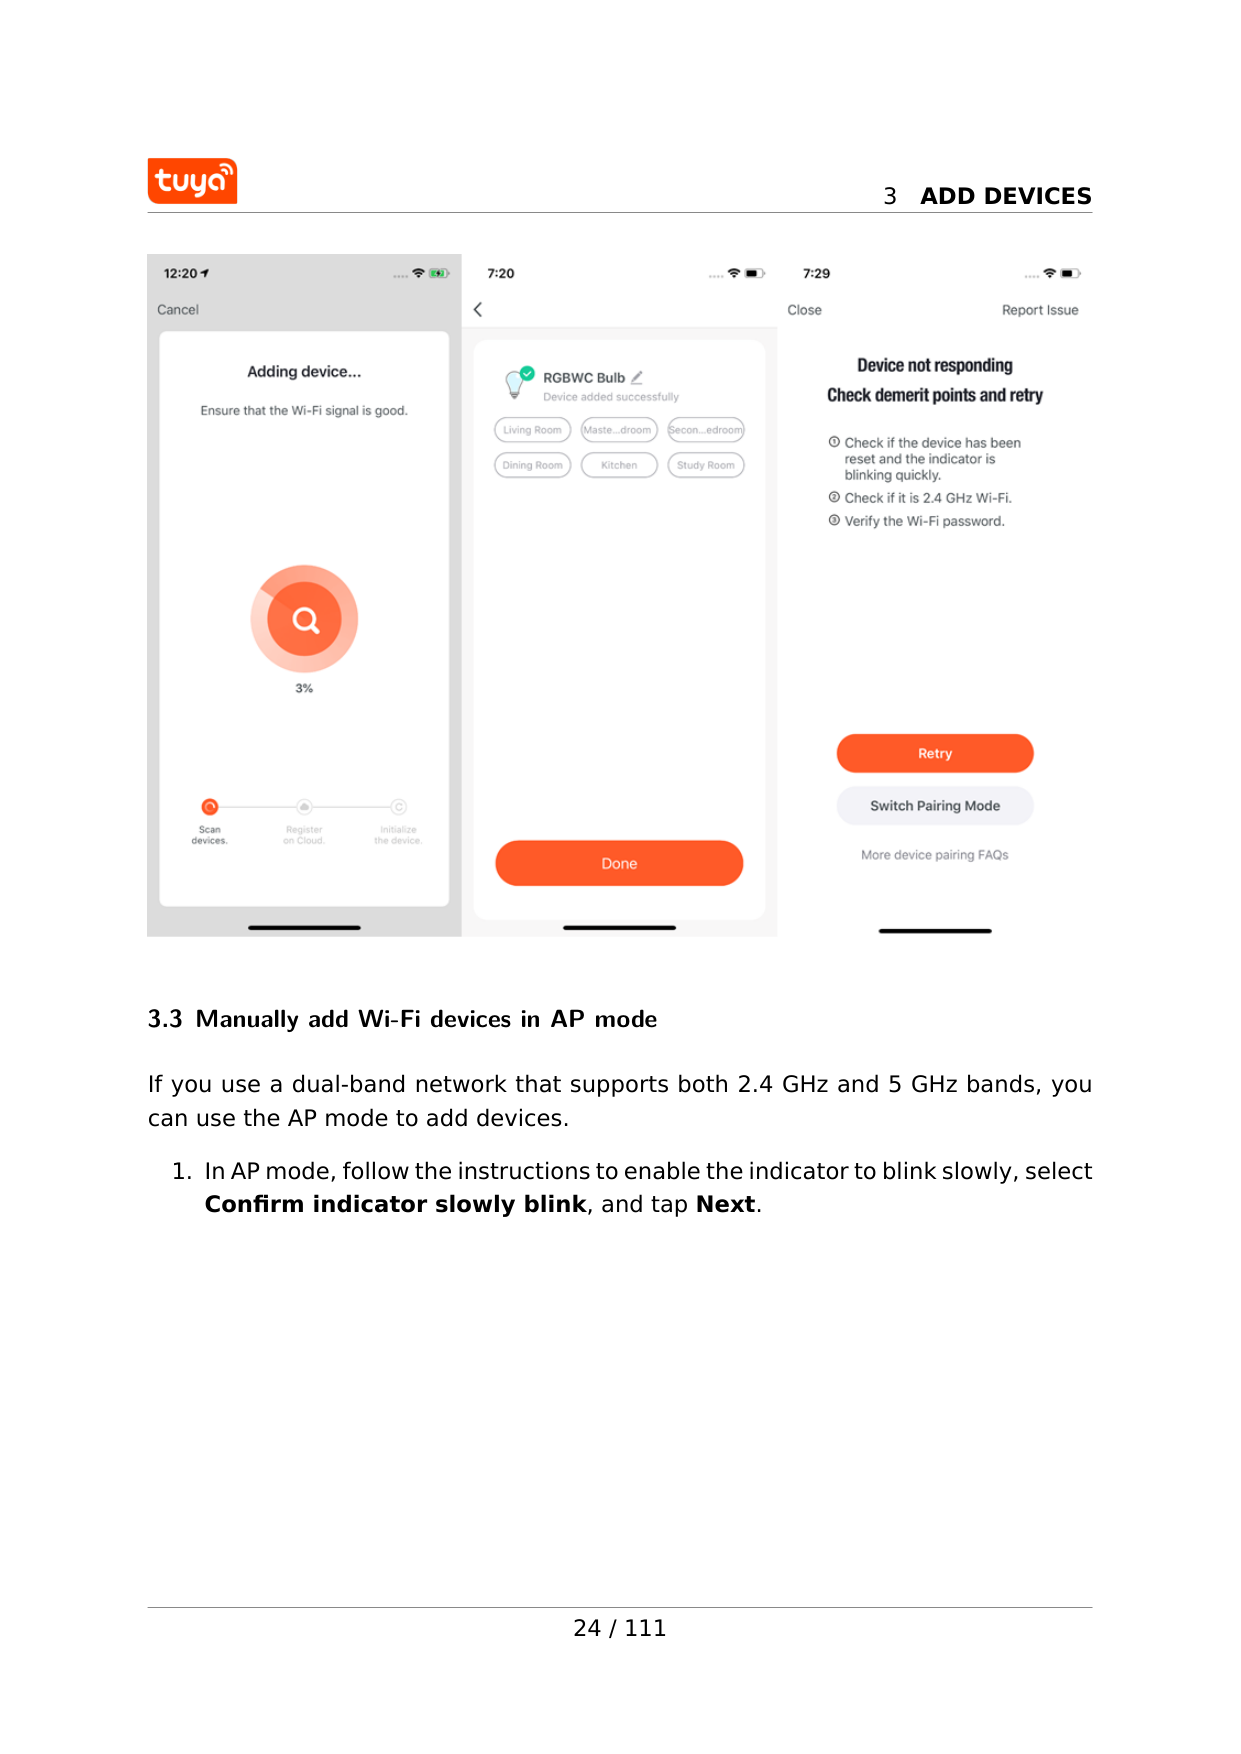
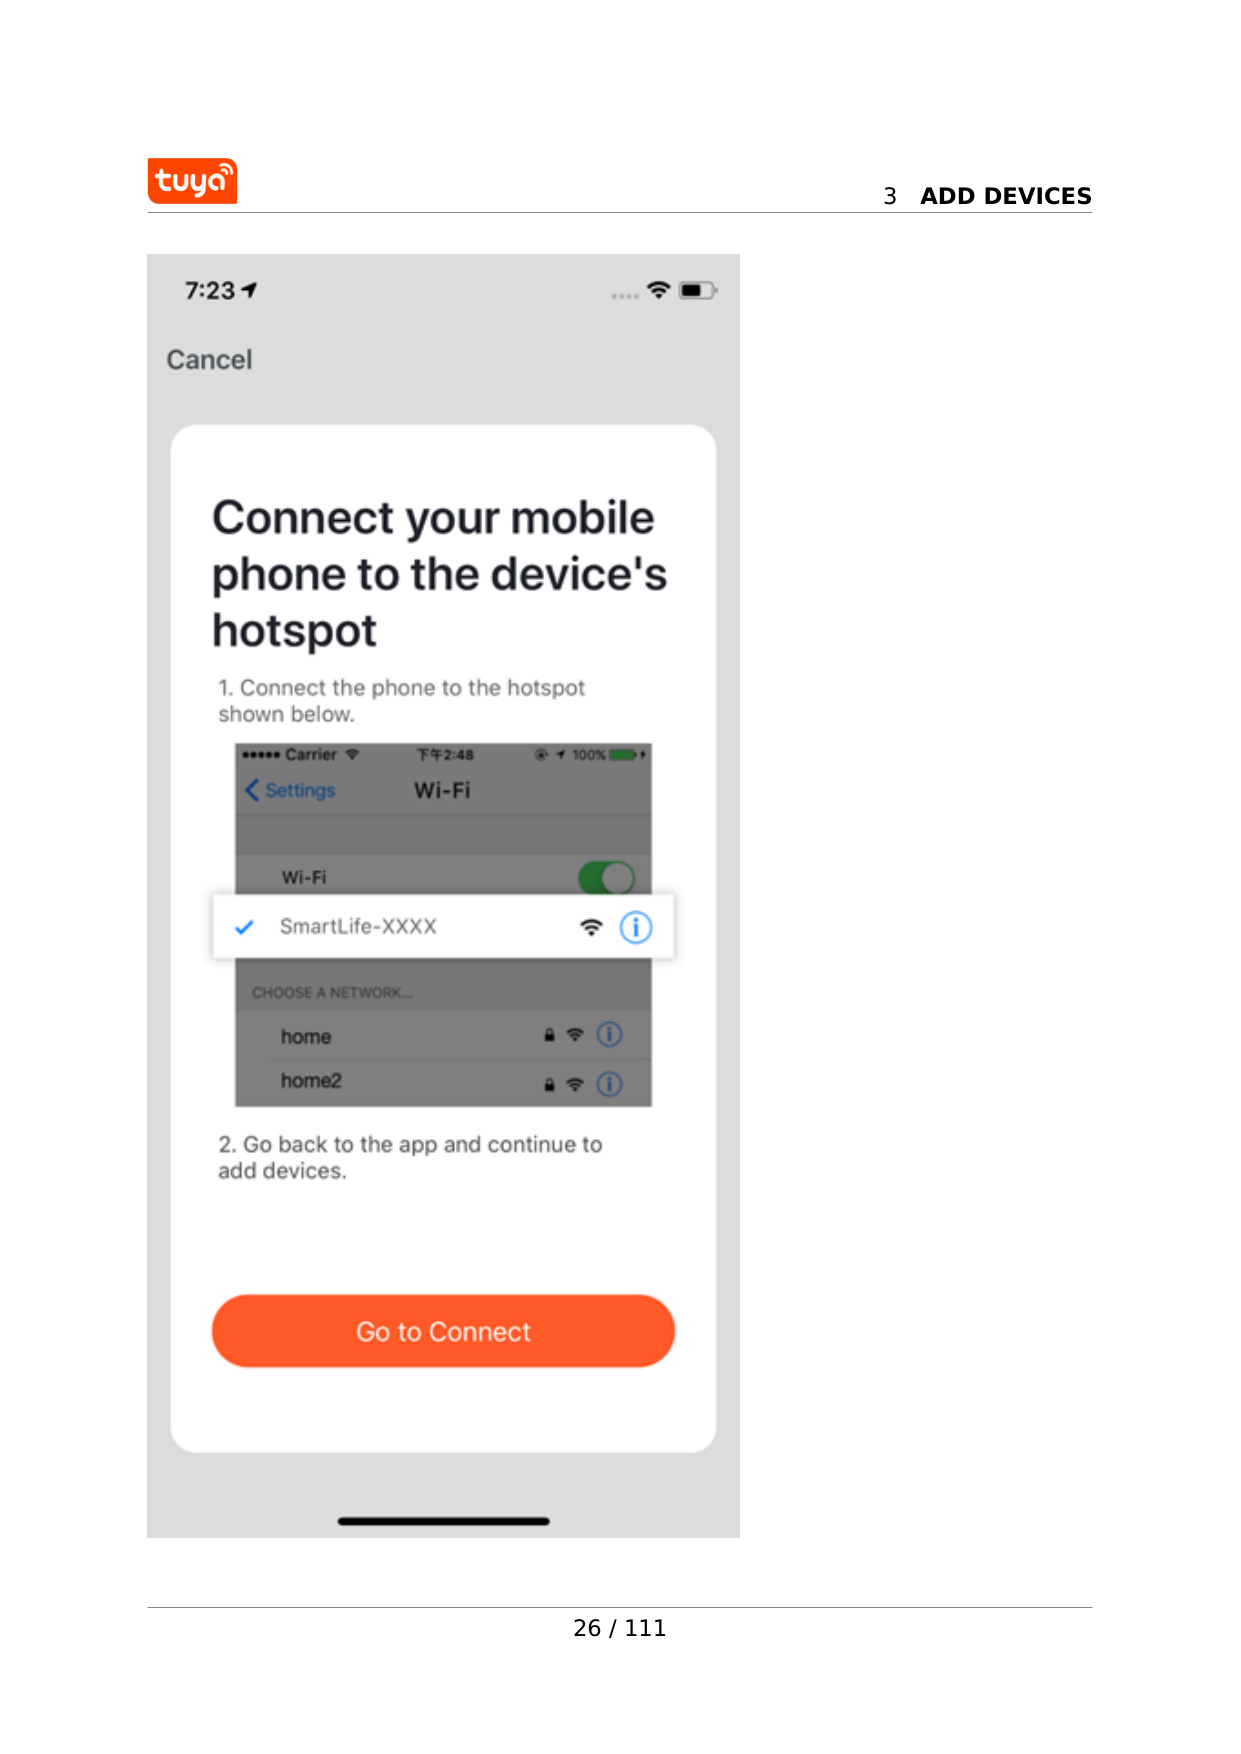
3.3 Manually add Wi-Fi devices in AP mode If you use a dual-band network that supports both 2.4 GHz and 5 GHz bands, you can use the AP mode to add devices.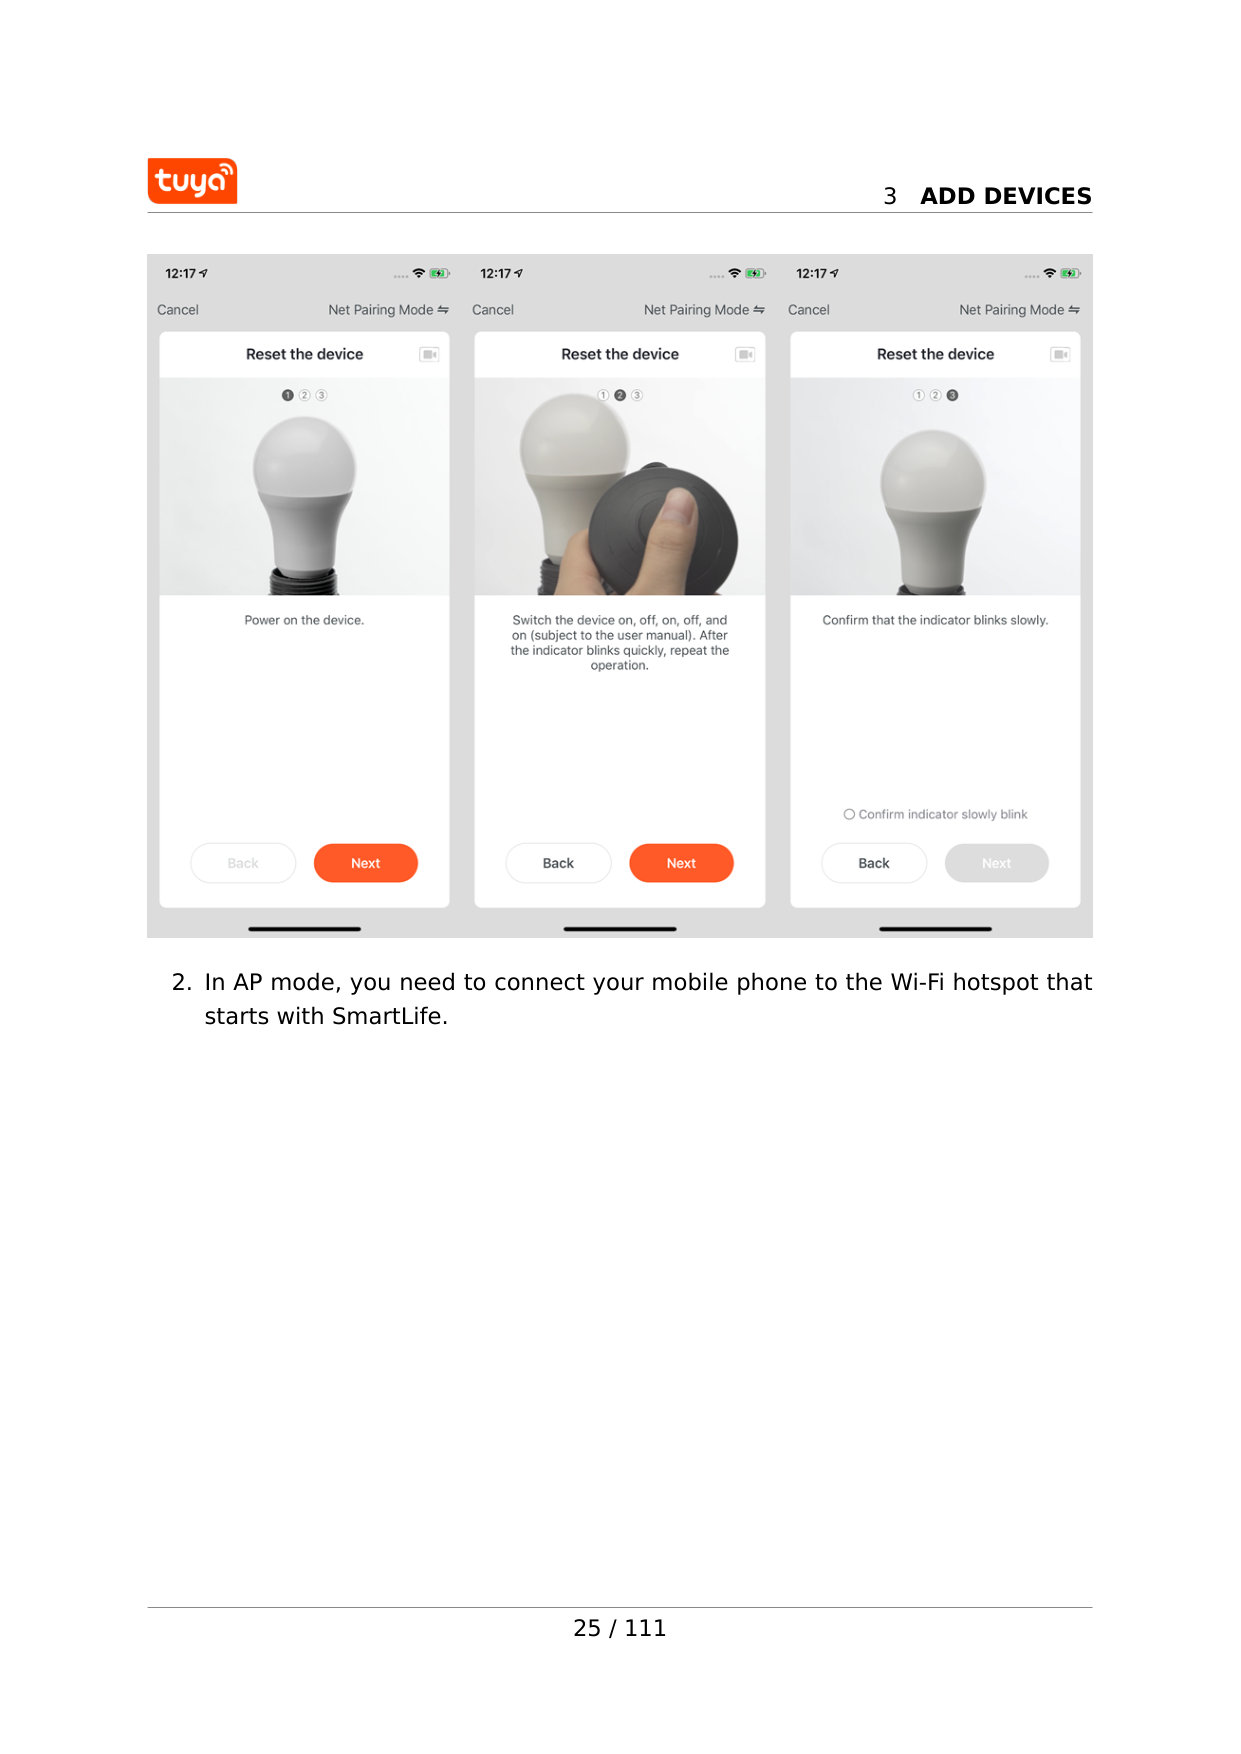
3
Add Devices
3
Add Devices
26 / 111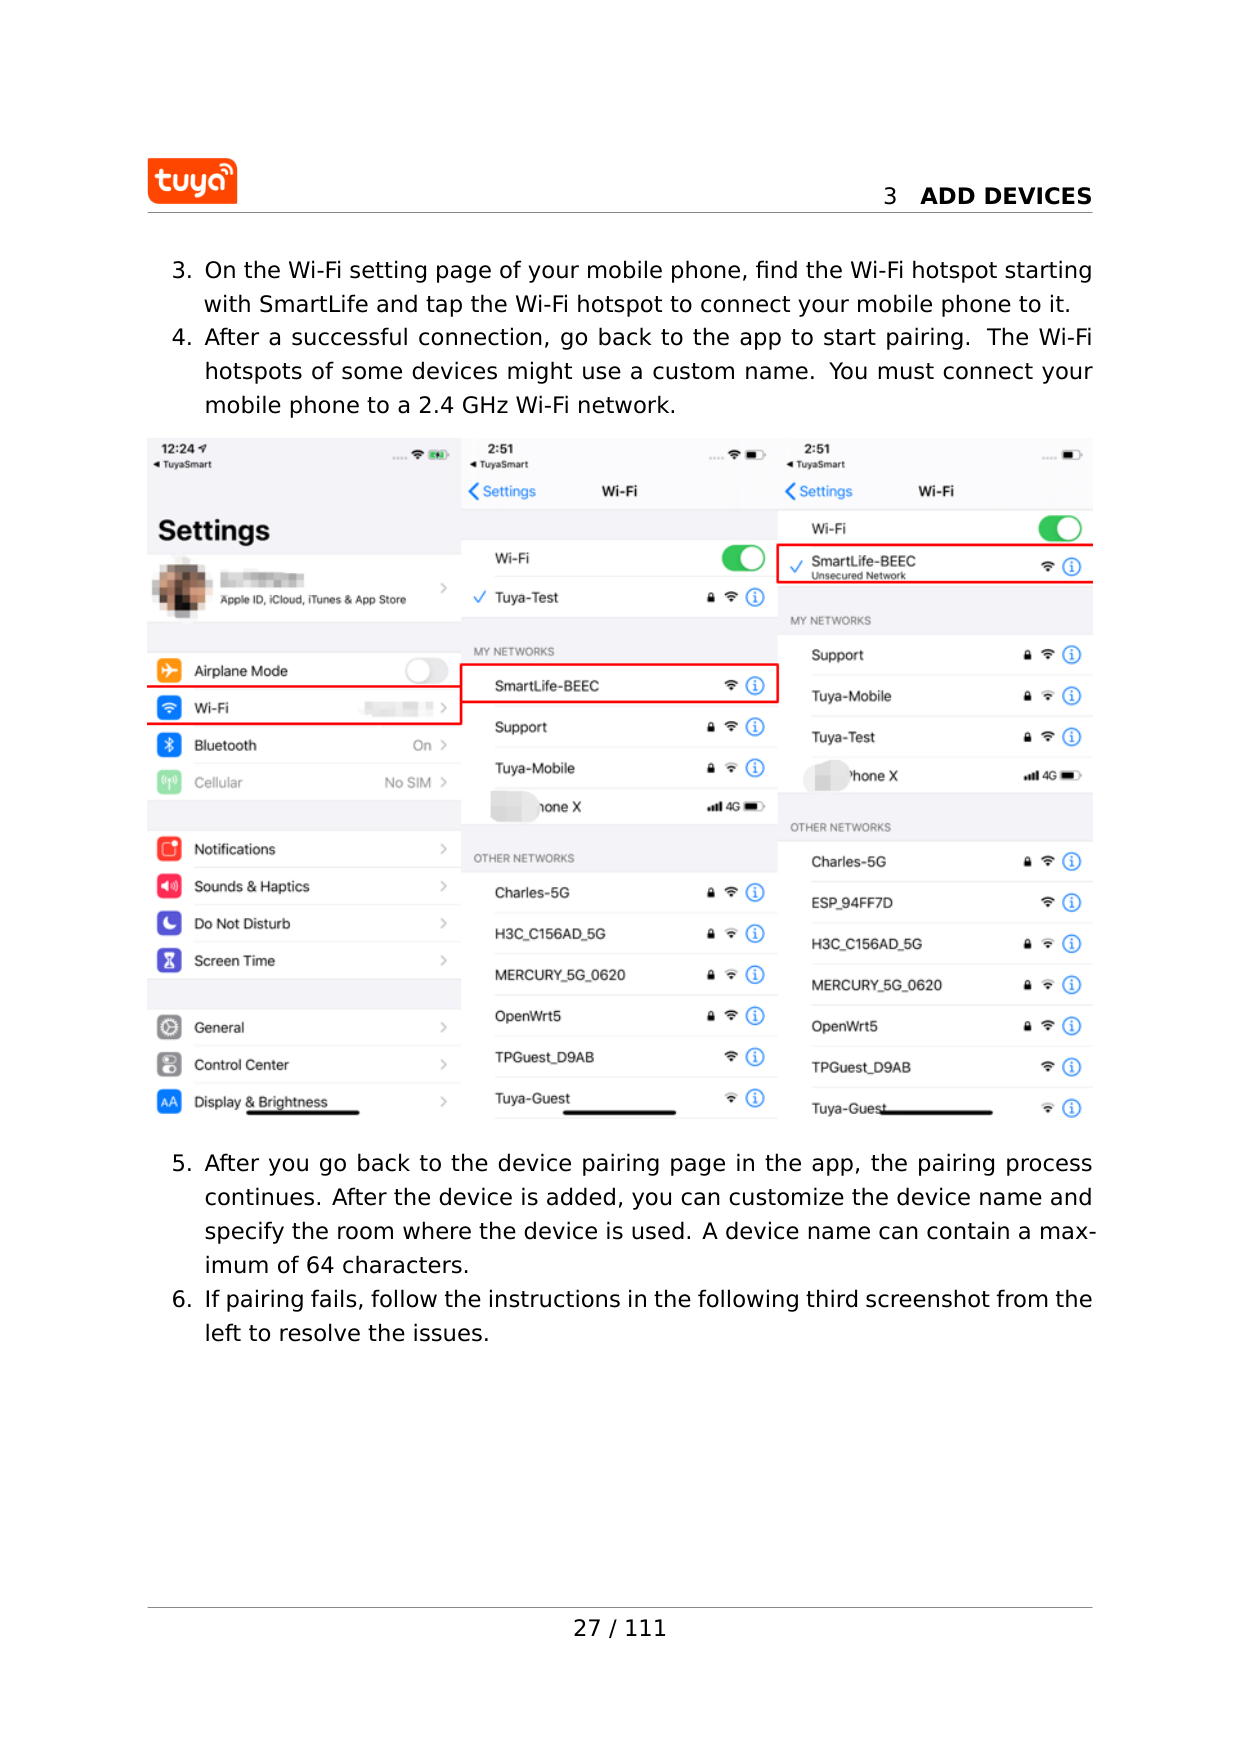
3
Add Devices
3
Add Devices
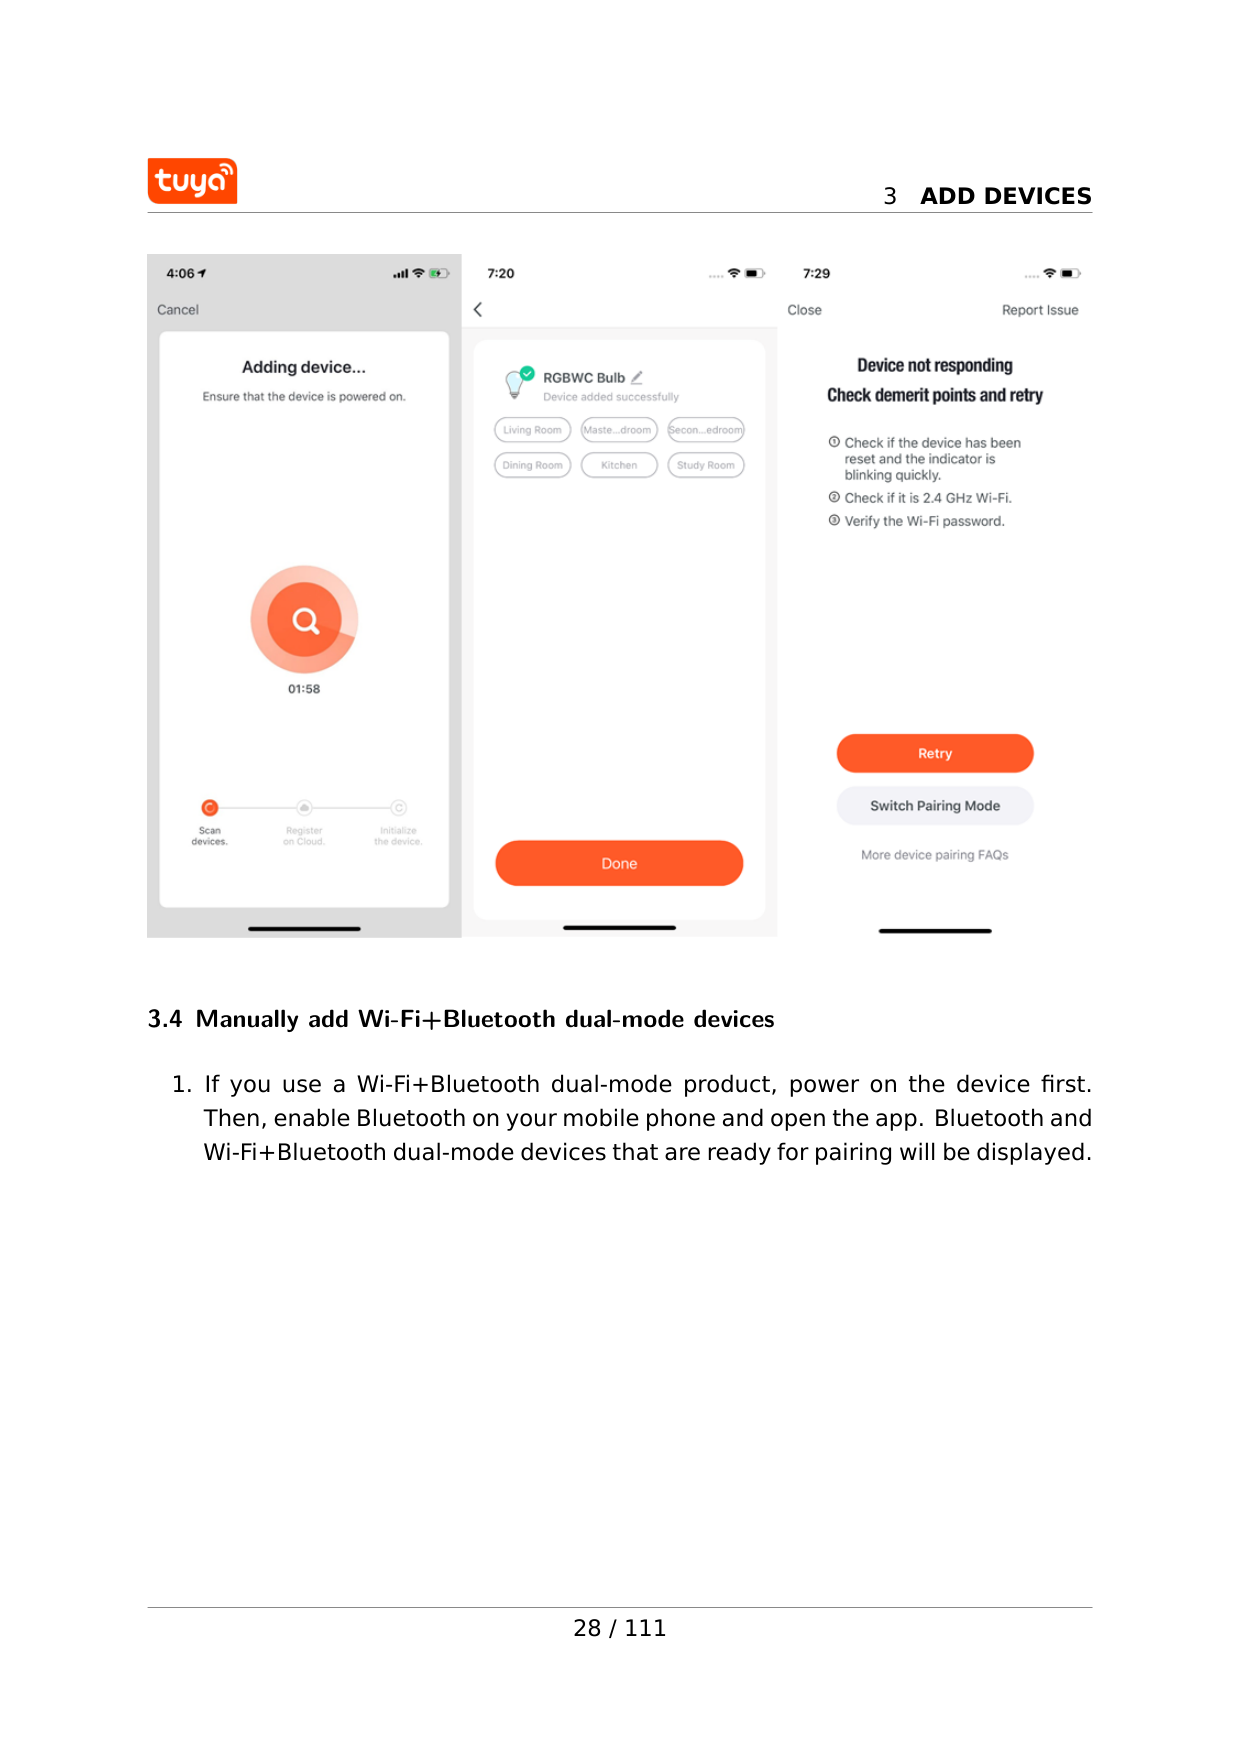
3.4 Manually add Wi-Fi+Bluetooth dual-mode devices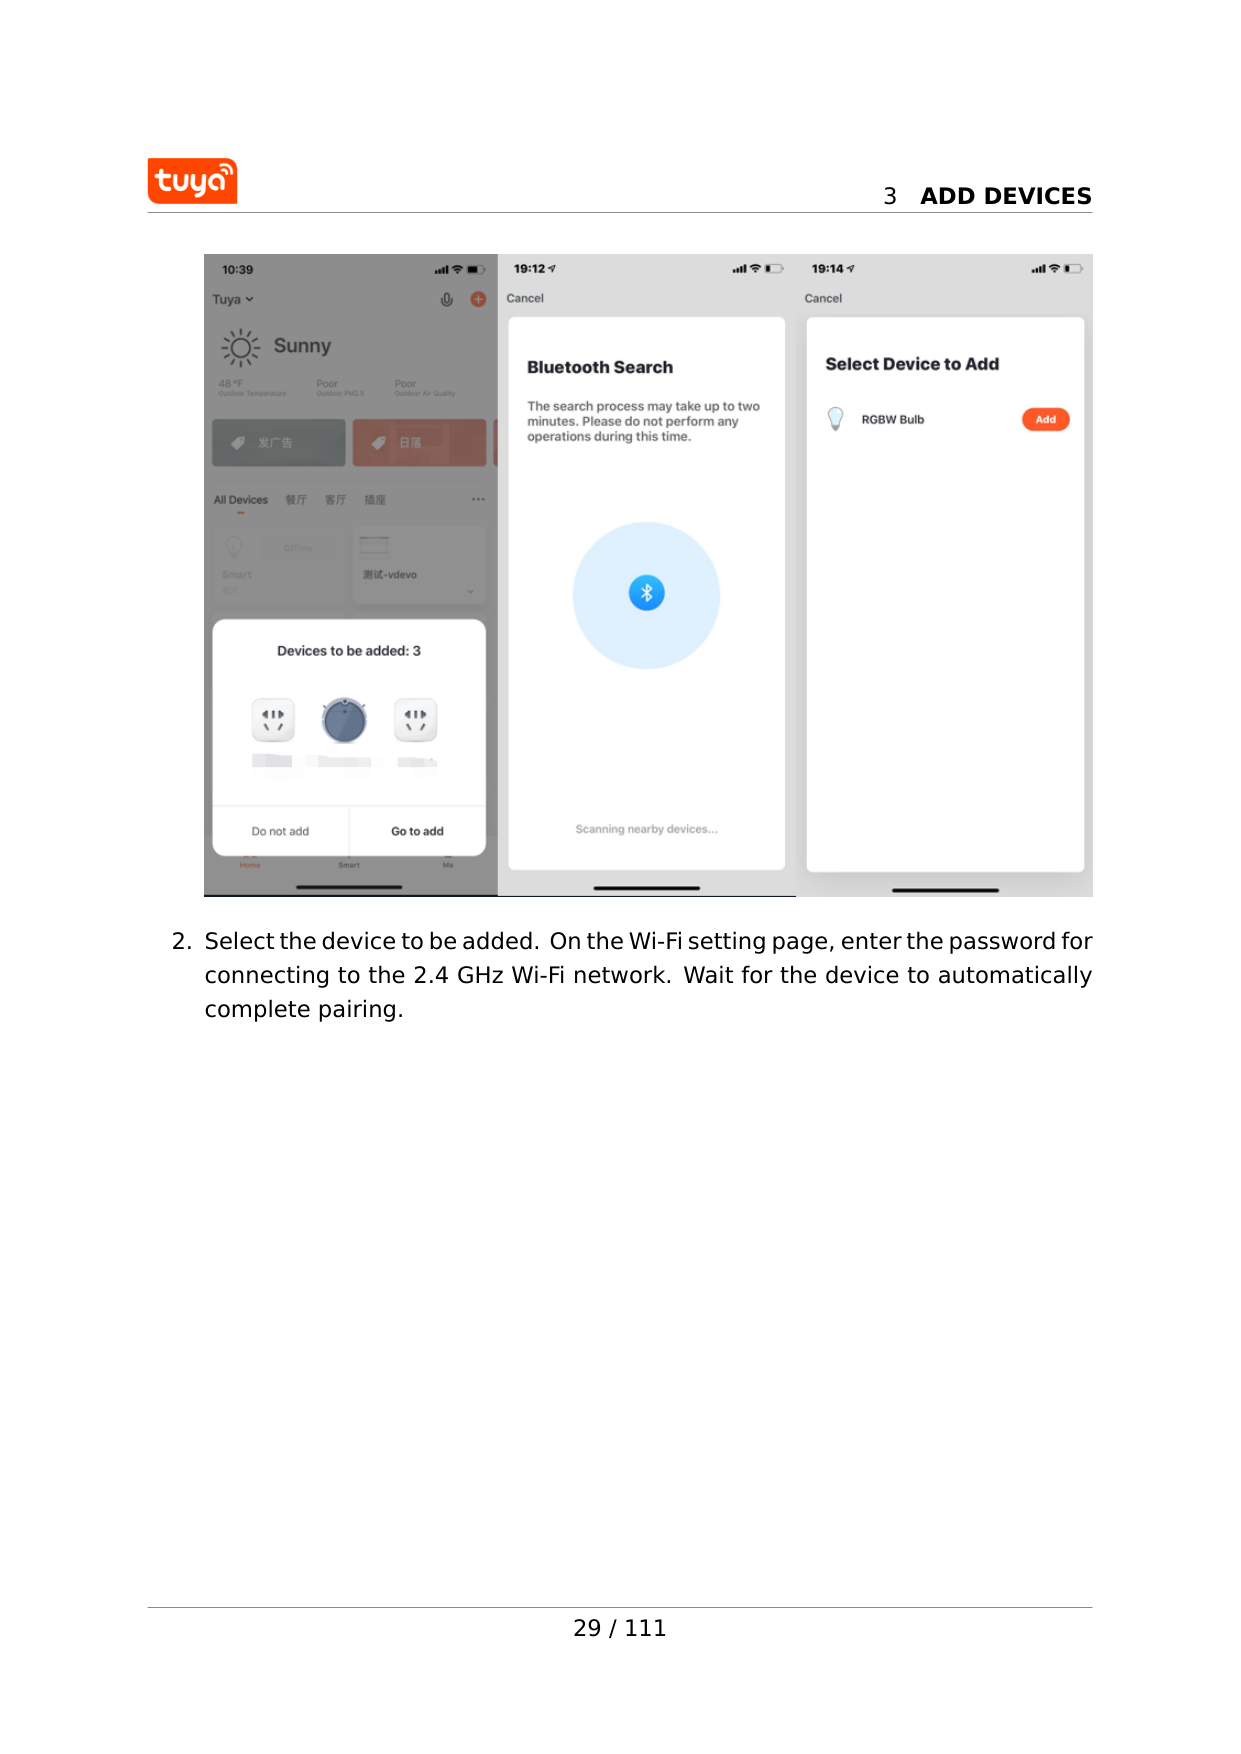
3
Add Devices
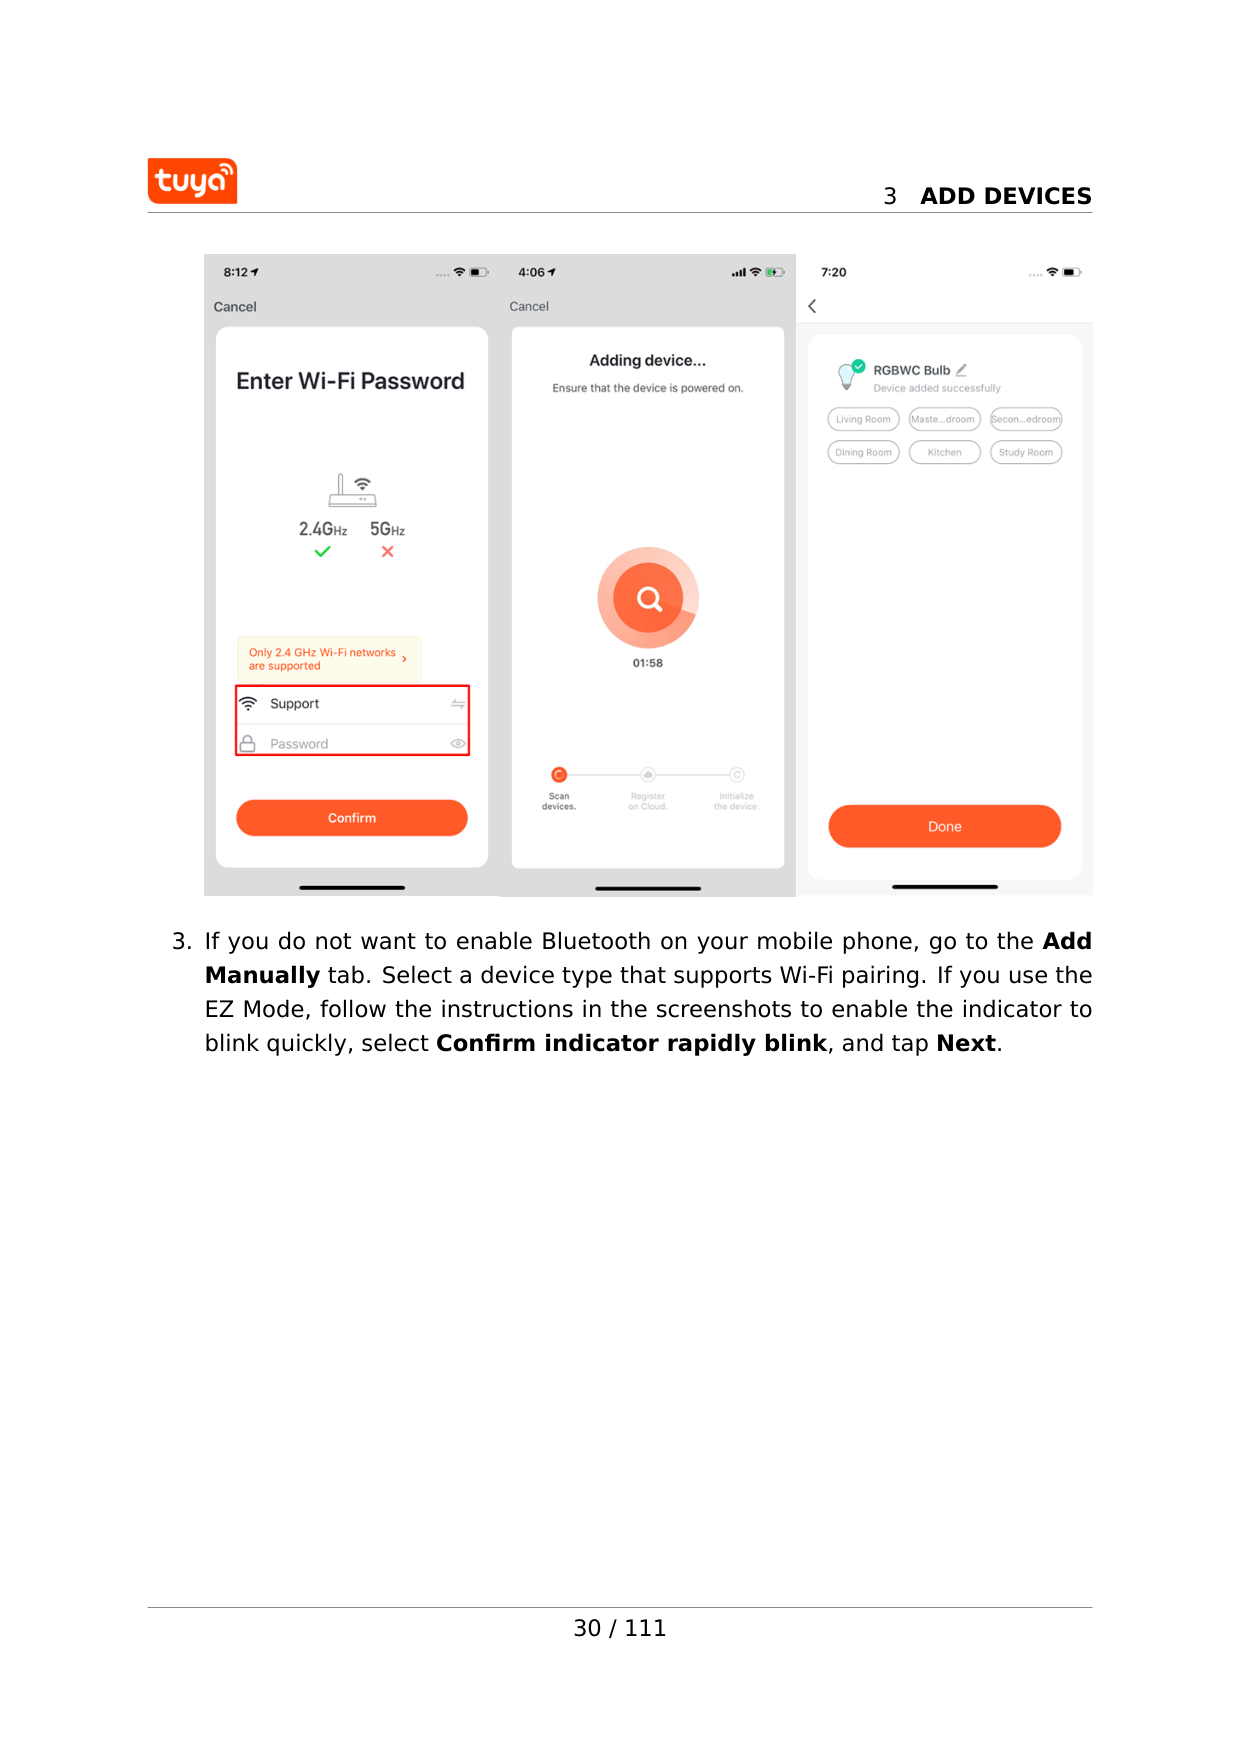
3
Add Devices

3
Add Devices
3
Add Devices
steps to add the device by using Bluetooth.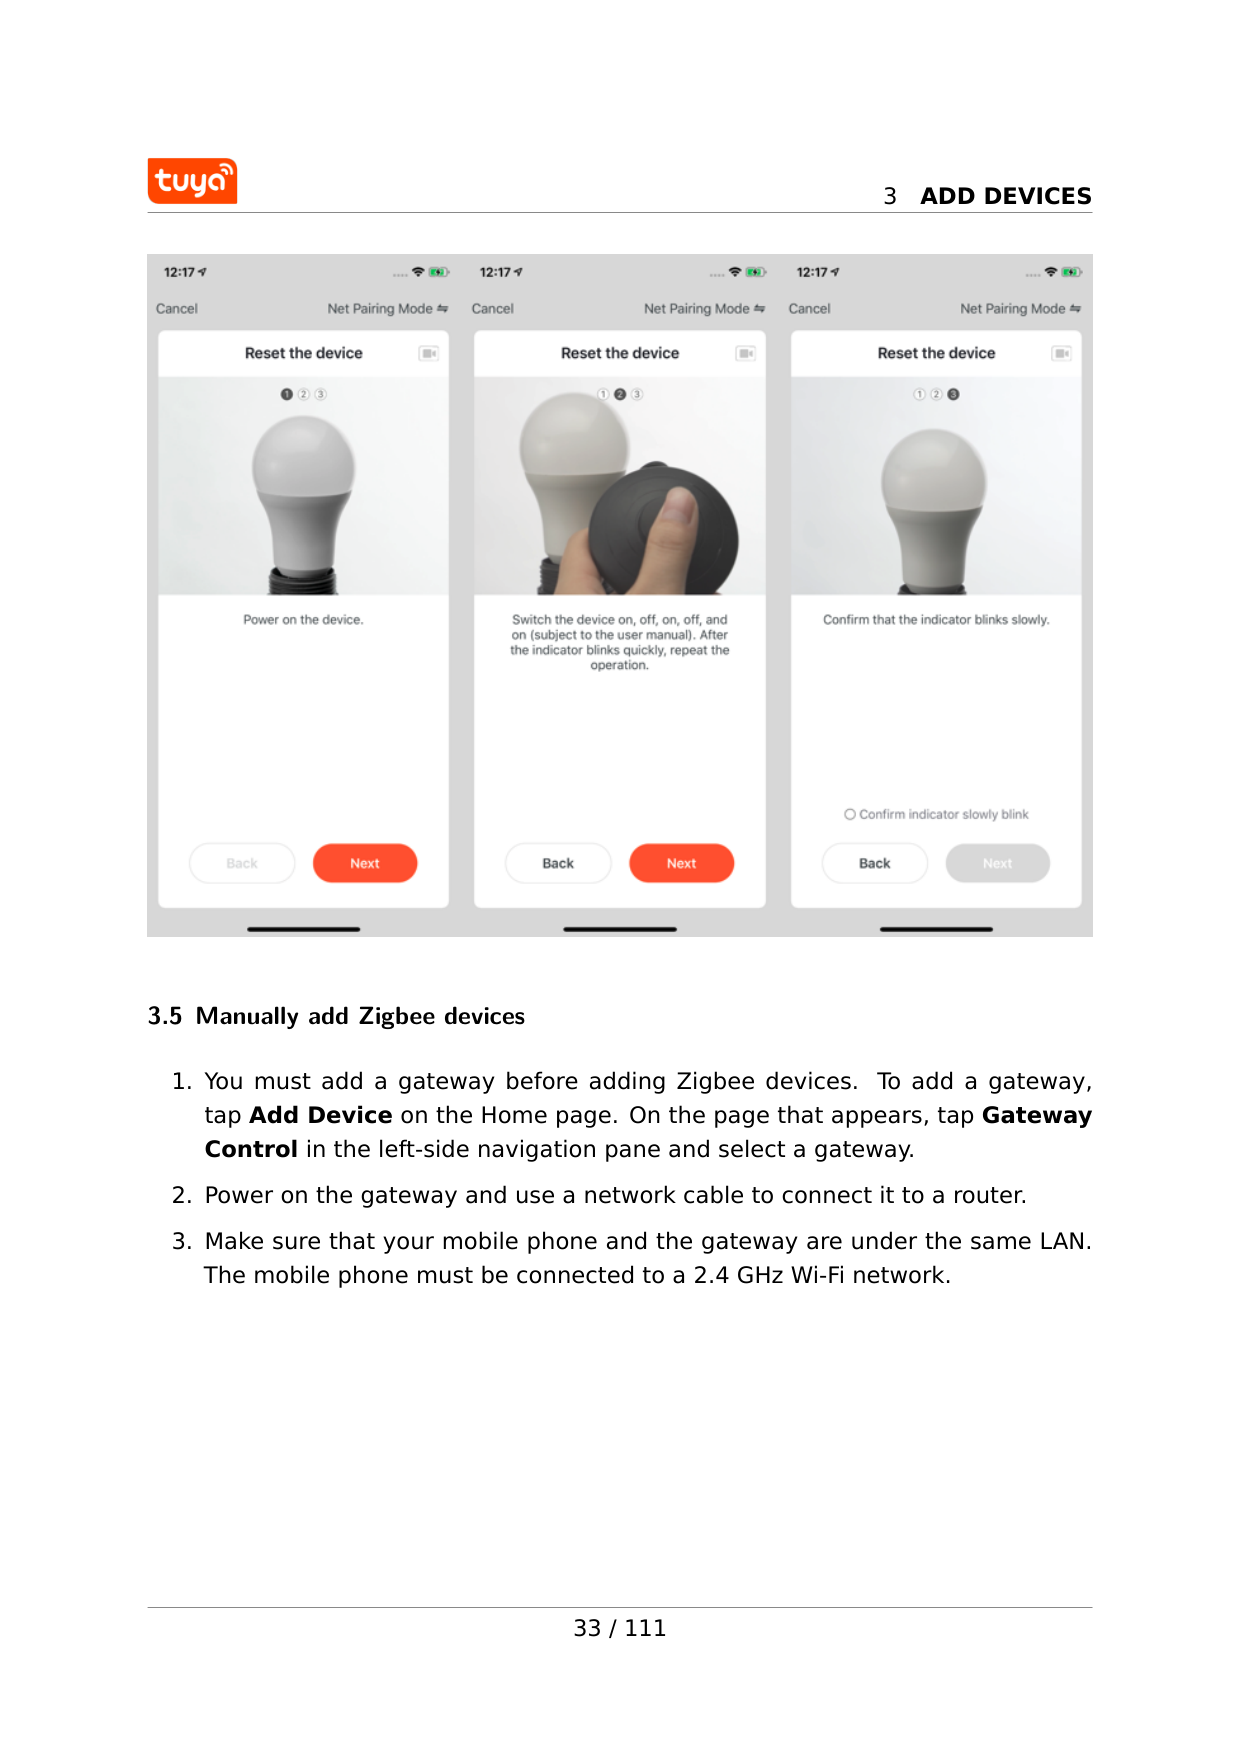
3
Add Devices
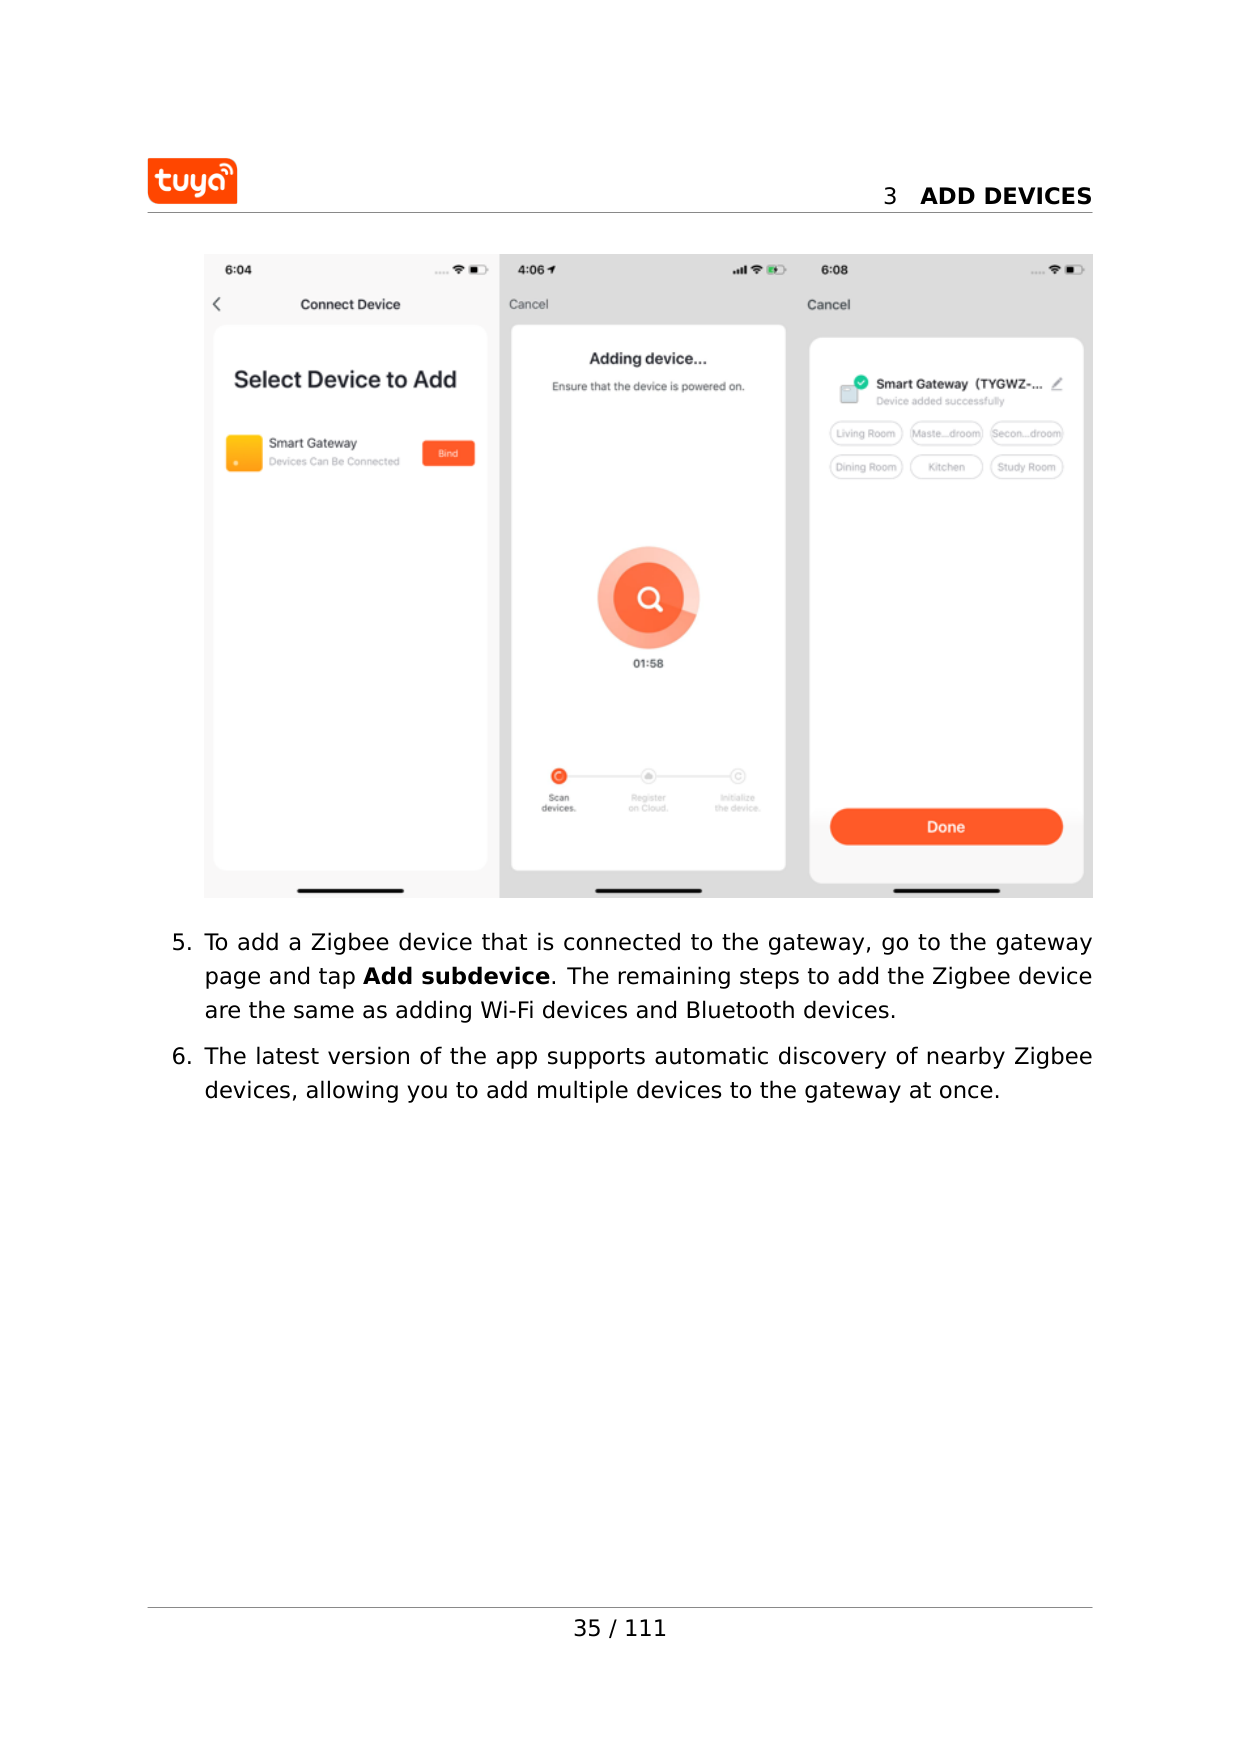
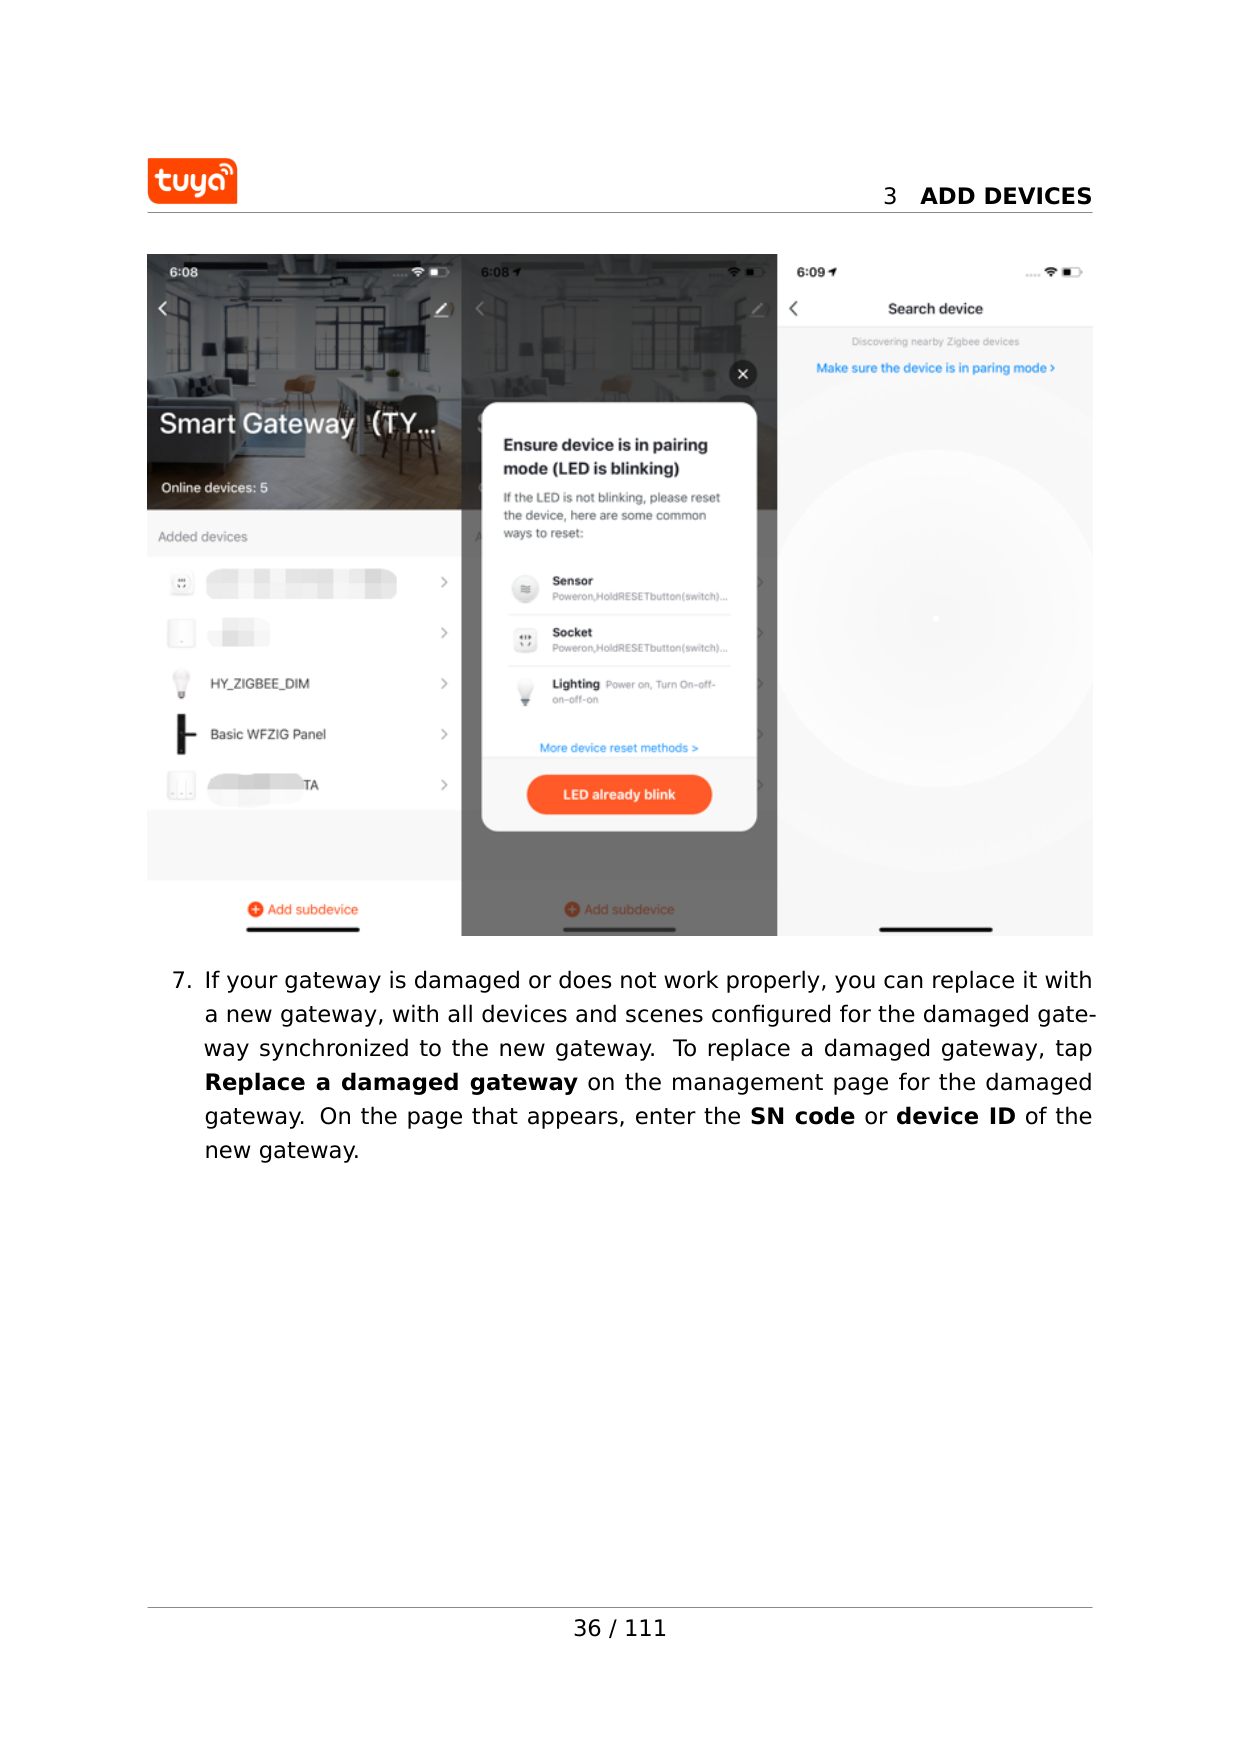
3.5 Manually add Zigbee devices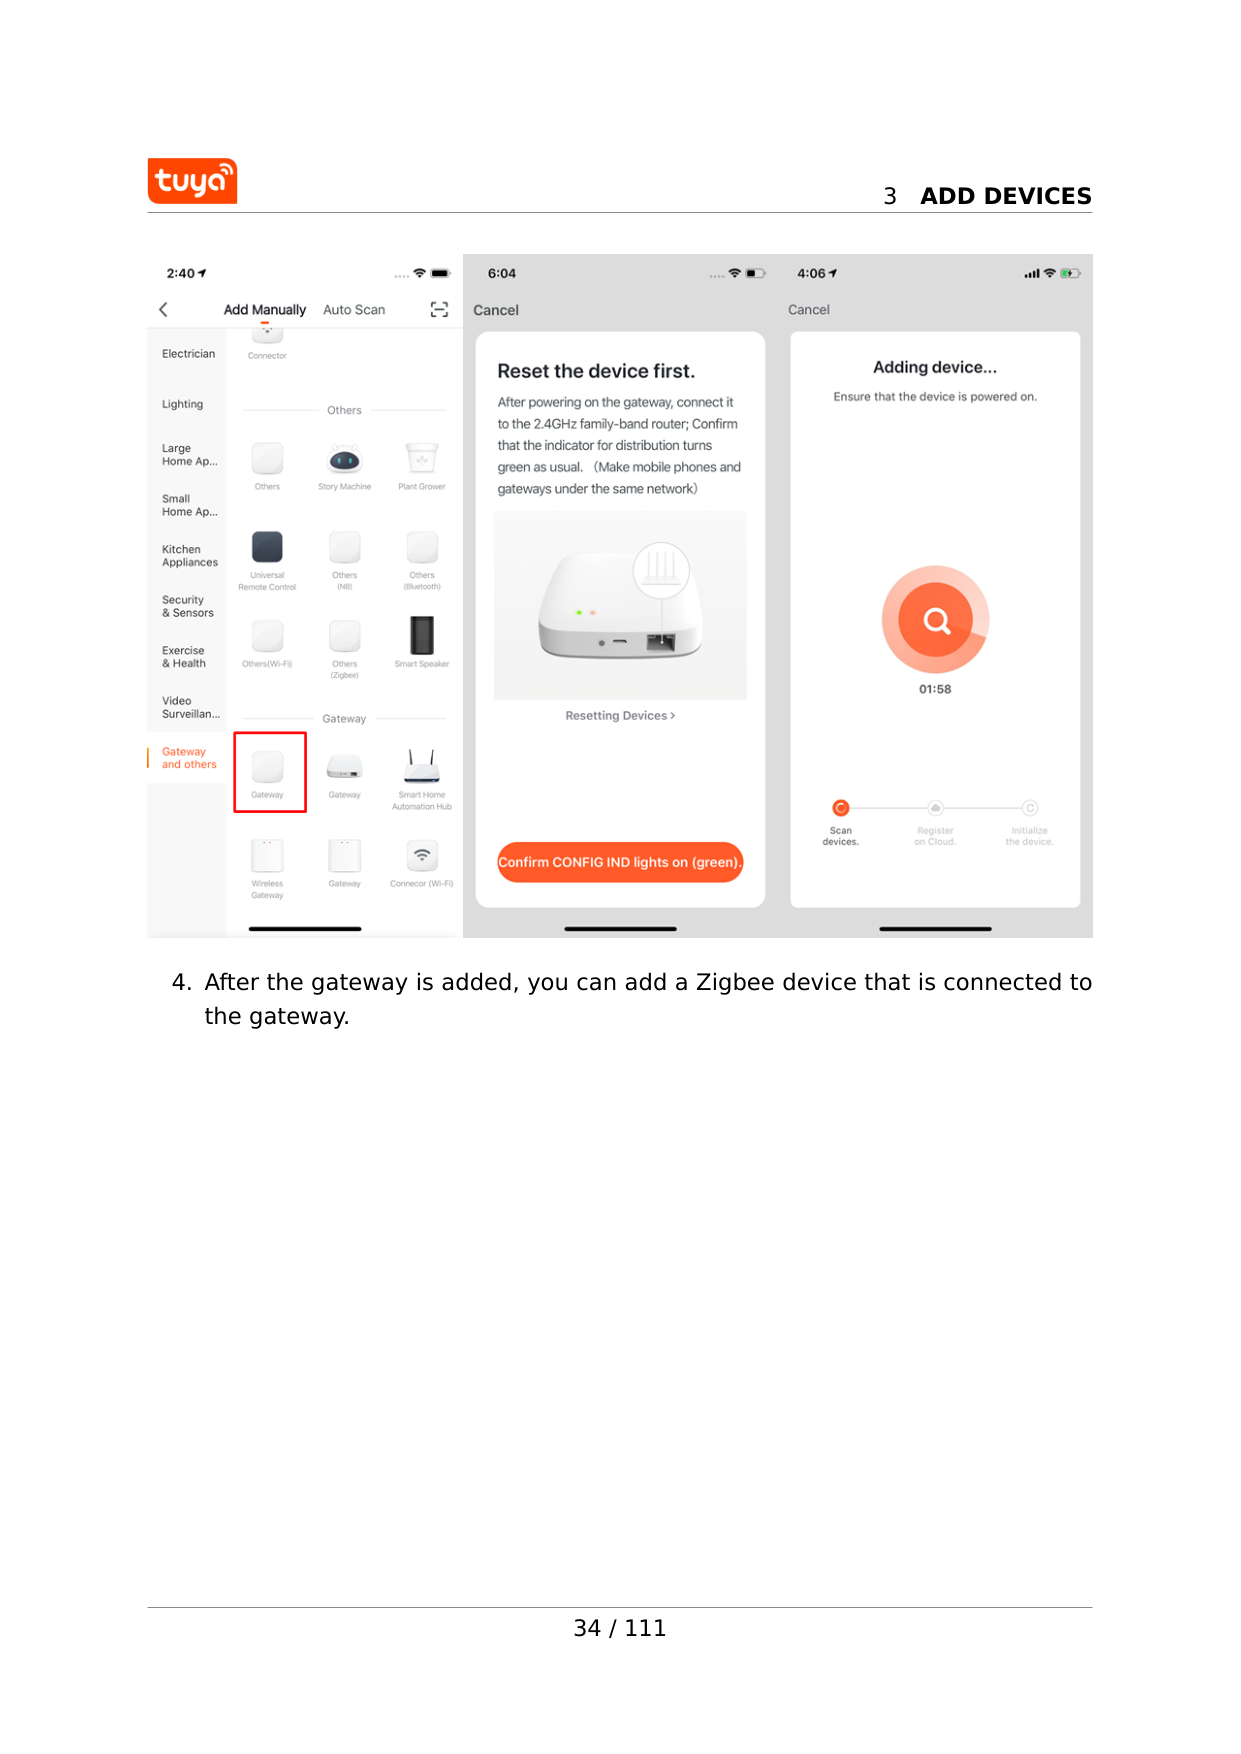
3
Add Devices
3
Add Devices
3
Add Devices
3
Add Devices
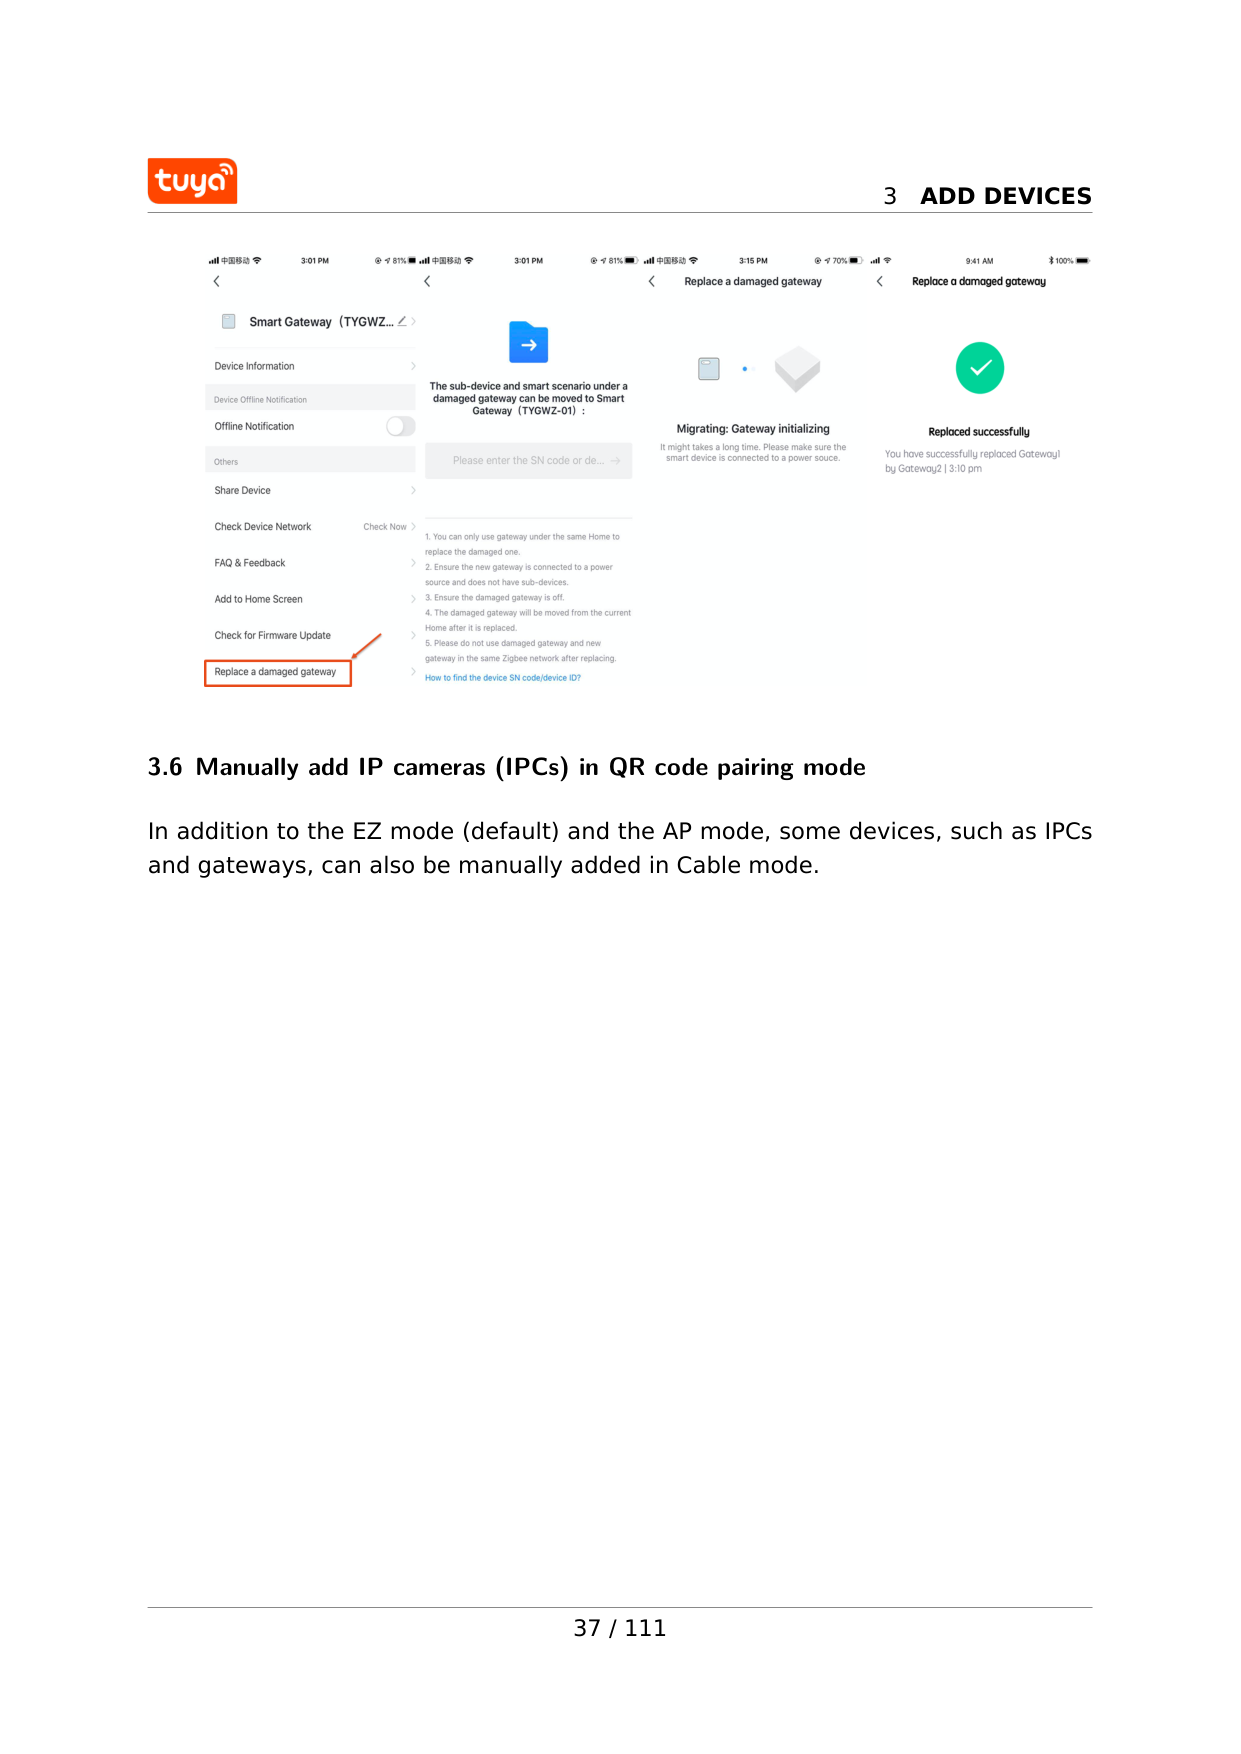
3.6 Manually add IP cameras (IPCs) in QR code pairing mode In addition to the EZ mode (default) and the AP mode, some devices, such as IPCs and gateways, can also be manually added in Cable mode. 37 / 111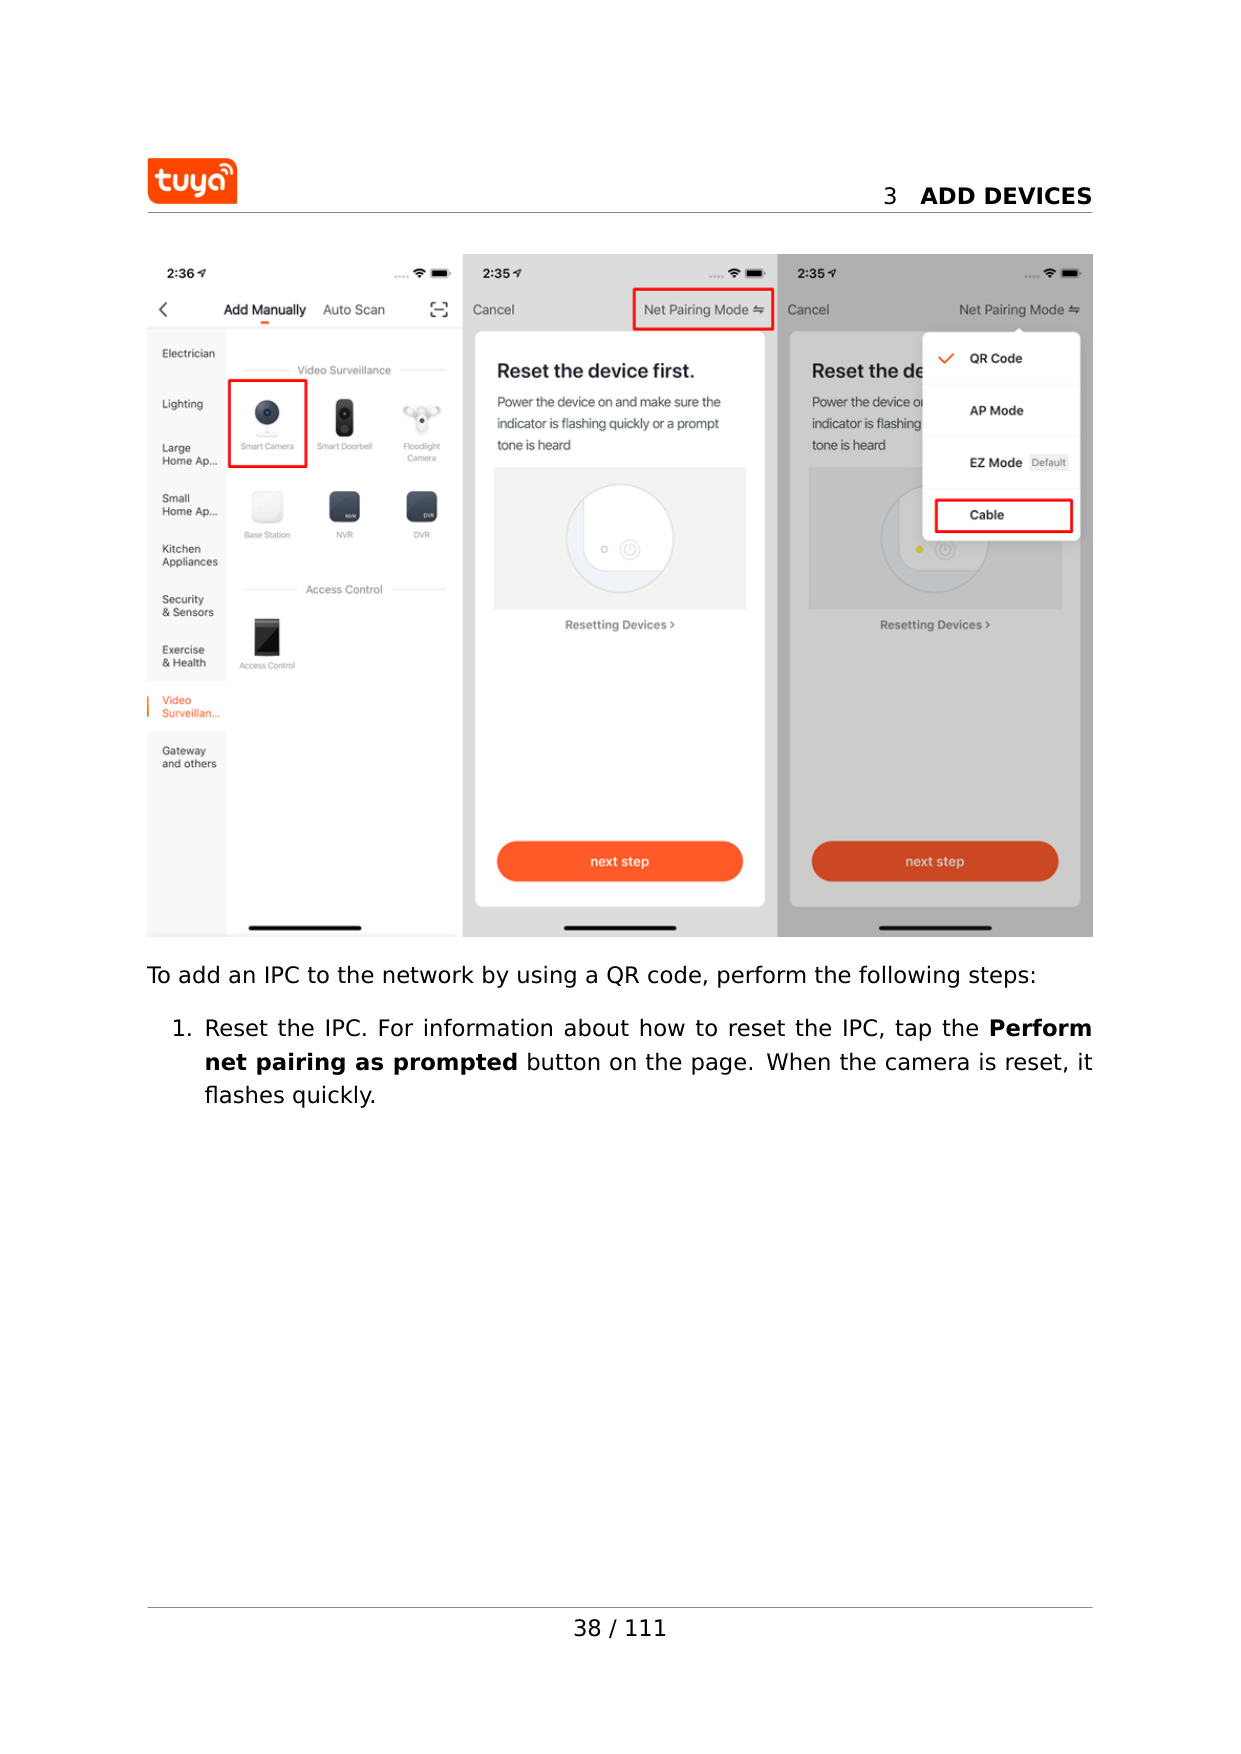
3
Add Devices
To add an IPC to the network by using a QR code, perform the following steps: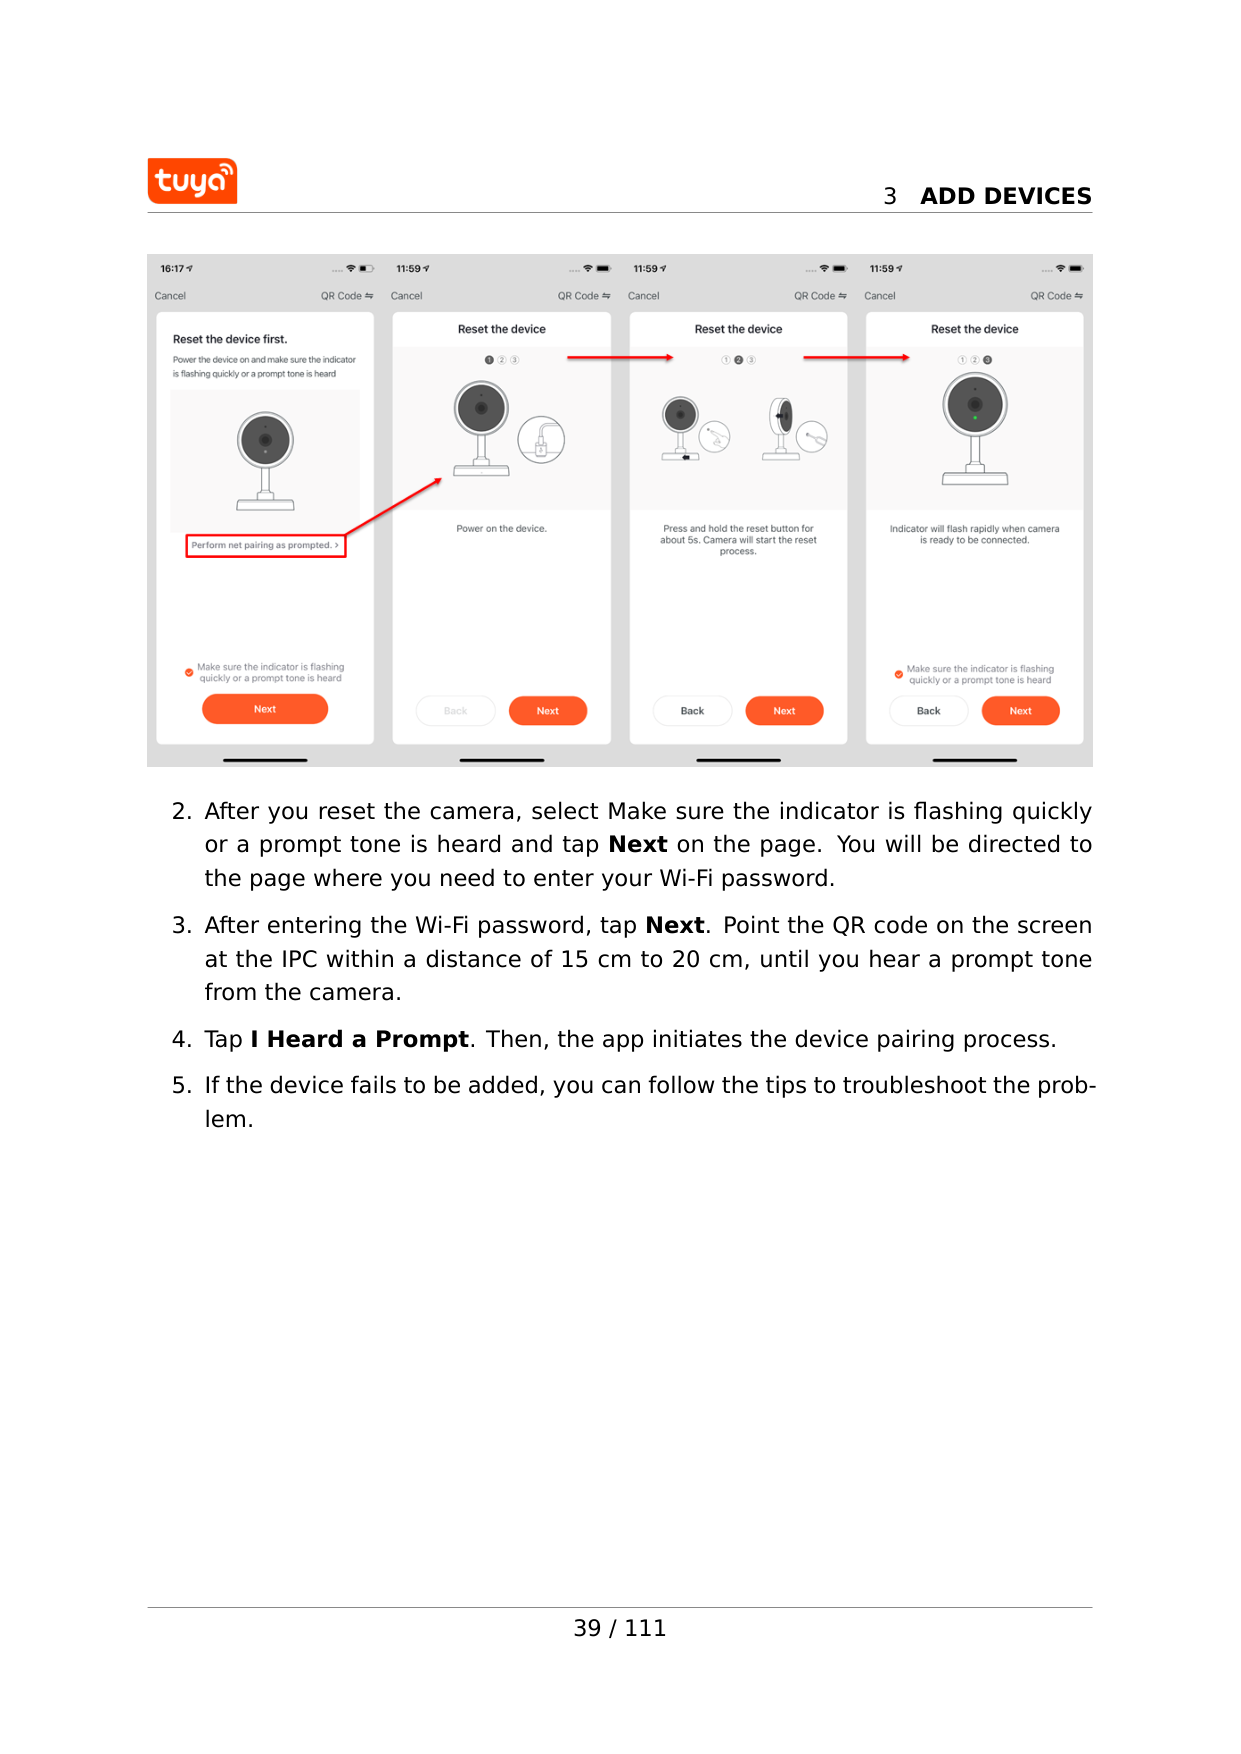
3
Add Devices

3
Add Devices
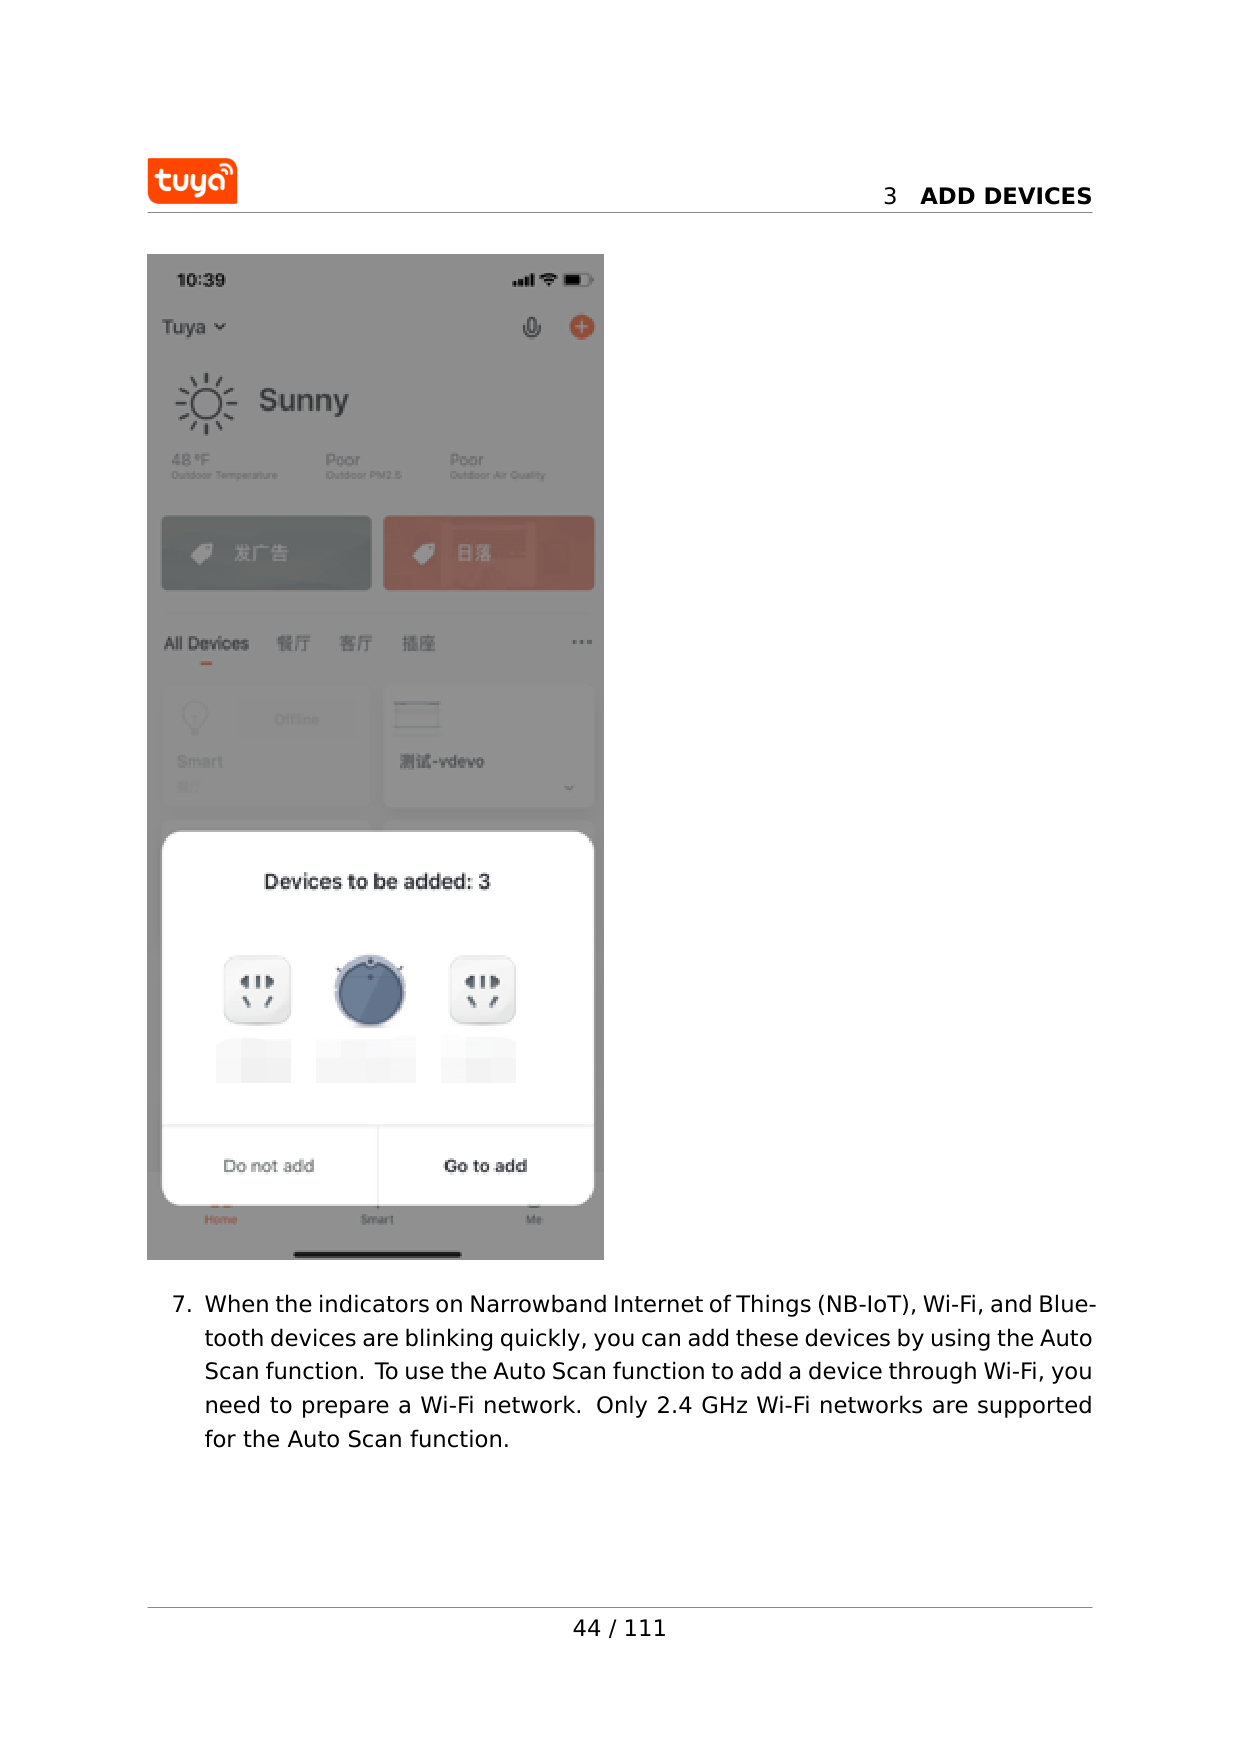
3.7 Add devices in auto scan mode 1.The Auto Scan enables you to search for multiple devices, including Wi-Fi devices, Bluetooth gateways, Bluetooth mesh devices, Zigbee gateways, and Zigbee devices connected to your gateway. All devices found can be added with one tap. 2. If the search times out and no devices are found, follow the instructions to troubleshoot and try again, or try to add the devices manually. 40 / 111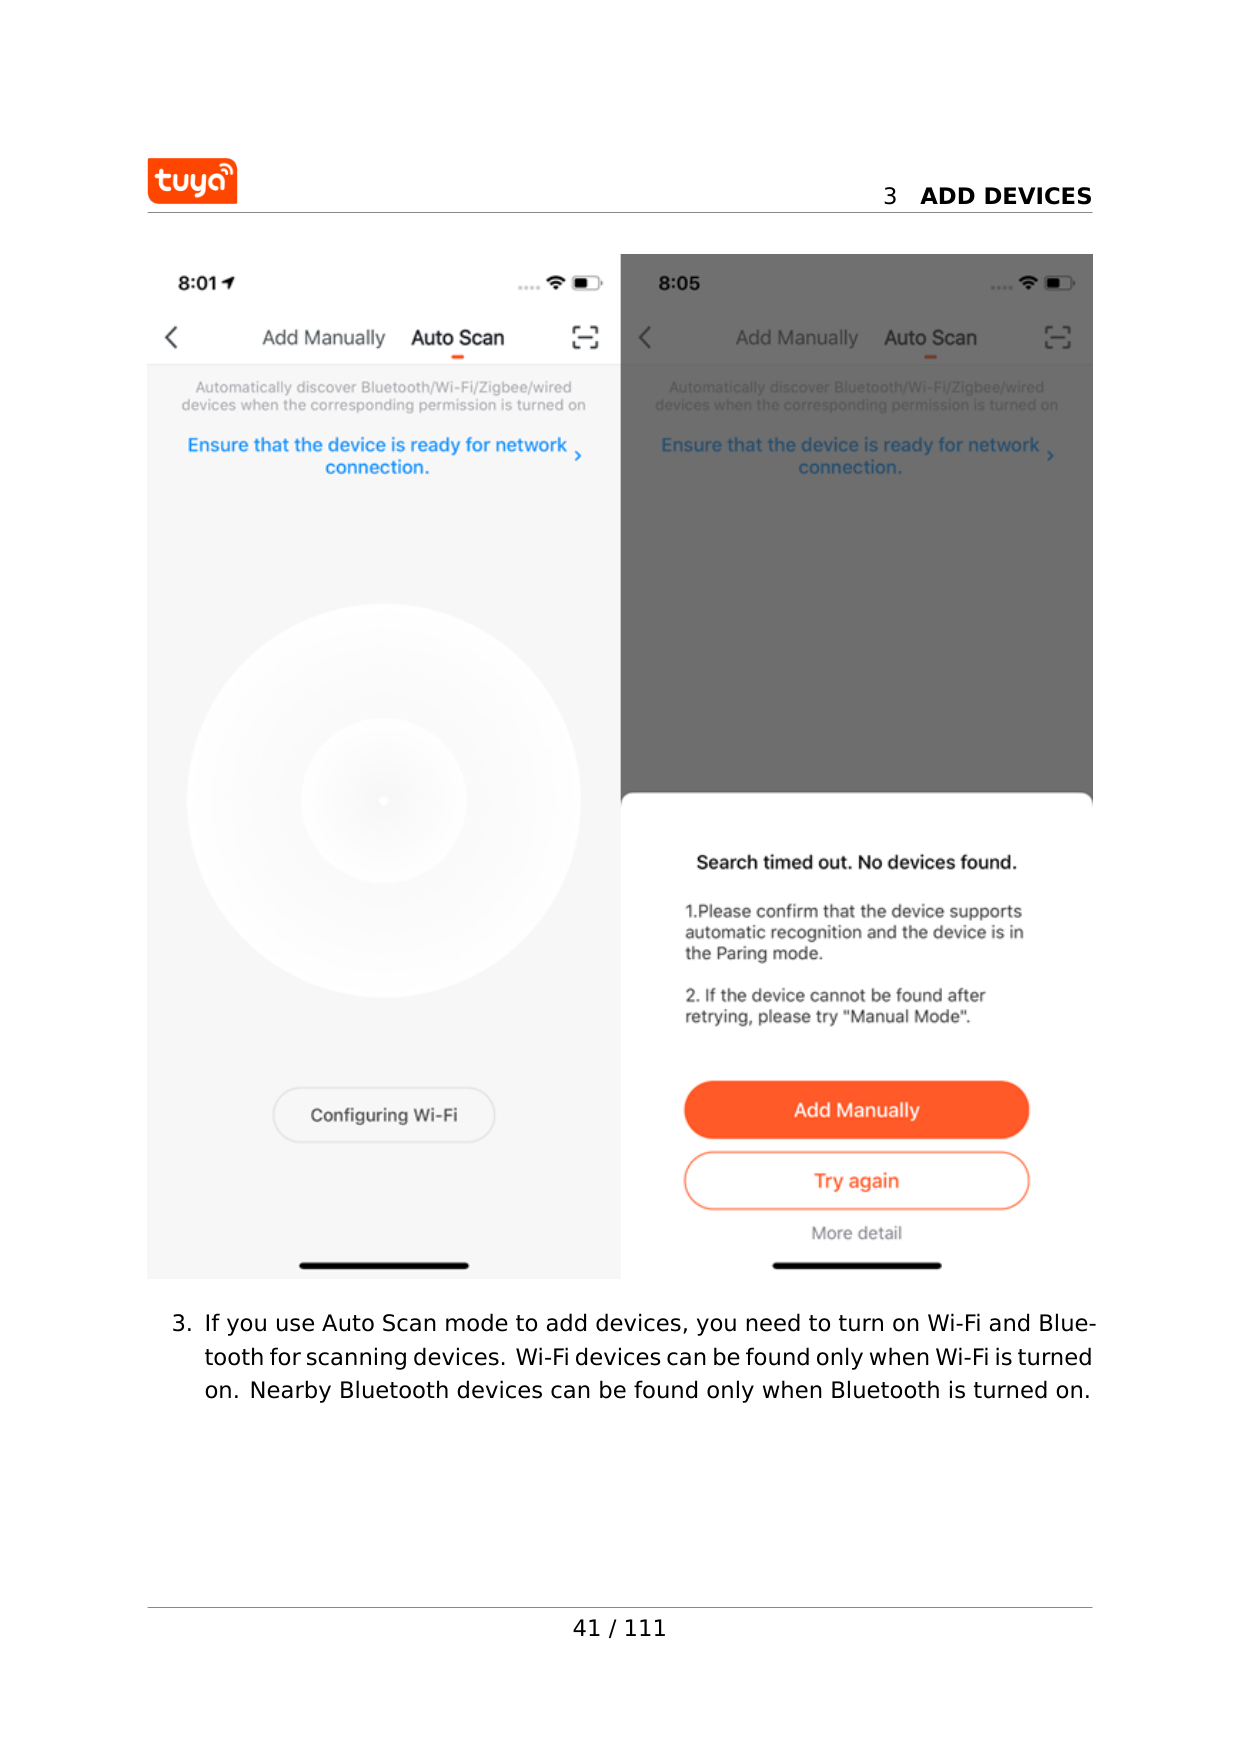
3
Add Devices
3
Add Devices
42 / 111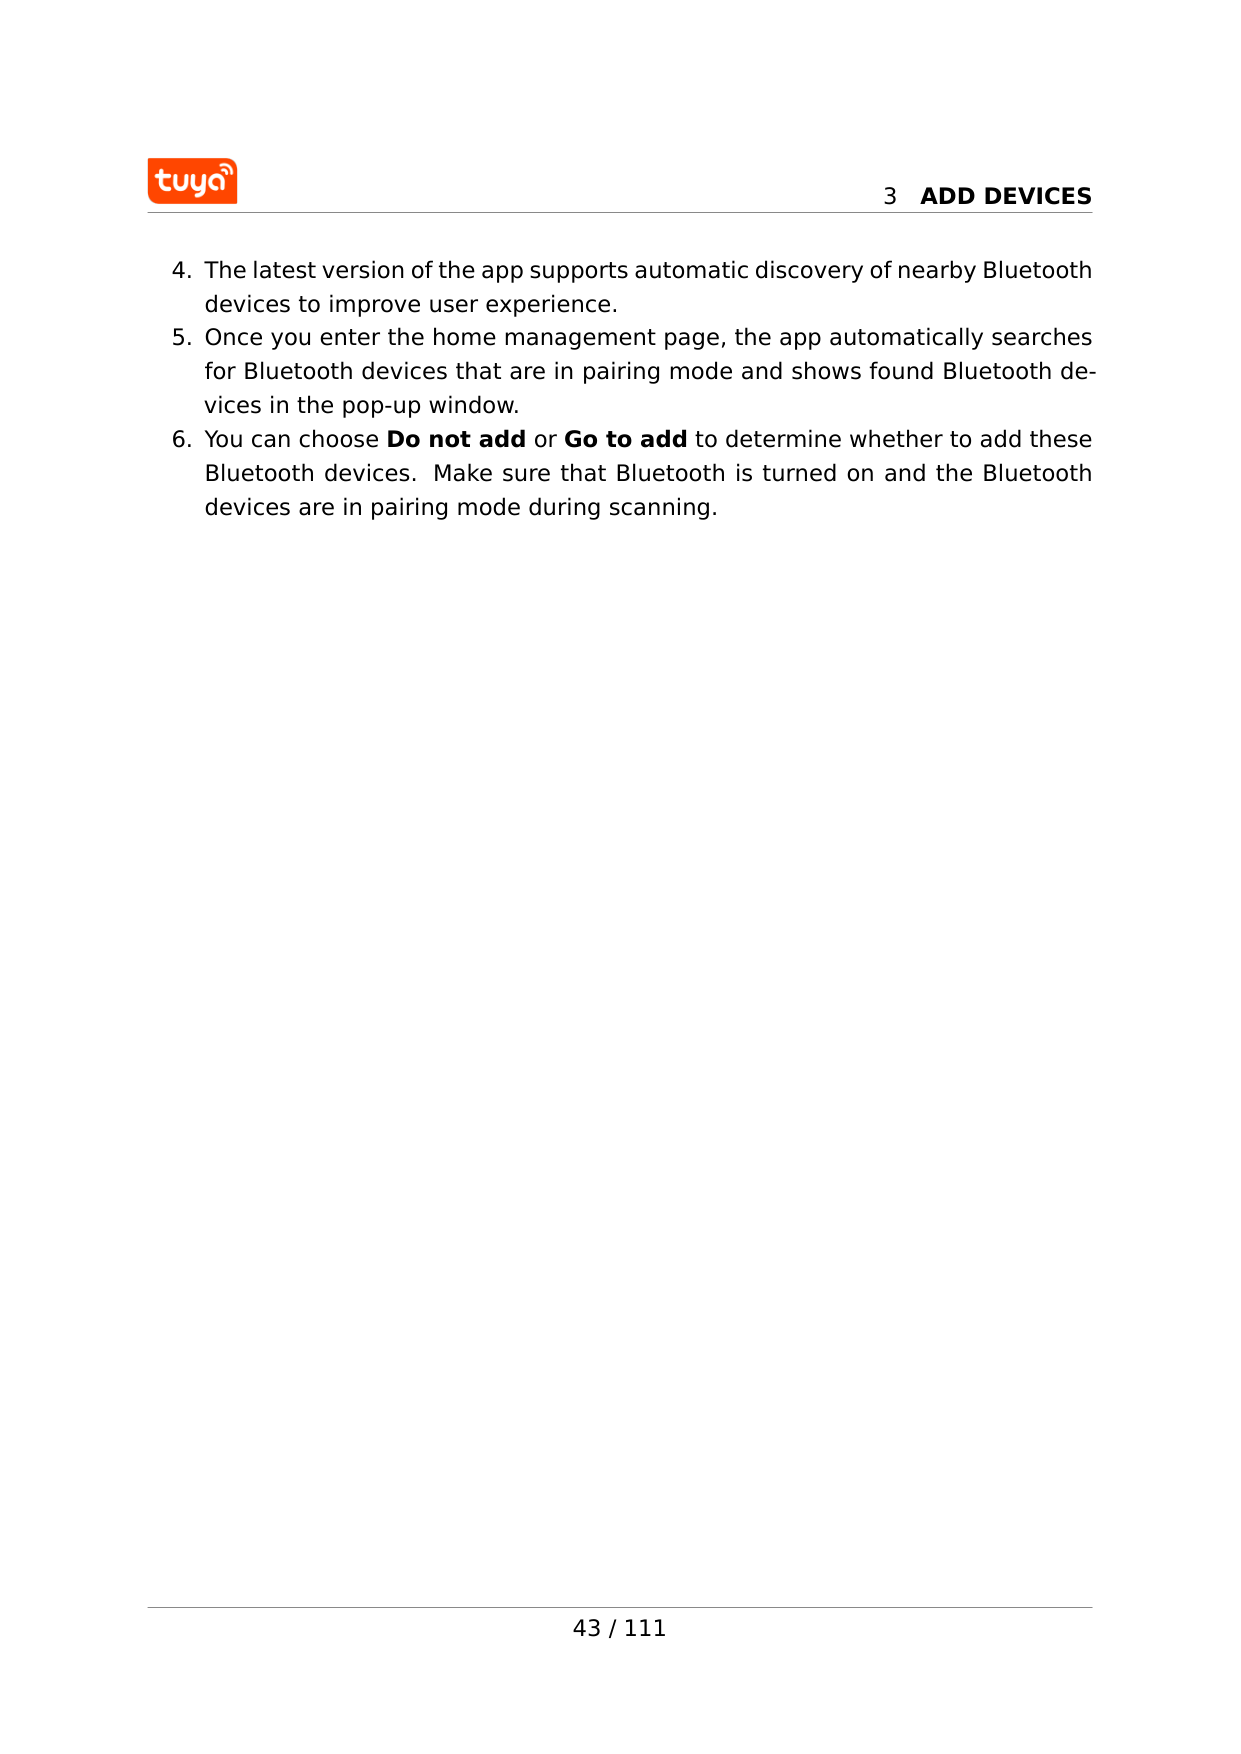
3
Add Devices
3
Add Devices
3
Add Devices
3.8 Scan QR codes or enter device IDs to add NB-IoT products You can add an NB-IoT product by scanning the device’s QR code or entering the International Mobile Equipment Identity (IMEI) number on the device label. You need to grant the app access to the camera on your phone to scan the QR code. 45 / 111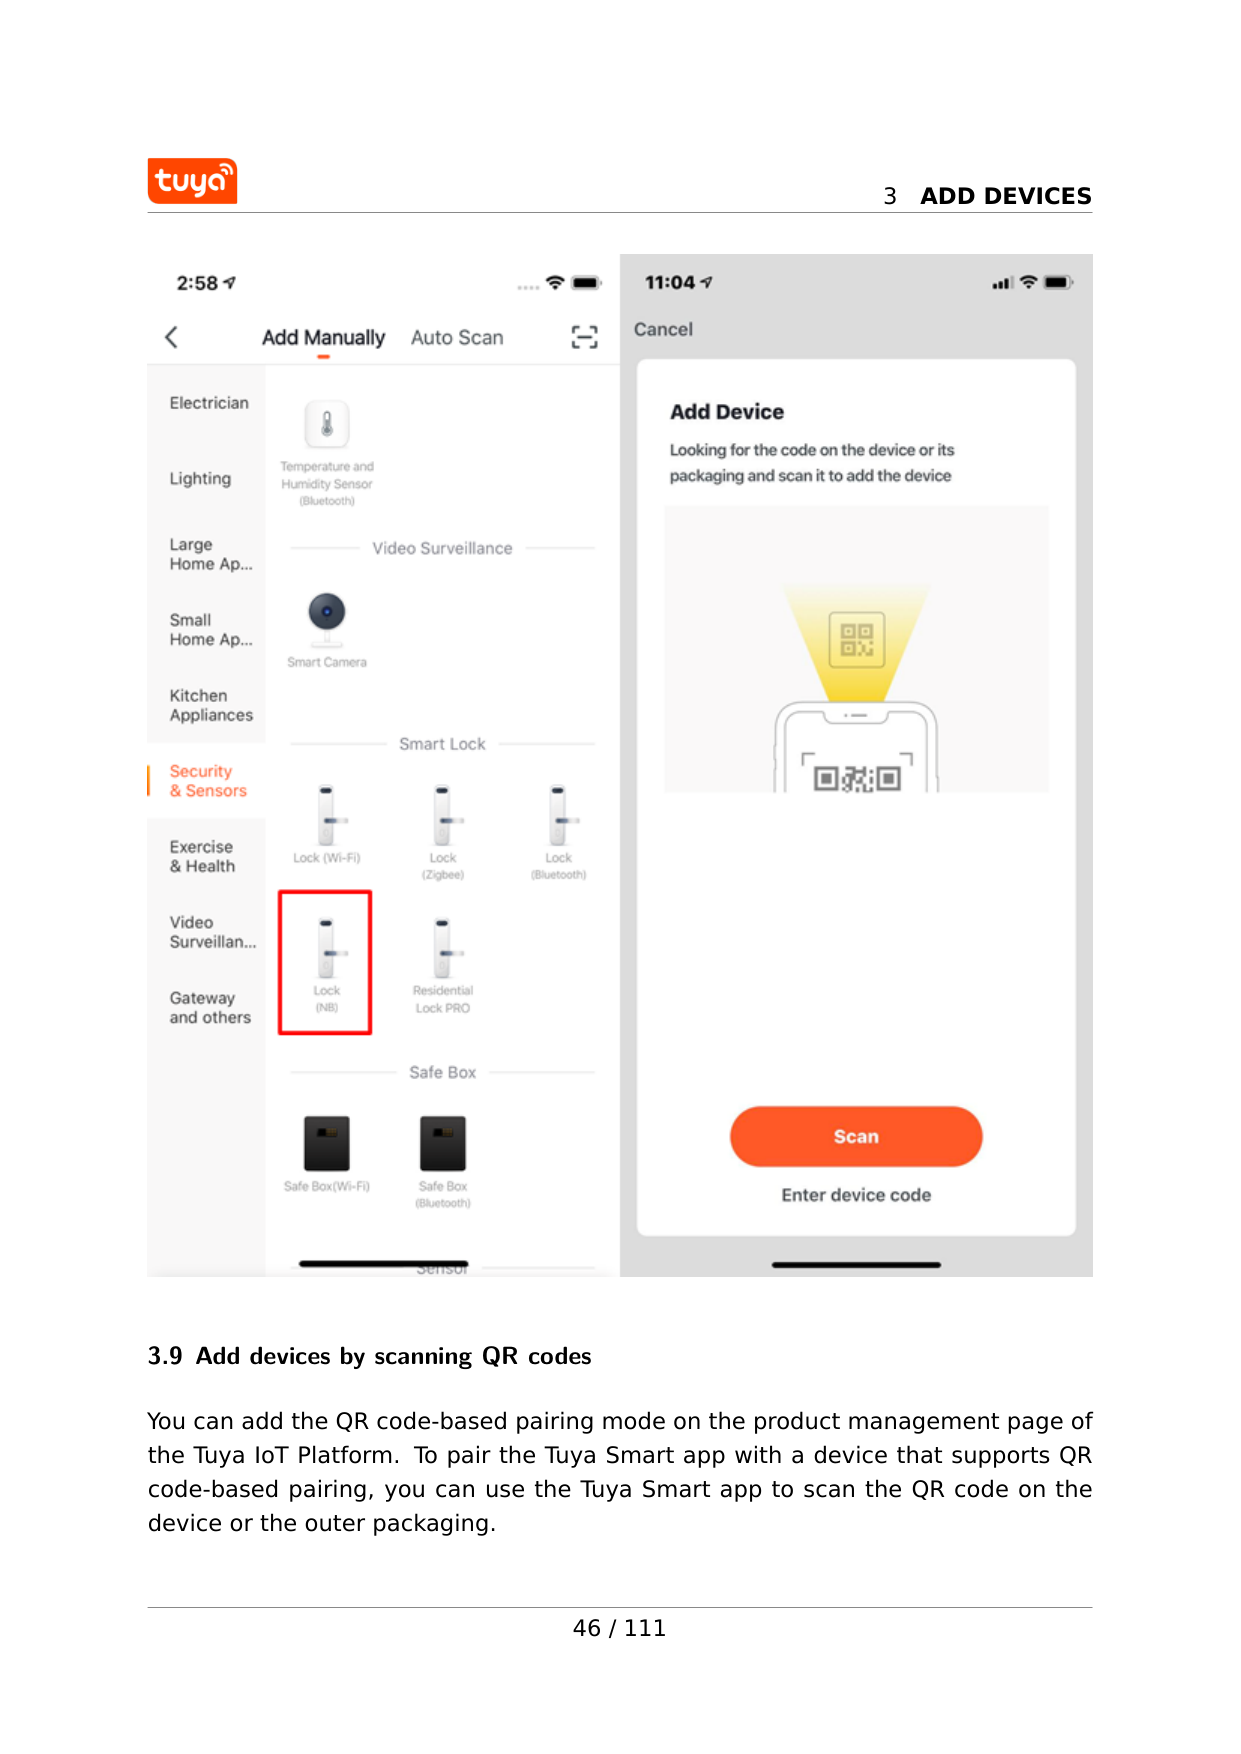
3
Add Devices
3.9 Add devices by scanning QR codes You can add the QR code-based pairing mode on the product management page of the Tuya IoT Platform. To pair the Tuya Smart app with a device that supports QR code-based pairing, you can use the Tuya Smart app to scan the QR code on the device or the outer packaging. 46 / 111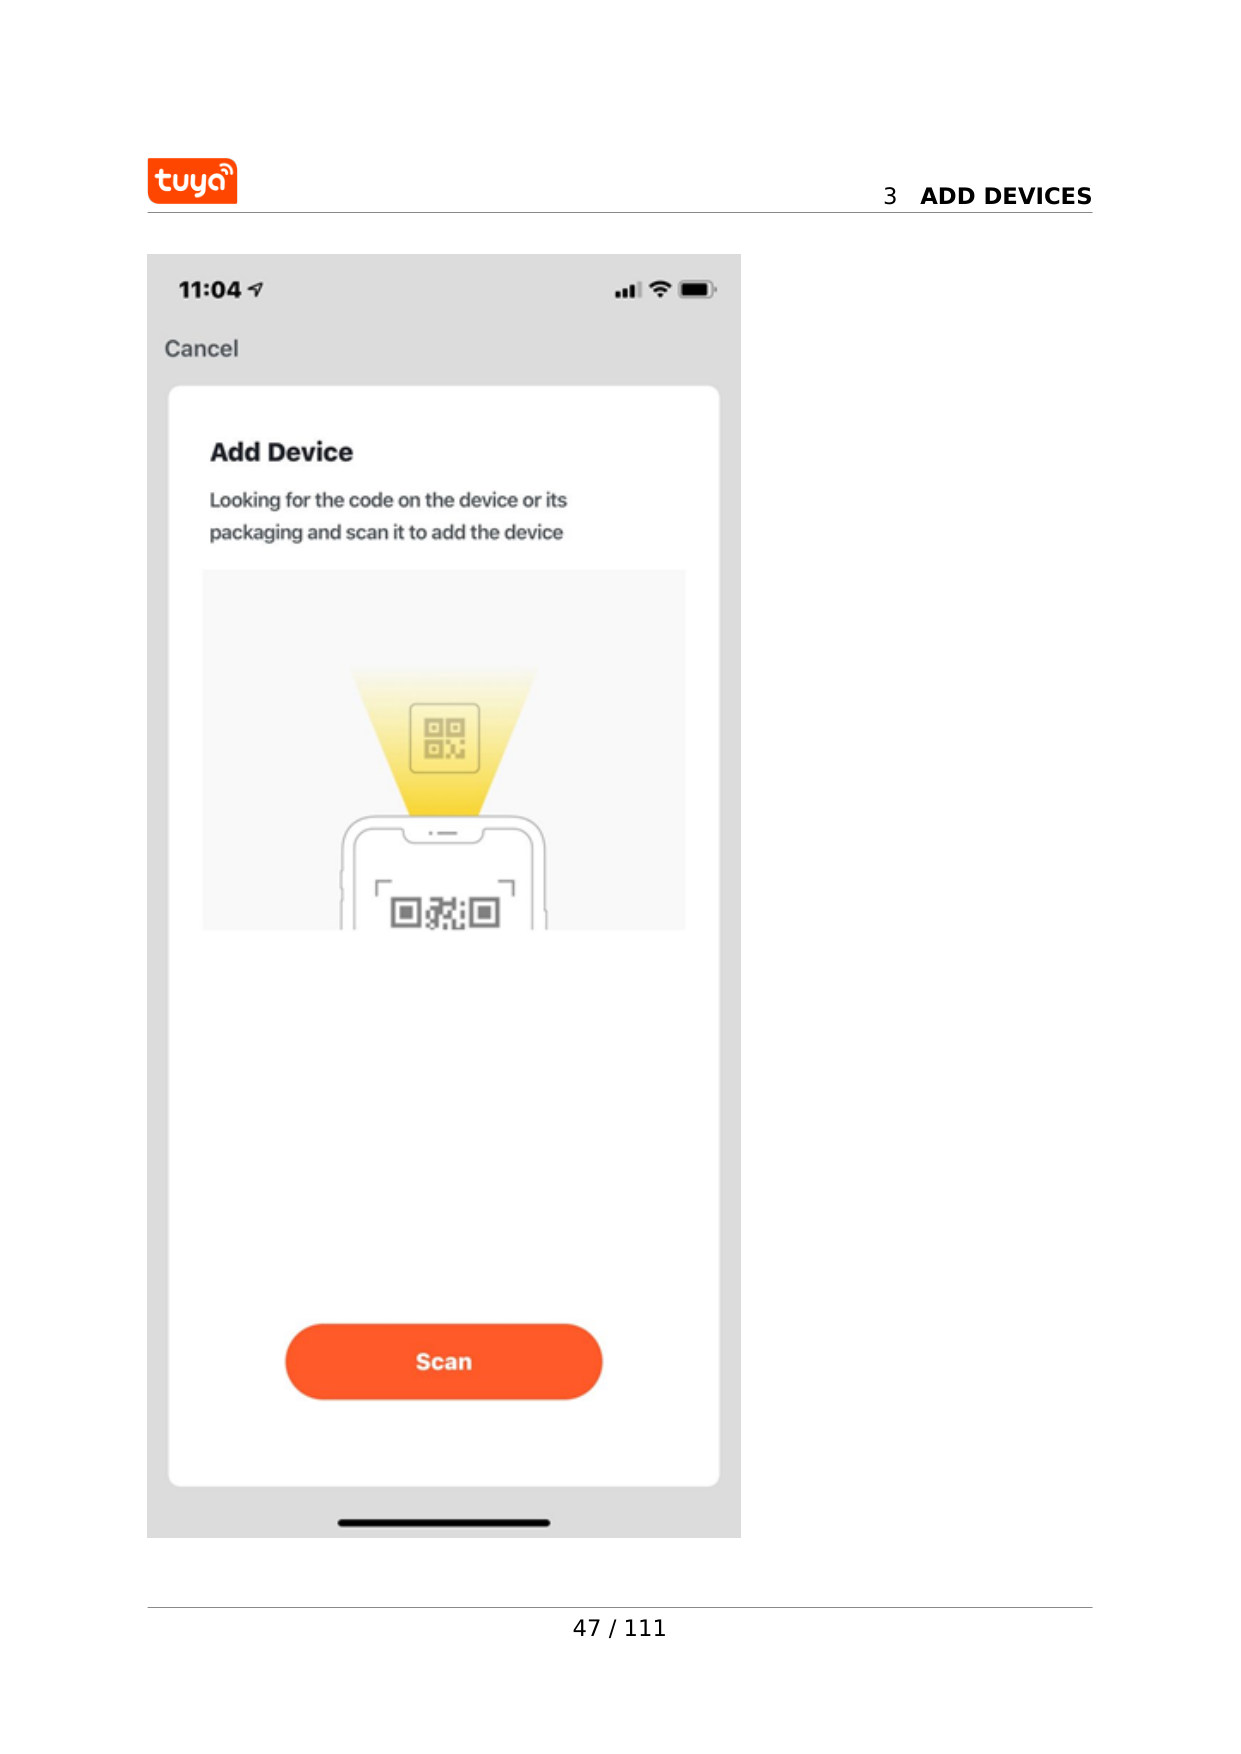
3
Add Devices
47 / 111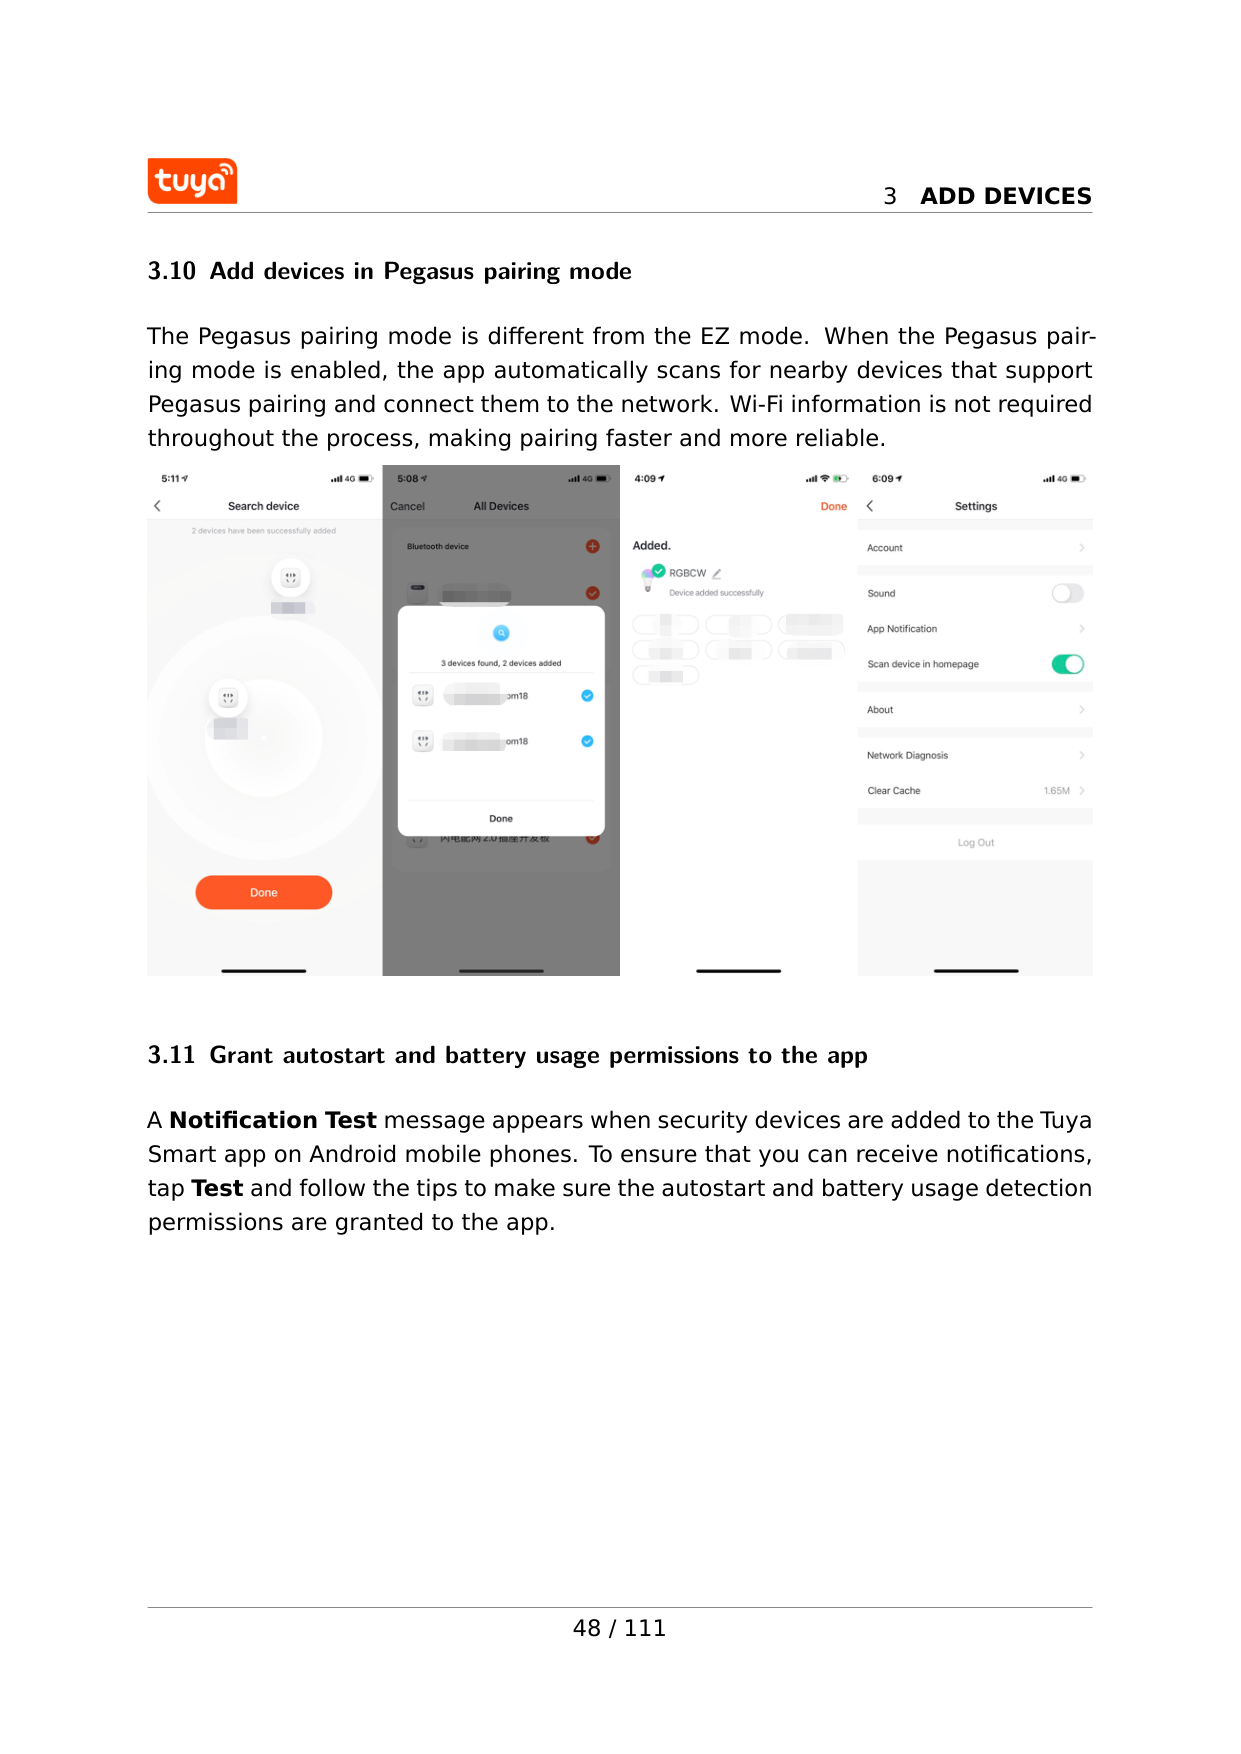
3
Add Devices
3.10 Add devices in Pegasus pairing mode The Pegasus pairing mode is different from the EZ mode. When the Pegasus pair- ing mode is enabled, the app automatically scans for nearby devices that support Pegasus pairing and connect them to the network. Wi-Fi information is not required throughout the process, making pairing faster and more reliable. 3.11 Grant autostart and battery usage permissions to the app A Notification Test message appears when security devices are added to the Tuya Smart app on Android mobile phones. To ensure that you can receive notifications, tap Test and follow the tips to make sure the autostart and battery usage detection permissions are granted to the app. 48 / 111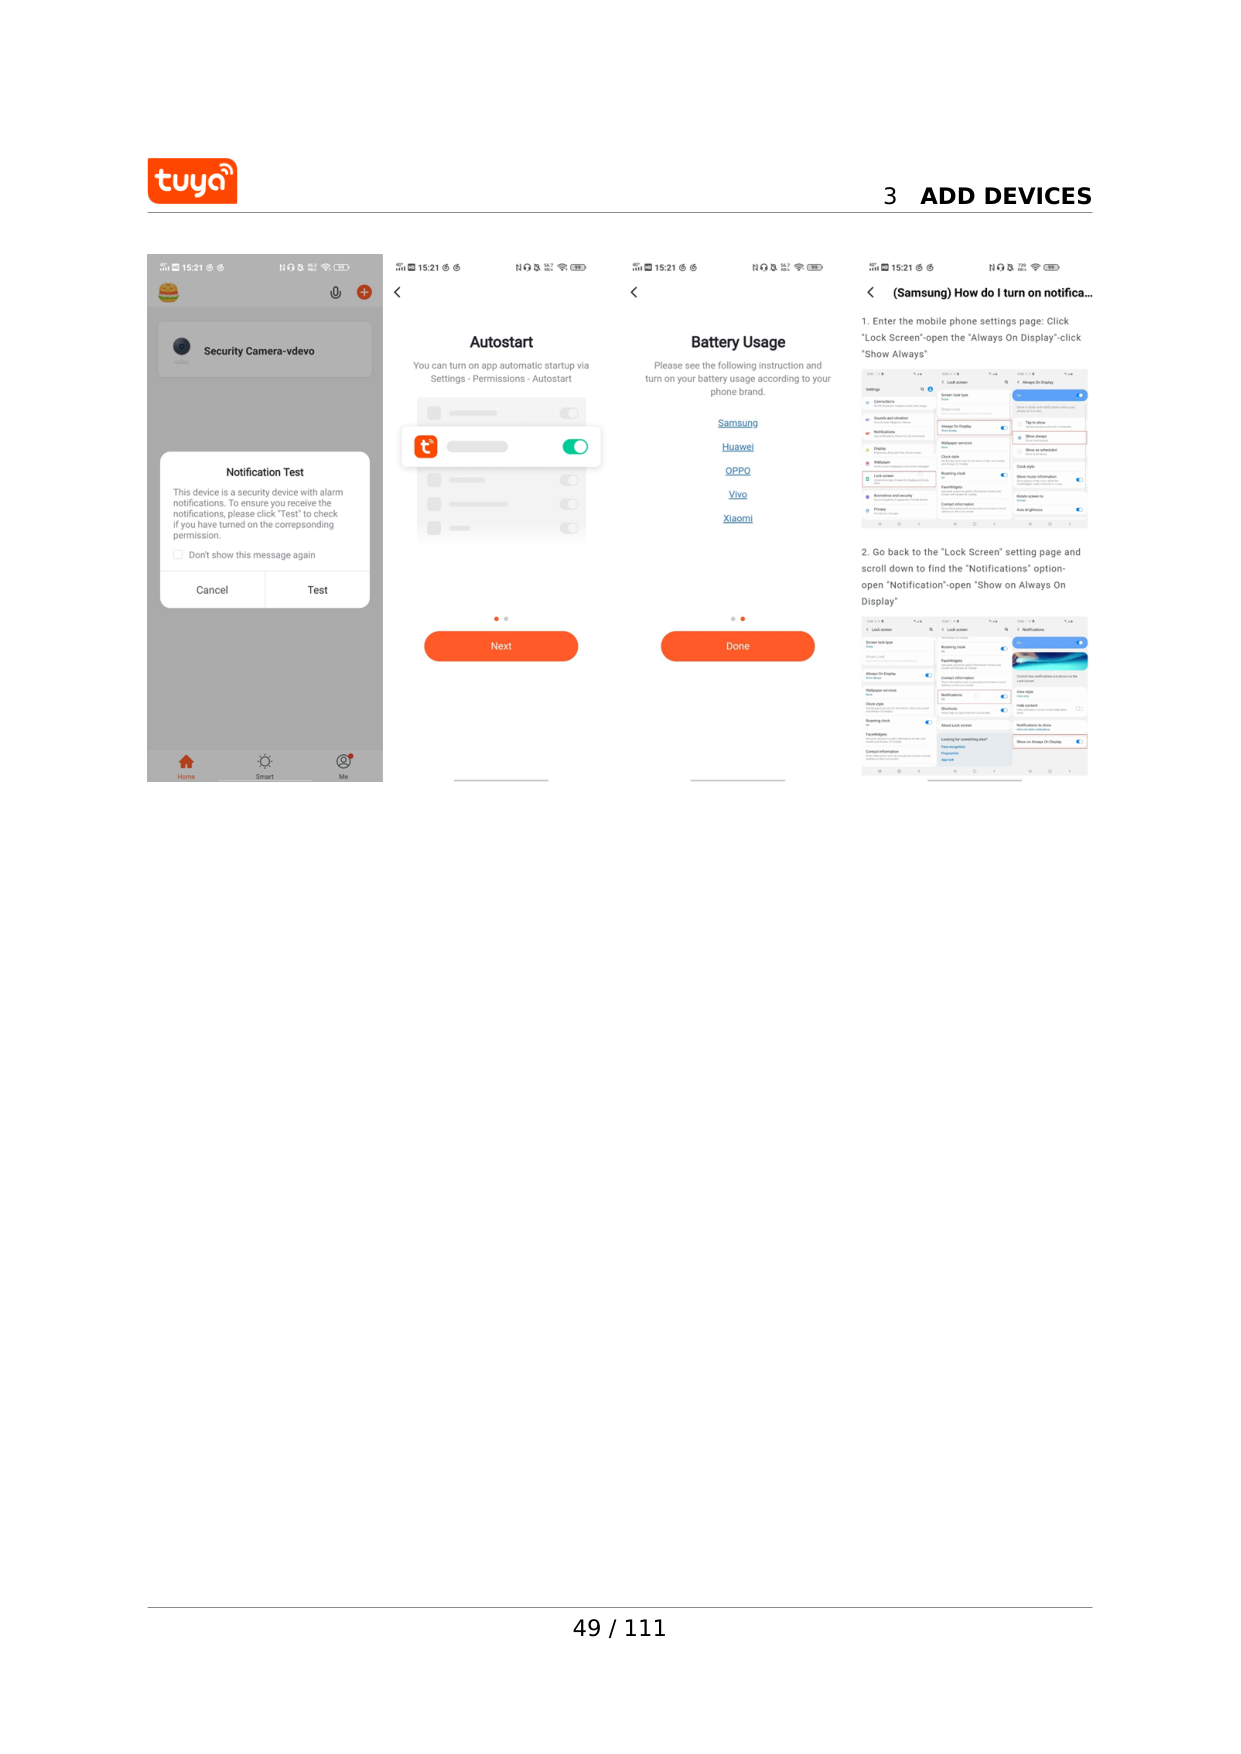
3
Add Devices
49 / 111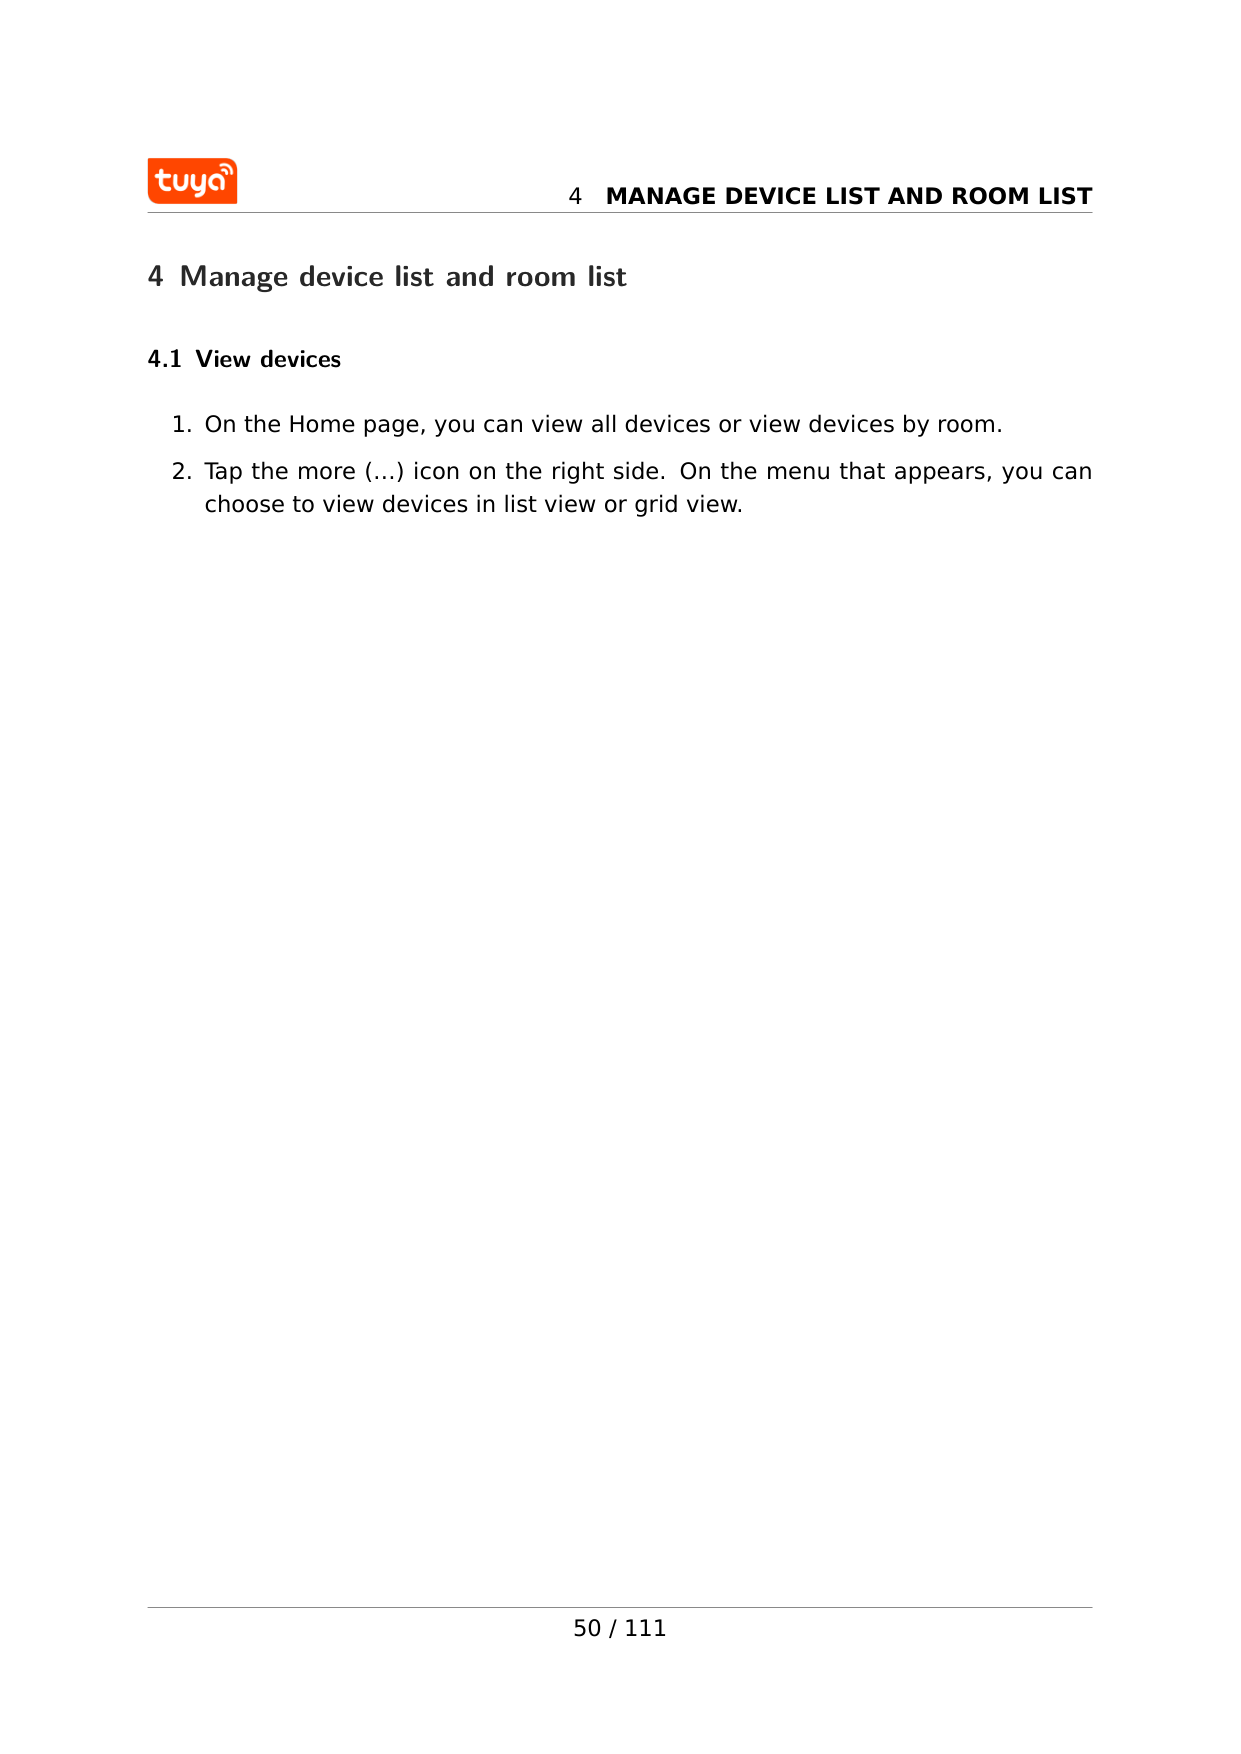
4
Manage Device List And Room List
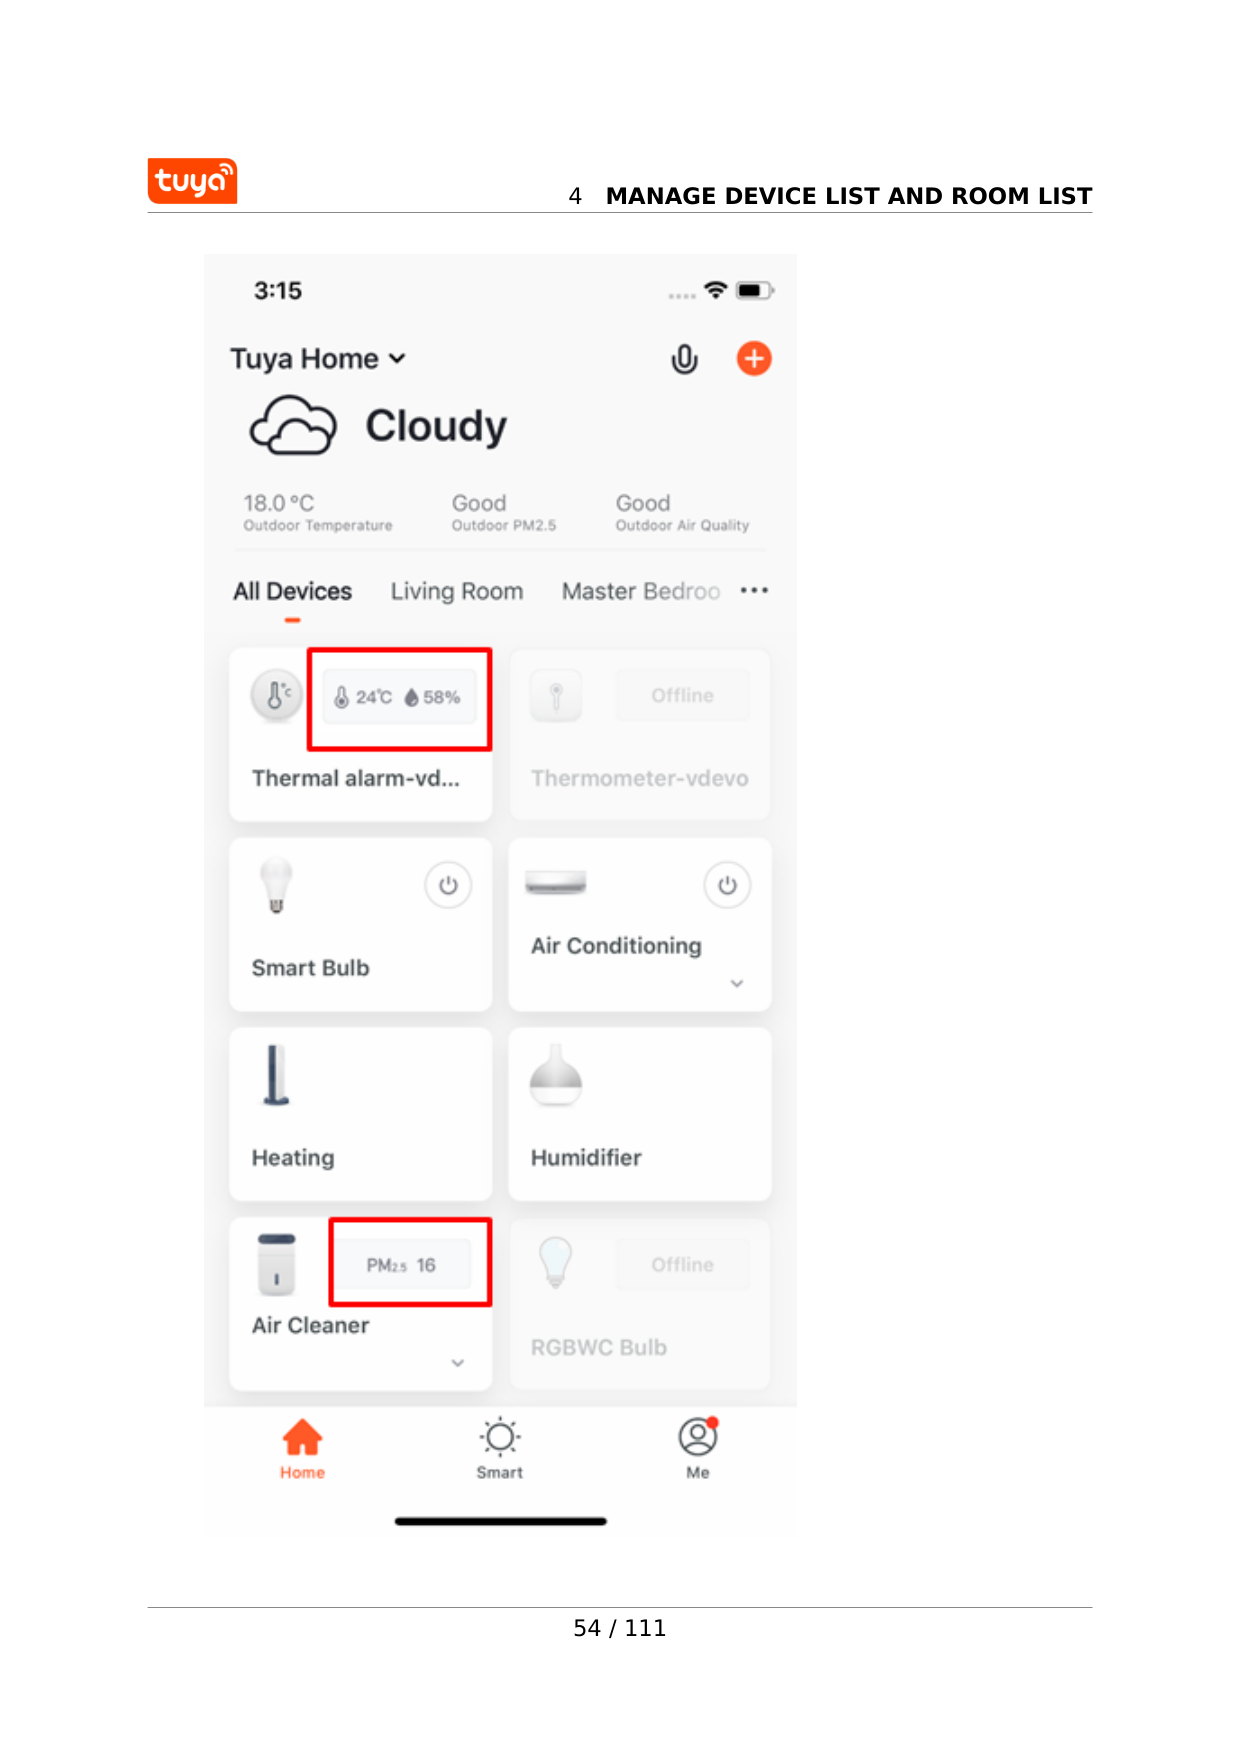
4 Manage device list and room list 4.1 View devices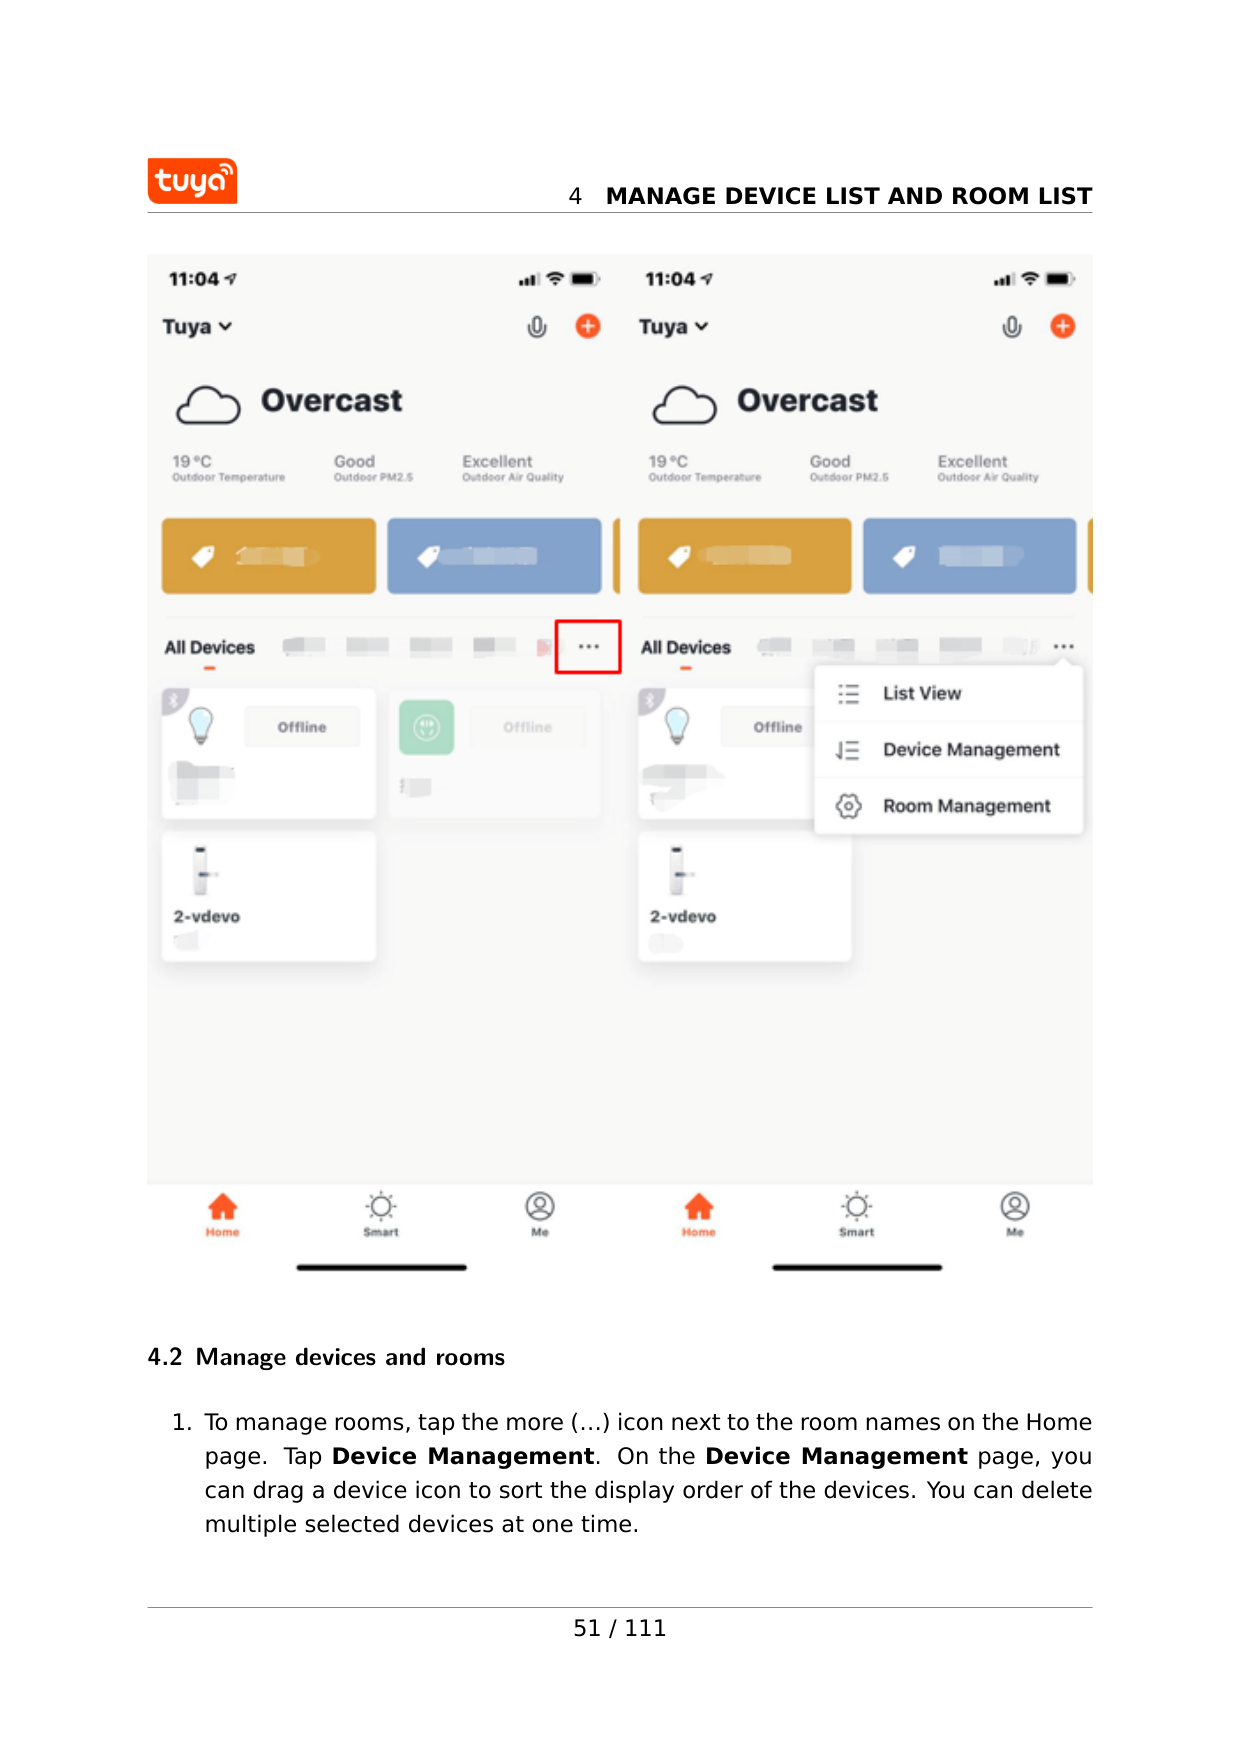
4
Manage Device List And Room List
4.2 Manage devices and rooms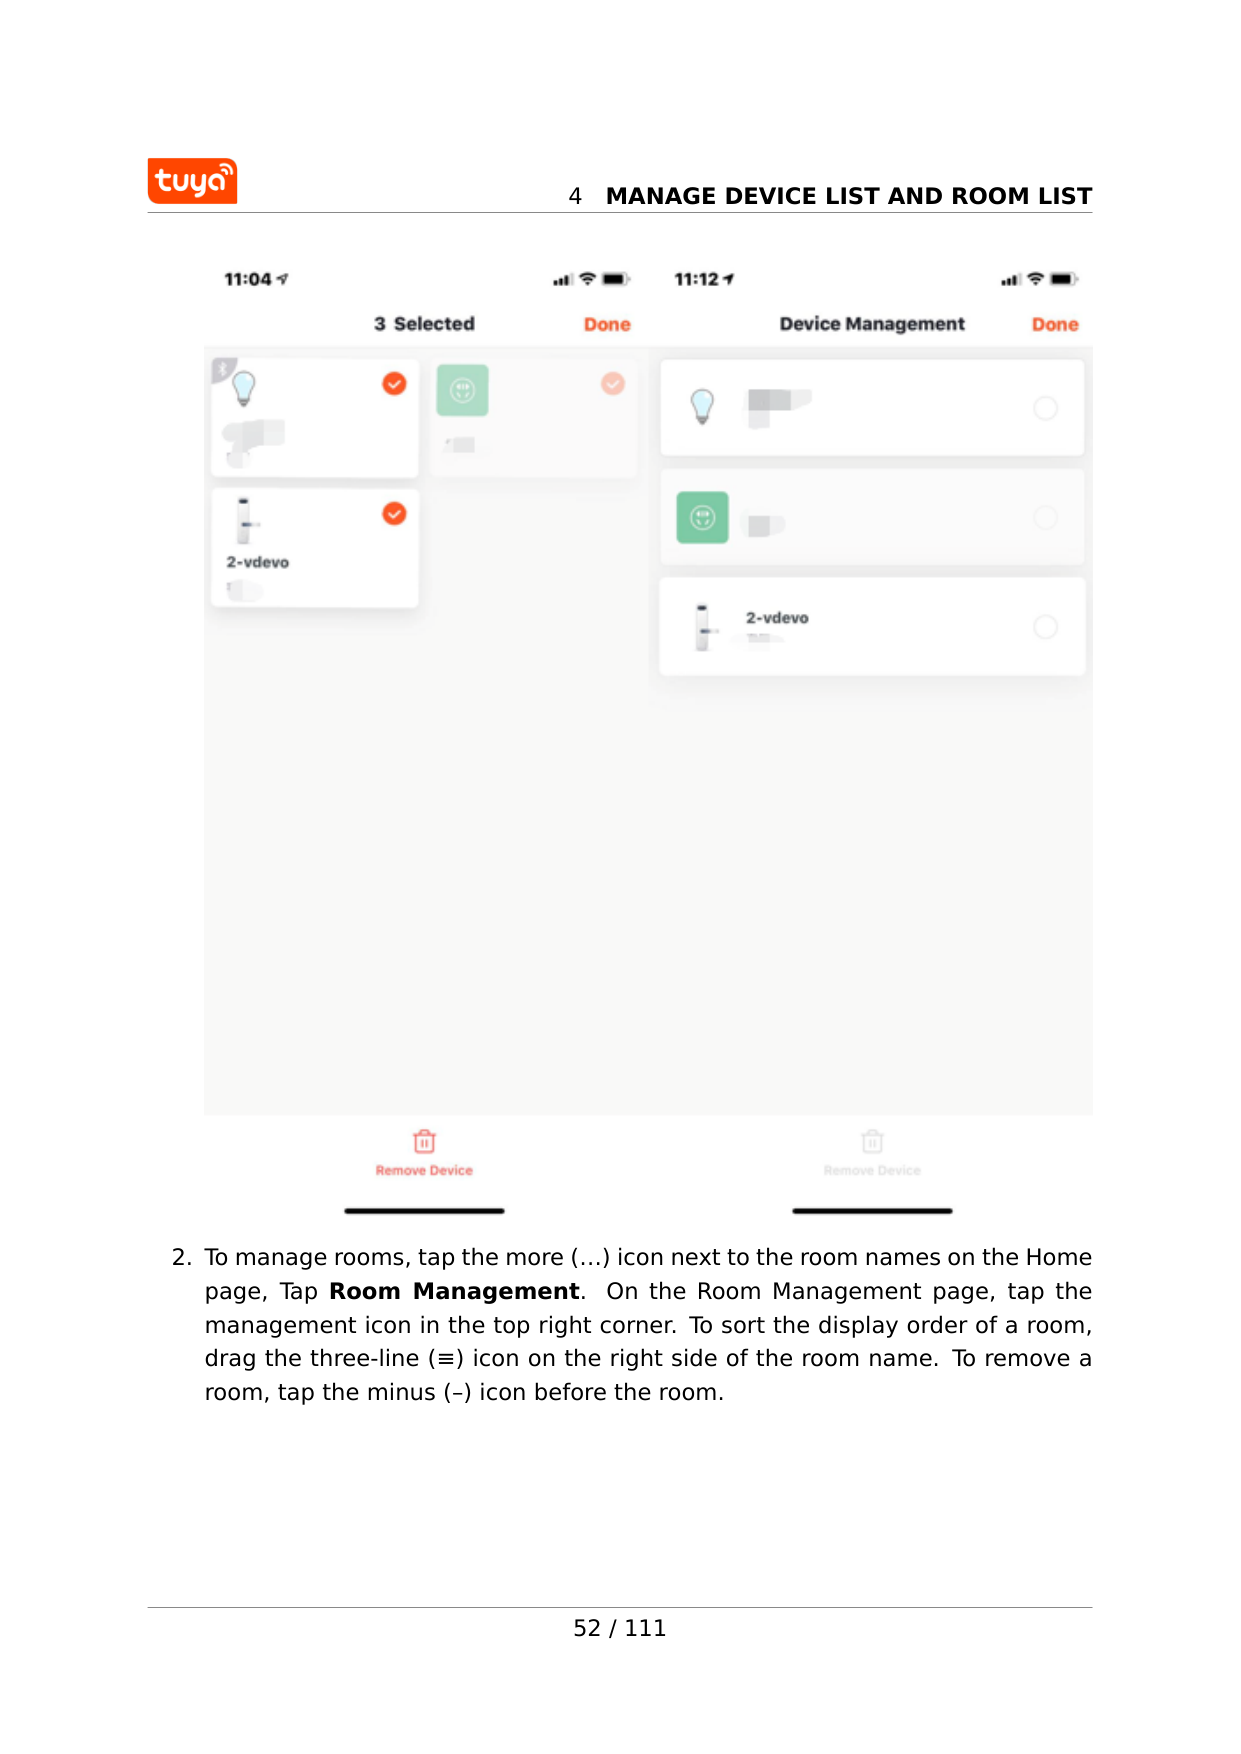
4
Manage Device List And Room List
4
Manage Device List And Room List
4
Manage Device List And Room List
54 / 111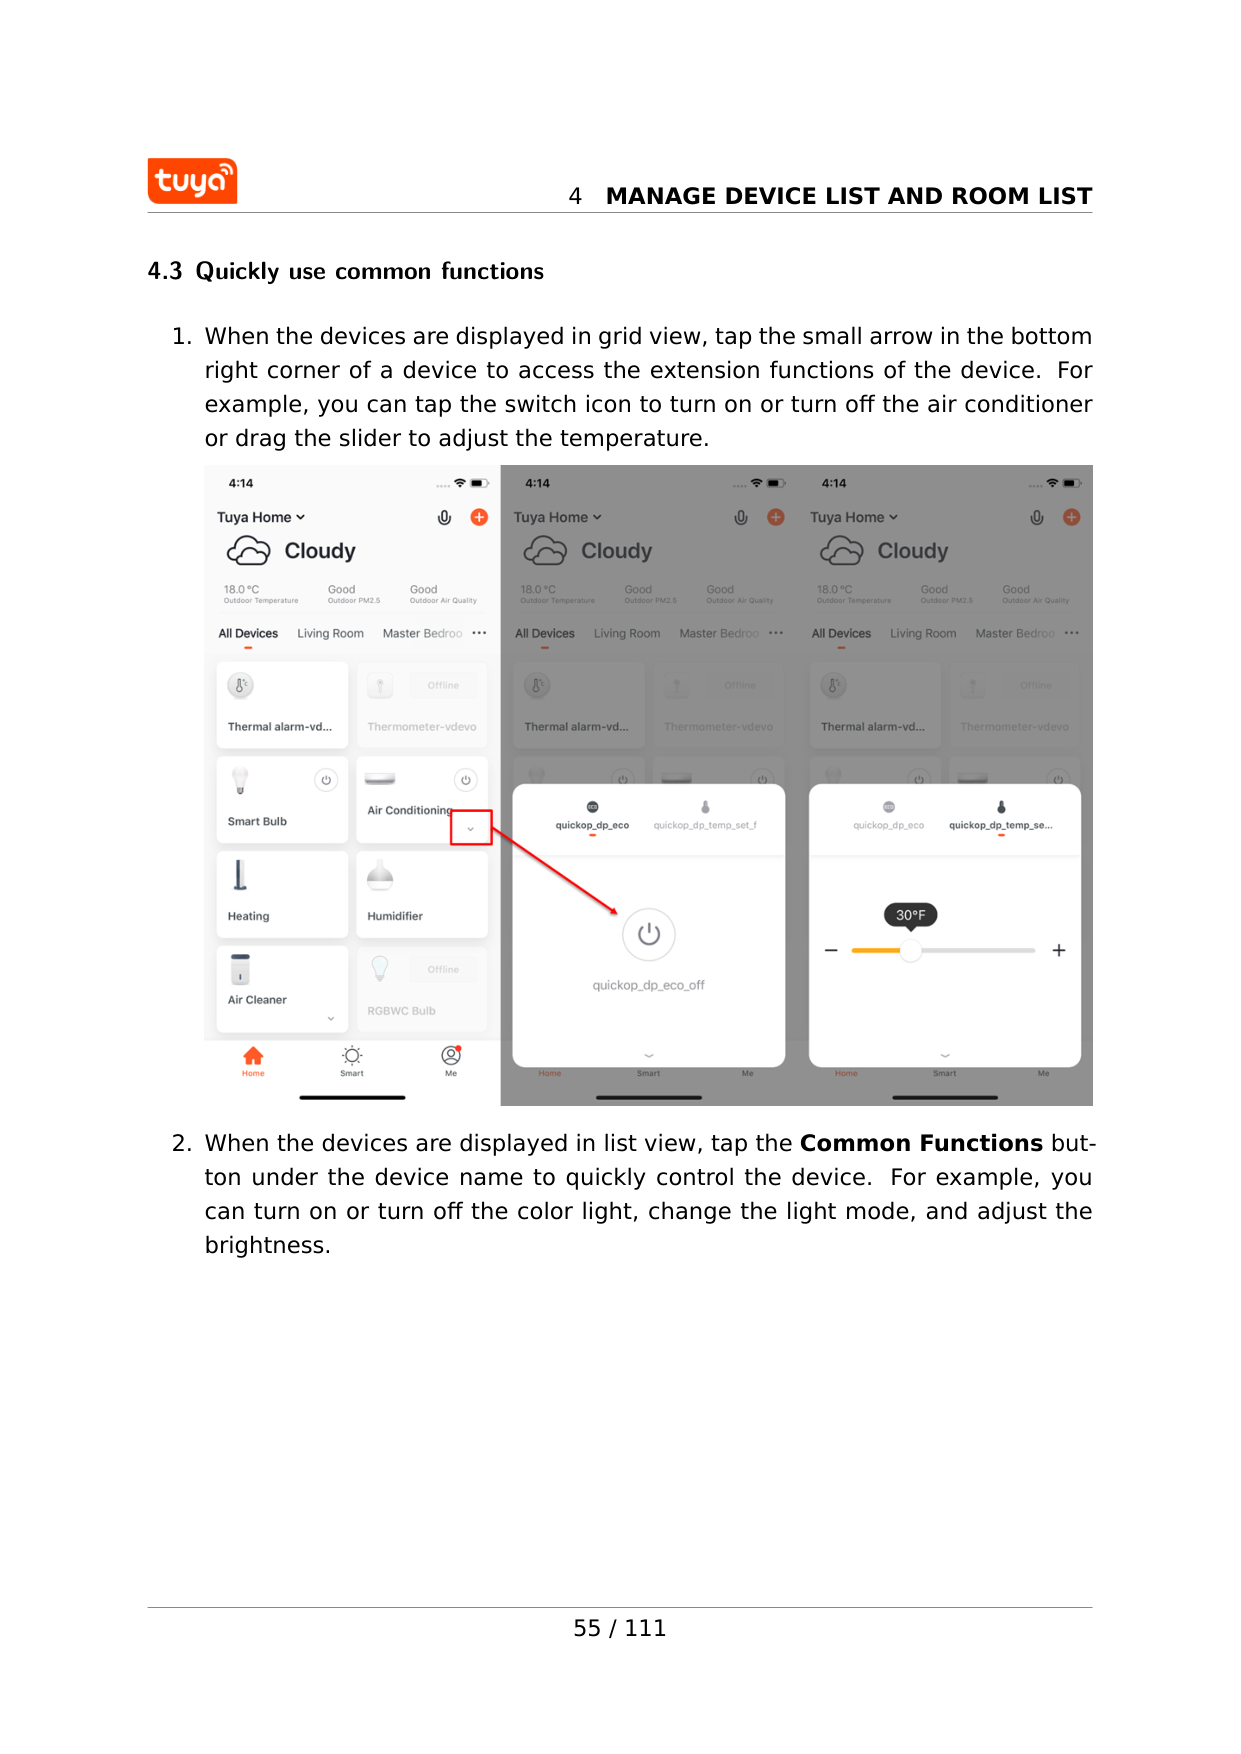
4
Manage Device List And Room List
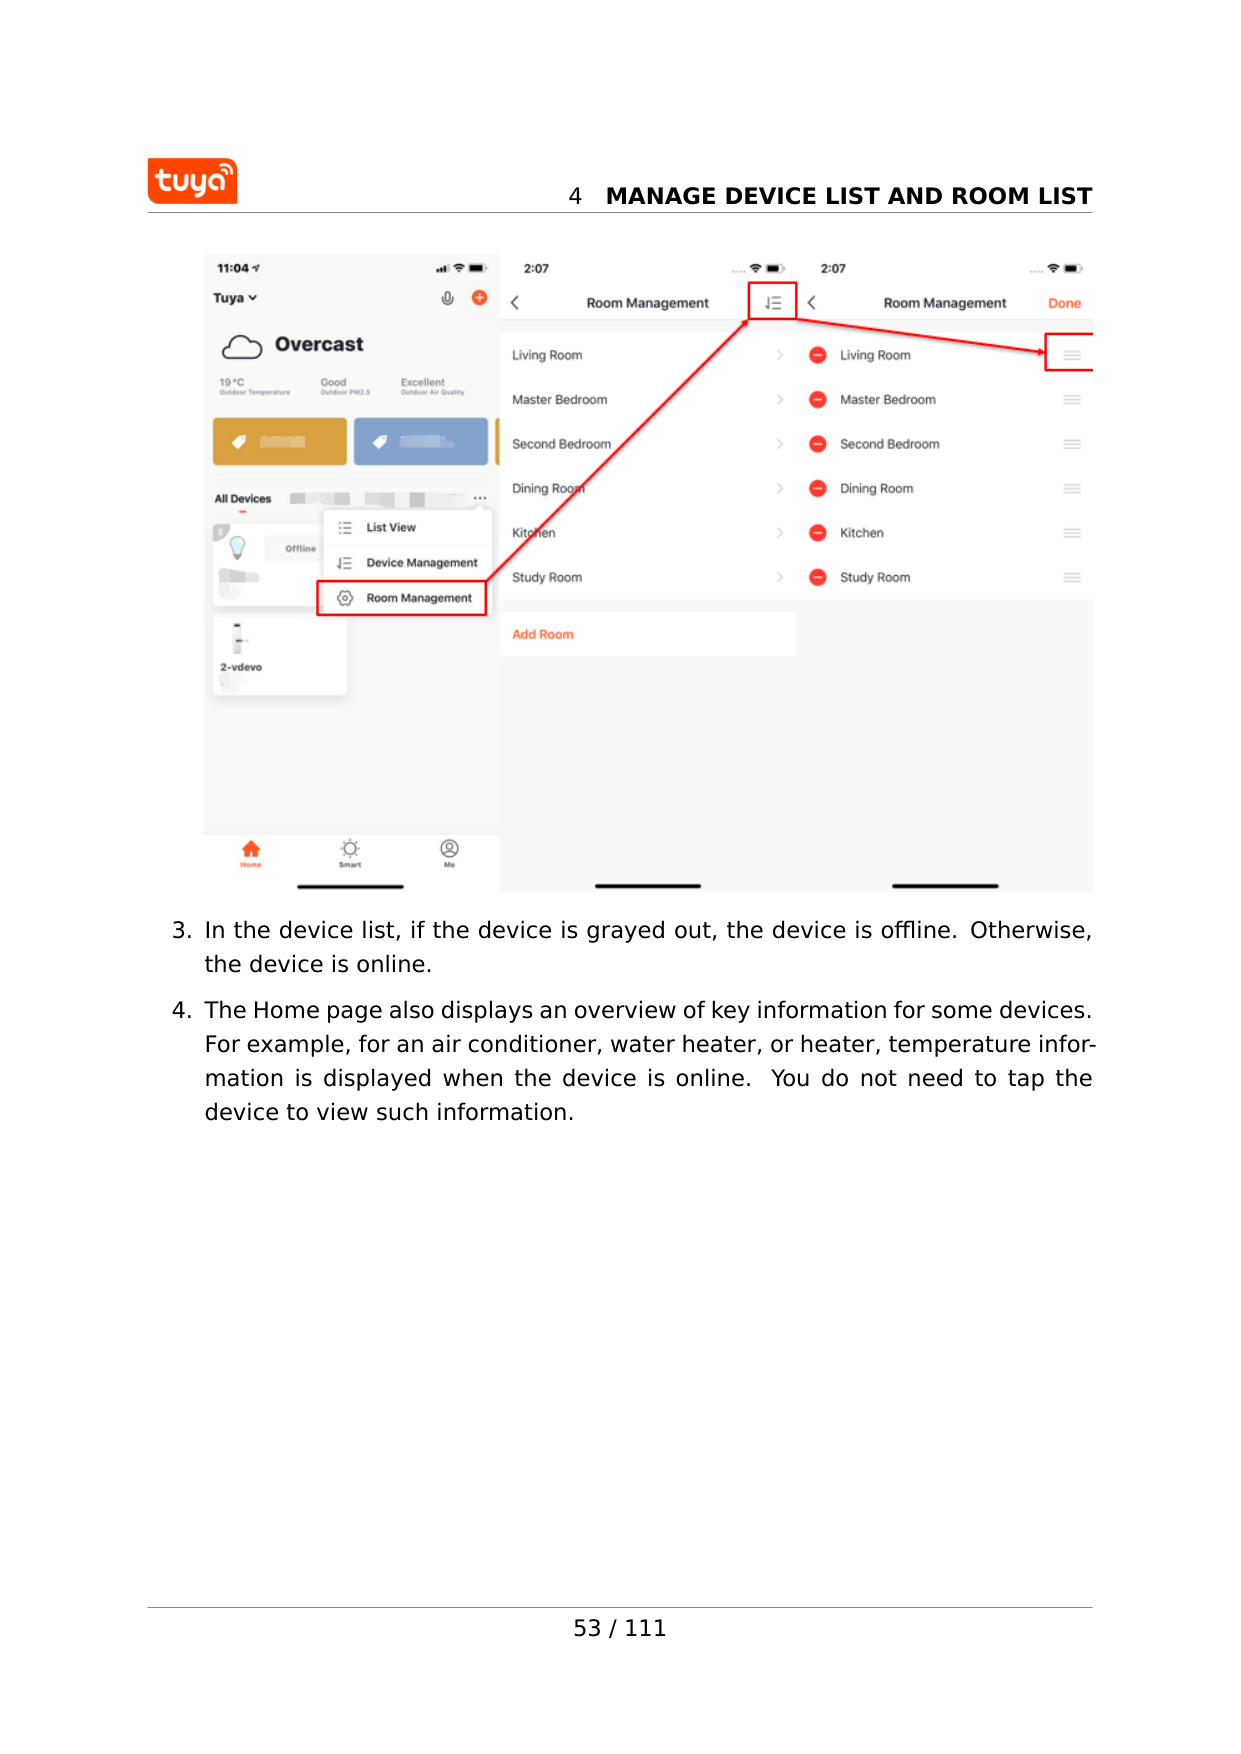
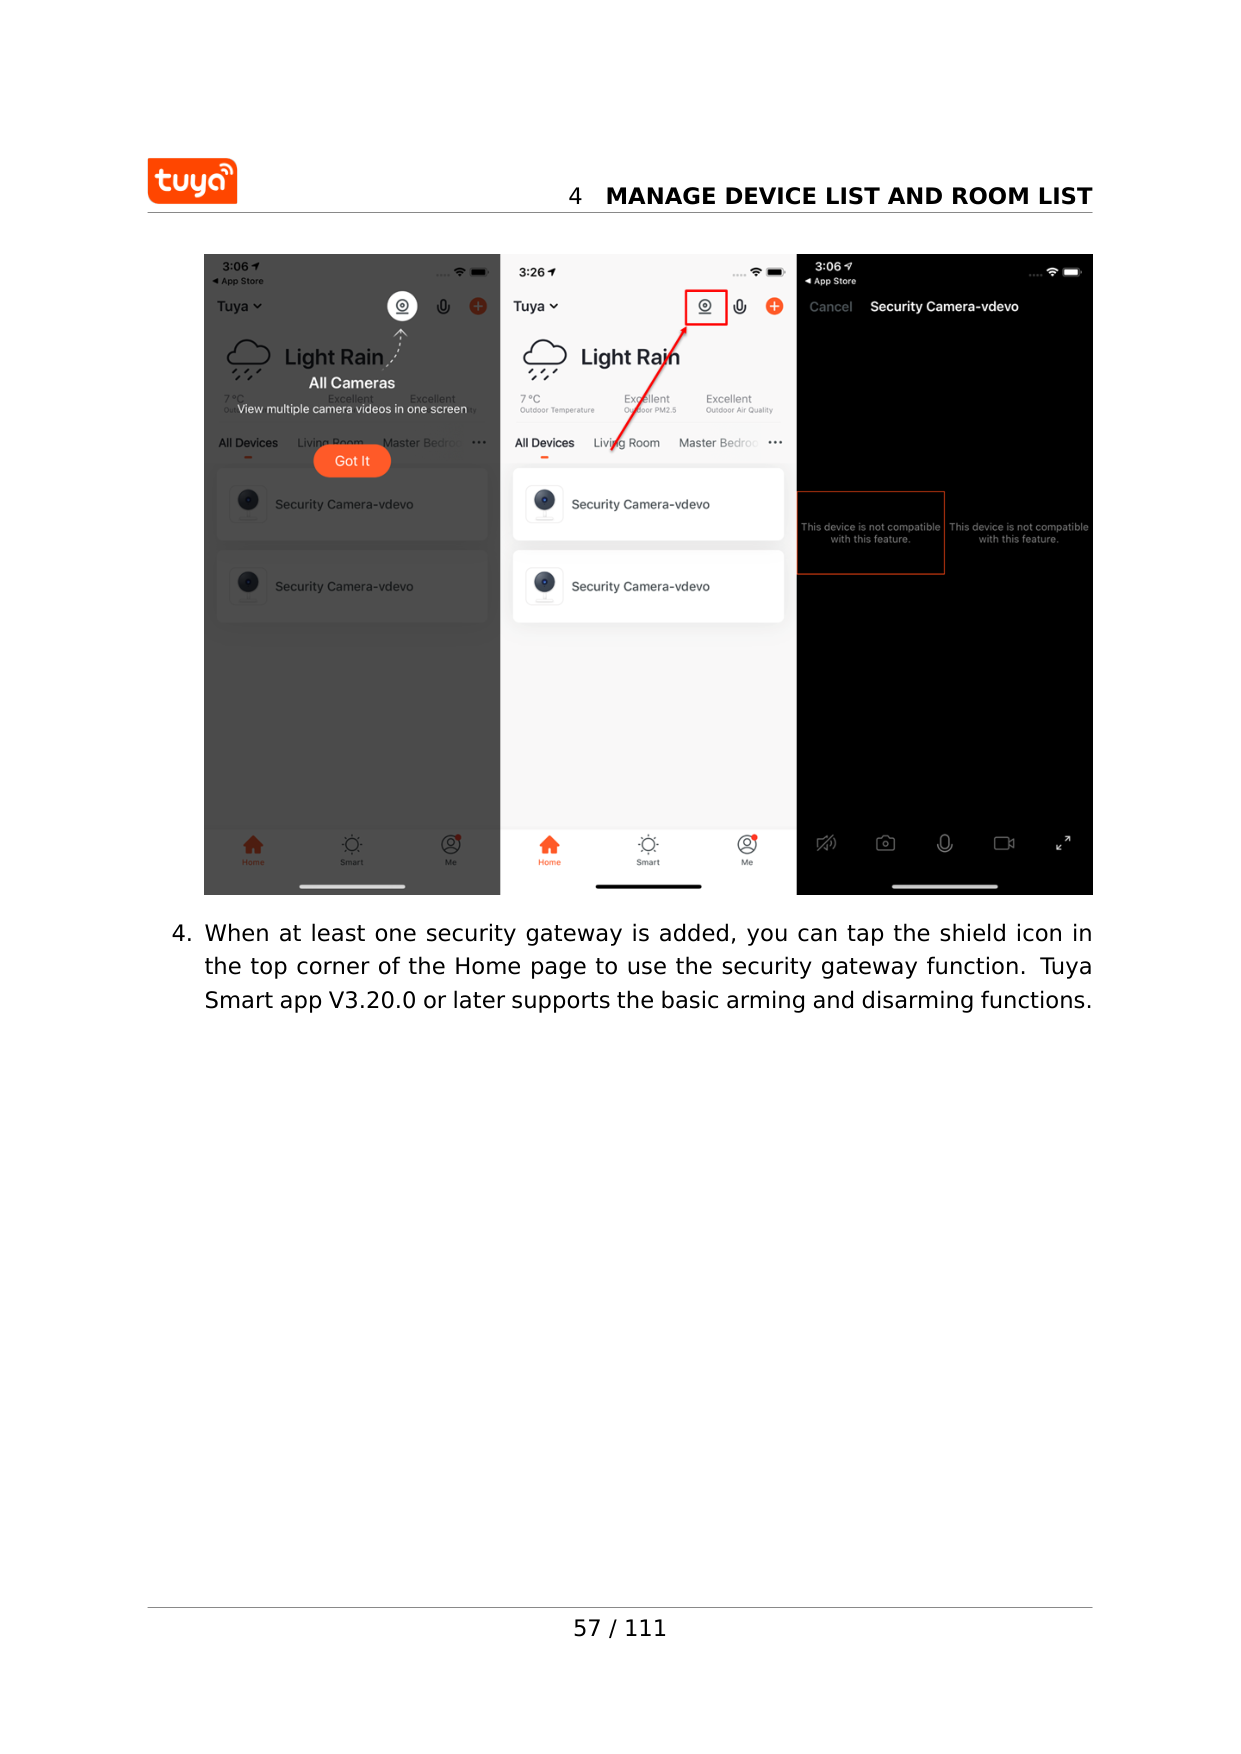
4.3 Quickly use common functions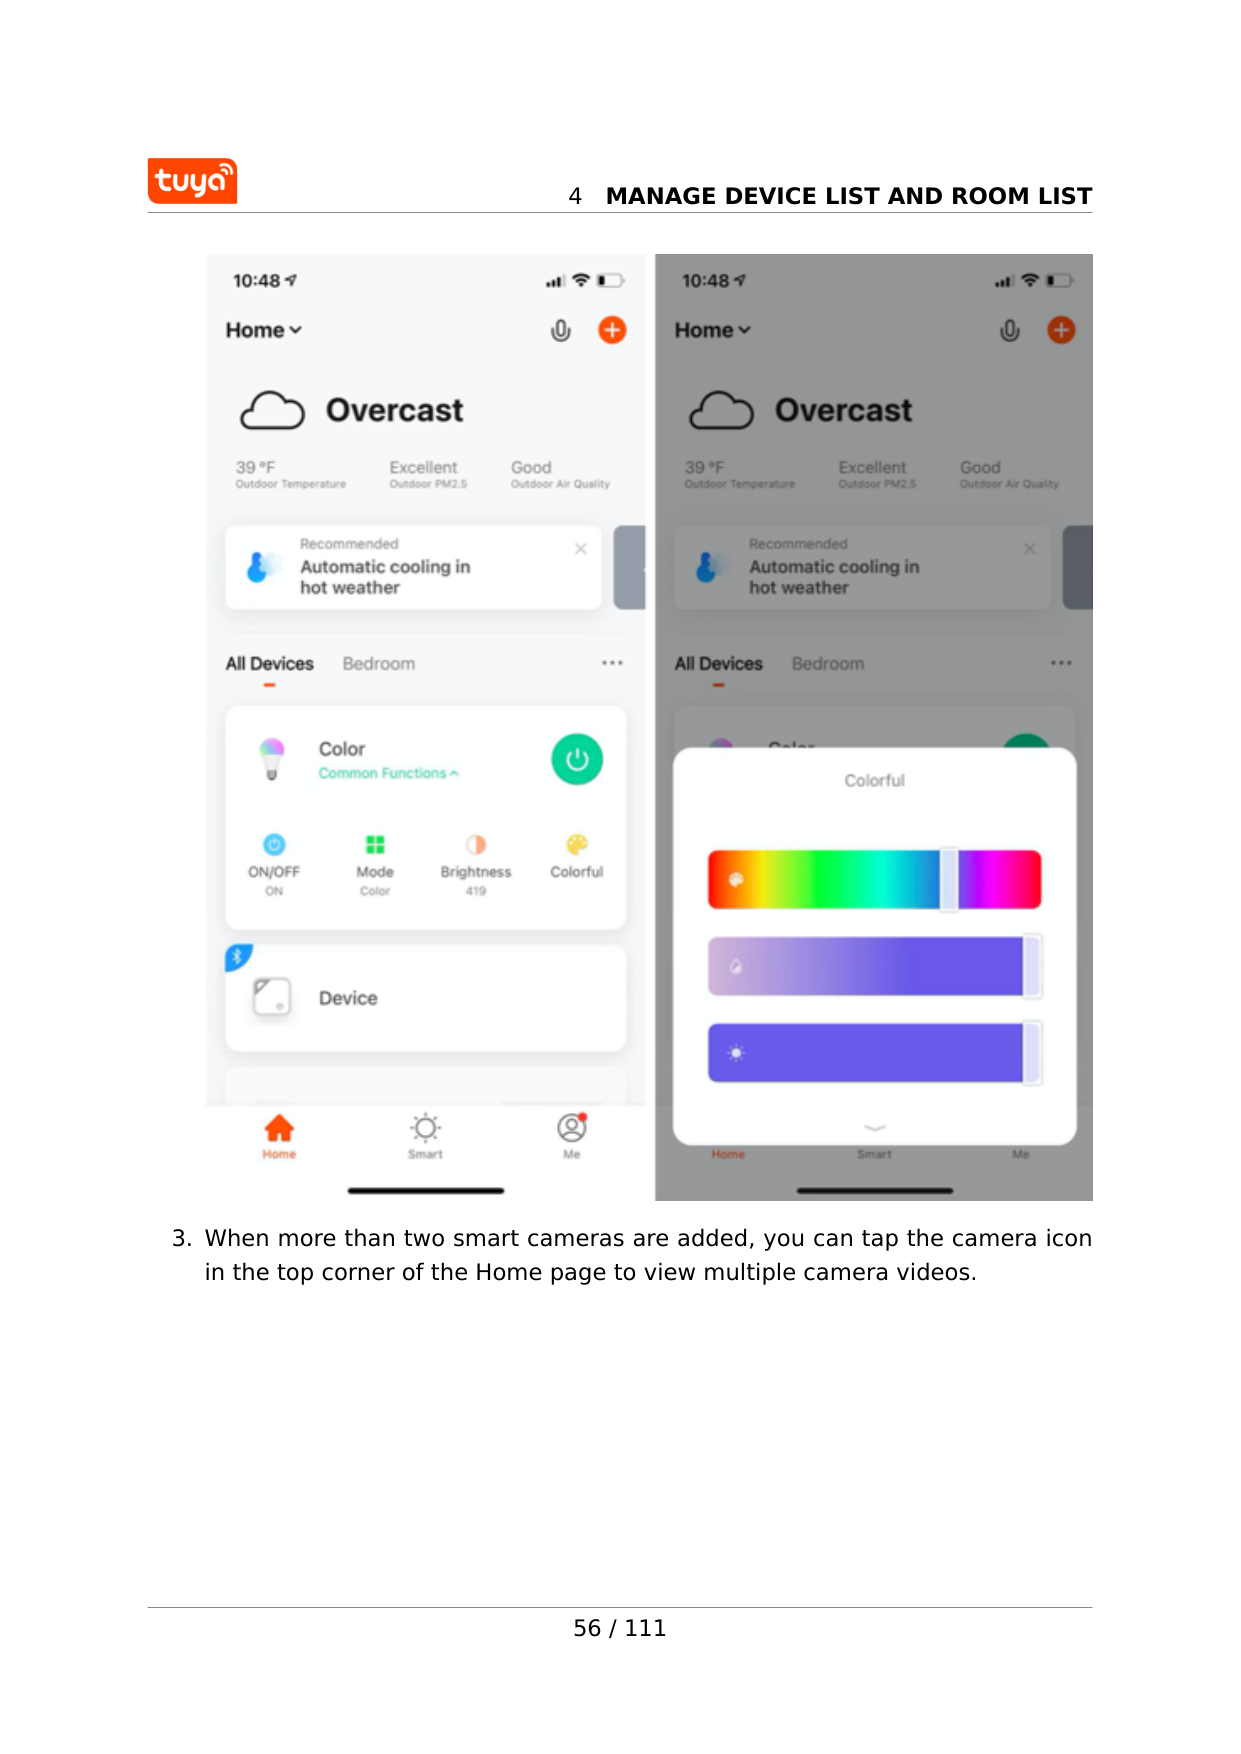
4
Manage Device List And Room List
4
Manage Device List And Room List
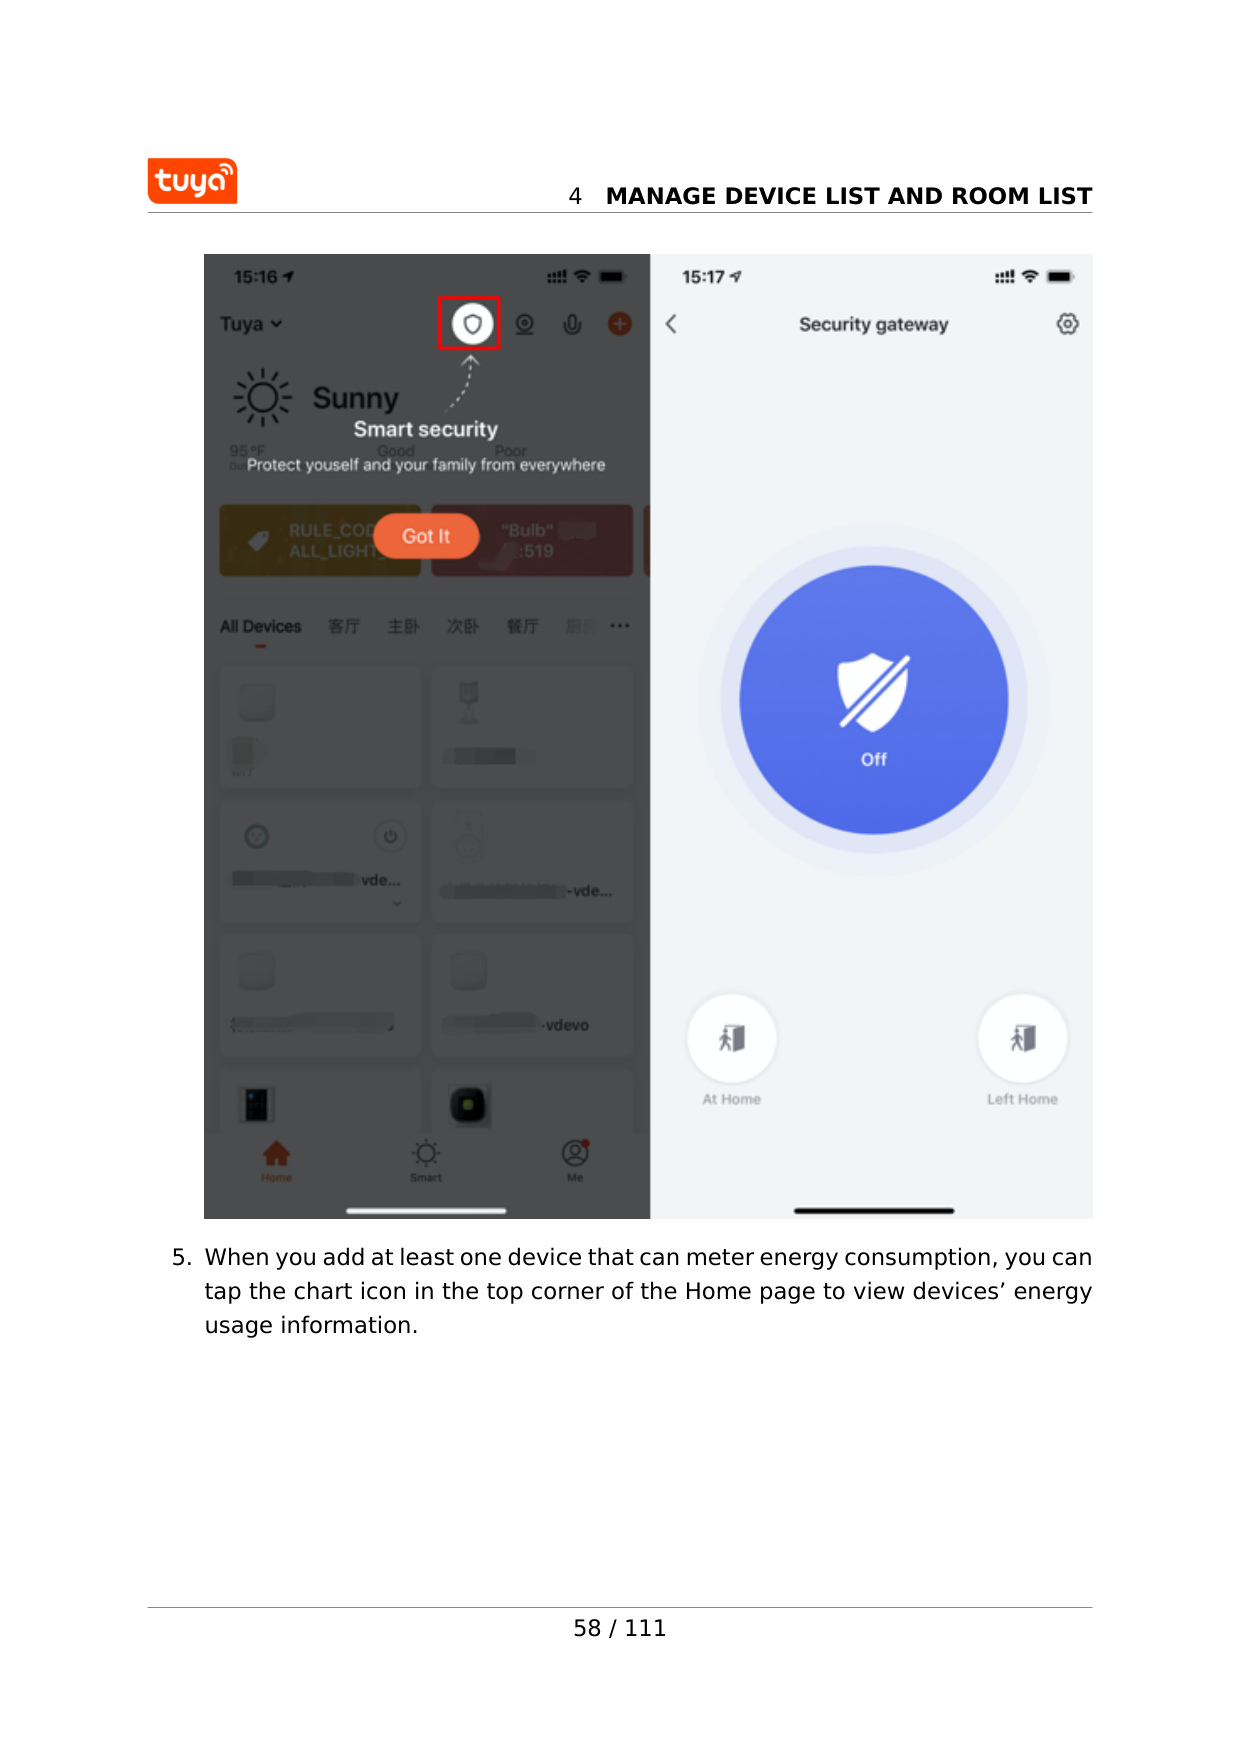
4
Manage Device List And Room List
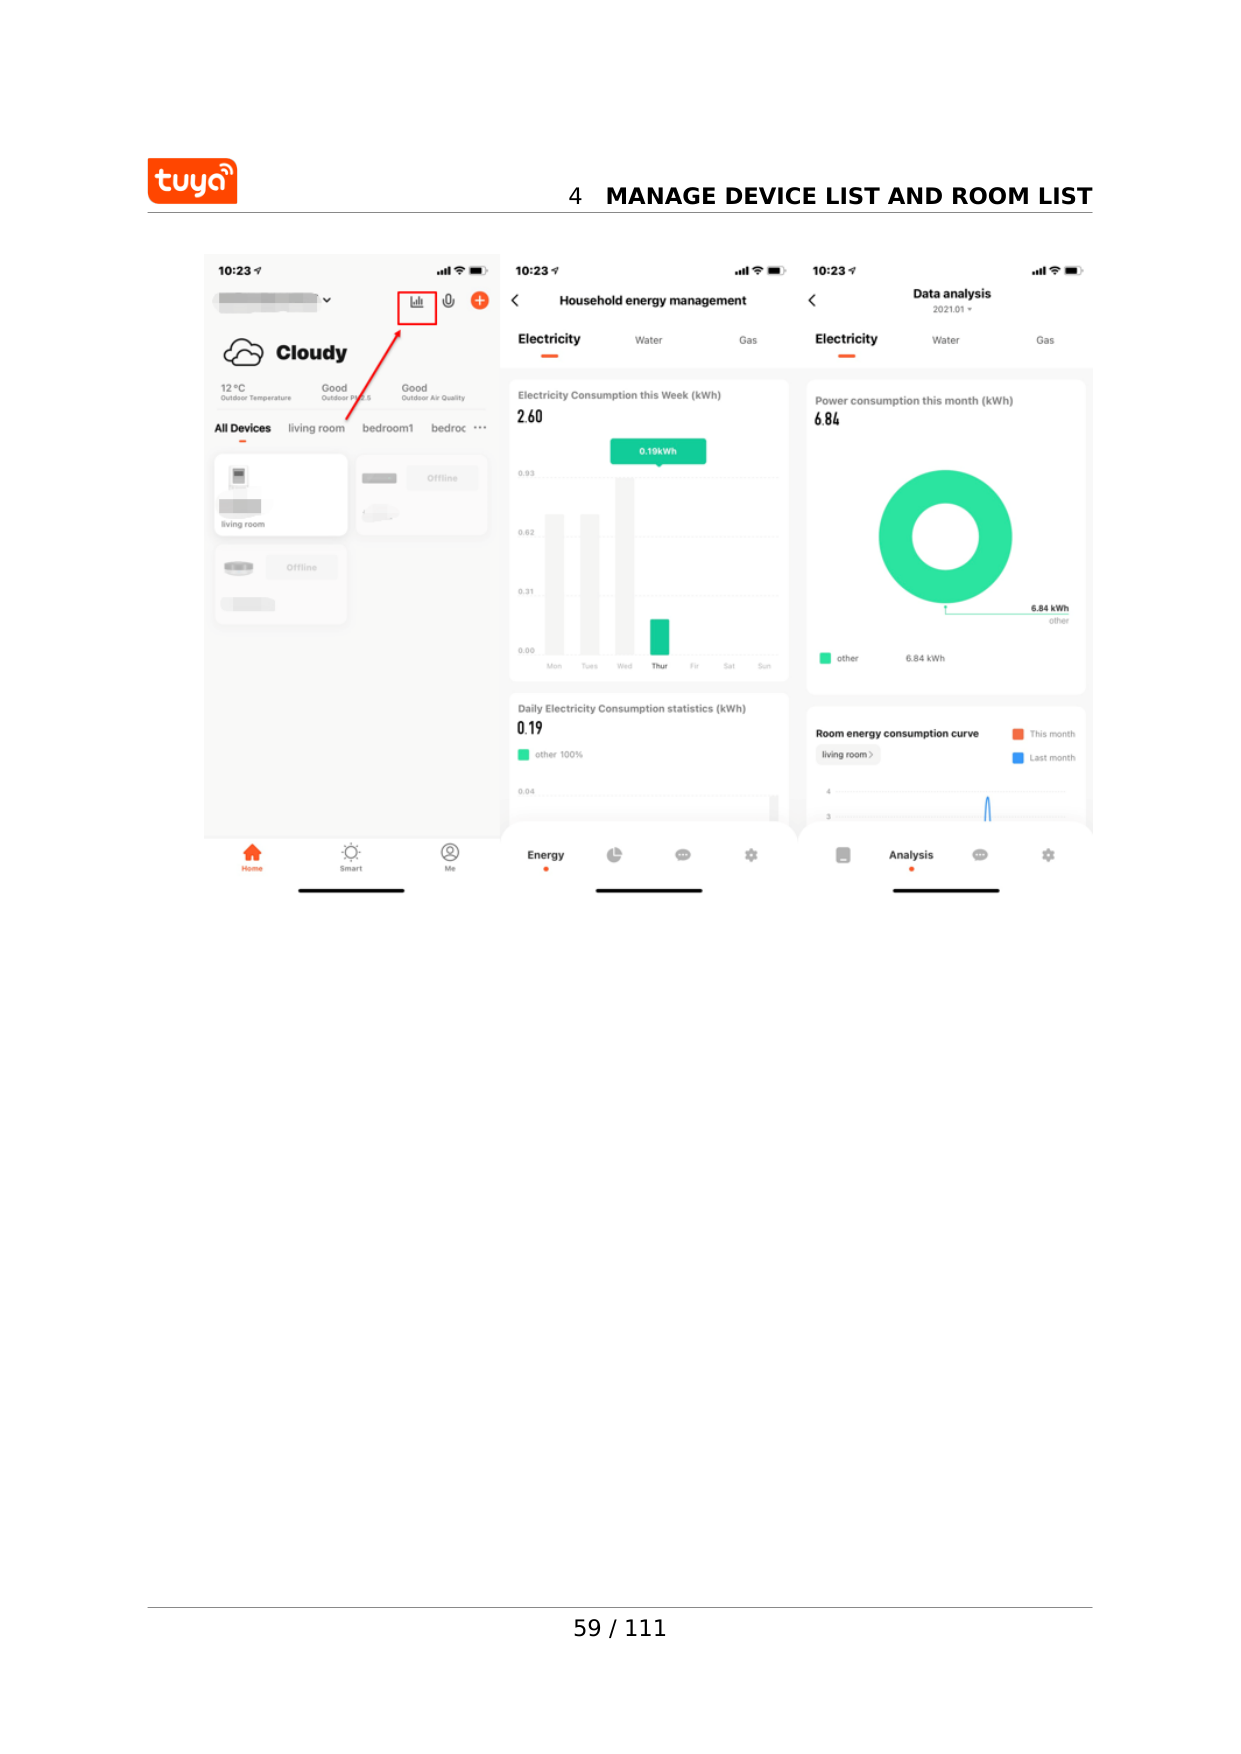
4
Manage Device List And Room List
59 / 111
5
Control Devices
5 Control devices 5.1 Use control panels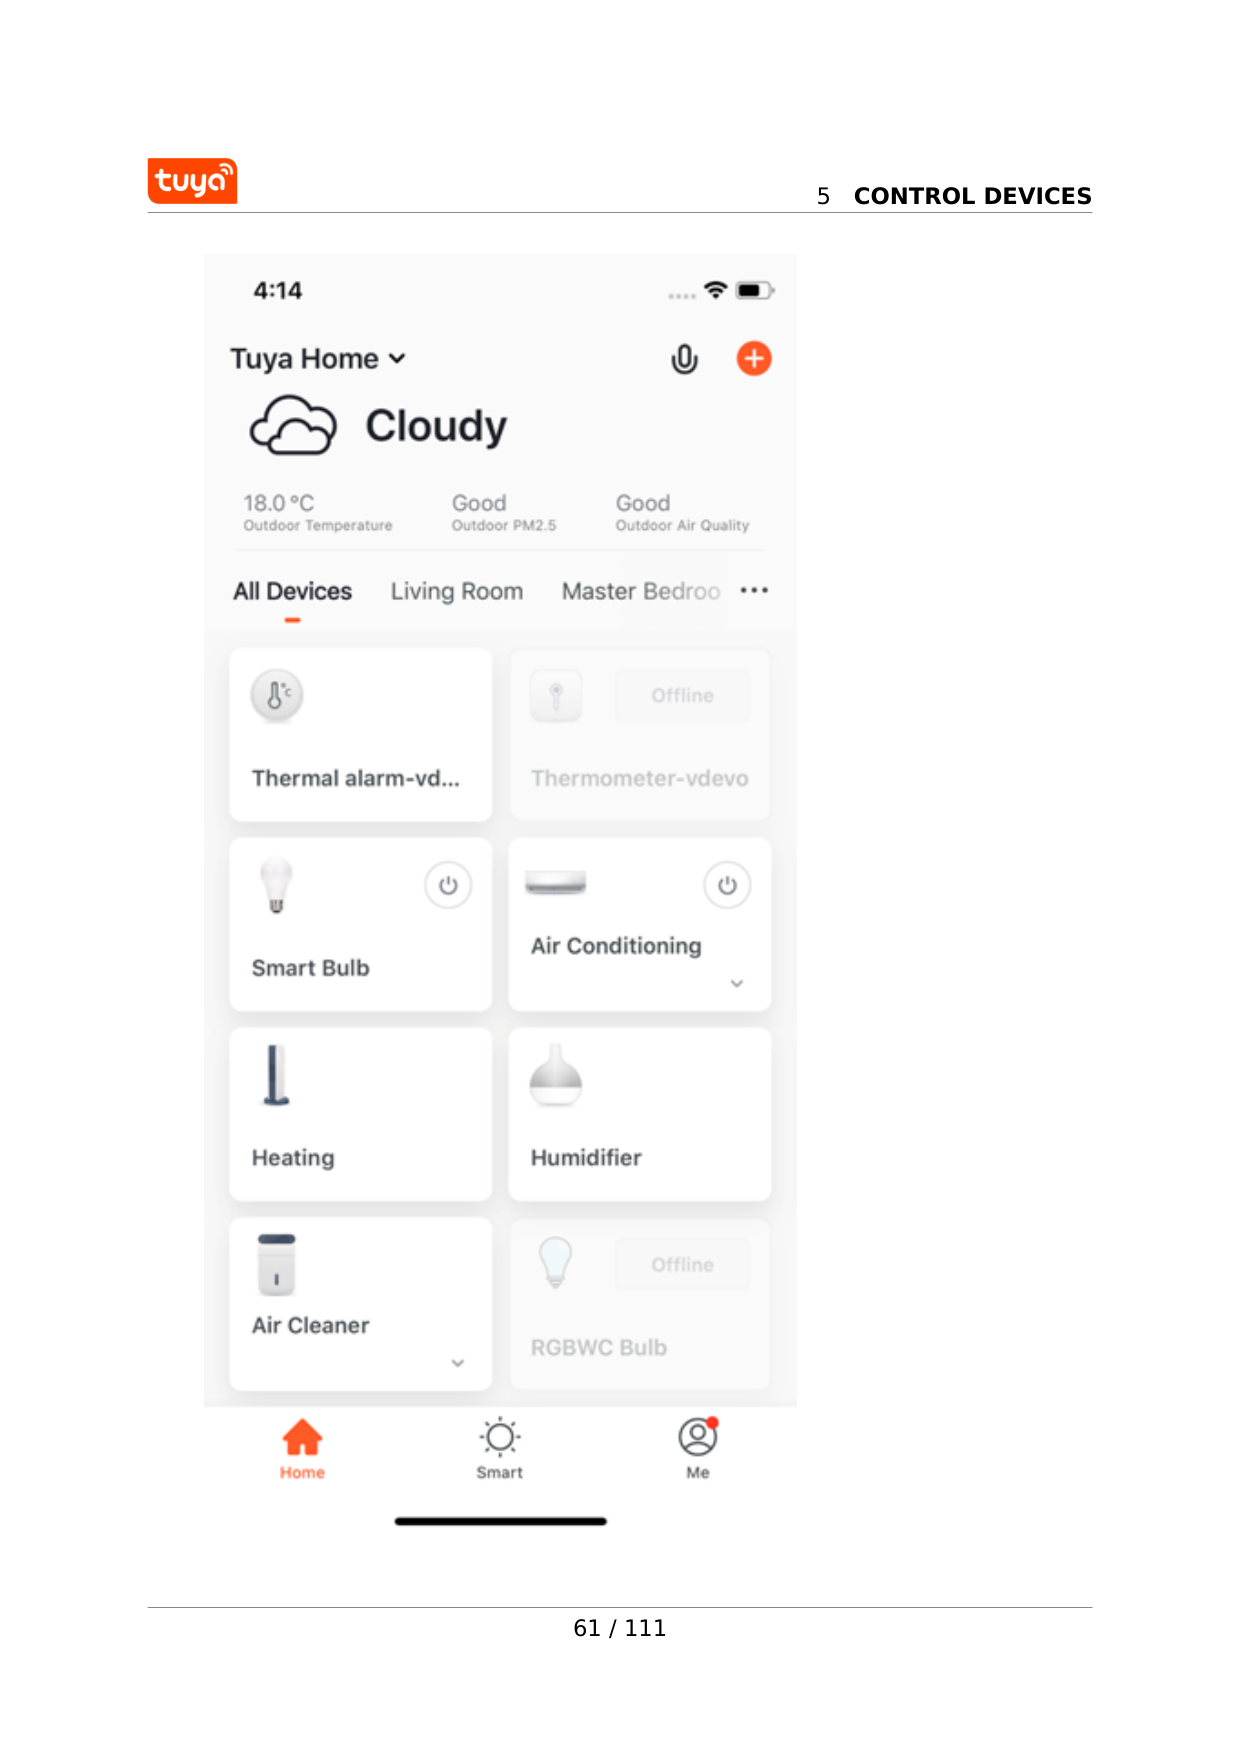
5
Control Devices
61 / 111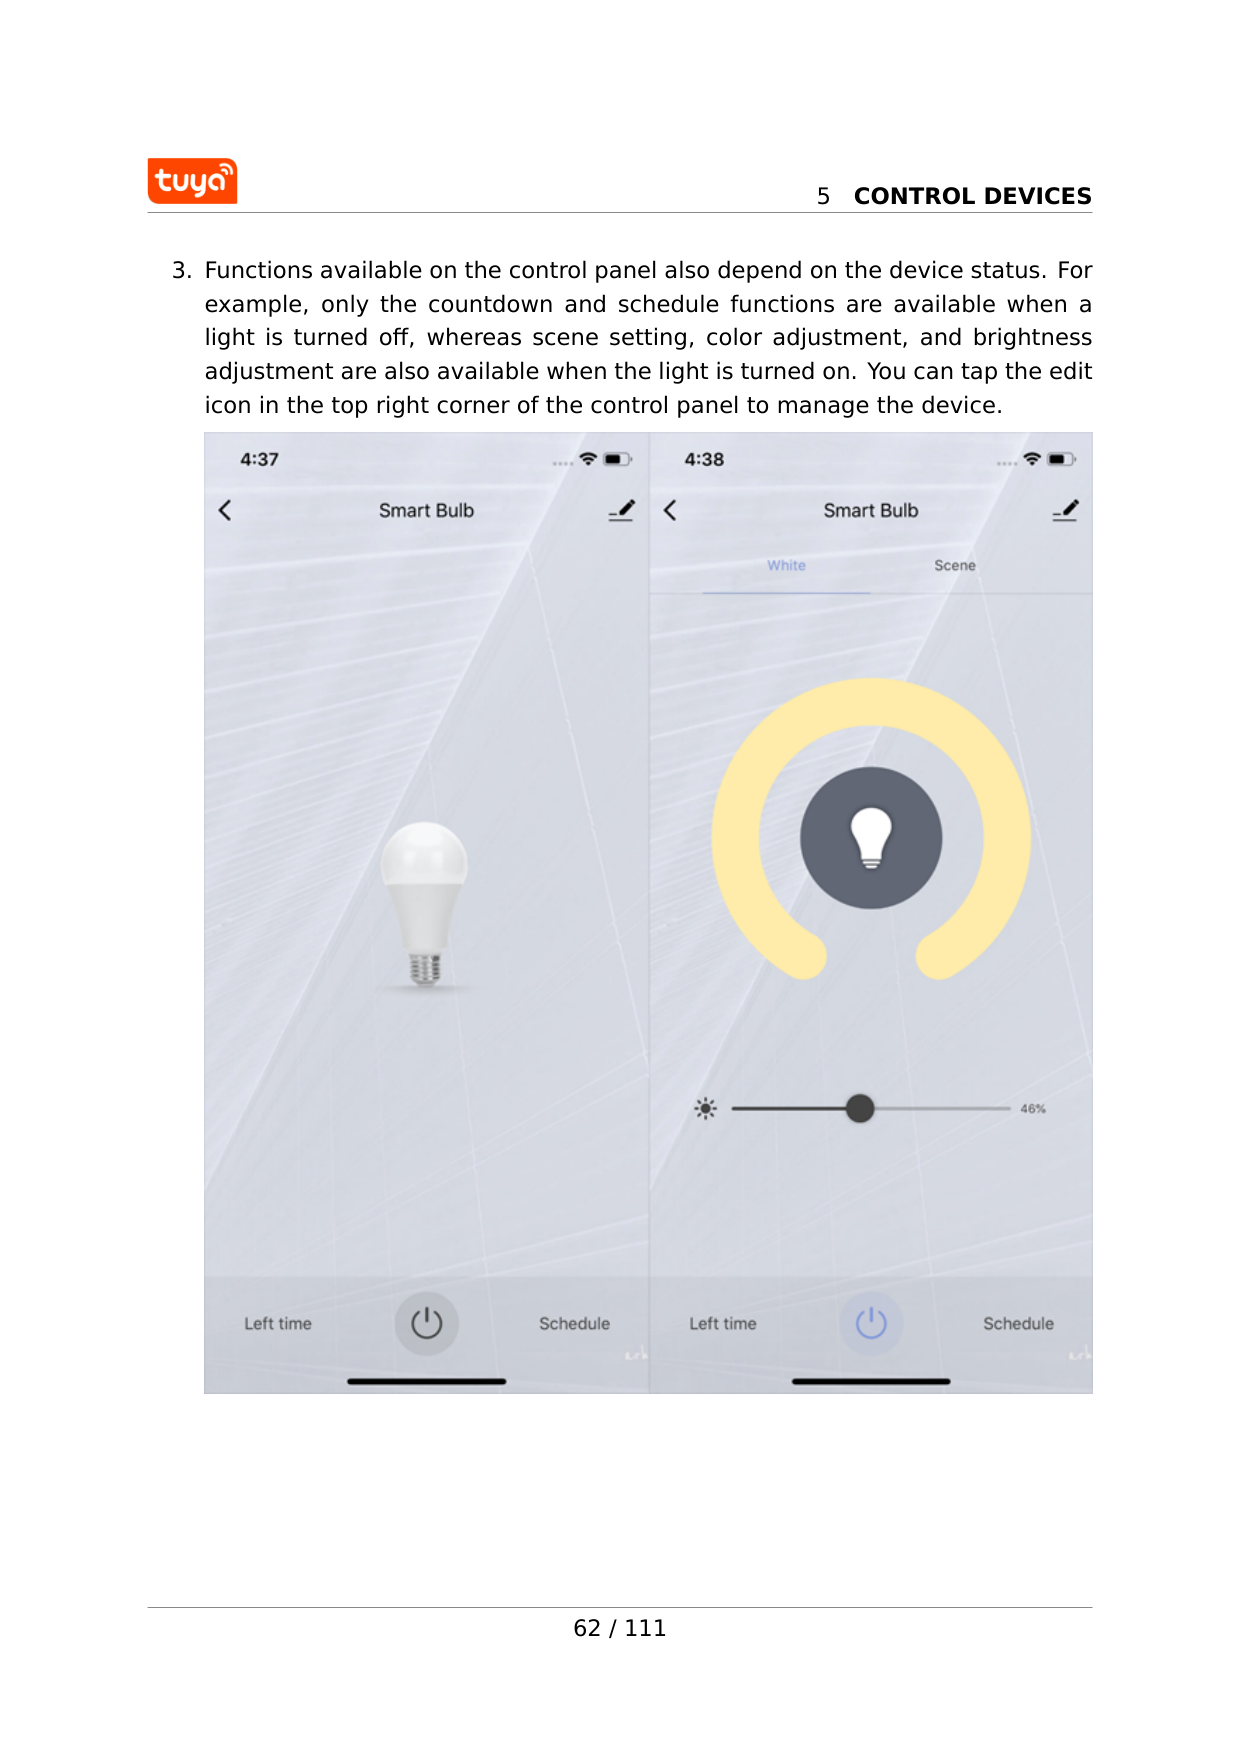
5
Control Devices
5
Control Devices
5.2 Manage devices On the device management page, you can manage the device settings and infor- mation.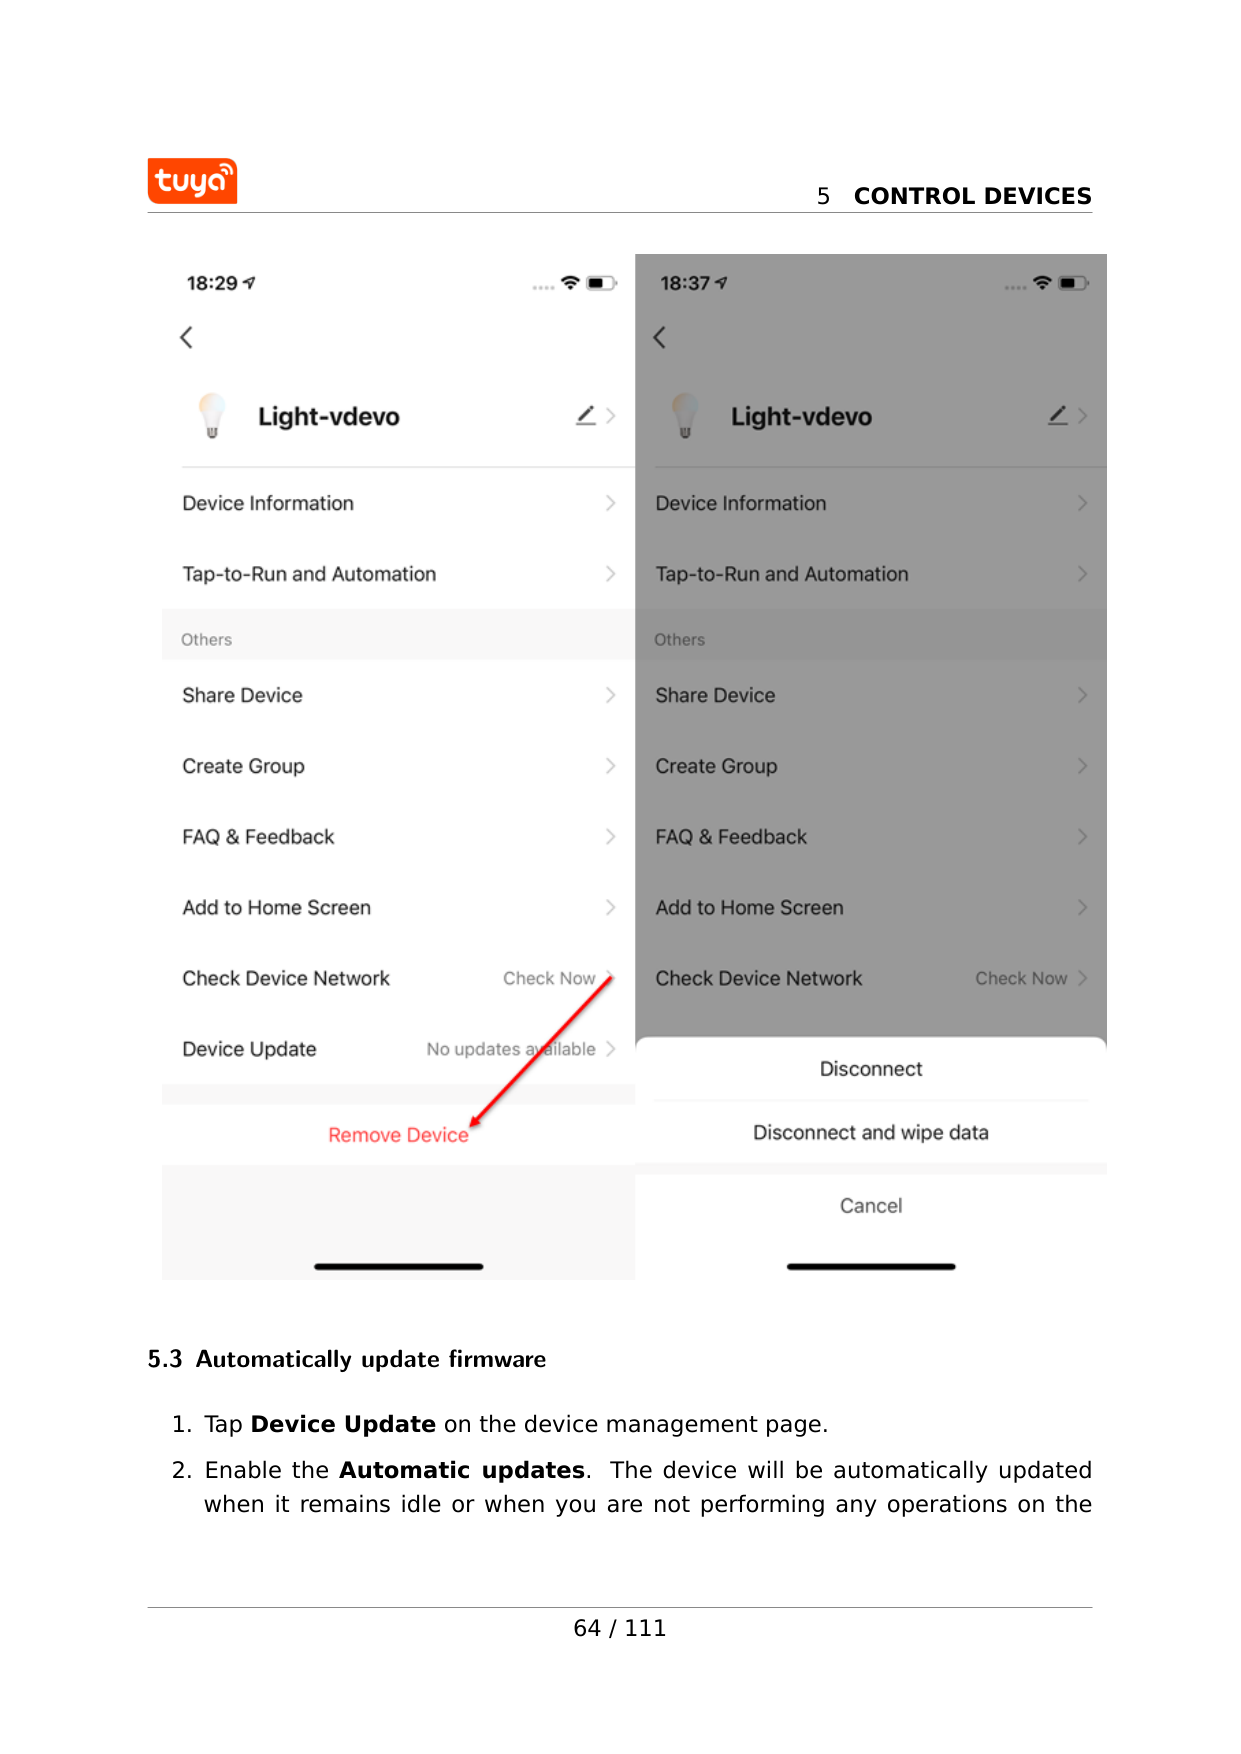
5
Control Devices
5.3 Automatically update firmware
5
Control Devices
device. 1  5.4 Network Switching function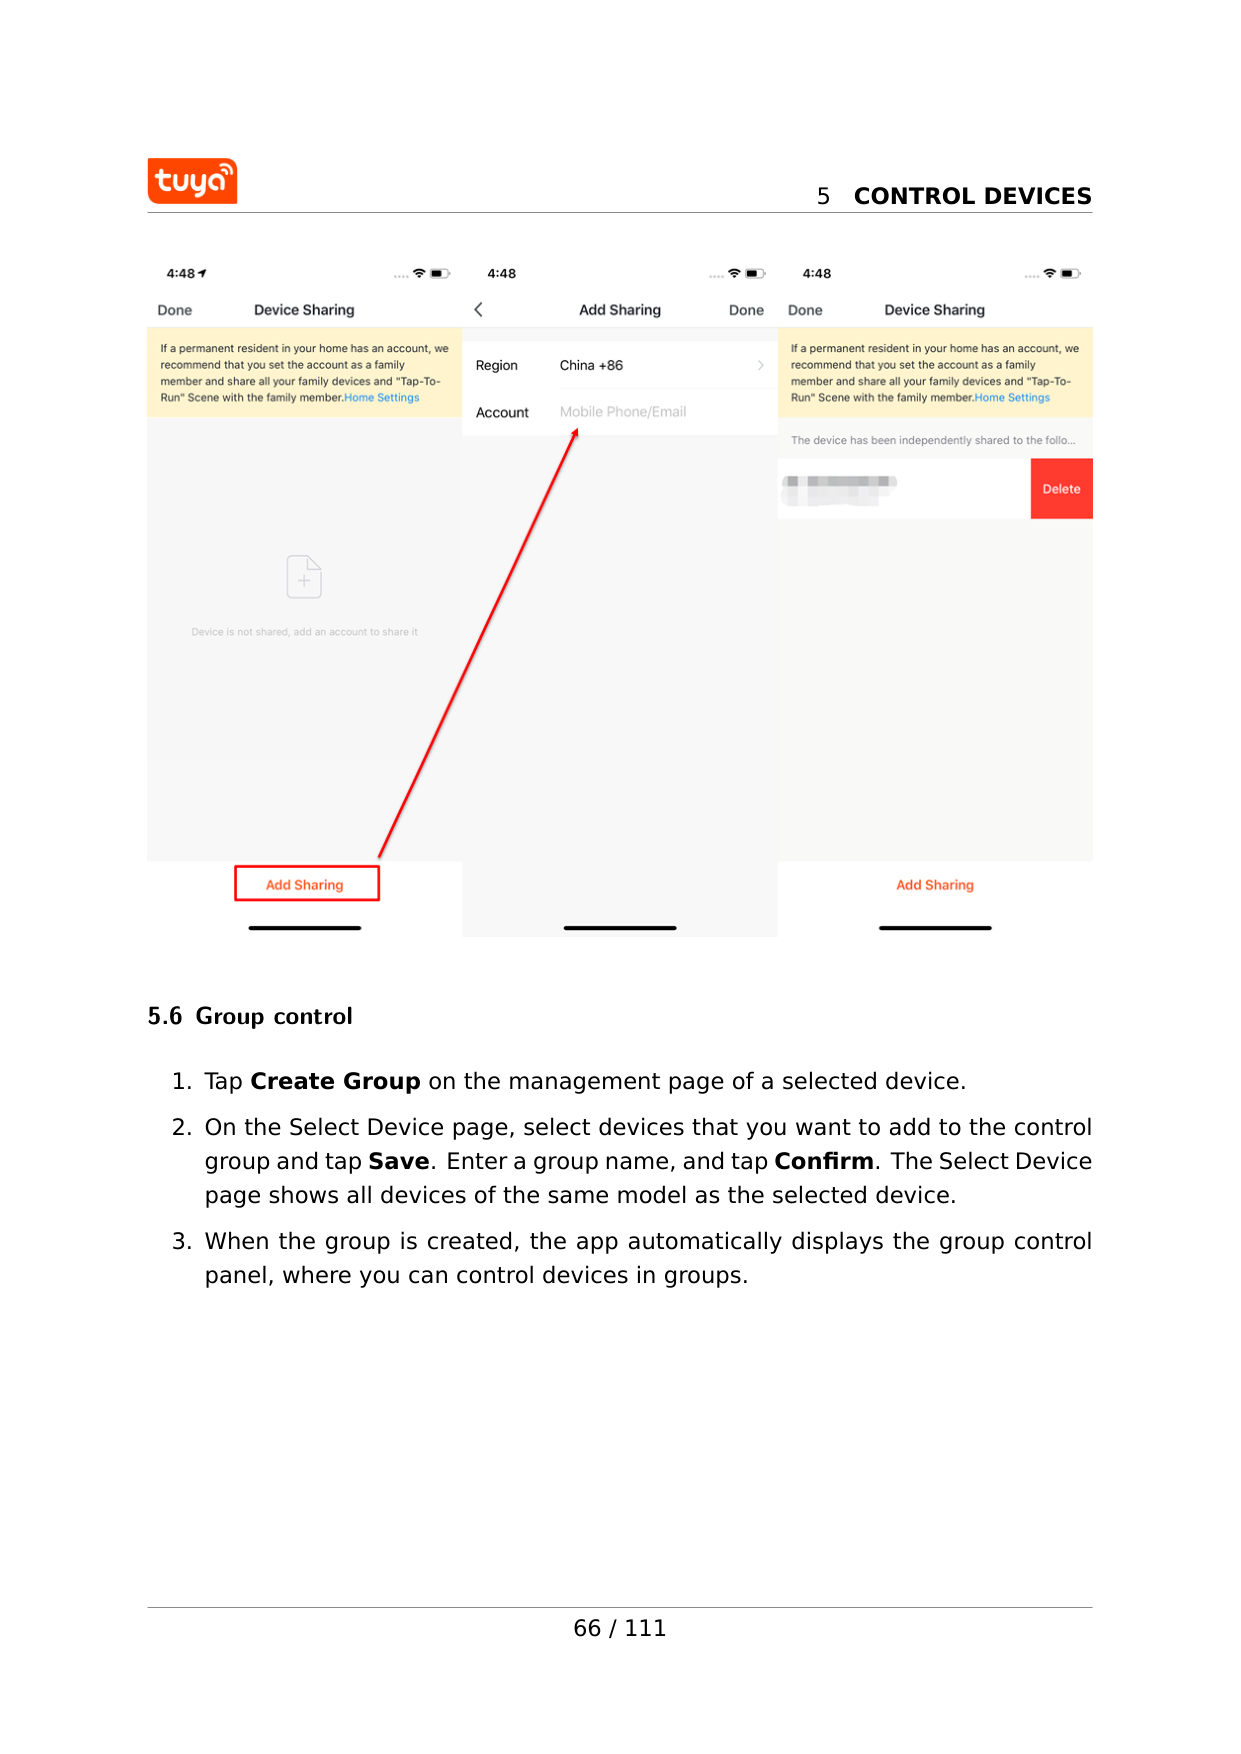
5
Control Devices
5.6 Group control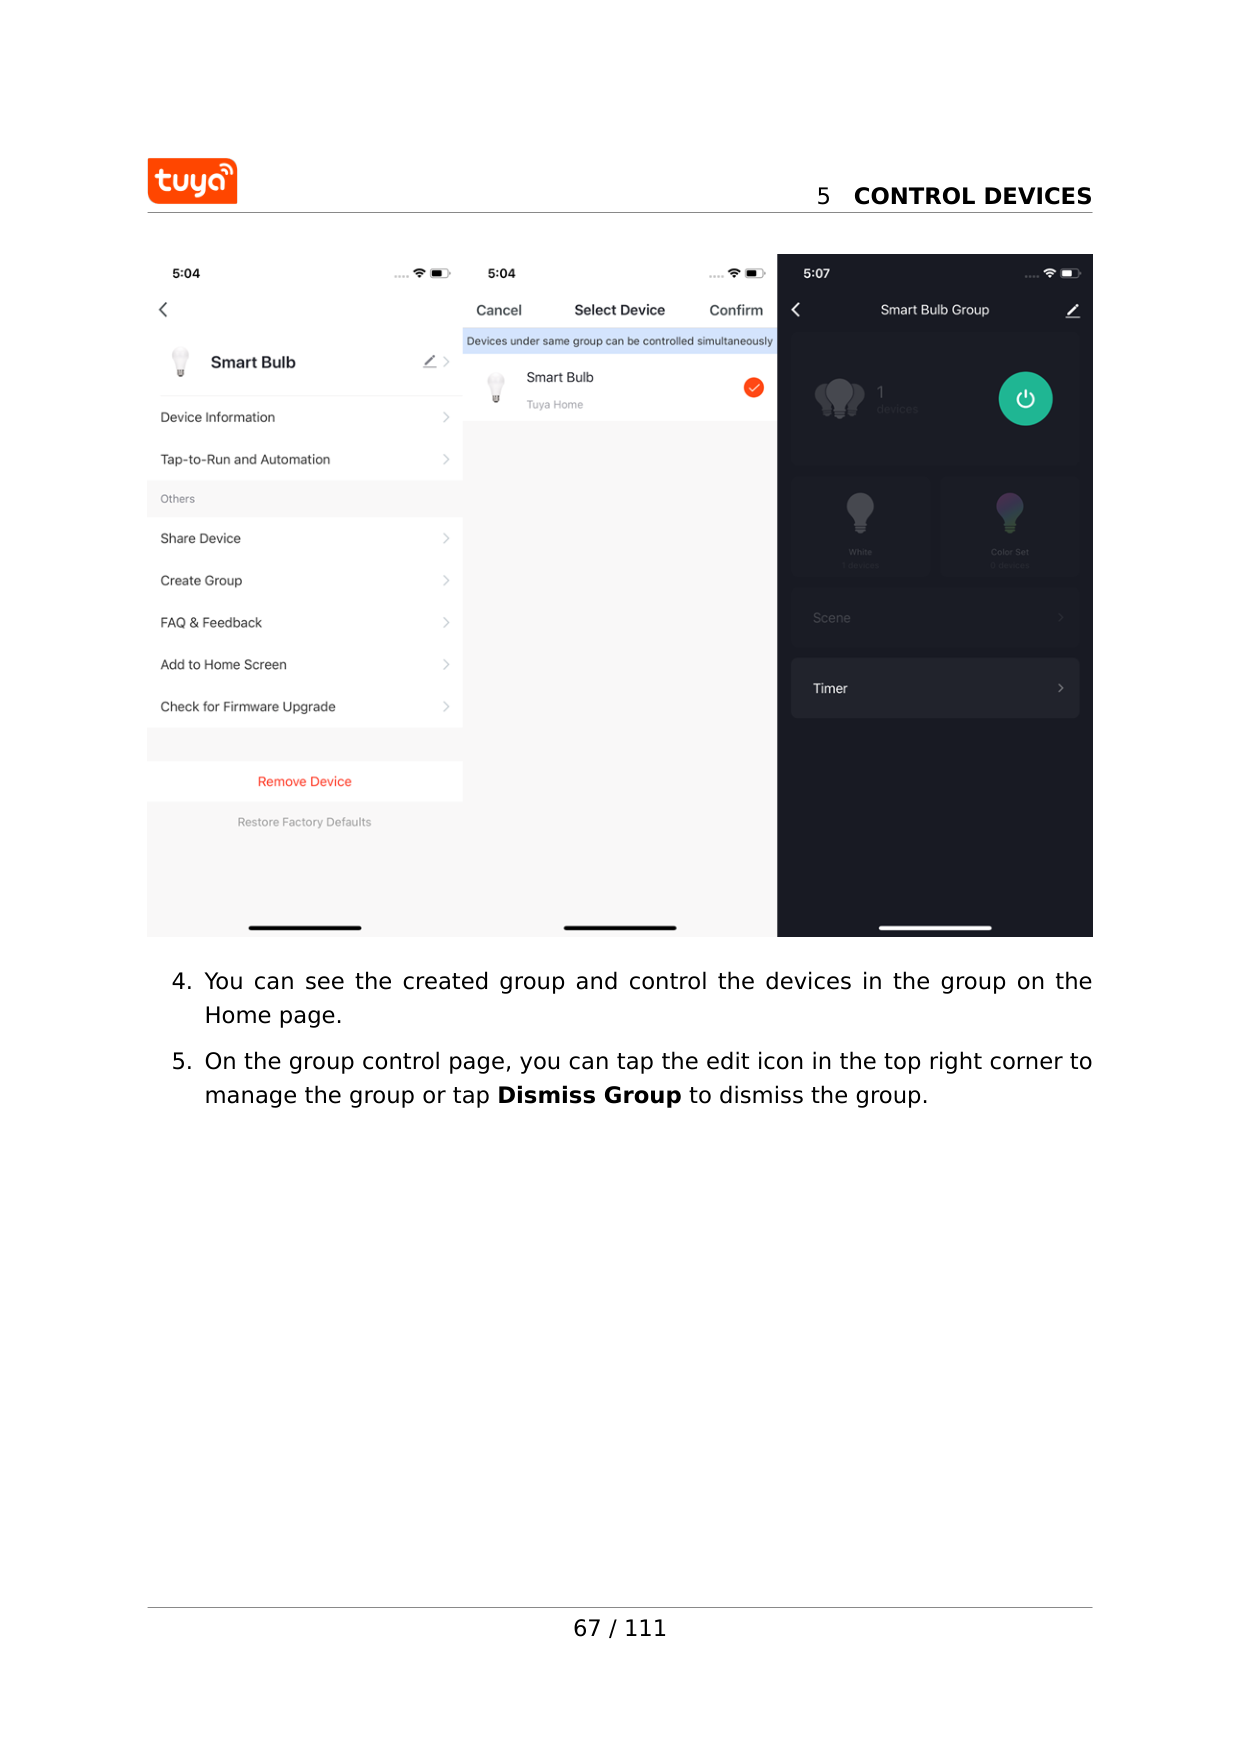
5
Control Devices
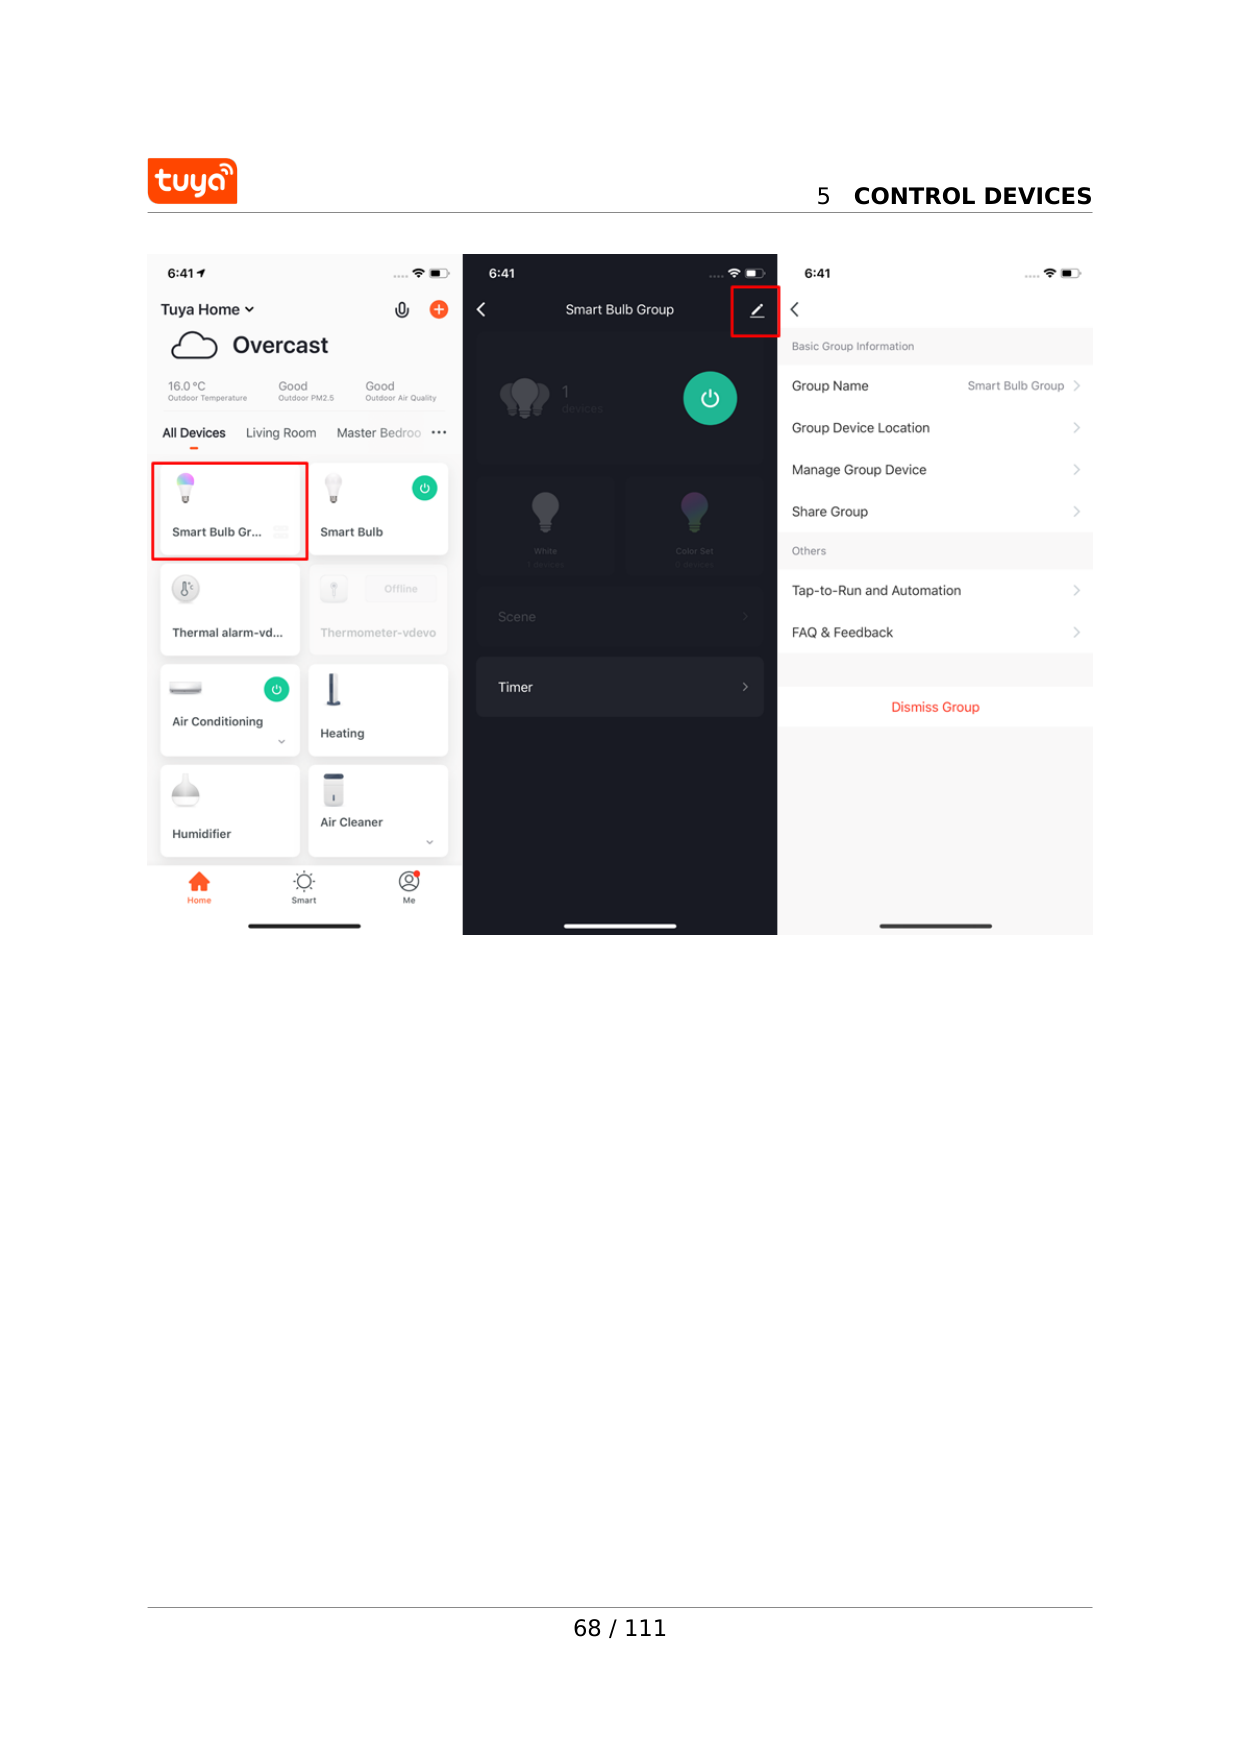
5
Control Devices
68 / 111
6
Automation And Tap-To-Run
6 Automation and tap-to-run 6.1 Automation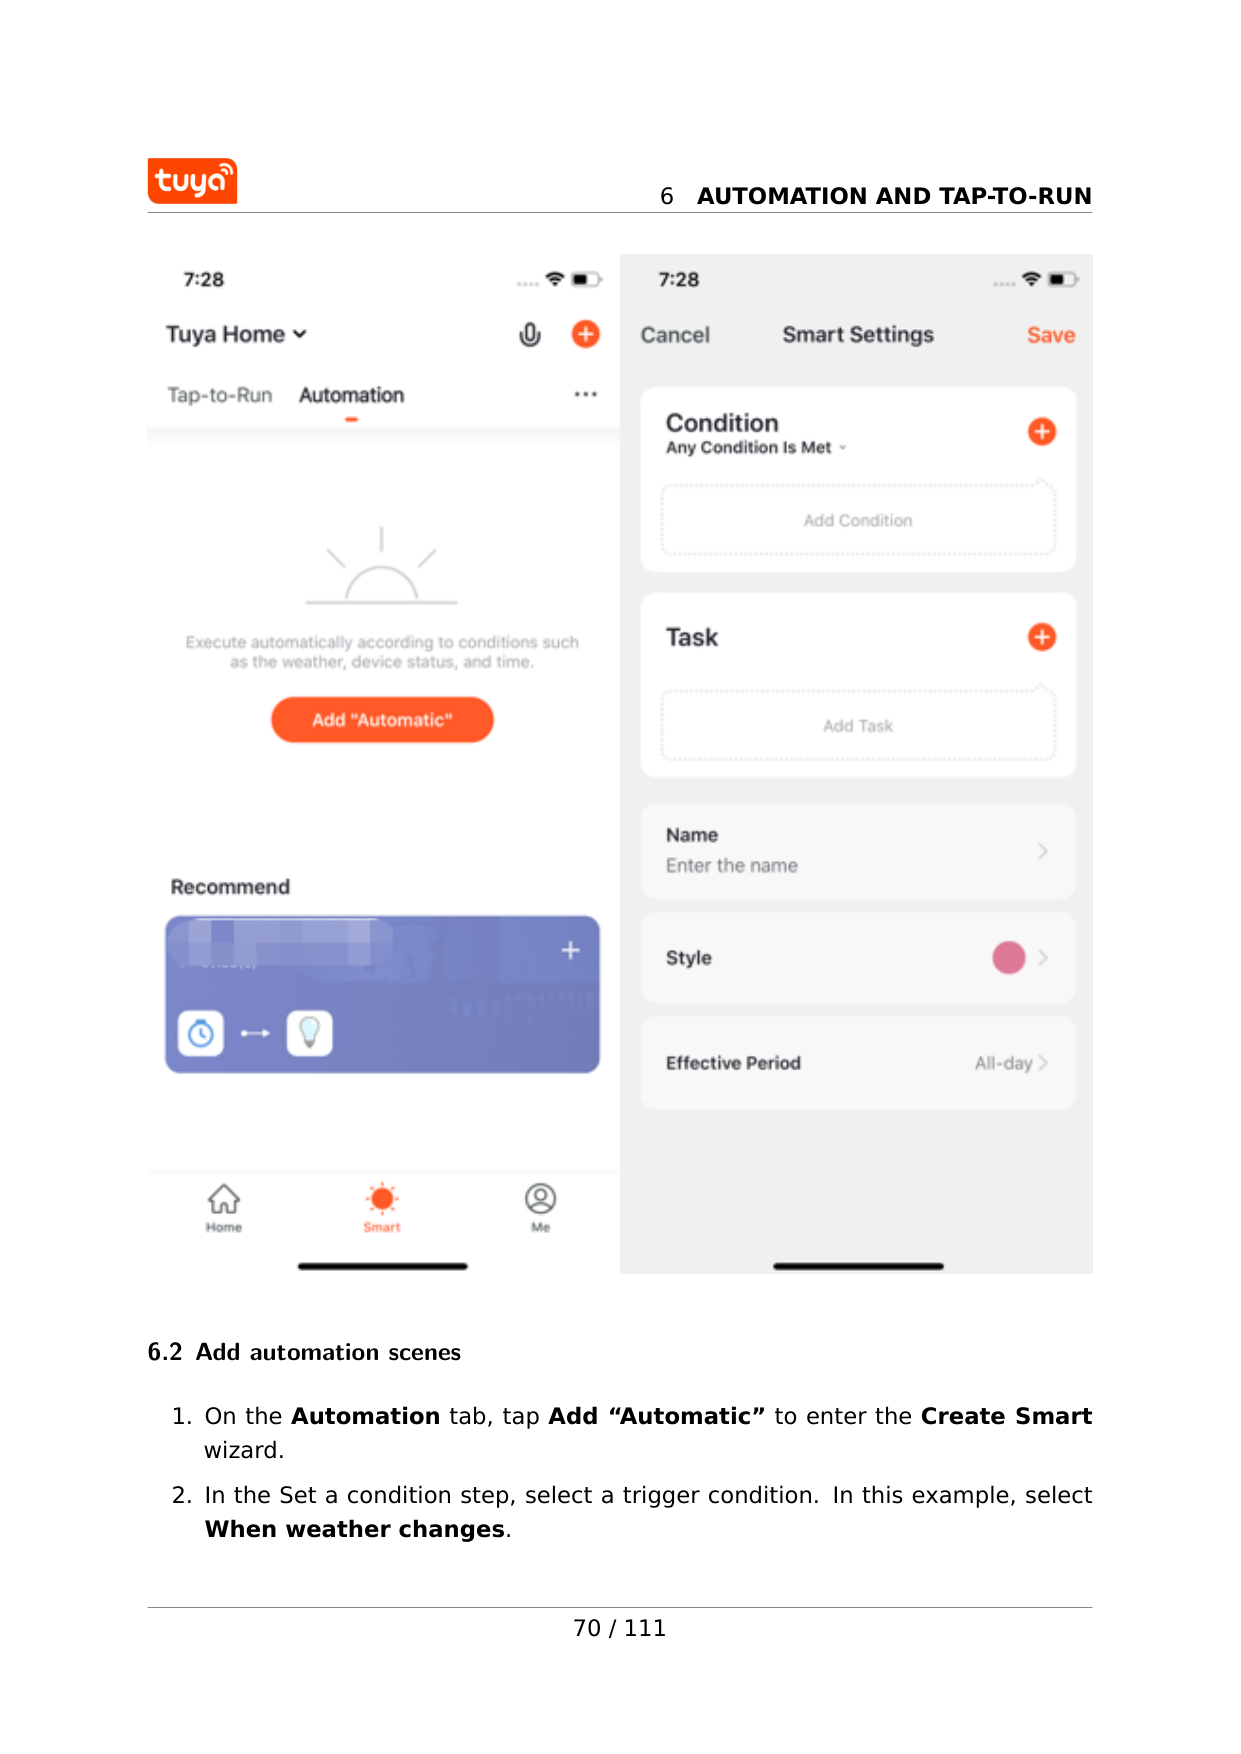
6
Automation And Tap-To-Run
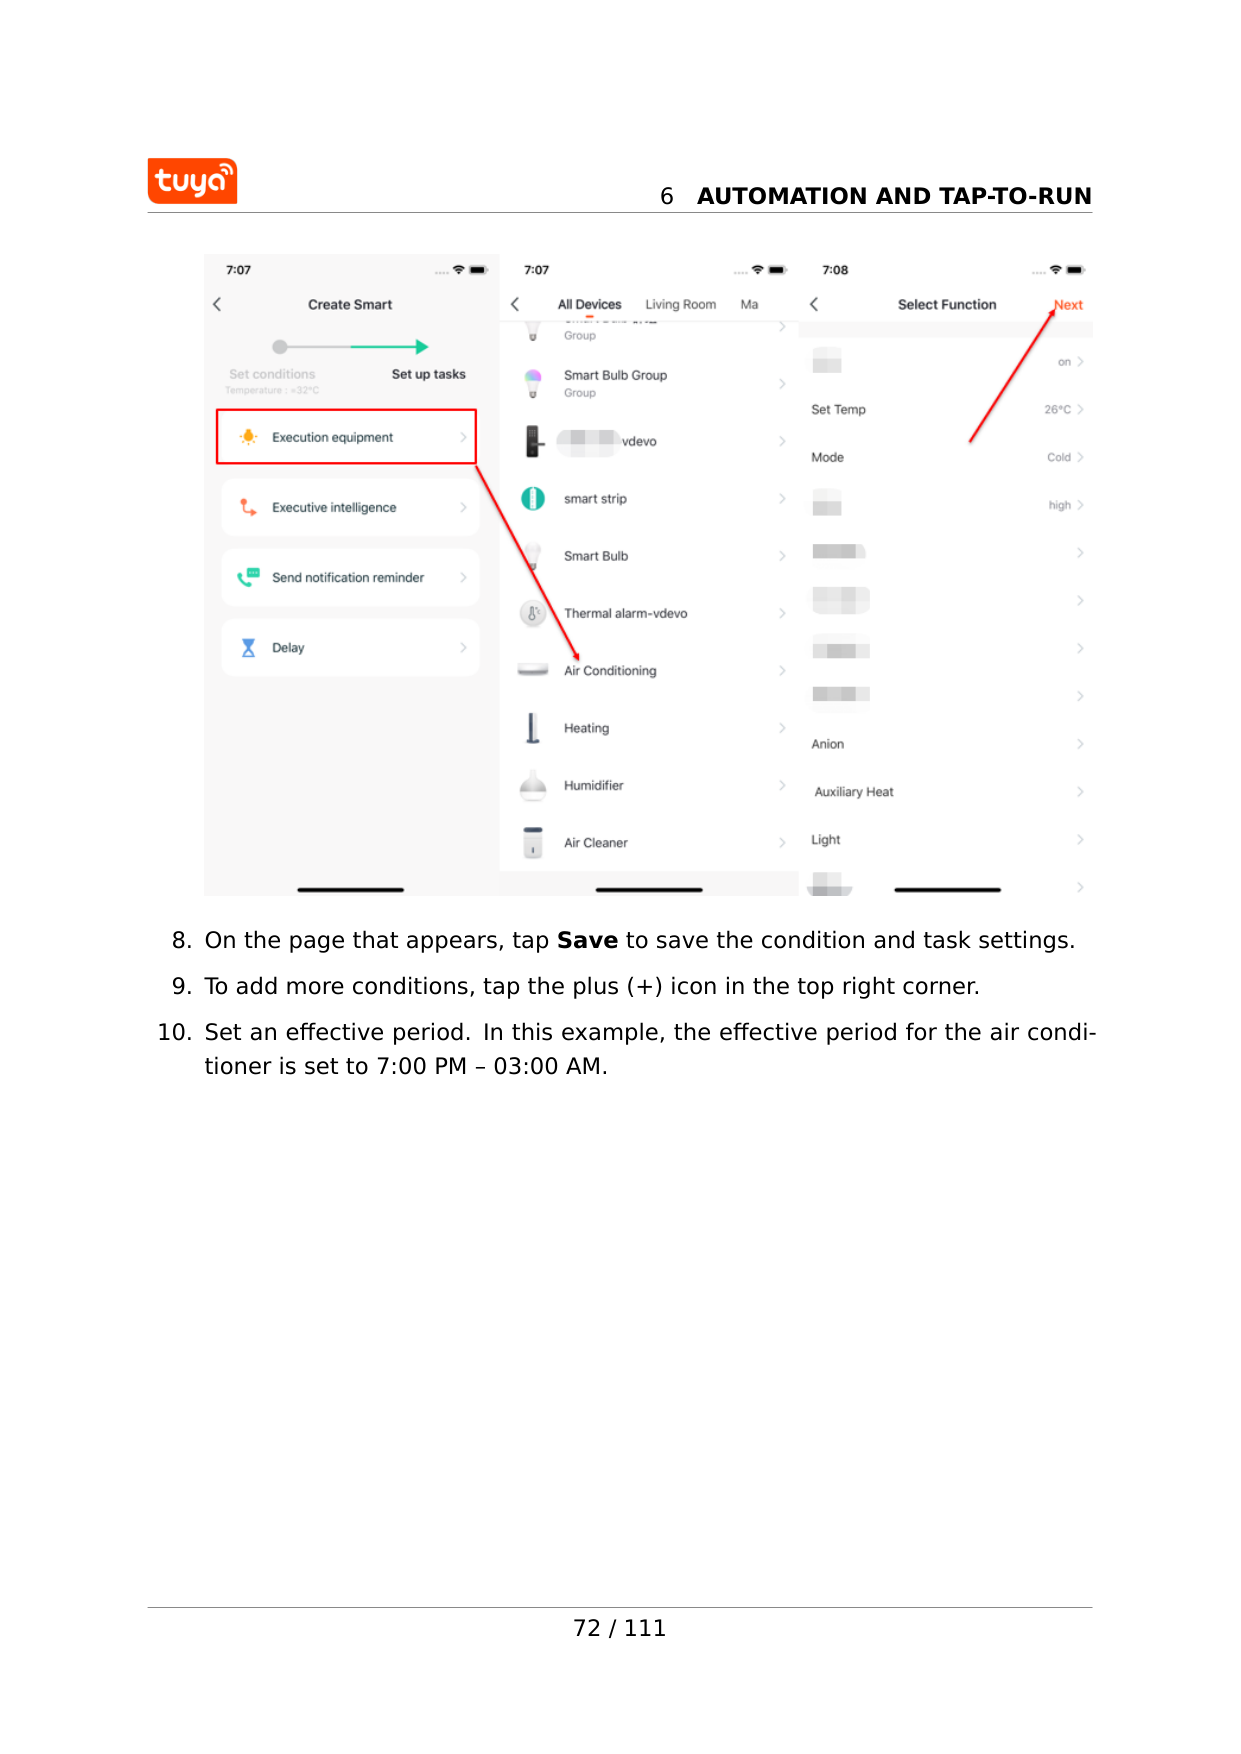
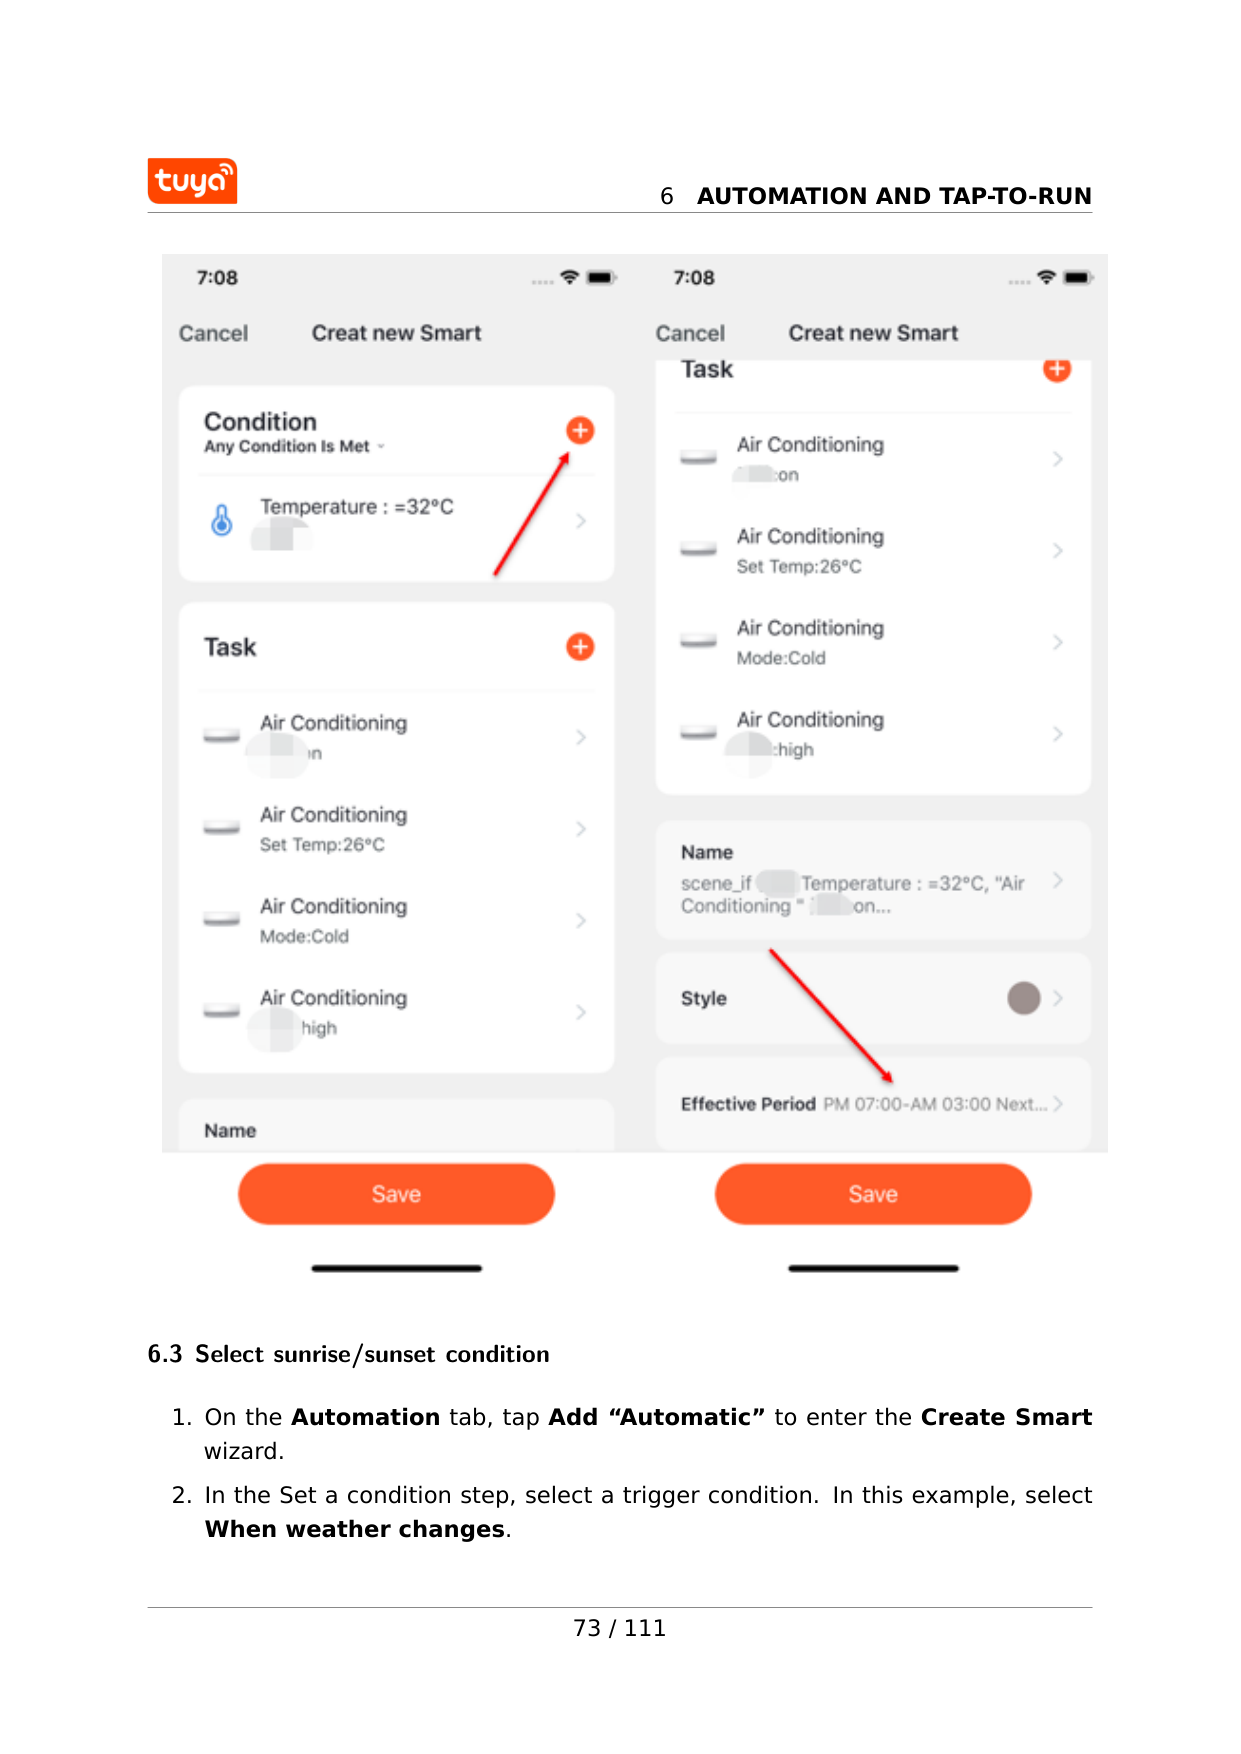
6.2 Add automation scenes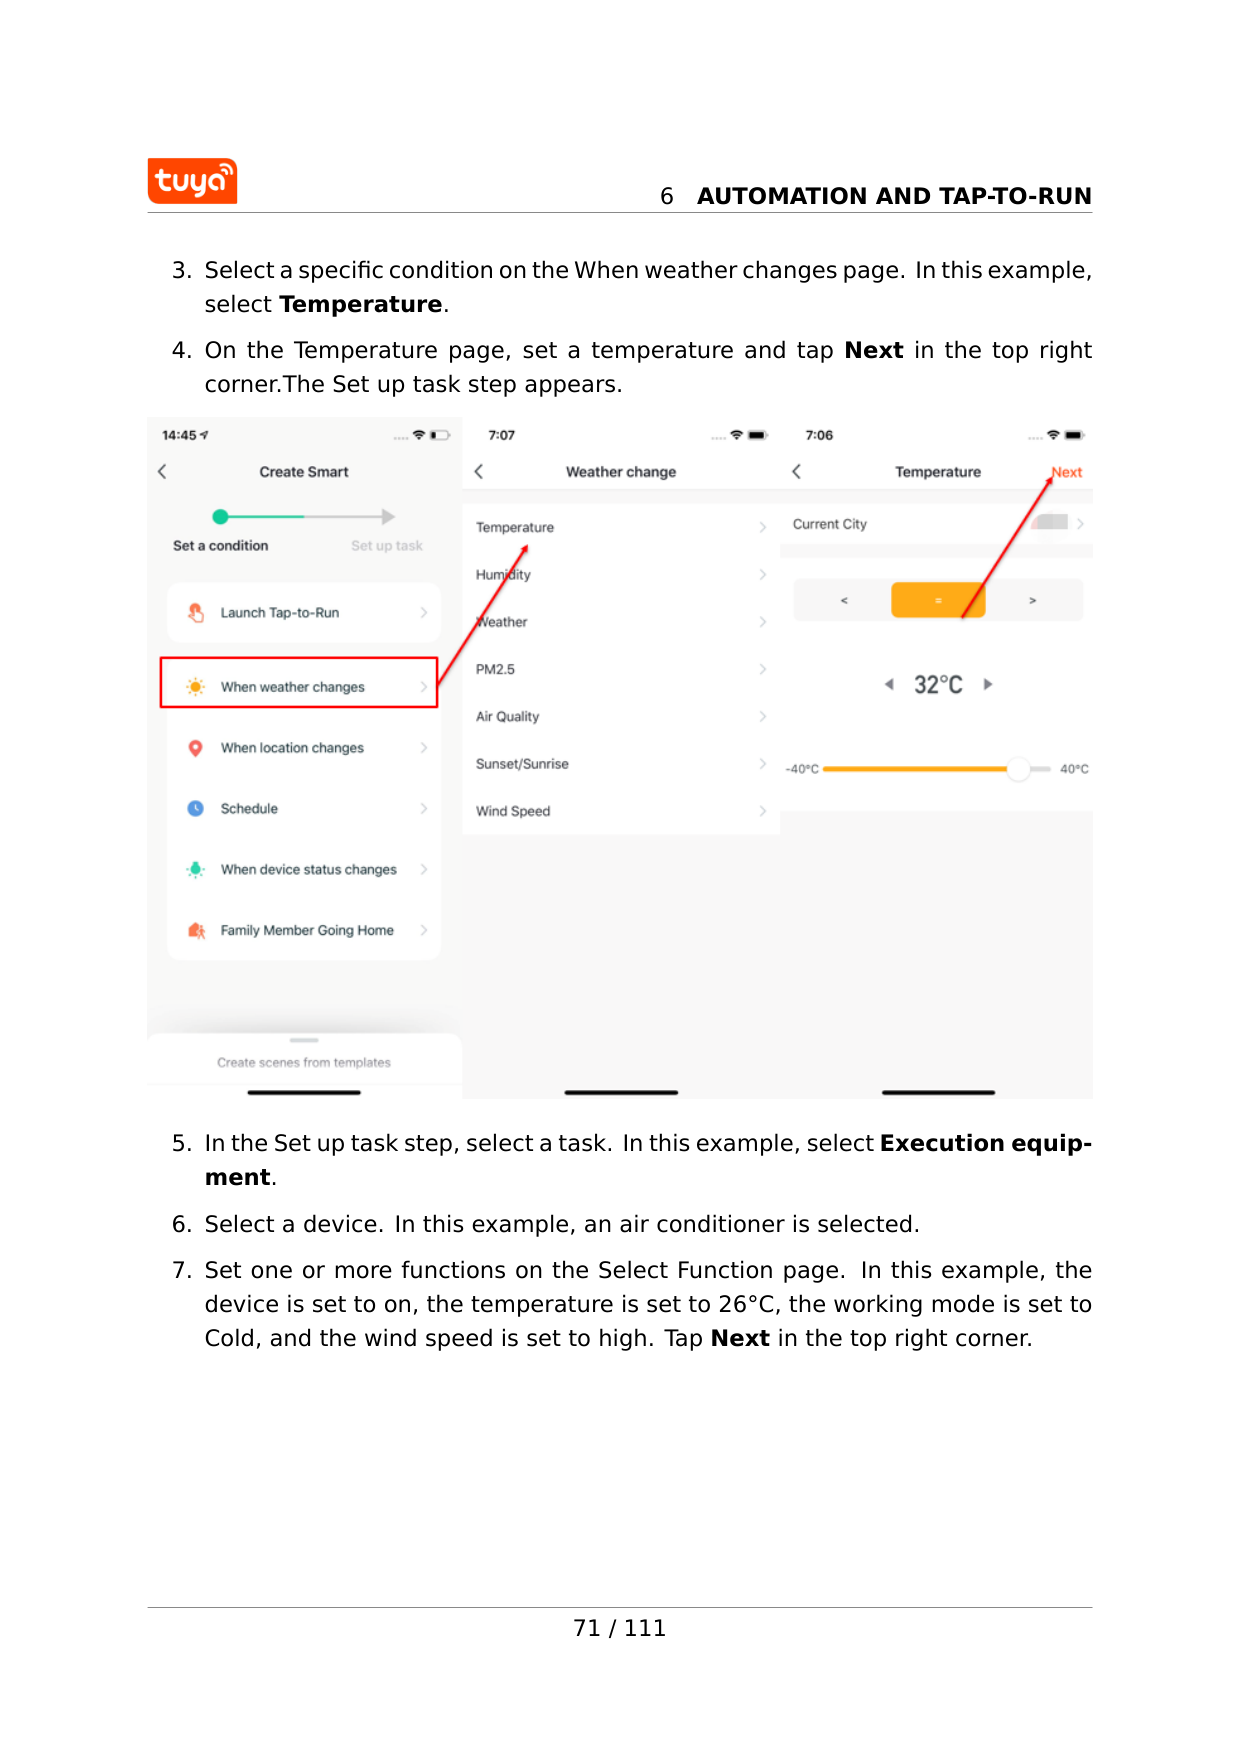
6
Automation And Tap-To-Run
6
Automation And Tap-To-Run
6
Automation And Tap-To-Run
6.3 Select sunrise/sunset condition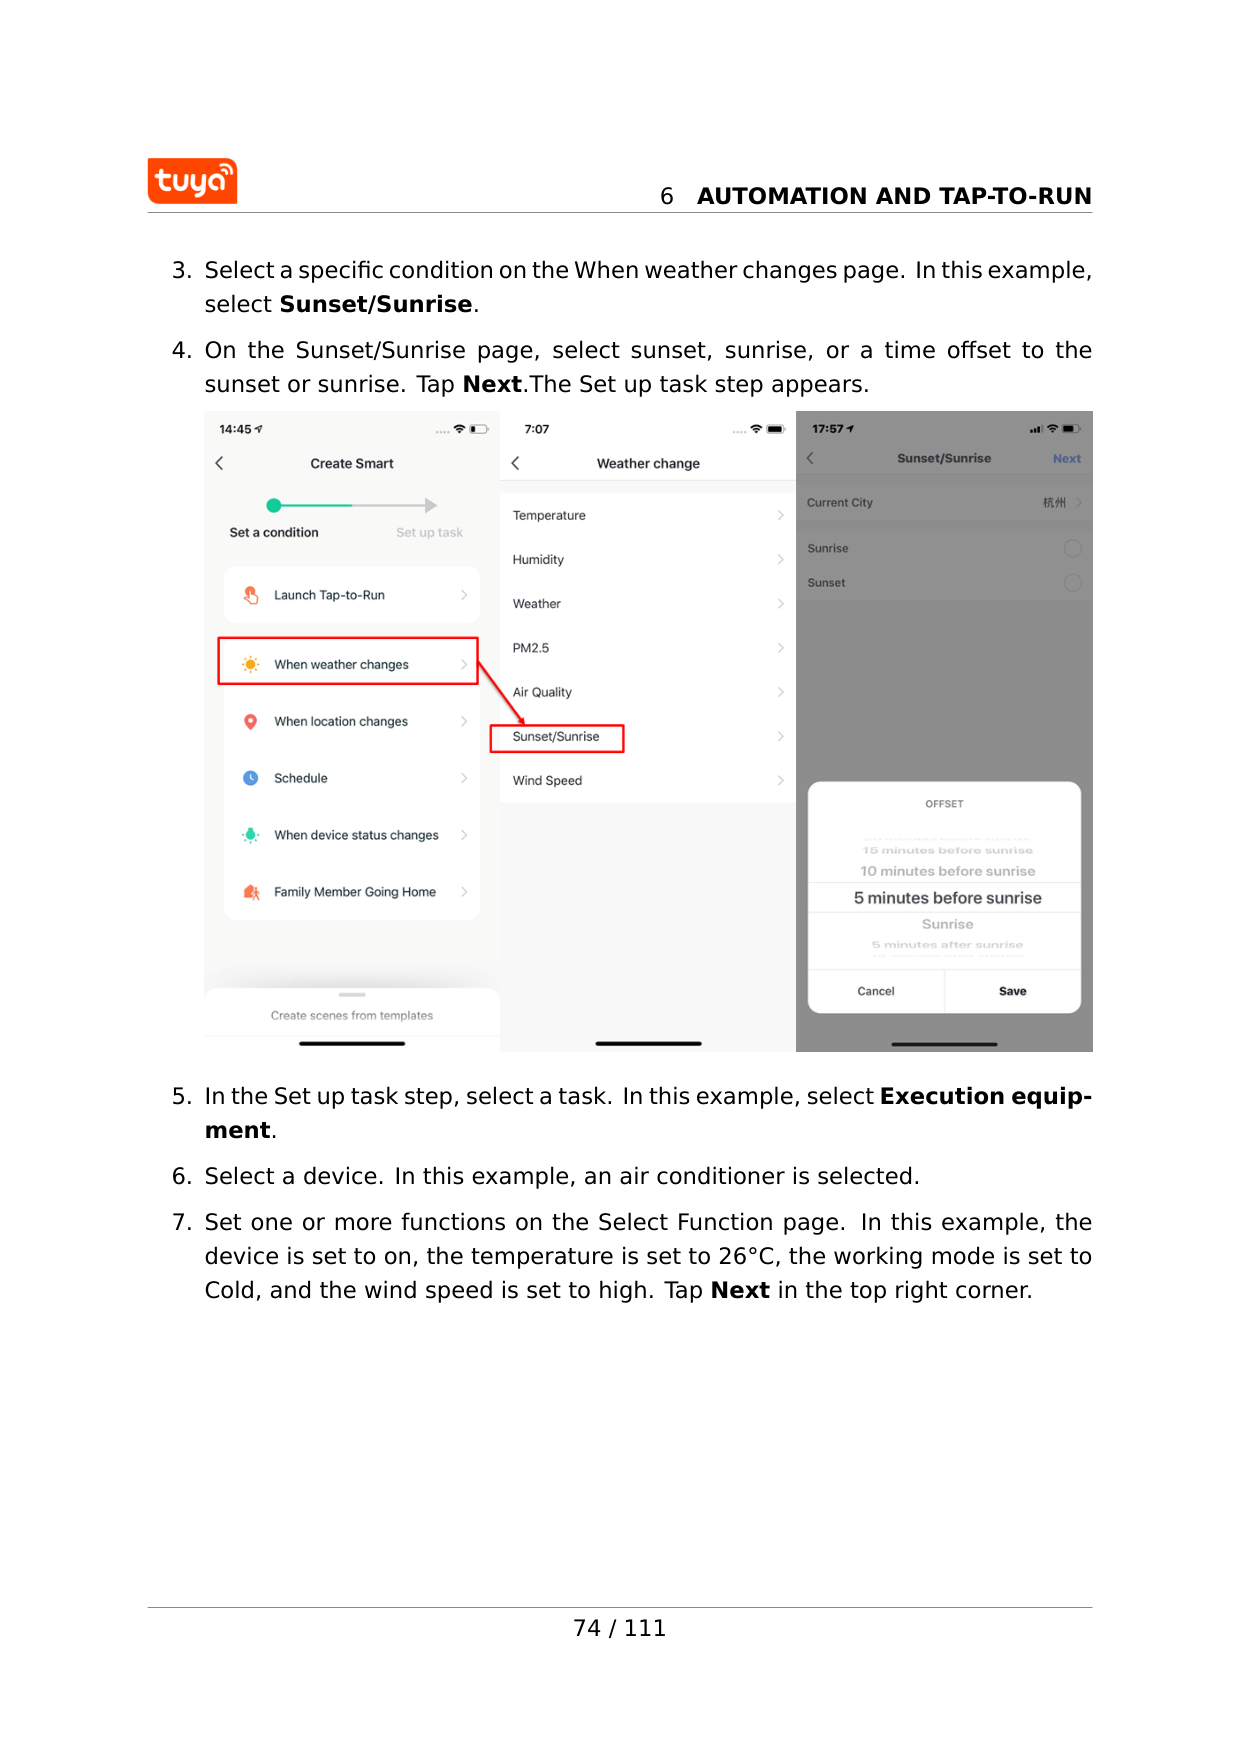
6
Automation And Tap-To-Run

6
Automation And Tap-To-Run
6.4 Select leave/arrive condition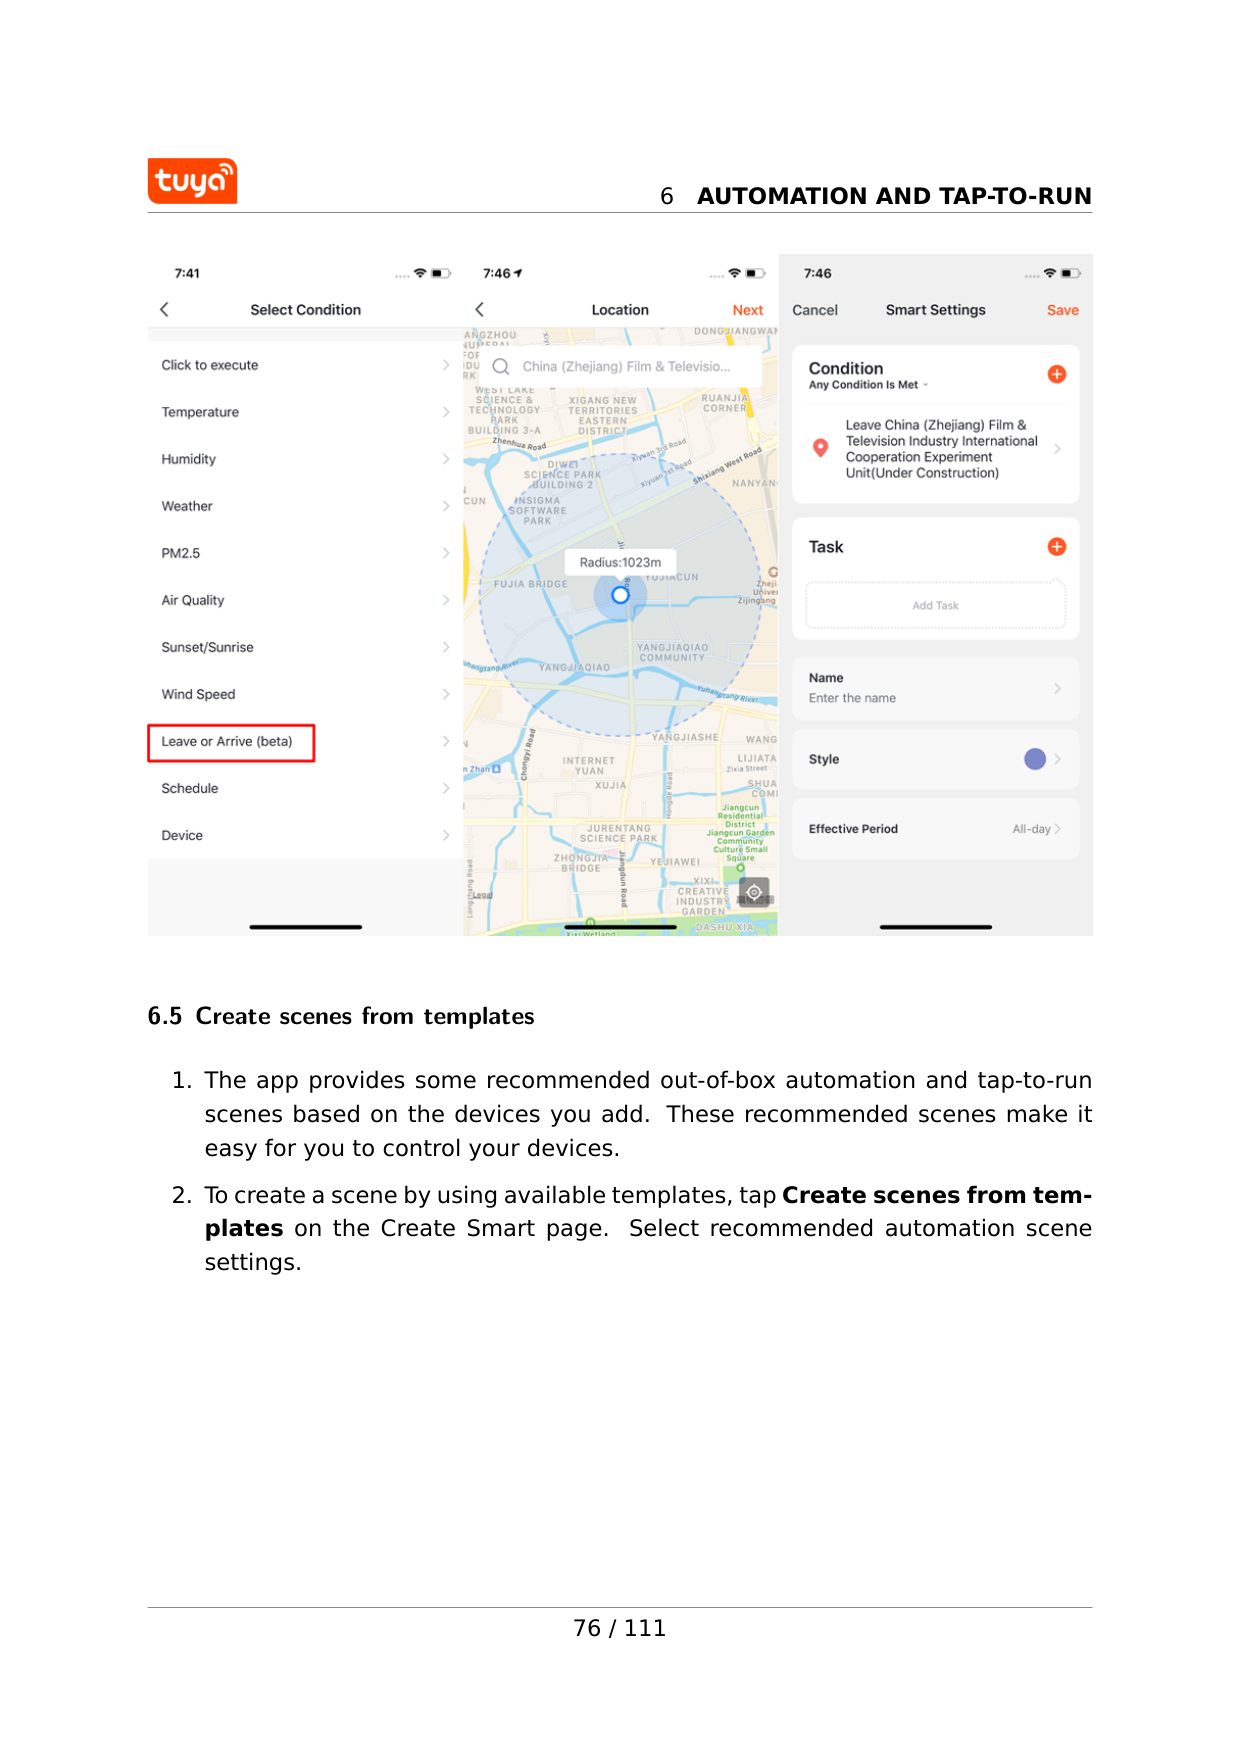
6
Automation And Tap-To-Run
6.5 Create scenes from templates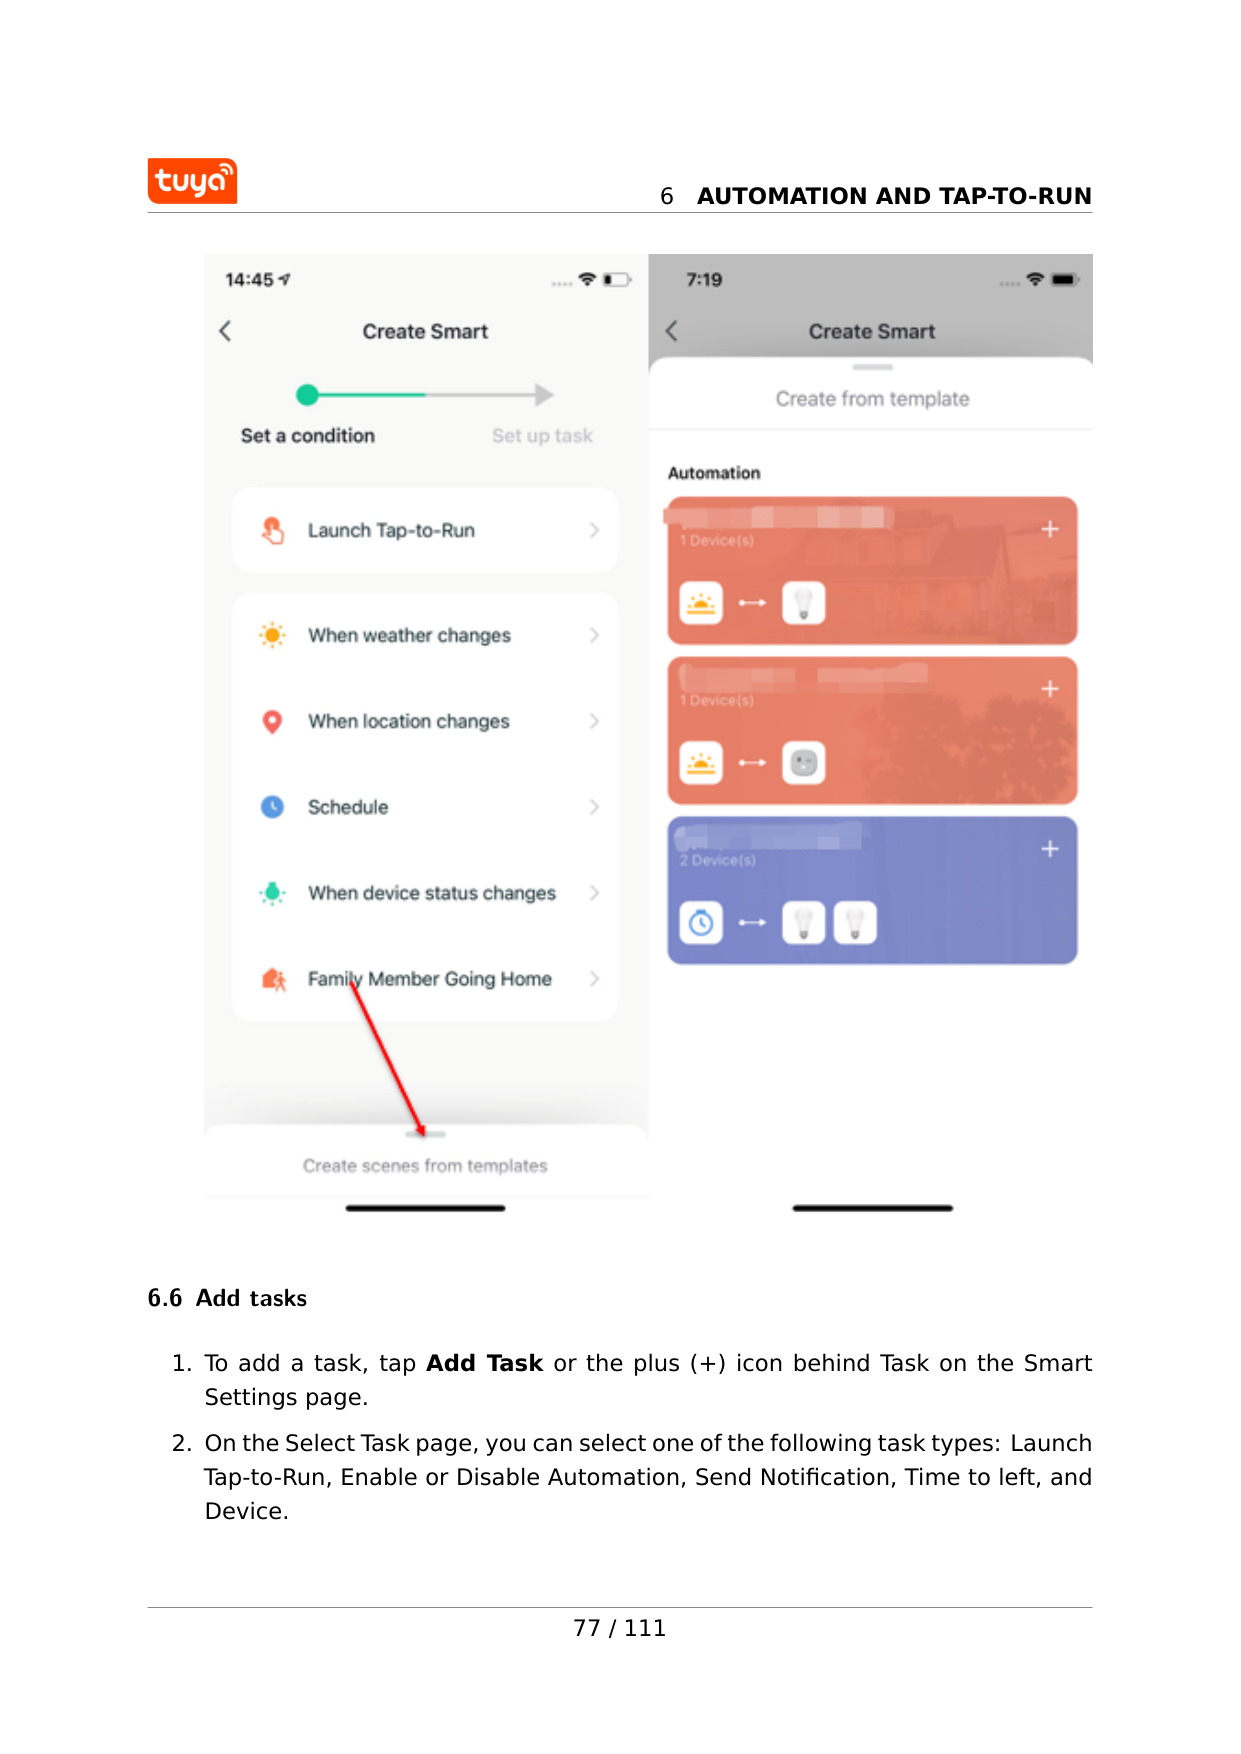
6
Automation And Tap-To-Run
6.6 Add tasks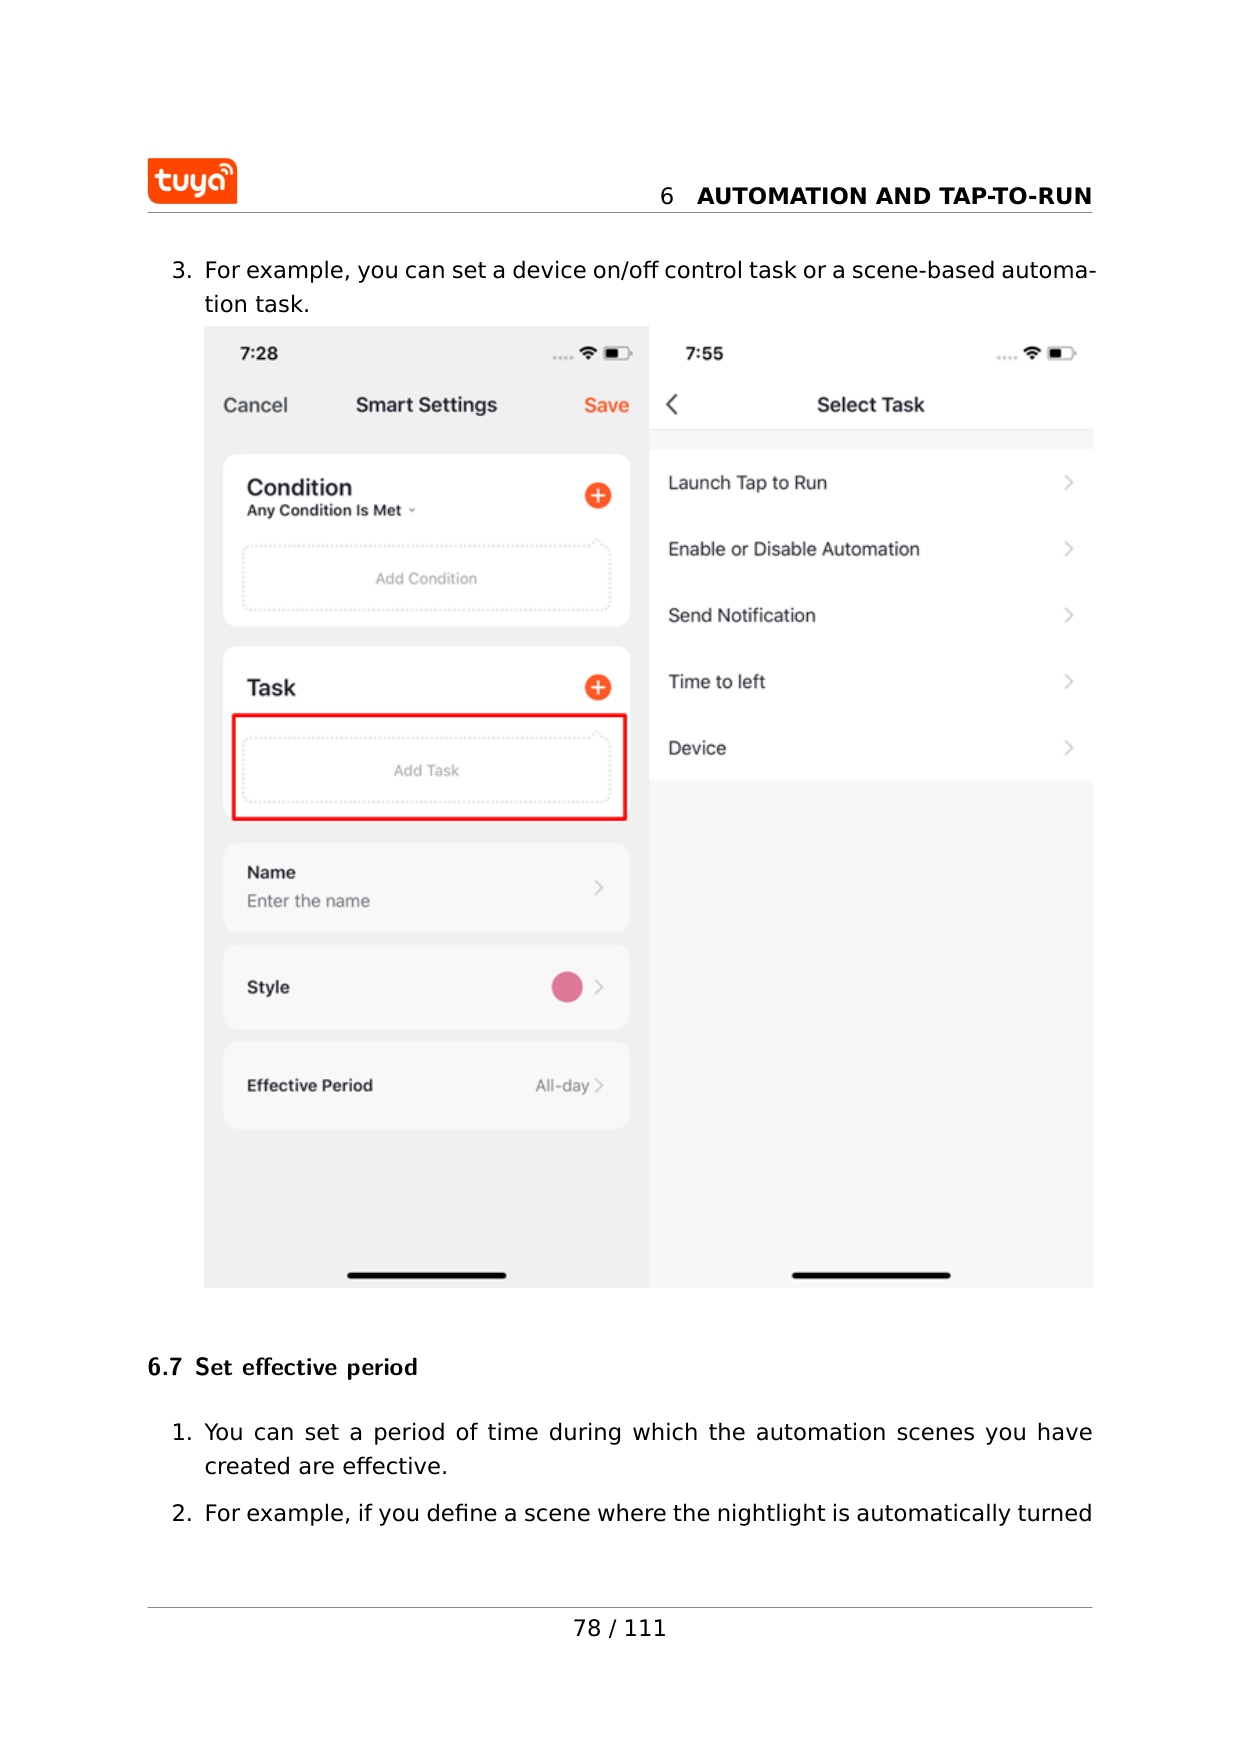
6
Automation And Tap-To-Run

6
Automation And Tap-To-Run
on when the human motion sensor detects the presence of humans, you can select night as the effective period. In this case, the nightlight will not be automatically turned on in the daytime. 6.8 Create automation scene You can create an automation scene to implement automated device control. The following figure shows an example automation scene with conditions and actions set. 79 / 111
6
Automation And Tap-To-Run
The app supports four automation types: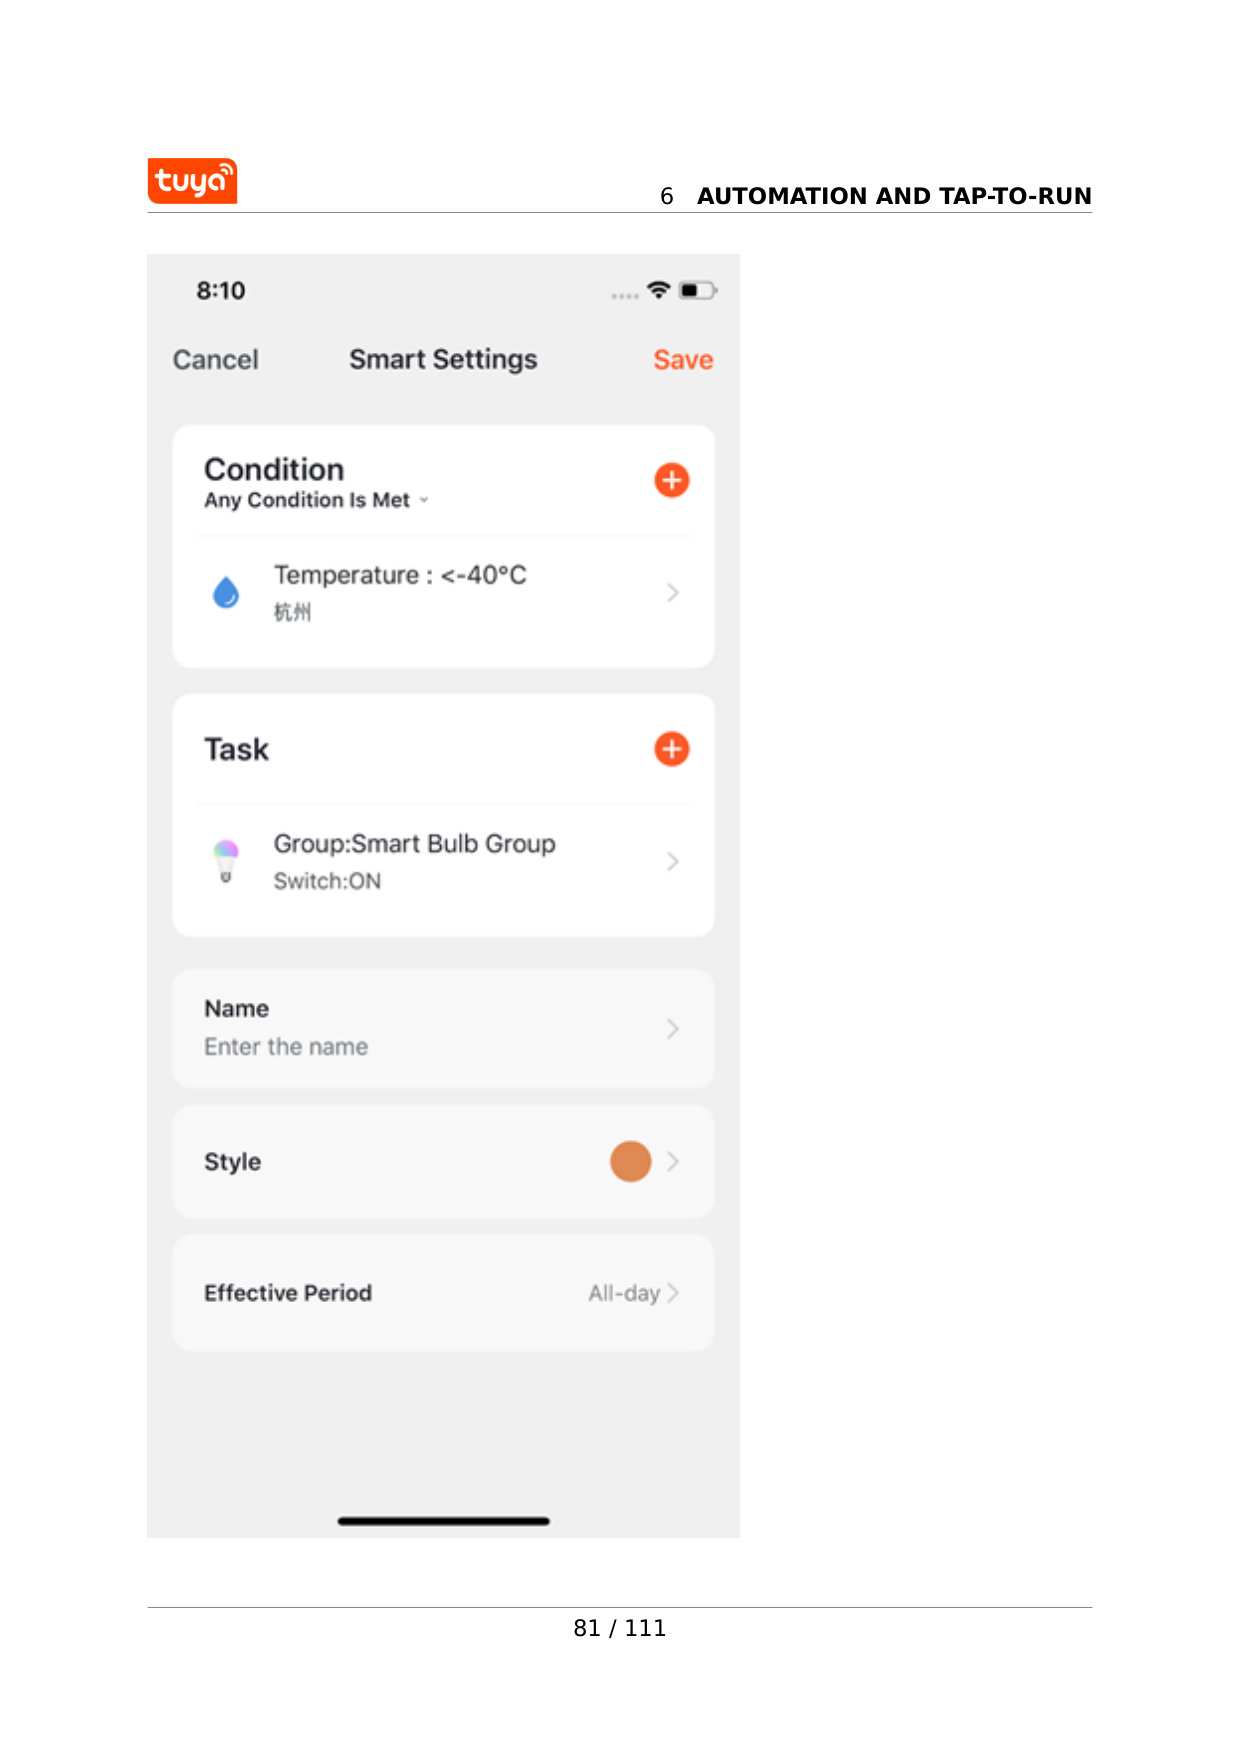
6
Automation And Tap-To-Run
81 / 111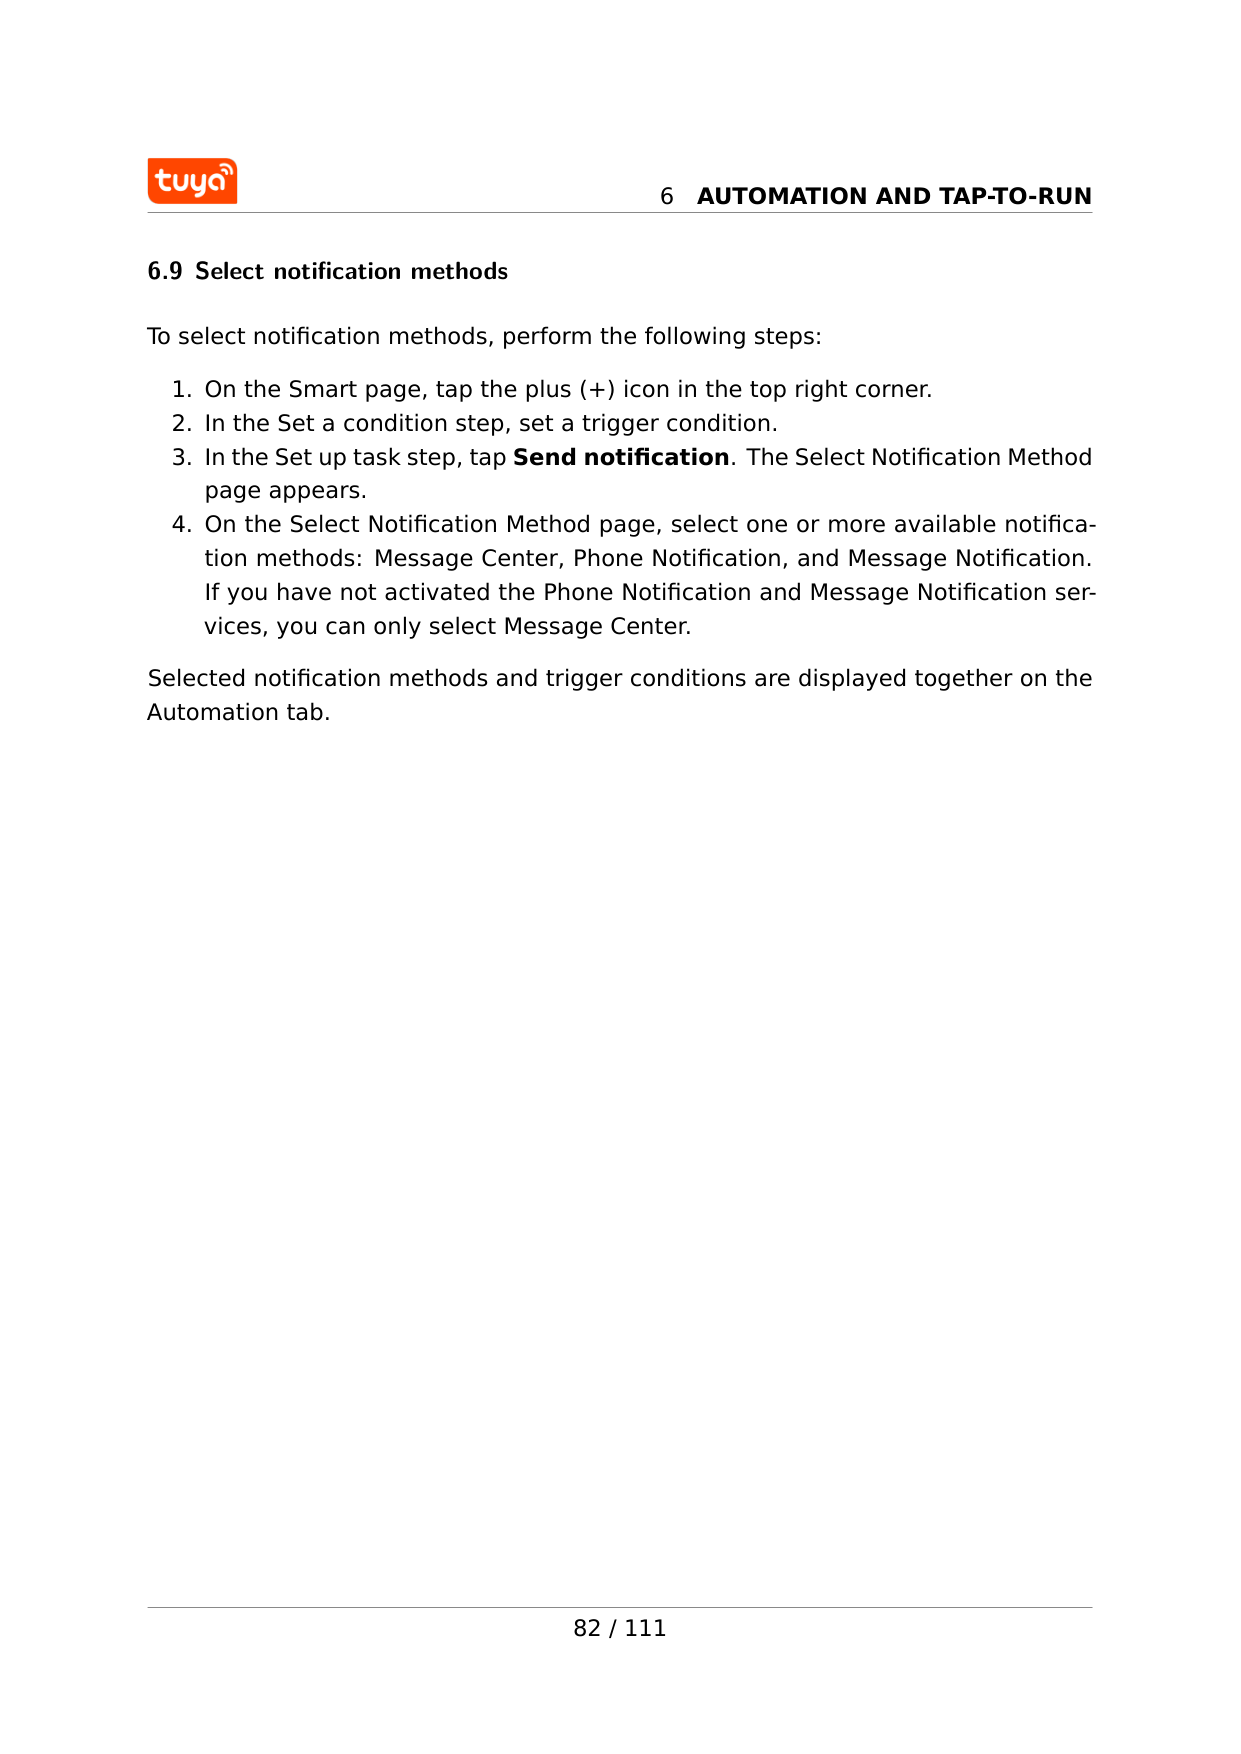
6
Automation And Tap-To-Run
6.9 Select notification methods To select notification methods, perform the following steps: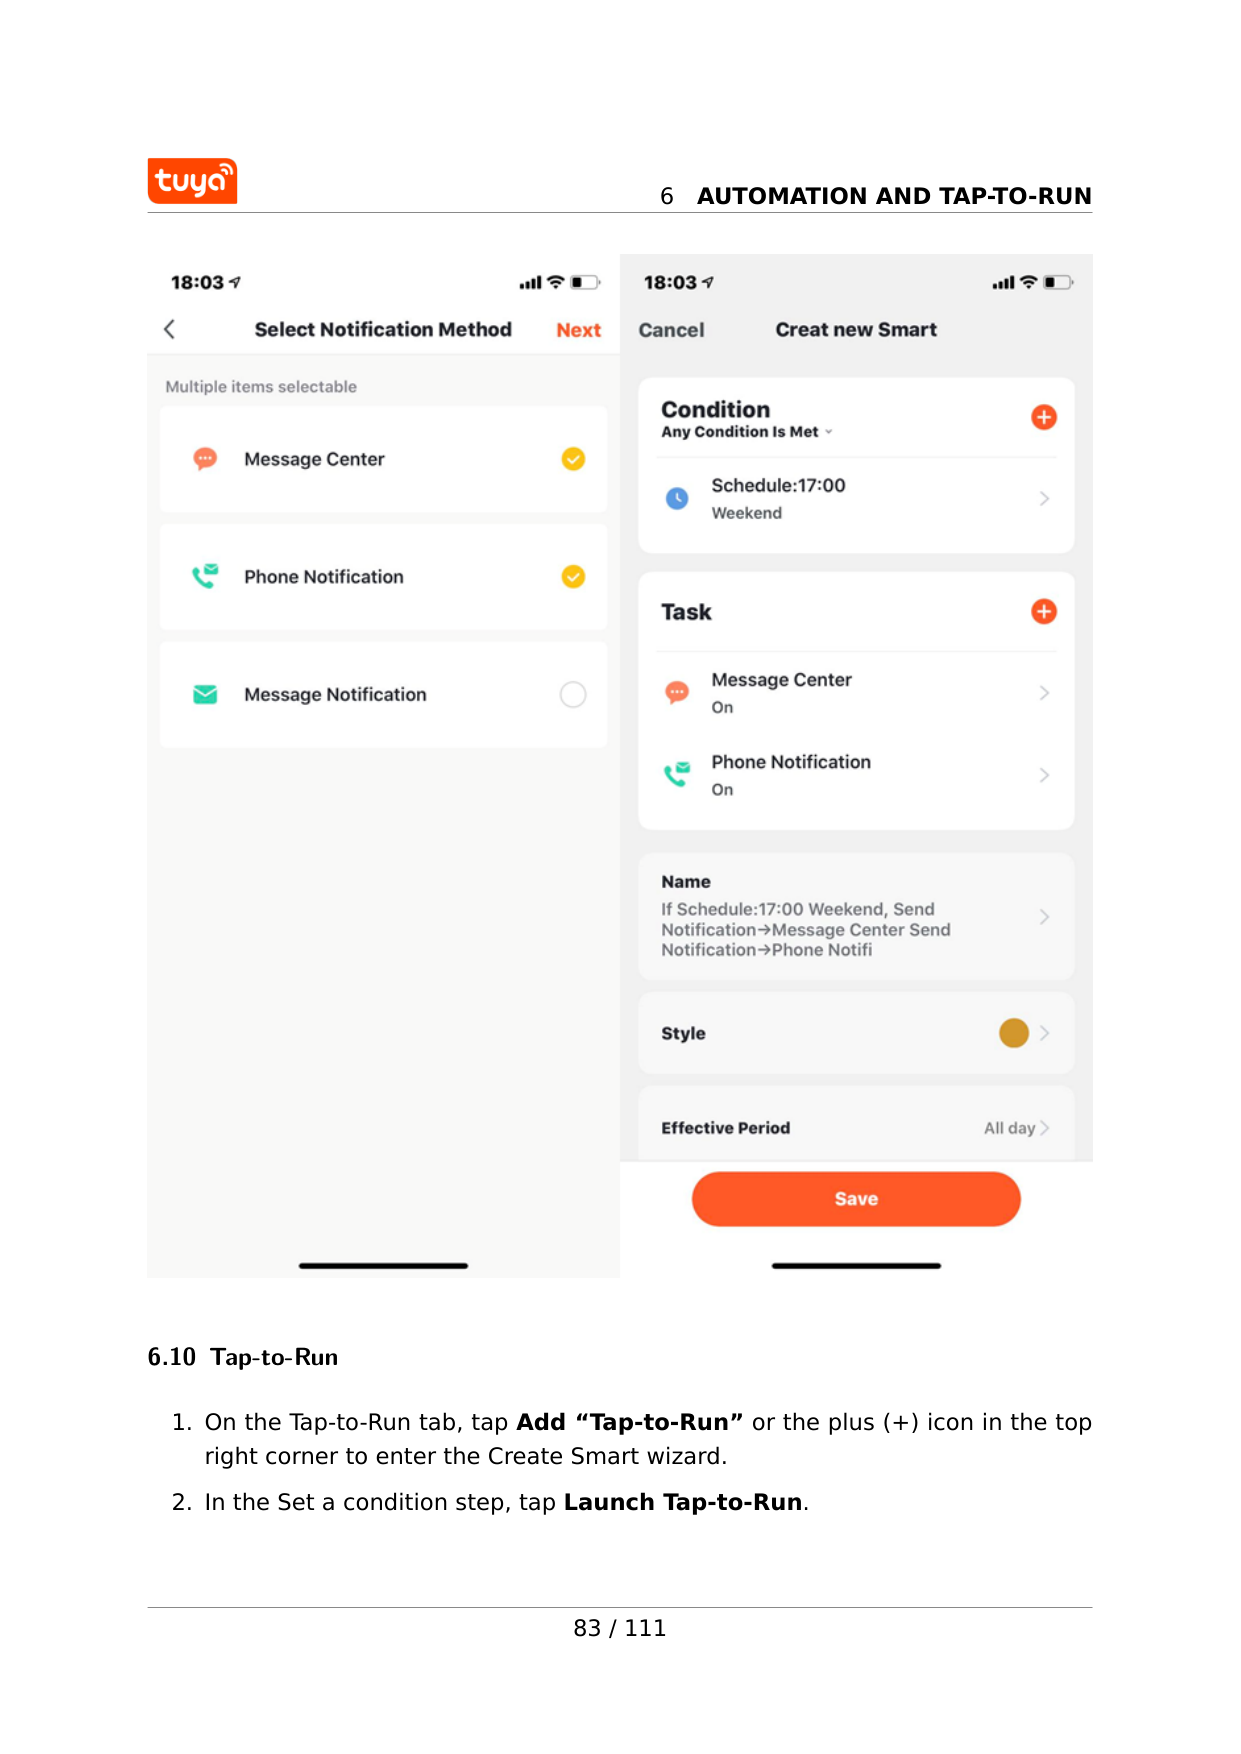
6
Automation And Tap-To-Run
6.10 Tap-to-Run
6
Automation And Tap-To-Run
1 If you select Launch Tap-to-Run, you cannot select **Launch Tap 2 to Run on the Executive intelligence** page and Send notificatio 3 n reminder in the Set up task step. 4  Preset automation is required if you select Enable or Disable Automation as the task when you set the scene. If you tap Enable or Disable Automation, a list of available automation scenes appears. You can enable or disable a scene by tapping it. Tap Next, enter the scene name, and tap Save. The Effective Period function is not available for tap-to-run scenes.Click for more introduction 84 / 111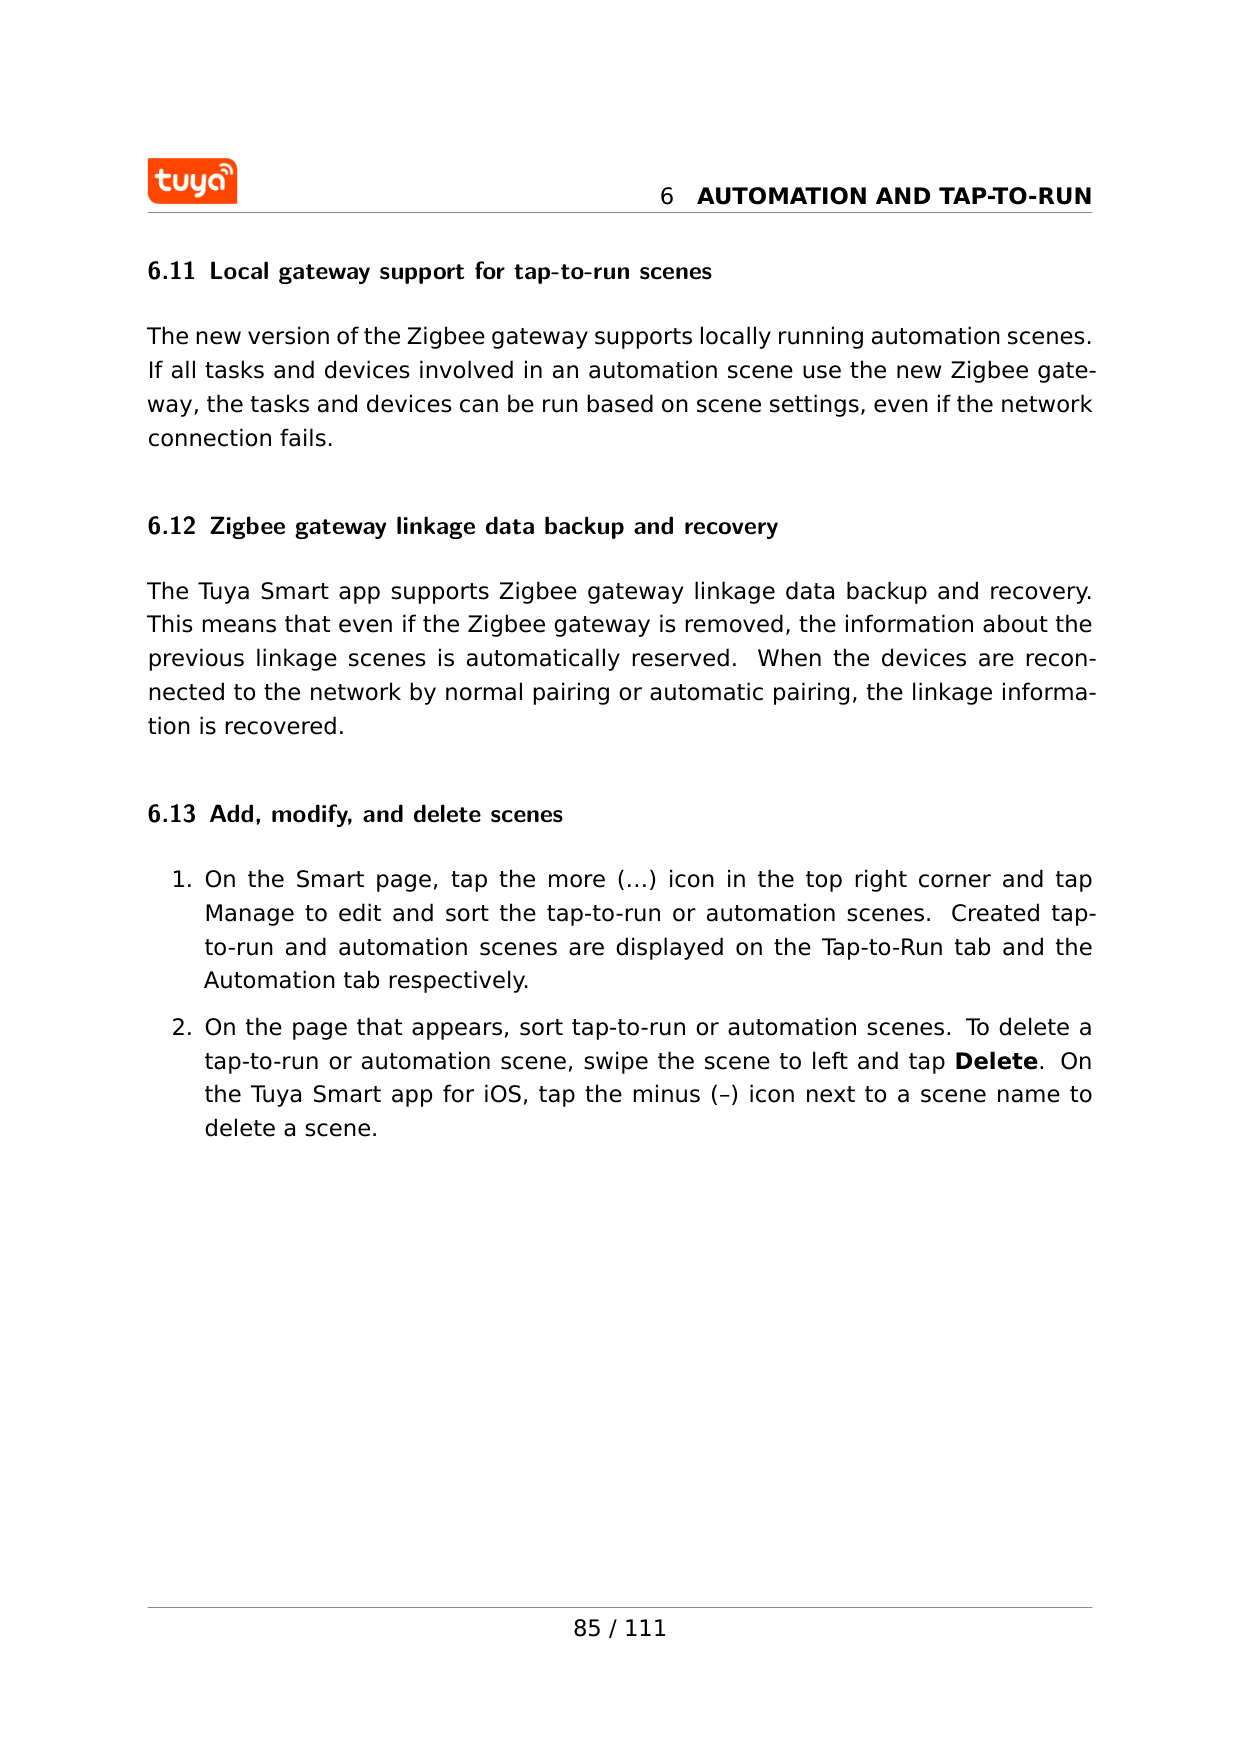
6
Automation And Tap-To-Run
6.11 Local gateway support for tap-to-run scenes The new version of the Zigbee gateway supports locally running automation scenes. If all tasks and devices involved in an automation scene use the new Zigbee gate- way, the tasks and devices can be run based on scene settings, even if the network connection fails. 6.12 Zigbee gateway linkage data backup and recovery The Tuya Smart app supports Zigbee gateway linkage data backup and recovery. This means that even if the Zigbee gateway is removed, the information about the previous linkage scenes is automatically reserved. When the devices are recon- nected to the network by normal pairing or automatic pairing, the linkage informa- tion is recovered. 6.13 Add, modify, and delete scenes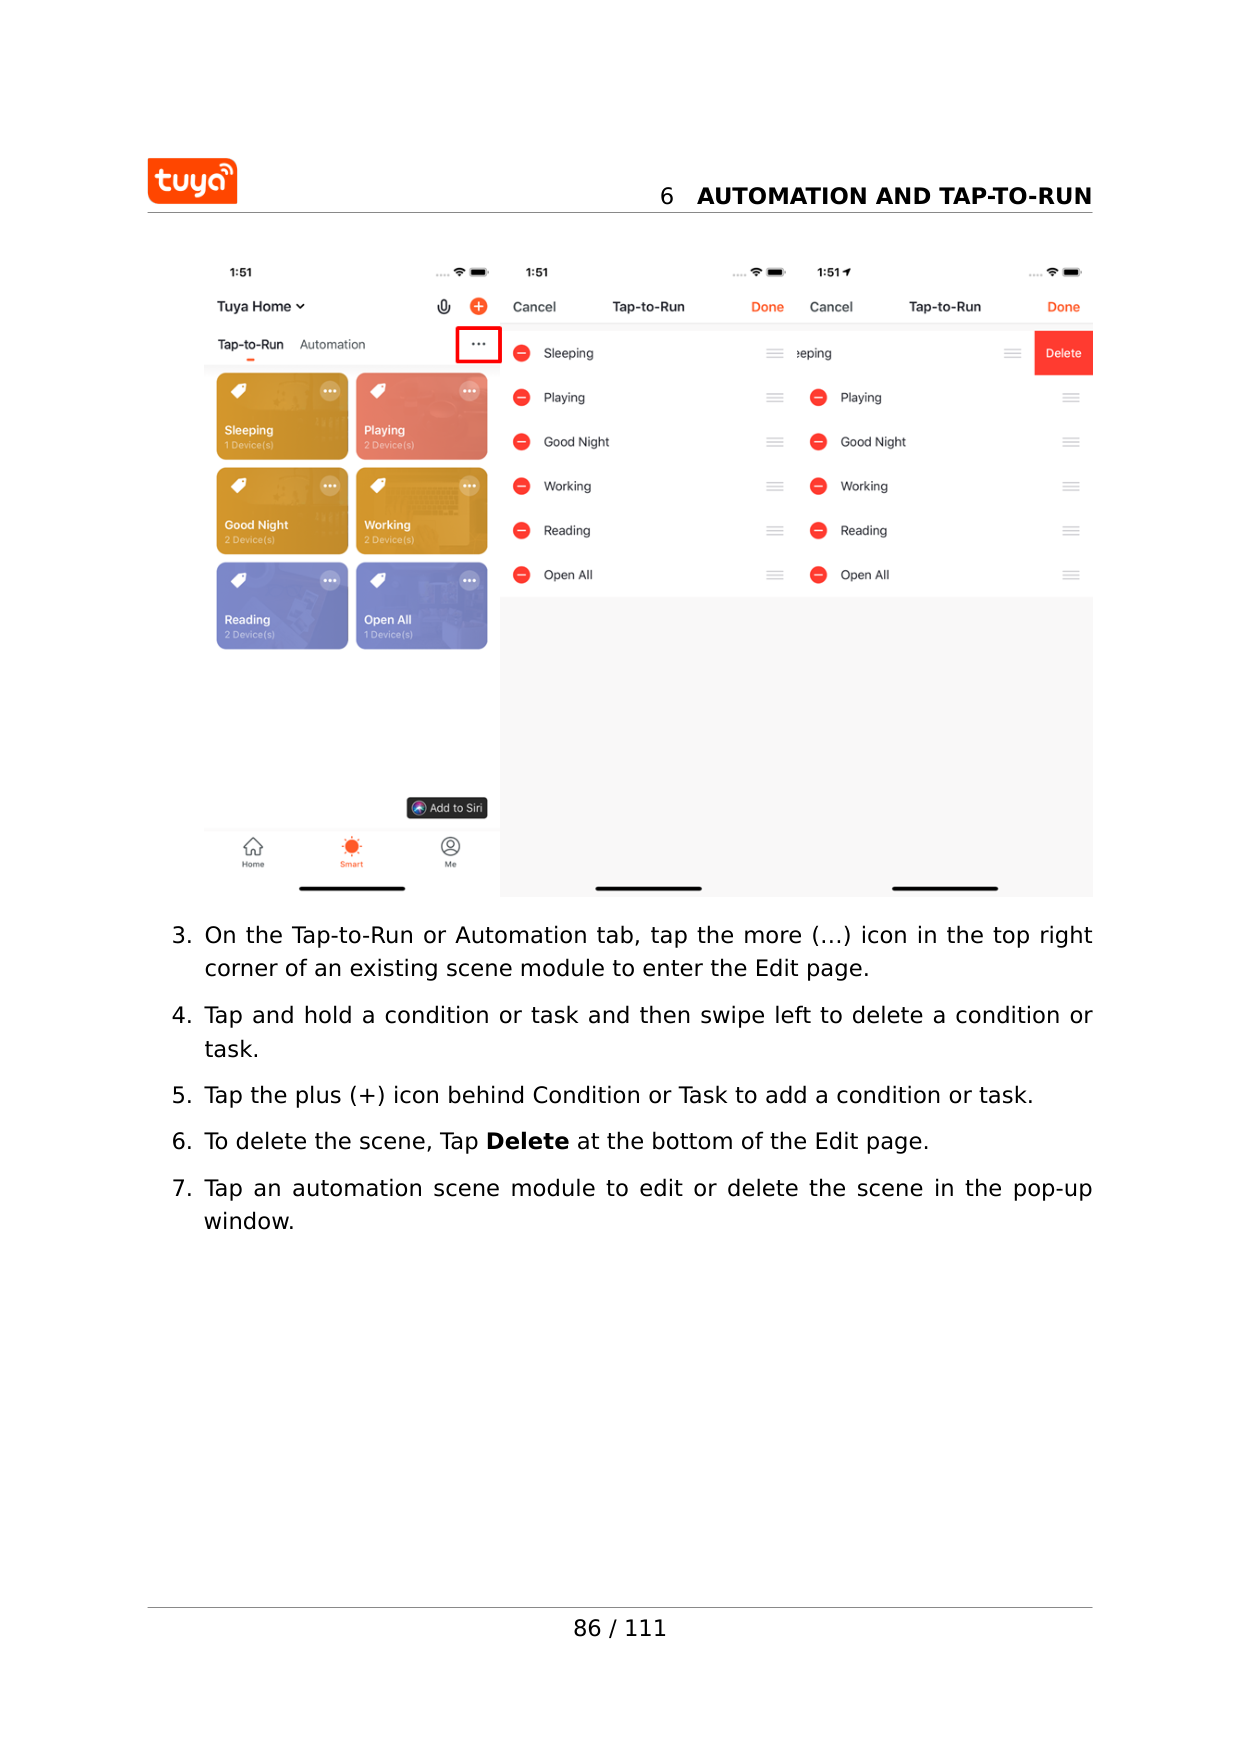
6
Automation And Tap-To-Run
6
Automation And Tap-To-Run
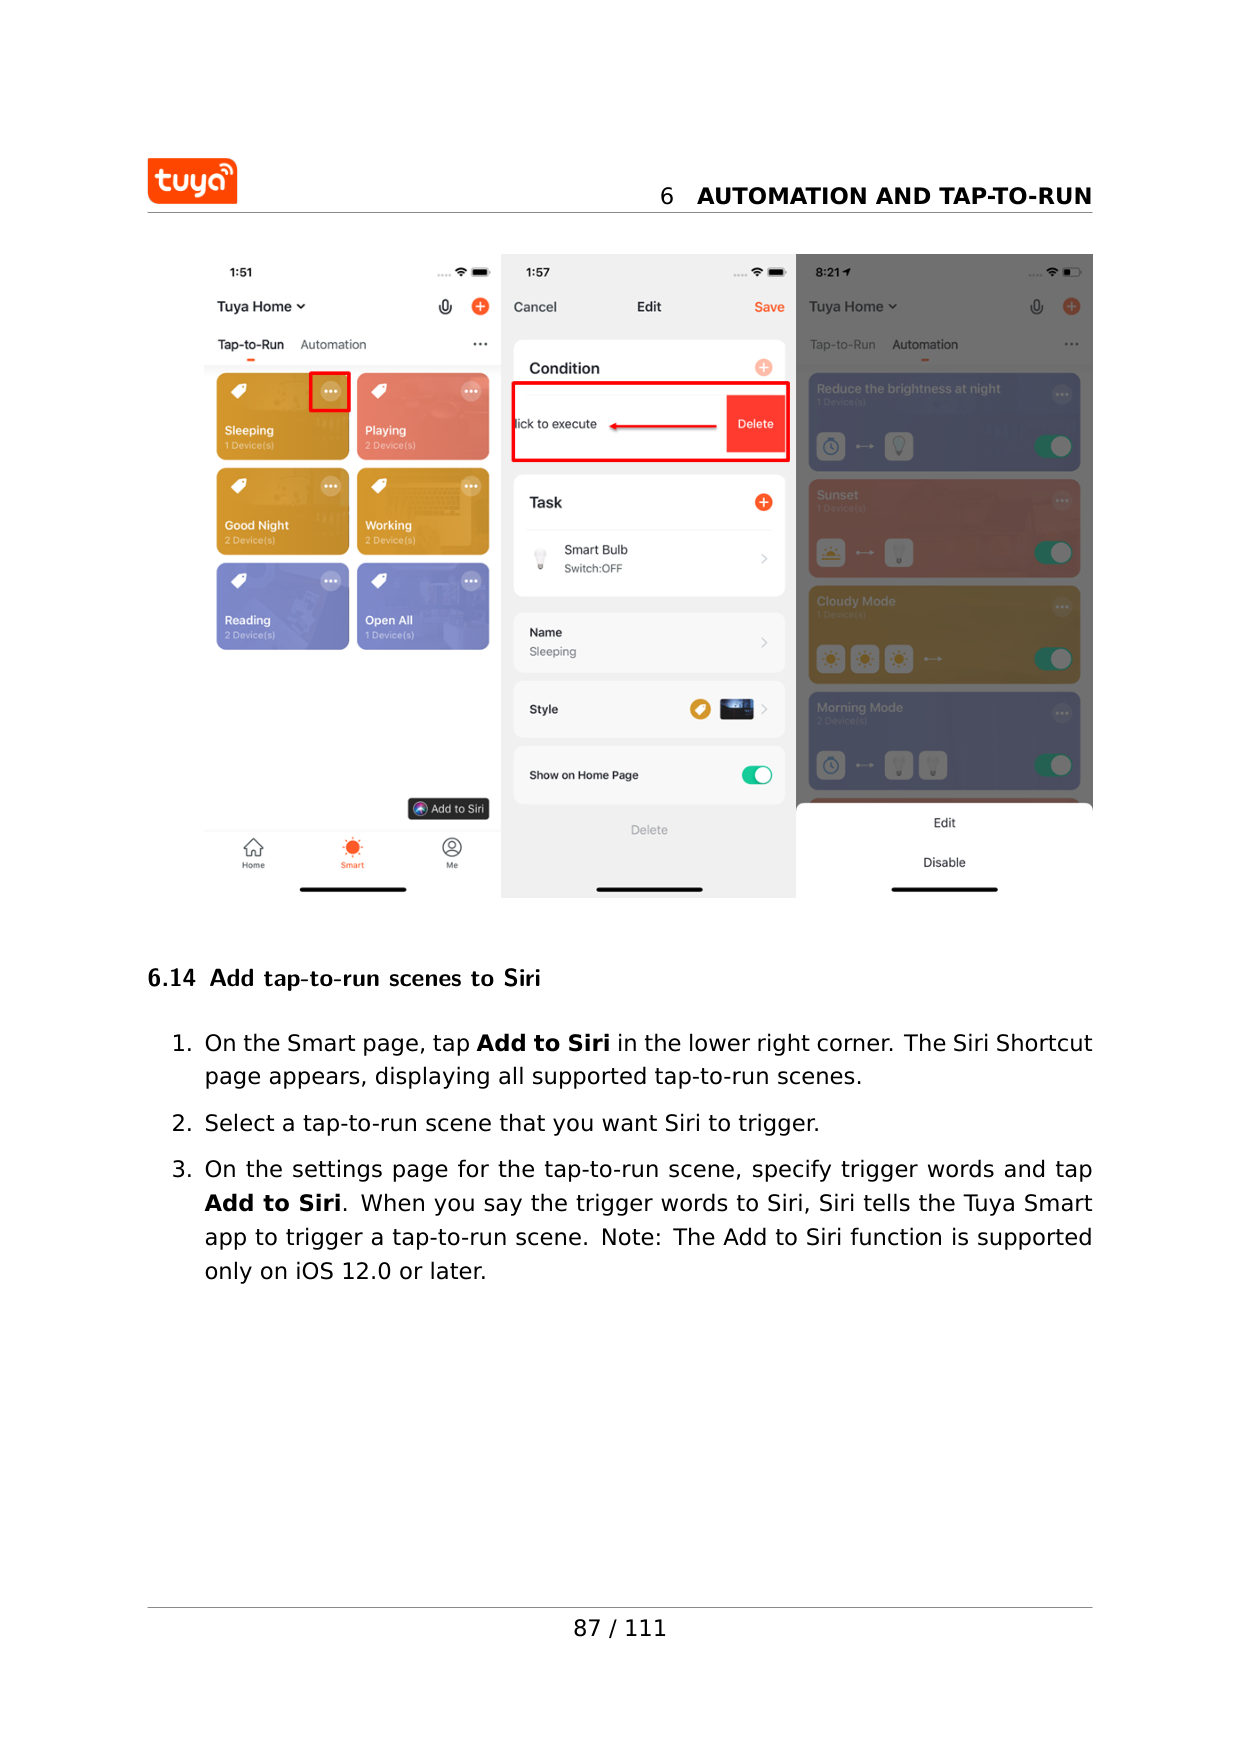
6.14 Add tap-to-run scenes to Siri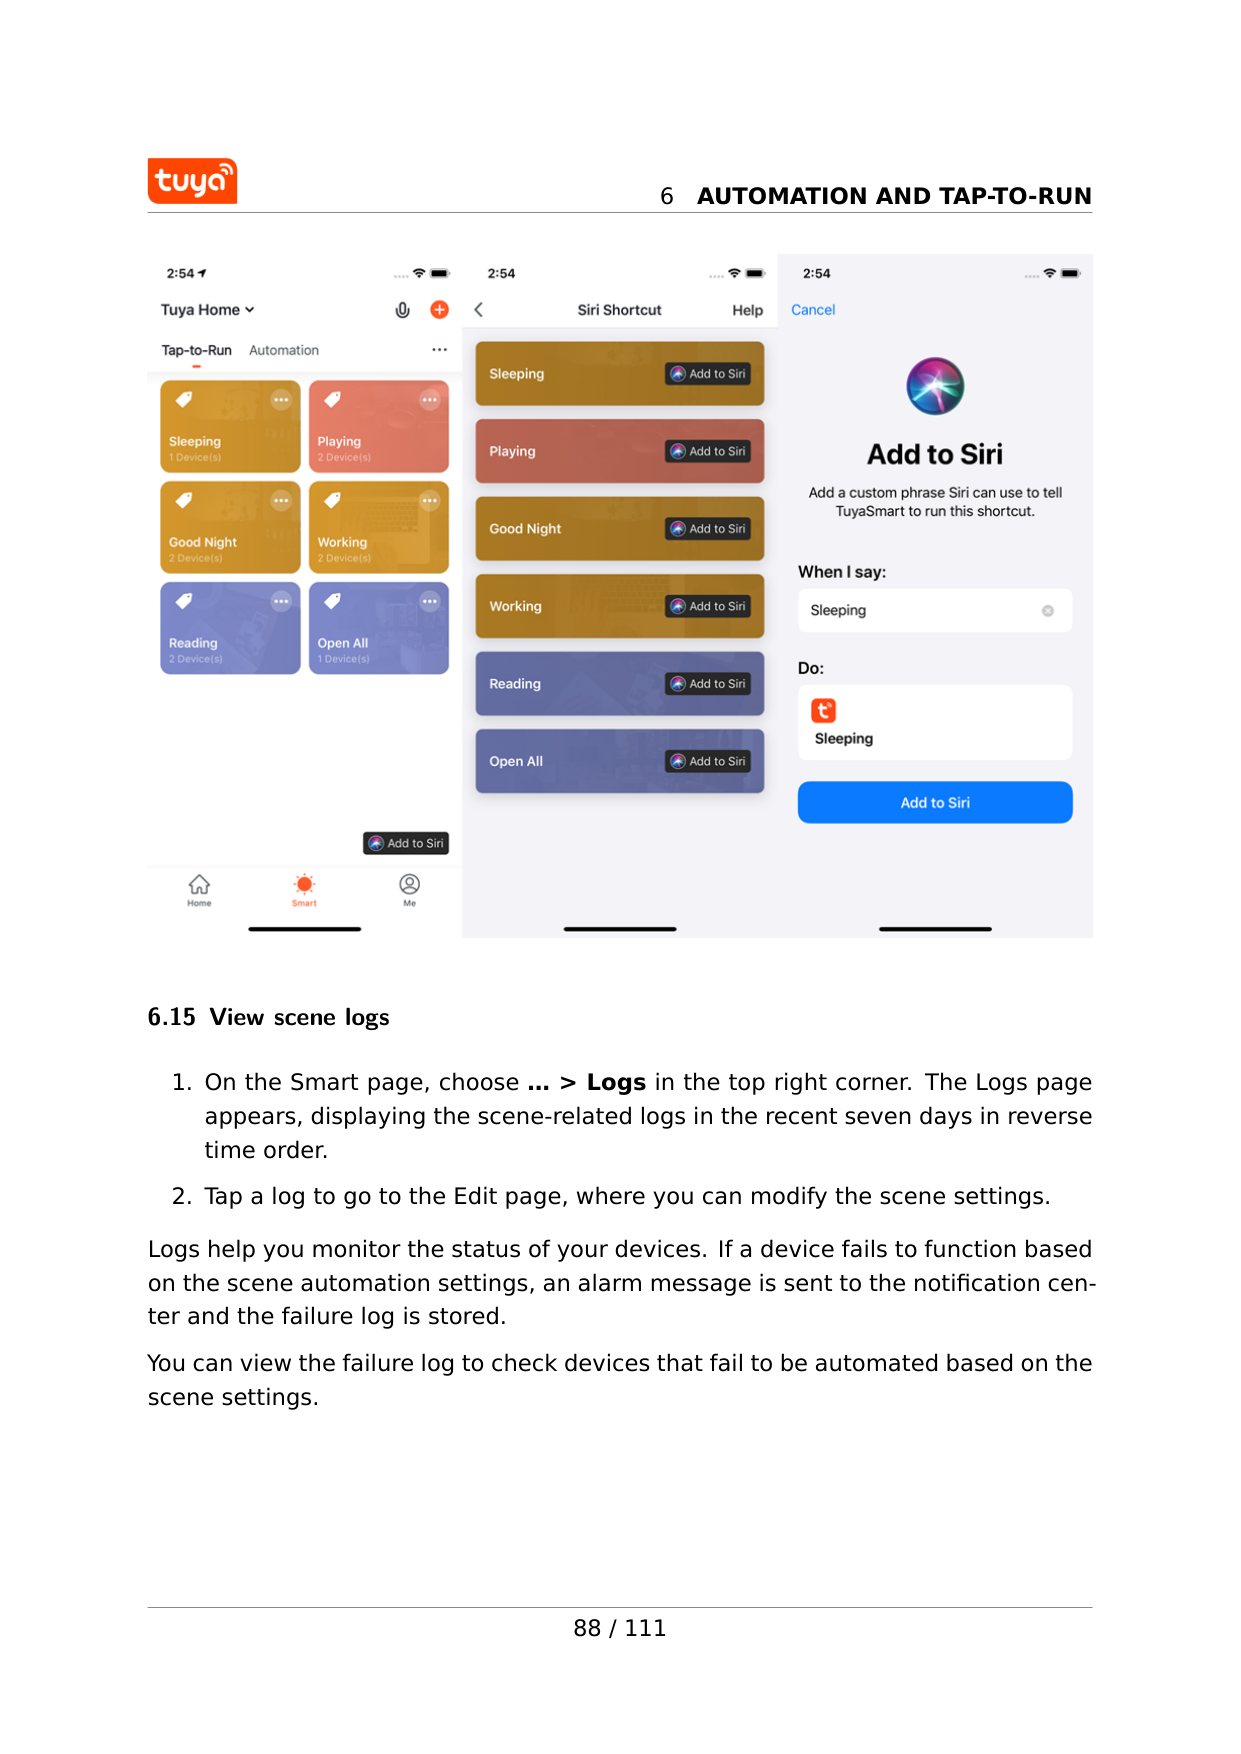
6
Automation And Tap-To-Run
6.15 View scene logs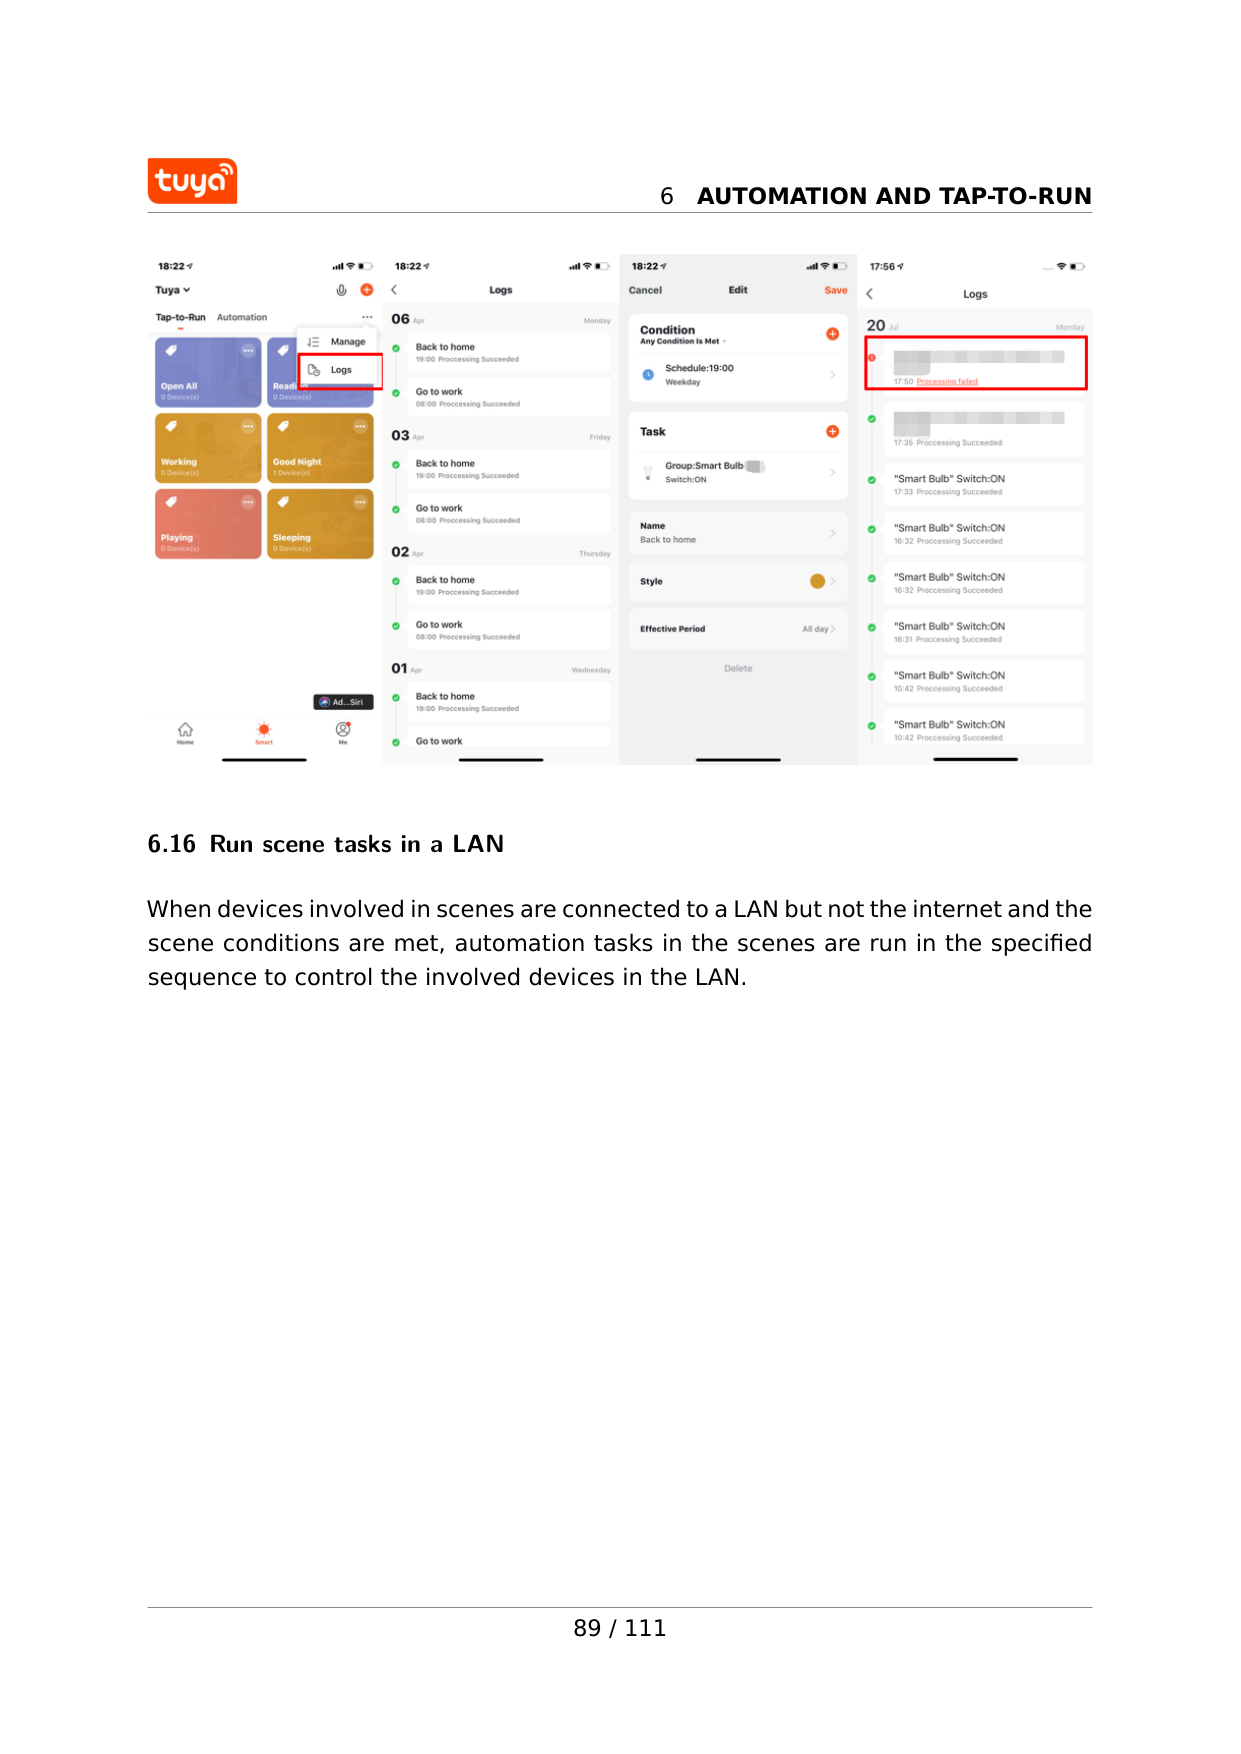
6
Automation And Tap-To-Run
6.16 Run scene tasks in a LAN When devices involved in scenes are connected to a LAN but not the internet and the scene conditions are met, automation tasks in the scenes are run in the specified sequence to control the involved devices in the LAN. 89 / 111
7
Home
7 Home On the Home page, you can perform the following operations: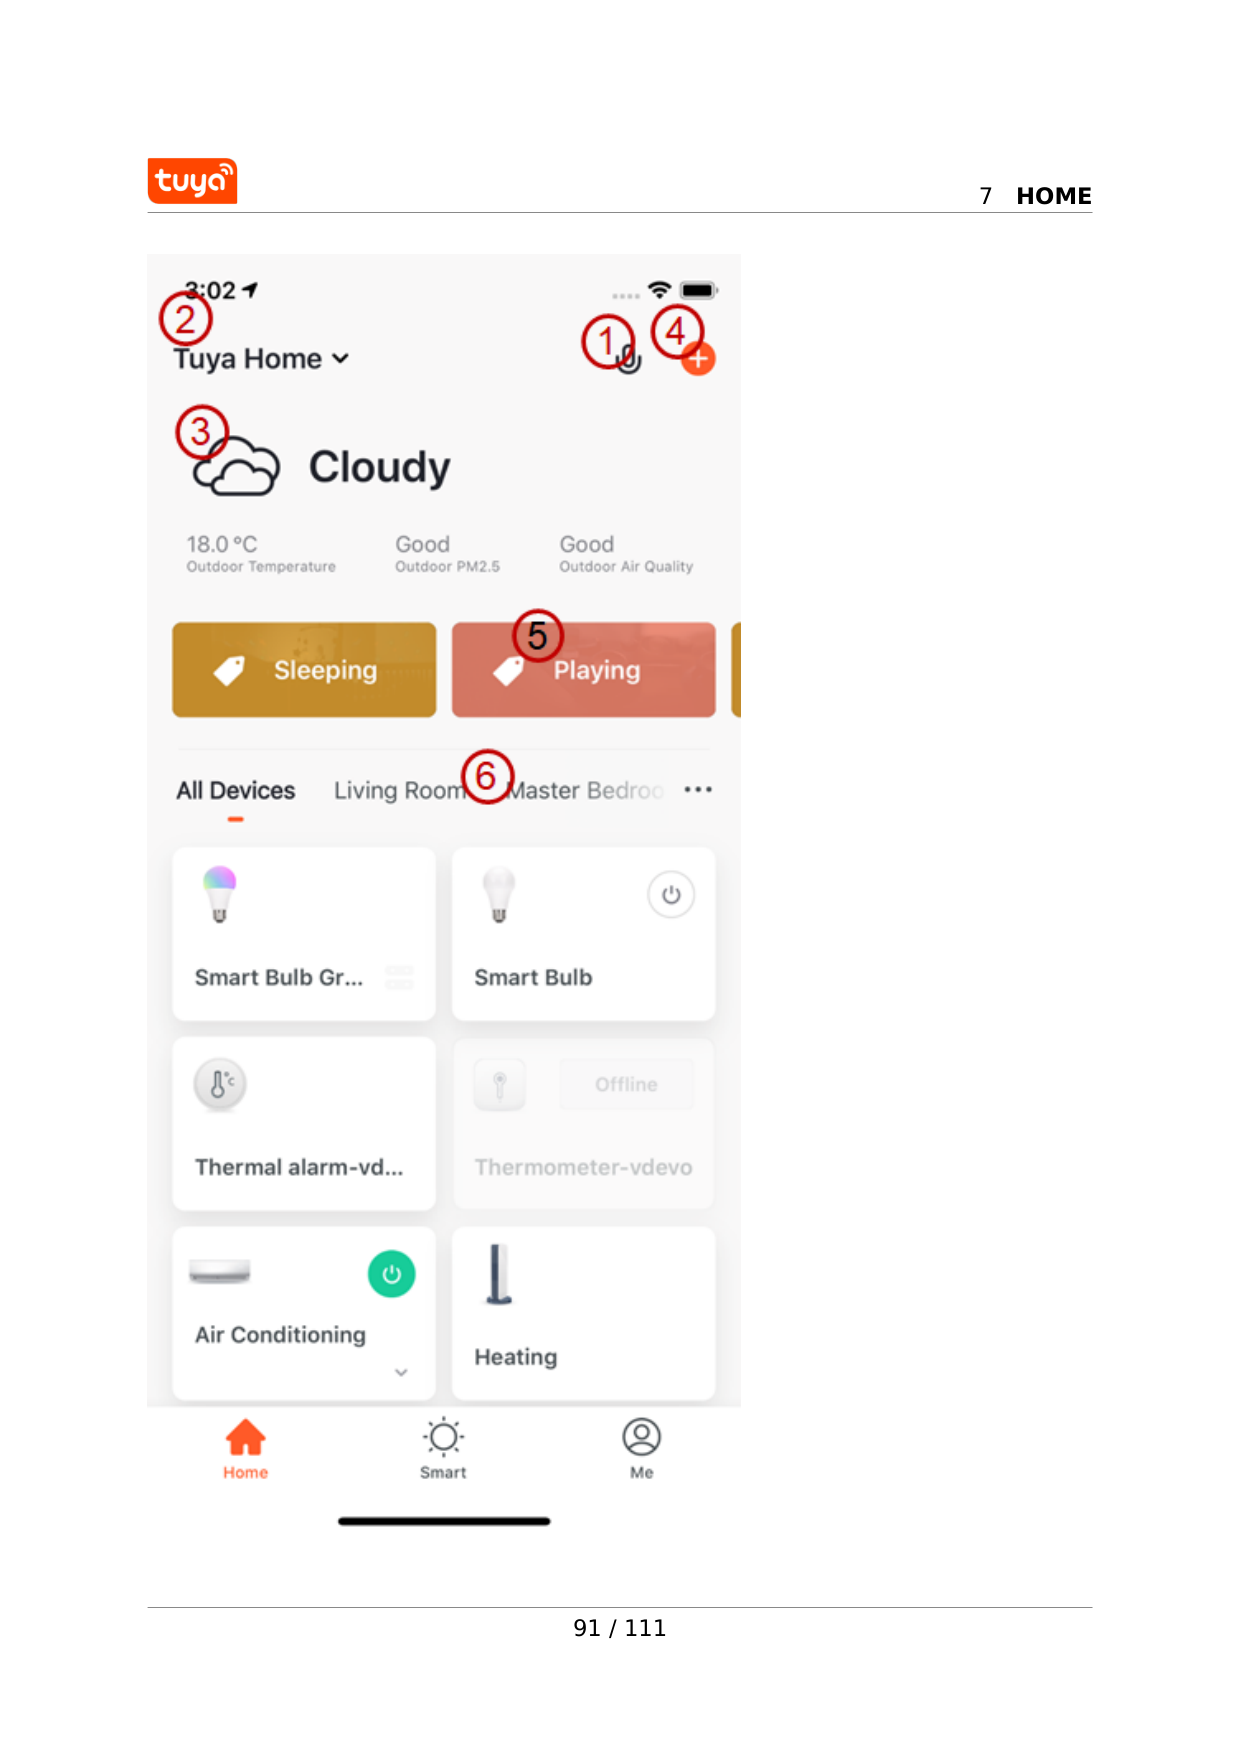
7
Home
91 / 111
8
Me
8 Me The following sections and icon are displayed on the Me page: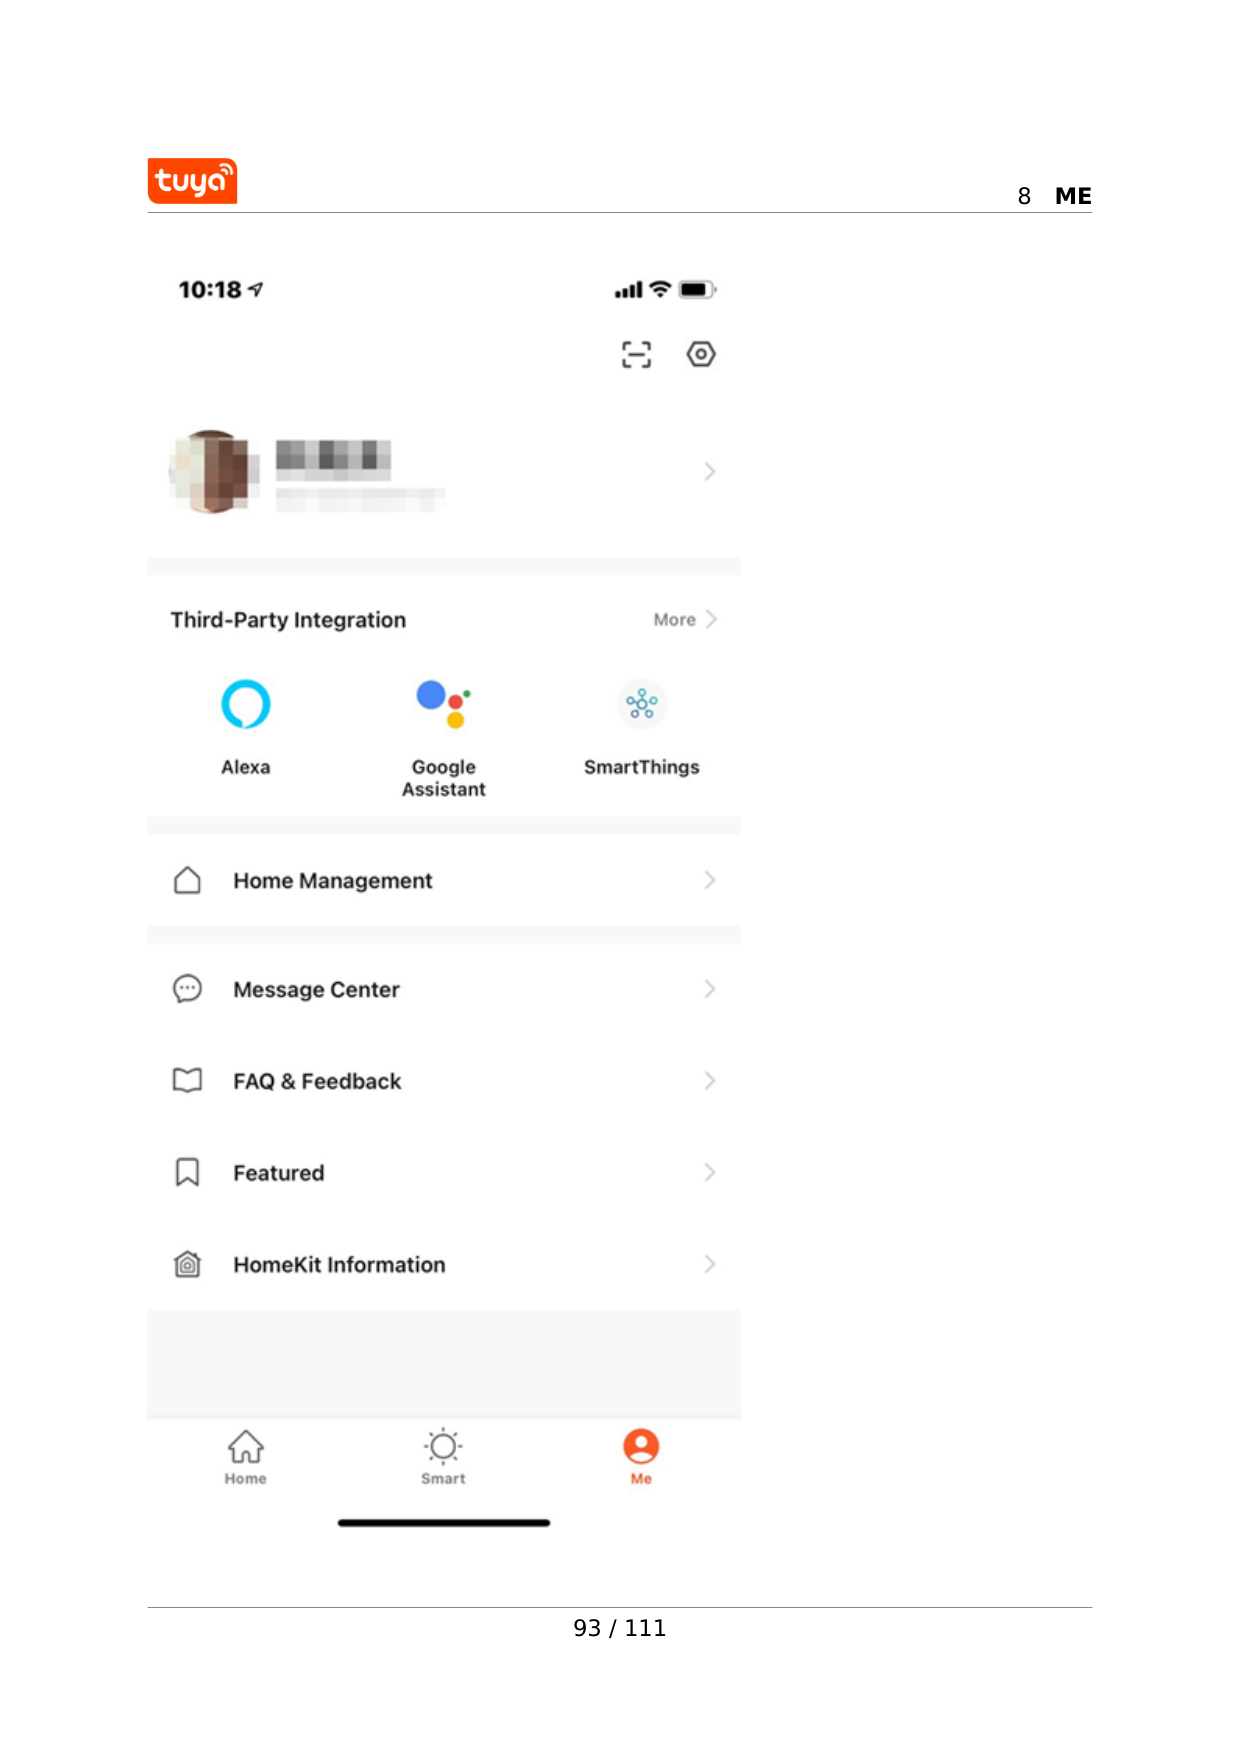
8
Me
93 / 111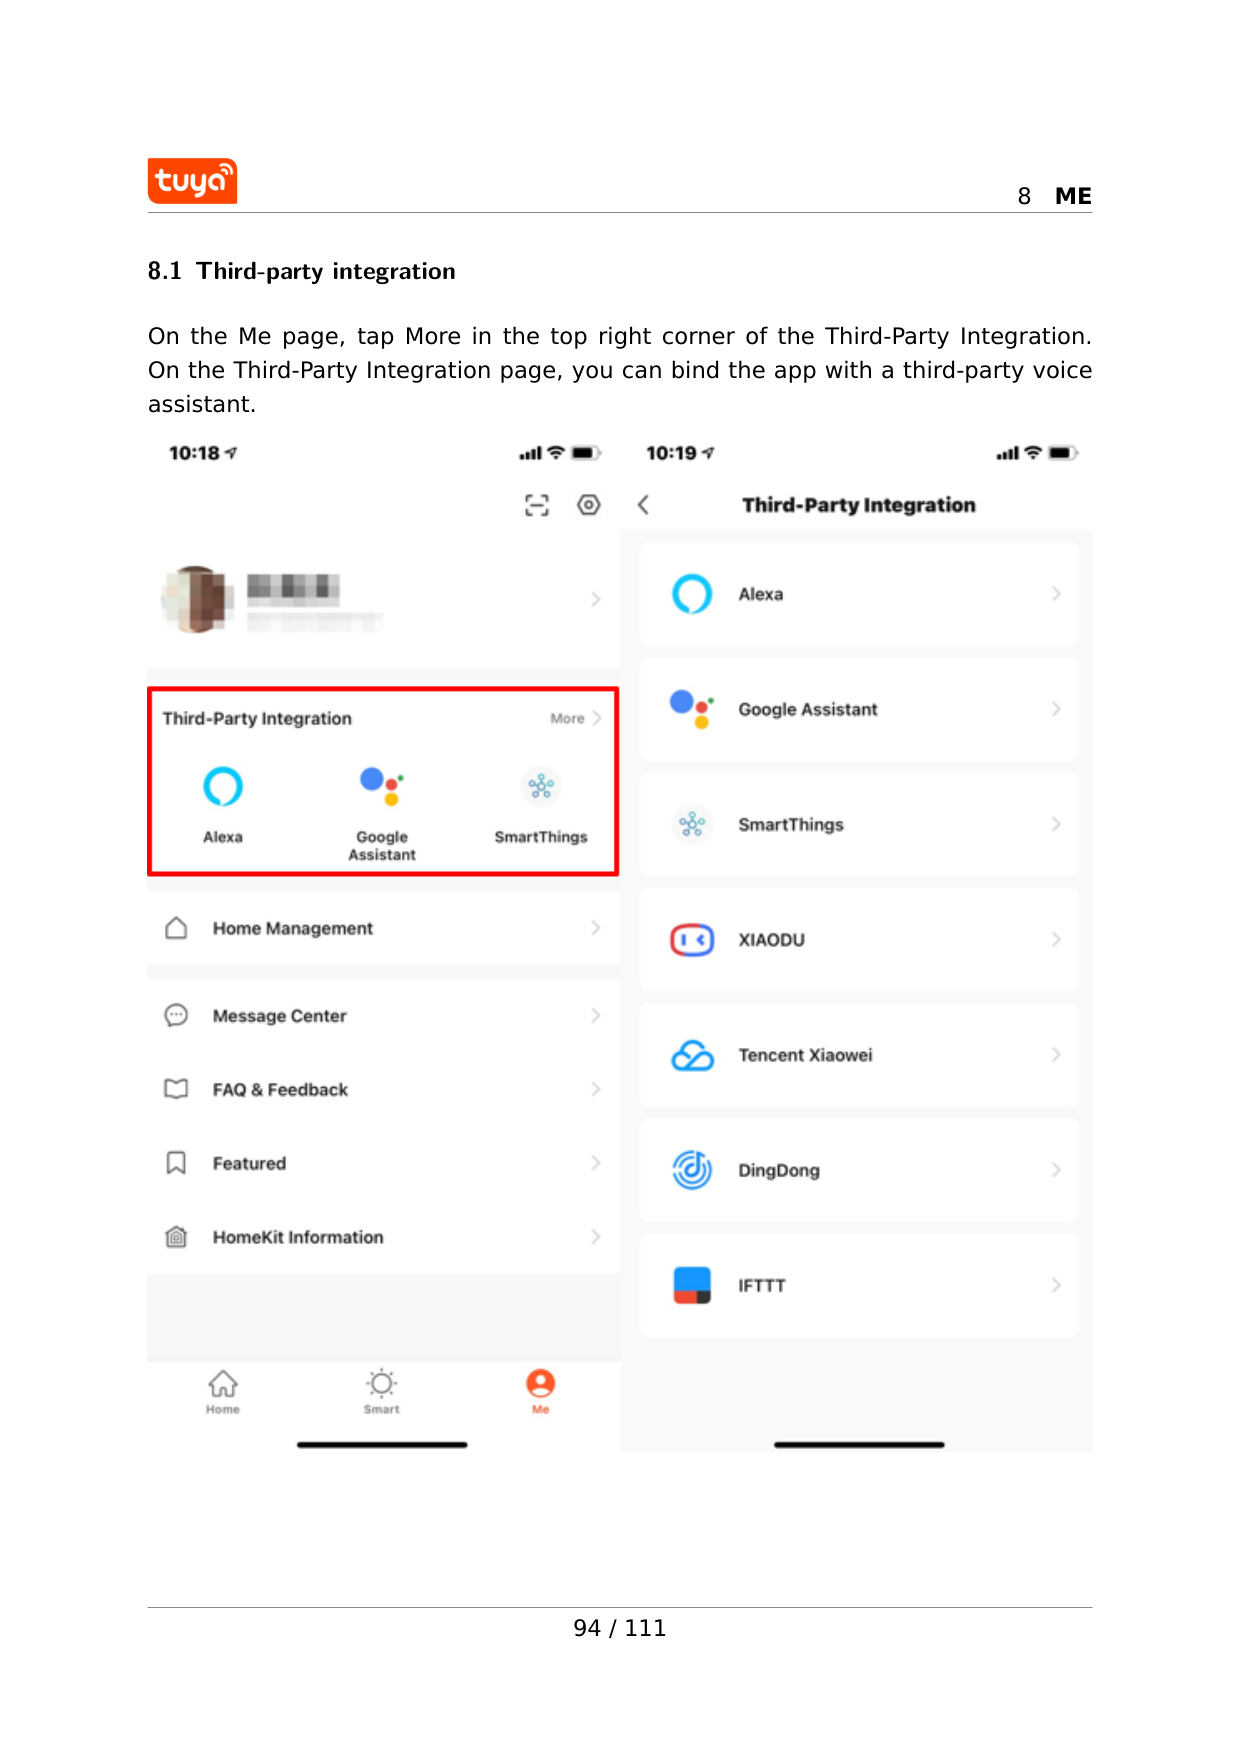
8
Me
8.1 Third-party integration On the Me page, tap More in the top right corner of the Third-Party Integration. On the Third-Party Integration page, you can bind the app with a third-party voice assistant. 94 / 111
8
Me
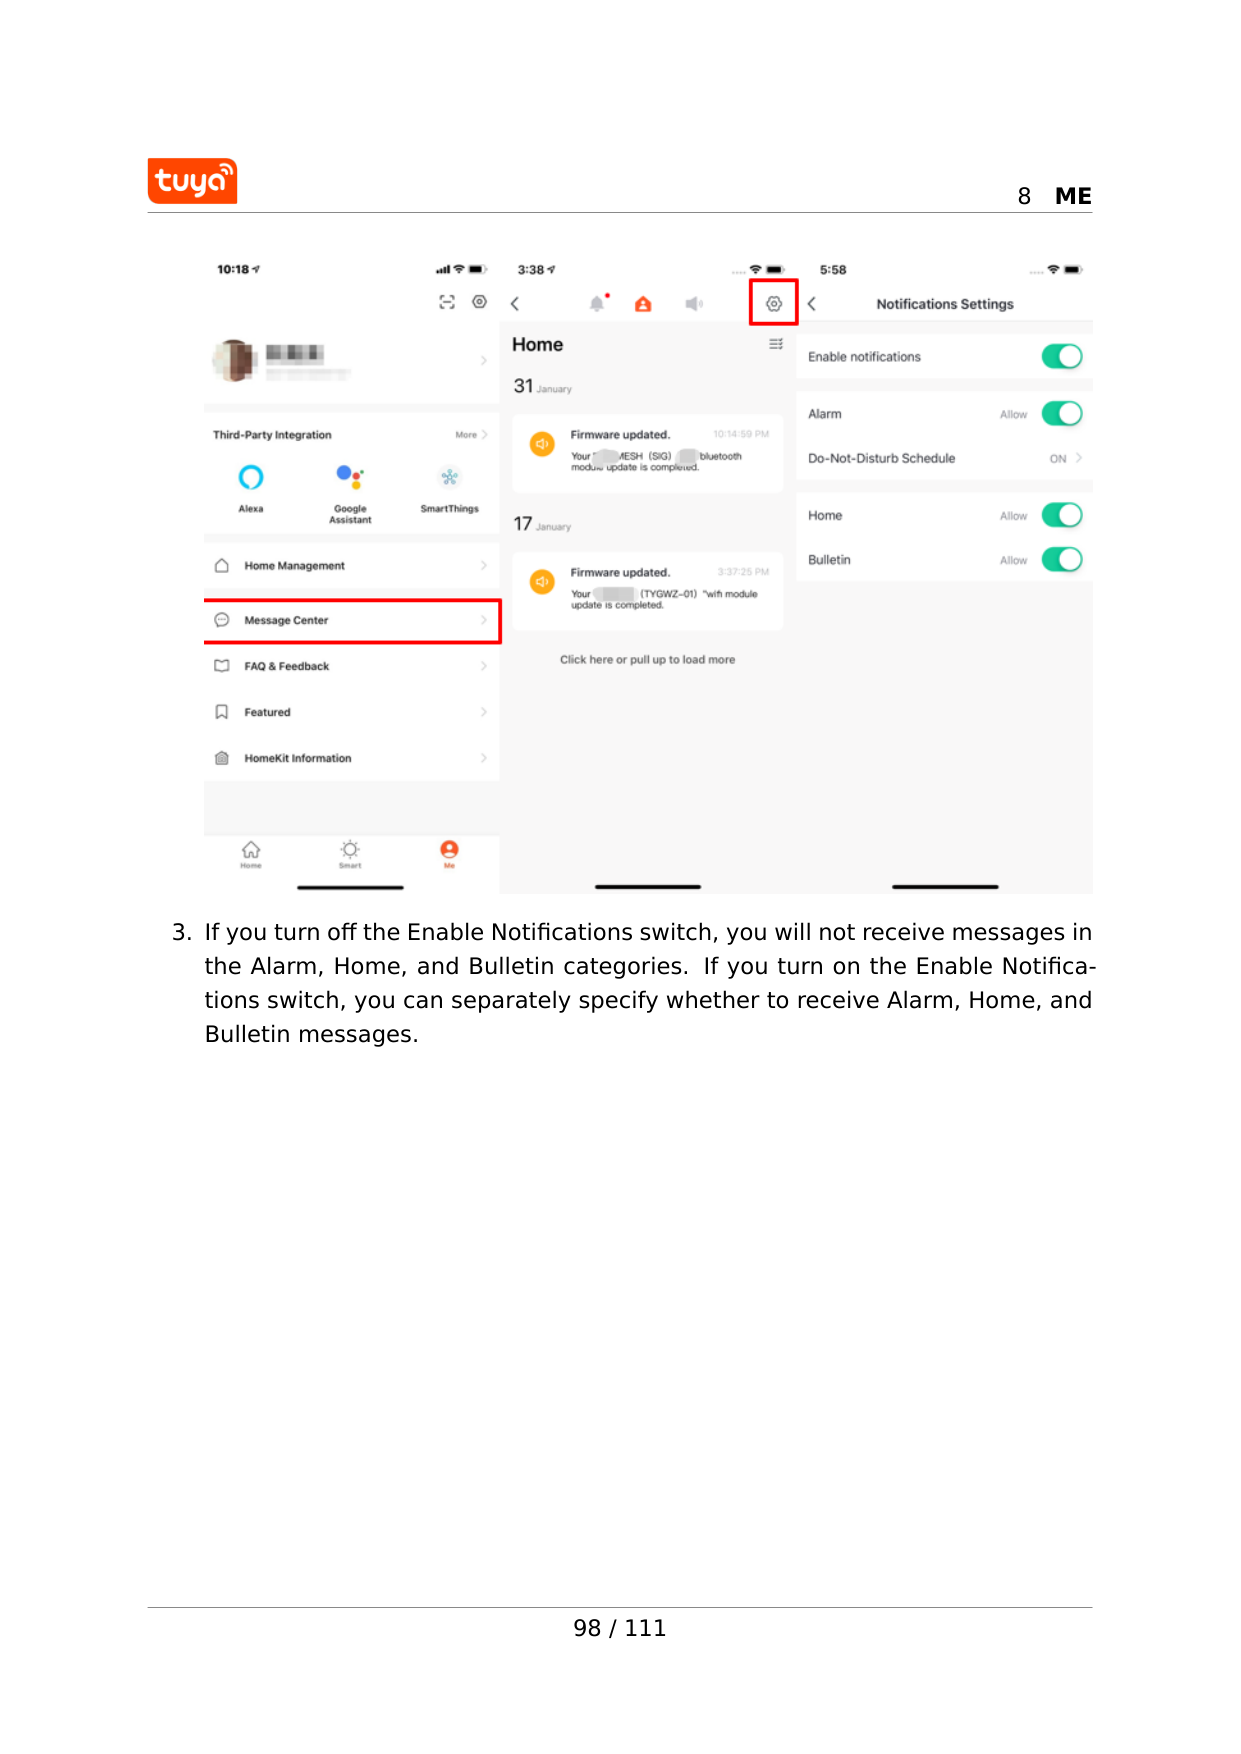
8.2 Message center Three types of messages are displayed in Message Center: Alarm, Home, and Bul- letin: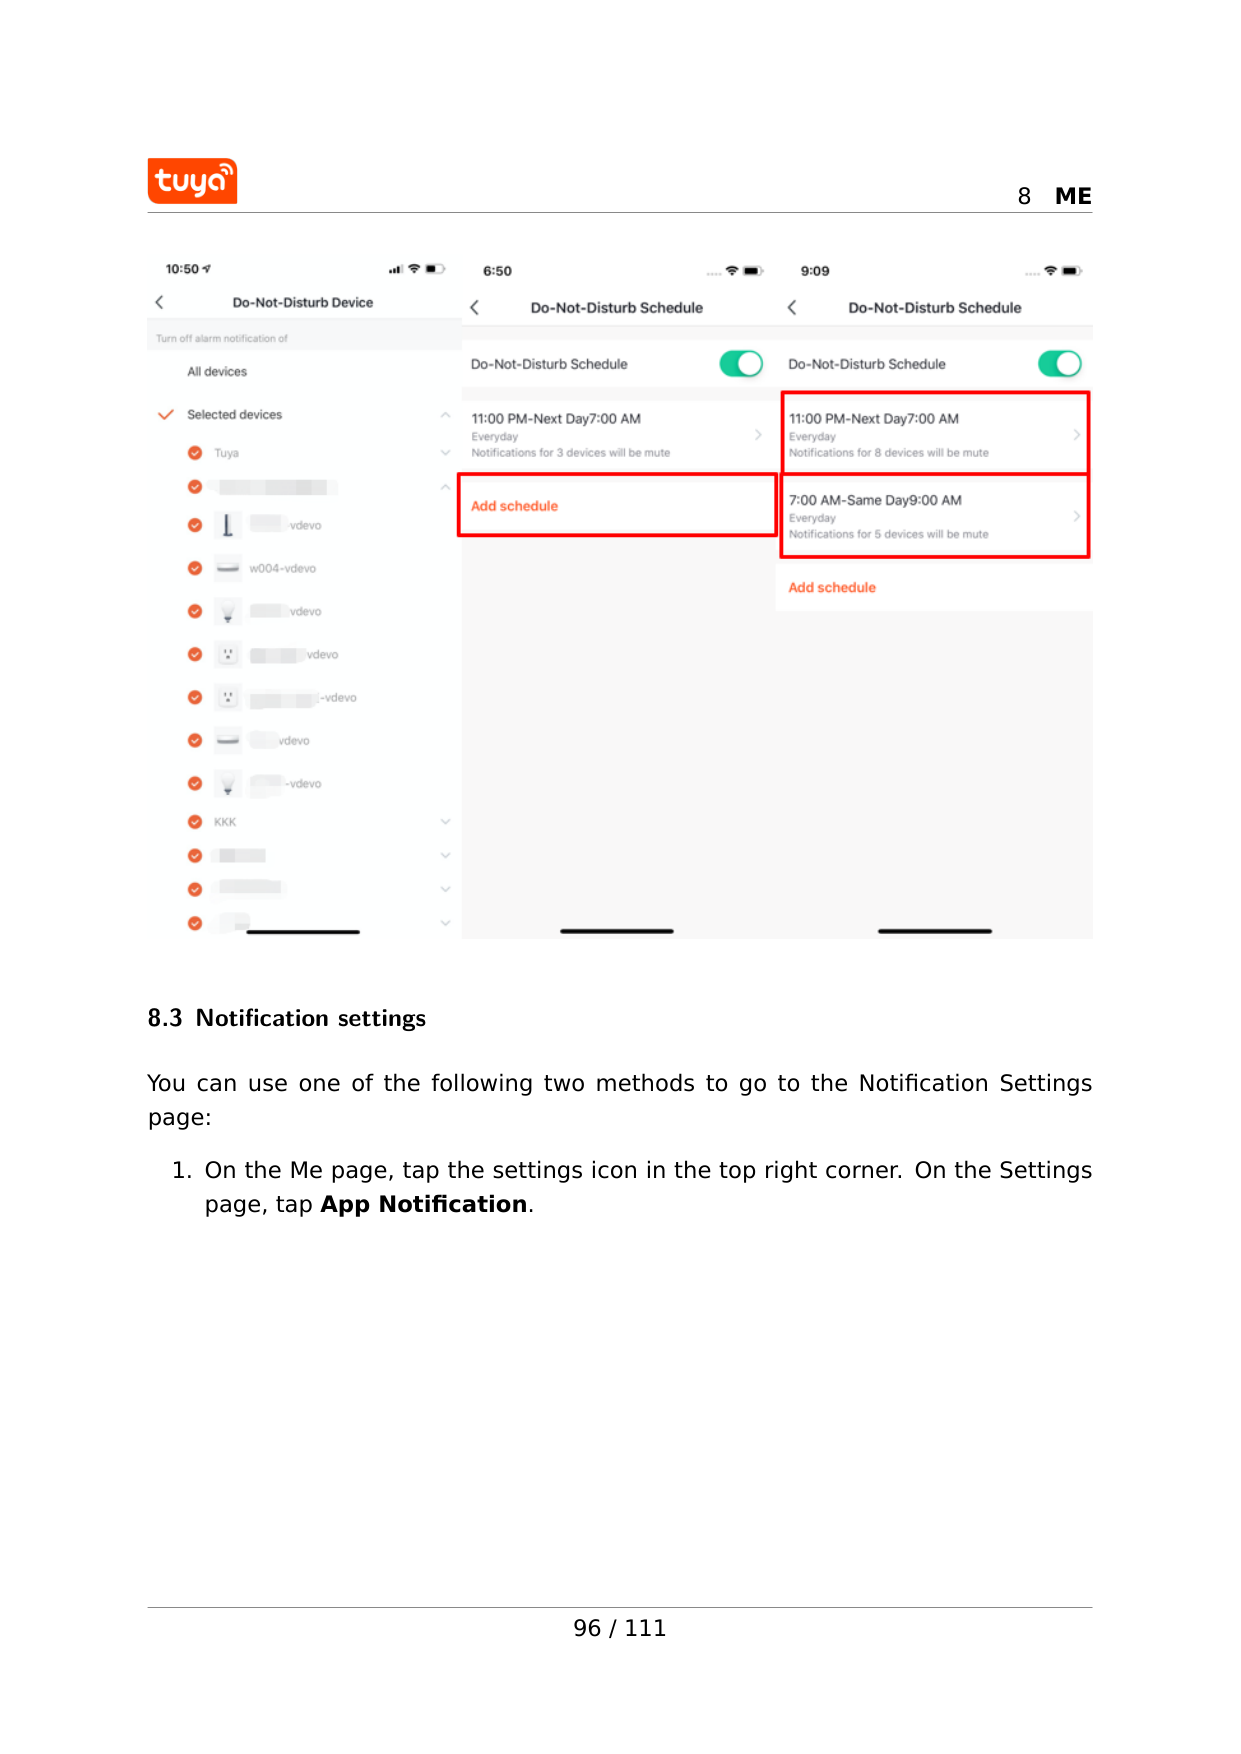
8
Me
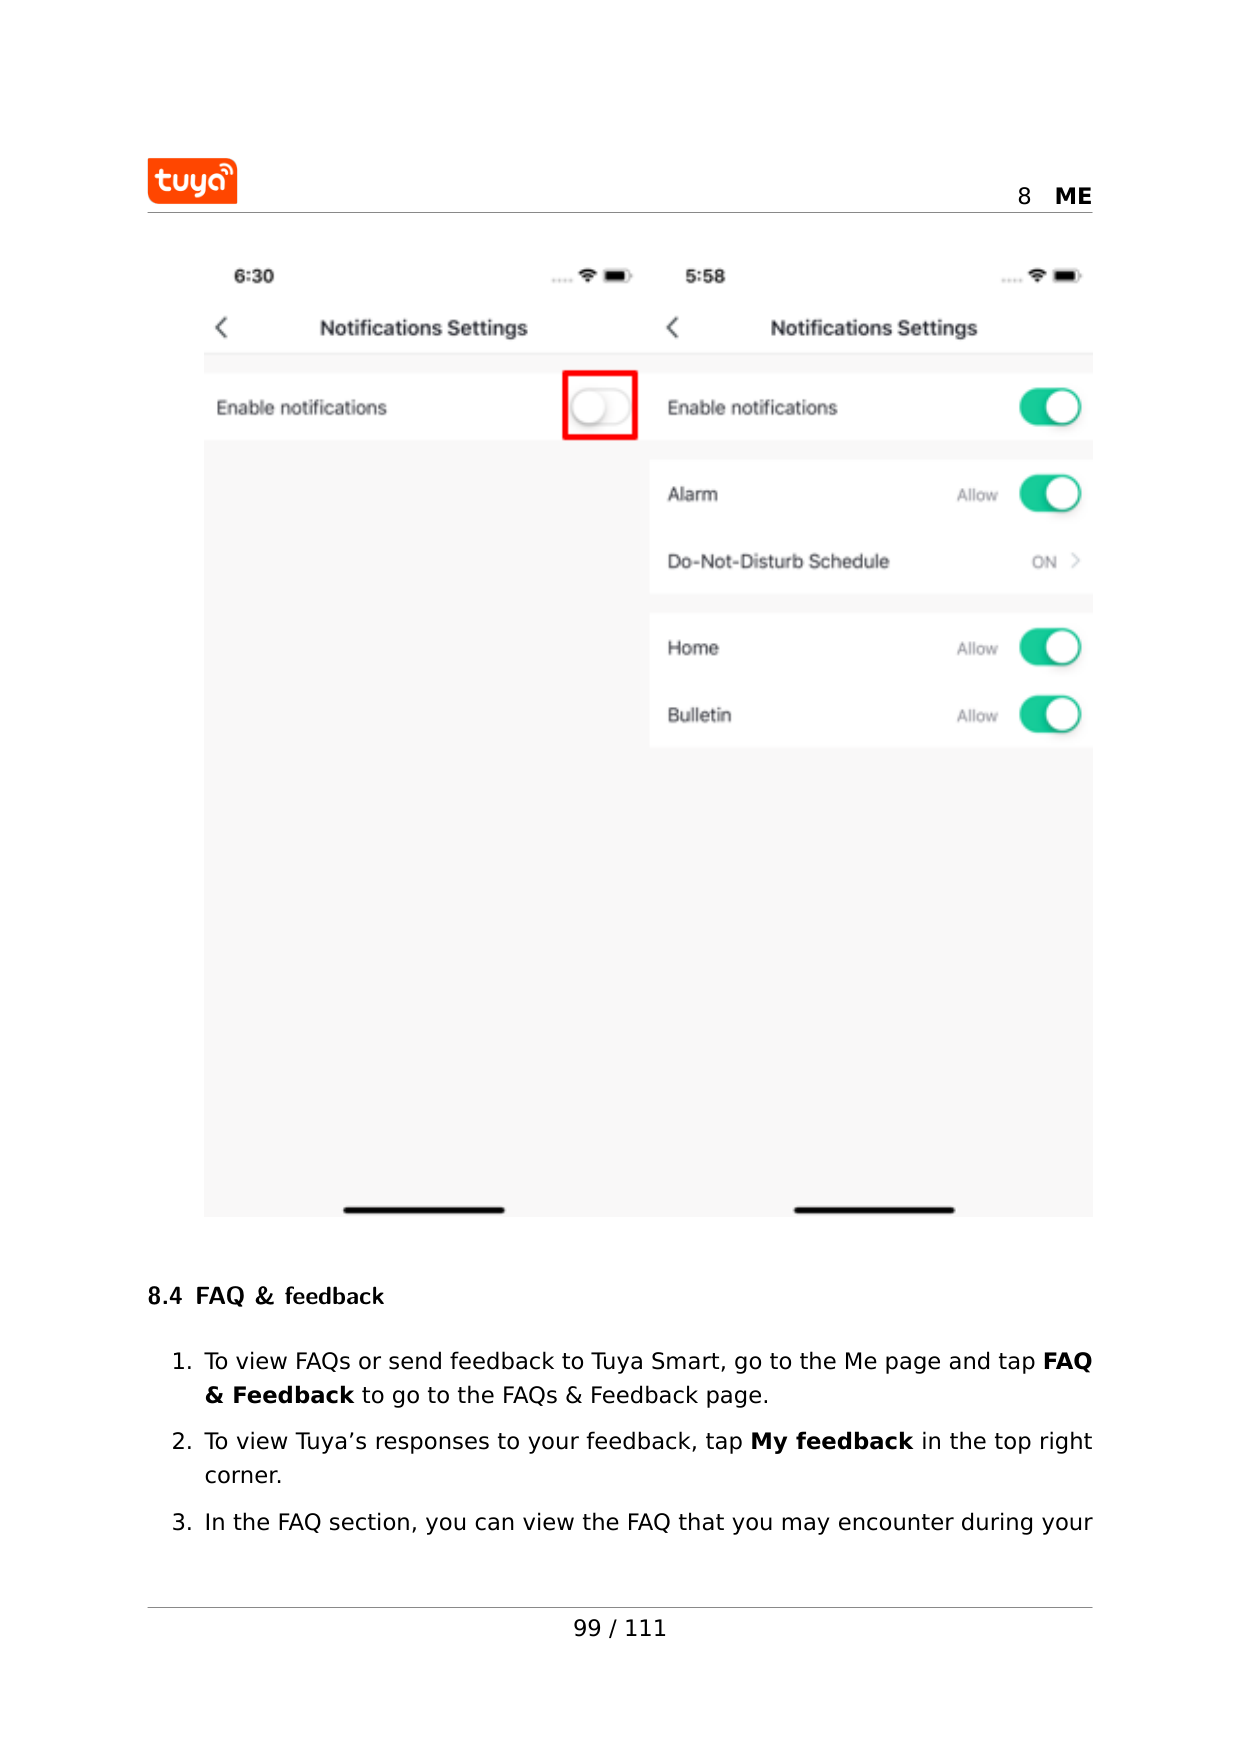
8.3 Notification settings You can use one of the following two methods to go to the Notification Settings page: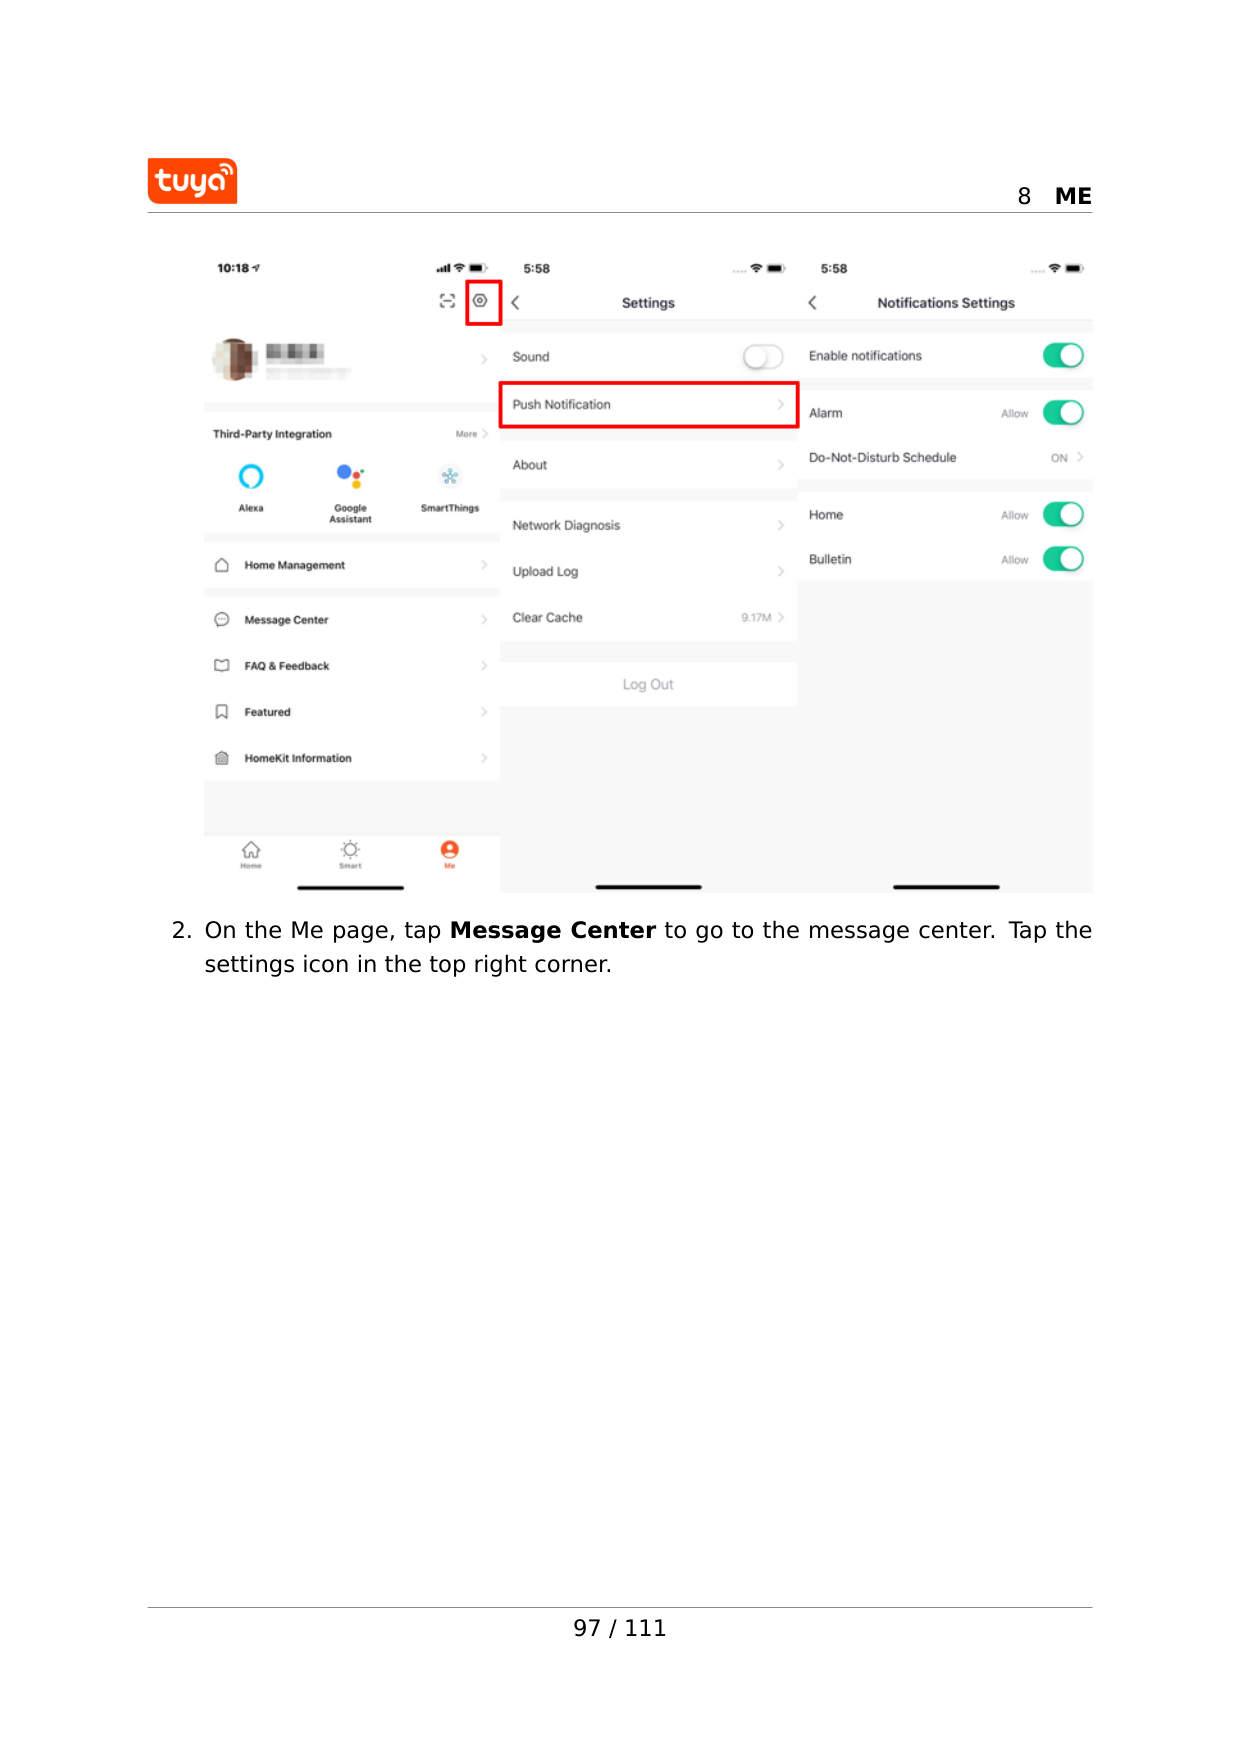
8
Me
8
Me
8
Me
8.4 FAQ & feedback
8
Me
use of the app.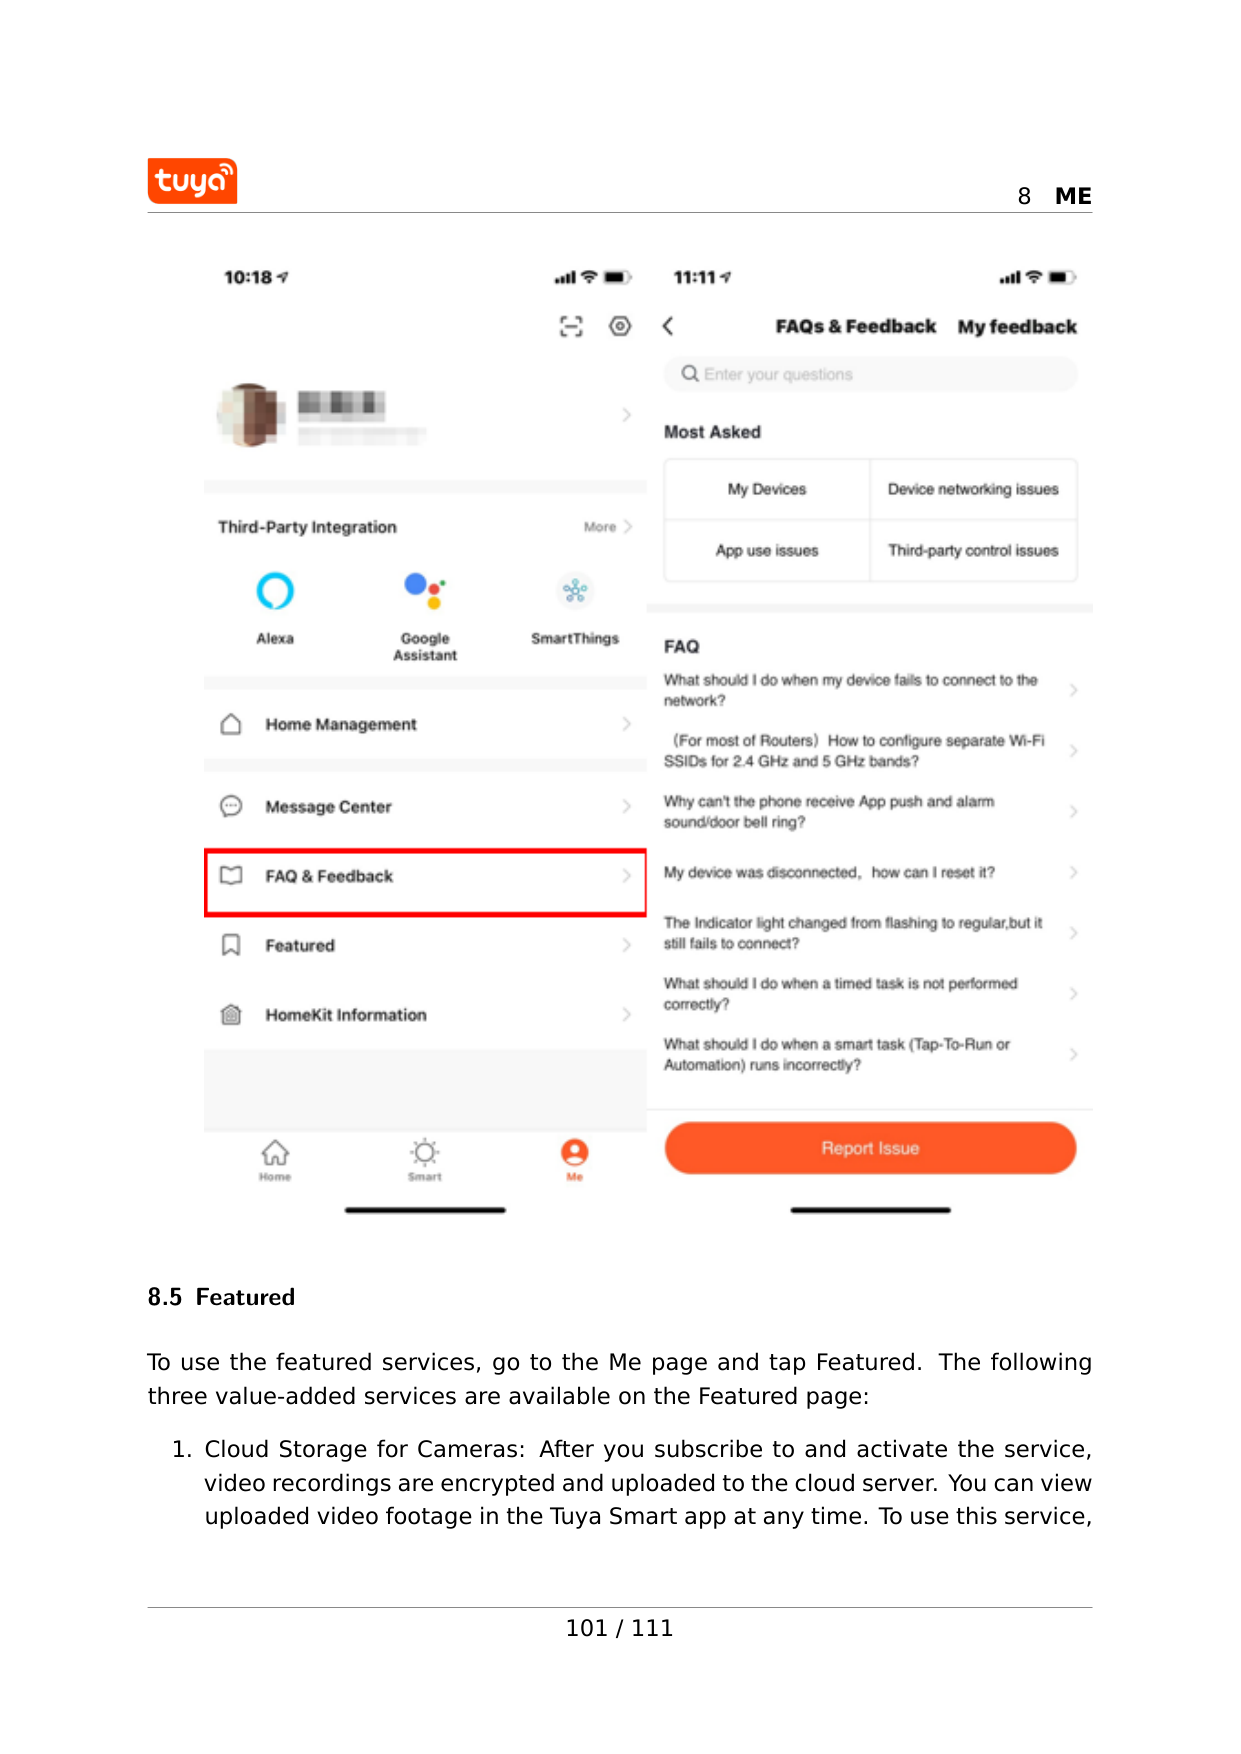
8
Me
8.5 Featured To use the featured services, go to the Me page and tap Featured. The following three value-added services are available on the Featured page:
8
Me
you must add one or more smart cameras to the Tuya Smart app. Previously uploaded videos cannot be downloaded.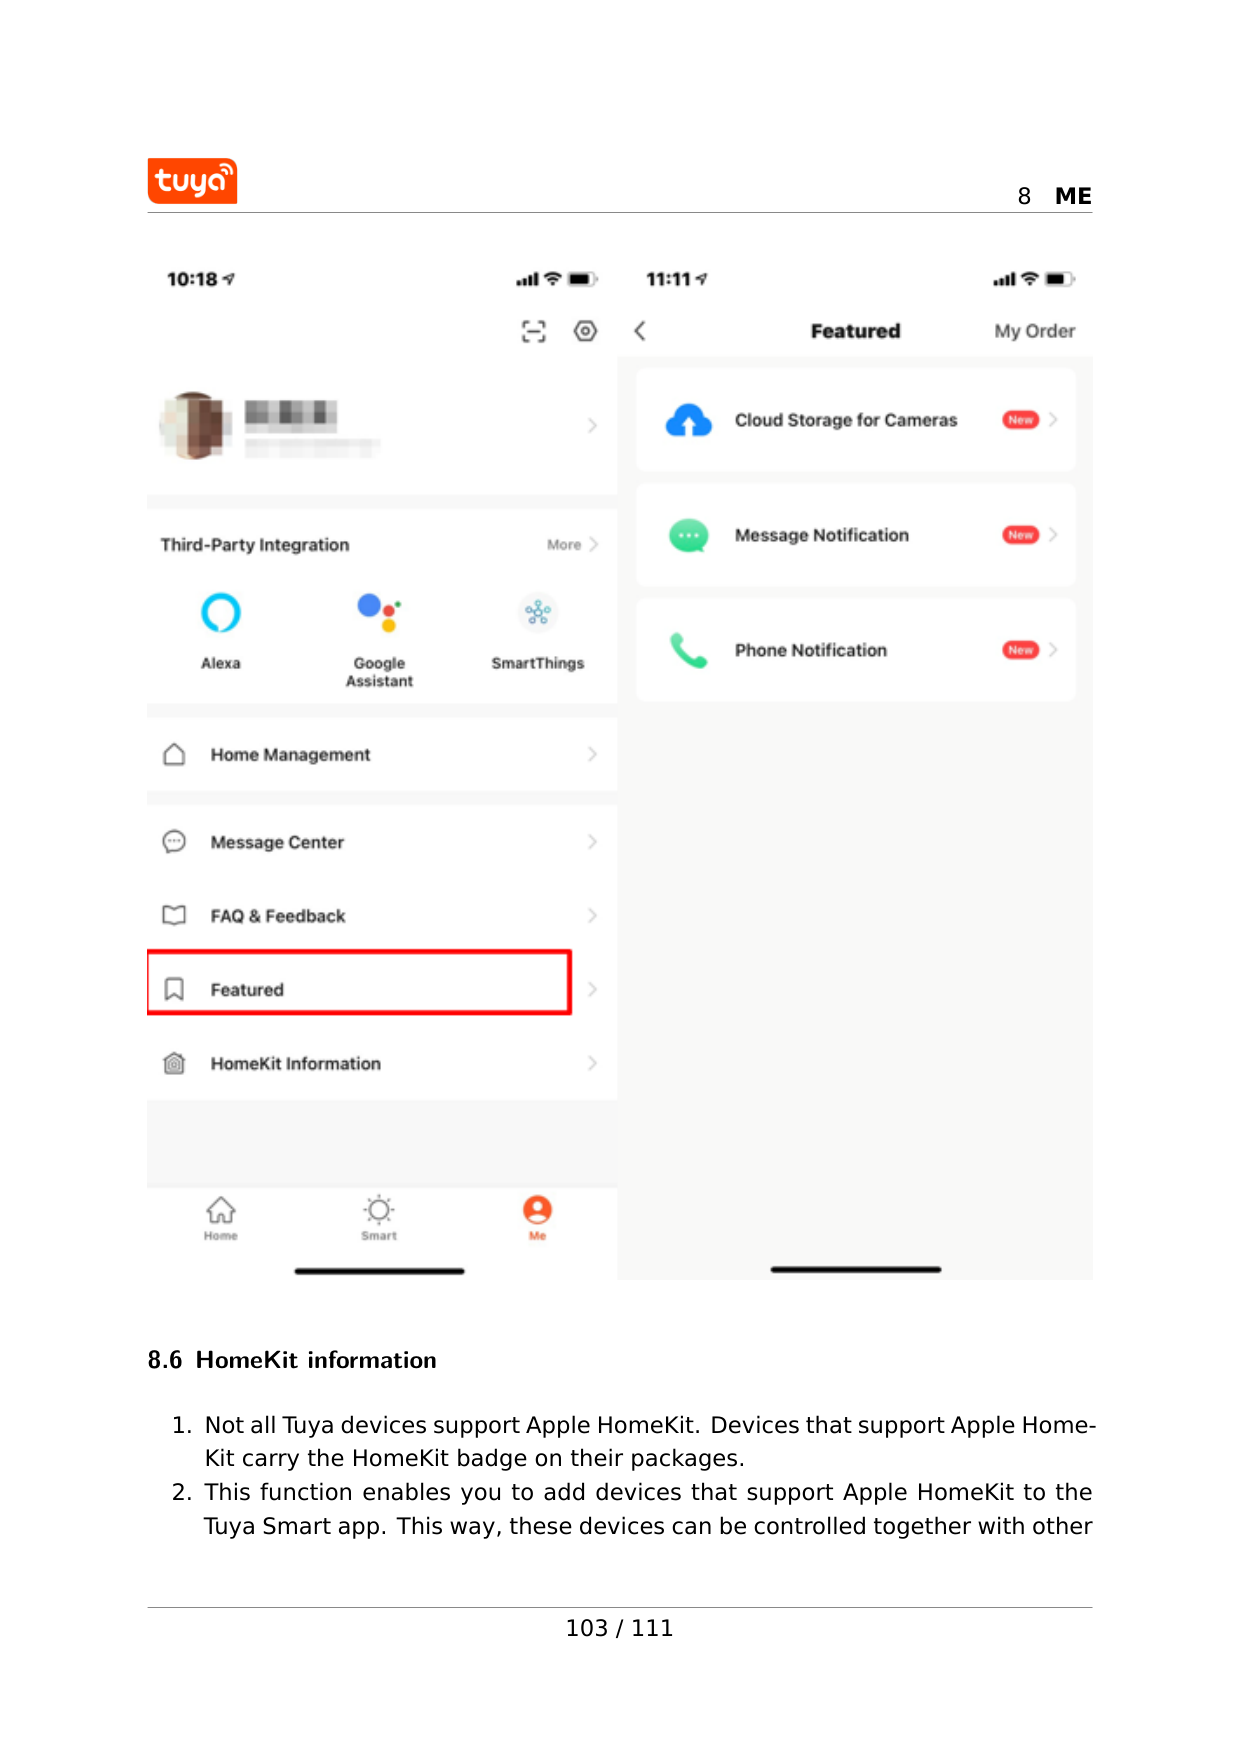
8
Me
8.6 HomeKit information
8
Me
devices added in the Tuya Smart app based on scene linkages.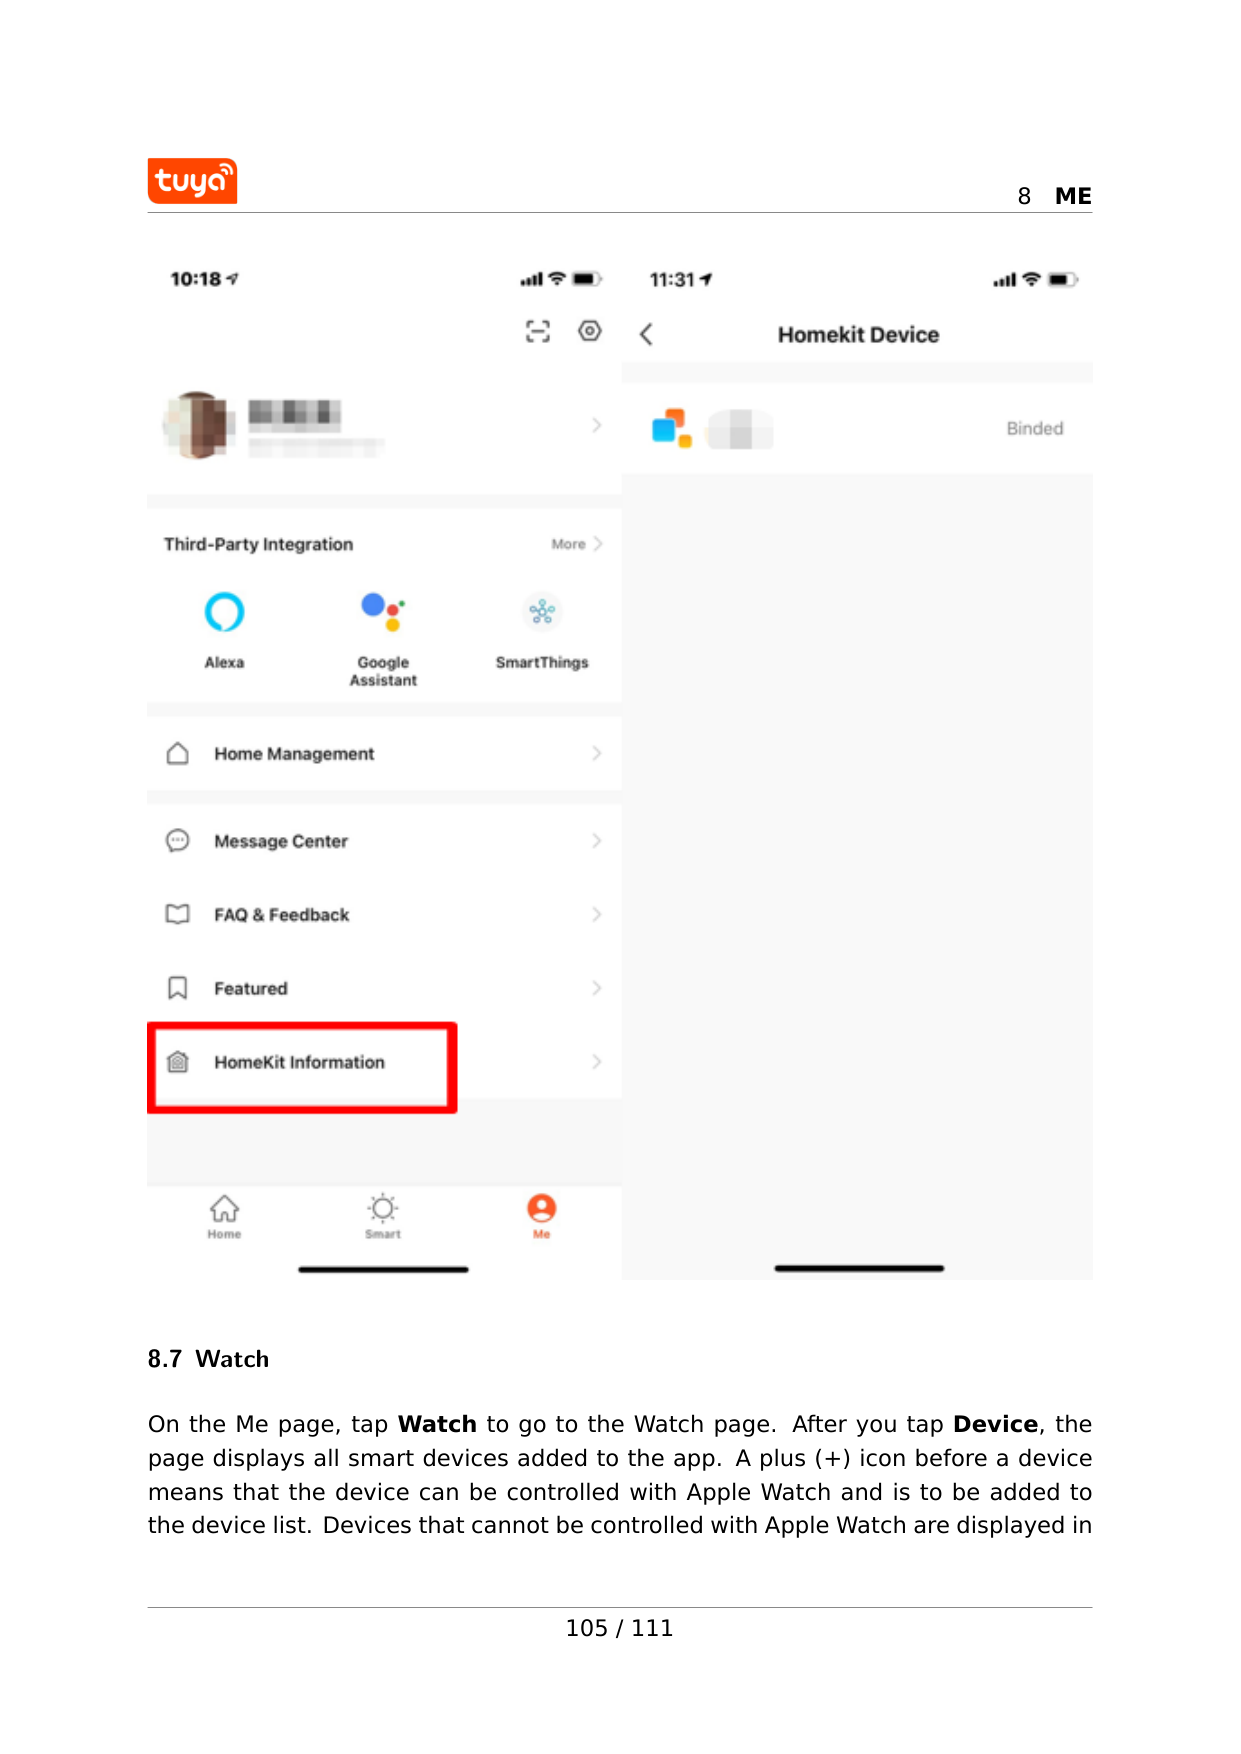
8
Me
8.7 Watch On the Me page, tap Watch to go to the Watch page. After you tap Device, the page displays all smart devices added to the app. A plus (+) icon before a device means that the device can be controlled with Apple Watch and is to be added to the device list. Devices that cannot be controlled with Apple Watch are displayed in 105 / 111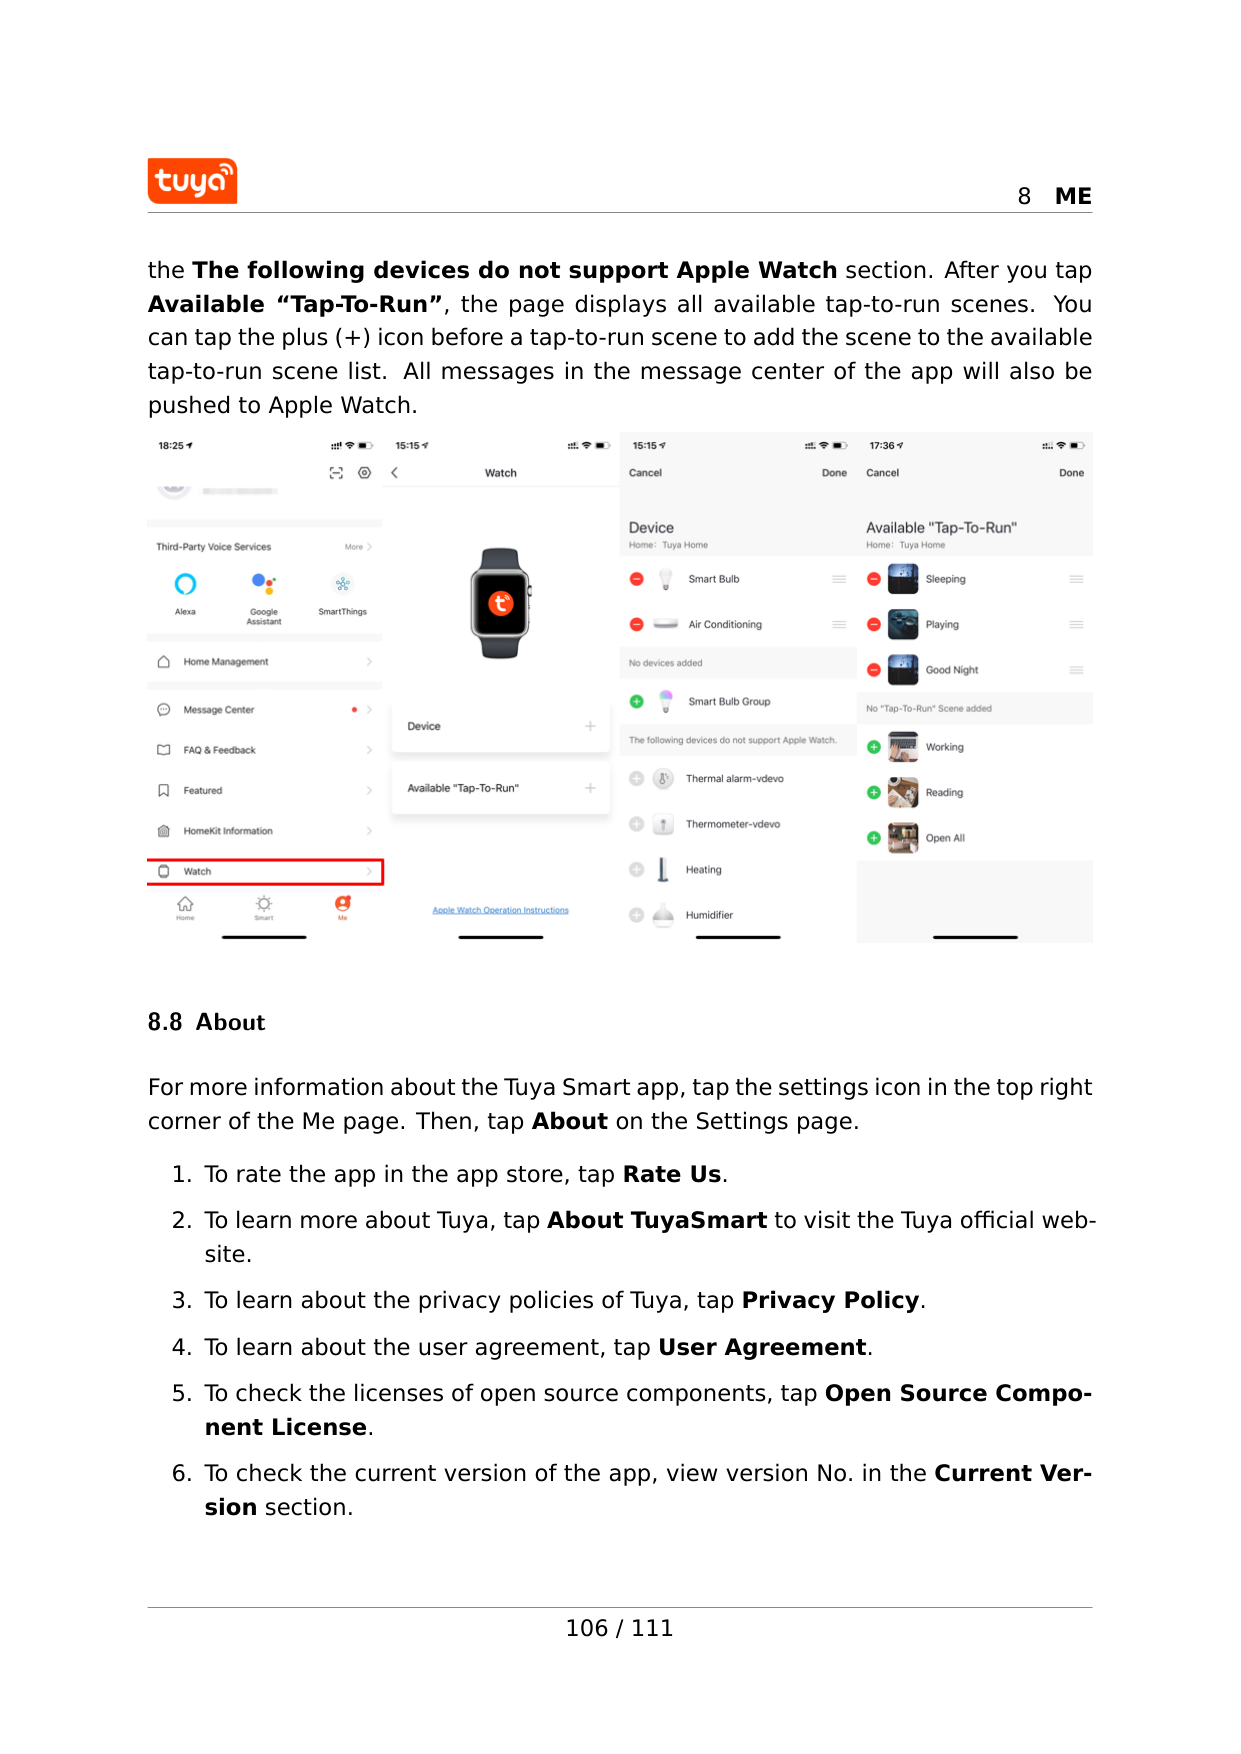
8
Me
the The following devices do not support Apple Watch section. After you tap Available “Tap-To-Run”, the page displays all available tap-to-run scenes. You can tap the plus (+) icon before a tap-to-run scene to add the scene to the available tap-to-run scene list. All messages in the message center of the app will also be pushed to Apple Watch. 8.8 About For more information about the Tuya Smart app, tap the settings icon in the top right corner of the Me page. Then, tap About on the Settings page.
8
Me
8.9 Account You can view your account information and change the profile photo, nickname, temperature scale, and time zone on the Account page. To go to the Account page, tap your profile photo on the Me page. You can tap Account and Security on the Account page to go to the Account and 107 / 111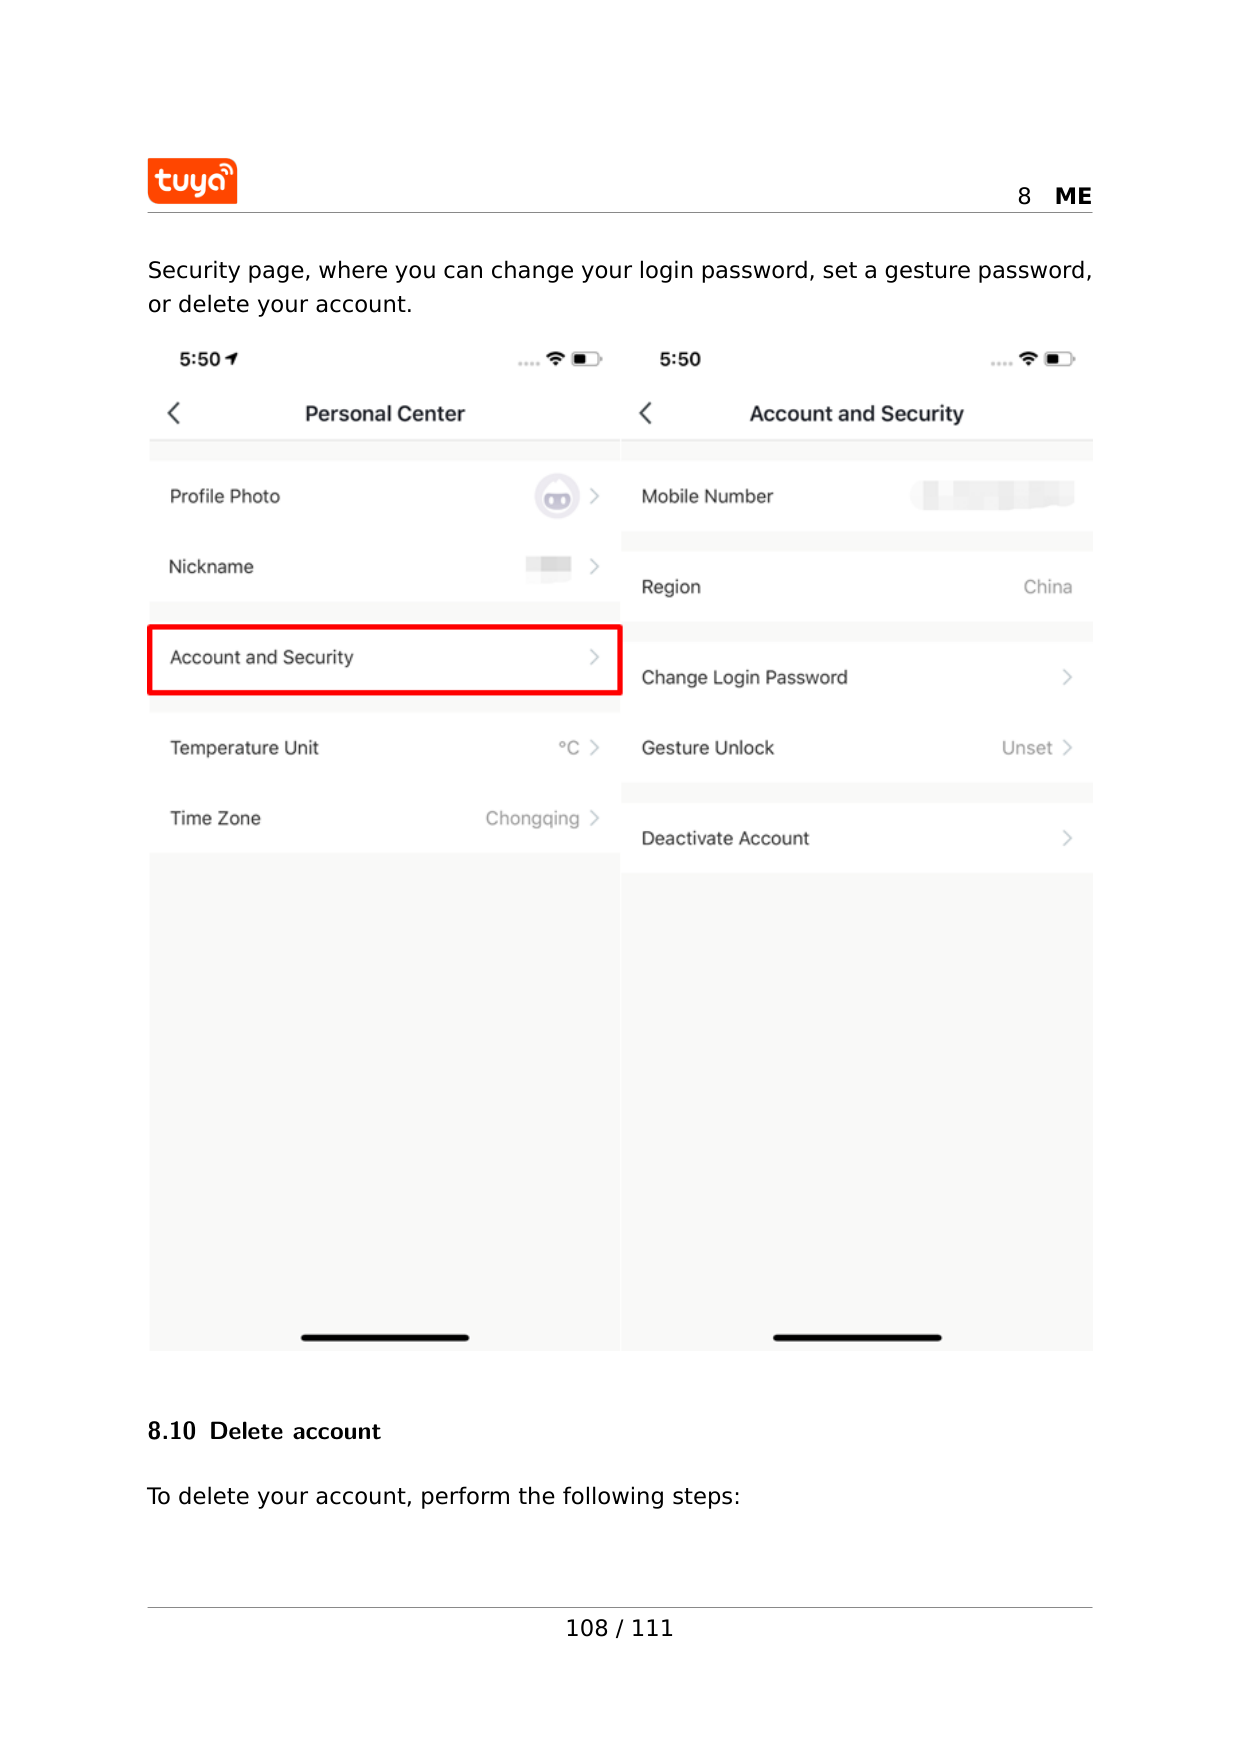
8
Me
Security page, where you can change your login password, set a gesture password, or delete your account. 8.10 Delete account To delete your account, perform the following steps: 108 / 111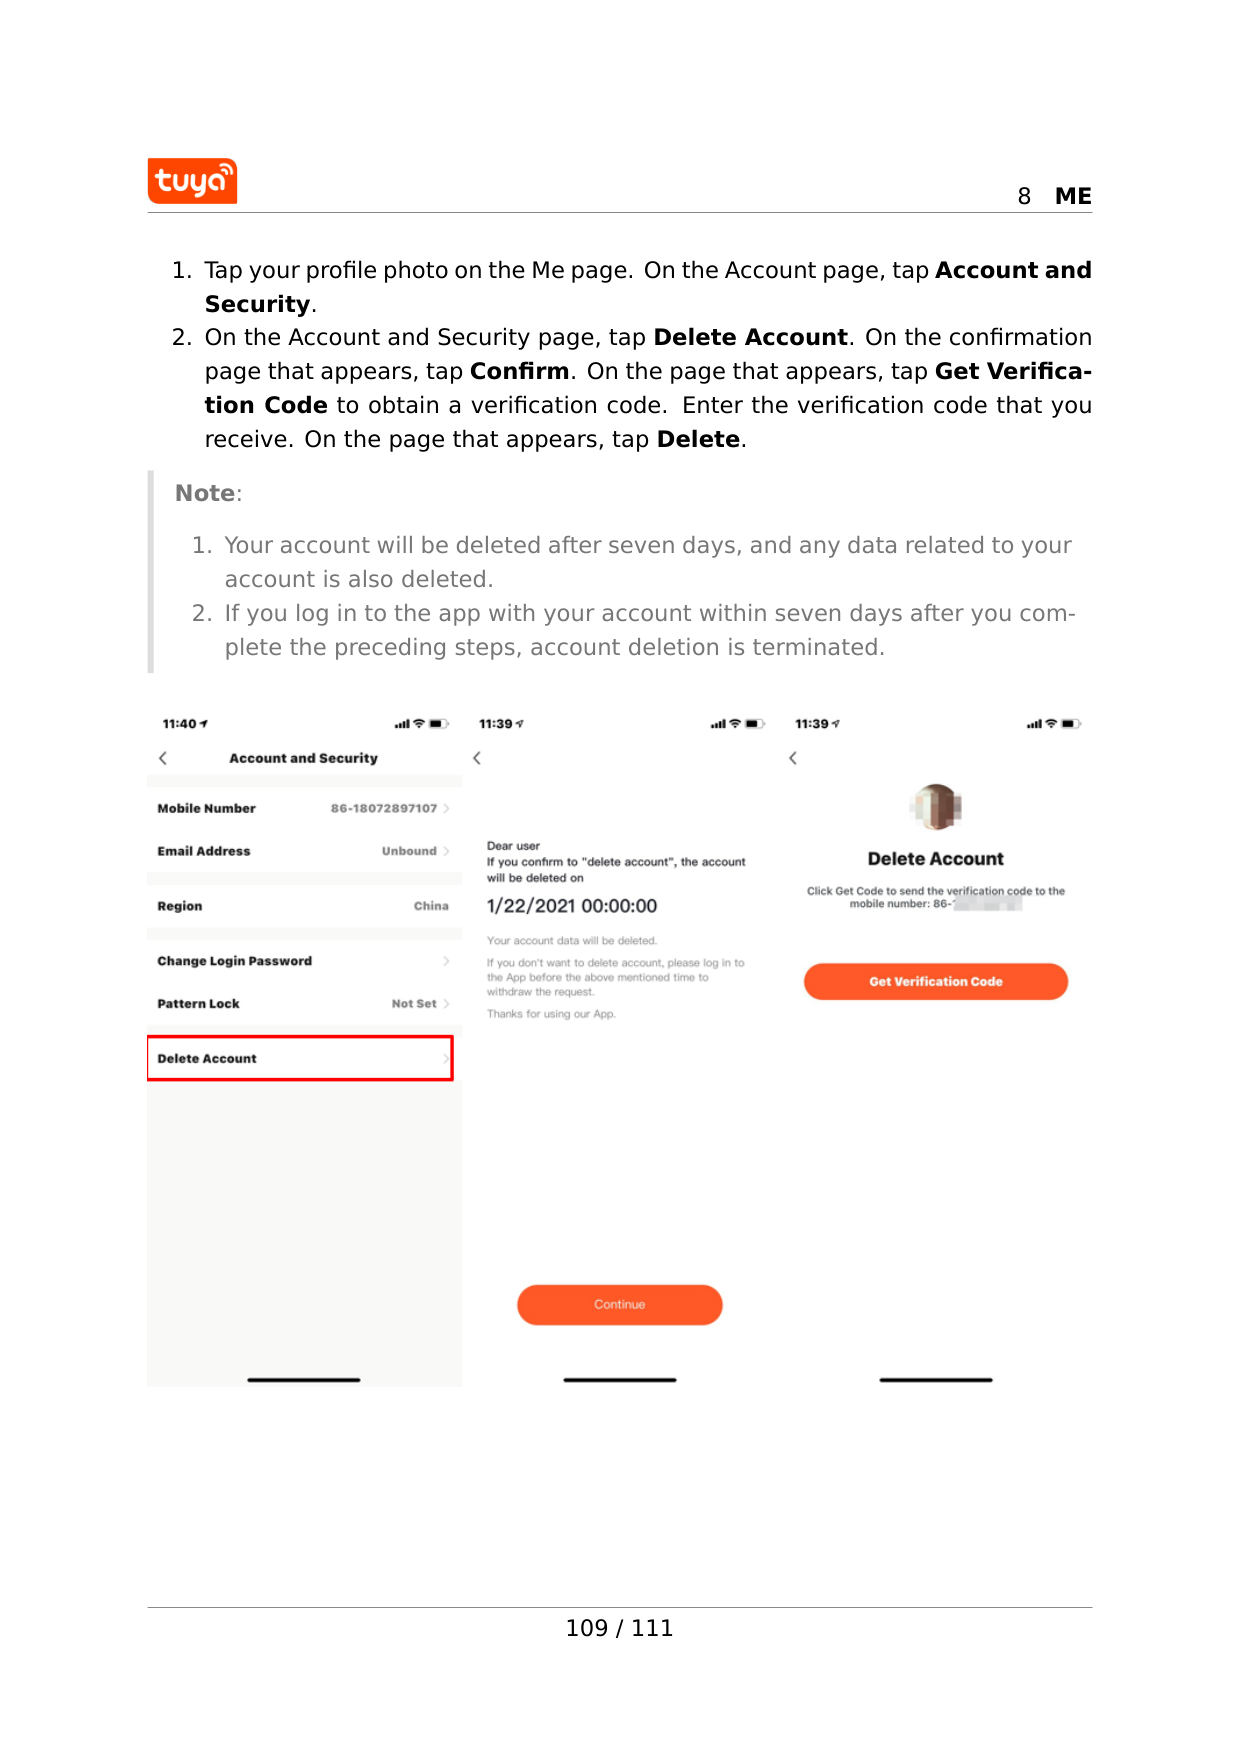
8
Me
8
Me
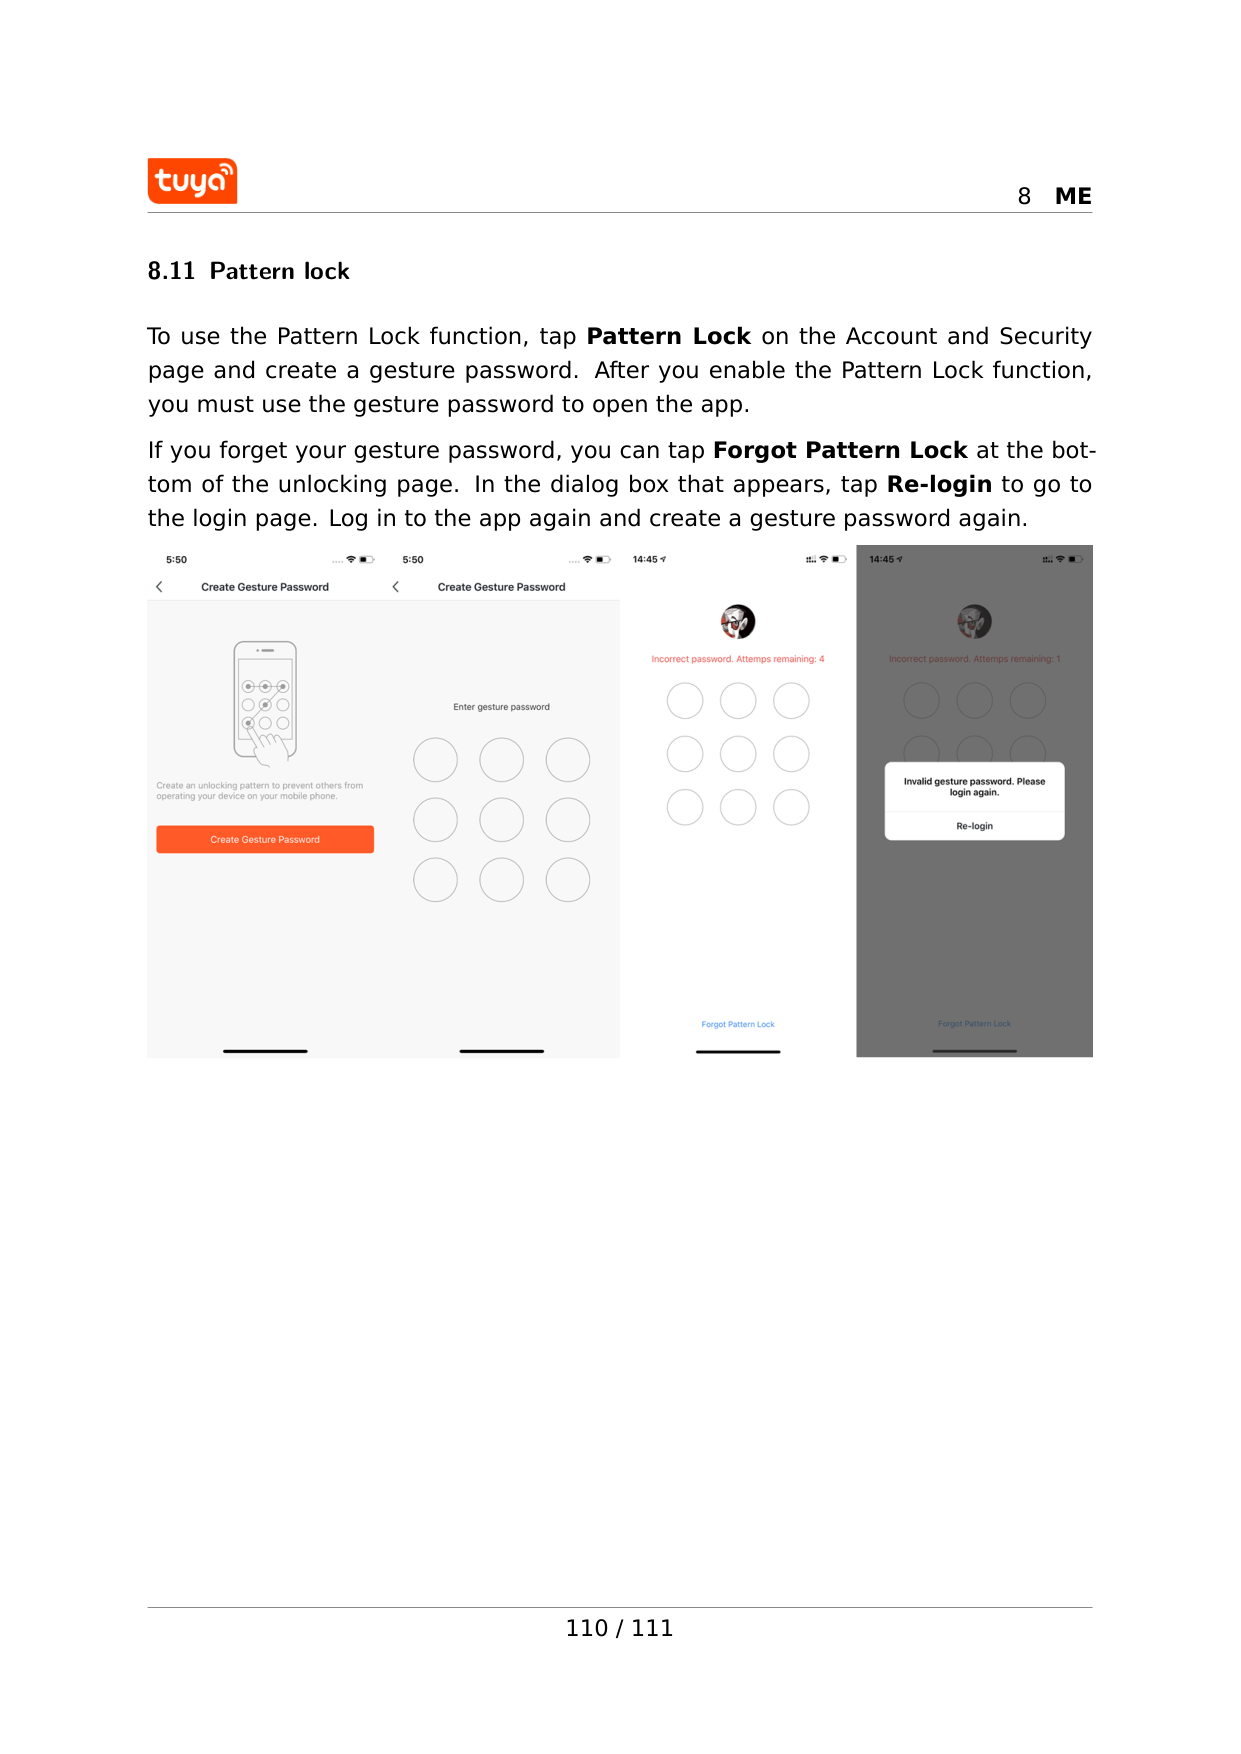
8.11 Pattern lock To use the Pattern Lock function, tap Pattern Lock on the Account and Security page and create a gesture password. After you enable the Pattern Lock function, you must use the gesture password to open the app. If you forget your gesture password, you can tap Forgot Pattern Lock at the bot- tom of the unlocking page. In the dialog box that appears, tap Re-login to go to the login page. Log in to the app again and create a gesture password again. 110 / 111
9