
Ask AI
— answers from the official manualAnswers from the official manual.
Common questions
Common Questions
10 totalWhat should I do if my Brandt Bop7538x oven displays 'no water'?
Check that you have filled the tank to the max. level and that it is firmly seated in its housing. Once these items are verified, cooking will automatically restart when the door is closed.
How do I clean the steam generator in my Brandt Bop7538x oven?
Pour half a cup of white alcohol vinegar onto the steam generator, allow it to sit for several minutes, and then clean and rinse with water. Do not use sponges, abrasive powders or coffee maker descaler.
Can I cancel the minute minder on my Brandt Bop7538x oven?
Return to the timer’s menu and set it to 00:00. If you do not confirm, it will be saved automatically after a few seconds.
What is the maximum capacity of the water tank for my Brandt Bop7538x oven?
The removable tank has a capacity of approximately one litre when filled to its maximum level.
How do I unlock the keypad on my Brandt Bop7538x oven?
Press + and - simultaneously until the symbol disappears from the screen to unlock the keypad.
What is the operating principle of steam cooking in my Brandt Bop7538x oven?
The water in the tank is conveyed into the cavity via a pipe. It turns into steam when it contacts the floor’s hot surface, creating real steaming conditions.
Full Manual
16 pages

#### EN - USER GUIDE BRANDT BUILT-IN STEAM OVEN 26L 315129/BKV6132X
A1.1
2050
1050
450
560 550
542
592
442
MAX 425
B
455
|C| |---|
|B
A D
C
F
G
E| |---|
2.4
|fig.1
fig.2
| |---|
|fig.3| |---|
|fig.4| |---|
3.1
| | | |---|---| | | |
3.3
3.4
| | | |---|---| | | |
| | | |---|---| | | |
| | | |---|---| | | |
| | | |---|---| | | |
4.1
| | | |---|---| | | |
| | | |---|---|

| | |
| | | |---|---| | | |
X2
| | | |---|---| | | |
| | | |---|---| | | |
| | | |---|---| | | |
4.2
| | | |---|---| | | |
| | | |---|---| | | |
| | | |---|---| | | |
4.3
4.4
| | | |---|---| | | |
| | | |---|---| | | |
Dear Customer,
Thank you for purchasing and placing your trust in a BRANDT product.
We have designed and made this product with you, your lifestyle and your requirements in mind so that it meets your expectations. This product benefits from our know-how, our innovative spirit and the passion that has been guiding us for over 60 years.
In a continuous effort to better satisfy your needs, our customer service department is available to listen and answer all your questions and receive any suggestions you may have.

We also invite you to visit our website www.brandt.com where you will find the very latest innovations, along with some additional, useful information.
BRANDT is pleased to be on hand to offer daily support and to help you make the most of your purchase.
Important: Before switching your appliance on, please read this user guide carefully to familiarise yourself quickly with its operation.
Installation1
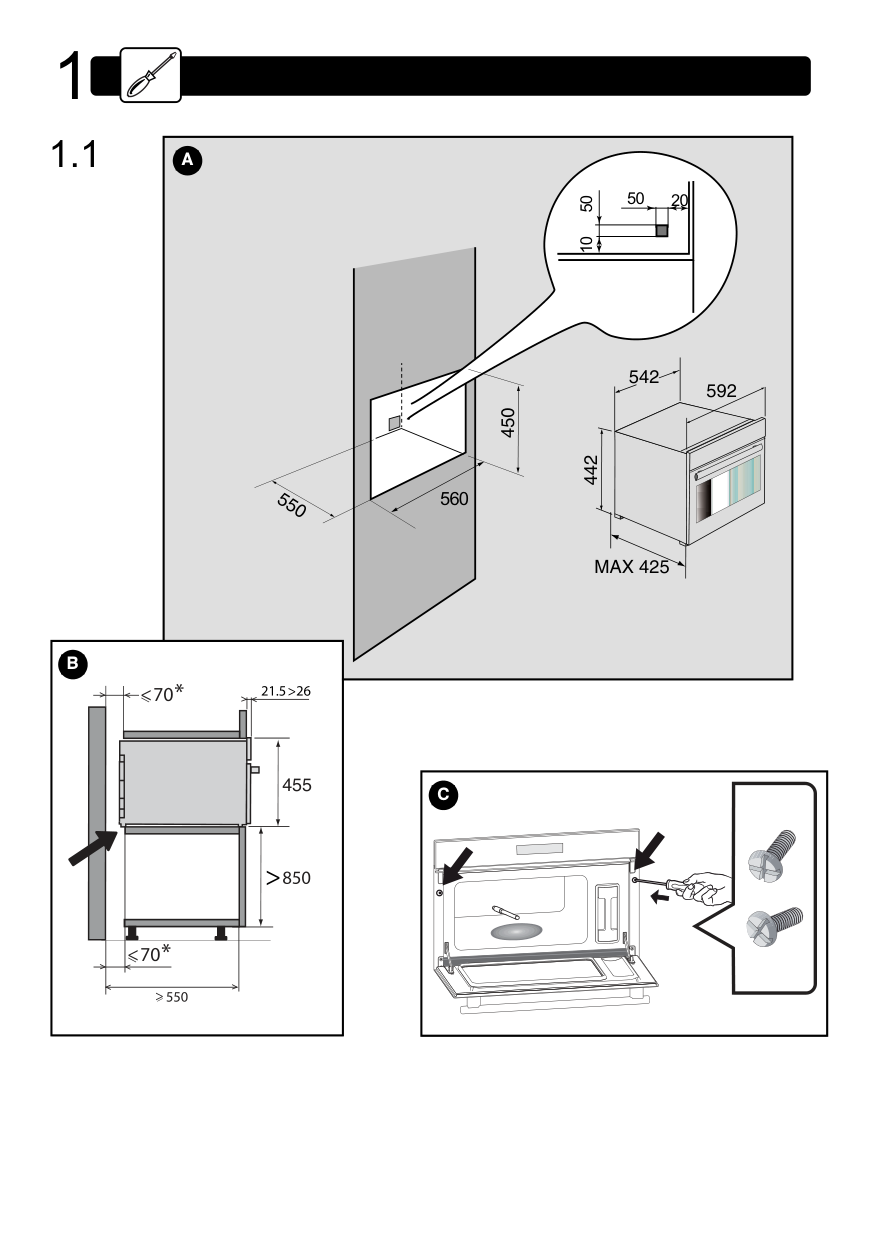
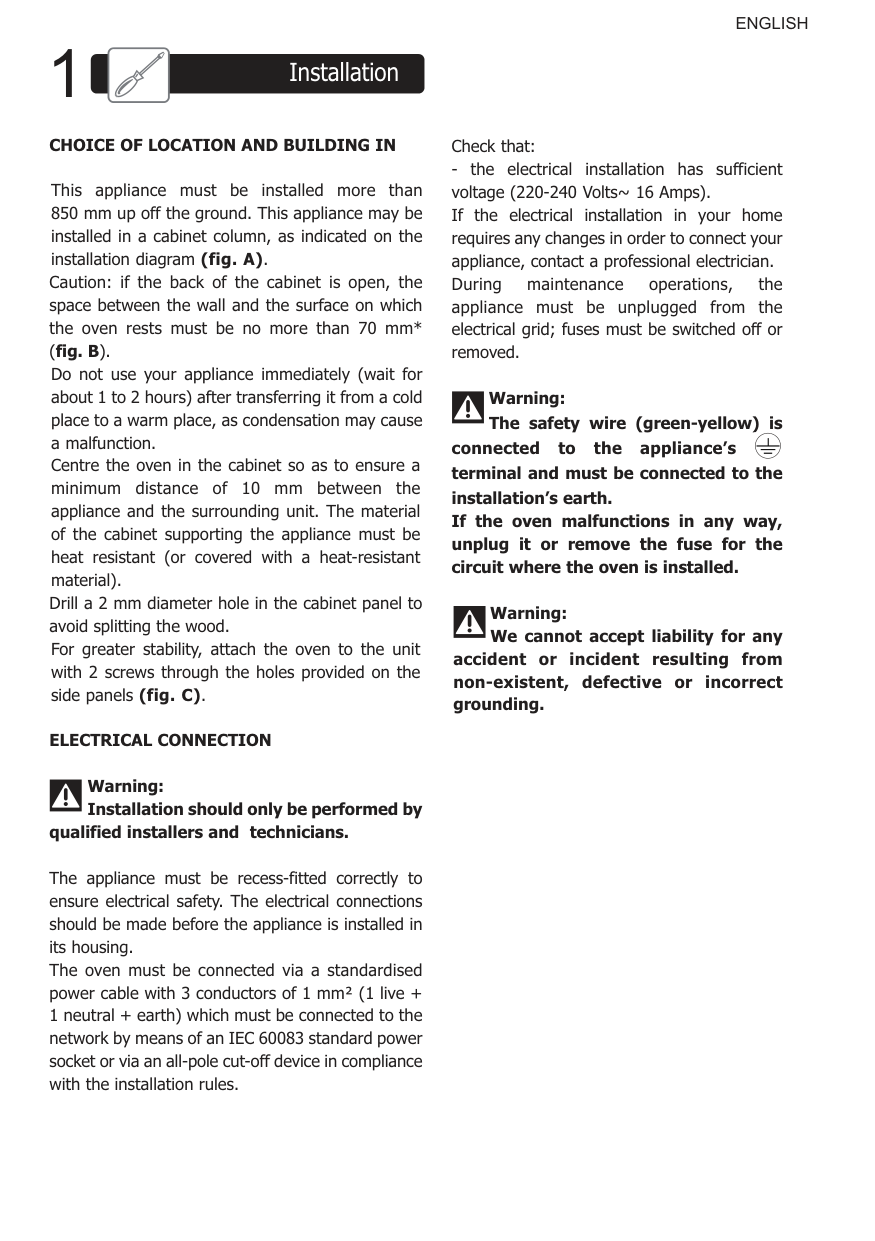
CHOICE OF LOCATION AND BUILDING IN
This appliance must be installed more than 850 mm up off the ground. This appliance may be installed in a cabinet column, as indicated on the installation diagram (fig. A). Caution: if the back of the cabinet is open, the space between the wall and the surface on which the oven rests must be no more than 70 mm* (fig. B). Do not use your appliance immediately (wait for about 1 to 2 hours) after transferring it from a cold place to a warm place, as condensation may cause a malfunction. Centre the oven in the cabinet so as to ensure a minimum distance of 10 mm between the appliance and the surrounding unit. The material of the cabinet supporting the appliance must be heat resistant (or covered with a heat-resistant material). Drill a 2 mm diameter hole in the cabinet panel to avoid splitting the wood. For greater stability, attach the oven to the unit with 2 screws through the holes provided on the side panels (fig. C).
ELECTRICAL CONNECTION
Warning: Installation should only be performed by
qualified installers and technicians.
The appliance must be recess-fitted correctly to ensure electrical safety. The electrical connections should be made before the appliance is installed in its housing. The oven must be connected via a standardised power cable with 3 conductors of 1 mm² (1 live + 1 neutral + earth) which must be connected to the network by means of an IEC 60083 standard power socket or via an all-pole cut-off device in compliance with the installation rules.
Check that:
Warning: The safety wire (green-yellow) is
connected to the appliance’s terminal and must be connected to the installation’s earth. If the oven malfunctions in any way, unplug it or remove the fuse for the circuit where the oven is installed.
Warning: We cannot accept liability for any accident or incident resulting from non-existent, defective or incorrect grounding.
Description of the oven2
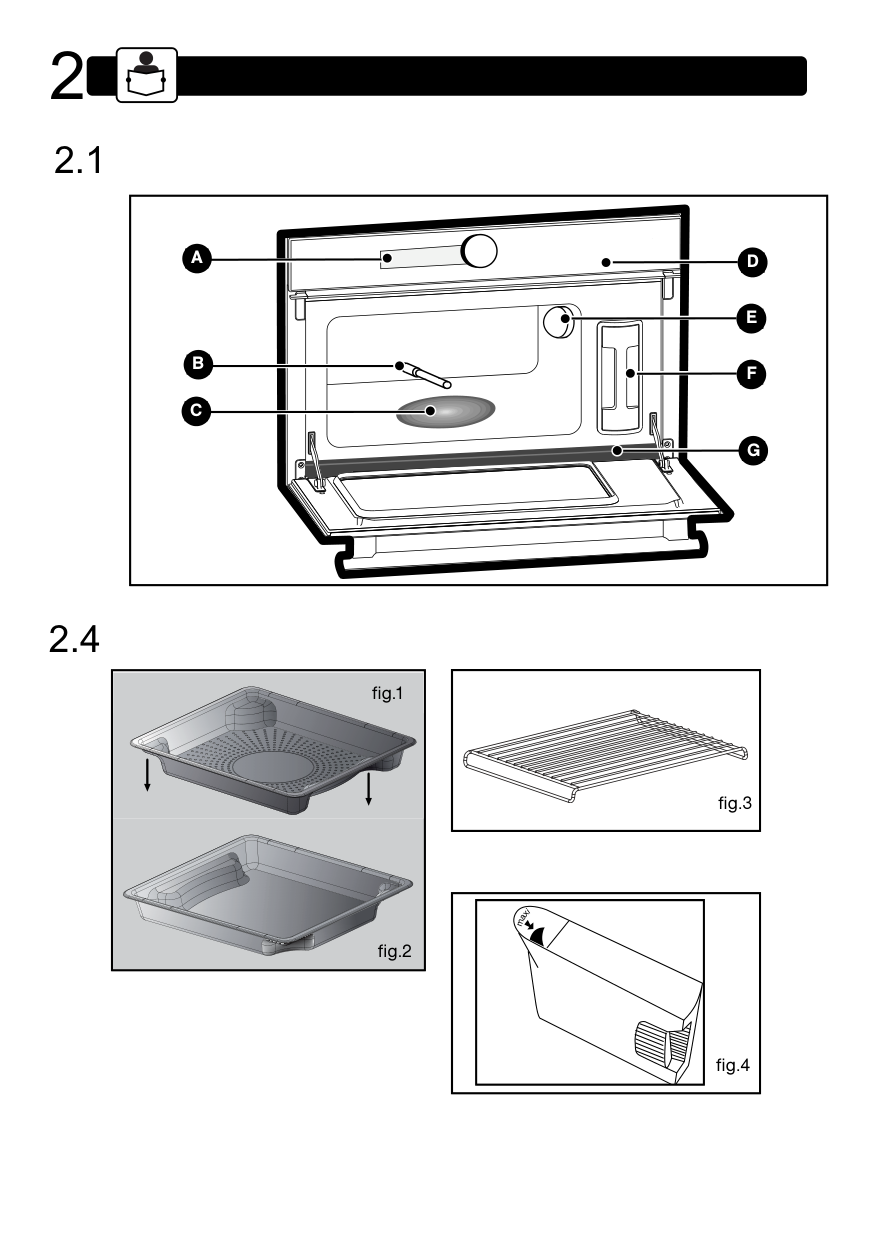
2.4ACCESSORIES
Tip When cooking, place the dish in fig.1 on top of the dish in fig.2 the other way round, so that they do not nest inside each other.
For storage, place the fig.1 dish on top of the fig.2 dish the same way round, so that they nest inside each other.
Set clock and cooking time/Menu
+ button Start
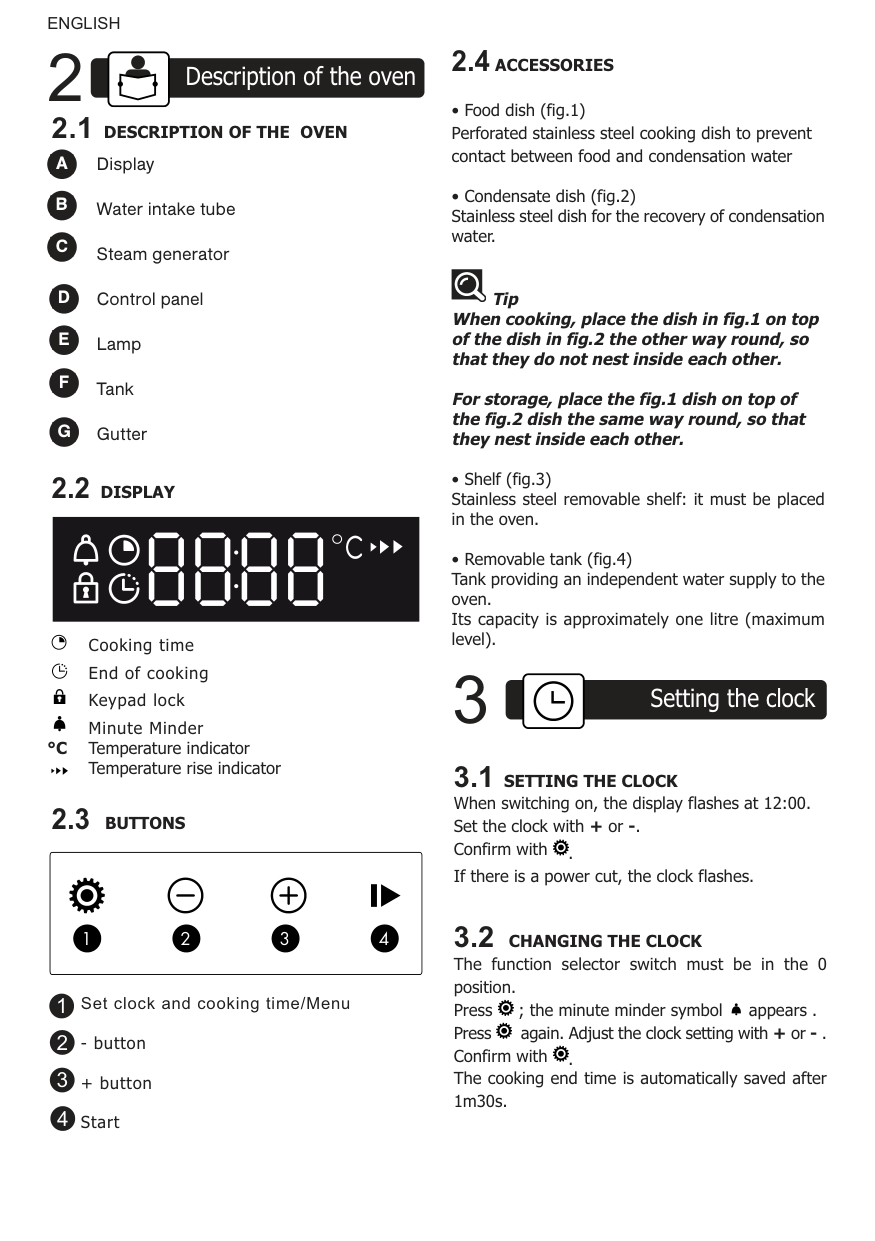
Display Water intake tube Steam generator Control panel Lamp Tank Gutter
| | |---|
Cooking time End of cooking Keypad lock Minute Minder °C Temperature indicator
Temperature rise indicator
| | | |---|---| | | |
1 2 3 4
Setting the clock3
##### 3.1 SETTING THE CLOCK
When switching on, the display flashes at 12:00. Set the clock with + or -. Confirm with . If there is a power cut, the clock flashes.
##### 3.2 CHANGING THE CLOCK
The function selector switch must be in the 0 position. Press ; the minute minder symbol appears . Press again. Adjust the clock setting with + or - . Confirm with . The cooking end time is automatically saved after 1m30s.
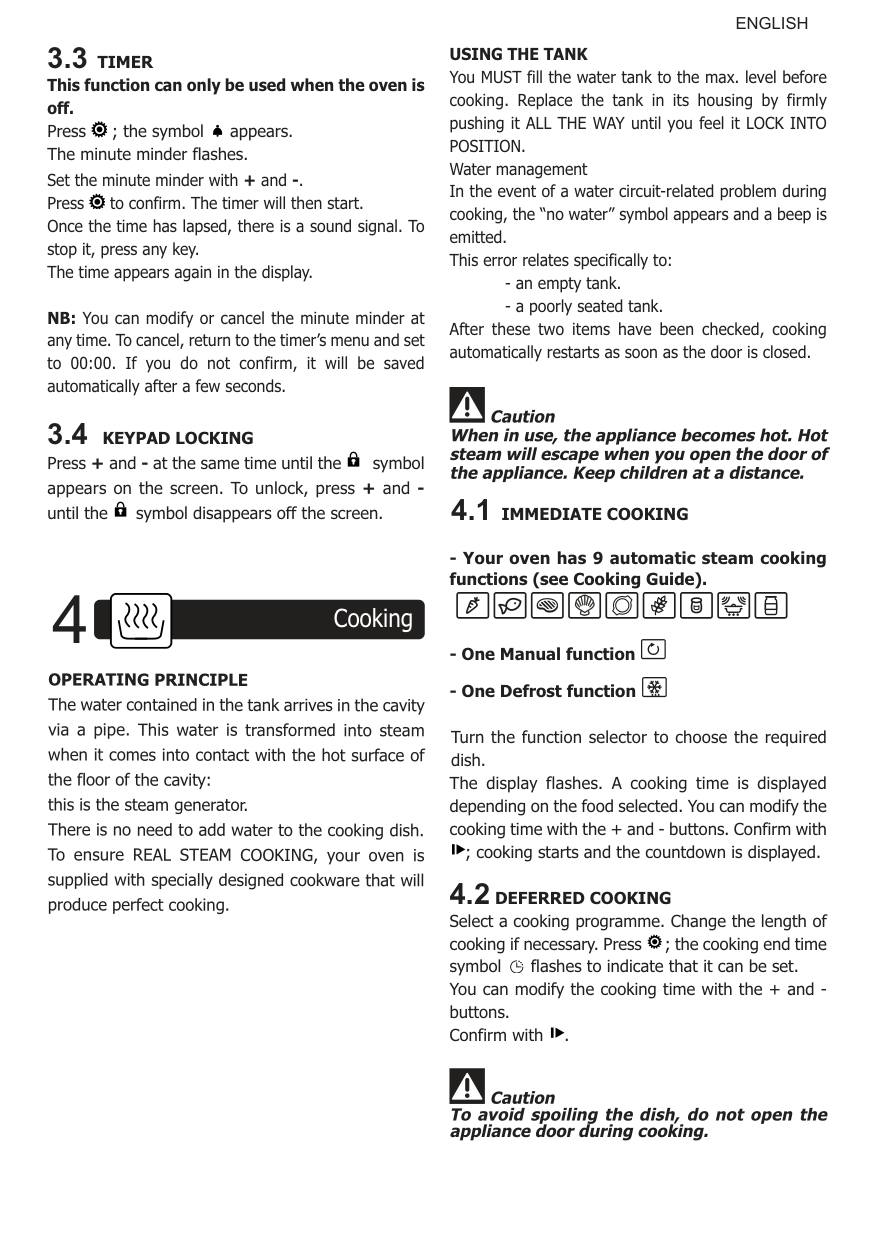
##### 3.3 TIMER
This function can only be used when the oven is off. Press ; the symbol appears. The minute minder flashes. Set the minute minder with + and -. Press to confirm. The timer will then start. Once the time has lapsed, there is a sound signal. To stop it, press any key. The time appears again in the display.
NB: You can modify or cancel the minute minder at any time. To cancel, return to the timer’s menu and set to 00:00. If you do not confirm, it will be saved automatically after a few seconds.
##### 3.4 KEYPAD LOCKING
Press + and - at the same time until the symbol appears on the screen. To unlock, press + and until the symbol disappears off the screen.
Cooking4
OPERATING PRINCIPLE The water contained in the tank arrives in the cavity via a pipe. This water is transformed into steam when it comes into contact with the hot surface of the floor of the cavity: this is the steam generator. There is no need to add water to the cooking dish. To ensure REAL STEAM COOKING, your oven is supplied with specially designed cookware that will produce perfect cooking.
USING THE TANK You MUST fill the water tank to the max. level before cooking. Replace the tank in its housing by firmly pushing it ALL THE WAY until you feel it LOCK INTO POSITION. Water management In the event of a water circuit-related problem during cooking, the “no water” symbol appears and a beep is emitted. This error relates specifically to:
After these two items have been checked, cooking automatically restarts as soon as the door is closed.
Caution
When in use, the appliance becomes hot. Hot steam will escape when you open the door of the appliance. Keep children at a distance.
4.1 IMMEDIATE COOKING
| | |---|
| | |---|
Turn the function selector to choose the required dish. The display flashes. A cooking time is displayed depending on the food selected. You can modify the cooking time with the + and - buttons. Confirm with
; cooking starts and the countdown is displayed.
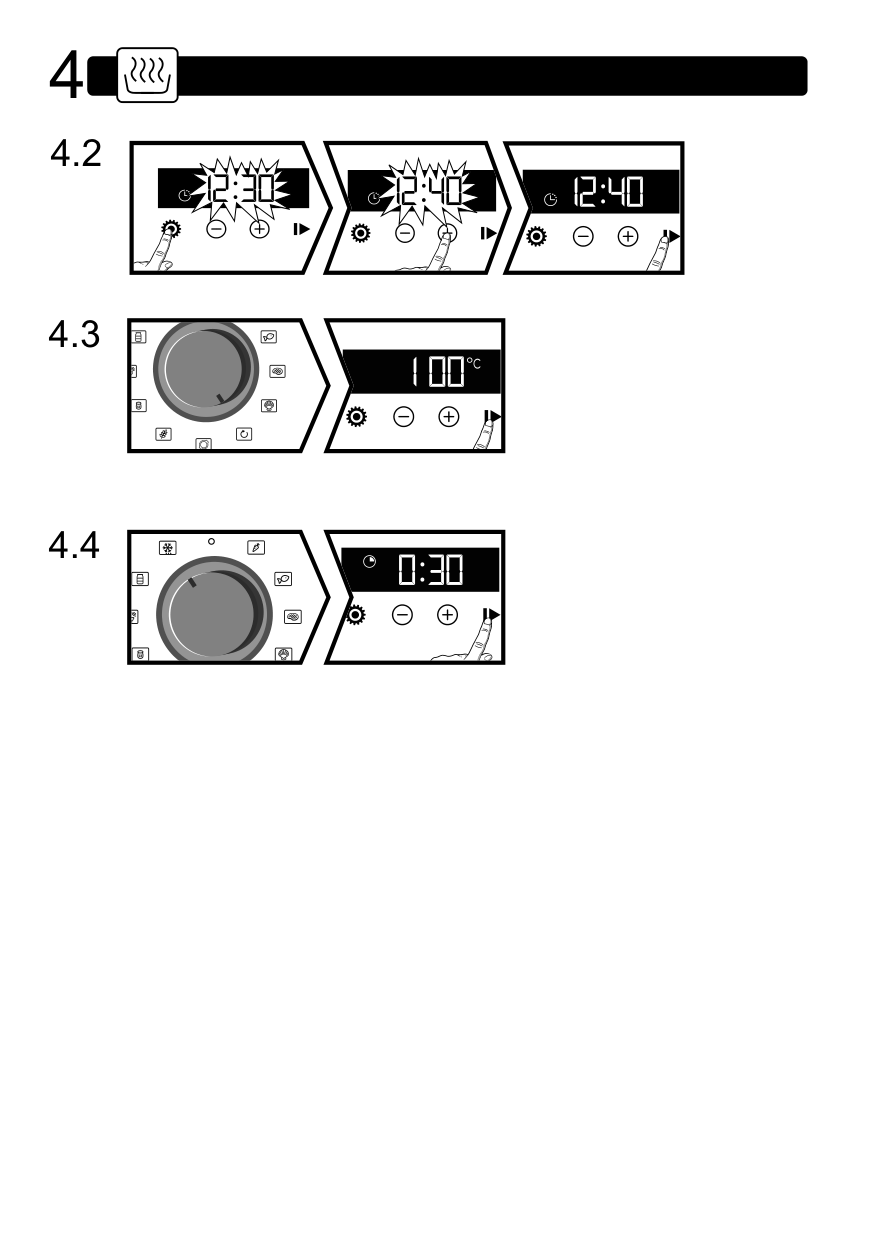
4.2DEFERRED COOKING Select a cooking programme. Change the length of cooking if necessary. Press ; the cooking end time symbol flashes to indicate that it can be set. You can modify the cooking time with the + and buttons. Confirm with .
########## Caution To avoid spoiling the dish, do not open the appliance door during cooking.
Cooking4

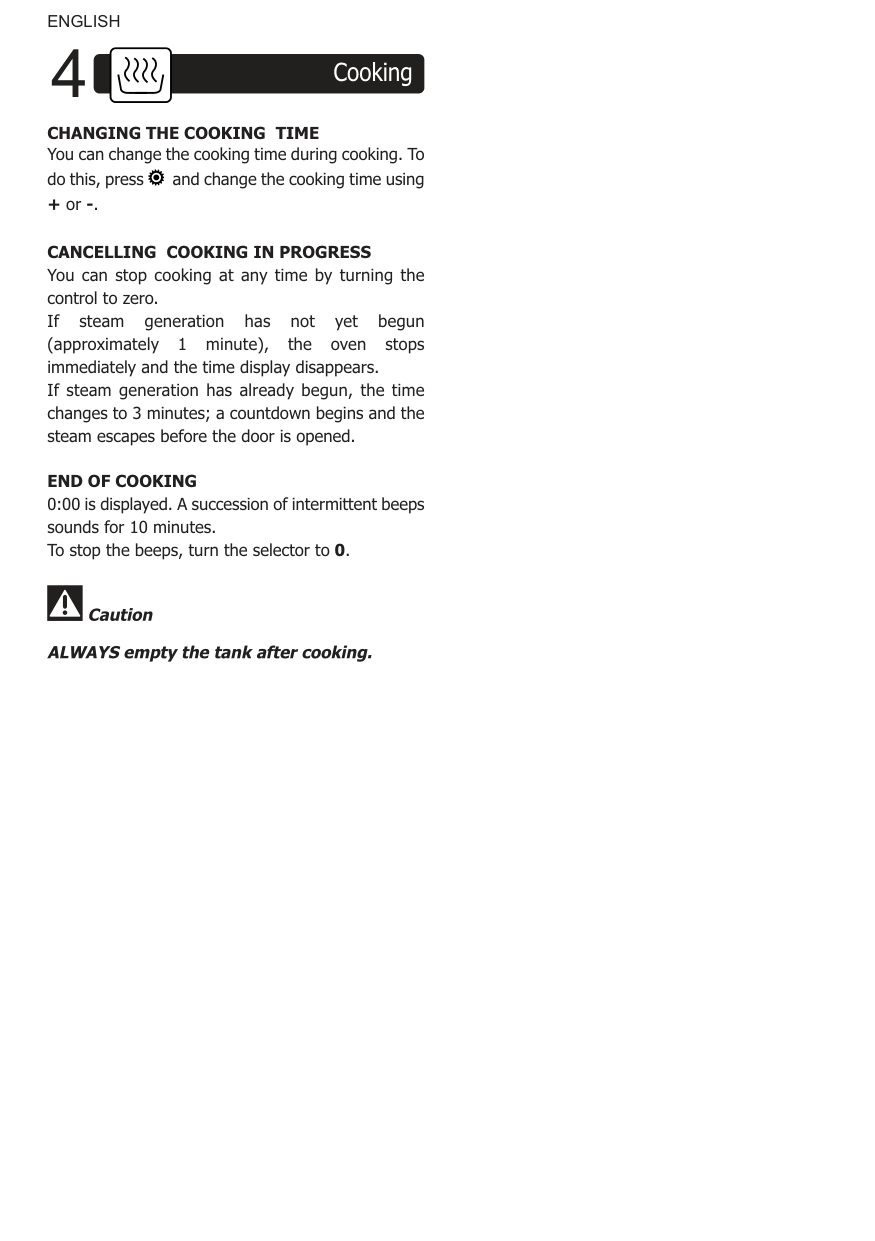
########### CHANGING THE COOKING TIME
You can change the cooking time during cooking. To do this, press and change the cooking time using + or -.
CANCELLING COOKING IN PROGRESS You can stop cooking at any time by turning the control to zero. If steam generation has not yet begun (approximately 1 minute), the oven stops immediately and the time display disappears. If steam generation has already begun, the time changes to 3 minutes; a countdown begins and the steam escapes before the door is opened.
END OF COOKING 0:00 is displayed. A succession of intermittent beeps sounds for 10 minutes. To stop the beeps, turn the selector to 0.
Caution ALWAYSemptythetankaftercooking.
Guide to Automatic Cooking5
GUIDE TO AUTOMATIC COOKING
######## Cooking Functions Pre-programmed time Min. time setting Max. time setting
| | |---|
Vegetables Fish Meat Shellfish Prepared meals Cereals Yoghurt Reheating Conserve
5 min 5 min 5 min 5 min 5 min 5 min 5 min 5 min 5 min
20 min 15 min 50 min 10 min 10 min 20 min 7 hours 20 min 25 min
| | |---|
| | |---|
| | |---|
| | |---|
| | |---|
| | |---|
| | |---|
| | |---|
Guide to Manual Cooking6
6.3MANUAL MODE
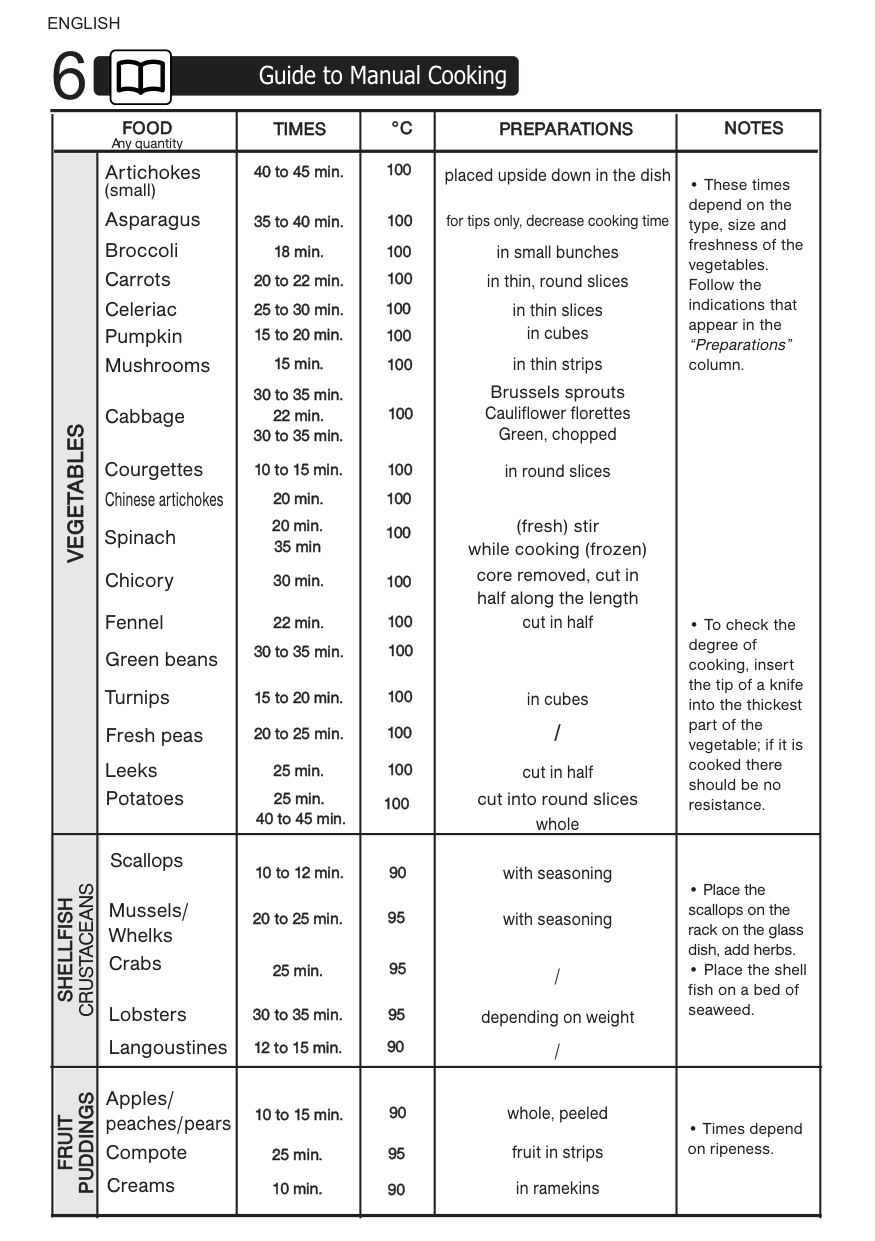
With the manual function, you can choose the cooking temperature and time depending on the food (see table on next page).
| | |---|
Turn the function selector to . The display flashes and a recommended cooking time is shown. Refer to the guide to manual cooking on the next page. Adjust the temperature and confirm with ; cooking starts and the time is displayed. You can change the cooking duration and temperature by pressing and adjust the time or duration using + and -.
1 hour 1 hour 1 hour 1 hour 1 hour 1 hour 10 hours 1 hour 1 hour
|FOOD Any quantity|FOOD Any quantity|TIMES|°C|PREPARATIONS|NOTES| |---|---|---|---|---|---| |VEGETABLES|Potatoes
Fresh peas
Green beans
Artichokes (small)
Asparagus Broccoli Carrots Celeriac Pumpkin Mushrooms
Courgettes Chinese artichokes
Spinach Chicory Fennel
Turnips
Leeks
Cabbage|40 to 45 min.
35 to 40 min. 18 min. 20 to 22 min. 25 to 30 min. 15 to 20 min. 15 min.
10 to 15 min. 20 min. 20 min. 35 min 30 min. 22 min. 30 to 35 min.
15 to 20 min. 20 to 25 min.
25 min. 40 to 45 min.
25 min.
30 to 35 min. 22 min. 30 to 35 min.|100
100 100 100 100 100 100
100 100 100
100 100 100 100 100 100
100
100|placed upside down in the dish
for tips only, decrease cooking time in small bunches in thin, round slices in thin slices in cubes
in round slices
core removed, cut in half along the length cut in half
in cubes
cut in half cut into round slices whole
(fresh) stir while cooking (frozen)
/
Brussels sprouts Cauliflower florettes Green, chopped
in thin strips|• These times depend on the type, size and freshness of the vegetables. Follow the indications that appear in the “Preparations” column.
• To check the degree of cooking, insert the tip of a knife into the thickest part of the vegetable; if it is cooked there should be no resistance.
| |SHELLFISH
CRUSTACEANS|Scallops Mussels/ Whelks Crabs Lobsters Langoustines
|10 to 12 min.
20 to 25 min.
25 min.
30 to 35 min. 12 to 15 min.
|90
95
95
95 90
|with seasoning with seasoning / depending on weight /|• Place the scallops on the rack on the glass dish, add herbs.
• Place the shell fish on a bed of seaweed.
| |FRUIT
PUDDINGS|Apples/ peaches/pears Compote Creams
|10 to 15 min. 25 min. 10 min.
|90
95 90
|whole, peeled fruit in strips in ramekins|• Times depend on ripeness.|
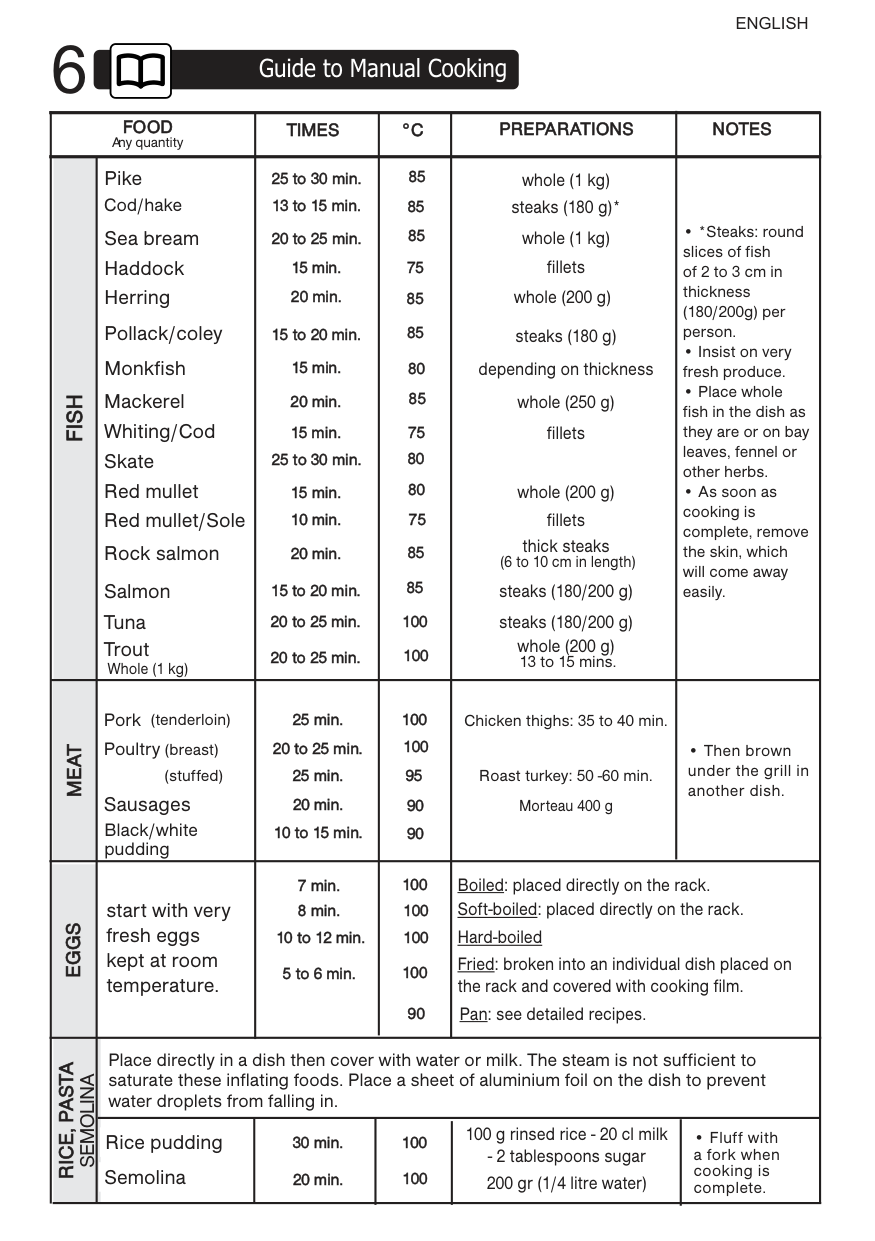
|FOOD Any quantity|FOOD Any quantity|TIMES|°C|PREPARATIONS|NOTES| |---|---|---|---|---|---| |FISH|Pike Cod/hake
Sea bream Haddock Herring Pollack/coley Monkfish Mackerel Whiting/Cod Skate Red mullet Red mullet/Sole Rock salmon Salmon
Tuna Trout Whole (1 kg)
|25 to 30 min. 13 to 15 min. 20 to 25 min. 15 min. 20 min. 15 to 20 min. 15 min. 20 min. 15 min. 25 to 30 min. 15 min. 10 min. 20 min.
15 to 20 min. 20 to 25 min. 20 to 25 min.
|85 75 85 85 80 85 75 80 80 75
85 85
85 85 100 100
|whole (1 kg) steaks (180 g)* whole (1 kg) fillets whole (200 g) steaks (180 g)
whole (250 g)
depending on thickness
fillets
whole (200 g) fillets thick steaks (6 to 10 cm in length) steaks (180/200 g) steaks (180/200 g)
whole (200 g) 13 to 15 mins.|• *Steaks: round slices of fish of 2 to 3 cm in thickness (180/200g) per person.
• Insist on very fresh produce.
• Place whole fish in the dish as they are or on bay leaves, fennel or other herbs.
• As soon as cooking is complete, remove the skin, which will come away easily.
| |MEAT|
Pork (tenderloin) Poultry (breast)


(stuffed) Sausages


Black/white pudding|25 min. 20 to 25 min. 25 min. 20 min. 10 to 15 min.|100 100
95 90 90|Chicken thighs: 35 to 40 min.
Roast turkey: 50 -60 min. Morteau 400 g|• Then brown under the grill in another dish.| |EGGS|start with very fresh eggs kept at room temperature.|7 min.
5 to 6 min.
8 min.
10 to 12 min.|100 100 100
90
100|Boiled: placed directly on the rack. Soft-boiled: placed directly on the rack.
Fried: broken into an individual dish placed on the rack and covered with cooking film.
Hard-boiled
Pan: see detailed recipes.
|Boiled: placed directly on the rack. Soft-boiled: placed directly on the rack.
Fried: broken into an individual dish placed on the rack and covered with cooking film.
Hard-boiled
Pan: see detailed recipes.
| |RICE, PASTA
SEMOLINA|Place directly in a dish then cover with water or milk. The steam is not sufficient to saturate these inflating foods. Place a sheet of aluminium foil on the dish to prevent water droplets from falling in.|Place directly in a dish then cover with water or milk. The steam is not sufficient to saturate these inflating foods. Place a sheet of aluminium foil on the dish to prevent water droplets from falling in.|Place directly in a dish then cover with water or milk. The steam is not sufficient to saturate these inflating foods. Place a sheet of aluminium foil on the dish to prevent water droplets from falling in.|Place directly in a dish then cover with water or milk. The steam is not sufficient to saturate these inflating foods. Place a sheet of aluminium foil on the dish to prevent water droplets from falling in.|Place directly in a dish then cover with water or milk. The steam is not sufficient to saturate these inflating foods. Place a sheet of aluminium foil on the dish to prevent water droplets from falling in.| |RICE, PASTA
SEMOLINA|Rice pudding Semolina
|30 min. 20 min.
|100 100
|100 g rinsed rice - 20 cl milk - 2 tablespoons sugar 200 gr (1/4 litre water)|• Fluff with a fork when cooking is complete.
|
Defrost Guide6
6.4DEFROSTING Turn the function selector to . The display flashes. You can change the cooking time. To do this, press and change the cooking time using + or -. Confirm with ; defrosting starts and the countdown is displayed.
| | |---|
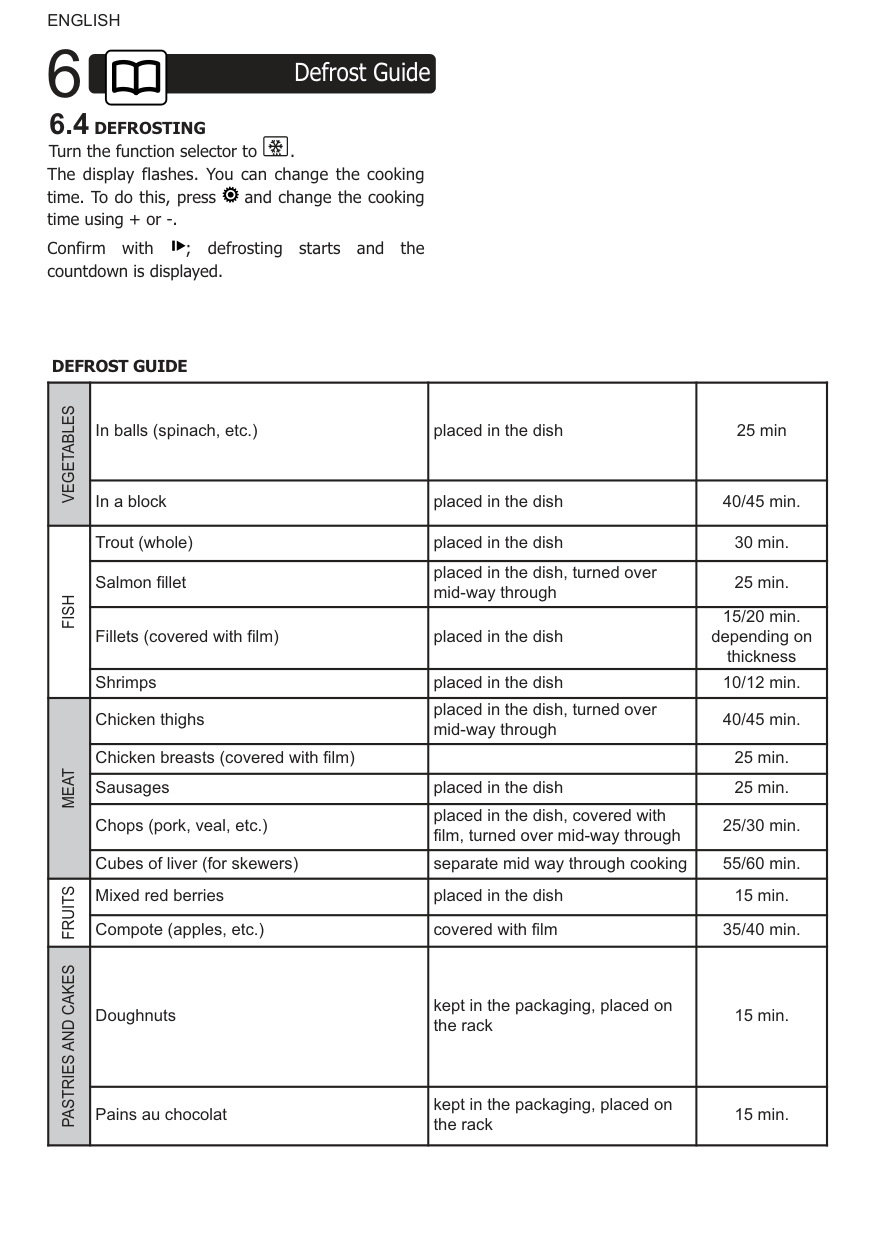
########### DEFROST GUIDE
|VEGETABLES|In balls (spinach, etc.)|placed in the dish|25 min| |---|---|---|---| |VEGETABLES|In a block|placed in the dish|40/45 min.| |FISH|Trout (whole)|placed in the dish|30 min.| |FISH|Salmon fillet|placed in the dish, turned over mid-way through|25 min.| |FISH|Fillets (covered with film)|placed in the dish|15/20 min. depending on thickness| |FISH|Shrimps|placed in the dish|10/12 min.| |MEAT|Chicken thighs|placed in the dish, turned over mid-way through|40/45 min.| |MEAT|Chicken breasts (covered with film)| |25 min.| |MEAT|Sausages|placed in the dish|25 min.| |MEAT|Chops (pork, veal, etc.)|placed in the dish, covered with film, turned over mid-way through|25/30 min.| |MEAT|Cubes of liver (for skewers)|separate mid way through cooking|55/60 min.| |FRUITS|Mixed red berries|placed in the dish|15 min.| |FRUITS|Compote (apples, etc.)|covered with film|35/40 min.| |PASTRIES AND CAKES|Doughnuts|kept in the packaging, placed on the rack|15 min.| |PASTRIES AND CAKES|Pains au chocolat|kept in the packaging, placed on the rack|15 min.|
Settings7
########### SETTINGS MENU
| |Activate/de-activate the beeping sound of the buttons| |---|---| | |Activate/de-activate demonstration setting|
You can adjust different settings on your oven. To do so:
Press for a few seconds until you get to the “MENU” display to access the settings mode. Press again to scroll through the different settings. Activate or de-activate the different parameters with
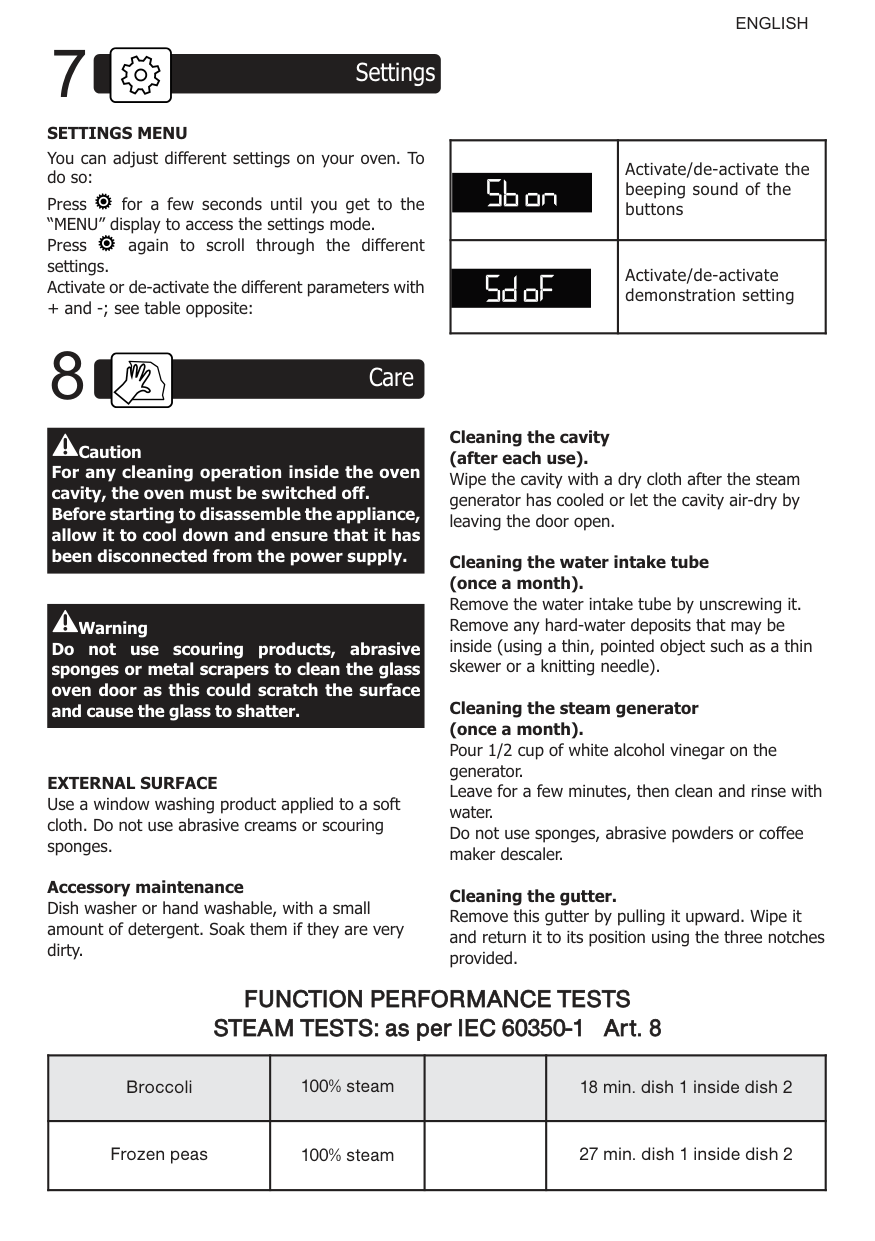
+ and -; see table opposite:
8 Care
Cleaning the cavity (after each use).
Caution For any cleaning operation inside the oven cavity, the oven must be switched off. Before starting to disassemble the appliance, allow it to cool down and ensure that it has been disconnected from the power supply.
Wipe the cavity with a dry cloth after the steam generator has cooled or let the cavity air-dry by leaving the door open.
Cleaning the water intake tube (once a month). Remove the water intake tube by unscrewing it. Remove any hard-water deposits that may be inside (using a thin, pointed object such as a thin skewer or a knitting needle).
Warning
Do not use scouring products, abrasive sponges or metal scrapers to clean the glass oven door as this could scratch the surface and cause the glass to shatter.
Cleaning the steam generator (once a month). Pour 1/2 cup of white alcohol vinegar on the generator. Leave for a few minutes, then clean and rinse with water. Do not use sponges, abrasive powders or coffee maker descaler.
EXTERNAL SURFACE Use a window washing product applied to a soft cloth. Do not use abrasive creams or scouring sponges.
Accessory maintenance Dish washer or hand washable, with a small amount of detergent. Soak them if they are very dirty.
Cleaning the gutter. Remove this gutter by pulling it upward. Wipe it and return it to its position using the three notches provided.
###### FUNCTION PERFORMANCE TESTS STEAM TESTS: as per IEC 60350-1 Art. 8
|Broccoli|100% steam|5 0 0 g|18 min. dish 1 inside dish 2| |---|---|---|---| |Frozen peas|100% steam| |27 min. dish 1 inside dish 2|
Troubleshooting9
You may resolve certain little problems yourself: The display does not light up. Check the power (fuse OK).
Water or steam leak around the door during cooking. Check that the oven door is properly closed.
The oven light is not working. Replace the bulb or fuse of your installation. Check that the oven is properly connected.
The oven is not heating. Check that the oven is correctly connected. Check that the oven is not set to “DEMO” mode (see settings menu).
Contact the after-sales service if one of the faults persists.
Environment10
########### ENVIRONMENTAL COMPLIANCE
The packaging material of this appliance is recyclable. Make sure to recycle them and thus contribute to the protection of the environment by depositing them in the municipal containers provided for this purpose.
Your appliance also contains many recyclable materials. It is therefore marked with this logo to indicate that used appliances should not be mixed with other waste. Appliance recycling organised by your manufacturer is carried out under optimum conditions, in accordance with European Directive 2002/96/EC on the disposal of waste electrical and electronic equipment. Contact your local authority or retailer for information on used appliance collection points close to your home. We thank you for your help in protecting the environment.
After-Sales Service11
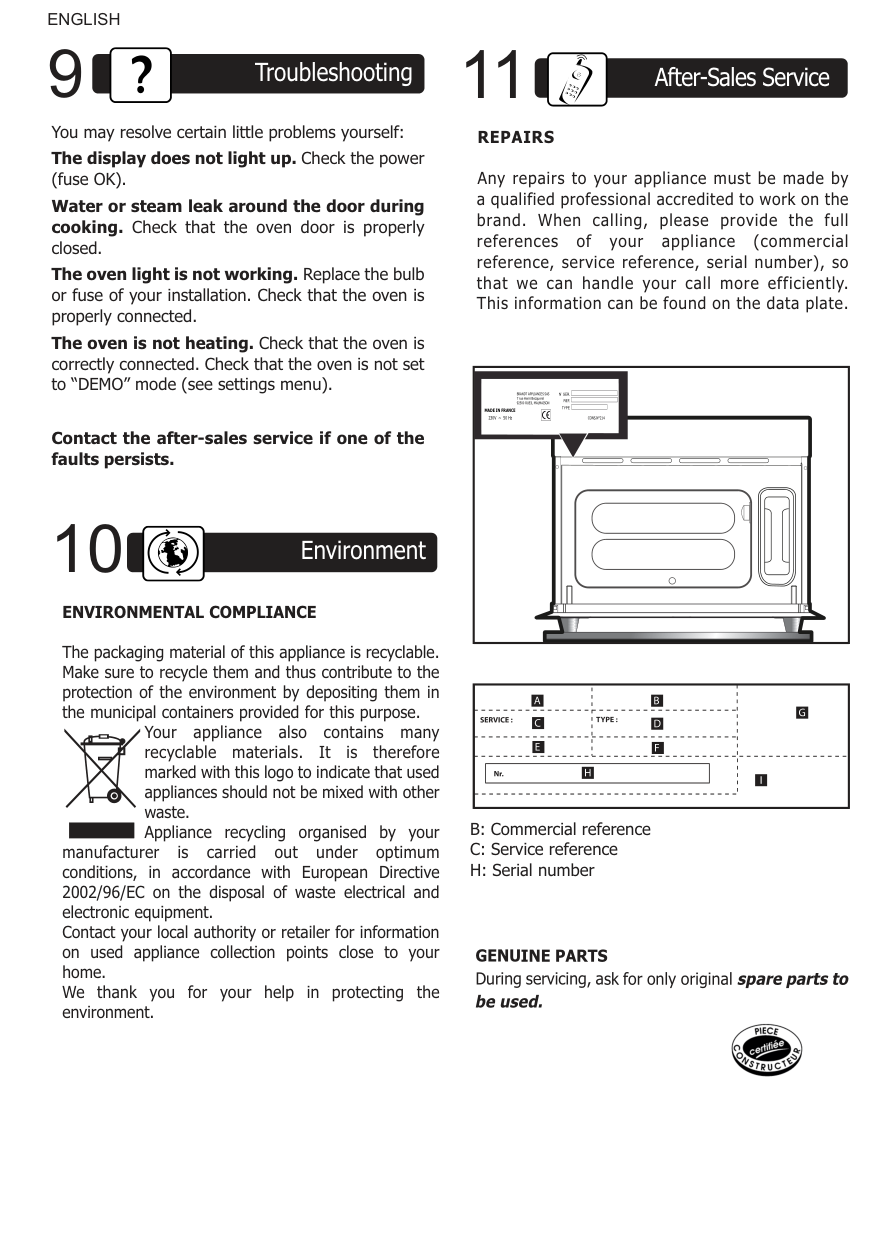
########### REPAIRS
Any repairs to your appliance must be made by a qualified professional accredited to work on the brand. When calling, please provide the full references of your appliance (commercial reference, service reference, serial number), so that we can handle your call more efficiently. This information can be found on the data plate.
|BRANDT APPLIANCES SAS 7 rue Henri Becquerel 92500 RUEIL MALMAISON
230V ~ 50 Hz
MADE IN FRANCE| |---|
| | | | | |---|---|---|---| | | | | | | | | | | | | | | | | | | | |
GENUINE PARTS During servicing, ask for only originalspare parts to be used.
