
Bushnell Golf Phantom 2 Golf Gps Rangefinder
Ask AI
— answers from the official manualAnswers from the official manual.
Common questions
Common Questions
10 totalHow do I check and set the battery charge level on the Phantom 2?
Press and hold the POWER button to access SETTINGS, then select BATTERY. Use this menu item to check the battery condition (charge %). (Page 4)
What is the recommended battery charging time for a full charge?
A fully discharged Phantom 2 will take about 3 hours to recharge completely, while partially charged units may require less time. A full circle around the battery icon indicates that charging is complete.
How do I update my course data on the Phantom 2?
Connect your Phantom 2 to the Bushnell Golf Mobile App via Bluetooth. In the app, select Course Update and follow instructions to search for and install updates.
How do I change the unit’s measurement from yards to meters?
From SETTINGS, press SELECT on UNITS menu item and highlight YARDS or METERS. Press SELECT again to confirm your selection.
Can I update multiple golf courses at once?
Yes, use the Bushnell Golf Update Manager website (https://appsupport.bushnellgolf.com) in Google Chrome to update multiple course files.
How do I connect my Phantom 2 to a mobile device?
Download the Bushnell Golf app, register your device, and follow on-screen instructions within the app to pair and connect your Phantom 2.
Full Manual
10 pages

GPS RANGEFINDER

User Manual
Model #’s 362110, 362111, 362112, 362113 4-21
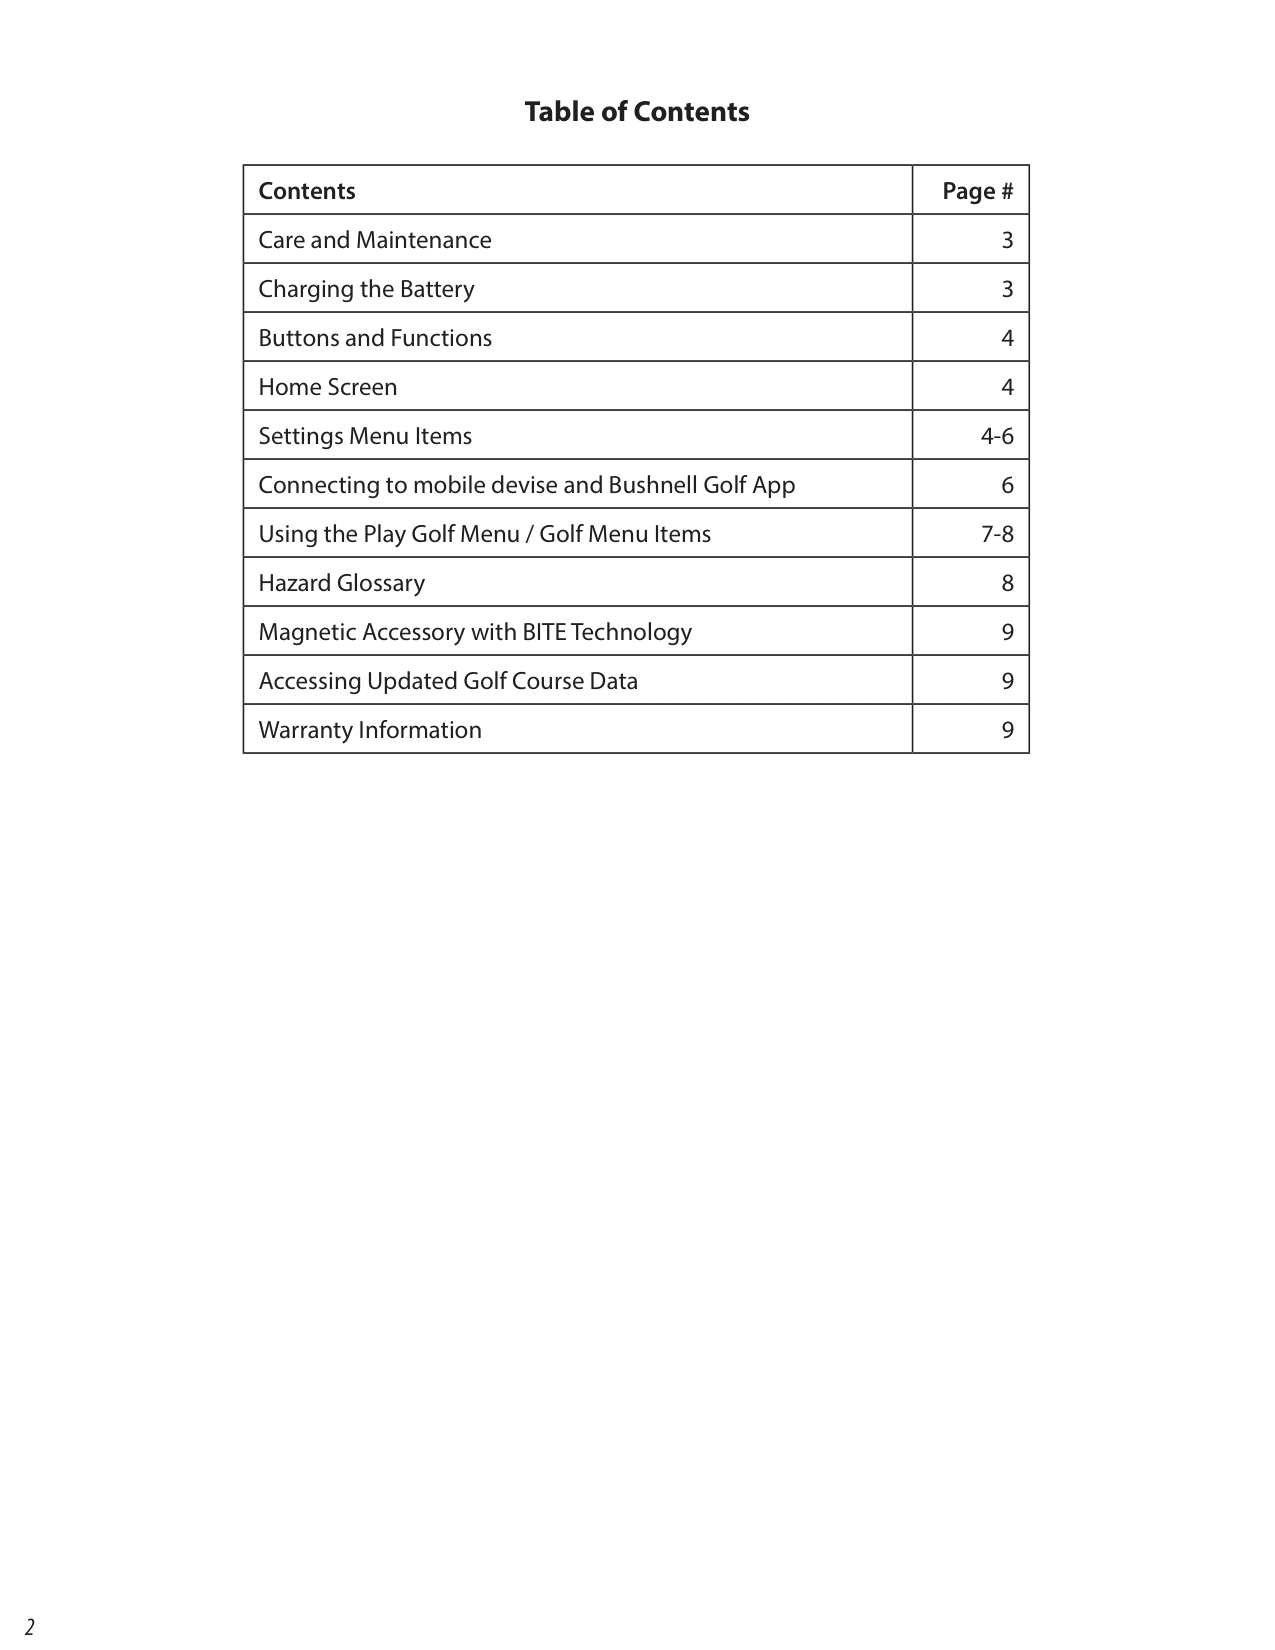
######### Table of Contents
|Contents|Page #| |---|---| |Care and Maintenance|3| |Charging the Battery|3| |Buttons and Functions|4| |Home Screen|4| |Settings Menu Items|4-6| |Connecting to mobile devise and Bushnell Golf App|6| |Using the Play Golf Menu / Golf Menu Items|7-8| |Hazard Glossary|8| |Magnetic Accessory with BITE Technology|9| |Accessing Updated Golf Course Data|9| |Warranty Information|9|
|Care and Maintenance To help ensure reliable operation, the following care and maintenance guidelines are recommended :
• Avoid exposing the unit to extreme environmental conditions for a prolonged period of time. The unit is IPX7 rated; it is water resistant, but not waterproof. Unit should not be submerged in any liquids.
• Avoid severe impacts on the unit.
• You may clean the unit occasionally with a soft, damp cloth.
• DO NOT expose the unit to strong chemicals such as gasoline and alcohol, as they will damage the unit.
• Store the unit in a dry place when it is not in use.
WARNING Do not attempt to open the Phantom 2. Unit contains a lithium ion battery.
• Do not attempt to open, disassemble or service the internal battery. The battery is not replaceable.
• Do not crush, puncture or short the battery’s external contacts.
• Do not expose to temperatures above 140oF (60oC). Do not charge battery when temperature is over 113oF (45oC). Do not store unit in temperatures above 113oF (45oC) or below 32oF (0oC).
• Properly recycle or dispose of the battery. Do not dispose in fire or water.
Legal Disclaimer By using this product, you agree that Bushnell Outdoor Products will not be held legally responsible for any injury or damage to you or any person or property caused by the user’s improper operation and/or poor judgment while using this product. Note: See Limited Warranty for other limitations to our liability.
Additional Information The Global Positioning System (GPS), a network of 32 satellites orbiting Earth, is operated and maintained by the U.S. government. This GPS device requires at least 3 satellites to be acquired to accurately determine your position. Any change made to the system by the government could affect the accuracy and performance of this product.
Bushnell Golf Website www.bushnellgolf.comis the best online resource for all Bushnell Golf product owners, including product support, FAQs, etc.| |---|
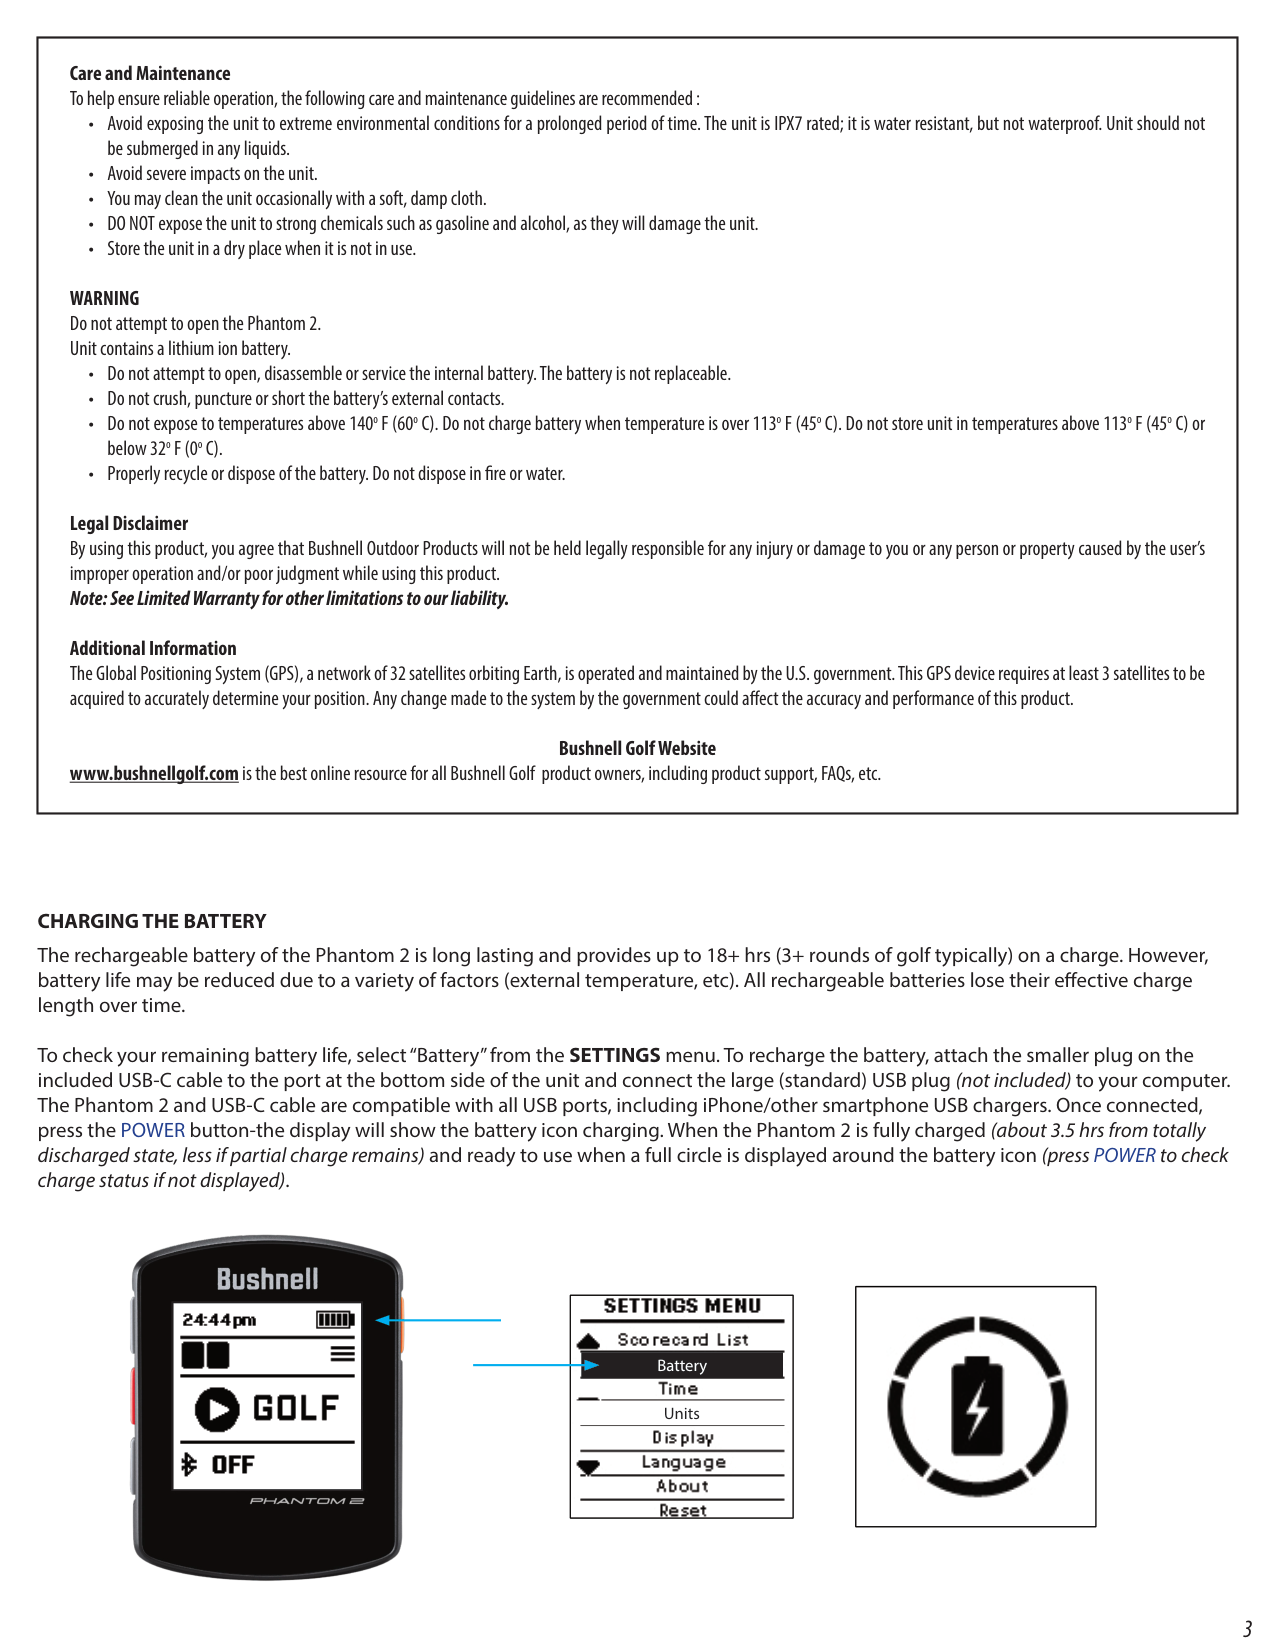
############### CHARGING THE BATTERY
The rechargeable battery of the Phantom 2 is long lasting and provides up to 18+ hrs (3+ rounds of golf typically) on a charge. However, battery life may be reduced due to a variety of factors (external temperature, etc). All rechargeable batteries lose their effective charge length over time.
To check your remaining battery life, select “Battery” from the SETTINGS menu. To recharge the battery, attach the smaller plug on the included USB-C cable to the port at the bottom side of the unit and connect the large (standard) USB plug (not included) to your computer. The Phantom 2 and USB-C cable are compatible with all USB ports, including iPhone/other smartphone USB chargers. Once connected, press the POWER button-the display will show the battery icon charging. When the Phantom 2 is fully charged (about 3.5 hrs from totally discharged state, less if partial charge remains) and ready to use when a full circle is displayed around the battery icon (press POWER to check charge status if not displayed).


|
| |---|
Battery
Units
|| |---|
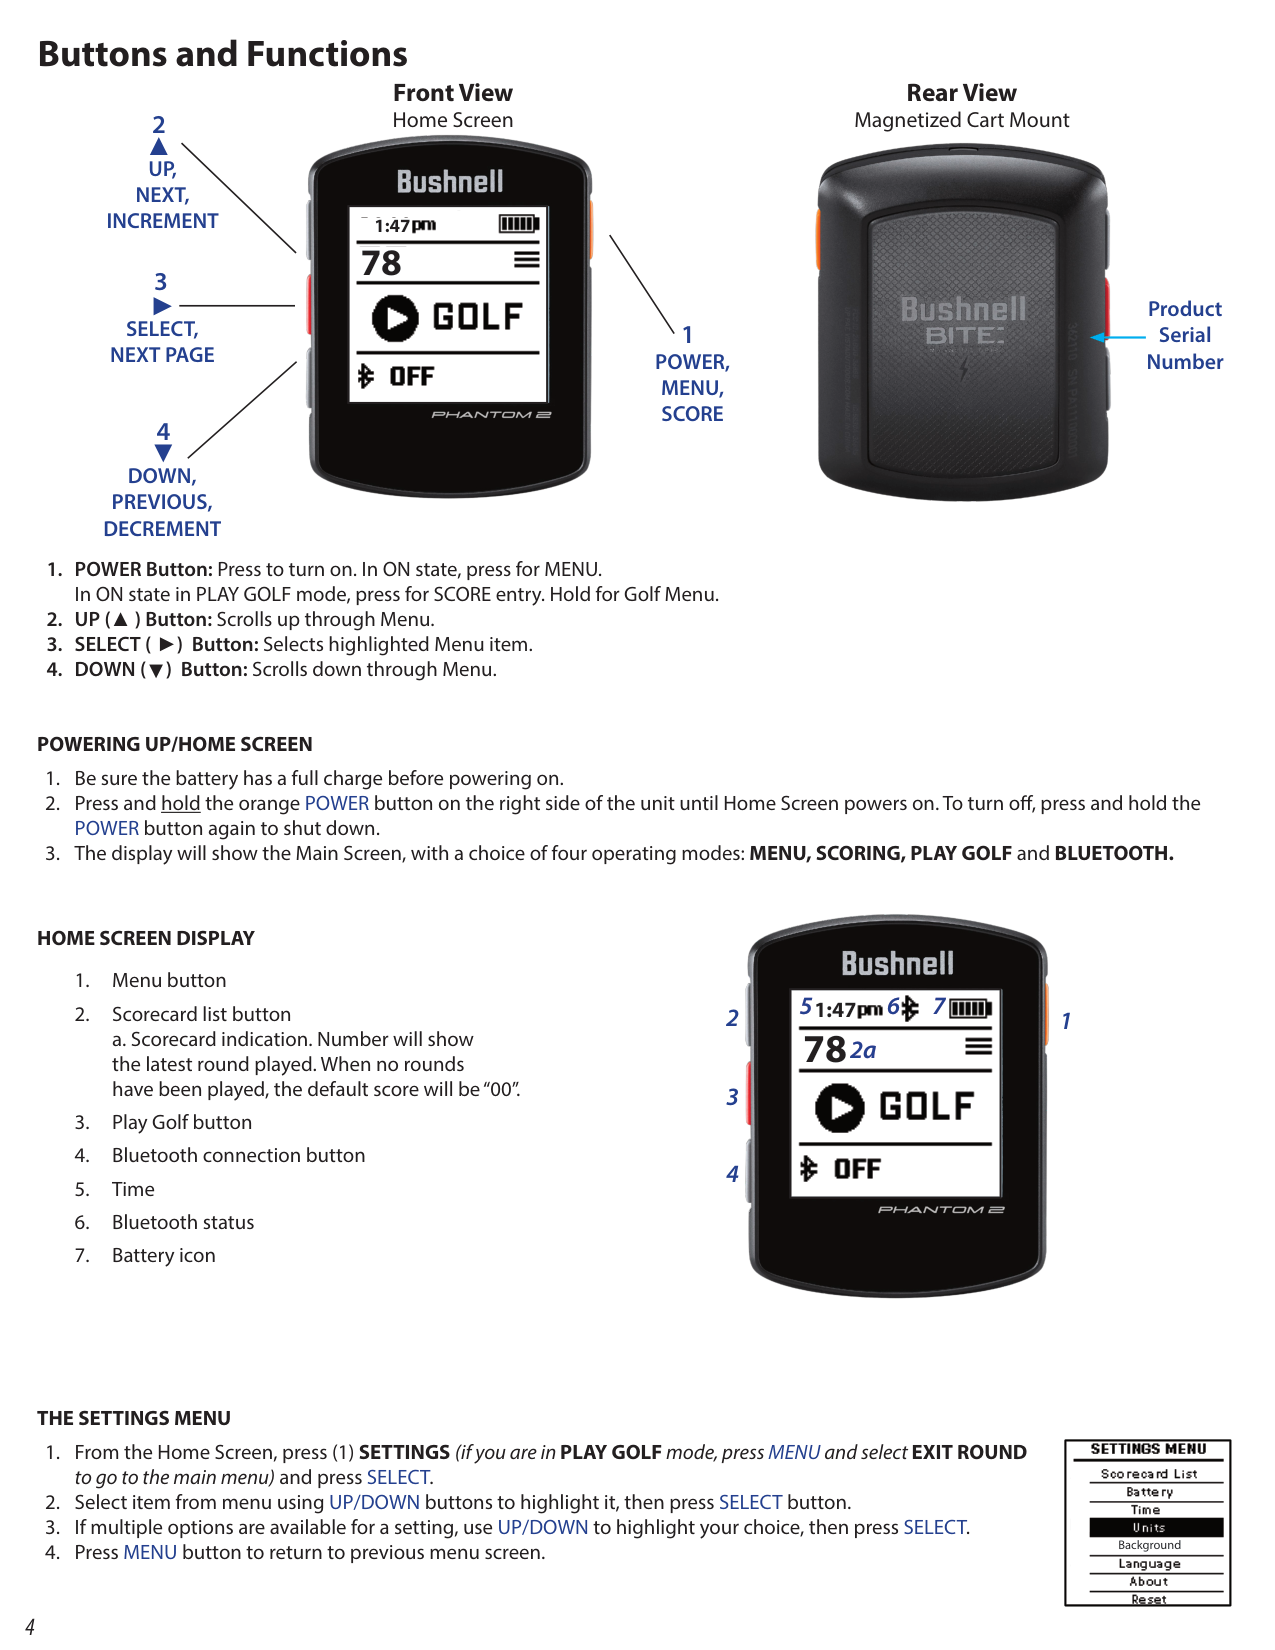
######## Buttons and Functions
Front View Home Screen
2 UP, NEXT, INCREMENT

▲
|
78
1:47| |---|
3 SELECT, NEXT PAGE ◄
1 POWER, MENU, SCORE
4 DOWN, PREVIOUS, DECREMENT
▼
◄
) Button: Selects highlighted Menu item.
Rear View Magnetized Cart Mount

############## Product Serial Number
############### POWERING UP/HOME SCREEN
############### HOME SCREEN DISPLAY

|
78
1:47 6 7 2a
5| |---|
12
############### THE SETTINGS MENU
|
Background
| |---|
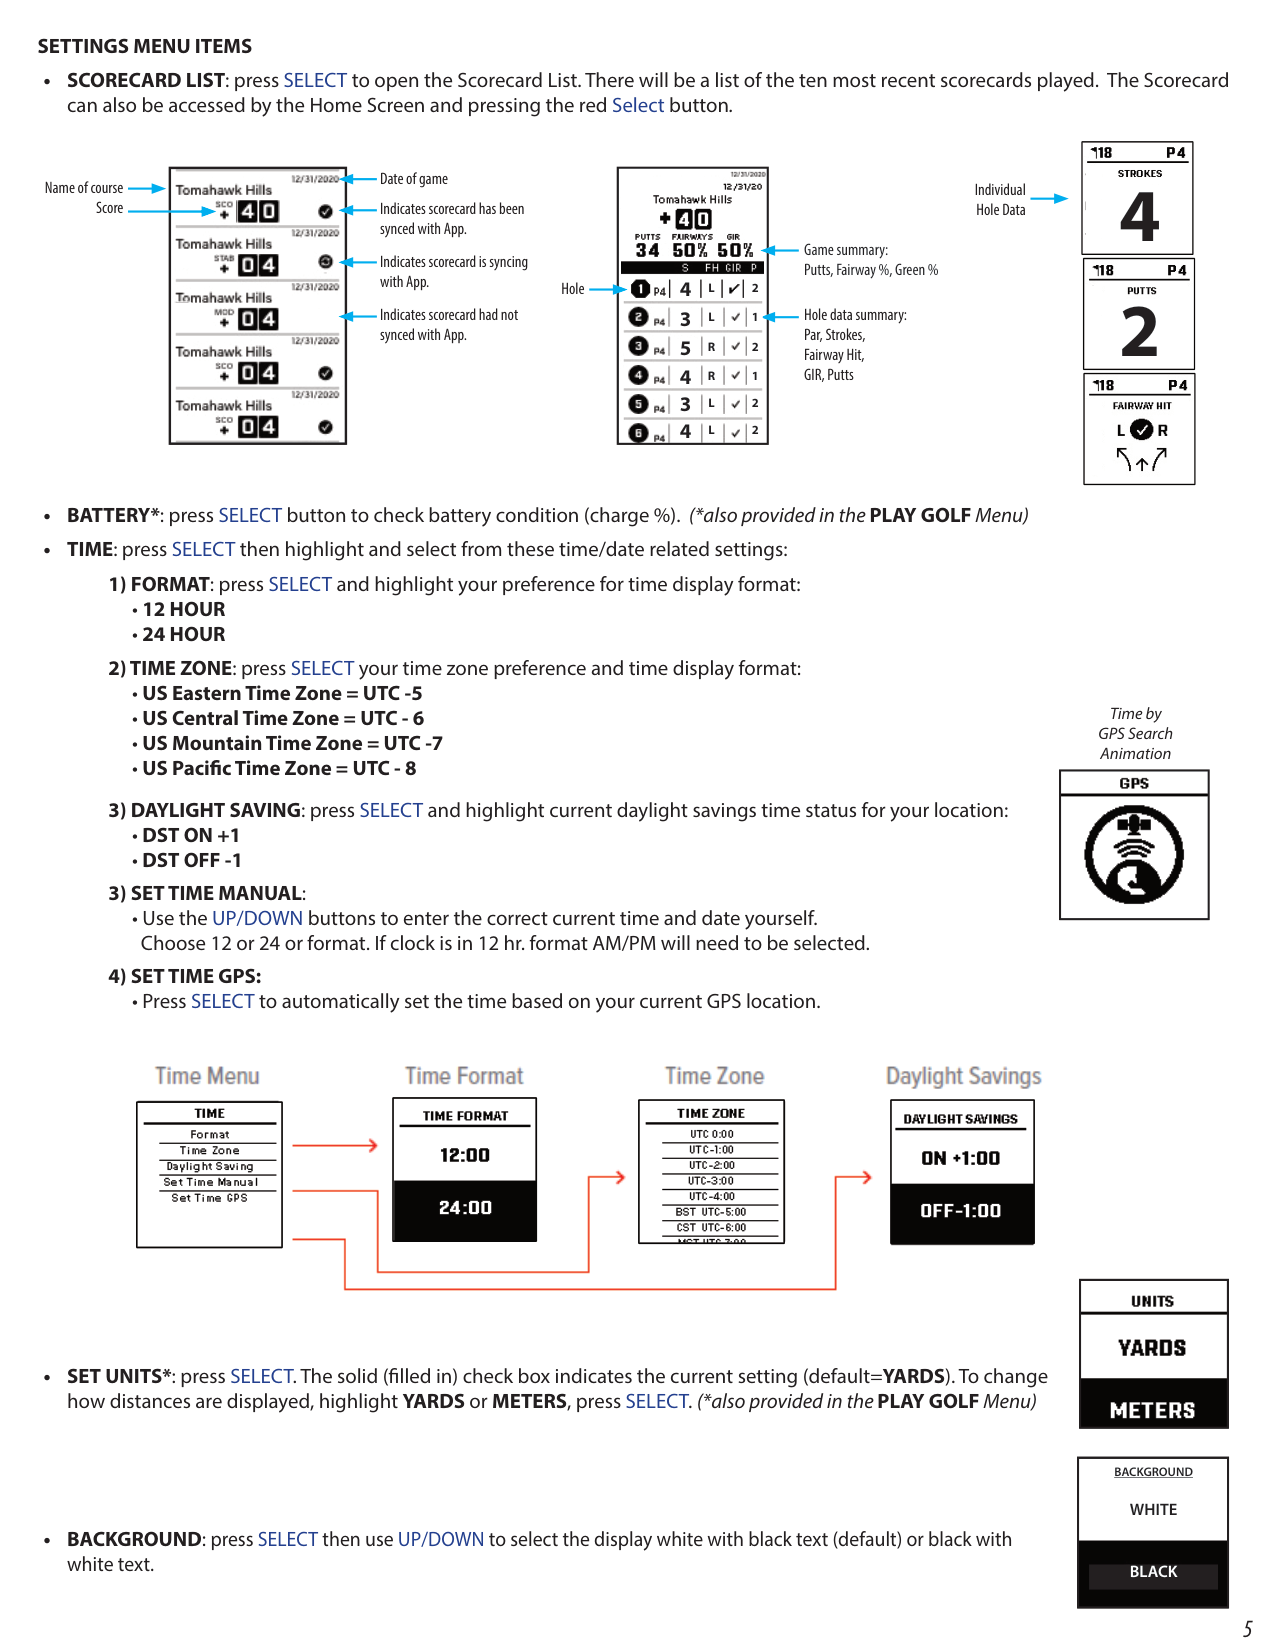
############### SETTINGS MENU ITEMS
• Use the UP/DOWN buttons to enter the correct current time and date yourself. Choose 12 or 24 or format. If clock is in 12 hr. format AM/PM will need to be selected.
• Press SELECT to automatically set the time based on your current GPS location.
|
4
| |---|


|
4 2
3 1
5 2
4 1
3 2
4 2
L L R R L L
| |---| ||
Date of game Name of course
Individual Hole Data
Score
Indicates scorecard has been synced with App.
Game summary: Putts, Fairway %, Green %
Indicates scorecard is syncing with App.
|
2
| |---|
Hole
Hole data summary: Par, Strokes, Fairway Hit, GIR, Putts
Indicates scorecard had not synced with App.
|
| |---|
Time by GPS Search Animation
| || |---|---| | | |

|| |---|
| | |---|
|| |---|

|
| |---|

|
WHITE
BLACK
BACKGROUND| |---|
|
| |---|
|
| |---|

| | | |---|---| | |
| | | | | | |
CONNECTING YOUR PHANTOM 2 TO YOUR MOBILE DEVICE & BUSHNELL GOLF APP To connect your Phantom 2 to your phone and the Bushnell Golf Mobile app:
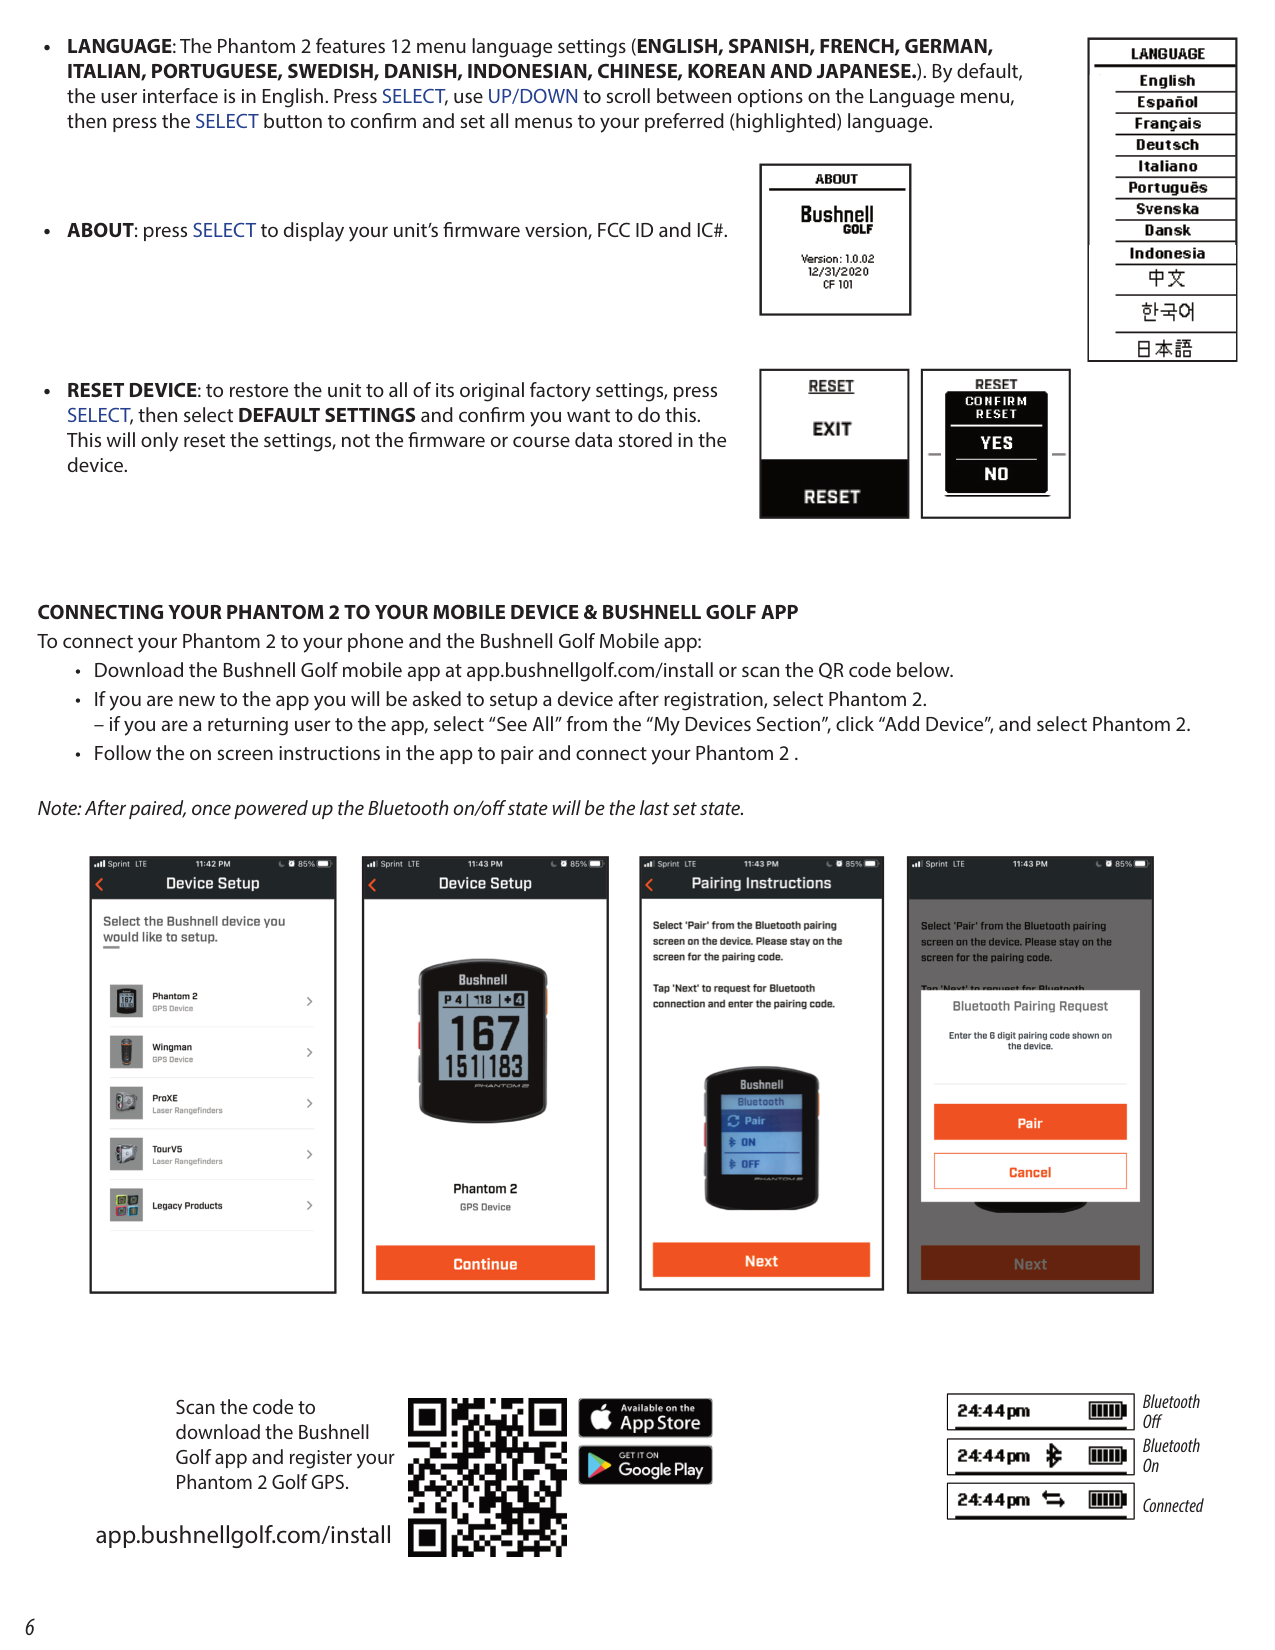
– if you are a returning user to the app, select “See All” from the “My Devices Section”, click “Add Device”, and select Phantom 2.
Note: After paired, once powered up the Bluetooth on/off state will be the last set state.
|| |---|
|| |---|
|| |---|
|| |---|
Scan the code to download the Bushnell Golf app and register your Phantom 2 Golf GPS.
############ app.bushnellgolf.com/install


Bluetooth Off Bluetooth On
|| |---|
|| |---|
|| |---|
Connected
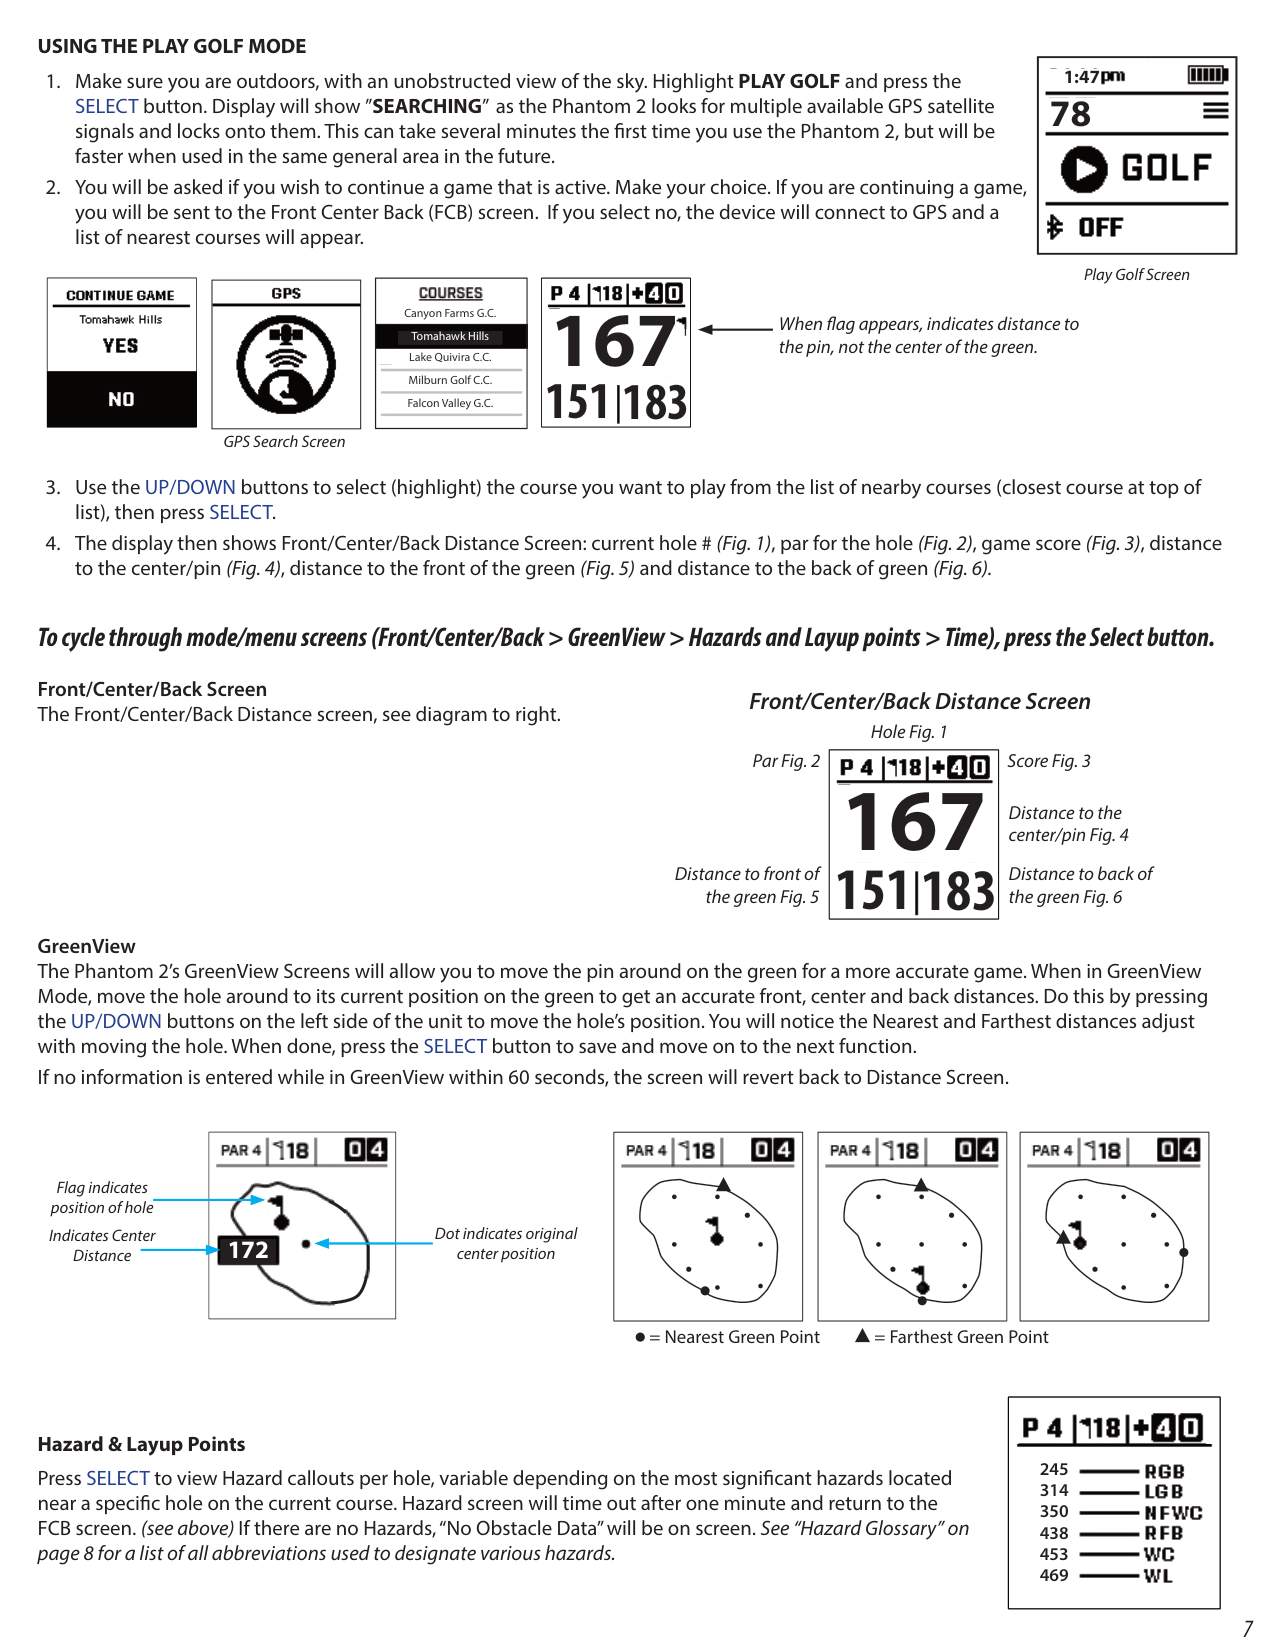
############### USING THE PLAY GOLF MODE
|
78
1:47| |---|
|| |---|

Play Golf Screen
|
167
151 183
| |---|
|
Tomahawk Hills
Canyon Farms G.C.
Lake Quivira C.C. Milburn Golf C.C. Falcon Valley G.C.
| |---|
|GPS Search Screen
|| |---| | |---|
When flag appears, indicates distance to the pin, not the center of the green.
########## To cycle through mode/menu screens (Front/Center/Back > GreenView > Hazards and Layup points > Time), press the Select button. Front/Center/Back Screen The Front/Center/Back Distance screen, see diagram to right.
############# Front/Center/Back Distance Screen
Hole Fig. 1 Par Fig. 2 Score Fig. 3
|
167
151 183
| |---|
Distance to the center/pin Fig. 4
Distance to front of the green Fig. 5
Distance to back of the green Fig. 6
GreenView The Phantom 2’s GreenView Screens will allow you to move the pin around on the green for a more accurate game. When in GreenView Mode, move the hole around to its current position on the green to get an accurate front, center and back distances. Do this by pressing the UP/DOWN buttons on the left side of the unit to move the hole’s position. You will notice the Nearest and Farthest distances adjust with moving the hole. When done, press the SELECT button to save and move on to the next function. If no information is entered while in GreenView within 60 seconds, the screen will revert back to Distance Screen.
GreenView Screen Par, Hole and Score


Par, Hole and Score


Flag indicates position of hole
Dot indicates original
center position172Indicates CenterDistance
= Nearest Green Point = Farthest Green Point
Hazards Screen


############### Hazard & Layup Points
245 314 350 438 453 469
Press SELECT to view Hazard callouts per hole, variable depending on the most significant hazards located near a specific hole on the current course. Hazard screen will time out after one minute and return to the FCB screen. (see above) If there are no Hazards, “No Obstacle Data” will be on screen. See “Hazard Glossary” on page 8 for a list of all abbreviations used to designate various hazards.
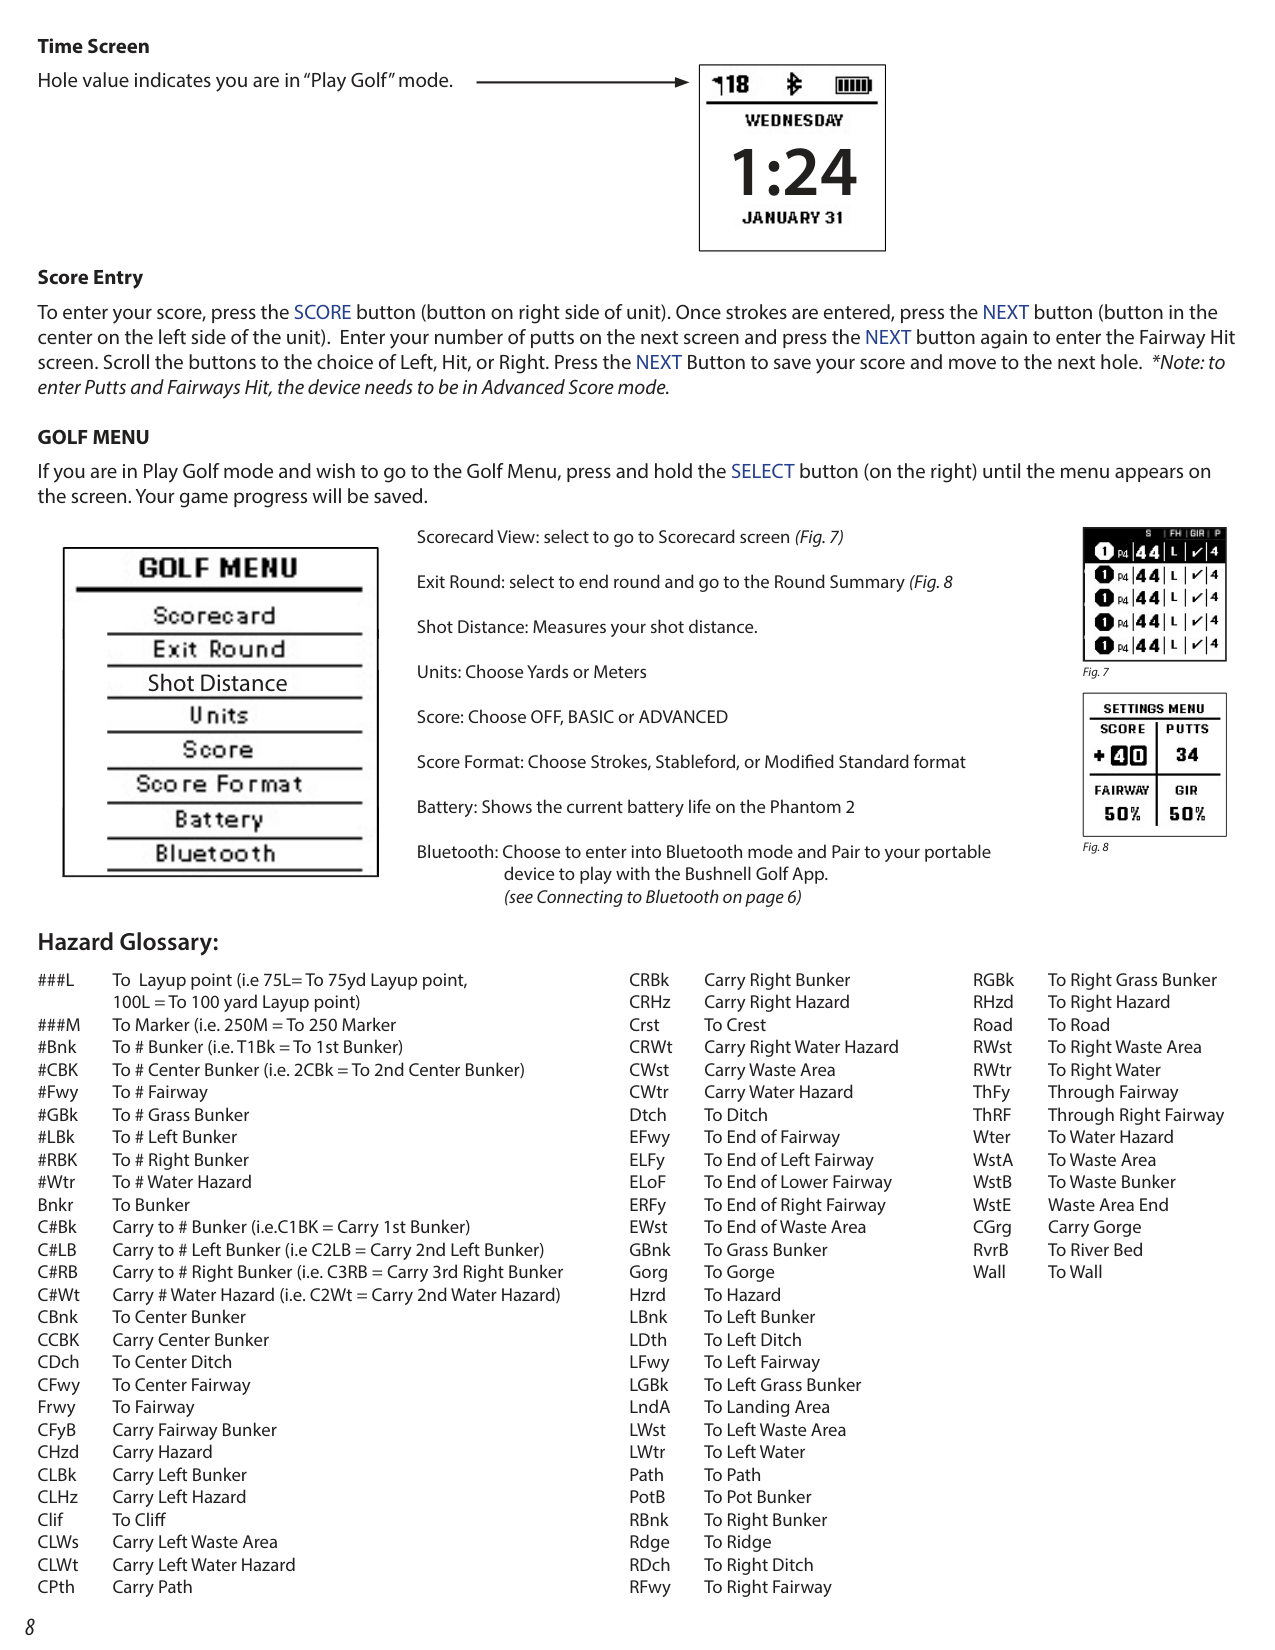
Time Screen Hole value indicates you are in “Play Golf” mode.
|

1:24| |---|
############### Score Entry
To enter your score, press the SCORE button (button on right side of unit). Once strokes are entered, press the NEXT button (button in the center on the left side of the unit). Enter your number of putts on the next screen and press the NEXT button again to enter the Fairway Hit screen. Scroll the buttons to the choice of Left, Hit, or Right. Press the NEXT Button to save your score and move to the next hole. *Note: to enter Putts and Fairways Hit, the device needs to be in Advanced Score mode.
############### GOLF MENU
If you are in Play Golf mode and wish to go to the Golf Menu, press and hold the SELECT button (on the right) until the menu appears on the screen. Your game progress will be saved.
| | |---| |


Shot Distance

| |Hazard Glossary:| |To Layup point (i.e 75L= To 75yd Layup point,|
Scorecard View: select to go to Scorecard screen (Fig. 7) Exit Round: select to end round and go to the Round Summary (Fig. 8 Shot Distance: Measures your shot distance. Units: Choose Yards or Meters Score: Choose OFF, BASIC or ADVANCED Score Format: Choose Strokes, Stableford, or Modified Standard format Battery: Shows the current battery life on the Phantom 2 Bluetooth: Choose to enter into Bluetooth mode and Pair to your portable
|
| |---|
|| |---|
device to play with the Bushnell Golf App. (see Connecting to Bluetooth on page 6)
###L
CRBk Carry Right Bunker CRHz Carry Right Hazard Crst To Crest CRWt Carry Right Water Hazard CWst Carry Waste Area CWtr Carry Water Hazard Dtch To Ditch EFwy To End of Fairway ELFy To End of Left Fairway ELoF To End of Lower Fairway ERFy To End of Right Fairway EWst To End of Waste Area GBnk To Grass Bunker Gorg To Gorge Hzrd To Hazard LBnk To Left Bunker LDth To Left Ditch LFwy To Left Fairway LGBk To Left Grass Bunker LndA To Landing Area LWst To Left Waste Area LWtr To Left Water Path To Path PotB To Pot Bunker RBnk To Right Bunker Rdge To Ridge RDch To Right Ditch RFwy To Right Fairway
RGBk To Right Grass Bunker RHzd To Right Hazard Road To Road RWst To Right Waste Area RWtr To Right Water ThFy Through Fairway ThRF Through Right Fairway Wter To Water Hazard
100L = To 100 yard Layup point) ###M To Marker (i.e. 250M = To 250 Marker #Bnk To # Bunker (i.e. T1Bk = To 1st Bunker) #CBK To # Center Bunker (i.e. 2CBk = To 2nd Center Bunker) #Fwy To # Fairway #GBk To # Grass Bunker #LBk To # Left Bunker #RBK To # Right Bunker #Wtr To # Water Hazard Bnkr To Bunker C#Bk Carry to # Bunker (i.e.C1BK = Carry 1st Bunker) C#LB Carry to # Left Bunker (i.e C2LB = Carry 2nd Left Bunker) C#RB Carry to # Right Bunker (i.e. C3RB = Carry 3rd Right Bunker C#Wt Carry # Water Hazard (i.e. C2Wt = Carry 2nd Water Hazard) CBnk To Center Bunker CCBK Carry Center Bunker CDch To Center Ditch CFwy To Center Fairway Frwy To Fairway CFyB Carry Fairway Bunker CHzd Carry Hazard CLBk Carry Left Bunker CLHz Carry Left Hazard Clif To Cliff
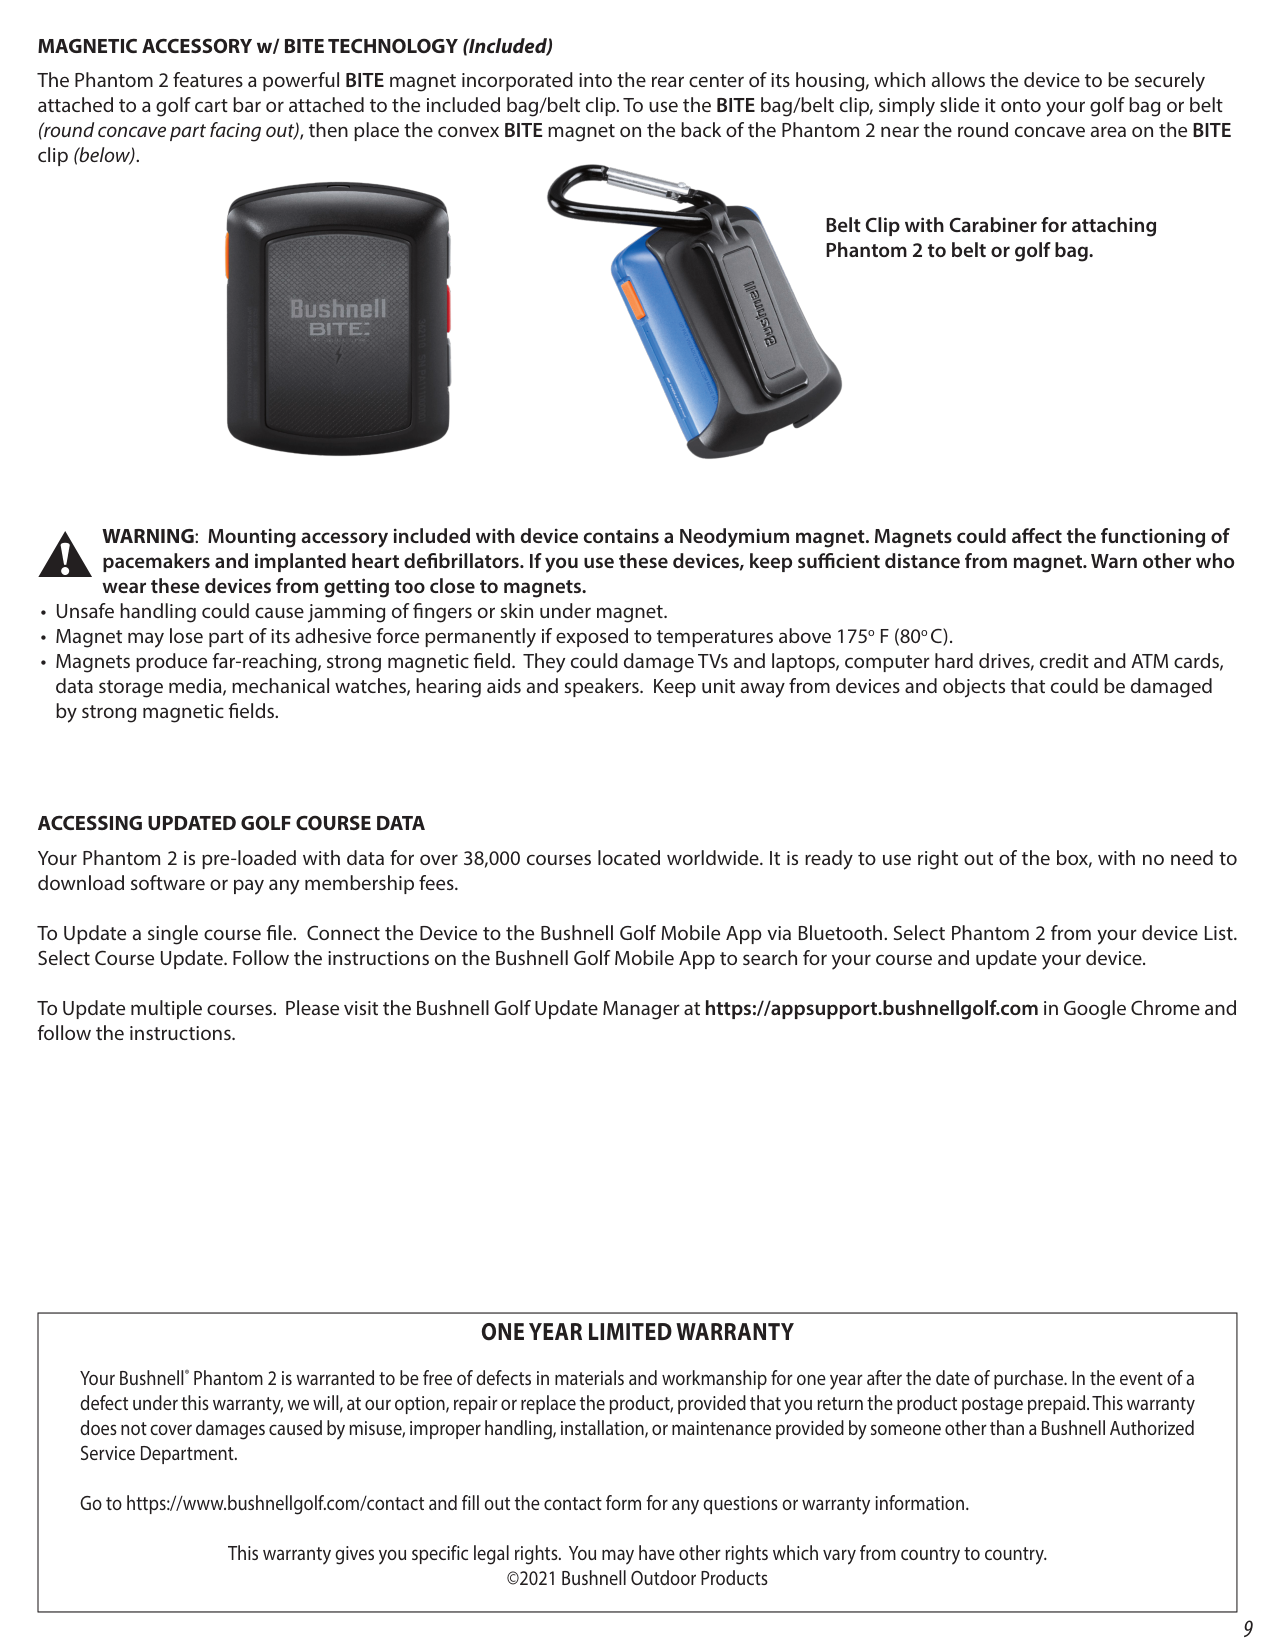
############### MAGNETIC ACCESSORY w/ BITE TECHNOLOGY (Included)
The Phantom 2 features a powerful BITE magnet incorporated into the rear center of its housing, which allows the device to be securely attached to a golf cart bar or attached to the included bag/belt clip. To use the BITE bag/belt clip, simply slide it onto your golf bag or belt (round concave part facing out), then place the convex BITE magnet on the back of the Phantom 2 near the round concave area on the BITE clip (below).


############### Belt Clip with Carabiner for attaching Phantom 2 to belt or golf bag.
############### WARNING: Mounting accessory included with device contains a Neodymium magnet. Magnets could affect the functioning of pacemakers and implanted heart defibrillators. If you use these devices, keep sufficient distance from magnet. Warn other who wear these devices from getting too close to magnets.
############### ACCESSING UPDATED GOLF COURSE DATA
Your Phantom 2 is pre-loaded with data for over 38,000 courses located worldwide. It is ready to use right out of the box, with no need to download software or pay any membership fees.
To Update a single course file. Connect the Device to the Bushnell Golf Mobile App via Bluetooth. Select Phantom 2 from your device List. Select Course Update. Follow the instructions on the Bushnell Golf Mobile App to search for your course and update your device.
To Update multiple courses. Please visit the Bushnell Golf Update Manager at https://appsupport.bushnellgolf.com in Google Chrome and follow the instructions.
|ONE YEAR LIMITED WARRANTY
Your Bushnell® Phantom 2 is warranted to be free of defects in materials and workmanship for one year after the date of purchase. In the event of a defect under this warranty, we will, at our option, repair or replace the product, provided that you return the product postage prepaid. This warranty does not cover damages caused by misuse, improper handling, installation, or maintenance provided by someone other than a Bushnell Authorized Service Department.
Go to https://www.bushnellgolf.com/contact and fill out the contact form for any questions or warranty information.
This warranty gives you specific legal rights. You may have other rights which vary from country to country. ©2021 Bushnell Outdoor Products| |---|
############### FCC Statement
This device complies with part 15 of the FCC Rules. Operation is subject to the following two conditions: (1) This device may not cause harmful interference, and (2) this device must accept any interference received, including interference that may cause undesired operation.
This equipment has been tested and found to comply with the limits for a Class B digital device, pursuant to Part 15 of the FCC Rules. These limits are designed to provide reasonable protection against harmful interference in a residential installation. This equipment generates, uses and can radiate radio frequency energy and, if not installed and used in accordance with the instructions, may cause harmful interference to radio communications. However, there is no guarantee that interference will not occur in a particular installation. If this equipment does cause harmful interference to radio or television reception, which can be determined by turning the equipment off and on, the user is encouraged to try to correct the interference by one or more of the following measures:
Shielded interface cable must be used with the equipment in order to comply with the limits for a digital device pursuant to Subpart B of Part 15 of FCC Rules. Specifications and designs are subject to change without any notice or obligation on the part of the manufacturer.
################ Industry Canada Statement :
This device complies with ISED’s license-exempt RSSs. Operation is subject to the following two conditions: (1) This device may not cause harmful interference, and (2) this device must accept any interference received, including interference that may cause undesired operation.
Le présent appareil est conforme aux CNR d’ ISED applicables aux appareils radio exempts de licence. L’exploitation est autorisée aux deux conditions suivantes: (1) le dispositif ne doit pas produire de brouillage préjudiciable, et (2) ce dispositif doit accepter tout brouillage reçu, y compris un brouillage susceptible de provoquer un fonctionnement indésirable.
################ Radiation Exposure Statement / Déclaration d’exposition aux radiations :
This device complies with the Industry Canada portable RF exposure limit set forth for an uncontrolled environment and is safe for the intended operation as described in this manual. Further RF exposure reduction can be achieved if the product can be kept as far as possible from the user’s body or if the device is set to a lower output power if such function is available.
Le produit est conforme aux limites d’exposition pour les appareils portables RF pour les Etats-Unis et le Canada établies pour un environnement non contrôlé. Le produit est sûr pour un fonctionnement tel que décrit dans ce manuel. La réduction aux expositions RF peut être augmentée si l’appareil peut être conservé aussi loin que possible du corps de l’utilisateur ou que le dispositif est réglé sur la puissance de sortie la plus faible si une telle fonction est disponible.
WARNING: Bite feature included with device contains a Neodymium magnet. Magnets could affect the functioning of pacemakers and implanted heart defibrillators. If you use these devices, keep sufficient distance from magnet. Warn others who wear these devices from getting too close to magnets.
Windows is a registered trademark of Microsoft Corporation in the United States and other countries. Mac and Mac OS are trademarks of Apple Inc., registered in the U.S. and other countries. Other names may be trademarks of their respective owners.
FCC ID: 2ASQI-36211 IC: 24886-36211


################ Disposal of Electric and Electronic Equipment (Applicable in the EU and other European countries with separate collection systems)
This equipment contains electric and/or electronic parts and must therefore not be disposed of as normal household waste. Instead, it should be disposed at the respective collection points for recycling provided by the communities. For you, this is free of charge.
If the equipment contains exchangeable (rechargeable) batteries, these too must be removed before and, if necessary, in turn be disposed of according to the relevant regulations (see also the respective comments in this unit’s instructions).
Further information about the subject is available at your community administration, your local waste collection company, or in the store where you purchased this equipment.
Customer Service: (800) 423-3537 www.bushnellgolf.com
©2021 Bushnell Outdoor Products