
Ask AI
— answers from the official manualAnswers from the official manual.
Common questions
Common Questions
10 totalWhat should I do if water is spurting from my dispenser?
If the issue occurs with a newly installed filter cartridge, run water through the dispenser for at least three minutes (about one and a half gallons) to clear it.
How do I replace light bulbs in the fresh food compartment?
Set Master Light switch to the OFF position, allow lamps to cool. To access the lamps, remove top pan of refrigerator and follow instructions from page 20 for replacing type one bulbs.
How do I factory reset the [product]?
Press and hold the Power button for 10 seconds until the LED flashes red. This clears all settings and returns the device to factory defaults. You will need to re-pair all connected devices after the reset.
How do I set the temperature controls on my Monogram refrigerator?
To change temperature settings, press either of the buttons until the desired temperatures appear in the display. Allow 24 hours for the refrigerator to reach the new temperature setting.
What steps should I take when moving my Monogram refrigerator?
Secure all loose items such as shelves and drawers by taping them securely in place. Ensure the refrigerator stays upright during transportation. Disassemble grille, etc., to protect against damage.
What safety precautions should I follow when cleaning the refrigerator's halogen lights?
Turn off power at circuit breaker or fuse box and ensure lamps are sufficiently cooled before attempting replacement. Also review light bulb information and warning on page 20 for additional safety measures.
Full Manual
32 pages
Owner’s Manual
Side-by-Side 36″,42″,48″ Built-In Refrigerators
Introduction Your new Monogram refrigerator makes an eloquent statement of style, convenience and kitchen planning flexibility. Whether you chose it for its purity of design, practical storage arrangements or assiduous attention to detail–or for all of these reasons–you’ll find that your Monogram refrigerator’s superior blend of form and function will delight you for years to come.
The Monogram refrigerator was designed to provide the flexibility to blend in with your kitchen cabinetry. Decorative door insert panels allow it to match your kitchen cabinets or blend with your kitchen decor. Through a series of product choices, the Monogram refrigerator can be beautifully integrated into the kitchen.
Since this is designed to be a built-in product, custom panels are required on the front of the Monogram refrigerator. Consult your kitchen designer or cabinetmaker for your customized look.
The information on the following pages will help you operate and maintain your refrigerator properly.
If you have any questions, visit our website at: www.monogram.com
Contents Consumer Services Important Phone Numbers . . . . . . . . . . . . .31 Model and Serial Numbers . . . . . . . . . . . . . .3 Problem Solver . . . . . . . . . . . . . . . . . . . .25–28 Product Registration . . . . . . . . . . . . . . . . . . .3 Safety Instructions . . . . . . . . . . . . . . . . . . . 4–7 Smartwater Filter Performance Data Sheet . . . . . . . . . . . . . . . . . . . . . . . . . .29 State of California Water Treatment Device Certificate . . . . . . . . . . . . . . . . . . . . .30 Warranty for customers in the USA . . . . . . . . . . . . . . . . . . Back Cover
############ Care and Cleaning
Cleaning–Outside and Inside . . . . . . . . . . . .19 Cleaning–Condenser . . . . . . . . . . . . . . . . . .24 Light Bulb Replacement . . . . . . . . . . . . 20–23 Moving and Vacation . . . . . . . . . . . . . . . . . .24 Master Light Switch . . . . . . . . . . . . . . . . . . .21
############ Operating Instructions
Automatic Icemaker . . . . . . . . . . . . . . . . . . .12 Climate Control Drawer . . . . . . . . . .13, 14, 16 Control Lock . . . . . . . . . . . . . . . . . . . . . . . .14 Ice and Water Dispenser . . . . . . . . . . . .10, 11 Shelves and Bins . . . . . . . . . . . . . . . . . . .17, 18 Storage Pans . . . . . . . . . . . . . . . . . . . . . .15, 16 Temperature Controls . . . . . . . . . . . . . . . . . .8 Water Filter Cartridge . . . . . . . . . . . . . . . . . .9
####### Before using your refrigerator
Read this manual carefully. It is intended to help you operate and maintain your new refrigerator properly.
Keep it handy for answers to your questions.
If you don’t understand something or need more help, there is a list of toll-free consumer service numbers included in the back section of this manual.
OR Visit our Website at: www.monogram.com
####### Write down the model & serial numbers
You’ll see them on a label above the freezer compartment behind the grille panel.
These numbers are also on the Consumer Product Ownership Registration Card included with this manual.
Before sending in this card, please write these numbers here:
Model Number
Serial Number Use these numbers in any correspondence or service calls concerning your refrigerator.
####### If you received a damaged refrigerator
Immediately contact the dealer (or builder) that sold you the refrigerator.
####### Save time & money
Before you request service, check the Problem Solver in the back of this manual.
It lists causes of minor operating problems that you can correct yourself.
####### If you need service
To obtain service, see the Consumer Services page in the back of this manual.
We’re proud of our service and want you to be pleased. If for some reason you are not happy with the service you receive, here are steps to follow for further help.
############ For customers in the USA:
FIRST, contact the people who serviced your appliance. Explain why you are not pleased. In most cases, this will solve the problem.
NEXT, if you are still not pleased, write all the details–including your phone number–to:
Manager, Customer Relations GE Appliances Appliance Park Louisville, KY 40225
############ For customers in Canada:
FIRST, contact the people who serviced your appliance. Explain why you are not pleased. In most cases, this will solve the problem.
NEXT, if you are still not pleased, write all the details–including your phone number to:
Manager, Consumer Relations Camco Inc. 1 Factory Lane, Suite 310 Moncton, N.B. E1C 9M3
READ AND SAVE THESE INSTRUCTIONS
w WARNING – When using this appliance, always exercise basic safety precautions, including the following:
w DANGER: RISK OF CHILD ENTRAPMENT
Child entrapment and suffocation are not problems of the past. Junked or abandoned refrigeration products are still dangerous… even if they will sit for “just a few days.” If you are getting rid of your old appliance, please follow these instructions to help prevent accidents.
Before You Throw Away Your Old Refrigeration Product:
CFC DISPOSAL
Your old refrigerator may have a cooling system that used CFCs (chlorofluorocarbons). CFCs are believed to harm stratospheric ozone.
If you are throwing away an old refrigeration product, make sure the CFC refrigerant is removed for proper disposal by a qualified servicer. If you intentionally release this CFC refrigerant, you can be subject to fines and imprisonment under provisions of environmental legislation.
LIRE ET CONSERVER CES INSTRUCTIONS
w AVERTISSEMENT : Lorsque vous utilisez le réfrigérateur, observez toujours certaines précautions de base, notamment :
w DANGER! RISQUES POUR LES ENFANTS
Les enfants pris au piège ou morts d’asphyxie sont toujours d’actualité. Les appareils de réfrigération abandonés sont toujours aussi dangereux, même si on n’attend que “quelque jours” pour s’en débarasser. Si vous ne gardez pas votre ancien appareil, veuillez suivre les directives ci-dessous afin de prévenir les accidents.
Avant de vous débarasser de votre vieux appareil de réfrigération:
SE DÉBARRASSER DU CFC
Votre ancien réfrigérateur peut avoir un système de refroidissement qui a utilisé les CFC (chlorofluorocarbones). Les CFCs sont jugés nocifs pour l’ozone stratosphérique.
Si vous débarrassez de votre viel appareil de réfrigération, assurez-vous que le frigorigène avec CFC soit enlevé correctement par un technicien qualifié. Si vous libérez intentionnellement ce frigogène avec CFC, vouz pouvez être soumis aux contraventions et à l’emprisonnement après les stipulations des lois sur l’environment.
HOW TO CONNECT ELECTRICITY
Do not, under any circumstances, cut or remove the third (ground) prong from the power cord. For personal safety, this appliance must be properly grounded.
The power cord of this appliance is equipped with a 3-prong (grounding) plug which mates with a standard 3-prong (grounding) wall outlet to minimize the possibility of electric shock hazard from this appliance.
Have the wall outlet and circuit checked by a qualified electrician to make sure the outlet is properly grounded.
Where a standard 2-prong wall outlet is encountered, it is your personal responsibility and obligation to have it replaced with a properly grounded 3-prong wall outlet.
Use of a GFI (Ground Fault Interruptor) is not recommended for the refrigerator outlet.
The appliance should always be plugged into its own individual electrical outlet which has a voltage rating that matches the rating plate. This provides the best performance and also prevents overloading house wiring circuits which could cause a fire hazard from overheated wires.
DO NOT USE AN ADAPTER PLUG TO CONNECT THE REFRIGERATOR TO A 2-PRONG OUTLET.
DO NOT USE AN EXTENSION CORD WITH THIS APPLIANCE.
Never unplug an appliance by pulling on the power cord. Always grip the plug firmly and pull straight out from the outlet.
Repair or replace immediately all power cords that have become frayed or otherwise damaged. Do not use a cord that shows cracks or abrasion damage along its length or at either end.
When moving the appliance, be careful not to roll over or damage the power cord.
SAVE THESE INSTRUCTIONS
RACCORDEMENT ÉLECTRIQUE
Ne coupez ni retirez en aucun cas la troisième broche (mise à la terre) de la fiche du cordon d’alimentation. Pour votre sécurité, cet appareil doit être correctement mis à la terre.
Le cordon d’alimentation de cet appareil est muni d’une fiche à 3 broches (mise à la terre) qui se branche dans une prise mural ordinaire à 3 alvéoles (mise à la terre) pour réduire au minimum les risques du chocs électriques.
Faites examiner la prise de courant et le circuit par un électricien qualifié pour vous assurer que la prise est correctement mise à la terre.
Si la prise murale est du type standard à 2 alvéoles, il vous incombe de la faire remplacer par une prise à 3 alvéoles correctement mise à la terre.
L’utilisation d’un interrupteur de défaut à la terre (GFI–Ground Fault Interruptor) nést pas recommandé pour la prise de courant du réfrigérateur.
La machine à glaçons doit toujours être branché dans sa propre prise de courant, dont la tension nominale est identique à celle indiquée sur la plaque signalétique. Cette précaution est recommandée pour garantir un rendement optimum et éviter une surcharge des circuits électriques de la résidence, ce qui pourrait créer un risque d’incendie par surschauffe des fils.
N’UTILISEZ PAS UNE FICHE D’ADAPTATION POUR RACCORDER LE RÉFRIGÉRATEUR DANS UNE PRISE MURALE À 2 ALVÉOLES.
N’UTILISEZ PAS DE CORDONS PROLONGATEURS AVEC CET APPAREIL.
Ne débranchez jamais l’appareil en tirant le cordon d’alimentation. Saisissez fermement la fiche du cordon et tirez droit pour la retirer de la prise.
Réparez ou remplacez immédiatement tout cordon effiloché ou endommagé. N’utilisez pas un cordon fendillé ou présentant des signes d’usure.
Lorsque vous déplacez l’appareil du mur, faites attention de ne pas la faire rouler sur le cordon d’alimentation afin de ne pas l’endommager.
CONSERVEZ CES DIRECTIVES
######## Temperature Controls
Built-In Refrigerators
####### Temperature controls
Preset Settings: Allow 24 hours to reach these preset temperatures.
The temperature display shows the actual temperature of the freezer and fresh food compartments. The actual temperature may vary slightly from the set temperature based on factors such as door opening, amount of food, defrost cycling and room temperature.
To turn off the cooling system in both the freezer and fresh food compartments, press either pad until both displays show OFF.
############ To turn the cooling system on, press either
pad. The preset temperatures of 0°F and 37°F will appear in the display.
To check the current temperature setting for the fresh food or freezer compartment, press the or pad once. After 5 seconds, the display will return to the actual temperature.
To change the temperature settings, press the or pads. Allow 24 hours for the refrigerator to reach the temperature you have set.
Temperature Ranges
Low High Fresh Food
|34°F 1°C
–6°F
–21°C
45°F 7°C
+6°F –14°C|
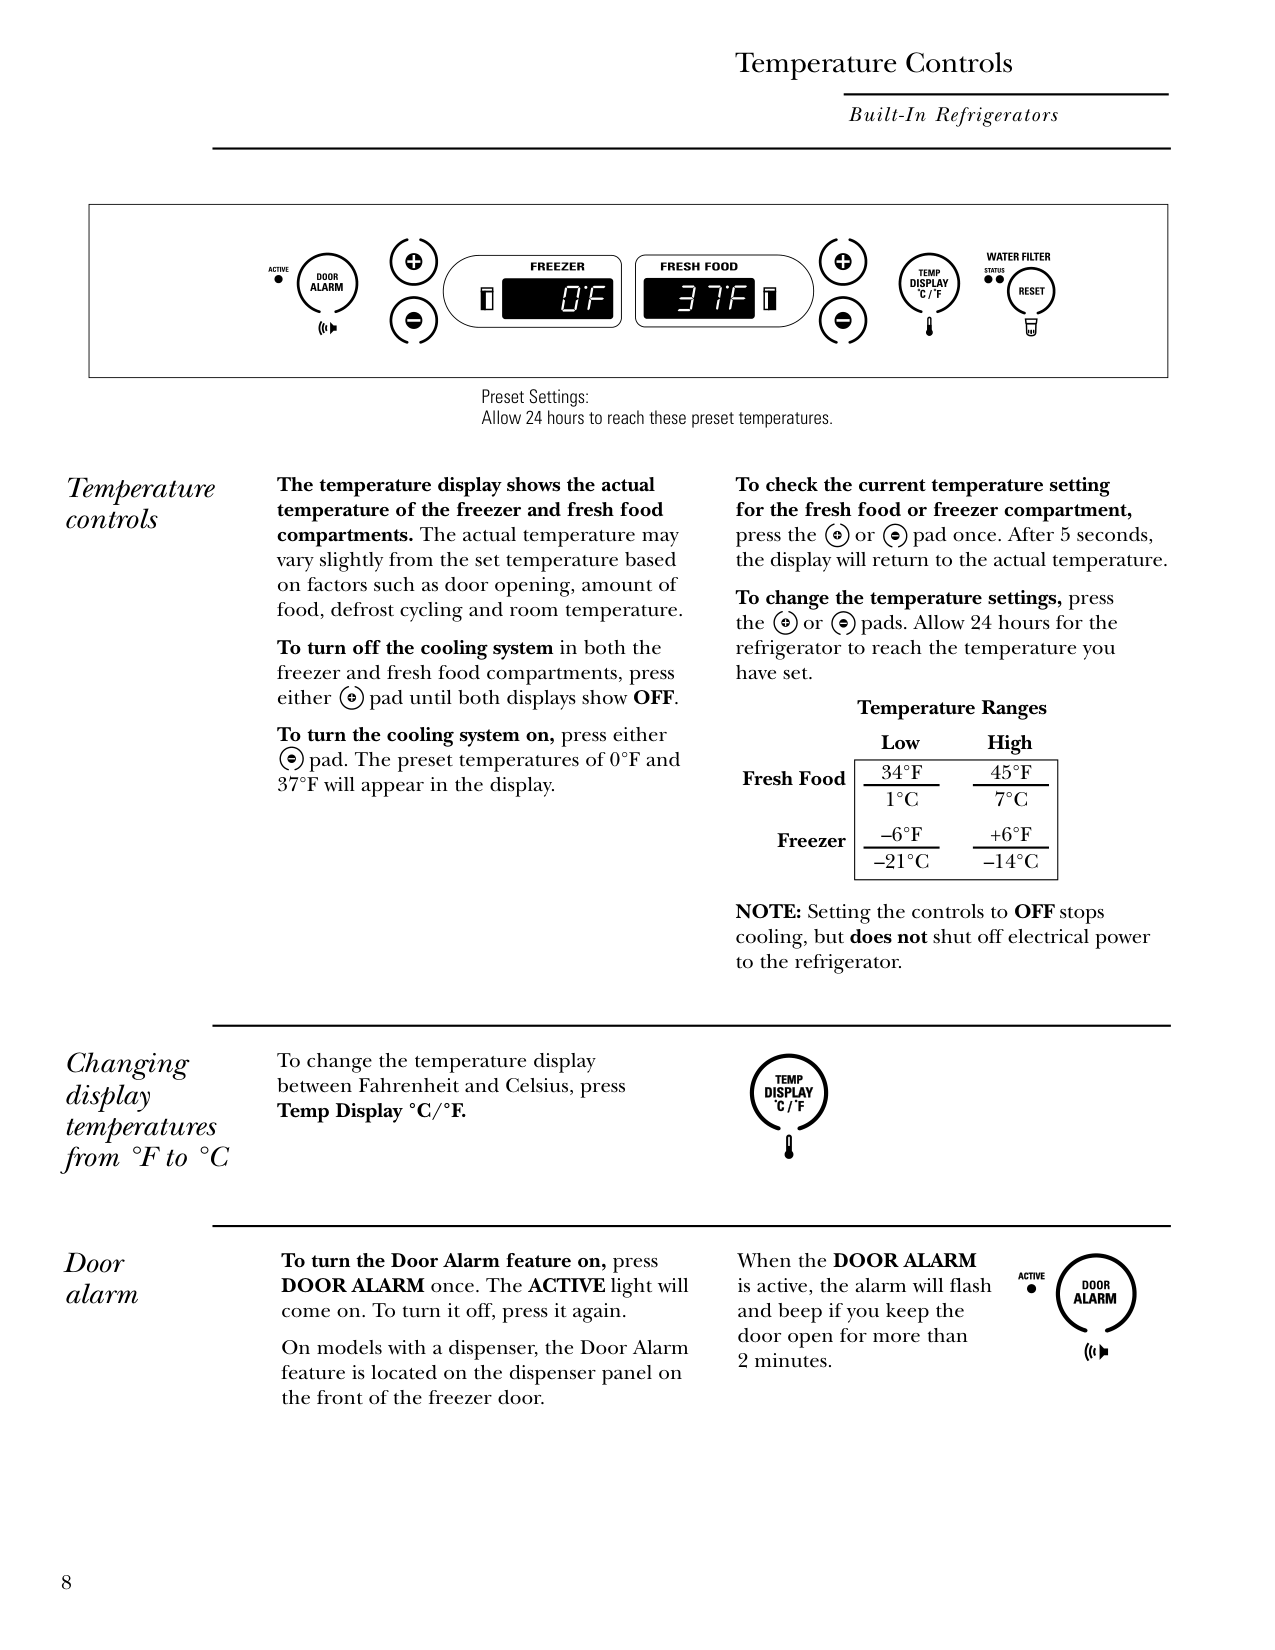
|---|
Freezer
NOTE: Setting the controls to OFF stops cooling, but does not shut off electrical power to the refrigerator.
####### Changing display temperatures from °F to °C
To change the temperature display between Fahrenheit and Celsius, press Temp Display °C/°F.
####### Door alarm
To turn the Door Alarm feature on, press DOOR ALARM once. The ACTIVE light will come on. To turn it off, press it again. On models with a dispenser, the Door Alarm feature is located on the dispenser panel on the front of the freezer door.
When the DOOR ALARM is active, the alarm will flash and beep if you keep the door open for more than 2 minutes.
######## Water Filter Cartridge
####### Water filter cartridge
Built-In Refrigerators
To Reset the Filter Status Light: Press and hold the RESET pad for 3 seconds. Filter Bypass Plug: You must use the filter bypass plug:
The water filter cartridge is located in the back upper right corner of the refrigerator compartment.
To Replace the Filter: The filter cartridge is designed to filter 500 gallons of water (lasting approximately 12 months).
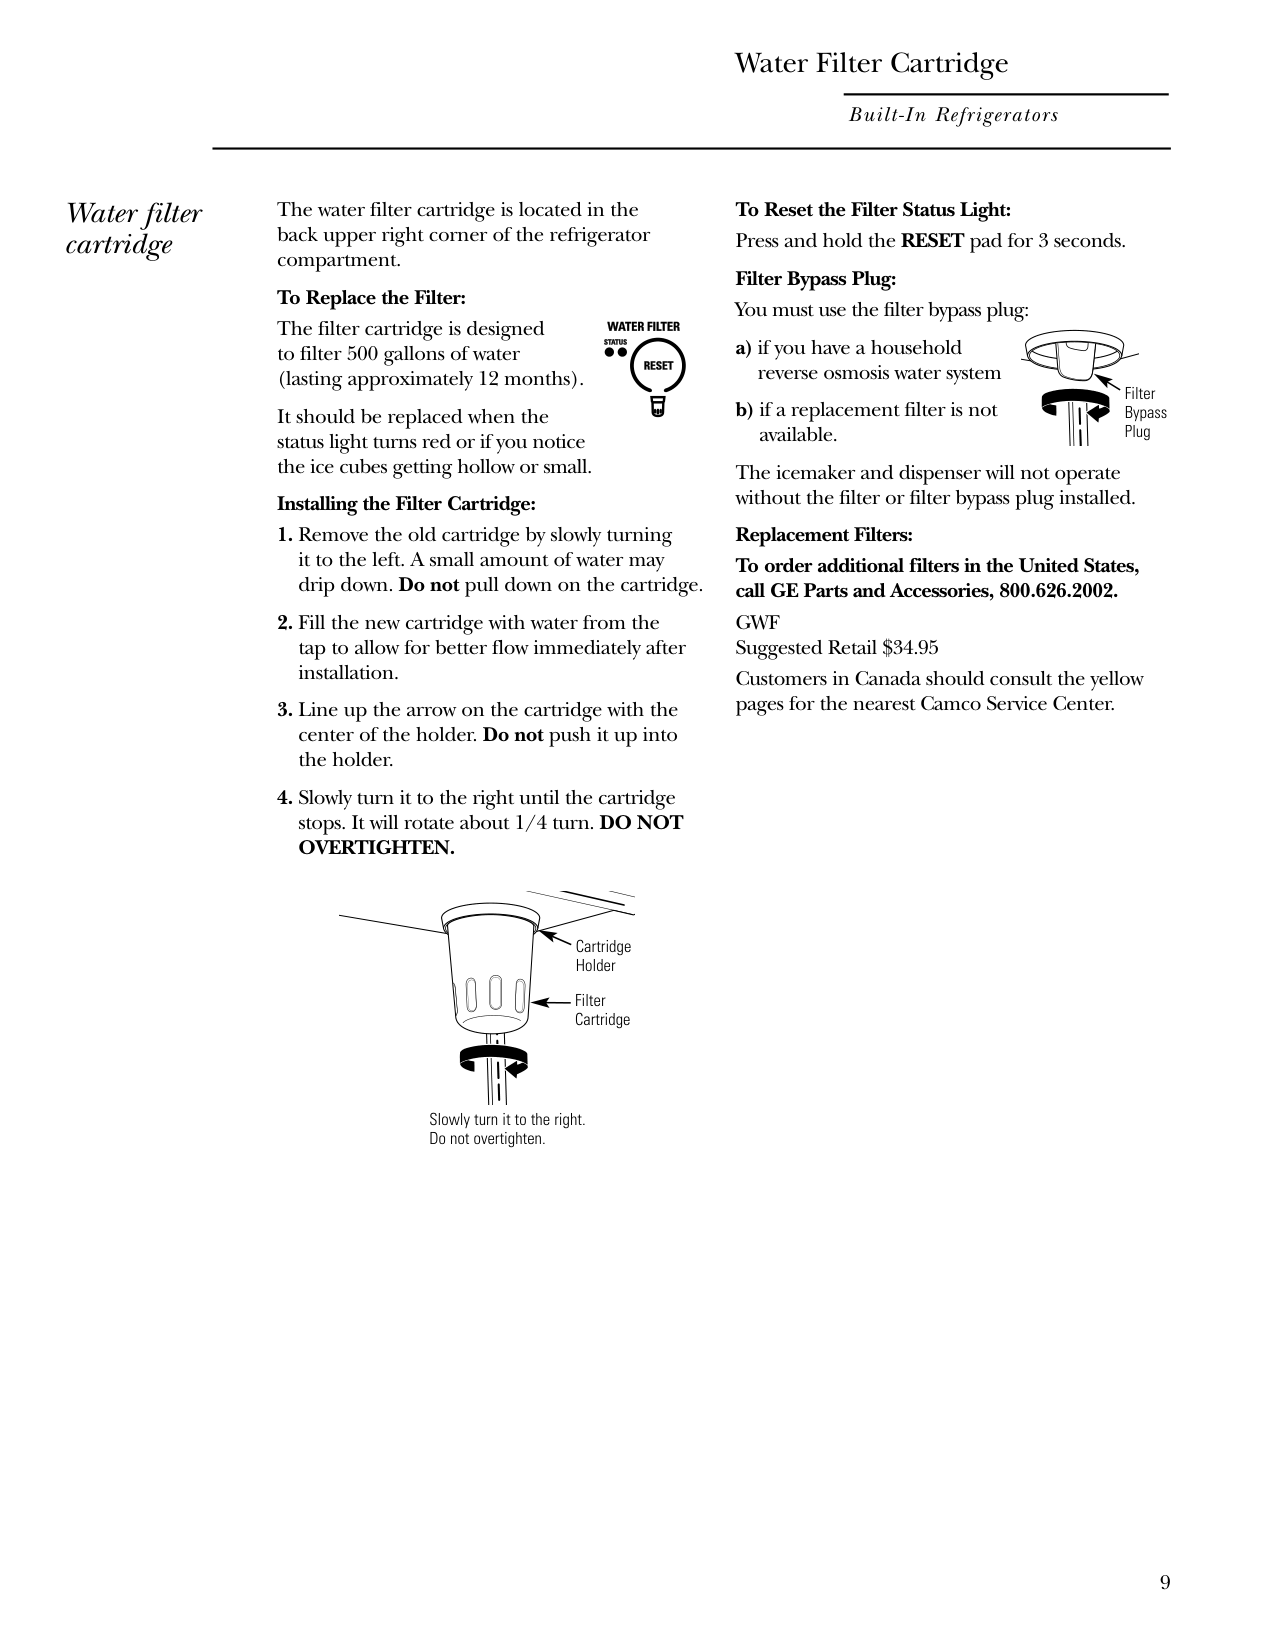
Filter Bypass Plug
It should be replaced when the status light turns red or if you notice the ice cubes getting hollow or small.
The icemaker and dispenser will not operate without the filter or filter bypass plug installed.
############ Installing the Filter Cartridge:
Replacement Filters: To order additional filters in the United States, call GE Parts and Accessories, 800.626.2002. GWF Suggested Retail $34.95 Customers in Canada should consult the yellow pages for the nearest Camco Service Center.
Cartridge Holder
Filter Cartridge
Slowly turn it to the right. Do not overtighten.
####### Dispenser with glass-touch controls
######## Ice & Water Dispenser (on some models)
########## How it Works
The electronic controls on the dispenser are truly interactive. The control panel is equipped with a proximity sensor that causes the panel to light up as you approach the dispenser (approx. 2 inches). To make a selection, simply touch the graphic for the feature you want, and the halo for that feature will light up. When you walk away from the refrigerator, the lighted graphics switch off automatically.
############# Built-In Refrigerators
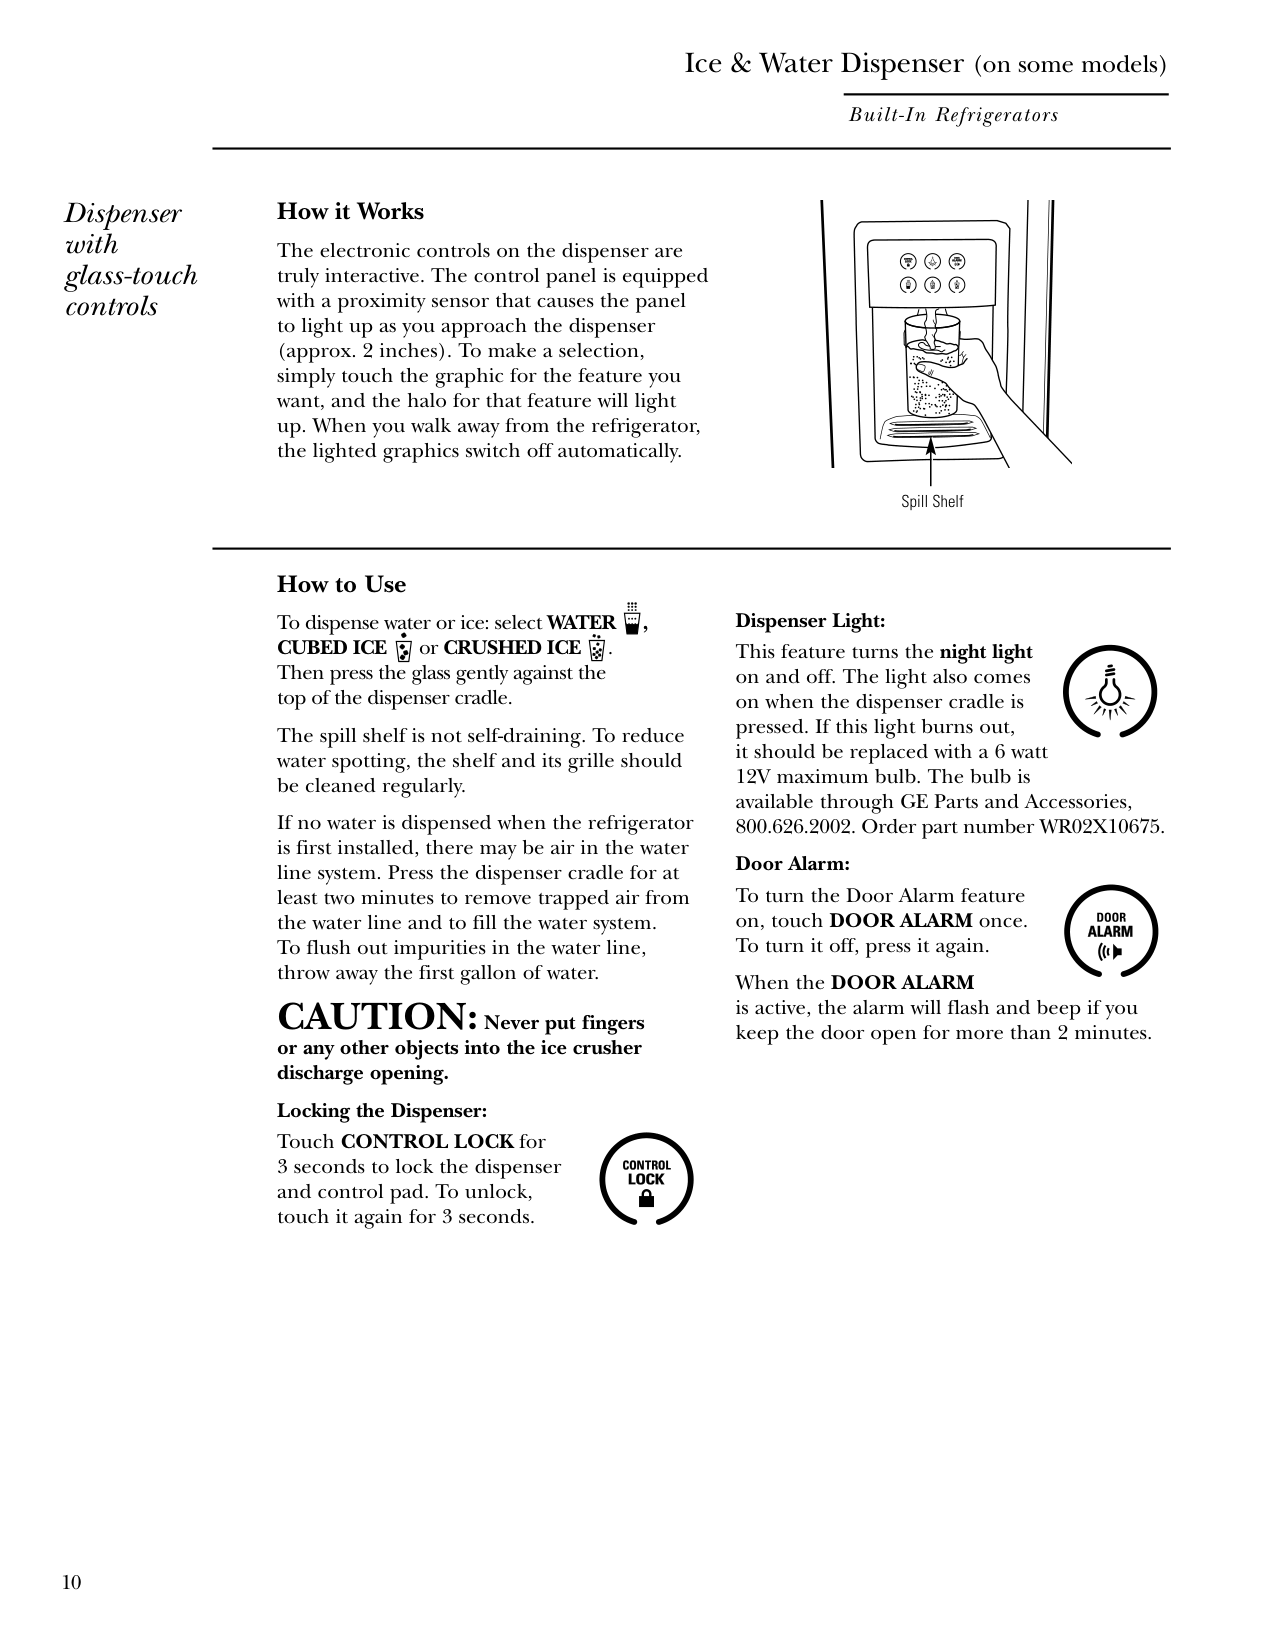
Spill Shelf
How to Use To dispense water or ice: select WATER , CUBED ICE or CRUSHED ICE . Then press the glass gently against the top of the dispenser cradle.
The spill shelf is not self-draining. To reduce water spotting, the shelf and its grille should be cleaned regularly.
If no water is dispensed when the refrigerator is first installed, there may be air in the water line system. Press the dispenser cradle for at least two minutes to remove trapped air from the water line and to fill the water system. To flush out impurities in the water line, throw away the first gallon of water.
CAUTION:Never put fingers or any other objects into the ice crusher discharge opening.
Locking the Dispenser: Touch CONTROL LOCK for 3 seconds to lock the dispenser and control pad. To unlock, touch it again for 3 seconds.
Dispenser Light: This feature turns the night light on and off. The light also comes on when the dispenser cradle is pressed. If this light burns out, it should be replaced with a 6 watt 12V maximum bulb. The bulb is available through GE Parts and Accessories, 800.626.2002. Order part number WR02X10675. Door Alarm:
To turn the Door Alarm feature on, touch DOOR ALARM once. To turn it off, press it again.
When the DOOR ALARM is active, the alarm will flash and beep if you keep the door open for more than 2 minutes.
####### Ice storage bin
To remove: Lift up the access door to reach the icemaker. Set the icemaker power switch to the O (off) position. With the access door closed, support the storage bin at the bottom while slightly lifting. Pull bin straight out.
To replace: Slide the bin back until the tab on the bin locks into the slot on the shelf. If the bin does not go all the way back, remove it and rotate the drive mechanism 1/4 turn. Then push the bin back again.
Access Door
Ice Storage Bin
Rotate
Drive Mechanism
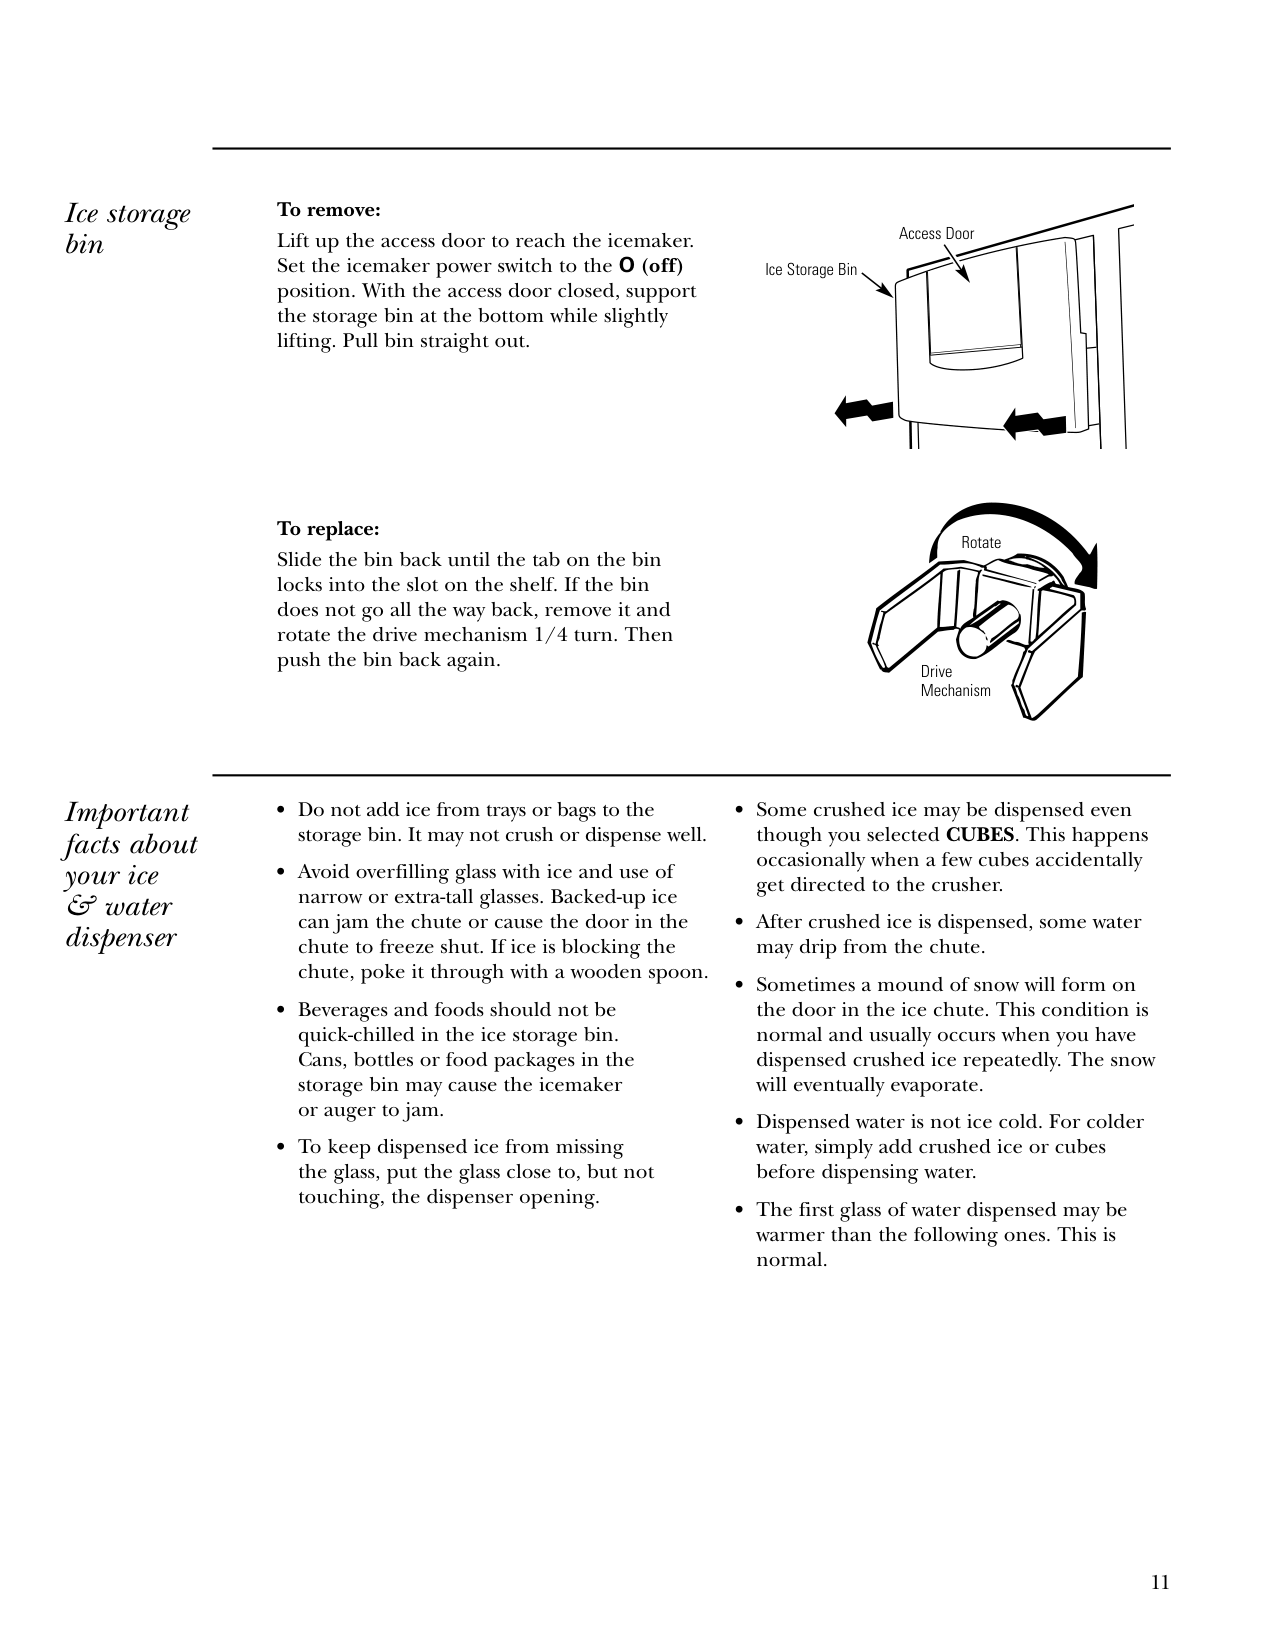
####### Important facts about your ice & water dispenser
####### Automatic icemaker
######## Automatic Icemaker
############# Built-In Refrigerators
A newly-installed refrigerator may take 12–24 hours to begin making ice.
The icemaker will produce seven cubes per cycle–approximately 15 cycles in a 24-hour period, depending on freezer compartment temperature, room temperature, number of door openings and other use conditions.
If the refrigerator is operated before the water connection is made to the icemaker, set the power switch to O (off).
When the refrigerator has been connected to the water supply, set the power switch to I (on). The green light will come on.
Throw away the first full bucket of ice. Be sure nothing interferes with the sweep of the feeler arm.
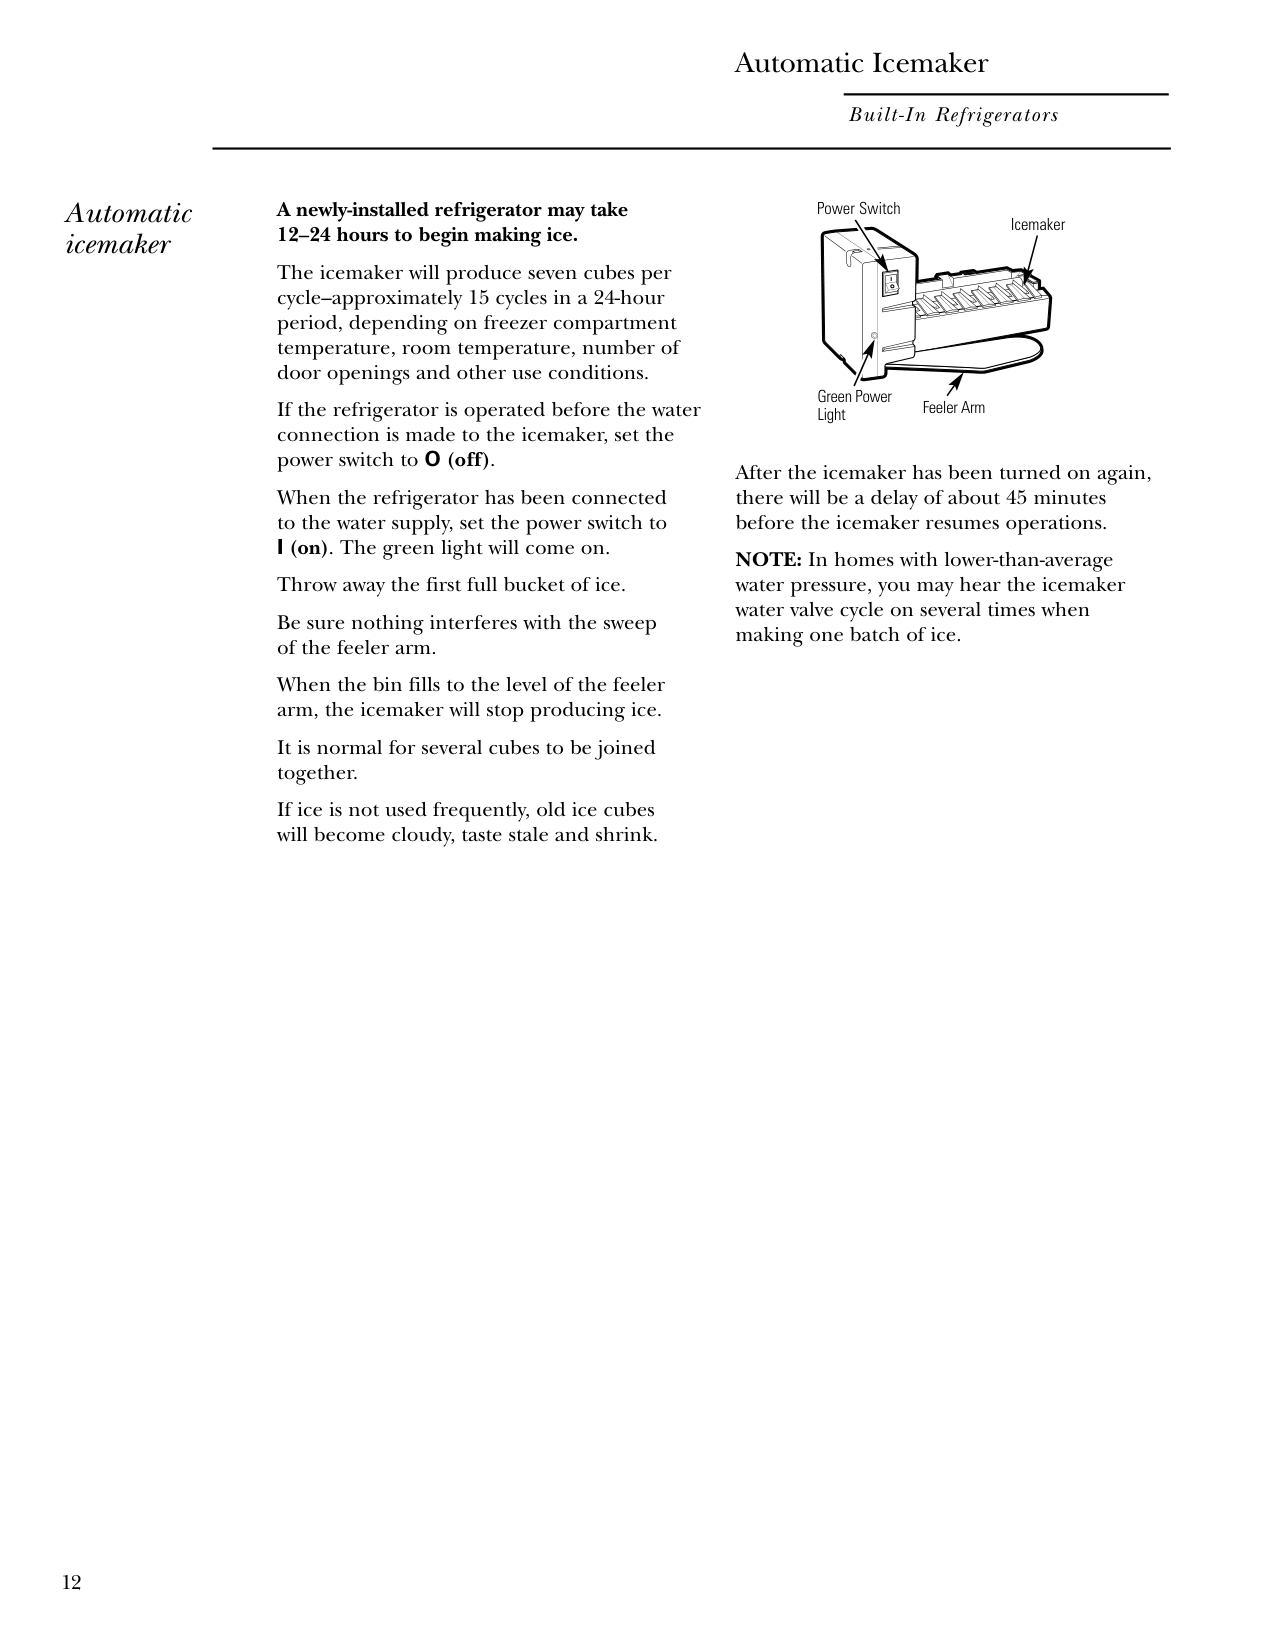
When the bin fills to the level of the feeler arm, the icemaker will stop producing ice.
It is normal for several cubes to be joined together.
If ice is not used frequently, old ice cubes will become cloudy, taste stale and shrink.
Power Switch
Green Power Light
Icemaker
Feeler Arm
After the icemaker has been turned on again, there will be a delay of about 45 minutes before the icemaker resumes operations.
NOTE: In homes with lower-than-average water pressure, you may hear the icemaker water valve cycle on several times when making one batch of ice.
########## How it Works
Control drawer
The Climate Control feature is a system of dampers, a fan, a temperature thermistor, a heater and a specially designed tray. The Climate Control drawer can be used to chill items quickly, thaw foods quickly or store items at their optimum temperatures.
air throughout the drawer. Temperature is maintained in the drawer by cycling a small heater off and on as needed. Once the thaw cycle is complete, the pan will automatically adjust to a temperature of 32°F to store the food at its optimum temperature.
The drawer is tightly sealed to prevent the drawer’s temperature from causing temperature fluctuations in the rest of the refrigerator.
SELECT TEMP–Use this feature to store items at their optimum temperatures. The CITRUS setting will maintain a drawer temperature of 43°F by cycling a small heater off and on as needed. The PRODUCE setting will maintain the drawer temperature at 34°F by drawing in additional cold air as needed. The MEAT setting will maintain the drawer temperature at 32°F by drawing in additional cold air as needed.
Climate Control Tray–Besides using the specially designed Climate Control tray when using the drawer, it can also be used as a chilled serving tray to keep foods cold.
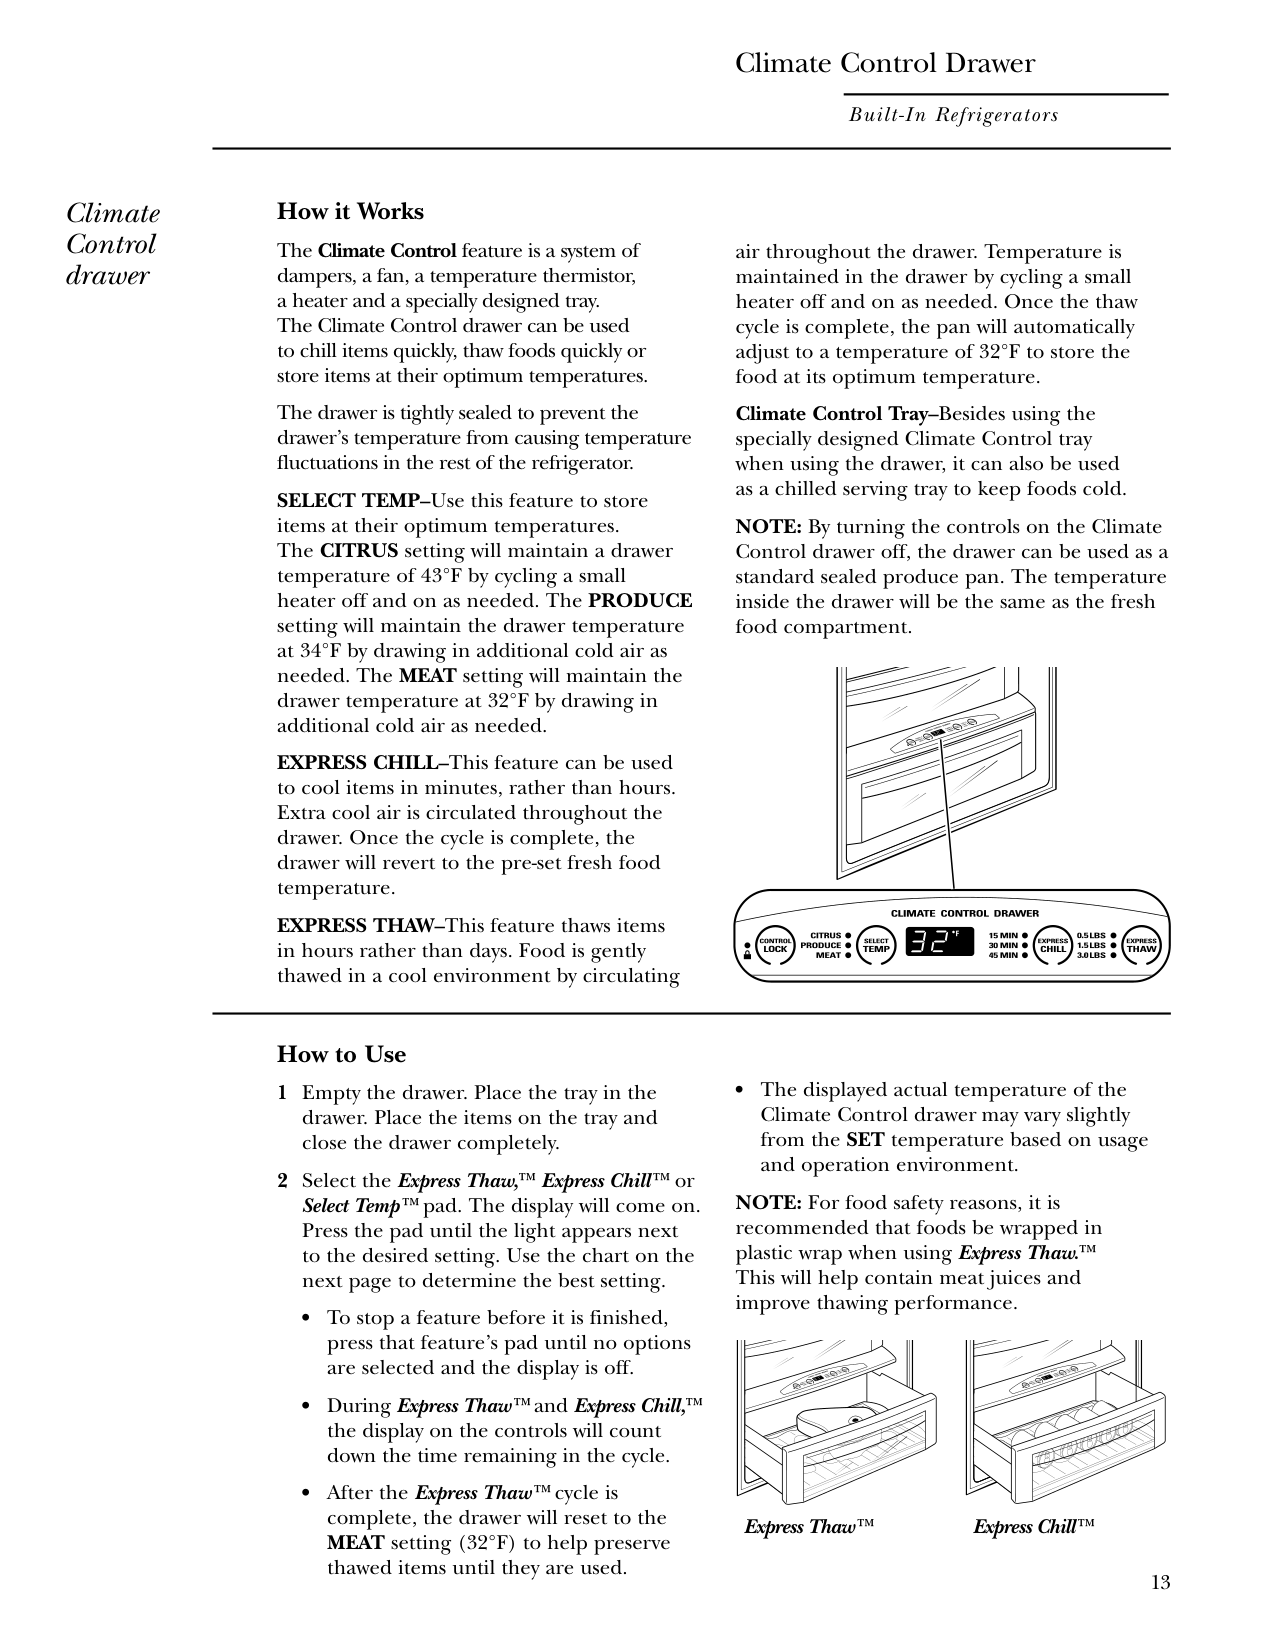
NOTE: By turning the controls on the Climate Control drawer off, the drawer can be used as a standard sealed produce pan. The temperature inside the drawer will be the same as the fresh food compartment.
EXPRESS CHILL–This feature can be used to cool items in minutes, rather than hours. Extra cool air is circulated throughout the drawer. Once the cycle is complete, the drawer will revert to the pre-set fresh food temperature.
EXPRESS THAW–This feature thaws items in hours rather than days. Food is gently thawed in a cool environment by circulating
########## How to Use
• The displayed actual temperature of the Climate Control drawer may vary slightly from the SET temperature based on usage and operation environment.
NOTE: For food safety reasons, it is recommended that foods be wrapped in plastic wrap when using Express Thaw.™ This will help contain meat juices and improve thawing performance.
############ Express Thaw™ Express Chill™
NOTE: Results may vary depending on packaging, starting temperature and other food traits.
Control chart
############ Citrus Setting (43°F)
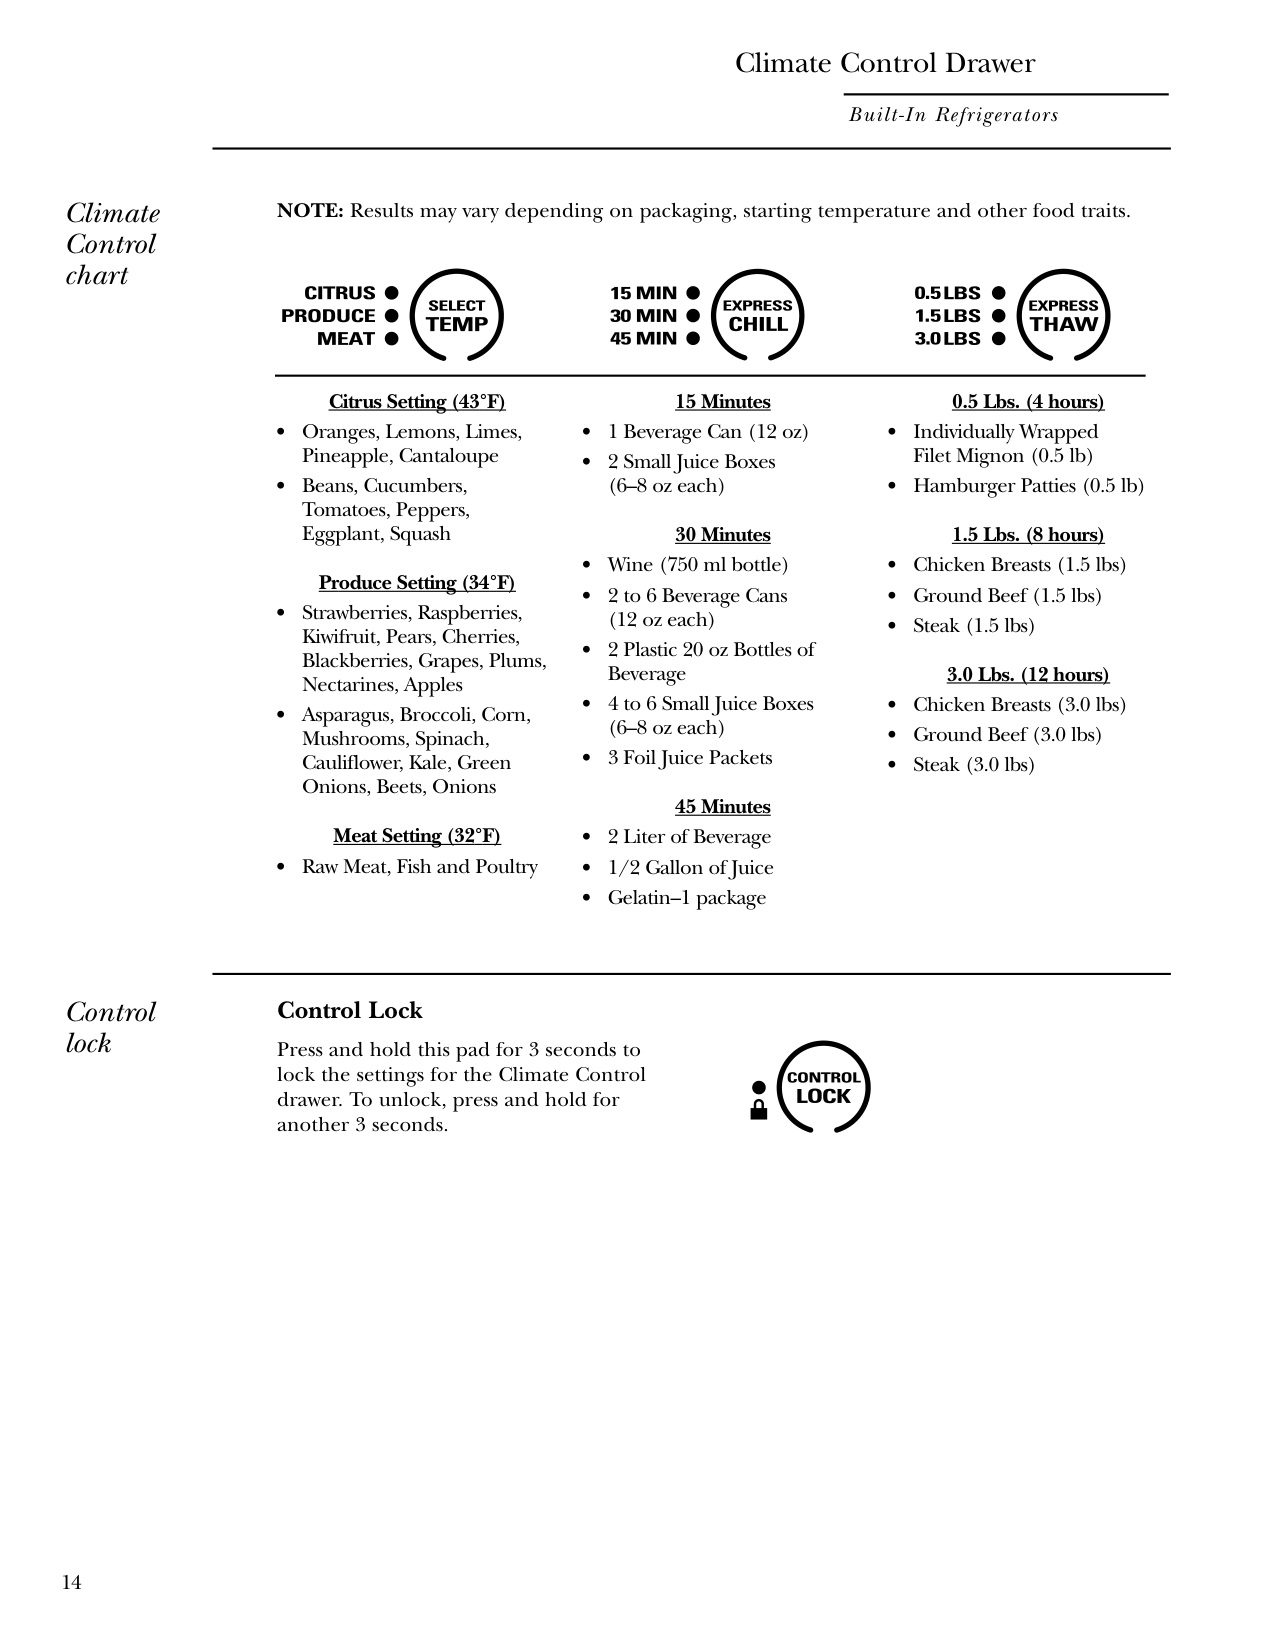
Produce Setting (34°F)
Meat Setting (32°F)
############ 15 Minutes
30 Minutes
############ 0.5 Lbs. (4 hours)
####### Control lock
########## Control Lock
Press and hold this pad for 3 seconds to lock the settings for the Climate Control drawer. To unlock, press and hold for another 3 seconds.
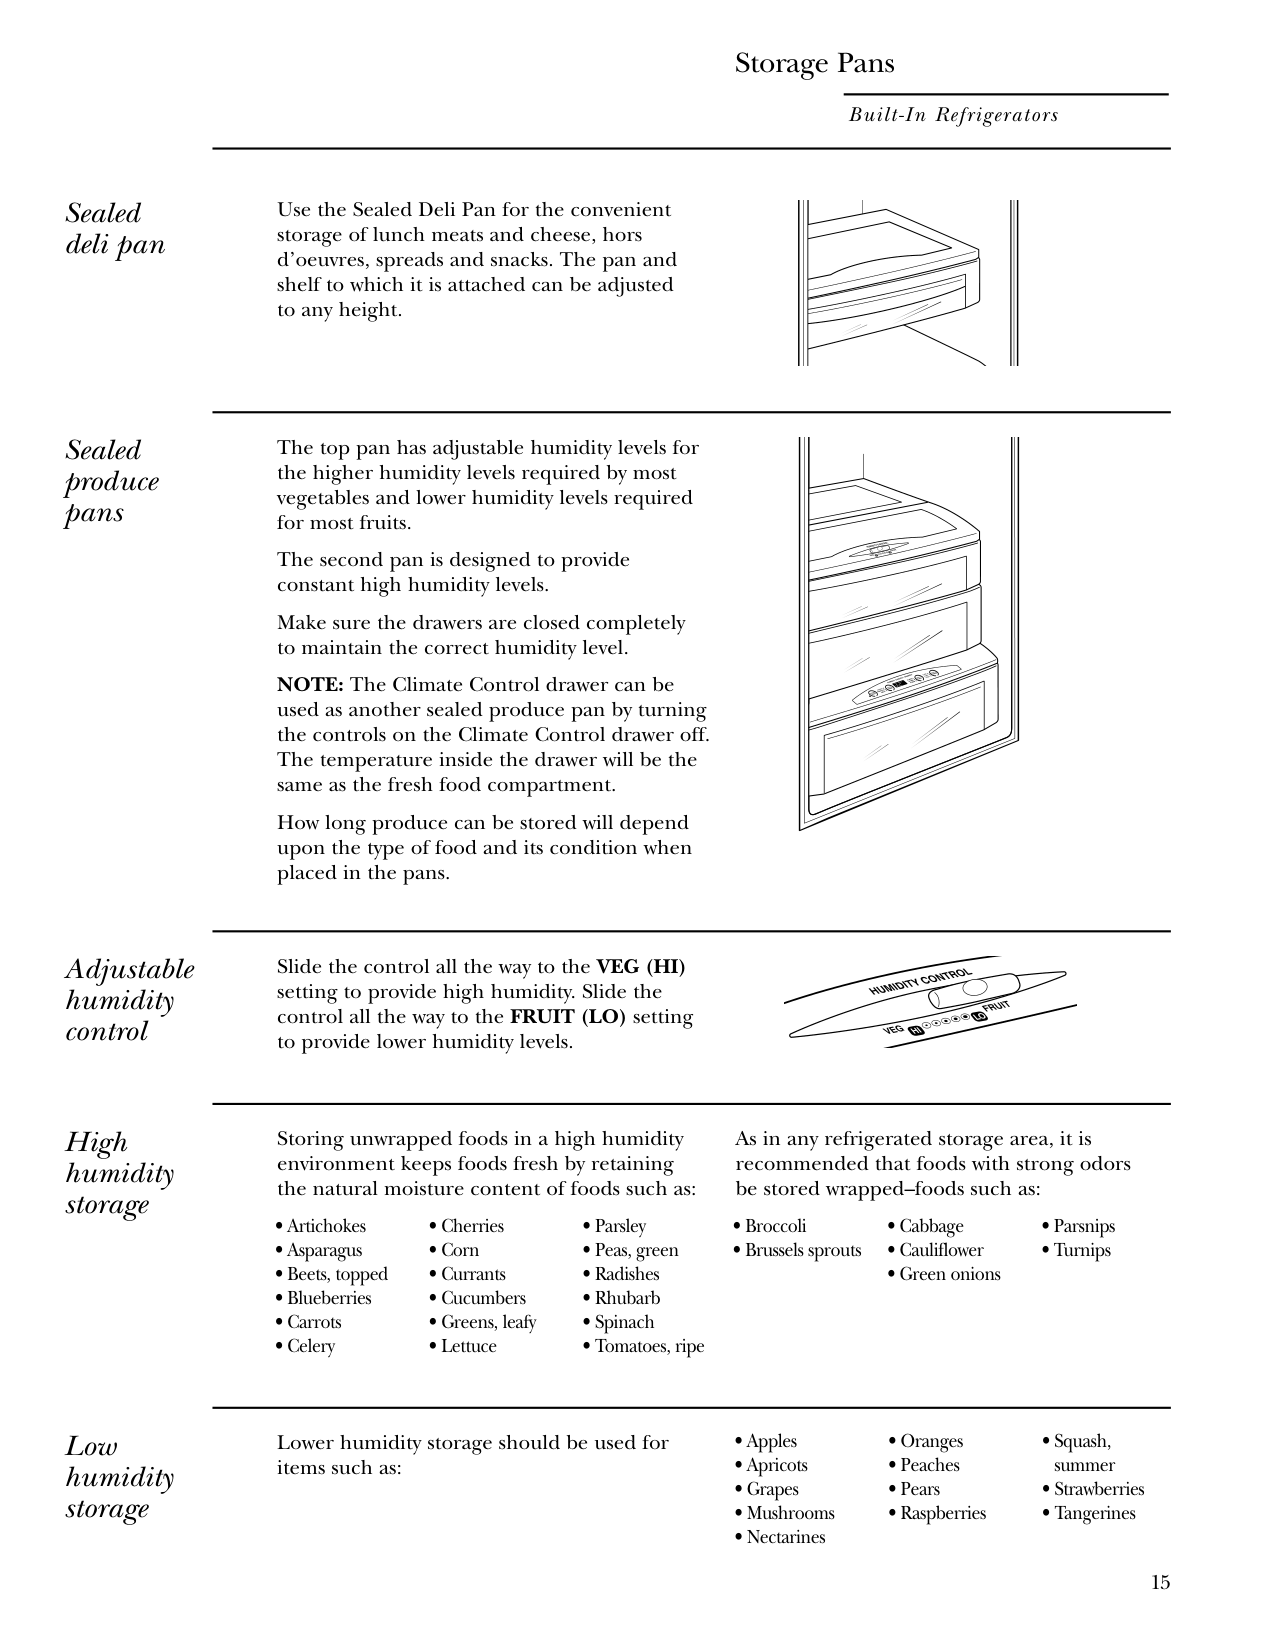
####### Sealed deli pan
######## Storage Pans
Built-In Refrigerators
Use the Sealed Deli Pan for the convenient storage of lunch meats and cheese, hors d’oeuvres, spreads and snacks. The pan and shelf to which it is attached can be adjusted to any height.
####### Sealed produce pans
####### Adjustable humidity control
The top pan has adjustable humidity levels for the higher humidity levels required by most vegetables and lower humidity levels required for most fruits.
The second pan is designed to provide constant high humidity levels.
Make sure the drawers are closed completely to maintain the correct humidity level.
NOTE: The Climate Control drawer can be used as another sealed produce pan by turning the controls on the Climate Control drawer off. The temperature inside the drawer will be the same as the fresh food compartment.
How long produce can be stored will depend upon the type of food and its condition when placed in the pans.
Slide the control all the way to the VEG (HI) setting to provide high humidity. Slide the control all the way to the FRUIT (LO) setting to provide lower humidity levels.
####### High humidity storage
Storing unwrapped foods in a high humidity environment keeps foods fresh by retaining the natural moisture content of foods such as:
As in any refrigerated storage area, it is recommended that foods with strong odors be stored wrapped–foods such as:
####### Low humidity storage
Lower humidity storage should be used for items such as:
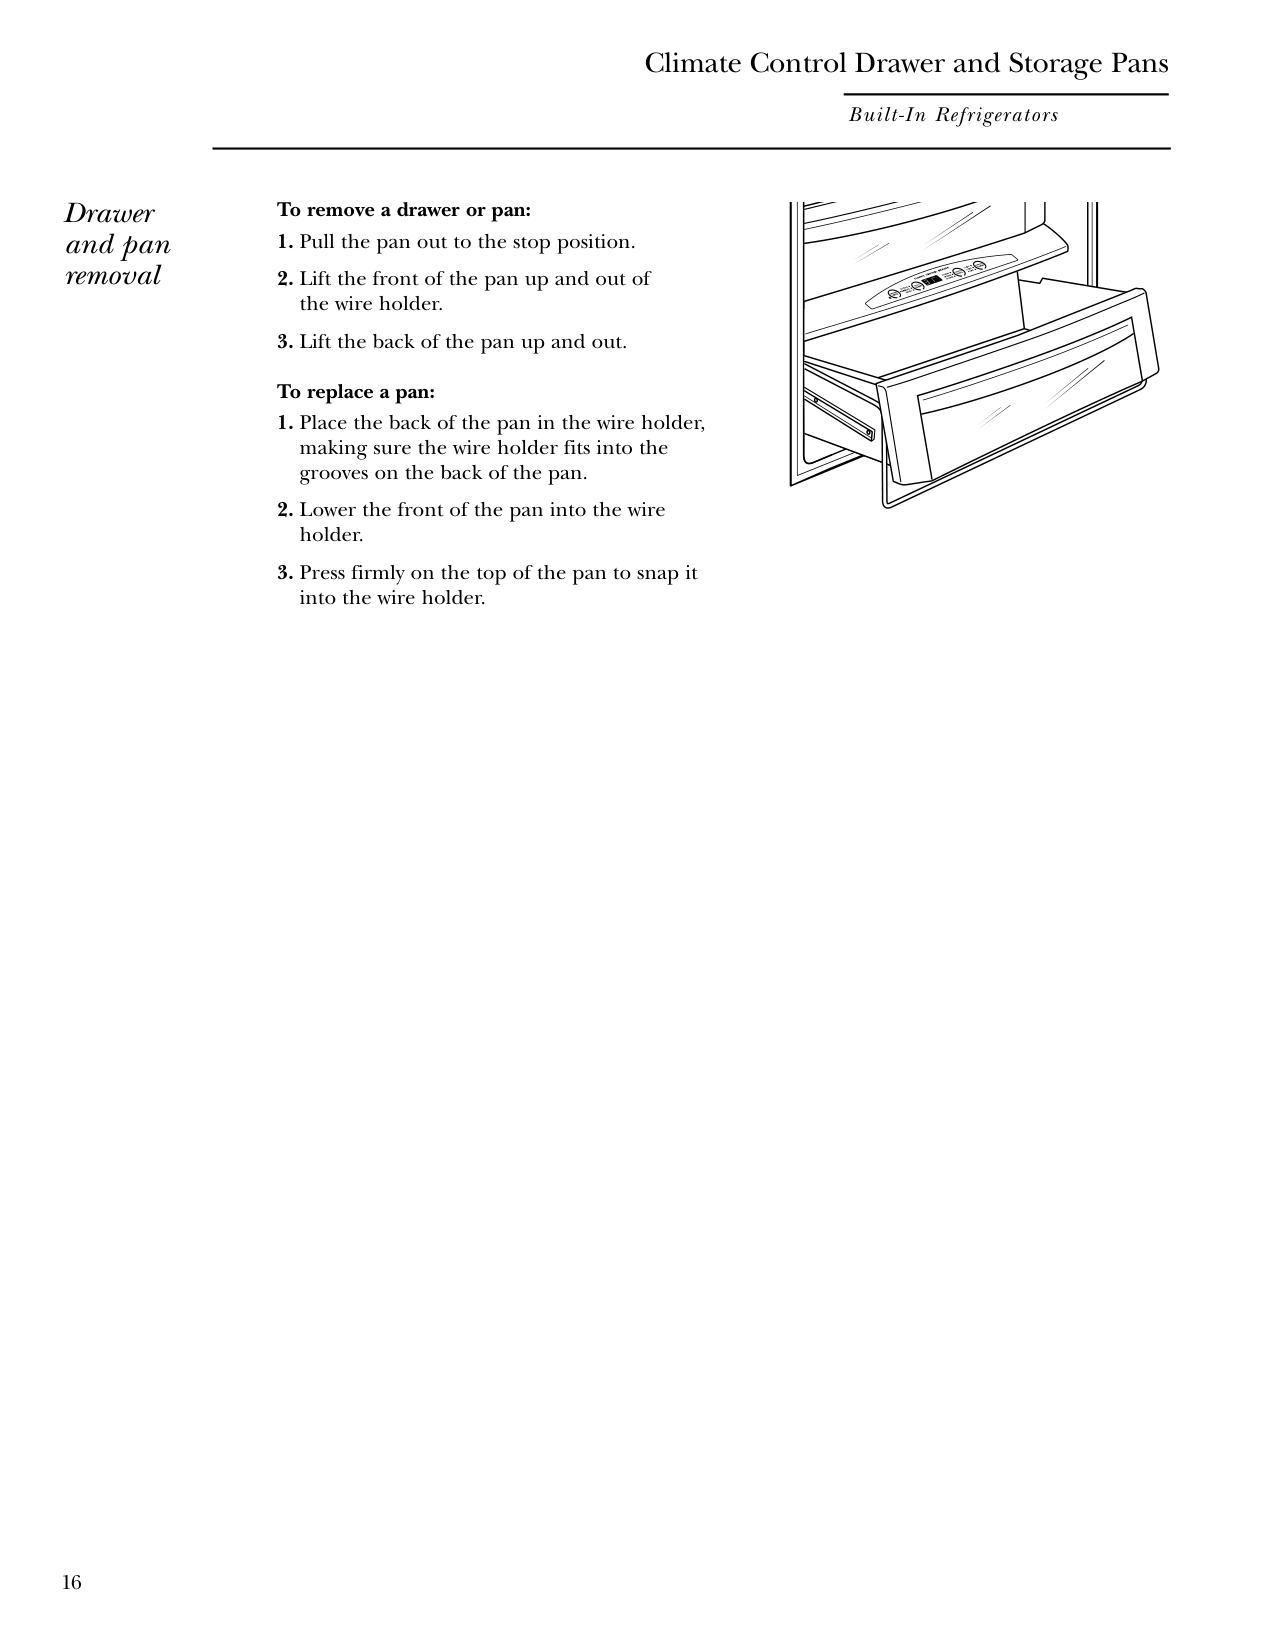
####### Drawer and pan removal
######## Climate Control Drawer and Storage Pans
Built-In Refrigerators
############ To remove a drawer or pan:
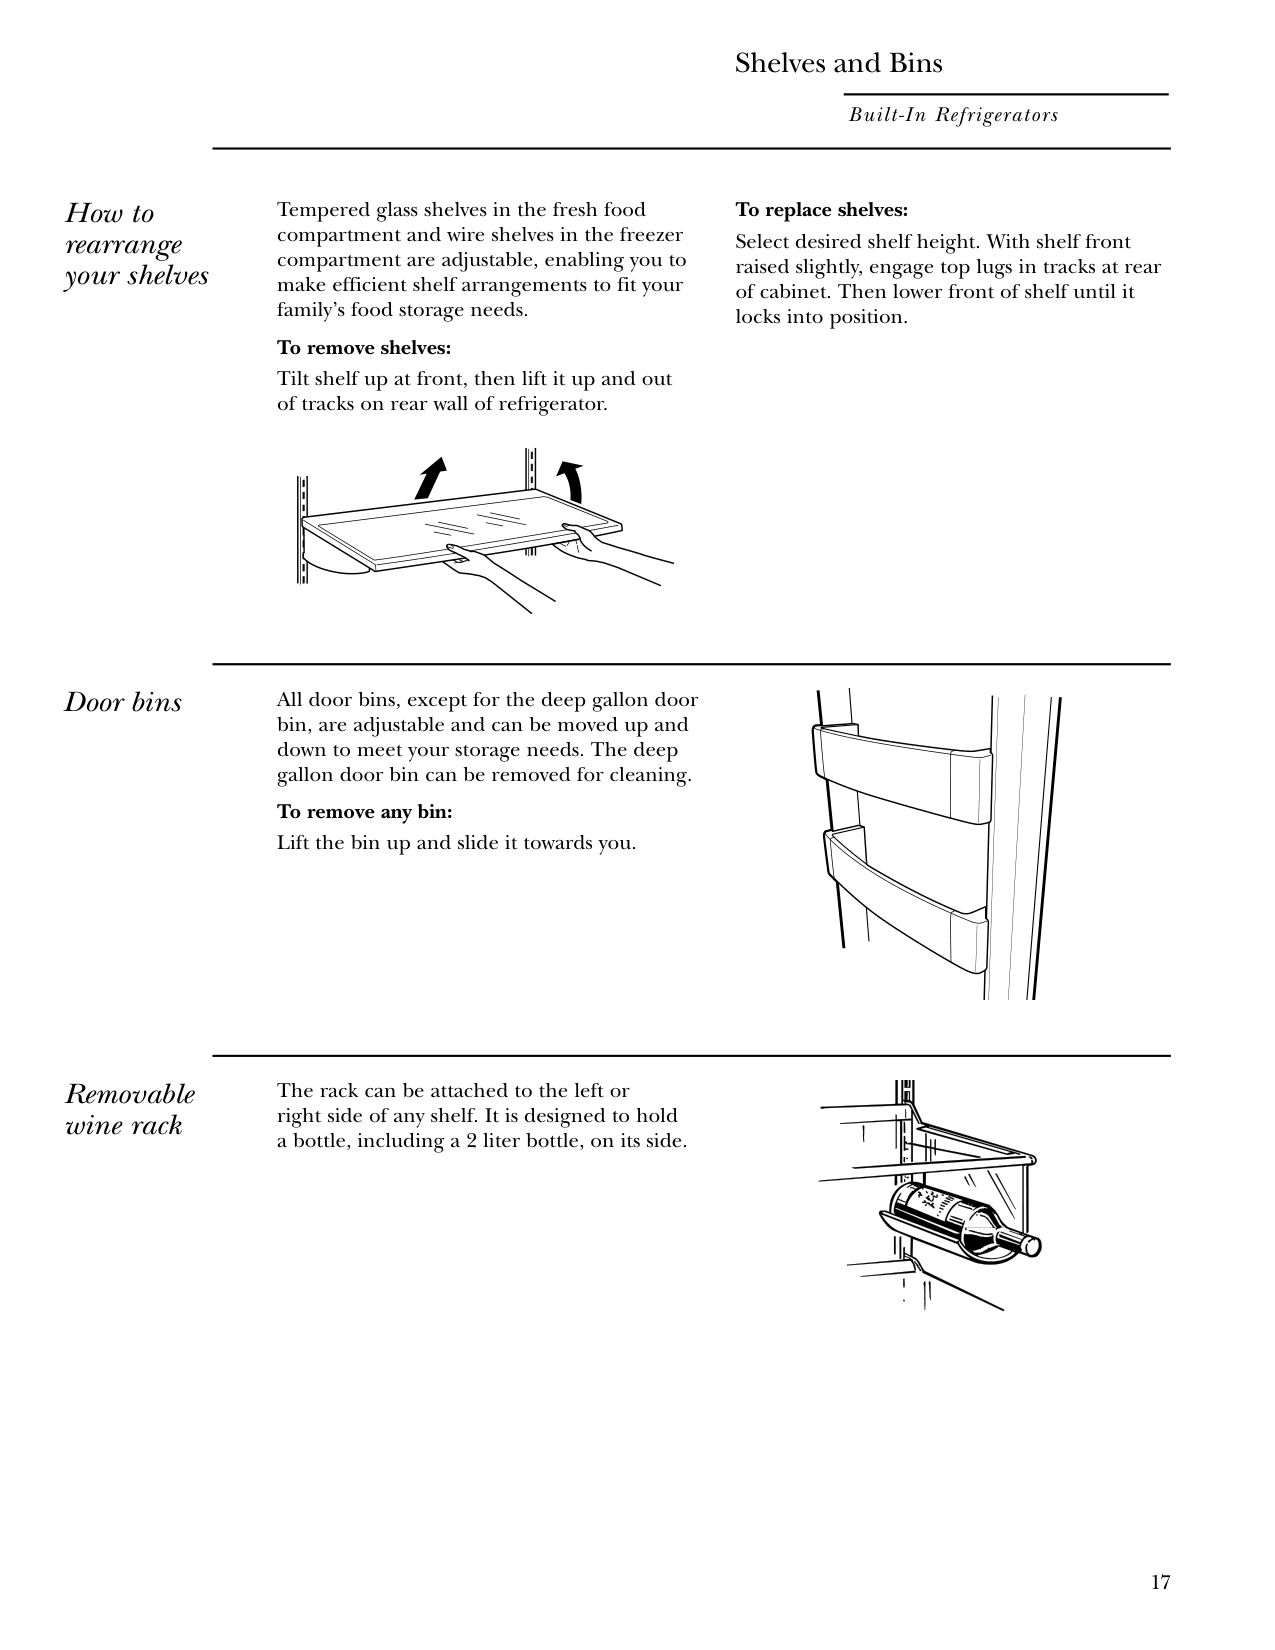
####### How to rearrange your shelves
Tempered glass shelves in the fresh food compartment and wire shelves in the freezer compartment are adjustable, enabling you to make efficient shelf arrangements to fit your family’s food storage needs.
To remove shelves: Tilt shelf up at front, then lift it up and out of tracks on rear wall of refrigerator.
To replace shelves: Select desired shelf height. With shelf front raised slightly, engage top lugs in tracks at rear of cabinet. Then lower front of shelf until it locks into position.
Door bins All door bins, except for the deep gallon door bin, are adjustable and can be moved up and down to meet your storage needs. The deep gallon door bin can be removed for cleaning.
To remove any bin: Lift the bin up and slide it towards you.
####### Removable wine rack
The rack can be attached to the left or right side of any shelf. It is designed to hold a bottle, including a 2 liter bottle, on its side.
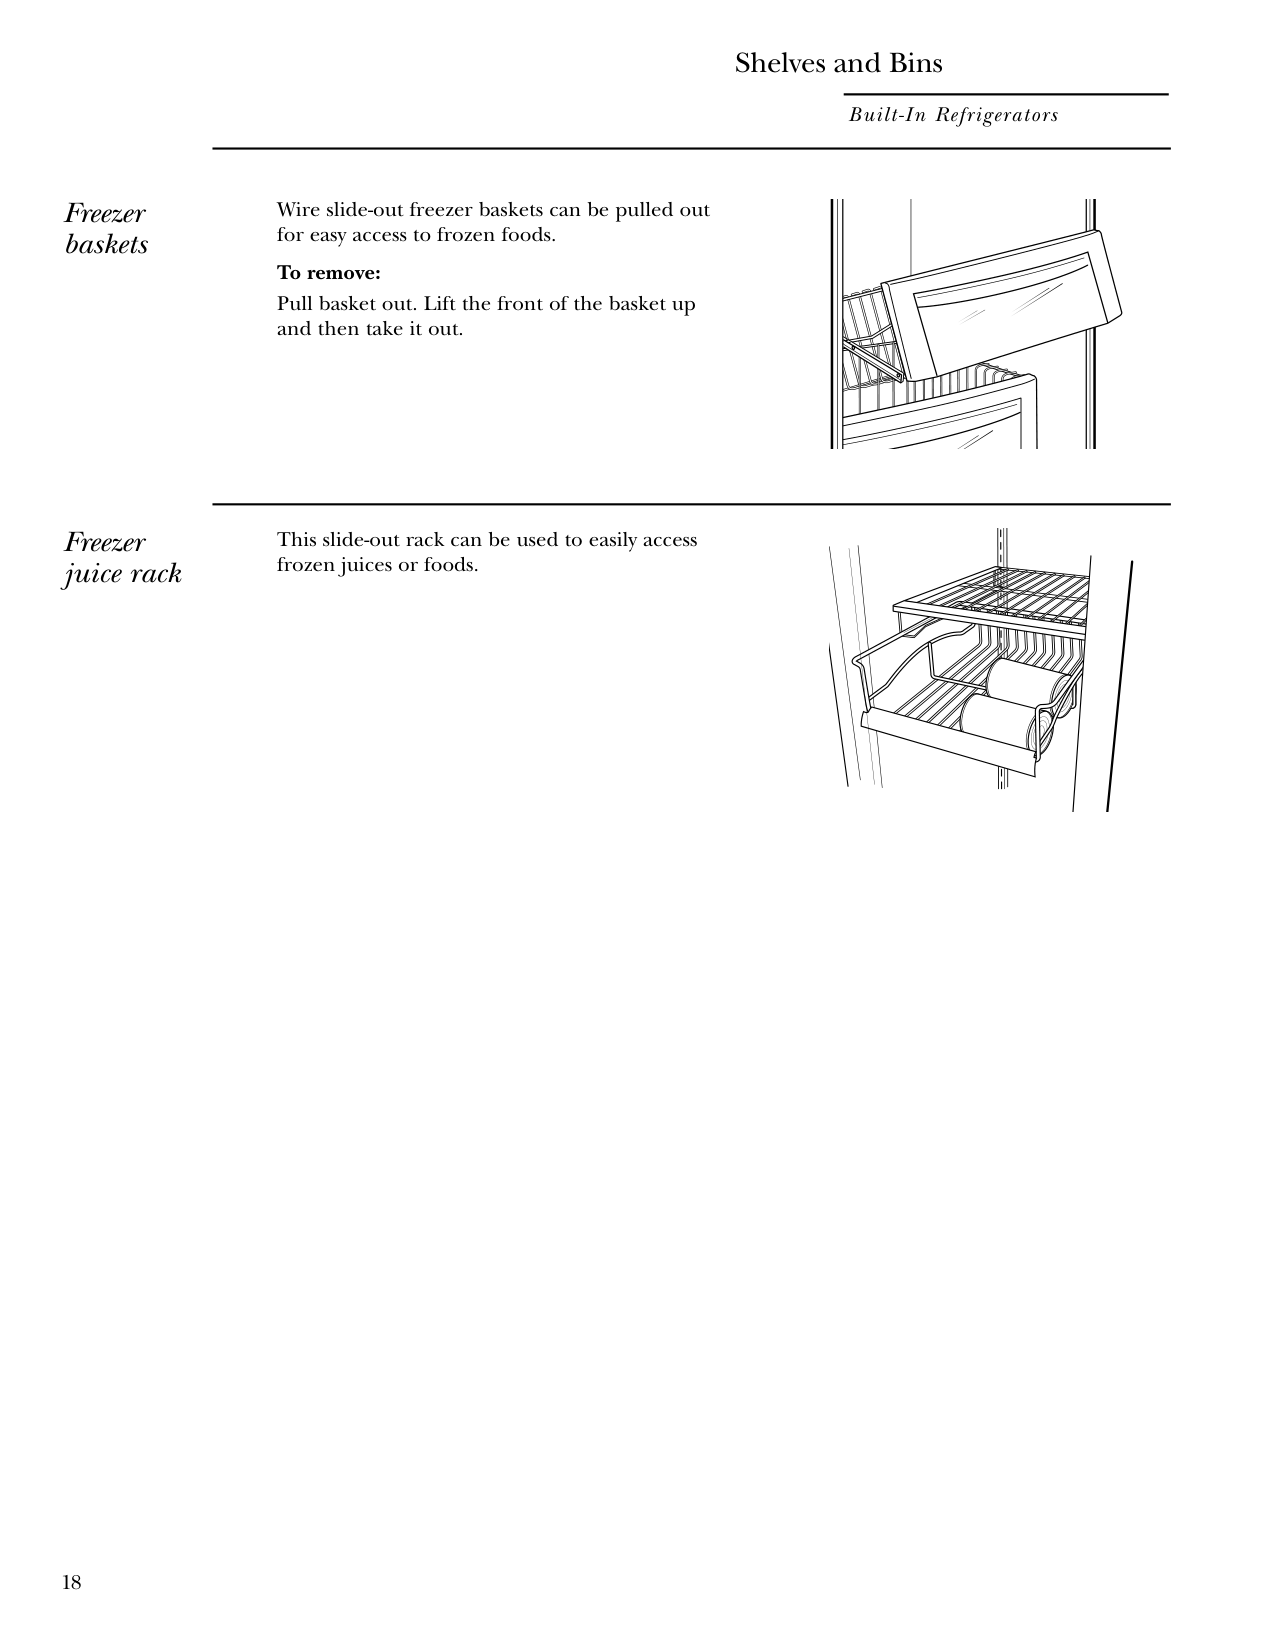
####### Freezer baskets
####### Freezer juice rack
Wire slide-out freezer baskets can be pulled out for easy access to frozen foods.
To remove: Pull basket out. Lift the front of the basket up and then take it out.
This slide-out rack can be used to easily access frozen juices or foods.
####### Cleaning outside
####### Cleaning inside
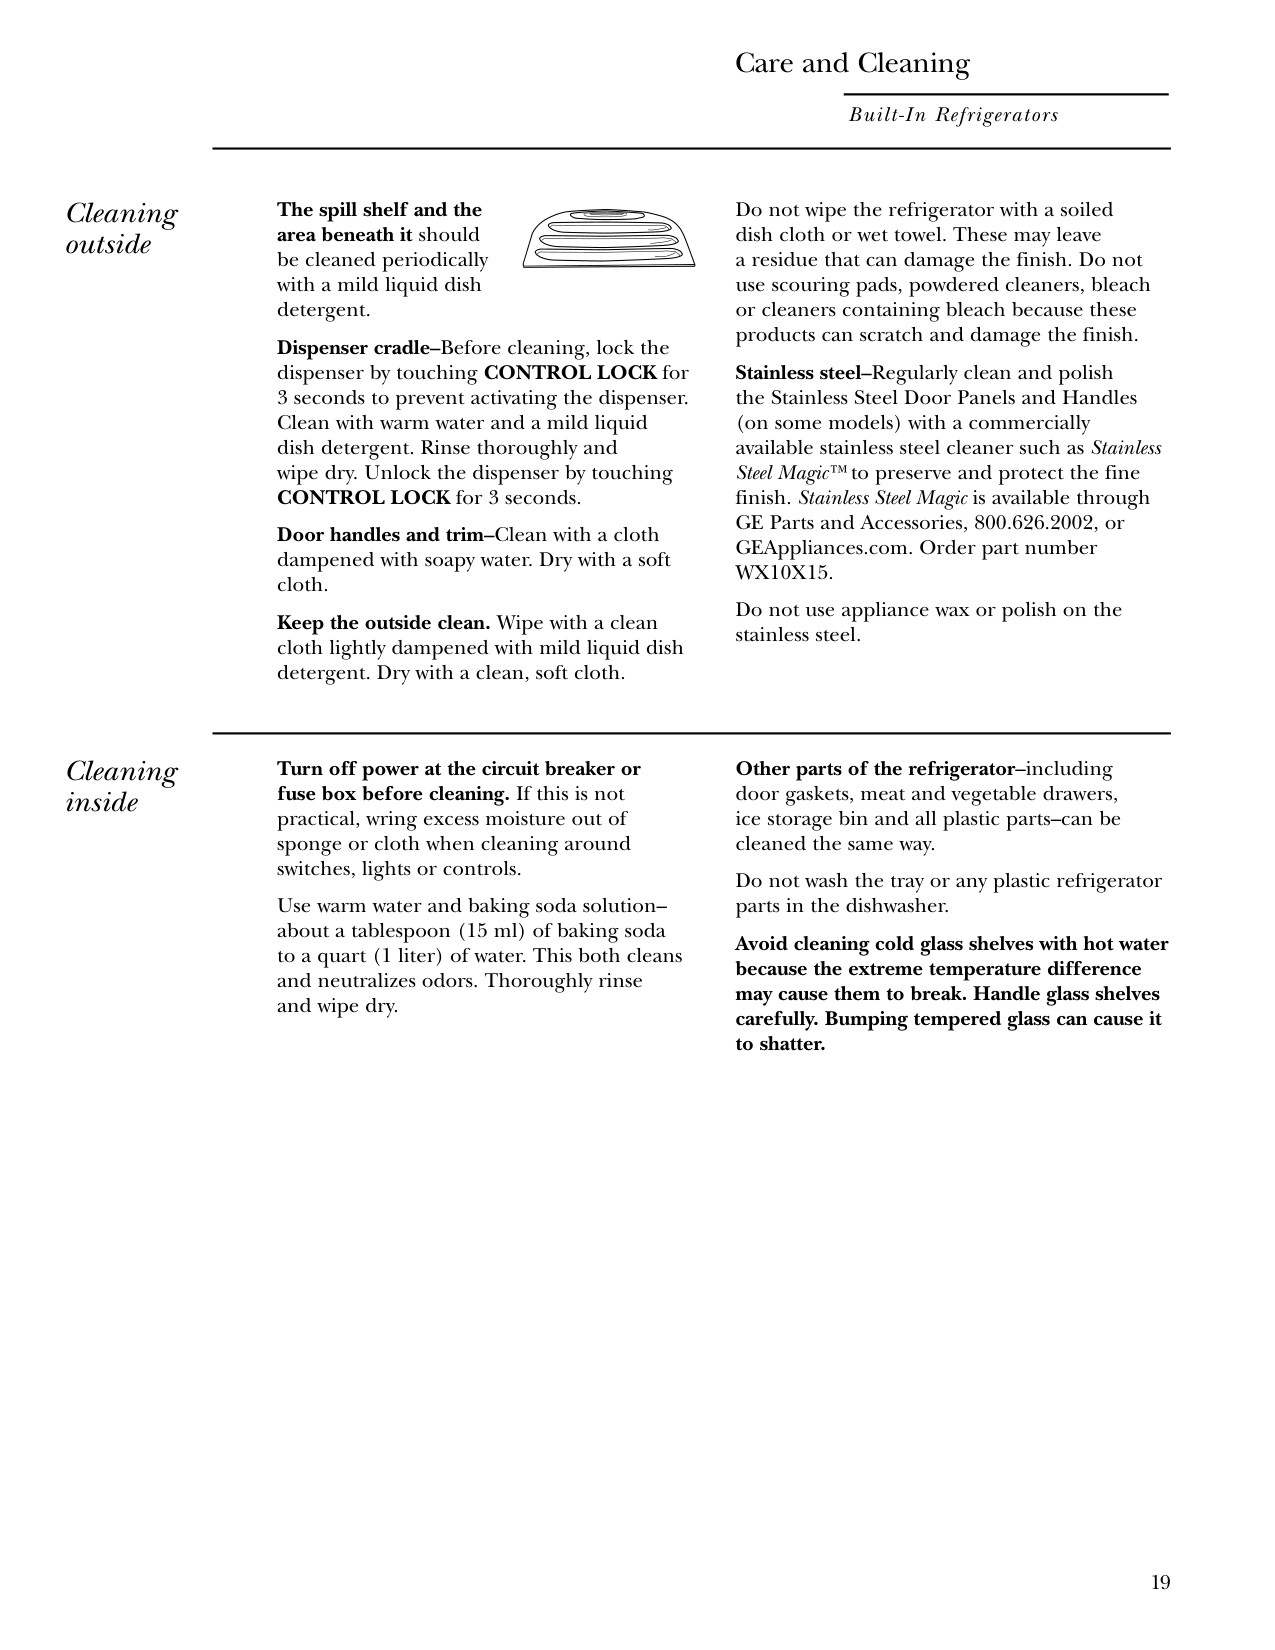
The spill shelf and the area beneath it should be cleaned periodically with a mild liquid dish detergent.
Dispenser cradle–Before cleaning, lock the dispenser by touching CONTROL LOCK for 3 seconds to prevent activating the dispenser. Clean with warm water and a mild liquid dish detergent. Rinse thoroughly and wipe dry. Unlock the dispenser by touching CONTROL LOCK for 3 seconds. Door handles and trim–Clean with a cloth dampened with soapy water. Dry with a soft cloth. Keep the outside clean. Wipe with a clean cloth lightly dampened with mild liquid dish detergent. Dry with a clean, soft cloth.
Do not wipe the refrigerator with a soiled dish cloth or wet towel. These may leave a residue that can damage the finish. Do not use scouring pads, powdered cleaners, bleach or cleaners containing bleach because these products can scratch and damage the finish.
Stainless steel–Regularly clean and polish the Stainless Steel Door Panels and Handles (on some models) with a commercially available stainless steel cleaner such as Stainless Steel Magic™ to preserve and protect the fine finish. Stainless Steel Magic is available through GE Parts and Accessories, 800.626.2002, or GEAppliances.com. Order part number WX10X15.
Do not use appliance wax or polish on the stainless steel.
Turn off power at the circuit breaker or fuse box before cleaning. If this is not practical, wring excess moisture out of sponge or cloth when cleaning around switches, lights or controls.
Use warm water and baking soda solution– about a tablespoon (15 ml) of baking soda to a quart (1 liter) of water. This both cleans and neutralizes odors. Thoroughly rinse and wipe dry.
############ Other parts of the refrigerator–including
door gaskets, meat and vegetable drawers, ice storage bin and all plastic parts–can be cleaned the same way.
Do not wash the tray or any plastic refrigerator parts in the dishwasher.
Avoid cleaning cold glass shelves with hot water because the extreme temperature difference may cause them to break. Handle glass shelves carefully. Bumping tempered glass can cause it to shatter.
####### Light bulb replacement
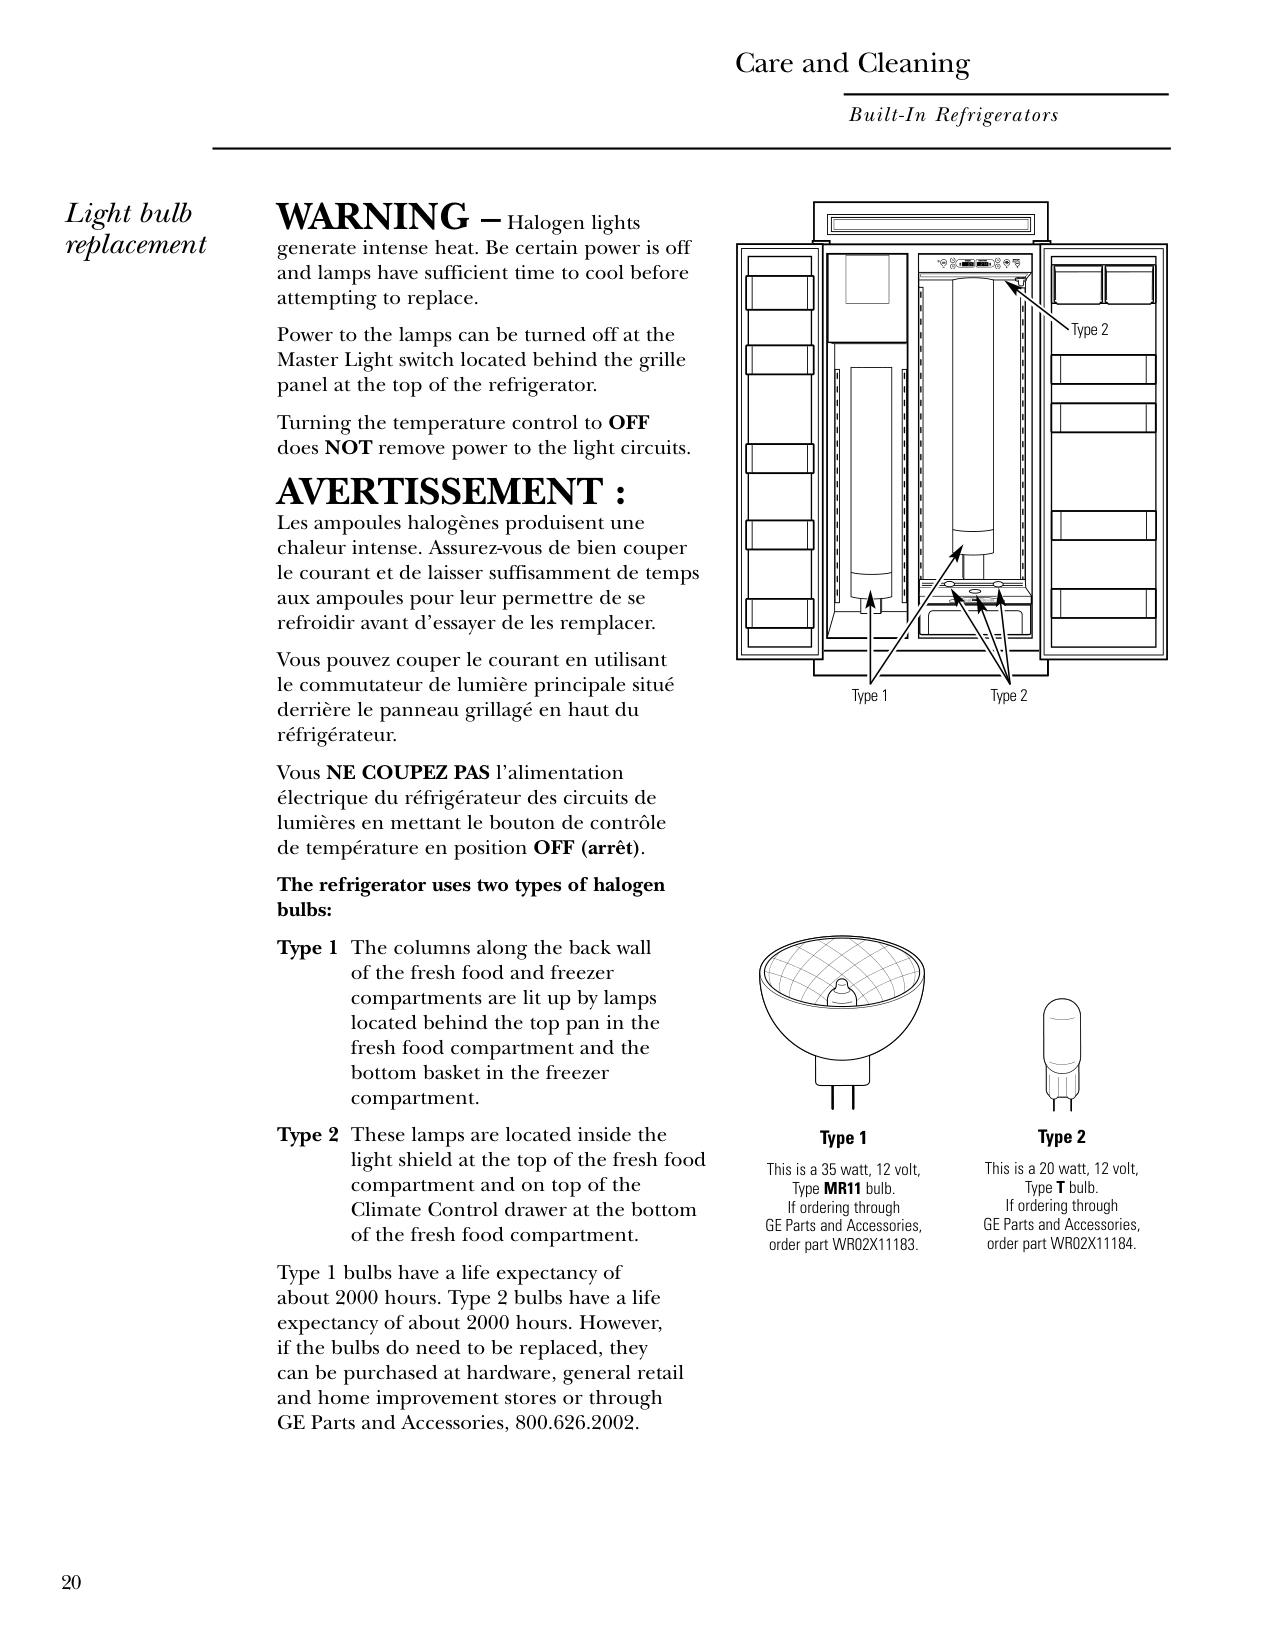
WARNING –Halogen lights
generate intense heat. Be certain power is off and lamps have sufficient time to cool before attempting to replace.
Power to the lamps can be turned off at the Master Light switch located behind the grille panel at the top of the refrigerator.
Turning the temperature control to OFF does NOT remove power to the light circuits.
AVERTISSEMENT : Les ampoules halogènes produisent une chaleur intense. Assurez-vous de bien couper le courant et de laisser suffisamment de temps aux ampoules pour leur permettre de se refroidir avant d’essayer de les remplacer.
Vous pouvez couper le courant en utilisant le commutateur de lumière principale situé derrière le panneau grillagé en haut du réfrigérateur.
Vous NE COUPEZ PAS l’alimentation électrique du réfrigérateur des circuits de lumières en mettant le bouton de contrôle de température en position OFF (arrêt).
The refrigerator uses two types of halogen bulbs:
Type 1 bulbs have a life expectancy of about 2000 hours. Type 2 bulbs have a life expectancy of about 2000 hours. However, if the bulbs do need to be replaced, they can be purchased at hardware, general retail and home improvement stores or through GE Parts and Accessories, 800.626.2002.
||Type 2|Type 2|Type 2| |---|---|---| | | | | | | | | | |---|
| | |---| | | | | | |
Type 2Type 1
Type 1 This is a 35 watt, 12 volt, Type MR11 bulb. If ordering through GE Parts and Accessories, order part WR02X11183.
Type 2 This is a 20 watt, 12 volt, Type T bulb. If ordering through GE Parts and Accessories, order part WR02X11184.
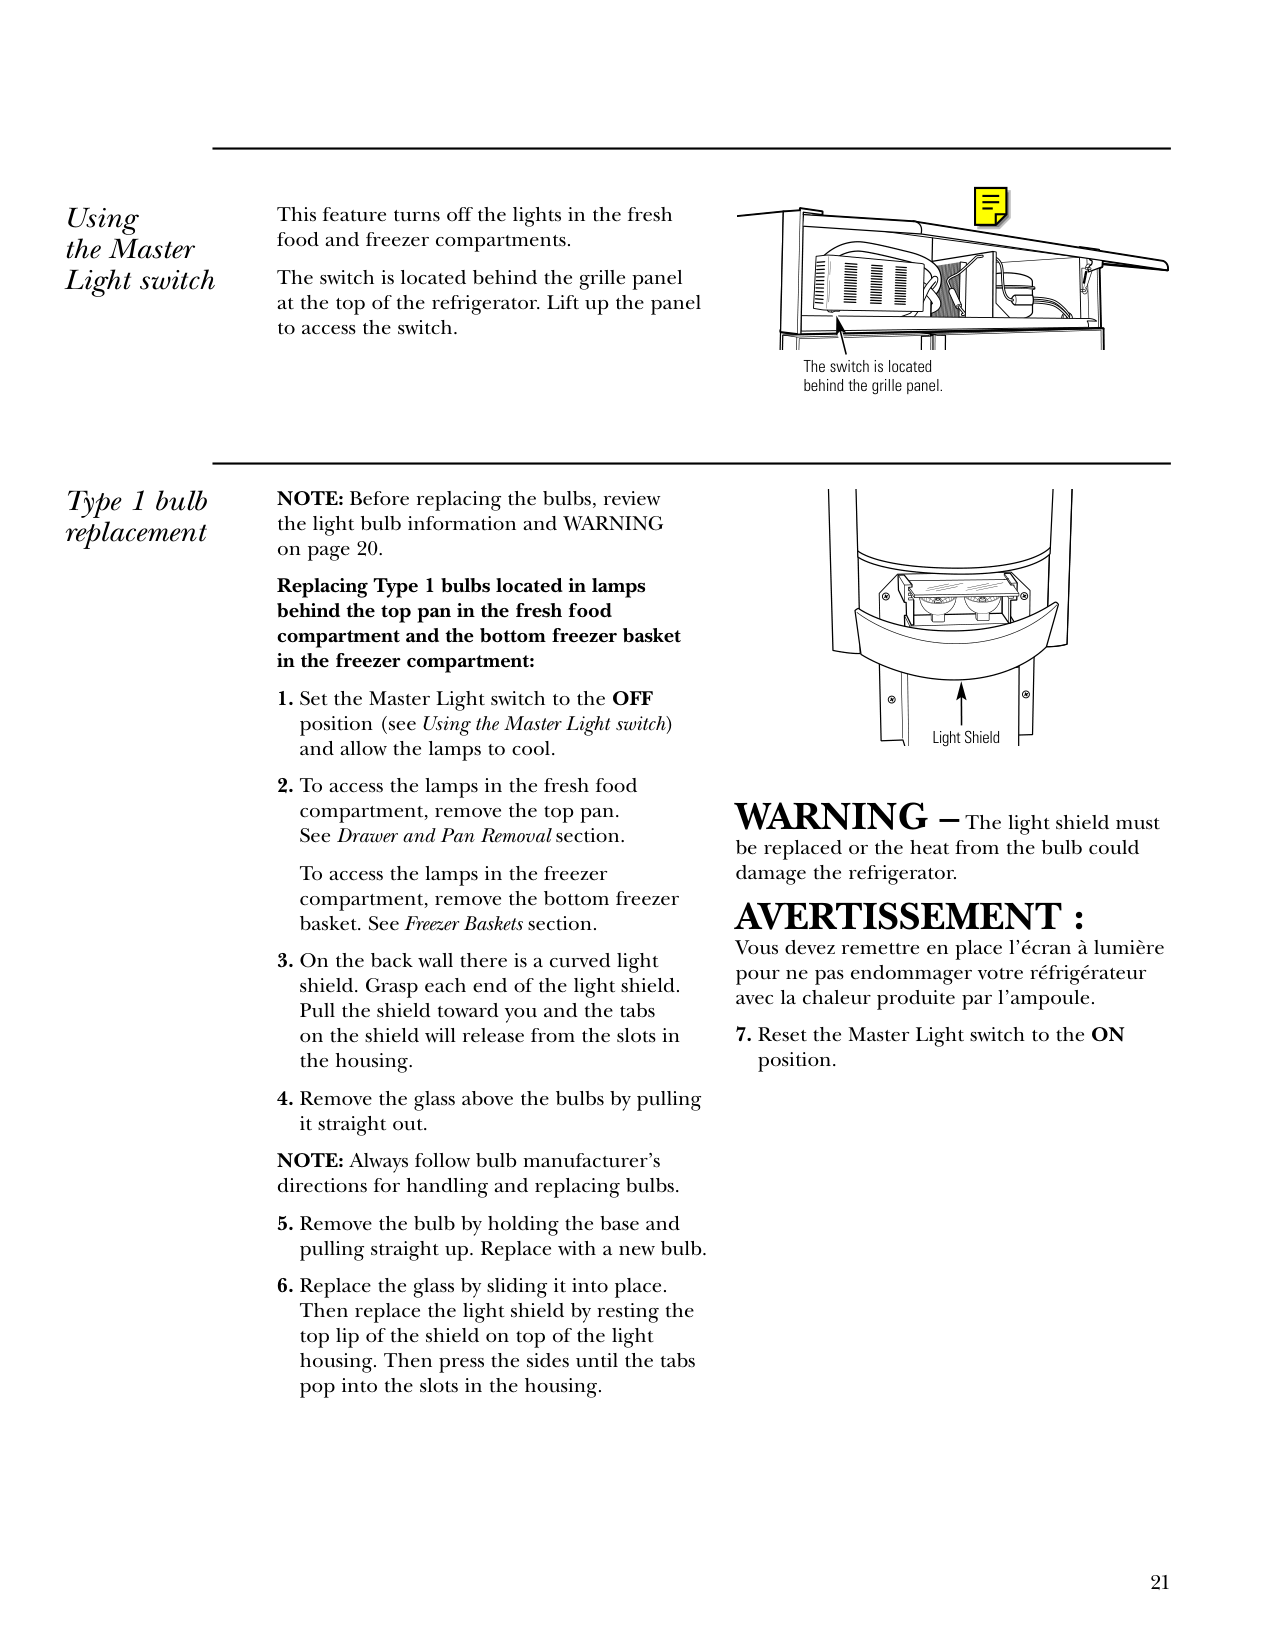
####### Using the Master Light switch
####### Type 1 bulbreplacement
This feature turns off the lights in the fresh food and freezer compartments.
The switch is located behind the grille panel at the top of the refrigerator. Lift up the panel to access the switch.
The switch is located behind the grille panel.
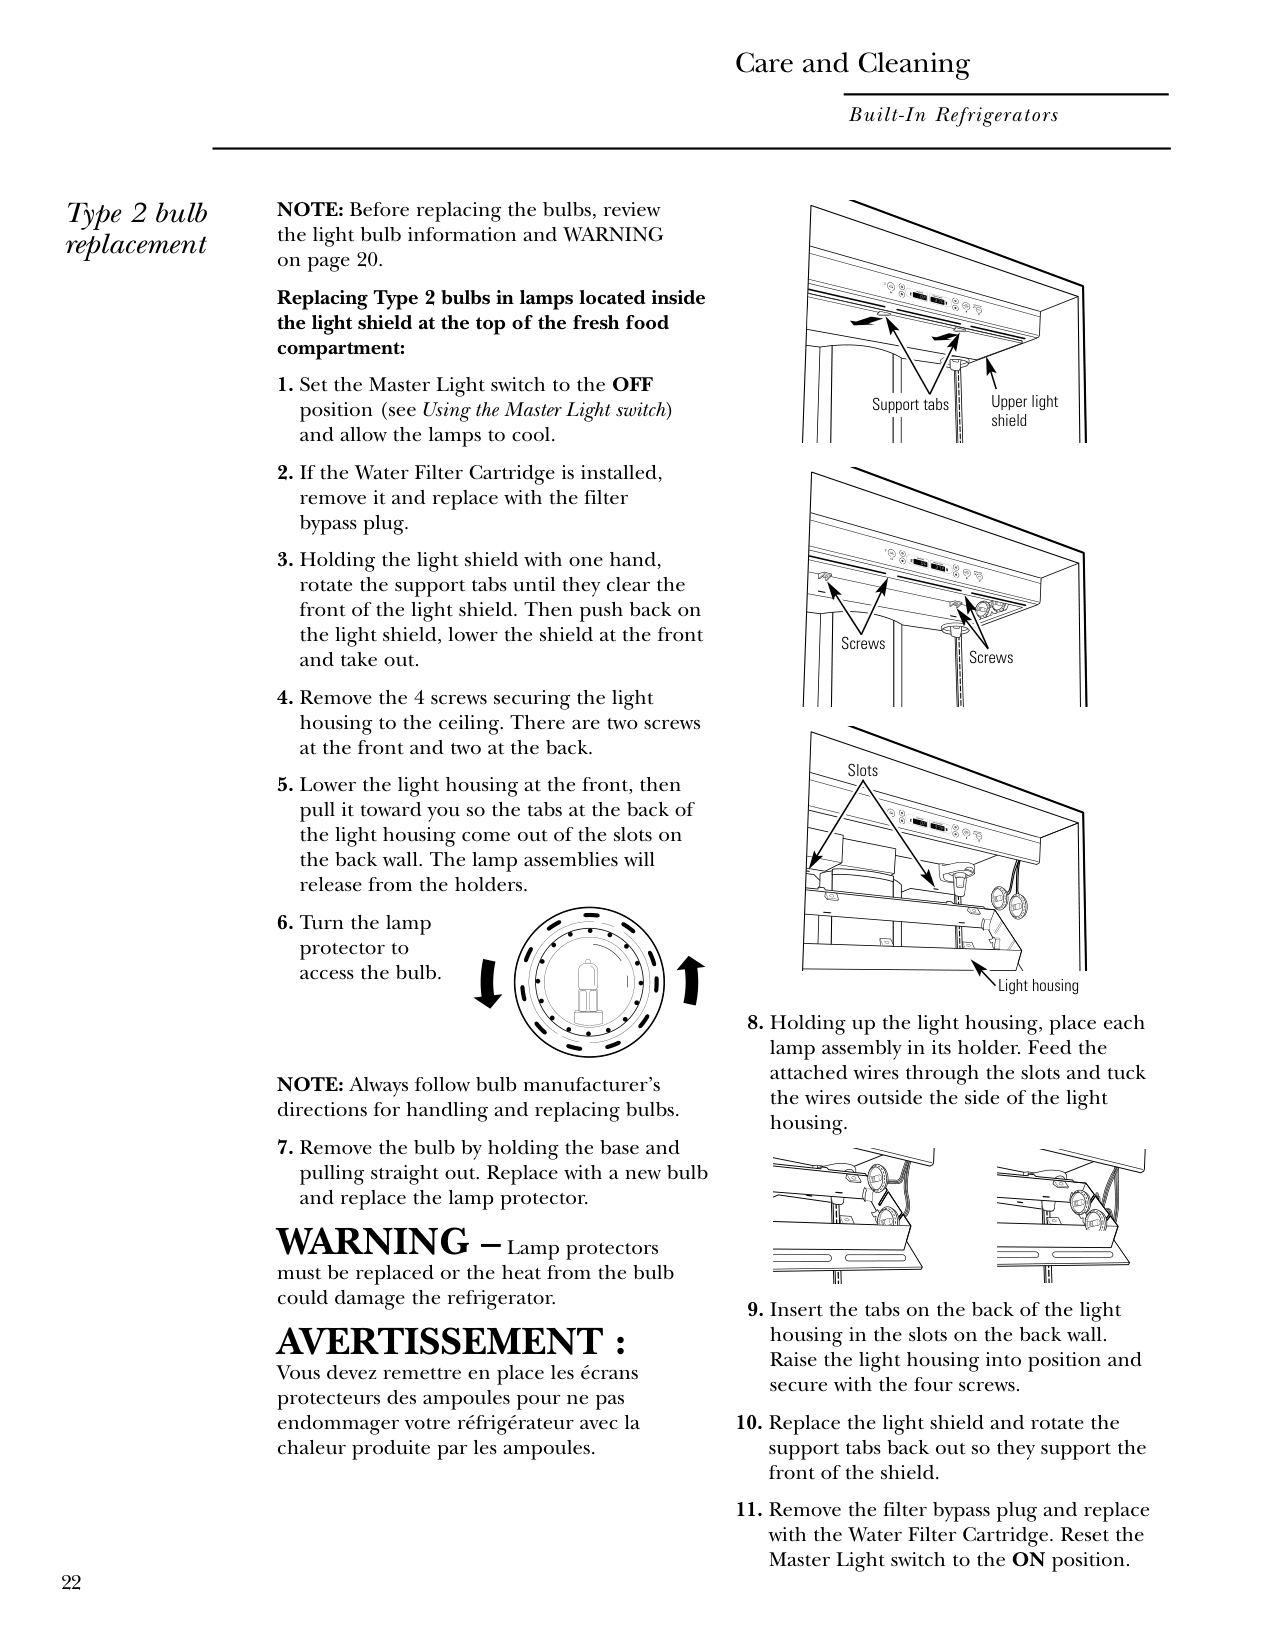
NOTE: Before replacing the bulbs, review the light bulb information and WARNING on page 20.
To access the lamps in the freezer compartment, remove the bottom freezer basket. See Freezer Baskets section.
NOTE: Always follow bulb manufacturer’s directions for handling and replacing bulbs.
Light Shield
WARNING –The light shield must be replaced or the heat from the bulb could damage the refrigerator.
AVERTISSEMENT : Vous devez remettre en place l’écran à lumière pour ne pas endommager votre réfrigérateur avec la chaleur produite par l’ampoule.

position.
####### Type 2 bulbreplacement
NOTE: Before replacing the bulbs, review the light bulb information and WARNING on page 20.
NOTE: Always follow bulb manufacturer’s directions for handling and replacing bulbs.
Upper light shield
Support tabs
Screws
Screws
Slots
Light housing
WARNING –Lamp protectors must be replaced or the heat from the bulb could damage the refrigerator.
AVERTISSEMENT : Vous devez remettre en place les écrans protecteurs des ampoules pour ne pas endommager votre réfrigérateur avec la chaleur produite par les ampoules.
####### Type 2 bulb replacement
NOTE: Before replacing the bulbs, review the light bulb information and WARNING on page 20.
Lower lamp assemblies
Replacing Type 2 bulbs in lamps located in the top of the Climate Control drawer:
NOTE: Always follow bulb manufacturer’s directions for handling and replacing bulbs.
WARNING –Lamp protectors must be replaced or the heat from the bulb could damage the refrigerator.
AVERTISSEMENT : Vous devez remettre en place les écrans protecteurs des ampoules pour ne pas endommager votre réfrigérateur avec la chaleur produite par les ampoules.
Climate Control drawer lamp
####### Cleaning the condenser
There is no need for routine condenser cleanings in normal home operating environments. However, in environments that may be particularly dusty or greasy, the condenser should be cleaned (at least annually) for efficient refrigerator operation.
############ To clean the condenser:
####### Preparing for vacation
For long vacations or absences, remove food and shut off power to the refrigerator at the fuse box or circuit breaker. Clean the interior (see Cleaning Inside). Leave doors open.
For shorter vacations, remove perishable foods and leave controls at regular settings. However, if the room temperature is expected to drop below 60°F (16°C), follow the same instructions as for long vacations.
Set the icemaker power switch to the O (off) position and be sure to shut off the water supply to the refrigerator.
####### Preparing to move
Secure all loose items such as grille, shelves and drawers by taping them securely in place to prevent damage.
Be sure the refrigerator stays in an upright position during moving.
|REFRIGERATOR DOES NOT OPERATE|• May be in defrost cycle when compressor does not operate for about 30 minutes.
• Temperature control set at OFF.
• If interior light is not on, refrigerator may not be plugged in at wall outlet.
• The fuse is blown/circuit breaker is tripped. Replace fuse or reset the breaker.
| |---|---| |MOTOR OPERATES FOR LONG PERIODS OR CYCLES ON AND OFF FREQUENTLY (Modern refrigerators with more storage space and a larger freezer require more operating time. They start and stop often to maintain even temperatures.)|• Normal when refrigerator is first plugged in. Wait 24 hours for the refrigerator to completely cool down.
• Often occurs when large amounts of food are placed in refrigerator. This is normal.
• Door left open or package holding door open.
• Hot weather or frequent door openings. This is normal.
• Temperature controls set at the coldest setting. See Temperature Controls.
| |ACTUAL TEMPERATURE NOT EQUAL TO SET TEMPERATURE|• Refrigerator just plugged in. Allow 24 hours for system to stabilize.
• Door open for too long. Allow 24 hours for system to stabilize.
• Warm food added to refrigerator. Allow 24 hours for system to stabilize.
• Defrost cycle is in process. Allow 24 hours for system to stabilize.
| |VIBRATION OR RATTLING (Slight vibration is normal.)|• Refrigerator is not level. See Installation Instructions.
| |OPERATING SOUNDS|• Normal fan air flow–one fan blows cold air through the fresh food and freezer compartments–another fan cools the compressor motor.
• These NORMAL sounds will also be heard from time to time:
• Defrost water dripping.
• Refrigerant boiling or gurgling.
• Cracking or popping of cooling coils caused by expansion and contraction during defrost and refrigeration following defrost.
• Ice cubes dropping into the bin and water running in pipes as icemaker refills.
• The icemaker water valve will buzz when the icemaker fills with water.
| |DOOR NOT CLOSING PROPERLY|• Refrigerator is not level. See Installation Instructions.|
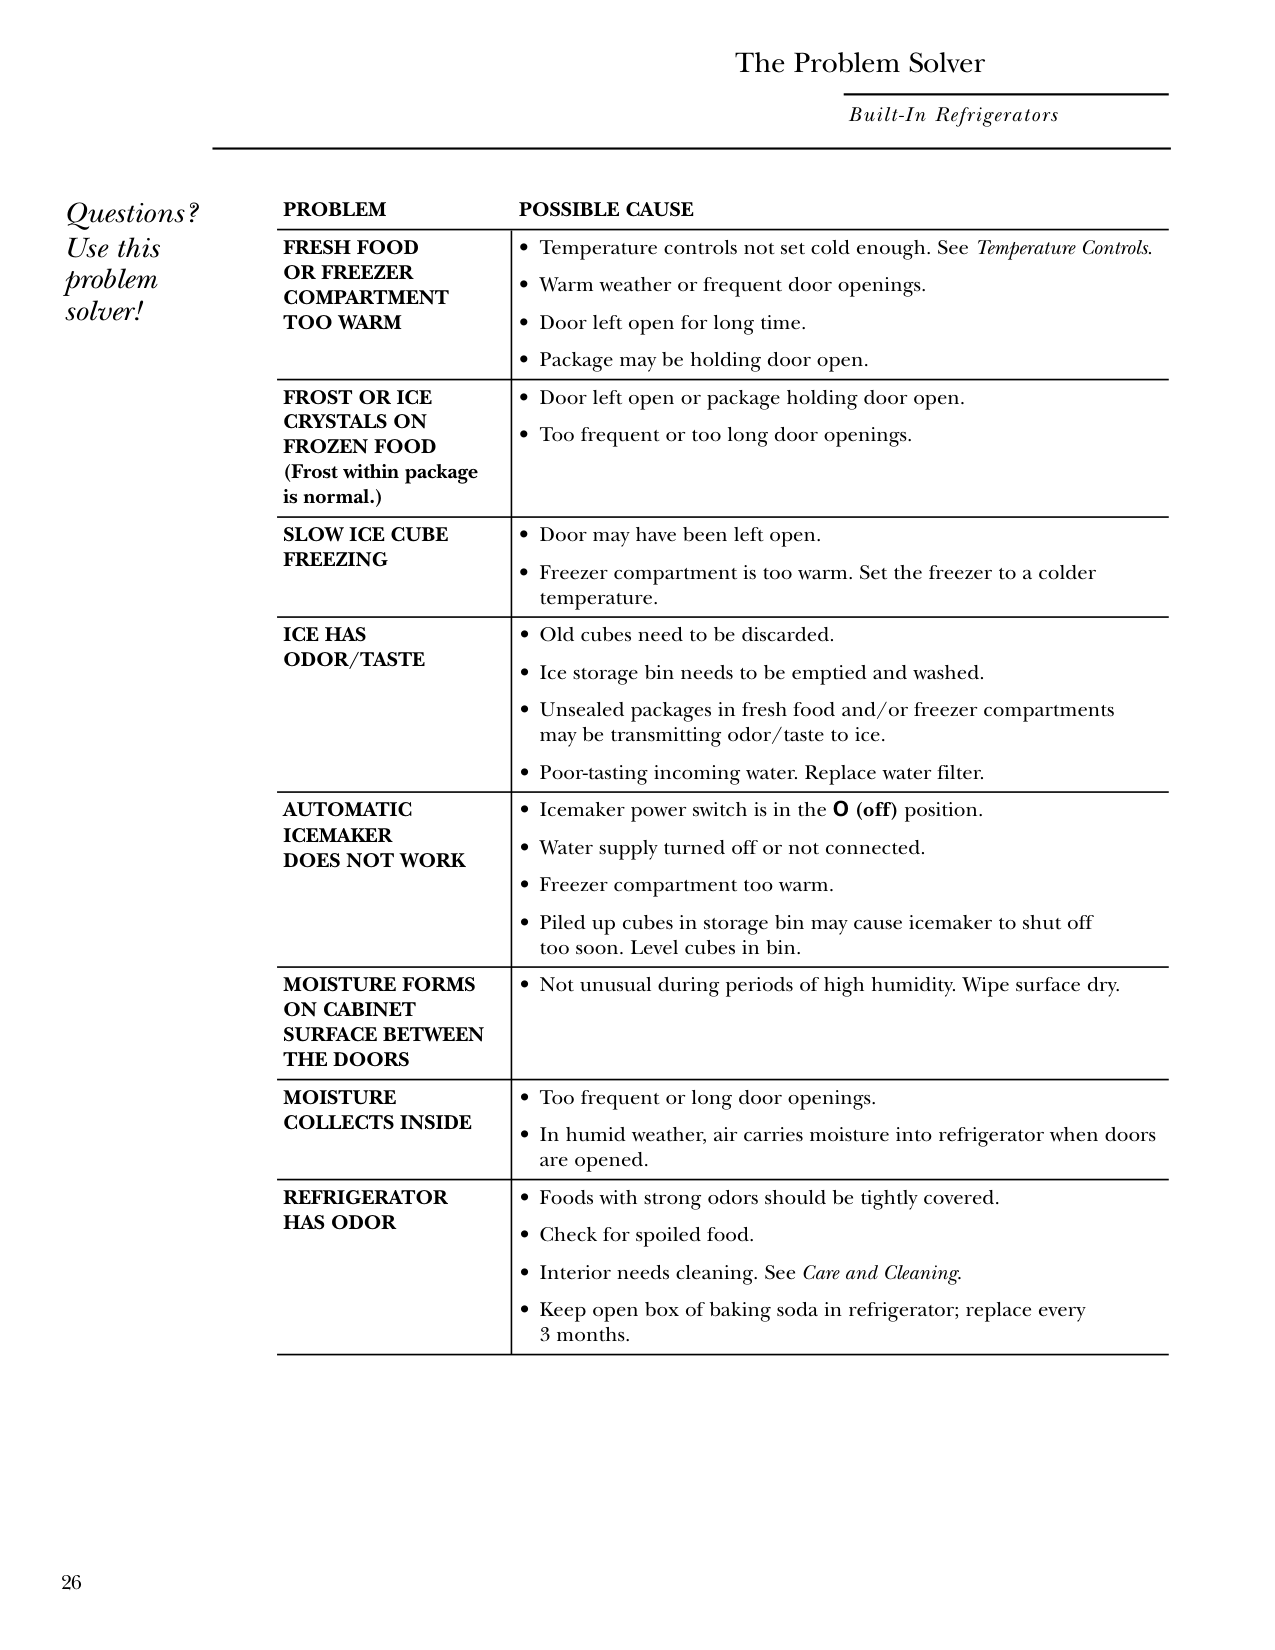
####### Use this problem solver!
|FRESH FOOD OR FREEZER COMPARTMENT TOO WARM|• Temperature controls not set cold enough. See Temperature Controls.
• Warm weather or frequent door openings.
• Door left open for long time.
• Package may be holding door open.
| |---|---| |FROST OR ICE CRYSTALS ON FROZEN FOOD (Frost within package is normal.)|• Door left open or package holding door open.
• Too frequent or too long door openings.
| |SLOW ICE CUBE FREEZING|• Door may have been left open.
• Freezer compartment is too warm. Set the freezer to a colder temperature.
| |ICE HAS ODOR/TASTE|• Old cubes need to be discarded.
• Ice storage bin needs to be emptied and washed.
• Unsealed packages in fresh food and/or freezer compartments may be transmitting odor/taste to ice.
• Poor-tasting incoming water. Replace water filter.
| |AUTOMATIC ICEMAKER DOES NOT WORK
|• Icemaker power switch is in the O (off) position.
• Water supply turned off or not connected.
• Freezer compartment too warm.
• Piled up cubes in storage bin may cause icemaker to shut off too soon. Level cubes in bin.
| |MOISTURE FORMS ON CABINET SURFACE BETWEEN THE DOORS|• Not unusual during periods of high humidity. Wipe surface dry.
| |MOISTURE COLLECTS INSIDE|• Too frequent or long door openings.
• In humid weather, air carries moisture into refrigerator when doors are opened.
| |REFRIGERATOR HAS ODOR|• Foods with strong odors should be tightly covered.
• Check for spoiled food.
• Interior needs cleaning. See Care and Cleaning.
• Keep open box of baking soda in refrigerator; replace every 3 months.
|
####### Use this problem solver!
############ PROBLEM POSSIBLE CAUSE
|INTERIOR LIGHT DOES NOT WORK
|• No power at outlet.
• Light bulb needs replacing. See Care and Cleaning.
• Master Light switch is in the OFF position.
• The refrigerator is equipped with a safety feature that turns off the refrigerator lights when the doors have been opened for an extended period. Once the refrigerator doors are closed and the lights have had time to cool, they will again come on automatically when the doors are opened.
| |---|---| |SMALL OR HOLLOW CUBES
|• Water filter clogged. Replace the filter or use the filter bypass plug.| |WATER ON THE FLOOR
|• If you use an extra tall glass or pitcher, or overfill a glass or pitcher, you may be jamming the cubes in the funnel chute. They can fuse inside the chute and drop out later, leaving water or ice on the floor.| |UNEVEN SPACING OR GAPS BETWEEN DOORS AND KITCHEN CABINET|• Kitchen cabinets are not level or square. Call the installer or cabinetmaker.
|
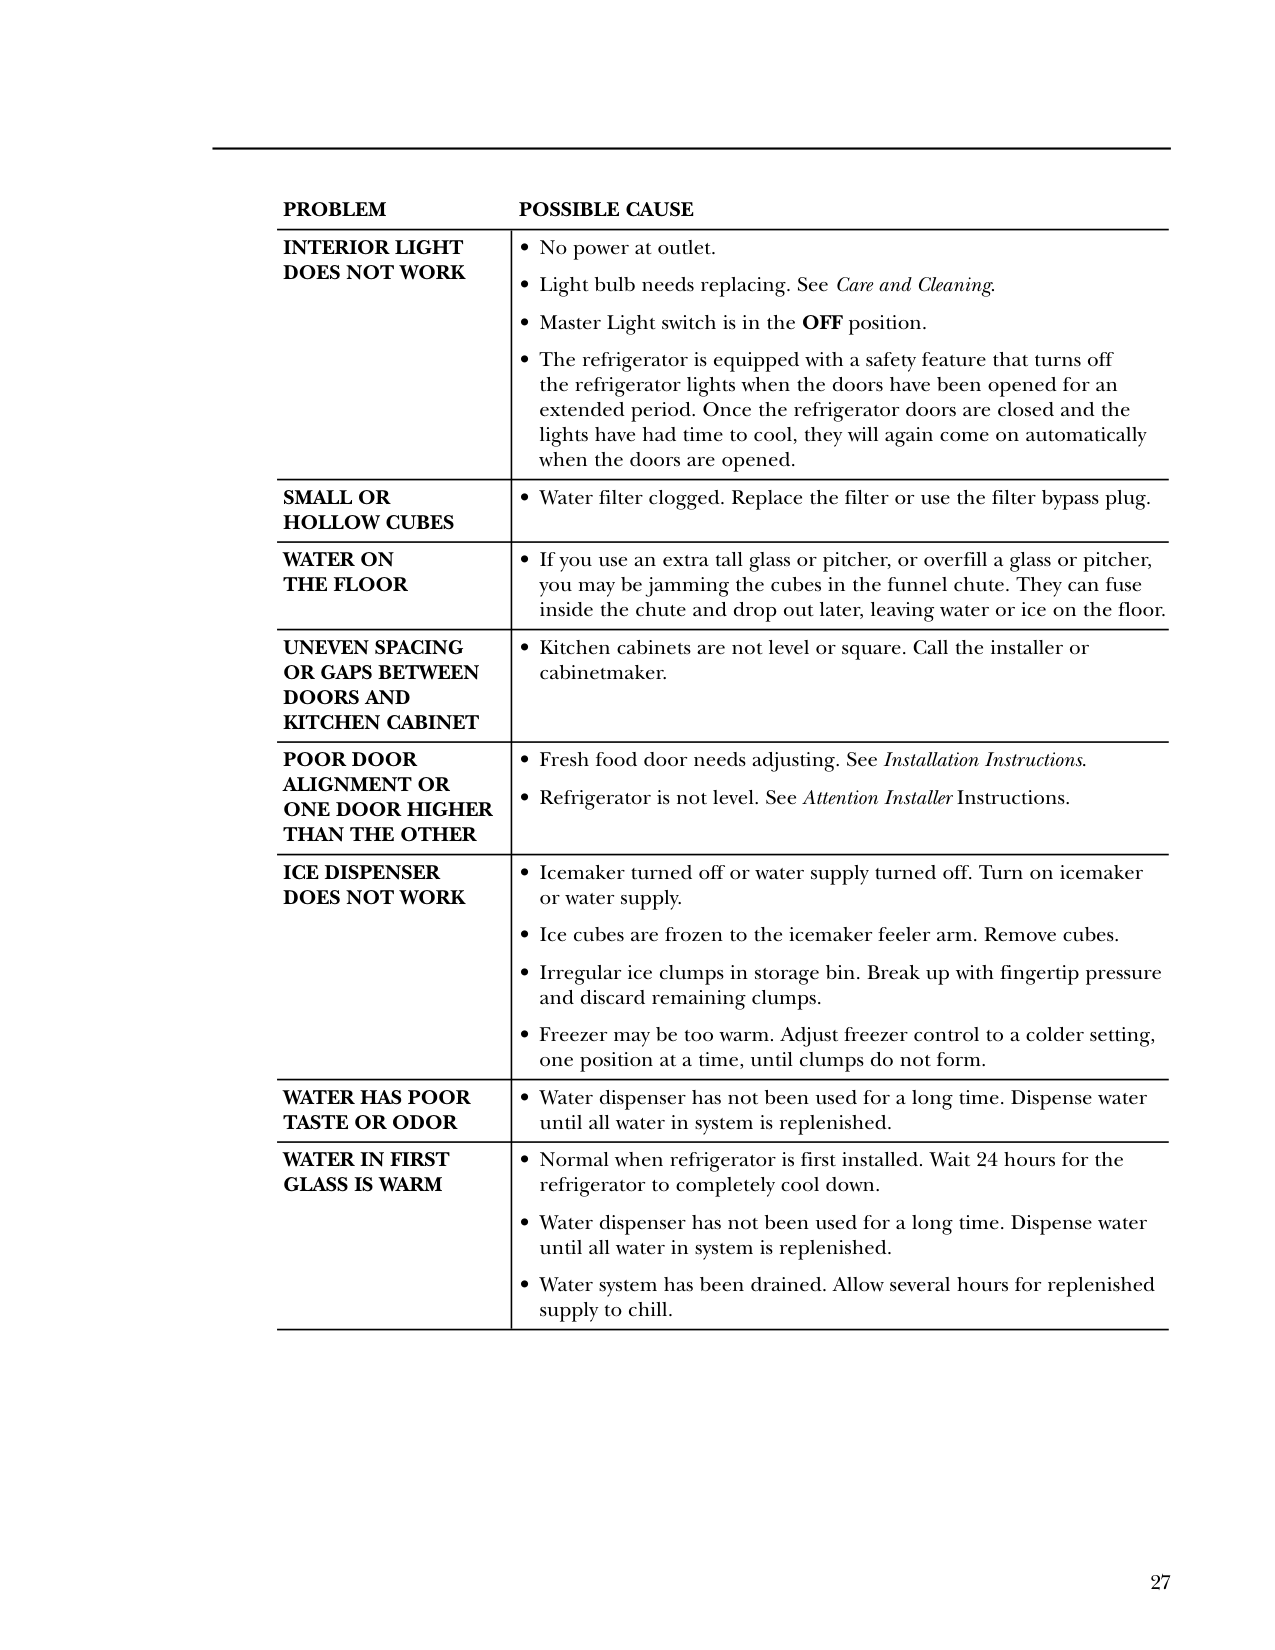
|POOR DOOR ALIGNMENT OR ONE DOOR HIGHER THAN THE OTHER
|• Fresh food door needs adjusting. See Installation Instructions.
• Refrigerator is not level. See Attention Installer Instructions.
| |ICE DISPENSER DOES NOT WORK|• Icemaker turned off or water supply turned off. Turn on icemaker or water supply.
• Ice cubes are frozen to the icemaker feeler arm. Remove cubes.
• Irregular ice clumps in storage bin. Break up with fingertip pressure and discard remaining clumps.
• Freezer may be too warm. Adjust freezer control to a colder setting, one position at a time, until clumps do not form.
| |WATER HAS POOR TASTE OR ODOR|• Water dispenser has not been used for a long time. Dispense water until all water in system is replenished.
| |WATER IN FIRST GLASS IS WARM|• Normal when refrigerator is first installed. Wait 24 hours for the refrigerator to completely cool down.
• Water dispenser has not been used for a long time. Dispense water until all water in system is replenished.
• Water system has been drained. Allow several hours for replenished supply to chill.
|
|WATER DISPENSER DOES NOT WORK|• Water supply line turned off or not connected.
• Water filter clogged. Replace the filter or use the filter bypass plug.
• The CONTROL LOCK on the dispenser has been activated. To unlock the dispenser, touch CONTROL LOCK for 3 seconds.
• Air may be trapped in system. Press the dispenser arm for at least 2 minutes.
| |---|---| |WATER SPURTING FROM DISPENSER
|• Newly installed filter cartridge. Run water from the dispenser for 3 minutes (about one and a half gallons).| |NO WATER OR ICE PRODUCTION|• Supply line or shutoff valve is clogged. Call a plumber.
• Water filter clogged. Replace the filter or use the filter bypass plug.
| |CUBED ICE WAS SELECTED BUT CRUSHED ICE WAS DISPENSED
|• Last setting was CRUSHED ICE. A few cubes were left in the crusher from the previous setting. This is normal.| |FOOD IS NOT THAWING/CHILLING
|• Packaging. Increase time or re-package in plastic.
• Wrong weight selected. Select a larger weight.
• Item with high fat content. Select a larger weight.
• Not using the Climate Control tray. Place items on tray and allow space in between items for better air flow.
| |SELECT TEMP FEATURE ON CLIMATE CONTROL DRAWER IS NOT WORKING
|• Fresh Food temperature control is set at warmest setting. This is normal. In order to minimize energy usage, the Select Temp feature is disabled when the Fresh Food control is set at the warmest setting.| |CLIMATE CONTROL DRAWER CONTROLS DO NOT WORK|• Control Lock feature is active. Press and hold the CONTROL LOCK pad on the Climate Control drawer for 3 seconds.|
####### Use this problem solver!
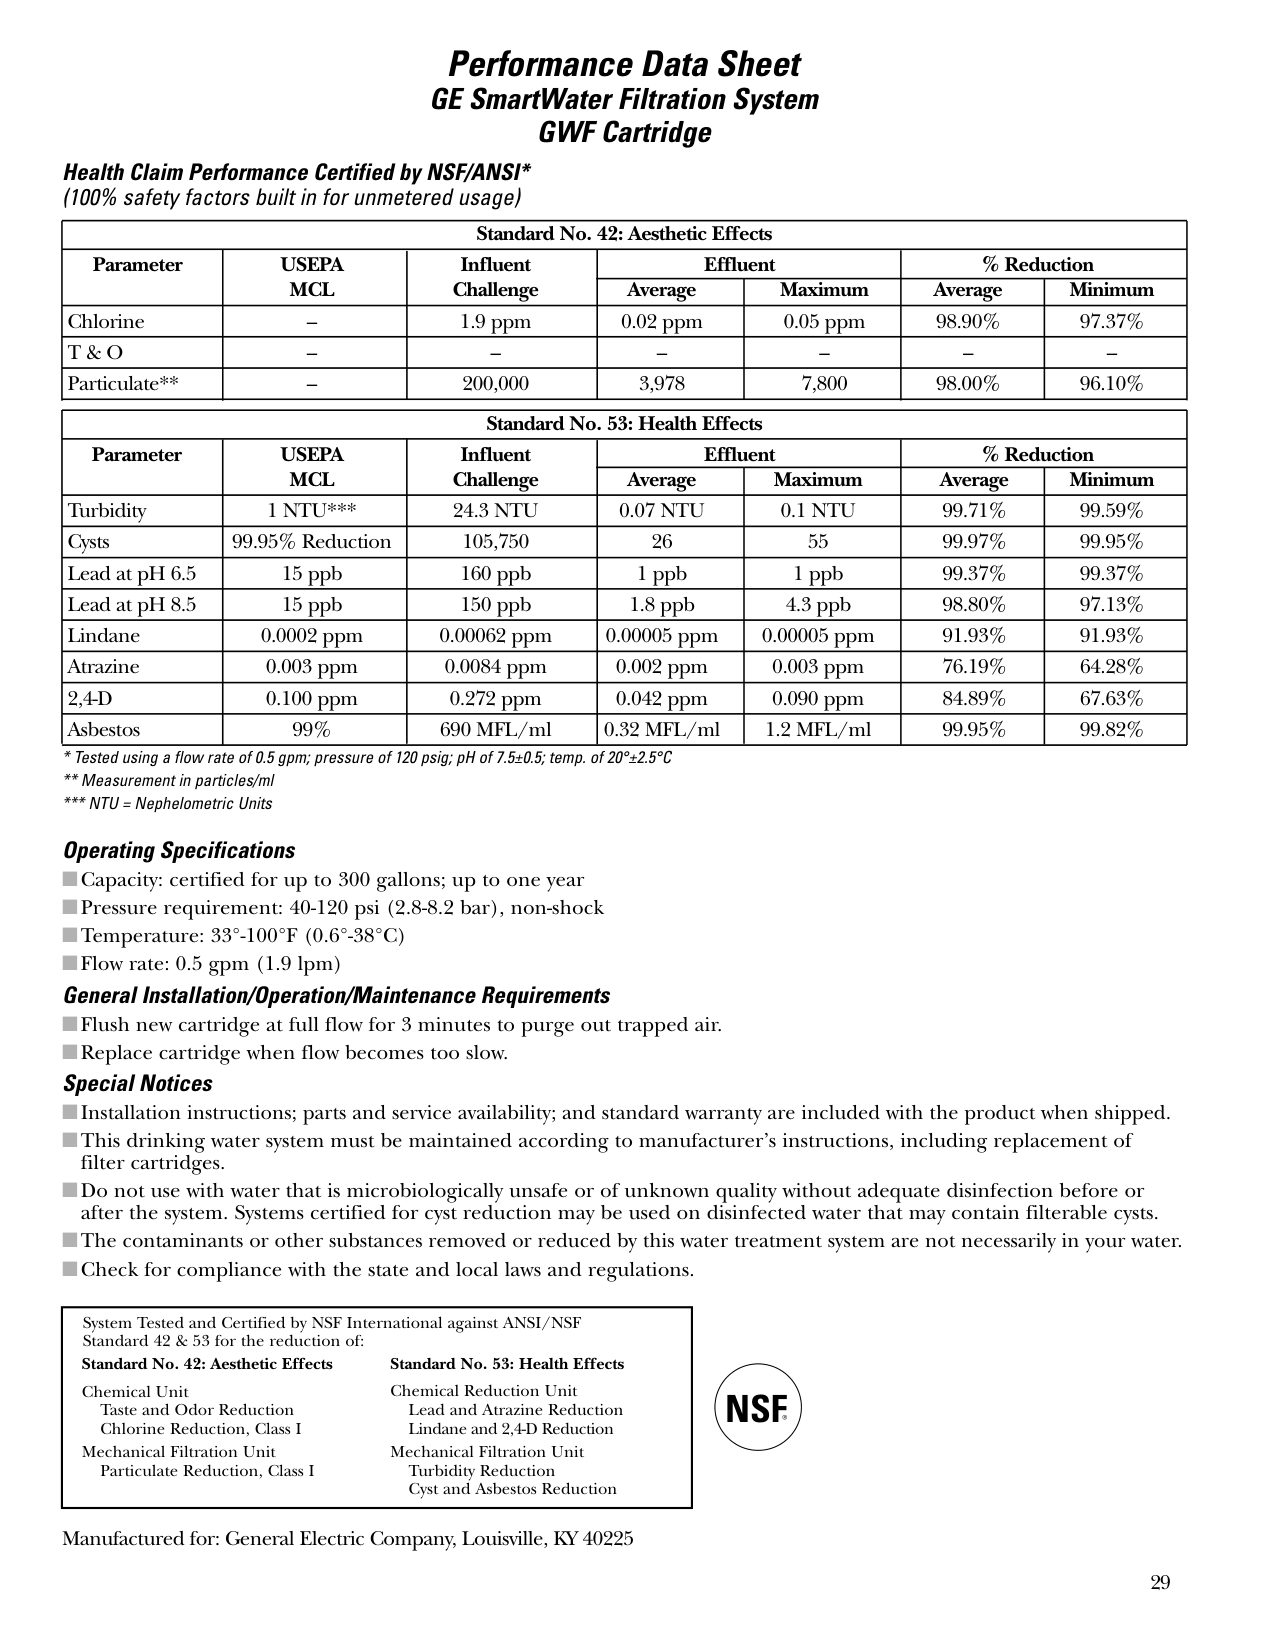
##### Performance Data Sheet GE SmartWater Filtration System GWF Cartridge
########### Health Claim Performance Certified by NSF/ANSI* (100% safety factors built in for unmetered usage)
|Standard No. 42: Aesthetic Effects|Standard No. 42: Aesthetic Effects|Standard No. 42: Aesthetic Effects|Standard No. 42: Aesthetic Effects|Standard No. 42: Aesthetic Effects|Standard No. 42: Aesthetic Effects|Standard No. 42: Aesthetic Effects| |---|---|---|---|---|---|---| |Parameter|USEPA MCL|Influent Challenge|Effluent|Effluent|% Reduction|% Reduction| |Parameter|USEPA MCL|Influent Challenge|Average|Maximum|Average|Minimum| |Chlorine|–|1.9 ppm|0.02 ppm|0.05 ppm|98.90%|97.37%| |T & O|–|–|–|–|–|–| |Particulate**|–|200,000|3,978|7,800|98.00%|96.10%|
|Standard No. 53: Health Effects|Standard No. 53: Health Effects|Standard No. 53: Health Effects|Standard No. 53: Health Effects|Standard No. 53: Health Effects|Standard No. 53: Health Effects|Standard No. 53: Health Effects|
|---|---|---|---|---|---|---| |Parameter
|USEPA MCL|Influent Challenge|Effluent|Effluent|% Reduction|% Reduction| |Parameter
|USEPA MCL|Influent Challenge|Average|Maximum|Average|Minimum| |Turbidity|1 NTU***|24.3 NTU|0.07 NTU|0.1 NTU|99.71%|99.59%| |Cysts|99.95% Reduction|105,750|26|55|99.97%|99.95%| |Lead at pH 6.5|15 ppb|160 ppb|1 ppb|1 ppb|99.37%|99.37%| |Lead at pH 8.5|15 ppb|150 ppb|1.8 ppb|4.3 ppb|98.80%|97.13%| |Lindane|0.0002 ppm|0.00062 ppm|0.00005 ppm|0.00005 ppm|91.93%|91.93%| |Atrazine|0.003 ppm|0.0084 ppm|0.002 ppm|0.003 ppm|76.19%|64.28%| |2,4-D|0.100 ppm|0.272 ppm|0.042 ppm|0.090 ppm|84.89%|67.63%| |Asbestos|99%|690 MFL/ml|0.32 MFL/ml|1.2 MFL/ml|99.95%|99.82%|
########### *** NTU = Nephelometric Units Operating Specifications
Capacity: certified for up to 300 gallons; up to one year Pressure requirement: 40-120 psi (2.8-8.2 bar), non-shock Temperature: 33°-100°F (0.6°-38°C) Flow rate: 0.5 gpm (1.9 lpm)
General Installation/Operation/Maintenance Requirements Flush new cartridge at full flow for 3 minutes to purge out trapped air. Replace cartridge when flow becomes too slow.
Special Notices Installation instructions; parts and service availability; and standard warranty are included with the product when shipped. This drinking water system must be maintained according to manufacturer’s instructions, including replacement of filter cartridges. Do not use with water that is microbiologically unsafe or of unknown quality without adequate disinfection before or after the system. Systems certified for cyst reduction may be used on disinfected water that may contain filterable cysts. The contaminants or other substances removed or reduced by this water treatment system are not necessarily in your water. Check for compliance with the state and local laws and regulations.
|System Tested and Certified by NSF International against ANSI/NSF Standard 42 & 53 for the reduction of: Standard No. 42: Aesthetic Effects Chemical Unit
Taste and Odor Reduction Chlorine Reduction, Class I
Mechanical Filtration Unit Particulate Reduction, Class I
Standard No. 53: Health Effects Chemical Reduction Unit
Lead and Atrazine Reduction Lindane and 2,4-D Reduction
Mechanical Filtration Unit Turbidity Reduction Cyst and Asbestos Reduction| |---|
Manufactured for: General Electric Company, Louisville, KY 40225
#### NSF®
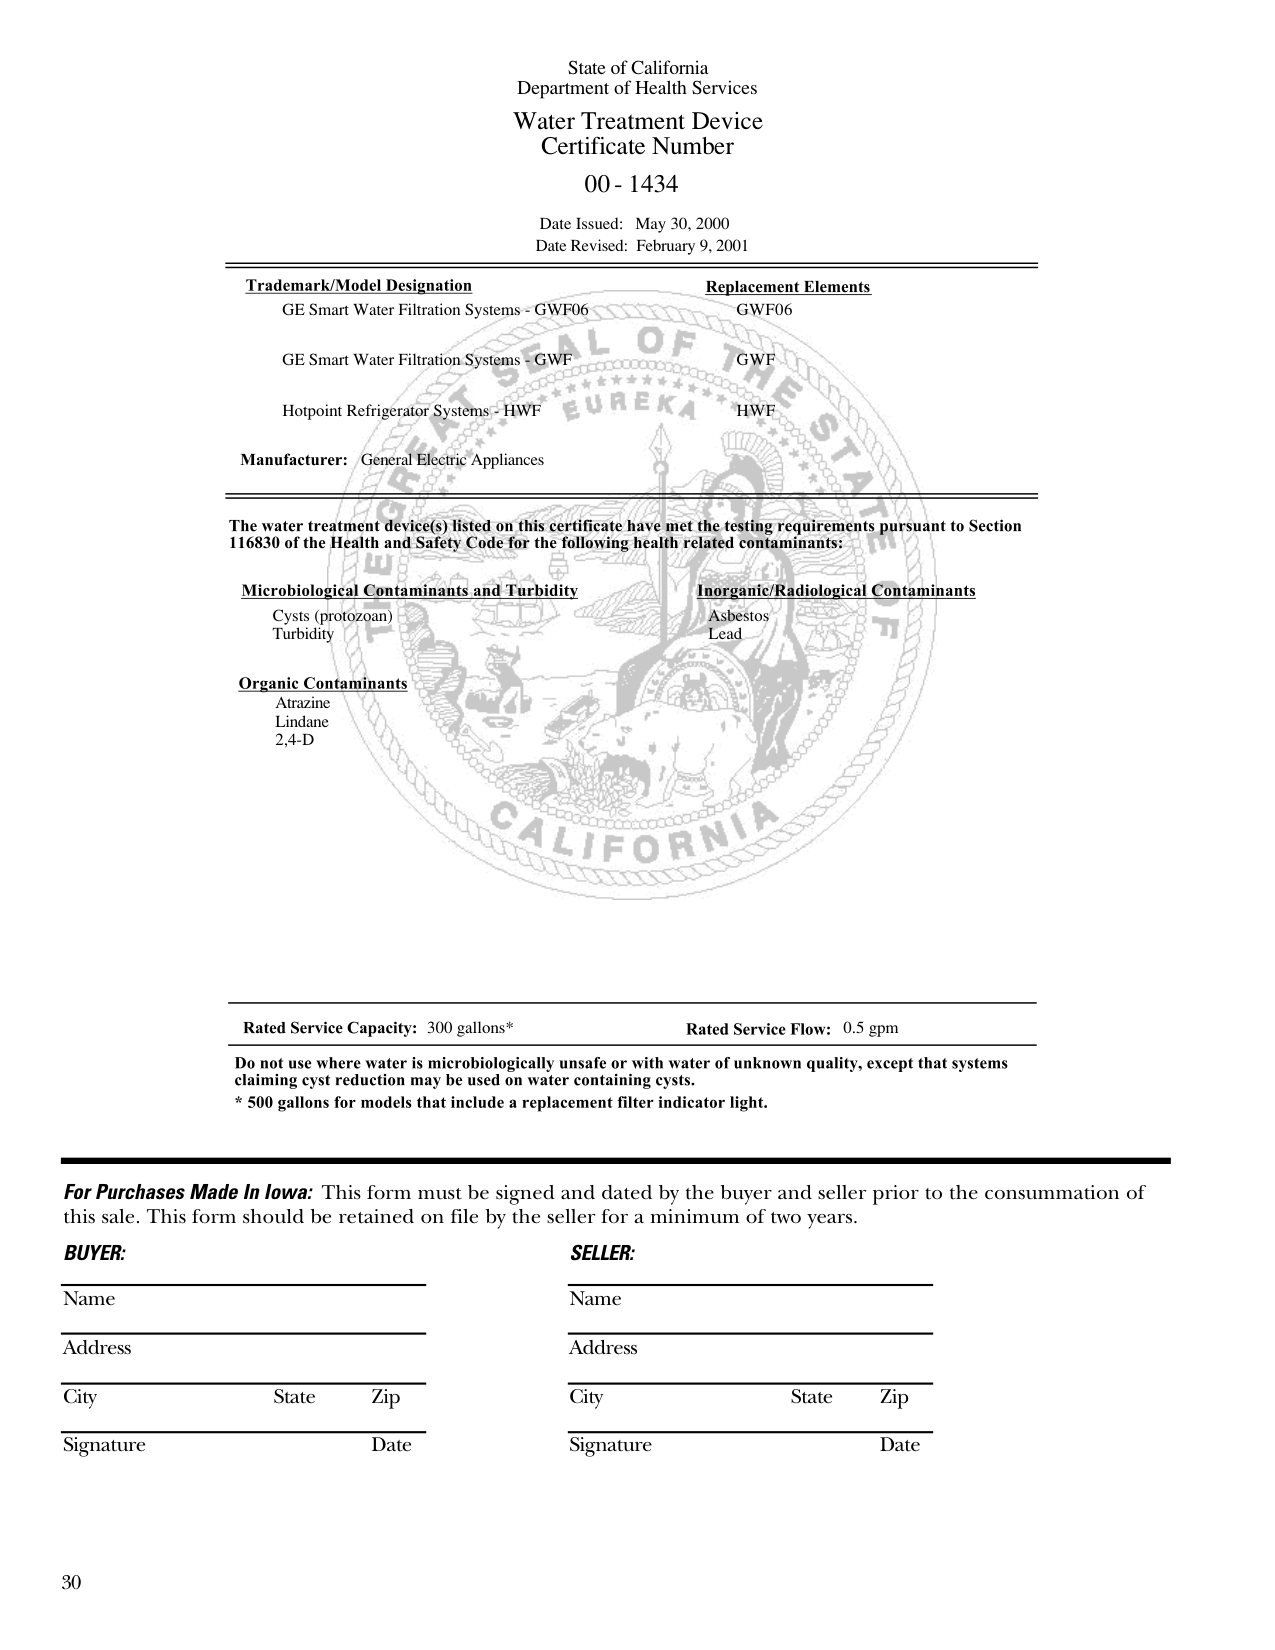
######### State of California Department of Health Services Water Treatment Device Certificate Number
######### 143400-
Date Issued: May 30, 2000 Date Revised: February 9, 2001

GE Smart Water Filtration Systems - GWF06 GWF06
GE Smart Water Filtration Systems - GWF GWF
Hotpoint Refrigerator Systems - HWF HWF
General Electric Appliances
Cysts (protozoan) Turbidity
Asbestos Lead
Atrazine Lindane 2,4-D
300 gallons* 0.5 gpm
For Purchases Made In Iowa: This form must be signed and dated by the buyer and seller prior to the consummation of this sale. This form should be retained on file by the seller for a minimum of two years.
BUYER: SELLER: Name Name Address Address City State Zip City State Zip Signature Date Signature Date
######## Consumer Services
Built-In Refrigerators
###### With the purchase of your new Monogram appliance, receive the assurance that if you ever need information or assistance from GE, we will be there. All you have to do is call–toll-free!
###### GE Answer Center®
Whatever your question about any Monogram major appliance, GE Answer Center® information service is available to help. Your call–and your question–will be answered promptly and courteously. And you can call any time. GE Answer Center® service is open 24 hours a day, 7 days a week. OR Visit our Website at: www.monogram.com In Canada, call 1.888.880.3030.
In the USA: 800.626.2000
###### In-Home Repair Service
In the USA: 800.444.1845
In Canada: 1.888.880.3030
A GE consumer service professional will provide expert repair service, scheduled at a time that’s convenient for you. Many GE Consumer Service company-operated locations offer you service today or tomorrow, or at your convenience (7:00 a.m. to 7:00 p.m. weekdays, 9:00 a.m. to 2:00 p.m. Saturdays). Our factory-trained technicians know your appliance inside and out–so most repairs can be handled in just one visit.
###### For Customers With Special Needs…
In the USA: 800.626.2000
GE offers Braille controls for a variety of GE appliances, and a brochure to assist in planning a barrier-free kitchen for persons with limited mobility.
Consumers with impaired hearing or speech who have access to a TDD or a conventional teletypewriter may call 800.TDD.GEAC (800.833.4322) to request information or service.
###### Service Contracts
In the USA: 800.626.2224
In Canada: 1.888.880.3030
You can have the secure feeling that GE Consumer Service will still be there after your warranty expires. Purchase a GE contract while your warranty is still in effect and you’ll receive a substantial discount. With a multiple-year contract, you’re assured of future service at today’s prices.
###### Parts and Accessories
Individuals qualified to service their own appliances can have parts or accessories sent directly to their home. The GE parts system provides access to over 47,000 parts…and all GE Genuine Renewal Parts are fully warranted. VISA, MasterCard and Discover cards are accepted.
In the USA: 800.626.2002
User maintenance instructions contained in this manual cover procedures intended to be performed by any user. Other servicing generally should be referred to qualified service personnel. Caution must be exercised, since improper servicing may cause unsafe operation.
In Canada: 1.888.880.3030
######## Warranty
Built-In Refrigerators
###### YOUR MONOGRAM REFRIGERATOR WARRANTY Staple sales slip or cancelled check here. Proof of original purchase date is needed to obtain service under warranty.
###### WHAT IS COVERED
From the Date of the Original Purchase
FULL TWO-YEAR WARRANTY For two years from date of original purchase, we will provide, free of charge, parts and service labor in your home to repair or replace any part of the refrigerator that fails because of a manufacturing defect. FULL FIVE-YEAR WARRANTY
For five years from date of original purchase, we will provide, free of charge, parts and service labor in your home to repair or replace any part of the sealed refrigerating system (the compressor, condenser, evaporator and all connecting tubing) that fails because of a manufacturing defect.
LIMITED ADDITIONAL SEVEN-YEAR WARRANTY ON THE SEALED SYSTEM For the sixth through twelfth year from the date of the original purchase, we will provide, free of charge, replacement parts for any part of the sealed refrigerating system (the compressor, condenser, evaporator and all connecting tubing) that fails because of a manufacturing defect. You pay for the service trip to your home and for service labor charges.
LIMITED LIFETIME WARRANTY ON FULL EXTENSION SLIDES From the date of the original purchase we will provide, free of charge, replacement parts for any part of the full extension slides that fails because of a manufacturing defect. You pay for the service trip to your home and for service labor charges.
This warranty is extended to the original purchaser and any succeeding owner for products purchased for ordinary home use in the 48 mainland states, Hawaii, Washington, D.C. or Canada. In Alaska the warranty is the same except that it is LIMITED because you must pay to ship the product to the service shop or for the service technician’s travel costs to your home.
All warranty service will be provided by our Factory Service Centers or by our authorized Customer Care® servicers during normal working hours.
Should your appliance need service, during warranty period or beyond, in the USA call 800.444.1845. In Canada: 888.880.3030.
###### WHAT IS NOT COVERED
If you have an installation problem, contact your dealer or installer. You are responsible for providing adequate electrical, plumbing and other connecting facilities.
Some states/provinces do not allow the exclusion or limitation of incidental or consequential damages, so the above limitation or exclusion may not apply to you. This warranty gives you specific legal rights, and you may also have other rights which vary from state to state/province to province. To know what your legal rights are in your state/province, consult your local or state/provincial consumer affairs office or your state’s Attorney General.
Warrantor in USA: General Electric Company,
Louisville, KY 40225 Warrantor in Canada: Camco Inc.
|162D3947P007| |---| |49-60128-2|
############# 35930-2 03-02 JR
Printed in the United States