
Ask AI
— answers from the official manualAnswers from the official manual.
Common questions
Common Questions
20 totalHow do I connect my Honor phone to a Windows PC?
To connect your Honor phone to a Windows PC for seamless management of notifications, photos, and calls, swipe down from the top right of the screen on your phone to open the Control Center and tap Link to Windows. Follow prompts to scan a QR code displayed on your PC browser and complete setup following instructions provided on both devices. (Page 23)
How can I enable HONOR Share for file transfer between my Honor phone and other compatible devices?
To turn on HONOR Share, swipe down from the top right of your Honor phone screen to open Control Center and toggle on HONOR Share. Alternatively, go to Settings > More connections > HONOR Share and follow prompts to enable it for file sharing between supported devices like other HONOR phones or compatible PCs. (Page 26)
What steps should I take if my Honor phone gets an error during setup?
If your Honor device encounters an issue such as the appearance of unknown errors, refer to the troubleshooting section or contact customer support through Settings > Help & feedback for further assistance. Detailed instructions for resolving common issues are also available within the app guide after accessing the Support menu in settings. (Page 1)
How do I migrate data from my old device to a new Honor phone using Device Clone?
For transferring data from an old device to your new Honor phone, install the Device Clone app on both devices. On the new phone, open this application and select 'This is the new device.' Follow instructions for connecting both phones via Wi-Fi or scanning codes displayed by each device consecutively. Choose which data types you want to transfer before initiating data migration. (Page 3)
Can I use Wi-Fi Direct to transfer files between two Honor devices?
Yes, using Wi-Fi Direct on your Honor device enables swift data exchange without needing a physical connection or creating a paired network. Ensure both devices are enabled for this feature and search for nearby available connections through the system settings or specific applications designed for file transfers like Gallery's Share option. Tap the identified receiver and send selected files via Wi-Fi Direct directly from the sending phone. (Page 9)
How do I set up mobile hotspot on my Honor phone?
To configure a Personal Hotspot for sharing internet data, go to Settings > Mobile network and under Personal hotspot, switch this feature ON. This enables you to share your mobile connection with other devices either via Bluetooth, Wi-Fi Direct or USB tethering methods as selected within the same settings page further down in options such as ‘More’. Ensure both connecting devices establish secure connections following on screen steps for each method chosen. (Page 9)
Show 14 more questions
How do I reset my Honor phone to factory settings?
How can I connect my Honor phone to Wi-Fi?
How do I enable the HONOR Share feature?
What should I do if my phone stops responding when charging?
How can I enable VoLTE for better call quality?
How do I set up Emergency SOS services?
How do I set up Wi-Fi Direct?
What steps should I follow for a factory reset via recovery mode?
How can I enable airplane mode?
How do I create a new contact?
How do I take advantage of the Connected Apps feature on my Honor device?
How can I set up HONOR Connect for cross-device collaboration?
How do I enable wireless projection to a TV?
How can I secure my Honor phone during wireless charging?
Full Manual
110 pages
User Guide
| | |---|
Contents
#### Get Familiar
Change Navigation Method 1 Migrate Data from the Old Device to the New Device 1 Learn about Lock Screen and Unlock 2 Connect to the Mobile Network 3 Connect to the Wi-Fi Network 5 Learn about the Home Screen 7 View and Disable Notifications 10 Adjust the Volume 11 Power On/Off and Restart 13 Charge Your Phone 14
#### Smart Collaboration
Smart Collaboration 16 Smart Collaboration Control Center 17 Connected Apps 19 Connected Call 22 Phone and Non-HONOR PC Collaboration 23 Easy Projection 25 HONOR Share 26 Log in to HONOR ID 28
#### Video Creation
Photography Basics 29 Take Photos 30 Shoot Videos 35 Edit Images 38 Edit Videos 40 View Images and Videos 42
#### Enjoy Smart Life
Magic Text 46
#### Tips
#### Apps
Enable Frequently Used Features of the App Fast 48 Screenshot and Screen Recording 48 Process Tasks in Multi-window Simultaneously 52
Apps 57 Contacts 58 Phone 60
i
#### Settings
Contents
Calendar 63 Clock 64 Notepad 66 Email 70 Calculator 70 Flashlight 71 Compass 71 Mirror 72 App Twin 72 System Manager 72 Device Clone 73 Tips 73
Wi-Fi 75 Bluetooth 76 Mobile Network 77 More Connections 79 Home Screen & Wallpaper 82 Display and Brightness 85 Sounds 88 Notifications 90 Biometrics & Password 92 App 94 Battery 94 Storage 96 Security 97 Privacy 98 Accessibility 98 Set Multi-User 101 System & Updates 102 About Phone 105
ii
Get Familiar
Change Navigation Method
####### Change the System Navigation Mode
Use gesture navigation Go to Settings > System & updates > System navigation and select Gestures. You can:
to lock the task, locked tasks will not be cleared in batches by tapping in the multitasking interface.
You can also go to Settings, turn on the Show navigation bar switch to assist gesture operations using the navigation bar.
Use Three-key Navigation Go to Settings > System & updates > System navigation and select Three-key navigation. After you enable the Three-key Navigation, you can:
Migrate Data from the Old Device to the New Device
Use Device Clone to Move Data to Your New Device Device Clone lets you quickly and seamlessly move all the basic data (including contacts, calendar, images, and videos) from your old phone to your new phone.
######## Migrate Data from a Device
| | |---|
Device Clone is only available on phones running Android 7.0 or later, iOS 8.0 or later.
Learn about Lock Screen and Unlock
####### Lock and Unlock Your Screen
Lock Screen If you do not operate the phone for a period of time, the screen will be locked automatically. You can also manually lock the screen by the following:
Set the Screen Timeout Period Go to Settings > Display & brightness > Sleep and select a screen timeout period.
Unlock the Screen with Password Once the screen is turned on, swipe up from the middle of the screen to display the password input panel. Then, enter your lock screen password.
Use Face Unlock Turn on the screen and align it with your face. Your phone will unlock once your face is recognized.
Use Fingerprint Unlock Once the screen is turned on, the fingerprint icon will display on the screen. Touch the icon with an enrolled finger to unlock the screen.
Display Your Signature on the Lock Screen Go to Settings > Home screen & wallpaper, touch Lock screen signature, then type text to display on the lock screen. To remove the signature, touch Lock screen signature and delete the text.
Launch apps from the lock screen You can launch common apps, such as Camera, Calculator, and Timer from the lock screen.
Connect to the Mobile Network
####### Connect to Mobile Data

To save battery power and mobile data, disable the mobile data service when you don't need it.
####### Enable 5G
| | |---|
Fifth generation mobile networks, fifth generation wireless systems, or fifth-generation (5G) is the fifth generation mobile communication technology. Compared to 4G, 5G offers higher data transfer rates and shorter latency. When two SIM cards are inserted, support dual card 5G by default.
Manage SIM Cards You can enable or disable SIM cards and name them for easier identification.
Enable or Disable a SIM Card Go to Settings > Mobile network > SIM management, and enable or disable a SIM as needed. Once disabled, a SIM card cannot be used for calling, messaging, or accessing the Internet.
Name Your SIM Card You can name your SIM cards for easier identification and management. For example, you could mark one SIM card as "Work" and the other as "Personal".
Go to Settings > Mobile network > SIM management, and touch to edit the SIM card name.
Share Your Network Connection with Other Devices Once Personal hotspot has been enabled, you can share your mobile data or the Wi-Fi network your phone is currently connected to with other devices.
######## Share Your Network via Personal Hotspot
| | |---|
Some Wi-Fi networks that require authentication cannot be shared. Go to Settings > Mobile network > Personal hotspot, and enable Personal hotspot. The mobile data or Wi-Fi network connection of your phone will then be shared with other devices. You can also perform the following for the personal hotspot:
Share Your Network via Bluetooth
Share Your Network via USB
Enable or Disable Airplane Mode When taking a plane, you can turn on the Airplane mode according to the requirements of the airline. In the Airplane mode, calling, messaging, or using mobile data on your phone will be banned, but other functions can work normally. You can enable or disable Airplane mode using any of the following methods:
After you turn on the Airplane mode for the first time, Wi-Fi and Bluetooth on your phone will be turned off automatically. If allowed by the airline, you can manually turn on or off Wi-Fi and Bluetooth on your phone, and your phone will keep this setting when you enabled Airplane mode next time.
Manage Data Usage Open System Manager , then touch Data usage to view data usage and manage network access.
Connect to the Wi-Fi Network
Introduction to Wi-Fi Connecting to the Internet over Wi-Fi is an effective way to save mobile data. You can also enable Wi-Fi security monitoring to avoid risky hotspots and ensure safe Internet access.
Access Wi-Fi Network Please be cautious when accessing free Wi-Fi in public places to avoid potential safety hazards such as privacy leakage and property loss.
| | |---|
######## Enter PIN to connect to Wi-Fi network
When the status bar displays , it indicates that the phone is accessing the Internet through Wi-Fi. Connect via scanning QR code
| | |---|
Some encrypted networks may not support connection by code scanning. Please refer to the actual situation.
####### Transfer Data Using Wi-Fi Direct
You can use Wi-Fi Direct to transfer data between HONOR devices. Wi-Fi Direct allows you to transfer large files to a nearby device more quickly than Bluetooth and without having to pair the devices.
| | |---|
These steps may be different if you are sharing files directly from an app.
Select a Network Using Wi-Fi+ When Wi-Fi+ is enabled, if your phone detects a Wi-Fi network that it has previously connected to or is free, it will automatically enable Wi-Fi and connect to the network. Your phone will also evaluate the quality of the current Wi-Fi network and switch between Wi-Fi and mobile data for the best network connection.
1 Go to Settings > Wi-Fi. 2 Touch More settings and enable or disable Wi-Fi+.
Learn about the Home Screen
####### Explore your home screen On the home screen, you can:
You can pinch with two fingers on the home screen, and go to Home screen settings to change the layout style.
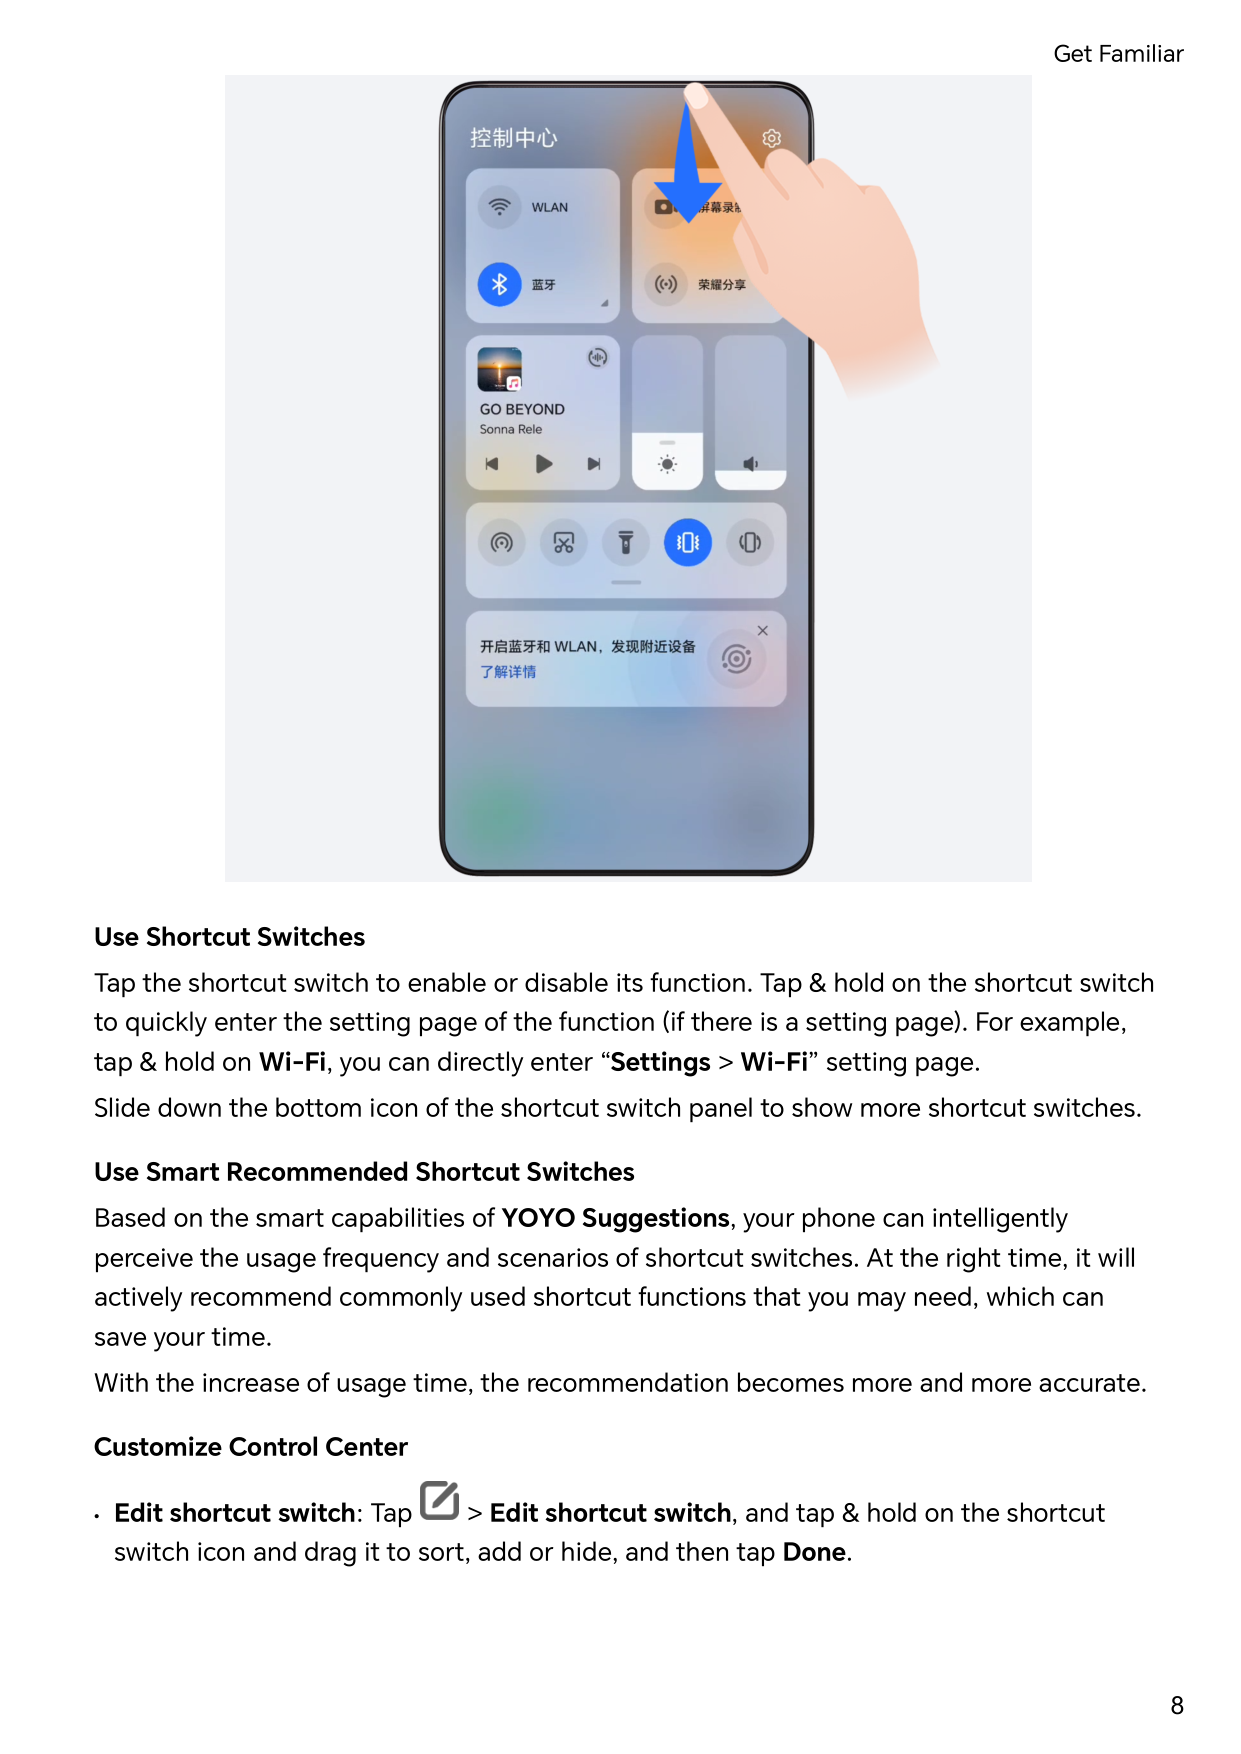
Control Center You can use the phone's shortcut functions or make quick settings in the Control Center. Swipe down from the top right of the screen to open the Control Center. Swipe down from the top middle or left of the screen to open the Notification Center. Swipe left or right on the blank space to switch between them.

Use Shortcut Switches Tap the shortcut switch to enable or disable its function. Tap & hold on the shortcut switch to quickly enter the setting page of the function (if there is a setting page). For example, tap & hold on Wi-Fi, you can directly enter “Settings > Wi-Fi” setting page. Slide down the bottom icon of the shortcut switch panel to show more shortcut switches.
Use Smart Recommended Shortcut Switches Based on the smart capabilities of YOYO Suggestions, your phone can intelligently perceive the usage frequency and scenarios of shortcut switches. At the right time, it will actively recommend commonly used shortcut functions that you may need, which can save your time. With the increase of usage time, the recommendation becomes more and more accurate.
######## Customize Control Center


######## • Hide or show the device collaboration page of HONOR Connect: tap > HideHONOR Connect (or Show HONOR Connect), to close or show the entrance of thedevice collaboration page of HONOR Connect.

Service cards Keeping informed with important information and one touch to access frequently used features without opening apps. The multi-style cards distinguish your home screen from others. Apps supporting service cards have an indicator bar by default at the bottom (go to Settings > Home screen & wallpaper > Home screen settings to enable or disable Show card bar).
Add service cards by editing the home screen Pinch two fingers on the home screen to enter the edit screen, tap Cards, select Gallery, Weather, or others, swipe left and right to select your preferred style, tap ADD TO HOME SCREEN.
Swipe up app icons to add service cards Swipe up app icons supporting service cards, unfold service cards (tap other areas to
collapse), and tap in the upper right corner of the card to pin it to the home screen.
Edit Service Cards Using Notes as an example, you can edit the cards in the following way: Long press the Notes card and select Edit Card in the pop-up list to select the category of Notes.
Remove service cards Long press the service card, select Remove in the pop-up list, then tap REMOVE in the confirmation box to remove the card.
Big folders Store your apps in a big folder. You can access them without having to open the folder, making the home screen more efficient to interact with.
Switch to Large Folder Press and hold a small folder and tap Enlarge.
| | |---|
If there are more than 8 apps in the folder, a cascaded icon will be displayed at the lower right corner.
Enable App in the Large Folder Tap the app icon in the large folder to enable the app.
Tap the cascaded icon at the lower right corner of the large folder to expand the large folder and view or open more apps.
More Operations for Large Folder Rename large folders: Long press a large folder to rename it.
Add or remove apps: Open the large folder, tap , and follow the on-screen instructions to add or remove apps.
Switch to Small Folder Long press the large folder and tap Shrink to switch it to a small folder.
App suggestions App suggestions recommend apps that you need for your daily life. Based on your current needs,making it more efficient to access the apps and services.
Enable App suggestions App suggestions card is pre-installed on the home screen by default.
Go to Settings > Assistant > YOYO Suggestions > App suggestions, make sure the switches of the apps supporting App suggestions are turned on.
Add App suggestions to the Home Screen You can select the bigger App suggestions card for more accurate recommendations and a better experience. Pinch two fingers on the home screen to enter the edit screen, tap Cards, and select YOYO Suggestions. Swipe left and select the 2*4 App suggestions card style, then tap ADD TO HOME SCREEN. If there is no space on the home screen, Cards will be added to another screen.
Stop the app from being recommended You can remove the app that you do not want to be recommended by YOYO Suggestions in the following two ways. Take Settings as an example: Go to the YOYO Suggestions card on the home screen, long press the Settings app until the dialog box appears, and tap Not interested > OK. The Settings app will not be recommended any more.
View and Disable Notifications
View and Clear Notifications
Check Notifications When there are any notification reminders, you can unlock the screen, and open the Notification Center by swiping down from the top middle or left of the screen to view the messages.
######## Clear Notifications.
| | |---|
Some system notifications and notifications from apps running in the foreground cannot be cleared.
Do not show notification To not get disturbed by notifications, swipe left on the notification you want to process,
and tap , you can select:
| | |---|
Adjust the Volume
####### Adjust Sound Settings
Press a Volume Button to Adjust the Volume Press the Volume up or down button to adjust the volume.
######## Switch Sound Mode Via Control Center
Set the Default Volume Go to Settings > Sounds & vibration, and you can then set the volume for the following items:
Press the Power Button to Mute Your Device When It Rings When your phone rings for an incoming call or alarm, you can press the Power button to mute it.
Flip to mute When you receive a call, flip the phone to mute it. Before using this feature, go to Settings > Accessibility features > Shortcuts & gestures > Mute ringtone/Reduce volume and make sure Flip to mute ringtone is turned on.
Pick up the phone to lower the volume When you receive a call, pick up the phone to reduce the ring. Before using this feature, go to Settings > Accessibility features > Shortcuts & gestures > Mute ringtone/Reduce volume and make sure Raise to reduce volume is turned on.
Change Ringtone and Vibration You can change the ringtone for messages, notifications, and calls, and customize vibration.
##### 1 Go to Settings > Sounds & vibration, and tap Phone ringtone orNotification tone.
System Haptics The system uses haptics to provide feedback when certain operations are completed, such as when you touch and hold text, a contact, or some other elements on the screen. Go to Settings > Sounds & vibration > More settings and enable or disable System haptics according to your preferences.
Set up More settings Go to Settings > Sounds & vibration > More settings and explore more ways to alert. Such as Screen lock, Screenshot.
Power On/Off and Restart
####### Power On and Off or Restart Your Device
Power Your Device On and Off To power off your device, press and hold the Power button for a few seconds, touch Power off and Touch to power off.
To power on your device, press and hold the Power button for a few seconds until your device vibrates and displays the logo.
Restart Your Device Restart your device on a regular basis to clear the cache and keep the device in an optimal state. A restart can sometimes resolve the issue when your device encounters a problem. Just press and hold the Power button for a few seconds, then touch Restart and Touch to restart.
Forcefully restart your phone You can forcefully restart your phone if it is not working or turning off normally. Just press and hold the Volume down and Power buttons for more than 10 seconds to force restart your device.
Charge Your Phone
Charge Your Phone Your phone will alert you when it is running out of power. Please make sure to charge your phone in time to prevent it from turning off automatically when the power runs out.
######## Precautions for Charging
Use the Charger that Came with Your Device 1 Use the USB cable that came with your phone to connect your phone and the adapter. 2 Plug the adapter into a power socket. Charging Your Phone with a PC
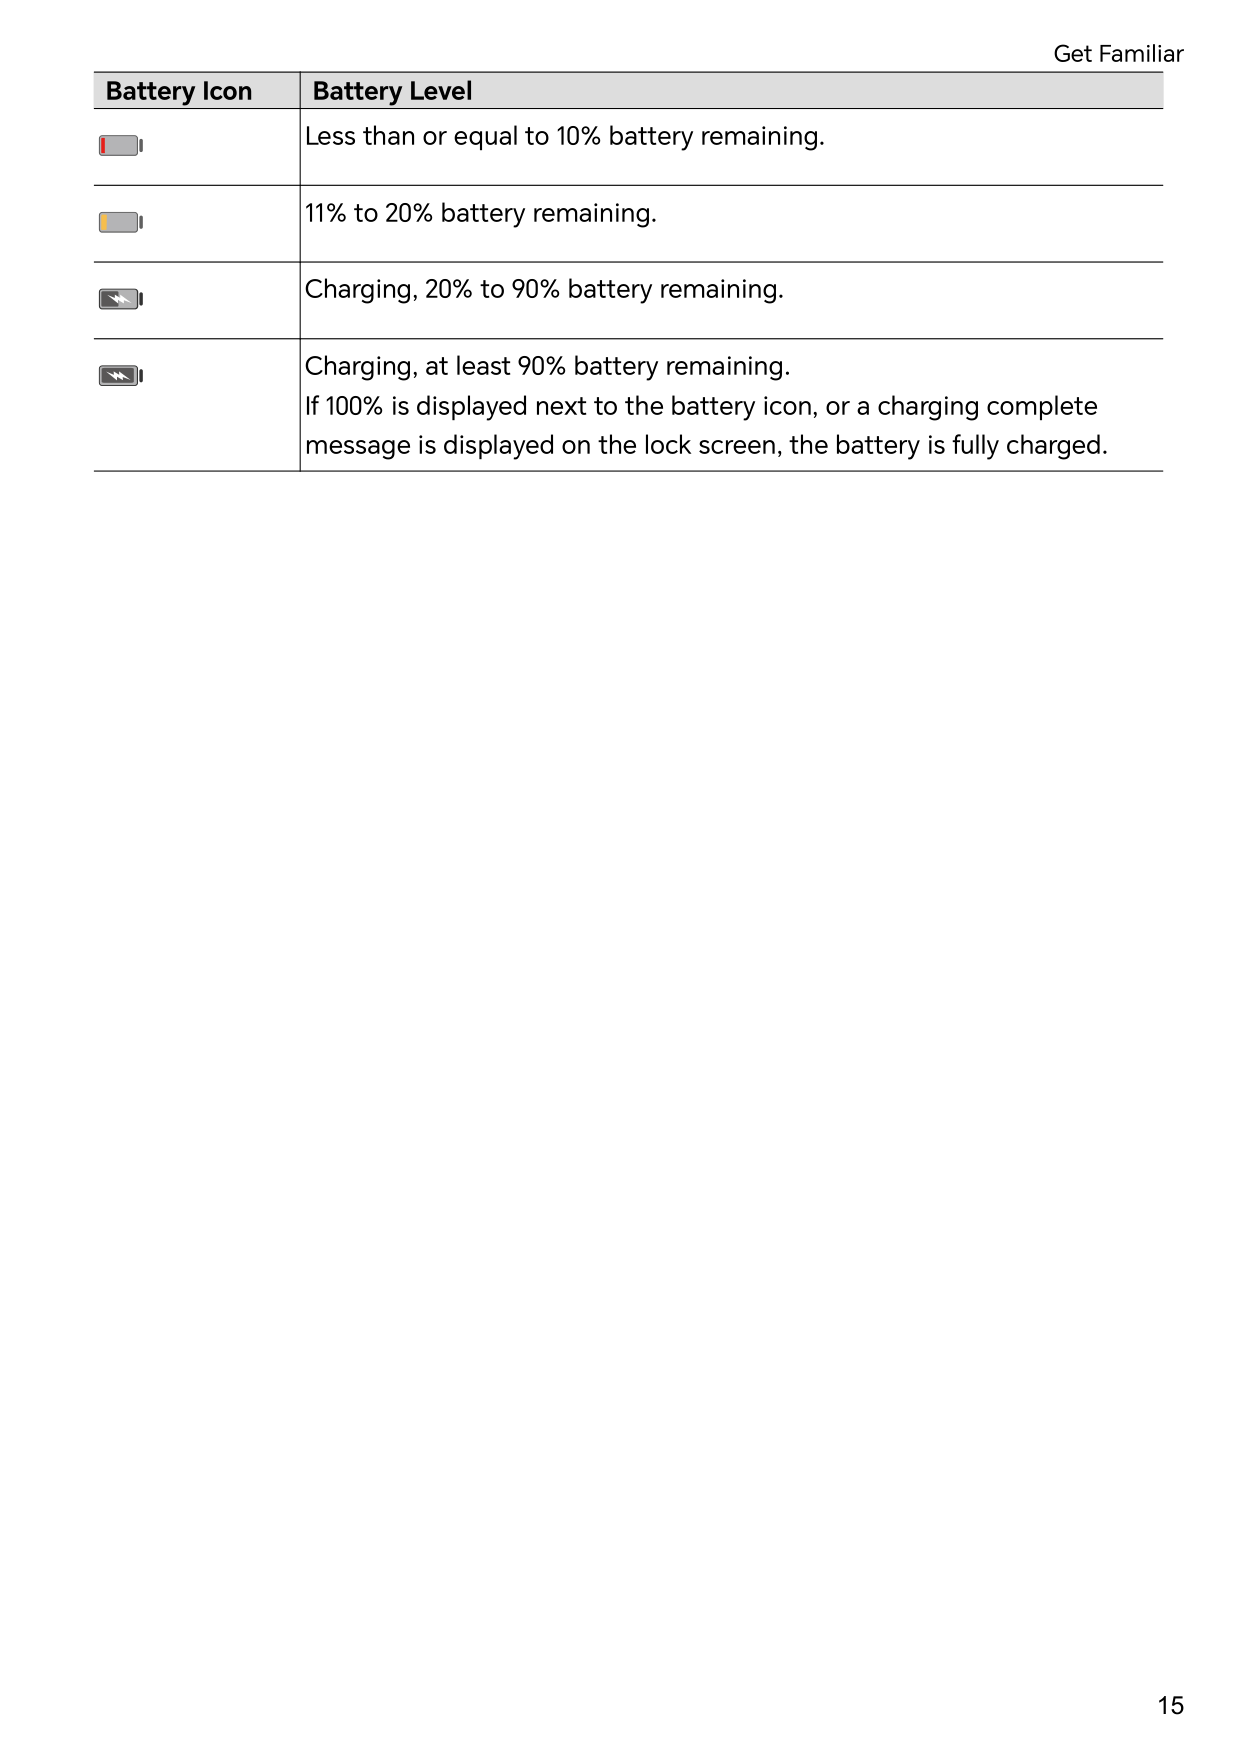
Overview of Battery Icons You can check the battery level from the battery icon on the phone screen.
|Battery Icon|Battery Level| |---|---|
| |Less than or equal to 10% battery remaining.| | |11% to 20% battery remaining.| | |Charging, 20% to 90% battery remaining.| | |Charging, at least 90% battery remaining. If 100% is displayed next to the battery icon, or a charging complete message is displayed on the lock screen, the battery is fully charged.|
Smart Collaboration
Smart Collaboration
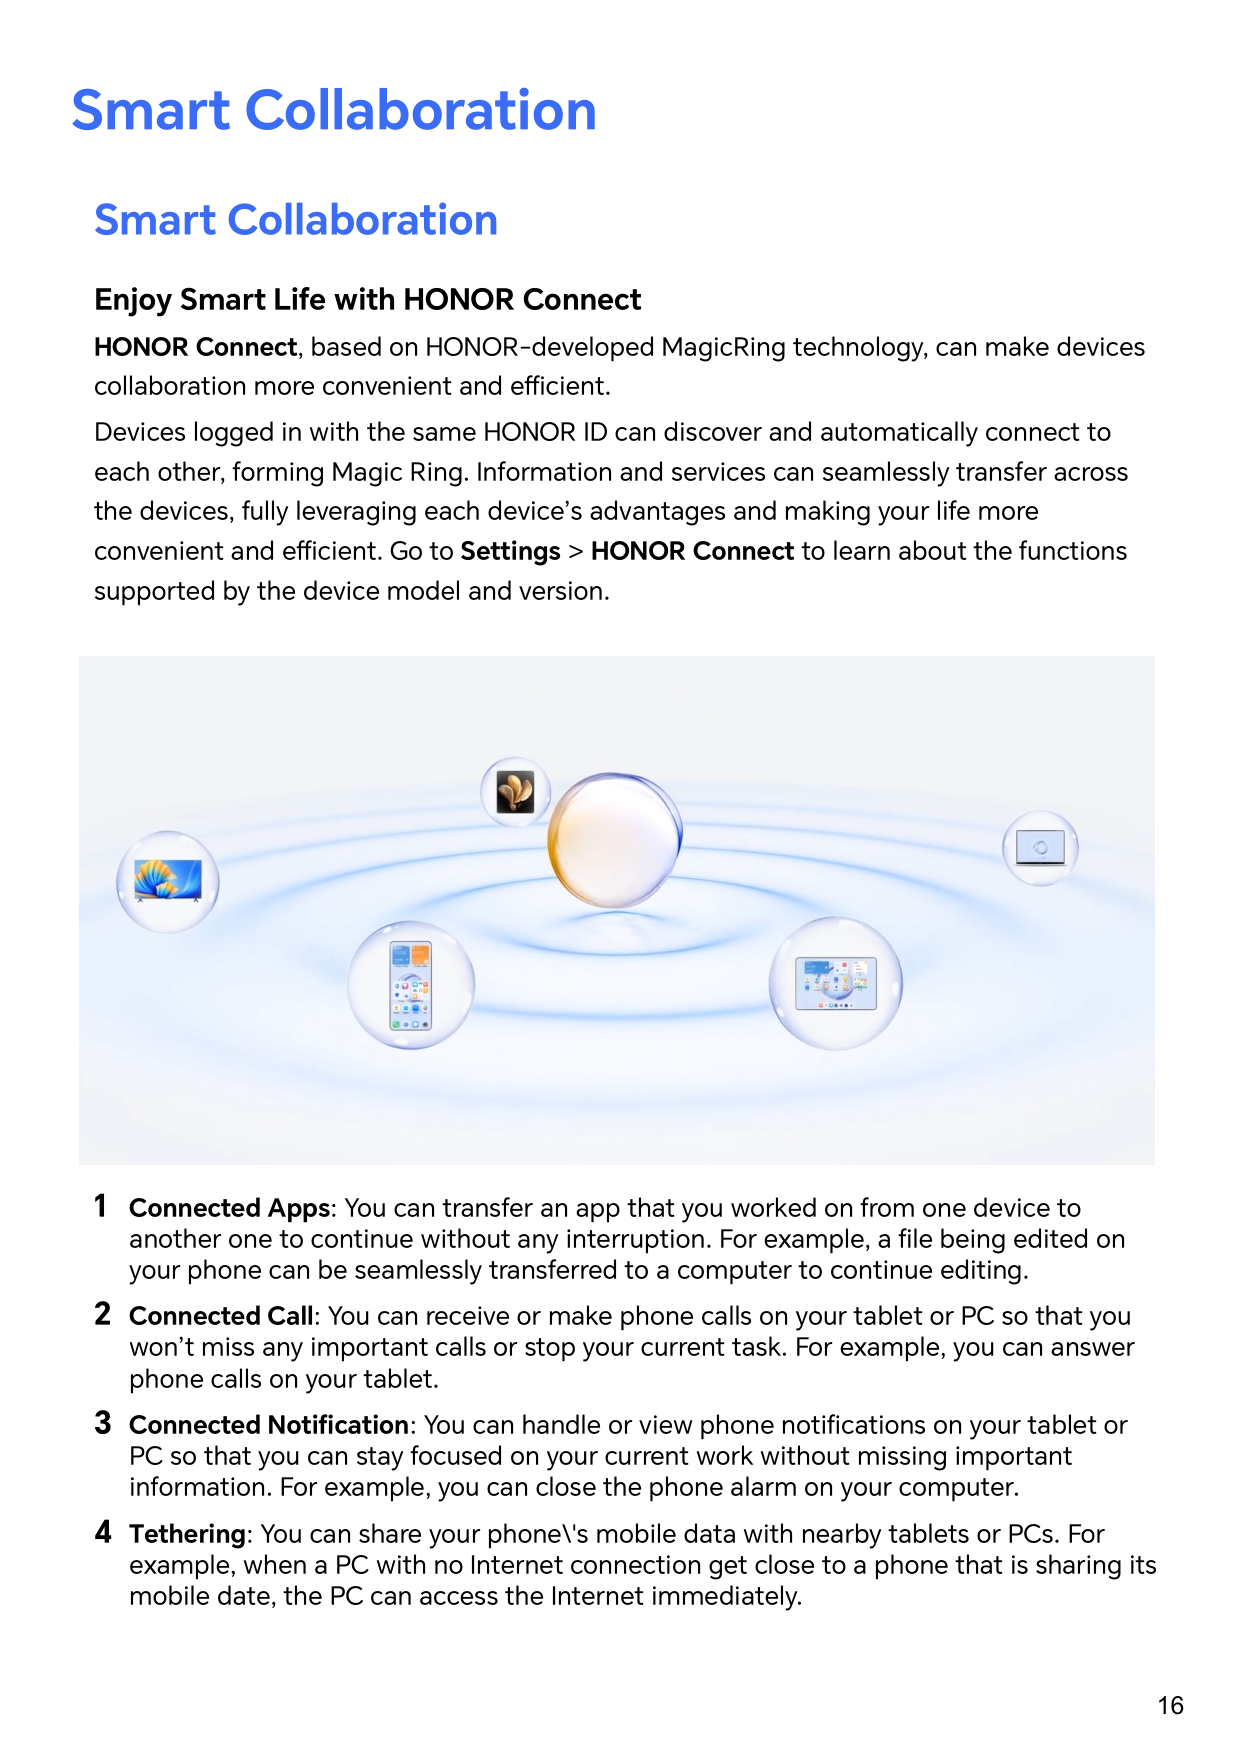
Enjoy Smart Life with HONOR Connect HONOR Connect, based on HONOR-developed MagicRing technology, can make devices collaboration more convenient and efficient. Devices logged in with the same HONOR ID can discover and automatically connect to each other, forming Magic Ring. Information and services can seamlessly transfer across the devices, fully leveraging each device’s advantages and making your life more convenient and efficient. Go to Settings > HONOR Connect to learn about the functions supported by the device model and version.

In addition, on HONOR Connect Multi-Device Collaboration, you can see nearby devices with the same account in the Magic Ring to create collaboration and transfer apps with ease.
| | |---|
Connect More Devices with HONOR Connect First, update all the devices to be connected to the latest version and make sure they all support HONOR Connect.
On the setting page of HONOR Connect on the phone, the device with “Nearby” displayed indicates that it has been connected. Tap its name and make sure the services of HONOR Connect are enabled.
| | |---|
• To ensure a faster and more stable connection, it is recommended to connect devices to the same Wi-Fi.
Manage HONOR Connect of your Phone/Tablet Go to Settings > HONOR Connect on the phone/tablet. On the list of SERVICES ON THIS DEVICE, you can enable or disable HONOR Connect on the current device. For example, tap Connected Apps, turn off Connected Apps, and applications and services from this phone/tablet and either device will no longer flow to each other.
Manage HONOR Connect of Other Devices Go to Settings > HONOR Connect on the phone, tap the device with Nearby displayed, you can enable or disable HONOR Connect of a single device. For example, tap a laptop with Nearby displayed, turn off Connected Apps, and applications and services from the phone and this laptop will no longer flow to each other. Other devices will not be affected.
Disable HONOR Connect on your Phone/Tablet Go to Settings > HONOR Connect > > About on the phone/tablet, and tap Disable service to disable all HONOR Connect services on the device. If you want to restore them, go to Settings > HONOR Connect and AGREE to the user agreement again.
Smart Collaboration Control Center
Establish Cross-device Collaboration by HONOR Connect HONOR Connect is a unified portal for cross-device collaboration services. There, you can check the status of nearby devices, start collaboration, and transfer services and apps.
| | |---|
Go to HONOR Connect Plan to check device models that support this feature.
Enable HONOR Connect Swipe down from the top right of the screen to open the Control Center and tap HONOR

Connect card. If the card of HONOR Connect is deleted, tap and select Show HONOR Connect.
Find and Collaborate with Nearby Devices After enabling HONOR Connect, your phone will automatically search for nearby devices logged in to the same account and display the devices found as balls. You can view ongoing collaborations there and drag the balls to establish a new collaboration. Preparations
Log in to the same HONOR ID on your phone and nearby devices, turn on Wi-Fi and Bluetooth, and enable HONOR Connect in Settings. Multi-Screen Collaboration with tablet/computer
With HONOR Connect, your phone, tablet and PC can establish collaboration fast, making your work more efficient. In the virtual phone window on the tablet/computer, you can view and edit files, drag and drop documents, and operate phone apps.
Disconnect Drag the device ball out to stop collaboration. You can also tap on the screen center and select Disconnect.
Transfer Apps to Nearby Devices You can transfer apps across devices via HONOR Connect. Preparations
Log in to the same HONOR ID on your phone and nearby devices, turn on Wi-Fi and Bluetooth, and enable HONOR Connect in Settings. Transfer apps
Swipe up with three fingers in the app to enable HONOR Connect. A task card will form. Drag it to the target device, and the app will be transferred. Means of transfer
The means of transfer depend on apps and target devices.
Connected Apps
Connected Apps When you edit a note or file, watch videos, or listen to music on your phone, Connected Apps enables you to seamlessly transfer the current task to other nearby devices with the same HONOR ID. For example, you can continue to edit the note on your PC without interruption. Availability Tablets, phones and PCs that support HONOR Connect. Supported system apps Notes and Email Supported third-party apps
| | |---|
Notes Continuation The Notes that is being edited on your phone can be transferred to another device for more convenient operation. Before use
Notes continuation
of the screen and pause in Gestures mode or tap in Three-key mode) if the connected device is a mobile phone.
and pause in Gestures mode or tap in Three-key mode) if the connected device is a tablet.
Clipboard Continuation After you copy a picture or text on your phone, you can paste the content on another device nearby with the same ID. The opposite is also available. After you copy on another device nearby with the same ID, you can paste it on your phone. Before use
######## Clipboard continuation
| | |---|
Continue to Edit or Browse a File on Another Device Files (such as WPS) that are being edited and browsed on your phone can be transferred to another device for more convenient operation. Before use
File continuation In order to continue to use a file (such as WPS Office), you need to:
the screen and pause in Gestures mode or tap in Three-key mode) if the connected device is a mobile phone.
and pause in Gestures mode or tap in Three-key mode) if the connected device is a tablet.
| | |---|
If the app is not installed on the connected device, you can follow the prompts to install it and continue.
Audio and Video Continuation The video (such as YOUKU) or music (such as KUGOU) played on your phone can connect to a more suitable device for better effect. Before use
Continue the audio and video In order to continue YOUKU video on a another device, you need to do the following:
of the screen and pause in Gestures mode or tap in Three-key mode) if the connected device is a mobile phone.
and pause in Gestures mode or tap in Three-key mode) if the connected device is a tablet.
| | |---|
If the Video or Music apps are not installed on the connected device, you can follow the prompts to install and operate. You need to install the apps on TV in advance before you receive a connection prompt.
Connected Call
Connected Call It allows nearby devices including laptops and tablets to share the Call function of the phone. You can answer or make a call on these devices, or transfer your phone call to these devices. Switch calls seamlessly between devices. Available devices Phones, tablets, laptops which support HONOR Connect. Preparations
| | |---|
phone, go to Phone > > Settings, tap Call forwarding, select a transfer mode and enter the target number (this function requires carrier service support, please consult the network operator for details).
Allow nearby devices to answer/make calls Phone calls will be automatically transferred to connected laptops and tablets. You can choose a device at will to answer or make a call.
| | |---|
######## Transfer a call to nearby devices manually

After you pick up a call, you can tap on the call screen to transfer your call to the other device, such as laptop.
Phone and Non-HONOR PC Collaboration
Connect Your Phone to Your Windows PC After connecting your phone to your Windows PC, you can manage your phone notifications, photos, and calls, and access your phone screen and apps on your PC, making your work or study more efficient.
######## Connect Your Phone to PC
| | |---|
Add additional PCs to your phone
| | |---|
The new PC needs to be logged in with the same Microsoft account as your phone.
Manage phone notifications and text messages on your PC Once the phone is connected to your PC, you can manage your phone's notifications or send and receive text messages through the PC.
phone notifications. Click next to the notification bar to clear notifications. The notifications will also be deleted from your phone.
| | |---|
When using this feature for the first time, you need to confirm on your phone to allow your PC to access the phone notifications.
Making and receiving phone calls on the PC Once the phone is connected to the PC, you can make or receive calls on the PC or select the device for the call, or manage the call log and contacts by the PC.
| |
|---|
You PC must support Bluetooth to use this feature. Follow the prompts to connect the phone and the PC via Bluetooth before use and allow access from the PC.
Access phone photos on your PC Once your phone is connected to your PC, in the Phone Link app on your PC, click Photos to view and manage the last 2,000 photos stored on your phone. You can also drag and drop the photos to your PC by long pressing them.
| | |---|
Deleting photos on your PC will also permanently delete them from your phone.
Access phone apps on the PC Once the phone is connected to the PC, you can access the apps of your phone on the PC and control them with the mouse.
| | |---|
To use this feature, you need to connect your phone to the same network as your PC and follow the prompts to allow access to your PC.
Open the phone screen on the PC After the phone is connected to the PC, in the Phone Link app on the PC, click Apps > Open phone screen to open a window of the phone screen on the PC. You can operate the phone in the window with the mouse. Such as checking text messages, making calls, or accessing mobile apps.
| | |---|
To use this feature, you need to connect your phone to the same network as your PC and follow the prompts to allow access from the PC.
Disconnect the phone from the PC On the phone, go to Settings > More connections > Link to Windows.
Remove this device, and follow the prompts to delete the phone in Phone Link > > My Devices on the PC.
Easy Projection
Project Your Phone Screen Wirelessly For security reasons, after projecting your phone screen wirelessly to a large display (such as a TV) for work or entertainment, notifications such as incoming call notifications, SMS messages, and clock alarms will only be displayed on your phone.
| | |---|
To check whether the large display supports Miracast and how to enable wireless projection on it, consult the user guide or customer service of the large display manufacturer.
After the connection is set up, you can place your phone in landscape mode for a better display. Alternatively, swipe down from the top middle or left of the screen to open the Notification Center, and touch Disconnect.
HONOR Share
HONOR Share HONOR Share is a wireless sharing technology that allows you to quickly transfer images, videos, documents, and other types of files between devices. This technology uses Bluetooth to discover nearby devices that supports HONOR Share and Wi-Fi Direct to transfer files without using mobile data.
Enable or Disable HONOR Share You can enable or disable HONOR Share in either of the following ways:
Share Files Between Phones with HONOR Share You can use HONOR Share to quickly share files between HONOR phones. The recipient can preview the files before they are sent, then view the full content of the files once they have been received.
| | |---|
Share Files Between Your Phone and Computer with HONOR Share You can use HONOR Share to easily share files wirelessly between your phone and a computer. View and edit phone files on your PC without the need for a data cable, or send files from your PC to your phone. From your phone to PC:
######## From your PC to phone:
| | |---|
Only supports HONOR notebooks with PC Manager Version 15.0 and above. This feature may vary by product, please refer to the actual situation.
One-Touch Printing with HONOR Share When a printer that supports HONOR Share is nearby, you can use HONOR Share to find the printer and print out pictures or PDF files stored on your phone.
If you are connecting a Bluetooth printer to your phone for the first time, find the printer on your phone, touch the printer name, then press and hold the Power button on the printer for about 1 second to confirm the connection.
| | |---|
For a list of supported printers, touch Help on the HONOR Share sharing screen, select Printers, then touch What printers are supported?.
Log in to HONOR ID
Log in to HONOR ID Fast On the new device, go to Settings > Log in to HONOR ID, you can log in by:
HONOR ID, then tap , scan the QR code on the new device, and tap Confirm.
Video Creation
Photography Basics
Launch Camera There are multiple ways to open the Camera app.
From the Home Screen From the home screen, open Camera.
From the Lock Screen When the screen is locked, turn on the screen, then swipe up on the camera icon in the lower right corner to open the camera.
Adjust Camera Settings You can adjust the camera settings to take photos and videos more quickly.
| | |---|
The following features may not be available in some camera modes.
######## Adjust the Aspect Ratio
Go to Camera > > Aspect ratio and select an aspect ratio.
| | |---|
This feature is not available in some modes.
Enable Location Tag Enable Location tag to tag your location in photos and videos. Swipe up on a photo or video in Gallery to view its shooting location.
Use the Assistive Grid to Compose Your Photos Use the assistive grid to help you line up the perfect shot.
1 Enable Assistive grid. Grid lines will then appear in the viewfinder. 2 Place the subject of your photo at one of the intersecting points, then touch the shutter
button.
######## Enable Mirror Reflection
When using the front camera, touch to enable or disable Mirror reflection.
Mute the Shutter Sound Enable Mute to mute the camera shutter sound.
| | |---|
This feature is only available in some countries and regions.
######## Capture Smiles
Tap Camera > > Smart capture to enable Capture smiles. The camera will take a photo automatically when it detects a smile in the viewfinder.
Use the Horizontal Level for Better Compositions Enable Horizontal level to display a horizontal guiding line on the viewfinder. When the dotted line overlaps with the solid line, it indicates that the camera is parallel with the horizontal level.
Take Photos
####### Taking Photos
When (Auto) is selected, if the camera detects that you are in a dark environment, a flash alert will appear in the viewfinder and the flash will automatically turn on when shooting.
| | |---|
Use the Floating Shutter When using the camera, you can turn on the floating shutter and drag the floating shutter button to your preferred position.
Take Timed Photos The camera timer allows you to set a countdown so you can get into position after you have touched the shutter button.
Photography using gestures When taking a selfie with the front camera, raise your palm to face the preview screen to take the shot.
####### Shoot in Portrait, Night, and Wide Aperture Modes
Try Portrait Mode The Portrait mode can beautify faces, blur the background, and make your photo subject stand out.
the lowest value. When you shoot with the front camera, tap , and tap again in the beauty effect settings.
Tap the flash icon and select (auto) or (always on).
Take Night Shots Night mode gives your photos sharper details and brighter colors even when shooting in low light or at night.
Take Wide Aperture Photos Wide aperture mode allows you to shoot photos where the background is blurred while your subject remains in sharp focus.

aperture value will create a more blurred background.
Take Professional-Looking Photos AI Photography is a pre-installed camera feature that helps you take better photos by intelligently identifying objects and scenes (such as food, beaches, and text) and optimizing the color and brightness settings accordingly.
.
Take Panoramic Photos Add some width to your landscape or group photos with the Panorama feature. The camera takes multiple photos of objects within your field of view and stitches them together into a single panoramic photo.
Use the Rear Camera to Take Panoramic Photos Panorama mode combines multiple shots into a seamless panoramic photo. Simply move the camera as you shoot and the camera will take care of the rest.

Add Stickers to Photos Add a sticker, such as time, location, weather, mood, food or sport , to spice up your photos.
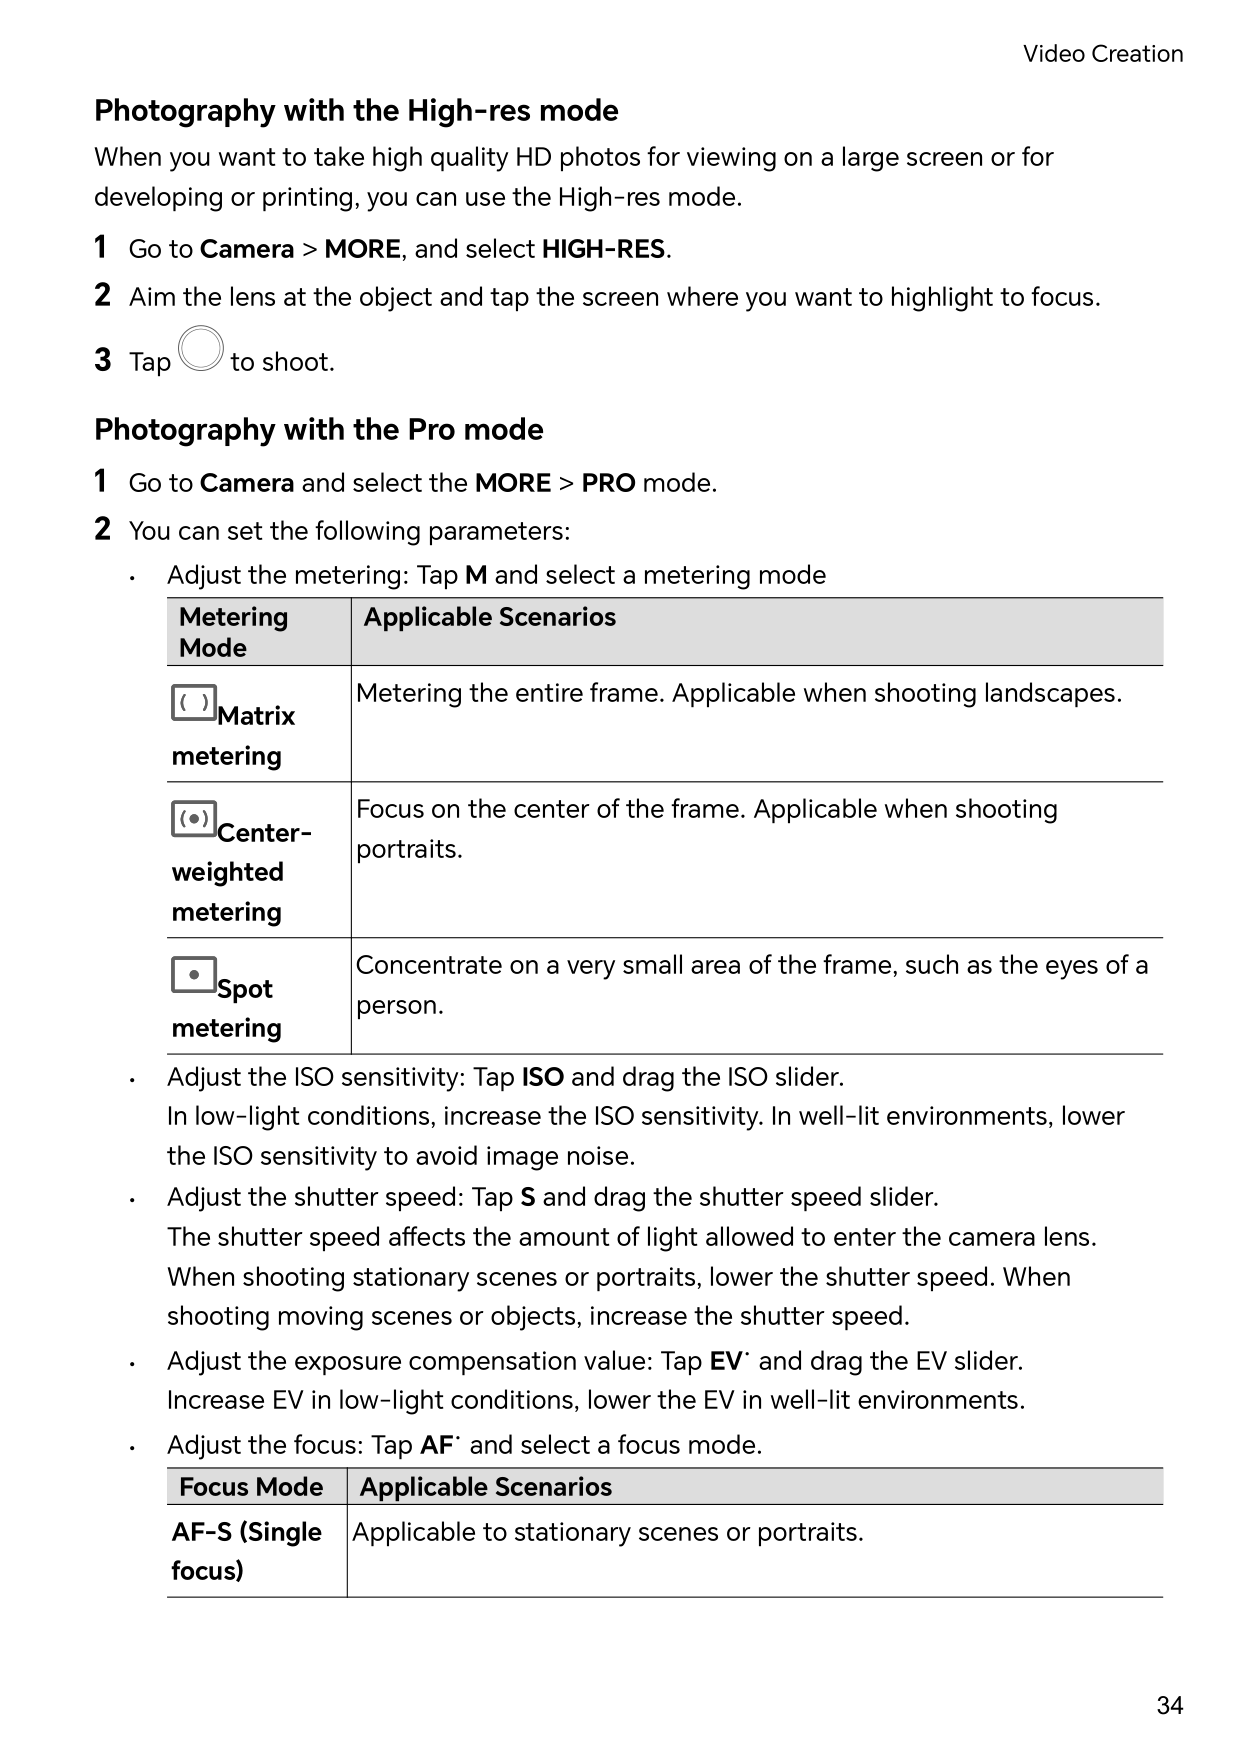
Photography with the High-res mode When you want to take high quality HD photos for viewing on a large screen or for developing or printing, you can use the High-res mode.
|Metering Mode|Applicable Scenarios| |---|---| |Matrix metering|Metering the entire frame. Applicable when shooting landscapes.|
|Center-
weighted metering|Focus on the center of the frame. Applicable when shooting portraits.| |Spot metering|Concentrate on a very small area of the frame, such as the eyes of a person.|
|Focus Mode|Applicable Scenarios| |---|---| |AF-S (Single focus)|Applicable to stationary scenes or portraits.|
|Focus Mode|Applicable Scenarios| |---|---| |AF-C (Continuous focus)|Applicable to moving scenes or portraits.| |MF (Manual focus)|Tap the area you want to focus on (such as the face of a person).|
When shooting in bright sunlight, you can select . In low-light environments,
select .
Tap to adjust the color temperature, giving a cooler or warmer tone to the photo.
| | |---|
Adjusting some settings may cause other settings to change accordingly. Please adjust carefully according to your needs.
Magic Text Scan Magic Text can scan your documents, PPTs of the meetings, etc. for electronic storage and sharing.
Scan Document
| | |---|
Go to Files to view the exported document.
Shoot Videos
Shoot Videos In the video mode, you can use auxiliary functions such as zoom, focus, and beauty, and you can also set the video resolution and frame rate.
When recording with the front camera, you can select the flash to be (Always on) in low light conditions. When turned on, the camera will ring fill in the light by boosting the screen brightness to enhance the brightness of faces.
| | |---|
Not all products support the above features, please refer to your product for details.
Multi-Video Recording With the multi-video mode, you can switch between different camera combinations to make unique and fun videos.
Multi-Video Mode Select different multi-video modes to switch between camera combinations:
Make Multi-camera Videos
| | |---|
During multi-video recording, only the front camera and the rear camera in the Rear mode supports Beauty.
Shoot Multi-Video Microfilms With the multi-video microfilm mode, you can make amazing multi-video movies simply by following a template without conceiving camera combinations.
Make Microfilms with Multi-Video Mode With the Multi-video mode, you can make amazing clips simply by following a template.
Use Time-Lapse to Create a Short Video You can use Time-lapse to capture images slowly over several minutes or even hours, then condense them into a short video. This allows you to capture the beauty of change – blooming flowers, drifting clouds, and more.
Edit Images
Edit Photos and Videos Gallery offers a wide range of editing features for photos and videos.
######## Basic Editing

To rotate the photo by 90 degrees, touch . To mirror the photo, touch .
######## Add Stickers to Photos

######## Pixelate Photos

######## Rename Photos
Create Collage You can use the Collage feature to quickly stitch together multiple pictures from the Gallery into one for sharing.
Edit Videos
Instant Movie After you select images and videos, Instant Movie can synthesize them into an easy-toshare short video with the template. This feature may vary by device.
| | |---|
Once you have added the background music, tap . In the Edit you can adjust the music clip or tap Volume to adjust the music volume.
| |

|---|
Some material can only be accessed by VIP.
New video In Gallery, you can select your favorite pictures and videos and use a variety of templates to create clips with background music. You can also add filters, transitions, text and other effects to your clips.
| | |---|
• Go to Create > New video to select pictures or videos. Tap Create on the upper right of the screen.
the transition is to be added, tap Cut. With transition divider added, tap in the preview bar to add transition effects. If you have added more than one dividers, you can choose to apply the transition to the whole video.
| | |---|
For some materials, a paid VIP is required.
View Images and Videos
View Photos In Gallery, you can view, edit, and share your photos.
View by Shooting Time Open Gallery. On the Photos tab, pinch in on the screen to switch to the monthly view and pinch out to switch to the daily view. You can also drag the track ball on the edge to view the time.
View by Album You can view photos by album on the Albums tab. Some photos are stored in default albums. For example, photos recorded with the camera are saved in the Camera album. Screenshots and screen recordings are saved in the Screenshots album.
######## View Details About Photos
Share Images Go to Gallery > Albums, you can share images in the following ways:
select multiple images and tap to share.
Safe Photo Sharing Safe Photo Sharing helps you remove information such as photo location and shooting data to avoid privacy leakage when sharing.
Organize Albums Organize photos and videos into albums to easily sift through them.
Add Albums
Sort Albums 1 Go to Gallery > Albums > and touch Sort albums. 2 Drag next to an album to the desired position. Touch Reset to reset the albums to
the default order.
Hide Albums If you have private pictures and videos that you do not want to show in the album, you can hide them. On the Albums page, tap to open an album, touch and hold the pictures or videos that you
want to hide, and tap > Hide > OK.
The selected pictures and videos will be hidden. You can:
| | |---|
######## Move Photos and Videos
| |
|---|
The All photos and Videos albums show all photos and videos stored on your device. Moving items across albums will not remove them from these albums.
Delete Photos and Videos Touch and hold to select the items you want to delete, then go to Delete > Delete.
| | |---|
Some preset albums, such as All photos, My favorites, Videos, and Camera albums, cannot be deleted.
Deleted photos and videos will be temporarily moved to the Recently deleted album.They will be permanently deleted after a certain period. To permanently delete a photo or video manually, touch and hold its thumbnail in the Recently deleted album, then go to Delete > Delete.
Recover Deleted Photos and Videos In the Recently deleted album, touch and hold to select the items you want to recover,
then touch to restore them to their original albums. If the original album has been deleted, a new one will be created.
Block Albums Block third-party app albums to prevent them from being displayed in Gallery.
1 In the Others list, touch the album you want to block. 2 If is displayed at the top, it indicates that the album can be blocked. Go to >
Block. Blocked albums can only be viewed in Files.
3 To unblock an album, open the Others list, touch View blocked albums, then touch
Unblock next to the album.
| | |---|
Only some albums in Others can be blocked.
######## Add Photos and Videos to Favorites
Open a photo or video, then touch . The item will appear in both its original album and the My favorites album.
Enjoy Smart Life
Magic Text
Magic Text Magic Text can extract text from images, and you copy, drag, or tap it to get related services.
| | |---|
The feature availability varies by languages. More languages will be released gradually with the MagicOS version, please refer to the actual situation.
Enable Magic Text Tap Settings > Assistant > Magic Text and make sure that Magic Text is enabled.
Extract Text from Images You can extract text from images in the following two ways:
Tap the icon to extract text:
Long press the text on the image to extract text:
| | |---|
Handwriting recognition is supported. The extraction results may vary with images.
######## Take Screenshots Using Your Knuckles
Enjoy Smart Life
Tips
Enable Frequently Used Features of the App Fast
Access Frequently Used App Features from the Home Screen You can access frequently used features of certain apps from app icons on the home screen, and even add shortcuts for these features to the home screen.
Quickly Access Frequently Used App Features Touch and hold an app icon until a pop-up menu is displayed, then touch a frequently used feature to access it.
For example, touch and hold the icon, then touch a shooting mode, such as Selfie or Video, from the pop-up menu to access it.
| | |---|
If no pop-up menu is displayed after you touch and hold an app icon, it indicates that the app does not support this feature.
Add Frequently Used App Features to the Home Screen Touch and hold an app icon on your home screen to bring up the pop-up menu. Touch and hold the desired feature and drag it to your home screen to create a shortcut.
Screenshot and Screen Recording
####### Take a Screenshot
Use Your Knuckle to Take a Screenshot
Use a Key Combination to Take a Screenshot Press and hold the Power and Volume down buttons simultaneously to take a screenshot.
######## Take screenshots with the shortcut button
Swipe down from the top right of the screen to open the Control Center. Tap to take the full screenshot.
######## Share and Edit a Screenshot or Switch to Scrollshot

After you take a screenshot, a thumbnail will be displayed in the lower left corner of the screen. You can then:
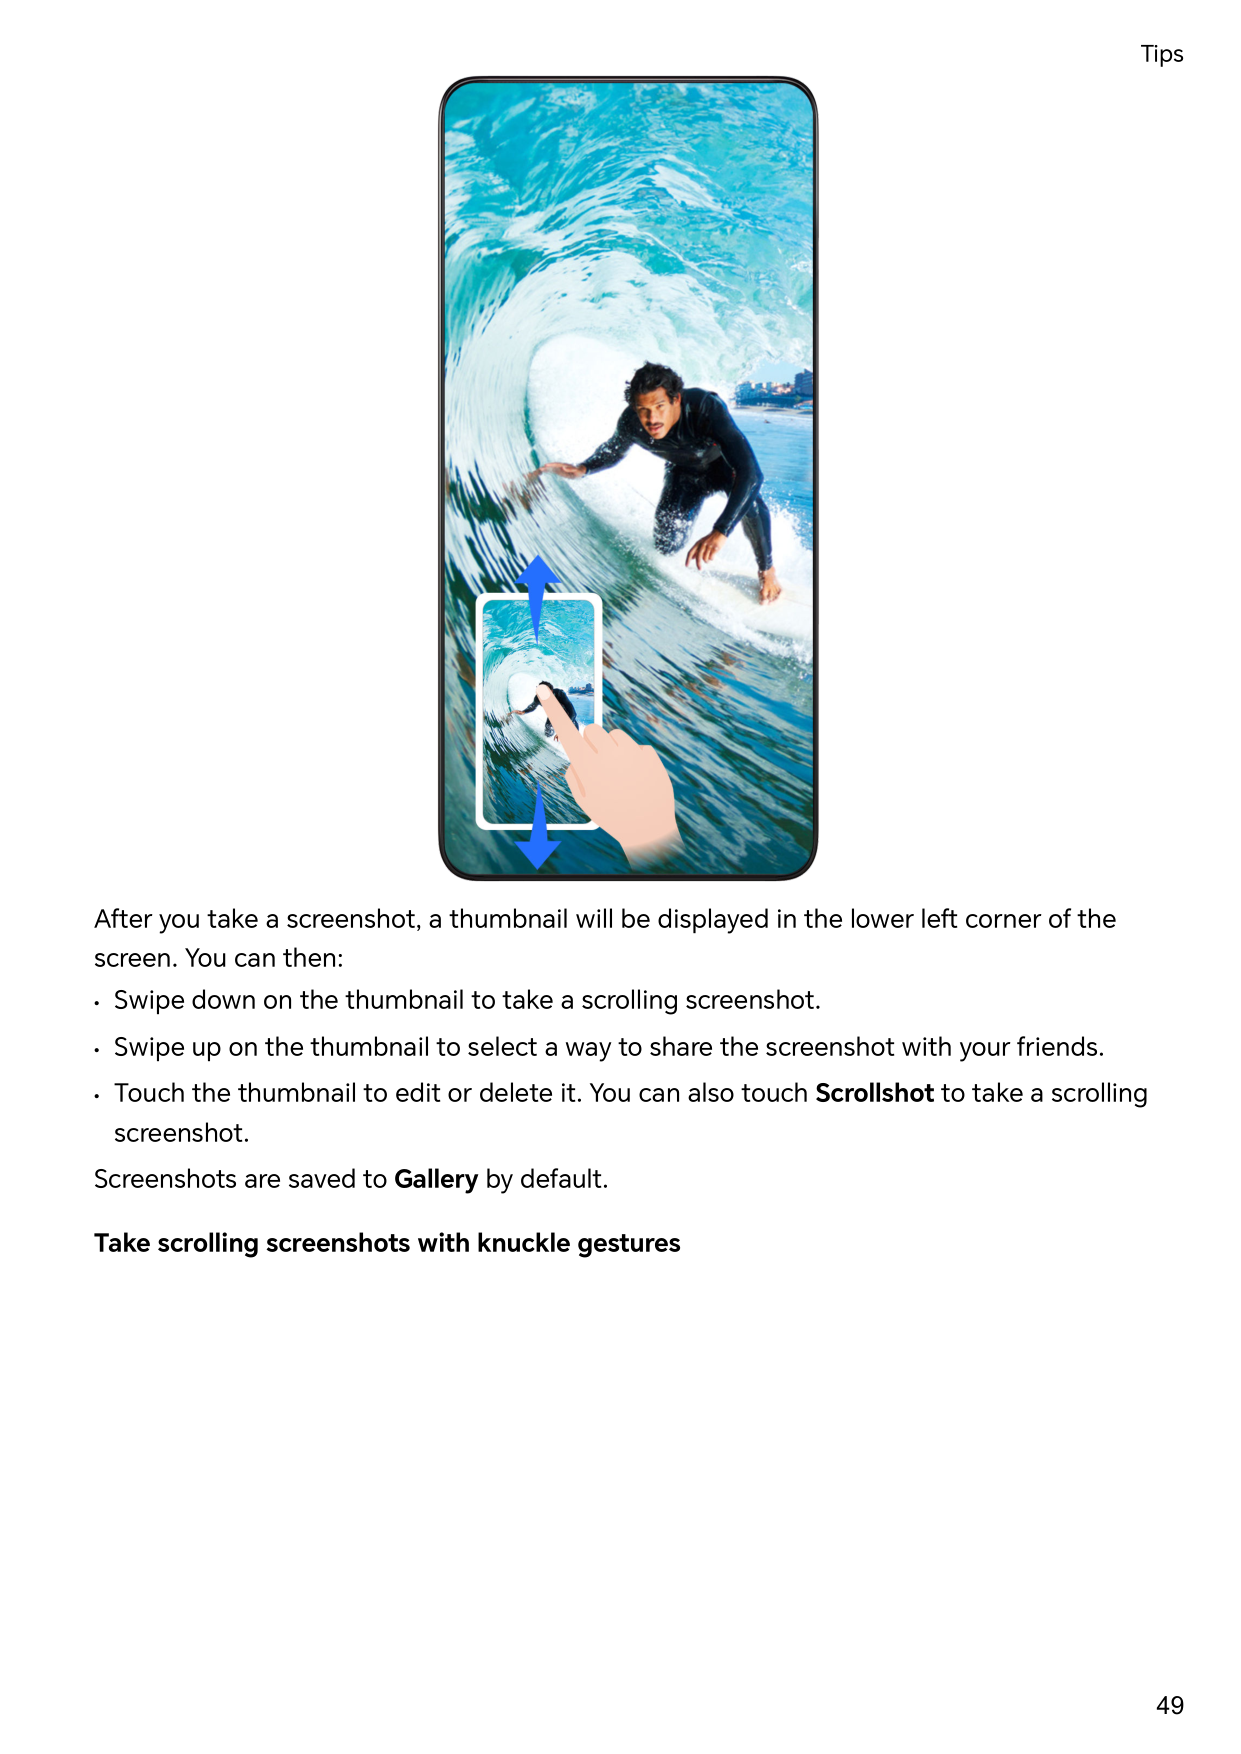
######## Take scrolling screenshots with knuckle gestures

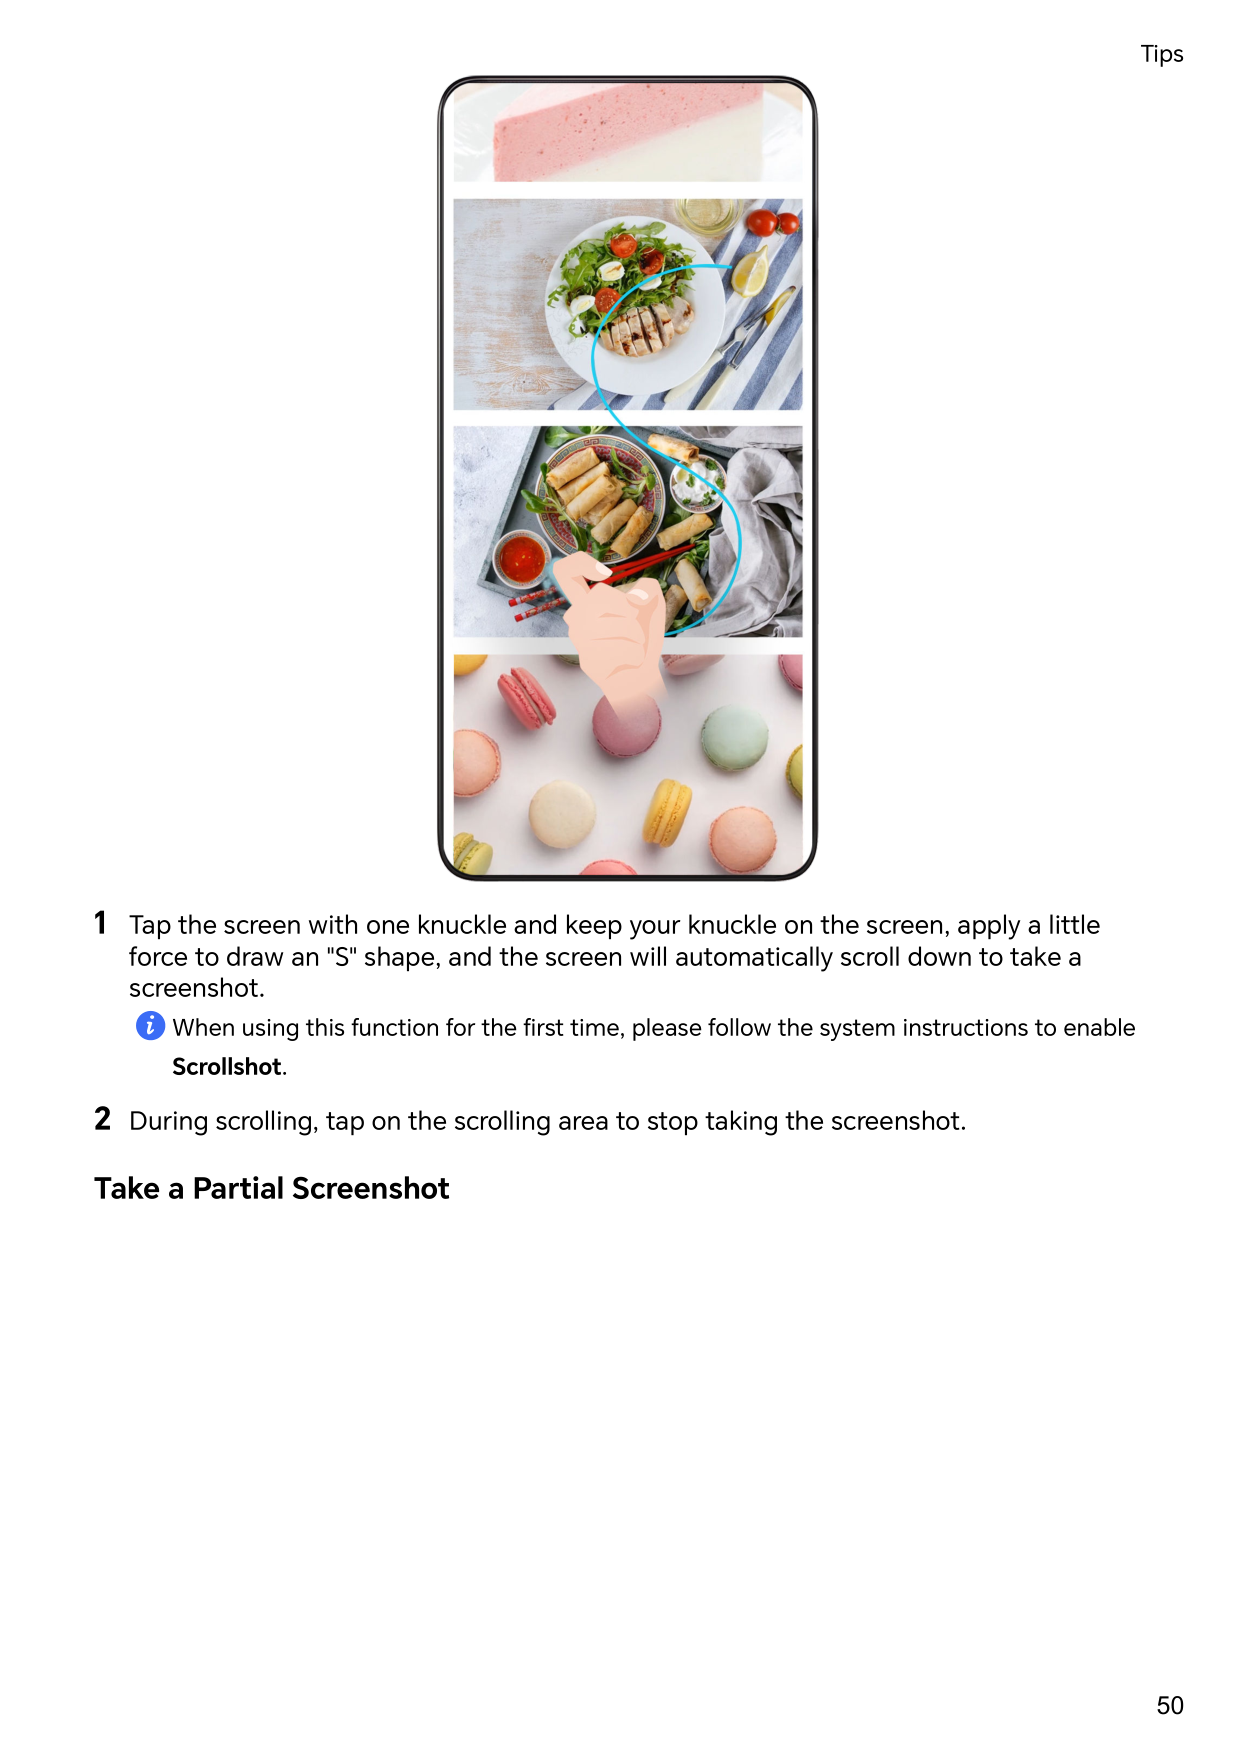
###### 1 Tap the screen with one knuckle and keep your knuckle on the screen, apply a littleforce to draw an "S" shape, and the screen will automatically scroll down to take ascreenshot.
| | |---|
When using this function for the first time, please follow the system instructions to enable Scrollshot.
###### 2 During scrolling, tap on the scrolling area to stop taking the screenshot.Take a Partial Screenshot

Record screen You can record operations on the screen as a video and share it with your friends and family.
Use a Key Combination to Start Screen Recording Press and hold the Power and Volume up buttons simultaneously to start screen recording. To stop recording, press and hold both buttons again.
######## Use a Shortcut to Start Screen Recording
Use Two Knuckles to Start Screen Recording 1 Go to Settings > Accessibility features > Shortcuts & gestures > Record screen, and
ensure that Record screen is enabled.
2 Knock the screen twice in quick succession with two knuckles to start screen recording.
To stop recording, knock twice again.
Record Your Voice During Screen Recording You can enable the microphone to record your voice while recording the screen. After starting a screen recording, touch the microphone icon and ensure that it is displayed
as . You can now record your voice.
| |

|---|
If the microphone is disabled (if it is displayed as ), you will only be able to record system sounds, such as music. If you don't want any system sounds in your screen recording, mute your phone and turn off any music or other media sounds before starting the screen recording.
Process Tasks in Multi-window Simultaneously
Multi-Window Browsing apps in a floating window or split screen makes multi-tasking easier, more flexible and efficient.
######### • Dual-window: You can use two of the same app at the same time in a split screen.
| | |---|
• Apps that support Multi-Window may vary by device model and version.
Floating Windows Make Switching Tasks Easier Use communication apps without leaving the game? All it requires is to enable floating windows. Before using, go to Settings > Accessibility features > Multi-Window and make ensure Multi-Window dock is turned on. Open a floating window
Swipe inwards from either side of the screen and hold to open Multi-Window dock. Tap an app to open the floating window. Adjust the size Slide the bottom two corners of the floating window. Move the floating window
Drag the on top of the floating window.
Minimize the floating window Try out the following methods:

| | |---|
Multi-tasks in Floating Windows You can find and switch floating windows quickly with the floating window task manager.
Floating Window & Mini Window Minimize a floating window, and you will get a mini window. You can enable mini window from the state of full-screen or floating window, by any of the following methods:

Tap the mini window once, it will go back to the floating window. Tap it twice, it will become a full screen.
| | |---|
• Mini window is a special form of the floating window. You can only operate it as a whole such as moving, but cannot use the app in the mini-window directly.
Open an Attachment in a Floating Window You can open a link or attachment within specific apps (such as Email or Notepad) in a floating window.
| | |---|
This feature is unavailable in some apps. 1 Open the Email app. 2 Touch a link or attachment in the Email app to open it in the floating window.
Drag and Drop Between Apps with Multi-Window Use the Multi-Window feature to easily drag and drop images, text, and documents between apps.
| | |---|
Not all apps fully support drag-and-drop with Multi-Window.
######## Add, Move, or Remove an App from the Multi-Window Dock
######## Switch between the split-screen display and the floating window display Switch from split-screen view to floating windows
Drag on top of the app to either side of the screen and lift your hand. Switch from a floating window to split-screen view Try out the following methods:
Multi-Window View for a Single App You can create two task windows for the same app (such as Email and Notepad), and drag images, text, or documents between them.
| | |---|
This feature is unavailable in some apps.
######## Disable Multi-Window dock Multi-Window dock is enabled by default. To disable it, go to Settings > Accessibility features > Multi-Window, then disable Multi-Window dock.
Apps
Apps
####### App Basics
Uninstall an App You can uninstall an app using any of the following methods:
| | |---|
Some pre-installed system apps can't be uninstalled, as uninstalling them may cause system errors.
######## Manage Background Apps
| | |---|
.
preview. Touching will not close this app.
Clear the Cache of an App Delete app cache files to free up storage space. Go to Settings > Apps > Apps, select the app that you want to clear the cache of, then go to Storage > CLEAR CACHE.
Contacts
Add and manage contacts You can open Contacts on the home screen (or open Phone and go to the Contacts interface) and add, share, or delete contacts.
######## Manually create contacts
On the Contacts screen, tap , go to the New contact interface, enter name, phone
number, and other information, and tap to save.
Merge duplicate contacts
On the Contacts interface, go to > Settings > Organize contacts > Merge duplicate contacts, select the duplicate contacts, and tap Merge.
Search contacts You can search contacts in the following ways:
| | |---|
You can also enter multiple keywords at once for a more precise search, such as "John Beijing".

Share contacts 1 On the Contacts interface, long press the contacts to be shared, and tap Share contact.
Or tap the contacts to be shared, tap More > Share contact
.
2 Select a method to share and follow the on-screen instructions.
Delete contacts You can delete (or bulk delete) contacts in the following ways: On the Contacts interface,
| | |---|
To restore contacts deleted by accident, open the Contacts interface, go to > Settings > Organize contacts > Recently deleted, long press to select the contacts to restore, and tap Restore.
Manage contact groups You can manage a large number of contacts by grouping them according to your preference, making it easier to send group emails or messages. The system automatically groups contacts by company, city, and the most recent of contact. You can also create groups of your own.
Create groups
Edit groups On the Contacts interface, select Groups, and enter the group you want to edit.
Delete groups On the Contacts interface, go to Groups. You can delete phone groups in any of the following ways:
####### Delete contact history
Phone
####### Make a Call
Dial a Number or Select a Contact to Make a Call Use either of the following methods to make a call:
Touch to end the call.
Use Speed Dial Once you've set up speed dialing for a contact, you can quickly call that contact with the assigned number key.
Go to Phone > > Settings > Speed dial, select a number key, then set a contact for this speed dial number.
Press the Power Button to End a Call During a call, press the Power button to end the call.
######## Go to Phone > > Settings > More, and enable Power button ends call.
Set a Call Background To set a wallpaper as the call background, do the following:
Make an International Call
until the + icon is displayed. Enter the country code and phone number, then touch to make an international call.
Manage Incoming Calls You can use the call waiting feature to answer incoming calls when you are already engaged in a previous call. If you cannot answer a call because your phone is faulty or the network signal is poor, you can also set call forwarding to forward calls to another number or device.
Answer or Reject an Incoming Call If you receive a call when the screen is unlocked:
Enable Call Waiting The Call waiting feature lets you answer an incoming call when a call is already in progress by placing the first call on hold. This feature requires the support of your carrier. For details, contact your carrier.
Go to Phone > > Settings and then go to More > Call waiting. If your phone has two SIM cards installed, configure the settings for SIM 1 and SIM 2 respectively. This feature may vary depending on your carrier.
| | |---|
######## Answer a New Incoming Call During a Call
Enable Call Forwarding After the Call forwarding feature is enabled, calls that meet your pre-set conditions will be automatically transferred to a specified phone number. This feature requires the support of your carrier. For details, contact your carrier.
| | |---|
If your phone has two SIM cards installed, configure the settings for SIM 1 and SIM 2 respectively. This feature may vary depending on your carrier.
######## Disable Call Forwarding
1 Open Phone, go to > Settings, and touch Call forwarding. 2 Select the forwarding mode and disable it.
Emergency SOS and Calls Use Emergency SOS If you are in an emergency situation, you can quickly and secretly send an SOS message or make an SOS call to your emergency contacts. 1 Go to Settings > Safety & emergency > Emergency SOS, and touch Emergency
contacts to add an emergency contact.
2 Enable Also send SOS message and Auto-SOS call, and set related permissions as
prompted. Once you have enabled the Emergency SOS feature and you are in an emergency situation, press the Power button five times in quick succession and your phone will automatically send a message with your current location to your emergency contacts. It will also automatically call your emergency contacts one by one and play a pre-recorded SOS message, then end the call automatically. If Auto-SOS call is disabled, after the message is sent, your phone will bring up the emergency call screen, from which you can quickly call an emergency service or one of your emergency contacts.
Make Emergency Calls In the event of an emergency, you can make emergency calls directly from the lock screen of your phone even if there is no signal.
| | |---|
The emergency call feature is subject to local regulations and individual mobile carriers. Network issues or other types of interference may lead to emergency calls not working.
Perform In-call Operations During a call, an in-call menu will be displayed.
Calendar
Use Events Events help you schedule activities in your daily and work life, such as attending company meetings, arranging social get-togethers, and making credit card repayments. You can add events and set reminders to help you arrange your schedule in advance.
######## Add Schedules
Import Meeting Reminders
Search for an Event
Delete Schedules You can delete schedules using either of the following methods:
• On the Calendar screen, tap the schedule you want to delete, then tap > Delete.
• On the Schedule screen, tap and hold a schedule, then tap Delete event.
Important Events Add priority to events and differentiate important events with a priority to highlight important events, focus on important matters, and handle them efficiently.
######## Add Important Events
Enable Calendar, tap , and tap Priority to set the event as Important in the interface of details. Enter details such as title, location, start and end time of the event, etc. and tap
to save them.
Set a Calendar Notification Set the calendar notification type according to your requirements. You can set status bar notifications, banner notifications, and ringtone notifications. After setting the default reminder time, your phone will send a notification at the specified time.
Go to Calendar > > Settings.
Customize Calendar View Settings You can customize calendar view settings, such as by specifying the start day of the week, and whether to show week numbers.
1 Go to Calendar > > Settings. 2 Select the start day of the week, or enable the switch to show week numbers.
Set Alternate Calendars You can switch to other calendars, such as the Chinese lunar calendar or the Islamic calendar.
Go to Calendar > > Settings > Alternate calendars, and select a calendar you want to use.
Clock
Set Alarms You can set alarms to play a sound or vibrate at specific times.
######## Add an alarm
Modify or Delete an Alarm Touch an existing alarm to modify or delete it.
Snooze an Alarm If you don't want to get up when an alarm rings, simply touch the snooze button or press the Power button. The snooze length is set when creating the alarm.
Turn Off an Alarm When an alarm rings, swipe left or right on the button that appears at the bottom of the screen to turn it off.
Use the Timer or Stopwatch You can use the timer to count down from a specified time. You can also use the stopwatch to measure the duration of an event.
######## Timer
Go to Clock > Timer, set the duration of time, and touch to start the timer. To stop it,
touch .
Stopwatch Go to Clock > Stopwatch, and touch to start the stopwatch. To stop it, touch . Display Dual Clocks on the Lock Screen When you are away from your home time zone, use Dual clocks to display the time of both your home city and current location on the lock screen. Go to Settings > System & updates > Date & time, enable Dual clocks, and set a Home city. The time of your home city and current location will now both display on the lock screen.
| | |---|
Only one clock will display on the lock screen if your current location is in the same time zone as your home city.
Notepad
Create a Note To help you quickly keep a track of your thoughts and inspirations, you can create notes using the Handwrite (to write or draw content) and Scan document modes.
Create Note
Scan Document by Camera and Create Note
Global Favorites Swipe down with three fingers to quickly save useful knowledge to Notes. You can check and edit them at any time.
Save Web Pages to Notes Swipe down with three fingers to save web pages to Notes with ads being filtered automatically. You can check and edit the page even if the original URL is invalid.
| | |---|
Create To-dos You can create to-dos to keep a track of day-to-day essentials, such as daily shopping lists, tasks at work, and household chores.
Add a To-dos Item Record things you plan to do in your To-dos and set reminders to complete your To-dos at specific times . If you have marked the to-do item as important, you will be prompted to complete your to-do with a full-screen reminder when the screen is locked.
| |
|---|
This feature may vary by device.
Set Repeated Reminders for a To-do Item If you specify a time for a to-do item, you can select a repeat mode for it (for example, Never, Every day, Every week, Every month, or Every year), and your phone will repeatedly prompt you to complete the to-do item at the specified time.
Old Notes Transfer You can migrate your notes in the Notes from your old phone to your new phone through different ways such as HONOR ID sync, Device Clone, data backup, HONOR Share, etc.
Notes Format Conversion After migrating notes from the old phone to a new phone, if the name in the old phone is Notes, no format conversion is required. If the note name in the old phone is Notepad (old format), the new phone only supports viewing but it can be edited after conversion to the new format. Open Notes > Notes, tap the menu on the right side of All notes, and view Old notes format.
• Convert all: Open Old format notes > CONVERT ALL > CONVERT, and after conversion
Old format notes will disappear.
• Convert one by one: When opening an old-format note for the first time, there will be an
instruction of Convert this note, and you can tap CONVERT. If you don’t convert the format after seeing the instruction, the note that you open only supports Delete and Convert format, not editing. You can edit it only after format conversion.
Manage Notes You can categorize your notes into different folders, delete unwanted items, and share your notes with others. When viewing notes, tap the status bar at the top of the screen to quickly return to the first item or the beginning of the item you are viewing.
Set Password for Notes Lock Notes: Go to Settings > Security > App Lock, follow the on-screen instructions to enter your lock screen password or customize the app lock password, and turn on the switch next to your notes.
Sort Notes Items by Category To sort the notes into different folders by category, you can add labels in different colors to distinguish the categories and edit the folders to make your notes more clearly categorized and easy to find. View all notes:
######## Create/Edit folders:

| | |---|
Notes in the folder under the Exchange account are not supported for editing.
Share Notes You can share notes in a variety of ways:
record to be shared, and tap to complete the sharing following the on-screen instructions. You can share your notes in Notes in such methods as As image, As text, Export as document, or To another device, etc.
| |
|---|
You can export files in TXT or HTML format when Export as document, and they are saved inFiles > Phone > Documents > NotePad by default.
shared, check the notes to be shared, and tap to complete the sharing following the on-screen instructions.
######## Print Notes
Delete Notes You can delete notes using either of the following methods:


select multiple records to be deleted, and tap . If you want to restore the notes that have been deleted by mistake, tap All notes or All to-
dos, select the record you want to keep in the Recently deleted folder, and tap .
Add Email Accounts Add your email account in Email to start using your phone for convenient email access.
######## Add a Personal Email Account
Add an Exchange Account Microsoft Exchange enables digital messaging within a company. If your company mailbox uses the Exchange server, you can log in to your company email account on your phone.
Calculator
Calculator Use the calculator on your phone to perform basic mathematical calculations and for calculating exponential, logarithmic, and trigonometric functions.
Use the Basic Calculator You can open the calculator using either of the following methods:
to open the calculator.
######## Use the Scientific Calculator
Open the calculator and go to > Scientific.
######## Copy, Delete, or Clear Numbers
to complete the calculation.
Flashlight
Flashlight You can turn on the flashlight using either of the following methods:
touch to turn the flashlight on or off. When turned on, a notification indicating that the flashlight has been turned on will be
displayed on the lock screen. Touch to turn off the flashlight.
Compass
compass The compass displays the orientation of the phone and the latitude and longitude of its current position.
• Swipe down from the middle of the home screen to open the search box, enter
Compass, The top search result is the system's own Compass.
• Open Compass in the Tools folder.
To obtain more accurate orientation information, please try to keep the compass horizontal or vertical to the ground without angular deviation.
Mirror
Use Your Phone as a Mirror You can use your phone as a mirror to check how you look. Go to Tools > Mirror. You can then:
resume. When the image is paused, tap to save the image. You can find the saved image in Gallery.
App Twin
Enable App Twin Log in to two WhatsApp or Facebook accounts at the same time to separate work from personal life.
| | |---|
Only certain apps support App Twin. If the phone has added multiple users, App Twin is only available for the device owner.
Go to Settings > Apps > App Twin and toggle on the switch of an app. The twin of that app will be displayed on the home screen.
System Manager
Clear Phone Storage The Cleanup of System Manager will scan the Storage for redundant files and large files, such as application residues, redundant installation packages, data generated by WeChat, etc., and provide cleaning suggestions to help you free up space.
1 Go to System Manager and tap Cleanup. 2 When the scan is completed, tap CLEAN UP or Clean up behind the item to be cleaned
and follow the instructions to delete redundant files.
| | |---|
Swipe down from the top of the screen and the phone will rescan the Storage.
Clean Up Duplicate Files System Manager can identify duplicate files on your phone. On the Cleanup screen, touch Duplicate files, then select unwanted files to delete them.
Manage Data Usage Open System Manager , then touch Data usage to view data usage and manage network access.
Device Clone
Use Device Clone to Move Data to Your New Device Device Clone lets you quickly and seamlessly move all the basic data (including contacts, calendar, images, and videos) from your old phone to your new phone.
######## Migrate Data from a Device
| | |---|
Device Clone is only available on phones running Android 7.0 or later, iOS 8.0 or later.
Tips
Tips Tips has a selection of tips and tricks to help you quickly learn how to use your phone. It also provides a full version of the user manual for easy reference at any time. Tips Section introduction:
Tips Main functions:
| | |---|
Settings
Wi-Fi
Introduction to Wi-Fi Connecting to the Internet over Wi-Fi is an effective way to save mobile data. You can also enable Wi-Fi security monitoring to avoid risky hotspots and ensure safe Internet access.
Access Wi-Fi Network Please be cautious when accessing free Wi-Fi in public places to avoid potential safety hazards such as privacy leakage and property loss.
| | |---|
Enter PIN to connect to Wi-Fi network
When the status bar displays , it indicates that the phone is accessing the Internet through Wi-Fi. Connect via scanning QR code
| | |---|
Some encrypted networks may not support connection by code scanning. Please refer to the actual situation.
####### Transfer Data Using Wi-Fi Direct
You can use Wi-Fi Direct to transfer data between HONOR devices. Wi-Fi Direct allows you to transfer large files to a nearby device more quickly than Bluetooth and without having to pair the devices.
| | |---|
These steps may be different if you are sharing files directly from an app.
Select a Network Using Wi-Fi+ When Wi-Fi+ is enabled, if your phone detects a Wi-Fi network that it has previously connected to or is free, it will automatically enable Wi-Fi and connect to the network. Your phone will also evaluate the quality of the current Wi-Fi network and switch between Wi-Fi and mobile data for the best network connection.
Bluetooth
Phone Bluetooth basic You can connect your phone to Bluetooth earbuds, speakers, car entertainment systems, or share data from your phone to other devices via Bluetooth. We will introduce the following Bluetooth functions of your phone: ① turn on or turn off Bluetooth; ② edit Bluetooth device's name; ③ pair Bluetooth devices; ④ transfer files via Bluetooth; ⑤ unpair devices. The effective distance of Bluetooth is 10 meters. Please use Bluetooth functions within the effective range.
######## Turning Bluetooth on or off
######## Change the name of the Bluetooth device
Transfer Files via Bluetooth You can use Bluetooth to transfer videos, pictures, contacts, and more to another device provided that both devices are within the effective Bluetooth range.
, and select Bluetooth.
| | |---|
Operations may vary if you are sharing files from apps directly.
Unpair a Bluetooth Device 1 On the Bluetooth settings screen, enable the Bluetooth switch. 2 In the list of Paired devices, touch next to the name of the device you wish to
unpair, then touch Unpair.
Mobile Network
Connect to Mobile Data 1 Make sure that mobile data is available on your SIM card. 2 Connect to mobile data using either of the following methods:
To save battery power and mobile data, disable the mobile data service when you don't need it.
Enable 5G
| | |---|
Manage SIM Cards You can enable or disable SIM cards and name them for easier identification.
Enable or Disable a SIM Card Go to Settings > Mobile network > SIM management, and enable or disable a SIM as needed. Once disabled, a SIM card cannot be used for calling, messaging, or accessing the Internet.
Name Your SIM Card You can name your SIM cards for easier identification and management. For example, you could mark one SIM card as "Work" and the other as "Personal".
Go to Settings > Mobile network > SIM management, and touch to edit the SIM card name.
Share Your Network Connection with Other Devices Once Personal hotspot has been enabled, you can share your mobile data or the Wi-Fi network your phone is currently connected to with other devices.
######## Share Your Network via Personal Hotspot
| | |---|
Some Wi-Fi networks that require authentication cannot be shared. Go to Settings > Mobile network > Personal hotspot, and enable Personal hotspot. The mobile data or Wi-Fi network connection of your phone will then be shared with other devices. You can also perform the following for the personal hotspot:
Share Your Network via Bluetooth
Share Your Network via USB 1 Use a USB cable to connect your phone to your computer. 2 On your phone, go to Settings > Mobile network > Personal hotspot > More, and
enable USB tethering to share your mobile data or the currently connected Wi-Fi network.
Enable or Disable Airplane Mode When taking a plane, you can turn on the Airplane mode according to the requirements of the airline. In the Airplane mode, calling, messaging, or using mobile data on your phone will be banned, but other functions can work normally. You can enable or disable Airplane mode using any of the following methods:
After you turn on the Airplane mode for the first time, Wi-Fi and Bluetooth on your phone will be turned off automatically. If allowed by the airline, you can manually turn on or off Wi-Fi and Bluetooth on your phone, and your phone will keep this setting when you enabled Airplane mode next time.
Manage Data Usage Open System Manager , then touch Data usage to view data usage and manage network access.
More Connections
Introduction to NFC Near Field Communication (NFC) is a short-range wireless communications technology that allows mobile and other electronic devices to connect in countless ways, allowing you to transfer data and make mobile payments easily.
| | |---|
Enable or Disable NFC You can enable or disable NFC as follows:
Make Payments with NFC If you have installed a payment app (such as Wallet) on your phone and enabled the payment service, you can make payments with NFC.
1 Open NFC and go to NFC, then select Default app . 2 Enable NFC payments in the payment app. 3 Hold the NFC sensor (located near the rear camera) of your phone against a POS
terminal to bring up the payment screen automatically. Complete the payment with a password or fingerprint.
| | |---|
This feature may vary by product. There may be situations where payment is completed directly after approaching a POS terminal.
Project Your Phone Screen Wirelessly For security reasons, after projecting your phone screen wirelessly to a large display (such as a TV) for work or entertainment, notifications such as incoming call notifications, SMS messages, and clock alarms will only be displayed on your phone.
it. Ensure that the wireless HDMI adapter is connected to a power supply. To check whether the large display supports Miracast and how to enable wireless projection on it, consult the user guide or customer service of the large display manufacturer.
| | |---|
After the connection is set up, you can place your phone in landscape mode for a better display. Alternatively, swipe down from the top middle or left of the screen to open the Notification Center, and touch Disconnect.
HONOR Share HONOR Share is a wireless sharing technology that allows you to quickly transfer images, videos, documents, and other types of files between devices. This technology uses Bluetooth to discover nearby devices that supports HONOR Share and Wi-Fi Direct to transfer files without using mobile data.
Enable or Disable HONOR Share You can enable or disable HONOR Share in either of the following ways:
Share Files Between Phones with HONOR Share You can use HONOR Share to quickly share files between HONOR phones. The recipient can preview the files before they are sent, then view the full content of the files once they have been received.
| | |---|
Share Files Between Your Phone and Computer with HONOR Share You can use HONOR Share to easily share files wirelessly between your phone and a computer. View and edit phone files on your PC without the need for a data cable, or send files from your PC to your phone. From your phone to PC:
######## From your PC to phone:
| | |---|
Only supports HONOR notebooks with PC Manager Version 15.0 and above. This feature may vary by product, please refer to the actual situation.
One-Touch Printing with HONOR Share When a printer that supports HONOR Share is nearby, you can use HONOR Share to find the printer and print out pictures or PDF files stored on your phone.
| | |---|
For a list of supported printers, touch Help on the HONOR Share sharing screen, select Printers, then touch What printers are supported?.
Home Screen & Wallpaper
####### Set Your Wallpaper
Use a Preset Wallpaper
Show Date and Time When the Screen Is Off With Always On Display enabled, the lock screen will show the date, time, and more when the screen is off.
Enable Always On Display 1 Go to Settings > Home screen & wallpaper > Always On Display, and enable Always
On Display.
2 Set Display mode as prompted.
Enable Animated Always On Display Add personalized pictures or animations while your screen is off to make your phone vivid and interesting.
Go to Always On Display. In Images, select a picture or animation you like and tap APPLY. When you turn on face unlock, the phone may be unlocked when you try to turn on the screen, which causes you to miss the Always On Display. Please avoid having your face directly in front of the phone.
| | |---|
Select GIF images or animated photos You can display a local image (such as a GIF image or animated photo) when the screen is off to make the Always On Display vivid and interesting.
Add your artist's signature You can add different font, colors, and decorative stickers to personalize the Always On Display.
Create an Artistic Image for Always On Display You can choose from multiple modern art styles (such as the Mondrian style). You can also specify the color scheme for the artistic image, by taking a photo or choosing from your favorite photos. The colors in the photo will form a color palette for the artistic image.
Clock Styles You can select an Analog or Digital clock style for Always On Display.
Manage the Home Screen Layout You can customize the home screen layout to suit your phone usage habits.
Rearrange icons on the home screen Touch and hold an icon until it enlarges, then drag it to the desired position on the home screen.
Keep Home Screen Icons Aligned Pinch two fingers together on the home screen to access Home screen settings mode, then enable Auto-align. With this feature enabled, empty spaces will automatically be filled when apps are removed.
Lock Home Screen Icon Positions Pinch two fingers together on the home screen to access Home screen settings mode, then enable Lock layout.
Select the Home Screen Layout Pattern Pinch two fingers together on the home screen, go to Home screen settings > Layout, then select a layout pattern you prefer.
Display and Brightness
####### Adjust Font
######## Adjust Font Style
| | |---|
Adjust Font Size and Boldness Go to Settings > Display & brightness > Text size & boldness and you can adjust the following by dragging the controller:
Adjust Display Size Go to Settings > Display & brightness > Display size, and you can adjust the size of pictures or other elements on the screen by dragging the controller:
Automatically Adjust the Screen Brightness Go to Settings > Display & brightness, and enable Automatic. Your phone will automatically adjust the screen brightness according to the ambient lighting conditions.
Manually Adjust Screen Brightness You can manually adjust the screen brightness by either of the following methods:
drag the slider to adjust the screen brightness in the area.
in the area.
Use Eye Comfort Mode Eye comfort mode can effectively reduce harmful blue light and adjust the screen to display warmer colors, relieving eye fatigue and protecting your eyesight.
| |
|---|
######## Enable or Disable Eye Comfort Mode
######## Enable all day.
Once Eye comfort mode is enabled, will be displayed in the status bar, and the screen will take on a yellow tint since less blue light is being emitted.
Set a Schedule for Eye Comfort Mode Go to Settings > Display & brightness > Eye Comfort & Sleep, enable Scheduled, then set Start and End according to your preferences.
Dark mode Soften screen brightness to bring you an immersive visual experience, and can turn on and off automatically with sunset and sunrise, saving power and trouble.
Enable Dark Mode Enable the Dark mode of the screen background to protect your eyes by reducing the brightness and irritation. You can enable or disable Dark mode using any of the following methods:
• Swipe down from the top right of the screen to open the Control Center, turn on or off
Dark mode. Touch and hold it to enter the Dark mode setting page.
######## • Go to Settings > Display & brightness, tap Dark to enter Dark mode, and tap Light to quit Dark mode.
Set Dark Mode to Turn On and Off Automatically Go to Settings > Display & brightness, turn on Auto-switch, and tap Schedule. If From sunset to sunrise is selected, the system will determine the time of night based on your geographic location and clock. You can also tap Custom time to set the automatic switching time of the “Dark mode” according to the usage habit.
Apply E-book Mode After E-book mode is enabled, your phone screen will become black and white to reduce your eye fatigue. You can enable or disable the mode using any of the following methods:
######### • Swipe down from the top right of the screen to open the Control Center. Turn on or off

eBook mode (If there is no eBook mode quick switch showed on the panel, tap > Edit shortcut switch, and you can find eBook mode switch on the panel below).
######## • Go to Settings > Display & brightness and toggle on or off eBook mode.
| | |---|
####### Screen resolution adjustment
Smart screen resolution adjustment Go to Settings > Display & brightness > Screen resolution and turn on Smart Resolution. The system will adjust the screen resolution up or down according to the apps being run.
Manually adjust the screen resolution Go to Settings > Display & brightness > Screen resolution and turn off Smart Resolution. Then manually adjust the screen resolution. The higher the resolution, the sharper the display, but the screen uses more power.
Adjust Screen Refresh Rate Go to Settings > Display & brightness > Screen refresh rate, and select the refresh rate based on your needs:
How to enable Video Enhancer When you enable Video Enhancer, the system will automatically optimize the color and contrast when you play the video in full-screen, which makes the picture more vivid. Go to Settings > Display & brightness > Video enhancer, turn on or off the Video enhancer switch.
| | |---|
In the list of SUPPORTED APPS, you can view the apps supporting this function.
####### Full Screen Display
######## Apply Full Screen Display
Set the display area at the top of the screen 1 Go to Settings > Display & brightness > More display settings > Display Cutout. 2 To set the top area for a specific app, select the app and set how the top area is
displayed.
Sounds
####### Adjust Sound Settings
Press a Volume Button to Adjust the Volume Press the Volume up or down button to adjust the volume.
Switch Sound Mode Via Control Center 1 Swipe down from the top right of the screen to open the Control Center. 2 Tap Sound, Silent, or Vibration to switch between different sound modes. In the ring mode, the phone plays all sounds. In the silent mode, the phone mutes ringtones of calls, messages, notifications, and some third-party app reminders. Alarms, communication, music, video, and games are not affected. In the vibration mode, the phone is muted and vibrates instead, which can prevent you from missing important calls or messages. You can also go to Settings > Sounds & vibration to switch between Sound, Vibration, and Silent. Set the Default Volume
Go to Settings > Sounds & vibration, and you can then set the volume for the following items:
Press the Power Button to Mute Your Device When It Rings When your phone rings for an incoming call or alarm, you can press the Power button to mute it.
Flip to mute When you receive a call, flip the phone to mute it. Before using this feature, go to Settings > Accessibility features > Shortcuts & gestures > Mute ringtone/Reduce volume and make sure Flip to mute ringtone is turned on.
Pick up the phone to lower the volume When you receive a call, pick up the phone to reduce the ring. Before using this feature, go to Settings > Accessibility features > Shortcuts & gestures > Mute ringtone/Reduce volume and make sure Raise to reduce volume is turned on.
Change Ringtone and Vibration You can change the ringtone for messages, notifications, and calls, and customize vibration.
System Haptics The system uses haptics to provide feedback when certain operations are completed, such as when you touch and hold text, a contact, or some other elements on the screen. Go to Settings > Sounds & vibration > More settings and enable or disable System haptics according to your preferences.
Set up More settings Go to Settings > Sounds & vibration > More settings and explore more ways to alert. Such as Screen lock, Screenshot.
Enable or disable Do Not Disturb You can enable or disable Do Not Disturb using any of the the following methods:
When Do Not Disturb is enabled, a moon icon appears on the status bar. Open the Notification Center by swiping down from the top middle or left of the screen to view Do
Not Disturb notifications. Swipe the notification to the left and tap to set a delayed reminder. When there are incoming calls, notifications, and messages, the phone will not be turned on and is muted.
Set a Schedule for Do Not Disturb
Answer calls or messages in the Do Not Disturb mode You can allow calls or messages from certain people in the Do Not Disturb mode. Go to Settings > Sounds & vibration > Do Not Disturb and turn on Do Not Disturb or Scheduled. Then you can:
Notifications
App Badges When new notifications arrive for an app, a numbered badge will appear on the app icon. You can also set a dot as the badge, or hide the badge for some or all apps.
Turn Off App Badges
Change the Badge Display Mode On the App icon badges screen, touch Badge display mode, and select Numbers or Dots according to your preference.
####### Disable App Notifications
Turn off Notifications of Some Apps If you don’t want notifications from some apps, you can turn them off by any of the following methods:
Center, and then tap > DISABLE NOTIFICATIONS.
| | |---|
This feature is unavailable in some apps.
Disable Notifications from Apps in Batches To disable notifications from multiple apps at a time, go to Settings > Notifications > Manage all, and turn off the switch next to each app.
Hide Content of Notifications on the Lock Screen Stop the content of notifications from being seen by others by hiding it from the lock screen. Go to Settings > Notifications, and enable Hide notification content on lock screen.
####### More App Notification Settings
Set Notification Method for Apps Go to Settings > Notifications. Select an app to set the notification method for the app.
| |
|---|
The notification method supported by each app may be different.
Notifications Turn on Screen Go to Settings > Notifications > More notification settings, and enable Wake screen for notifications. Your phone will then automatically turn on the lock screen when it receives a notification.
Show Notification Icons in the Status Bar Go to Settings > Notifications > More notification settings, and enable Show notification icons in the status bar.
Biometrics & Password
Use fingerprint ID You can use your fingerprint ID to unlock the screen, automatically enter account numbers and passwords, or access private information such as the App Lock.
######## Enroll a Fingerprint
######## Add in-screen fingerprint ID
Rename or Delete a Fingerprint 1 Go to Settings > Biometrics & password > Fingerprint ID and enter your lock screen
password.
2 In the Fingerprint list section, touch an enrolled fingerprint to rename or delete it.
Identify a Fingerprint Fingerprint identification allows you to match your fingers with the enrolled fingerprints.
Use Your Fingerprint to Access Your Safe 1 Go to Settings > Biometrics & password > Fingerprint ID and enter your lock screen
password.
2 Turn on the switch for Access Safe and follow the onscreen instructions to link your
fingerprint with the Safe. Now you can go to Files > Browse, touch Safe, then use your fingerprint to access it. Face Recognition
Face Recognition allows you to unlock your phone or access locked apps with your facial data.
Enroll Facial Data
| | |---|
The settings items vary by device. If your phone does not provide a specific item, it indicates that the corresponding feature is not supported.
Set an Alternate Look You can add an alternate look for more accurate and convenient face recognition. On the Face Recognition screen, touch Set an alternate look, and follow the onscreen instructions to enroll the alternate facial data.
Enable Face Unlock On the Face Recognition screen, touch Unlock device, and select an unlock method.
| | |---|
If you have enabled PrivateSpace on or added multiple users to your phone , you can use Face unlock only in MainSpace or with the Owner account.
Access App Lock with Face Recognition On the Face Recognition screen, enable Access App Lock, and follow the onscreen instructions to add your facial data to App Lock. You can then touch a locked app on your home screen and use face recognition to access the app.
Smart Lock Screen Notifications On lock screen, the details of banner notifications from WeChat, QQ and Weibo will be automatically hid and only be shown after your face is recognized. This helps avoid message leakage and protect privacy when others use the device or when you are surrounded by others. 1 Go to Settings > Biometrics & password > Face Recognition, fill in the lock screen
password to enter Face Recognition, and toggle on the Show notifications.
2 Tap Unlock device and select unlock method of Slide to unlock. To delete facial data, toggle off Show notifications. After ensuring that the lock screen password has been enrolled, refer to "Hide Content of Notifications on the Lock Screen" Chapter to hide the lock screen notification details.
| | |---|
Disable or Delete Facial Data On the Face Recognition screen, you can do the following:
App
Enable App Twin Log in to two WhatsApp or Facebook accounts at the same time to separate work from personal life.
| | |---|
Only certain apps support App Twin. If the phone has added multiple users, App Twin is only available for the device owner.
Go to Settings > Apps > App Twin and toggle on the switch of an app. The twin of that app will be displayed on the home screen.
View or Change App Settings Go to Settings > Apps > Apps and touch an app. You can force stop it, uninstall it, view and change the app permissions, set notification modes, and more.
| | |---|
Some apps cannot be uninstalled.
Battery
Power Management On the Battery screen, you can check the estimated battery time remaining, and enable a power saving mode to extend the battery life of your phone.
Enable Power Saving Mode If Power Saving mode is enabled on your device and the battery level is higher than 10%, some functions will be disabled, background apps will be restricted, and visual effects will be weakened to reduce power consumption. When the battery level is lower than or equal to 10%, stricter power saving measures are taken to ensure the longest standby time. It is recommended that you enable Power Saving mode when the battery level is lower than or equal to 20%. To do so, go to Settings > Battery (or System Manager > Battery), and enable Power
Saving mode . A icon will then be displayed in the status bar. You can touch > Learn more to view details about power saving measures. Enable Performance Mode Performance mode adjusts the power settings of your phone to deliver maximum performance. This will cause the battery to drain more quickly, especially when graphicintensive apps are used. When the battery has sufficient power, go to Settings > Battery (or System Manager > Battery) and enable Performance mode. A icon will then be displayed in the status bar.
| | |---|
Performance mode is available on selected devices only. If the Performance mode option is not displayed in Battery , it indicates that your device does not support the feature.
Enable Smart Charge Smart Charge learns from your charging habits and manages the charging process intelligently. This feature reduces the battery wear level and prolongs the battery life by reducing the time your device spends fully charged. It is advised that you keep this feature enabled. For example, if you are used to charging your devices overnight or for an extended period of time, Smart Charge will pause the charging when the battery capacity reaches a certain level. Before you get up in the morning, Smart Charge will resume charging until your device is fully charged. This reduces the time your device spends fully charged to slow down battery wear and prolong the battery life.
| | |---|
Data about your charging habits will only be used on your device and will not be backed up or uploaded to the cloud.
######## To enable this feature, go to Settings > Battery > More battery settings, and enable Smart Charge.
Enable Smart Battery Capacity Smart Battery Capacity intelligently adjusts the maximum available battery capacity based on the current battery state to slow down battery wear and prolong the battery lifespan. It is advised that you keep this feature enabled. To enable this feature, go to Settings > Battery > More battery settings, and enable Smart Battery Capacity.
Battery Settings You can also set whether or not to display the battery percentage in the status bar, and whether to maintain a network connection when the phone screen is turned off.
Display Battery Percentage in the Status Bar Go to Settings > Battery (or System Manager > Battery), touch Battery percentage, and select whether the battery percentage will be displayed inside or next to the battery icon.
Stay Connected While Your Device Is Sleeping Keep your phone connected to the Internet when it sleeps to continue to receive messages or download data in sleep mode. Please note that this may increase power consumption. To do so, on the Battery screen, touch More battery settings, and enable Stay connected while asleep.
Storage
Check Storage Usage Go to Settings > Storage to check storage usage and optimize it when you feel necessary.
Clear Phone Storage The Cleanup of System Manager will scan the Storage for redundant files and large files, such as application residues, redundant installation packages, data generated by WeChat, etc., and provide cleaning suggestions to help you free up space.
1 Go to System Manager and tap Cleanup. 2 When the scan is completed, tap CLEAN UP or Clean up behind the item to be cleaned
and follow the instructions to delete redundant files.
| | |---|
Swipe down from the top of the screen and the phone will rescan the Storage.
Clean Up Duplicate Files System Manager can identify duplicate files on your phone. On the Cleanup screen, touch Duplicate files, then select unwanted files to delete them.
Security
####### Used Password Vault to automatically fill in your account number and password
Use Password Vault to save your account number and password for applications and fill them in automatically when logging in to the application. Account numbers and passwords are stored on the device through hardware encryption and are not accessed by Honor, nor are your data uploaded to the Internet or servers.
| | |---|
Autofill Usernames and Passwords
• If you want to store the username and password locally only, please tap SAVE ON
THE DEVICE ONLY in the pop-up.
• If you want to sync your username and password to other devices that are logged into your HONOR ID, go to Settings > Security > Password Vault, tap Sync Password Vault data, or tap SYNC TO OTHER DEVICES in the pop-up to store password.
Through Device Clone, the data in Password Vault can be transferred to HONORphone when changing a new device. You can quickly log in the new phone.
View or Delete Stored Usernames and Passwords You can view or delete the usernames and passwords stored in Password Vault at any time. Go to Settings > Security > Password Vault > ACCOUNTS to view or delete the stored usernames and passwords.
Disable Password Vault Go to Settings > Security > Password Vault, and disable Automatically save and fill in usernames and passwords.
Use App Lock to Protect Your Privacy You can lock apps containing private data, such as chat and payment apps, to prevent unauthorized access.
Enable App Lock Go to Settings > Security > App Lock > ENABLE, then follow the onscreen instructions to set the App Lock password and select the apps to lock. If you have enabled face or fingerprint unlock, you can link App Lock with a face ID or fingerprint ID as prompted.
| | |---|
This feature may vary by device.
Privacy
Use Location Services Some apps need to obtain your location information to provide better services. You can enable or disable location services, and grant or deny permissions to access location information for particular apps as required.
Enable or Disable Location Services You can enable or disable location services in either of the following ways:
disable .
After location services are disabled, your phone will prevent all apps and services from collecting and using location information, with the exception of some built-in apps. When these apps or services need to use location information, your phone will remind you to enable location services again.
Allow or Forbid Apps to Obtain Location Information You can allow or forbid an app to access location information, set to allow only while in use, allow all the time, or deny, and more.
Accessibility
Use a TalkBack App TalkBack apps are designed to assist visually impaired users to use a phone.
Enable Color Correction to Customize the Screen Color Color correction helps people with poor eyesight see the screen content more easily. 1 Go to Settings > Accessibility features > Accessibility > Color correction and enable
Color correction.
2 Touch Correction mode to select a color correction mode.
Magnification gestures You can zoom in on the screen using magnification gestures. Go to Settings > Accessibility features > Accessibility > Magnification, turn on the switch for Magnification. Quickly tap the screen three times with 1 finger, then:
Enable color inversion Color inversion is used to change colors of the text and background on the screen. When this feature is enabled, your phone will show white text on a black background. Go to Settings > Accessibility features > Accessibility, turn on the switch for Colour inversion.
Enable High Contrast Text This feature can deepen the font color and improve the contrast between text and background to assist visually impaired users. Go to Settings > Accessibility features > Accessibility, and enable High contrast text.
Enable accessibility features by shortcut You can enable an accessibility feature of your choice by the Volume key shortcut.
1 Go to Settings > Accessibility features > Accessibility > Accessibility shortcut. 2 Tap Select feature, choose the feature to be enabled by shortcut. 3 Enable Accessibility shortcut. Touch and hold the volume up and down keys at the
same time for 3 seconds to enable the accessibility feature.
Adjust Touch Response Time This feature allows you to adjust the screen response time when you touch and long press on the screen.
######## Go to Settings > Accessibility features > Accessibility > Touch settings, and adjust Tap duration and Long press duration as needed.
TalkBack TalkBack allows your phone to automatically read out what you touch, select, and open. Operating your phone is still possible when you can’t see the screen clearly.
TalkBack Go to Settings > Accessibility features > Accessibility > TalkBack, enable TalkBack, and tap OK.
Read Text in Images Read the text in images to help visually impaired users access information.
Adjust Speech Rate Go to Settings > Accessibility features > Accessibility > ScreenReader > More settings > Text-to-speech settings, and drag the slider of Speech rate. If ScreenReader has been enabled, you need to drag the slider with two fingers.
TalkBack Operations 1 When enabled, you can operate your phone in the following ways:
######## Add ScreenReader Watermark Go to Settings > Accessibility features > Accessibility > ScreenReader, and enable Show TalkBack watermark.
Disable TalkBack Press and hold the power button until Restart and Power off menu pops up on your phone. Long press on the screen with two fingers over three seconds to disable ScreenReader.
Set Scheduled Power On/Off Use the Scheduled power on/off feature to power your phone on and off at set times, to save power and prevent interruptions while resting. 1 Go to Settings > Accessibility features > Scheduled power on/off, and enable
######## Scheduled power on/off.

2 Set the power on and off times, as well as the repeat cycle. Your phone will power on
and off automatically at the specified times. To stop using this feature, disable Scheduled power on/off.
Set Multi-User
####### Add a User or Guest Account
A maximum of three user and one guest accounts can be added. Authorize a User or Guest Account to Make Calls You can set whether to allow a user or guest account to make calls or use other functions on your phone. 1 Access your phone as the administrator and go to Settings > Users & accounts >
######## USERS > Current user.
2 Touch the related account, and select the permissions you want to authorize.
Switch Between the Owner, User, and Guest You can switch to a different account using either of the following methods:
Delete a User or Guest Account Deleting a user or guest account will delete all its related data. Please exercise caution. After accessing your phone as the owner, use either of the following methods to delete a user or guest account:

System & Updates
####### Change system language and region
| | |---|
Set the System Date and Time Your phone is able to sync to the local date, time, and time zone over a mobile network. You can also manually set the date, time, and time zone for your phone. Go to Settings > System & updates > Date & time, then set the options according to your requirements.
######## Set the Date and Time Automatically or Manually
Change the Time Zone

Use Device Clone to Move Data to Your New Device Device Clone lets you quickly and seamlessly move all the basic data (including contacts, calendar, images, and videos) from your old phone to your new phone.
######## Migrate Data from a Device
| | |---|
Device Clone is only available on phones running Android 7.0 or later, iOS 8.0 or later.
####### Back Up with an External Storage Device
Back up data to USB storage devices When the phone is low on storage space, you should regularly back up large files or important data to a USB storage device (e.g., USB flash drive, card reader).
To reset the password, go to the USB storage backup screen, tap > Reset password, and follow on-screen instructions to complete the reset.

| | |---|
The reset password is valid only for subsequent backups, not for previous backups.
######## Recover backup data from USB storage devices
####### Restore Your Phone to Default Settings or Factory Settings
Reset Network Settings This operation will reset your Wi-Fi , mobile data network, and Bluetooth settings. It will not change any other settings on your phone or delete any data. Go to Settings > System & updates > Reset, touch Reset network settings, then follow the onscreen instructions to reset network settings.
Reset All Settings This will restore network settings, lock screen passwords and home screen layout. If the phone supports fingerprint or face recognition, it will also restore fingerprint and face IDs, but will not delete other types of data or files. Other settings, including , user account, device administrator and app settings will not be restored.
| | |---|
If you have set password and Fingerprint or Face ID in the app at the same time (such as Safe), the Fingerprint or Face ID will be deleted after restoring the settings, but the password will stay. Please backup the data in advance before restoring the settings.
If Stay in sync is enabled, and the Data Sync switch is turned on, the Wi-Fi setting data stored locally or on the cloud of the phone and other HONOR devices (logged in to the same HONOR ID) will be restored at the same time.
Go to Settings > System & updates > Reset, tap Reset all settings, and restore it based on the prompt.
Restore Factory Settings This operation will erase data on your phone, including your accounts, app data and system settings, installed apps, music, images, all files in the internal storage, security chip contents, and locally-stored system, app, and personal data related to HONOR IDs. Make sure to back up your data before restoring your phone to its factory settings. Go to Settings > System & updates > Reset > Reset phone, touch Reset phone , and follow the onscreen instructions to restore factory settings.
Enable or Exit Simple Mode Simple mode adopts a more concise layout for easy navigation, enlarges icons and fonts for the home screen, and maximizes the volume.
Enable Simple Mode Go to Settings > System & updates > Simple mode and touch ENABLE. Touch and hold any icon to drag it to the desired location or uninstall it if it is not a mandatory app.
Exit Simple mode Open Settings and touch Exit Simple mode.
Update Your Phone System Online When an update is available, your phone will prompt you to download and install the update package.
| | |---|
To disable automatic updates, touch > Device settings on the Software update screen, then disable Auto-download over Wi-Fi.
About Phone
####### Legal Notice Copyright © Honor Device Co., Ltd. 2023. All rights reserved.
This guide is for your reference only. The actual product, including but not limited to the colour, size, and screen layout, may vary. All statements, information, and recommendations in this guide do not constitute a warranty of any kind, express or implied.
Model: ALI-NX1 ALI-NX3
MagicOS 7.2_01