Ask AI
— answers from the official manualAnswers from the official manual.
Common questions
Common Questions
20 totalWhat are the minimum system requirements to install HP Click on a Windows computer?
HP Click requires Microsoft Windows 7 or later (64-bit only), an Intel Core i3 2.4 GHz processor with four virtual cores/threads, 4 GB of RAM, and 3.5 GB of free hard disk space plus 100 MB for each additional printer. A screen resolution of 1280 × 1024 pixels and an Ethernet network with IPv4 at 100 Mb/s or faster are also required. Performance can be improved by exceeding these minimum specifications. (Page 5)
How do I add a printer that is not automatically detected by HP Click?
You can add a printer manually by going to Preferences > Printers and clicking the Add button, then entering the printer's IP address or hostname. If adding by hostname fails with an 'unreachable' message, try adding the printer by IP address instead, as some computers cannot resolve hostnames. Note that only HP printers can be connected to this application. (Page 12)
Why is the Print button disabled and how do I fix it?
The Print button is disabled if no thumbnails are selected for printing, if there is no connection between the printer and computer, or if the printer is turned off. Ensure at least one thumbnail is selected, verify the printer is powered on, and confirm the network connection between the printer and computer is active. (Page 22)
How does the trial license for HP Click work and how do I install it?
A trial license allows you to use the software free for 60 days. To install it, open your web browser, enter the printer's IP address, navigate to the Embedded Web Server, click the Setup tab, then Firmware update, and follow the instructions to upload the downloaded trial license. HP Click will display how much trial license time remains in the Printers panel menu. (Page 10)
What does the yellow overlay in the print preview mean?
A yellow overlay in the preview indicates the part of the page that will be clipped and not printed because it exceeds the width of the loaded paper. To resolve this, ensure the printer has a roll loaded that is wide enough for the image, or use the Page options to reduce the size of the image so it fits on the roll. (Pages 17 and 22)
How does nesting work and how do I enable it?
Nesting saves paper and time by printing two or more pages closely aligned on the paper when the paper is wide enough. You can turn nesting on or off for each printer using the settings icon, and you can also set the gap distance between nested pages. Note that the application may automatically reorder or rotate pages when nesting is enabled to maximize paper savings. (Page 18)
Show 14 more questions
What should I do if HP Click says a printer has an incompatible firmware version?
Can I reprint a previously sent job, and how do I check the status of print jobs?
Does HP Click update automatically, and how can I manually get the latest version?
What are the minimum system requirements for HP Click Printing Software?
Which printers are supported by HP Click Printing Software?
How do I change language settings in HP Click Printing Software?
What are some common troubleshooting issues with HP Click Printing Software and their solutions?
How do I access the notification center in HP Click Software?
What file formats does HP Click Printing Software support?
How do I update the software to its latest version manually?
What should I do when a file fails due to unsupported format?
Is there a trial version available for HP Click Printing Software?
How can I add a printer manually to HP Click?
What file formats can I print using HP Click?
Full Manual
30 pages

HP Click Printing Software User Guide

Edition 14 © Copyright 2015–2021 HP Development Company, L.P. Legal notices The information contained herein is subject to change without notice. The only warranties for HP products and services are set forth in the express warranty statements accompanying such products and services. Nothing herein should be construed as constituting an additional warranty. HP shall not be liable for technical or editorial errors or omissions contained herein. Trademarks Microsoft® and Windows® are U.S. registered trademarks of Microsoft Corporation.
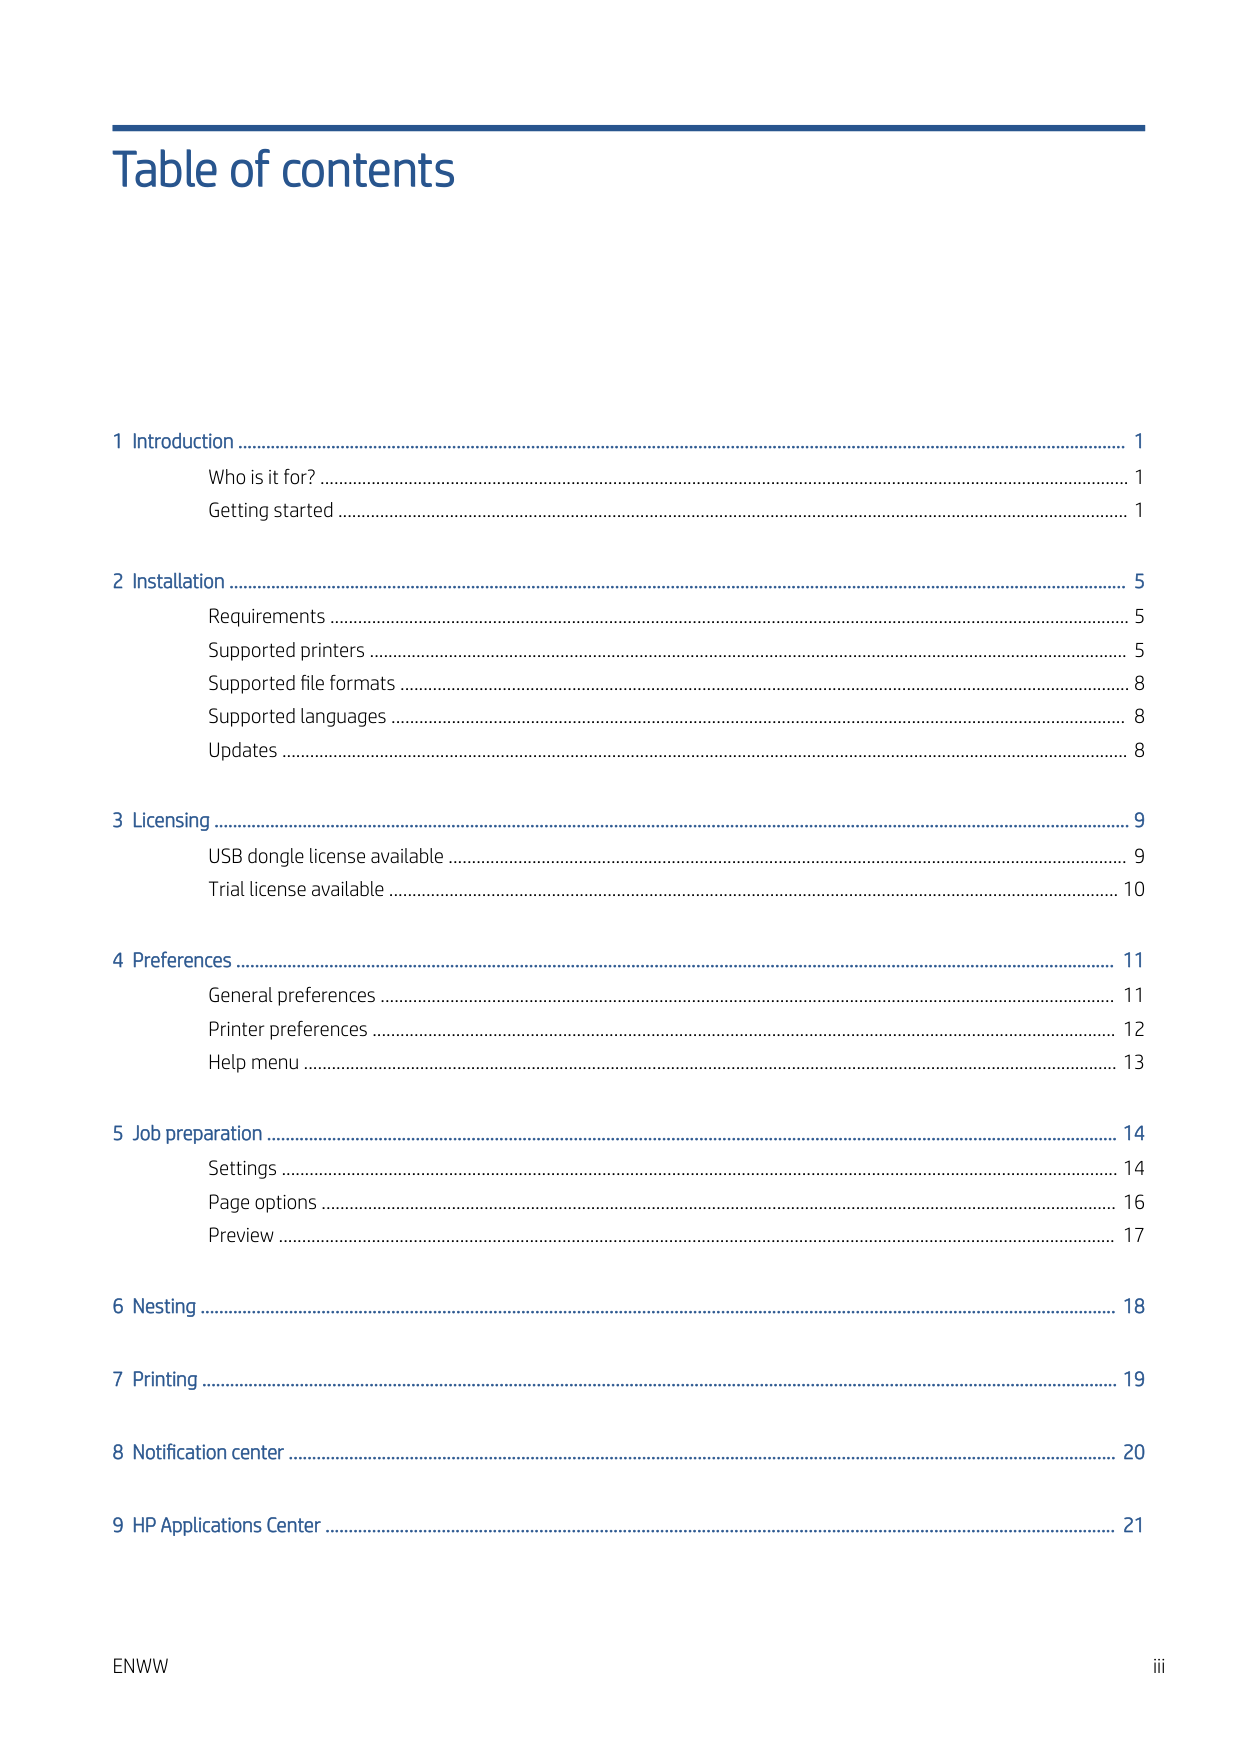
Table of contents 1 Introduction ............................................................................................................................................................................................... 1 Who is it for? .............................................................................................................................................................................. 1 Getting started .......................................................................................................................................................................... 1 2 Installation ................................................................................................................................................................................................. 5 Requirements ............................................................................................................................................................................ 5 Supported printers ................................................................................................................................................................... 5 Supported file formats ............................................................................................................................................................. 8 Supported languages .............................................................................................................................................................. 8 Updates ...................................................................................................................................................................................... 8 3 Licensing ..................................................................................................................................................................................................... 9 USB dongle license available .................................................................................................................................................. 9 Trial license available ............................................................................................................................................................. 10 4 Preferences ............................................................................................................................................................................................. 11 General preferences .............................................................................................................................................................. 11 Printer preferences ................................................................................................................................................................ 12 Help menu ............................................................................................................................................................................... 13 5 Job preparation ....................................................................................................................................................................................... 14 Settings .................................................................................................................................................................................... 14 Page options ........................................................................................................................................................................... 16 Preview .................................................................................................................................................................................... 17 6 Nesting ..................................................................................................................................................................................................... 18 7 Printing ..................................................................................................................................................................................................... 19 8 Notification center .................................................................................................................................................................................. 20 9 HP Applications Center .......................................................................................................................................................................... 21
Enww
iii
10 Troubleshooting ................................................................................................................................................................................... 22 Appendix A Shortcut keys ......................................................................................................................................................................... 23 Menus ....................................................................................................................................................................................... 23 Panels ...................................................................................................................................................................................... 23 Dialogs ..................................................................................................................................................................................... 24 Usage ....................................................................................................................................................................................... 24 Preview .................................................................................................................................................................................... 25 Index ............................................................................................................................................................................................................. 26 iv
Enww
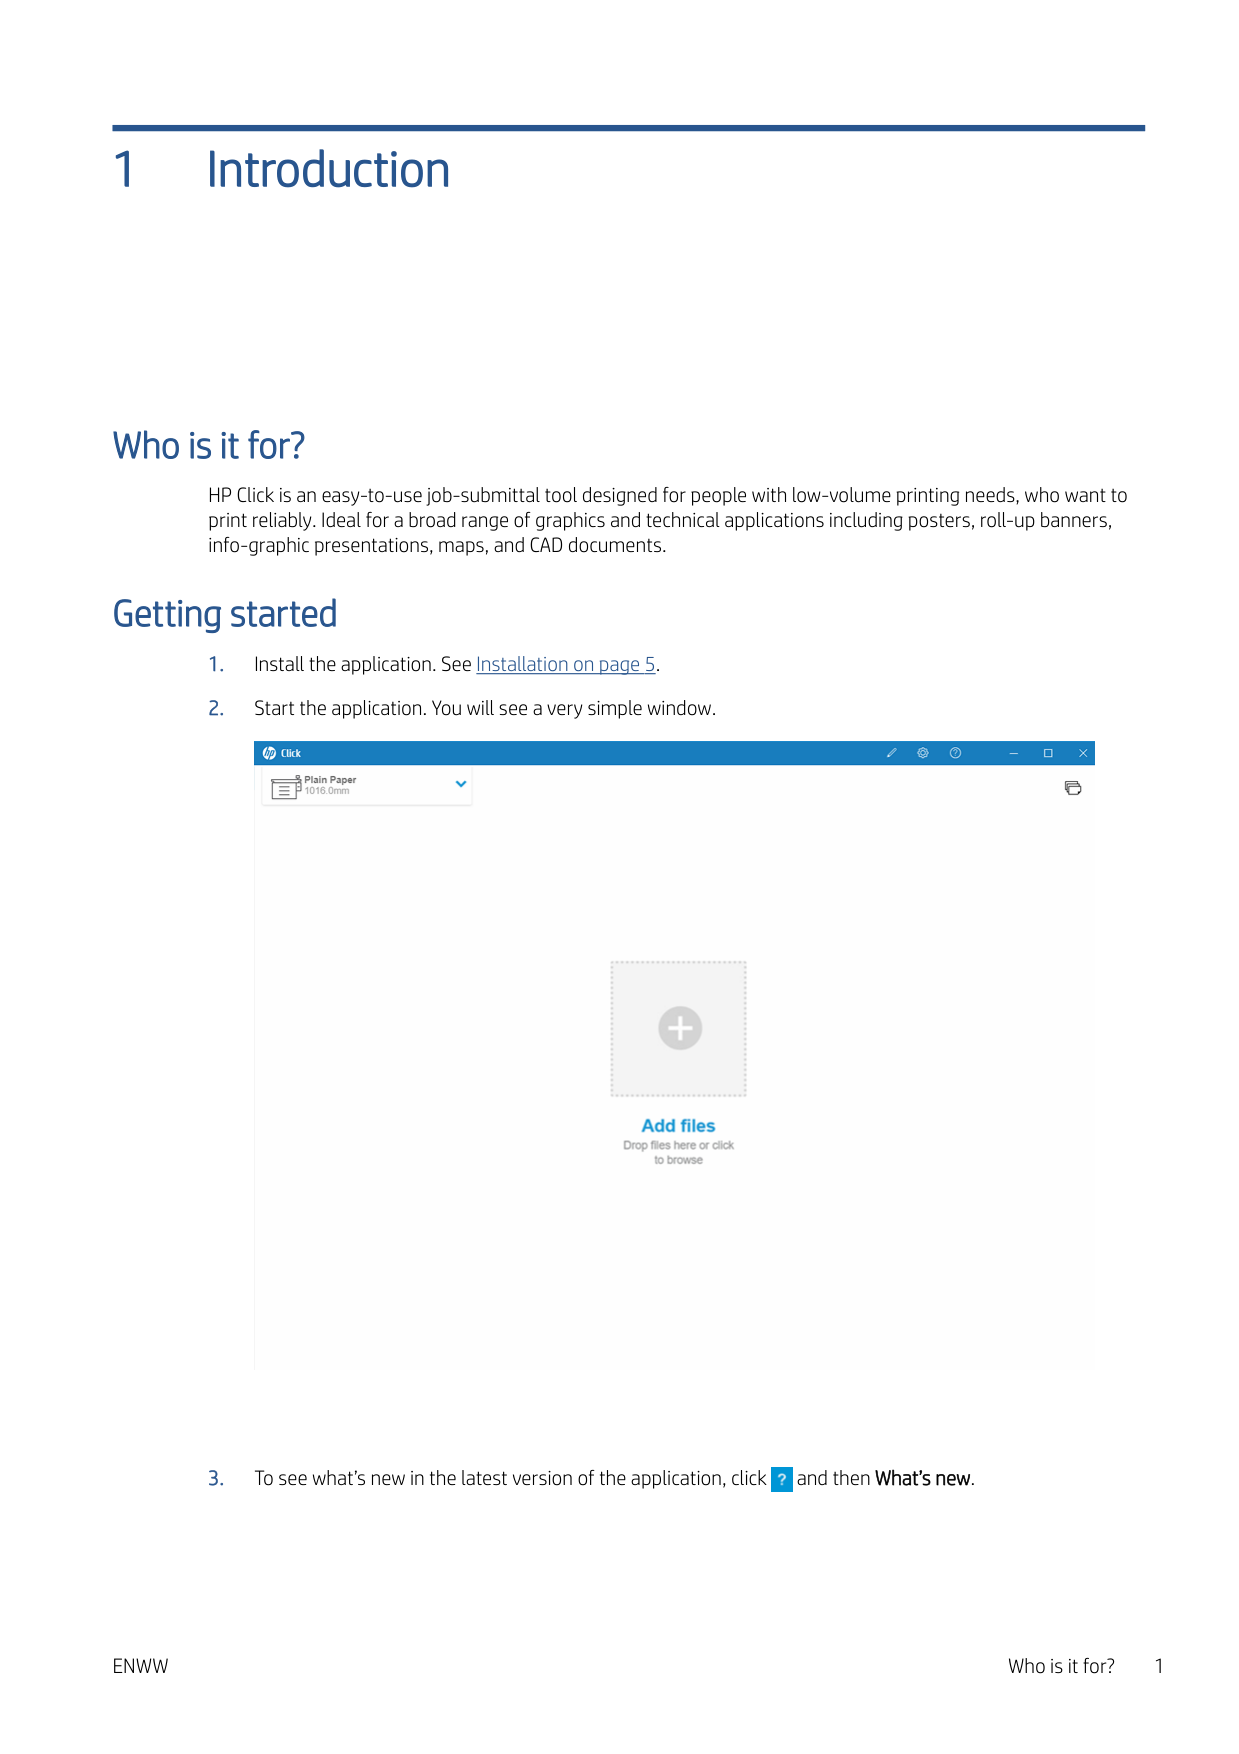
1 Introduction Who is it for? HP Click is an easy-to-use job-submittal tool designed for people with low-volume printing needs, who want to print reliably. Ideal for a broad range of graphics and technical applications including posters, roll-up banners, info-graphic presentations, maps, and CAD documents. Getting started
Enww
Who is it for? 1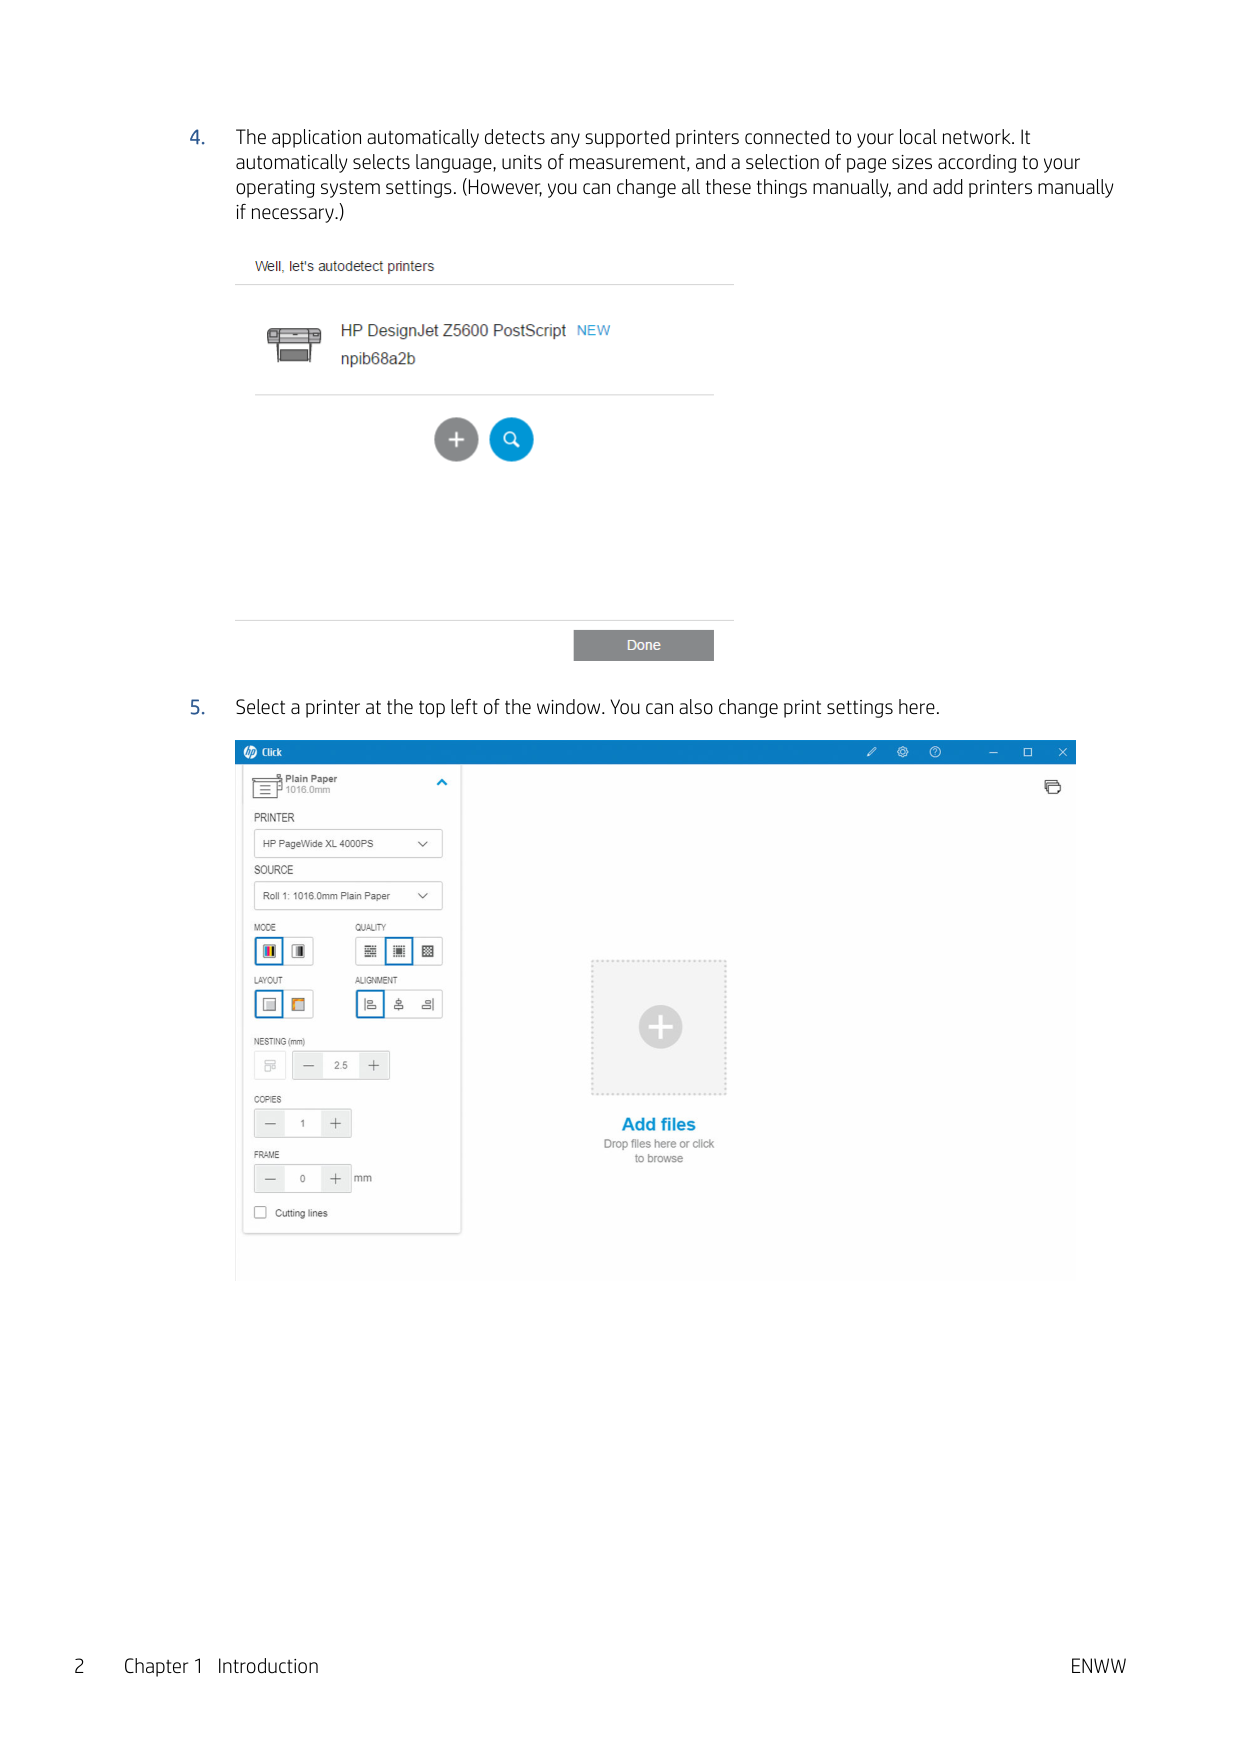
Enww
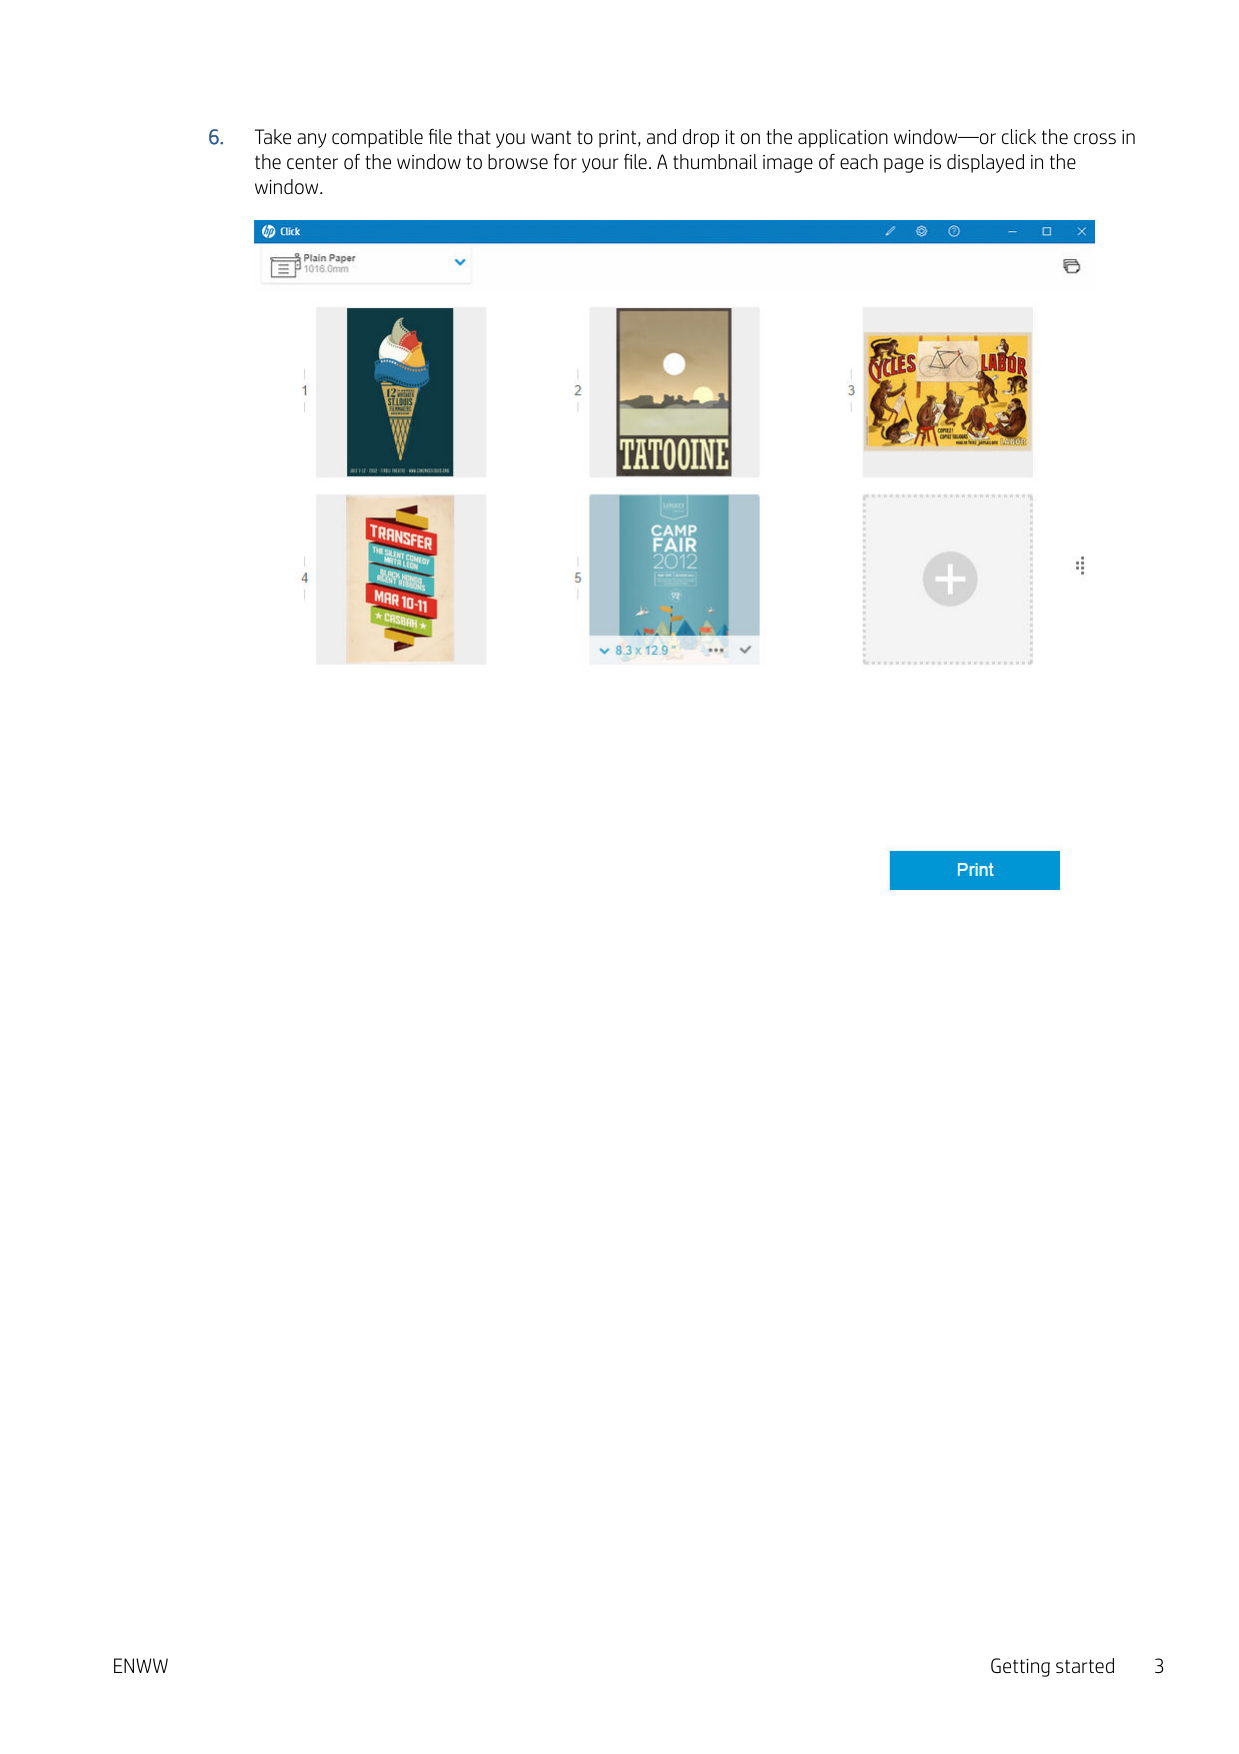
Enww
Getting started 3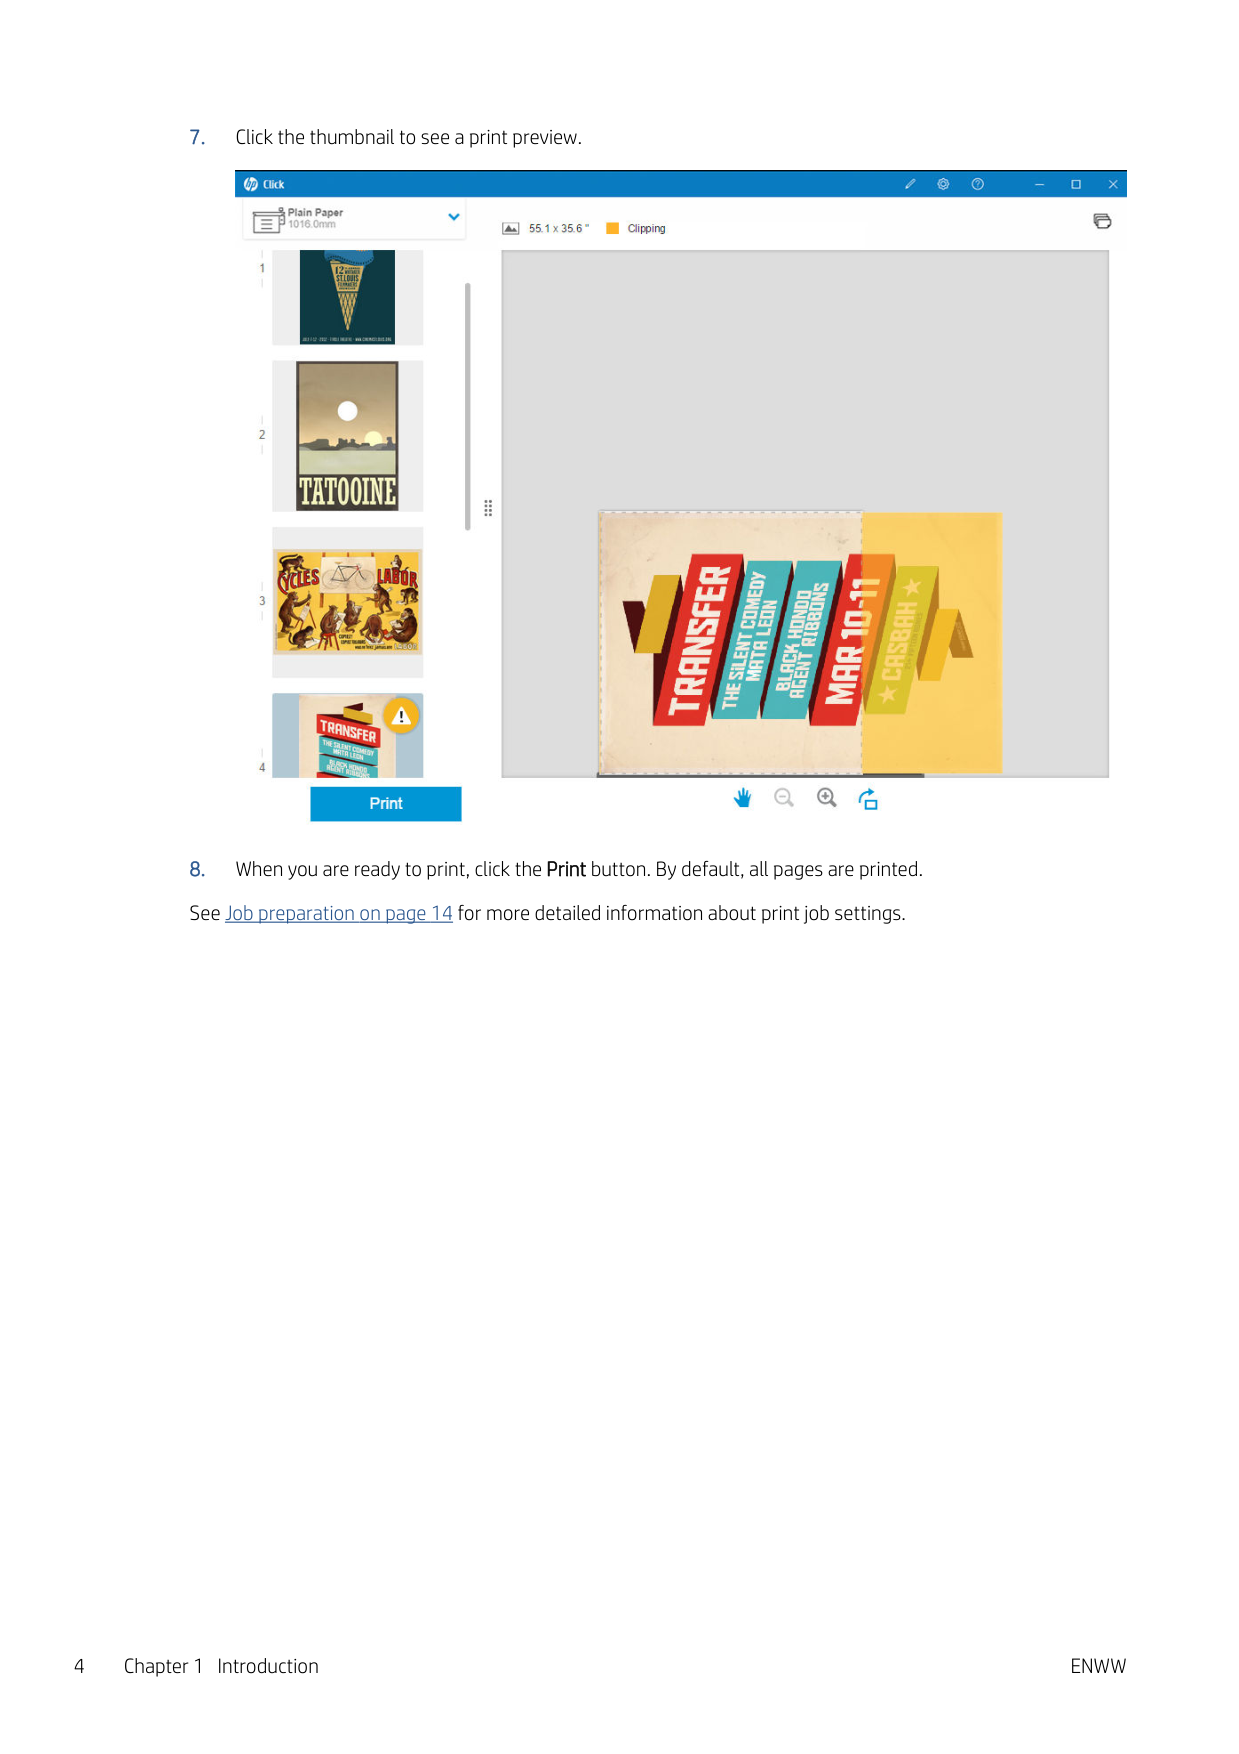
Enww
2 Installation Requirements Microsoft Windows 7 or later (64-bit only) ● Intel Core i3 2.4 GHz with four virtual cores/threads, or equivalent or better processor ● 4 GB of RAM, or more ● 3.5 GB of free space on hard disk, or more, plus 100 MB for each additional printer ● Screen resolution of 1280 × 1024 pixels, or more, tuned or calibrated to sRGB for optimal performance ● Ethernet network, IPv4, 100 Mb/s or faster Mac OS X 10.10 or later ● Intel Core i5 1.6GHz with dual core, or equivalent or better processor ● 4 GB of RAM, or more ● 3.5 GB of free space on hard disk, or more ● Screen resolution of 1280 × 1024 pixels, or more, tuned or calibrated to sRGB for optimal performance ● Ethernet network, IPv4, 100 Mb/s or faster Ensure that your computer is connected to the same subnet as your printers. Otherwise, ensure that computer and printers are able to communicate through the 8080, 8085, 8086, 9100, 9102 TCP, and 161 UDP ports. If you feel the need of improvement, the performance of the application can be improved by exceeding the minimum specifications above: more than 4GB of RAM (which requires a 64-bit operating system), a faster processor with more cores, a faster network, and a faster hard disk drive (ideally a solid-state drive). Supported printers HP Click currently supports the following printers: ● HP DesignJet D5800 Production Printer (60 in, available only in APJ) ● HP DesignJet Studio printer (24 and 36 in) ● HP DesignJet T100 printer (24 in) ● HP DesignJet T120 printer (24 in) ● HP DesignJet T125 printer (24 in) ● HP DesignJet T130 printer (24 in) ● HP DesignJet T210 printer (24 in)
Enww
Requirements 5
● HP DesignJet T230 printer (24 in) ● HP DesignJet T250 printer (24 in) ● HP DesignJet T520 printer (24 and 36 in) ● HP DesignJet T525 printer (24 and 36 in) ● HP DesignJet T530 printer (24 and 36 in) ● HP DesignJet T630 printer (24 and 36 in) ● HP DesignJet T650 printer (24 and 36 in) ● HP DesignJet T730 printer (36 in) ● HP DesignJet T790 printer (24 and 44 in, with and without PostScript) ● HP DesignJet T795 printer (44 in) ● HP DesignJet T830 MFP (24 and 36 in) ● HP DesignJet T920 printer (36 in, with and without PostScript) ● HP DesignJet T930 printer (36 in, with and without PostScript) ● HP DesignJet T940 Printer (36 in) * ● HP DesignJet T1300 printer (44 in, with and without PostScript) ● HP DesignJet T1500 printer (36 in, with and without PostScript) ● HP DesignJet T1530 printer (36 in, with and without PostScript) ● HP DesignJet T1600 and T1600dr printers (36 in, with and without PostScript) ● HP DesignJet T1700 and T1700dr printers (44 in, with and without PostScript) ● HP DesignJet T1708 and T1708dr printers (44 in, with and without PostScript) ● HP DesignJet T2300 MFP (44/36 in, with and without PostScript) ● HP DesignJet T2500 MFP (36 in, with and without PostScript) ● HP DesignJet T2530 MFP (36 in, with and without PostScript) ● HP DesignJet T2600 and T2600dr MFPs (36 in, with and without PostScript) ● HP DesignJet T3500 MFP (36 in, with and without PostScript) ● HP DesignJet T7100 printer (42 in, with and without PostScript) ● HP DesignJet T7200 printer (42 in, with and without PostScript) ● HP DesignJet Z6 (24 and 44 in, with PostScript) ● HP DesignJet Z6dr (44 in, with PostScript) ● HP DesignJet Z9+ (24 and 44 in, with PostScript) ● HP DesignJet Z9+dr (44 in, with PostScript) 6 Chapter 2 Installation
Enww
● HP DesignJet Z6 Pro 64-in Printers ● HP DesignJet Z9+ Pro 64-in Printers
● HP DesignJet Z3200 Photo printer (24 and 44 in, with and without PostScript) ● HP DesignJet Z5200 printer (44 in, with and without PostScript) ● HP DesignJet Z5400 printer (44 in, with and without PostScript) ● HP DesignJet Z5600 PostScript printer ● HP DesignJet Z6200 printer (42 and 60 in, with and without PostScript) ● HP DesignJet Z6600 printer (60 in, with and without PostScript) ● HP DesignJet Z6610 printer (60 in, with and without PostScript) ● HP DesignJet Z6800 printer (60 in, with and without PostScript) ● HP DesignJet Z6810 printer (42 and 60 in, with and without PostScript) ● HP DesignJet XL 3600 MFP (36 in, with PostScript) ● HP PageWide XL 3900/3920 MFP (40 in, PostScript only) ● HP PageWide XL 4000 printer and MFP (40 in, PostScript only) ● HP PageWide XL 4100 printer and MFP (40 in, PostScript only) ● HP PageWide XL 4200 printer and MFP (40 in, PostScript only) ● HP PageWide XL 4500 printer and MFP (40 in, PostScript only) ● HP PageWide XL 4600 printer and MFP (40 in, PostScript only) ● HP PageWide XL 4700 printer and MFP (40 in, PostScript only) ● HP PageWide XL 5000 printer and MFP (40 in, PostScript and AMS only) – HP Click license required for printer in AMS region. ● HP PageWide XL 5100 printer and MFP (40 in, PostScript and AMS only) – HP Click license required for printer in AMS region. ● HP PageWide XL 5200 printer and MFP (40 in, PostScript and AMS only) – HP Click license required for printer in AMS region. ● HP PageWide XL Pro 5200 printer and MFP (40 in, PostScript and AMS only) – HP Click license required for printer in AMS region.
Note:
HP Click supports only HP original ink supplies.Enww
Supported printers 7 ● HP DesignJet Z2100 Photo printer (24 and 44 in) ● HP DesignJet Z2600 PostScript printer
Supported file formats HP Click can print the following file formats: ●
Jpeg
●Hp-Gl/2
●Png
●Tiff
● DWF (Windows only) Supported languages HP Click can operate in English, Portuguese, Spanish, Catalan, French, Dutch, Italian, German, Polish, Russian, Chinese Simplified, Chinese Traditional, Korean, or Japanese. Updates HP Click is updated automatically to incorporate bug and security fixes, add new features or performance enhancements. If you want to make sure you´ve got the latest version of HP Click or want to manually download it, go to http://www.hp.com/go/hpclick/software. 8 Chapter 2 InstallationEnww
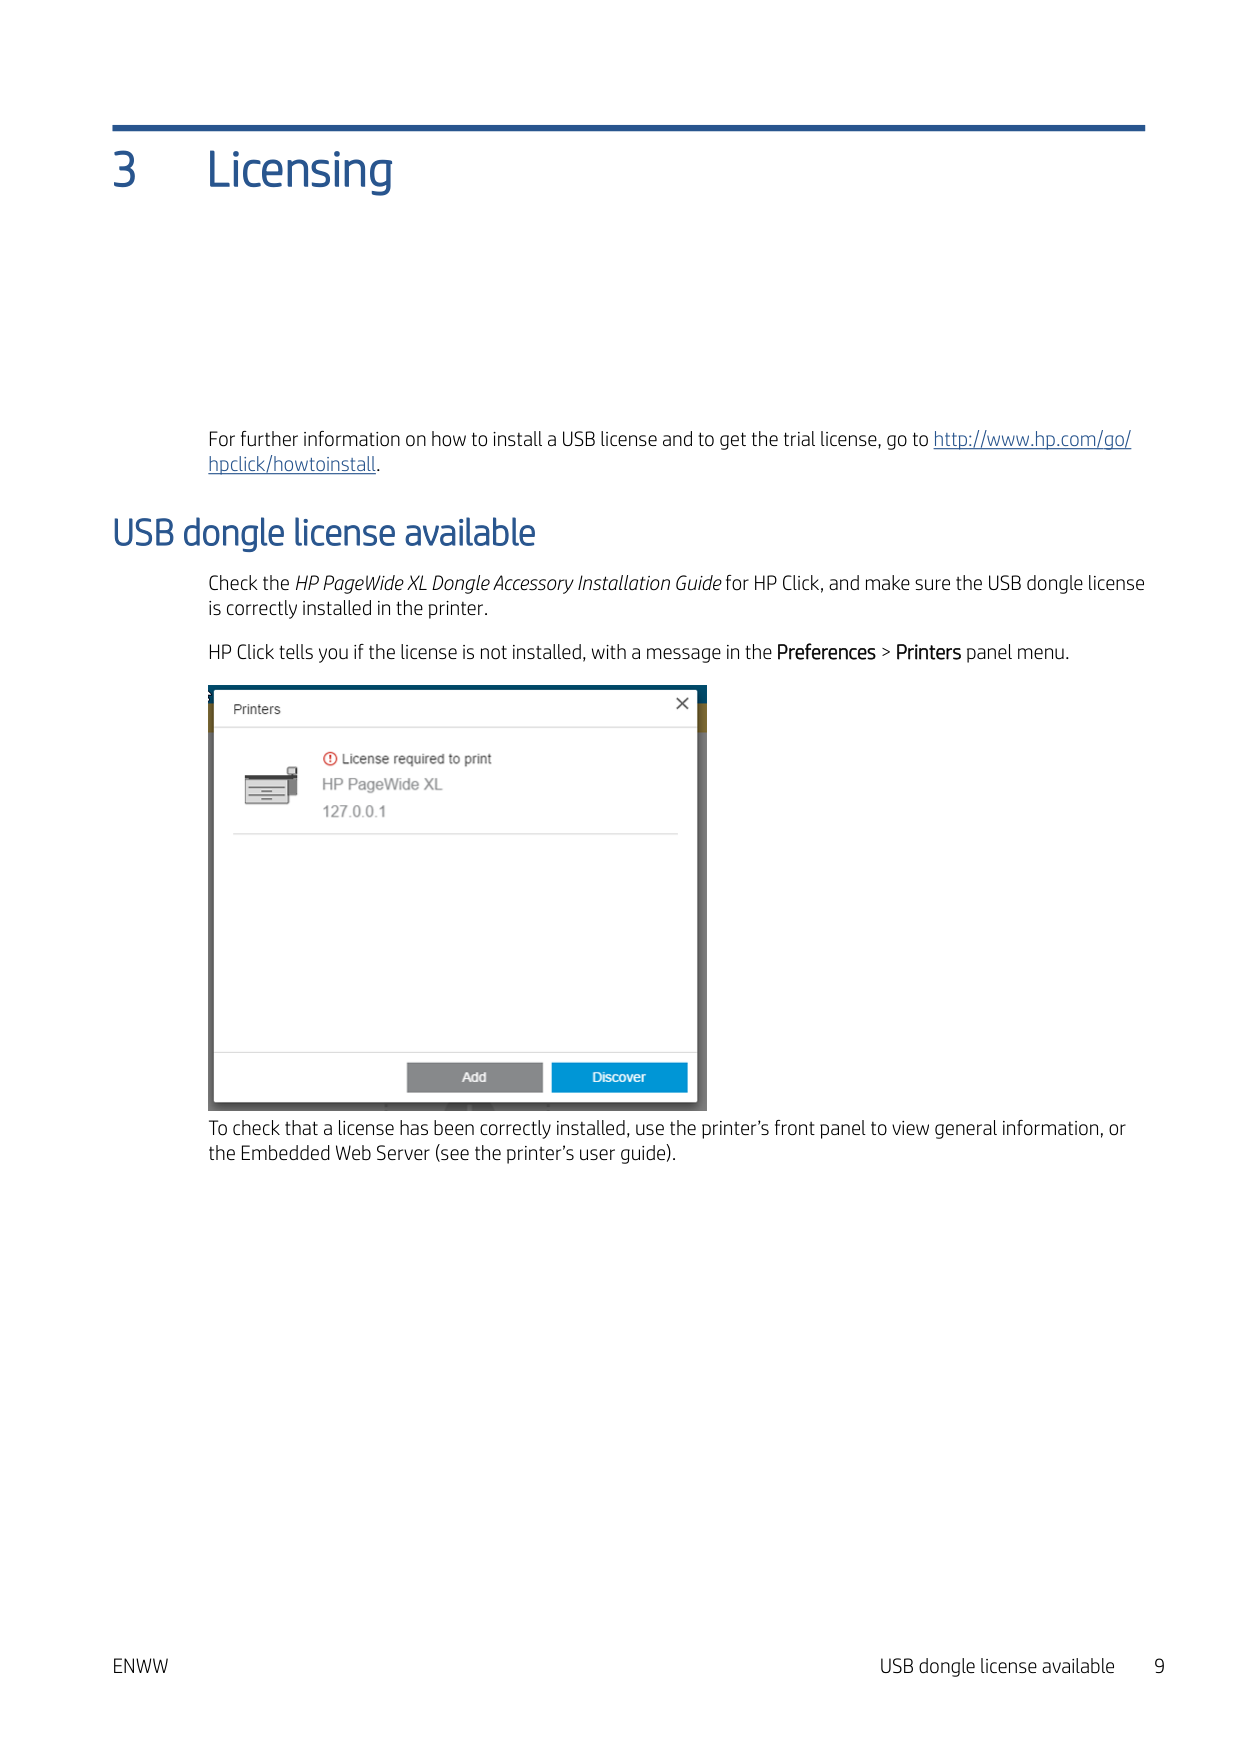
3 Licensing For further information on how to install a USB license and to get the trial license, go to http://www.hp.com/go/ hpclick/howtoinstall. USB dongle license available Check the HP PageWide XL Dongle Accessory Installation Guide for HP Click, and make sure the USB dongle license is correctly installed in the printer. HP Click tells you if the license is not installed, with a message in the Preferences > Printers panel menu. To check that a license has been correctly installed, use the printer’s front panel to view general information, or the Embedded Web Server (see the printer’s user guide).
Enww
USB dongle license available 9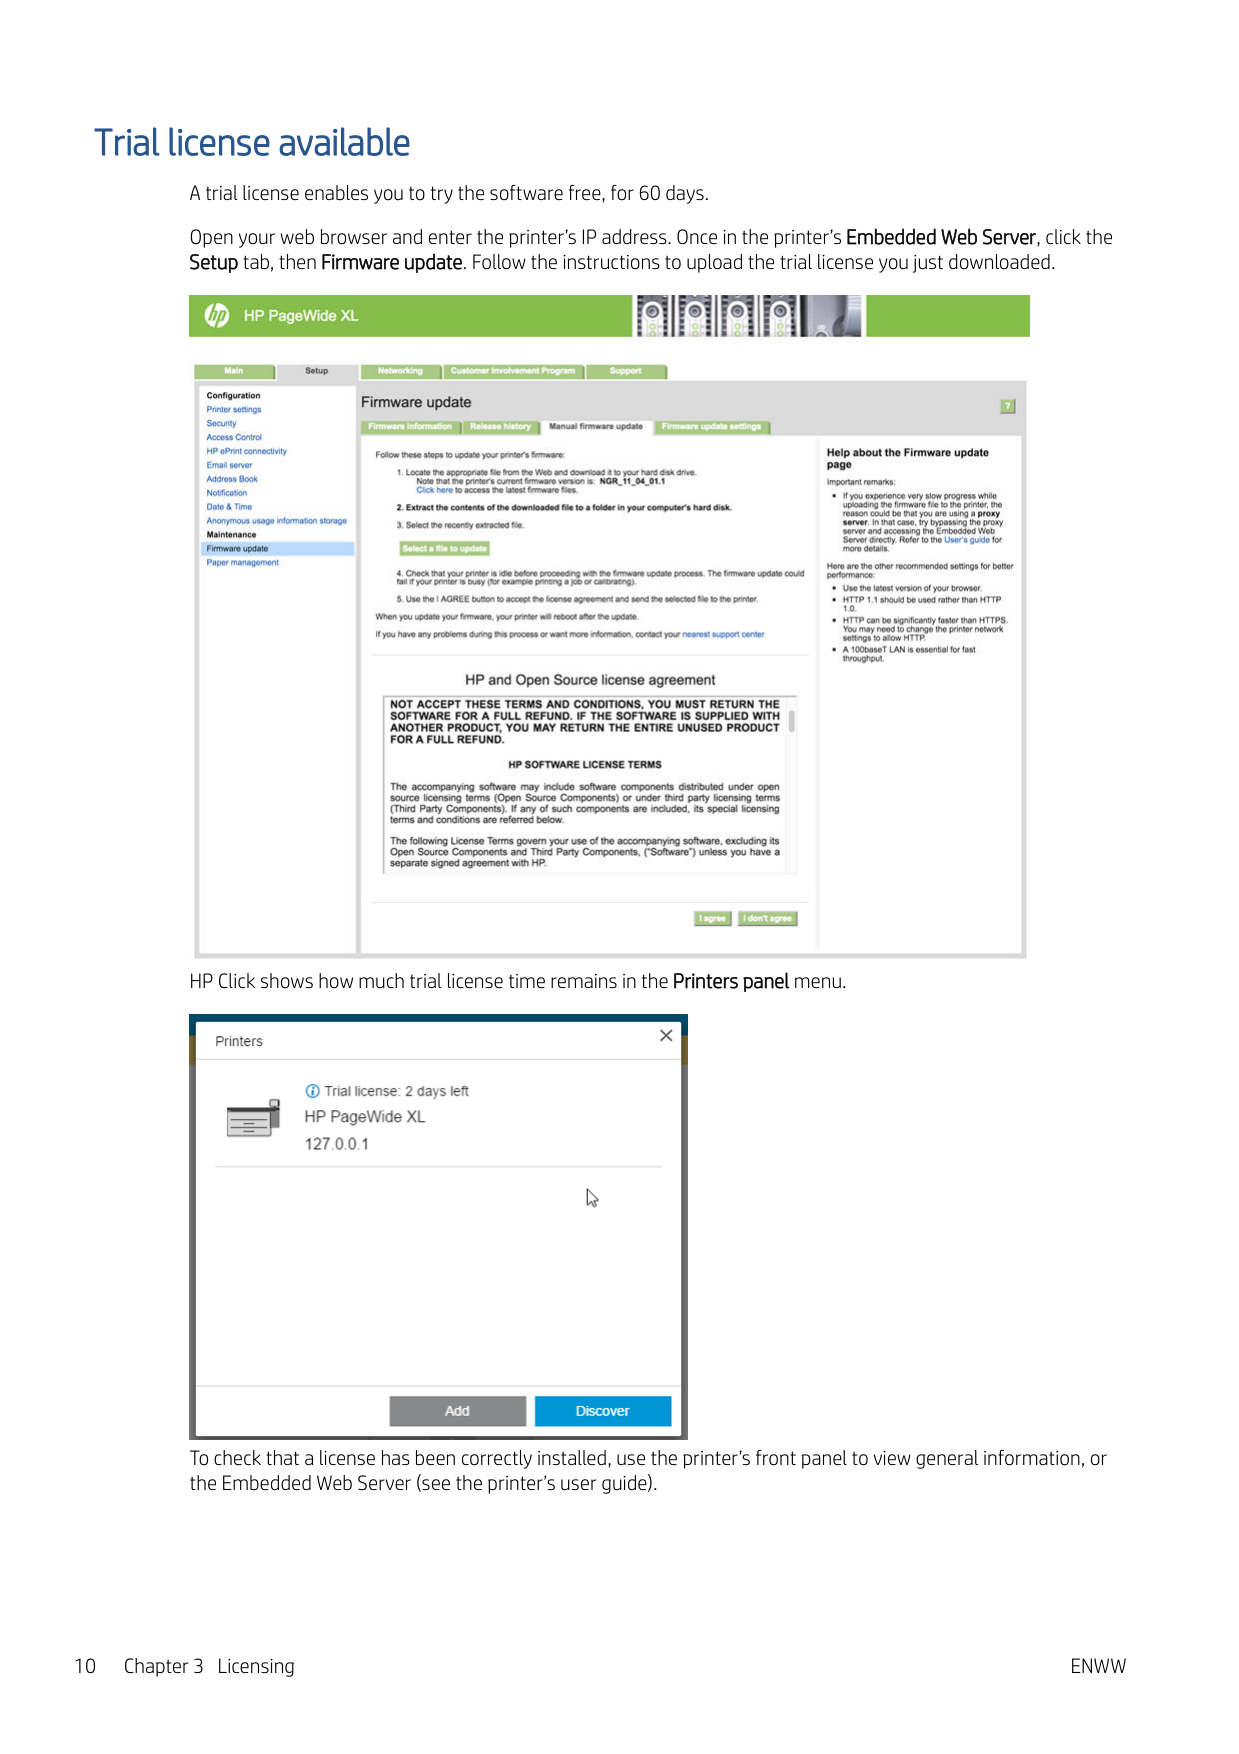
Trial license available A trial license enables you to try the software free, for 60 days. Open your web browser and enter the printer’s IP address. Once in the printer’s Embedded Web Server, click the Setup tab, then Firmware update. Follow the instructions to upload the trial license you just downloaded. HP Click shows how much trial license time remains in the Printers panel menu. To check that a license has been correctly installed, use the printer’s front panel to view general information, or the Embedded Web Server (see the printer’s user guide). 10 Chapter 3 Licensing
Enww
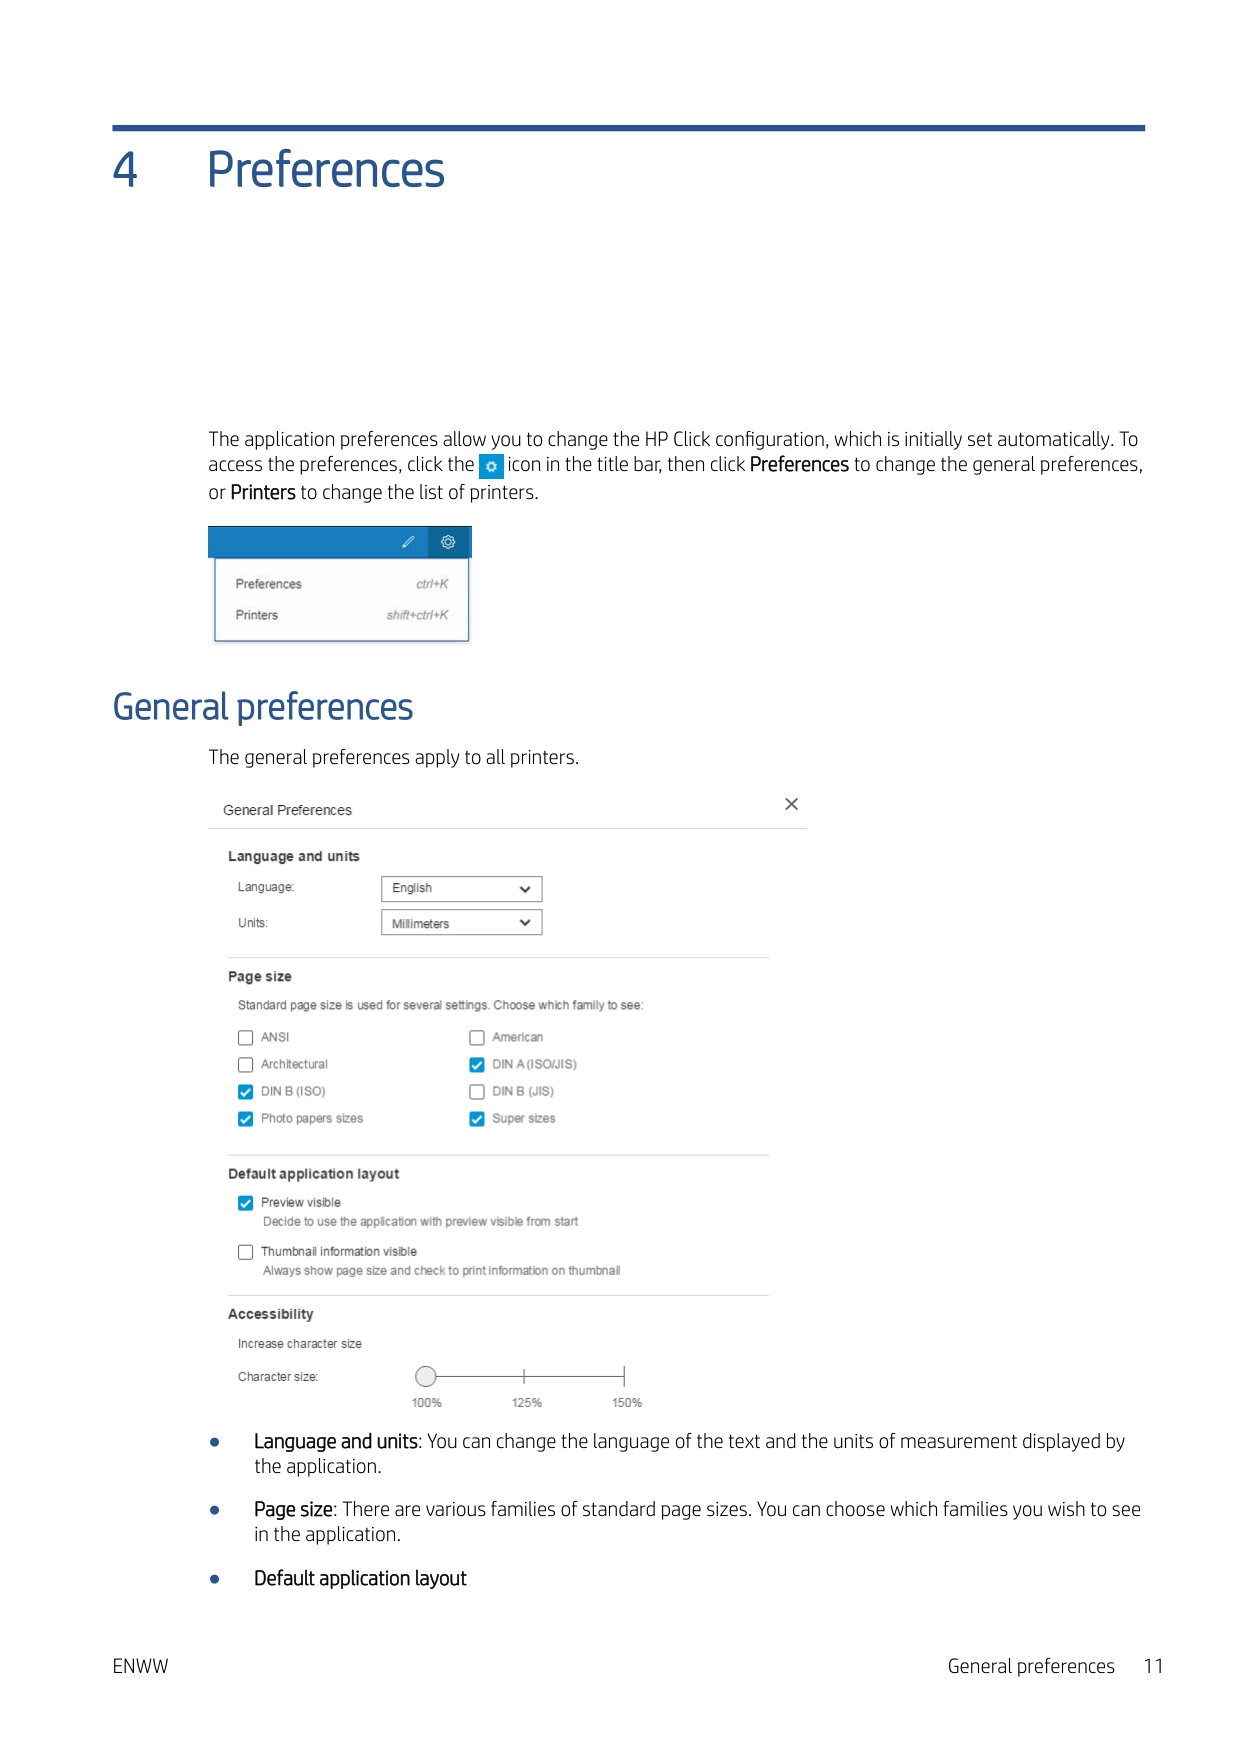
4 Preferences The application preferences allow you to change the HP Click configuration, which is initially set automatically. To access the preferences, click the icon in the title bar, then click Preferences to change the general preferences, or Printers to change the list of printers. General preferences The general preferences apply to all printers. ● Language and units: You can change the language of the text and the units of measurement displayed by the application. ● Page size: There are various families of standard page sizes. You can choose which families you wish to see in the application. ● Default application layout
Enww
General preferences 11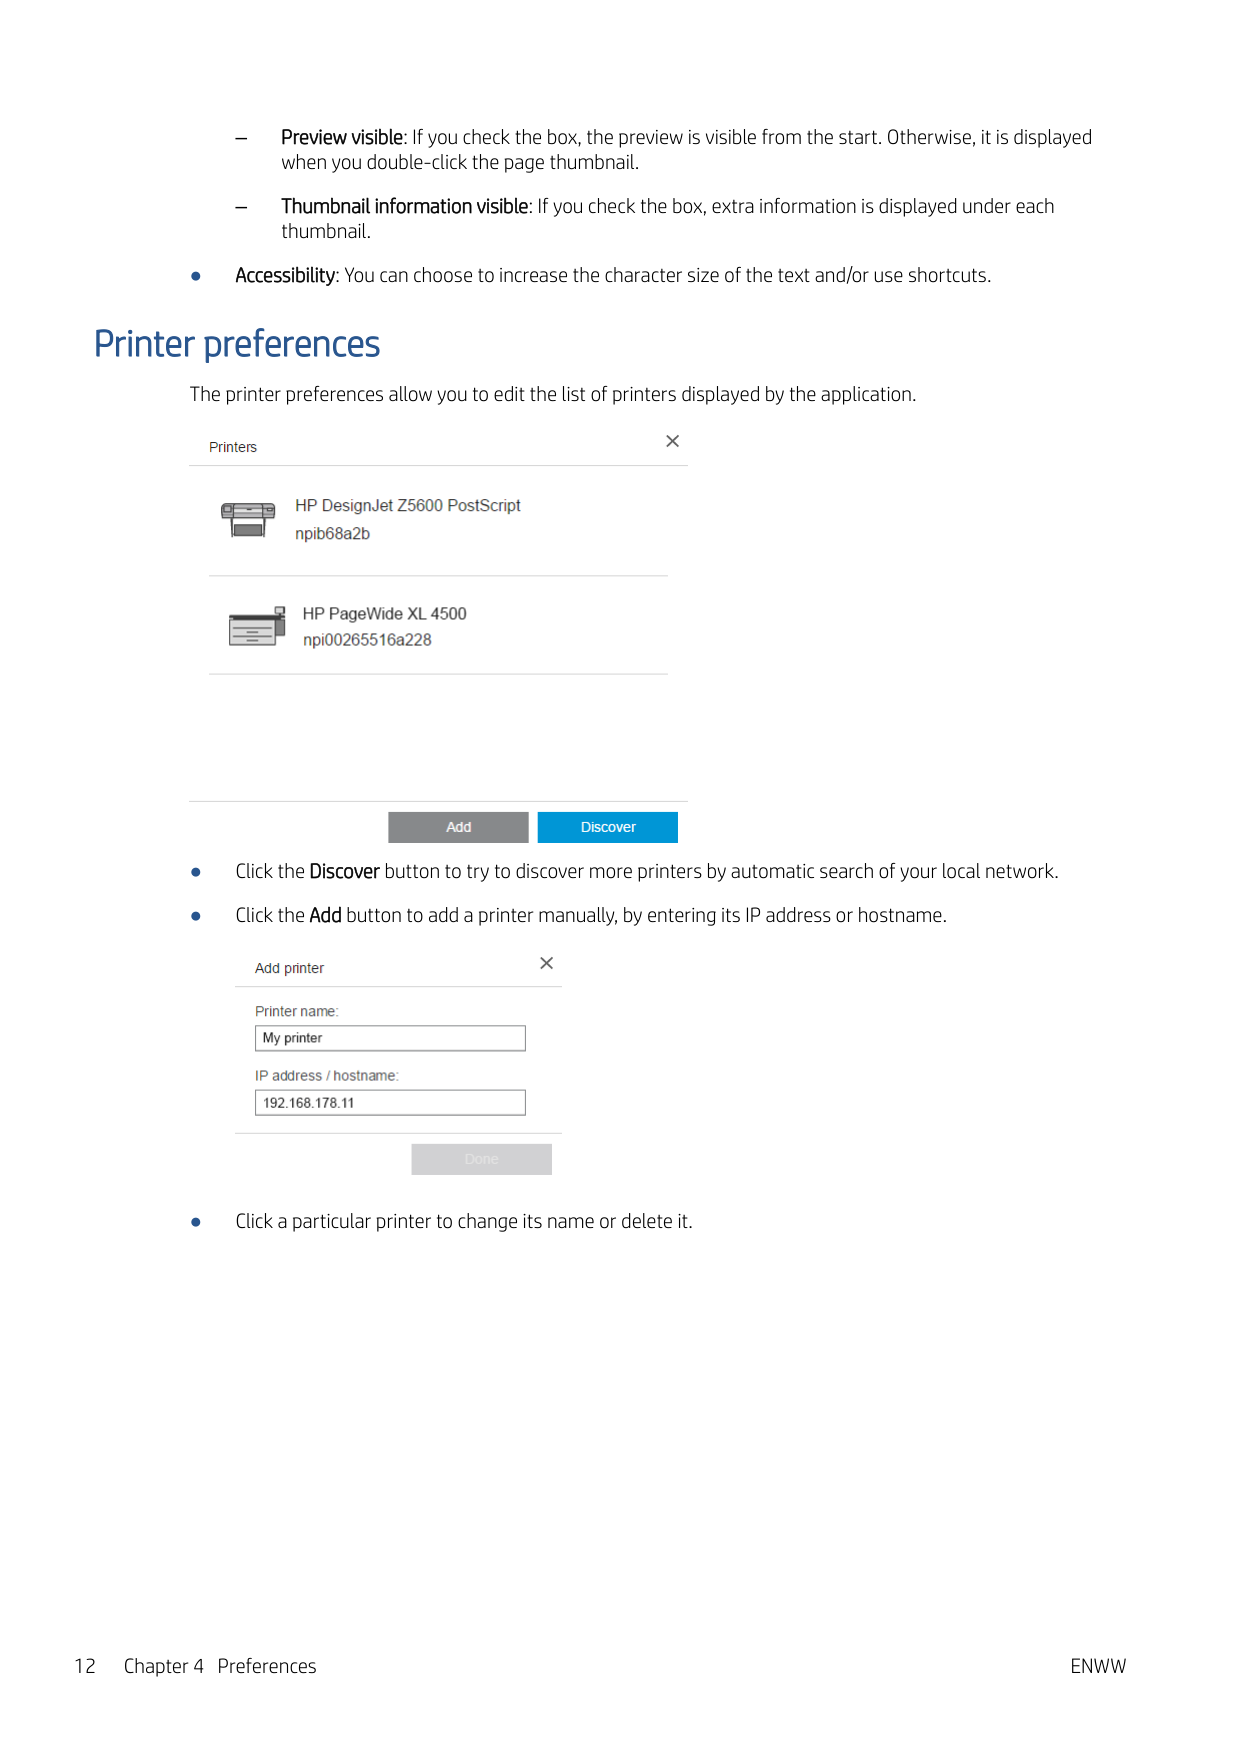
– Preview visible: If you check the box, the preview is visible from the start. Otherwise, it is displayed when you double-click the page thumbnail. – Thumbnail information visible: If you check the box, extra information is displayed under each thumbnail. ● Accessibility: You can choose to increase the character size of the text and/or use shortcuts. Printer preferences The printer preferences allow you to edit the list of printers displayed by the application. ● Click the Discover button to try to discover more printers by automatic search of your local network. ● Click the Add button to add a printer manually, by entering its IP address or hostname. ● Click a particular printer to change its name or delete it. 12 Chapter 4 Preferences
Enww
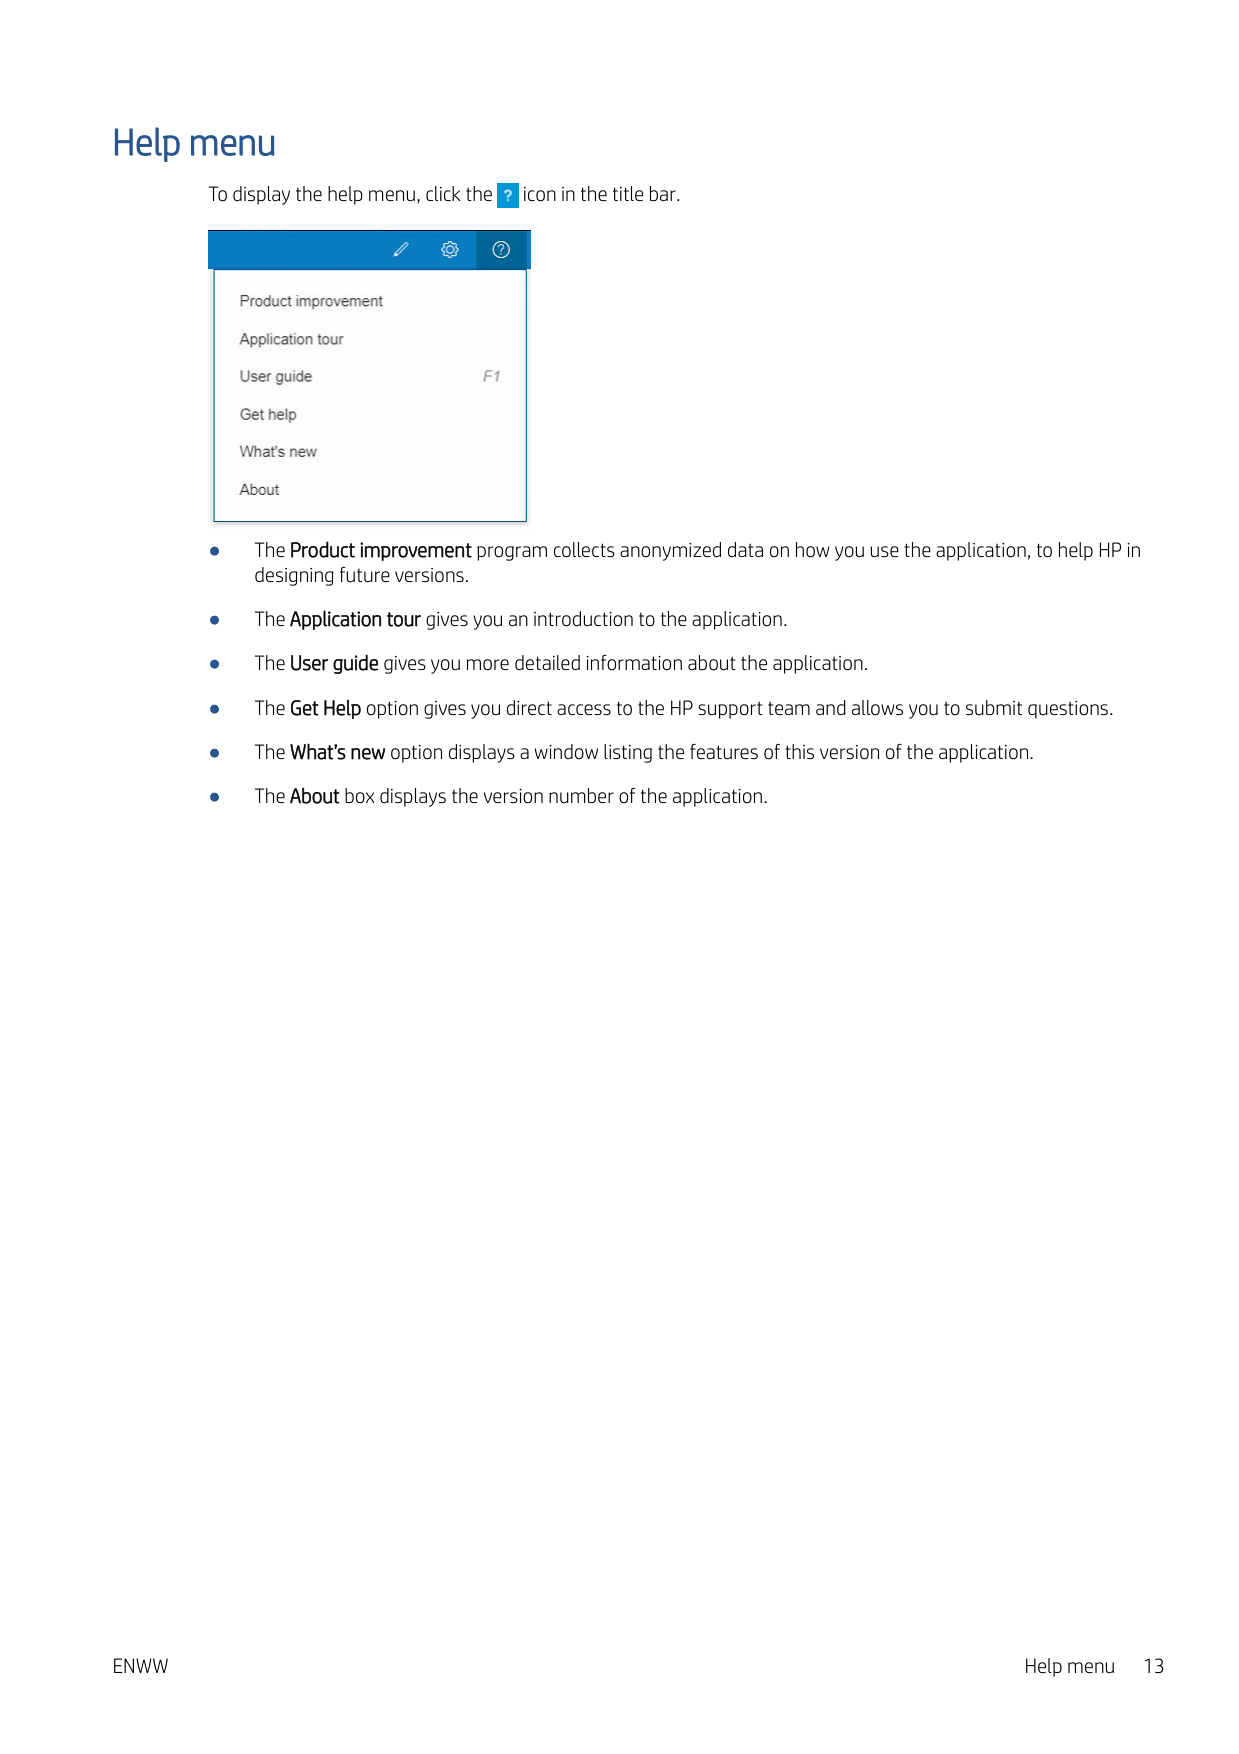
Help menu To display the help menu, click the icon in the title bar. ● The Product improvement program collects anonymized data on how you use the application, to help HP in designing future versions. ● The Application tour gives you an introduction to the application. ● The User guide gives you more detailed information about the application. ● The Get Help option gives you direct access to the HP support team and allows you to submit questions. ● The What’s new option displays a window listing the features of this version of the application. ● The About box displays the version number of the application.
Enww
Help menu 13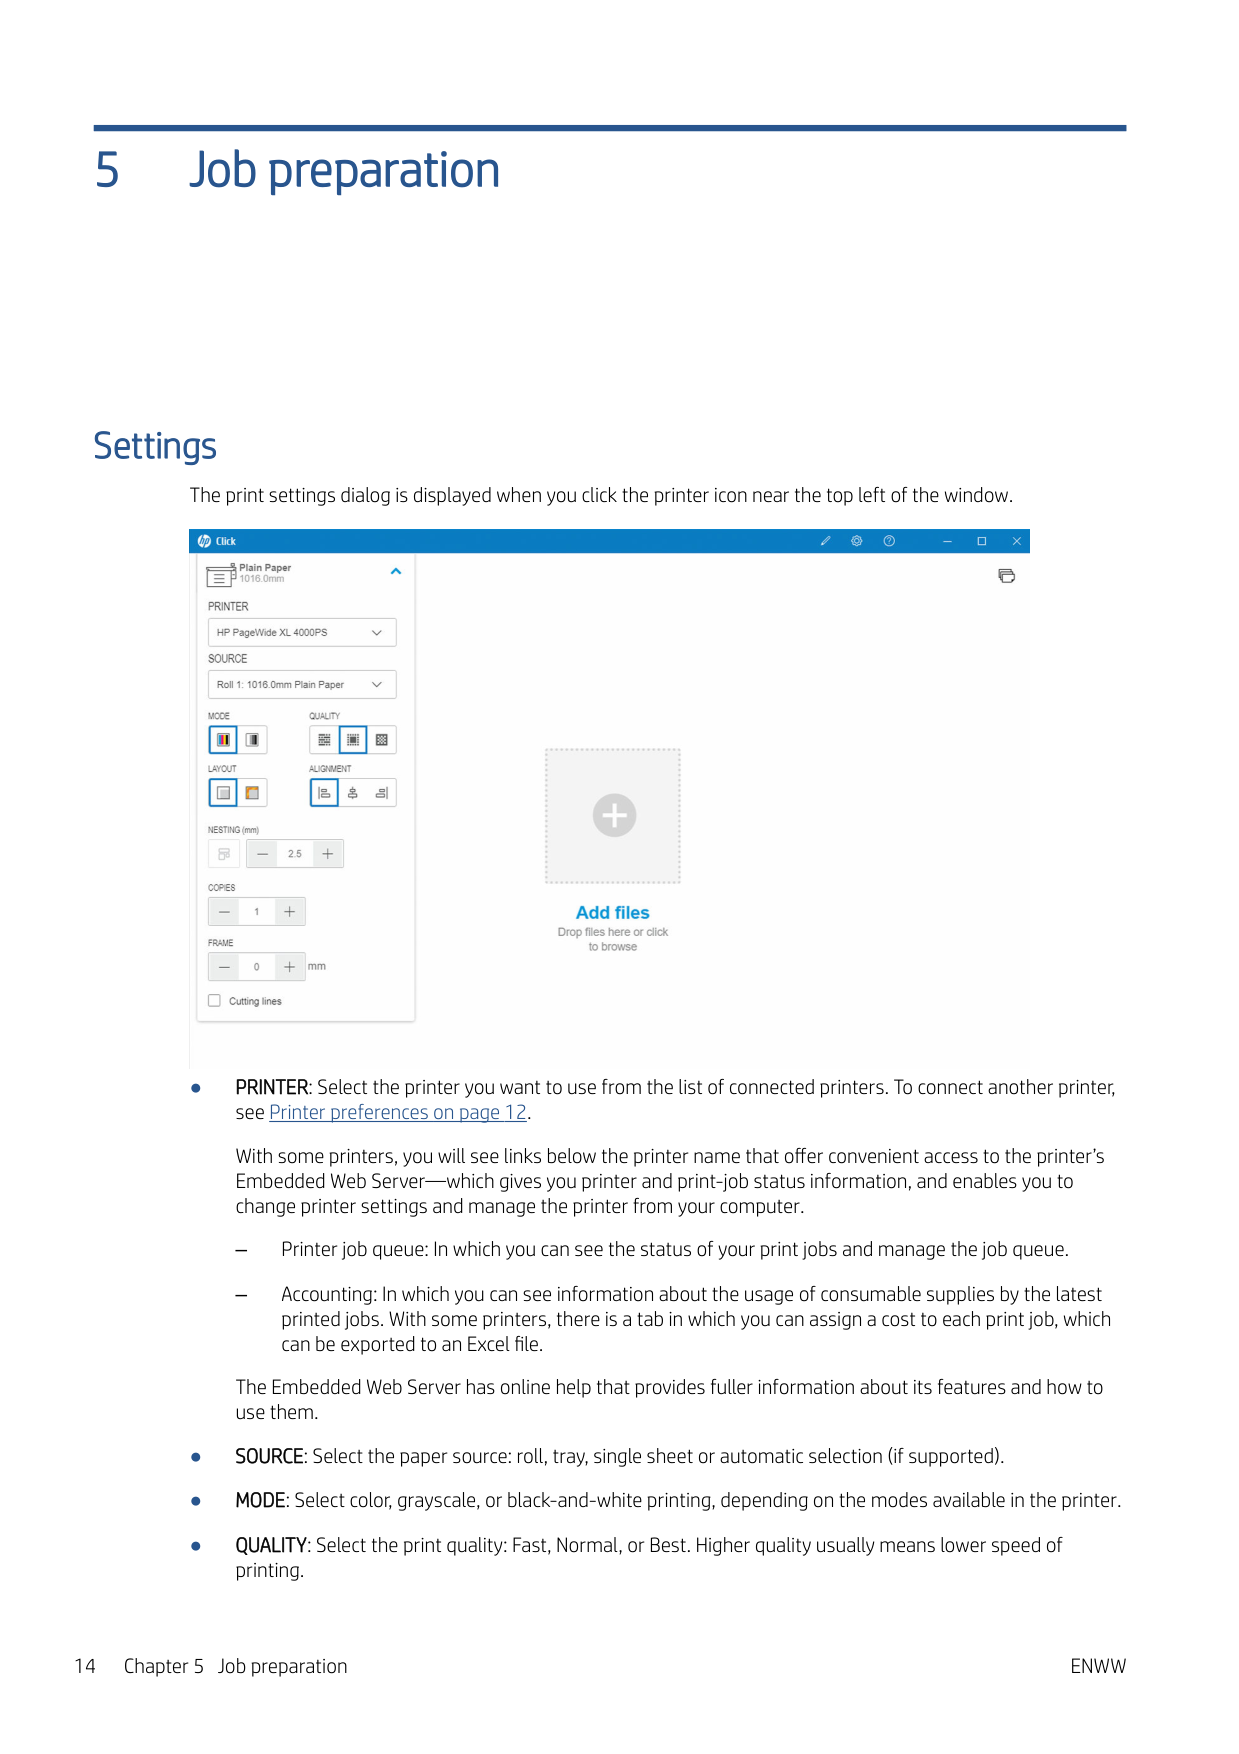
5 Job preparation Settings The print settings dialog is displayed when you click the printer icon near the top left of the window. ● PRINTER: Select the printer you want to use from the list of connected printers. To connect another printer, see Printer preferences on page 12. With some printers, you will see links below the printer name that offer convenient access to the printer’s Embedded Web Server—which gives you printer and print-job status information, and enables you to change printer settings and manage the printer from your computer. – Printer job queue: In which you can see the status of your print jobs and manage the job queue. – Accounting: In which you can see information about the usage of consumable supplies by the latest printed jobs. With some printers, there is a tab in which you can assign a cost to each print job, which can be exported to an Excel file. The Embedded Web Server has online help that provides fuller information about its features and how to use them. ● SOURCE: Select the paper source: roll, tray, single sheet or automatic selection (if supported). ● MODE: Select color, grayscale, or black-and-white printing, depending on the modes available in the printer. ● QUALITY: Select the print quality: Fast, Normal, or Best. Higher quality usually means lower speed of printing. 14 Chapter 5 Job preparation
Enww
● Gloss enhancer: This setting is available only for the HP DesignJet Z9+ Printer series, if gloss enhancer is installed, and if the loaded paper supports gloss enhancer. To use gloss enhancer ink and achieve superior gloss uniformity, you need to install a separate kit available for the whole Z9+ series. ● ALIGNMENT: Select where content should be aligned on the roll/sheet. ● NESTING: Turn nesting on or off (default: off), and select the gap between pages. See Nesting on page 18. ● COPIES: Select the number of copies of the job to be printed, from 1 to 99. Two or more job copies will be sent to the printer as collated sets. ● Clip content by margins: If this is checked, the application assumes that the printer margins are zero, and that it can print across the full width of the paper. However, the printer will not print anything that falls within the actual printer margins. ● Cutting lines: If this is checked, additional marks are printed to indicate where the paper should be cut to obtain the desired page size. ● Borderless: If your printer supports borderless printing and/or uses a specific trimming device, this setting will be available when the conditions apply, based on the paper loaded.
Tip:
Some paper types do not support borderless printing to the edges of the paper, but they may support borderless printing using a vertical trimmer, if the printer has a vertical trimmer. ● V-Trimmer: If vertical trimming is supported by the printer, additional cutting lines are displayed in the page preview. Make sure this feature is activated in your printer.Tip:
HP recommends using Borderless if selected manually and V-Trimmer if activated. Due to printer margins, printable area may be reduced when using the vertical trimmer. If you prefer to avoid clipping the image, deactivate it to use the whole surface of the paper. ● Remember last settings: If this is checked, the application will remember the last set of printing settings that you selected, saving you some time and effort. Printer status Printer is ready Printer is sending warning messages, but can print Printer is sending error messages, and may not be able to print Printer is disconnected: you cannot print to itEnww
Settings 15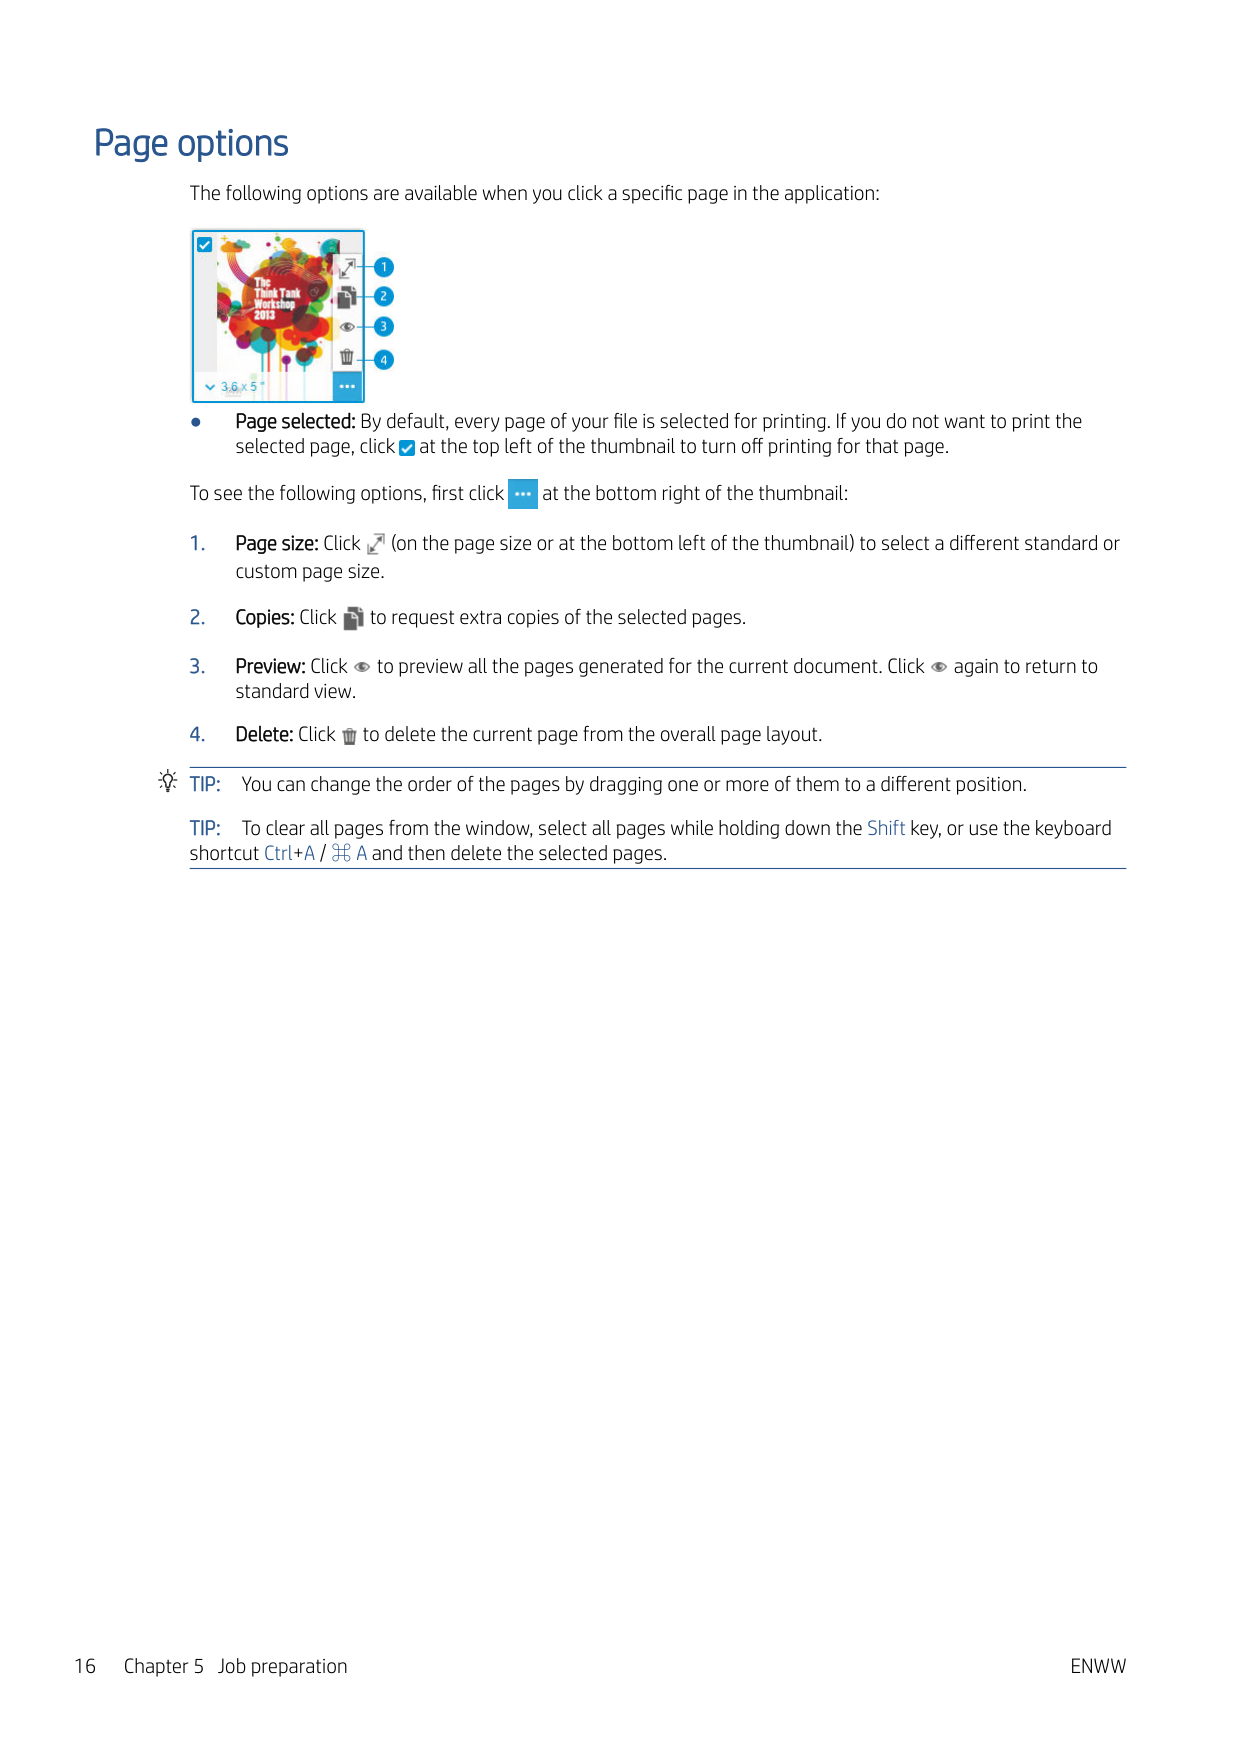
Page options The following options are available when you click a specific page in the application: ● Page selected: By default, every page of your file is selected for printing. If you do not want to print the selected page, click at the top left of the thumbnail to turn off printing for that page. To see the following options, first click at the bottom right of the thumbnail:
Tip:
You can change the order of the pages by dragging one or more of them to a different position.Tip:
To clear all pages from the window, select all pages while holding down the Shift key, or use the keyboard shortcut Ctrl+A / ⌘ A and then delete the selected pages. 16 Chapter 5 Job preparationEnww
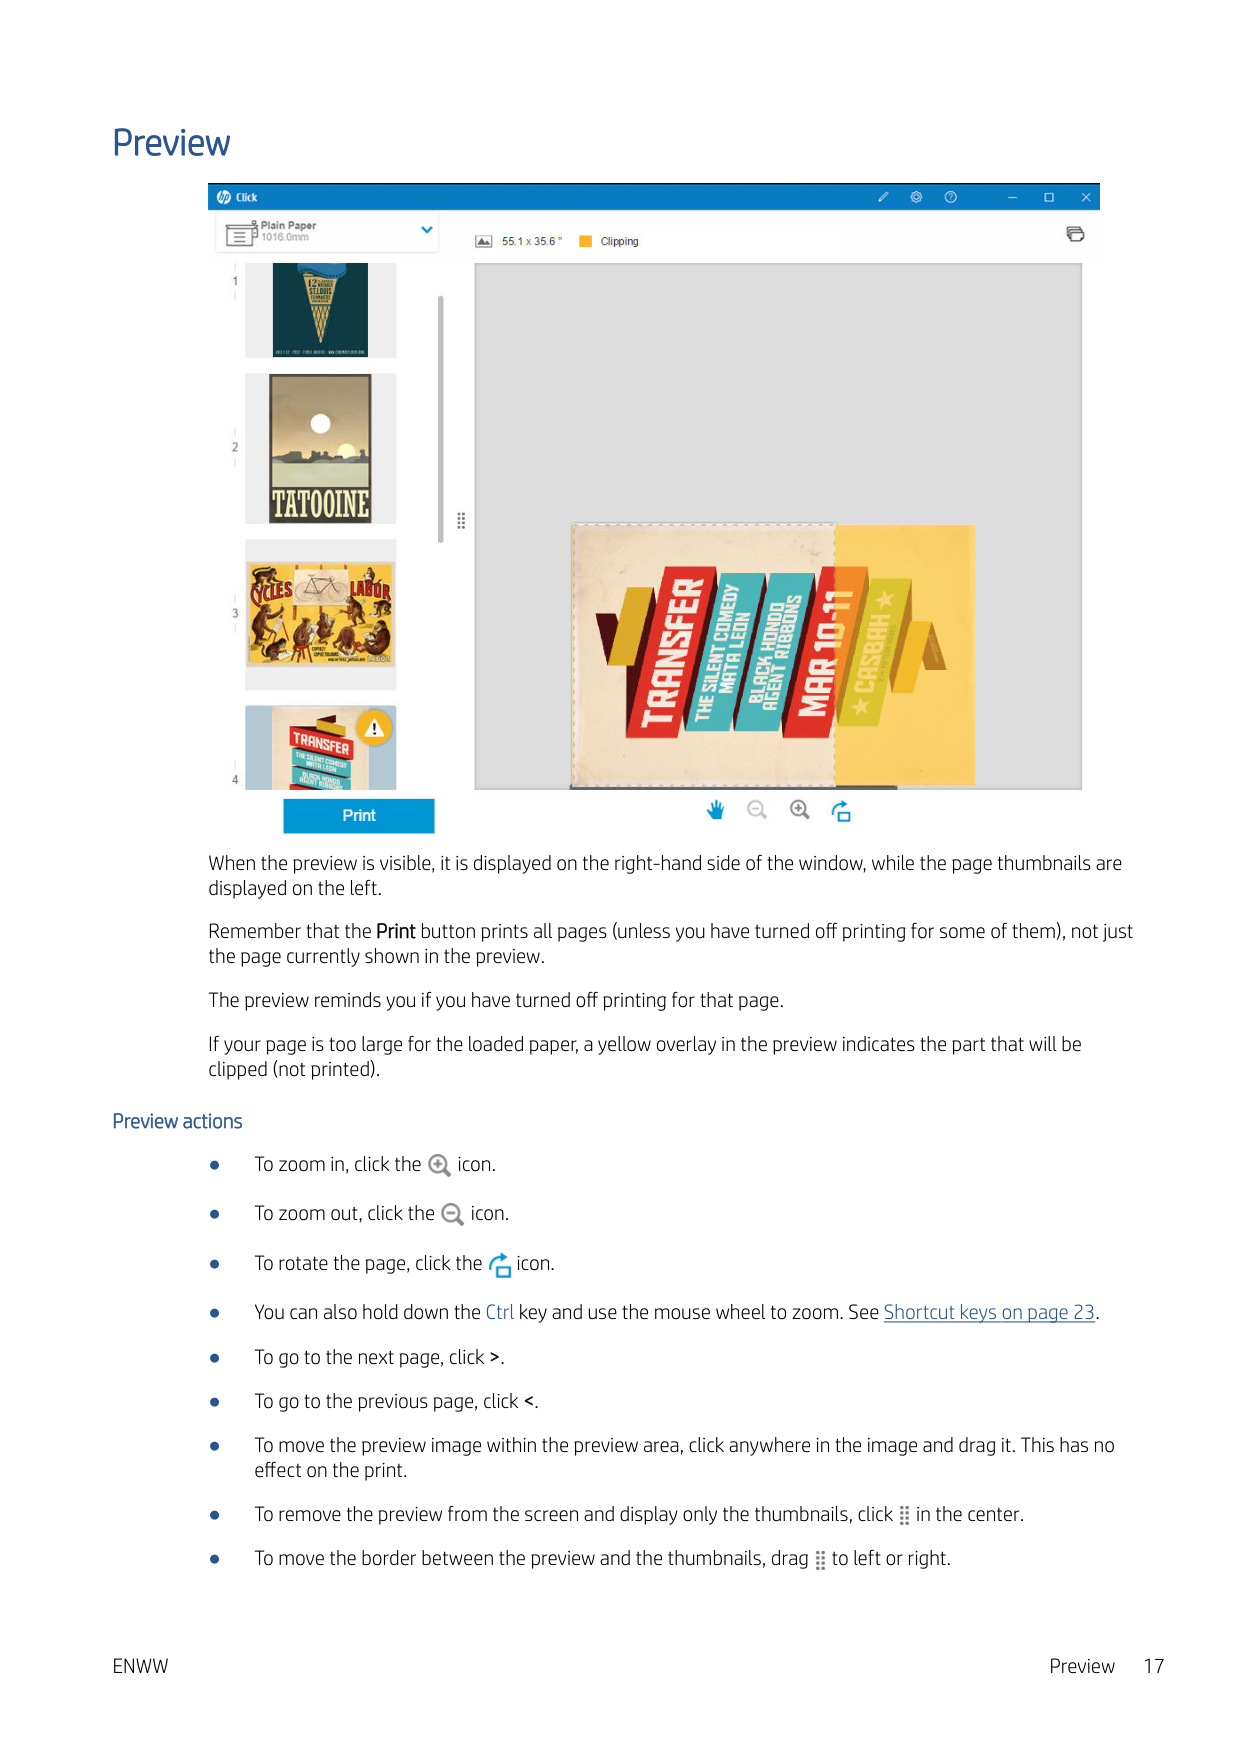
Preview When the preview is visible, it is displayed on the right-hand side of the window, while the page thumbnails are displayed on the left. Remember that the Print button prints all pages (unless you have turned off printing for some of them), not just the page currently shown in the preview. The preview reminds you if you have turned off printing for that page. If your page is too large for the loaded paper, a yellow overlay in the preview indicates the part that will be clipped (not printed). Preview actions ● To zoom in, click the icon. ● To zoom out, click the icon. ● To rotate the page, click the icon. ● You can also hold down the Ctrl key and use the mouse wheel to zoom. See Shortcut keys on page 23. ● To go to the next page, click >. ● To go to the previous page, click <. ● To move the preview image within the preview area, click anywhere in the image and drag it. This has no effect on the print. ● To remove the preview from the screen and display only the thumbnails, click in the center. ● To move the border between the preview and the thumbnails, drag to left or right.
Enww
Preview 17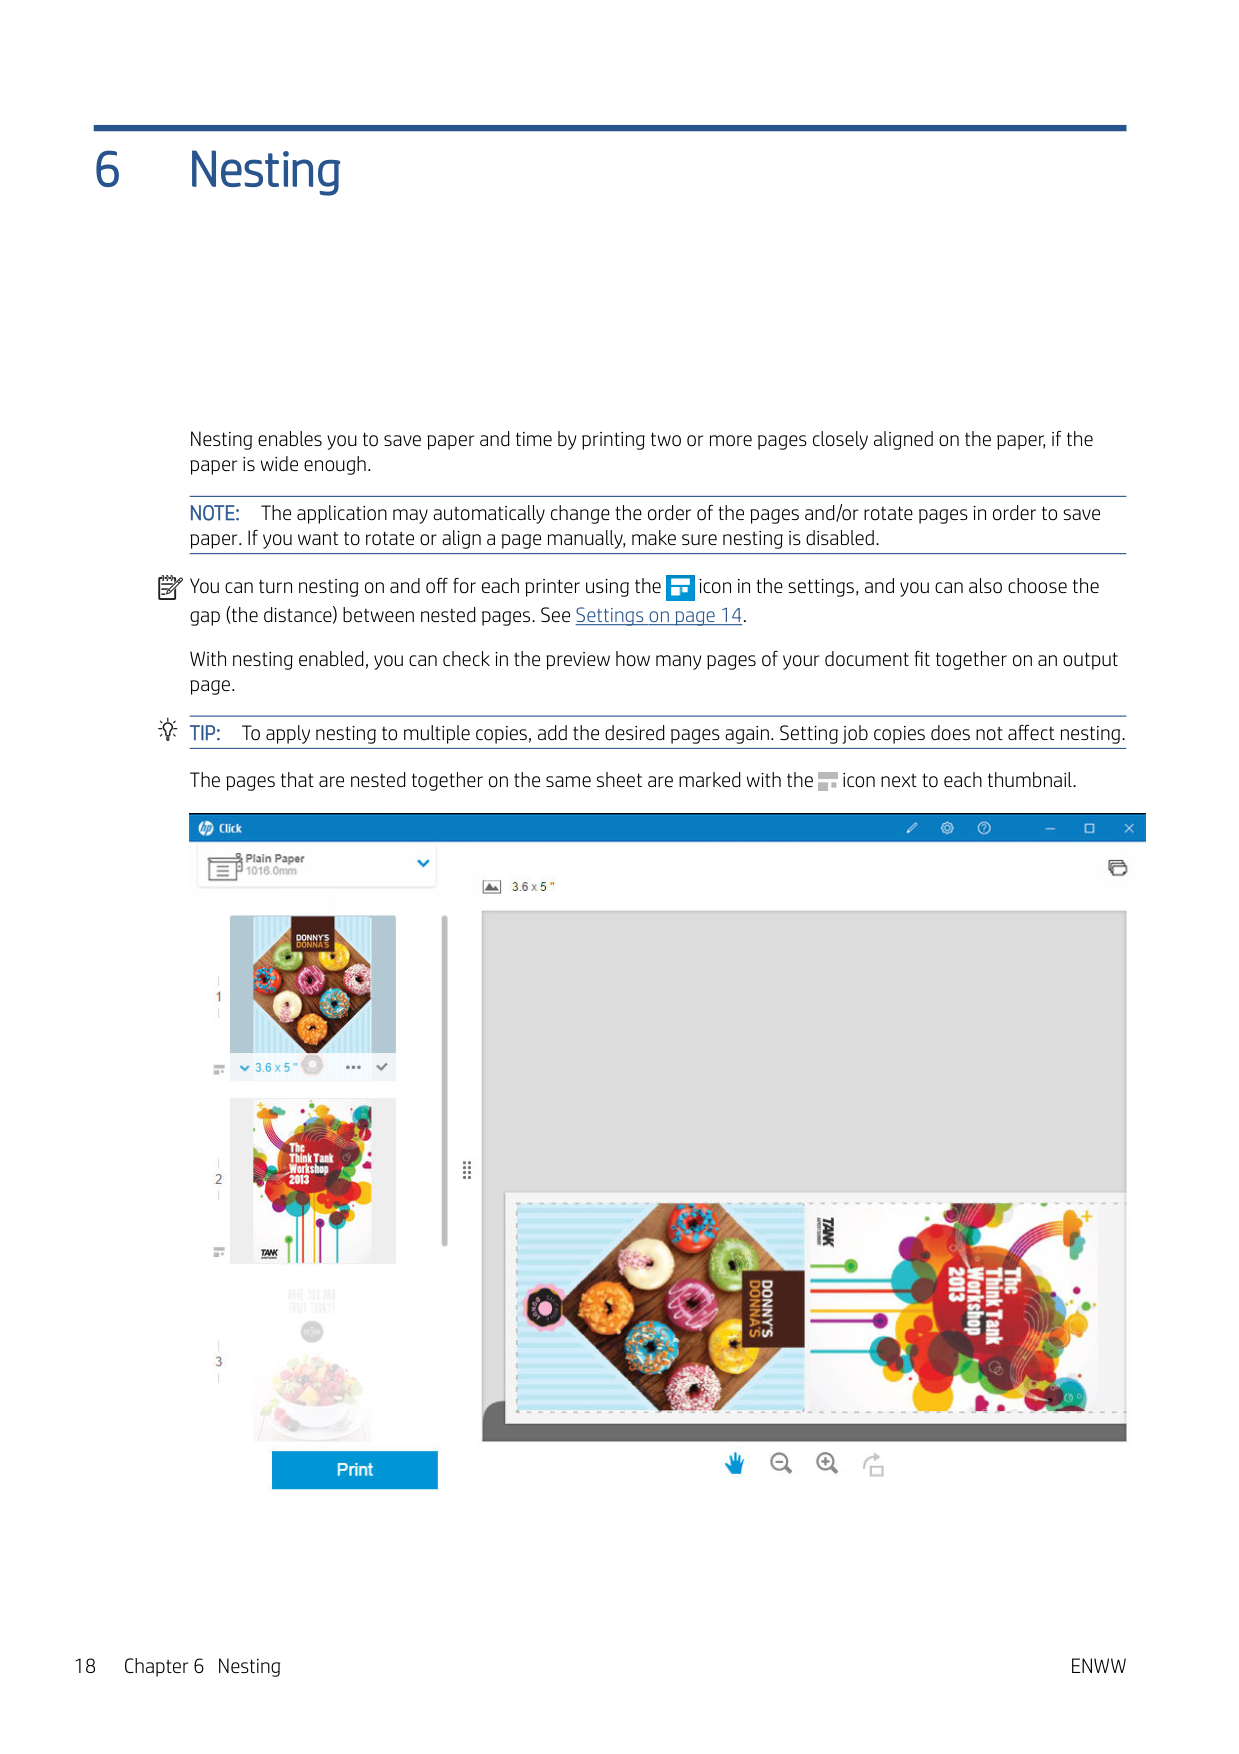
6 Nesting Nesting enables you to save paper and time by printing two or more pages closely aligned on the paper, if the paper is wide enough.
Note:
The application may automatically change the order of the pages and/or rotate pages in order to save paper. If you want to rotate or align a page manually, make sure nesting is disabled. You can turn nesting on and off for each printer using the icon in the settings, and you can also choose the gap (the distance) between nested pages. See Settings on page 14. With nesting enabled, you can check in the preview how many pages of your document fit together on an output page.Tip:
To apply nesting to multiple copies, add the desired pages again. Setting job copies does not affect nesting. The pages that are nested together on the same sheet are marked with the icon next to each thumbnail. 18 Chapter 6 NestingEnww
7 Printing When printing is possible, the Print button is enabled. If it is disabled, you must ensure that the printer is connected and ready for printing, or use a different printer that is ready for printing. When you click the Print button, all pages loaded into the application are printed, except those pages that you have unchecked; see Page options on page 16. By default, pages are printed at the original size specified in the file, unless you have used the resizing options. See Page options on page 16. If the printer can hold pages in a queue, all the pages are immediately sent to the printer. Otherwise, the application holds each page until the printer is ready to receive it. The progress of sending the job to the printer is indicated in the Print button. You can see the jobs in the queue by selecting the Printer job queue link available in the Print settings dialog, which will open a link to the Embedded Web Server in your default browser. The application sends the pages of a job in the order in which they appear on the screen.
Note:
The application provides information to the user about the status of the job sent to print: Printed, Canceled or Failed.Enww
19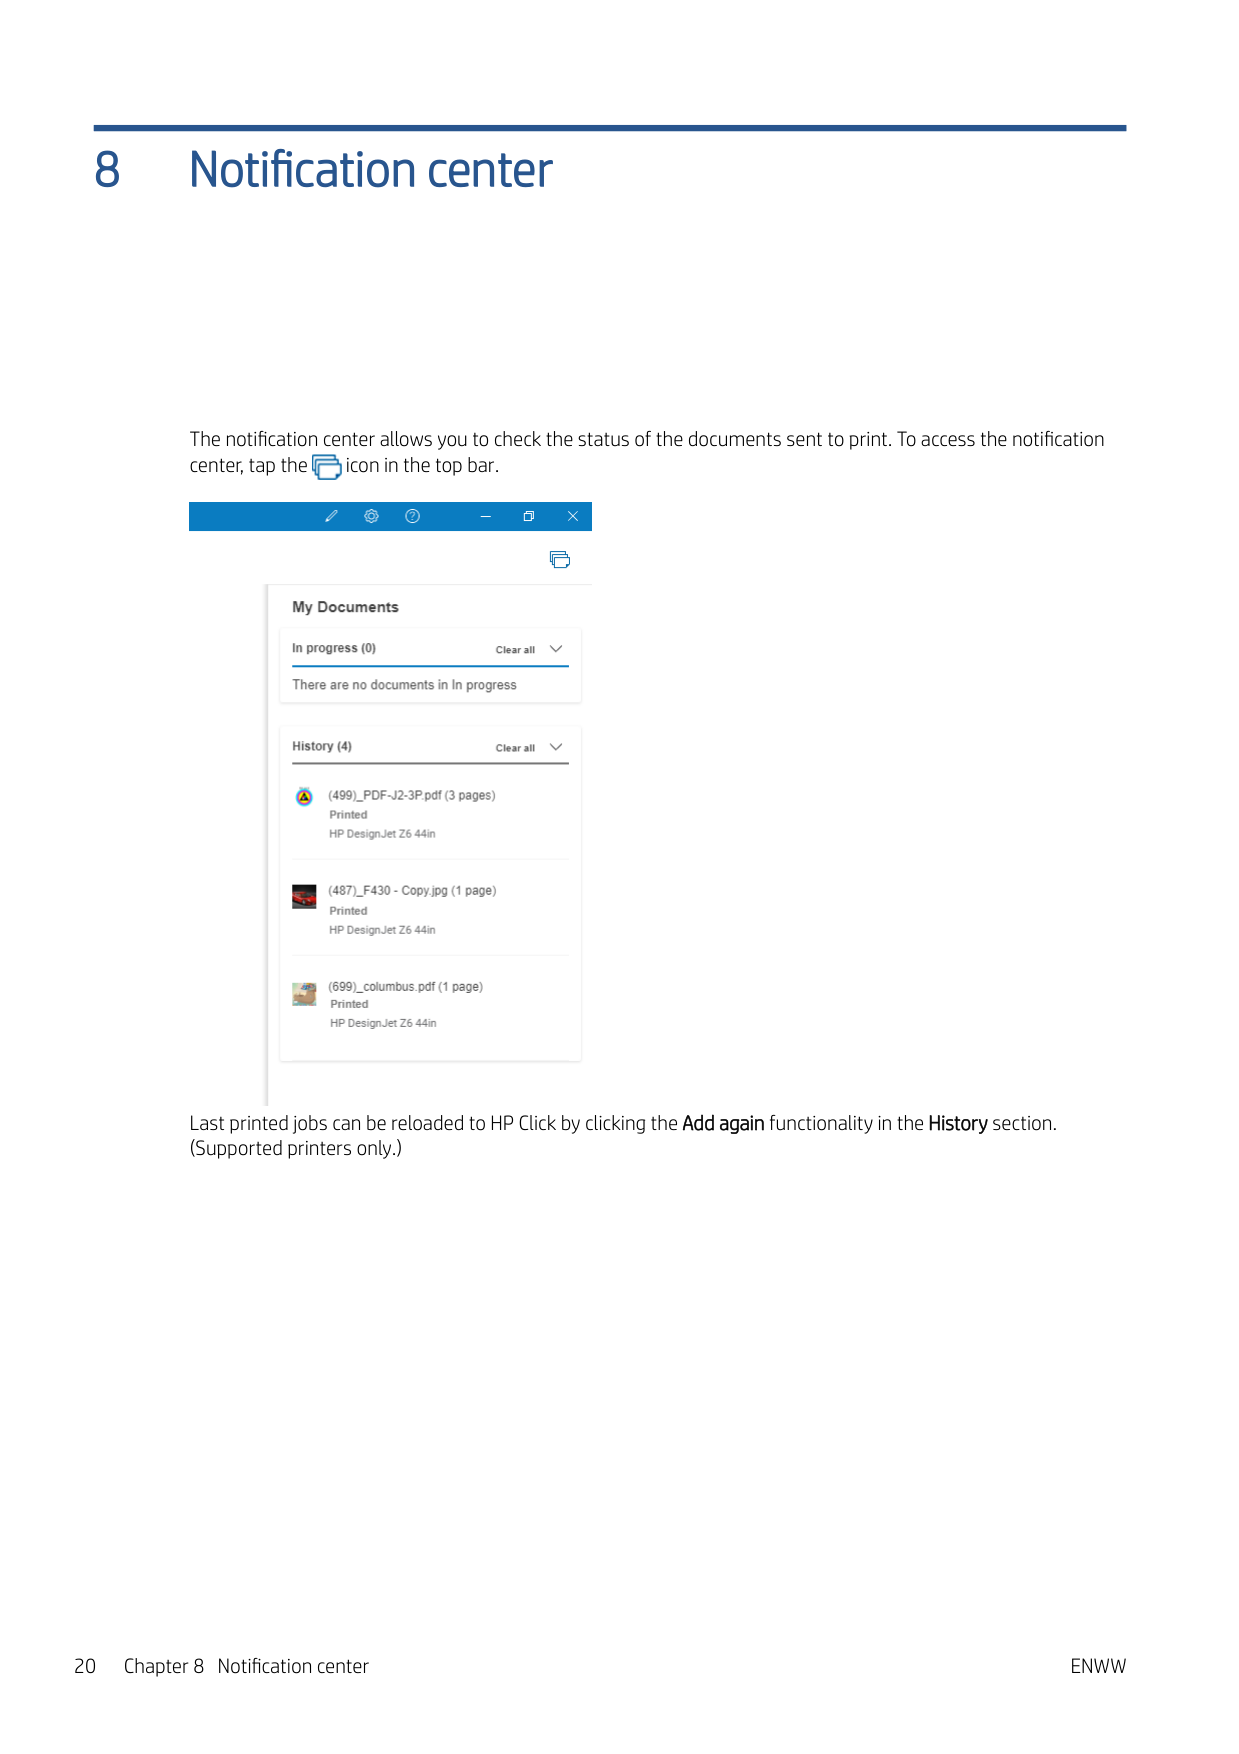
8 Notification center The notification center allows you to check the status of the documents sent to print. To access the notification center, tap the icon in the top bar. Last printed jobs can be reloaded to HP Click by clicking the Add again functionality in the History section. (Supported printers only.) 20 Chapter 8 Notification center
Enww
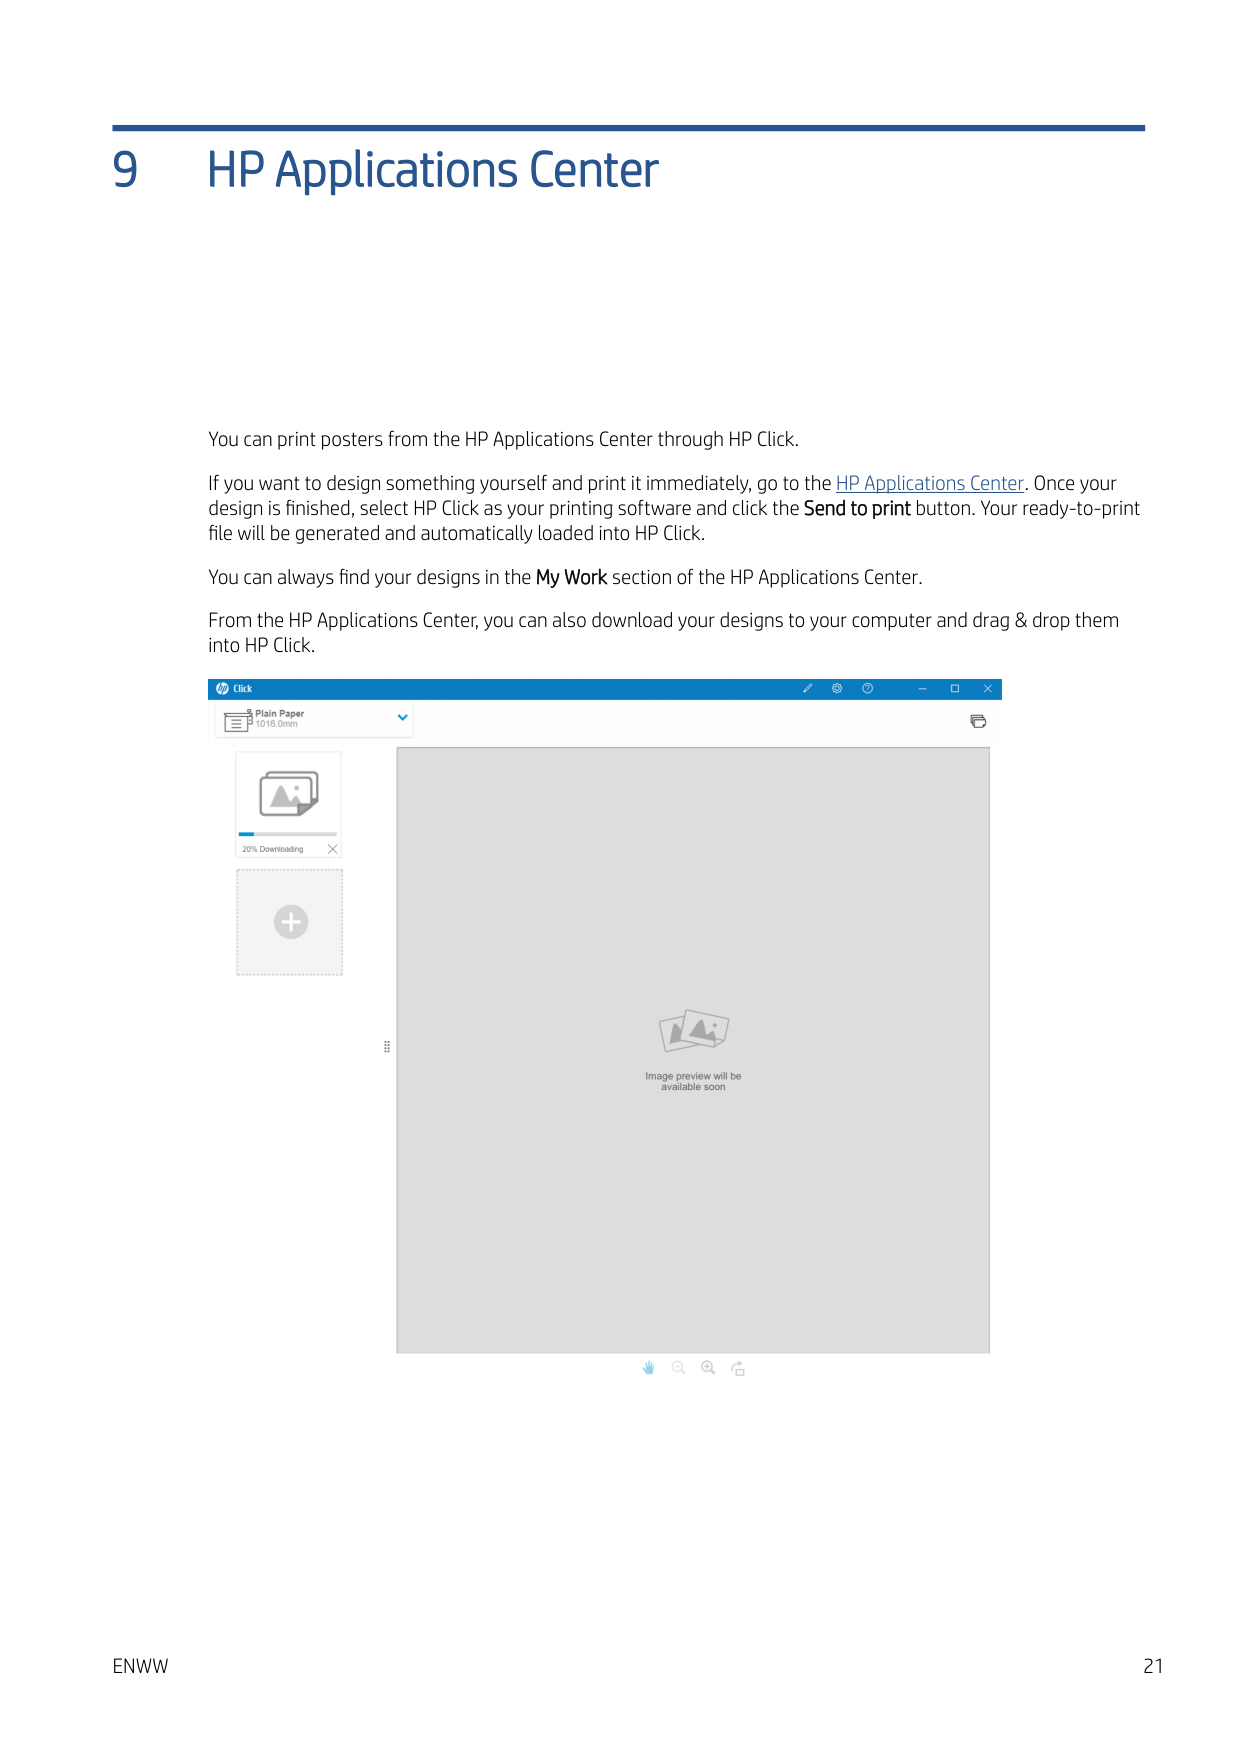
9 HP Applications Center You can print posters from the HP Applications Center through HP Click. If you want to design something yourself and print it immediately, go to the HP Applications Center. Once your design is finished, select HP Click as your printing software and click the Send to print button. Your ready-to-print file will be generated and automatically loaded into HP Click. You can always find your designs in the My Work section of the HP Applications Center. From the HP Applications Center, you can also download your designs to your computer and drag & drop them into HP Click.
Enww
21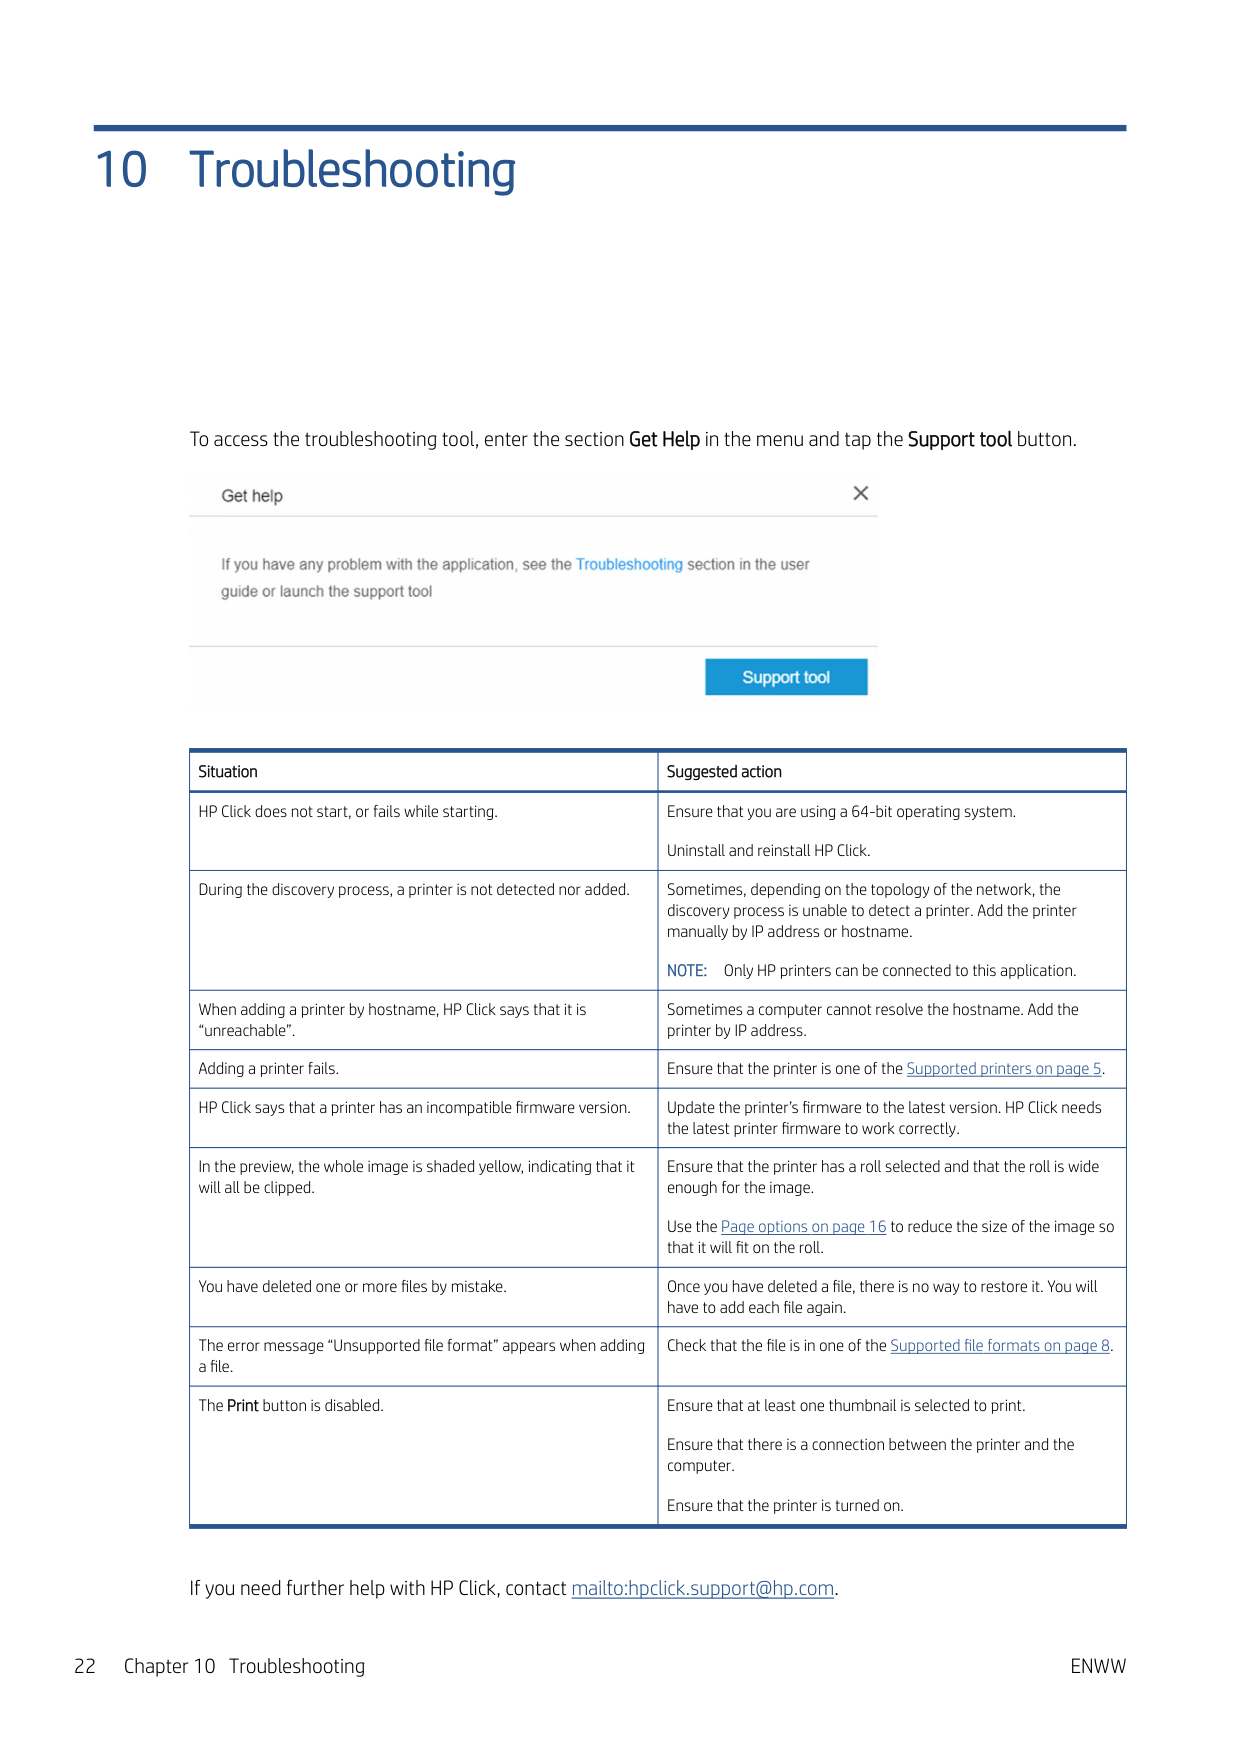
10 Troubleshooting To access the troubleshooting tool, enter the section Get Help in the menu and tap the Support tool button. Situation Suggested action HP Click does not start, or fails while starting. Ensure that you are using a 64-bit operating system. Uninstall and reinstall HP Click. During the discovery process, a printer is not detected nor added. Sometimes, depending on the topology of the network, the discovery process is unable to detect a printer. Add the printer manually by IP address or hostname.
Note:
Only HP printers can be connected to this application. When adding a printer by hostname, HP Click says that it is “unreachable”. Sometimes a computer cannot resolve the hostname. Add the printer by IP address. Adding a printer fails. Ensure that the printer is one of the Supported printers on page 5. HP Click says that a printer has an incompatible firmware version. Update the printer’s firmware to the latest version. HP Click needs the latest printer firmware to work correctly. In the preview, the whole image is shaded yellow, indicating that it will all be clipped. Ensure that the printer has a roll selected and that the roll is wide enough for the image. Use the Page options on page 16 to reduce the size of the image so that it will fit on the roll. You have deleted one or more files by mistake. Once you have deleted a file, there is no way to restore it. You will have to add each file again. The error message “Unsupported file format” appears when adding a file. Check that the file is in one of the Supported filefile formats on page 8. The Print button is disabled. Ensure that at least one thumbnail is selected to print. Ensure that there is a connection between the printer and the computer. Ensure that the printer is turned on. If you need further help with HP Click, contact mailto:hpclick.support@hp.com. 22 Chapter 10 TroubleshootingEnww
A
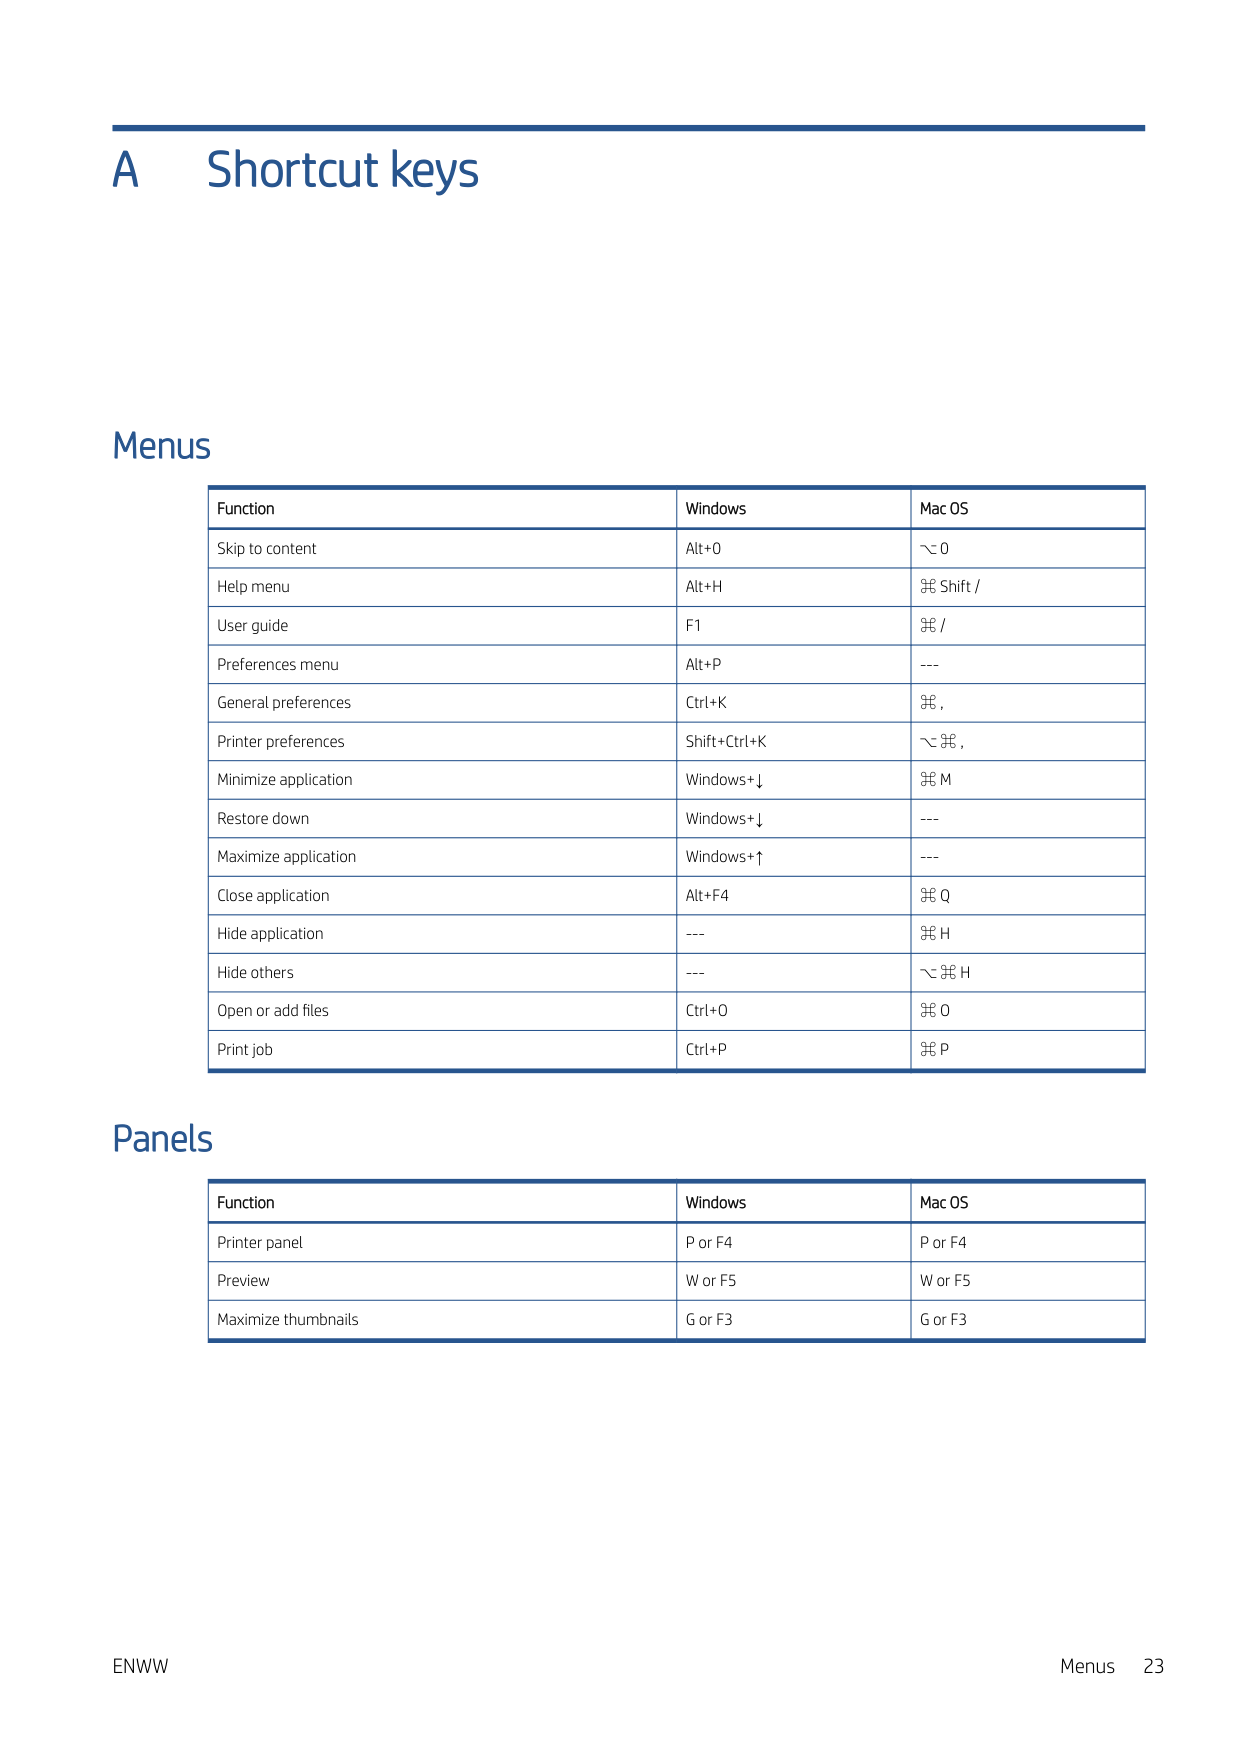
Shortcut keys Menus Function Windows Mac OS Skip to content Alt+0 ⌥ 0 Help menu Alt+H ⌘ Shift / User guideF1
⌘ / Preferences menu Alt+P --- General preferences Ctrl+K ⌘ , Printer preferences Shift+Ctrl+K ⌥ ⌘ , Minimize application Windows+↓⌘ M
Restore down Windows+↓ --- Maximize application Windows+↑ --- Close application Alt+F4⌘ Q
Hide application ---⌘ H
Hide others ---⌥ ⌘ H
Open or add files Ctrl+O⌘ O
Print job Ctrl+P⌘ P
Panels Function Windows Mac OS Printer panel P or F4 P or F4 Preview W or F5 W or F5 Maximize thumbnails G or F3 G or F3Enww
Menus 23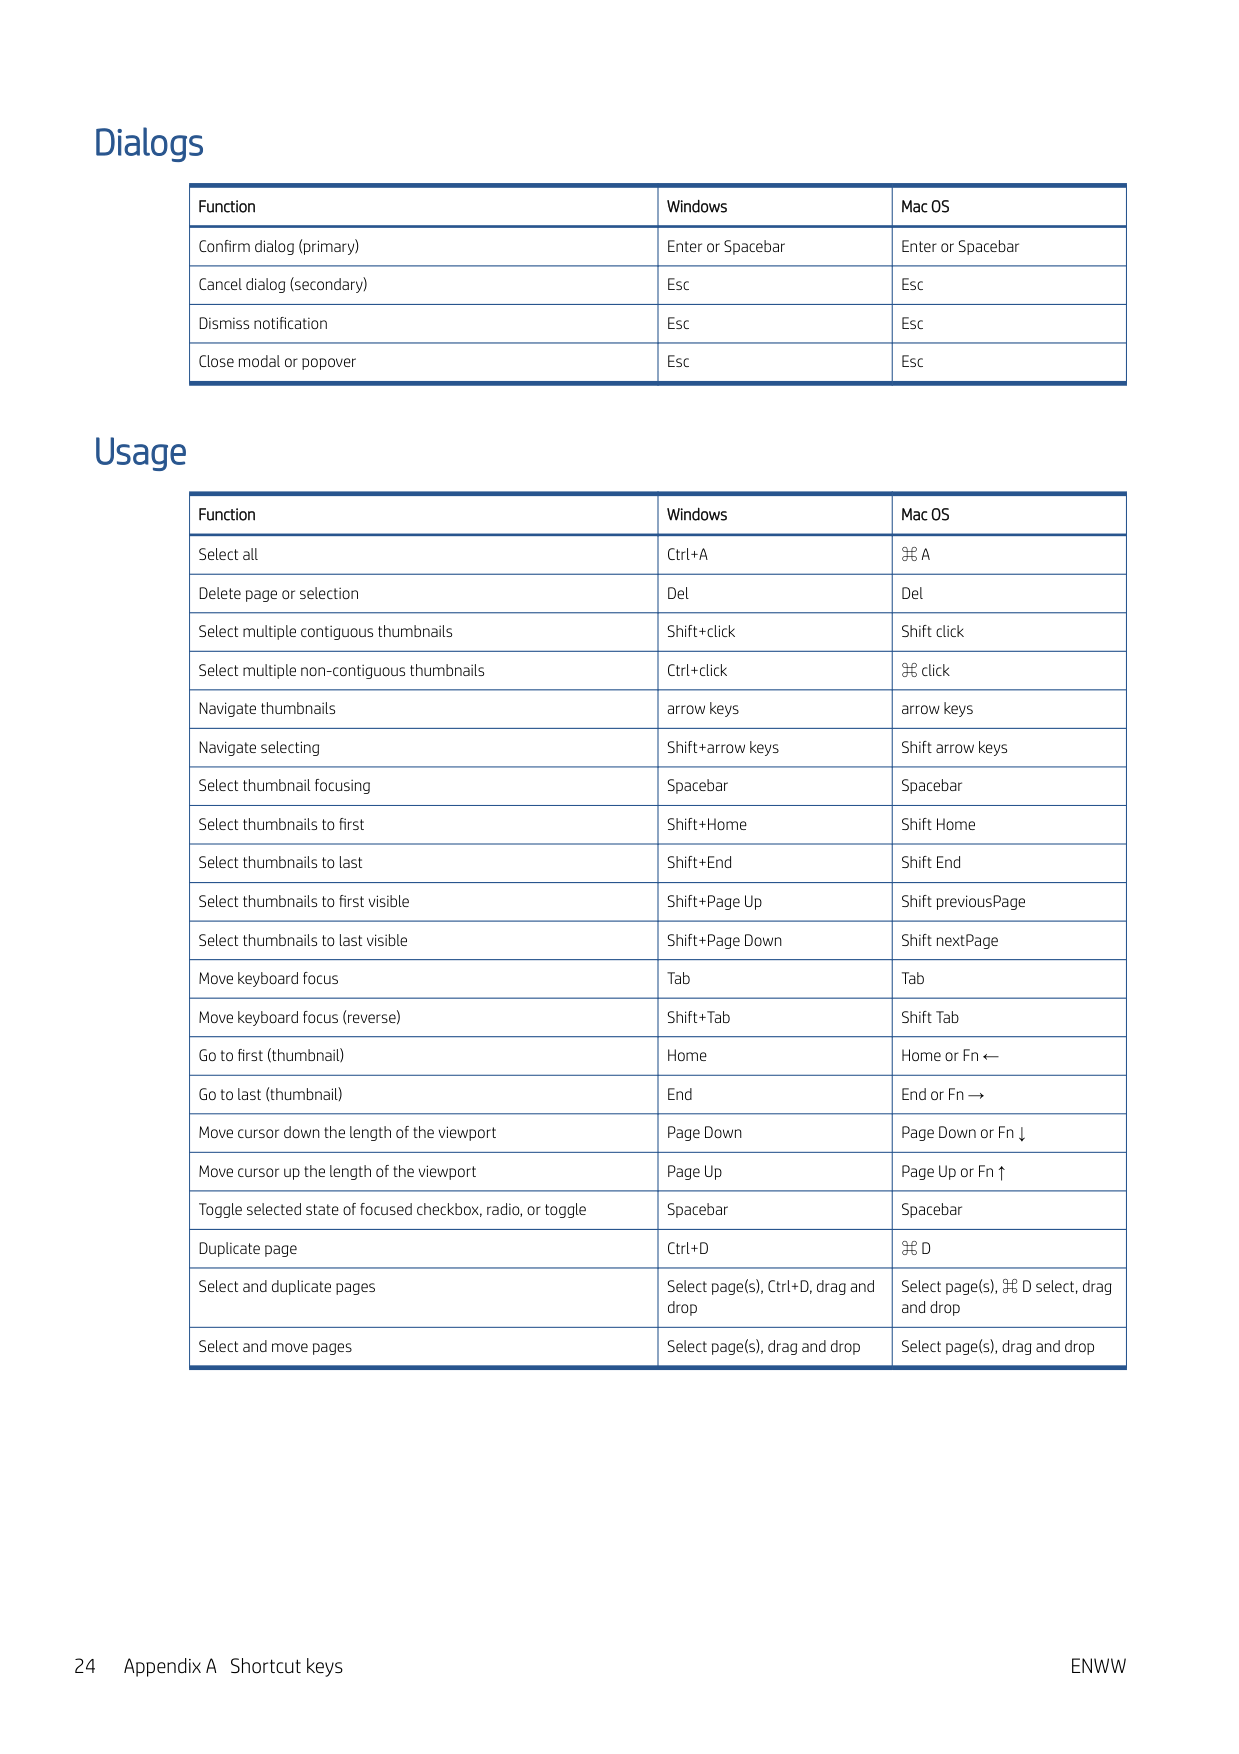
Dialogs Function Windows Mac OS Confirm dialog (primary) Enter or Spacebar Enter or Spacebar Cancel dialog (secondary) Esc Esc Dismiss notification Esc Esc Close modal or popover Esc Esc Usage Function Windows Mac OS Select all Ctrl+A
⌘ A
Delete page or selection Del Del Select multiple contiguous thumbnails Shift+click Shift click Select multiple non-contiguous thumbnails Ctrl+click ⌘ click Navigate thumbnails arrow keys arrow keys Navigate selecting Shift+arrow keys Shift arrow keys Select thumbnail focusing Spacebar Spacebar Select thumbnails to first Shift+Home Shift Home Select thumbnails to last Shift+End Shift End Select thumbnails to first visible Shift+Page Up Shift previousPage Select thumbnails to last visible Shift+Page Down Shift nextPage Move keyboard focus Tab Tab Move keyboard focus (reverse) Shift+Tab Shift Tab Go to first (thumbnail) Home Home or Fn ← Go to last (thumbnail) End End or Fn → Move cursor down the length of the viewport Page Down Page Down or Fn ↓ Move cursor up the length of the viewport Page Up Page Up or Fn ↑ Toggle selected state of focused checkbox, radio, or toggle Spacebar Spacebar Duplicate page Ctrl+D⌘ D
Select and duplicate pages Select page(s), Ctrl+D, drag and drop Select page(s), ⌘ D select, drag and drop Select and move pages Select page(s), drag and drop Select page(s), drag and drop 24 Appendix A Shortcut keysEnww
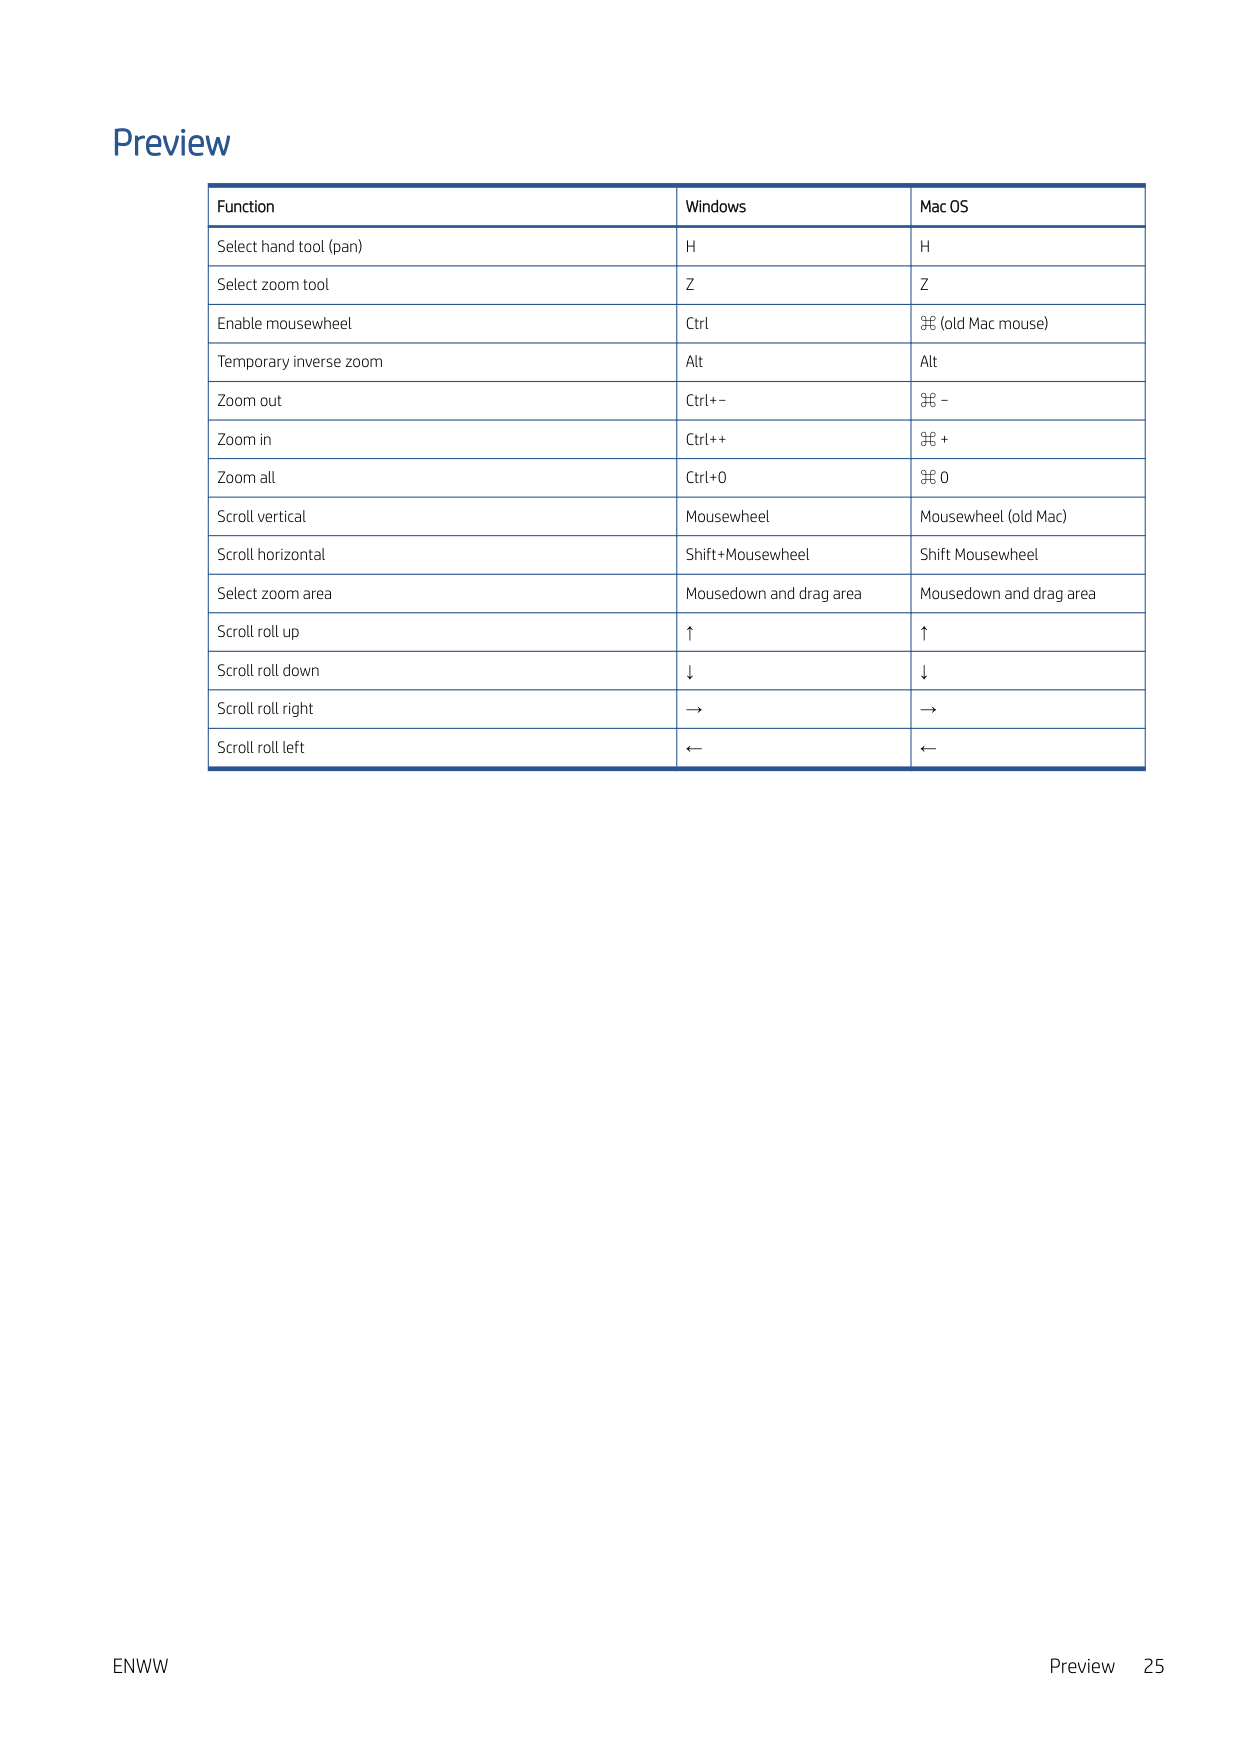
Preview Function Windows Mac OS Select hand tool (pan)
H
H
Select zoom toolZ
Z
Enable mousewheel Ctrl ⌘ (old Mac mouse) Temporary inverse zoom Alt Alt Zoom out Ctrl+− ⌘ − Zoom in Ctrl++ ⌘ + Zoom all Ctrl+0 ⌘ 0 Scroll vertical Mousewheel Mousewheel (old Mac) Scroll horizontal Shift+Mousewheel Shift Mousewheel Select zoom area Mousedown and drag area Mousedown and drag area Scroll roll up ↑ ↑ Scroll roll down ↓ ↓ Scroll roll right → → Scroll roll left ← ←Enww
Preview 25
Index