HP Color Laserjet Pro Mfp 3301 3304 3388 Printer
Ask AI
— answers from the official manualAnswers from the official manual.
Common questions
Common Questions
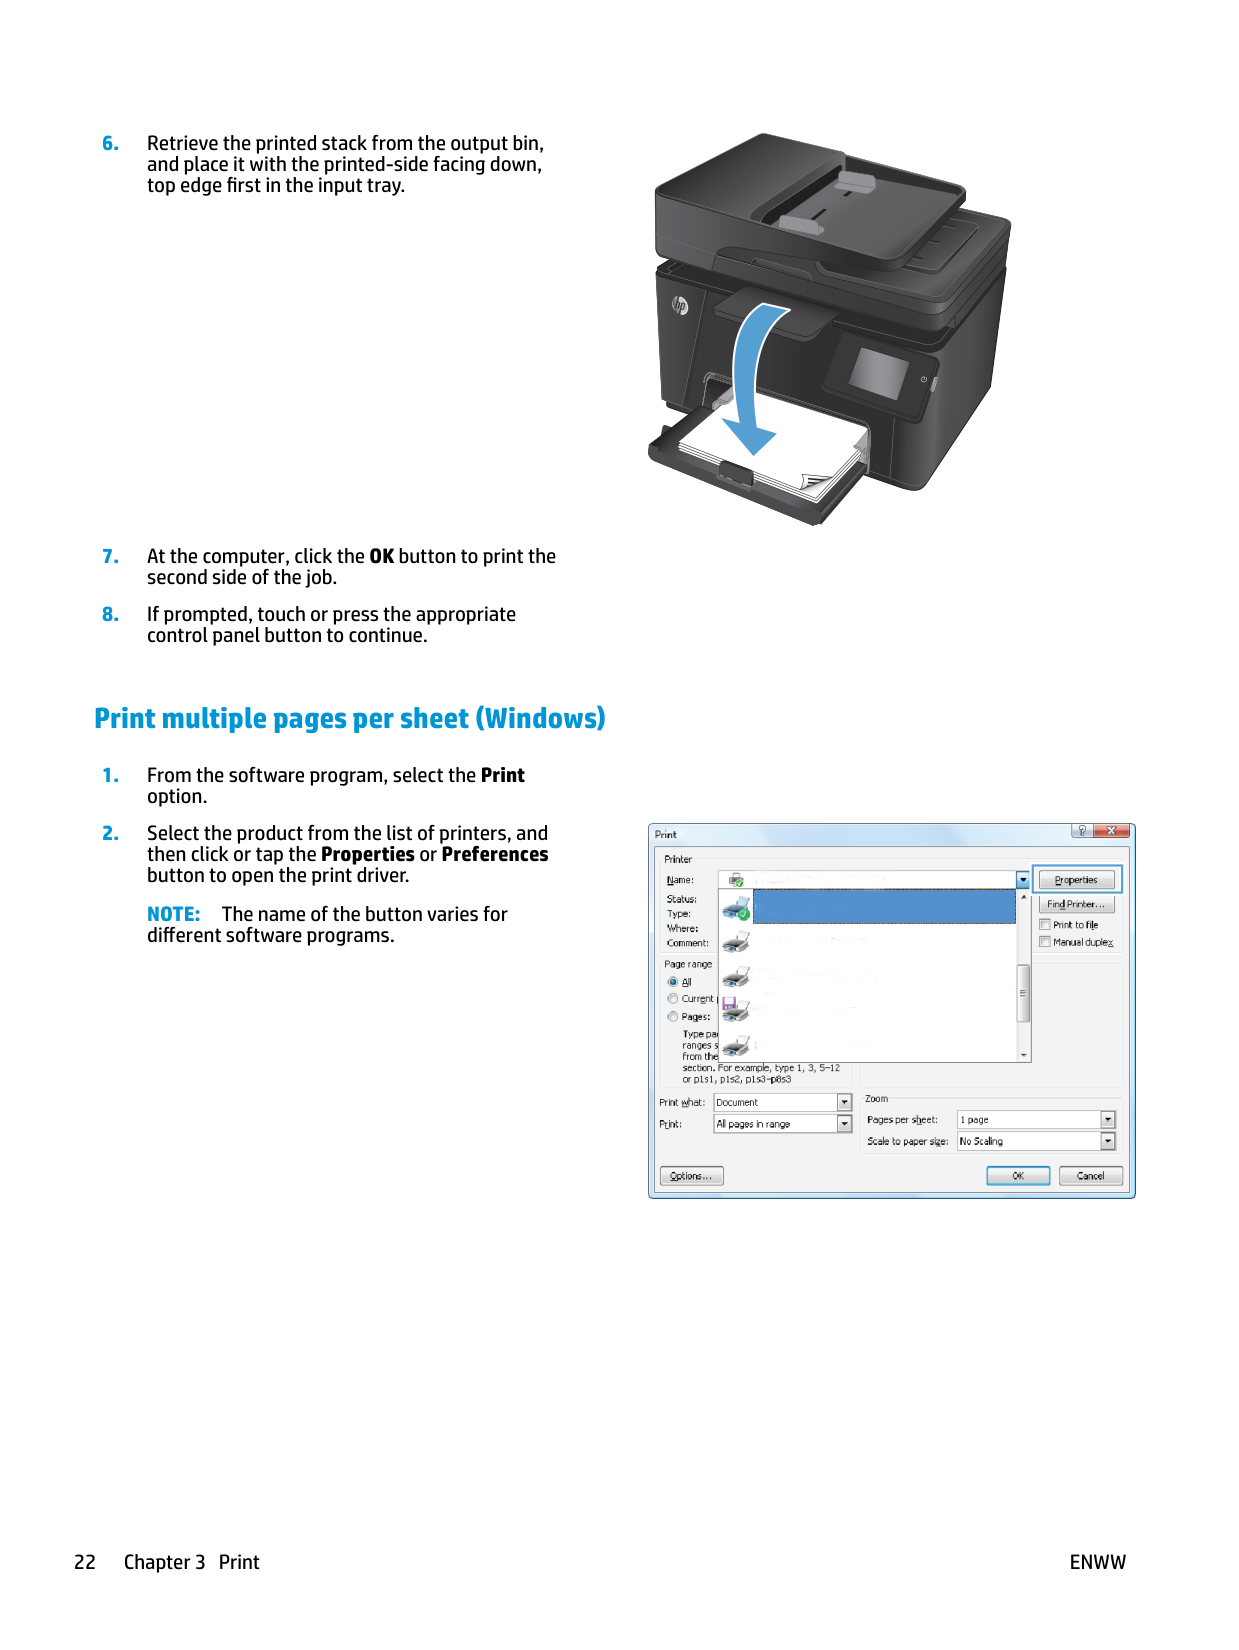
25 totalHow do I configure the fax machine’s time, date, and header?
From the Home screen on the control panel, select Setup > Fax Setup > Basic Setup > Time/Date. Use the keypad to enter the current time or date, then select OK.
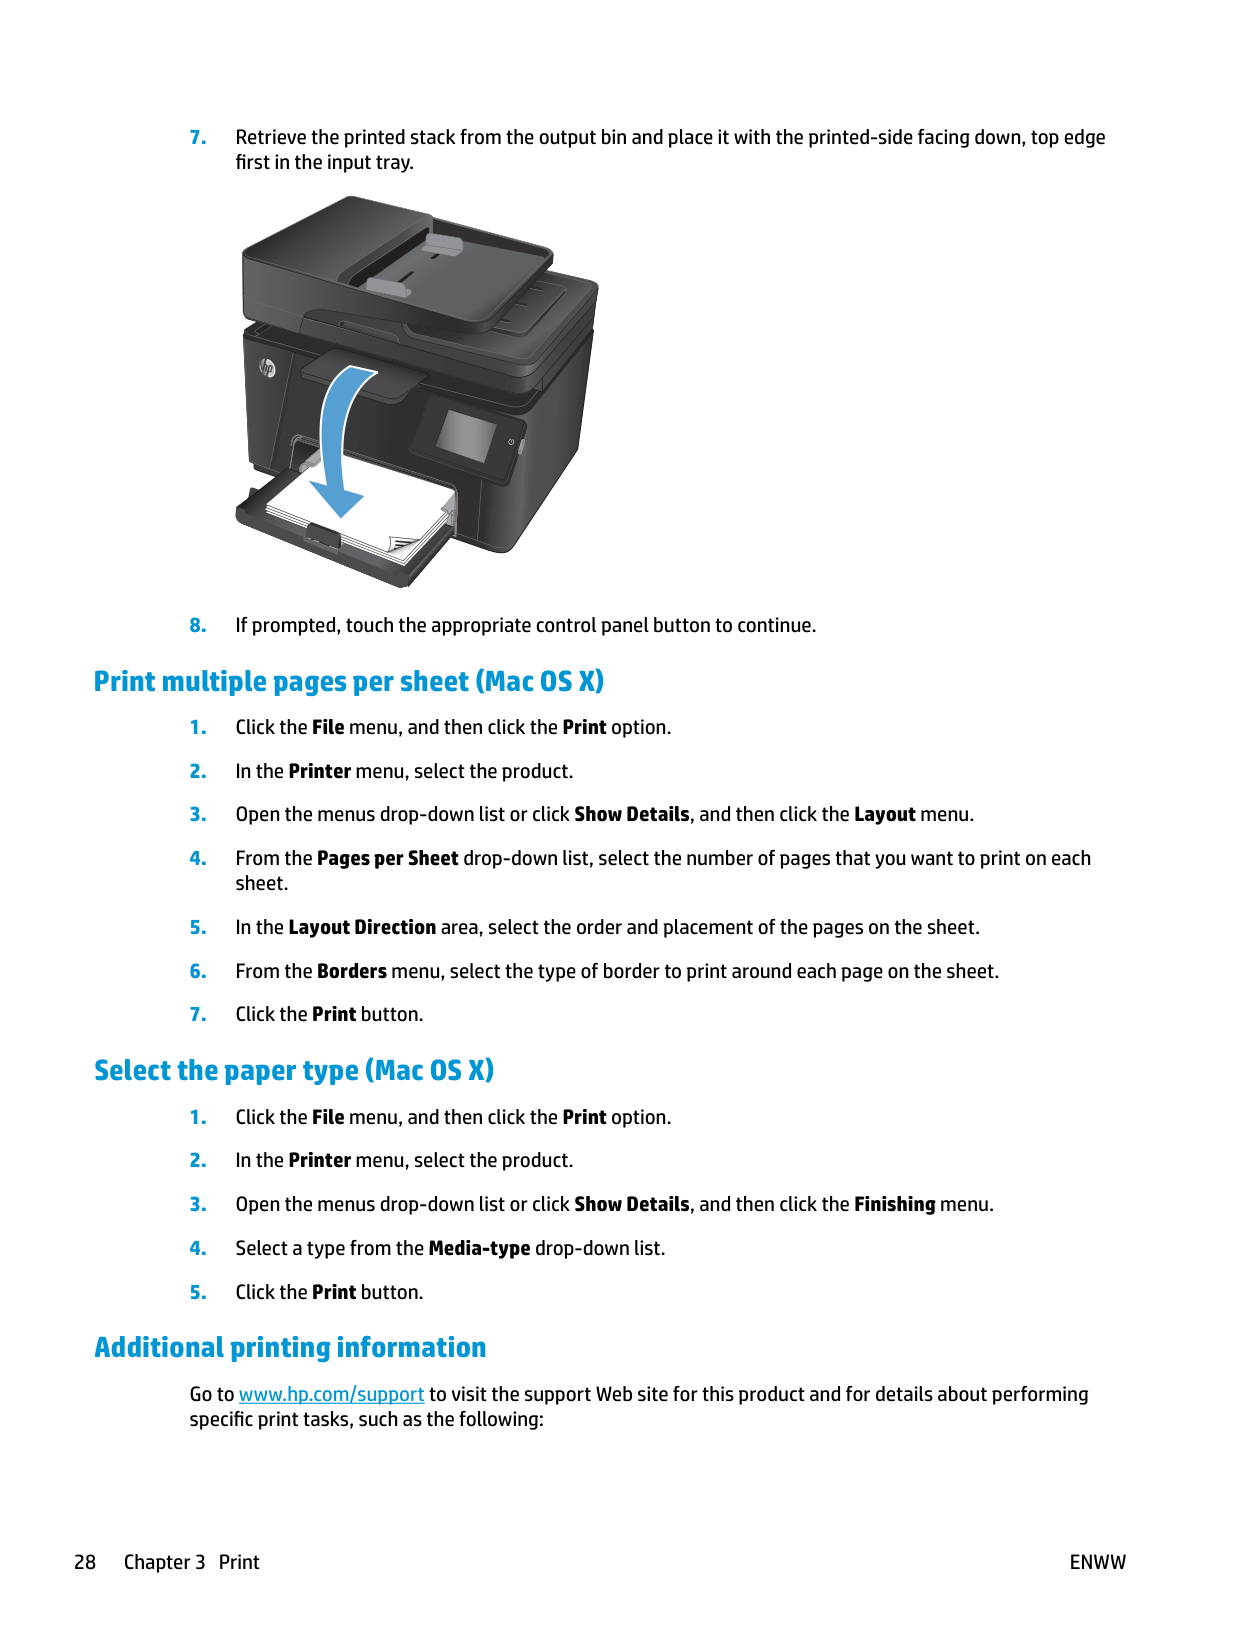
How do I print multiple pages per sheet?
In your software program, go to Print option and in the printer properties window, set the number of pages per sheet from the Properties or Preferences dialog box. Ensure correct paper orientation is selected.
What should I do if a warning message about low cartridge levels displays on the control panel?
A <Color> cartridge is low or <Color> cartridge is very low message can be enabled/disabled using Economy settings, and it notifies that the toner needs replacement when quality is no longer acceptable.
How do I load Legal-size paper into the printer?
To load Legal paper, squeeze the side latch at the front of the tray and pull it towards you. Tray 2 will extend from the front of the printer by approximately 2 inches (50.8 mm). For more printer-specific help, visit hp.com/support. (Page 5)
My computer is connected to a VPN and the software can't find the printer during setup. What should I do?
Disconnect from the VPN before installing the HP printer software, then reconnect to the VPN after finishing printer setup. Note that you should consider your location and the security of the Wi-Fi network before disconnecting from a VPN. (Page 6)
My computer is connected via Ethernet. Do I need to disconnect it to set up the printer's Wi-Fi?
No, you do not need to disconnect the Ethernet cable from the printer. Simply turn on the computer's Wi-Fi while setting up the printer, and the Ethernet connection can remain active. (Page 6)
Show 19 more questions
What should I do if the printer won't reconnect or maintain a Wi-Fi connection after setup is complete?
What ports are available on the back of the HP Color LaserJet Pro MFP 3301-3304/3388?
Where is the walk-up USB port located on the printer?
How do I access printer tasks and status quickly from the control panel?
How do I control access to the printer?
Where can I find troubleshooting help and support videos for my HP Color LaserJet Pro MFP printer?
如何解决由于Vpn连接导致的无线设置问题?
如何通过控制面板进行登录/注销操作?
在哪里可以找到关于打印故障排除的信息?
What are the steps to set up HP Wireless Direct Printing?
How do I perform a manual duplex copy?
How do I optimize copy quality on my printer?
What should I do if my printer is not picking up paper?
How do I select the correct paper type when printing?
How do I manually print on both sides (duplex) from Windows?
如何访问和使用打印机的所有功能?
怎样装载Legal大小的纸张?
如何查看和调整网络设置?
发生连接超时,如何重新启动无线设置模式?
Full Manual
120 pages

COLOR LASERJET PRO MFP
User Guide


OK


X


M176 M177
HP Color LaserJet Pro MFP M176, M177
User Guide
########### Copyright and License
© Copyright 2015 HP Development Company, L.P.
Reproduction, adaptation, or translation without prior written permission is prohibited, except as allowed under the copyright laws.

The information contained herein is subject to change without notice.
The only warranties for HP products and services are set forth in the express warranty statements accompanying such products and services. Nothing herein should be construed as constituting an additional warranty. HP shall not be liable for technical or editorial errors or omissions contained herein.
Edition 1, 11/2015
########### Trademark Credits
Adobe®, Acrobat®, and PostScript® are trademarks of Adobe Systems Incorporated.
Apple and the Apple logo are trademarks of Apple Computer, Inc., registered in the U.S. and other countries. iPod is a trademark of Apple Computer, Inc. iPod is for legal or rightholderauthorized copying only. Don't steal music.
Bluetooth is a trademark owned by its proprietor and used by HP Company under license.
Microsoft®, Windows®, Windows® XP, and Windows Vista® are U.S. registered trademarks of Microsoft Corporation.
Table of contents
Product front view ............................................................................................................................... 4 Product back view ............................................................................................................................... 5
Control panel overview .......................................................................................................................................... 6 LCD control-panel layout (M176n model) ........................................................................................... 6 Touchscreen control-panel layout (M177fw model) .......................................................................... 7 Control-panel Home screen ................................................................................................................ 8
Supported paper sizes ...................................................................................................................... 12 Supported paper types ..................................................................................................................... 13
Load the input tray .............................................................................................................................................. 15
How to print (Windows) ..................................................................................................................... 20 Manually print on both sides (Windows) ........................................................................................... 20 Print multiple pages per sheet (Windows) ........................................................................................ 22 Select the paper type (Windows) ...................................................................................................... 25 Additional printing information ........................................................................................................ 26
Print tasks (Mac OS X) .......................................................................................................................................... 27 How to print (Mac OS X) ..................................................................................................................... 27 Manually print on both sides (Mac OS X) ........................................................................................... 27 Print multiple pages per sheet (Mac OS X) ........................................................................................ 28 Select the paper type (Mac OS X) ...................................................................................................... 28 Additional printing information ........................................................................................................ 28
Web-based printing ............................................................................................................................................. 30 HP ePrint ............................................................................................................................................ 30
ENWW iii

HP ePrint software ............................................................................................................................ 30 AirPrint ............................................................................................................................................... 31
Set up HP Wireless Direct Printing (touchscreen models only) .......................................................................... 32
Connect the product .......................................................................................................................... 42 Configure the product ....................................................................................................................... 43
Configure fax time, date, and header ............................................................................. 43 Control panel ................................................................................................ 43 HP Fax Setup Wizard (Windows) .................................................................. 44
Configure for stand-alone fax ........................................................................................ 44 Configure for an answering machine .............................................................................. 44 Configure for an extension phone .................................................................................. 44
Install the HP Fax software (Windows, optional) .............................................................................. 45
Send a fax ............................................................................................................................................................ 46 Send a fax by dialing manually from the product control panel ...................................................... 46 Send a fax from the HP software (Windows) .................................................................................... 46
Create, edit, and delete speed-dial entries ......................................................................................................... 47 Create and edit speed-dial entries .................................................................................................... 47 Delete speed-dial entries .................................................................................................................. 47
Open the HP Utility ............................................................................................................................ 54 HP Utility features ............................................................................................................................. 54
Product security features .................................................................................................................................... 56 Set or change the product password ................................................................................................ 56
Lock the product ................................................................................................................................ 57
Economy settings ................................................................................................................................................ 58 Print with EconoMode ....................................................................................................................... 58 Configure the Sleep/Auto Off After setting ....................................................................................... 58
A
Enable or disable the Very Low settings ........................................................................................... 60 Replace the toner cartridge ................................................................................................................................. 62 Replace the imaging drum ................................................................................................................................... 66
The product does not pick up paper ................................................................................................. 74 The product picks up multiple sheets of paper ................................................................................ 74 Frequent or recurring paper jams ..................................................................................................... 74 Prevent paper jams ........................................................................................................................... 75

Clear jams from the input tray ............................................................................................................................. 76 Clear jams in the output bin ................................................................................................................................. 78 Clear jams in the document feeder ..................................................................................................................... 80 Improve print quality ........................................................................................................................................... 82
Print from a different software program .......................................................................................... 82 Set the paper-type setting for the print job ..................................................................................... 82
Check the paper-type setting (Windows) ....................................................................... 82 Check the paper-type setting (Mac OS X) ....................................................................... 83
Check the toner-cartridge status ...................................................................................................... 83 Calibrate the product to align the colors .......................................................................................... 84 Print a cleaning page ......................................................................................................................... 84 Perform additional print quality troubleshooting ............................................................................ 85
Print the print quality page ............................................................................................. 85 Interpret the print quality page ...................................................................................... 85
Inspect the toner cartridge for damage ............................................................................................ 86 Check the paper and printing environment ...................................................................................... 86
Use paper that meets HP specifications ......................................................................... 86 Check the product environment ..................................................................................... 87
Check the EconoMode settings ......................................................................................................... 87 Adjust color settings (Windows) ....................................................................................................... 87
Improve copy and scan quality ............................................................................................................................ 89 Check the scanner glass for dirt and smudges ................................................................................. 89 Check the paper settings .................................................................................................................. 89
ENWW v
Check the image adjustment settings .............................................................................................. 90 Optimize for text or pictures ............................................................................................................. 90 Edge-to-edge copying ....................................................................................................................... 91 Clean the pickup rollers and separation pad in the document feeder ............................................. 91
Improve fax image quality ................................................................................................................................... 93 Check the scanner glass for dirt or smudges ................................................................................... 93 Check the send-fax resolution setting .............................................................................................. 93 Check the lightness/darkness setting ............................................................................................... 93 Check the Error Correction setting .................................................................................................... 94 Check the Fit-to-Page setting ........................................................................................................... 94 Clean the pickup rollers and separation pad in the document feeder ............................................. 94 Send to a different fax machine ........................................................................................................ 95 Check the sender's fax machine ........................................................................................................ 95
Solve wired network problems ............................................................................................................................ 96 Poor physical connection .................................................................................................................. 96 The computer is using the incorrect IP address for the product ...................................................... 96 The computer is unable to communicate with the product .............................................................. 96 The product is using incorrect link and duplex settings for the network ........................................ 97 New software programs might be causing compatibility problems ................................................ 97 The computer or workstation might be set up incorrectly ............................................................... 97 The product is disabled, or other network settings are incorrect .................................................... 97
Solve wireless network problems ....................................................................................................................... 98 Wireless connectivity checklist ......................................................................................................... 98 The product does not print after the wireless configuration completes ......................................... 99 The product does not print, and the computer has a third-party firewall installed ........................ 99 The wireless connection does not work after moving the wireless router or product .................... 99 Cannot connect more computers to the wireless product ............................................................... 99 The wireless product loses communication when connected to a VPN ........................................... 99 The network does not appear in the wireless networks list ............................................................ 99 The wireless network is not functioning ........................................................................................ 100 Perform a wireless network diagnostic test ................................................................................... 100 Reduce interference on a wireless network ................................................................................... 100
Solve fax problems ............................................................................................................................................ 102 Check the hardware setup .............................................................................................................. 102 Faxes are sending slowly ................................................................................................................ 103 Fax quality is poor ........................................................................................................................... 104 Fax cuts off or prints on two pages ................................................................................................. 104
Accessories ........................................................................................................................................................ 106
######## Index ........................................................................................................................................................... 107
ENWW vii

1 Product introduction
ENWW 1
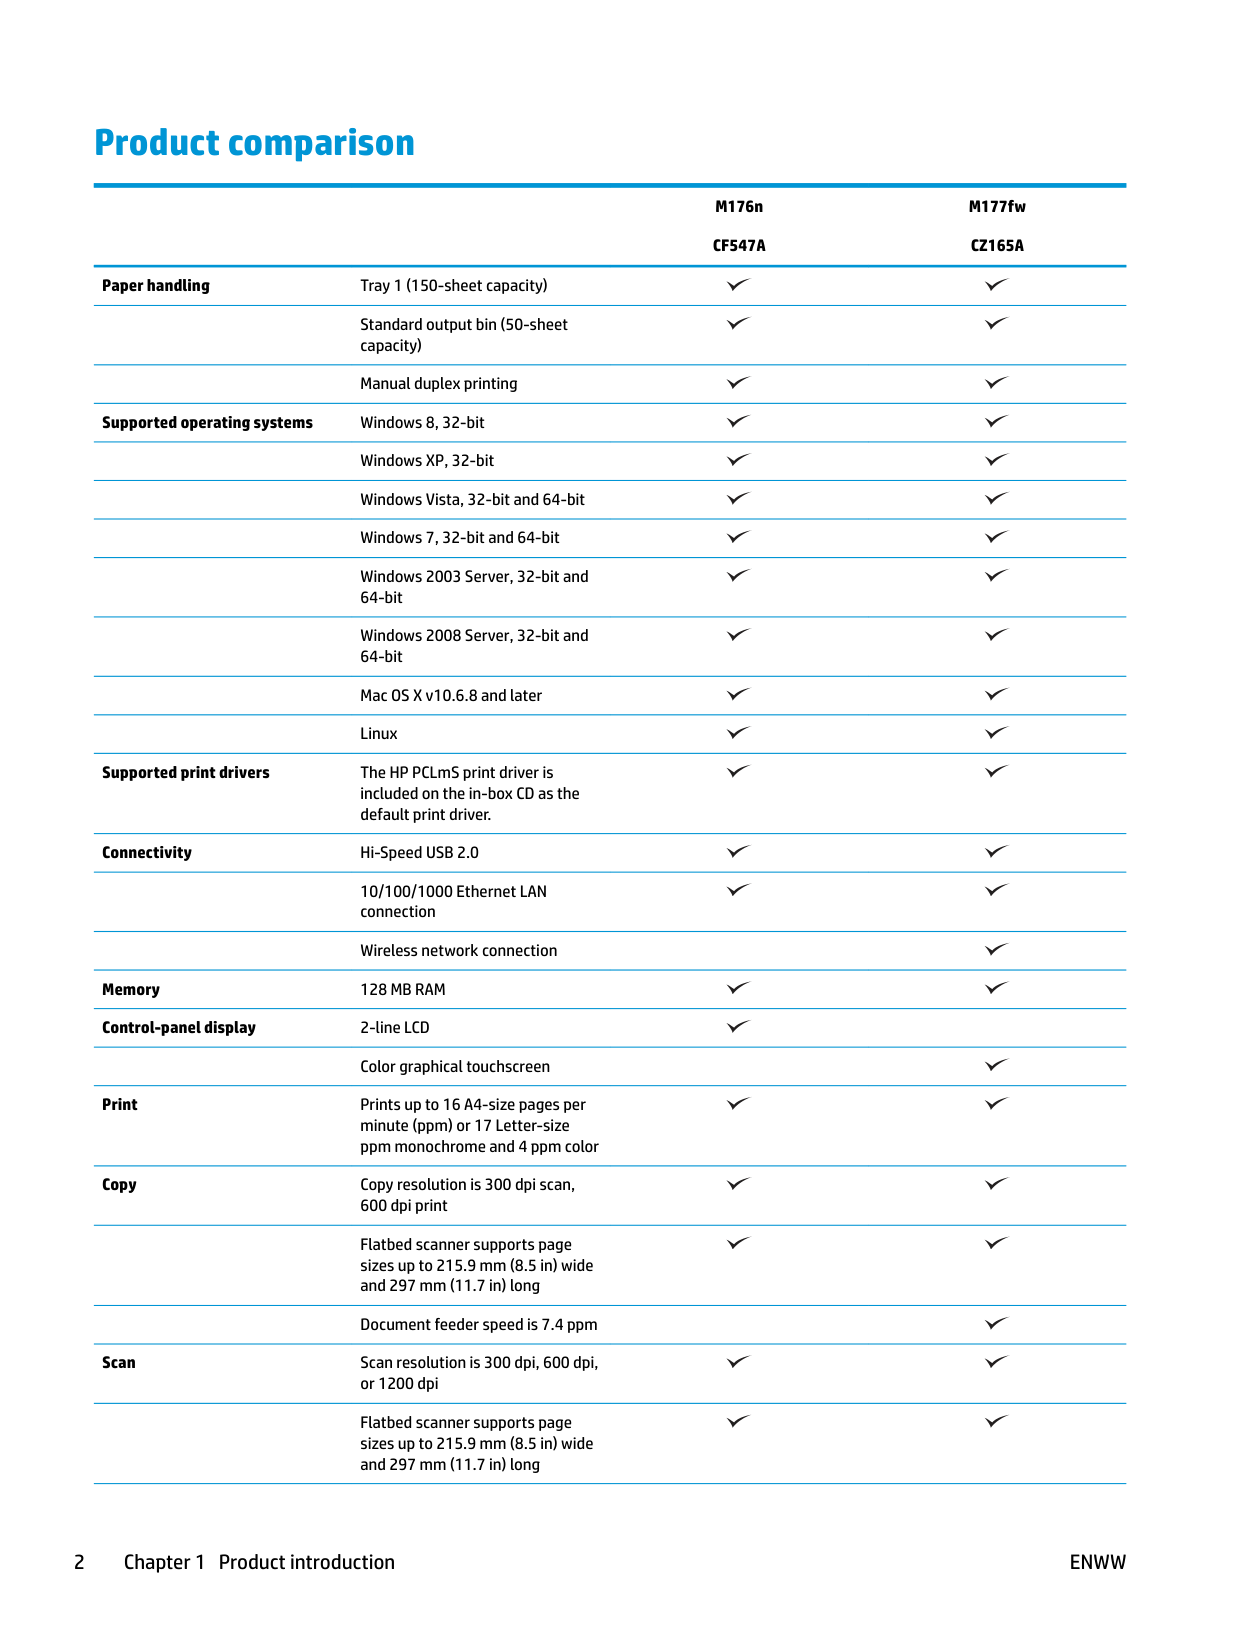
#### Product comparison
Paper handling Tray 1 (150-sheet capacity)
Standard output bin (50-sheet capacity)
Manual duplex printing
Supported operating systems Windows 8, 32-bit Windows XP, 32-bit Windows Vista, 32-bit and 64-bit Windows 7, 32-bit and 64-bit Windows 2003 Server, 32-bit and 64-bit Windows 2008 Server, 32-bit and 64-bit Mac OS X v10.6.8 and later Linux
Supported print drivers The HP PCLmS print driver is included on the in-box CD as the default print driver.
Connectivity Hi-Speed USB 2.0
10/100/1000 Ethernet LAN connection
Wireless network connection Memory 128 MB RAM Control-panel display 2-line LCD
Color graphical touchscreen
Print Prints up to 16 A4-size pages per minute (ppm) or 17 Letter-size ppm monochrome and 4 ppm color
Copy Copy resolution is 300 dpi scan, 600 dpi print Flatbed scanner supports page sizes up to 215.9 mm (8.5 in) wide and 297 mm (11.7 in) long Document feeder speed is 7.4 ppm

Scan Scan resolution is 300 dpi, 600 dpi, or 1200 dpi Flatbed scanner supports page sizes up to 215.9 mm (8.5 in) wide and 297 mm (11.7 in) long
M176n CF547A
M177fw CZ165A
Document feeder speed is 7.4 ppm Fax V.34 with two RJ-11 fax ports
Approximately 500 pages of fax storage, with four days of powerfail recovery
M176n CF547A
M177fw CZ165A
ENWW Product comparison 3
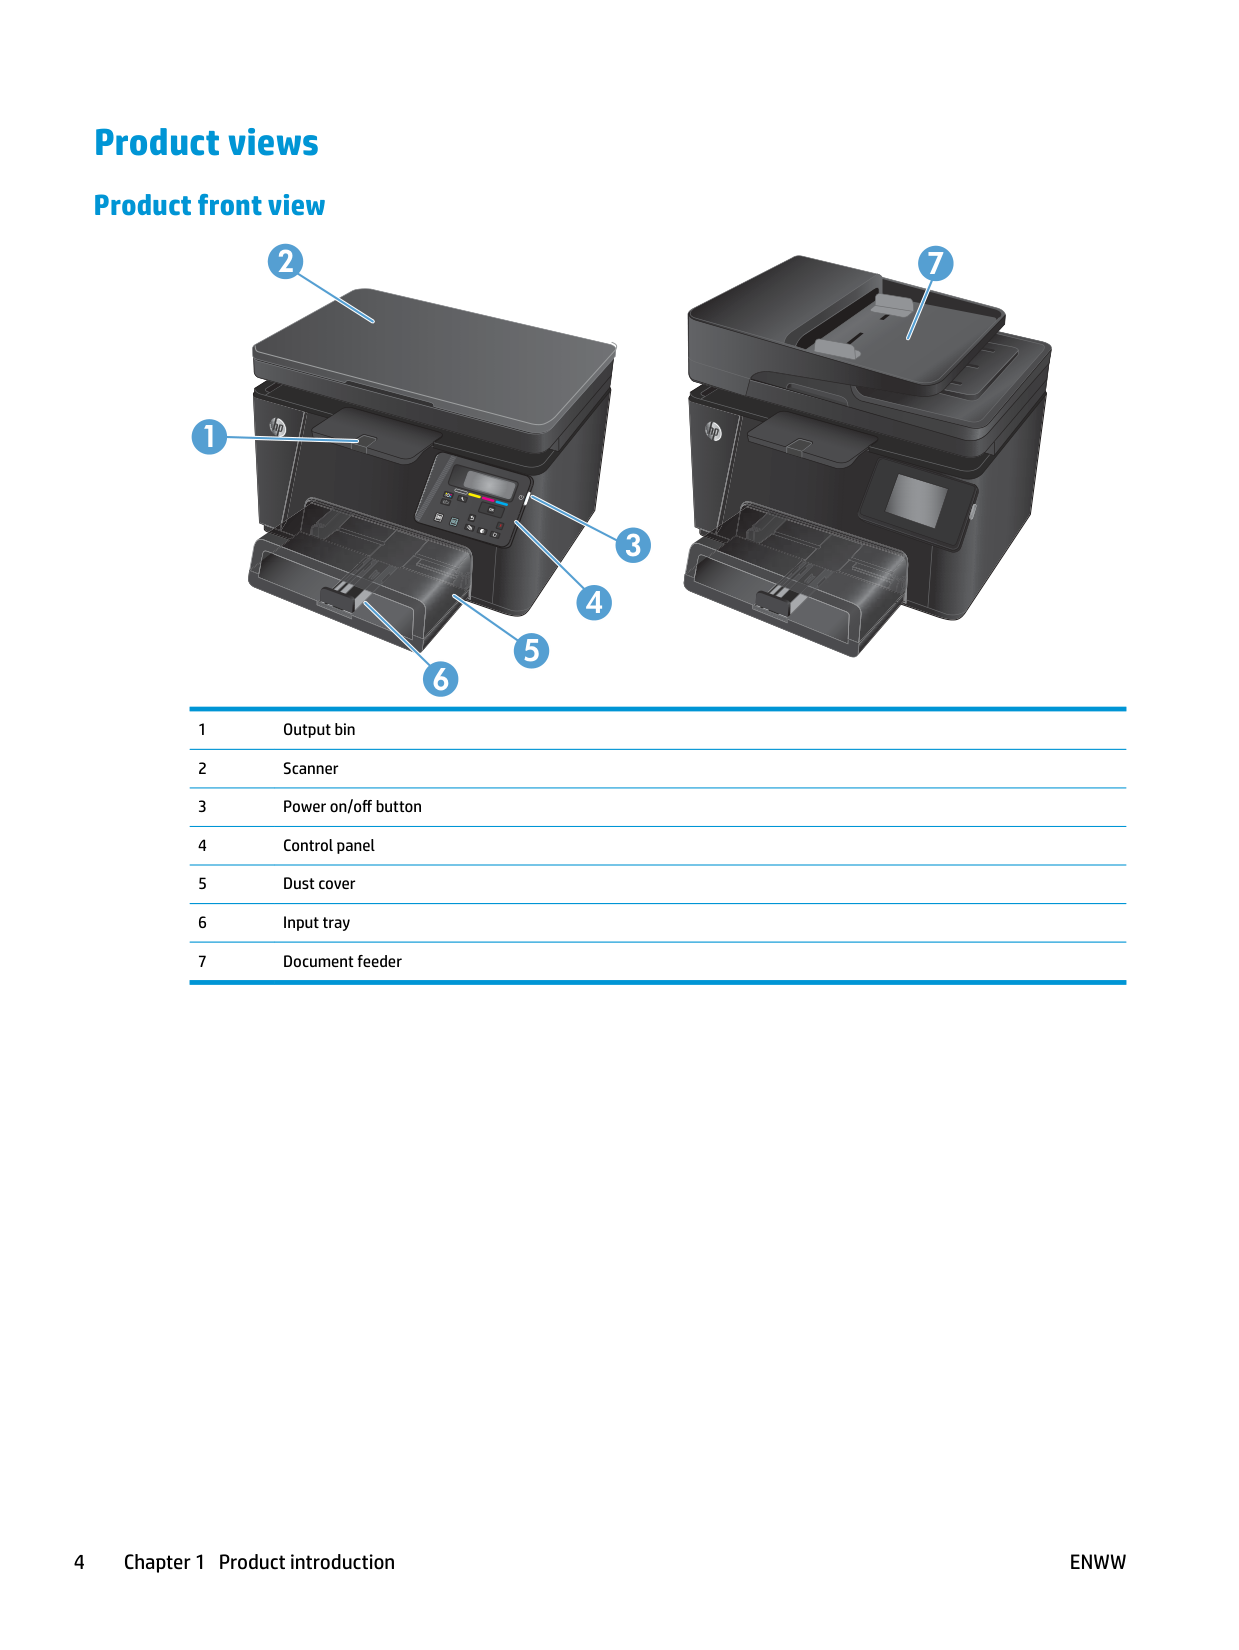
#### Product views
###### Product front view
2
1


OK


X
3


4

5

6
7


###### Product back view
5
3
4
6
7
ENWW Product views 5
#### Control panel overview
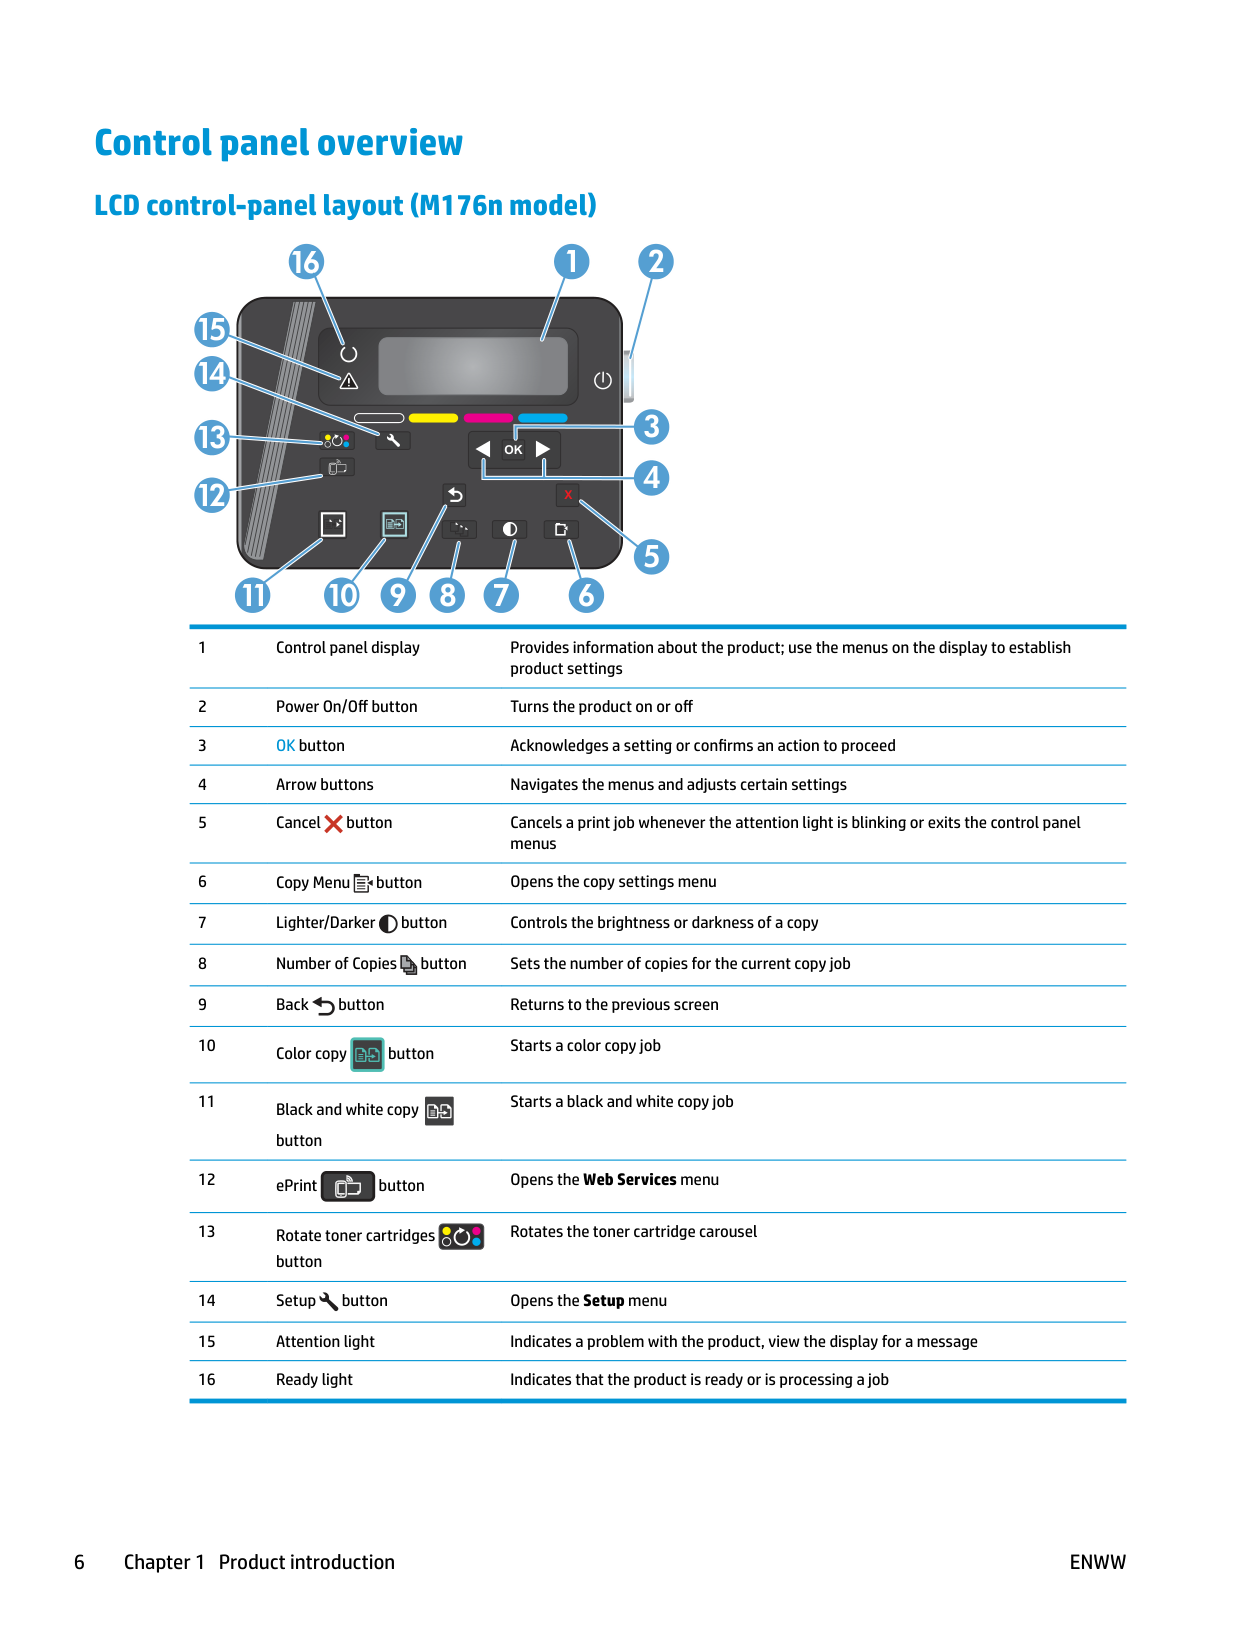
LCD control-panel layout (M176n model)
1 2
11
16
| | | |---|---| |OK| | |X| |
3
4

5 678910
menus
| | |---|
Starts a black and white copy job
Rotates the toner cartridge carousel
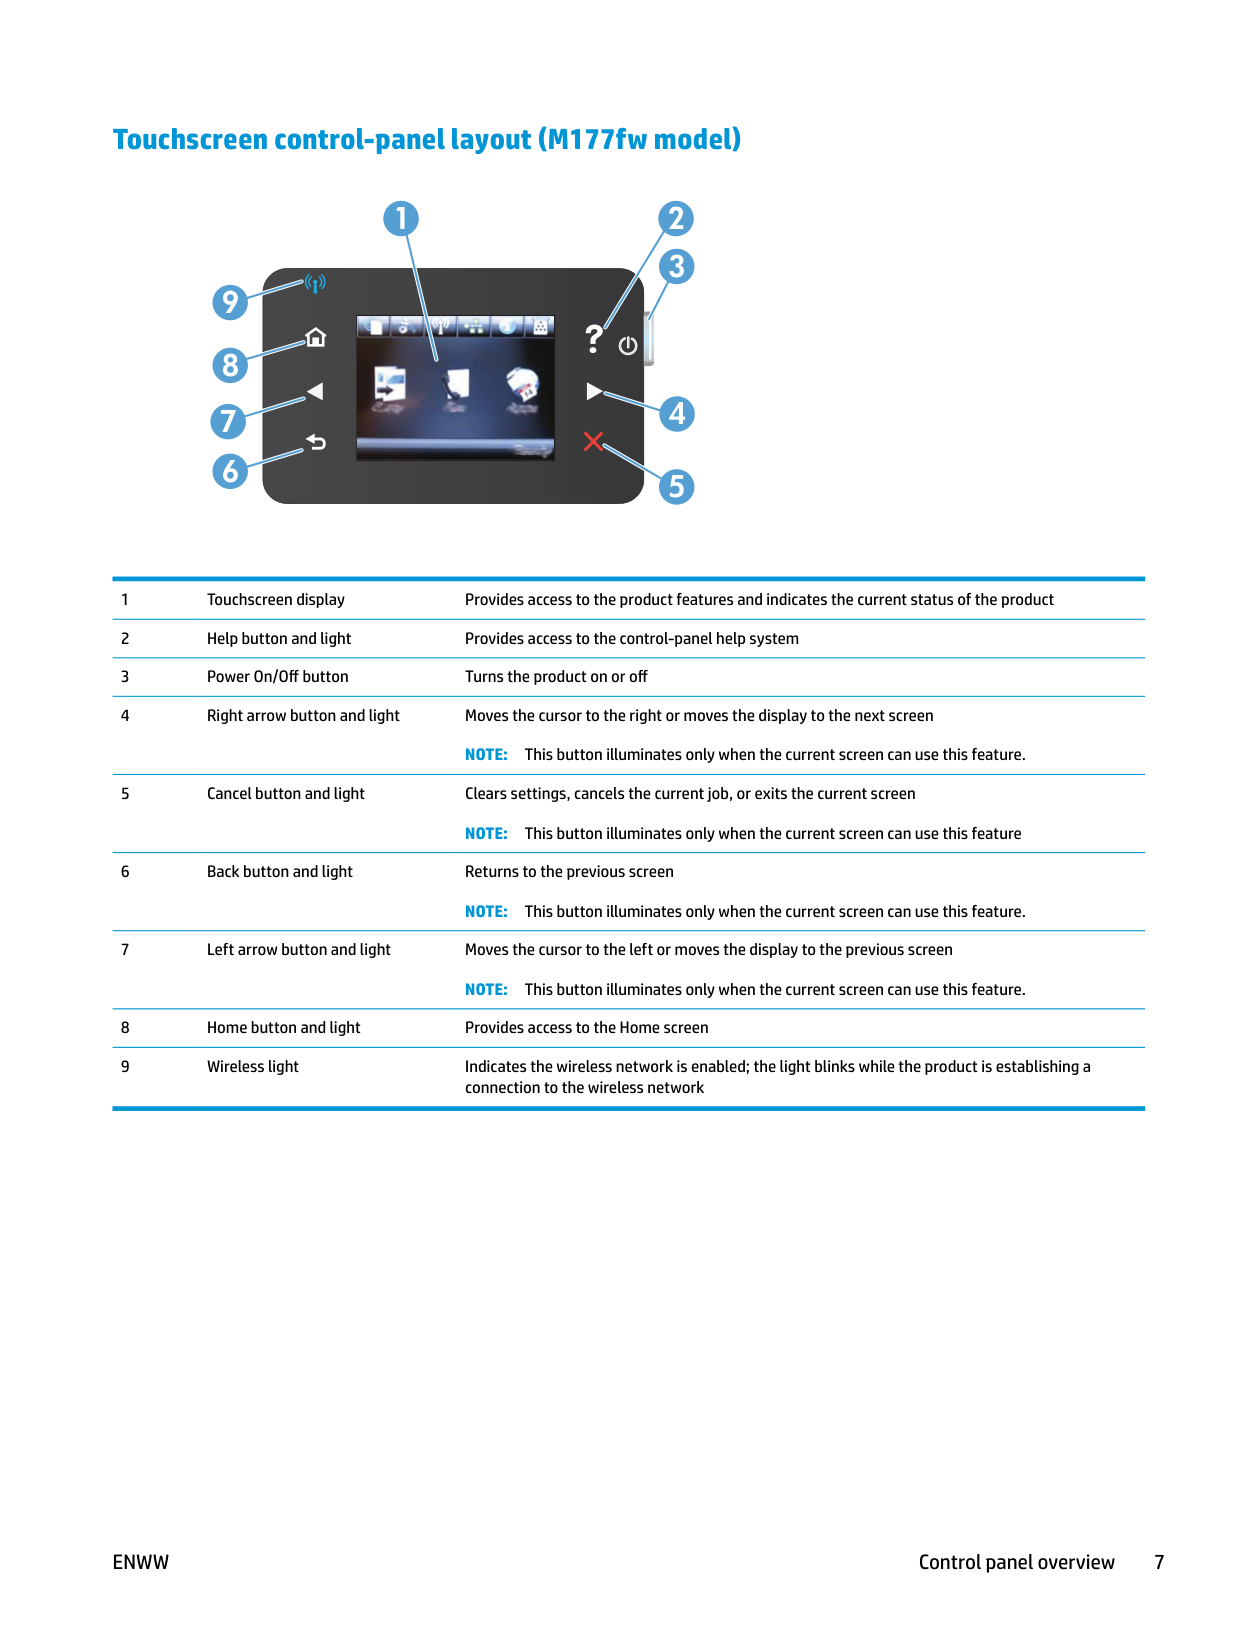
###### Touchscreen control-panel layout (M177fw model)
##### 1
2
##### 9

##### 876
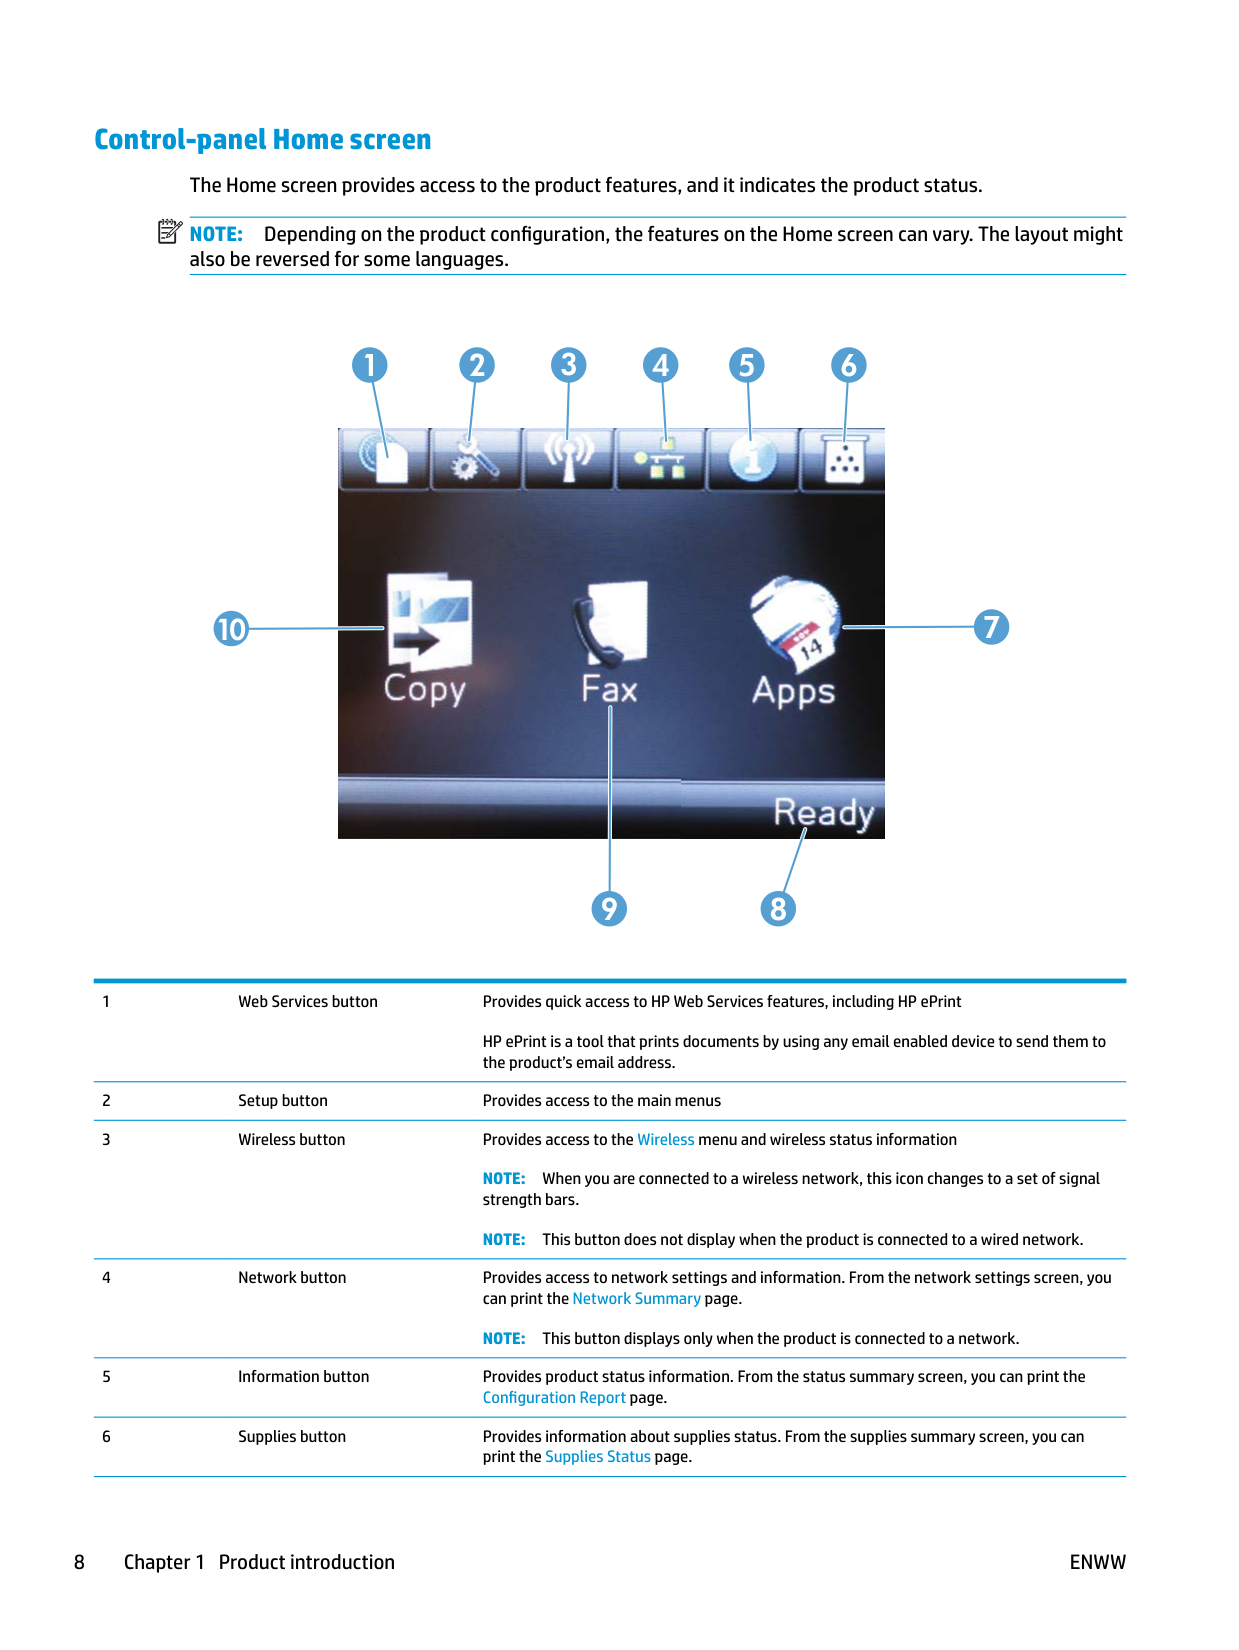
Control-panel Home screen The Home screen provides access to the product features, and it indicates the product status. NOTE: Depending on the product configuration, the features on the Home screen can vary. The layout might also be reversed for some languages.
| | |---|
##### 1 2 3 4 5 6


10 7

##### 89
HP ePrint is a tool that prints documents by using any email enabled device to send them to the product’s email address.
NOTE: When you are connected to a wireless network, this icon changes to a set of signal strength bars.
NOTE: This button does not display when the product is connected to a wired network.
2 Paper trays
ENWW 11
#### Supported paper sizes and types
###### Supported paper sizes
| | |---|
NOTE: To obtain the best results, select the correct paper size and type in the print driver before printing.
Size Dimensions Letter 216 x 279 mm (8.5 x 11 in) Legal 216 x 356 mm (8.5 x 14 in) Executive 184 x 267 mm (7.3 x 10.5 in) Oficio 8.5 x 13 216 x 330 mm (8.5 x 13 in)
100 x 148 mm (3.9 x 5.8 in)
Double Japanese Postcard Rotated D Postcard (JIS)
200 x 148 mm (7.9 x 5.8 in)
Envelope #10 105 x 241 mm (4.1 x 9.5 in) Envelope Monarch 98 x 191 mm (3.9 x 7.5 in)

Supported paper types The product supports the following paper types: NOTE: To obtain the best results, select the correct paper size and type in the print driver before printing.
| | |---|
ENWW Supported paper sizes and types 13

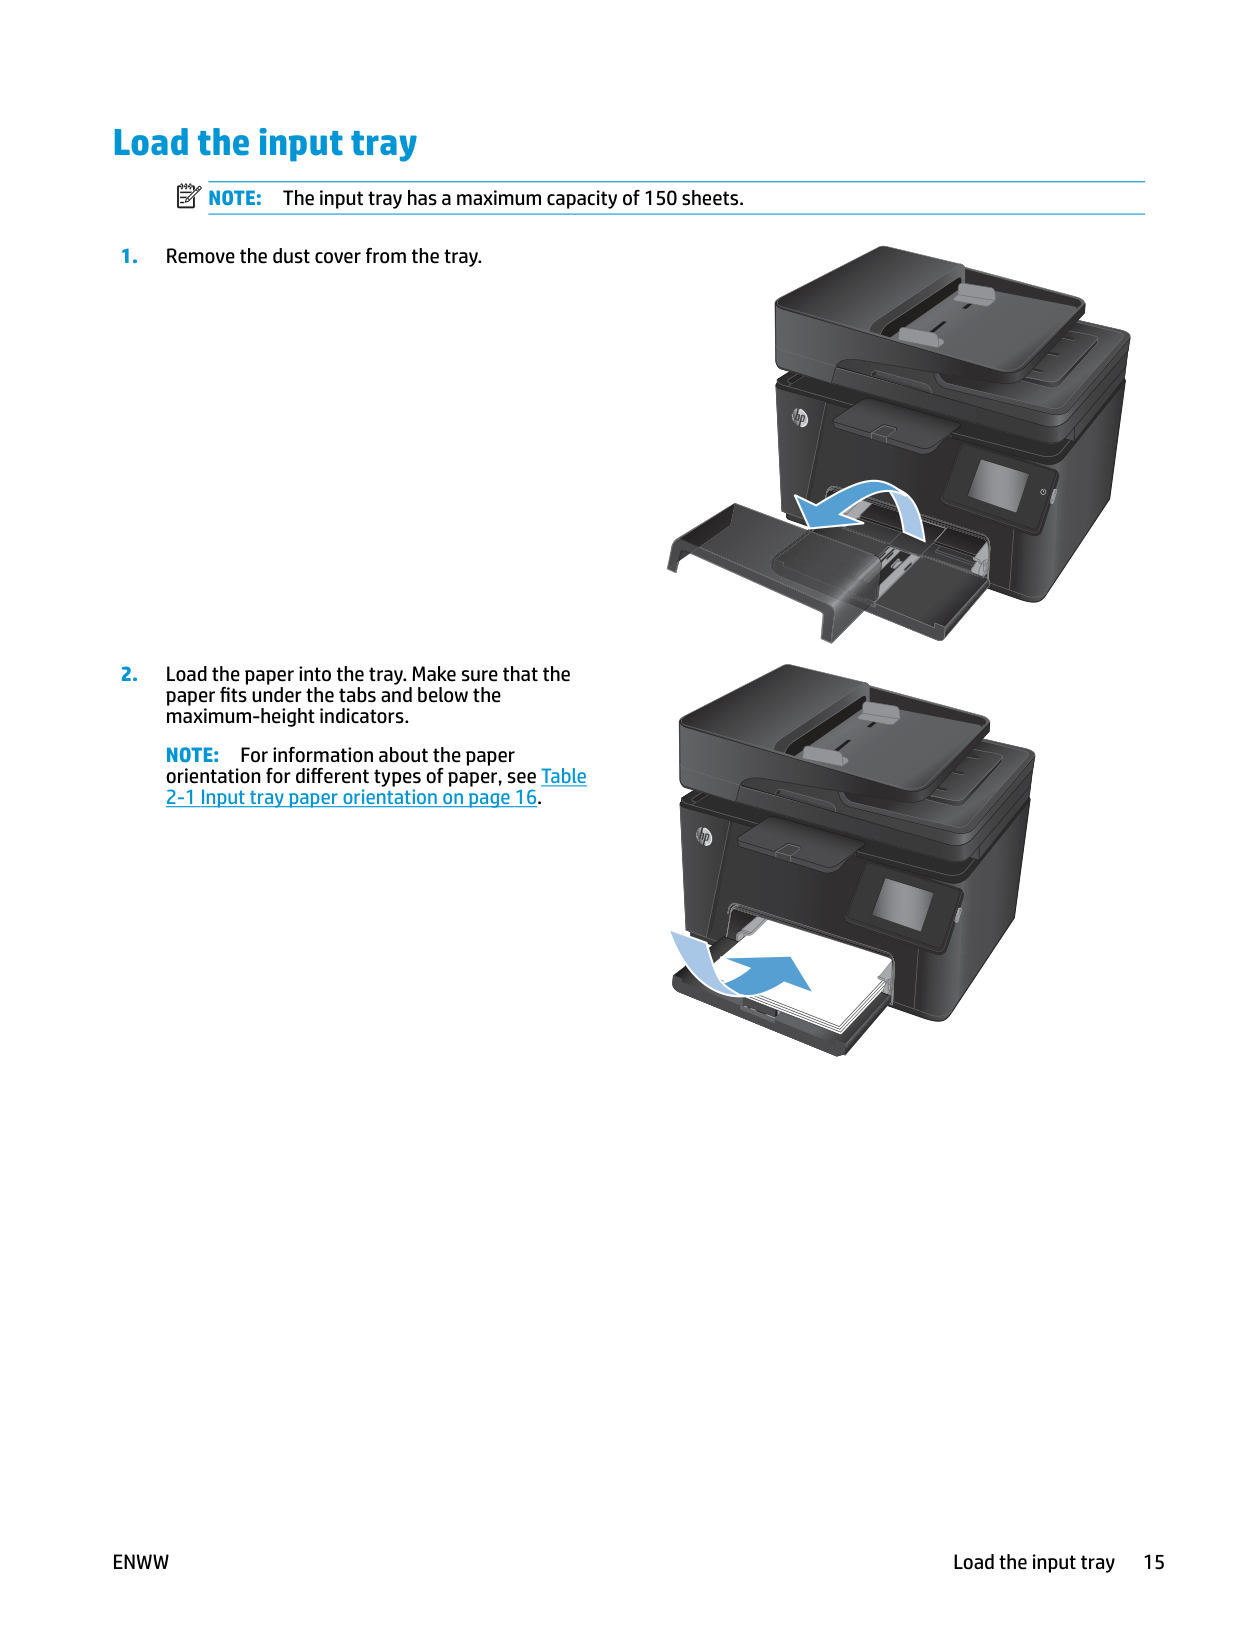
#### Load the input tray
| | |---|
NOTE: The input tray has a maximum capacity of 150 sheets.


NOTE: For information about the paper orientation for different types of paper, see Table 2-1 Input tray paper orientation on page 16.


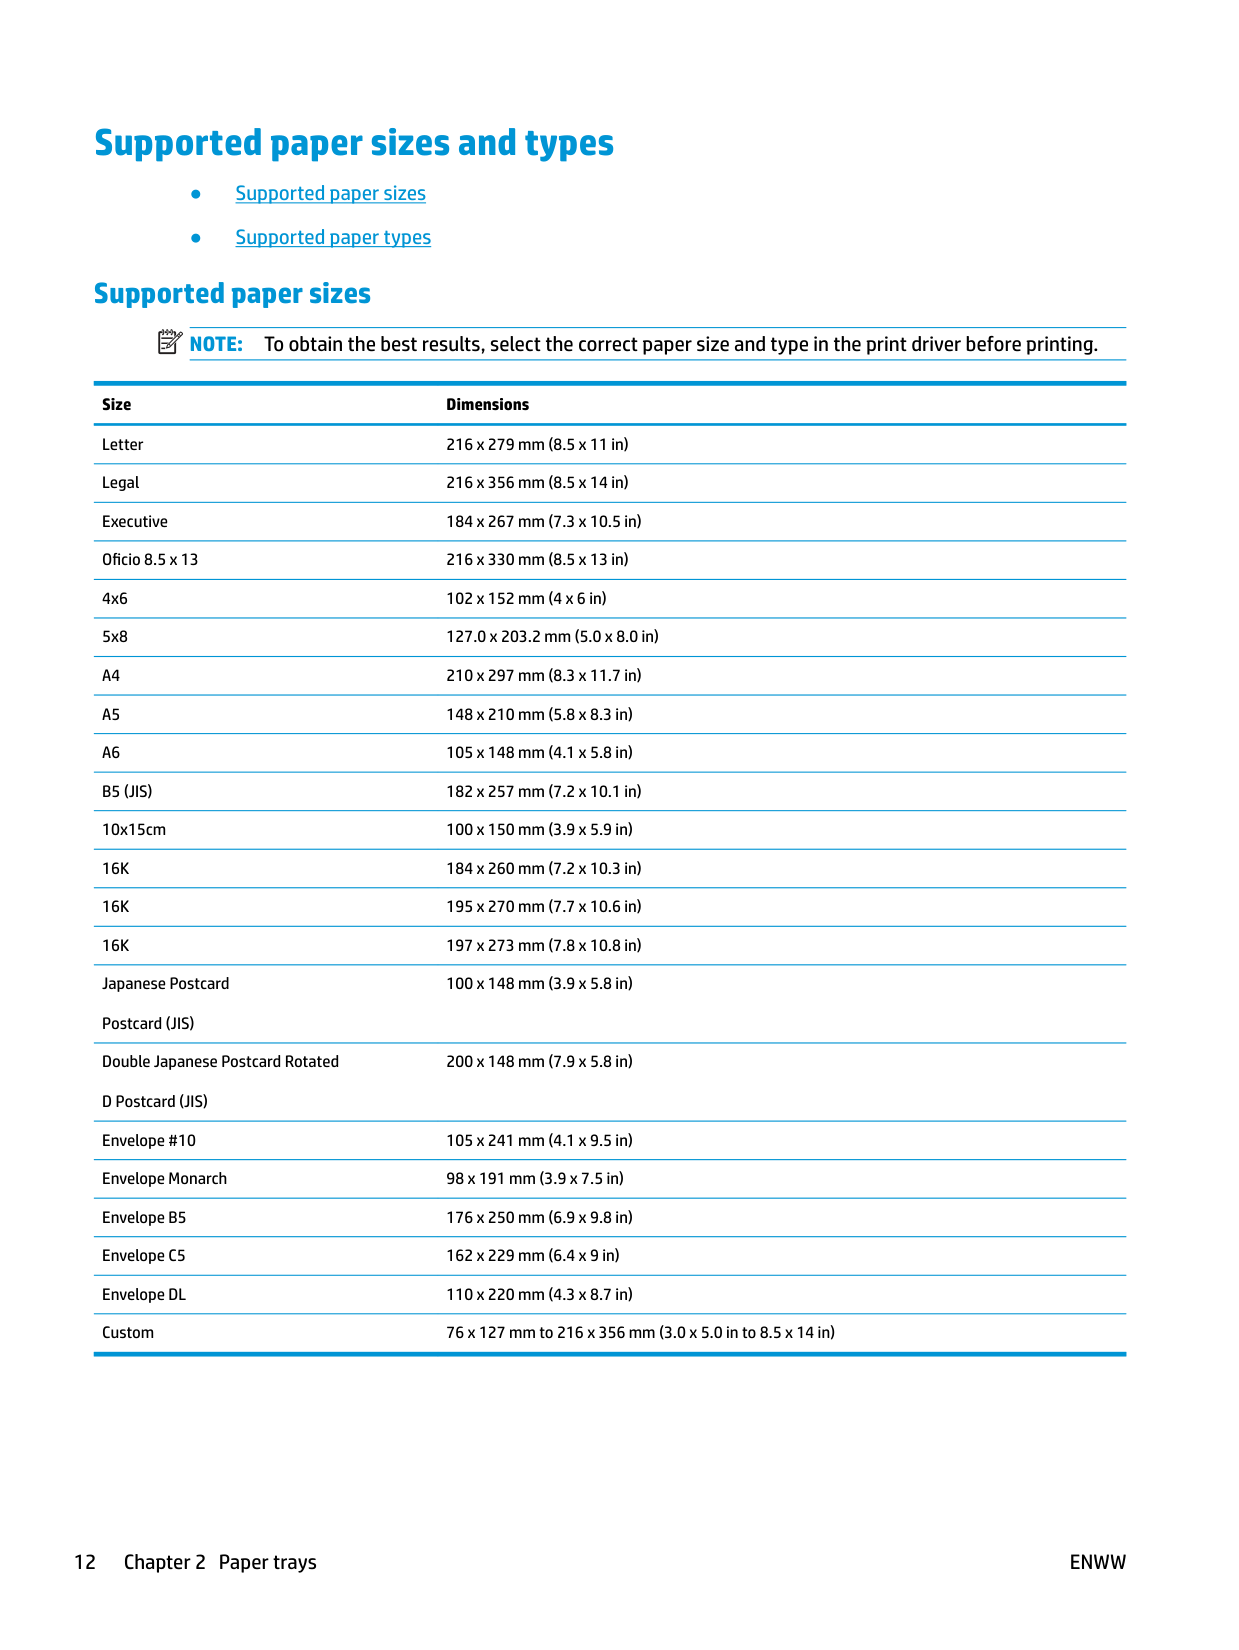


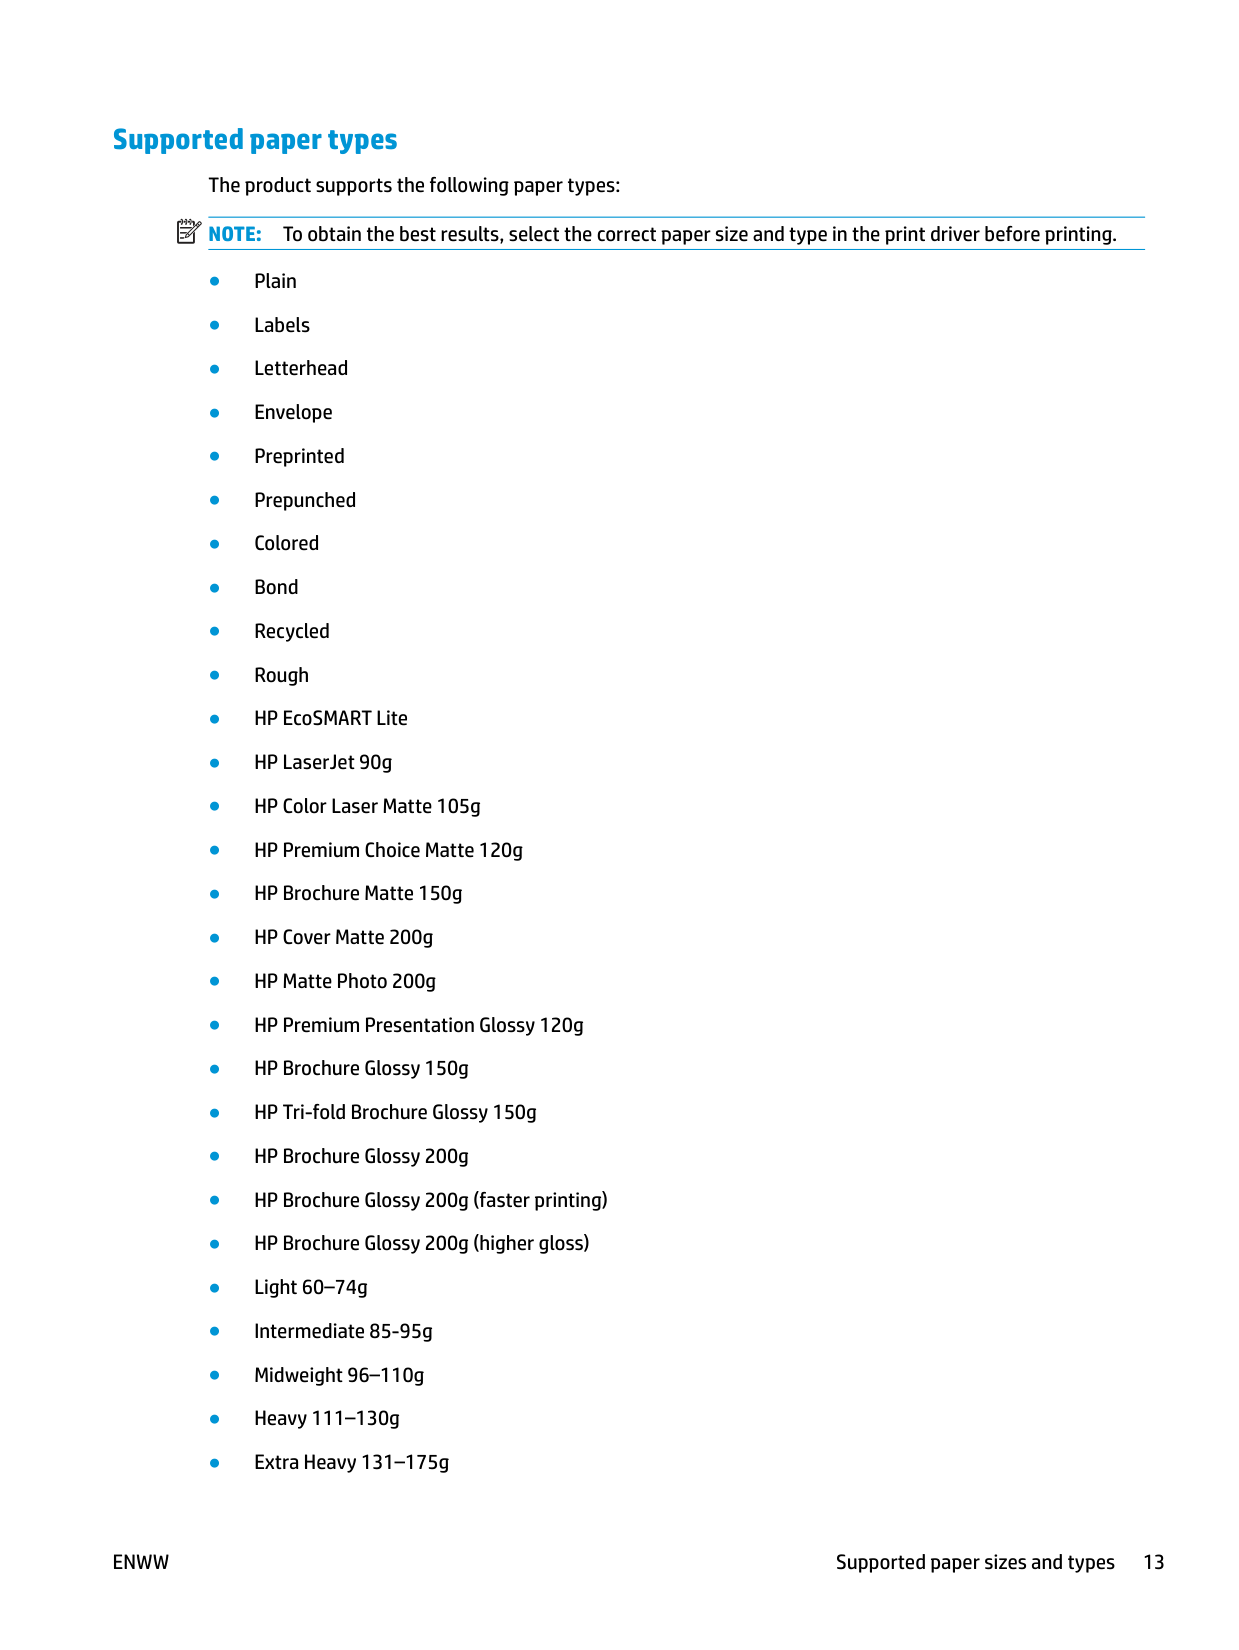


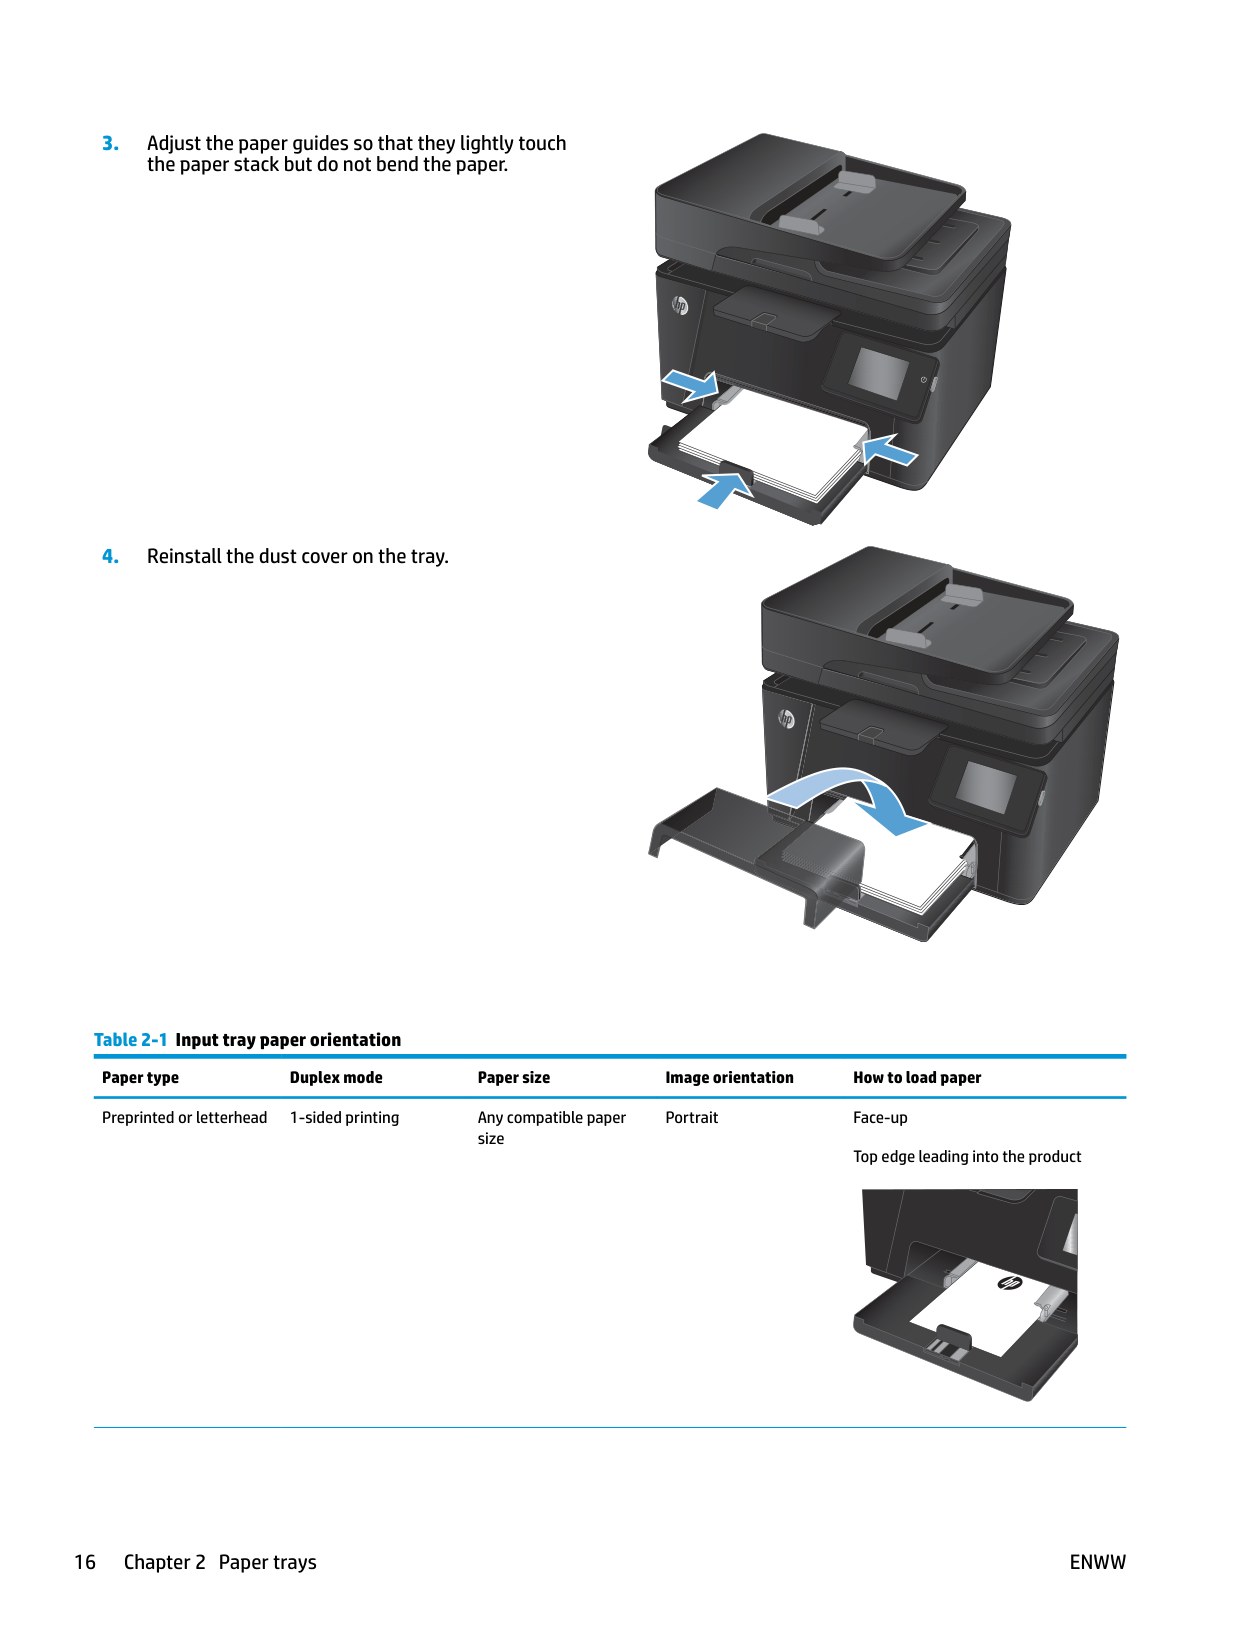
Table 2-1 Input tray paper orientation Paper type Duplex mode Paper size Image orientation How to load paper Preprinted or letterhead 1-sided printing Any compatible paper
Portrait Face-up Top edge leading into the product
size

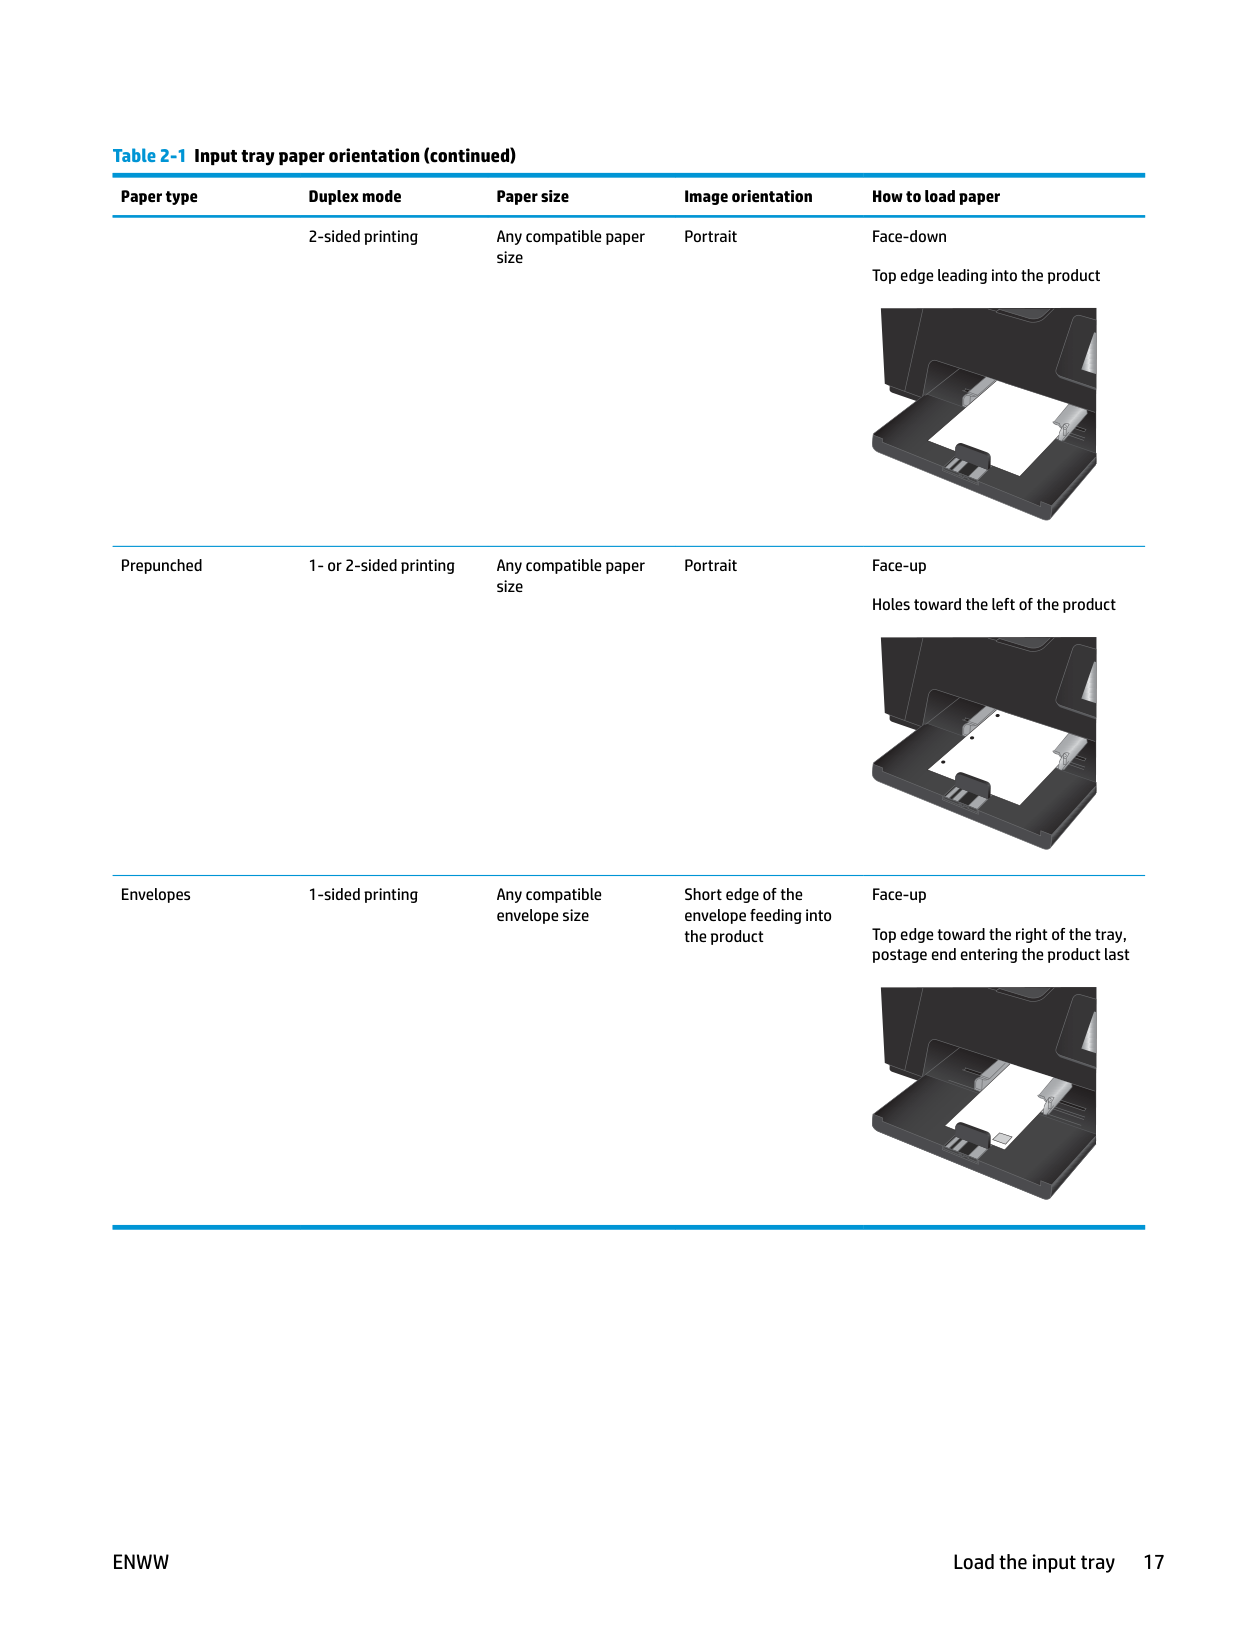
########## Table 2-1 Input tray paper orientation (continued)
########### Paper type Duplex mode Paper size Image orientation How to load paper
2-sided printing Any compatible paper size
Portrait Face-down Top edge leading into the product
Prepunched 1- or 2-sided printing Any compatible paper size
Envelopes 1-sided printing Any compatible envelope size
Portrait Face-up Holes toward the left of the product
Short edge of the envelope feeding into the product
Face-up
Top edge toward the right of the tray, postage end entering the product last
3 Print
ENWW 19
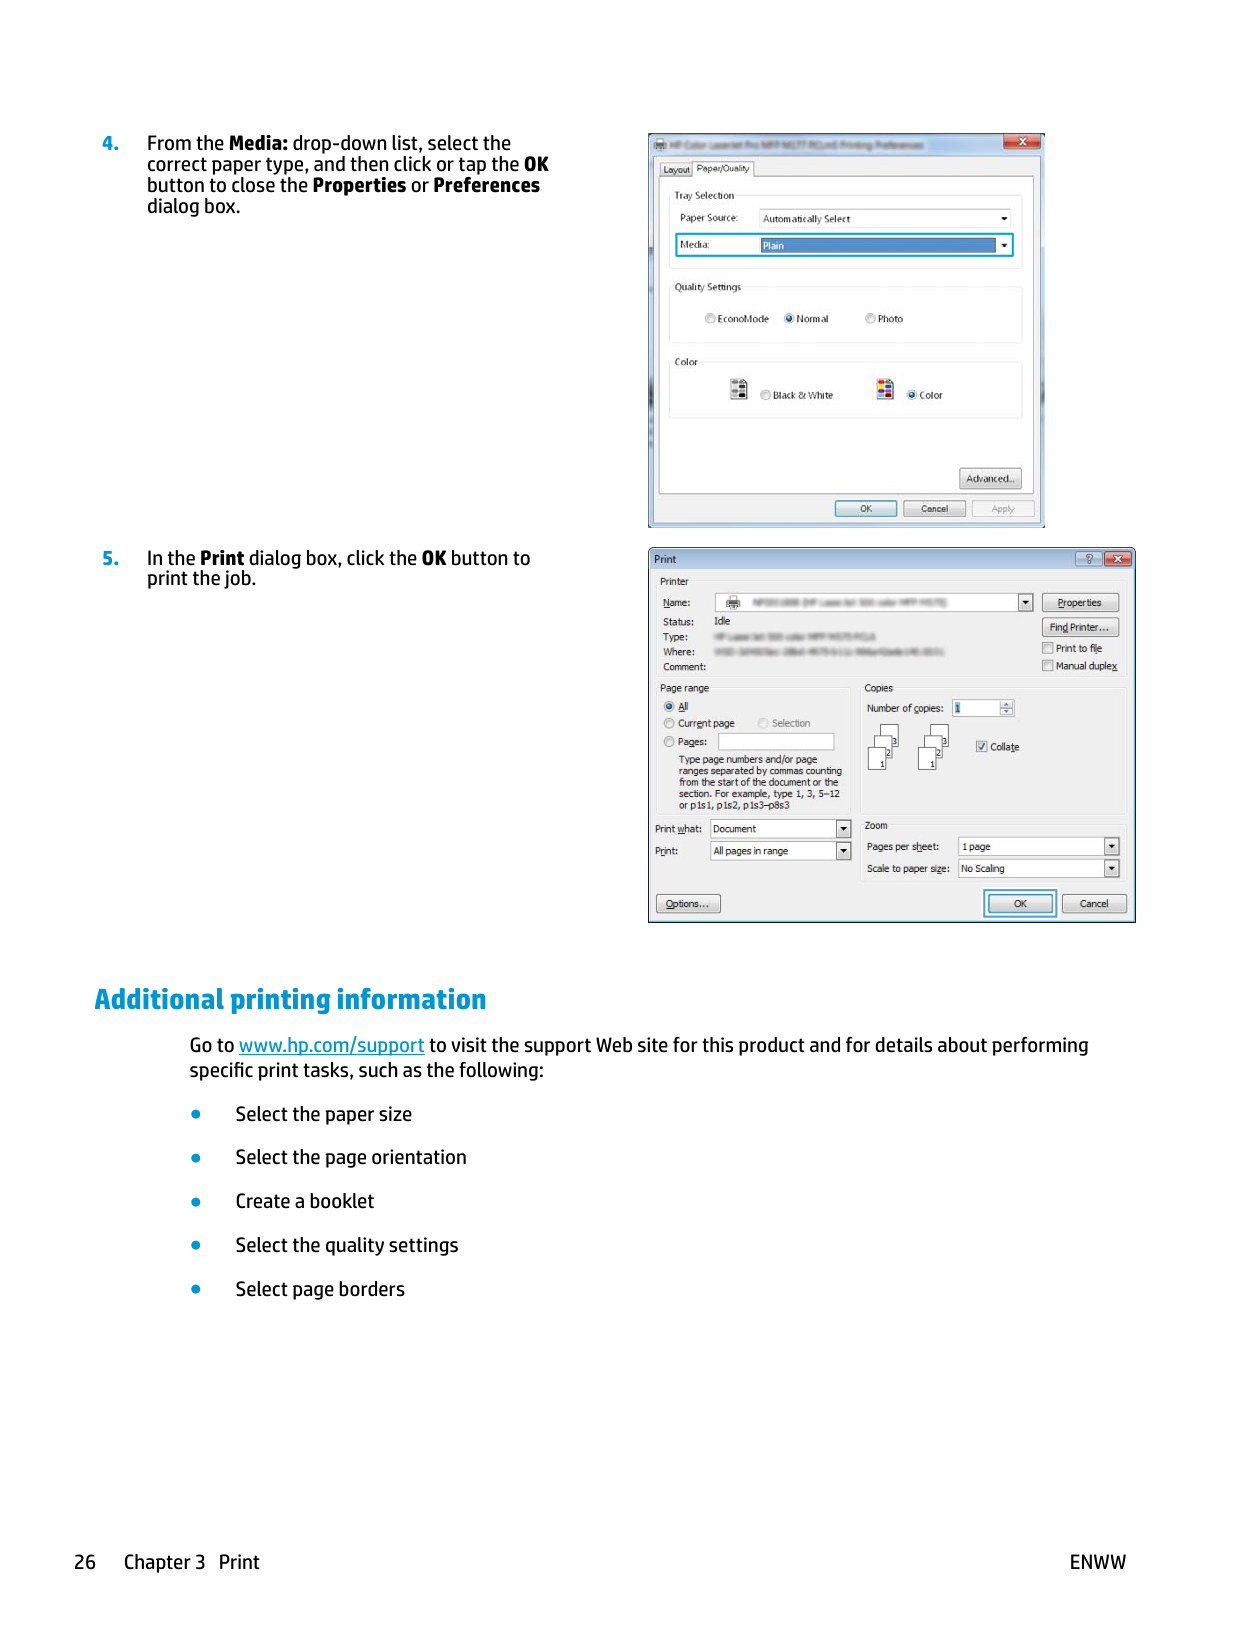
#### Print tasks (Windows)
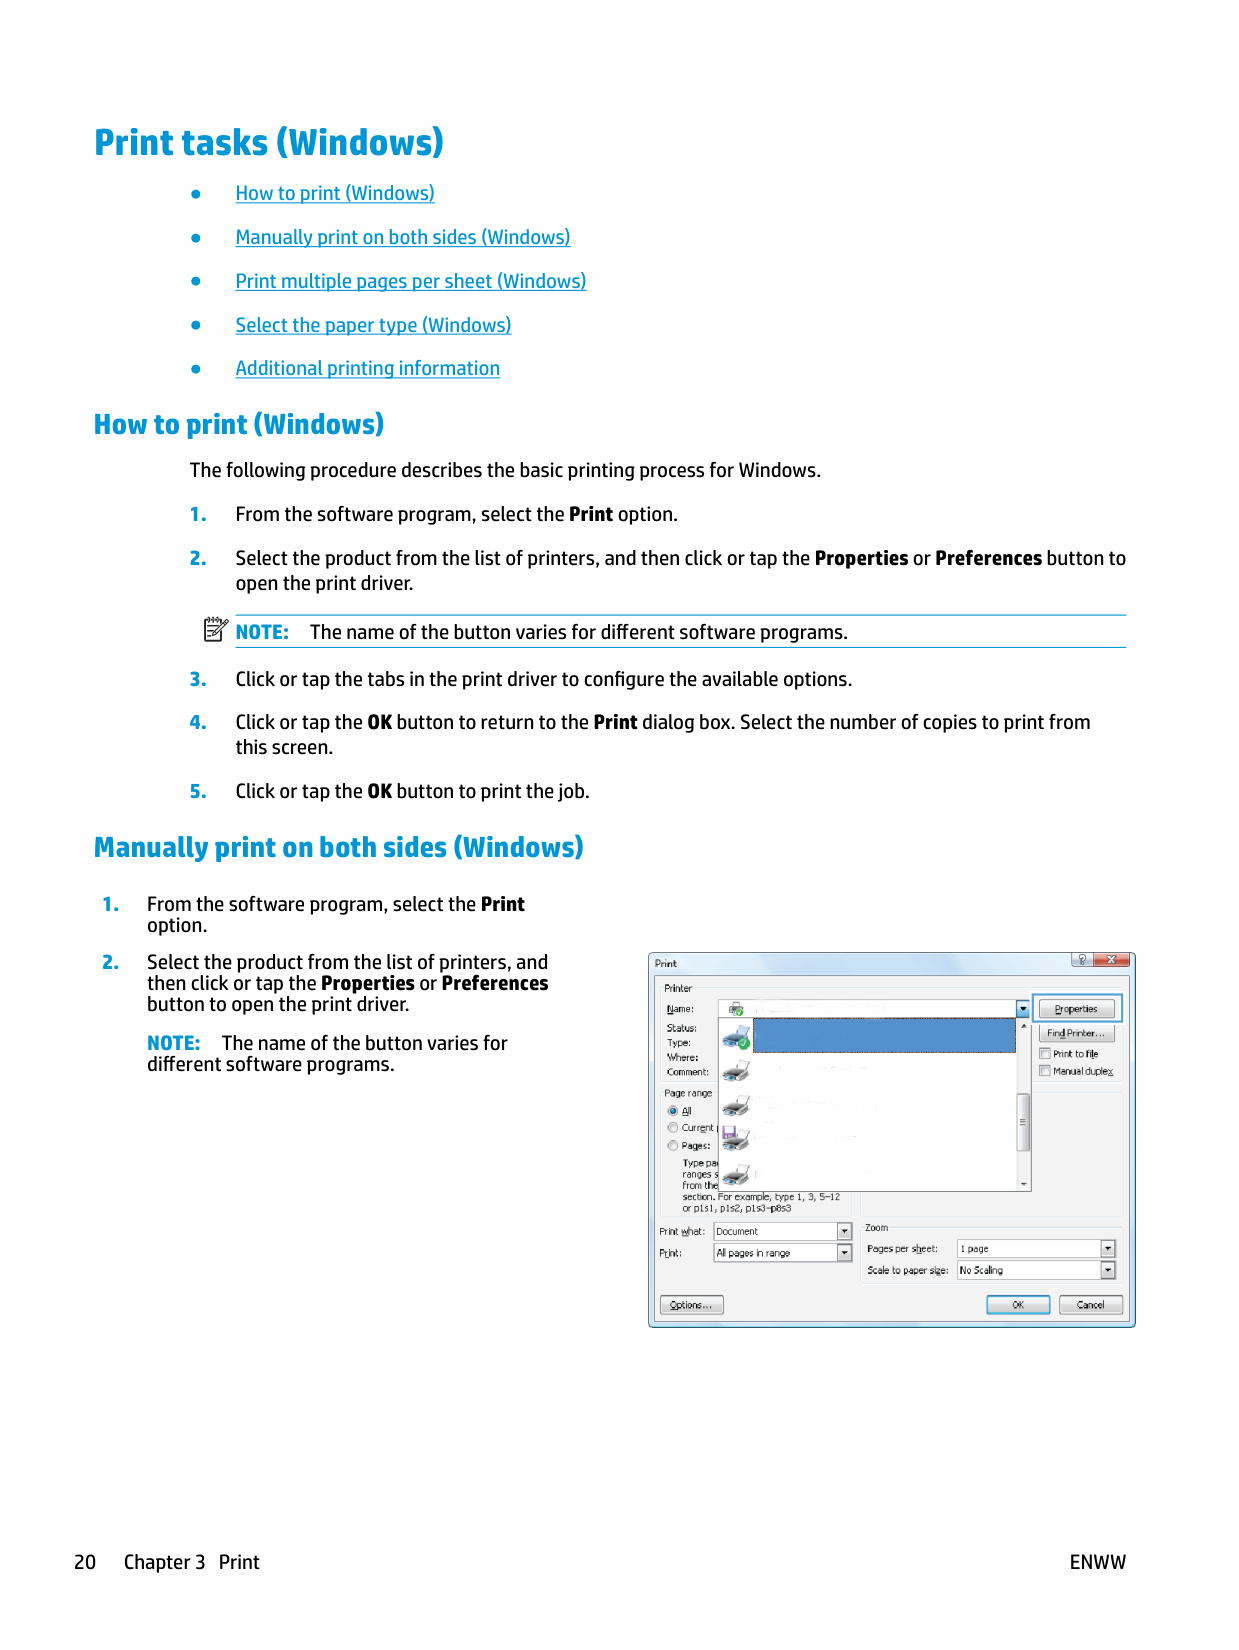
###### How to print (Windows)
The following procedure describes the basic printing process for Windows.
| | |---|
###### Manually print on both sides (Windows)
NOTE: The name of the button varies for different software programs.

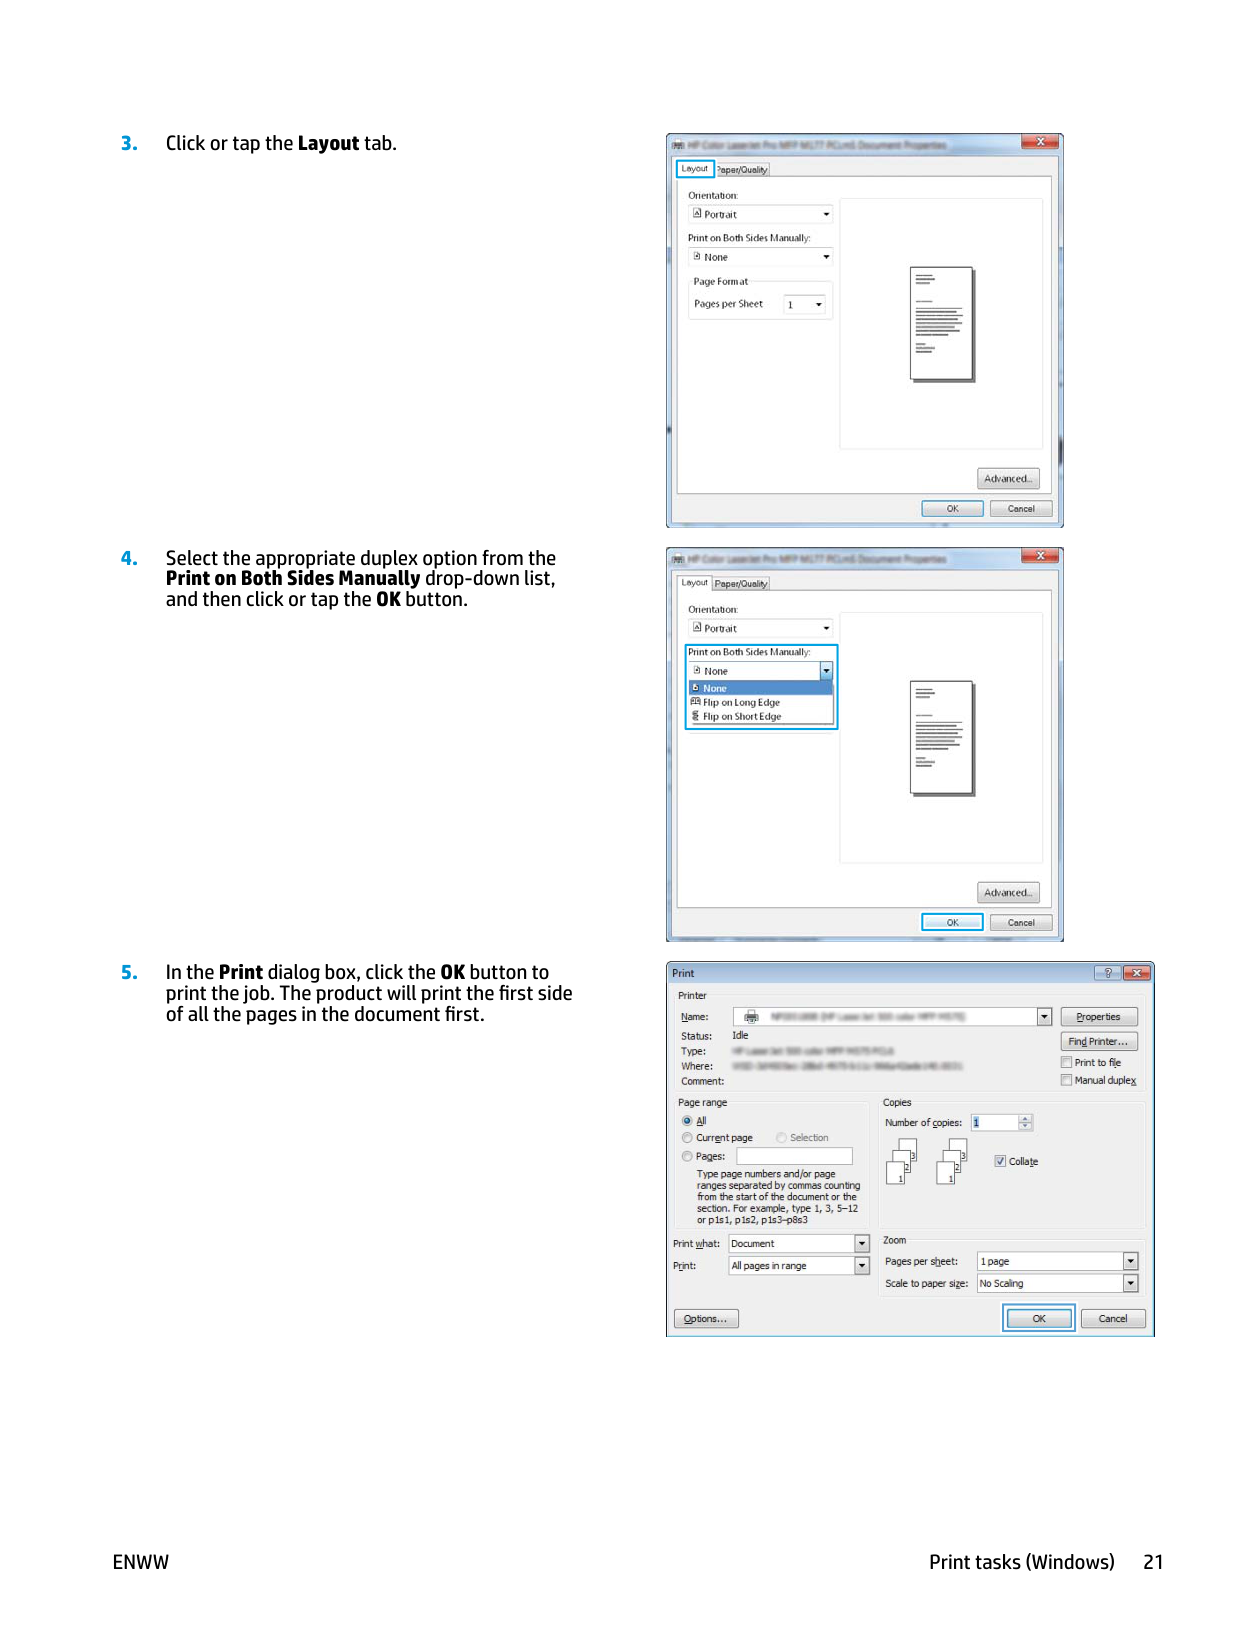
######### 4. Select the appropriate duplex option from thePrint on Both Sides Manually drop-down list,and then click or tap the OK button.
######### 5. In the Print dialog box, click the OK button toprint the job. The product will print the first sideof all the pages in the document first.


| | |---|


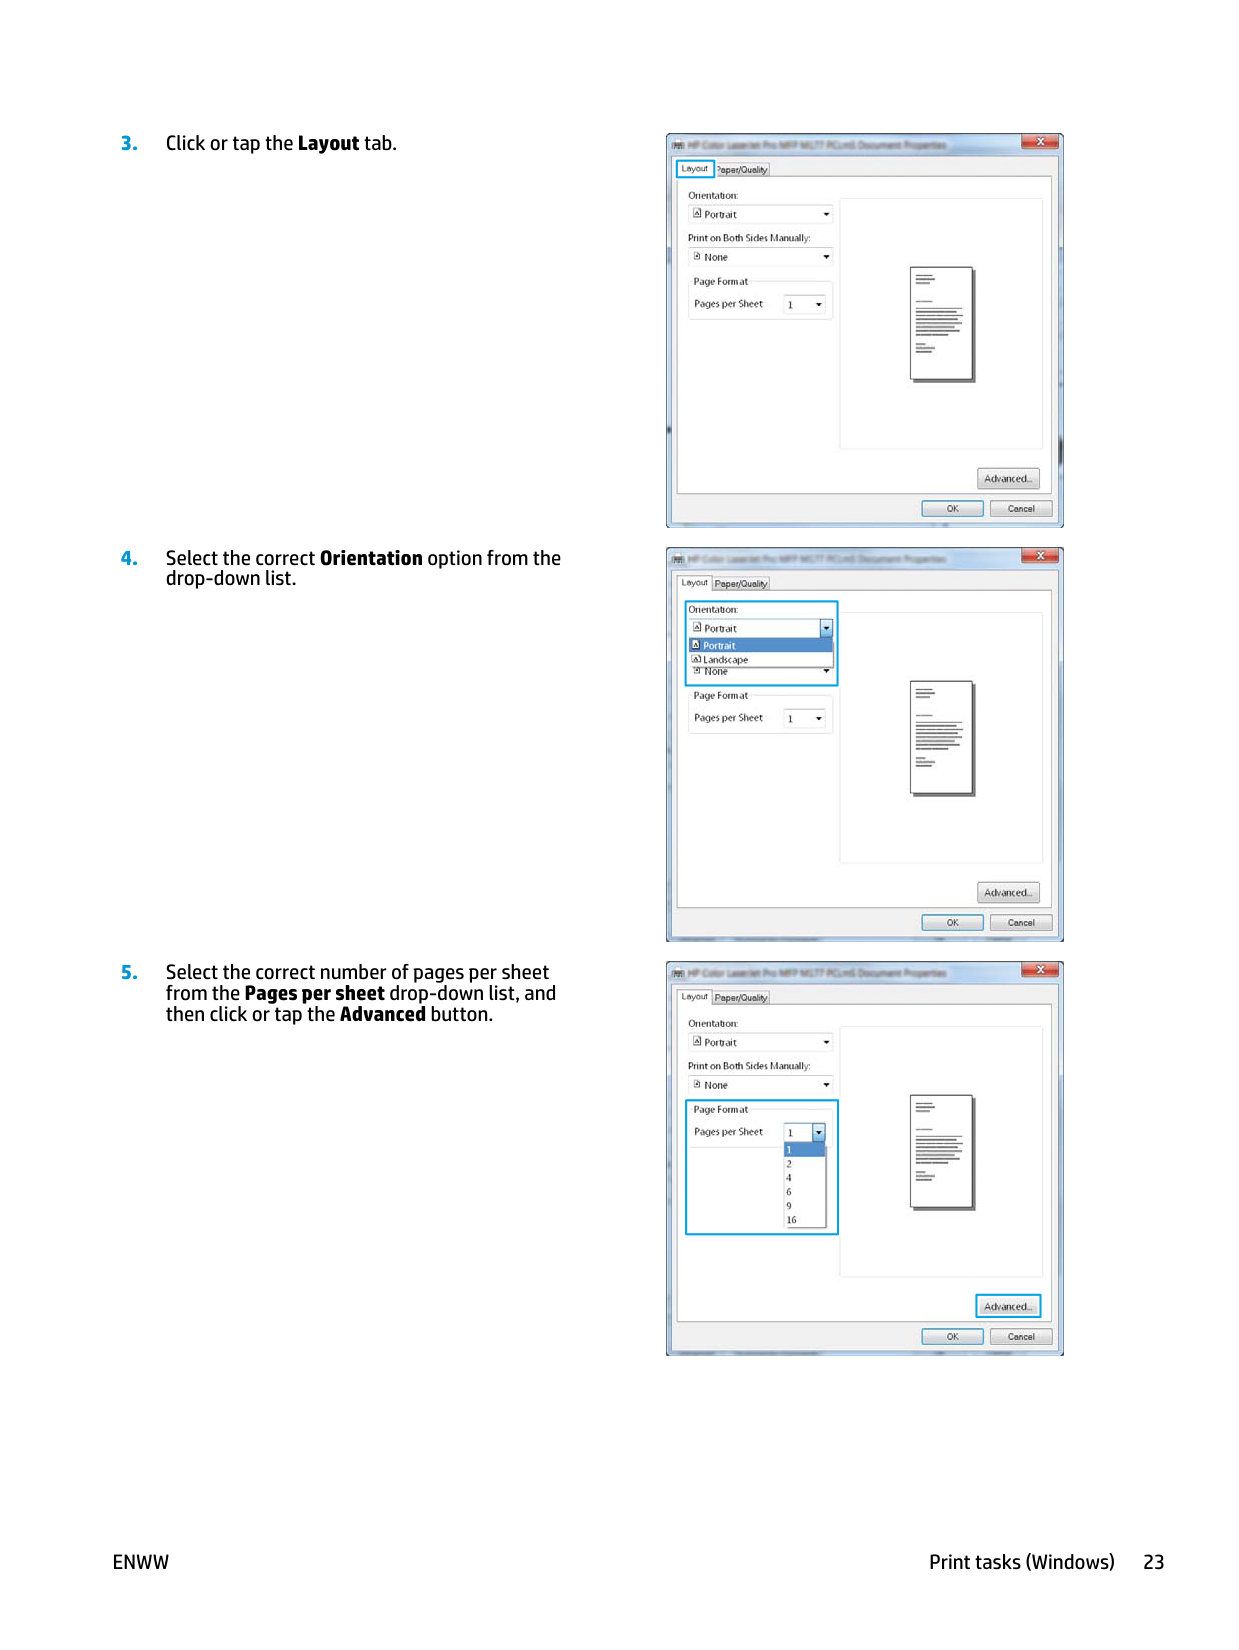
###### Print multiple pages per sheet (Windows)
NOTE: The name of the button varies for different software programs.

######### 4. Select the correct Orientation option from thedrop-down list.
######### 5. Select the correct number of pages per sheetfrom the Pages per sheet drop-down list, andthen click or tap the Advanced button.

| | |---|


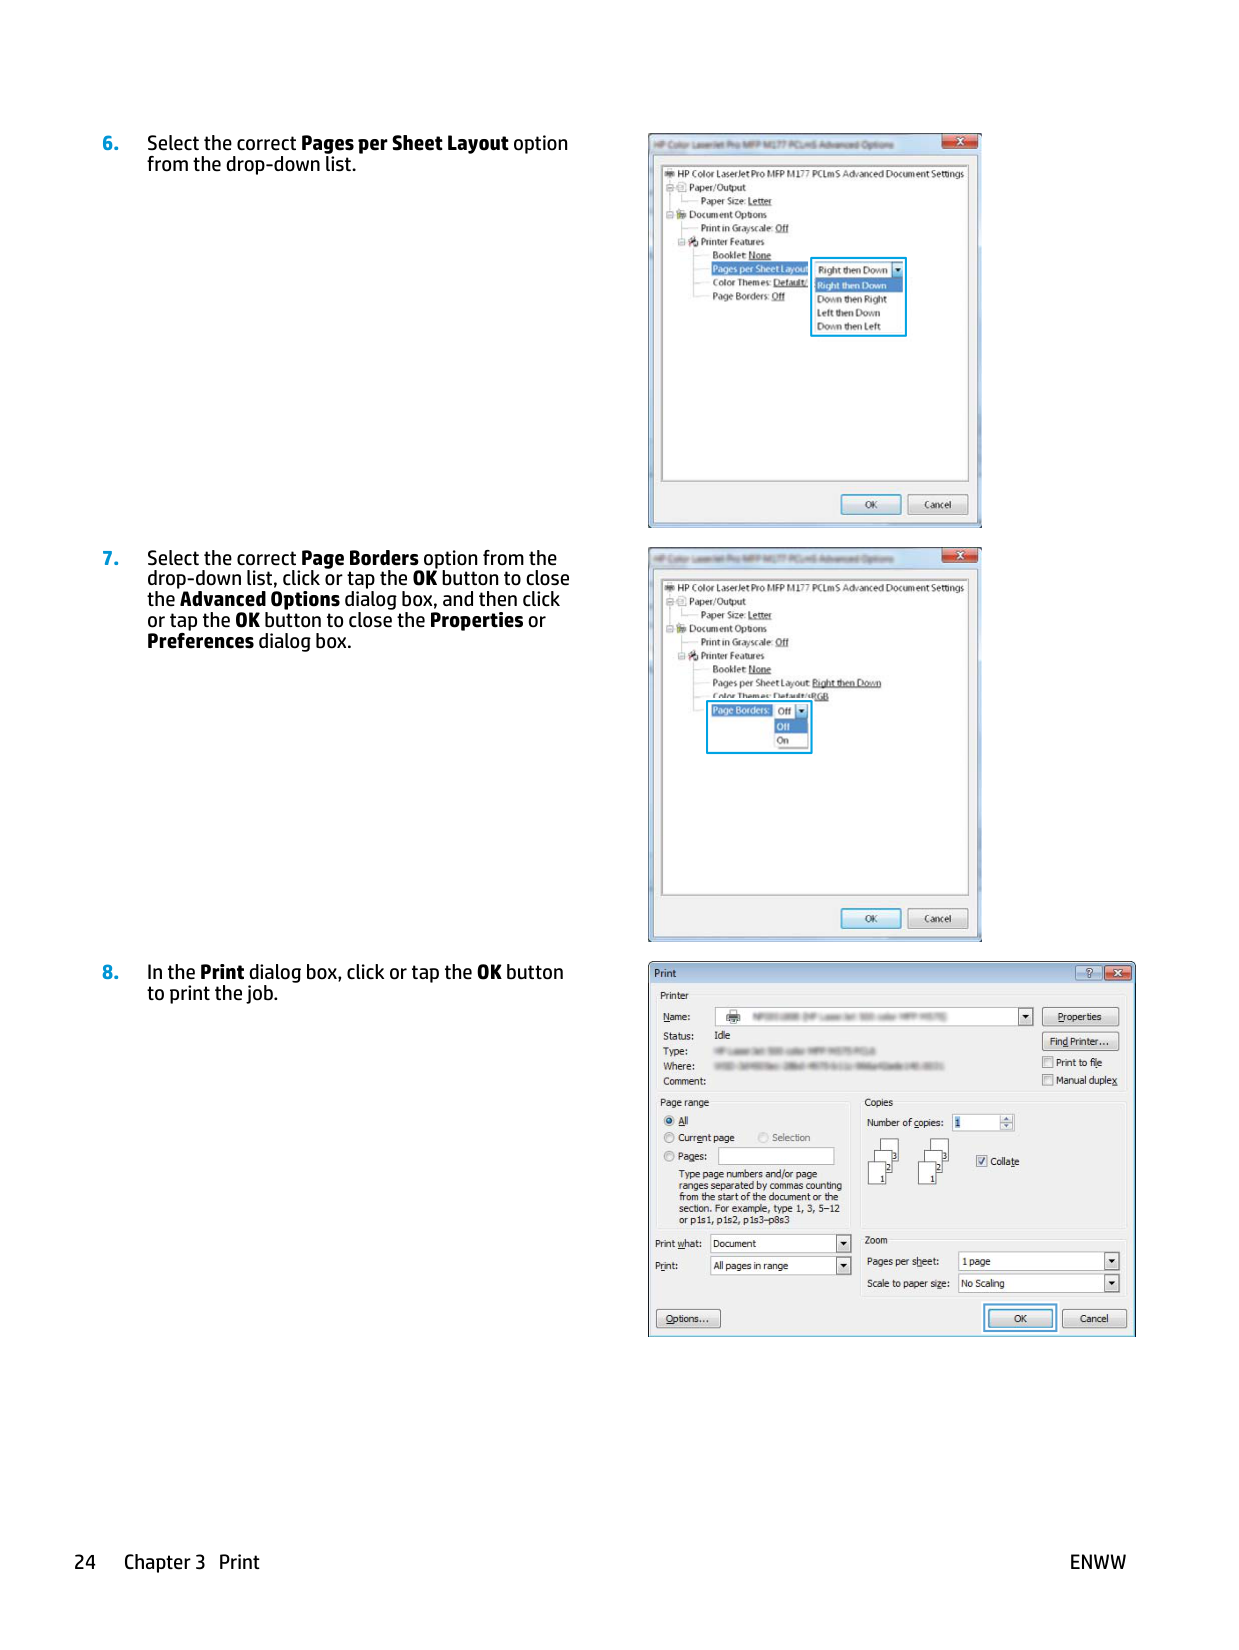
######### 6. Select the correct Pages per Sheet Layout optionfrom the drop-down list.
######### 7. Select the correct Page Borders option from thedrop-down list, click or tap the OK button to closethe Advanced Options dialog box, and then clickor tap the OK button to close the Properties orPreferences dialog box.
######### 8. In the Print dialog box, click or tap the OK buttonto print the job.

| | |---|

| | |---|

| | |---|
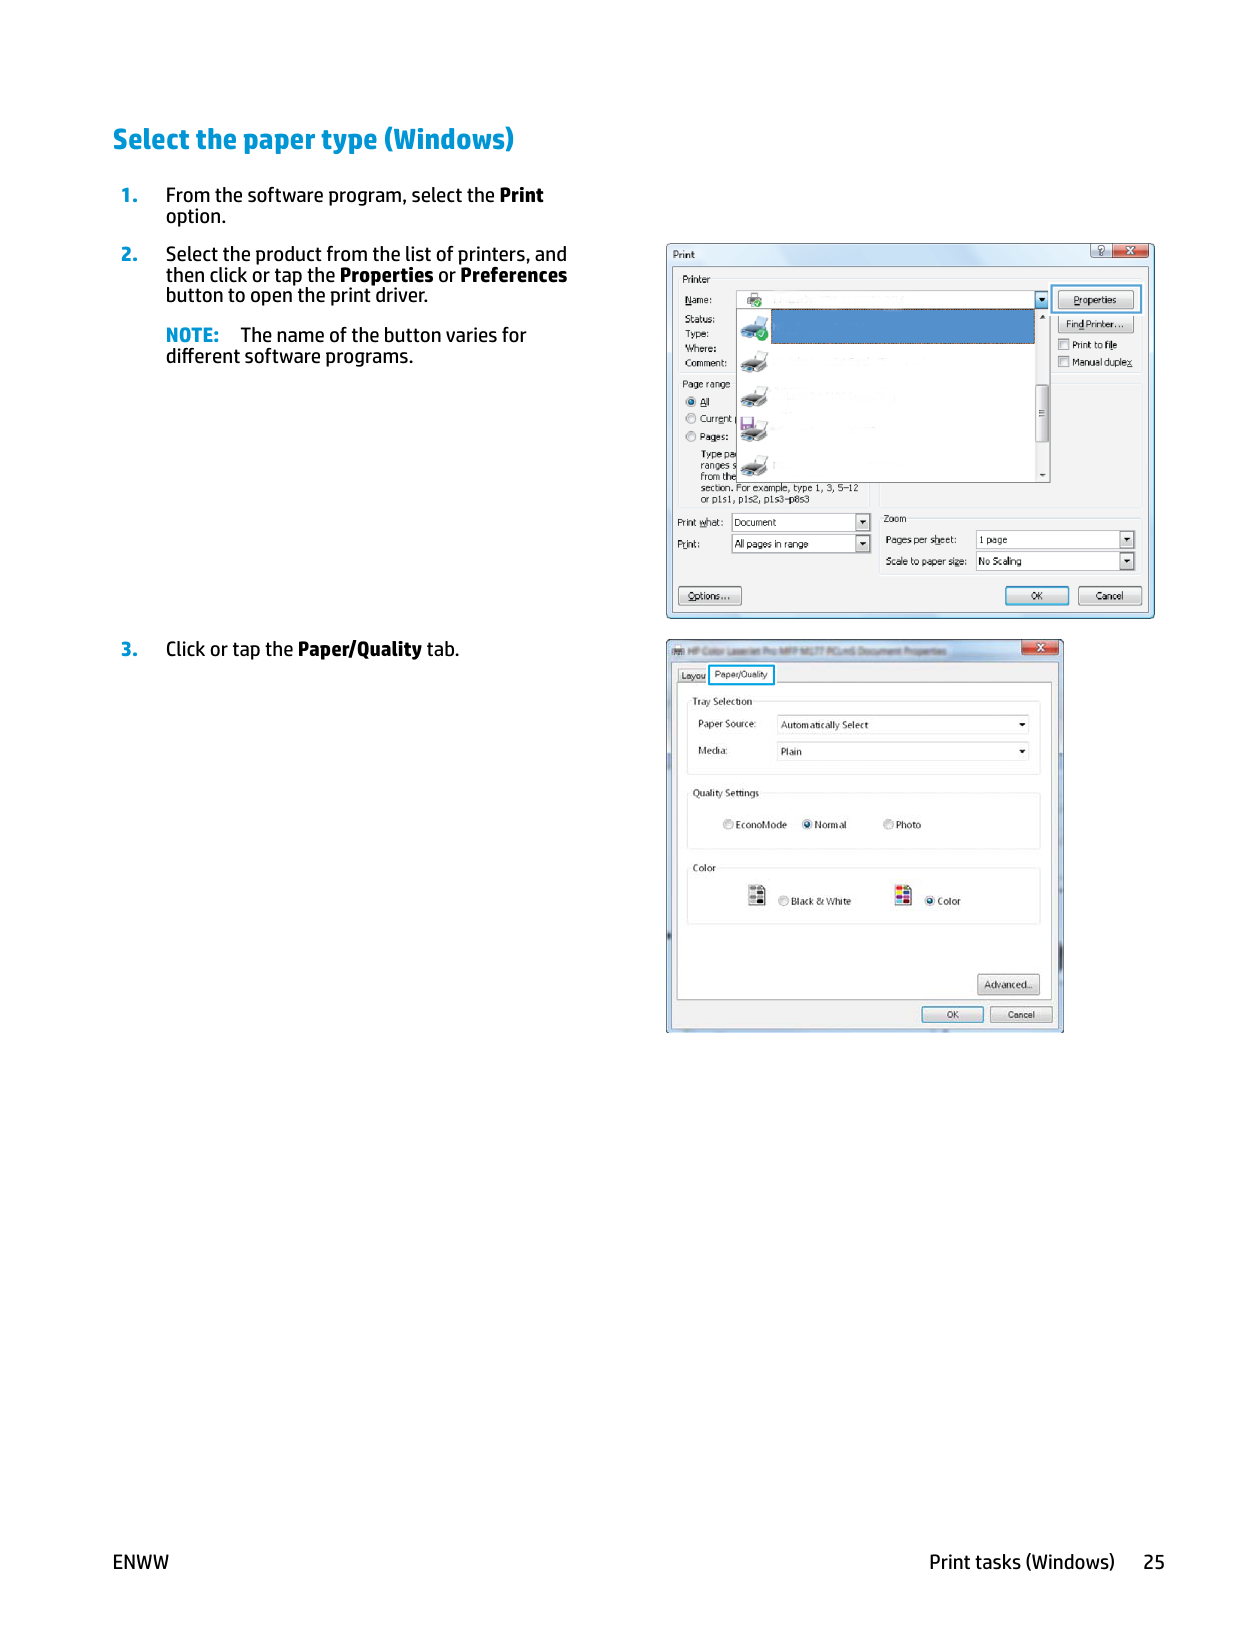
###### Select the paper type (Windows)
NOTE: The name of the button varies for different software programs.


| | |---|

| | |---|
###### Additional printing information
Go to www.hp.com/support to visit the support Web site for this product and for details about performing specific print tasks, such as the following:
#### Print tasks (Mac OS X)
###### How to print (Mac OS X)
The following procedure describes the basic printing process for Mac OS X.
###### Manually print on both sides (Mac OS X)
| | |---|
NOTE: This feature is available if you install the HP print driver. It might not be available if you are using AirPrint.


###### Print multiple pages per sheet (Mac OS X)
###### Select the paper type (Mac OS X)
###### Additional printing information
Go to www.hp.com/support to visit the support Web site for this product and for details about performing specific print tasks, such as the following:
#### Web-based printing
Several options are available for remote printing over the Internet.
###### HP ePrint
Use HP ePrint to print documents by sending them as an email attachment to the product's email address from any email enabled device.
To use HP ePrint, the product must meet these requirements:
The information page contains the printer code that you use to register your HP product at HP Connected.
The information page contains the printer code that you use to register your HP product at HP Connected.
For more information, go to www.hp.com/support to review additional support information for your product.
###### HP ePrint software
The HP ePrint software makes it easy to print from a desktop or laptop computer to any HP ePrint capable product. After installing the software, open the Print option from within your application, and then select HP ePrint from the installed printers list. This software makes it easy to find HP ePrint-enabled products that are
registered to your HP Connected account. The target HP product can be at your desk or in a remote location, such as a branch office or across the globe.
For Windows, the HP ePrint software also supports traditional direct IP printing to local network printers on the network (LAN or WAN) to supported PostScript® products.
| | |---|
Go to www.hp.com/go/eprintsoftware for drivers and information. NOTE: The HP ePrint software is a PDF workflow utility for Mac, and is not technically a print driver. HP ePrint software for Mac supports print paths only through HP Connected and does not support direct IP printing to local network printers.
###### AirPrint
Direct printing using Apple’s AirPrint is supported for iOS 4.2 or later. Use AirPrint to print directly to the product from an iPad, iPhone (3GS or later), or iPod touch (third generation or later) in the following applications:
To use AirPrint, the product must be connected to the same wireless network as the Apple device. For more information about using AirPrint and about which HP products are compatible with AirPrint, go to www.hp.com/go/airprint.
| | |---|
NOTE: AirPrint does not support USB connections. AirPrint provides print-only mobile functionality. AirPrint does not support scanning.
ENWW Web-based printing 31
Set up HP Wireless Direct Printing (touchscreen models only) NOTE: This feature is available with wireless models only and the product might require a firmware update to use this feature. The HP Wireless Direct Printing feature lets you print from your wireless mobile device directly to an HP Wireless Direct-enabled product without requiring connection to an established network or the Internet. Use HP Wireless Direct to print wirelessly from the following devices:
| | |---|
For more information on HP Wireless Direct, go to www.hp.com/go/wirelessprinting, and then click HP Wireless Direct.
To set up HP Wireless Direct from the control panel, complete the following steps:
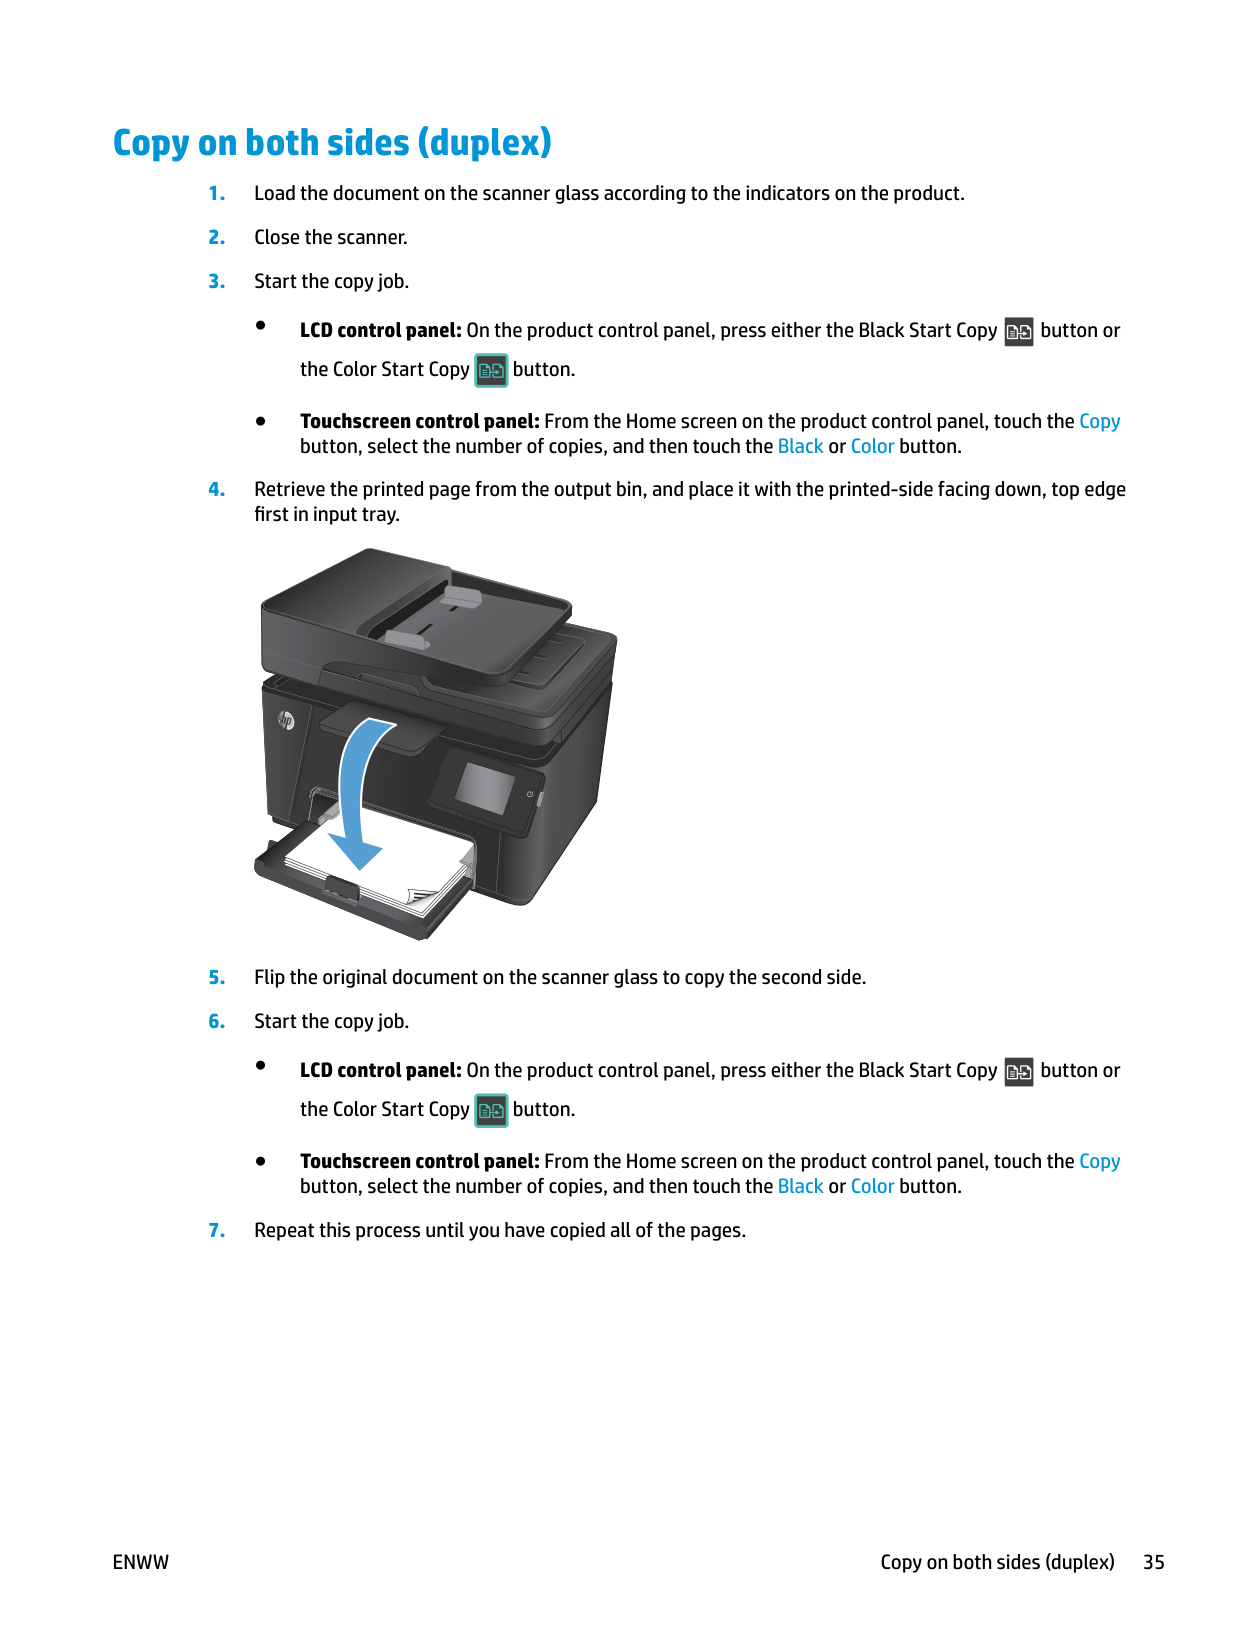
4 Copy
ENWW 33
#### Make a copy
######## LCD control panel
| | |---|
button or the Color Start Copy button to start copying.
######## Touchscreen control panel
#### Copy on both sides (duplex)
| | |---|
button or the Color Start Copy button.


| | |---|
button or the Color Start Copy button.
ENWW Copy on both sides (duplex) 35
#### Optimize copy quality
The following copy-quality settings are available:
######## LCD control panel
| | |---|
button or the Color Start Copy button to start copying.
######## Touchscreen control panel

5 Scan
ENWW 37
#### Scan by using the HP Scan software (Windows)
Use the HP Scan software to initiate scanning from software on your computer. You can save the scanned image as a file or send it to another software application.
| | |---|
NOTE: For best results, load small-size paper (Letter, A4, or smaller) with the long edge of the paper along the left side of the scanner glass.
| | |---|
#### Scan by using the HP Scan software (Mac OS X)
Use the HP Scan software to initiate scanning from software on your computer.
NOTE: For best results, load small-size paper (letter, A4, or smaller) with the long edge of the paper along the left side of the scanner glass.
| | |---|
ENWW Scan by using the HP Scan software (Mac OS X) 39
6 Fax
ENWW 41
#### Connect and configure the product for fax
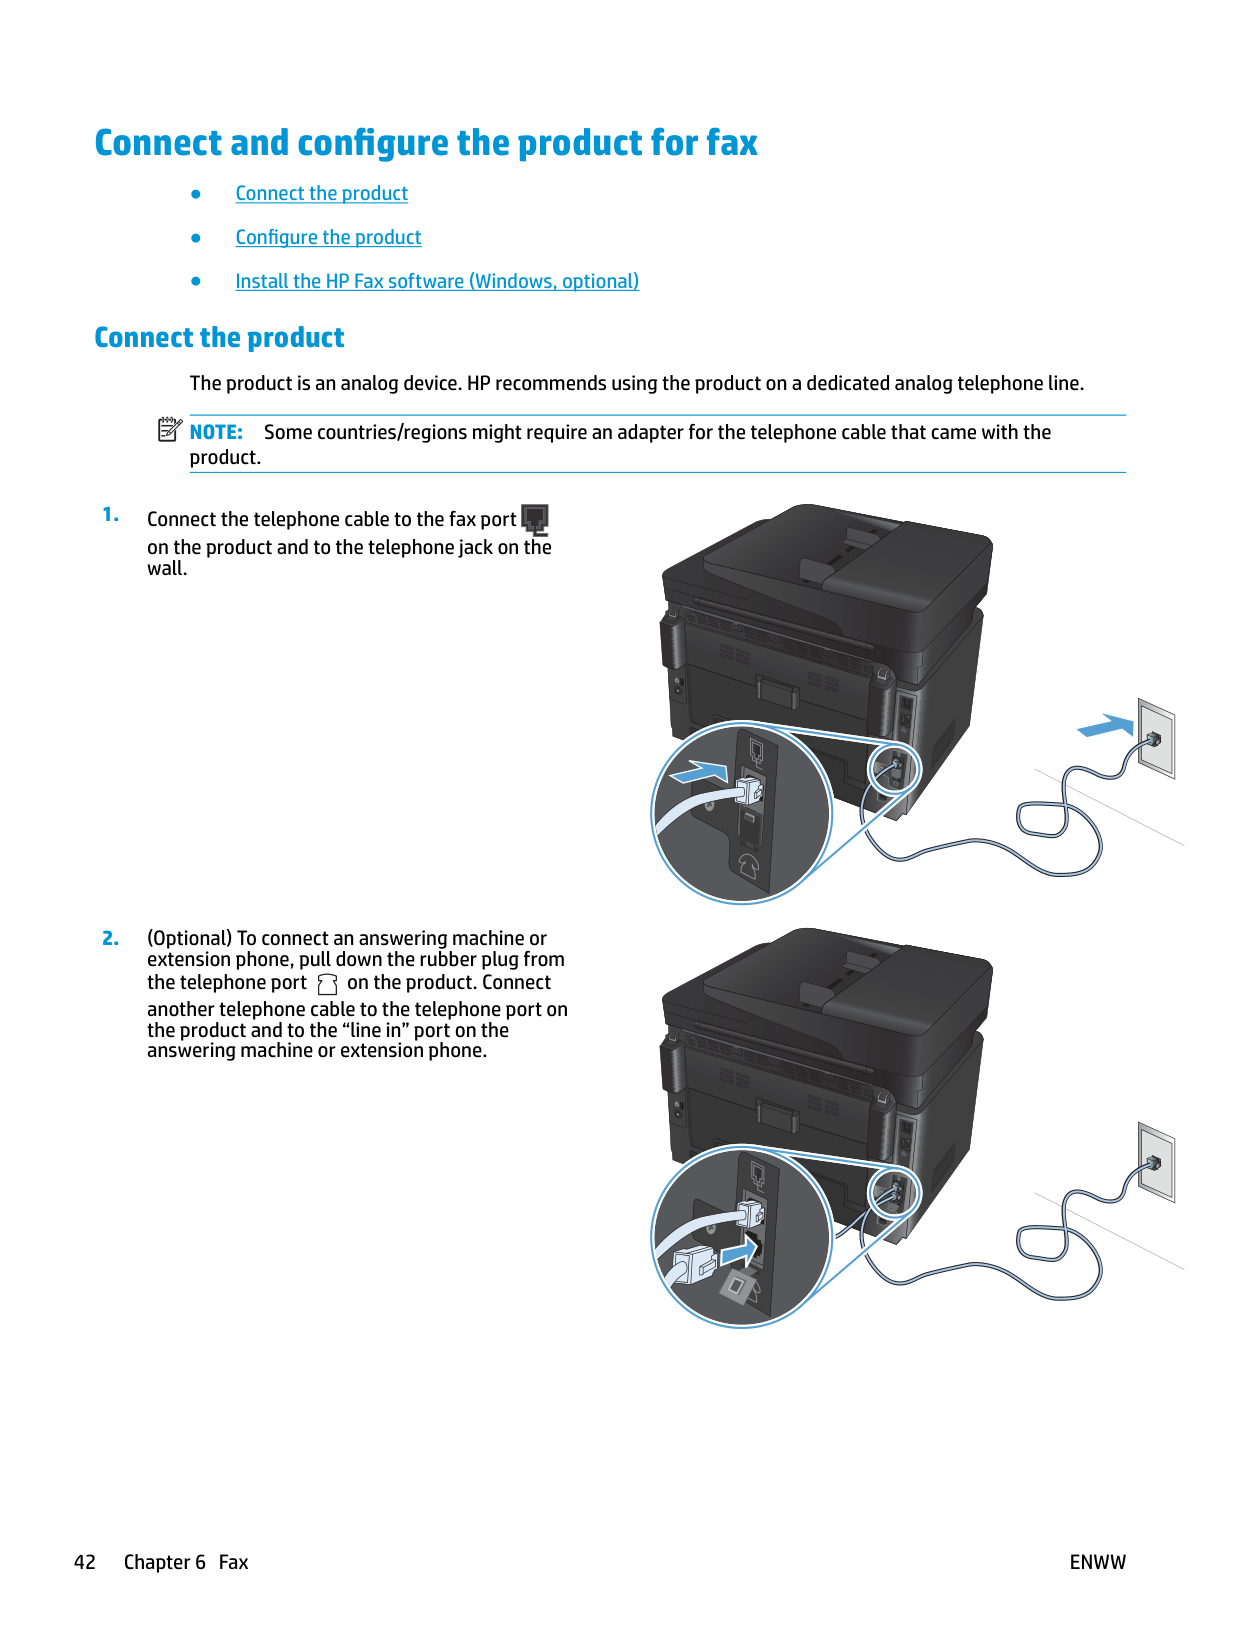
Connect the product The product is an analog device. HP recommends using the product on a dedicated analog telephone line. NOTE: Some countries/regions might require an adapter for the telephone cable that came with the product.
| | |---|
on the product and to the telephone jack on the wall.
another telephone cable to the telephone port on the product and to the “line in” port on the answering machine or extension phone.
###### Configure the product
How you configure the product varies depending on whether you set it up for standalone fax, with an answering machine, or with an extension phone.
| | |---|
NOTE: Configuring the fax time, date, and header settings is required to use the fax feature.
####### Configure fax time, date, and header
You might have configured these settings when you installed the software. You can configure these settings at any time by using the product control panel or the HP Fax Setup Wizard.
######## Control panel
| | |---|
To enter special characters that are not on the standard keypad, select @#$ to open a keypad that contains special characters.
| | |---|
NOTE: The maximum number of characters for the fax header is 40.
######## HP Fax Setup Wizard (Windows)
####### Configure for stand-alone fax
You can use the product as a stand-alone fax machine without connecting it to a computer or a network.
| | |---|
NOTE: The maximum number of characters for the fax number is 20. The maximum number of characters for the fax header is 40.
####### Configure for an answering machine
If you connect a telephone answering machine to the product, you need to configure the Rings to Answer and Answer Mode settings for the product. Follow these steps to configure the product.
With this setting, the product listens for fax tones after the answering machine has picked up the call. The product picks up a call if fax tones are detected.
####### Configure for an extension phone
If you connect an extension phone to the product, you need to change some fax settings for the product to work with this configuration. Follow these steps to configure the product.
With this setting turned on, you can alert the product to pick up the incoming fax call by pressing 1-2-3 sequentially on the telephone keypad. Turn this setting off only if you use pulse dialing or if you have a
service from your telephone company that also uses the 1-2-3 sequence. The telephone company service does not work if it conflicts with the product.
With this setting, the product automatically picks up all calls and determines if the call is a voice or fax call. If the call is a fax call, the product handles the call as an incoming fax. If the incoming call is detected as a voice call, the product generates an audible synthesized ring to alert you of an incoming voice call.
###### Install the HP Fax software (Windows, optional)
With HP Fax software, you can fax electronic documents from a computer if you meet the following requirements:
| | |---|
NOTE: The HP Fax software that came with the product is the only computer fax program that works with the product. The product is not compatible with fax software produced by other manufacturers.
If the HP Fax software is not installed on your computer, use one of the following methods to install the software.
| | |---|
NOTE: When prompted by the software installer, make sure that HP Fax Software is selected as one of the software components to install.
#### Send a fax
###### Send a fax by dialing manually from the product control panel
NOTE: To use access codes, credit cards, or calling cards, you must dial the fax number manually to allow for pauses and dialing codes. To send a fax to an international destination, dial manually to allow for pauses and international dialing codes. You cannot use speed dials with access codes, credit cards, calling cards, or to dial international destinations.
| | |---|
| | |---|
| | |---|
NOTE: If you are faxing from the scanner glass and your document includes multiple pages, follow the control panel prompts to confirm and load additional pages.
###### Send a fax from the HP software (Windows)
NOTE: If documents are in the document feeder and on the scanner glass at the same time, the product processes the document in the document feeder and not the one on the scanner glass.
| | |---|
#### Create, edit, and delete speed-dial entries
You can store frequently dialed fax numbers (up to 100 entries) as speed-dial entries.
###### Create and edit speed-dial entries
###### Delete speed-dial entries
| | |---|
ENWW Create, edit, and delete speed-dial entries 47
7 Manage the product

ENWW 49
#### Change the product connection type (Windows)
If you are already using the product and you wish to change the way it is connected, use the Reconfigure your HP Device shortcut on your computer desktop to change the connection. For example, you can reconfigure the product to use a different wireless address, to connect to a wired or wireless network, or change from a network connection to a USB connection. You can change the configuration without inserting the product CD. After you select the type of connection you wish to make, the program goes directly to the portion of the product setup procedure that needs to change.
#### Use HP Web Services applications (touchscreen models only)
Several innovative applications are available for this product that you can download directly from the Internet. For more information and to download these applications go to the HP Connected Web site at www.hpconnected.com.
To use this feature, the product must be connected to a computer or network that has an Internet connection. HP Web Services must be enabled on the product.
After you download an application from the HP Connected Web site, it is available in the Apps menu on the product control panel. This process enables both HP Web Services and the Apps menu.
ENWW Use HP Web Services applications (touchscreen models only) 51
#### HP Device Toolbox (Windows)
Use the HP Device Toolbox for Windows to check product status or to view or change product settings from your computer. This tool opens the HP Embedded Web Server for the product.
| | |---|
NOTE: This tool is available only if you performed a full installation when you installed the product. Depending on how the product is connected, some features might not be available.
Tab or section Description Home tab
Provides product, status, and configuration information.
########### System tab
Provides the ability to configure the product from your computer.
NOTE: The System tab can be password-protected. If this product is on a network, always consult with the administrator before changing settings on this tab.
########### Print tab
Provides the ability to change default print settings from your computer.
Printing: Change the default product print settings, such as number of copies and paper orientation. These are the same options that are available on the control panel.
Tab or section Description Fax tab ● Phone Book: Add or delete entries in the fax phone book.

########### Networking tab
Provides the ability to change network settings from your computer.
Network administrators can use this tab to control network-related settings for the product when it is connected to an IP-based network. It also allows the network administrator to set up Wireless Direct functionality. This tab does not appear if the product is directly connected to a computer.
HP Web Services tab Use this tab to set up and use various Web tools with the product.
ENWW HP Device Toolbox (Windows) 53
HP Utility for Mac OS X Use the HP Utility for Mac OS X to view or change product settings from your computer. You can use the HP Utility when the product is connected with a USB cable or is connected to a TCP/IP-based network.
Open the HP Utility From the Finder, click Applications, click HP, and then click HP Utility. If HP Utility is not included, use the following procedure to open it:
###### HP Utility features
The HP Utility toolbar is at the top of every page. It includes these items:
HP Utility consists of pages that you open by clicking in the All Settings list. The following table describes the tasks that you can perform with HP Utility.
Menu Item Description Information and Support Supplies Status Show the product supplies status and provides links for ordering
supplies online.
Device Information Show information about the currently selected product, including the product Service ID (if assigned), the firmware version (FW Version), the Serial Number, and the IP address.
Menu Item Description File Upload Transfer files from the computer to the product. You can upload
the following types of files:
HP Connected Access the HP Connected Web site. Information Message Center Display error events that have occurred with the product. Printer Settings Auto-off Configure the product to automatically turn off after a period of
inactivity. You can adjust the number of minutes after which the product turns off.
Network Settings Configure the network settings, such as the IPv4 settings, IPv6
settings, Bonjour settings, and other settings.
Supplies Management Configure how the product should behave when supplies are
nearing the end of their estimated life. Trays Configuration Change the paper size and type for each of the trays. Additional Settings Open the HP Embedded Web Server (EWS) for the product.
NOTE: USB connections are not supported. Fax Settings Basic Fax Settings Set up the fields in the fax header and configure how the product
answers incoming calls. Junk Fax Blocking Store the fax numbers you want to block. Fax Forwarding Set up the product to send the incoming faxes to a different
number. Fax Logs View the logs of all faxes. Fax Speed Dials Add fax numbers to the speed dial list.
ENWW HP Utility for Mac OS X 55
#### Product security features
The product supports security standards and recommended protocols that help you keep the product secure, protect critical information on your network, and simplify the way you monitor and maintain the product.
For in-depth information about HP's secure imaging and printing solutions, visit www.hp.com/go/ secureprinting. The site provides links to white papers and FAQ documents about security features.
###### Set or change the product password
Use the HP Embedded Web Server to set a password or change an existing password for a product on a network.
######## LCD control panel
NOTE: You can also access the HP Embedded Web Server from the HP Device Toolbox for Windows or the HP Utility for Mac OS X.
NOTE: If a password has previously been set, you are prompted to provide the password. Enter the password, and then click the Apply button.
| | |---|
| | |---|
######## Touchscreen control panel
NOTE: You can also access the HP Embedded Web Server from the HP Device Toolbox for Windows or the HP Utility for Mac OS X.
NOTE: If a password has previously been set, you are prompted to provide the password. Enter the password, and then click the Apply button.
| | |---|
| | |---|
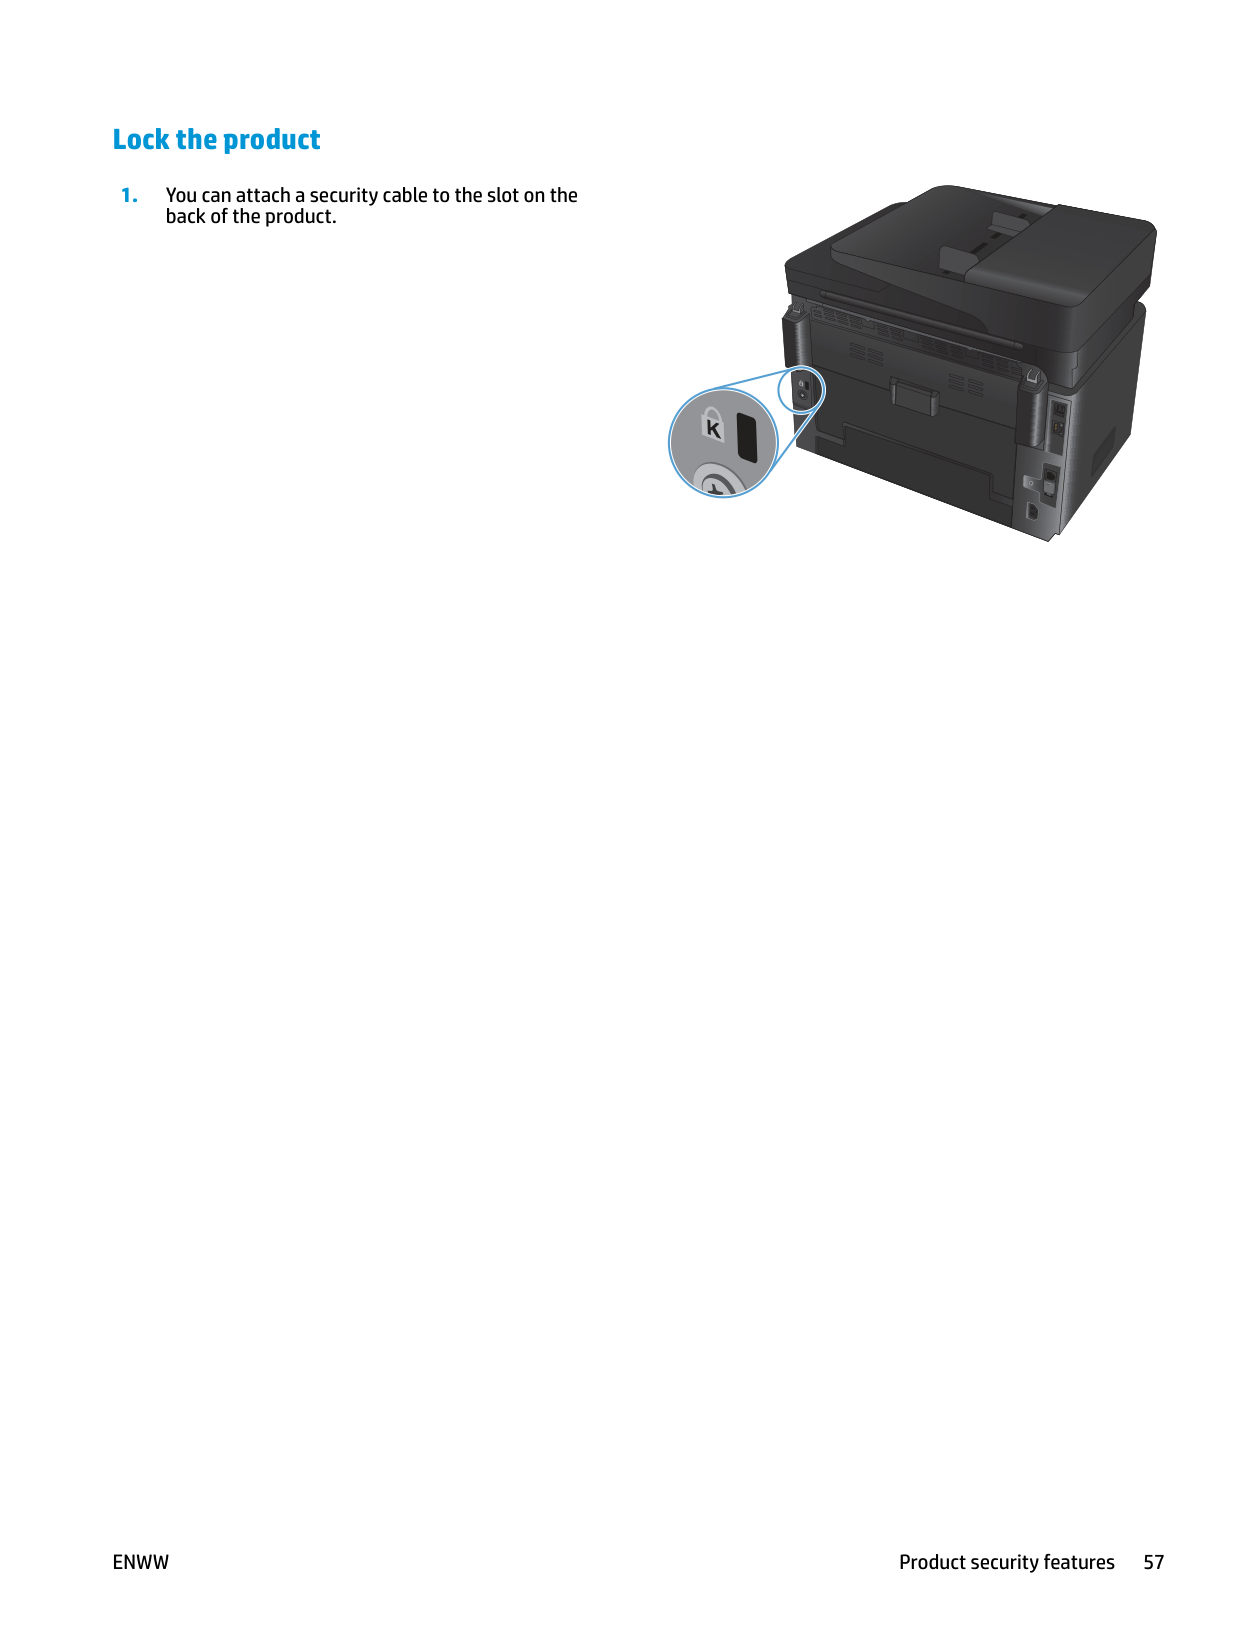
###### Lock the product
back of the product.
ENWW Product security features 57
#### Economy settings
###### Print with EconoMode
This product has an EconoMode option for printing drafts of documents. Using EconoMode can use less toner. However, using EconoMode can also reduce print quality.
HP does not recommend the full-time use of EconoMode. If EconoMode is used full-time, the toner supply might outlast the mechanical parts in the toner cartridge. If print quality begins to degrade and is no longer acceptable, consider replacing the toner cartridge.
| | |---|

NOTE: If this option is not available in your print driver, you can set it using the HP Embedded Web Server.
###### Configure the Sleep/Auto Off After setting
######## LCD control panel
| | |---|
######## Touchscreen control panel
| | |---|
ENWW Economy settings 59
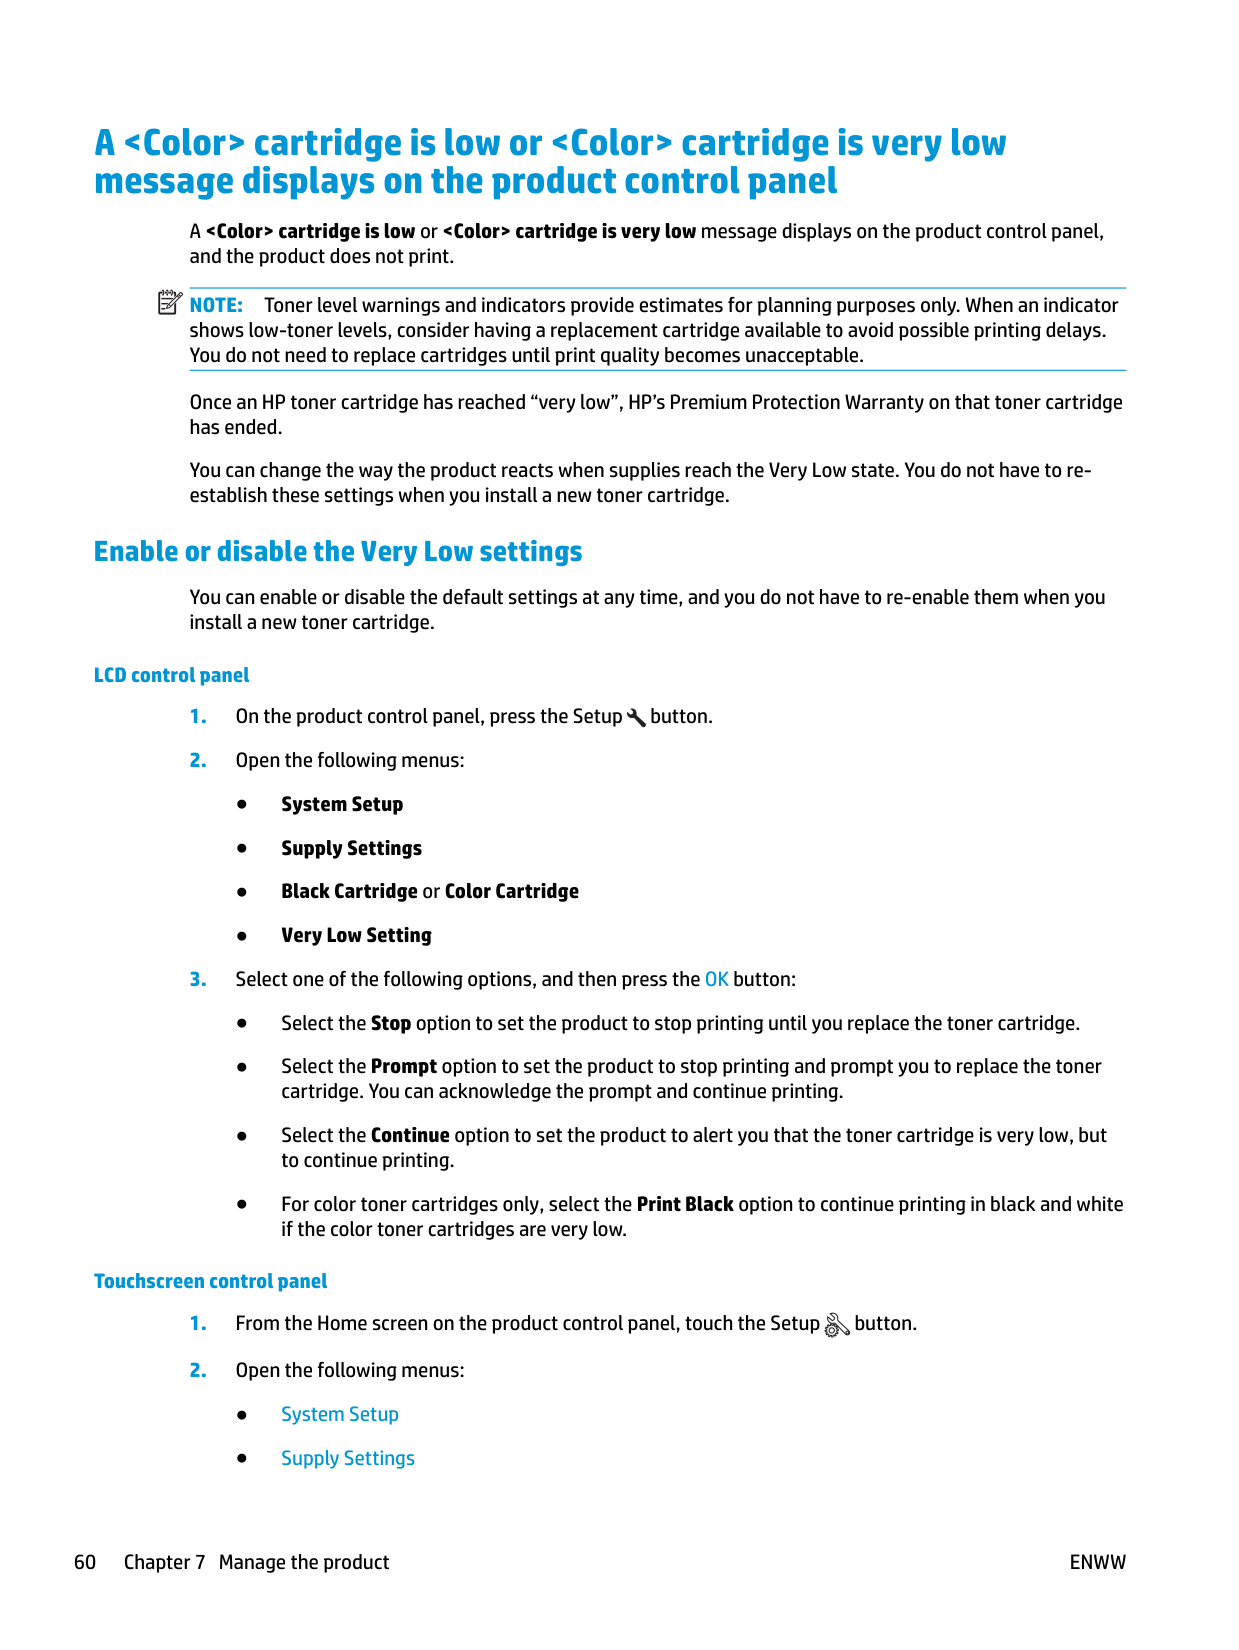
#### A
A
| | |---|
NOTE: Toner level warnings and indicators provide estimates for planning purposes only. When an indicator shows low-toner levels, consider having a replacement cartridge available to avoid possible printing delays. You do not need to replace cartridges until print quality becomes unacceptable.
Once an HP toner cartridge has reached “very low”, HP’s Premium Protection Warranty on that toner cartridge has ended.
You can change the way the product reacts when supplies reach the Very Low state. You do not have to reestablish these settings when you install a new toner cartridge.
###### Enable or disable the Very Low settings
You can enable or disable the default settings at any time, and you do not have to re-enable them when you install a new toner cartridge.
######## LCD control panel
######## Touchscreen control panel
For models with fax, when the product is set to the Stop option there is some risk that faxes will not print after the new cartridge is installed if your product has received more faxes than the memory can hold while stopped.
For models with fax, when the product is set to the Prompt option, there is some risk that faxes will not print after the new cartridge is installed if your product has received more faxes than the memory can hold while the product is waiting for the prompt to be acknowledged.
Once an HP toner cartridge has reached Very Low, HP’s Premium Protection Warranty on that toner cartridge has ended. All print defects or cartridge failures incurred when an HP toner cartridge is used in Continue at very low mode will not be considered to be defects in materials or workmanship in the toner cartridge under the HP Print Cartridge Warranty Statement.
ENWW A
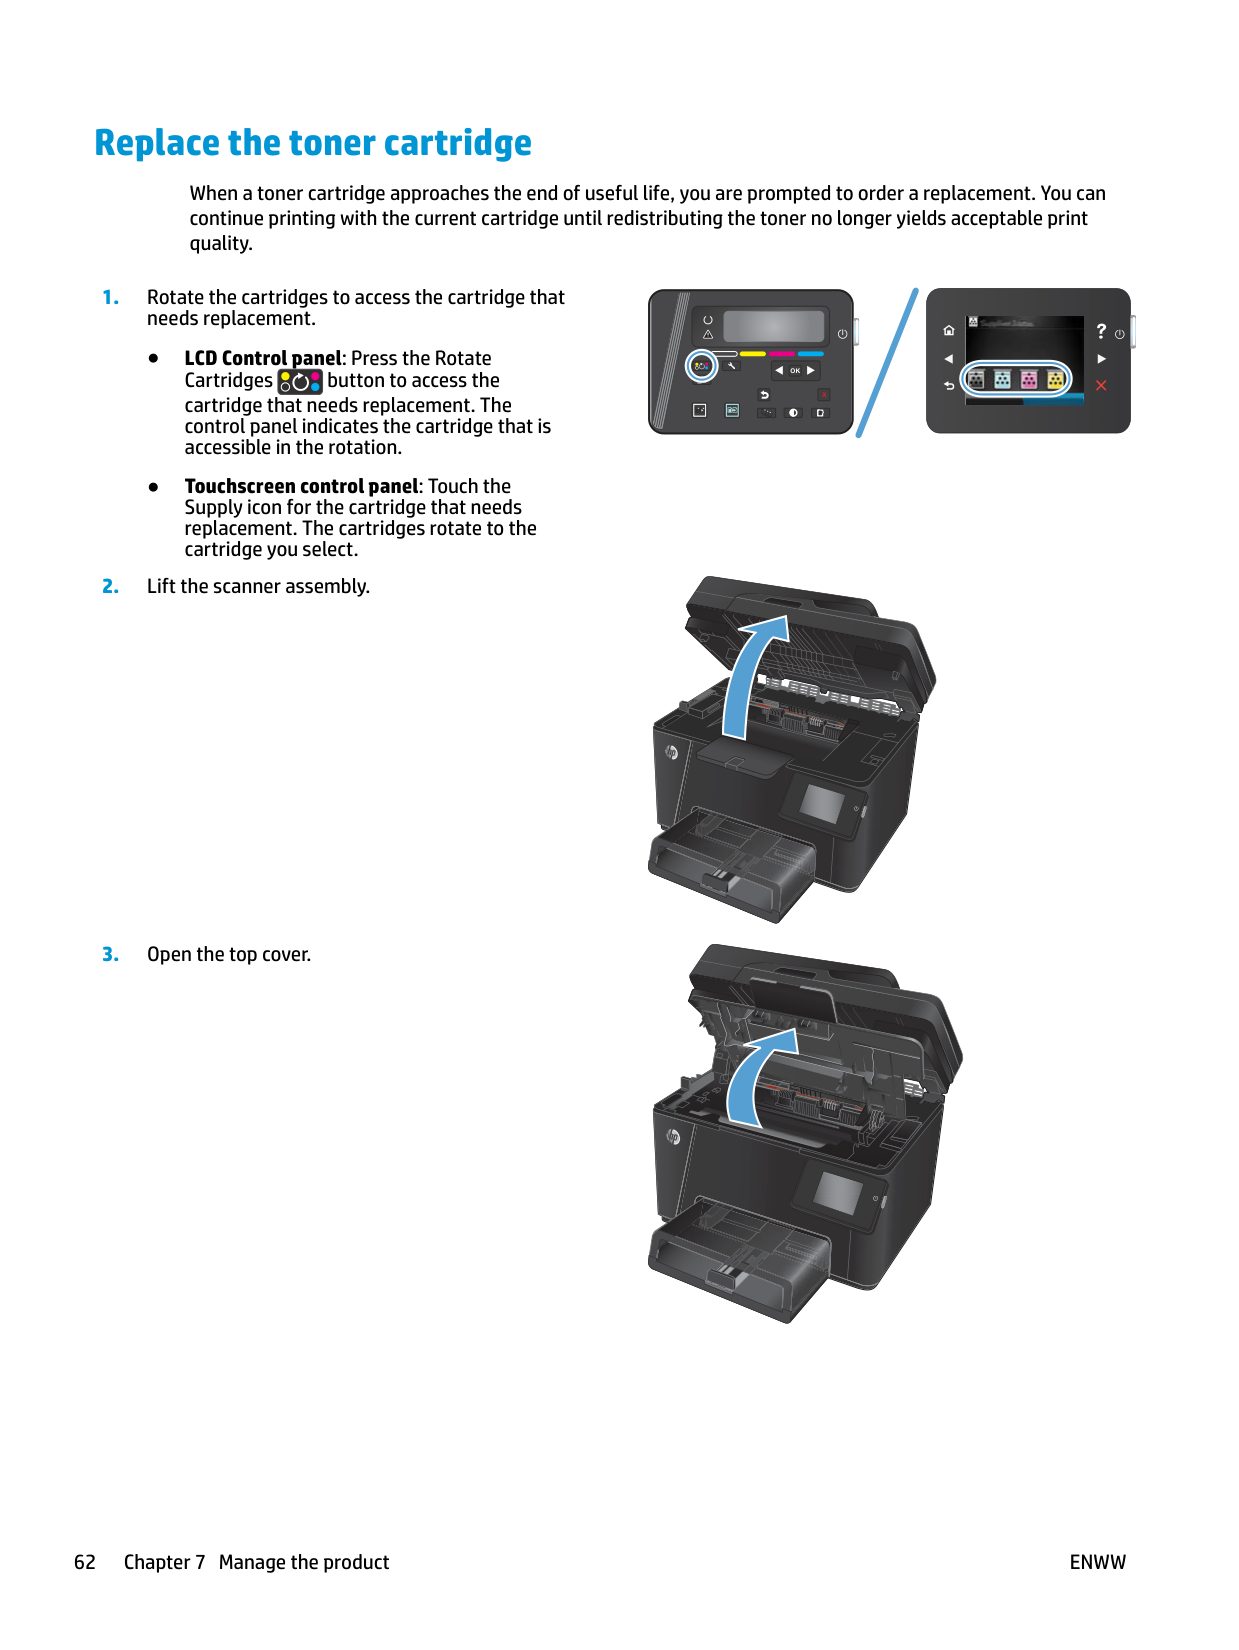
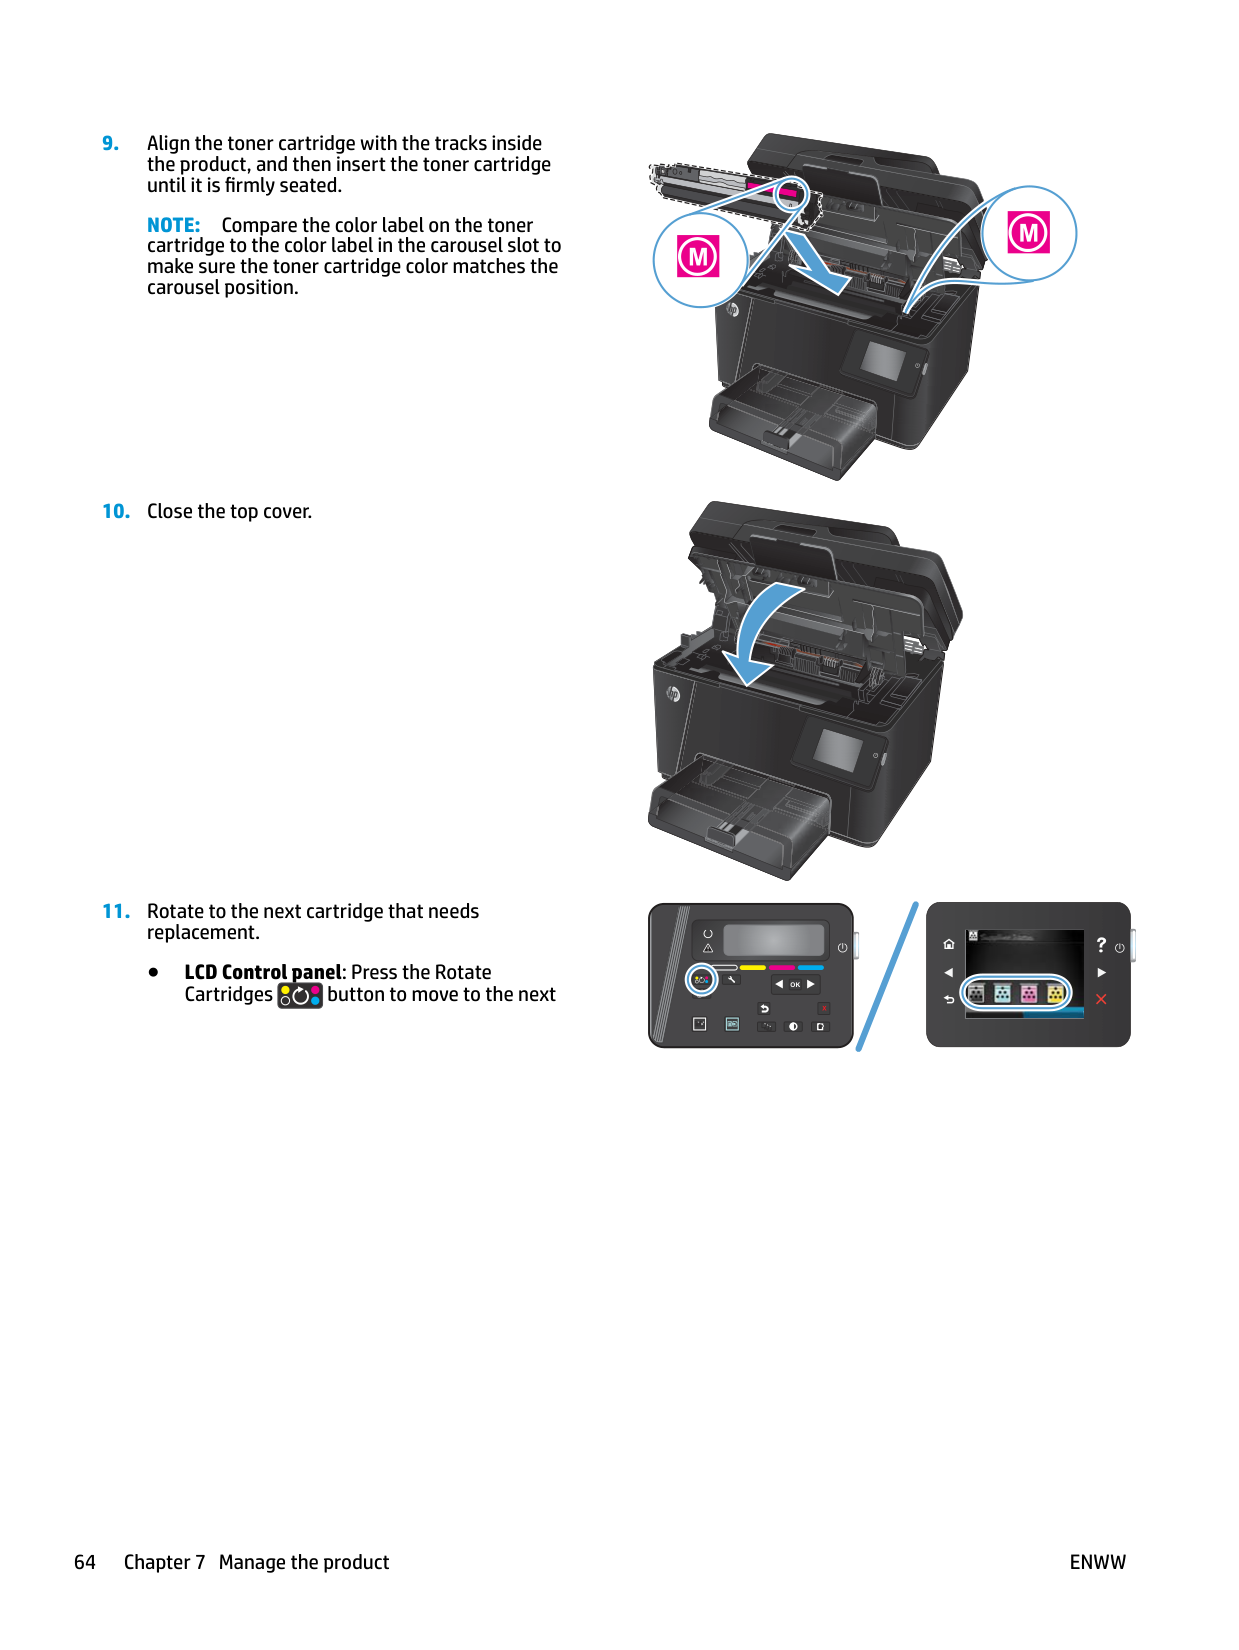
#### Replace the toner cartridge
When a toner cartridge approaches the end of useful life, you are prompted to order a replacement. You can continue printing with the current cartridge until redistributing the toner no longer yields acceptable print quality.
|OK| |---|
|X| |---|
|| |---|


CAUTION: Do not touch the shutter or the surface of the roller.
NOTE: Compare the color label on the toner
cartridge to the color label in the carousel slot to make sure the toner cartridge color matches the carousel position.


|| |---|
|OK| |---|
|X| |---|
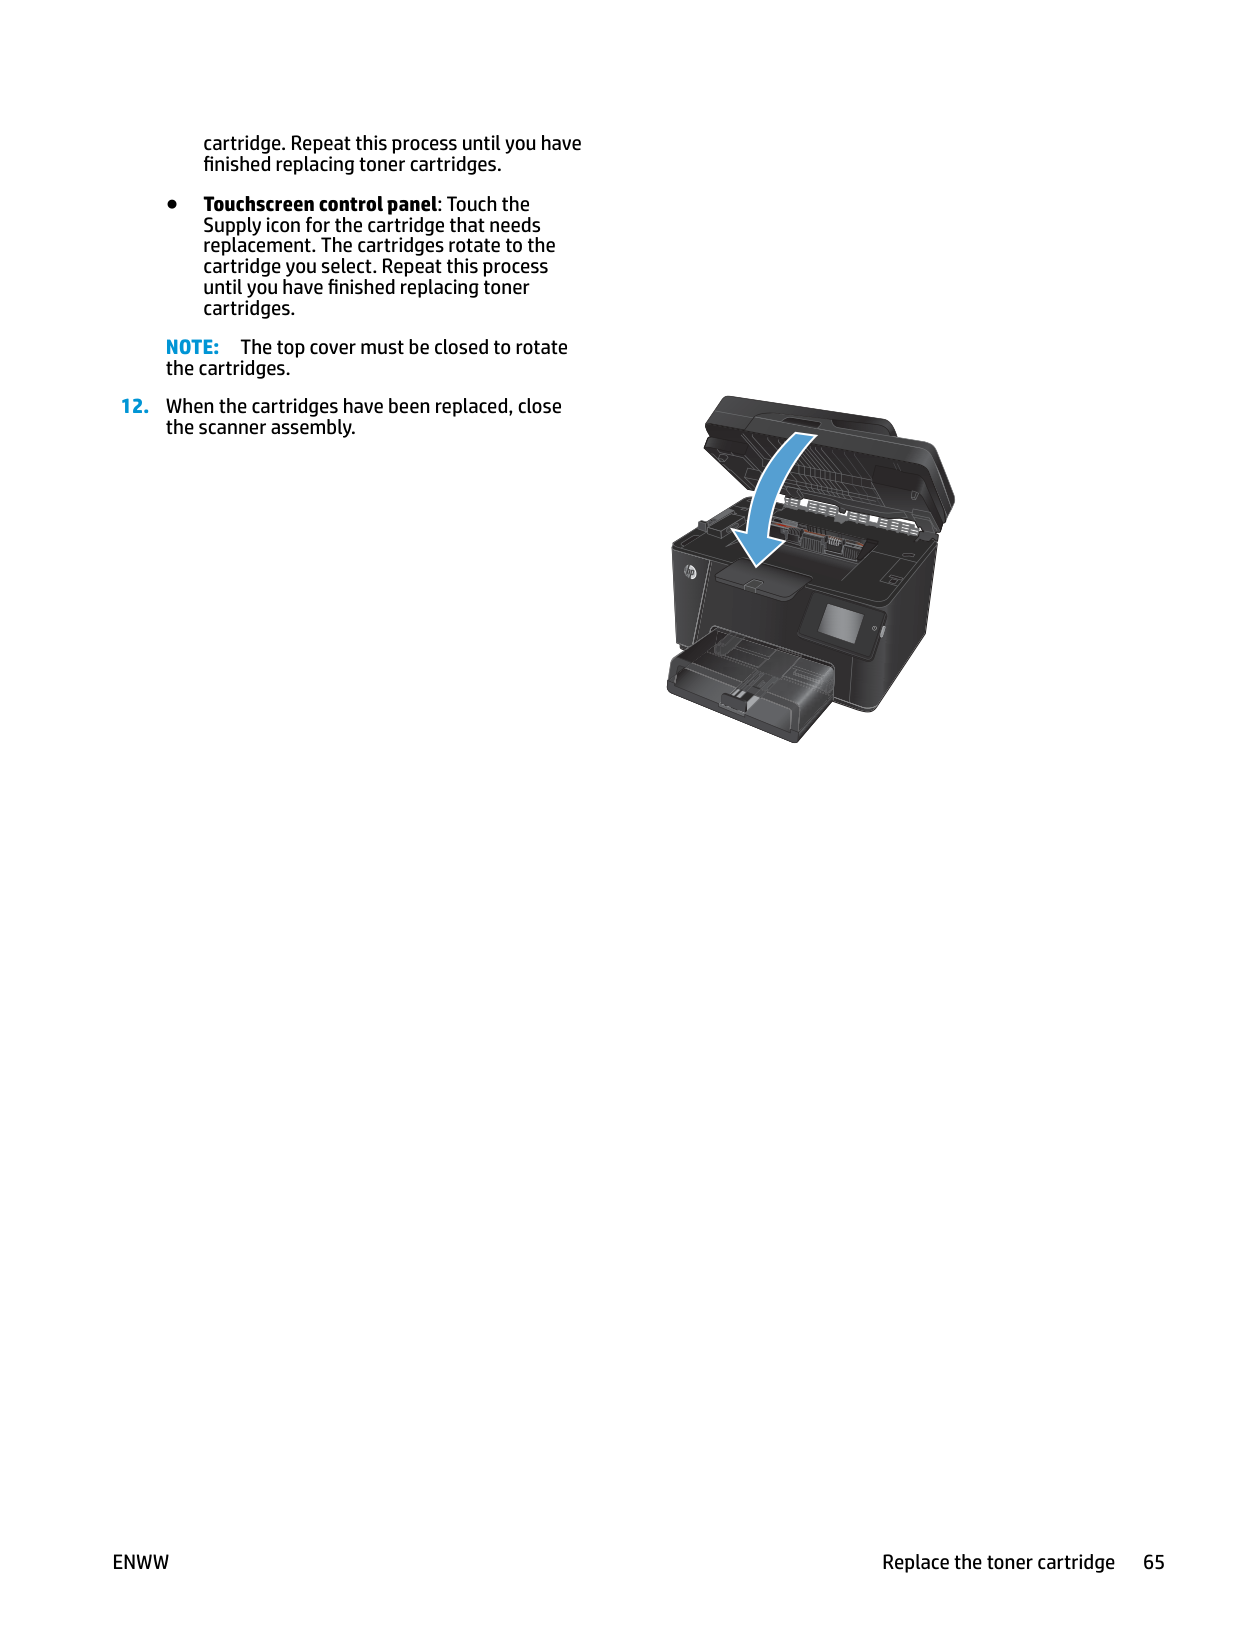
cartridge. Repeat this process until you have finished replacing toner cartridges.
NOTE: The top cover must be closed to rotate the cartridges.


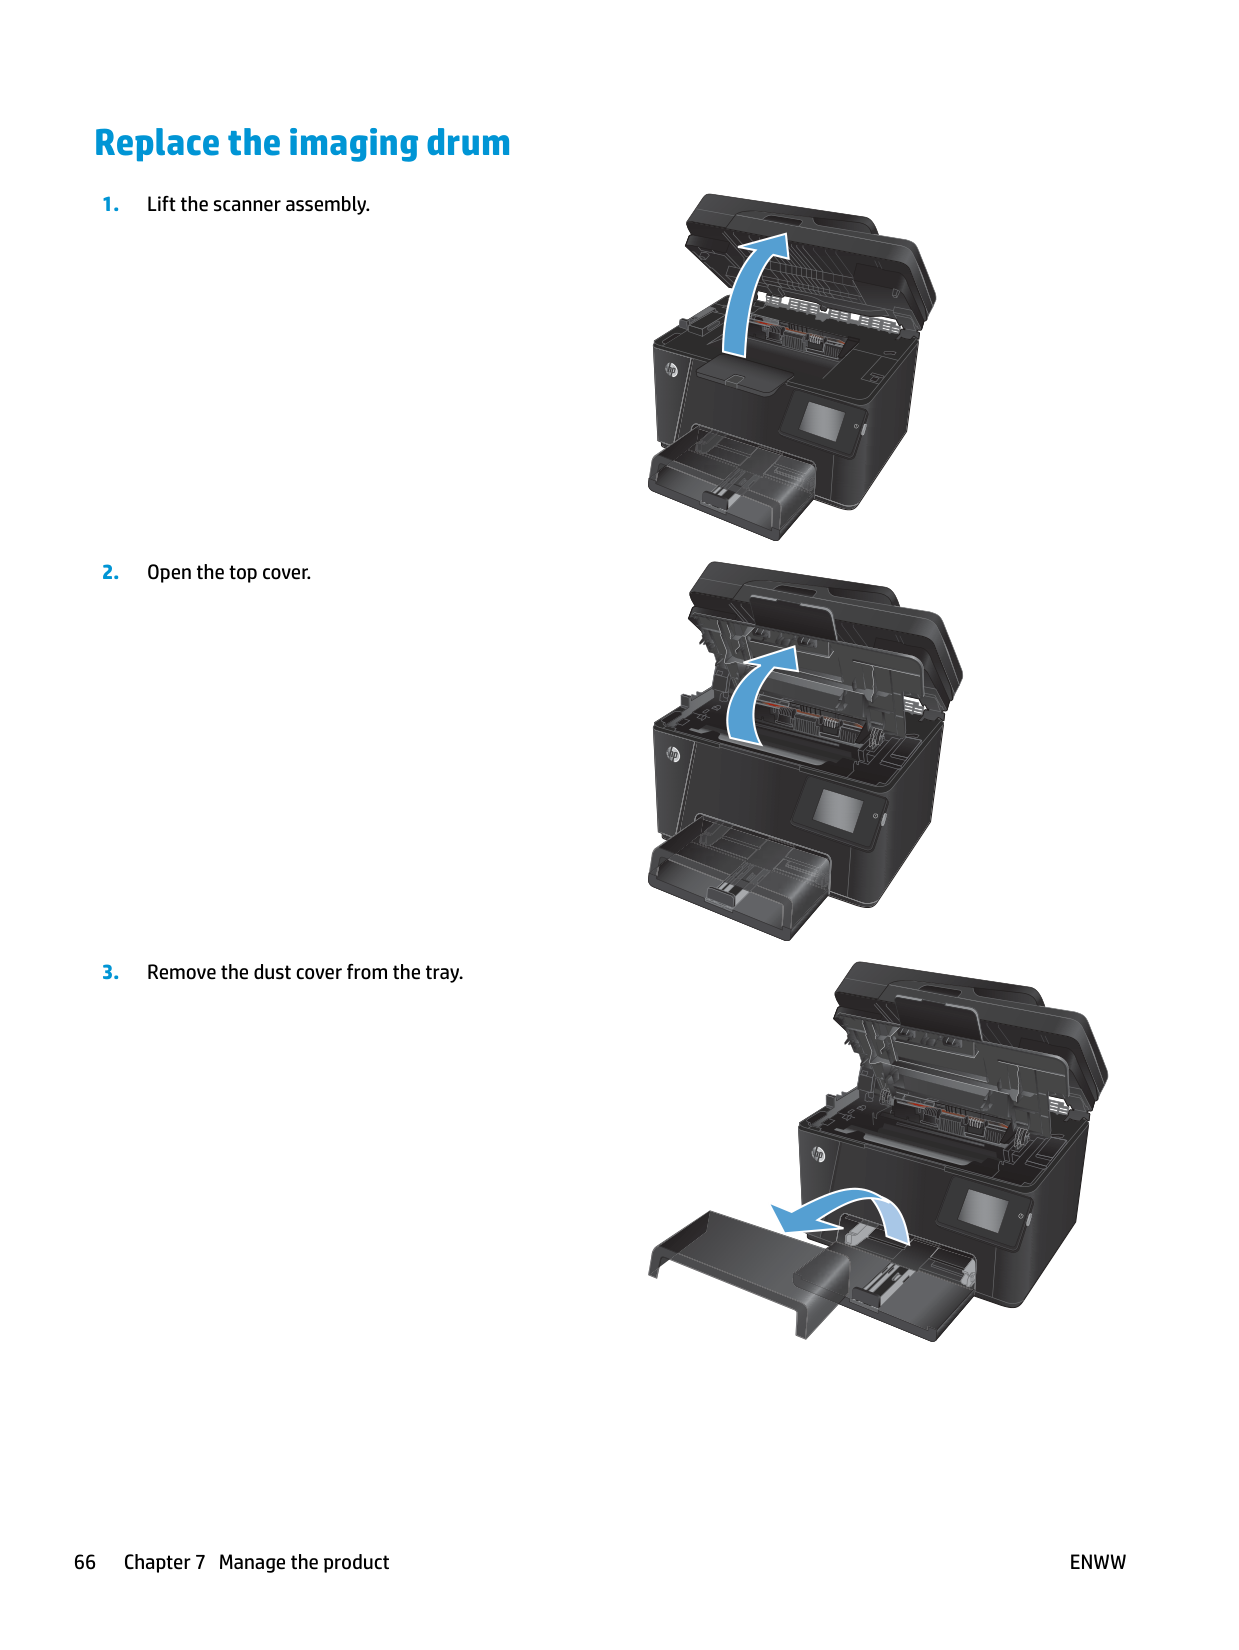
#### Replace the imaging drum


######### 4. Open the front cover.
######### 5. Lift the two levers that hold the imaging drum.
######### 6. Remove the old imaging drum.


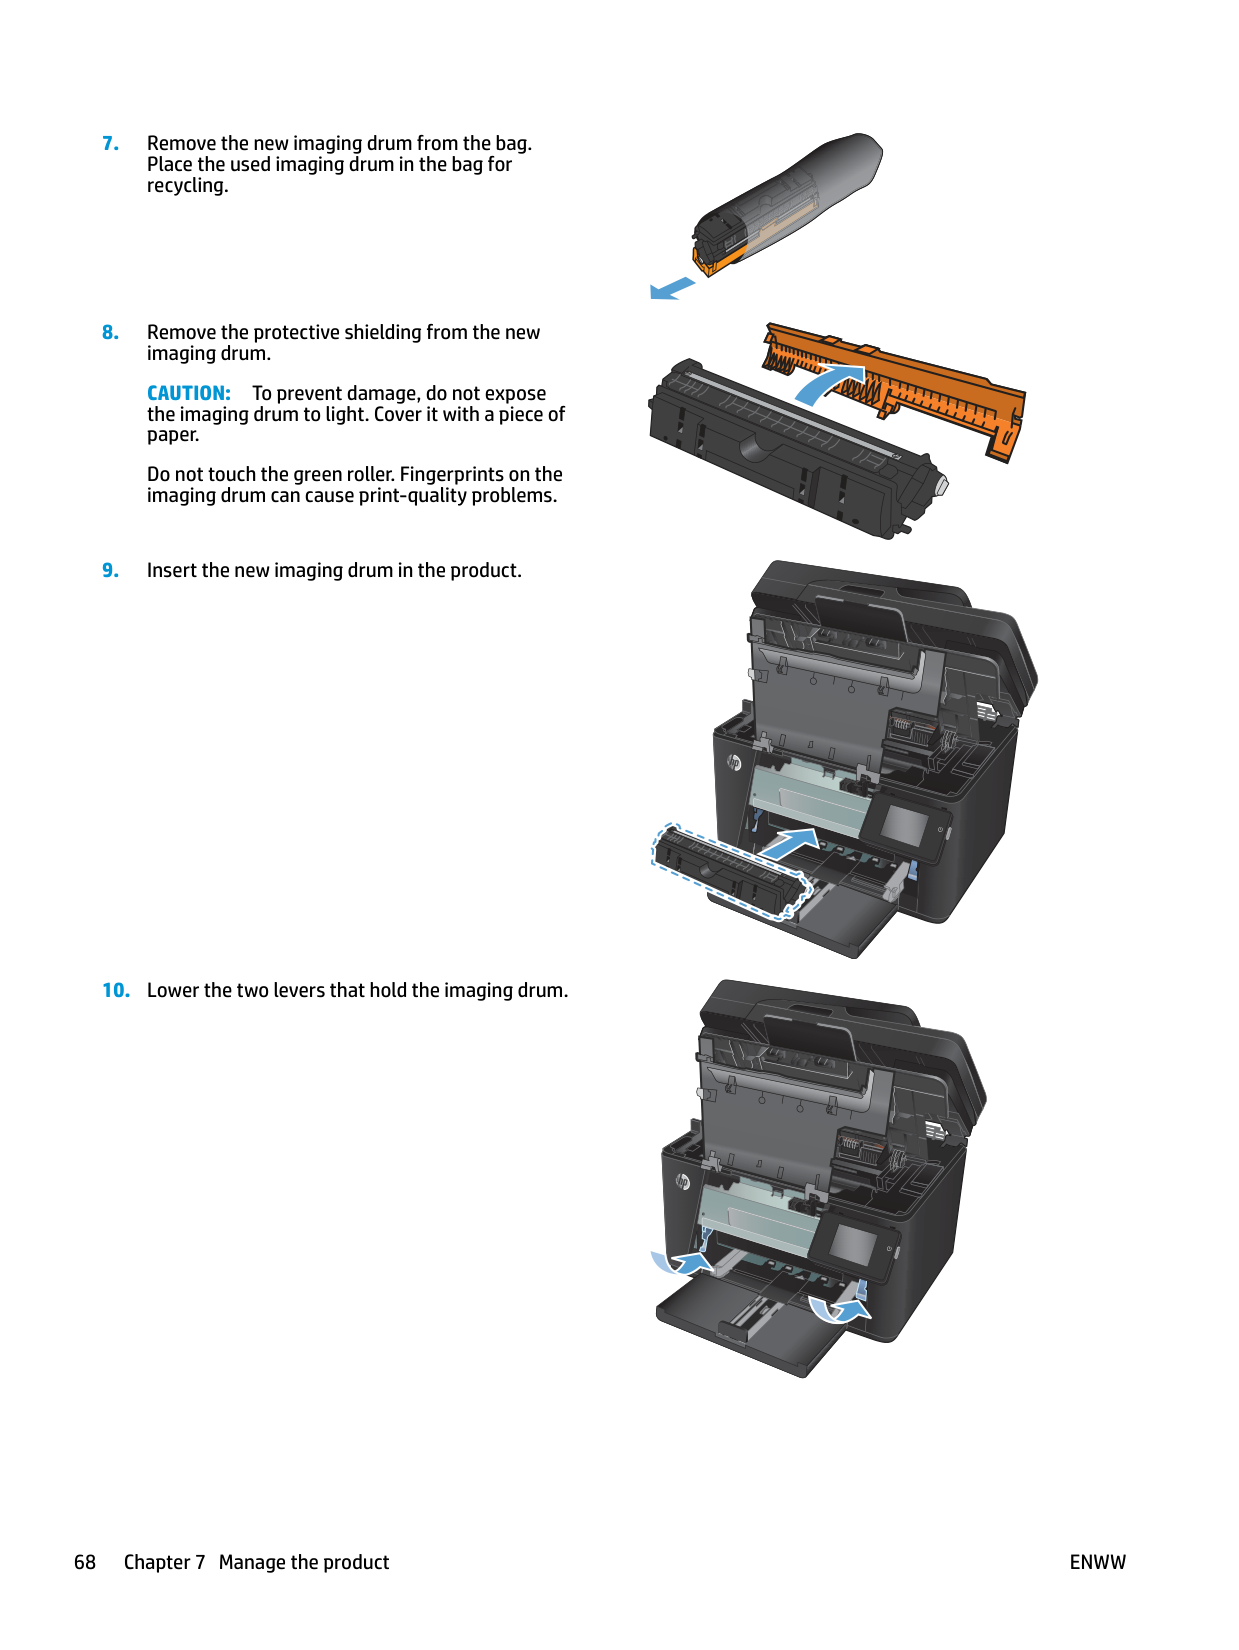
######### 7. Remove the new imaging drum from the bag.Place the used imaging drum in the bag forrecycling.

######### 8. Remove the protective shielding from the newimaging drum.
CAUTION: To prevent damage, do not expose the imaging drum to light. Cover it with a piece of paper.
Do not touch the green roller. Fingerprints on the imaging drum can cause print-quality problems.
######### 9. Insert the new imaging drum in the product.
######### 10. Lower the two levers that hold the imaging drum.


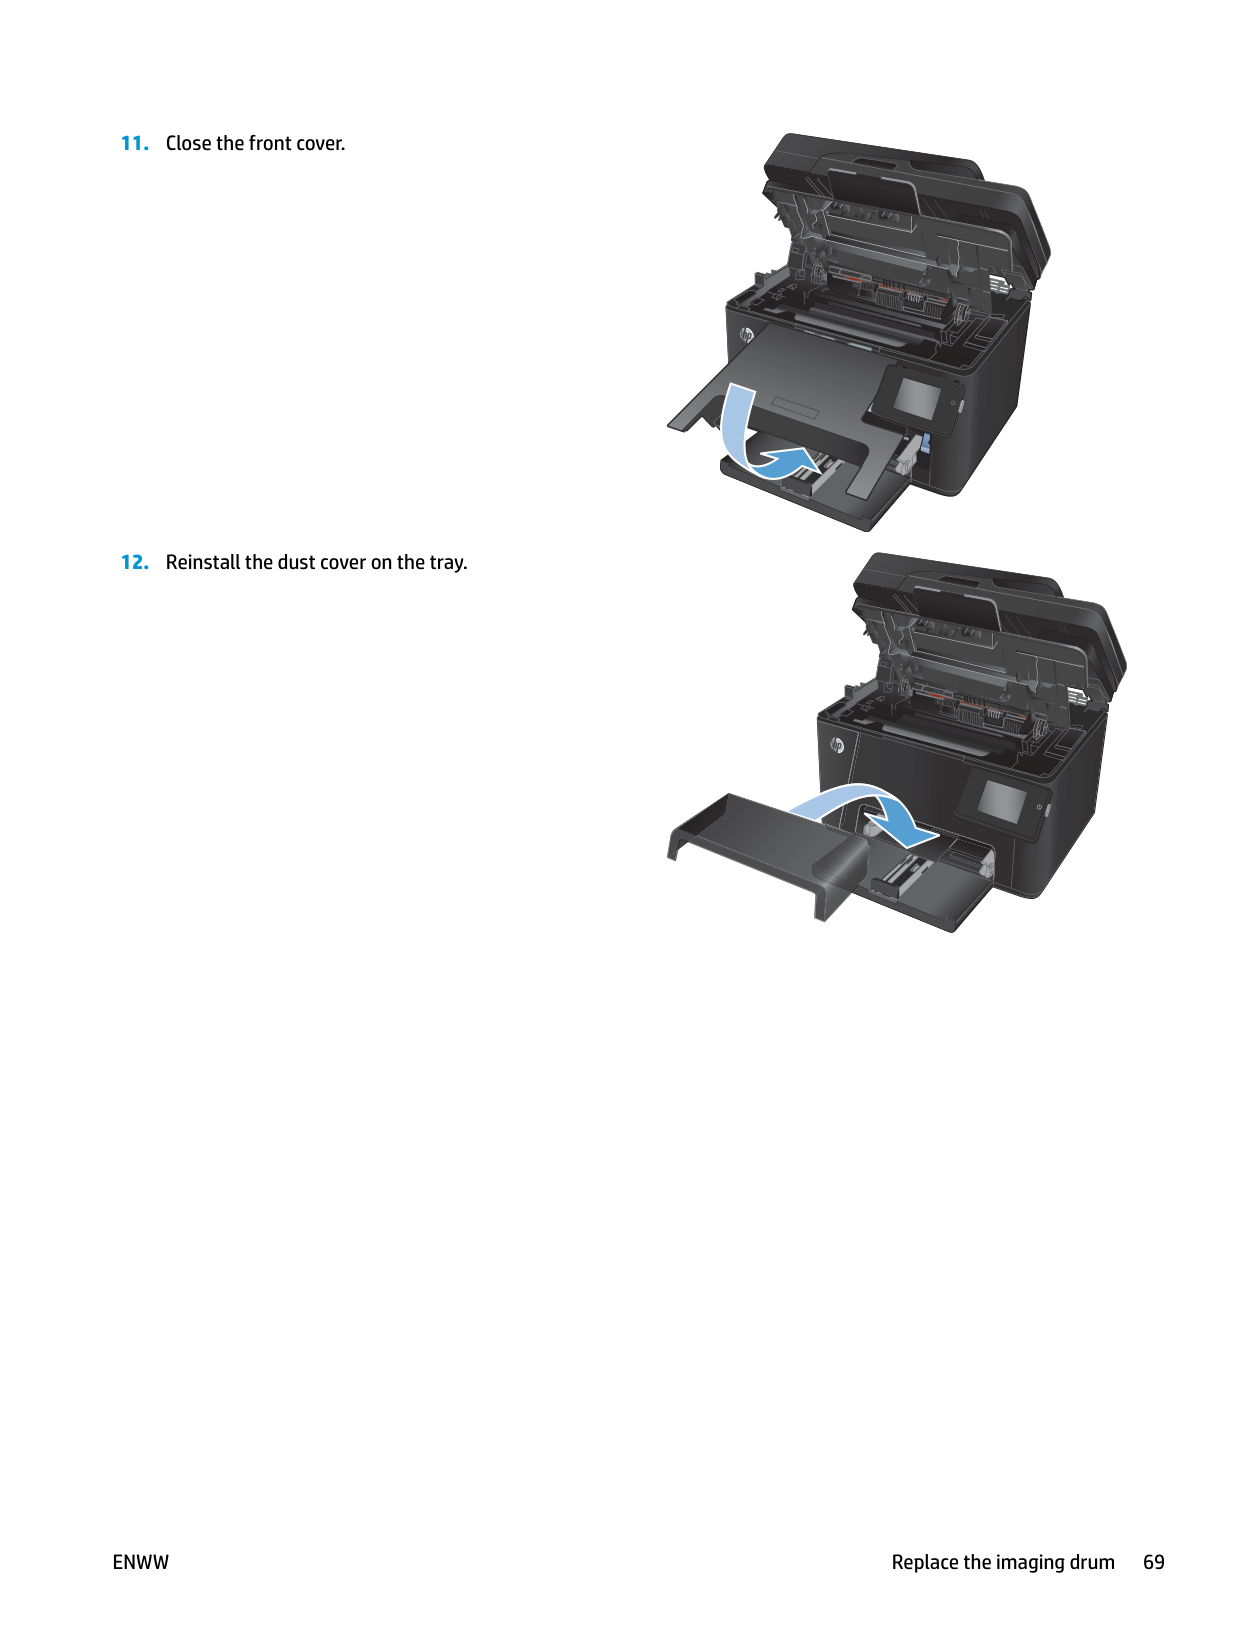
######### 11. Close the front cover.
######### 12. Reinstall the dust cover on the tray.


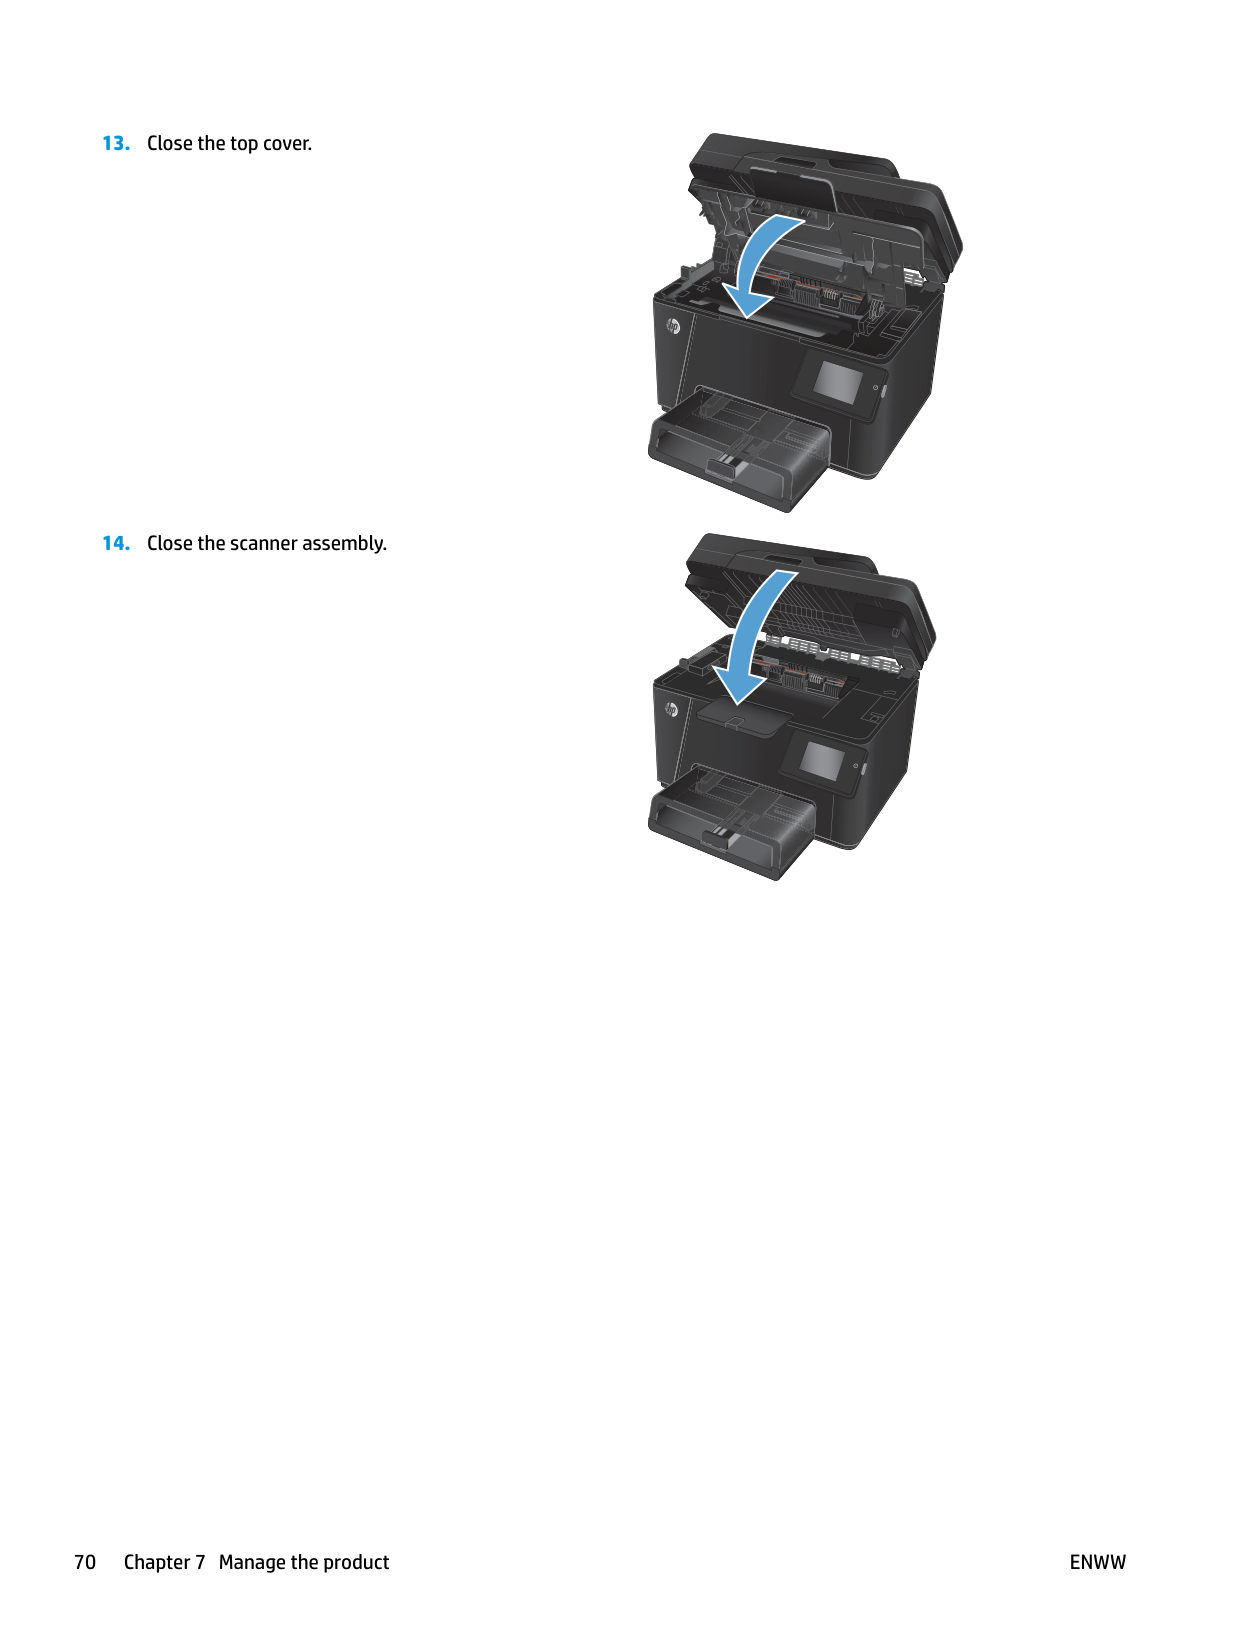
######### 13. Close the top cover.
######### 14. Close the scanner assembly.


8 Solve problems
ENWW 71
#### Control panel help system (touchscreen models only)
The product has a built-in Help system that explains how to use each screen. To open the Help system, touch the Help button in the upper-right corner of the screen.

For some screens, the Help opens to a global menu where you can search for specific topics. You can browse through the menu structure by touching the buttons in the menu.
Some Help screens include animations that guide you through procedures, such as clearing jams. For screens that contain settings for individual jobs, the Help opens to a topic that explains the options for that screen. If the product alerts you of an error or warning, touch the Help button to open a message that describes the problem. The message also contains instructions to help solve the problem.
#### Restore the factory-set defaults
Restoring the factory-set defaults returns all of the product and network settings to the factory defaults. It will not reset the page count, tray size, or language. To restore the product to the factory-default settings, follow these steps.
CAUTION: Restoring the factory-set defaults returns all of the settings to the factory defaults, and it also deletes any pages that are stored in the memory.
ENWW Restore the factory-set defaults 73
#### Solve paper feed or jam problems
If the product has recurring problems with paper feeding or with jams, use the following information to reduce the number of occurrences.
###### The product does not pick up paper
If the product does not pick up paper from the tray, try these solutions.
###### The product picks up multiple sheets of paper
If the product picks up multiple sheets of paper from the tray, try these solutions.
###### Frequent or recurring paper jams
Follow these steps to solve problems with frequent paper jams. If the first step does not resolve the problem continue with the next step until you have resolved the problem.
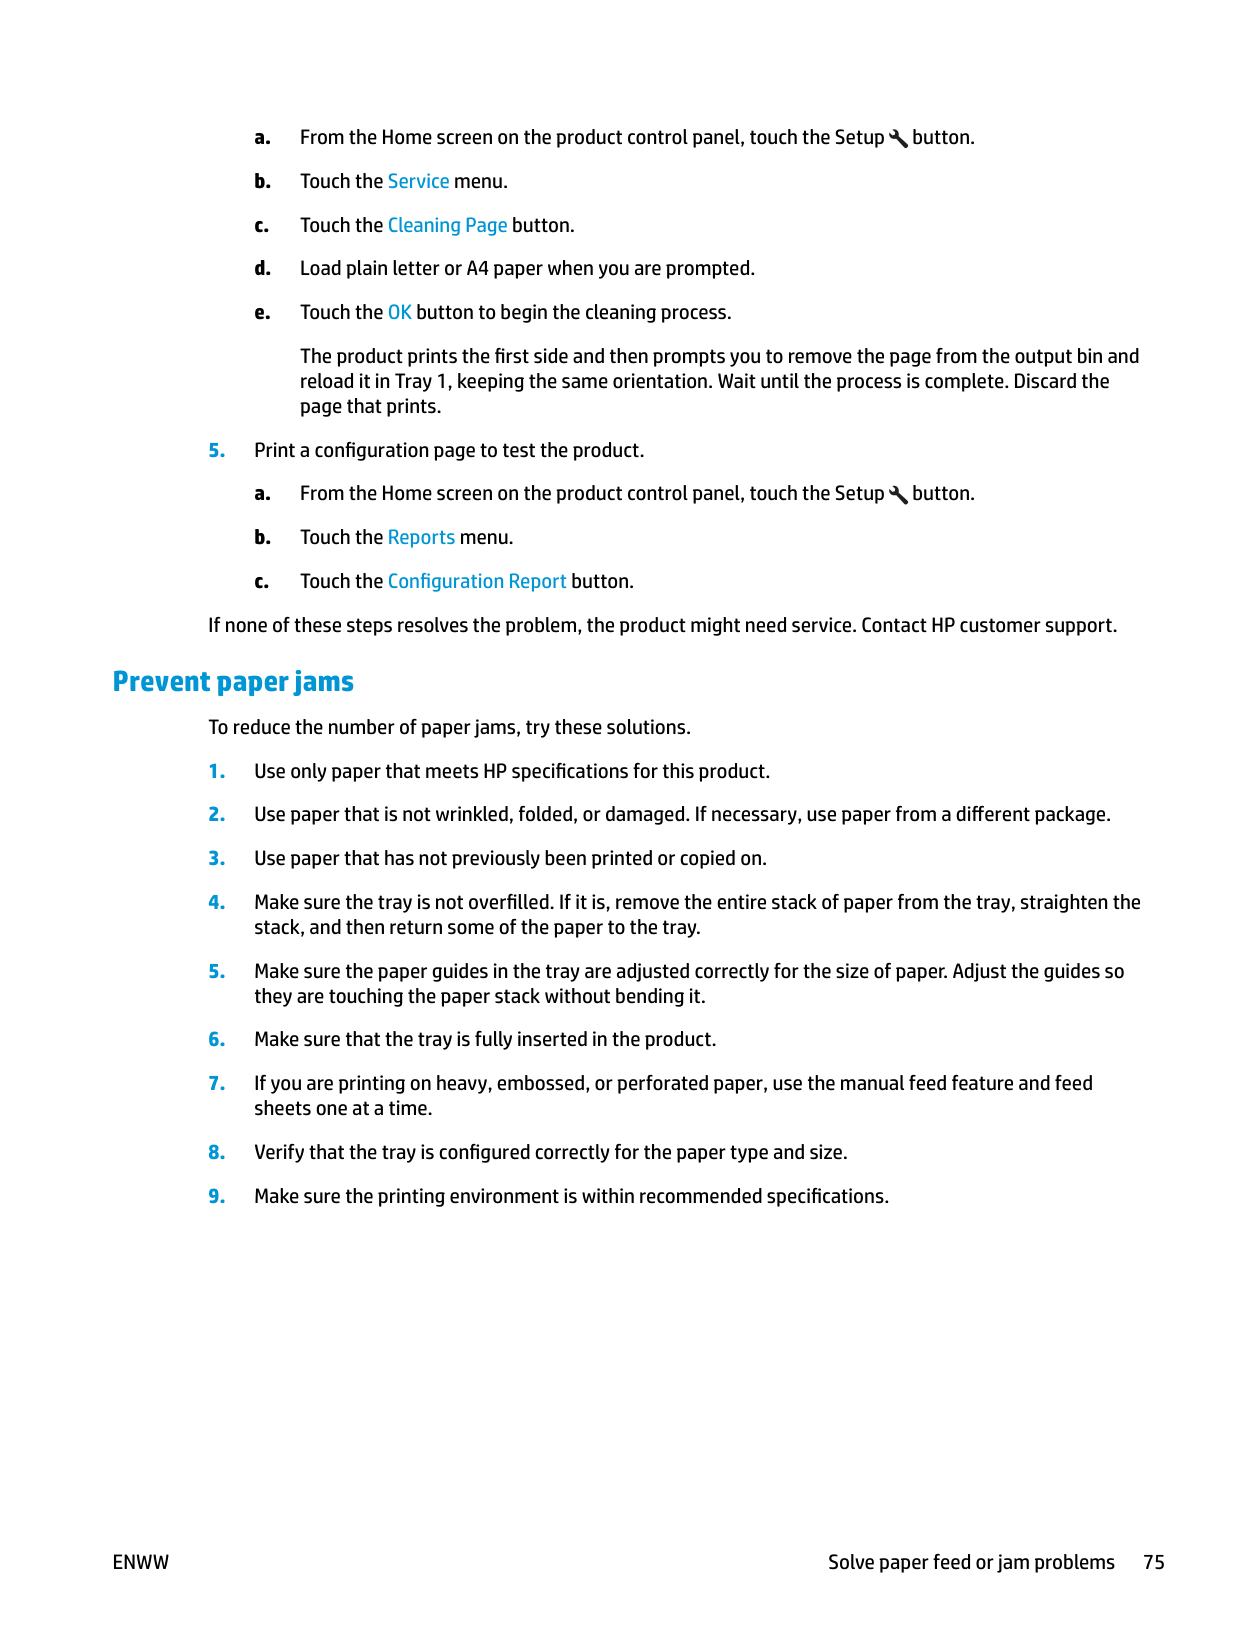
The product prints the first side and then prompts you to remove the page from the output bin and reload it in Tray 1, keeping the same orientation. Wait until the process is complete. Discard the page that prints.
If none of these steps resolves the problem, the product might need service. Contact HP customer support.
###### Prevent paper jams
To reduce the number of paper jams, try these solutions.
ENWW Solve paper feed or jam problems 75
#### Clear jams from the input tray
A Jam in tray 1. Clear Jam and press [OK] message displays on the product control panel.


ENWW Clear jams from the input tray 77
#### Clear jams in the output bin
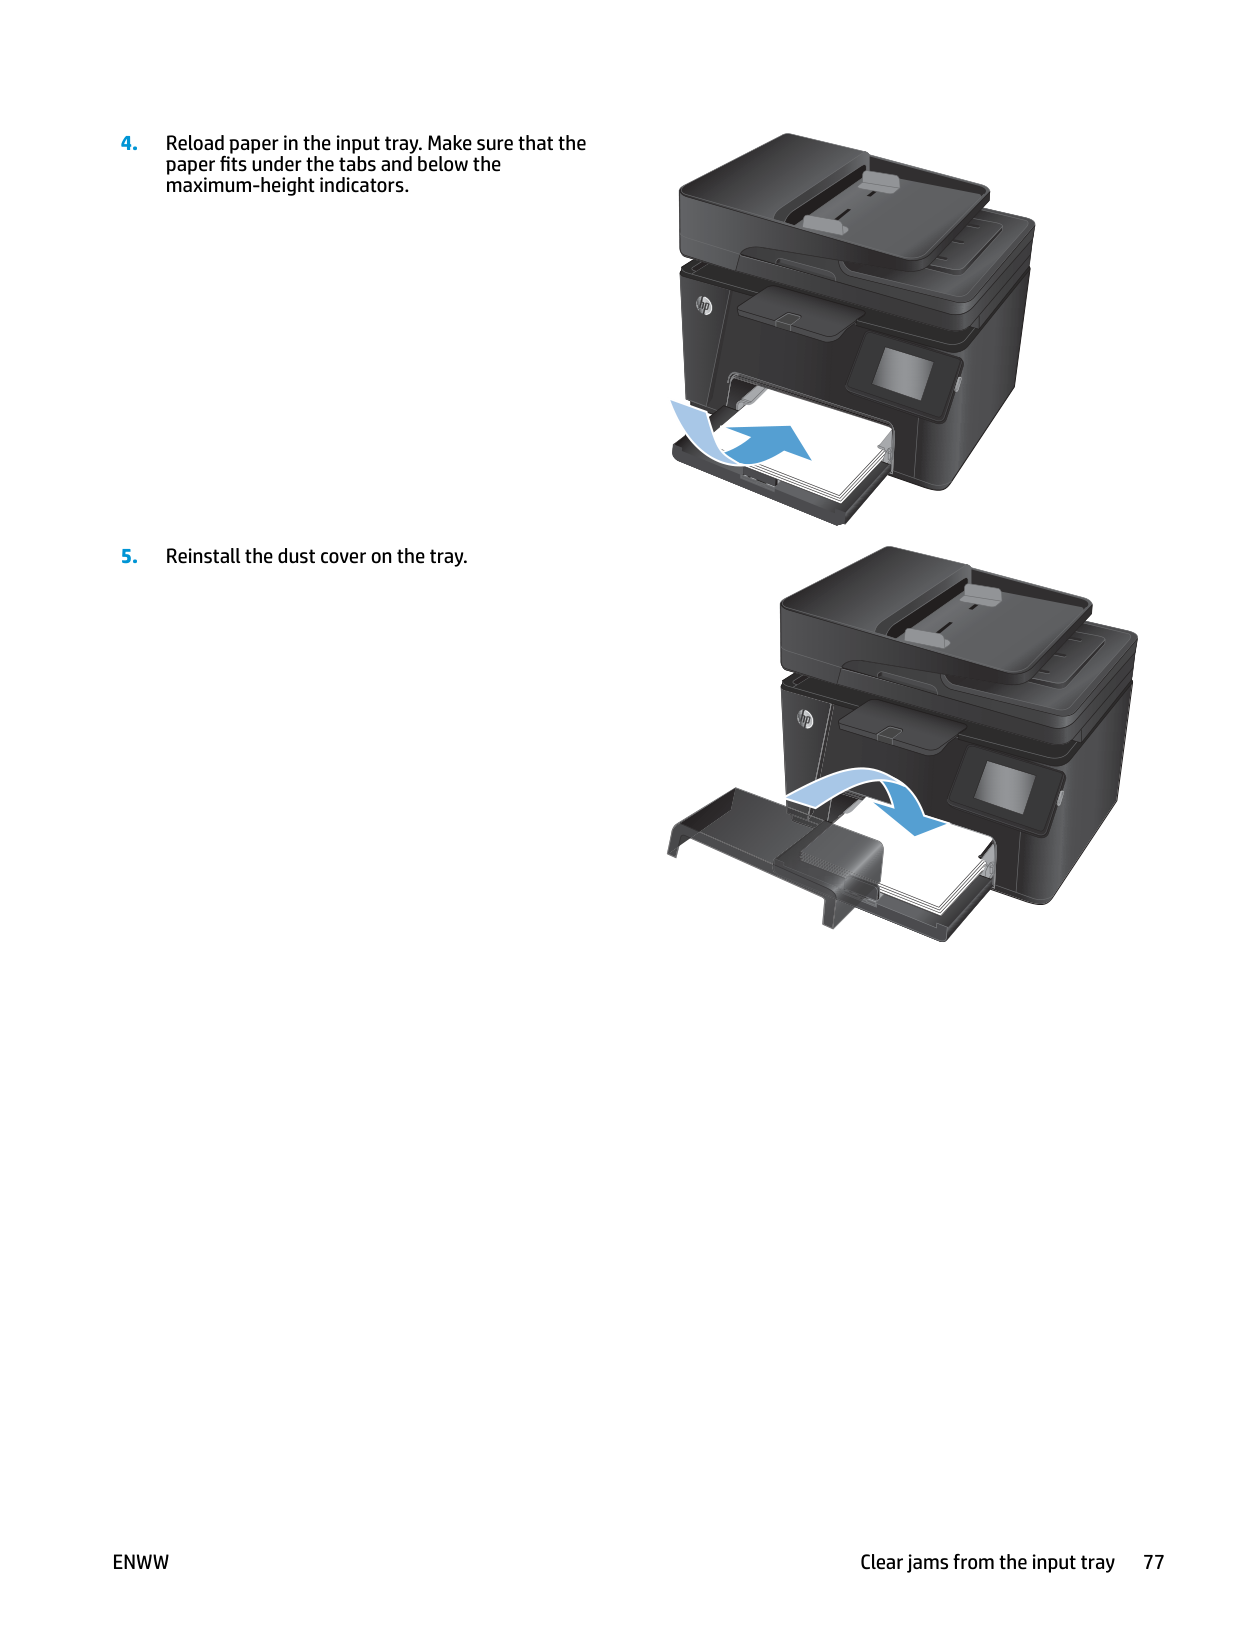
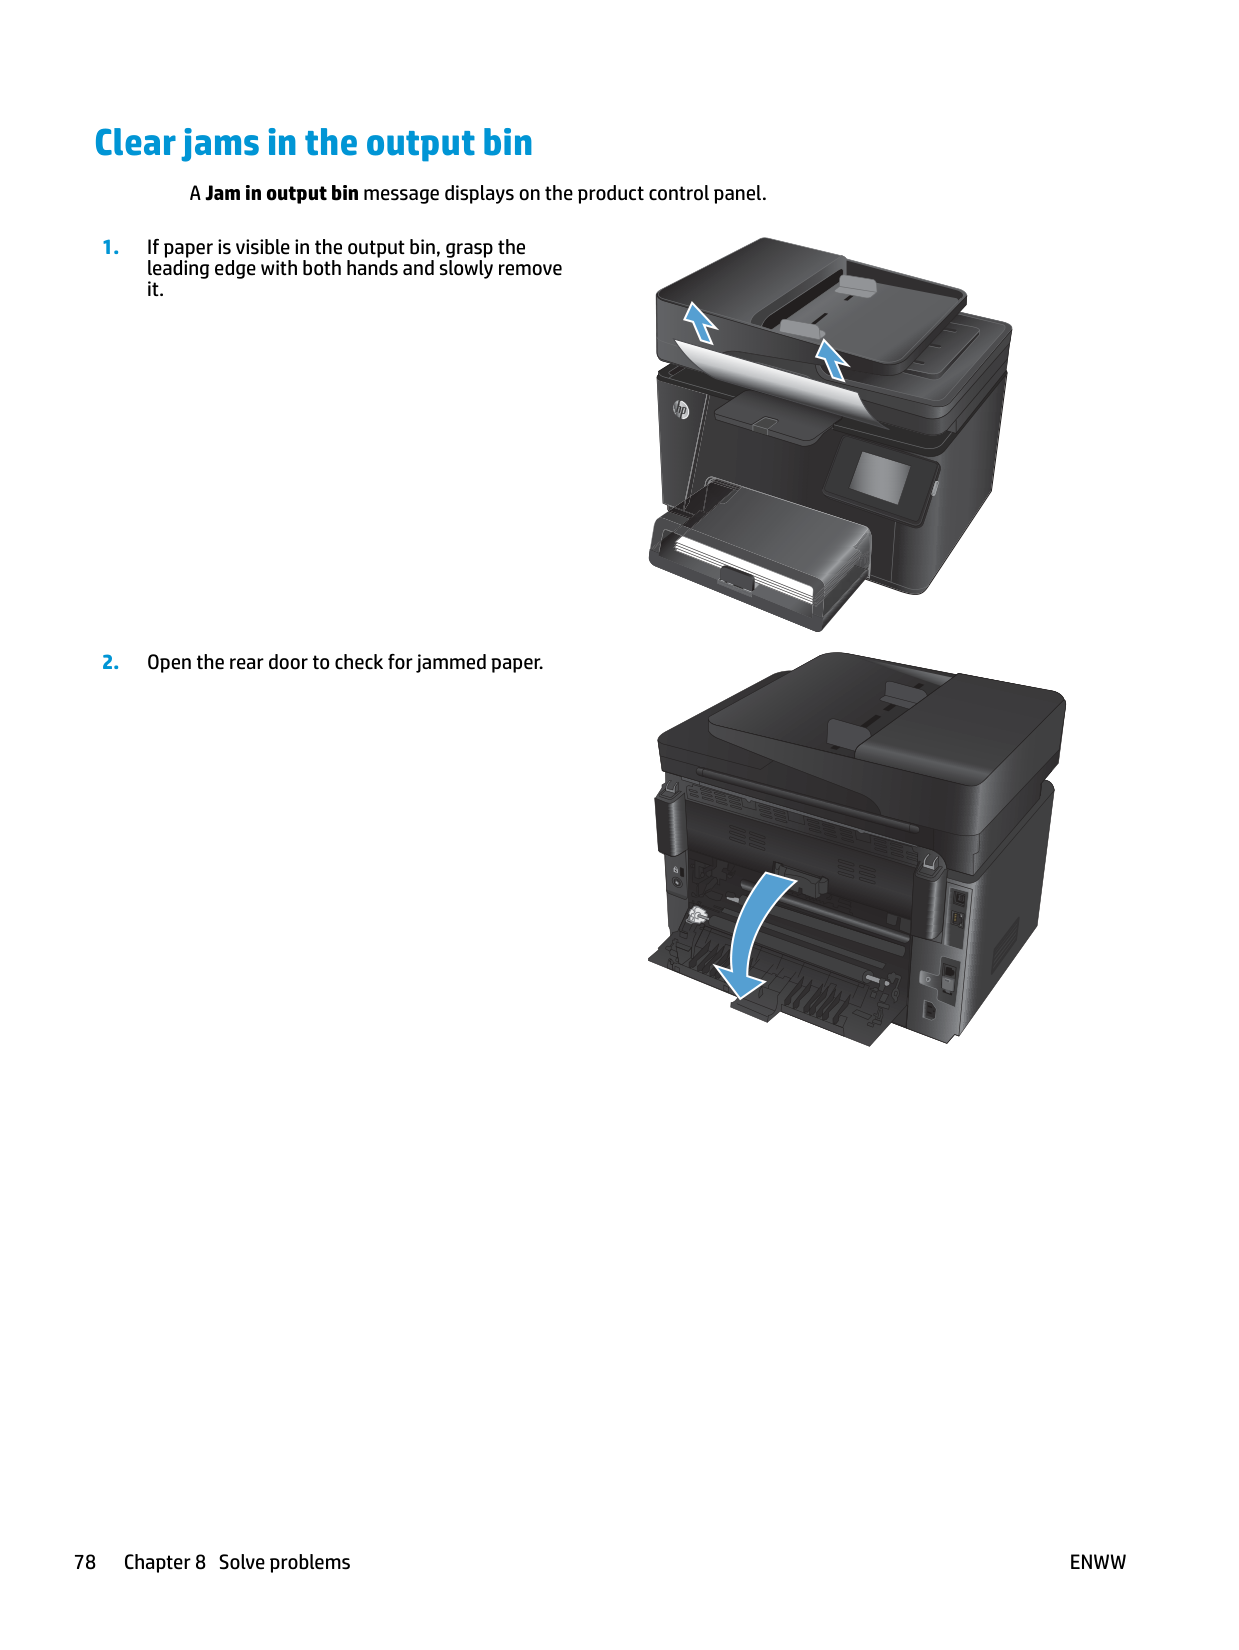
A Jam in output bin message displays on the product control panel.


ENWW Clear jams in the output bin 79
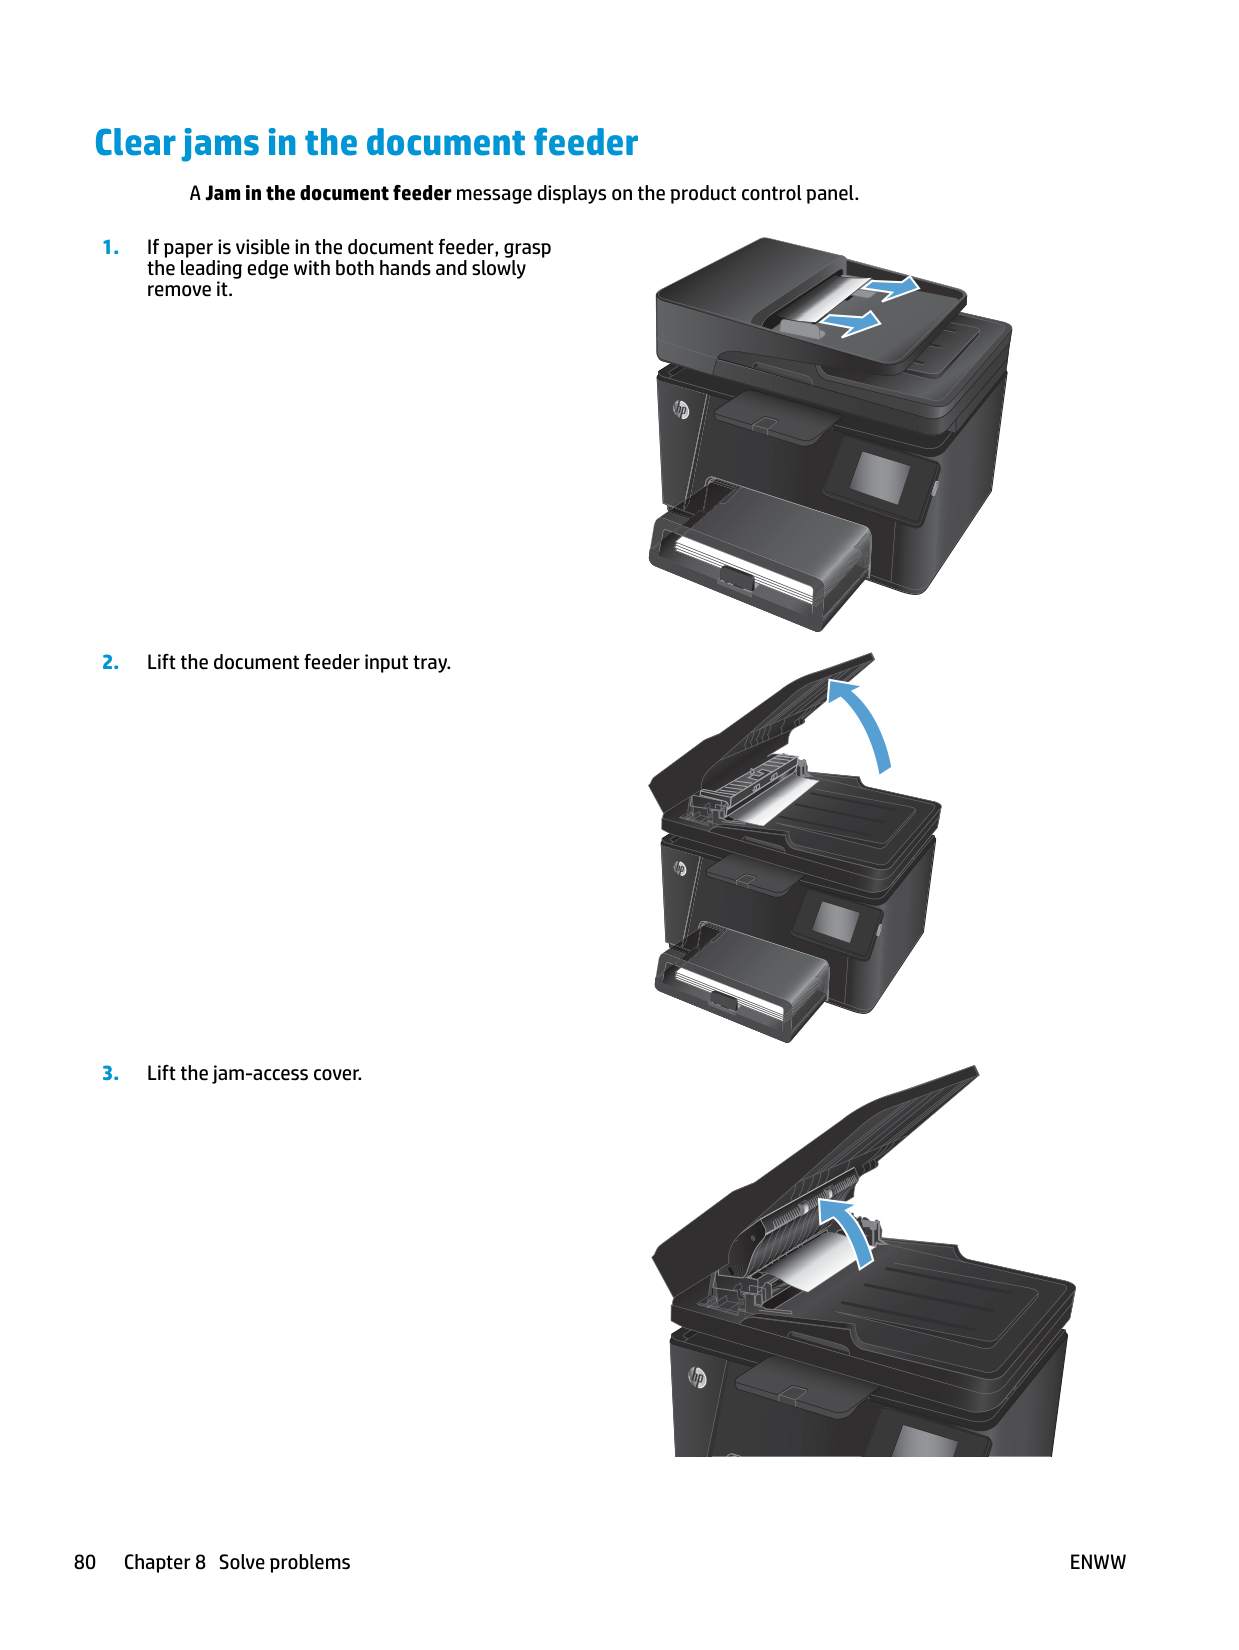
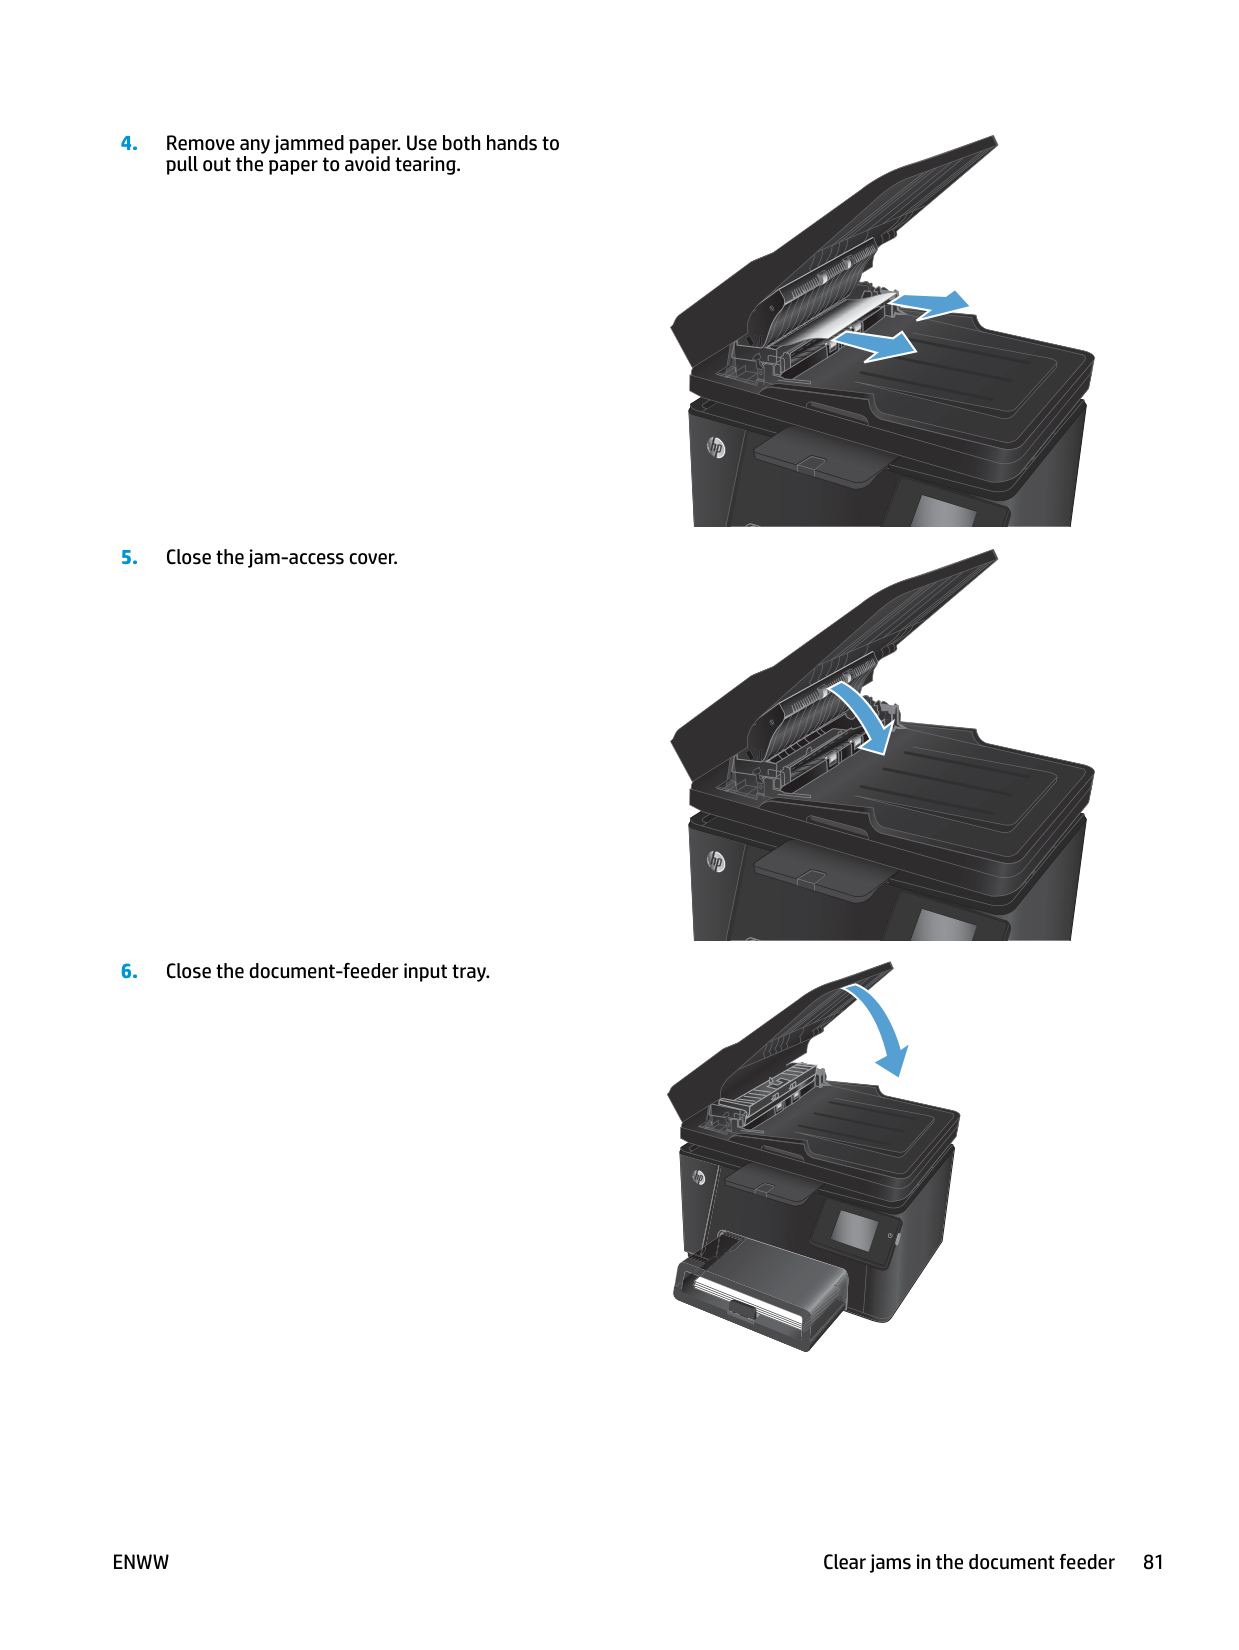
#### Clear jams in the document feeder
A Jam in the document feeder message displays on the product control panel.


ENWW Clear jams in the document feeder 81
#### Improve print quality
###### Print from a different software program
Try printing from a different software program. If the page prints correctly, the problem is with the software program from which you were printing.
###### Set the paper-type setting for the print job
Check the paper-type setting if you are printing from a software program and the pages have any of these problems:
####### Check the paper-type setting (Windows)
button to print the job.
####### Check the paper-type setting (Mac OS X)
###### Check the toner-cartridge status
Check the supplies status page for the following information:
######## LCD control panel
######## Touchscreen control panel
###### Calibrate the product to align the colors
If the printed output has colored shadows, blurry graphics, or areas that have poor color, you might need to calibrate the product to align the colors. Print the diagnostics page from the Reports menu on the control panel to check the color alignment. If the blocks of color on that page are not aligned with each other, you need to calibrate the product.
######## LCD control panel

######## Touchscreen control panel
###### Print a cleaning page
######## LCD control panel
The product prints the first side and then prompts you to remove the page from the output bin and reload it in Tray 1, keeping the same orientation. Wait until the process is complete. Discard the page that prints.
######## Touchscreen control panel
The product prints the first side and then prompts you to remove the page from the output bin and reload it in Tray 1, keeping the same orientation. Wait until the process is complete. Discard the page that prints.
###### Perform additional print quality troubleshooting Print the print quality page LCD control panel
######## Touchscreen control panel
####### Interpret the print quality page
This page contains five bands of color, which are divided into four groups as indicated in the following illustration. By examining each group, you can isolate the problem to a particular toner cartridge.
Section Toner cartridge
###### Inspect the toner cartridge for damage
CAUTION: Do not touch the roller on the toner cartridges. Fingerprints on the roller can cause printquality problems.
###### Check the paper and printing environment Use paper that meets HP specifications
Use different paper if you are having any of the following problems:
Always use a paper type and weight that this product supports. In addition, follow these guidelines when selecting paper:
####### Check the product environment
Verify that the product is operating within the environmental specifications listed in the product Warranty and Legal Guide.
###### Check the EconoMode settings
HP does not recommend the full-time use of EconoMode. If EconoMode is used full-time, the toner supply might outlast the mechanical parts in the toner cartridge. If print quality begins to degrade and is no longer acceptable, consider replacing the toner cartridge.
Follow these steps if the entire page is too dark or too light.
● If you a printing photos, select the Photo option. ● For all other print jobs, select the Normal option.
###### Adjust color settings (Windows)
######## Change the color theme
######## Change the color options
NOTE: When Black & White is selected, the Print in Grayscale setting in the Advanced Options is automatically changed to the Black print cartridge only option.
| | |---|
#### Improve copy and scan quality
###### Check the scanner glass for dirt and smudges
Over time, specks of debris might collect on the scanner glass and white plastic backing, which can affect performance. Use the following procedure to clean the scanner.
CAUTION: Do not use abrasives, acetone, benzene, ammonia, ethyl alcohol, or carbon tetrachloride on any part of the product; these can damage the product. Do not place liquids directly on the glass or platen. They might seep and damage the product.
###### Check the paper settings
######## LCD control panel
######## Touchscreen control panel
###### Check the image adjustment settings
The following image adjustment settings are available:
######## LCD control panel
######## Touchscreen control panel
###### Optimize for text or pictures
The following copy-quality settings are available:
######## LCD control panel
| |
|---|
button or the Color Start Copy button to start copying.
######## Touchscreen control panel
###### Edge-to-edge copying
The product cannot print fully edge-to-edge. There is a 4 mm (0.2 inch) unprintable border around the page.
######## Considerations for printing or scanning documents with cropped edges:
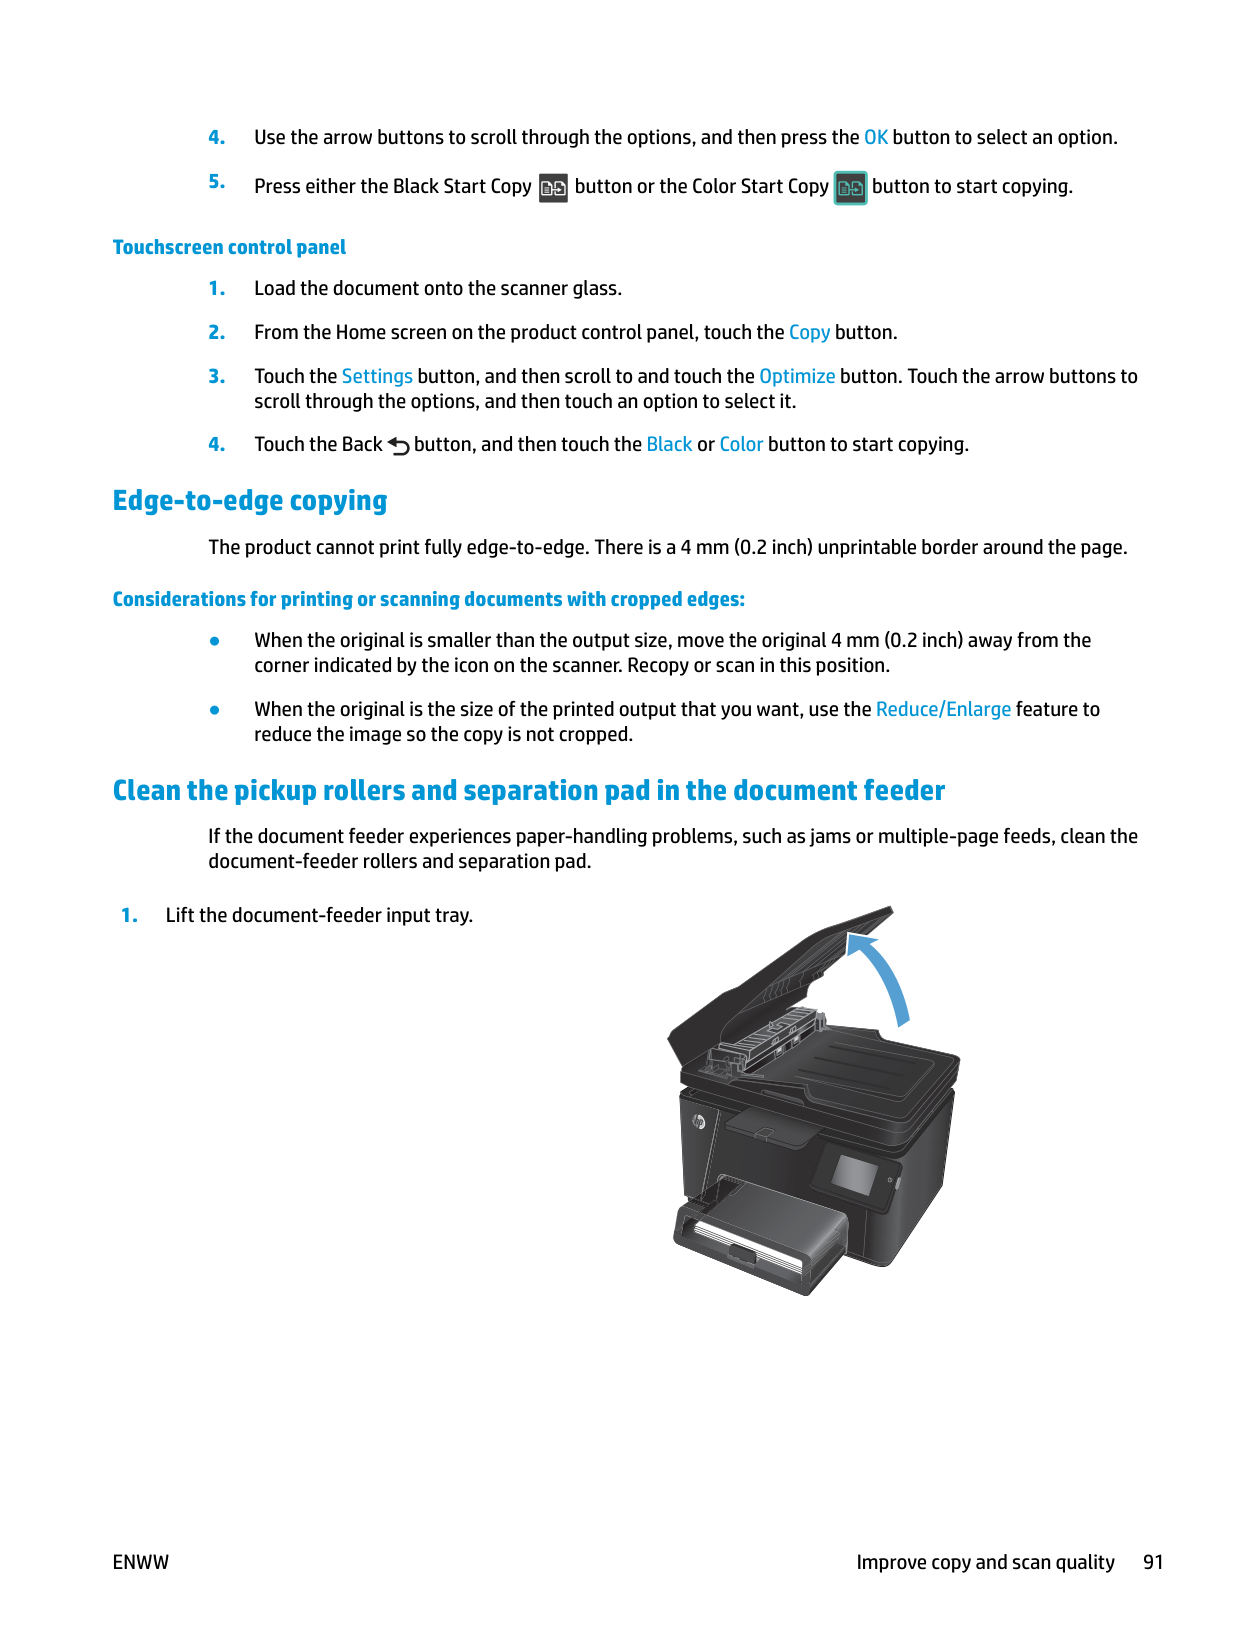
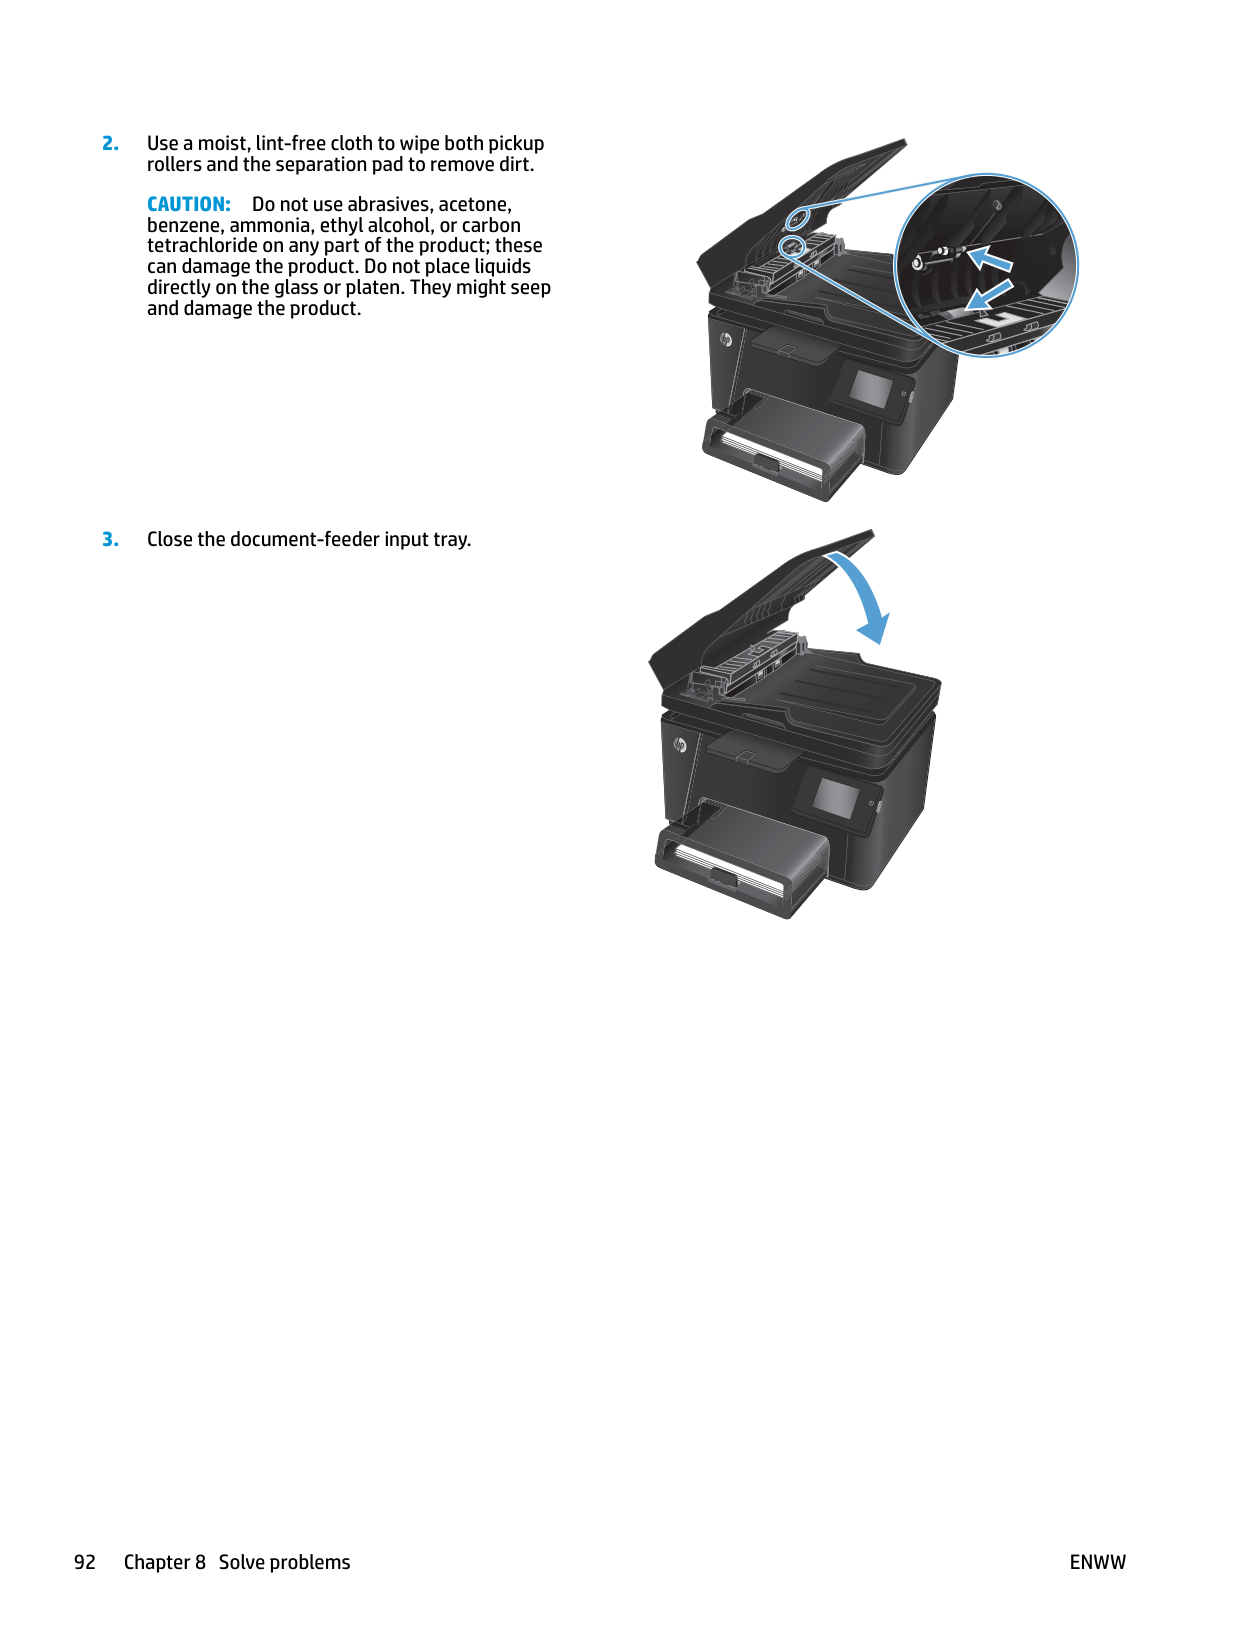
###### Clean the pickup rollers and separation pad in the document feeder
If the document feeder experiences paper-handling problems, such as jams or multiple-page feeds, clean the document-feeder rollers and separation pad.


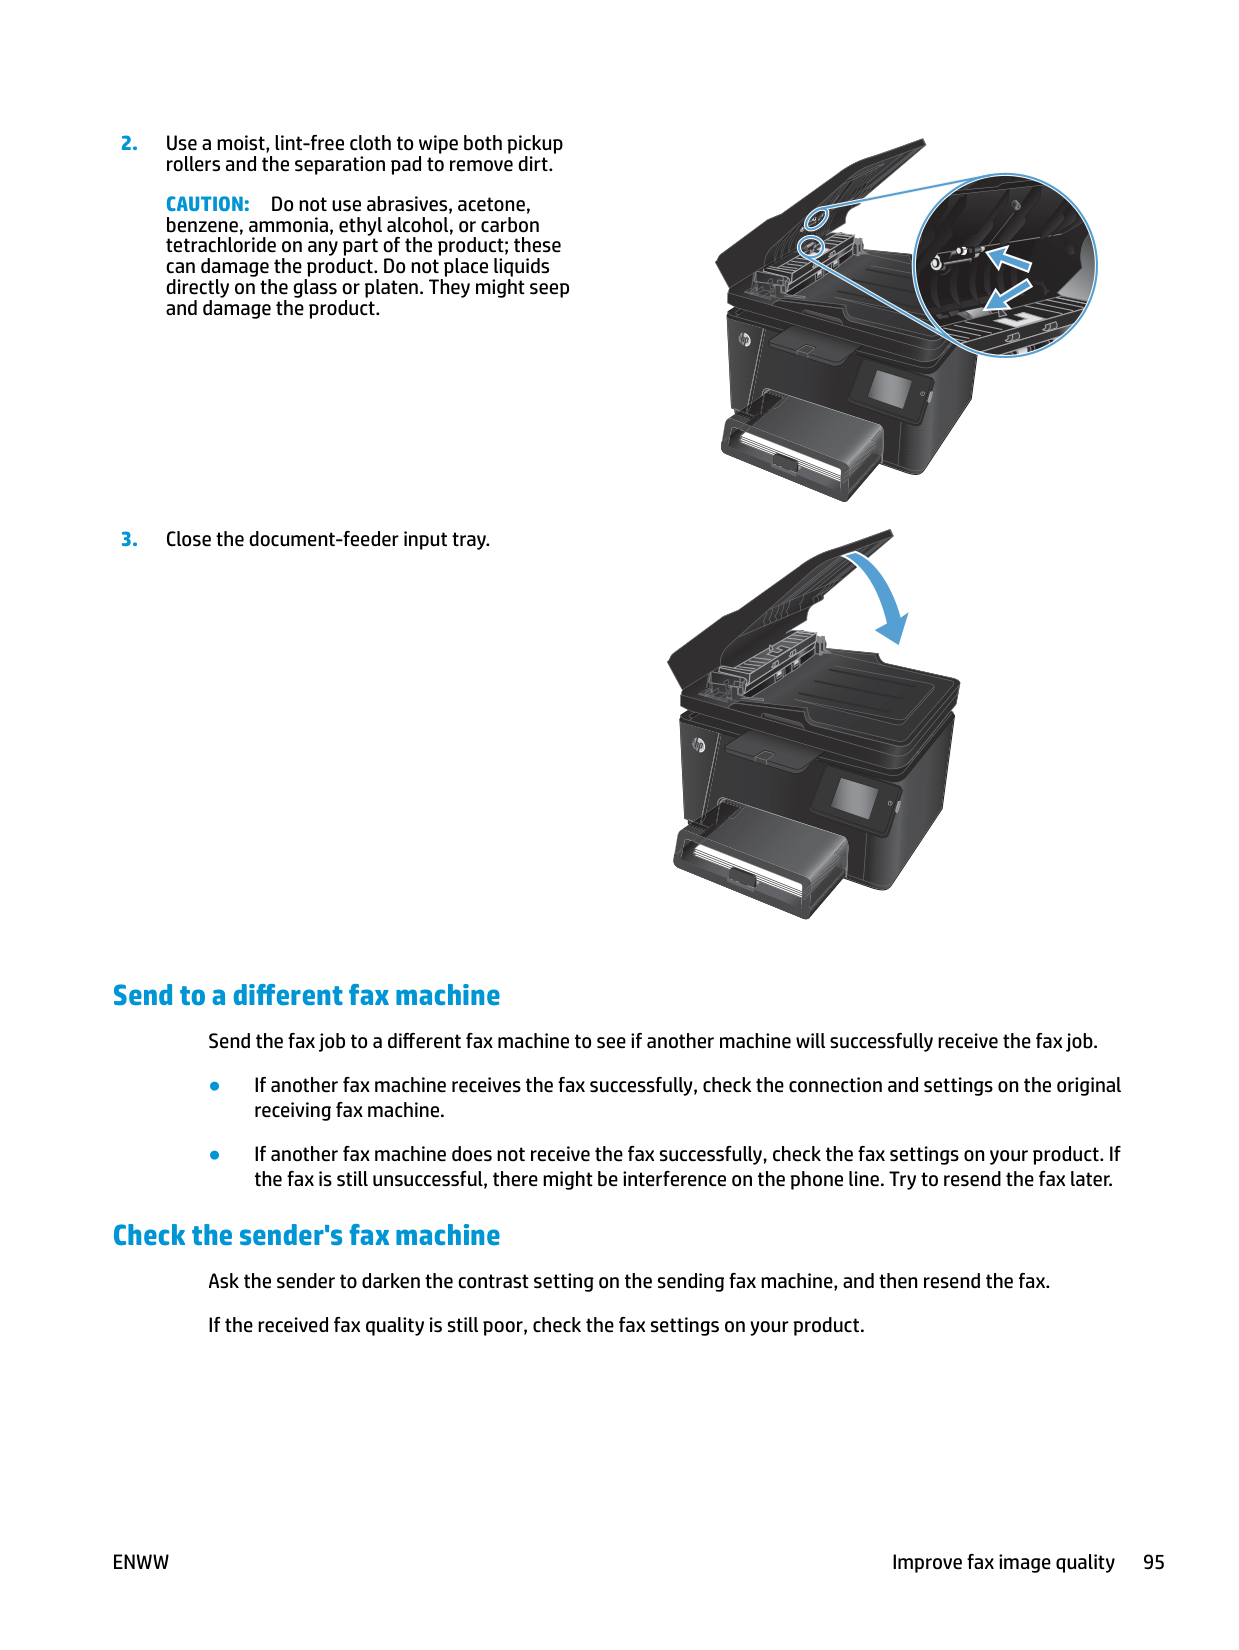
######### 2. Use a moist, lint-free cloth to wipe both pickuprollers and the separation pad to remove dirt.
CAUTION: Do not use abrasives, acetone, benzene, ammonia, ethyl alcohol, or carbon tetrachloride on any part of the product; these can damage the product. Do not place liquids directly on the glass or platen. They might seep and damage the product.
######### 3. Close the document-feeder input tray.


#### Improve fax image quality
###### Check the scanner glass for dirt or smudges
Over time, specks of debris might collect on the scanner glass and white plastic backing, which can affect performance. Use the following procedure to clean the scanner.
CAUTION: Do not use abrasives, acetone, benzene, ammonia, ethyl alcohol, or carbon tetrachloride on any part of the product; these can damage the product. Do not place liquids directly on the glass or platen. They might seep and damage the product.
###### Check the send-fax resolution setting
###### Check the lightness/darkness setting
If the fax output is too light or too dark, check the lightness/darkness setting to make sure it is appropriate for the fax job.
###### Check the Error Correction setting
Usually, the product monitors the signals on the telephone line while it is sending or receiving a fax. If the product detects an error during the transmission and the error-correction setting is On, the product can request that the portion of the fax be resent. The factory-set default for error correction is On.
You should turn off error correction only if you are having trouble sending or receiving a fax, and you are willing to accept the errors in the transmission. Turning off the setting might be useful when you are trying to send a fax overseas or receive one from overseas, or if you are using a satellite telephone connection.
Check the Fit-to-Page setting If the product printed a fax job off the page, turn on the fit-to-page feature from the product control panel. NOTE: Make sure that the default paper size setting matches the size of the paper in the tray.
| | |---|
###### Clean the pickup rollers and separation pad in the document feeder
If the document feeder experiences paper-handling problems, such as jams or multiple-page feeds, clean the document-feeder rollers and separation pad.


CAUTION: Do not use abrasives, acetone, benzene, ammonia, ethyl alcohol, or carbon tetrachloride on any part of the product; these can damage the product. Do not place liquids directly on the glass or platen. They might seep and damage the product.


###### Send to a different fax machine
Send the fax job to a different fax machine to see if another machine will successfully receive the fax job.
Check the sender's fax machine Ask the sender to darken the contrast setting on the sending fax machine, and then resend the fax. If the received fax quality is still poor, check the fax settings on your product.
#### Solve wired network problems
Check the following items to verify that the product is communicating with the network. Before beginning, print a configuration page from the product control panel and locate the product IP address that is listed on this page.
| | |---|
NOTE: HP does not support peer-to-peer networking, as the feature is a function of Microsoft operating systems and not of the HP print drivers. For more information, go to Microsoft at www.microsoft.com.
###### Poor physical connection
###### The computer is using the incorrect IP address for the product
###### The computer is unable to communicate with the product
a. Open a command-line prompt on your computer. For Windows, click Start, click Run, type cmd, and
then press Enter.
b. Type ping followed by the IP address for your product.
For Mac OS X, open the Network Utility, and then supply the IP address in the correct field in the Ping pane.
c. If the window displays round-trip times, the network is working.
###### The product is using incorrect link and duplex settings for the network
HP recommends leaving these settings in automatic mode (the default setting). If you change these settings, you must also change them for your network.
###### New software programs might be causing compatibility problems
Verify that any new software programs are correctly installed and that they use the correct print driver.
###### The computer or workstation might be set up incorrectly
###### The product is disabled, or other network settings are incorrect
ENWW Solve wired network problems 97
#### Solve wireless network problems
###### Wireless connectivity checklist
###### The product does not print after the wireless configuration completes
###### The product does not print, and the computer has a third-party firewall installed
###### The wireless connection does not work after moving the wireless router or product
configuration for the computer.
wireless setup for the product.
###### Cannot connect more computers to the wireless product
###### The wireless product loses communication when connected to a VPN
● Typically, you cannot connect to a VPN and other networks at the same time.
###### The network does not appear in the wireless networks list
###### The wireless network is not functioning
For Mac OS X, open the Network Utility, and then supply the IP address in the correct field in the Ping pane.
###### Perform a wireless network diagnostic test
From the product control panel, you can run a diagnostic test that provides information about the wireless network settings.
######## LCD control panel
######## Touchscreen control panel
###### Reduce interference on a wireless network
The following tips can reduce interference in a wireless network:
#### Solve fax problems
###### Check the hardware setup
The utility checks for firmware updates for your HP product. If updates are found, the utility installs the available update.

| | |---|
###### Faxes are sending slowly
The product is experiencing poor phone line quality.
| | |---|
| | |---|
ENWW Solve fax problems 103
###### Fax quality is poor
Fax is blurry or light.
| | |---|
###### Fax cuts off or prints on two pages
| | |---|
NOTE: If the Fit to Page setting is off and the Default Paper Size setting is set to Letter, a Legal-size original prints on two pages.
9 Parts, supplies, and accessories
ENWW 105
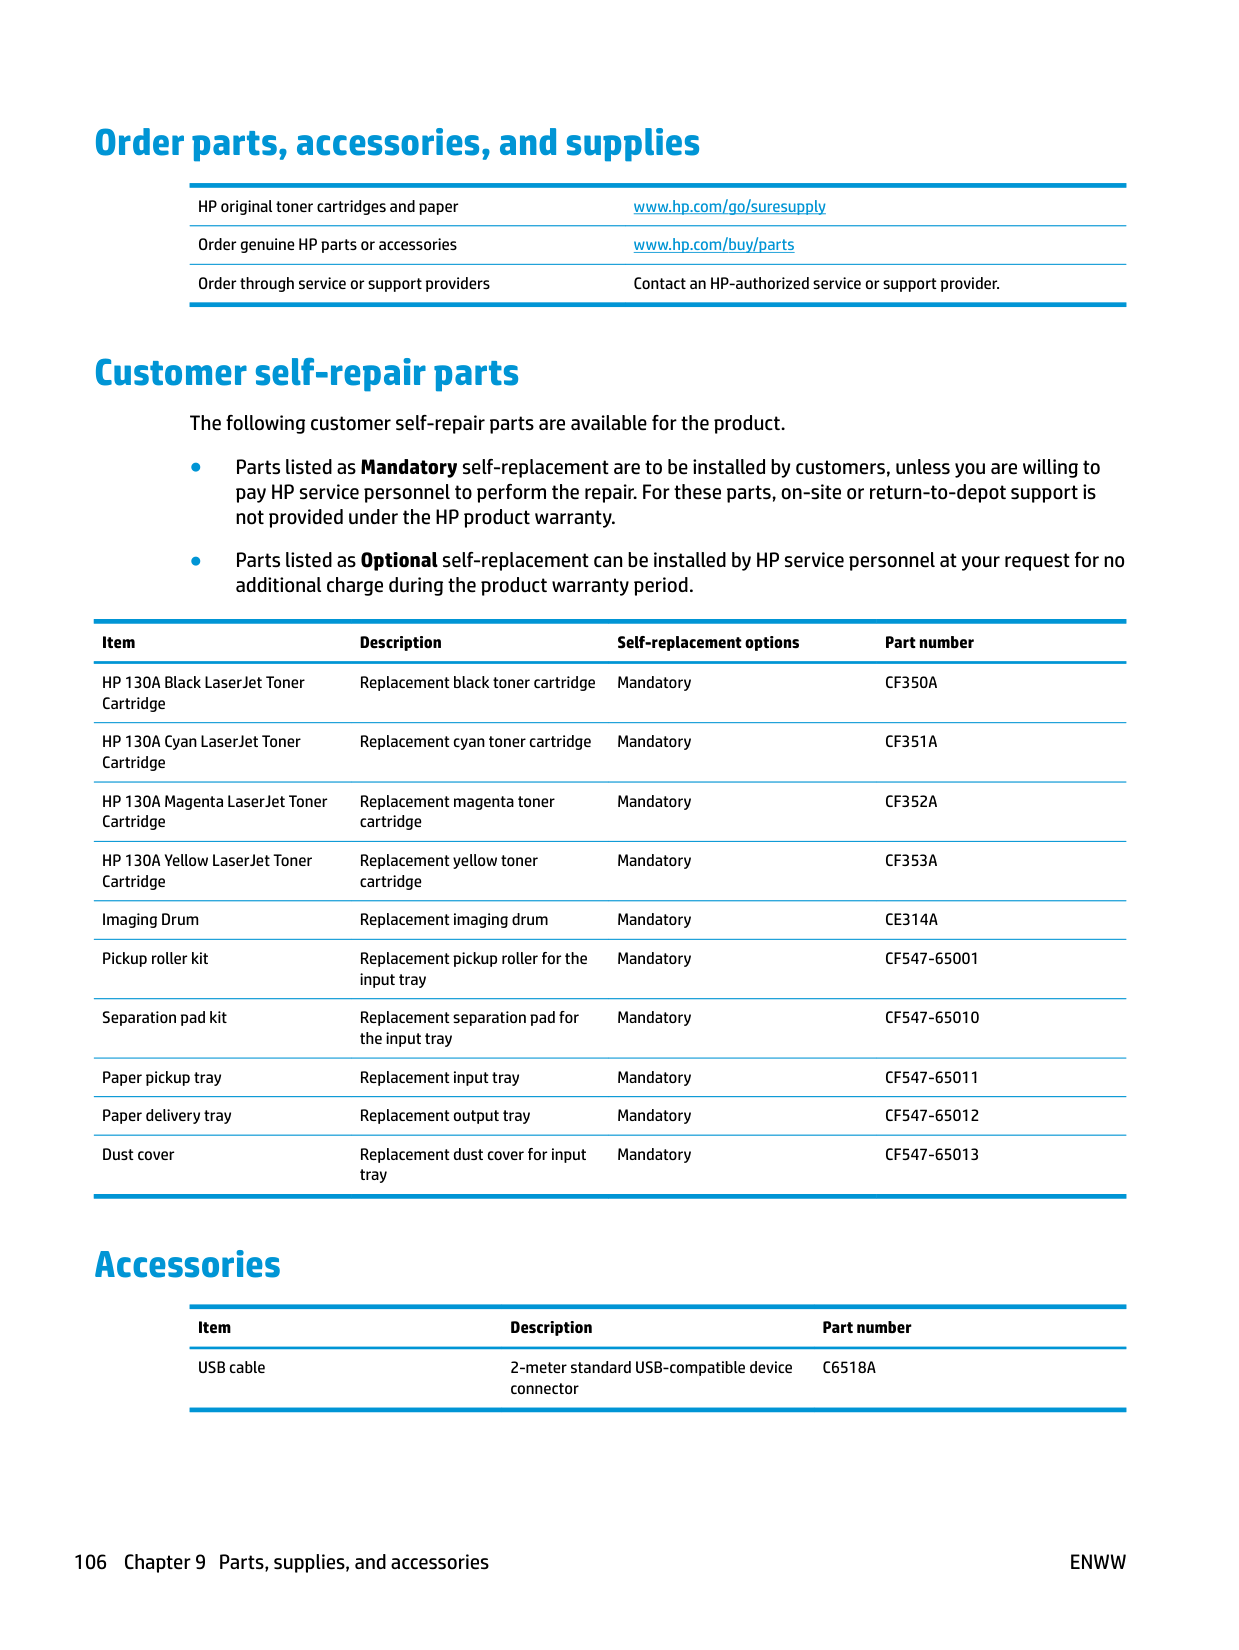
#### Order parts, accessories, and supplies
HP original toner cartridges and paper www.hp.com/go/suresupply Order genuine HP parts or accessories www.hp.com/buy/parts Order through service or support providers Contact an HP-authorized service or support provider.
#### Customer self-repair parts
The following customer self-repair parts are available for the product.
Item Description Self-replacement options Part number
HP 130A Black LaserJet Toner Cartridge
Replacement black toner cartridge Mandatory CF350A
HP 130A Cyan LaserJet Toner Cartridge
Replacement cyan toner cartridge Mandatory CF351A
HP 130A Magenta LaserJet Toner Cartridge
Replacement magenta toner cartridge
Mandatory CF352A
HP 130A Yellow LaserJet Toner Cartridge
Replacement yellow toner cartridge
Mandatory CF353A
Imaging Drum Replacement imaging drum Mandatory CE314A Pickup roller kit Replacement pickup roller for the
Mandatory CF547-65001
input tray
Separation pad kit Replacement separation pad for the input tray
Mandatory CF547-65010
Paper pickup tray Replacement input tray Mandatory CF547-65011 Paper delivery tray Replacement output tray Mandatory CF547-65012 Dust cover Replacement dust cover for input
Mandatory CF547-65013
tray
#### Accessories
Item Description Part number USB cable 2-meter standard USB-compatible device
C6518A
connector
106 Chapter 9 Parts, supplies, and accessories ENWW
Index
ordering 106 part numbers 106
AirPrint 31 applications
downloading 51 Apps menu 51
locating 4
replacing 62 checklist
wireless connectivity 98
cleaning glass 89 paper path 84
color alignment, calibrating 84 color options
changing, Windows 87 color theme
changing, Windows 87
control panel help 72 Home screen 8 LCD buttons and lights 6 locating 4 touchscreen buttons and lights
7 copy quality
improving 89
copying edges of documents 91 multiple copies 34
optimizing for text or pictures
90 quality, adjusting 36 setting paper size and type 89 single copies 34 two-sided documents 35
covers, locating 4 customer self-repair
part numbers 106
copying two-sided documents
35 double-sided copying 35 double-sided printing
Mac 27 Windows 20
drivers
paper types 13 drum
replacing 66 duplex 35 duplex printing Mac 27
duplex printing (double-sided) Windows 20
duplexing manually (Mac) 27 manually (Windows) 20
changing password 56 opening 56
hardware setup 102
fax troubleshooting 102 help, control panel 72 Home screen, control panel 8 HP Device Toolbox, using 52 HP Embedded Web Server
changing password 56 opening 56
HP ePrint 30 HP ePrint software 30 HP Scan software (Mac) 39 HP Scan software (Windows) 38 HP Utility 54 HP Utility for Mac
Bonjour 54 features 54 HP Utility, Mac 54 HP Web Services
applications 51 enabling 51
HP Wireless Direct Printing 32
replacing 66 input tray
loading 15 interface ports
locating 5
J jams
causes of 75
L labels
printing (Windows) 25 loading
input tray 15 lock
product 57
HP Utility 54 maintenance kits
part numbers 106
manual duplex Mac 27 Windows 20
memory included 2
multiple pages per sheet printing (Mac) 28 printing (Windows) 22
password, changing 56 password, setting 56
network installation 50 networks
installing the product 50 models supporting 2
number of copies, changing 34
supplies and accessories 106 output bin
locating 4
selecting (Mac) 28 selecting (Windows) 22

paper jams 75
ordering 106 selecting 86 supported sizes 12 supported types 13
paper pickup problems
solving 74 paper type
selecting (Windows) 25 paper types
selecting (Mac) 28
part numbers customer self-repair 106 maintenance kits 106 supplies 106
ports
locating 5 power connection locating 5 power switch, locating 4 print on both sides
Mac 27 manually, Windows 20 Windows 20
print quality improving 82
print quality page interpreting 85 printing 85
improving 89 scanner
glass cleaning 89
scanning from HP Scan software (Mac) 39 from HP Scan software
(Windows) 38 settings
factory-set defaults, restoring 73 sleep delay
setting 58 software

HP Utility 54
special paper printing (Windows) 25
status Home screen, control panel 8 HP Utility, Mac 54
supplies low threshold settings 60 ordering 106 part numbers 106 replacing imaging drum 66 replacing toner cartridge 62 status, viewing with HP Utility for
Mac 54
using when low 60 supplies status
checking 83 supplies status page printing 83
supported paper sizes 12
T toner
amount remaining 83
toner cartridge checking for damage 86 low threshold settings 60 replacing 62 using when low 60
transparencies
printing (Windows) 25 Tray 1
orientation 16 trays
included 2 locating 4
troubleshooting faxes 102 jams 75 network problems 96 paper feed problems 74 wired network 96 wireless network 98
two-sided copying 35
W Web Services
applications 51 enabling 51
wireless network troubleshooting 98
######### wireless network interference 100