HP Color Laserjet Pro Mfp 4301 4303dw Fdn Fdw Printer
Printers · 9 Q&As

HP Color Laserjet Pro Mfp 4301 4303dw Fdn Fdw Printer

Ask AI

— answers from the official manual

Answers from the official manual.

Common questions

Common Questions

9 total
1

What should I do if my printer isn’t connecting properly?

Perform a self-diagnostic test by going to Setup > Self Diagnostics > Run Wireless Test or Run Fax Test depending on your issue. This can help identify and resolve various connectivity problems (Page 9, Page 10).

2

How do I set up a Wi-Fi Direct connection?

To enable Wi-Fi Direct for secure or unsecured printing directly from a mobile device without requiring network connection: touch the Settings button > select On/Off and choose whether to turn Security on/off with necessary passphrases (Page 5).

3

What steps are needed for USB installation?

For Windows, do not connect the USB cable before installing the software; disconnect it if already connected. After downloading, launch the setup file and follow on-screen instructions to install. For Mac users, connect the USB cable first, then proceed with software installation (Page 4).

4

How do I set up scan features for devices on a network?

For Scan to Network Folder and Scan to Email, ensure your shared network folder is accessible and know the SMTP server details, respectively. Use HP Utility or Set Preferences in the HP app to configure these settings following the on-screen instructions (Page 10-11).

5

How can I manually set up Wi-Fi?

To enable Wi-Fi for mobile devices, touch Settings > On/Off and select On. For secure printing, choose Security settings to turn it on and note the passphrase provided (Page 5).

6

How should I verify a wired Ethernet connection?

Check that the printer is connected via an appropriate-length cable to the correct network port. Ensure lights next to the port are illuminated and try pinging the printer’s IP address from your computer for connectivity confirmation (Page 10).

Show 3 more questions

Full Manual

12 pages
Page 1

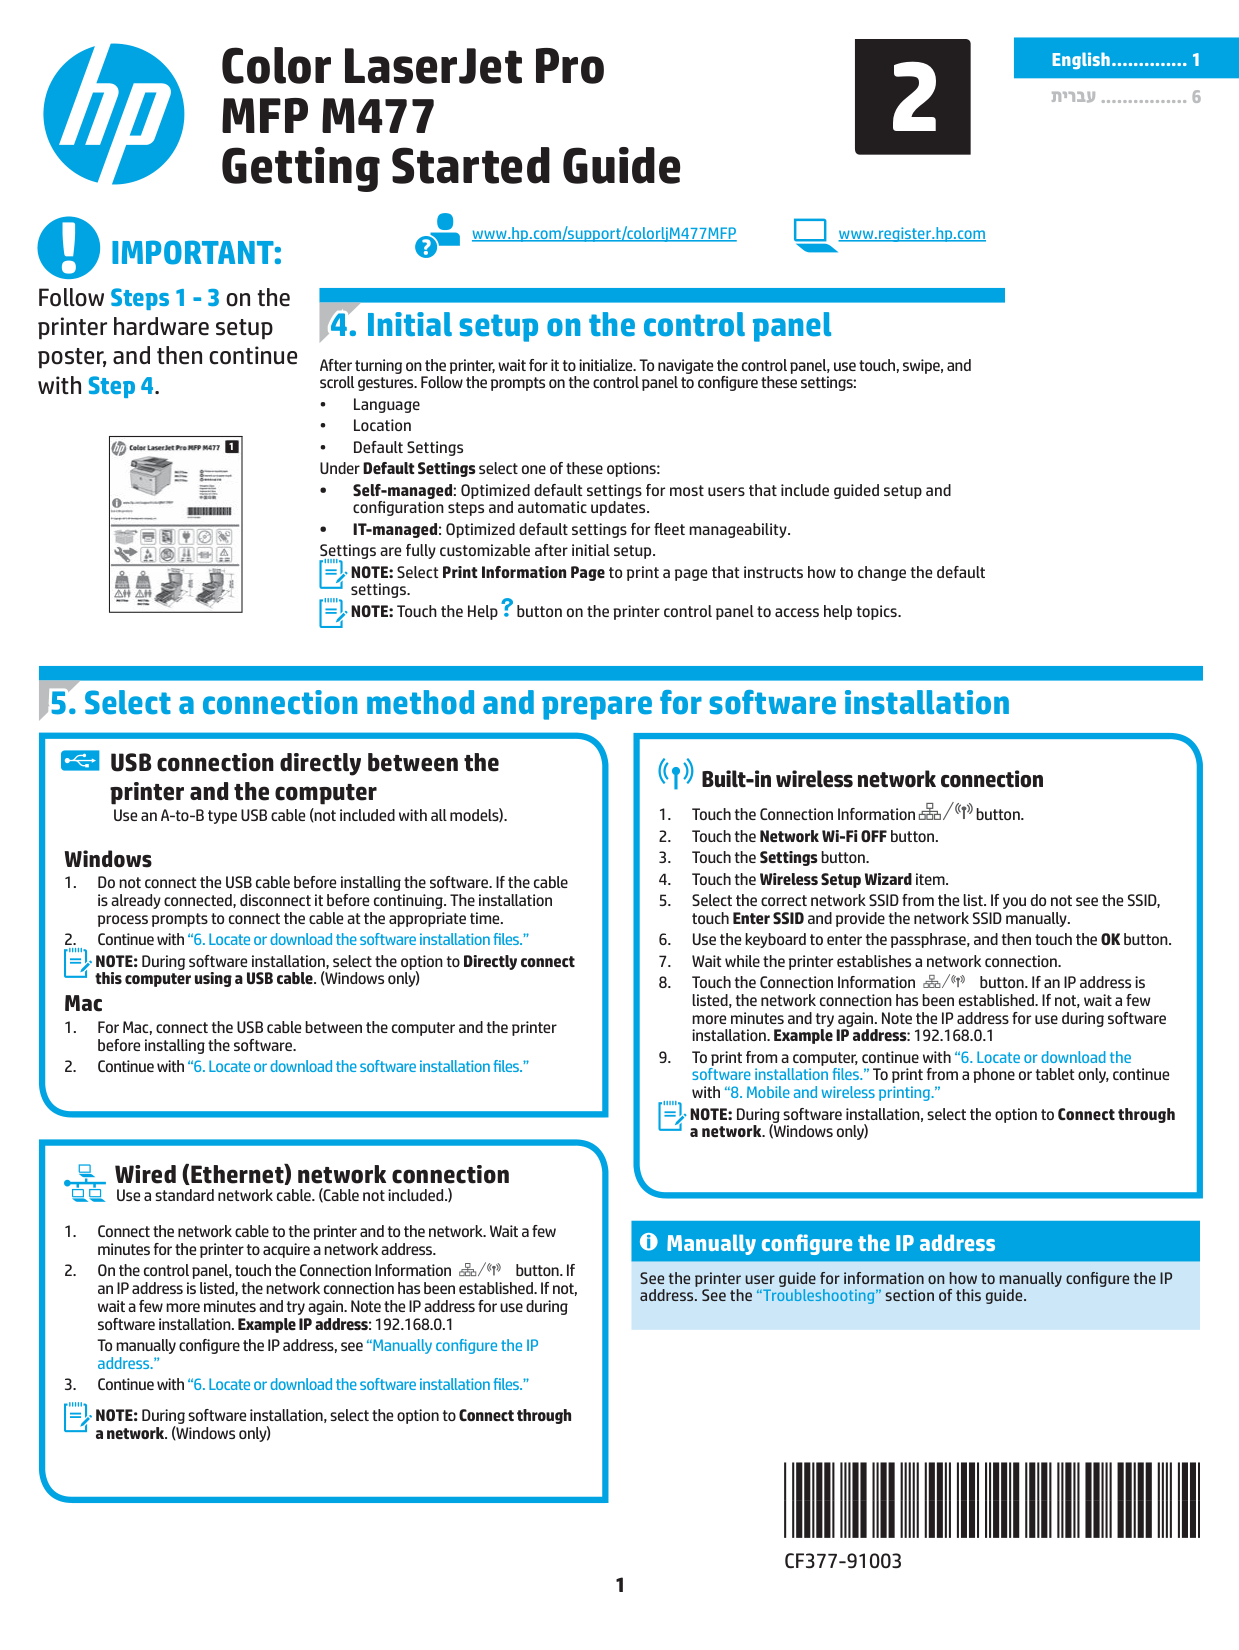
Color LaserJet Pro MFP M477 Getting Started Guide

2

www.hp.com/support/colorljM477MFP www.register.hp.com

#### IMPORTANT:

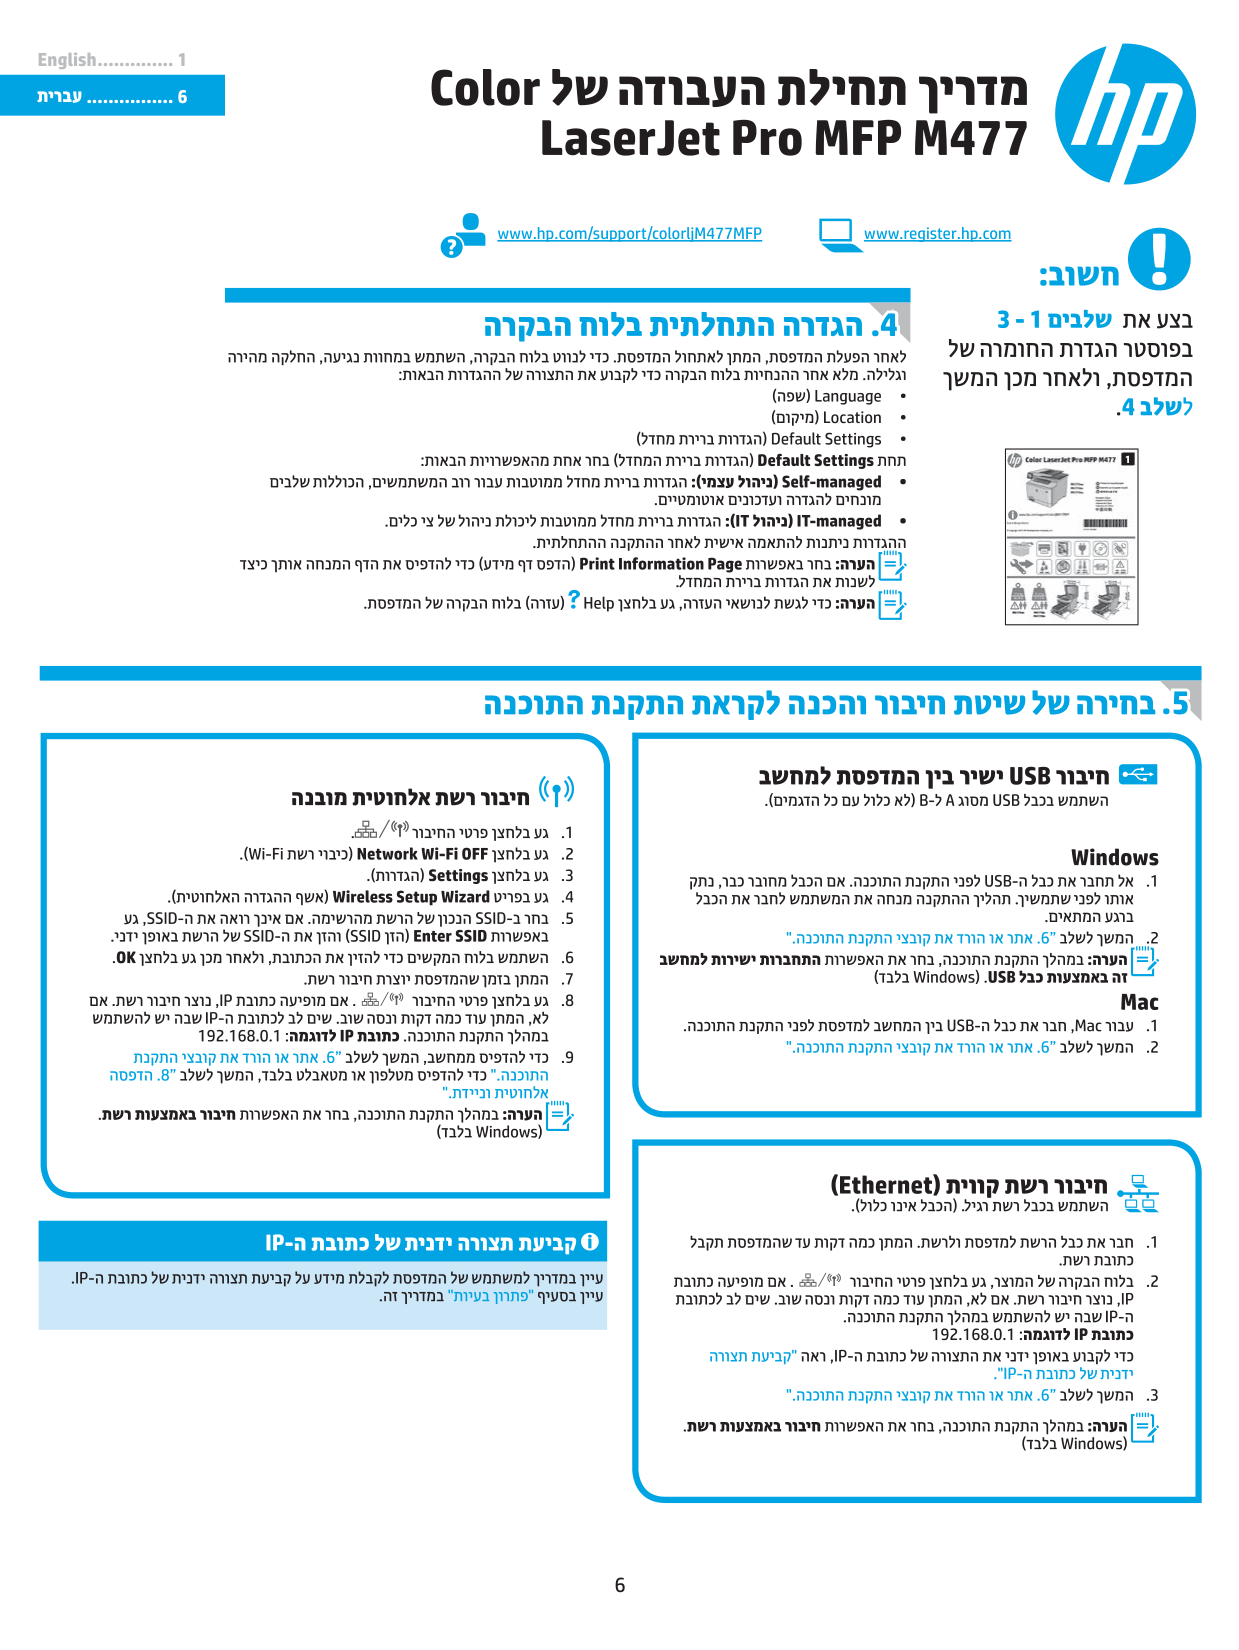
Follow Steps 1 - 3 on the printer hardware setup poster, and then continue with Step 4.

#### 4. Initial setup on the control panel

After turning on the printer, wait for it to initialize. To navigate the control panel, use touch, swipe, and scroll gestures. Follow the prompts on the control panel to configure these settings:

  • • Language
  • • Location
  • • Default Settings Under Default Settings select one of these options:
  • • Self-managed: Optimized default settings for most users that include guided setup and configuration steps and automatic updates.
  • • IT-managed: Optimized default settings for fleet manageability. Settings are fully customizable after initial setup.
  • |![image 1](c04703572_images/imageFile1.png)

    1| |---|

    NOTE: Select Print Information Page to print a page that instructs how to change the default settings. NOTE: Touch the Help button on the printer control panel to access help topics.

    English .............. 1

    ................ 6

  • Select a connection method and prepare for software installation
  • USB connection directly between the printer and the computer Use an A-to-B type USB cable (not included with all models).

    ###### Built-in wireless network connection

  • 1. Touch the Connection Information button.
  • Page 2

  • 2. Touch the Network Wi-Fi OFF button.
  • 3. Touch the Settings button.
  • 4. Touch the Wireless Setup Wizard item.
  • 5. Select the correct network SSID from the list. If you do not see the SSID, touch Enter SSID and provide the network SSID manually.
  • 6. Use the keyboard to enter the passphrase, and then touch the OK button.
  • 7. Wait while the printer establishes a network connection.
  • 8. Touch the Connection Information button. If an IP address is listed, the network connection has been established. If not, wait a few more minutes and try again. Note the IP address for use during software installation. Example IP address: 192.168.0.1
  • 9. To print from a computer, continue with “6. Locate or download the software installation files.” To print from a phone or tablet only, continue with “8. Mobile and wireless printing.”
  • ###### Windows

  • 1. Do not connect the USB cable before installing the software. If the cable is already connected, disconnect it before continuing. The installation process prompts to connect the cable at the appropriate time.
  • 2. Continue with“6. Locate or download the software installation files.”
  • NOTE: During software installation, select the option to Directly connect this computer using a USB cable. (Windows only)

    ###### Mac

  • 1. For Mac, connect the USB cable between the computer and the printer before installing the software.
  • 2. Continue with“6. Locate or download the software installation files.”
  • NOTE: During software installation, select the option to Connect through a network. (Windows only)

    ##### Wired (Ethernet) network connection

    Use a standard network cable. (Cable not included.)

  • 1. Connect the network cable to the printer and to the network. Wait a few minutes for the printer to acquire a network address.
  • 2. On the control panel, touch the Connection Information button. If an IP address is listed, the network connection has been established. If not, wait a few more minutes and try again. Note the IP address for use during software installation. Example IP address: 192.168.0.1
  • To manually configure the IP address, see “Manually configure the IP address.”

  • 3. Continue with“6. Locate or download the software installation files.”
  • Page 3

    ###### Manually configure the IP address

    See the printer user guide for information on how to manually configure the IP address. See the “Troubleshooting” section of this guide.

    NOTE: During software installation, select the option to Connect through a network. (Windows only)

  • 6. Locate or download the software installation files
  • 7. Install the software
  • 8. Mobile and wireless printing (optional)
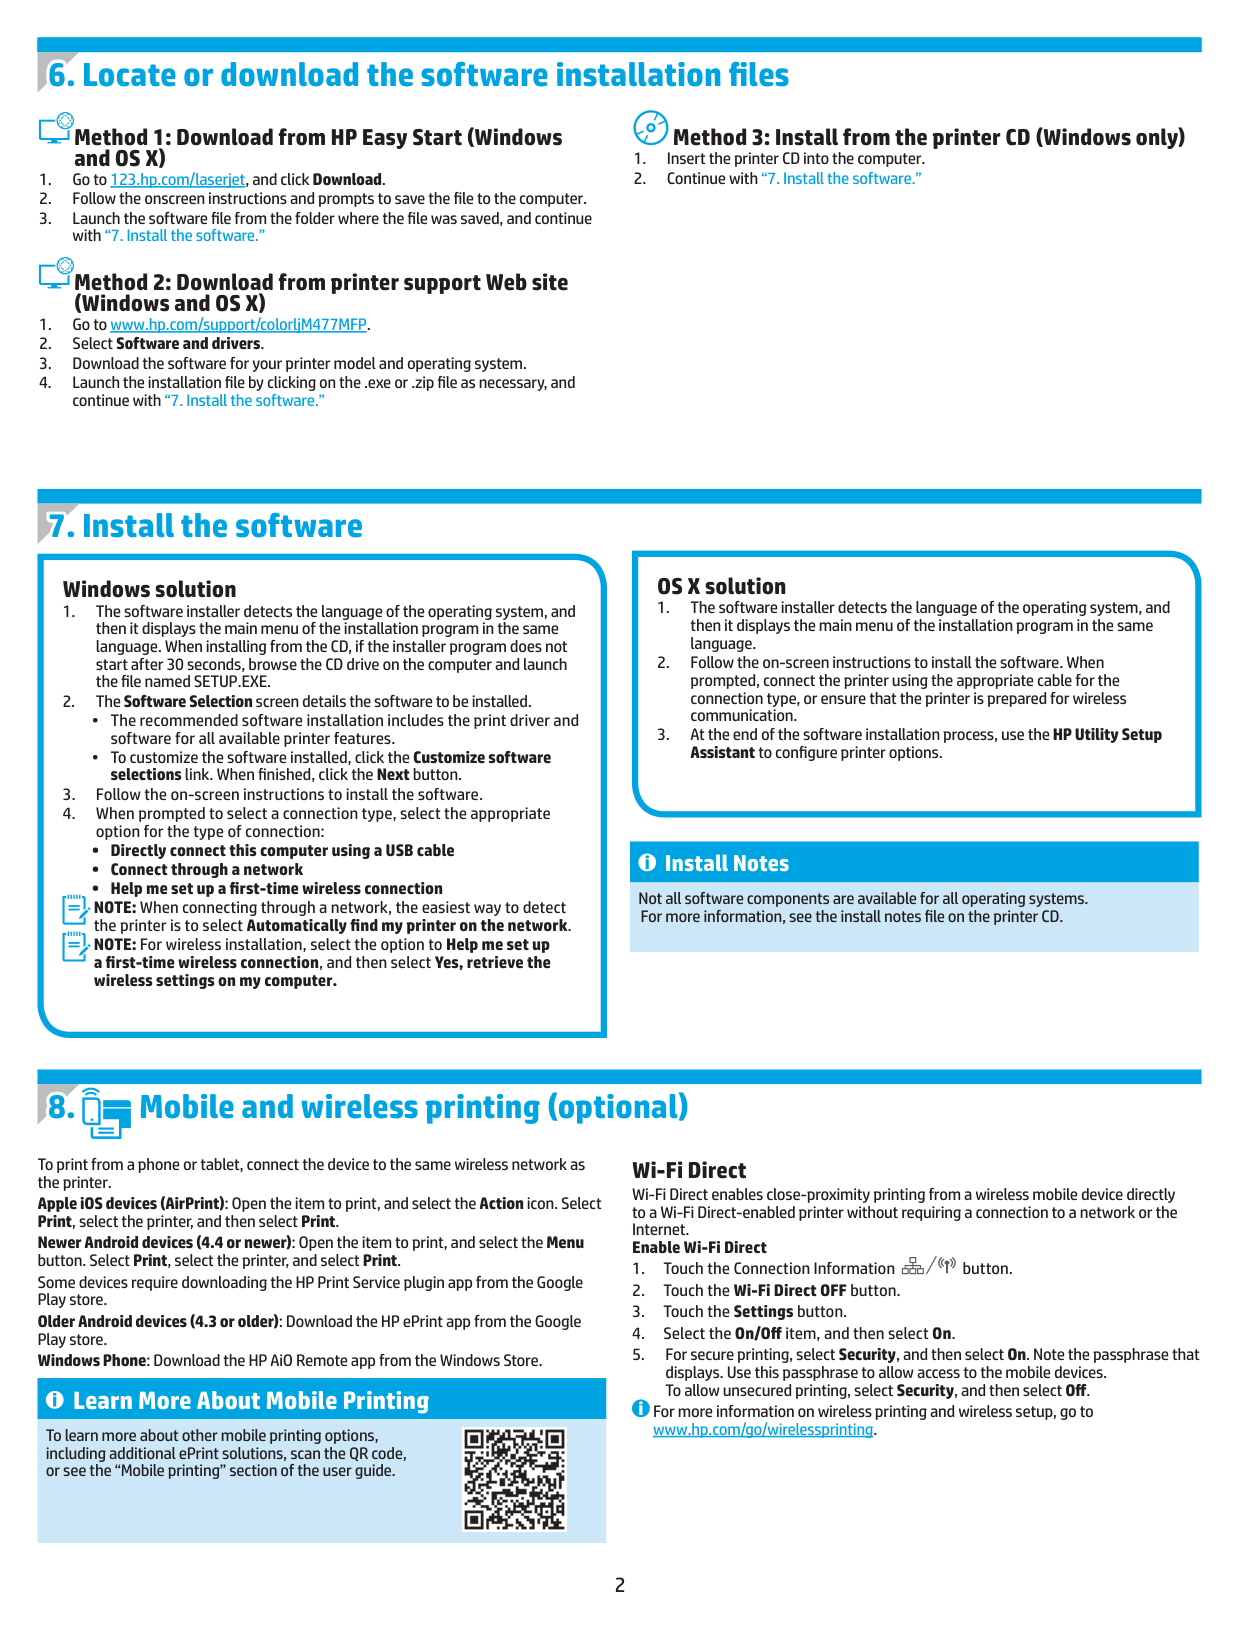
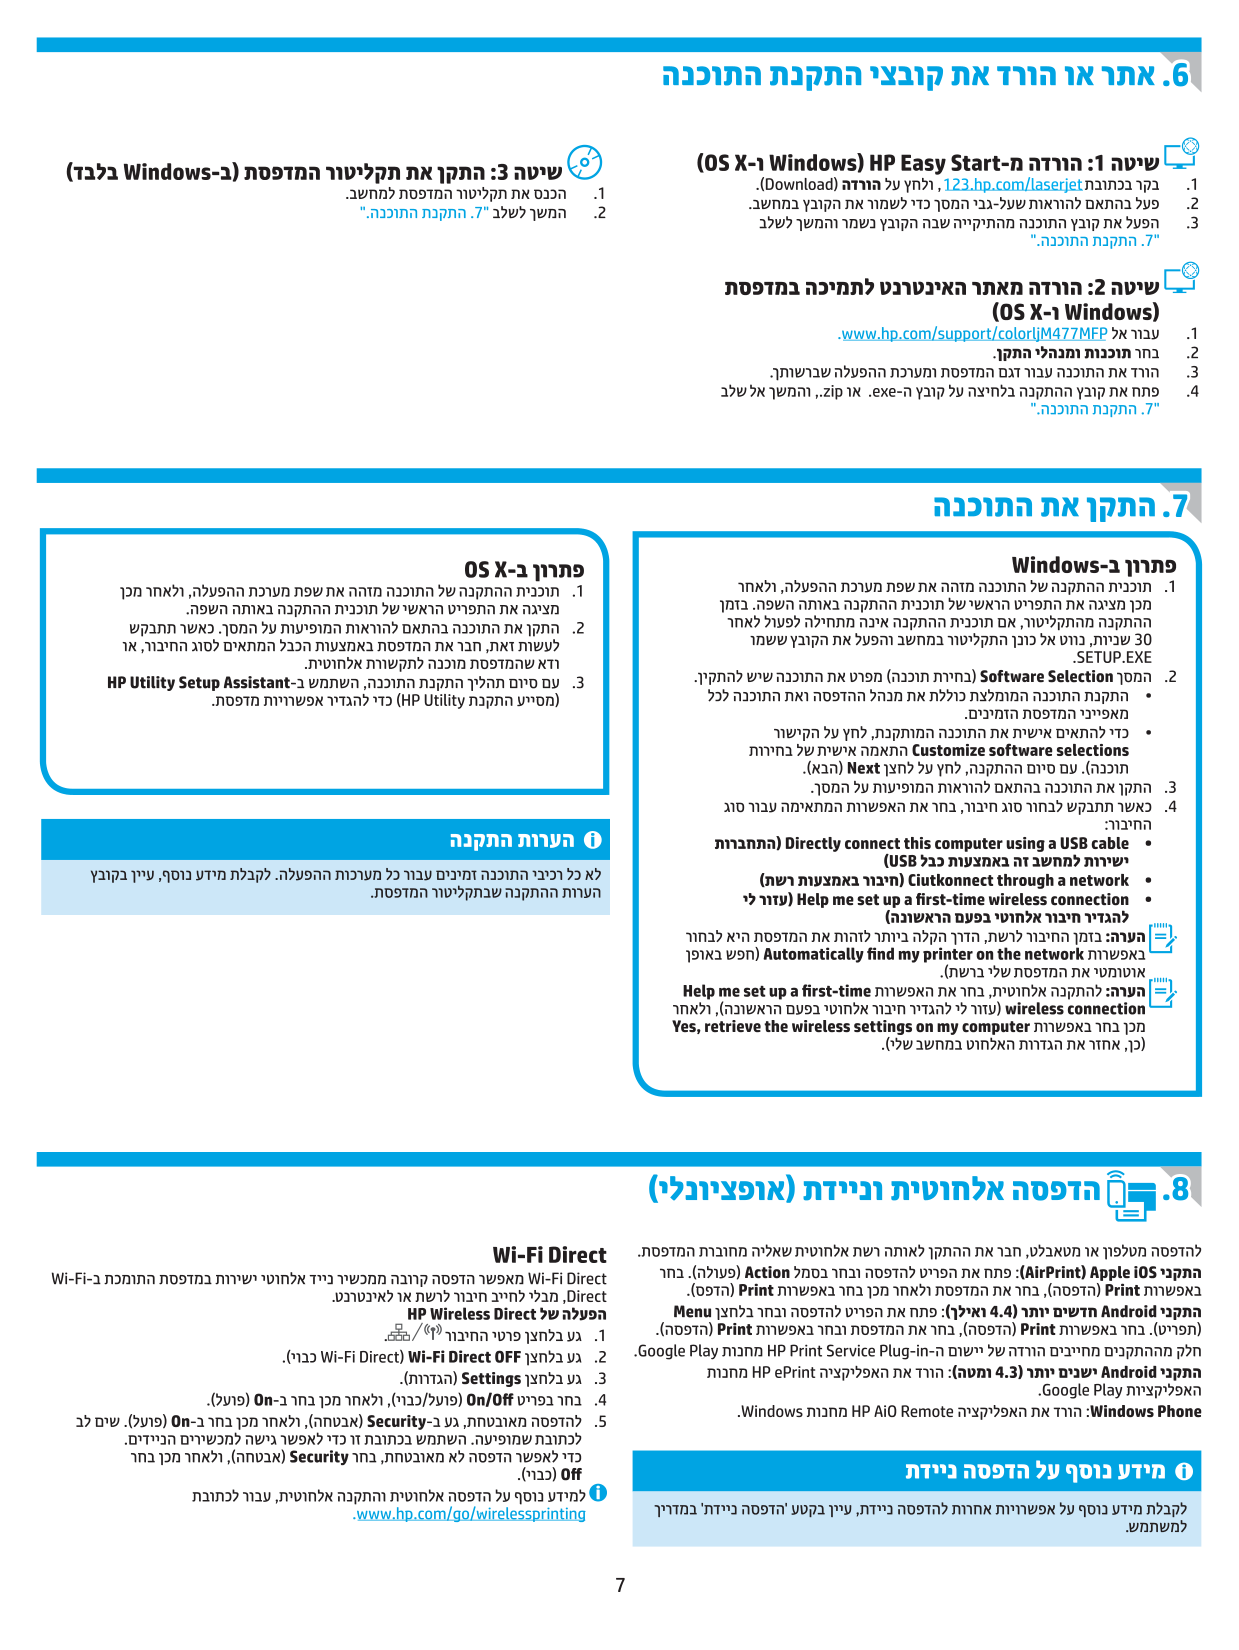
  • ###### Method 1: Download from HP Easy Start (Windowsand OS X)

    ###### Method 3: Install from the printer CD (Windows only)

  • 1. Insert the printer CD into the computer.
  • 2. Continue with “7. Install the software.”
  • 1. Go to 123.hp.com/laserjet, and click Download.
  • 2. Follow the onscreen instructions and prompts to save the file to the computer.
  • 3. Launch the software file from the folder where the file was saved, and continue with “7. Install the software.”
  • ###### Method 2: Download from printer support Web site(Windows and OS X)

  • 1. Go to www.hp.com/support/colorljM477MFP.
  • 2. Select Software and drivers.
  • 3. Download the software for your printer model and operating system.
  • 4. Launch the installation file by clicking on the .exe or .zip file as necessary, and continue with “7. Install the software.”
  • ###### OS X solution

    Page 4

    ###### Windows solution

  • 1. The software installer detects the language of the operating system, and then it displays the main menu of the installation program in the same language.
  • 2. Follow the on-screen instructions to install the software. When prompted, connect the printer using the appropriate cable for the connection type, or ensure that the printer is prepared for wireless communication.
  • 3. At the end of the software installation process, use the HP Utility Setup Assistant to configure printer options.
  • 1. The software installer detects the language of the operating system, and then it displays the main menu of the installation program in the same language. When installing from the CD, if the installer program does not start after 30 seconds, browse the CD drive on the computer and launch the file named SETUP.EXE.
  • 2. TheSoftware Selection screen details the software to be installed.
  • • The recommended software installation includes the print driver and software for all available printer features.
  • • To customize the software installed, click the Customize software selections link. When finished, click the Next button.
  • 3. Follow the on-screen instructions to install the software.
  • 4. When prompted to select a connection type, select the appropriate option for the type of connection:
  • • Directly connect this computer using a USB cable
  • • Connect through a network
  • • Help me set up a first-time wireless connection NOTE: When connecting through a network, the easiest way to detect the printer is to select Automatically find my printer on the network. NOTE: For wireless installation, select the option to Help me set up a first-time wireless connection, and then select Yes, retrieve the wireless settings on my computer.
  • ###### Install Notes

    Not all software components are available for all operating systems. For more information, see the install notes file on the printer CD.

    To print from a phone or tablet, connect the device to the same wireless network as the printer.

    Apple iOS devices (AirPrint): Open the item to print, and select the Action icon. Select Print, select the printer, and then select Print. Newer Android devices (4.4 or newer): Open the item to print, and select the Menu button. Select Print, select the printer, and select Print. Some devices require downloading the HP Print Service plugin app from the Google Play store. Older Android devices (4.3 or older): Download the HP ePrint app from the Google Play store. Windows Phone: Download the HP AiO Remote app from the Windows Store.

    ##### Learn More About Mobile Printing

    To learn more about other mobile printing options, including additional ePrint solutions, scan the QR code, or see the “Mobile printing” section of the user guide.

    ![image 2](c04703572_images/imageFile2.png)

    ###### Wi-Fi Direct

    Page 5

    Wi-Fi Direct enables close-proximity printing from a wireless mobile device directly to a Wi-Fi Direct-enabled printer without requiring a connection to a network or the Internet.

    ######### Enable Wi-Fi Direct

  • 1. Touch the Connection Information button.
  • 2. Touch the Wi-Fi Direct OFF button.
  • 3. Touch the Settings button.
  • 4. Select the On/Off item, and then select On.
  • 5. For secure printing, select Security, and then select On. Note the passphrase that displays. Use this passphrase to allow access to the mobile devices. To allow unsecured printing, select Security, and then select Off.
  • For more information on wireless printing and wireless setup, go to www.hp.com/go/wirelessprinting.

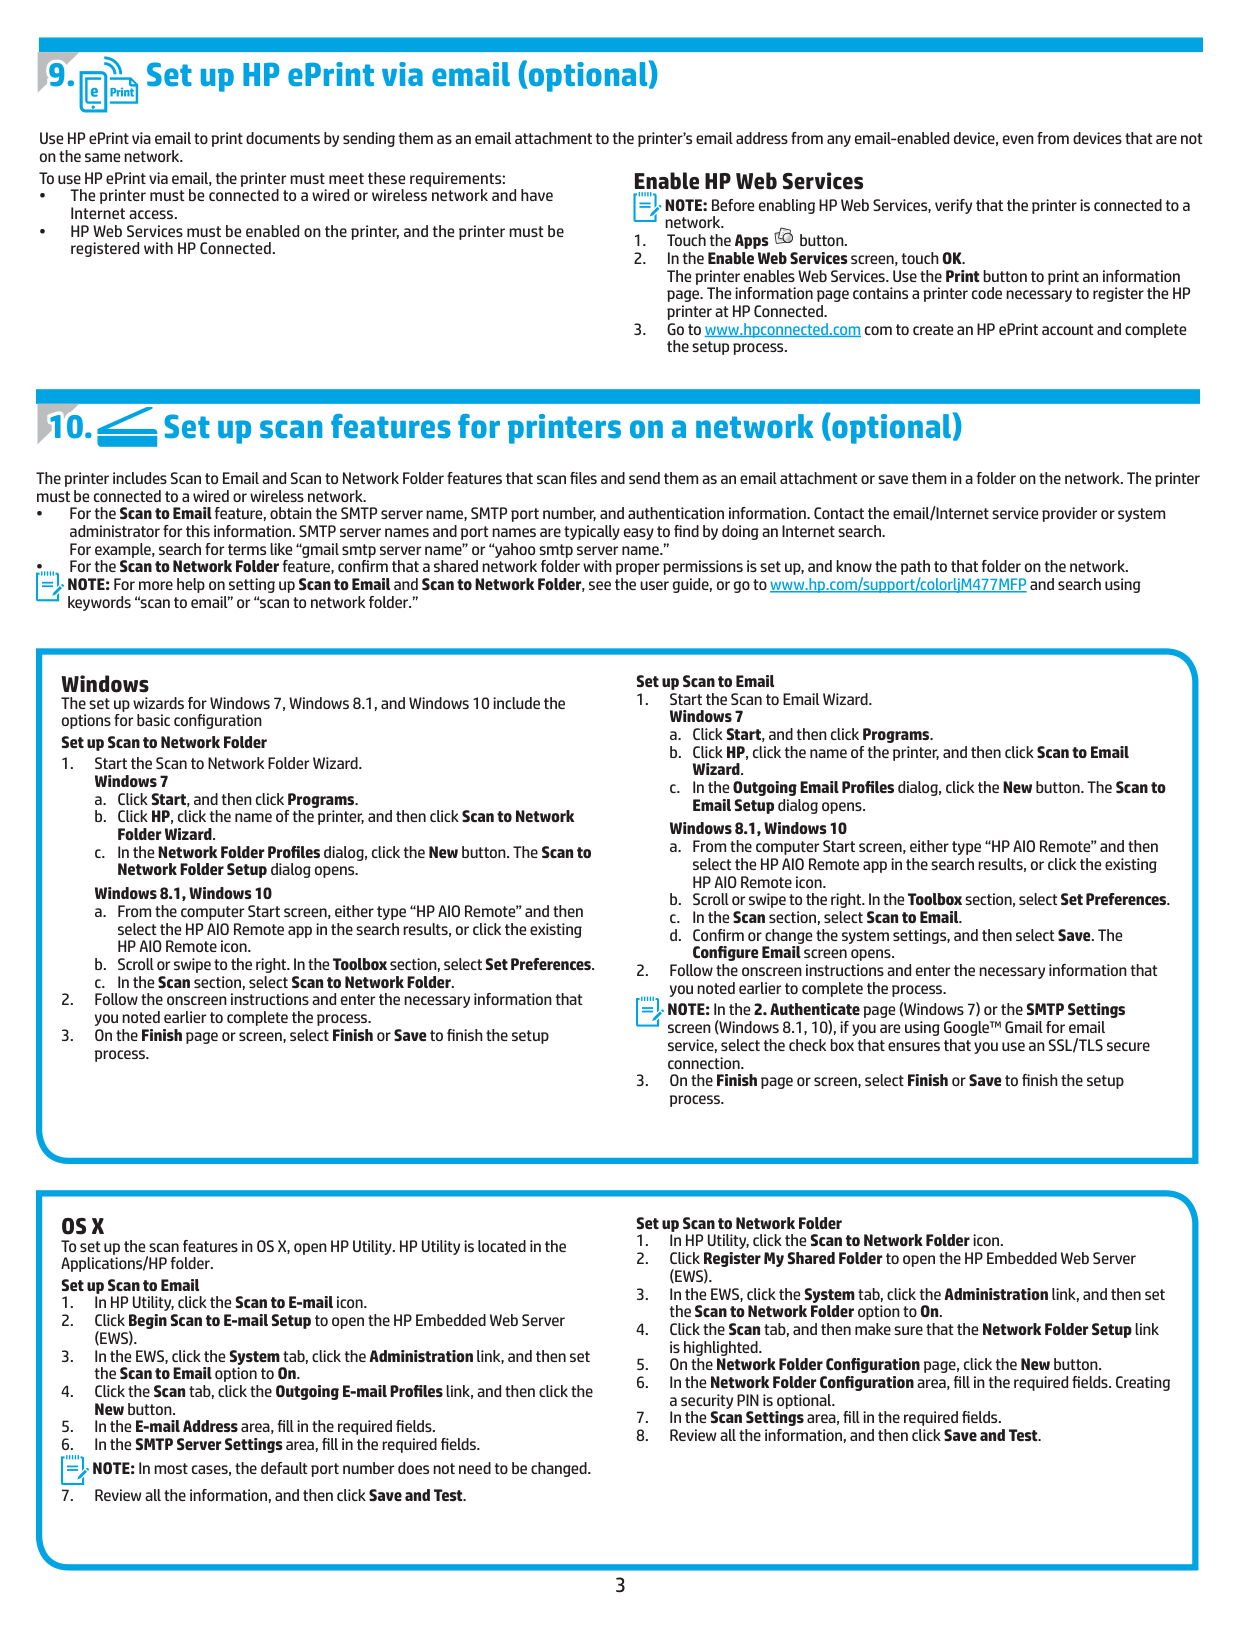
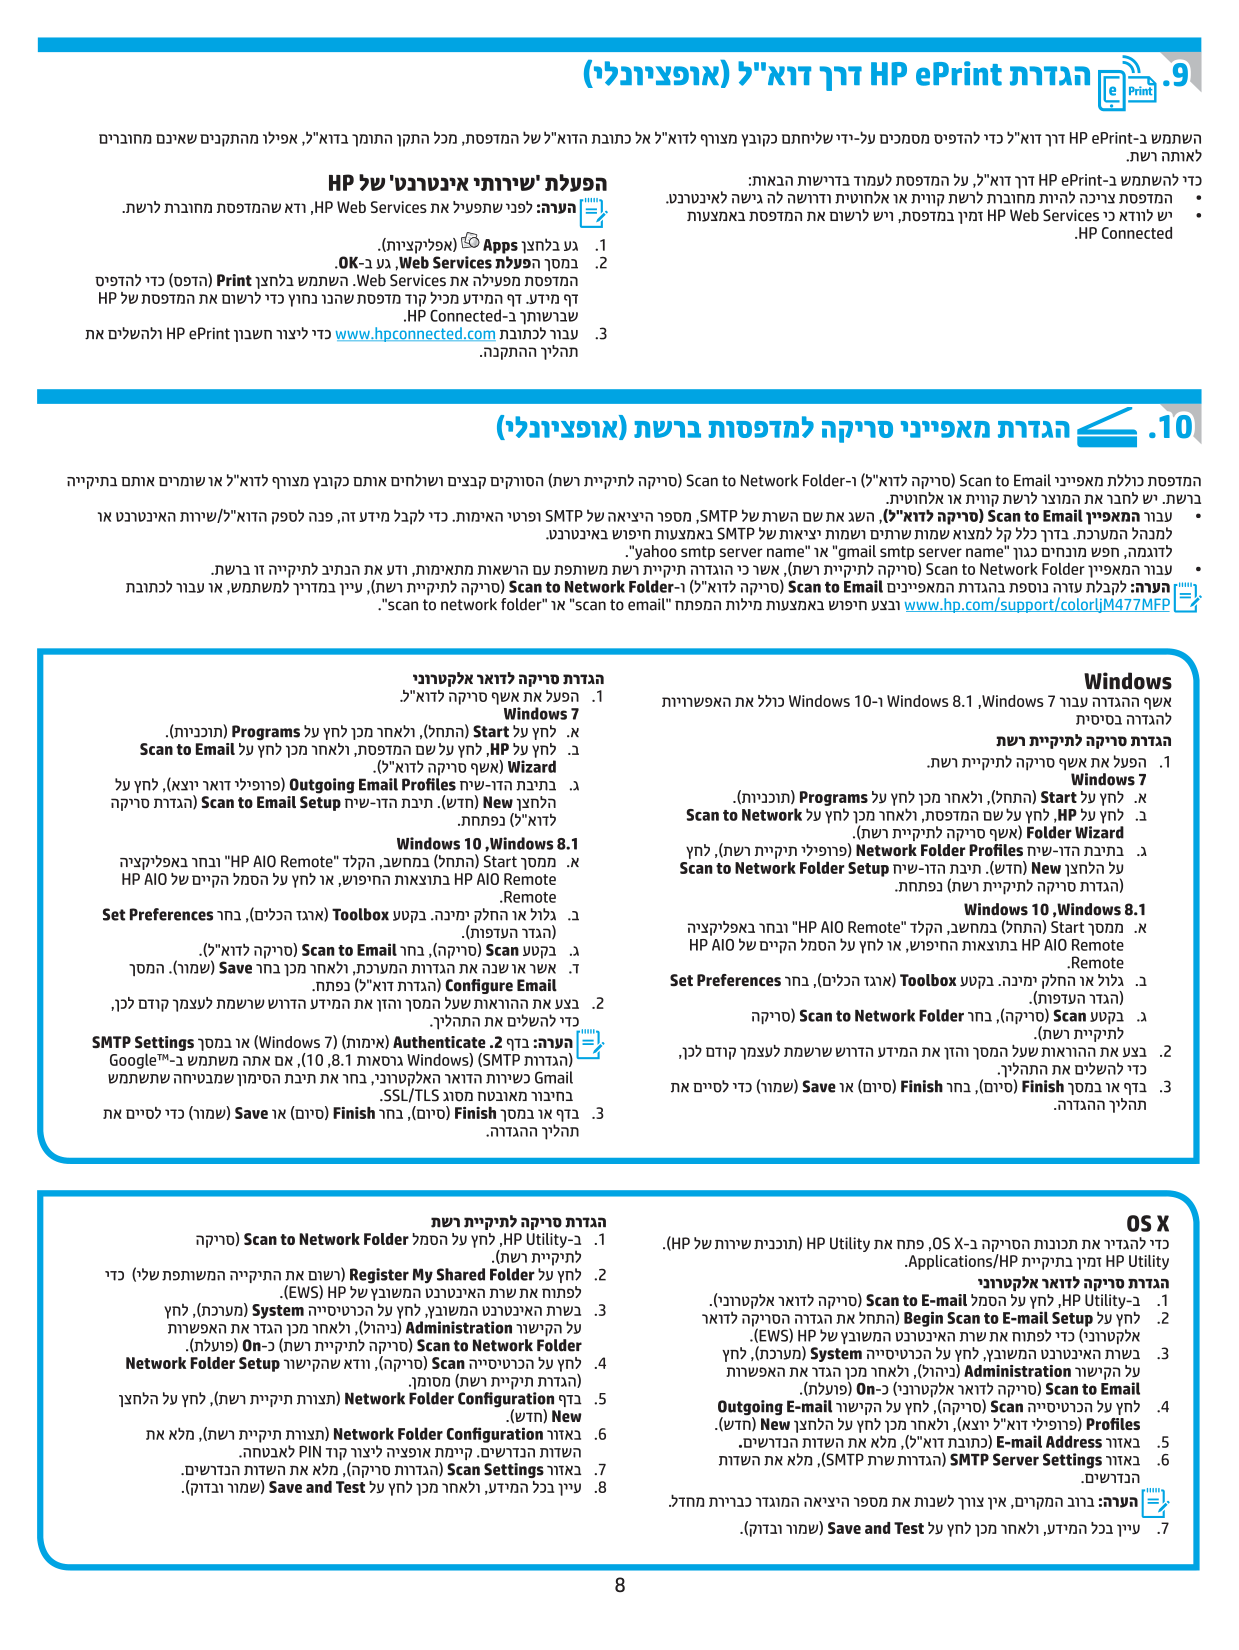
    #### 9. Set up HP ePrint via email (optional)

    Use HP ePrint via email to print documents by sending them as an email attachment to the printer’s email address from any email-enabled device, even from devices that are not on the same network.

    ###### Enable HP Web Services

    To use HP ePrint via email, the printer must meet these requirements:

  • • The printer must be connected to a wired or wireless network and have Internet access.
  • • HP Web Services must be enabled on the printer, and the printer must be registered with HP Connected.
  • NOTE: Before enabling HP Web Services, verify that the printer is connected to a network.

  • 1. Touch the Apps button.
  • 2. In the Enable Web Services screen, touch OK. The printer enables Web Services. Use the Print button to print an information page. The information page contains a printer code necessary to register the HP printer at HP Connected.
  • 3. Go to www.hpconnected.com com to create an HP ePrint account and complete the setup process.
  • #### 10. Set up scan features for printers on a network (optional)

    The printer includes Scan to Email and Scan to Network Folder features that scan files and send them as an email attachment or save them in a folder on the network. The printer must be connected to a wired or wireless network.

    Page 6

  • • For the Scan to Email feature, obtain the SMTP server name, SMTP port number, and authentication information. Contact the email/Internet service provider or system administrator for this information. SMTP server names and port names are typically easy to find by doing an Internet search. For example, search for terms like “gmail smtp server name” or “yahoo smtp server name.”
  • • For the Scan to Network Folder feature, confirm that a shared network folder with proper permissions is set up, and know the path to that folder on the network.
  • NOTE: For more help on setting up Scan to Email and Scan to Network Folder, see the user guide, or go to www.hp.com/support/colorljM477MFP and search using keywords “scan to email” or “scan to network folder.”

    Windows The set up wizards for Windows 7, Windows 8.1, and Windows 10 include the options for basic configuration Set up Scan to Network Folder

  • 1. Start the Scan to Network Folder Wizard.
  • Windows 7
  • a. Click Start, and then click Programs.
  • b. Click HP, click the name of the printer, and then click Scan to Network Folder Wizard.
  • c. In the Network Folder Profiles dialog, click the New button. The Scan to Network Folder Setup dialog opens.
  • Windows 8.1, Windows 10
  • a. From the computer Start screen, either type “HP AIO Remote” and then select the HP AIO Remote app in the search results, or click the existing HP AIO Remote icon.
  • b. Scroll or swipe to the right. In the Toolboxsection, select Set Preferences.
  • c. In the Scan section, select Scan to Network Folder.
  • 2. Follow the onscreen instructions and enter the necessary information that you noted earlier to complete the process.
  • 3. On the Finish page or screen, select Finish or Save to finish the setup process.
  • ######### Set up Scan to Email

  • 1. Start the Scan to Email Wizard.
  • Windows 7
  • a. Click Start, and then click Programs.
  • b. Click HP, click the name of the printer, and then click Scan to Email Wizard.
  • Page 7

  • c. In the Outgoing Email Profiles dialog, click the New button. The Scan to Email Setup dialog opens.
  • Windows 8.1, Windows 10
  • a. From the computer Start screen, either type “HP AIO Remote” and then select the HP AIO Remote app in the search results, or click the existing HP AIO Remote icon.
  • b. Scroll or swipe to the right. In the Toolbox section, select Set Preferences.
  • c. In the Scan section, select Scan to Email.
  • d. Confirm or change the system settings, and then select Save. The Configure Email screen opens.
  • 2. Follow the onscreen instructions and enter the necessary information that you noted earlier to complete the process.
  • NOTE: In the 2. Authenticate page (Windows 7) or the SMTP Settings screen (Windows 8.1, 10), if you are using Google™ Gmail for email service, select the check box that ensures that you use an SSL/TLS secure connection.

  • 3. On the Finish page or screen, select Finish or Save to finish the setup process.
  • OS X To set up the scan features in OS X, open HP Utility. HP Utility is located in the Applications/HP folder. Set up Scan to Email

  • 1. In HP Utility, click the Scan to E-mail icon.
  • 2. Click Begin Scan to E-mail Setup to open the HP Embedded Web Server (EWS).
  • 3. In the EWS, click the System tab, click the Administration link, and then set the Scan to Email option to On.
  • 4. Click the Scan tab, click the Outgoing E-mail Profiles link, and then click the New button.
  • 5. In the E-mail Address area, fill in the required fields.
  • 6. In the SMTP Server Settings area, fill in the required fields.
  • NOTE: In most cases, the default port number does not need to be changed.

  • 7. Review all the information, and then click Save and Test.
  • ######### Set up Scan to Network Folder

  • 1. In HP Utility, click the Scan to Network Folder icon.
  • 2. Click Register My Shared Folder to open the HP Embedded Web Server (EWS).
  • 3. In the EWS, click the System tab, click the Administration link, and then set the Scan to Network Folder option to On.
  • Page 8

  • 4. Click the Scan tab, and then make sure that the Network Folder Setup link is highlighted.
  • 5. On the Network Folder Configuration page, click the New button.
  • 6. In the Network Folder Configuration area, fill in the required fields. Creating a security PIN is optional.
  • 7. In the Scan Settings area, fill in the required fields.
  • 8. Review all the information, and then click Save and Test.
  • #### 11. Set up fax (optional)

    #### 11.1 11.2

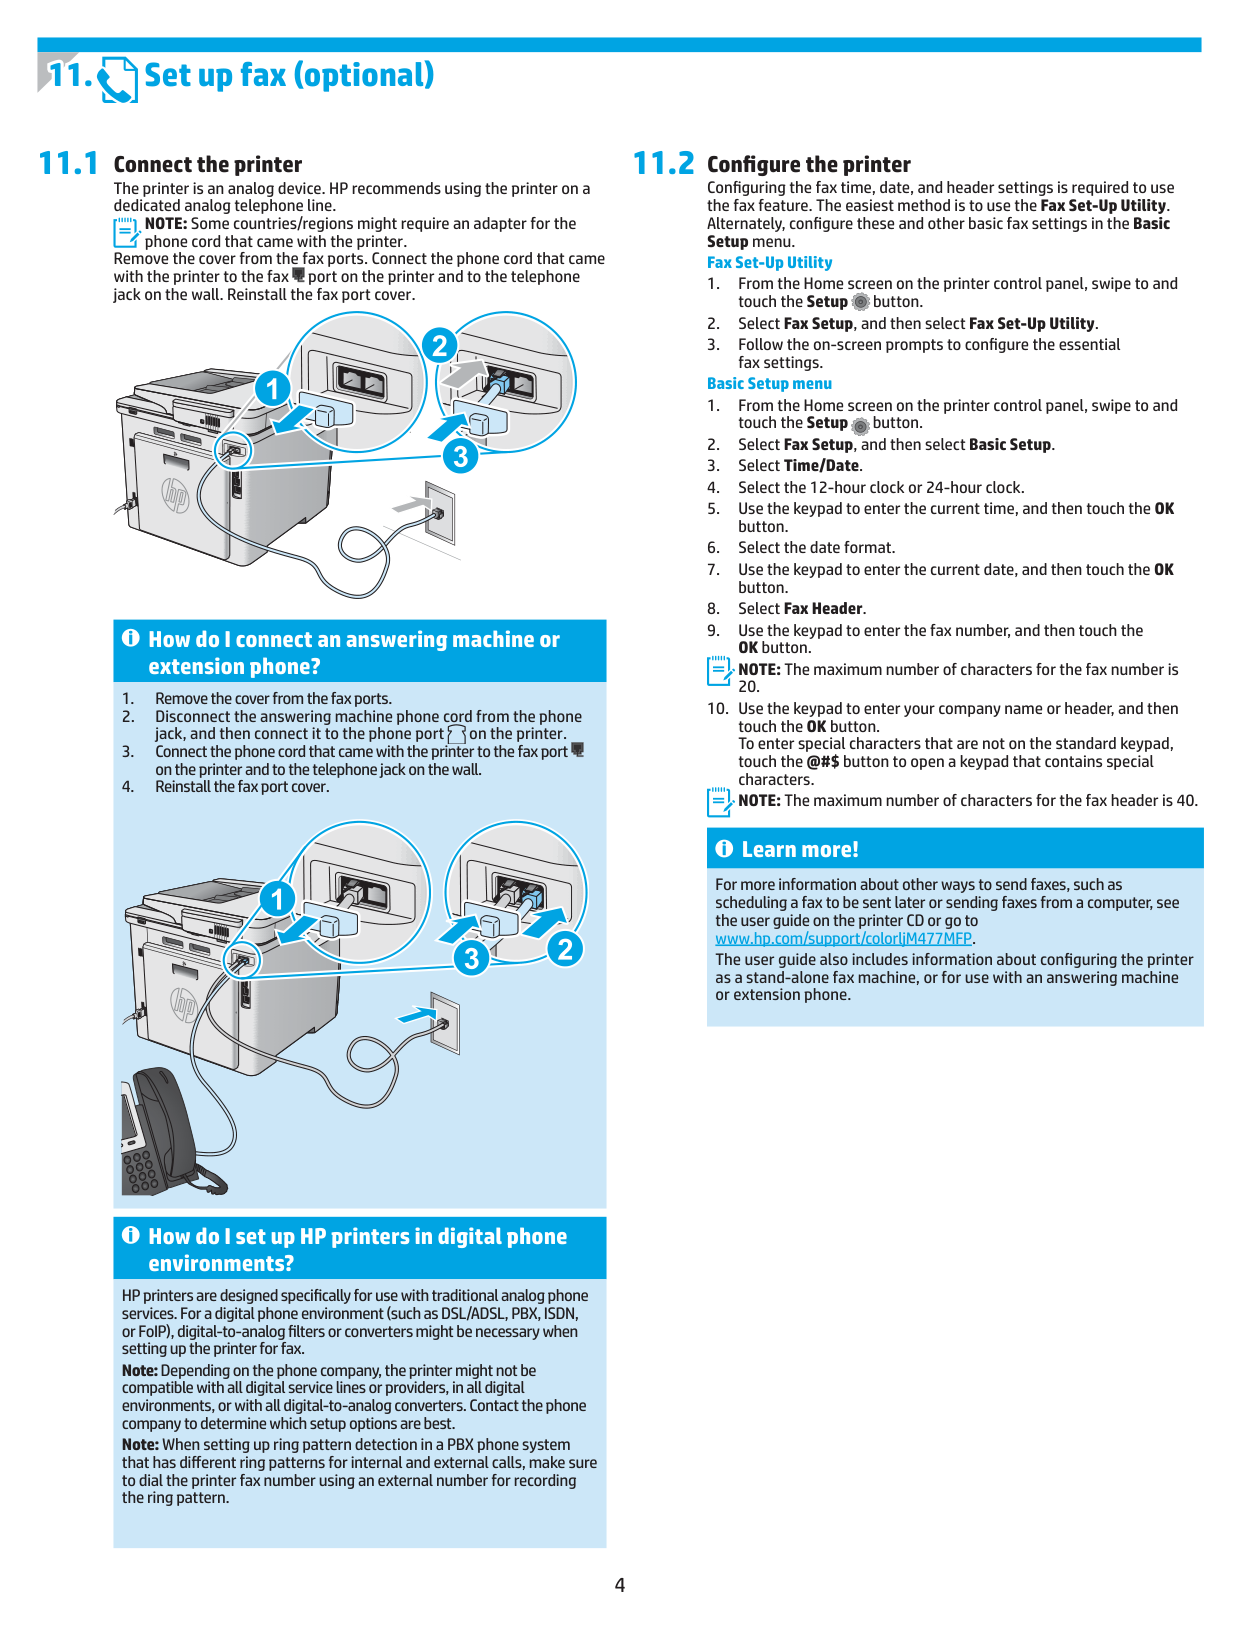
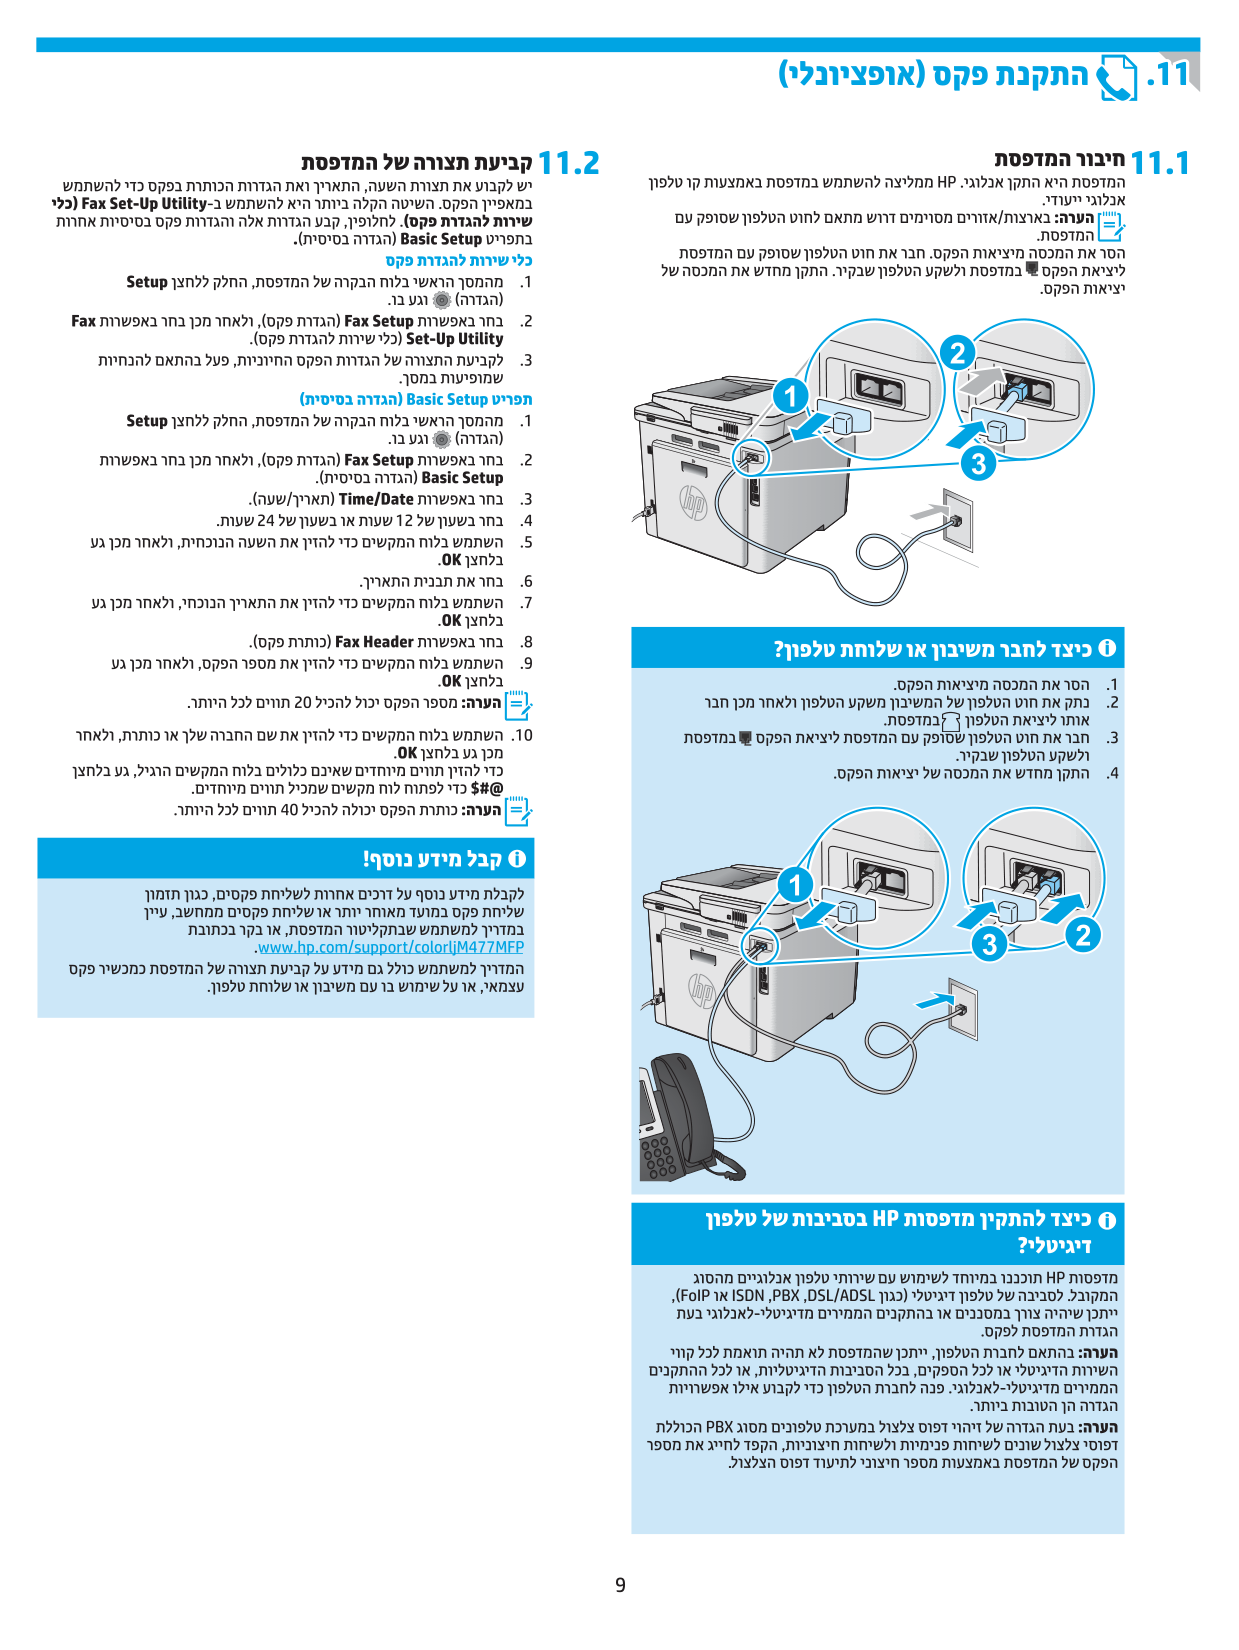
    Connect the printer The printer is an analog device. HP recommends using the printer on a dedicated analog telephone line.

    NOTE: Some countries/regions might require an adapter for the phone cord that came with the printer.

    Remove the cover from the fax ports. Connect the phone cord that came with the printer to the fax port on the printer and to the telephone jack on the wall. Reinstall the fax port cover.

    ###### How do I connect an answering machine or extension phone?

  • 1. Remove the cover from the fax ports.
  • 2. Disconnect the answering machine phone cord from the phone jack, and then connect it to the phone port on the printer.
  • 3. Connect the phone cord that came with the printer to the fax port on the printer and to the telephone jack on the wall.
  • 4. Reinstall the fax port cover.
  • ###### How do I set up HP printers in digital phone environments?

    HP printers are designed specifically for use with traditional analog phone services. For a digital phone environment (such as DSL/ADSL, PBX, ISDN, or FoIP), digital-to-analog filters or converters might be necessary when setting up the printer for fax. Note:Depending on the phone company, the printer might not be compatible with all digital service lines or providers, in all digital environments, or with all digital-to-analog converters. Contact the phone company to determine which setup options are best. Note: When setting up ring pattern detection in a PBX phone system that has different ring patterns for internal and external calls, make sure to dial the printer fax number using an external number for recording the ring pattern.

    Configure the printer Configuring the fax time, date, and header settings is required to use the fax feature. The easiest method is to use the Fax Set-Up Utility. Alternately, configure these and other basic fax settings in the Basic Setup menu. Fax Set-Up Utility

  • 1. From the Home screen on the printer control panel, swipe to and touch the Setup button.
  • 2. Select Fax Setup, and then select Fax Set-Up Utility.
  • 3. Follow the on-screen prompts to configure the essential fax settings.
  • Page 9

    ######### Basic Setup menu

  • 1. From the Home screen on the printer control panel, swipe to and touch the Setup button.
  • 2. Select Fax Setup, and then select Basic Setup.
  • 3. Select Time/Date.
  • 4. Select the 12-hour clock or 24-hour clock.
  • 5. Use the keypad to enter the current time, and then touch the OK button.
  • 6. Select the date format.
  • 7. Use the keypad to enter the current date, and then touch the OK button.
  • 8. Select Fax Header.
  • 9. Use the keypad to enter the fax number, and then touch the OK button.
  • NOTE: The maximum number of characters for the fax number is 20.

  • 10. Use the keypad to enter your company name or header, and then touch the OK button. To enter special characters that are not on the standard keypad, touch the @#$ button to open a keypad that contains special characters.
  • NOTE: The maximum number of characters for the fax header is 40.

    ###### Learn more!

    For more information about other ways to send faxes, such as scheduling a fax to be sent later or sending faxes from a computer, see the user guide on the printer CD or go to www.hp.com/support/colorljM477MFP. The user guide also includes information about configuring the printer as a stand-alone fax machine, or for use with an answering machine or extension phone.
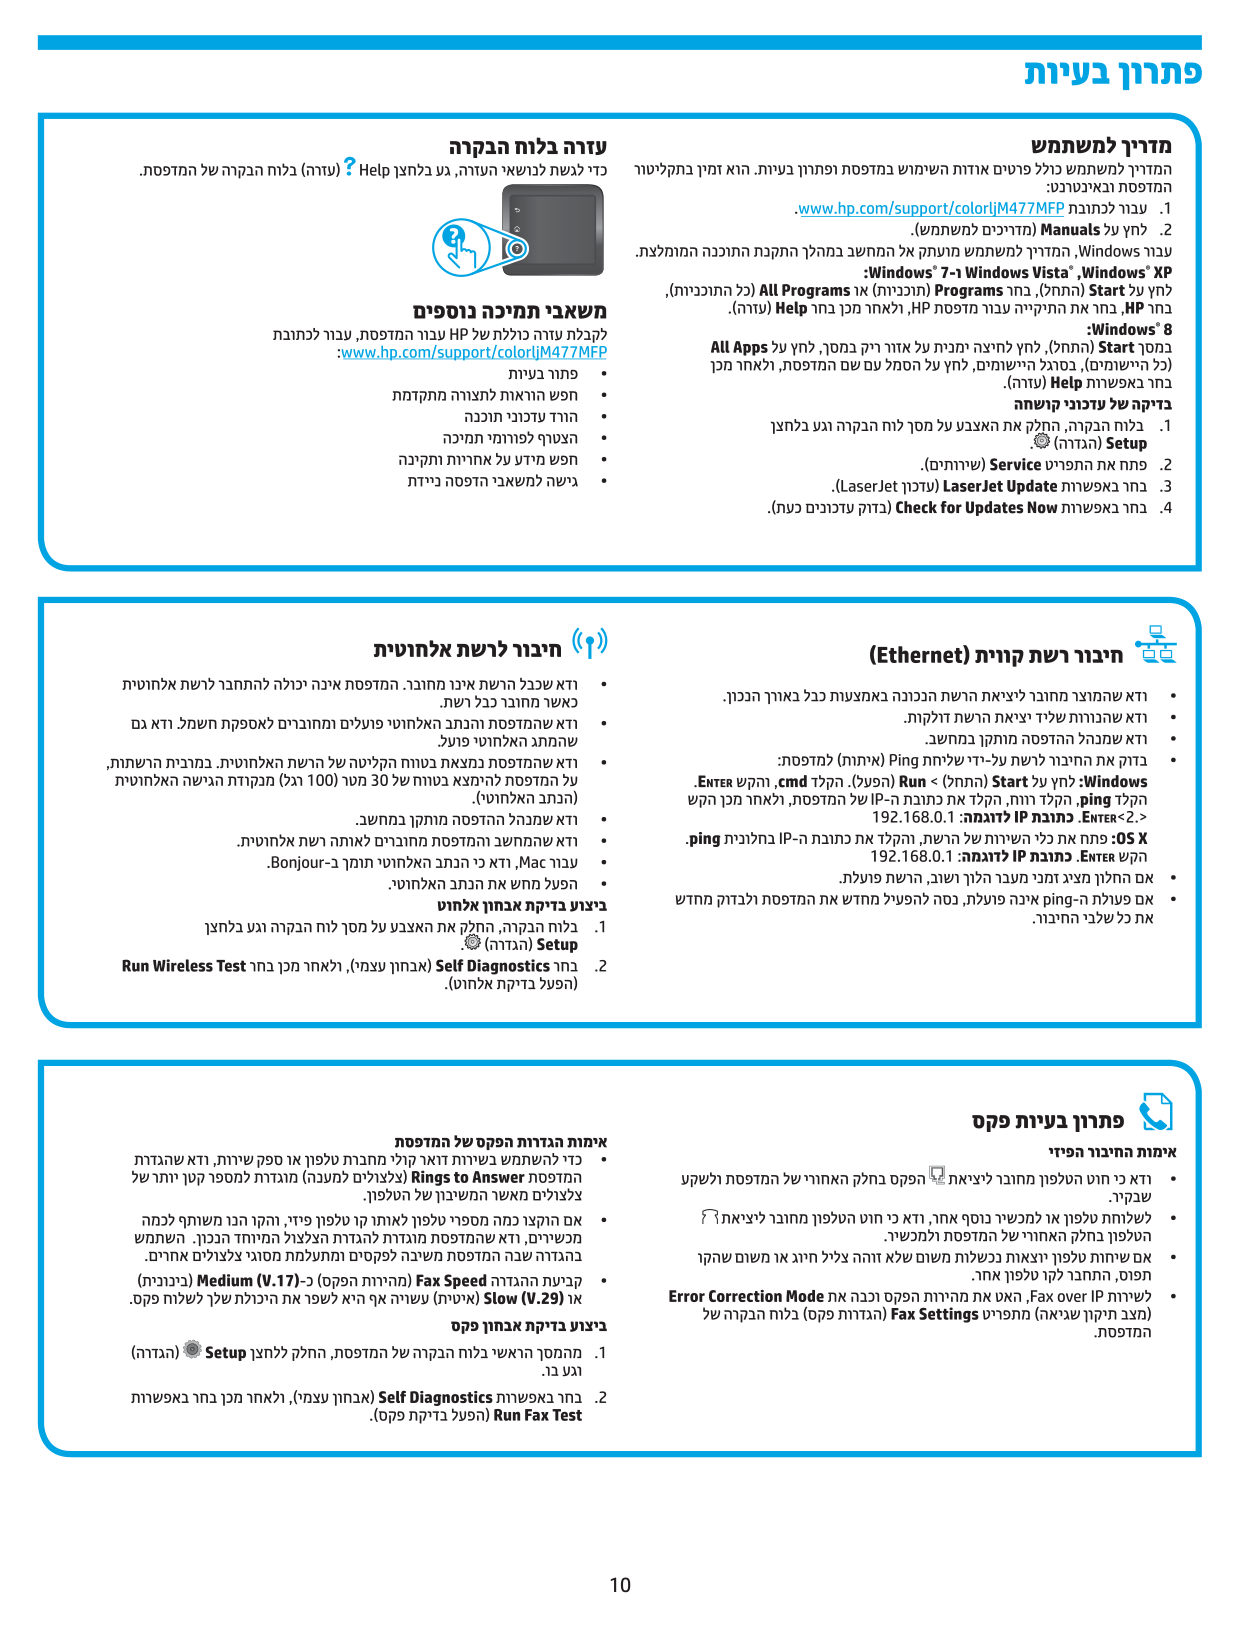
    Troubleshooting

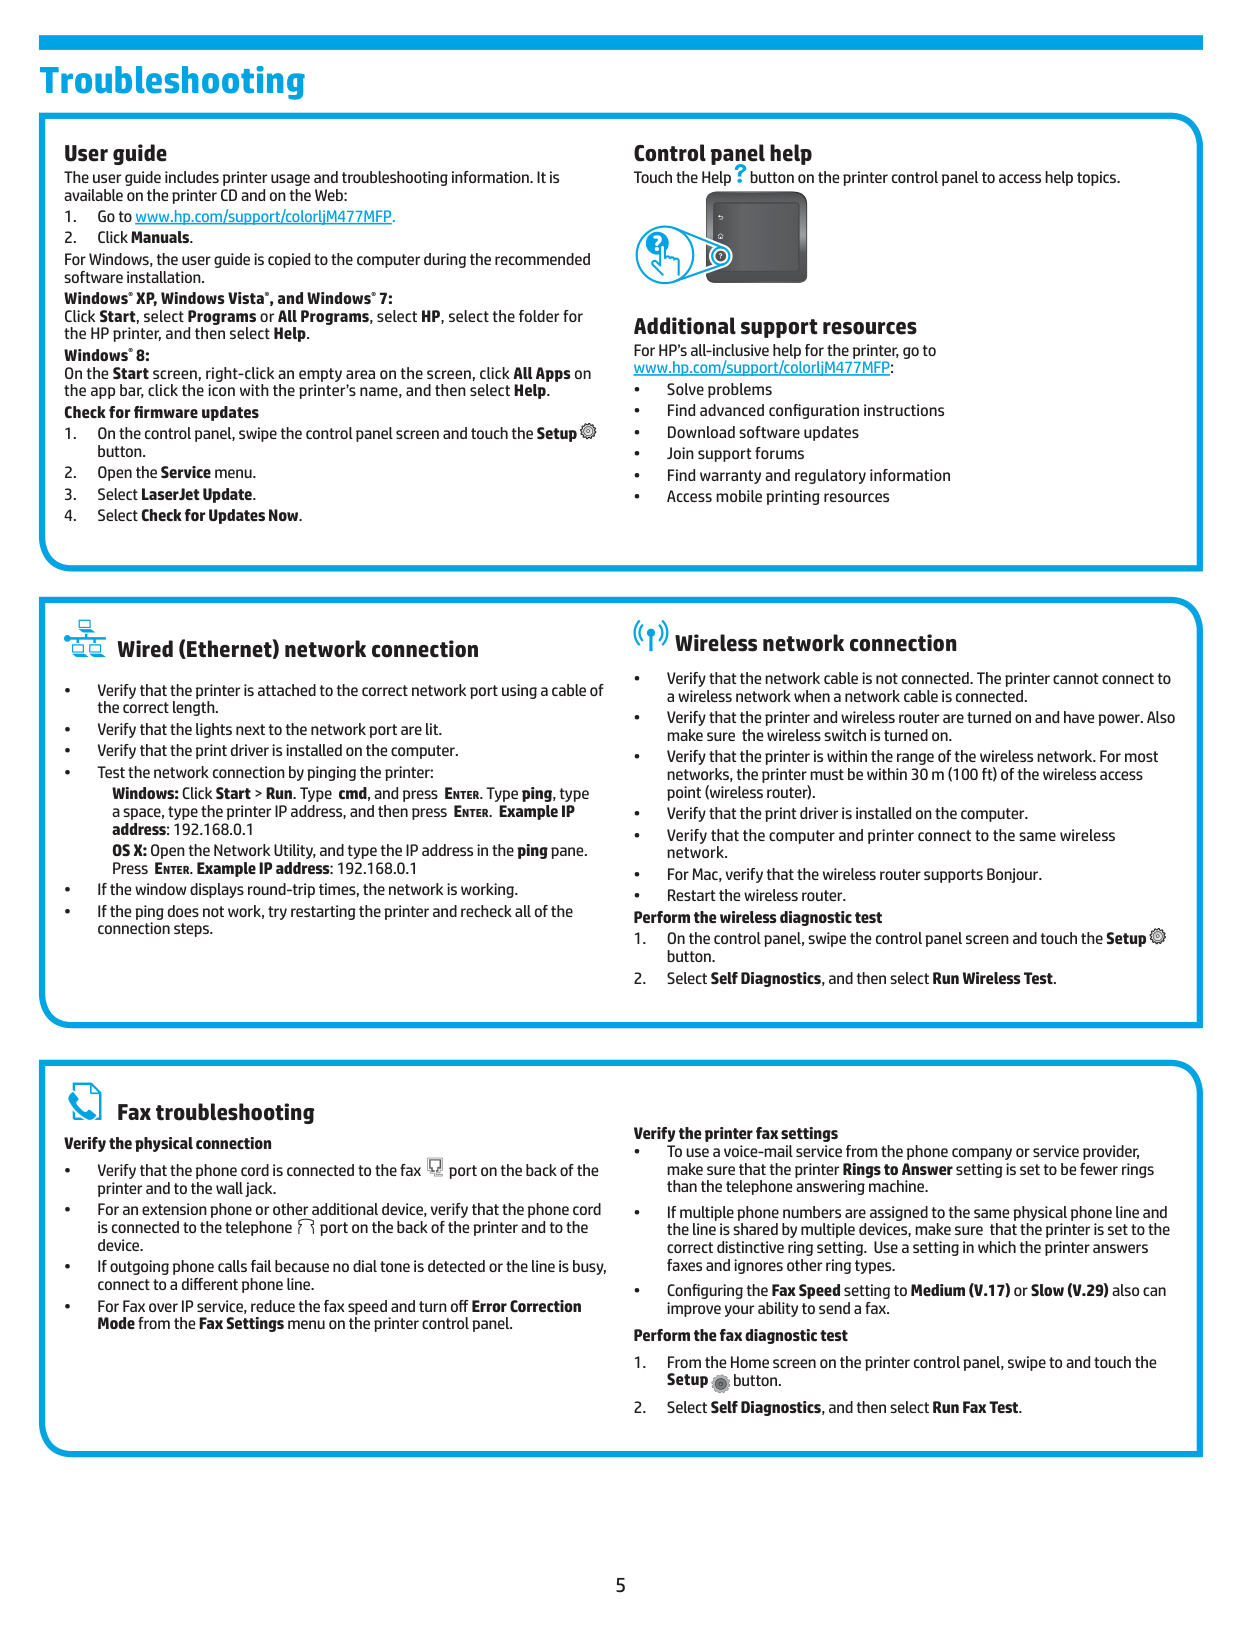
    User guide The user guide includes printer usage and troubleshooting information. It is available on the printer CD and on the Web:

  • 1. Go to www.hp.com/support/colorljM477MFP.
  • 2. Click Manuals.
  • For Windows, the user guide is copied to the computer during the recommended software installation. Windows® XP, Windows Vista®, and Windows® 7: Click Start, select Programs or All Programs, select HP, select the folder for the HP printer, and then select Help. Windows® 8: On the Start screen, right-click an empty area on the screen, click All Apps on the app bar, click the icon with the printer’s name, and then select Help. Check for firmware updates

  • 1. On the control panel, swipe the control panel screen and touch the Setup button.
  • 2. Open the Service menu.
  • Page 10

  • 3. Select LaserJet Update.
  • 4. Select Check for Updates Now.
  • Control panel help Touch the Help button on the printer control panel to access help topics.

    Additional support resources For HP’s all-inclusive help for the printer, go to www.hp.com/support/colorljM477MFP:

  • • Solve problems
  • • Find advanced configuration instructions
  • • Download software updates
  • • Join support forums
  • • Find warranty and regulatory information
  • • Access mobile printing resources
  • ###### Wired (Ethernet) network connection

  • • Verify that the printer is attached to the correct network port using a cable of the correct length.
  • • Verify that the lights next to the network port are lit.
  • • Verify that the print driver is installed on the computer.
  • • Test the network connection by pinging the printer:
  • Windows: Click Start > Run. Type cmd, and press EntEr. Type ping, type a space, type the printer IP address, and then press EntEr. Example IP address: 192.168.0.1 OS X: Open the Network Utility, and type the IP address in the ping pane. Press EntEr. Example IP address: 192.168.0.1

  • • If the window displays round-trip times, the network is working.
  • • If the ping does not work, try restarting the printer and recheck all of the connection steps.
  • ###### Wireless network connection

  • • Verify that the network cable is not connected. The printer cannot connect to a wireless network when a network cable is connected.
  • • Verify that the printer and wireless router are turned on and have power. Also make sure the wireless switch is turned on.
  • • Verify that the printer is within the range of the wireless network. For most networks, the printer must be within 30 m (100 ft) of the wireless access point (wireless router).
  • • Verify that the print driver is installed on the computer.
  • • Verify that the computer and printer connect to the same wireless network.
  • • For Mac, verify that the wireless router supports Bonjour.
  • • Restart the wireless router. Perform the wireless diagnostic test
  • Page 11

  • 1. On the control panel, swipe the control panel screen and touch the Setup button.
  • 2. Select Self Diagnostics, and then select Run Wireless Test.
  • ###### Fax troubleshooting Verify the physical connection

  • • Verify that the phone cord is connected to the fax port on the back of the printer and to the wall jack.
  • • For an extension phone or other additional device, verify that the phone cord is connected to the telephone port on the back of the printer and to the device.
  • • If outgoing phone calls fail because no dial tone is detected or the line is busy, connect to a different phone line.
  • • For Fax over IP service, reduce the fax speed and turn off Error Correction Mode from the Fax Settings menu on the printer control panel.
  • ######### Verify the printer fax settings

  • • To use a voice-mail service from the phone company or service provider, make sure that the printer Rings to Answer setting is set to be fewer rings than the telephone answering machine.
  • • If multiple phone numbers are assigned to the same physical phone line and the line is shared by multiple devices, make sure that the printer is set to the correct distinctive ring setting. Use a setting in which the printer answers faxes and ignores other ring types.
  • • Configuring the Fax Speed setting to Medium (V.17) or Slow (V.29) also can improve your ability to send a fax.
  • ######### Perform the fax diagnostic test

  • 1. From the Home screen on the printer control panel, swipe to and touch the Setup button.
  • 2. Select Self Diagnostics, and then select Run Fax Test.
  • English .............. 1

    ................ 6

    www.hp.com/support/colorljM477MFP www.register.hp.com

    #### .4

    Page 12

    |![image 3](c04703572_images/imageFile3.png)

    1| |---|

    #### .5

  • .6
  • .7
  • .8
  • .9
  • .10
  • #### .11

    #### 11.111.2

    © 2015 Copyright HP Development Company, L.P.

    Reproduction, adaptation or translation without prior written permission is prohibited, except as allowed under the copyright laws.

    The information contained herein is subject to change without notice. The only warranties for HP products and services are set forth in the express warranty statements accompanying such products and services. Nothing herein should be construed as constituting an additional warranty. HP shall not be liable for technical or editorial errors or omissions contained herein. Trademark Credits Windows® is a U.S. registered trademark of Microsoft Corporation. FCC Regulations This equipment has been tested and found to comply with the limits for a Class B digital device, pursuant to Part 15 of the FCC rules. These limits are designed to provide reasonable protection against harmful interference in a residential installation. This equipment generates, uses, and can radiate radio-frequency energy. If this equipment is not installed and used in accordance with the instructions, it may cause harmful interference to radio communications. However, there is no guarantee that interference will not occur in a particular installation. If this equipment does cause harmful interference to radio or television reception, which can be determined by turning the equipment off and on, correct the interference by one or more of the following measures:

  • • Reorient or relocate the receiving antenna.
  • • Increase separation between equipment and receiver.
  • • Connect equipment to an outlet on a circuit different from that to which the receiver is located.
  • • Consult your dealer or an experienced radio/TV technician.
  • Any changes or modifications to the product that are not expressly approved by HP could void the user’s authority to operate this equipment. Use of a shielded interface cable is required to comply with the Class B limits of Part 15 of FCC rules. For more regulatory information, see the electronic user guide. HP shall not be liable for any direct, indirect, incidental, consequential, or other damage alleged in connection with the furnishing or use of this information.

    www.hp.com

    ![image 4](c04703572_images/imageFile4.png)

    More from HP

    Similar Printers