Ask AI
— answers from the official manualAnswers from the official manual.
Common questions
Common Questions
9 totalHow can I factory reset my printer?
Press and hold the Power button for 10 seconds until the LED flashes red. This clears all settings and returns the device to factory defaults. You will need to re-pair all connected devices after the reset. (Page 23)
What media types are compatible with my printer?
The printer supports plain paper, card stock, custom sizes up to A5 and beyond, preprinted paper, letterhead paper, recycled paper, bond paper, colored papers including HP LaserJet-specific varieties. Refer to specifications for exact weight ranges by type.
How do I load paper in Tray 2?
Extract tray, adjust guides to align with paper size, insert trimmed stack of papers with guide pressed firmly against paper. Ensure bottom edges align properly before sliding back into machine and securing.
What is recommended for special media like cardstock or preprinted paper?
For best results, use margins of at least 6.4 mm (0.25 inches) from edges when printing special media and verify ink dryness on preprinted material to avoid quality issues.
How do I perform an ID card copy?
Press the ID Copy button, place card face down on scanner glass with arrows indicating correct placement. Close lid and press Start for front side. Flip card over as guided by screen instructions and start again to capture rear.
How do I set up the printer hardware and software?
For basic setup instructions, refer to the Quick Installation Guide included with the printer or visit www.hp.com/support/ljM438MFP for model-specific instructions. To install software: Download the full software solution from hp.com, then follow on-screen instructions to install and configure; supported operating systems include Windows XP, Vista, 7, 8, 8.1, and 10 (both 32-bit and 64-bit versions).
Show 3 more questions
Full Manual
154 pages
HP LaserJet MFP M438 HP LaserJet MFP M440
User Guide
www.hp.com/videos/laserjet www.hp.com/support/ljM438MFP www.hp.com/support/ljM440MFP

HP LaserJet MFP M438, M440, M442, M443
############# Copyright and License
© Copyright 2019 HP Development Company, L.P.
Reproduction, adaptation, or translation without prior written permission is prohibited, except as allowed under the copyright laws.

The information contained herein is subject to change without notice.
The only warranties for HP products and services are set forth in the express warranty statements accompanying such products and services. Nothing herein should be construed as constituting an additional warranty. HP shall not be liable for technical or editorial errors or omissions contained herein.
Edition 1, 2/2020
############# Trademark Credits
Adobe®, Adobe Photoshop®, Acrobat®, and PostScript® are trademarks of Adobe Systems Incorporated.
Microsoft®, Windows®, Windows® XP, and Windows Vista® are U.S. registered trademarks of Microsoft Corporation.
Table of contents
Components ......................................................................................................................................................... 9 Front view ........................................................................................................................................................... 10 Rear view ............................................................................................................................................................ 11
Control panel overview ......................................................................................................................................................... 12
Copy feature menu ............................................................................................................................................ 17 Copy Setup Menu ............................................................................................................................................... 18 Print Setup Menu ............................................................................................................................................... 19 System Setup Menu .......................................................................................................................................... 20 Network Menu .................................................................................................................................................... 23 Secured Job Menu ............................................................................................................................................. 23 Scan Menu .......................................................................................................................................................... 23

Introduction ........................................................................................................................................................ 27 Preparing paper ................................................................................................................................................. 27 Tray 2 / optional tray ........................................................................................................................................ 27 Multi-purpose Tray 1 ........................................................................................................................................ 30
Printing on special media ...................................................................................................................................................... 32 Card stock/Custom-sized paper ...................................................................................................................... 32 Preprinted paper ................................................................................................................................................ 33
ENWW iii
Setting the paper size and type ........................................................................................................................................... 34 Loading the original ............................................................................................................................................................... 35
Introduction ........................................................................................................................................................ 35 Preparing originals ............................................................................................................................................ 35 Loading originals ............................................................................................................................................... 36
On the scanner glass .................................................................................................................... 36 In the document feeder ............................................................................................................... 38
Print media specifications ..................................................................................................................................................... 39
Copy feature ....................................................................................................................................................... 50 Copy Setup .......................................................................................................................................................... 53
Basic copying .......................................................................................................................................................................... 53 Changing the settings for each copy ................................................................................................................................... 54

Darkness ............................................................................................................................................................. 54 Original Type ....................................................................................................................................................... 54 Reduced or enlarged copy ................................................................................................................................ 55
ID card copying ....................................................................................................................................................................... 56
Introduction ........................................................................................................................................................ 60 Scan feature ....................................................................................................................................................... 60
Scanning from a computer ................................................................................................................................................... 62 Introduction ........................................................................................................................................................ 62 Scan to PC ........................................................................................................................................................... 62 Scanning from the HP Scan Software ............................................................................................................ 63 Scanning from image editing program .......................................................................................................... 63 Scanning using the WIA driver ......................................................................................................................... 64 Scanning via WSD .............................................................................................................................................. 64
Installing a WSD Printer Driver .................................................................................................... 64 Scanning using the WSD feature ................................................................................................ 65
Sending scanned images to different destinations .......................................................................................................... 66 Setting up an email account ............................................................................................................................ 66 Scanning and sending an email ...................................................................................................................... 66 Setting up an FTP/SMB server ......................................................................................................................... 66 Scanning and sending to FTP/SMB server ..................................................................................................... 67
Imaging unit handling instructions ................................................................................................................. 82 Toner cartridge usage ....................................................................................................................................... 82 Estimated toner cartridge life .......................................................................................................................... 83
Redistributing toner ............................................................................................................................................................... 83 Toner cartridge installation ................................................................................................................................................... 86 Imaging unit installation ....................................................................................................................................................... 89 Monitoring the supplies life .................................................................................................................................................. 96 Setting the toner low alert .................................................................................................................................................... 96 Cleaning the machine ............................................................................................................................................................ 97
Cleaning the outside ......................................................................................................................................... 97 Cleaning the inside ............................................................................................................................................ 97 Cleaning the roller ............................................................................................................................................. 98 Cleaning the scan unit .................................................................................................................................... 102
Update the firmware ........................................................................................................................................................... 103 Step one: Download the firmware from HP.com ....................................................................................... 103 Step two: Update the firmware ..................................................................................................................... 103
ENWW v
Introduction ...................................................................................................................................................... 113 Tray 2 ................................................................................................................................................................ 113 In Multi-purpose Tray 1 .................................................................................................................................. 115 Inside the printer ............................................................................................................................................. 116 In the exit area ................................................................................................................................................. 118 In the duplex unit area .................................................................................................................................... 120 Clearing original document jams .................................................................................................................. 122
Original paper jam in front of scanner .................................................................................... 122 Original paper jam inside of scanner ....................................................................................... 124 Original paper jam in exit area of scanner .............................................................................. 127 Original paper jam in scanner duplex path ............................................................................. 129
Understanding the status LED ........................................................................................................................................... 131 Understanding display messages ..................................................................................................................................... 132
Paper Jam-related messages ....................................................................................................................... 132 Toner-related messages ................................................................................................................................ 133 Tray-related messages .................................................................................................................................. 134 Network-related messages ........................................................................................................................... 134 Misc. messages ................................................................................................................................................ 135
Power and cable connecting problems ............................................................................................................................ 136 Printing problems ................................................................................................................................................................ 137 Printing quality problems ................................................................................................................................................... 139 Copying problems ................................................................................................................................................................ 144 Scanning problems .............................................................................................................................................................. 145 Operating system problems .............................................................................................................................................. 146
1 Introduction
This chapter provides information you need to know before using the machine.
ENWW 1
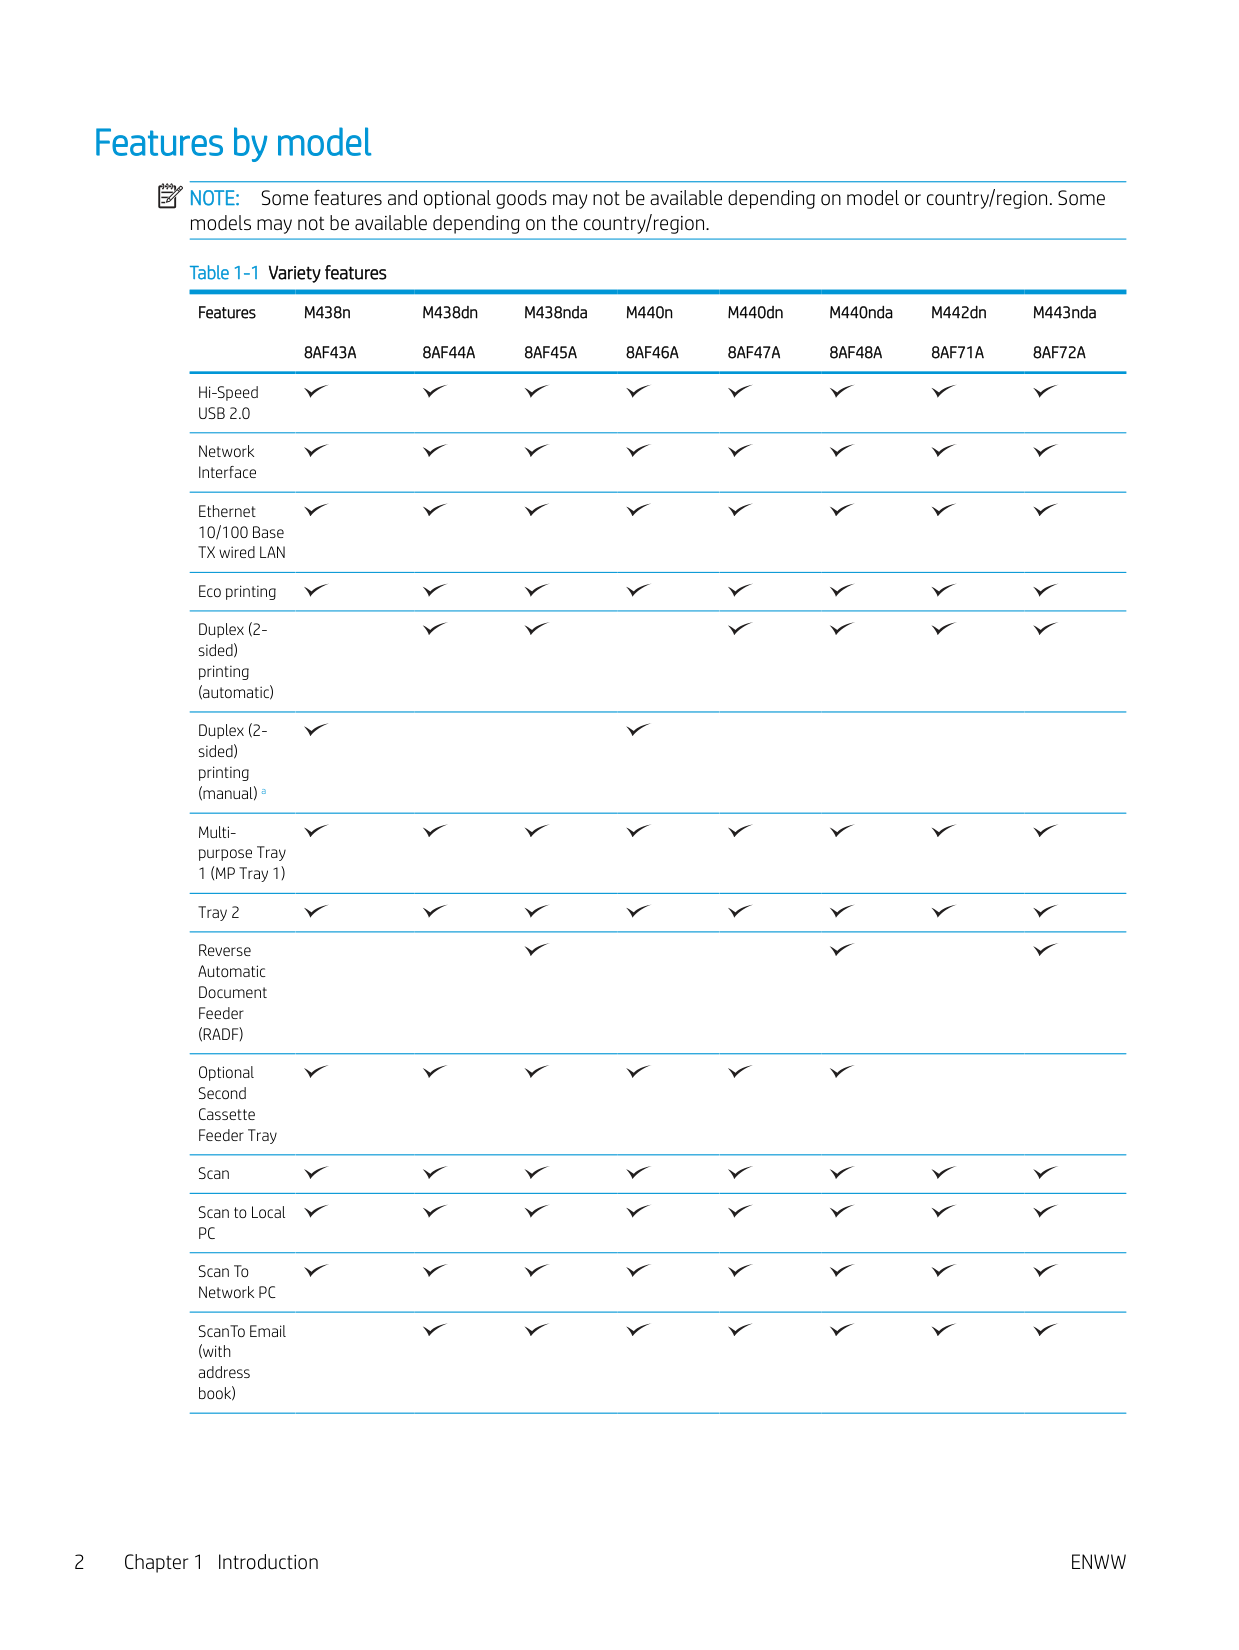
#### Features by model
| | |---|
NOTE: Some features and optional goods may not be available depending on model or country/region. Some models may not be available depending on the country/region.
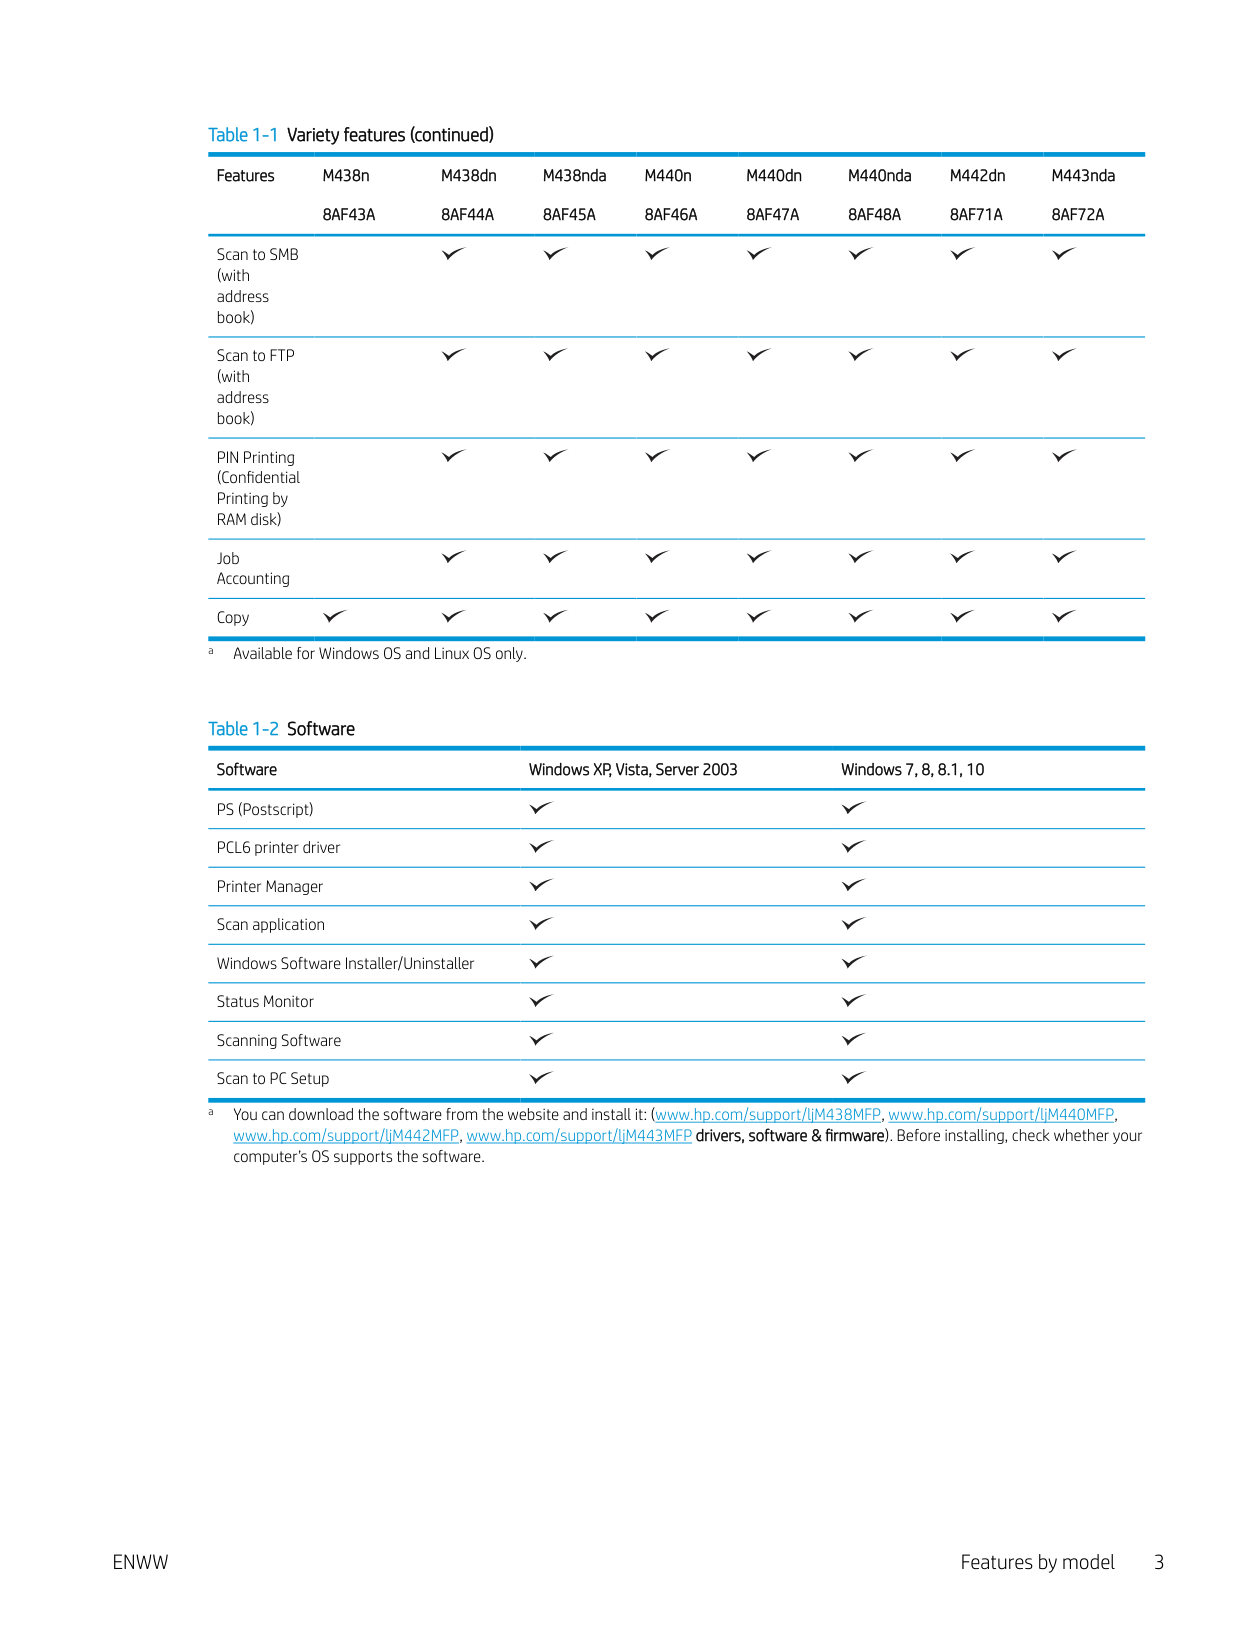
Table 1-1 Variety features
Features M438n 8AF43A
M438dn 8AF44A
M438nda 8AF45A
M440n 8AF46A
M440dn 8AF47A
M440nda 8AF48A
M442dn 8AF71A
M443nda 8AF72A
Hi-Speed USB 2.0
Network Interface
Ethernet 10/100 Base TX wired LAN
Eco printing Duplex (2sided) printing (automatic) Duplex (2sided) printing (manual) a Multipurpose Tray 1 (MP Tray 1) Tray 2 Reverse Automatic Document Feeder (RADF) Optional Second Cassette Feeder Tray Scan Scan to Local PC Scan To Network PC ScanTo Email (with address book)
########### Table 1-1 Variety features (continued)Features M438n
M438dn 8AF44A
M438nda 8AF45A
M440n 8AF46A
M440dn 8AF47A
M440nda 8AF48A
M442dn 8AF71A
M443nda 8AF72A
8AF43A
Scan to SMB (with address book)
Scan to FTP (with address book)
PIN Printing (Confidential Printing by RAM disk)
Job Accounting
Copy a Available for Windows OS and Linux OS only.
############ Table 1-2 SoftwareSoftware Windows XP, Vista, Server 2003 Windows 7, 8, 8.1, 10PS (Postscript)PCL6 printer driverPrinter ManagerScan applicationWindows Software Installer/UninstallerStatus MonitorScanning SoftwareScan to PC Setup
a You can download the software from the website and install it: (www.hp.com/support/ljM438MFP, www.hp.com/support/ljM440MFP, www.hp.com/support/ljM442MFP, www.hp.com/support/ljM443MFP drivers, software & firmware). Before installing, check whether your computer’s OS supports the software.
ENWW Features by model 3
#### About this user’s guide
This user's guide provides information for your basic understanding of the machine as well as detailed steps to explain machine usage.
#### Safety information
These warnings and precautions are included to prevent injury to you and others, and to prevent any potential damage to your machine. Be sure to read and understand all of these instructions before using the machine. After reading this section, keep it in a safe place for future reference.
Warning Hazards or unsafe practices that may result in personal
injury.
Caution Hazards or unsafe practices that may result in minor
personal injury or property damage.
Do not attempt.
Warning
Do not use if the power cord is damaged or if the electrical outlet is not grounded. Equipment damage could occur.
Do not place anything on top of the machine (water, small metal or heavy objects, candles, lit cigarettes, etc.). Equipment damage could occur.
Equipment damage could occur. Do not bend, step on, or place heavy objects on the power cord. Stepping on or allowing the power cord to be crushed by a heavy object could result in equipment damage.
Do not remove the plug by pulling on the cord; do not handle the plug with wet hands. Equipment damage could occur.
Caution
Be careful, the paper output area may be hot.
########### Table 1-4 Operating environment (continued)
If the machine has been dropped, or if the cabinet appears damaged, unplug the machine from all interface connections and request assistance from qualified service personnel.
If the machine does not operate properly after these instructions have been followed, unplug the machine from all interface connections and request assistance from qualified service personnel.
If the plug does not easily enter the electrical outlet, do not attempt to force it in. Call an electrician to change the electrical outlet.
########### Table 1-5 Operating method
Caution
Do not forcefully pull the paper out during printing. Equipment damage could occur.
When removing jammed paper, do not use tweezers or sharp metal objects. Equipment damage could occur.
Do not allow too many papers to stack up in the paper output tray. This may cause paper jams.
Do not block or push objects into the ventilation opening. Equipment damage could occur.
To switch off the power supply, remove the power cord from the electrical outlet.
########### Table 1-6 Installation/Moving
Warning
Place the machine in the environment where it meets the operating temperature and humidity specification. Temperature: 15° to 27° C (59° to 80.6° F) Relative Humidity: 30% to 70% relative humidity (RH)
Caution
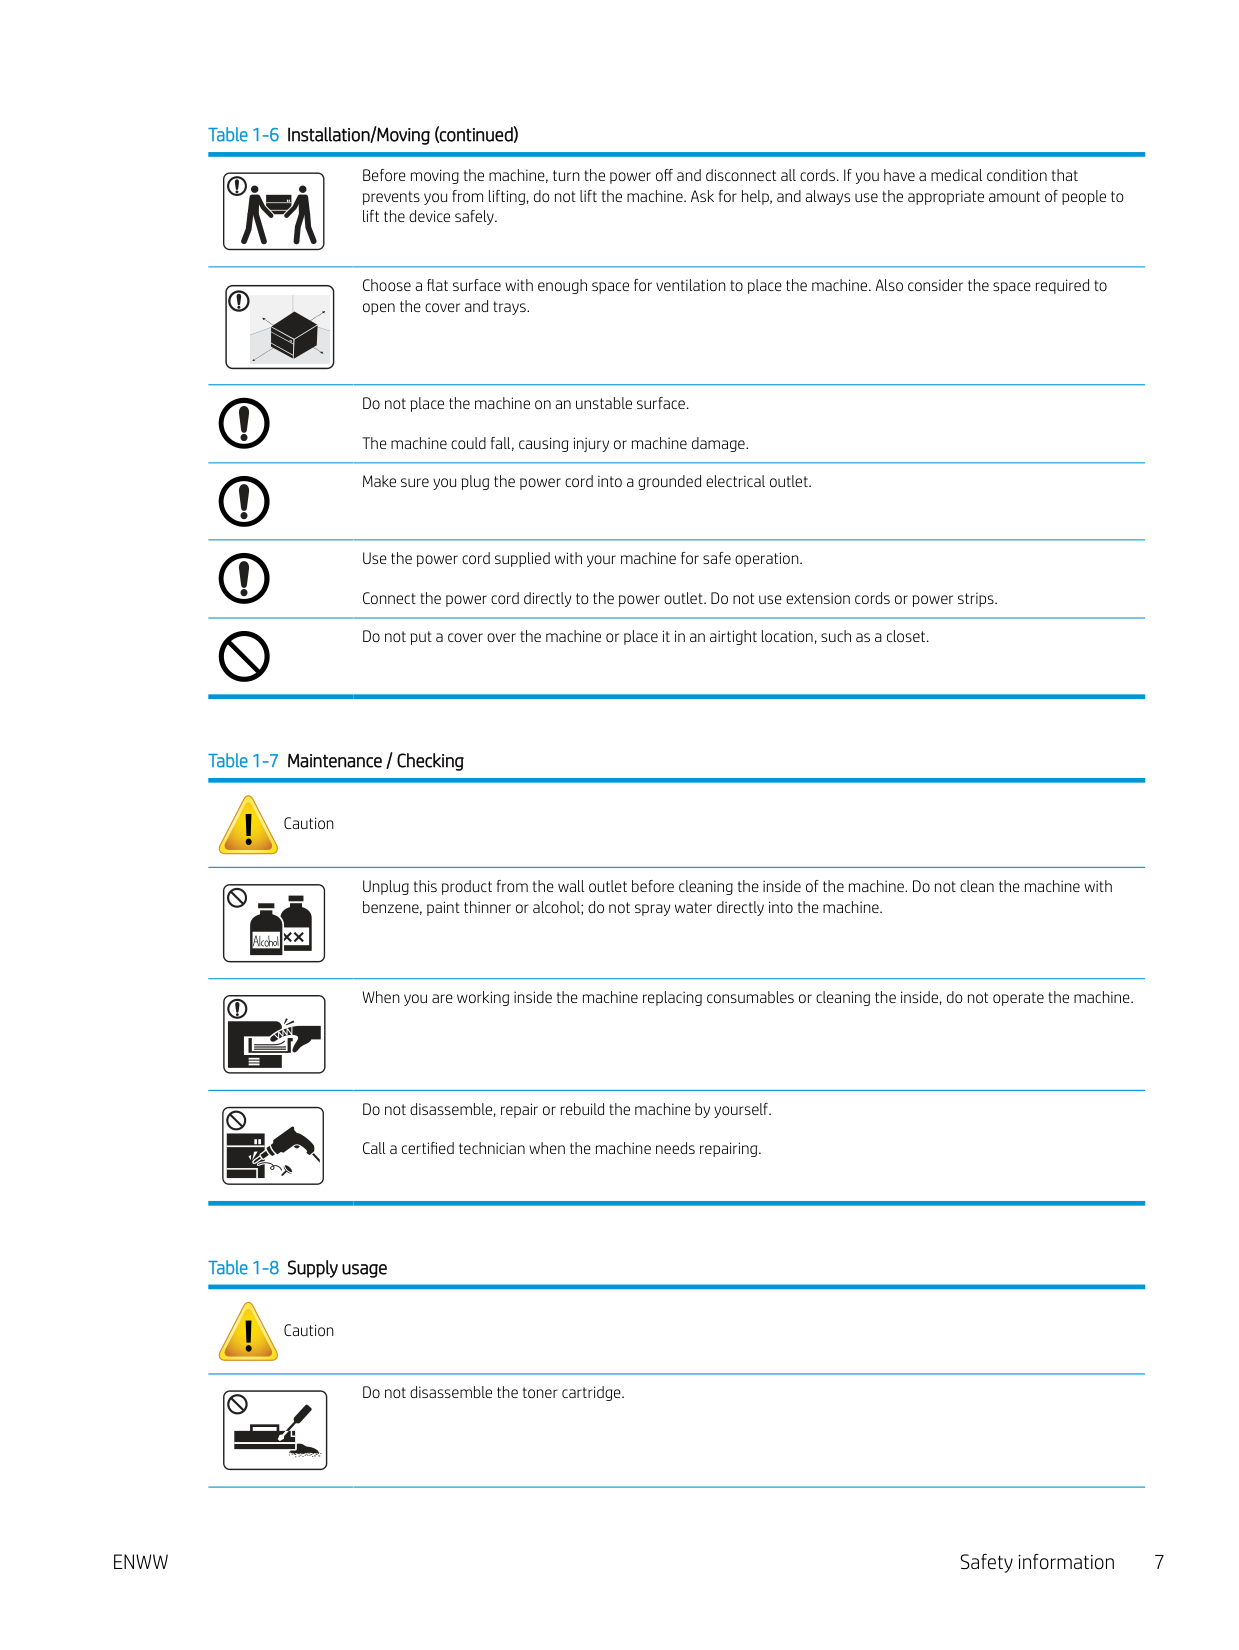
########### Table 1-6 Installation/Moving (continued)
Before moving the machine, turn the power off and disconnect all cords. If you have a medical condition that prevents you from lifting, do not lift the machine. Ask for help, and always use the appropriate amount of people to lift the device safely.
Choose a flat surface with enough space for ventilation to place the machine. Also consider the space required to open the cover and trays.
Do not place the machine on an unstable surface. The machine could fall, causing injury or machine damage.

Make sure you plug the power cord into a grounded electrical outlet.
Use the power cord supplied with your machine for safe operation. Connect the power cord directly to the power outlet. Do not use extension cords or power strips.
Do not put a cover over the machine or place it in an airtight location, such as a closet.
########### Table 1-7 Maintenance / Checking
Caution
Unplug this product from the wall outlet before cleaning the inside of the machine. Do not clean the machine with benzene, paint thinner or alcohol; do not spray water directly into the machine.
When you are working inside the machine replacing consumables or cleaning the inside, do not operate the machine.
Do not disassemble, repair or rebuild the machine by yourself. Call a certified technician when the machine needs repairing.
########### Table 1-8 Supply usage
Caution
Do not disassemble the toner cartridge.
########### Table 1-8 Supply usage (continued)

Using recycled consumables, such as toner, can cause damage to the machine.
When toner gets on your clothing, do not use hot water to wash it. Use cold water.
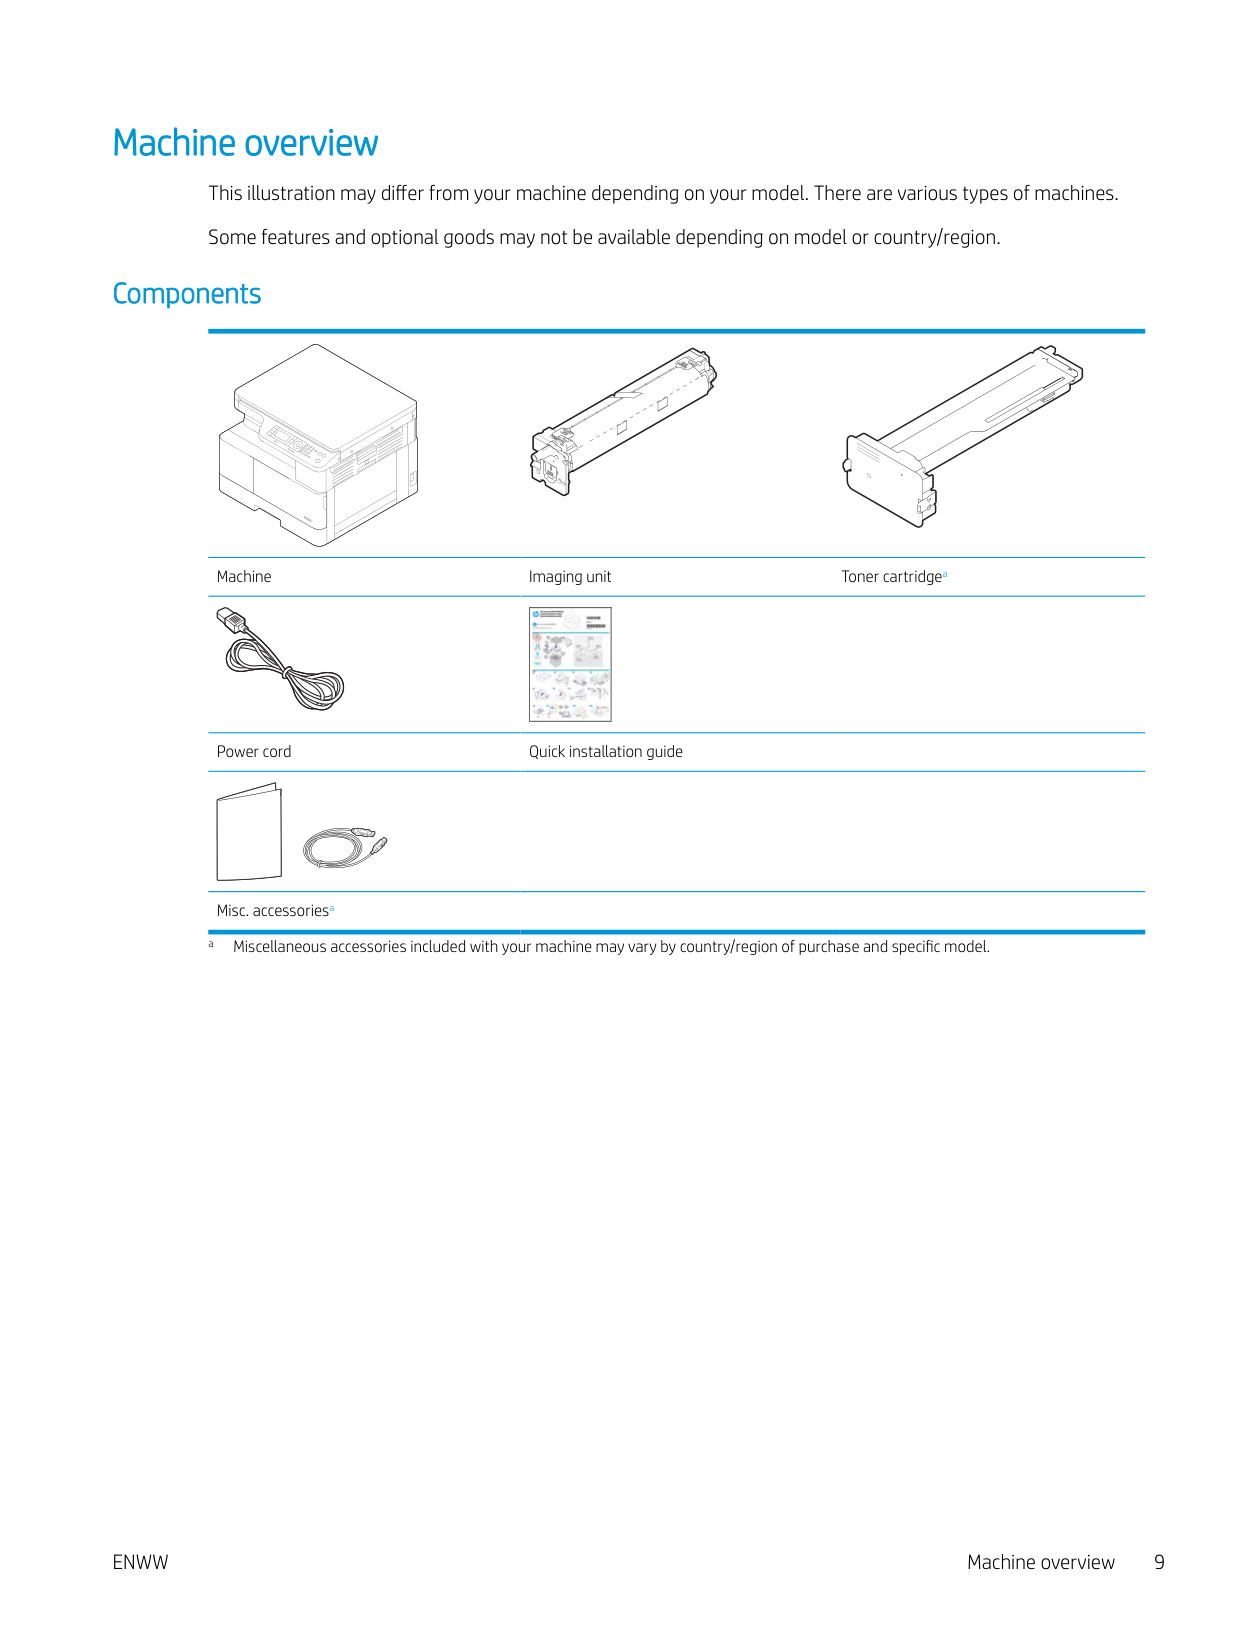
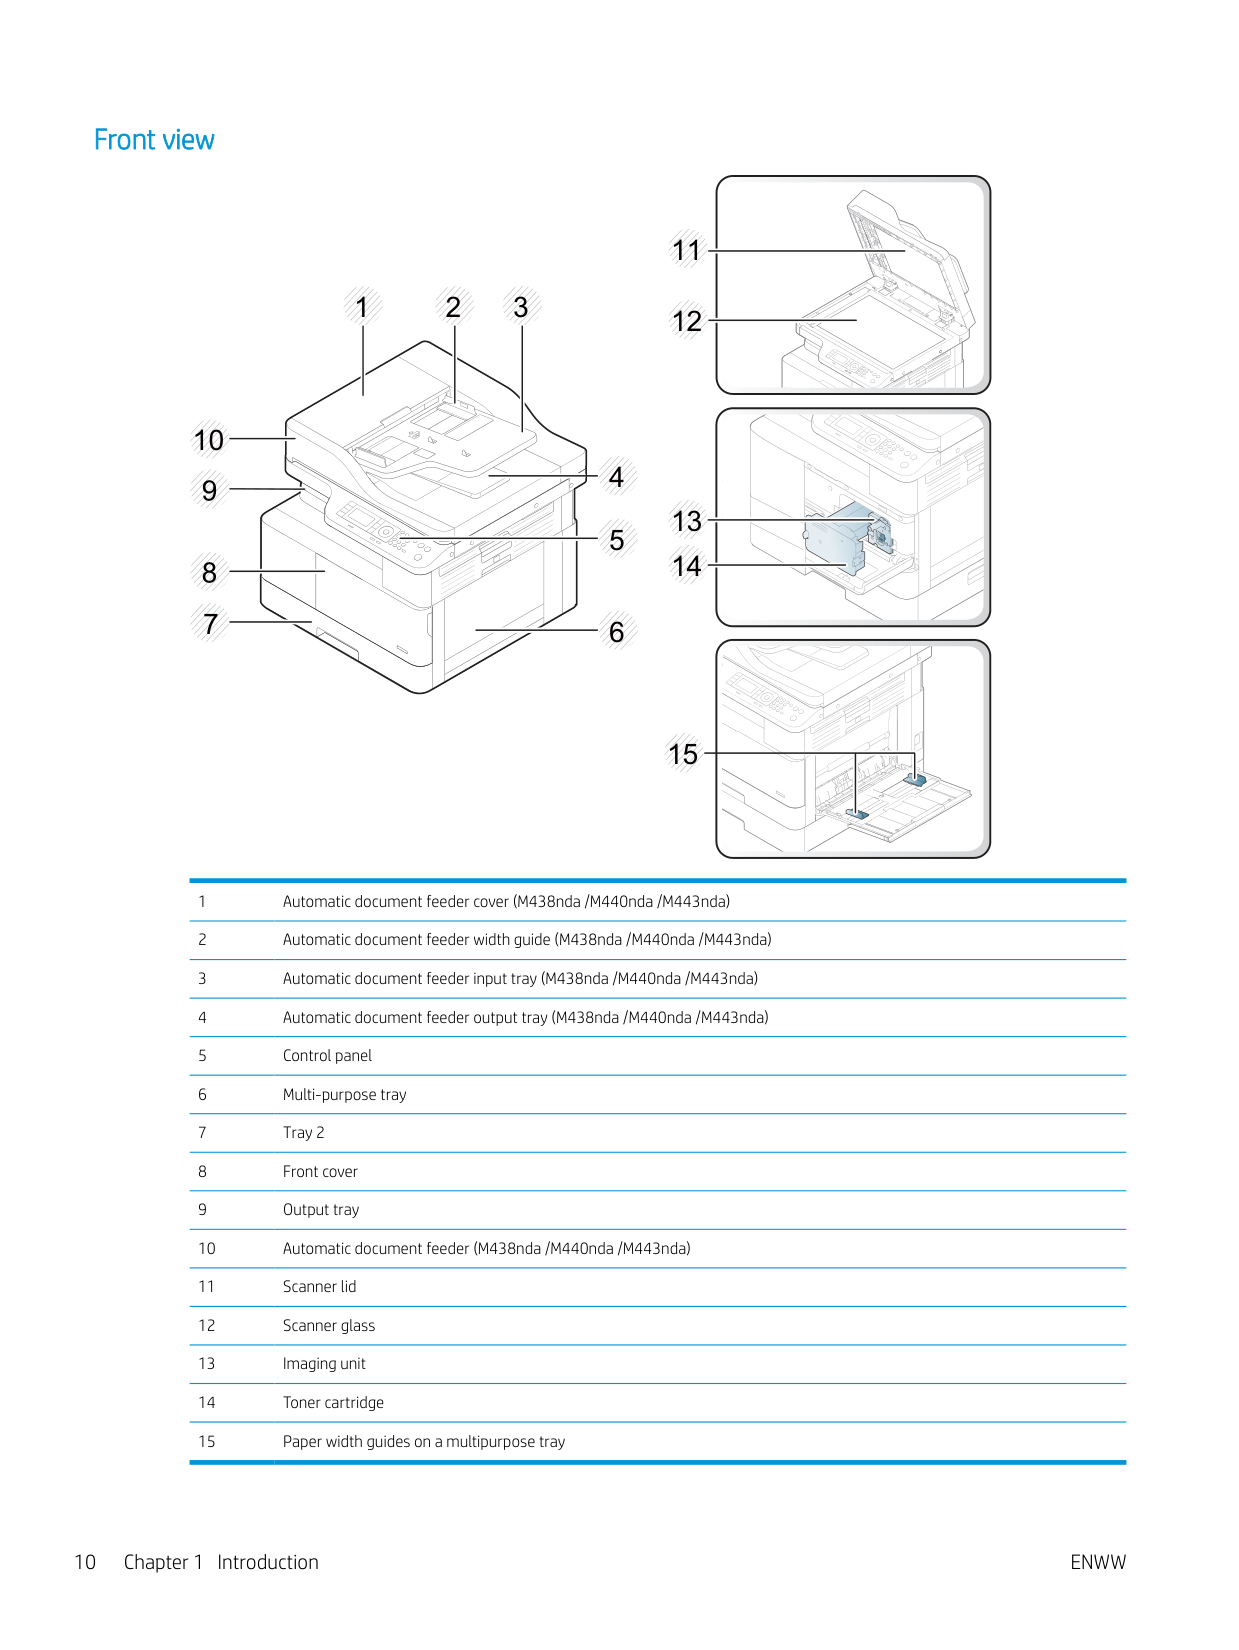
Machine overview This illustration may differ from your machine depending on your model. There are various types of machines. Some features and optional goods may not be available depending on model or country/region.
###### Components
Machine Imaging unit Toner cartridgea
|| |---|
Power cord Quick installation guide
Misc. accessoriesa a Miscellaneous accessories included with your machine may vary by country/region of purchase and specific model.
###### Front view
1 2 3
10
4
12
11

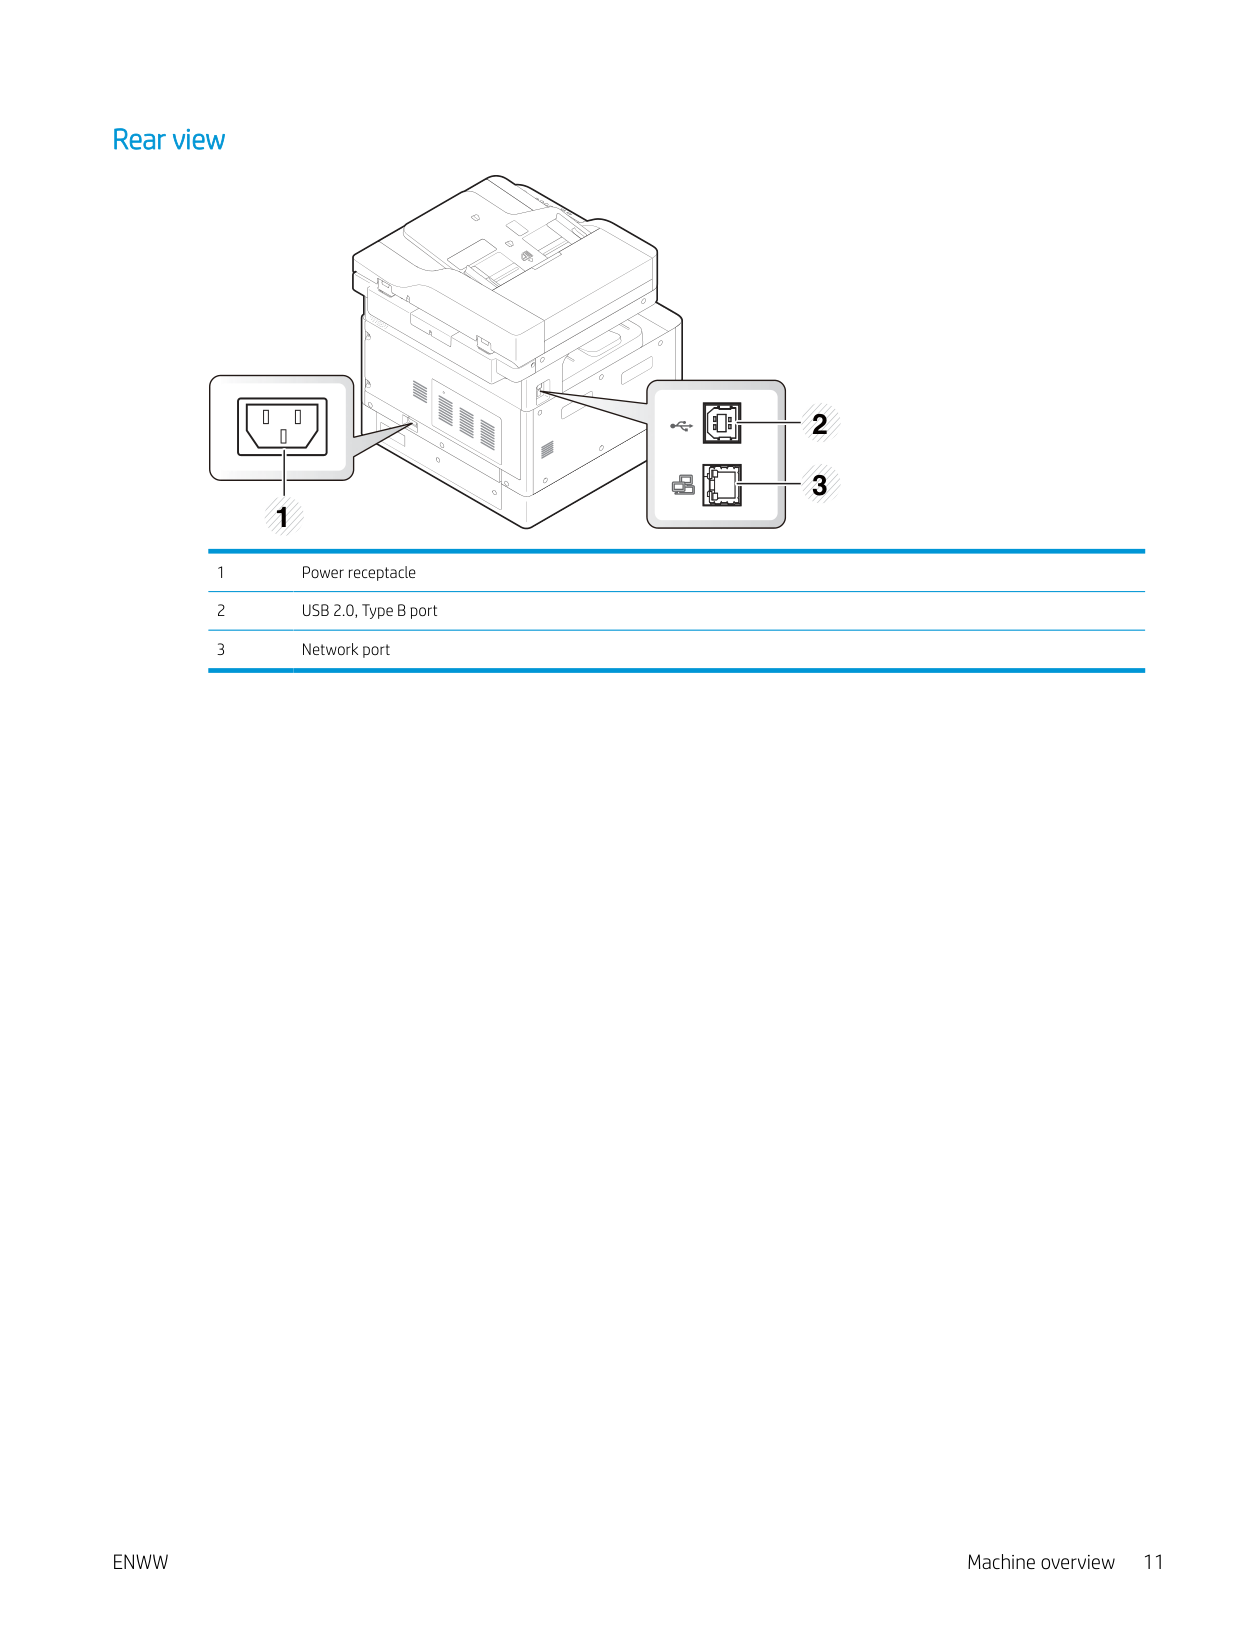
###### Rear view


2
| | | |---|---| | | |
3 1
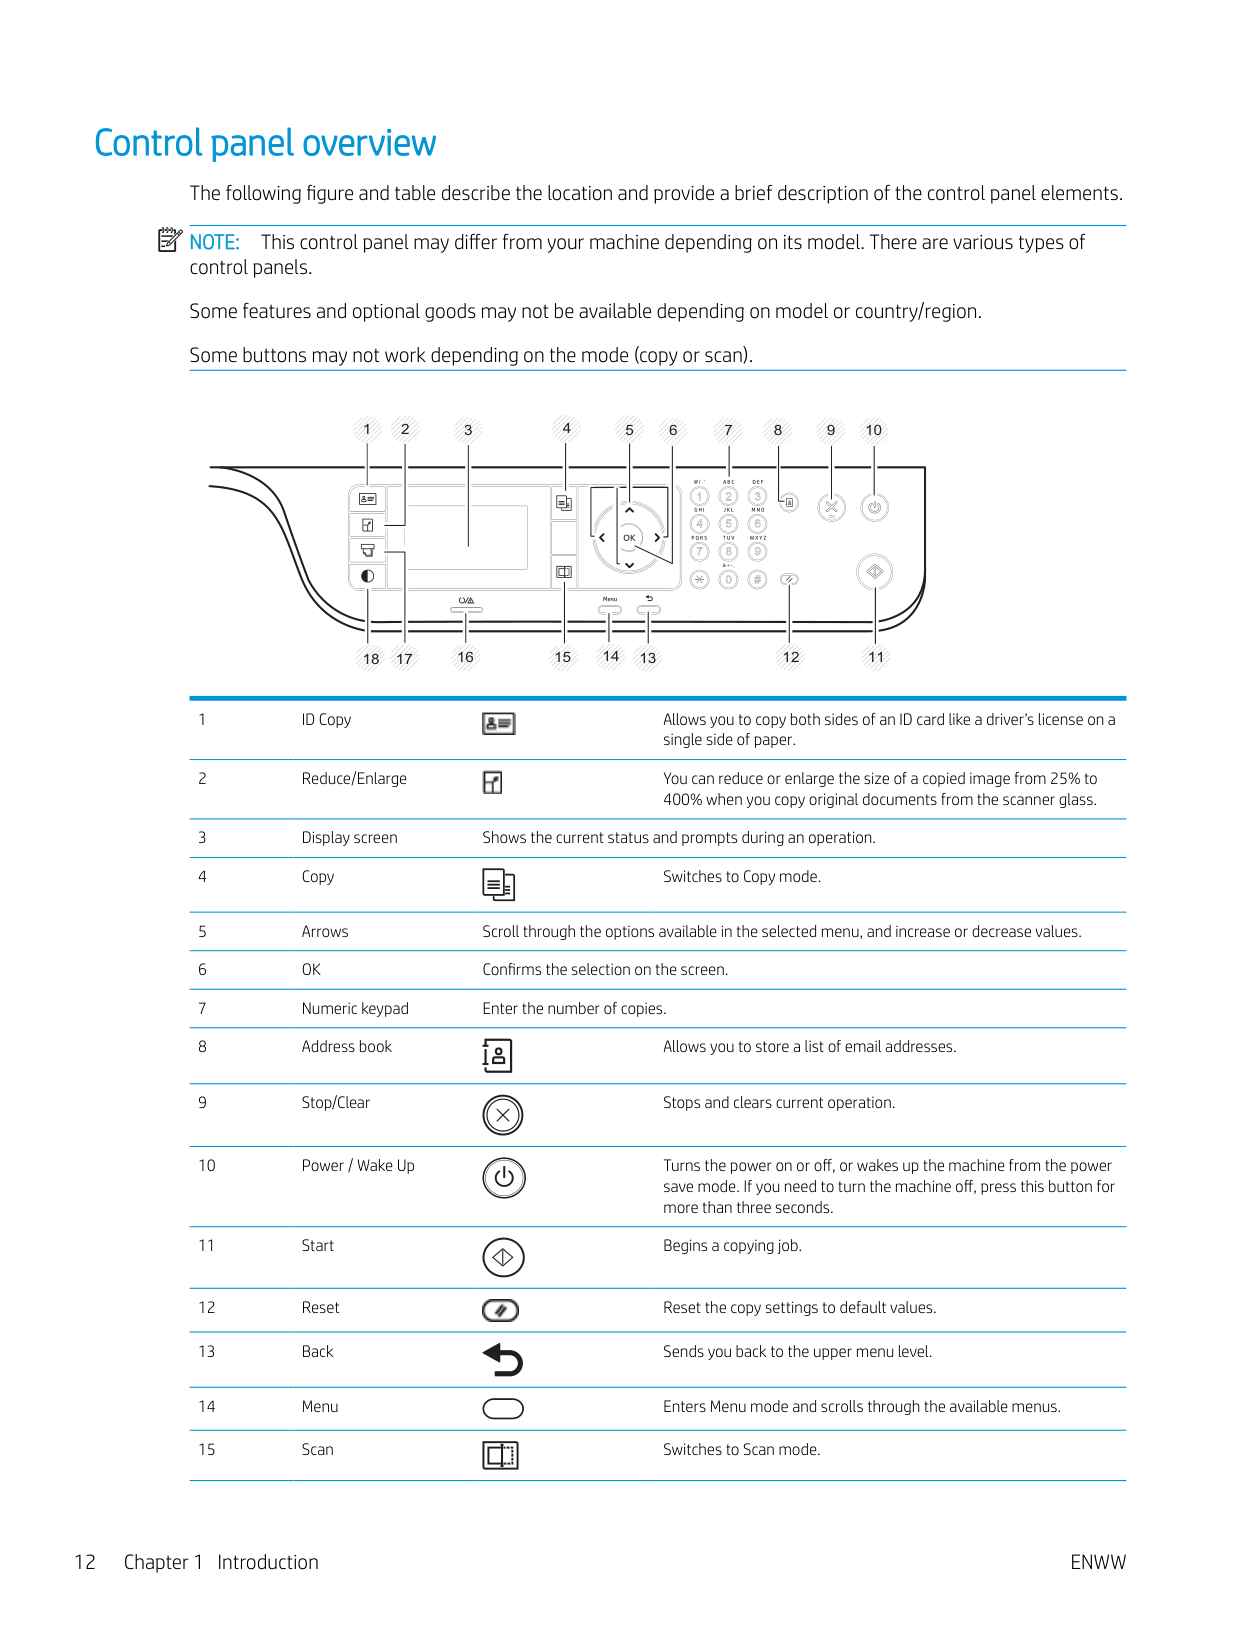
Control panel overview The following figure and table describe the location and provide a brief description of the control panel elements. NOTE: This control panel may differ from your machine depending on its model. There are various types of control panels. Some features and optional goods may not be available depending on model or country/region. Some buttons may not work depending on the mode (copy or scan).
| | |---|
4
8 9 10762135
12 11181716151413


save mode. If you need to turn the machine off, press this button for more than three seconds.


ENWW Control panel overview 13
2 Menu Overview
This chapter provides information about the overall menu structure.
ENWW 15
#### Accessing the menus
Some menus may not appear on the display depending on the options selected, the product model, or your country/region of residence. If so, it is not applicable to your machine.

Menu features are also accessible remotely from the Embedded Web Server (EWS) on network-connected printers. For more information about the EWS, go to http://support.hp.com.
#### Menu overview
###### Copy feature menu
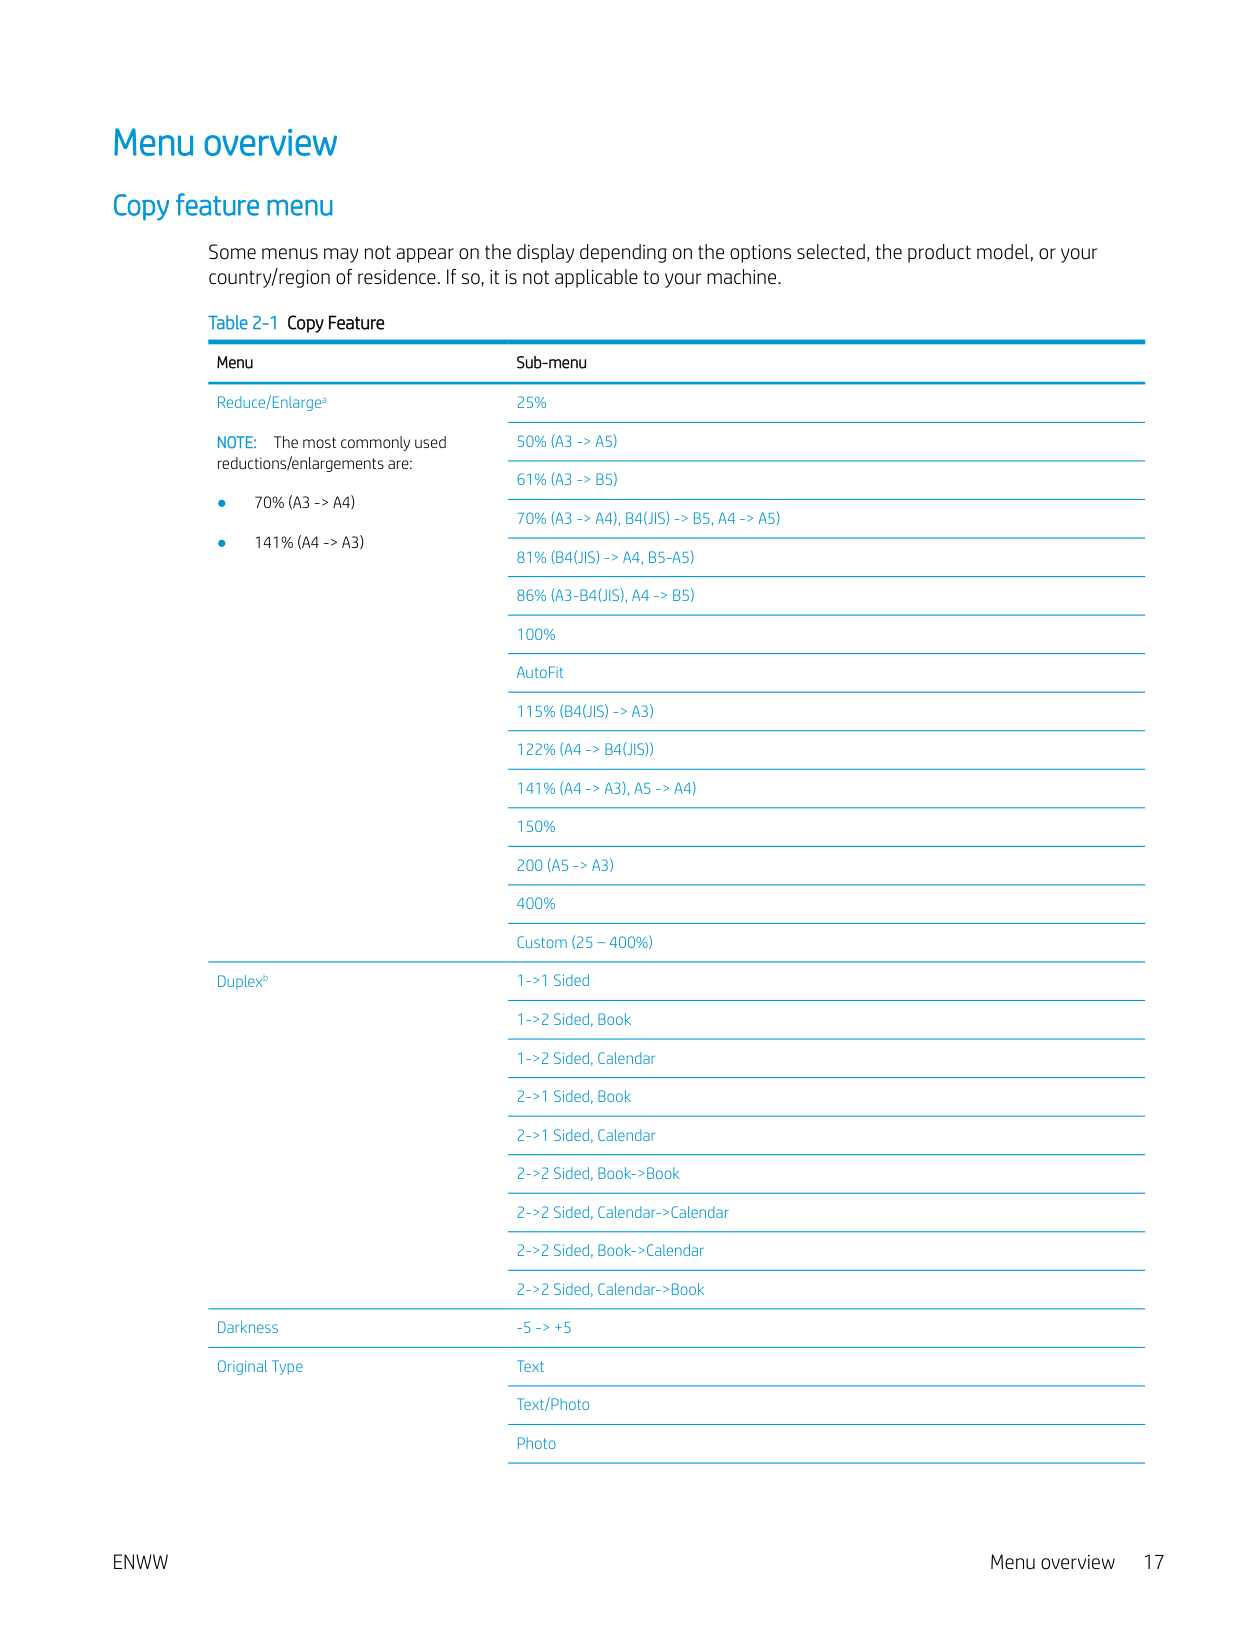
Some menus may not appear on the display depending on the options selected, the product model, or your country/region of residence. If so, it is not applicable to your machine.
Table 2-1 Copy Feature Menu Sub-menu Reduce/Enlargea NOTE: The most commonly used reductions/enlargements are:
25% 50% (A3 -> A5) 61% (A3 -> B5) 70% (A3 -> A4), B4(JIS) -> B5, A4 -> A5) 81% (B4(JIS) -> A4, B5-A5) 86% (A3-B4(JIS), A4 -> B5) 100% AutoFit 115% (B4(JIS) -> A3) 122% (A4 -> B4(JIS)) 141% (A4 -> A3), A5 -> A4) 150% 200 (A5 -> A3) 400% Custom (25 – 400%)
Duplexb 1->1 Sided

Darkness -5 -> +5 Original Type Text
Text/Photo Photo
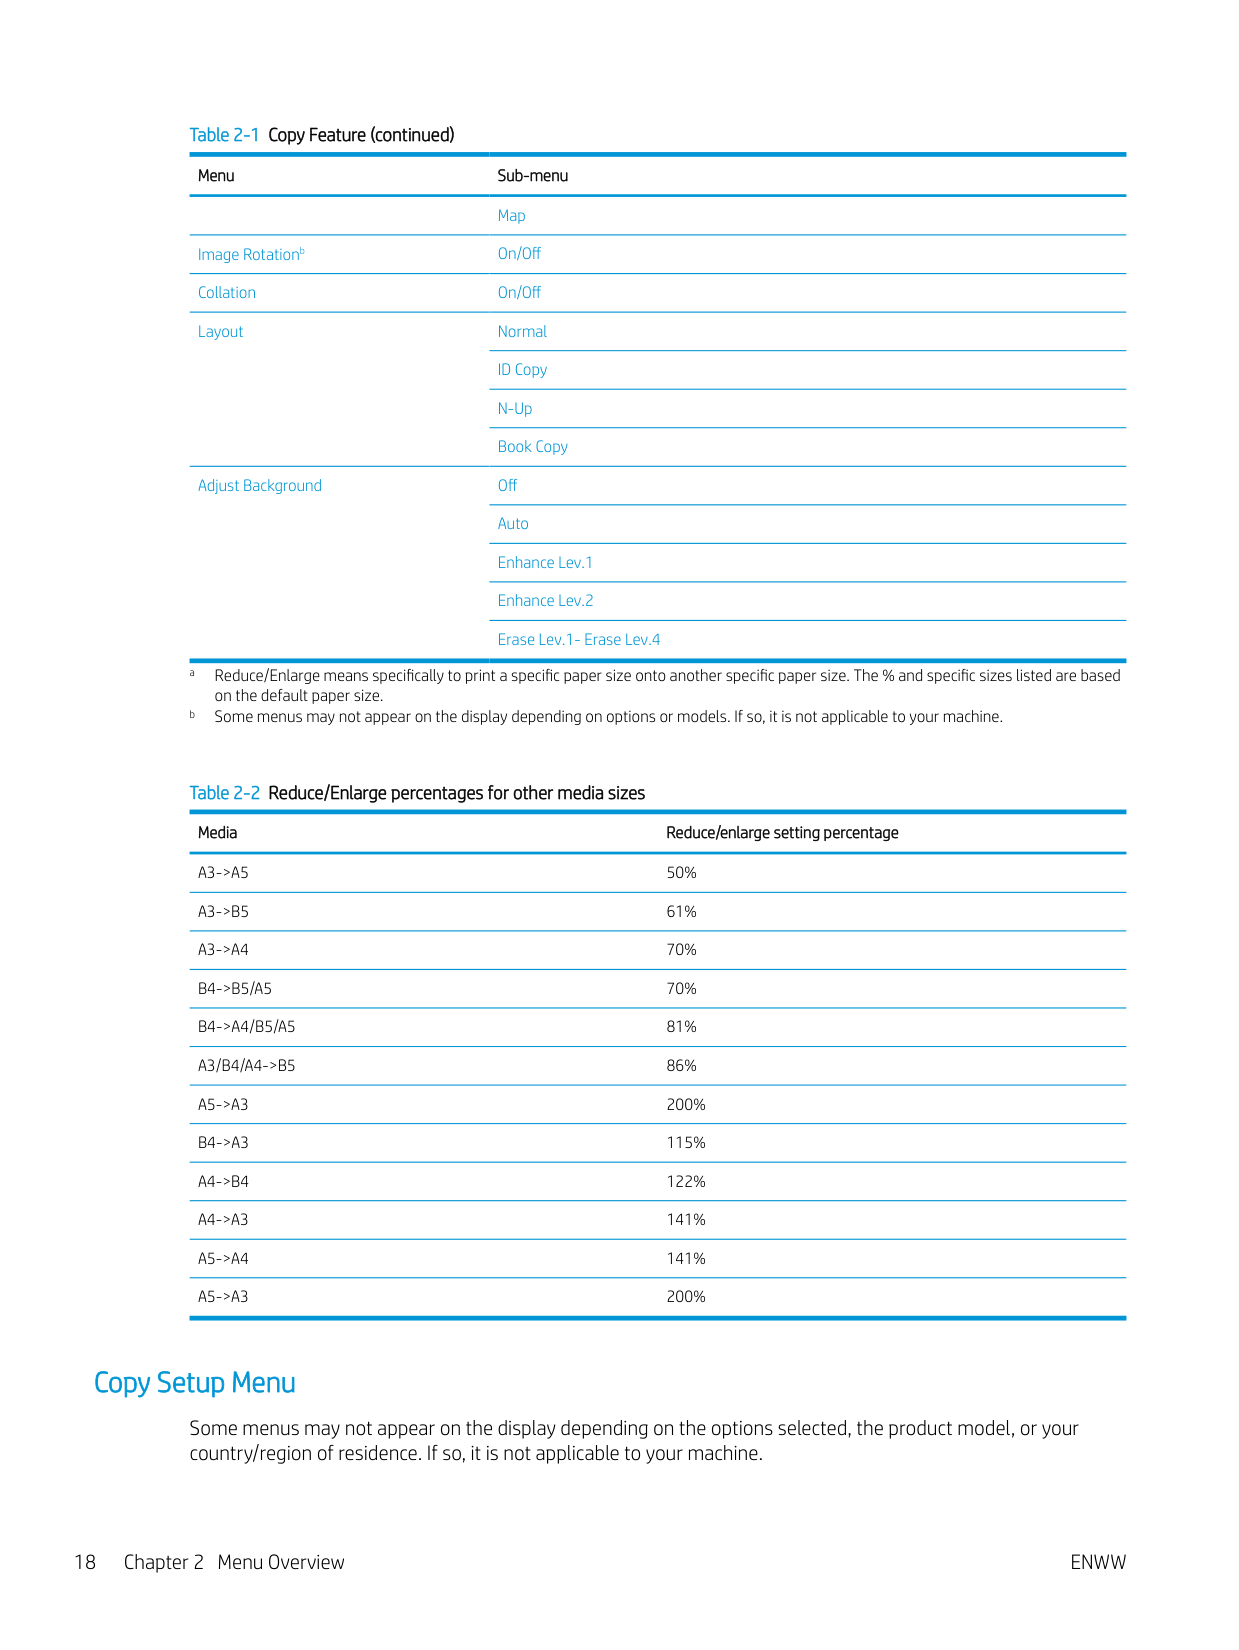
########### Table 2-1 Copy Feature (continued)Menu Sub-menu
Map
Image Rotationb On/Off Collation On/Off Layout Normal
ID Copy N-Up Book Copy
Adjust Background Off Auto

########### Table 2-2 Reduce/Enlarge percentages for other media sizesMedia Reduce/enlarge setting percentage
###### Copy Setup Menu
Some menus may not appear on the display depending on the options selected, the product model, or your country/region of residence. If so, it is not applicable to your machine.
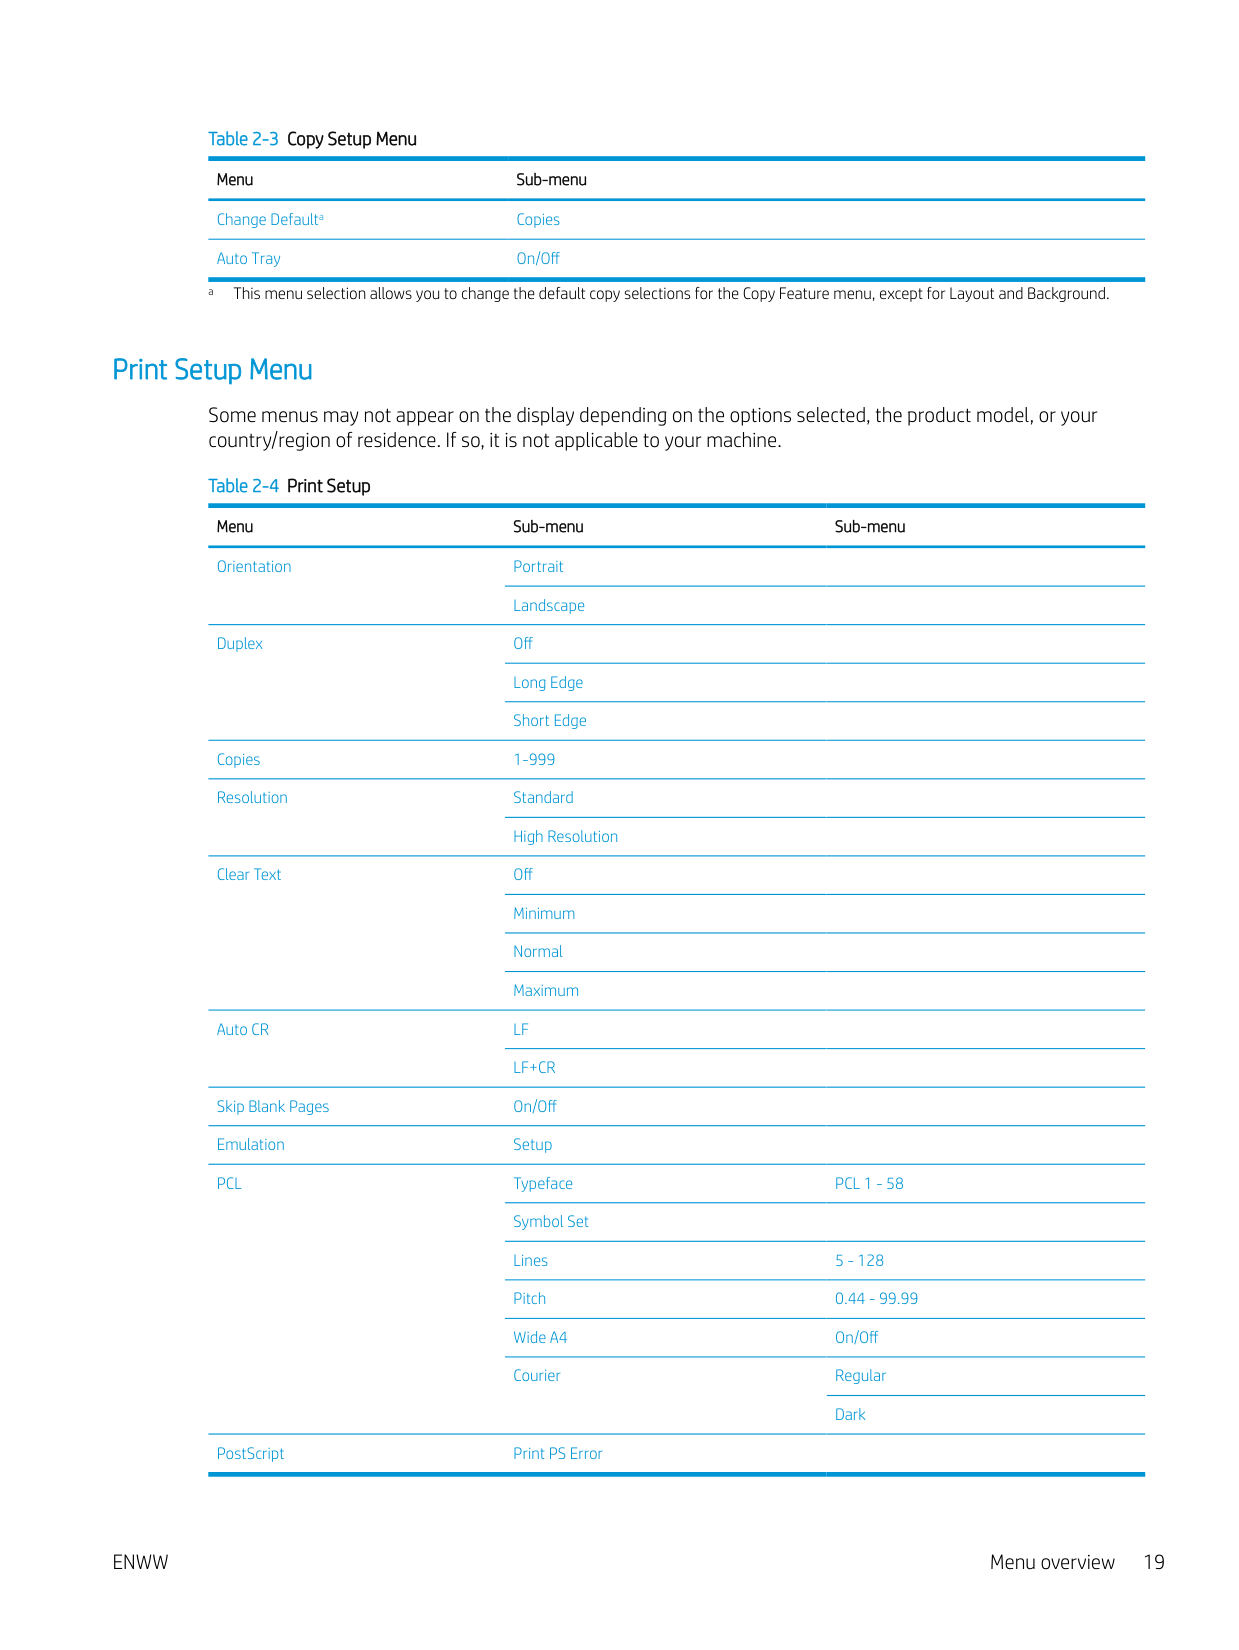
########### Table 2-3 Copy Setup Menu
############# Menu Sub-menu
Change Defaulta Copies Auto Tray On/Off
a This menu selection allows you to change the default copy selections for the Copy Feature menu, except for Layout and Background.
###### Print Setup Menu
Some menus may not appear on the display depending on the options selected, the product model, or your country/region of residence. If so, it is not applicable to your machine.
Table 2-4 Print Setup Menu Sub-menu Sub-menu Orientation Portrait
Landscape
Duplex Off Long Edge Short Edge
Copies 1-999 Resolution Standard
High Resolution
Clear Text Off Minimum Normal Maximum
Auto CR LF
LF+CR Skip Blank Pages On/Off Emulation Setup PCL Typeface PCL 1 - 58
Symbol Set Lines 5 - 128 Pitch 0.44 - 99.99 Wide A4 On/Off Courier Regular
Dark PostScript Print PS Error
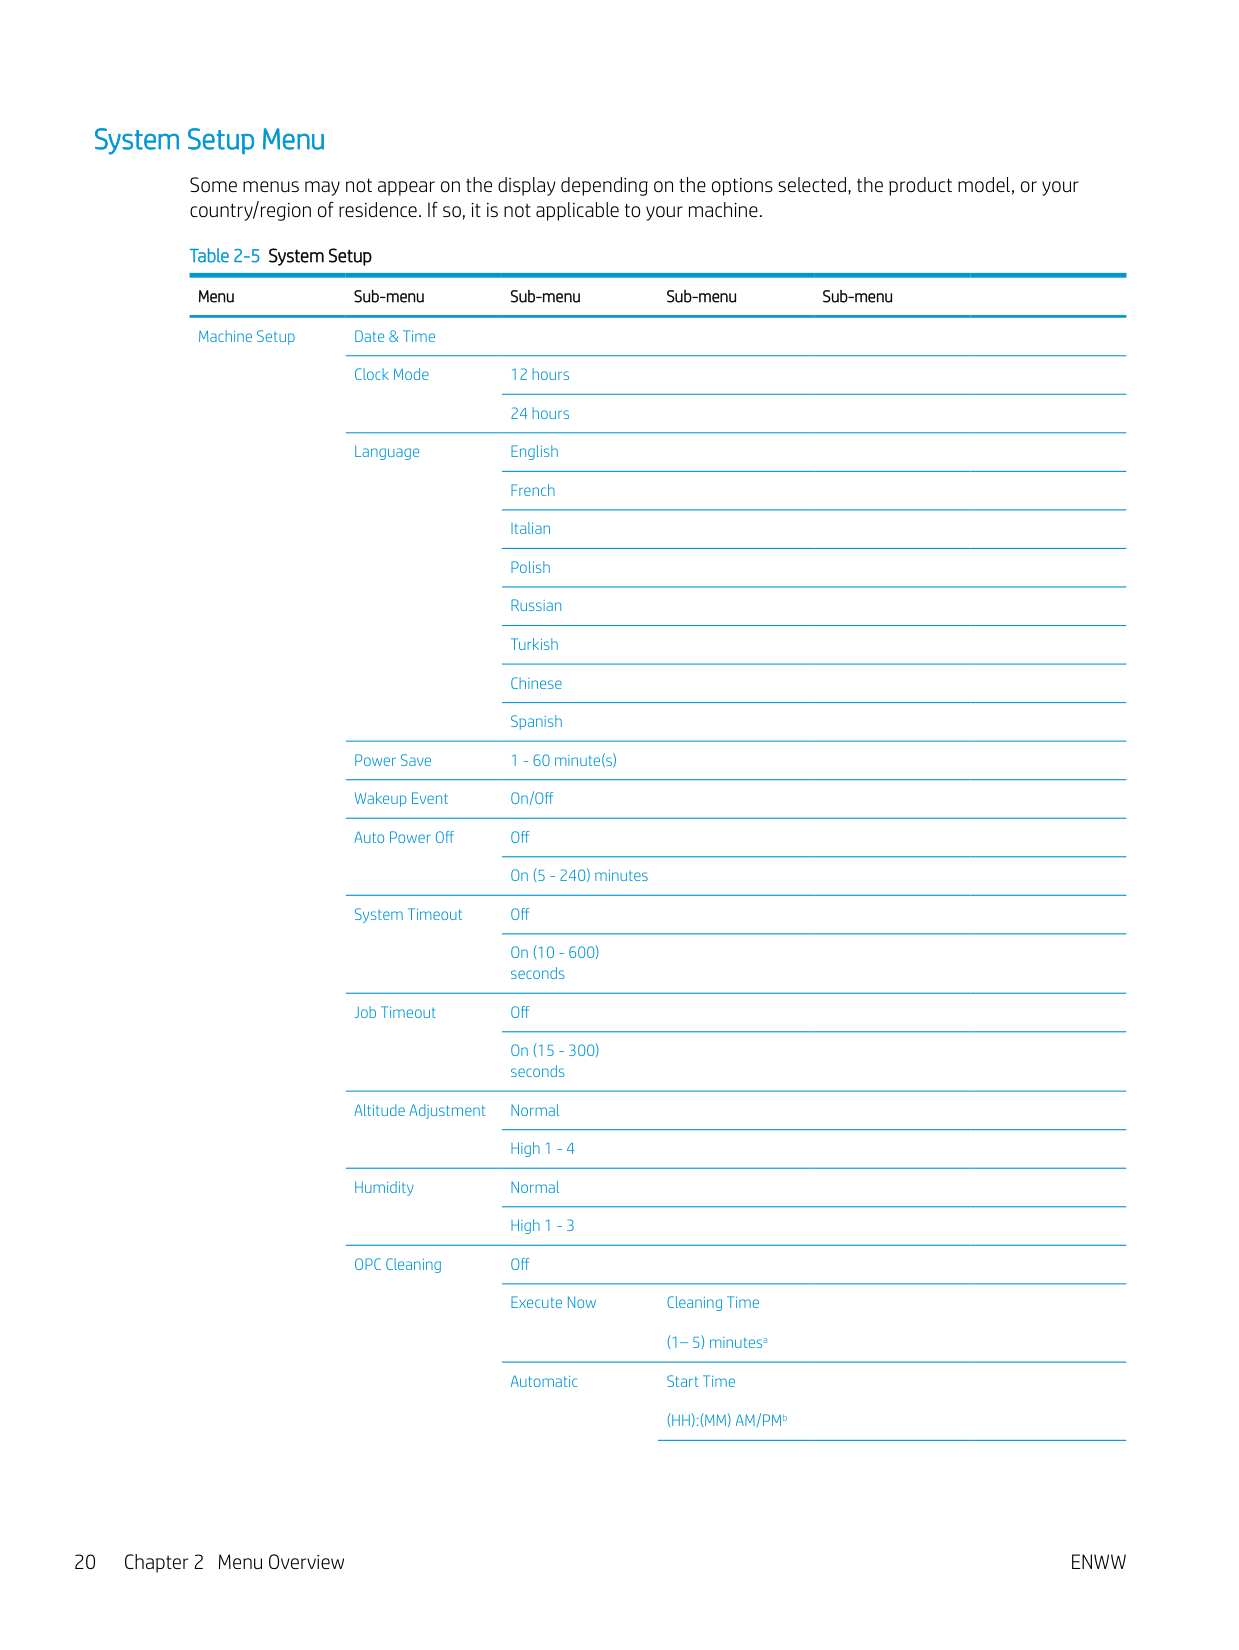
###### System Setup Menu
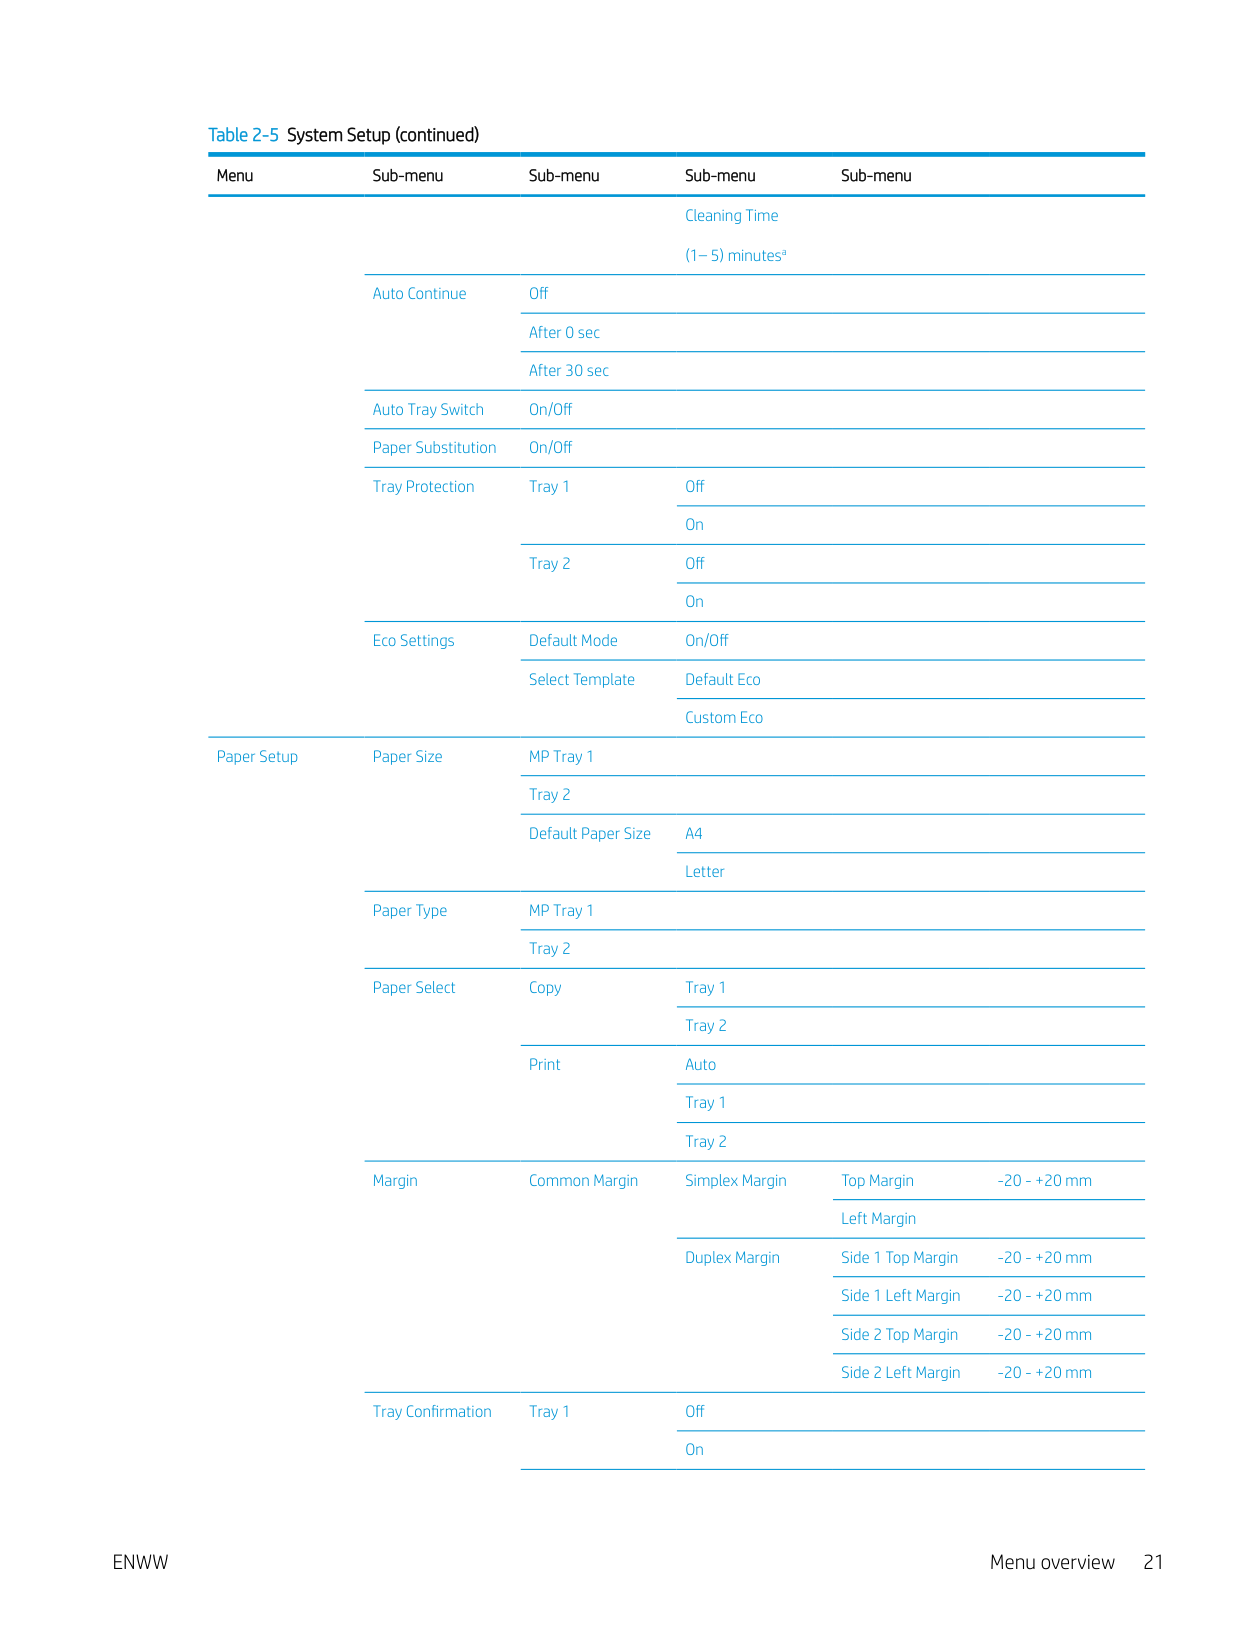
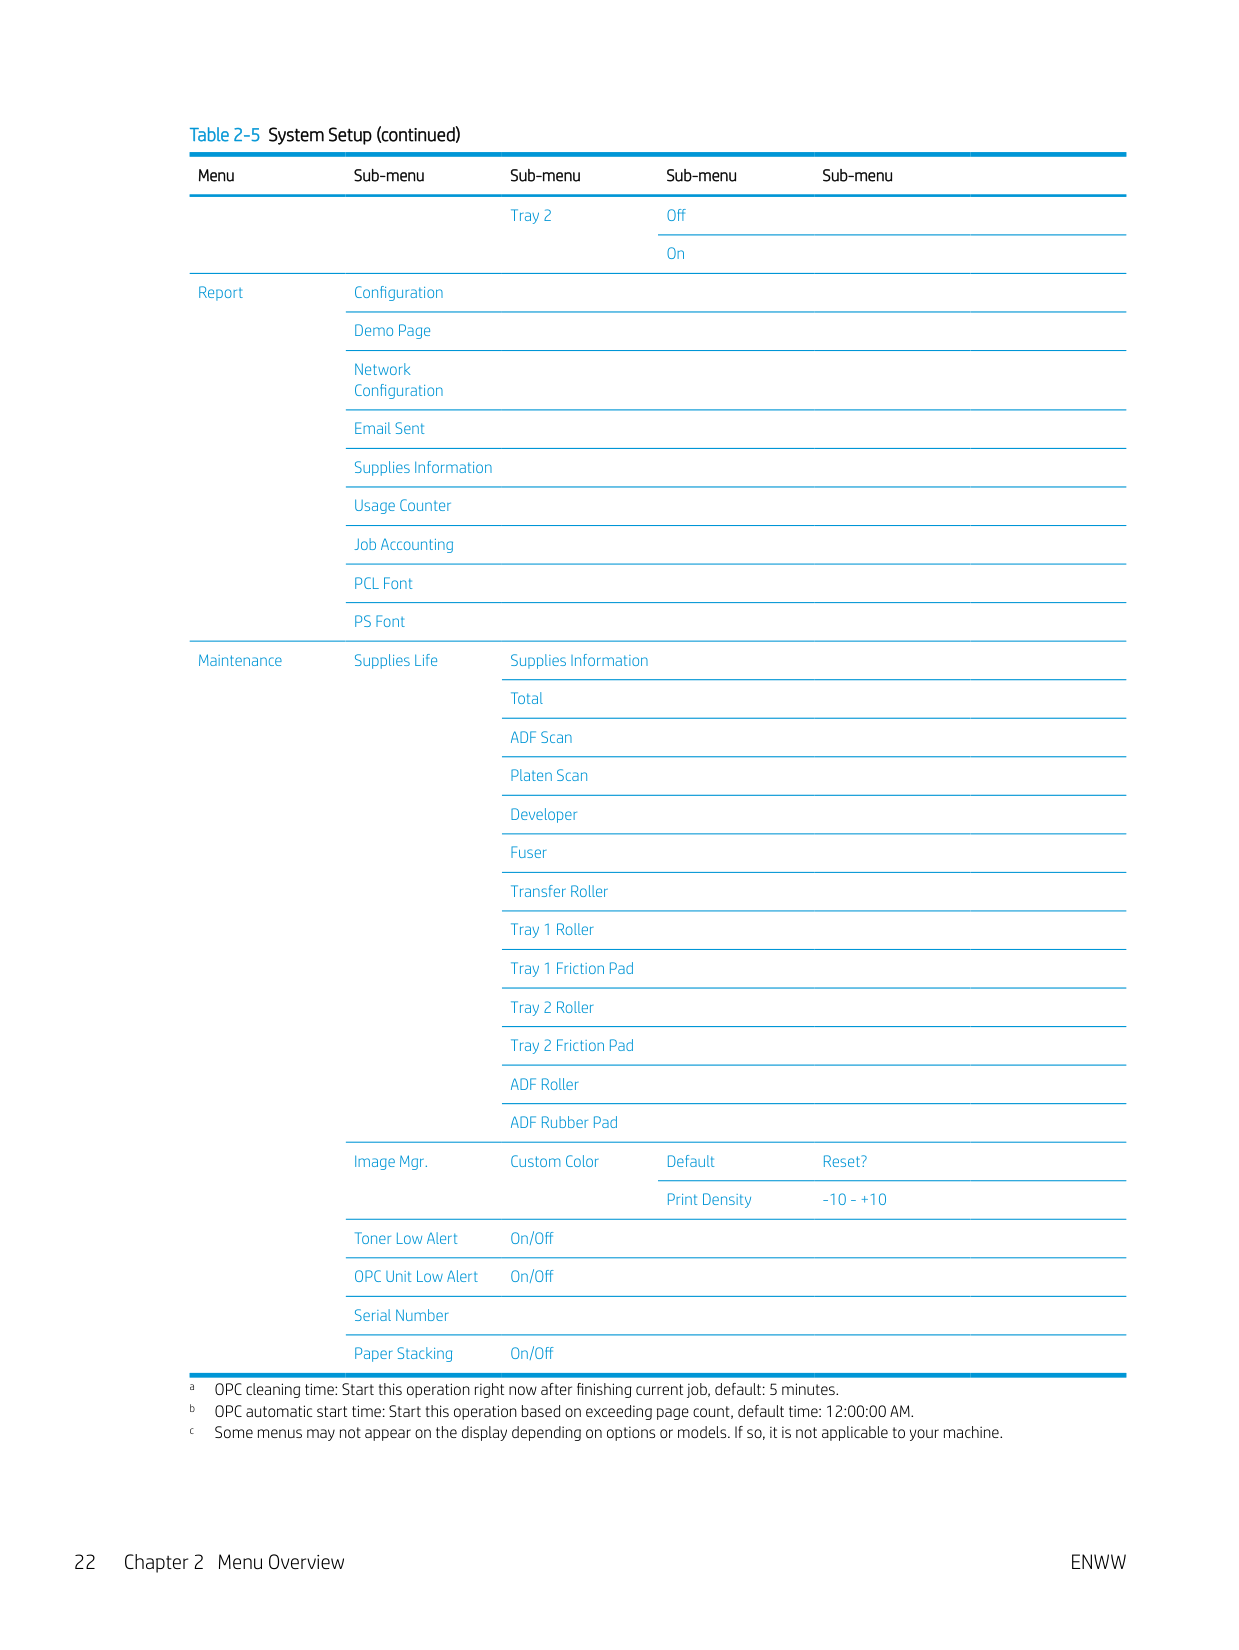
Some menus may not appear on the display depending on the options selected, the product model, or your country/region of residence. If so, it is not applicable to your machine.
Table 2-5 System Setup Menu Sub-menu Sub-menu Sub-menu Sub-menu Machine Setup Date & Time
Clock Mode 12 hours 24 hours
Language English French Italian Polish Russian Turkish Chinese Spanish
Power Save 1 - 60 minute(s) Wakeup Event On/Off Auto Power Off Off
On (5 - 240) minutes System Timeout Off
On (10 - 600) seconds
Job Timeout Off
On (15 - 300) seconds
Altitude Adjustment Normal
High 1 - 4 Humidity Normal
High 1 - 3 OPC Cleaning Off
Execute Now Cleaning Time
(1– 5) minutesa Automatic Start Time
(HH):(MM) AM/PMb
Cleaning Time (1– 5) minutesa
Auto Continue Off After 0 sec After 30 sec
Auto Tray Switch On/Off Paper Substitution On/Off Tray Protection Tray 1 Off
On Tray 2 Off On
Eco Settings Default Mode On/Off
Select Template Default Eco Custom Eco
Paper Setup Paper Size MP Tray 1 Tray 2 Default Paper Size A4
Letter Paper Type MP Tray 1
Tray 2 Paper Select Copy Tray 1
Tray 2 Print Auto
Margin Common Margin Simplex Margin Top Margin -20 - +20 mm Left Margin Duplex Margin Side 1 Top Margin -20 - +20 mm
Tray Confirmation Tray 1 Off On
Tray 2 Off On
Report Configuration Demo Page Network Configuration Email Sent Supplies Information Usage Counter Job Accounting PCL Font PS Font
Maintenance Supplies Life Supplies Information Total ADF Scan Platen Scan Developer Fuser Transfer Roller
Image Mgr. Custom Color Default Reset? Print Density -10 - +10
Toner Low Alert On/Off OPC Unit Low Alert On/Off Serial Number Paper Stacking On/Off
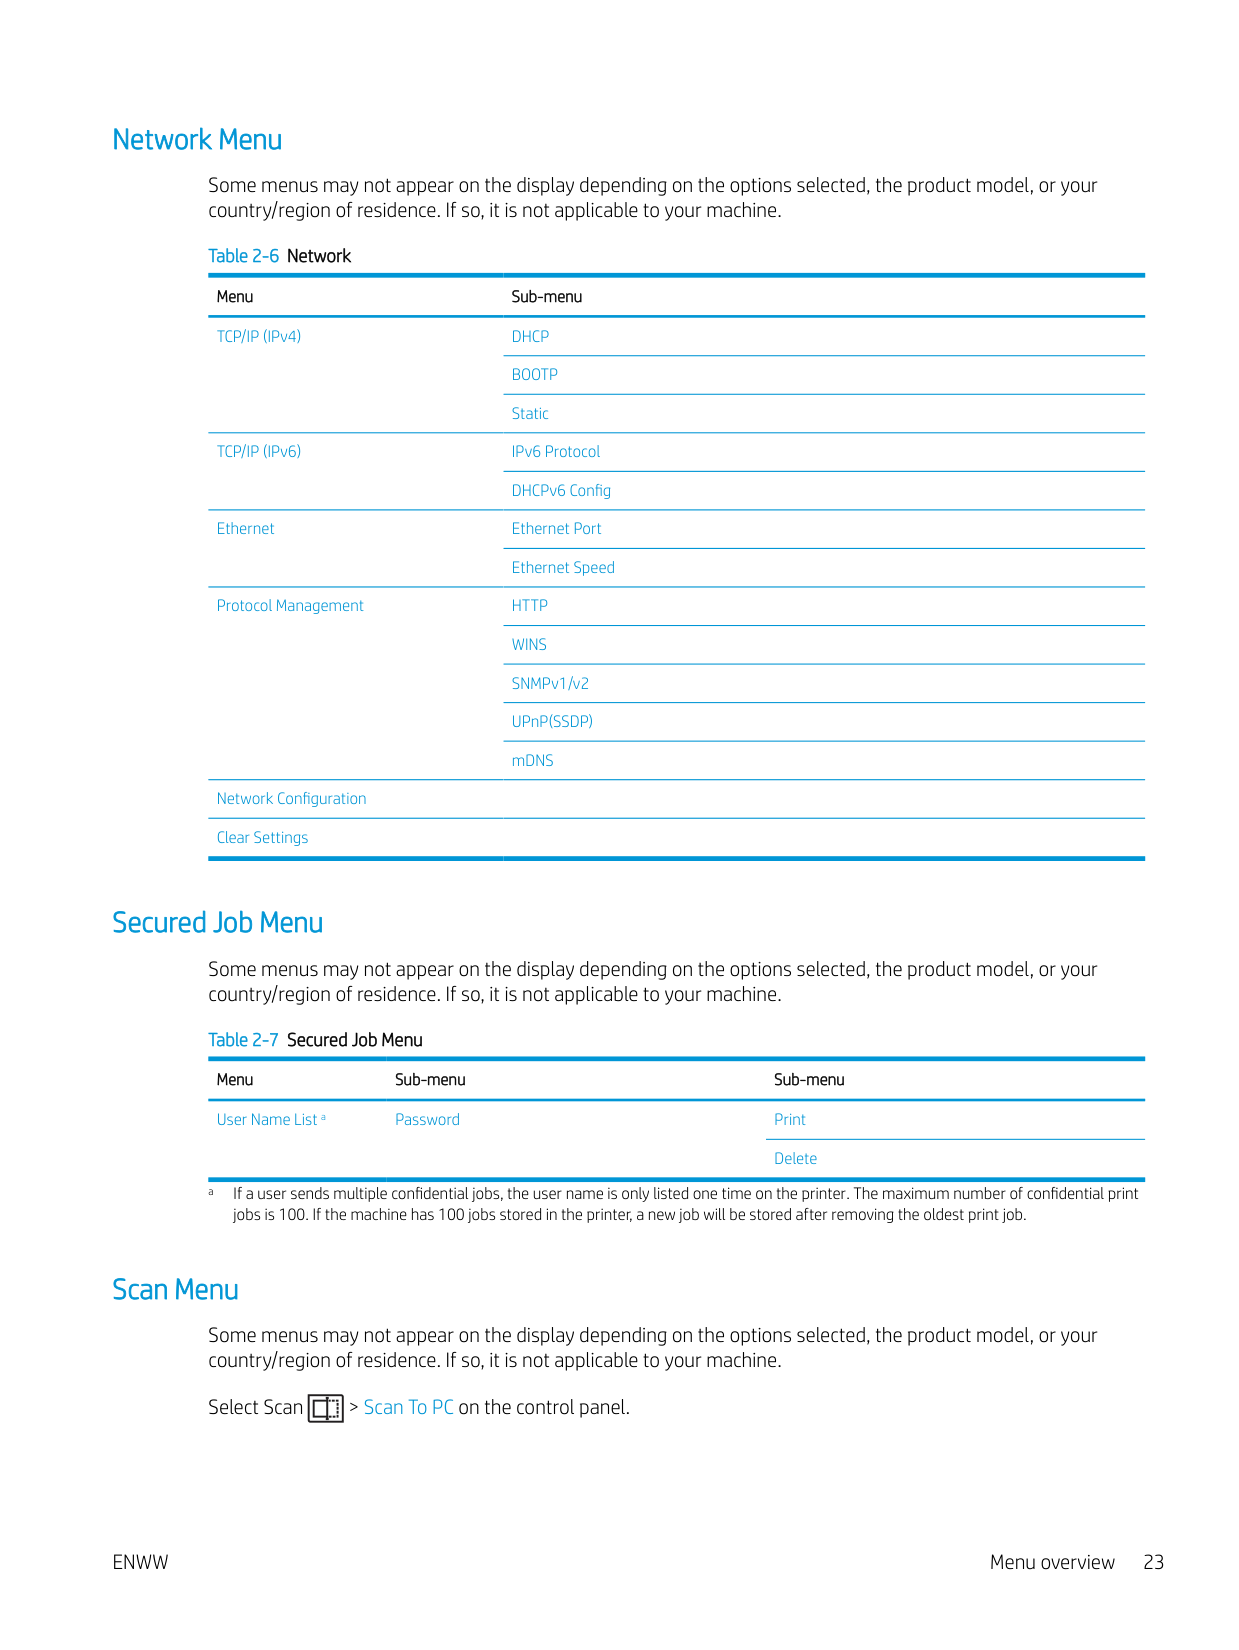
###### Network Menu
Some menus may not appear on the display depending on the options selected, the product model, or your country/region of residence. If so, it is not applicable to your machine.
Table 2-6 Network Menu Sub-menu TCP/IP (IPv4) DHCP
BOOTP Static
TCP/IP (IPv6) IPv6 Protocol
DHCPv6 Config Ethernet Ethernet Port
Ethernet Speed
Protocol Management HTTP WINS SNMPv1/v2 UPnP(SSDP) mDNS
Network Configuration Clear Settings
###### Secured Job Menu
Some menus may not appear on the display depending on the options selected, the product model, or your country/region of residence. If so, it is not applicable to your machine.
Table 2-7 Secured Job Menu Menu Sub-menu Sub-menu User Name List a Password Print
Delete a If a user sends multiple confidential jobs, the user name is only listed one time on the printer. The maximum number of confidential print jobs is 100. If the machine has 100 jobs stored in the printer, a new job will be stored after removing the oldest print job.
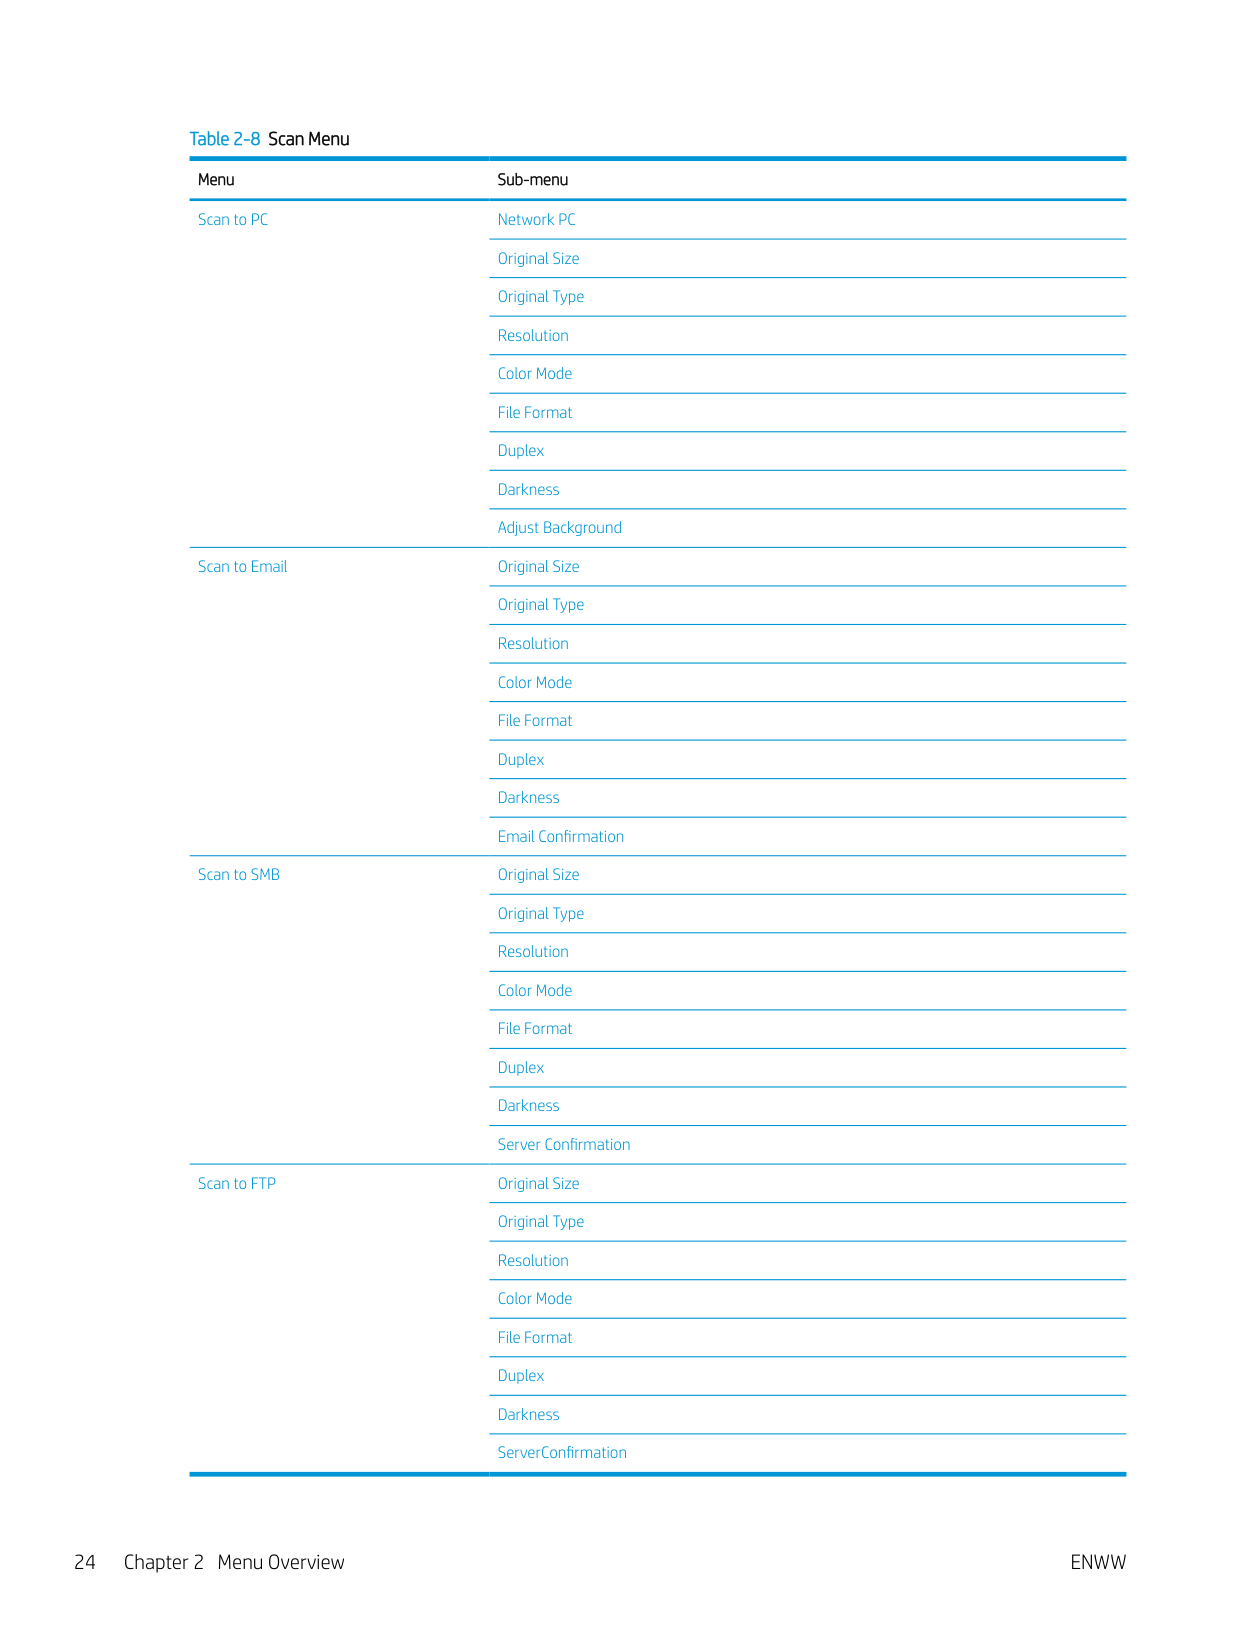
###### Scan Menu
Some menus may not appear on the display depending on the options selected, the product model, or your country/region of residence. If so, it is not applicable to your machine.
Select Scan > Scan To PC on the control panel.
########### Table 2-8 Scan Menu Menu Sub-menu Scan to PC Network PC
Original Size Original Type Resolution Color Mode File Format Duplex Darkness Adjust Background
Scan to Email Original Size Original Type Resolution Color Mode File Format Duplex Darkness Email Confirmation
Scan to SMB Original Size Original Type Resolution Color Mode File Format Duplex Darkness Server Confirmation
Scan to FTP Original Size Original Type Resolution Color Mode File Format Duplex Darkness ServerConfirmation
3 Media and Tray
This chapter provides information on how to load print media into your machine.
ENWW 25
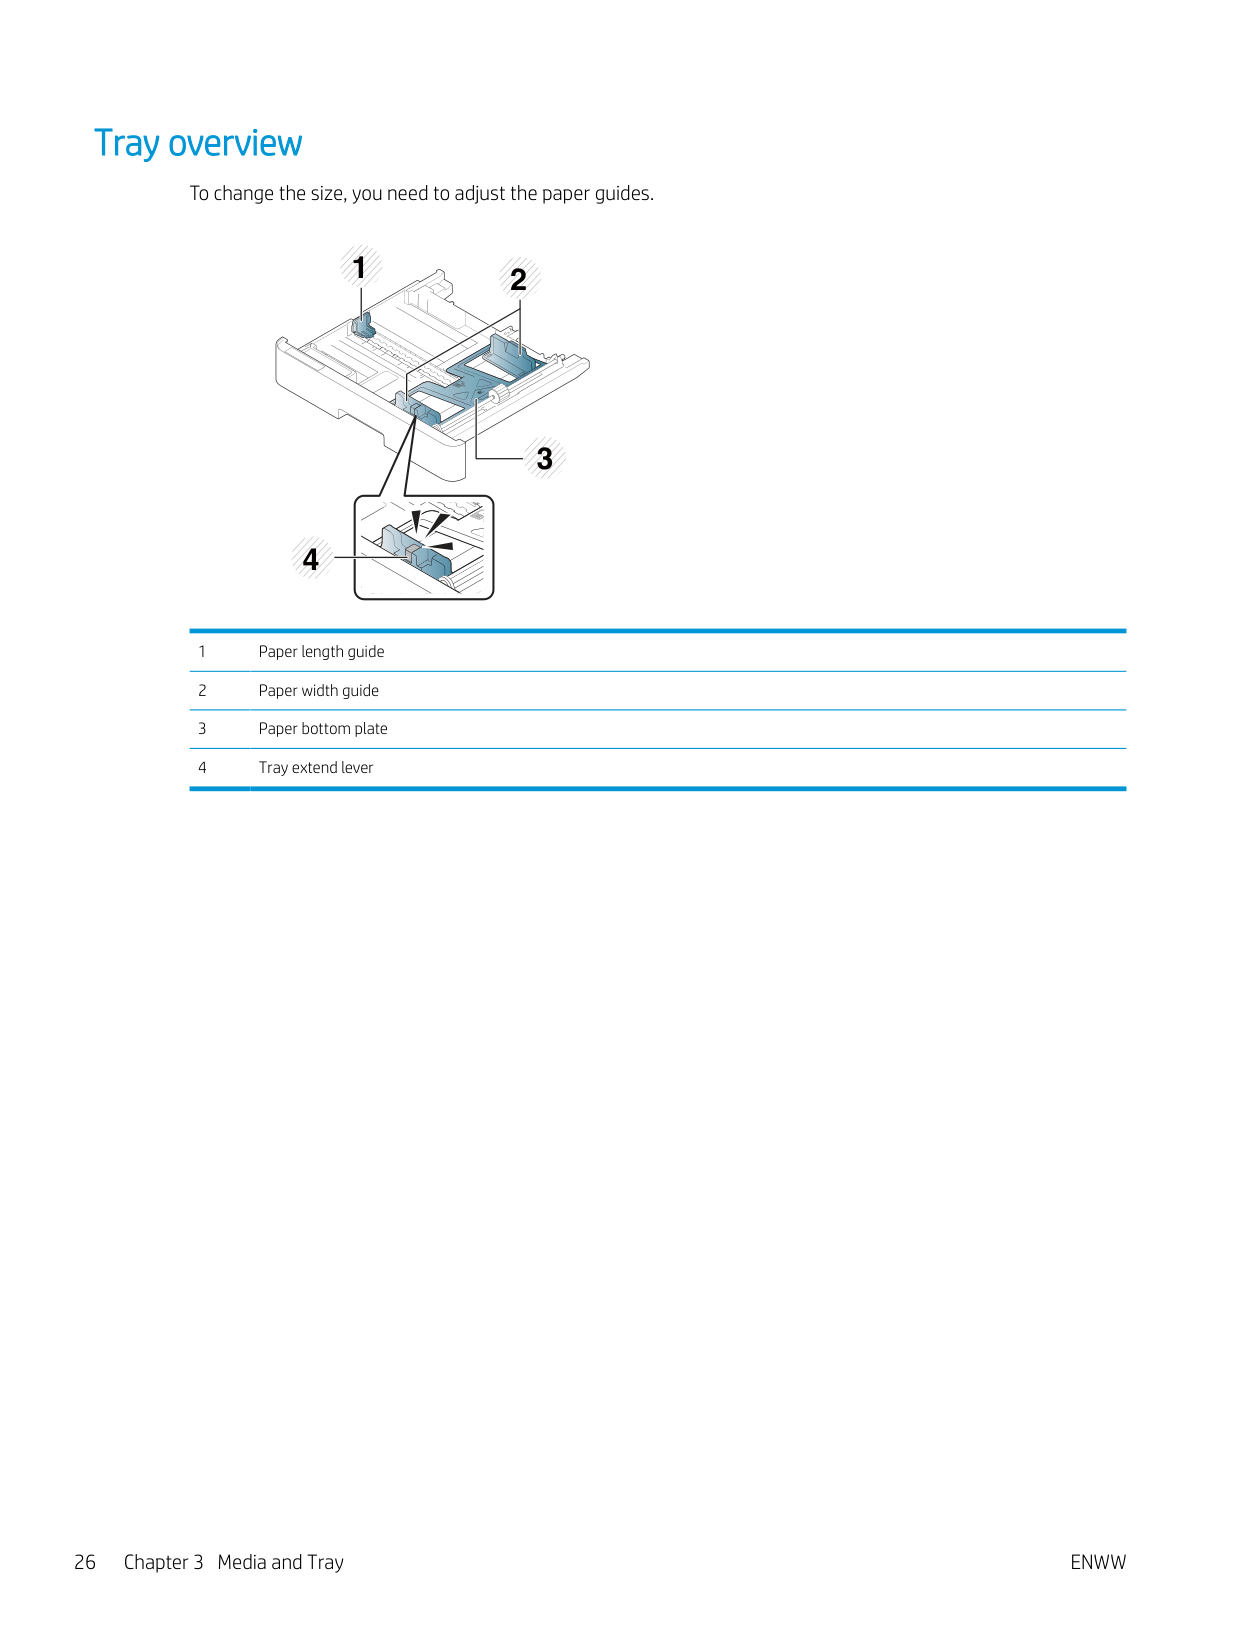
#### Tray overview
To change the size, you need to adjust the paper guides.
1 2


3

4
#### Loading paper in the tray
###### Introduction
The following topics describe how to prepare and load paper in Tray 2, optional Tray 3, and Multi-purpose Tray 1.
###### Preparing paper
– Low printing quality, paper jams, excessive wear on the machine.
This may occur due to mishandling of the print media, unsuitable temperature or humidity, or other uncontrollable factors.
WARNING! The use of inflammable media or foreign materials left in the printer may lead to overheating of the unit and, in rare cases may cause a fire.
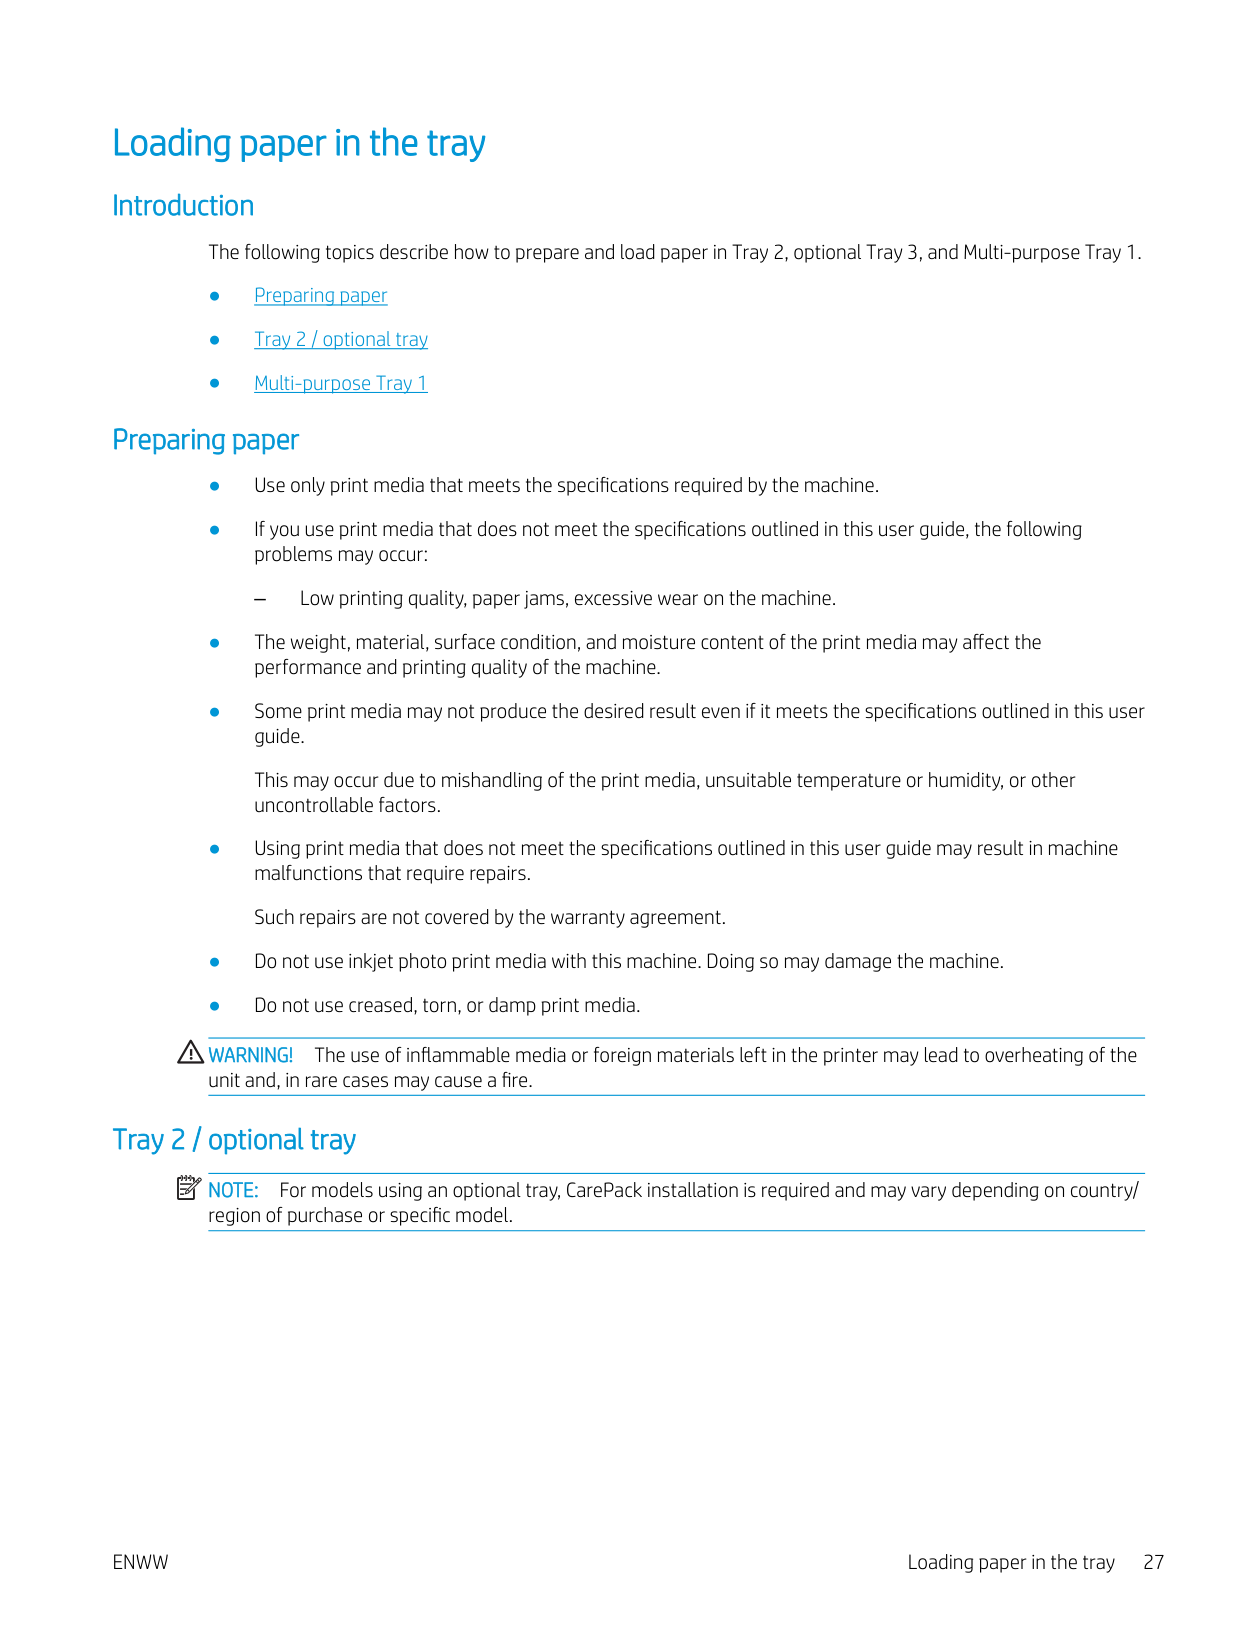
###### Tray 2 / optional tray
| | |---|
NOTE: For models using an optional tray, CarePack installation is required and may vary depending on country/ region of purchase or specific model.
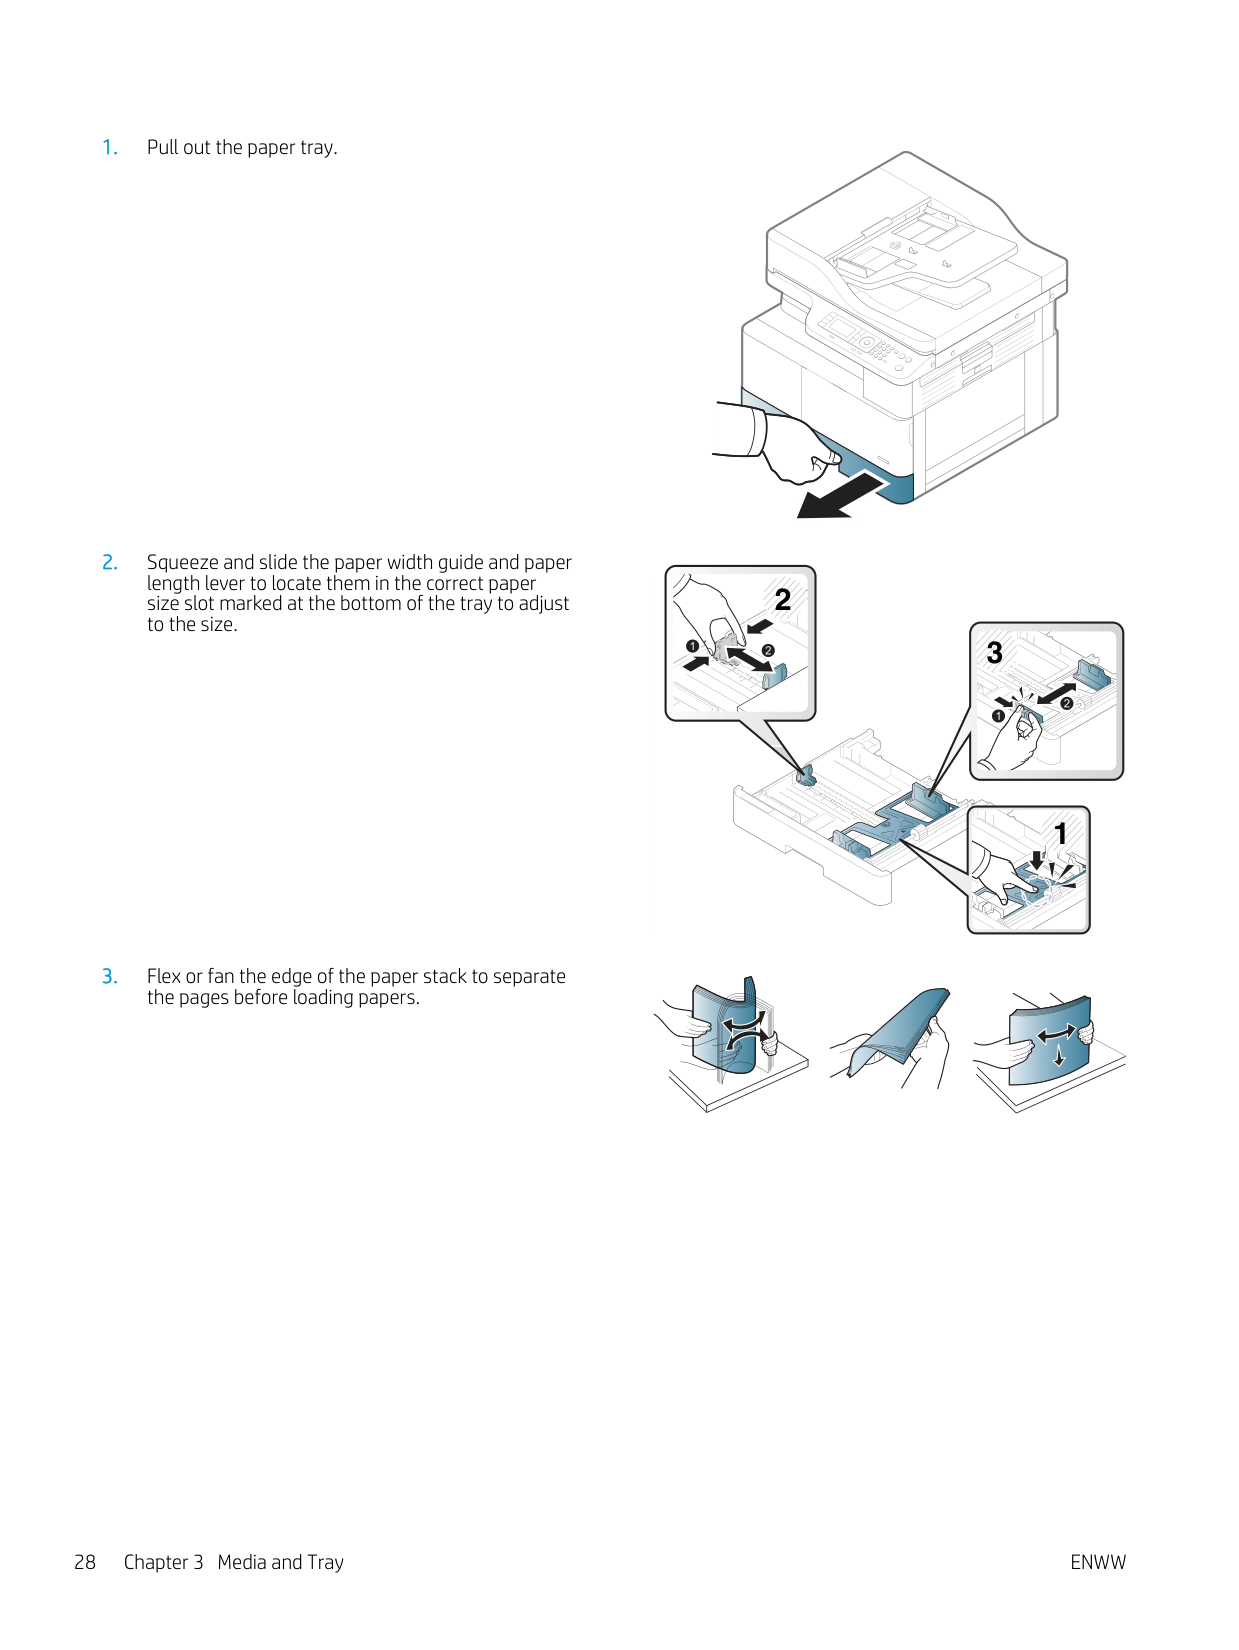
########## 1. Pull out the paper tray.
########## 2. Squeeze and slide the paper width guide and paperlength lever to locate them in the correct papersize slot marked at the bottom of the tray to adjustto the size.
########## 3. Flex or fan the edge of the paper stack to separatethe pages before loading papers.


2

3


1


3 2

| | | |---|---| | | |


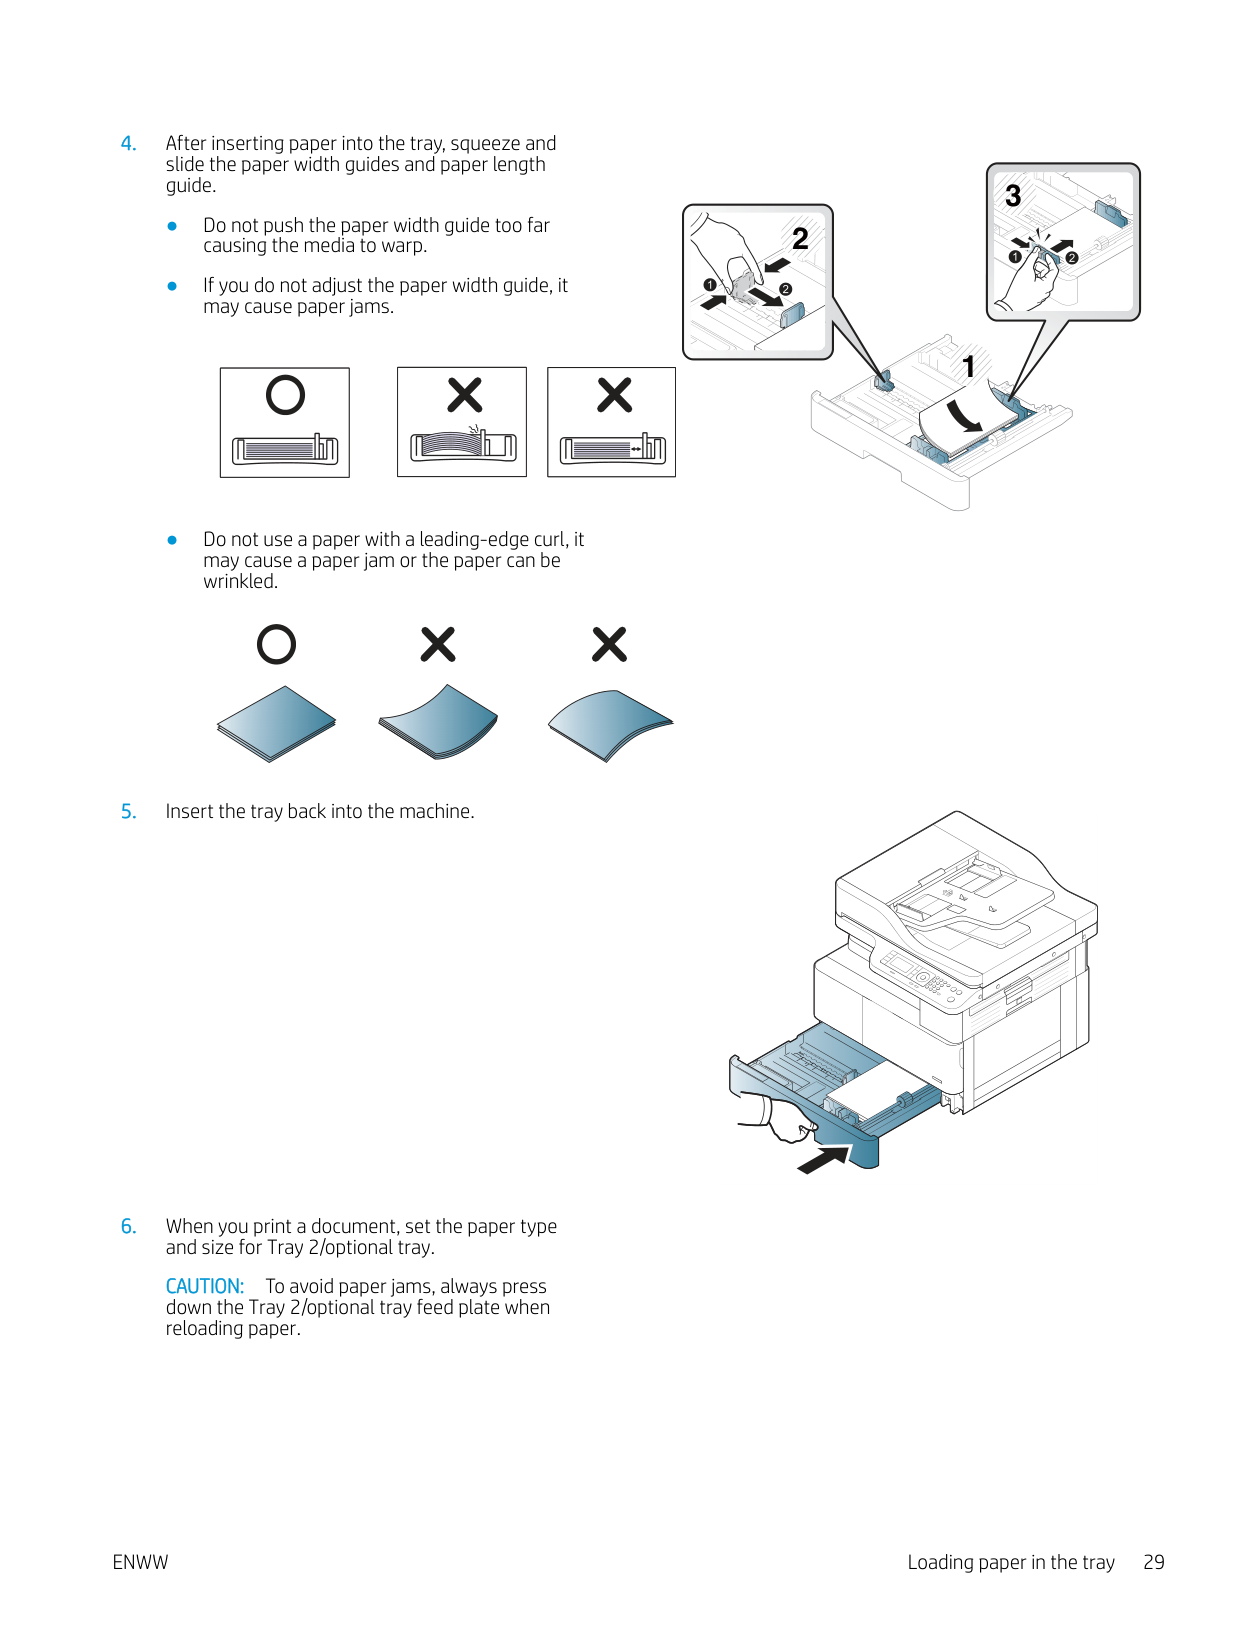
1
CAUTION: To avoid paper jams, always press down the Tray 2/optional tray feed plate when reloading paper.
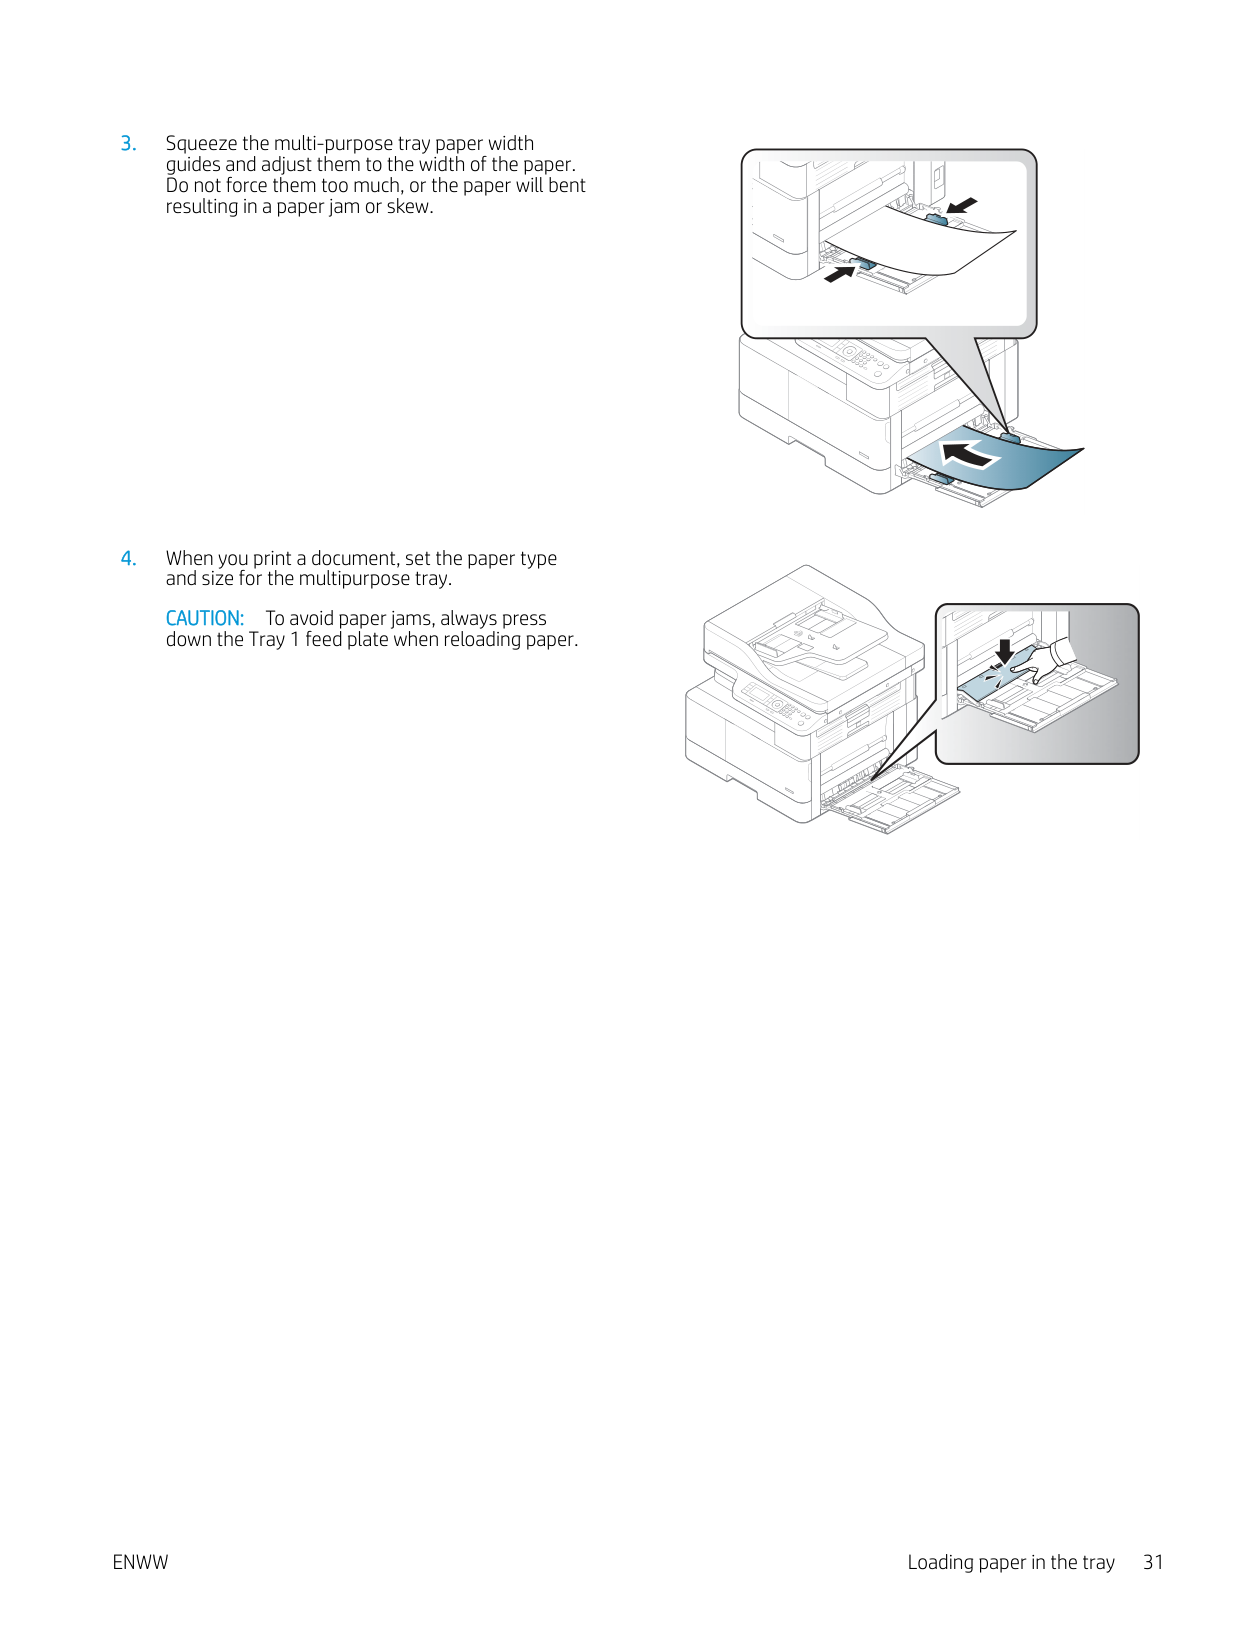
###### Multi-purpose Tray 1
The multi-purpose tray can hold special sizes and types of print material, such as postcards and note cards.

CAUTION: To avoid paper jams, always press down the Tray 1 feed plate when reloading paper.

Printing on special media The paper setting in the machine and driver should match to print without a paper mismatch error. Or if your machine supports a display screen, you can set it using the Menu button on the control panel. Then, set the paper type from the Printing preferences window > Paper tab > Paper Type. NOTE:
| | |---|
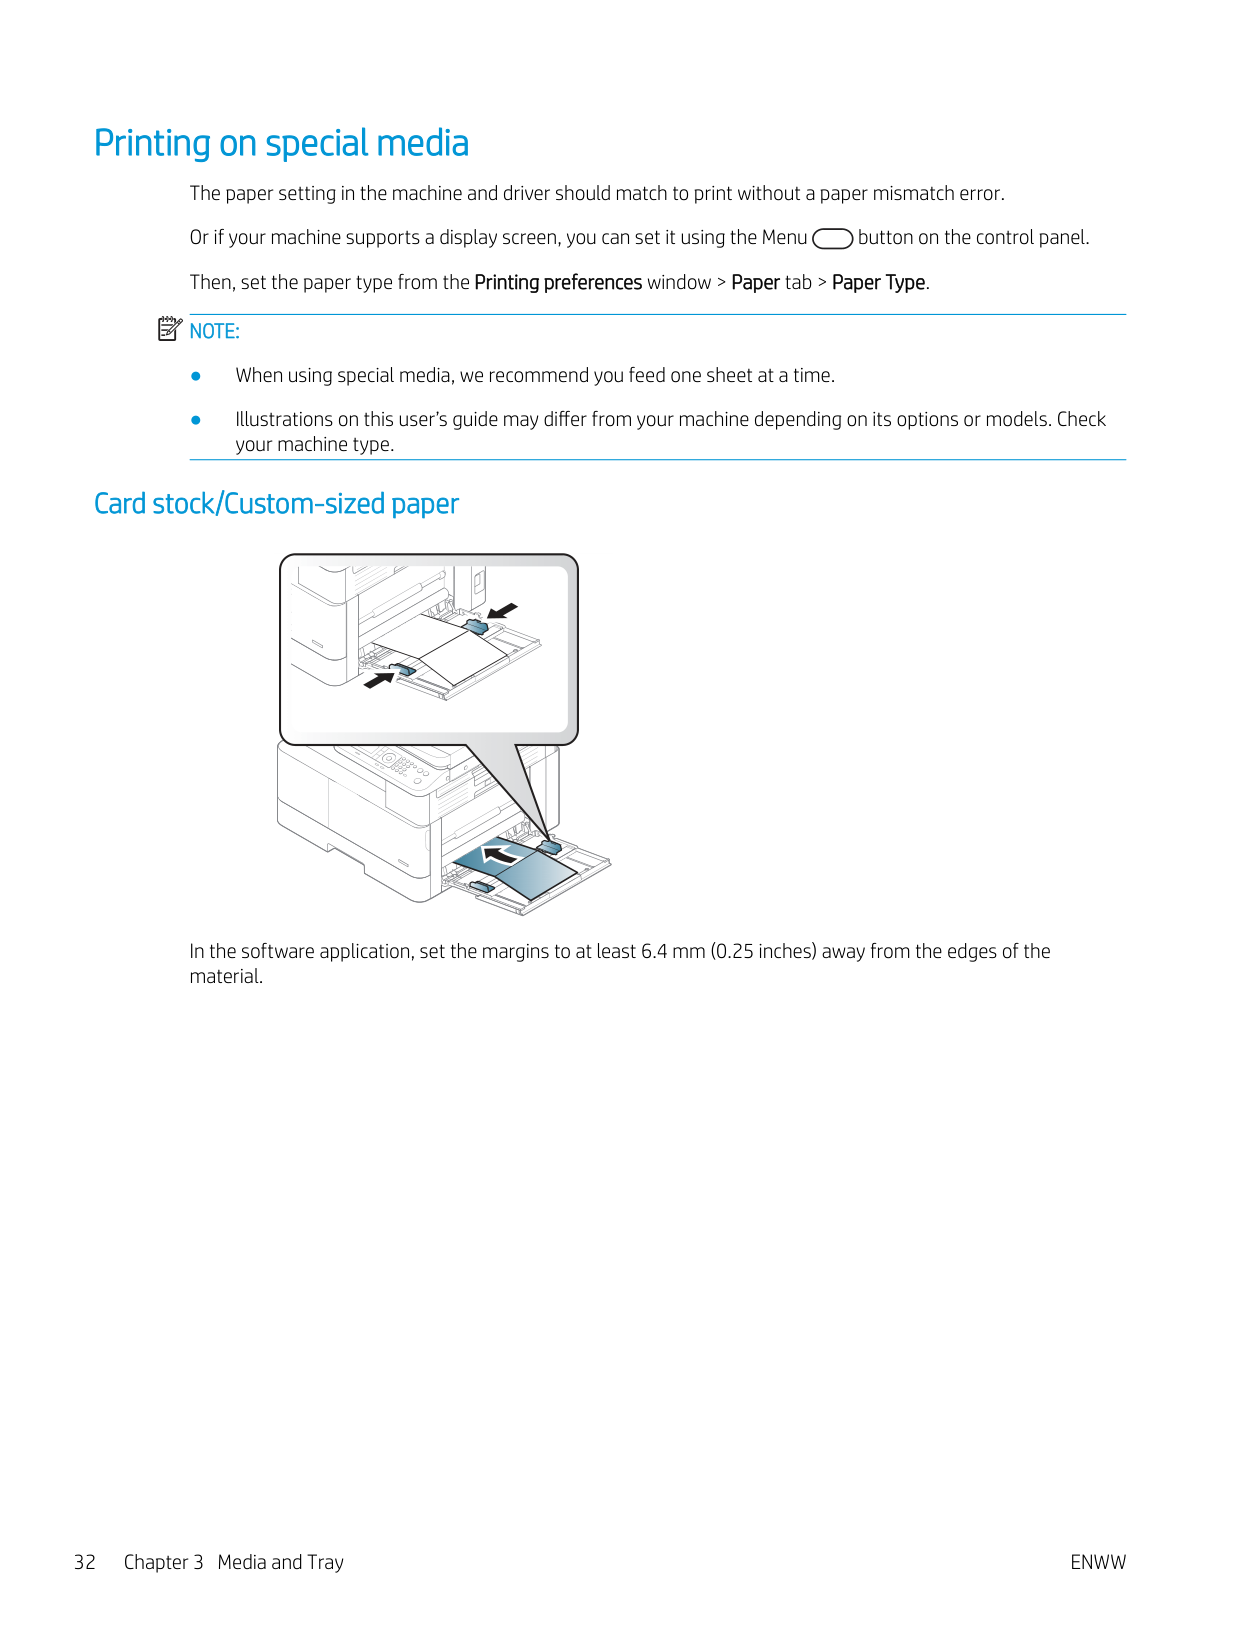
###### Card stock/Custom-sized paper
In the software application, set the margins to at least 6.4 mm (0.25 inches) away from the edges of the material.
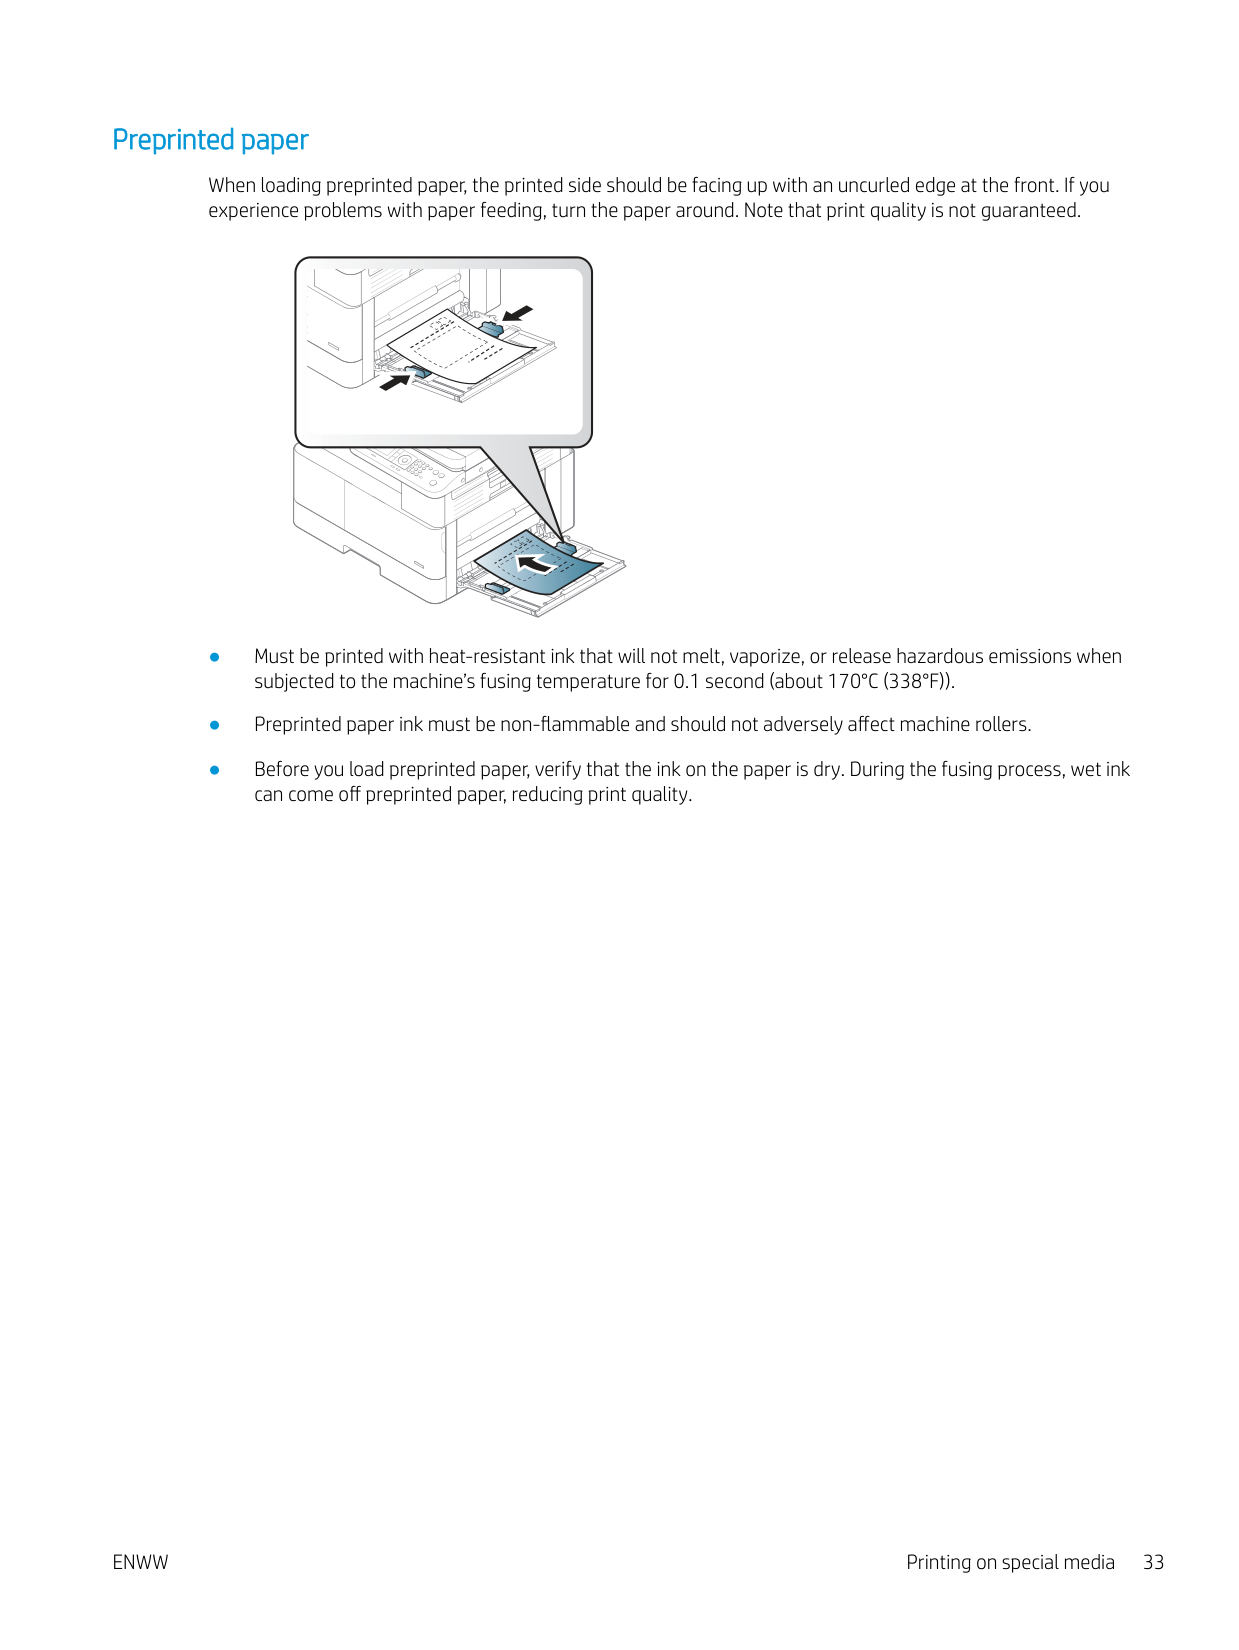
###### Preprinted paper
When loading preprinted paper, the printed side should be facing up with an uncurled edge at the front. If you experience problems with paper feeding, turn the paper around. Note that print quality is not guaranteed.
ENWW Printing on special media 33
Setting the paper size and type The paper setting in the machine and driver should match to print without a paper mismatch error. From the print driver or application, set the paper type from the Print Options window > Properties > Paper tab > Type. NOTE: It may be necessary to press OK to navigate to lower-level menus for some models. After loading paper in the paper tray, set the paper size and type using the control panel buttons.
| | |---|
| | |---|
NOTE: If you want to use special-sized paper such as billing paper, select the Paper tab > Size > Edit... and set Custom Paper Size Settings in the Printing Preferences.
#### Loading the original
###### Introduction
The following topics describe how to prepare originals for copying and how to load originals on the scanner glass or in the document feeder.
###### Preparing originals
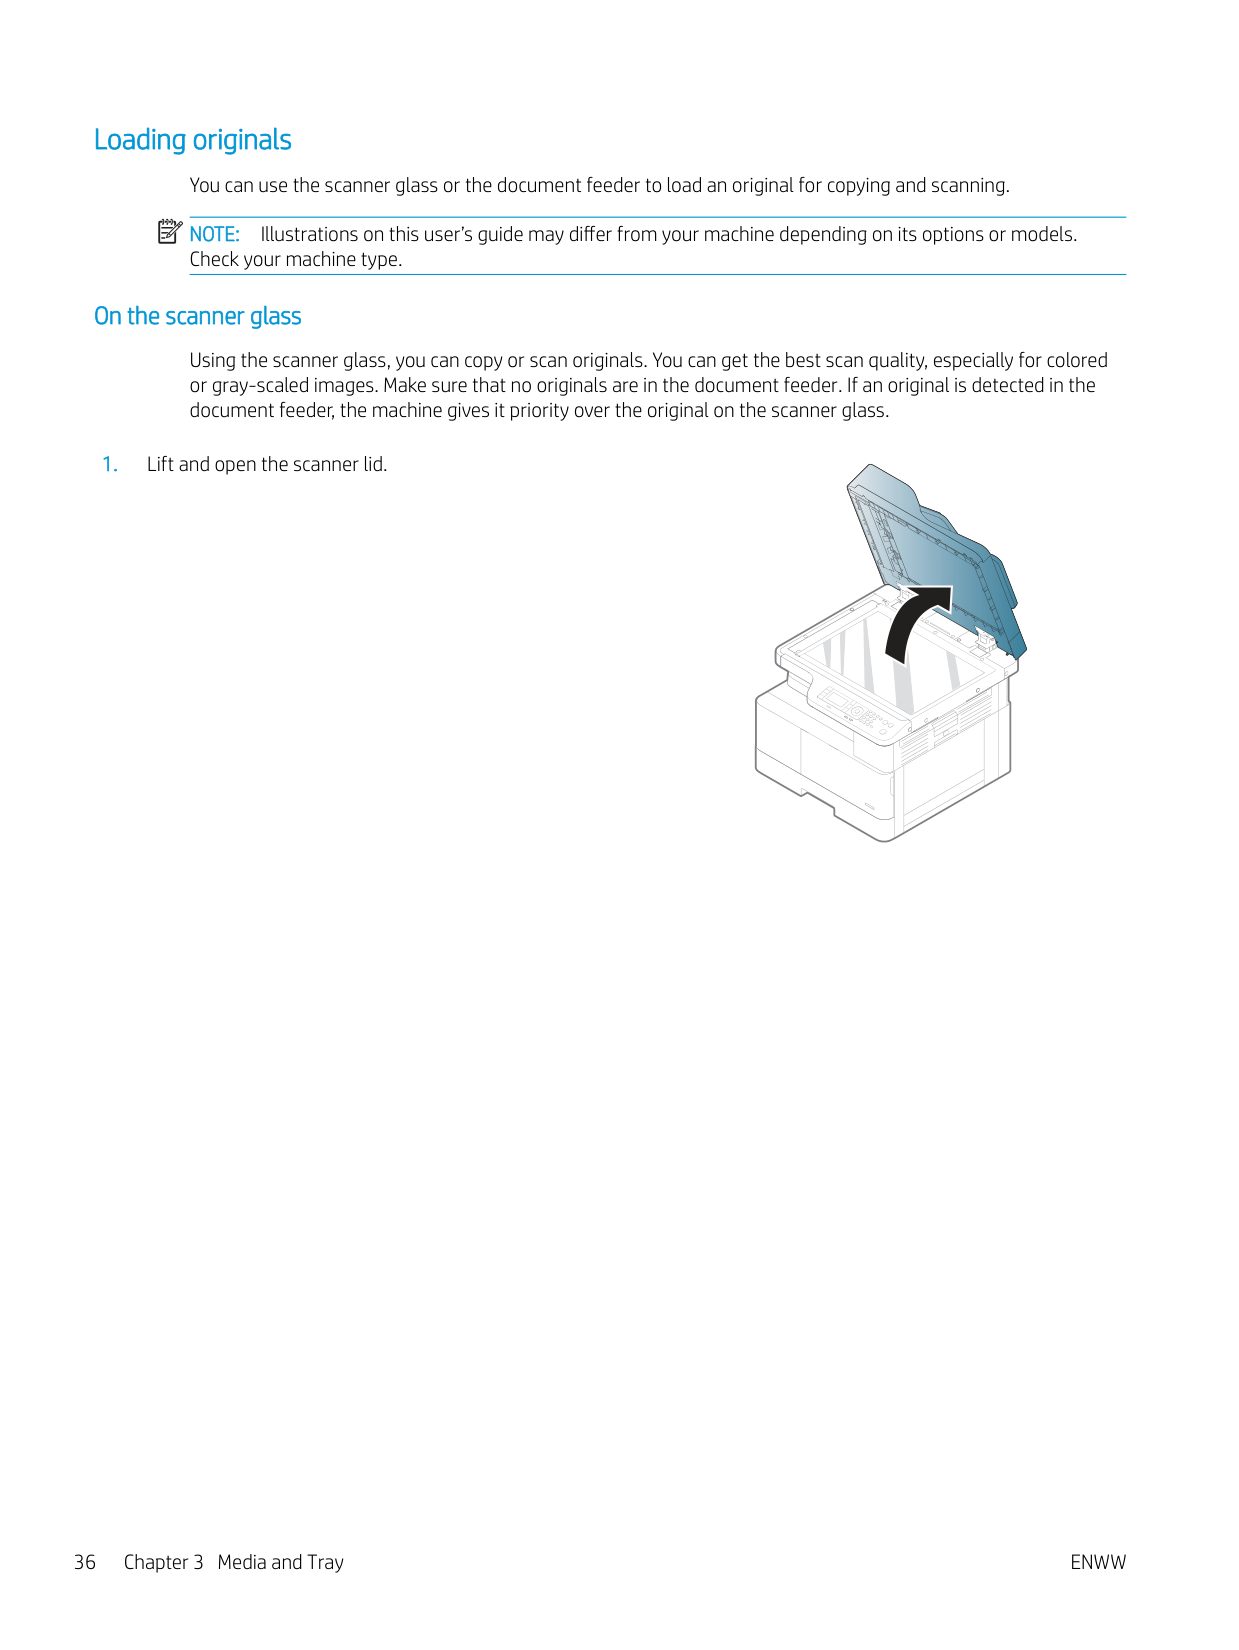
Loading originals You can use the scanner glass or the document feeder to load an original for copying and scanning. NOTE: Illustrations on this user’s guide may differ from your machine depending on its options or models. Check your machine type.
| | |---|
####### On the scanner glass
Using the scanner glass, you can copy or scan originals. You can get the best scan quality, especially for colored or gray-scaled images. Make sure that no originals are in the document feeder. If an original is detected in the document feeder, the machine gives it priority over the original on the scanner glass.
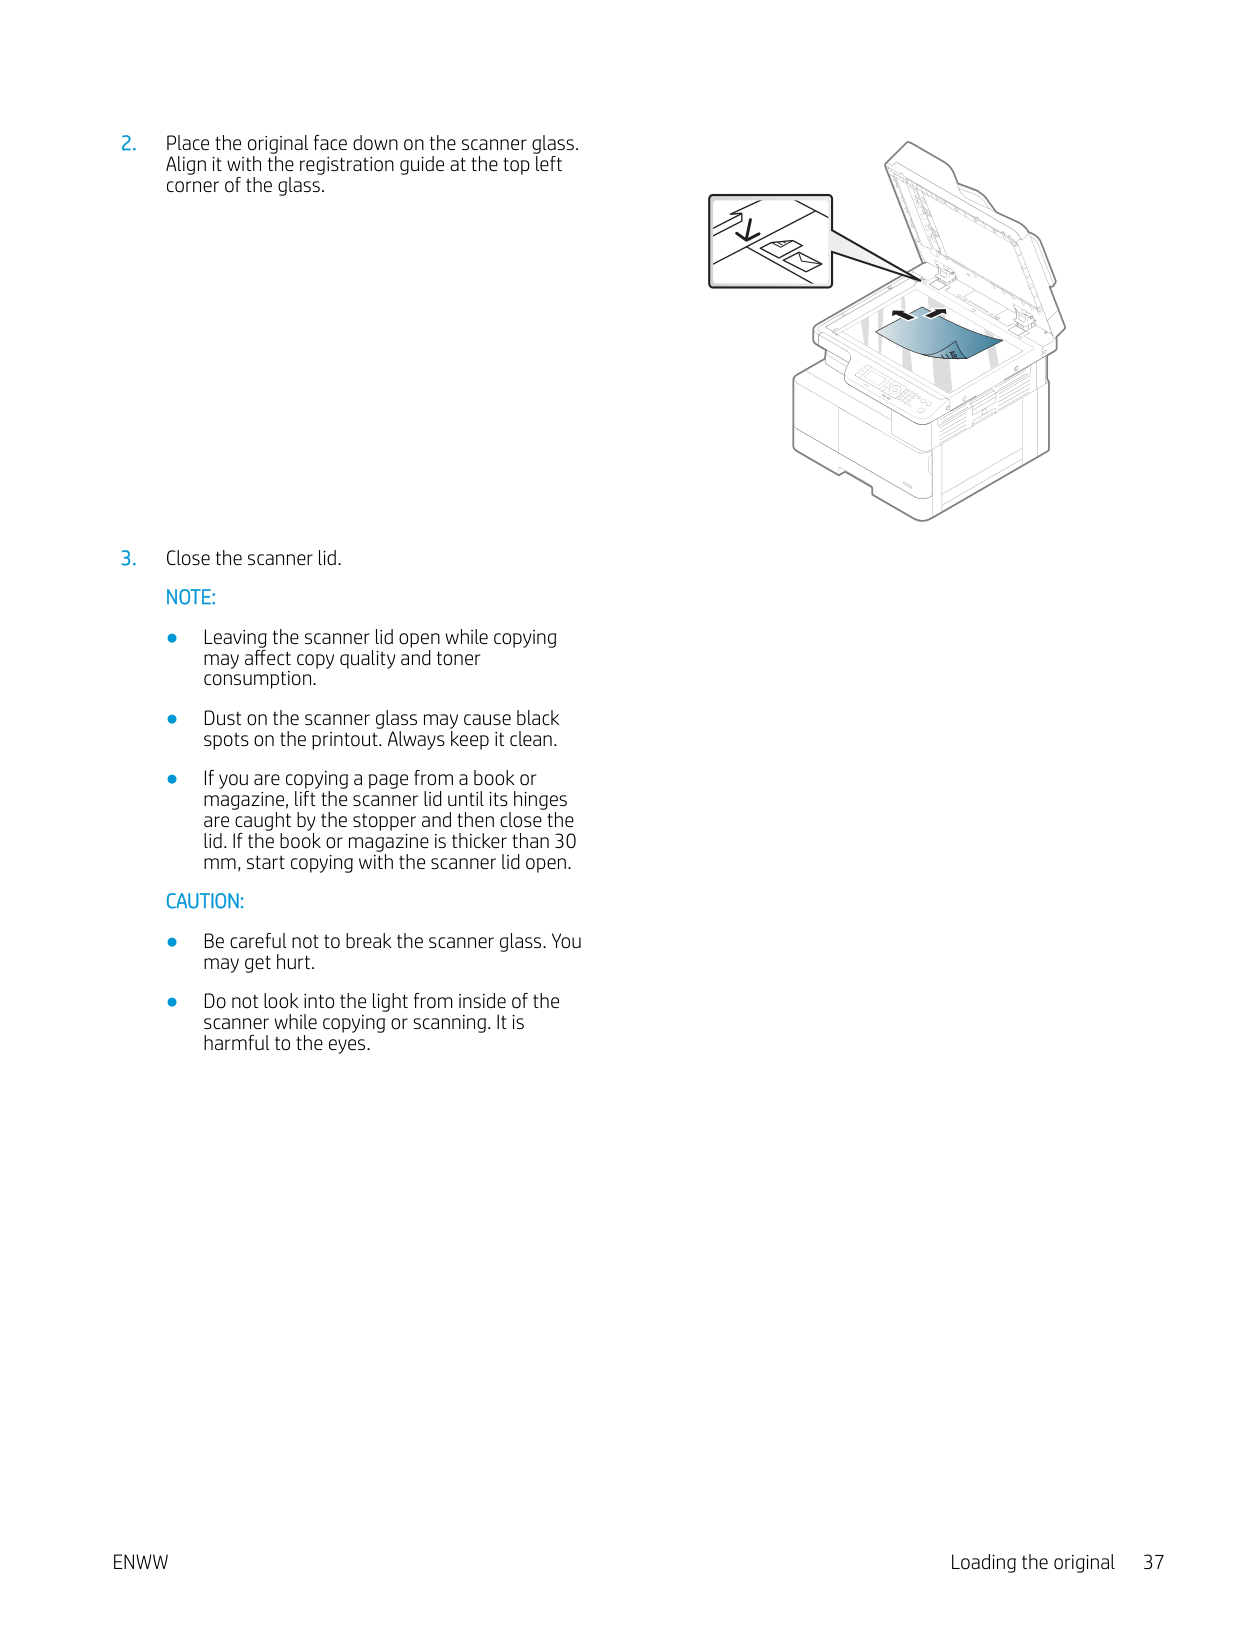
######### CAUTION:
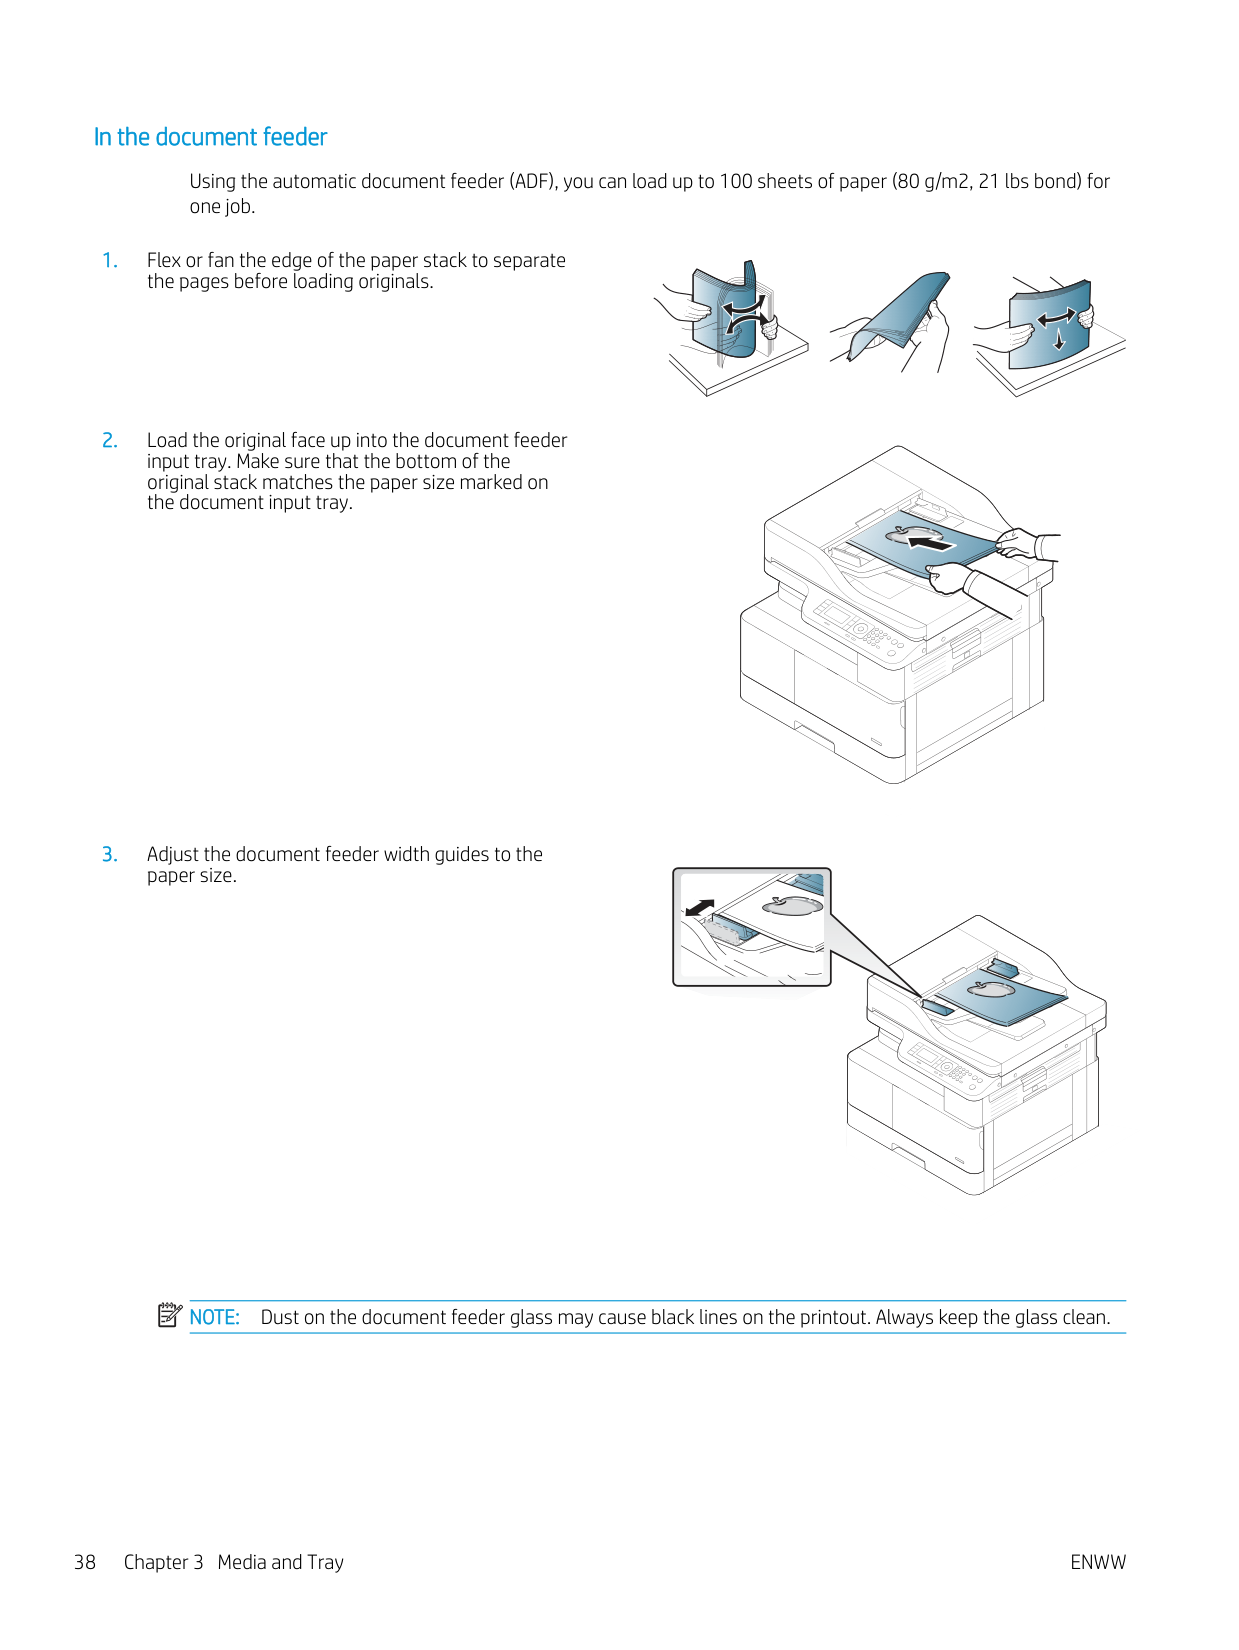
####### In the document feeder
Using the automatic document feeder (ADF), you can load up to 100 sheets of paper (80 g/m2, 21 lbs bond) for one job.
| | |---|
NOTE: Dust on the document feeder glass may cause black lines on the printout. Always keep the glass clean.
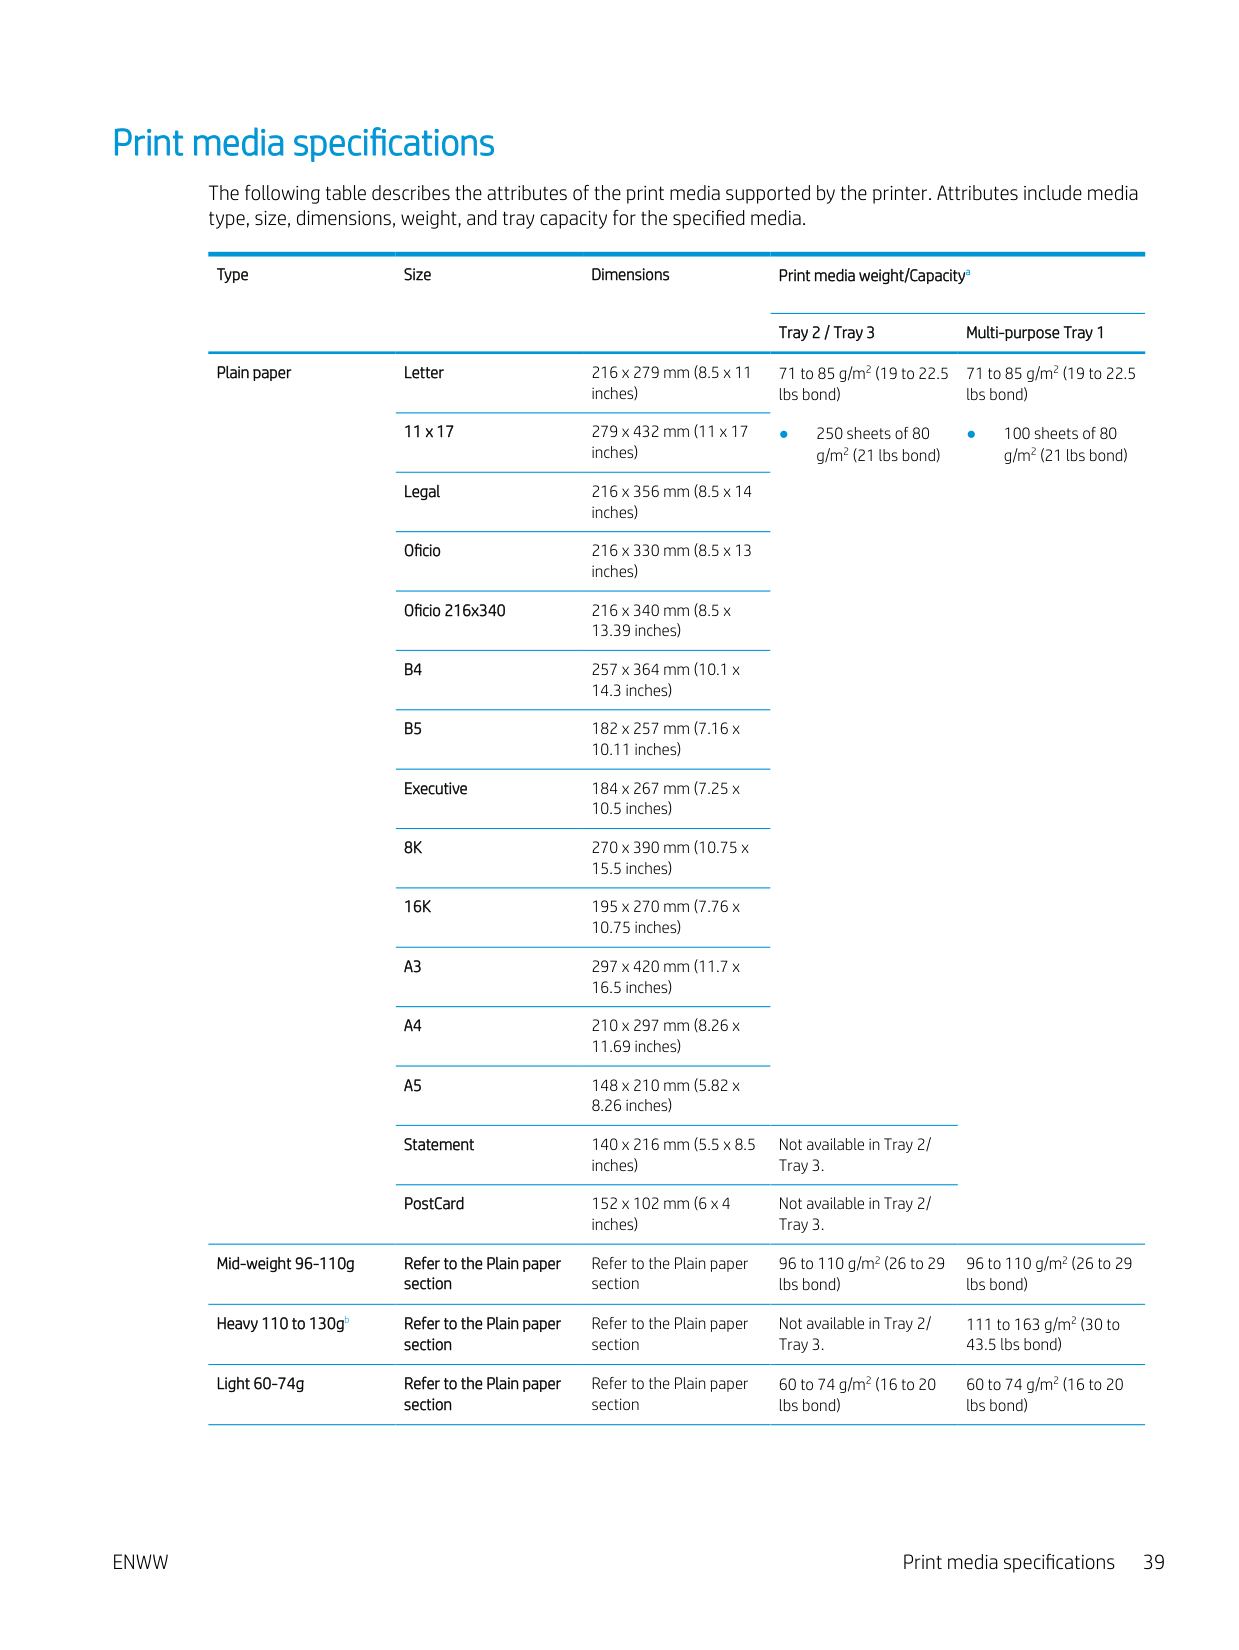
#### Print media specifications
The following table describes the attributes of the print media supported by the printer. Attributes include media type, size, dimensions, weight, and tray capacity for the specified media.
Type Size Dimensions Print media weight/Capacitya
Tray 2 / Tray 3 Multi-purpose Tray 1 Plain paper Letter 216 x 279 mm (8.5 x 11
71 to 85 g/m2 (19 to 22.5 lbs bond)
71 to 85 g/m2 (19 to 22.5 lbs bond)
inches)
11 x 17 279 x 432 mm (11 x 17
● 250 sheets of 80 g/m2 (21 lbs bond)
● 100 sheets of 80 g/m2 (21 lbs bond)
inches)
Legal 216 x 356 mm (8.5 x 14
inches)
Oficio 216 x 330 mm (8.5 x 13
inches)
Oficio 216x340 216 x 340 mm (8.5 x
14.3 inches)
Executive 184 x 267 mm (7.25 x
10.5 inches)
8K 270 x 390 mm (10.75 x
15.5 inches)
16K 195 x 270 mm (7.76 x
10.75 inches)
Statement 140 x 216 mm (5.5 x 8.5
Not available in Tray 2/ Tray 3.
inches)
PostCard 152 x 102 mm (6 x 4
Not available in Tray 2/ Tray 3.
inches)
############# Mid-weight 96-110g Refer to the Plain paper section
Refer to the Plain paper section
96 to 110 g/m2 (26 to 29 lbs bond)
96 to 110 g/m2 (26 to 29 lbs bond)
############# Heavy 110 to 130gb Refer to the Plain paper section
Refer to the Plain paper section
Not available in Tray 2/ Tray 3.
111 to 163 g/m2 (30 to 43.5 lbs bond)
############# Light 60-74g Refer to the Plain paper section
Refer to the Plain paper section
60 to 74 g/m2 (16 to 20 lbs bond)
60 to 74 g/m2 (16 to 20 lbs bond)
ENWW Print media specifications 39
Type Size Dimensions Print media weight/Capacitya
Tray 2 / Tray 3 Multi-purpose Tray 1
HP LaserJet 90g, Colored paper, Pre-Printed paper, LetterHead paper, PrePunched paper
Refer to the Plain paper section
Refer to the Plain paper section
75 to 90 g/m2 (20 to 24lbs bond)
75 to 90 g/m2 (20 to 24lbs bond)
############# Recycled paper Refer to the Plain paper section
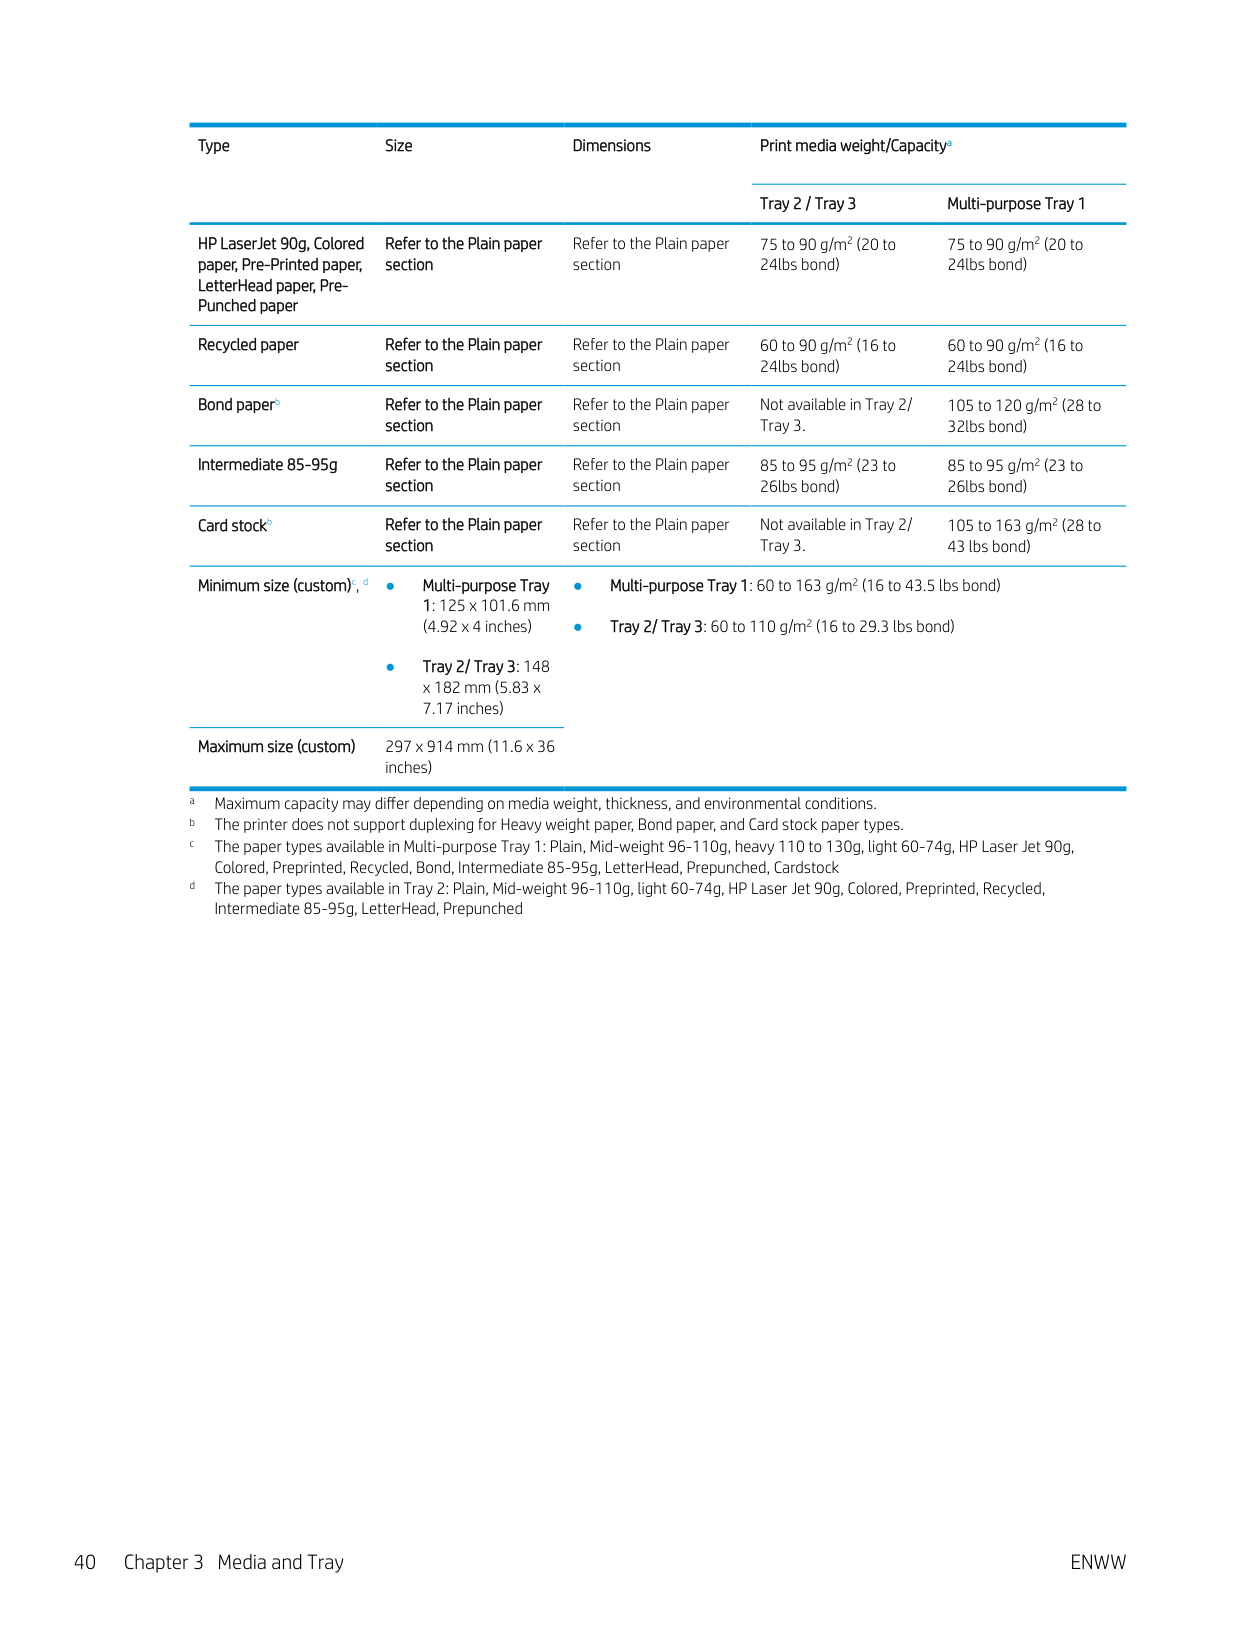
Refer to the Plain paper section
60 to 90 g/m2 (16 to 24lbs bond)
60 to 90 g/m2 (16 to 24lbs bond)
############# Bond paperb Refer to the Plain paper section
Refer to the Plain paper section
Not available in Tray 2/ Tray 3.
105 to 120 g/m2 (28 to 32lbs bond)
############# Intermediate 85-95g Refer to the Plain paper section
Refer to the Plain paper section
85 to 95 g/m2 (23 to 26lbs bond)
85 to 95 g/m2 (23 to 26lbs bond)
############# Card stockb Refer to the Plain paper section

Refer to the Plain paper section
Not available in Tray 2/ Tray 3.
105 to 163 g/m2 (28 to 43 lbs bond)
############# Minimum size (custom)c, d ● Multi-purpose Tray 1: 125 x 101.6 mm (4.92 x 4 inches)
● Tray 2/ Tray 3: 148 x 182 mm (5.83 x 7.17 inches)
Maximum size (custom) 297 x 914 mm (11.6 x 36
inches)

4 Printer installation
ENWW 41
#### Printer hardware setup and software installation
For basic setup instructions, see the Quick Installation Guide that came with the printer. For additional instructions, go to HP support on the Web.
Go to www.hp.com/support/ljM438MFP, www.hp.com/support/ljM440MFP, www.hp.com/support/ljM442MFP, www.hp.com/support/ljM443MFP for HP's all-inclusive help for the printer. Find the following support:
#### Software installation instructions

######### The full software install is available for the following operating systems:
Server operating system platforms support the installation of the HP LaserJet MFP M438, M440, M442, M443 print driver only using the Add Printer Wizard.
######### Other supported HP LaserJet MFP M438, M440, M442, M443 print drivers available for download on hp.com:
######### Install the software

ENWW Software installation instructions 43
5 Printing
This chapter explains common printing tasks.
| | |---|
ENWW 45
#### Print setup on the control panel
The following information describes the printer setup functions available from the control panel. These functions control the appearance of the printed pages.
| | |---|
NOTE: Some menus may not appear in the display depending on options or models. If so, it is not applicable to your machine. To change the menu options: Press Menu > Print Setup on the control panel.
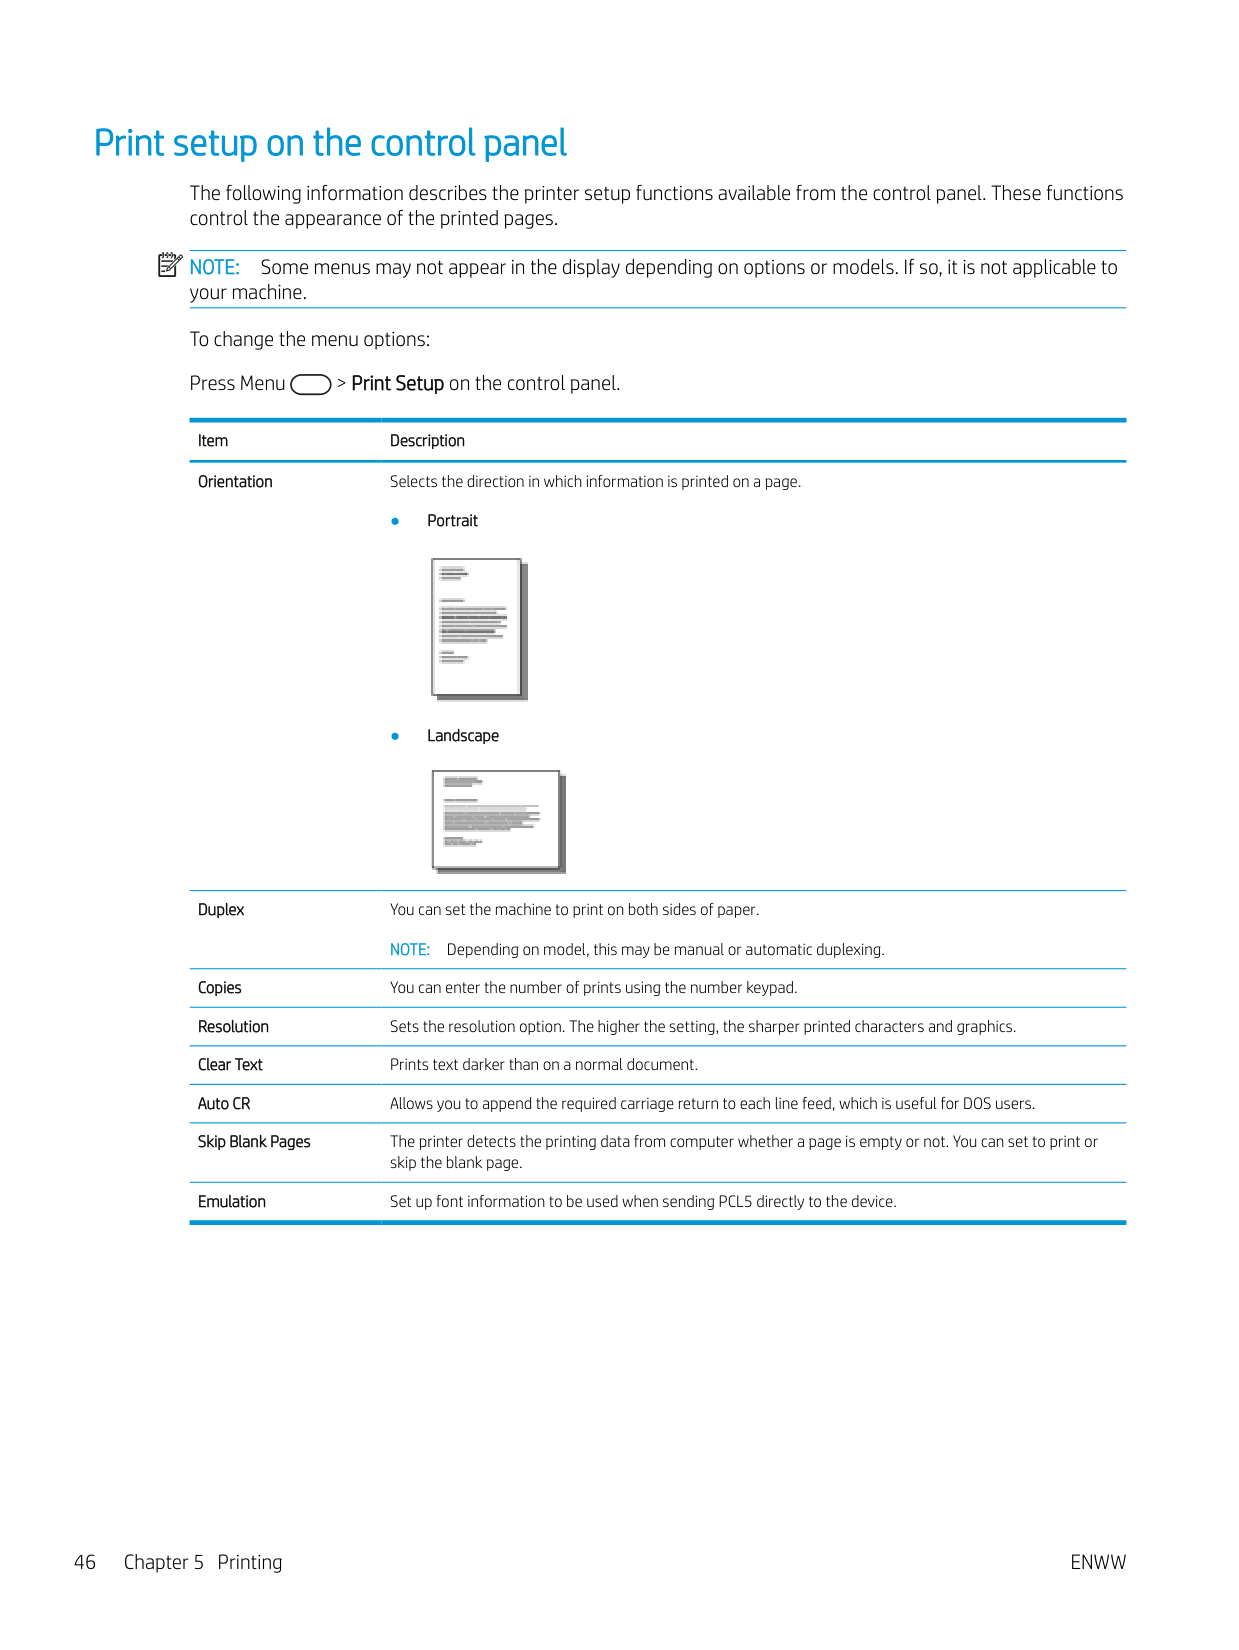
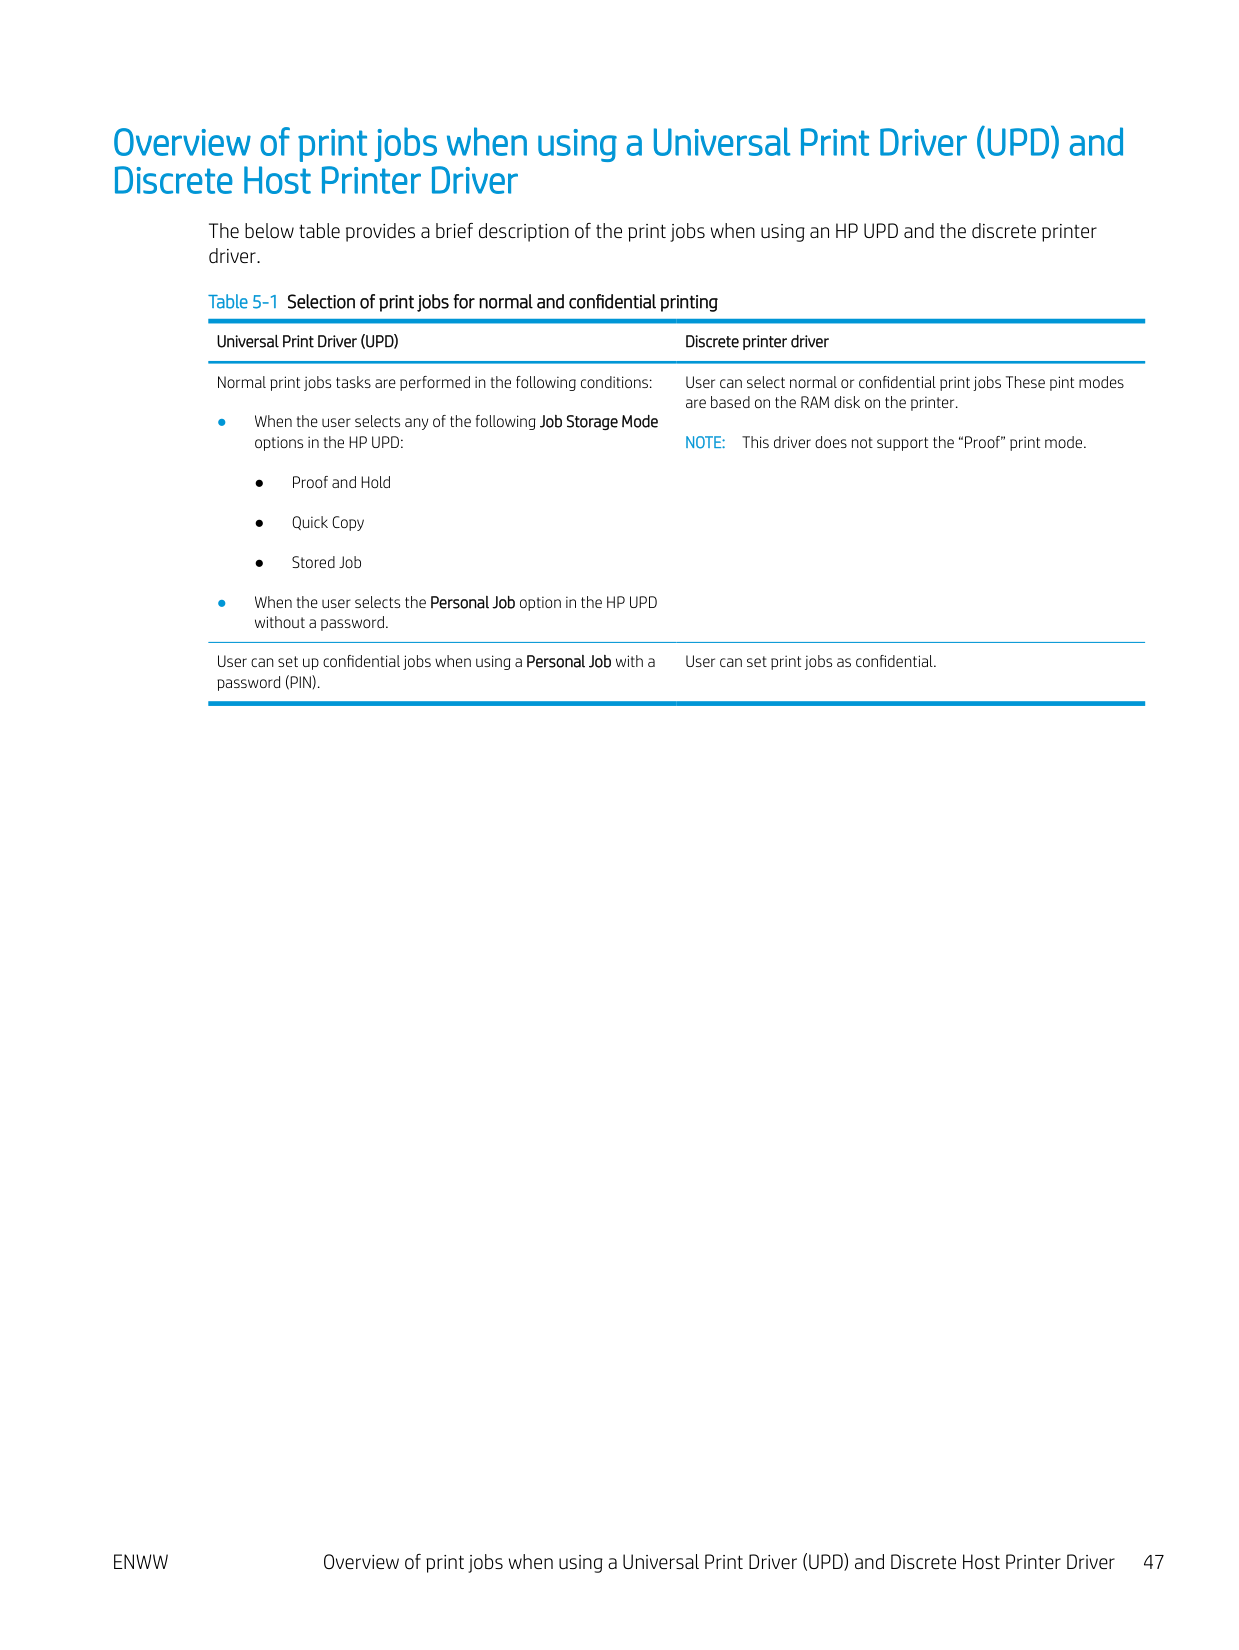
Item Description Orientation Selects the direction in which information is printed on a page.
############# ● Portrait

############# ● Landscape

Duplex You can set the machine to print on both sides of paper.
NOTE: Depending on model, this may be manual or automatic duplexing. Copies You can enter the number of prints using the number keypad. Resolution Sets the resolution option. The higher the setting, the sharper printed characters and graphics. Clear Text Prints text darker than on a normal document. Auto CR Allows you to append the required carriage return to each line feed, which is useful for DOS users. Skip Blank Pages The printer detects the printing data from computer whether a page is empty or not. You can set to print or
skip the blank page.
Emulation Set up font information to be used when sending PCL5 directly to the device.
#### Overview of print jobs when using a Universal Print Driver (UPD) and Discrete Host Printer Driver
The below table provides a brief description of the print jobs when using an HP UPD and the discrete printer driver.
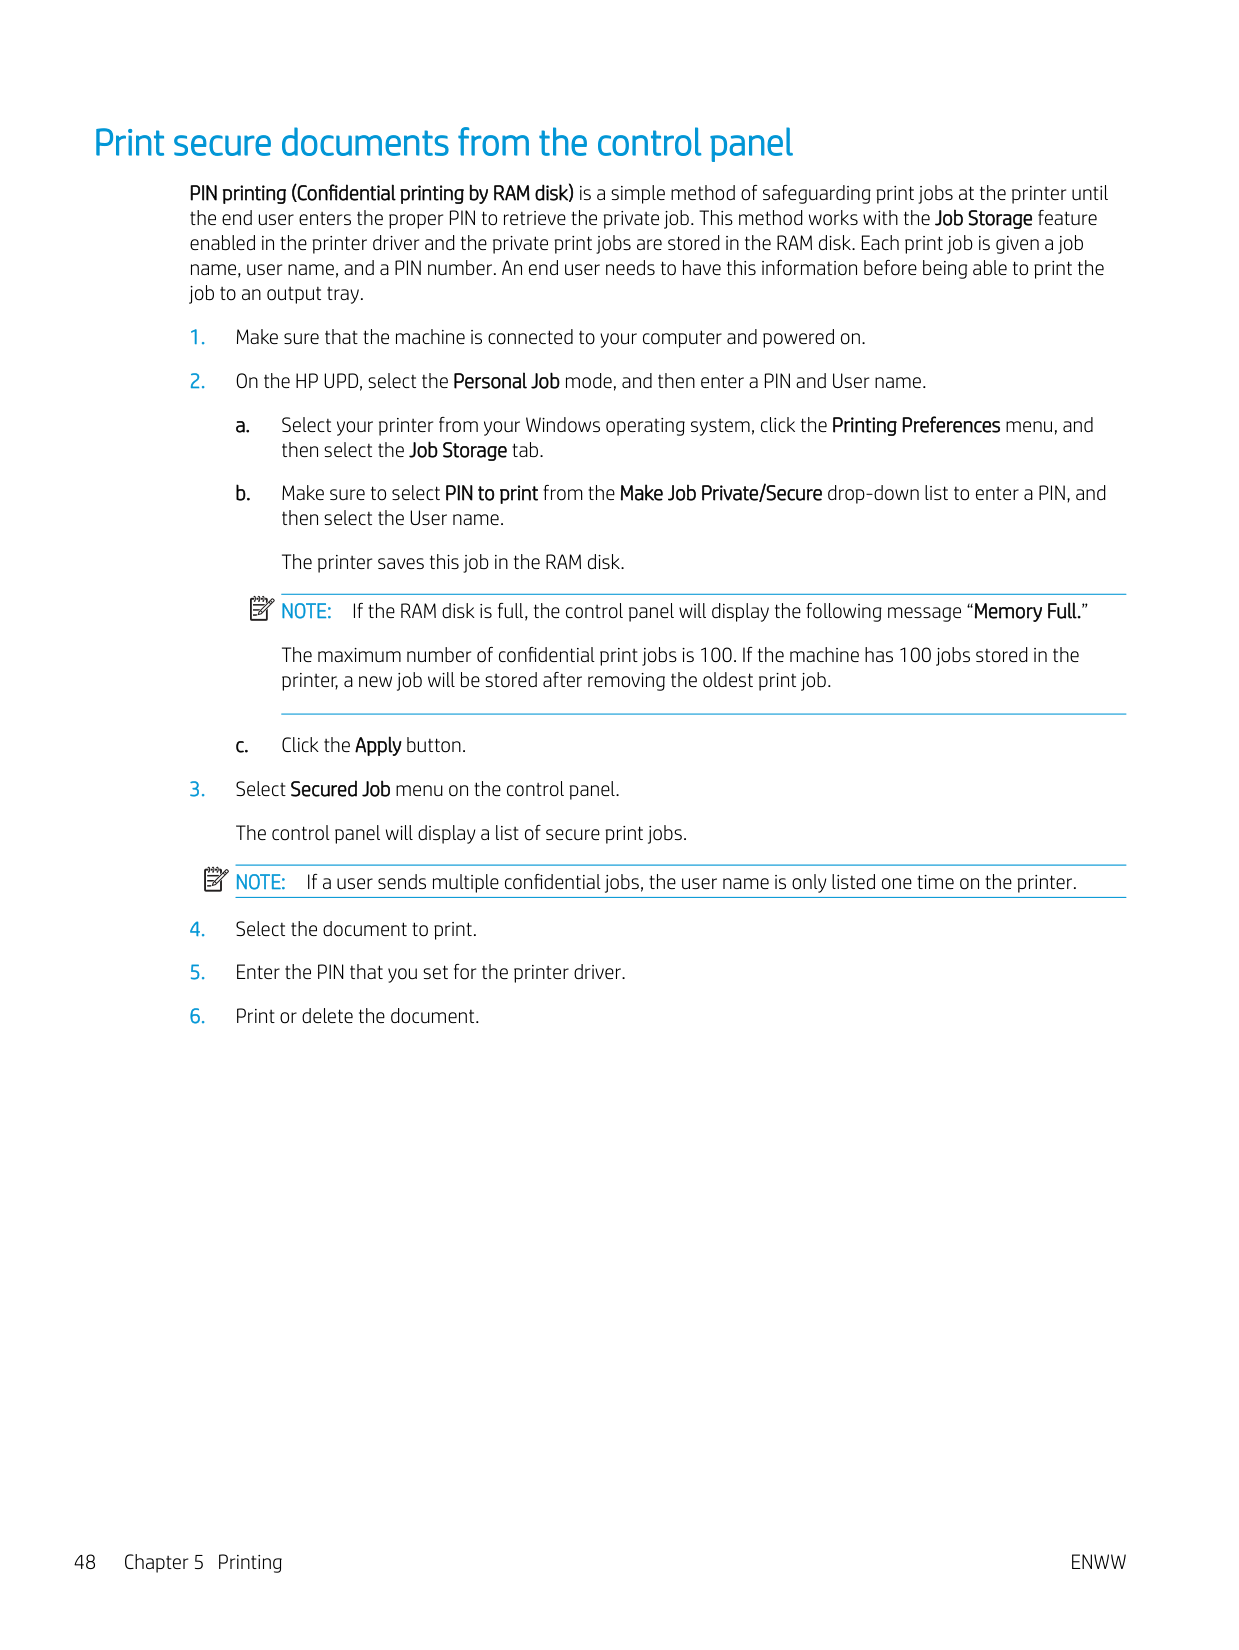
Table 5-1 Selection of print jobs for normal and confidential printing Universal Print Driver (UPD) Discrete printer driver Normal print jobs tasks are performed in the following conditions:
User can select normal or confidential print jobs These pint modes are based on the RAM disk on the printer.
NOTE: This driver does not support the “Proof” print mode.
User can set up confidential jobs when using a Personal Job with a password (PIN).
User can set print jobs as confidential.
ENWW Overview of print jobs when using a Universal Print Driver (UPD) and Discrete Host Printer Driver 47
#### Print secure documents from the control panel
PIN printing (Confidential printing by RAM disk) is a simple method of safeguarding print jobs at the printer until the end user enters the proper PIN to retrieve the private job. This method works with the Job Storage feature enabled in the printer driver and the private print jobs are stored in the RAM disk. Each print job is given a job name, user name, and a PIN number. An end user needs to have this information before being able to print the job to an output tray.
The maximum number of confidential print jobs is 100. If the machine has 100 jobs stored in the printer, a new job will be stored after removing the oldest print job.
| | |---|
| | |---|
6 Copying
This chapter explains common copying tasks.
ENWW 49
#### Copy features on the control panel
###### Copy feature
The following topics describe how to use the Copy and Copy Setup features on the control panel. These features control the appearance of the generated copies.
| | |---|
NOTE: Some menus may not appear in the display depending on options or models. If so, it is not applicable to your machine. To change the menu options: Press Copy > Menu > Copy Feature on the control panel. Or Menu > Copy Feature on the control panel. Table 6-1 Copy feature
Item Description Reduce/Enlarge Reduces or enlarges the size of a copied image.
NOTE: If the machine is set to Eco mode, reduce and enlarge features are not available.
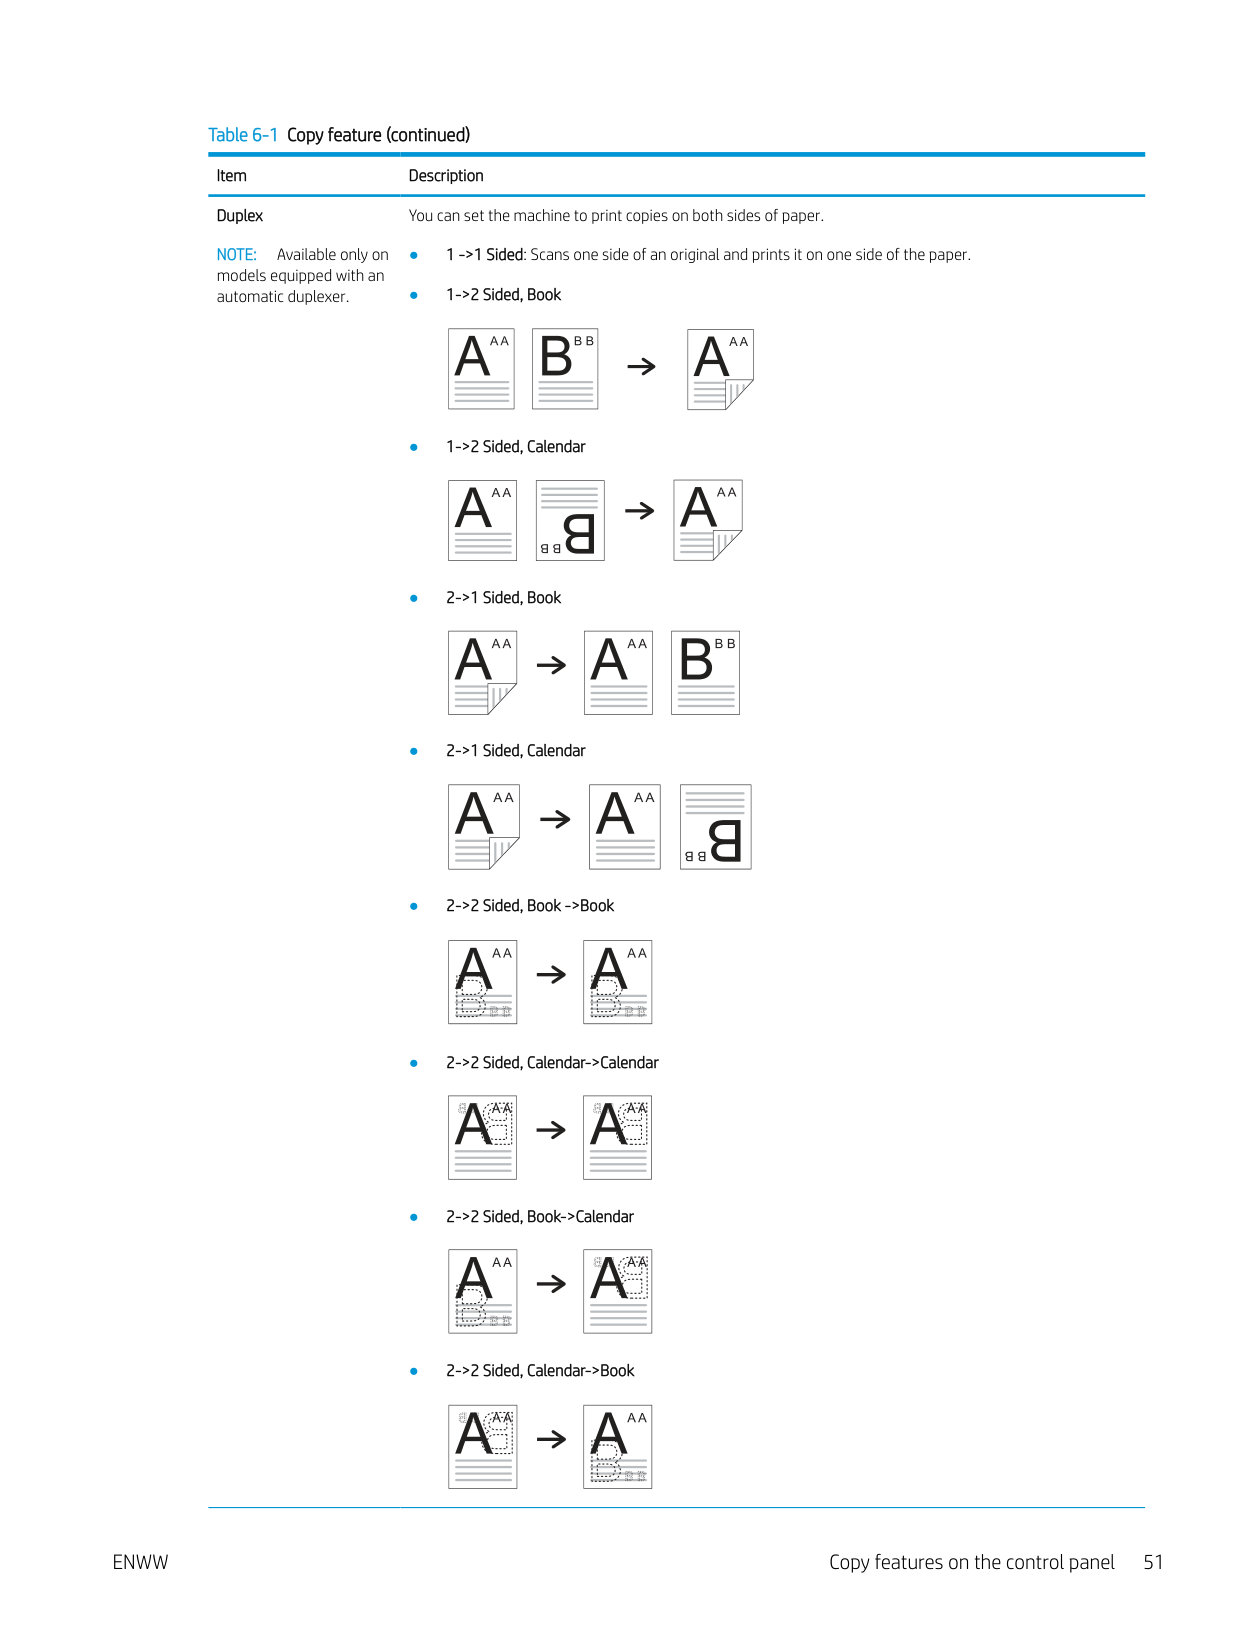
Duplex NOTE: Available only on models equipped with an automatic duplexer.
You can set the machine to print copies on both sides of paper.
ENWW Copy features on the control panel 51
Darkness Adjusts the brightness level to make a copy that is easier to read, when the original contains faint markings
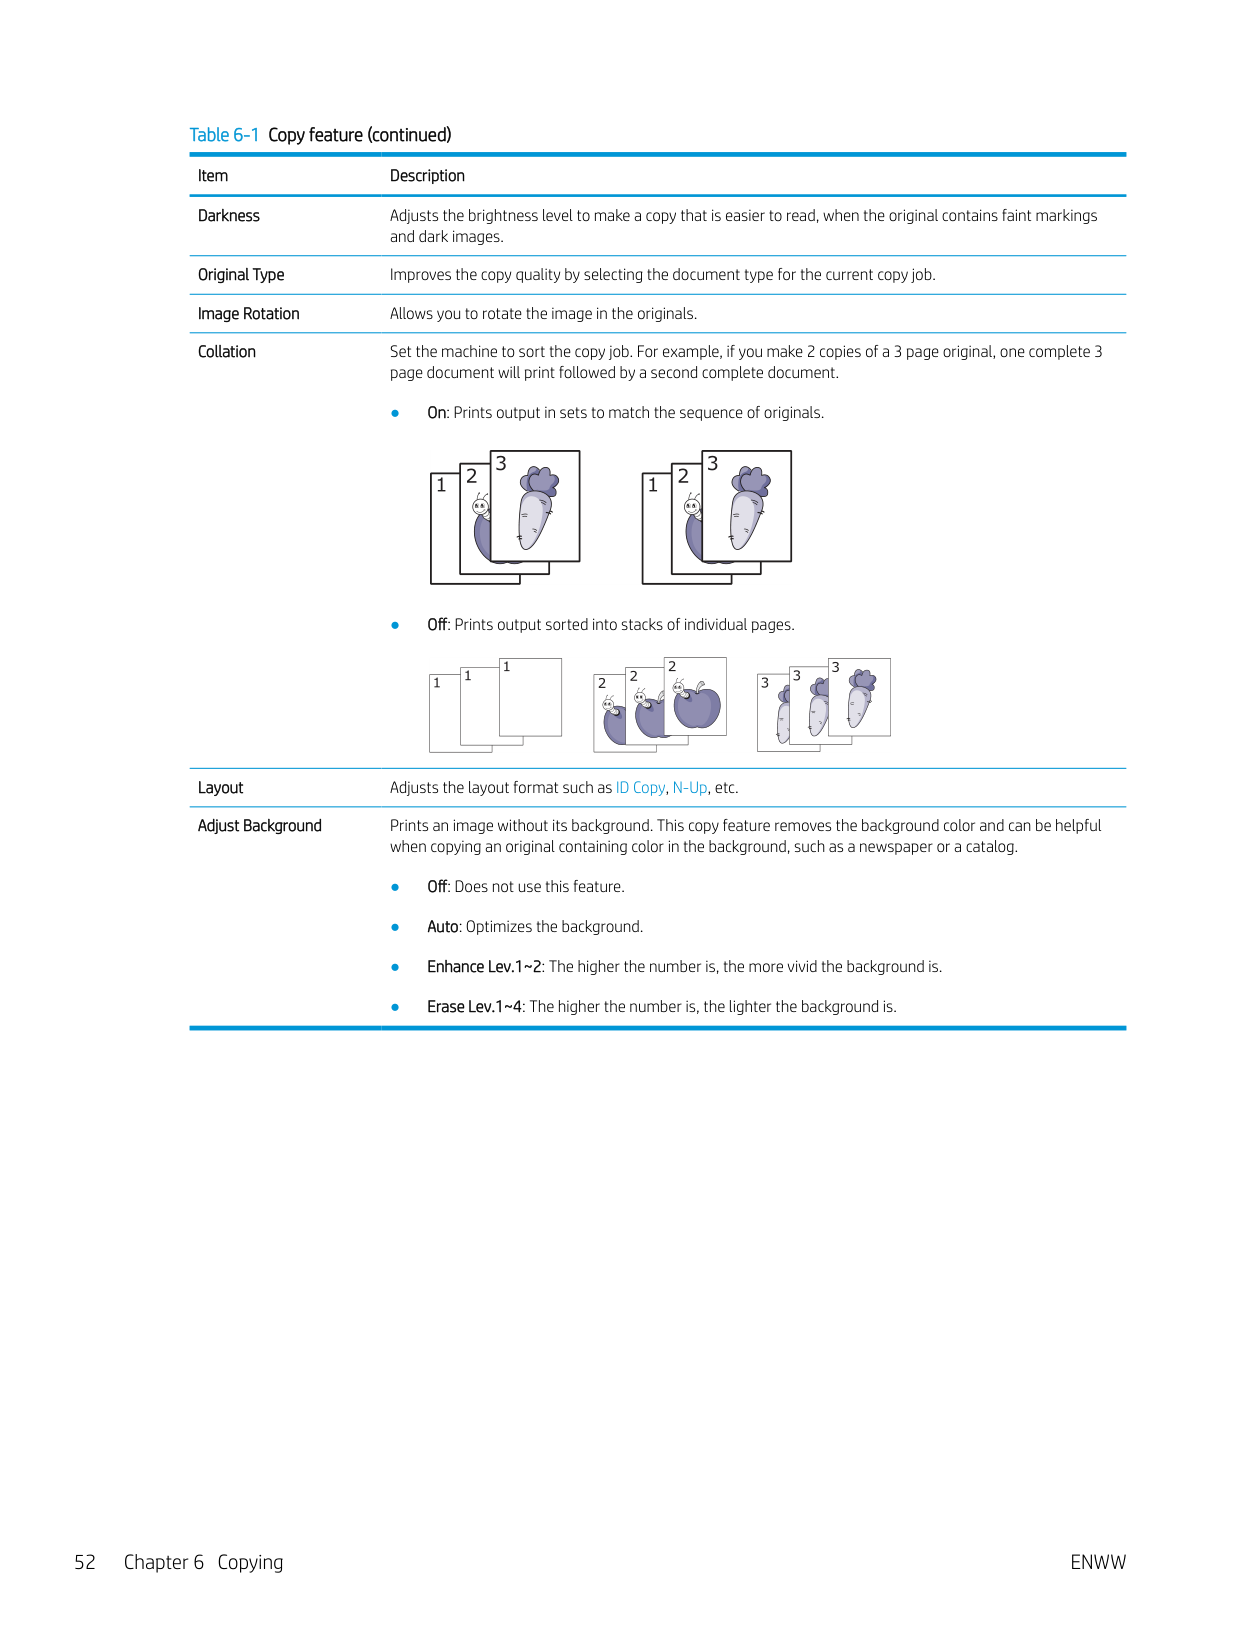
and dark images. Original Type Improves the copy quality by selecting the document type for the current copy job. Image Rotation Allows you to rotate the image in the originals. Collation Set the machine to sort the copy job. For example, if you make 2 copies of a 3 page original, one complete 3
page document will print followed by a second complete document.
Layout Adjusts the layout format such as ID Copy, N-Up, etc. Adjust Background Prints an image without its background. This copy feature removes the background color and can be helpful
when copying an original containing color in the background, such as a newspaper or a catalog.
Copy Setup NOTE: Some menus may not appear in the display depending on options or models. If so, it is not applicable to your machine. To change the menu options: Press Copy > Menu > Copy Setup on the control panel. Or Menu > Copy Setup on the control panel. Table 6-2 Copy Setup
| | |---|
Item Description Change Default The copy options can be set to those most frequently used. Auto Tray This is the option to set if the machine is to continue printing or not when any tray becomes empty.
#### Basic copying
| | |---|
NOTE: If you need to cancel the copying job during the operation, press the Stop/Clear button and the copying will stop.
ENWW Basic copying 53
Changing the settings for each copy Your machine provides default settings for copying so that you can quickly and easily make a copy. NOTE:
| | |---|
for the current copy job will be canceled and returned to their default status. Or, they will automatically return to their default status after the machine completes the copy in progress.
###### Darkness
If you have an original containing faint marking and dark images, you can adjust the brightness to make a copy that is easier to read.

###### Original Type
The original setting is used to improve the copy quality by selecting the document for the current copy job.
| | |---|
Reduced or enlarged copy You can reduce or enlarge the size of a copied image from 25% to 400% from the document feeder or scanner glass. NOTE: ● This feature may not be available depending on model or optional goods.
| | |---|
● If the machine set to Eco mode, reduce and enlarge features are not available.
######### To select from the predefined copy sizes
######### To scale the copy by directly entering the scale rate
| | |---|
NOTE: When you make a reduced copy, black lines may appear at the bottom of your copy.
ENWW Changing the settings for each copy 55
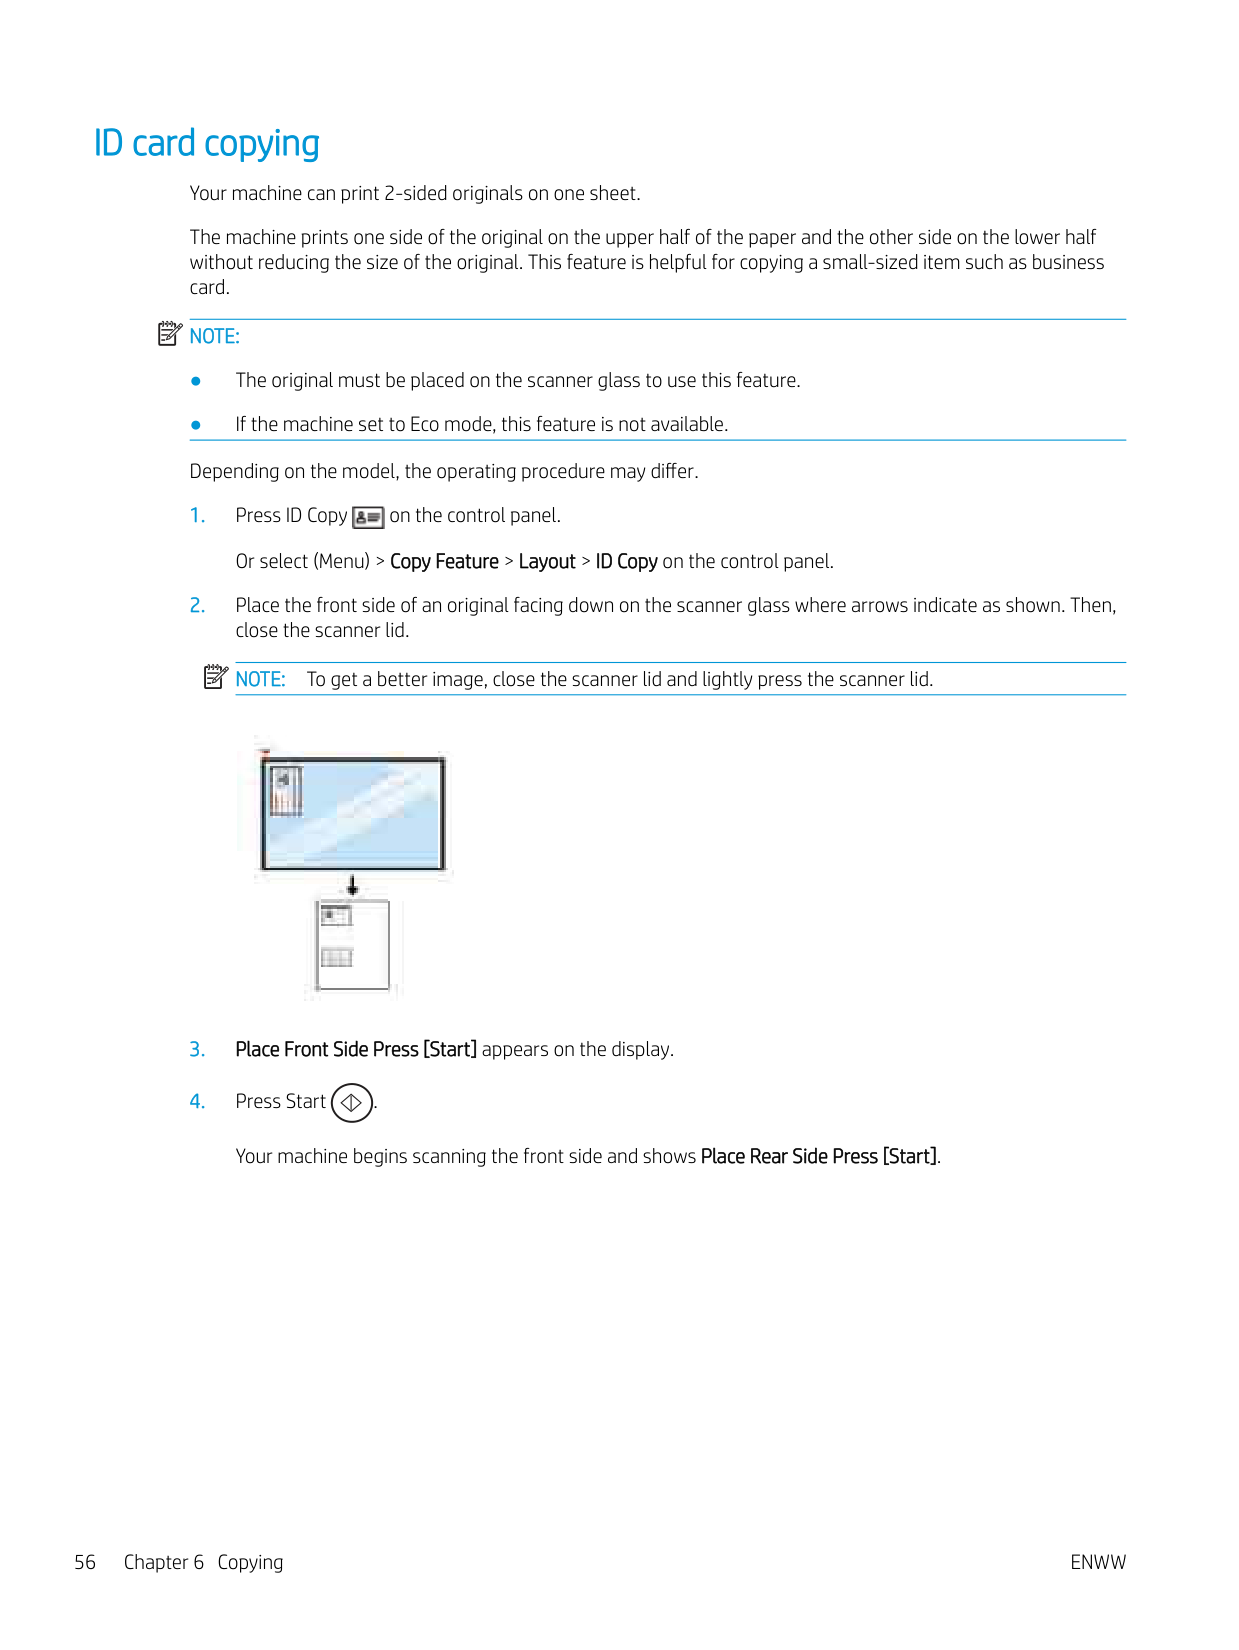
ID card copying Your machine can print 2-sided originals on one sheet. The machine prints one side of the original on the upper half of the paper and the other side on the lower half without reducing the size of the original. This feature is helpful for copying a small-sized item such as business card. NOTE:
| | |---|

| | |---|
Your machine begins scanning the front side and shows Place Rear Side Press [Start].
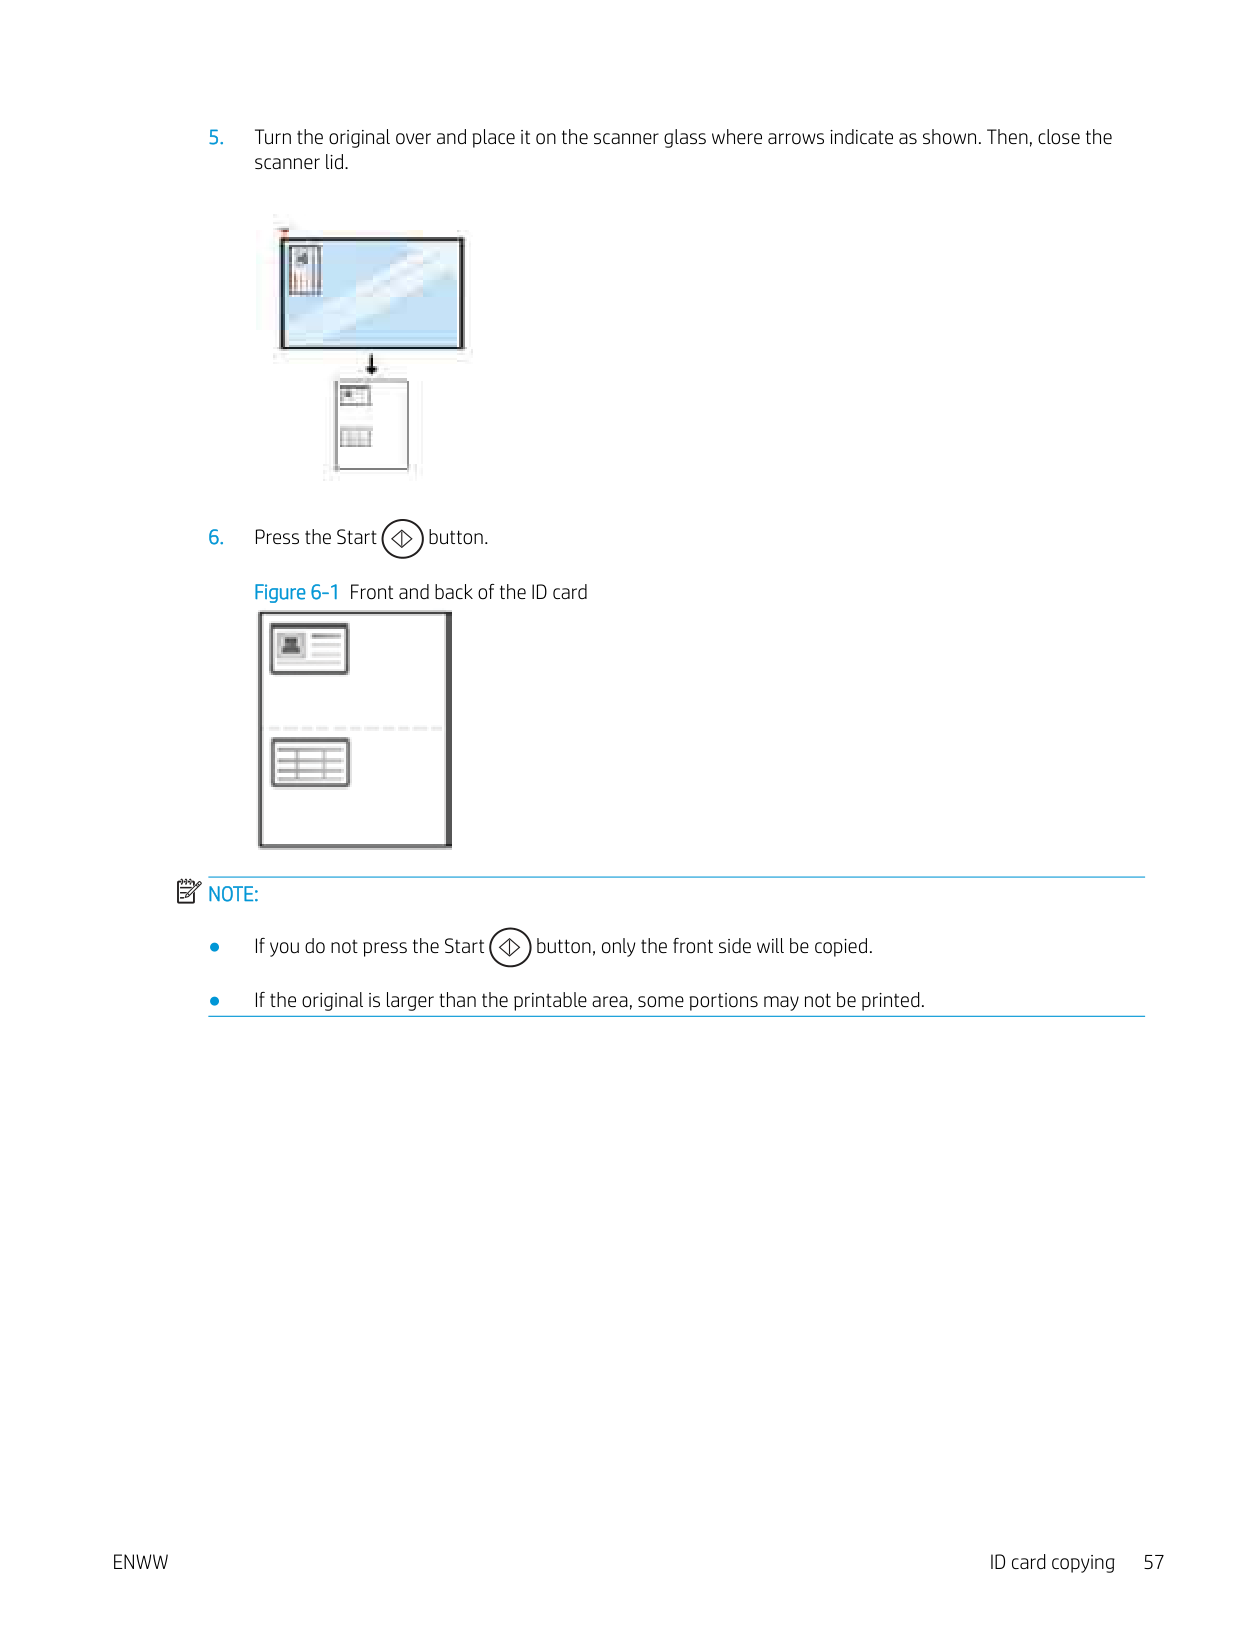

Figure 6-1 Front and back of the ID card

| | |---|
######### NOTE:
ENWW ID card copying 57

7 Scanning
| | |---|
This chapter explains the normal and usual procedure for scanning originals. NOTE: A scan job cannot run concurrently with a print job.
ENWW 59
#### Scanning from the machine
###### Introduction
The following topics describe how to set up the Scan menu options from the control panel and then scan a document.
###### Scan feature
| | |---|
NOTE: Some menus may not appear in the display depending on options or models. If so, it is not applicable to your machine.
| | |---|
NOTE: In order for the Scan To button to function, you must install the HP Scan Software on the PC. To change the menu options: Press Scan > Scan To PC on the control panel.
Item Description Scan to PC Selects the scan destination to a local or network-connected computer that has the scan software installed
and the Scan To feature configured. Scan to Email Sets scan destination to an email. Scan to FTP Sets scan destination to a FTP server. Scan to SMB Sets scan destination to a SMB server. File Format Sets the file format in which the image is to be saved. If you select JPEG, TIFF or PDF, you can select to scan
multiple pages. Depending on the selected scan type, this option may not appear.
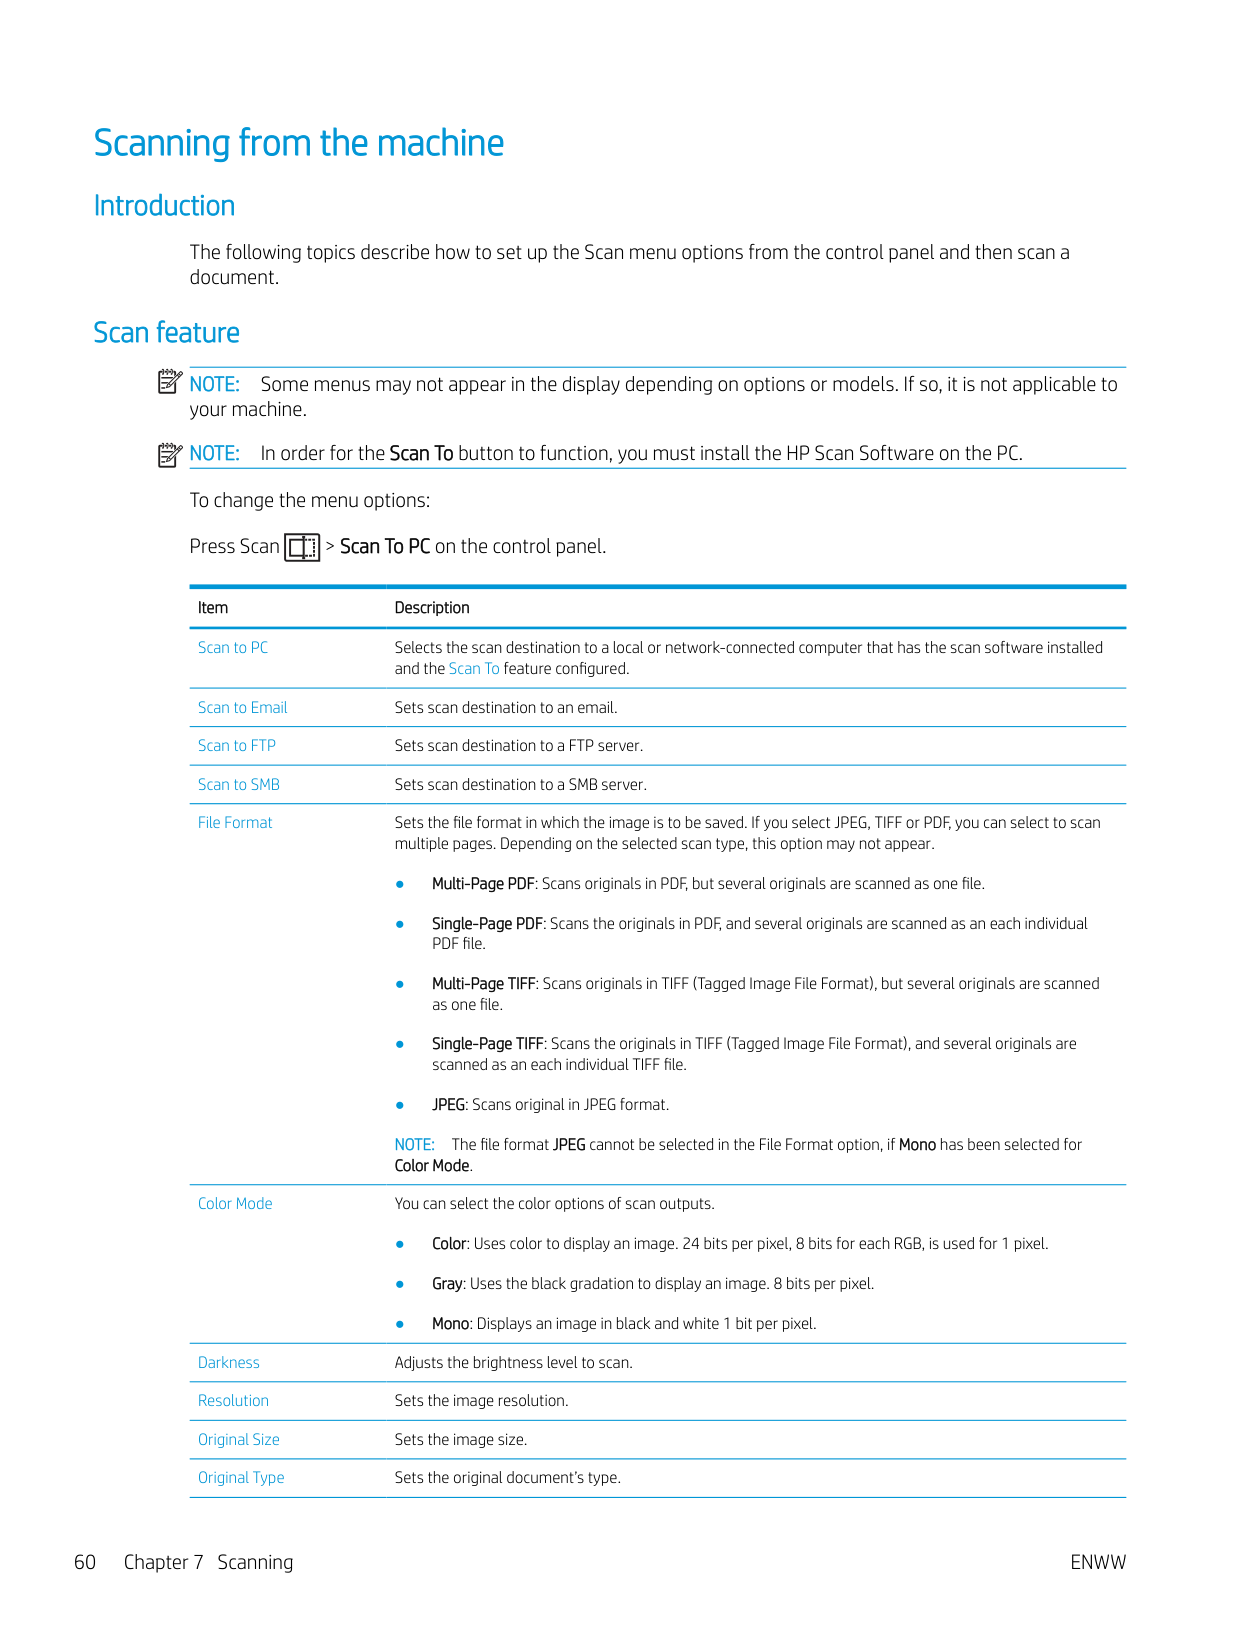
NOTE: The file format JPEG cannot be selected in the File Format option, if Mono has been selected for Color Mode.
Color Mode You can select the color options of scan outputs.
Darkness Adjusts the brightness level to scan. Resolution Sets the image resolution. Original Size Sets the image size. Original Type Sets the original document’s type.
Item Description Duplex Selects if the machine scans one side of the paper (1 Sided), both sides of the paper (2 Sided), or both sides
of the paper (2 Sided Rotated).
NOTE: If an original is placed on the scanner glass, the machine shows the window asking to place another page. Load another original and press Yes. When you finish, select No for this option.
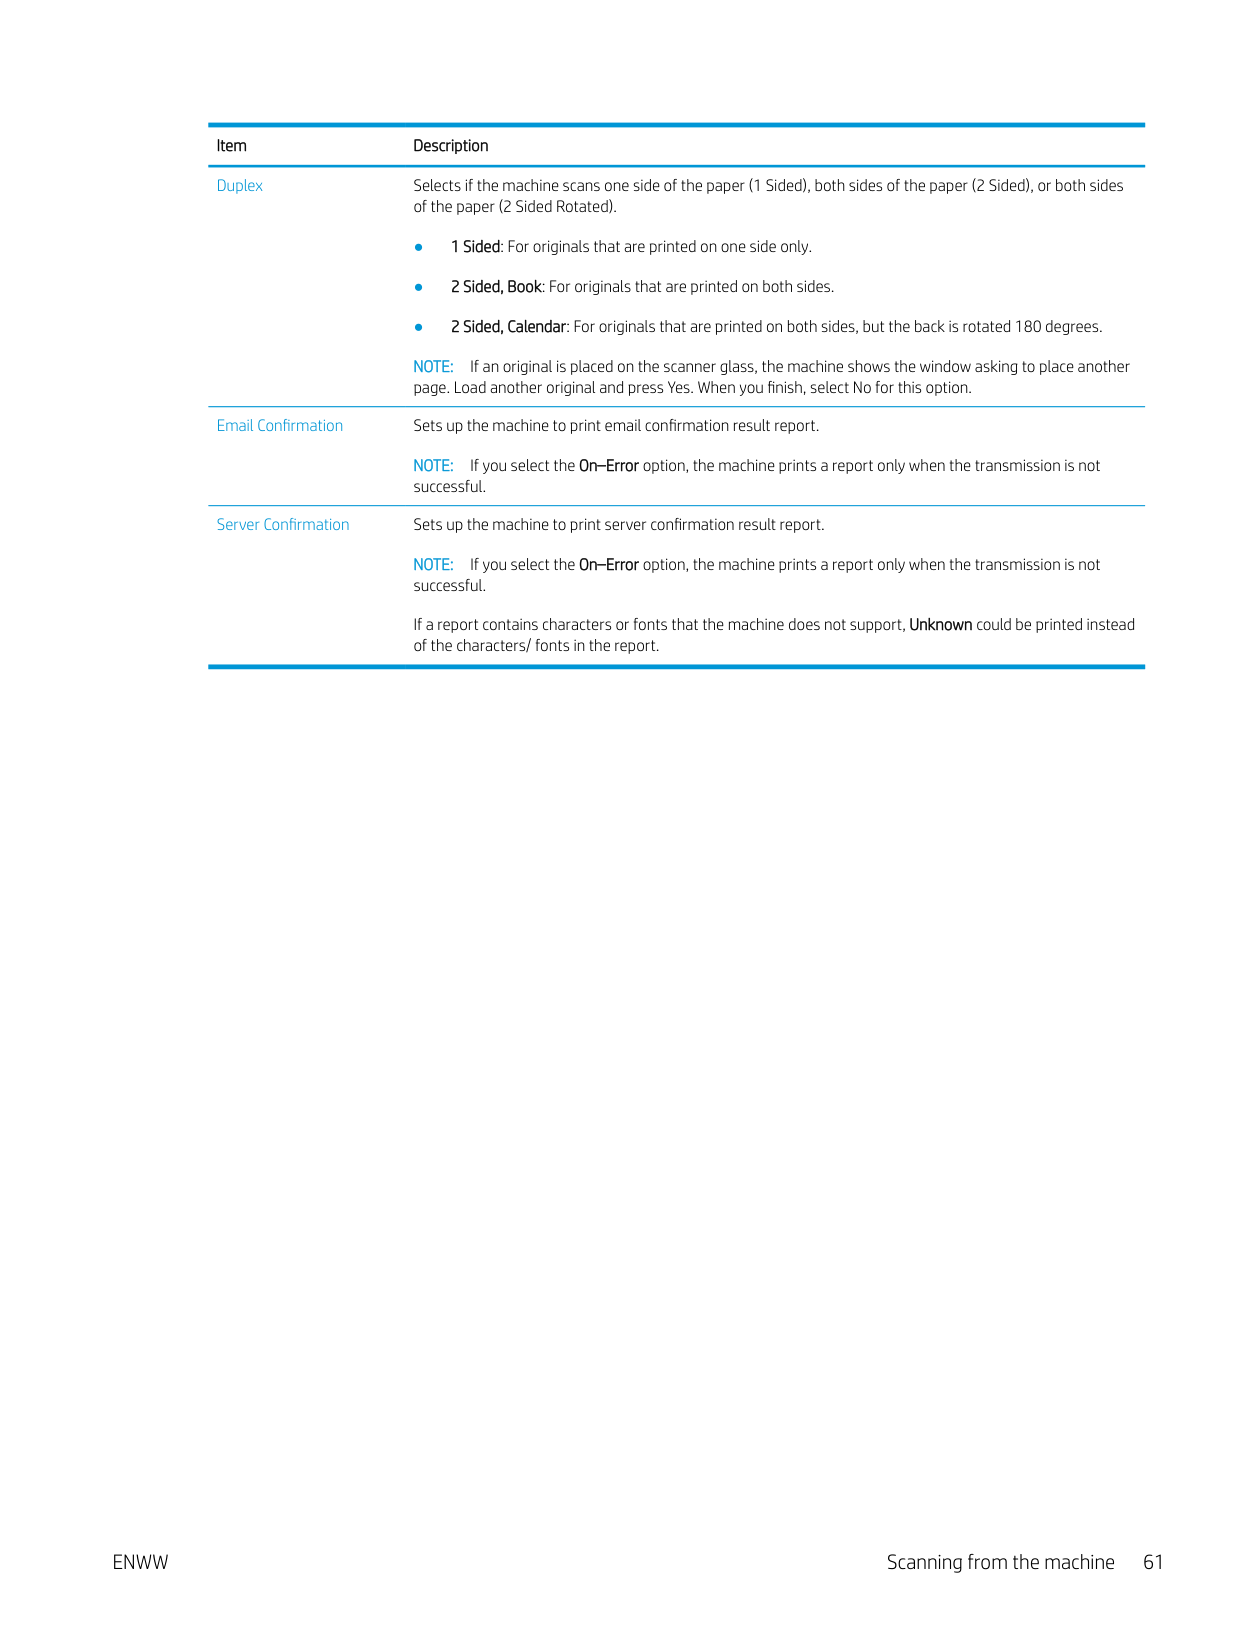
Email Confirmation Sets up the machine to print email confirmation result report.
NOTE: If you select the On–Error option, the machine prints a report only when the transmission is not successful.
Server Confirmation Sets up the machine to print server confirmation result report. NOTE: If you select the On–Error option, the machine prints a report only when the transmission is not successful. If a report contains characters or fonts that the machine does not support, Unknown could be printed instead of the characters/ fonts in the report.
ENWW Scanning from the machine 61
#### Scanning from a computer
Introduction The following topics describe several methods for scanning a document from the scanner to a computer. NOTE: The maximum resolution that can be achieved depends upon various factors, including computer speed, available disk space, memory, the size of the image being scanned, and bit depth settings. Thus, depending on your system and what you are scanning, you may not be able to scan at certain resolutions, especially using enhanced dpi.
| | |---|
###### Scan to PC
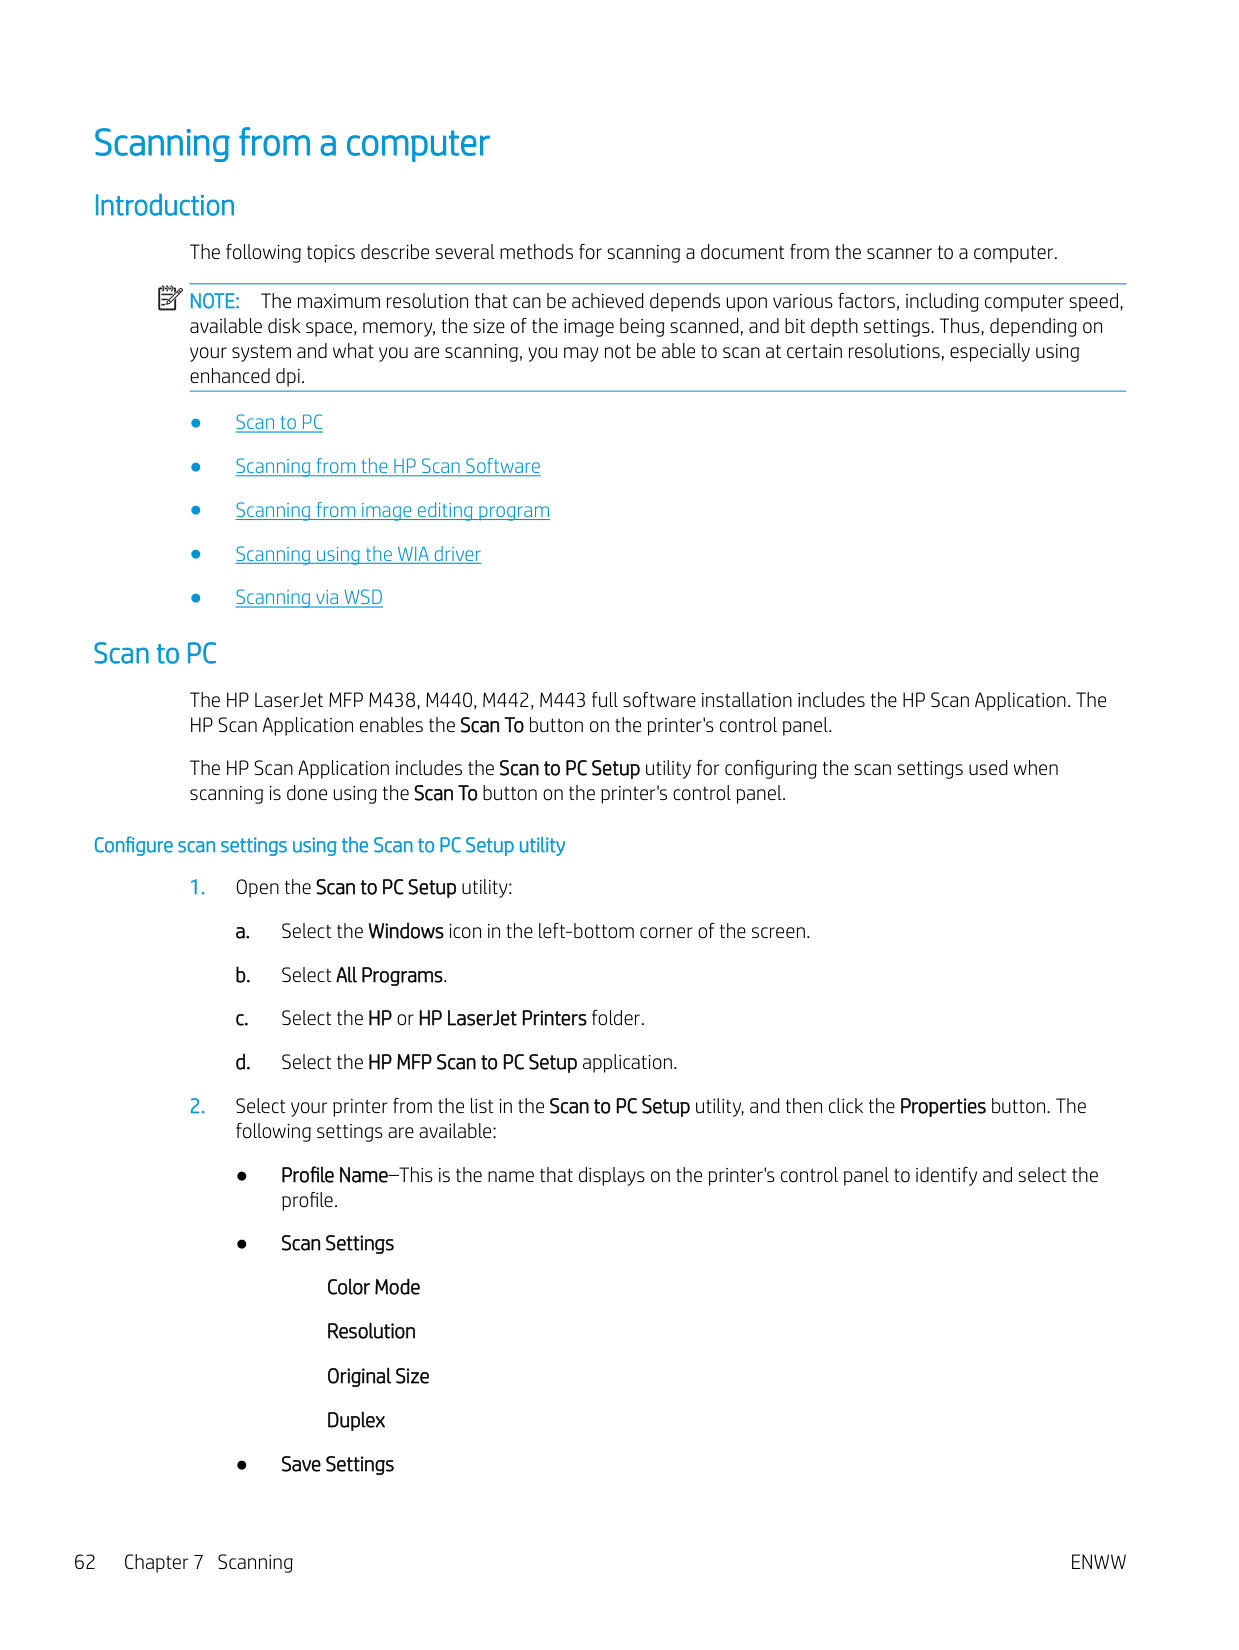
The HP LaserJet MFP M438, M440, M442, M443 full software installation includes the HP Scan Application. The HP Scan Application enables the Scan To button on the printer's control panel.
The HP Scan Application includes the Scan to PC Setup utility for configuring the scan settings used when scanning is done using the Scan To button on the printer's control panel.
Configure scan settings using the Scan to PC Setup utility
######### Save Location File Format Action After Saving
######### Scan to PC
| | |---|
NOTE: Scanned images are saved in C:\Users\users name\My Documents. The saved folder may differ, depending on your operating system or the application you are using.
###### Scanning from the HP Scan Software
The full software solution available at hp.com, includes a TWAIN compliant scan application.
###### Scanning from image editing program
You can scan and import documents in the image editing software such as Adobe Photoshop, if the software is TWAIN-compliant. Follow the steps below to scan with TWAIN-compliant software:
###### Scanning using the WIA driver
Your machine supports the Windows Image Acquisition (WIA) driver for scanning images. WIA is one of the standard components provided by Microsoft Windows and works with digital cameras and scanners. Unlike the TWAIN driver, the WIA driver allows you to scan and easily adjust images without using additional software:
NOTE: When using the document feeder as the paper source the File Type and Page Size must be configured in the Settings menu.
| |
|---|
###### Scanning via WSD
Scans the originals and saves the scanned data on a connected computer if the computer supports the WSD (Web Service for Device) feature. To use the WSD feature, you need to install the WSD printer driver on your computer. For Windows, you can install the WSD driver by Control Panel > Devices and Printers > Add a printer. Click Add a network printer from the wizard.
| | |---|
IMPORTANT: To use the WSD feature the computer must have Network Discovery and File and Print Sharing enabled.
| | |---|
######### NOTE:
| | |---|
######### NOTE:
####### Scanning using the WSD feature
NOTE: If you see Not Available message, check the port connection. Or check the printer driver for WSD is correctly installed.

| | |---|
Sending scanned images to different destinations The following topics provide information to set up and send scanned images using email or an FTP/SMB server. NOTE: M438n does not support the scan to email or FTP/SMB server features. The machine will display the following message Feature is not supported when a user presses the Address book button.
| | |---|
###### Setting up an email account
Scanning and sending an email NOTE: To scan and send an image as an email attachment, make sure to configure the network settings in the EWS. Make sure a network cable is connected to the machine.
| | |---|
Setting up an FTP/SMB server NOTE: To scan and send an image to a server destination, make sure to configure the network settings in the EWS. Make sure a network cable is connected to the machine.
| | |---|
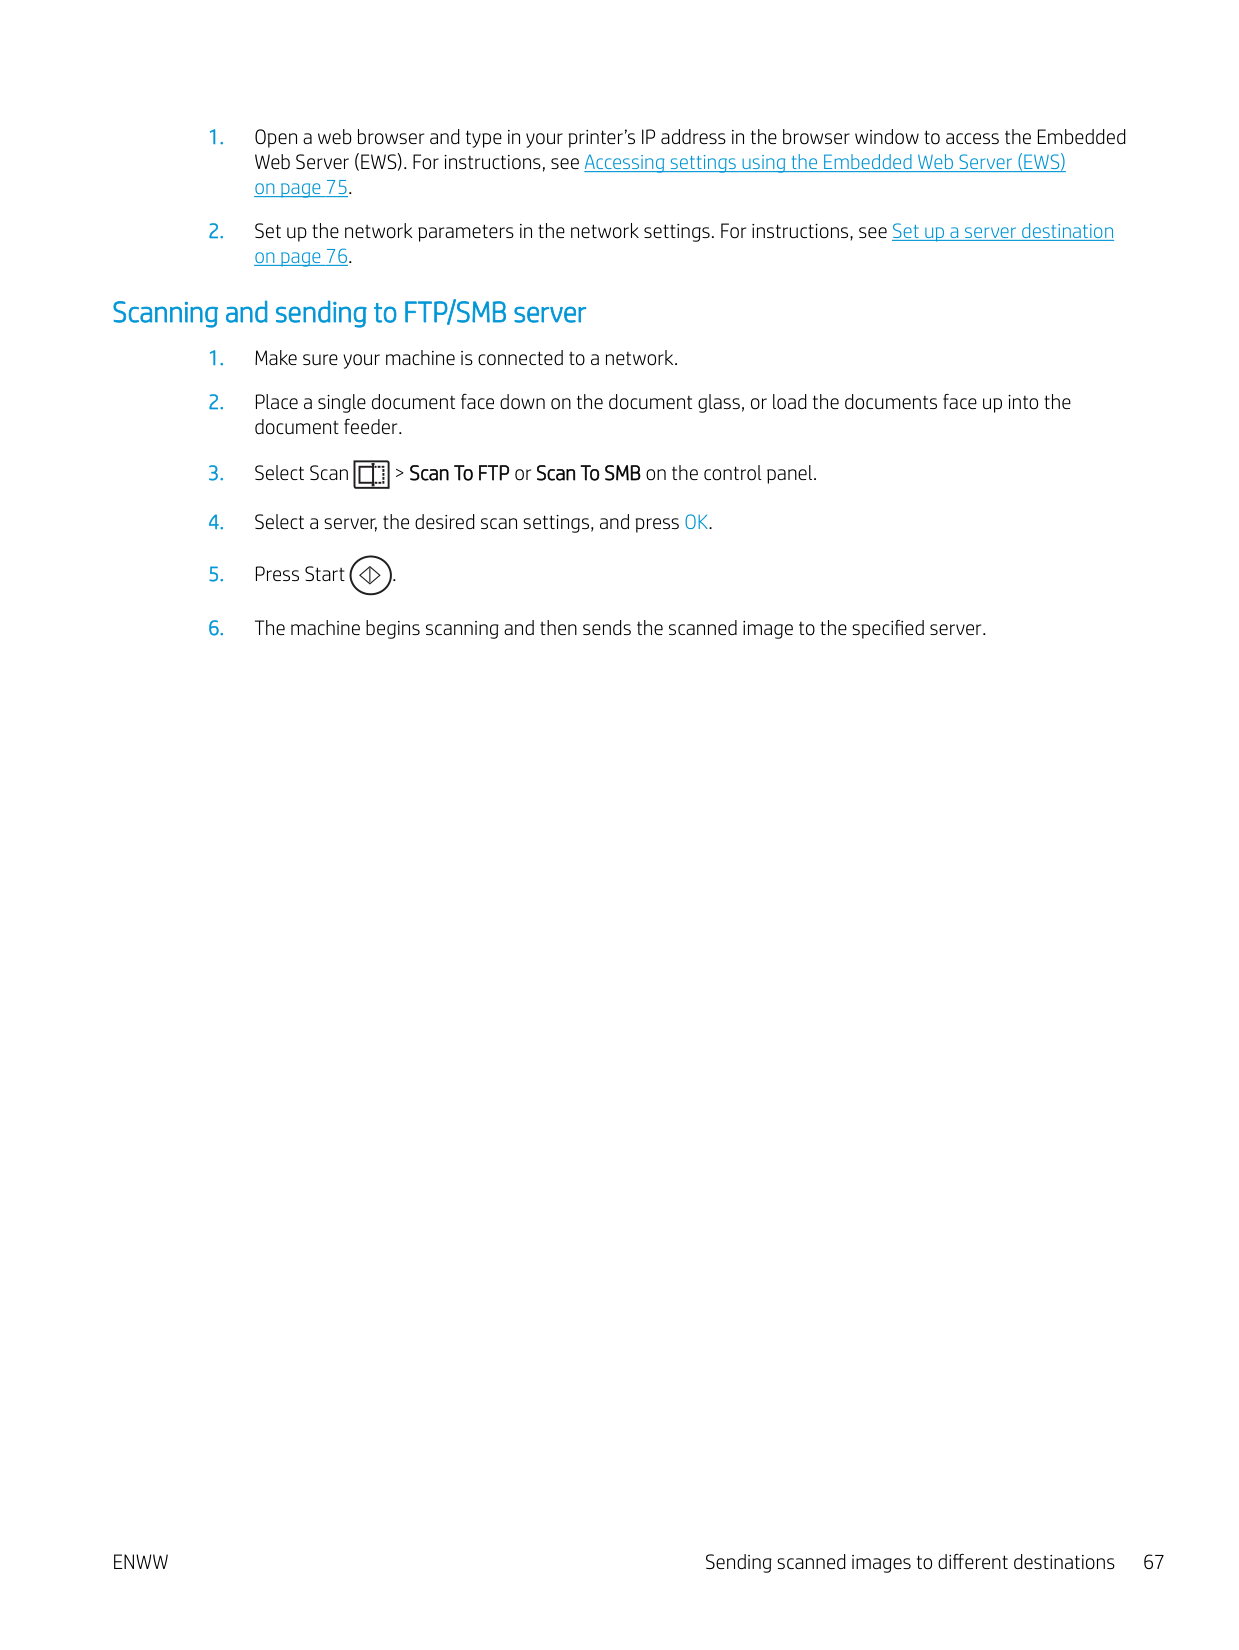
###### Scanning and sending to FTP/SMB server
ENWW Sending scanned images to different destinations 67
8 System and Other Settings
ENWW 69
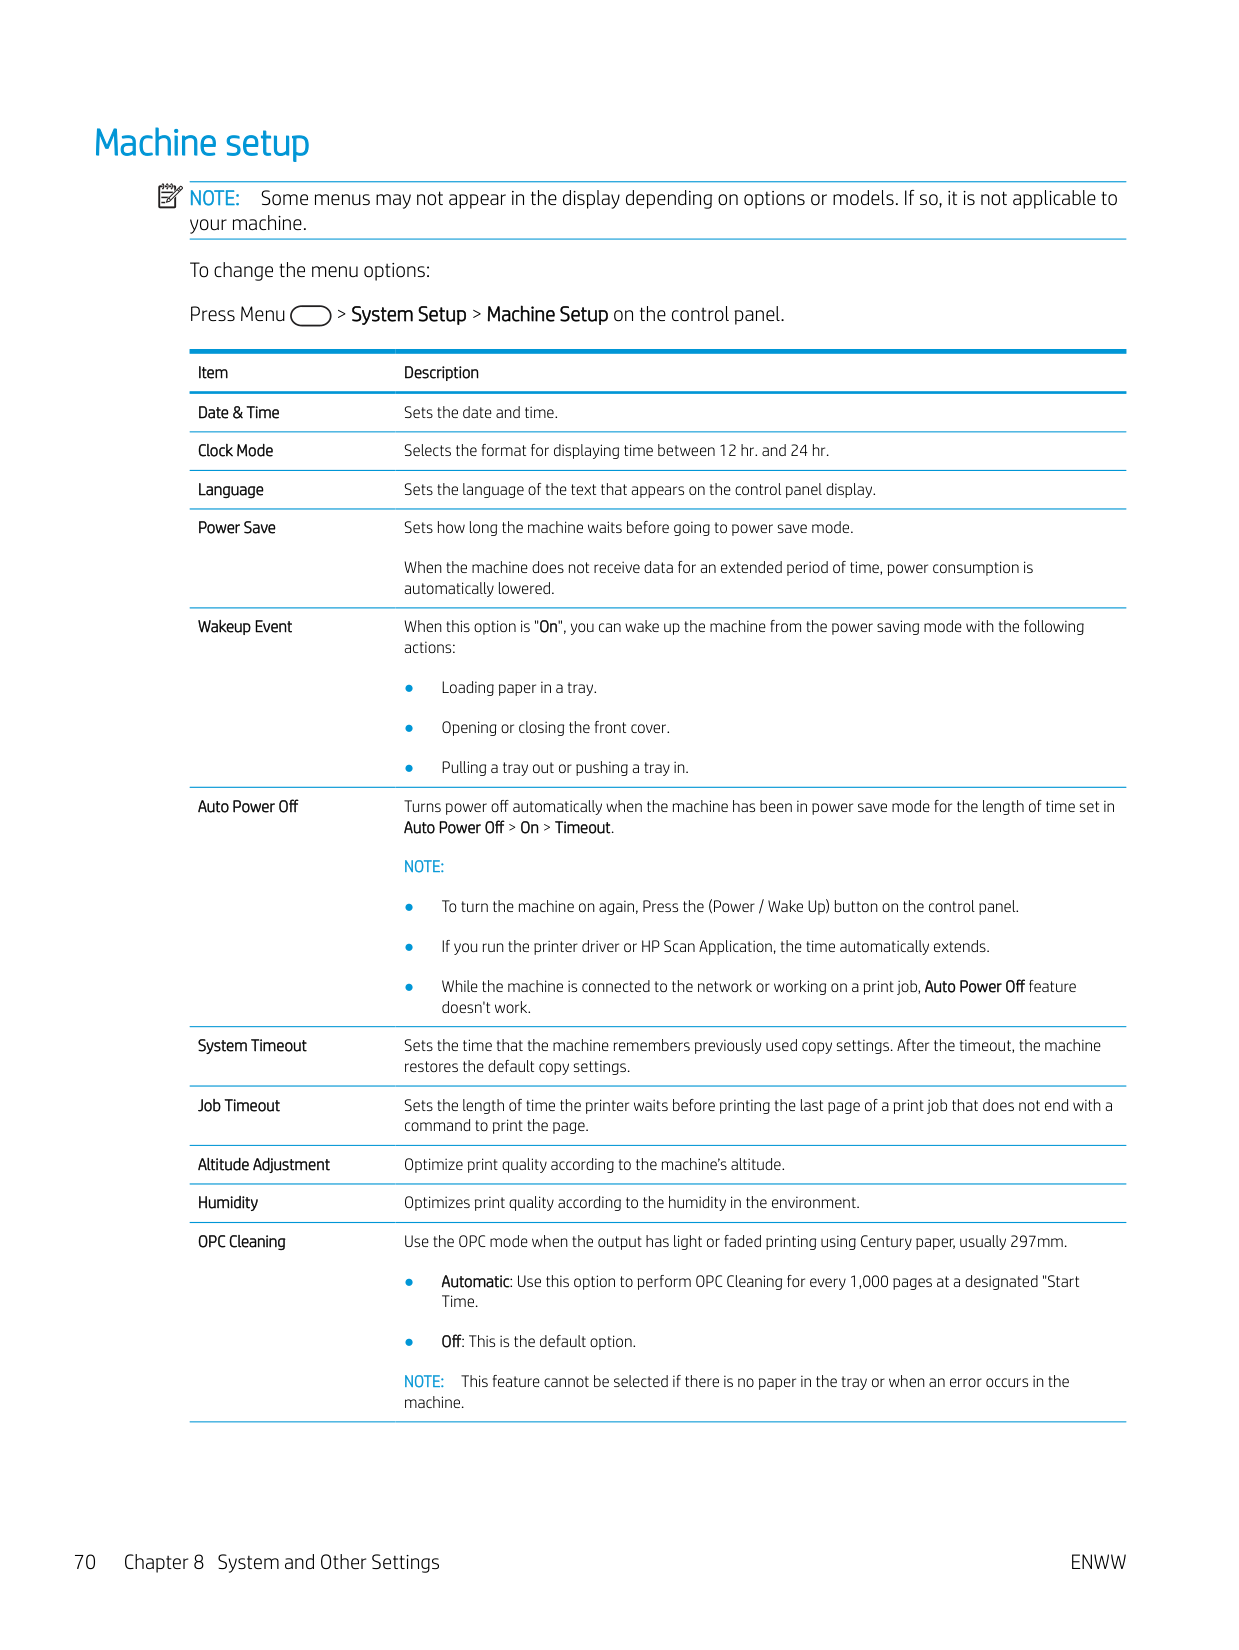
Machine setup NOTE: Some menus may not appear in the display depending on options or models. If so, it is not applicable to your machine. To change the menu options: Press Menu > System Setup > Machine Setup on the control panel.
| | |---|
Item Description Date & Time Sets the date and time. Clock Mode Selects the format for displaying time between 12 hr. and 24 hr. Language Sets the language of the text that appears on the control panel display. Power Save Sets how long the machine waits before going to power save mode.
When the machine does not receive data for an extended period of time, power consumption is automatically lowered.
Wakeup Event When this option is "On", you can wake up the machine from the power saving mode with the following
actions:
Auto Power Off Turns power off automatically when the machine has been in power save mode for the length of time set in Auto Power Off > On > Timeout. NOTE:
System Timeout Sets the time that the machine remembers previously used copy settings. After the timeout, the machine
restores the default copy settings.
Job Timeout Sets the length of time the printer waits before printing the last page of a print job that does not end with a
command to print the page. Altitude Adjustment Optimize print quality according to the machine’s altitude. Humidity Optimizes print quality according to the humidity in the environment. OPC Cleaning Use the OPC mode when the output has light or faded printing using Century paper, usually 297mm.
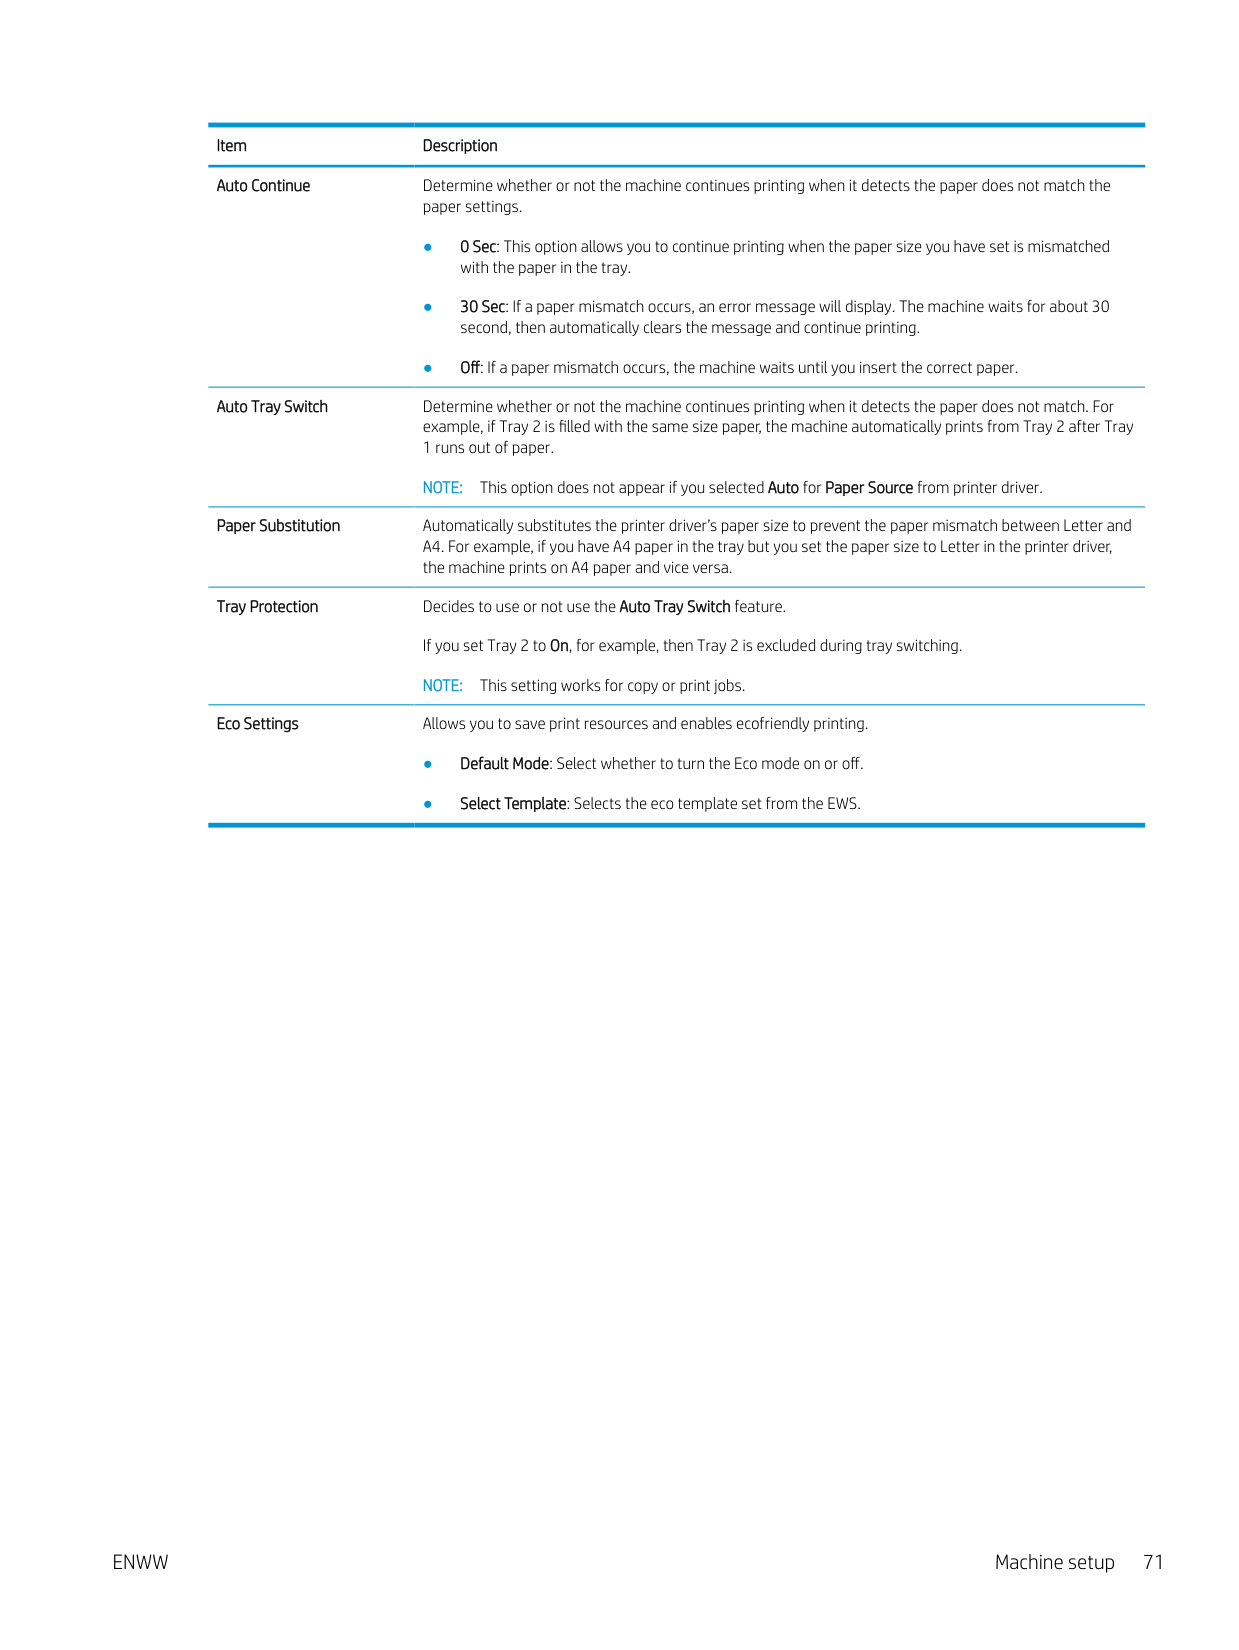
Item Description Auto Continue Determine whether or not the machine continues printing when it detects the paper does not match the
paper settings.

Auto Tray Switch Determine whether or not the machine continues printing when it detects the paper does not match. For example, if Tray 2 is filled with the same size paper, the machine automatically prints from Tray 2 after Tray 1 runs out of paper.
NOTE: This option does not appear if you selected Auto for Paper Source from printer driver.
Paper Substitution Automatically substitutes the printer driver’s paper size to prevent the paper mismatch between Letter and A4. For example, if you have A4 paper in the tray but you set the paper size to Letter in the printer driver, the machine prints on A4 paper and vice versa.
Tray Protection Decides to use or not use the Auto Tray Switch feature. If you set Tray 2 to On, for example, then Tray 2 is excluded during tray switching. NOTE: This setting works for copy or print jobs.
Eco Settings Allows you to save print resources and enables ecofriendly printing.
ENWW Machine setup 71
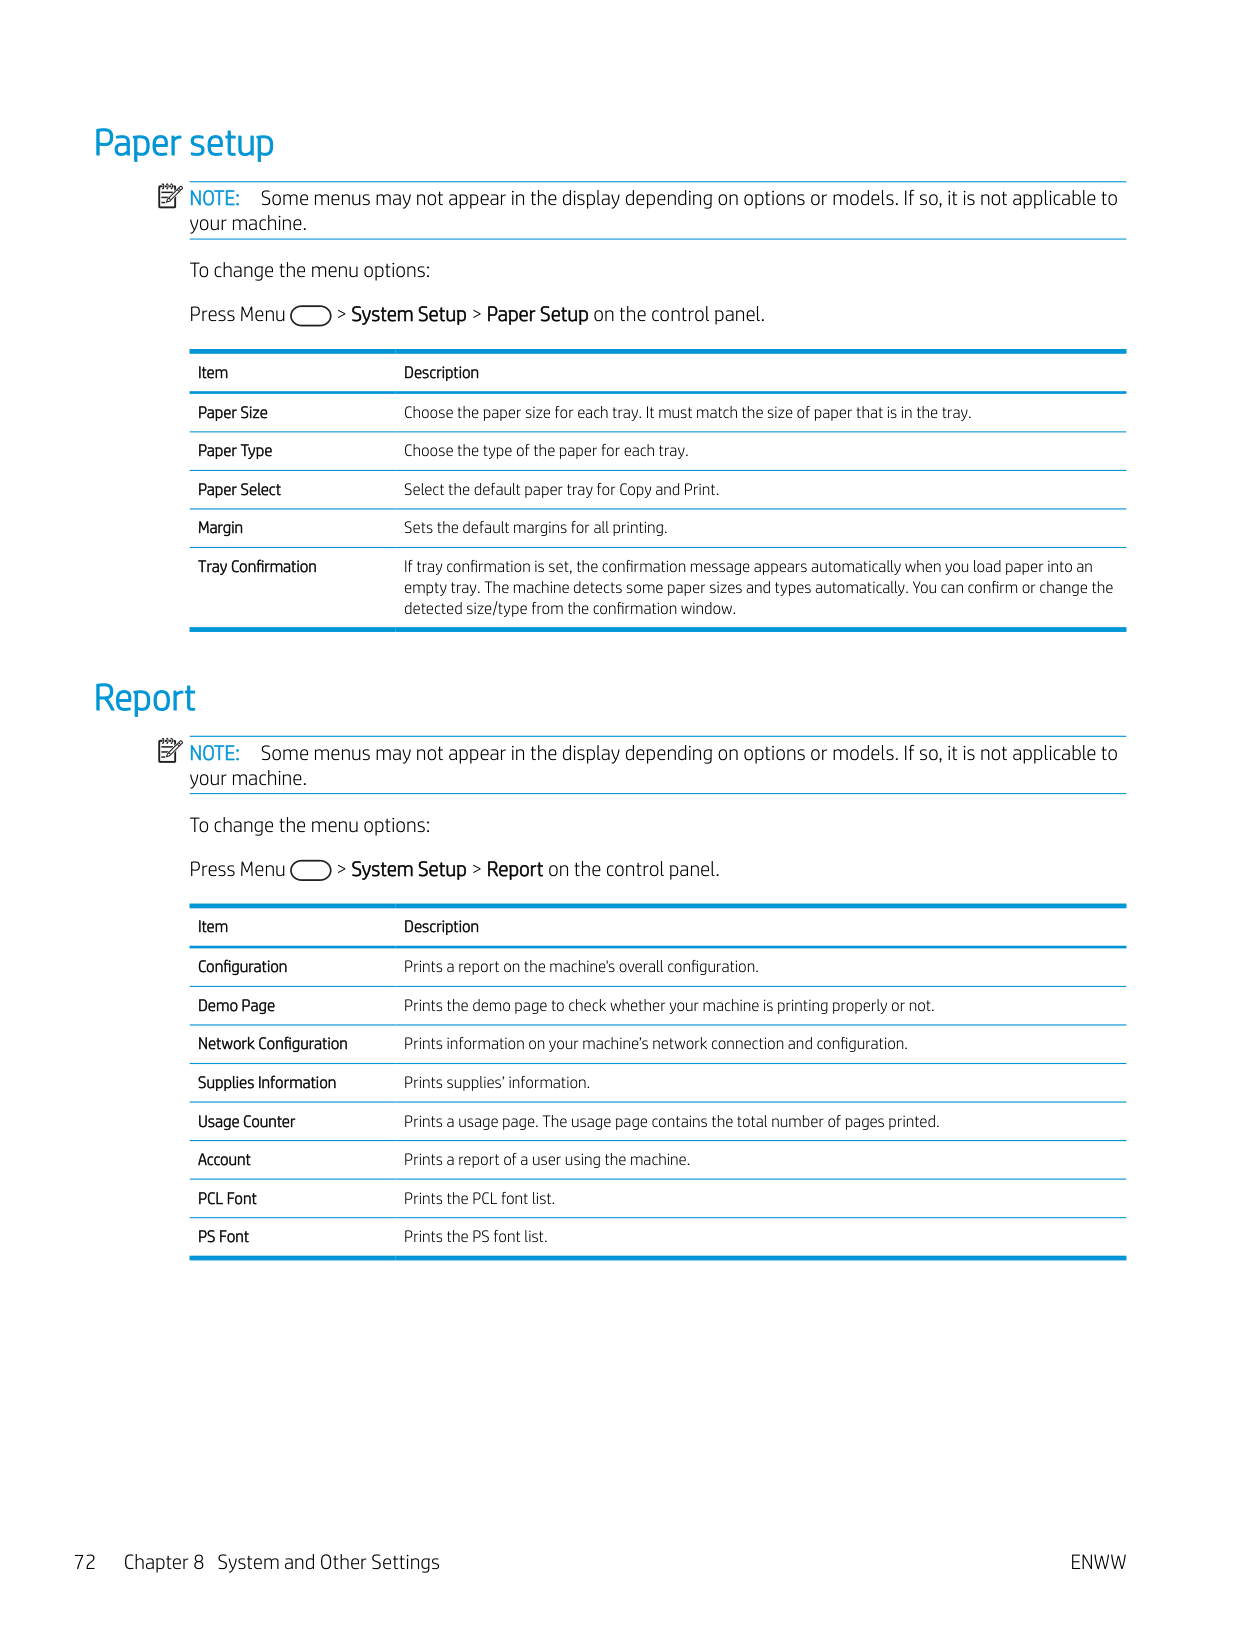
Paper setup NOTE: Some menus may not appear in the display depending on options or models. If so, it is not applicable to your machine. To change the menu options: Press Menu > System Setup > Paper Setup on the control panel.
| | |---|
Item Description Paper Size Choose the paper size for each tray. It must match the size of paper that is in the tray. Paper Type Choose the type of the paper for each tray. Paper Select Select the default paper tray for Copy and Print. Margin Sets the default margins for all printing. Tray Confirmation If tray confirmation is set, the confirmation message appears automatically when you load paper into an
empty tray. The machine detects some paper sizes and types automatically. You can confirm or change the detected size/type from the confirmation window.
#### Report
| | |---|
NOTE: Some menus may not appear in the display depending on options or models. If so, it is not applicable to your machine. To change the menu options: Press Menu > System Setup > Report on the control panel.
Item Description Configuration Prints a report on the machine's overall configuration. Demo Page Prints the demo page to check whether your machine is printing properly or not. Network Configuration Prints information on your machine’s network connection and configuration. Supplies Information Prints supplies’ information. Usage Counter Prints a usage page. The usage page contains the total number of pages printed. Account Prints a report of a user using the machine. PCL Font Prints the PCL font list. PS Font Prints the PS font list.
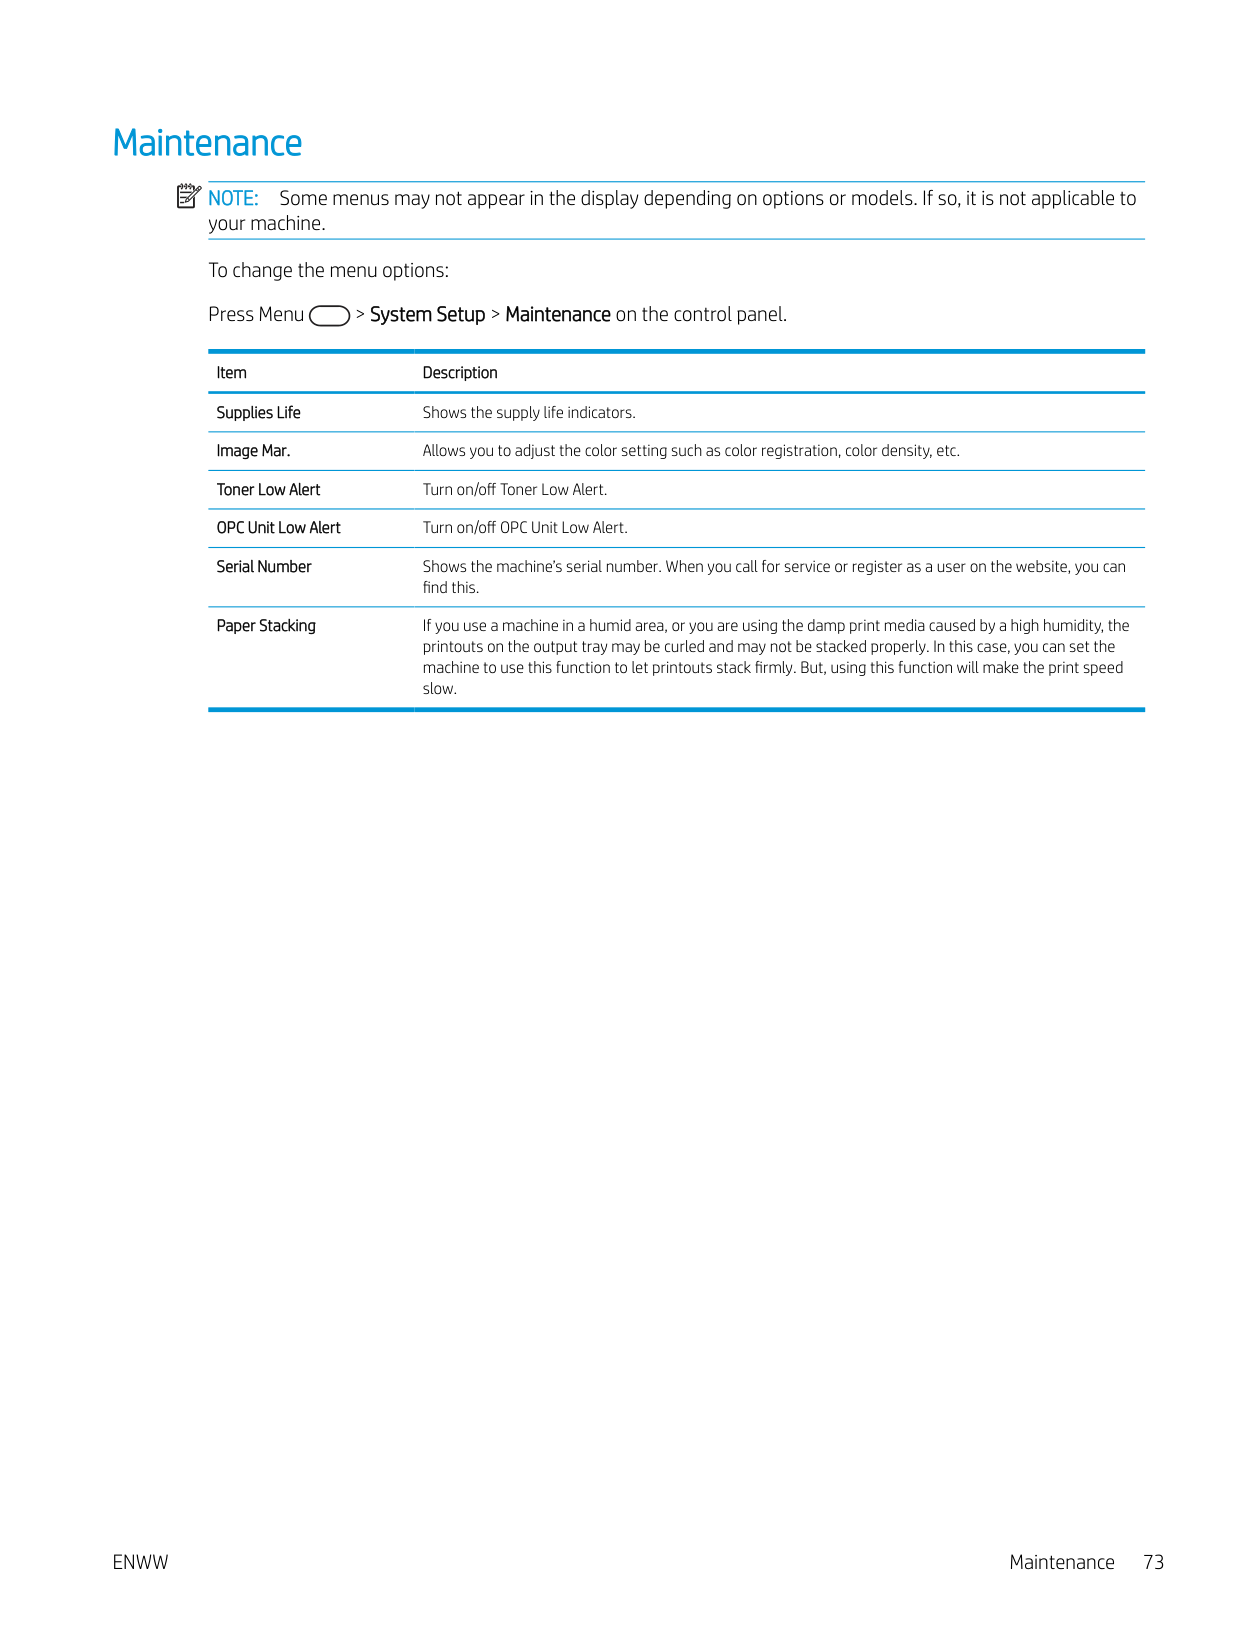
Maintenance NOTE: Some menus may not appear in the display depending on options or models. If so, it is not applicable to your machine. To change the menu options: Press Menu > System Setup > Maintenance on the control panel.
| | |---|
Item Description Supplies Life Shows the supply life indicators. Image Mar. Allows you to adjust the color setting such as color registration, color density, etc. Toner Low Alert Turn on/off Toner Low Alert. OPC Unit Low Alert Turn on/off OPC Unit Low Alert. Serial Number Shows the machine’s serial number. When you call for service or register as a user on the website, you can
find this.
Paper Stacking If you use a machine in a humid area, or you are using the damp print media caused by a high humidity, the printouts on the output tray may be curled and may not be stacked properly. In this case, you can set the machine to use this function to let printouts stack firmly. But, using this function will make the print speed slow.
ENWW Maintenance 73
Network setup NOTE: Some menus may not appear in the display depending on options or models. If so, it is not applicable to your machine. To change the menu options: Press Menu > Network on the control panel.
| | |---|
Option Description TCP/IP (IPv4) Selects the appropriate protocol and configure parameters to use the network
environment. NOTE: There are lots of parameters to be set. If you are not sure, leave as is, or consult the network administrator.
TCP/IP (IPv6) Selects this option to use the network environment through IPv6. Ethernet Configure the network transmission speed or port.
NOTE: Turn the power off and on after you change this option. Protocol Management HTTP You can set whether to use Web Service or not.
NOTE: Turn the power off and on after you change this option to Off. WINS You can configure the WINS server. WINS (Windows Internet Name Service) is used in the
Windows operating system.
SNMP V1/V2 You can set SNMP (Simple Network Management Protocol). Administrator’s can use SNMP
to monitor and manage machines on the network. UPnP(SSDP) You can set UPNP protocol.

NOTE: Turn the power off and on after you change this option to Off.
MDNS You can set mDNS (Multicast Domain Name System) settings. Network Configuration This list shows information on your machine’s network connection and configuration. Clear Settings Reverts the network settings to the default values.
NOTE: Turn the power off and on after you change this option.
Accessing settings using the Embedded Web Server (EWS) Network-connected MFPs have an Embedded Web Server available to view and modify printer settings. For more information about the EWS, go to http://support.hp.com.
######### Access the EWS
Use the following steps to open the EWS:
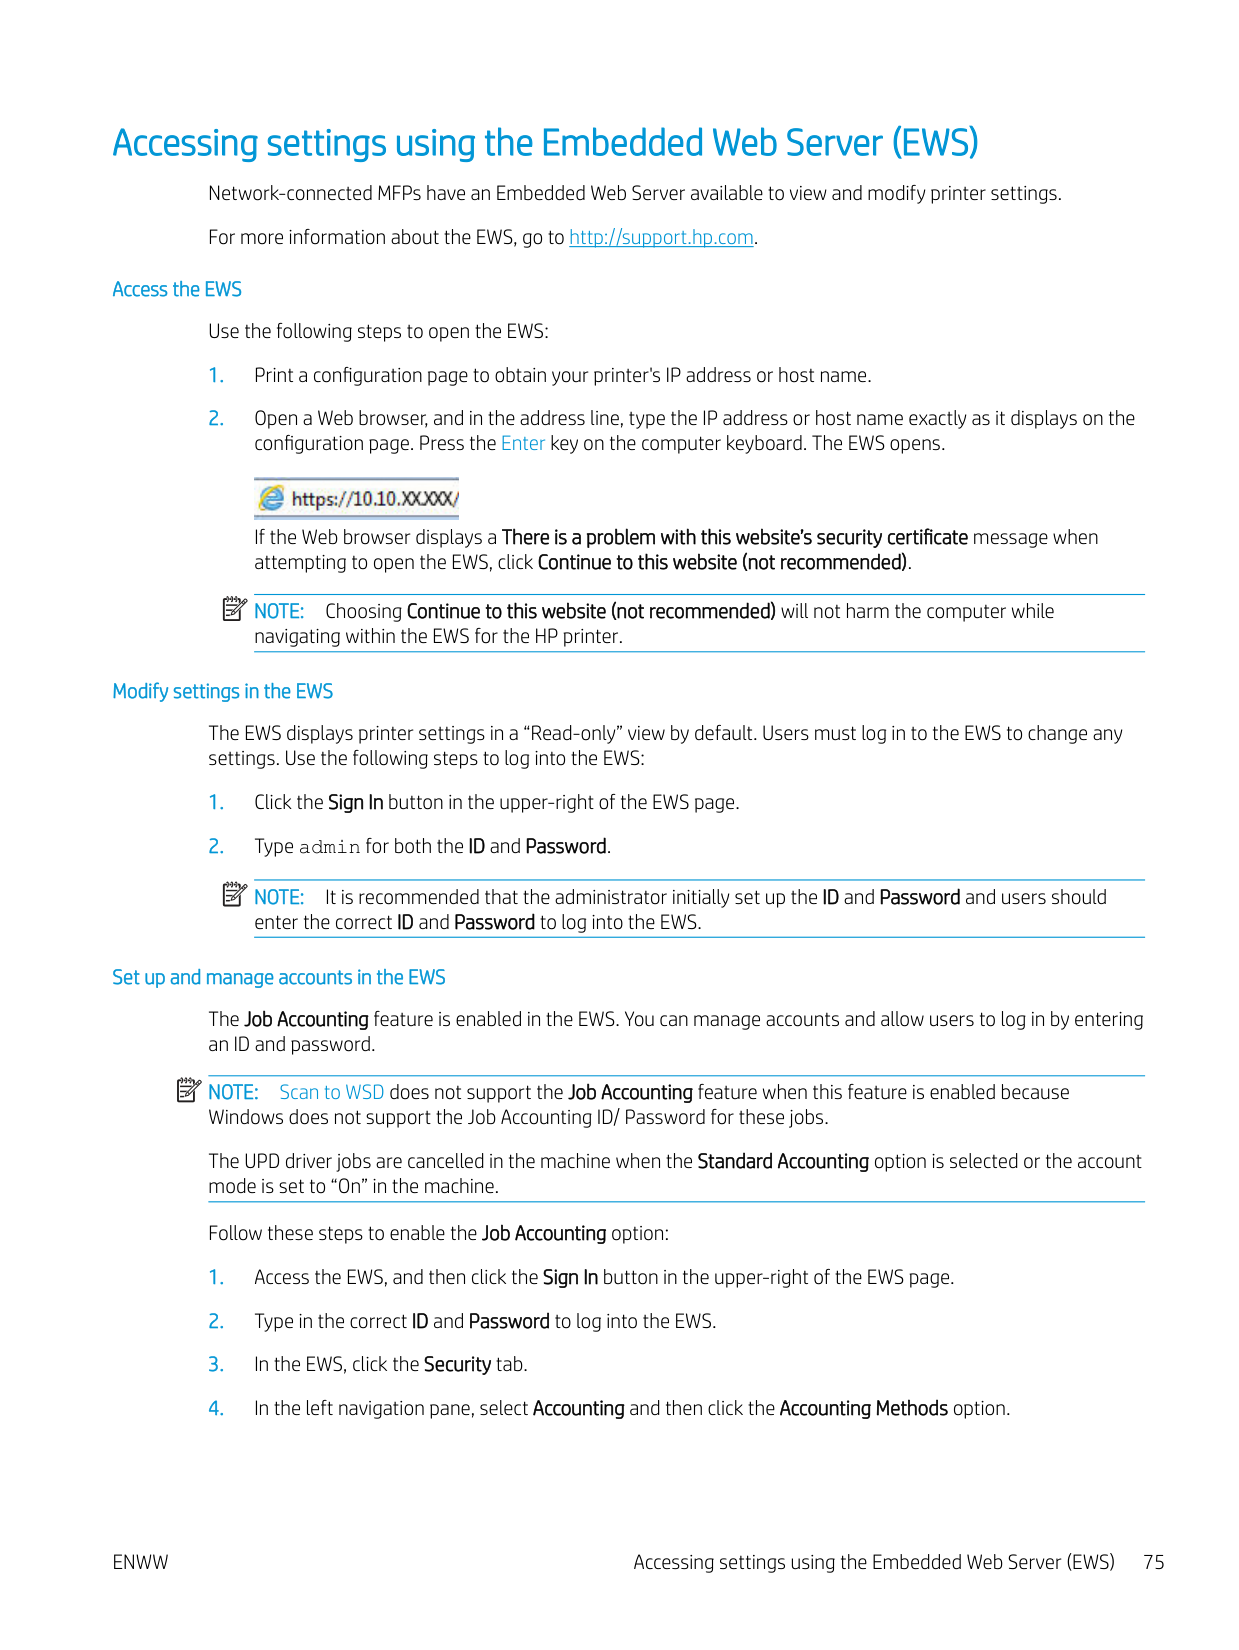
configuration page. Press the Enter key on the computer keyboard. The EWS opens.

######### If the Web browser displays a There is a problem with this website’s security certificate message when attempting to open the EWS, click Continue to this website (not recommended).
| | |---|

NOTE: Choosing Continue to this website (not recommended) will not harm the computer while navigating within the EWS for the HP printer.
######### Modify settings in the EWS
The EWS displays printer settings in a “Read-only” view by default. Users must log in to the EWS to change any settings. Use the following steps to log into the EWS:
| | |---|
NOTE: It is recommended that the administrator initially set up the ID and Password and users should enter the correct ID and Password to log into the EWS.
######### Set up and manage accounts in the EWS
The Job Accounting feature is enabled in the EWS. You can manage accounts and allow users to log in by entering an ID and password.
| | |---|
NOTE: Scan to WSD does not support the Job Accounting feature when this feature is enabled because Windows does not support the Job Accounting ID/ Password for these jobs. The UPD driver jobs are cancelled in the machine when the Standard Accounting option is selected or the account mode is set to “On” in the machine. Follow these steps to enable the Job Accounting option:
| | |---|
Set up an email account NOTE: Make sure the network is connected to the printer.
| | |---|
You can set up an Address Book in the EWS and manage 200 individual contacts and 200 groups in the address book.
Follow these steps to set up an email account:
Set up a server destination NOTE: Make sure the network is connected to the printer. Follow these steps to set up an email account:
| | |---|
| | |---|
9 Maintenance
This chapter provides information about purchasing supplies, accessories, and maintenance parts available for your machine.
ENWW 79
#### Ordering supplies and accessories
| | |---|
NOTE: Available accessories may differ from country/region to country/region. Contact your sales representatives to obtain the list of available supplies and maintenance parts.
#### Available consumables
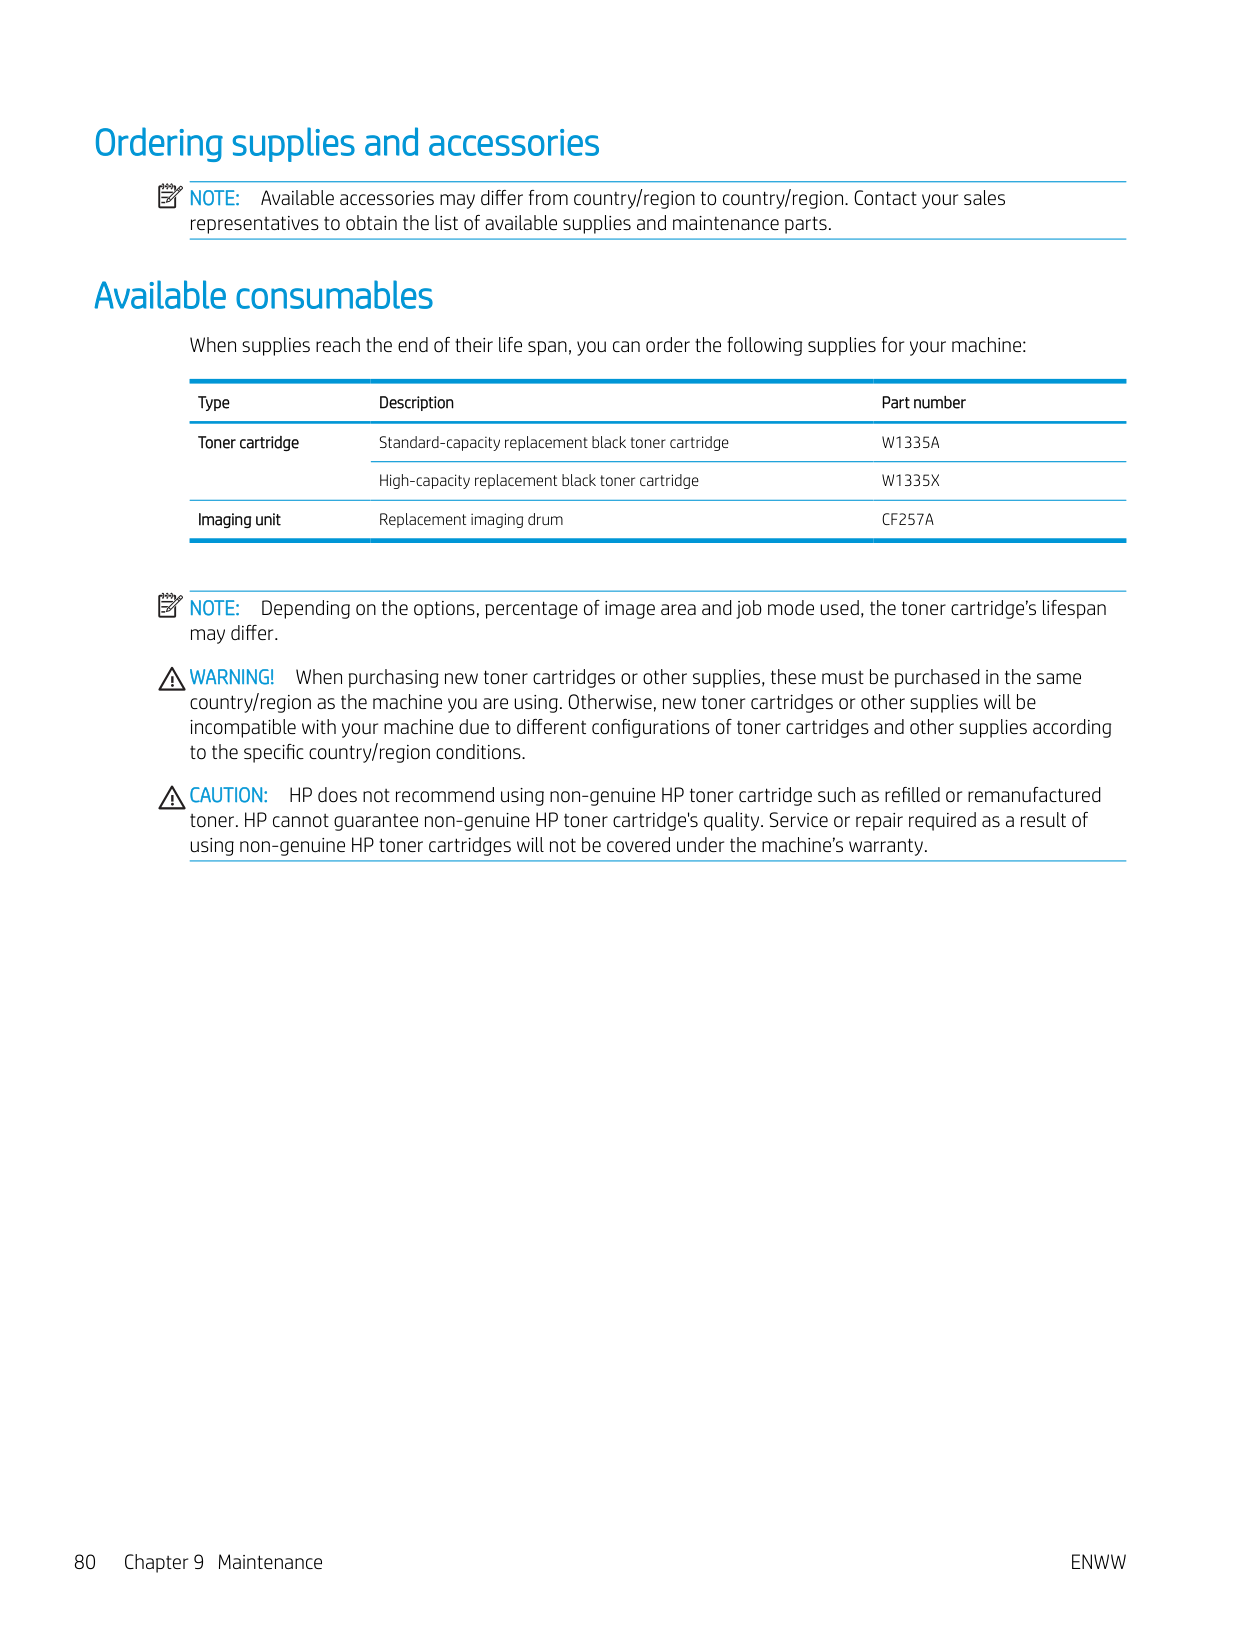
When supplies reach the end of their life span, you can order the following supplies for your machine:
Type Description Part number Toner cartridge Standard-capacity replacement black toner cartridge W1335A
High-capacity replacement black toner cartridge W1335X Imaging unit Replacement imaging drum CF257A
| | |---|
NOTE: Depending on the options, percentage of image area and job mode used, the toner cartridge’s lifespan may differ.
WARNING! When purchasing new toner cartridges or other supplies, these must be purchased in the same country/region as the machine you are using. Otherwise, new toner cartridges or other supplies will be incompatible with your machine due to different configurations of toner cartridges and other supplies according to the specific country/region conditions.
CAUTION: HP does not recommend using non-genuine HP toner cartridge such as refilled or remanufactured toner. HP cannot guarantee non-genuine HP toner cartridge's quality. Service or repair required as a result of using non-genuine HP toner cartridges will not be covered under the machine’s warranty.
#### Available accessories
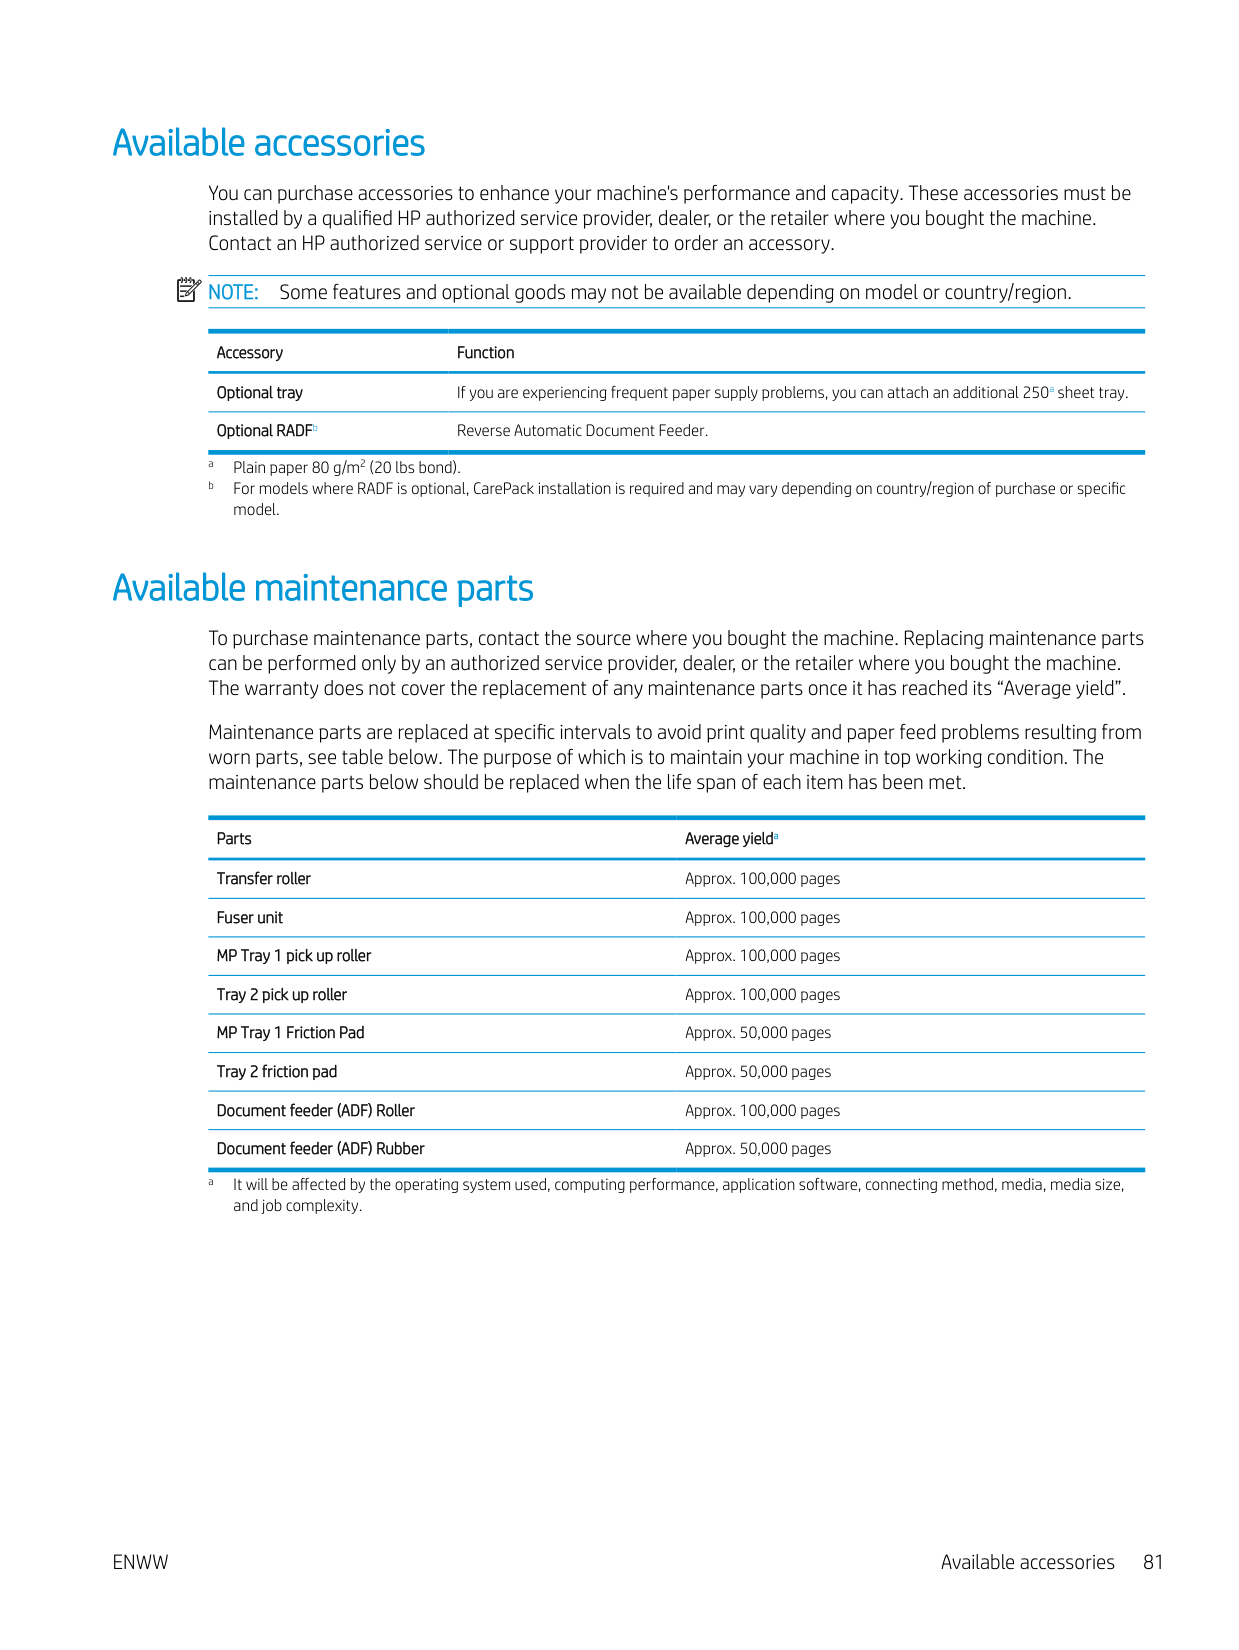
You can purchase accessories to enhance your machine's performance and capacity. These accessories must be installed by a qualified HP authorized service provider, dealer, or the retailer where you bought the machine. Contact an HP authorized service or support provider to order an accessory.
| | |---|
NOTE: Some features and optional goods may not be available depending on model or country/region.
Accessory Function Optional tray If you are experiencing frequent paper supply problems, you can attach an additional 250a sheet tray. Optional RADFb Reverse Automatic Document Feeder.
#### Available maintenance parts
To purchase maintenance parts, contact the source where you bought the machine. Replacing maintenance parts can be performed only by an authorized service provider, dealer, or the retailer where you bought the machine. The warranty does not cover the replacement of any maintenance parts once it has reached its “Average yield”.
Maintenance parts are replaced at specific intervals to avoid print quality and paper feed problems resulting from worn parts, see table below. The purpose of which is to maintain your machine in top working condition. The maintenance parts below should be replaced when the life span of each item has been met.
Parts Average yielda Transfer roller Approx. 100,000 pages Fuser unit Approx. 100,000 pages MP Tray 1 pick up roller Approx. 100,000 pages Tray 2 pick up roller Approx. 100,000 pages MP Tray 1 Friction Pad Approx. 50,000 pages Tray 2 friction pad Approx. 50,000 pages Document feeder (ADF) Roller Approx. 100,000 pages Document feeder (ADF) Rubber Approx. 50,000 pages
a It will be affected by the operating system used, computing performance, application software, connecting method, media, media size, and job complexity.
ENWW Available accessories 81
#### Storing the consumables
Consumables contain components that are sensitive to light, temperature, and humidity. HP suggests users follow these recommendations to ensure optimal performance, highest quality, and longest life from your new HP consumables.
Store the consumables in the same environment in which the printer will be used. This should be in controlled temperature and humidity conditions. The consumables should remain in their original and unopened package until installation.
If the consumables are removed from the printer, follow the instructions below to store the imaging unit properly.
###### Imaging unit handling instructions
Toner cartridge usage HP cannot recommend the use of non-HP toner cartridges, either new or remanufactured. NOTE: For HP printer products, the use of a non-HP toner cartridge or a refilled toner cartridge does not affect either the warranty to the customer or any HP support contract with the customer. However, if product failure or damage is attributable to the use of a non-HP toner cartridge or refilled toner cartridge, HP will charge its standard time and materials charges to service the product for the particular failure or damage.
| | |---|
###### Estimated toner cartridge life
Print cartridge life is approximate, based on average A4 /Letter-size page count with ISO coverage. Declared cartridge yield value in accordance with ISO/IEC 19798. Actual yields vary considerably based on images printed and other factors. For more information, go to http://www.hp.com/go/learnaboutsupplies.
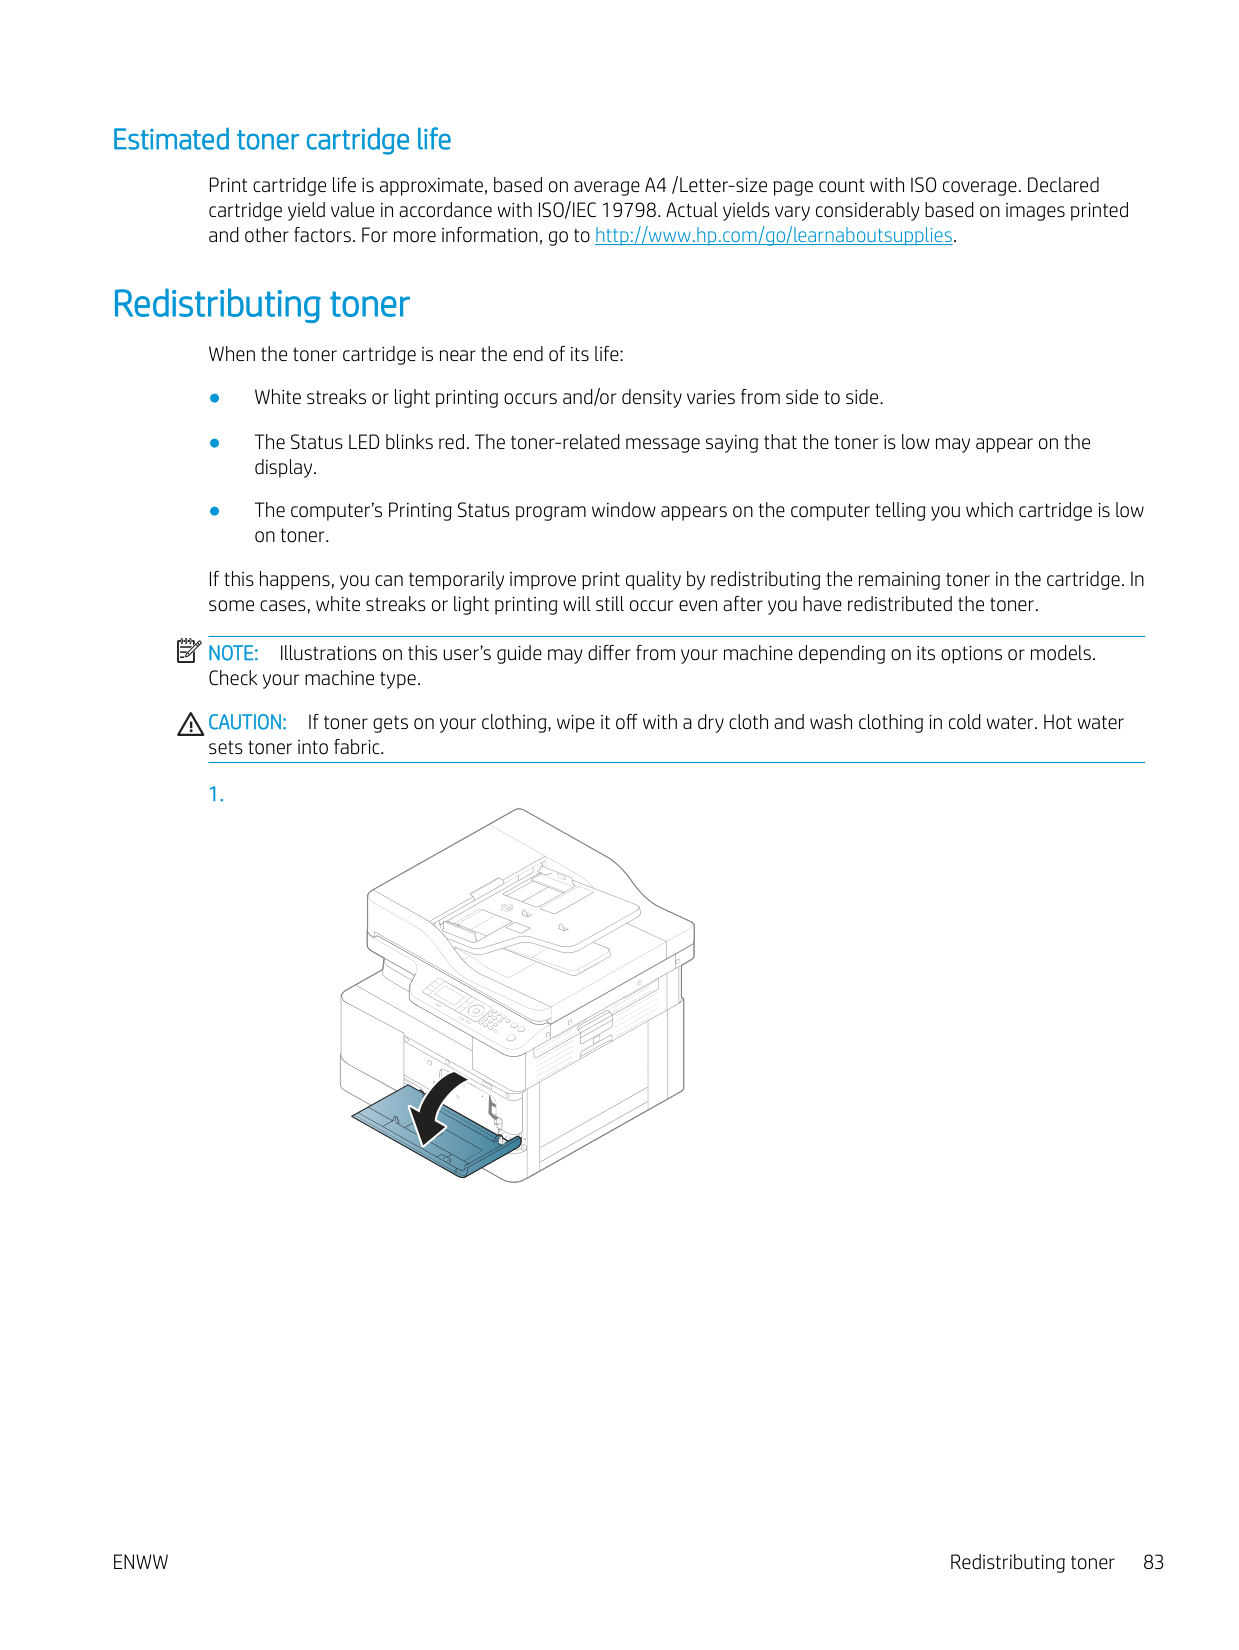
#### Redistributing toner
When the toner cartridge is near the end of its life:
If this happens, you can temporarily improve print quality by redistributing the remaining toner in the cartridge. In some cases, white streaks or light printing will still occur even after you have redistributed the toner.
| | |---|
NOTE: Illustrations on this user’s guide may differ from your machine depending on its options or models. Check your machine type.
CAUTION: If toner gets on your clothing, wipe it off with a dry cloth and wash clothing in cold water. Hot water sets toner into fabric.
######### 1.
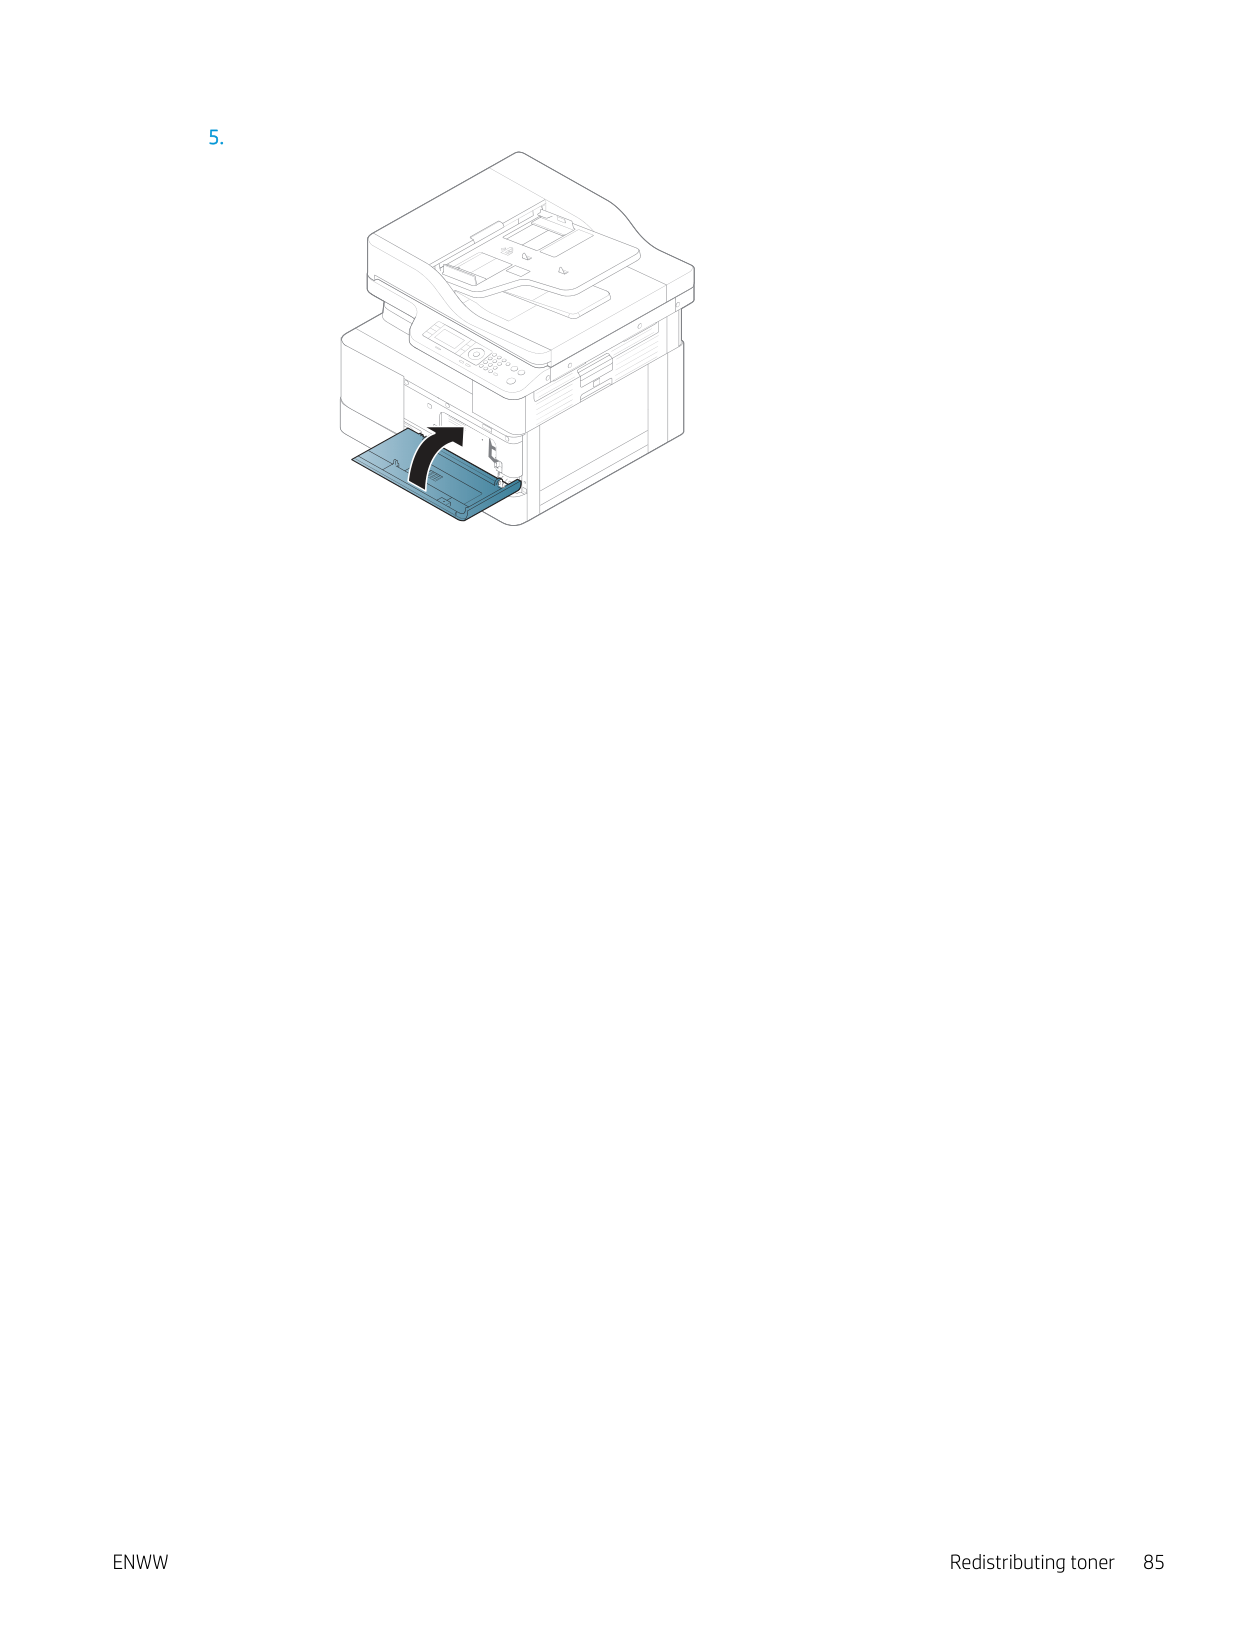
######### 5.
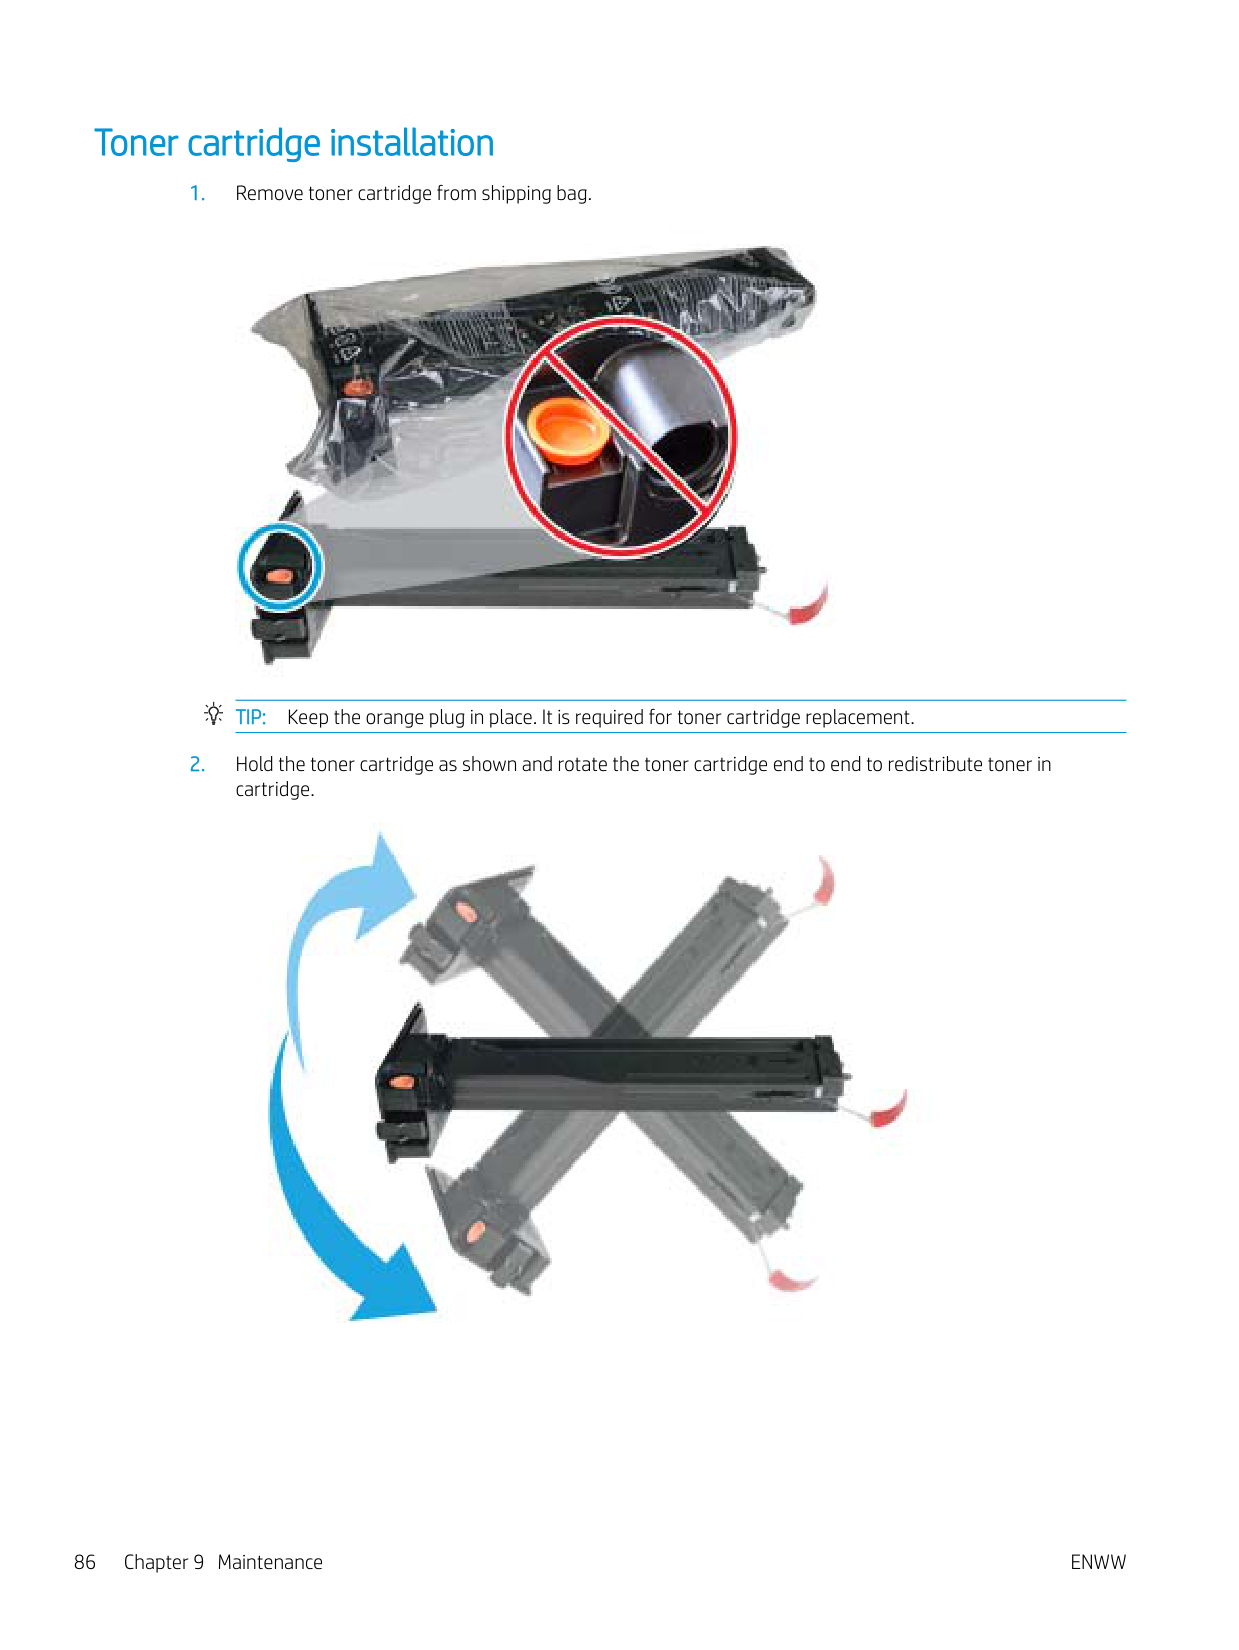
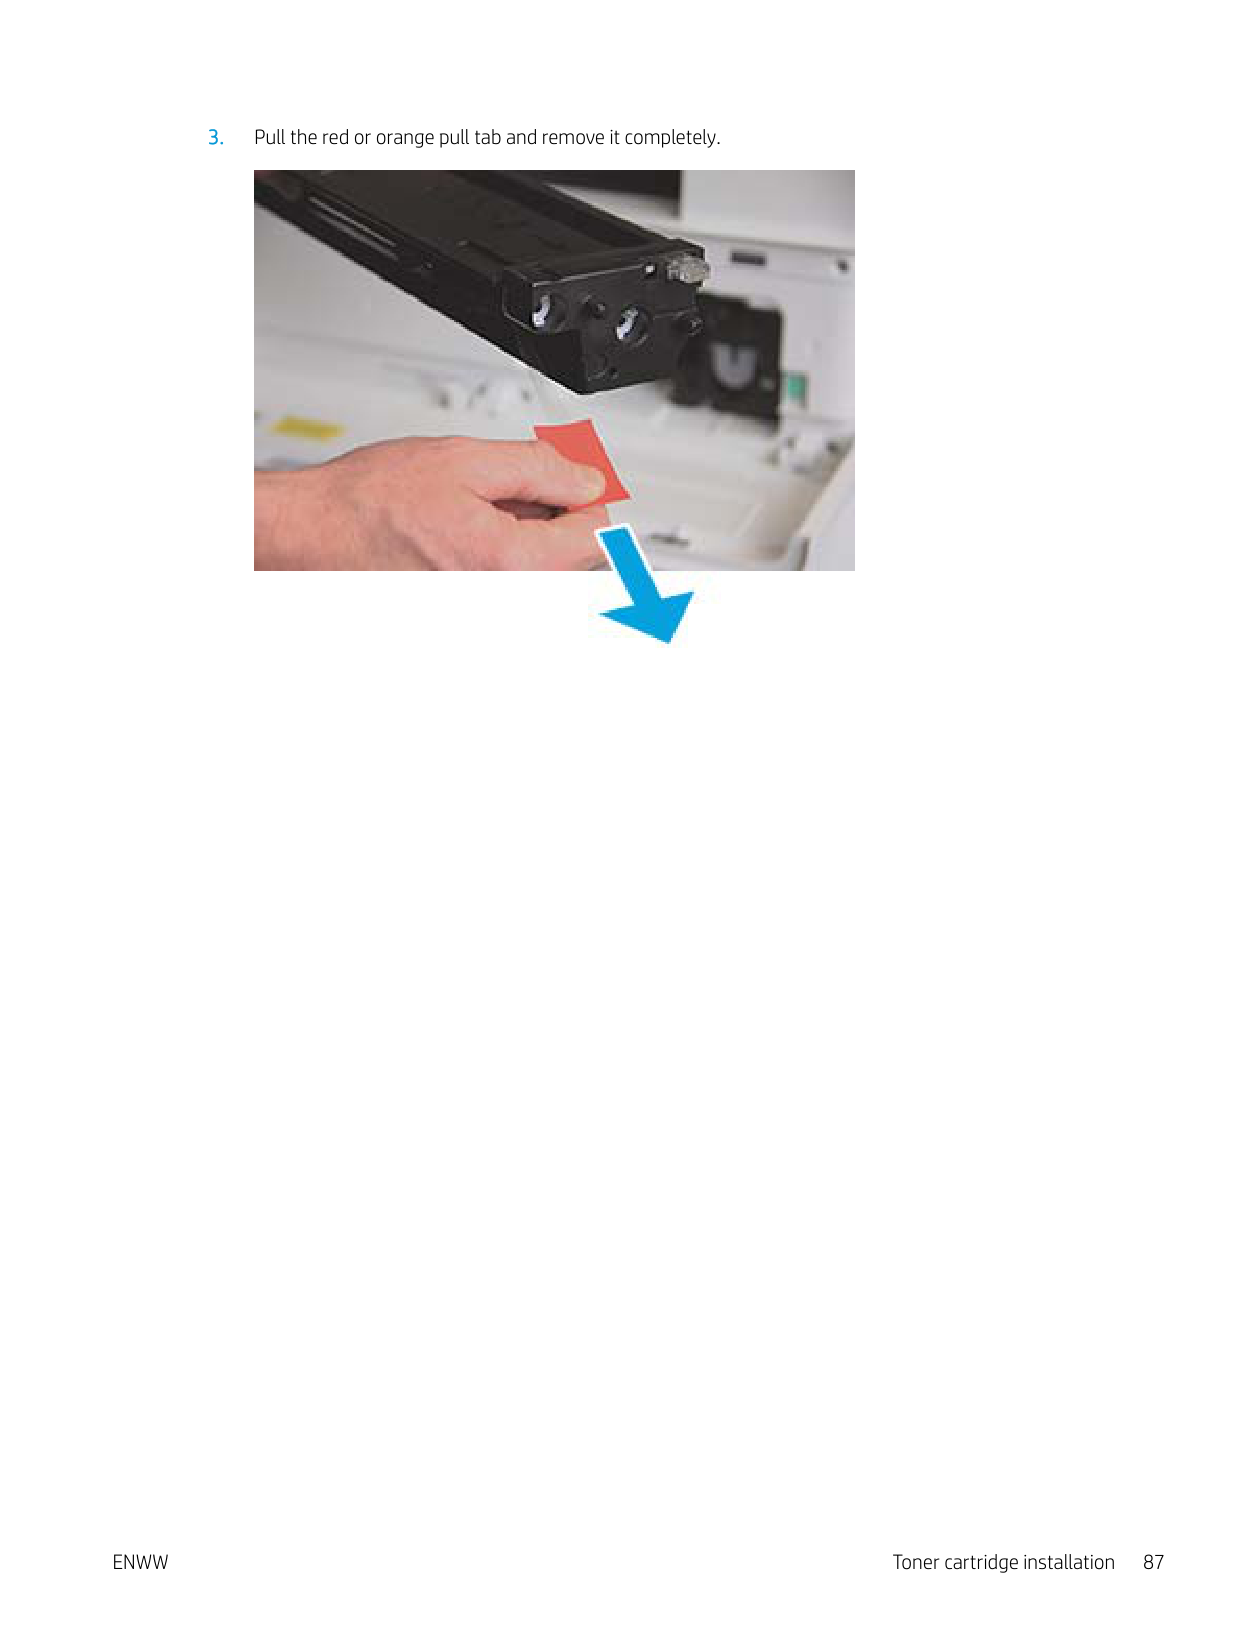
#### Toner cartridge installation

TIP: Keep the orange plug in place. It is required for toner cartridge replacement.


ENWW Toner cartridge installation 87
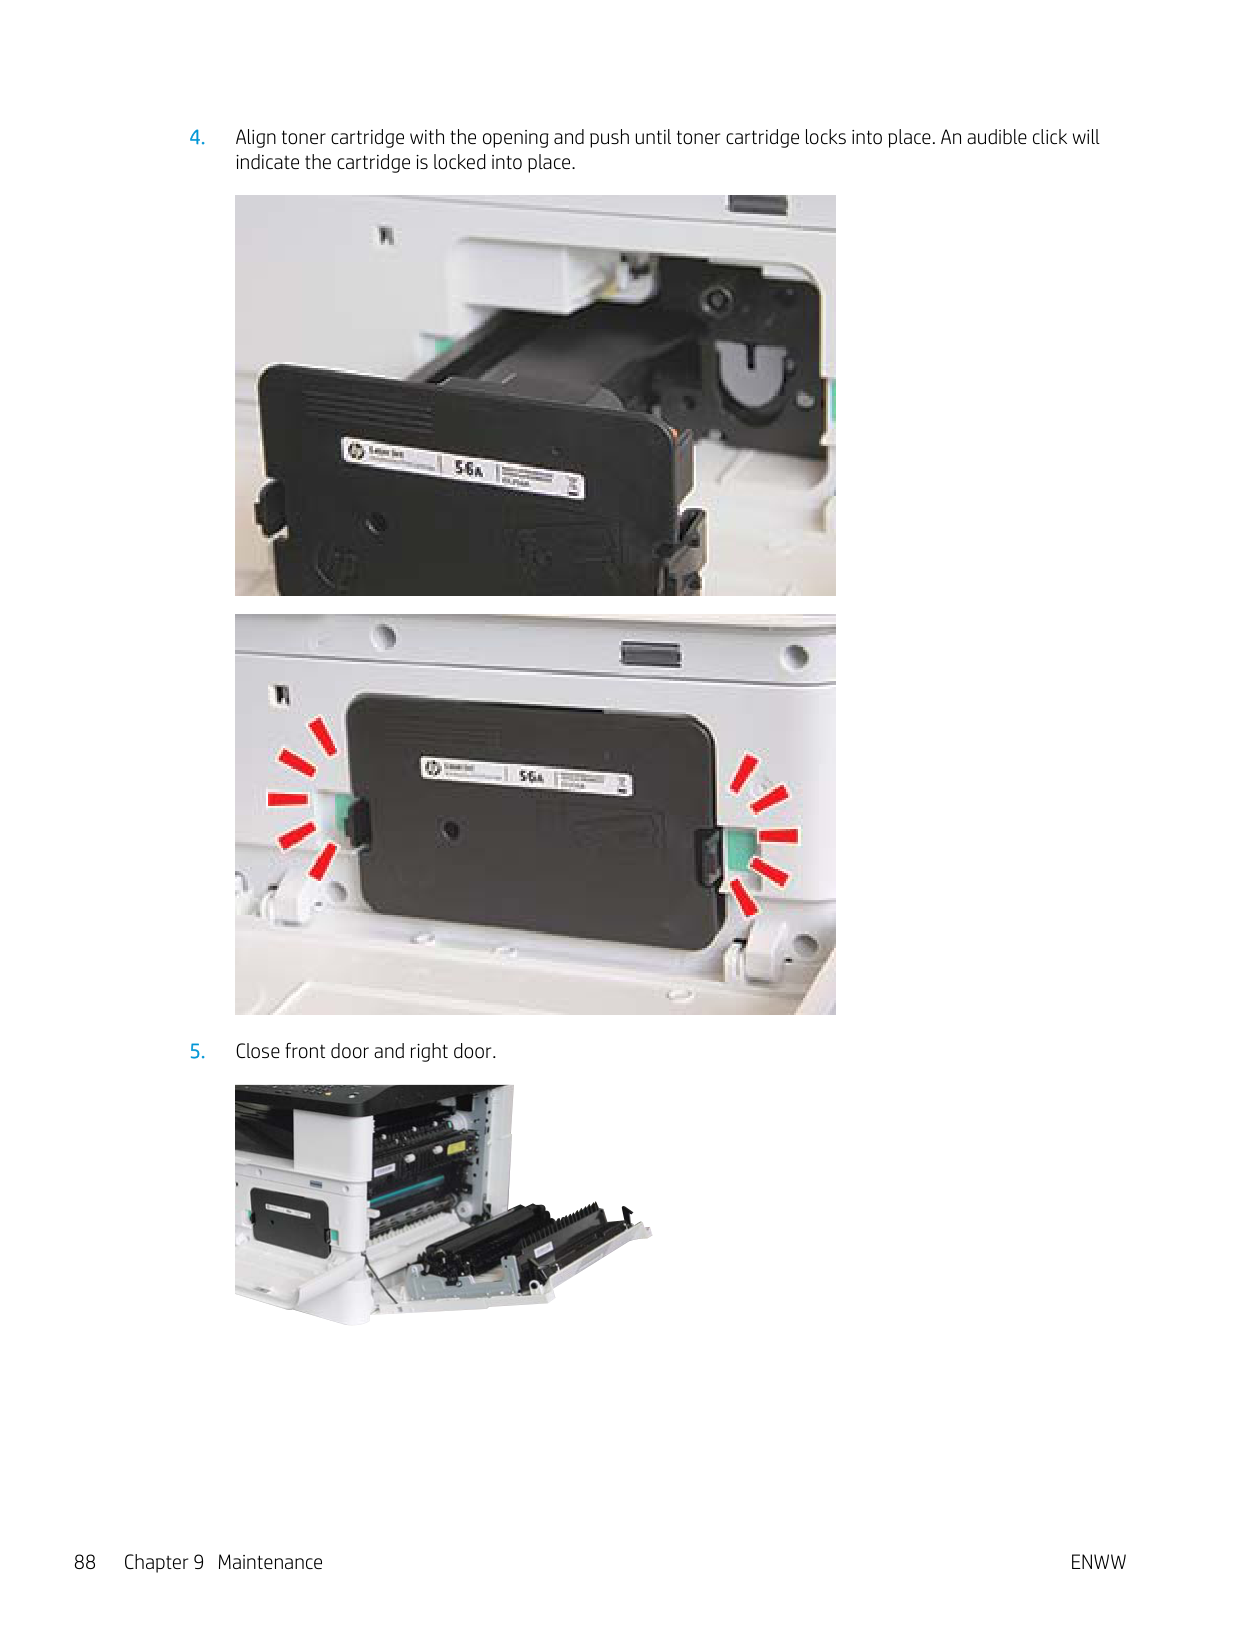
########## 4. Align toner cartridge with the opening and push until toner cartridge locks into place. An audible click willindicate the cartridge is locked into place.


########## 5. Close front door and right door.

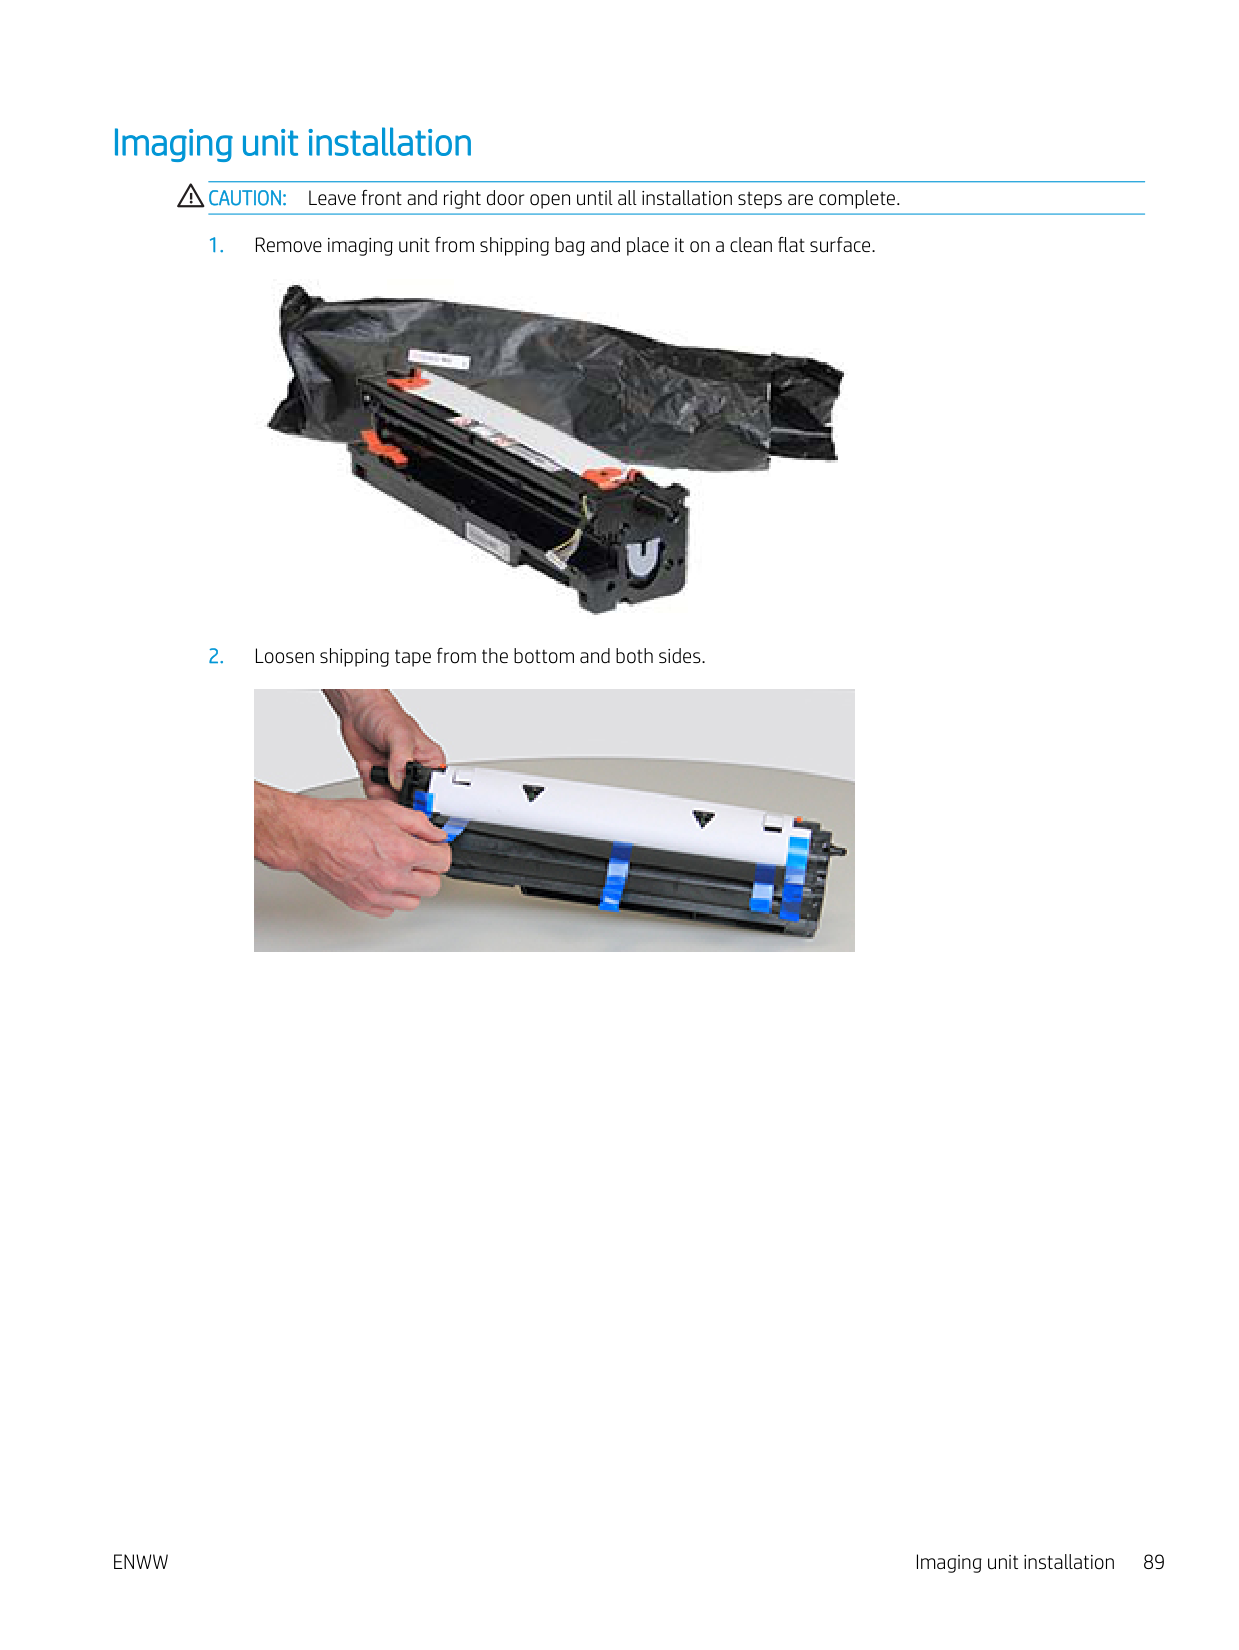
#### Imaging unit installation
CAUTION: Leave front and right door open until all installation steps are complete.

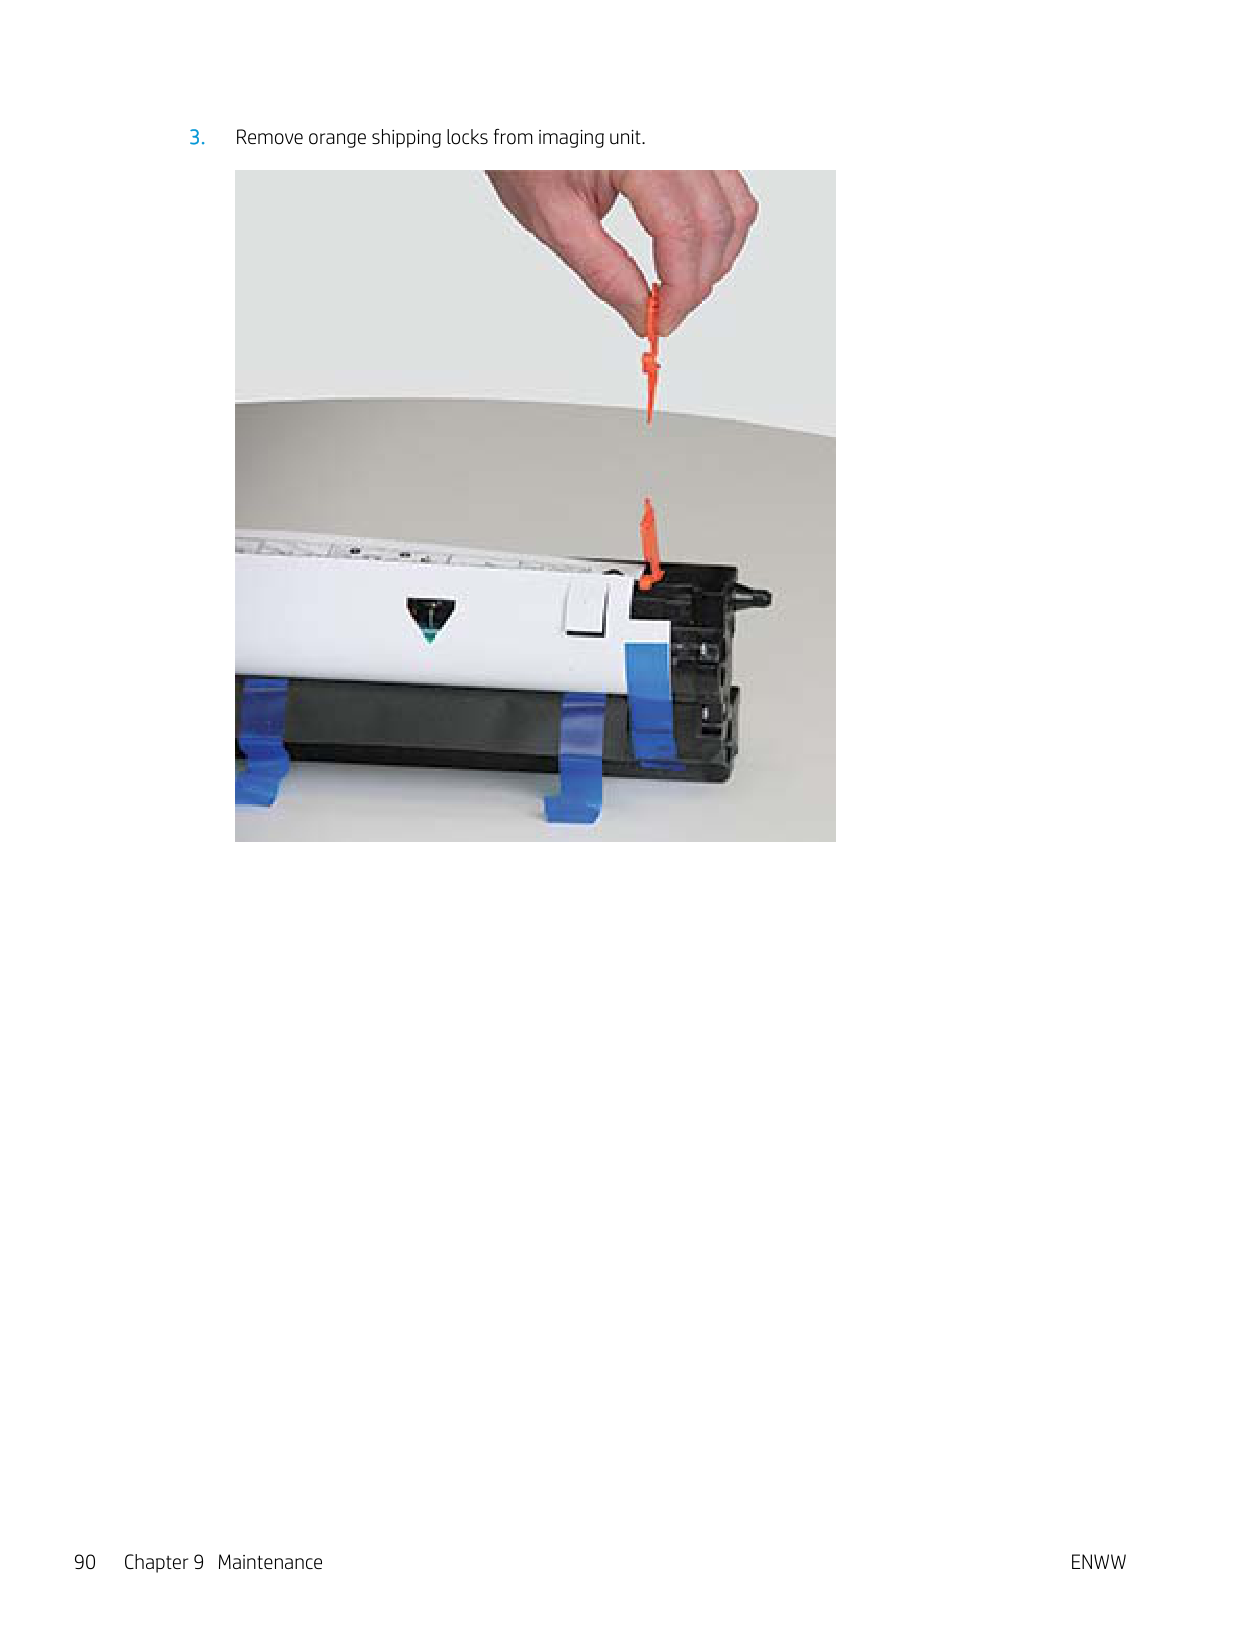

########## 3. Remove orange shipping locks from imaging unit.


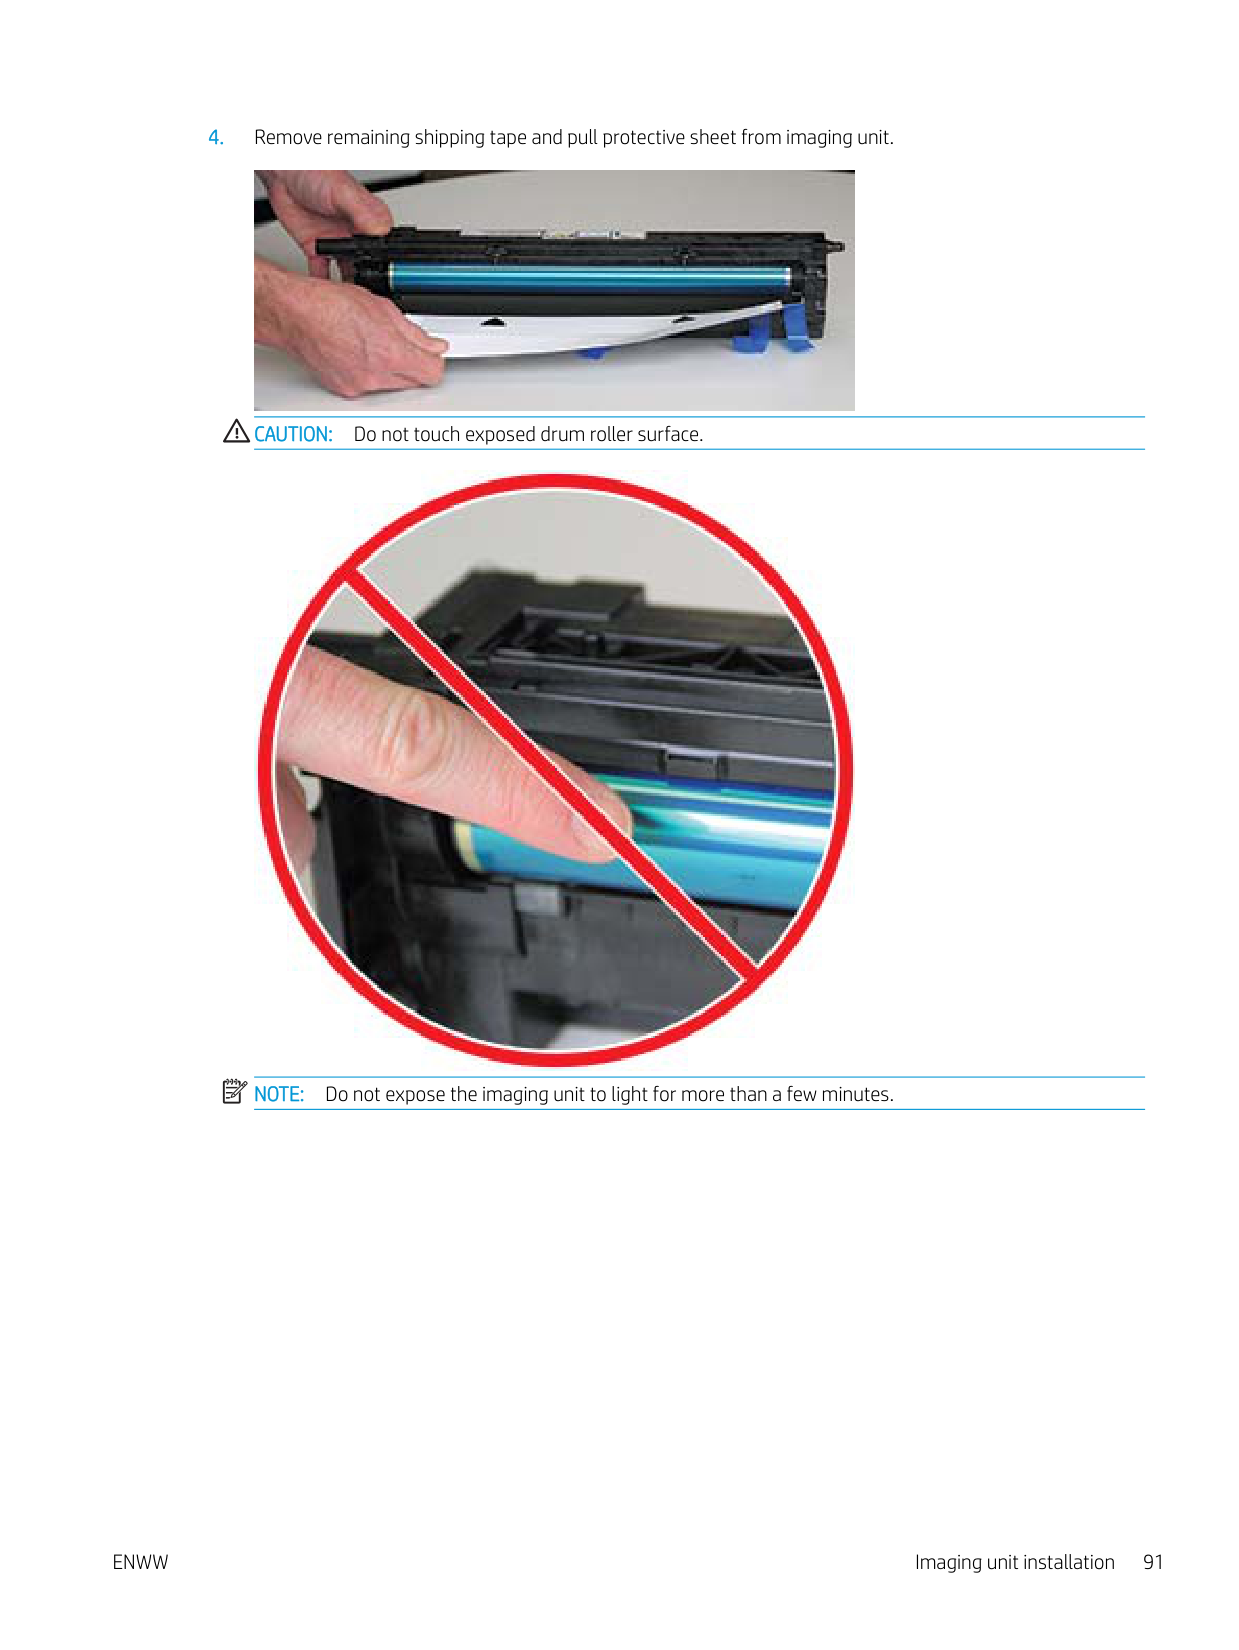
CAUTION: Do not touch exposed drum roller surface.
| | |---|

NOTE: Do not expose the imaging unit to light for more than a few minutes.

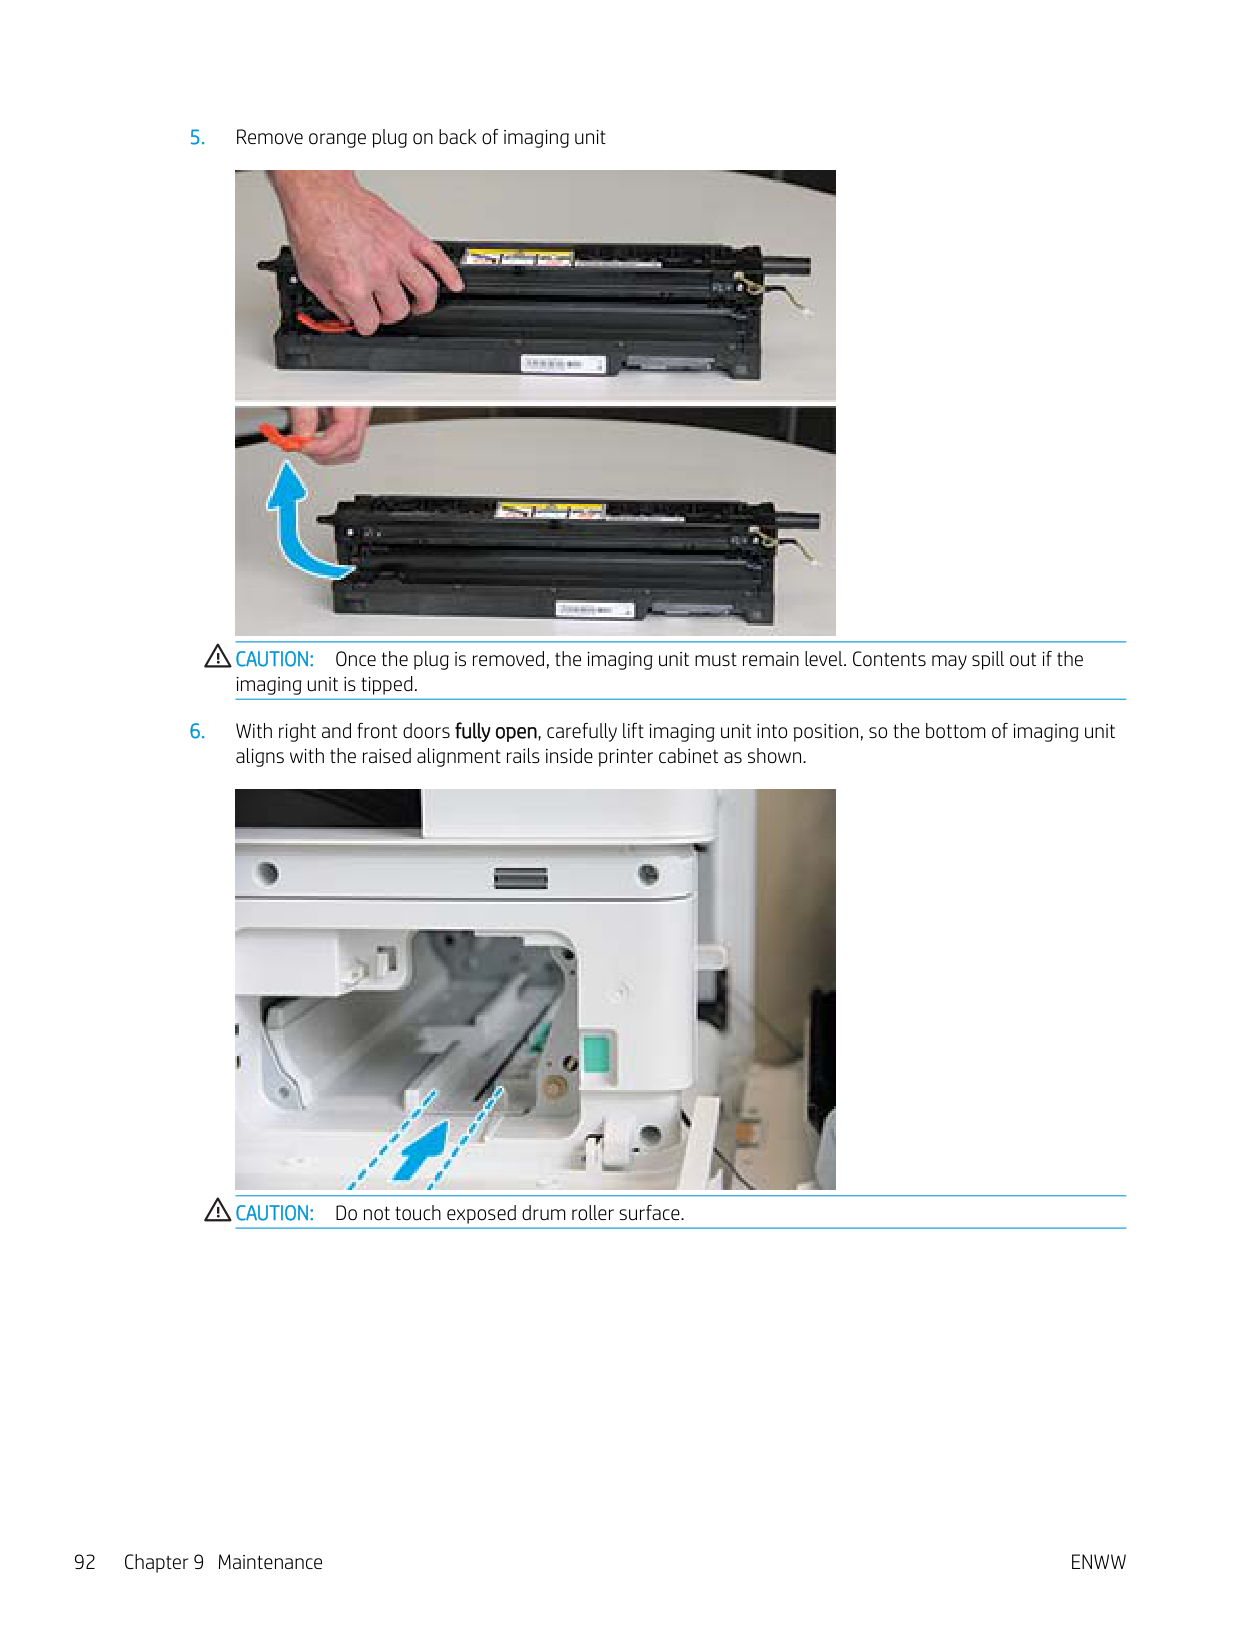
CAUTION: Once the plug is removed, the imaging unit must remain level. Contents may spill out if the imaging unit is tipped.

CAUTION: Do not touch exposed drum roller surface.
| | |---|

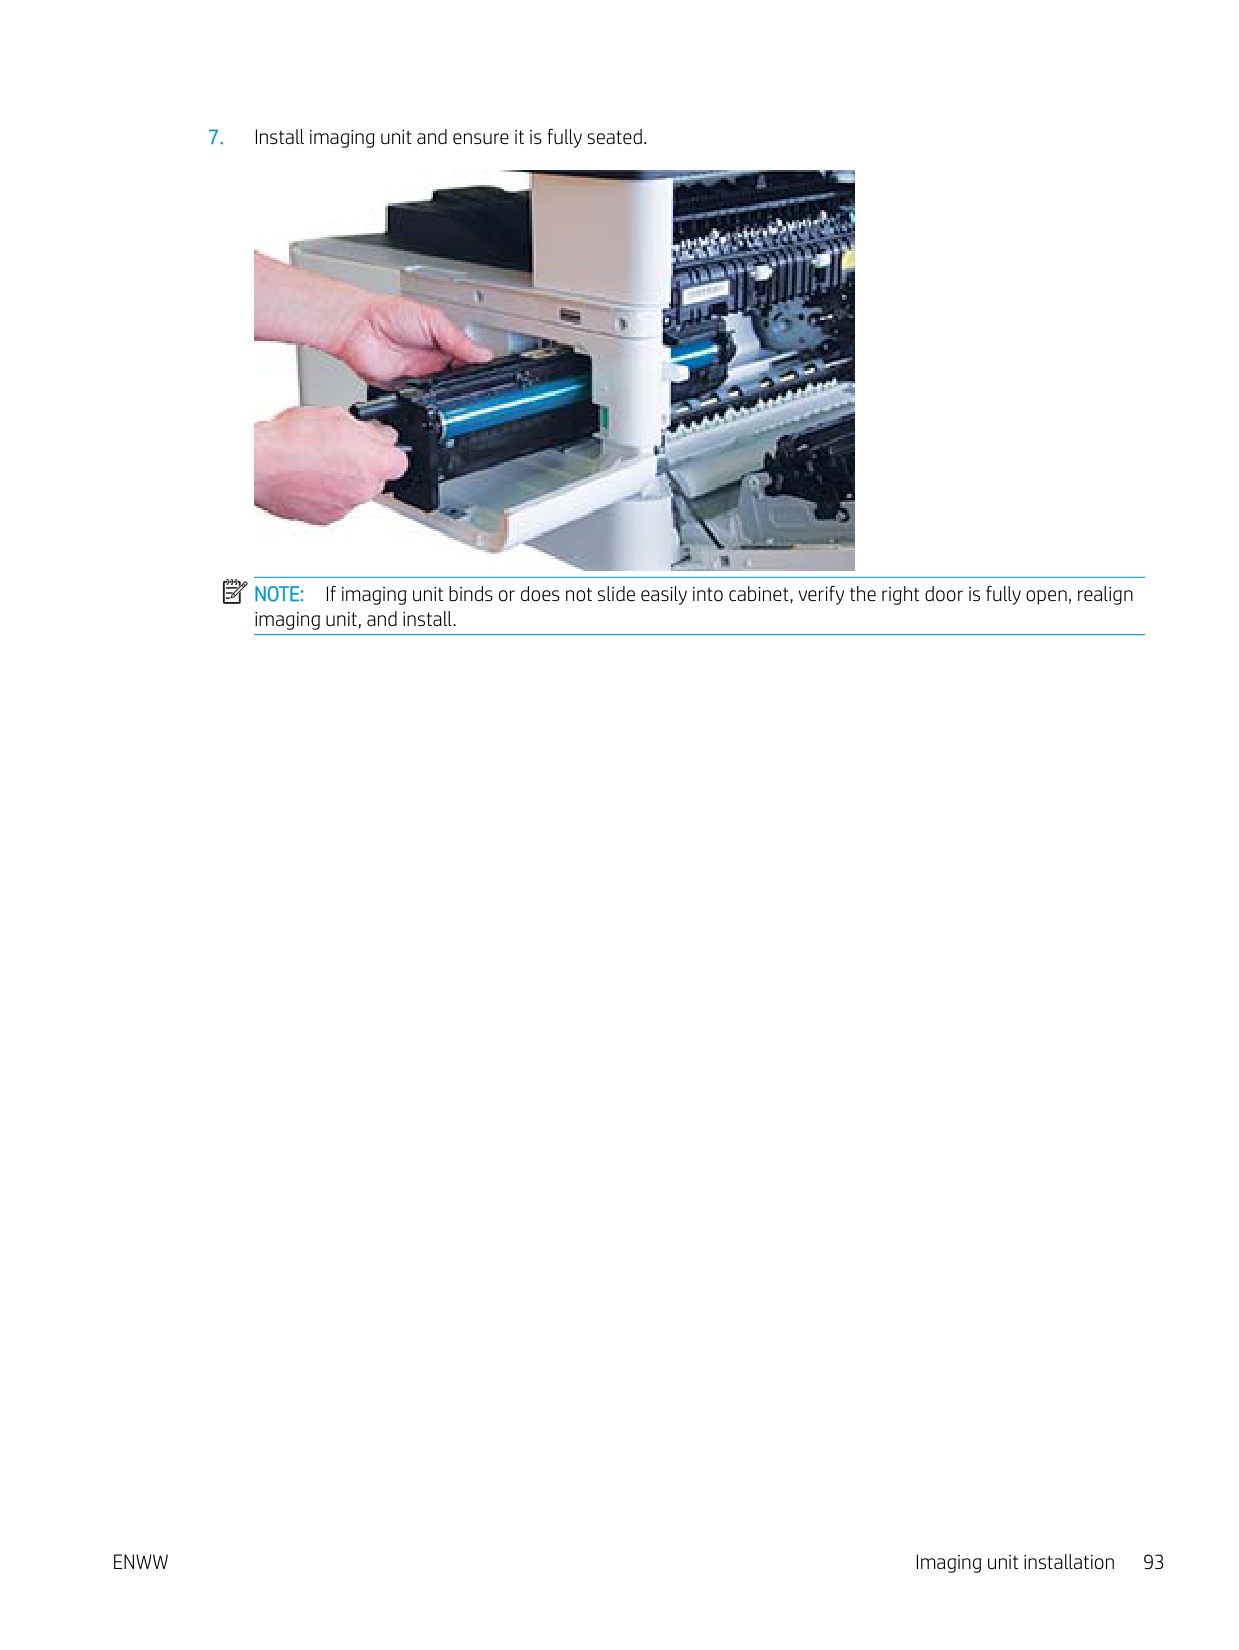
NOTE: If imaging unit binds or does not slide easily into cabinet, verify the right door is fully open, realign imaging unit, and install.


CAUTION: Make sure the connector is fully seated in the socket.
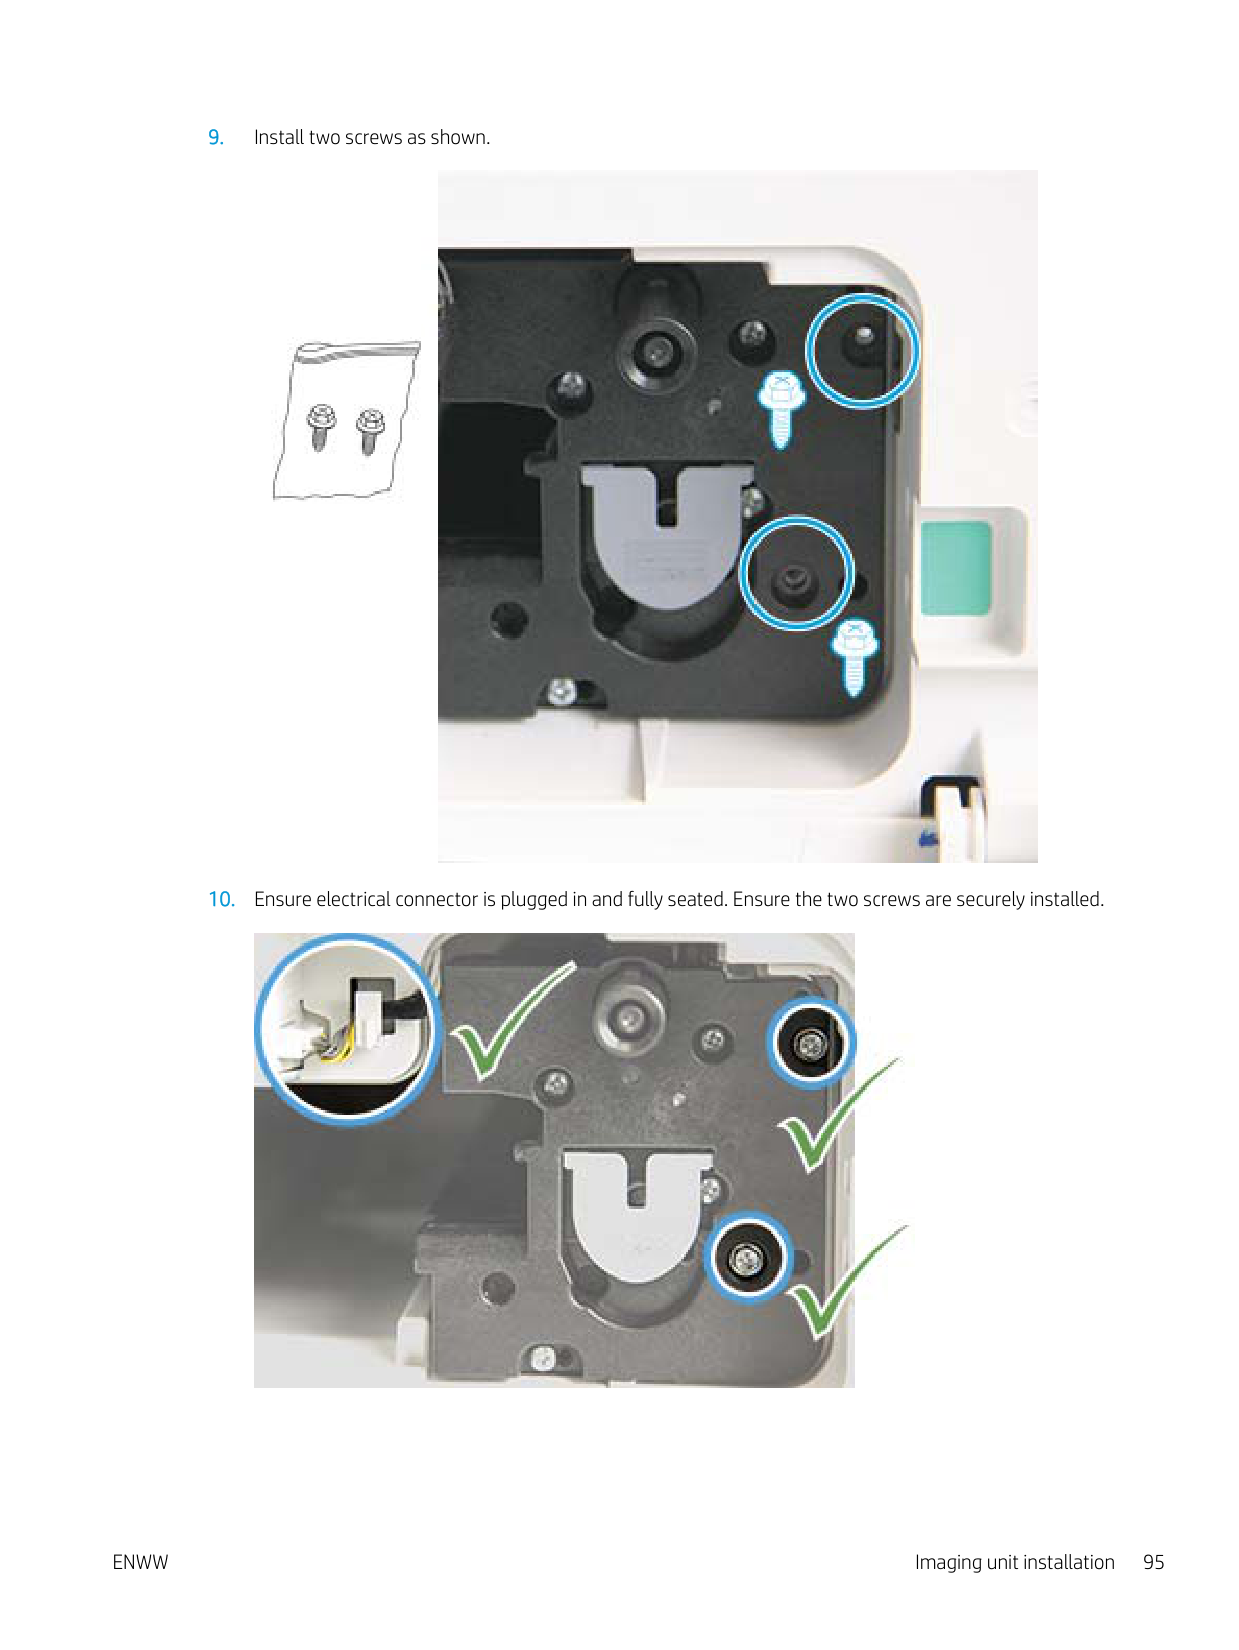
########## 9. Install two screws as shown.

########## 10. Ensure electrical connector is plugged in and fully seated. Ensure the two screws are securely installed.

#### Monitoring the supplies life
If you experience frequent paper jams or printing problems, check the number of pages the machine has printed or scanned. Replace the corresponding parts, if necessary.
| | |---|
######### NOTE:
#### Setting the toner low alert
If the amount of toner in the cartridge is low, a message or LED informing the user to change the toner cartridge appears. You can set the option for whether or not this message or LED appears.
| | |---|
NOTE: It may be necessary to press OK to navigate to lower-level menus for some models.

#### Cleaning the machine
If printing quality problems occur or if you use your machine in a dusty environment, you need to clean your machine regularly to keep it in the best printing condition and use your machine longer.
######### CAUTION:
###### Cleaning the outside
Clean the machine cabinet with a soft, lint-free cloth. Dampen the cloth slightly with water, but be careful not to let any water drip onto or into the machine.
###### Cleaning the inside
During the printing process, paper, toner, and dust particles can accumulate inside the machine. This buildup can cause print quality problems, such as toner specks or smearing. Cleaning the inside of the machine clears and reduces these problems.
######### CAUTION:
| | |---|
######### NOTE:
ENWW Cleaning the machine 97
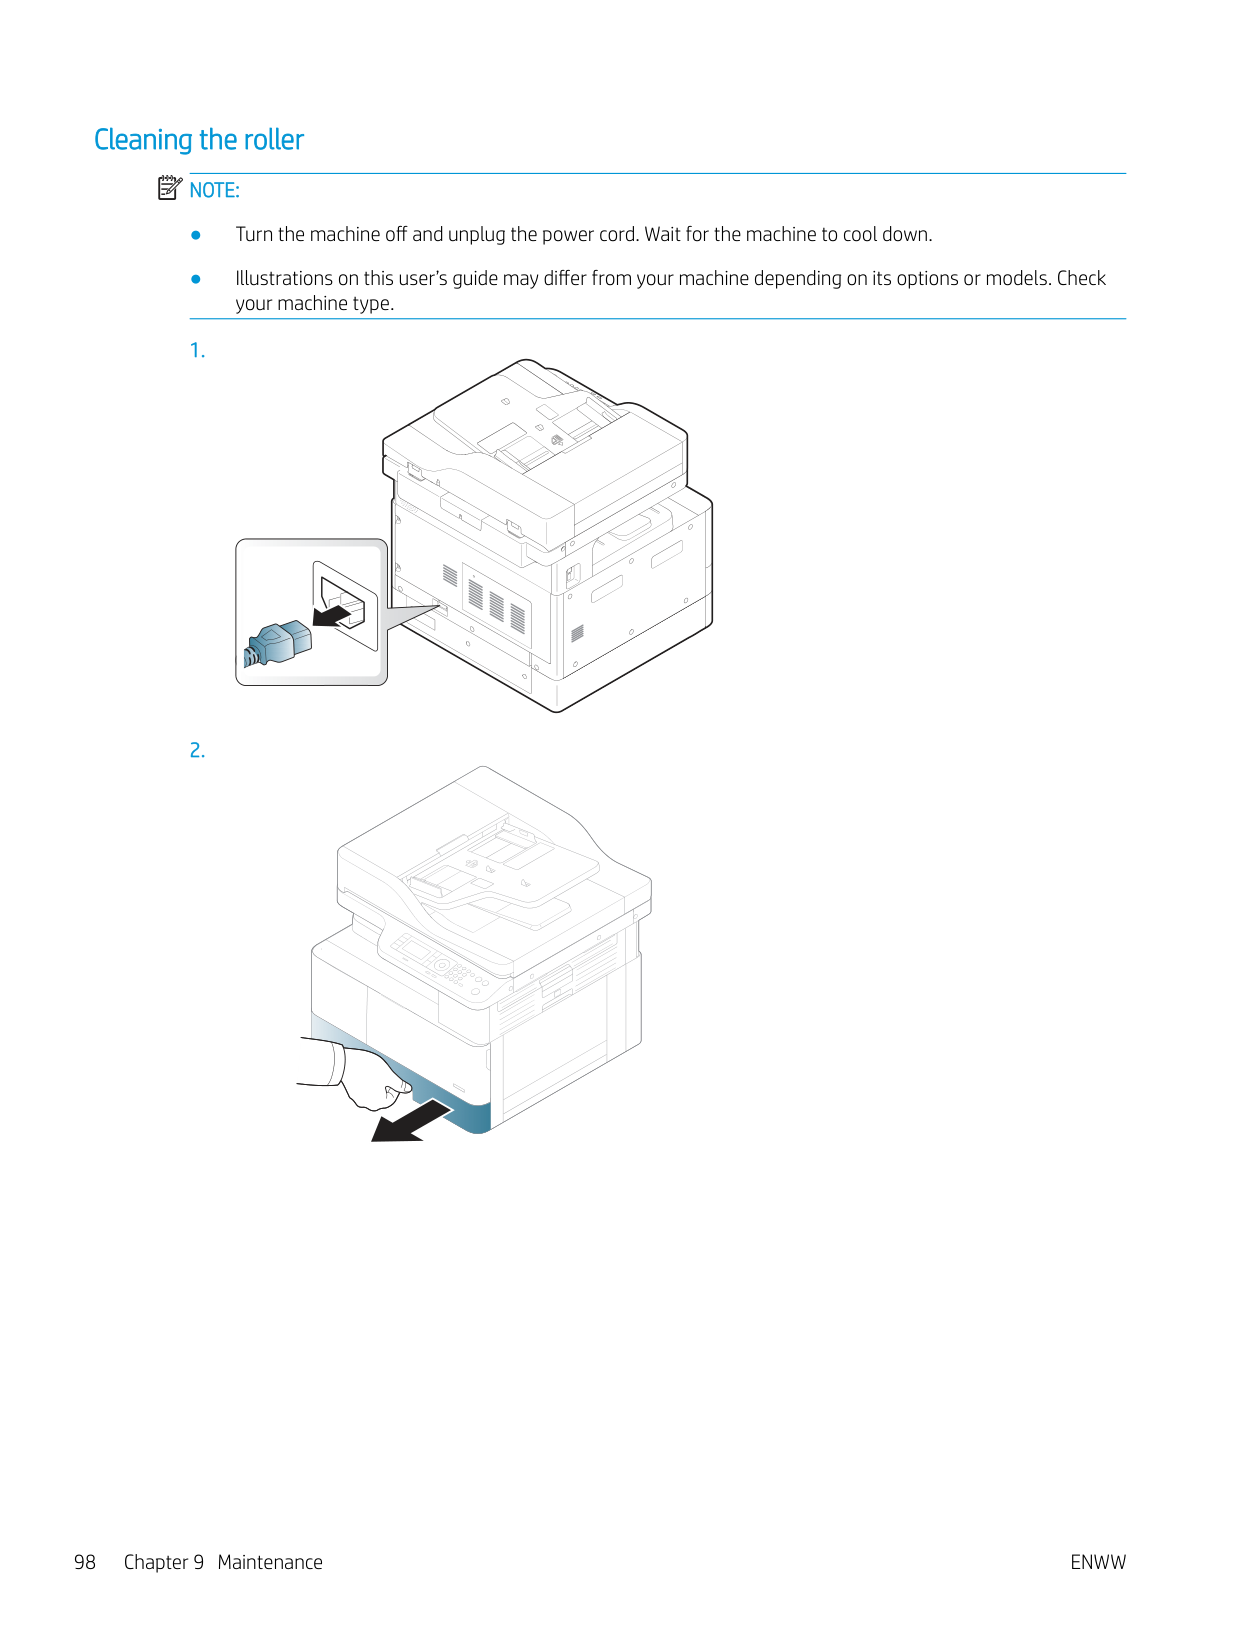
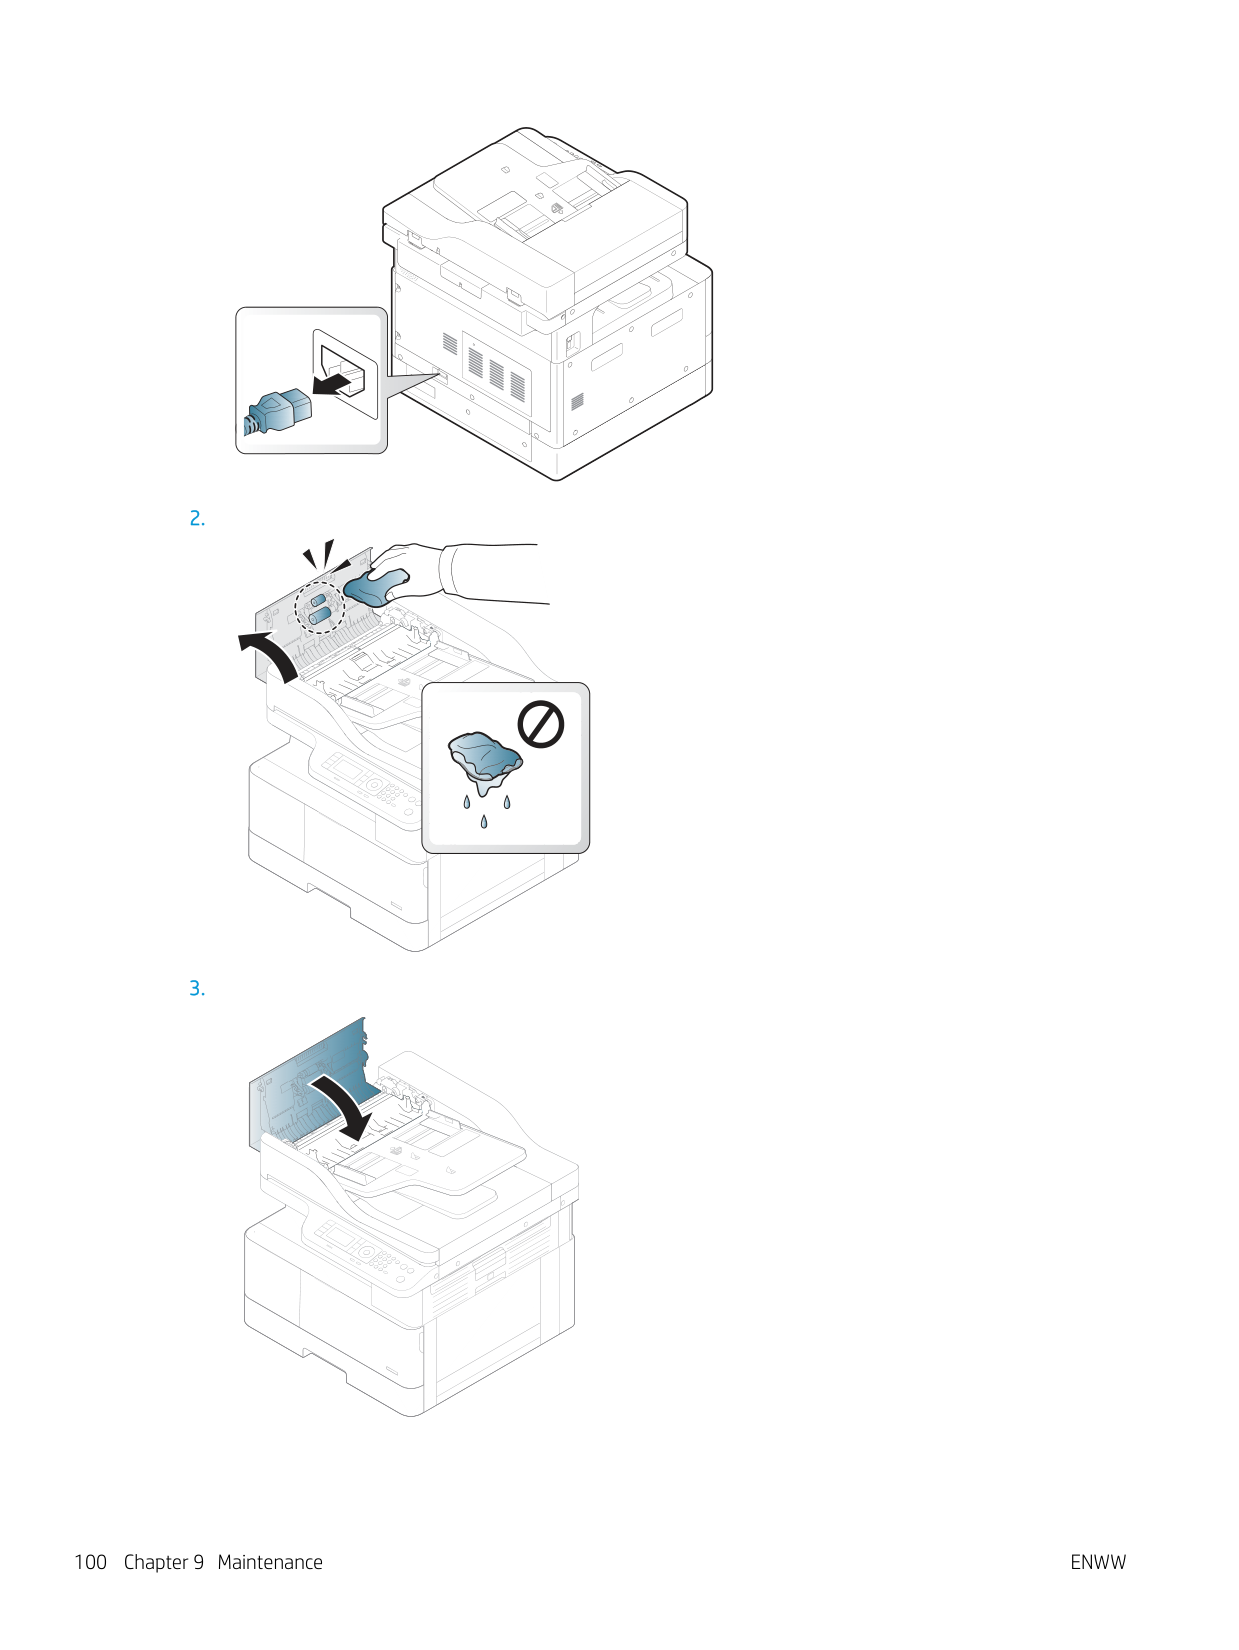
###### Cleaning the roller
| | |---|
######### NOTE:
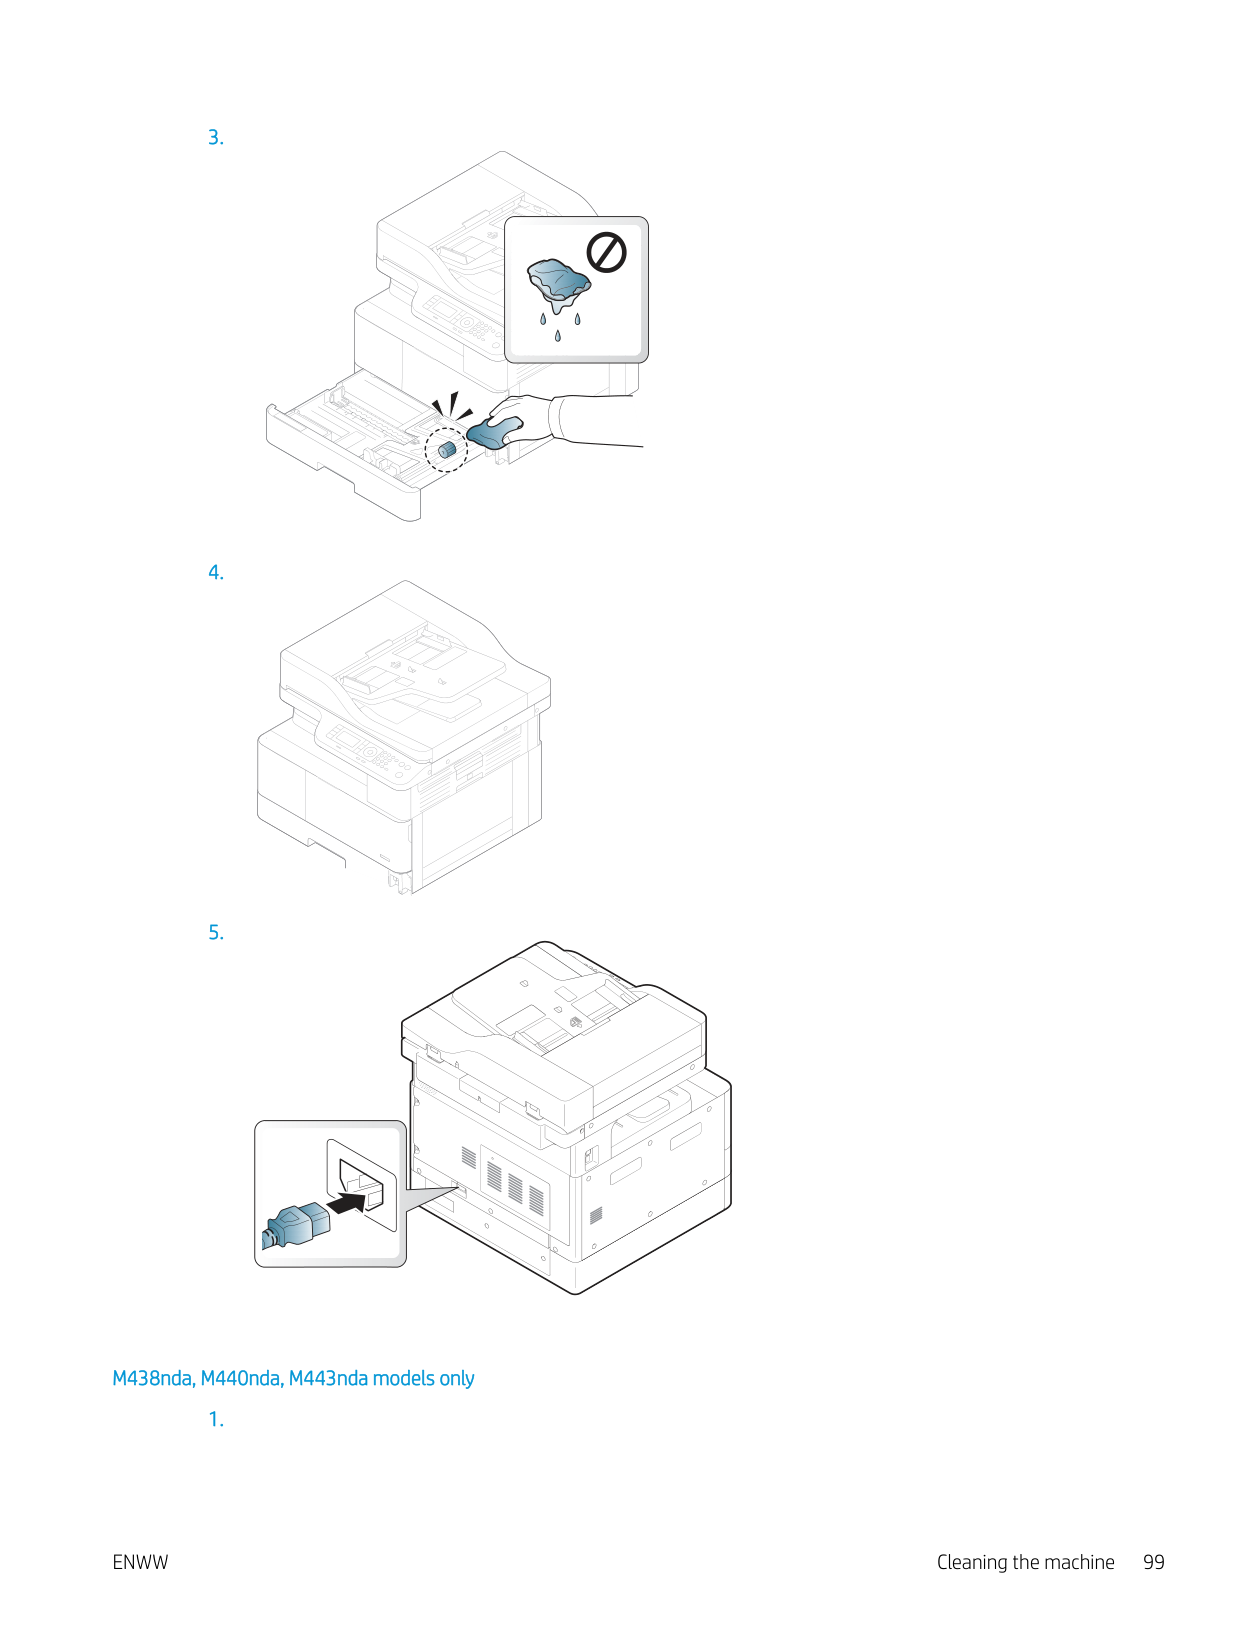
M438nda, M440nda, M443nda models only
ENWW Cleaning the machine 99
######### 2.
######### 3.


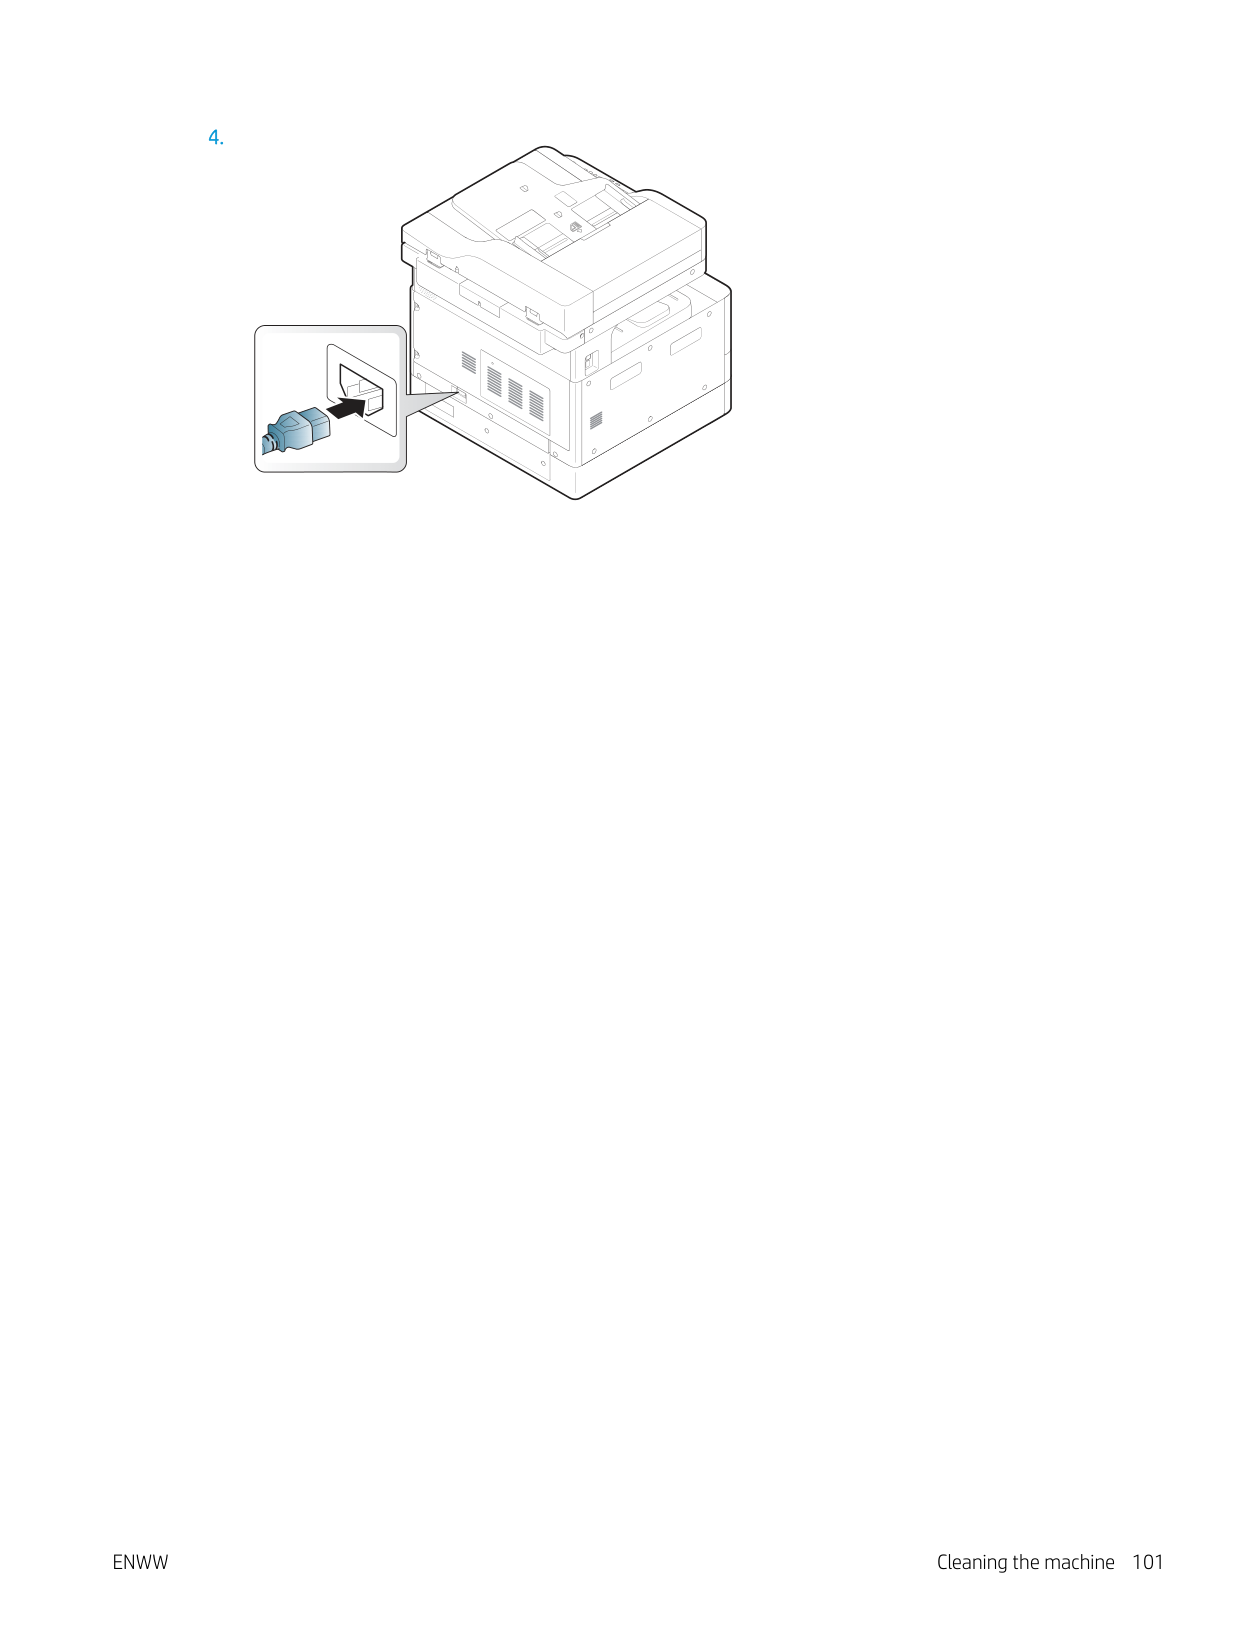
######### 4.
ENWW Cleaning the machine 101
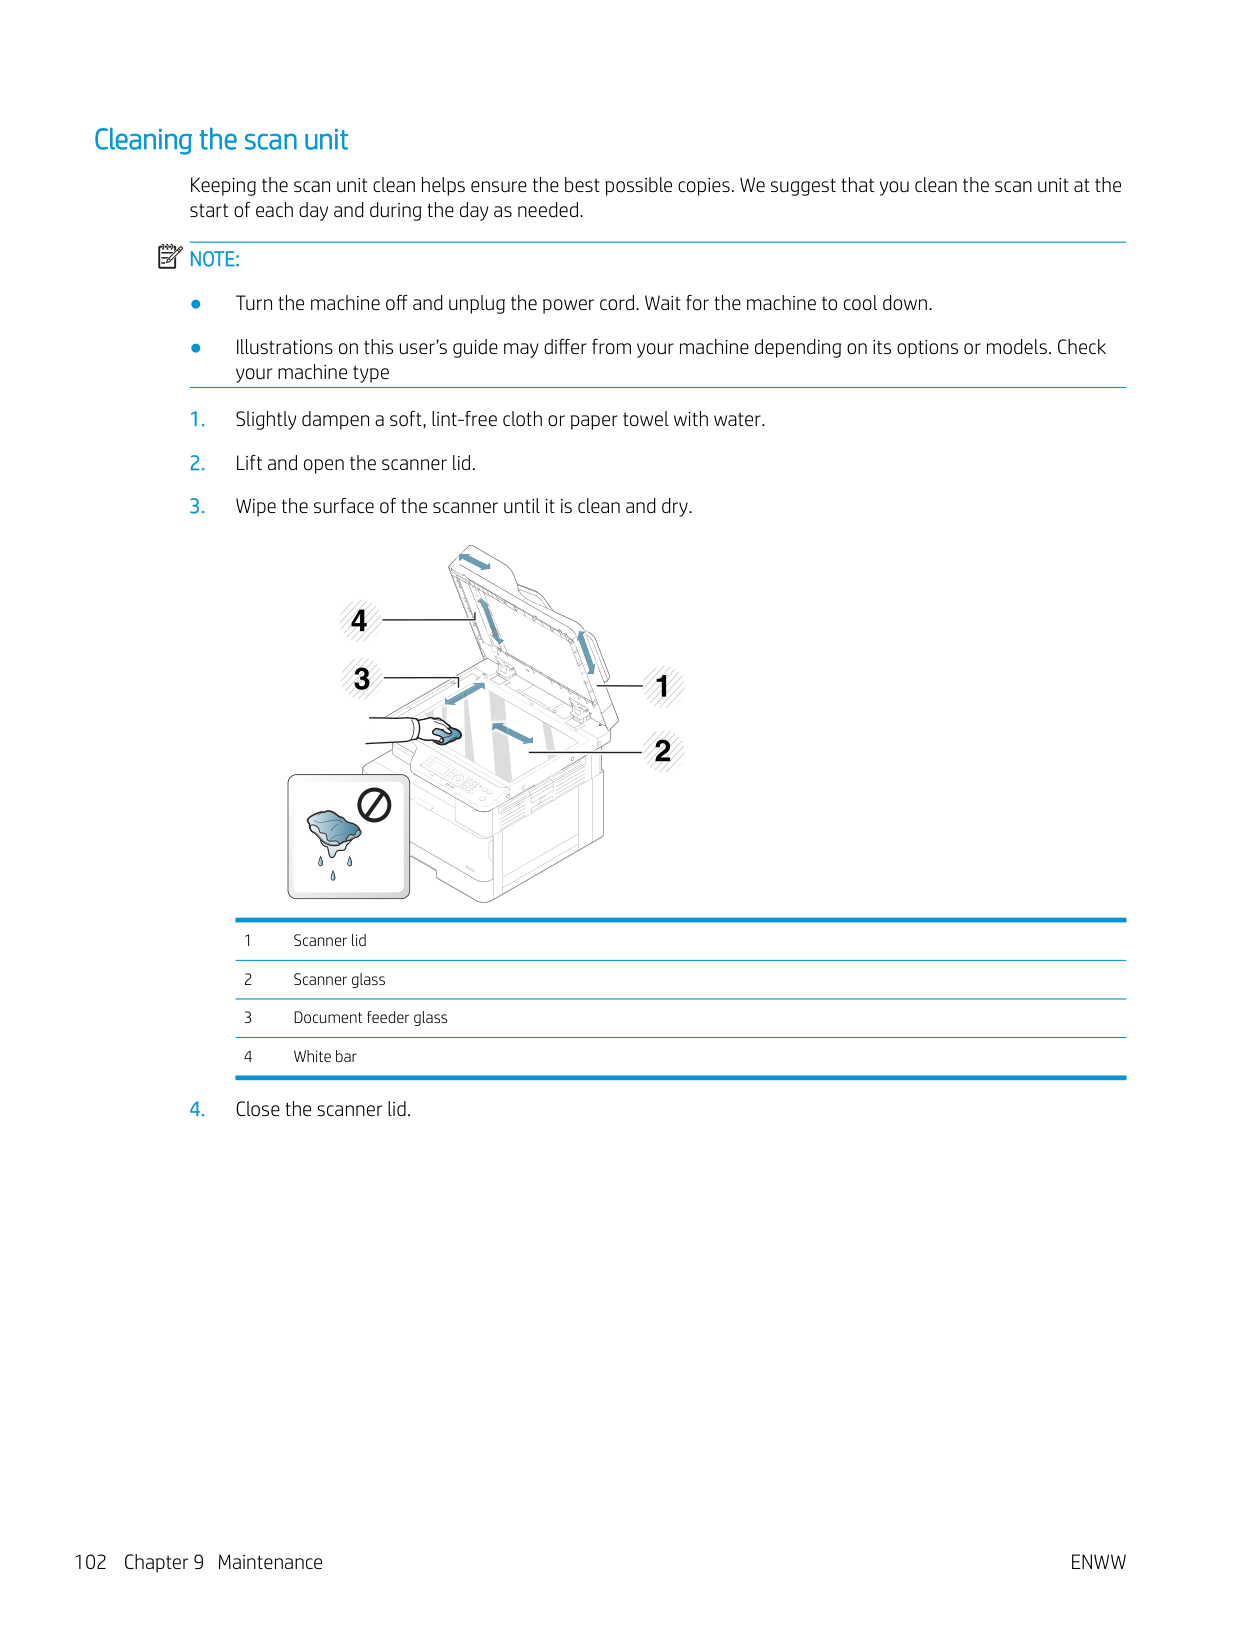
###### Cleaning the scan unit
Keeping the scan unit clean helps ensure the best possible copies. We suggest that you clean the scan unit at the start of each day and during the day as needed.
| | |---|
######### NOTE:


#### Update the firmware
The following steps explain how to download and update the firmware on the printer.
###### Step one: Download the firmware from HP.com
###### Step two: Update the firmware
Follow the appropriate steps for either a USB cable connection or a wired network connection.
Method one: Update the firmware for a USB-connected printer (Windows XP/Vista/7/8/8.1/10) Use this method to update the firmware if the printer is connected to the computer via a USB cable. NOTE: In order to use this method, you must have a driver or full software solution installed.
| | |---|


Method two: Update the firmware for a network-connected printer Use this method to update the firmware if the printer is connected to the computer via a wired network. NOTE: In order to use this method, you must use a computer browser to open the Embedded Web Server (EWS).
| | |---|

If the Web browser displays a There is a problem with this website’s security certificate message when attempting to open the EWS, click Continue to this website (not recommended).
NOTE: Choosing Continue to this website (not recommended) will not harm the computer while navigating within the EWS for the HP printer.

NOTE: If you have not yet created a password for the EWS, enter the default credentials of admin for both the Username and the Password.

| | |---|
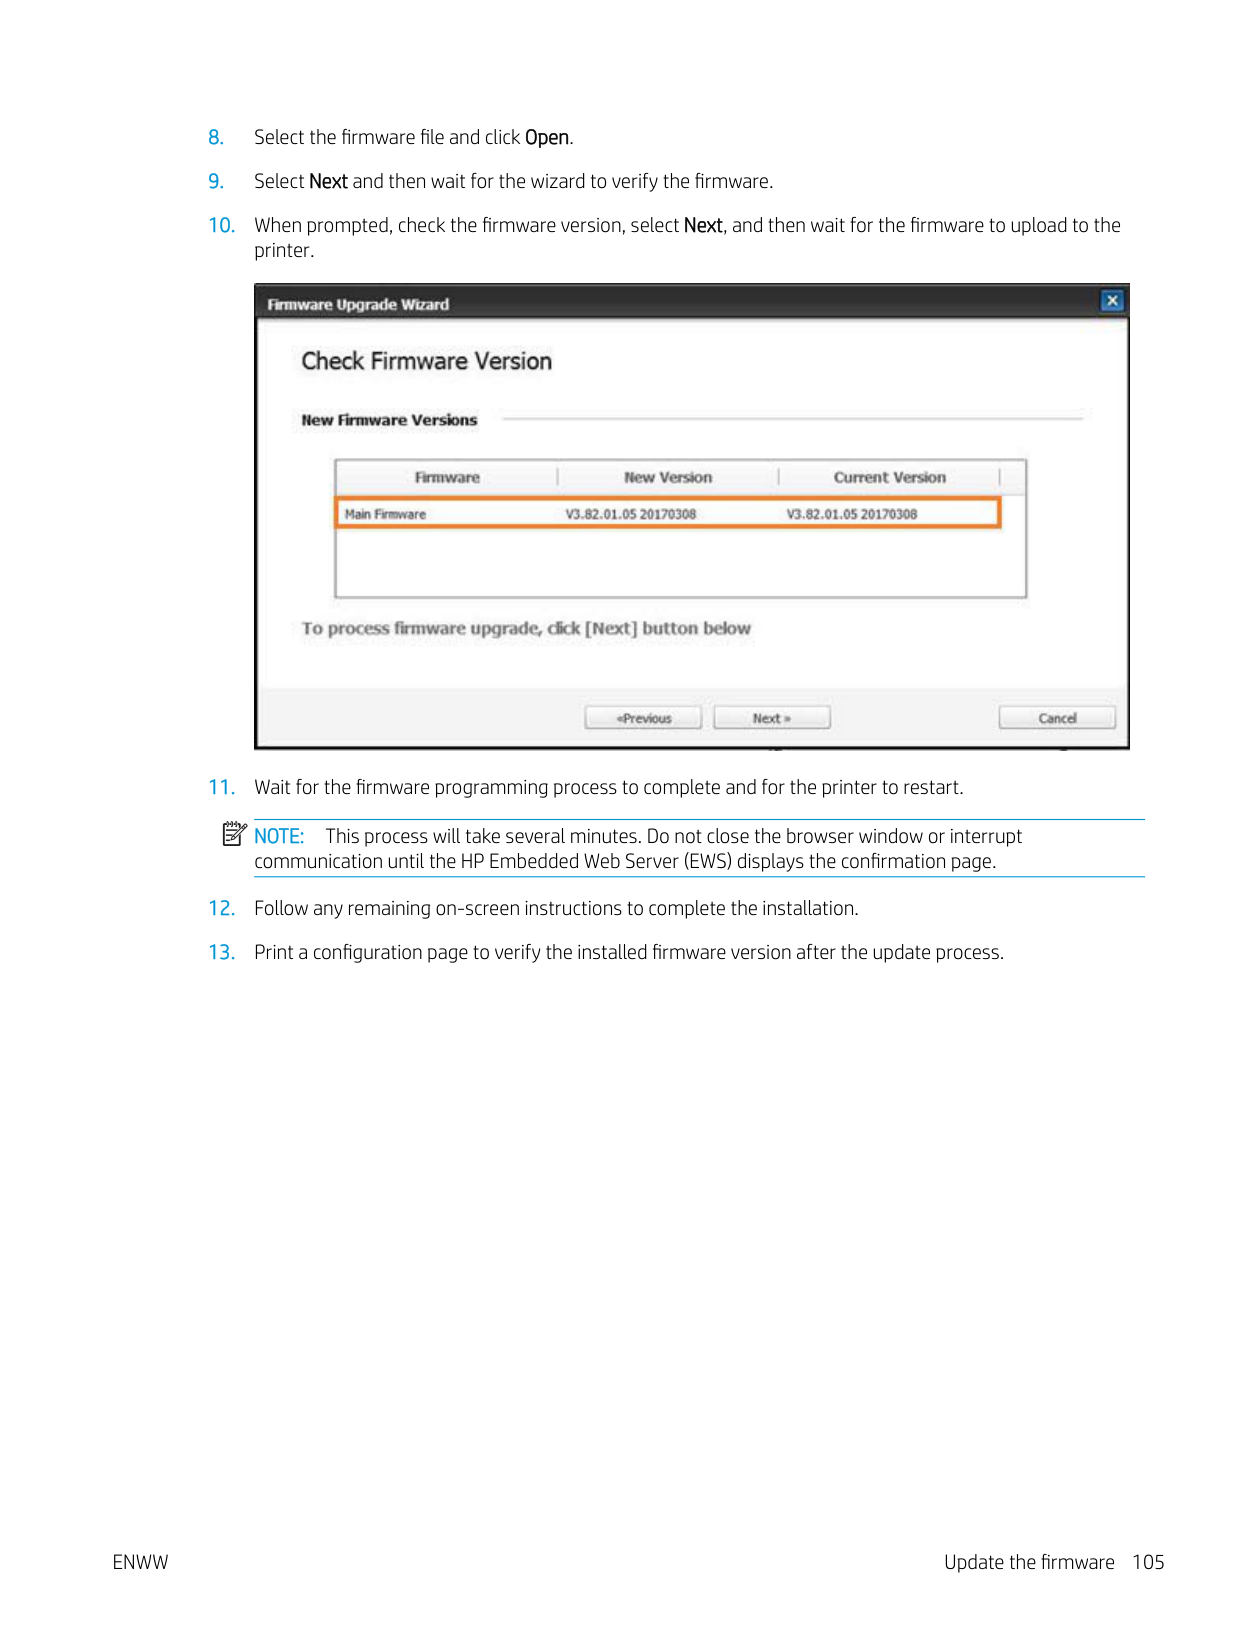
| | |---|
| | |---|

NOTE: This process will take several minutes. Do not close the browser window or interrupt communication until the HP Embedded Web Server (EWS) displays the confirmation page.
| | |---|
10 Useful Settings
This chapter explains how to browse the current status of your machine, and the method of setting for advanced machine setup.
ENWW 107
#### Machine’s initial set up
After setting up the printer and connecting the printer to a power cable, follow these steps to set up a password:

| | |---|
| | |---|
NOTE: If a password is not valid, “Invalid input” error message will display on the screen. Press the OK button.
Machine’s basic settings To change the machine’s default settings, follow these steps: NOTE: It may be necessary to press OK to navigate to lower-level menus for some models.
| | |---|
NOTE: When you press the Power/Wake Up button or start printing, the product will wake up from the power saving mode.
| | |---|
The printer's settings are also available for viewing/modifying in the EWS.
ENWW Machine’s basic settings 109
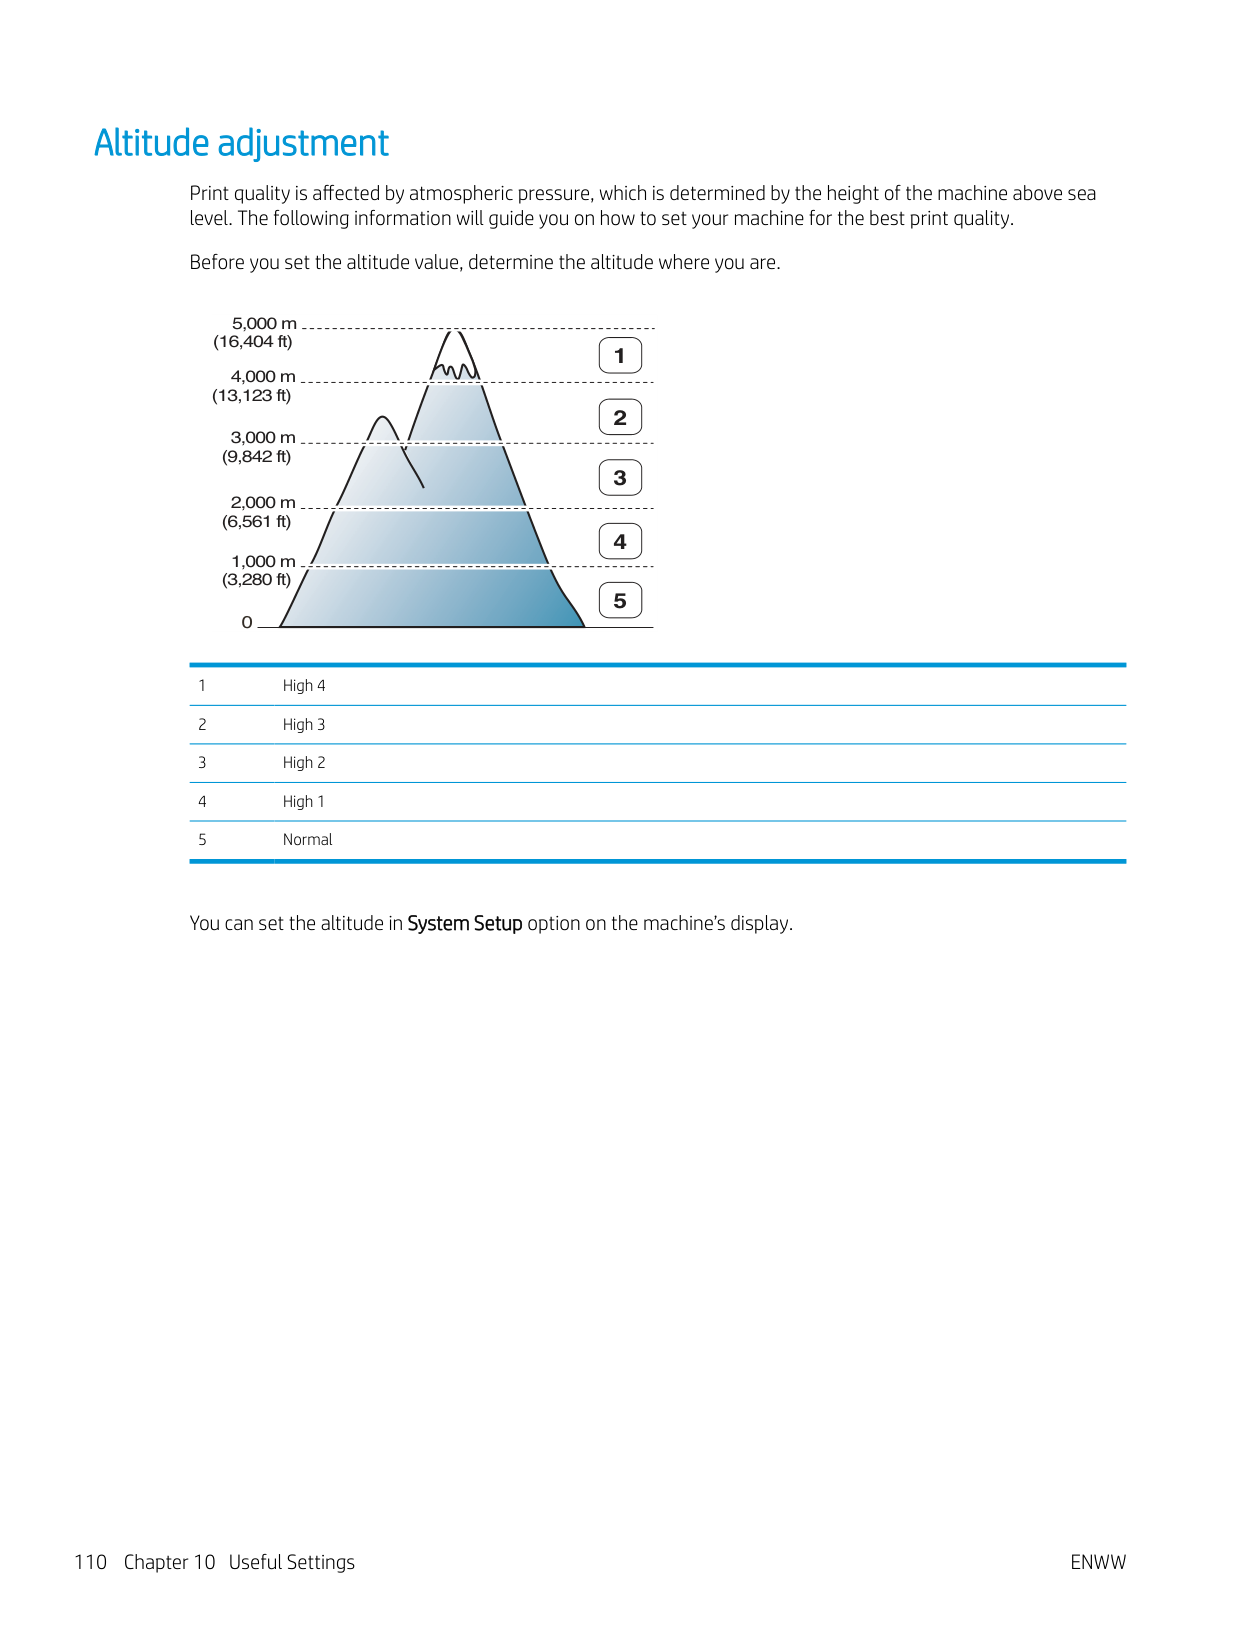
#### Altitude adjustment
Print quality is affected by atmospheric pressure, which is determined by the height of the machine above sea level. The following information will guide you on how to set your machine for the best print quality.
Before you set the altitude value, determine the altitude where you are.
5,000 m (16,404 ft)

1
4,000 m (13,123 ft)
2
3,000 m (9,842 ft)
3
2,000 m (6,561 ft)
4
1,000 m (3,280 ft)
######## 5
0
You can set the altitude in System Setup option on the machine’s display.
11 Troubleshooting
This chapter gives helpful information for what to do if you encounter an error.
ENWW 111
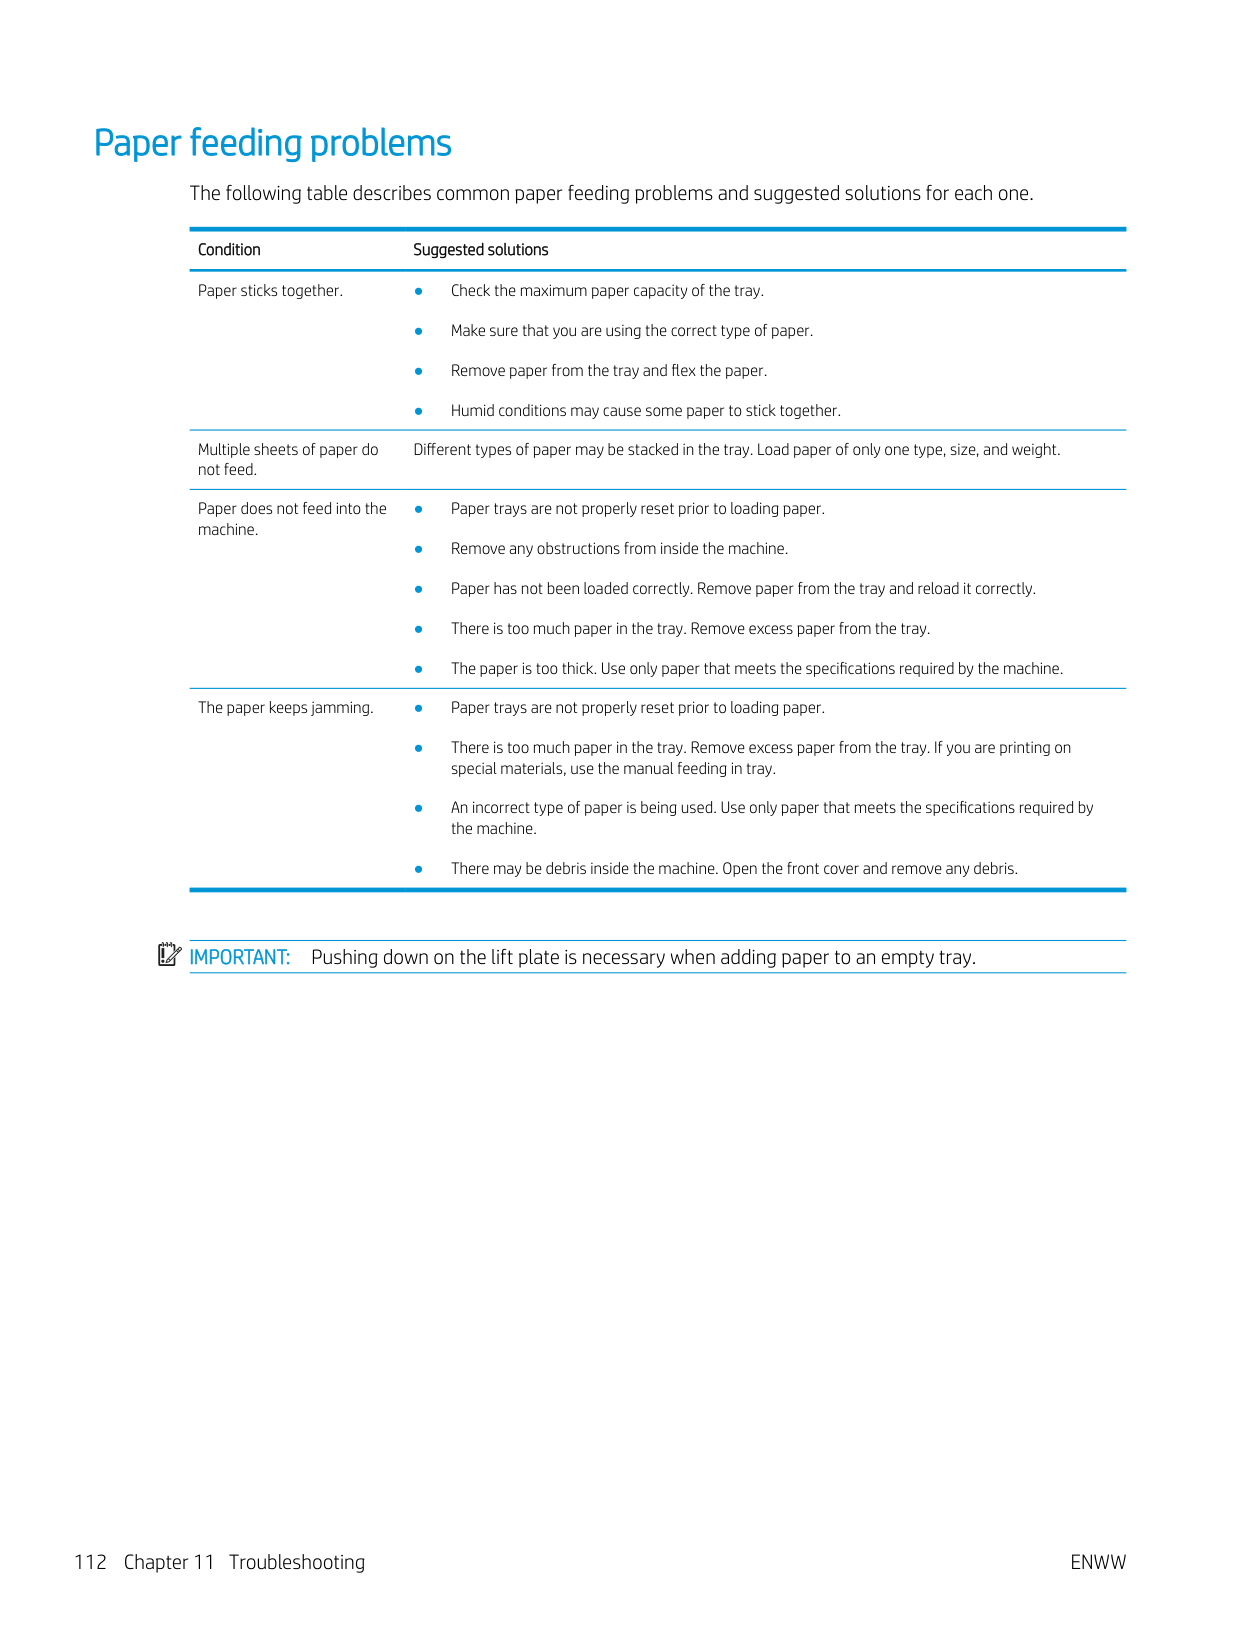
#### Paper feeding problems
The following table describes common paper feeding problems and suggested solutions for each one.
Condition Suggested solutions Paper sticks together. ● Check the maximum paper capacity of the tray.
Multiple sheets of paper do not feed.
Different types of paper may be stacked in the tray. Load paper of only one type, size, and weight.
Paper does not feed into the machine.
The paper keeps jamming. ● Paper trays are not properly reset prior to loading paper.
| | |---|
IMPORTANT: Pushing down on the lift plate is necessary when adding paper to an empty tray.
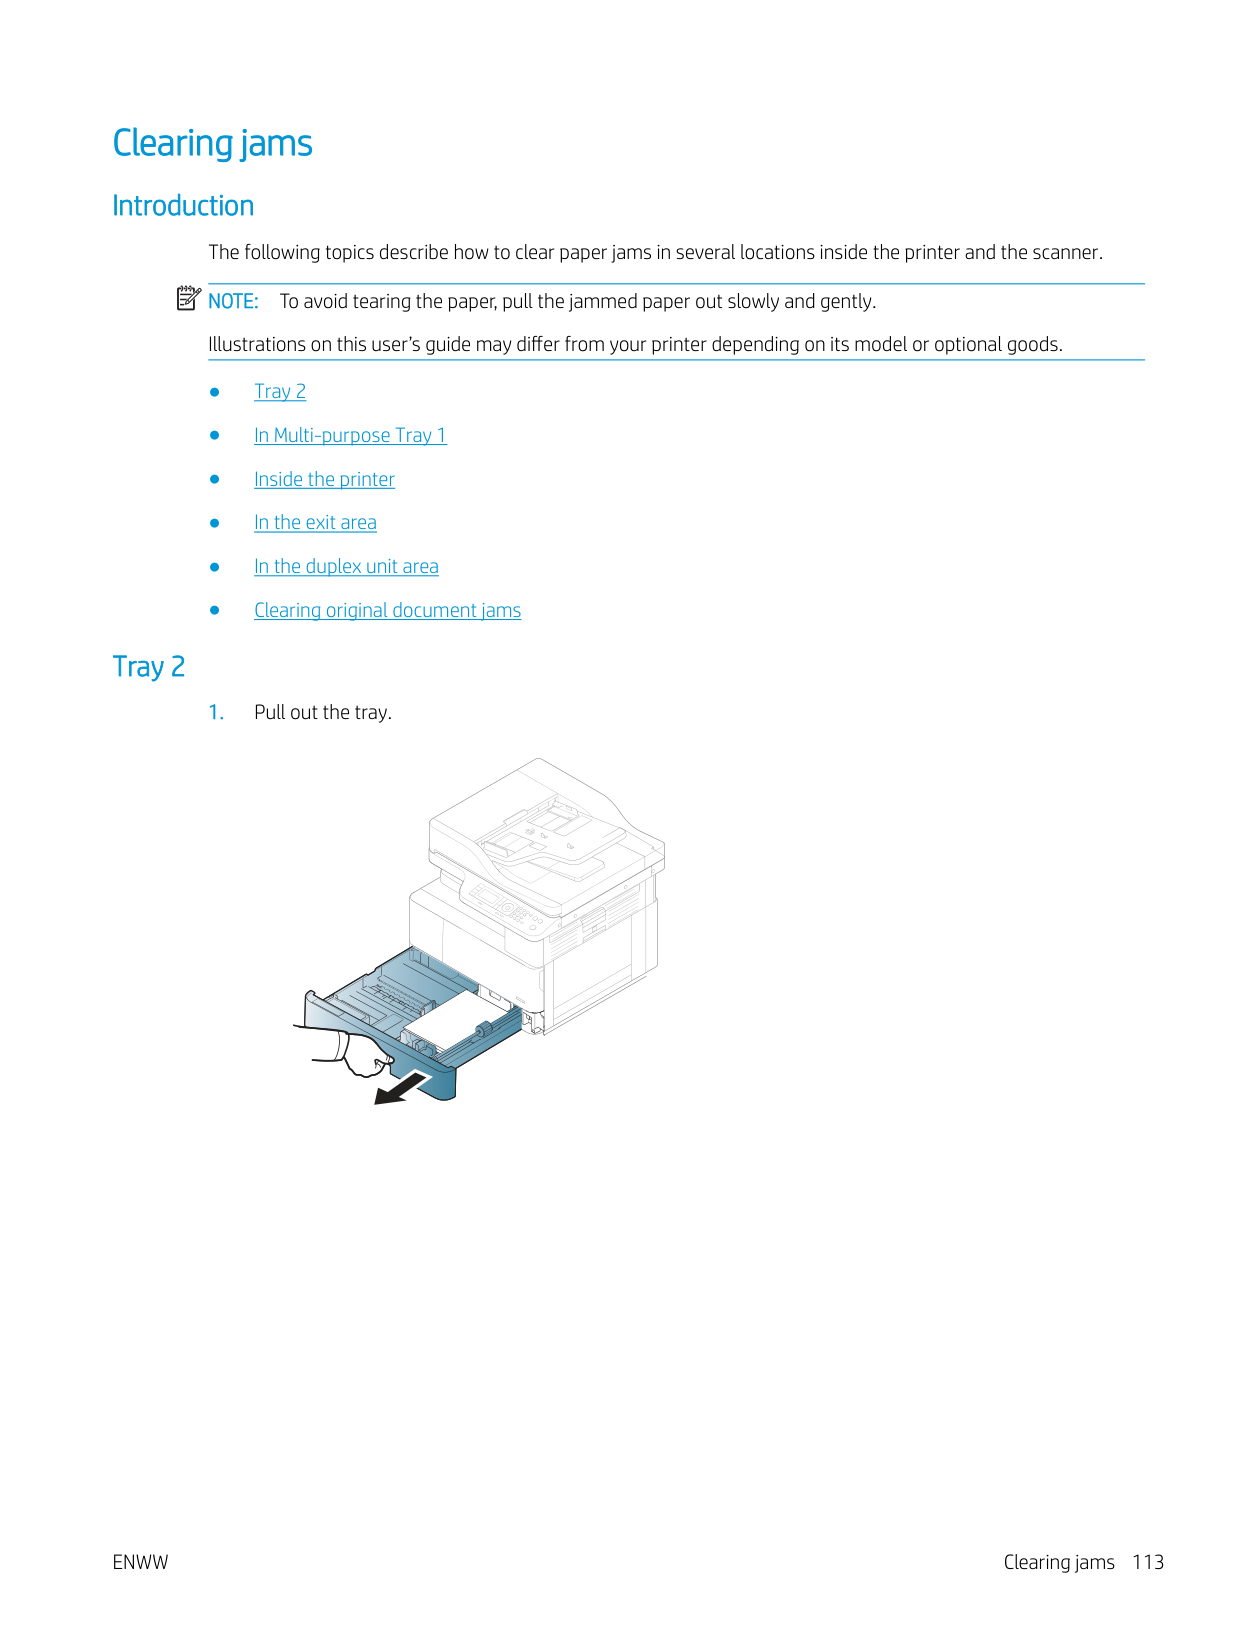
#### Clearing jams
Introduction The following topics describe how to clear paper jams in several locations inside the printer and the scanner. NOTE: To avoid tearing the paper, pull the jammed paper out slowly and gently. Illustrations on this user’s guide may differ from your printer depending on its model or optional goods.
| | |---|
###### Tray 2
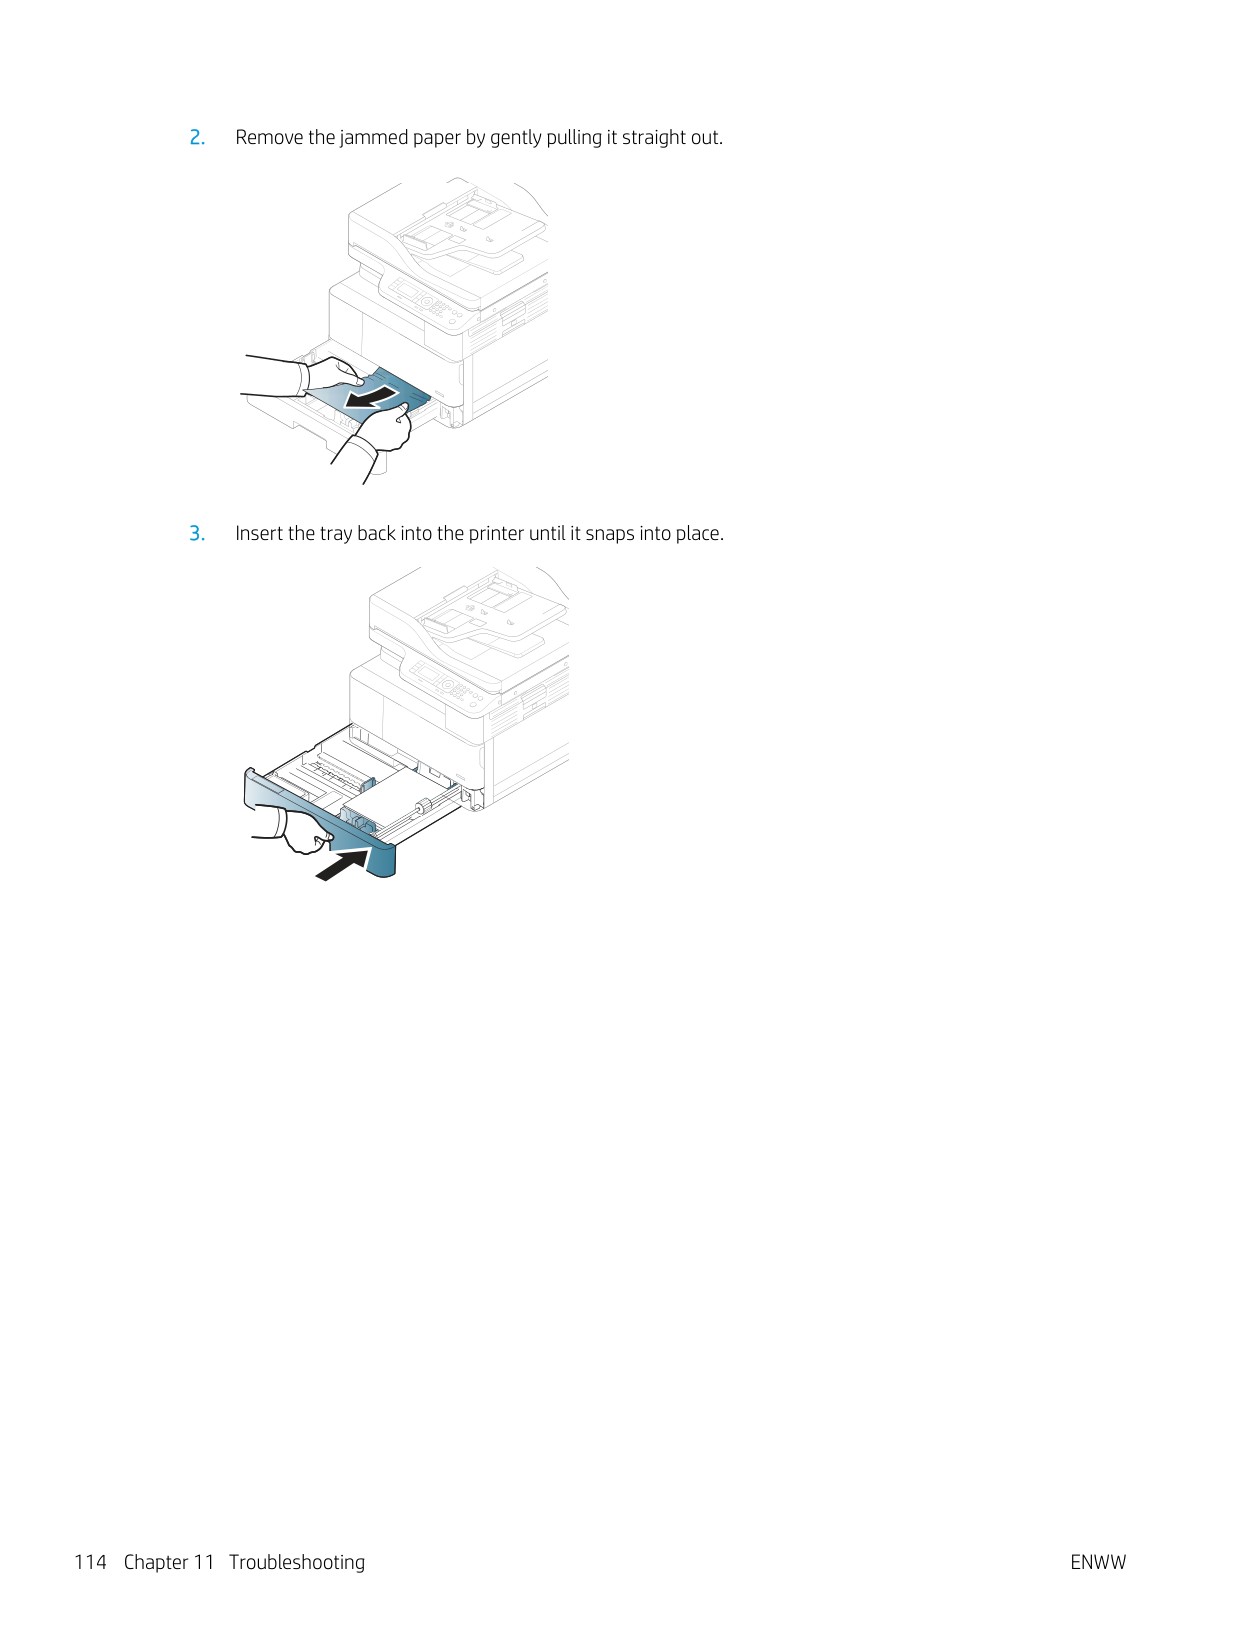
########## 2. Remove the jammed paper by gently pulling it straight out.

########## 3. Insert the tray back into the printer until it snaps into place.
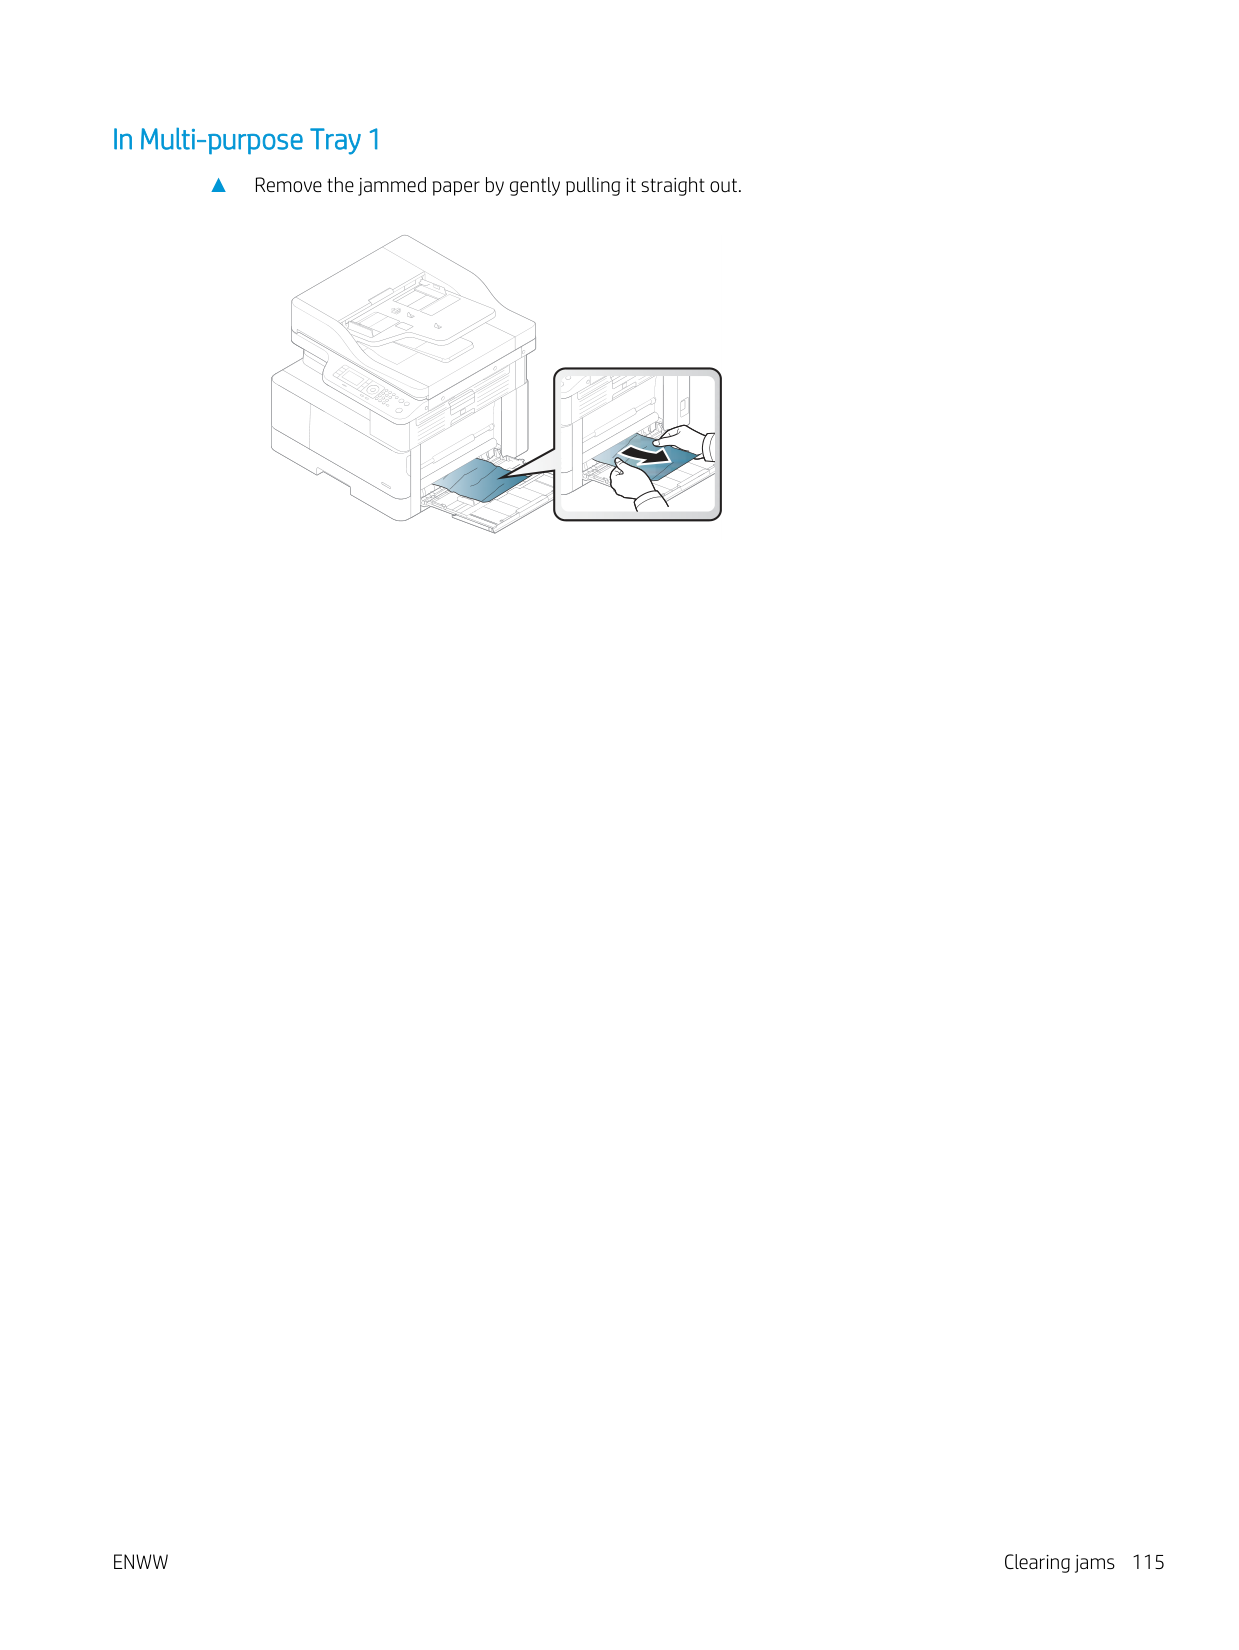
###### In Multi-purpose Tray 1
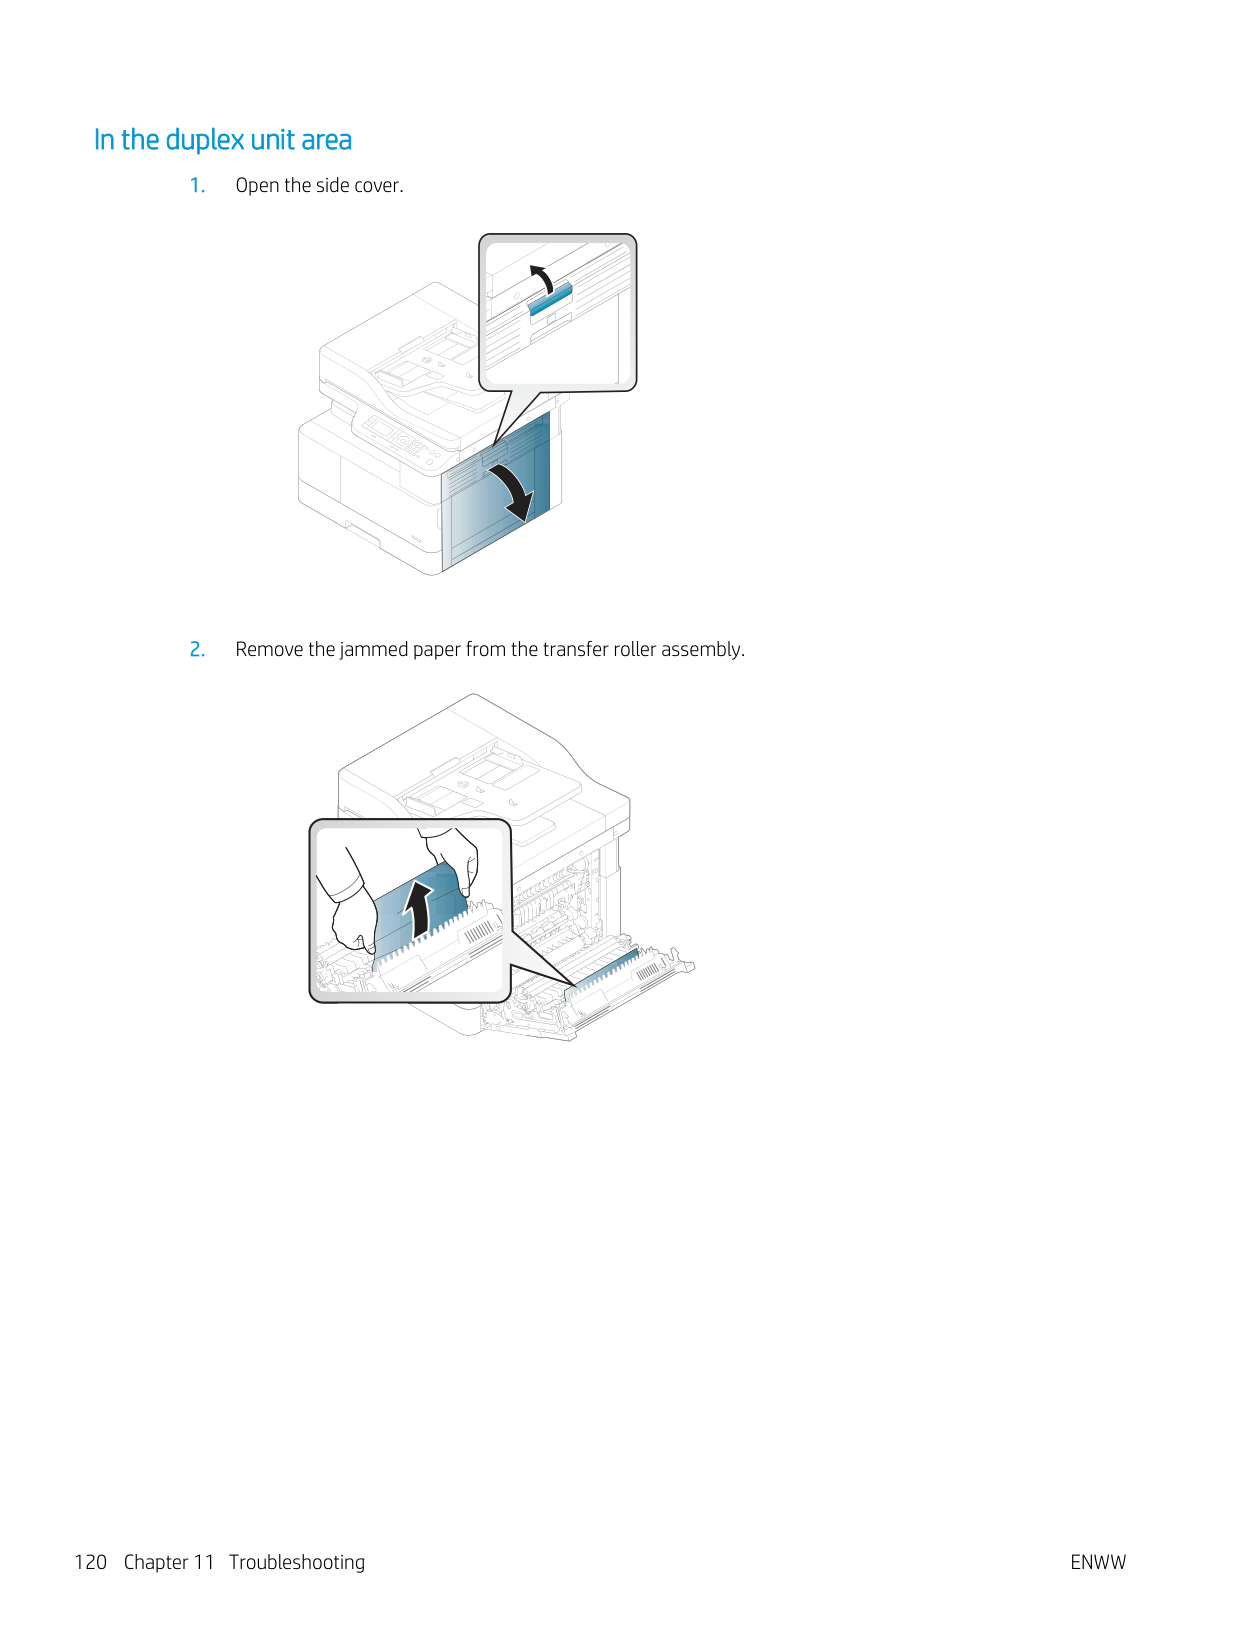
▲ Remove the jammed paper by gently pulling it straight out.


###### Inside the printer


########## 4. Close the side cover.

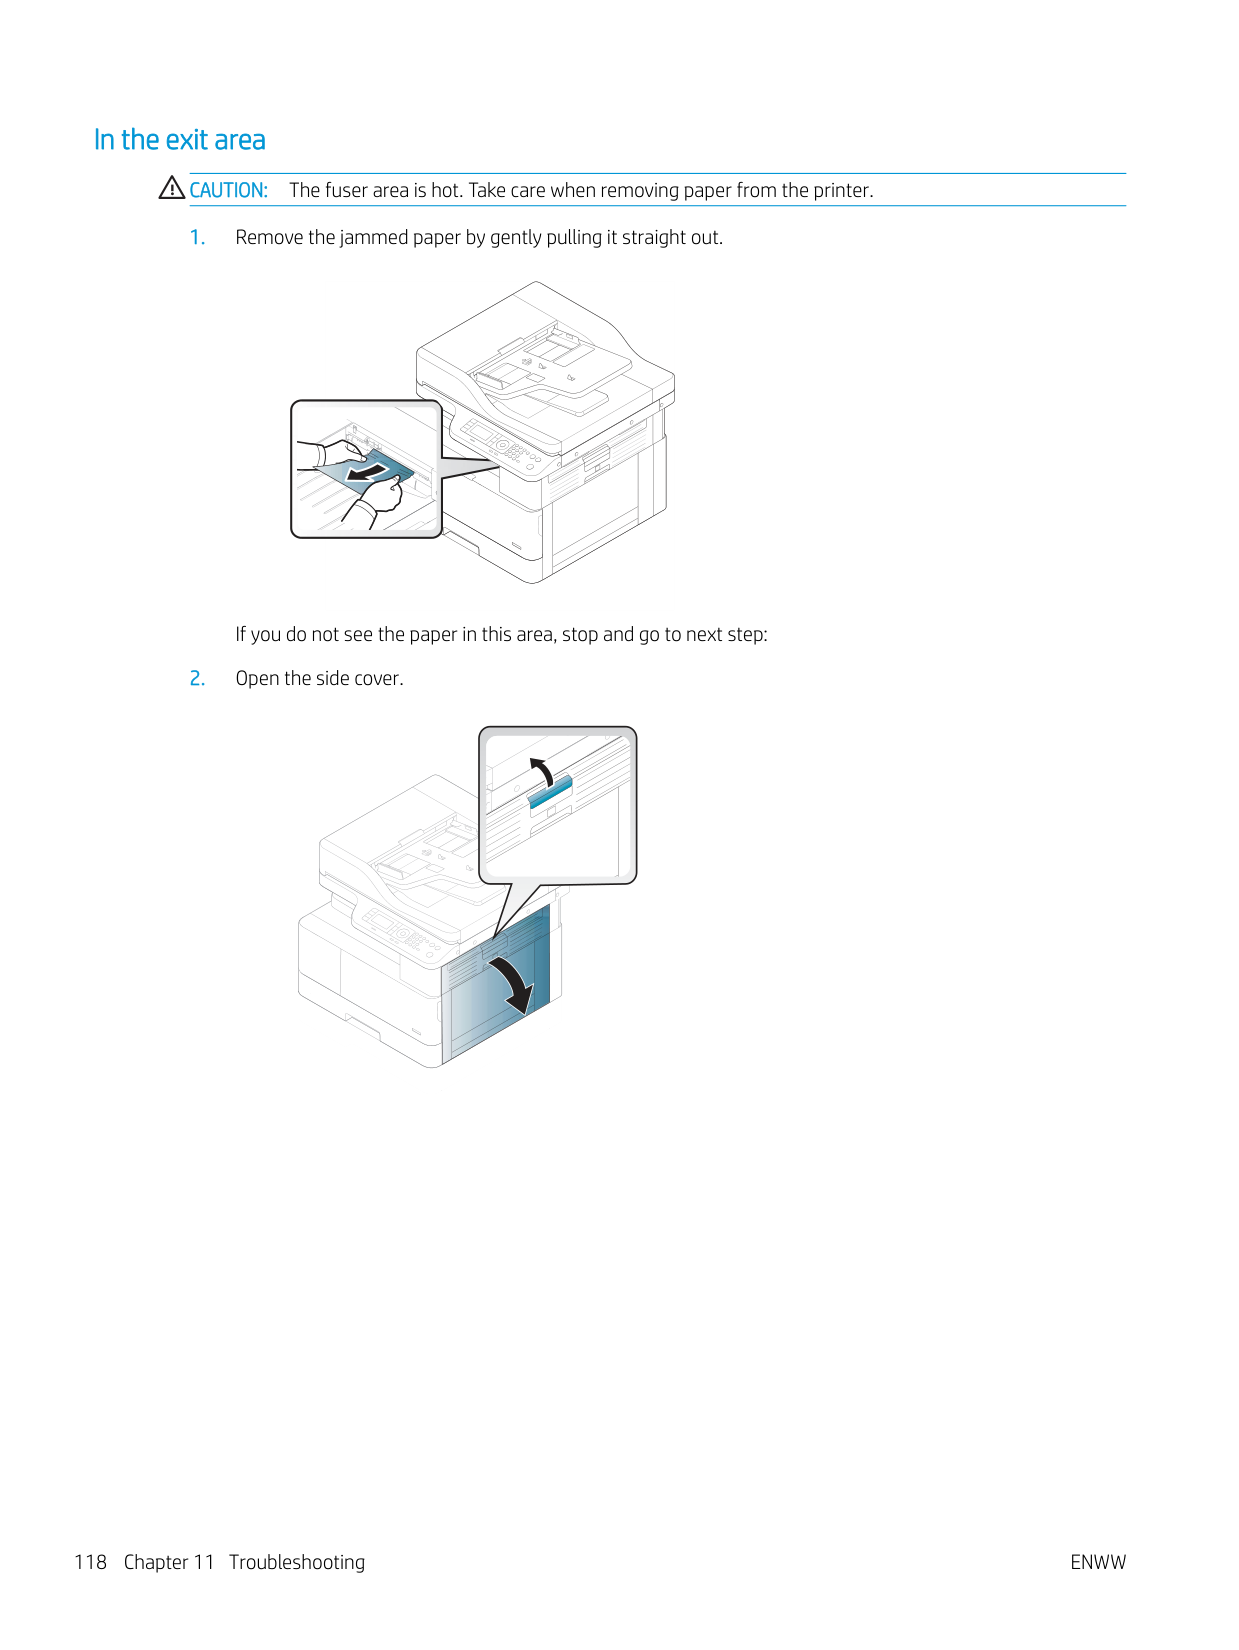
###### In the exit area
CAUTION: The fuser area is hot. Take care when removing paper from the printer.


If you do not see the paper in this area, stop and go to next step:


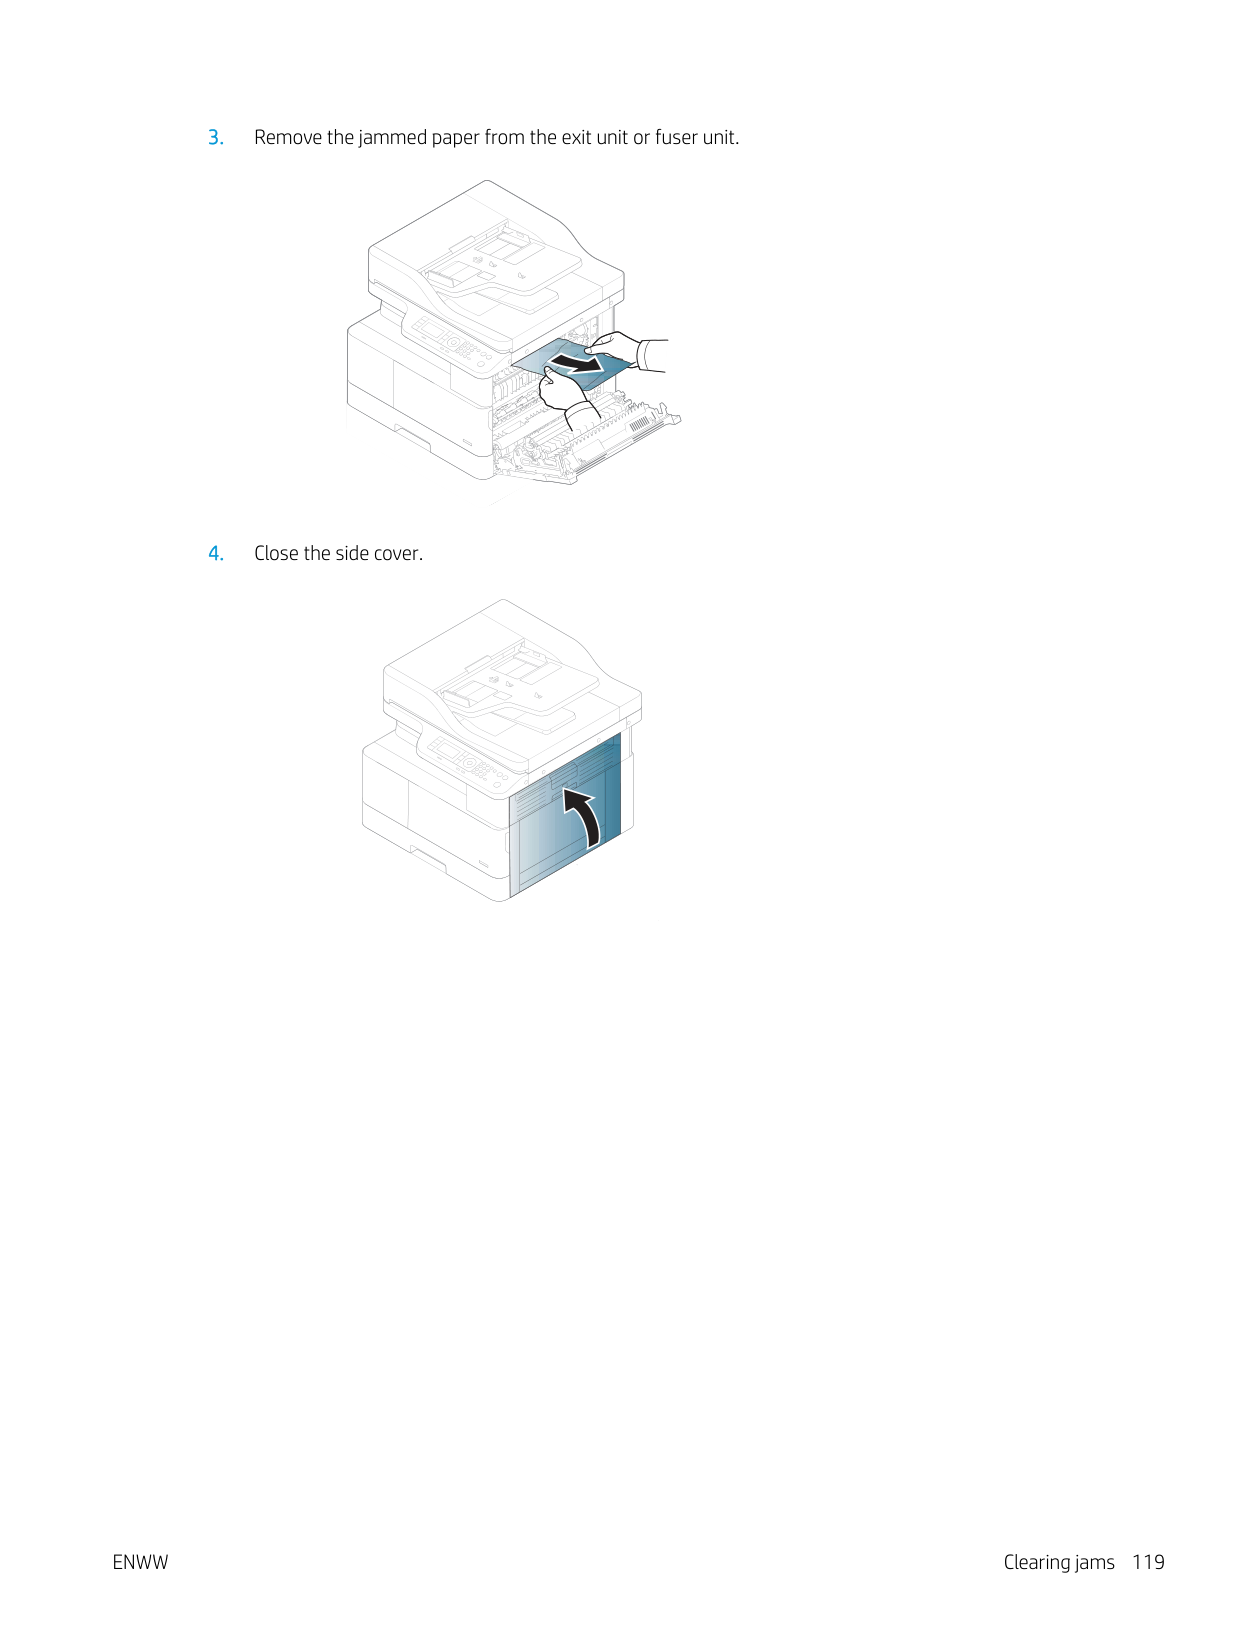
########## 3. Remove the jammed paper from the exit unit or fuser unit.


########## 4. Close the side cover.

###### In the duplex unit area


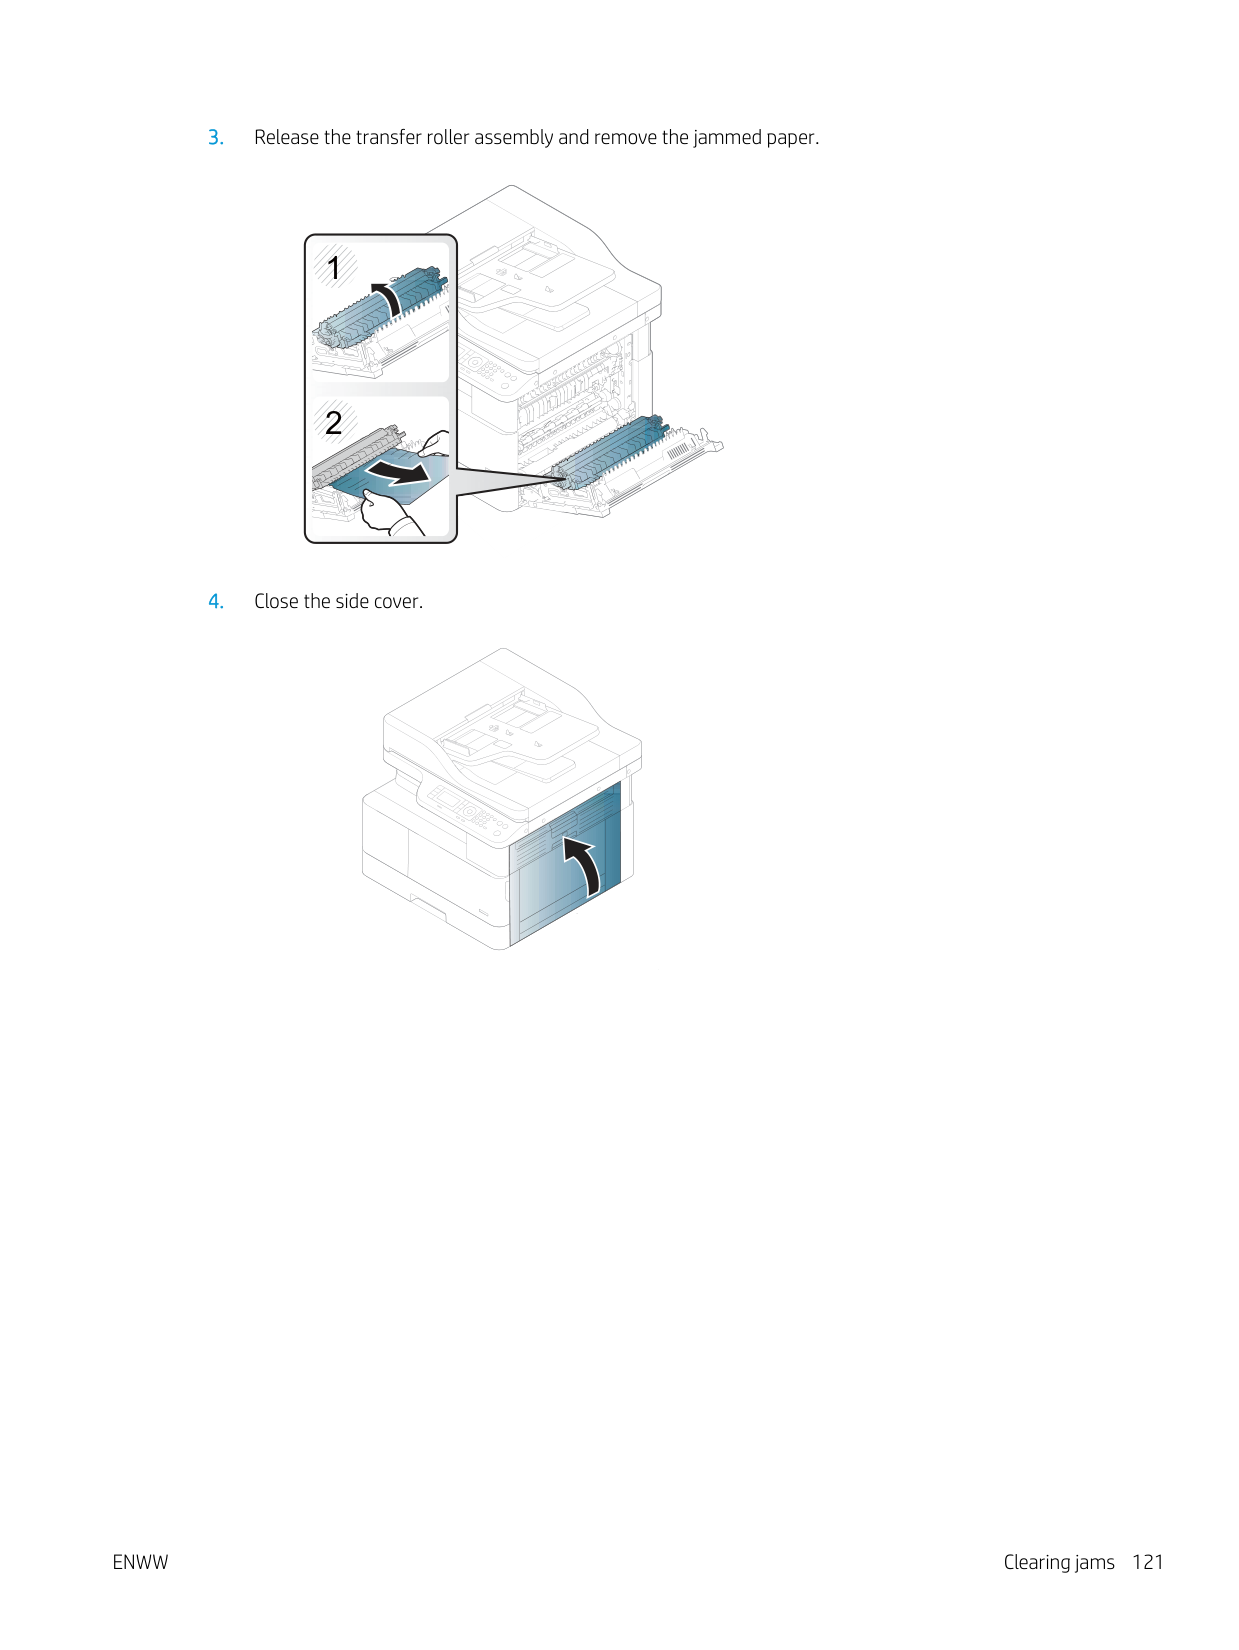
########## 3. Release the transfer roller assembly and remove the jammed paper.

| | | |---|---| | | |


########## 4. Close the side cover.

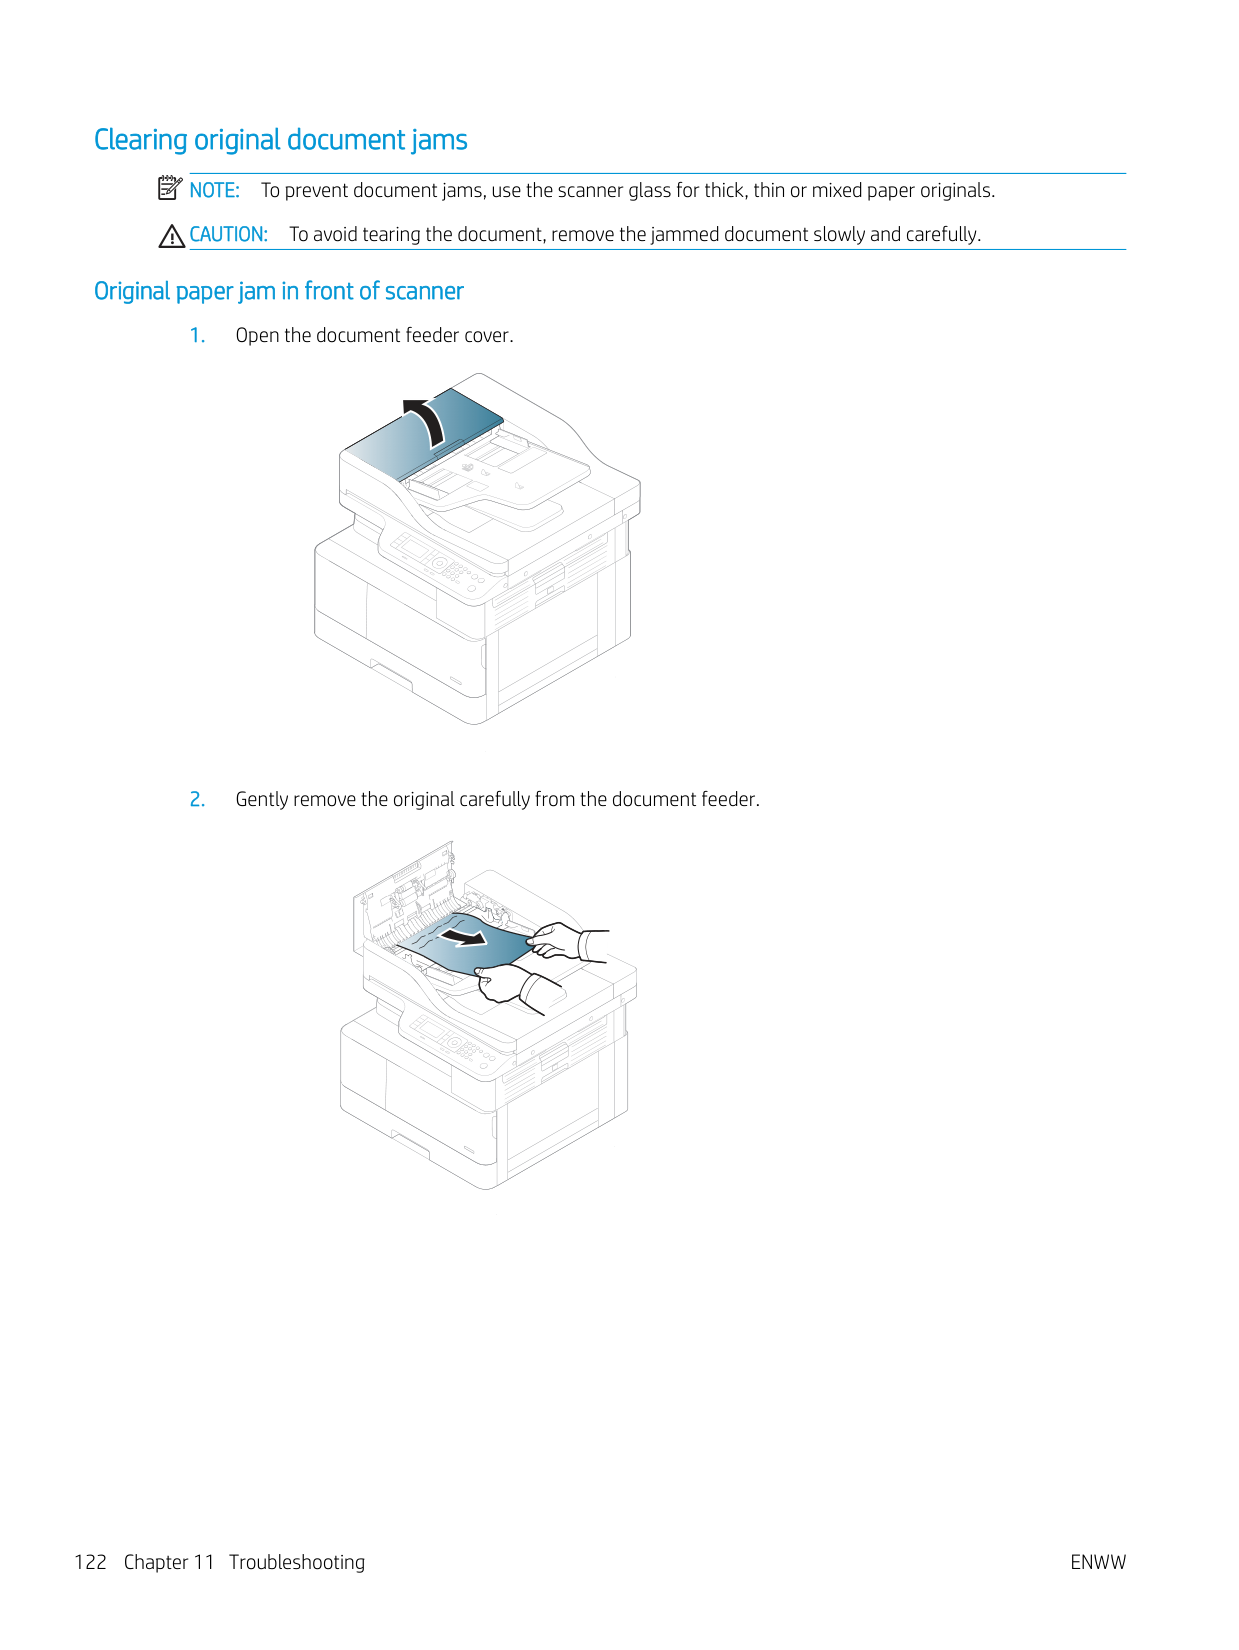
Clearing original document jams NOTE: To prevent document jams, use the scanner glass for thick, thin or mixed paper originals. CAUTION: To avoid tearing the document, remove the jammed document slowly and carefully.
| | |---|
####### Original paper jam in front of scanner

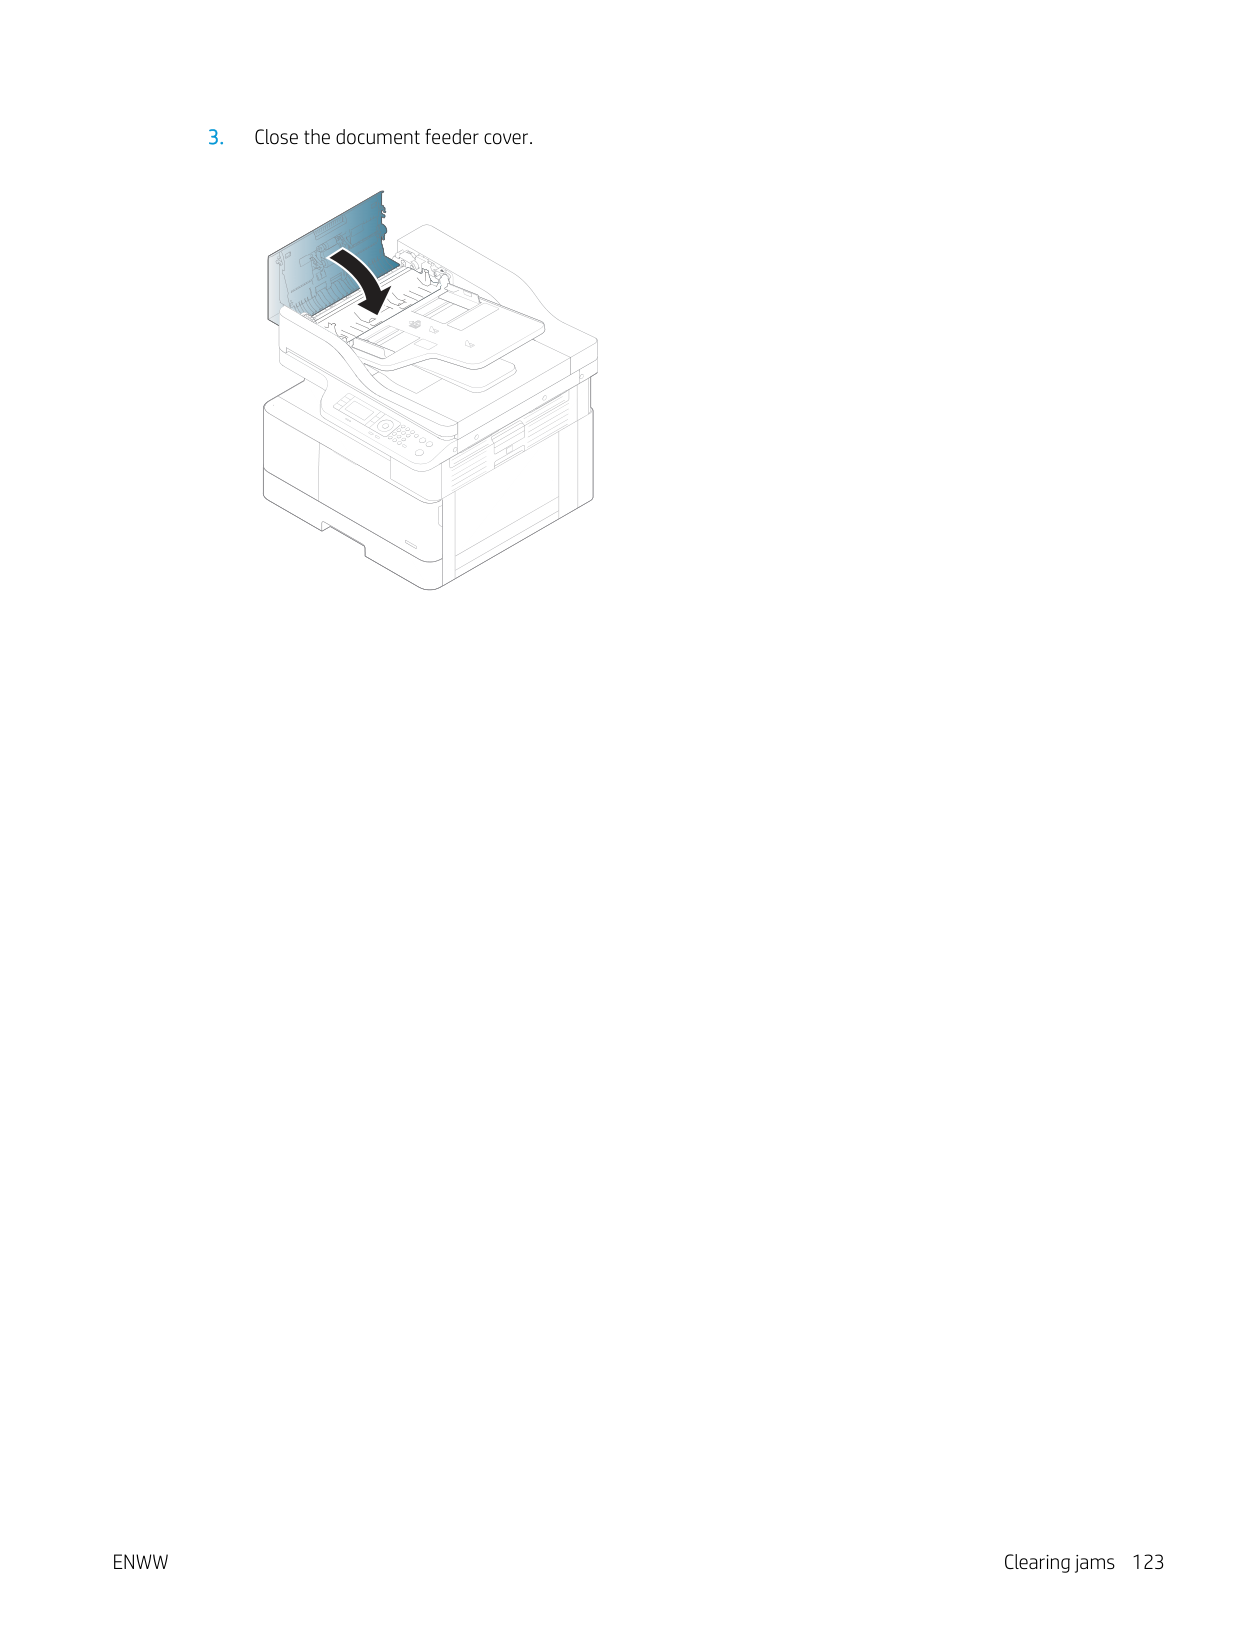
########## 3. Close the document feeder cover.


####### Original paper jam inside of scanner


If you do not see the paper in this area, stop and go to next step:
########## 3. Open the scanner lid.

########## 4. Grasp the misfeed original, and remove the paper from the feed area by carefully pulling it.


| | | |---|---| | | |

########## 5. Close the scanner lid.

########## 6. Close the document feeder cover.

####### Original paper jam in exit area of scanner


1
2


2


1

####### Original paper jam in scanner duplex path


########## 3. Close the duplex jam cover and document feeder cover.

#### Understanding the status LED The color of the LED indicates the machine's current status. NOTE:
| | |---|
LED Status Description Status Off ● The machine is off-line.
● The machine is in power save mode. Green Blinking When the backlight blinks, the machine is receiving or printing data. On ● The machine is on-line and can be used.
Red Blinking ● A minor error has occurred and the machine is waiting for the error to be cleared. Check the display message. When the problem is cleared, the machine resumes.
● Small amount of toner is left in the cartridge. The estimated cartridge lifea of toner is close. Prepare a new cartridge for replacement. You may temporarily increase the printing quality by redistributing the toner.b
On ● A toner cartridge has almost reached its estimated cartridge lifea. It is recommended to replace the toner cartridge.
White On The machine is in power save mode. Off The machine is in ready mode or machine’s power is off.
Power / Wake Up
ENWW Understanding the status LED 131
#### Understanding display messages
Messages appear on the control panel display to indicate the machine’s status or errors. Refer to the tables below to understand the messages and their meaning, and correct the problem, if necessary.
| | |---|
######### NOTE:
###### Paper Jam-related messages
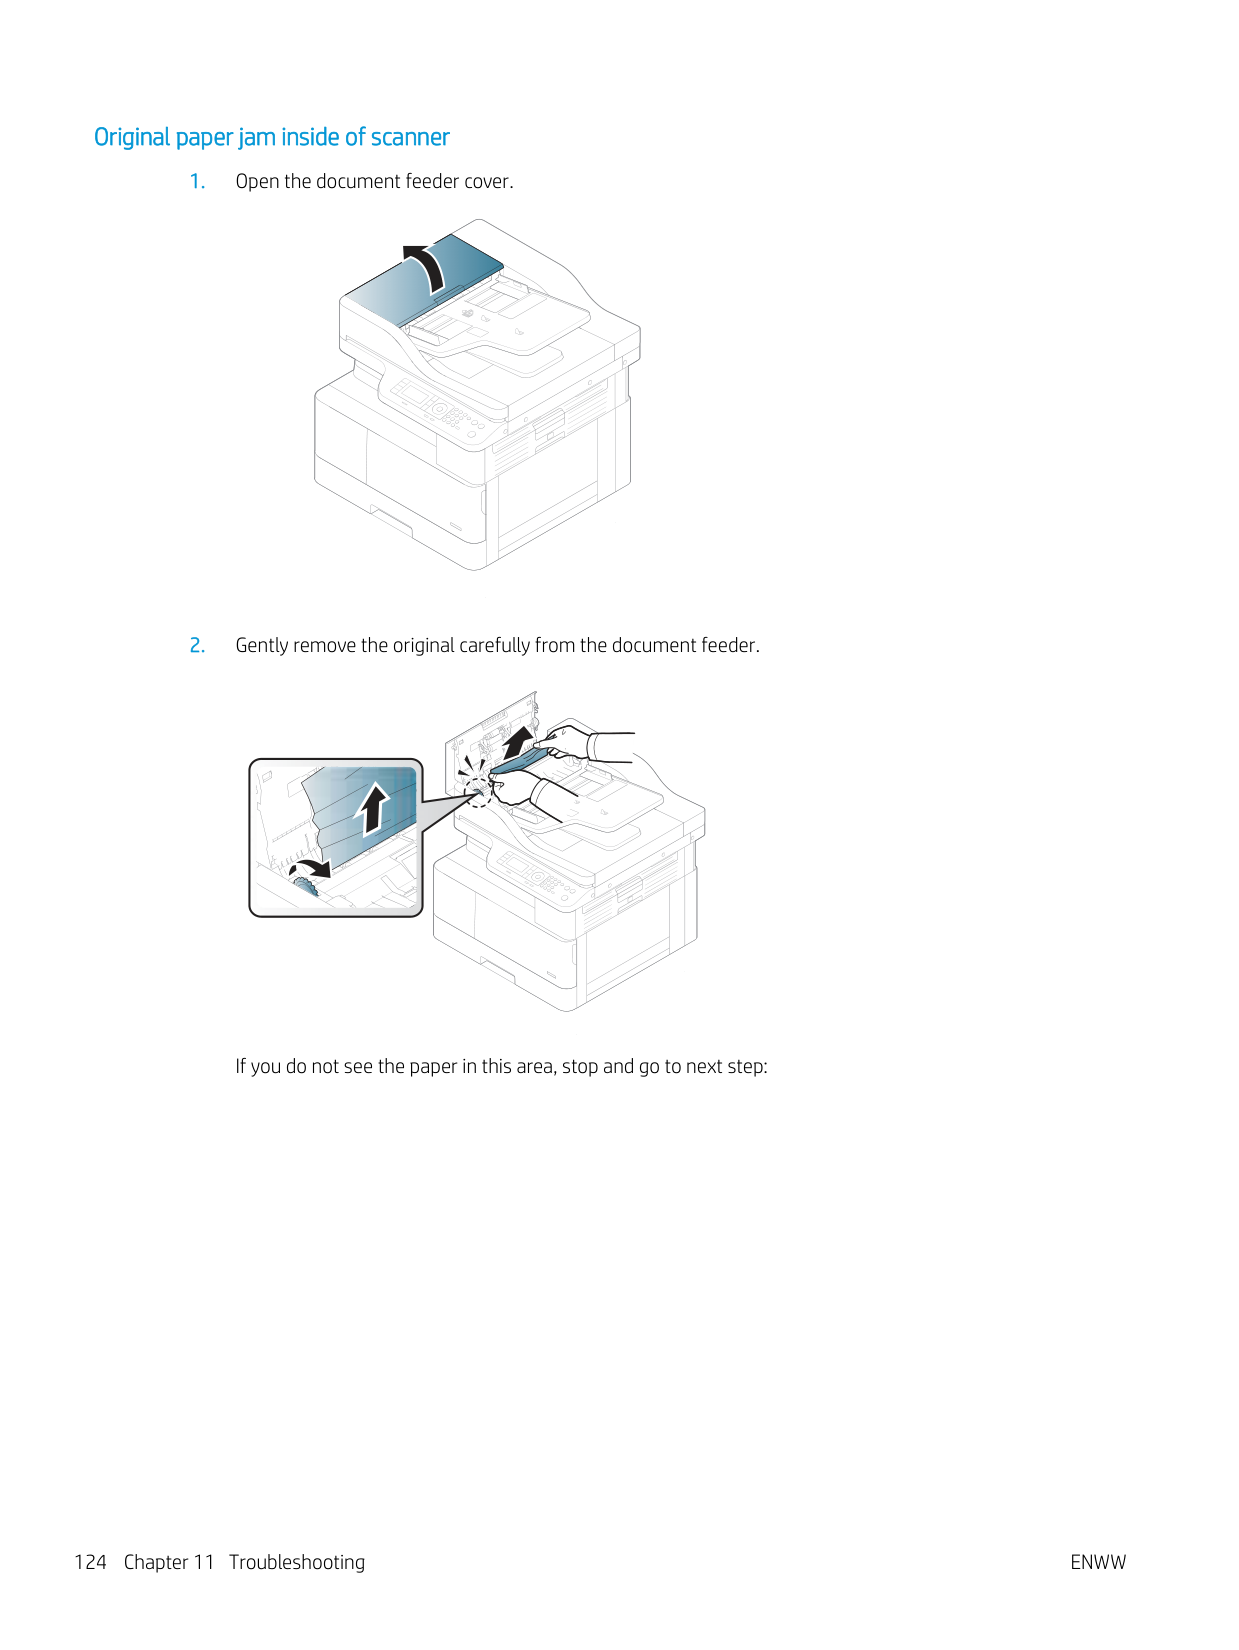
############# Message Meaning Suggested solutions Original paper jam The loaded original document has jammed in document
Clear the jam.
feeder.
Paper Jam in Tray 2 Paper has jammed in the tray. Clear the jam. Paper Jam in Tray 1 Paper has jammed in the multipurpose tray. Clear the jam. Jam inside of duplex Paper has jammed inside the duplex. Clear the jam. Jam in exit area Paper has jammed in the paper exit area. Clear the jam.
###### Toner-related messages
############# Message Meaning Suggested solutions
Toner Cart Failure [error number]
Call for service
Toner cartridge is not installed. Install it.
A toner cartridge is not installed. Reinstall the toner cartridge. A toner cartridge is not being detected. Reinstall the toner cartridge two or
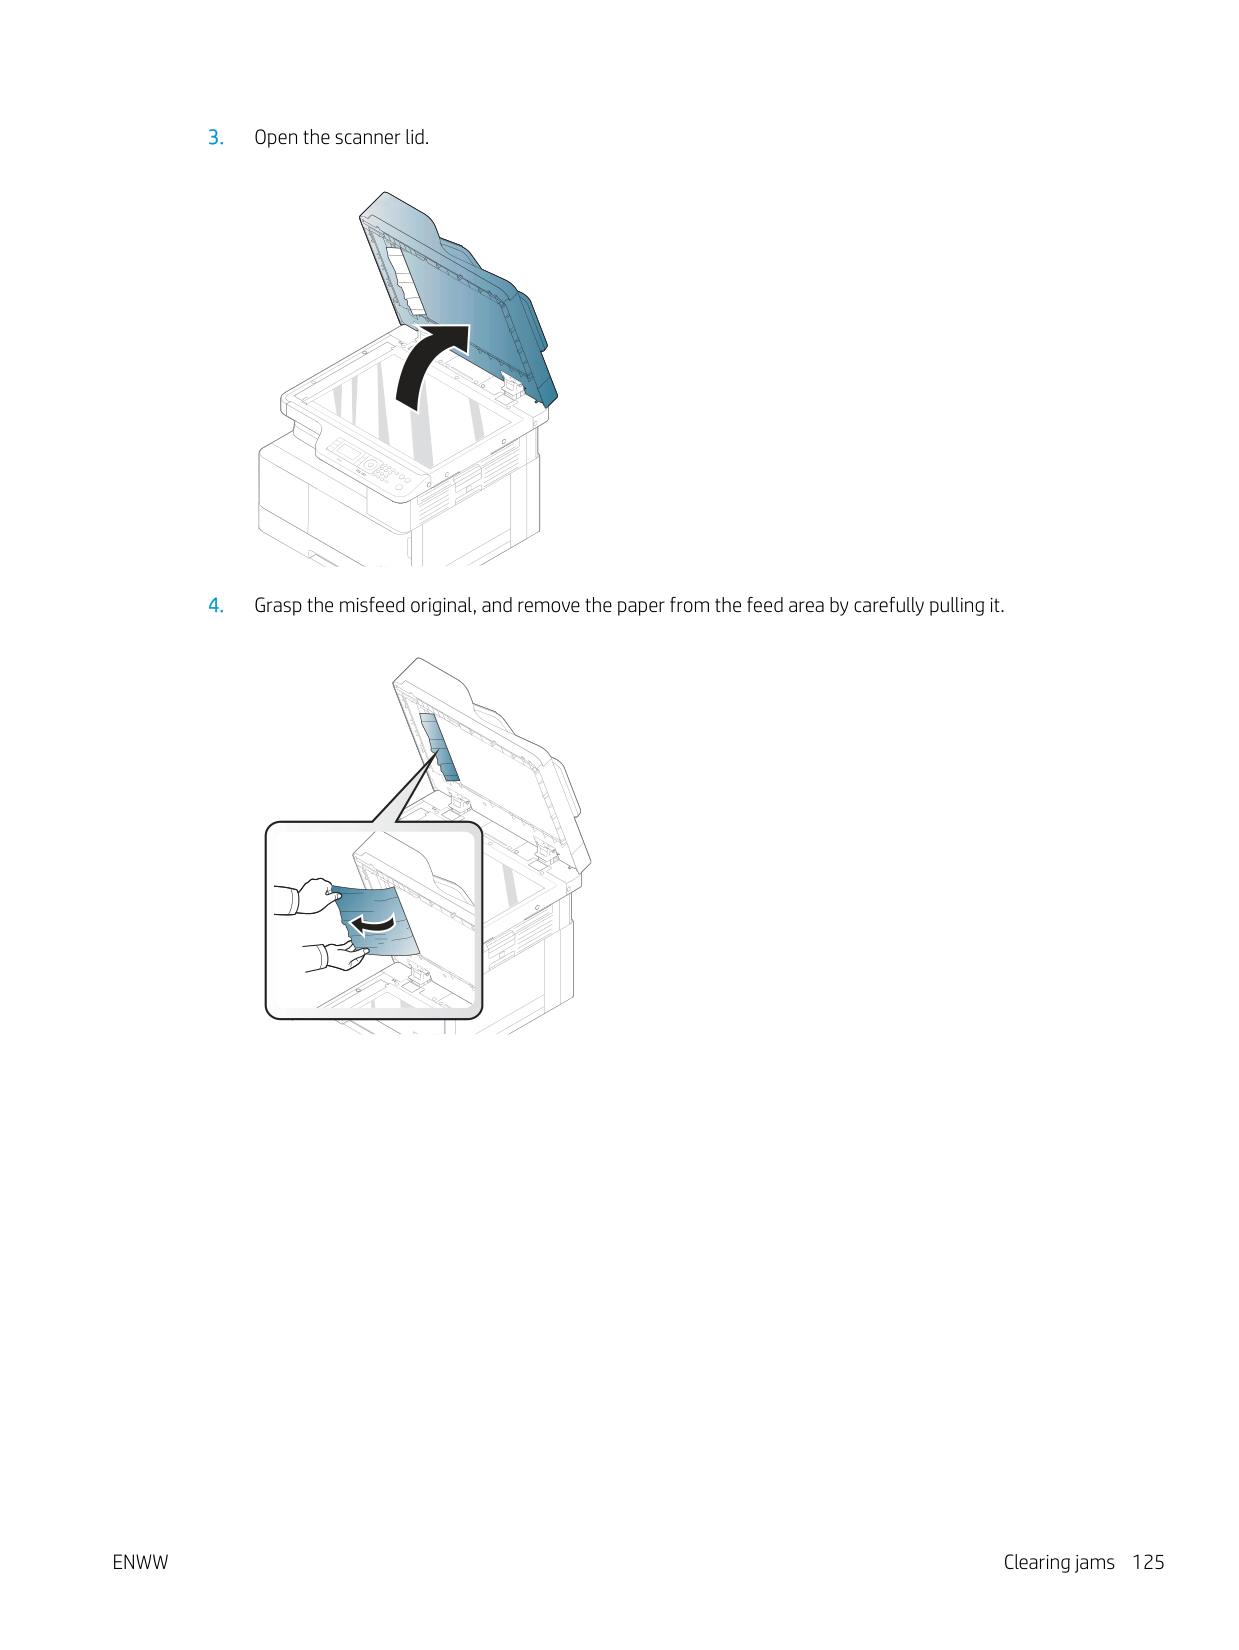
three times to confirm it is seated properly. If the problem persists, contact the service representatives.
Protective film is not removed from toner. Remove the protective film from the toner cartridge.
Imaging unit is not compatible. Check guide
The imaging unit you have installed is not for your machine. Install a HP genuine imaging unit, designed for your machine.
Imaging unit is not installed. Install the unit.
The imaging unit is not installed. Reinstall the imaging unit two or three times. If the problem persists, call for service.
The estimated imaging unit life is close. Prepare a new imaging unit for replacement.
The indicated imaging unit has almost reached its estimated imaging unit life.

Toner cartridge is not compatible. Check guide
The indicated toner cartridge is not suitable for your machine.
Replace the indicated toner cartridge with an HP cartridge.
Small amount of toner is left in the indicated cartridge. The estimated cartridge lifea of toner is close.
Prepare a new cartridge for a replacement. You may temporarily increase the printing quality by redistributing the toner.
The indicated toner cartridge has almost reached its estimated cartridge life.
● You can choose Stop or Continue as shown on the control panel. If you select Stop, the printer stops printing. If you select Continue, the printer keeps printing but the
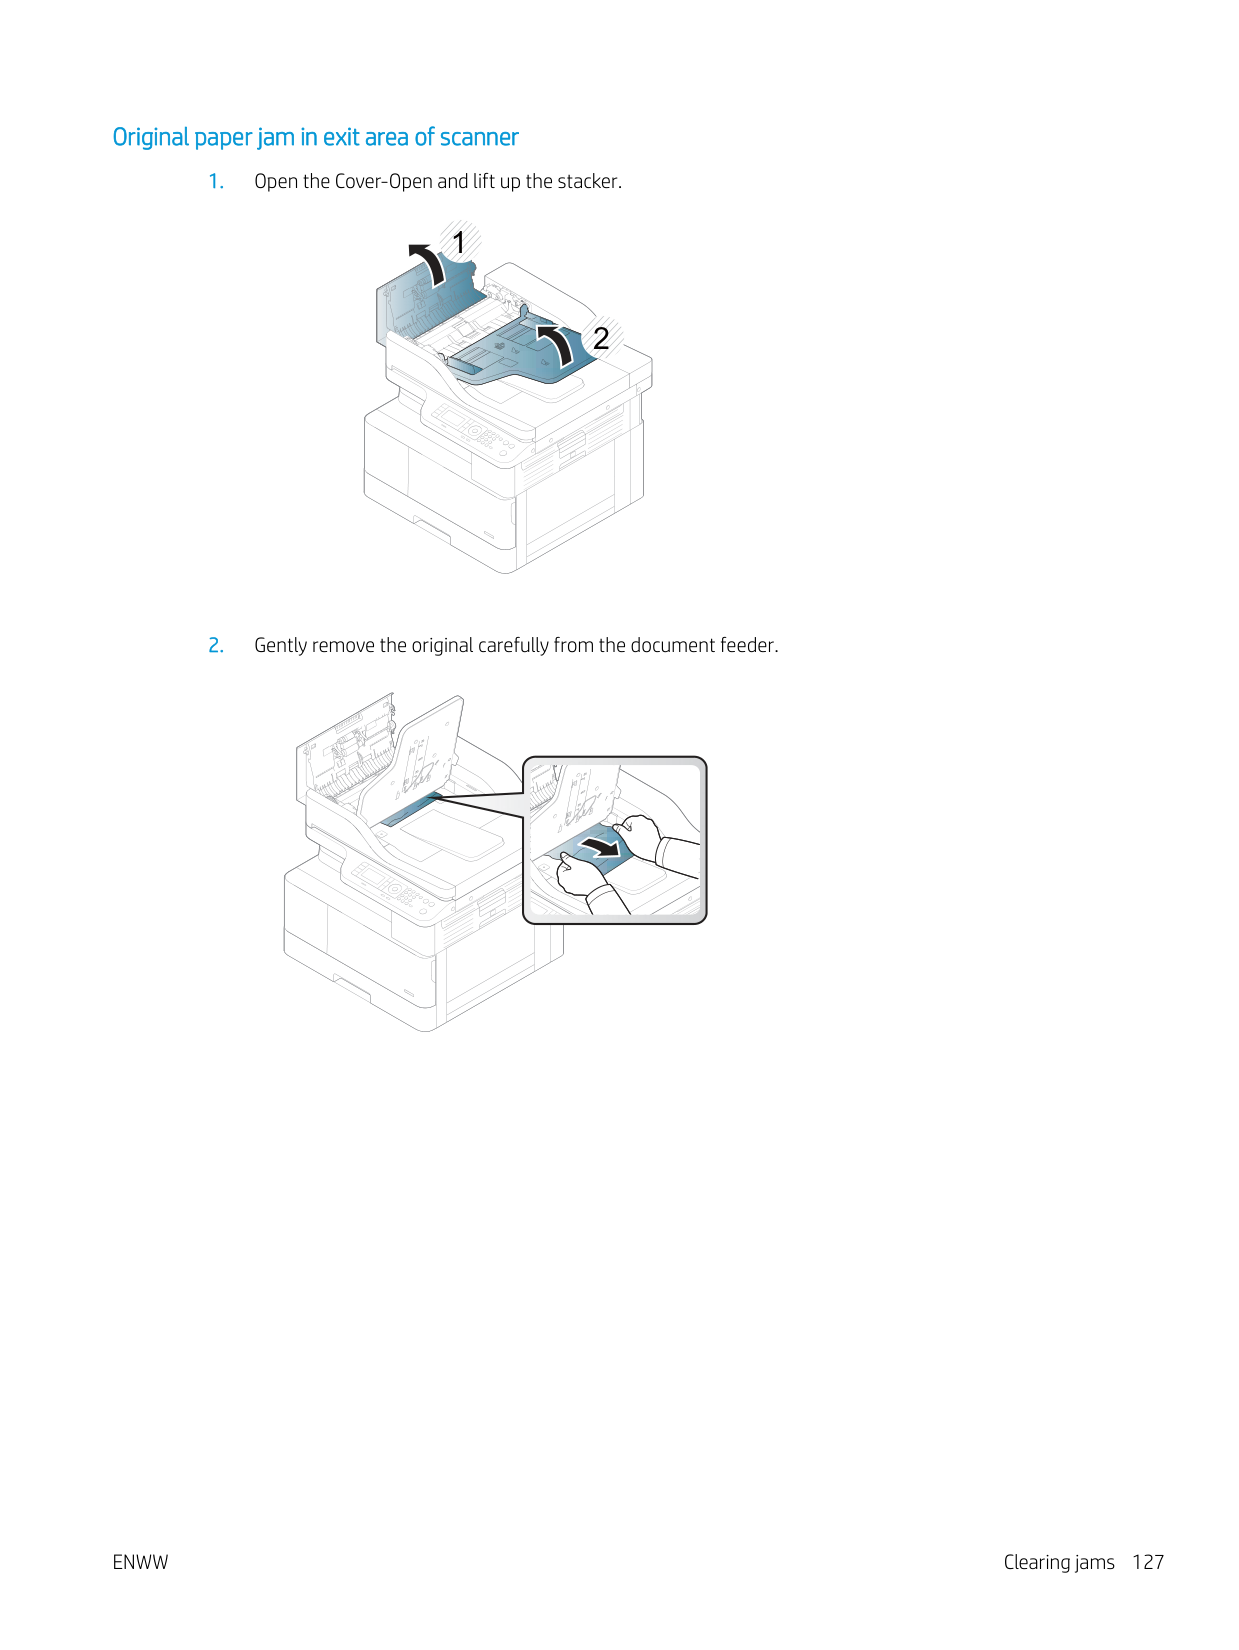
Replace with new toner cartridge
############# Message Meaning Suggested solutions
printing quality cannot be guaranteed.
● Replace the toner cartridge for the best print quality when this message appears. Using a cartridge beyond this stage can result in printing quality issues.
The indicated toner cartridge has reached its estimated cartridge life
Replace the toner cartridge.
a The printer indicates when the cartridge level is low. Actual cartridge life remaining may vary. Consider having a replacement available to install when print quality is no longer acceptable. The cartridge does not need to be replaced now unless the print quality is no longer acceptable.
CAUTION: For HP printer products, the use of a non-HP toner cartridge or a refilled toner cartridge does not affect either the warranty to the customer or any HP support contract with the customer. However, if product failure or damage is attributable to the use of a non-HP toner cartridge or refilled toner cartridge, HP will charge its standard time and materials charges to service the product for the particular failure or damage.
###### Tray-related messages
Message Meaning Suggested solutions
There is no paper in all tray. Load paper in tray.
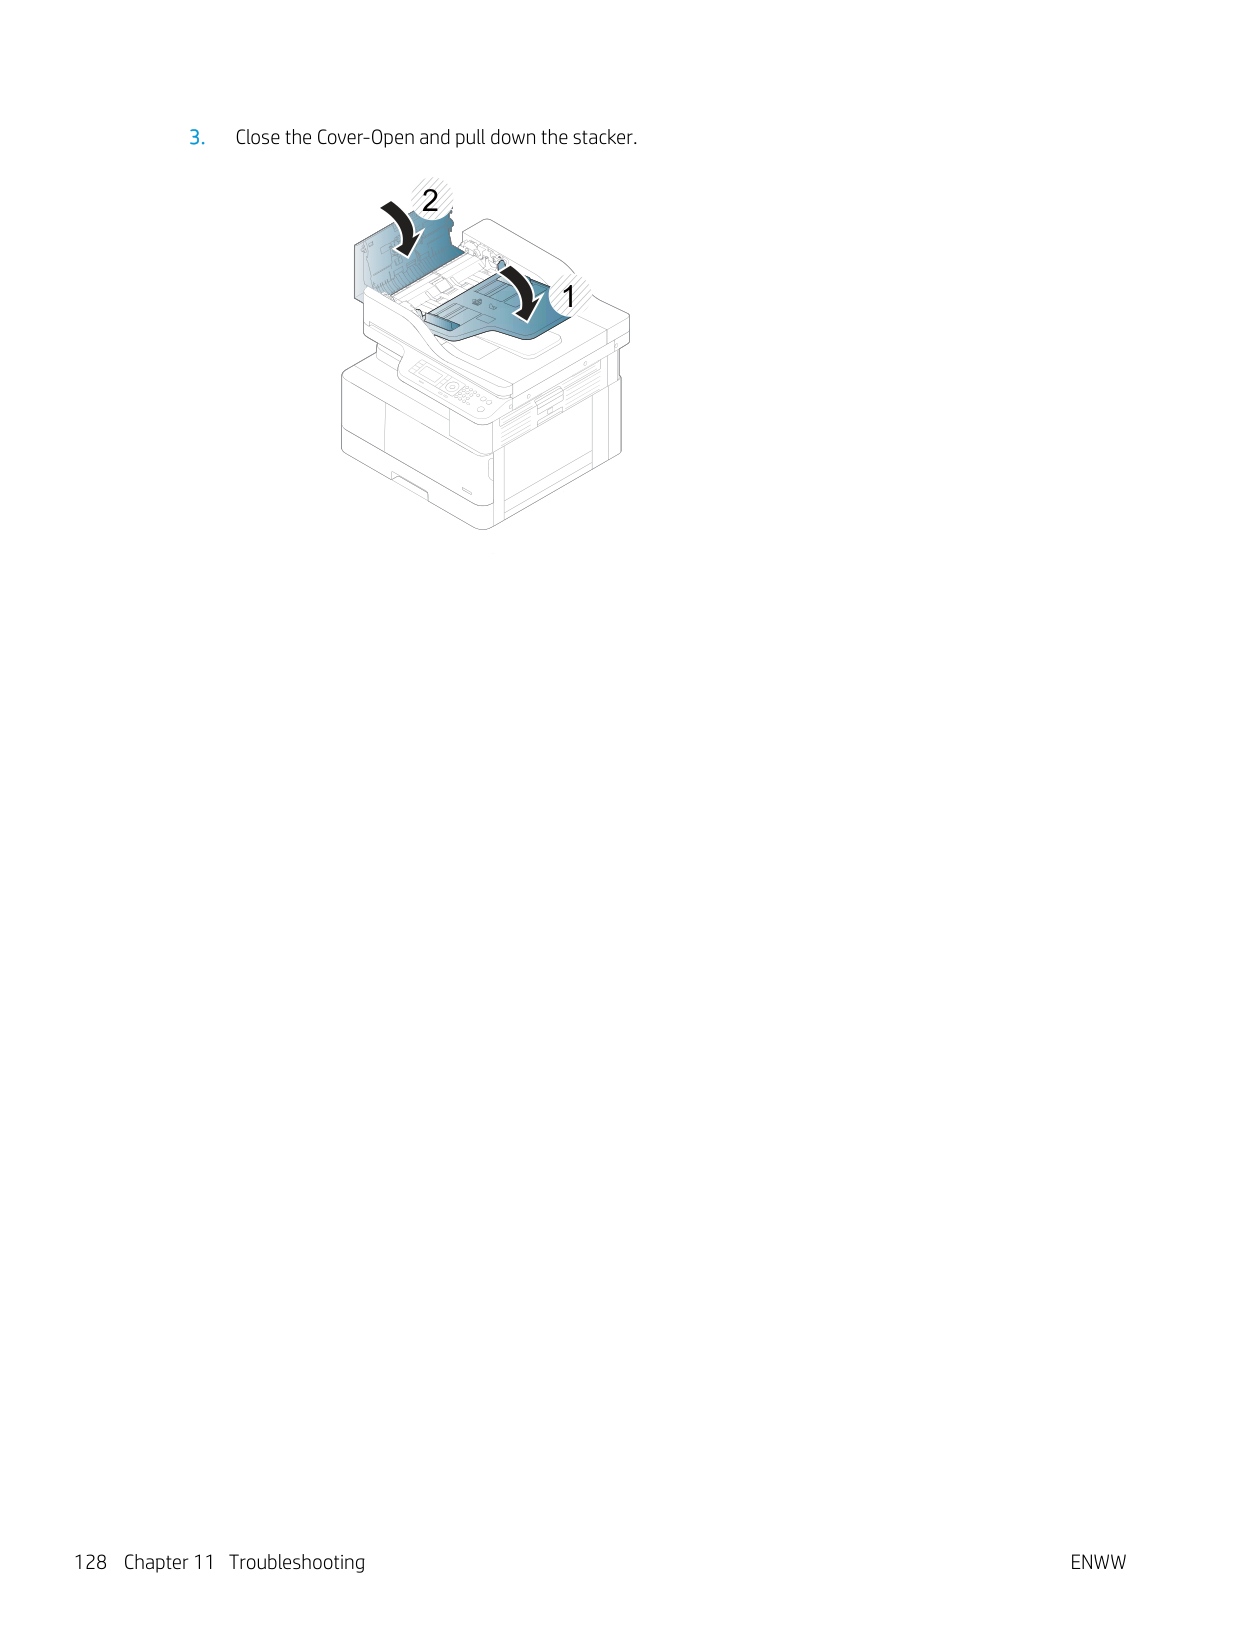
There is no paper in tray. Load paper in tray.
There is no paper in the multi-purpose tray. Load paper in the multi-purpose tray.
###### Network-related messages
Message Meaning Suggested solutions IP Conflict This IP address conflicts with that of other system
The network IP address you have set is being used by someone else.
Check the IP address and reset it if necessary.
###### Misc. messages
Message Meaning Suggested solutions
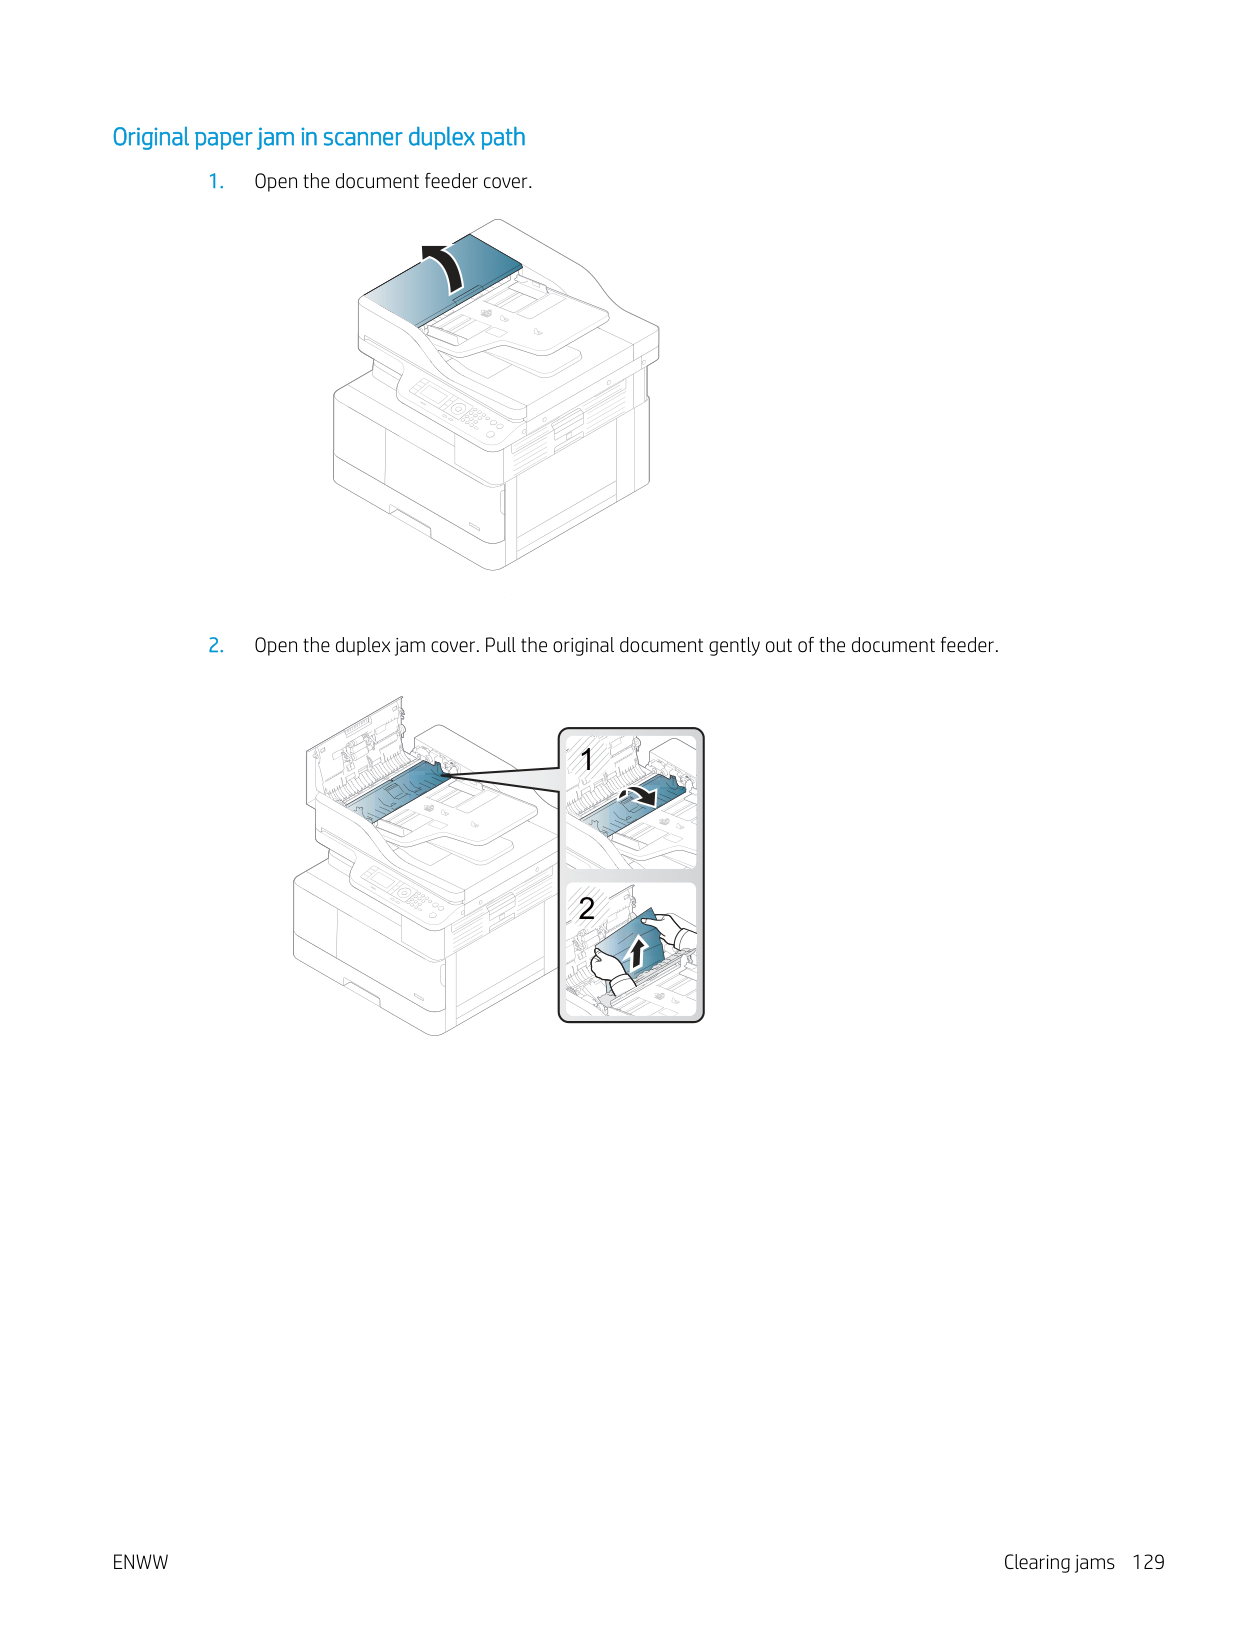
The Tray 2 door, front door or right door is not securely latched.
Close the door until it locks into place.
Door of scanner is open. Close the door
The document feeder cover is not securely latched.
Close the cover until it locks into place.
Not Proper room temperature. Change room temperature
The machine is in a room with improper room temperature.
Move the machine to a room with proper room temperature
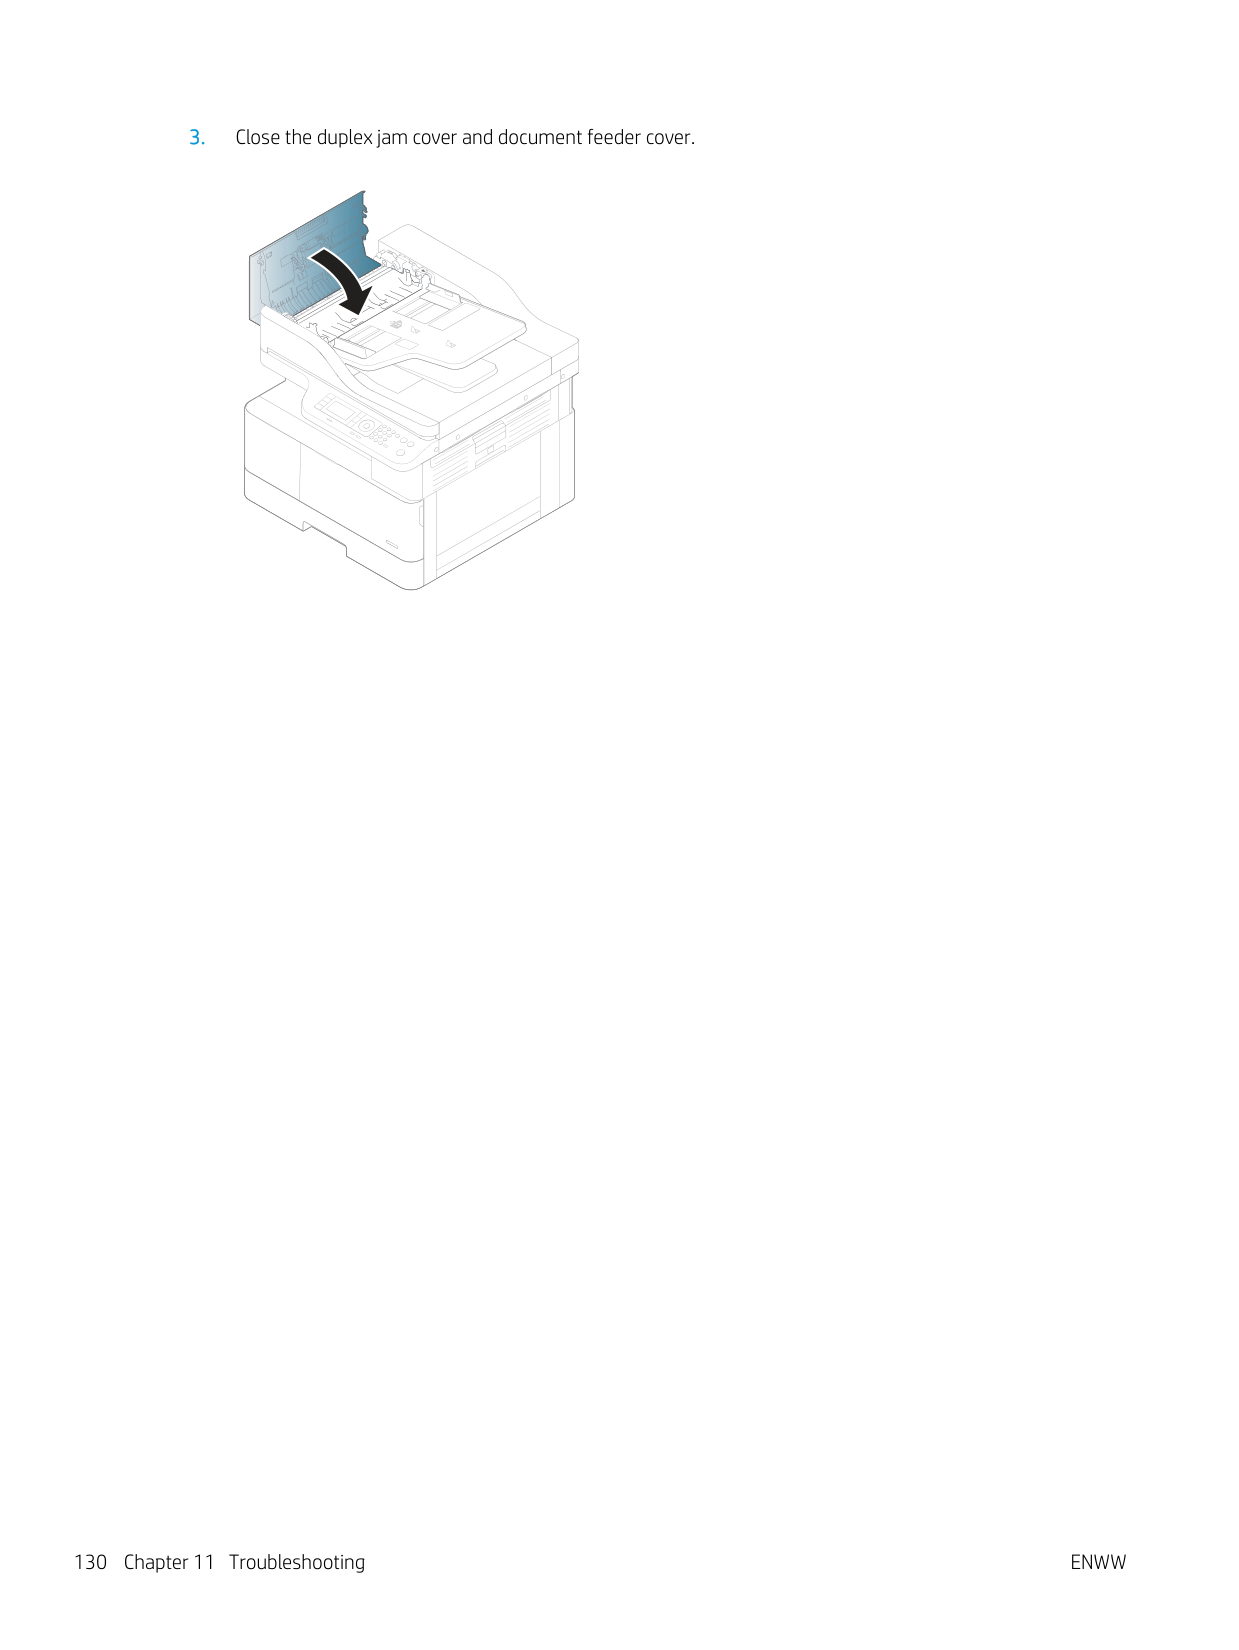
The life of the tray reverse roller has expired.
Replace the tray reverse roller with a new one. Contact the service representatives.
Scanner is locked. Press Stop/Clear button.
The scanner is locked. Reboot the power. If the problem persists, please call for service.
Door of scanner is open. Close the door
The document feeder cover is not securely latched.
Close the cover until it locks into place.
Turn off then on. Call for service if the problem persists
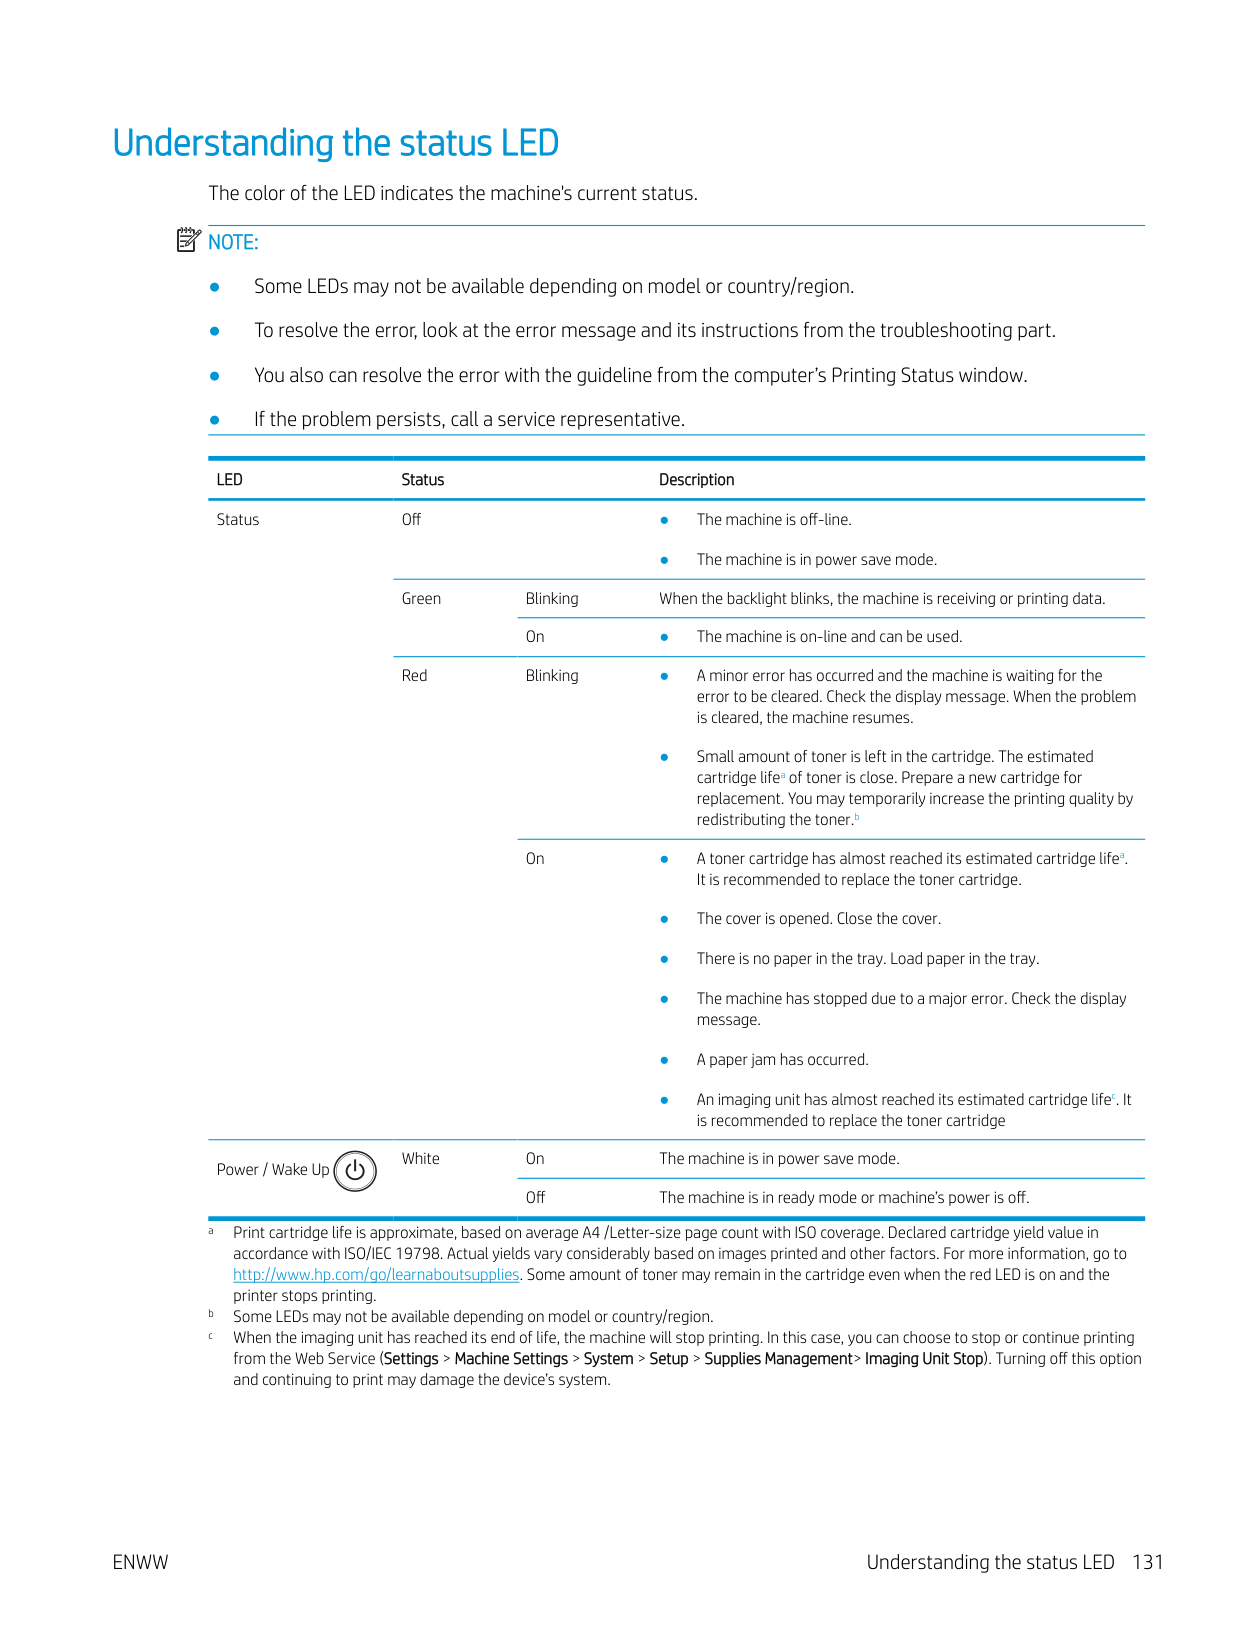
There is a problem in the fuser unit. Reboot the power. If the problem persists, please call for service.
Turn off then on. Call for service if the problem persists
There is a problem in the Motor system. Reboot the power. If the problem persists, please call for service.
Turn off then on. Call for service if the problem persists
There is a problem in the LSU. Reboot the power. If the problem persists, please call for service.
There is a problem in a Tray. Check the Tray connection.
#### Power and cable connecting problems
Condition Suggested solutions The machine is not receiving power, or the connection cable between the computer and the machine is not connected properly.

#### Printing problems
The following table describes common printing problems, the possible causes, and suggested solutions.
Condition Possible cause Suggested solutions The machine does not print.
The machine is not receiving power. Connect the machine to the electricity supply first. If the machine has a Power / Wake Up button on the control, press it.
The machine is not selected as the default machine. Select your machine as your default machine in
Windows. Check the machine for the following:
Disconnect the machine cable and reconnect it.
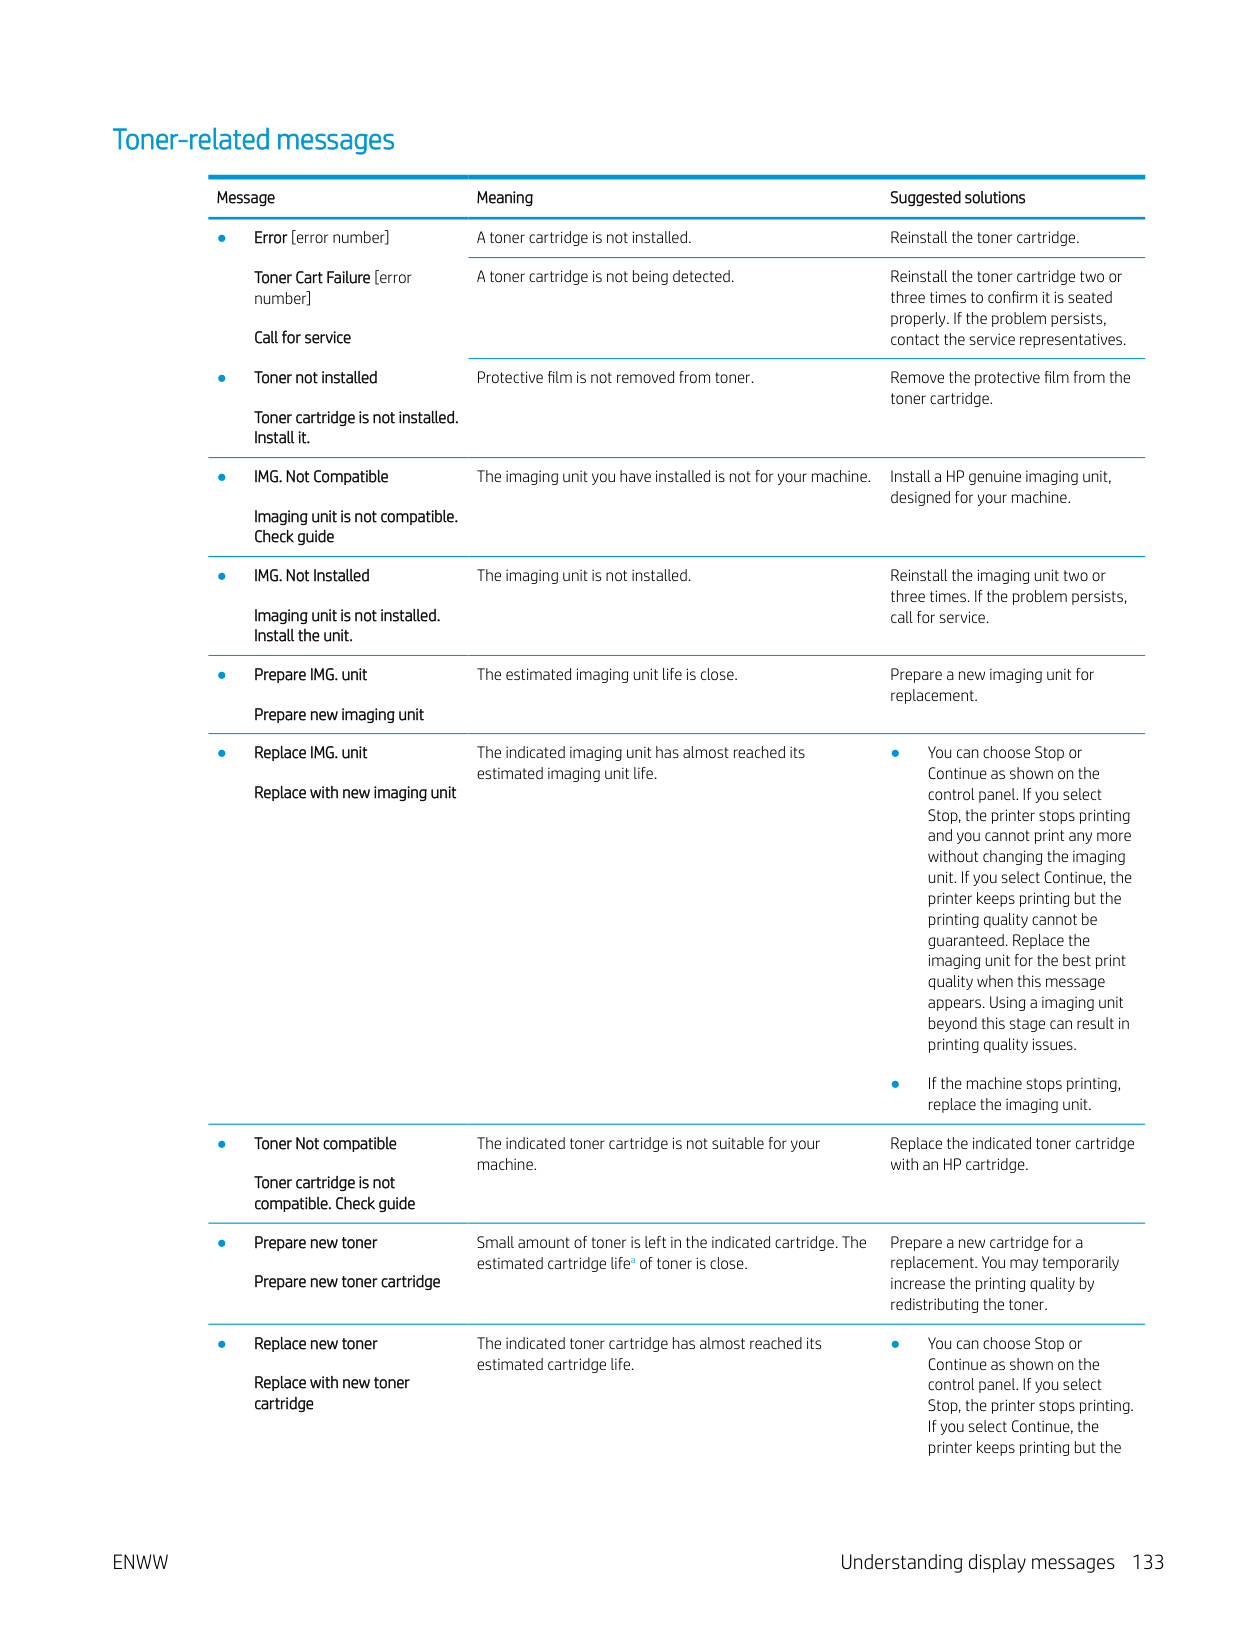
The connection cable between the computer and the machine is defective.
If possible, attach the cable to another computer that is working properly and print a job. You can also try using a different machine cable.
The port setting is incorrect. Check the Windows printer settings to make sure that the print job is sent to the correct port. If the computer has more than one port, make sure that the machine is attached to the correct one.
The machine may be configured incorrectly. Check the Printing Preferences to ensure that all of
the print settings are correct. The printer driver may be incorrectly installed. Uninstall and reinstall the machine’s driver. The machine is malfunctioning. Check the display message on the control panel to
see if the machine is indicating a system error. Contact a service representative.
The document size is so big that the hard disk space of the computer is insufficient to access the print job.
Get more hard disk space and print the document again.
The output tray is full. Once the paper is removed from the output tray, the machine resumes printing.
############# The machine selects print materials from the wrong paper source.
The paper option that was selected in the Printing Preferences may be incorrect.
For many software applications, the paper source selection is found under the Paper tab within the Printing Preferences. Select the correct paper source. See the printer driver help screen.
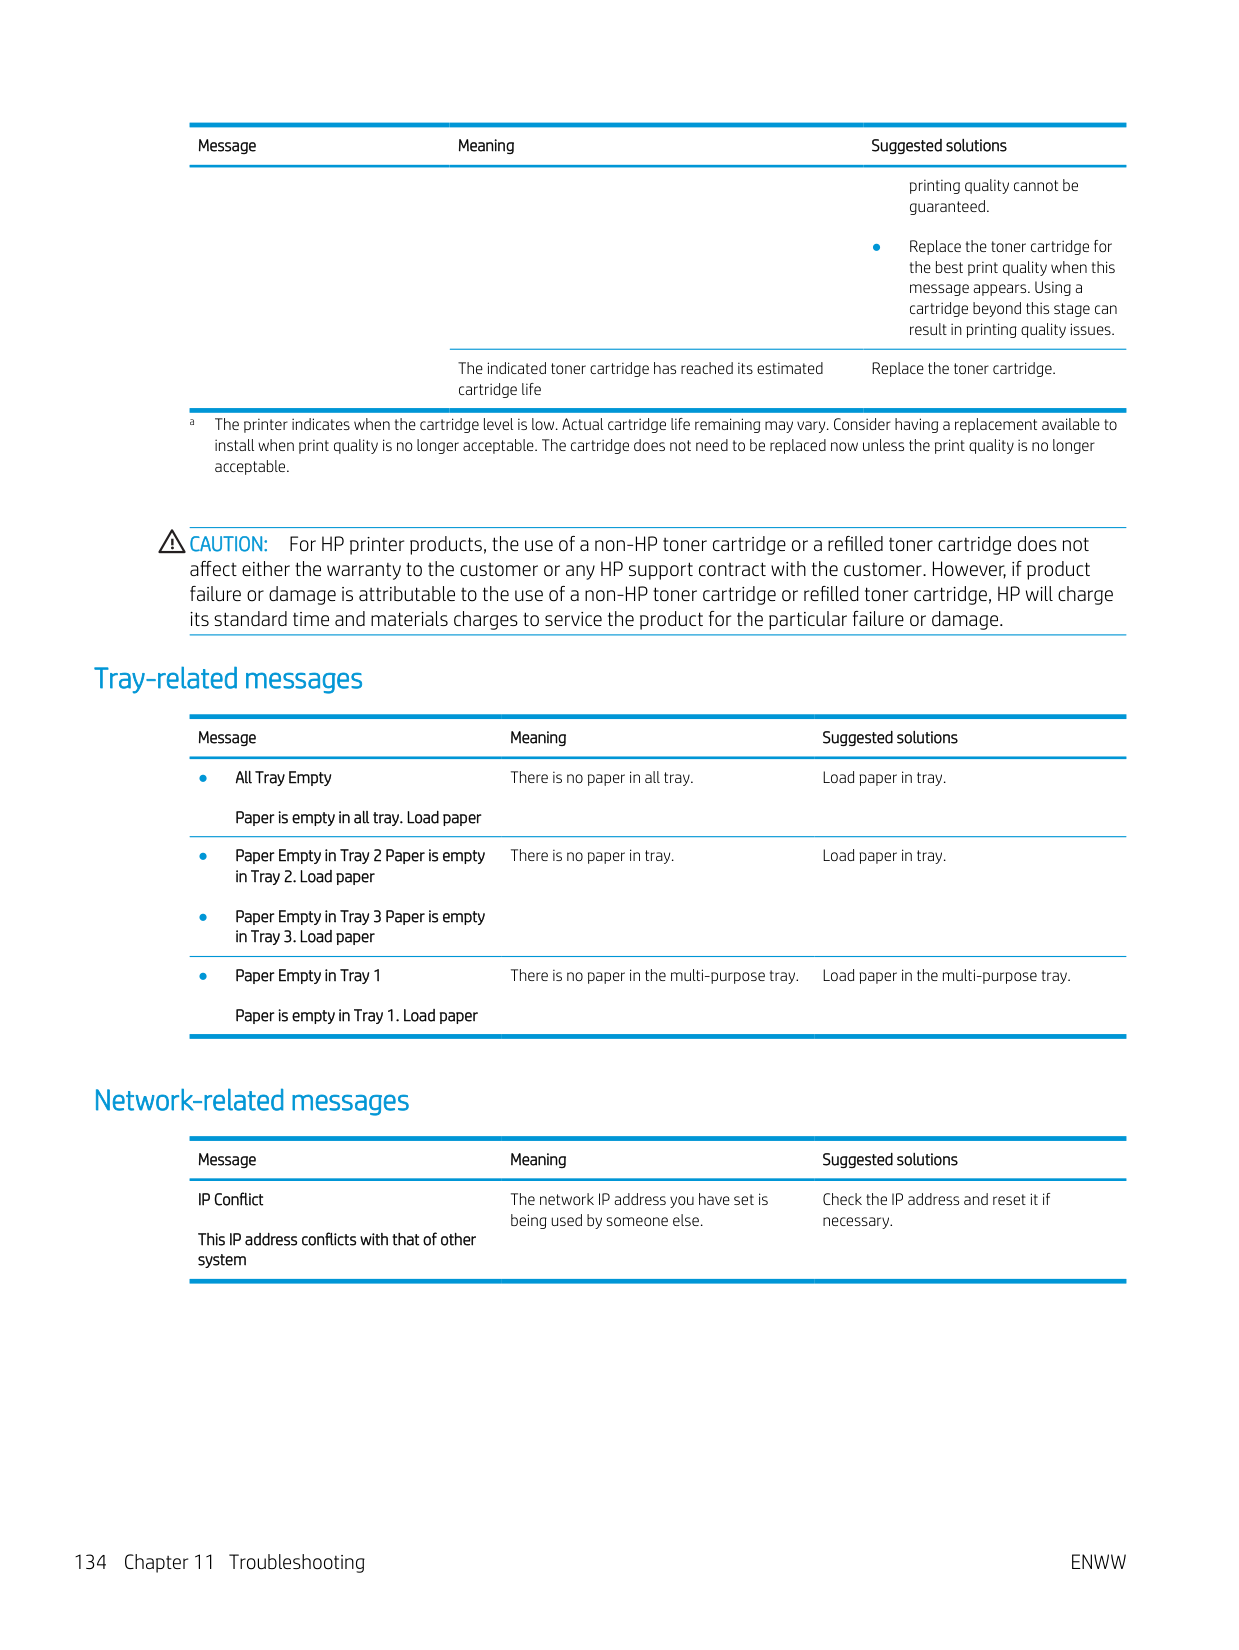
############# A print job is extremely slow.
The job may be very complex. Reduce the complexity of the page or try adjusting the print quality settings.
Half the page is blank. The page orientation setting may be incorrect. Change the page orientation in your application.
ENWW Printing problems 137
############# Condition Possible cause Suggested solutions
The paper size and the paper size settings do not match.
Ensure that the paper size in the printer driver settings matches the paper in the tray. Or, ensure that the paper size in the printer driver settings matches the paper selection in the software application settings you use.
############# The machine prints, but the text is wrong, garbled, or incomplete.
The machine cable is loose or defective. Disconnect the machine cable and reconnect. Try a print job that you have already printed successfully. If possible, attach the cable and the machine to another computer that you know works and try a print job. Finally, try a new machine cable.
The wrong printer driver was selected. Check the application’s printer selection menu to
ensure that your machine is selected. The software application is malfunctioning. Try printing a job from another application. The operating system is malfunctioning. Exit Windows and reboot the computer. Turn the
machine off and back on again.
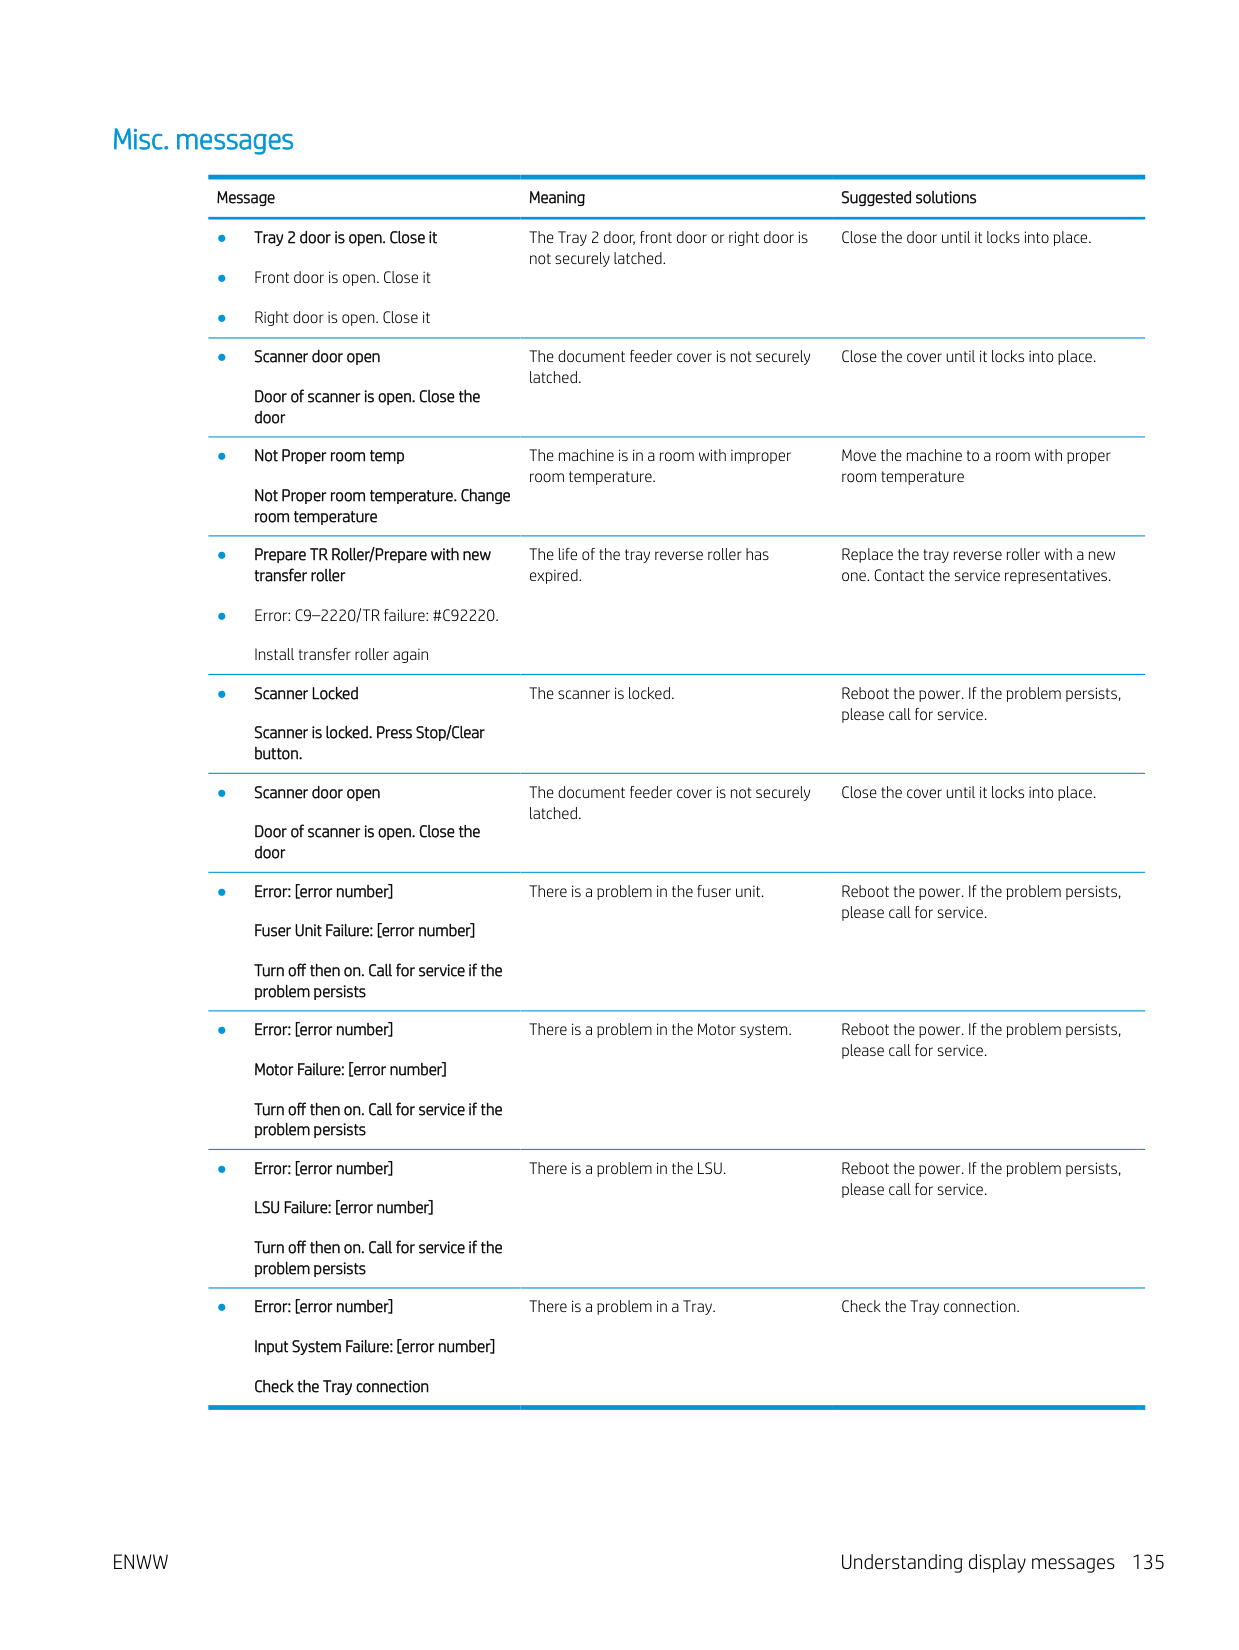
############# Pages print, but they are blank.
The toner cartridge is defective or out of toner. Redistribute the toner, if necessary. If necessary, replace the toner cartridge.
The file may have blank pages. Check the file to ensure that it does not contain blank pages.
Some parts, such as the controller or the board, may be defective.
Contact a service representative.
The machine does not print PDF files correctly. Some parts of graphics, text, or illustrations are missing.
Incompatibility between the PDF file and the Acrobat products.
Printing the PDF file as an image may enable the file to print. Turn on Print As Image from the Acrobat printing options.
NOTE: It will take longer to print when you print a PDF file as an image.
############# The print quality of photos is not good. Images are not clear.
The resolution of the photo is very low. Reduce the photo size. If you increase the photo size in the software application, the resolution will be reduced.
############# Before printing, the machine emits vapor near the output tray.

Using damp/wet paper can cause vapor [white smoke] during printing.
This is not a problem, just keep printing. If you are bothered by the smoke [vapor], then replace the paper with fresh paper from an unopened ream.
############# The machine does not print special-sized paper, such as billing paper.
Paper size and paper size setting do not match. Set the correct paper size in the Custom in Paper tab in Printing Preferences.
############# The printed billing paper is curled.
The paper type setting does not match. Change the printer option and try again. Go to Printing Preferences, click Paper tab, and set type to Thin.
#### Printing quality problems
The following table describes common printing quality problems, shows examples of each one, and lists suggested solutions.
Condition Example Suggested solutions Light or faded print
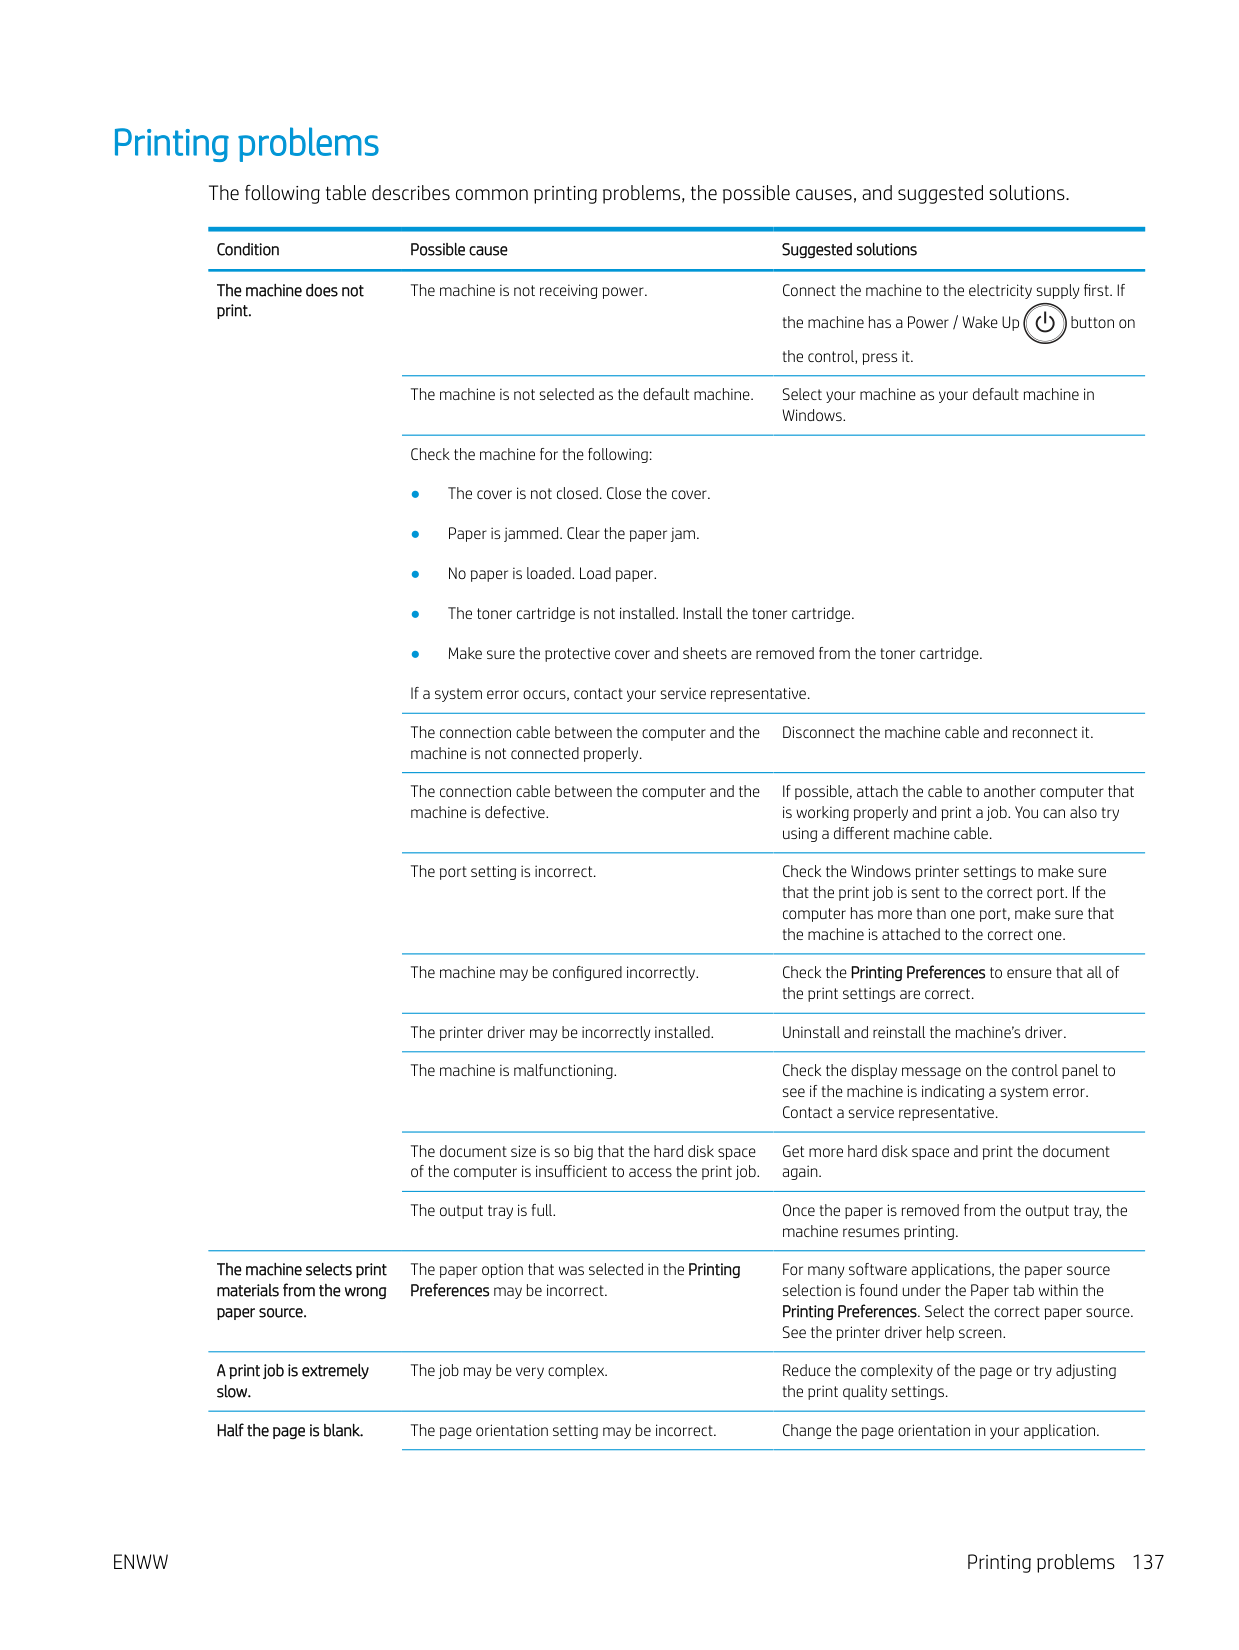
| | |---|
The top half of the paper is printed lighter than the rest of the paper
The toner might not adhere properly to this type of paper.
| | |---|
● Change the printer option and try again. Go to Printing Preferences, click the Paper tab, and set the paper type to Recycled.
Toner specks
|AaBbCc AaBbCc AaBbCc AaBbCc AaBbCc|
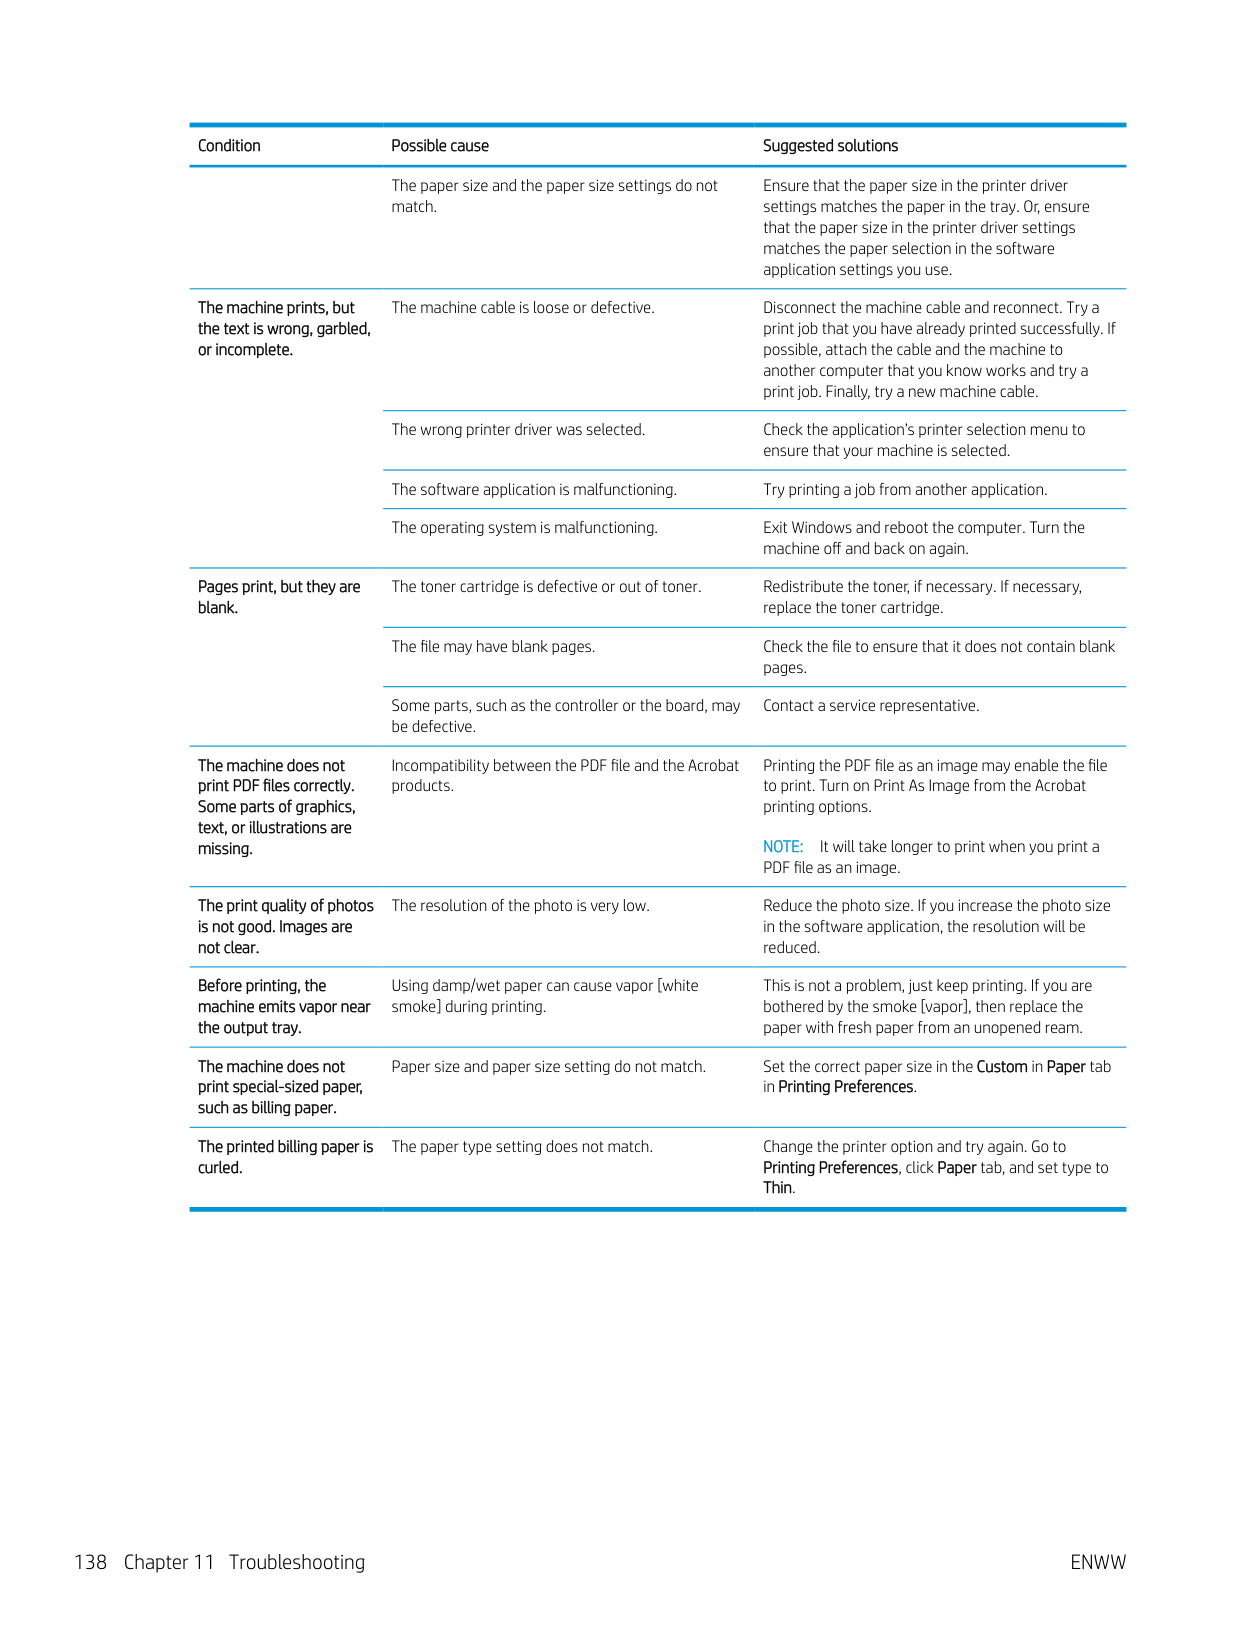
|---|
Dropouts
If faded areas, generally rounded, occur randomly on the page:
|AaBbC AaBbC AaBbC AaBbC AaBbC
| |---|
If these steps do not correct the problem, contact a service representative.
############# White Spots
If white spots appear on the page:
| |
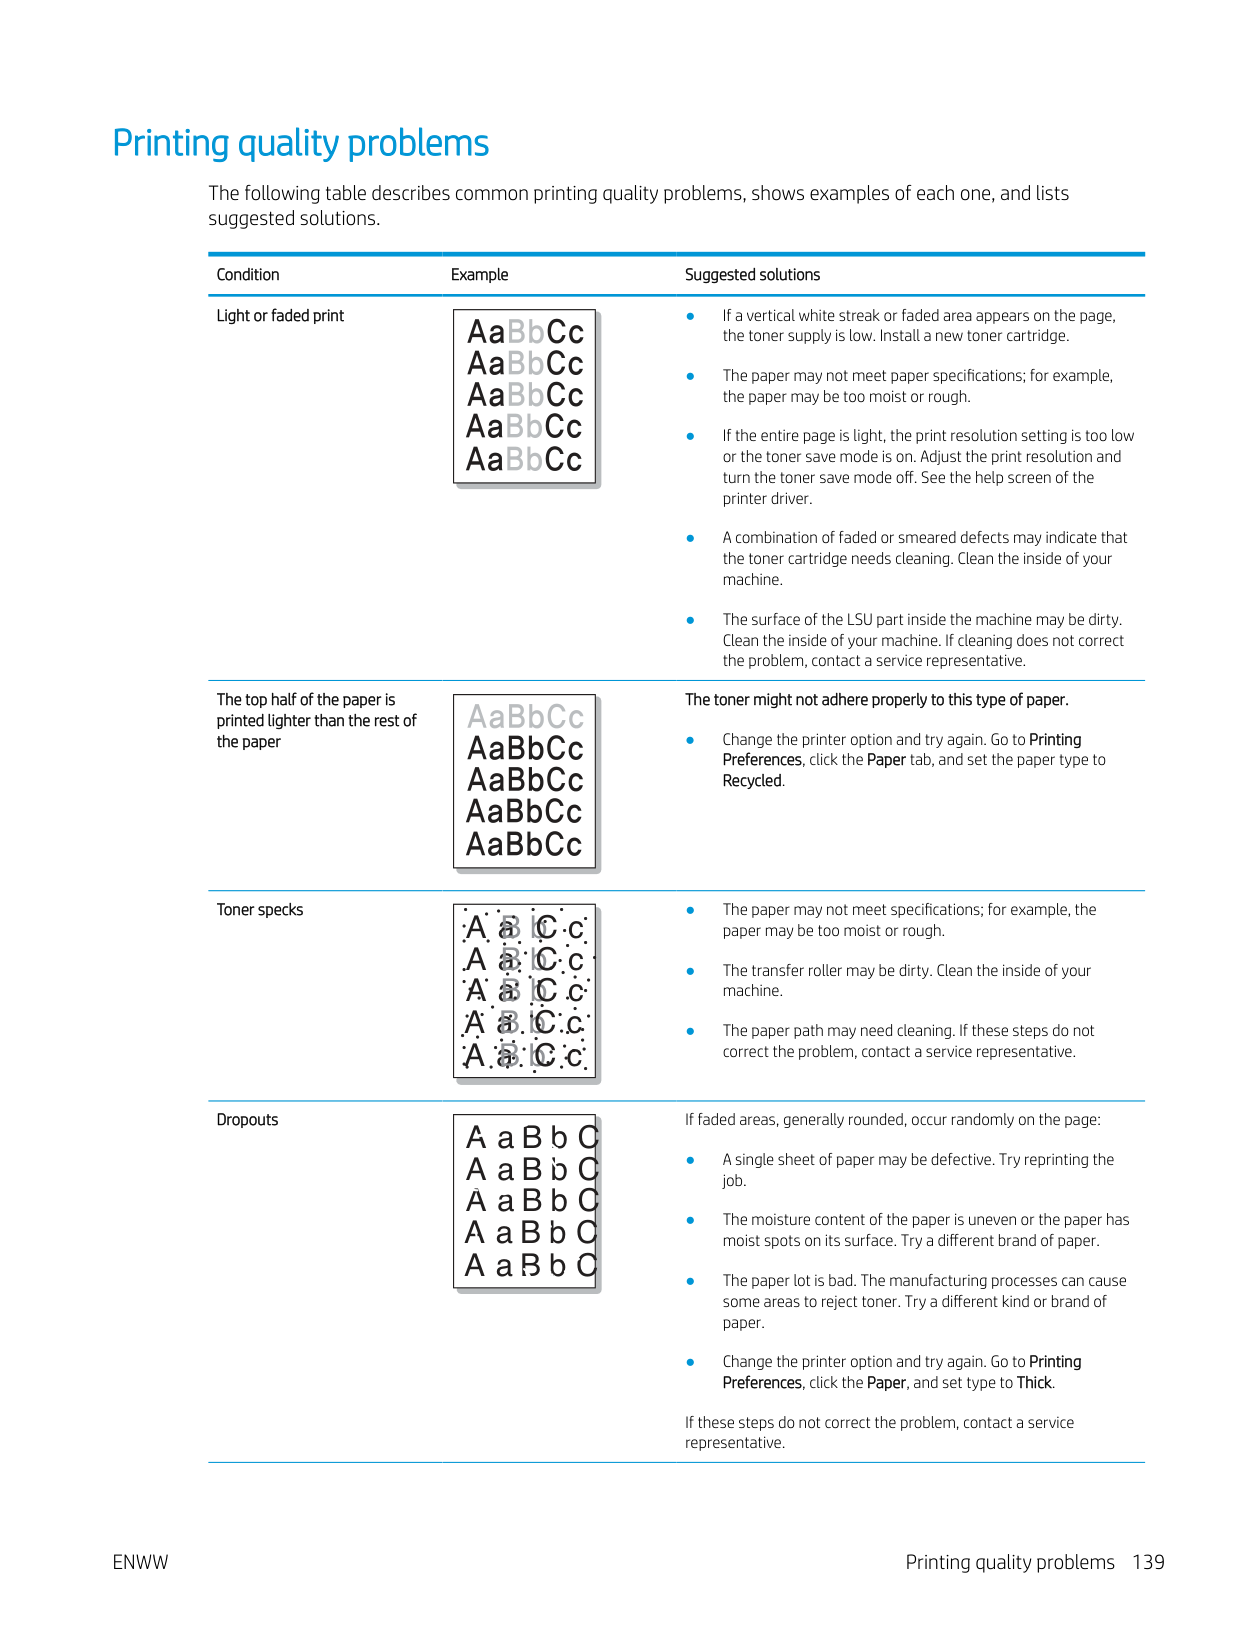
|---|
If these steps do not correct the problem, contact a service representative.
############# Vertical lines
If black vertical streaks appear on the page:
| | | |---|---|
● The surface (drum part) of the cartridge inside the machine has probably been scratched. Remove the cartridge and install a new one.
If white vertical streaks appear on the page:
● The surface of the LSU part inside the machine may be dirty. Clean the inside of your machine. If cleaning does not correct the problem, contact a service representative.
############# Black or color background
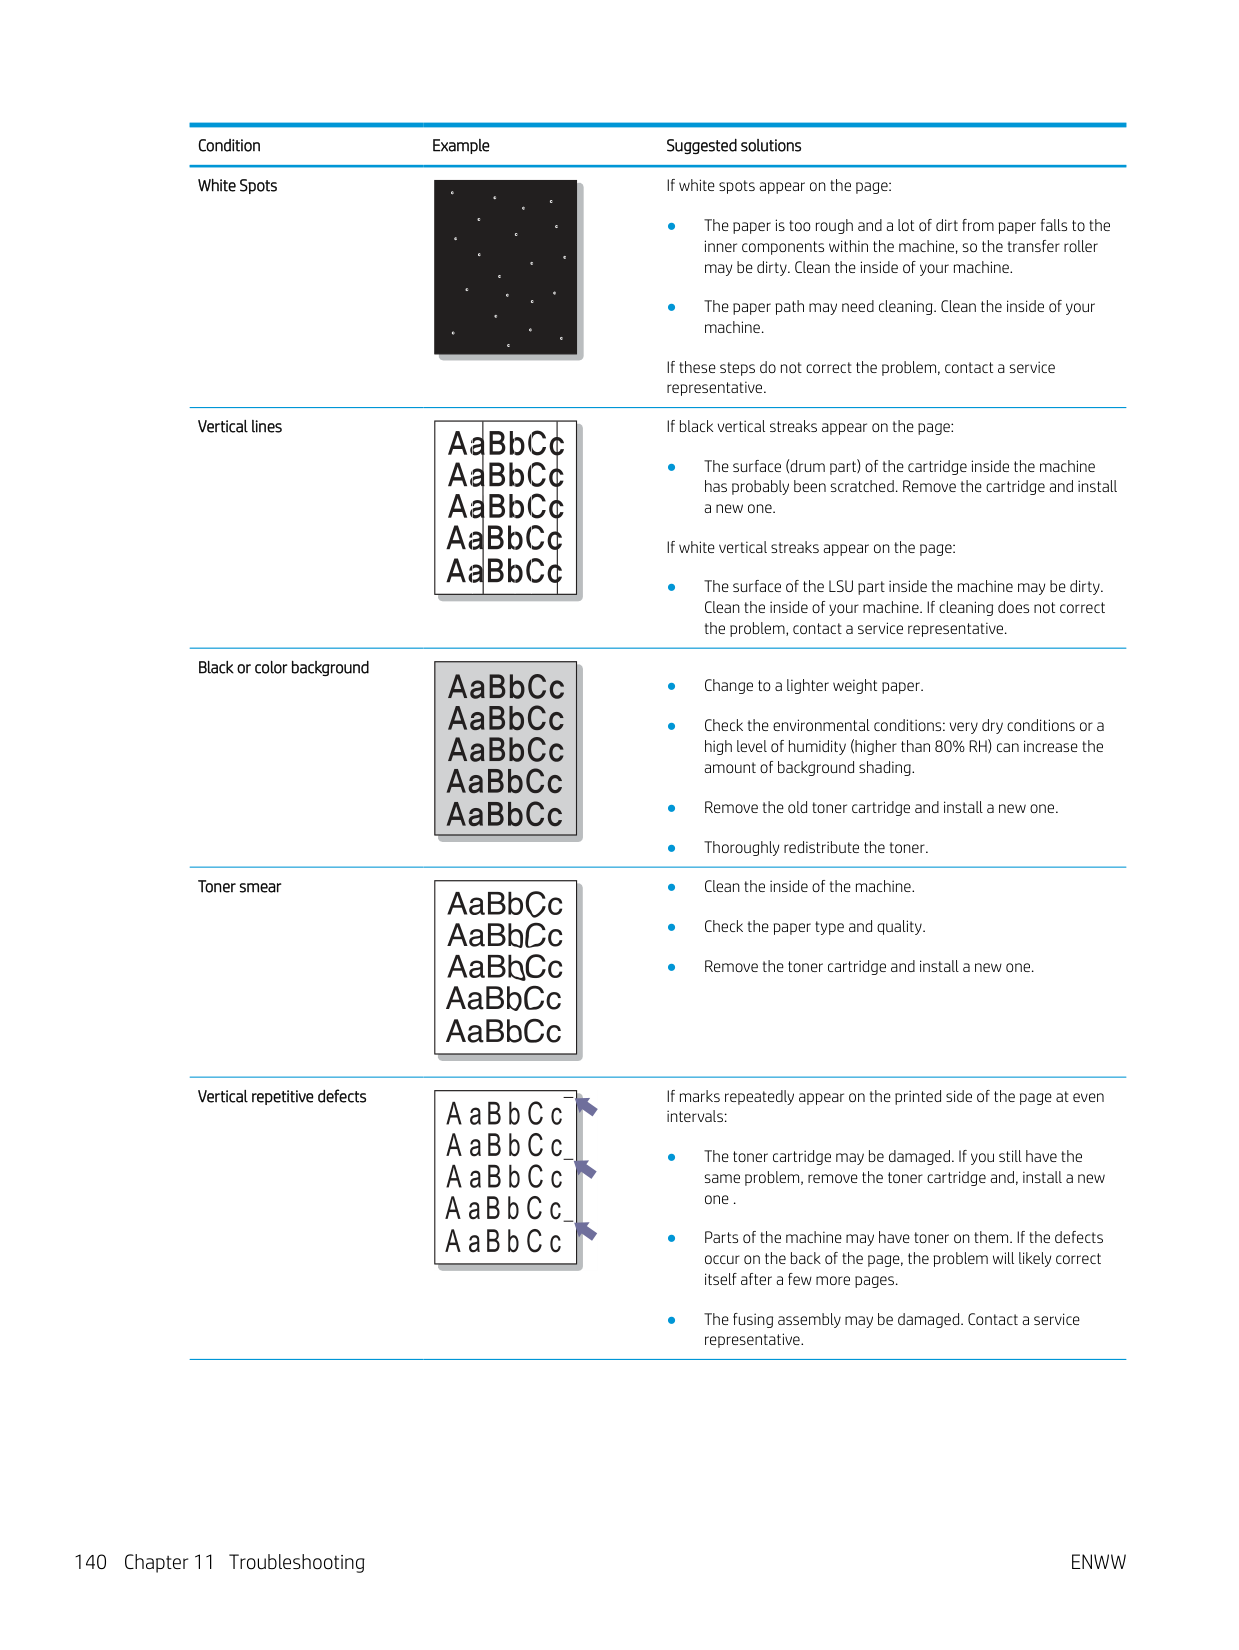
| | |---|
############# Toner smear
| | |---|
############# Vertical repetitive defects
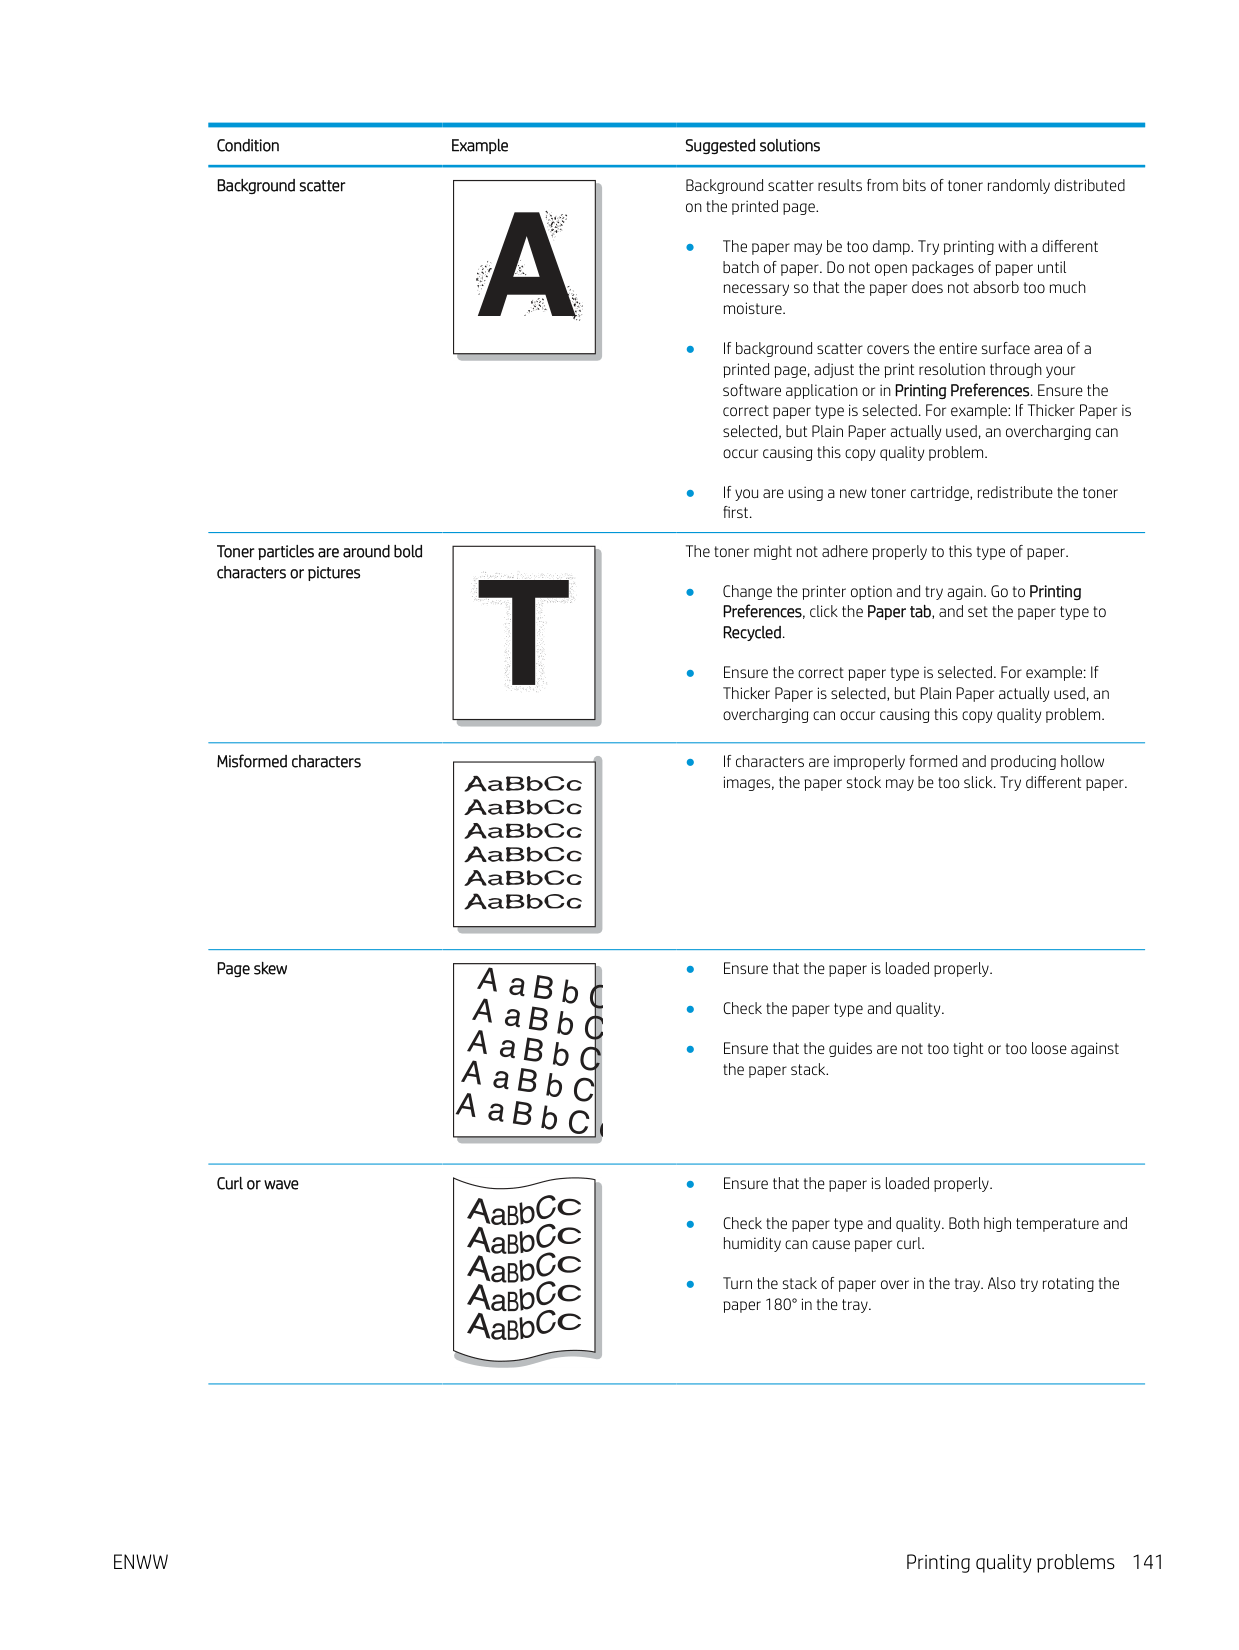
If marks repeatedly appear on the printed side of the page at even intervals:
| | |---|
Background scatter
Background scatter results from bits of toner randomly distributed on the printed page.
|A
| |---|
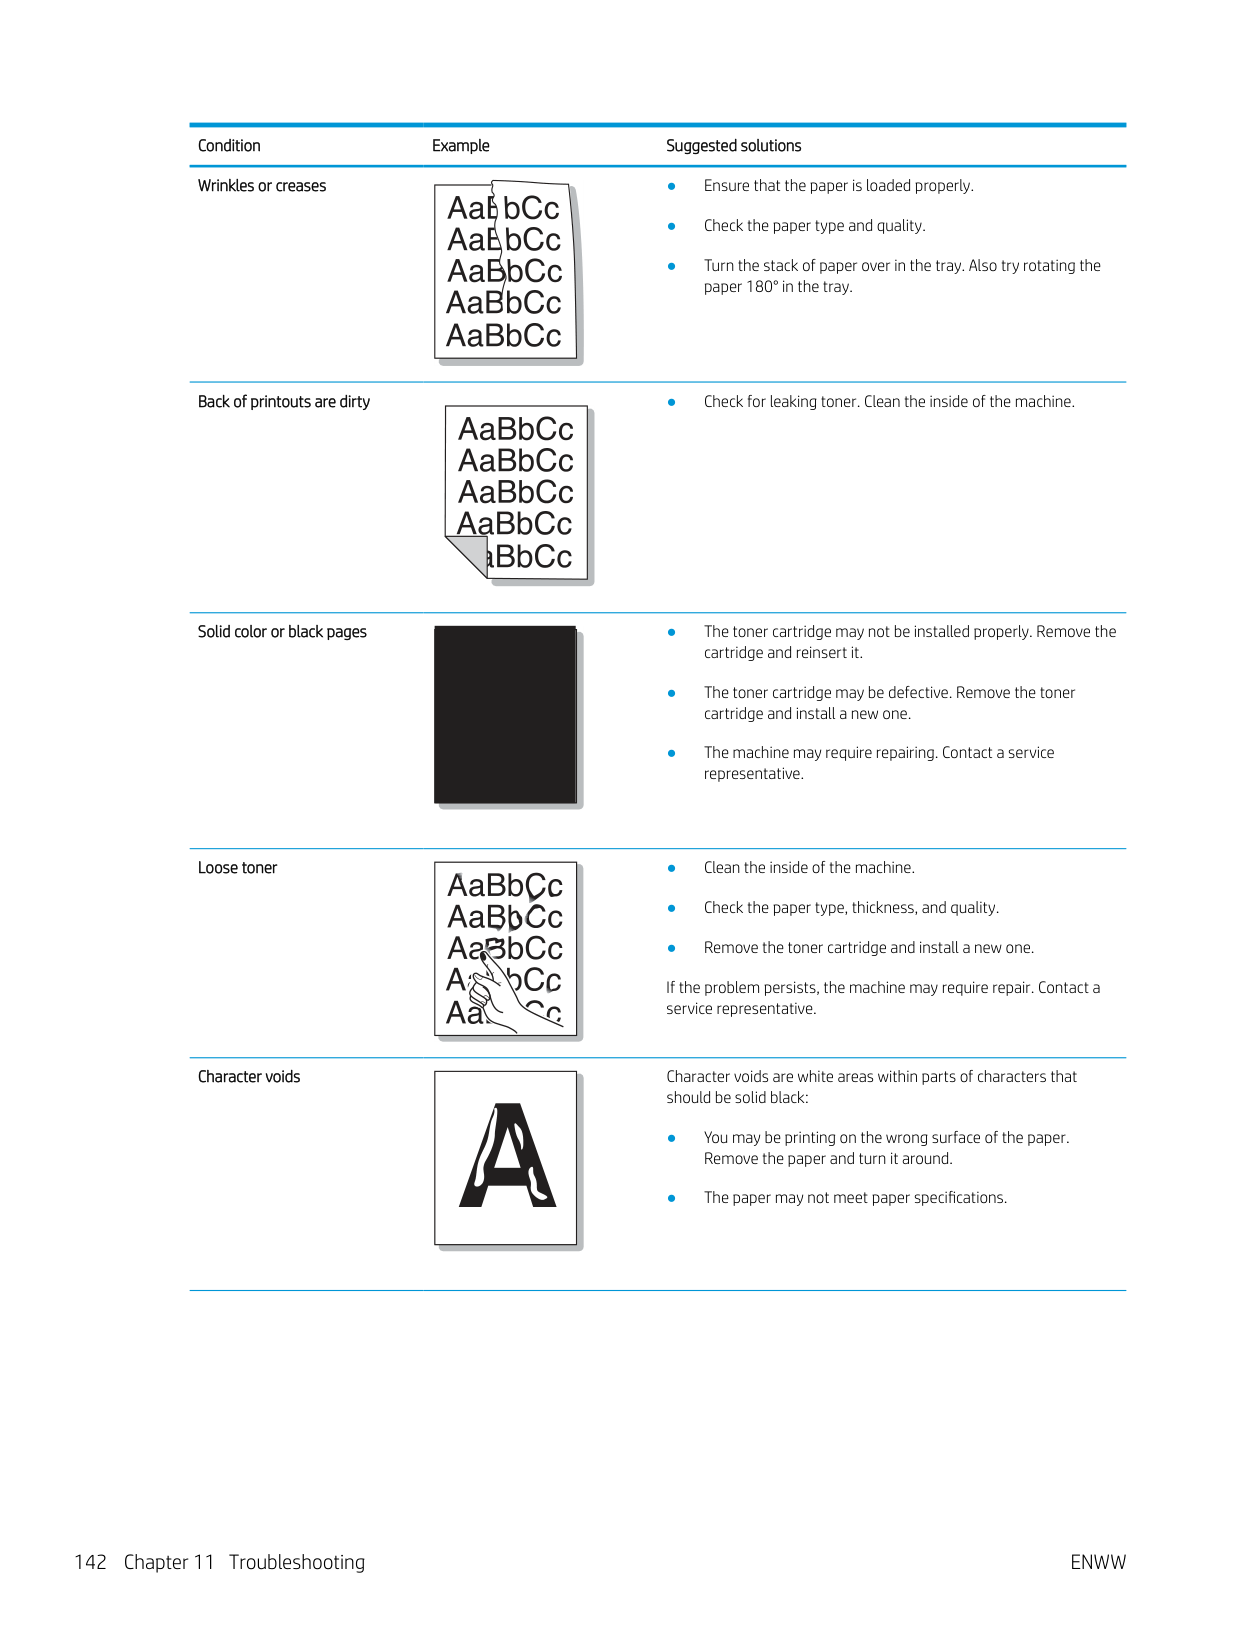
############# Toner particles are around bold characters or pictures
The toner might not adhere properly to this type of paper.
| | |---|
############# Misformed characters
● If characters are improperly formed and producing hollow images, the paper stock may be too slick. Try different paper.
| | |---|
Page skew
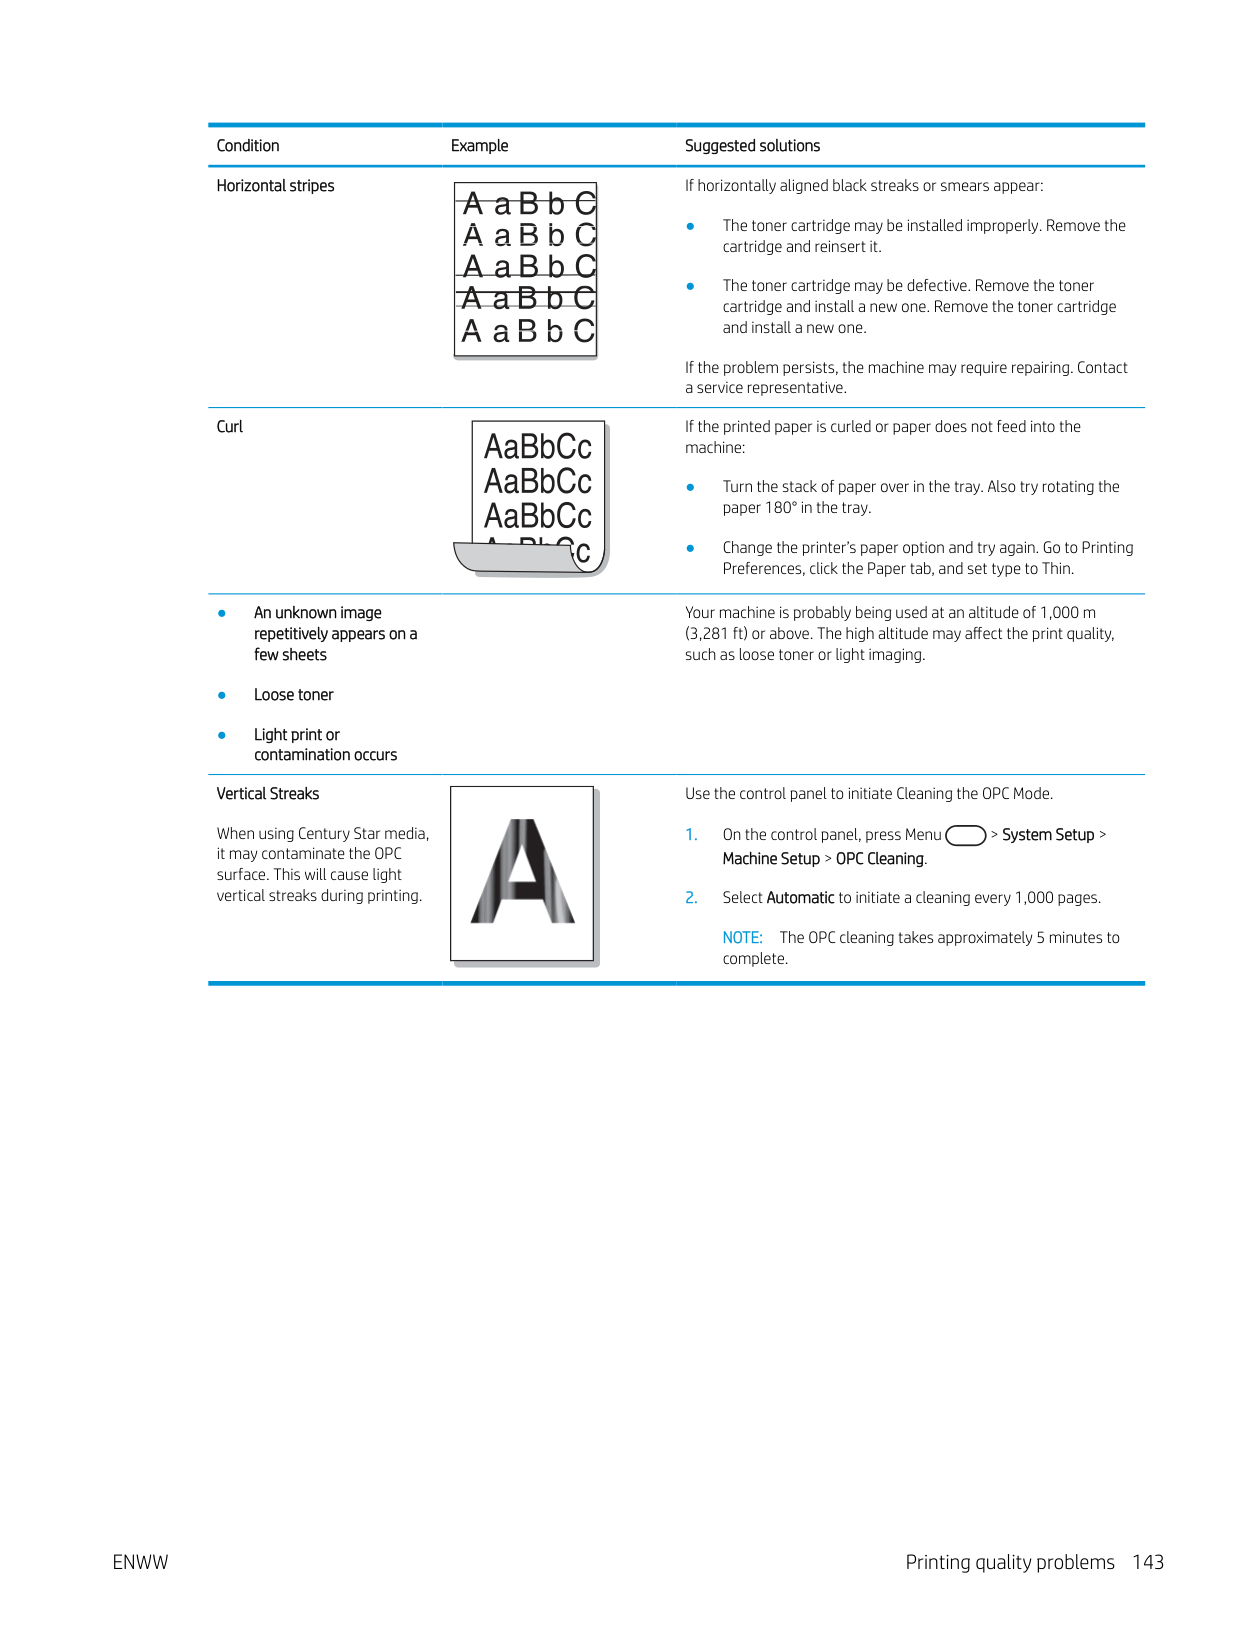
|AaBb
AaBbC AaBbC
AaBbC AaBbC| |---|
##### C
c
Curl or wave ● Ensure that the paper is loaded properly.
Wrinkles or creases ● Ensure that the paper is loaded properly.
Back of printouts are dirty ● Check for leaking toner. Clean the inside of the machine.
############# Solid color or black pages
| | |---|
############# Loose toner
| | |---|
If the problem persists, the machine may require repair. Contact a service representative.
Character voids
Character voids are white areas within parts of characters that should be solid black:
|A
| |---|
############# Horizontal stripes
If horizontally aligned black streaks or smears appear:
| | |---|

If the problem persists, the machine may require repairing. Contact a service representative.
Curl If the printed paper is curled or paper does not feed into the
machine:
Your machine is probably being used at an altitude of 1,000 m (3,281 ft) or above. The high altitude may affect the print quality, such as loose toner or light imaging.
############# Vertical Streaks
Use the control panel to initiate Cleaning the OPC Mode.

When using Century Star media, it may contaminate the OPC surface. This will cause light vertical streaks during printing.
NOTE: The OPC cleaning takes approximately 5 minutes to complete.
#### Copying problems
The following table describes common copying problems and suggested solutions.
Condition Suggested solutions
Copies are too light or too dark.
Adjust the darkness in copy feature to lighten or darken the backgrounds of copies.
Smears, lines, marks, or spots appear on copies.
Copy image is skewed. ● Ensure that the original is aligned with the registration guide.
● The transfer roller may be dirty. Clean the inside of your machine. Blank copies print out. Ensure that the original is face down on the scanner glass or face up in the document feeder.
If these steps do not correct the problem, contact a service representative. Image rubs off the copy easily. ● Replace the paper in the tray with paper from a new package.
● In high humidity areas, do not leave paper in the machine for extended periods of time.
Frequent copy paper jams occur.
#### Scanning problems
The following table describes common scanning problems and suggested solutions.
Condition Suggested solutions The scanner does not work. ● Make sure that you place the original to be scanned face down on the scanner glass, or face up in
the document feeder.
The unit scans very slowly. ● Check if the machine is printing received data. If so, scan the document after the received data has been printed.
● Graphics are scanned more slowly than text.
Message appears on your computer screen:
ENWW Scanning problems 145
#### Operating system problems
############# Condition Suggested solutions
“File in Use” message appears during installation.
Exit all software applications. Remove all software from the startup group, then restart Windows. Reinstall the printer driver.
“General Protection Fault”, “Exception OE”, “Spool 32”, or “Illegal Operation” messages appear.
Close all other applications, reboot Windows and try printing again.
“Fail To Print”, “A printer timeout error occurred” message appear.
These messages may appear during printing. Just keep waiting until the machine finishes printing. If the message appears in ready mode or after printing has completed, check the connection and/or whether an error has occurred.
Machine information is not displayed when you click the device in the Devices and Printers.
Check the Printer properties. Click the Ports tab. (Control Panel > Devices and Printers > Right-click on your printer icon and select Printer properties) If the port is set to File or LPT, uncheck them and select TCP/IP, USB, or WSD.
| | |---|
NOTE: Refer to the Microsoft Windows User’s Guide that came with your computer for further information on Windows error messages.