Ask AI
— answers from the official manualAnswers from the official manual.
Common questions
Common Questions
28 totalHow many people are required to lift and install the HP LaserJet MFP M72625/M72630 printer assembly?
Four people are required to lift and install the printer assembly. This caution applies when mounting the printer onto the feeder, feed tray, or stand.
What temperature must the room and equipment reach before powering on the printer?
The room and equipment must be at a minimum temperature of 15°C (59°F) before turning on the printer. If the printer and hardware were stored below 0°C (32°F), a longer acclimatization period may be required.
How long should I allow the printer and consumables to acclimatize after unpacking?
After unpacking the printer, imaging drum, toner collection unit, and associated hardware, allow them to acclimatize for four hours. If stored below 0°C (32°F), a longer acclimatization period may be needed.
When should I remove the shipping tape and protective packaging materials from the printer?
Do not remove the shipping tape or protective packaging materials until after the printer has been installed on the feeder, feed tray, or stand. Open every door and tray to locate and remove all shipping tapes and packaging materials after installation.
Is there a warning about the scanner lock screw that must be addressed before powering on the printer?
Yes, the scanner lock screw must be removed before operating the printer — this is listed as a warning. The red sticker on the left side of the printer also needs to be removed along with the lock screw.
How do I prepare the toner cartridge before installing it in the printer?
Remove the toner cartridge from its packaging and shake it from side to side approximately five times to distribute the toner evenly throughout the cartridge. Then pull out the tab to remove the seal from the back of the cartridge before installation.
Show 22 more questions
What precaution should I take when handling the imaging unit during installation?
Should I connect the network cable before powering on the printer for the first time?
How long does the printer take to complete the initialization process on first startup?
How should paper be loaded into Tray 2, and what paper size is used for printing configuration sheets?
How do I reset the printer to factory settings?
How do I handle the drum unit safely?
How do I adjust paper trays?
What are steps to install the ink carriage?
How do I perform a factory reset on the HP LaserJet MFP M72630?
What are the basic steps for setting up a network connection for my HP LaserJet MFP M72630?
How do I troubleshoot paper jams in the HP LaserJet MFP M72630?
How can I replace the toner cartridge in my HP LaserJet MFP M72630?
How do I clean the printer’s exterior and display screen?
What should I do if my printer displays an orange status LED?
How do I install the printer driver on Windows?
How do I change the printer’s IP address through WebUI?
How do I configure email notifications for printer alerts?
How do I set up printing on special media like envelopes or labels?
What is the recommended temperature for setting up the device?
How should I align the scanner with the printer during installation?
What safety precautions should I follow when installing the printer?
How do I install the toner cartridge?
Full Manual
173 pages

LaserJet MFP M72625, M72630 Series Printer
User Guide

support.hp.com

HP LaserJet MFP M72625, M72630 Series Printer
User Guide
Copyright and License
© Copyright 2018 HP Development Company, L.P.
Reproduction, adaptation, or translation without prior written permission is prohibited, except as allowed under the copyright laws.
The information contained herein is subject to change without notice.
The only warranties for HP products and services are set forth in the express warranty statements accompanying such products and services. Nothing herein should be construed as constituting an additional warranty. HP shall not be liable for technical or editorial errors or omissions contained herein.
Edition 2, 1/2019
Trademark Credits
Adobe®, Adobe Photoshop®, Acrobat®, and PostScript® are trademarks of Adobe Systems Incorporated.

Apple and the Apple logo are trademarks of Apple Inc., registered in the U.S. and other countries.
macOS is a trademark of Apple Inc., registered in the U.S. and other countries.
Google™ is a trademark of Google Inc. Microsoft®, Windows®, Windows® XP, and Windows Vista® are U.S. registered trademarks of Microsoft Corporation. UNIX® is a registered trademark of The Open Group.
Table of contents
Conventions .......................................................................................................................................................... 3 Printer overview ........................................................................................................................................................................ 4
Printer specifications ............................................................................................................................................................... 8 Technical specifications ...................................................................................................................................... 8 Supported operating systems ......................................................................................................................... 10 Mobile printing solutions .................................................................................................................................. 11 Printer dimensions ............................................................................................................................................ 12 Power consumption, electrical specifications, and acoustic emissions ................................................... 12 Operating-environment range ........................................................................................................................ 12
Control panel overview ......................................................................................................................................................... 13 Connecting a network cable ................................................................................................................................................. 14 Turning on the printer ........................................................................................................................................................... 15 Understanding the LEDs ....................................................................................................................................................... 17
Understanding the status LED ........................................................................................................................ 17 Power LED .......................................................................................................................................................... 18
Display screen and useful buttons ...................................................................................................................................... 19 Display screen .................................................................................................................................................... 19 Counter button ................................................................................................................................................... 19 Eco button .......................................................................................................................................................... 20 Job Status button .............................................................................................................................................. 20 Interrupt button ................................................................................................................................................. 22
Understanding the pop-up keyboard ................................................................................................................................. 22 Printer hardware setup and software installation ............................................................................................................ 22

ENWW iii
Accessing network setup ...................................................................................................................................................... 25 Network settings (TCP/IP) ..................................................................................................................................................... 25
Ethernet .............................................................................................................................................................. 25 TCP/IP Protocol .................................................................................................................................................. 25
Installing driver over the network ....................................................................................................................................... 27 Windows .............................................................................................................................................................. 27 macOS ................................................................................................................................................................. 28 Linux .................................................................................................................................................................... 29
WebUI (embedded web server) ........................................................................................................................................... 30 What is WebUI? .................................................................................................................................................. 30 Required web browser ...................................................................................................................................... 30 Connecting to WebUI ......................................................................................................................................... 30 Logging into WebUI ........................................................................................................................................... 31 Information tab .................................................................................................................................................. 31 Address book tab ............................................................................................................................................... 32 Settings tab ........................................................................................................................................................ 32 Security tab ......................................................................................................................................................... 32 Maintenance tab ................................................................................................................................................ 34 Additional network-connected tasks ............................................................................................................. 34
Additional network-connected tasks .................................................................................................................................. 35
Scanner glass ..................................................................................................................................................... 37 Document feeder .............................................................................................................................................. 38
Selecting print media ............................................................................................................................................................. 41 Guidelines to select print media ...................................................................................................................... 41
Loading paper in the tray ...................................................................................................................................................... 42 Tray overview ..................................................................................................................................................... 42 Standard tray / optional dual cassette feeder .............................................................................................. 42 Tray 1 (MP) .......................................................................................................................................................... 49 Media sizes automatically detected ............................................................................................................... 52
Printing on special media ...................................................................................................................................................... 54 Envelope ............................................................................................................................................................. 54 Labels .................................................................................................................................................................. 55 Card stock/ Custom-sized paper .................................................................................................................... 57 Letterhead/Pre-printed paper ........................................................................................................................ 57 Additional information for printing on special media .................................................................................. 57
Tray Settings ........................................................................................................................................................................... 58 Setting the paper size ....................................................................................................................................... 58 Setting the paper type ...................................................................................................................................... 58
Setting the tray confirmation message ......................................................................................................... 58 Auto tray switch ................................................................................................................................................. 59 Auto continue ..................................................................................................................................................... 59 Paper substitution ............................................................................................................................................. 59 Tray protection ................................................................................................................................................... 59 Tray priority setting ........................................................................................................................................... 59

Canceling a print job .......................................................................................................................................... 62
macOS printing ....................................................................................................................................................................... 63 Printing a document .......................................................................................................................................... 63 Changing printer settings ................................................................................................................................. 63 Printing multiple pages on one sheet ............................................................................................................ 63 Printing on both sides of the paper ................................................................................................................ 64 Using help ........................................................................................................................................................... 64
Additional print tasks ............................................................................................................................................................. 65
Basic tab .............................................................................................................................................................. 67 Advanced tab ...................................................................................................................................................... 67 Image tab ............................................................................................................................................................ 67
Basic copying .......................................................................................................................................................................... 68
Copying originals of different sizes ................................................................................................................ 68 Quick copying .......................................................................................................................................................................... 70 Using special copy features .................................................................................................................................................. 72 Additional copy tasks ............................................................................................................................................................. 78
Understanding the Scan to Email screen ...................................................................................................... 81 Setting up an email account ............................................................................................................................ 82 Scanning and sending an email ...................................................................................................................... 83 Resending to the last email address .............................................................................................................. 83 Printing an email confirmation report ............................................................................................................ 84
Scanning and sending via SMB/FTP .................................................................................................................................... 85 Understanding the Scan to Server screen ..................................................................................................... 85
ENWW v
Setting up an FTP/SMB server ......................................................................................................................... 86 Scanning and sending to an SMB/FTP server ............................................................................................... 87 Resending to the last server address ............................................................................................................ 87
Scanning and sending to your computer ........................................................................................................................... 89 For a network or USB connected printer ....................................................................................................... 89
Scanning and sending to USB/shared folder ..................................................................................................................... 90 Understanding the USB /shared folder screen ............................................................................................. 90 Scanning to a USB /shared folder ................................................................................................................... 91

macOS scanning ..................................................................................................................................................................... 92
Scanning with network ..................................................................................................................................... 92 Additional scan tasks ............................................................................................................................................................. 93
Log-in ................................................................................................................................................................ 100 Printer Details .................................................................................................................................................. 100 General Settings .............................................................................................................................................. 101 Security ............................................................................................................................................................. 103 Printer hardware setup .................................................................................................................................. 105
Handling instructions ..................................................................................................................................... 110 Toner cartridge usage .................................................................................................................................... 110 Estimated cartridge life .................................................................................................................................. 110
Redistributing toner ............................................................................................................................................................ 111 Replacing the toner cartridge ............................................................................................................................................ 112 Replacing the toner collection unit ................................................................................................................................... 113 Checking the supplies life ................................................................................................................................................... 114
From the printer .............................................................................................................................................. 114
Cleaning the printer ............................................................................................................................................................. 115 Cleaning the outside or display screen ........................................................................................................ 115 Cleaning the inside .......................................................................................................................................... 115 Cleaning the imaging unit area ..................................................................................................................... 116 Cleaning the toner collection unit area ........................................................................................................ 117 Cleaning the scan unit .................................................................................................................................... 117 Cleaning the chargers of imaging unit ......................................................................................................... 118
Tips for storing the printer, supplies, and paper ............................................................................................................ 120 Printer ............................................................................................................................................................... 120 Toner cartridge/ Imaging unit ....................................................................................................................... 120 Paper ................................................................................................................................................................. 120
Tips for moving the printer ................................................................................................................................................ 121
Jam in Tray 2 .................................................................................................................................................... 124 Jam in optional trays ...................................................................................................................................... 125 Jam in Tray 1 (MP) ........................................................................................................................................... 127 Jam inside the printer ..................................................................................................................................... 127 Jam in the fuser area ...................................................................................................................................... 127 Jam in the exit area ......................................................................................................................................... 128 Jam in the duplex unit area ........................................................................................................................... 129 Clearing original document jams .................................................................................................................. 130 Original paper jam in exit area of scanner .................................................................................................. 131 Jam in the optional inner finisher area ........................................................................................................ 132

Understanding display messages ..................................................................................................................................... 135 Paper Jam-related messages ....................................................................................................................... 135 Toner-related messages ................................................................................................................................ 136 Tray-related messages .................................................................................................................................. 137 Network-related messages ........................................................................................................................... 137 Misc. messages ................................................................................................................................................ 139
Paper feeding problems ..................................................................................................................................................... 143 Power and cable connecting problems ............................................................................................................................ 144 Solving other problems ...................................................................................................................................................... 145
Display screen problem ................................................................................................................................. 145 Paper feeding problems ................................................................................................................................ 145 Printing problems ........................................................................................................................................... 146 Printing quality problems .............................................................................................................................. 148 Copying problems ........................................................................................................................................... 153 Scanning problems ......................................................................................................................................... 154 Additional troubleshooting tasks ................................................................................................................. 155
##### Appendix A Revision History .................................................................................................................................................................. 156Revision History ................................................................................................................................................................... 157
ENWW vii
##### Appendix B Glossary ............................................................................................................................................................................... 158Glossary of terms ................................................................................................................................................................ 159
1 Introduction
For more information: The following information is correct at the time of publication. For current information, see support.hp.com. HP's all-inclusive help for the printer includes the following information:
ENWW 1
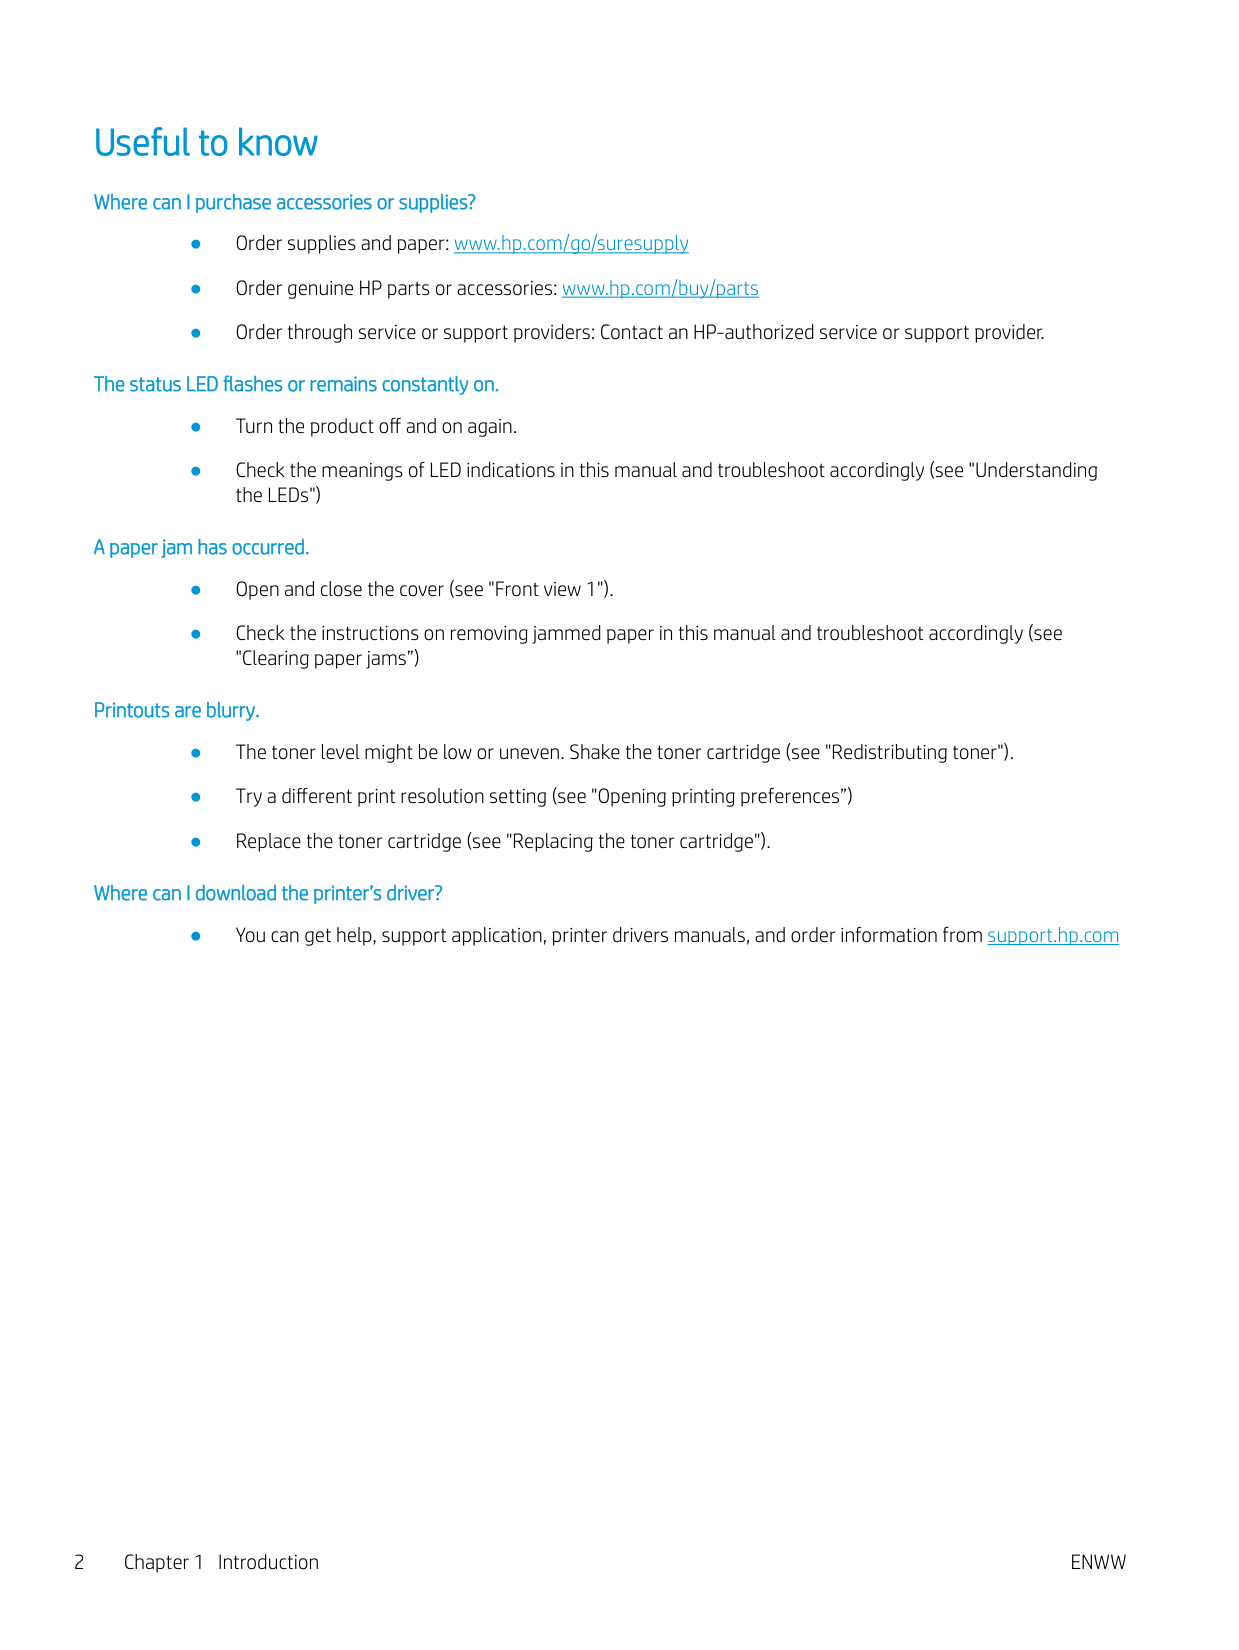
Useful to know
Where can I purchase accessories or supplies?

The status LED flashes or remains constantly on.
##### A paper jam has occurred.
##### Printouts are blurry.
##### Where can I download the printer’s driver?
● You can get help, support application, printer drivers manuals, and order information from support.hp.com
About this user’s guide
This user’s guide provides information for your basic understanding of the printer as well as detailed steps to explain printer usage.
#### Conventions
Some terms in this guide are used interchangeably, as below:
ENWW About this user’s guide 3
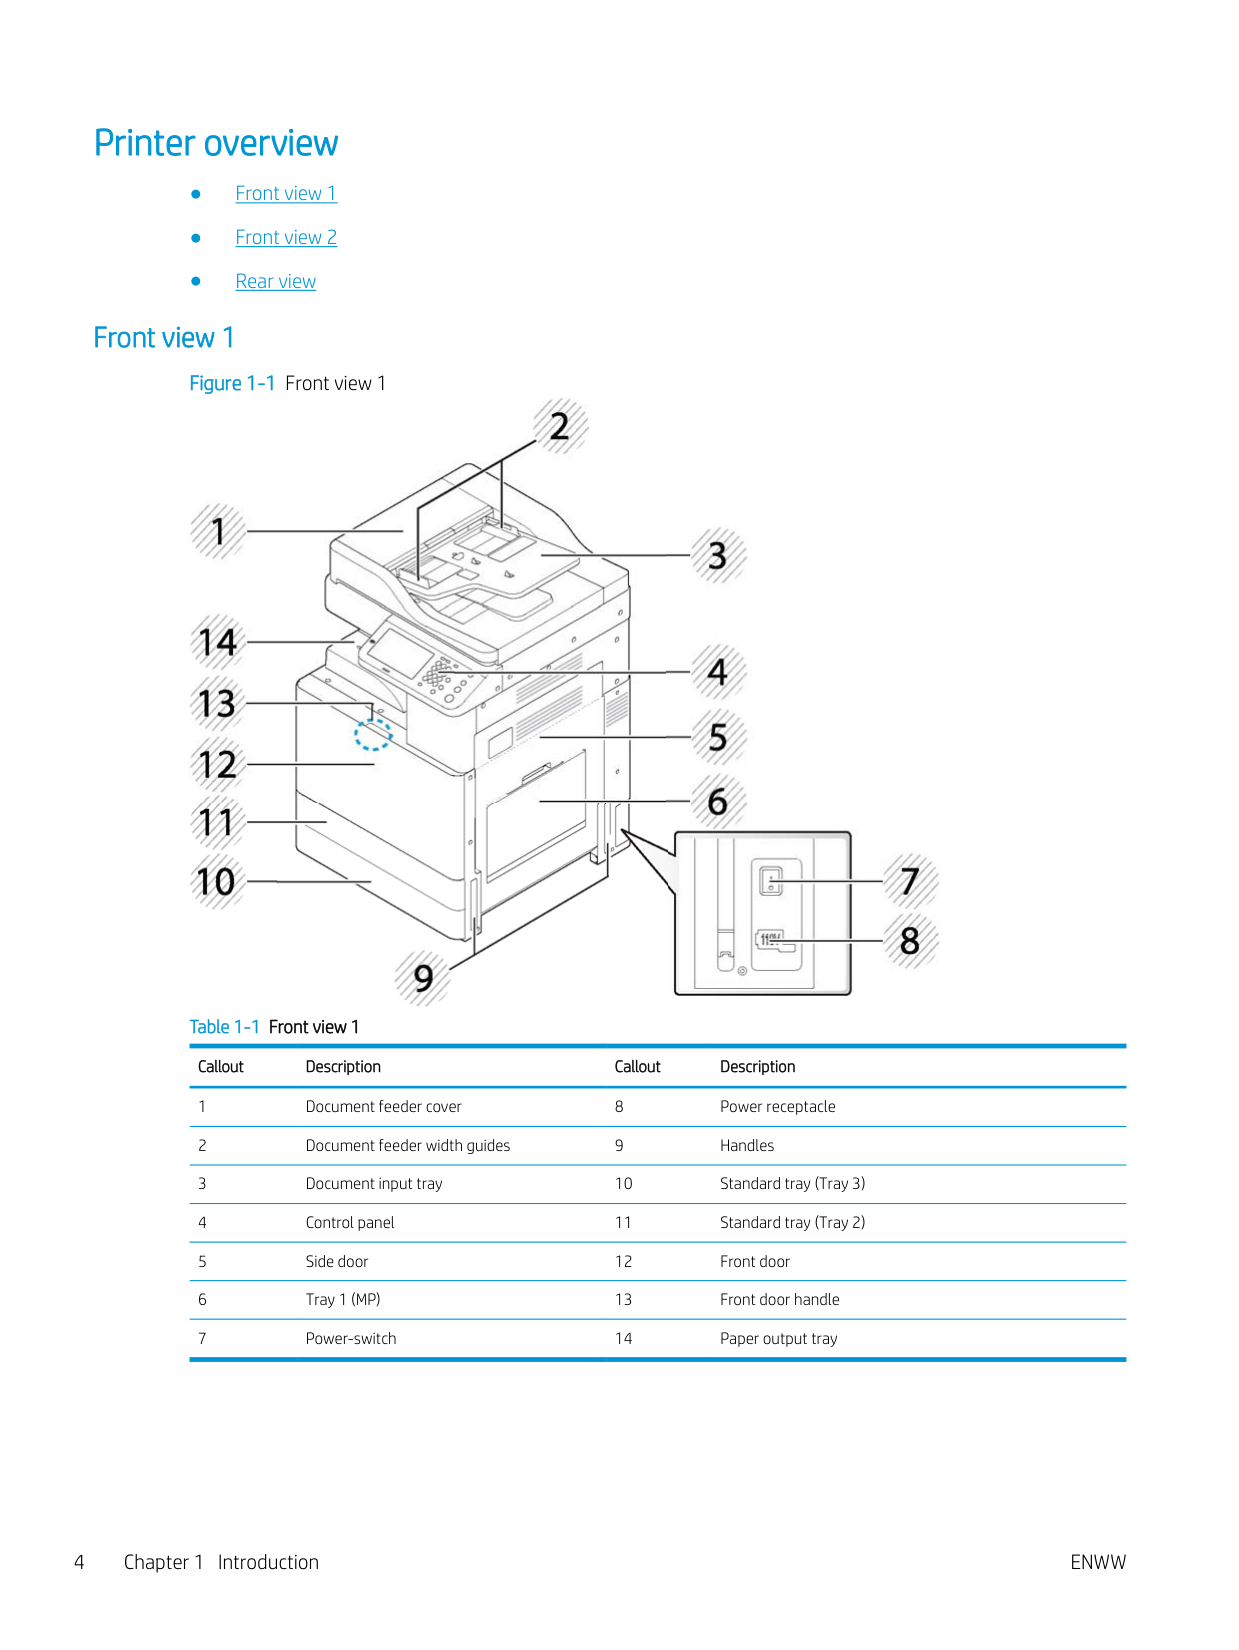
Printer overview
#### Front view 1

Figure 1-1 Front view 1


Table 1-1 Front view 1
Callout Description Callout Description
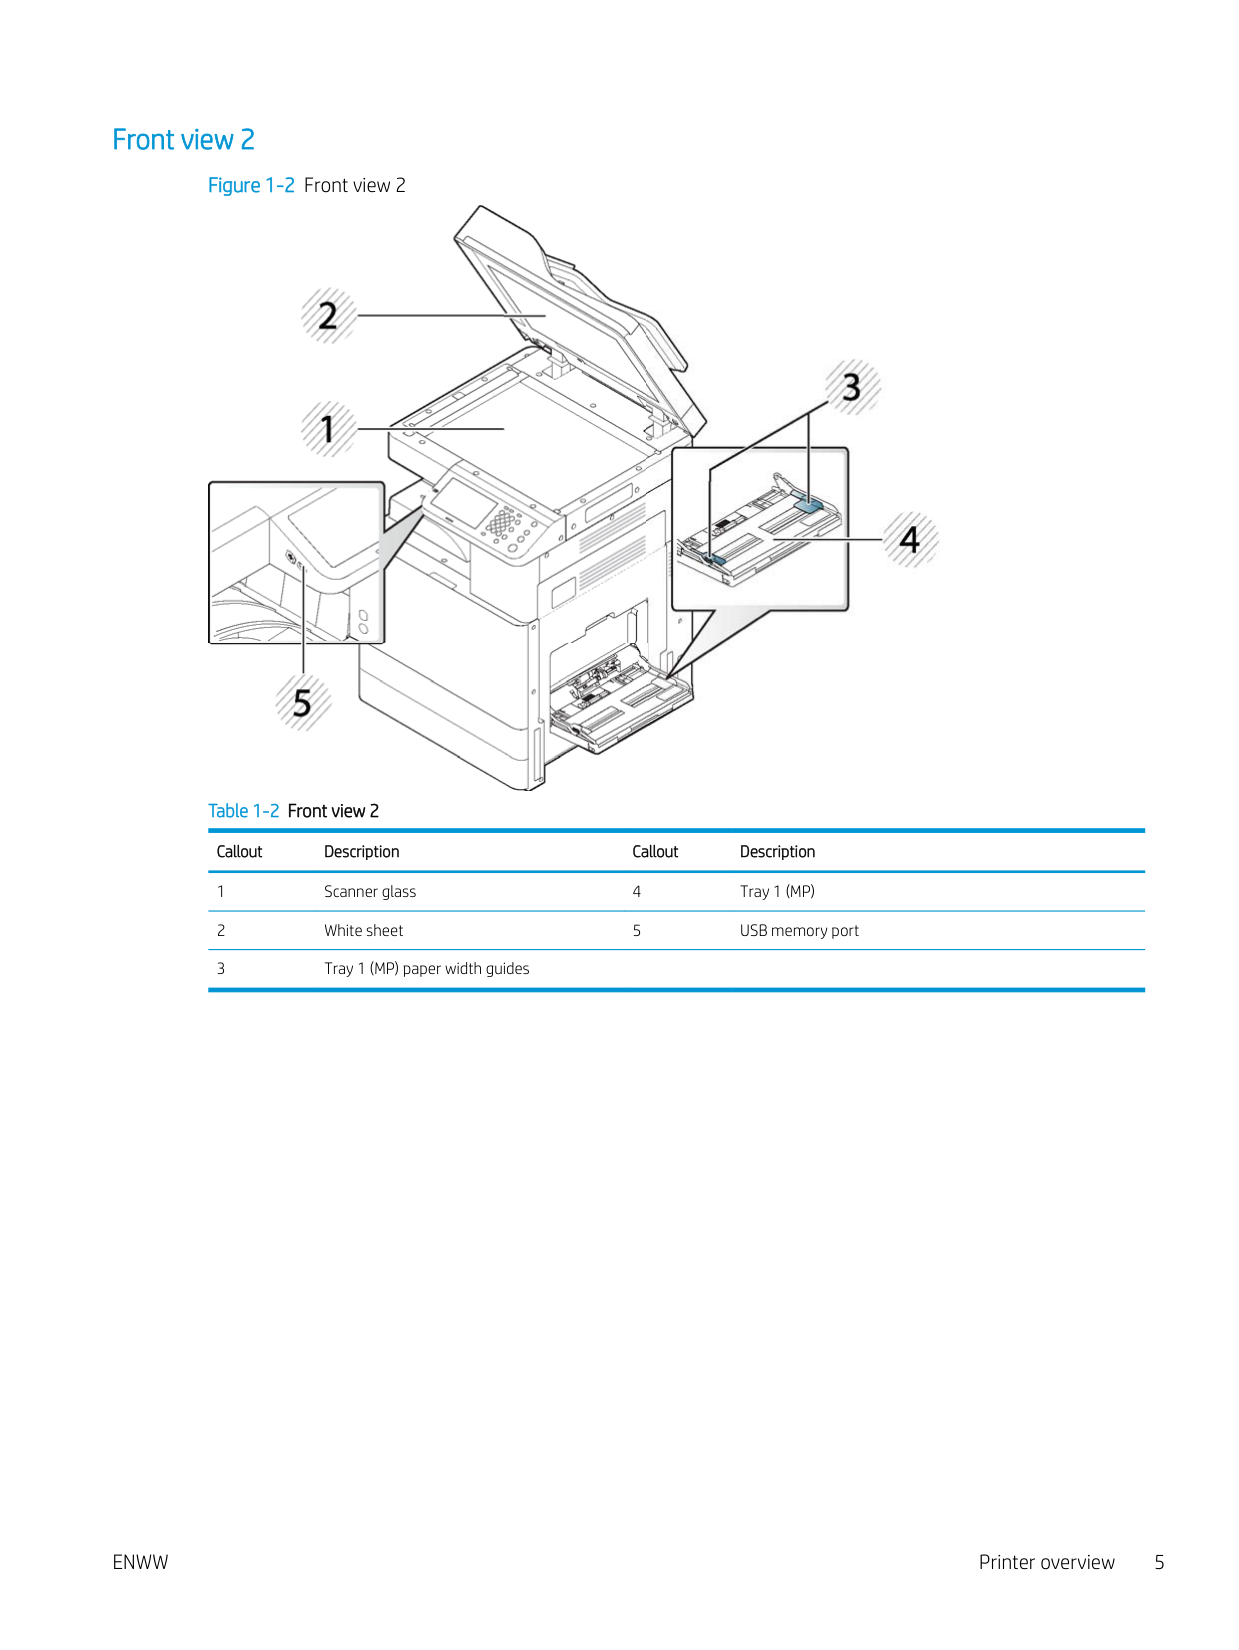
#### Front view 2


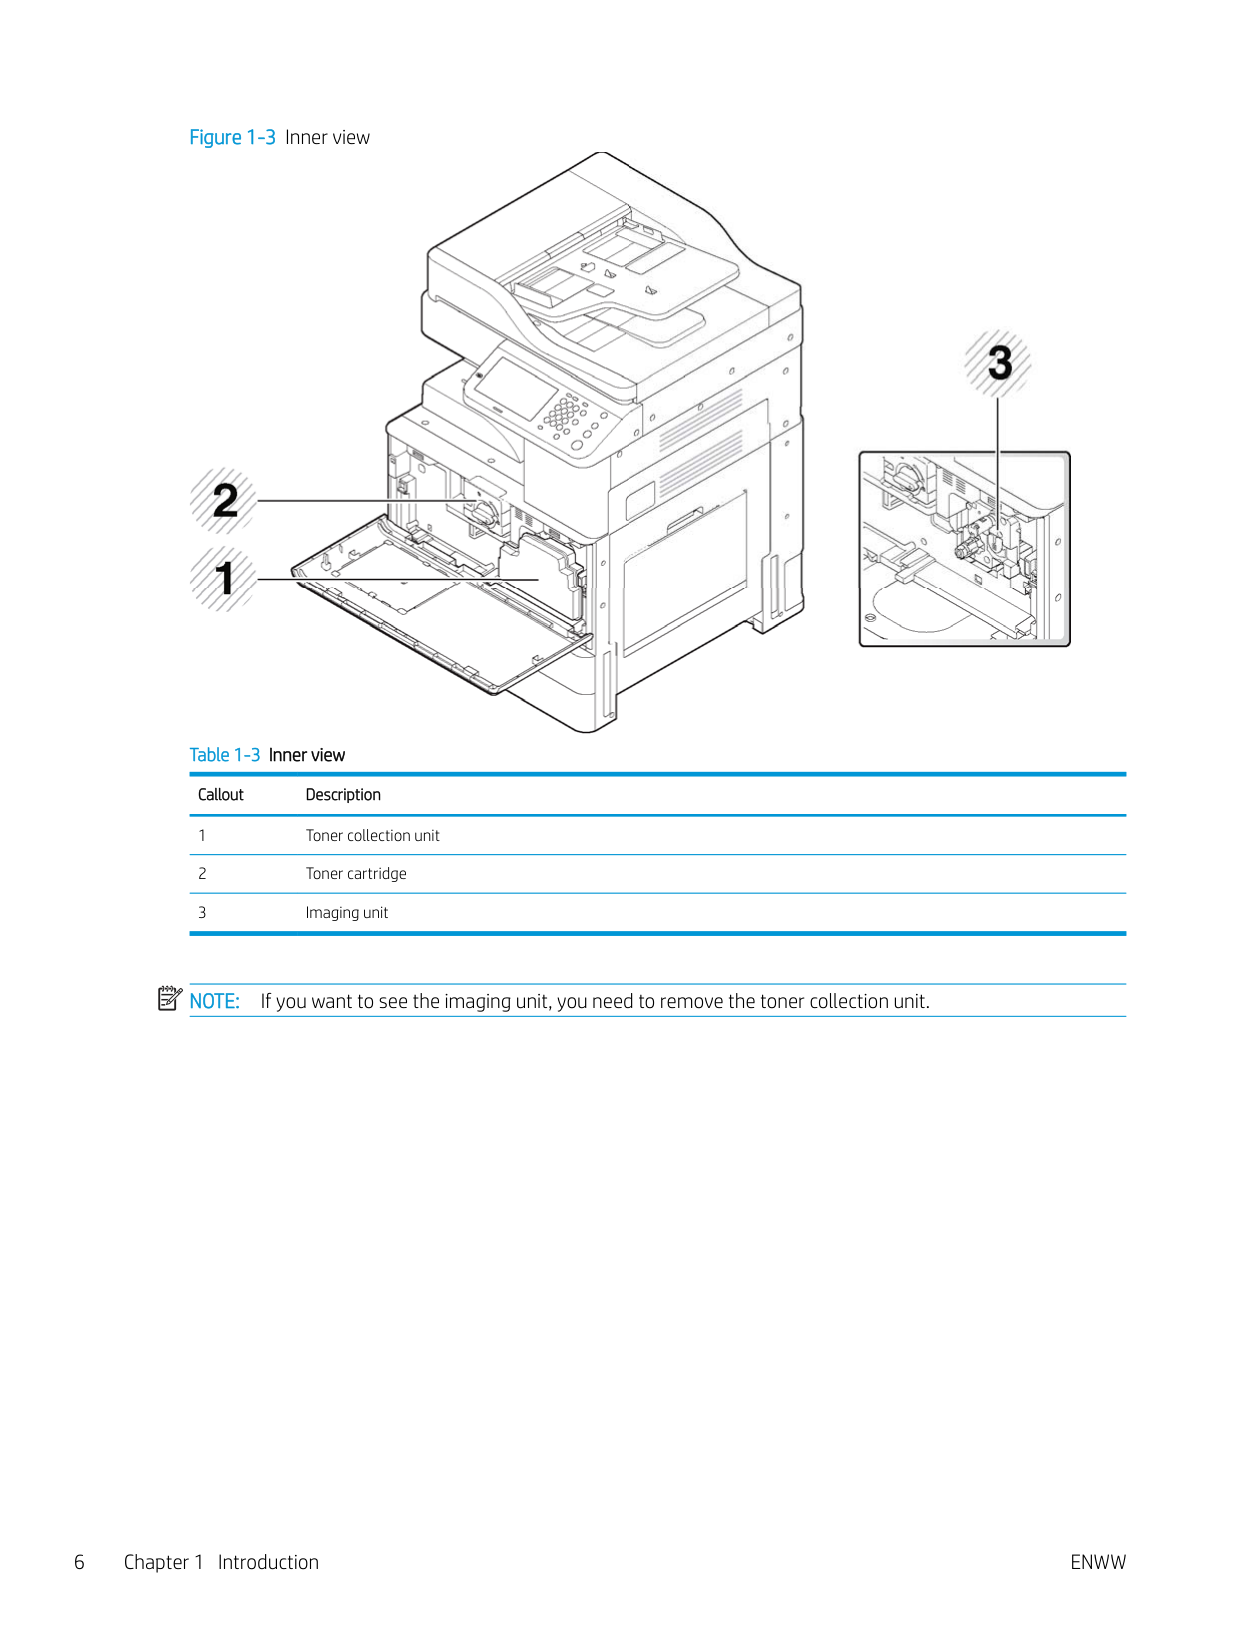
##### Figure 1-3 Inner view


####### Table 1-3 Inner viewCallout Description
| | |---|
NOTE: If you want to see the imaging unit, you need to remove the toner collection unit.
#### Rear view
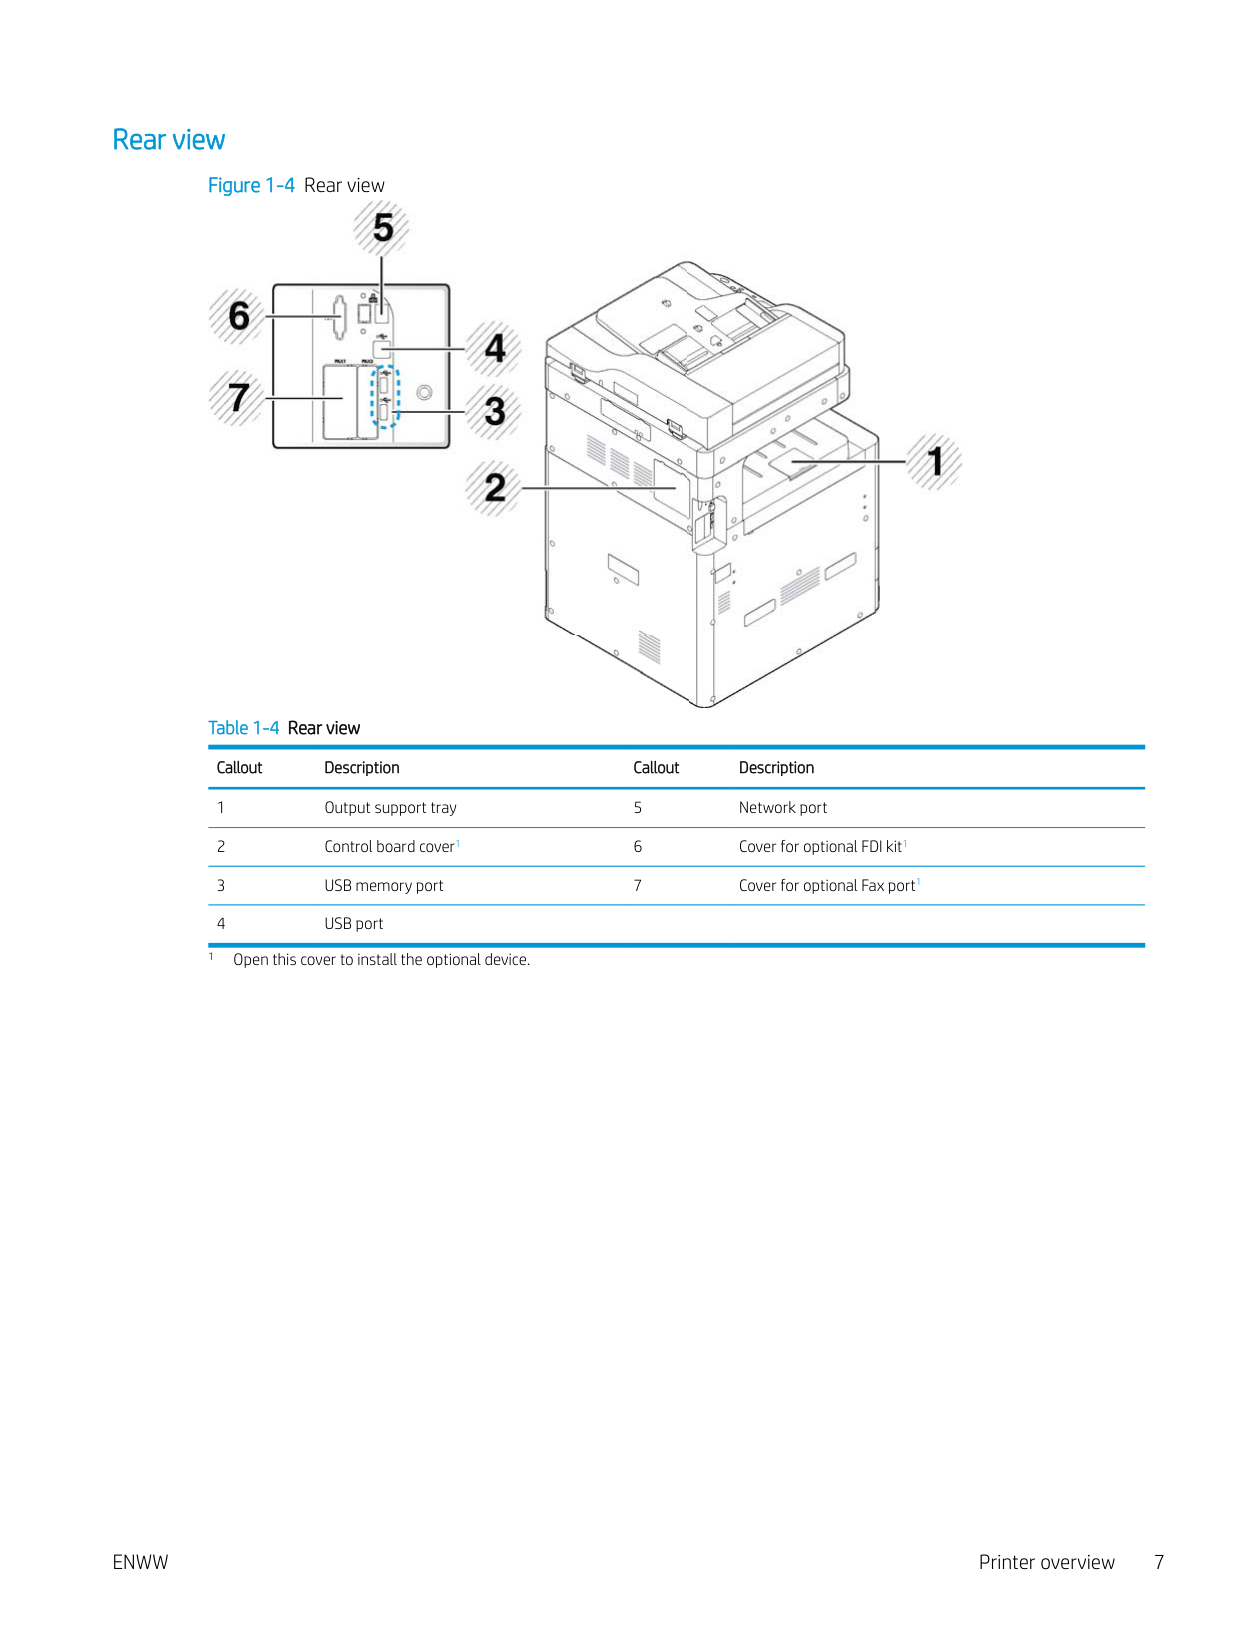
##### Figure 1-4 Rear view


Table 1-4 Rear view
Callout Description Callout Description
1 Open this cover to install the optional device.
Printer specifications
| | |---|
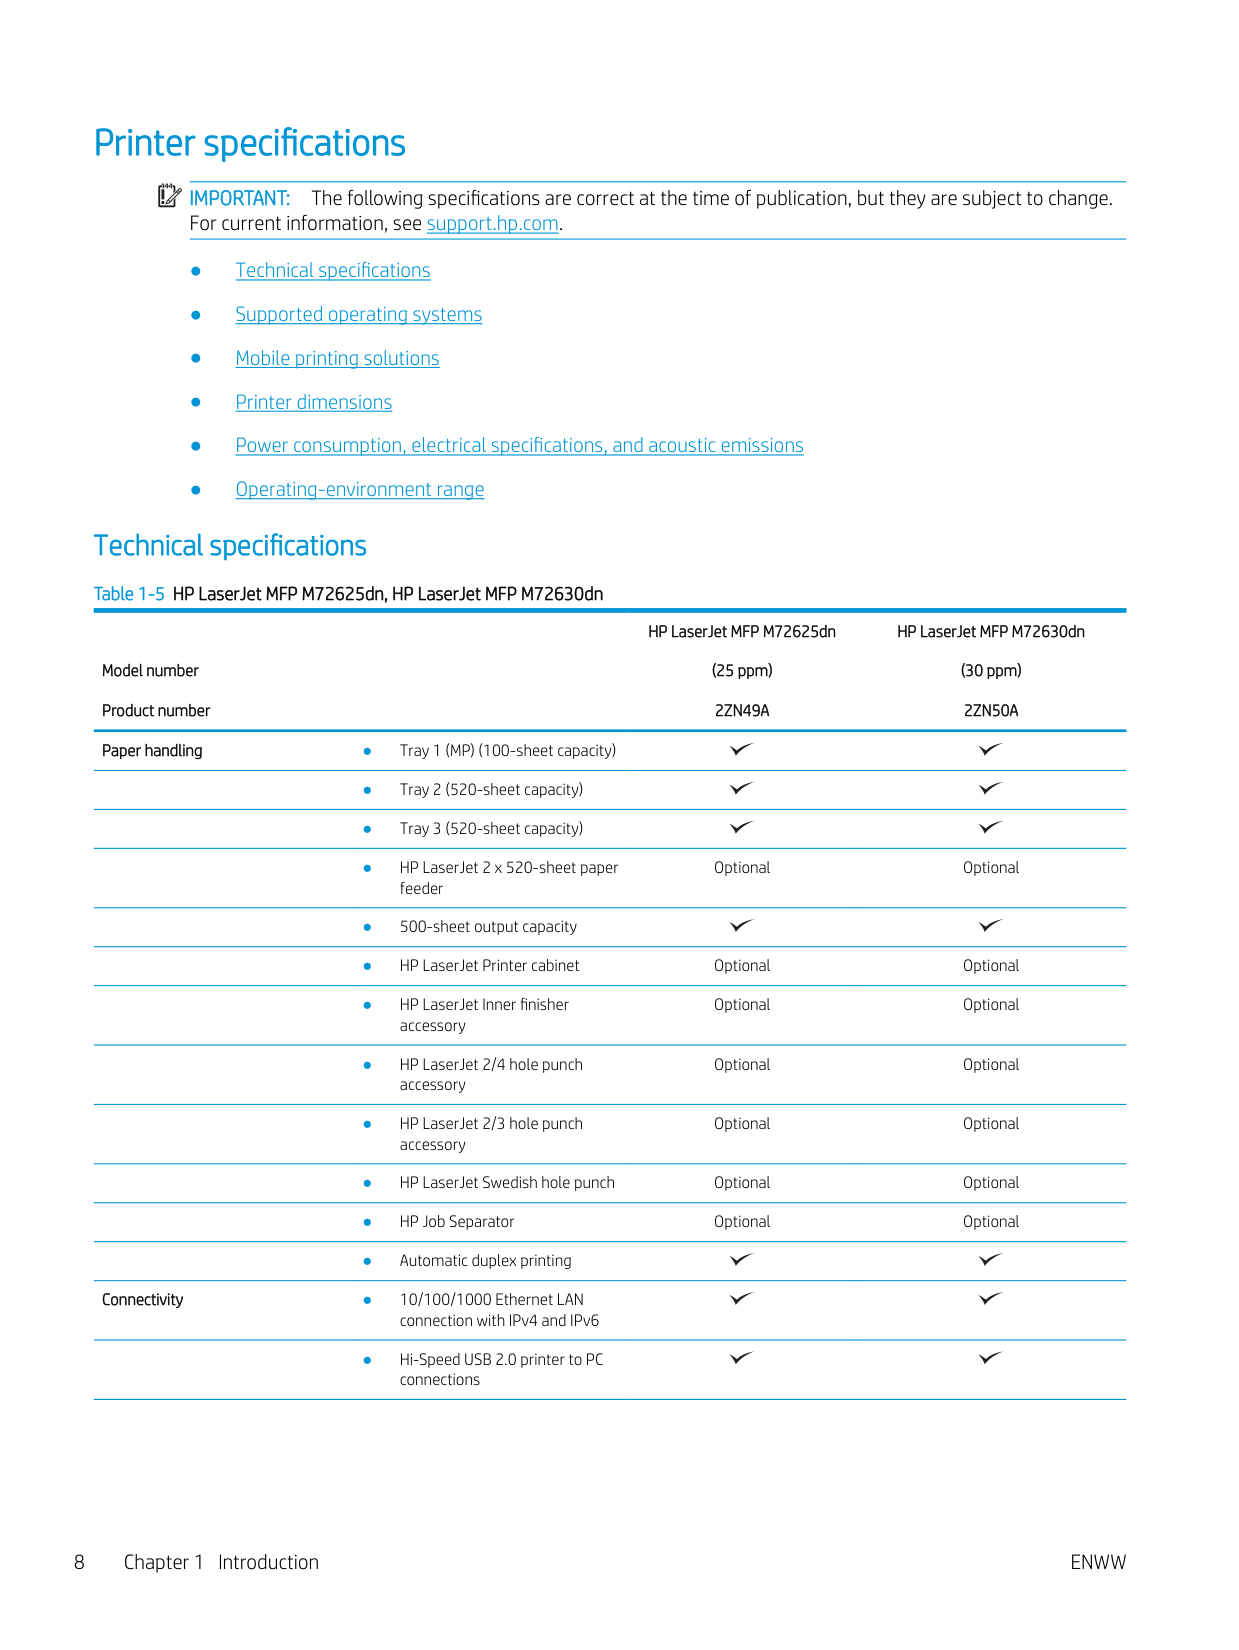
IMPORTANT: The following specifications are correct at the time of publication, but they are subject to change. For current information, see support.hp.com.
#### Technical specifications
Table 1-5 HP LaserJet MFP M72625dn, HP LaserJet MFP M72630dn
Model number Product number
HP LaserJet MFP M72625dn (25 ppm) 2ZN49A
HP LaserJet MFP M72630dn (30 ppm) 2ZN50A
Paper handling ● Tray 1 (MP) (100-sheet capacity)
Optional Optional
Optional Optional
Optional Optional
Optional Optional
Connectivity ● 10/100/1000 Ethernet LAN
connection with IPv4 and IPv6
● Hi-Speed USB 2.0 printer to PC
connections
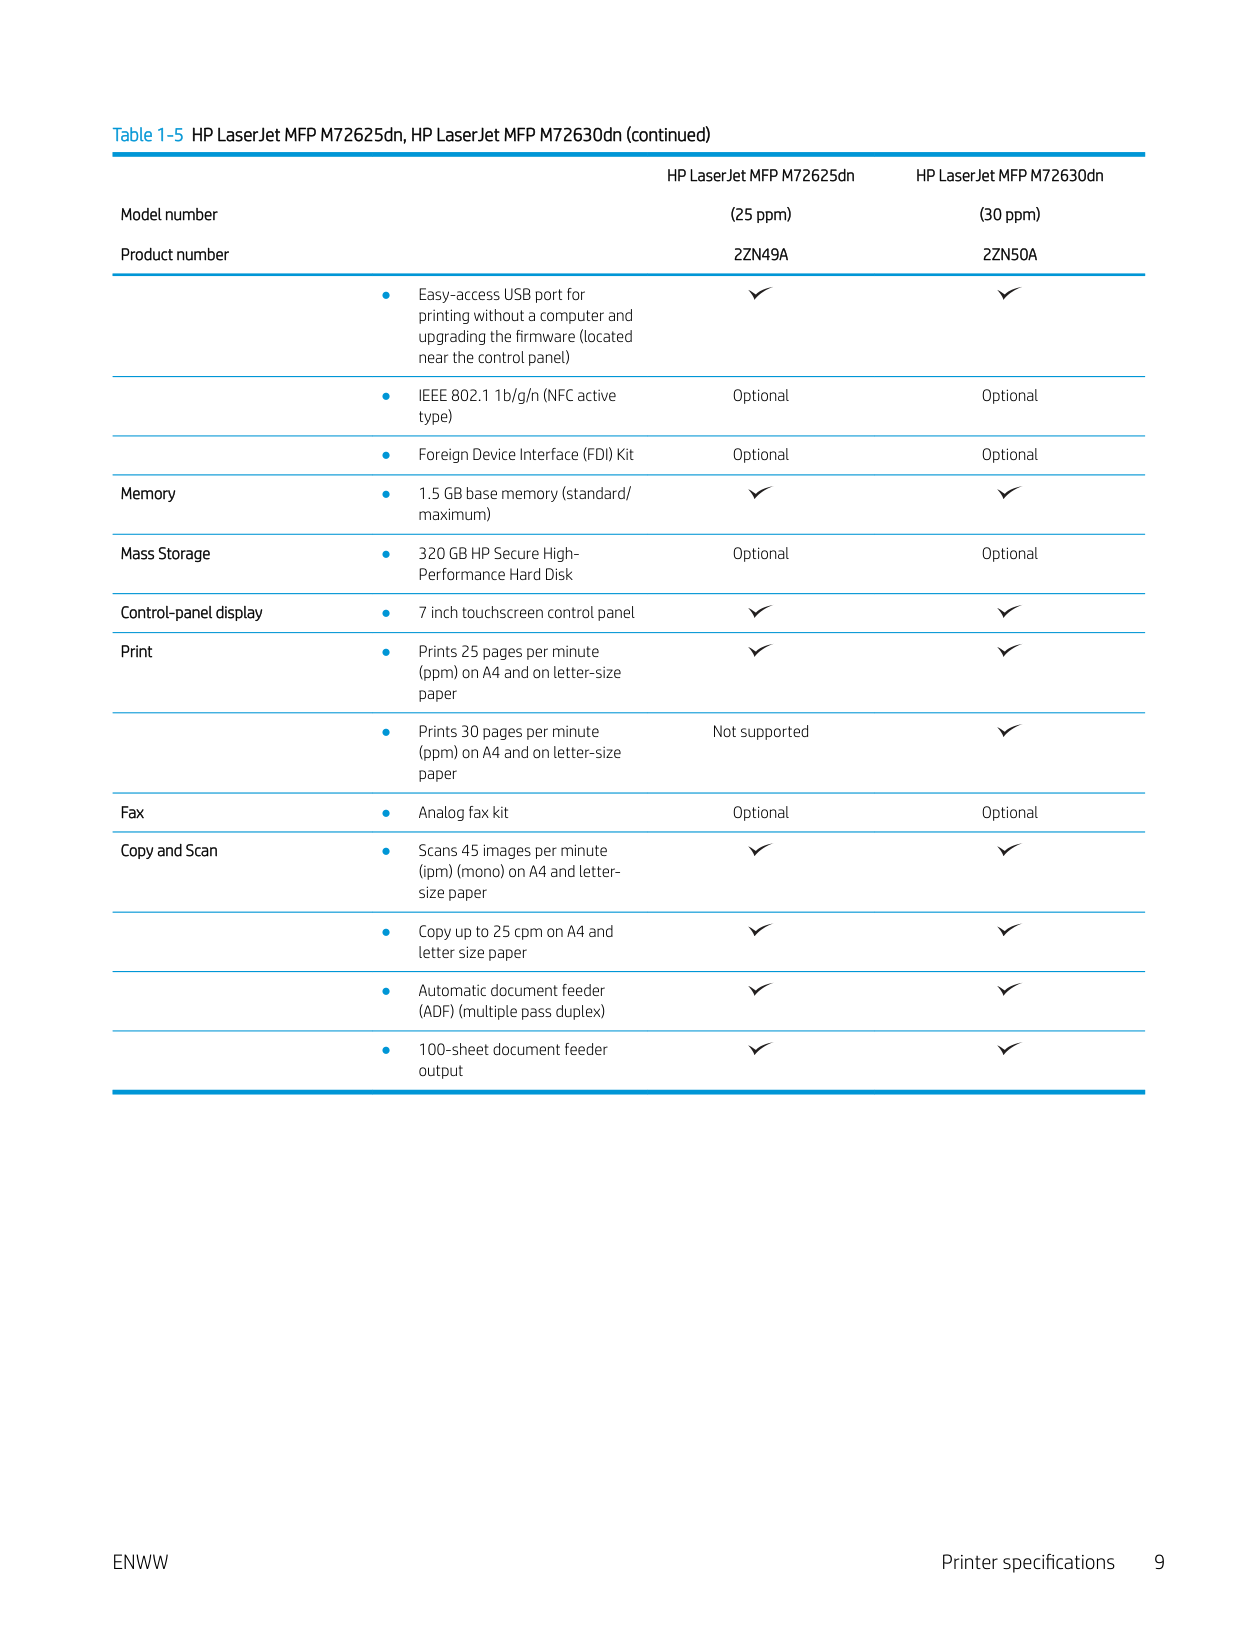
Table 1-5 HP LaserJet MFP M72625dn, HP LaserJet MFP M72630dn (continued)
Model number Product number
HP LaserJet MFP M72625dn (25 ppm) 2ZN49A
HP LaserJet MFP M72630dn (30 ppm) 2ZN50A
Optional Optional
Memory ● 1.5 GB base memory (standard/
maximum)
Mass Storage ● 320 GB HP Secure High-
Performance Hard Disk
Optional Optional
Control-panel display ● 7 inch touchscreen control panel Print ● Prints 25 pages per minute
(ppm) on A4 and on letter-size paper
● Prints 30 pages per minute (ppm) on A4 and on letter-size paper
Not supported
Fax ● Analog fax kit Optional Optional Copy and Scan ● Scans 45 images per minute
(ipm) (mono) on A4 and lettersize paper
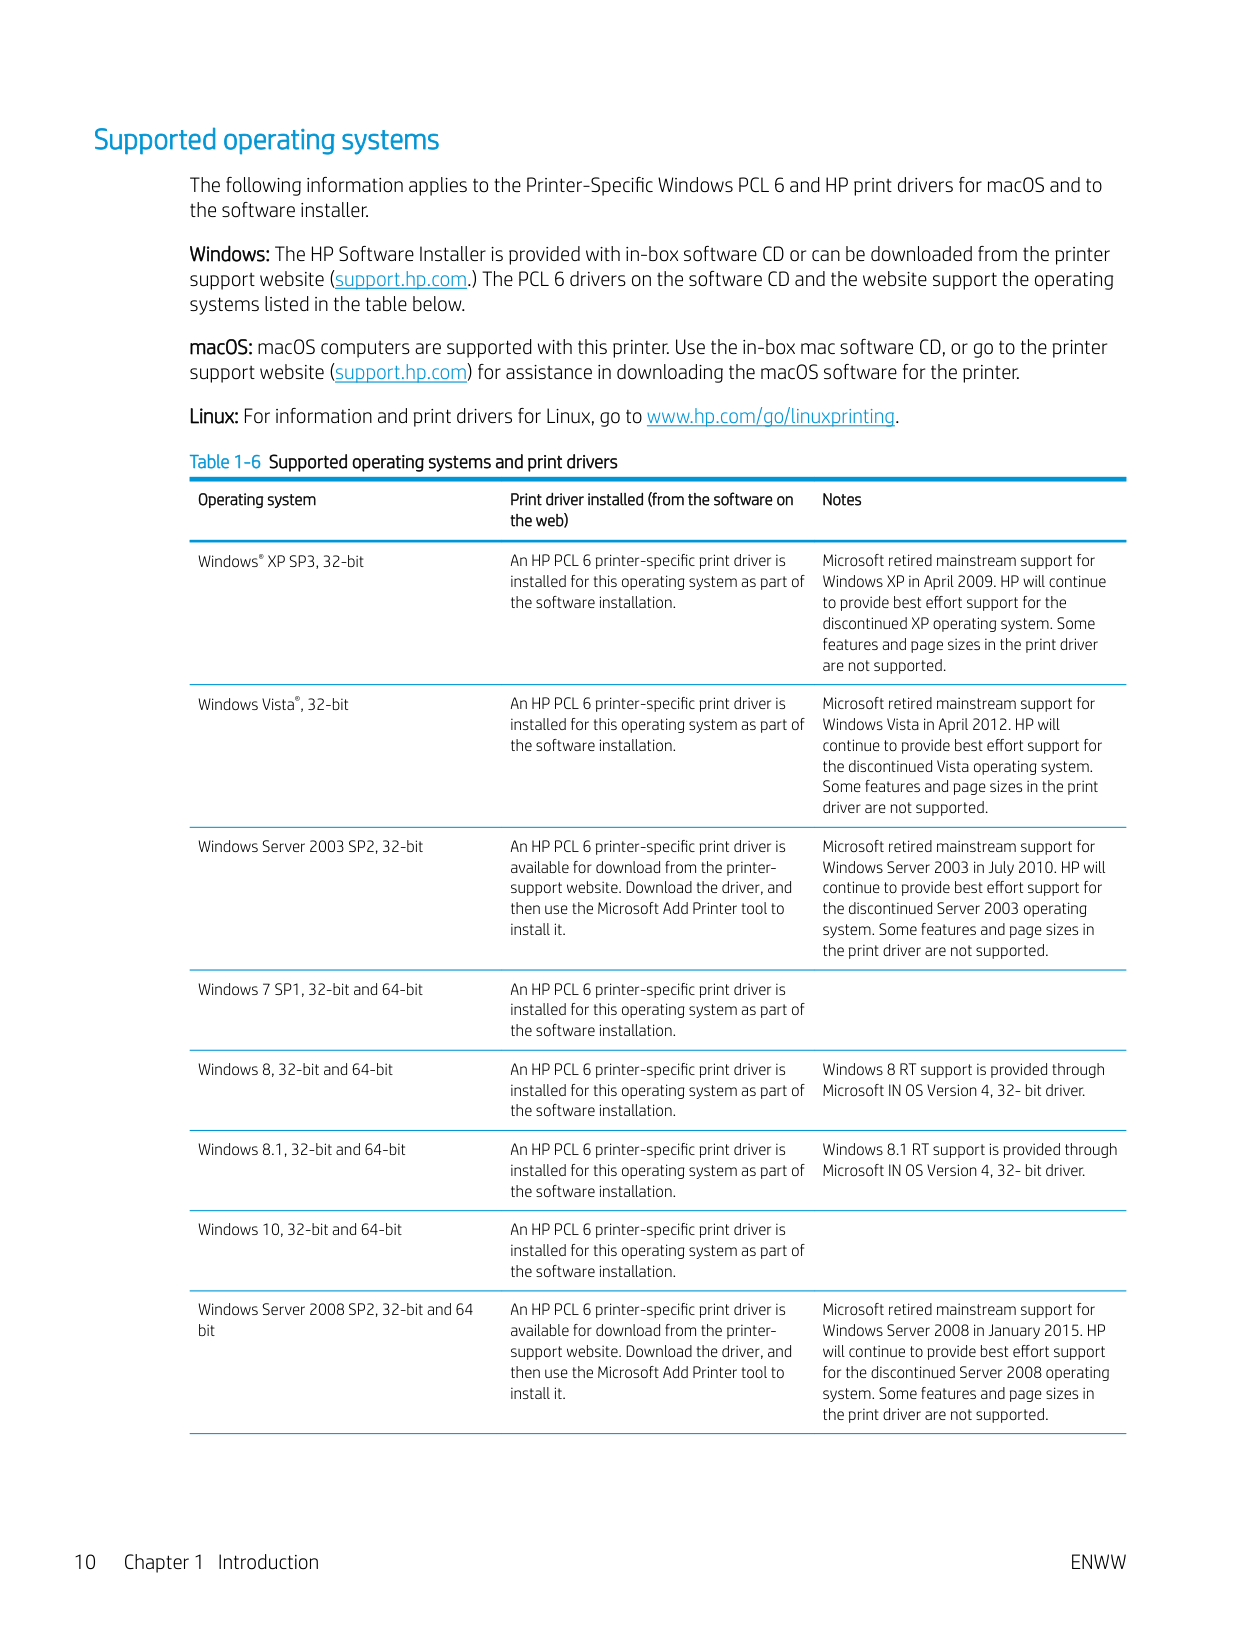
#### Supported operating systems
The following information applies to the Printer-Specific Windows PCL 6 and HP print drivers for macOS and to the software installer.
Windows: The HP Software Installer is provided with in-box software CD or can be downloaded from the printer support website (support.hp.com.) The PCL 6 drivers on the software CD and the website support the operating systems listed in the table below.
macOS: macOS computers are supported with this printer. Use the in-box mac software CD, or go to the printer support website (support.hp.com) for assistance in downloading the macOS software for the printer.
Linux: For information and print drivers for Linux, go to www.hp.com/go/linuxprinting. Table 1-6 Supported operating systems and print drivers
Operating system Print driver installed (from the software on the web)
Notes
Windows® XP SP3, 32-bit An HP PCL 6 printer-specific print driver is installed for this operating system as part of the software installation.
Microsoft retired mainstream support for Windows XP in April 2009. HP will continue to provide best effort support for the discontinued XP operating system. Some features and page sizes in the print driver are not supported.
Windows Vista®, 32-bit An HP PCL 6 printer-specific print driver is installed for this operating system as part of the software installation.
Microsoft retired mainstream support for Windows Vista in April 2012. HP will continue to provide best effort support for the discontinued Vista operating system. Some features and page sizes in the print driver are not supported.
Windows Server 2003 SP2, 32-bit An HP PCL 6 printer-specific print driver is available for download from the printersupport website. Download the driver, and then use the Microsoft Add Printer tool to install it.
Microsoft retired mainstream support for Windows Server 2003 in July 2010. HP will continue to provide best effort support for the discontinued Server 2003 operating system. Some features and page sizes in the print driver are not supported.
Windows 8 RT support is provided through Microsoft IN OS Version 4, 32- bit driver.
Windows 8.1, 32-bit and 64-bit An HP PCL 6 printer-specific print driver is installed for this operating system as part of the software installation.
Windows 8.1 RT support is provided through Microsoft IN OS Version 4, 32- bit driver.
Windows 10, 32-bit and 64-bit An HP PCL 6 printer-specific print driver is installed for this operating system as part of the software installation.
Windows Server 2008 SP2, 32-bit and 64 bit
An HP PCL 6 printer-specific print driver is available for download from the printersupport website. Download the driver, and then use the Microsoft Add Printer tool to install it.
Microsoft retired mainstream support for Windows Server 2008 in January 2015. HP will continue to provide best effort support for the discontinued Server 2008 operating system. Some features and page sizes in the print driver are not supported.
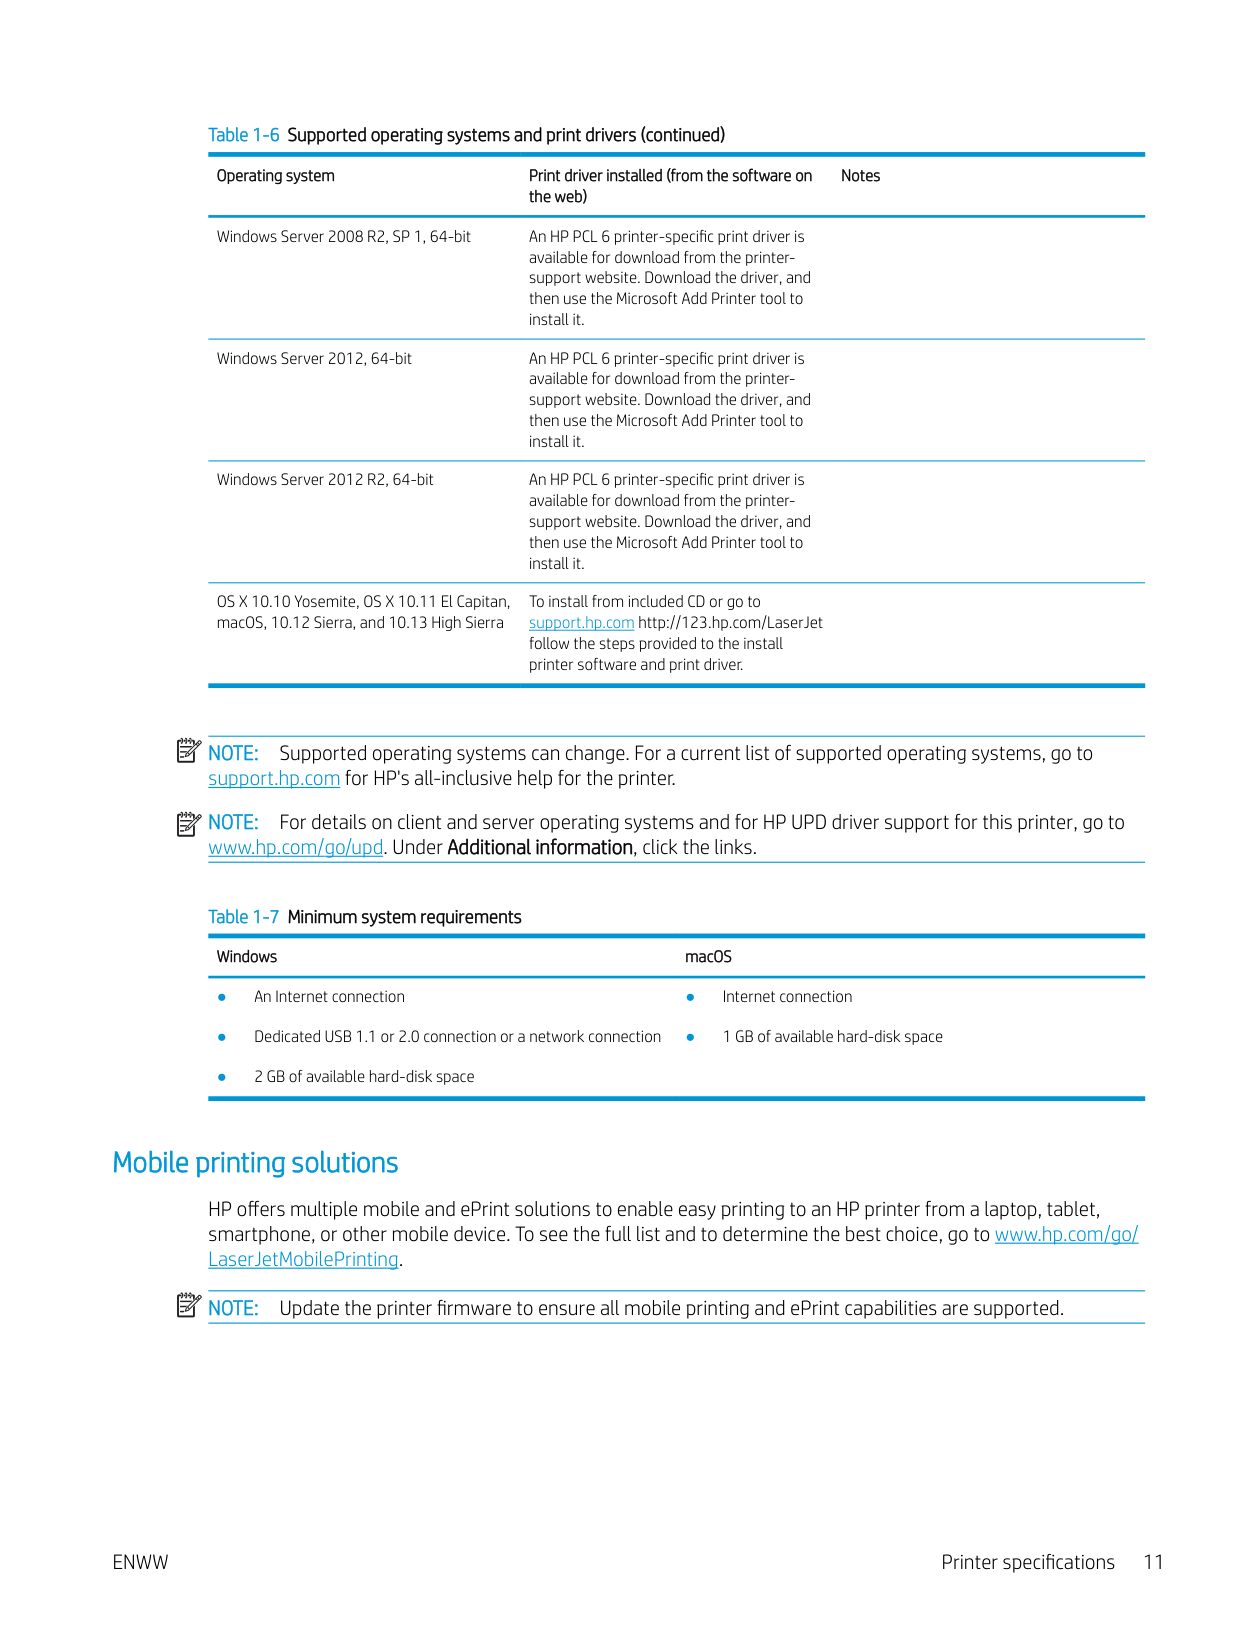
####### Table 1-6 Supported operating systems and print drivers (continued)
Operating system Print driver installed (from the software on the web)
Notes
Windows Server 2008 R2, SP 1, 64-bit An HP PCL 6 printer-specific print driver is available for download from the printersupport website. Download the driver, and then use the Microsoft Add Printer tool to install it.
Windows Server 2012, 64-bit An HP PCL 6 printer-specific print driver is available for download from the printersupport website. Download the driver, and then use the Microsoft Add Printer tool to install it.
Windows Server 2012 R2, 64-bit An HP PCL 6 printer-specific print driver is available for download from the printersupport website. Download the driver, and then use the Microsoft Add Printer tool to install it.
OS X 10.10 Yosemite, OS X 10.11 El Capitan, macOS, 10.12 Sierra, and 10.13 High Sierra
To install from included CD or go to support.hp.com http://123.hp.com/LaserJet follow the steps provided to the install printer software and print driver.
| | |---|
NOTE: Supported operating systems can change. For a current list of supported operating systems, go to support.hp.com for HP's all-inclusive help for the printer.
| | |---|
NOTE: For details on client and server operating systems and for HP UPD driver support for this printer, go to www.hp.com/go/upd. Under Additional information, click the links.
####### Table 1-7 Minimum system requirementsWindows macOS
#### Mobile printing solutions
HP offers multiple mobile and ePrint solutions to enable easy printing to an HP printer from a laptop, tablet, smartphone, or other mobile device. To see the full list and to determine the best choice, go to www.hp.com/go/ LaserJetMobilePrinting.
| | |---|
NOTE: Update the printer firmware to ensure all mobile printing and ePrint capabilities are supported.
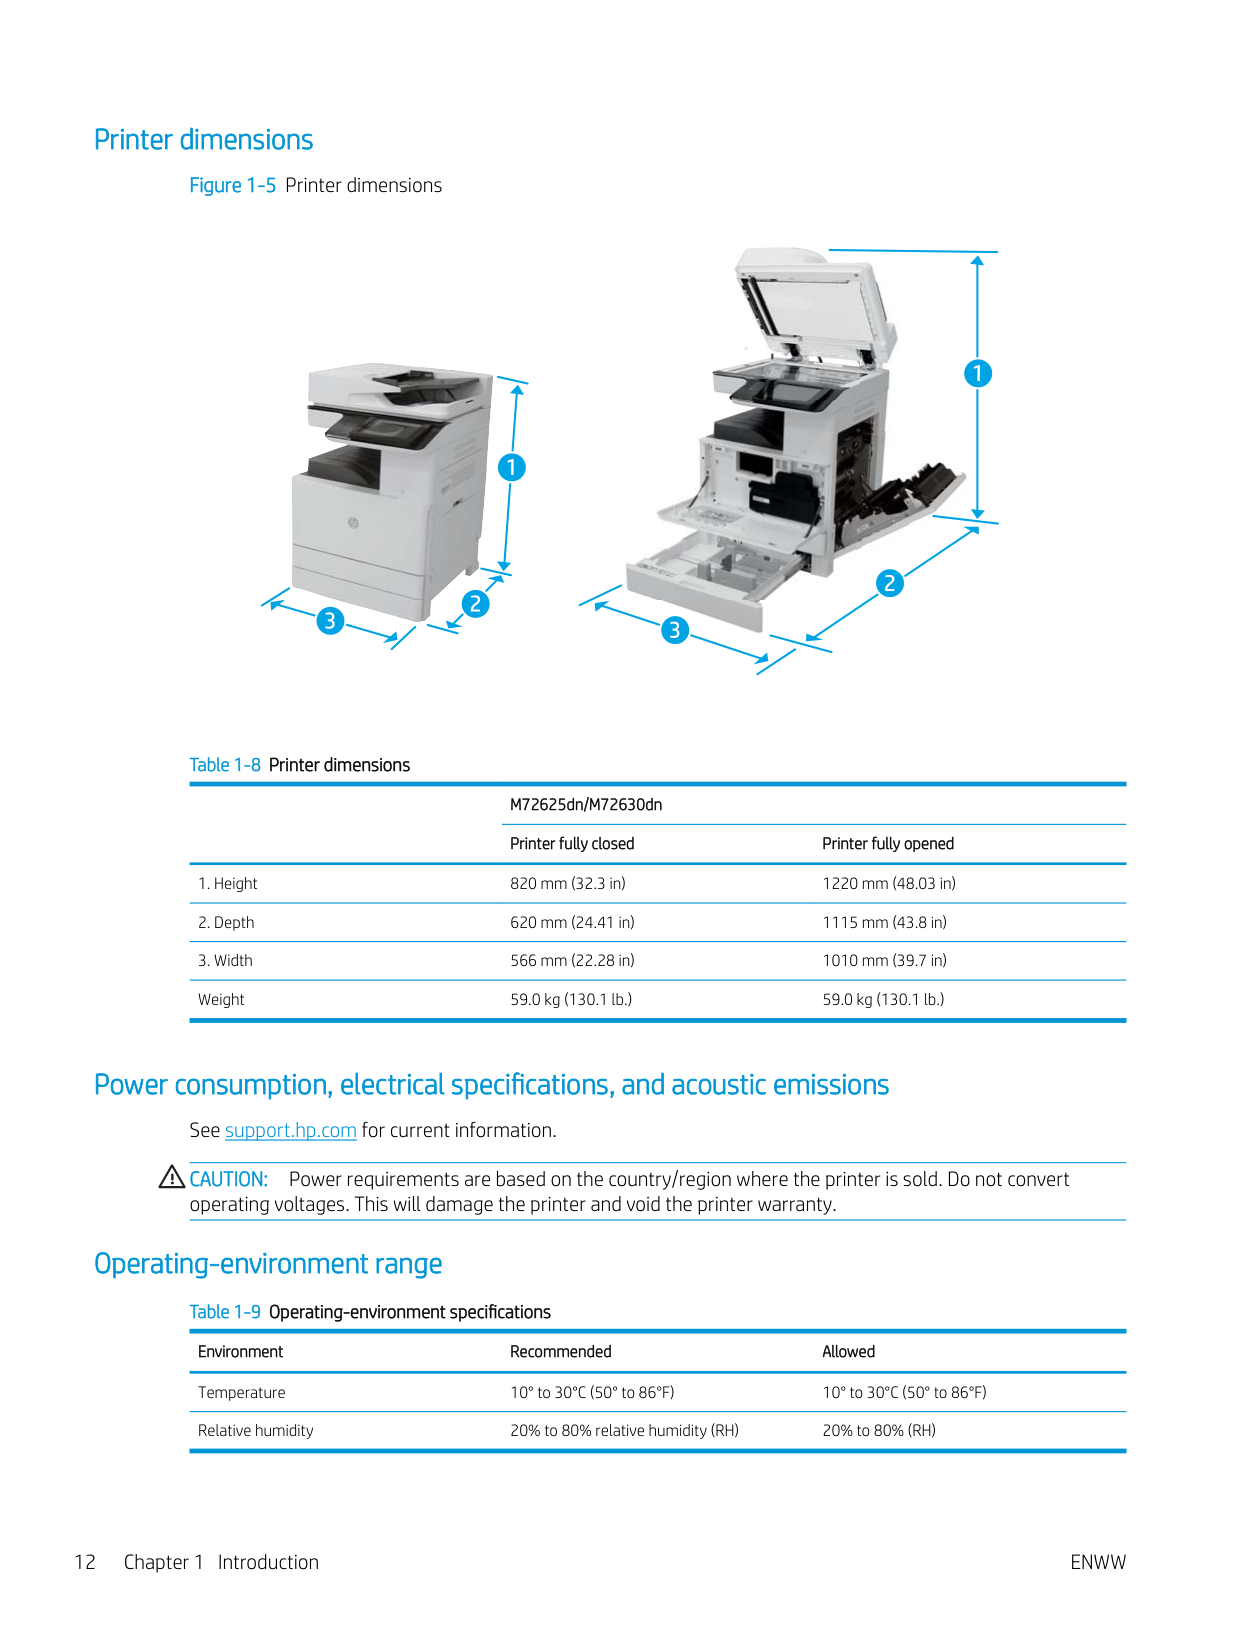
#### Printer dimensions
Figure 1-5 Printer dimensions

1
2
3


1

2 3

Table 1-8 Printer dimensions
M72625dn/M72630dn Printer fully closed Printer fully opened
Power consumption, electrical specifications, and acoustic emissions See support.hp.com for current information. CAUTION: Power requirements are based on the country/region where the printer is sold. Do not convert operating voltages. This will damage the printer and void the printer warranty.
#### Operating-environment range
Table 1-9 Operating-environment specifications Environment Recommended Allowed Temperature 10° to 30°C (50° to 86°F) 10° to 30°C (50° to 86°F) Relative humidity 20% to 80% relative humidity (RH) 20% to 80% (RH)
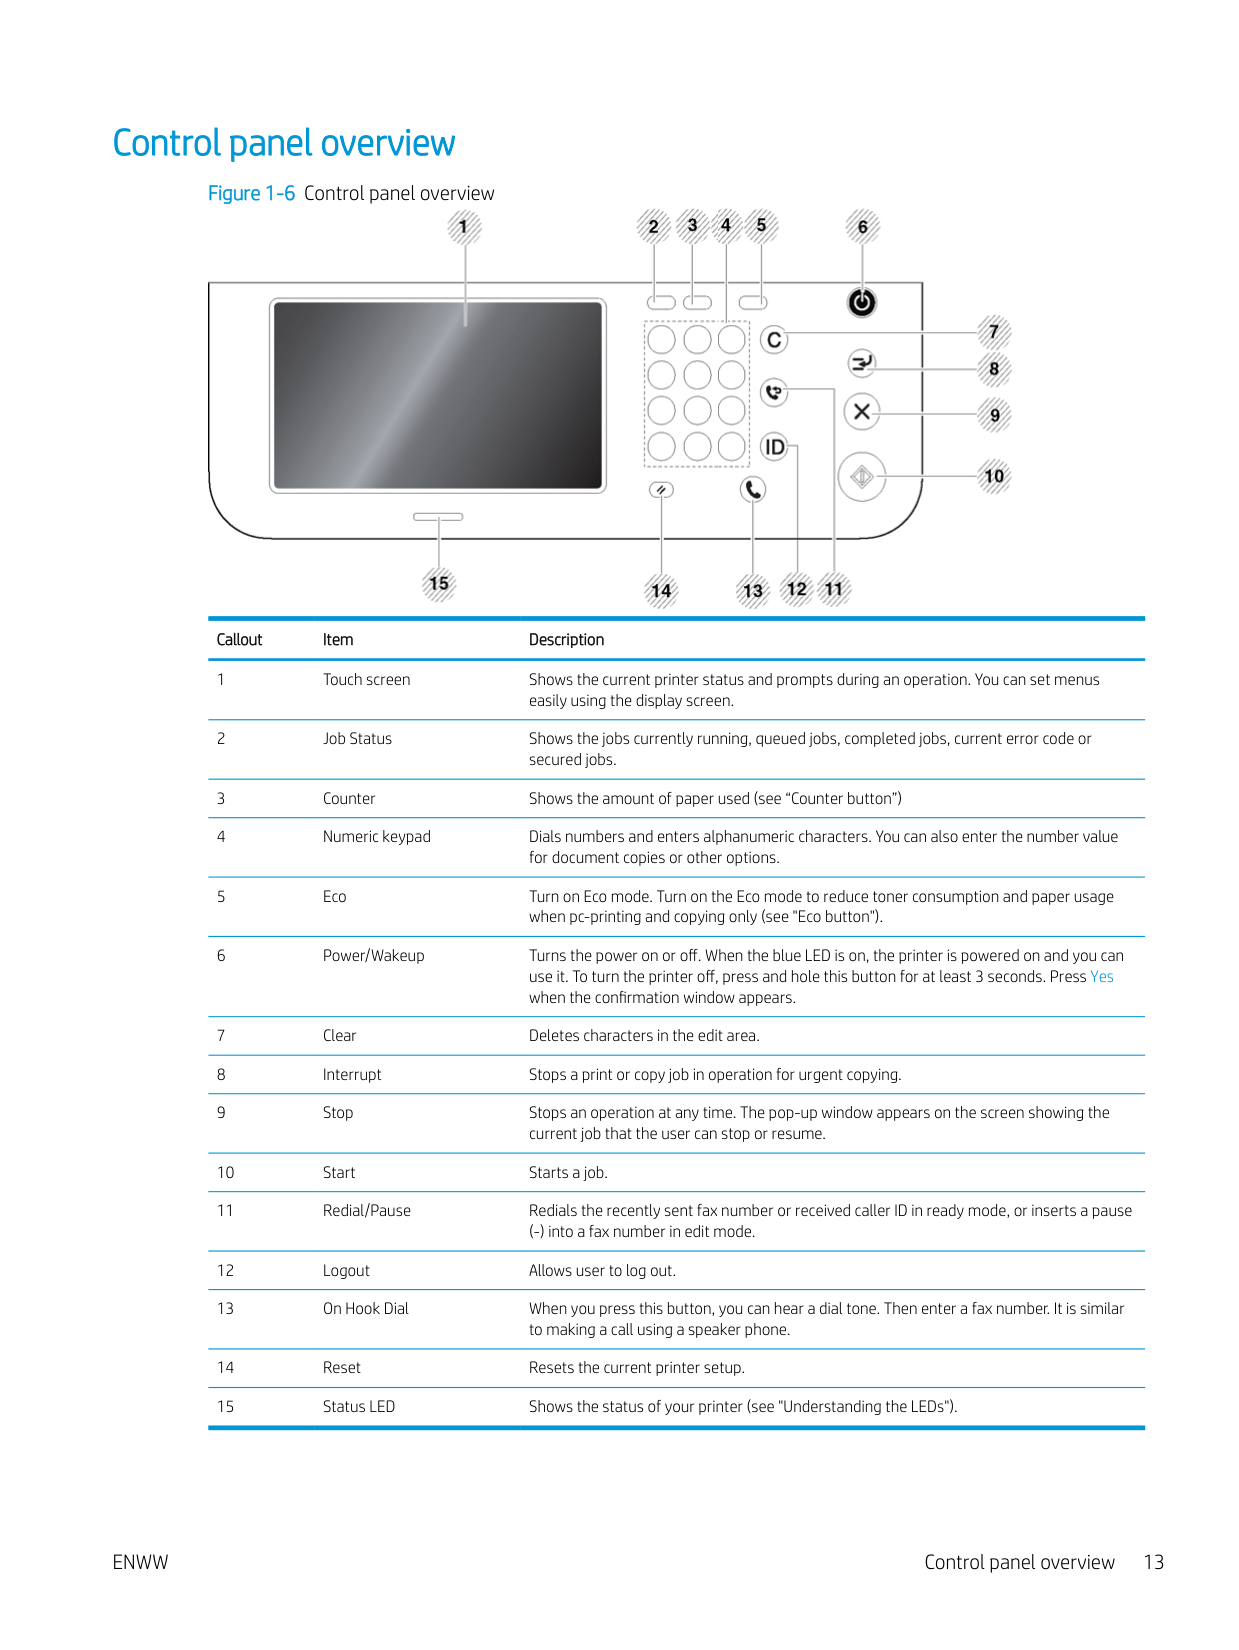
Control panel overview
Figure 1-6 Control panel overview


Callout Item Description
ENWW Control panel overview 13
| | |---|
IMPORTANT: When you use the display screen, use your finger only. The screen may be damaged with anything else.
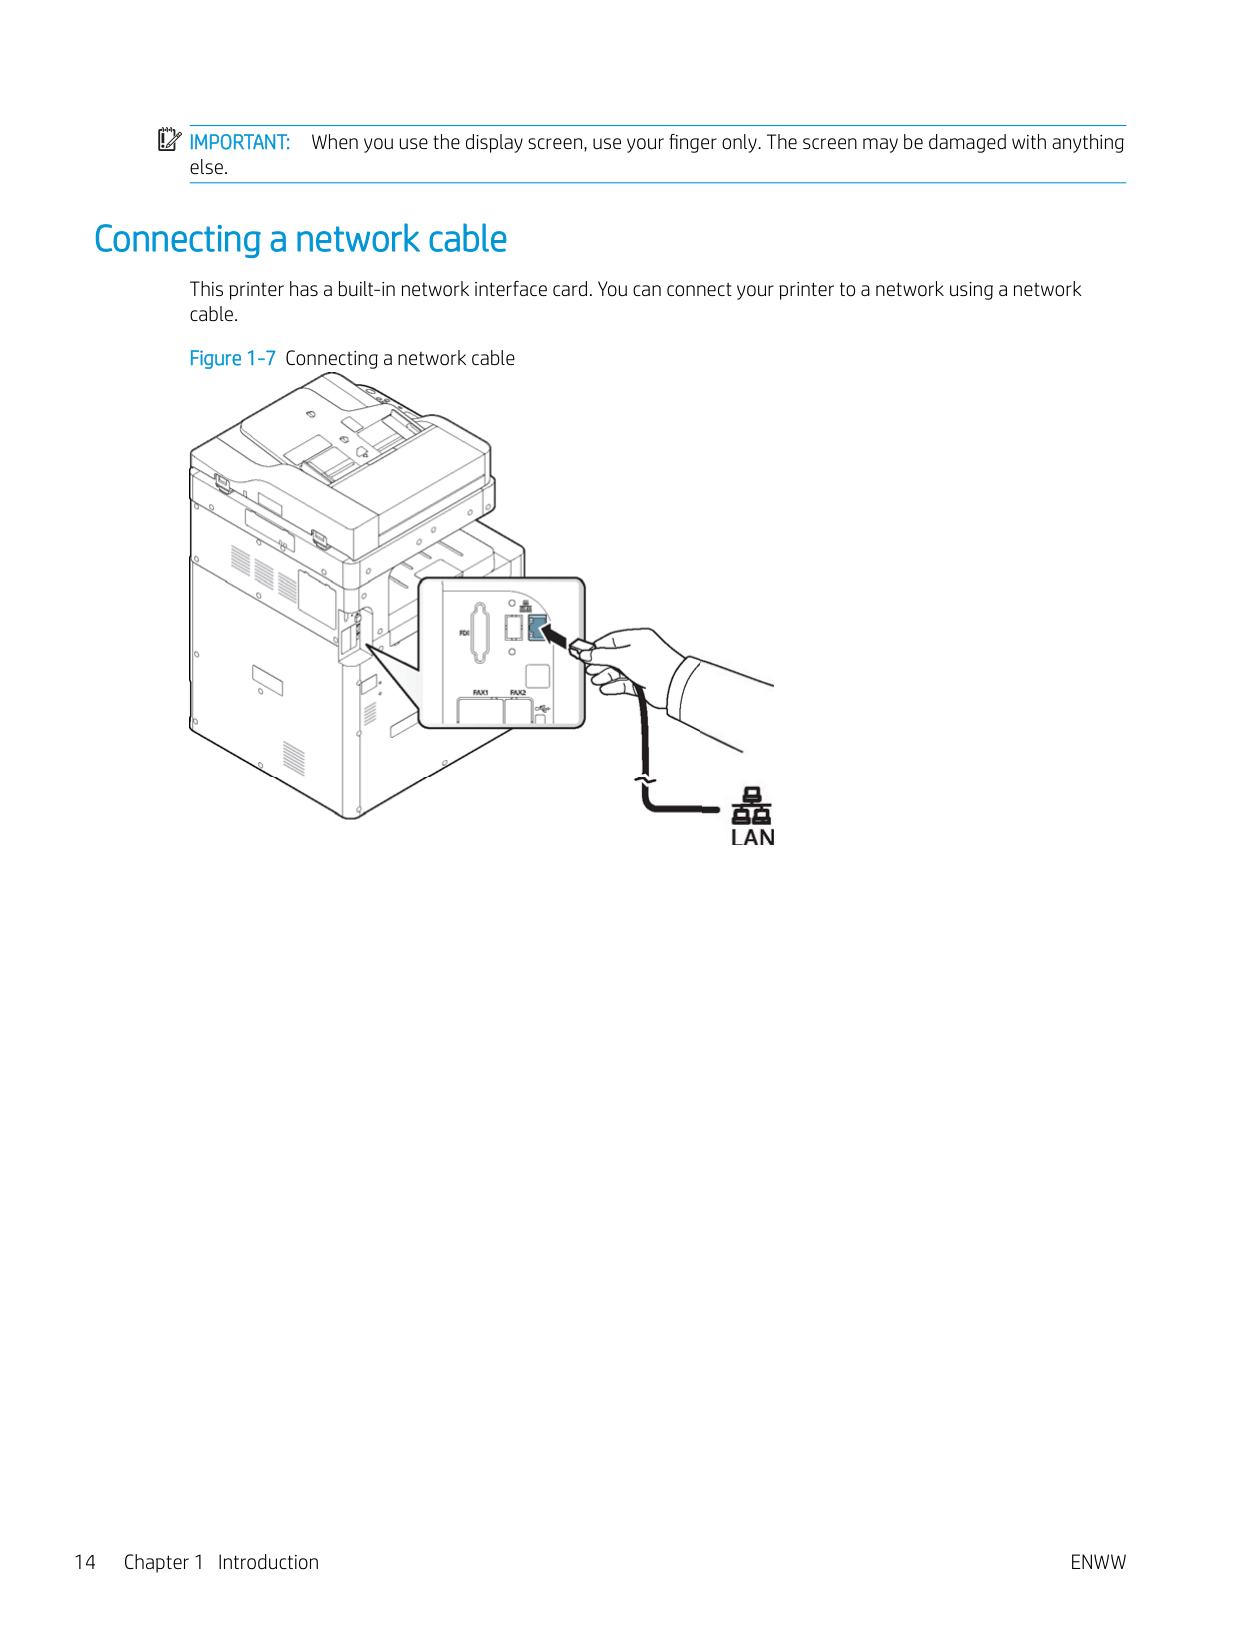
Connecting a network cable
This printer has a built-in network interface card. You can connect your printer to a network using a network cable.
Figure 1-7 Connecting a network cable


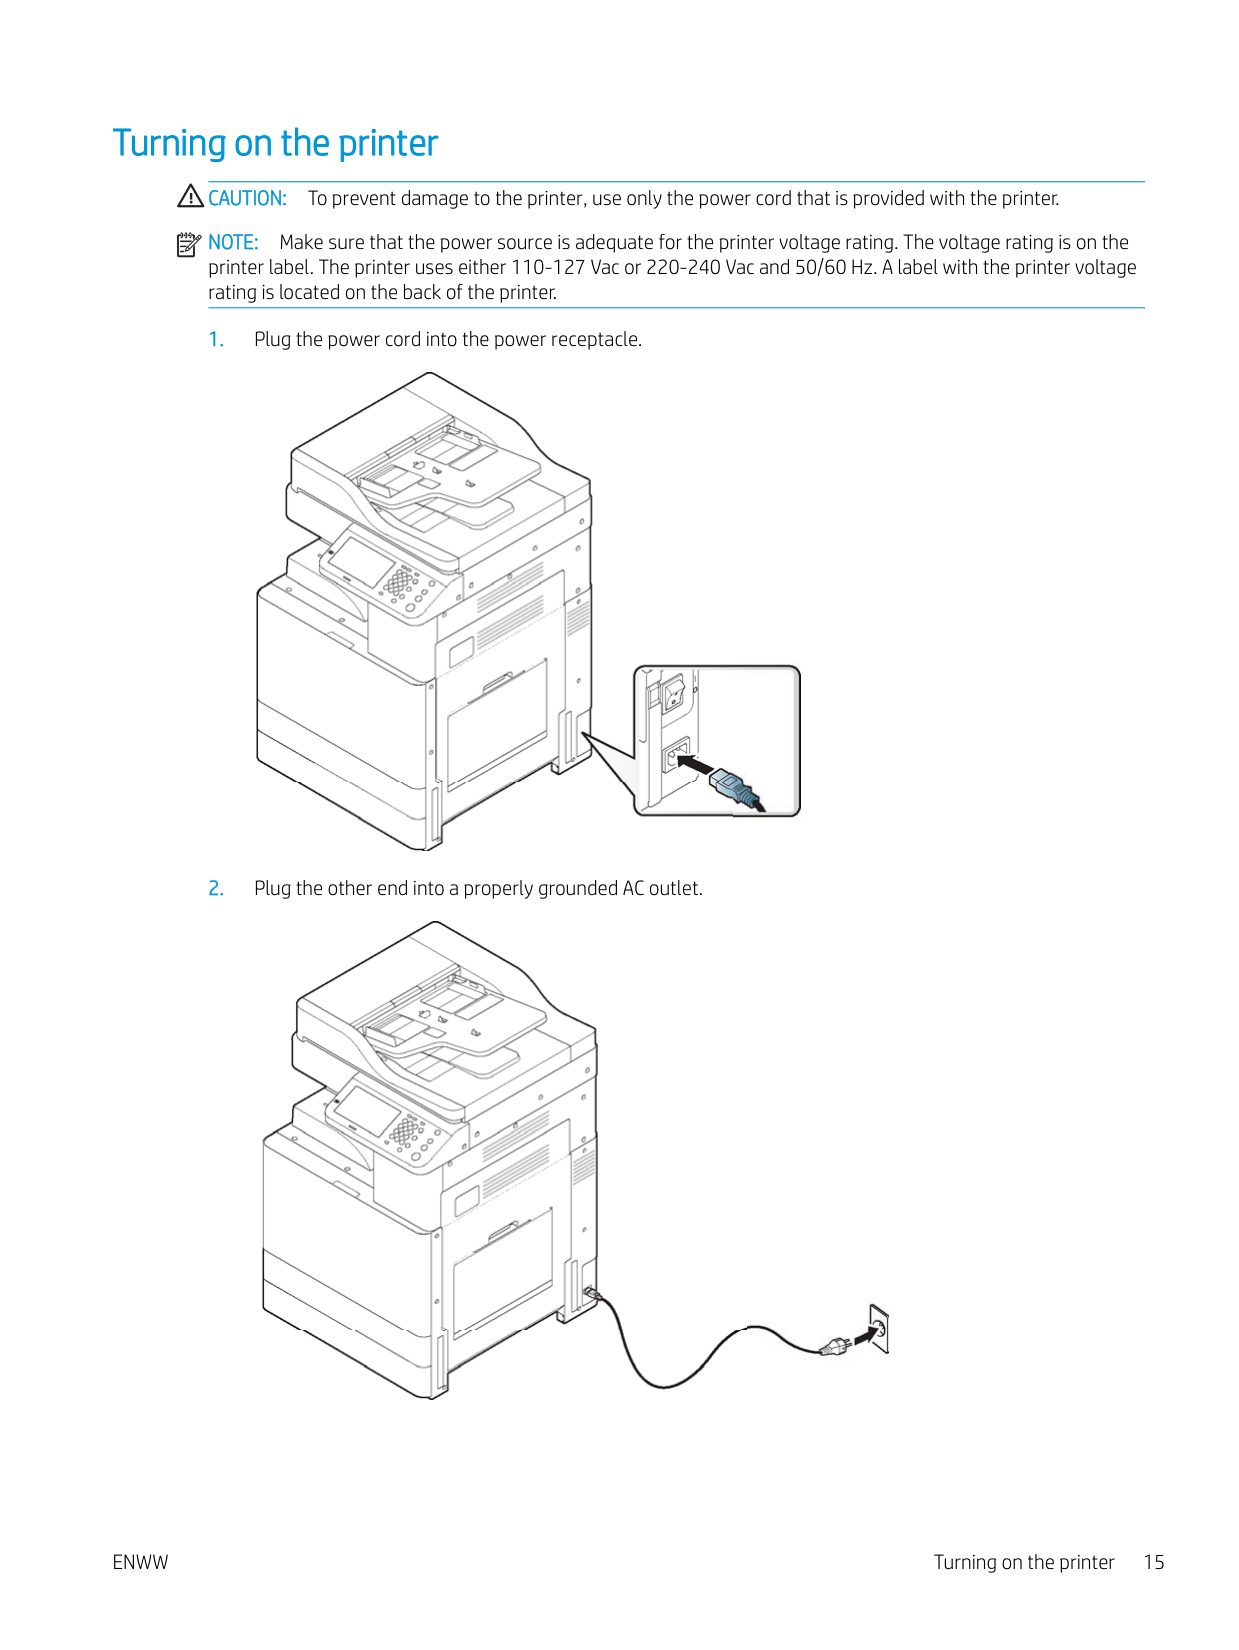
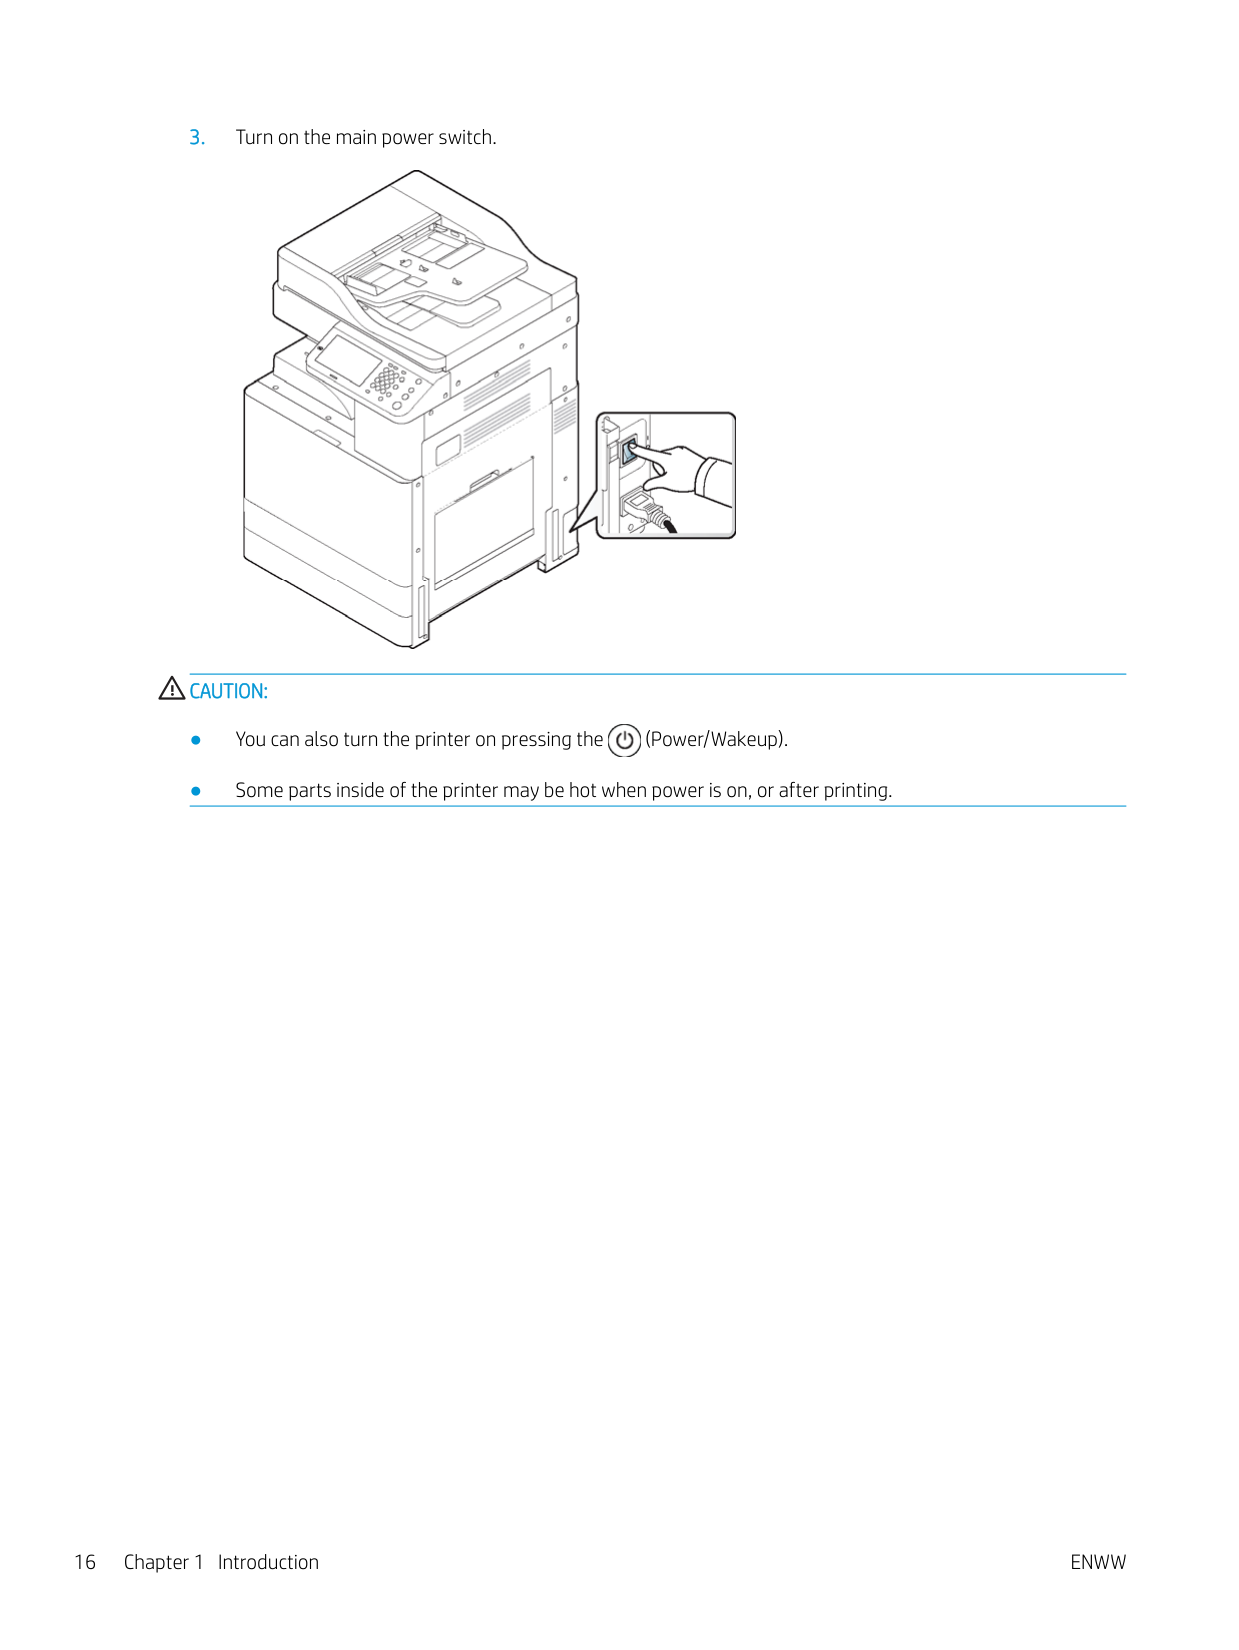
Turning on the printer CAUTION: To prevent damage to the printer, use only the power cord that is provided with the printer. NOTE: Make sure that the power source is adequate for the printer voltage rating. The voltage rating is on the printer label. The printer uses either 110-127 Vac or 220-240 Vac and 50/60 Hz. A label with the printer voltage rating is located on the back of the printer.
| | |---|


ENWW Turning on the printer 15


##### CAUTION:

Understanding the LEDs The color of the status LED indicates the printer's current status. NOTE:
| | |---|
#### Understanding the status LED
####### Table 1-10 Understanding the status LED Status Description Off ● The printer is off-line.
● The printer is in power save mode. Blue On The printer is on-line and can be used.
Blinking Fax The printer is sending or receiving faxes. Copy The printer is copying documents. Scan The printer is scanning documents. Print ● When the status LED slowly blinks, the printer is
receiving data from the computer.
● When the status LED blinks rapidly, the printer is
printing data.
ENWW Understanding the LEDs 17
Table 1-10 Understanding the status LED (continued) Status Description Orange On ● A toner cartridge has almost reached its estimated cartridge life. It is recommended to replace the toner cartridge.
Blinking ● A minor error has occurred and the printer is waiting for the error to be cleared. Check the display message (see "Understanding display messages"). When the problem is cleared, the printer resumes its original task.
● The toner cartridge life or imaging unit is near the end of its life. Order a new toner cartridge or imaging unit. You can temporarily improve print quality by redistributing the toner.
| | |---|
NOTE: Check the message on the display screen. Follow the instructions in the message or refer to the troubleshooting chapter (see "Understanding display messages"). If the problem persists, call for service.
Power LED The color of the status LED indicates the printer's current status. Table 1-11 Power LED
Status Description Off The printer is off-line. Blue On ● The printer is on-line and can be used.
● The printer is in power save mode. When data is received, or any screen is pressed, it
switches to on-line automatically.
| | |---|
NOTE: Check the message on the display screen. Follow the instructions in the message or refer to the troubleshooting chapter (see "Understanding display messages"). If the problem persists, call for service.
Display screen and useful buttons
#### Display screen
The display screen on the control panel allows user-friendly operation of the printer. Once you press the home icon ( ) on the screen, it shows the display screen. The display screen image in this user’s guide may differ from your printer depending on its option or model.
| | |---|
##### NOTE:
| | |---|
NOTE: Some menus are only configured by an administrator or an authorized user who has an ID and password registered on the printer by an administrator. When the printer requests, enter the ID and password.
#### Counter button
When you press the Counter button on the control panel, you can see the number of impressions.
When you select Device, you can see the number of impressions by device. An impression typically refers to a single side of a sheet and not a one-sided print.
#### Eco button
The eco feature allows you to save print resources and leads you to eco-friendly printing. When you press the Eco button, the printer turns eco mode on or off. If the eco mode is on, you can see the eco image ( ) on some features. Some options in the features are not available to use in the eco mode.

| | |---|
##### NOTE:
Table 1-12 Eco button Status Description Off The printer is not in Eco mode. Green On The printer is in Eco mode.
#### Job Status button
When you press the Job Status button, the screen lists the currently running, queued, and completed jobs.
##### Current Job
Displays the list of jobs in progress and pending. Pressing the job name shows more detailed information.
Completed Job Displays the list of completed jobs. Pressing the job name shows more detailed information.
##### Secured Job
Displays the list of secured jobs the user has set in the printer driver (see "Print Mode"). You need to enter the ID and Password set in the printer driver.
##### Active Notice
Displays any error messages and codes that have occurred.
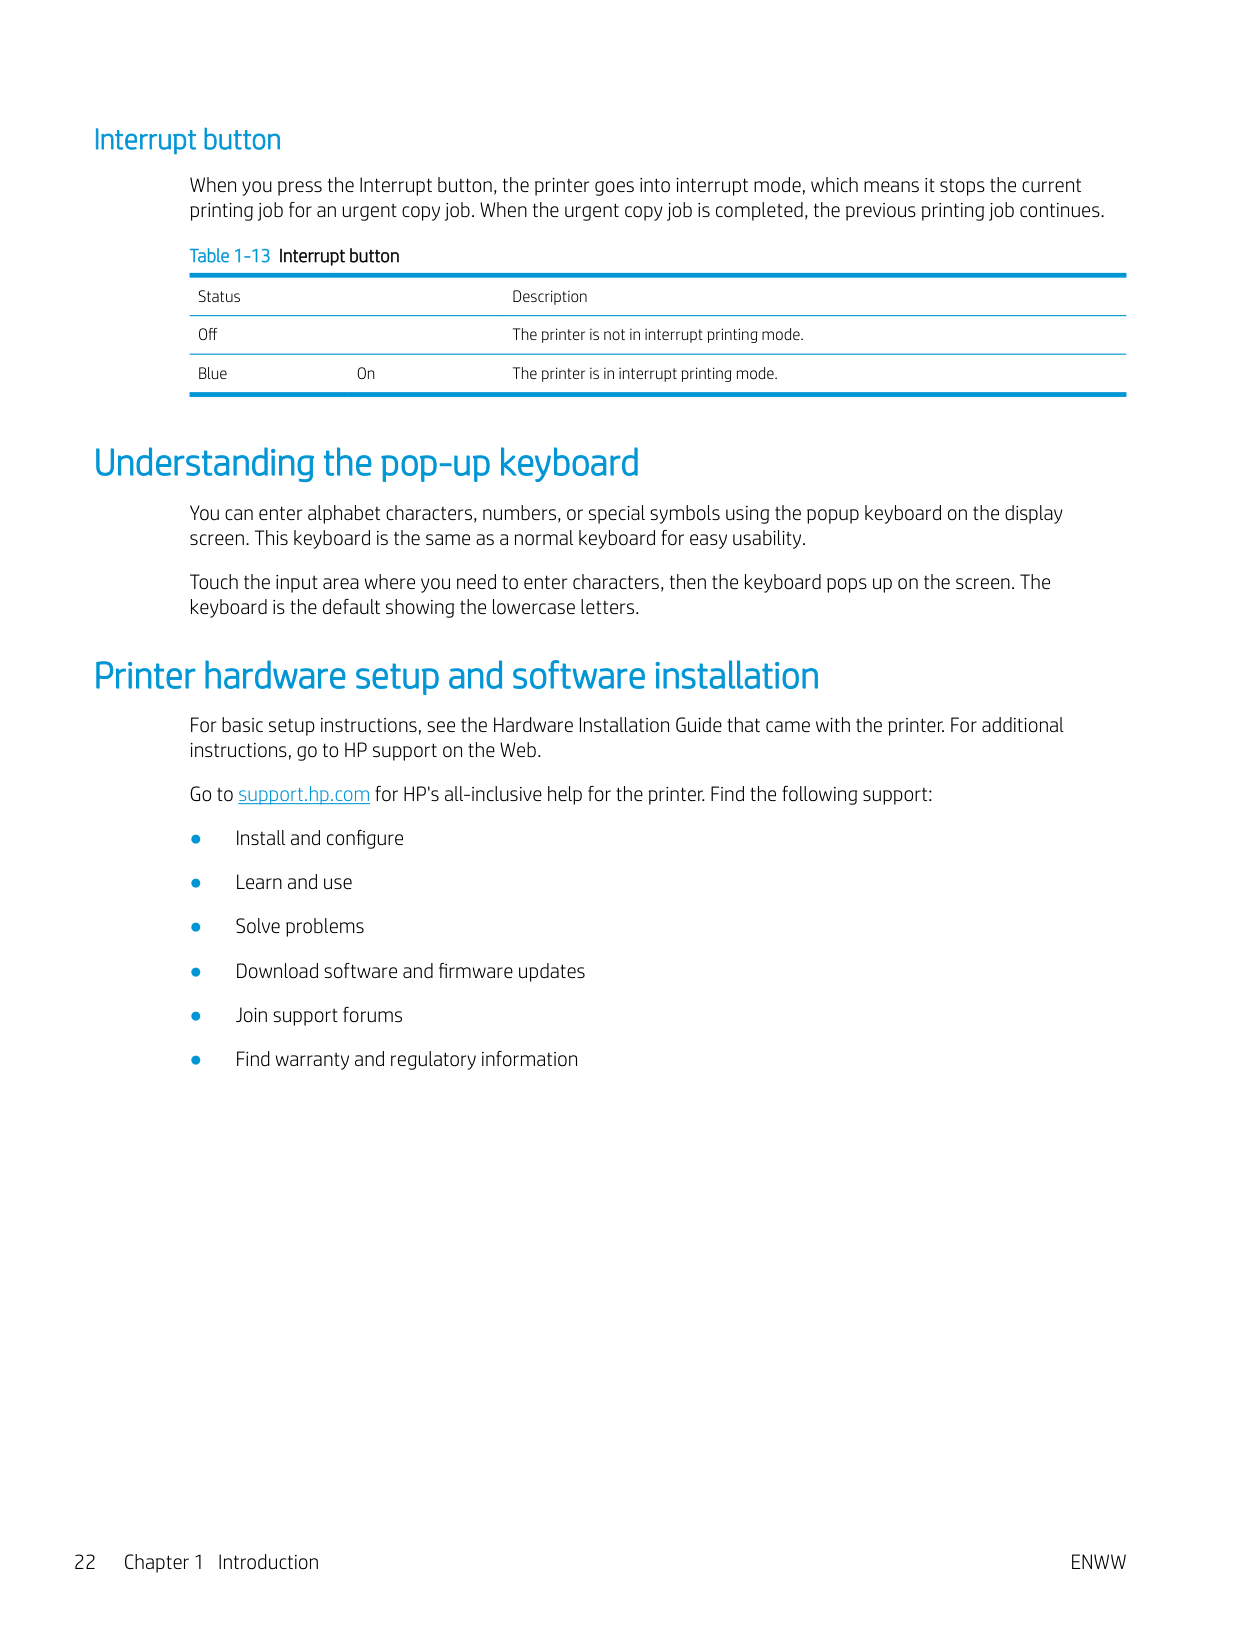
#### Interrupt button
When you press the Interrupt button, the printer goes into interrupt mode, which means it stops the current printing job for an urgent copy job. When the urgent copy job is completed, the previous printing job continues.
Table 1-13 Interrupt button Status Description Off The printer is not in interrupt printing mode. Blue On The printer is in interrupt printing mode.
Understanding the pop-up keyboard
You can enter alphabet characters, numbers, or special symbols using the popup keyboard on the display screen. This keyboard is the same as a normal keyboard for easy usability.
Touch the input area where you need to enter characters, then the keyboard pops up on the screen. The keyboard is the default showing the lowercase letters.
Printer hardware setup and software installation
For basic setup instructions, see the Hardware Installation Guide that came with the printer. For additional instructions, go to HP support on the Web.
Go to support.hp.com for HP's all-inclusive help for the printer. Find the following support:
2 Using a Network-Connected Printer
ENWW 23
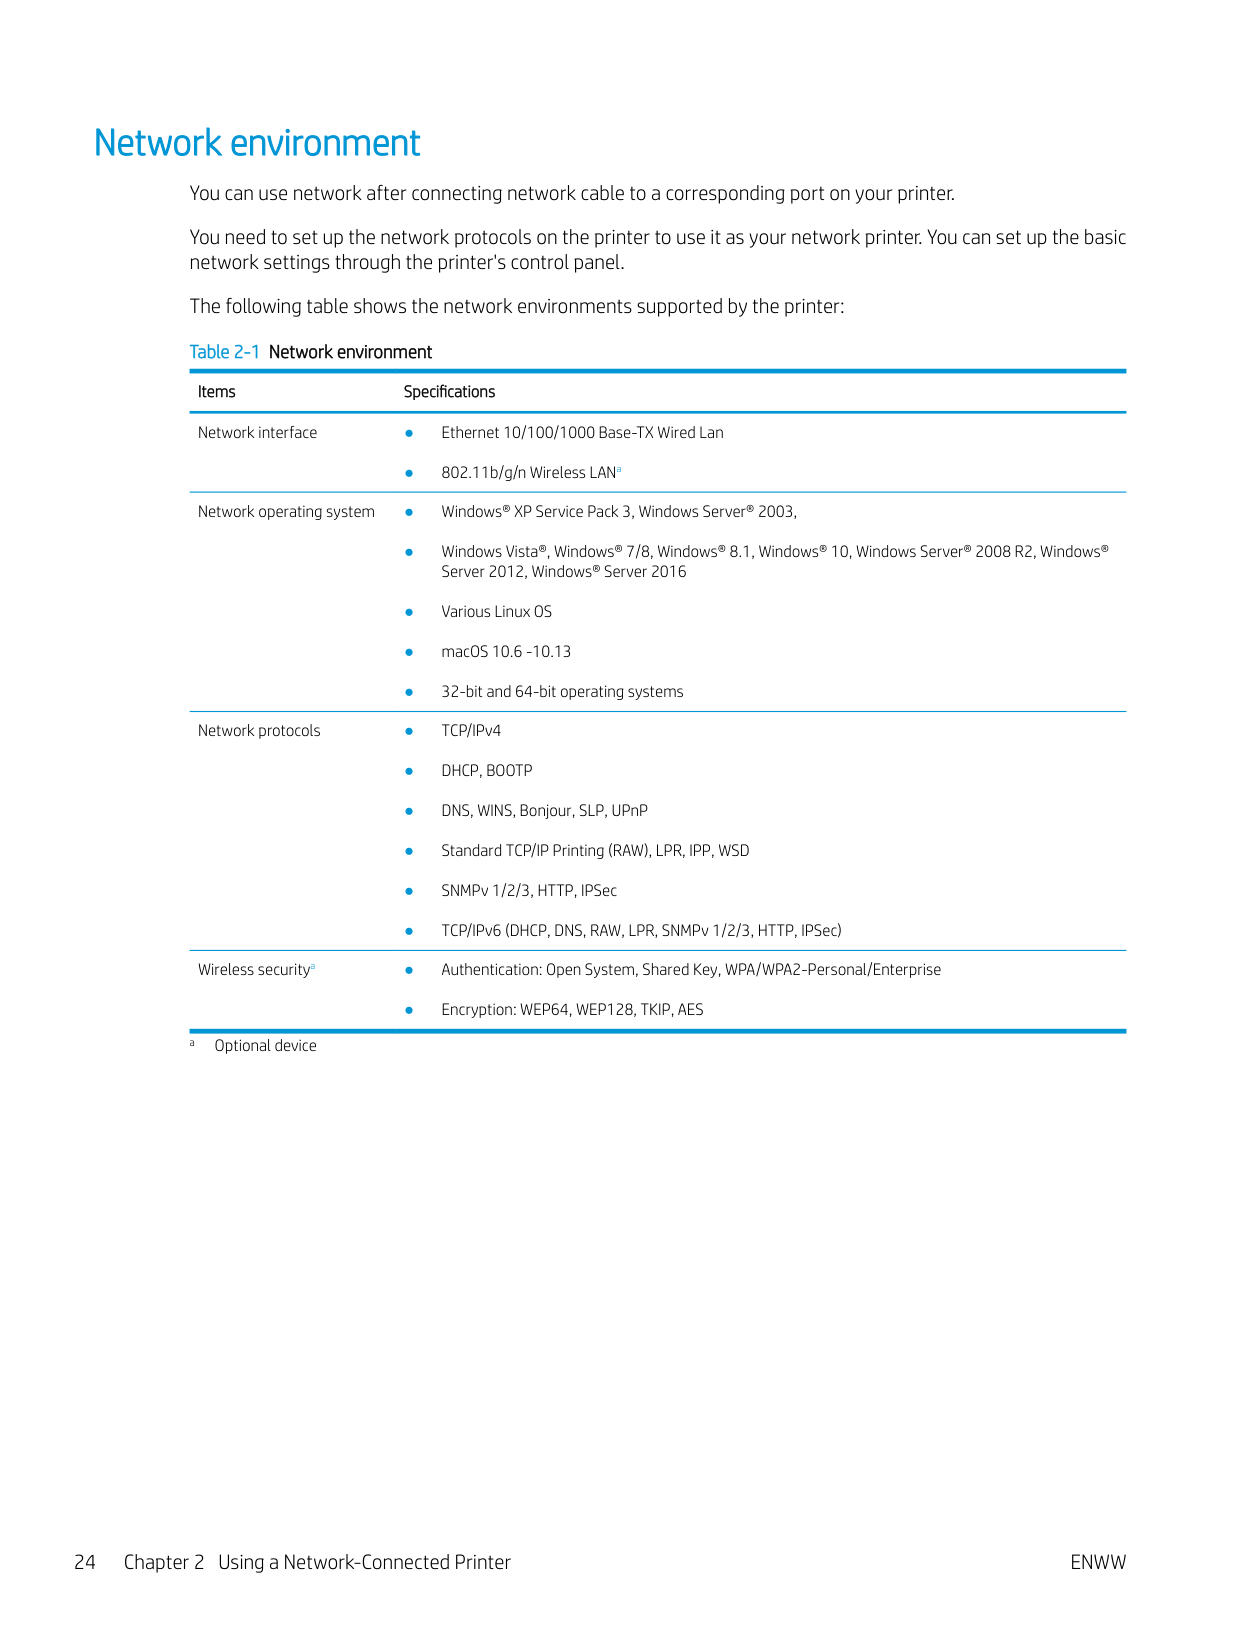
Network environment You can use network after connecting network cable to a corresponding port on your printer. You need to set up the network protocols on the printer to use it as your network printer. You can set up the basic network settings through the printer's control panel. The following table shows the network environments supported by the printer: Table 2-1 Network environment
Items Specifications Network interface ● Ethernet 10/100/1000 Base-TX Wired Lan
● 802.11b/g/n Wireless LANa
Network operating system ● Windows® XP Service Pack 3, Windows Server® 2003,
Network protocols ● TCP/IPv4
Wireless securitya ● Authentication: Open System, Shared Key, WPA/WPA2-Personal/Enterprise
● Encryption: WEP64, WEP128, TKIP, AES a Optional device
Accessing network setup
| | |---|
Network settings (TCP/IP)
When you connect your printer to a network, you must first configure the TCP/IP settings for the printer. The settings shown below are the basic settings required for using your printer as a network printer. You can set TCP/IP, DNS server, TCP/IPv6, Ethernet, and IP address allocation methods.
#### Ethernet
| | |---|
You can set ethernet settings. Press Machine Setup > Network Settings > TCP/IP > Ethernet from the display screen. NOTE: You can also use this feature from the WebUI. Open the Web browser from your networked computer and type the IP address of your printer (see "Settings tab").
TCP/IP Protocol You can set IPv4 settings. Press Machine Setup > Network Settings > TCP/IP > TCP/IPv4 from the display screen. NOTE: You can also use this feature from the WebUI. Open the Web browser from your networked computer and type the IP address of your printer (see "Settings tab").
| | |---|
ENWW Accessing network setup 25

##### IP Setting
You can choose the method for allocating IP addresses.
##### DNS Configuration
You can configure the DNS server.
##### WINS (Windows Internet Name Service)
You can configure the WINS server. WINS is used in the Windows operating system.
##### Display IP address
You can set the printer to display the IP address on the Notification Bar. If you select this option, the IP address will show on the Notification Bar.
Installing driver over the network
You must install the printer driver software for printing. The software includes drivers, applications, and other support programs.
Make sure that the network setup for your printer is completed. All applications should be closed on your computer before beginning installation.
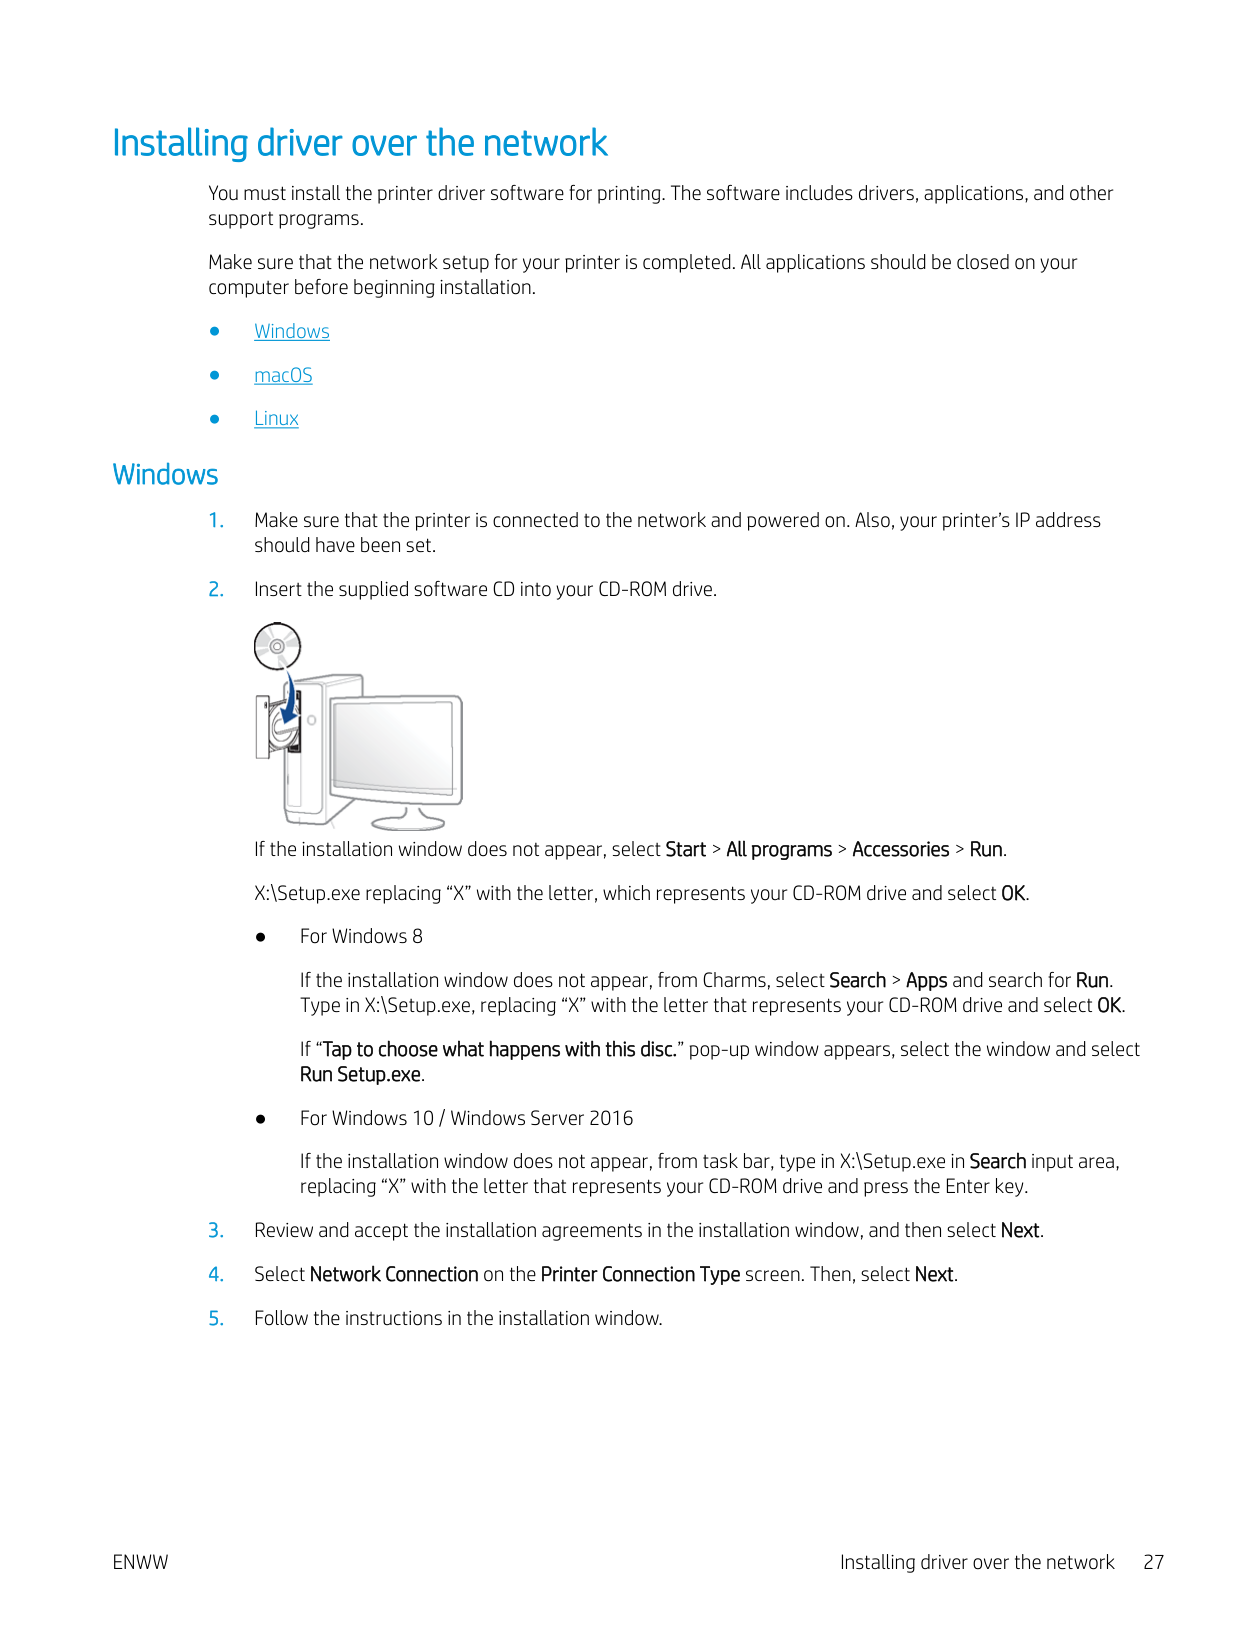
#### Windows

If the installation window does not appear, select Start > All programs > Accessories > Run. X:\Setup.exe replacing “X” with the letter, which represents your CD-ROM drive and select OK.
If the installation window does not appear, from Charms, select Search > Apps and search for Run. Type in X:\Setup.exe, replacing “X” with the letter that represents your CD-ROM drive and select OK.
If “Tap to choose what happens with this disc.” pop-up window appears, select the window and select Run Setup.exe.
If the installation window does not appear, from task bar, type in X:\Setup.exe in Search input area, replacing “X” with the letter that represents your CD-ROM drive and press the Enter key.
##### In Windows 8.1, 10
The V4 class driver is automatically installed from the operating system when your computer is connected to the network.

NOTE: You can print a Network Configuration Report from the printer’s control panel that will show the current printer’s host name.
| | |---|
| | |---|
#### macOS
| | |---|
#### Linux
You need to download Linux software packages from the HP Linux Imaging and Printing (HPLIP) website to install the printer software.
WebUI (embedded web server) This section gives you step-by-step instructions for setting up the network environment using WebUI. NOTE:
| | |---|
#### What is WebUI?
If you have connected your printer to a network and set up TCP/IP network parameters correctly, you can manage the printer via WebUI. Use WebUI to:
#### Required web browser
You need one of the following web browsers to use WebUI:
#### Connecting to WebUI
##### IPv4 supported web browser
| | |---|
##### IPv6 supported web browser
| | |---|
| | |---|
#### Logging into WebUI
Before configuring options in WebUI, you need to log-in as an administrator. You can still use WebUI without logging in, but you will not have access to or view the Settings tab and the Security tab.
| | |---|
#### Information tab
This tab gives you general information about your printer. You can check things, such as the printer’s status, supplies’ status, count information, network information, and more. You can also print reports, such as configuration page.
#### Address book tab
You can manage the address book. This feature is also available from the printer (see "Setting up an address book from the control panel").
#### Settings tab
Settings tab has sub menus, Machine Settings and Network Settings. You cannot view or access this tab if you do not log-in as an administrator (see "Logging into WebUI”).
#### Security tab
The security tab has System Security, Network Security, User Access Control and System Log. You cannot access this tab if you do not log-in as an administrator (see "Logging into WebUI).
##### ● System Security: From the WebUI, select the Security tab > System Security.

##### ● Network Security: From the WebUI, select the Security tab > Network Security.
○ IPv4 Filtering: You can enable/disable IPv4 filtering as well as manage filtering rules. ○ IPv6 Filtering: You can enable/disable IPv6 filtering as well as manage filtering rules. ○ MAC Filtering: You can enable/disable Mac filtering as well as manage filtering rules.
###### ● User Access Control: You can restrict users from accessing the printer or application. You can also givespecific permission for user to only use certain feature of the printer. For example, you can allow user A toonly use print feature. In this case, user A will not be able to scan, copy or fax with the printer.

#### Maintenance tab
This tab allows you to maintain your printer by upgrading firmware, managing applications, and setting contact information for sending emails. You can also connect to the HP website or download manuals and drivers by selecting the Link menu.
Additional network-connected tasks For more information go to support.hp.com Instructions are available for performing specific scan task, such as the following:
● Wireless network setup (optional accessory required)
Additional network-connected tasks
Go to support.hp.com. Instructions are available for performing specific copy tasks, such as the following:
● Setting IP address
ENWW Additional network-connected tasks 35
3 Media and tray
Loading originals
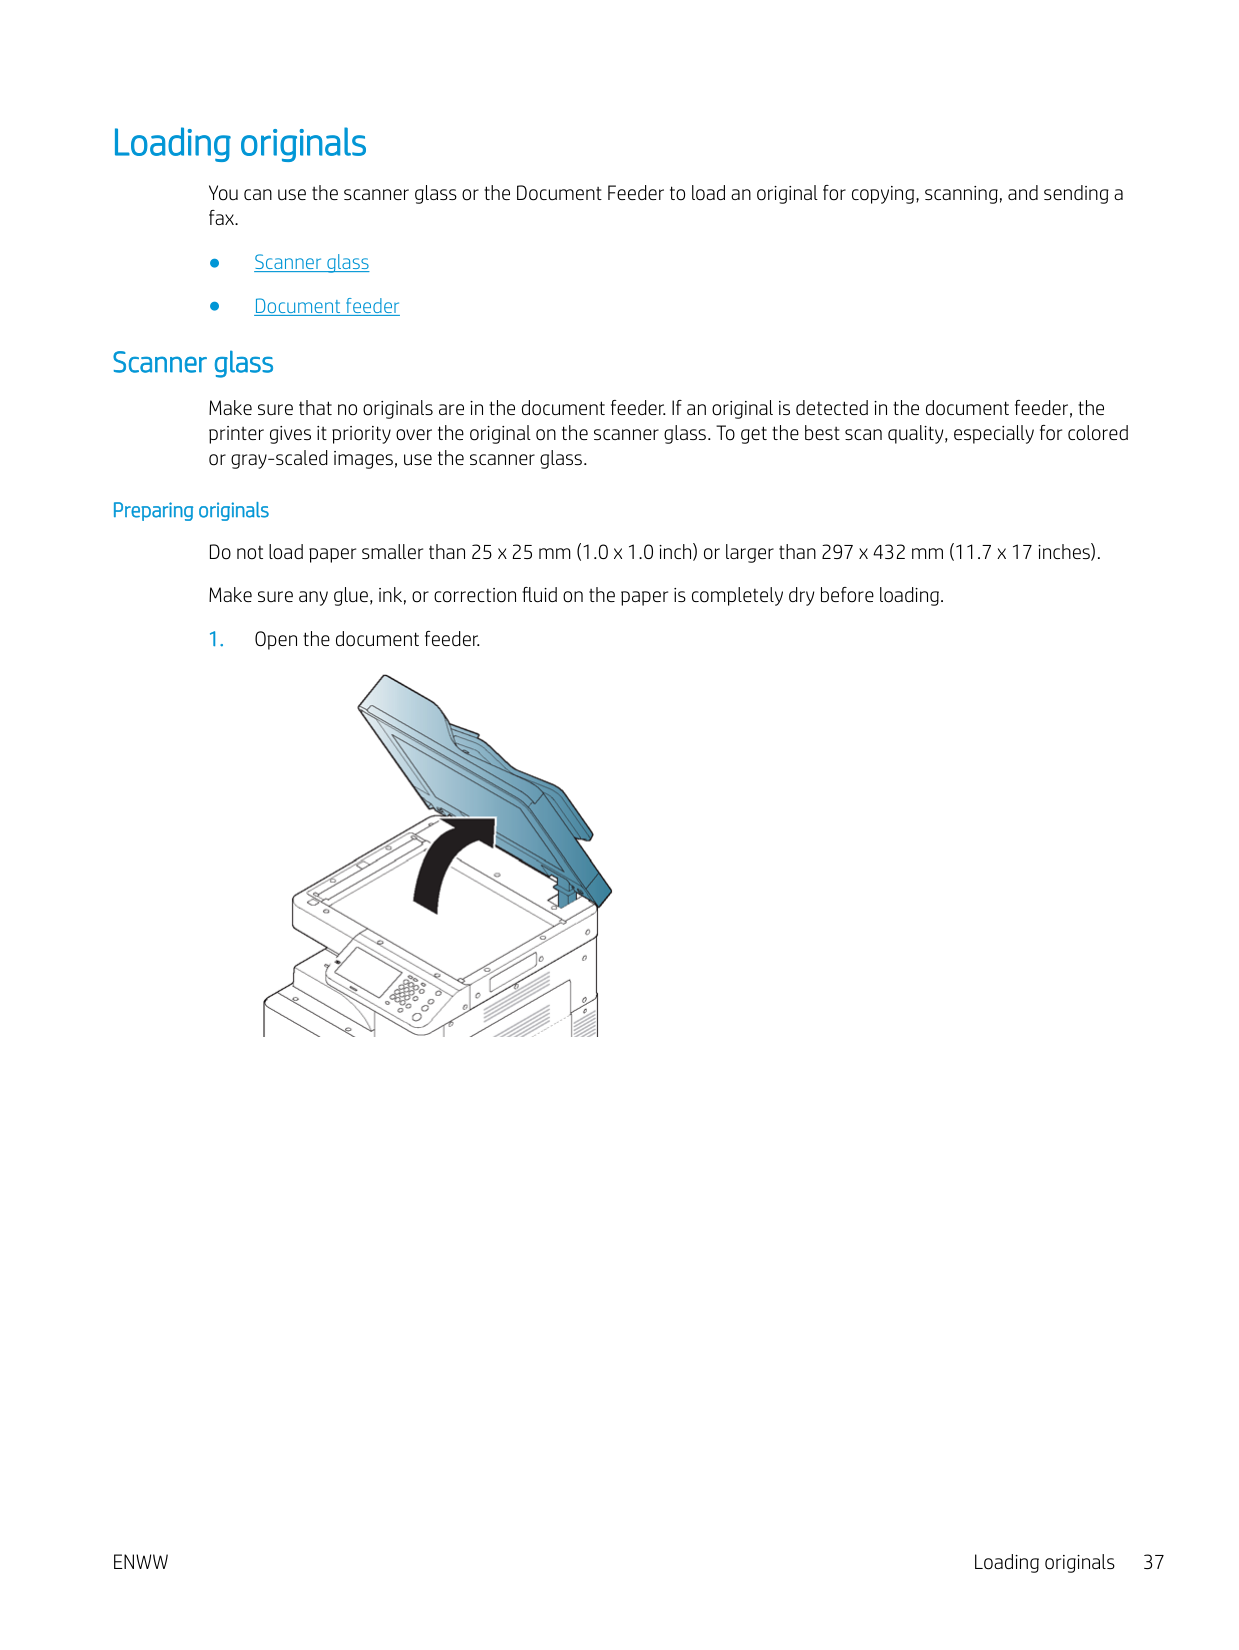
You can use the scanner glass or the Document Feeder to load an original for copying, scanning, and sending a fax.
#### Scanner glass
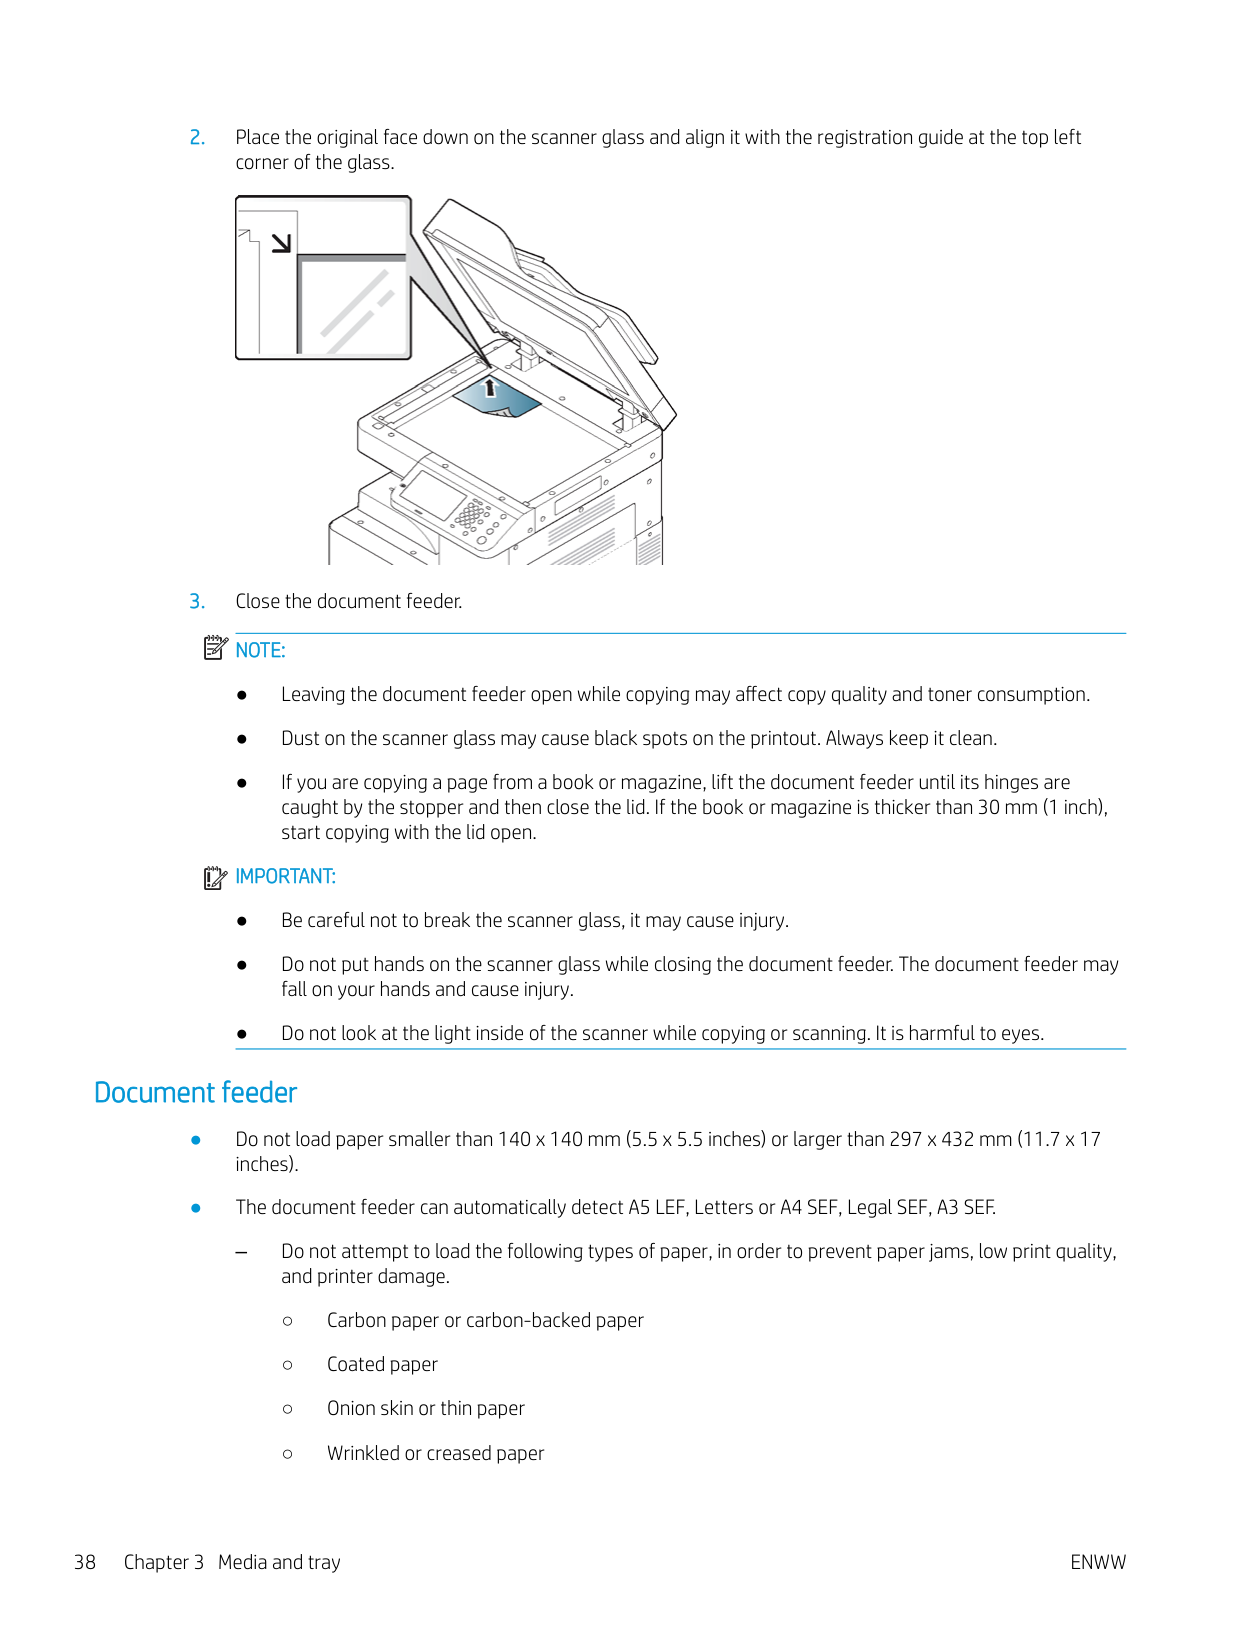
Make sure that no originals are in the document feeder. If an original is detected in the document feeder, the printer gives it priority over the original on the scanner glass. To get the best scan quality, especially for colored or gray-scaled images, use the scanner glass.
Preparing originals Do not load paper smaller than 25 x 25 mm (1.0 x 1.0 inch) or larger than 297 x 432 mm (11.7 x 17 inches). Make sure any glue, ink, or correction fluid on the paper is completely dry before loading.


| | |---|
| | |---|
##### IMPORTANT:
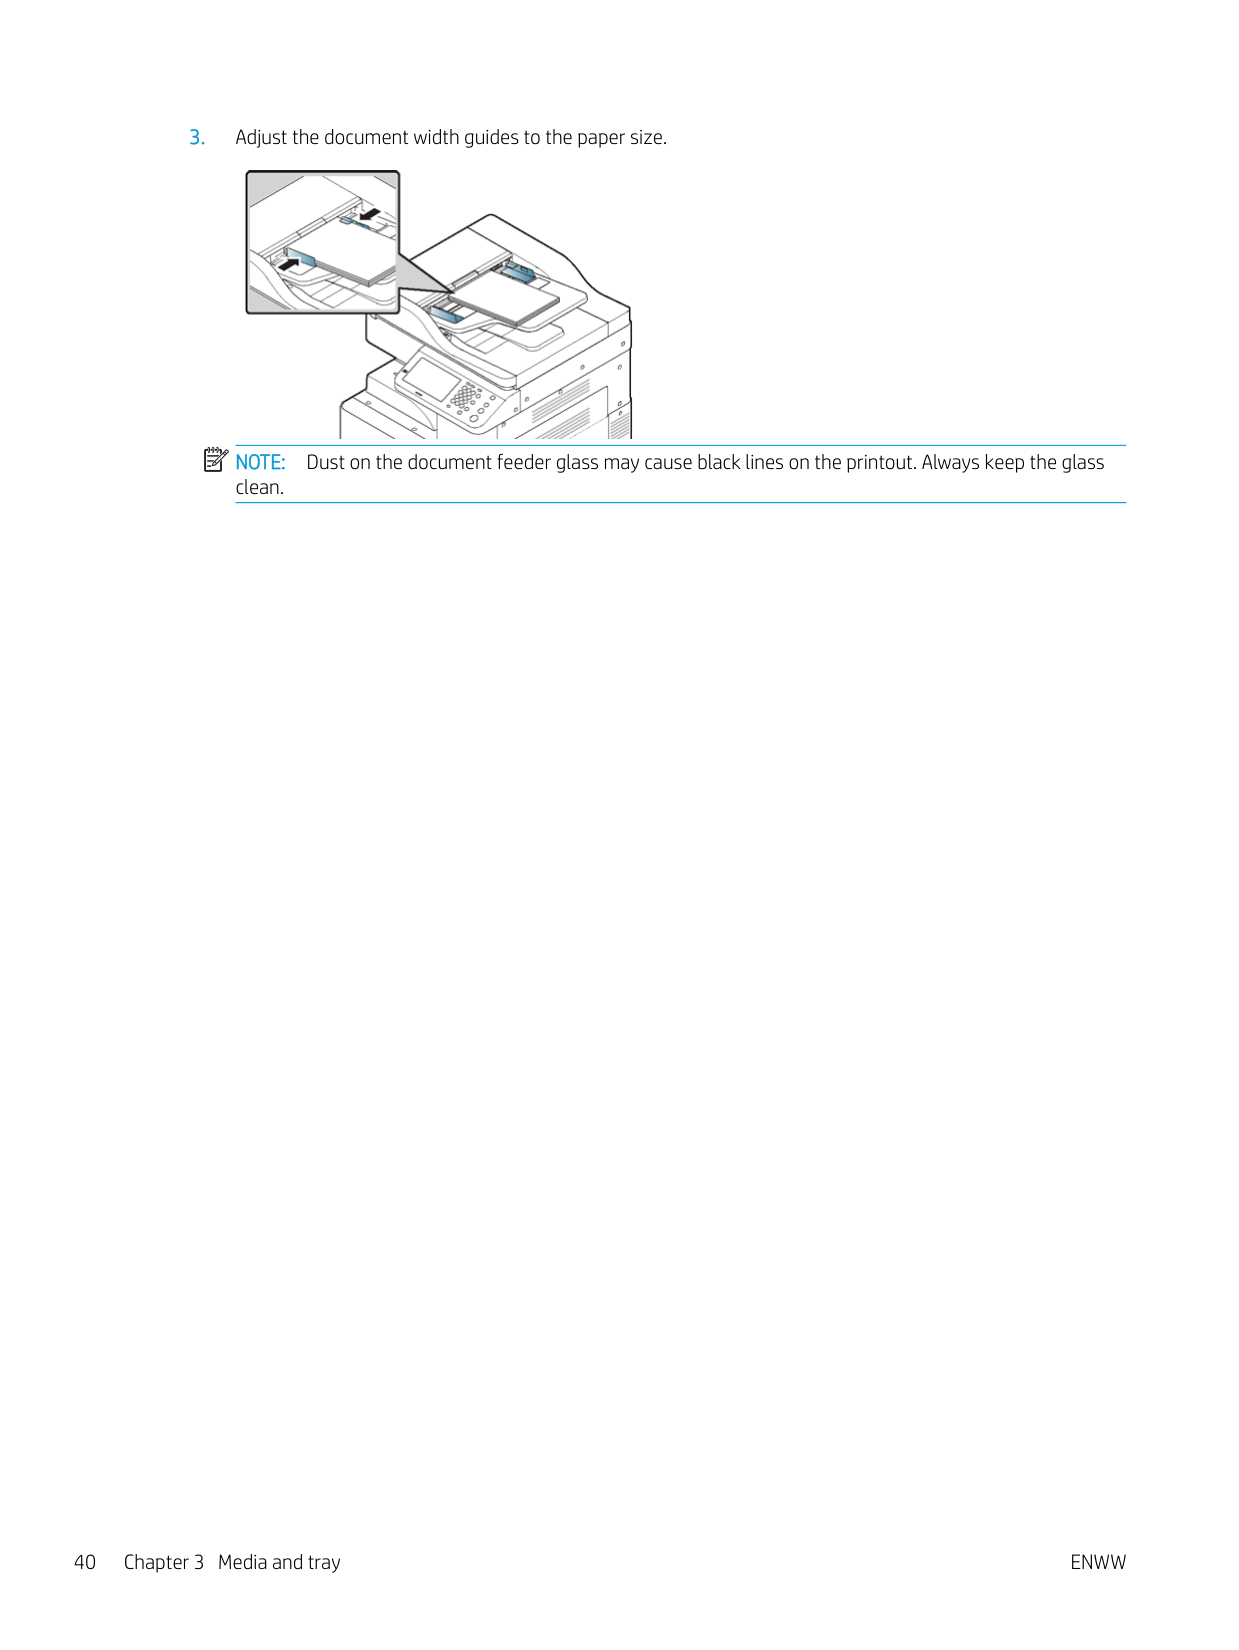
#### Document feeder
– Do not attempt to load the following types of paper, in order to prevent paper jams, low print quality,
and printer damage.

##### Preparing originals
Using the document feeder, you can load up to 100 sheets of paper (80 g/m2, 20 lb. bond) for one job.

| | |---|

NOTE: Do not overload the tray: it may cause original jams. Make sure that the paper is below the maximum paper capacity indicator inside the tray.

1 Paper capacity indicator
| | |---|

NOTE: Dust on the document feeder glass may cause black lines on the printout. Always keep the glass clean.
Selecting print media
You can print on a variety of print media, such as plain paper, envelopes and labels. Always use print media that meet the guidelines for use with your printer.
● Guidelines to select print media
#### Guidelines to select print media
Print media that does not meet the guidelines outlined in this user’s guide may cause the following problems:
Properties, such as weight, composition, grain, and moisture content, are important factors that affect the printer’s performance and the output quality. When you choose print materials, consider the following:
| | |---|
NOTE: Some print media may meet all of the guidelines in this user’s guide and still not produce satisfactory results. This may be the result of the sheets characteristics, improper handling, unacceptable temperature and humidity levels, or other variables over which cannot be controlled.
Before purchasing large quantities of print media, ensure that it meets the requirements specified in this user’s guide.
CAUTION: Using print media that does not meet these specifications may cause problems or require repairs. Such repairs are not covered by HP’s warranty or service agreements. The amount of paper put into the tray may differ according to media type used (see "Print media specifications"). Make sure not to use the inkjet photo paper with this printer. It could cause damage to the printer. Use designated print media (see "Print media specifications"). WARNING! The use of inflammable media or foreign materials left in the printer may lead to overheating of the unit and equipment damage. The amount of paper put into the tray may differ according to media type used (see "Print media specifications").
ENWW Selecting print media 41
Loading paper in the tray
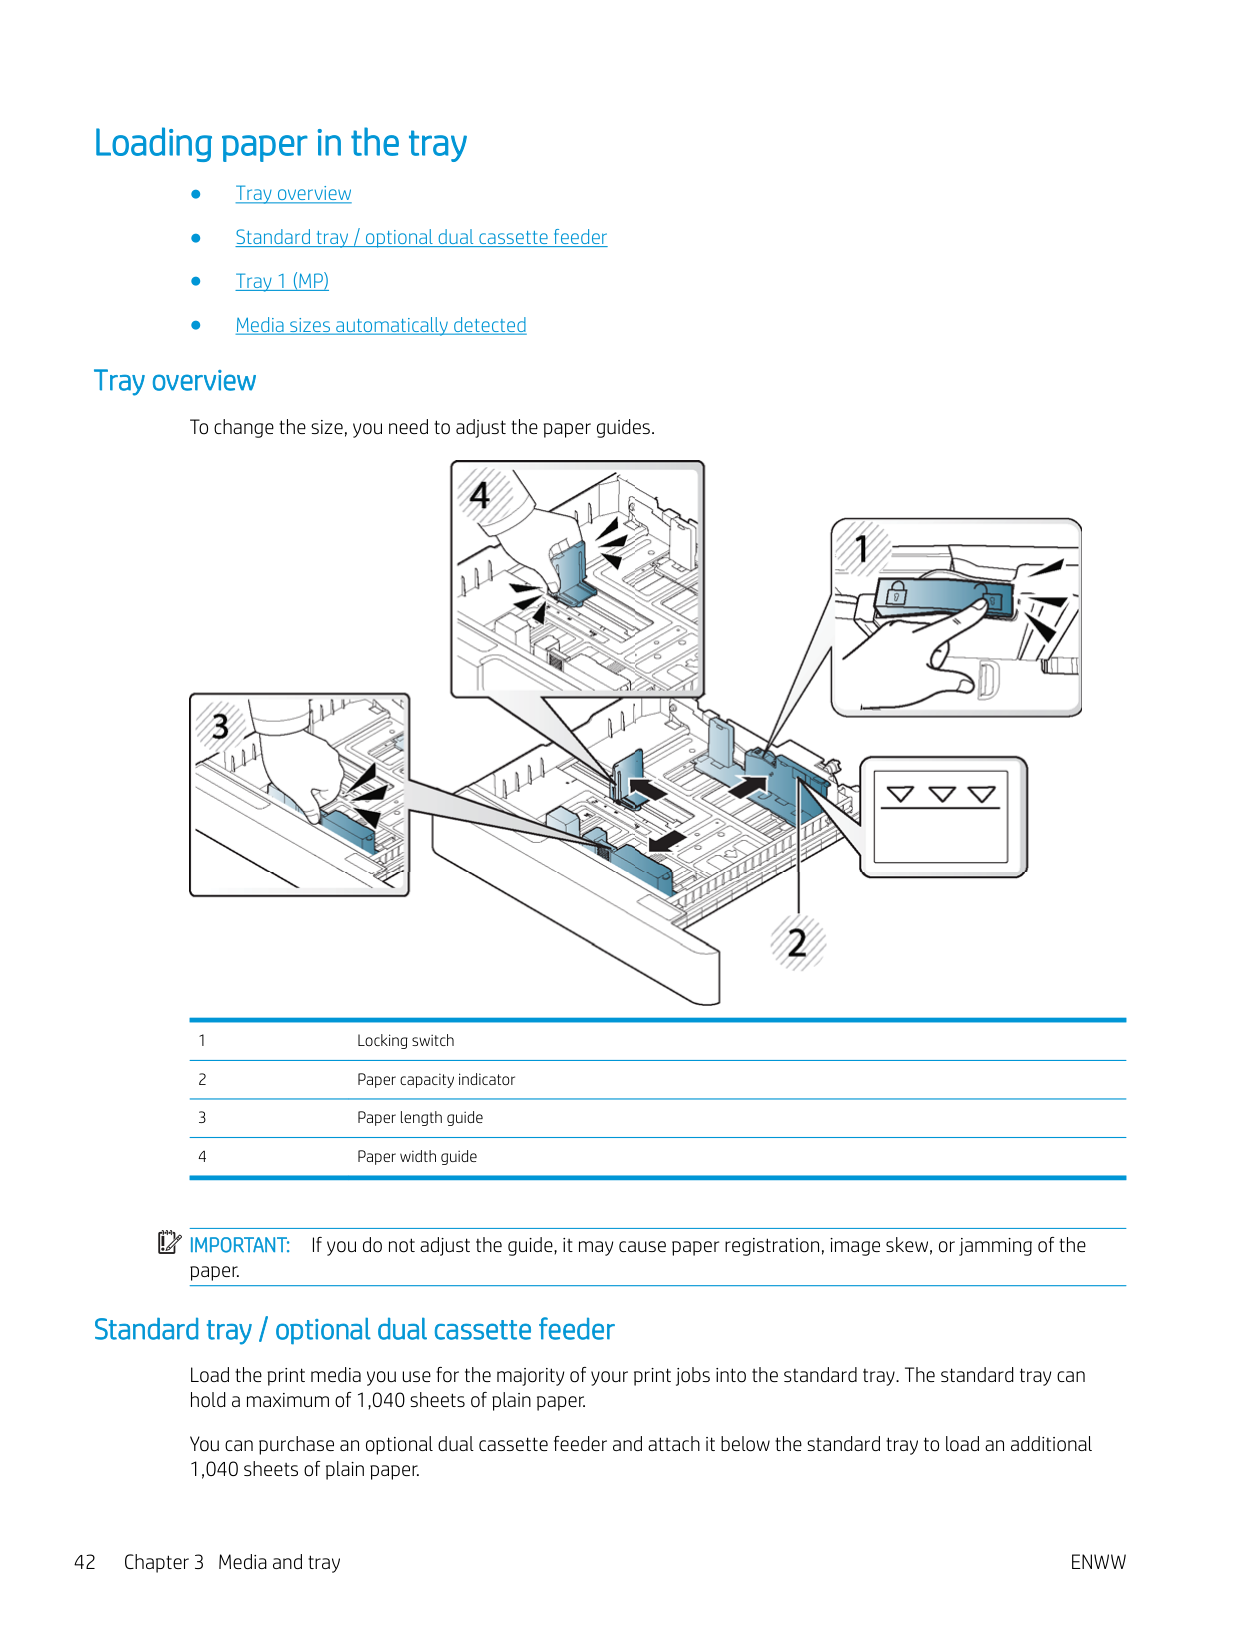
#### Tray overview
To change the size, you need to adjust the paper guides.


| | |---|
IMPORTANT: If you do not adjust the guide, it may cause paper registration, image skew, or jamming of the paper.
#### Standard tray / optional dual cassette feeder
Load the print media you use for the majority of your print jobs into the standard tray. The standard tray can hold a maximum of 1,040 sheets of plain paper.
You can purchase an optional dual cassette feeder and attach it below the standard tray to load an additional 1,040 sheets of plain paper.
| | |---|
| | |---|
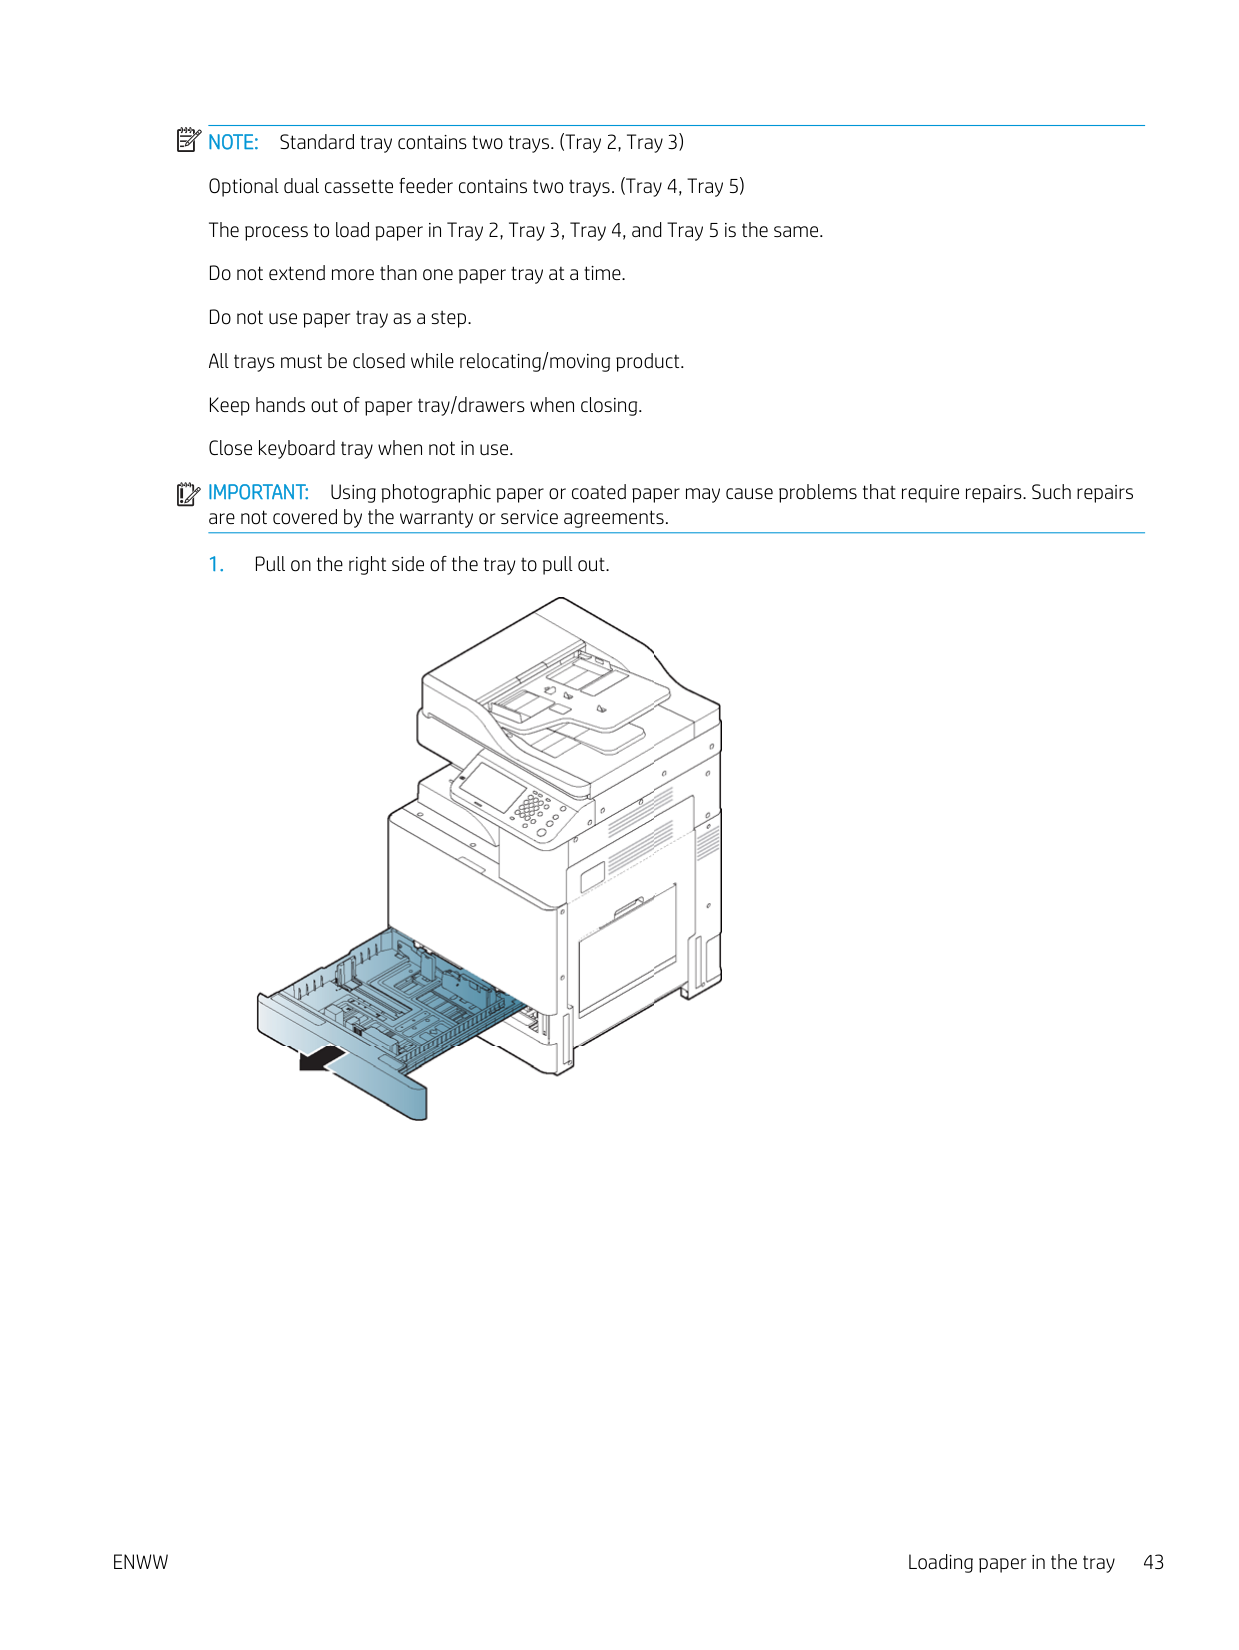
NOTE: Standard tray contains two trays. (Tray 2, Tray 3) Optional dual cassette feeder contains two trays. (Tray 4, Tray 5) The process to load paper in Tray 2, Tray 3, Tray 4, and Tray 5 is the same. Do not extend more than one paper tray at a time. Do not use paper tray as a step. All trays must be closed while relocating/moving product. Keep hands out of paper tray/drawers when closing. Close keyboard tray when not in use. IMPORTANT: Using photographic paper or coated paper may cause problems that require repairs. Such repairs are not covered by the warranty or service agreements.


###### 2. Squeeze the paper length guide, and pull it to the end of the tray.


1 Paper length guide
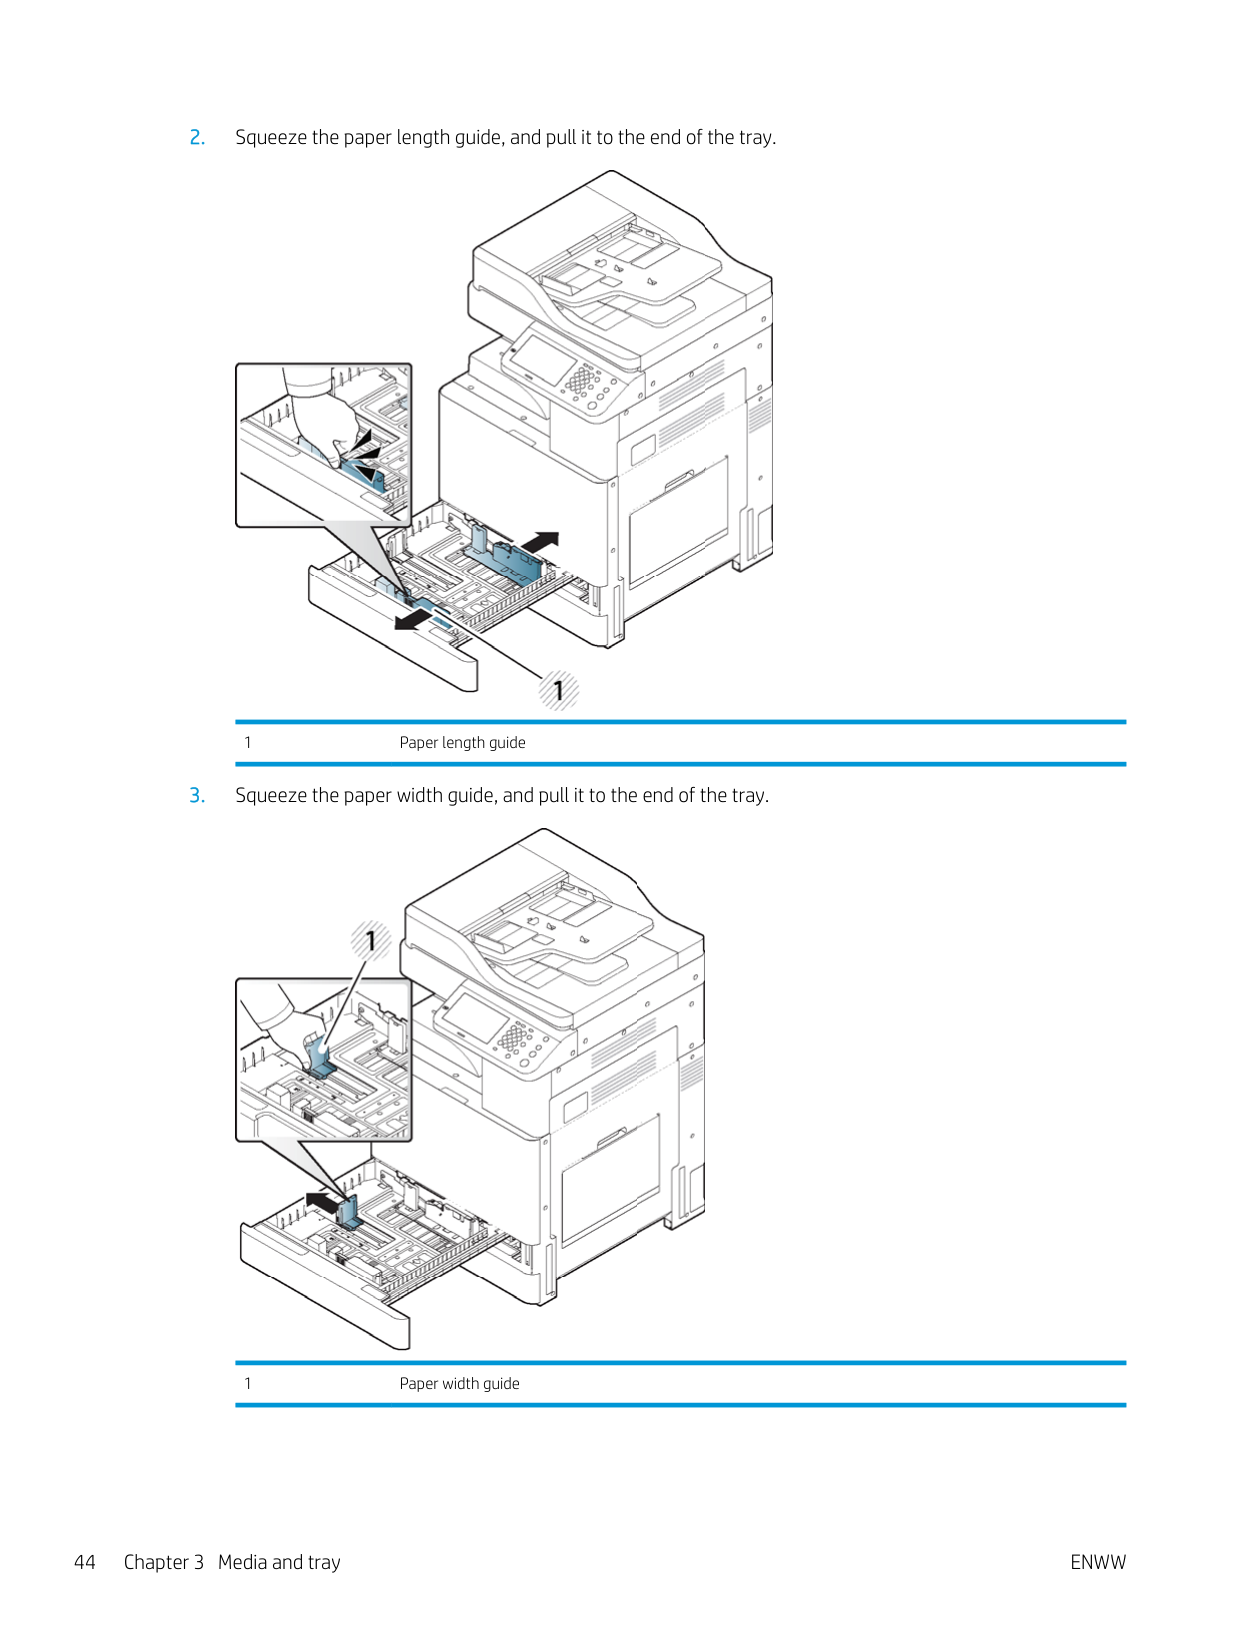
###### 3. Squeeze the paper width guide, and pull it to the end of the tray.


1 Paper width guide
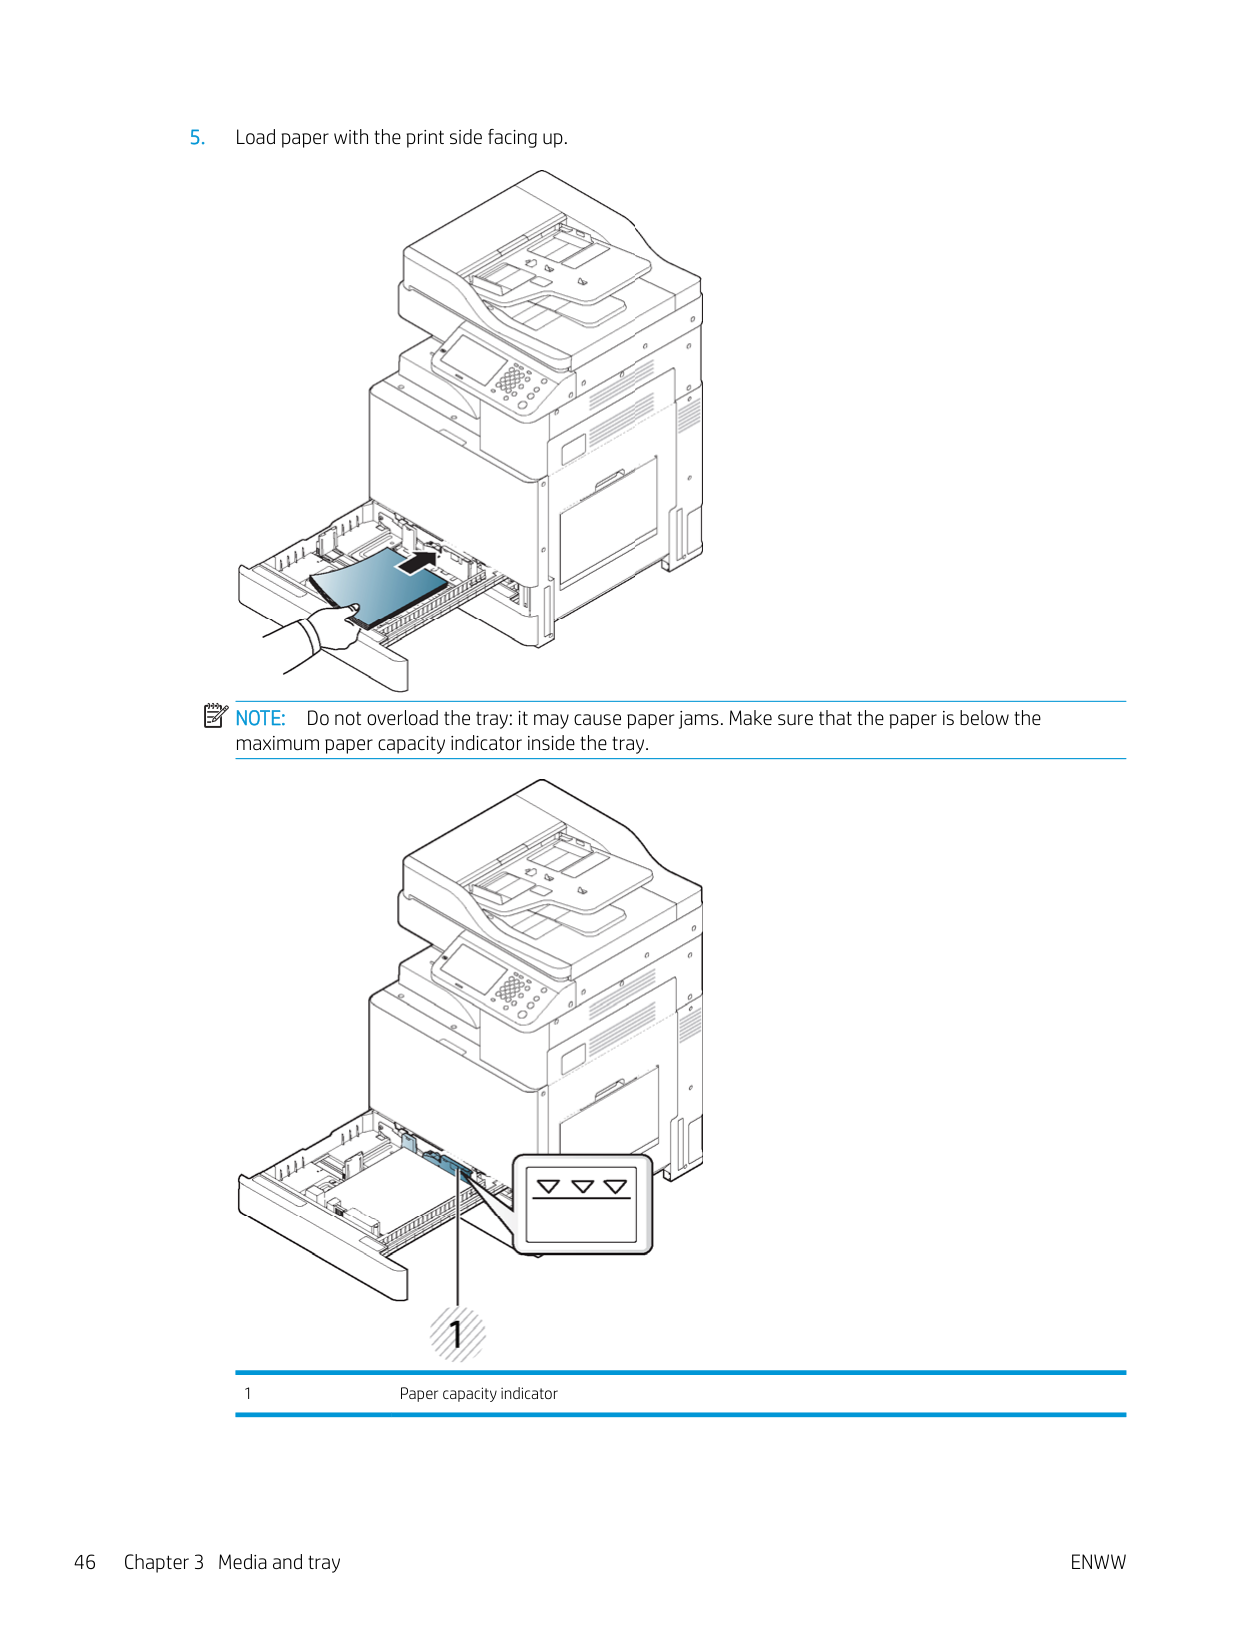
###### 4. Flex and fan the edge of the paper stack to separate the pages before loading papers.

| | |---|


NOTE: Do not overload the tray: it may cause paper jams. Make sure that the paper is below the maximum paper capacity indicator inside the tray.


1 Paper capacity indicator
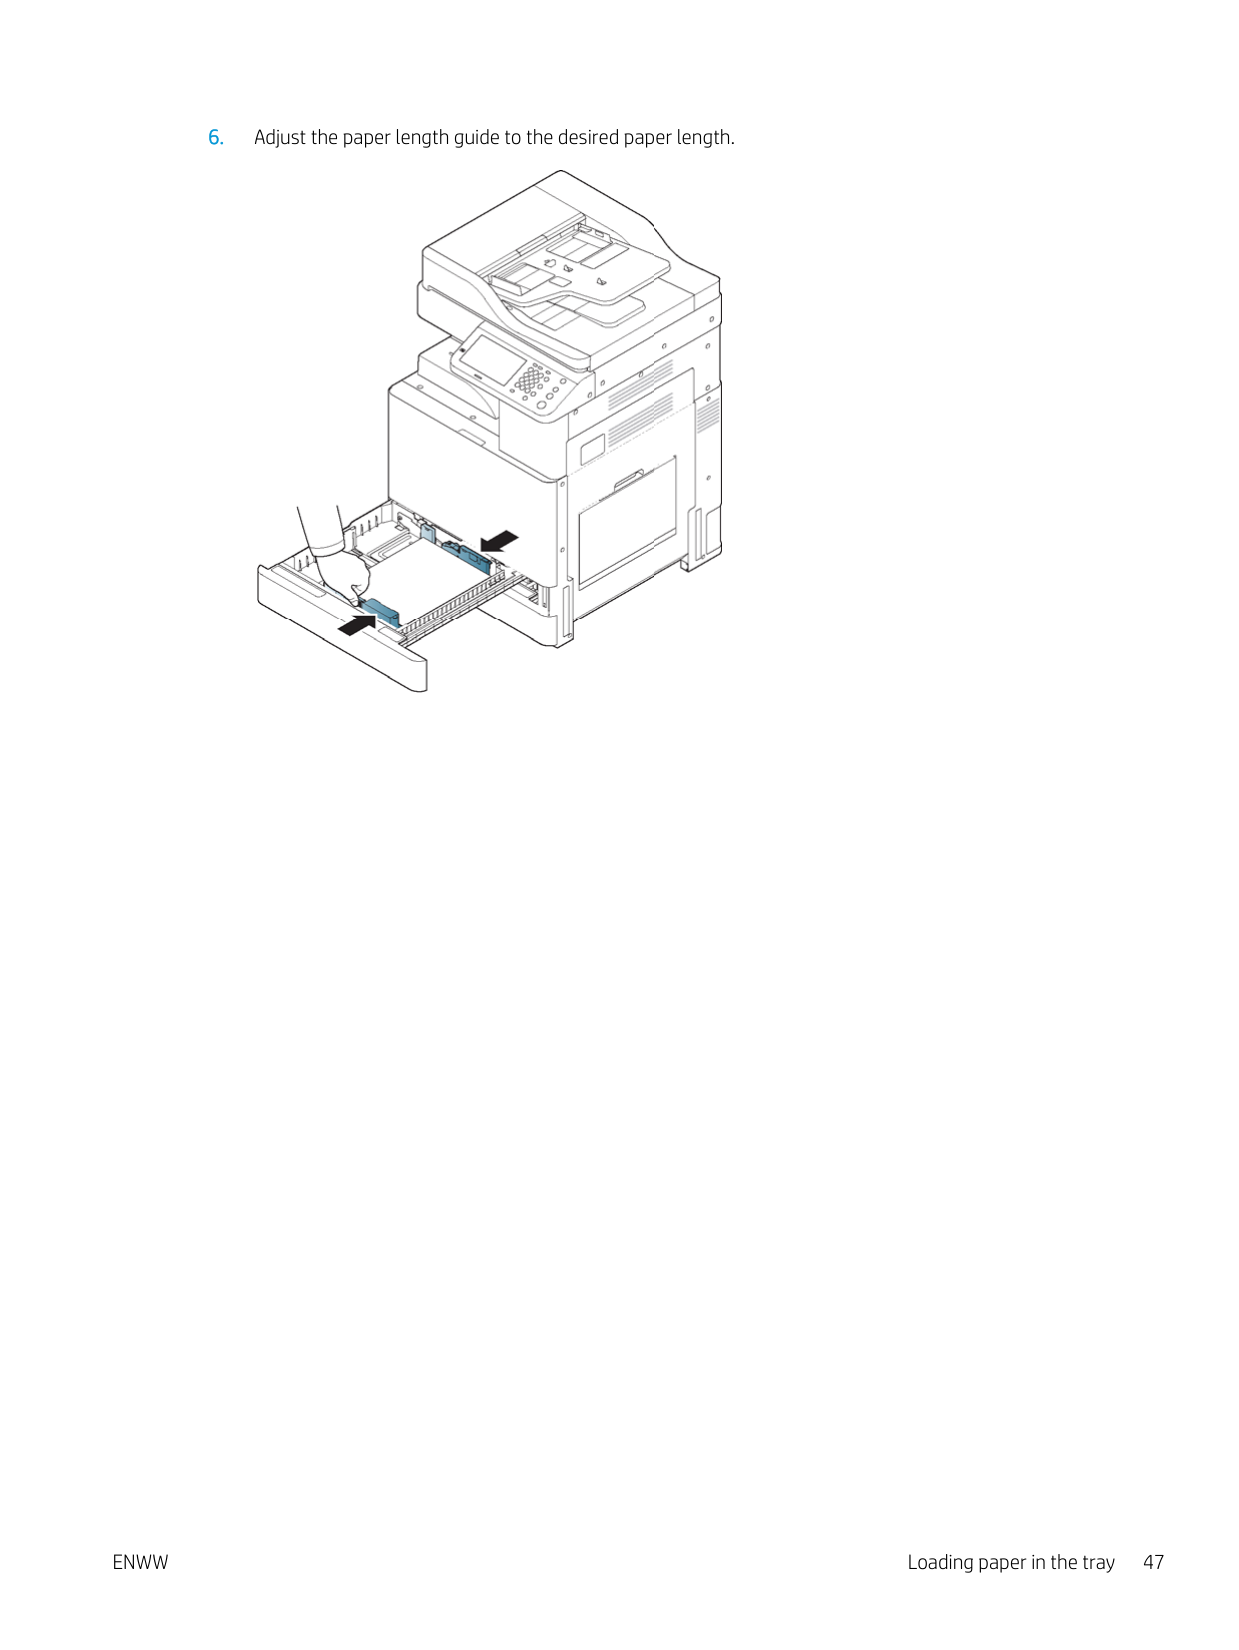
###### 6. Adjust the paper length guide to the desired paper length.


| | |---|


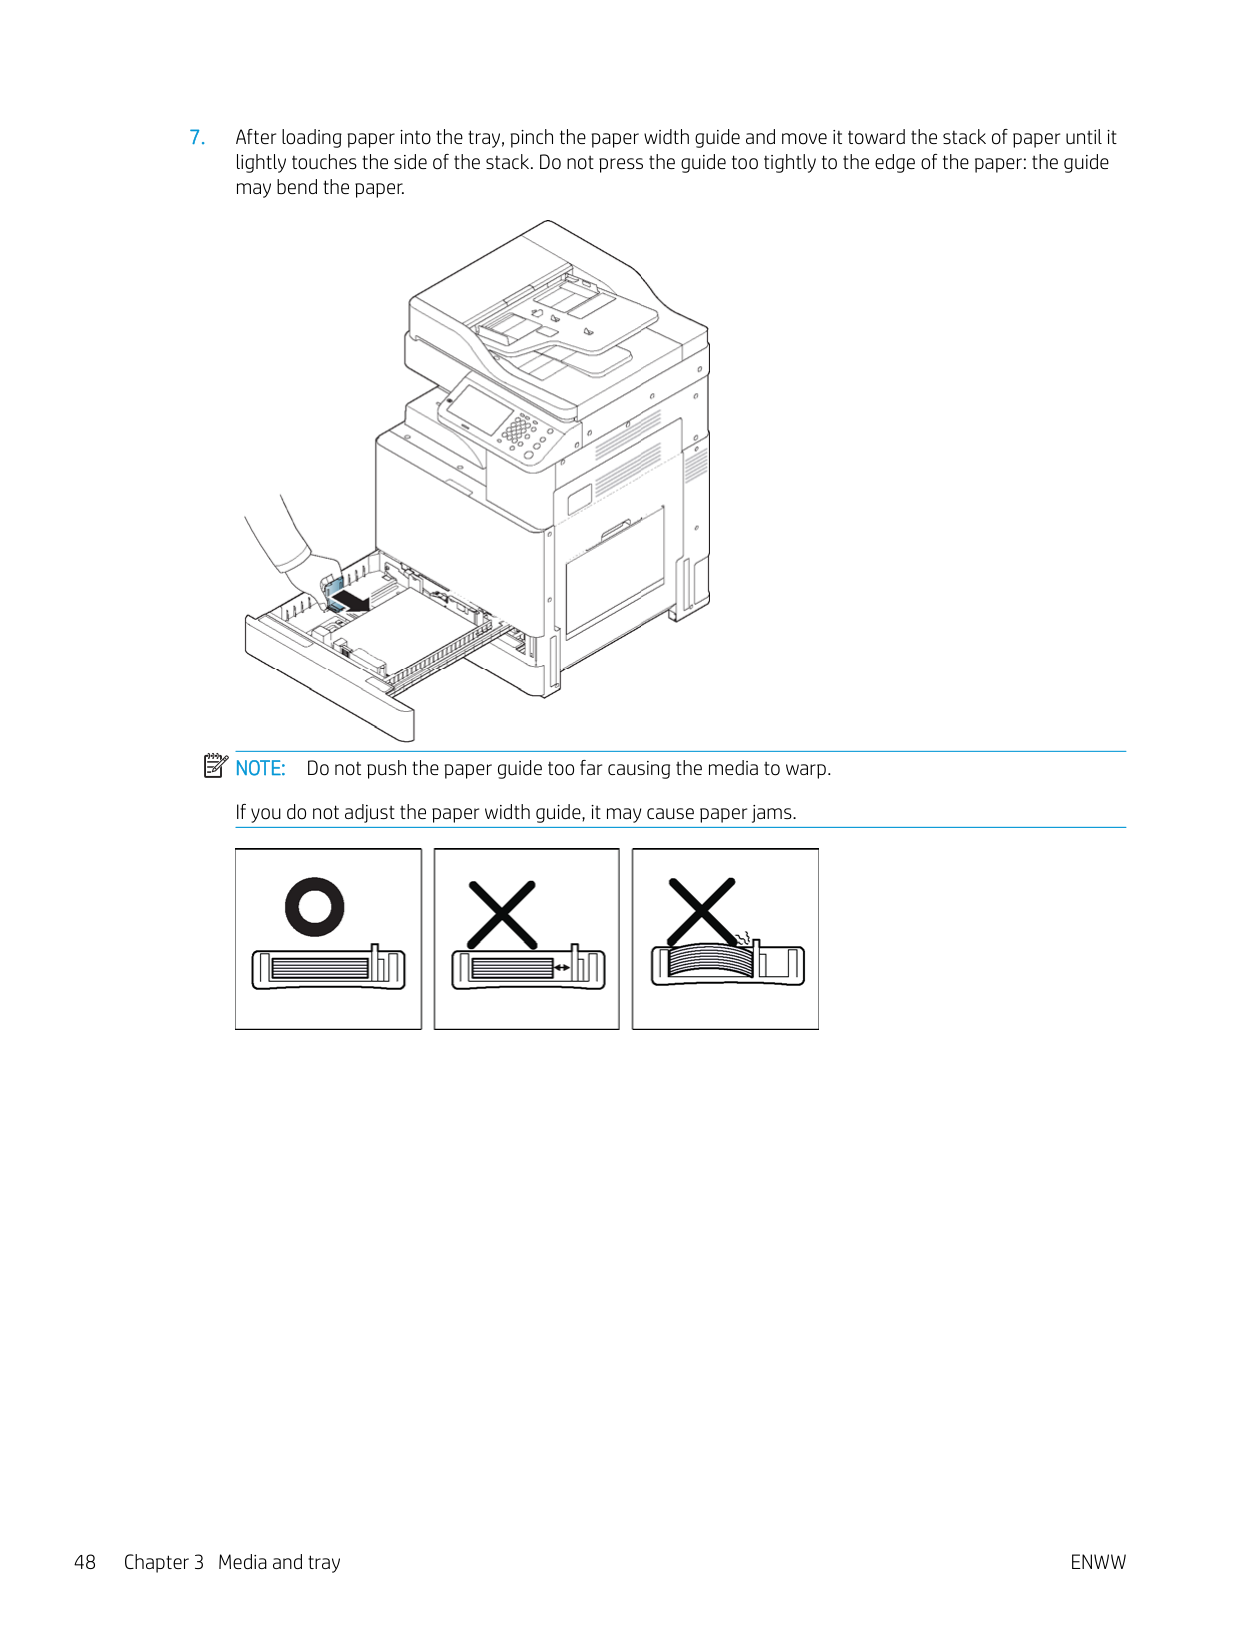
NOTE: Do not push the paper guide too far causing the media to warp. If you do not adjust the paper width guide, it may cause paper jams.


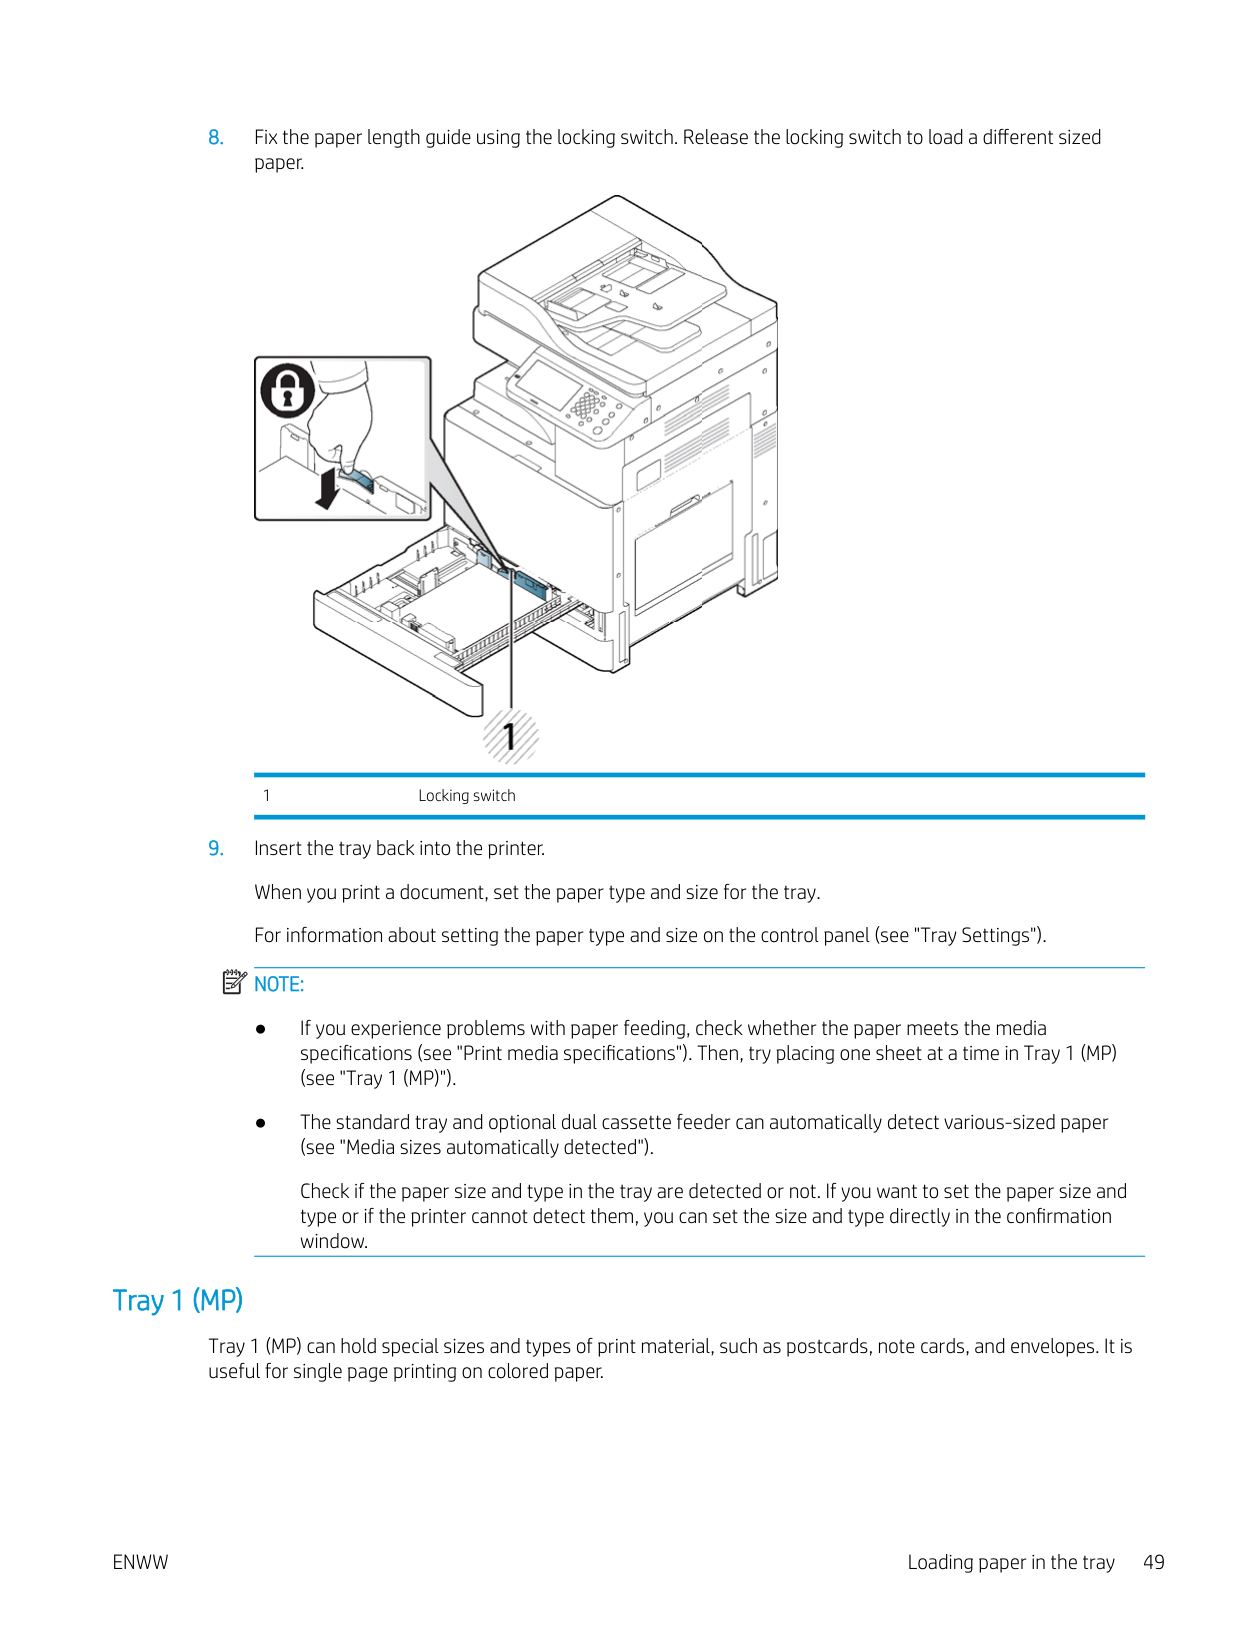
1 Locking switch
| | |---|
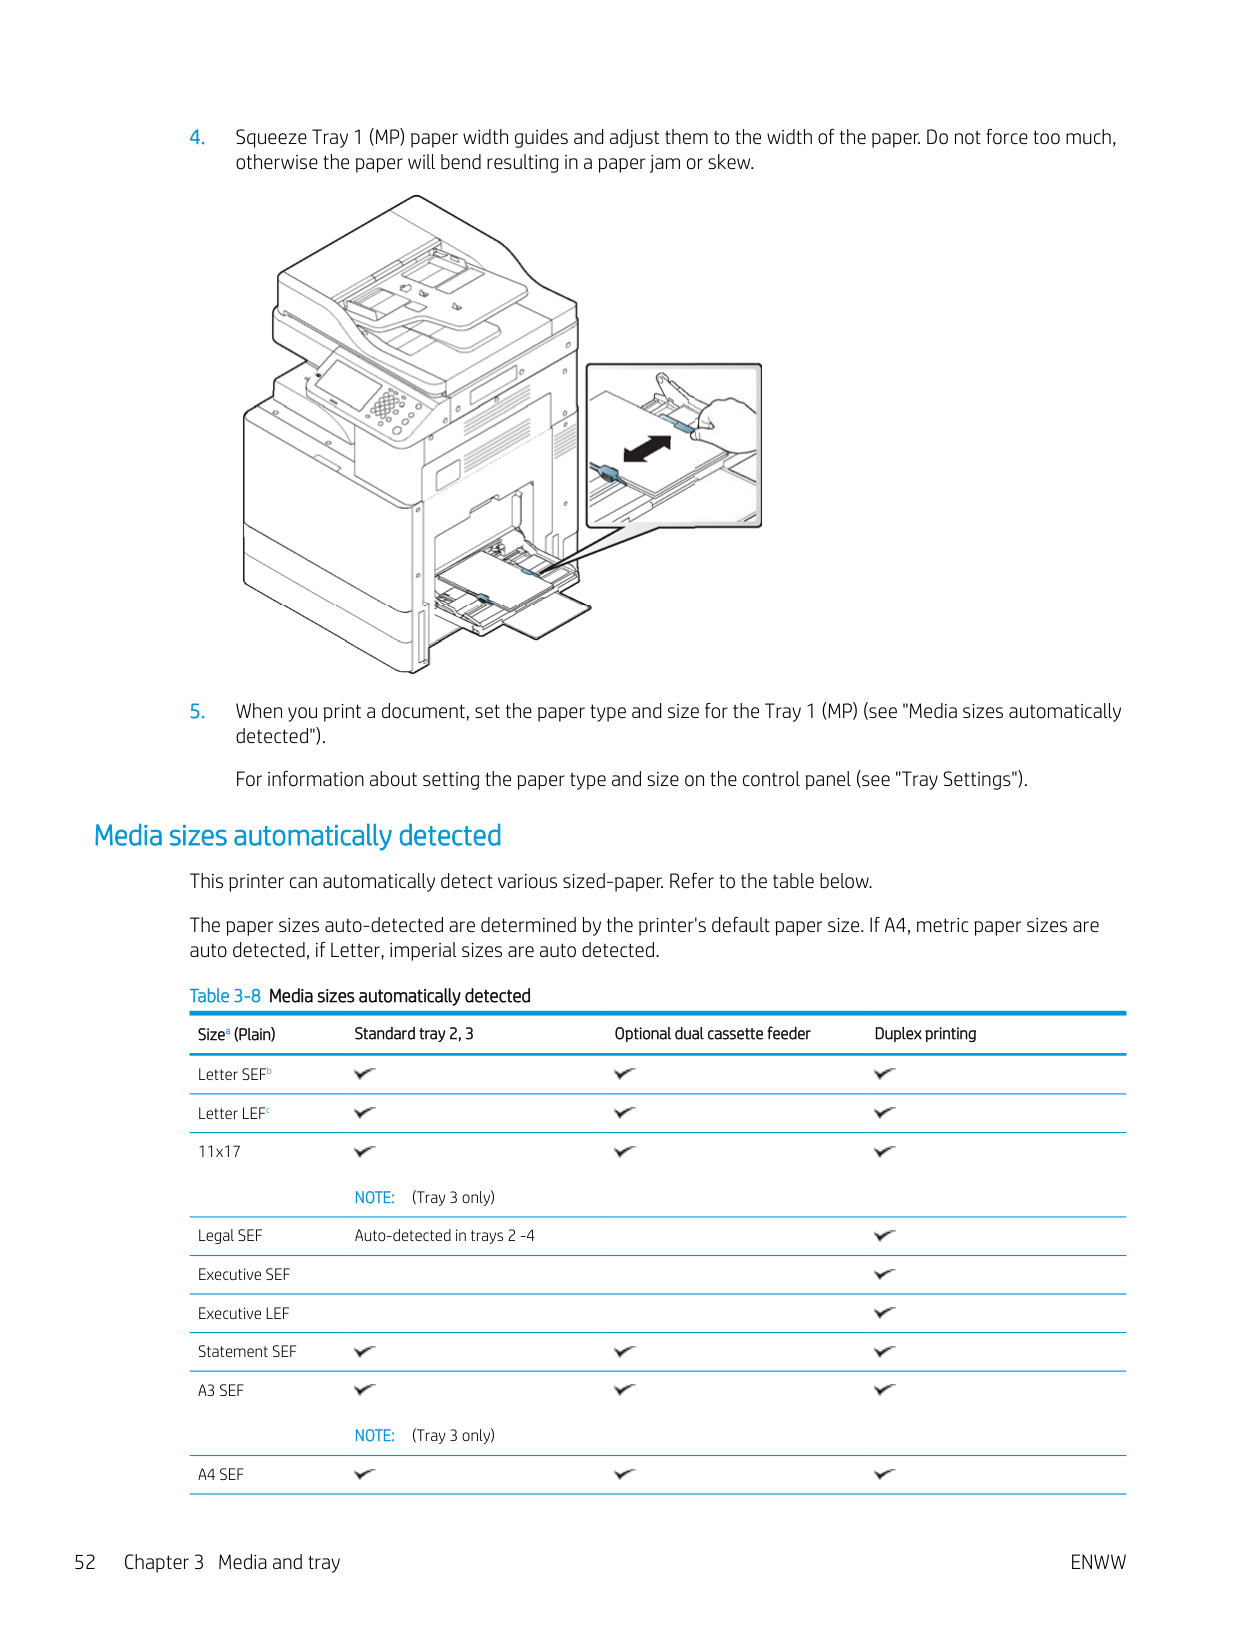
Check if the paper size and type in the tray are detected or not. If you want to set the paper size and type or if the printer cannot detect them, you can set the size and type directly in the confirmation window.
#### Tray 1 (MP)
Tray 1 (MP) can hold special sizes and types of print material, such as postcards, note cards, and envelopes. It is useful for single page printing on colored paper.
##### Tips on using Tray 1 (MP)


| | |---|

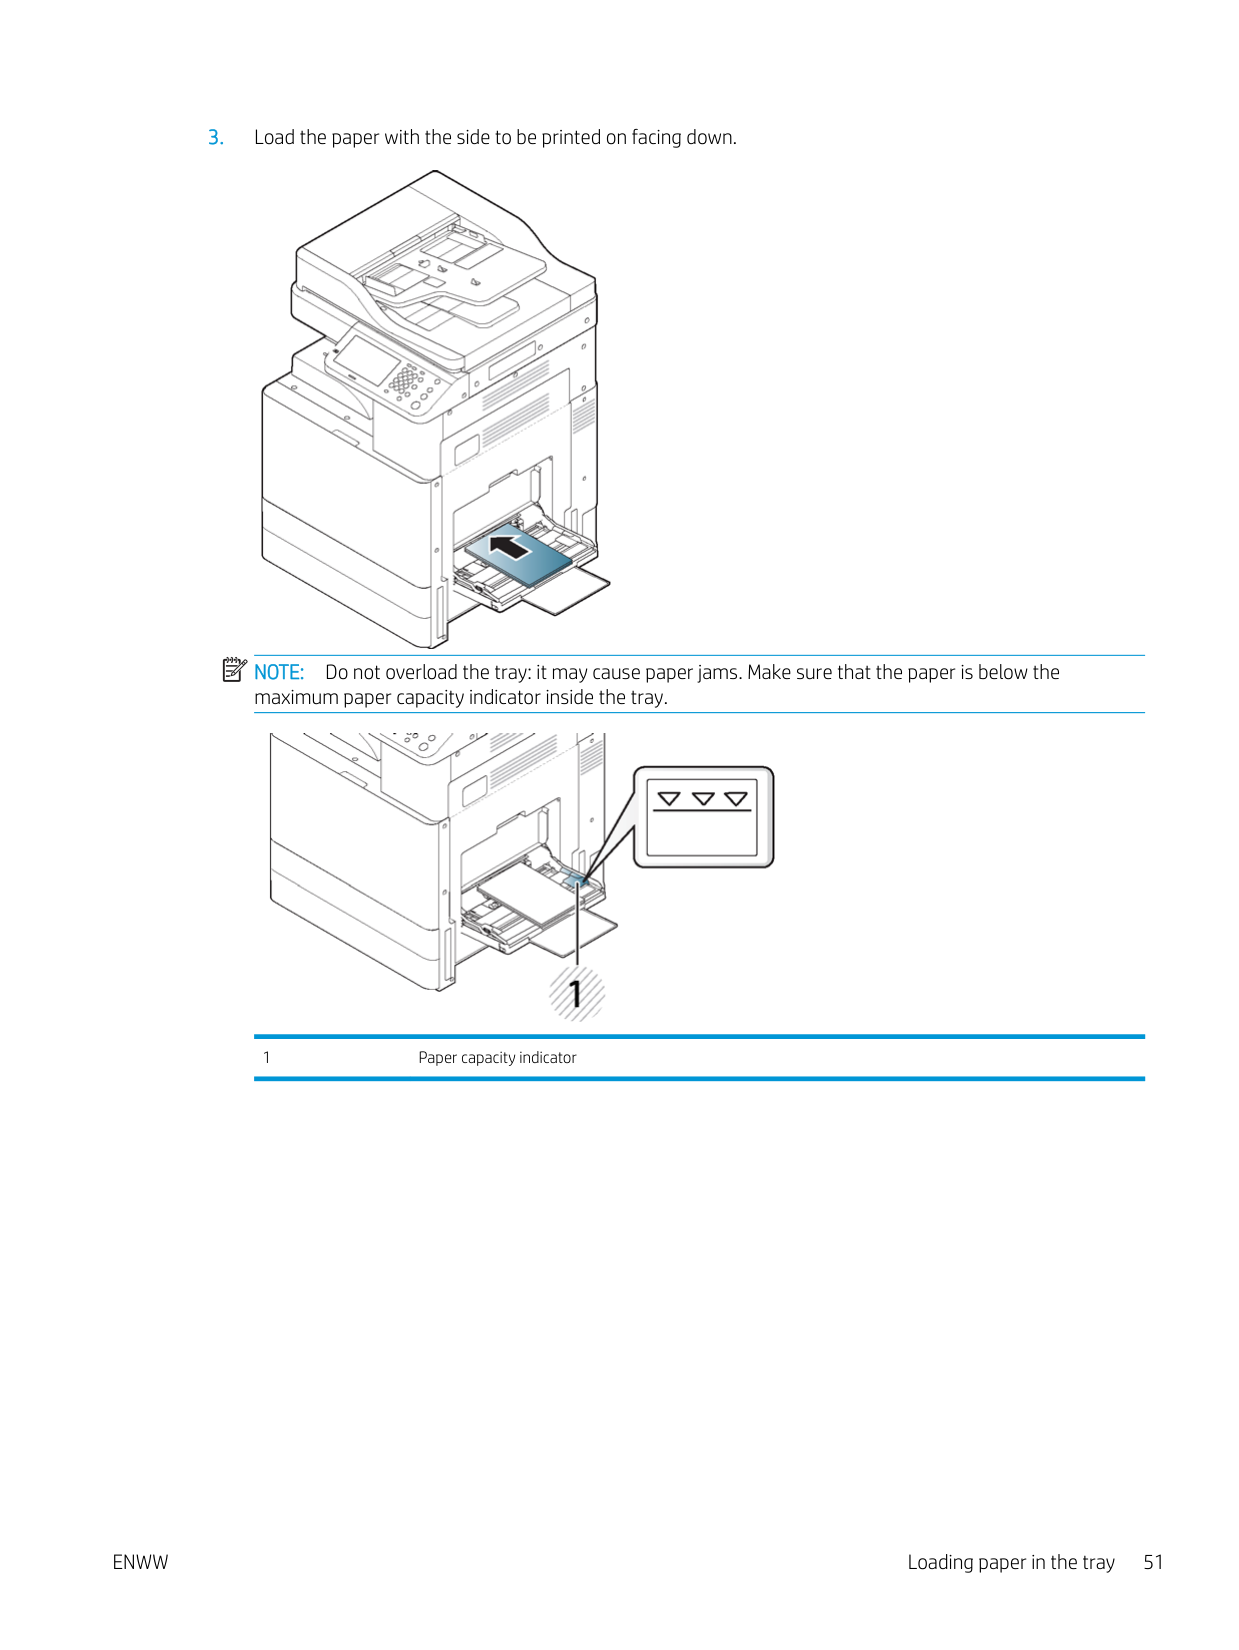
NOTE: Do not overload the tray: it may cause paper jams. Make sure that the paper is below the maximum paper capacity indicator inside the tray.

1 Paper capacity indicator


Media sizes automatically detected This printer can automatically detect various sized-paper. Refer to the table below. The paper sizes auto-detected are determined by the printer's default paper size. If A4, metric paper sizes are auto detected, if Letter, imperial sizes are auto detected. Table 3-8 Media sizes automatically detected
Sizea (Plain) Standard tray 2, 3 Optional dual cassette feeder Duplex printing
Letter SEFb Letter LEFc 11x17


NOTE: (Tray 3 only) Legal SEF Auto-detected in trays 2 -4 Executive SEF Executive LEF Statement SEF


NOTE: (Tray 3 only)


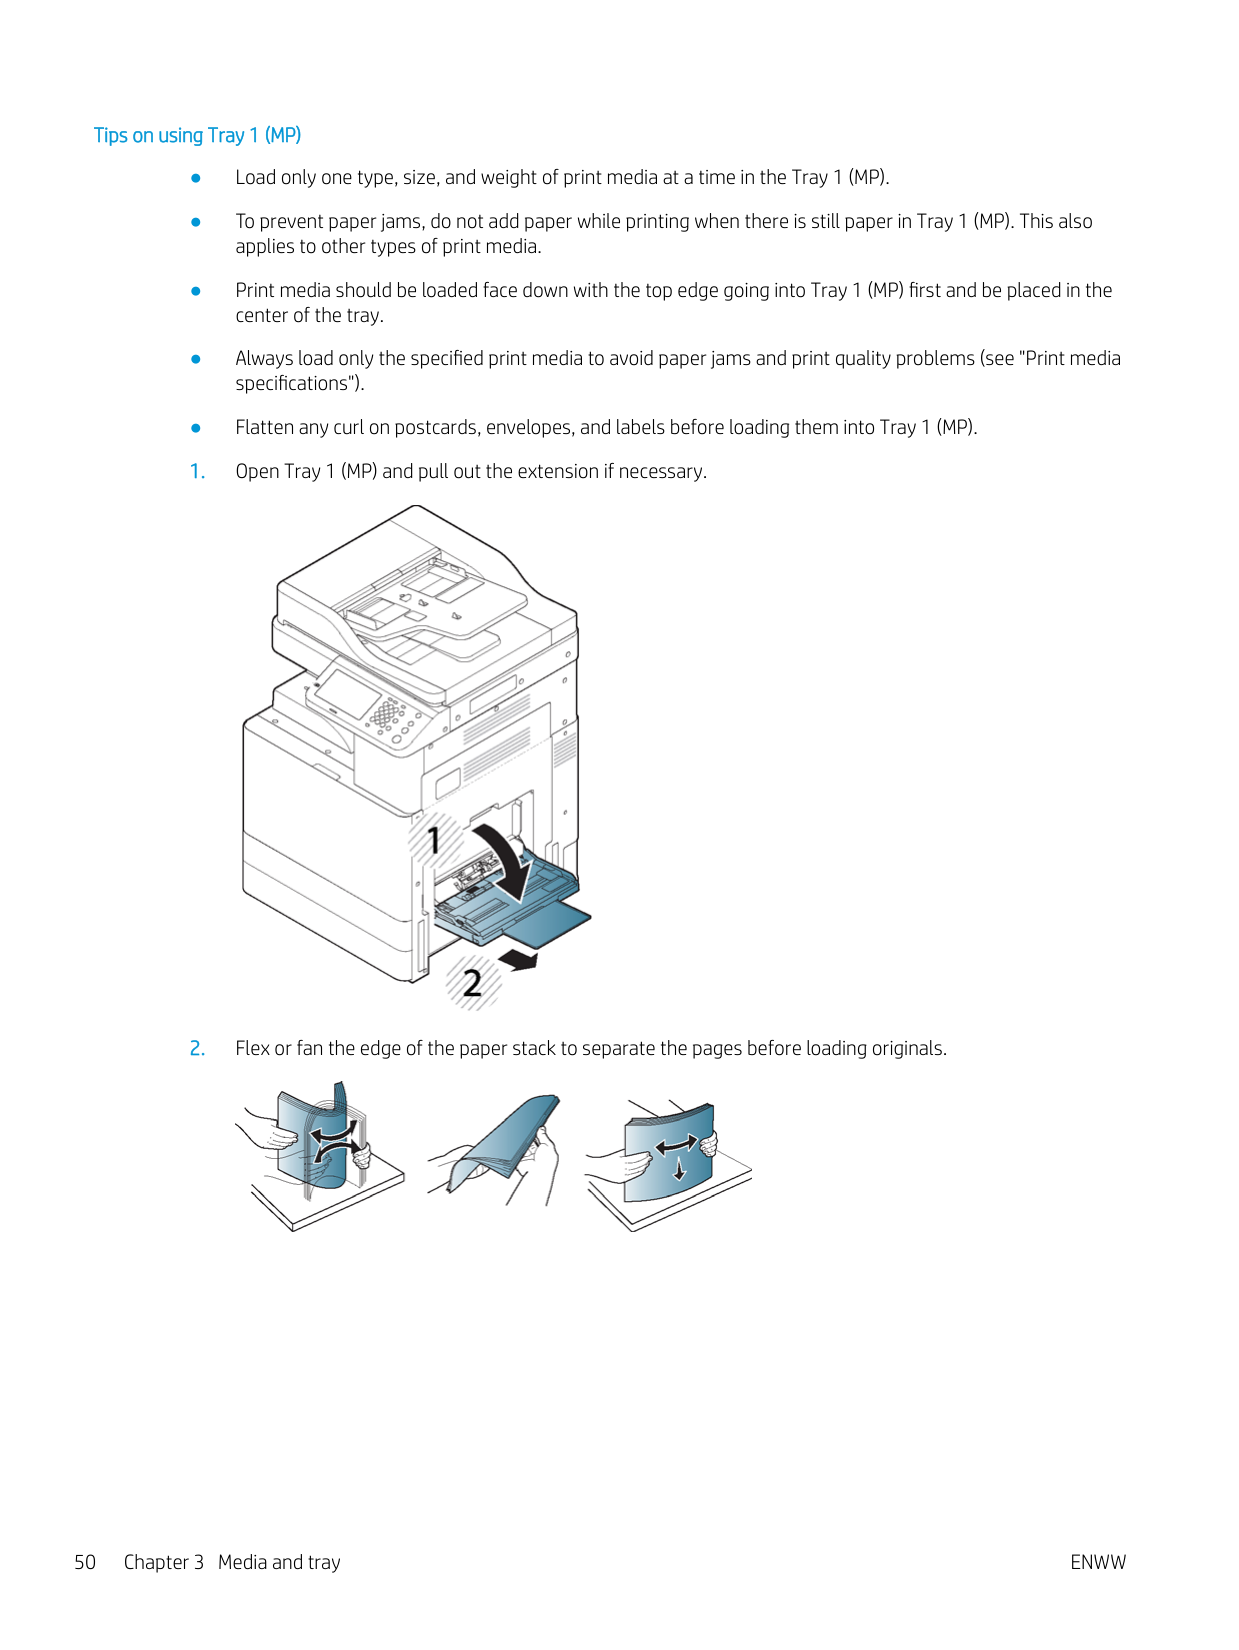


Table 3-8 Media sizes automatically detected (continued)
Sizea (Plain) Standard tray 2, 3 Optional dual cassette feeder Duplex printing


Officio 216 x 340 mm SEF
8K 270 x 390 mm SEF
16K 195 x 270 mm SEF
16K 195 x 270 mm LEF


Printing on special media
| | |---|
NOTE: The media types are shown in the Printing Preferences. This paper type option allows you to set the type of paper to be loaded in the tray. This setting appears in the list so that you can select it. This will let you get the best quality printout. If not, the desired print quality may not be achieved.
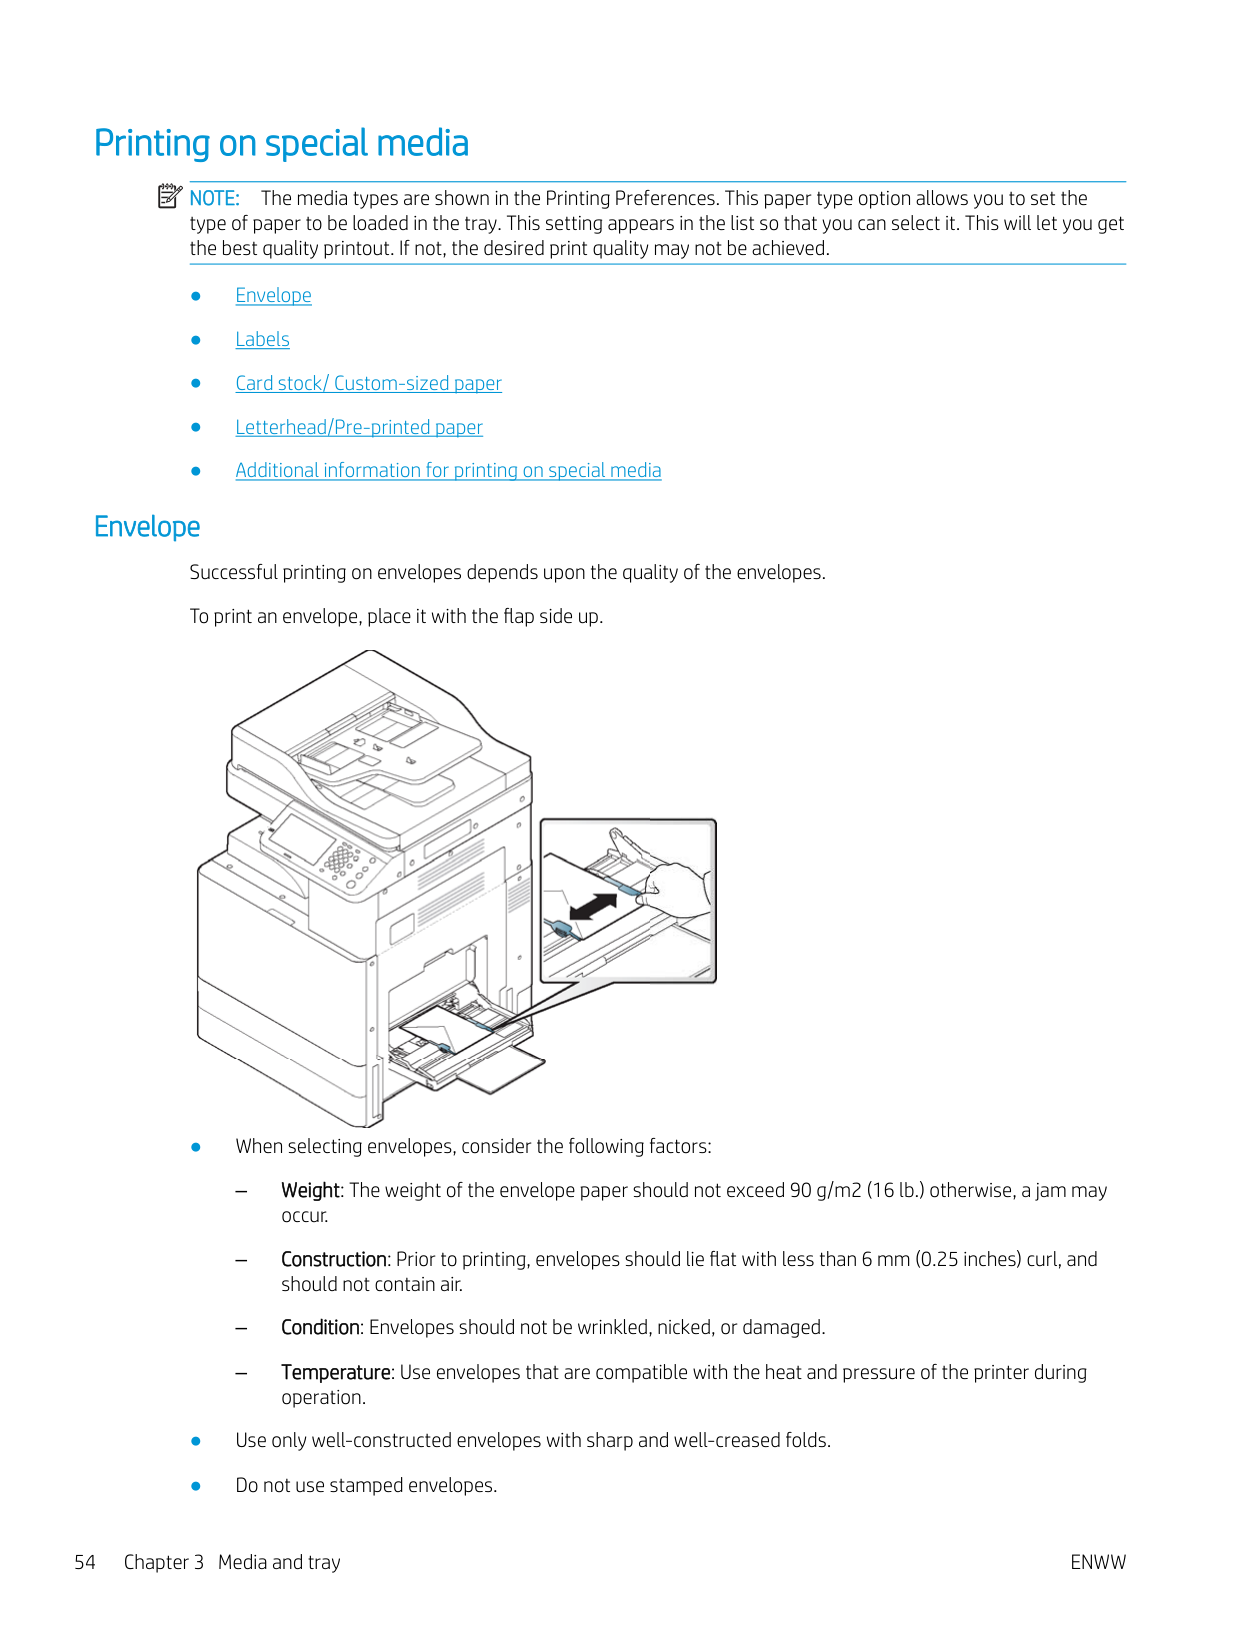
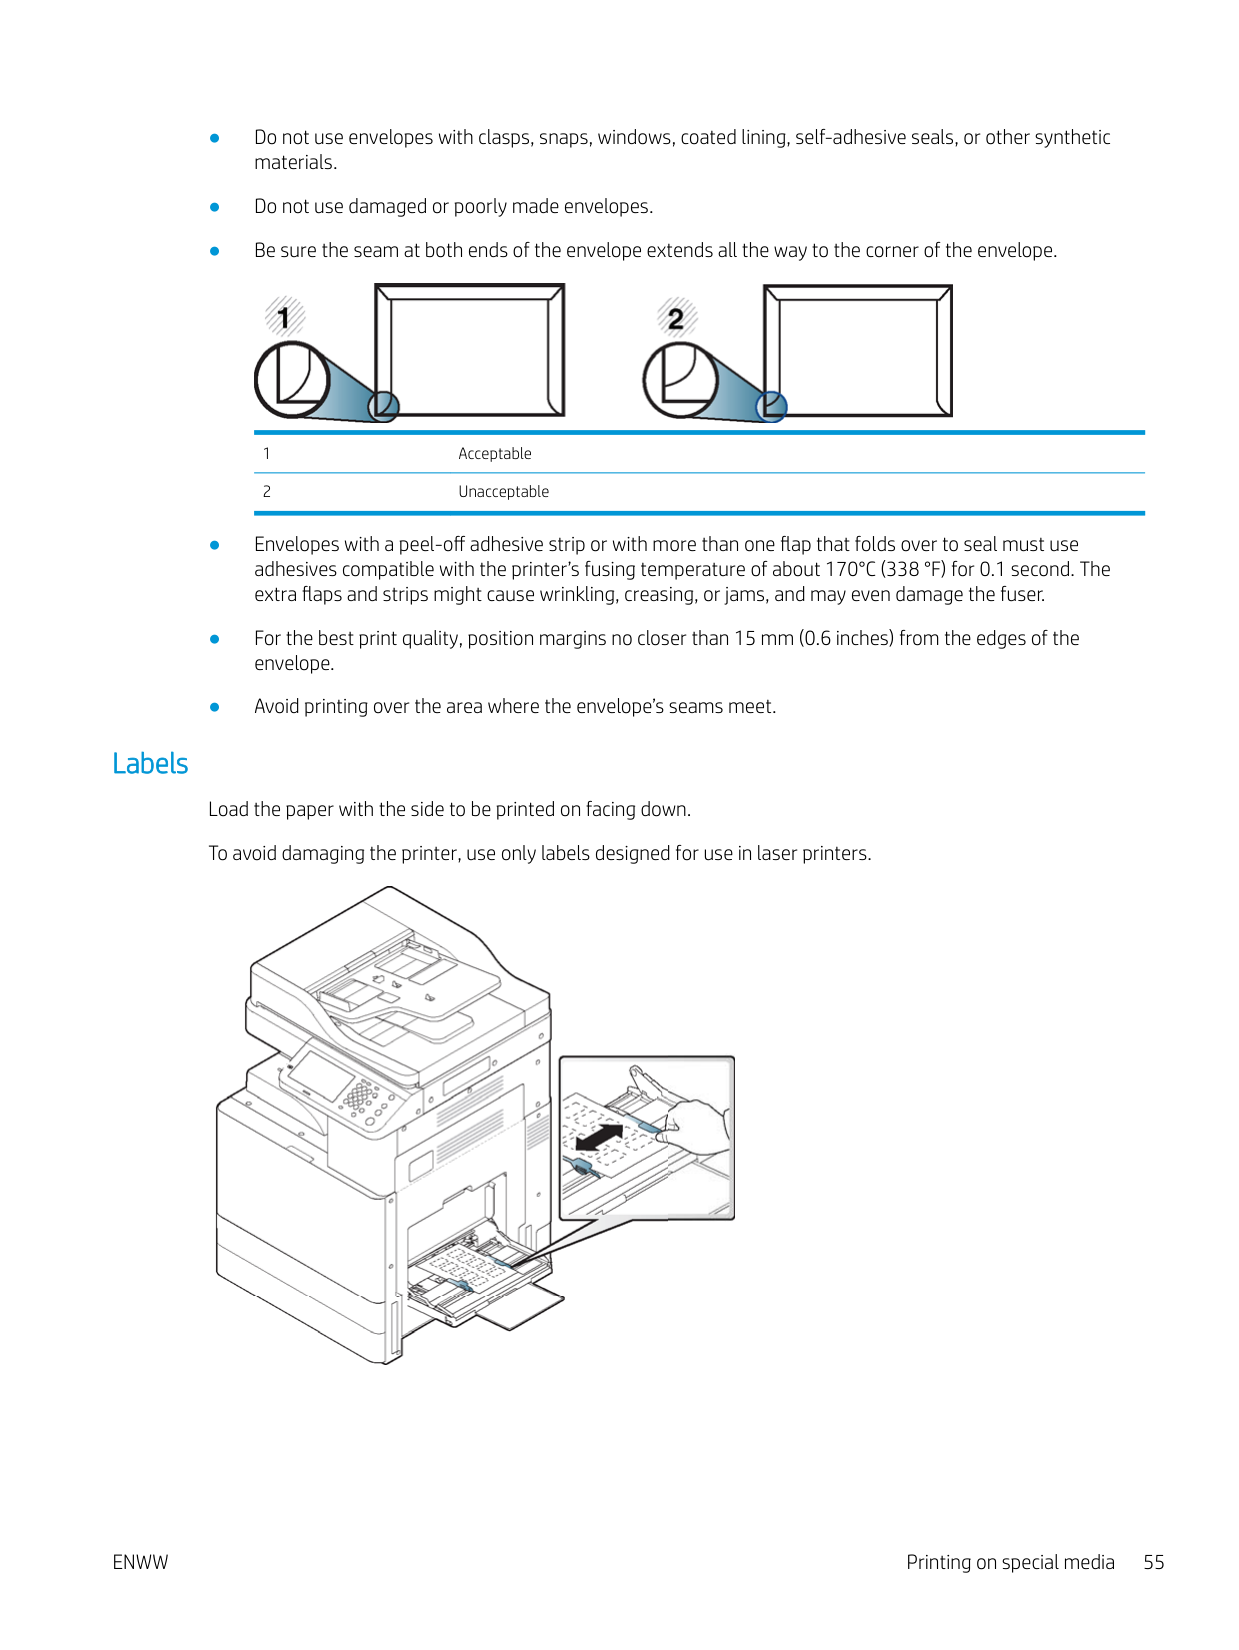
Envelope Successful printing on envelopes depends upon the quality of the envelopes. To print an envelope, place it with the flap side up.


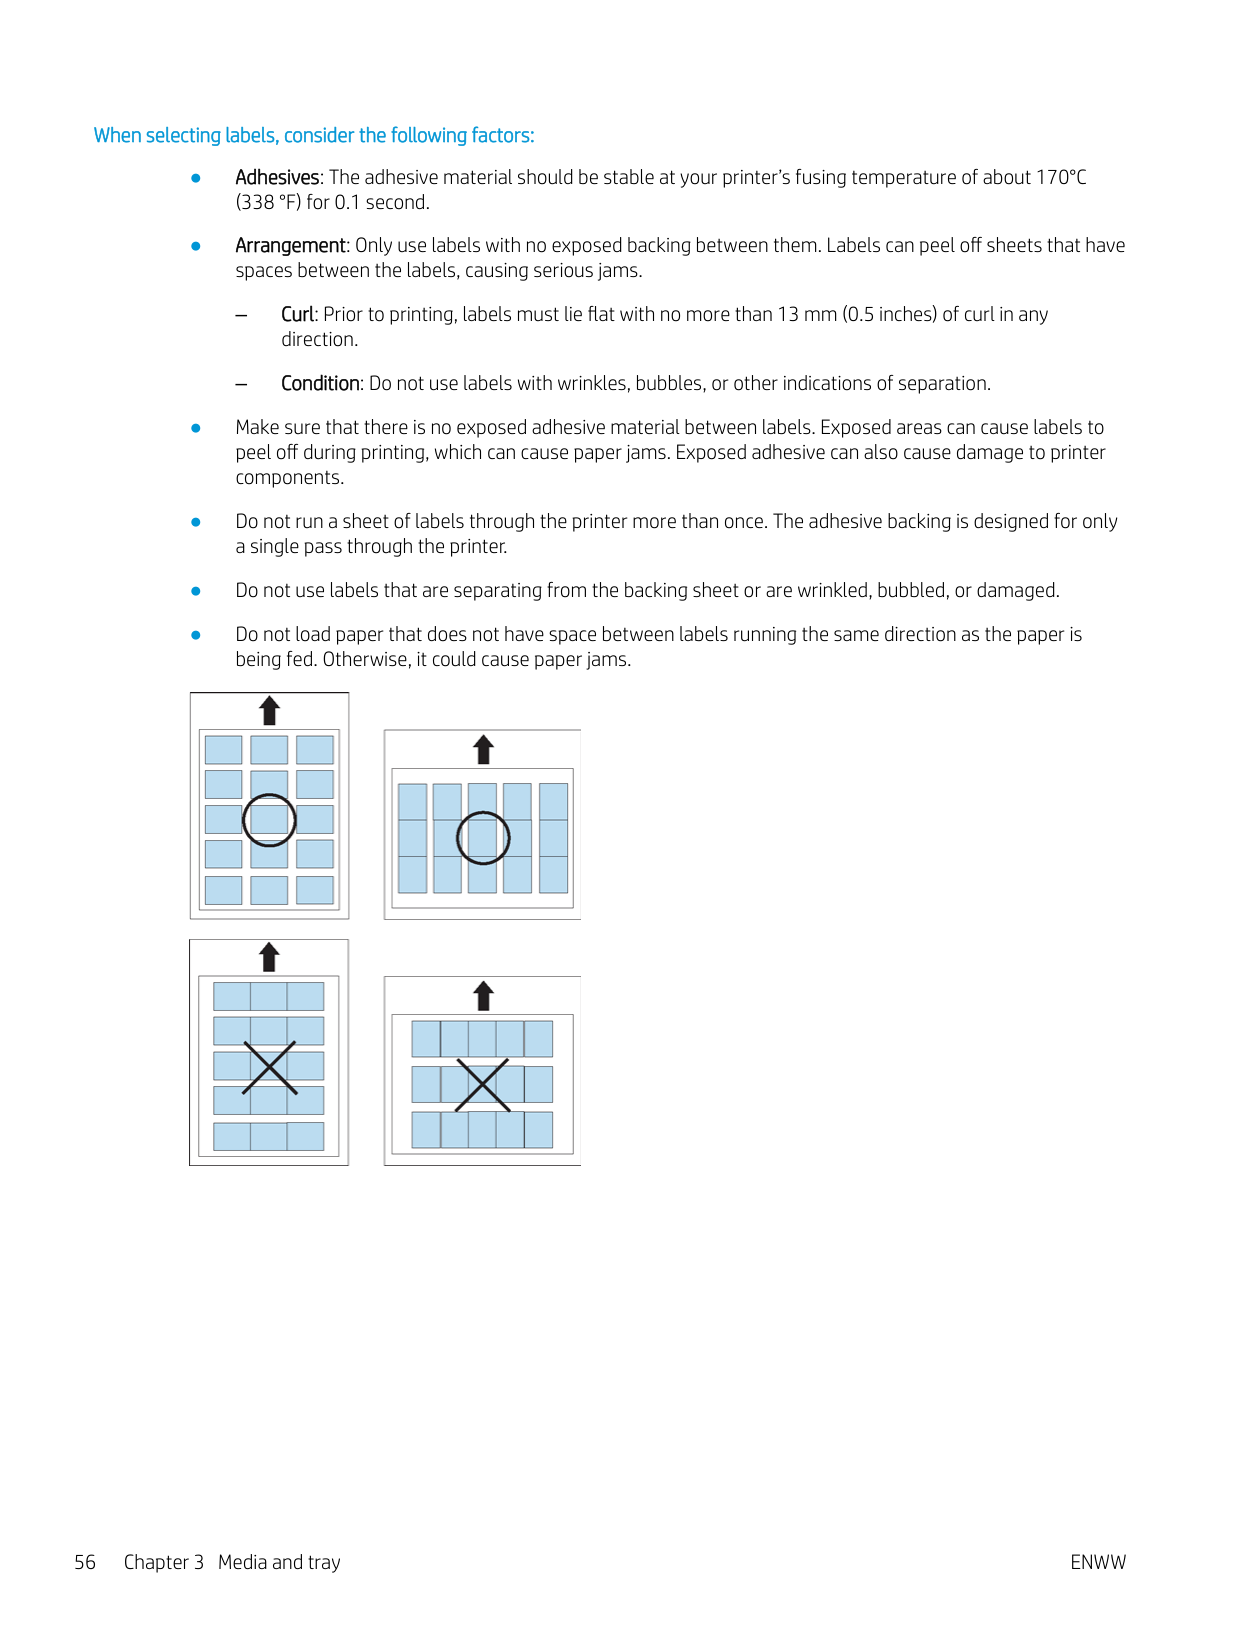
#### Labels
Load the paper with the side to be printed on facing down. To avoid damaging the printer, use only labels designed for use in laser printers.


##### When selecting labels, consider the following factors:

#### Card stock/ Custom-sized paper


#### Letterhead/Pre-printed paper
Table 3-10 Letterhead / Pre-printed paper
Tray Single-sided Double-sided
Standard tray/Optional dual cassette feeder
Face up Face down
Tray 1 (MP) Face down Face up
#### Additional information for printing on special media
Go to support.hp.com. Instructions are available for performing specific scan tasks, such as the following:
● Special media types and what each tray will support
Tray Settings
After loading paper in the paper tray, set the paper size and type using the display screen. For computer printing, select the paper size and type in the application program you use on your computer (see "Opening printing preferences").
| | |---|
NOTE: The paper setting in the printer and driver should match to print without a paper mismatch error.
#### Setting the paper size
NOTE: If there is no required size paper or you need to use custom size paper, press the Custom Size button to set the paper size. You can also set and save the custom size using Custom Size. You can select the custom size whenever you need it.
| | |---|

#### Setting the paper type

#### Setting the tray confirmation message
When you load paper into a tray, you can set the confirmation message to appear automatically; or not at all. This printer can detect some paper sizes and types automatically. If you want to set the paper size and type, or the printer cannot detect them, you can set the size and type directly in the confirmation window.
#### Auto tray switch
This is the option to set if the printer is to continue printing or not when any tray becomes empty. For example, both tray 1 and tray 2 are filled with the same size paper, the printer automatically prints from tray 2 after the tray 1 runs out of paper.
#### Auto continue
This option allows you to continue printing when the paper size you have set is mismatched with the paper in the tray. When this option is activated, the printer continues printing using similar or large size paper. If this option is inactivated, the printer waits until the required size paper is loaded in the tray.
#### Paper substitution
When the requested paper for a print job is not available in the tray, this feature allows you to substitute similar paper size. For example, if the requested ledger sized paper is not available in the tray, this printer substitutes A3 for the requested paper.
| | |---|
NOTE: When the paper is substituted, some image loss may occur.

#### Tray protection
When you choose this option, the selected tray will be protected. This will be used to prevent like paper from being fed if Auto Switching is “ON”.
#### Tray priority setting
When you do not select the tray for printing, the tray selected as in the Tray Priority Setting will be used in order. If the tray does not have the paper on which you want to print, the printer automatically prints from the trays in the priority order set.
ENWW Tray Settings 59
4 Printing
Printer driver features NOTE: The procedures in the chapter are based on the print drivers provided on the CD received with your printer. Check the operating systems that are compatible with your printer (see "System requirements"). Your printer drivers support the following standard features:
| | |---|
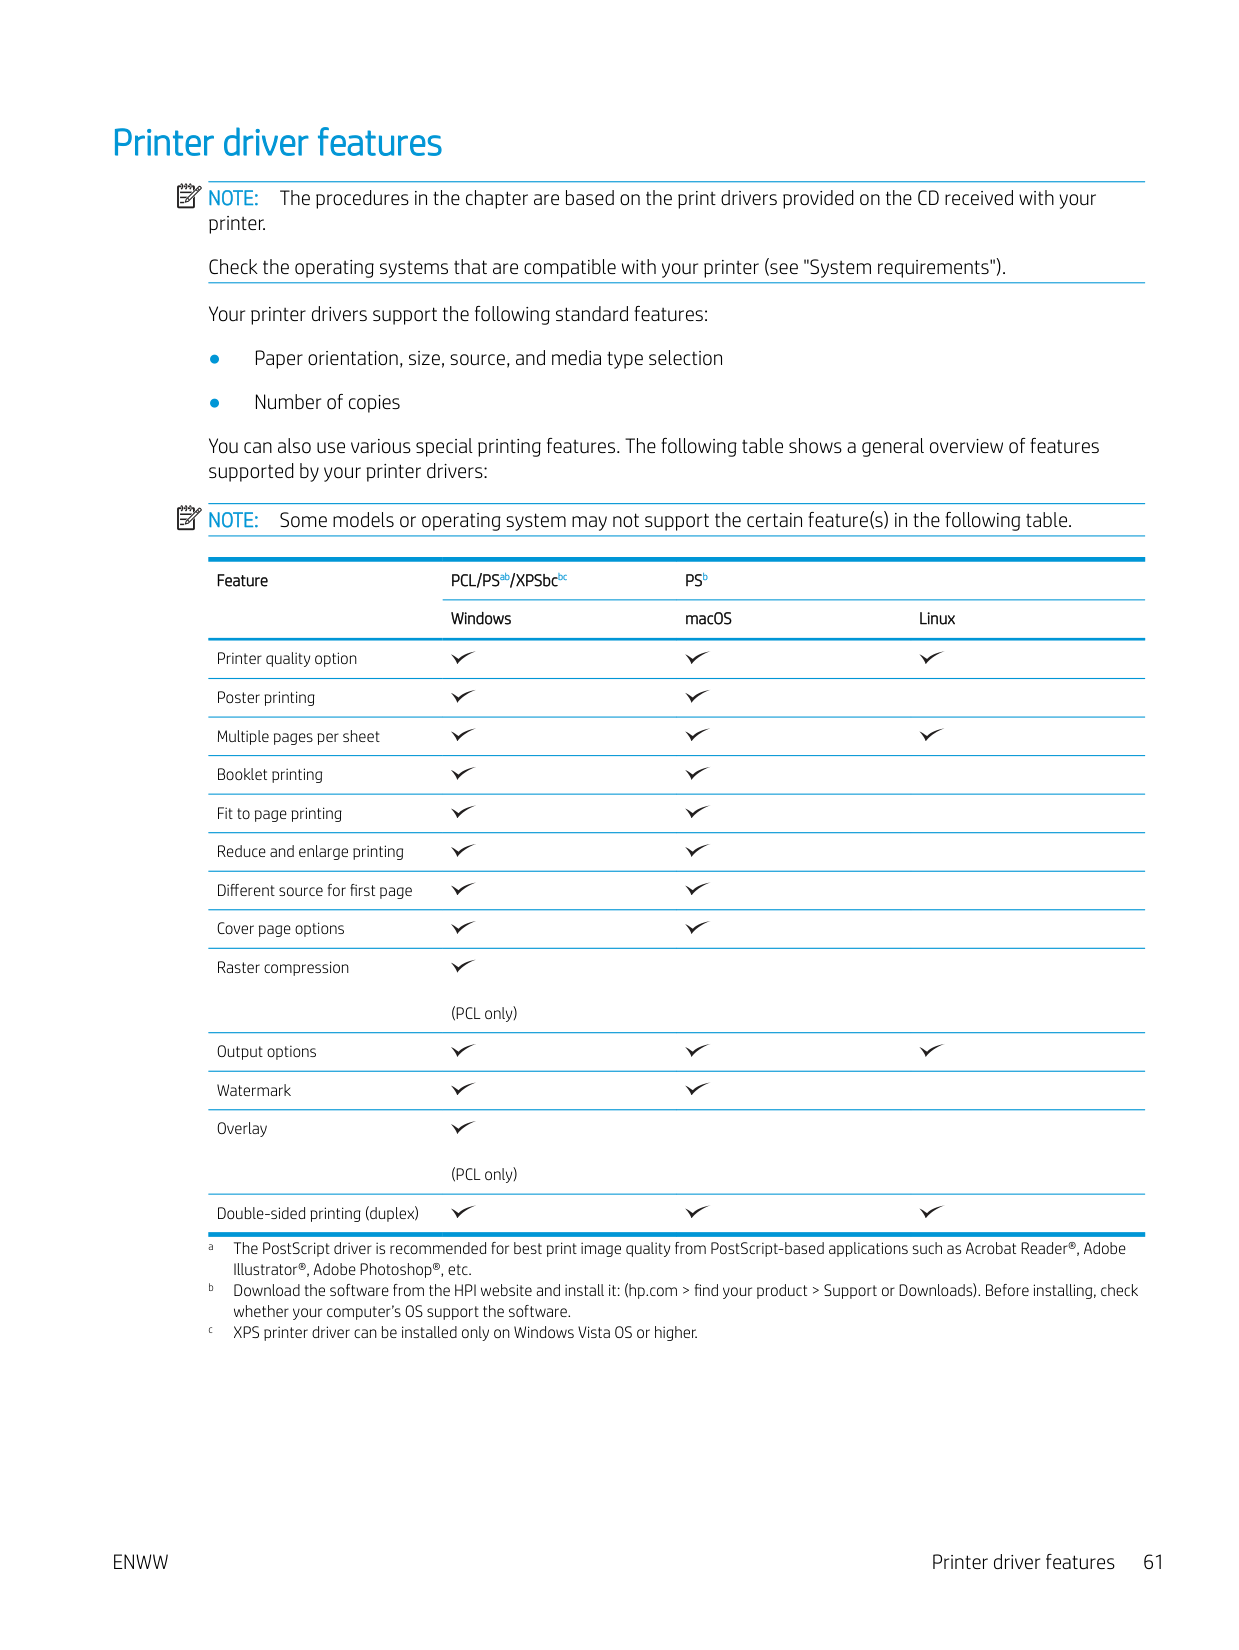
You can also use various special printing features. The following table shows a general overview of features supported by your printer drivers:
| | |---|
NOTE: Some models or operating system may not support the certain feature(s) in the following table.
Feature PCL/PSab/XPSbcbc PSb Windows macOS Linux
Printer quality option Poster printing Multiple pages per sheet Booklet printing Fit to page printing Reduce and enlarge printing Different source for first page Cover page options Raster compression
Output options Watermark Overlay
(PCL only)
(PCL only) Double-sided printing (duplex)
ENWW Printer driver features 61
Basic printing
| | |---|
##### NOTE:
The following Printing Preferences window is for Notepad in Windows 7. Your Printing Preferences window may differ, depending on your operating system or the application you are using.
The basic print settings including the number of copies and print range are selected within the Print window.
NOTE: To take advantage of the printer features provided by your printer driver, click Properties or Preferences in the application’s Print window to change the print setting (see "Opening printing preferences").
| | |---|
#### Canceling a print job
If the print job is waiting in the print queue or print spooler, cancel the job as follows:


macOS printing
| | |---|
NOTE: Some features may not be available depending on models or options. It means that the features are not supported.
#### Printing a document
When you print with macOS, you need to check the printer driver settings in each application you use. Follow the steps below to print from macOS:
Changing printer settings You can use advanced printing features when using your printer. Open an application and select Print from the File menu. The printer name, which appears in the printer properties window, may differ depending on the printer in use.
#### Printing multiple pages on one sheet
You can print more than one page on a single sheet of paper. This feature provides a cost-effective way to print draft copies.
ENWW macOS printing 63
Printing on both sides of the paper NOTE: Some features may not be available depending on models or options. It means that the features are not supported Before printing in the duplex mode, decide on which edge you will be binding your finished document. The binding options are, as follows:
| | |---|
| | |---|
IMPORTANT: If you print more than 2 copies, the first copy and the second copy might print on the same sheet of paper. Avoid printing on both sides of paper when you are printing more than 1 copy.
#### Using help
Click the question mark on the bottom-left corner of the window and click on the topic you want to know about. A pop-up window appears with information about that option's feature, which is provided from the driver.
Additional print tasks Go to support.hp.com. Instructions are available for performing specific print tasks, such as the following:
ENWW Additional print tasks 65
5 Copying
Understanding the copy screen

When you press Copy from the display screen, the Copy screen appears which has several tabs and lots of copying options. All the options are grouped by features so that you can configure your selections easily.
If a different screen is displayed, press (Home) to go to the home display screen.
#### Basic tab
#### Advanced tab
#### Image tab
ENWW Understanding the copy screen 67
edges of a document.
Basic copying
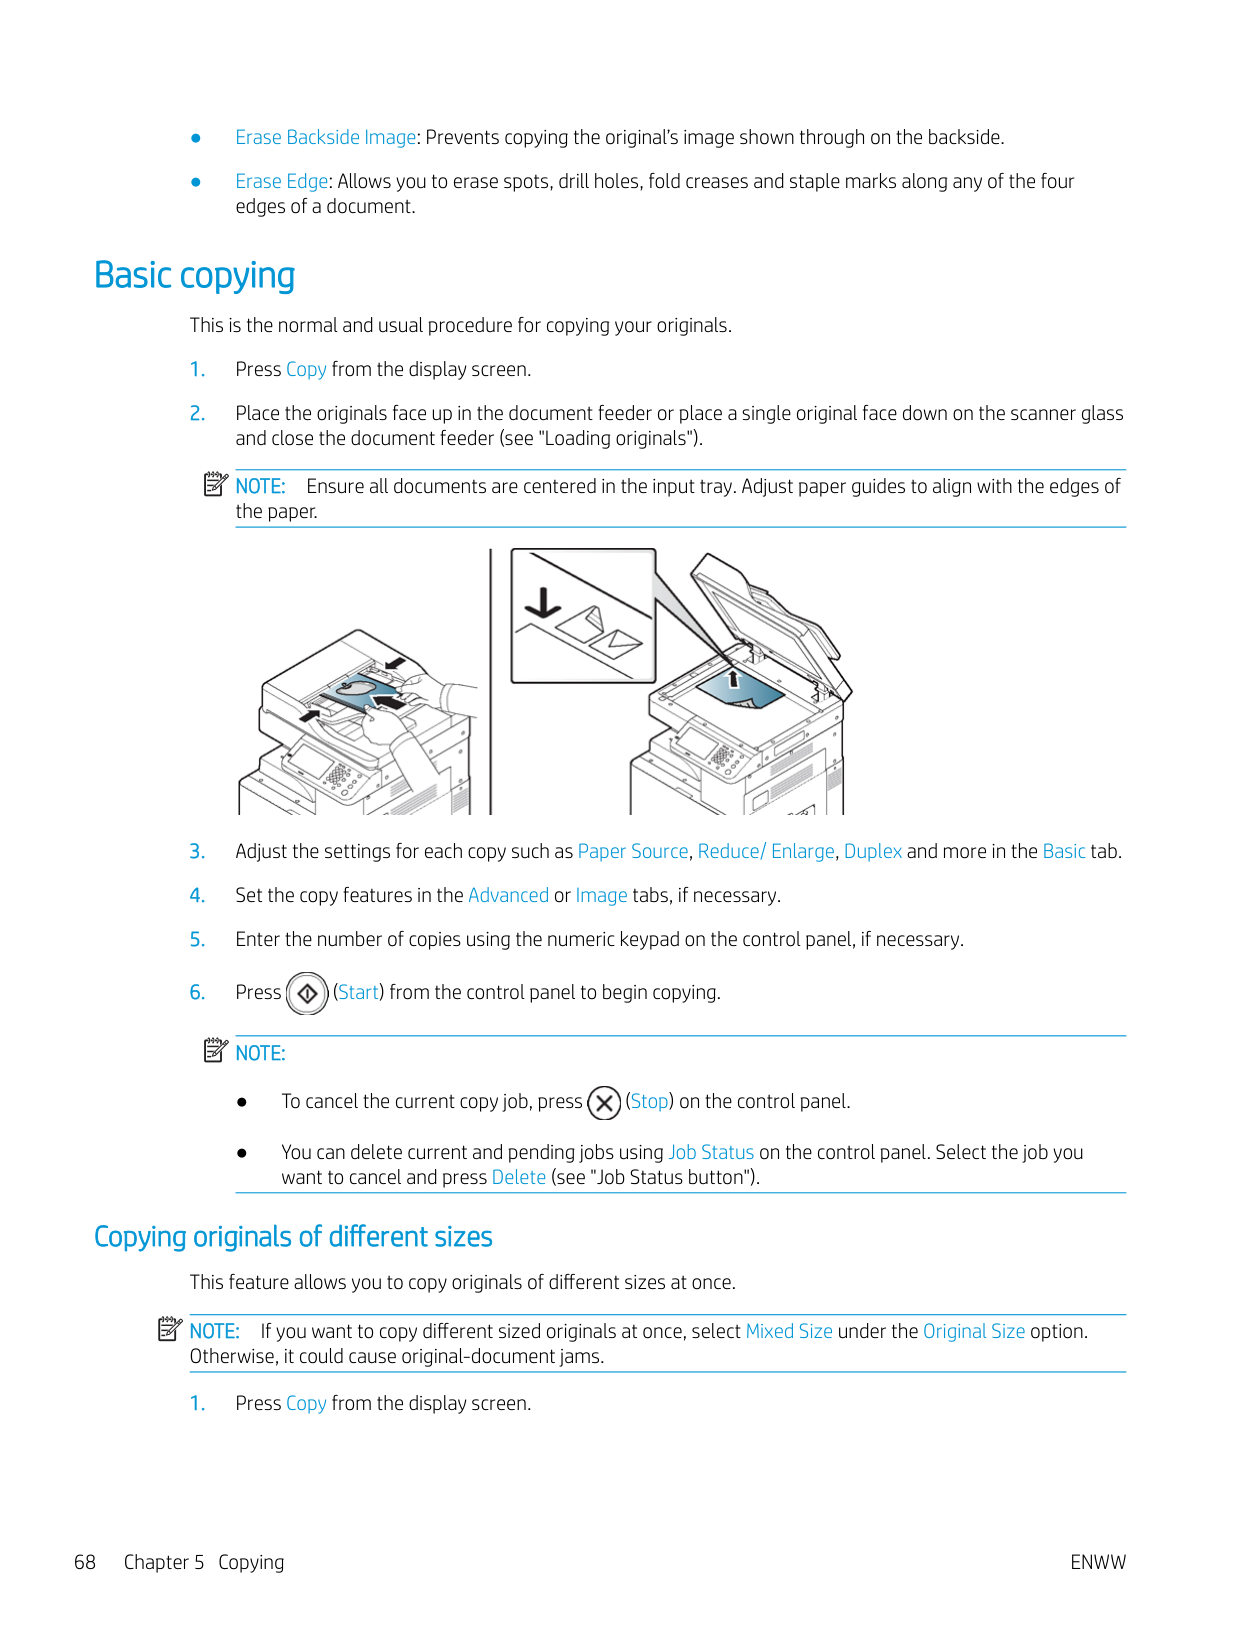
This is the normal and usual procedure for copying your originals.
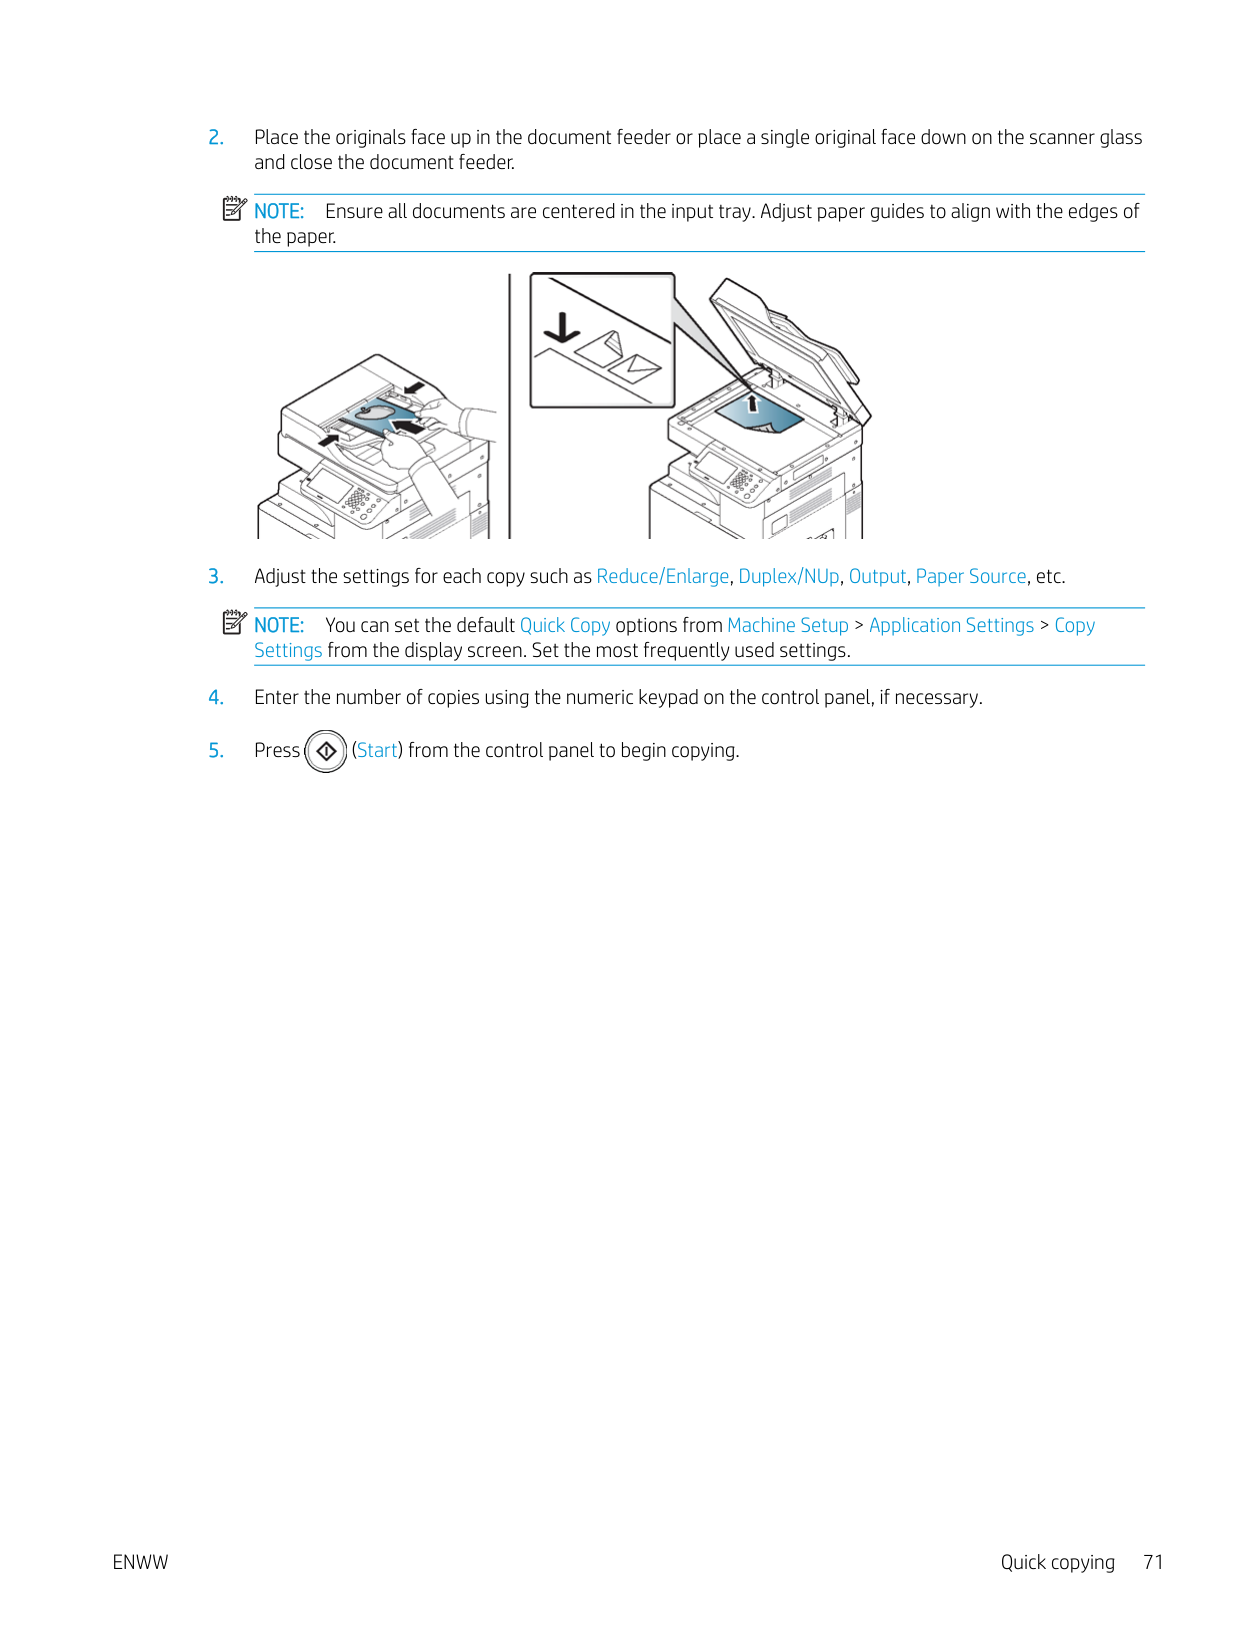
NOTE: Ensure all documents are centered in the input tray. Adjust paper guides to align with the edges of the paper.

| | |---|

| | |---|
##### NOTE:

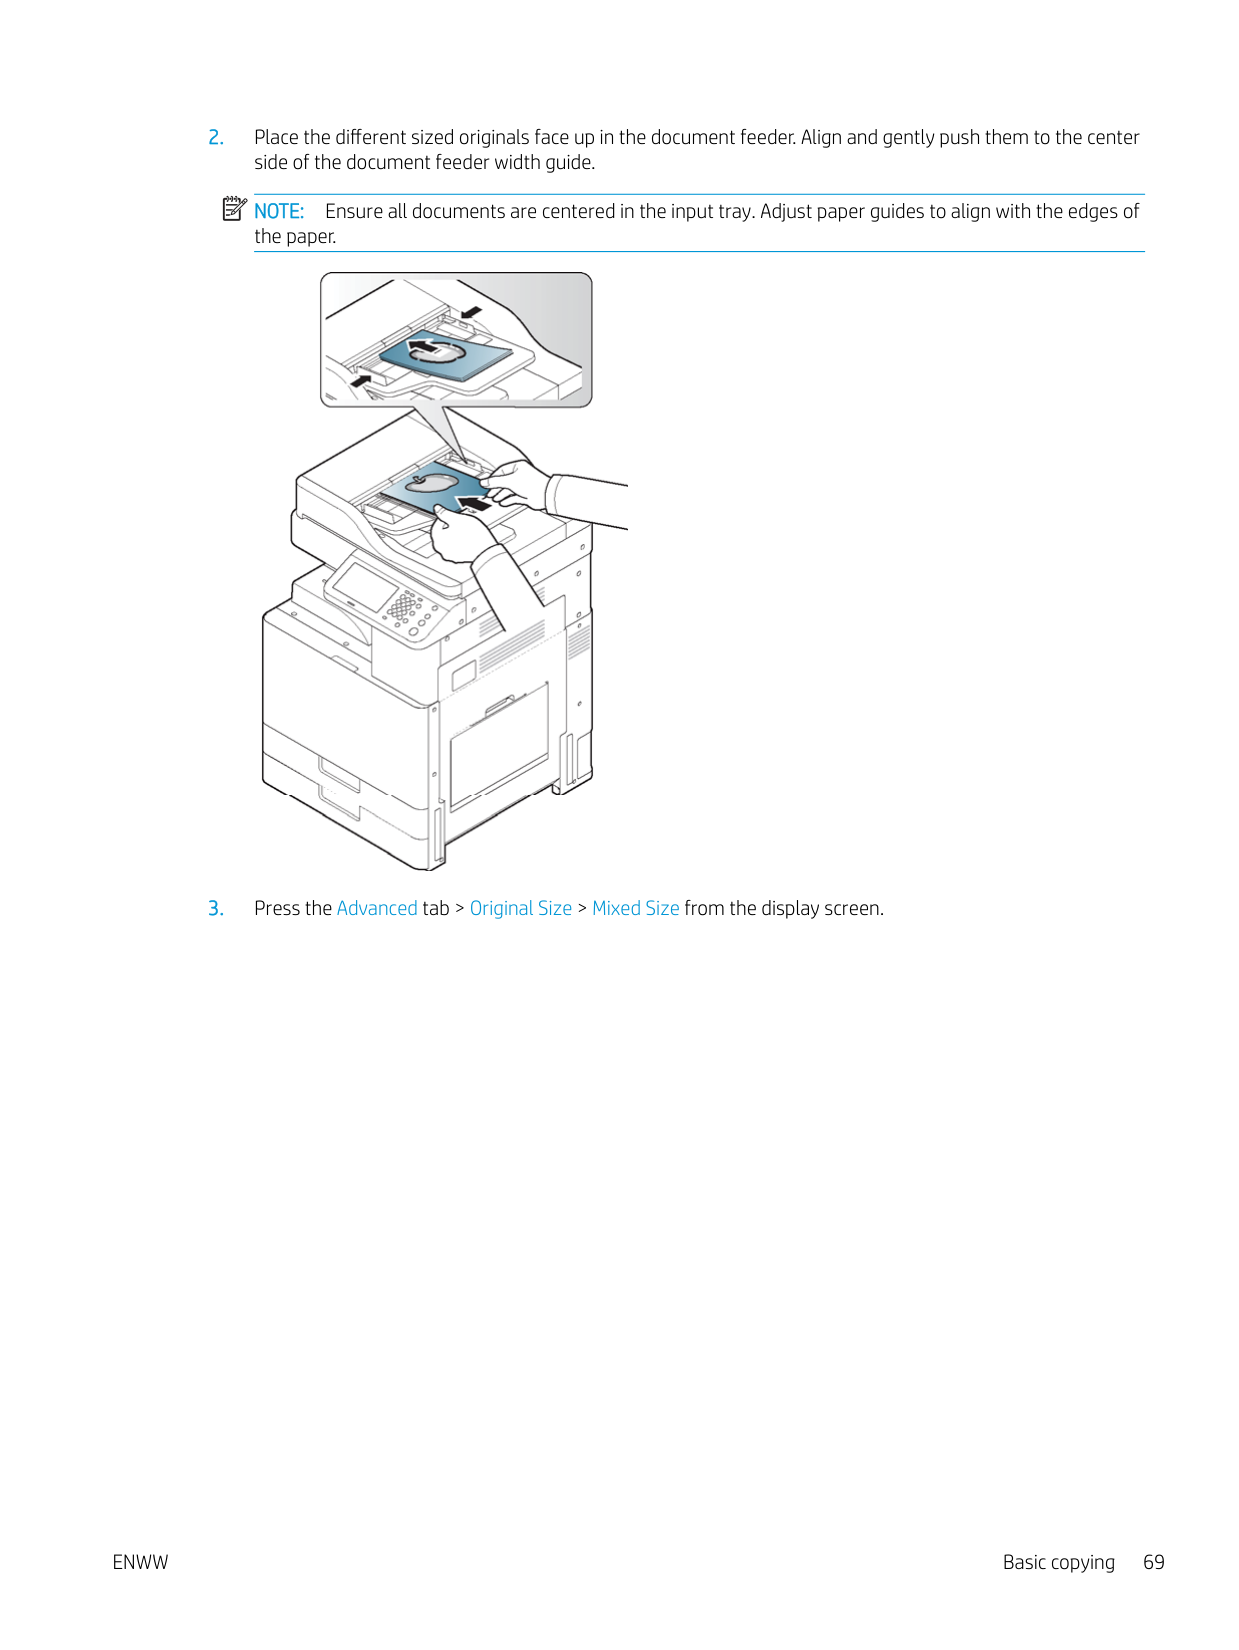
Copying originals of different sizes This feature allows you to copy originals of different sizes at once. NOTE: If you want to copy different sized originals at once, select Mixed Size under the Original Size option. Otherwise, it could cause original-document jams.
| | |---|
NOTE: Ensure all documents are centered in the input tray. Adjust paper guides to align with the edges of the paper.


| | |---|
ENWW Basic copying 69
| | |---|
##### NOTE:

Quick copying
The Quick Copy menu allows you to quickly set copy options without having to move to a lower level menu or another tab. But, this menu does not provide all copy options. If you need to use other copy options, use the copy options in the Copy menu.
NOTE: Ensure all documents are centered in the input tray. Adjust paper guides to align with the edges of the paper.

NOTE: You can set the default Quick Copy options from Machine Setup > Application Settings > Copy Settings from the display screen. Set the most frequently used settings.
| | |---|
| | |---|

ENWW Quick copying 71
Using special copy features On the Basic, Advanced, or Image tab of the Copy screen, you can select specific copy features. NOTE: Some menus may not appear in the display depending on options or models. To change the menu options:
| | |---|
Item Description Paper Source Paper Source sets the tray containing the paper to be used for printing. The printer prints the
scanned image on the paper in the selected tray. You can see the icons that show paper sizes and the remaining amount of paper in each tray.
Reduce/Enlarge Reduces or enlarges the size of a copied image.
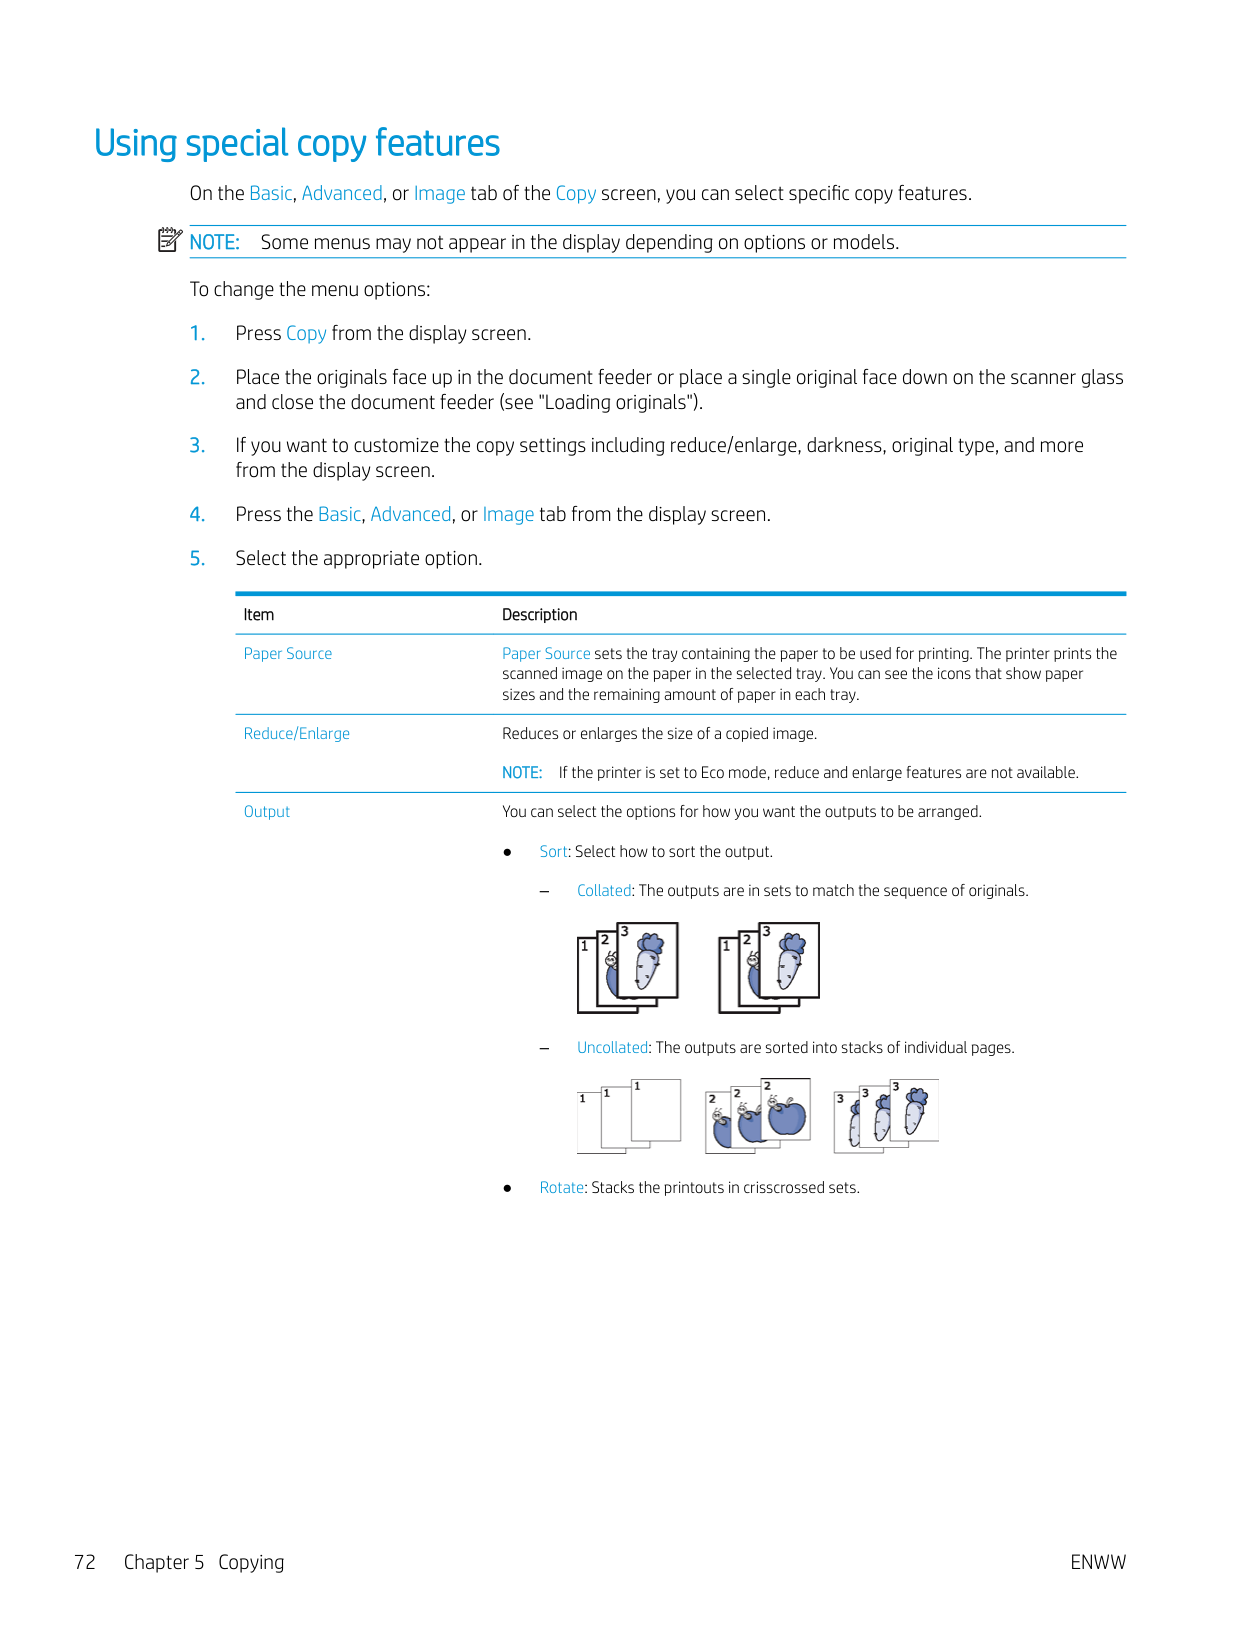
NOTE: If the printer is set to Eco mode, reduce and enlarge features are not available. Output You can select the options for how you want the outputs to be arranged.


######## NOTE:
Darkness You can adjust the degree of darkness. This feature allows dark images to be printed into lighter images, or light images into darker images.
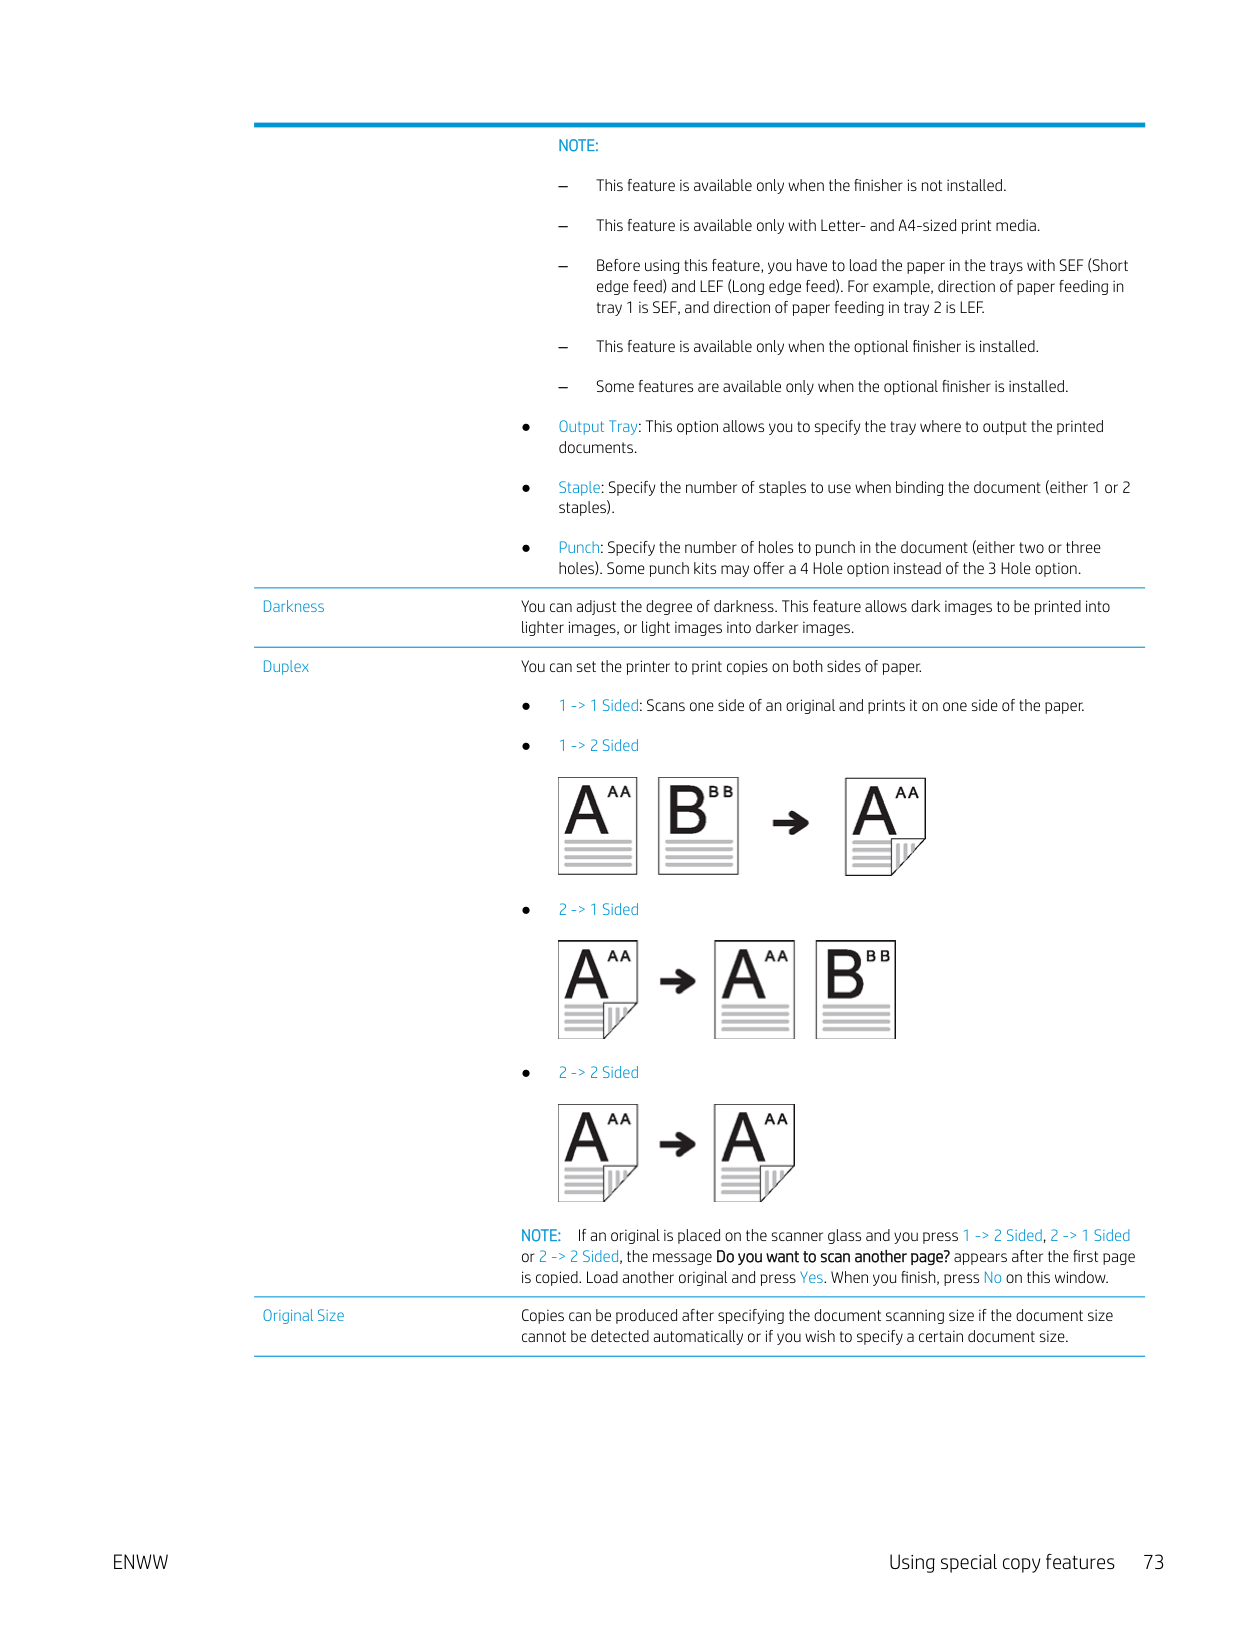
Duplex You can set the printer to print copies on both sides of paper.


NOTE: If an original is placed on the scanner glass and you press 1 -> 2 Sided, 2 -> 1 Sided or 2 -> 2 Sided, the message Do you want to scan another page? appears after the first page is copied. Load another original and press Yes. When you finish, press No on this window.
Original Size Copies can be produced after specifying the document scanning size if the document size cannot be detected automatically or if you wish to specify a certain document size.
Original Orientation When copying double-sided documents or making double-sided copies or combined copies, specify the document orientation; otherwise, the copies may not be printed in the correct page order or correct front and back page arrangement.
● Upright Images: Select this setting for an original document loaded with the top toward
the back of the printer.
● Sideways Images: Select this setting for an original document loaded into the document feeder with the top of the original document toward the left side of the printer or an original document placed on the scanner glass with the top of the original document toward the right side of the printer.
Original Type The original type setting is used to improve copy quality by selecting document types for current copy jobs.
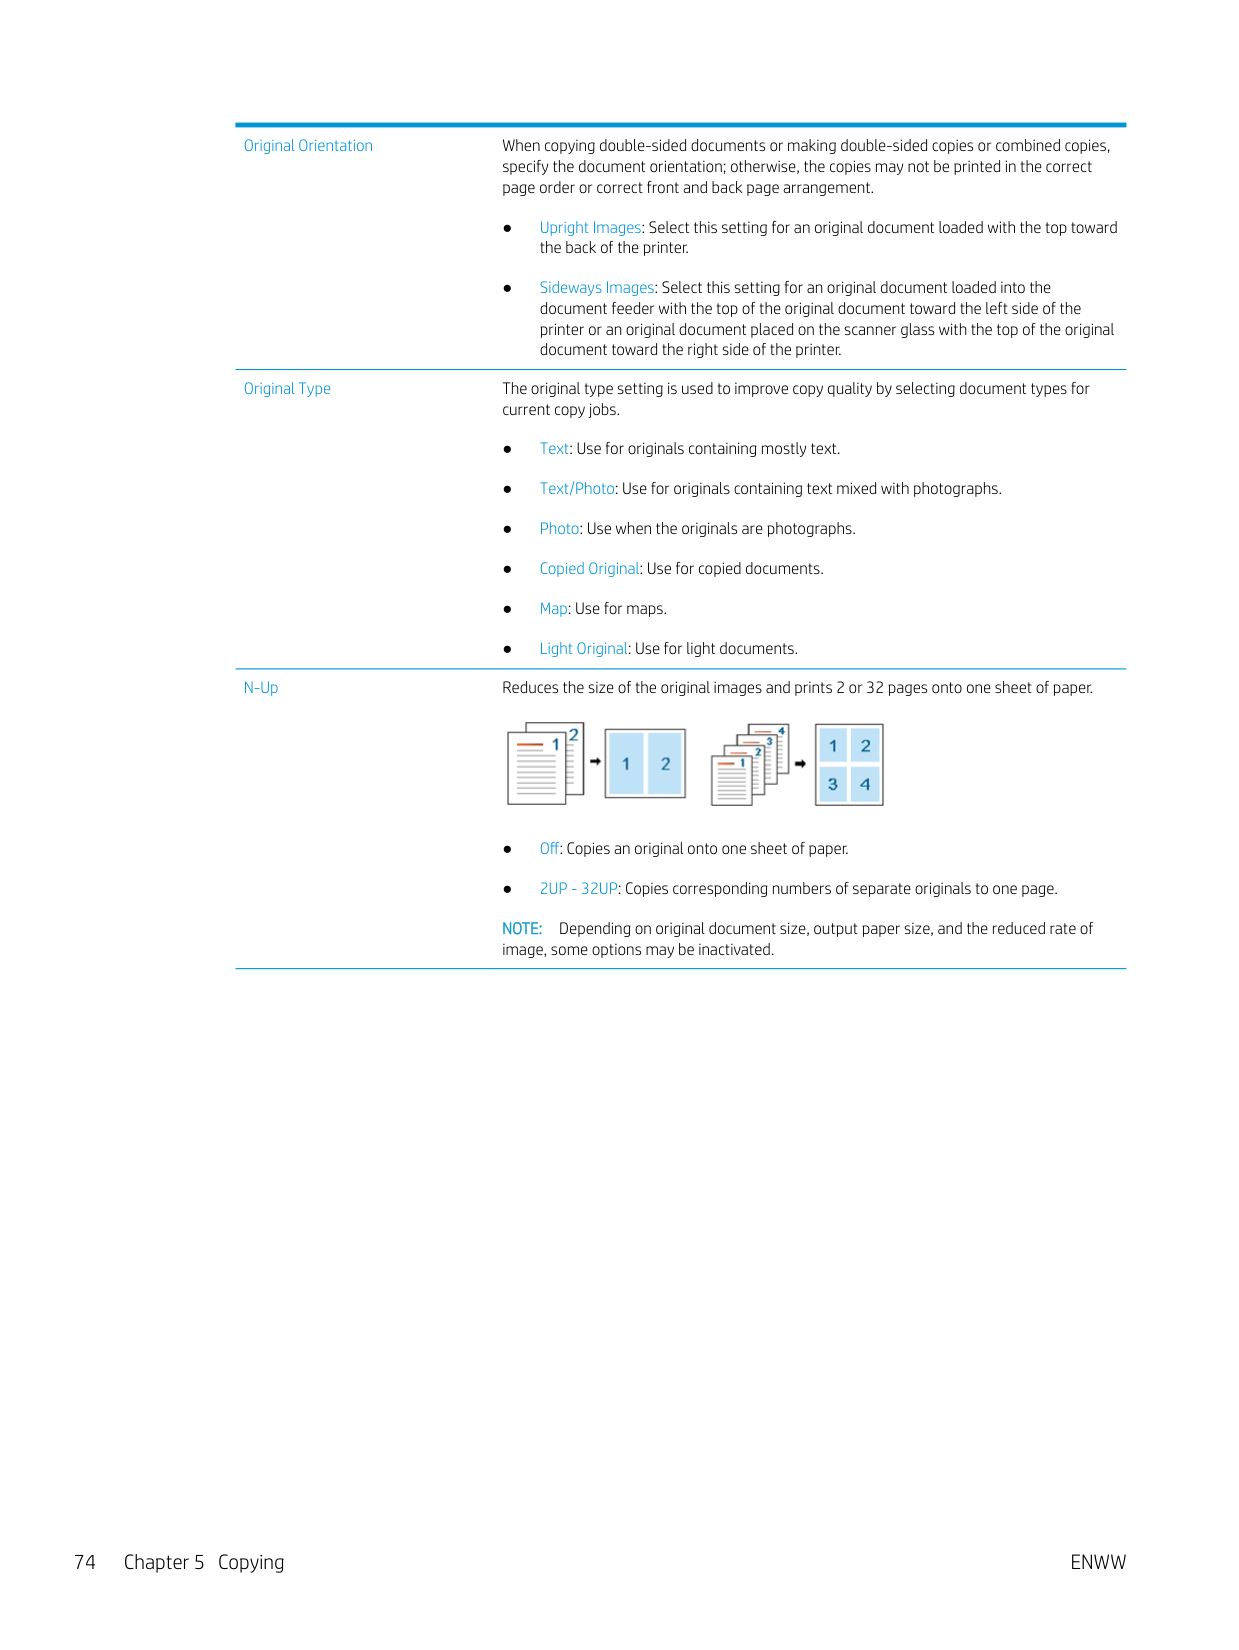
N-Up Reduces the size of the original images and prints 2 or 32 pages onto one sheet of paper.

NOTE: Depending on original document size, output paper size, and the reduced rate of image, some options may be inactivated.
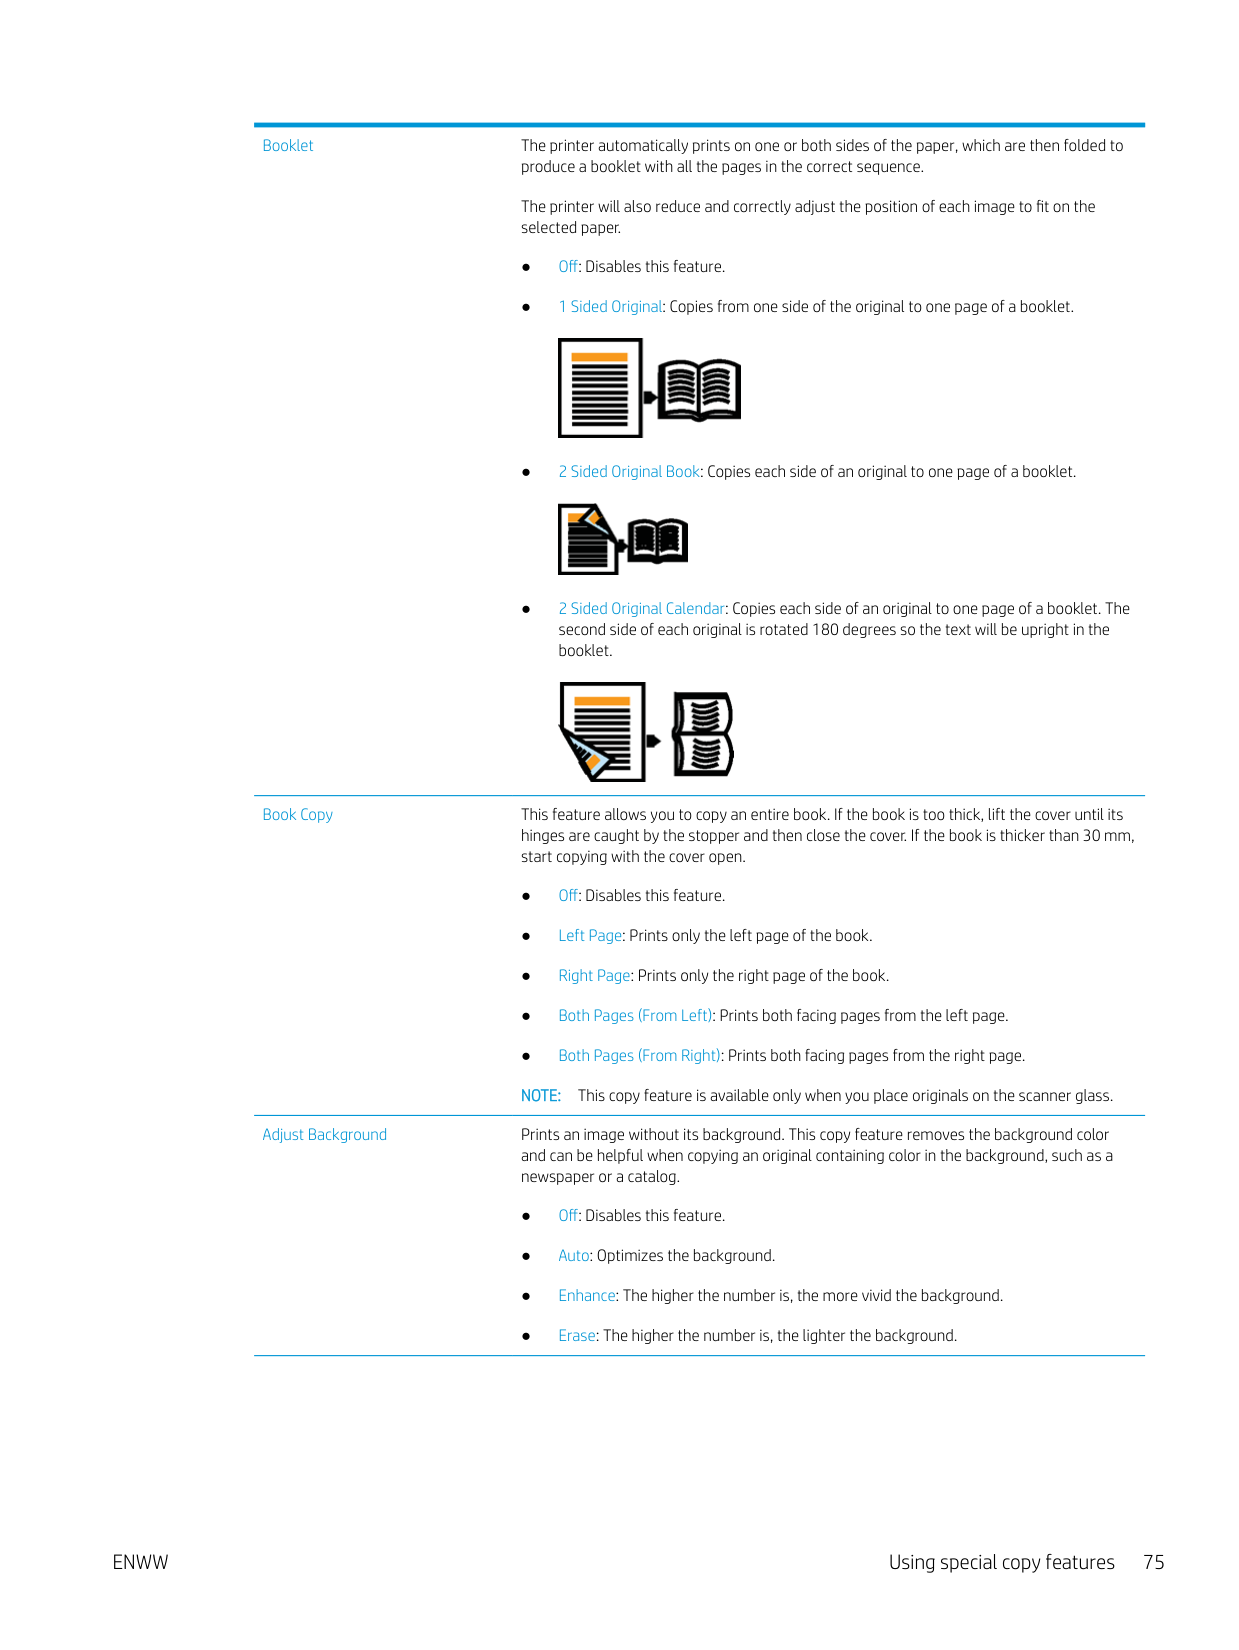
Booklet The printer automatically prints on one or both sides of the paper, which are then folded to produce a booklet with all the pages in the correct sequence. The printer will also reduce and correctly adjust the position of each image to fit on the selected paper.


Book Copy This feature allows you to copy an entire book. If the book is too thick, lift the cover until its hinges are caught by the stopper and then close the cover. If the book is thicker than 30 mm, start copying with the cover open.

Adjust Background Prints an image without its background. This copy feature removes the background color and can be helpful when copying an original containing color in the background, such as a newspaper or a catalog.
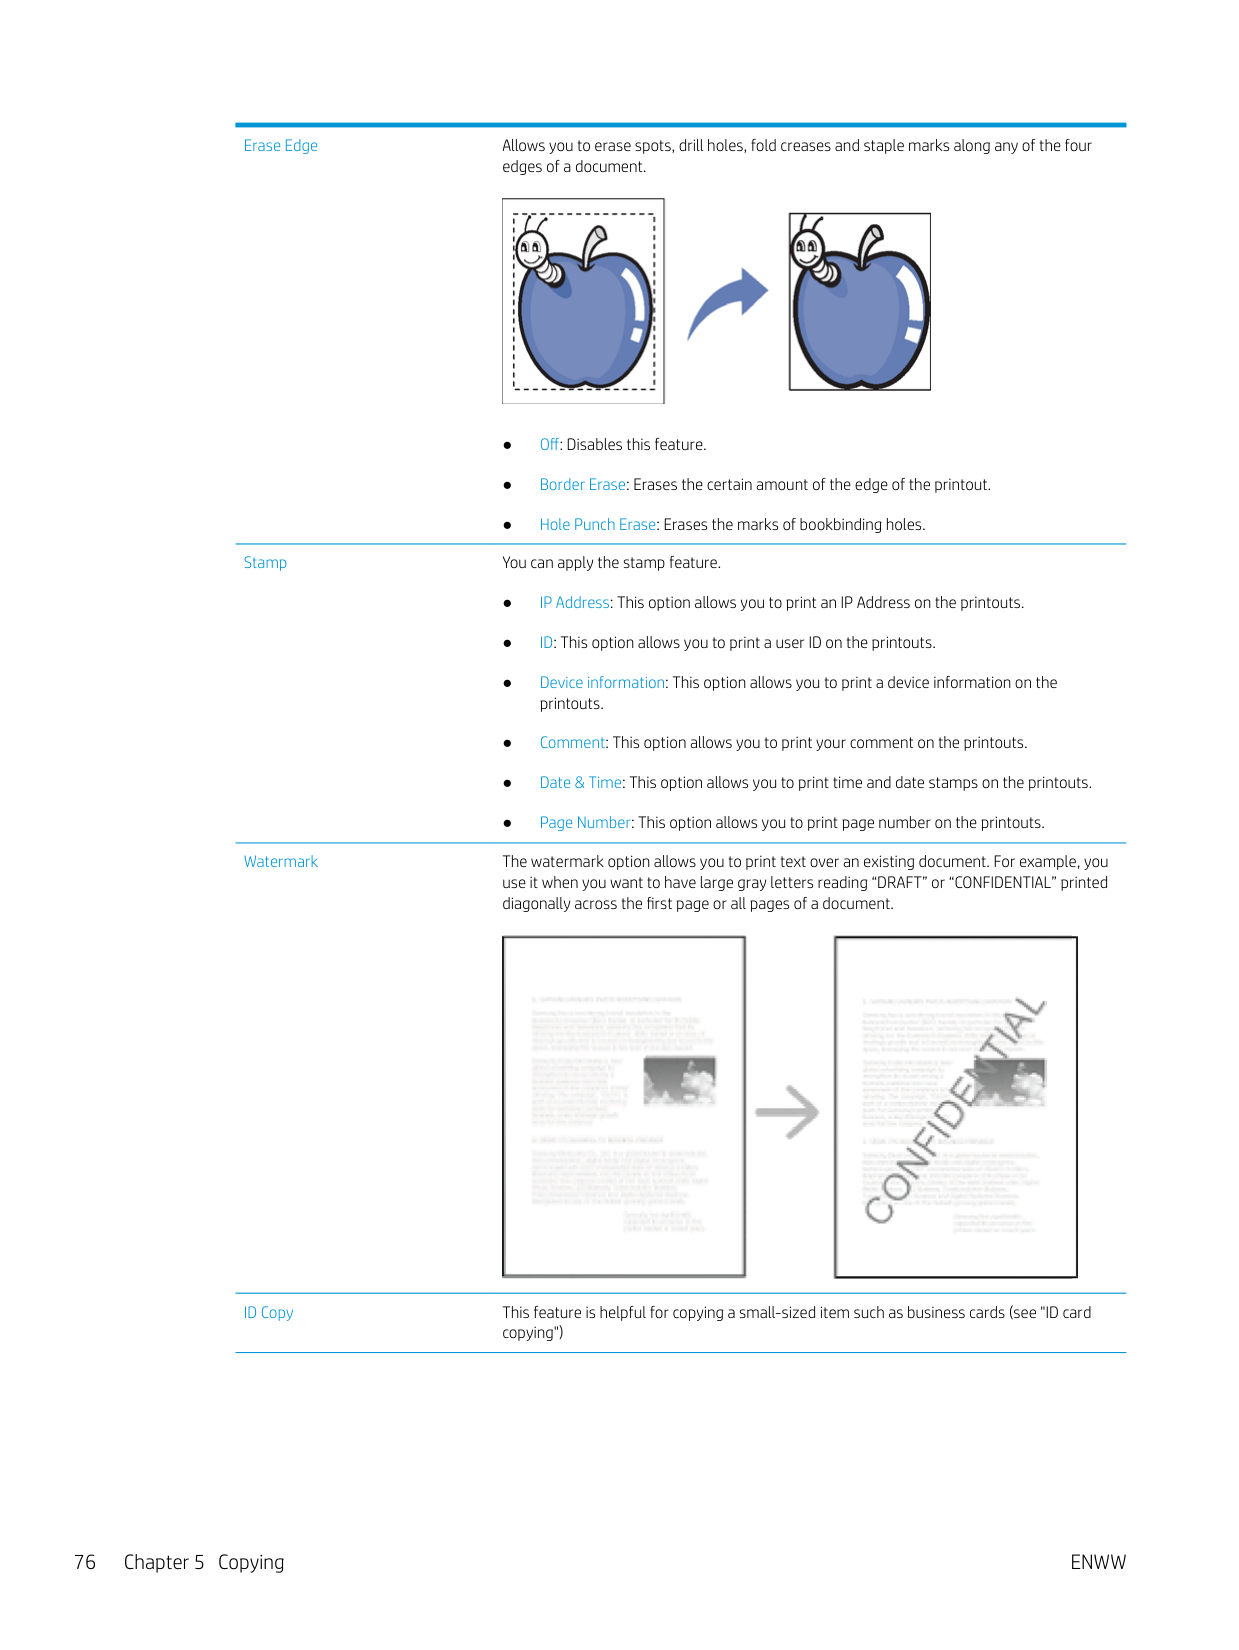
Erase Edge Allows you to erase spots, drill holes, fold creases and staple marks along any of the four edges of a document.

Stamp You can apply the stamp feature.

Watermark The watermark option allows you to print text over an existing document. For example, you use it when you want to have large gray letters reading “DRAFT” or “CONFIDENTIAL” printed diagonally across the first page or all pages of a document.

ID Copy This feature is helpful for copying a small-sized item such as business cards (see "ID card copying")
Erase Backside Image When the original is thin and backside images show through, you can use this feature to remove the backside images.
Build Job After the scanning is finished, the Scan More Pages window appears to ask if you want to scan another page. If you select Yes, then you can scan another page in the current job. If you select No, then the scanning process is completed and the remainder of the job is performed.
Additional copy tasks
Go to support.hp.com. Instructions are available for performing specific copy tasks, such as the following:
6 Scanning
Scanning with your printer lets you turn pictures and text into digital files that can be stored on your computer.

| | |---|
NOTE: The maximum resolution that can be achieved depends upon various factors, including computer speed, available disk space, memory, the size of the image being scanned, and bit depth settings. Thus, depending on your system and what you are scanning, you may not be able to scan at certain resolutions, especially using enhanced resolution.
ENWW 79
Understanding the scan methods
To use the scanning feature, press Scan to Email, Scan to USB, Scan to Server, Scan to PC, or Scan to Shared Folder on the display screen.
If a different screen is displayed, press ( ) to go to the home display screen.
| | |---|
| | |---|
NOTE: If you want to use this feature, you need to insert a USB memory device into the USB memory port on your printer.
Scanning and sending through email You can scan originals and send the scanned image to several destinations from the printer by email. NOTE: To scan and send an image as an email attachment, you need to set up network parameters, SMTP settings and Scan to Email settings using the control panel (see "Setting up an email account").
| | |---|
#### Understanding the Scan to Email screen
Press Scan to Email in the display screen.
##### Basic tab

stored addresses. You can save frequently used email addresses using the control panel (see "Setting up an address book from the control panel").
##### Advanced tab
##### Image tab
You can move to the next or previous page using the up/down arrows located at the bottom left.
##### Output tab
#### Setting up an email account

● None: Port 25 is used by default. ● SSL: Port 465 is used by default. ● TLS: Port 587 is used by default.
| | |---|
| | |---|
| | |---|
##### NOTE:
Scanning and sending an email You can scan originals and send the scanned image to several destinations from the printer by email. NOTE: To scan and send an image as an email attachment, you need to set up network parameters, SMTP settings and Scan to Email settings using the control panel (see "Setting up an email account").
| | |---|

| | |---|
| | |---|

current and pending jobs using Job Status on the control panel. Select the job you want to cancel and press Delete (see "Job Status button").
#### Resending to the last email address
To resend to the last used email address:
to delete. Then press Delete.
| | |---|

If an original is placed on the scanner glass, the printer shows the window asking if you want to place another page. Load another original and press Yes. When you finish, press No on this window.
Printing an email confirmation report You can set the printer to print a report whether an email transmission is successfully completed or not. NOTE: If a report contains characters or fonts that the printer does not support, Unknown could be printed instead of the characters/fonts in the report.
| | |---|

Scanning and sending via SMB/FTP
If you install a mass storage device (hard disk), you can send scanned images to up to ten different destinations via SMB or FTP. Without a mass storage device, you can only send scanned images to a single destination via SMB or FTP.
| | |---|
NOTE: To scan and send an image to a server, you need to set up network parameters using the control panel (see "Setting up an FTP/SMB server").
#### Understanding the Scan to Server screen
Press Scan to Server in the display screen.
##### Basic tab

addresses. You can save frequently used email addresses using the control panel (see "Setting up an address book from the control panel").
##### Advanced tab
##### Image tab
You can move to the next or previous page using the up/down arrows located at the bottom left.
##### Output tab
● Quality: Adjusts the display quality of the scanned output. ● File Format: Selects the file format of the scanned output.
#### Setting up an FTP/SMB server

| | |---|
| | |---|
##### NOTE:
Scanning and sending to an SMB/FTP server You can select destinations using SMB, or FTP servers. NOTE: To scan and send an image to a server, you need to set up network parameters using the control panel (see "Setting up an FTP/SMB server").
| | |---|

| | |---|
The printer begins scanning and then sends the scanned image to the specified server. If an original is placed on the scanner glass, the printer shows the window asking if you want to place another page. Load another original and press Yes. When you finish, press No on this window. NOTE:

pending jobs using Job Status on the control panel. Select the job you want to cancel and press Delete (see "Job Status button").
#### Resending to the last server address
To resend a file to the server address last sent to:
to delete. Then press Delete.
| | |---|

If an original is placed on the scanner glass, the printer shows the window asking if you want to place another page. Load another original and press Yes. When you finish, press No on this window.
Scanning and sending to your computer

This option allows you to scan an image on the printer and send it out to your network-connected computer.
● For a network or USB connected printer
#### For a network or USB connected printer
Make sure the scanner driver is installed on your computer.
NOTE: This feature is enabled by default if HP MFP Scan To PC Setup is selected during installation. To enable/disable this feature later launch HP MFP Scan to PC Setup > select the corresponding device.
| | |---|
| | |---|

| | |---|
NOTE: The scanned image is saved in the computer’s My Documents > Scan folder.
ENWW Scanning and sending to your computer 89
Scanning and sending to USB/shared folder You can scan a document and save the scanned image onto USB memory device/ shared folder. When you scan a document, the printer uses the default settings, such as for resolution. You can also customize your own scan settings (see "Changing the scan feature settings"). ● Understanding the USB /shared folder screen ● Scanning to a USB /shared folder
Understanding the USB /shared folder screen Press Scan to USB or Scan to Shared Folder in the display screen. NOTE: This option is available when the USB inserted or mass storage device (hard disk) installed.
| | |---|
##### Basic tab
##### Advanced tab

##### Image tab
You can move to the next or previous pages using the up/down arrows located at the bottom left.
##### Output tab
#### Scanning to a USB /shared folder
| | |---|
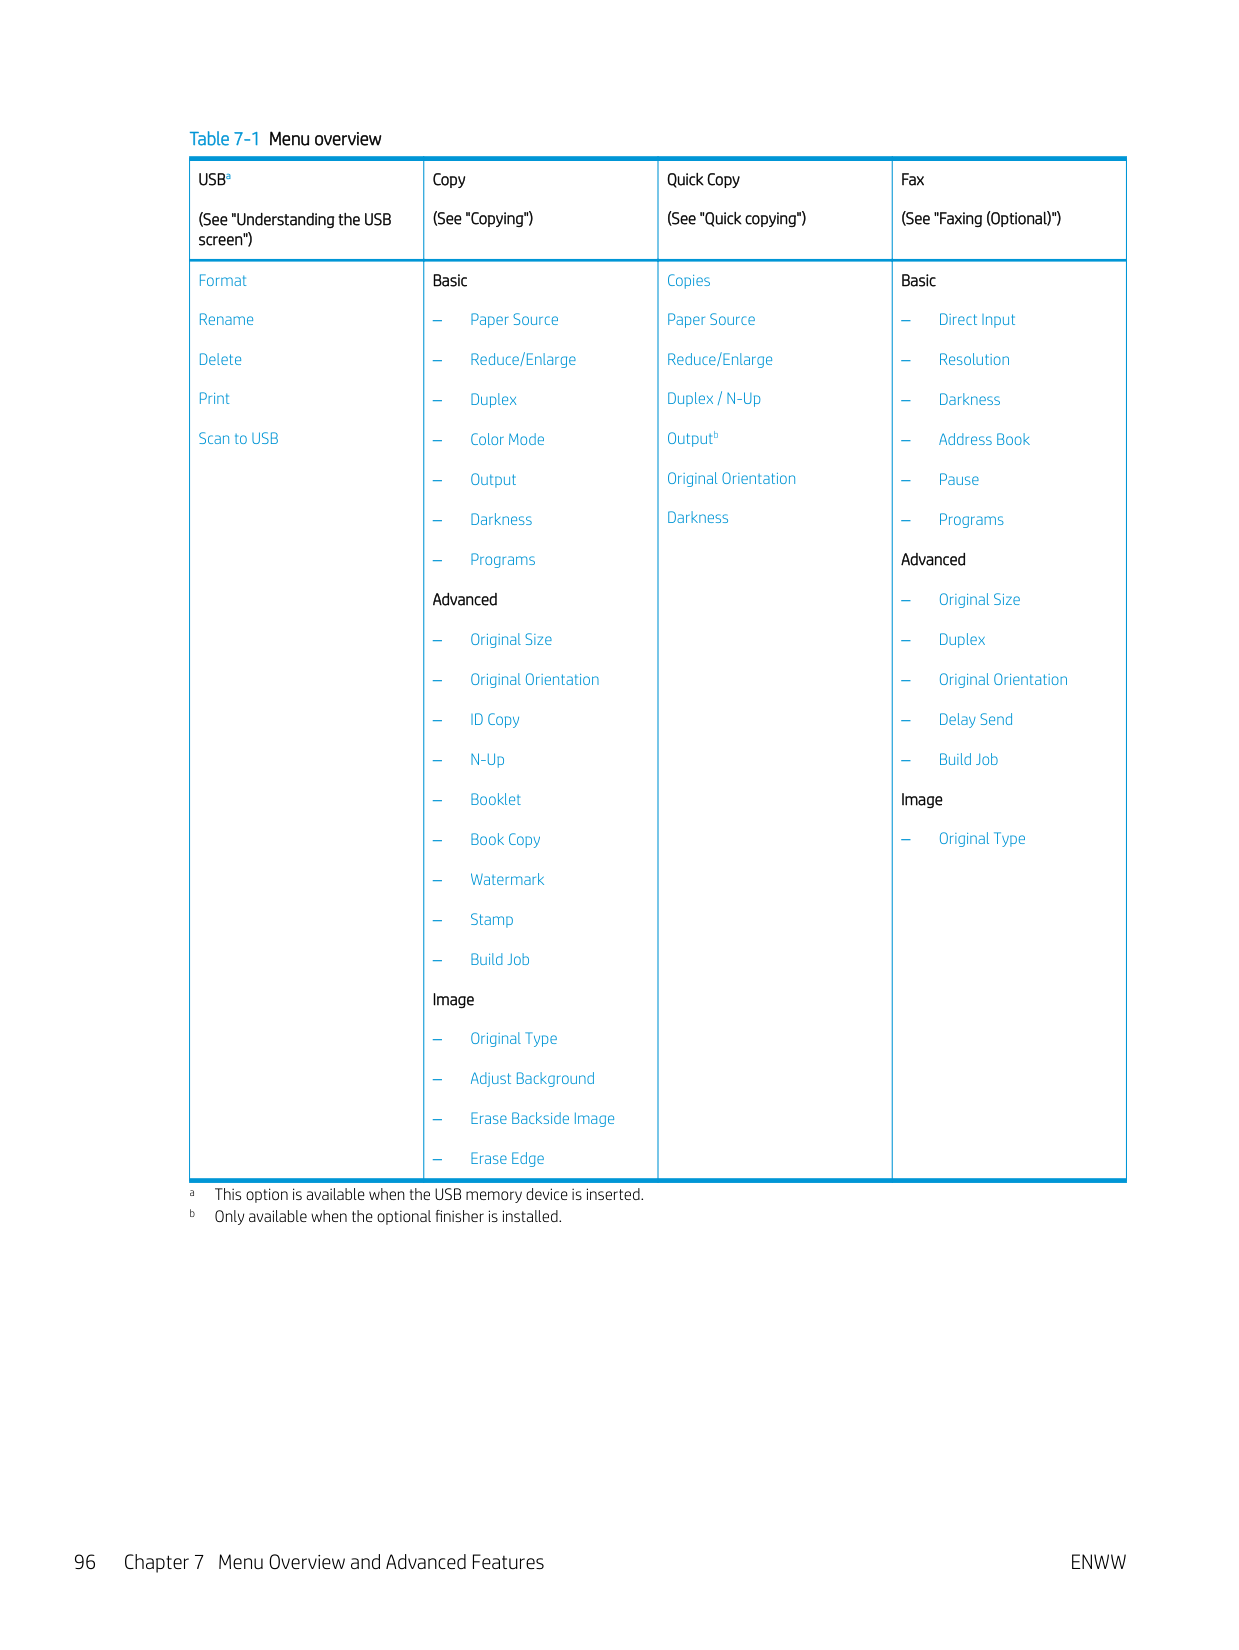
##### NOTE:

If an original is placed on the scanner glass, the printer shows the window asking if you want to place another page. Load another original and press Yes. When you finish, press No on this window.
ENWW Scanning and sending to USB/shared folder 91
macOS scanning
You can scan documents using Image Capture program. macOS offers the Image Capture program.
#### Scanning with network
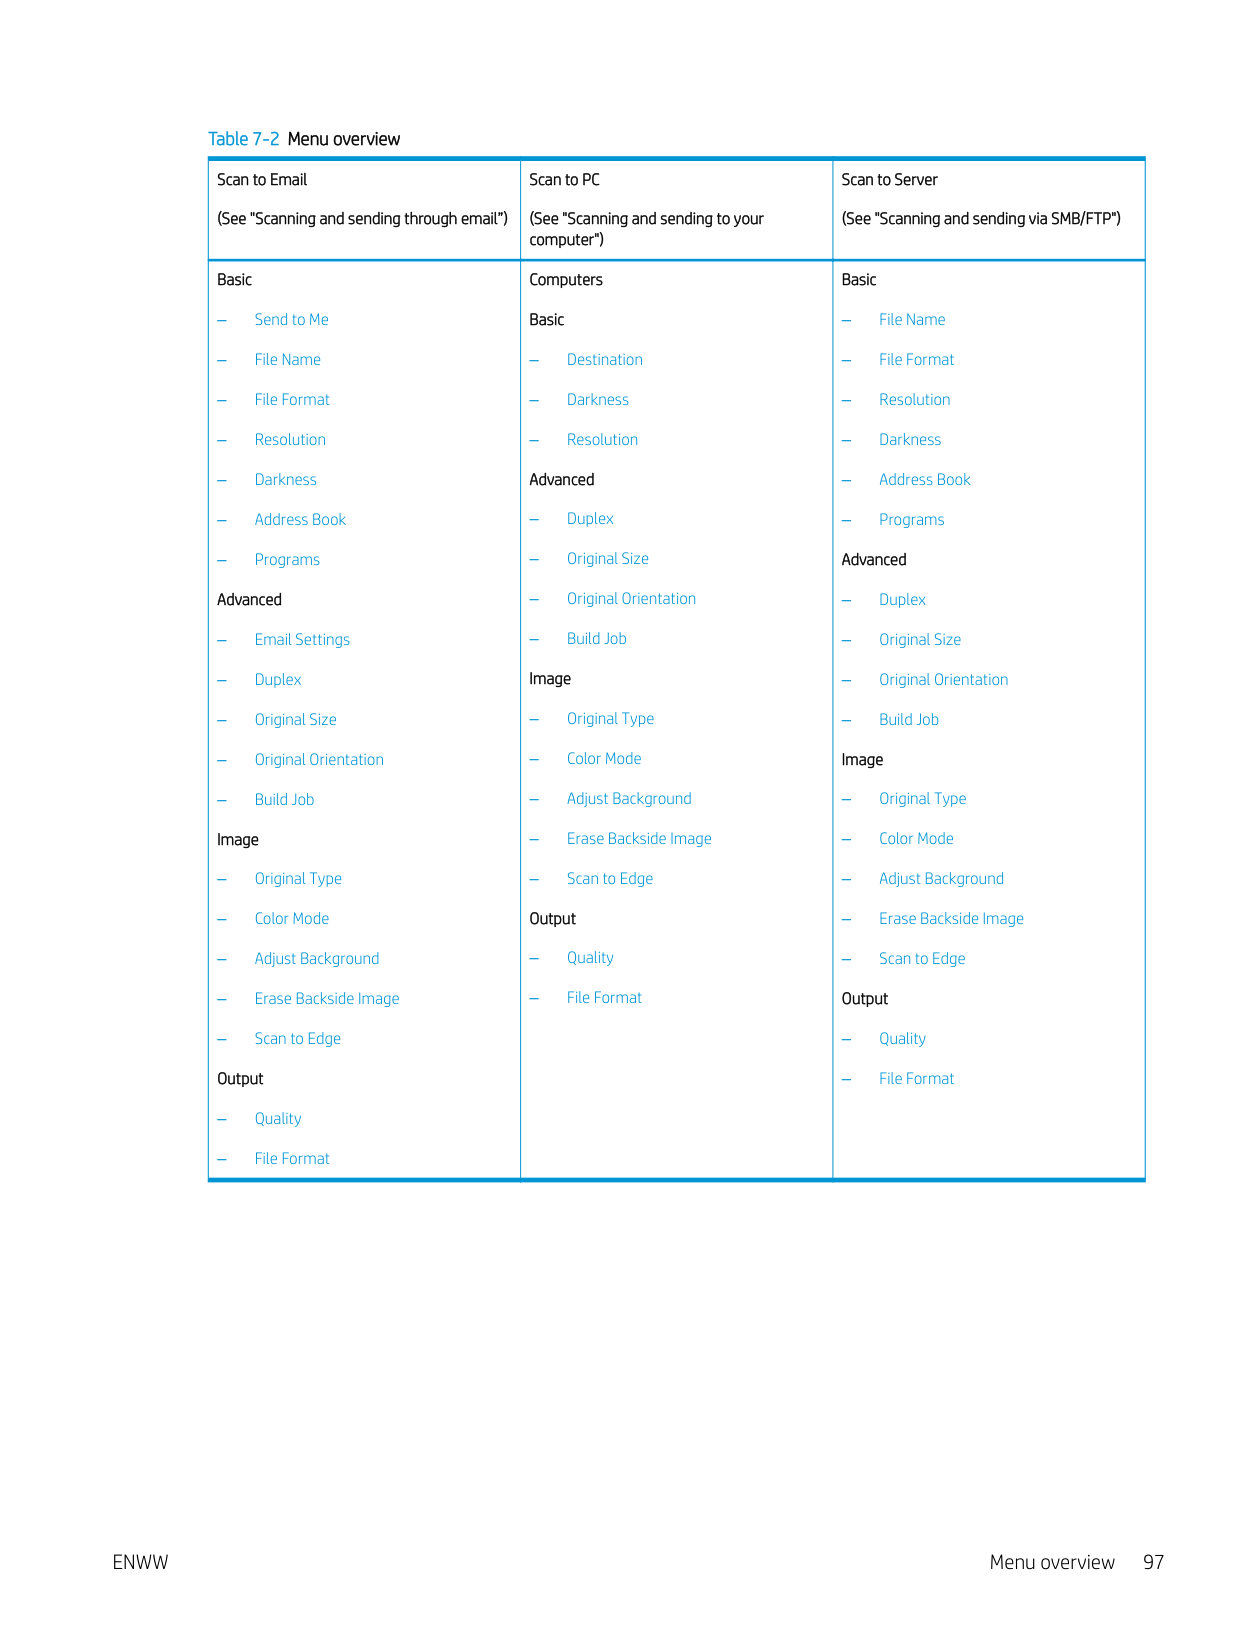
| | |---|
Additional scan tasks Go to support.hp.com. Instructions are available for performing specific scan tasks, such as the following:
ENWW Additional scan tasks 93

7 Menu Overview and Advanced Features
This chapter shows an overview of menus provided by your printer and explains the Machine Setup menu in detail. The Machine Setup menu provides various options for administrators to set in order to use the printer to its full capabilities. Read this chapter carefully to understand the diverse features your printer provides.
| | |---|
##### NOTE:
Menu overview
Your printer is equipped with various menus that will be useful for both users and administrators. With the menus, administrators can set the settings for the printer or use the various features provided. You can access the menus by pressing the display screen on the control panel.
The following table shows the menus provided by your printer. Use the following table to view the menu structure. The menu column shows the main menu and the option column shows its submenus.
| | |---|
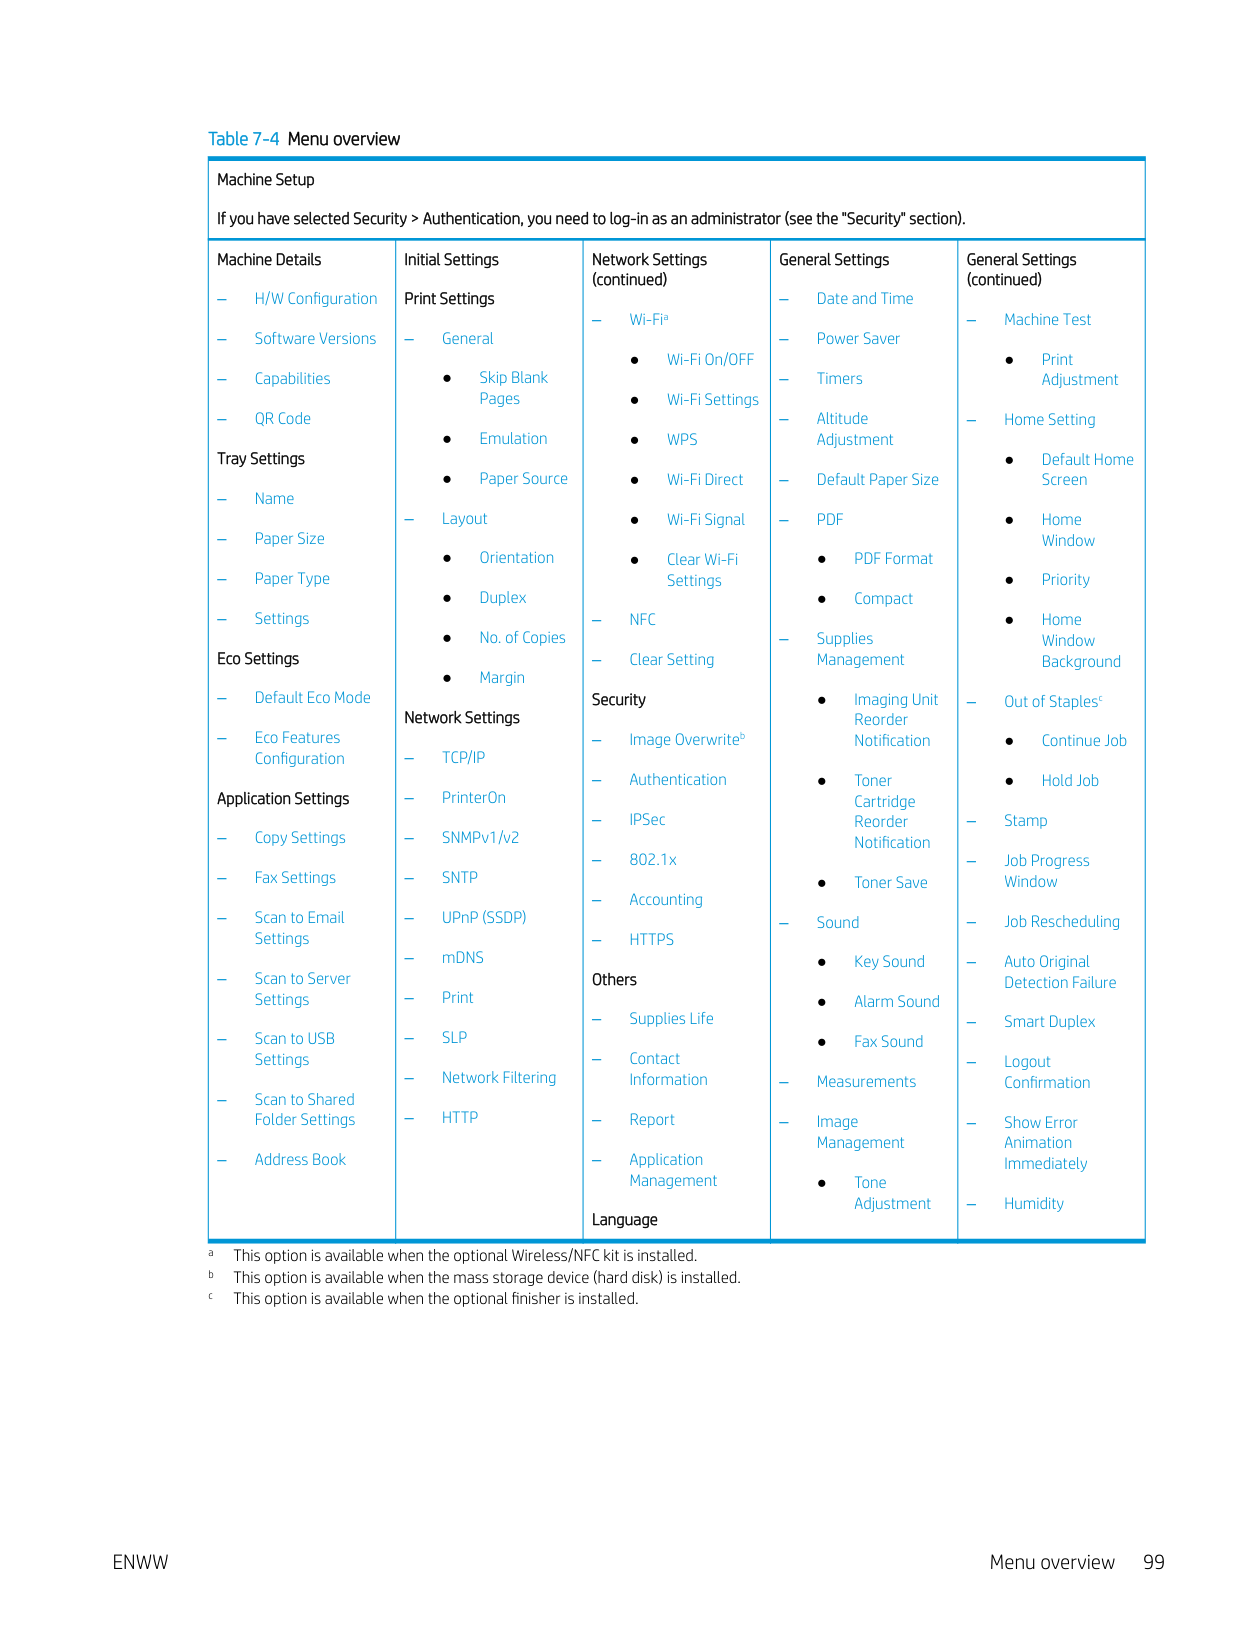
NOTE: Some menus may not appear on the display screen depending on the settings or models. If so, it is not applicable to your printer.
|USBa (See "Understanding the USB screen")|Copy (See "Copying")|Quick Copy (See "Quick copying")|Fax (See "Faxing (Optional)")| |---|---|---|---| |Format Rename Delete Print Scan to USB|Basic
– Paper Source
– Reduce/Enlarge
– Duplex
– Color Mode
– Output
– Darkness
– Programs Advanced
– Original Size
– Original Orientation
– ID Copy
– N-Up
– Booklet
– Book Copy
– Watermark
– Stamp
– Build Job Image
– Original Type
– Adjust Background
– Erase Backside Image
– Erase Edge
|Copies Paper Source Reduce/Enlarge Duplex / N-Up Outputb Original Orientation Darkness|Basic
– Direct Input
– Resolution
– Darkness
– Address Book
– Pause
– Programs Advanced
– Original Size
– Duplex
– Original Orientation
– Delay Send
– Build Job Image
– Original Type
|
######### a This option is available when the USB memory device is inserted. b Only available when the optional finisher is installed.
|Scan to Email (See "Scanning and sending through email”)|Scan to PC (See "Scanning and sending to your computer")|Scan to Server (See "Scanning and sending via SMB/FTP")| |---|---|---| |Basic
– Send to Me
– File Name
– File Format
– Resolution
– Darkness
– Address Book
– Programs Advanced
– Email Settings
– Duplex
– Original Size
– Original Orientation
– Build Job Image
– Original Type
– Color Mode
– Adjust Background
– Erase Backside Image
– Scan to Edge Output
– Quality
– File Format
|Computers Basic
– Destination
– Darkness
– Resolution Advanced
– Duplex
– Original Size
– Original Orientation
– Build Job Image
– Original Type
– Color Mode
– Adjust Background
– Erase Backside Image
– Scan to Edge Output
– Quality
– File Format
|Basic
– File Name
– File Format
– Resolution
– Darkness
– Address Book
– Programs Advanced
– Duplex
– Original Size
– Original Orientation
– Build Job Image
– Original Type
– Color Mode
– Adjust Background
– Erase Backside Image
– Scan to Edge Output
– Quality
– File Format
|
|Scan to USBa (See "Scanning to a USB memory device"|Scan to Shared Folderb (See "Scanning and sending to USB /shared folder")|Stored Document (See "Understanding the Stored Document screen")|Shared Folderb (See "Understanding the Shared Folder screen")| |---|---|---|---| |Basic
– Edit
– File Name
– File Format
– Resolution
– Darkness
– Programs Advanced
– Duplex
– Original Size
– Original Orientation
– Build Job Image
– Original Type
– Color Mode
– Adjust Background
– Erase Backside Image
– Scan to Edge Output
– Quality
– File Format
– Filing Policy
|Basic
– Destination
– File Name
– File Format
– Resolution
– Darkness Advanced
– Duplex
– Original Size
– Original Orientation
– Build Job Image
– Original Type
– Color Mode
– Adjust Background
– Erase Backside Image
– Scan to Edge Output
– Quality
– File Format
– Filing Policy
|Public Private|Rename Delete Print|
######### a This option is available when the USB memory device is inserted. b This option is available when the mass storage device (hard disk) is installed.
|Machine Setup If you have selected Security > Authentication, you need to log-in as an administrator (see the "Security" section).|Machine Setup If you have selected Security > Authentication, you need to log-in as an administrator (see the "Security" section).|Machine Setup If you have selected Security > Authentication, you need to log-in as an administrator (see the "Security" section).|Machine Setup If you have selected Security > Authentication, you need to log-in as an administrator (see the "Security" section).|Machine Setup If you have selected Security > Authentication, you need to log-in as an administrator (see the "Security" section).| |---|---|---|---|---| |Machine Details
– H/W Configuration
– Software Versions
– Capabilities
– QR Code Tray Settings
– Name
– Paper Size
– Paper Type
– Settings Eco Settings
– Default Eco Mode
– Eco Features Configuration
Application Settings
– Copy Settings
– Fax Settings
– Scan to Email Settings
– Scan to Server Settings
– Scan to USB Settings
– Scan to Shared Folder Settings
– Address Book
|Initial Settings Print Settings
– General
● Skip Blank Pages
● Emulation
● Paper Source
– Layout
● Orientation
● Duplex
● No. of Copies
● Margin
Network Settings
– TCP/IP
– PrinterOn
– SNMPv1/v2
– SNTP
– UPnP (SSDP)
– mDNS
– Print
– SLP
– Network Filtering
– HTTP
|Network Settings (continued)
– Wi-Fia
● Wi-Fi On/OFF
● Wi-Fi Settings
● WPS
● Wi-Fi Direct
● Wi-Fi Signal
● Clear Wi-Fi Settings
– NFC
– Clear Setting Security
– Image Overwriteb
– Authentication
– IPSec
– 802.1x
– Accounting
– HTTPS Others
– Supplies Life
– Contact Information
– Report
– Application Management
Language|General Settings
– Date and Time
– Power Saver
– Timers
– Altitude Adjustment
– Default Paper Size
– PDF
● PDF Format
● Compact
– Supplies Management
● Imaging Unit Reorder Notification
● Toner Cartridge Reorder Notification
● Toner Save
– Sound
● Key Sound
● Alarm Sound
● Fax Sound
– Measurements
– Image Management
● Tone
Adjustment|General Settings (continued)
– Machine Test
● Print
Adjustment
– Home Setting
● Default Home Screen
● Home Window
● Priority
● Home Window Background
– Out of Staplesc
● Continue Job
● Hold Job
– Stamp
– Job Progress Window
– Job Rescheduling
– Auto Original Detection Failure
– Smart Duplex
– Logout Confirmation
– Show Error Animation Immediately
– Humidity
|
######### a This option is available when the optional Wireless/NFC kit is installed. b This option is available when the mass storage device (hard disk) is installed. c This option is available when the optional finisher is installed.
Printer setup
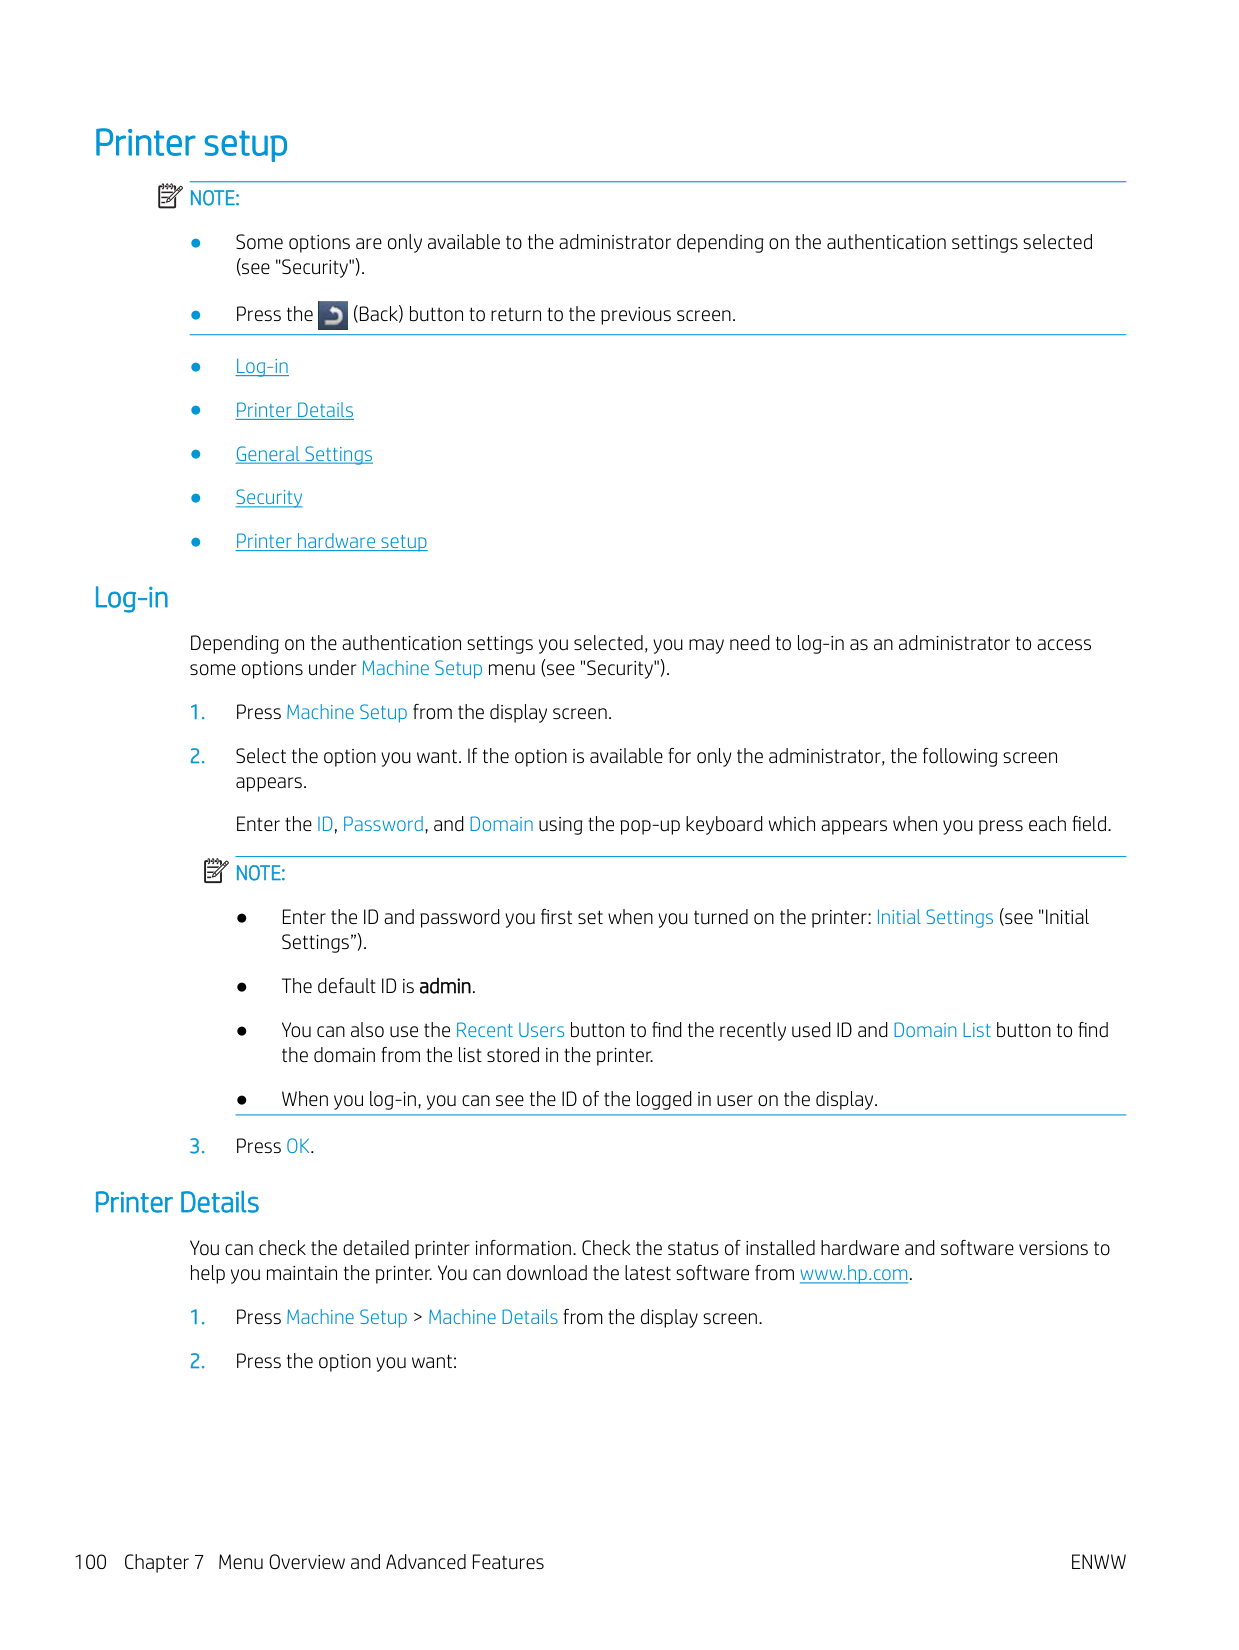
| | |---|
##### NOTE:

#### Log-in
Depending on the authentication settings you selected, you may need to log-in as an administrator to access some options under Machine Setup menu (see "Security").
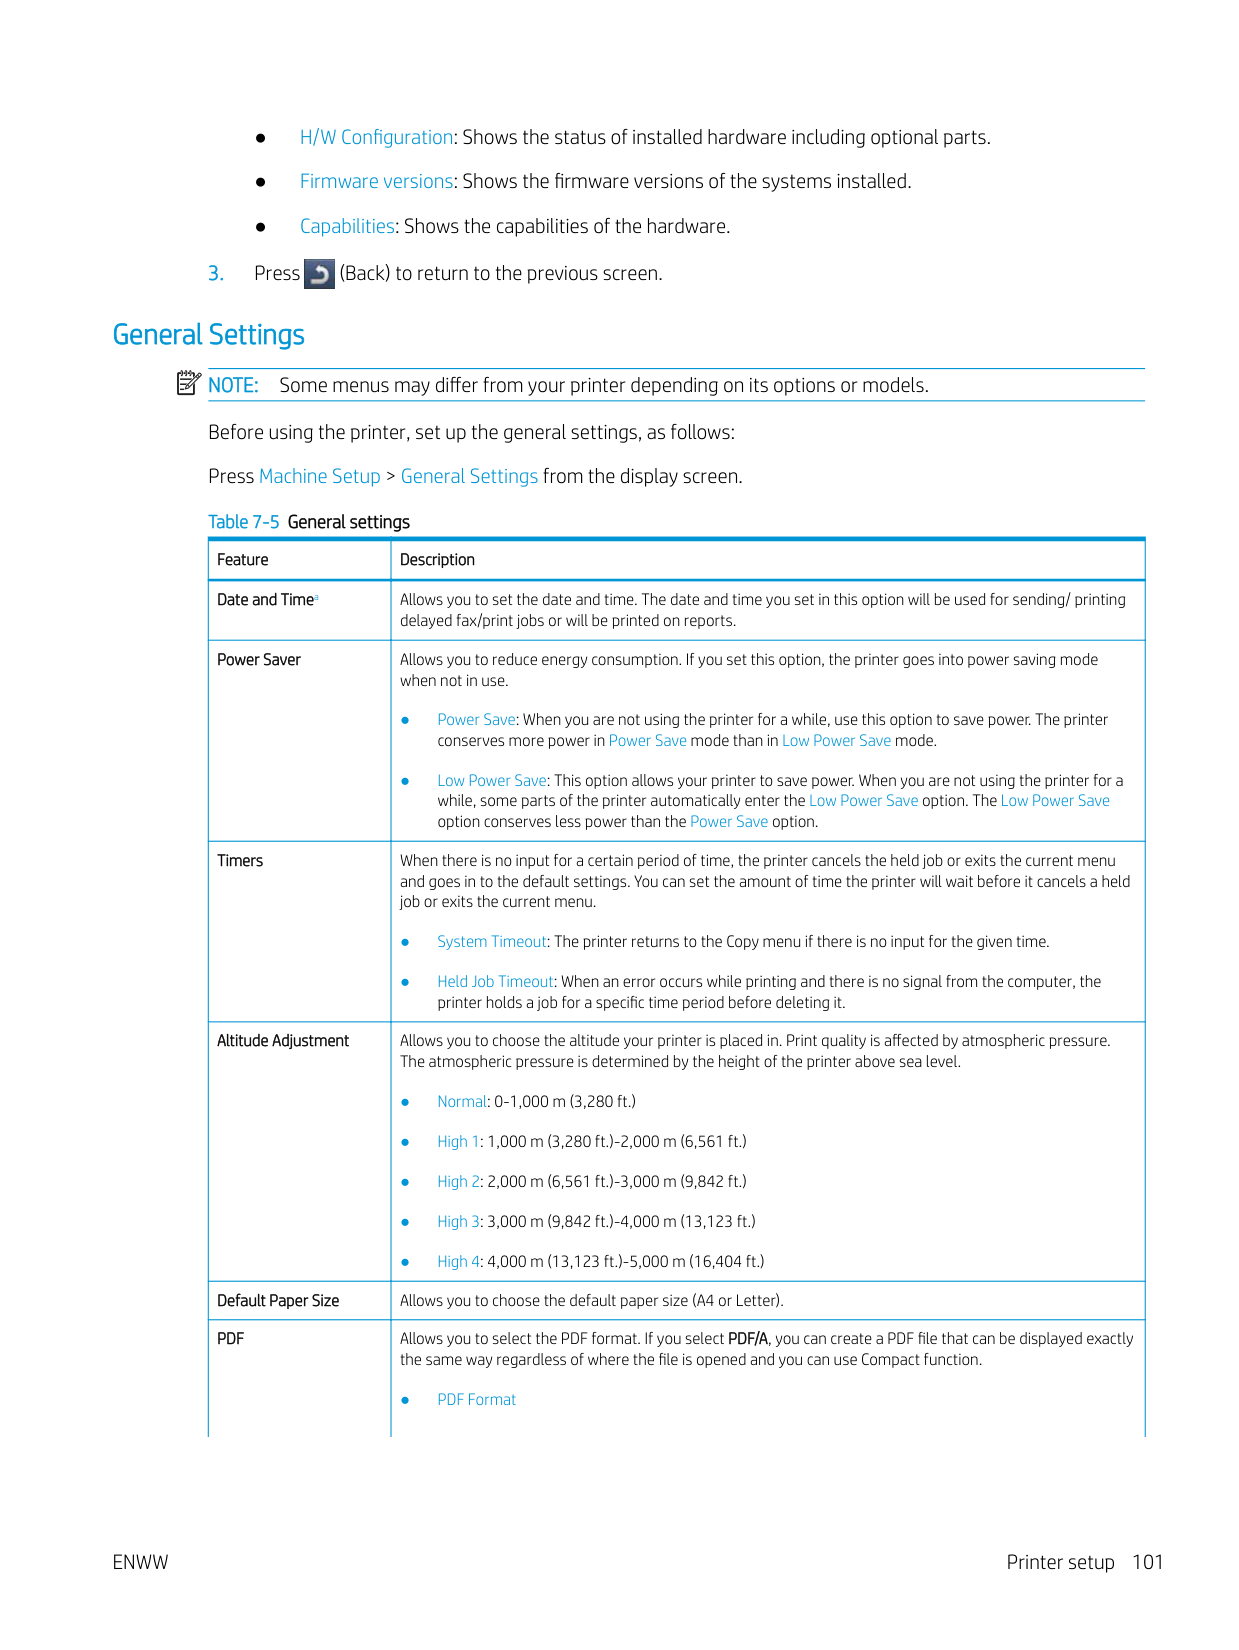
| | |---|
#### Printer Details
You can check the detailed printer information. Check the status of installed hardware and software versions to help you maintain the printer. You can download the latest software from www.hp.com.

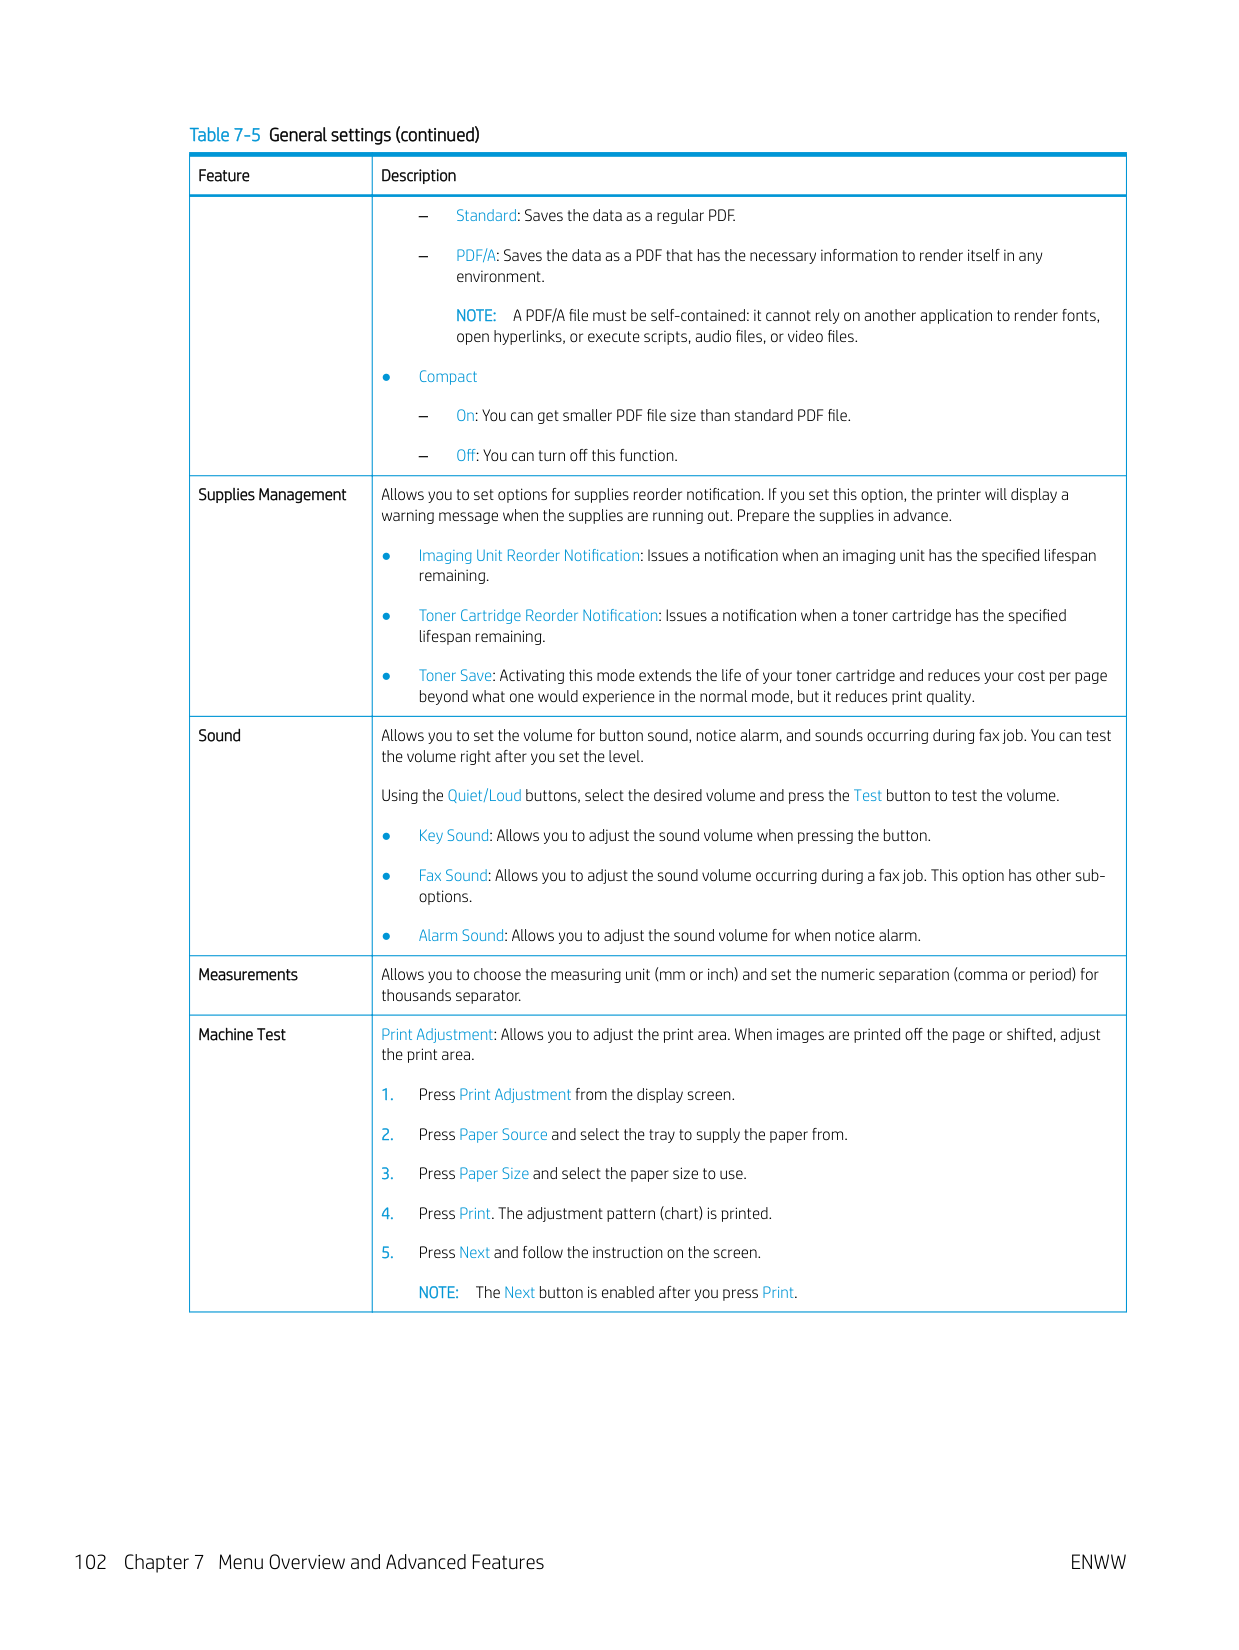
General Settings NOTE: Some menus may differ from your printer depending on its options or models. Before using the printer, set up the general settings, as follows: Press Machine Setup > General Settings from the display screen. Table 7-5 General settings
| | |---|
|Feature|Description| |---|---| |Date and Timea|Allows you to set the date and time. The date and time you set in this option will be used for sending/ printing delayed fax/print jobs or will be printed on reports.| |Power Saver|Allows you to reduce energy consumption. If you set this option, the printer goes into power saving mode when not in use.
● Power Save: When you are not using the printer for a while, use this option to save power. The printer conserves more power in Power Save mode than in Low Power Save mode.
● Low Power Save: This option allows your printer to save power. When you are not using the printer for a while, some parts of the printer automatically enter the Low Power Save option. The Low Power Save option conserves less power than the Power Save option.
| |Timers|When there is no input for a certain period of time, the printer cancels the held job or exits the current menu and goes in to the default settings. You can set the amount of time the printer will wait before it cancels a held job or exits the current menu.
● System Timeout: The printer returns to the Copy menu if there is no input for the given time.
● Held Job Timeout: When an error occurs while printing and there is no signal from the computer, the printer holds a job for a specific time period before deleting it.
| |Altitude Adjustment|Allows you to choose the altitude your printer is placed in. Print quality is affected by atmospheric pressure. The atmospheric pressure is determined by the height of the printer above sea level.
● Normal: 0-1,000 m (3,280 ft.)
● High 1: 1,000 m (3,280 ft.)-2,000 m (6,561 ft.)
● High 2: 2,000 m (6,561 ft.)-3,000 m (9,842 ft.)
● High 3: 3,000 m (9,842 ft.)-4,000 m (13,123 ft.)
● High 4: 4,000 m (13,123 ft.)-5,000 m (16,404 ft.)
| |Default Paper Size|Allows you to choose the default paper size (A4 or Letter).| |PDF|Allows you to select the PDF format. If you select PDF/A, you can create a PDF file that can be displayed exactly the same way regardless of where the file is opened and you can use Compact function.
● PDF Format|
|Feature|Description| |---|---| | |– Standard: Saves the data as a regular PDF.
– PDF/A: Saves the data as a PDF that has the necessary information to render itself in any environment.
NOTE: A PDF/A file must be self-contained: it cannot rely on another application to render fonts, open hyperlinks, or execute scripts, audio files, or video files.
● Compact
– On: You can get smaller PDF file size than standard PDF file.
– Off: You can turn off this function.
| |Supplies Management|Allows you to set options for supplies reorder notification. If you set this option, the printer will display a warning message when the supplies are running out. Prepare the supplies in advance.
● Imaging Unit Reorder Notification: Issues a notification when an imaging unit has the specified lifespan remaining.
● Toner Cartridge Reorder Notification: Issues a notification when a toner cartridge has the specified lifespan remaining.
● Toner Save: Activating this mode extends the life of your toner cartridge and reduces your cost per page beyond what one would experience in the normal mode, but it reduces print quality.
| |Sound|Allows you to set the volume for button sound, notice alarm, and sounds occurring during fax job. You can test the volume right after you set the level.
Using the Quiet/Loud buttons, select the desired volume and press the Test button to test the volume.
● Key Sound: Allows you to adjust the sound volume when pressing the button.
● Fax Sound: Allows you to adjust the sound volume occurring during a fax job. This option has other suboptions.
● Alarm Sound: Allows you to adjust the sound volume for when notice alarm.
| |Measurements|Allows you to choose the measuring unit (mm or inch) and set the numeric separation (comma or period) for thousands separator.| |Machine Test|Print Adjustment: Allows you to adjust the print area. When images are printed off the page or shifted, adjust the print area.
1. Press Print Adjustment from the display screen.
2. Press Paper Source and select the tray to supply the paper from.
3. Press Paper Size and select the paper size to use.
4. Press Print. The adjustment pattern (chart) is printed.
5. Press Next and follow the instruction on the screen. NOTE: The Next button is enabled after you press Print.
|
|Feature|Description|

|---|---| |Home Setting|Allows you to choose the menu order of the Home window.
● Home Window: You can select the menus that display on the Home screen. Select the menu and press Enable and OK.
● Priority: You can select the order of the home window menus. Select the Application you want to move and press the Up/Down buttons to set the items in the desired order.
● Home Window Background: You can select the Home window background.
● Default Home Screen The default settings are used unless they are changed by using the Home window.
| |Stamp|Allows you to apply the stamp feature, prints the time and date, IP address, or user ID on the copied output.| |Job Progress Window|Allows you to show job progress in the display.| |Job Rescheduling|Allows the printer to proceed to the next job when the current job pauses due to a paper mismatch or paper empty error.| |Image Management|Allows you to manage the color settings including copy darkness and print density.| |Out of Staplesb|Determines what the printer does when the staple cartridge is empty.
● Continue Job: Continues to process the job even if there are no staples.
● Hold Job: Stops processing the job. The job resumes after you have refilled the staple cartridge.
| |Auto Original Detection Failure|Determines what the printer does when it fails to automatically detect the size of the original.
● Default Paper Size: Copies documents in the default paper size (A4 or Letter).
● Selected Paper Size: Copies documents on the paper in the selected tray. The printer automatically detects the available trays and selects a tray based on the tray priority. However, you can also manually select the tray.
| |Smart Duplex|Uses simplex mode when printing only one original page or a blank page although the duplex option is enabled.| |Logout Confirmation|Determines whether to use the confirmation pop-up when you log out.| |Show Error Animation Immediately|Determines whether to show the helpful animation for solving errors when one occurs.| |Humidity|Optimizes print quality according to the humidity in the environment.|
a May only be available for the administrator depending on the authentication settings selected (see the "Security" section). b This option appears only when the finisher option is installed.
#### Security
This feature allows you to configure the security related settings.
####### Table 7-6 Security
|Option|Description| |---|---| |Image Overwritea|You can set the printer to overwrite data stored in the memory. The printer overwrites the data with different patterns eliminating the possibilities of recovery.
● Automatic Image Overwrite: When a job is completed, there are temporal images left in the memory. For security reasons, you can set the printer to automatically overwrite secure nonvolatile memory. If you want to secure memory space, you can set the printer to automatically overwrite secure nonvolatile memory.
● Manual Image Overwrite: When printing, copying, scanning, and faxing, the printer temporarily uses memory space. For security reasons, you can set the printer to manually overwrite secure nonvolatile memory. If you want to secure memory space, you can manually overwrite secure nonvolatile memory. You can set the printer to repeat the manual image overwrite after the system is rebooted.
|
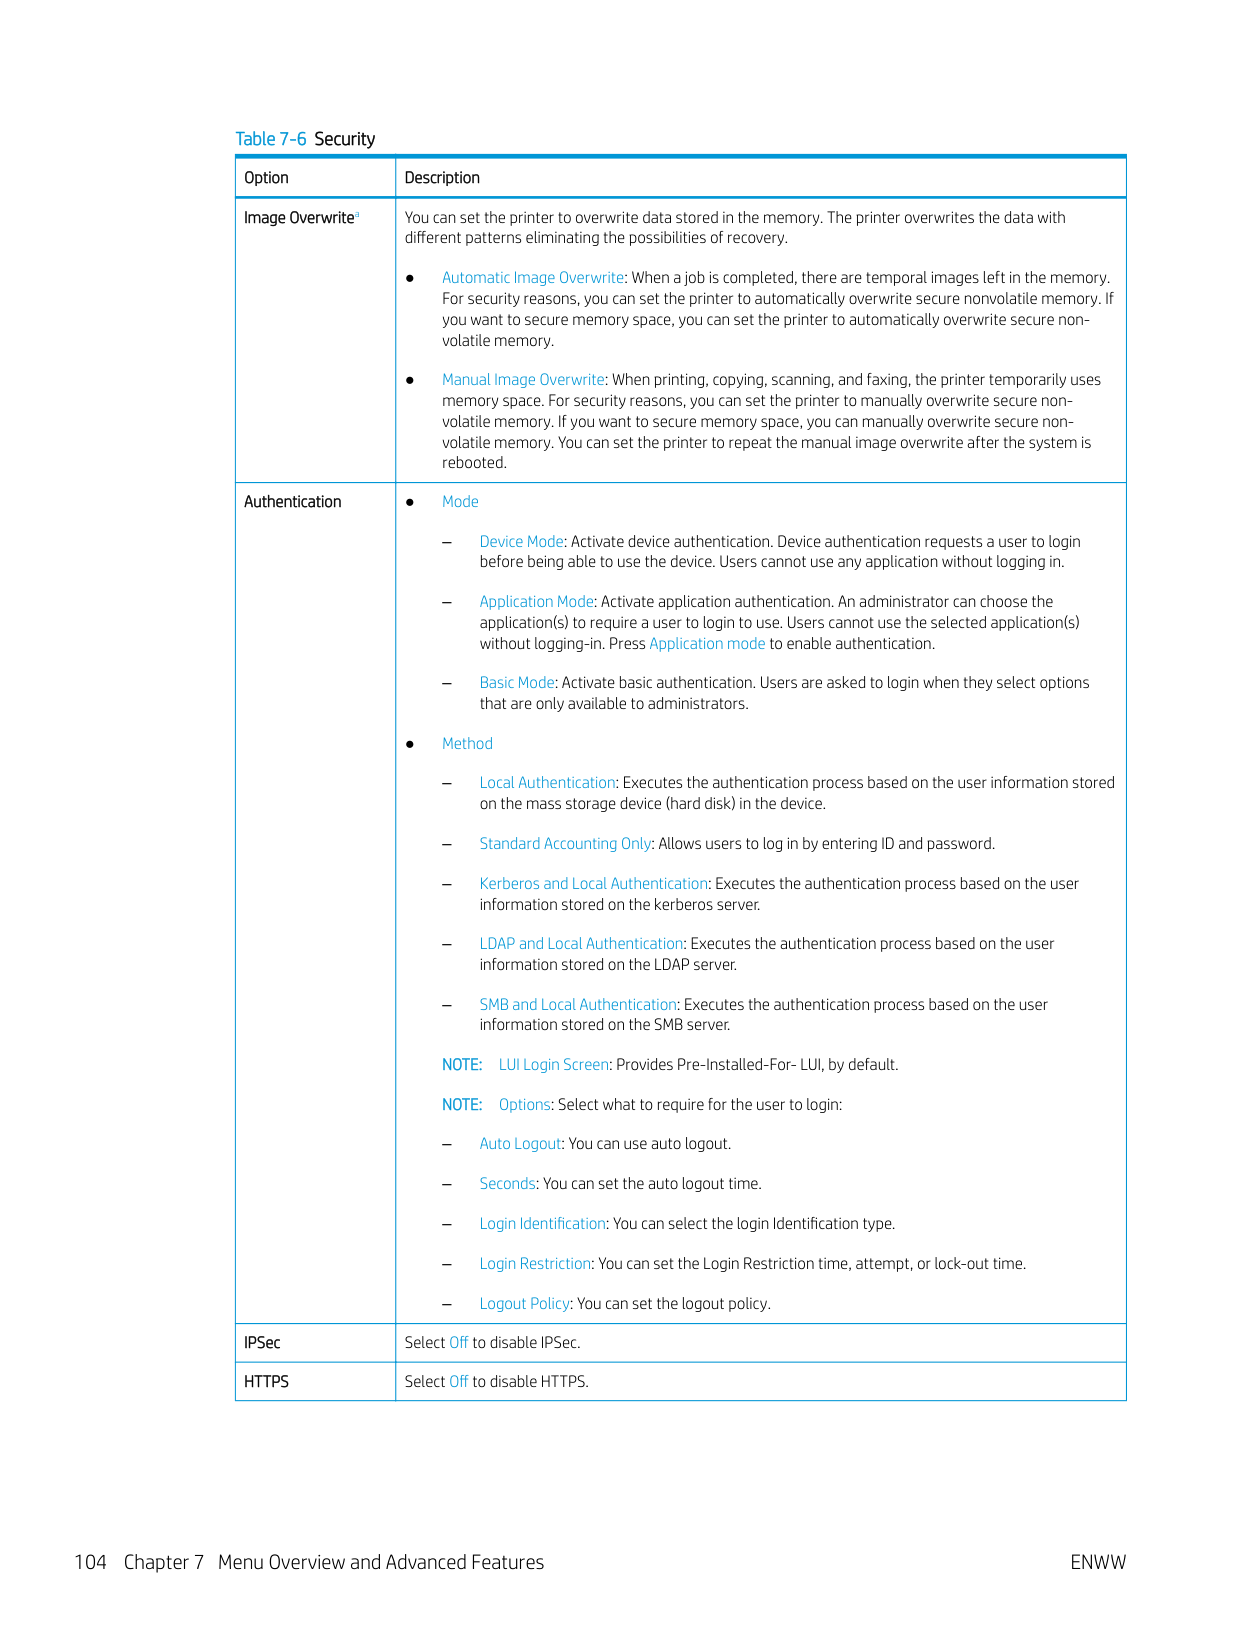
|Authentication|● Mode
– Device Mode: Activate device authentication. Device authentication requests a user to login before being able to use the device. Users cannot use any application without logging in.
– Application Mode: Activate application authentication. An administrator can choose the application(s) to require a user to login to use. Users cannot use the selected application(s) without logging-in. Press Application mode to enable authentication.
– Basic Mode: Activate basic authentication. Users are asked to login when they select options that are only available to administrators.
● Method
– Local Authentication: Executes the authentication process based on the user information stored on the mass storage device (hard disk) in the device.
– Standard Accounting Only: Allows users to log in by entering ID and password.
– Kerberos and Local Authentication: Executes the authentication process based on the user information stored on the kerberos server.
– LDAP and Local Authentication: Executes the authentication process based on the user information stored on the LDAP server.
– SMB and Local Authentication: Executes the authentication process based on the user information stored on the SMB server. NOTE: LUI Login Screen: Provides Pre-Installed-For- LUI, by default. NOTE: Options: Select what to require for the user to login:
– Auto Logout: You can use auto logout.
– Seconds: You can set the auto logout time.
– Login Identification: You can select the login Identification type.
– Login Restriction: You can set the Login Restriction time, attempt, or lock-out time.
– Logout Policy: You can set the logout policy.
| |IPSec|Select Off to disable IPSec.| |HTTPS|Select Off to disable HTTPS.|
####### Table 7-6 Security (continued)
|Option|Description| |---|---| |802.1x|You can enable 802.1x authentication, which is a port-based authentication. If this authentication is enabled, the printer is not allowed to access through the protected side of the network until the printer is authorized. Use this feature to protect your network.
● EAP-MD5: Offers minimal security. The MD5 hash function is vulnerable to dictionary attacks, and does not support key generation.
● PEAP: Recommended for users who only intend to use Microsoft desktop clients and servers. For other users, it is not recommended.
● EAP-MSCHAPv2: Provides two-way authentication between peers by combining a peer Challenge message with the Response packet, and an authenticator Response message on the Success packet.
● TLS: This is used to provide secure communication over the Internet between a client and server.
| |Accounting|● No Accounting: Select not to use this feature.
● Standard Accounting: Select to use the installed job accounting method.
|
a This feature may not be available depending on models or optional kits installed.
#### Printer hardware setup
For basic setup instructions, see the Installation Guide that came with the printer. For additional instructions, go to HP support on the Web. Go to support.hp.com for HP's all-inclusive help for the printer. Find the following support:
8 Supplies and accessories
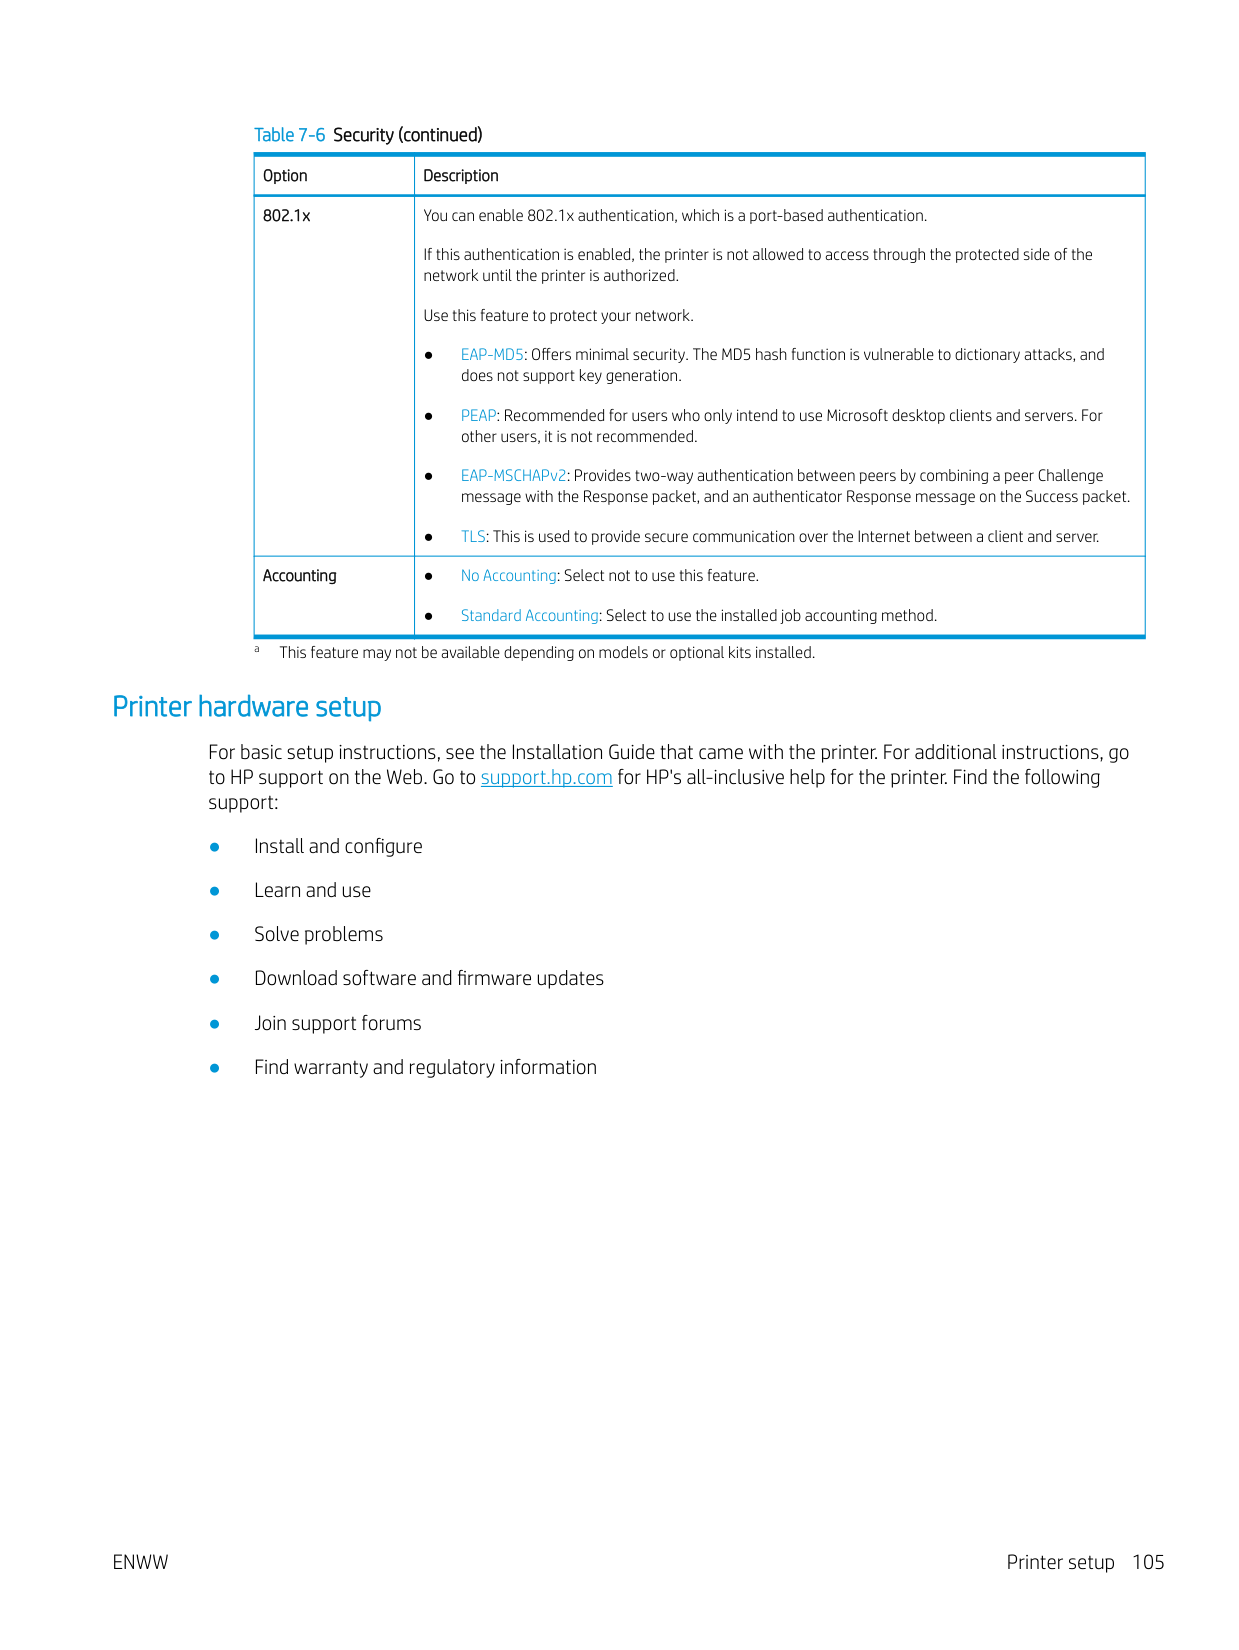
Ordering supplies and accessories
| | |---|
NOTE: Available accessories may differ from country/region to another. Contact your sales representatives to obtain the list of available supplies, and maintenance parts.
##### Ordering
##### For more information, see
Available supplies When supplies reach their lifespan, you can order the following types of supplies for your printer. NOTE: Depending on the options and job mode used, the toner cartridge’s lifespan may differ. Table 8-1 Long life consumables (LLCs)
| | |---|
Type Average yielda Part name Toner cartridge Average continuous black cartridge yield:
W1002YC
Approx. 33,000 standard pages
Replacement staple cartridge Y1G13A Toner collection unit Approx. 100,000 pages W9007MC
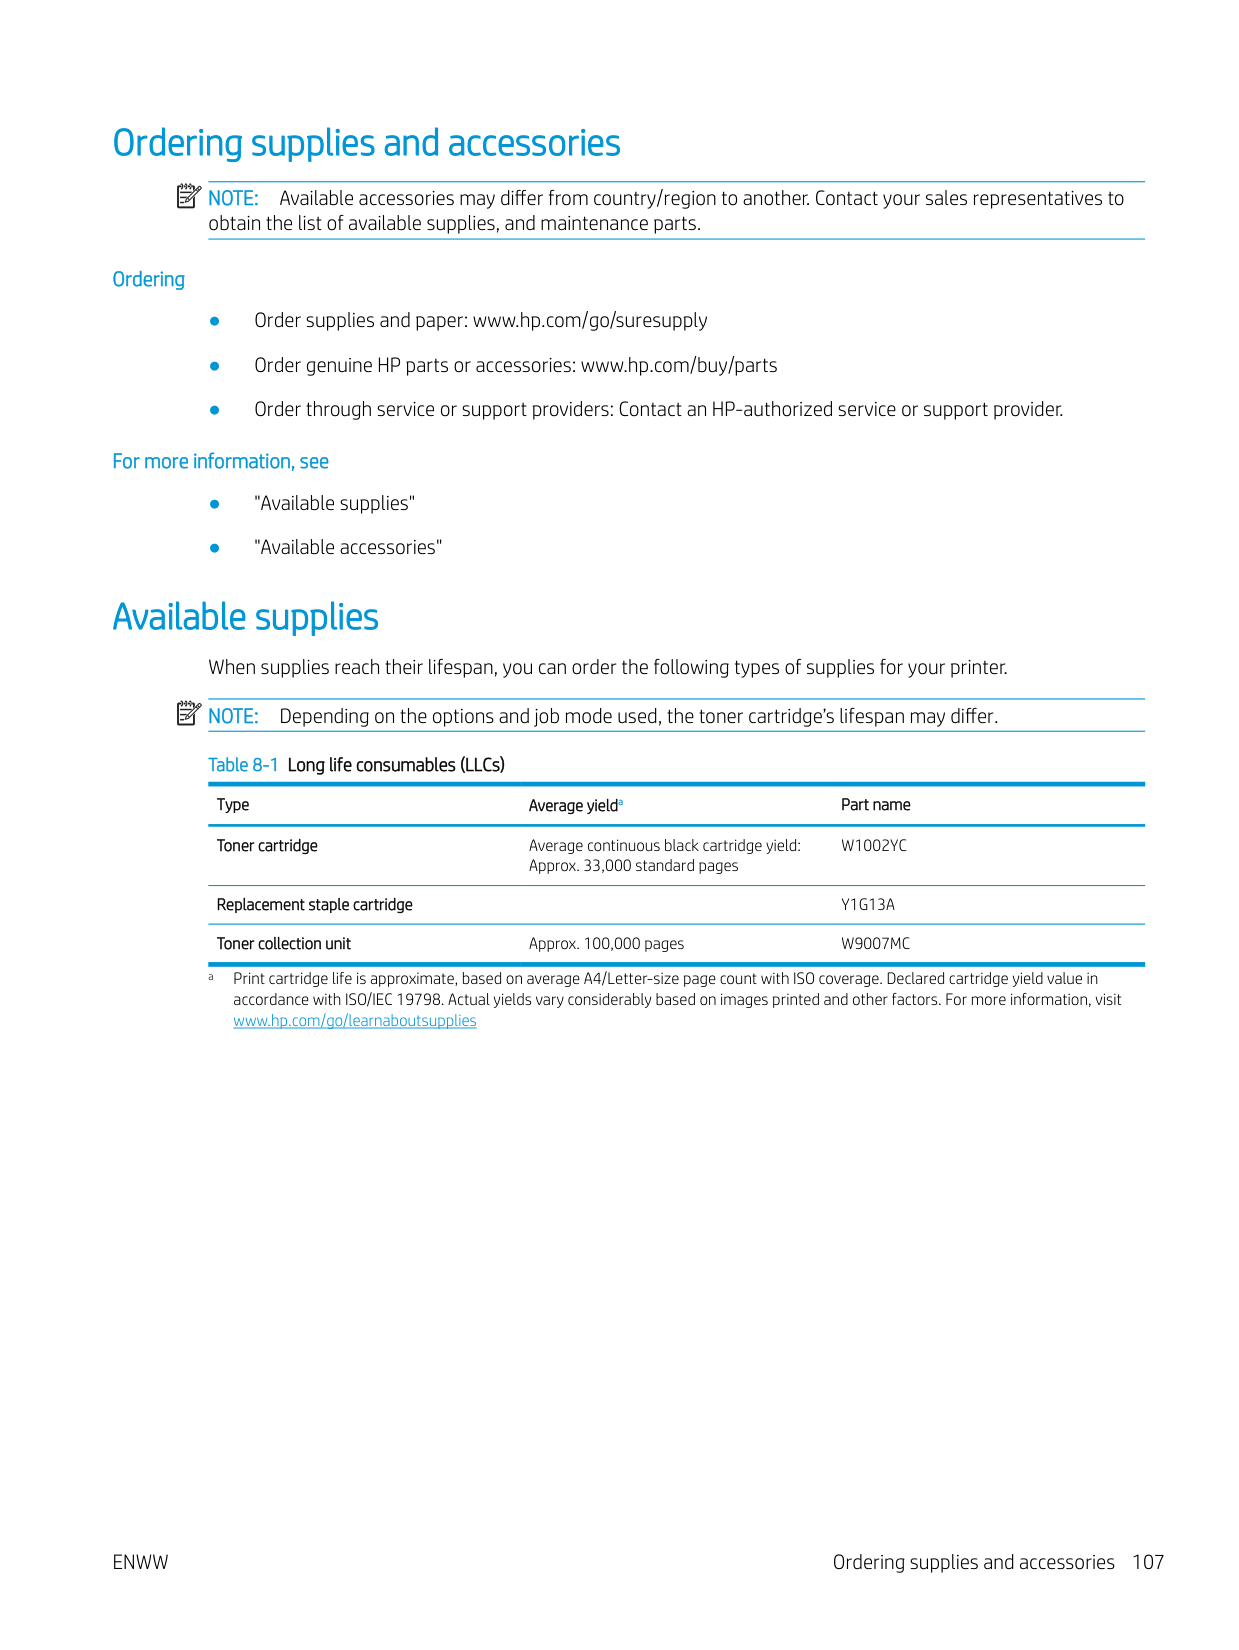
a Print cartridge life is approximate, based on average A4/Letter-size page count with ISO coverage. Declared cartridge yield value in accordance with ISO/IEC 19798. Actual yields vary considerably based on images printed and other factors. For more information, visit www.hp.com/go/learnaboutsupplies
ENWW Ordering supplies and accessories 107
Available accessories You can purchase and install accessories to enhance your printer’s performance and capacity. NOTE: If the installation guide for the optional accessory does not include information about how to install the accessory in your printer model, then visit support.hp.com Figure 8-1 Available accessories
| | |---|


Table 8-2 Available optional accessories
No Accessory Function Part number
This fax kit allows you to use your printer as a fax.
China only: SS411E#AB2 India only: SS411F#ACJ Taiwan only: SS411C#ABD Vietnam only: SS411F#ACJ All other Asia Pacific Countries/Regions: SS411B#EEE
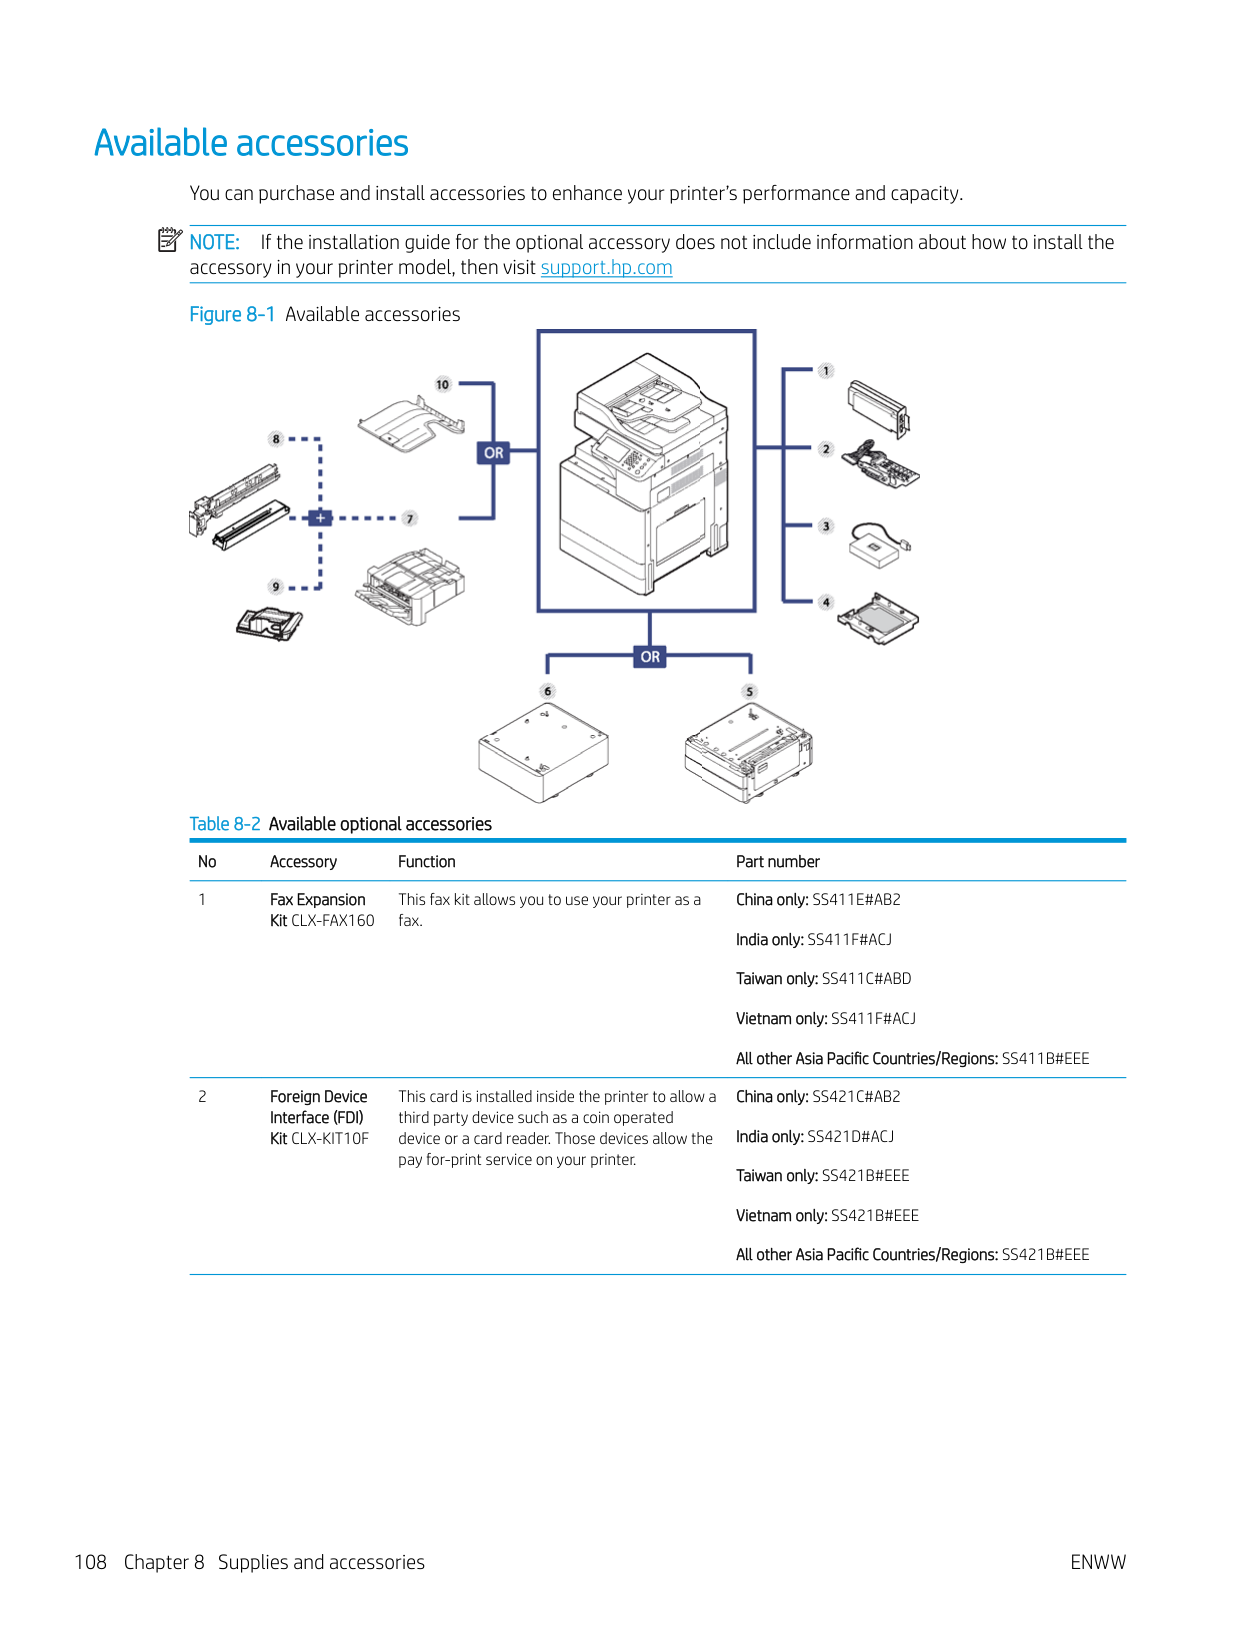
This card is installed inside the printer to allow a third party device such as a coin operated device or a card reader. Those devices allow the pay for-print service on your printer.
China only: SS421C#AB2 India only: SS421D#ACJ Taiwan only: SS421B#EEE Vietnam only: SS421B#EEE All other Asia Pacific Countries/Regions: SS421B#EEE
####### Table 8-2 Available optional accessories (continued)
To purchase the Wireless/NFC kit, contact the retailer or distributor where you purchased the printer. Only authorized service providers, distributors, or retailers are permitted to install the Wireless/NFC kit.
China only: SS474E#AB2 India only: SS474F#ACJ Taiwan only: SS474B#EEE Vietnam only: SS474B#EEE All other Asia Pacific Countries/Regions: SS474B#EEE
This HDD kit will help the printer to be used in various ways.
China only: SS441D#AB2 India only: SS441C#ACJ Taiwan only: SS441B#EEE Vietnam only: SS441B#EEE All other Asia Pacific Countries/Regions: SS441B#EEE
####### Table 8-3 Available paper handling accessoriesNo. Accessory Function Part name
Y1F97A
Y1G17A
This kit allows you to punch holes for filing the printouts. Y1G02A
8 HP LaserJet Inner Finisher Hole 2/4
punch
This kit allows you to punch holes for filing the printouts. Y1G03A
This kit allows you to punch holes for filing the printouts. Y1G04A
Y1G13A
a This accessory is available only when the optional inner finisher is installed.
| | |---|
NOTE: Many part numbers vary based on where you are located. It is important to contact your local HP parts suppliers to ensure you have the most current part number available based on your location.
ENWW Available accessories 109
Storing the toner cartridge
Toner cartridges contain components that are sensitive to light, temperature and humidity. HPI suggests users follow these recommendations to ensure optimal performance, highest quality, and longest life from your new HP toner cartridge.
Store the cartridge in the same environment in which the printer will be used. This should be in controlled temperature and humidity conditions. The toner cartridge should remain in its original and unopened package until installation – if original packaging is not available, cover the top opening of the cartridge with paper and store in a dark cabinet.
Opening the cartridge package prior to use dramatically shortens its useful shelf and operating life. Do not store on the floor. If the toner cartridge is removed from the printer, follow the instructions below to store the toner cartridge properly.
#### Handling instructions
Do not expose the cartridge to unnecessary vibrations or shock.
#### Toner cartridge usage
HP does not recommend the use of non-HP brand toner cartridges in your printer including generic, store brand, refilled, or remanufactured toner cartridges.
#### Estimated cartridge life
Print cartridge life is approximate, based on average A4/Letter-size page count with ISO coverage. Declared cartridge yield value in accordance with ISO/IEC 19798. Actual yields vary considerably based on images printed and other factors. For more information, visit www.hp.com/go/learnaboutsupplies.
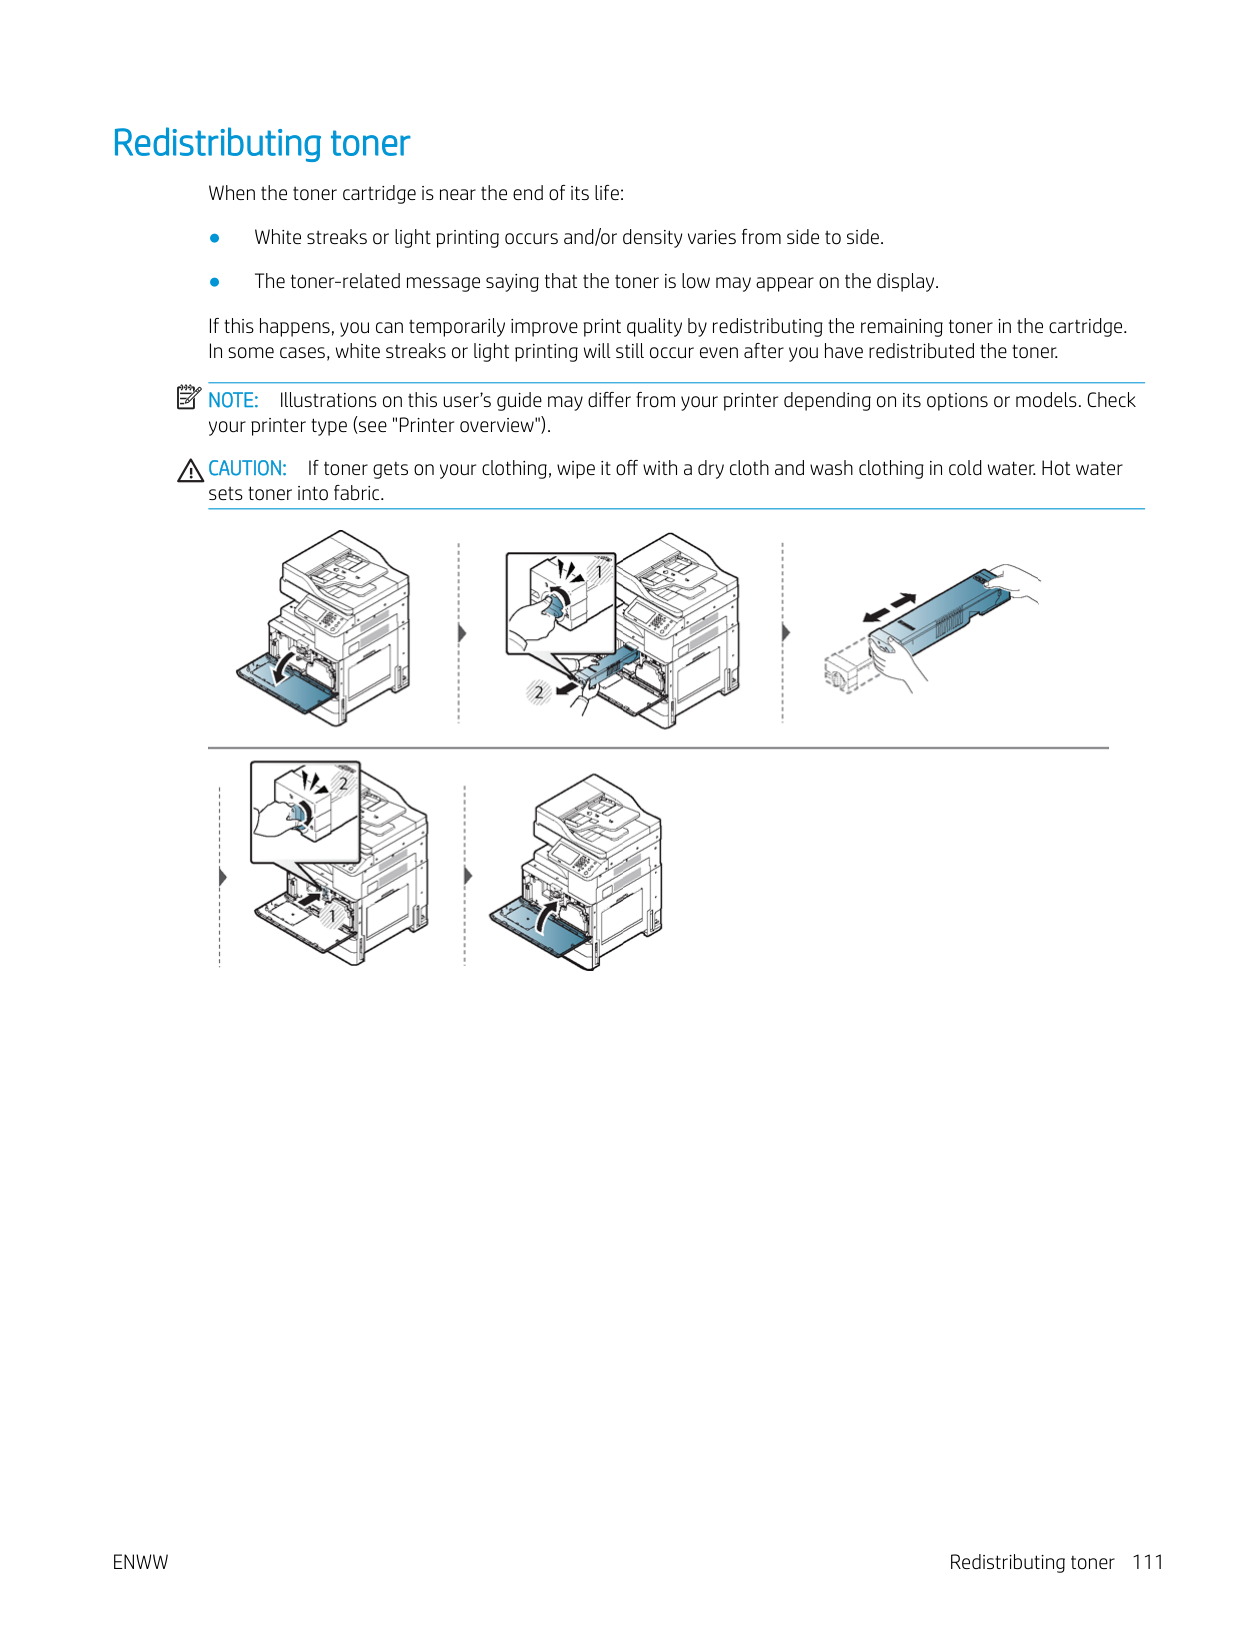
For example, if you print a lot of graphics, the consumption of the toner is higher and you may need to change the cartridge more often.
Redistributing toner
When the toner cartridge is near the end of its life:
If this happens, you can temporarily improve print quality by redistributing the remaining toner in the cartridge. In some cases, white streaks or light printing will still occur even after you have redistributed the toner.
| | |---|
NOTE: Illustrations on this user’s guide may differ from your printer depending on its options or models. Check your printer type (see "Printer overview").
CAUTION: If toner gets on your clothing, wipe it off with a dry cloth and wash clothing in cold water. Hot water sets toner into fabric.


ENWW Redistributing toner 111
Replacing the toner cartridge
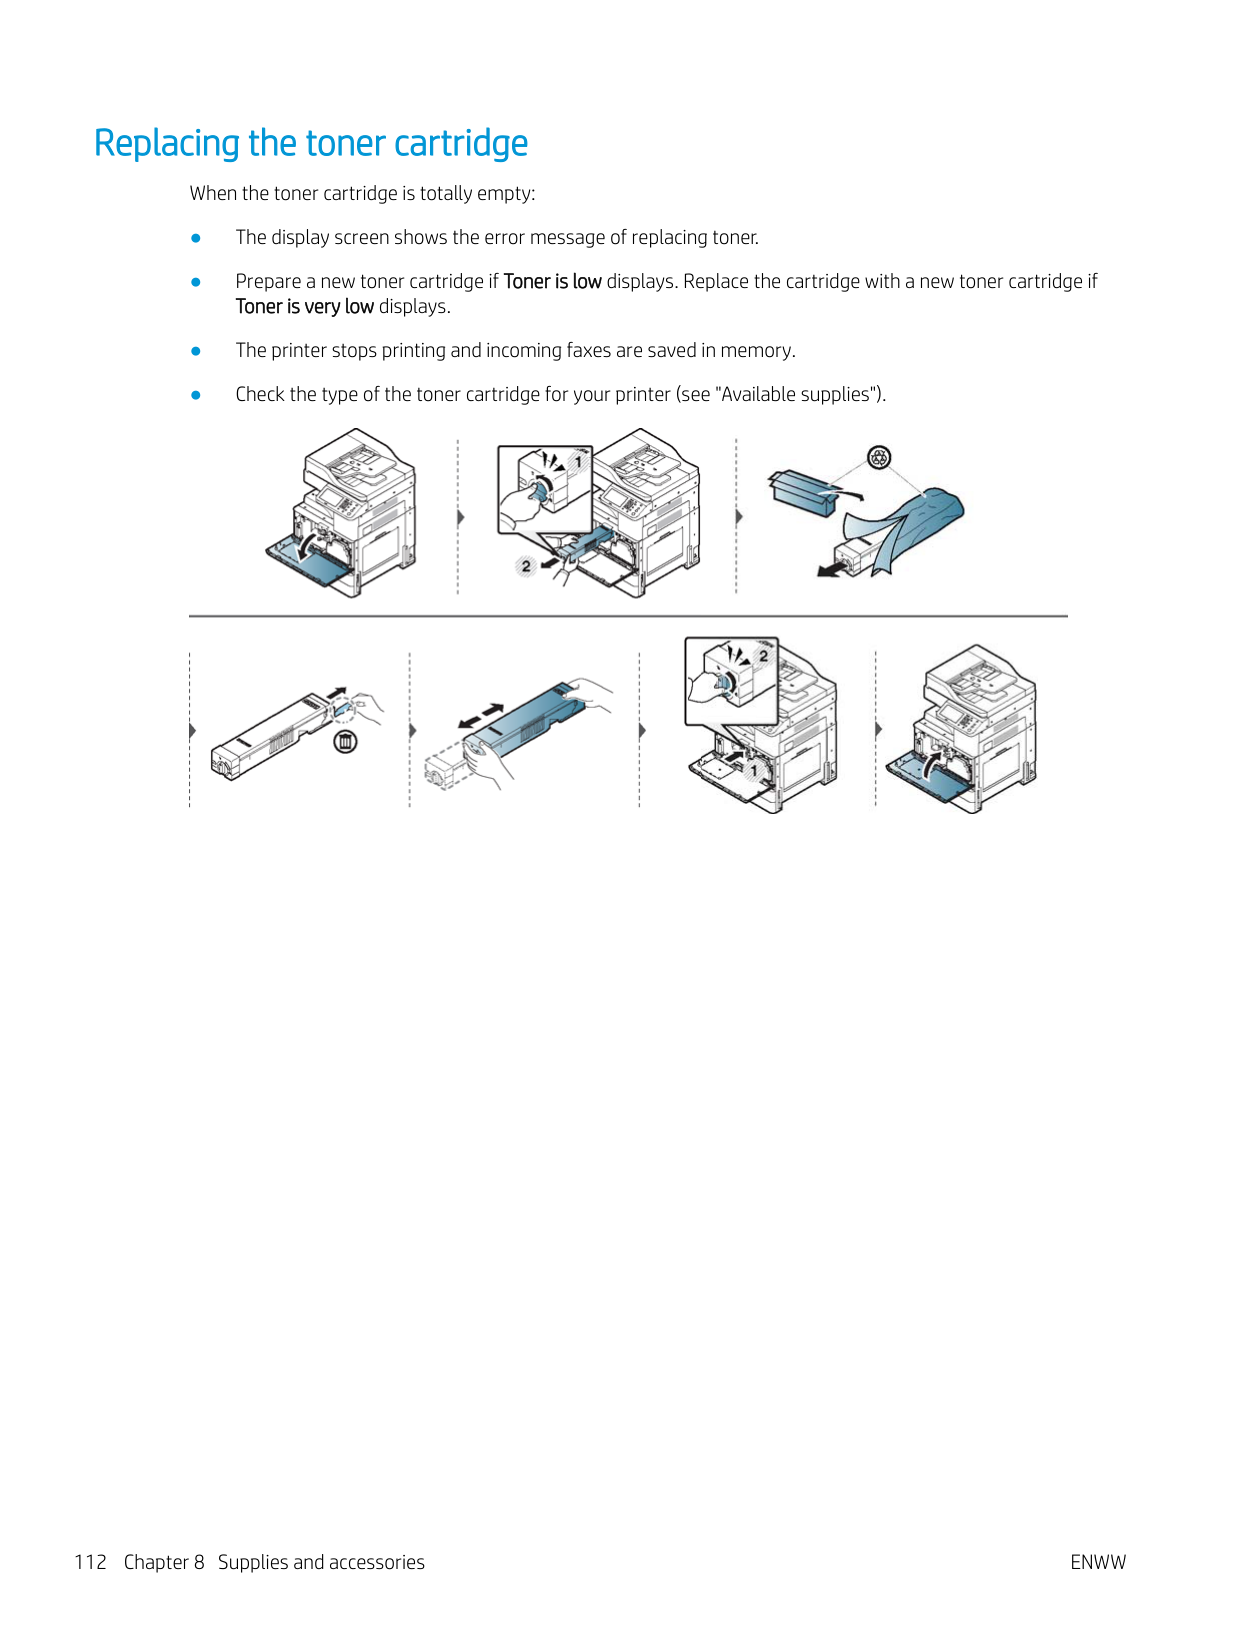
When the toner cartridge is totally empty:


Replacing the toner collection unit
When the toner collection unit is totally empty:


ENWW Replacing the toner collection unit 113
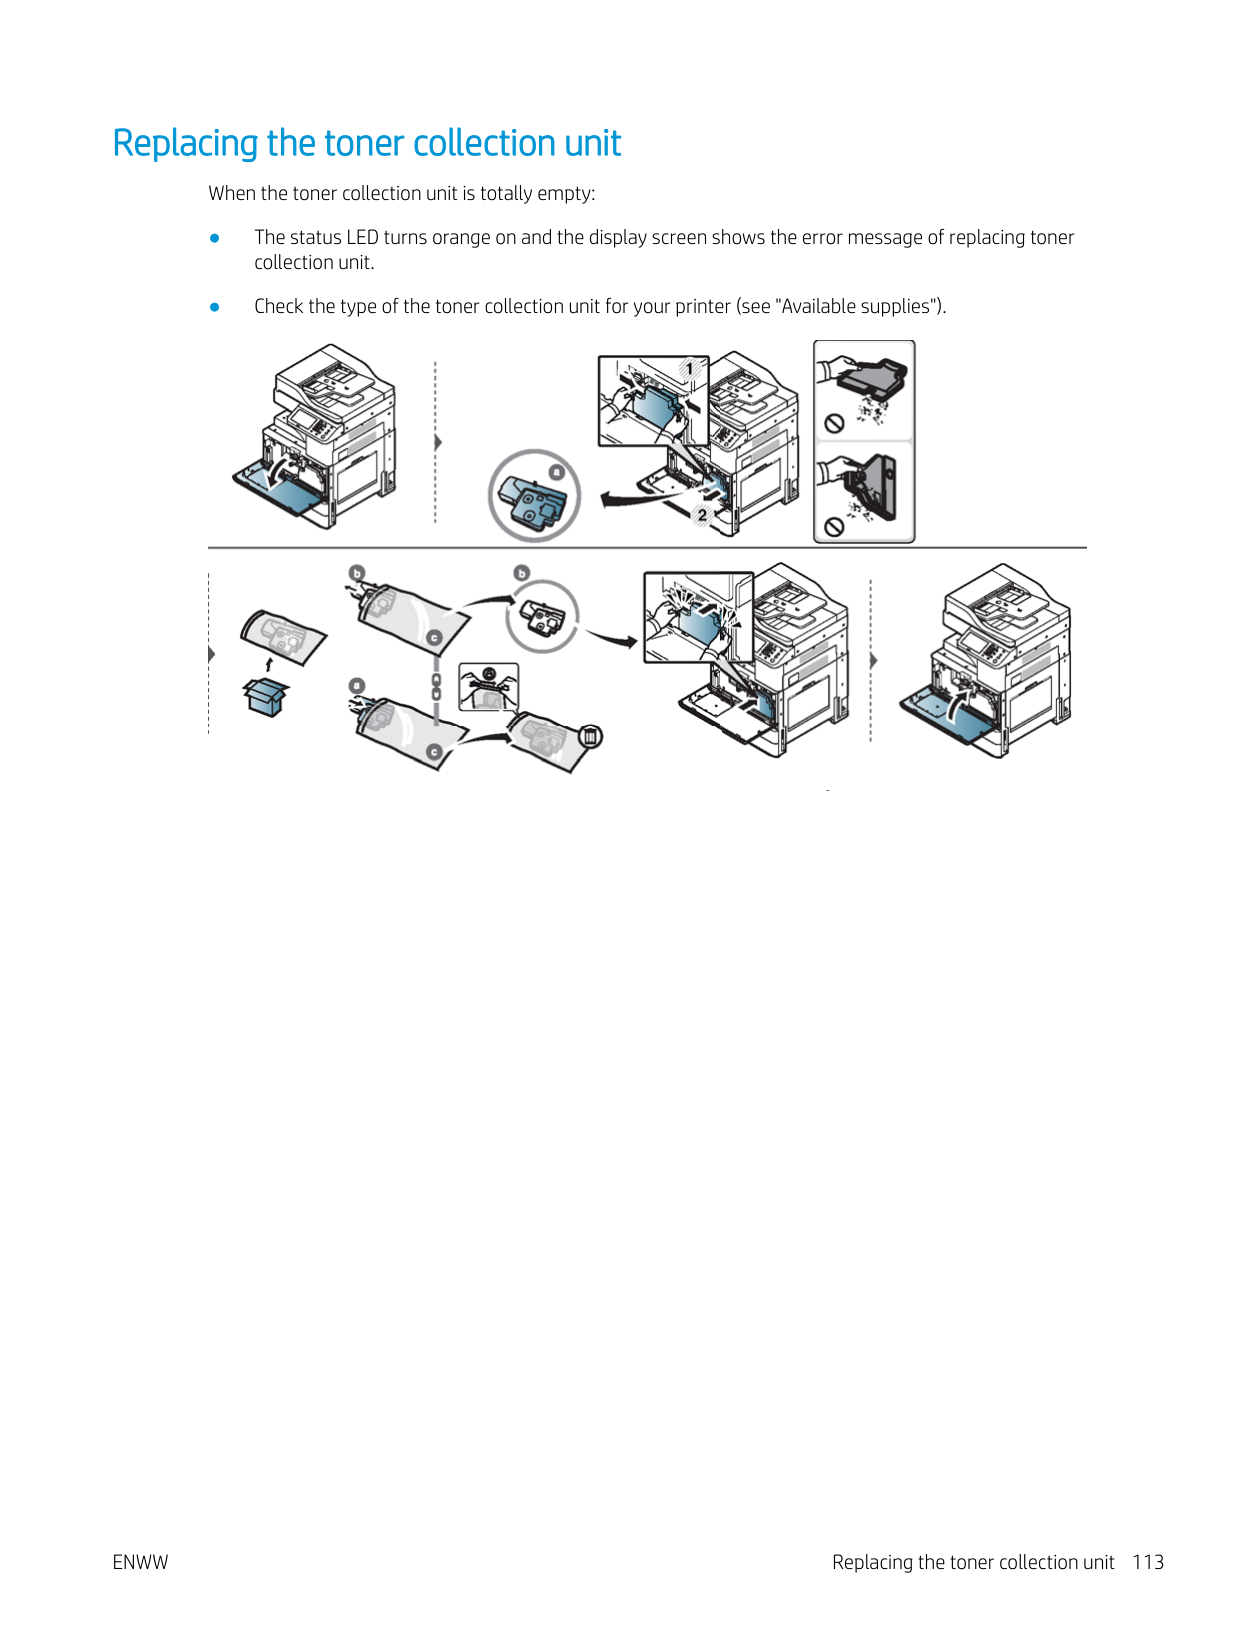
Checking the supplies life Check remaining life of the supplies and prepare the supplies in advance. You can also print the supplies life report. Select Supplies Information in the Report feature (see "Other settings").
● From the printer
#### From the printer
| | |---|
NOTE: We recommend you prepare new supplies or those that you have used over 90% of their average yield.
Cleaning the printer
If printing quality problems occur or if you use your printer in a dusty environment, you need to clean your printer regularly to keep the best printing condition and use your printer longer.
WARNING! Read the following precautions before cleaning the printer: any damages due to user’s mishandling is not covered by the warranty:
#### Cleaning the outside or display screen
Clean the printer cabinet or the display screen with a soft, lint-free cloth. Dampen the cloth slightly with water, but be careful not to let any water drip onto or into the printer.
#### Cleaning the inside
##### Toner cartridge area:
During the printing process, paper, toner, and dust particles can accumulate inside the printer. These accumulations can cause print quality problems, such as toner specks or smearing. Cleaning the inside of the printer clears and reduces printing quality problems.
CAUTION: Use a dry lint free cloth when cleaning the inside of the printer, be careful not to damage the transfer roller or any other inside parts. Do not use solvents such as benzene or thinner. Printing quality problems can occur and cause damage to the printer.


#### Cleaning the imaging unit area
##### CAUTION:
| | |---|


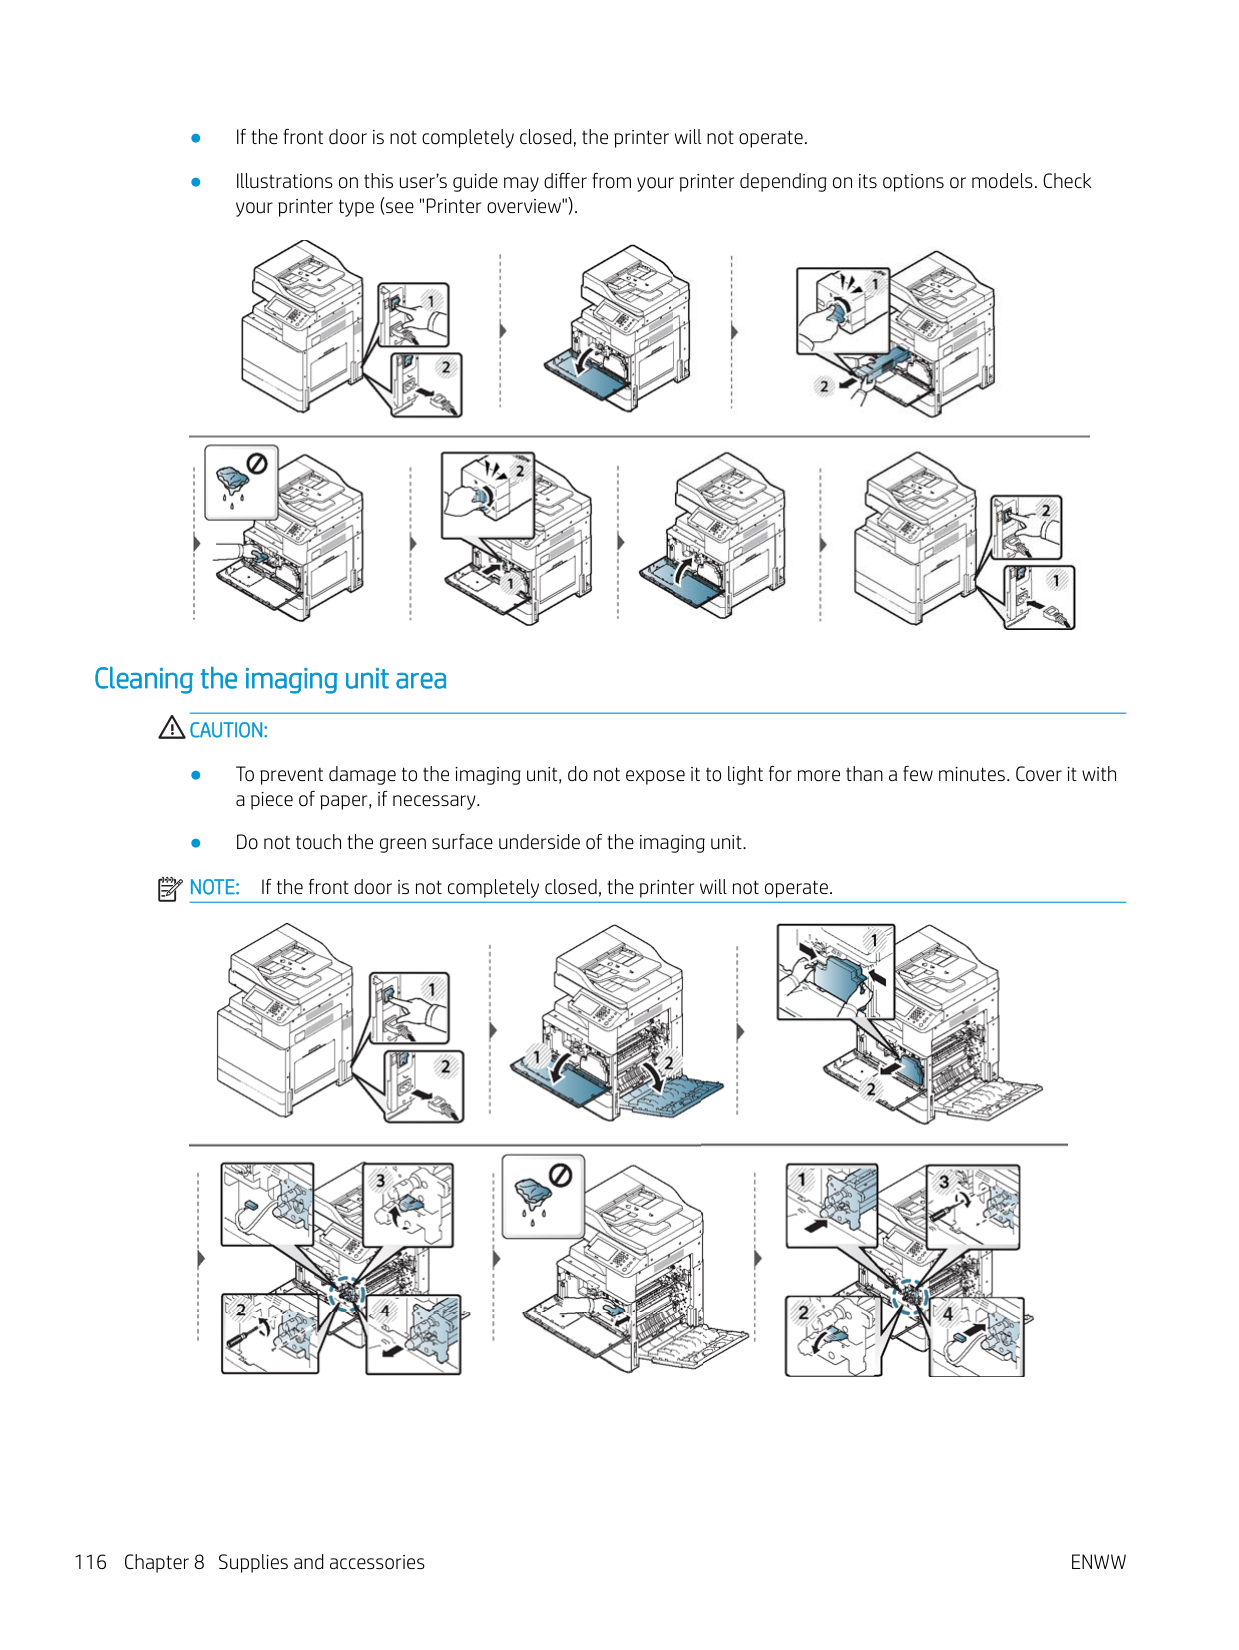
Cleaning the toner collection unit area


Cleaning the scan unit
Keeping the scan unit clean helps to ensure the best possible copy quality. We suggest that you clean the scan unit at the start of each day and during the day, as needed.
| | |---|
##### NOTE:


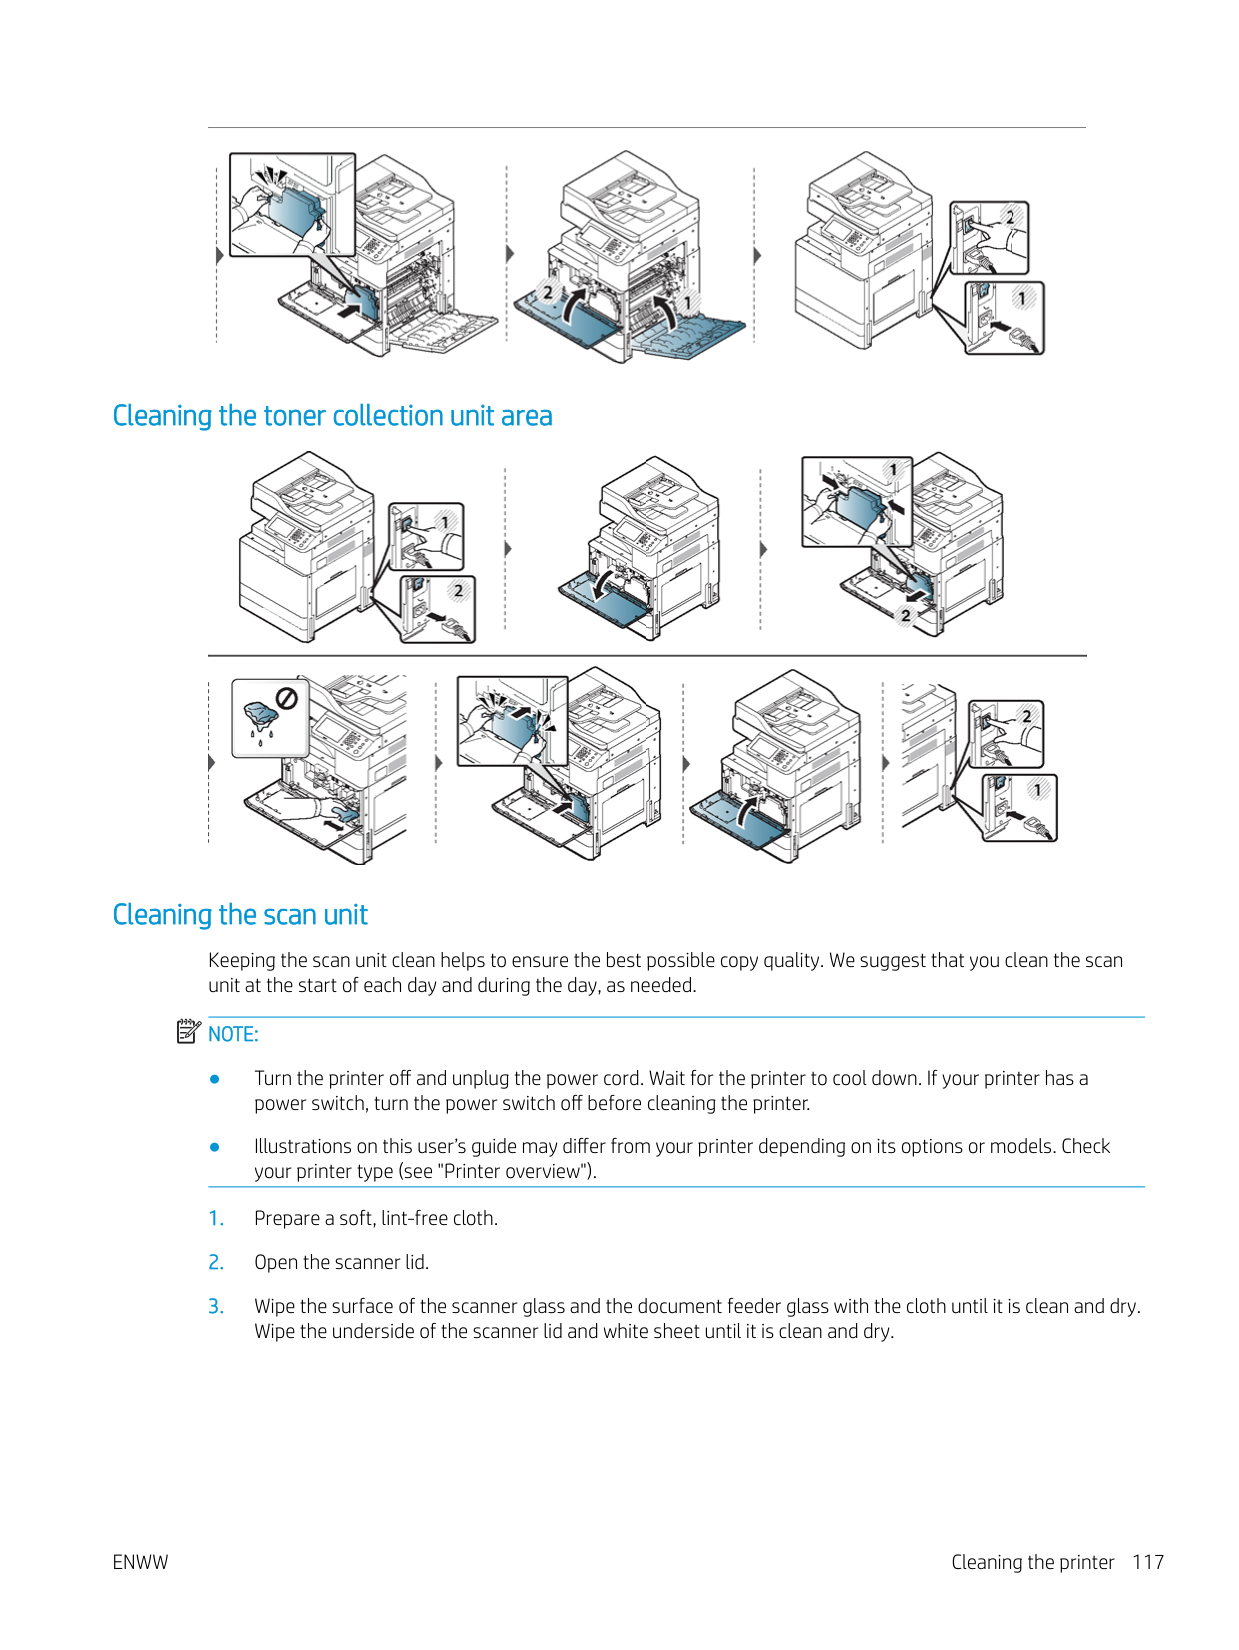

####### Table 8-4 Clean scanner areas
#### Cleaning the chargers of imaging unit
The paper dust stick and the chargers of the imaging unit will need to be cleaned after a specified number of pages are printed. When the message appears indicating that the chargers of the imaging unit must be cleaned, clean the paper dust stick first. Then, clean the chargers. The time when the message appears depends on environmental factors like altitude, temperature, humidity, and so on. You must clean the charger to maintain printing quality. If cleaning is done, the message will disappear automatically.


Tips for storing the printer, supplies, and paper
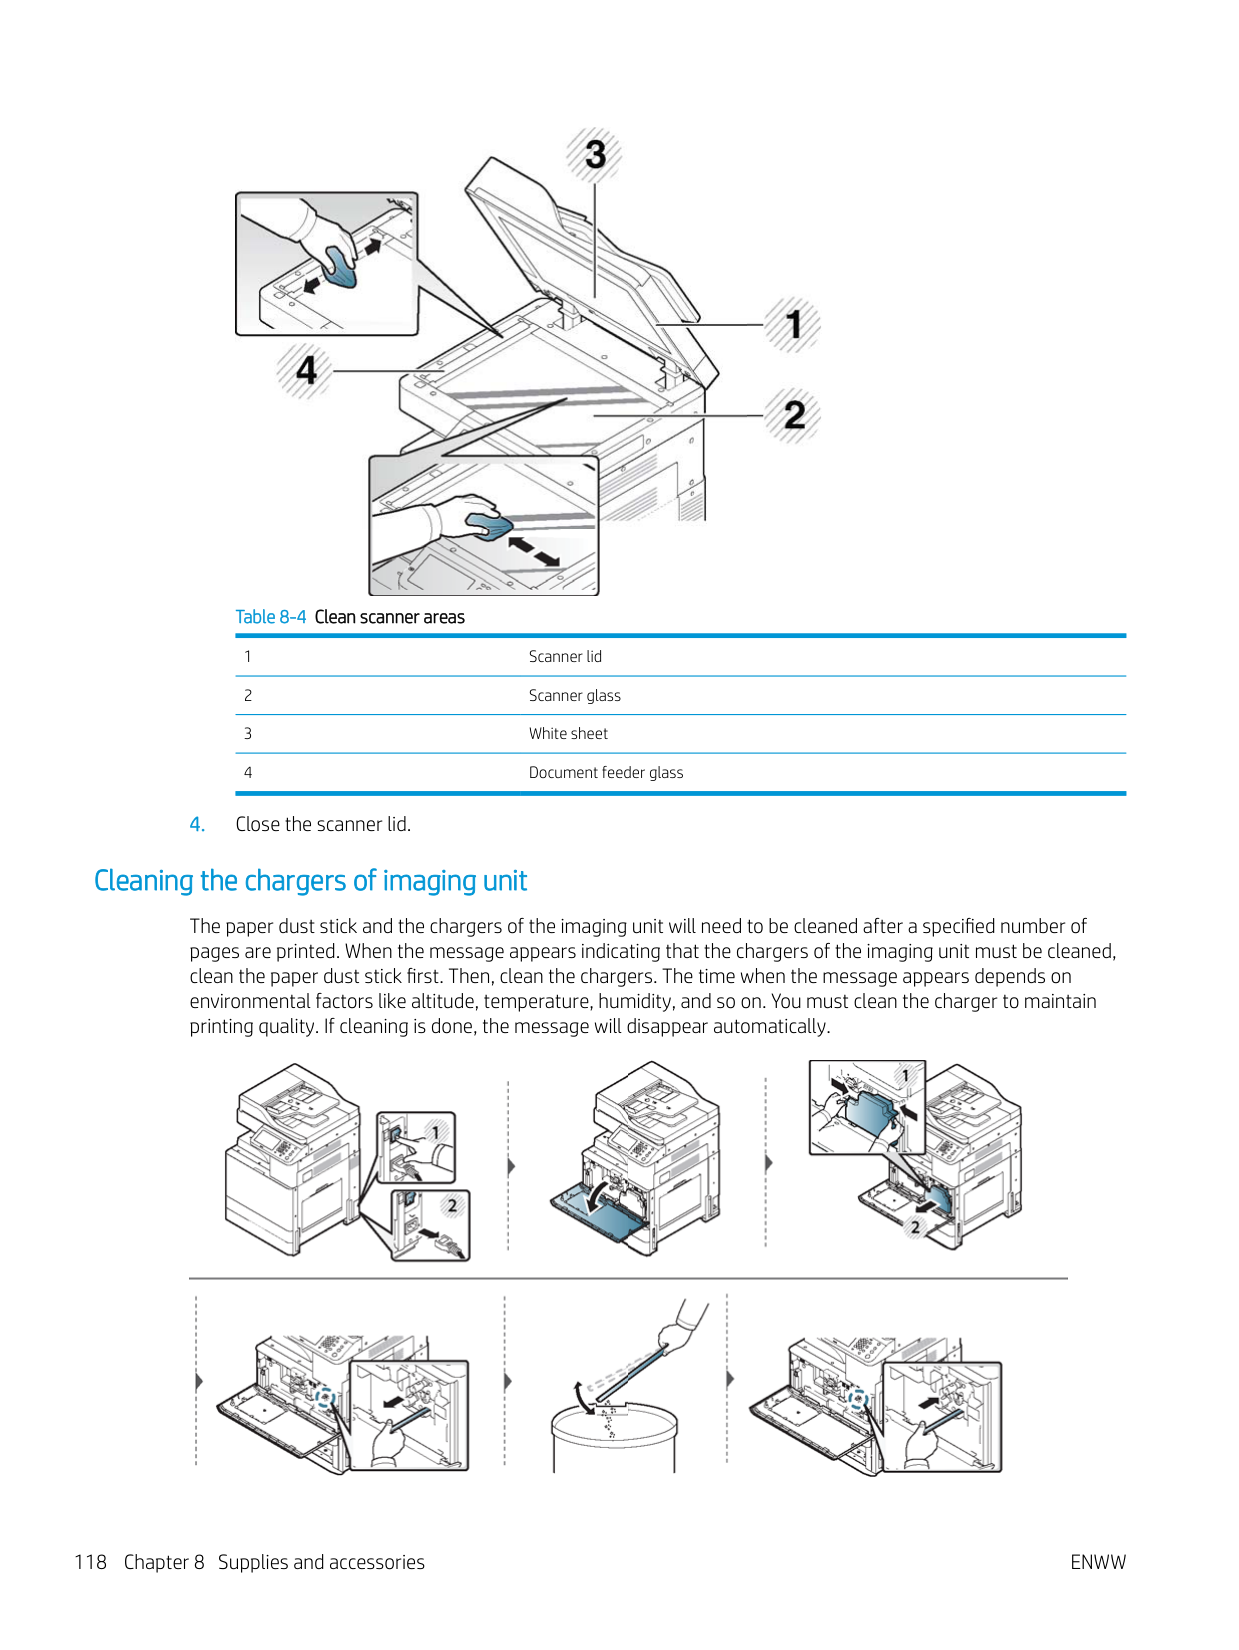
#### Printer
● When moving the printer, do not tilt or turn it upside down. Otherwise, the inside of the printer may be
contaminated by toner, which can cause damage to the printer or reduce print quality.
● When moving the printer, make sure at least four people are holding the printer securely.
#### Toner cartridge/ Imaging unit
To get the best, print quality from the toner cartridge, keep the following guidelines in mind:
#### Paper
Tips for moving the printer
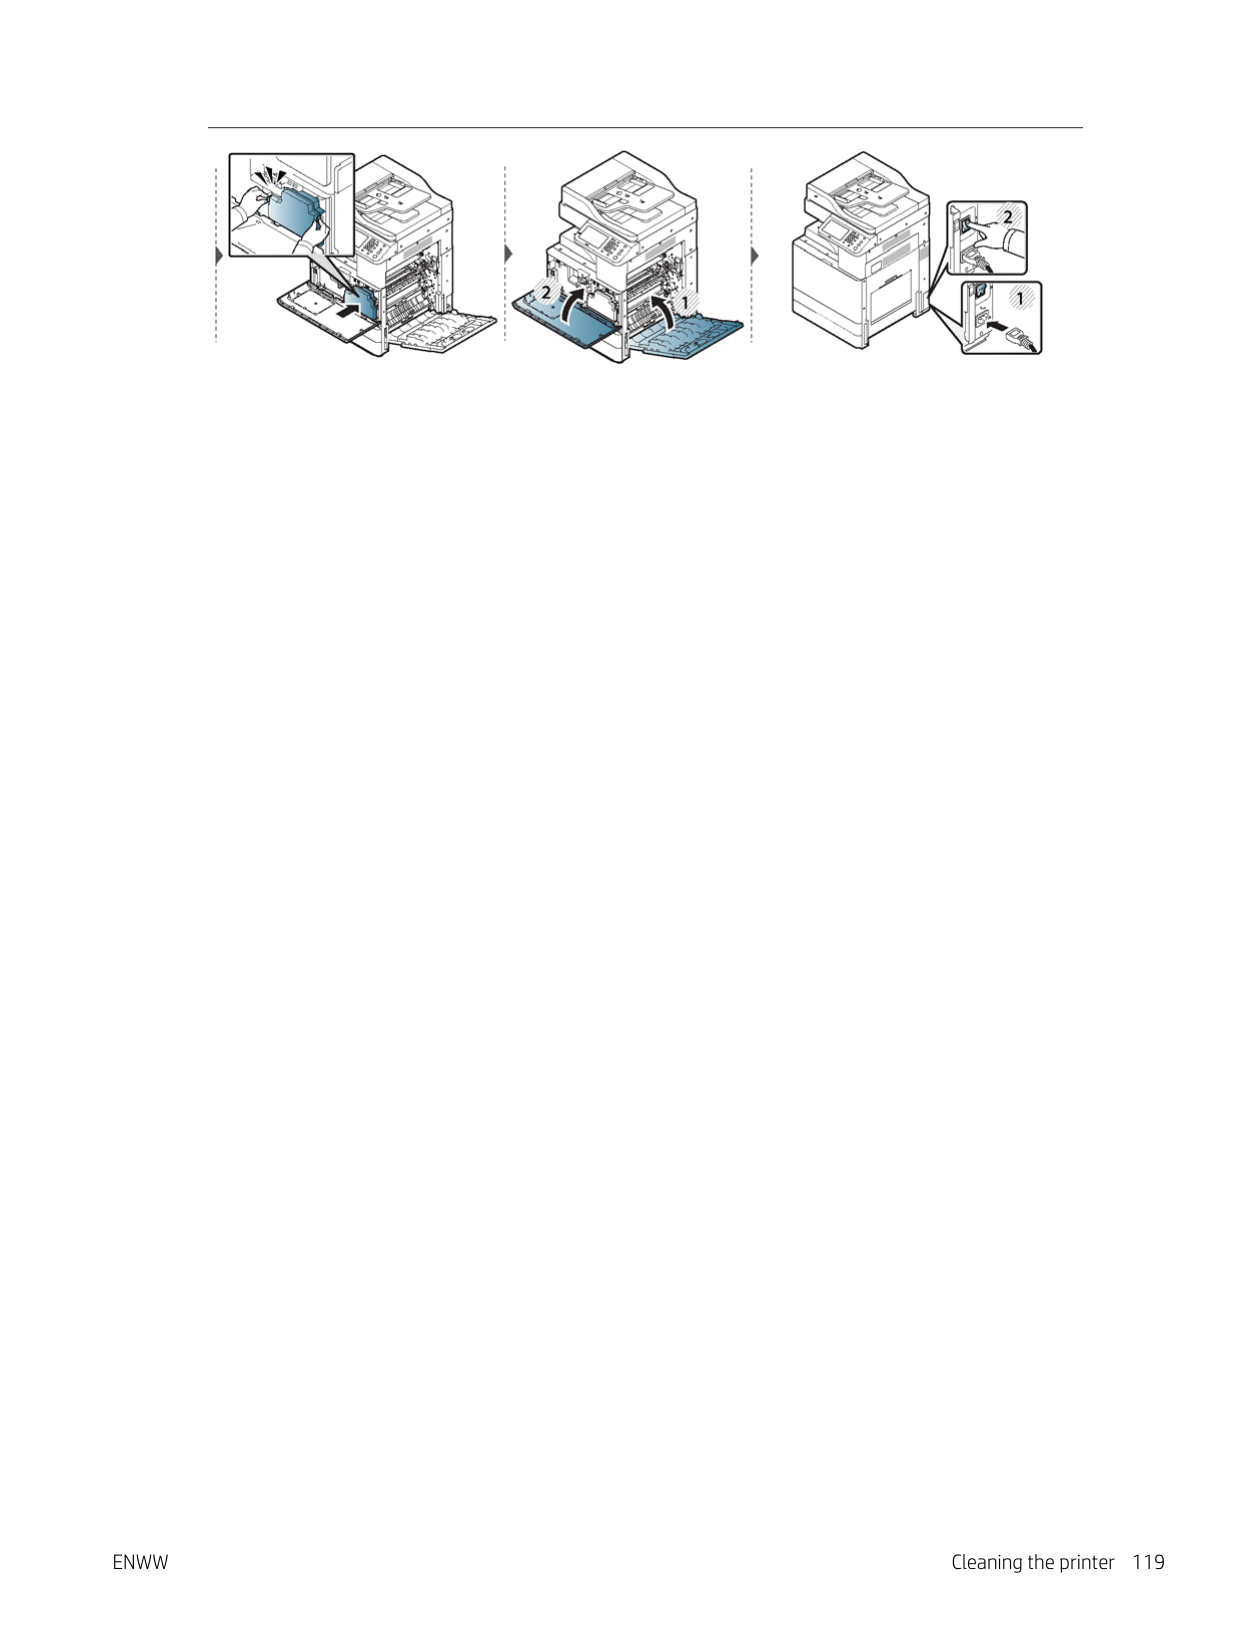
CAUTION: Use safe lifting and handling techniques. If you need to move this printer, you need at least four people. Use the lifting handles, as shown below. If less than four people attempt to lift the printer, it can lead to back injury.
– Remove the finisher.
ENWW Tips for moving the printer 121
9 Troubleshooting
Tips for avoiding paper jams
By selecting the correct media, most paper jams can be avoided. To avoid paper jams, refer to the following guidelines:
ENWW Tips for avoiding paper jams 123
Clearing paper jams When a paper jam occurs, a warning message appears on the display screen. CAUTION: To avoid tearing the paper, pull the jammed paper out slowly and gently. Follow the instructions in the following sections to clear the jam.
#### Jam in Tray 2
Illustrations in this user’s guide may differ from your printer depending on its options or models. Check your printer type (see "Printer overview").


If you do not see the paper in this area, stop and go to next step:


If you do not see the paper in this area, stop and go to next step:


#### Jam in optional trays
The procedure is same for all optional trays.


If you do not see the paper in this area, stop and go to next step:


If you do not see the paper in this area, stop and go to next step:


If you do not see the paper in this area, stop and go to next step:


Jam in Tray 1 (MP)

Jam inside the printer
The fuser area is hot. Turn the printer off and let the printer cool before removing paper from the Fuser Unit area. Failure to take care when removing paper from this area may cause injury.
| | |---|
NOTE: Illustrations on this user’s guide may differ from your printer depending on its options or models. Check your printer type (see "Printer overview"). Jam feed 1, Jam feed 2


Jam feed 3, Jam feed 4 (Optional device only)


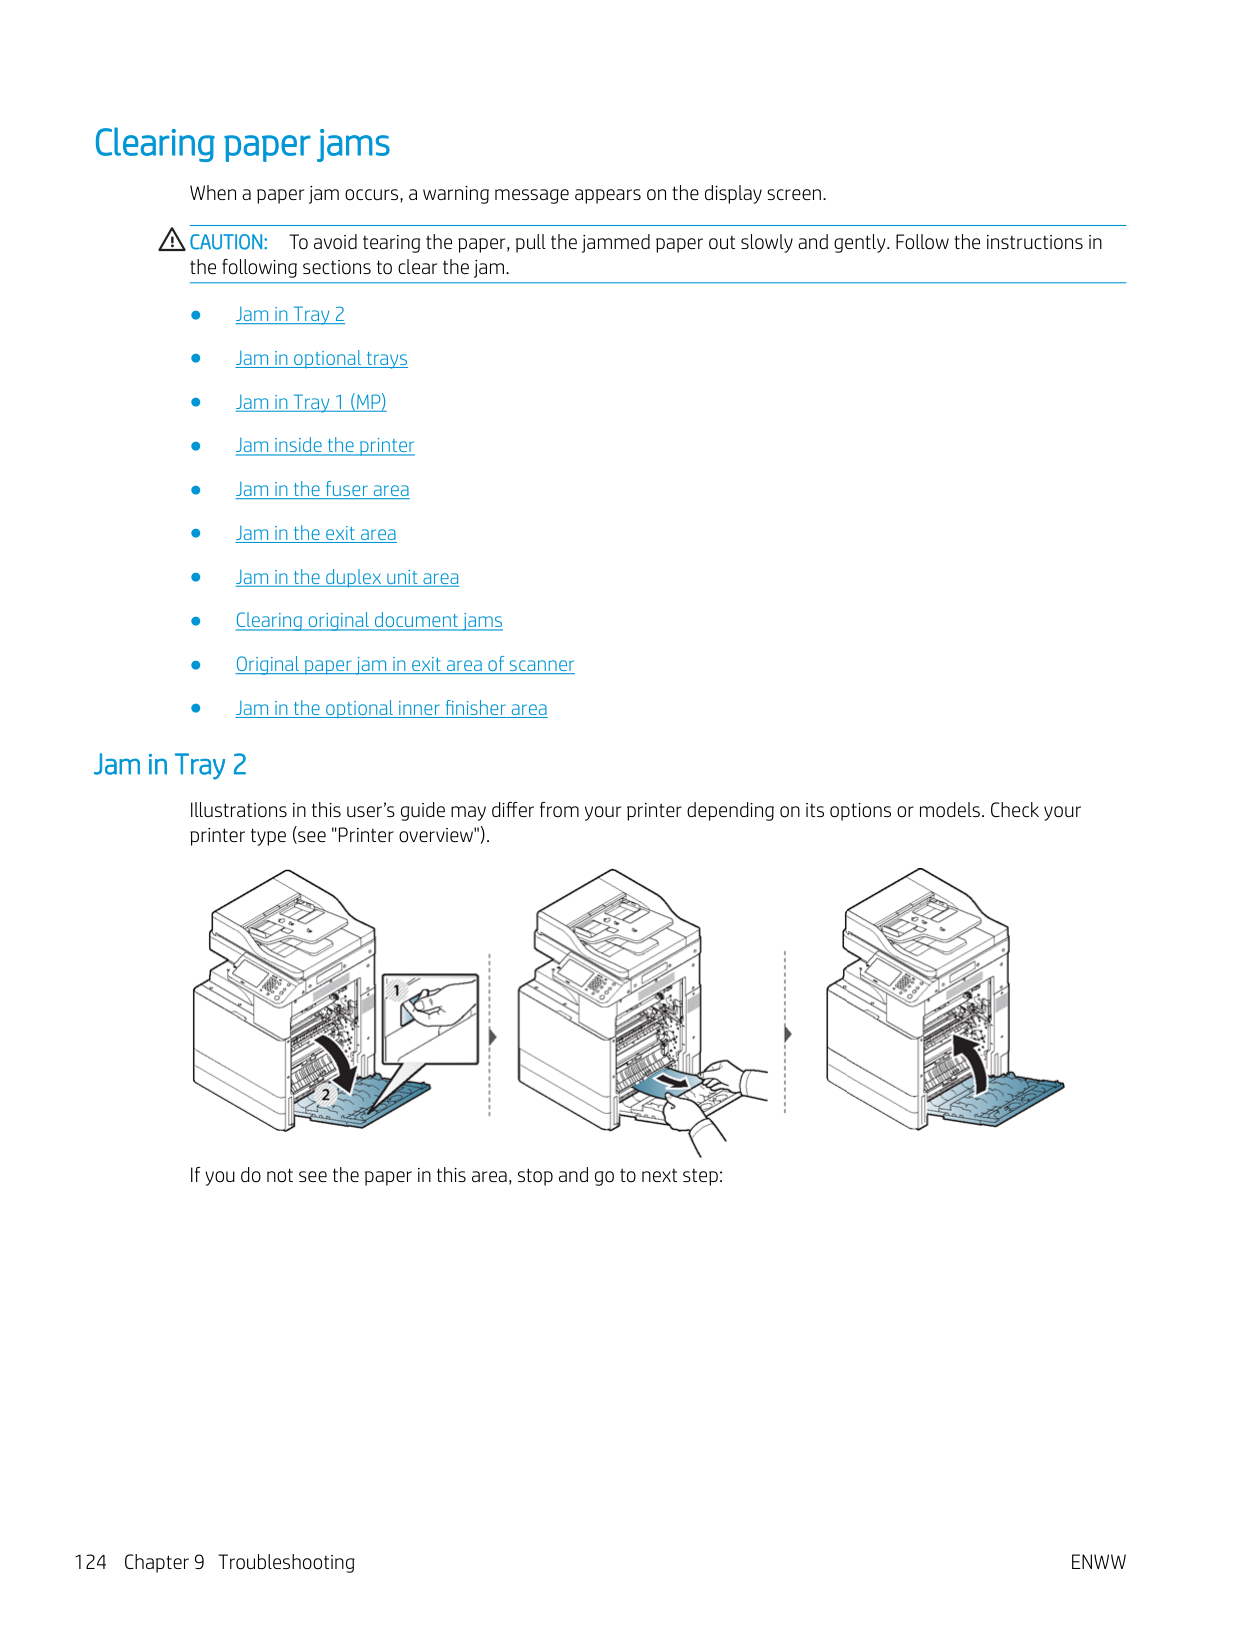
#### Jam in the fuser area
The fuser area is hot. Take care when removing paper from the printer.


If you do not see the paper in this area, stop and go to next step:


#### Jam in the exit area
The fuser area is hot. Take care when removing paper from the printer.

If you do not see the paper in this area, stop and go to next step: The fuser area is hot. Take care when removing paper from the printer.
| | |---|


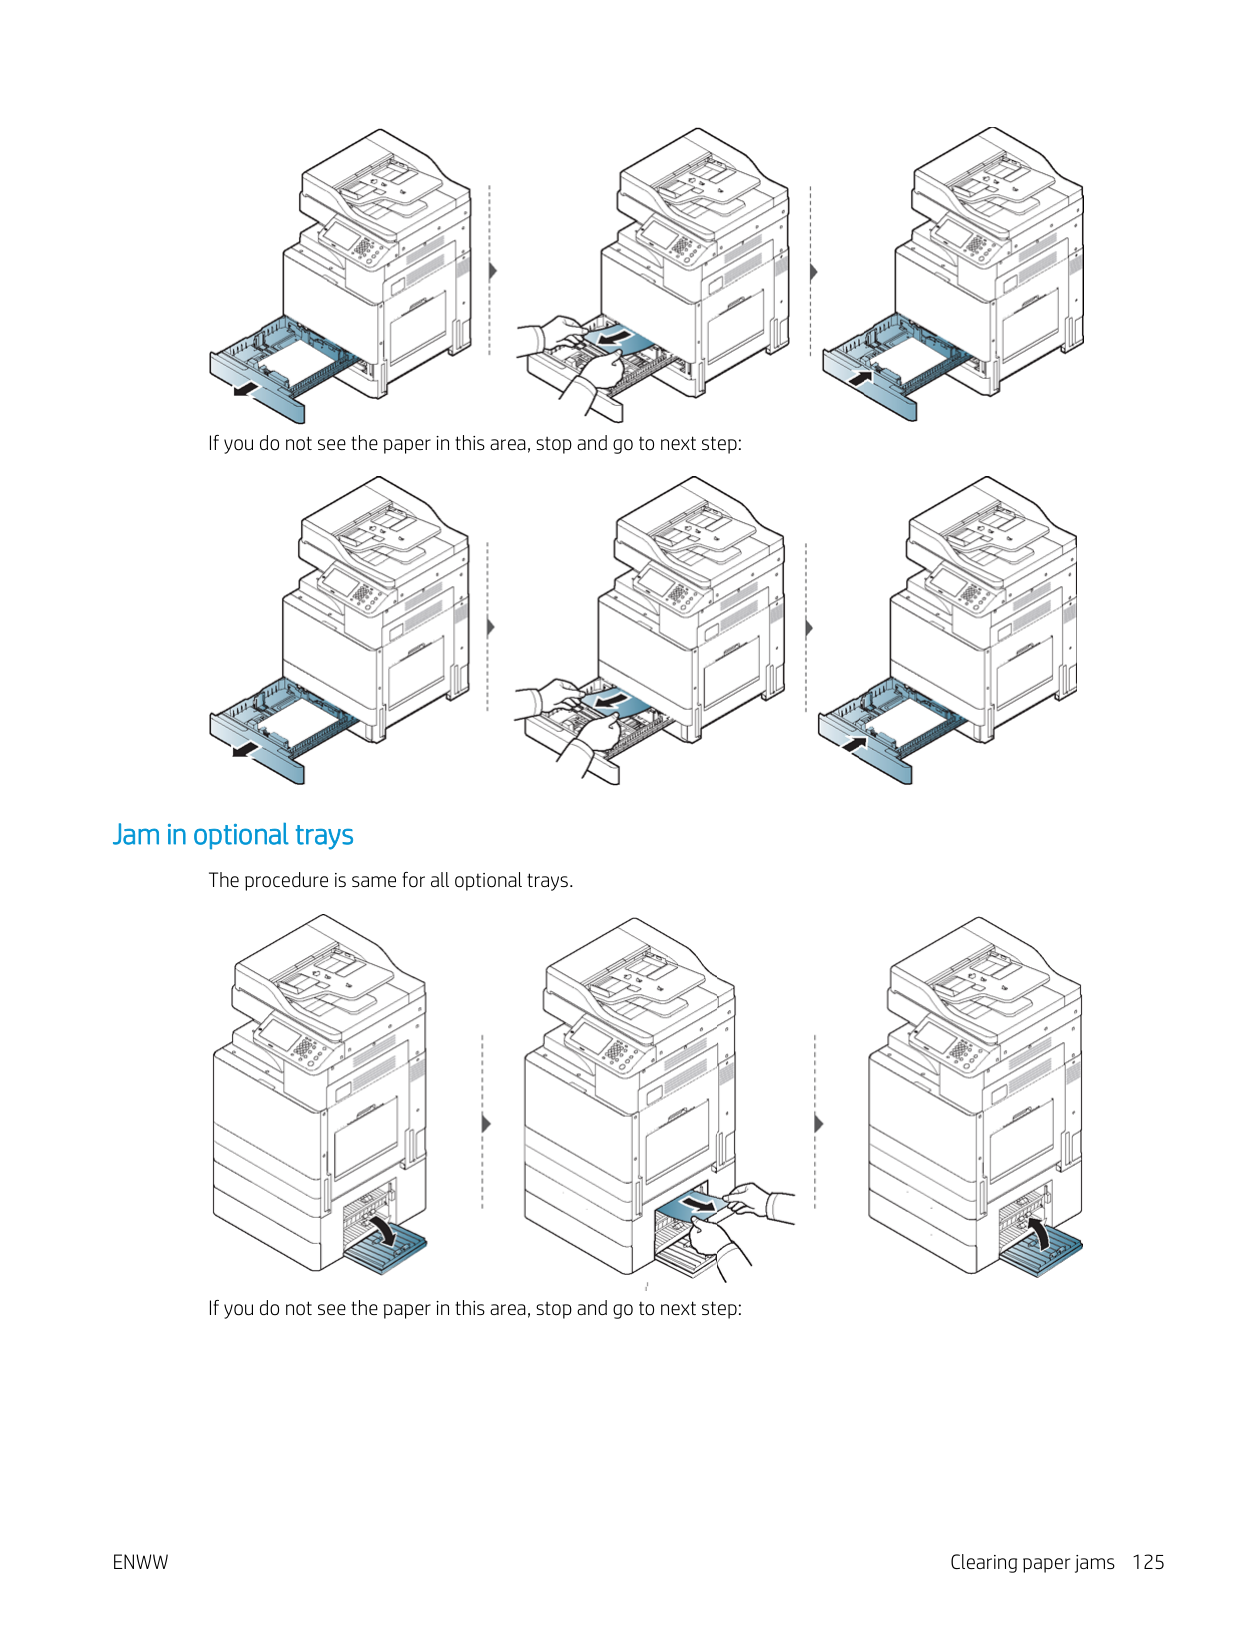
NOTE: If the optional Finisher is installed, remove the jammed paper as shown below.

If this paper jam persists, make sure the bin full sensor is unfolded. The bin full sensor is located in front of the output tray.

#### Jam in the duplex unit area
The fuser area is hot. Take care when removing paper from the printer.


If you do not see the paper in this area, stop and go to next step:


If you do not see the paper in this area, stop and go to next step:


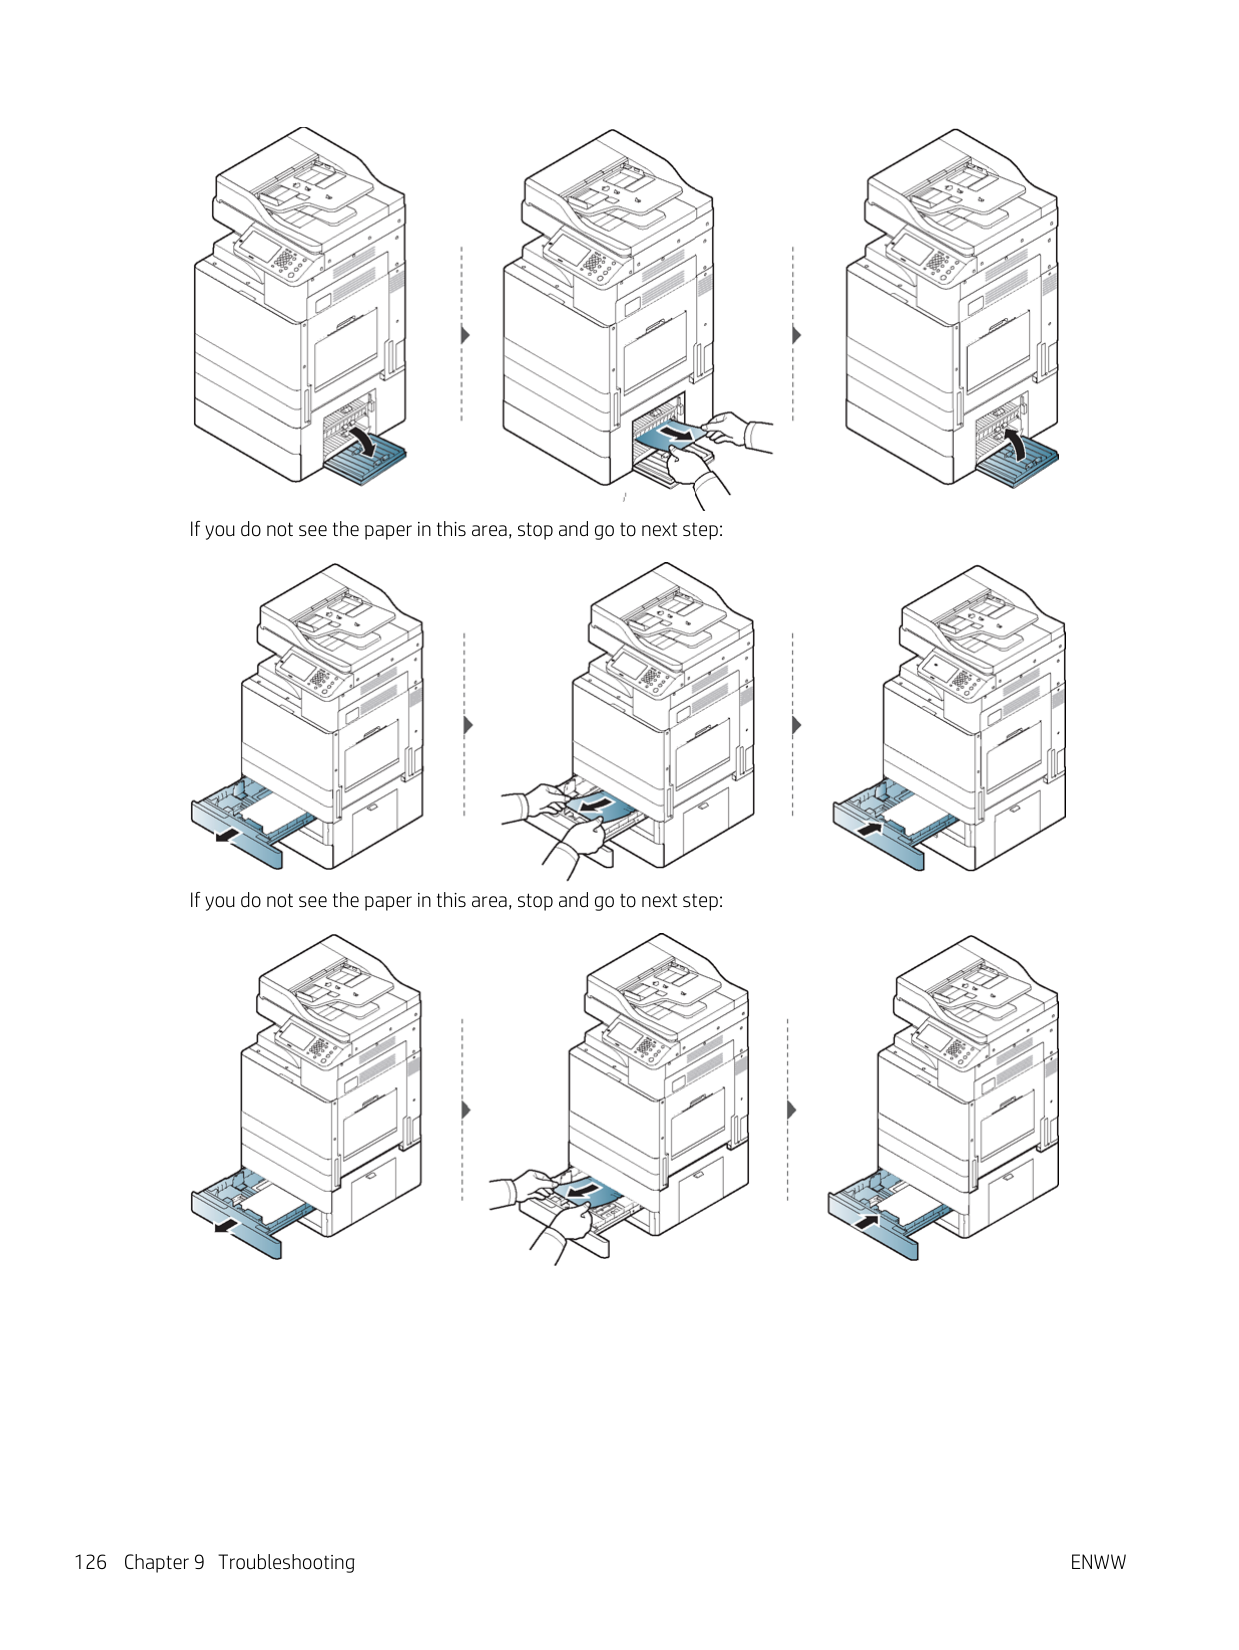
Clearing original document jams To prevent document jams, use the scanner glass for thick, thin or mixed paper originals. CAUTION: To avoid tearing the document, remove the jammed document slowly and carefully. Original paper jam in front of scanner
| | |---|


Original paper jam inside of scanner NOTE:


If you do not see the paper in this area, stop and go to next step:


If you do not see the paper in this area, stop and go to next step:


#### Original paper jam in exit area of scanner
Illustrations in this user’s guide may differ from your printer depending on the model and options installed. Check your printer type (see "Printer overview").
| | |---|
##### NOTE:
● This troubleshooting may not be available depending on model or optional goods (see "Printer overview").


#### Jam in the optional inner finisher area


If you do not see the paper in this area, stop and go to next step:
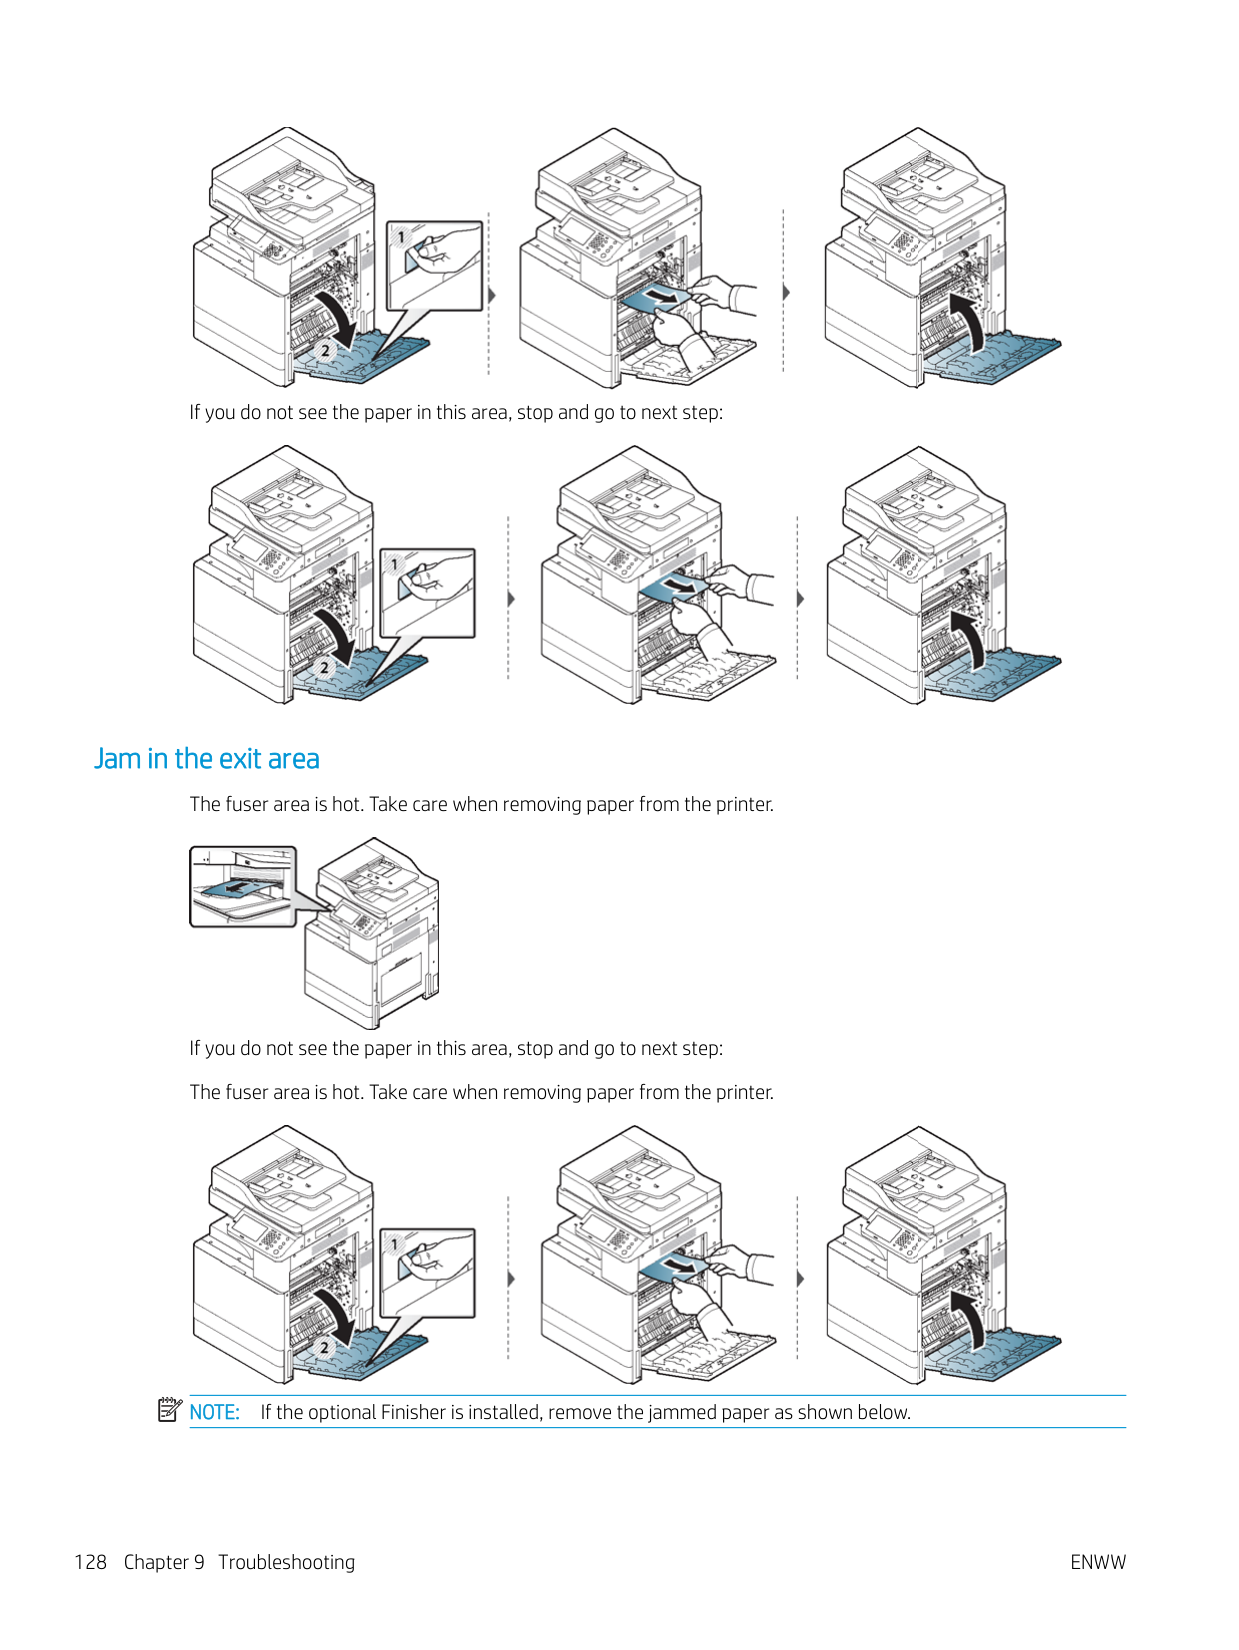


###### If you do not see the paper in this area, stop and go to next step:


Understanding display messages
Messages appear on the control panel display to indicate the printer’s status or errors. Refer to the tables below to understand the messages’ and their meaning, and correct the problem, if necessary.
| | |---|
##### NOTE:
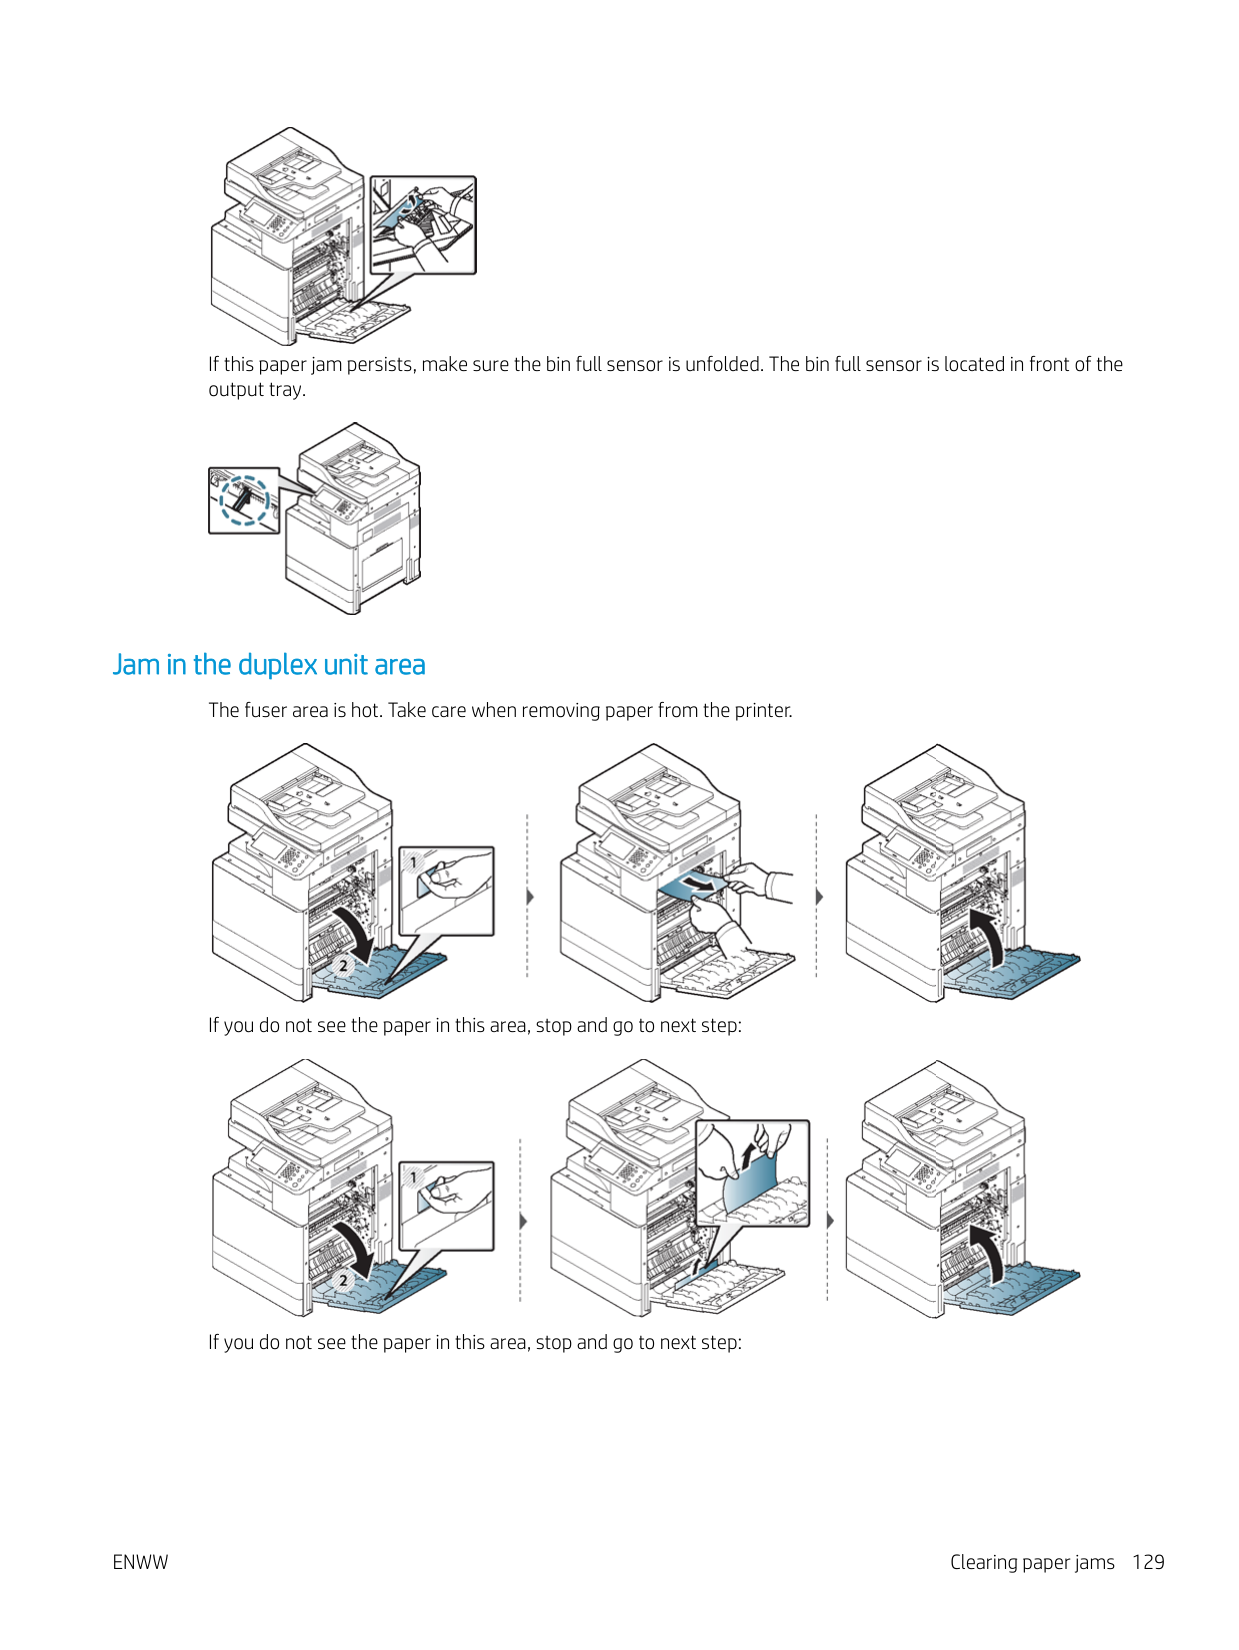
#### Paper Jam-related messages
Message Meaning Suggested solutions
The loaded original document has jammed in document feeder.
Clear the jam (see “Clearing original document jams”).
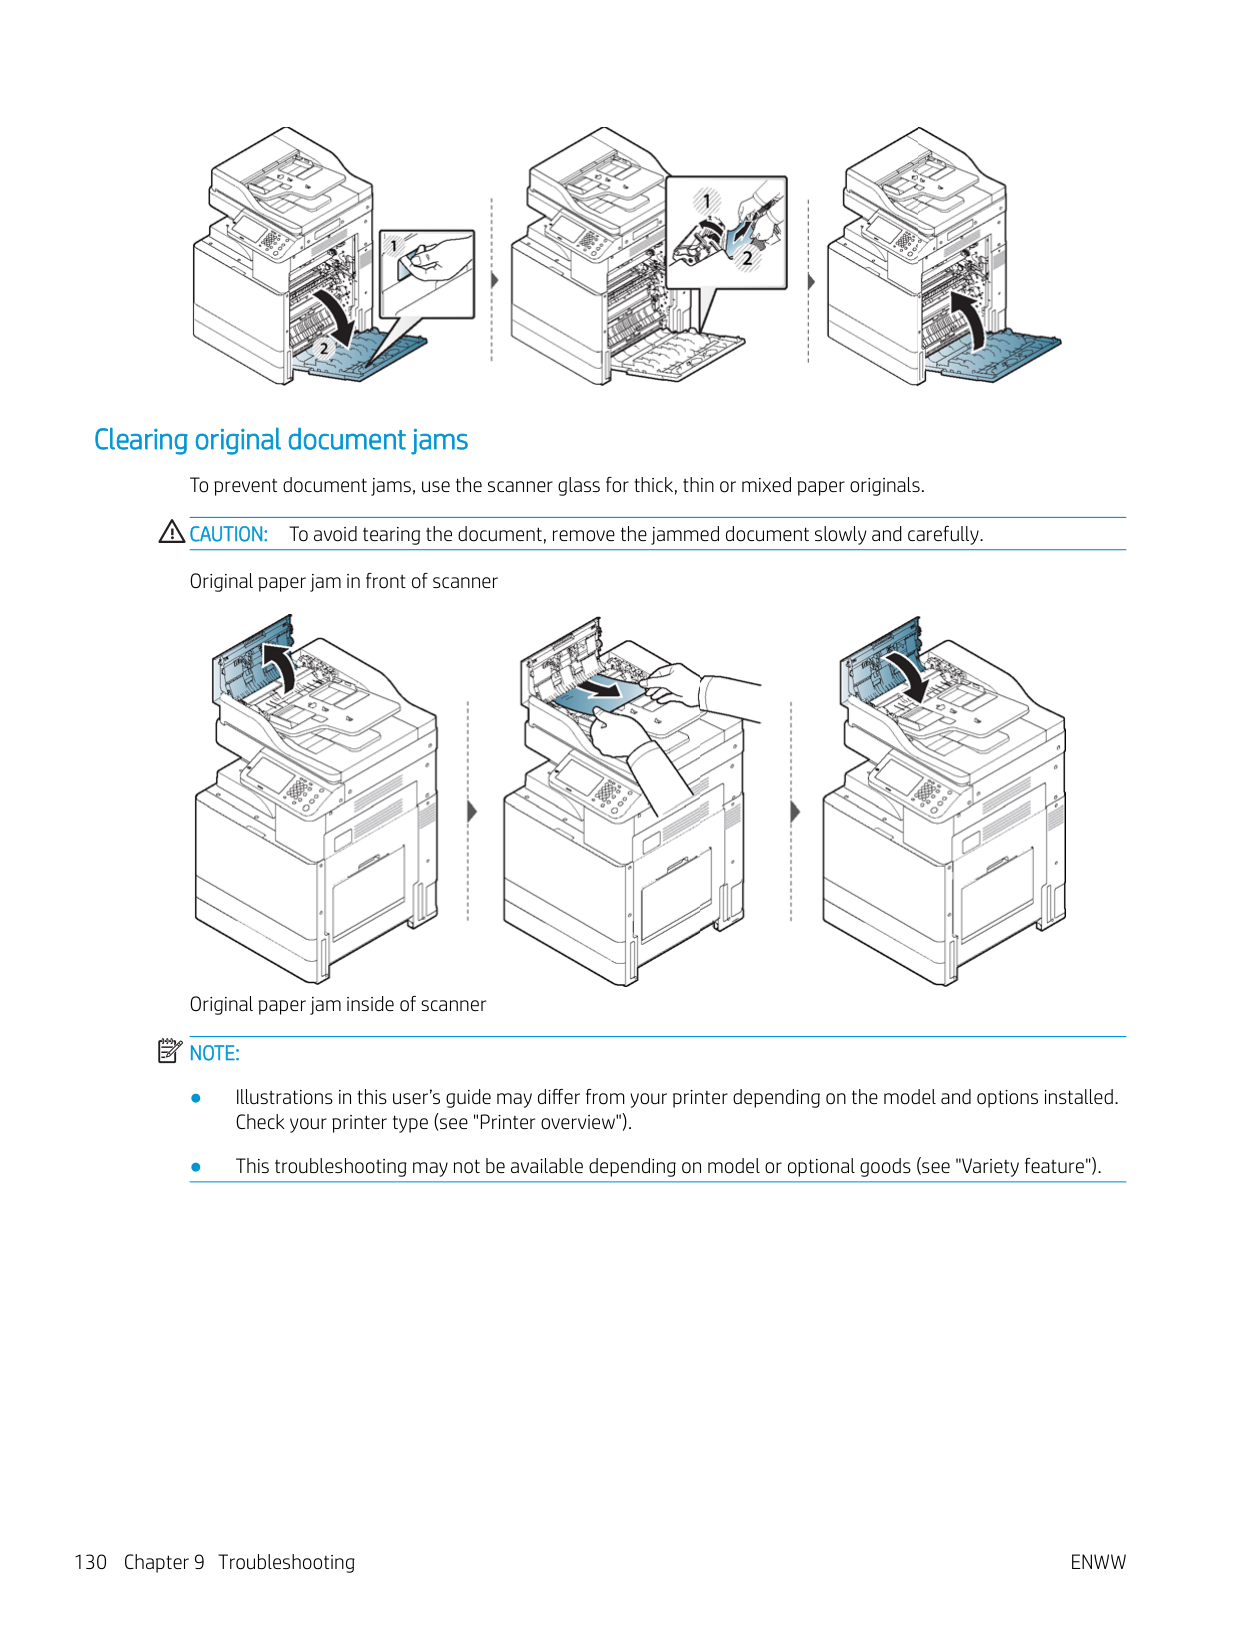
Paper has jammed during duplex printing. This is applicable only to printers with this feature.
Clear the jam (see “Clearing paper jams”).
Paper has jammed inside the printer. Clear the jam (see “Inside the printer”).
Paper jam in exit area Paper has jammed in the paper exit area. Clear the jam (see “In the exit area”). Paper jam in Tray 1 (MP) Paper has jammed in Tray 1 (MP). Clear the jam (see “Clearing paper jams”).
Paper has jammed in the tray. Clear the jam (see “Clearing paper jams”).
Paper has jammed during finishing. Clear the jam (see “In the optional finisher area”).
#### Toner-related messages
Message Meaning Suggested solutions Did not supply enough [color] toner The printer cannot detect a toner cartridge.
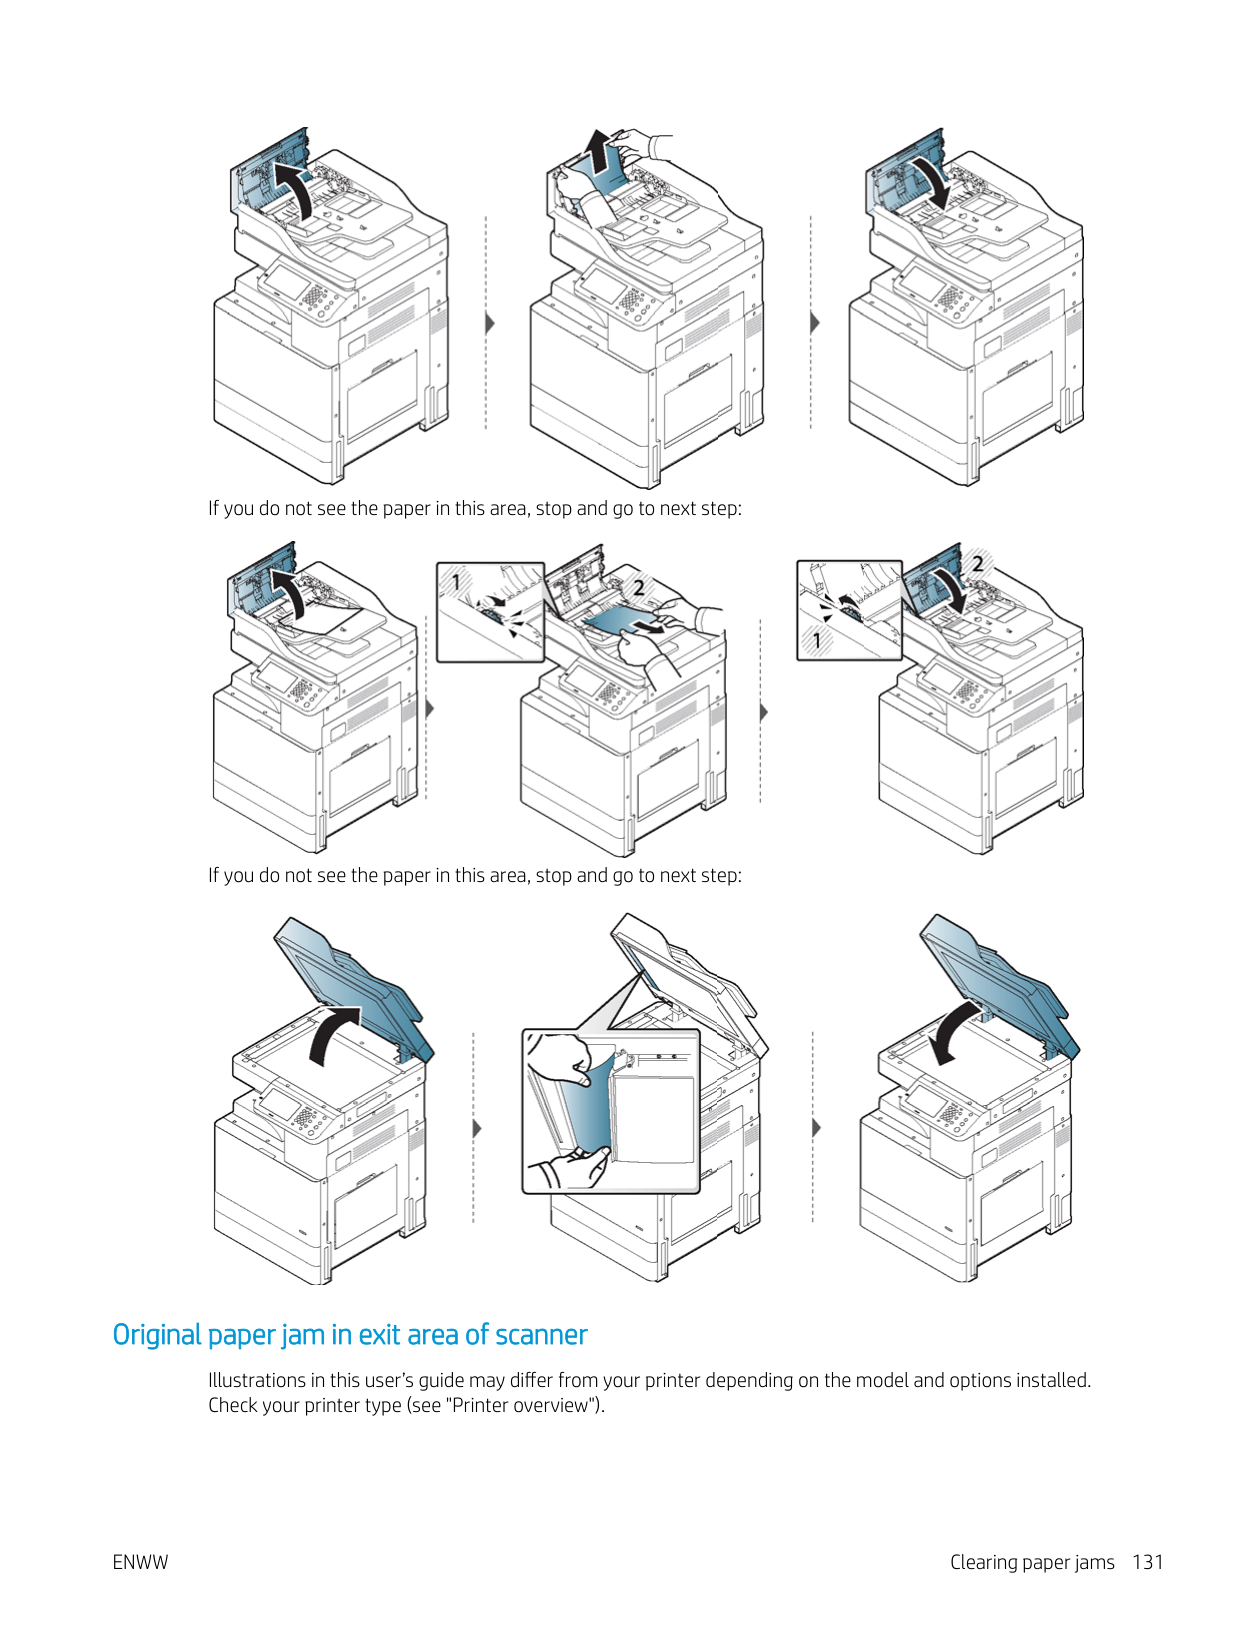
Remove seal tape of [color] toner cartridge or shake it. Call for service if the problem persists.
Or not removed seal tape of toner cartridge.
[color] toner cartridge is not compatible. Check users guide
The toner cartridge you have installed is not for your printer.
Install a genuine HP toner cartridge designed for your printer (see "Available supplies").
A toner cartridge is not installed. Reinstall the toner cartridge. A toner cartridge is not being detected. Reinstall the toner cartridge two or three
times to confirm it is seated properly. If the problem persists, please call for service.
Not removed protective film from toner. Remove the protective film from the toner cartridge. Refer to Quick Installation Guide provided with your printer.
Prepare new [color] toner cartridge. Prepare new toner cartridge (LED: RED blink) –> Toner is low (LED: Green On). Replace with new toner cartridge –> Toner is very low.
Prepare a new toner cartridge for a replacement. You may temporarily increase the printing quality by redistributing the toner (see “Redistributing toner”).
The indicated toner cartridge has almost reached its estimated cartridge life.
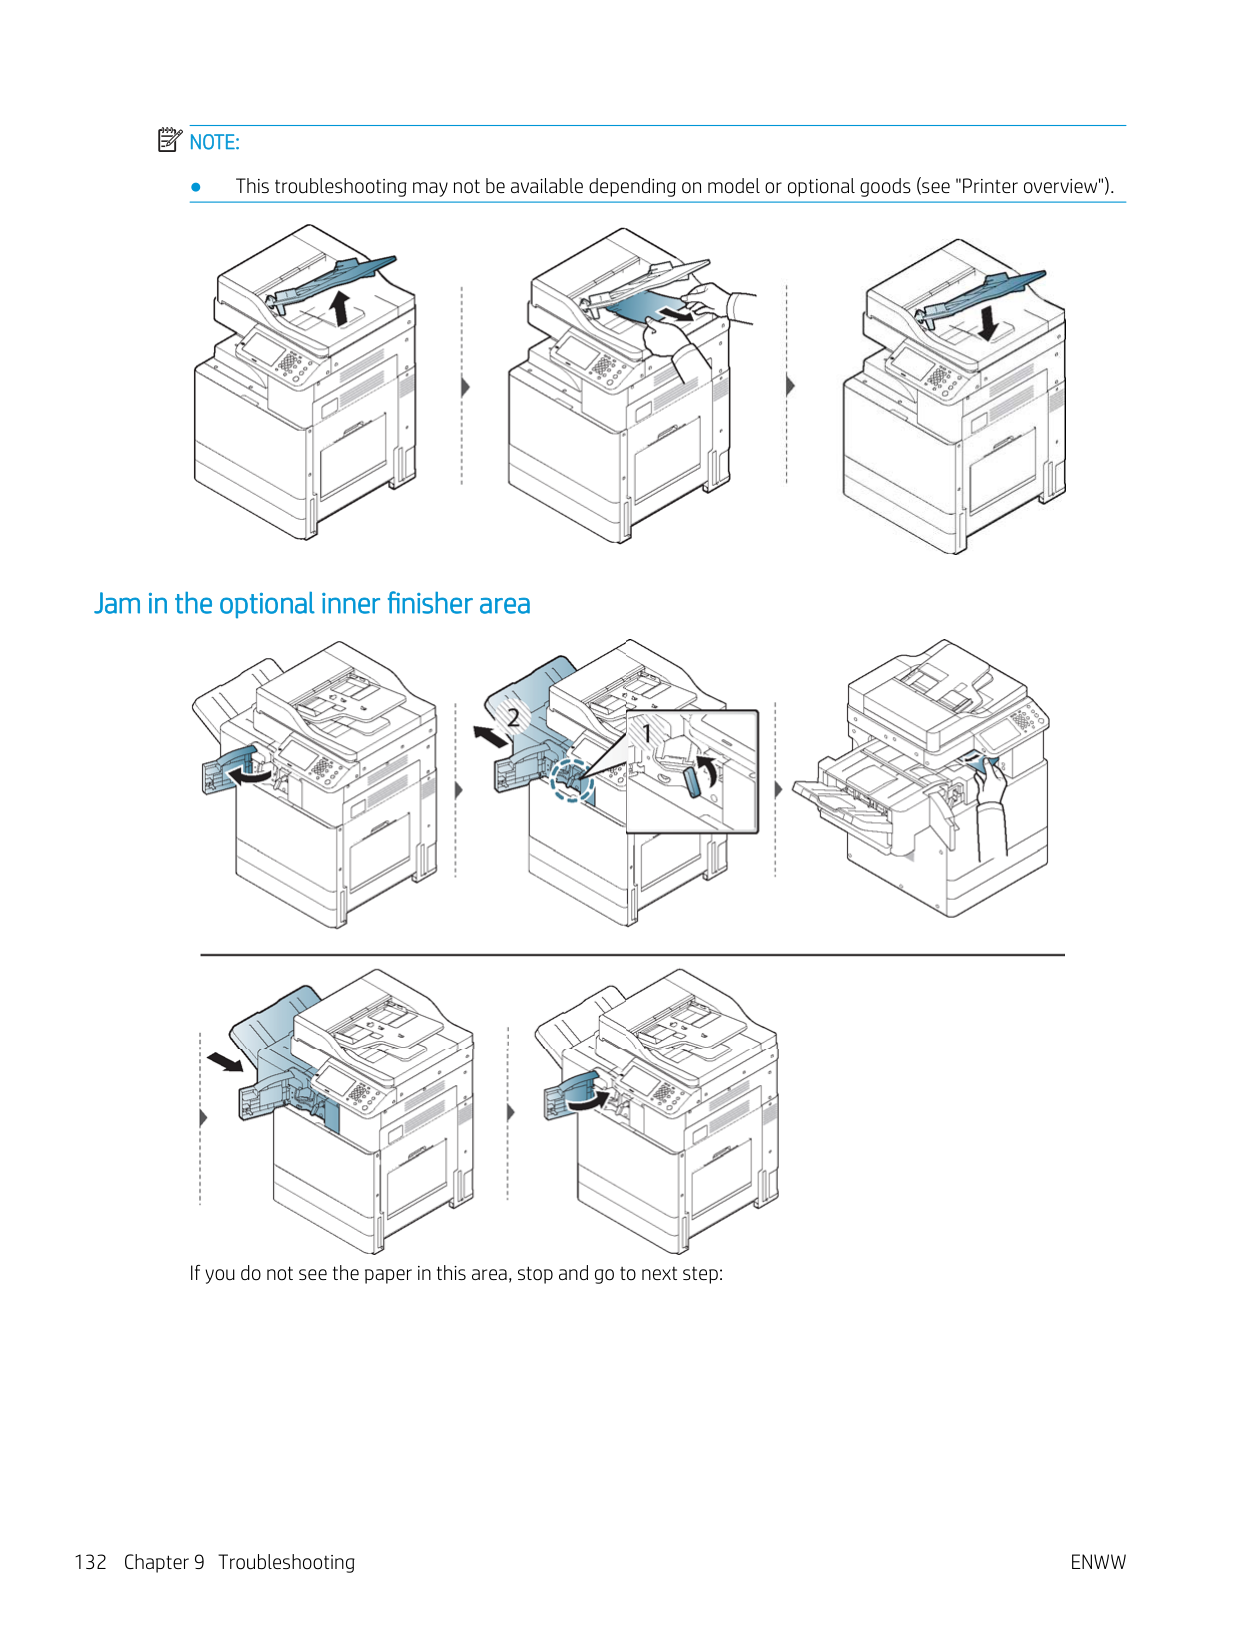
Small amount of toner is left in the indicated cartridge.
Small amount of toner is left in the indicated cartridge.
HP does not recommend using a non-genuine HP toner cartridge such as refilled or remanufactured. HP cannot guarantee a non-genuine HP toner cartridge's quality. Service or repair required as a result of using non-genuine HP toner cartridges will not be covered under the printer warranty.
#### Tray-related messages
Message Meaning Suggested solutions
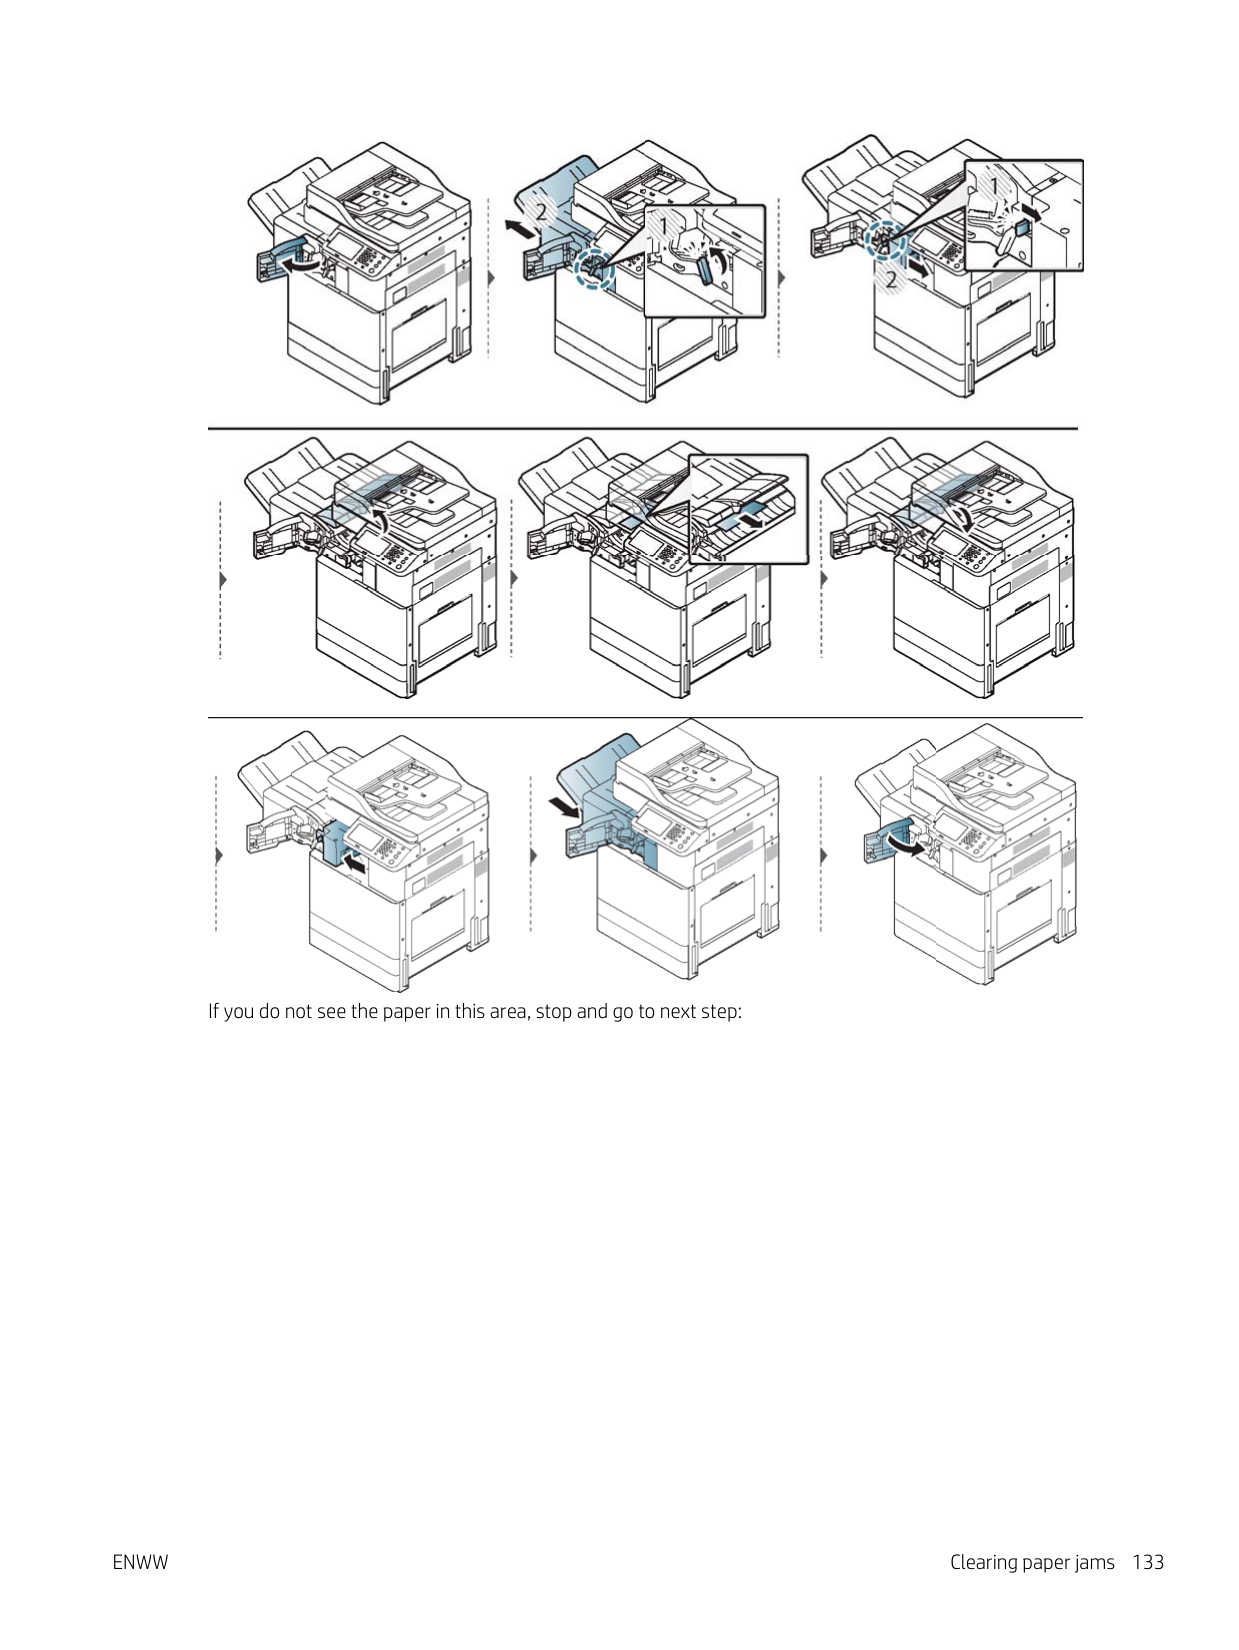
There is no paper in the indicated tray. Load paper in the tray (see “Loading paper in the tray”).
Paper is low in [tray number]. Running out of paper in the tray. Load paper in the tray. [Tray number] cassette is pulled out. Insert it properly
The tray is not securely latched. Close the tray until it locks into place.
Tray Failure: [error number]. Pull [tray number] out and insert it. Call for service if the problem persists
Tray Failure: [error number]. Check tray 3 connection and turn off then on. Call for service if the problem persists
The paper size specified in the printer properties does not match the paper loaded in the tray.
Select Continue to proceed with the print job with the incorrect paper, or select Cancel to stop the print job and load the correct paper in the tray.
The tray is not securely connected. Reinstall the tray. If the problem persists, call for service.
The tray is not securely connected. Reinstall the tray. If the problem persists, call for service.
#### Network-related messages
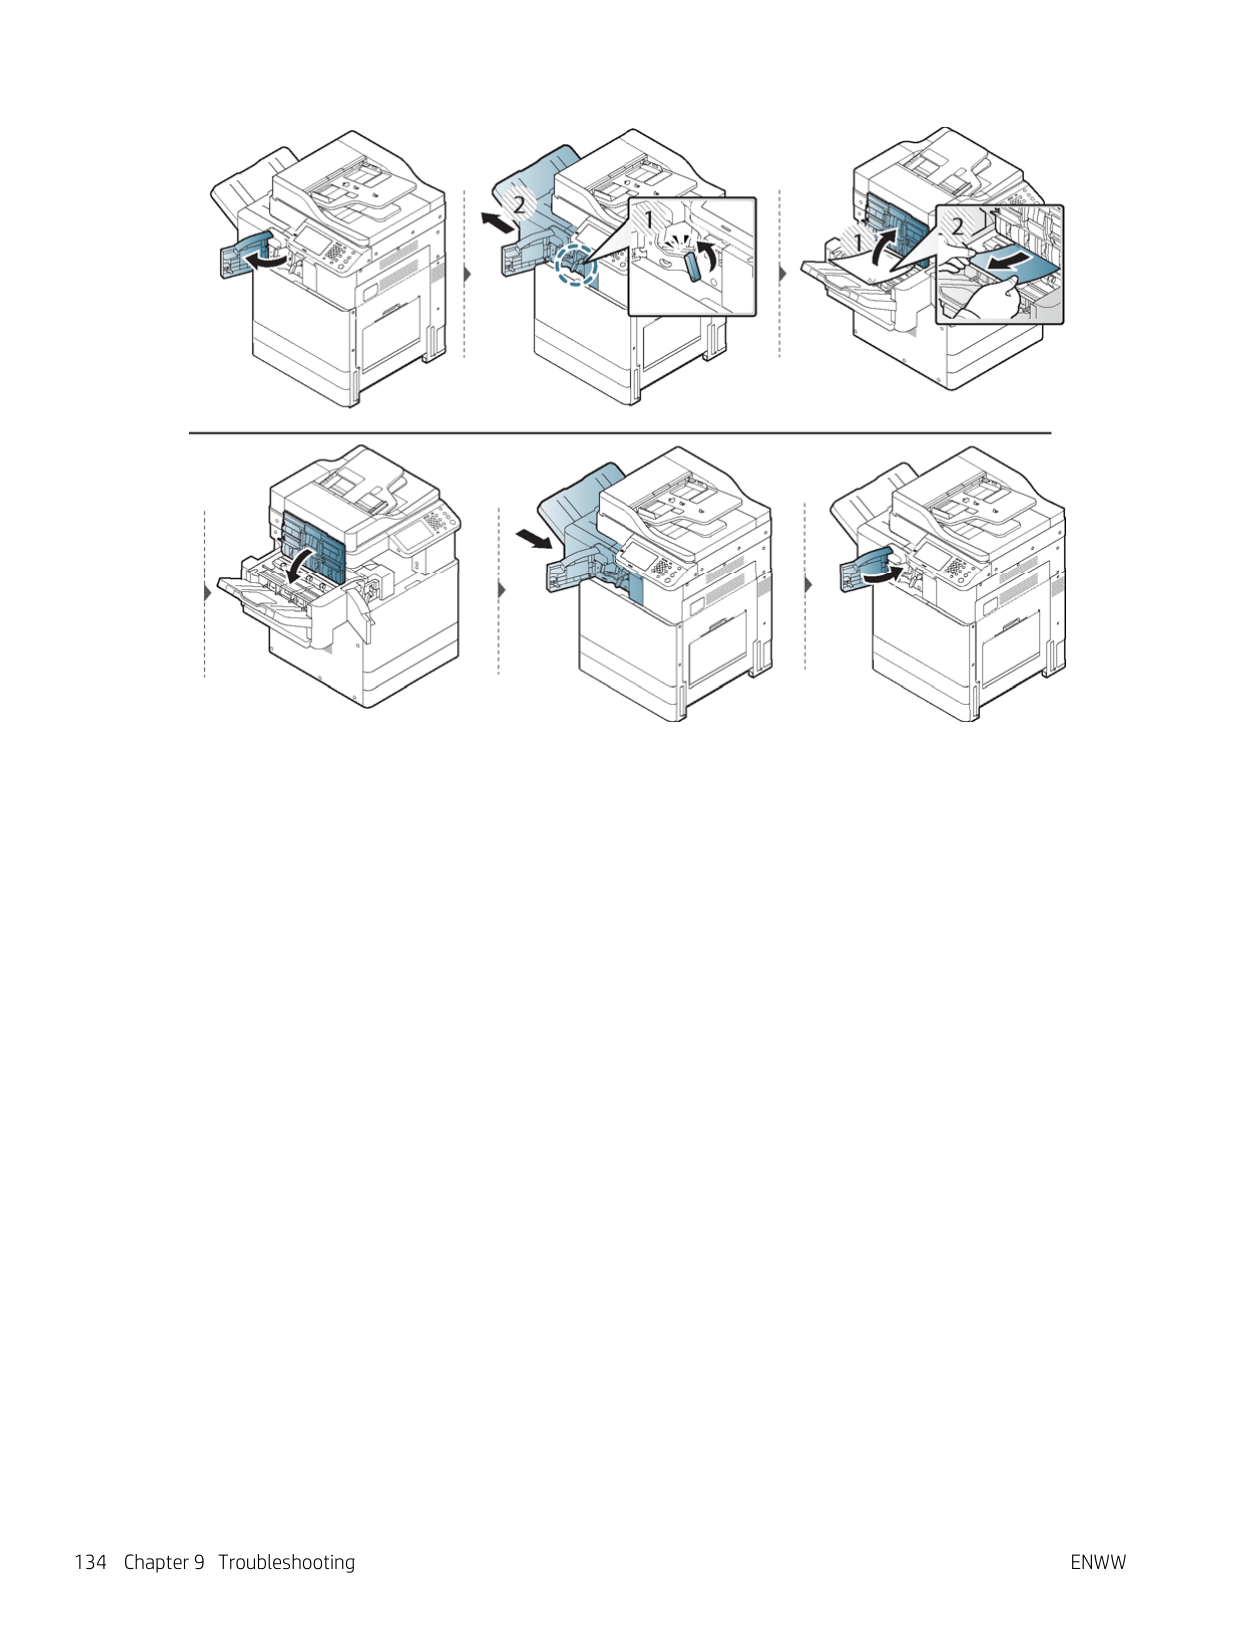
Message Meaning Suggested solutions 802.1x authentication failed. Please Contact the System Administrator
Fail to authenticate. Check the network authentication protocol. If the problem persists, contact your network administrator.
Cannot find a wireless network. Please check the wireless environment
The printer cannot find the wireless network.
Check the status of the wireless router or access point, including its configuration and power connections, as well as any devices that may affect wireless communication. If the problem persists, please call for service.
Failed to connect to Wi-Fi Direct. Turn off your mobile device and turn it on
The printer failed to connect via Wi-Fi Direct. Turn the Wi-Fi Direct feature off and then back on or reboot the printer or mobile device. If the problem persists, please call for service.
Failed connection to WPS. Try again or set up other wireless connection
The printer failed to connect via WPS. Check the WPS settings (see "Using the WPS menu").
MSOK System Failure: [error number]. Turn off then on
There is a problem in the engine system. Turn the printer off and back on again. If the
problem persists, call for service. Network cable is disconnected. Check it The printer is not connected with a network
Connect the printer to the network with a network cable.
cable.
Network Failure: [error number]. Turn off then on. Call for service if the problem persists
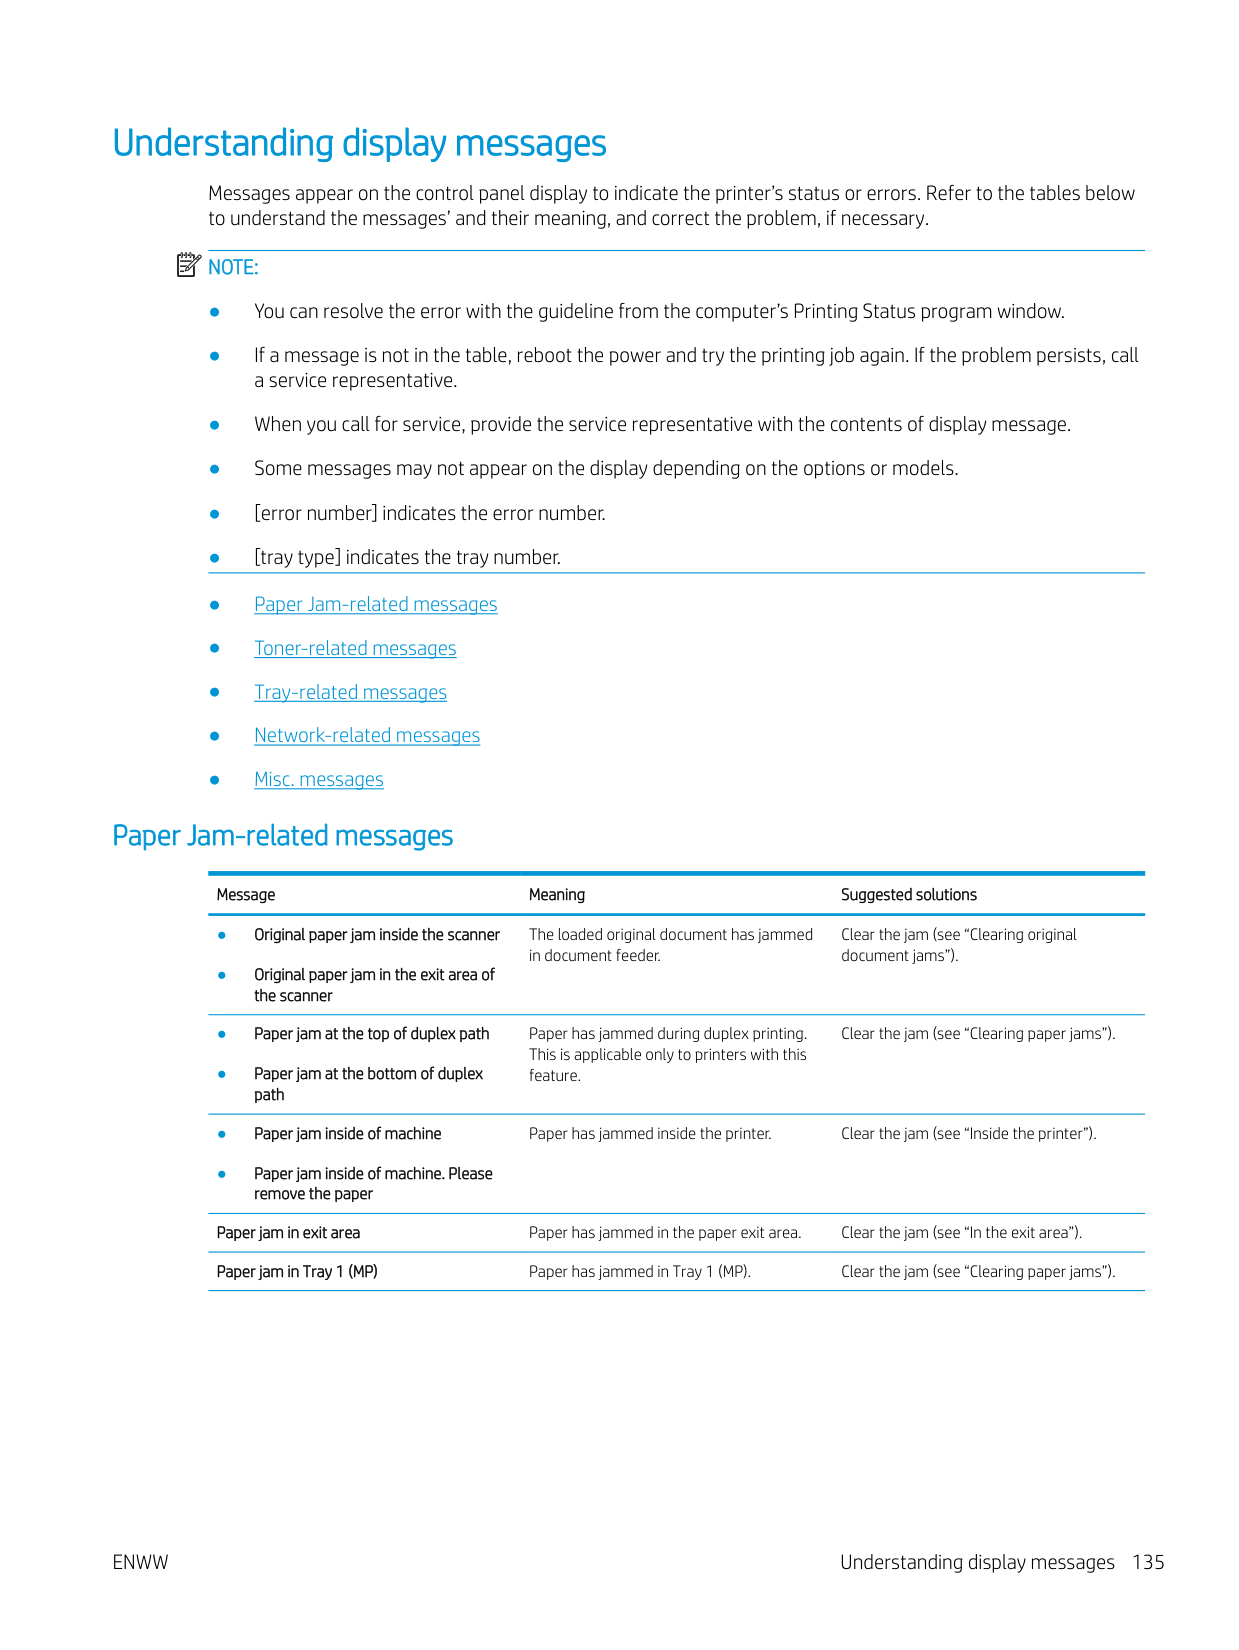
Not connected from the wireless AP. If you do not reconnect automatically, check the wireless settings
This IP address conflicts with that of other system. Check it
Video System Failure: [error number]. Turn off then on
Wi-Fi Direct is not ready. Turn off then on. Call for service if the problem persists
Wireless security settings are incorrect. Please change the settings
There is a problem in the network system. Turn the printer off and back on again. If the problem persists, call for service.
The printer failed to connect to the wireless AP (access point or wireless router).
Check the status of the access point, including its configuration and power connections, as well as any devices that may affect wireless communication. If the problem persists, please call for service.
The network IP address you have set is being used by someone else.
Check the IP address and reset it if necessary.
There is a problem in the CPU. Turn the printer off and back on again. If the problem persists, call for service.
The printer failed to initialize the Wi-Fi Direct connection.
Reboot the printer to initialize the wireless settings. If the problem persists, please call for service.
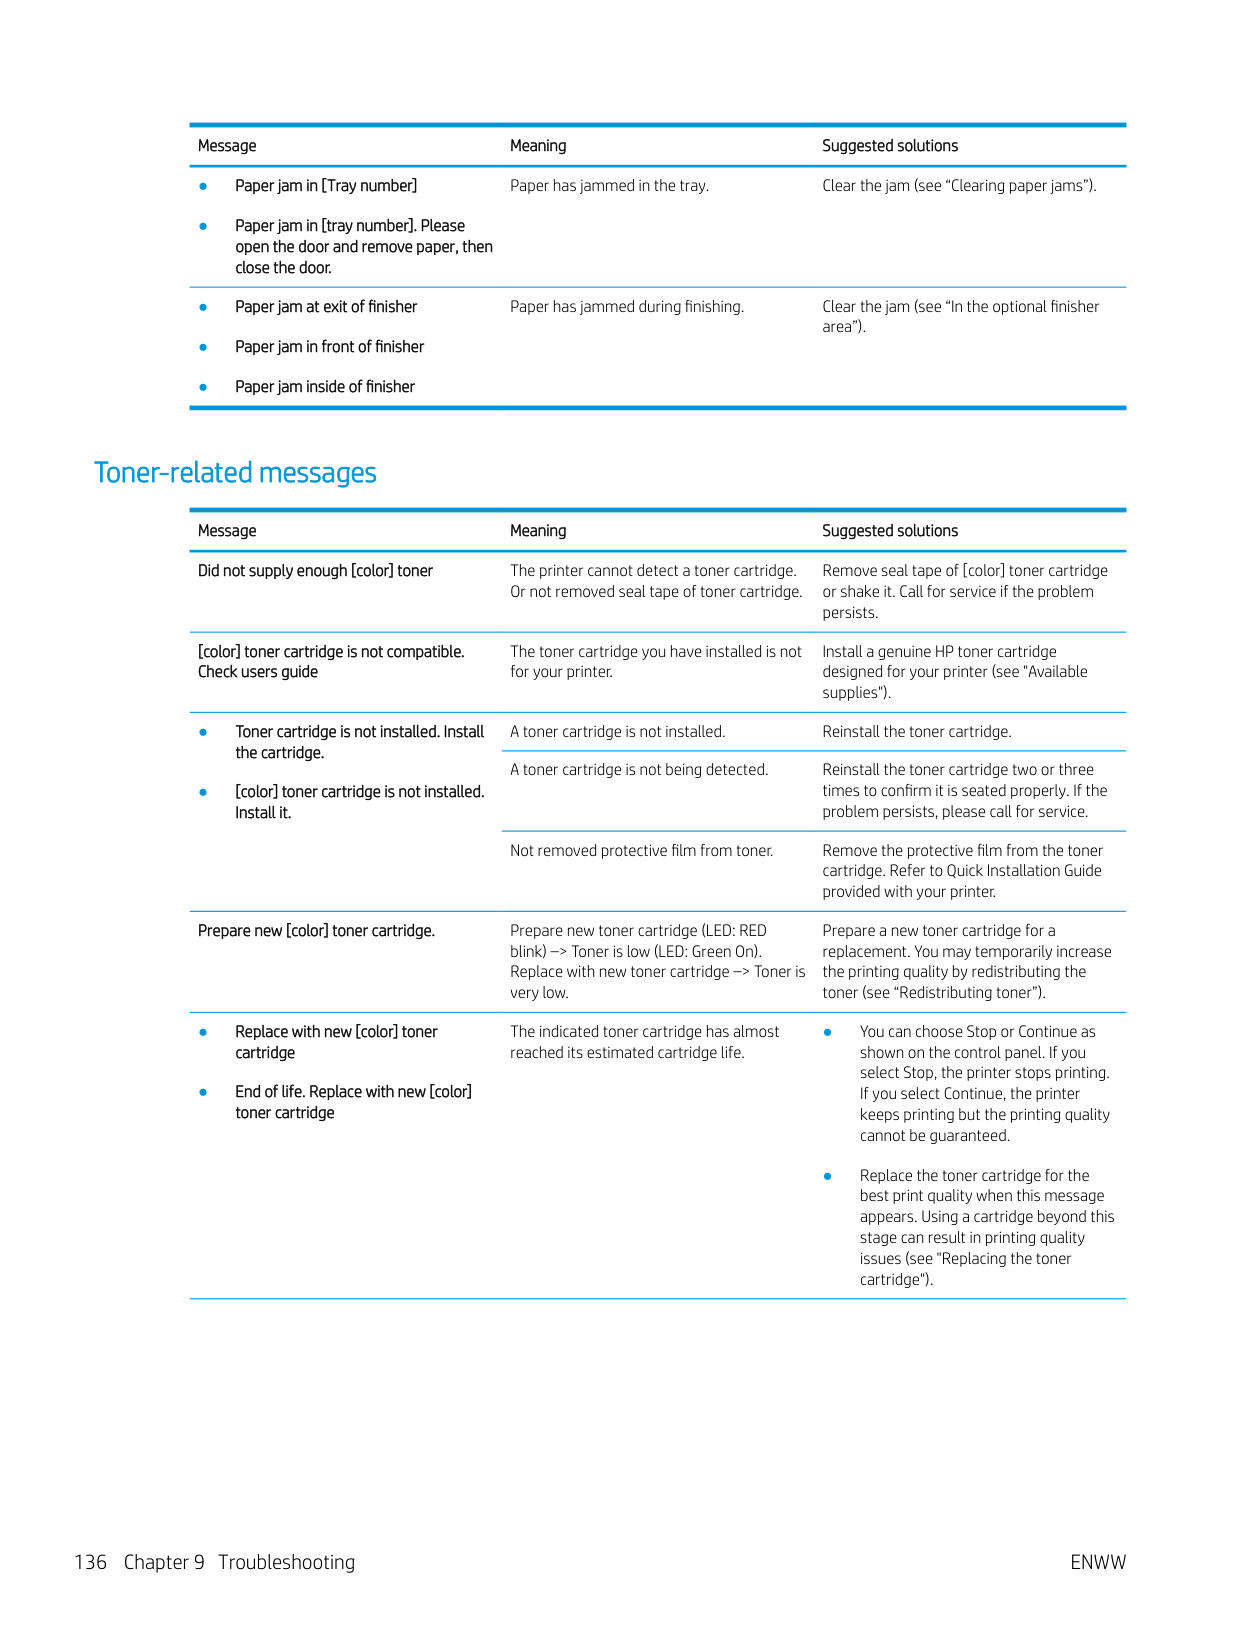
Reconfigure the wireless options in the printer, SWS, access point, or wireless router. The WPA2-PSK/AES security method is recommended. If the problem persists, please call for service.
#### Misc. messages
Message Meaning Suggested solutions
There is a problem in the developer. Unplug the power cord and plug it back in. If the problem persists, call for service.
[color] imaging unit is not compatible. Check users guide
The imaging unit you have installed is not for your printer.
Install a HP-genuine imaging unit, designed for your printer (see "Available supplies").
The imaging unit is not installed or the imaging unit is not properly installed.
Install the imaging unit. If it is already installed, try to reinstall the imaging unit. If the problem persists, call for service.
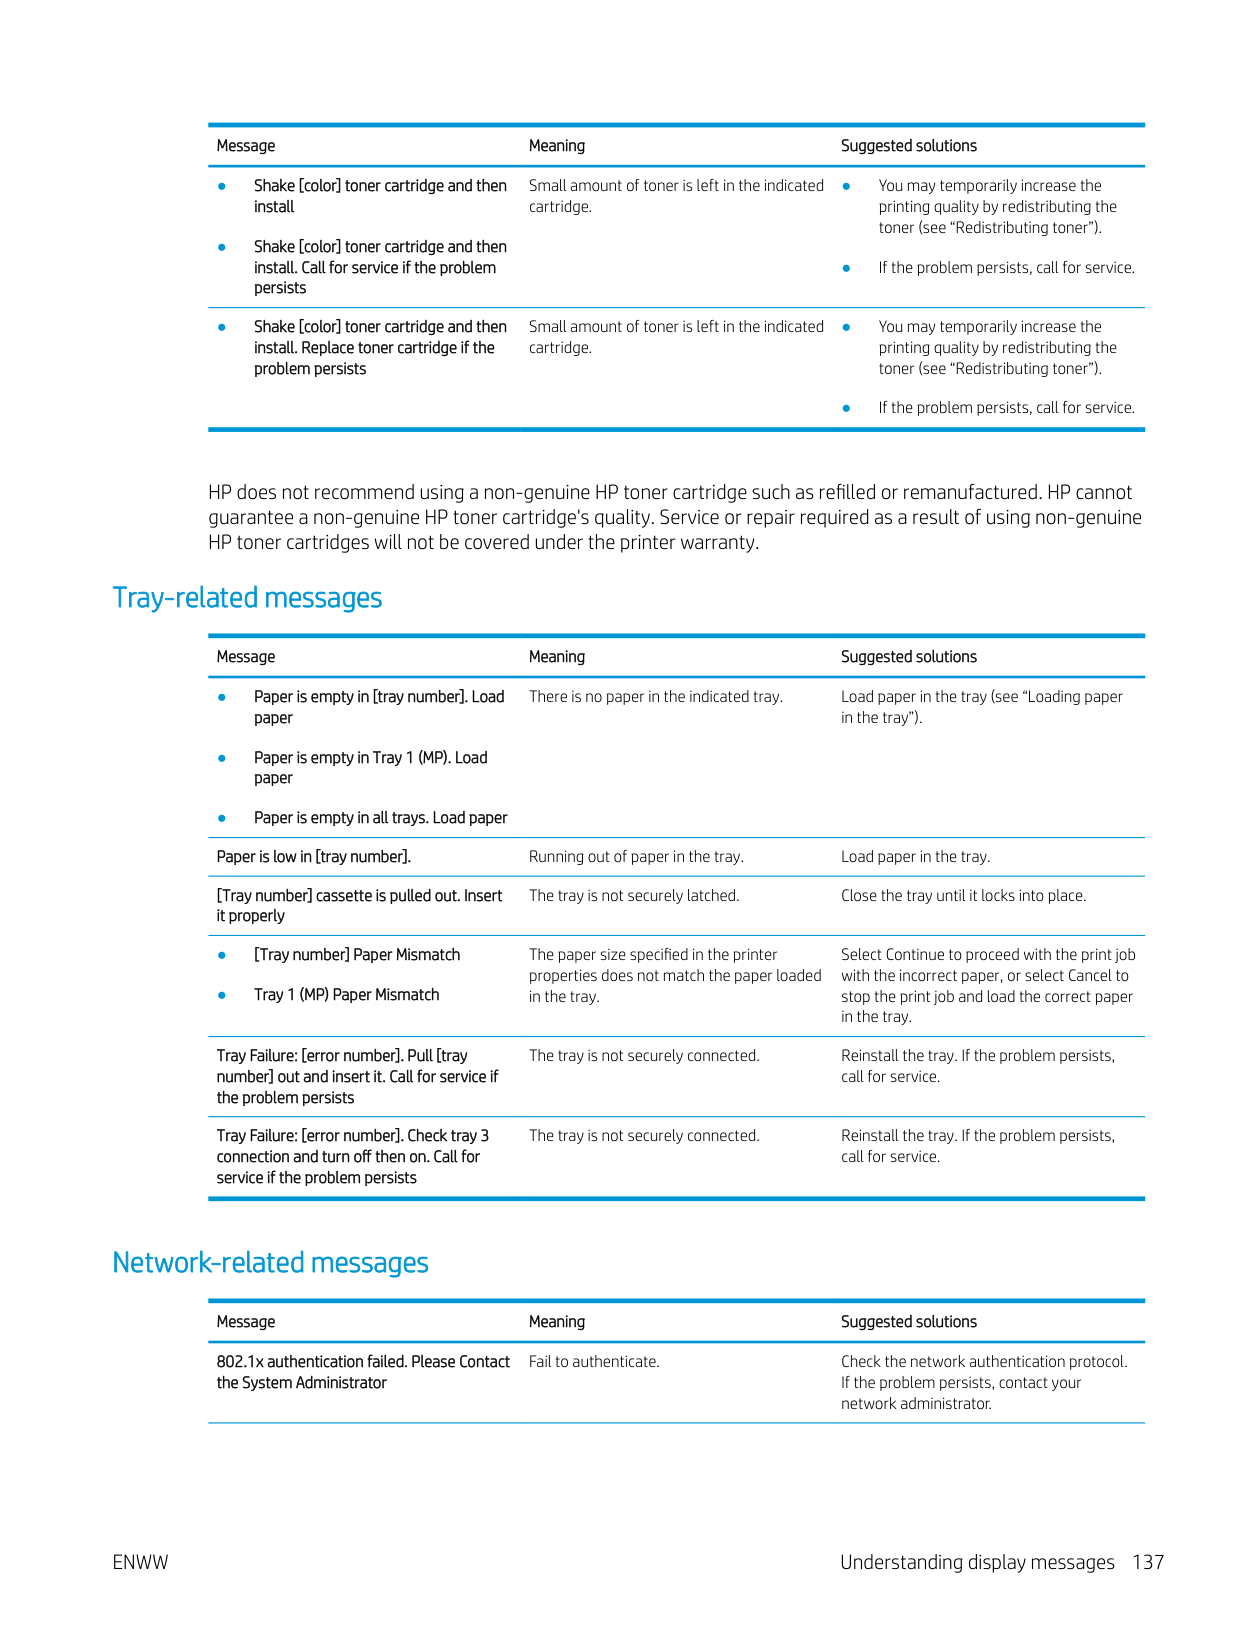
[color] Imaging Unit Failure: [error number]. Install [color] imaging unit again
The imaging unit is not installed. Install the imaging unit. If it is already installed, try to reinstall the imaging unit. If the problem persists, call for service.
End of life. Replace with new [color] imaging unit
The indicated imaging unit has almost reached its estimated cartridge life.a
Replace the imaging unit with a HP-genuine imaging unit (see "Replacing the imaging unit").
Engine System Failure [error number]: Turn off then on
There is a problem in the engine system. Unplug the power cord and plug it back in. If the problem persists, call for service.
Fan Failure: [error number]. Open the door, then close it. Call for service if the problem persists
There is a problem in the fan. Open the door, then close it. If the problem persists, call for service.
Fan Failure: [error number]. Turn off then on. Call for service if the problem persists
There is a problem in the fan. Unplug the power cord and plug it back in. If the problem persists, call for service.
There is a problem in the finisher system. Open the door, then close it. If the problem persists, call for service.
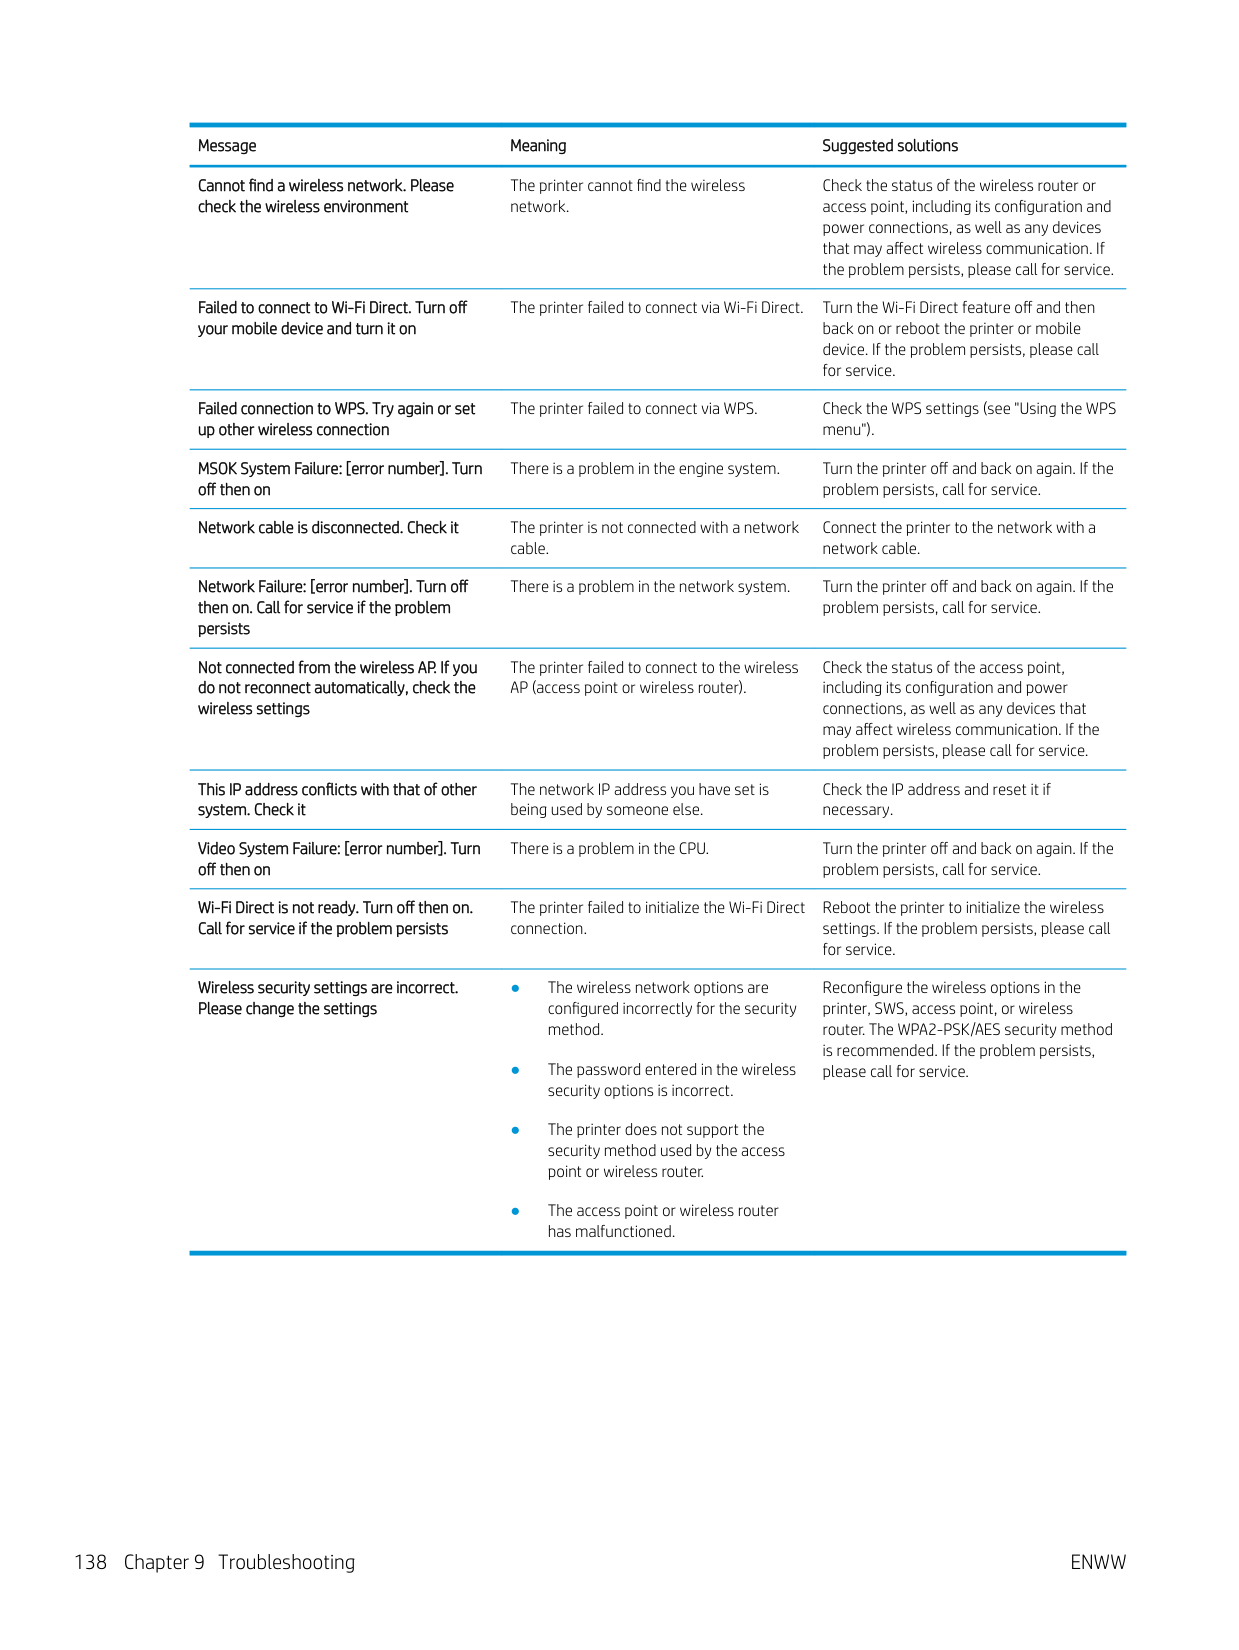
Finisher is pulled out. Insert it properly The finisher is not securely connected. Reinstall the finisher. If the problem
persists, call for service. Finisher jam door is open. Close it The finisher door is not securely latched. Close the door until it locks into place. Finisher stapler door is open. Close it The finisher stapler door is not securely
Close the door until it locks into place.
latched.
The front door or right door is not securely latched.
Close the door until it locks into place.
Fuser unit is not compatible. Check user’s guide.
The fuser unit you have installed is not for your printer.
Install a HP-genuine fuser unit, designed for your printer, call for service.
Fuser unit is not installed. Install it The fuser unit is not properly installed. Reinstall the fuser unit. If the problem
persists, call for service.

There is a problem in the fuser unit. Unplug the power cord and plug it back in. If the problem persists, call for service.
HDD System Failure: [error number]. Turn off then on. Call for service if the problem persists
There is a problem in the HDD system. Unplug the power cord and plug it back in. If the problem persists, call for service.
Hole punch hopper is full. Remove waste of hopper
The hole punch hopper is full. Remove the waste in the hopper.
Hole punch hopper is not installed. Install hopper
The hole punch hopper is not installed. Install the hole punch hopper. If it is already installed, try to reinstall the hole punch hopper. If the problem persists, call for service.
Imaging unit requires chargers cleaning. Clean the unit
The imaging unit requires charger cleaning. Cleaning the chargers of imaging unit (see "Cleaning the chargers of imaging unit").
Imaging Unit Failure: [error number]. Please turn off then on
There is a problem in the imaging unit. Turn the printer off and back on again. If the problem persists, call for service.
Inner output tray is full. Remove printed media
Inner output tray is full. Remove printed media.
Input System Failure: [error number]. Pull [Tray number] out and insert it
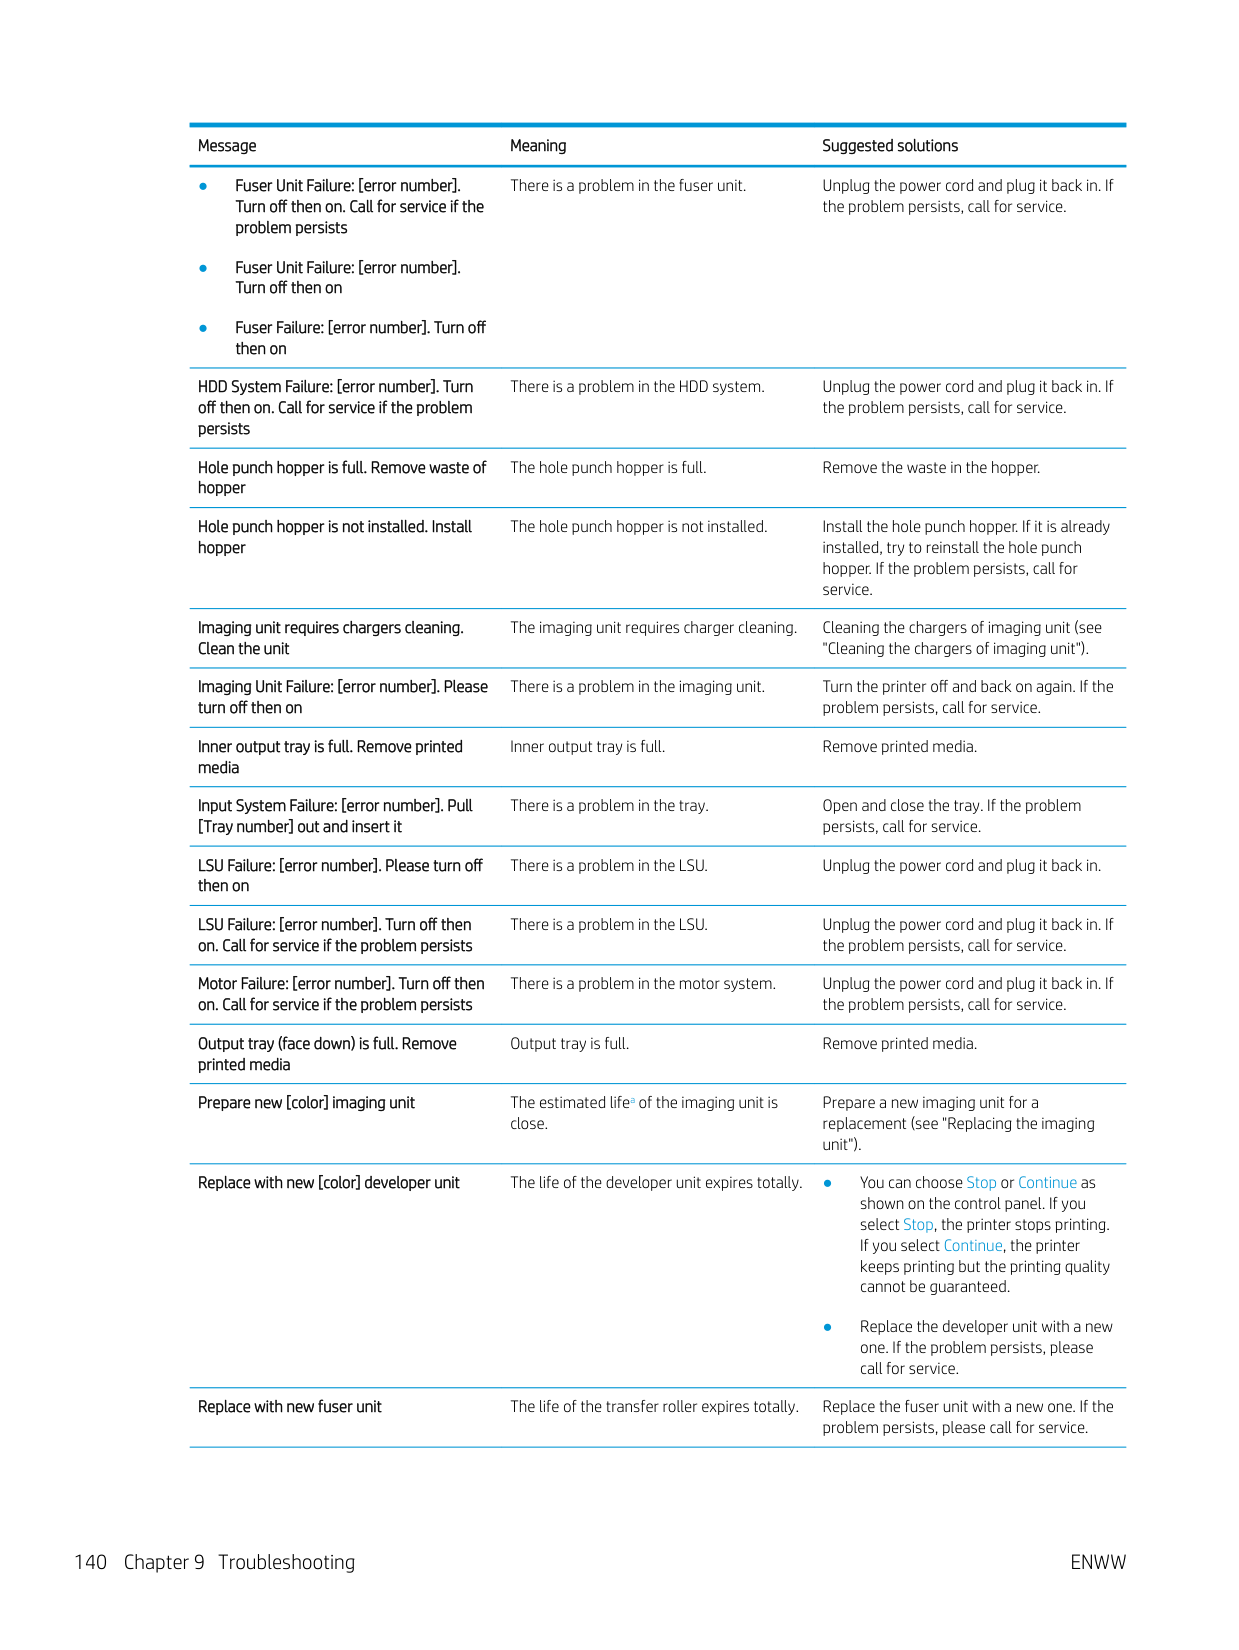
There is a problem in the tray. Open and close the tray. If the problem persists, call for service.
LSU Failure: [error number]. Please turn off then on
There is a problem in the LSU. Unplug the power cord and plug it back in.
LSU Failure: [error number]. Turn off then on. Call for service if the problem persists
There is a problem in the LSU. Unplug the power cord and plug it back in. If the problem persists, call for service.
Motor Failure: [error number]. Turn off then on. Call for service if the problem persists
There is a problem in the motor system. Unplug the power cord and plug it back in. If the problem persists, call for service.
Output tray (face down) is full. Remove printed media
Output tray is full. Remove printed media.
Prepare new [color] imaging unit The estimated lifea of the imaging unit is
close.
Prepare a new imaging unit for a replacement (see "Replacing the imaging unit").
Replace with new [color] developer unit The life of the developer unit expires totally. ● You can choose Stop or Continue as shown on the control panel. If you select Stop, the printer stops printing. If you select Continue, the printer keeps printing but the printing quality cannot be guaranteed.
● Replace the developer unit with a new one. If the problem persists, please call for service.
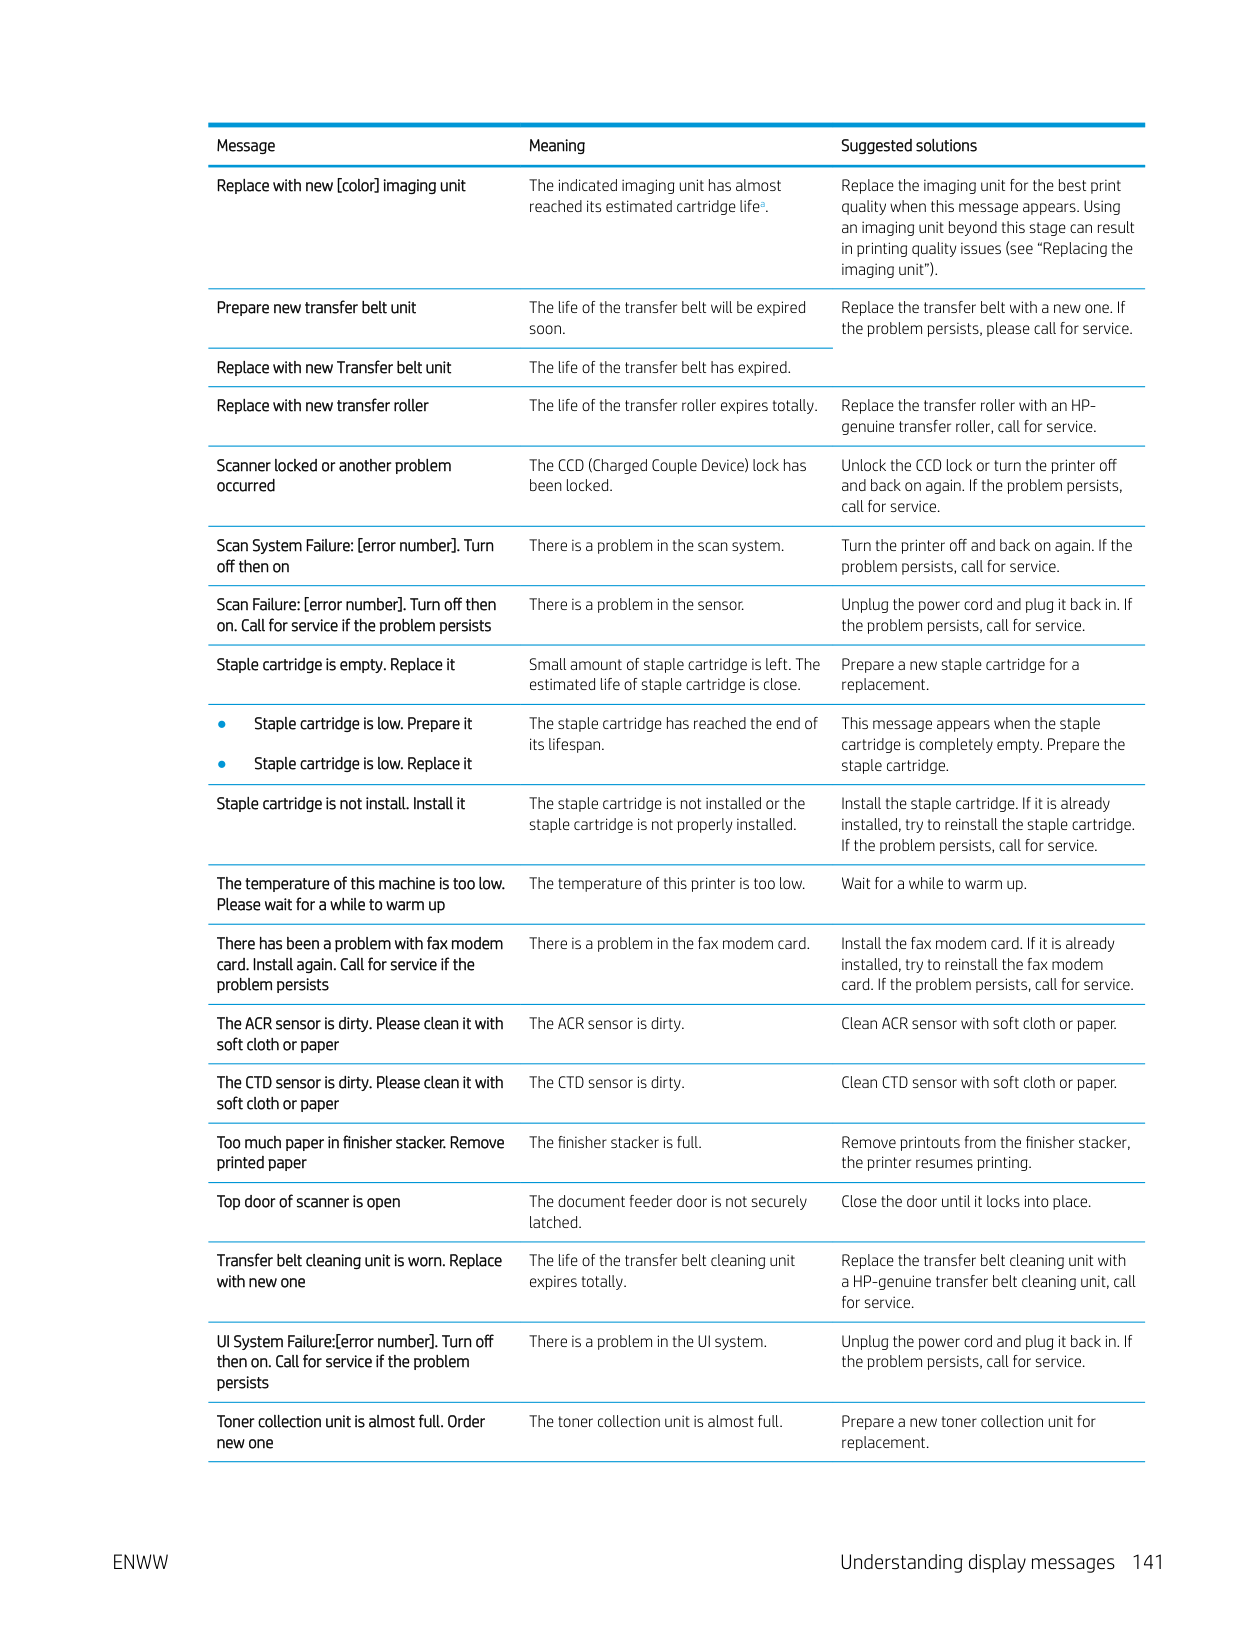
Replace with new fuser unit The life of the transfer roller expires totally. Replace the fuser unit with a new one. If the
problem persists, please call for service.
Replace with new [color] imaging unit The indicated imaging unit has almost
reached its estimated cartridge lifea.
Replace the imaging unit for the best print quality when this message appears. Using an imaging unit beyond this stage can result in printing quality issues (see “Replacing the imaging unit”).
Prepare new transfer belt unit The life of the transfer belt will be expired
soon.
Replace the transfer belt with a new one. If the problem persists, please call for service.
Replace with new Transfer belt unit The life of the transfer belt has expired. Replace with new transfer roller The life of the transfer roller expires totally. Replace the transfer roller with an HP-
genuine transfer roller, call for service.
Scanner locked or another problem occurred
The CCD (Charged Couple Device) lock has been locked.
Unlock the CCD lock or turn the printer off and back on again. If the problem persists, call for service.
Scan System Failure: [error number]. Turn off then on
There is a problem in the scan system. Turn the printer off and back on again. If the problem persists, call for service.

Scan Failure: [error number]. Turn off then on. Call for service if the problem persists
There is a problem in the sensor. Unplug the power cord and plug it back in. If
the problem persists, call for service. Staple cartridge is empty. Replace it Small amount of staple cartridge is left. The
Prepare a new staple cartridge for a replacement.
estimated life of staple cartridge is close.
The staple cartridge has reached the end of its lifespan.
This message appears when the staple cartridge is completely empty. Prepare the staple cartridge.
Staple cartridge is not install. Install it The staple cartridge is not installed or the
staple cartridge is not properly installed.
Install the staple cartridge. If it is already installed, try to reinstall the staple cartridge. If the problem persists, call for service.
The temperature of this machine is too low. Please wait for a while to warm up
The temperature of this printer is too low. Wait for a while to warm up.
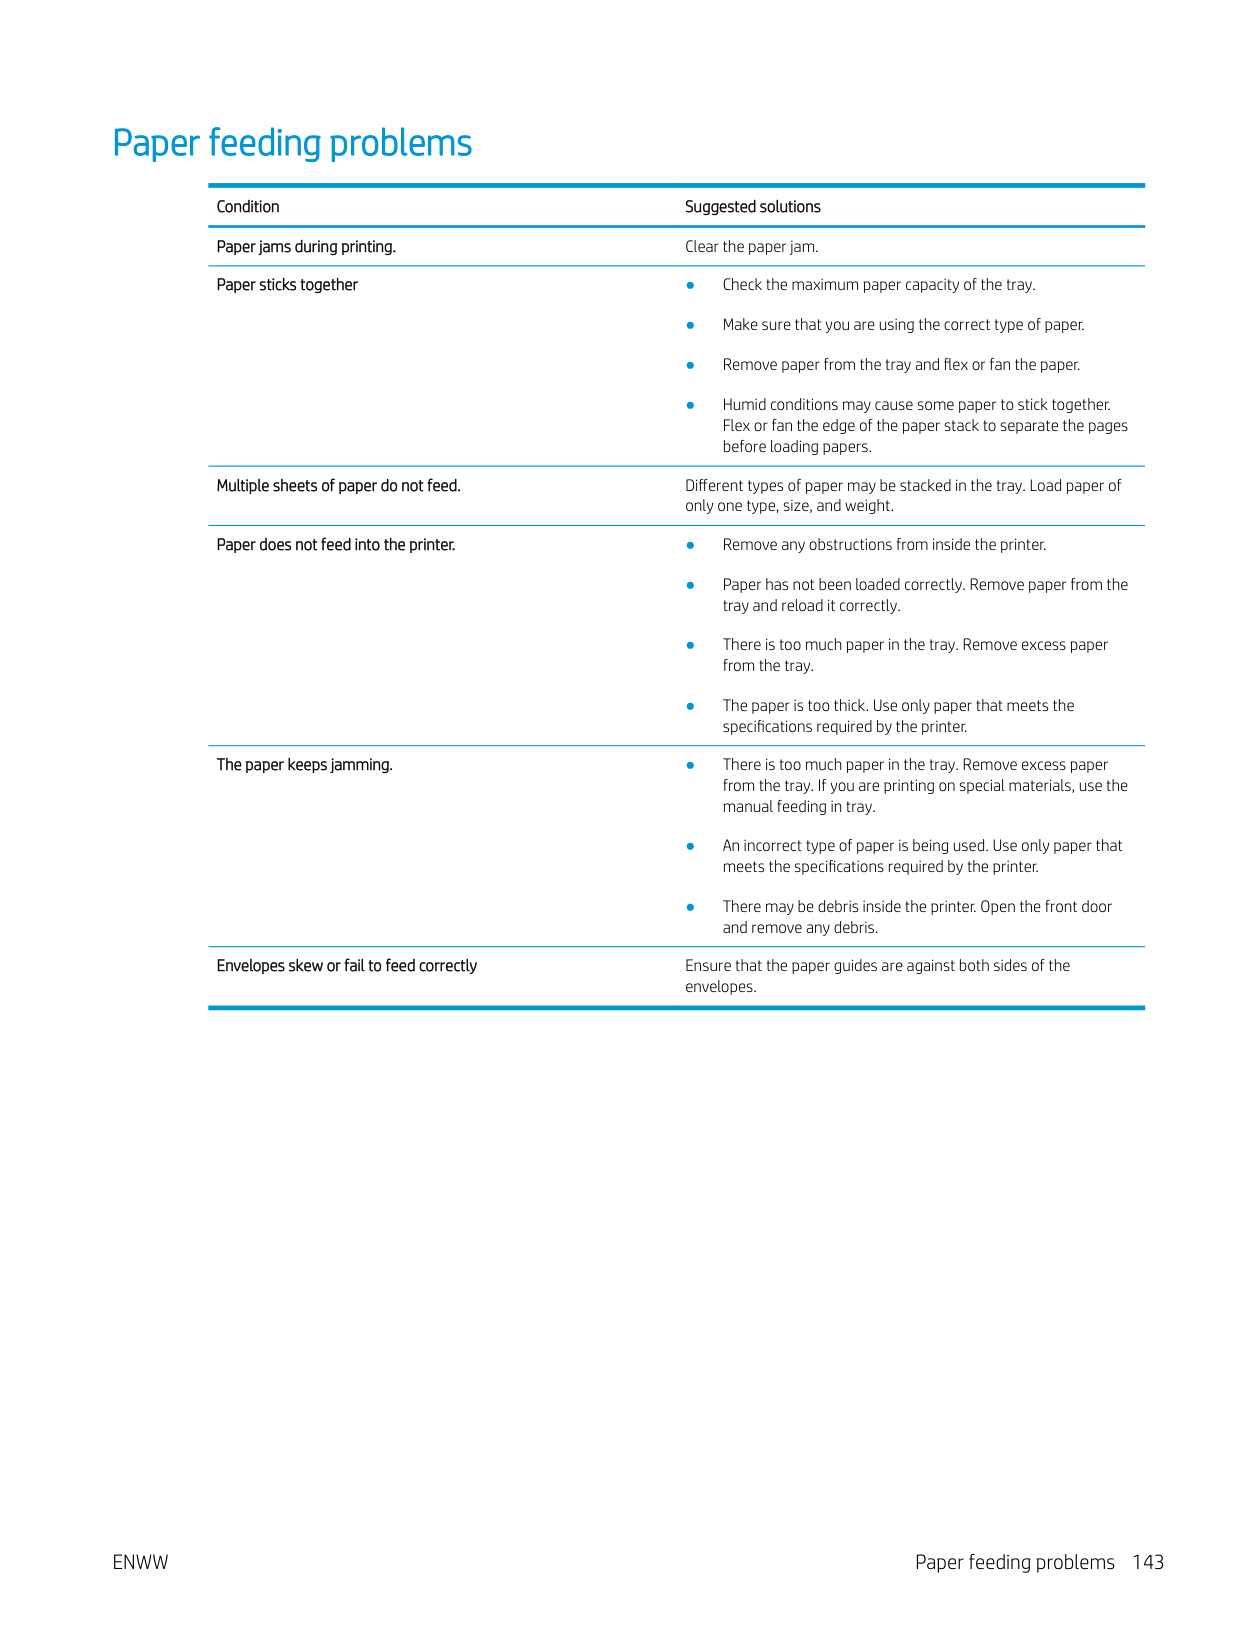
There has been a problem with fax modem card. Install again. Call for service if the problem persists
There is a problem in the fax modem card. Install the fax modem card. If it is already installed, try to reinstall the fax modem card. If the problem persists, call for service.
The ACR sensor is dirty. Please clean it with soft cloth or paper
The ACR sensor is dirty. Clean ACR sensor with soft cloth or paper.
The CTD sensor is dirty. Please clean it with soft cloth or paper
The CTD sensor is dirty. Clean CTD sensor with soft cloth or paper.
The finisher stacker is full. Remove printouts from the finisher stacker, the printer resumes printing.
Close the door until it locks into place.
Transfer belt cleaning unit is worn. Replace with new one
UI System Failure:[error number]. Turn off then on. Call for service if the problem persists
Toner collection unit is almost full. Order new one
The life of the transfer belt cleaning unit expires totally.

Replace the transfer belt cleaning unit with a HP-genuine transfer belt cleaning unit, call for service.
There is a problem in the UI system. Unplug the power cord and plug it back in. If the problem persists, call for service.
The toner collection unit is almost full. Prepare a new toner collection unit for replacement.
Toner collection unit is full. Replace it The toner collection unit is full and the printer will stop printing until a new toner collection unit is placed into the printer.
Replace the toner collection unit with a HPgenuine toner collection unit (see “Replacing the toner collection unit”).
Toner collection unit is not installed. Install it.
The toner collection unit is not installed. Install the toner collection unit. If it is already installed, try to reinstall the toner collection unit. If the problem persists, call for service.
a Print cartridge life is approximate, based on average A4/Letter-size page count with ISO coverage. Declared cartridge yield value in accordance with ISO/IEC 19798. Actual yields vary considerably based on images printed and other factors. For more information, visit www.hp.com/go/learnaboutsupplies.
Paper feeding problems
Condition Suggested solutions Paper jams during printing. Clear the paper jam. Paper sticks together ● Check the maximum paper capacity of the tray.
Multiple sheets of paper do not feed. Different types of paper may be stacked in the tray. Load paper of
only one type, size, and weight.
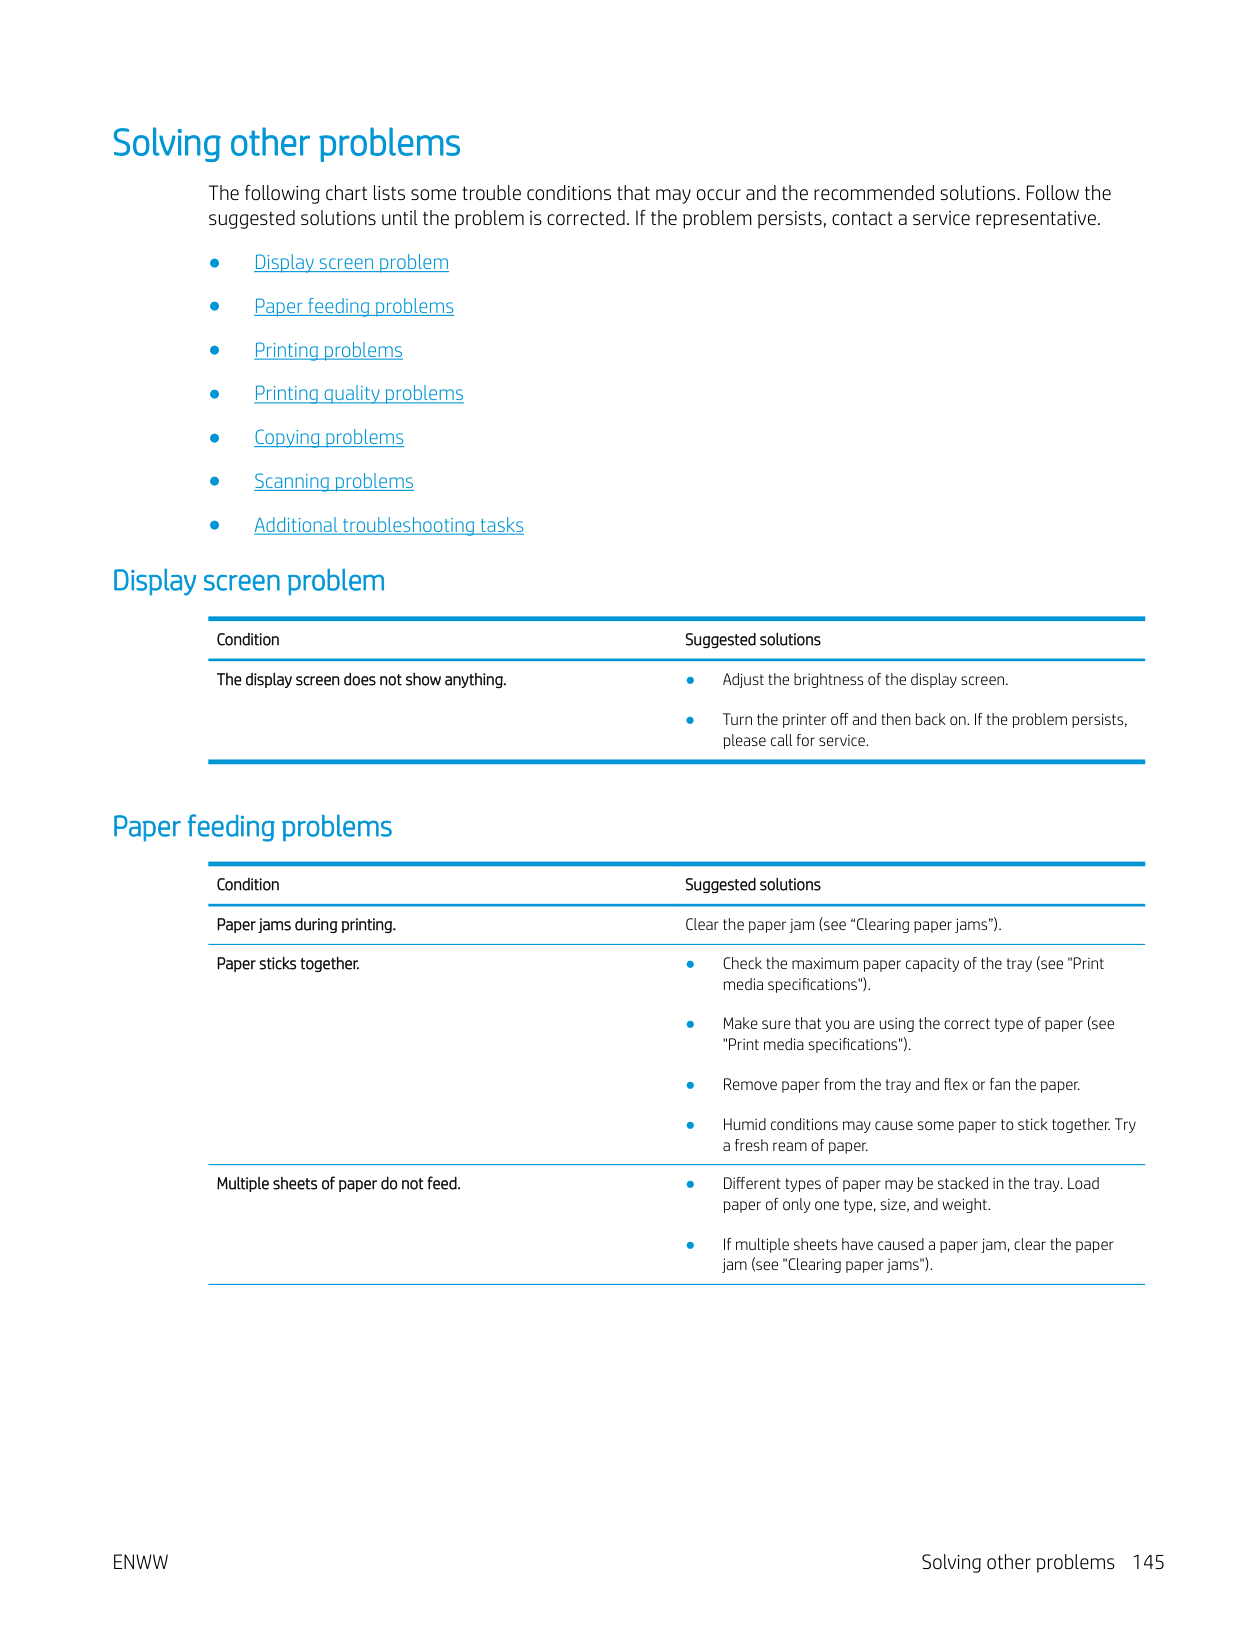
Paper does not feed into the printer. ● Remove any obstructions from inside the printer.
The paper keeps jamming. ● There is too much paper in the tray. Remove excess paper from the tray. If you are printing on special materials, use the manual feeding in tray.
Envelopes skew or fail to feed correctly Ensure that the paper guides are against both sides of the
envelopes.
ENWW Paper feeding problems 143
Power and cable connecting problems
Condition Suggested solutions The printer is not receiving power, or the connection cable between the computer and the printer is not connected properly.

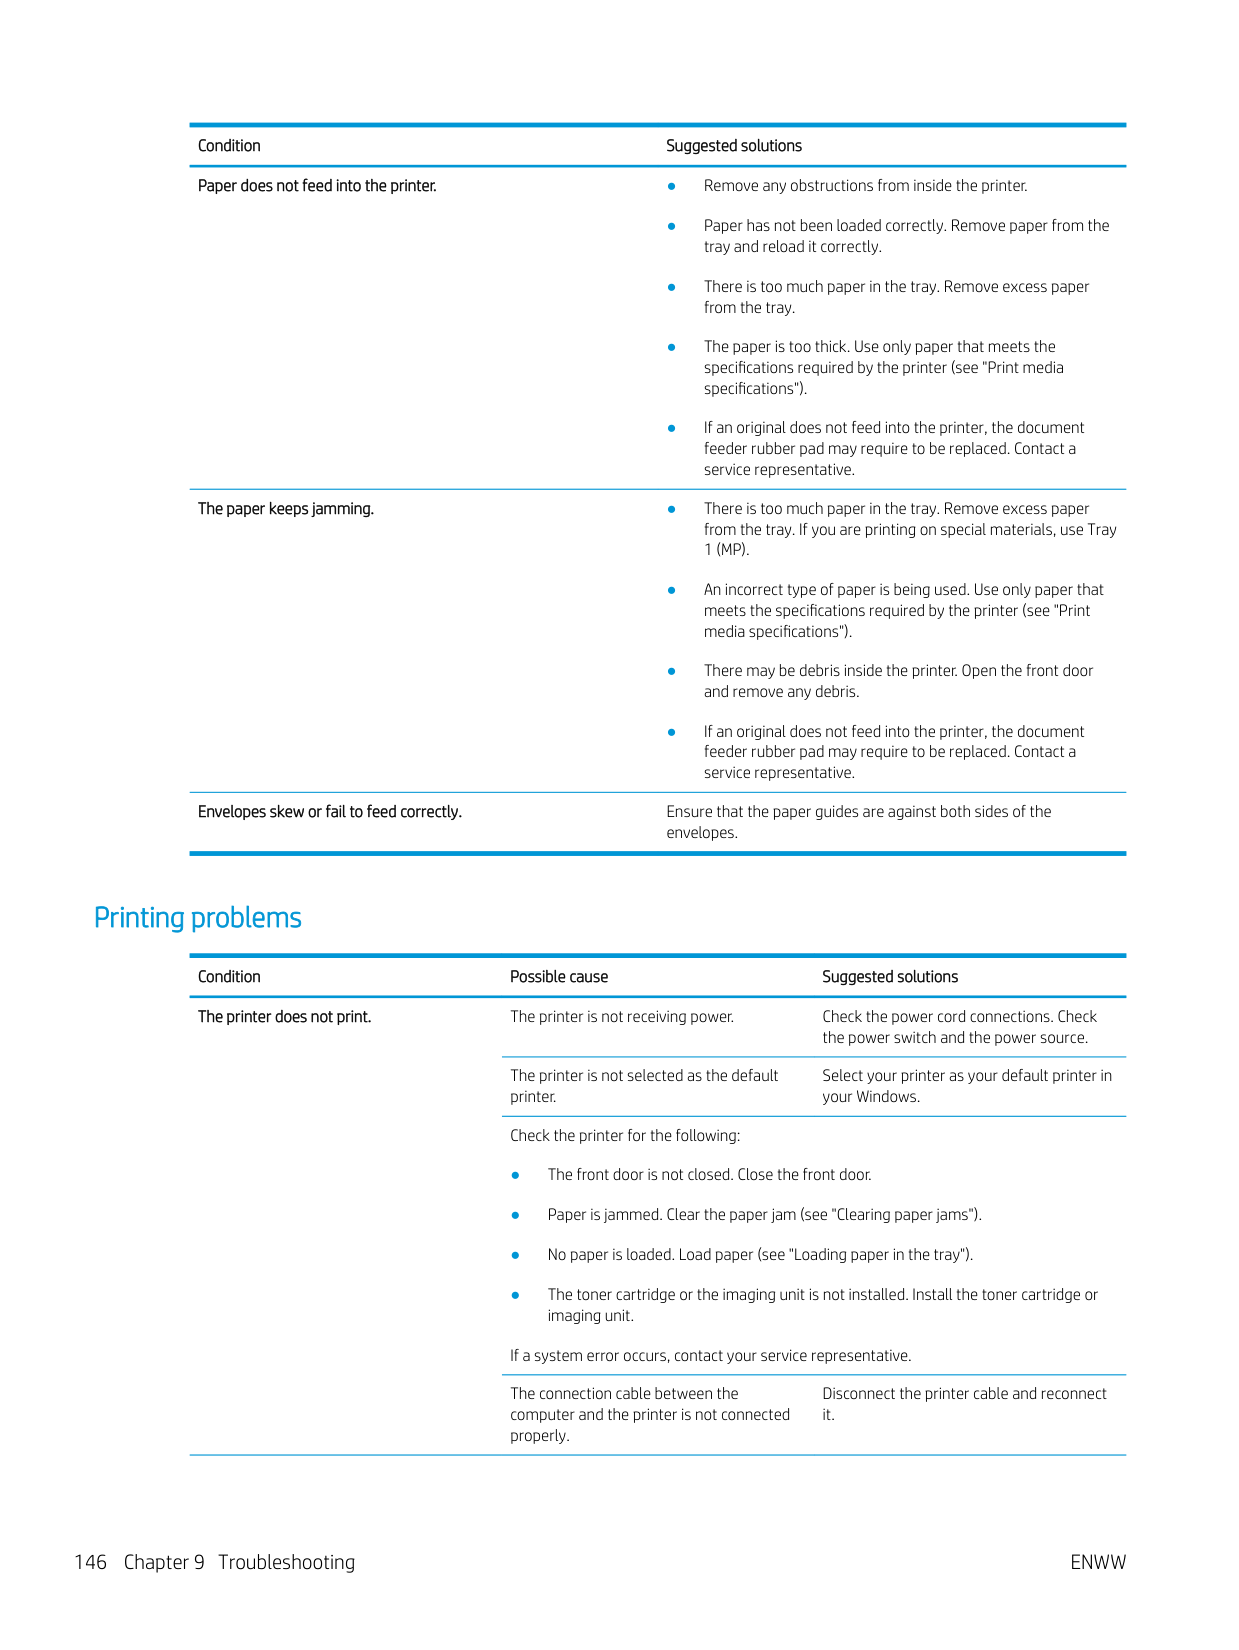

Solving other problems
The following chart lists some trouble conditions that may occur and the recommended solutions. Follow the suggested solutions until the problem is corrected. If the problem persists, contact a service representative.
#### Display screen problem
Condition Suggested solutions The display screen does not show anything. ● Adjust the brightness of the display screen.
● Turn the printer off and then back on. If the problem persists,
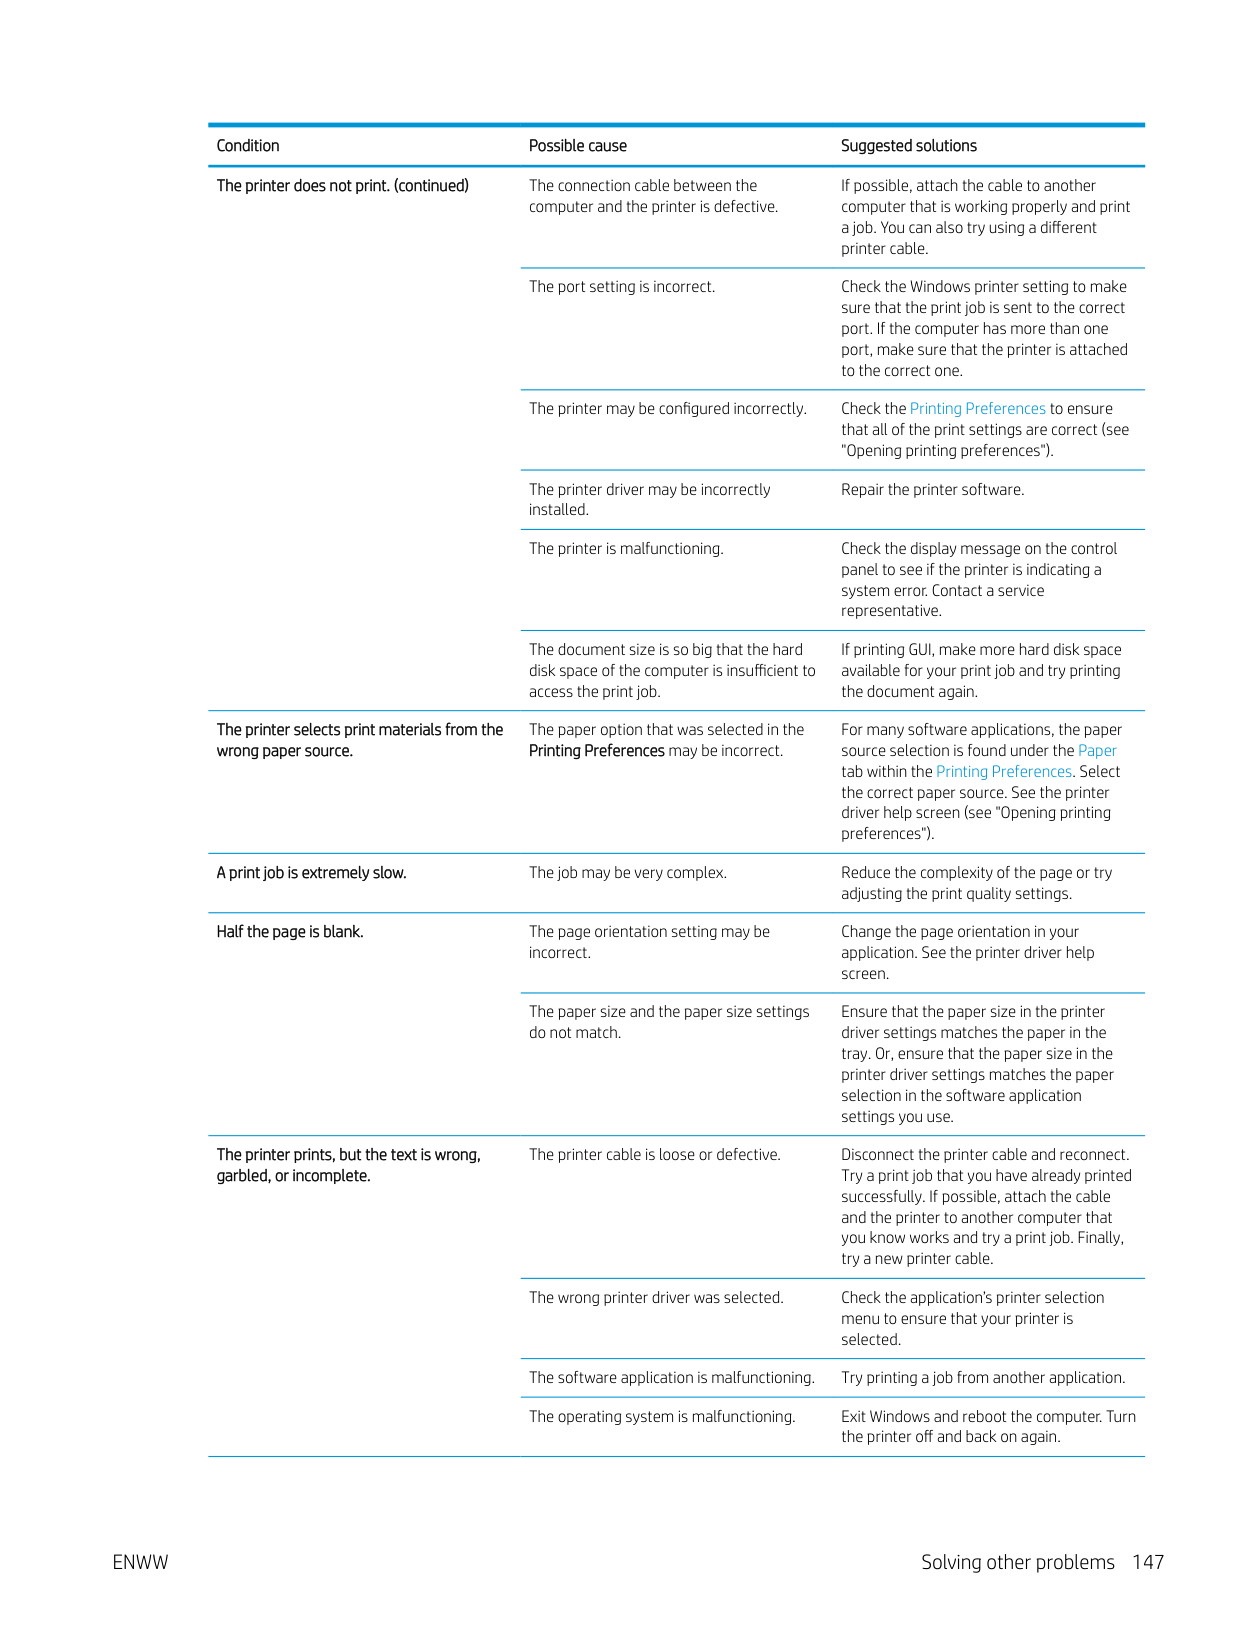
please call for service.
#### Paper feeding problems
Condition Suggested solutions Paper jams during printing. Clear the paper jam (see “Clearing paper jams”). Paper sticks together. ● Check the maximum paper capacity of the tray (see "Print
media specifications").
Multiple sheets of paper do not feed. ● Different types of paper may be stacked in the tray. Load
paper of only one type, size, and weight.
● If multiple sheets have caused a paper jam, clear the paper
jam (see "Clearing paper jams").
Condition Suggested solutions Paper does not feed into the printer. ● Remove any obstructions from inside the printer.
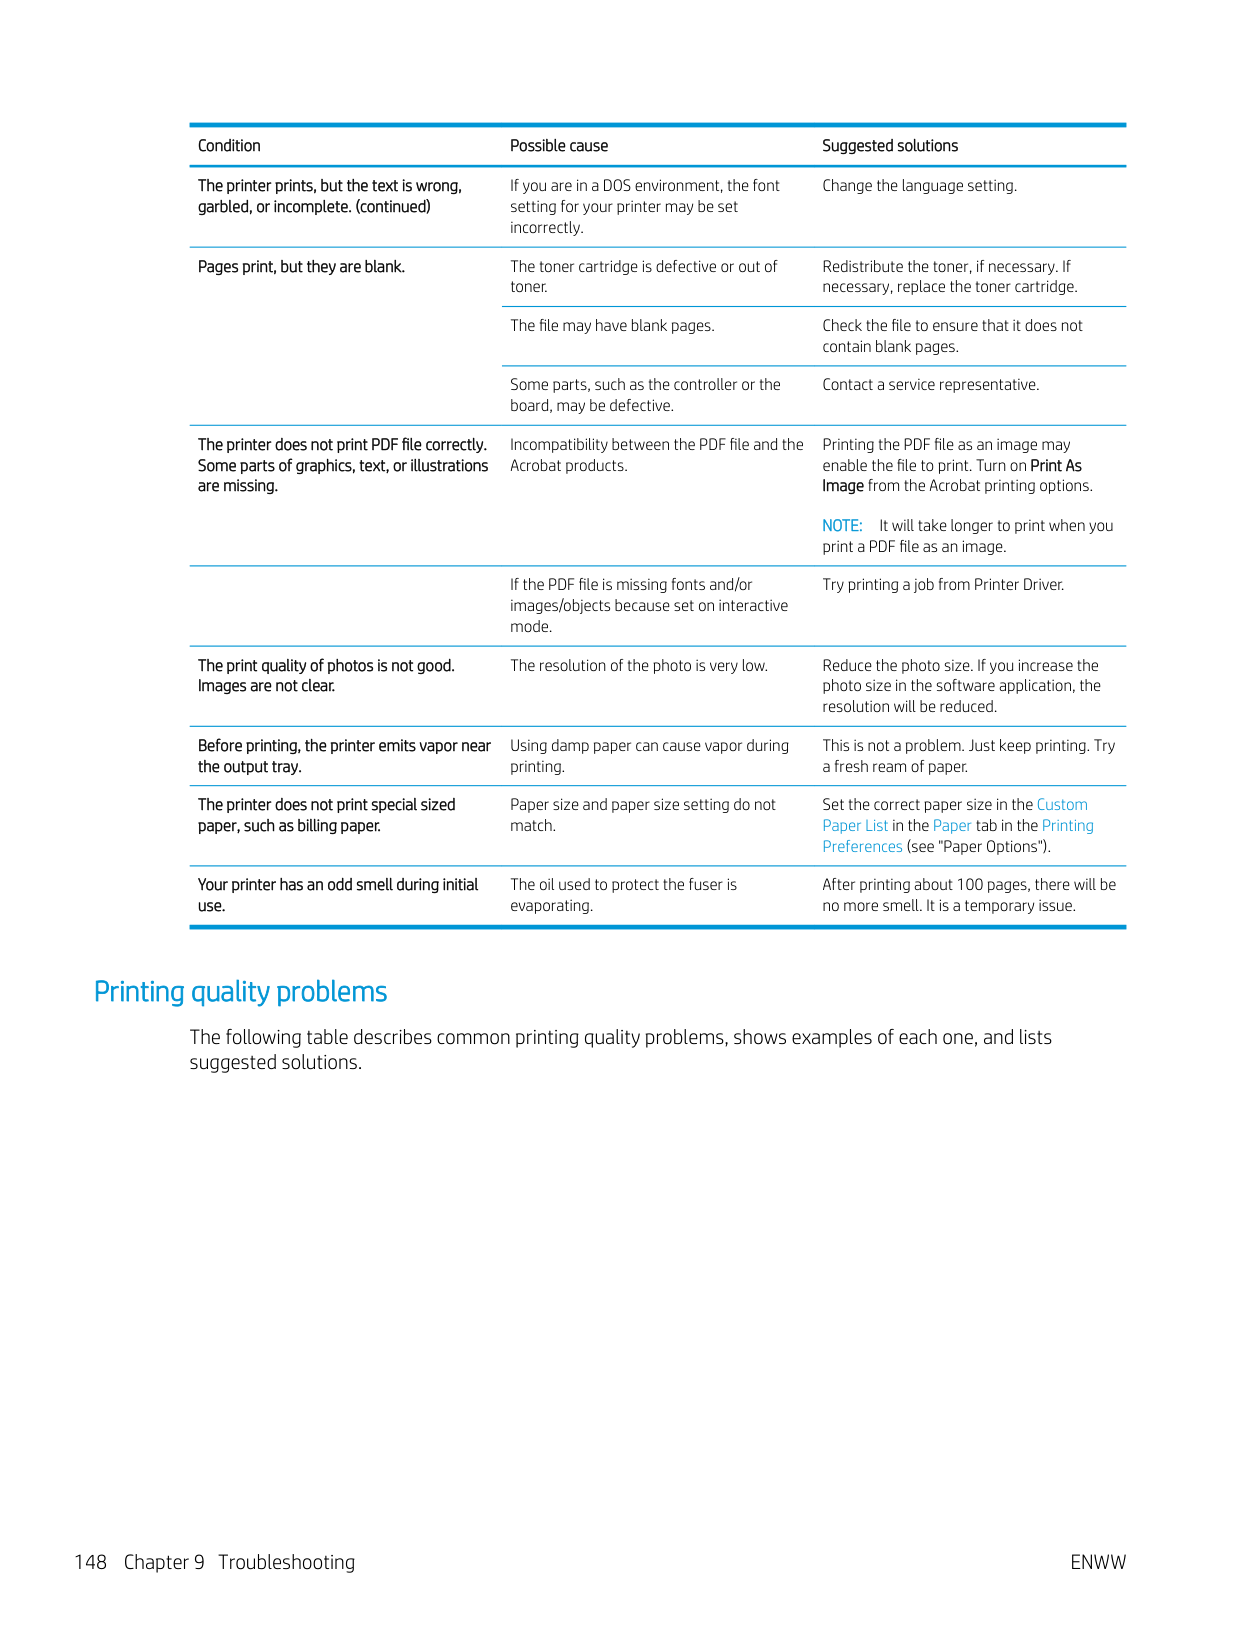
The paper keeps jamming. ● There is too much paper in the tray. Remove excess paper from the tray. If you are printing on special materials, use Tray 1 (MP).
Envelopes skew or fail to feed correctly. Ensure that the paper guides are against both sides of the
envelopes.
#### Printing problems
Condition Possible cause Suggested solutions The printer does not print. The printer is not receiving power. Check the power cord connections. Check
the power switch and the power source.
The printer is not selected as the default printer.
Check the printer for the following:
Select your printer as your default printer in your Windows.
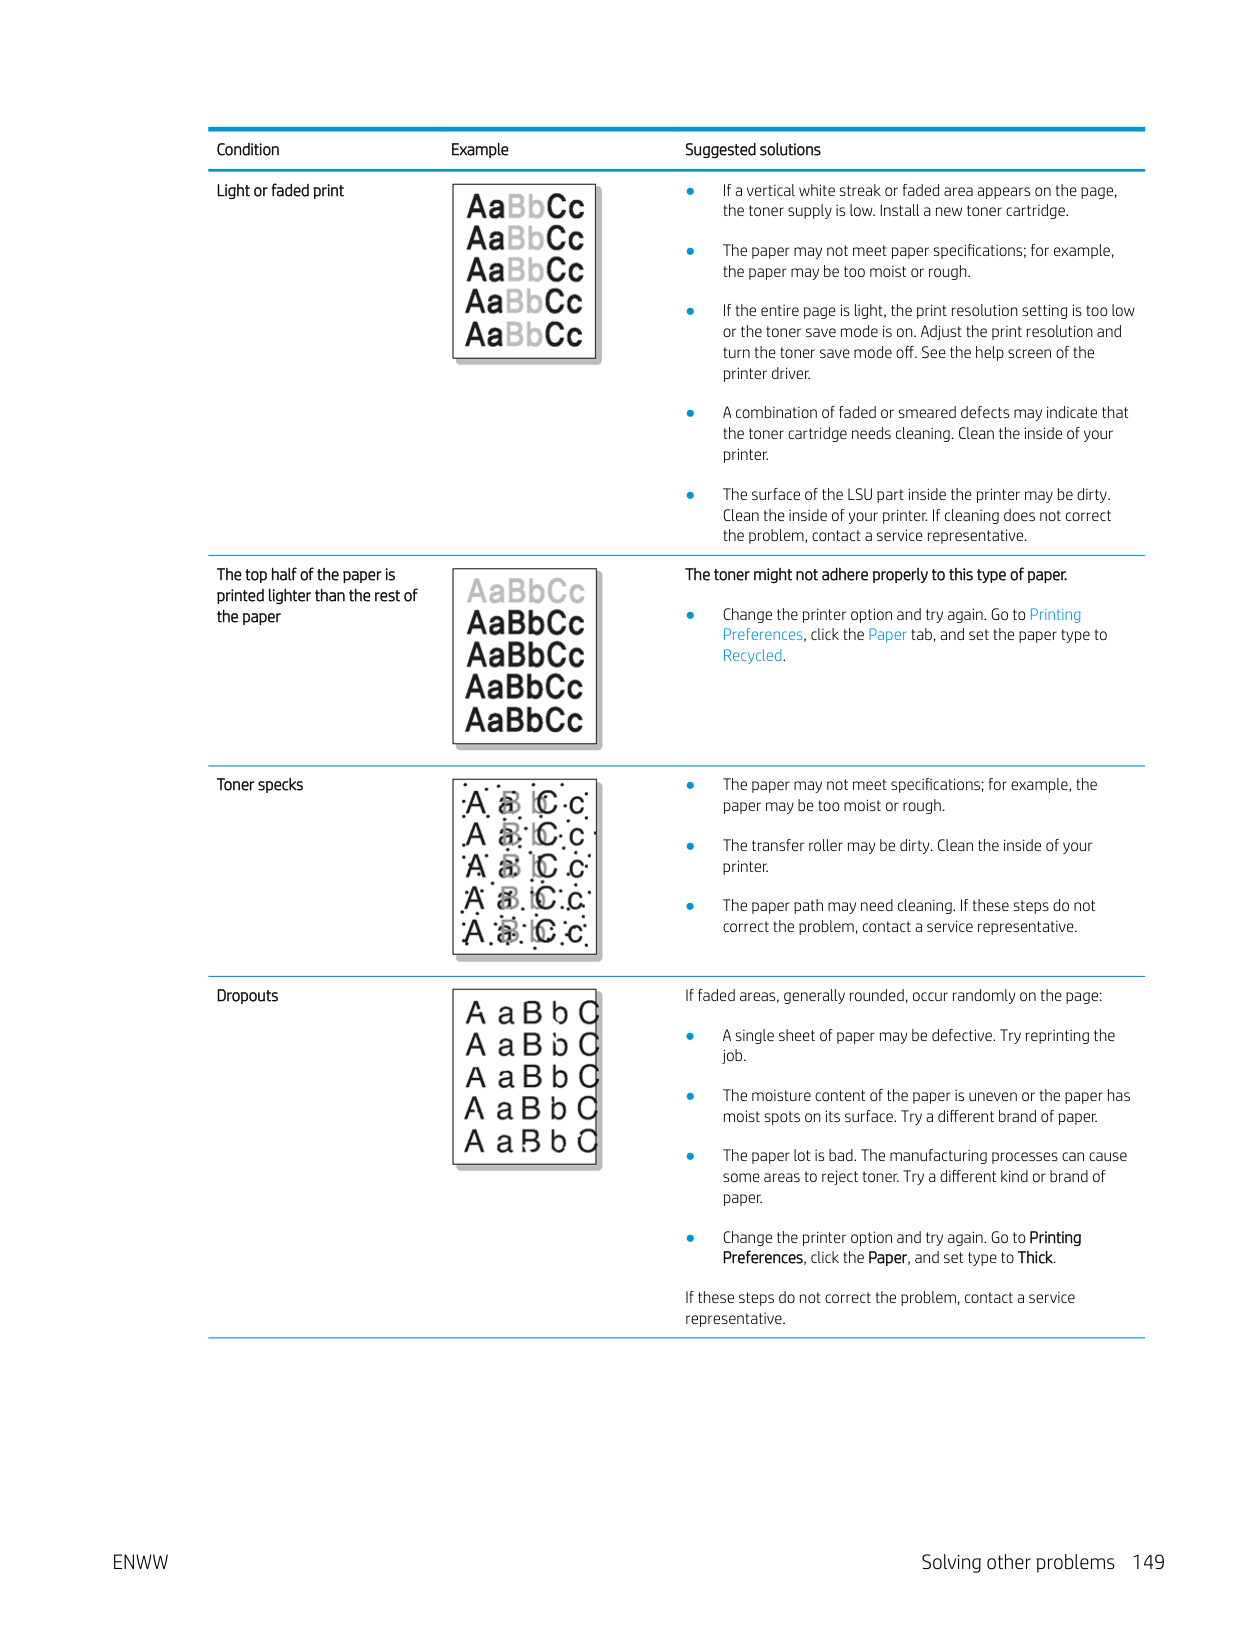
If a system error occurs, contact your service representative. The connection cable between the computer and the printer is not connected properly.
Disconnect the printer cable and reconnect it.
The printer does not print. (continued) The connection cable between the
computer and the printer is defective.
If possible, attach the cable to another computer that is working properly and print a job. You can also try using a different printer cable.
The port setting is incorrect. Check the Windows printer setting to make sure that the print job is sent to the correct port. If the computer has more than one port, make sure that the printer is attached to the correct one.
The printer may be configured incorrectly. Check the Printing Preferences to ensure that all of the print settings are correct (see "Opening printing preferences").
The printer driver may be incorrectly installed.
Repair the printer software.
The printer is malfunctioning. Check the display message on the control panel to see if the printer is indicating a system error. Contact a service representative.
The document size is so big that the hard disk space of the computer is insufficient to access the print job.
If printing GUI, make more hard disk space available for your print job and try printing the document again.
The printer selects print materials from the wrong paper source.
The paper option that was selected in the Printing Preferences may be incorrect.
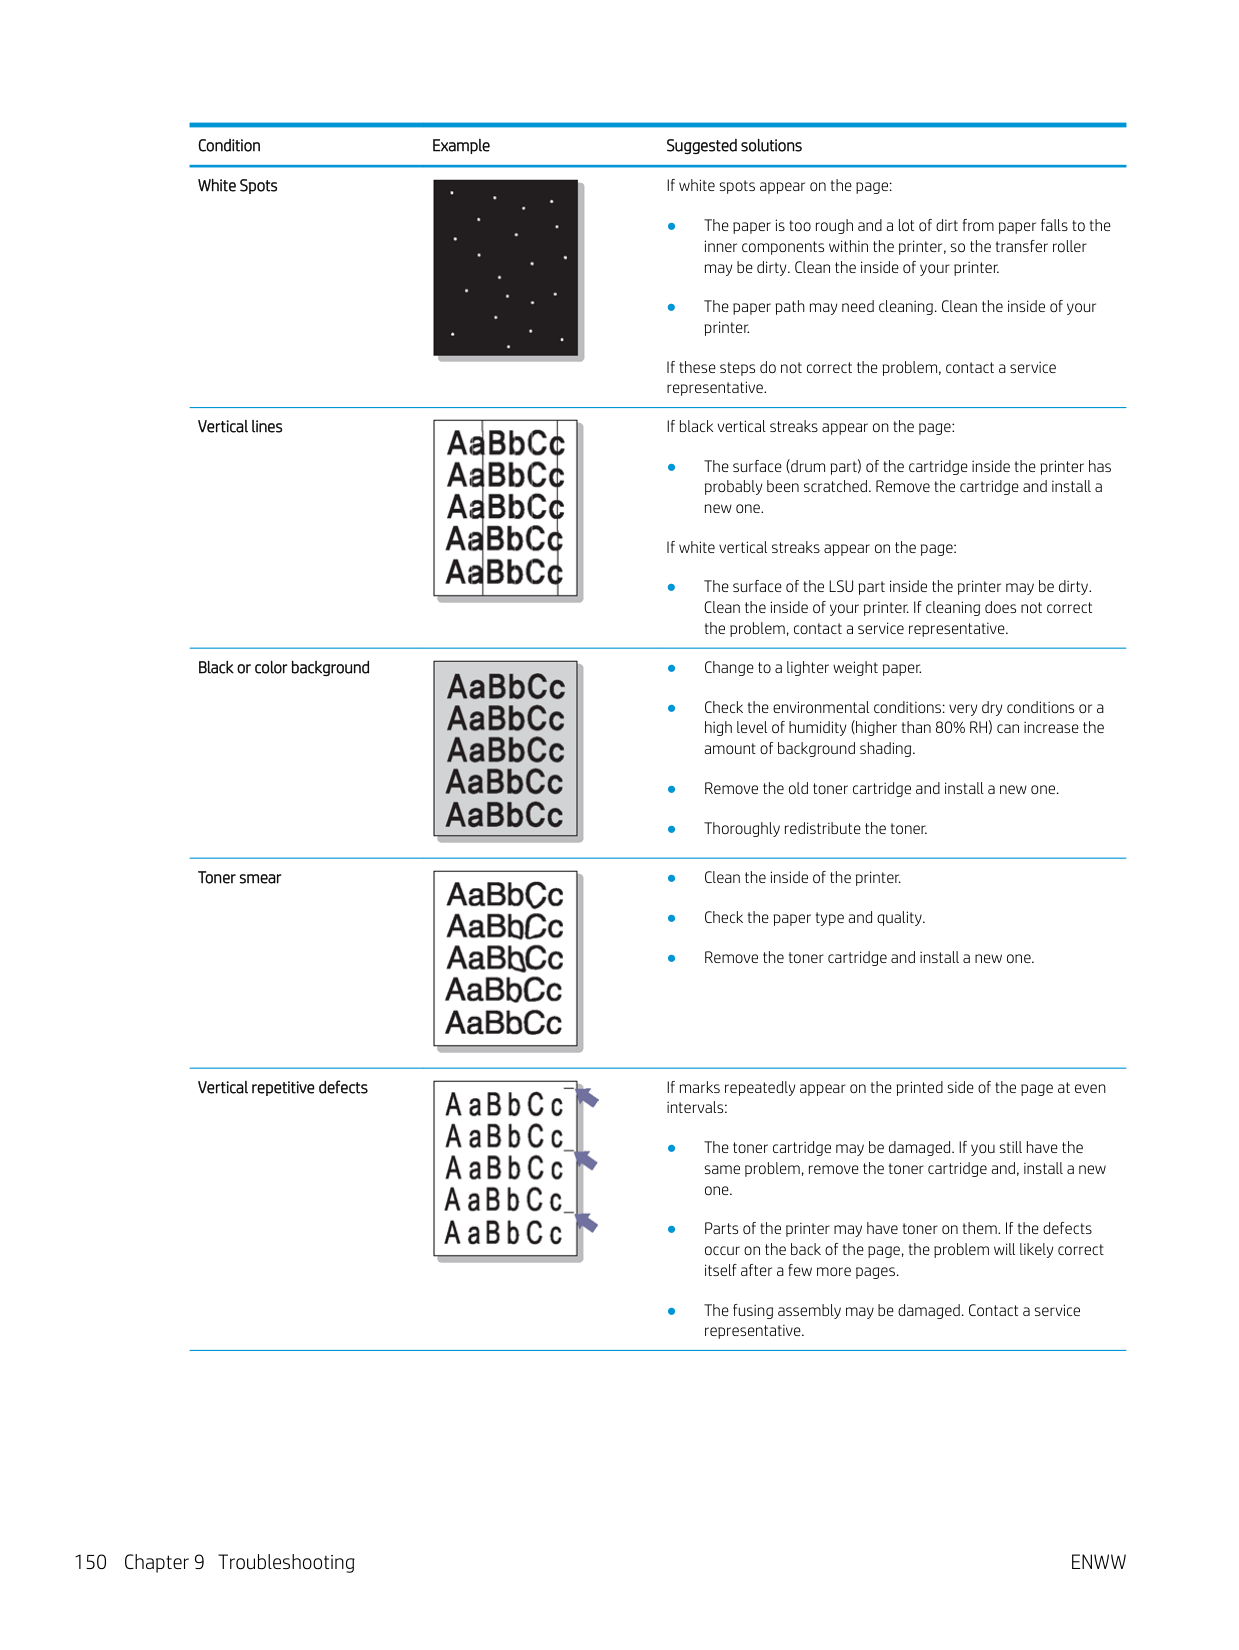
For many software applications, the paper source selection is found under the Paper tab within the Printing Preferences. Select the correct paper source. See the printer driver help screen (see "Opening printing preferences").
A print job is extremely slow. The job may be very complex. Reduce the complexity of the page or try
adjusting the print quality settings. Half the page is blank. The page orientation setting may be
Change the page orientation in your application. See the printer driver help screen.
incorrect.
The printer prints, but the text is wrong, garbled, or incomplete.
The paper size and the paper size settings do not match.
Ensure that the paper size in the printer driver settings matches the paper in the tray. Or, ensure that the paper size in the printer driver settings matches the paper selection in the software application settings you use.
The printer cable is loose or defective. Disconnect the printer cable and reconnect. Try a print job that you have already printed successfully. If possible, attach the cable and the printer to another computer that you know works and try a print job. Finally, try a new printer cable.
The wrong printer driver was selected. Check the application’s printer selection menu to ensure that your printer is selected.
The software application is malfunctioning. Try printing a job from another application. The operating system is malfunctioning. Exit Windows and reboot the computer. Turn
the printer off and back on again.
The printer prints, but the text is wrong, garbled, or incomplete. (continued)
If you are in a DOS environment, the font setting for your printer may be set incorrectly.
Change the language setting.
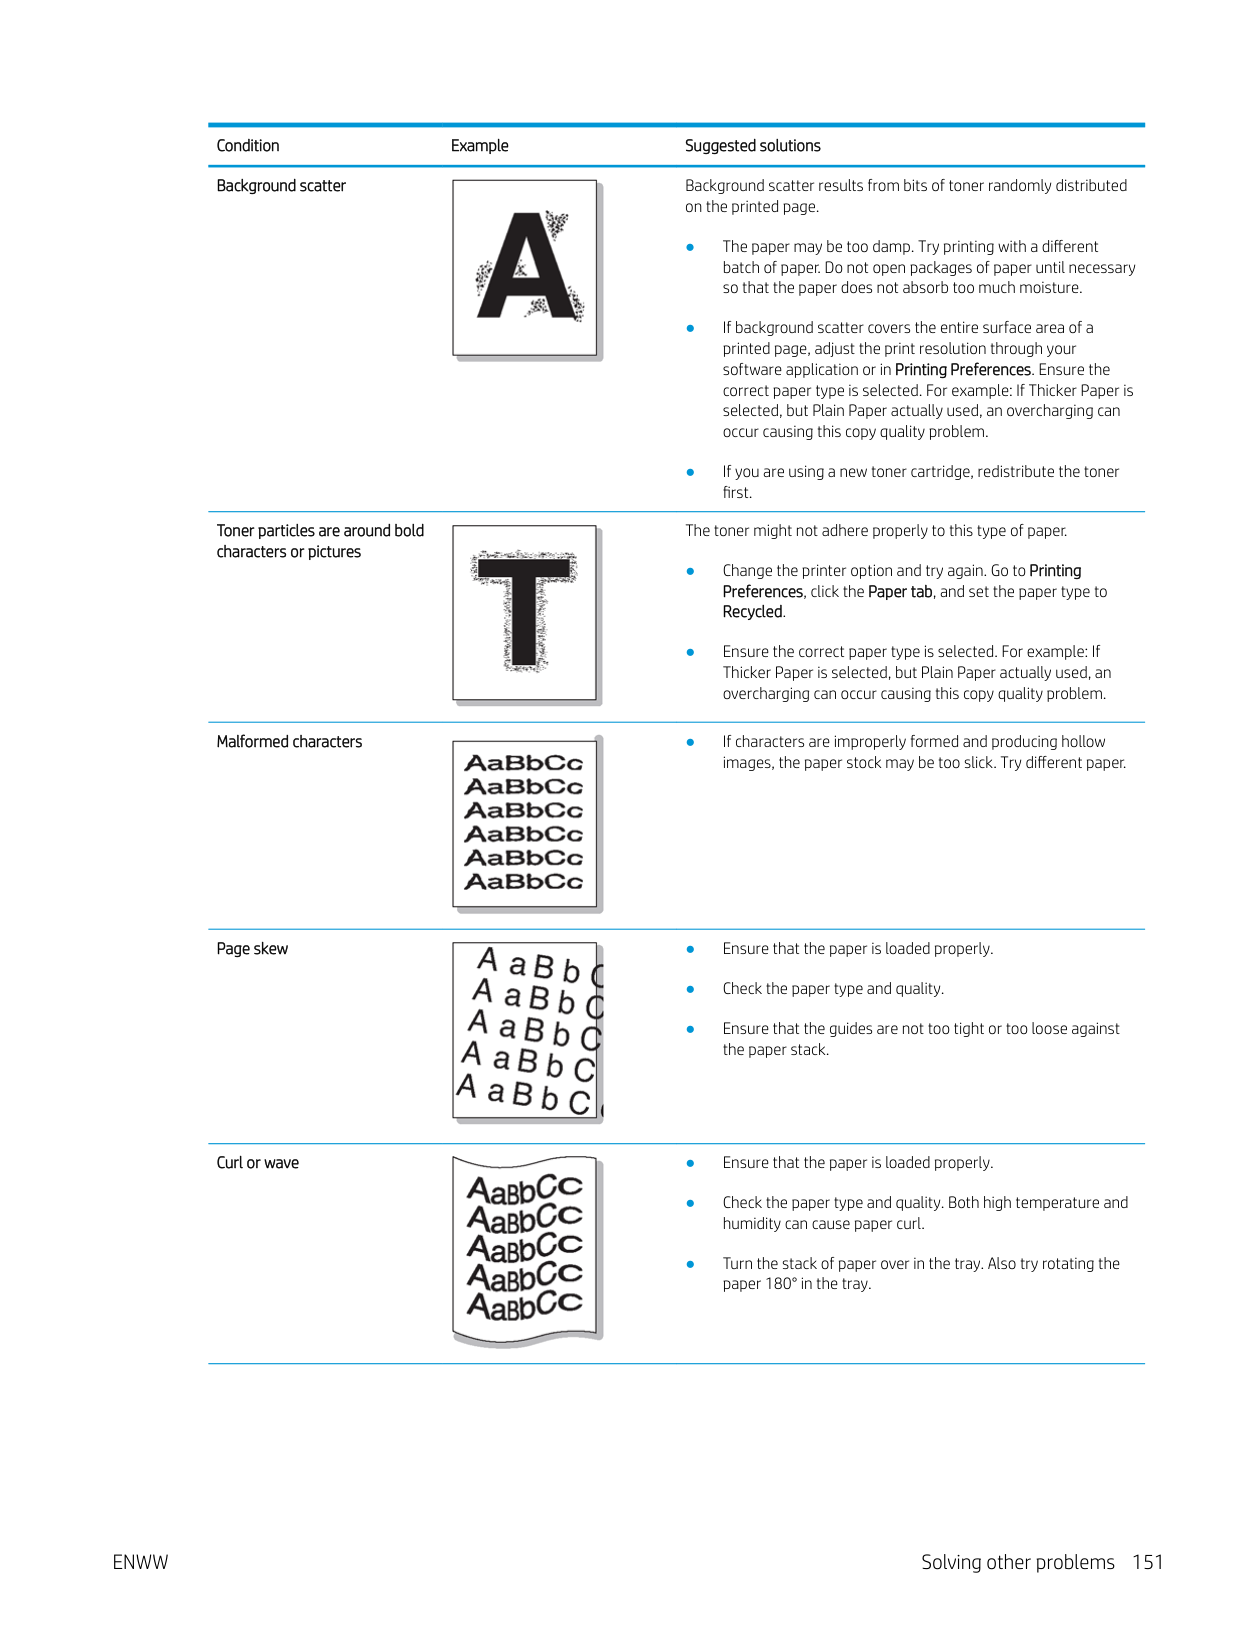
Pages print, but they are blank. The toner cartridge is defective or out of
toner.
Redistribute the toner, if necessary. If necessary, replace the toner cartridge.
The printer does not print PDF file correctly. Some parts of graphics, text, or illustrations are missing.
The file may have blank pages. Check the file to ensure that it does not contain blank pages.
Some parts, such as the controller or the board, may be defective.
Contact a service representative.
Incompatibility between the PDF file and the Acrobat products.
Printing the PDF file as an image may enable the file to print. Turn on Print As Image from the Acrobat printing options.
NOTE: It will take longer to print when you print a PDF file as an image.
If the PDF file is missing fonts and/or images/objects because set on interactive mode.
Try printing a job from Printer Driver.
The print quality of photos is not good. Images are not clear.
The resolution of the photo is very low. Reduce the photo size. If you increase the photo size in the software application, the resolution will be reduced.
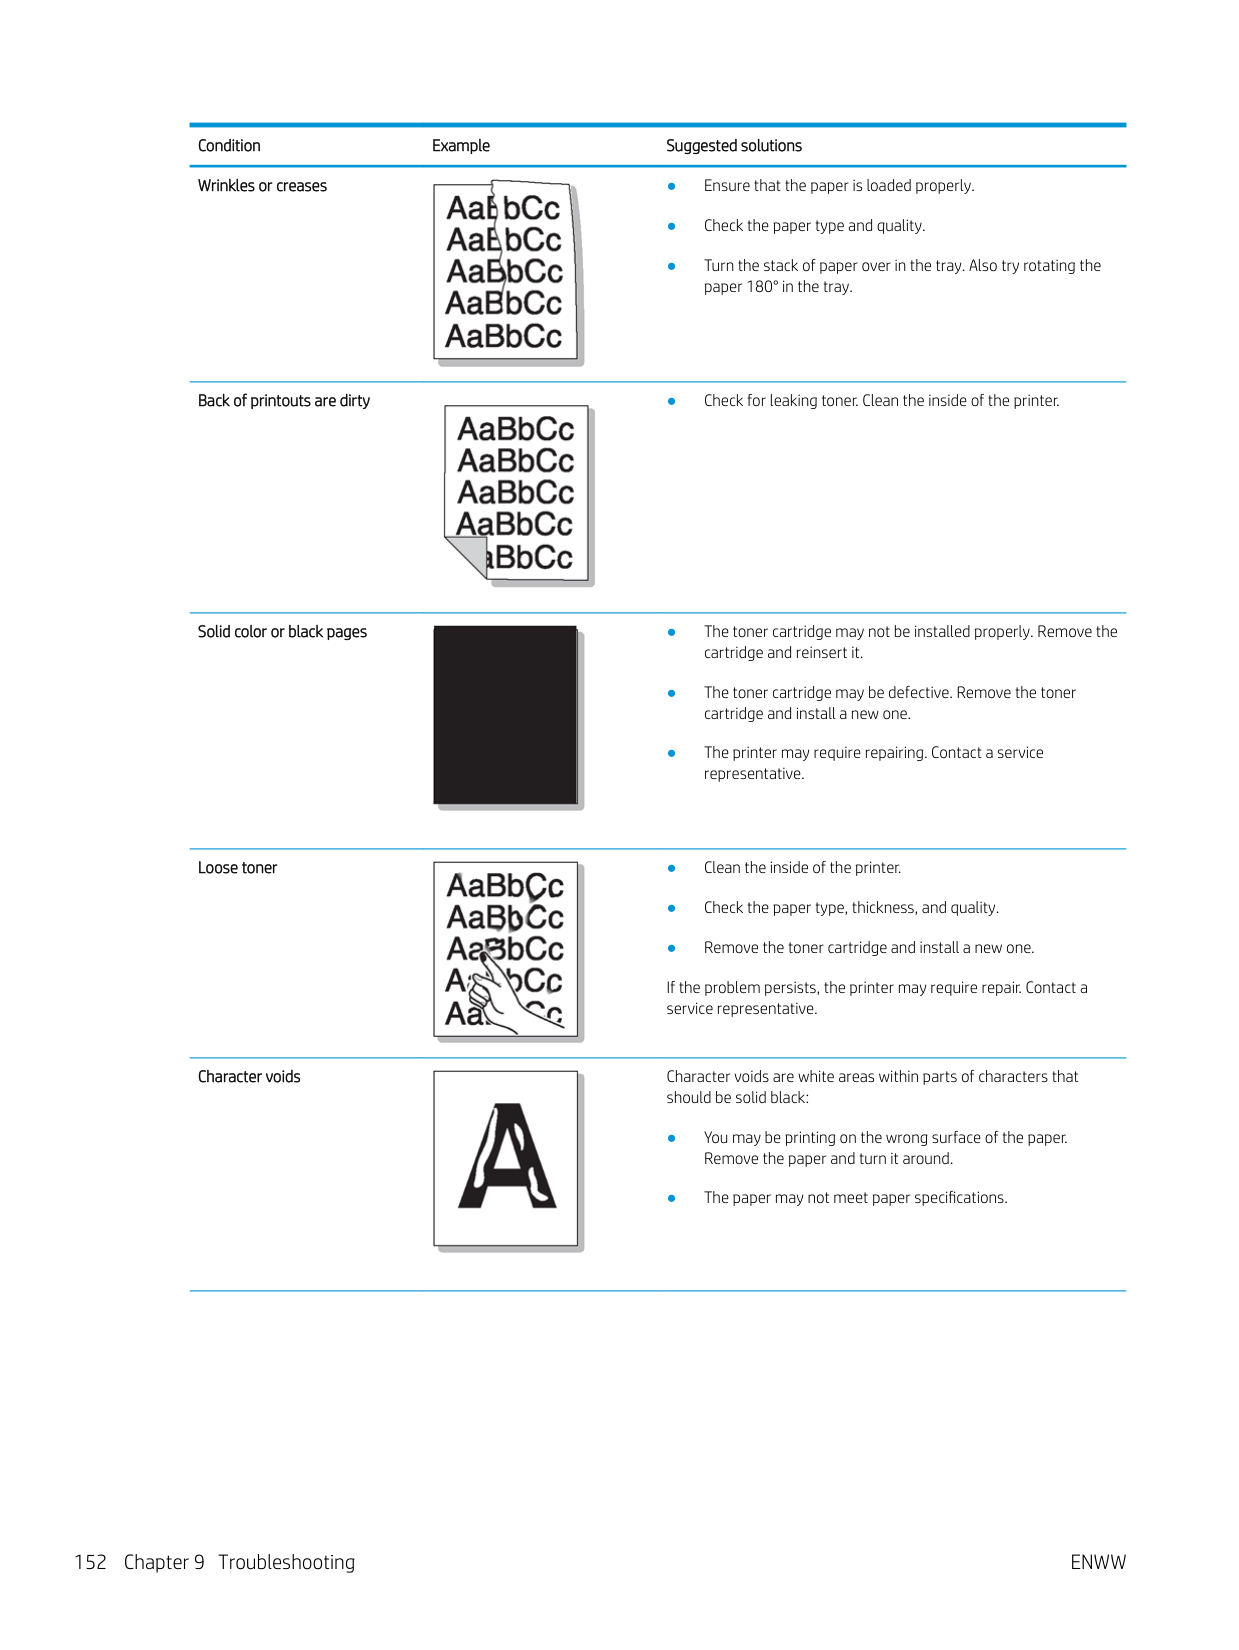
Before printing, the printer emits vapor near the output tray.
Using damp paper can cause vapor during printing.
The printer does not print special sized paper, such as billing paper.
Paper size and paper size setting do not match.
Your printer has an odd smell during initial use.
The oil used to protect the fuser is evaporating.
This is not a problem. Just keep printing. Try a fresh ream of paper.
Set the correct paper size in the Custom Paper List in the Paper tab in the Printing Preferences (see "Paper Options").
After printing about 100 pages, there will be no more smell. It is a temporary issue.
#### Printing quality problems
The following table describes common printing quality problems, shows examples of each one, and lists suggested solutions.
Light or faded print ● If a vertical white streak or faded area appears on the page,

the toner supply is low. Install a new toner cartridge.
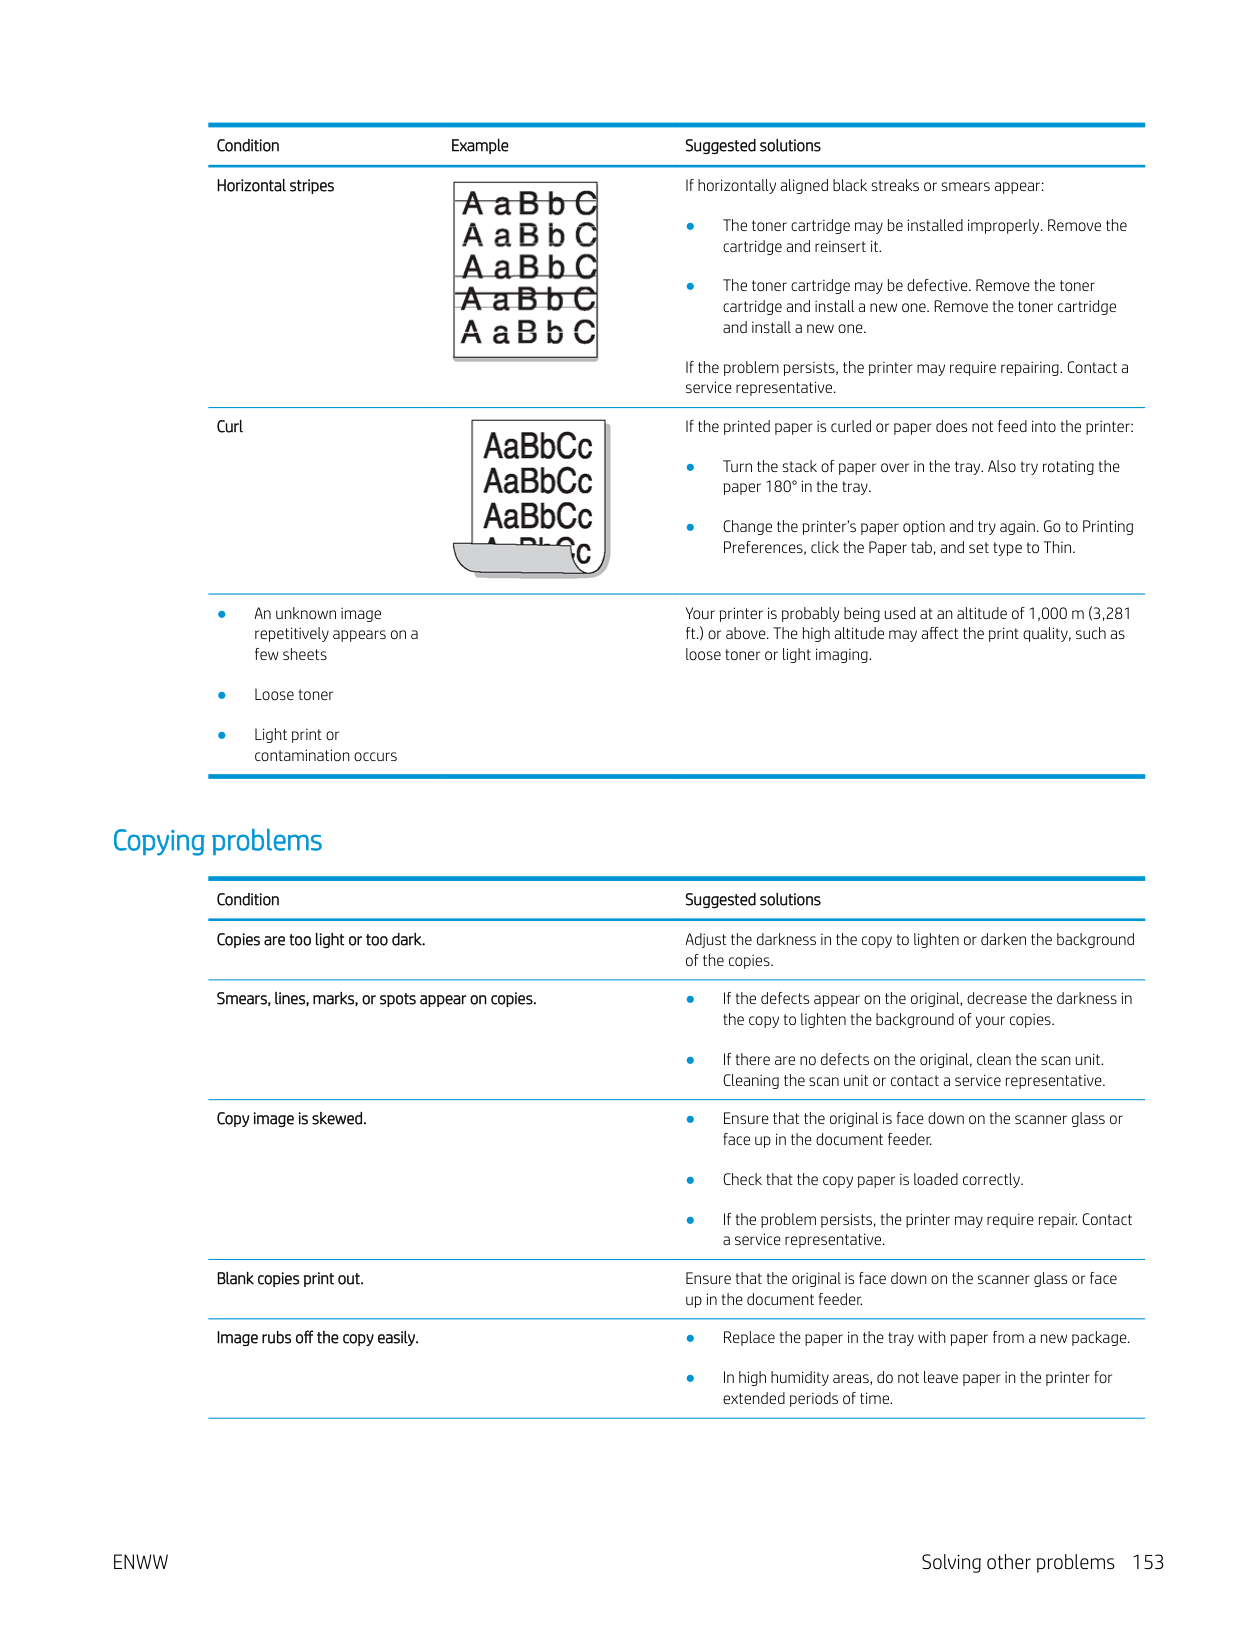
The top half of the paper is printed lighter than the rest of the paper

The toner might not adhere properly to this type of paper.
● Change the printer option and try again. Go to Printing Preferences, click the Paper tab, and set the paper type to Recycled.
Toner specks ● The paper may not meet specifications; for example, the

paper may be too moist or rough.
Dropouts If faded areas, generally rounded, occur randomly on the page:

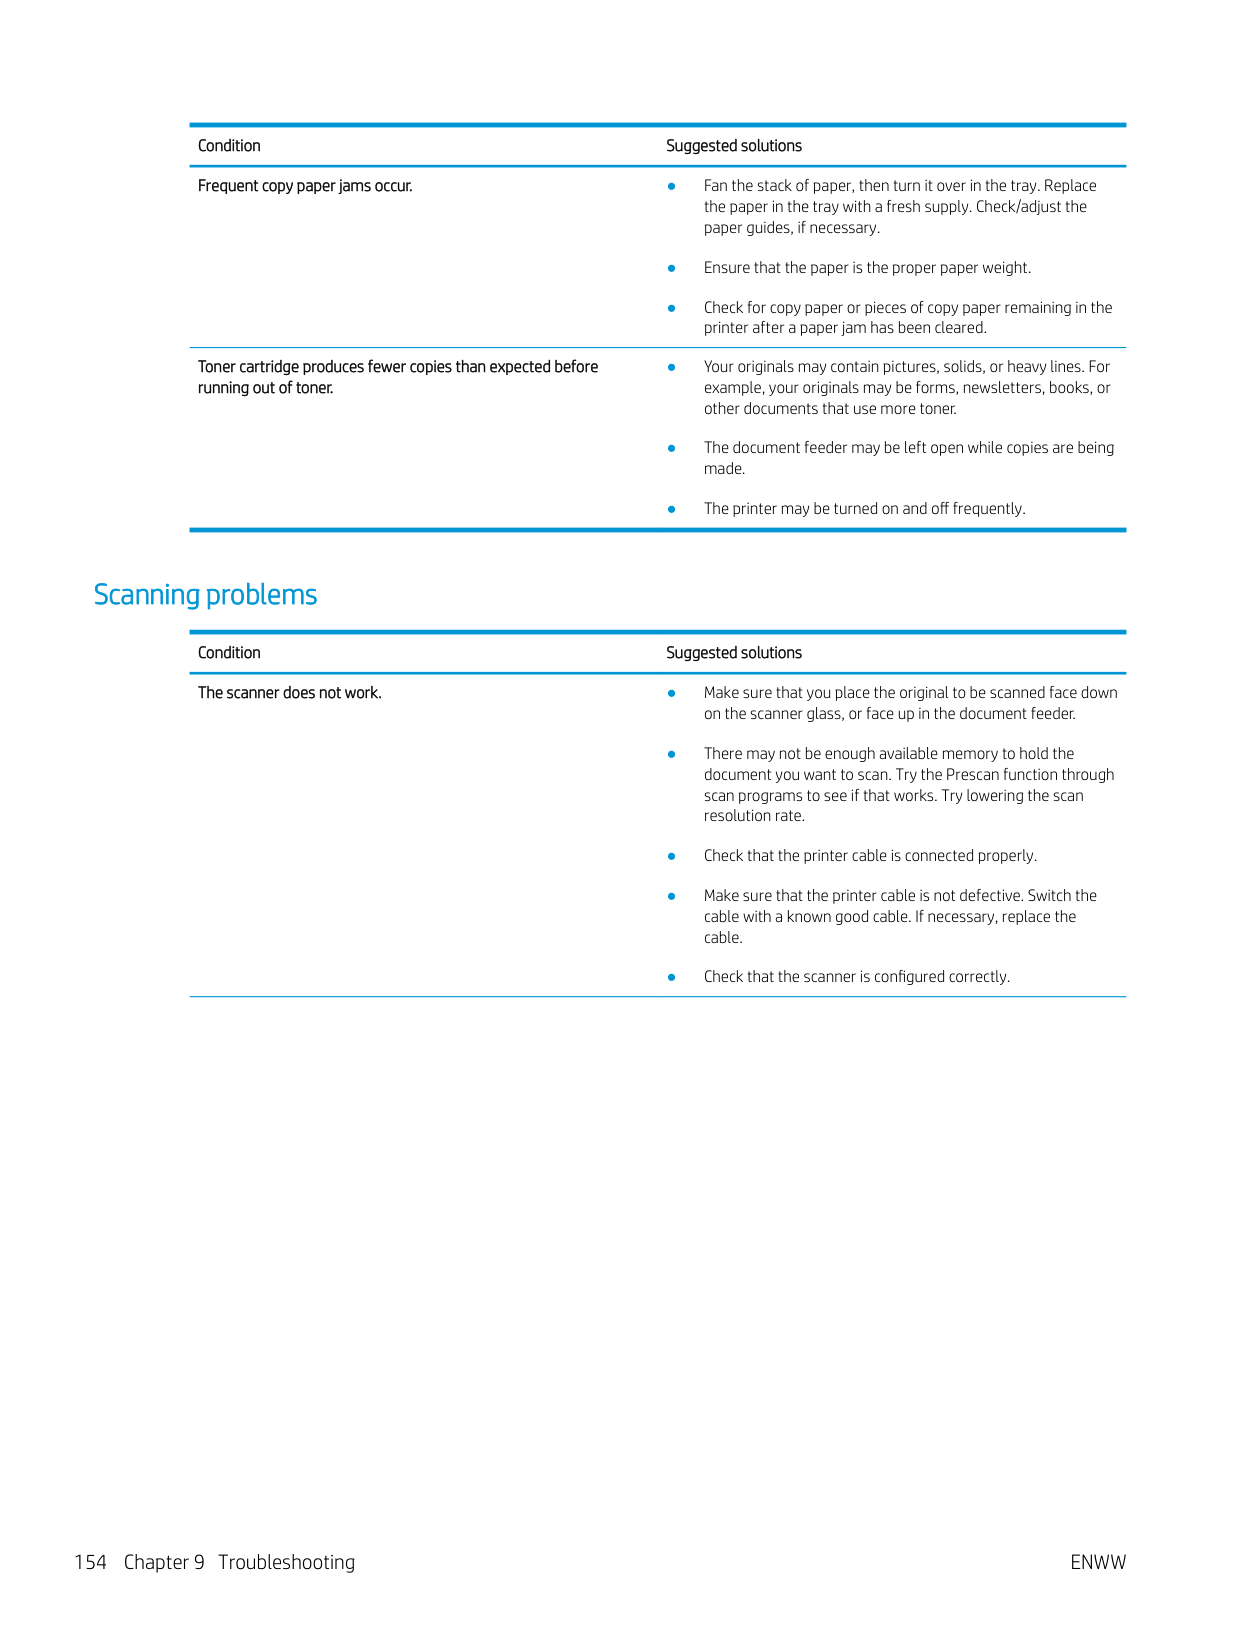
If these steps do not correct the problem, contact a service
White Spots If white spots appear on the page:

If these steps do not correct the problem, contact a service representative.
Vertical lines If black vertical streaks appear on the page:

● The surface (drum part) of the cartridge inside the printer has probably been scratched. Remove the cartridge and install a new one.
If white vertical streaks appear on the page:
● The surface of the LSU part inside the printer may be dirty. Clean the inside of your printer. If cleaning does not correct the problem, contact a service representative.
Black or color background ● Change to a lighter weight paper.

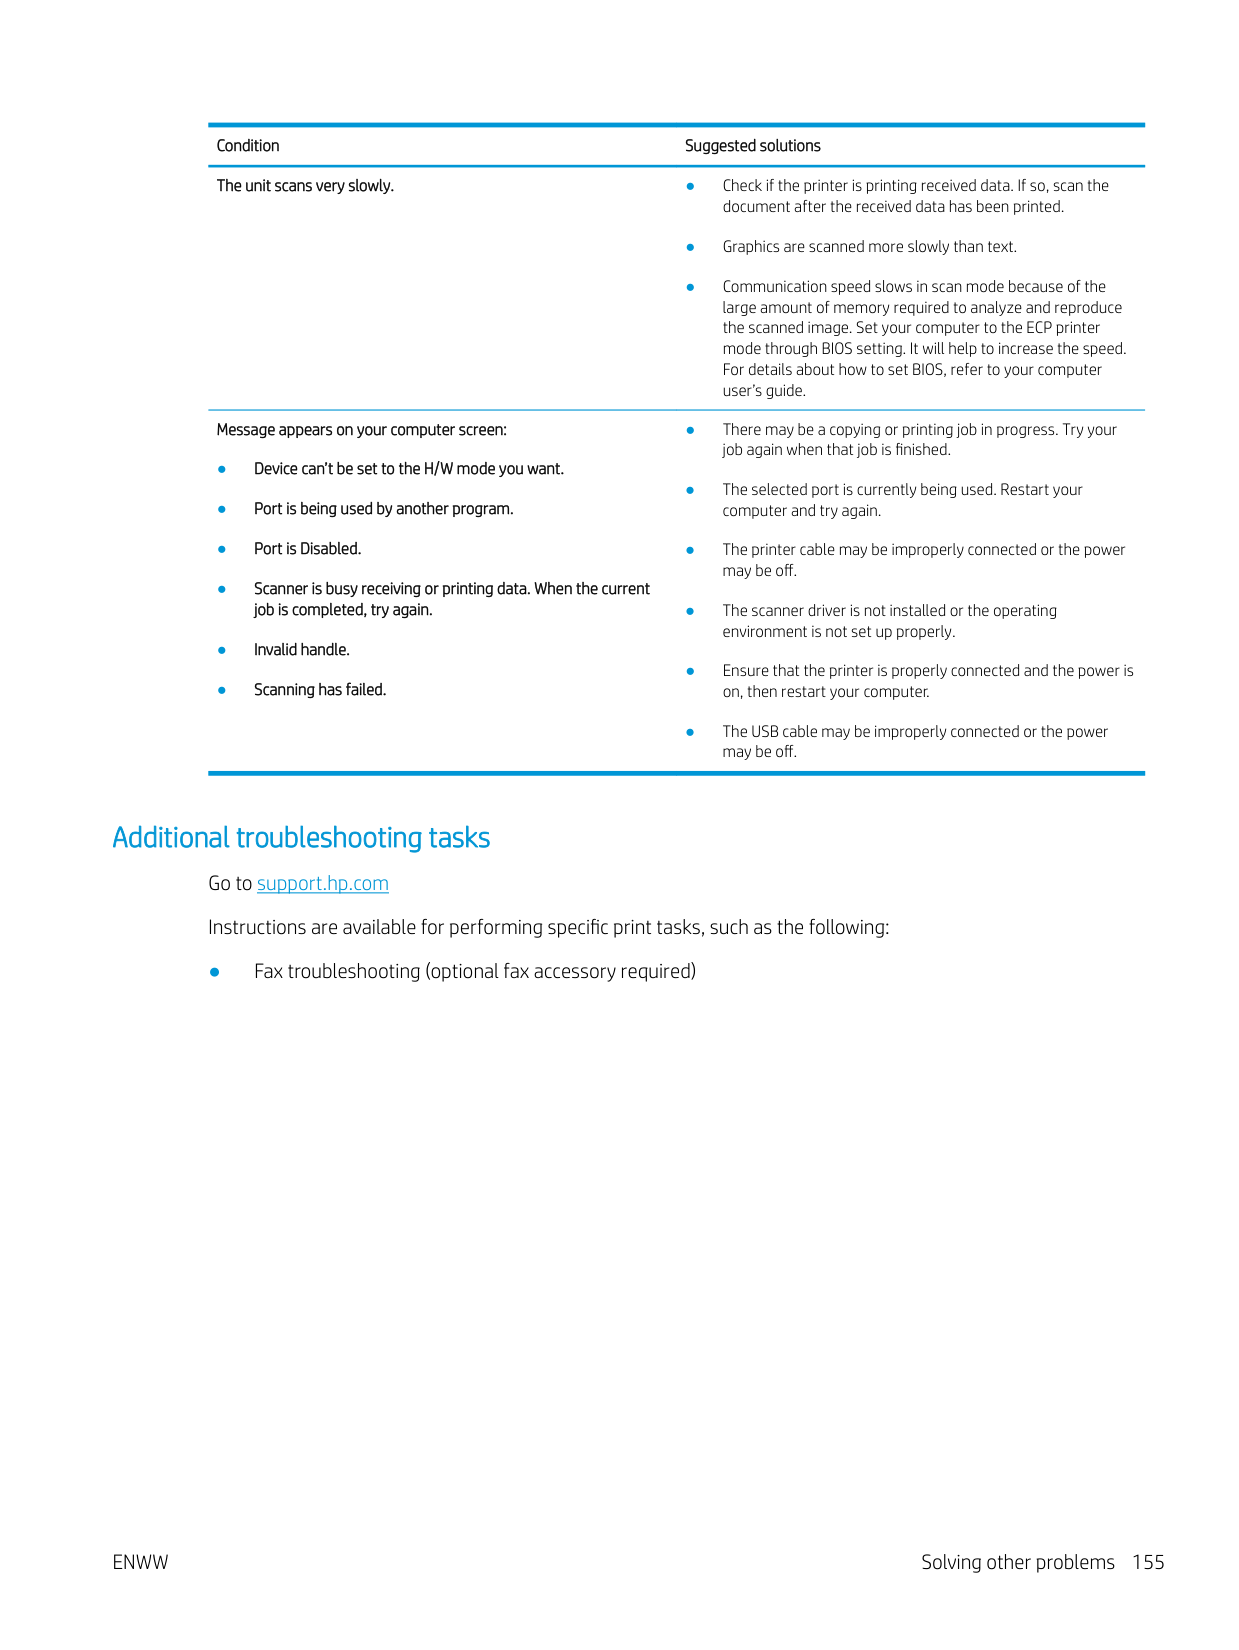
Toner smear ● Clean the inside of the printer.

Vertical repetitive defects If marks repeatedly appear on the printed side of the page at even

intervals:
Background scatter Background scatter results from bits of toner randomly distributed


on the printed page.
Toner particles are around bold characters or pictures

The toner might not adhere properly to this type of paper.
Malformed characters ● If characters are improperly formed and producing hollow

images, the paper stock may be too slick. Try different paper.
Page skew ● Ensure that the paper is loaded properly.


Curl or wave ● Ensure that the paper is loaded properly.

Wrinkles or creases ● Ensure that the paper is loaded properly.

paper 180° in the tray.
Back of printouts are dirty ● Check for leaking toner. Clean the inside of the printer.

Solid color or black pages ● The toner cartridge may not be installed properly. Remove the

cartridge and reinsert it.

● The toner cartridge may be defective. Remove the toner
cartridge and install a new one.
● The printer may require repairing. Contact a service
representative.
Loose toner ● Clean the inside of the printer.

If the problem persists, the printer may require repair. Contact a service representative.
Character voids Character voids are white areas within parts of characters that

should be solid black:
Horizontal stripes If horizontally aligned black streaks or smears appear:

● The toner cartridge may be installed improperly. Remove the
cartridge and reinsert it.
● The toner cartridge may be defective. Remove the toner cartridge and install a new one. Remove the toner cartridge and install a new one.
If the problem persists, the printer may require repairing. Contact a service representative.
Curl If the printed paper is curled or paper does not feed into the printer:

Your printer is probably being used at an altitude of 1,000 m (3,281 ft.) or above. The high altitude may affect the print quality, such as loose toner or light imaging.
#### Copying problems
Condition Suggested solutions Copies are too light or too dark. Adjust the darkness in the copy to lighten or darken the background
of the copies.
Smears, lines, marks, or spots appear on copies. ● If the defects appear on the original, decrease the darkness in
the copy to lighten the background of your copies.
● If there are no defects on the original, clean the scan unit. Cleaning the scan unit or contact a service representative.
Copy image is skewed. ● Ensure that the original is face down on the scanner glass or
face up in the document feeder.
Blank copies print out. Ensure that the original is face down on the scanner glass or face
up in the document feeder.
Image rubs off the copy easily. ● Replace the paper in the tray with paper from a new package.
● In high humidity areas, do not leave paper in the printer for
extended periods of time.
Frequent copy paper jams occur. ● Fan the stack of paper, then turn it over in the tray. Replace the paper in the tray with a fresh supply. Check/adjust the paper guides, if necessary.
Toner cartridge produces fewer copies than expected before running out of toner.
printer after a paper jam has been cleared.
#### Scanning problems
Condition Suggested solutions The scanner does not work. ● Make sure that you place the original to be scanned face down
on the scanner glass, or face up in the document feeder.
The unit scans very slowly. ● Check if the printer is printing received data. If so, scan the
document after the received data has been printed.
Message appears on your computer screen:
Additional troubleshooting tasks Go to support.hp.com Instructions are available for performing specific print tasks, such as the following:
● Fax troubleshooting (optional fax accessory required)
A Revision History
● Revision History
156 Appendix A Revision History ENWW
Revision History
Table A-1 Revision History Revision Number Revision Date Revision Notes 1.0 March, 2018 User guide initial release
ENWW Revision History 157
B Glossary
Glossary of terms
The following glossary includes terminology commonly used with printing as well as terminology used in this user’s manual.
Table B-1 Glossary of terms
802.11 802.11 is a set of standards for wireless local area network (WLAN) communication, developed by the IEEE LAN/MAN Standards Committee (IEEE 802).
802.11b/g/n 802.11b/g/n can share the same hardware and use the 2.4 GHz band. 802.11b supports bandwidth up to 11 Mbps, 802.11n supports bandwidth up to 150 Mbps. 802.11b/g/n devices might occasionally suffer interferences from microwave ovens, cordless telephones, and Bluetooth devices.
Access point Access point or wireless access point (AP or WAP) is a device that connects wireless communication devices together on a wireless local area networks (WLAN), and acts as a central transmitter and receiver of WLAN radio signals.
ADF An Automatic Document Feeder (ADF) is a scanning unit that will automatically feed an original sheet of paper for scanning.
BOOTP Bootstrap Protocol. A network protocol used by a network client to obtain its IP address automatically. This is usually done in the bootstrap process of computers or operating systems running on them. The BOOTP servers assigns an IP address from a pool of addresses to each client. BOOTP enables “diskless workstation” computers to obtain an IP address prior to loading any advanced operating system.
Build job After scanning is finished, the Scan More Pages window appears to ask if you want to scan additional pages. If you select Yes, then you can scan additional pages to the current job. If you select No, then the scanning process is complete and the remainder of the job is finished.
CCD Charged Coupled Device (CCD) is a hardware which enables the scan job. The CCD locking mechanism is also used to hold the CCD module to prevent any damage when the device is moved.
Collation Collation is a process of printing a multiple-copy job in sets. When collation is selected, the device prints an
entire set before printing additional copies. Confidential This mode is used for printing confidential documents. Password is often required to print the print job. Control Panel The control panel is a flat, typically vertical panel or screen where control or monitoring instruments are
displayed. The control panel is found on the front of the device.
Coverage Coverage is the printing term used for a toner usage measurement on printing. For example, 5% coverage means that an A4 sided paper has about 5% image or text on it. If the paper or original has complicated images or a large amount of text, the coverage will be higher and at the same time, a toner usage will be as much as the coverage.
Default The value or setting that is in effect when a device is unboxed, reset, or initialized. Developer unit The developer unit contains toner carrier that is supplied to the magnetic (development) roller by the two
mixing augers.
DHCP A Dynamic Host Configuration Protocol (DHCP) is a client-server networking protocol. A DHCP server provides configuration parameters specific to the DHCP client host requesting, generally, information required by the client host to participate on an IP network. The DHCP also provides a mechanism for allocation of IP addresses to client hosts.
DIMM Dual Inline Memory Module (DIMM) is a small circuit board that holds memory. The DIMM stores all data within the device, such as printing data and received fax data.
DNS The Domain Name Server (DNS) is a system that stores information associated with domain names in a distributed database on networks, such as the internet.
Duplex A mechanism that will automatically turn over a sheet of paper so that the device can print (or scan) on both sides of the paper. A device is equipped with a duplex unit can print on both sides of the paper during one print cycle.
Duty Cycle Duty cycle is the page quantity which does not affect device performance for a month. Generally, the device has the lifespan limitation such as pages per year. The lifespan means the average capacity of print-outs, usually within the warranty period. For example, if the duty cycle is 48,000 pages per month assuming 20 working days, a printer limits 2,400 pages a day.
Eco The Eco feature allows you to save print resources and results in an eco-friendly printing. Emulation Emulation is a technique of one printer obtaining the same results as another. An emulator duplicates the
functions of one system with a different system, so that the second system behaves like the first system. Emulation focuses on exact reproduction of external behavior. This is different from simulation, which concerns an abstract model of the system being simulated, often considering its internal state.
Erase backside image Prevents copying the original’s image shown through on the back side. Erase edge Allow the erasing of spots, drill holes, fold creases and staple marks along any of the four edges of a
document when making a copy.
Ethernet Ethernet is a frame-based computer networking technology for local area networks (LANs). It defines wiring and signaling for the physical layer, and frame formats and protocols for the media access control (MAC)/data link layer of the OSI model. Ethernet is mostly standardized as IEEE 802.3. Ethernet has become the most widespread LAN technology in use during the 1990s to present.
FDI Foreign Device Interface (FDI) is a card installed inside the device to allow use of a third-party device, such as a coin operated device or a card reader. Those devices allow the pay-to-print service on your device.
Filing Policy Automatically renames or overwrites when the USB memory device has a file with the same name. You can choose the policy for generating file names before you proceed with the scan job through the USB memory device.
FTP A File Transfer Protocol (FTP) is a commonly used protocol for exchanging files over any network that supports the TCP/IP protocol (such as the internet or an intranet).
Fuser Unit The fuser unit is part of a laser printer that fuses the toner onto the print media. It consists of a heat roller and a pressure roller. After toner is transferred onto the paper, the fuser unit applies heat and pressure to make sure that the toner stays on the paper permanently, which is why paper is warm when it comes out of a laser printer.
Gateway A connection between computer networks, or between a computer network and a telephone line. It is very popular, as it is a computer or a network that allows access to another computer or network.
Grayscale Shades of gray that represent light and dark portions of an image when color images are converted to grayscale. Colors are represented by various shades of gray.
Halftone An image type that simulates grayscale by varying the number of dots. Highly colored areas consist of a large number of dots, while lighter areas consist of a smaller number of dots.
HDD Hard Disk Drive (HDD), commonly referred to as a hard drive or hard disk drive, is a non-volatile storage device which stores digitally-encoded data on rapidly rotating platters with magnetic surfaces.
ID copy Prints two-sided originals on one sheet of paper. The device prints one side of the original on the upper half of the paper and the other side on the lower half of the paper. This feature is helpful for coping a small sized item, such as a business card.
IEEE The Institute of Electrical and Electronics Engineers (IEEE) is an international non-profit, professional
organization for the advancement of technology related to electricity. Imaging Unit Imaging unit consists of the OPC drum unit and the developer unit. Intranet A private network that uses internet protocols, network connectivity, and possibly the public
telecommunication systems to securely share part of an organization’s information or operations with its employees. Sometimes the term refers only to the most visible service, the internal website.
IP address An Internet Protocol (IP) address is a unique number that a device uses in order to identify and communicate with other devices on a network utilizing the Internet Protocol standard.
IPM The Images Per Minute (IPM) is a method of measuring the speed of a printer. An IPM rate indicates the number of single-sided sheets a printer can complete in one minute.
IPP The Internet Printing Protocol (IPP) defines a standard protocol for printing and managing print jobs, media size, resolution, etc. IPP can be used locally, or over the internet to reach hundreds of devices, and also supports access control, authentication, and encryption, making it a capable and secure printing solution.
ISO The International Organization for Standardization (ISO) is an international standard-setting body composed of representatives from national standards bodies. In produces world-wide industrial and commercial standards.
JPEG Joint Photographic Experts Group (JPEG) is a commonly used standard method of loss compression for
photographic images. It is the format used for storing and transmitting photographs on the World Wide Web. LDAP The Lightweight Directory Access Protocol (LDAP) is a networking protocol for querying and modifying
directory services running over TCP / IP. LED A Light-Emitting Diode (LED) is a semiconductor device that indicates the status of a printer. LEF Long Edge Feed, rotation of the media by 90 degrees when loaded into the cassette tray. The longer edge of
the media is fed into the device first. LSU Laser scanner unit forms a latent image on the surface of the OPC drum. MAC address Media Access Control (MAC) address is a unique identifier associated with a network adapter. MAC address is a
unique 48-bit identifier usually written as 12 hexadecimal characters grouped in pairs (e.g., 00-00-0c-34-11-4e). This address is usually hard-coded into a Network Interface Card (NIC) by the manufacturer, and used as an aid for routers trying to locate printers on a large network.
MFP Multi-Function Printer (MFP) is an office device that includes multiple functionality in one physical body, such as a printer, copier, fax, scanner, etc.
Modem A device that modulates a carrier signal to encode digital information, and also demodulates such a carrier signal to decode transmitted information.
NFC Near field communications allows you to directly print from your mobile device just by holding your mobile
device over the NFC tag on the Wireless/NFC LAN option. Need a NFC supported mobile device. N-up Prints two or more originals images, reduced to fit onto one sheet of paper. Offset When printing multiple copies, this option shifts the output position of each set. OPC Organic Photo Conductor (OPC) is a mechanism that makes a virtual image for print using a laser beam
emitted from a laser printer. It is usually green or rust colored and has a cylinder shape. An imaging unit containing a drum slowly wears the drum surface during its usage in the printer, and it should be replaced appropriately due to wear from contact with the cartridge development brush, cleaning mechanism, and paper.
Originals The first example of something, such as a document, photograph, or text which is copied, reproduced, or translated to produce additional copies. The original itself is not copied or derived from something else.
Overlay An overlay is text and / or images stored on the computer hard drive (HDD) as a special file format that can be printed on any document. Overlays are often used to take place of letterhead paper. Rather than using preprinted letterhead, you can create an overlay containing exactly the same information that is on your letterhead.
PCL Printer Command Language (PCL) is a Page Description Language (PDL) developed by HP as a printer protocol. PCL has become an industry standard. Originally developed for early Inkjet printers, PCL has been released in varying levels for thermal, dot matrix printers and laser printers.
PDF Portable Document Format (PDF) is a proprietary file format developed by Adobe Systems. A PDF represents two dimension documents in a device independent and resolution independent format.
PostScript (PS) PostScript (PS) is a page description language and programming language used primarily in electronic and desktop publishing. PostScript is run in an interpreter to generate an image.
Printer Driver A program used to send commands and transfer data from the computer to the printer. Print Media Media like paper, envelopes, labels, and transparencies which can be used in a printer, scanner, fax, or copier. PPM Pages Per Minute (PPM) is a method of measurement for determining how fast a device works, meaning the
number of pages a device can produce in one minute. PRN file An interface for a device driver, this allows software to interact with the device driver using standard input / output system calls, which simplifies many tasks. Protocol A convention or standard that controls or enables the connection, communication, and data transfer between two computing endpoints. PSTN The Public-Switched Telephone Network (PSTN) is the network of the world’s public circuit-switched telephone networks which, on industrial premises, is usually routed through the switchboard. Quick copy Quick copy menu allows you to quickly set copy options without having to move to a lower level menu or another tab. This option does not provide all copy options.
Resolution The sharpness of an image, measured in Dots Per Inch (DPI). The higher the DPI, the greater the resolution. SEF Short Edge Feed, the media is loaded into the cassette tray where the short side of the paper is fed into the
device first.
SMB Server Message Block (SMB) is a network protocol mainly applied to share files, printers, serial ports, and miscellaneous communications between nodes on a network. SMB also provides an authenticated Interprocess communication mechanism.
SMTP Simple Mail Transfer Protocol (SMTP) is the standard for email transmissions across the internet. SMTP is a relatively simple, text-based protocol, where one or more recipients of a message are specified and the message text is transferred. It is a client server protocol where the client transmits an email message to the server.
SSID Service Set Identifier (SSID) is a name of a wireless local area network (WLAN). All wireless devices in the WLAN use the same SSID in order to communicate with each other. The SSIDs are case-sensitive and have a maximum length of 32 characters.
Stamp Allows the printing of some information such as date and time, page number, ID, IP address, and comments. Subnet Mask The subnet mask is used in conjunction with the network address to determine which part of the address is
the network address and which part is the host address. TCP / IP The Transmission Control Protocol (TCP) and the Internet Protocol (IP) are the set of communications protocols that implement the protocol stack on which the internet and most commercial networks run. TIFF Tagged Image File Format (TIFF) is a variable-resolution bitmapped image format. TIFF describes image data
that typically come from scanners. TIFF images use tags, keywords defining the characteristics of the image that is included in the file. This flexible and platform-independent format can be used for pictures that have been made by various image processing applications.
Toner Cartridge A bottle or container that holds toner, which is used in a device like a printer. Toner is a powder used in laser printers and photocopiers. The toner forms the text and images on printed paper. Toner can be fused by a combination of heat/pressure from the fuser, causing it to bind the fibers in the paper.
Toner collection unit A container that holds contaminated toner. Tray 1 (MP) The Tray 1 multi-purpose (MP) tray can hold special sizes and types of print material, such as postcards note
cards and envelopes. It is useful for single page printing on colored paper.
TWAIN An industry standard for scanners and software. By using a TWAIN compliant scanner with TWAIN-compliant software, a scan can be initiated from the program. TWAIN is an image capture API for Microsoft Windows and Apple Macintosh operating systems.
URL Uniform Resource Locator (URL) is the global address of documents and resources on the internet. The first part of the address indicates what protocol to use. The second part specifies the IP address or the domain name where the resource is located.
USB Universal Serial Bus (USB) is a standard that was developed by the USB Implementers Forum, Inc., to connect computers and peripherals. Unlike the parallel port, USB is designed to concurrently connect a single computer USB port to multiple peripherals.
Watermark A watermark is a recognizable image or pattern in paper that appears lighter when viewed by transmitted light. Watermarks were first introduced in Bologna, Italy in 1282. Watermarks have been used by papermakers to identify their product, and also on postage stamps, currency, and other government documents to discourage counterfeiting.
WEP Wired Equivalent Privacy (WEP) is a security protocol specified in IEEE 802.11 to provide the same level of security as that of a wired LAN. WEP provides security by encrypting data over radio so that it is protected as it is transmitted from one end point to another.
WPS Wi-Fi Protected Setup (WPS) is a network security standard to create a secure wireless home network. WPA Wi-Fi Protected Access (PA) is a class of systems to secure wireless (Wi-Fi) computer networks, which was
created to improve the security features of WEP.
XPS XML Paper Specification (XPS) is a specification for a Page Description Language (PDL) and a new document format developed by Microsoft. This has benefits for portable document and electronic documents. It is an XML-based specification based on a new print path and vector-based, device-independent document format.