HP Laserjet Pro 400 Printer M401
Printers · 10 Q&As

HP Laserjet Pro 400 Printer M401

Ask AI

— answers from the official manual

Answers from the official manual.

Common questions

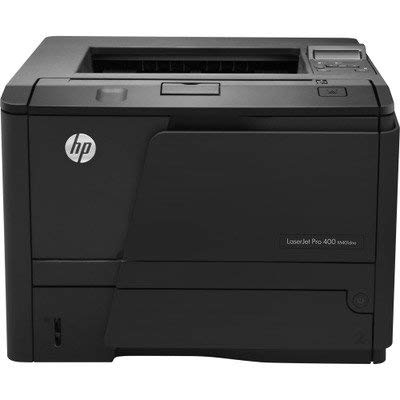
This printer is from 2014 and a lot of small offices still won't replace it. There's a reason. The print engine is overbuilt, CF280 toner is cheap and easy to find, and HP has continued to publish drivers for it across multiple Windows generations. If yours is running, the question isn't "should I upgrade" — it's "what should I do to keep this one going for another five years."

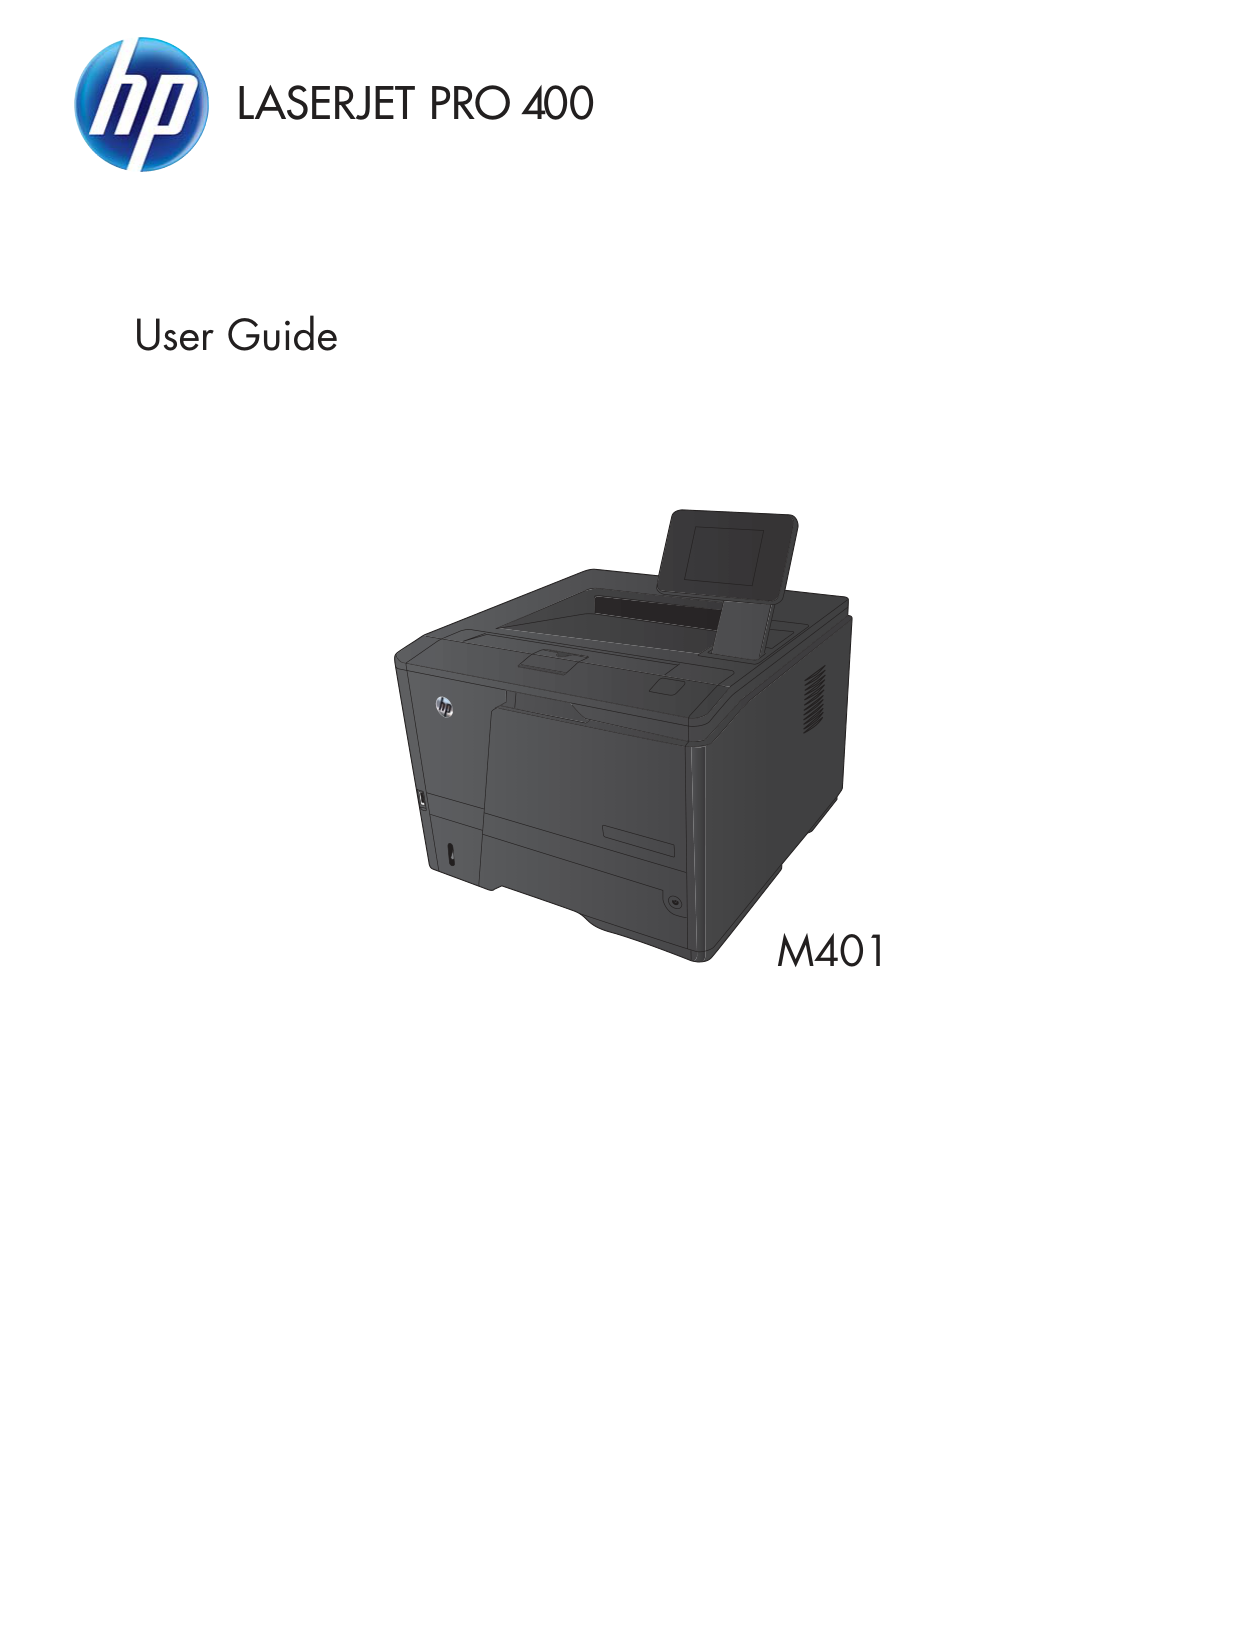
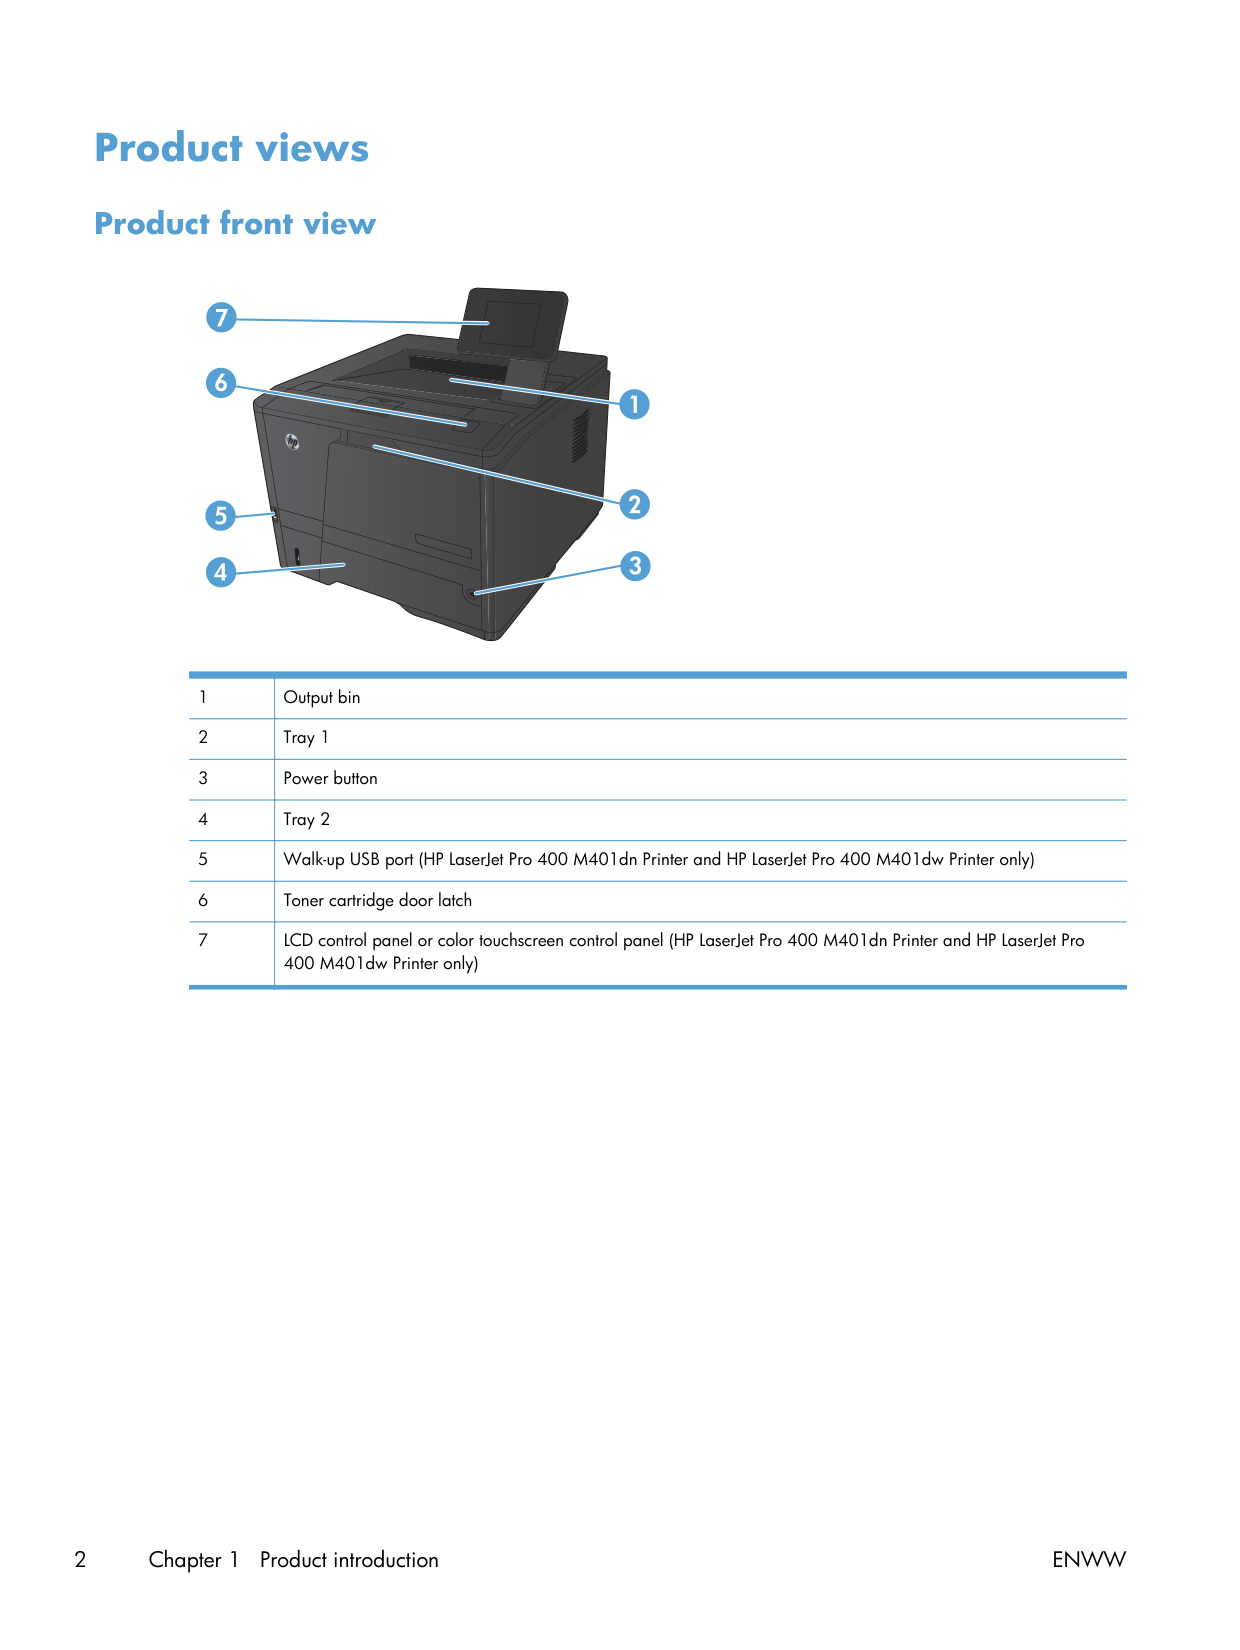
The lineup is M401a / M401d / M401dn / M401dw, and the only thing that varies is connectivity. a is USB-only. d adds duplex. dn adds Ethernet. dw adds Ethernet plus Wi-Fi. Every variant uses the same toner, same drum, same fuser, same pickup roller. Spare parts swap freely across the line.

Keep it running

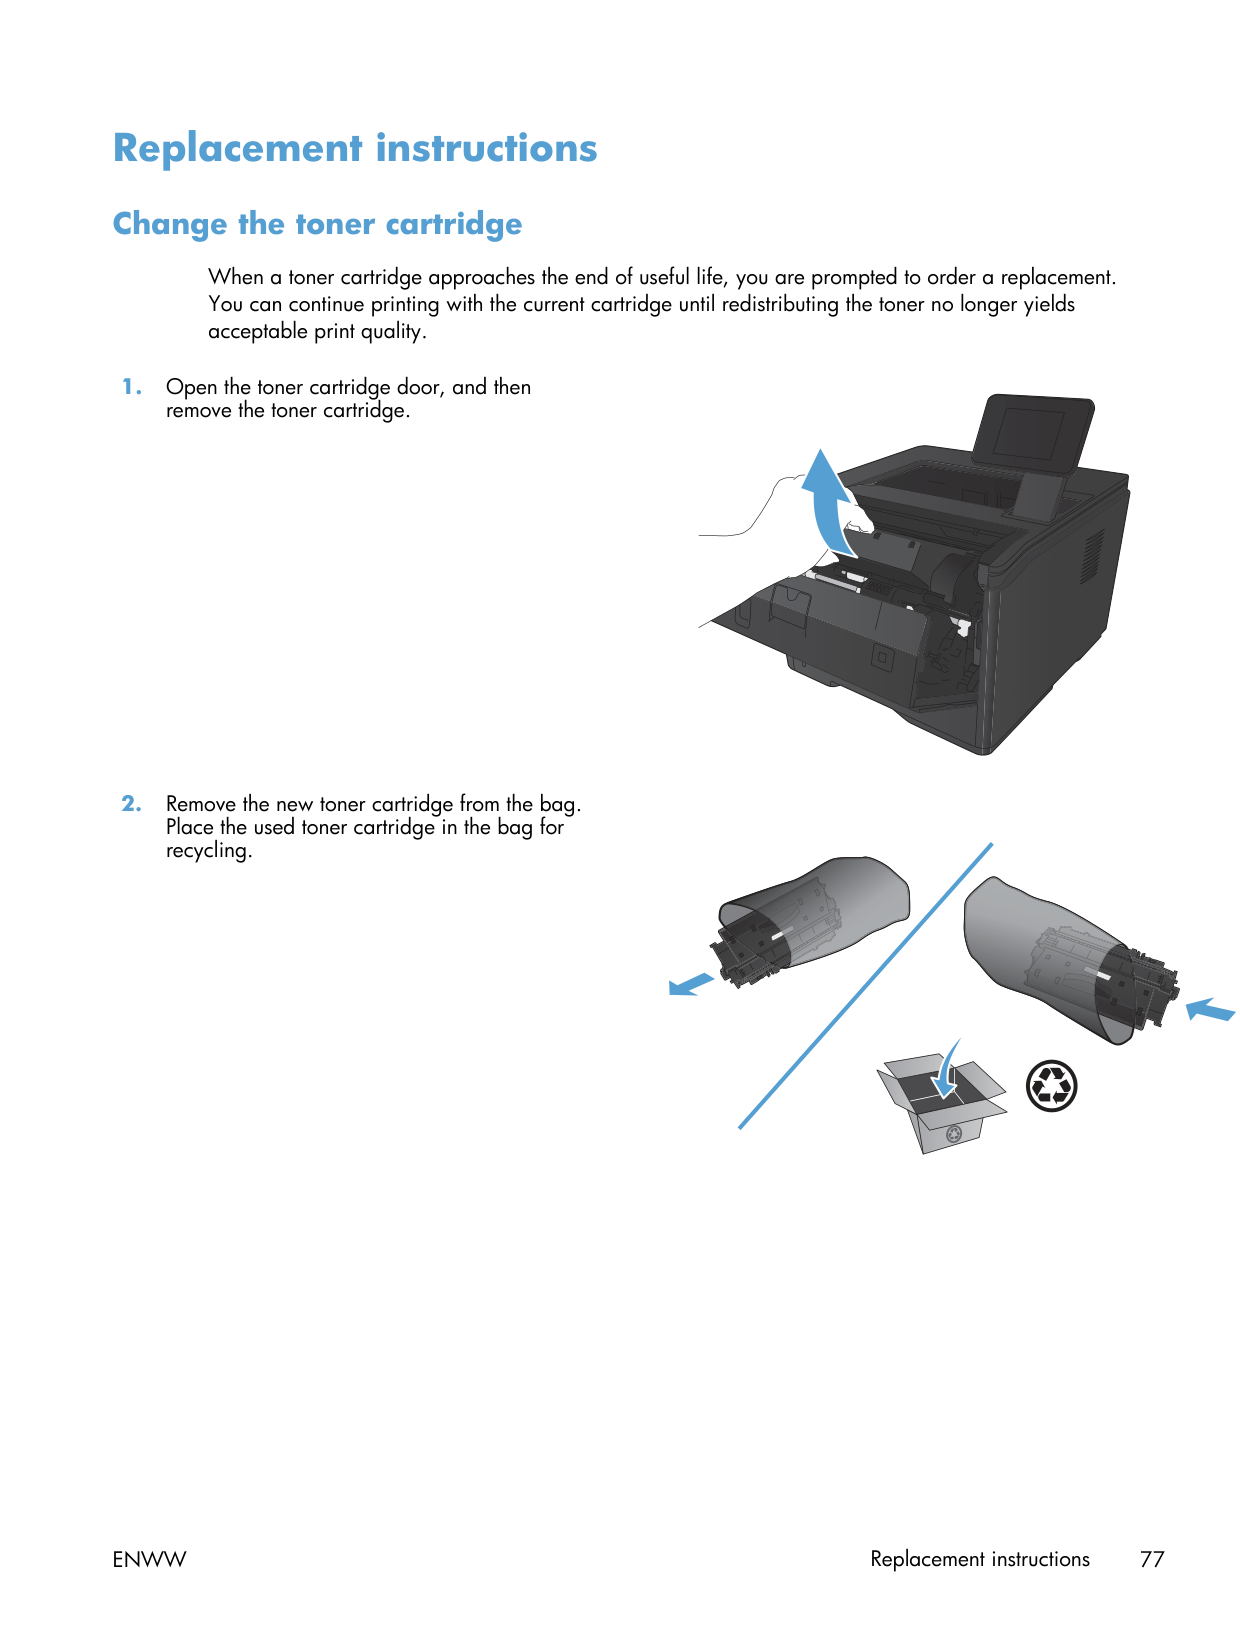
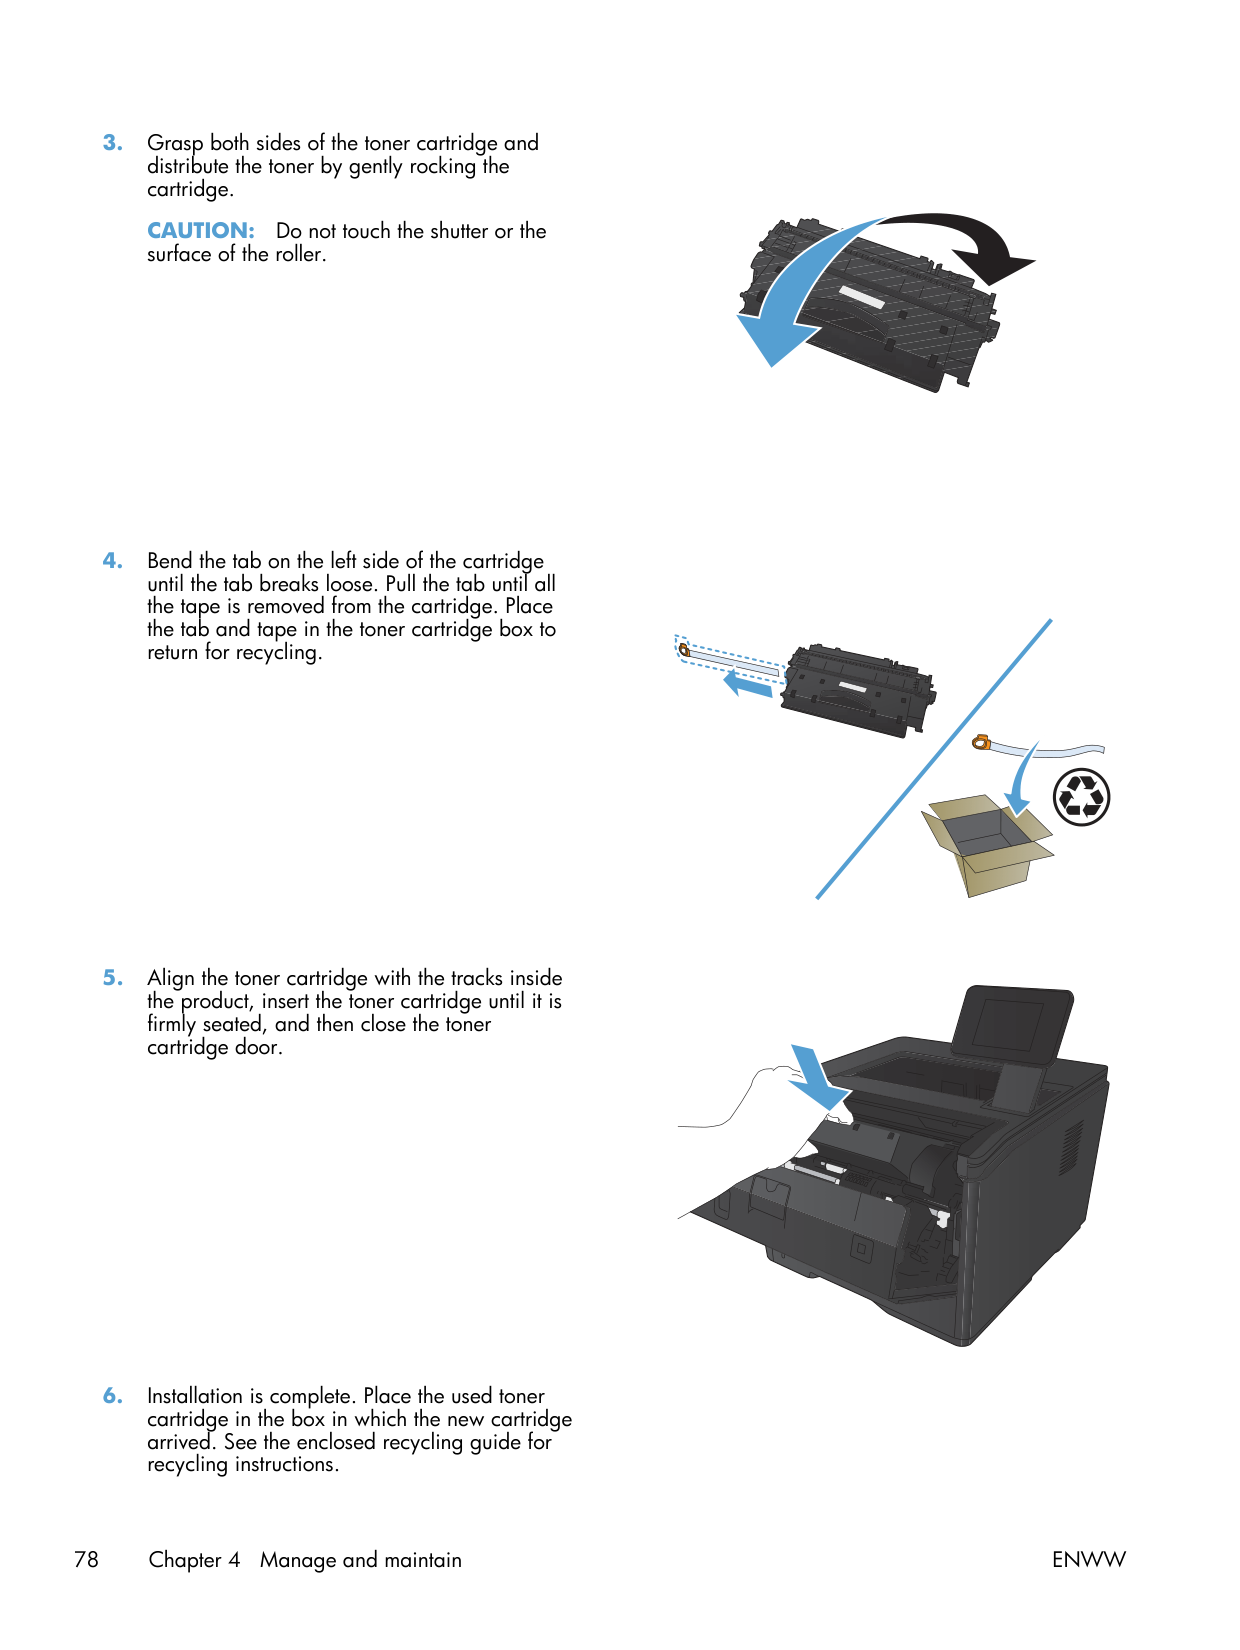
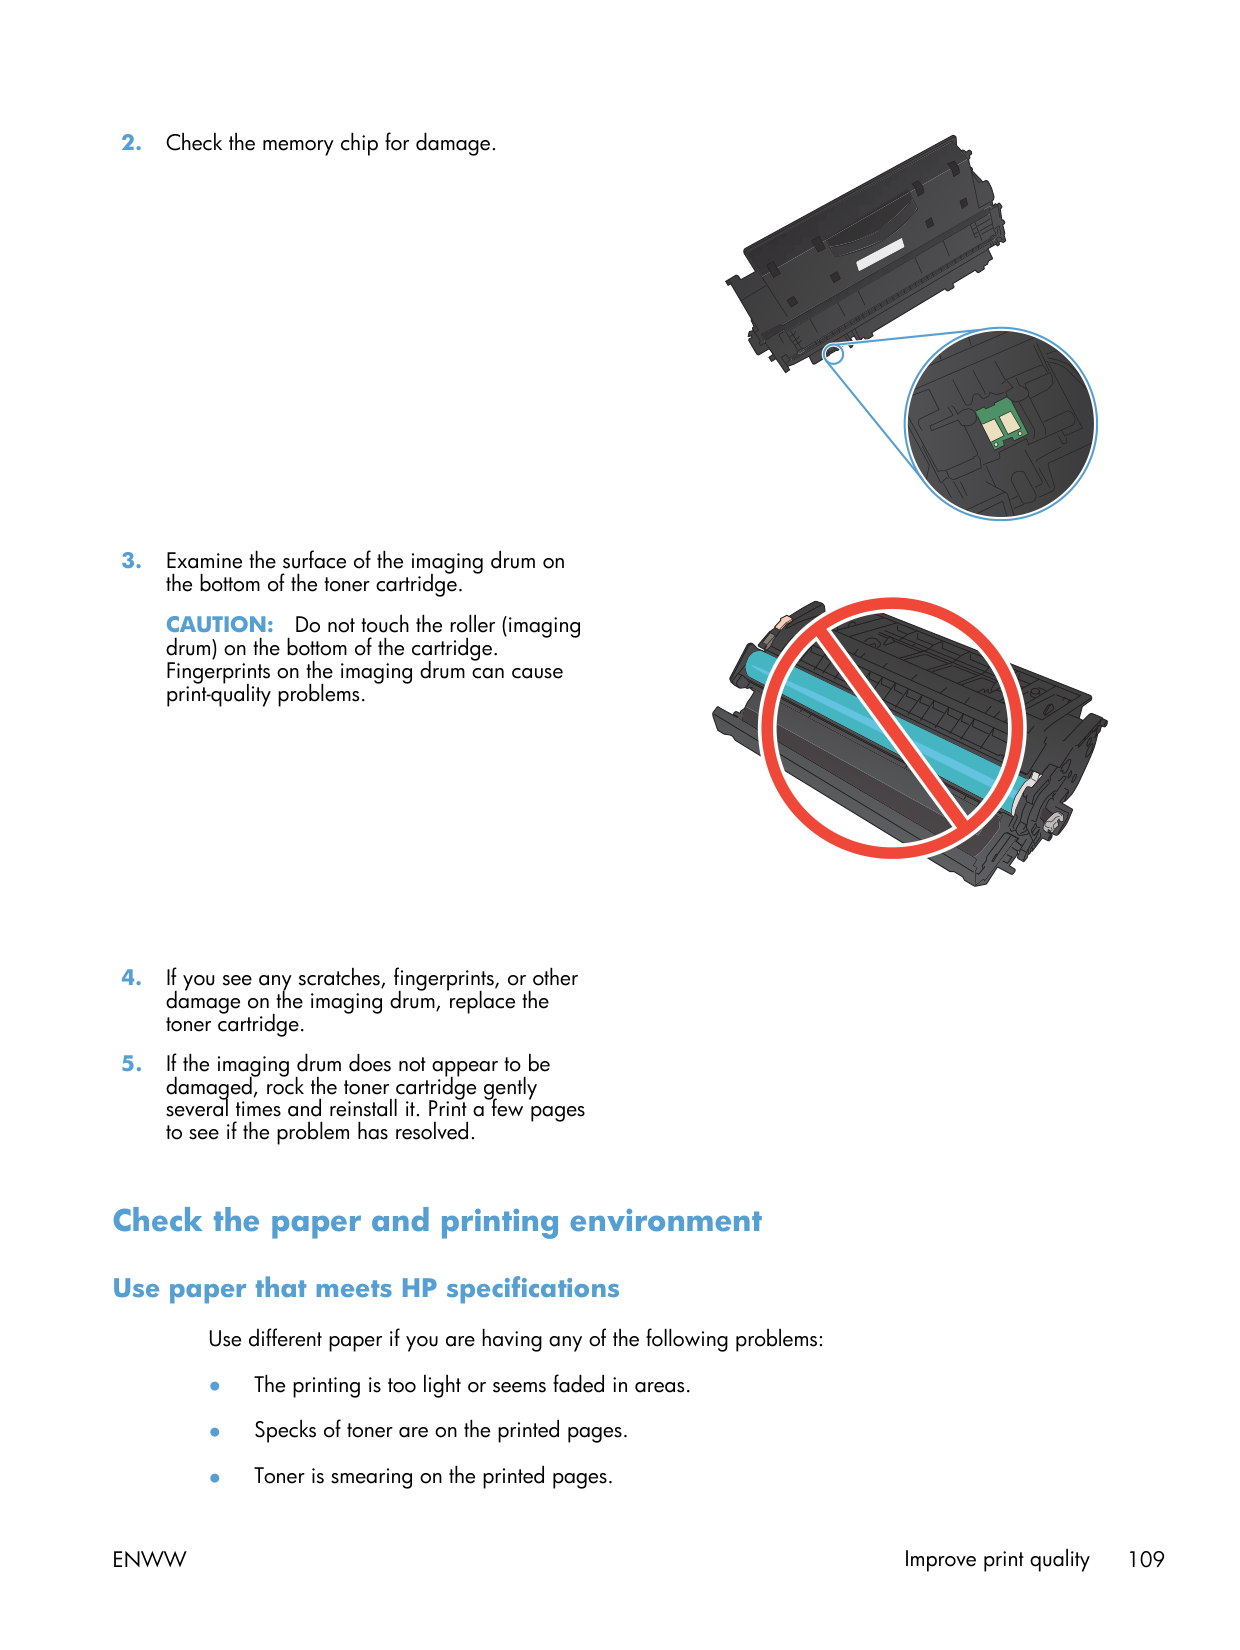
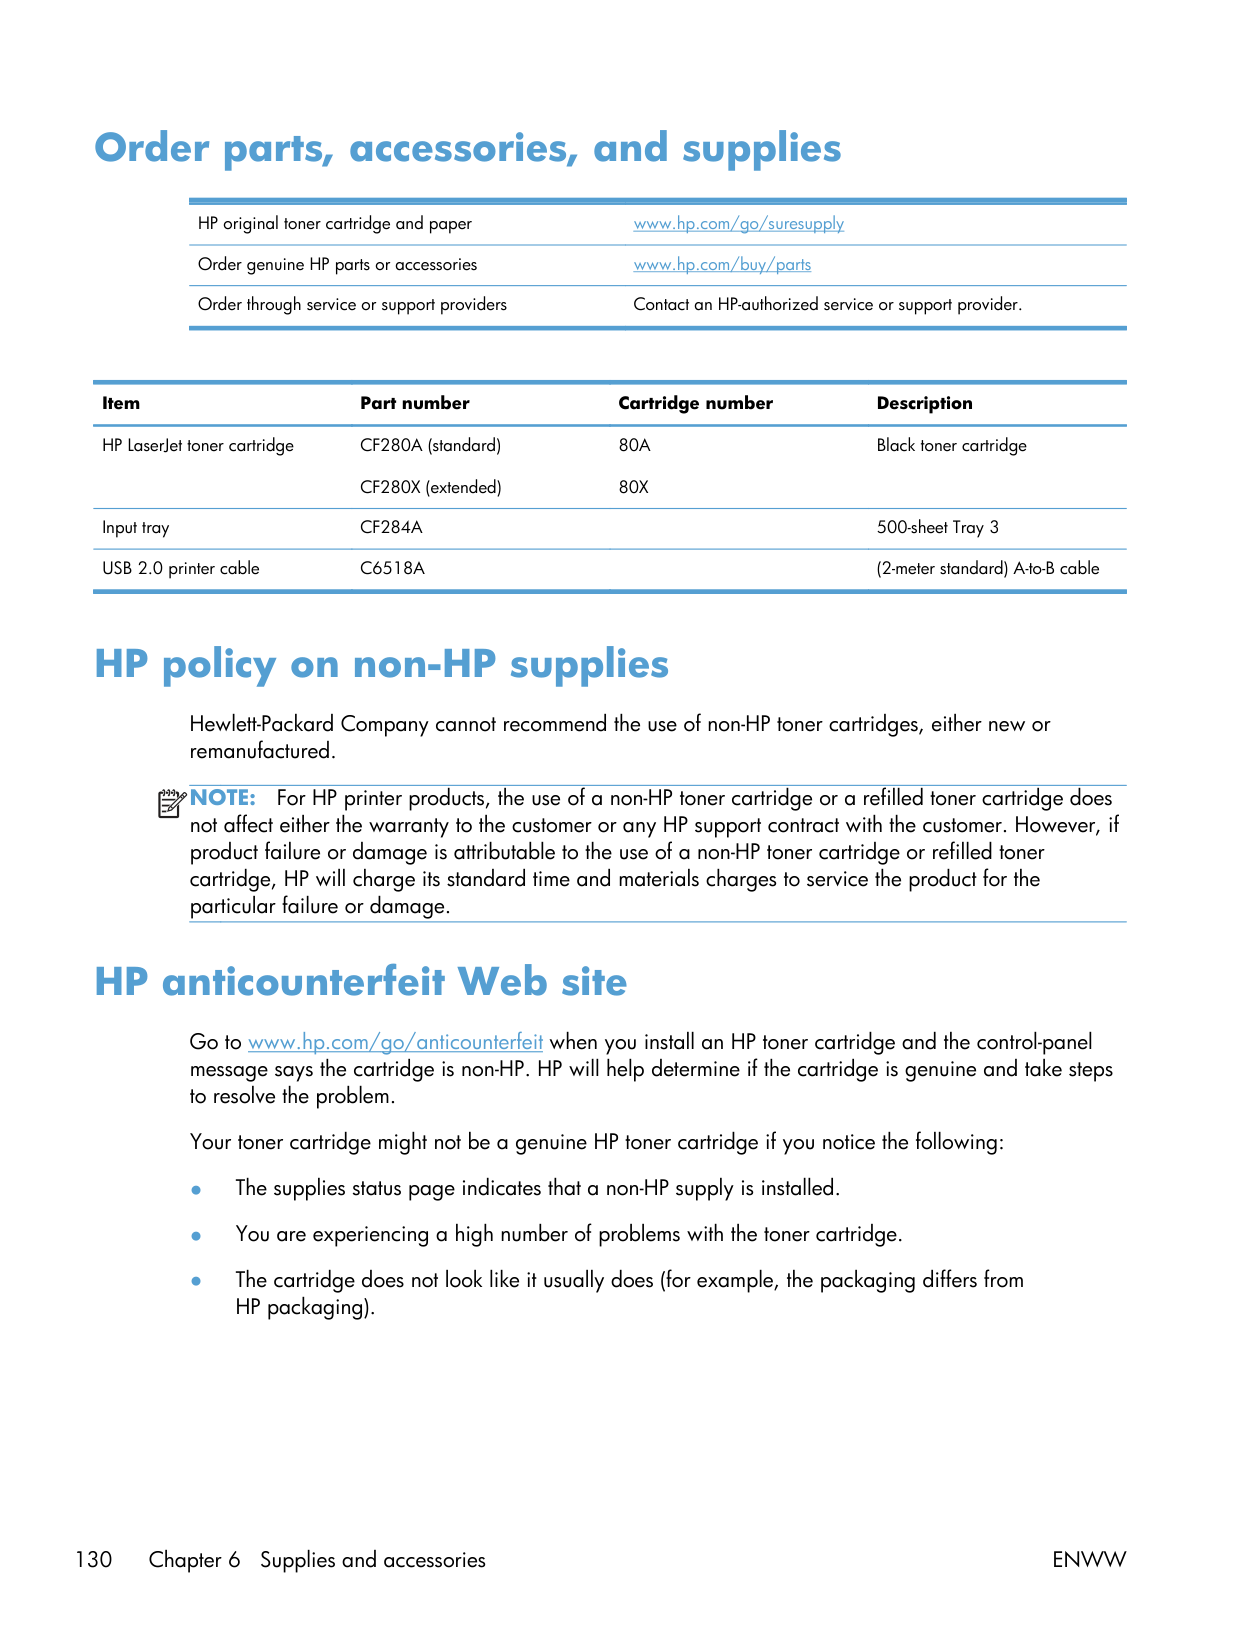
Toner. Use HP CF280A or CF280X. The chip handshake on this generation is strict, and aftermarket cartridges trigger 10.x supply errors more often than the savings justify. The M402 successor (2017) loosened chip validation; the M401 didn't. If you're tempted by an aftermarket cartridge, the predictable outcome is a 10.x error and a printer that won't print.

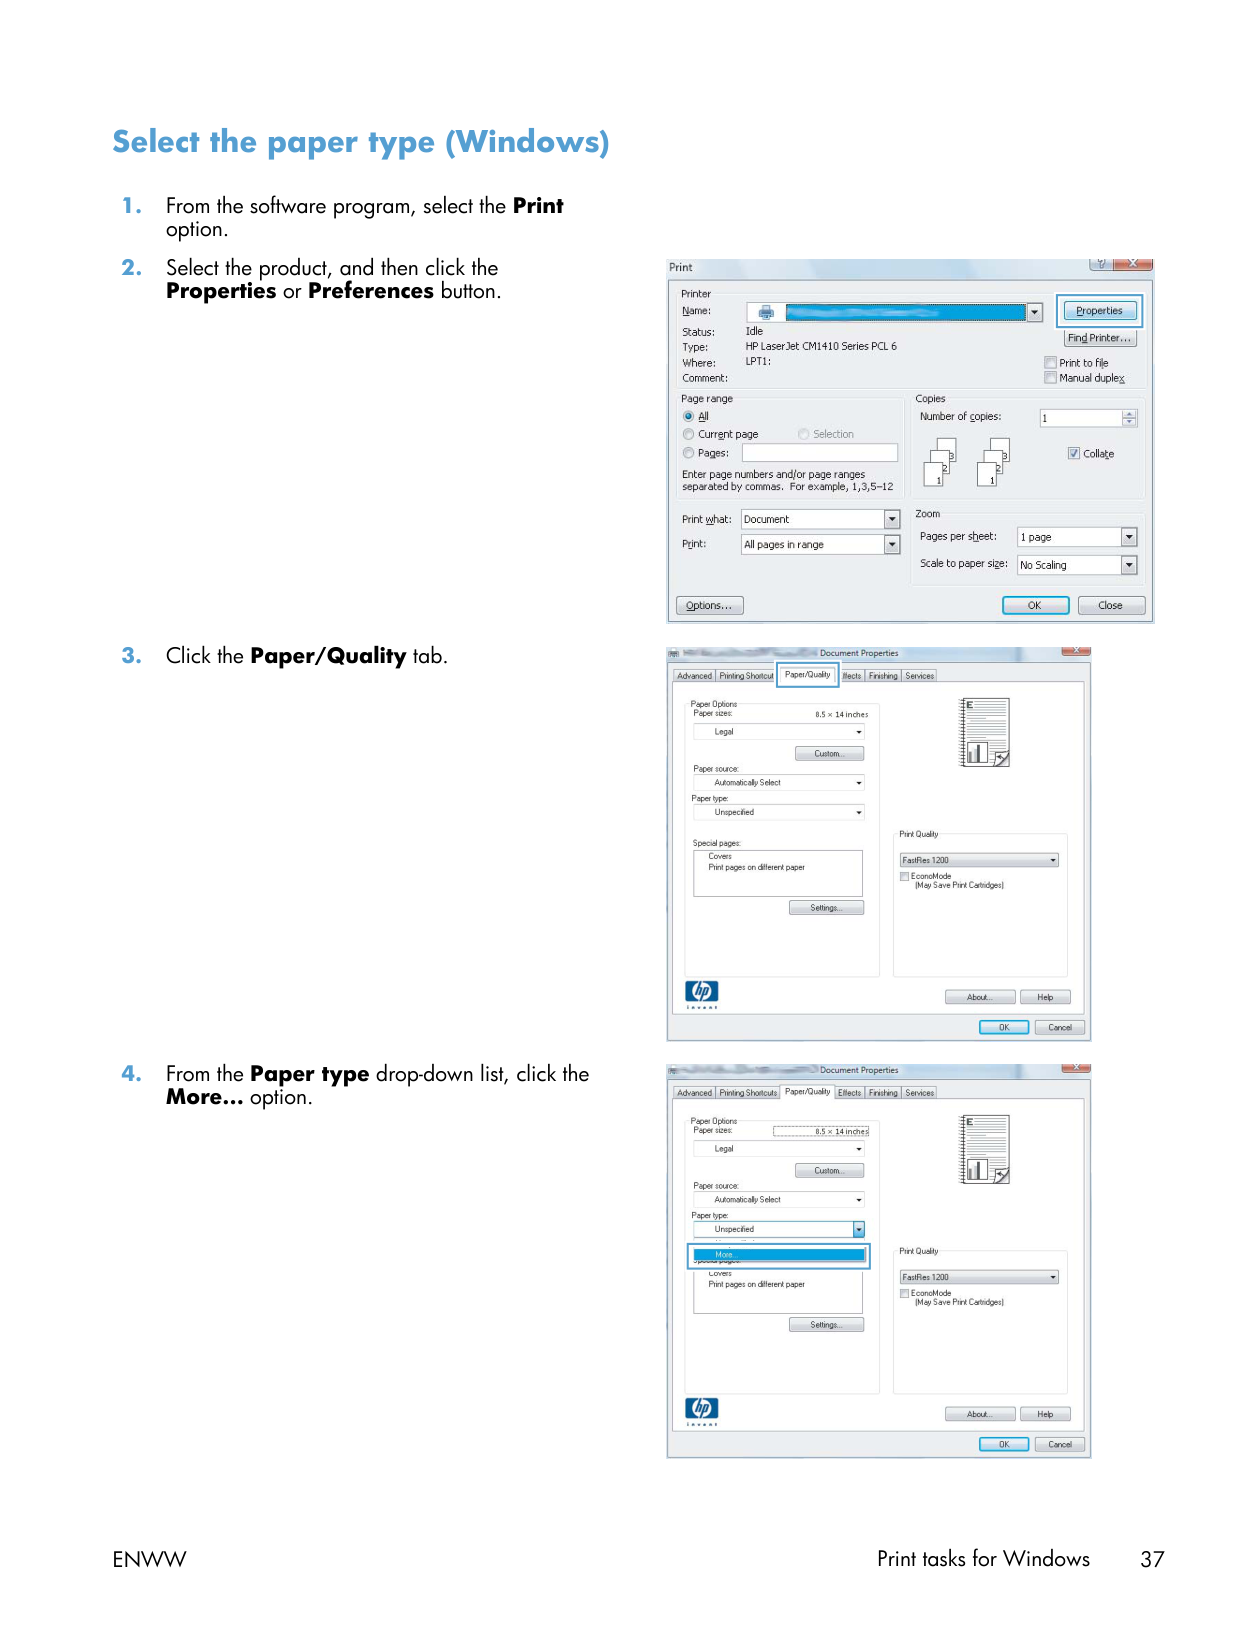
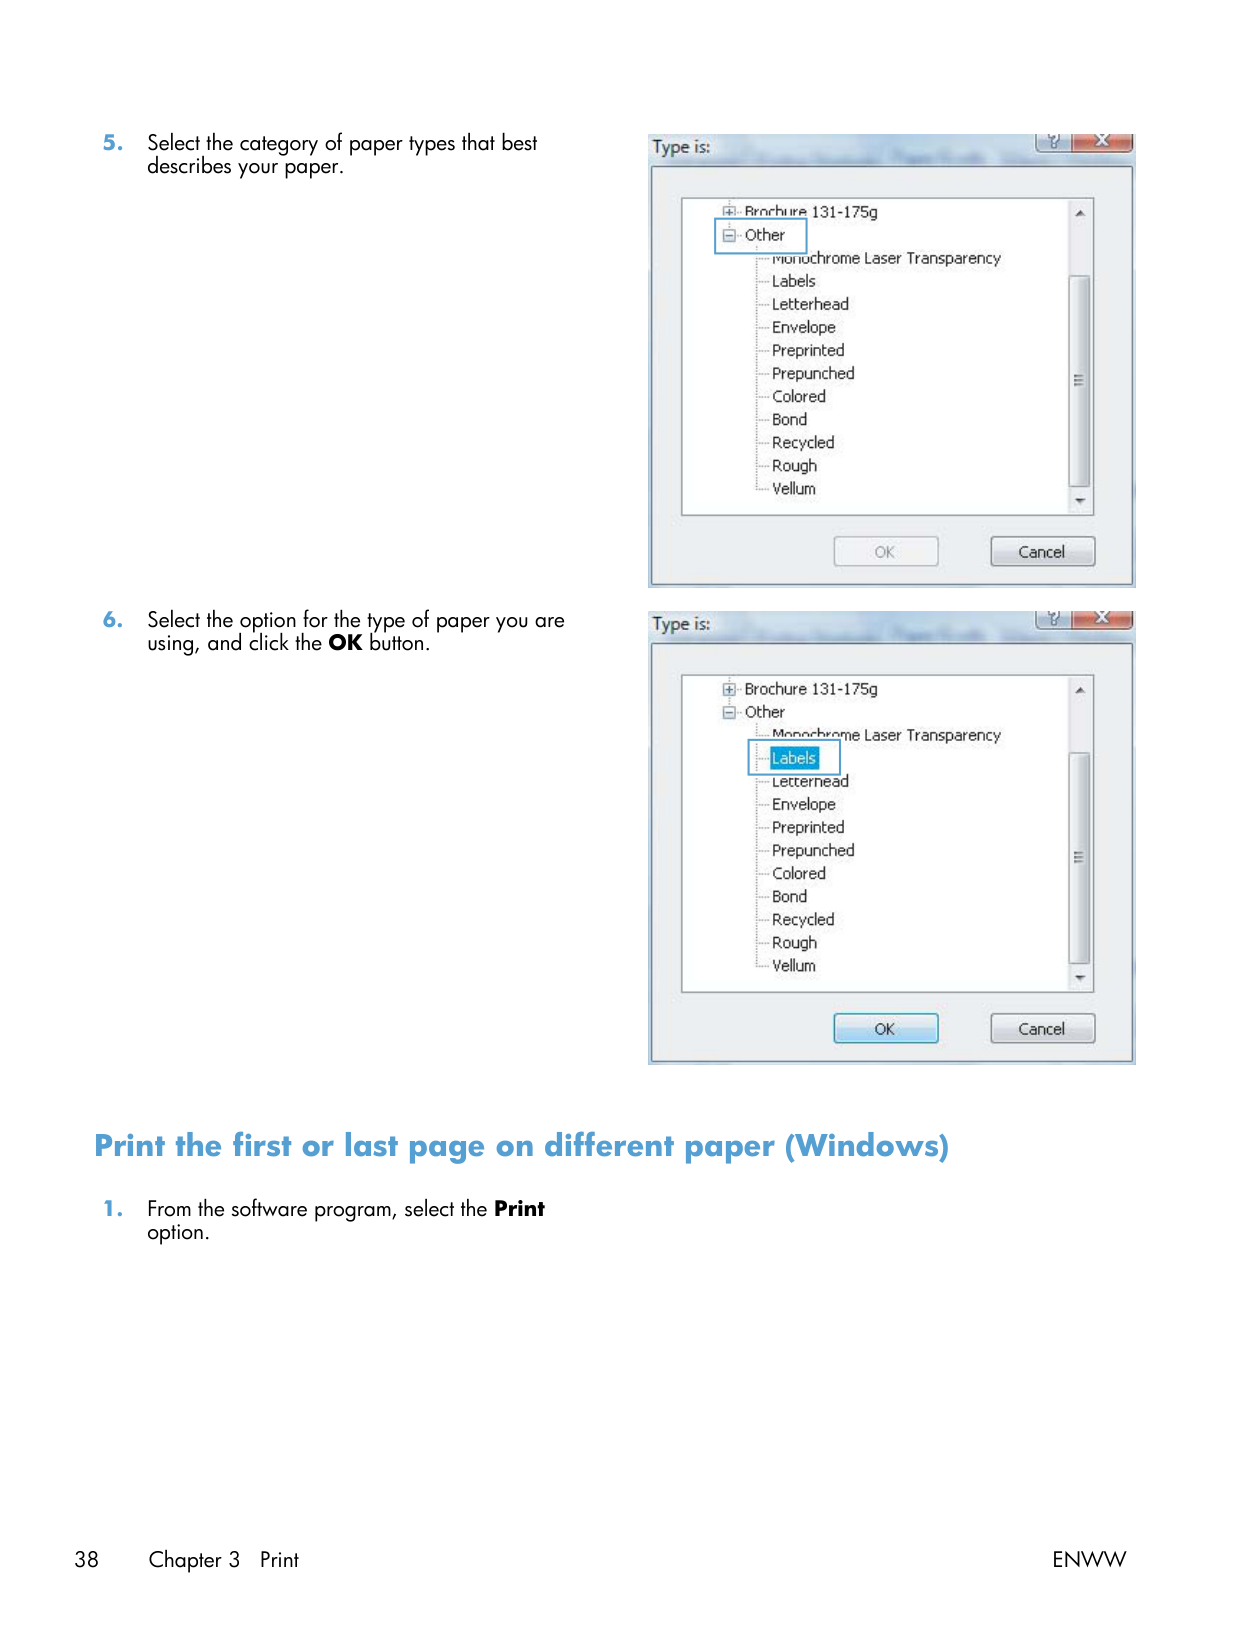
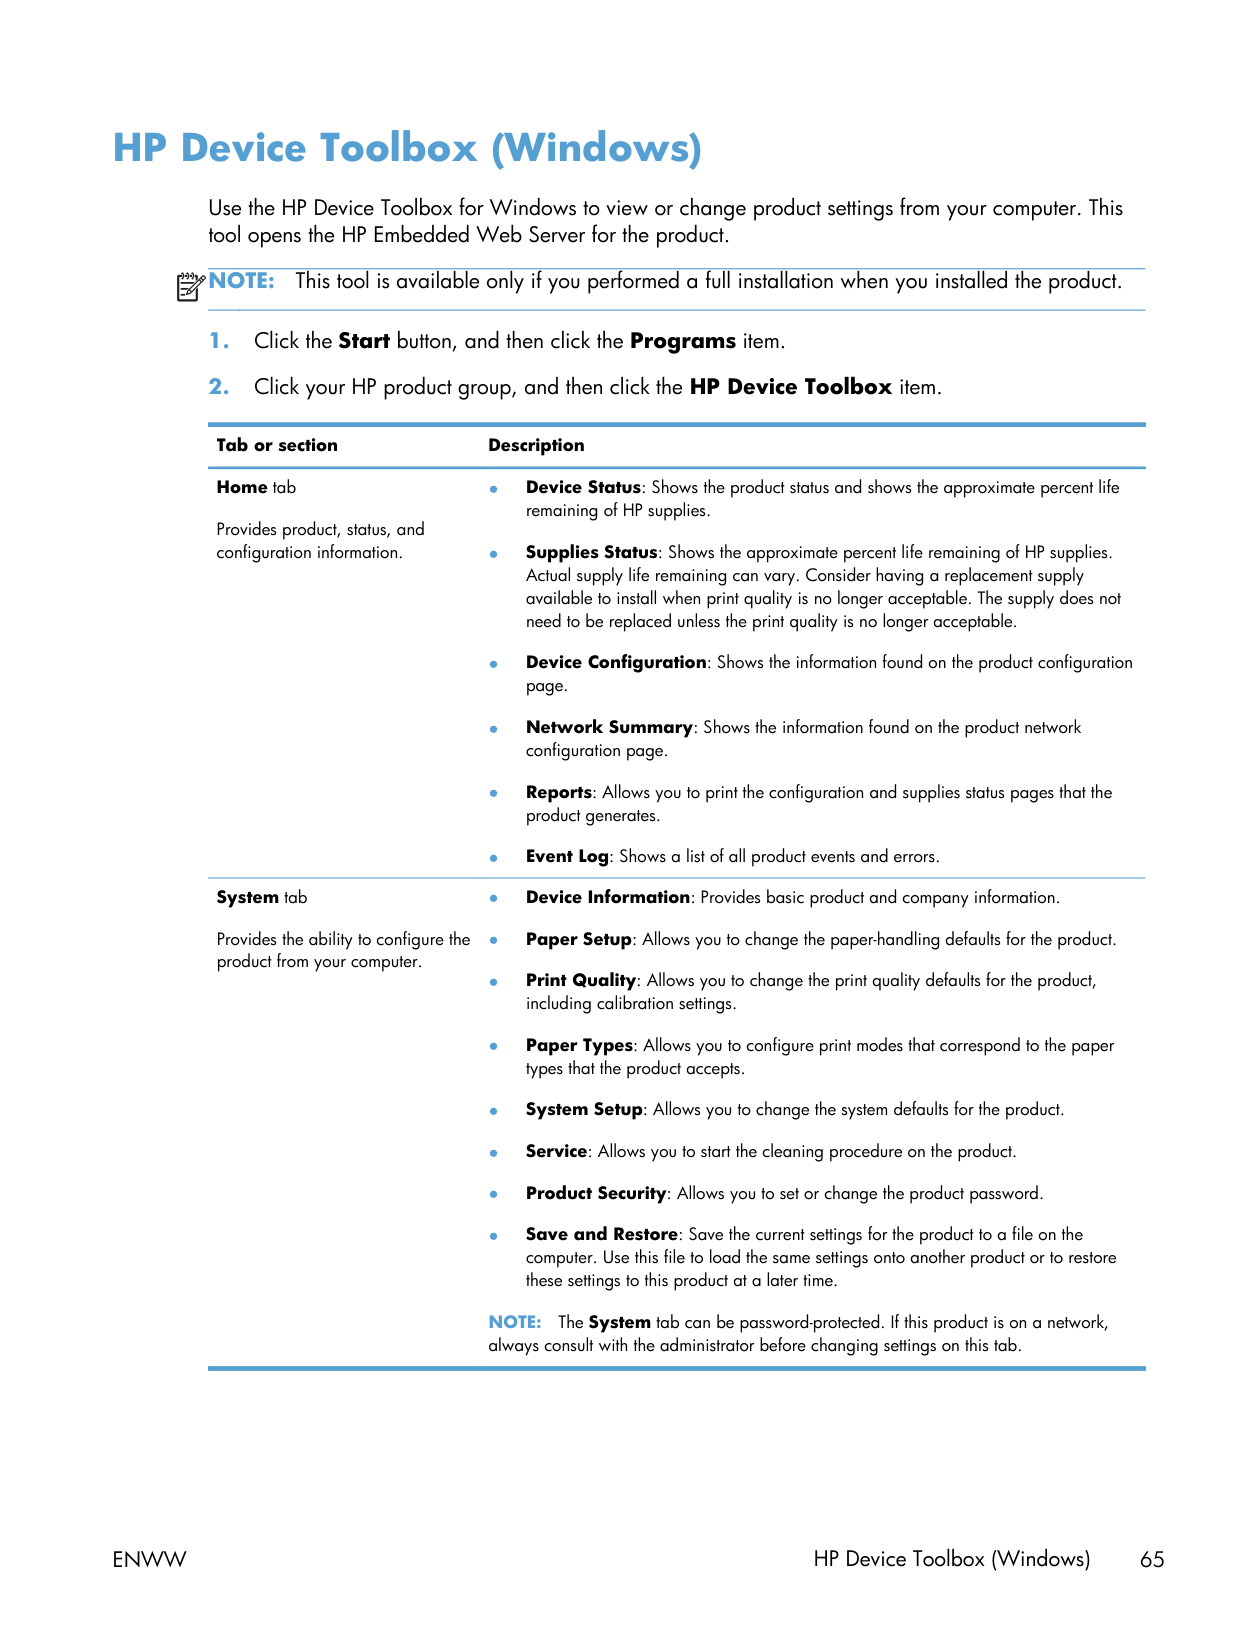
Print quality going off. Three things to check, in order. Toner level — if HP-branded and running low, replace it before troubleshooting further. Paper-type setting — printing on cardstock with the driver set to "plain" is a common cause of streaking on this model. Cleaning page — run it from the HP Device Toolbox utility (downloadable from HP Support if it isn't already installed). The fuser and laser scanner rarely fail on this generation, so if those three don't fix it, the cartridge is still your most likely culprit.

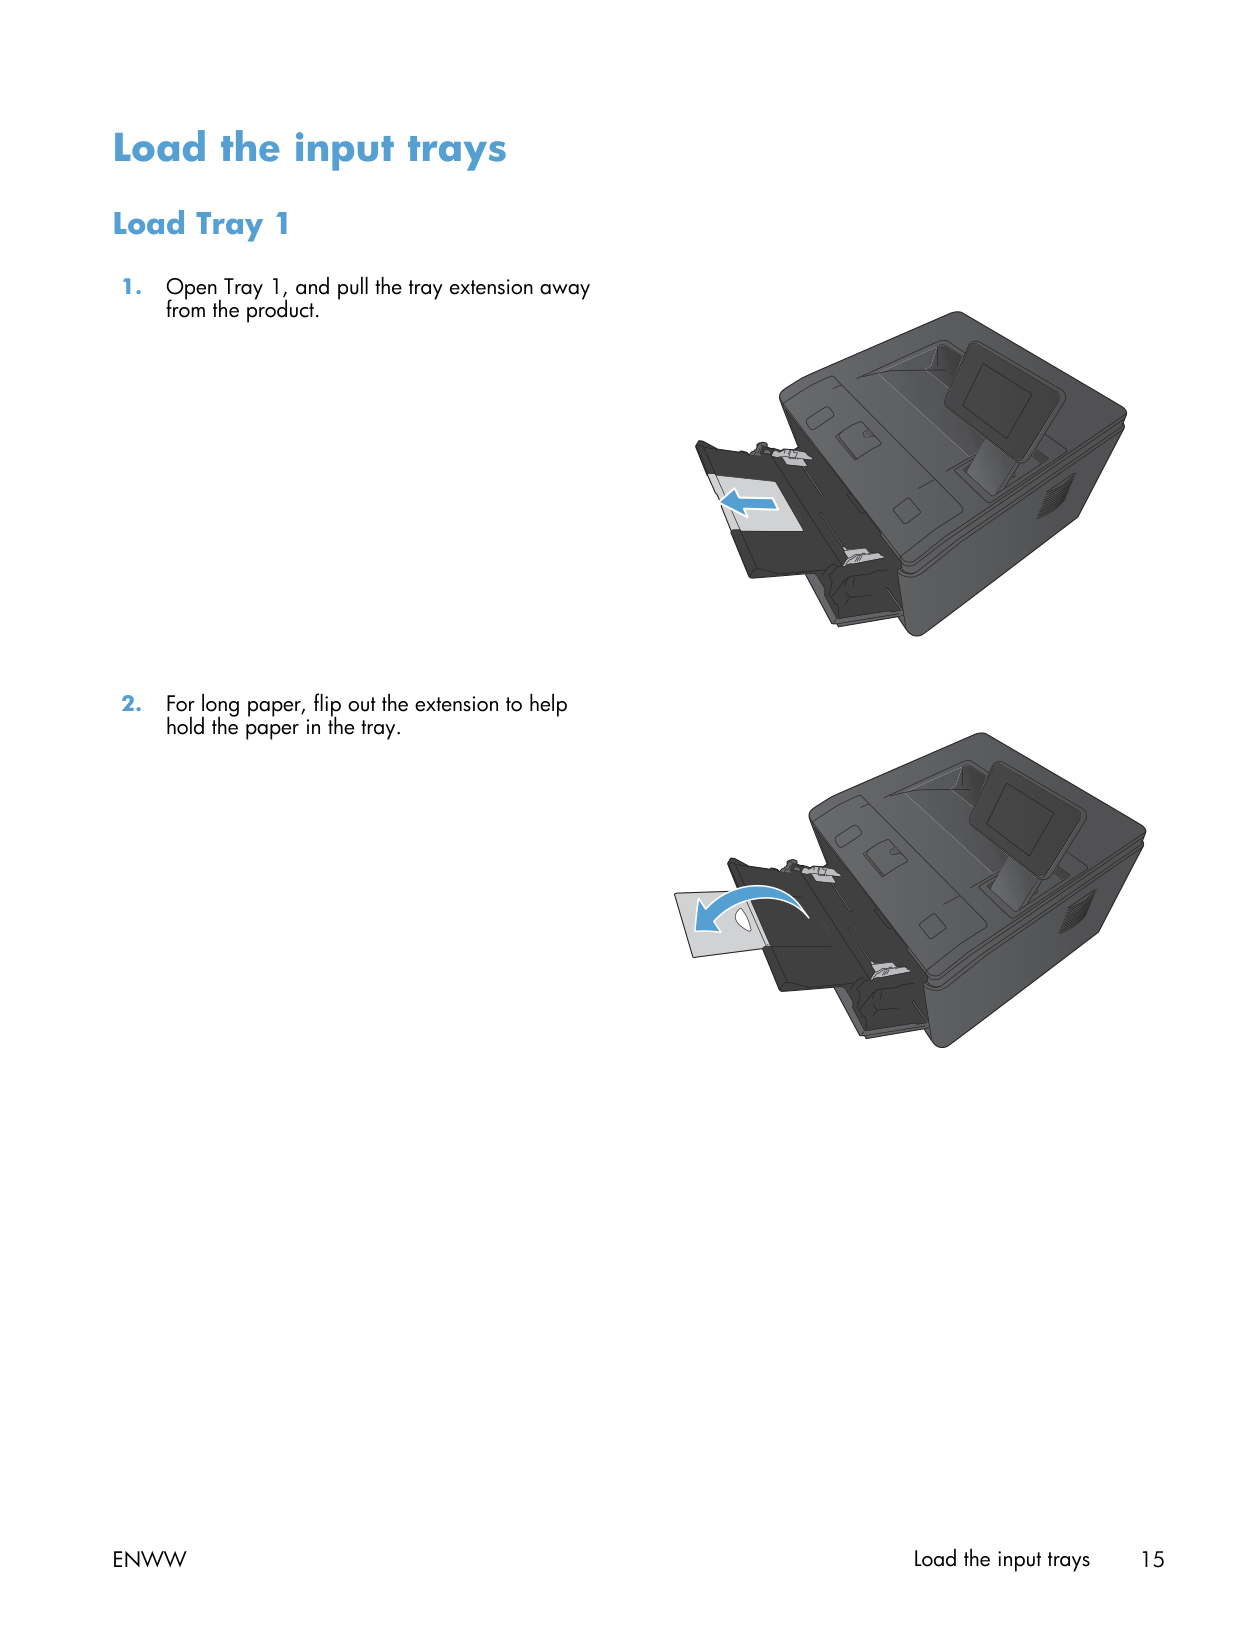
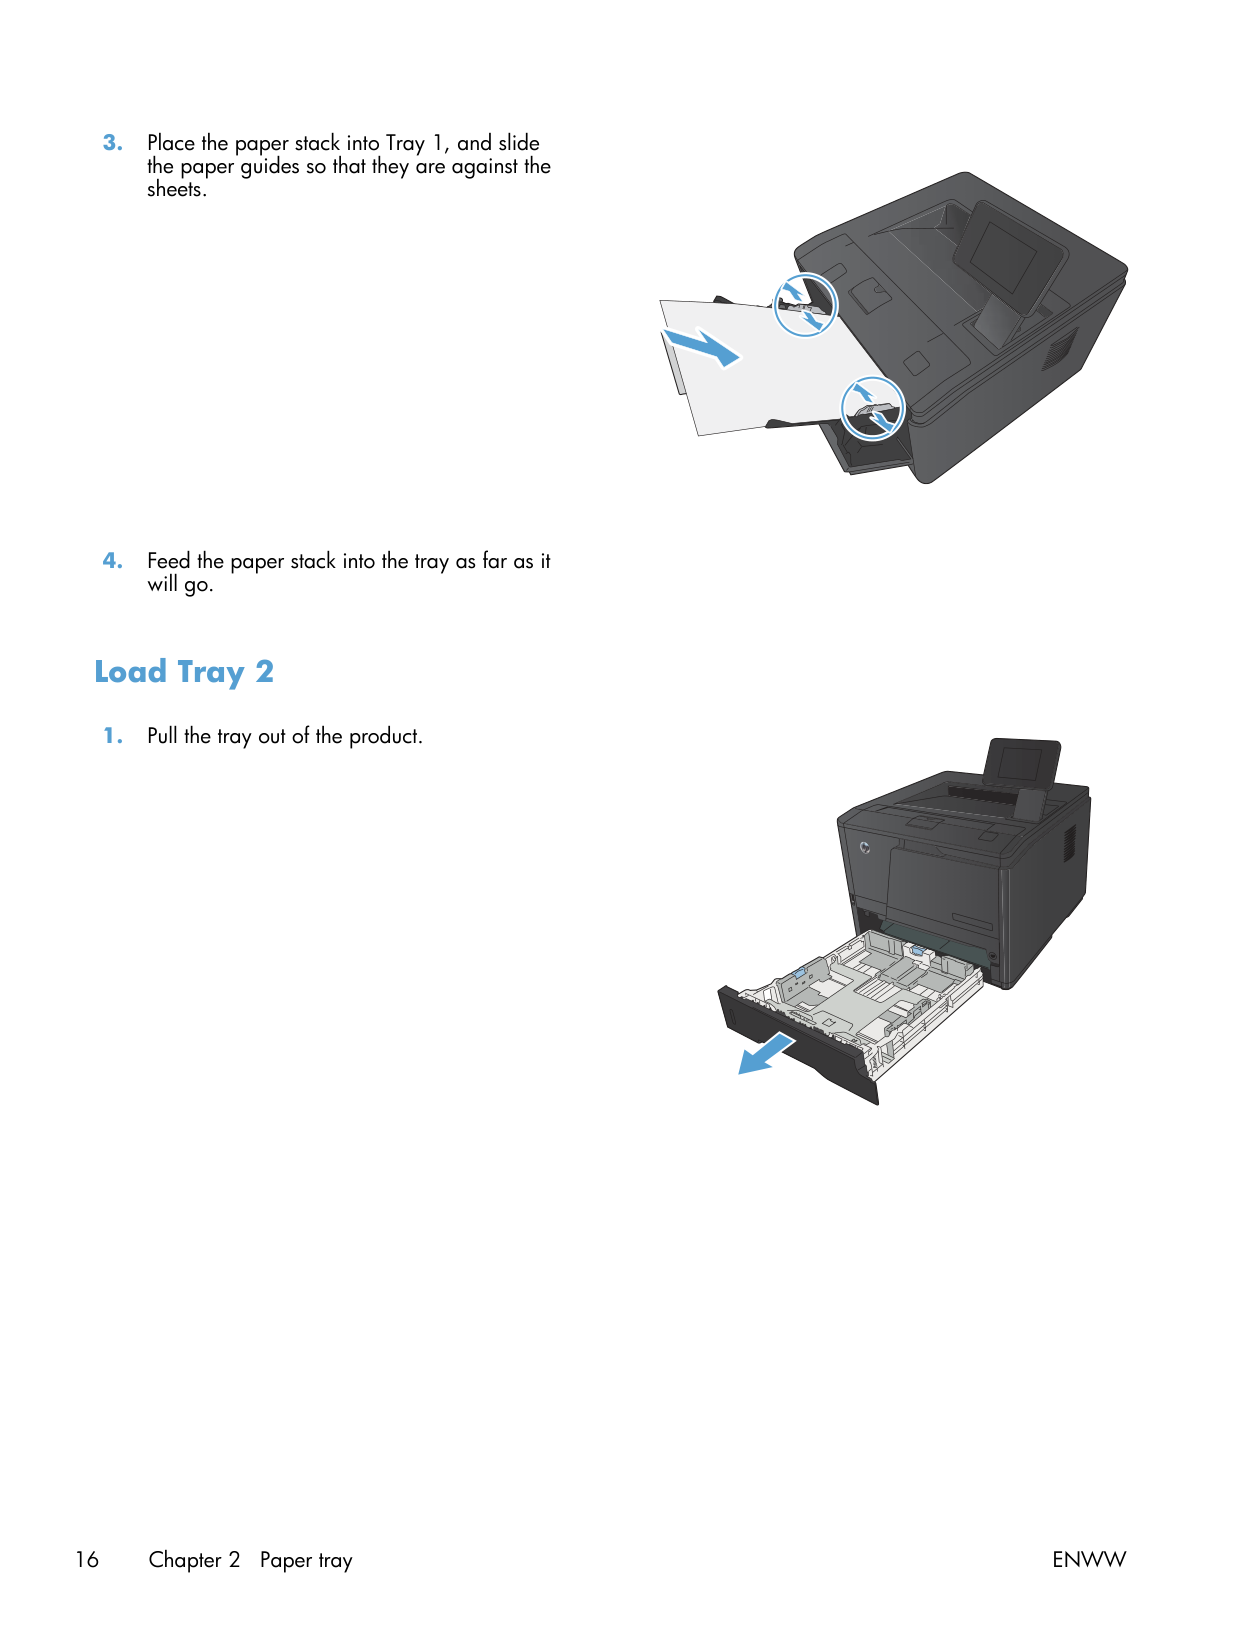
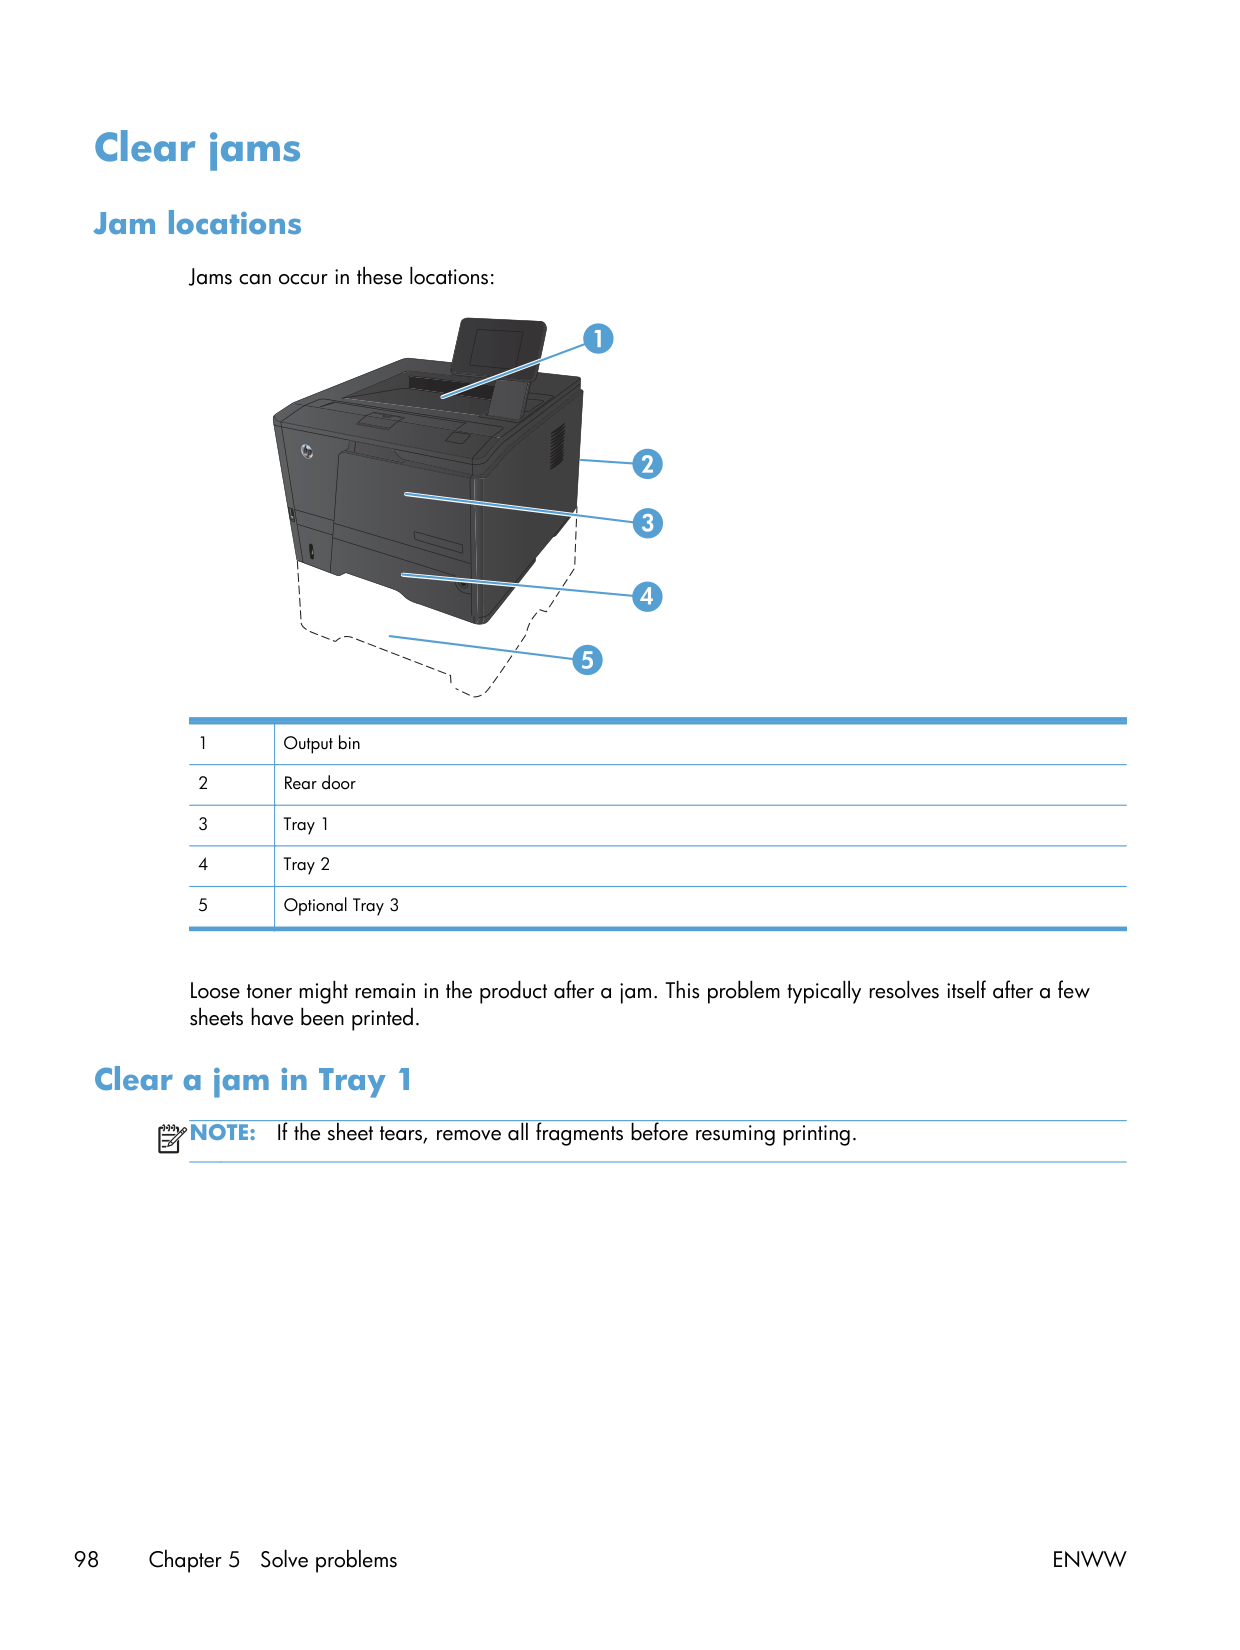
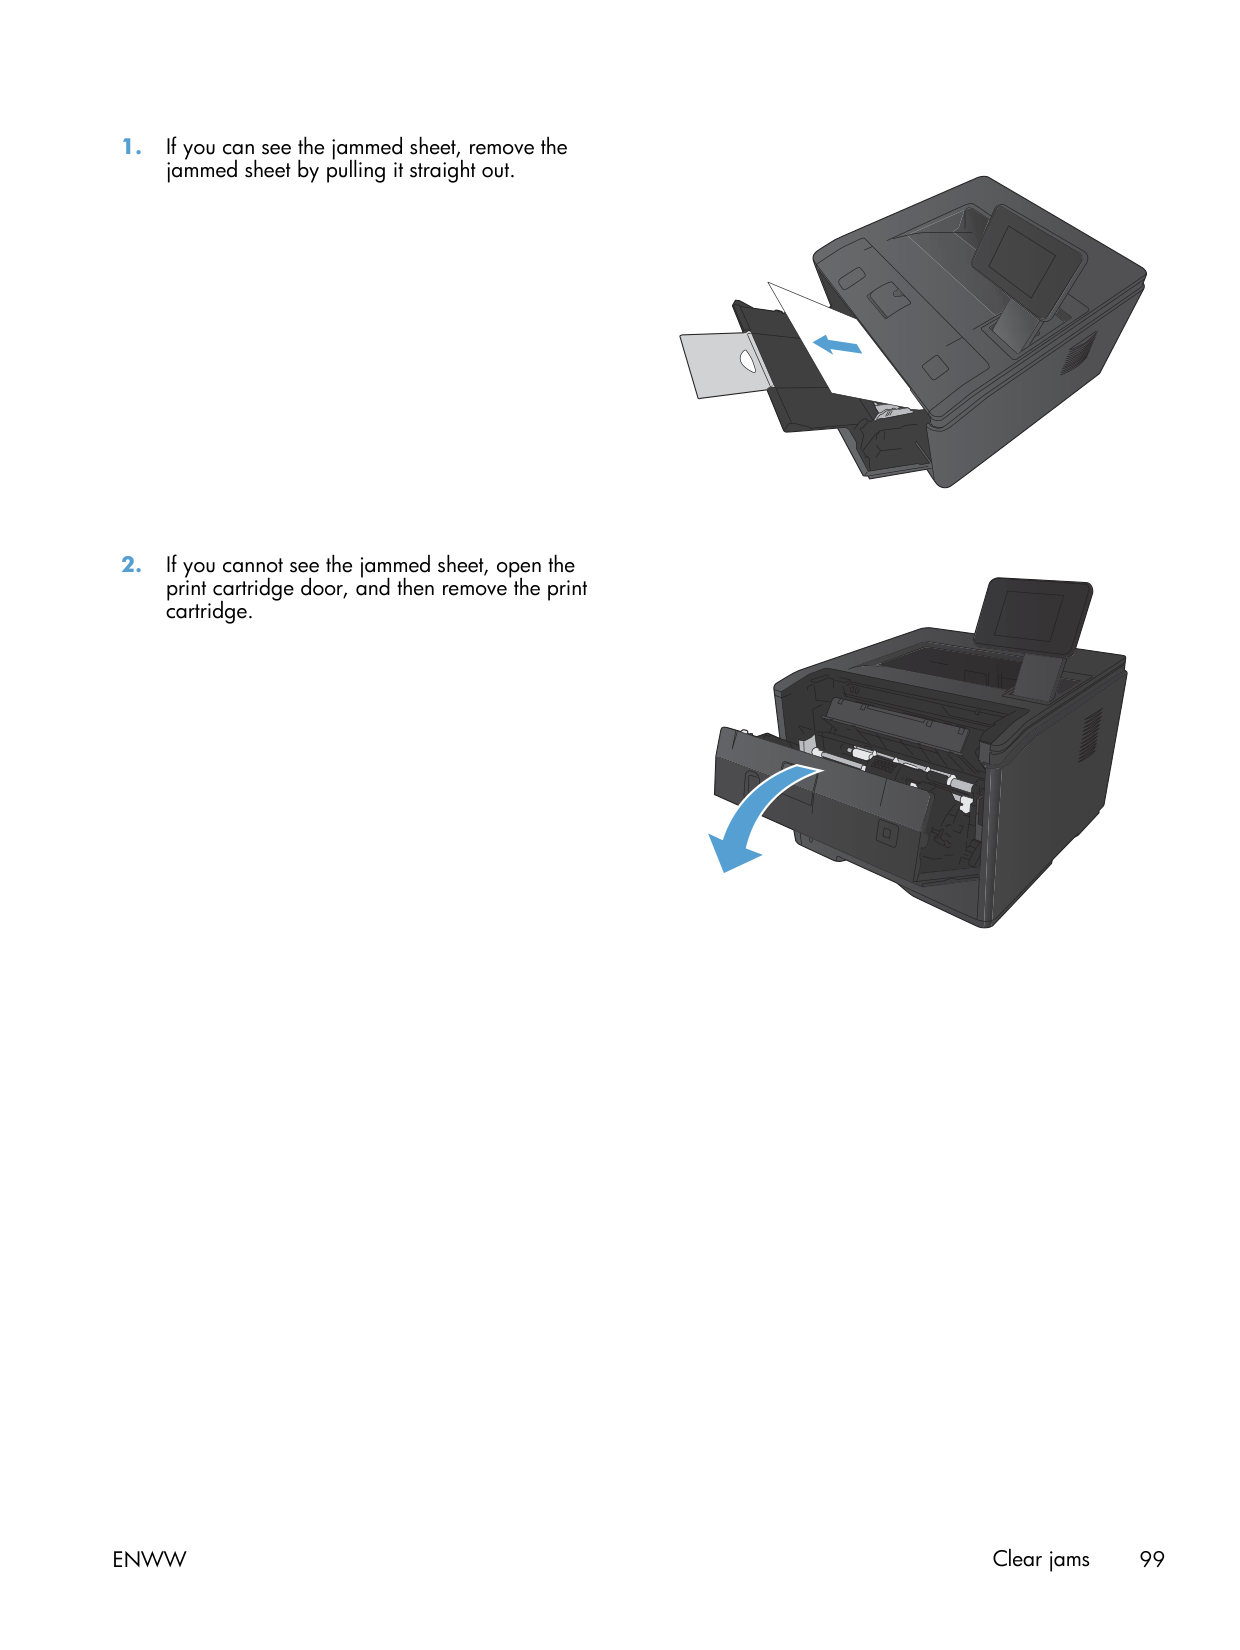
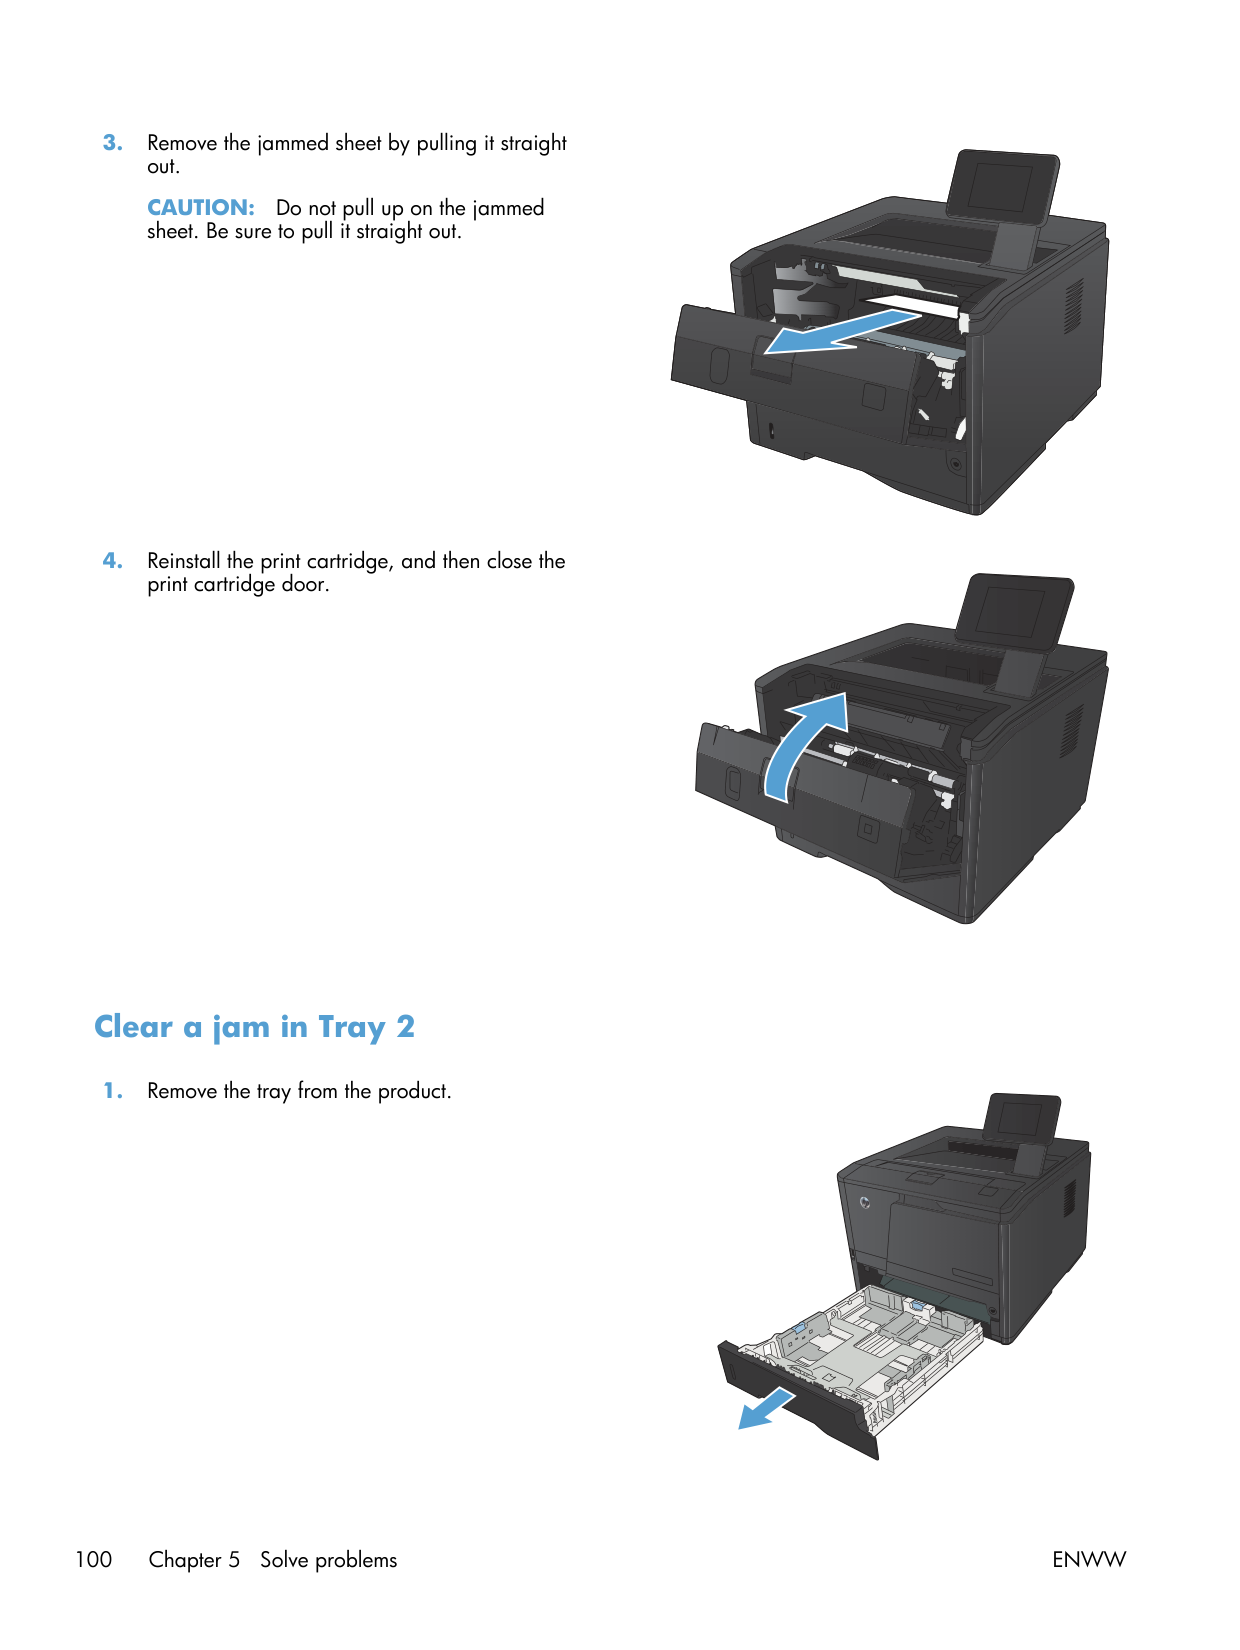
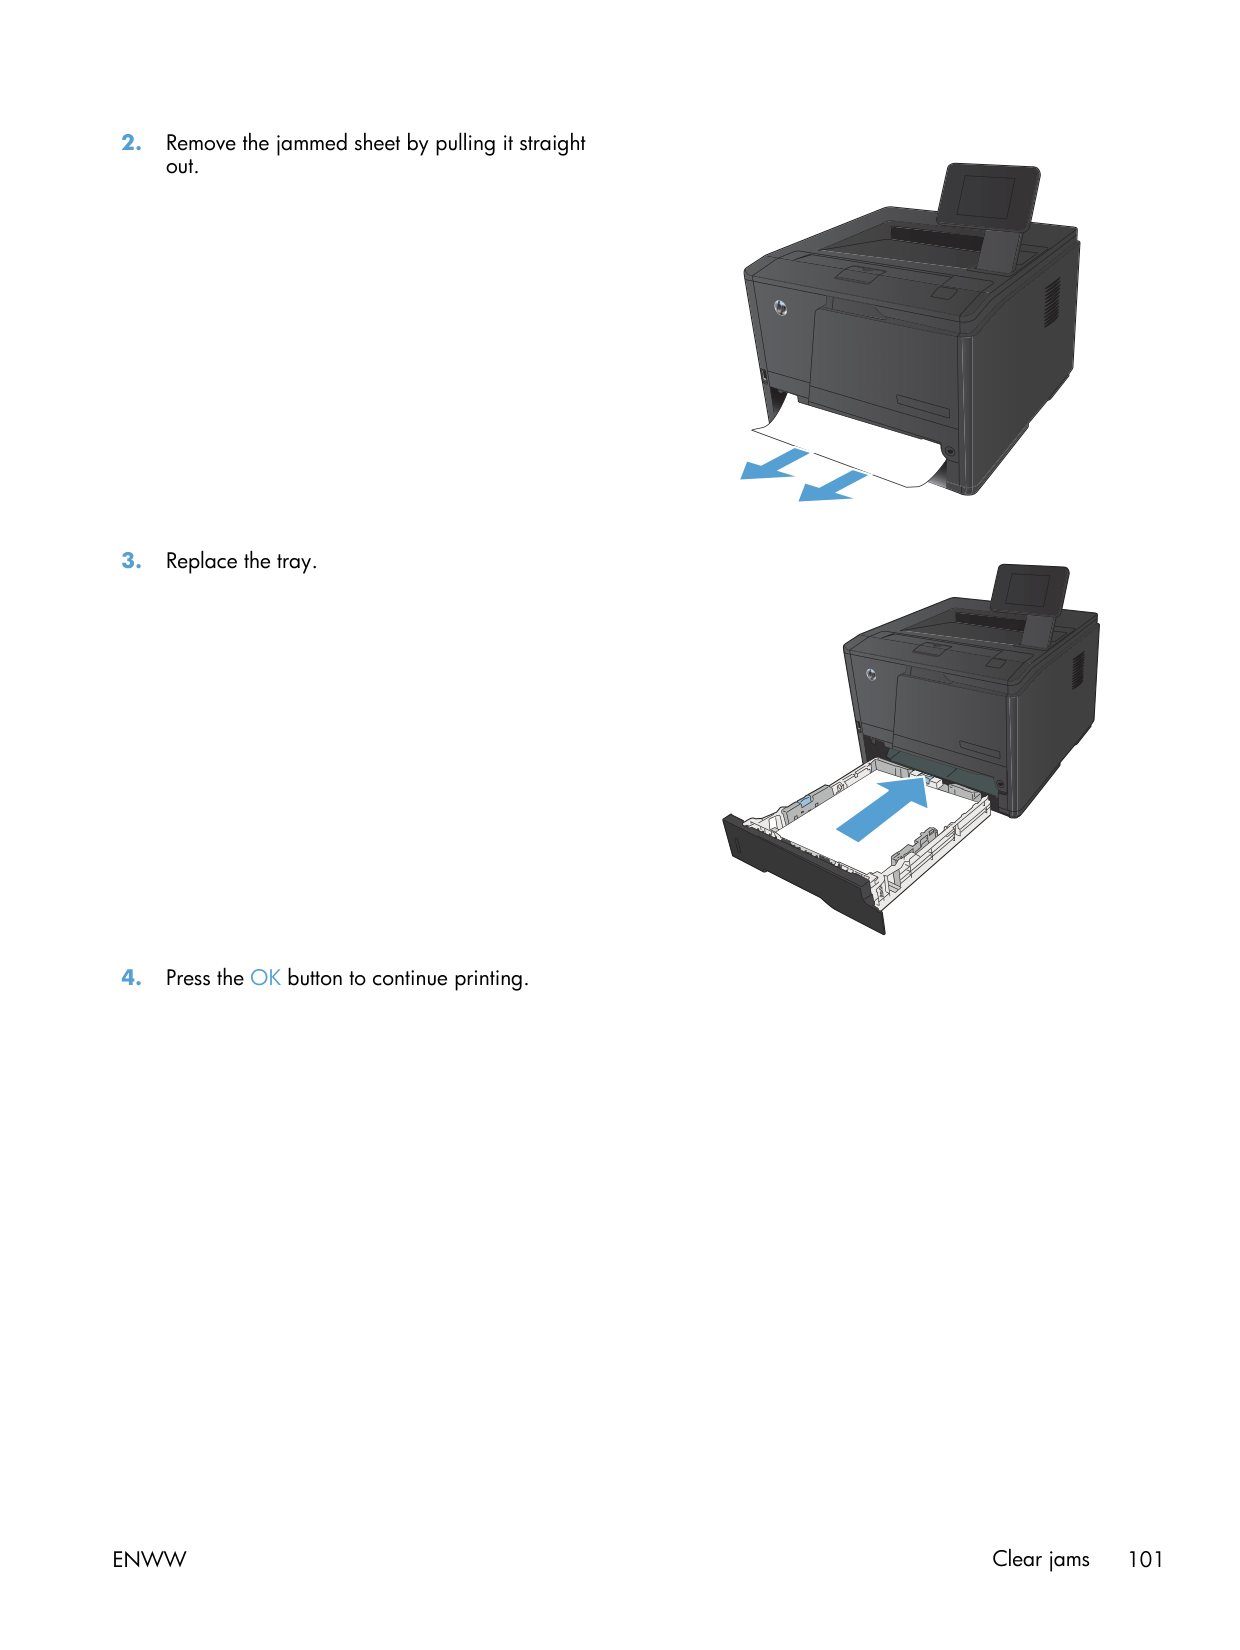
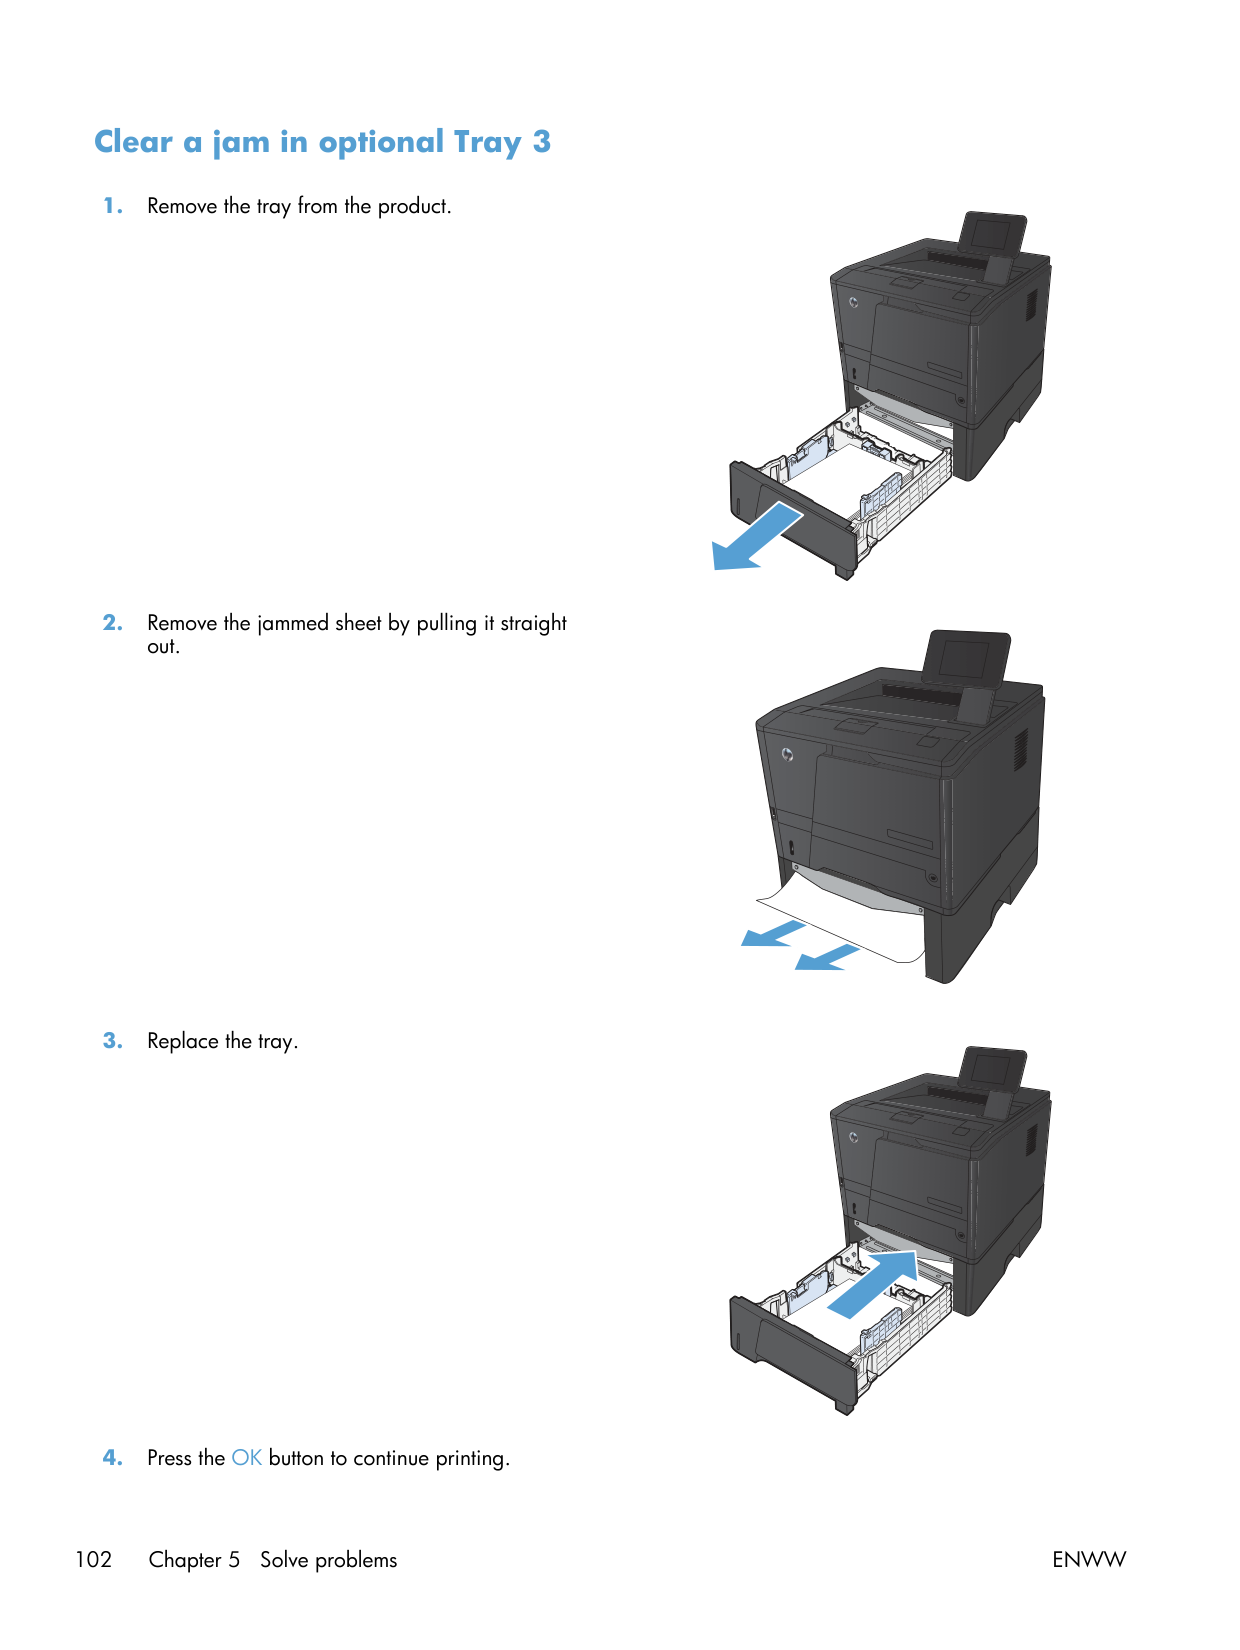
Paper jams. Tray 1 jams almost always trace to the side guides set too tight, with a curl on the front edge of the stack. Square the stack on a desk first, fan it, place against the back wall of the tray, slide the guides until they touch the stack but don't crush it. Recurring jams in the same spot after a clean usually mean the pickup roller is wearing — order one.

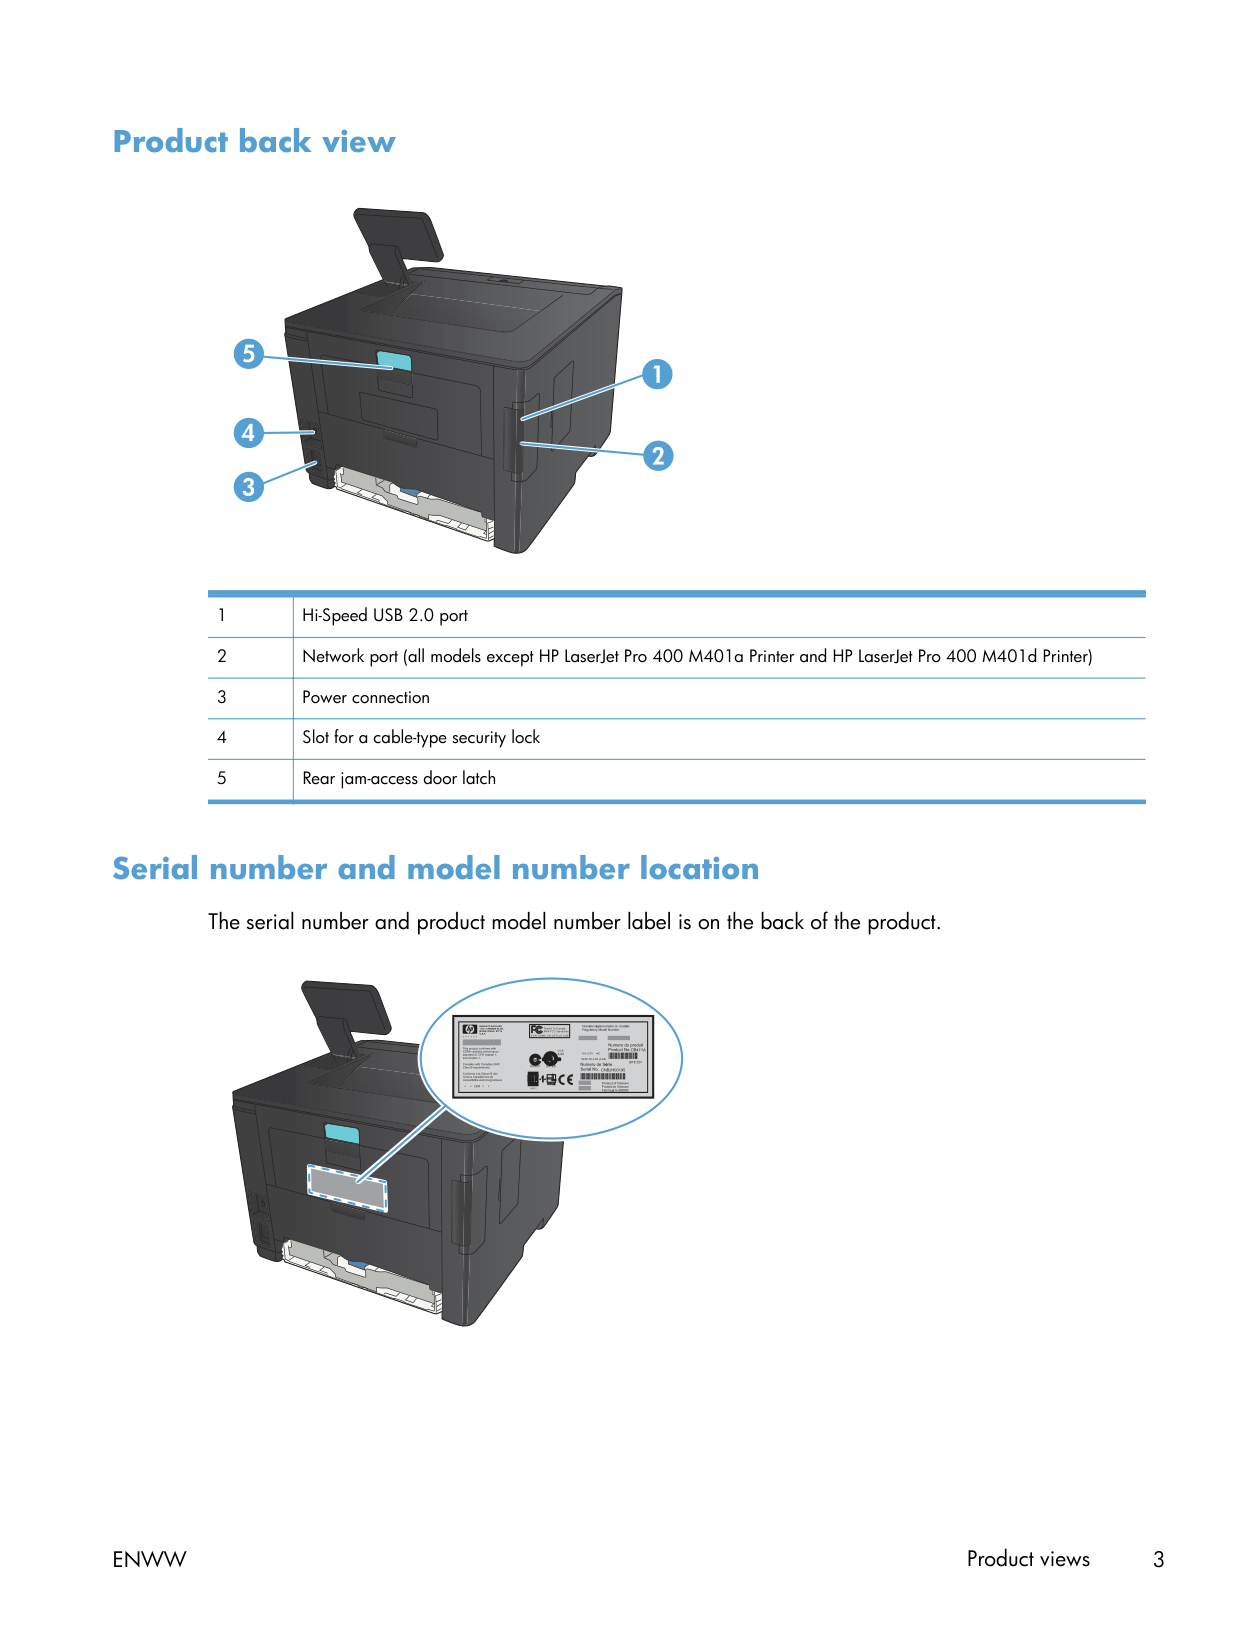
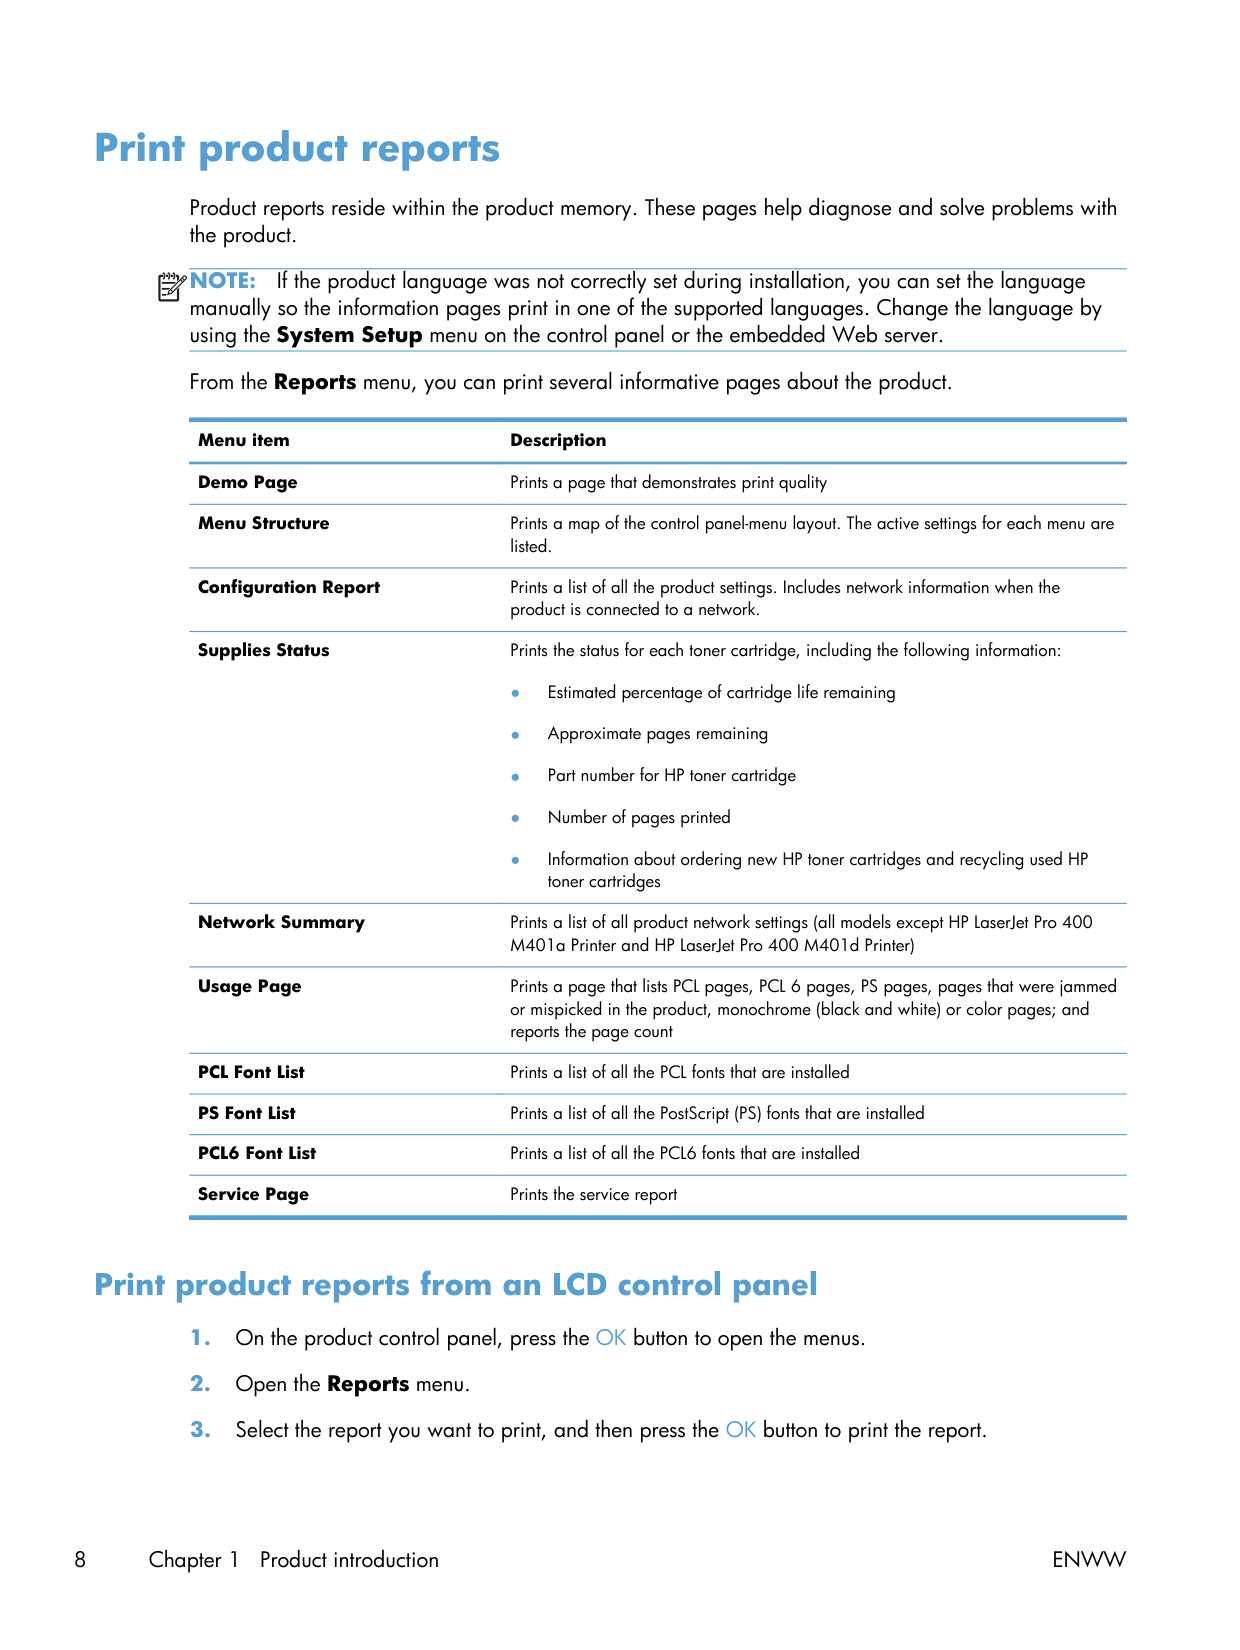
Wi-Fi setup, dw model. The setup wizard wants WPS by default, and a lot of routers have WPS disabled. If yours does, set up via USB cable first, then push the network credentials through the Embedded Web Server. The IP address is on a config page (Tools → Reports → Config Report from the panel).

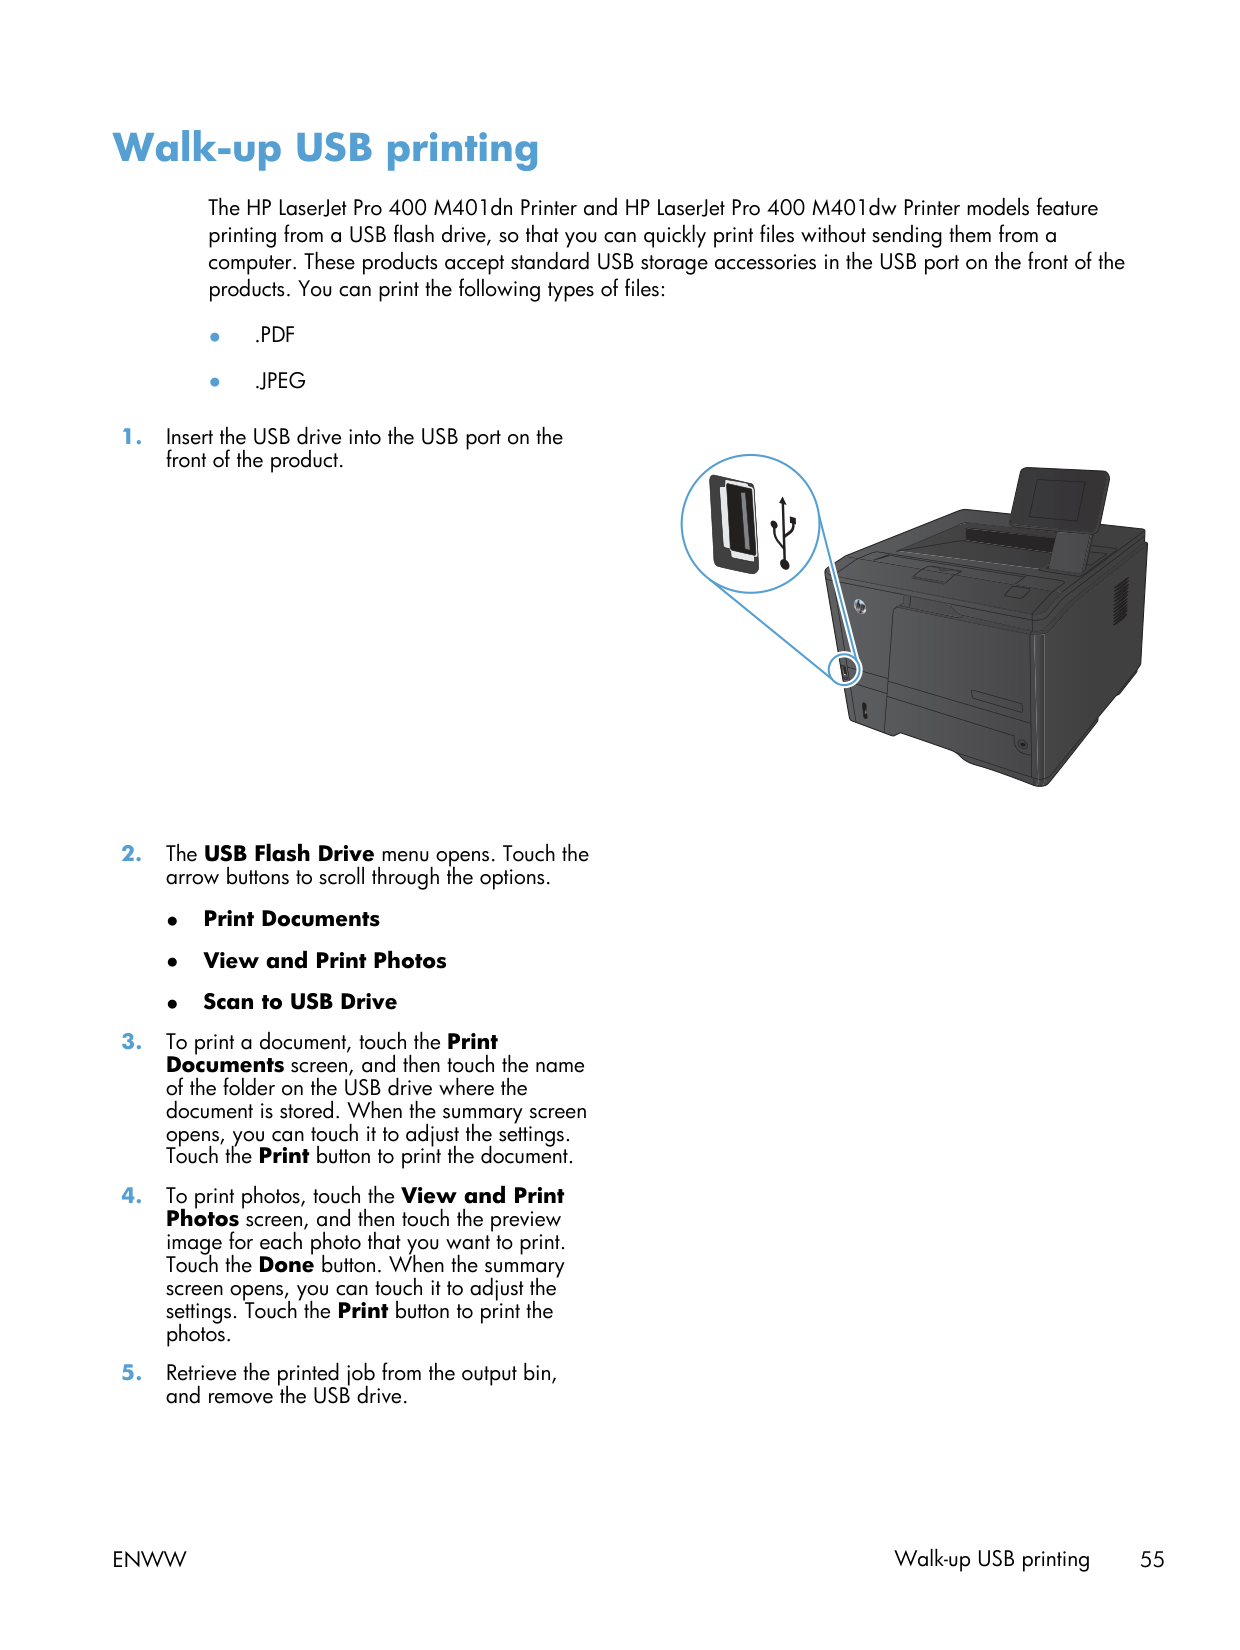
Walk-up USB printing. Plug a thumb drive into the front port. PDFs and image formats (JPG, PNG, TIFF) print directly. Office formats won't — convert to PDF first. Drive limit is 32GB, FAT32-formatted only on this firmware.

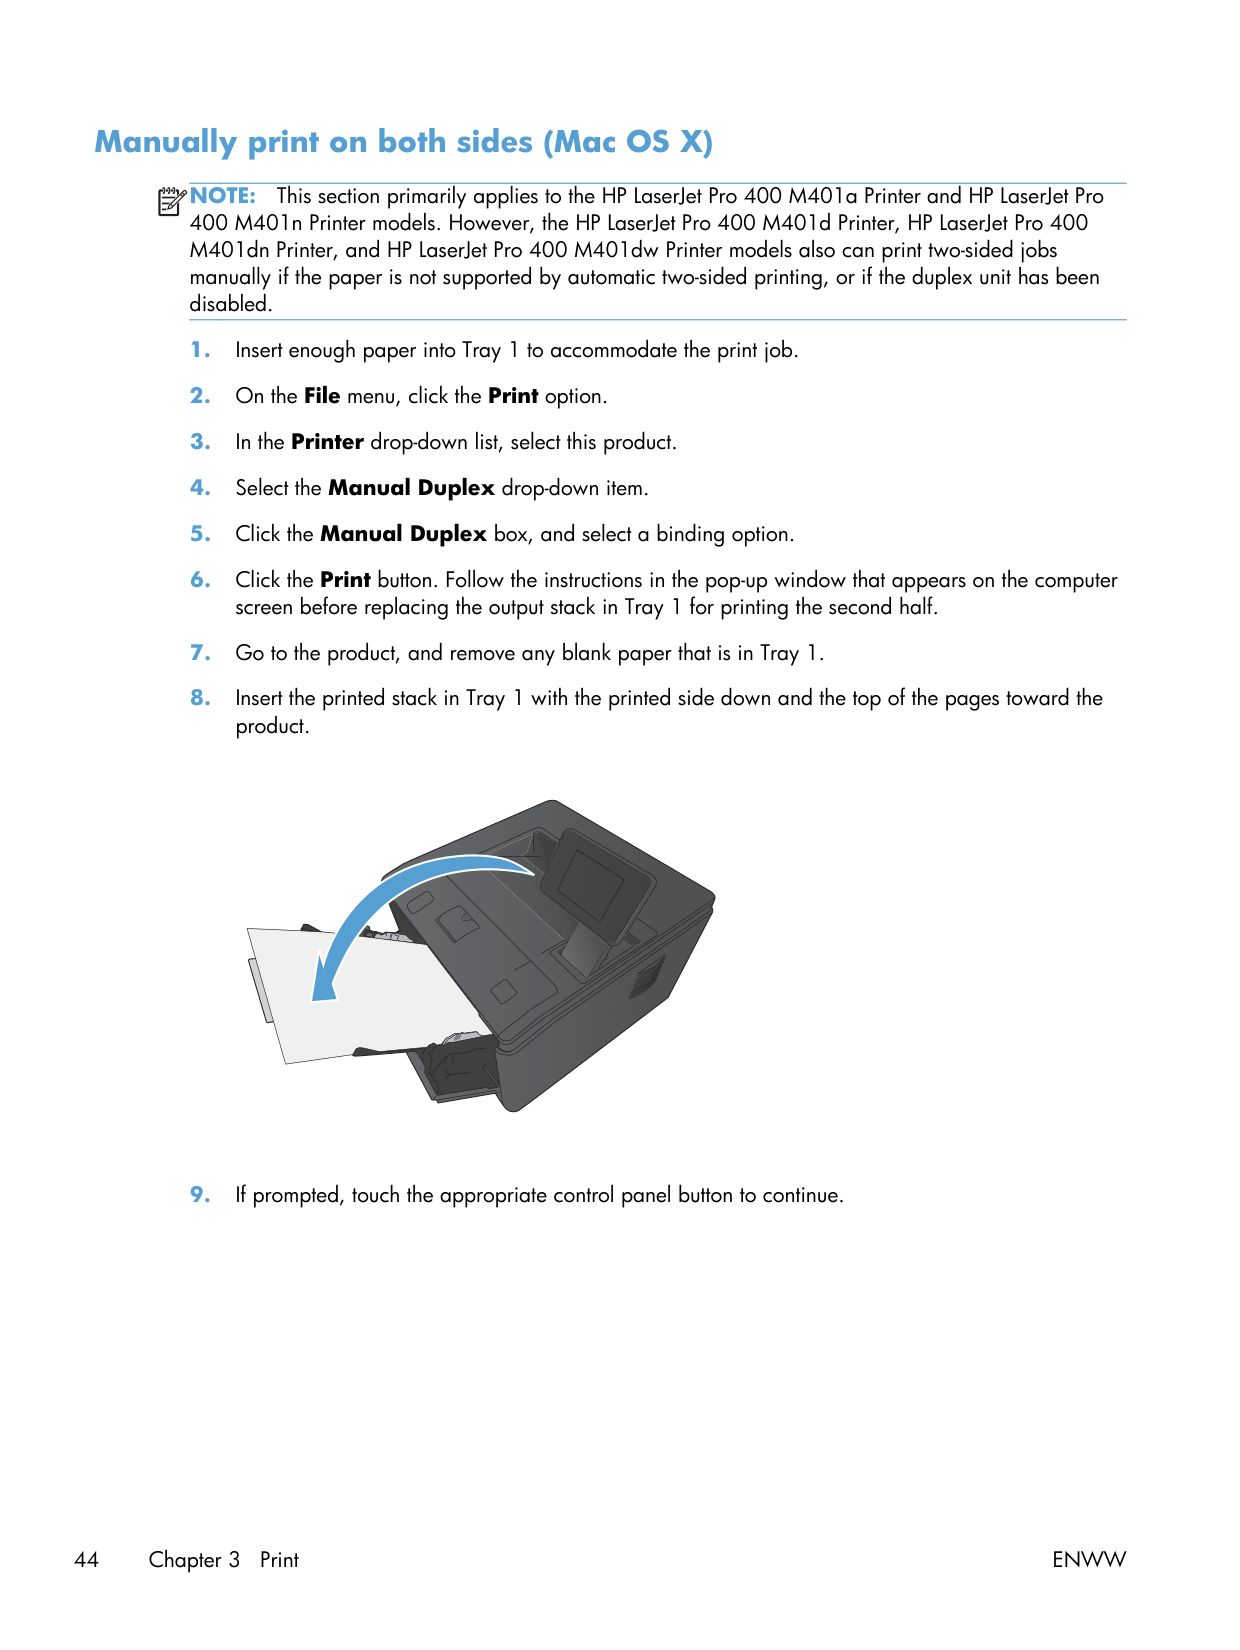
Things you'll only learn the hard way

Duplex slows it down on heavy paper. The 33 ppm spec is one-sided plain. On cardstock with duplex enabled, you'll see closer to 15 ppm.

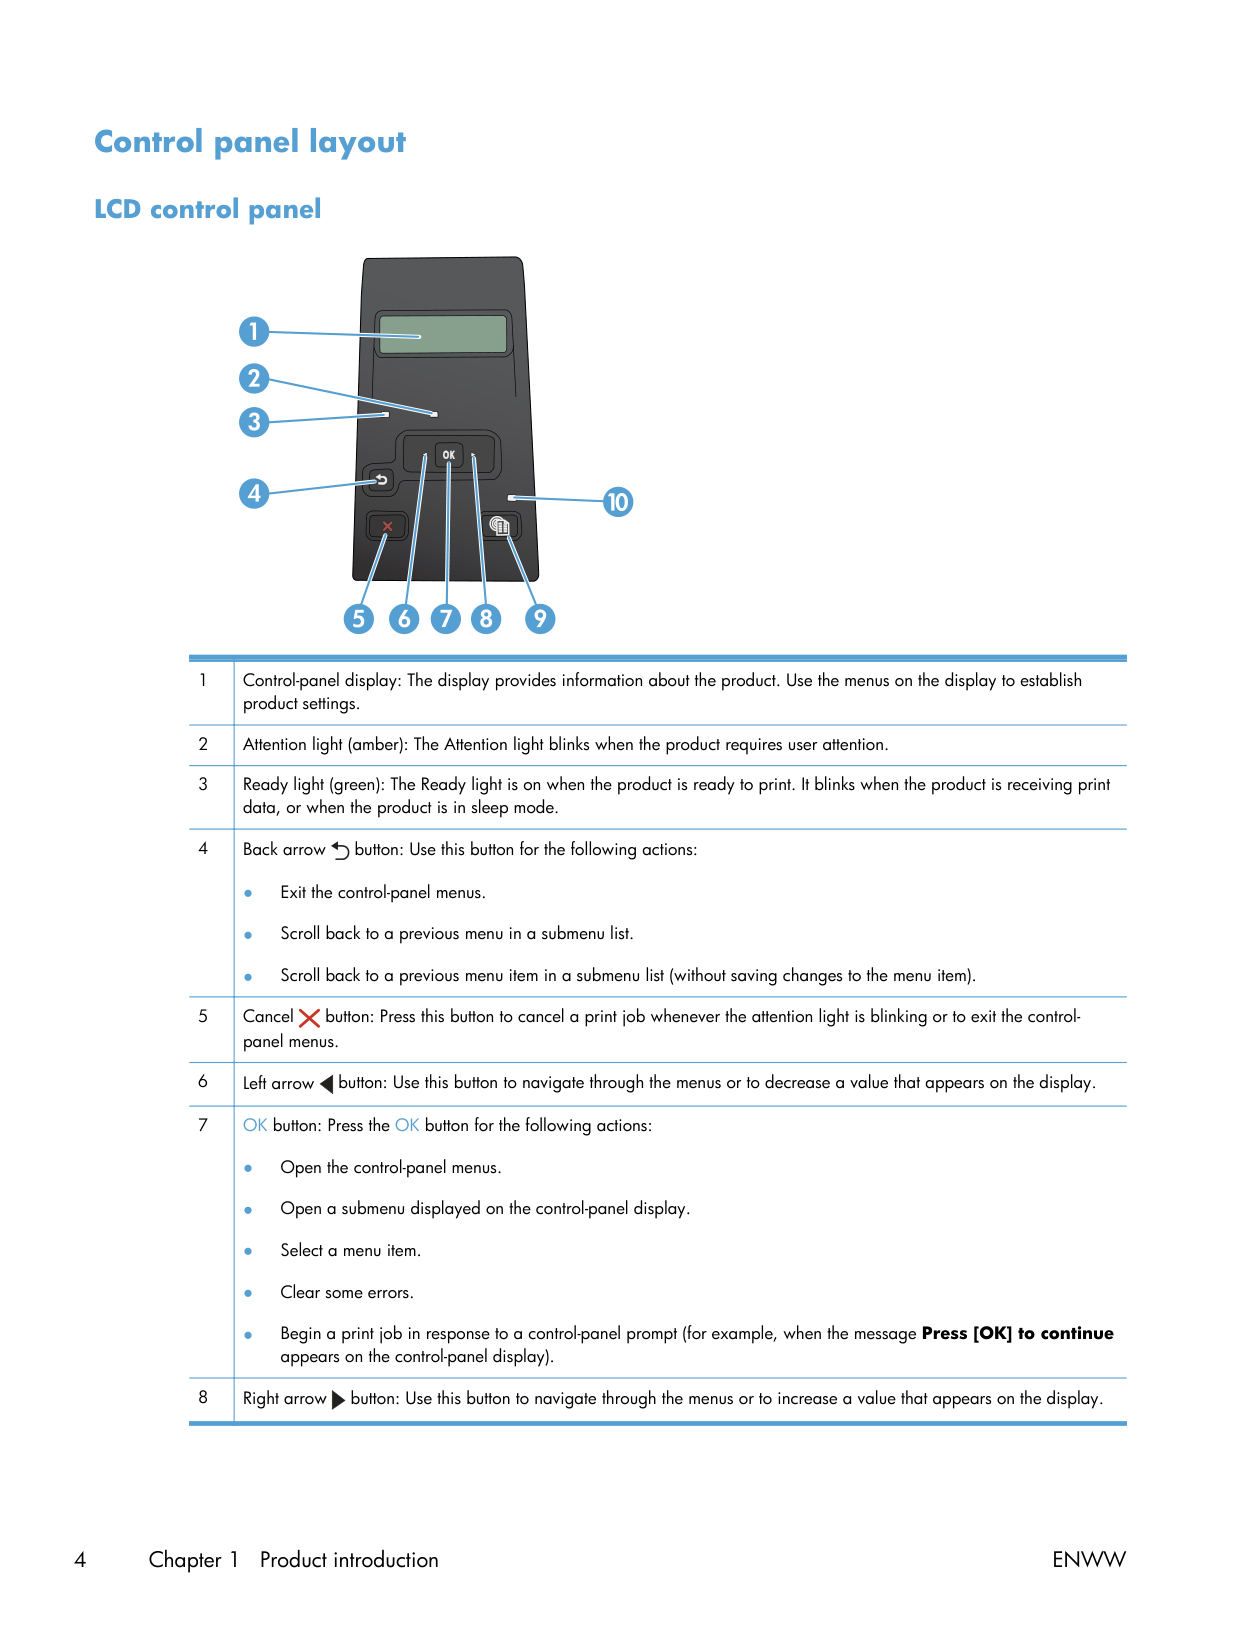
Factory reset clears your Wi-Fi credentials. Press and hold the Cancel (X) button until the LCD shows Restore Defaults, select Yes, OK. Save your network password somewhere before you do this.

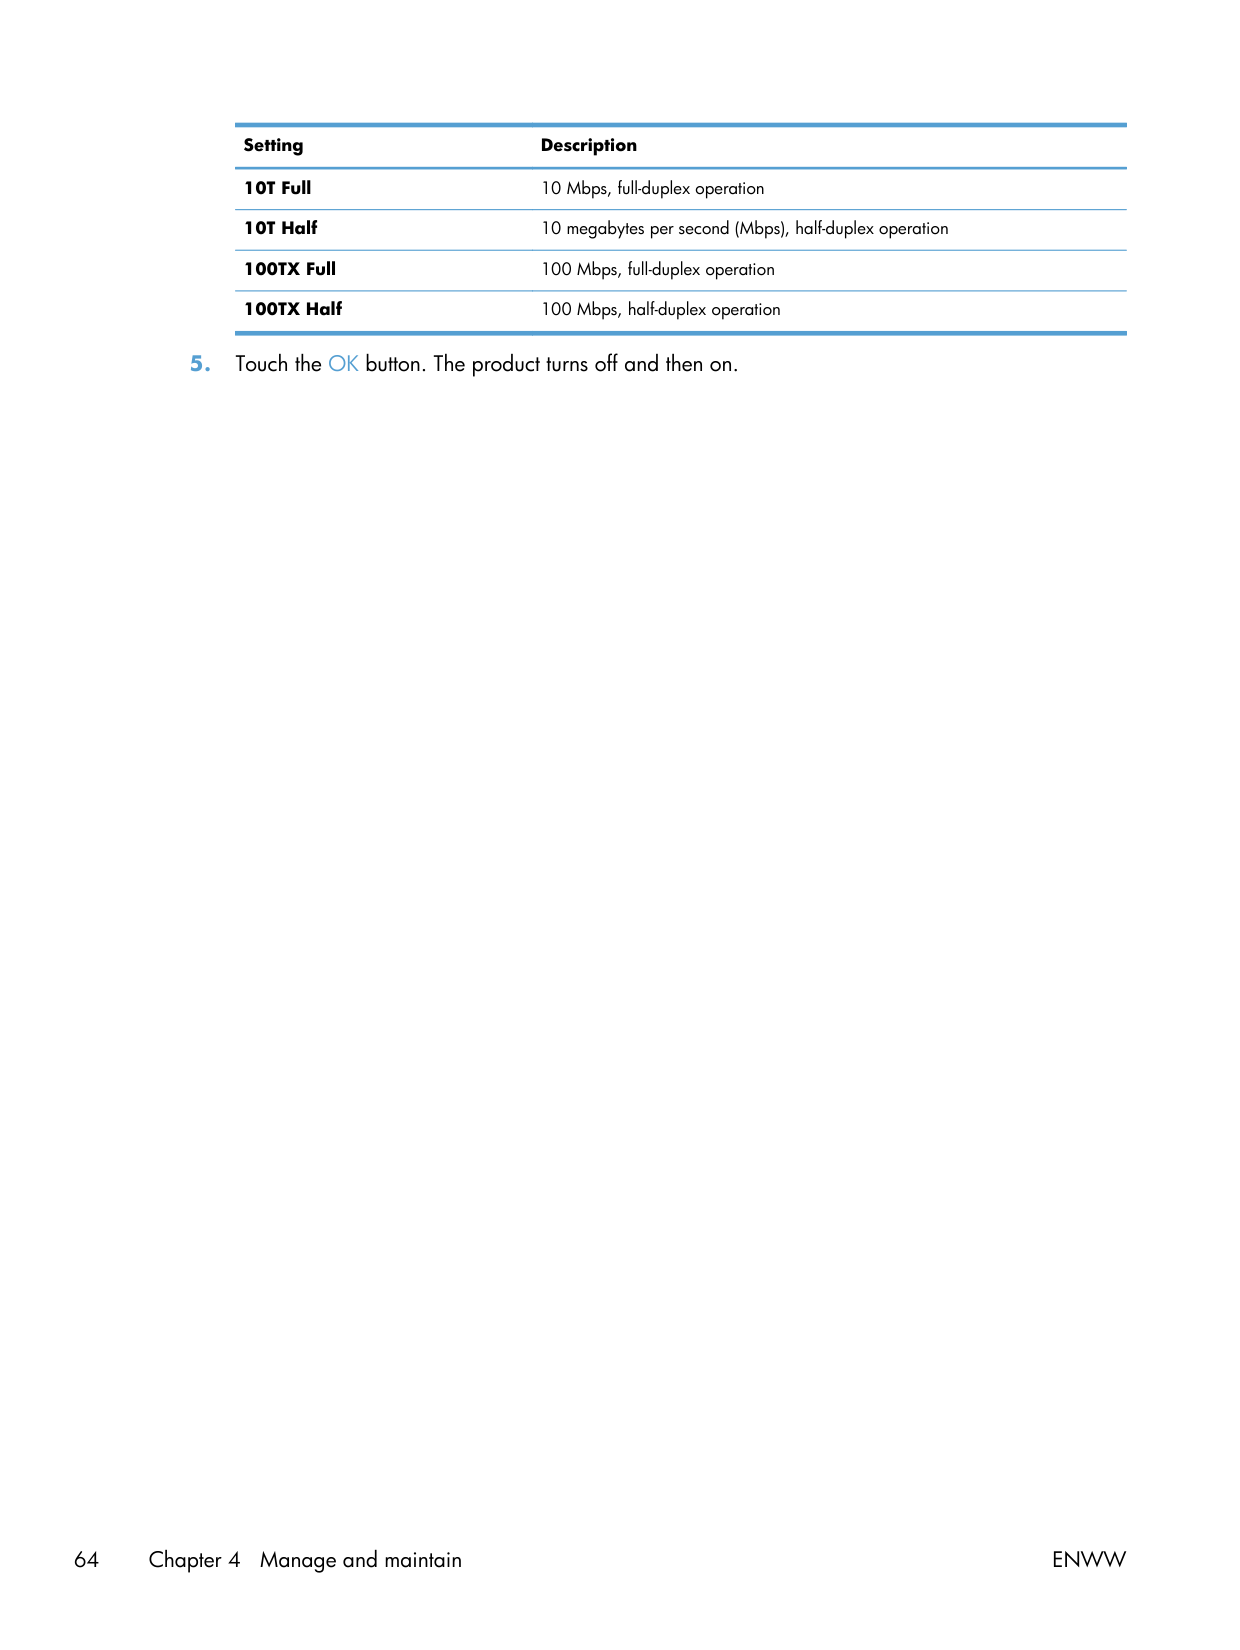
HP Device Toolbox is a separate utility. If your driver is just the auto-detected Microsoft one, you're missing cleaning-page, calibration, and toner-level reporting. The full driver package from HP Support includes Device Toolbox; the in-box Windows driver doesn't.

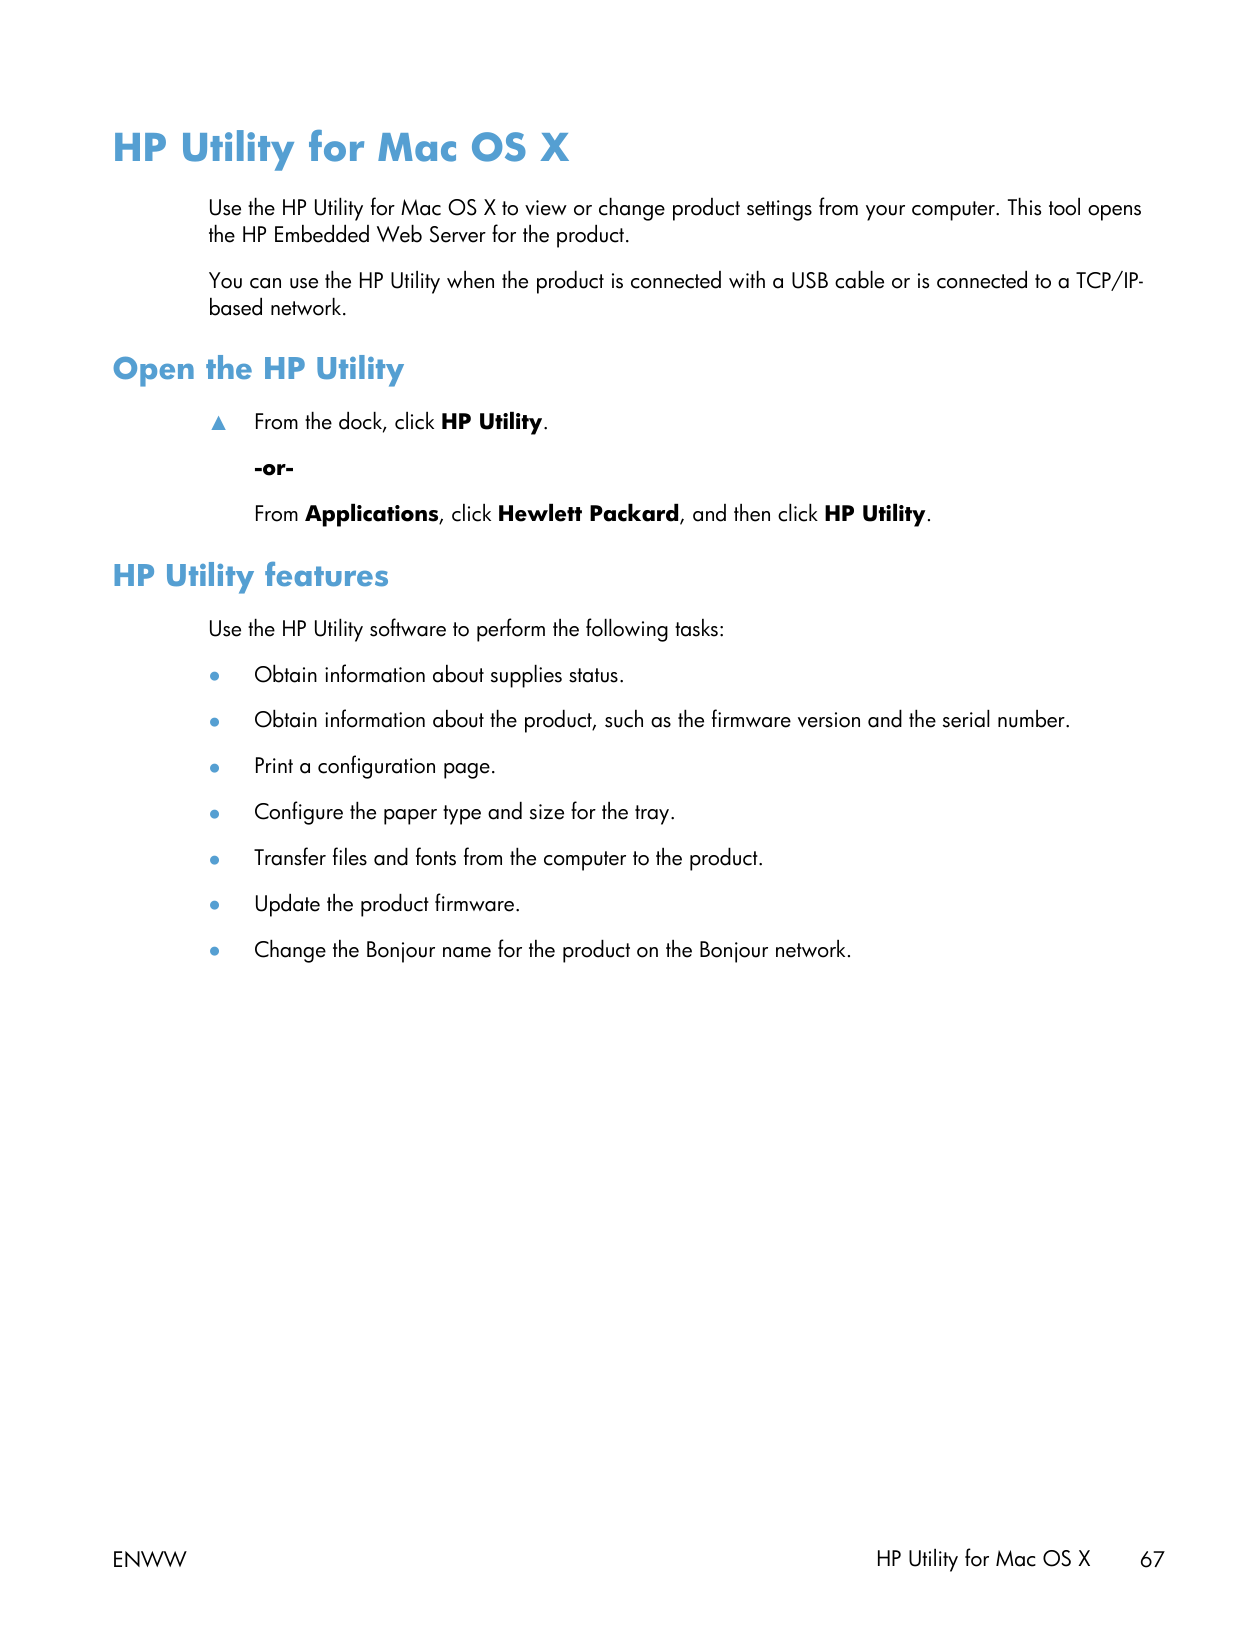
Mac printing presets save where you'd expect them to. Configure your settings in the Print dialog, Presets dropdown → Save Current Settings as Preset. Pick whether it applies to this printer only or all printers.

Codes to know

  • 10.x — supplies. Cartridge, drum, or chip issue. Re-seat first. If it persists with HP-branded toner, the drum is at end-of-life.
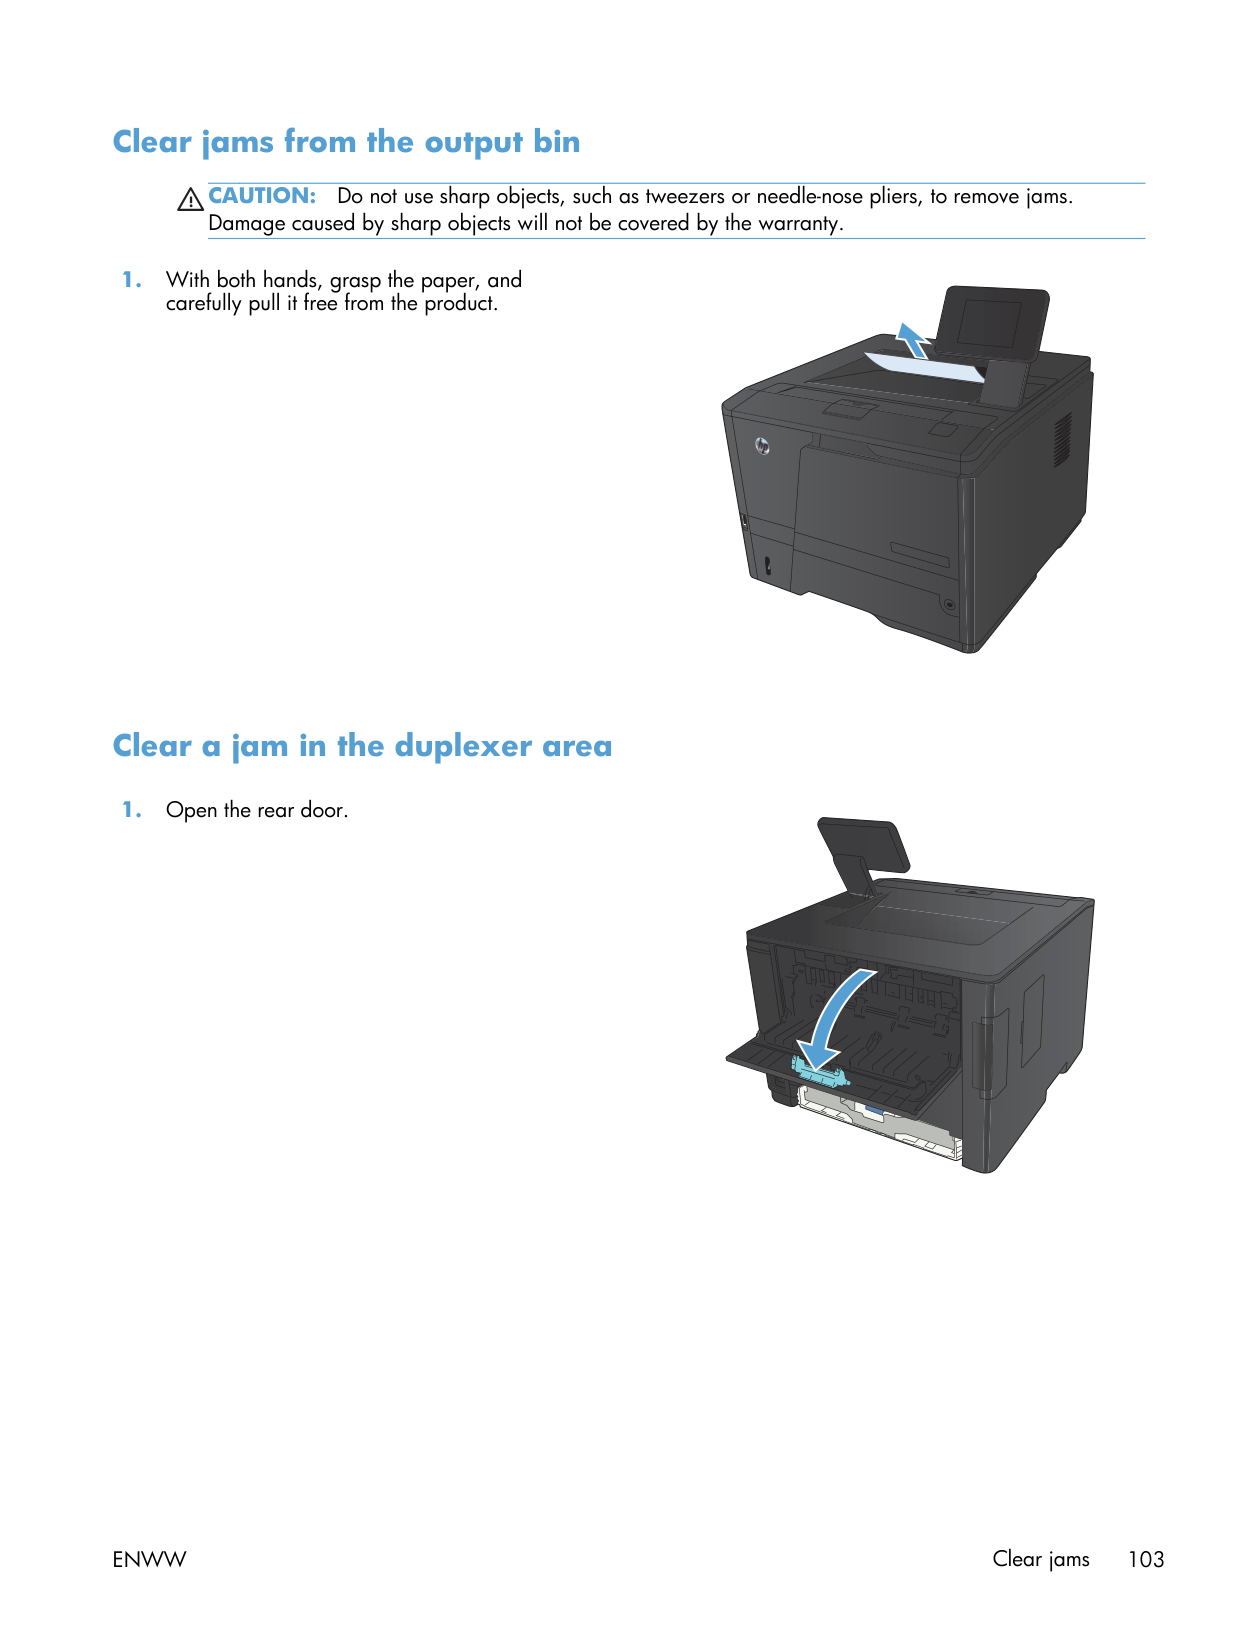
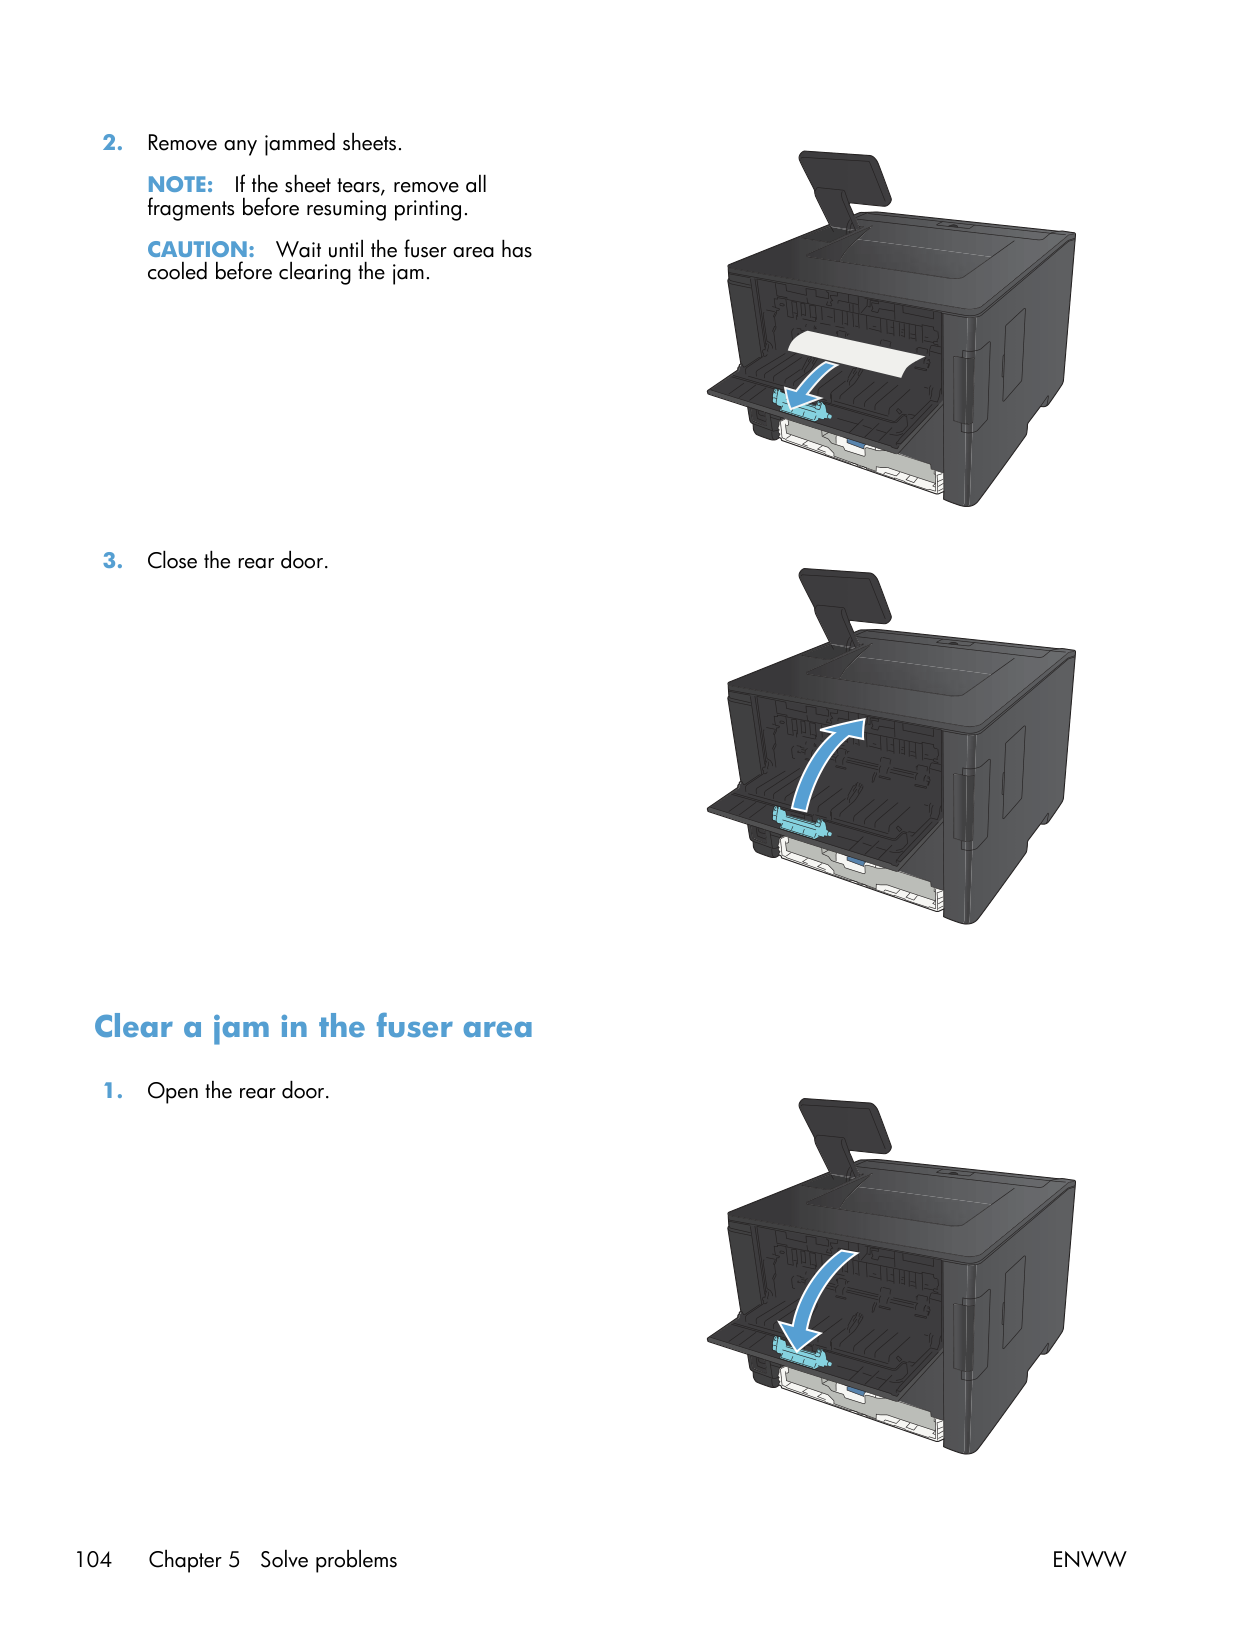
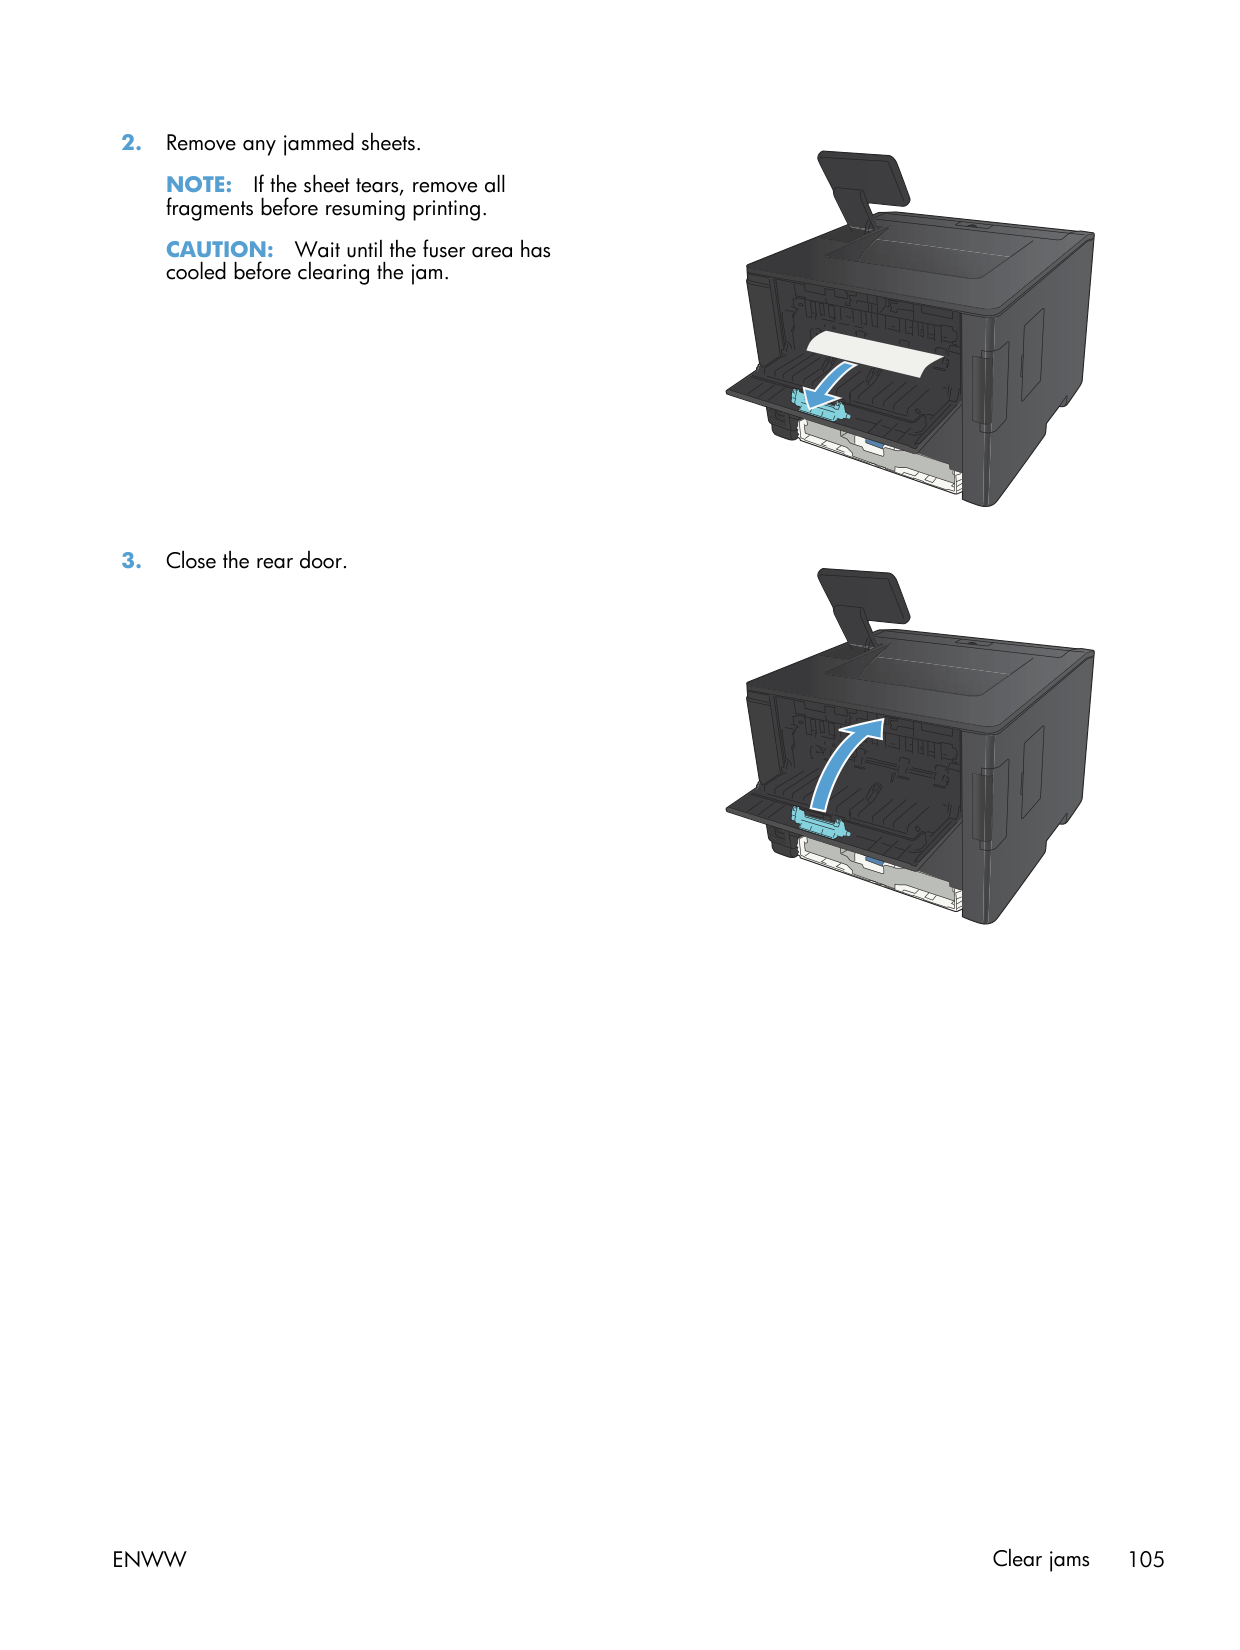
  • 13.x — paper jam. Open the rear door, pull in the direction of travel.
  • 50.x — fuser. Power-cycle, two-minute wait, back on. If it returns, you're parts-shopping.

For 10.x with HP-branded toner re-seated, or 13.x recurring at the same point, HP Support's part lookup for your serial is the right next call. https://support.hp.com/us-en/product/details/hp-laserjet-pro-400-printer-m401-series

Newer alternatives

Full Manual

148 pages
Page 1

![image 1](c02871908_images/imageFile1.png)

LASERJET PRO 400

User Guide

![image 2](c02871908_images/imageFile2.png)

![image 3](c02871908_images/imageFile3.png)

![image 4](c02871908_images/imageFile4.png)

![image 5](c02871908_images/imageFile5.png)

#### M401

HP LaserJet Pro 400 M401 Printer Series

User Guide

############ Copyright and License

© 2014 Copyright Hewlett-Packard Development Company, L.P.

Reproduction, adaptation, or translation without prior written permission is prohibited, except as allowed under the copyright laws.

The information contained herein is subject to change without notice.

The only warranties for HP products and services are set forth in the express warranty statements accompanying such products and services. Nothing herein should be construed as constituting an additional warranty. HP shall not be liable for technical or editorial errors or omissions contained herein.

Page 2

Edition 1, 9/2014 Part number: CF270-91009

############ Trademark Credits

Adobe®, Acrobat®, and PostScript® are trademarks of Adobe Systems Incorporated.

Apple and the Apple logo are trademarks of Apple Computer, Inc., registered in the U.S. and other countries. iPod is a trademark of Apple Computer, Inc. iPod is for legal or rightholder-authorized copying only. Don't steal music.

Bluetooth is a trademark owned by its proprietor and used by Hewlett-Packard Company under license.

Java™ is a US trademark of Sun Microsystems, Inc.

Microsoft®, Windows®, Windows® XP, and Windows Vista® are U.S. registered trademarks of Microsoft Corporation.

UNIX® is a registered trademark of The Open Group.

Table of contents

######### 1 Product introduction ......................................................................................................... 1Product views .......................................................................................................................... 2

Product front view ..................................................................................................... 2 Product back view ..................................................................................................... 3 Serial number and model number location ................................................................... 3 Control panel layout .................................................................................................. 4

LCD control panel ...................................................................................... 4 Touchscreen control panel ........................................................................... 5

Touchscreen Home screen .......................................................................................... 7

Print product reports ................................................................................................................. 8 Print product reports from an LCD control panel ............................................................ 8 Print product reports from a touchscreen control panel ................................................... 9

Page 3

Printer sharing disclaimer .......................................................................................................... 9

########## 2 Paper tray ...................................................................................................................... 11Supported paper sizes ............................................................................................................ 12Supported paper types ........................................................................................................... 14Load the input trays ................................................................................................................ 15

  • Load Tray 1 ............................................................................................................ 15
  • Load Tray 2 ............................................................................................................ 16 Load optional Tray 3 ............................................................................................... 18
  • ########## 3 Print ............................................................................................................................... 21Supported printer drivers (Windows) ........................................................................................ 22Change print-job settings (Windows) ........................................................................................ 24

    Priority for changing print-job settings ........................................................................ 24 Change the settings for all print jobs until the software program is closed ....................... 24 Change the default settings for all print jobs ............................................................... 24 Change the product configuration settings .................................................................. 25

    Change print-job settings (Mac OS X) ....................................................................................... 26 Priority for changing print-job settings ........................................................................ 26

    ENWW iii

    Change the settings for all print jobs until the software program is closed ....................... 26 Change the default settings for all print jobs ............................................................... 26 Change the product configuration settings .................................................................. 26

    Print tasks for Windows .......................................................................................................... 28 Use a printing shortcut (Windows) ............................................................................. 28 Create a printing shortcut (Windows) ........................................................................ 29 Automatically print on both sides with Windows ......................................................... 31 Manually print on both sides with Windows ............................................................... 32 Print multiple pages per sheet with Windows .............................................................. 34 Select the page orientation (Windows) ...................................................................... 36 Select the paper type (Windows) .............................................................................. 37 Print the first or last page on different paper (Windows) ............................................... 38 Scale a document to fit page size (Windows) ............................................................. 40 Create a booklet (Windows) ..................................................................................... 41

    Print tasks for Mac OS X ......................................................................................................... 43 Use a printing preset (Mac OS X) .............................................................................. 43 Create a printing preset (Mac OS X) ......................................................................... 43 Automatically print on both sides (Mac OS X) ............................................................. 43 Manually print on both sides (Mac OS X) ................................................................... 44 Print multiple pages on one sheet of paper (Mac OS X) ............................................... 45 Select the page orientation (Mac OS X) ..................................................................... 45 Select the paper type (Mac OS X) ............................................................................. 45 Print a cover page (Mac OS X) ................................................................................. 46 Scale a document to fit page size (Mac OS X) ............................................................ 46 Create a booklet (Mac OS X) ................................................................................... 46

    Additional print tasks (Windows) ............................................................................................. 47 Cancel a print job (Windows) ................................................................................... 47 Select the paper size (Windows) ............................................................................... 47 Select a custom paper size (Windows) ...................................................................... 47 Print watermarks (Windows) ..................................................................................... 48

    Additional print tasks (Mac OS X) ............................................................................................ 49 Cancel a print job (Mac OS X) ................................................................................. 49 Select the paper size (Mac OS X) .............................................................................. 49 Select a custom paper size (Mac OS X) ..................................................................... 49 Print watermarks (Mac OS X) .................................................................................... 49

    Create archival-quality prints ................................................................................................... 51 Create archival-quality prints (LCD control panel) ........................................................ 51 Create archival-quality prints (touchscreen control panel) ............................................. 51

    Use HP ePrint ......................................................................................................................... 52 Set up HP ePrint (LCD control panel) .......................................................................... 52 Set up HP ePrint (touchscreen control panel) ............................................................... 53

    Page 4

    Use AirPrint ........................................................................................................................... 54 Walk-up USB printing ............................................................................................................. 55

  • 4 Manage and maintain .................................................................................................... 57 Use the HP Reconfiguration Utility to change the product connection ............................................ 58 Set up HP Wireless Direct Printing ............................................................................................ 59 Use HP Web Services applications ........................................................................................... 60
  • Use HP Web Services applications (LCD control panel) ................................................ 60 Use HP Web Services applications (touchscreen control panel) ..................................... 60

    Configure IP network settings ................................................................................................... 61 View or change network settings ............................................................................... 61 Manually configure IPv4 TCP/IP parameters from the control panel ............................... 61

    Manually configure IPv4 TCP/IP parameters (LCD control panel) .................... 61 Manually configure IPv4 TCP/IP parameters (touchscreen control panel) ......... 61

    Rename the product on a network ............................................................................. 62 Link speed and duplex settings .................................................................................. 63

    Link speed and duplex settings (LCD control panel) ....................................... 63 Link speed and duplex settings (touchscreen control panel) ............................ 63

    HP Device Toolbox (Windows) ................................................................................................ 65 HP Utility for Mac OS X .......................................................................................................... 67

    Open the HP Utility ................................................................................................. 67 HP Utility features .................................................................................................... 67

    HP Web Jetadmin .................................................................................................................. 68 Product security features .......................................................................................................... 69

    Lock the product ...................................................................................................... 69 Set or change the product password .......................................................................... 69

    Economy settings ................................................................................................................... 71 Print with EconoMode .............................................................................................. 71 Set the sleep delay .................................................................................................. 71

    Set the sleep delay (LCD control panel) ....................................................... 71 Set the sleep delay (touchscreen control panel) ............................................ 72

    Set the Auto Power Down delay ................................................................................ 72 Set the Auto Power Down delay (LCD control panel) ..................................... 72 Set the Auto Power Down delay (touchscreen control panel) .......................... 73

    Page 5

    Print when a toner cartridge is at estimated end of life ................................................................ 74 Enable or disable the At Very Low settings (LCD control panel) ..................................... 74 Enable or disable the At Very Low settings (touchscreen control panel) ........................... 75

    Store and recycle supplies ....................................................................................................... 76 Recycle supplies ...................................................................................................... 76 Toner cartridge storage ............................................................................................ 76

    Replacement instructions ......................................................................................................... 77

    ENWW v

    Change the toner cartridge ...................................................................................... 77 Memory ................................................................................................................................ 79 Update the firmware ............................................................................................................... 80

    Manually update the firmware (LCD control panel) ...................................................... 80 Manually update the firmware (touchscreen control panel) ........................................... 80 Set the product to automatically update the firmware (LCD control panel) ....................... 80 Set the product to automatically update the firmware (touchscreen control panel) ............ 81

    ######### 5 Solve problems ............................................................................................................... 83Solve problems checklist ......................................................................................................... 84

  • Step 1: Make sure that the product is set up correctly .................................................. 84
  • Step 2: Check the cabling or wireless connection ........................................................ 84
  • Step 3: Check the control panel for error messages ..................................................... 85
  • Step 4: Check the paper .......................................................................................... 85
  • Step 5: Check the software ....................................................................................... 85
  • Step 6: Test print functionality ................................................................................... 85
  • Step 7: Check the toner cartridge .............................................................................. 85
  • Step 8: Try sending a print job from a computer ......................................................... 85
  • Restore the factory-set defaults ................................................................................................. 86 Restore the factory-set defaults (LCD control panel) ...................................................... 86 Restore the factory-set defaults (touchscreen control panel) ............................................ 86

    Control panel help system ....................................................................................................... 87 Interpret control panel messages .............................................................................................. 88

    Page 6

    Control panel message types .................................................................................... 88 Control panel messages ........................................................................................... 88

    10.x000 Supply Error ............................................................................... 88 49 Error Turn off then on ........................................................................... 88

  • 50.x Fuser Error Turn off then on ................................................................ 89
  • 51.XX Error Turn off then on ...................................................................... 89
  • 54.XX Error Turn off then on ...................................................................... 89
  • 55.X Error Turn off then on ........................................................................ 89 57 Fan error Turn off then on ..................................................................... 90 59.X Error Turn off then on ........................................................................ 90 79 Error Turn off then on ........................................................................... 90 79 Service error Turn off then on ................................................................ 91 Black cartridge low .................................................................................. 91 Black cartridge very low ........................................................................... 91 Cleaning ................................................................................................. 91 Device error Press [OK] ............................................................................. 92 Door open ............................................................................................... 92 Genuine HP supply installed ...................................................................... 92
  • Install black cartridge ............................................................................... 92 Invalid driver Press [OK] ........................................................................... 92 Jam in ..................................................................................... 93 Jam in Tray Clear jam and then Press [OK] ........................................... 93 Load tray 1 , ..................................................................... 93 Load tray 1 PLAIN Cleaning Mode .................................................. 93 Load tray Press [OK] for available media ............................................. 93 Load tray ................................................................... 94 Manual duplex Load tray Press [OK] .................................................... 94 Manual feed , Press [OK] for available media ....................... 94 Memory is low Press [OK] ......................................................................... 94 Misprint Press [OK] .................................................................................. 94 Print failure, press OK. If error repeats, turn off then on. ................................ 95 Rear door open ....................................................................................... 95 Remove shipping material from toner cartridge ............................................ 95 Replace black cartridge ............................................................................ 95 Supplies low ............................................................................................ 96 Unexpected size in tray Load Press [OK] .................................... 96 Unsupported black cartridge Press [OK] to continue ..................................... 96 Used black cartridge is installed Press [OK] to continue ................................ 96

    Paper feeds incorrectly or becomes jammed .............................................................................. 97 The product does not pick up paper .......................................................................... 97 The product picks up multiple sheets of paper ............................................................. 97 Prevent paper jams .................................................................................................. 97

    Clear jams ............................................................................................................................ 98 Jam locations .......................................................................................................... 98 Clear a jam in Tray 1 .............................................................................................. 98 Clear a jam in Tray 2 ............................................................................................ 100 Clear a jam in optional Tray 3 ................................................................................ 102 Clear jams from the output bin ................................................................................ 103 Clear a jam in the duplexer area ............................................................................ 103 Clear a jam in the fuser area .................................................................................. 104

    Improve print quality ............................................................................................................. 106 Check the paper type setting (Windows) .................................................................. 106 Check the paper type setting (Mac OS X) ................................................................. 106 Check toner cartridge status ................................................................................... 107

    Print the supplies status page (LCD control panel) ....................................... 107 Print the supplies status page (touchscreen control panel) ............................ 107 Check the supplies status ......................................................................... 107

    Print a cleaning page ............................................................................................ 108 Print a cleaning page (LCD control panel) ................................................. 108

    ENWW vii

    Print a cleaning page (touchscreen control panel) ....................................... 108 Inspect the toner cartridge for damage .................................................................... 108 Check the paper and printing environment ............................................................... 109

    Use paper that meets HP specifications ..................................................... 109 Check the product environment ................................................................ 110

    Page 7

    Check print job settings .......................................................................................... 110

    Check the EconoMode setting .................................................................. 110 Use the print driver that best meets your printing needs .............................................. 110

    The product does not print or it prints slowly ............................................................................ 112 The product does not print ...................................................................................... 112 The product prints slowly ........................................................................................ 113

    Solve walk-up USB printing problems ...................................................................................... 114 The USB Flash Drive menu does not open when you insert the USB accessory ............... 114 The file does not print from the USB storage accessory ............................................... 114 The file that you want to print is not listed in the USB Flash Drive menu ........................ 115

    Solve direct connection problems ........................................................................................... 116 Solve wired network problems ............................................................................................... 117

    Poor physical connection ....................................................................................... 117 The computer is using the incorrect IP address for the product ..................................... 117 The computer is unable to communicate with the product ........................................... 118 The product is using incorrect link and duplex settings for the network ......................... 118 New software programs might be causing compatibility problems .............................. 118 The computer or workstation might be set up incorrectly ............................................. 118 The product is disabled, or other network settings are incorrect ................................... 118

    Solve wireless network problems ............................................................................................ 119 Wireless connectivity checklist ................................................................................ 119 The product does not print after the wireless configuration completes ........................... 119 The product does not print, and the computer has a third-party firewall installed ........... 120 The wireless connection does not work after moving the wireless router or product ........ 120 Cannot connect more computers to the wireless product ............................................. 120 The wireless product loses communication when connected to a VPN .......................... 120 The network does not appear in the wireless networks list .......................................... 120 The wireless network is not functioning ..................................................................... 121 Perform a wireless network diagnostic test ................................................................ 121 Reduce interference on a wireless network ............................................................... 122

    Solve product software problems with Windows ...................................................................... 123 A print driver for the product is not visible in the Printer folder .................................... 123 An error message was displayed during the software installation ................................ 123 The product is in Ready mode, but nothing prints ...................................................... 123

    Solve product software problems with Mac OS X ..................................................................... 125 The print driver is not listed in the Print & Fax or Print & Scan list ................................. 125

    The product name does not appear in the product list in the Print & Fax or Print & Scan list ....................................................................................................................... 125 The print driver does not automatically set up the selected product in the Print & Fax or Print & Scan list ..................................................................................................... 125 A print job was not sent to the product that you wanted ............................................. 126 When connected with a USB cable, the product does not appear in the Print & Fax or Print & Scan list after the driver is selected. ............................................................... 126 You are using a generic print driver when using a USB connection ............................. 126

    Remove software (Windows) ................................................................................................. 127 Remove software (Mac OS X) ................................................................................................ 128

  • 6 Supplies and accessories .............................................................................................. 129 Order parts, accessories, and supplies ................................................................................... 130 HP policy on non-HP supplies ................................................................................................ 130 HP anticounterfeit Web site ................................................................................................... 130
  • ######### Index ............................................................................................................................... 131

    ENWW ix

    Page 8

    1 Product introduction

  • ● Product views
  • ● Print product reports
  • ● Printer sharing disclaimer
  • ENWW 1

    ##### Product views

    Product front view

    ![image 6](c02871908_images/imageFile6.png)

    ![image 7](c02871908_images/imageFile7.png)

    ![image 8](c02871908_images/imageFile8.png)

    ![image 9](c02871908_images/imageFile9.png)

    |1|Output bin| |---|---| |2|Tray 1| |3|Power button| |4|Tray 2|

    Page 9

    |5|Walk-up USB port (HP LaserJet Pro 400 M401dn Printer and HP LaserJet Pro 400 M401dw Printer only)| |6|Toner cartridge door latch| |7|LCD control panel or color touchscreen control panel (HP LaserJet Pro 400 M401dn Printer and HP LaserJet Pro 400 M401dw Printer only)|

    ####### Product back view

    ![image 10](c02871908_images/imageFile10.png)

    ![image 11](c02871908_images/imageFile11.png)

    ![image 12](c02871908_images/imageFile12.png)

    ![image 13](c02871908_images/imageFile13.png)

    ![image 14](c02871908_images/imageFile14.png)

    ![image 15](c02871908_images/imageFile15.png)

    ![image 16](c02871908_images/imageFile16.png)

    ![image 17](c02871908_images/imageFile17.png)

    ![image 18](c02871908_images/imageFile18.png)

    ![image 19](c02871908_images/imageFile19.png)

    ![image 20](c02871908_images/imageFile20.png)

    Page 10

    ![image 21](c02871908_images/imageFile21.png)

    ![image 22](c02871908_images/imageFile22.png)

    |1|Hi-Speed USB 2.0 port| |---|---| |2|Network port (all models except HP LaserJet Pro 400 M401a Printer and HP LaserJet Pro 400 M401d Printer)| |3|Power connection| |4|Slot for a cable-type security lock| |5|Rear jam-access door latch|

    ####### Serial number and model number location

    The serial number and product model number label is on the back of the product.

    ![image 23](c02871908_images/imageFile23.png)

    ![image 24](c02871908_images/imageFile24.png)

    ![image 25](c02871908_images/imageFile25.png)

    ![image 26](c02871908_images/imageFile26.png)

    ![image 27](c02871908_images/imageFile27.png)

    ![image 28](c02871908_images/imageFile28.png)

    ![image 29](c02871908_images/imageFile29.png)

    Page 11

    ![image 30](c02871908_images/imageFile30.png)

    ![image 31](c02871908_images/imageFile31.png)

    ![image 32](c02871908_images/imageFile32.png)

    ![image 33](c02871908_images/imageFile33.png)

    ![image 34](c02871908_images/imageFile34.png)

    ![image 35](c02871908_images/imageFile35.png)

    ####### Control panel layout

    LCD control panel

    |1|Control-panel display: The display provides information about the product. Use the menus on the display to establish product settings.| |---|---| |2|Attention light (amber): The Attention light blinks when the product requires user attention.| |3|Ready light (green): The Ready light is on when the product is ready to print. It blinks when the product is receiving print data, or when the product is in sleep mode.| |4|Back arrow button: Use this button for the following actions:

    ● Exit the control-panel menus.
    ● Scroll back to a previous menu in a submenu list.
    ● Scroll back to a previous menu item in a submenu list (without saving changes to the menu item).
    | |5|Cancel button: Press this button to cancel a print job whenever the attention light is blinking or to exit the controlpanel menus.

    | |6|Left arrow button: Use this button to navigate through the menus or to decrease a value that appears on the display.

    | |7|OK button: Press the OK button for the following actions:

    ● Open the control-panel menus.
    ● Open a submenu displayed on the control-panel display.
    ● Select a menu item.
    ● Clear some errors.
    ● Begin a print job in response to a control-panel prompt (for example, when the message Press [OK] to continue appears on the control-panel display).
    | |8|Right arrow button: Use this button to navigate through the menus or to increase a value that appears on the display.

    |

    |9|Setup button: This button provides quick access to the Setup menu.

    |

    Page 12

    |---|---| |10|LED light: This light is not functional on this product.|

    ######## Touchscreen control panel

    NOTE: The touchscreen control panel is available on the HP LaserJet Pro 400 M401dn Printer model and the HP LaserJet Pro 400 M401dw Printer model.

    | | |---|

    ![image 36](c02871908_images/imageFile36.png)

    |1|Wireless light: indicates the wireless network is enabled. The light blinks while the product is establishing a connection to the wireless network (available on the HP LaserJet Pro 400 M401dw Printer model only).| |---|---| |2|Touchscreen display| |3|Attention light: indicates a problem with the product| |4|Ready light: indicates the product is ready| |5|Help button and light: provides access to the control panel help system| |6|Right arrow button and light: moves the cursor to the right or moves the display image to the next screen

    NOTE: This button illuminates only when the current screen can use this feature.| |7|Cancel button and light: clears settings, cancels the current job or exits the current screen

    NOTE: This button illuminates only when the current screen can use this feature.| |8|Back button and light: returns to the previous screen

    NOTE: This button illuminates only when the current screen can use this feature.|

    |9|Left arrow button and light: moves the cursor to the left

    NOTE: This button illuminates only when the current screen can use this feature.| |---|---| |10|Home button and light: provides access to the Home screen|

    Page 13

    Touchscreen Home screen NOTE: The touchscreen control panel is available on the HP LaserJet Pro 400 M401dn Printer model and the HP LaserJet Pro 400 M401dw Printer model. The Home screen provides access to the product features, and it indicates the product status. NOTE: Depending on the product configuration, the features on the Home screen can vary. The layout might also be reversed for some languages.

    | | |---|

    | | |---|

    ![image 37](c02871908_images/imageFile37.png)

    |1|Web Services button: provides quick access to HP Web Services features, including HP ePrint

    HP ePrint is a tool that prints documents by using any email enabled device to send them to the product’s email address.| |---|---| |2|Setup button: provides access to the main menus

    | |3|Wireless button: provides access to the Wireless Menu and wireless status information (HP LaserJet Pro 400 M401dw Printer model only)

    NOTE: When you are connected to a wireless network, this icon changes to a set of signal strength bars.| |4|Network button: provides access to network settings and information (HP LaserJet Pro 400 M401n Printer, HP LaserJet Pro 400 M401dn Printer, and HP LaserJet Pro 400 M401dw Printer models only). From the network settings screen, you can print the Network Summary page.

    | |5|Information button: provides product status information. From the status summary screen, you can print the Configuration Report page.

    | |6|Supplies button: provides information about supplies status. From the supplies summary screen, you can print the Supplies Status page.

    | |7|Apps button: provides access to the Apps menu to print directly from Web applications that you have downloaded from the HP ePrintCenter Web site at www.hpeprintcenter.com

    | |8|Product status| |9|USB button: provides access to the USB Flash Drive menu|

    ##### Print product reports

    Product reports reside within the product memory. These pages help diagnose and solve problems with the product.

    Page 14

    NOTE: If the product language was not correctly set during installation, you can set the language manually so the information pages print in one of the supported languages. Change the language by using the System Setup menu on the control panel or the embedded Web server.

    | | |---|

    From the Reports menu, you can print several informative pages about the product.

    Menu item Description Demo Page Prints a page that demonstrates print quality Menu Structure Prints a map of the control panel-menu layout. The active settings for each menu are

    listed.

    Configuration Report Prints a list of all the product settings. Includes network information when the

    product is connected to a network.

    Supplies Status Prints the status for each toner cartridge, including the following information:

  • ● Estimated percentage of cartridge life remaining
  • ● Approximate pages remaining
  • ● Part number for HP toner cartridge
  • ● Number of pages printed
  • ● Information about ordering new HP toner cartridges and recycling used HP toner cartridges
  • Network Summary Prints a list of all product network settings (all models except HP LaserJet Pro 400

    M401a Printer and HP LaserJet Pro 400 M401d Printer)

    Page 15

    Usage Page Prints a page that lists PCL pages, PCL 6 pages, PS pages, pages that were jammed or mispicked in the product, monochrome (black and white) or color pages; and reports the page count

    PCL Font List Prints a list of all the PCL fonts that are installed PS Font List Prints a list of all the PostScript (PS) fonts that are installed PCL6 Font List Prints a list of all the PCL6 fonts that are installed Service Page Prints the service report

    ####### Print product reports from an LCD control panel

  • 1. On the product control panel, press the OK button to open the menus.
  • 2. Open the Reports menu.
  • 3. Select the report you want to print, and then press the OK button to print the report.
  • ####### Print product reports from a touchscreen control panel

  • 1. From the Home screen on the product control panel, touch the Setup button.
  • 2. Touch the Reports button.
  • 3. Touch the name of the report that you want to print.
  • ##### Printer sharing disclaimer

    HP does not support peer-to-peer networking, as the feature is a function of Microsoft operating systems and not of the HP printer drivers. Go to Microsoft at www.microsoft.com.

    ENWW Printer sharing disclaimer 9

    2 Paper tray

    ● Supported paper sizes ● Supported paper types ● Load the input trays

    Page 16

    ENWW 11

    Supported paper sizes This product supports a number of paper sizes, and it adapts to various media. NOTE: To obtain best results, select the correct paper size and type in the print driver before printing.

    | | |---|

    Table 2-1 Supported paper and print media sizes

    Size and dimensions Tray 1 Tray 2 Optional 500sheet Tray 3

    Duplexer (duplex models only)

    Letter 216 x 279 mm (8.5 x 11 in) Legal 216 x 356 mm (8.5 x 14 in)

  • A4 210 x 297 mm (8.27 x 11.69 in)
  • A5
  • 148 x 210 mm (5.83 x 8.27 in)

  • A6
  • 105 x 148 mm (4.1 x 5.8 in) B5 (JIS) 182 x 257 mm (7.17 x 10.12 in) Executive 184 x 267 mm (7.24 x 10.51 in) Postcard (JIS) 100 x 148 mm (3.9 x 5.8 in) Double Postcard (JIS) 148 x 200 mm (5.8 x 7.9 in) 16K 184 x 260 mm (7.2 x 10.2 in) 16K 195 x 270 mm (7.7 x 10.6 in) 16K 197 x 273 mm (7.8 x 10.8 in) 8.5 x 13 216 x 330 mm (8.5 x 13 in)

    ########### Table 2-1 Supported paper and print media sizes (continued)

    Page 17

    Size and dimensions Tray 1 Tray 2 Optional 500sheet Tray 3

    Envelope Commercial #10

    105 x 241 mm (4.13 x 9.49 in)

  • Envelope B5 ISO
  • 176 x 250 mm (6.7 x 9.8 in)

  • Envelope C5 ISO
  • 162 x 229 mm (6.93 x 9.84 in) Envelope DL ISO 110 x 220 mm (4.33 x 8.66 in) Envelope Monarch 98 x 191 mm (3.9 x 7.5 in) Custom 76 x 127 mm to 216 x 356 mm (3.0 x 5.0 in to 8.5 x 14 in)

    Duplexer (duplex models only)

    ENWW Supported paper sizes 13

    ##### Supported paper types

    For a complete list of specific HP-brand paper that this product supports, go to www.hp.com/support/ ljm401series.

    Paper type (control panel) Paper type (print driver) Tray 1 Tray 2 Optional 500-sheet Tray 3

    PLAIN 75–95 G Plain

    HP EcoSMART Lite HP EcoSMART Lite

    Page 18

    LIGHT 60-74 G Light 60-74g

    MID-WEIGHT 96-110 Mid-weight

    HEAVY 111–130 G Heavy 111–130g

    EXTRA HEAVY 131–175 G Extra heavy 131–175g

    TRANSPARENCY Monochrome Laser

    Transparency LABELS Labels

    LETTERHEAD Letterhead

    PREPRINTED Preprinted

    PREPUNCHED Prepunched

    COLOR Colored

    ROUGH Rough

    BOND Bond

    RECYCLED Recycled

    ENVELOPE Envelope

    Duplexer (duplex models only)

    Page 19

    ##### Load the input trays

    ####### Load Tray 1

  • 1. Open Tray 1, and pull the tray extension away from the product.
  • ![image 38](c02871908_images/imageFile38.png)

    ![image 39](c02871908_images/imageFile39.png)

    ![image 40](c02871908_images/imageFile40.png)

    ![image 41](c02871908_images/imageFile41.png)

    ![image 42](c02871908_images/imageFile42.png)

    ![image 43](c02871908_images/imageFile43.png)

  • 2. For long paper, flip out the extension to help hold the paper in the tray.
  • ![image 44](c02871908_images/imageFile44.png)

    ![image 45](c02871908_images/imageFile45.png)

    ![image 46](c02871908_images/imageFile46.png)

    ![image 47](c02871908_images/imageFile47.png)

    Page 20

    ![image 48](c02871908_images/imageFile48.png)

    ![image 49](c02871908_images/imageFile49.png)

  • 3. Place the paper stack into Tray 1, and slide the paper guides so that they are against the sheets.
  • ![image 50](c02871908_images/imageFile50.png)

    ![image 51](c02871908_images/imageFile51.png)

    ![image 52](c02871908_images/imageFile52.png)

    ![image 53](c02871908_images/imageFile53.png)

    ![image 54](c02871908_images/imageFile54.png)

    ![image 55](c02871908_images/imageFile55.png)

  • 4. Feed the paper stack into the tray as far as it will go.
  • ####### Load Tray 2

  • Pull the tray out of the product.
  • ![image 56](c02871908_images/imageFile56.png)

    ![image 57](c02871908_images/imageFile57.png)

    Page 21

    ![image 58](c02871908_images/imageFile58.png)

    ![image 59](c02871908_images/imageFile59.png)

    ########## 3. To load Legal-size paper, extend the tray bypressing the release button at the back of thetray inward and pulling the back of the trayout.

    NOTE: When loaded with Legal-size paper, the tray extends from the rear of the product approximately 70 mm (2.75 in).

    ########## 4. Place the paper in the tray and make sure thatit is flat at all four corners. Slide the paperlength and width guides so that they areagainst the stack of paper.

    ![image 60](c02871908_images/imageFile60.png)

    ![image 61](c02871908_images/imageFile61.png)

    ![image 62](c02871908_images/imageFile62.png)

    ![image 63](c02871908_images/imageFile63.png)

    ![image 64](c02871908_images/imageFile64.png)

    ![image 65](c02871908_images/imageFile65.png)

    ![image 66](c02871908_images/imageFile66.png)

    ![image 67](c02871908_images/imageFile67.png)

    paper stack is below the paper limit tabs on the right side and rear of the tray.

    Page 22

  • Slide the tray into the product.
  • ####### Load optional Tray 3

  • Pull the tray out of the product.
  • ![image 68](c02871908_images/imageFile68.png)

    ![image 69](c02871908_images/imageFile69.png)

    ![image 70](c02871908_images/imageFile70.png)

    ![image 71](c02871908_images/imageFile71.png)

    ![image 72](c02871908_images/imageFile72.png)

    ![image 73](c02871908_images/imageFile73.png)

    ![image 74](c02871908_images/imageFile74.png)

    ![image 75](c02871908_images/imageFile75.png)

    ![image 76](c02871908_images/imageFile76.png)

    ![image 77](c02871908_images/imageFile77.png)

    ![image 78](c02871908_images/imageFile78.png)

    ![image 79](c02871908_images/imageFile79.png)

    Page 23

  • To load Legal-size paper, extend the tray by pressing the release button at the back of the tray inward and pulling the back of the tray out.
  • NOTE: When loaded with Legal-size paper, the tray extends from the rear of the product approximately 70 mm (2.75 in).

  • Place the paper in the tray and make sure that it is flat at all four corners. Slide the paper length and width guides so that they are against the stack of paper.
  • ![image 80](c02871908_images/imageFile80.png)

    ![image 81](c02871908_images/imageFile81.png)

    ![image 82](c02871908_images/imageFile82.png)

    ![image 83](c02871908_images/imageFile83.png)

    ![image 84](c02871908_images/imageFile84.png)

    ![image 85](c02871908_images/imageFile85.png)

    ![image 86](c02871908_images/imageFile86.png)

    ![image 87](c02871908_images/imageFile87.png)

    paper stack is below the paper limit tabs at the rear of the tray.

  • Slide the tray into the product.
  • ![image 88](c02871908_images/imageFile88.png)

    Page 24

    ![image 89](c02871908_images/imageFile89.png)

    ![image 90](c02871908_images/imageFile90.png)

    ![image 91](c02871908_images/imageFile91.png)

    ![image 92](c02871908_images/imageFile92.png)

    ![image 93](c02871908_images/imageFile93.png)

    ![image 94](c02871908_images/imageFile94.png)

    ![image 95](c02871908_images/imageFile95.png)

    3Print

  • ● Supported printer drivers (Windows)
  • ● Change print-job settings (Windows)
  • ● Change print-job settings (Mac OS X)
  • ● Print tasks for Windows
  • ● Print tasks for Mac OS X
  • ● Additional print tasks (Windows)
  • ● Additional print tasks (Mac OS X)
  • Page 25

  • ● Create archival-quality prints
  • ● Use HP ePrint
  • ● Use AirPrint
  • ● Walk-up USB printing
  • ENWW 21

    ##### Supported printer drivers (Windows)

    Printer drivers provide access to the product features and allow the computer to communicate with the product (using a printer language). Check the installation notes and readme files on the product CD for additional software and languages.

    ######### HP PCL 6 driver description

  • ● Installs automatically when installing the product software
  • ● Provided as the default driver
  • ● Recommended for printing in all supported Windows environments
  • ● Provides the overall best speed, print quality, and product-feature support for most users
  • ● Developed to align with the Windows Graphic Device Interface (GDI) for the best speed in Windows environments
  • ● Might not be fully compatible with third-party and custom software programs that are based on PCL 5
  • ######### HP UPD PS driver description

  • ● Available for download from the Web at www.hp.com/support/ljm401series
  • Page 26

  • ● Recommended for printing with Adobe® software programs or with other highly graphics-intensive software programs
  • ● Provides support for printing from postscript emulation needs, or for postscript flash font support
  • ######### HP UPD PCL 5 driver description

  • ● Available for download from the Web at www.hp.com/support/ljm401series
  • ● Compatible with previous PCL versions and older HP LaserJet products
  • ● The best choice for printing from third-party or custom software programs
  • ● Designed for use in corporate Windows environments to provide a single driver for use with multiple printer models
  • ● Preferred when printing to multiple printer models from a mobile Windows computer
  • ######### HP UPD PCL 6 driver description

  • ● Available for download from the Web at www.hp.com/support/ljm401series
  • ● Recommended for printing in all supported Windows environments
  • ● Provides the overall best speed, print quality, and product-feature support for most users
  • ● Developed to align with the Windows Graphic Device Interface (GDI) for the best speed in Windows environments
  • ● Might not be fully compatible with third-party and custom software programs that are based on PCL 5
  • ENWW Supported printer drivers (Windows) 23

    Page 27

    ##### Change print-job settings (Windows)

    Priority for changing print-job settings Changes to print settings are prioritized depending on where the changes are made: NOTE: The names of commands and dialog boxes might vary depending on your software program.

    | | |---|

  • ● Page Setup dialog box: Click Page Setup or a similar command on the File menu of the program you are working in to open this dialog box. Settings changed here override settings changed anywhere else.
  • ● Print dialog box: Click Print, Print Setup, or a similar command on the File menu of the program you are working in to open this dialog box. Settings changed in the Print dialog box have a lower priority and usually do not override changes made in the Page Setup dialog box.
  • ● Printer Properties dialog box (printer driver): Click Properties in the Print dialog box to open the printer driver. Settings changed in the Printer Properties dialog box usually do not override settings anywhere else in the printing software. You can change most of the print settings here.
  • ● Default printer driver settings: The default printer driver settings determine the settings used in all print jobs, unlesssettings are changed in the Page Setup, Print, or Printer Properties dialog boxes.
  • ● Printer control panel settings: Settings changed at the printer control panel have a lower priority than changes made anywhere else.
  • ####### Change the settings for all print jobs until the software program is closed

  • 1. From the software program, select the Print option.
  • 2. Select the driver, and then click Properties or Preferences.
  • ####### Change the default settings for all print jobs

  • 1. Windows XP, Windows Server 2003, and Windows Server 2008 (using the default Start menu view): Click Start, and then click Printers and Faxes.
  • Windows XP, Windows Server 2003, and Windows Server 2008 (using the Classic Start menu view): Click Start, click Settings, and then click Printers.

    Windows Vista: Click Start, click Control Panel, and then in the category for Hardware and Sound click Printer.

    Page 28

    Windows 7: Click Start, and then click Devices and Printers.

  • 2. Right-click the driver icon, and then select Printing Preferences.
  • ####### Change the product configuration settings

  • 1. Windows XP, Windows Server 2003, and Windows Server 2008 (using the default Start menu view): Click Start, and then click Printers and Faxes.
  • Windows XP, Windows Server 2003, and Windows Server 2008 (using the Classic Start menu view): Click Start, click Settings, and then click Printers.

    Windows Vista: Click Start, click Control Panel, and then in the category for Hardware and Sound click Printer.

    Windows 7: Click Start, and then click Devices and Printers.

  • 2. Right-click the driver icon, and then select Properties or Printer properties.
  • 3. Click the Device Settings tab.
  • ENWW Change print-job settings (Windows) 25

    ##### Change print-job settings (Mac OS X)

    Priority for changing print-job settings Changes to print settings are prioritized depending on where the changes are made: NOTE: The names of commands and dialog boxes might vary depending on your software program.

    | | |---|

    Page 29

  • ● Page Setup dialog box: Click Page Setup or a similar command on the File menu of the program you are working in to open this dialog box. Settings changed here might override settings changed anywhere else.
  • ● Print dialog box: Click Print, Print Setup, or a similar command on the File menu of the program you are working in to open this dialog box. Settings changed in the Print dialog box have a lower priority and do notoverride changes made in the Page Setup dialog box.
  • ● Default print driver settings: The default print driver settings determine the settings used in all print jobs, unlesssettings are changed in the Page Setup or Print dialog boxes.
  • ● Printer control panel settings: Settings changed at the printer control panel have a lower priority than changes made anywhere else.
  • ####### Change the settings for all print jobs until the software program is closed

  • 1. On the File menu, click the Print item.
  • 2. In the Printer menu, select this product.
  • 3. From the settings drop-down list, change the settings that you want to change.
  • ####### Change the default settings for all print jobs

  • 1. On the File menu, click the Print item.
  • 2. In the Printer menu, select this product.
  • 3. From the settings drop-down list, change the settings that you want to change.
  • 4. On the Presets menu, click the Save As... option and type a name for the preset.
  • These settings are saved in the Presets menu. To use the new settings, you must select the saved preset option every time you open a program and print.

    ####### Change the product configuration settings

  • 1. From the Apple menu , click the System Preferences menu and then click the Print & Fax icon.
  • 2. Select the product in the left side of the window.
  • Page 30

  • 3. Click the Options & Supplies button.
  • 4. Click the Driver tab.
  • 5. Configure the installed options.
  • ENWW Change print-job settings (Mac OS X) 27

    ##### Print tasks for Windows

    ####### Use a printing shortcut (Windows)

  • 1. From the software program, select the Print option.
  • 2. Select the product, and then click the Properties or Preferences button.
  • ![image 96](c02871908_images/imageFile96.png)

    | | |---|

  • 3. Click the Printing Shortcuts tab.
  • ![image 97](c02871908_images/imageFile97.png)

    | | |---|

  • 4. Select one of the shortcuts, and then click the OK button.
  • Page 31

    NOTE: When you select a shortcut, the corresponding settings change on the other tabs in the printer driver.

    ![image 98](c02871908_images/imageFile98.png)

    | | |---|

    ####### Create a printing shortcut (Windows)

  • 1. From the software program, select the Print option.
  • 2. Select the product, and then click the Properties or Preferences button.
  • ![image 99](c02871908_images/imageFile99.png)

    | | |---|

  • 3. Click the Printing Shortcuts tab.
  • ![image 100](c02871908_images/imageFile100.png)

    | | |---|

    Page 32

  • 4. Select an existing shortcut as a base.
  • NOTE: Always select a shortcut before adjusting any of the settings on the right side of the screen. If you adjust the settings and then select a shortcut, or if you select a different shortcut, all your adjustments are lost.

    ![image 101](c02871908_images/imageFile101.png)

    | | |---|

    ########## 5. Select the print options for the new shortcut.

    NOTE: You can select the print options on this tab or on any other tab in the printer driver. After selecting options on other tabs, return to the Printing Shortcuts tab before continuing with the next step.

    ########## 6. Click the Save As button.

    ########## 7. Type a name for the shortcut, and click the OKbutton.

    ![image 102](c02871908_images/imageFile102.png)

    | | |---|

    ![image 103](c02871908_images/imageFile103.png)

    | | |---|

    Page 33

    ![image 104](c02871908_images/imageFile104.png)

    ####### Automatically print on both sides with Windows

    NOTE: This section applies to the HP LaserJet Pro 400 M401d Printer, HP LaserJet Pro 400 M401dn Printer, and HP LaserJet Pro 400 M401dw Printer models only.

    | | |---|

  • 1. On the File menu in the software program, click Print.
  • ![image 105](c02871908_images/imageFile105.png)

    | | |---|

  • 2. Select the product, and then click the Properties or Preferences button.
  • ![image 106](c02871908_images/imageFile106.png)

    | | |---|

    Page 34

  • 3. Click the Finishing tab.
  • ![image 107](c02871908_images/imageFile107.png)

  • 4. Select the Print on both sides check box. Click the OK button to print the job.
  • ![image 108](c02871908_images/imageFile108.png)

    ####### Manually print on both sides with Windows

    NOTE: This section primarily applies to the HP LaserJet Pro 400 M401a Printer and HP LaserJet Pro 400 M401n Printer models. However, the HP LaserJet Pro 400 M401d Printer, HP LaserJet Pro 400 M401dn Printer, and HP LaserJet Pro 400 M401dw Printer models also can print two-sided jobs manually if the paper is not supported by automatic two-sided printing, or if the duplexing unit has been disabled.

    | | |---|

  • 1. On the File menu in the software program, click Print.
  • ![image 109](c02871908_images/imageFile109.png)

    | | |---|

    ########## 2. Select the product, and then click theProperties or Preferences button.

    ######### 3. Click the Finishing tab.

    Page 35

    ########## 4. Select the Print on both sides (manually)check box. Click the OK button to print thefirst side of the job.

    ![image 110](c02871908_images/imageFile110.png)

    | | |---|

    ![image 111](c02871908_images/imageFile111.png)

    | | |---|

    ![image 112](c02871908_images/imageFile112.png)

  • 5. Retrieve the printed stack from the output bin and, maintaining the same orientation, place it in Tray 1 with the printed side down and the top of the pages toward the product.
  • ![image 113](c02871908_images/imageFile113.png)

    ![image 114](c02871908_images/imageFile114.png)

    ![image 115](c02871908_images/imageFile115.png)

    ![image 116](c02871908_images/imageFile116.png)

    ![image 117](c02871908_images/imageFile117.png)

    Page 36

    ![image 118](c02871908_images/imageFile118.png)

  • 6. On the control panel, press the OK button to print the second side of the job.
  • ####### Print multiple pages per sheet with Windows

  • 1. On the File menu in the software program, click Print.
  • ![image 119](c02871908_images/imageFile119.png)

    | | |---|

  • 2. Select the product, and then click the Properties or Preferences button.
  • ![image 120](c02871908_images/imageFile120.png)

    | | |---|

    ######### 3. Click the Finishing tab.

    ########## 4. Select the number of pages per sheet from thePages per sheet drop-down list.

    ######### 5. Select the correct Print page borders,Page order, and Orientation options.

    Page 37

    ![image 121](c02871908_images/imageFile121.png)

    ![image 122](c02871908_images/imageFile122.png)

    | | |---|

    ![image 123](c02871908_images/imageFile123.png)

    | | |---|

    ####### Select the page orientation (Windows)

  • 1. From the software program, select the Print option.
  • 2. Select the product, and then click the Properties or Preferences button.
  • ![image 124](c02871908_images/imageFile124.png)

    | | |---|

  • 3. Click the Finishing tab.
  • ![image 125](c02871908_images/imageFile125.png)

    Page 38

    | | |---|

  • 4. In the Orientation area, select the Portrait or Landscape option.
  • To print the page image upside down, select the Rotate by 180 degrees option.

    ![image 126](c02871908_images/imageFile126.png)

    | | |---|

    ####### Select the paper type (Windows)

  • 1. From the software program, select the Print option.
  • 2. Select the product, and then click the Properties or Preferences button.
  • ![image 127](c02871908_images/imageFile127.png)

    | | |---|

  • 3. Click the Paper/Quality tab.
  • Page 39

    ![image 128](c02871908_images/imageFile128.png)

    | | |---|

  • 4. From the Paper type drop-down list, click the More... option.
  • ![image 129](c02871908_images/imageFile129.png)

    | | |---|

  • 5. Select the category of paper types that best describes your paper.
  • ![image 130](c02871908_images/imageFile130.png)

    | | |---|

  • 6. Select the option for the type of paper you are using, and click the OK button.
  • ![image 131](c02871908_images/imageFile131.png)

    | |

    Page 40

    |---|

    ####### Print the first or last page on different paper (Windows)

  • 1. From the software program, select the Print option.
  • ########## 2. Select the product, and then click theProperties or Preferences button.

    ######### 3. Click the Paper/Quality tab.

    ########## 4. Click the Print pages on different paperitem, and then click the Settings button toselect the necessary settings for the front cover,other pages, and back cover.

    ![image 132](c02871908_images/imageFile132.png)

    | | |---|

    ![image 133](c02871908_images/imageFile133.png)

    | | |---|

    ![image 134](c02871908_images/imageFile134.png)

    ####### Scale a document to fit page size (Windows)

    Page 41

  • From the software program, select the Print
  • option.

  • 2. Select the product, and then click the Properties or Preferences button.
  • ![image 135](c02871908_images/imageFile135.png)

    | | |---|

  • 3. Click the Effects tab.
  • ![image 136](c02871908_images/imageFile136.png)

    | | |---|

  • 4. Select the Print document on option, and
  • then select a size from the drop-down list.

    ![image 137](c02871908_images/imageFile137.png)

    | |

    Page 42

    |---|

    ####### Create a booklet (Windows)

  • 1. From the software program, select the Print option.
  • 2. Select the product, and then click the Properties or Preferences button.
  • ![image 138](c02871908_images/imageFile138.png)

    | | |---|

  • 3. Click the Finishing tab.
  • ![image 139](c02871908_images/imageFile139.png)

    | | |---|

    ######### 4. Click the Print on both sides or Print onboth sides (manually) check box.

    ########## 5. In the Booklet layout drop-down list, selecta binding option. The Pages per sheetoption automatically changes to 2 pages persheet.

    ![image 140](c02871908_images/imageFile140.png)

    Page 43

    ![image 141](c02871908_images/imageFile141.png)

    | | |---|

    ##### Print tasks for Mac OS X

    ####### Use a printing preset (Mac OS X)

  • 1. On the File menu, click the Print option.
  • 2. In the Printer menu, select this product.
  • 3. In the Presets menu, select the printing preset.
  • 4. Click the Print button. NOTE: To use print driver default settings, select the standard option.
  • | | |---|

    ####### Create a printing preset (Mac OS X)

    Use printing presets to save the current printer driver settings for reuse.

  • 1. On the File menu, click the Print option.
  • 2. In the Printer menu, select this product.
  • 3. Select the print settings that you want to save for reuse.
  • 4. In the Presets menu, click the Save As... option, and type a name for the preset.
  • 5. Click the OK button.
  • Page 44

    ####### Automatically print on both sides (Mac OS X)

    NOTE: This section applies to the HP LaserJet Pro 400 M401d Printer, HP LaserJet Pro 400 M401dn Printer, and HP LaserJet Pro 400 M401dw Printer models only.

    | | |---|

  • 1. Insert enough paper into one of the trays to accommodate the print job.
  • 2. On the File menu, click the Print option.
  • 3. In the Printer drop-down list, select this product.
  • 4. Select the Layout drop-down item.
  • 5. From the Two-Sided drop-down list, select a binding option.
  • 6. Click the Print button.
  • ####### Manually print on both sides (Mac OS X)

    NOTE: This section primarily applies to the HP LaserJet Pro 400 M401a Printer and HP LaserJet Pro 400 M401n Printer models. However, the HP LaserJet Pro 400 M401d Printer, HP LaserJet Pro 400 M401dn Printer, and HP LaserJet Pro 400 M401dw Printer models also can print two-sided jobs manually if the paper is not supported by automatic two-sided printing, or if the duplex unit has been disabled.

    | | |---|

  • 1. Insert enough paper into Tray 1 to accommodate the print job.
  • 2. On the File menu, click the Print option.
  • 3. In the Printer drop-down list, select this product.
  • Page 45

  • 4. Select the Manual Duplex drop-down item.
  • 5. Click the Manual Duplex box, and select a binding option.
  • 6. Click the Print button. Follow the instructions in the pop-up window that appears on the computer screen before replacing the output stack in Tray 1 for printing the second half.
  • 7. Go to the product, and remove any blank paper that is in Tray 1.
  • 8. Insert the printed stack in Tray 1 with the printed side down and the top of the pages toward the product.
  • ![image 142](c02871908_images/imageFile142.png)

    ![image 143](c02871908_images/imageFile143.png)

    ![image 144](c02871908_images/imageFile144.png)

    ![image 145](c02871908_images/imageFile145.png)

    ![image 146](c02871908_images/imageFile146.png)

    ![image 147](c02871908_images/imageFile147.png)

  • 9. If prompted, touch the appropriate control panel button to continue.
  • ####### Print multiple pages on one sheet of paper (Mac OS X)

  • 1. On the File menu, click the Print option.
  • 2. In the Printer menu, select this product.
  • 3. Open the Layout menu.
  • 4. From the Pages per Sheet menu, select the number of pages that you want to print on each sheet (1, 2, 4, 6, 9, or 16).
  • 5. In the Layout Direction area, select the order and placement of the pages on the sheet.
  • 6. From the Borders menu, select the type of border to print around each page on the sheet.
  • Page 46

  • 7. Click the Print button.
  • ####### Select the page orientation (Mac OS X)

  • 1. On the File menu, click the Print option.
  • 2. In the Printer menu, select this product.
  • 3. In the Copies & Pages menu, click the Page Setup button.
  • 4. Click the icon that represents the page orientation that you want to use, and then click the OK button.
  • 5. Click the Print button.
  • ####### Select the paper type (Mac OS X)

  • 1. On the File menu, click the Print option.
  • 2. In the Printer menu, select this product.
  • 3. Open the Finishing menu.
  • 4. Select a type from the Media-type drop-down list.
  • 5. Click the Print button.
  • ####### Print a cover page (Mac OS X)

  • 1. On the File menu, click the Print option.
  • 2. In the Printer menu, select this product.
  • 3. Open the Cover Page menu, and then select where to print the cover page. Click either the Before Document button or the After Document button.
  • 4. In the Cover Page Type menu, select the message that you want to print on the cover page.
  • Page 47

    | | |---|

    NOTE: To print a blank cover page, select the standard option from the Cover Page Type menu.

  • 5. Click the Print button.
  • ####### Scale a document to fit page size (Mac OS X)

  • 1. On the File menu, click the Print option.
  • 2. In the Printer menu, select this product.
  • 3. Open the Paper Handling menu.
  • 4. In the Destination Paper Size area, click the Scale to fit paper size box, and then select the size from the drop-down list.
  • 5. Click the Print button.
  • ####### Create a booklet (Mac OS X)

  • 1. On the File menu, click the Print option.
  • 2. In the Printer menu, select this product.
  • 3. Open the Manual Duplex menu.
  • 4. Click the Manual Duplex box.
  • 5. Open the Booklet Printing menu.
  • 6. Click the Format Output as Booklet box, and select a binding option.
  • 7. Select the paper size.
  • 8. Click the Print button.
  • Page 48

    ##### Additional print tasks (Windows)

    ####### Cancel a print job (Windows)

  • 1. If the print job is currently printing, cancel it by pressing the Cancel button on the product control panel. NOTE: Pressing the Cancel button clears the job that the product is currently processing. If more than one process is running, pressing the Cancel button clears the process that currently appears on the product control panel.
  • | | |---|

  • 2. You can also cancel a print job from a software program or a print queue.
  • ● Software program: Typically, a dialog box appears briefly on the computer screen, allowing you to cancel the print job.
  • ● Windows print queue: If a print job is waiting in a print queue (computer memory) or print spooler, delete the job there.
  • ◦ Windows XP, Server 2003, or Server 2008: Click Start, click Settings, and then click Printers and Faxes. Double-click the product icon to open the window, right-click the print job that you want to cancel, and then click Cancel.
  • ◦ Windows Vista: Click Start, click Control Panel, and then, under Hardware and Sound, click Printer. Double-click the product icon to open the window, rightclick the print job that you want to cancel, and then click Cancel.
  • ◦ Windows 7: Click Start, and then click Devices and Printers. Double-click the product icon to open the window, right-click the print job that you want to cancel, and then click Cancel.
  • ####### Select the paper size (Windows)

  • 1. From the software program, select the Print option.
  • 2. Select the product, and then click the Properties or Preferences button.
  • 3. Click the Paper/Quality tab.
  • Page 49

  • 4. Select a size from the Paper size drop-down list.
  • ####### Select a custom paper size (Windows)

  • 1. From the software program, select the Print option.
  • 2. Select the product, and then click the Properties or Preferences button.
  • 3. Click the Paper/Quality tab.
  • 4. Click the Custom button.
  • ENWW Additional print tasks (Windows) 47

  • 5. Type a name for the custom size and specify the dimensions.
  • ● The width is the short edge of the paper.
  • ● The length is the long edge of the paper. NOTE: Always load paper into the trays short edge first.
  • | | |---|

  • 6. Click the Save button, and then click the Close button.
  • ####### Print watermarks (Windows)

  • 1. From the software program, select the Print option.
  • Page 50

  • 2. Select the product, and then click the Properties or Preferences button.
  • 3. Click the Effects tab.
  • 4. Select a watermark from the Watermarks drop-down list.
  • Or, to add a new watermark to the list, click the Edit button. Specify the settings for the watermark, and then click the OK button.

  • 5. To print the watermark on the first page only, select the First page only check box. Otherwise, the watermark is printed on each page.
  • ##### Additional print tasks (Mac OS X)

    ####### Cancel a print job (Mac OS X)

  • 1. If the print job is currently printing, cancel it by pressing the Cancel button on the product control panel. NOTE: Pressing the Cancel button clears the job that the product is currently processing. If more than one print job is waiting, pressing the Cancel button clears the print job that currently appears on the product control panel.
  • | | |---|

  • 2. You can also cancel a print job from a software program or a print queue.
  • ● Software program: Typically, a dialog box appears briefly on the computer screen, allowing you to cancel the print job.
  • ● Mac print queue: Open the print queue by double-clicking the product icon in the dock. Highlight the print job, and then click Delete.
  • ####### Select the paper size (Mac OS X)

  • 1. On the File menu, click the Print option.
  • Page 51

  • 2. In the Printer menu, select this product.
  • 3. In the Copies & Pages menu, click the Page Setup button.
  • 4. Select a size from the Paper Size drop-down list, and then click the OK button.
  • 5. Click the Print button.
  • ####### Select a custom paper size (Mac OS X)

  • 1. On the File menu, click the Print option.
  • 2. In the Printer menu, select this product.
  • 3. In the Copies & Pages menu, click the Page Setup button.
  • 4. From the Paper Size drop-down list, select the Manage Custom Sizes option.
  • 5. Specify the dimensions for the page size, and then click the OK button.
  • 6. Click the Print button.
  • ####### Print watermarks (Mac OS X)

  • 1. On the File menu, click the Print option.
  • 2. In the Printer menu, select this product.
  • 3. Open the Watermarks menu.
  • ENWW Additional print tasks (Mac OS X) 49

  • 4. Click the Watermark check box.
  • 5. Beneath the check box, use the drop-down lists to set the various watermark elements.
  • 6. Click the Print button.
  • Page 52

    ##### Create archival-quality prints

    Archive print produces output that is less susceptible to toner smearing and dusting. Use archive print to create documents that you want to preserve or archive.

    NOTE: Archival-quality printing is accomplished by increasing the temperature of the fuser. Because of the increased temperatures, the product prints at half-speed to avoid damage.

    | | |---|

    ####### Create archival-quality prints (LCD control panel)

  • 1. On the product control panel, press the OK button to open the menus.
  • 2. Open the following menus:
  • ● Service
  • ● Archive Print
  • 3. Select the On option, and then press the OK button.
  • ####### Create archival-quality prints (touchscreen control panel)

  • 1. From the Home screen on the product control panel, touch the Setup button.
  • 2. Touch the Service menu.
  • 3. Touch the Archive Print button, and then touch the On button.
  • Page 53

    ENWW Create archival-quality prints 51

    ##### Use HP ePrint

    Use HP ePrint to print documents by sending them as an email attachment to the product's email address from any email enabled device.

    NOTE: The product must be connected to a wired or wireless network and have Internet access to use HP ePrint. HP ePrint is not available with the HP LaserJet Pro 400 M401d Printer.

    | | |---|

    ####### Set up HP ePrint (LCD control panel)

  • 1. To use HP ePrint, you must first enable HP Web Services.
  • a. On the product control panel, press the OK button to open the menus.
  • b. Select the HP Web Services menu, and then press the OK button.
  • c. Select the Enable Web Services option, and then press the OK button.
  • When the Web Services option is enabled, the product prints an information sheet that includes the product code and instructions to sign up at www.eprintcenter.com.

  • 2. Once you have registered the product, use the HP ePrintCenter Web site to define security settings and to configure default print settings for all HP ePrint jobs sent to this product.
  • a. Go to www.hpeprintcenter.com.
  • Page 54

  • b. Click Sign In, and enter your HP ePrintCenter credentials or sign up for a new account.
  • c. Select your product from the list, or click + Add printer to add it. To add the product, you need the printer code, which is the segment of the product email address that is before the @ symbol. You can get this code by printing the Web Services page from the product control panel.
  • After you have added your product, you will have the option to customize the product email address.

    | | |---|

    NOTE: This code is valid for only 24 hours from the time you enable HP Web Services. If it expires, follow the instructions to enable HP Web Services again, and obtain a new code.

  • d. To prevent your product from printing unexpected documents, click ePrint Settings, and then click the Allowed Senders tab. Click Allowed Senders Only, and add the email addresses from which you want to allow ePrint jobs.
  • e. To set up default settings for all ePrint jobs sent to this product, click ePrint Settings, click Print Options, and select the settings that you want to use.
  • 3. To print a document, attach it to an email message sent to the product's email address. Both the email message and the attachment will print.
  • ####### Set up HP ePrint (touchscreen control panel)

  • 1. To use HP ePrint, you must first enable HP Web Services.
  • a. From the Home screen on the product control panel, touch the Web Services button.
  • b. Touch the Enable Web Services button.
  • 2. From the HP Web Services menu, touch the Display E-Mail Address button to display the product's email address on the control panel.
  • 3. Use the HP ePrintCenter Web site to define security settings and to configure default print settings for all HP ePrint jobs sent to this product.
  • Page 55

  • a. Go to www.hpeprintcenter.com.
  • b. Click Sign In, and enter your HP ePrintCenter credentials or sign up for a new account.
  • c. Select your product from the list, or click + Add printer to add it. To add the product, you need the printer code, which is the segment of the product email address that is before the @ symbol. You can get this code by printing the Web Services page from the product control panel.
  • After you have added your product, you will have the option to customize the product email address.

    | | |---|

    NOTE: This code is valid for only 24 hours from the time you enable HP Web Services. If it expires, follow the instructions to enable HP Web Services again, and obtain a new code.

  • d. To prevent your product from printing unexpected documents, click ePrint Settings, and then click the Allowed Senders tab. Click Allowed Senders Only, and add the email addresses from which you want to allow ePrint jobs.
  • e. To set up default settings for all ePrint jobs sent to this product, click ePrint Settings, click Print Options, and select the settings that you want to use.
  • 4. To print a document, attach it to an email message sent to the product's email address. Both the email message and the attachment will print.
  • ENWW Use HP ePrint 53

    ##### Use AirPrint

    Direct printing using Apple’s AirPrint is supported for iOS 4.2 or later. Use AirPrint to print directly to the product from an iPad (iOS 4.2), iPhone (3GS or later), or iPod touch (third generation or later) in the following applications:

  • ● Mail
  • ● Photos
  • Page 56

  • ● Safari
  • ● Select third-party applications
  • To use AirPrint, the product must be connected to a network, or be connected through a wireless direct connection. For more information about using AirPrint and about which HP products are compatible with AirPrint, go to www.hp.com/go/airprint.

    NOTE: You might need to upgrade the product firmware to use AirPrint. Go to www.hp.com/ support/ljm401series.

    | | |---|

    ##### Walk-up USB printing

    The HP LaserJet Pro 400 M401dn Printer and HP LaserJet Pro 400 M401dw Printer models feature printing from a USB flash drive, so that you can quickly print files without sending them from a computer. These products accept standard USB storage accessories in the USB port on the front of the products. You can print the following types of files:

  • ● .PDF
  • ● .JPEG
  • 1. Insert the USB drive into the USB port on the front of the product.
  • ![image 148](c02871908_images/imageFile148.png)

    ![image 149](c02871908_images/imageFile149.png)

    ![image 150](c02871908_images/imageFile150.png)

    ![image 151](c02871908_images/imageFile151.png)

    Page 57

  • 2. The USB Flash Drive menu opens. Touch the arrow buttons to scroll through the options.
  • ● Print Documents
  • ● View and Print Photos
  • ● Scan to USB Drive
  • 3. To print a document, touch the Print Documents screen, and then touch the name of the folder on the USB drive where the document is stored. When the summary screen opens, you can touch it to adjust the settings. Touch the Print button to print the document.
  • 4. To print photos, touch the View and Print Photos screen, and then touch the preview image for each photo that you want to print. Touch the Done button. When the summary screen opens, you can touch it to adjust the settings. Touch the Print button to print the photos.
  • 5. Retrieve the printed job from the output bin, and remove the USB drive.
  • ENWW Walk-up USB printing 55

    4 Manage and maintain

  • ● Use the HP Reconfiguration Utility to change the product connection
  • ● Set up HP Wireless Direct Printing
  • ● Use HP Web Services applications
  • ● Configure IP network settings
  • ● HP Device Toolbox (Windows)
  • ● HP Utility for Mac OS X
  • Page 58

  • ● HP Web Jetadmin
  • ● Product security features
  • ● Economy settings
  • ● Print when a toner cartridge is at estimated end of life
  • ● Store and recycle supplies
  • ● Replacement instructions
  • ● Memory
  • ● Update the firmware
  • ENWW 57

    ##### Use the HP Reconfiguration Utility to change the product connection

    If you are already using the product and you wish to change the way it is connected, use the HP Reconfiguration Utility to set up the connection. For example, you can reconfigure the product to use a different wireless address, to connect to a wired or wireless network, or change from a network connection to a USB connection. You can change the configuration without inserting the product CD. After you select the type of connection you wish to make, the program goes directly to the portion of the product setup procedure that needs to change.

    The HP Reconfiguration Utility is located in the HP programs group on your computer.

    ##### Set up HP Wireless Direct Printing

    NOTE: This feature is available with wireless models only.

    Page 59

    | | |---|

    The HP Wireless Direct Printing feature lets you print from your wireless mobile device directly to an HP Wireless Direct-enabled product without requiring connection to an established network or the Internet. Use HP Wireless Direct to print wirelessly from the following devices:

  • ● iPhone, iPad, or iTouch using Apple AirPrint
  • ● Mobile devices that run Android, iOS, or Symbian using the HP ePrint Home & Biz application To set up HP Wireless Direct from the control panel, complete the following steps:
  • 1. From the Home screen on the product control panel, touch the Setup button.
  • 2. Open the following menus:
  • ● Network Setup
  • ● Wireless Menu
  • ● Wireless Direct Settings
  • ● Wireless Direct On/Off
  • | | |---|

    NOTE: If the Wireless Direct Settings item does not appear on the control panel, you need to upload the current version of the product firmware. To get the current version, go to www.hp.com, enter the HP product number in the search box, select the specific product model, and then click the Software & Driver Downloads link.

  • 3. Touch the On menu item. The product saves the setting and then returns the control panel to the Wireless Direct Settings menu.
  • Page 60

    ENWW Set up HP Wireless Direct Printing 59

    ##### Use HP Web Services applications

    Several innovative applications are available for this product that you can download directly from the Internet. For more information and to download these applications go to the HP ePrintCenter Web site at www.hpeprintcenter.com.

    To use this feature, the product must be connected to a computer or network that has an Internet connection. HP Web Services must be enabled on the product. Follow this procedure to enable HP Web Services:

    ####### Use HP Web Services applications (LCD control panel)

  • 1. On the control panel, press the OK button.
  • 2. Select the HP Web Services menu, and then press the OK button.
  • After you download an application from the HP ePrintCenter Web site, it is available in the Apps menu on the product control panel.

    ####### Use HP Web Services applications (touchscreen control panel)

  • 1. From the Home screen on the product control panel, touch the Web Services button.
  • 2. Touch the Enable Web Services button.
  • After you download an application from the HP ePrintCenter Web site, it is available in the Apps menu on the product control panel.

    ##### Configure IP network settings

    ####### View or change network settings

    Page 61

    Use the HP Device Toolbox to view or change IP configuration settings.

  • 1. Print a configuration page, and locate the IP address.
  • ● If you are using IPv4, the IP address contains only digits. It has this format: xxx.xxx.xxx.xxx
  • ● If you are using IPv6, the IP address is a hexadecimal combination of characters and digits. It has a format similar to this: xxxx::xxxx:xxxx:xxxx:xxxx
  • 2. Open the HP Device Toolbox by clicking the Start button, clicking the Programs or All Programs group, clicking HP, clicking the product group, and then clicking HP Product Settings.
  • 3. Click the Networking tab to obtain network information. You can change settings as needed.
  • ####### Manually configure IPv4 TCP/IP parameters from the control panel

    ######## Manually configure IPv4 TCP/IP parameters (LCD control panel)

  • 1. On the control panel, press the OK button.
  • 2. Use the arrow buttons to select the Network Setup option, and then press the OK button.
  • 3. Use the arrow buttons to select the TCP/IP configuration option, and then press the OK button.
  • 4. Use the arrow buttons to select the Manual option, and then press the OK button.
  • 5. Use the alphanumeric buttons to type the IP address, and then press the OK button.
  • 6. If the IP address is incorrect, use the arrow buttons to select the No option, and then press the OK button. Repeat step 5 with the correct IP address, and then repeat step 5 for the subnet mask and default gateway settings.
  • ######## Manually configure IPv4 TCP/IP parameters (touchscreen control panel)

    Use the control-panel menus to manually set an IPv4 address, subnet mask, and default gateway.

  • 1. From the Home screen on the product control panel, touch the Setup button.
  • Page 62

  • 2. Scroll to and touch the Network Setup menu.
  • 3. Touch the TCP/IP Config menu, and then touch the Manual button.
  • 4. Use the numeric keypad to enter the IP address, and touch the OK button. Touch the Yes button to confirm.
  • 5. Use the numeric keypad to enter the subnet mask, and touch the OK button. Touch the Yes button to confirm.
  • 6. Use the numeric keypad to enter the default gateway, and touch the OK button. Touch the Yes button to confirm.
  • ####### Rename the product on a network

    If you want to rename the product on a network so that it can be uniquely identified, use the HP Embedded Web Server.

  • 1. To open the HP Embedded Web Server, type the product IP address into the address line of a Web browser.
  • | | |---|

    NOTE: You can also access the HP Embedded Web Server from the HP Device Toolbox for Windows or the HP Utility for Mac OS X.

  • 2. Open the System tab.
  • 3. On the Device Information page, the default product name is in the Device Status field. You can change this name to uniquely identify this product. NOTE: Completing the other fields on this page is optional.
  • | | |---|

    Page 63

  • 4. Click the Apply button to save the changes.
  • ####### Link speed and duplex settings

    NOTE: This information applies only to Ethernet networks. It does not apply to wireless networks.

    | | |---|

    The link speed and communication mode of the print server must match the network hub. For most situations, leave the product in automatic mode. Incorrect changes to the link speed and duplex settings might prevent the product from communicating with other network devices. If you need to make changes, use the product control panel.

    NOTE: The setting must match with the network product to which you are connecting (a network hub, switch, gateway, router, or computer).

    | | |---|

    NOTE: Making changes to these settings causes the product to turn off and then on. Make changes only when the product is idle.

    | | |---|

    ######## Link speed and duplex settings (LCD control panel)

  • 1. On the control panel, press the OK button.
  • 2. Use the arrow buttons to select the Network Setup option, and then press the OK button.
  • Page 64

  • 3. Use the arrow buttons to select the Link Speed option, and then press the OK button.
  • 4. Use the arrow buttons to select one of the following settings.
  • Setting Description

    Automatic The print server automatically configures itself for the highest link speed and

    communication mode allowed on the network. 10T Full 10 Mbps, full-duplex operation 10T Half 10 megabytes per second (Mbps), half-duplex operation 100TX Full 100 Mbps, full-duplex operation 100TX Half 100 Mbps, half-duplex operation

  • 5. Press the OK button. The product turns off and then on.
  • ######## Link speed and duplex settings (touchscreen control panel)

  • 1. On the Home screen, touch the Setup button.
  • 2. Scroll to and touch the Network Setup menu.
  • 3. Touch the Link Speed menu.
  • 4. Select one of the following options.
  • Setting Description

    Automatic The print server automatically configures itself for the highest link speed and

    communication mode allowed on the network.

    Setting Description 10T Full 10 Mbps, full-duplex operation 10T Half 10 megabytes per second (Mbps), half-duplex operation 100TX Full 100 Mbps, full-duplex operation 100TX Half 100 Mbps, half-duplex operation

    Page 65

    ########## 5. Touch the OK button. The product turns off and then on.

    ##### HP Device Toolbox (Windows)

    Use the HP Device Toolbox for Windows to view or change product settings from your computer. This tool opens the HP Embedded Web Server for the product.

    NOTE: This tool is available only if you performed a full installation when you installed the product.

    | | |---|

  • 1. Click the Start button, and then click the Programs item.
  • 2. Click your HP product group, and then click the HP Device Toolbox item.
  • Tab or section Description

    Home tab

    Provides product, status, and configuration information.

  • ● Device Status: Shows the product status and shows the approximate percent life remaining of HP supplies.
  • ● Supplies Status: Shows the approximate percent life remaining of HP supplies. Actual supply life remaining can vary. Consider having a replacement supply available to install when print quality is no longer acceptable. The supply does not need to be replaced unless the print quality is no longer acceptable.
  • ● Device Configuration: Shows the information found on the product configuration page.
  • ● Network Summary: Shows the information found on the product network configuration page.
  • ● Reports: Allows you to print the configuration and supplies status pages that the product generates.
  • ● Event Log: Shows a list of all product events and errors.
  • Page 66

    ############ System tab

    Provides the ability to configure the product from your computer.

  • ● Device Information: Provides basic product and company information.
  • ● Paper Setup: Allows you to change the paper-handling defaults for the product.
  • ● Print Quality: Allows you to change the print quality defaults for the product, including calibration settings.
  • ● Paper Types: Allows you to configure print modes that correspond to the paper types that the product accepts.
  • ● System Setup: Allows you to change the system defaults for the product.
  • ● Service: Allows you to start the cleaning procedure on the product.
  • ● Product Security: Allows you to set or change the product password.
  • ● Save and Restore: Save the current settings for the product to a file on the computer. Use this file to load the same settings onto another product or to restore these settings to this product at a later time.
  • NOTE: The System tab can be password-protected. If this product is on a network, always consult with the administrator before changing settings on this tab.

    ENWW HP Device Toolbox (Windows) 65

    Tab or section Description

    Print tab

    Provides the ability to change default print settings from your computer.

  • ● Printing: Change the default product print settings, such as number of copies and paper orientation. These are the same options that are available on the control panel.
  • ● PCL5c: View and change the PCL5c settings.
  • ● PostScript: Turn off or on the Print PS Errors feature.
  • Page 67

    ############ Networking tab

    Provides the ability to change network settings from your computer.

    Network administrators can use this tab to control network-related settings for the product when it is connected to an IP-based network. It also allows the network administrator to set up wireless direct functionality. This tab does not appear if the product is directly connected to a computer.

    HP Web Services tab Use this tab to set up and use various Web tools with the product.

    ##### HP Utility for Mac OS X

    Use the HP Utility for Mac OS X to view or change product settings from your computer. This tool opens the HP Embedded Web Server for the product.

    You can use the HP Utility when the product is connected with a USB cable or is connected to a TCP/IPbased network.

    ####### Open the HP Utility

    ▲ From the dock, click HP Utility.

    -orFrom Applications, click Hewlett Packard, and then click HP Utility.

    ####### HP Utility features

    Use the HP Utility software to perform the following tasks:

  • ● Obtain information about supplies status.
  • ● Obtain information about the product, such as the firmware version and the serial number.
  • ● Print a configuration page.
  • ● Configure the paper type and size for the tray.
  • Page 68

  • ● Transfer files and fonts from the computer to the product.
  • ● Update the product firmware.
  • ● Change the Bonjour name for the product on the Bonjour network.
  • ENWW HP Utility for Mac OS X 67

    ##### HP Web Jetadmin

    HP Web Jetadmin is an award-winning, industry-leading tool for efficiently managing a wide variety of networked HP devices, including printers, multifunction products, and digital senders. This single solution allows you to remotely install, monitor, maintain, troubleshoot, and secure your printing and imaging environment — ultimately increasing business productivity by helping you save time, control costs, and protect your investment.

    HP Web Jetadmin updates are periodically made available to provide support for specific product features. Visit www.hp.com/go/webjetadmin and click the Self Help and Documentation link to learn more about updates.

    NOTE: Device plug-ins can be installed into HP Web Jetadmin to provide support for specific product features.

    | | |---|

    NOTE: Browsers must be Java-enabled. Web Jetadmin is not supported for Mac OS X.

    | | |---|

    ##### Product security features

    The product supports security standards and recommended protocols that help you keep the product secure, protect critical information on your network, and simplify the way you monitor and maintain the product.

    Page 69

    For in-depth information about HP's secure imaging and printing solutions, visit www.hp.com/go/ secureprinting. The site provides links to white papers and FAQ documents about security features.

    ####### Lock the product

  • You can attach a security cable to the slot on
  • the back of the product.

    ![image 152](c02871908_images/imageFile152.png)

    ![image 153](c02871908_images/imageFile153.png)

    ![image 154](c02871908_images/imageFile154.png)

    ![image 155](c02871908_images/imageFile155.png)

    ![image 156](c02871908_images/imageFile156.png)

    ![image 157](c02871908_images/imageFile157.png)

    ![image 158](c02871908_images/imageFile158.png)

    ![image 159](c02871908_images/imageFile159.png)

    ![image 160](c02871908_images/imageFile160.png)

    ![image 161](c02871908_images/imageFile161.png)

    ![image 162](c02871908_images/imageFile162.png)

    Page 70

    ![image 163](c02871908_images/imageFile163.png)

    ![image 164](c02871908_images/imageFile164.png)

    ####### Set or change the product password

    Use the HP Embedded Web Server to set a password or change an existing password for a product on a network.

  • 1. LED control panel: Print a configuration page from the control panel Reports menu.
  • Touchscreen control panel: From the Home screen on the product control panel, touch the Network button to find the product IP address.

  • 2. To open the HP Embedded Web Server, type the product IP address into the address line of a Web browser.
  • | | |---|

    NOTE: You can also access the HP Embedded Web Server from the HP Device Toolbox for Windows or the HP Utility for Mac OS X.

  • 3. Click the Settings tab, and click the Security link.
  • NOTE: If a password has previously been set, you are prompted to type the password. Type the password, and then click the Apply button.

    | | |---|

    Page 71

    ENWW Product security features 69

  • 4. Type the new password in the New Password box and in the Verify password box.
  • 5. At the bottom of the window, click the Apply button to save the password.
  • ##### Economy settings

    Print with EconoMode This product has an EconoMode option for printing drafts of documents. Using EconoMode can use less toner and decrease the cost per page. However, using EconoMode can also reduce print quality. HP does not recommend the full-time use of EconoMode. If EconoMode is used full-time, the toner supply might outlast the mechanical parts in the toner cartridge. If print quality begins to degrade and is no longer acceptable, consider replacing the toner cartridge. NOTE: If this option is not available in your print driver, you can set it using the HP Embedded Web Server.

    | | |---|

  • 1. From the software program, select the Print option.
  • 2. Select the product, and then click the Properties or Preferences button.
  • 3. Click the Paper/Quality tab.
  • 4. Click the EconoMode check box.
  • ####### Set the sleep delay

    The sleep delay feature determines how long the product must be inactive before it switches to sleep mode to reduce power consumption.

    ######## Set the sleep delay (LCD control panel)

  • 1. On the product control panel, press the OK button to open the menus.
  • 2. Open the following menus:
  • Page 72

  • ● System Setup
  • ● Energy Settings
  • ● Sleep Delay
  • 3. Select the time for the delay, and then press the OK button. NOTE: The default value is 15 Minutes.
  • | | |---|

    ######## Set the sleep delay (touchscreen control panel)

  • 1. From the Home screen on the product control panel, touch the Setup button.
  • 2. Open the following menus:
  • ● System Setup
  • ● Energy Settings
  • ● Sleep Delay
  • 3. Select the time for the sleep delay. NOTE: The default value is 15 Minutes.
  • | | |---|

    Page 73

    ####### Set the Auto Power Down delay

    ######## Set the Auto Power Down delay (LCD control panel)

  • 1. On the product control panel, press the OK button to open the menus.
  • 2. Open the following menus:
  • ● System Setup
  • ● Energy Settings
  • ● Auto Power Down
  • ● Auto Power Down Delay
  • 3. Select the time for the power-down delay. NOTE: The default value is 30 Minutes.
  • | | |---|

  • 4. The product automatically wakes from the auto power-down mode when it receives jobs or when you press a button on the control panel. You can change which events cause the product to wake. Open the following menus:
  • ● System Setup
  • ● Energy Settings
  • ● Auto Power Down
  • ● Wake Events To turn off a wake event, select the event and then select the No option.
  • Page 74

    ######## Set the Auto Power Down delay (touchscreen control panel)

  • 1. From the Home screen on the product control panel, touch the Setup button.
  • 2. Open the following menus:
  • ● System Setup
  • ● Energy Settings
  • ● Auto Power Down
  • ● Auto Power Down Delay
  • 3. Select the time for the power-down delay. NOTE: The default value is 30 Minutes.
  • | | |---|

  • 4. The product automatically wakes from the auto power-down mode when it receives jobs or when you press a button on the control panel. You can change which events cause the product to wake. Open the following menus:
  • ● System Setup
  • ● Energy Settings
  • ● Auto Power Down
  • ● Wake Events To turn off a wake event, select the event and then select the No option.
  • ##### Print when a toner cartridge is at estimated end of life

    Page 75

    Black Low: The product indicates when a toner cartridge level is low. Actual toner cartridge life remaining may vary. Consider having a replacement available to install when print quality is no longer acceptable. The toner cartridge does not need to be replaced now.

    Black Very Low: The product indicates when the toner cartridge level is very low. Actual toner cartridge life remaining may vary. Consider having a replacement available to install when print quality is no longer acceptable. The toner cartridge does not need to be replaced now unless the print quality is no longer acceptable.

    Once an HP toner cartridge has reached “very low”, HP’s Premium Protection Warranty on that toner cartridge has ended.

    You can change the way the product reacts when supplies reach the Very Low state. You do not have to re-establish these settings when you install a new toner cartridge.

    ####### Enable or disable the At Very Low settings (LCD control panel)

    You can enable or disable the default setting at any time, and you do not have to re-enable it when you install a new toner cartridge.

  • 1. On the product control panel, press the OK button to open the menus.
  • 2. Open the following menus:
  • ● System Setup
  • ● Supply Settings
  • ● Black Cartridge
  • ● Very Low Setting
  • 3. Select one of the following options.
  • ● Select the Continue option to set the product to alert you that the toner cartridge is very low, but to continue printing.
  • ● Select the Stop option to set the product to stop printing until you replace the toner cartridge.
  • ● Select the Prompt option to set the product to stop printing and prompt you to replace the toner cartridge. You can acknowledge the prompt and continue printing. A customer configurable option on this product is "Prompt to Remind Me in 100 pages, 200 pages, 300 pages, 400 pages, or never." This option is provided as a customer convenience and is not an indication these pages will have acceptable print quality.
  • Page 76

    Once an HP toner cartridge has reached Very Low, HP’s premium Protection Warranty on that toner cartridge has ended.

    ####### Enable or disable the At Very Low settings (touchscreen control panel)

    You can enable or disable the default settings at any time, and you do not have to re-enable them when you install a new toner cartridge.

  • 1. From the Home screen on the product control panel, touch the Setup button.
  • 2. Open the following menus:
  • ● System Setup
  • ● Supply Settings
  • ● Black Cartridge
  • ● Very Low Setting
  • 3. Select one of the following options:
  • ● Select the Continue option to set the product to alert you that the toner cartridge is very low, but to continue printing.
  • ● Select the Stop option to set the product to stop printing until you replace the toner cartridge.
  • ● Select the Prompt option to set the product to stop printing and prompt you to replace the toner cartridge. You can acknowledge the prompt and continue printing. A customer configurable option on this product is "Prompt to Remind Me in 100 pages, 200 pages, 300 pages, 400 pages, or never." This option is provided as a customer convenience and is not an indication these pages will have acceptable print quality.
  • Once an HP toner cartridge has reached Very Low, HP’s premium Protection Warranty on that toner cartridge has ended. All print defects or cartridge failures incurred when an HP toner cartridge is used in Continue at very low mode will not be considered to be defects in materials or workmanship in the toner cartridge under the HP Print Cartridge Warranty Statement.

    ENWW Print when a toner cartridge is at estimated end of life 75

    Page 77

    ##### Store and recycle supplies

    ####### Recycle supplies

    To recycle a genuine HP toner cartridge, place the used cartridge in the box in which the new cartridge arrived. Use the enclosed return label to send the used supply to HP for recycling. For complete information, see the recycling guide that is included with each new HP supply item.

    ####### Toner cartridge storage

    Do not remove the toner cartridge from its package until you are ready to use it.

    CAUTION: To prevent damage to the toner cartridge, do not expose it to light for more than a few minutes.

    ##### Replacement instructions

    ####### Change the toner cartridge

    When a toner cartridge approaches the end of useful life, you are prompted to order a replacement. You can continue printing with the current cartridge until redistributing the toner no longer yields acceptable print quality.

  • 1. Open the toner cartridge door, and then remove the toner cartridge.
  • ![image 165](c02871908_images/imageFile165.png)

    ![image 166](c02871908_images/imageFile166.png)

  • 2. Remove the new toner cartridge from the bag. Place the used toner cartridge in the bag for recycling.
  • ![image 167](c02871908_images/imageFile167.png)

    Page 78

    ![image 168](c02871908_images/imageFile168.png)

    ![image 169](c02871908_images/imageFile169.png)

    ![image 170](c02871908_images/imageFile170.png)

    ![image 171](c02871908_images/imageFile171.png)

    ![image 172](c02871908_images/imageFile172.png)

    ![image 173](c02871908_images/imageFile173.png)

    ![image 174](c02871908_images/imageFile174.png)

    ![image 175](c02871908_images/imageFile175.png)

    ![image 176](c02871908_images/imageFile176.png)

    ![image 177](c02871908_images/imageFile177.png)

    ![image 178](c02871908_images/imageFile178.png)

    ![image 179](c02871908_images/imageFile179.png)

    ![image 180](c02871908_images/imageFile180.png)

    ![image 181](c02871908_images/imageFile181.png)

    ![image 182](c02871908_images/imageFile182.png)

    Page 79

    ![image 183](c02871908_images/imageFile183.png)

    ![image 184](c02871908_images/imageFile184.png)

    ![image 185](c02871908_images/imageFile185.png)

    ![image 186](c02871908_images/imageFile186.png)

    ![image 187](c02871908_images/imageFile187.png)

    ![image 188](c02871908_images/imageFile188.png)

    ![image 189](c02871908_images/imageFile189.png)

    ![image 190](c02871908_images/imageFile190.png)

    ![image 191](c02871908_images/imageFile191.png)

    ![image 192](c02871908_images/imageFile192.png)

    ![image 193](c02871908_images/imageFile193.png)

    ![image 194](c02871908_images/imageFile194.png)

    ![image 195](c02871908_images/imageFile195.png)

    ![image 196](c02871908_images/imageFile196.png)

    Page 80

    ![image 197](c02871908_images/imageFile197.png)

    ![image 198](c02871908_images/imageFile198.png)

    ![image 199](c02871908_images/imageFile199.png)

    ![image 200](c02871908_images/imageFile200.png)

    ![image 201](c02871908_images/imageFile201.png)

    ![image 202](c02871908_images/imageFile202.png)

    ![image 203](c02871908_images/imageFile203.png)

    ![image 204](c02871908_images/imageFile204.png)

    ![image 205](c02871908_images/imageFile205.png)

    ![image 206](c02871908_images/imageFile206.png)

    ![image 207](c02871908_images/imageFile207.png)

    ![image 208](c02871908_images/imageFile208.png)

    ![image 209](c02871908_images/imageFile209.png)

    ![image 210](c02871908_images/imageFile210.png)

    ![image 211](c02871908_images/imageFile211.png)

    Page 81

    ![image 212](c02871908_images/imageFile212.png)

    ![image 213](c02871908_images/imageFile213.png)

    ![image 214](c02871908_images/imageFile214.png)

    ![image 215](c02871908_images/imageFile215.png)

    ![image 216](c02871908_images/imageFile216.png)

    ![image 217](c02871908_images/imageFile217.png)

    ![image 218](c02871908_images/imageFile218.png)

    ![image 219](c02871908_images/imageFile219.png)

    ![image 220](c02871908_images/imageFile220.png)

    ![image 221](c02871908_images/imageFile221.png)

    ![image 222](c02871908_images/imageFile222.png)

    ![image 223](c02871908_images/imageFile223.png)

    ![image 224](c02871908_images/imageFile224.png)

    ![image 225](c02871908_images/imageFile225.png)

    Page 82

    ![image 226](c02871908_images/imageFile226.png)

    ![image 227](c02871908_images/imageFile227.png)

    ![image 228](c02871908_images/imageFile228.png)

    ![image 229](c02871908_images/imageFile229.png)

    ![image 230](c02871908_images/imageFile230.png)

    ![image 231](c02871908_images/imageFile231.png)

    ![image 232](c02871908_images/imageFile232.png)

    ![image 233](c02871908_images/imageFile233.png)

    ![image 234](c02871908_images/imageFile234.png)

    ![image 235](c02871908_images/imageFile235.png)

    ![image 236](c02871908_images/imageFile236.png)

    ![image 237](c02871908_images/imageFile237.png)

    ![image 238](c02871908_images/imageFile238.png)

    ![image 239](c02871908_images/imageFile239.png)

    ![image 240](c02871908_images/imageFile240.png)

    Page 83

    ![image 241](c02871908_images/imageFile241.png)

    ![image 242](c02871908_images/imageFile242.png)

    ![image 243](c02871908_images/imageFile243.png)

    ![image 244](c02871908_images/imageFile244.png)

    ![image 245](c02871908_images/imageFile245.png)

    ![image 246](c02871908_images/imageFile246.png)

    ![image 247](c02871908_images/imageFile247.png)

    ![image 248](c02871908_images/imageFile248.png)

    ![image 249](c02871908_images/imageFile249.png)

    ![image 250](c02871908_images/imageFile250.png)

    ![image 251](c02871908_images/imageFile251.png)

    ![image 252](c02871908_images/imageFile252.png)

    ![image 253](c02871908_images/imageFile253.png)

    ![image 254](c02871908_images/imageFile254.png)

    Page 84

    ![image 255](c02871908_images/imageFile255.png)

    ![image 256](c02871908_images/imageFile256.png)

    ![image 257](c02871908_images/imageFile257.png)

    ![image 258](c02871908_images/imageFile258.png)

    ![image 259](c02871908_images/imageFile259.png)

    ENWW Replacement instructions 77

    ########## 3. Grasp both sides of the toner cartridge anddistribute the toner by gently rocking thecartridge.

    CAUTION: Do not touch the shutter or the surface of the roller.

    ![image 260](c02871908_images/imageFile260.png)

    ![image 261](c02871908_images/imageFile261.png)

    ![image 262](c02871908_images/imageFile262.png)

    ![image 263](c02871908_images/imageFile263.png)

    ![image 264](c02871908_images/imageFile264.png)

    ![image 265](c02871908_images/imageFile265.png)

    ########## 4. Bend the tab on the left side of the cartridgeuntil the tab breaks loose. Pull the tab until allthe tape is removed from the cartridge. Placethe tab and tape in the toner cartridge box toreturn for recycling.

    Page 85

    ########## 5. Align the toner cartridge with the tracks insidethe product, insert the toner cartridge until it isfirmly seated, and then close the tonercartridge door.

    ########## 6. Installation is complete. Place the used tonercartridge in the box in which the new cartridgearrived. See the enclosed recycling guide forrecycling instructions.

    ![image 266](c02871908_images/imageFile266.png)

    ![image 267](c02871908_images/imageFile267.png)

    ![image 268](c02871908_images/imageFile268.png)

    ![image 269](c02871908_images/imageFile269.png)

    ![image 270](c02871908_images/imageFile270.png)

    ![image 271](c02871908_images/imageFile271.png)

    ![image 272](c02871908_images/imageFile272.png)

    ![image 273](c02871908_images/imageFile273.png)

    ##### Memory

    This product includes a memory panel that will accept the following third-party font and barcode memory modules. Hewlett-Packard does not sell these products.

  • ● BarDIMM Pro, Jetmobile
  • ● MicrDIMM Pro, Jetmobile
  • ● TypeHaus Fonts and Barcodes Solutions, TypeHaus, Inc.
  • ● Asian Fonts, JITCO, Ltd.
  • Page 86

  • ● BarDIMM® Box, Jetmobile
  • ● BarSIMM 1.9, Jetmobile
  • ● EIO Hard-Disk for LaserJet Series, Oberon Service SRL
  • ● Ethernet to Token Ring Router (ETRR), Ringdale
  • ● EuroForm Barcode 100, EuroForm A/S
  • ENWW Memory 79

    ##### Update the firmware

    HP offers periodic upgrades to the product firmware. You can load the firmware updates manually, or you can set the product to automatically load firmware updates.

    ####### Manually update the firmware (LCD control panel)

  • 1. On the product control panel, press the OK button to open the menus.
  • 2. Open the following menus:
  • ● Service
  • ● LaserJet Update
  • ● Check For Updates Now
  • 3. Select the Yes option, and then press the OK button to prompt the product to search for firmware updates. If the product detects an upgrade, it will begin the update process.
  • ####### Manually update the firmware (touchscreen control panel)

  • 1. From the Home screen on the product control panel, touch the Setup button.
  • Page 87

  • 2. Open the following menus:
  • ● Service
  • ● LaserJet Update
  • ● Check For Updates Now
  • 3. Touch the Yes button to prompt the product to search for firmware updates. If the product detects an upgrade, it will begin the update process.
  • ####### Set the product to automatically update the firmware (LCD control panel)

    NOTE: This section applies to the HP LaserJet Pro 400 M401a Printer model only.

    | | |---|

  • 1. On the product control panel, press the OK button to open the menus.
  • 2. Open the following menus:
  • ● Service
  • ● LaserJet Update
  • ● Manage Updates
  • ● Prompt Before Install
  • 3. Select the Install Automatically option, and then press the OK button.
  • Page 88

    ####### Set the product to automatically update the firmware (touchscreen control panel)

    NOTE: This section applies to the HP LaserJet Pro 400 M401d Printer model only.

    | | |---|

  • 1. From the Home screen on the product control panel, touch the Setup button.
  • 2. Open the following menus:
  • ● Service
  • ● LaserJet Update
  • ● Manage Updates
  • ● Prompt Before Install
  • 3. Touch the Install Automatically option.
  • ENWW Update the firmware 81

    5 Solve problems

  • ● Solve problems checklist
  • Page 89

  • ● Restore the factory-set defaults
  • ● Control panel help system
  • ● Interpret control panel messages
  • ● Paper feeds incorrectly or becomes jammed
  • ● Clear jams
  • ● Improve print quality
  • ● The product does not print or it prints slowly
  • ● Solve walk-up USB printing problems
  • ● Solve direct connection problems
  • ● Solve wired network problems
  • ● Solve wireless network problems
  • ● Solve product software problems with Windows
  • ● Solve product software problems with Mac OS X
  • ● Remove software (Windows)
  • ● Remove software (Mac OS X)
  • Page 90

    ENWW 83

    ##### Solve problems checklist

    Follow these steps when trying to solve a problem with the product.

  • ● Step 1: Make sure that the product is set up correctly
  • ● Step 2: Check the cabling or wireless connection
  • ● Step 3: Check the control panel for error messages
  • ● Step 4: Check the paper
  • ● Step 5: Check the software
  • ● Step 6: Test print functionality
  • ● Step 7: Check the toner cartridge
  • ● Step 8: Try sending a print job from a computer
  • ####### Step 1: Make sure that the product is set up correctly

  • 1. Press the power button to turn on the product or to deactivate the Auto Power Down mode.
  • 2. Check the power-cable connections.
  • Page 91

  • 3. Make sure that the line voltage is correct for the product power configuration. (See the label on the back of the product for voltage requirements.) If you are using a power strip and its voltage is not within specifications, plug the product directly into the wall. If it is already plugged into the wall, try a different outlet.
  • 4. If none of these measures restores power, contact HP Customer Care.
  • ####### Step 2: Check the cabling or wireless connection

  • 1. Check the cable connection between the product and the computer. Make sure that the connection is secure.
  • 2. Make sure that the cable itself is not faulty by using a different cable, if possible.
  • 3. If the product is connected to a network, check the following items:
  • ● Check the light next to the network connection on the product. If the network is active, the light is green.
  • ● Make sure that you are using a network cable and not a phone cord to connect to the network.
  • ● Make sure the network router, hub, or switch is turned on and that it is working correctly.
  • ● If your computer or the product is connected to a wireless network, low signal quality or interference might be delaying print jobs.
  • 4. If you are using a personal firewall system on the computer, it might be blocking communication with the product. Try temporarily disabling the firewall to see if it is the source of the problem.
  • ####### Step 3: Check the control panel for error messages

    The product control panel should indicate ready status. If an error message appears, resolve the error.

    ####### Step 4: Check the paper

  • 1. Make sure that the paper that you are using meets specifications.
  • 2. Make sure that the paper is loaded correctly in the input tray.
  • Page 92

    ####### Step 5: Check the software

  • 1. Make sure that the product software is installed correctly.
  • 2. Verify that you have installed the print driver for this product. Check the program to make sure that
  • you are using the print driver for this product.

    ####### Step 6: Test print functionality

  • 1. Print a configuration page.
  • 2. If the page does not print, verify that the input tray contains paper.
  • 3. If the page jams in the product, clear the jam.
  • ####### Step 7: Check the toner cartridge

    Print a supplies status page and check the remaining life of the toner cartridge.

    ####### Step 8: Try sending a print job from a computer

  • 1. Try printing the job from another computer that has the product software installed.
  • 2. Check the USB or network cable connection. Direct the product to the correct port, or reinstall the software, selecting the connection type that you are using.
  • 3. If the print quality is unacceptable, verify that the print settings are correct for the media that you are using.
  • ENWW Solve problems checklist 85

    ##### Restore the factory-set defaults

    Page 93

    Restoring the factory-set defaults returns all of the product and network settings to the factory defaults. It will not reset the page count, tray size, or language. To restore the product to the factory-default settings, follow these steps.

    CAUTION: Restoring the factory-set defaults returns all of the settings to the factory defaults, and it also deletes any pages that are stored in the memory. The procedure then automatically restarts the product.

    ####### Restore the factory-set defaults (LCD control panel)

  • 1. On the product control panel, press the OK button to open the menus.
  • 2. Open the following menus:
  • ● Service
  • ● Restore Defaults The product automatically restarts.
  • ####### Restore the factory-set defaults (touchscreen control panel)

  • 1. From the Home screen on the product control panel, touch the Setup button.
  • 2. Scroll to and touch the Service menu.
  • 3. Scroll to and touch the Restore Defaults button, and then touch the OK button. The product automatically restarts.
  • ##### Control panel help system

    The HP LaserJet Pro 400 M401dn Printer and HP LaserJet Pro 400 M401dw Printer models have built-in Help systems that explain how to use each screen. To open the Help system, touch the Help button in the upper-right corner of the screen.

    For some screens, the Help opens to a global menu where you can search for specific topics. You can browse through the menu structure by touching the buttons in the menu.

    Page 94

    Some Help screens include animations that guide you through procedures, such as clearing jams. For screens that contain settings for individual jobs, the Help opens to a topic that explains the options for that screen. If the product alerts you of an error or warning, touch the Help button to open a message that describes the problem. The message also contains instructions to help solve the problem.

    ENWW Control panel help system 87

    ##### Interpret control panel messages

    Control panel message types The control panel messages indicate the current product status or situations that might require action. Alert and warning messages appear temporarily and might require you to acknowledge the message by pressing the OK button to resume or by pressing the Cancel button to cancel the job. With certain warnings, the job might not complete or the print quality might be affected. If the alert or warning message is related to printing and the auto-continue feature is on, the product will attempt to resume the printing job after the warning has appeared for 10 seconds without acknowledgement. Critical error messages can indicate some kind of failure. Turning off and then turning on the power might fix the problem. If a critical error persists, the product might require service.

    ####### Control panel messages

    10.x000 Supply Error Description The toner cartridge memory chip cannot be read or is missing.

  • ◦ 10.0000 = memory chip error
  • ◦ 10.1000 = memory chip is missing Recommended action Reinstall the toner cartridge. Turn the product off and then on. If the message persists, replace the toner cartridge.
  • 49 Error Turn off then on Description The product experienced an internal error. Recommended action Turn the product off, wait at least 30 seconds, and then turn the product on and wait for it to initialize. If you are using a surge protector, remove it. Plug the product directly into the wall socket. Turn the product power on. If the message persists, contact HP support.

    ######## 50.x Fuser Error Turn off then onDescriptionThe product has experienced an error with the fuser.Recommended action

    Turn the product power off, wait at least 30 seconds, and then turn the product power on and wait for it to initialize.

    Turn off the product, wait at least 25 minutes, and then turn on the product. If you are using a surge protector, remove it. Plug the product directly into the wall socket. Turn the product power on. If the message persists, contact HP support.

    ######## 51.XX Error Turn off then onDescriptionThe product has experienced an internal hardware error.Recommended action

    Turn the product power off, wait at least 30 seconds, and then turn the product power on and wait for it to initialize.

    If you are using a surge protector, remove it. Plug the product directly into the wall socket. Turn the product on.

    Page 95

    If the message persists, contact HP support.

  • 54.XX Error Turn off then on Description The product has experienced an error with one of the internal sensors. Recommended action
  • Turn the product power off, wait at least 30 seconds, and then turn the product power on and wait for it to initialize.

    If you are using a surge protector, remove it. Plug the product directly into the wall socket. Turn the product power on.

    If the message persists, contact HP support.

  • 55.X Error Turn off then on Description The product has experienced an internal error.
  • Turn the product power off, wait at least 30 seconds, and then turn the product power on and wait for it to initialize.

    If you are using a surge protector, remove it. Plug the product directly into the wall socket. Turn the product power on.

    If the message persists, contact HP support.

    57 Fan error Turn off then on Description The product has experienced a problem with its internal fan. Recommended action

    Turn the product power off, wait at least 30 seconds, and then turn the product power on and wait for it to initialize.

    If you are using a surge protector, remove it. Plug the product directly into the wall socket. Turn the product power on.

    If the message persists, contact HP support.

    59.X Error Turn off then on Description The product has experienced a problem with one of the motors. Recommended action

    Page 96

    Turn the product power off, wait at least 30 seconds, and then turn the product power on and wait for it to initialize.

    If you are using a surge protector, remove it. Plug the product directly into the wall socket. Turn the product power on.

    If the message persists, contact HP support.

    79 Error Turn off then on Description The product has experienced an internal firmware error. Recommended action

    Turn the product power off, wait at least 30 seconds, and then turn the product power on and wait for it to initialize.

    If you are using a surge protector, remove it. Plug the product directly into the wall socket. Turn the product power on.

    If the message persists, contact HP support.

    79 Service error Turn off then on Description An incompatible DIMM is installed. Recommended action

  • 1. Turn the product power off.
  • 2. Install a DIMM that the product supports.
  • 3. Turn the product on. If the message persists, contact HP support.
  • Black cartridge low Description The toner cartridge is nearing the end of its useful life. Recommended action Printing can continue, but consider having a replacement toner cartridge available.

    ######## Black cartridge very low Description

    The toner cartridge is at the end of its useful life. A customer configurable option on this product is "Prompt to Remind Me in 100 pages, 200 pages, 300 pages, 400 pages, or never." This option is provided as a customer convenience and is not an indication these pages will have acceptable print quality.

    ######### Recommended action

    Page 97

    To ensure optimal print quality, HP recommends replacing the toner cartridge at this point. You can continue printing until you notice a decrease in print quality. Actual cartridge life may vary.

    Once an HP toner cartridge has reached very low, HP's Premium Protection Warranty on that toner cartridge has ended. All print defects or cartridge failures incurred when an HP toner cartridge is used in continue at very low mode will not be considered to be defects in materials or workmanship in the toner cartridge under the HP Print Cartridge Warranty Statement.

    Cleaning Description The product periodically performs a cleaning procedure to maintain the best print quality.

    Wait for the cleaning process to finish.

    Device error Press [OK] Description An internal error occurred. Recommended action Press the OK button to resume the job.

    Door open Description The product front door is open. Recommended action Close the door.

    Genuine HP supply installed Description A genuine HP supply was installed. Recommended action No action necessary.

    Install black cartridge Description The toner cartridge is either not installed or not correctly installed in the product.

    Recommended action Install the toner cartridge.

    Invalid driver Press [OK] Description You are using an incorrect print driver. Recommended action Select the correct print driver.

    Jam in Description The product has detected a jam. Recommended action

    Clear the jam from the location indicated. The job should continue to print. If it does not, try reprinting the job.

    If the message persists, contact HP support.

    Jam in Tray Clear jam and then Press [OK] Description The product has detected a jam. Recommended action Clear the jam from the location indicated, and then press OK. If the message persists, contact HP support.

    Page 98

    Load tray 1 , Description No trays are configured for the paper type and size that the print job is requesting. Recommended action Load the correct paper into Tray 1, or press OK to use paper in a different tray.

    Load tray 1 PLAIN Cleaning Mode Description The product is ready to process the cleaning operation. Recommended action Load Tray 1 with plain paper in the size indicated, and then press the OK button.

    Load tray Press [OK] for available media Description The tray is empty. Recommended action Load paper into the tray to continue printing. Press the OK button to select a different tray.

    Load tray Description A tray is configured for the paper type and size that the print job is requesting, but that tray is empty. Recommended action Load the correct paper into the tray, or press the OK button to use paper in a different tray.

    ######## Manual duplex Load tray Press [OK]

    ######### Description

    The first side of a manual duplex job has printed, and the page needs to be loaded to process the second side.

    ######### Recommended action

    Load the page in the indicated tray with the side to be printed face up, and the top of the page away from you, and then press the OK button.

    Manual feed , Press [OK] for available media Description The product is set for manual feed mode. Recommended action Press the OK button to clear the message orload the correct paper into Tray 1.

    Memory is low Press [OK] Description The product memory is almost full. Recommended action Press the OK button to finish the job, or press the Cancel button to cancel the job. Break the job into smaller jobs that contain fewer pages.

    Misprint Press [OK] Description Paper has been delayed as it moves through the product. Recommended action Press the OK button to clear the message.

    To avoid this problem, try the following solutions:

  • ◦ Adjust the paper guides in the tray. Make sure the front paper guide is pushing the paper against the back edge of the tray.
  • ◦ Use paper that meets HP specifications. Store paper unopened in its original packaging.
  • ◦ Use the product in an area that meets the environmental specifications for this product.
  • Page 99

    Print failure, press OK. If error repeats, turn off then on. Description The product cannot process the page. Recommended action Press the OK button to continue printing the job, but output might be affected. If the error persists, turn the power off and then on. Resend the print job.

    Rear door open Description The product rear door is open. Recommended action Close the door.

    Remove shipping material from toner cartridge Description A toner cartridge shipping lock is installed. Recommended action Pull the orange tab to remove the shipping lock from the cartridge.

    ######## Replace black cartridge Description

    The toner cartridge is at the end of its useful like, and the product is customer-configured to stop printing when it reaches the very low state.

    ######### Recommended action

    To ensure optimal print quality, HP recommends replacing the toner cartridge at this point. You can continue printing until you notice a decrease in print quality. Actual cartridge life may vary. Once an HP toner cartridge has reached very low, HP's Premium Protection Warranty on that toner cartridge has ended. All print defects or cartridge failures incurred when an HP toner cartridge is used in continue at

    very low mode will not be considered to be defects in materials or workmanship in the toner cartridge under the HP Print Cartridge Warranty Statement.

    Supplies low Description A toner cartridge is low. Recommended action

    Printing will continue until a Very Low message displays. Consider having a replacement toner cartridge available.

    Unexpected size in tray Load Press [OK] Description The product has detected paper in the tray that does not match the configuration for the tray. Recommended action Load the correct paper into the tray, or configure the tray for the size that you have loaded.

    Unsupported black cartridge Press [OK] to continue Description The product has detected an installed toner cartridge that was not made by HP. Recommended action Press the OK button to continue printing. If you believe you purchased an HP supply, go to www.hp.com/go/anticounterfeit. Service or repairs that are required as a result of using unsupported supplies are not covered under HP warranty.

    ######## Used black cartridge is installed Press [OK] to continue

    ######### Description

    Page 100

    You are using a toner cartridge that reached the default low threshold while it was installed in another product.

    ######### Recommended action

    Press the OK button to clear the message. Printing can continue, but consider having a replacement toner cartridge available.

    ##### Paper feeds incorrectly or becomes jammed

    ####### The product does not pick up paper

    If the product does not pick up paper from the tray, try these solutions.

  • 1. Open the product and remove any jammed sheets of paper.
  • 2. Load the tray with the correct size of paper for your job.
  • 3. Make sure the paper guides in the tray are adjusted correctly for the size of paper. Adjust the guides so they are touching the paper stack without bending it.
  • 4. Check the product control panel to see if the product is waiting for you to acknowledge a prompt to feed the paper manually. Load paper, and continue.
  • ####### The product picks up multiple sheets of paper

    If the product picks up multiple sheets of paper from the tray, try these solutions.

  • 1. Remove the stack of paper from the tray and flex it, rotate it 180 degrees, and flip it over. Do not fan the paper.Return the stack of paper to the tray.
  • 2. Use only paper that meets HP specifications for this product.
  • 3. Use paper that is not wrinkled, folded, or damaged. If necessary, use paper from a different package.
  • 4. Make sure the tray is not overfilled. If it is, remove the entire stack of paper from the tray, straighten the stack, and then return some of the paper to the tray.
  • 5. Make sure the paper guides in the tray are adjusted correctly for the size of paper. Adjust the guides so they are touching the paper stack without bending it.
  • Page 101

    ####### Prevent paper jams

    To reduce the number of paper jams, try these solutions.

  • 1. Use only paper that meets HP specifications for this product.
  • 2. Use paper that is not wrinkled, folded, or damaged. If necessary, use paper from a different package.
  • 3. Use paper that has not previously been printed or copied on.
  • 4. Make sure the tray is not overfilled. If it is, remove the entire stack of paper from the tray, straighten the stack, and then return some of the paper to the tray.
  • 5. Make sure the paper guides in the tray are adjusted correctly for the size of paper. Adjust the guides so they are touching the paper stack without bending it.
  • 6. If you are printing on heavy, embossed, or perforated paper, use the manual feed feature and feed sheets one at a time.
  • ENWW Paper feeds incorrectly or becomes jammed 97

    ##### Clear jams

    ####### Jam locations

    Jams can occur in these locations:

    ![image 274](c02871908_images/imageFile274.png)

    ![image 275](c02871908_images/imageFile275.png)

    ![image 276](c02871908_images/imageFile276.png)

    ![image 277](c02871908_images/imageFile277.png)

    Page 102

    |1|Output bin| |---|---| |2|Rear door| |3|Tray 1| |4|Tray 2| |5|Optional Tray 3|

    Loose toner might remain in the product after a jam. This problem typically resolves itself after a few sheets have been printed.

    ####### Clear a jam in Tray 1

    NOTE: If the sheet tears, remove all fragments before resuming printing.

    | | |---|

    ########## 1. If you can see the jammed sheet, remove thejammed sheet by pulling it straight out.

    ########## 2. If you cannot see the jammed sheet, open theprint cartridge door, and then remove the printcartridge.

    ![image 278](c02871908_images/imageFile278.png)

    ![image 279](c02871908_images/imageFile279.png)

    ![image 280](c02871908_images/imageFile280.png)

    ![image 281](c02871908_images/imageFile281.png)

    Page 103

    ![image 282](c02871908_images/imageFile282.png)

    ![image 283](c02871908_images/imageFile283.png)

    ![image 284](c02871908_images/imageFile284.png)

    ![image 285](c02871908_images/imageFile285.png)

  • 3. Remove the jammed sheet by pulling it straight out.
  • CAUTION: Do not pull up on the jammed sheet. Be sure to pull it straight out.

    ![image 286](c02871908_images/imageFile286.png)

  • 4. Reinstall the print cartridge, and then close the print cartridge door.
  • ####### Clear a jam in Tray 2

  • 1. Remove the tray from the product.
  • ![image 287](c02871908_images/imageFile287.png)

    ![image 288](c02871908_images/imageFile288.png)

    ![image 289](c02871908_images/imageFile289.png)

    Page 104

    ![image 290](c02871908_images/imageFile290.png)

    ![image 291](c02871908_images/imageFile291.png)

    ![image 292](c02871908_images/imageFile292.png)

    ########## 2. Remove the jammed sheet by pulling it straightout.

    ########## 3. Replace the tray.

    ########## 4. Press the OK button to continue printing.

    ![image 293](c02871908_images/imageFile293.png)

    ![image 294](c02871908_images/imageFile294.png)

    ![image 295](c02871908_images/imageFile295.png)

    ![image 296](c02871908_images/imageFile296.png)

    ![image 297](c02871908_images/imageFile297.png)

    ![image 298](c02871908_images/imageFile298.png)

    ![image 299](c02871908_images/imageFile299.png)

    ![image 300](c02871908_images/imageFile300.png)

    ####### Clear a jam in optional Tray 3

    Page 105

  • 1. Remove the tray from the product.
  • ![image 301](c02871908_images/imageFile301.png)

    ![image 302](c02871908_images/imageFile302.png)

    ![image 303](c02871908_images/imageFile303.png)

    ![image 304](c02871908_images/imageFile304.png)

  • 2. Remove the jammed sheet by pulling it straight out.
  • ![image 305](c02871908_images/imageFile305.png)

    ![image 306](c02871908_images/imageFile306.png)

    ![image 307](c02871908_images/imageFile307.png)

    ![image 308](c02871908_images/imageFile308.png)

  • 3. Replace the tray.
  • ![image 309](c02871908_images/imageFile309.png)

    ![image 310](c02871908_images/imageFile310.png)

    ![image 311](c02871908_images/imageFile311.png)

    Page 106

    ![image 312](c02871908_images/imageFile312.png)

  • 4. Press the OK button to continue printing.
  • ####### Clear jams from the output bin

    CAUTION: Do not use sharp objects, such as tweezers or needle-nose pliers, to remove jams. Damage caused by sharp objects will not be covered by the warranty.

  • With both hands, grasp the paper, and
  • carefully pull it free from the product.

    ![image 313](c02871908_images/imageFile313.png)

    ![image 314](c02871908_images/imageFile314.png)

    ![image 315](c02871908_images/imageFile315.png)

    ![image 316](c02871908_images/imageFile316.png)

    ####### Clear a jam in the duplexer area

  • Open the rear door.
  • ![image 317](c02871908_images/imageFile317.png)

    ![image 318](c02871908_images/imageFile318.png)

    Page 107

    ![image 319](c02871908_images/imageFile319.png)

    ![image 320](c02871908_images/imageFile320.png)

    ![image 321](c02871908_images/imageFile321.png)

    ![image 322](c02871908_images/imageFile322.png)

    ![image 323](c02871908_images/imageFile323.png)

    ![image 324](c02871908_images/imageFile324.png)

    ![image 325](c02871908_images/imageFile325.png)

    ![image 326](c02871908_images/imageFile326.png)

    ![image 327](c02871908_images/imageFile327.png)

    CAUTION: Wait until the fuser area has cooled before clearing the jam.

  • Close the rear door.
  • ####### Clear a jam in the fuser area

  • Open the rear door.
  • ![image 328](c02871908_images/imageFile328.png)

    ![image 329](c02871908_images/imageFile329.png)

    Page 108

    ![image 330](c02871908_images/imageFile330.png)

    ![image 331](c02871908_images/imageFile331.png)

    ![image 332](c02871908_images/imageFile332.png)

    ![image 333](c02871908_images/imageFile333.png)

    ![image 334](c02871908_images/imageFile334.png)

    ![image 335](c02871908_images/imageFile335.png)

    ![image 336](c02871908_images/imageFile336.png)

    ![image 337](c02871908_images/imageFile337.png)

    ![image 338](c02871908_images/imageFile338.png)

    ![image 339](c02871908_images/imageFile339.png)

    ![image 340](c02871908_images/imageFile340.png)

    ![image 341](c02871908_images/imageFile341.png)

    ![image 342](c02871908_images/imageFile342.png)

    ![image 343](c02871908_images/imageFile343.png)

    Page 109

    ![image 344](c02871908_images/imageFile344.png)

    ![image 345](c02871908_images/imageFile345.png)

    ![image 346](c02871908_images/imageFile346.png)

    ![image 347](c02871908_images/imageFile347.png)

    ![image 348](c02871908_images/imageFile348.png)

    ![image 349](c02871908_images/imageFile349.png)

    ![image 350](c02871908_images/imageFile350.png)

    ![image 351](c02871908_images/imageFile351.png)

    ![image 352](c02871908_images/imageFile352.png)

    ![image 353](c02871908_images/imageFile353.png)

    ![image 354](c02871908_images/imageFile354.png)

    ![image 355](c02871908_images/imageFile355.png)

    ![image 356](c02871908_images/imageFile356.png)

    ![image 357](c02871908_images/imageFile357.png)

    ![image 358](c02871908_images/imageFile358.png)

    Page 110

    ![image 359](c02871908_images/imageFile359.png)

    ![image 360](c02871908_images/imageFile360.png)

    CAUTION: Wait until the fuser area has cooled before clearing the jam.

  • Close the rear door.
  • ![image 361](c02871908_images/imageFile361.png)

    ![image 362](c02871908_images/imageFile362.png)

    ![image 363](c02871908_images/imageFile363.png)

    ![image 364](c02871908_images/imageFile364.png)

    ![image 365](c02871908_images/imageFile365.png)

    ![image 366](c02871908_images/imageFile366.png)

    ![image 367](c02871908_images/imageFile367.png)

    ![image 368](c02871908_images/imageFile368.png)

    ![image 369](c02871908_images/imageFile369.png)

    ![image 370](c02871908_images/imageFile370.png)

    Page 111

    ![image 371](c02871908_images/imageFile371.png)

    ![image 372](c02871908_images/imageFile372.png)

    ![image 373](c02871908_images/imageFile373.png)

    ![image 374](c02871908_images/imageFile374.png)

    ![image 375](c02871908_images/imageFile375.png)

    ![image 376](c02871908_images/imageFile376.png)

    ![image 377](c02871908_images/imageFile377.png)

    ![image 378](c02871908_images/imageFile378.png)

    ![image 379](c02871908_images/imageFile379.png)

    ![image 380](c02871908_images/imageFile380.png)

    ![image 381](c02871908_images/imageFile381.png)

    ![image 382](c02871908_images/imageFile382.png)

    ##### Improve print quality

    ####### Check the paper type setting (Windows)

    Check the paper type setting if you are having any of the following problems:

    Page 112

  • ● Toner is smearing on the printed pages.
  • ● Repeated marks occur on the printed pages.
  • ● Printed pages are curled.
  • ● Toner flakes off the printed pages.
  • ● Printed pages have small unprinted areas.
  • 1. From the software program, select the Print option.
  • 2. Select the product, and then click the Properties or Preferences button.
  • 3. Click the Paper/Quality tab.
  • 4. From the Paper type drop-down list, click the More... option.
  • 5. Expand the list of Type is: options.
  • 6. Expand each category of paper types until you find the paper type that you are using.
  • 7. Select the option for the type of paper you are using, and then click the OK button.
  • ####### Check the paper type setting (Mac OS X)

    Check the paper type setting if you are having any of the following problems:

  • ● Toner is smearing on the printed pages.
  • ● Repeated marks occur on the printed pages.
  • ● Printed pages are curled.
  • ● Toner flakes off the printed pages.
  • ● Printed pages have small unprinted areas.
  • 1. On the File menu, click the Print option.
  • Page 113

  • 2. In the Printer menu, select this product.
  • 3. In the Copies & Pages menu, click the Page Setup button.
  • 4. Select a size from the Paper Size drop-down list, and then click the OK button.
  • 5. Open the Finishing menu.
  • 6. Select a type from the Media-type drop-down list.
  • 7. Click the Print button.
  • ####### Check toner cartridge status

    ######## Print the supplies status page (LCD control panel)

    Information pages reside within the product memory. These pages help diagnose and solve problems with the product.

    NOTE: If the product language was not correctly set during installation, you can set the language manually so the information pages print in one of the supported languages. Change the language by using the System Setup menu on the control panel or the embedded Web server.

    | | |---|

  • 1. On the product control panel, press the OK button to open the menus.
  • 2. Open the Reports menu.
  • 3. Select the Supplies Status item, and then press the OK button to print the report.
  • 4. Check the Supplies Status Page for "Approximate Pages Remaining" and other information
  • regarding the toner cartridge.

    Page 114

    ######## Print the supplies status page (touchscreen control panel)

    Information pages reside within the product memory. These pages help diagnose and solve problems with the product.

    NOTE: If the product language was not correctly set during installation, you can set the language manually so the information pages print in one of the supported languages. Change the language by using the System Setup menu on the control panel or the embedded Web server.

    | | |---|

  • 1. From the Home screen on the product control panel, touch the Setup button.
  • 2. Touch the Reports button.
  • 3. Touch the Supplies Status button to print the report.
  • ######## Check the supplies status

    Check the supplies status page for the following information:

  • ● Estimated percentage of cartridge life remaining
  • ● Approximate pages remaining
  • ● Part numbers for HP toner cartridges
  • ● Number of pages printed
  • ####### Print a cleaning page

    Page 115

    Print a cleaning page to remove dust and excess toner from the paper path if you are having any of the following problems:

  • ● Specks of toner are on the printed pages.
  • ● Toner is smearing on the printed pages.
  • ● Repeated marks occur on the printed pages.
  • ######## Print a cleaning page (LCD control panel)

  • 1. On the product control panel, press the OK button to open the menus.
  • 2. Open the following menus:
  • ● Service
  • ● Cleaning Page
  • 3. Load plain paper in Tray 1, and then press the OK button to start the cleaning process. Wait until the process is complete. Discard the page that prints.
  • ######## Print a cleaning page (touchscreen control panel)

  • 1. From the Home screen on the product control panel, touch the Setup button.
  • 2. Touch the Service menu.
  • 3. Touch the Cleaning Page button.
  • 4. Load plain letter or A4 paper when you are prompted.
  • 5. Touch the OK button to begin the cleaning process. Wait until the process is complete. Discard the page that prints.
  • Page 116

    ####### Inspect the toner cartridge for damage

  • 1. Remove the toner cartridge from the product, and verify that the sealing tape has been removed.
  • 2. Check the memory chip for damage.
  • ![image 383](c02871908_images/imageFile383.png)

    ![image 384](c02871908_images/imageFile384.png)

    ![image 385](c02871908_images/imageFile385.png)

    ![image 386](c02871908_images/imageFile386.png)

    ![image 387](c02871908_images/imageFile387.png)

    ![image 388](c02871908_images/imageFile388.png)

  • 3. Examine the surface of the imaging drum on the bottom of the toner cartridge.
  • CAUTION: Do not touch the roller (imaging drum) on the bottom of the cartridge. Fingerprints on the imaging drum can cause print-quality problems.

  • 4. If you see any scratches, fingerprints, or other damage on the imaging drum, replace the toner cartridge.
  • 5. If the imaging drum does not appear to be damaged, rock the toner cartridge gently several times and reinstall it. Print a few pages to see if the problem has resolved.
  • ####### Check the paper and printing environment

    Page 117

    ######## Use paper that meets HP specifications

    Use different paper if you are having any of the following problems:

  • ● The printing is too light or seems faded in areas.
  • ● Specks of toner are on the printed pages.
  • ● Toner is smearing on the printed pages.
  • ● Printed characters seem misformed.
  • ● Printed pages are curled.
  • Always use a paper type and weight that this product supports. In addition, follow these guidelines when selecting paper:

  • ● Use paper that is of good quality and free of cuts, nicks, tears, spots, loose particles, dust, wrinkles, voids, staples, and curled or bent edges.
  • ● Use paper that has not been previously printed on.
  • ● Use paper that is designed for use in laser printers. Do not use paper that is designed only for use in inkjet printers.
  • ● Use paper that is not too rough. Using smoother paper generally results in better print quality.
  • ######## Check the product environment

    Verify that the product is operating within the environmental specifications listed in the product Warranty and Legal Guide.

    ####### Check print job settings

    ######## Check the EconoMode setting

    This product has an EconoMode option for printing drafts of documents. Using EconoMode can use less toner. However, using EconoMode can also reduce print quality. To improve print quality, verify that the EconoMode setting is deactivated.

    Page 118

  • 1. From the software program, select the Print option.
  • 2. Select the product, and then click the Properties or Preferences button.
  • 3. Click the Paper/Quality tab.
  • 4. Verify that the EconoMode check box is cleared. If there is a checkmark in the check box, click
  • the check box to clear it.

    HP does not recommend the full-time use of EconoMode. If EconoMode is used full-time, the toner supply might outlast the mechanical parts in the toner cartridge. If print quality begins to degrade and is no longer acceptable, consider replacing the toner cartridge.

    ####### Use the print driver that best meets your printing needs

    You might need to use a different print driver if the printed page has unexpected lines in graphics, missing text, missing graphics, incorrect formatting, or substituted fonts.

    HP PCL 6 driver ● Provided as the default driver. This driver is automatically installed by the

    HP installer.

  • ● Recommended for all Windows environments
  • ● Provides the overall best speed, print quality, and product-feature support for most users
  • ● Developed to align with the Windows Graphic Device Interface (GDI) for the best speed in Windows environments
  • ● Might not be fully compatible with third-party and custom software programs that are based on PCL 5
  • HP UPD PS driver ● Recommended for printing with Adobe® software programs or with other

    highly graphics-intensive software programs

    Page 119

  • ● Provides support for printing from postscript emulation needs, or for postscript flash font support
  • ● Available for download from www.hp.com/go/upd
  • HP UPD PCL 5 driver ● Recommended for general office printing in Windows environments
  • ● Compatible with previous PCL versions and older HP LaserJet products
  • ● The best choice for printing from third-party or custom software programs
  • ● The best choice when operating with mixed environments that require the product to be set to PCL 5 (UNIX, Linux, mainframe)
  • ● Designed for use in corporate Windows environments to provide a single driver for use with multiple printer models
  • ● Preferred when printing to multiple printer models from a mobile Windows computer
  • ● Available for download from www.hp.com/go/upd
  • HP UPD PCL 6 driver ● Recommended for printing in all Windows environments
  • ● Provides the overall best speed, print quality, and printer feature support for most users
  • ● Developed to align with Windows Graphic Device Interface (GDI) for best speed in Windows environments
  • ● May not be fully compatible with third-party and custom solutions based on PCL5
  • ● Available for download from www.hp.com/go/upd
  • Download additional print drivers from this Web site: www.hp.com/support/ljm401series.

    ##### The product does not print or it prints slowly

    ####### The product does not print

    Page 120

    If the product does not print at all, try the following solutions.

  • 1. Make sure the product is turned on and that the control panel indicates it is ready.
  • ◦ If the control panel does not indicate the product is ready, turn the product off and then on again.
  • ◦ If the control panel indicates the product is ready, try sending the job again.
  • 2. If the control panel indicates the product has an error, resolve the error and then try sending the job again.
  • 3. Make sure the cables are all connected correctly. If the product is connected to a network, check the following items:
  • ◦ Check the light next to the network connection on the product. If the network is active, the light is green.
  • ◦ Make sure that you are using a network cable and not a phone cord to connect to the network.
  • ◦ Make sure the network router, hub, or switch is turned on and that it is working correctly.
  • 4. Install the HP software from the CD that came with the product, or download the latest print driver from www.hp.com. Using generic print drivers can cause delays clearing jobs from the print queue.
  • 5. From the list of printers on your computer, right-click the name of this product, click Properties, and open the Ports tab.
  • ◦ If you are using a network cable to connect to the network, make sure the printer name listed on the Ports tab matches the product name on the product configuration page.
  • ◦ If you are using a USB cable and are connecting to a wireless network, make sure the box is checked next to Virtual printer port for USB.
  • 6. If you are using a personal firewall system on the computer, it might be blocking communication with the product. Try temporarily disabling the firewall to see if it is the source of the problem.
  • 7. If your computer or the product is connected to a wireless network, low signal quality or interference might be delaying print jobs.
  • ####### The product prints slowly

    Page 121

    If the product prints, but it seems slow, try the following solutions.

  • 1. Make sure the computer meets the minimum specifications for this product. For a list of specifications, go to this Web site: www.hp.com/support/ljm401series.
  • 2. When you configure the product to print on some paper types, such as heavy paper, the product prints more slowly so it can correctly fuse the toner to the paper. If the paper type setting is not correct for the type of paper you are using, change the setting to the correct paper type. Using the archive printing mode also will slow the product printing process.
  • 3. If your computer or the product is connected to a wireless network, low signal quality or interference might be delaying print jobs.
  • ENWW The product does not print or it prints slowly 113

    ##### Solve walk-up USB printing problems

    NOTE: This section applies only to the HP LaserJet Pro 400 M401dn Printer and HP LaserJet Pro 400 M401dw Printer models.

    | | |---|

  • ● The USB Flash Drive menu does not open when you insert the USB accessory
  • ● The file does not print from the USB storage accessory
  • ● The file that you want to print is not listed in the USB Flash Drive menu
  • ####### The USB Flash Drive menu does not open when you insert the USB accessory

  • 1. You might be using a USB storage accessory or a file system that this product does not support. Save the files on a standard USB storage accessory that uses File Allocation Table (FAT) file systems. The product supports FAT12, FAT16, and FAT32 USB storage accessories.
  • Page 122

  • 2. If another menu is already open, close that menu and then reinsert the USB storage accessory.
  • 3. The USB storage accessory might have multiple partitions. (Some USB storage accessory manufacturers install software on the accessory that creates partitions, similar to a CD.) Reformat the USB storage accessory to remove the partitions, or use a different USB storage accessory.
  • 4. The USB storage accessory might require more power than the product can provide. a. Remove the USB storage accessory. b. Turn the product off and then on. c. Use a USB storage accessory that has its own power supply or that requires less power.
  • 5. The USB storage accessory might not be functioning correctly.
  • a. Remove the USB storage accessory.
  • b. Turn the product off and then on.
  • c. Try printing from another USB storage accessory.
  • ####### The file does not print from the USB storage accessory

  • 1. Make sure paper is in the tray.
  • 2. Check the control panel for messages. If paper is jammed in the product, clear the jam.
  • ####### The file that you want to print is not listed in the USB Flash Drive menu

  • You might be trying to print a file type that the USB printing feature does not support. The product
  • supports .PDF and .JPEG file types.

  • You might have too many files in a single folder on the USB storage accessory. Reduce the
  • number of files in the folder by moving them to subfolders.

  • You might be using a character set for the file name that the product does not support. In this case, the product replaces the file names with characters from a different character set. Rename the files using ASCII characters.
  • Page 123

    ENWW Solve walk-up USB printing problems 115

    ##### Solve direct connection problems

    If you have connected the product directly to a computer, check the cable.

  • ● Verify that the cable is connected to the computer and to the product.
  • ● Verify that the cable is not longer than 5 m (16.4 ft). Try using a shorter cable.
  • ● Verify that the cable is working correctly by connecting it to another product. Replace the cable if necessary.
  • Solve wired network problems NOTE: This section applies to all models except the HP LaserJet Pro 400 M401a Printer and HP LaserJet Pro 400 M401d Printer models. Check the following items to verify that the product is communicating with the network. Before beginning, print a configuration page from the product control panel and locate the product IP address that is listed on this page.

    | | |---|

  • ● Poor physical connection
  • ● The computer is using the incorrect IP address for the product
  • ● The computer is unable to communicate with the product
  • ● The product is using incorrect link and duplex settings for the network
  • ● New software programs might be causing compatibility problems
  • ● The computer or workstation might be set up incorrectly
  • Page 124

  • ● The product is disabled, or other network settings are incorrect
  • NOTE: HP does not support peer-to-peer networking, as the feature is a function of Microsoft operating systems and not of the HP print drivers. For more information, go to Microsoft at www.microsoft.com.

    | | |---|

    ####### Poor physical connection

  • 1. Verify that the product is attached to the correct network port using a cable of the correct length.
  • 2. Verify that cable connections are secure.
  • 3. Look at the network port connection on the back of the product, and verify that the amber activity light and the green link-status light are lit.
  • 4. If the problem continues, try a different cable or port on the hub.
  • ####### The computer is using the incorrect IP address for the product

  • 1. Open the printer properties and click the Ports tab. Verify that the current IP address for the product is selected. The product IP address is listed on the product configuration page.
  • 2. If you installed the product using the HP standard TCP/IP port, select the box labeled Always print to this printer, even if its IP address changes.
  • 3. If you installed the product using a Microsoft standard TCP/IP port, use the hostname instead of the IP address.
  • 4. If the IP address is correct, delete the product and then add it again.
  • 5. Create a new HP TCP/IP port with the correct address.
  • ENWW Solve wired network problems 117

    ####### The computer is unable to communicate with the product

    Page 125

  • 1. Test network communication by pinging the network.
  • a. Open a command-line prompt on your computer. For Windows, click Start, click Run, and then type cmd.
  • b. Type ping followed by the IP address for your product.
  • For Mac OS X, open the Network Utility, and then supply the IP address in the correct field in the Ping pane.

  • c. If the window displays round-trip times, the network is working.
  • 2. If the ping command failed, verify that the network hubs are on, and then verify that the network settings, the product, and the computer are all configured for the same network.
  • NOTE: You also can test the network connection by attempting to open the HP Embedded Web Server in a supported Web browser.

    | | |---|

    ####### The product is using incorrect link and duplex settings for the network

    Hewlett-Packard recommends leaving this setting in automatic mode (the default setting). If you change these settings, you must also change them for your network.

    ####### New software programs might be causing compatibility problems

    Verify that any new software programs are correctly installed and that they use the correct print driver.

    ####### The computer or workstation might be set up incorrectly

    Page 126

  • 1. Check the network drivers, print drivers, and the network redirection.
  • 2. Verify that the operating system is configured correctly.
  • ####### The product is disabled, or other network settings are incorrect

  • 1. Review the configuration page to check the status of the network protocol. Enable it if necessary.
  • 2. Reconfigure the network settings if necessary.
  • ##### Solve wireless network problems

    NOTE: This section applies to the HP LaserJet Pro 400 M401dw Printer model only.

    | | |---|

    ####### Wireless connectivity checklist

  • ● Verify that the network cable is not connected.
  • ● Verify that the product and the wireless router are turned on and have power. Also make sure that the wireless radio in the product is turned on.
  • ● Verify that the service set identifier (SSID) is correct. Print a configuration page to determine the SSID. If you are not sure the SSID is correct, run the wireless setup again.
  • ● With secured networks, verify that the security information is correct. If the security information is incorrect, run the wireless setup again.
  • ● If the wireless network is working correctly, try accessing other computers on the wireless network. If the network has Internet access, try connecting to the Internet over a wireless connection.
  • ● Verify that the encryption method (AES or TKIP) is the same for the product as it is for the wireless access point (on networks using WPA security).
  • ● Verify that the product is within the range of the wireless network. For most networks, the product must be within 30 m (100 ft) of the wireless access point (wireless router).
  • ● Verify that obstacles do not block the wireless signal. Remove any large metal objects between the access point and the product. Make sure poles, walls, or support columns containing metal or concrete do not separate the product and wireless access point.
  • Page 127

  • ● Verify that the product is located away from electronic devices that might interfere with the wireless signal. Many devices can interfere with the wireless signal including motors, cordless phones, security system cameras, other wireless networks, and some Bluetooth devices.
  • ● Verify that the print driver is installed on the computer.
  • ● Verify that you have selected the correct printer port.
  • ● Verify that the computer and product connect to the same wireless network.
  • ● For Mac OS X, verify that the wireless router supports Bonjour.
  • ####### The product does not print after the wireless configuration completes

  • 1. Make sure that the product is turned on and in the ready state.
  • 2. Turn off any third-party firewalls on your computer.
  • 3. Make sure that the wireless network is working correctly.
  • 4. Make sure that your computer is working correctly. If necessary, restart the computer.
  • 5. Try manually configuring the product from the control panel.
  • ####### The product does not print, and the computer has a third-party firewall installed

  • 1. Update the firewall with the most recent update available from the manufacturer.
  • 2. If programs request firewall access when you install the product or try to print, make sure you allow the programs to run.
  • 3. Temporarily turn off the firewall, and then install the wireless product on the computer. Enable the firewall when you have completed the wireless installation.
  • ####### The wireless connection does not work after moving the wireless router or product

  • 1. Make sure that the router or product connects to the same network that your computer connects to.
  • 2. Print a configuration page.
  • Page 128

  • 3. Compare the service set identifier (SSID) on the configuration page to the SSID in the printer configuration for the computer.
  • 4. If the numbers are not the same, the devices are not connecting to the same network. Reconfigure the wireless setup for the product.
  • ####### Cannot connect more computers to the wireless product

  • 1. Make sure that the other computers are within the wireless range and that no obstacles block the signal. For most networks, the wireless range is within 30 m (100 ft) of the wireless access point.
  • 2. Make sure that the product is turned on and in the ready state.
  • 3. Turn off any third-party firewalls on your computer.
  • 4. Make sure that the wireless network is working correctly.
  • 5. Make sure that your computer is working correctly. If necessary, restart the computer.
  • ####### The wireless product loses communication when connected to a VPN

    ● Typically, you cannot connect to a VPN and other networks at the same time.

    ####### The network does not appear in the wireless networks list

  • ● Make sure the wireless router is turned on and has power.
  • ● The network might be hidden. However, you can still connect to a hidden network.
  • ####### The wireless network is not functioning

  • 1. Make sure that the network cable is not connected.
  • 2. To verify if the network has lost communication, try connecting other devices to the network.
  • 3. Test network communication by pinging the network.
  • Page 129

  • a. Open a command-line prompt on your computer. For Windows, click Start, click Run, and then type cmd.
  • b. Type ping followed by the router IP address.
  • For Mac OS X, open the Network Utility, and then supply the IP address in the correct field in the Ping pane.

  • c. If the window displays round-trip times, the network is working.
  • 4. Make sure that the router or product connects to the same network that the computer connects to.
  • a. Print a configuration page.
  • b. Compare the service set identifier (SSID) on the configuration report to the SSID in the printer configuration for the computer.
  • c. If the numbers are not the same, the devices are not connecting to the same network. Reconfigure the wireless setup for the product.
  • ####### Perform a wireless network diagnostic test

    From the product control panel, you can run a diagnostic test that provides information about the wireless network settings.

  • 1. From the Home screen on the product control panel, touch the Setup button.
  • 2. Open the following menus
  • ● System Setup
  • ● Self Diagnostics
  • 3. Touch the Run Network Test button to start the test. The product prints a test page that shows test results.
  • Page 130

    ####### Reduce interference on a wireless network

    The following tips can reduce interference in a wireless network:

  • ● Keep the wireless devices away from large metal objects, such as filing cabinets, and other electromagnetic devices, such as microwaves and cordless telephones. These objects can disrupt radio signals.
  • ● Keep the wireless devices away from large masonry structures and other building structures. These objects can absorb radio waves and lower signal strength.
  • ● Position the wireless router in a central location in line of sight with the wireless products on the network.
  • ##### Solve product software problems with Windows

    ####### A print driver for the product is not visible in the Printer folder

  • 1. Reinstall the product software.
  • | | |---|

    NOTE: Close any applications that are running. To close an application that has an icon in the system tray, right-click the icon, and select Close or Disable.

  • 2. Try plugging the USB cable into a different USB port on the computer.
  • ####### An error message was displayed during the software installation

  • 1. Reinstall the product software.
  • Page 131

    | | |---|

    NOTE: Close any applications that are running. To close an application that has an icon in the system tray, right-click the icon, and select Close or Disable.

  • 2. Check the amount of free space on the drive where you are installing the product software. If necessary, free up as much space as you can, and reinstall the product software.
  • 3. If necessary, run the Disk Defragmenter, and reinstall the product software.
  • ####### The product is in Ready mode, but nothing prints

  • 1. Print a configuration page, and verify the product functionality.
  • 2. Verify that all of the cables are correctly seated and within specifications. This includes the USB and power cables. Try a new cable.
  • 3. Verify that the IP address on the configuration page matches the IP address for the software port. Use one of the following procedures:
  • Windows XP, Windows Server 2003, Windows Server 2008, and Windows Vista

  • a. Click Start.
  • b. Click Settings.
  • c. Click Printers and Faxes (using the default Start menu view) or click Printers (using the Classic Start menu view).
  • d. Right-click the product driver icon, and then select Properties.
  • e. Click the Ports tab, and then click Configure Port.
  • f. Verify the IP address, and then click OK or Cancel.
  • g. If the IP addresses are not the same, delete the driver, and reinstall the driver using the correct IP address.
  • h. Create a new HP TCP/IP port using the correct IP address.
  • Page 132

    ENWW Solve product software problems with Windows 123

    Windows 7

  • a. Click Start.
  • b. Click Devices and Printers.
  • c. Right-click the product driver icon, and then select Printer properties.
  • d. Click the Ports tab, and then click Configure Port.
  • e. Verify the IP address, and then click OK or Cancel.
  • f. If the IP addresses are not the same, delete the driver, and reinstall the driver using the correct IP address.
  • g. Create a new HP TCP/IP port using the correct IP address.
  • Try using the IP address to open the HP Embedded Web Server in a supported Web browser.
  • ##### Solve product software problems with Mac OS X

  • ● The print driver is not listed in the Print & Fax or Print & Scan list
  • ● The product name does not appear in the product list in the Print & Fax or Print & Scan list
  • ● The print driver does not automatically set up the selected product in the Print & Fax or Print & Scan list
  • ● A print job was not sent to the product that you wanted
  • ● When connected with a USB cable, the product does not appear in the Print & Fax or Print & Scan list after the driver is selected.
  • ● You are using a generic print driver when using a USB connection
  • Page 133

    ####### The print driver is not listed in the Print & Fax or Print & Scan list

  • 1. Make sure that the product .GZ file is in the following hard-drive folder: Library/Printers/ PPDs/Contents/Resources. If necessary, reinstall the software.
  • 2. If the GZ file is in the folder, the PPD file might be corrupt. Delete the file and then reinstall the software.
  • ####### The product name does not appear in the product list in the Print & Fax or Print & Scan list

  • 1. Make sure that the cables are connected correctly and the product is on.
  • 2. Use the + button to add the product to the Print & Fax (Print & Scan in Mac OS X v10.7) list.
  • 3. Replace the USB or network cable with a high-quality cable.
  • ####### The print driver does not automatically set up the selected product in the Print & Fax or Print & Scan list

  • 1. Make sure that the cables are connected correctly and the product is on.
  • 2. Make sure that the product .GZ file is in the following hard-drive folder: Library/Printers/ PPDs/Contents/Resources. If necessary, reinstall the software.
  • 3. If the GZ file is in the folder, the PPD file might be corrupt. Delete the file and then reinstall the software.
  • 4. Use the + button to add the product to the Print & Fax (Print & Scan in Mac OS X v10.7) list.
  • 5. Replace the USB or network cable with a high-quality cable.
  • ENWW Solve product software problems with Mac OS X 125

    ####### A print job was not sent to the product that you wanted

  • 1. Open the print queue and restart the print job.
  • Page 134

  • 2. Another product with the same or similar name might have received your print job. Print a configuration page to check the product name. Verify that the name on the configuration page matches the product name in the Print & Fax (Print & Scan in Mac OS X v10.7) list.
  • ####### When connected with a USB cable, the product does not appear in the Print & Fax or Print & Scan list after the driver is selected.

    ######### Software troubleshooting

  • 1. Make sure that your Mac operating system is Mac OS X 10.5 or later.
  • 2. Use the + button to add the product to the Print & Fax (Print & Scan in Mac OS X v10.7) list.
  • ######### Hardware troubleshooting

  • 1. Make sure that the product is turned on.
  • 2. Make sure that the USB cable is connected correctly.
  • 3. Make sure that you are using the appropriate Hi-Speed USB cable.
  • 4. Make sure that you do not have too many USB devices drawing power from the chain. Disconnect all of the devices from the chain, and then connect the cable directly to the USB port on the computer.
  • 5. Check to see if more than two non-powered USB hubs are connected in a row on the chain. Disconnect all of the devices from the chain, and then connect the cable directly to the USB port on the computer. NOTE: The iMac keyboard is a non-powered USB hub.
  • | | |---|

    ####### You are using a generic print driver when using a USB connection

    If you connected the USB cable before you installed the software, you might be using a generic print driver instead of the driver for this product.

  • 1. Delete the generic print driver.
  • Page 135

  • 2. Reinstall the software from the product CD. Do not connect the USB cable until the software installation program prompts you.
  • 3. If multiple printers are installed, make sure that you have selected the correct printer in the Format For drop-down menu in the Print dialog box.
  • ##### Remove software (Windows)

    ######### Windows XP

  • 1. Click Start, and then click Programs.
  • 2. Click HP, and then click the product name.
  • 3. Click Uninstall, and then follow the onscreen instructions to remove the software.
  • Windows Vista and Windows 7

  • 1. Click Start, and then click All Programs.
  • 2. Click HP, and then click the product name.
  • 3. Click Uninstall, and then follow the onscreen instructions to remove the software.
  • ENWW Remove software (Windows) 127

    ##### Remove software (Mac OS X)

    You must have administrator rights to remove the software.

  • 1. Disconnect the product from the computer.
  • 2. Open Applications.
  • 3. Select Hewlett Packard.
  • Page 136

  • 4. Select HP Uninstaller.
  • 5. Select the product from the list of devices, and then click the Uninstall button.
  • 6. After the software is uninstalled, restart the computer and empty the Trash.
  • 6 Supplies and accessories

  • ● Order parts, accessories, and supplies
  • ● HP policy on non-HP supplies
  • ● HP anticounterfeit Web site
  • ENWW 129

    ##### Order parts, accessories, and supplies

    HP original toner cartridge and paper www.hp.com/go/suresupply Order genuine HP parts or accessories www.hp.com/buy/parts Order through service or support providers Contact an HP-authorized service or support provider.

    ############ Item Part number Cartridge number Description

    HP LaserJet toner cartridge CF280A (standard)

    80A

    Black toner cartridge

    CF280X (extended)

    Page 137

    80X

    Input tray CF284A 500-sheet Tray 3 USB 2.0 printer cable C6518A (2-meter standard) A-to-B cable

    ##### HP policy on non-HP supplies

    Hewlett-Packard Company cannot recommend the use of non-HP toner cartridges, either new or remanufactured.

    NOTE: For HP printer products, the use of a non-HP toner cartridge or a refilled toner cartridge does not affect either the warranty to the customer or any HP support contract with the customer. However, if product failure or damage is attributable to the use of a non-HP toner cartridge or refilled toner cartridge, HP will charge its standard time and materials charges to service the product for the particular failure or damage.

    | | |---|

    ##### HP anticounterfeit Web site

    Go to www.hp.com/go/anticounterfeit when you install an HP toner cartridge and the control-panel message says the cartridge is non-HP. HP will help determine if the cartridge is genuine and take steps to resolve the problem.

    Your toner cartridge might not be a genuine HP toner cartridge if you notice the following:

  • ● The supplies status page indicates that a non-HP supply is installed.
  • ● You are experiencing a high number of problems with the toner cartridge.
  • ● The cartridge does not look like it usually does (for example, the packaging differs from HP packaging).
  • 130 Chapter 6 Supplies and accessories ENWW

    Index

    Page 138

  • A accessories
  • ordering 129, 130 AirPrint 54 amber light 4 anticounterfeit supplies 130 applications

    downloading 60 apps button 7 Apps menu 60 archival-quality printing

    creating 51 LCD control panel 51 touchscreen control panel 51

    attention light LCD control panel 4 touchscreen control panel 5

    automatic duplex printing (double-

    sided) with Mac 43 with Windows 31

  • B back arrow
  • LCD control panel 4 back button

    touchscreen control panel 5 bin, output

    locating 2 bins, output

    jams, clearing 103

    booklets printing (Mac) 46 printing (Windows) 41

    buttons on LCD control panel 4 on touchscreen control panel 5

    Page 139

    buttons on control panel 4

    C cancel button

    LCD control panel 4 touchscreen control panel 5

    canceling print job (Mac) 49 print job (Windows) 47

    cartridge part numbers 130 replacing 77 supplies status page 8

    cartridges non-HP 130 recycling 76 storage 76

    cleaning

    paper path 108 configuration page 8 control panel

    buttons and lights 4 help 87 locating 2 menu map, printing 8 message types 88 messages, troubleshooting 88 Reports menu 8, 9 counterfeit supplies 130

    D default gateway, setting 61 defaults, restoring 86 door release, locating 2 drivers

    changing settings (Mac) 26 changing settings (Windows)

    24

    presets (Mac) 43 settings (Mac) 43 usage page 8

    duplex printing (double-sided)

    Page 140

    automatic settings (Mac) 43 automatic settings (Windows)

    31 manual settings (Mac) 44 manual settings (Windows) 32

    duplex settings, changing 63

  • E EconoMode settings 71
  • checking 110 economy settings 71 Embedded Web Server

    changing network settings 61 changing password 69 changing product name 62 opening 61, 62, 69

    envelopes

    supported sizes 12 error messages, control panel 88 errors

    software 123

  • F factory-set defaults, restoring 86 fonts
  • lists, printing 8 fraud Web site 130 front cover

    locating 2

  • G gateway, setting default 61 green light 4
  • H help button and light
  • touchscreen control panel 5 help, control panel 87

    Page 141

    home button 5 Home screen, control panel 7 HP Device Toolbox, using 65 HP Embedded Web Server

    changing network settings 61 changing password 69 changing product name 62 opening 61, 62, 69

    HP ePrint setup 52, 53 using 52

    HP fraud Web site 130 HP PCL 6 print driver 111 HP Reconfiguration Utility

    network installation 58 HP UPD PCL 5 print driver 111 HP UPD PCL 6 print driver 111 HP UPD PS print driver 111 HP Utility for Mac

    Bonjour 67 features 67 opening 67 HP Utility, Mac 67 HP Web Jetadmin 68 HP Web Services

    applications 60 enabling 52, 60

  • I information button 7 input tray
  • loading 15 locating 2

    input trays

    loading 15 interface ports

    locating 3 IPv4 address 61

  • J jams
  • locating 98 output bin, clearing 103 preventing 97 tracking number of 8

    Page 142

    Jetadmin, HP Web 68

    L landscape orientation

    changing (Mac) 45 changing (Windows) 36

    LCD control panel

    buttons and lights 4 LED light 4 left arrow

    LCD control panel 4 touchscreen control panel 5

    lights on LCD control panel 4 on touchscreen control panel 5

    lights on control panel 4 link speed settings 63 loading paper

    input tray 15 lock

    product 69

  • M Mac
  • driver settings 26, 43 HP Utility 67 problems, troubleshooting 125

    managing network 61 media

    pages per sheet (Mac) 45 menus, control panel

    Page 143

    map, printing 8 messages, control panel 88 model number

    locating 3

    multiple pages per sheet Mac 45 printing (Windows) 34

  • N n-up printing
  • Mac 45 selecting (Windows) 34

    network password, changing 69 password, setting 69 product name, changing 62 settings, changing 61 settings, viewing 61 test wireless 121

    network button 7 network port

    locating 3

    networks configuration page 8 default gateway 61

    installing the product 58 IPv4 address 61 settings report 8 subnet mask 61

    non-HP supplies 130

  • O Ok button 4 online help, control panel 87 ordering
  • supplies and accessories 130 ordering supplies

    Web sites 129

    Page 144

    orientation changing (Mac) 45 changing (Windows) 36

    output bin locating 2

  • P page count 8 page orientation
  • changing (Mac) 45 changing (Windows) 36

    page sizes scaling documents to fit (Mac) 46 scaling documents to fit (Windows) 40

    pages per sheet Mac 45 selecting (Windows) 34

    paper jams 97 ordering 130 pages per sheet (Mac) 45 selecting 109 supported sizes 12 supported types 14

    paper environment 109 paper jams

    locating 98 paper path

    cleaning 108 paper pickup problems solving 97

    paper sizes selecting (Mac) 49 selecting (Windows) 47

    selecting custom sizes (Mac) 49 selecting custom sizes

    (Windows) 47 paper type

    checking settings 106

    Page 145

    paper types selecting (Mac) 45 selecting (Windows) 37

    paper, covers printing (Mac) 46 printing (Windows) 38

    part numbers

    toner cartridge 130 PCL font list 8 portrait orientation

    changing (Mac) 45 changing (Windows) 36

    ports

    locating 3 power button

  • locating 2
  • power connection

  • locating 3
  • power-down delay setting 72 presets (Mac) 43 print drivers

    choosing 110

    print drivers (Mac) changing settings 26 settings 43

    print job canceling (Mac) 49 canceling (Windows) 47

    Page 146

    print job settings

    checking 110 print quality

    improving 106 printer driver (Windows) supported 22 printer drivers (Mac) settings 43 printer drivers (Windows)

    changing settings 24 printing

    from USB storage accessories

    55 product reports 8, 9 settings (Mac) 43

    printing environment 109 printing on both sides

    automatic settings (Mac) 43 automatic settings (Windows)

    31 manual settings (Mac) 44 manual settings (Windows) 32

    problem-solving no response 112 slow response 113

    product status 7 PS font list 8

  • R ready light
  • LCD control panel 4 touchscreen control panel 5

    rear door

    locating 3 recycling supplies 76 replacing toner cartridge 77 reports

    Page 147

    Configuration Report 8 Demo Page 8 Menu Structure 8 Network Summary 8 PCL Font List 8 PCL6 Font List 8 PS Font List 8 Service Page 8 Supplies Status 8 Usage Page 8

    Reports menu 8, 9 resize documents

    Mac 46 Windows 40

    restoring factory-set defaults 86 right arrow

    LCD control panel 4 touchscreen control panel 5

  • S scale documents
  • Mac 46 Windows 40

    serial number

    locating 3 service page 8 settings

    driver presets (Mac) 43

    drivers 24 drivers (Mac) 26 factory-set defaults, restoring

    86

    network report 8 setup button 4

    touchscreen control panel 7

    Page 148

    shortcuts (Windows) creating 29 using 28

    sleep delay

    disabling 71 enabling 71 slot for security cable

    locating 3

    software HP Utility for Mac 67 HP Web Jetadmin 68 problems 123 uninstalling for Mac 128 uninstalling for Windows 127

    solving walk-up USB printing problems 114

    solving problems checklist 84 control panel messages 88 with paper feeds 97

    special paper for covers printing (Mac) 46 printing (Windows) 38

    status Home screen, control panel 7 HP Utility, Mac 67 supplies, printing report 8

    storing

    toner cartridges 76 subnet mask 61 supplies

    counterfeit 130 low threshold settings 74 non-HP 130 ordering 129, 130 part numbers 130 recycling 76 replacing toner cartridge 77 status, viewing with HP Utility

    for Mac 67

    using when low 74 supplies button 7

    supplies status page 8 printing 107

    T TCP/IP

    manually configuring IPv4 parameters 61

    toner cartridge checking for damage 108 checking status 107 door release, locating 2 low threshold settings 74 part numbers 130 replacing 77 supplies status page 8 using when low 74

    toner cartridges non-HP 130 recycling 76 storage 76

    touchscreen control panel buttons and lights 5 Home screen 7 touchscreen display 5 transparencies

    types supported 14

  • Tray 1 jams, clearing 98 loading 15 locating 2
  • Tray 2 loading 15 locating 2
  • Tray 3 loading 15
  • trays jams, clearing 100, 102 supported paper sizes 12 supported paper types 14

    troubleshooting checklist 84 control panel messages 88 jams 97 Mac problems 125 network problems 117 paper feed problems 97 USB connection 116 walk-up USB printing

    problems 114 Windows problems 123

    wired network 117 wireless network 119

    two-sided printing

    automatic settings (Mac) 43 automatic settings (Windows)

    31 manual settings (Mac) 44 manual settings (Windows) 32

    types of paper suppported 14

    U uninstalling Mac software 128 uninstalling Windows software

    127 usage page 8 USB button 7 USB cable, part number 130 USB connection

    troubleshooting 116 USB port

    locating 3

    USB storage accessories printing from 55

    W walk-up USB port locating 2 walk-up USB printing 55 watermarks

    printing (Mac) 49 printing (Windows) 48

    Web Services applications 60 enabling 60

    Web Services button 7 Web sites

    fraud reports 130 ordering supplies 129

    Windows

    driver settings 24 wireless button 7 wireless diagnostic test 121 wireless light 5 wireless network

    diagnostic test 121 troubleshooting 119

    wireless network interference 122

    © 2014 Hewlett-Packard Development Company, L.P. www.hp.com

    ###### *CF270-91009* *CF270-91009* CF270-91009

    ![image 389](c02871908_images/imageFile389.png)

    More from HP

    Similar Printers