
Ask AI
— answers from the official manualAnswers from the official manual.
Common questions
Common Questions
9 totalWhat are the supported operating systems?
The printer supports Windows Vista, XP, Windows 7, Server 2003, and 2008 (all in both 32-bit and 64-bit versions), as well as Mac OS X v10.4, v10.5, and v10.6.
How do I install the HP Universal Print Driver (UPD)?
You can download UPD from the Web at www.hp.com/go/upd. Choose either Traditional mode for a single computer or Dynamic mode for networked environments to discover and print in any location.
What are the printer maintenance schedules?
Maintenance includes cleaning according to usage patterns; refer to documentation on the software CD or online at www.hp.com/support/ljp1600series for detailed instructions and intervals.
How do I enable wireless capabilities?
Press and hold the Wireless button (P1102w, P1566, or P1606dn) for five seconds to turn on wireless features. Follow on-screen instructions using EWS in a Web browser.
How do I clear paper jams?
Open the front door and follow steps outlined in the online user guide or via HP's Embedded Web Server for specific model to safely retrieve jammed paper and reset the system without damaging internal components.
What paper sizes does this printer support?
Supported paper dimensions include A4, letter size, legal, and custom through dialog boxes that specify width and height control limits as detailed in tables on page 60 onwards.
Full Manual
282 pages
|LASERJET PROFESSIONAL P1100/P1560/P1600
SERIES PRINTERS
Software Technical Reference

Additional product information:
www.hp.com/support/ljp1100series www.hp.com/support/ljp1560series www.hp.com/support/ljp1600series


| |---|
| | |---|
HP LaserJet Professional P1100/P1560/ P1600 Series Printer
Software Technical Reference
############# Copyright and license
©2010 Copyright Hewlett-Packard Development Company, L.P.
Reproduction, adaptation or translation without prior written permission is prohibited, except as allowed under the copyright laws.
The information contained herein is subject to change without notice.

The only warranties for HP products and services are set forth in the express warranty statements accompanying such products and services. Nothing herein should be construed as constituting an additional warranty. HP shall not be liable for technical or editorial errors or omissions contained herein.
Edition 1, 3/2010
############# Trademark Credits
Adobe®, Acrobat® and PostScript® are trademarks of Adobe Systems Incorporated.
Corel® is a trademark or registered trademark of Corel Corporation or Corel Corporation Limited.
Microsoft®, Windows® and Windows NT® are U.S. registered trademarks of Microsoft Corporation.
Windows Vista™ is either a registered trademark or trademark of Microsoft Corporation in the United States and/or other countries.
ENERGY STAR® and the ENERGY STAR logo® are U.S. registered marks of the United States Enviromental Protection Agency.
Table of contents
Front and left side view ........................................................................................................ 7 Back view ........................................................................................................................... 10 Serial number and product number location ...................................................................... 11 Control-panel layout ........................................................................................................... 12
Printing-system software .................................................................................................................... 14
Operating-system support ................................................................................................ 14 Supported operating systems for Windows ....................................................... 15 Supported printer drivers for Windows .............................................................. 15 HP Universal Print Driver (UPD) ....................................................................... 15
UPD installation modes .................................................................... 16 Supported utilities for Windows ......................................................................... 16
HP Embedded Web Server .............................................................. 16 Supported operating systems for Macintosh ..................................................... 16 Supported printer drivers for Macintosh ............................................................ 16 Supported utilities for Macintosh ....................................................................... 17
HP LaserJet Utility ............................................................................ 17 Embedded Web Server .................................................................... 17
Availability and localization ............................................................................................... 17 Software component availability for Windows and Macintosh .......................... 18 Printing-system software on the Web ............................................................... 18 In-box printing-system software CD .................................................................. 19
Printing-system software CD ............................................................ 19 CD Versions ..................................................................................... 19
Documentation ................................................................................................................................... 23
Printing-system software CD ............................................................................................. 24 Main CD browser screen ................................................................................... 24 User Documentation ......................................................................................... 25

HP LaserJet Help Navigation ........................................................... 25 User Guide ....................................................................................... 34
ENWW iii
More Information .............................................................................. 35
######### 2 Software description .................................................................................................................................... 37Windows printing-system software ..................................................................................................... 38
Supported operating systems for Windows ....................................................................... 38 Windows operating system requirements .......................................................................... 38 Macintosh system requirements ........................................................................................ 39 Printer driver ...................................................................................................................... 39 Select the correct printer driver for Windows ..................................................................... 39 Priority for print settings ..................................................................................................... 40 Change printer-driver settings for Windows ....................................................................... 40 Printing system and installer .............................................................................................. 41
HP Smart Install ................................................................................................ 41 Printing-system software CD for Windows systems .......................................... 41
Driver version numbers for Windows operating systems ................................................... 43 Embedded Web Server ...................................................................................................................... 44
########## 3 Install Windows printing-system components .......................................................................................... 45Supported operating systems for Windows ........................................................................................ 46Windows operating system requirements .......................................................................................... 46Install overview ................................................................................................................................... 46Software installation types for Windows ............................................................................................. 47Installation options .............................................................................................................................. 47Microsoft Windows general installation overview ............................................................................... 48
HP LaserJet Professional P1100/P1560/P1600 Series Printer printing-system software for Windows systems ......................................................................................................... 48 HP Smart Install ................................................................................................ 48 CD installation ................................................................................................... 48 Install the print driver using the Microsoft Add Printer Wizard .......................... 49
Use an existing port for a direct connection ..................................... 51 Create a new TCP/IP port for a direct connection ............................ 56 Print server connection ..................................................................... 59
Detailed MS Windows installation instructions ................................................................................... 63
Install the Host-based driver using HP Smart Install ......................................................... 63 Install the print driver for USB and wired network connected products ............. 63 Install the print driver for wireless connected network products ........................ 67
Install the product on a secure wireless network .............................. 67 Install the print driver on a non-secured wireless network ................ 97
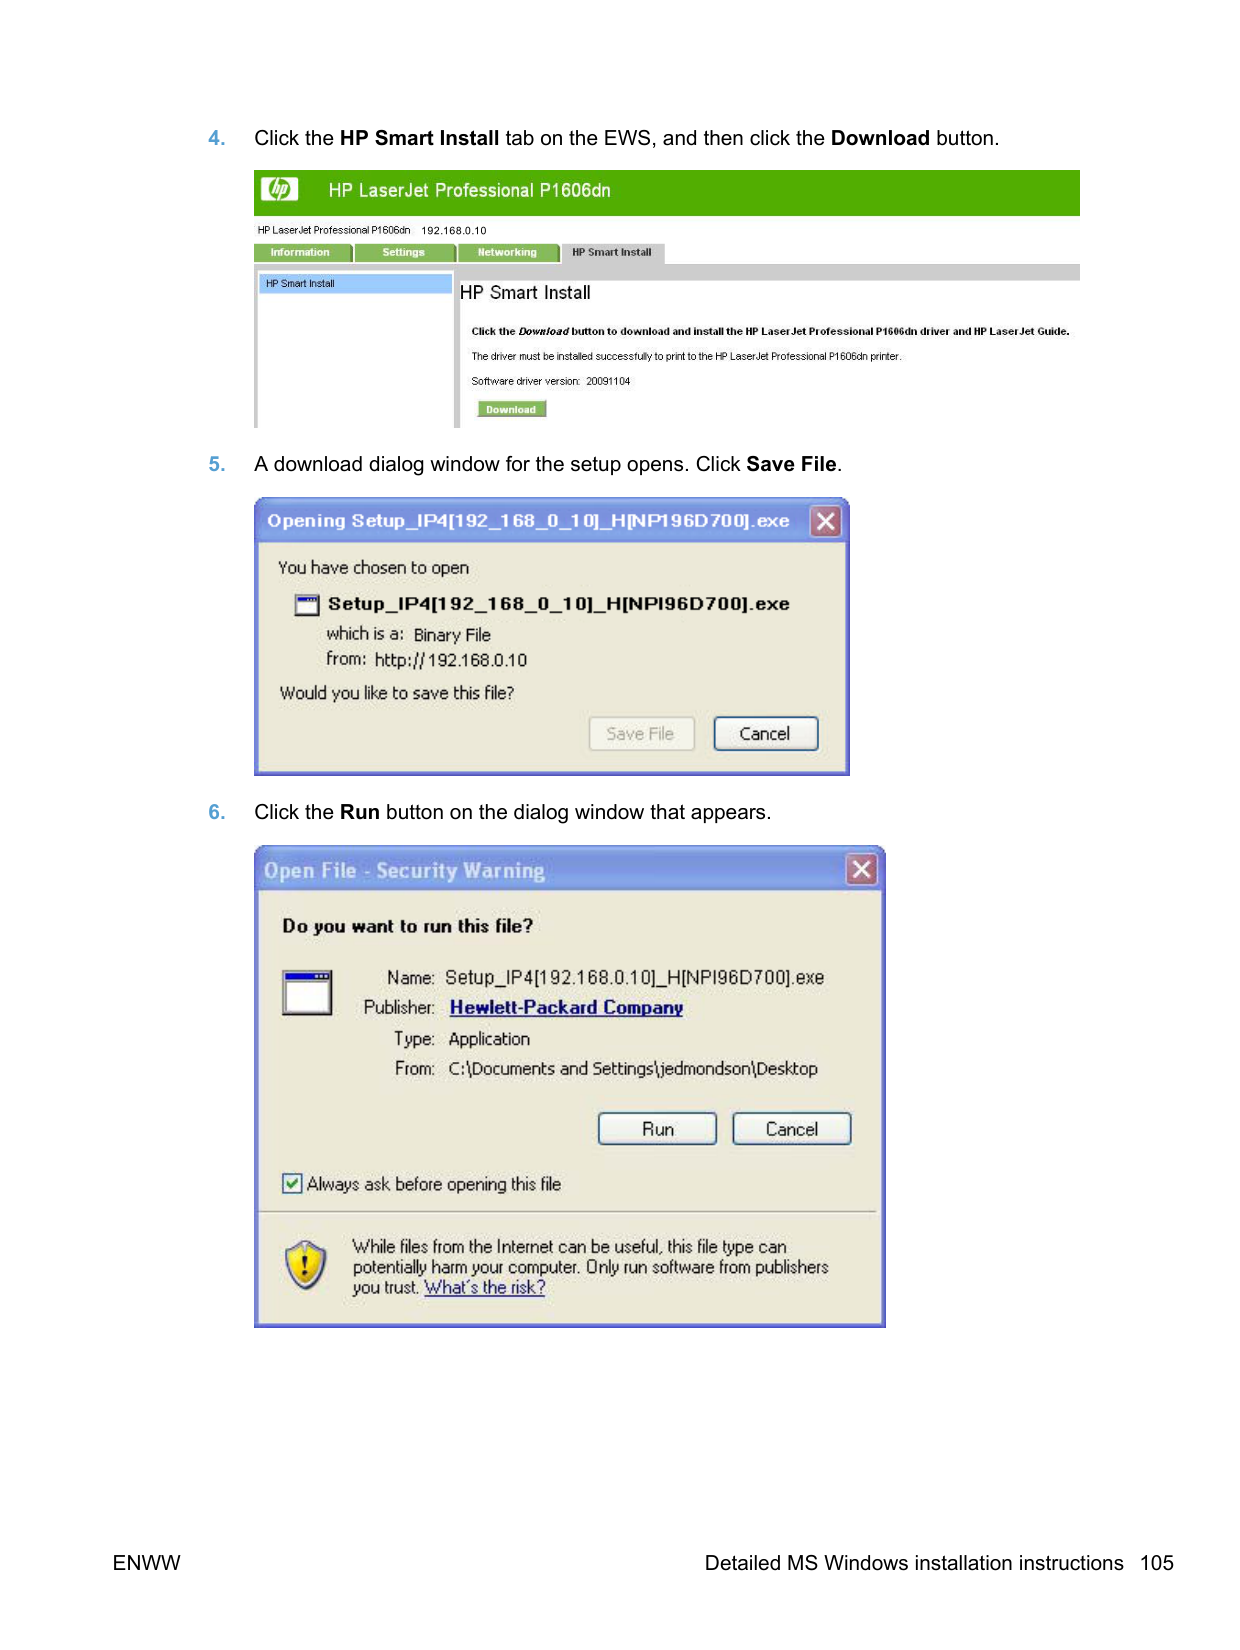
EWS Smart Install (network products) ............................................................ 104
Install the Host-based driver from the CD ........................................................................ 109 Install the print driver from the CD for USB connected products .................... 109 Install the print driver from the CD for wired network connected products ...... 115
Install the print driver from the CD for wireless network connected products .......................................................................................................... 124 Install the product on a secure wireless network ............................ 124 Install the print driver on a non-secure network .............................. 158
Install the print driver from the CD to print to a previously configured wireless network printer ................................................................................................ 167
Install the HP LaserJet Professional P1100/P1560/P1600 Series Printer XPS driver ..... 177 New driver install ............................................................................................. 177 Existing driver install ....................................................................................... 185
Additional installation information .................................................................................... 194 Use the Back, Next, Finish, and Cancel buttons ............................................................. 195 Set a default printer ......................................................................................................... 196
Uninstall software ............................................................................................................................. 197
Uninstall the Host-based driver ........................................................................................ 197 Use the HP Uninstall utility (recommended) ................................................... 197 Use Windows Add or Remove Programs feature ........................................... 197
Uninstall the XPS driver ................................................................................................... 198
Printing Preferences driver tabs ...................................................................................... 200 Properties driver tabs ....................................................................................................... 201
Help system ...................................................................................................................................... 202 “What's this?” Help ........................................................................................................... 202 Incompatible Print Settings messages ............................................................................. 202
Advanced tab features ..................................................................................................................... 203 Print Tasks Quick Sets .................................................................................................... 203 Copies .............................................................................................................................. 204
Copies ............................................................................................................. 204 Printer Features ............................................................................................................... 204 Document preview image ................................................................................................ 204
Paper/Quality tab features ................................................................................................................ 206 Print Tasks Quick Sets .................................................................................................... 206 Paper Options .................................................................................................................. 207
Size is .............................................................................................................. 207 Custom Paper Size ......................................................................................... 208
Name .............................................................................................. 208 Size ................................................................................................. 209 Units ............................................................................................... 209 Custom width and height control limits ........................................... 209 Show important instructions for printing on short media (P1100 base model only) ............................................................................ 209
Use Different Paper/Covers ............................................................................ 209
ENWW v
Source is ......................................................................................................... 210 Type Is ............................................................................................................ 211
Document preview image ................................................................................................ 211 Print Quality ..................................................................................................................... 212
Print Quality drop-down menu ......................................................................... 212 EconoMode check box .................................................................................... 212
Effects tab features .......................................................................................................................... 213 Print Tasks Quick Sets .................................................................................................... 213 Resizing Options ..............................................................................................................214
Actual size ....................................................................................................... 214 Print document on .......................................................................................... 214 Scale to fit ....................................................................................................... 214 % of normal size .............................................................................................. 215
Document preview image ................................................................................................ 215 Watermarks ..................................................................................................................... 216
Watermark Details ........................................................................................... 217 Current Watermarks ....................................................................... 217 Watermark Message ...................................................................... 218 Message Angle ............................................................................... 218 Font Attributes ................................................................................ 218 Default watermark settings ............................................................. 219
Finishing tab features ....................................................................................................................... 220 Print Tasks Quick Sets .................................................................................................... 220 Document Options ........................................................................................................... 221
Print On Both Sides ......................................................................................... 221 Print on both sides manually .......................................................... 222 Print on both side automatically (P1600 series products) .............. 224
Flip pages up ................................................................................................... 225 Booklet Printing ............................................................................................... 225
Book and booklet printing ............................................................... 225 Pages per sheet .............................................................................................. 226 Print page borders ........................................................................................... 226 Page order ...................................................................................................... 226
Document preview image ................................................................................................ 227 Orientation ....................................................................................................................... 227
Services tab features ........................................................................................................................ 228 Internet Services .............................................................................................................. 228 Print Information Pages ................................................................................................... 229
Device Settings ................................................................................................................................ 230 Jam Recovery ..................................................................................................................232 Status Messages ............................................................................................................. 232 Cleaning Page ................................................................................................................. 233 Quiet Mode (P1560/P1600 series only) ........................................................................... 233 Duplex Mode .................................................................................................................... 233
Print Density .................................................................................................................... 233 Auto-Off Console ............................................................................................................. 233
Macintosh system requirements ...................................................................................... 236
Hardware requirements ................................................................................... 236 Supported printer drivers for Mac .................................................................................... 236 Change printer-driver settings for Mac ............................................................................ 236
Printing-system software .................................................................................................................. 236 PDEs ................................................................................................................................ 237 HP Embedded Web Server ............................................................................................. 237 Install notes ...................................................................................................................... 237 Online help ....................................................................................................................... 237 Screen fonts ..................................................................................................................... 237
Macintosh installation instructions .................................................................................................... 238 HP LaserJet software CD, Macintosh partition ................................................................ 238 Install the HP LaserJet printing-system software for the Macintosh OS .......................... 238
General installation instructions ...................................................................... 238 Mac OS X installation ...................................................................................... 239
Main Install dialog box sequence ................................................... 239
Setup instructions ............................................................................................ 244 Wireless setup ................................................................................ 244 Troubleshooting the product setup ................................................. 245
Remove the printing-system software from Macintosh operating systems ...................................... 245
Determining the current level of firmware ....................................................................... 248 Download the firmware update utility from the HP Web site ............................................ 248 Run the firmware update utility ........................................................................................ 249
Media attributes ................................................................................................................................ 250 Paper sources and destinations ...................................................................................... 250 Paper-source commands ................................................................................................. 250 Driver-supported paper sizes ........................................................................................... 250 Driver-supported paper types .......................................................................................... 252 Custom paper sizes ......................................................................................................... 253 Paper-type commands (HP LaserJet Professional P1600 Series Printer only) ............... 253

Supported routers for wireless products that support automatic configuration. ............................... 254
######### Index ................................................................................................................................................................. 259
ENWW vii
List of tables
ENWW ix

List of figures
ENWW xi

ENWW xiii

ENWW xv
1 Purpose and scope
ENWW 1
#### Introduction
This software technical reference (STR) provides information about and troubleshooting tips for the printing-system software for the product.
This STR is prepared in an electronic format to serve as a quick-reference tool for Customer Care Center (CCC) agents, support engineers, system administrators, management information systems (MIS) personnel, and end users, as appropriate.
| | |---|
NOTE: This STR describes drivers that are available from the product firmware and shipped on the printing-system software CD that comes with the product. This STR does not describe drivers that will become available on the Web.
The following information is included in this STR:
For information about the location of information within chapters, see the table of contents. An index is also provided in this STR.
Additional detailed information about the printing-system software is published in an addendum to this STR. The following information is available in the addendum:
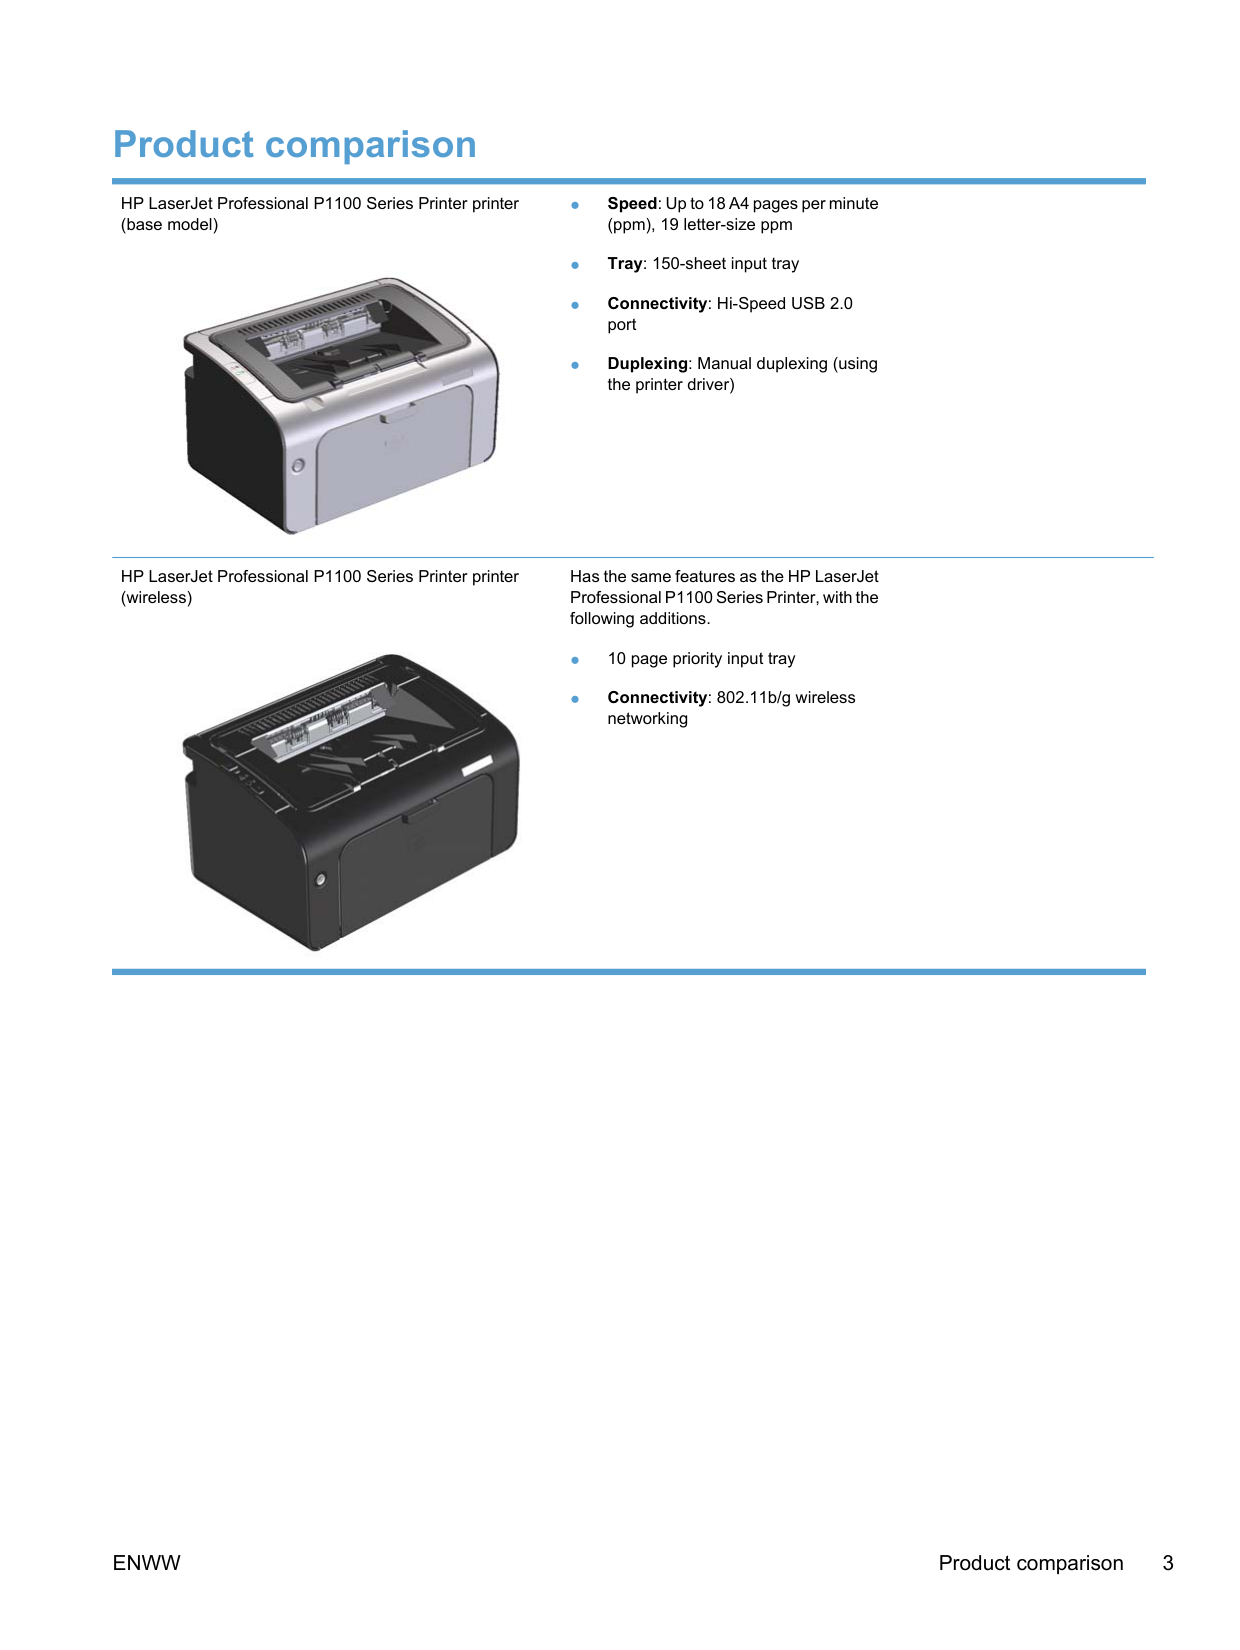
#### Product comparison

HP LaserJet Professional P1100 Series Printer printer (base model)

HP LaserJet Professional P1100 Series Printer printer (wireless)
Has the same features as the HP LaserJet Professional P1100 Series Printer, with the following additions.

ENWW Product comparison 3
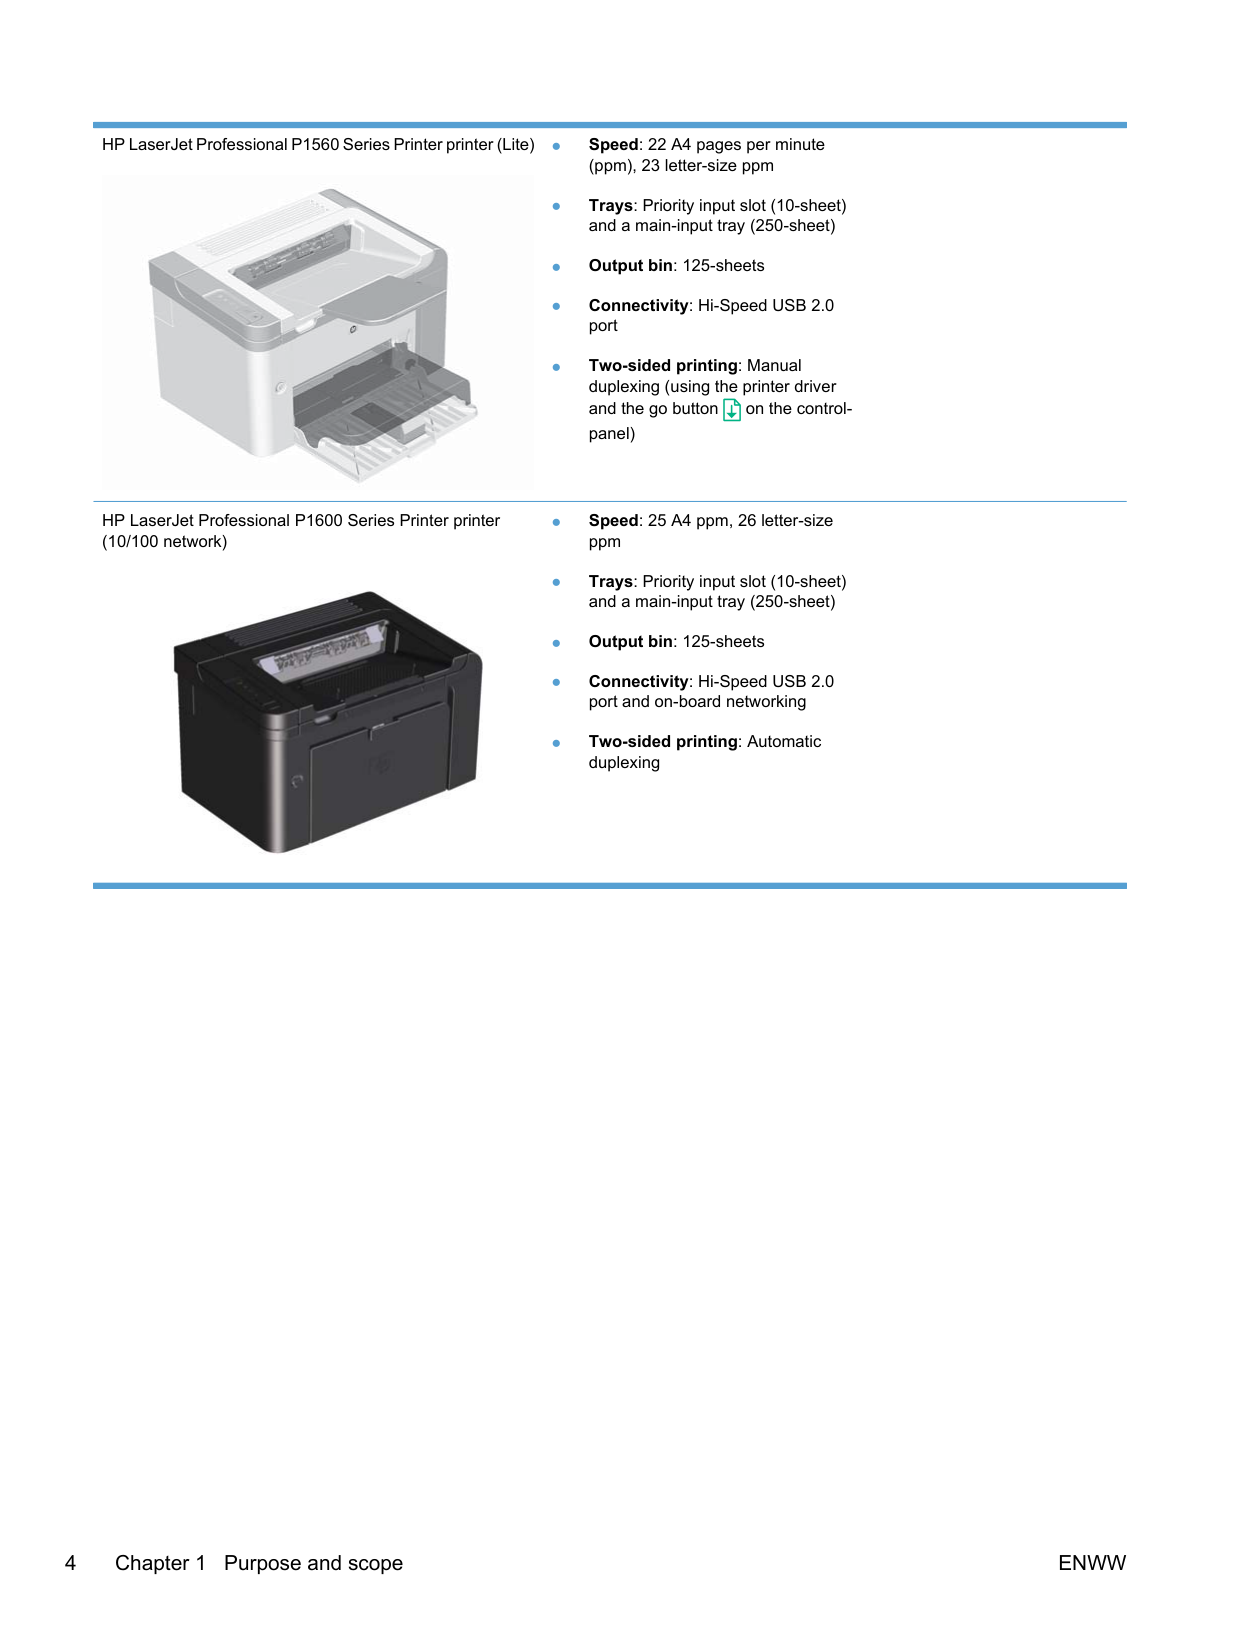
HP LaserJet Professional P1560 Series Printer printer (Lite) ● Speed: 22 A4 pages per minute
(ppm), 23 letter-size ppm


HP LaserJet Professional P1600 Series Printer printer (10/100 network)

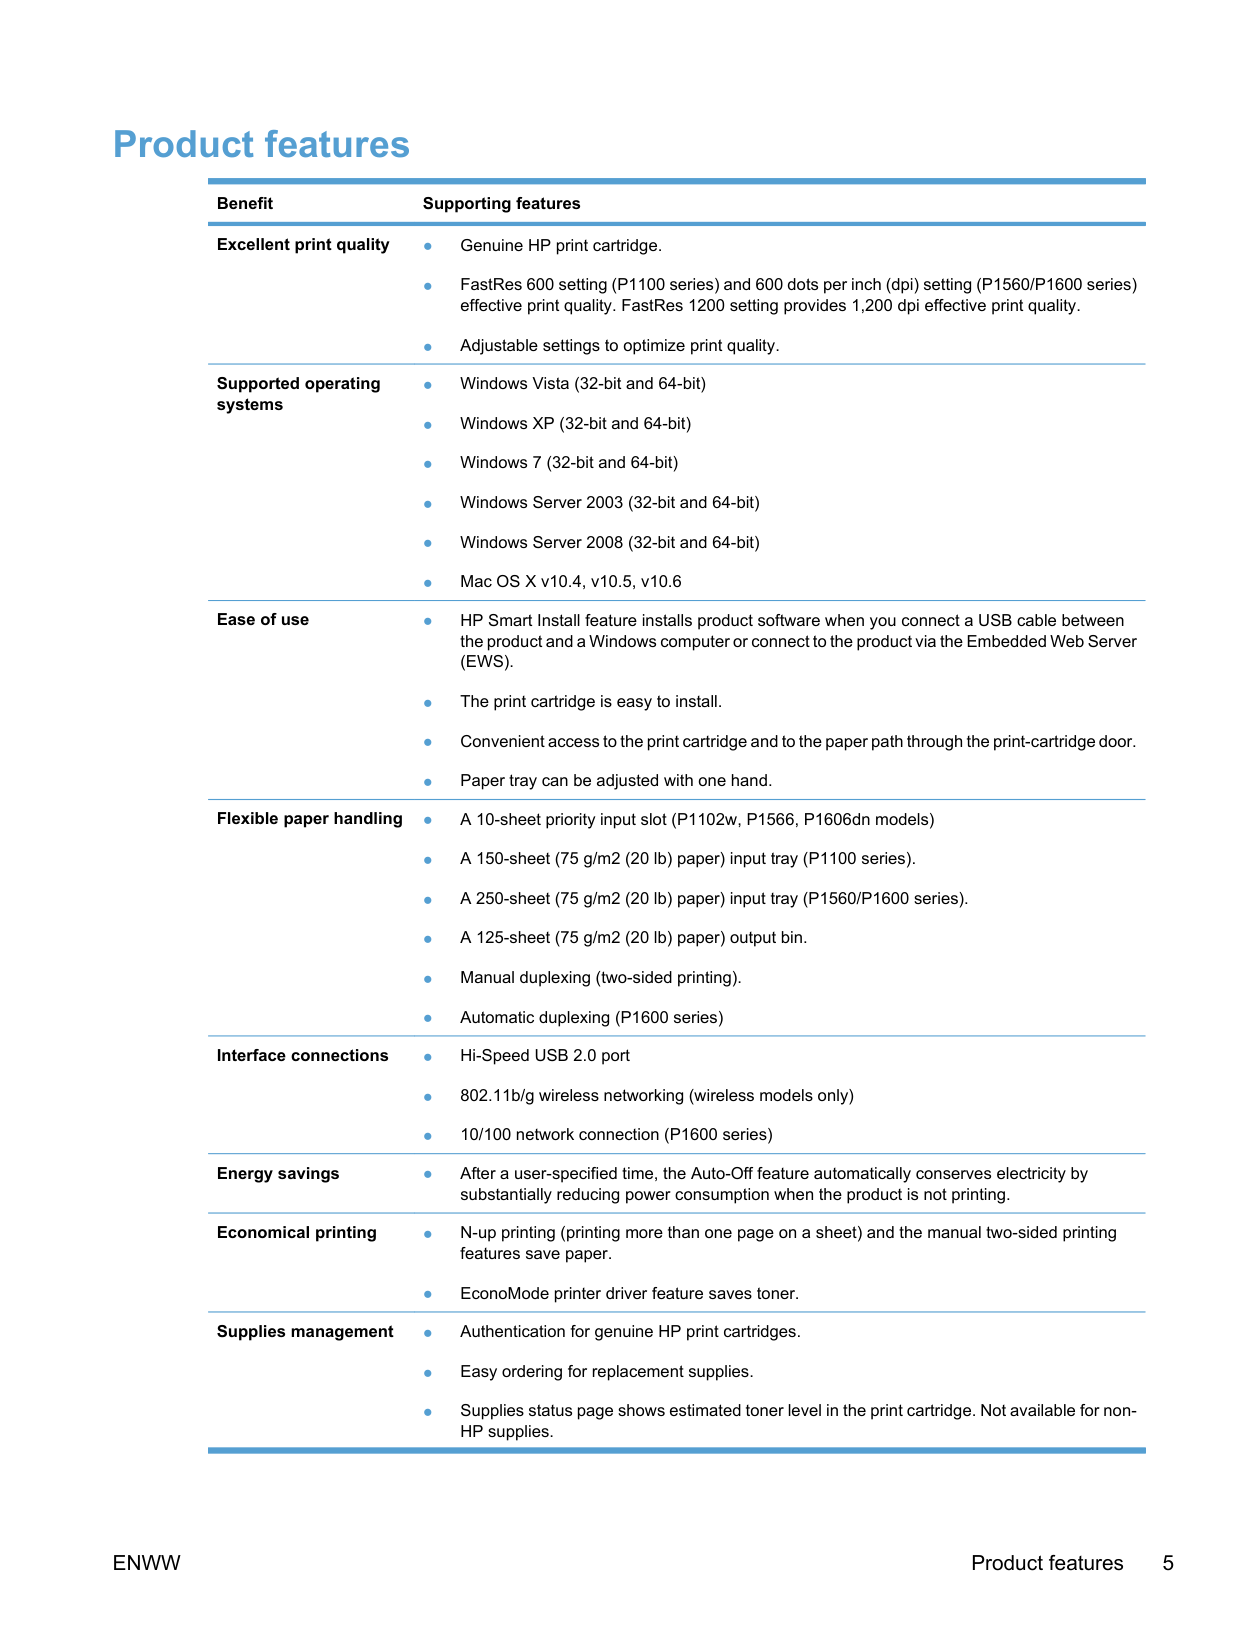
#### Product features
############# Benefit Supporting features
Excellent print quality ● Genuine HP print cartridge.

Supported operating systems
Ease of use ● HP Smart Install feature installs product software when you connect a USB cable between
the product and a Windows computer or connect to the product via the Embedded Web Server (EWS).
Flexible paper handling ● A 10-sheet priority input slot (P1102w, P1566, P1606dn models)
Interface connections ● Hi-Speed USB 2.0 port
Energy savings ● After a user-specified time, the Auto-Off feature automatically conserves electricity by
substantially reducing power consumption when the product is not printing.
Economical printing ● N-up printing (printing more than one page on a sheet) and the manual two-sided printing
features save paper.
● EconoMode printer driver feature saves toner. Supplies management ● Authentication for genuine HP print cartridges.
ENWW Product features 5
############# Benefit Supporting features
Accessibility ● The online user guide is compatible with text screen-readers.
● All doors and covers can be opened by using one hand. Security ● Kensington lock receptacle on the back of the product.
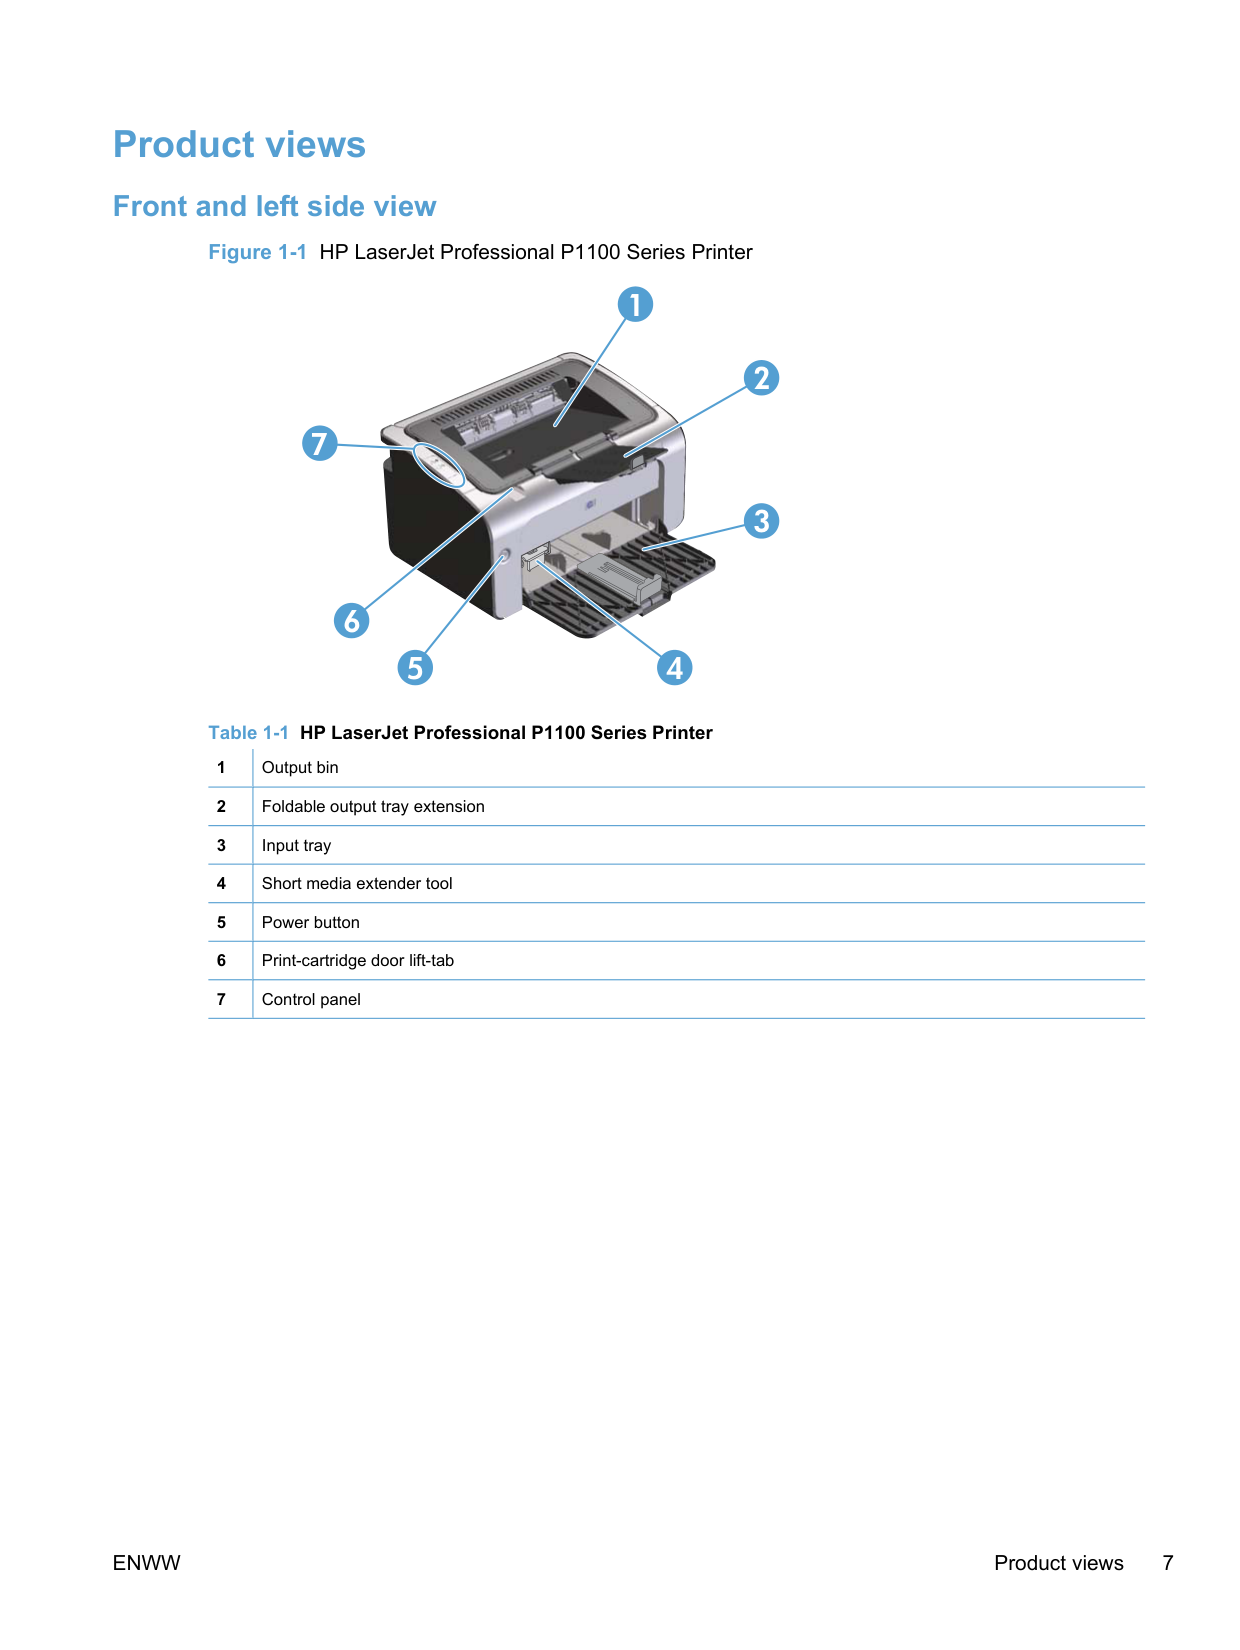
#### Product views
##### Front and left side view

2
1
3
5
4
########### Table 1-1 HP LaserJet Professional P1100 Series Printer
|1|Output bin
| |---|---|
|2|Foldable output tray extension| |3|Input tray
| |4|Short media extender tool
| |5|Power button| |6|Print-cartridge door lift-tab
| |7|Control panel|

3
2
5
1
4
|1|Output bin
| |---|---| |2|Foldable output tray extension| |3|Priority input slot
| |4|Main input tray
| |5|Power button| |6|Print-cartridge door lift-tab
| |7|Control panel|

1
###### 2
###### 7
3
###### 4
###### 6
###### 5
1 Output bin
|2|Output tray extension| |---|---| |3|Priority input slot| |4|Main-input tray
| |5|Power button
| |6|Cartridge door lift-tab| |7|Control panel|
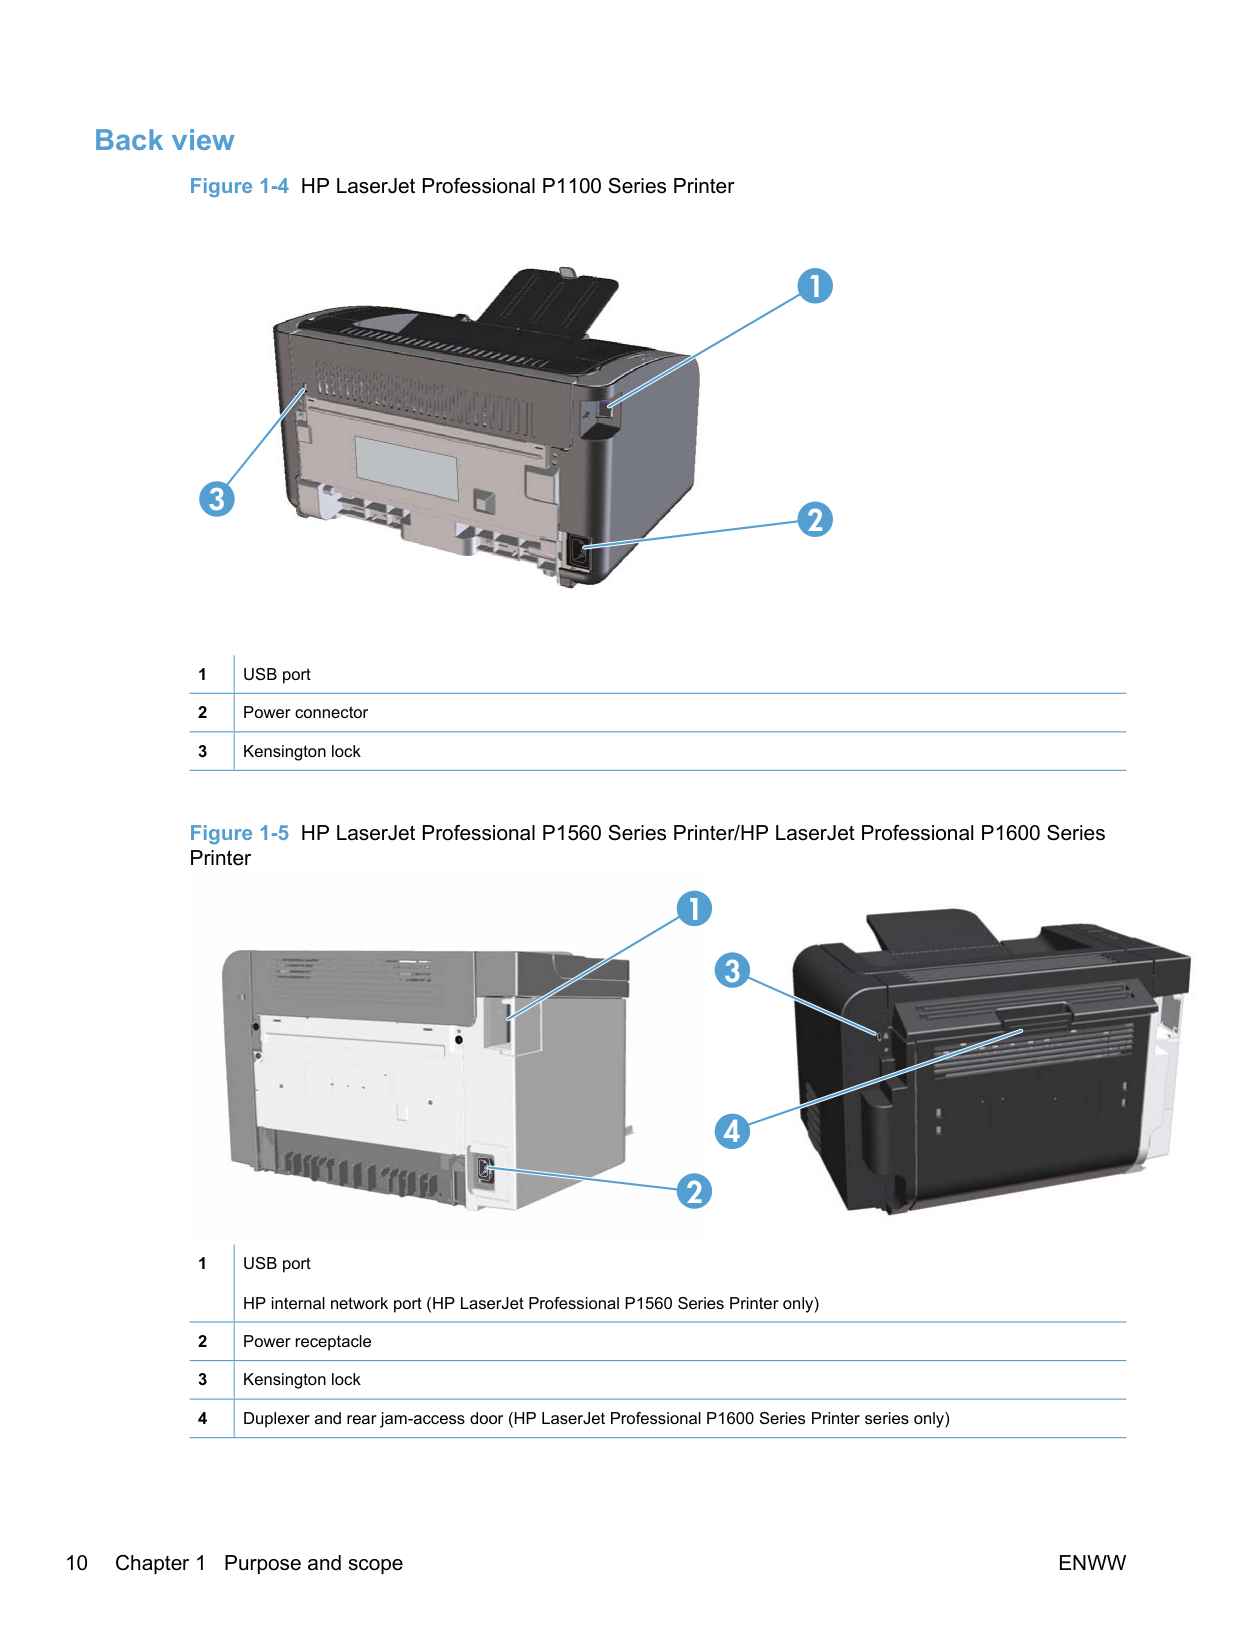
##### Back view

2
1
3
|1|USB port
| |---|---| |2|Power connector| |3|Kensington lock|


1
2
|1|USB port HP internal network port (HP LaserJet Professional P1560 Series Printer only)| |---|---| |2|Power receptacle
| |3|Kensington lock| |4|Duplexer and rear jam-access door (HP LaserJet Professional P1600 Series Printer series only)|
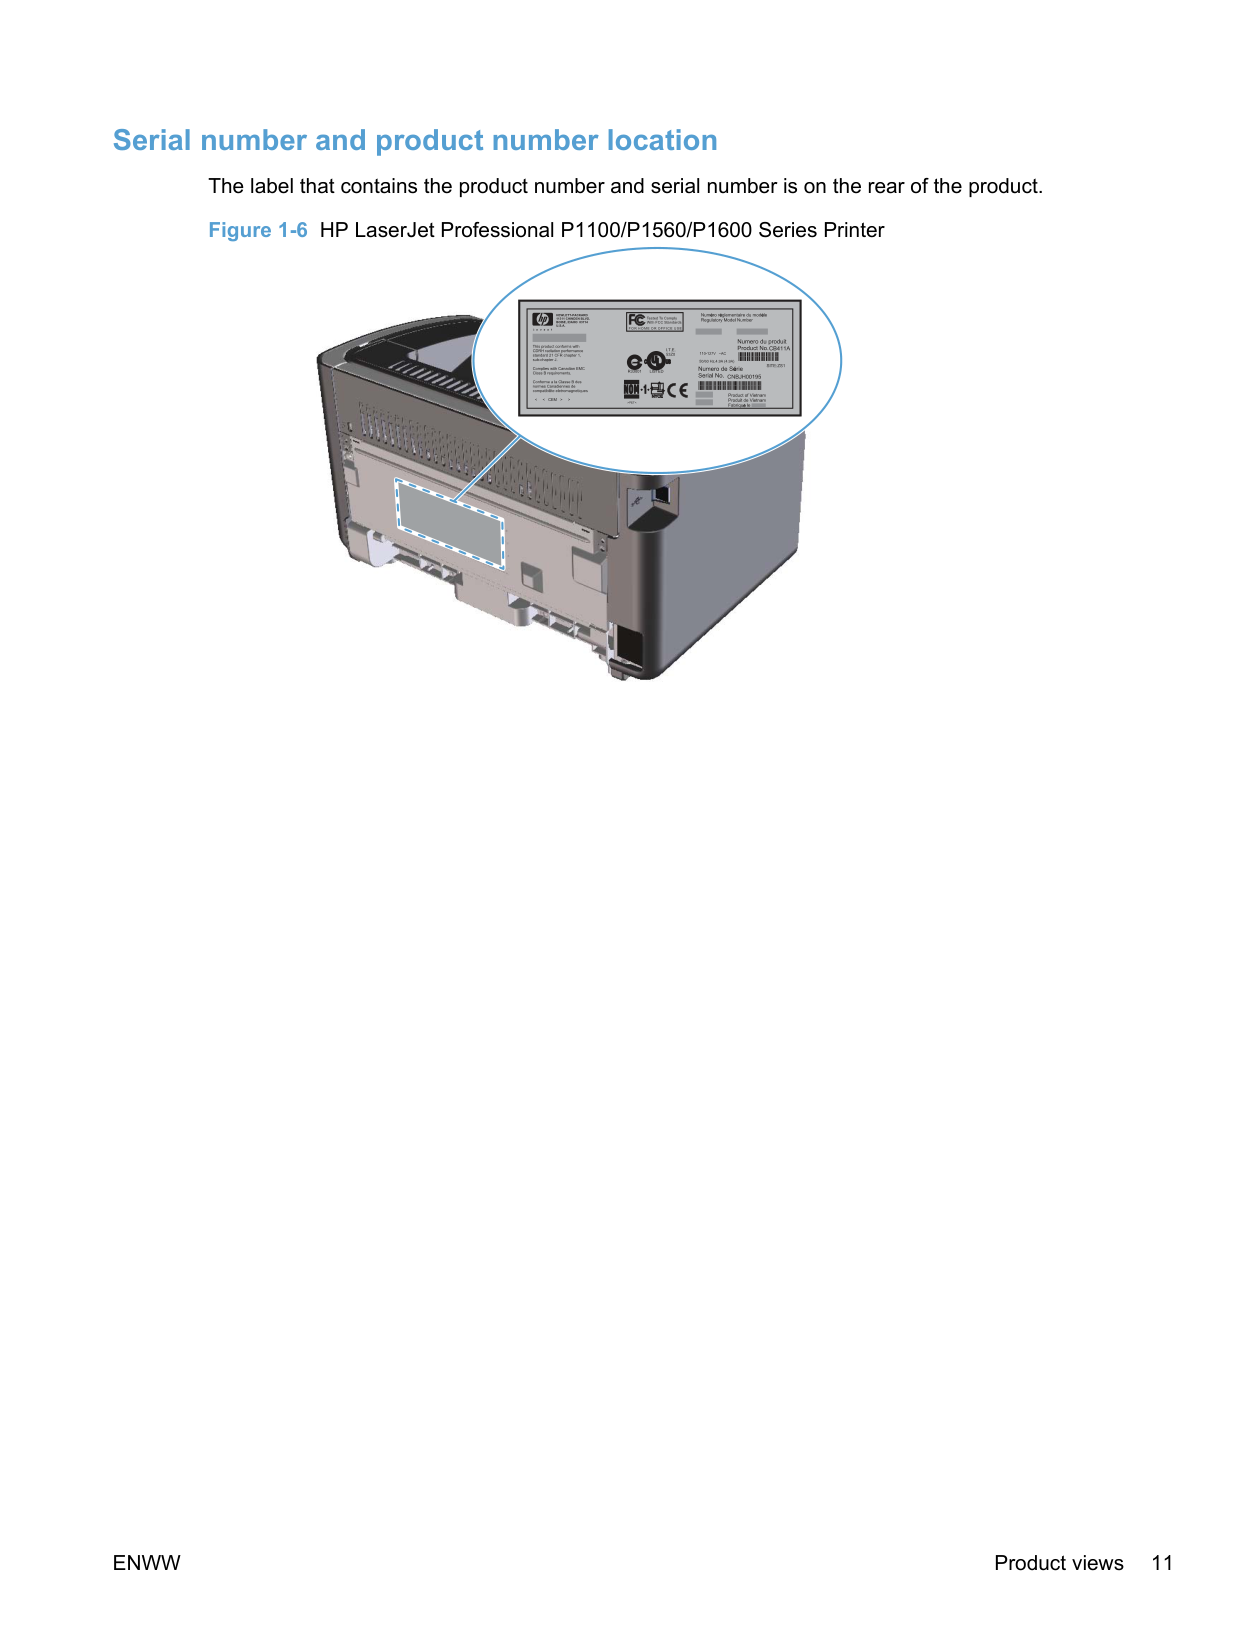
##### Serial number and product number location
The label that contains the product number and serial number is on the rear of the product.

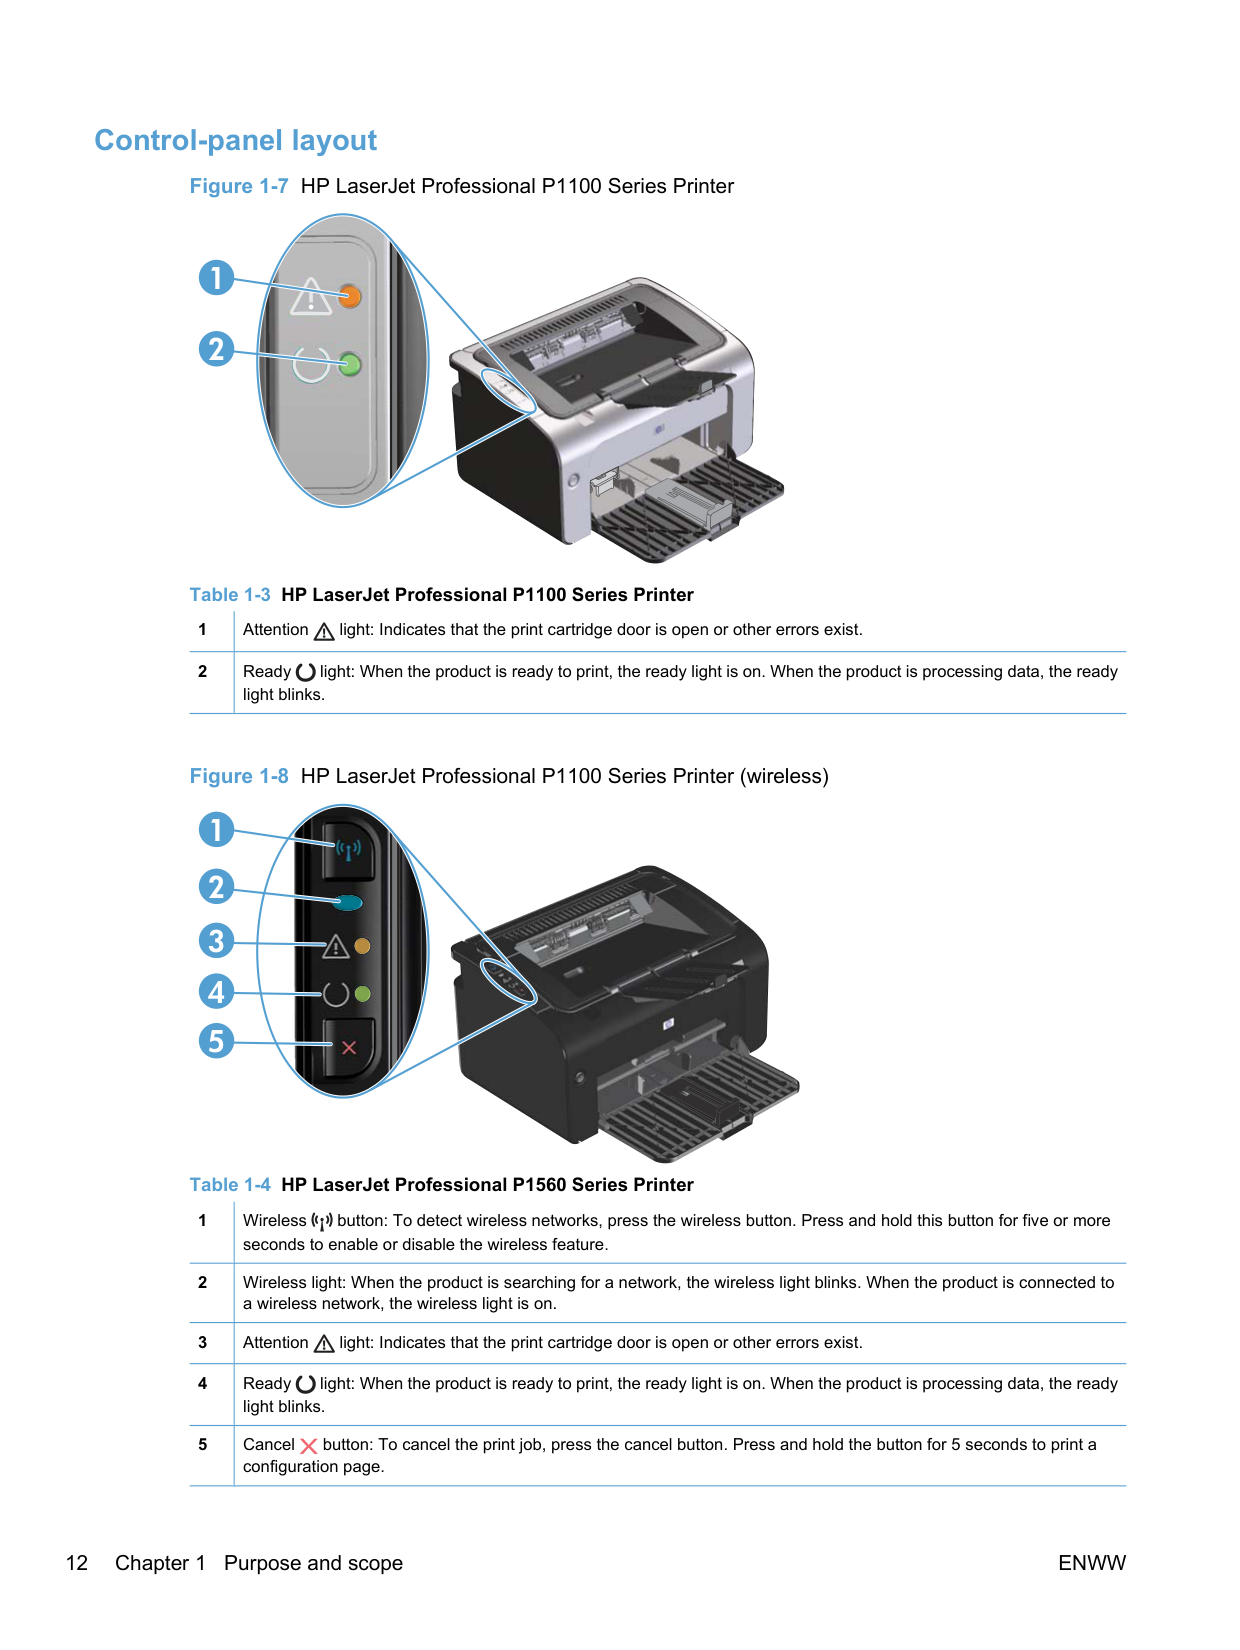
##### Control-panel layout


2

|1|Attention light: Indicates that the print cartridge door is open or other errors exist.
| |---|---| |2|Ready light: When the product is ready to print, the ready light is on. When the product is processing data, the ready light blinks.
|

Figure 1-8 HP LaserJet Professional P1100 Series Printer (wireless)


2 3 4 5
1


|1|Wireless button: To detect wireless networks, press the wireless button. Press and hold this button for five or more seconds to enable or disable the wireless feature.
| |---|---| |2|Wireless light: When the product is searching for a network, the wireless light blinks. When the product is connected to a wireless network, the wireless light is on.
| |3|Attention light: Indicates that the print cartridge door is open or other errors exist.
| |4|Ready light: When the product is ready to print, the ready light is on. When the product is processing data, the ready light blinks.
| |5|Cancel button: To cancel the print job, press the cancel button. Press and hold the button for 5 seconds to print a configuration page.
|
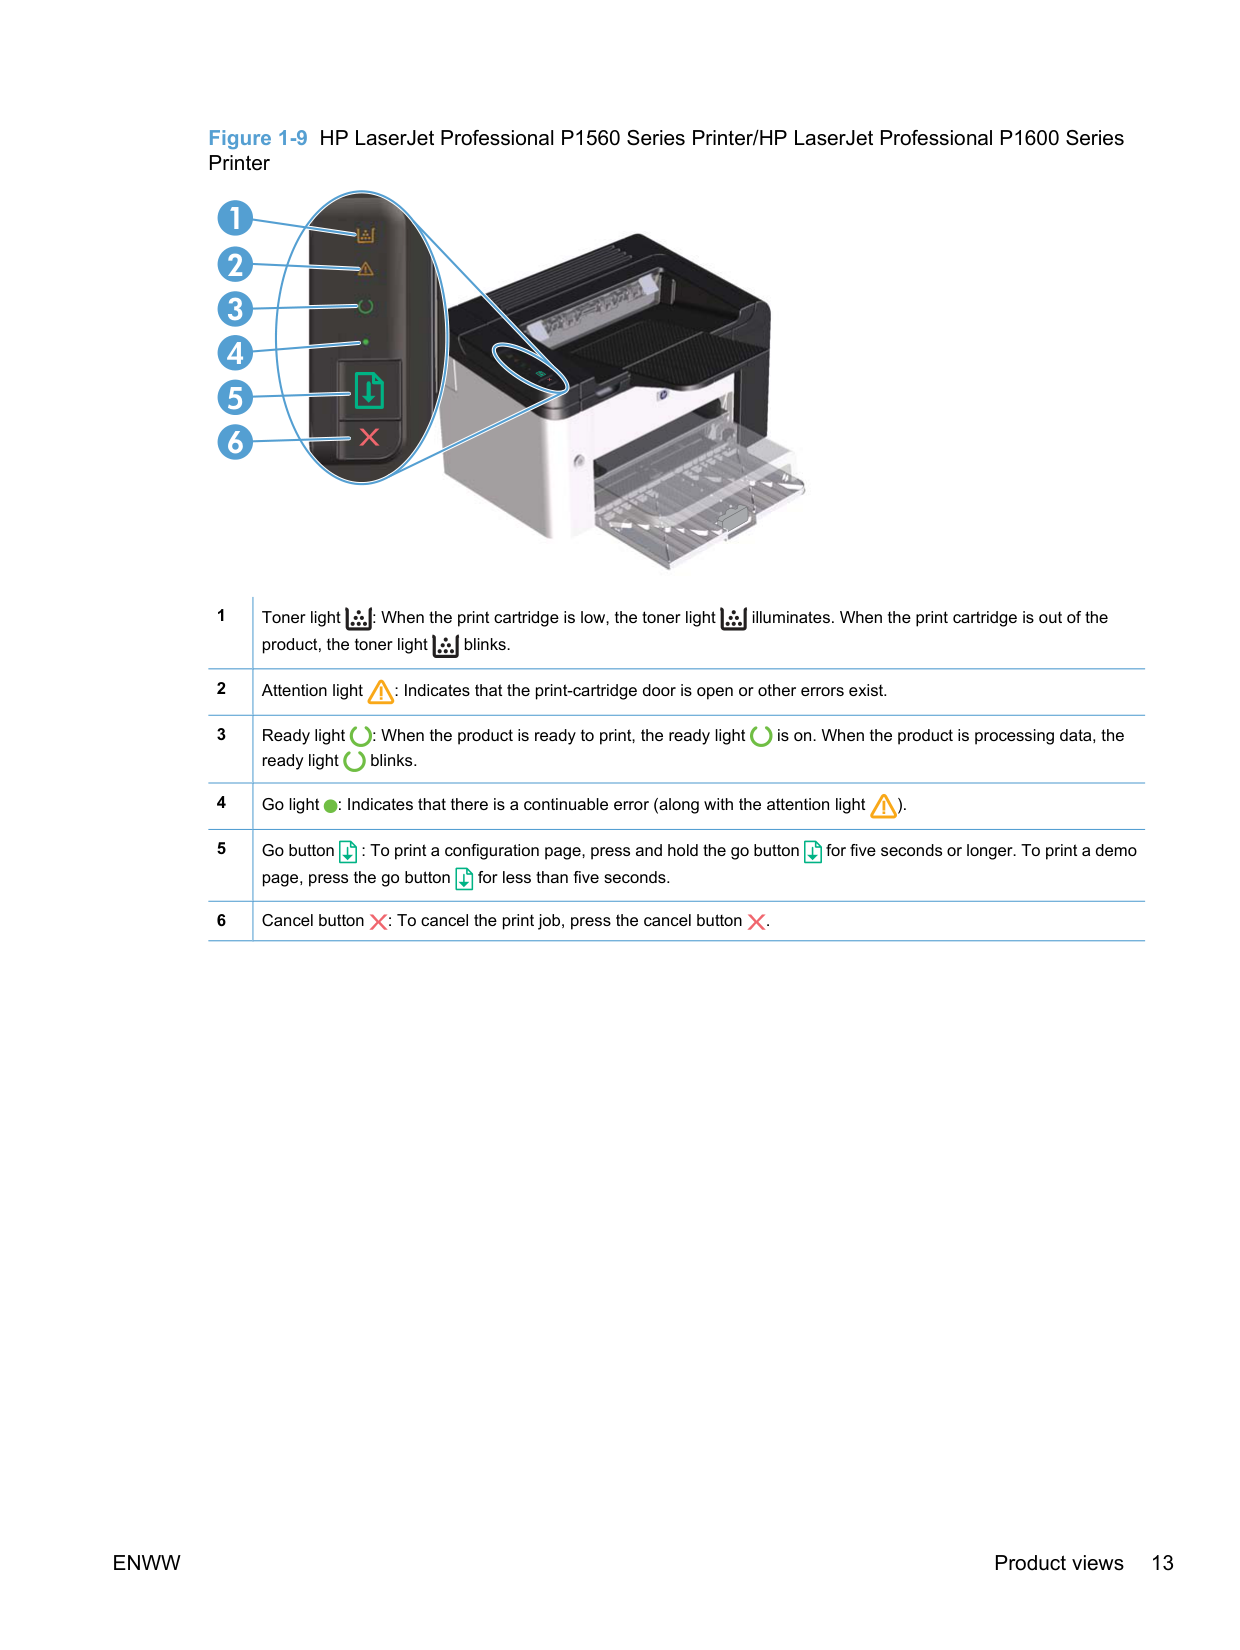
Figure 1-9 HP LaserJet Professional P1560 Series Printer/HP LaserJet Professional P1600 Series Printer


###### 1
|1|Toner light : When the print cartridge is low, the toner light illuminates. When the print cartridge is out of the product, the toner light blinks.
| |---|---| |2|Attention light : Indicates that the print-cartridge door is open or other errors exist.
| |3|Ready light : When the product is ready to print, the ready light is on. When the product is processing data, the ready light blinks.
| |4|Go light : Indicates that there is a continuable error (along with the attention light ).
| |5|Go button : To print a configuration page, press and hold the go button for five seconds or longer. To print a demo page, press the go button for less than five seconds.
| |6|Cancel button : To cancel the print job, press the cancel button .
|
#### Printing-system software
##### Operating-system support
Windows operating systems provide full-featured support for the product. Operating systems that are not described in this STR provide varying levels of functionality.
Throughout this document, Windows XP is used to denote Windows XP Home Edition and Windows XP Professional, unless noted otherwise.
Information relating to networking functions is specific to products that have network capabilities. The printing-system software has not been tested with and is not supported in the following operating systems:
Printer drivers for these operating systems are not included in the product firmware, on the printingsystem software CD, and are not available on the Web. Other printer drivers might work with the product, but some print-driver features and functions might not be available.
For more information about the product, go to the following Web sites: www.hp.com/support/ljp1100series www.hp.com/support/ljp1560series or www.hp.com/go/ljp1600series
######## Supported operating systems for Windows
The product comes with software for the following Windows® operating systems:
For more information about upgrading from Windows 2000 Server to Windows Server 2003, using Windows Server 2003 Point and Print, or using Windows Server 2003 Terminal Services and Printing, go to www.microsoft.com.
######## Supported printer drivers for Windows
The printer drivers include online Help that has instructions for common printing tasks and also describes the buttons, check boxes, and drop-down lists that are in the printer driver.
| | |---|
| | |---|
NOTE: The host-based driver is the only printer driver that is included with this product; it is included in the product firmware and on the printing-system CD. The PCL5e and XPS drivers are available by Web download only at www.hp.com/support/ ljp1100series and www.hp.com/support/ljp1560series or www.hp.com/go/ljp1600series. NOTE: For more information about the UPD, see www.hp.com/go/upd.
######## HP Universal Print Driver (UPD)
Each HP Universal Print Driver (UPD) for Windows is a single driver that gives you instant access to virtually any HP LaserJet product, from any location, without downloading separate drivers. It is built on proven HP print driver technology and has been tested thoroughly and used with many software programs. It is a powerful solution that performs consistently over time.
The HP UPD communicates directly with each HP product, gathers configuration information, and then customizes the user interface to show the product’s unique, available features. It automatically enables features that are available for the product, such as two-sided printing and stapling, so you do not need to enable them manually.
For more information, go to www.hp.com/go/upd. When you download and install a UPD from the product support Web page, www.hp.com/go/ ljp1600series, there will be some variations in the installation process and results depending on the driver that you select.
From the support page, click on the Download Drivers and Software link. After you select the printer model and operating system, there will be several selections on the download page. You can download drivers from the “Driver” section and from the “Driver - Universal Print Driver” section.
Drivers downloaded from the “Driver” section are wrapped with the HP DIU (Driver Installation Utility) and produce a “named” driver when installed. A named driver has the printer model number in the driver print queue name. These drivers always install in Traditional mode.
Drivers downloaded from the “Driver-Universal Print Driver” section includes the UPD installer. For these drivers, the driver print queue shows a non-product-specific name. When installing these drivers, you have a choice between Traditional or Dynamic mode as described below.
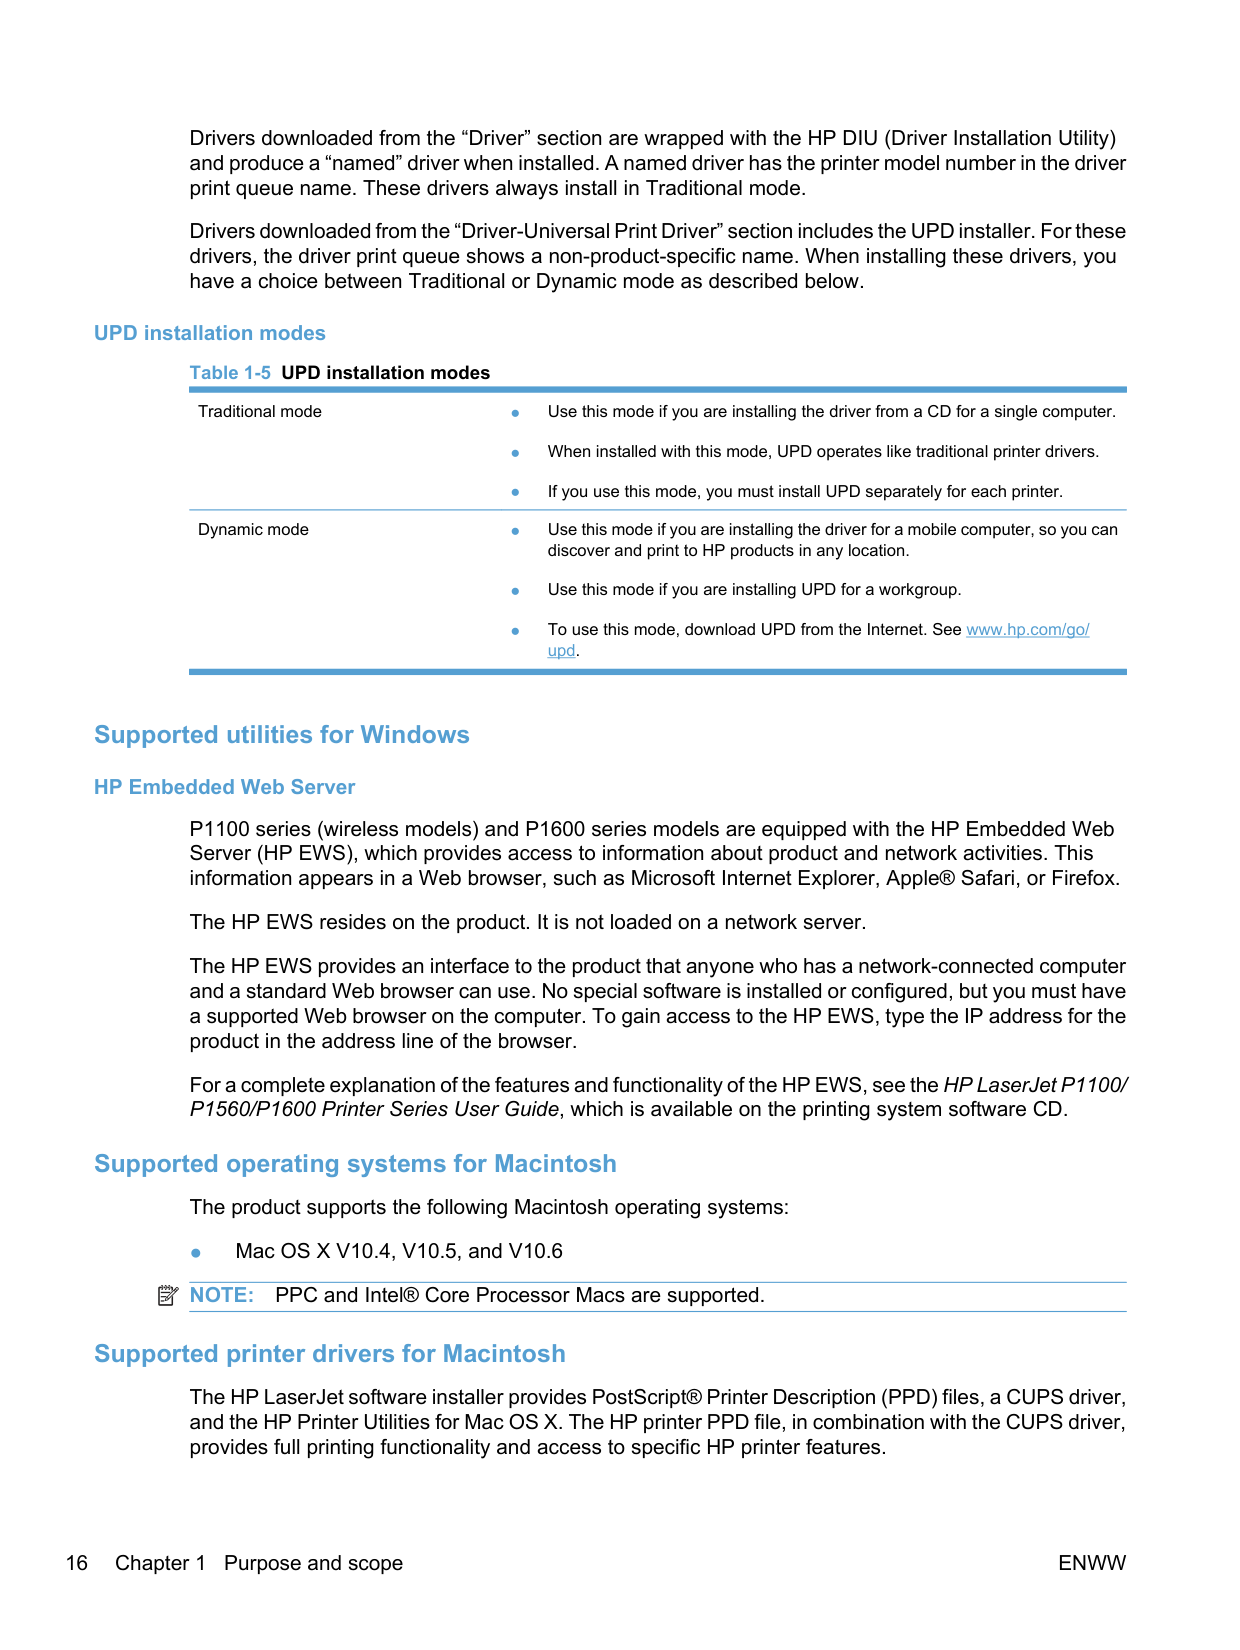
######### UPD installation modes
########### Table 1-5 UPD installation modes
Traditional mode ● Use this mode if you are installing the driver from a CD for a single computer.
Dynamic mode ● Use this mode if you are installing the driver for a mobile computer, so you can discover and print to HP products in any location.
######## Supported utilities for Windows HP Embedded Web Server
P1100 series (wireless models) and P1600 series models are equipped with the HP Embedded Web Server (HP EWS), which provides access to information about product and network activities. This information appears in a Web browser, such as Microsoft Internet Explorer, Apple® Safari, or Firefox.
The HP EWS resides on the product. It is not loaded on a network server.
The HP EWS provides an interface to the product that anyone who has a network-connected computer and a standard Web browser can use. No special software is installed or configured, but you must have a supported Web browser on the computer. To gain access to the HP EWS, type the IP address for the product in the address line of the browser.
For a complete explanation of the features and functionality of the HP EWS, see the HP LaserJet P1100/ P1560/P1600 Printer Series User Guide, which is available on the printing system software CD.
######## Supported operating systems for Macintosh
The product supports the following Macintosh operating systems:
| |
|---|
● Mac OS X V10.4, V10.5, and V10.6 NOTE: PPC and Intel® Core Processor Macs are supported.
######## Supported printer drivers for Macintosh
The HP LaserJet software installer provides PostScript® Printer Description (PPD) files, a CUPS driver, and the HP Printer Utilities for Mac OS X. The HP printer PPD file, in combination with the CUPS driver, provides full printing functionality and access to specific HP printer features.
######## Supported utilities for Macintosh
The following additional software is available for Macintosh for use with the HP LaserJet Professional P1100/P1560/P1600 Series Printer printer.
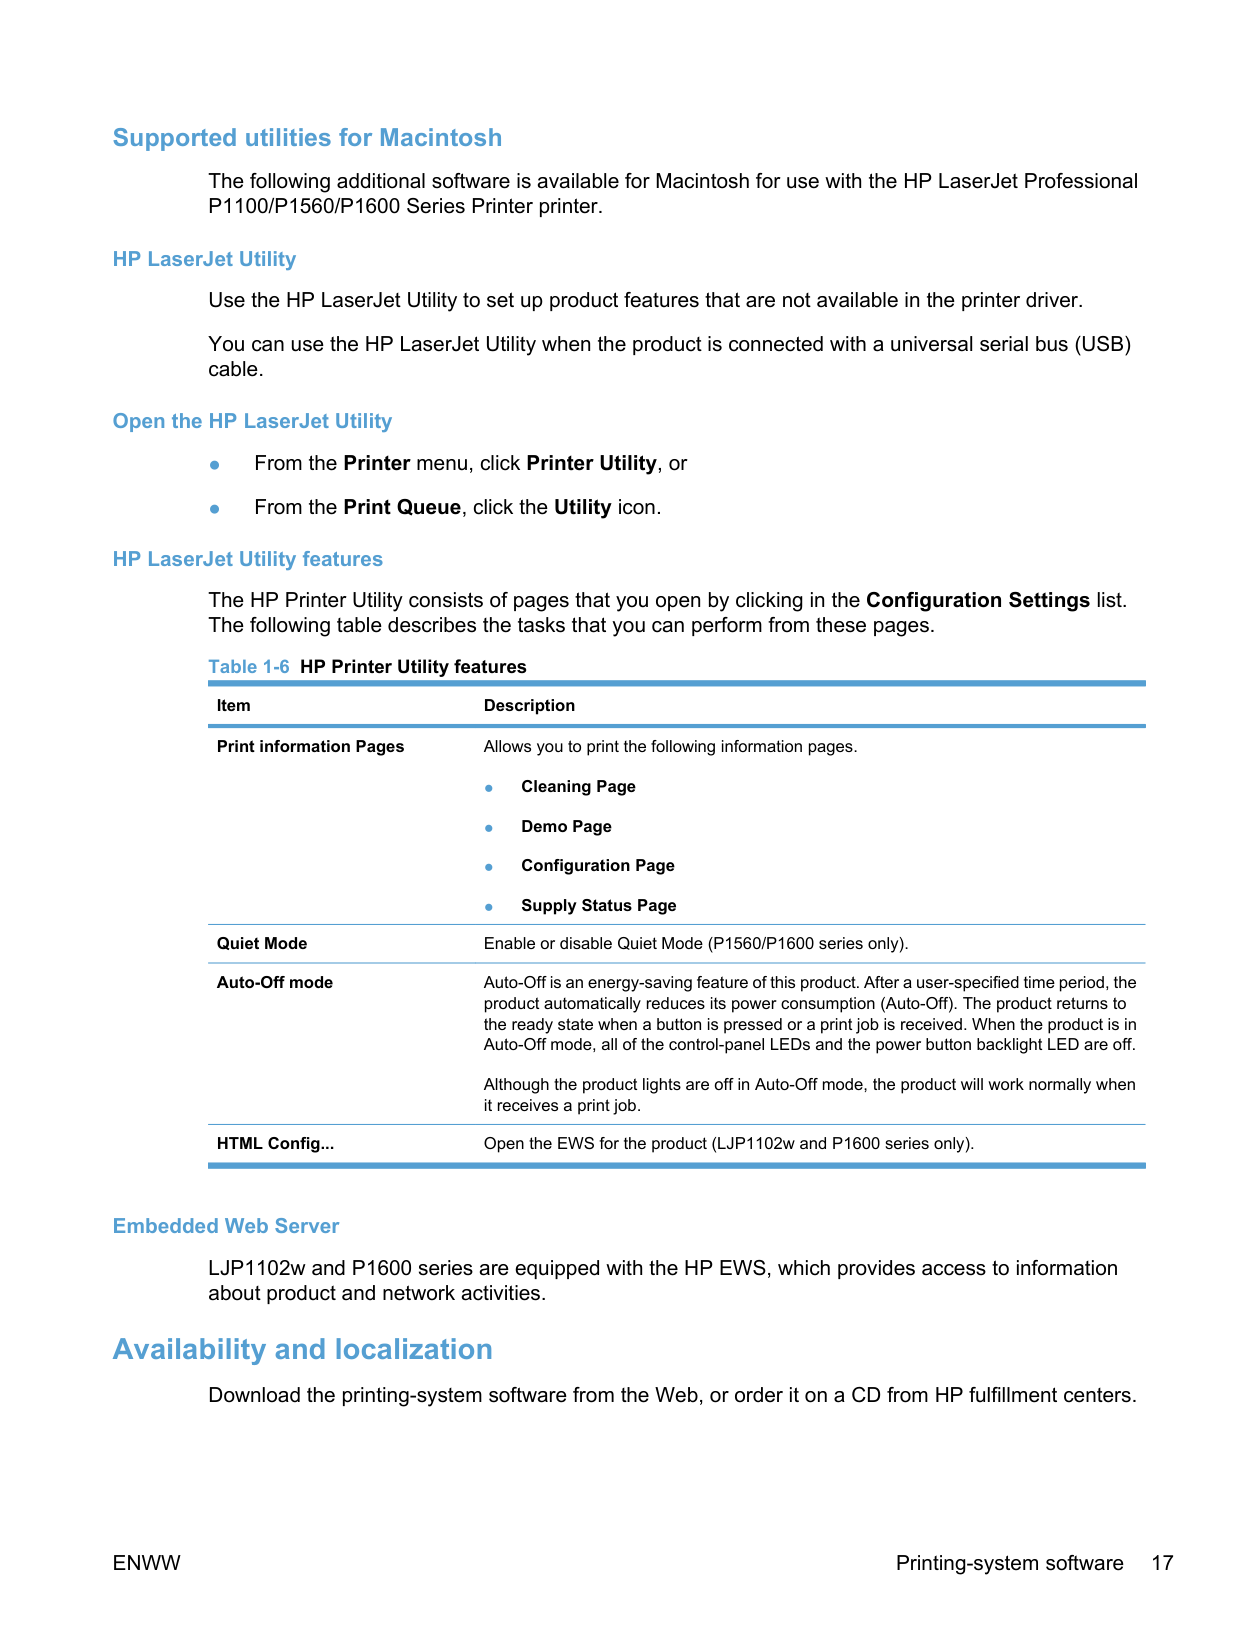
HP LaserJet Utility Use the HP LaserJet Utility to set up product features that are not available in the printer driver. You can use the HP LaserJet Utility when the product is connected with a universal serial bus (USB) cable.
######### Open the HP LaserJet Utility
######### HP LaserJet Utility features
The HP Printer Utility consists of pages that you open by clicking in the Configuration Settings list. The following table describes the tasks that you can perform from these pages.
Table 1-6 HP Printer Utility features
Item Description
Print information Pages Allows you to print the following information pages.
Quiet Mode Enable or disable Quiet Mode (P1560/P1600 series only). Auto-Off mode Auto-Off is an energy-saving feature of this product. After a user-specified time period, the
product automatically reduces its power consumption (Auto-Off). The product returns to the ready state when a button is pressed or a print job is received. When the product is in Auto-Off mode, all of the control-panel LEDs and the power button backlight LED are off.
Although the product lights are off in Auto-Off mode, the product will work normally when it receives a print job.
HTML Config... Open the EWS for the product (LJP1102w and P1600 series only).
######### Embedded Web Server
LJP1102w and P1600 series are equipped with the HP EWS, which provides access to information about product and network activities.
##### Availability and localization
Download the printing-system software from the Web, or order it on a CD from HP fulfillment centers.
| | |---|
NOTE: This STR describes drivers that are included in the product firmware and are also shipped with the printing-system software CD. This document does not describe any drivers that might be released by support personnel.
######## Software component availability for Windows and Macintosh
The following table lists the availability of printing-system software components for Windows and Macintosh computers.
Table 1-7 Software component availability Component Windows Macintosh HP Smart Install x Mac Installer
x
Windows Print Driver x Mac OS X V10.4 (or greater) Print Driver x 32–bit PCL5e UPD (link) x 64–bit PCL5e UPD (link) x 32 bit XPS (link) x 64–bit XPS (link) x Print Dialog Extensions x User Guide (CHM) x User Guide (PDF) x SW Install Notes x HP LaserJet Help Navigation x Web Registration (link) x Supplies (link) x Product Information (link) x HP.com (link) x CD Browser x
######## Printing-system software on the Web
All software that is contained in the product firmware and on the installation CD is also available on the Web.
Web deployment is the preferred method for obtaining the latest software. The HP Web site offers an option for automatic e-mail notification about new software releases. See the HP Proactive support link on the Download Drivers and Software page.
The printing-system software is available for download at the following Web sites: www.hp.com/support/ljp1100series www.hp.com/support/ljp1560series or www.hp.com/go/ljp1600series
The PCL 5e Universal Print Driver (P1600 series only) is available for download at the following Web site: hp.com/go/upd
######## In-box printing-system software CD
One CD is included in-box with the product. The printing-system software CD contains the following components:
The files in each partition of the printing-system software CD include documentation files and files that are required to install and uninstall the printing-system software components.
######### Printing-system software CD
The root directory in the Windows partition of the printing-system software CD contains the HpSetup.exe file, the setup.exe file, support files, and language specific directories.
To view the files, insert the printing-system software CD into the CD-ROM drive, right-click Start, click Explore, and then select the CD-ROM drive.
######### CD Versions
The printing-system software CD is available in one version and contains the printing-system software in all supported languages as follows:
######### CD – supported languages
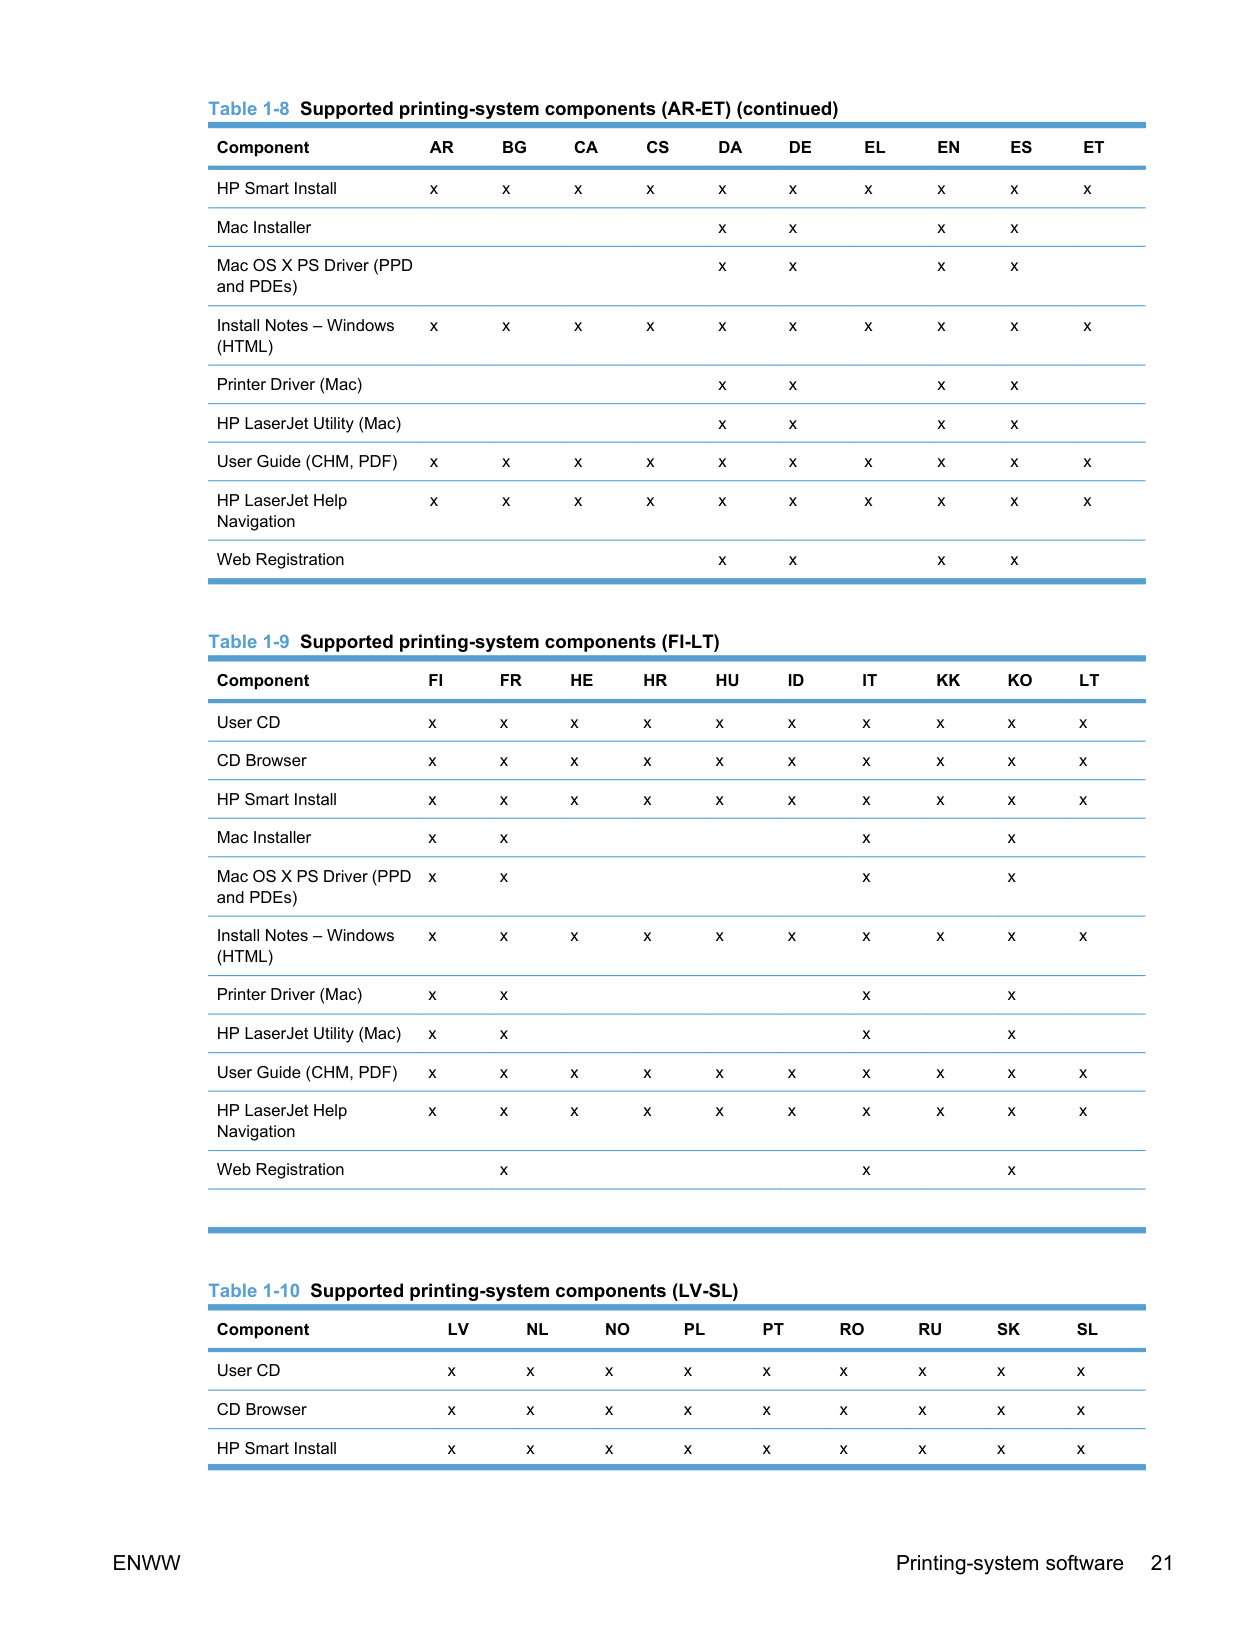
User CD x x x x x x x x x x CD Browser xxxxxxxxxx
Table 1-8 Supported printing-system components (AR-ET) (continued)
Component AR BG CA CS DA DE EL EN ES ET HP Smart Install x x x x x x x x x x Mac Installer x x x x Mac OS X PS Driver (PPD and PDEs)

x x x x
Install Notes – Windows (HTML)
x x x x x x x x x x
Printer Driver (Mac) x x x x HP LaserJet Utility (Mac) x x x x User Guide (CHM, PDF) x x x x x x x x x x HP LaserJet Help Navigation
x x x x x x x x x x
Web Registration x x x x
User CD x x x x x x x x x x CD Browser x x x x x x x x x x HP Smart Install x x x x x x x x x x Mac Installer x x x x Mac OS X PS Driver (PPD and PDEs)
x x x x
Install Notes – Windows (HTML)
x x x x x x x x x x
Printer Driver (Mac) x x x x HP LaserJet Utility (Mac) x x x x User Guide (CHM, PDF) x x x x x x x x x x HP LaserJet Help Navigation
x x x x x x x x x x
Web Registration x x x
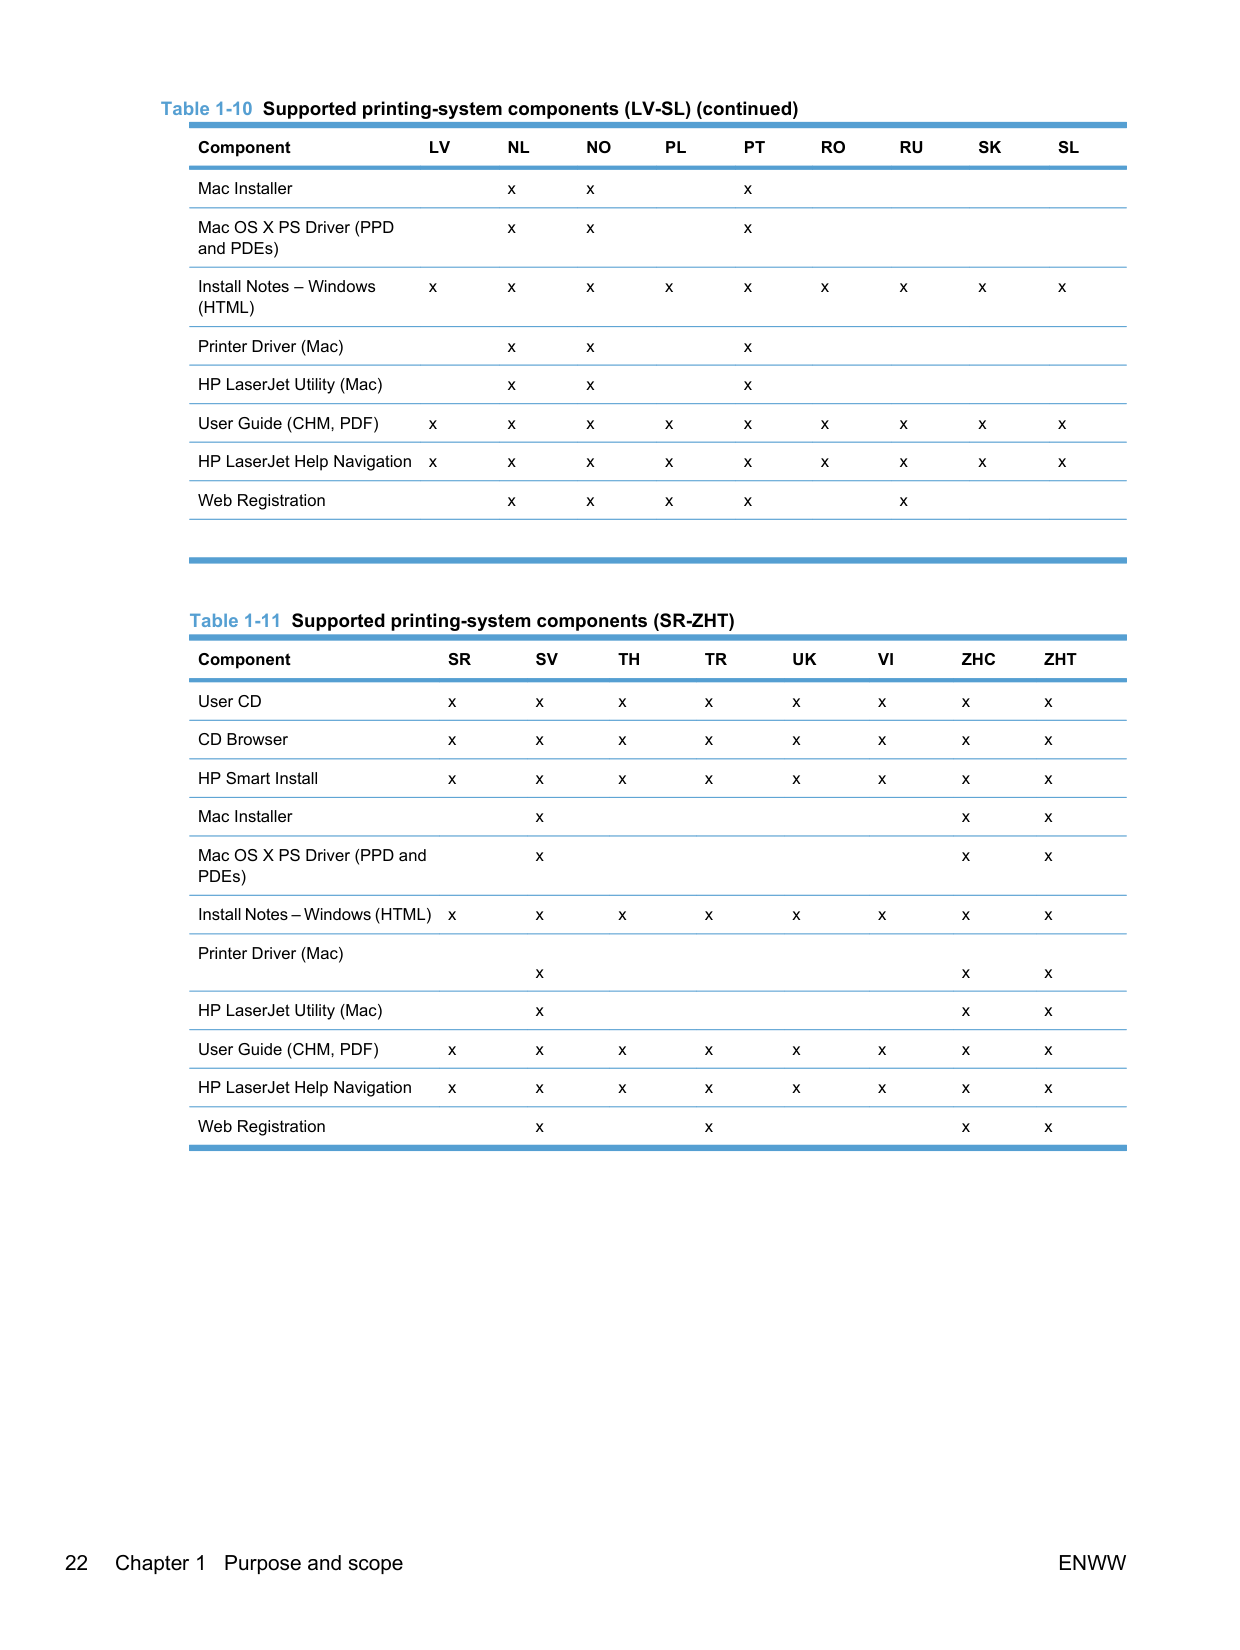
########### Table 1-10 Supported printing-system components (LV-SL) (continued)
Component LV NL NO PL PT RO RU SK SL Mac Installer x x x Mac OS X PS Driver (PPD and PDEs)
x x x
Install Notes – Windows (HTML)
x x x x x x x x x

Printer Driver (Mac) x x x HP LaserJet Utility (Mac) x x x User Guide (CHM, PDF) x x x x x x x x x HP LaserJet Help Navigation x x x x x x x x x Web Registration x x x x x
Mac OS X PS Driver (PPD and PDEs)
x x x
Install Notes – Windows (HTML) x x x x x x x x Printer Driver (Mac)
x x x HP LaserJet Utility (Mac) x x x User Guide (CHM, PDF) x x x x x x x x HP LaserJet Help Navigation x x x x x x x x Web Registration x x x x
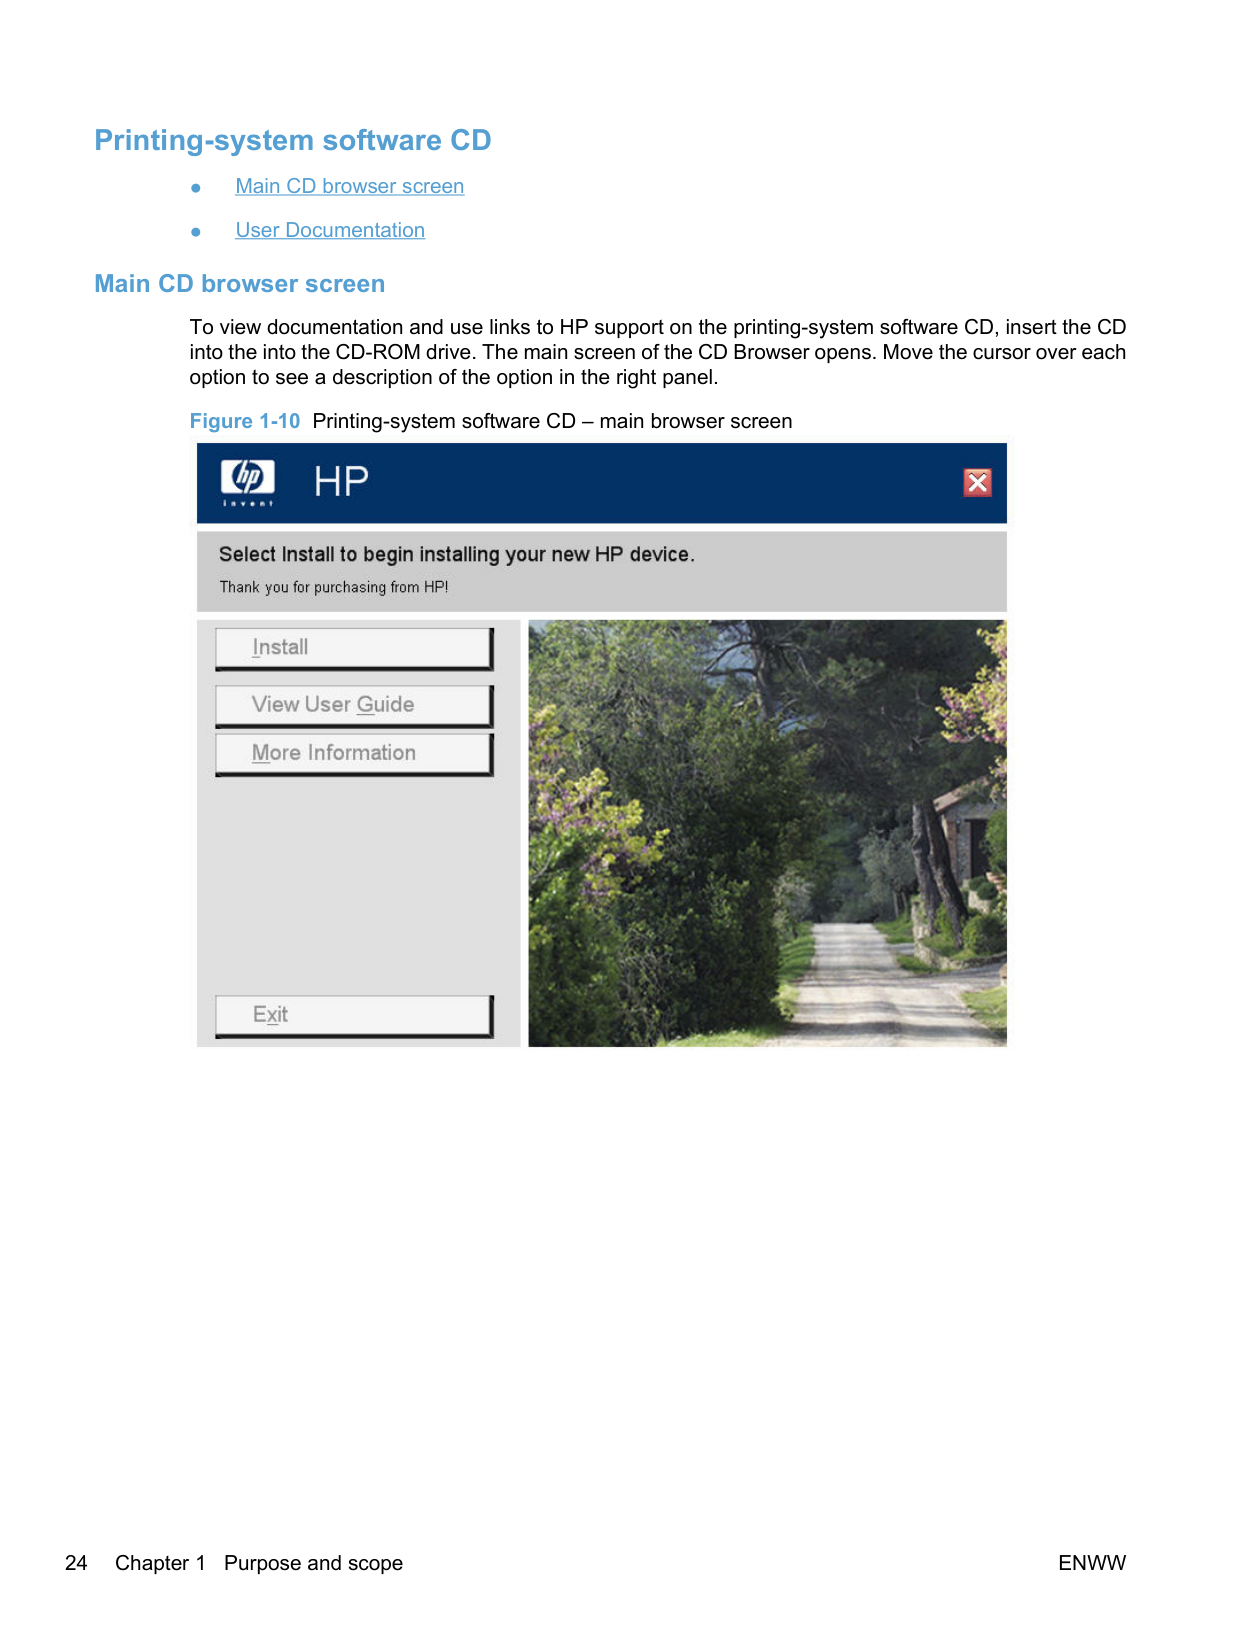
Documentation The printing-system software CD that is included with the product contains documentation. Access to the documents depends on the document type and location as follows:
To view documentation and use links to HP support on the printing-system software CD, insert the CD into the into the CD-ROM drive. The main screen of the CD Browser opens. Move the cursor over each option to see a description of the option in the right panel.

######## User Documentation
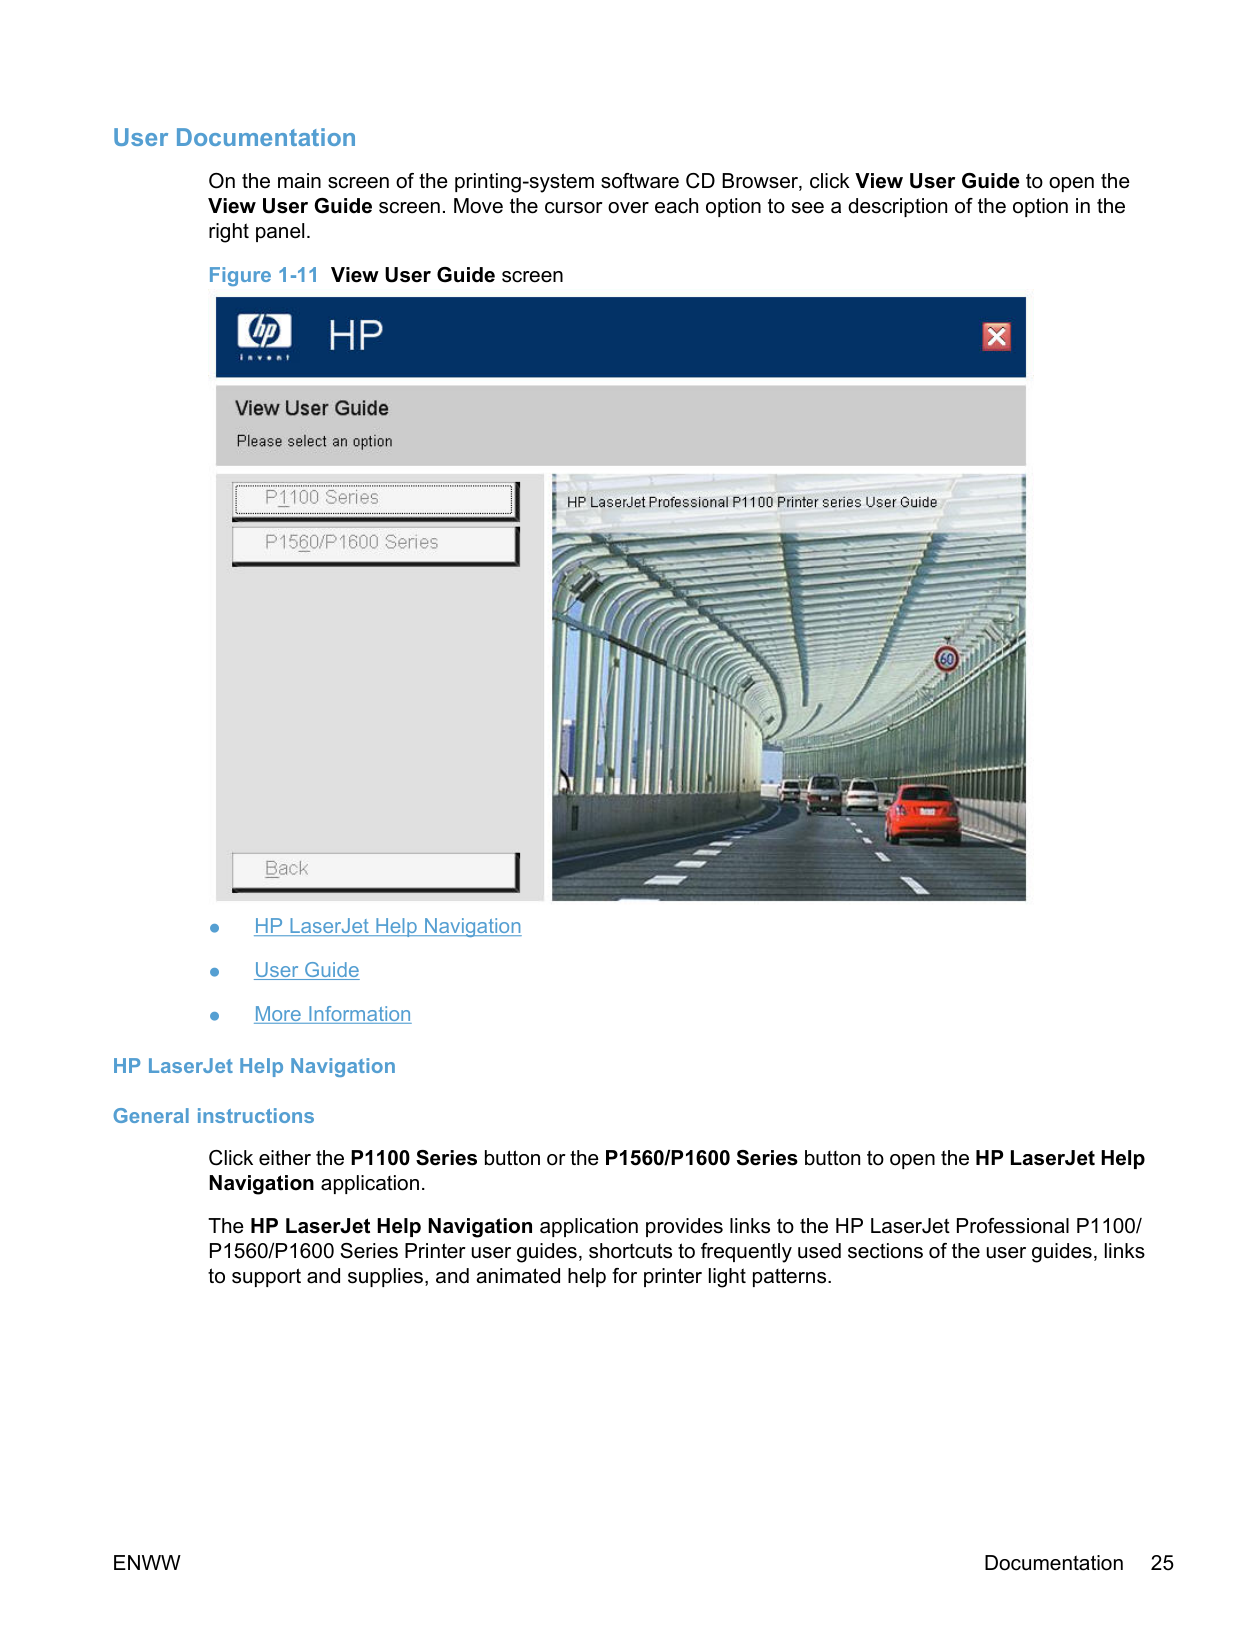
On the main screen of the printing-system software CD Browser, click View User Guide to open the View User Guide screen. Move the cursor over each option to see a description of the option in the right panel.
######### Figure 1-11 View User Guide screen

Click either the P1100 Series button or the P1560/P1600 Series button to open the HP LaserJet Help Navigation application.
The HP LaserJet Help Navigation application provides links to the HP LaserJet Professional P1100/ P1560/P1600 Series Printer user guides, shortcuts to frequently used sections of the user guides, links to support and supplies, and animated help for printer light patterns.
Click Browse User Guide to gain access to the product user guide.
| | |---|
NOTE: The product user guide is distributed in .CHM format only for Windows operating system installations and .PDF format only for Mac OS X operating system installations. HP LaserJet Help Navigation provides the following links to HP support sites.
HP LaserJet Help Navigation provides the following shortcut links to commonly used sections of the user guide.
◦ Load paper trays

Click the Manage & Maintain button to gain quick access to the following sections of the user guide.
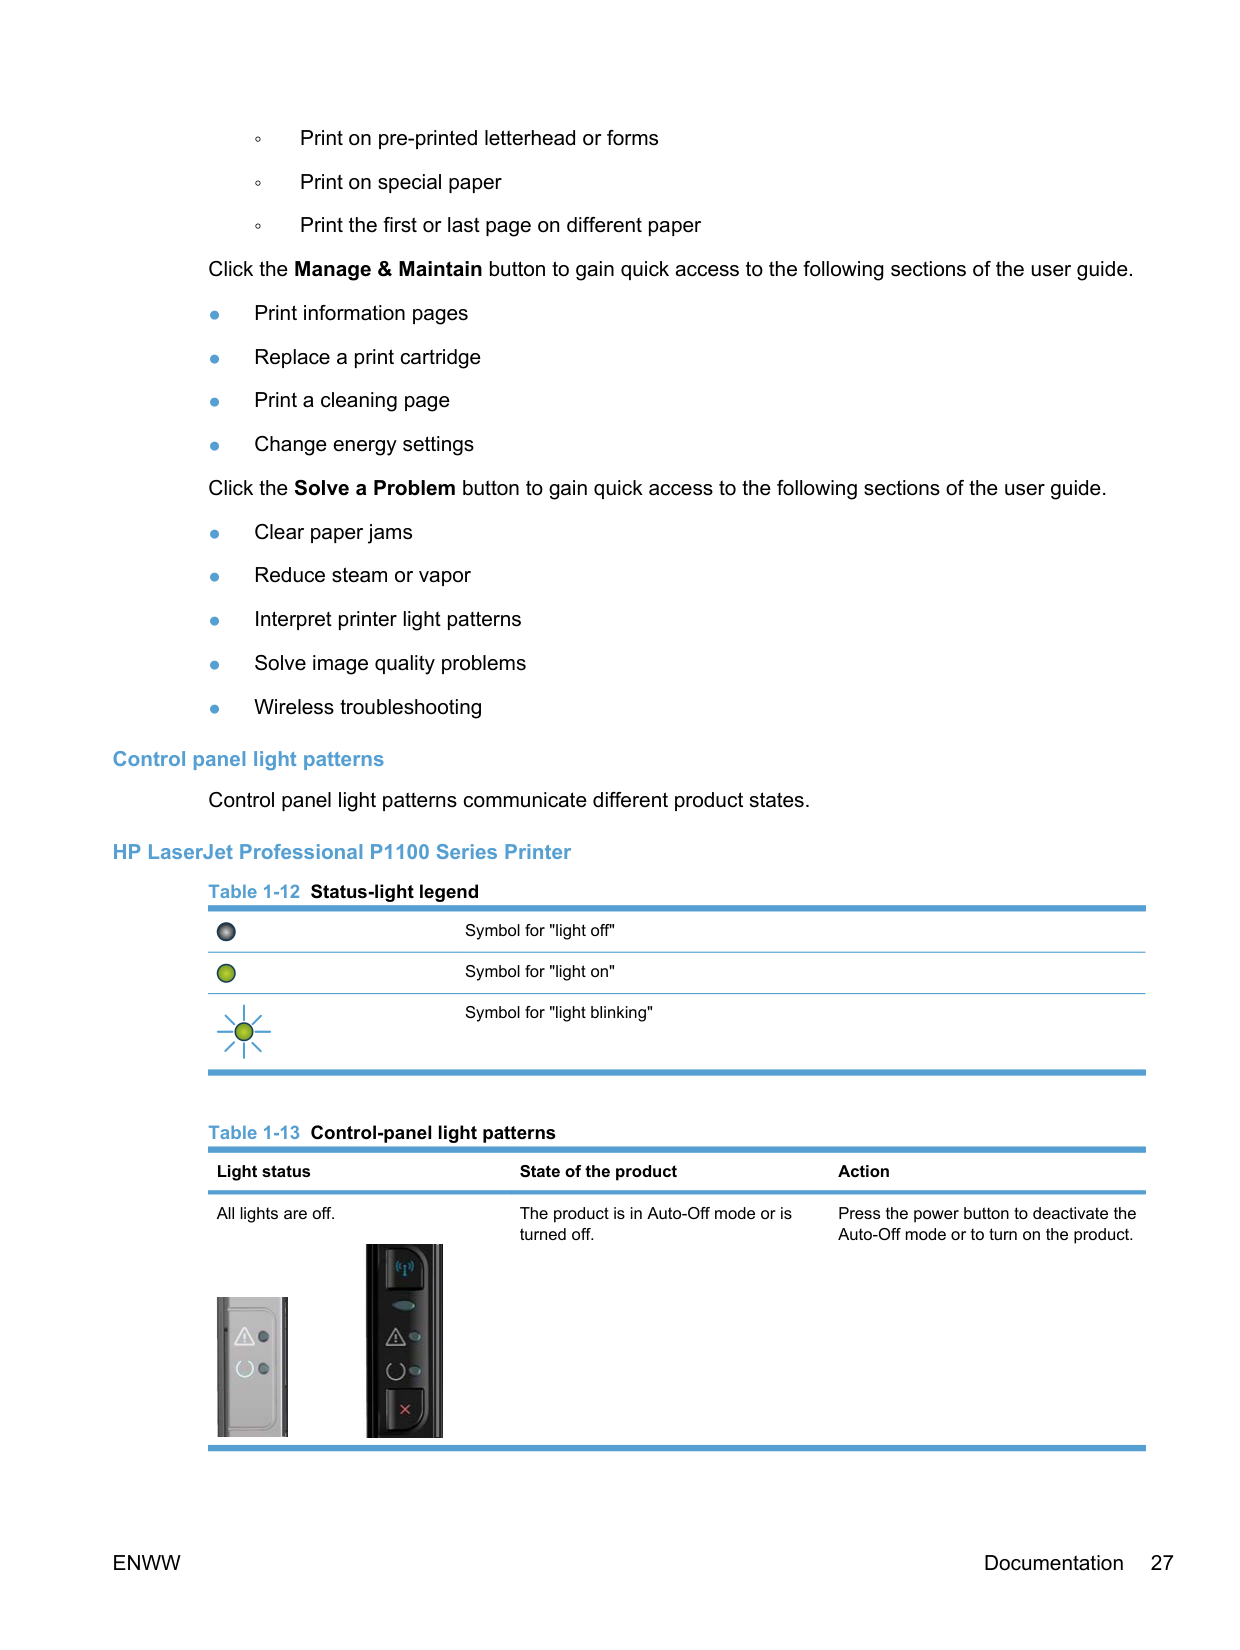
######### Control panel light patterns
Control panel light patterns communicate different product states.
######### HP LaserJet Professional P1100 Series Printer
########### Table 1-12 Status-light legend
Symbol for "light off"
Symbol for "light on"
Symbol for "light blinking"
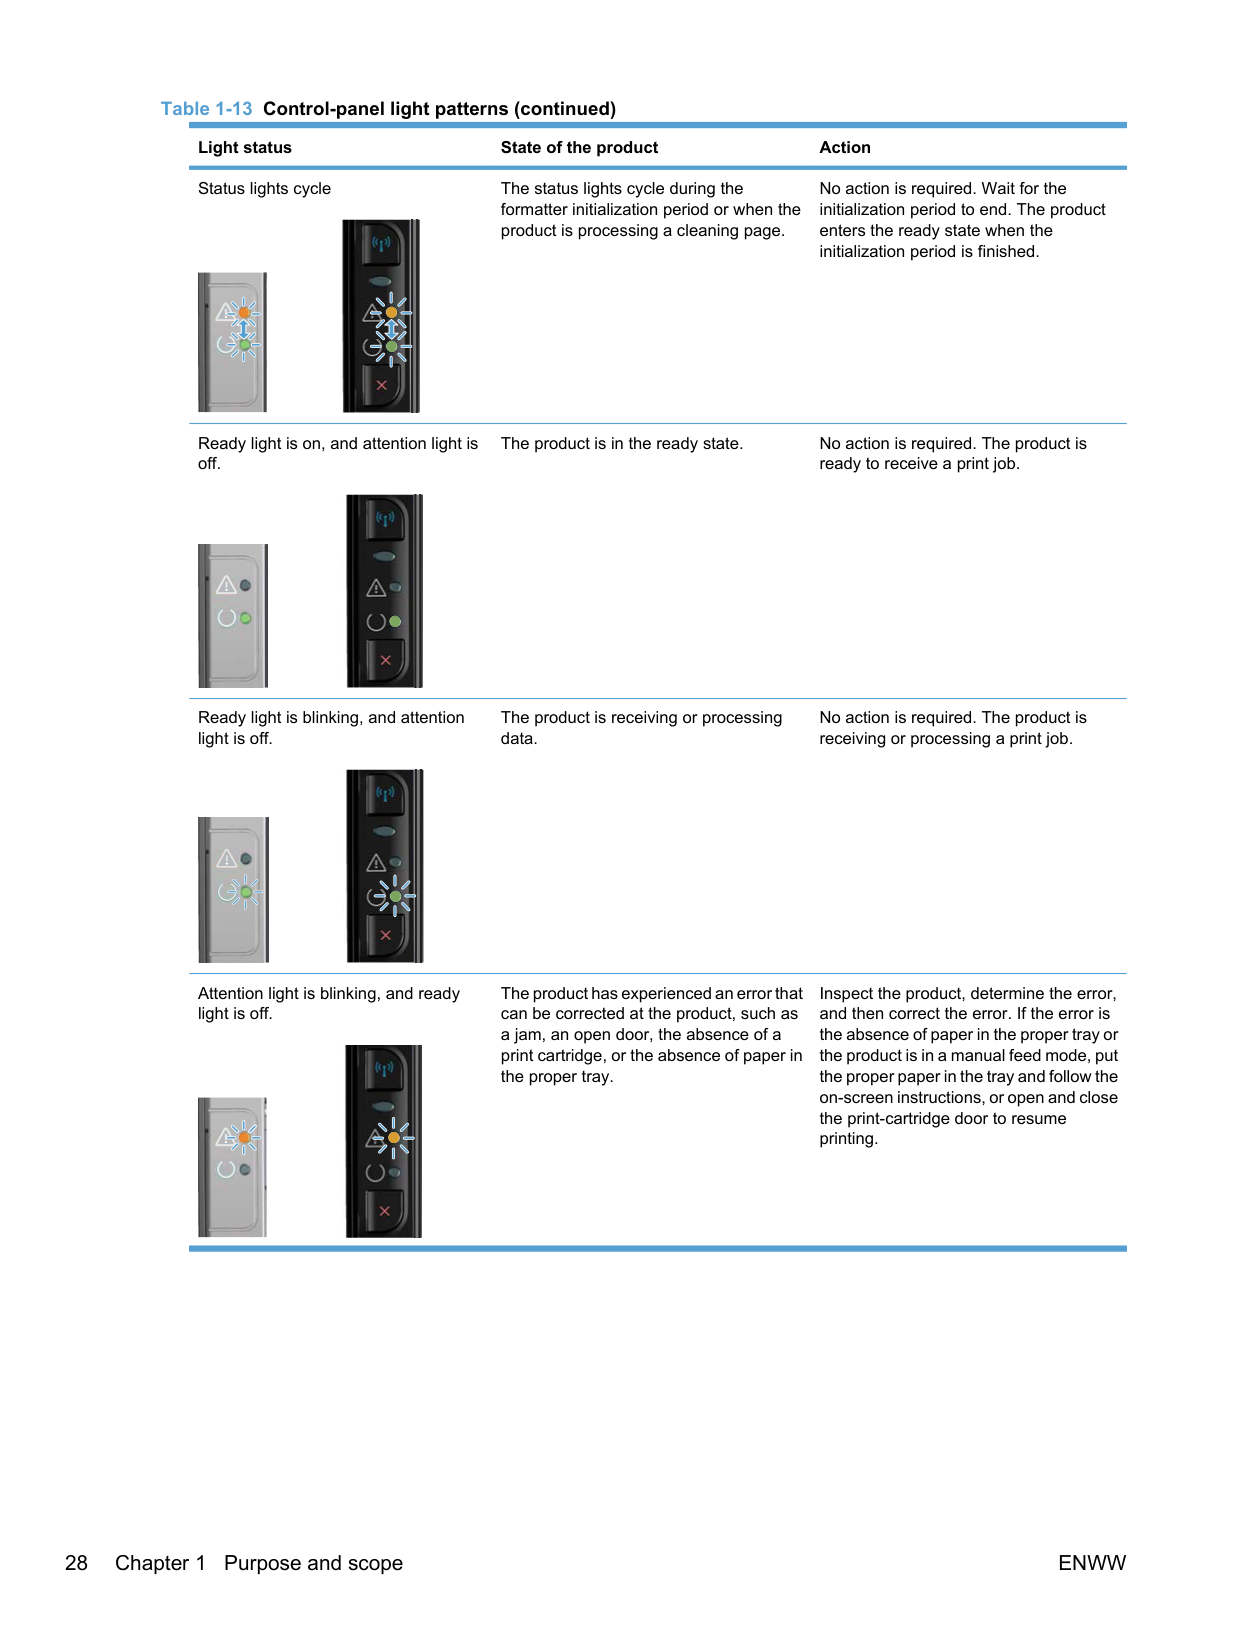
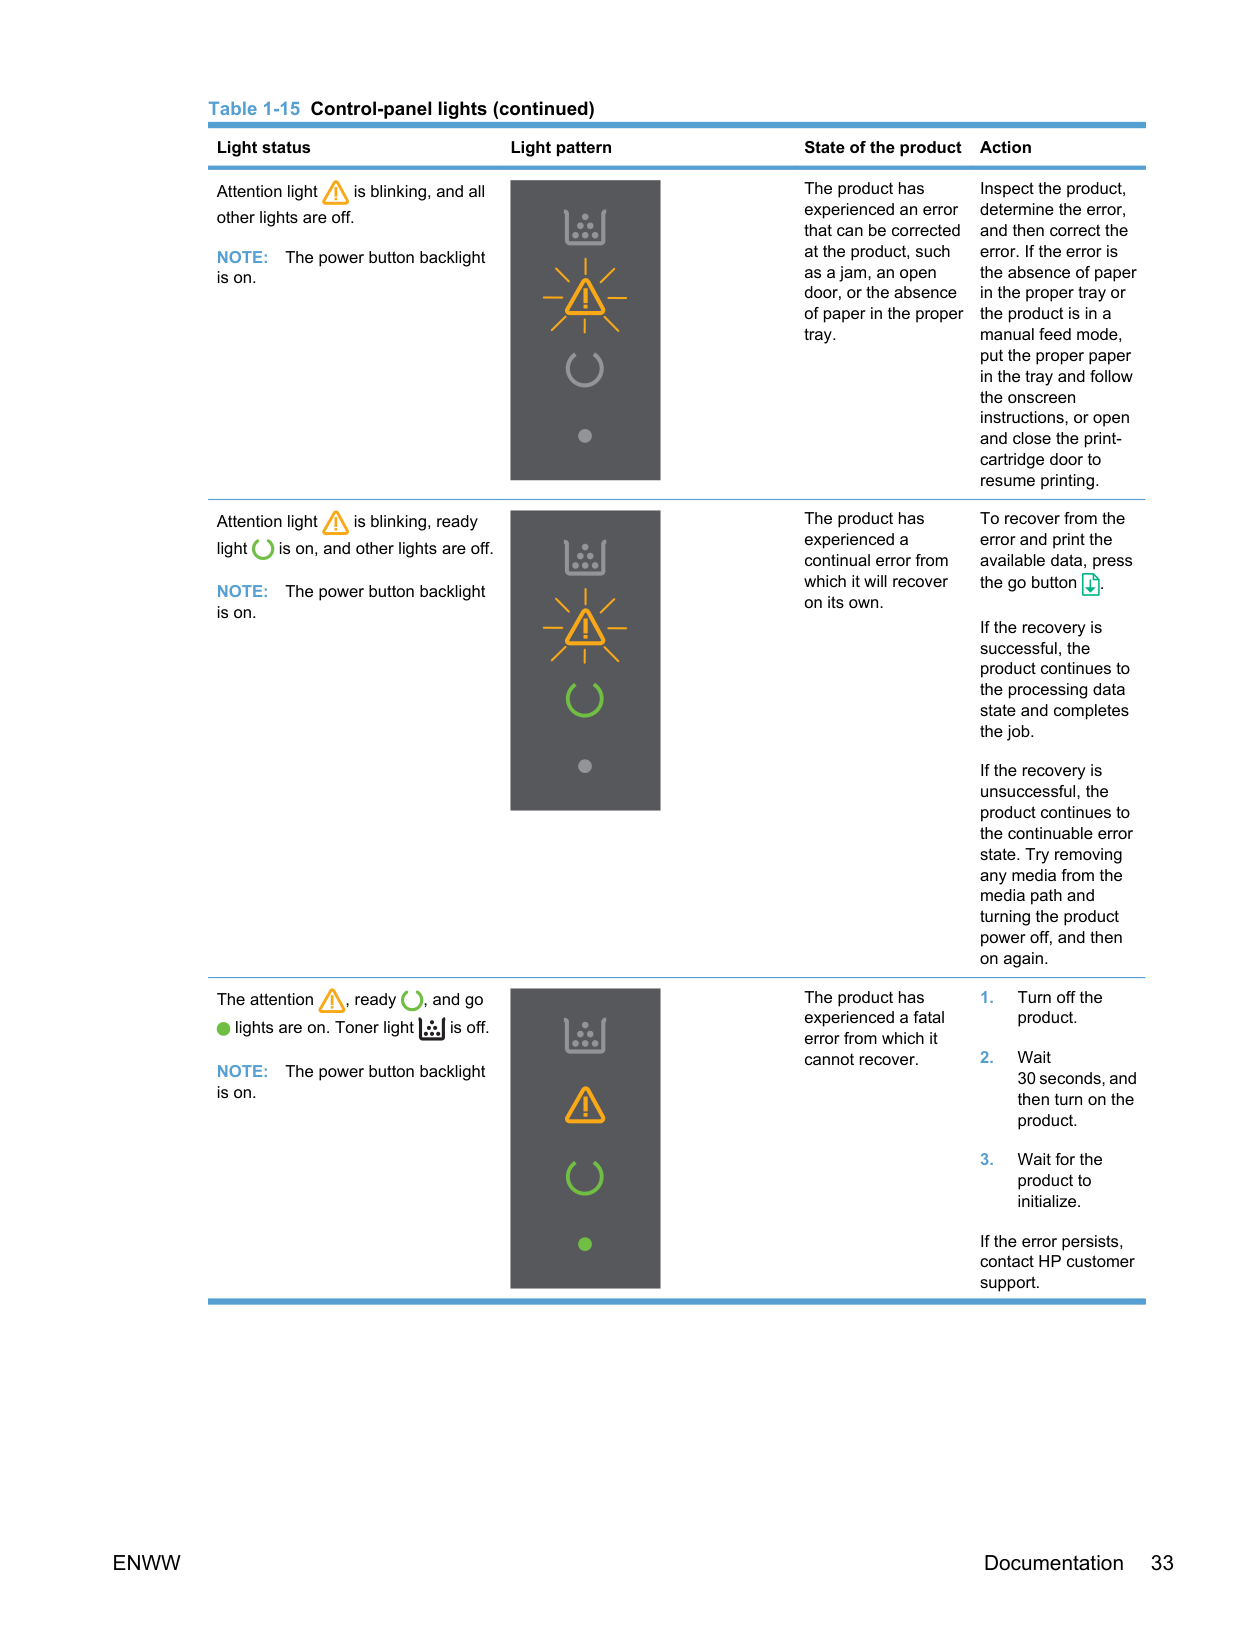
########### Table 1-13 Control-panel light patternsLight status State of the product Action
All lights are off. The product is in Auto-Off mode or is turned off.
Press the power button to deactivate the Auto-Off mode or to turn on the product.


Status lights cycle The status lights cycle during the
No action is required. Wait for the initialization period to end. The product enters the ready state when the initialization period is finished.
formatter initialization period or when the product is processing a cleaning page.


Ready light is on, and attention light is off.
The product is in the ready state. No action is required. The product is
ready to receive a print job.


Ready light is blinking, and attention light is off.
The product is receiving or processing data.
No action is required. The product is receiving or processing a print job.


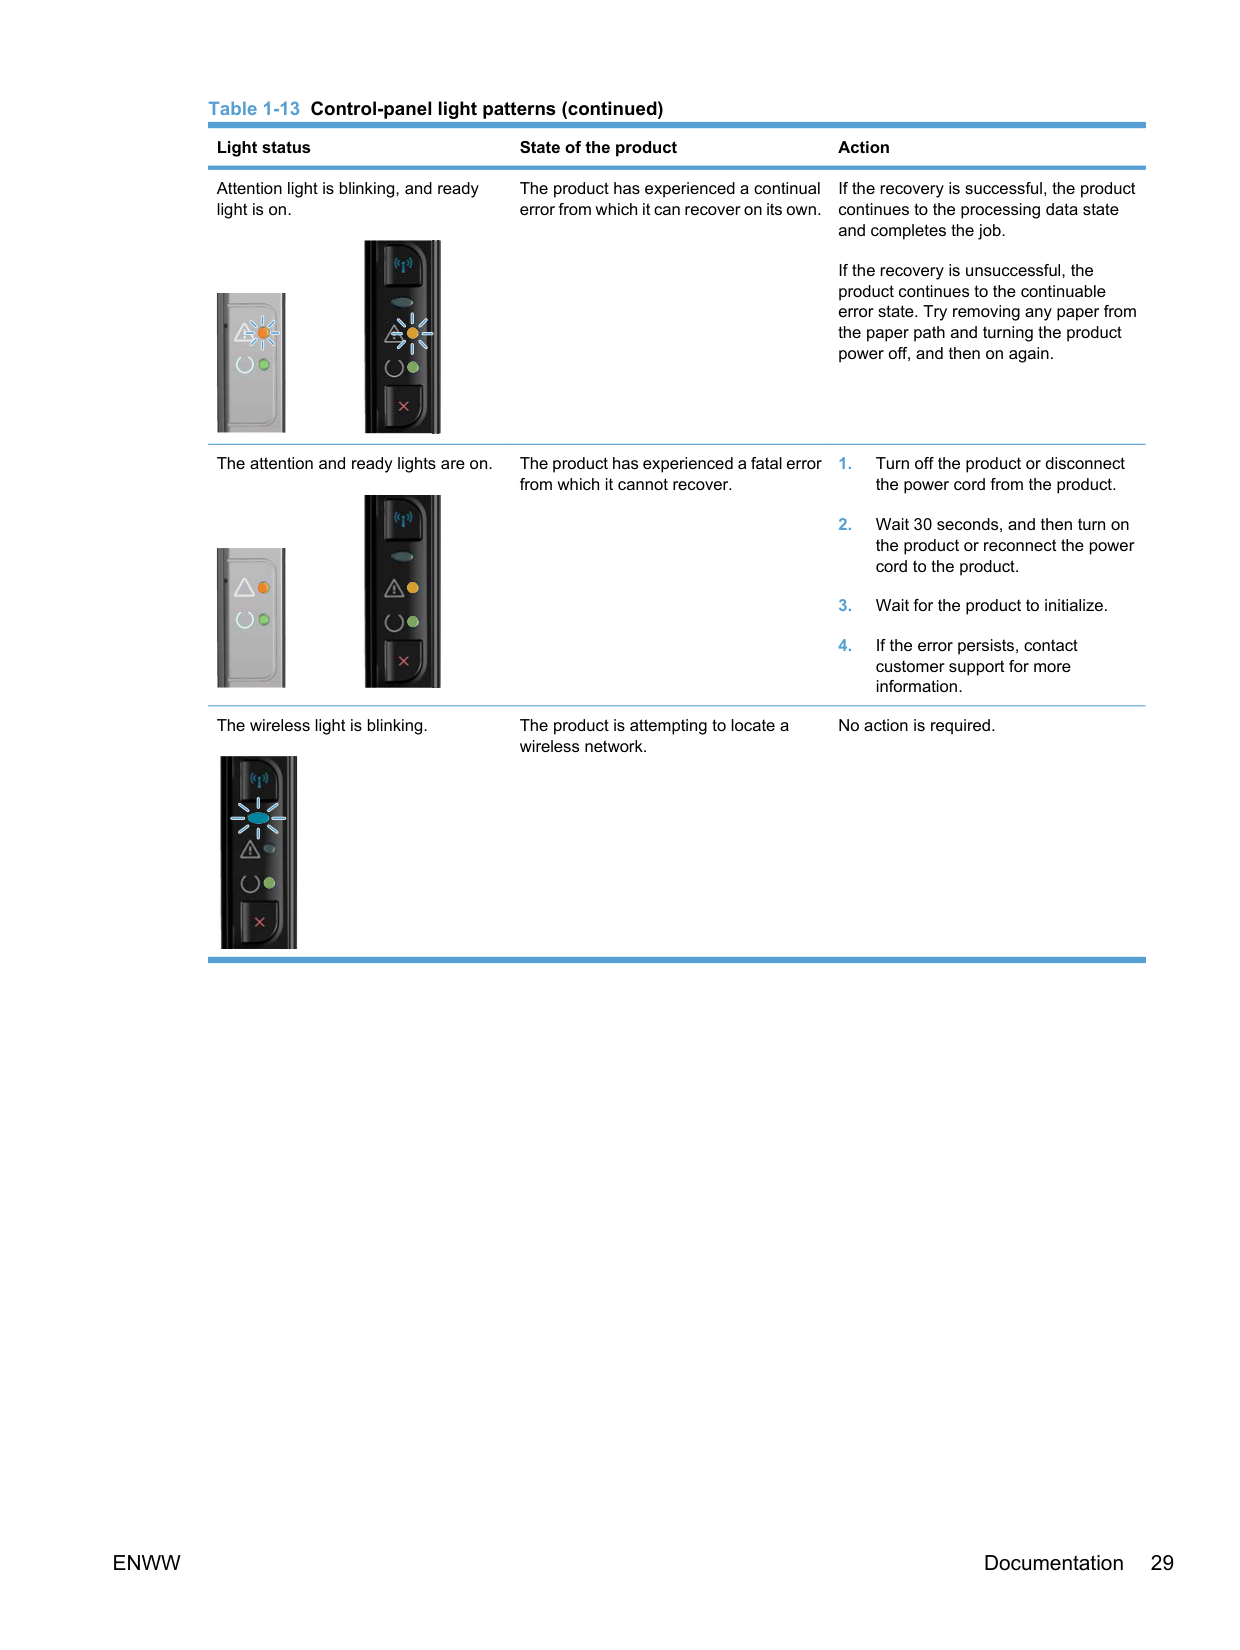
Attention light is blinking, and ready light is off.
The product has experienced an error that can be corrected at the product, such as a jam, an open door, the absence of a print cartridge, or the absence of paper in the proper tray.
Inspect the product, determine the error, and then correct the error. If the error is the absence of paper in the proper tray or the product is in a manual feed mode, put the proper paper in the tray and follow the on-screen instructions, or open and close the print-cartridge door to resume printing.


Attention light is blinking, and ready light is on.
The product has experienced a continual error from which it can recover on its own.
If the recovery is successful, the product continues to the processing data state and completes the job.


If the recovery is unsuccessful, the product continues to the continuable error state. Try removing any paper from the paper path and turning the product power off, and then on again.


The attention and ready lights are on. The product has experienced a fatal error
from which it cannot recover.


The wireless light is blinking. The product is attempting to locate a
No action is required.
wireless network.


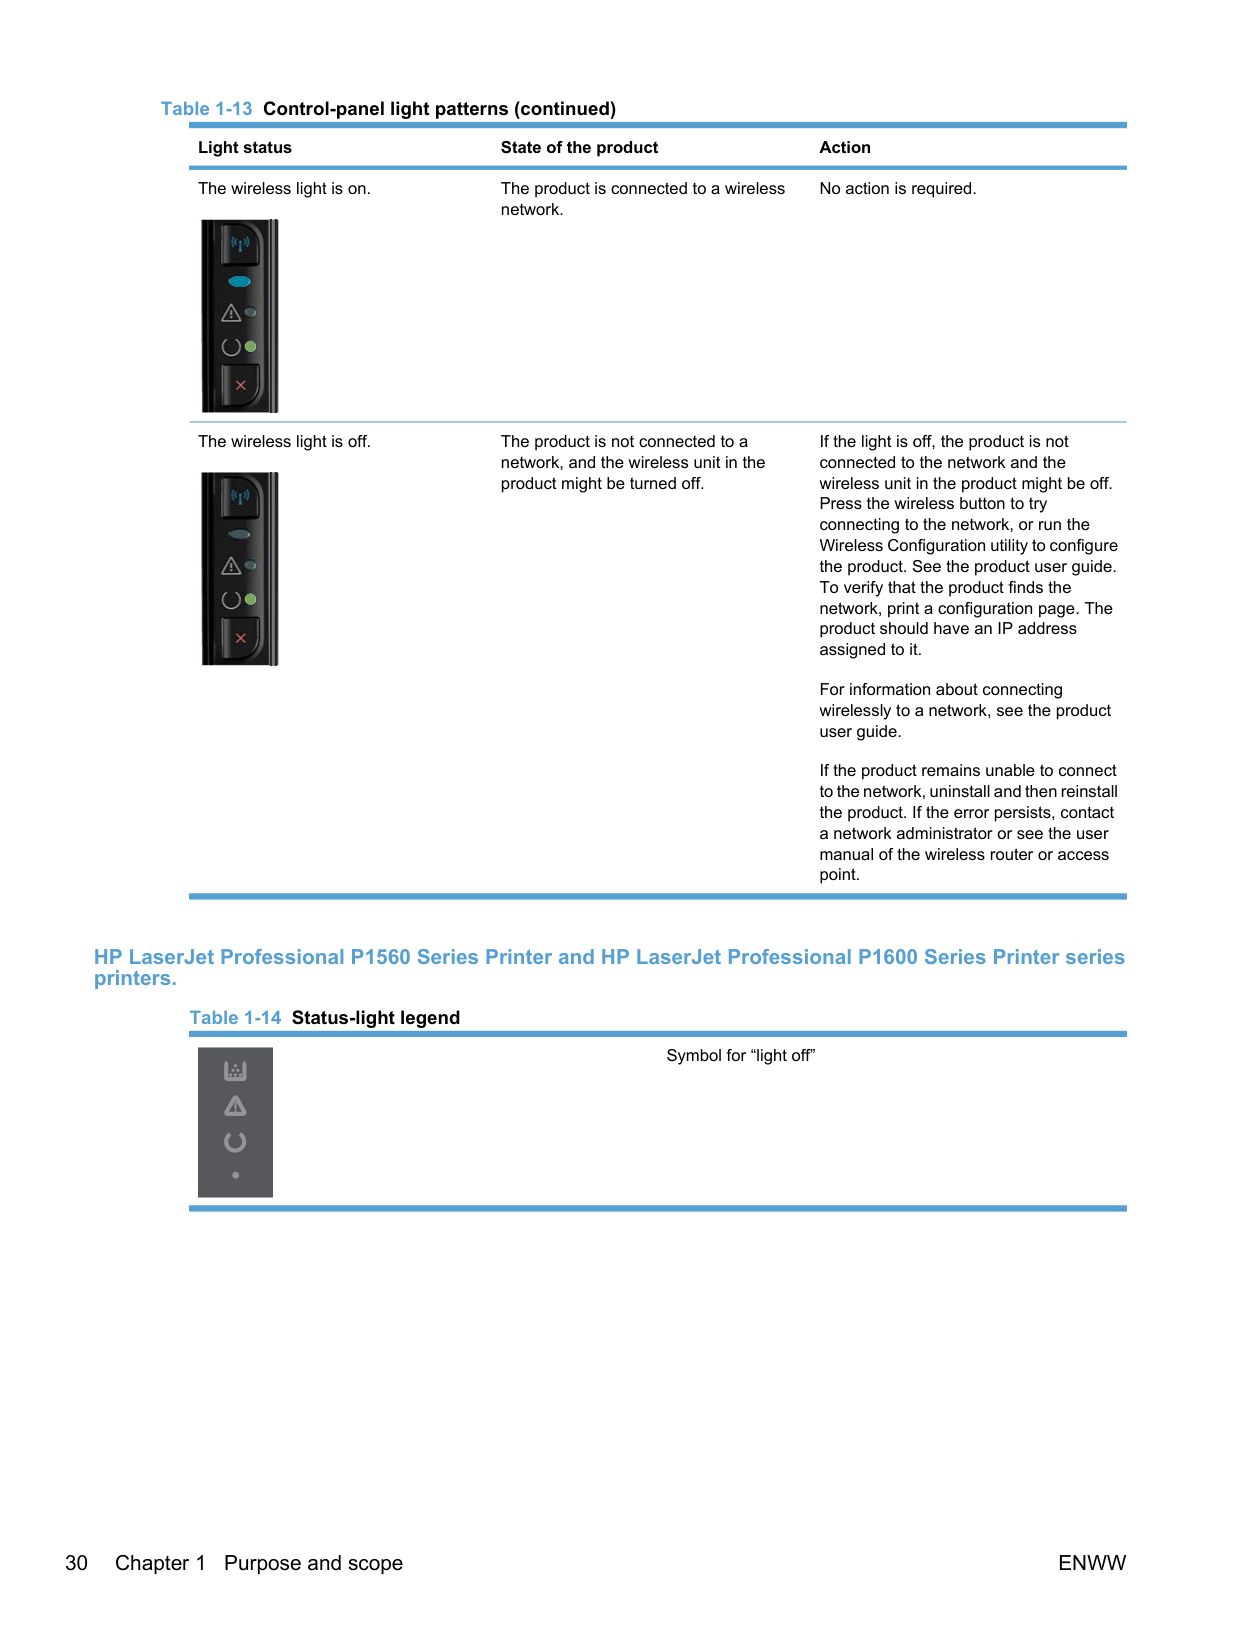
The wireless light is on. The product is connected to a wireless
No action is required.
network.


The wireless light is off. The product is not connected to a network, and the wireless unit in the product might be turned off.
If the light is off, the product is not connected to the network and the wireless unit in the product might be off. Press the wireless button to try connecting to the network, or run the Wireless Configuration utility to configure the product. See the product user guide. To verify that the product finds the network, print a configuration page. The product should have an IP address assigned to it.


For information about connecting wirelessly to a network, see the product user guide.
If the product remains unable to connect to the network, uninstall and then reinstall the product. If the error persists, contact a network administrator or see the user manual of the wireless router or access point.
######### HP LaserJet Professional P1560 Series Printer and HP LaserJet Professional P1600 Series Printer series printers.
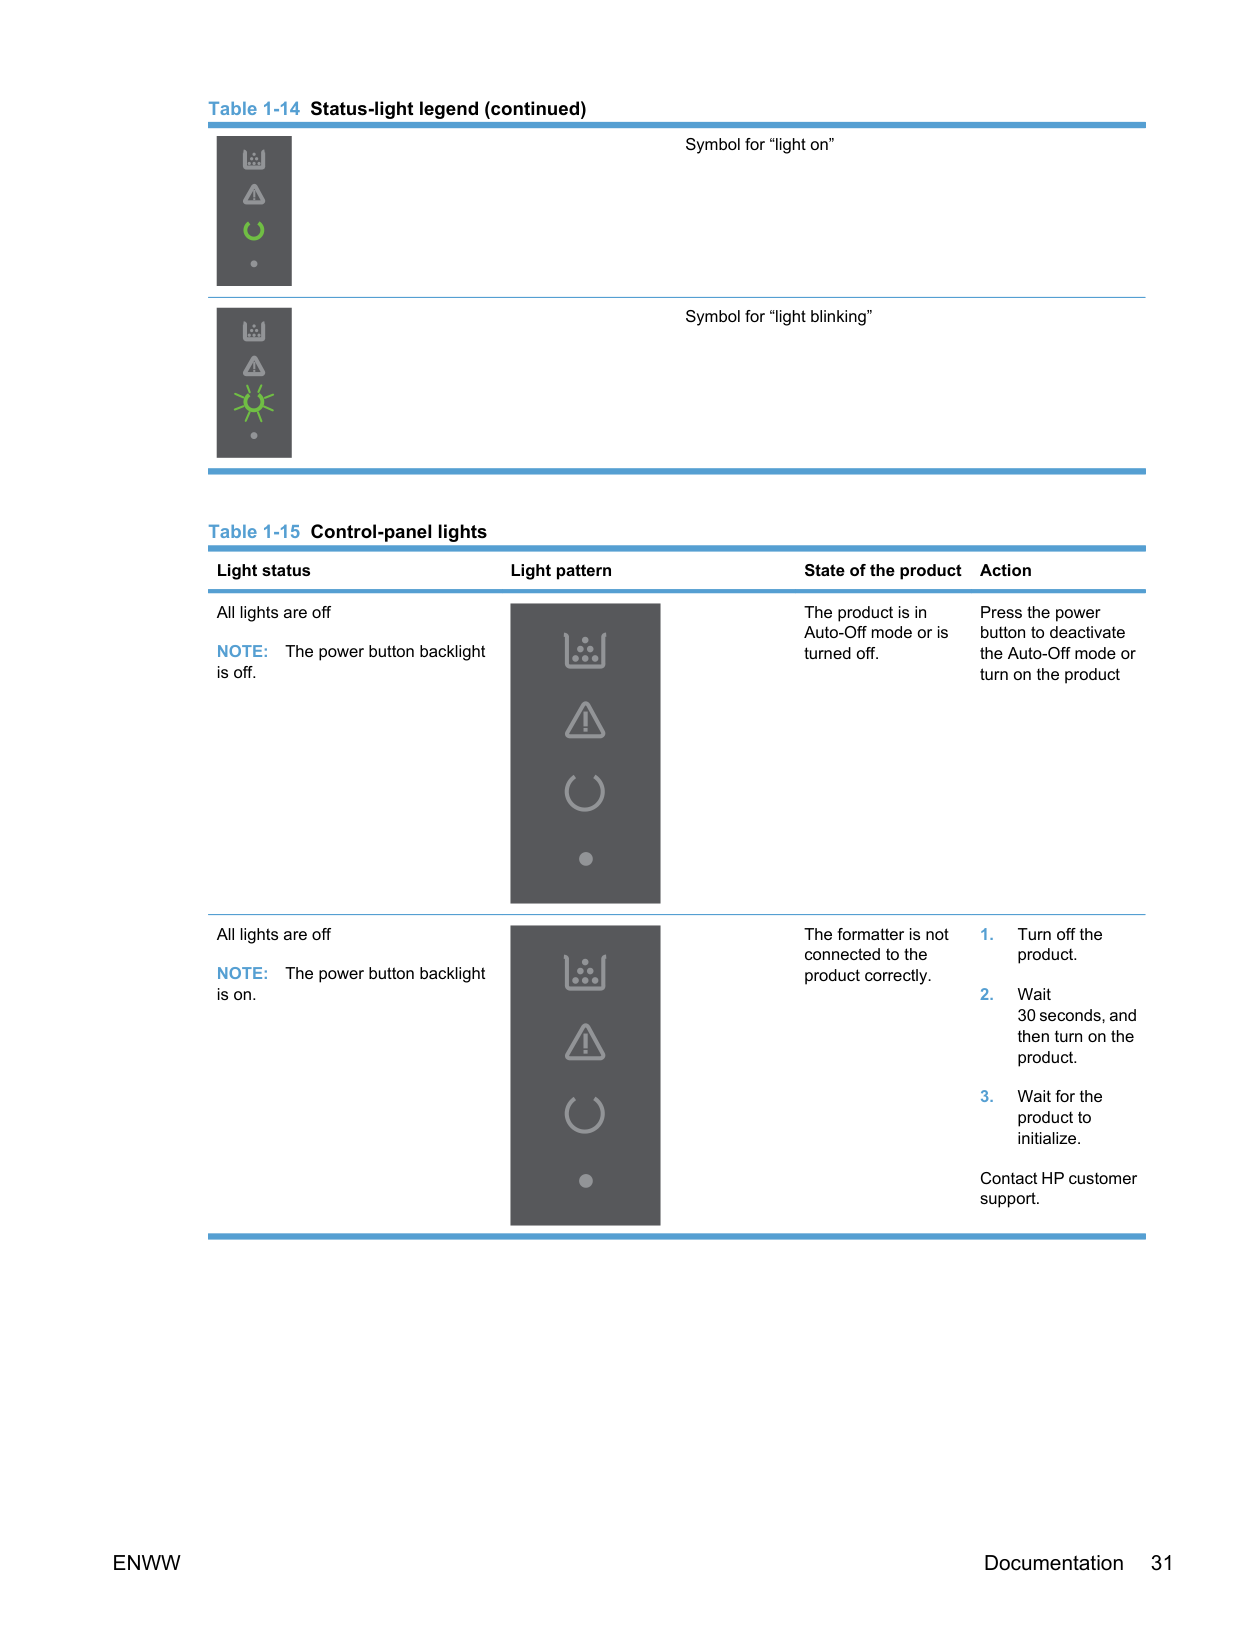
########### Table 1-14 Status-light legend (continued)
Symbol for “light on”
Symbol for “light blinking”
All lights are off NOTE: The power button backlight is off.
The product is in Auto-Off mode or is turned off.
Press the power button to deactivate the Auto-Off mode or turn on the product
All lights are off NOTE: The power button backlight is on.
The formatter is not connected to the product correctly.
Contact HP customer support.
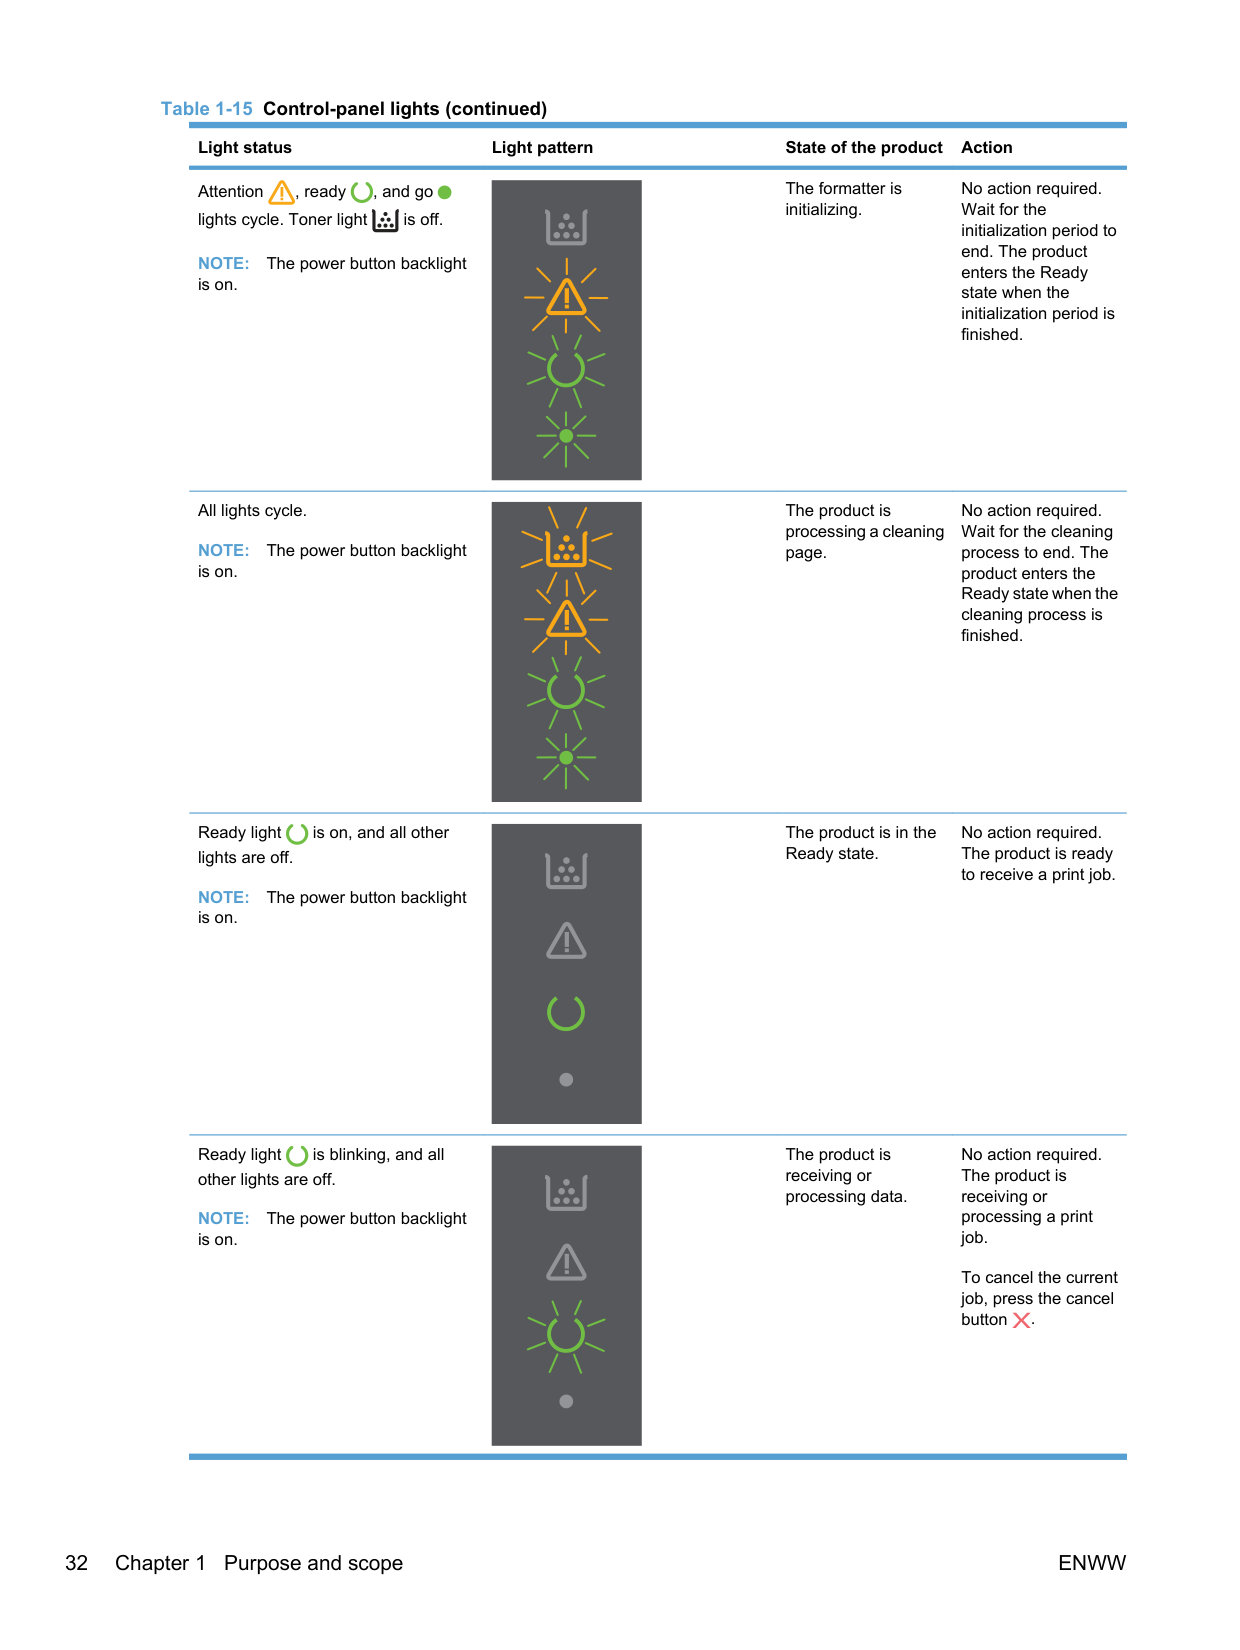
The formatter is initializing.
No action required. Wait for the initialization period to end. The product enters the Ready state when the initialization period is finished.
Attention , ready , and go lights cycle. Toner light is off.
NOTE: The power button backlight is on.
All lights cycle. NOTE: The power button backlight is on.
The product is processing a cleaning page.
No action required. Wait for the cleaning process to end. The product enters the Ready state when the cleaning process is finished.
The product is in the Ready state.
No action required. The product is ready to receive a print job.
Ready light is on, and all other lights are off.
NOTE: The power button backlight is on.
No action required. The product is receiving or processing a print job.
The product is receiving or processing data.
Ready light is blinking, and all other lights are off.
NOTE: The power button backlight is on.
To cancel the current job, press the cancel button .
The product has experienced an error that can be corrected at the product, such as a jam, an open door, or the absence of paper in the proper tray.
Inspect the product, determine the error, and then correct the error. If the error is the absence of paper in the proper tray or the product is in a manual feed mode, put the proper paper in the tray and follow the onscreen instructions, or open and close the printcartridge door to resume printing.
Attention light is blinking, and all other lights are off.
NOTE: The power button backlight is on.
The product has experienced a continual error from which it will recover on its own.
To recover from the error and print the available data, press the go button .
Attention light is blinking, ready light is on, and other lights are off.
NOTE: The power button backlight is on.
If the recovery is successful, the product continues to the processing data state and completes the job.
If the recovery is unsuccessful, the product continues to the continuable error state. Try removing any media from the media path and turning the product power off, and then on again.
The product has experienced a fatal error from which it cannot recover.
The attention , ready , and go
lights are on. Toner light is off.
NOTE: The power button backlight is on.
If the error persists, contact HP customer support.
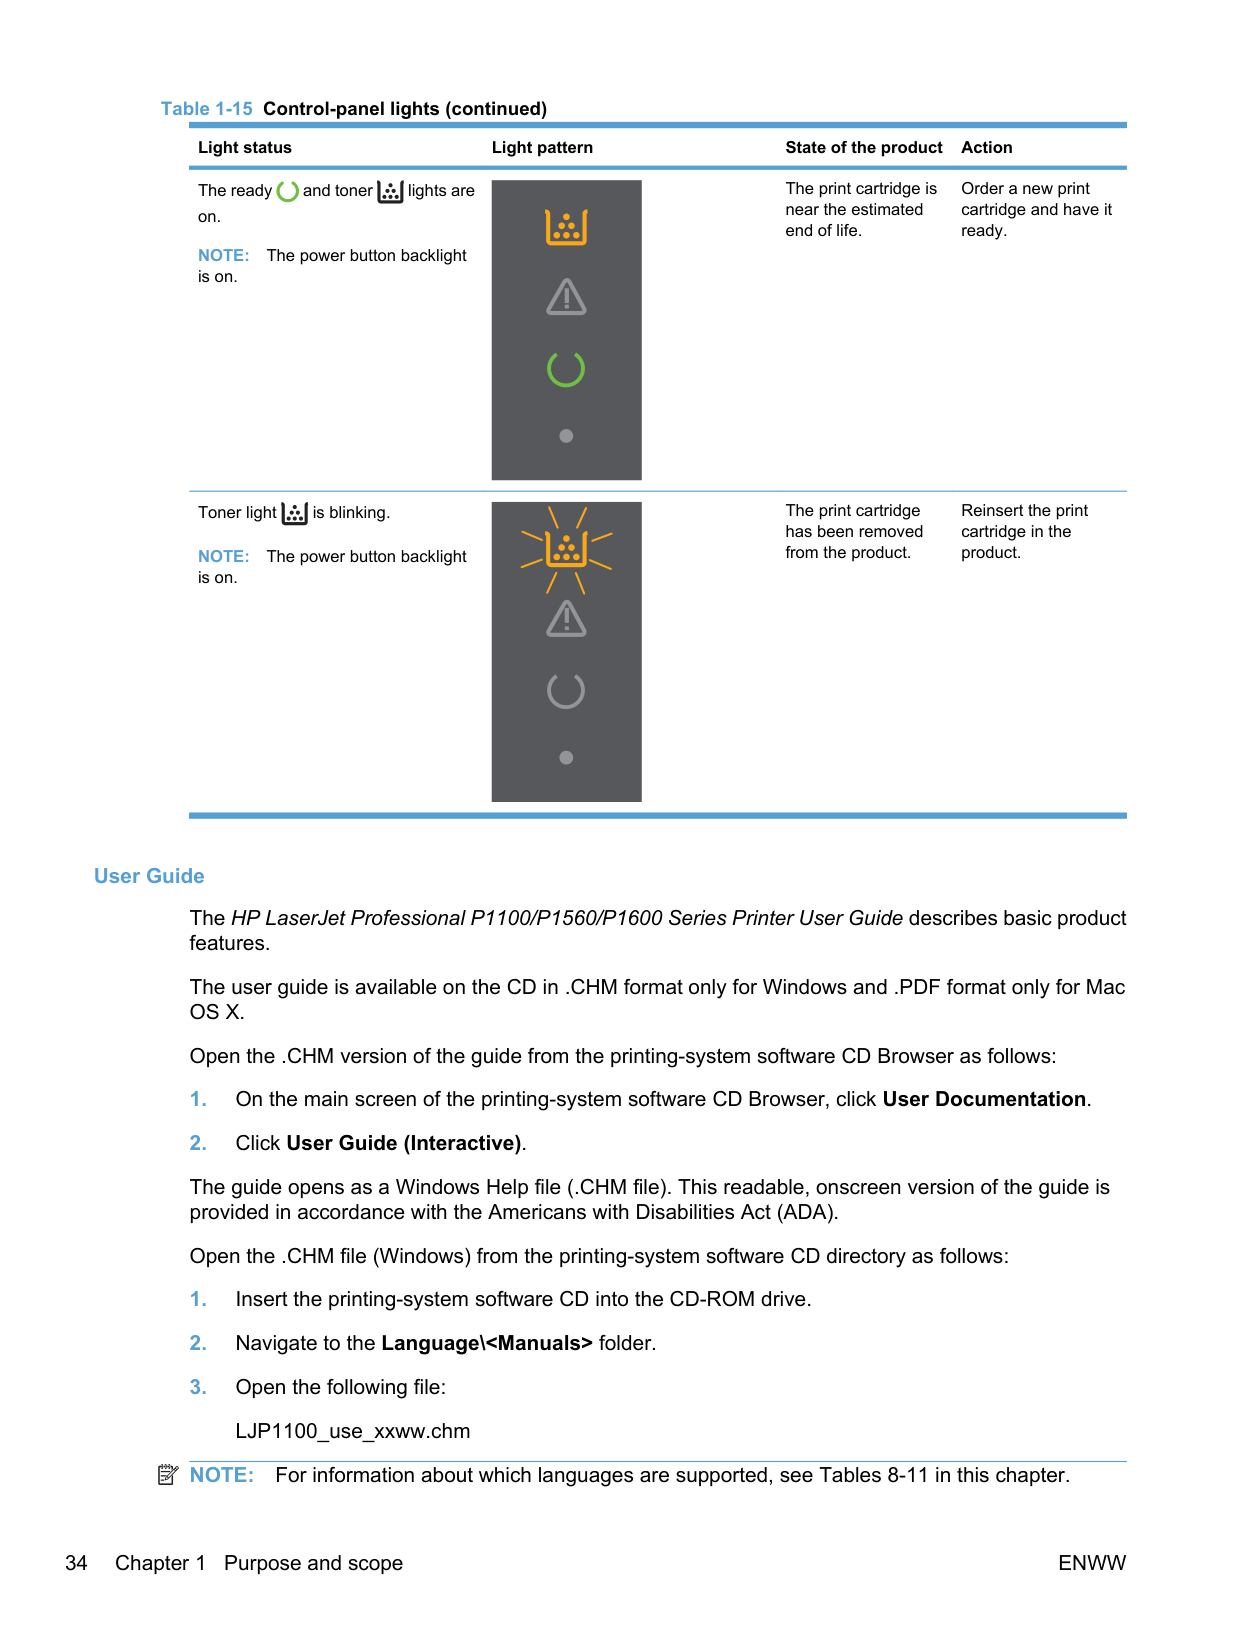
The print cartridge is near the estimated end of life.
Order a new print cartridge and have it ready.
The ready and toner lights are on.
NOTE: The power button backlight is on.
The print cartridge has been removed from the product.
Reinsert the print cartridge in the product.
Toner light is blinking.
NOTE: The power button backlight is on.
######### User Guide
The HP LaserJet Professional P1100/P1560/P1600 Series Printer User Guide describes basic product features.
The user guide is available on the CD in .CHM format only for Windows and .PDF format only for Mac OS X.
Open the .CHM version of the guide from the printing-system software CD Browser as follows:
The guide opens as a Windows Help file (.CHM file). This readable, onscreen version of the guide is provided in accordance with the Americans with Disabilities Act (ADA).
Open the .CHM file (Windows) from the printing-system software CD directory as follows:
| | |---|
NOTE: For information about which languages are supported, see Tables 8-11 in this chapter.
NOTE: The "xx" in the file name corresponds to the language. For French, the file name is LJP1100_use_frww.CHM. Open the .PDF file (Mac) from the printing-system software CD directory as follows:
| | |---|
NOTE: The "XX" in the file name corresponds to the language. For French, the file name is LJP1100_use_frww.pdf.

######### More Information
Click More Information to view the printing system install notes and to access the product support Web site.
######### Figure 1-12 More Information screen

######### Install Notes
The HP LaserJet Professional P1100/P1560/P1600 Series Printer Printing-System Install Notes (.HTM) contains important information about device features, instructions for installing the printing-system software, and technical assistance.
######### Open the install notes from the printing-system software CD Browser as follows:
######### Open the .HTM file directly:
######### Product Support Website
Visit the product support Web site to gain quick access to online support pages, software updates, FAQs, and more.
2 Software description
ENWW 37
#### Windows printing-system software
##### Supported operating systems for Windows
The product supports the following Windows operating systems:
##### Windows operating system requirements
The HP printing-system software has the following minimum system requirements for the following Windows operating systems:
######### ● Windows Vista (32-bit and 64-bit)
######### ● Windows XP, Server 2003, Server 2008 (32-bit and 64-bit)
######### ● Windows 7 (32-bit and 64-bit)
##### Macintosh system requirements
The HP printing-system software has the following minimum system requirements for the Mac OS X V10.4, V10.5, and V10.6.
| | |---|
##### Printer driver
Printer drivers provide access to product features, such as printing on custom-sized paper, resizing documents, and inserting watermarks.
| | |---|
NOTE: The most recent drivers are available at www.hp.com/support/ljp1100series and www.hp.com/ support/ljp1560series or www.hp.com/go/ljp1600series.
##### Select the correct printer driver for Windows
Printer drivers provide access to the product features and allow the computer to communicate with the product (by using a printer language).
######### HP LaserJet Professional P1100/P1560/P1600 Series Printer Host-based print driver
● The recommended print driver for most Windows applications. The Host-based driver is installed by default and recommended for most users.
######### HP PCL 5e Universal Print Driver description (P1600 series models only)
######### HP LaserJet Professional P1100/P1560/P1600 Series Printer XPS print driver
● Recommended for capturing and printing screen output exactly as it is rendered on the screen.
Priority for print settings Changes to print settings are prioritized depending on where the changes are made. NOTE: The names of commands and dialog boxes might vary depending on your software program.
| | |---|
##### Change printer-driver settings for Windows
Change the settings for all print jobs until the software program is closed
Change the default settings for all print jobs
Change the product configuration settings
Windows XP, Windows Server 2003, and Windows Server 2008 (using the default Start menu view): Click Start, and then click Printers and Faxes.

Windows XP, Windows Server 2003, and Windows Server 2008 (using the Classic Start menu view): Click Start, click Settings, and then click Printers.
Windows XP, Windows Server 2003, and Windows Server 2008 (using the default Start menu view): Click Start, and then click Printers and Faxes.
Windows XP, Windows Server 2003, and Windows Server 2008 (using the Classic Start menu view): Click Start, click Settings, and then click Printers.
The steps can vary; this procedure is most common.
##### Printing system and installer
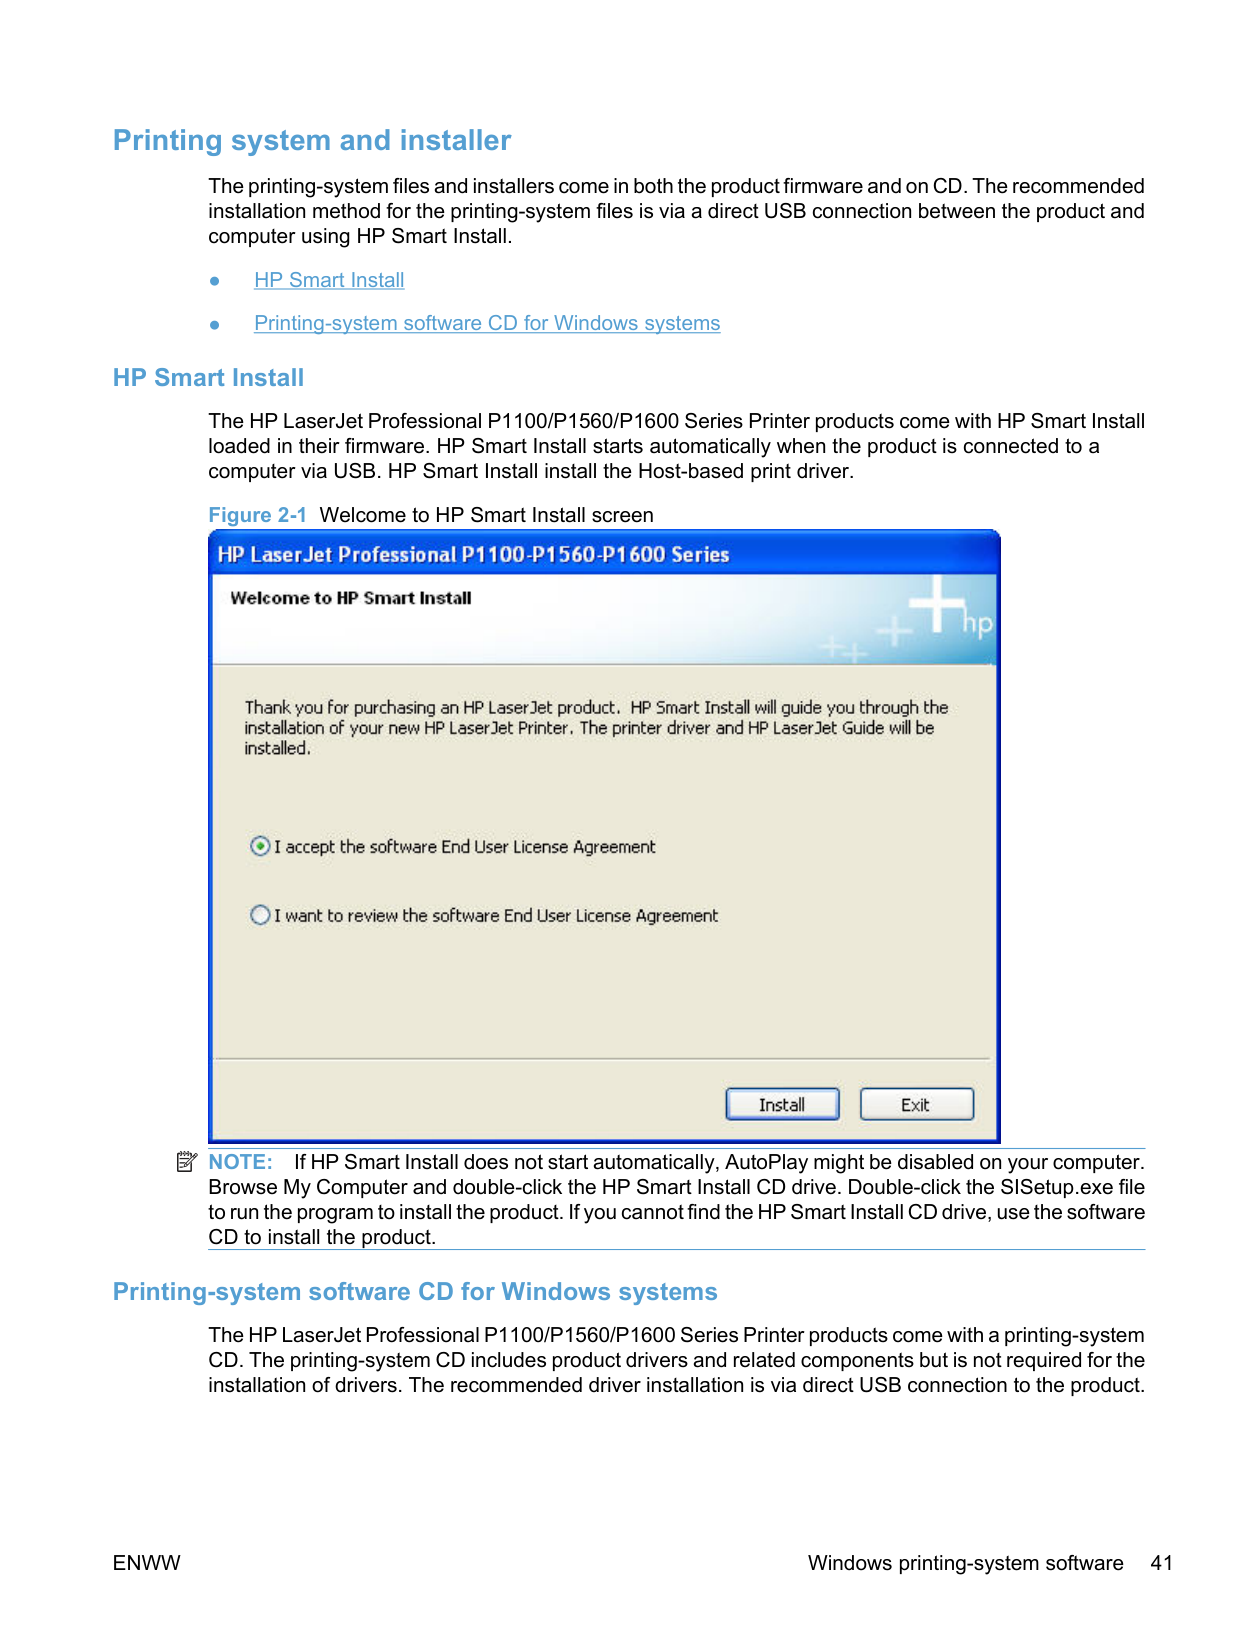
The printing-system files and installers come in both the product firmware and on CD. The recommended installation method for the printing-system files is via a direct USB connection between the product and computer using HP Smart Install.
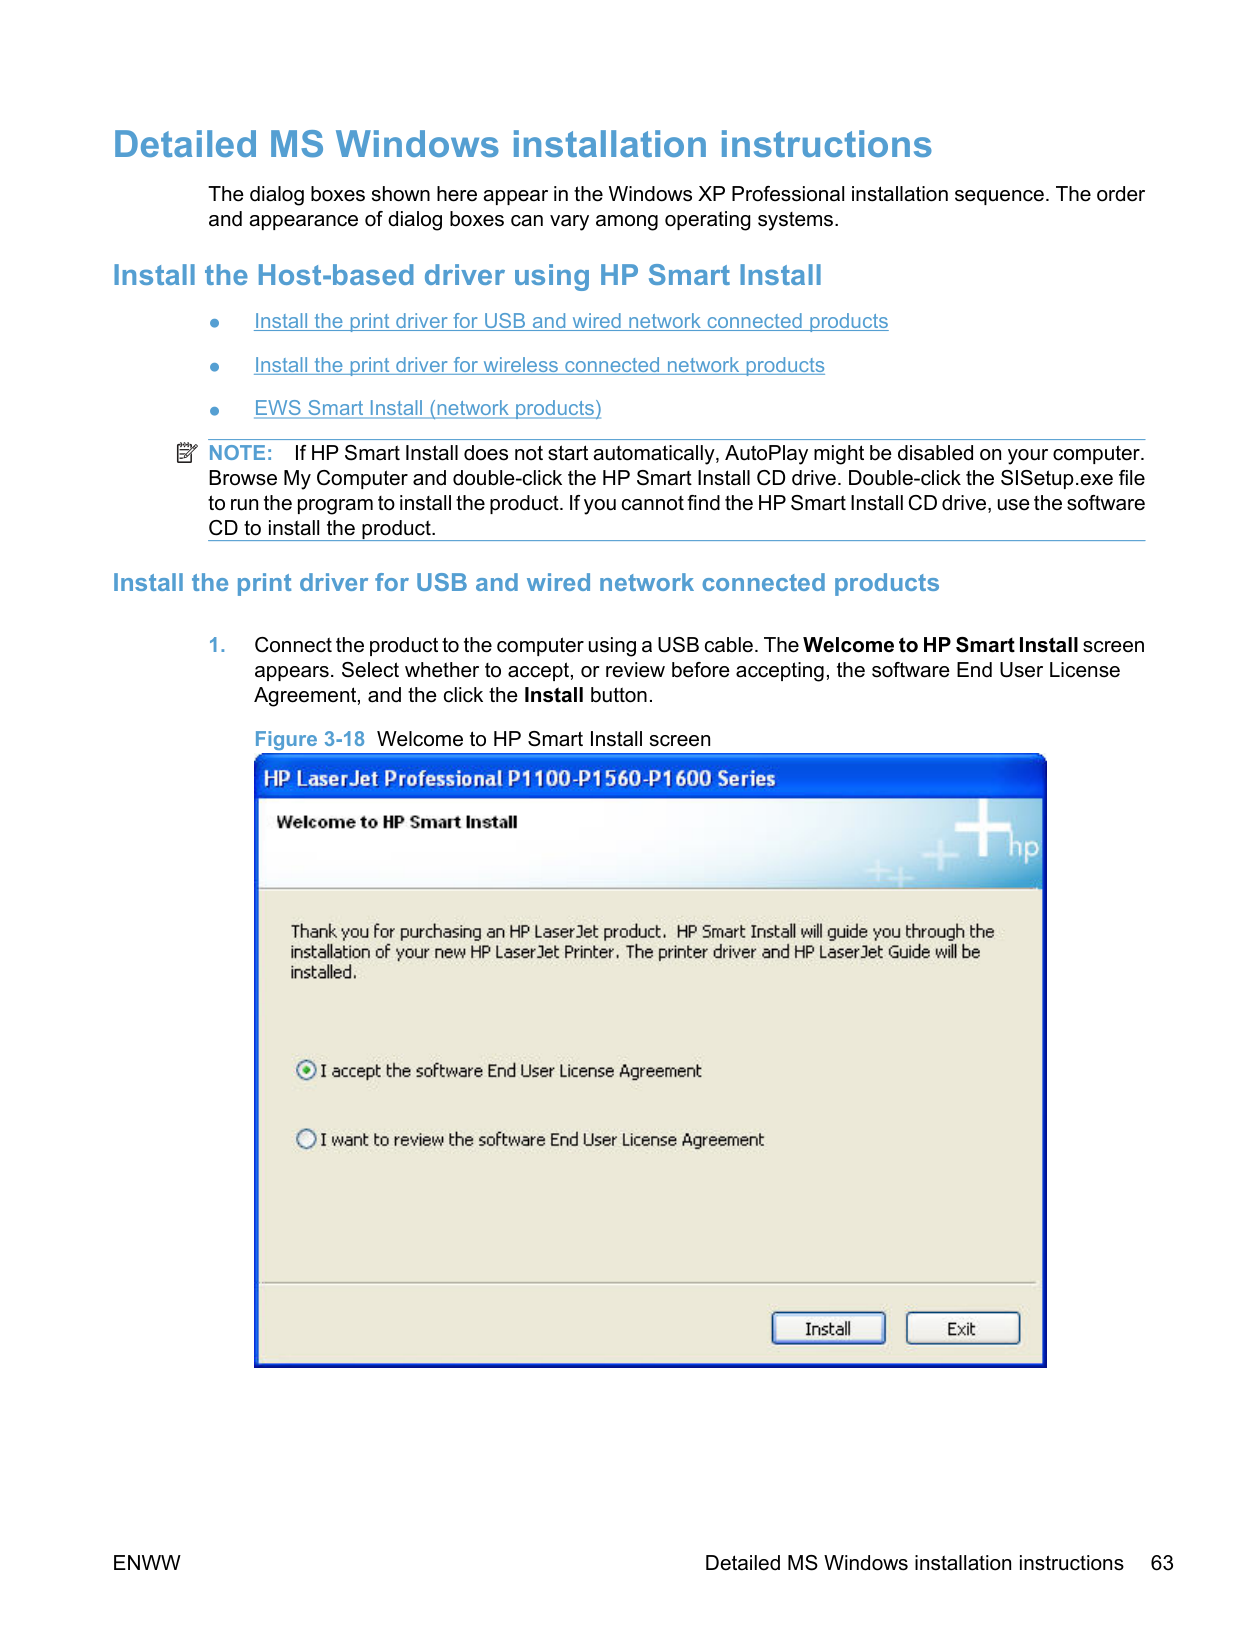
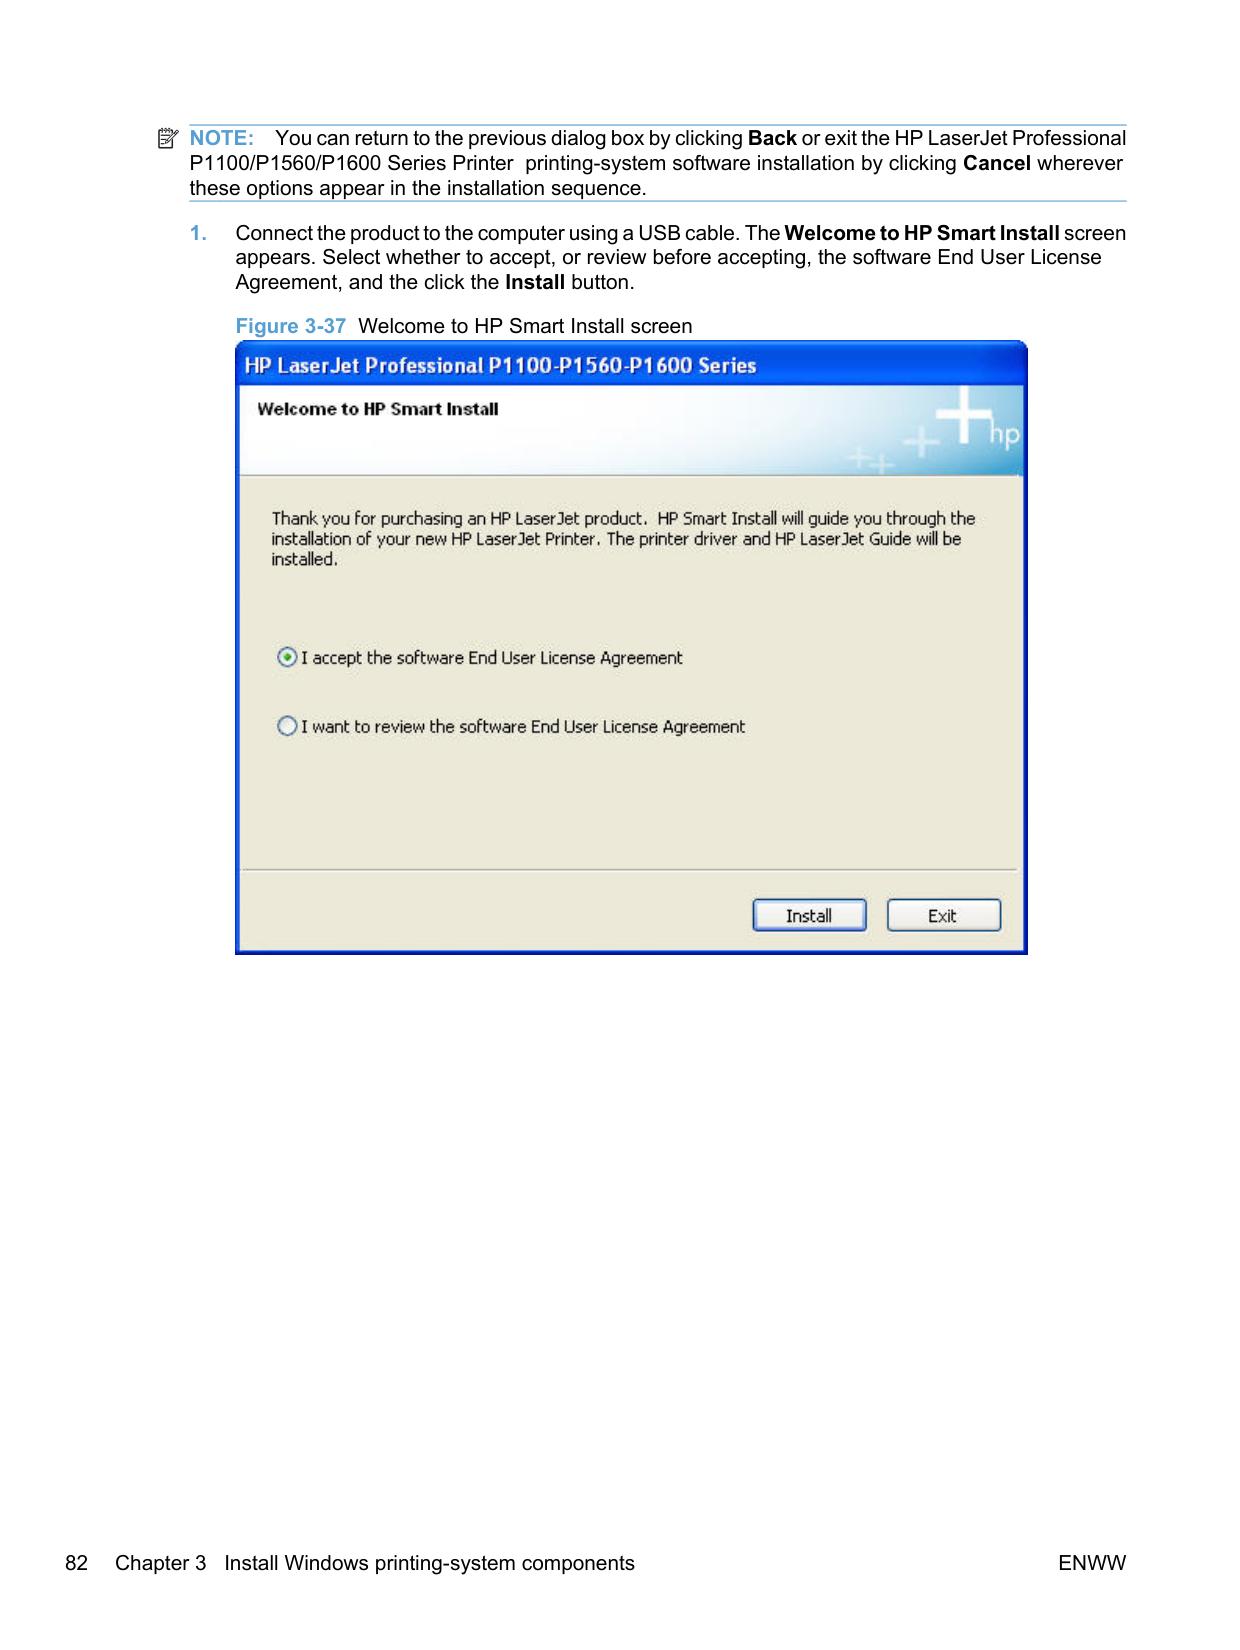
######## HP Smart Install
The HP LaserJet Professional P1100/P1560/P1600 Series Printer products come with HP Smart Install loaded in their firmware. HP Smart Install starts automatically when the product is connected to a computer via USB. HP Smart Install install the Host-based print driver.
| | |---|

Figure 2-1 Welcome to HP Smart Install screen

NOTE: If HP Smart Install does not start automatically, AutoPlay might be disabled on your computer. Browse My Computer and double-click the HP Smart Install CD drive. Double-click the SISetup.exe file to run the program to install the product. If you cannot find the HP Smart Install CD drive, use the software CD to install the product.
######## Printing-system software CD for Windows systems
The HP LaserJet Professional P1100/P1560/P1600 Series Printer products come with a printing-system CD. The printing-system CD includes product drivers and related components but is not required for the installation of drivers. The recommended driver installation is via direct USB connection to the product.
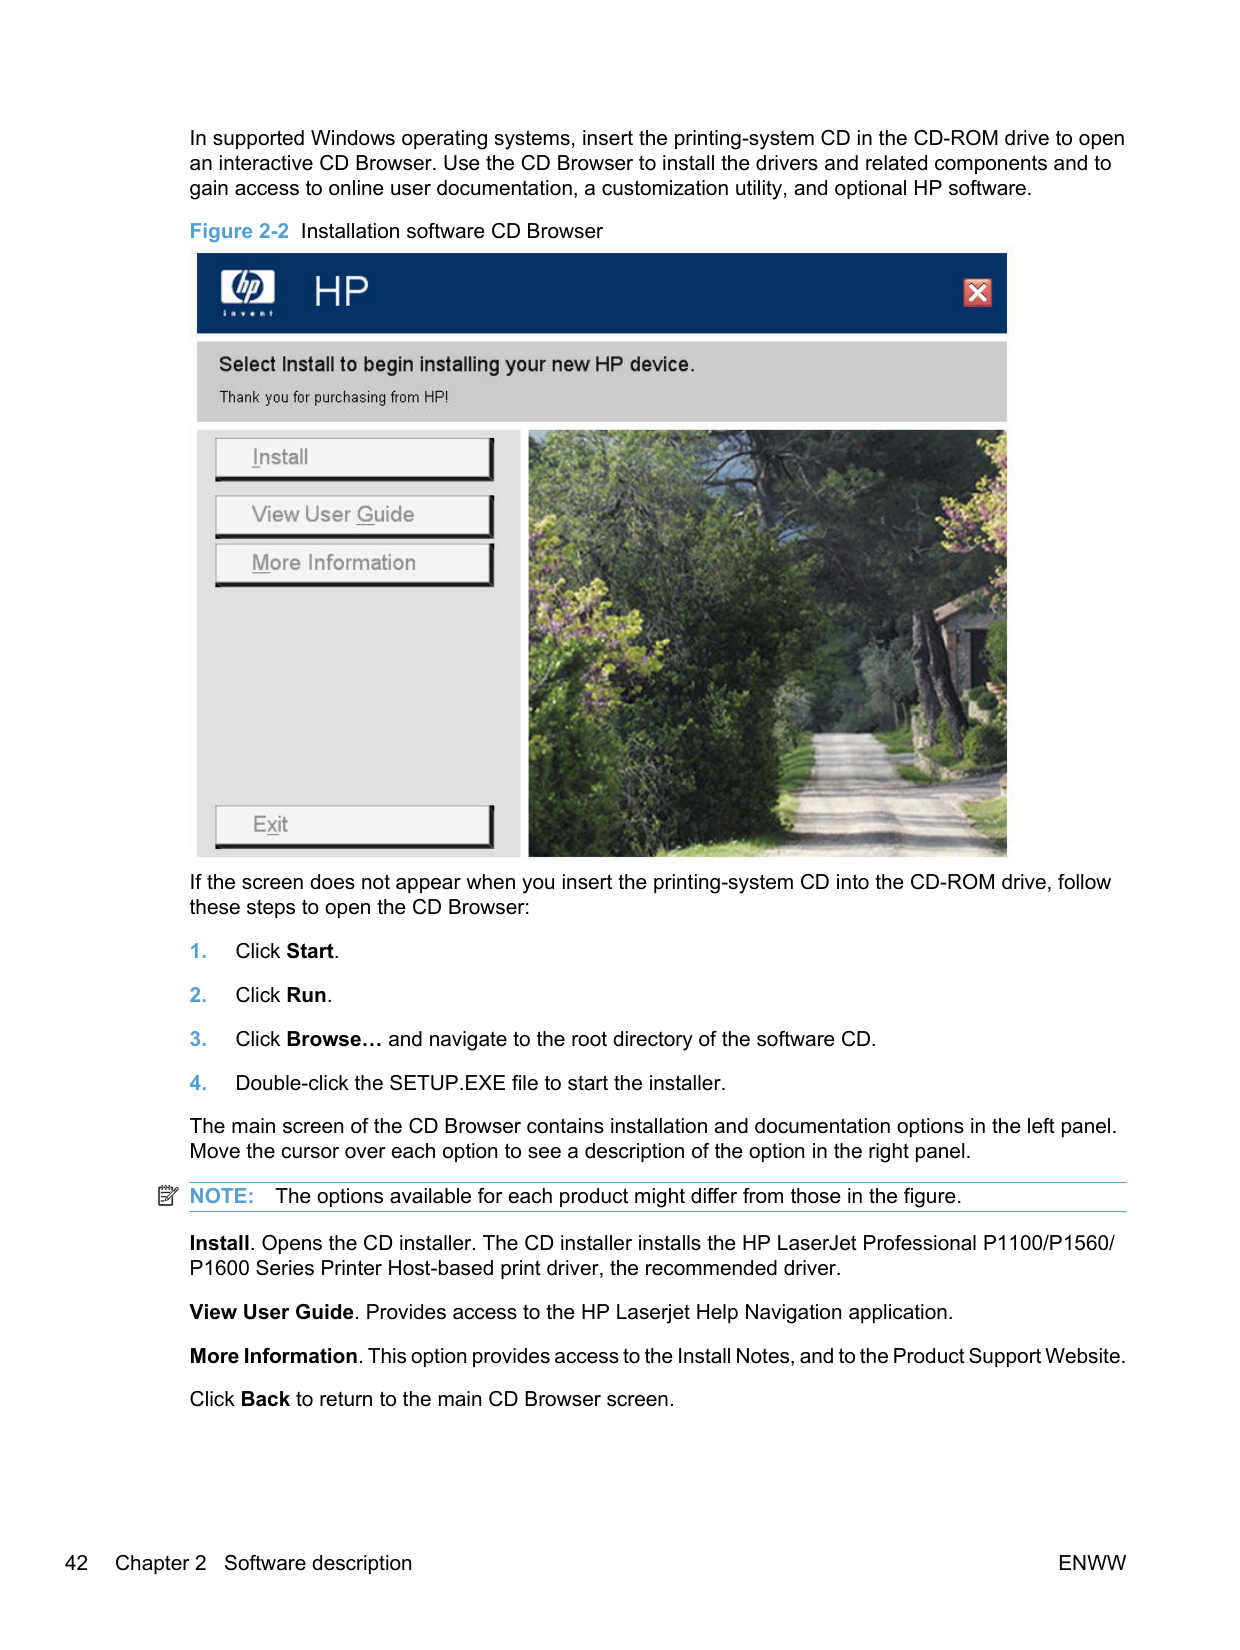
In supported Windows operating systems, insert the printing-system CD in the CD-ROM drive to open an interactive CD Browser. Use the CD Browser to install the drivers and related components and to gain access to online user documentation, a customization utility, and optional HP software.
Figure 2-2 Installation software CD Browser

If the screen does not appear when you insert the printing-system CD into the CD-ROM drive, follow these steps to open the CD Browser:
The main screen of the CD Browser contains installation and documentation options in the left panel. Move the cursor over each option to see a description of the option in the right panel.
| | |---|
NOTE: The options available for each product might differ from those in the figure. Install. Opens the CD installer. The CD installer installs the HP LaserJet Professional P1100/P1560/ P1600 Series Printer Host-based print driver, the recommended driver. View User Guide. Provides access to the HP Laserjet Help Navigation application. More Information. This option provides access to the Install Notes, and to the Product Support Website. Click Back to return to the main CD Browser screen.
##### Driver version numbers for Windows operating systems
Access to driver version numbers varies, depending on the operating system in which the printing system is installed.
| | |---|
NOTE: For a list of product drivers, updated HP printing-system software, and product-support information, go to:
www.hp.com/support/ljp1100series www.hp.com/support/ljp1560series or www.hp.com/go/ljp1600series In supported Windows operating systems, follow these steps to find driver-version information:
Windows Server 2003 and Windows XP Professional: Select Settings, and then select Printers and Faxes.
#### Embedded Web Server
LJP1102w and P1606 series are equipped with the HP Embedded Web Server (HP EWS), which provides access to information about product and network activities. This information appears in a Web browser, such as Microsoft Internet Explorer, Apple Safari, or Firefox.
The HP EWS resides on the product. It is not loaded on a network server.
The HP EWS provides an interface to the product that anyone who has a network-connected computer and a standard Web browser can use. No special software is installed or configured, but you must have a supported Web browser on the computer. To gain access to the HP EWS, type the IP address for the product in the address line of the browser.
For a complete explanation of the features and functionality of the HP EWS, see the user guide for your product.
3 Install Windows printing-system components
The HP LaserJet Professional P1100/P1560/P1600 Series Printer comes with software and installers for Microsoft Windows and Apple Macintosh systems. For information about Macintosh software, see Macintosh software and utilities on page 235 This chapter provides procedures for installing and uninstalling the HP LaserJet Professional P1100/P1560/P1600 Series Printer printing-system software for Windows operating systems.
ENWW 45
#### Supported operating systems for Windows
The HP LaserJet Professional P1100/P1560/P1600 Series Printer printer supports the following Windows operating systems:
#### Windows operating system requirements
The HP printing-system software has the following minimum system requirements for the following Windows operating systems:
######### ● Windows Vista (32-bit and 64-bit)
######### ● Windows XP, Server 2003, Server 2008 (32-bit and 64-bit)

######### ● Windows 7 (32-bit and 64-bit)
#### Install overview
The software for the HP LaserJet Professional P1100/P1560/P1600 Series Printer product is available from the product firmware or from the printing-system software CD. HP Smart Install installs the HP LaserJet Professional P1100/P1560/P1600 Series Printer printing-system software from the product firmware onto the hard disk and updates Windows files. HP Smart Install is the recommended installation method.
For all supported operating systems, each install option presents a series of screens that guide you through the installation process.
#### Software installation types for Windows
The HP LaserJet Professional P1100/P1560/P1600 Series Printer printing-system software can be installed in the following ways:
| | |---|
NOTE: If HP Smart Install does not start automatically, AutoPlay might be disabled on your computer. Browse My Computer and double-click the HP Smart Install CD drive. Double-click the SISetup.exe file to run the program to install the product. If you cannot find the HP Smart Install CD drive, use the software CD to install the product.
#### Installation options
The HP LaserJet Professional P1100/P1560/P1600 Series Printer printing-system software can be installed when the product is connected to the computer in the following configurations:

ENWW Software installation types for Windows 47
#### Microsoft Windows general installation overview
##### HP LaserJet Professional P1100/P1560/P1600 Series Printer printingsystem software for Windows systems
HP LaserJet Professional P1100/P1560/P1600 Series Printer printing-system software can be installed either via a direct USB connection to the product or from the printing-system software CD
######## HP Smart Install
| | |---|
NOTE: This installation type is supported for Windows only.
The HP Smart Install allows you to install the product driver and software by connecting the product to a computer through a USB cable.
| | |---|
NOTE: The installation CD is not required during a HP Smart Install. Do not insert the software installation CD into the computer CD drive.
the software.
######## CD installation
In supported Windows environments (Windows 7, Windows Server 2003, Windows Server 2008, Windows XP, and Windows Vista), insert the printing-system software CD in the CD-ROM drive to open an interactive CD Browser. Use the CD Browser to install the drivers and related components, and to gain access to online user documentation and optional HP software.
If the installation screen does not appear when you insert the printing-system software CD into the CDROM drive, follow these steps to open the CD Browser:
The main screen of the software CD Browser contains installation and documentation options in the left panel. Move the cursor over each option to see a description of the option in the right panel. The following
figure shows the main screen of the HP LaserJet Professional P1100/P1560/P1600 Series Printer printing-system software CD.
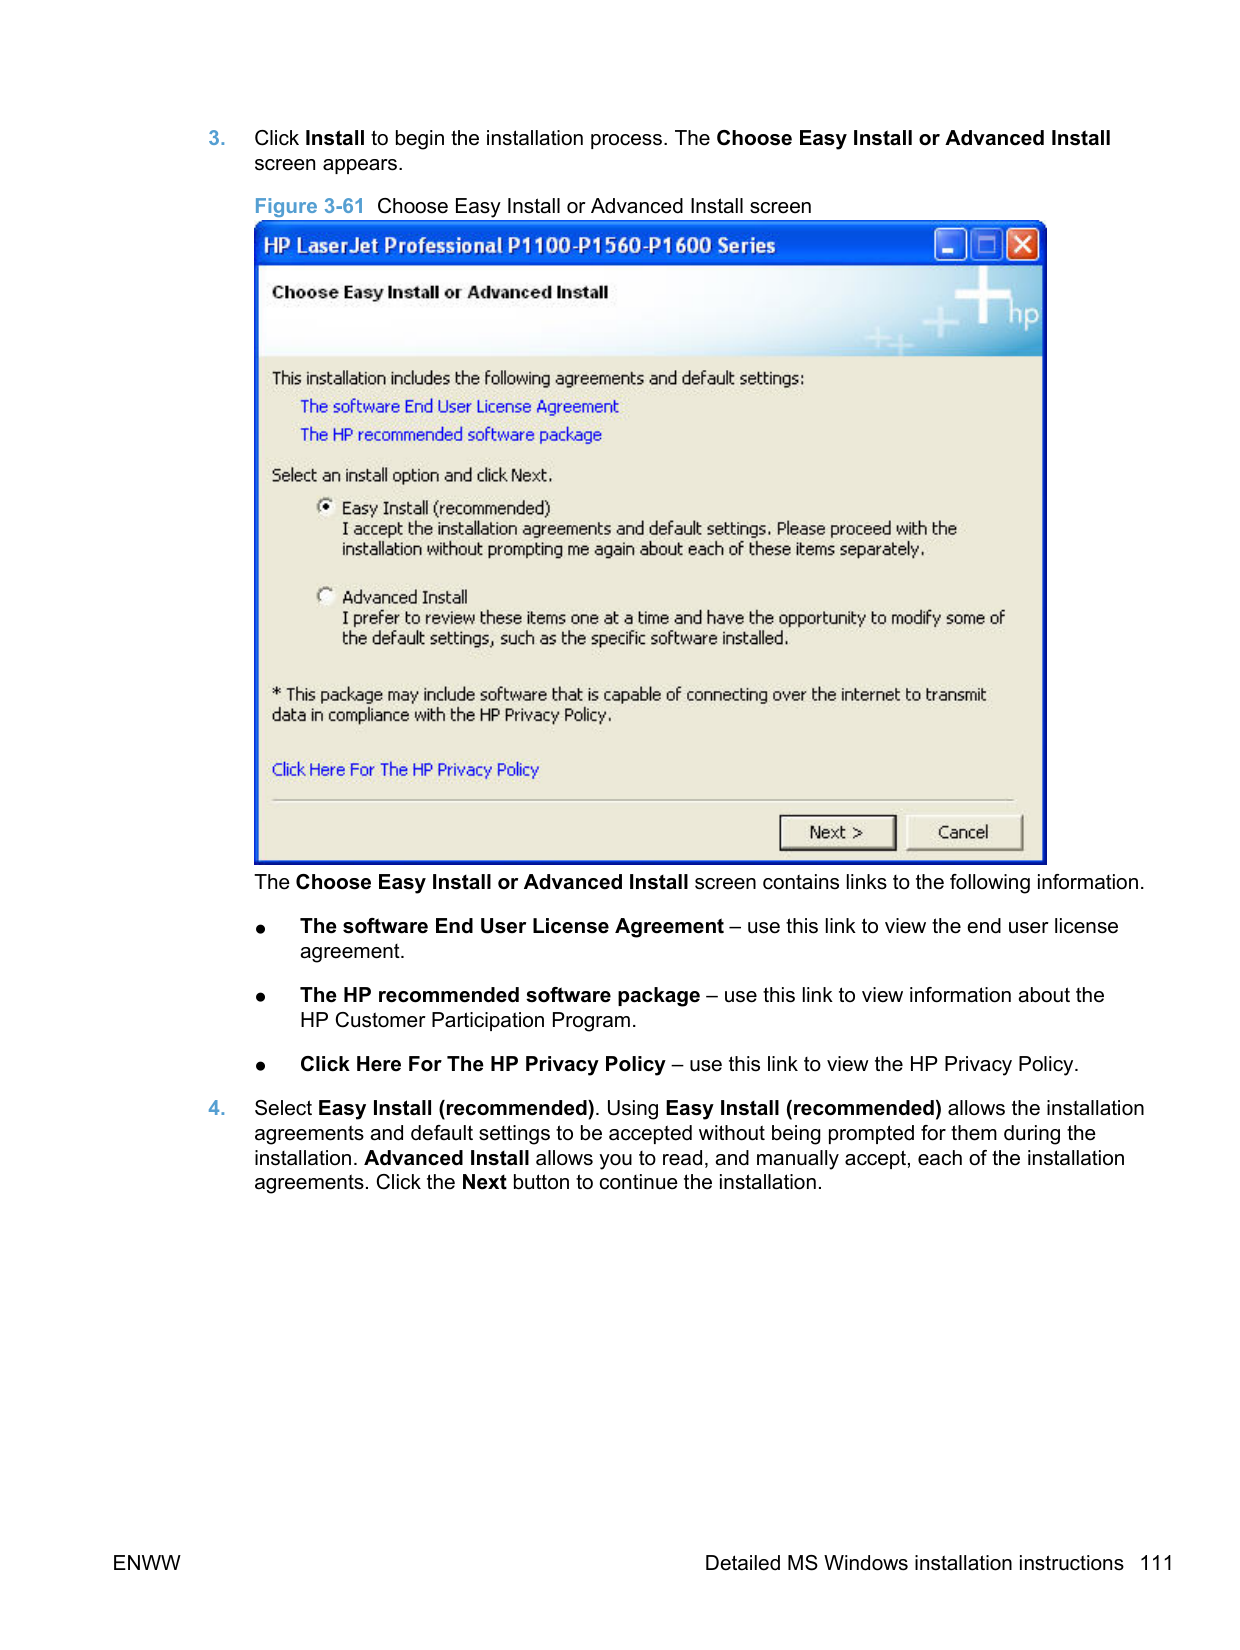
Figure 3-1 CD Browser – Main screen

Click Install to start the CD installer. By default, the CD installer installs the HP LaserJet Professional P1100/P1560/P1600 Series Printer Host-based print driver, the driver recommended for most users.
| | |---|
NOTE: For more information about HP LaserJet Professional P1100/P1560/P1600 Series Printer printer drivers, see HP Host-based print driver for Windows on page 199.
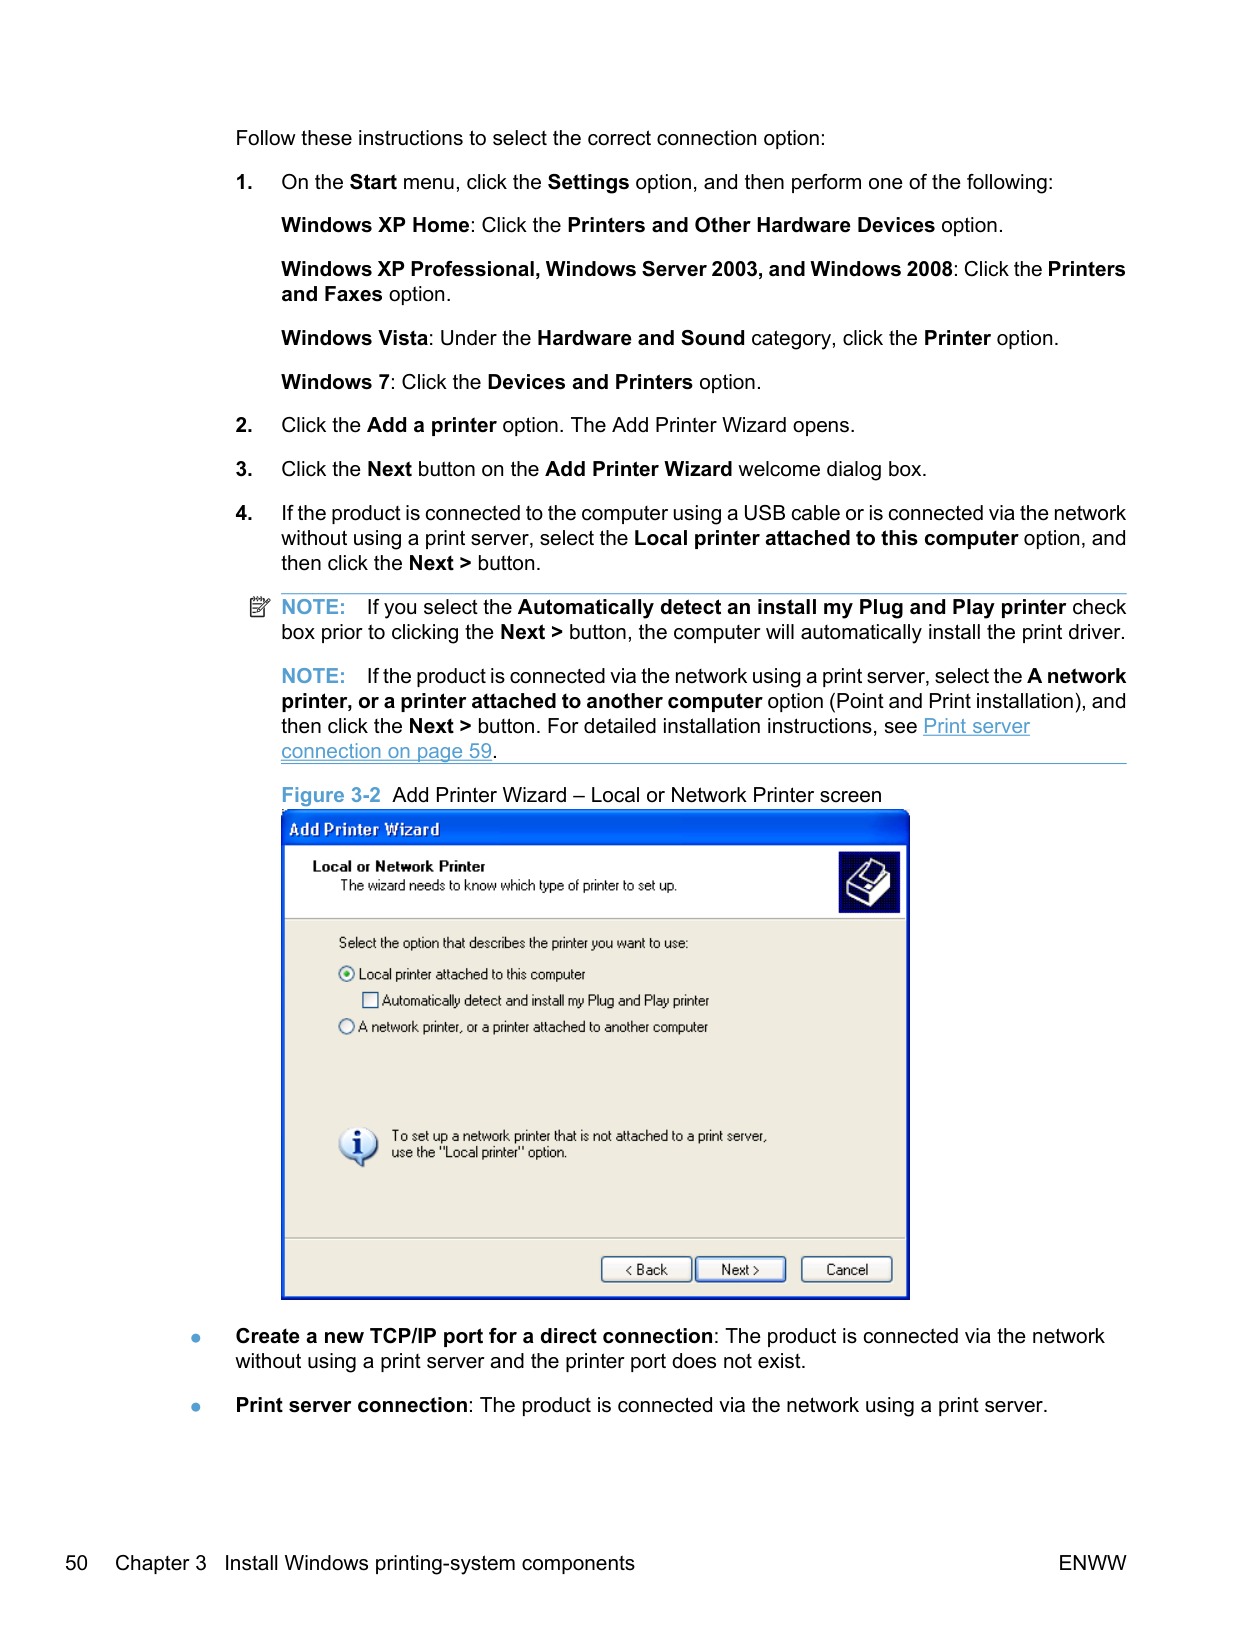
Install the print driver using the Microsoft Add Printer Wizard NOTE: You can return to the previous screen by clicking the < Back button, or exit the Add Printer Wizard by clicking the Cancel button. Select one of the following three options to install the print driver using the Microsoft Add Printer Wizard:
| | |---|
Follow these instructions to select the correct connection option:
Windows XP Professional, Windows Server 2003, and Windows 2008: Click the Printers and Faxes option.
Windows Vista: Under the Hardware and Sound category, click the Printer option. Windows 7: Click the Devices and Printers option.

| | |---|
NOTE: If you select the Automatically detect an install my Plug and Play printer check box prior to clicking the Next > button, the computer will automatically install the print driver.
NOTE: If the product is connected via the network using a print server, select the A network printer, or a printer attached to another computer option (Point and Print installation), and then click the Next > button. For detailed installation instructions, see Print server
connection on page 59. Figure 3-2 Add Printer Wizard – Local or Network Printer screen

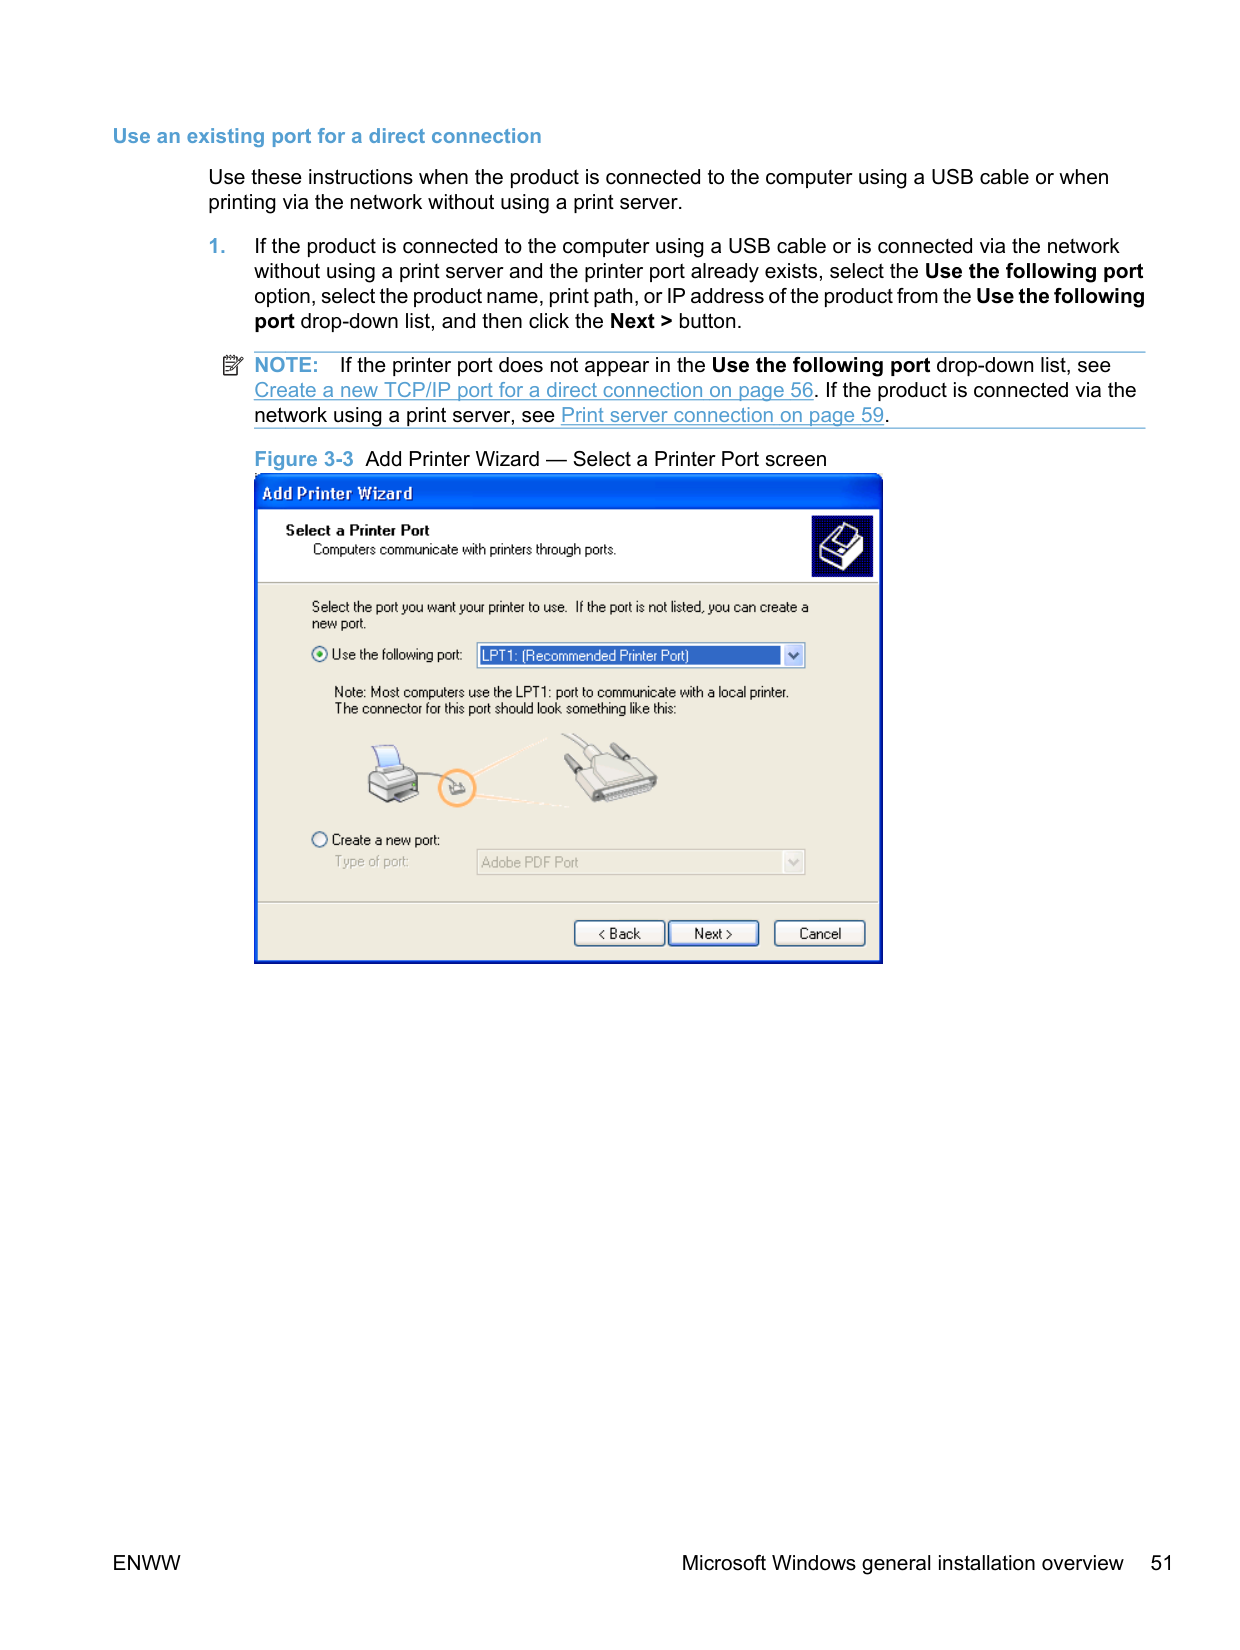
######### Use an existing port for a direct connection
Use these instructions when the product is connected to the computer using a USB cable or when printing via the network without using a print server.
| | |---|
NOTE: If the printer port does not appear in the Use the following port drop-down list, see Create a new TCP/IP port for a direct connection on page 56. If the product is connected via the network using a print server, see Print server connection on page 59.


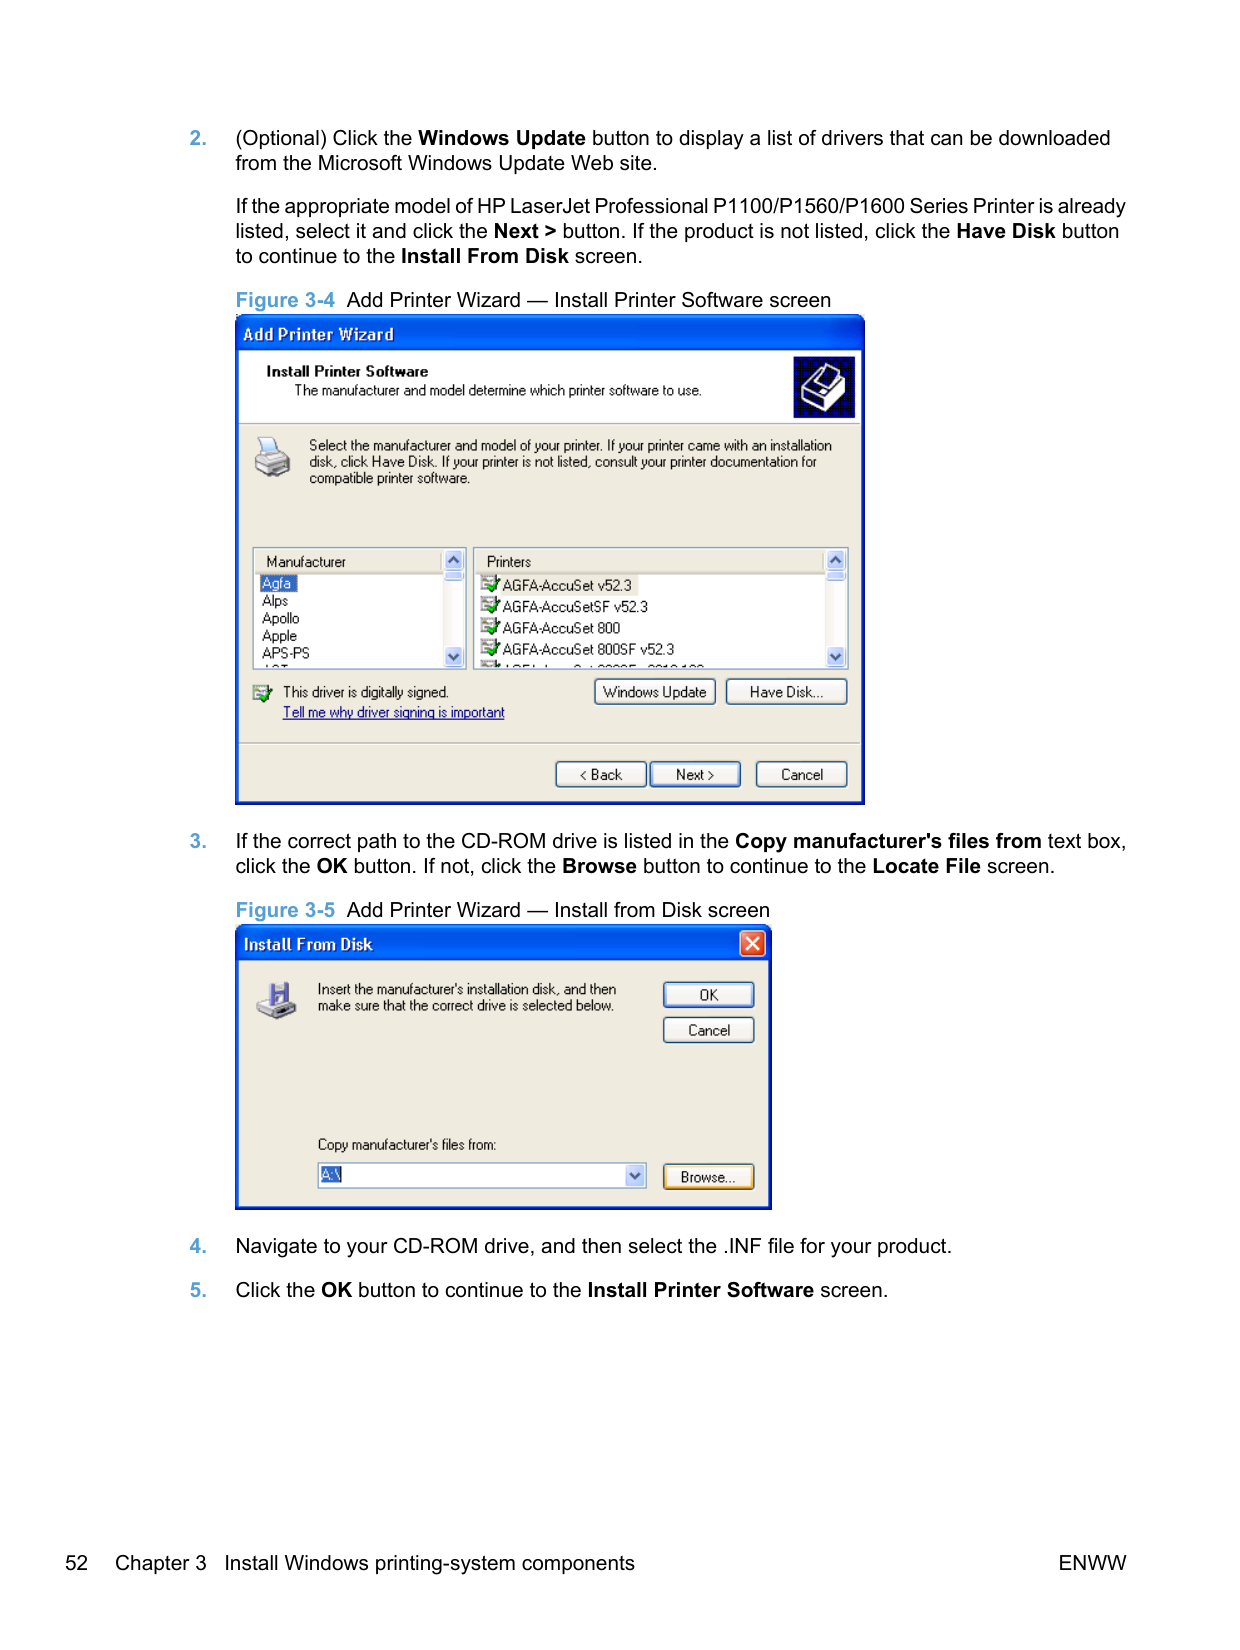
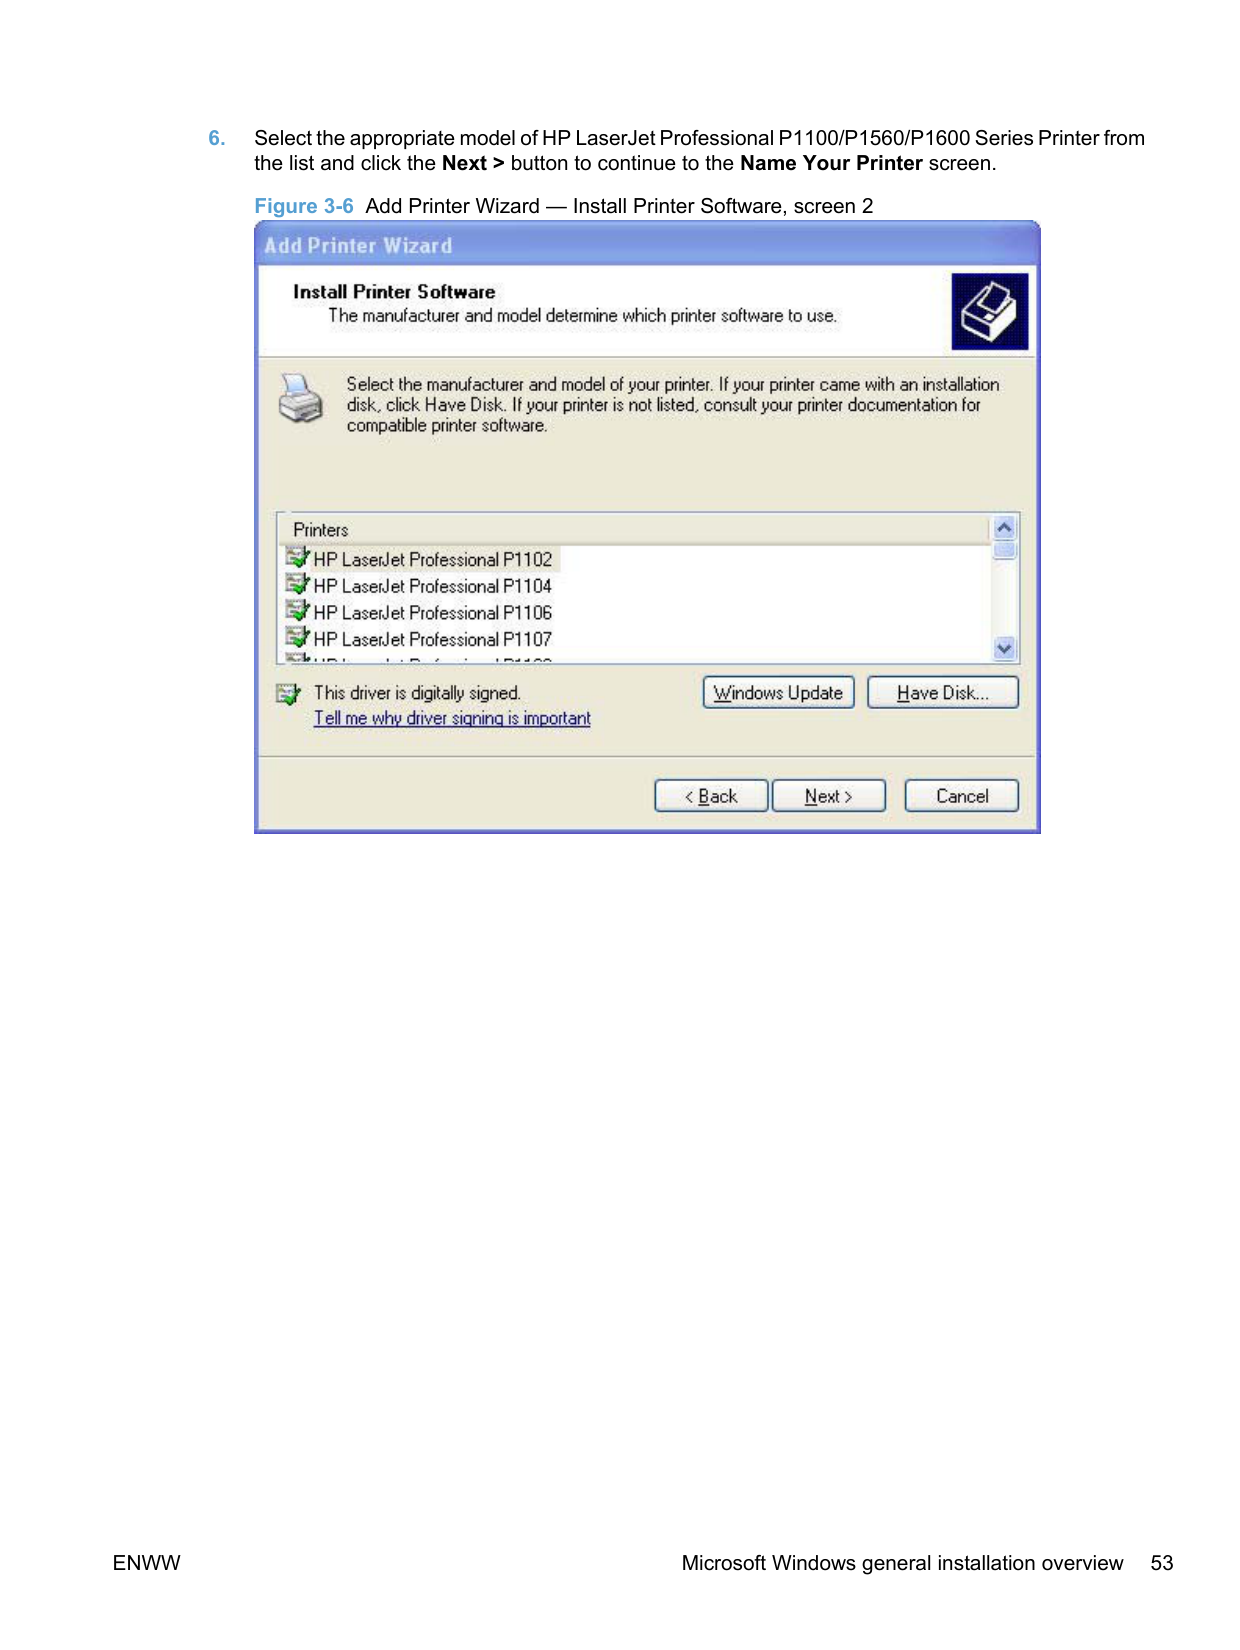
If the appropriate model of HP LaserJet Professional P1100/P1560/P1600 Series Printer is already listed, select it and click the Next > button. If the product is not listed, click the Have Disk button to continue to the Install From Disk screen.

click the OK button. If not, click the Browse button to continue to the Locate File screen.


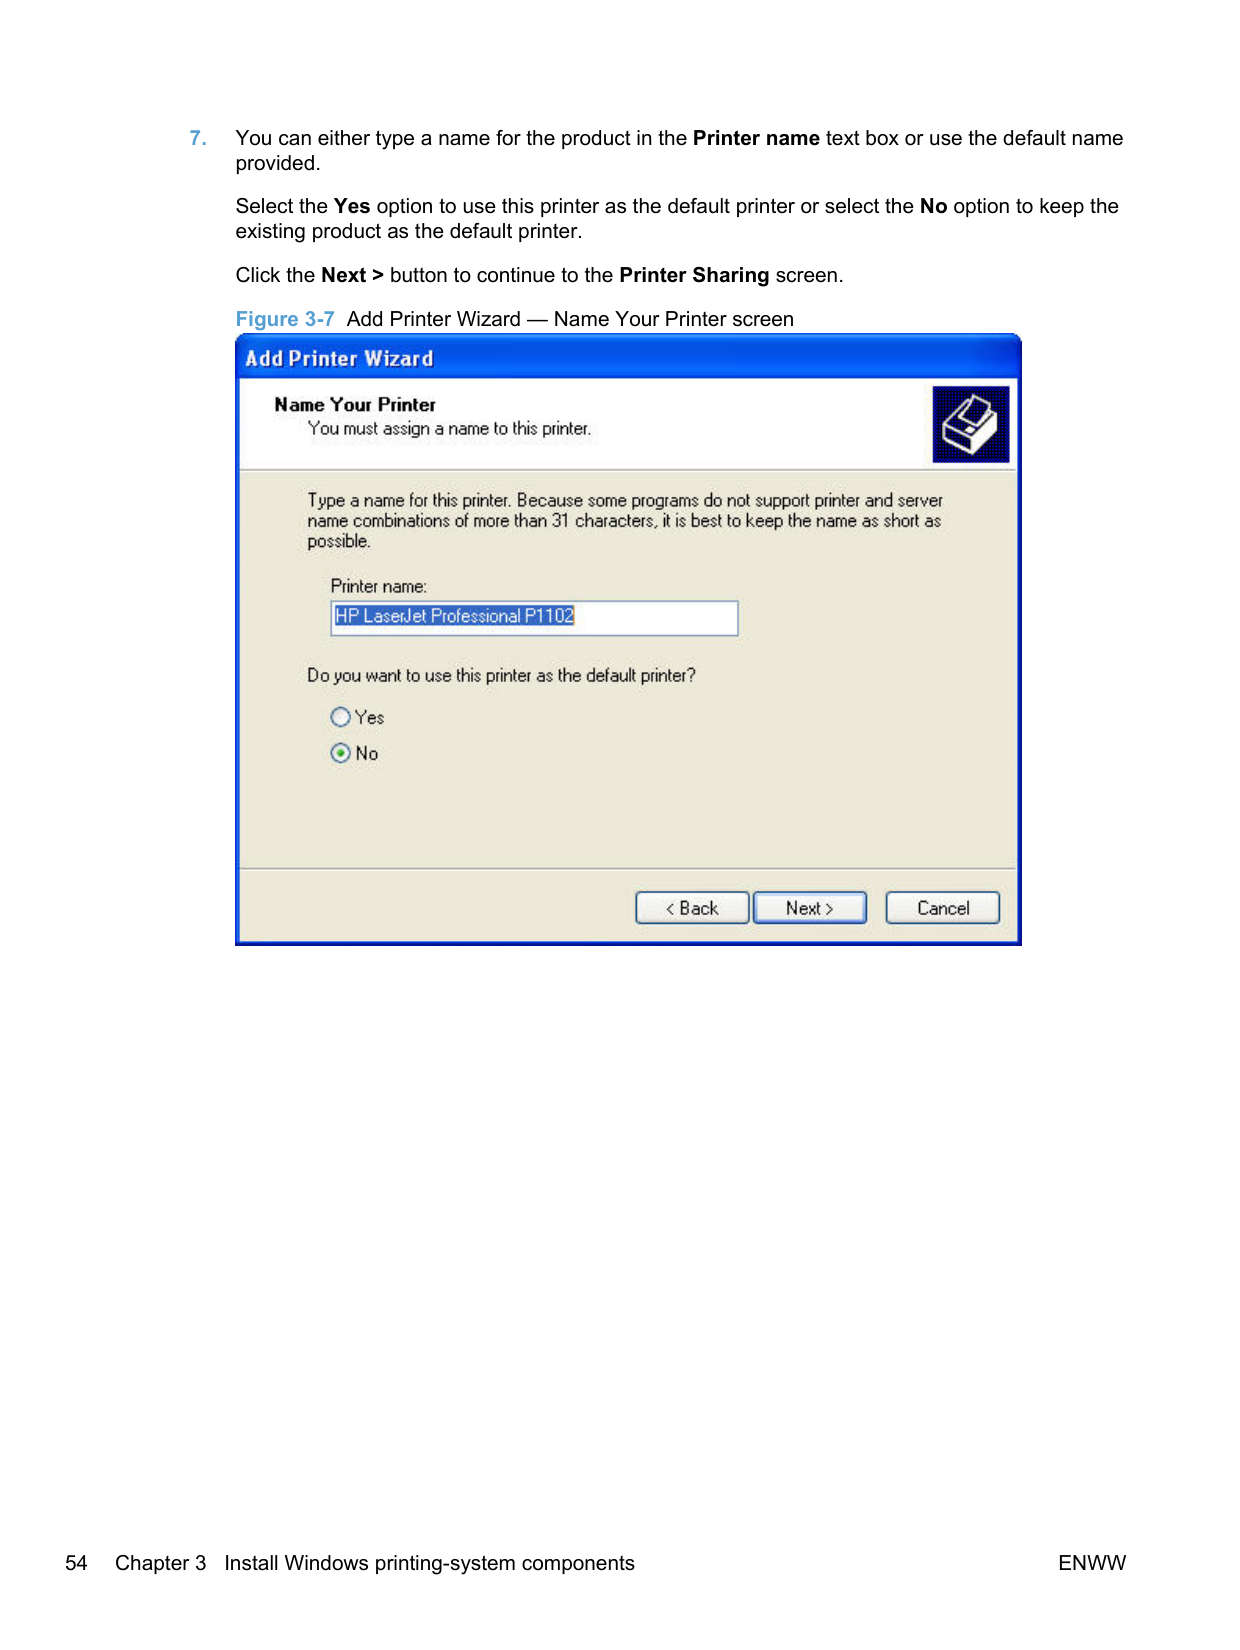
Select the Yes option to use this printer as the default printer or select the No option to keep the existing product as the default printer.
Click the Next > button to continue to the Printer Sharing screen.

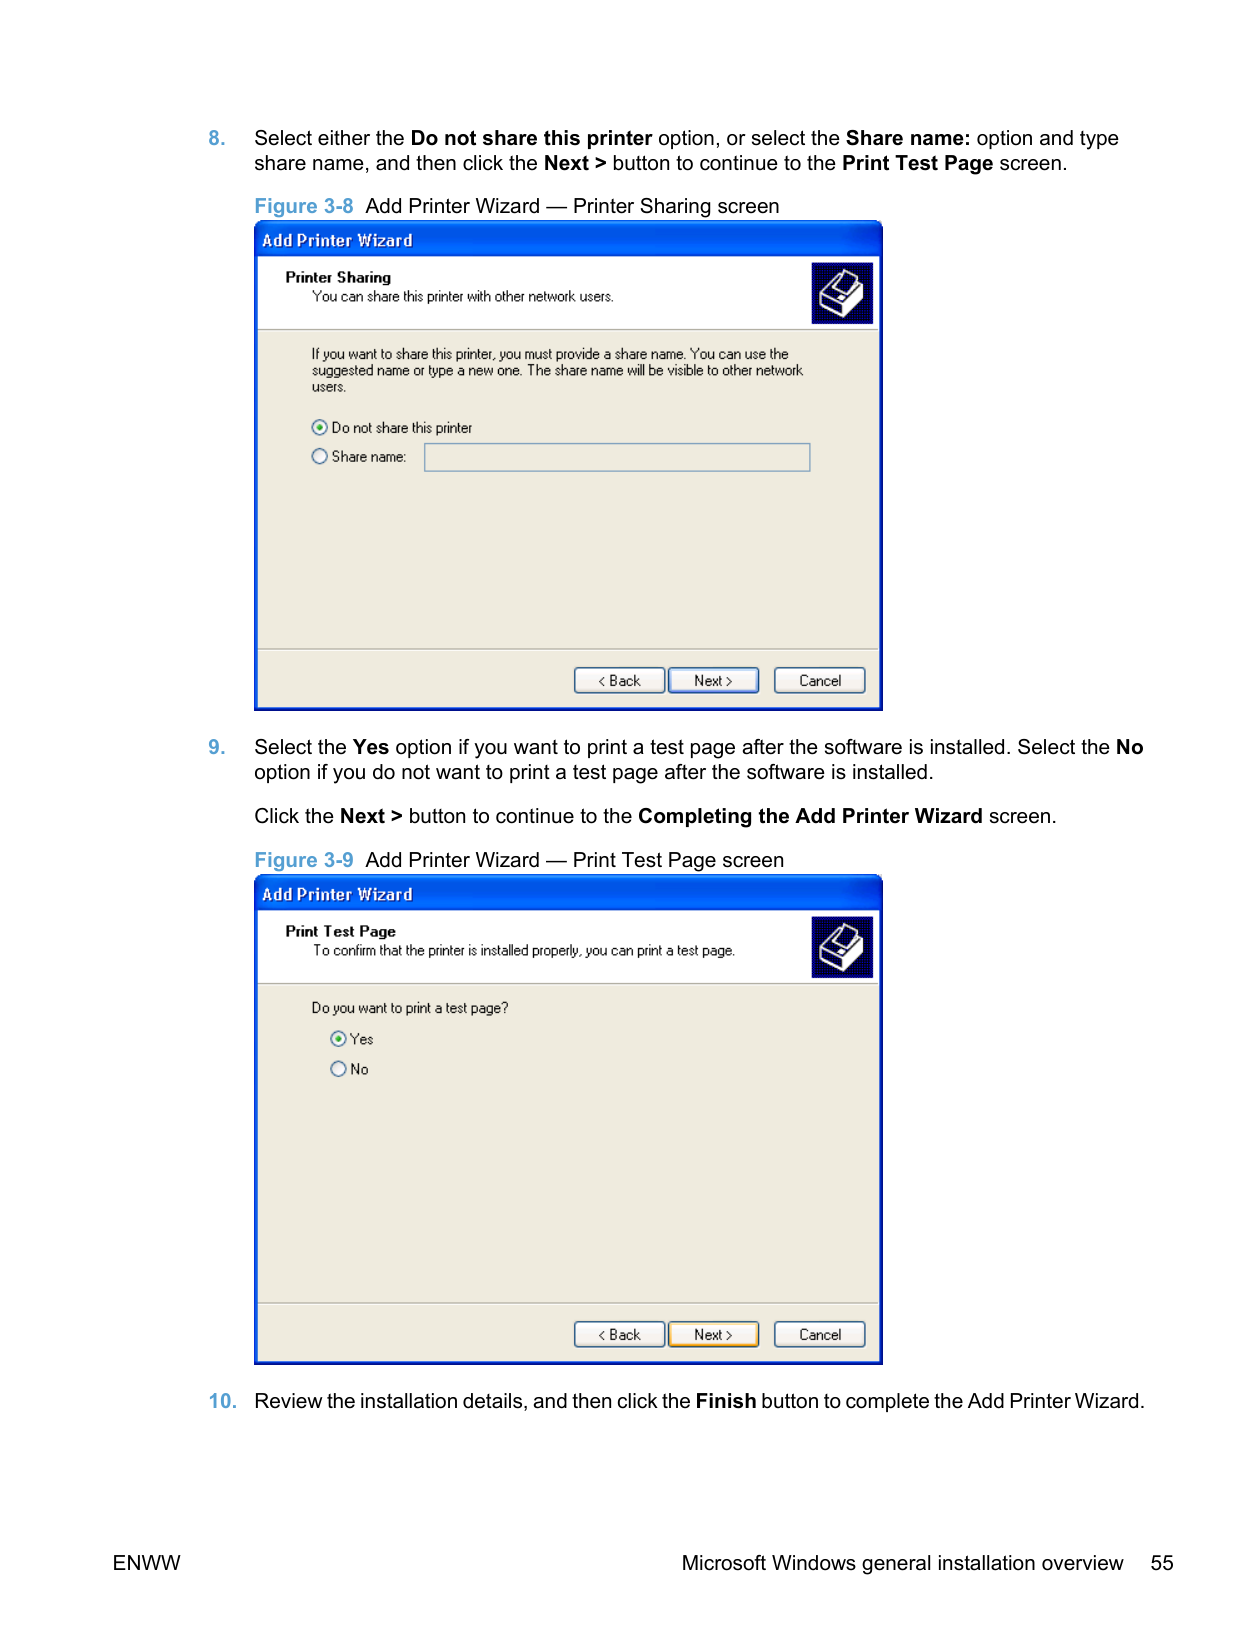
########## 8. Select either the Do not share this printer option, or select the Share name: option and typeshare name, and then click the Next > button to continue to the Print Test Page screen.


########## 10. Review the installation details, and then click the Finish button to complete the Add Printer Wizard.
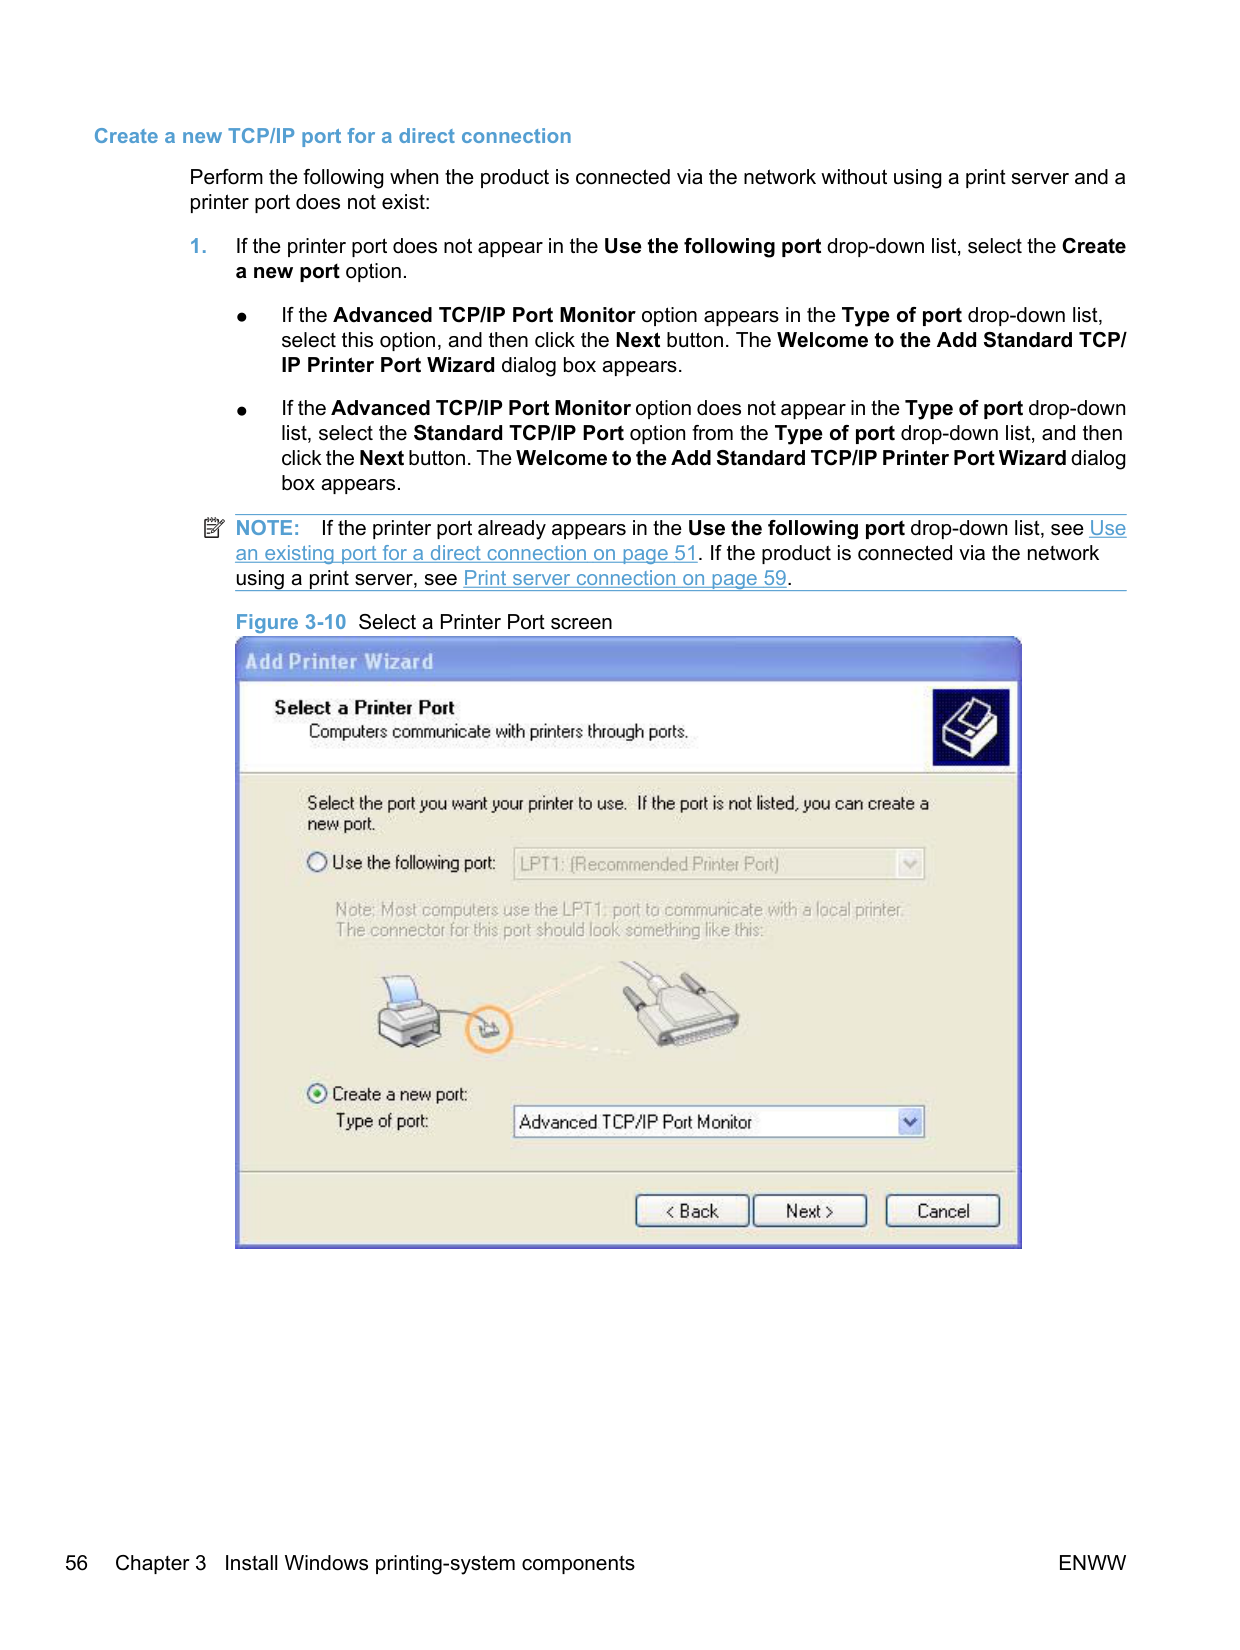
######### Create a new TCP/IP port for a direct connection
Perform the following when the product is connected via the network without using a print server and a printer port does not exist:
| | |---|
NOTE: If the printer port already appears in the Use the following port drop-down list, see Use an existing port for a direct connection on page 51. If the product is connected via the network using a print server, see Print server connection on page 59.


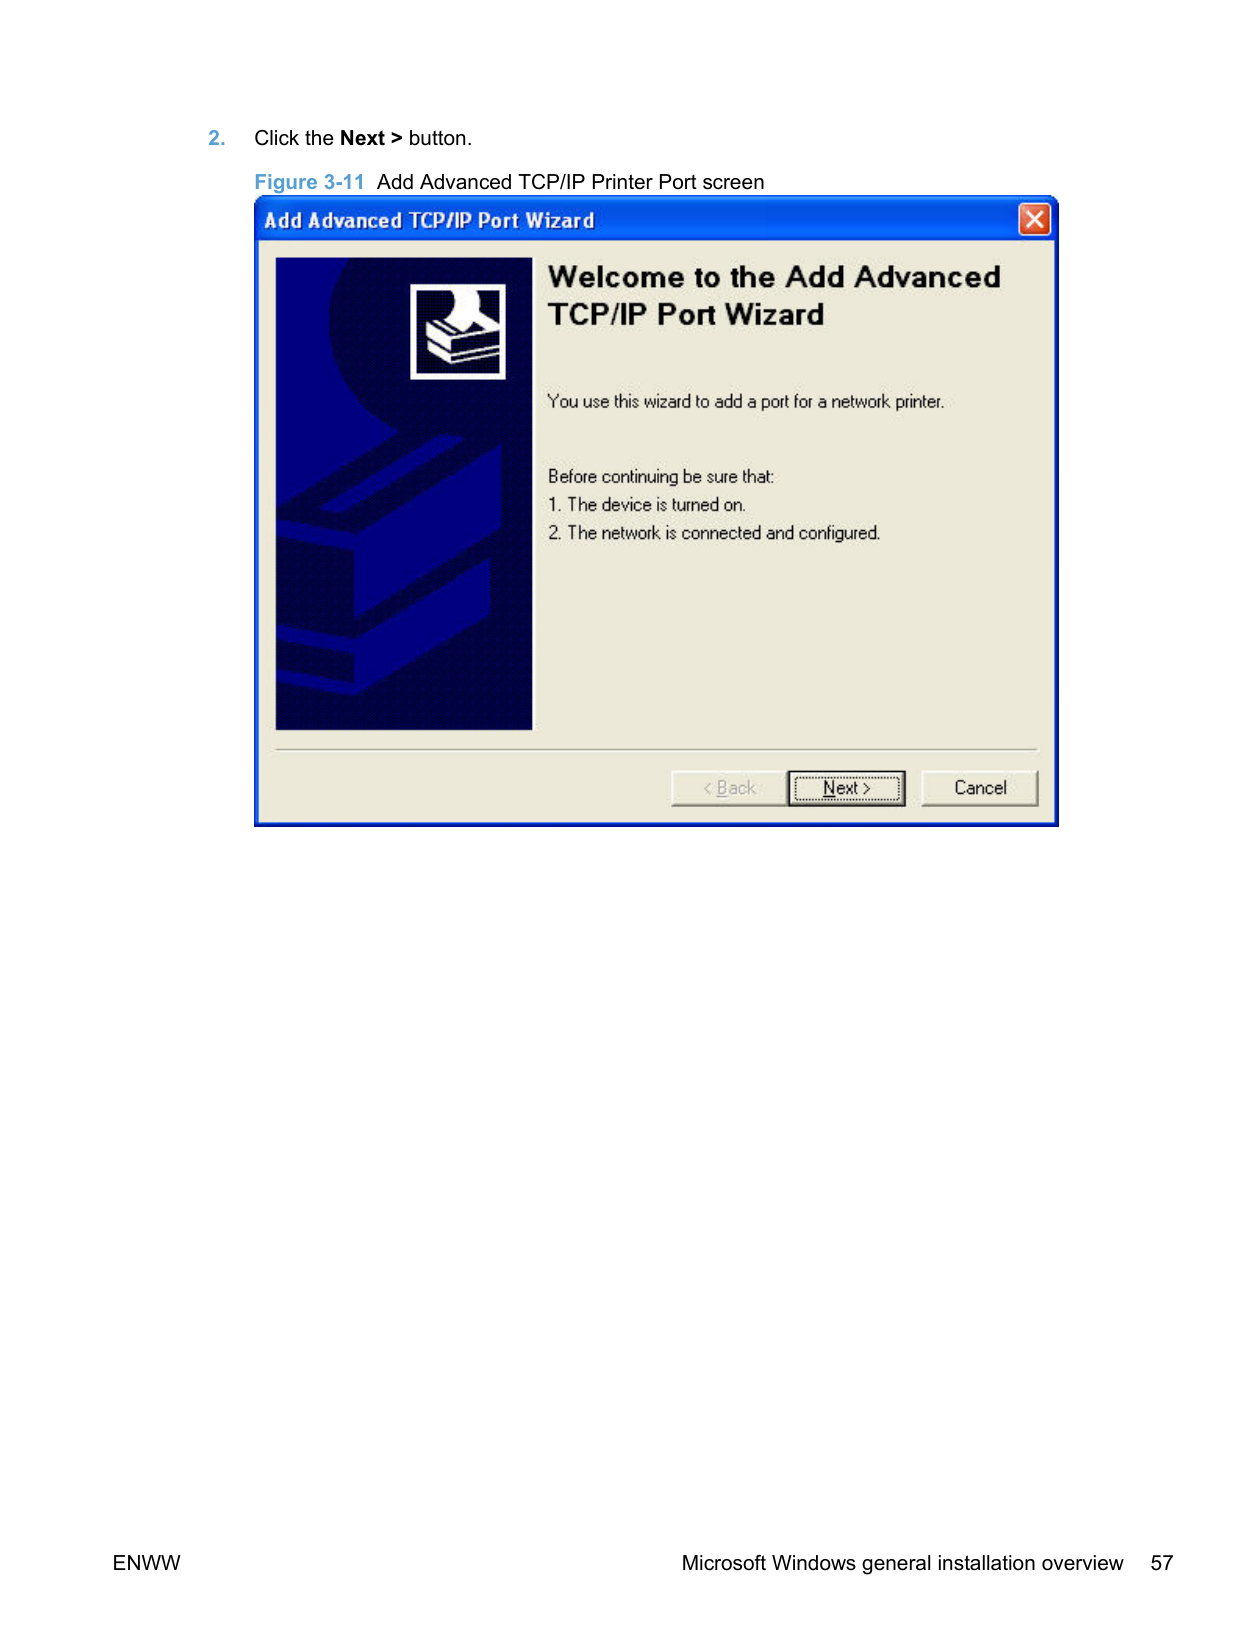
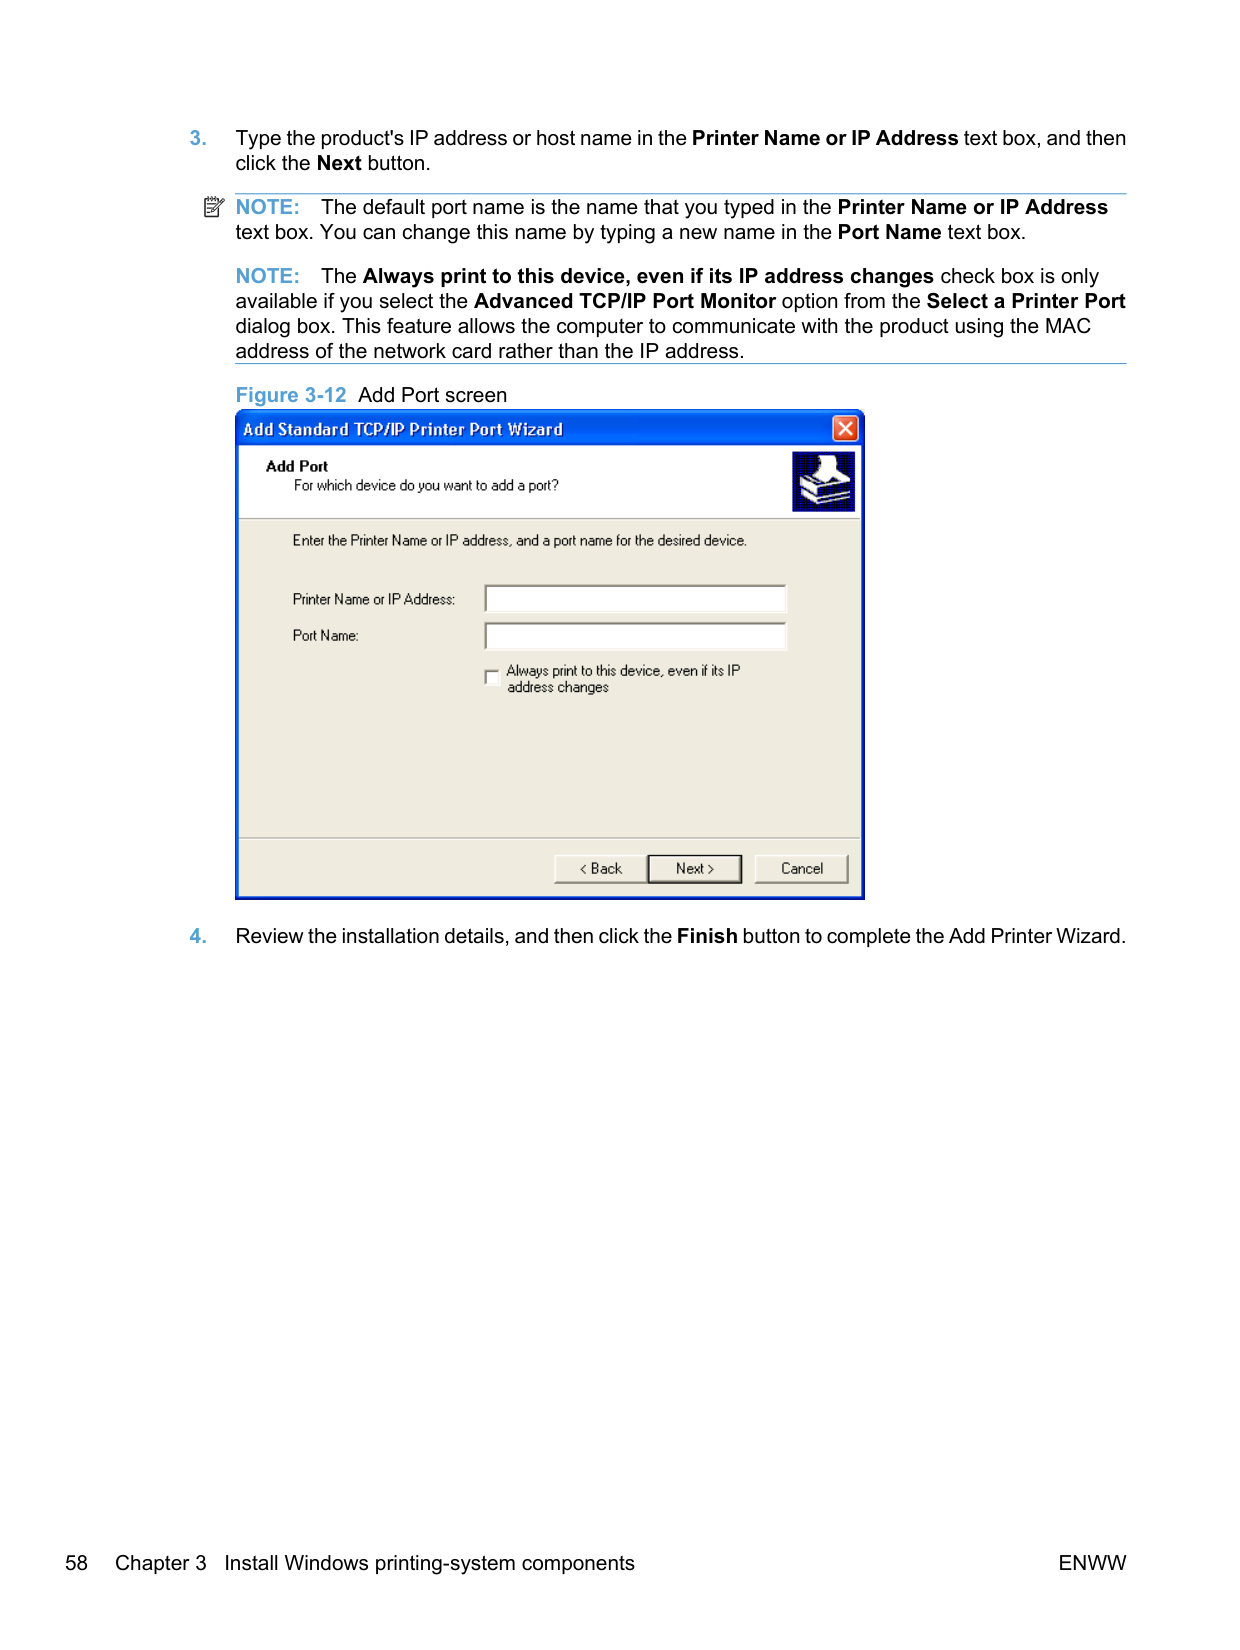
########## 3. Type the product's IP address or host name in the Printer Name or IP Address text box, and thenclick the Next button.
| | |---|
NOTE: The default port name is the name that you typed in the Printer Name or IP Address text box. You can change this name by typing a new name in the Port Name text box.
NOTE: The Always print to this device, even if its IP address changes check box is only available if you select the Advanced TCP/IP Port Monitor option from the Select a Printer Port dialog box. This feature allows the computer to communicate with the product using the MAC address of the network card rather than the IP address.

########## 4. Review the installation details, and then click the Finish button to complete the Add Printer Wizard.
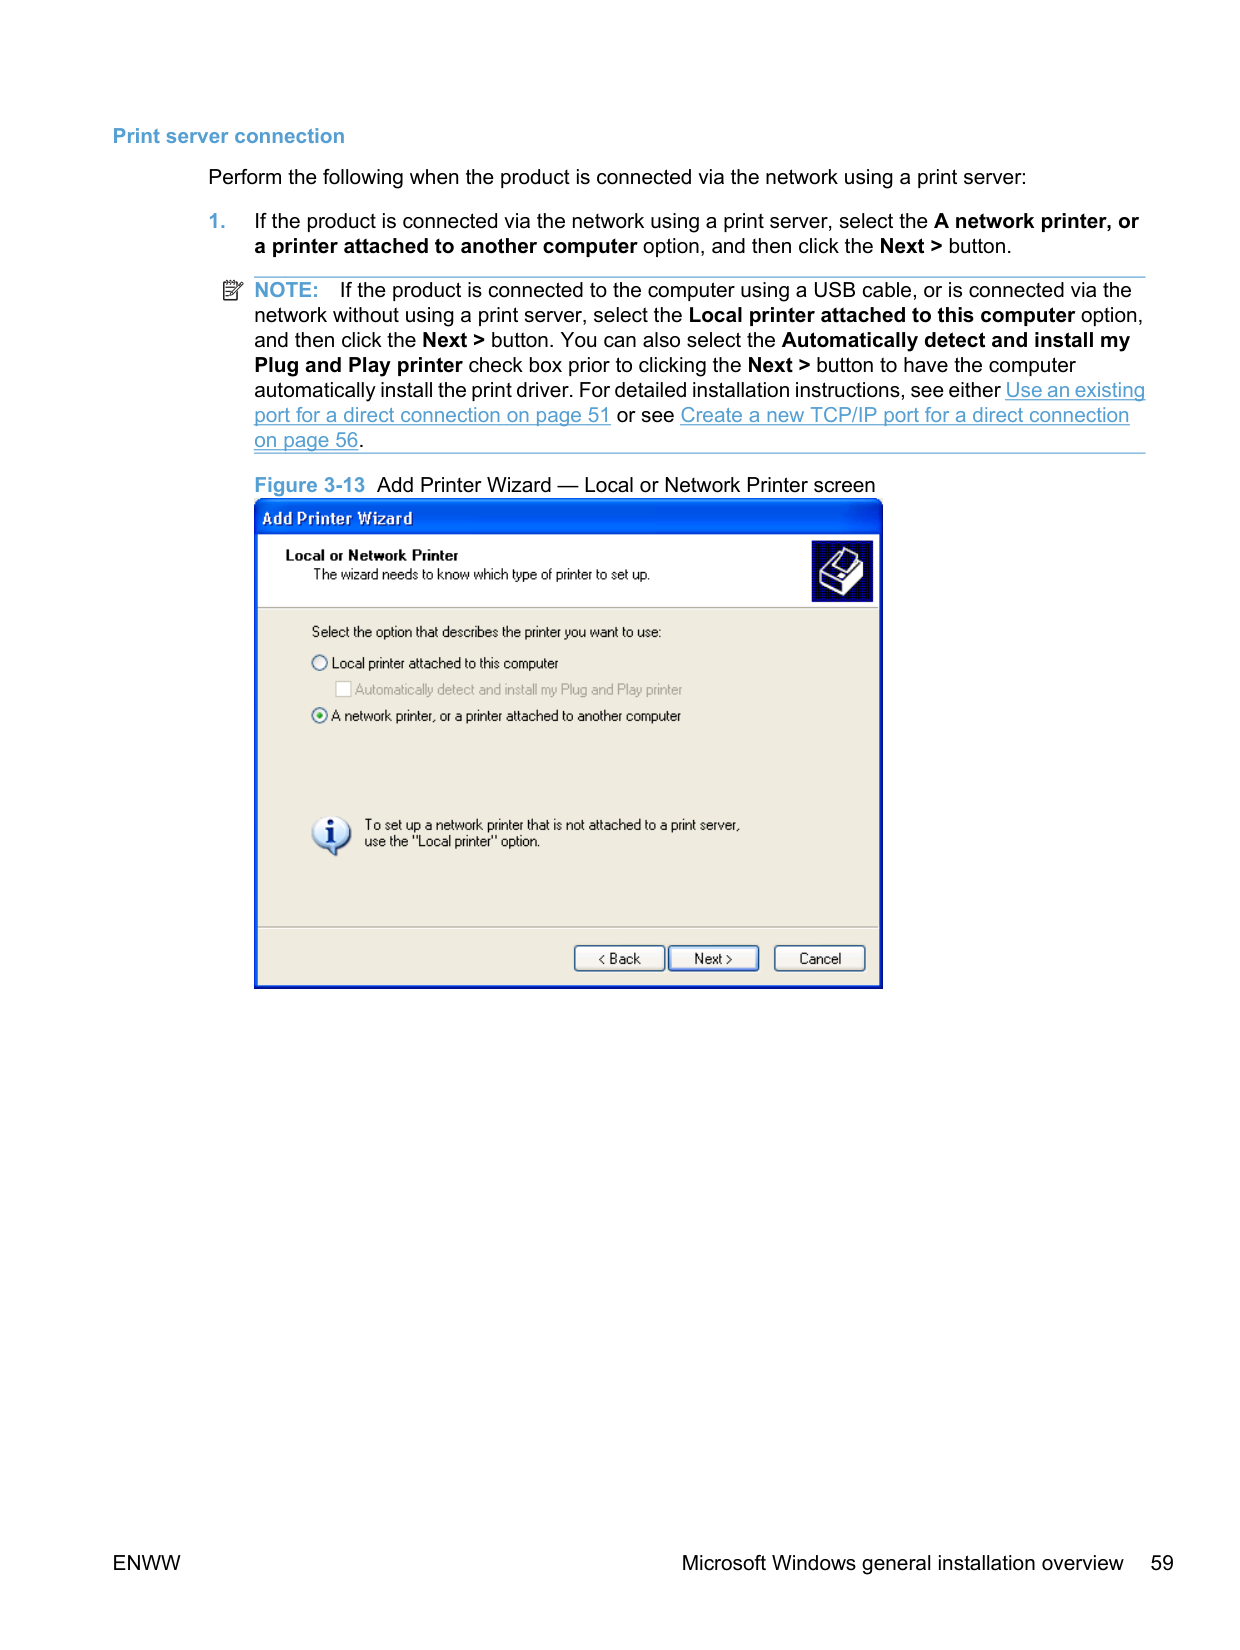
######### Print server connection
Perform the following when the product is connected via the network using a print server:
| | |---|
NOTE: If the product is connected to the computer using a USB cable, or is connected via the network without using a print server, select the Local printer attached to this computer option, and then click the Next > button. You can also select the Automatically detect and install my Plug and Play printer check box prior to clicking the Next > button to have the computer automatically install the print driver. For detailed installation instructions, see either Use an existing port for a direct connection on page 51 or see Create a new TCP/IP port for a direct connection on page 56.

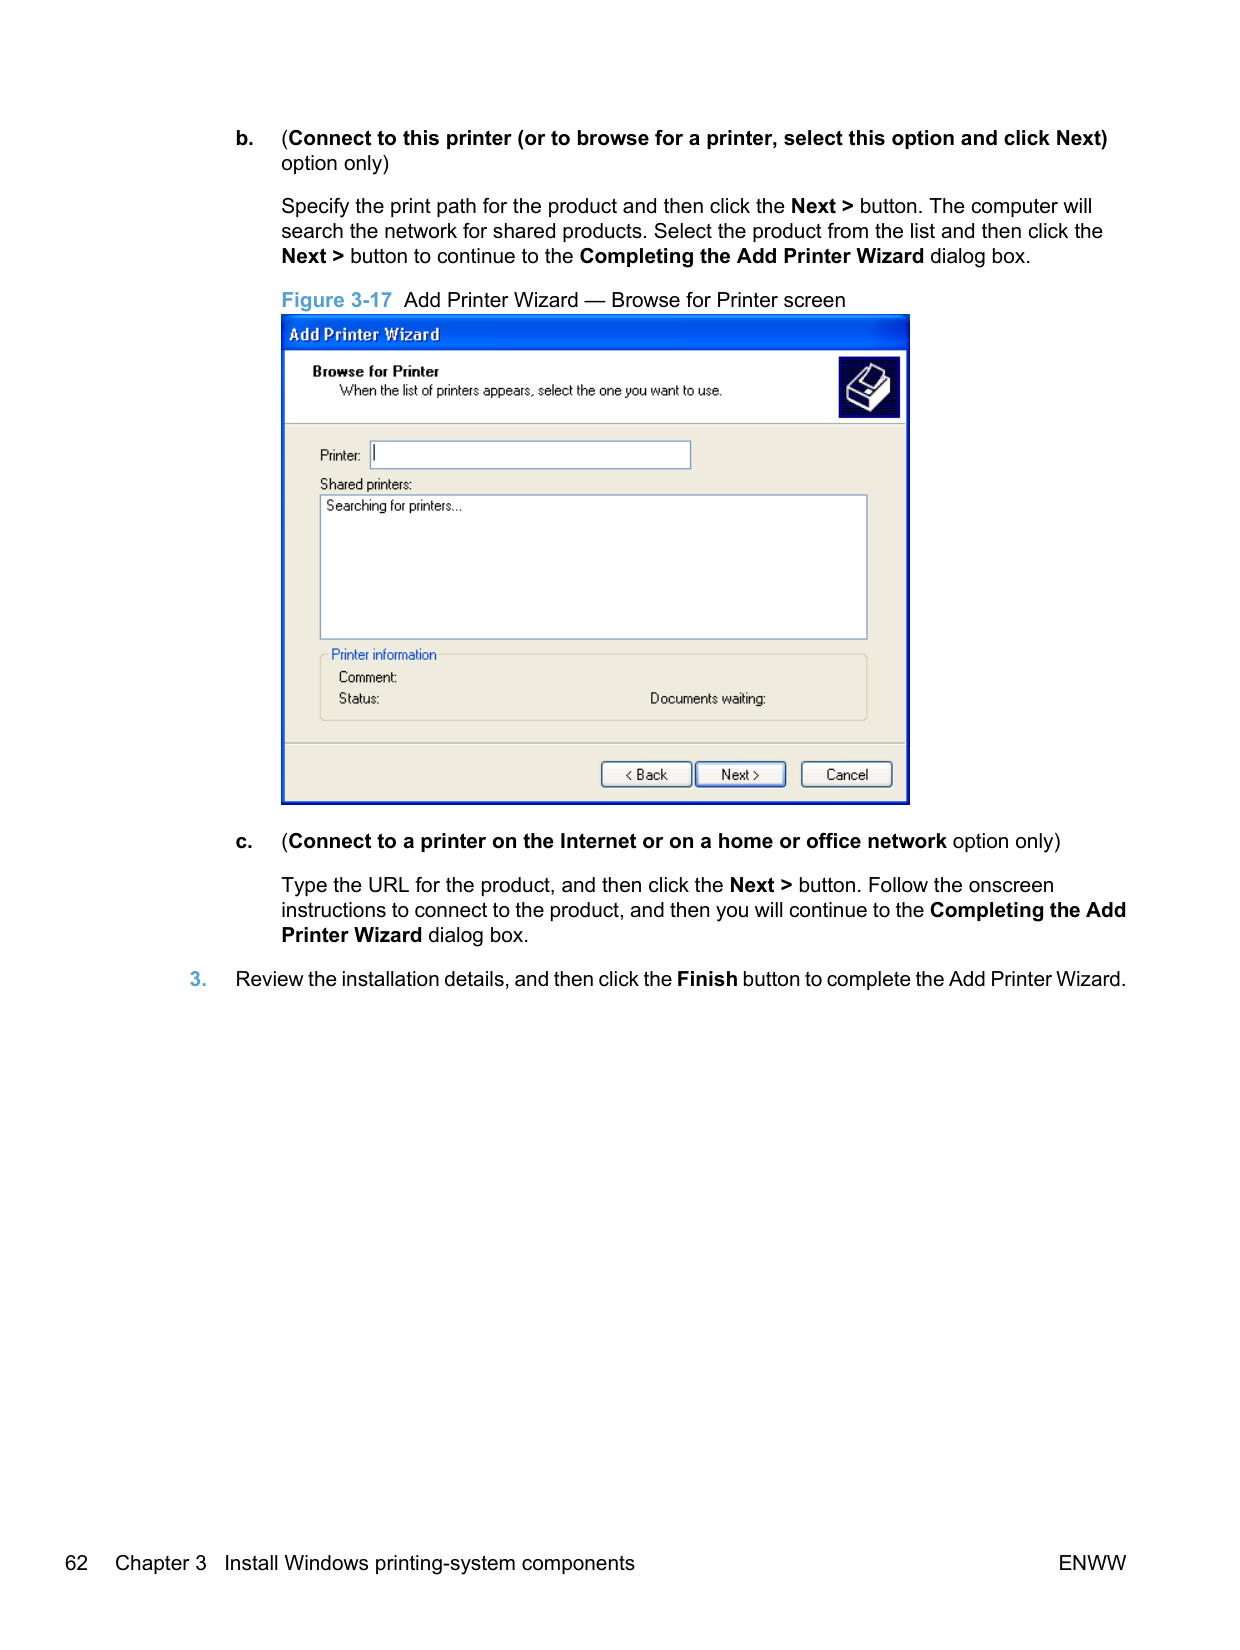
######### 2. Select either the Find a printer in the directory option, the Connect to this printer (or to browsefor a printer, select this option and click Next) option, or the Connect to a printer on theInternet or on a home or office network option, and then click the Next > button.

If you select the Find a printer in the directory option and then click the Next > button, you will continue to the Find Printers dialog box.
If you select the Connect to this printer (or to browse for a printer, select this option and click Next) option and then click the Next > button, you will continue to the Browse for Printer dialog box. If you select the Connect to a printer on the Internet or on a home or office network option and then click the Next > button, you will continue to the Completing the Add Printer Wizard dialog box.
Select one of the following options:
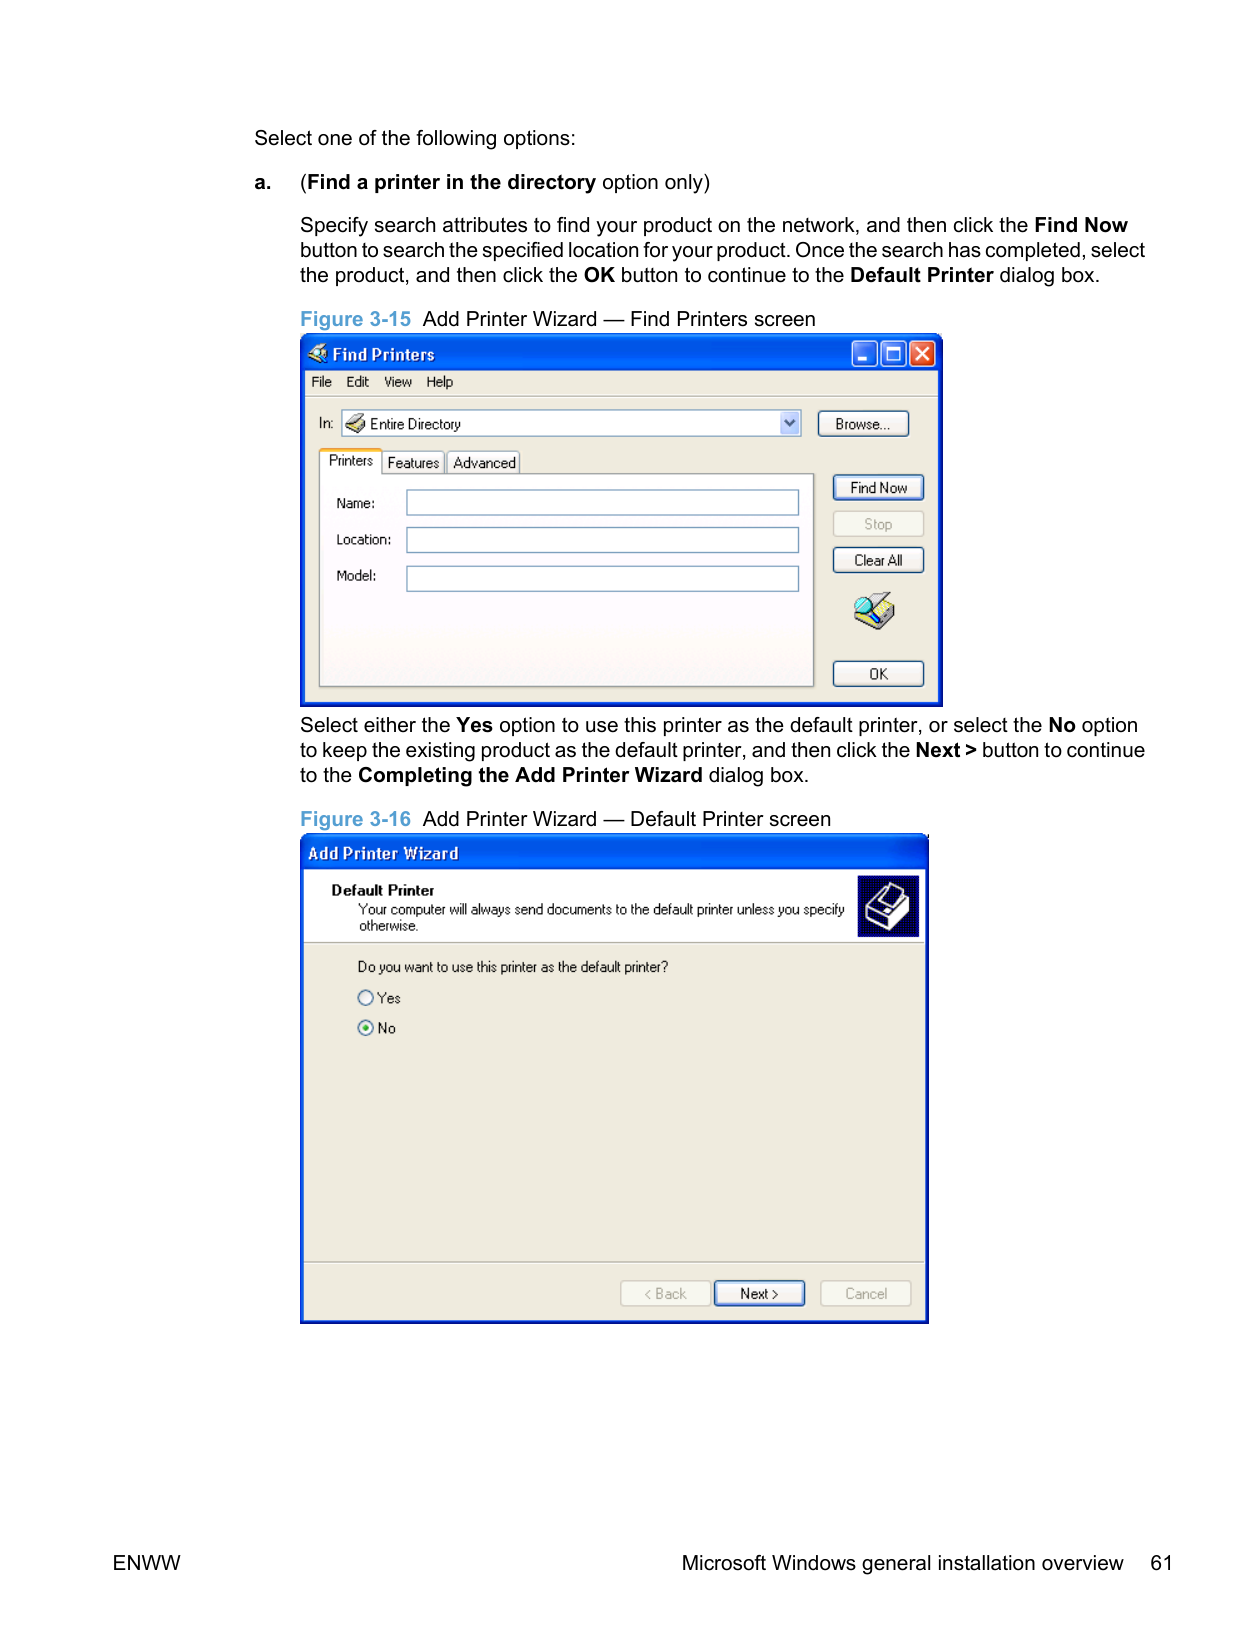
######### a. (Find a printer in the directory option only)
Specify search attributes to find your product on the network, and then click the Find Now button to search the specified location for your product. Once the search has completed, select the product, and then click the OK button to continue to the Default Printer dialog box.

Select either the Yes option to use this printer as the default printer, or select the No option to keep the existing product as the default printer, and then click the Next > button to continue to the Completing the Add Printer Wizard dialog box.

######### b. (Connect to this printer (or to browse for a printer, select this option and click Next)option only)
Specify the print path for the product and then click the Next > button. The computer will search the network for shared products. Select the product from the list and then click the Next > button to continue to the Completing the Add Printer Wizard dialog box.

######### c. (Connect to a printer on the Internet or on a home or office network option only)
Type the URL for the product, and then click the Next > button. Follow the onscreen instructions to connect to the product, and then you will continue to the Completing the Add Printer Wizard dialog box.
#### Detailed MS Windows installation instructions
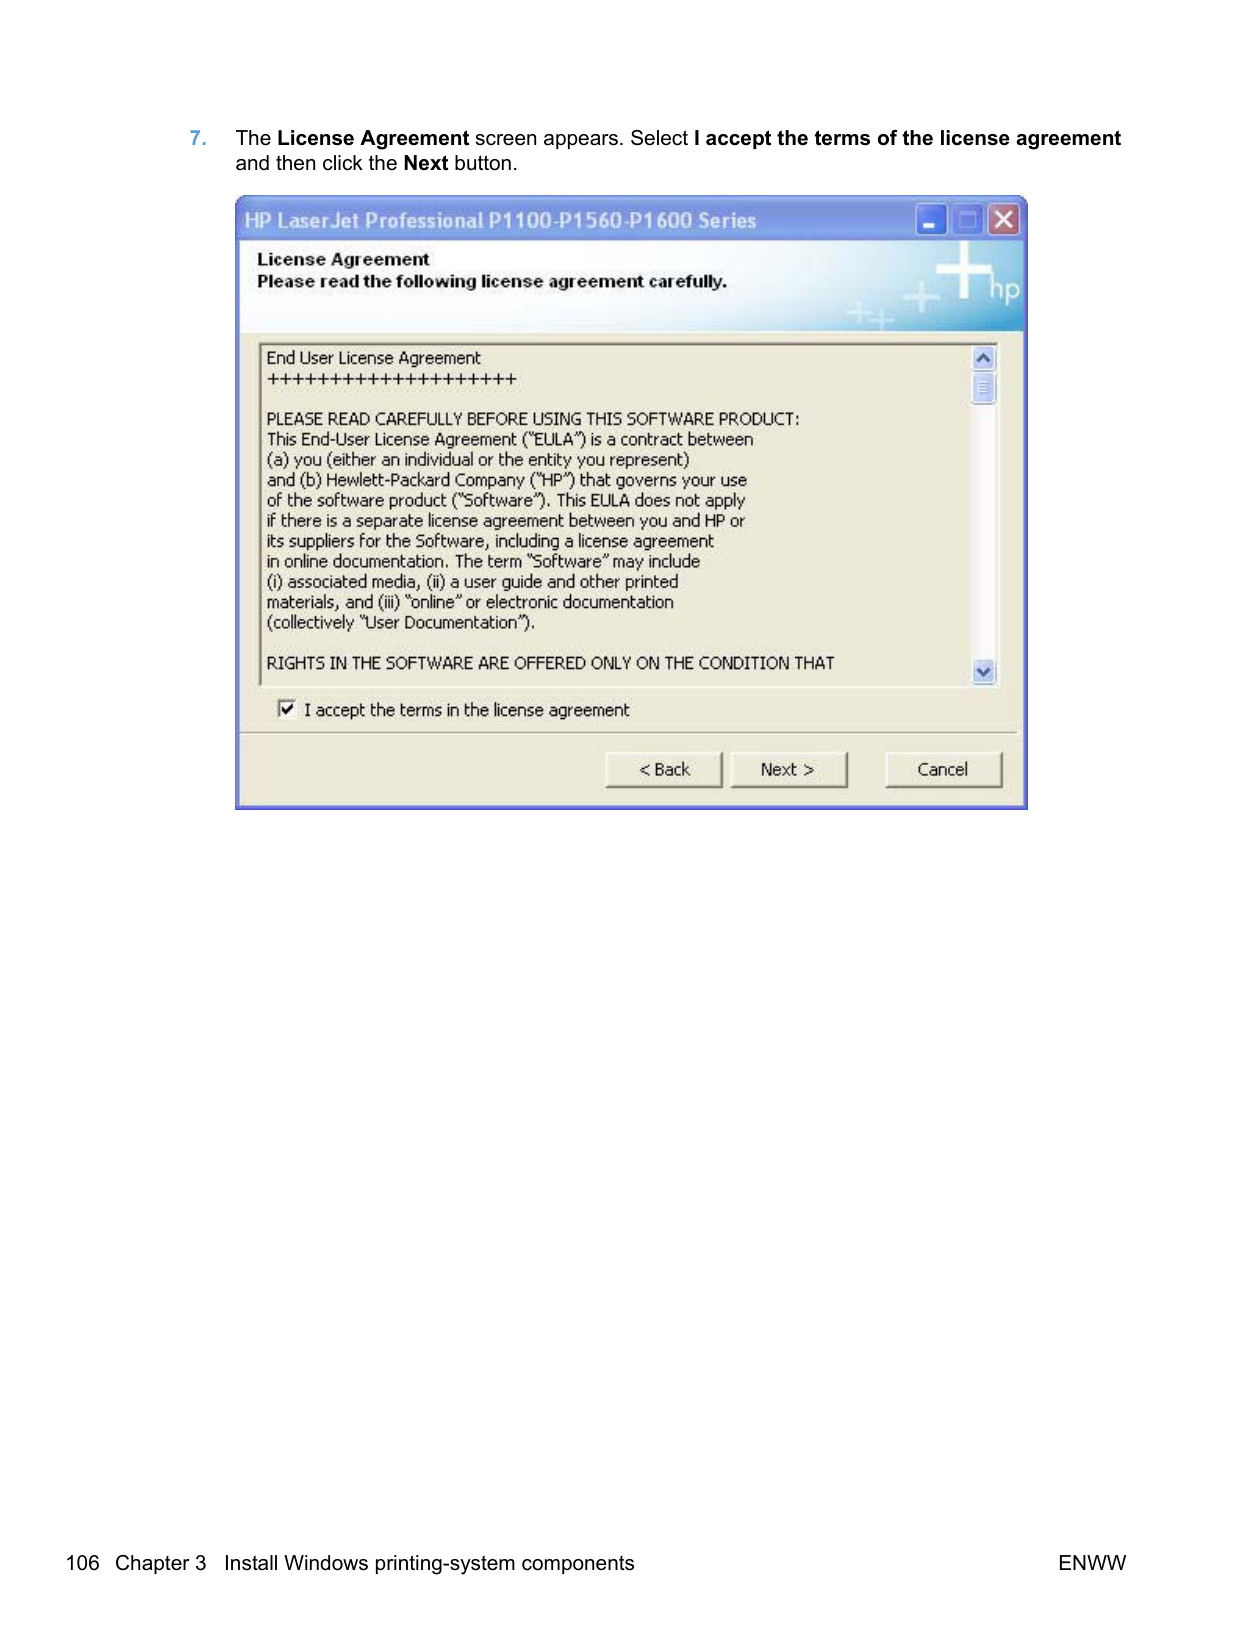
The dialog boxes shown here appear in the Windows XP Professional installation sequence. The order and appearance of dialog boxes can vary among operating systems.
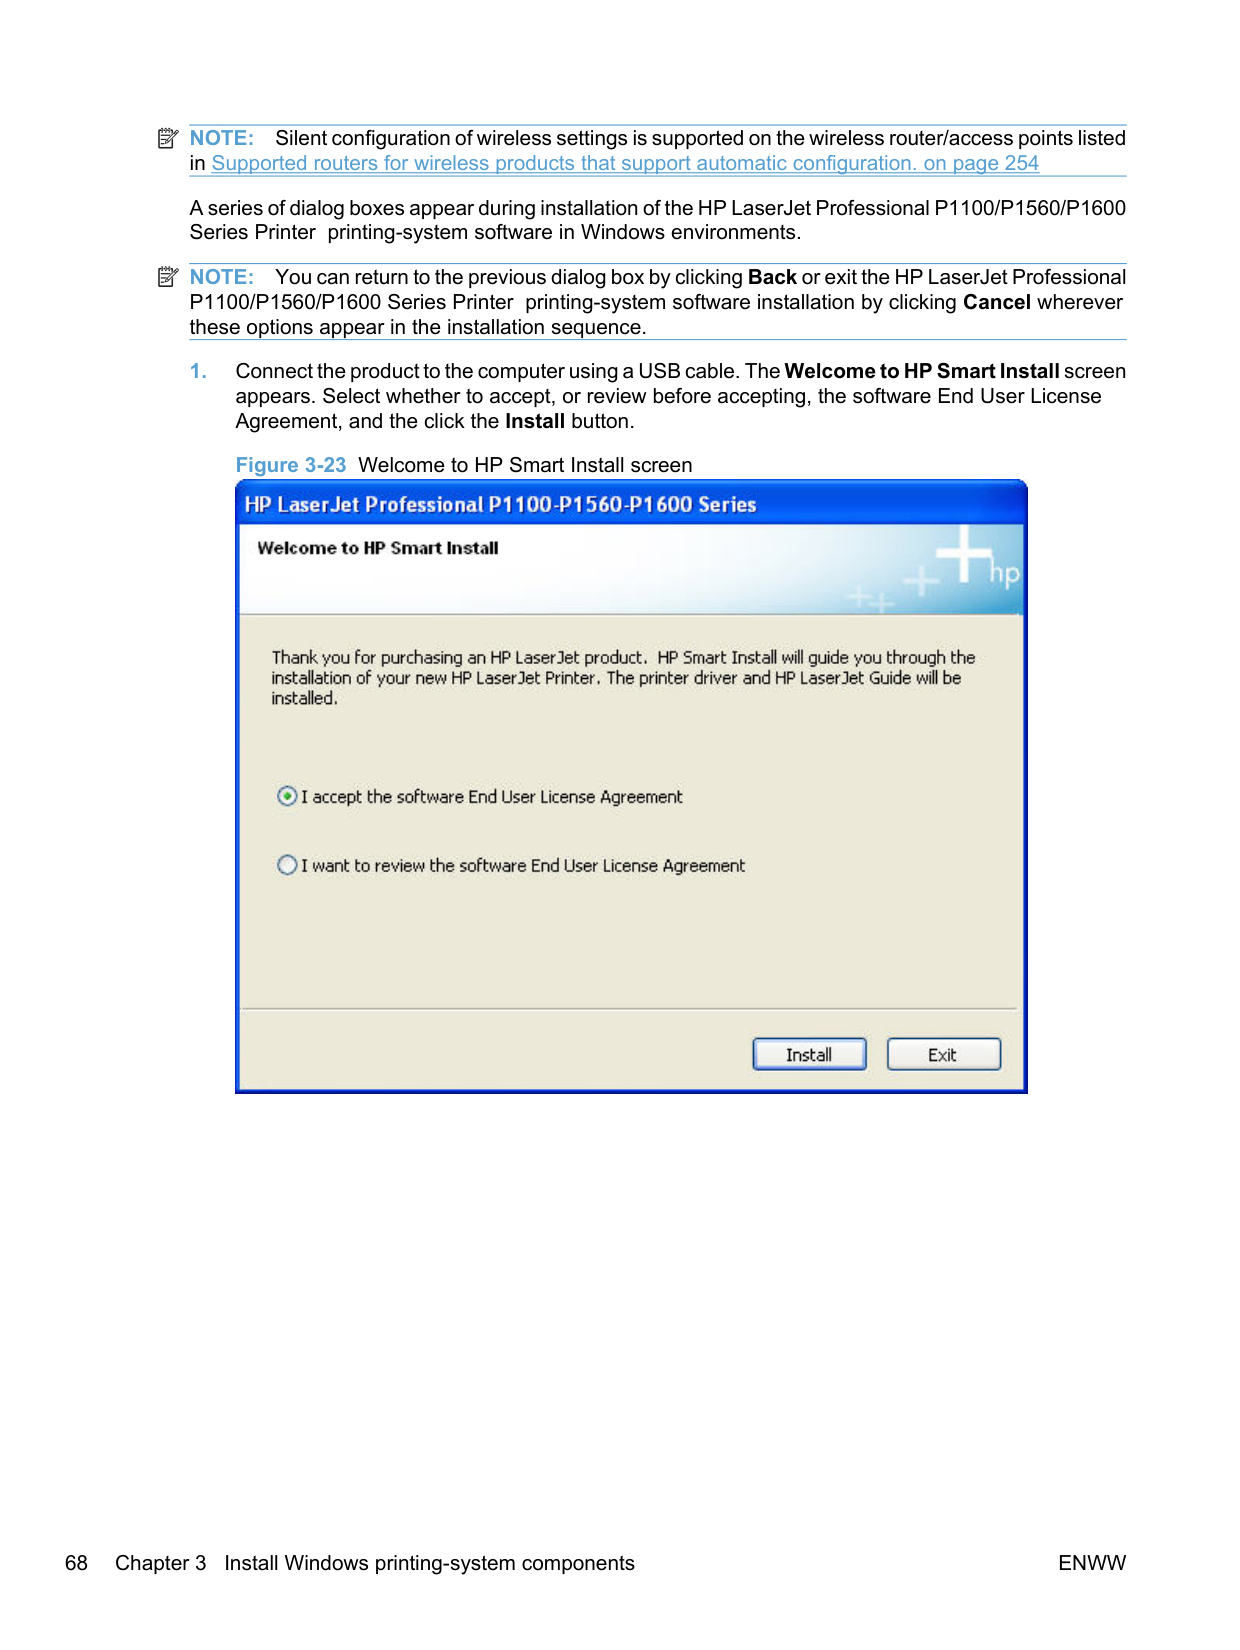
##### Install the Host-based driver using HP Smart Install
| | |---|
NOTE: If HP Smart Install does not start automatically, AutoPlay might be disabled on your computer. Browse My Computer and double-click the HP Smart Install CD drive. Double-click the SISetup.exe file to run the program to install the product. If you cannot find the HP Smart Install CD drive, use the software CD to install the product.
######## Install the print driver for USB and wired network connected products

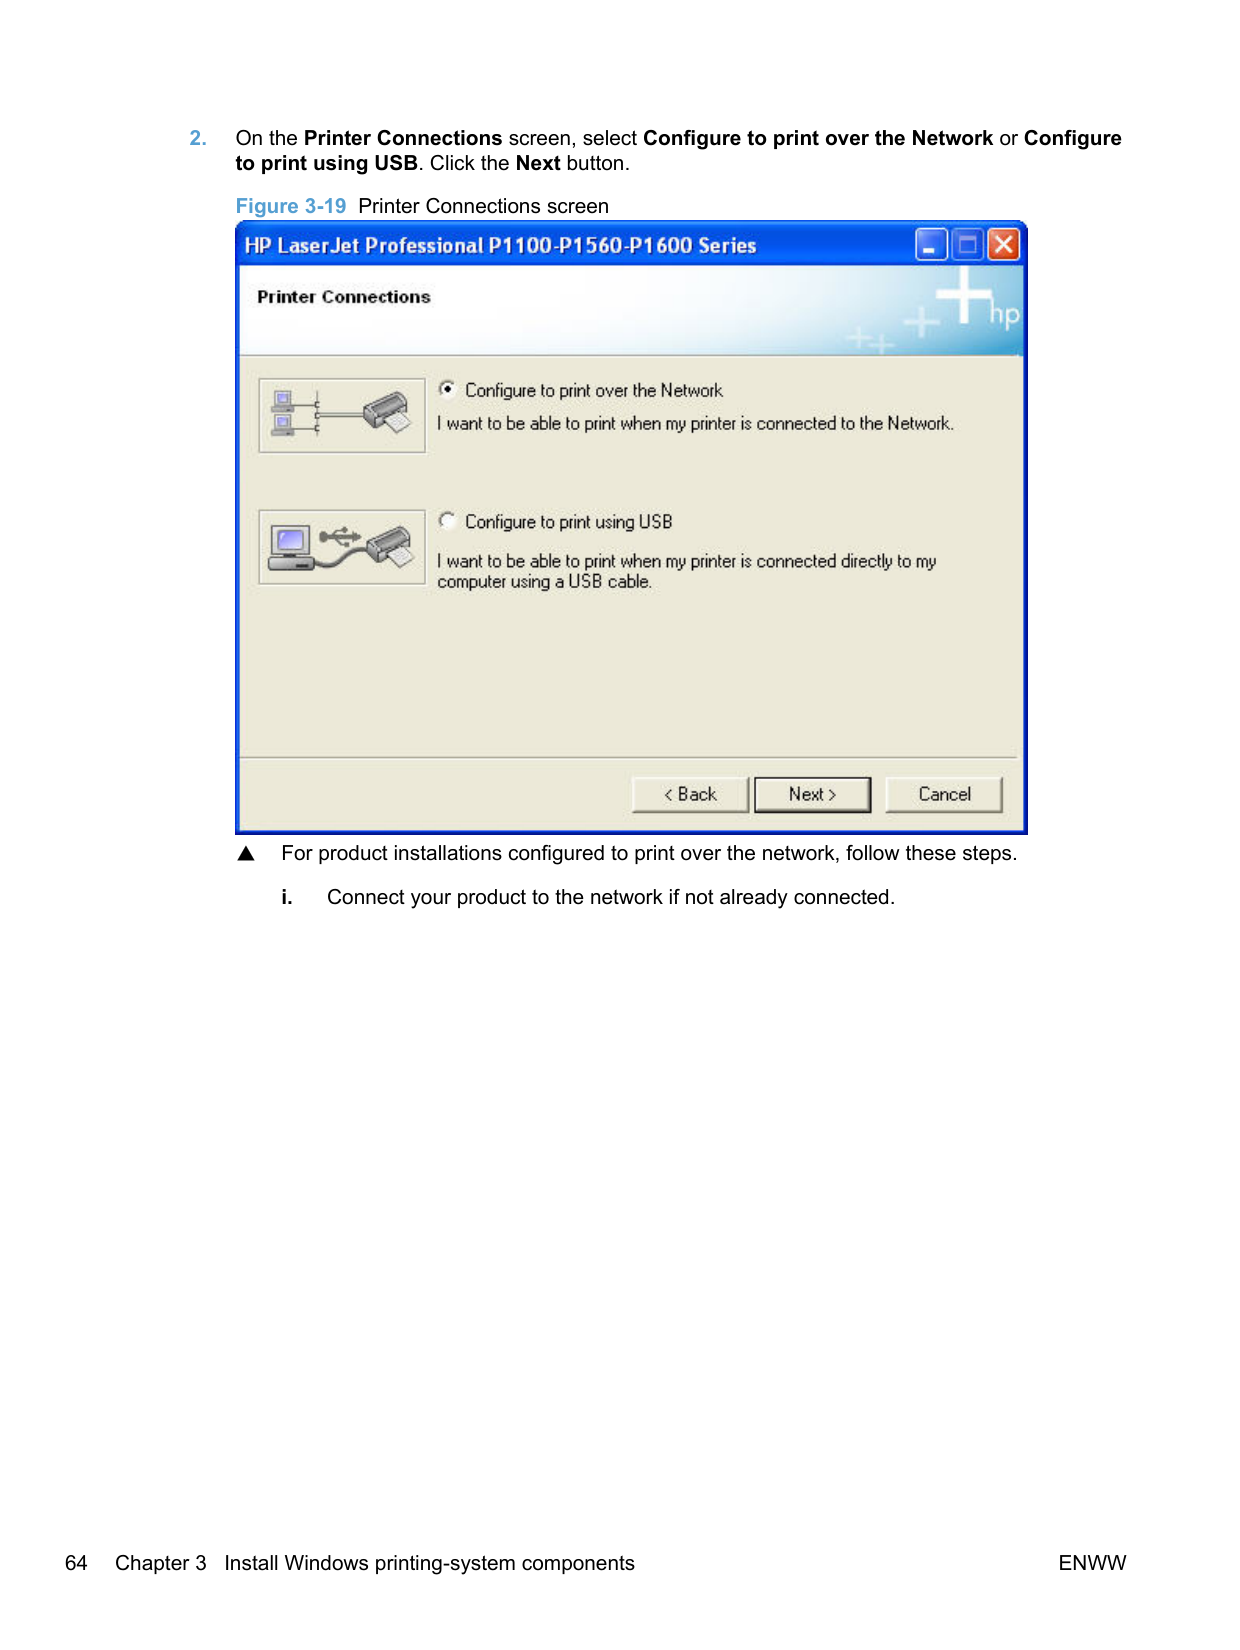
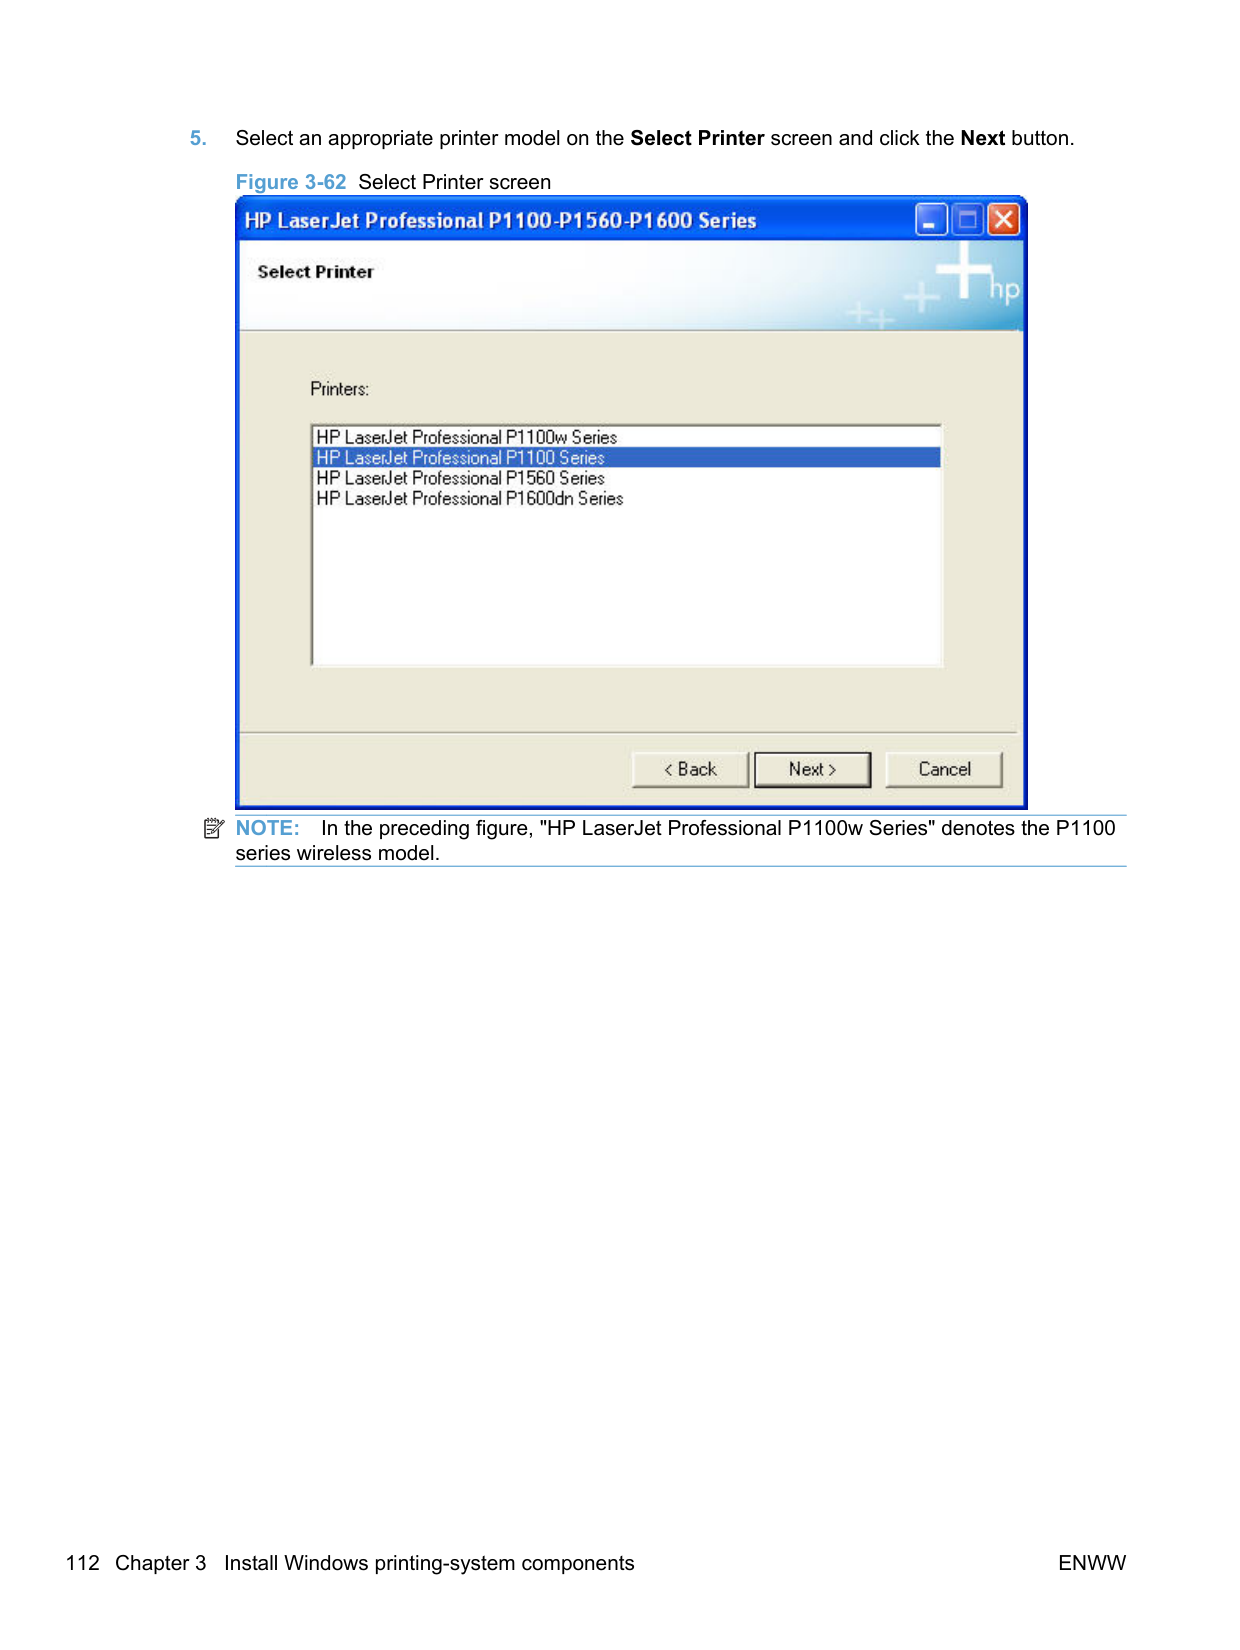
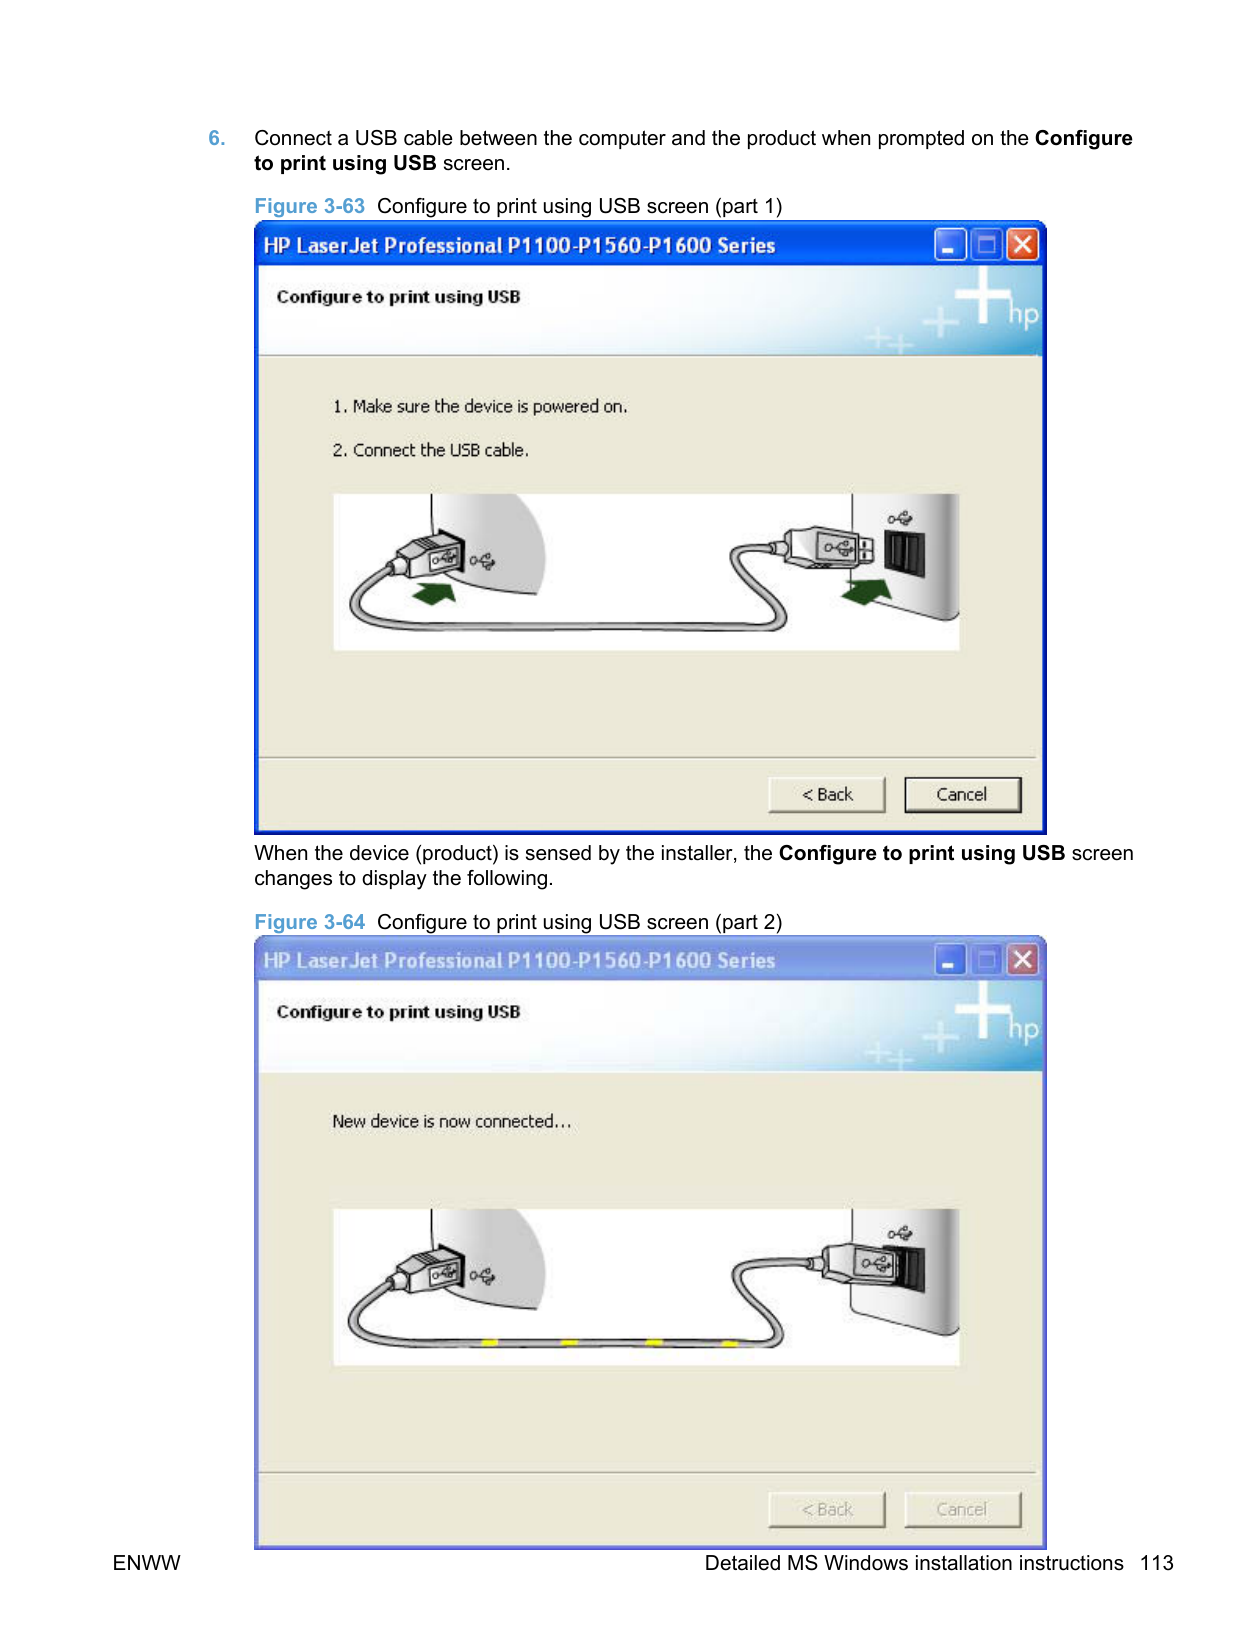
######### 2. On the Printer Connections screen, select Configure to print over the Network or Configureto print using USB. Click the Next button.

▲ For product installations configured to print over the network, follow these steps.
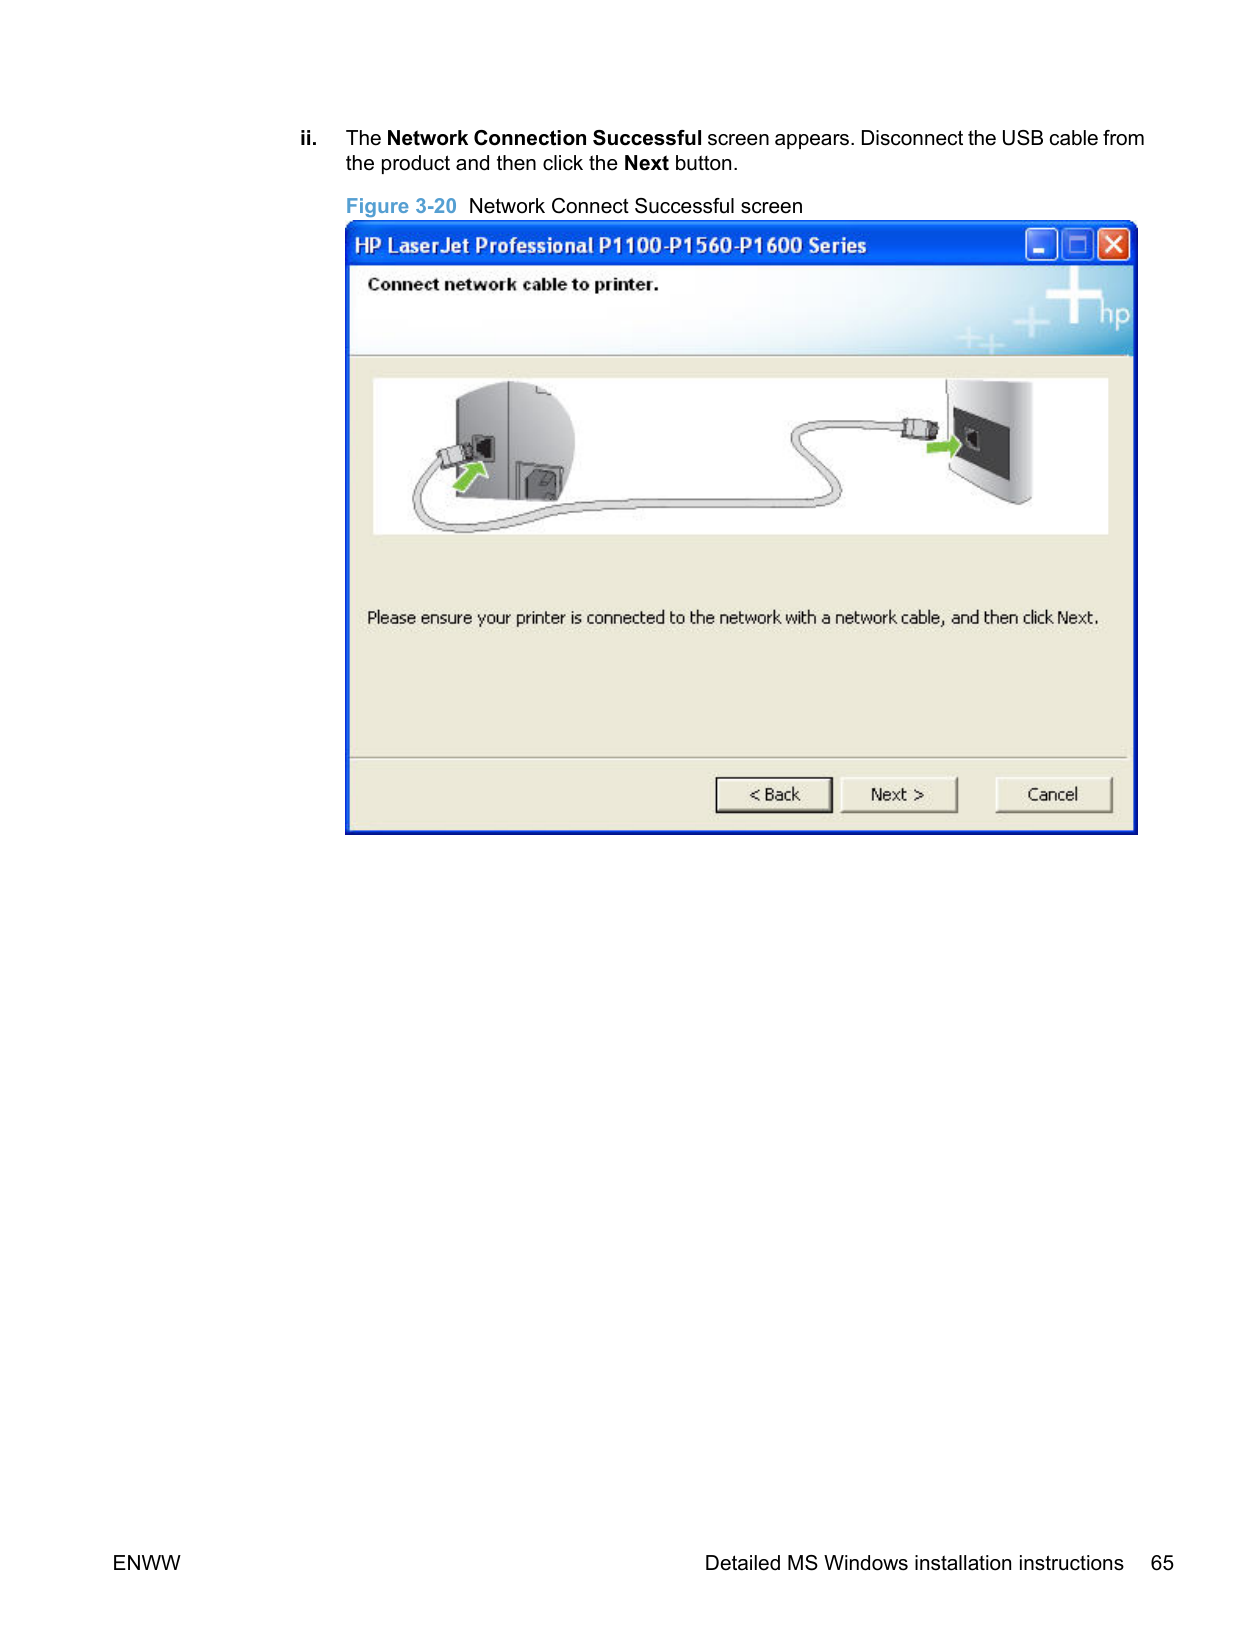
########## ii. The Network Connection Successful screen appears. Disconnect the USB cable fromthe product and then click the Next button.Figure 3-20 Network Connect Successful screen


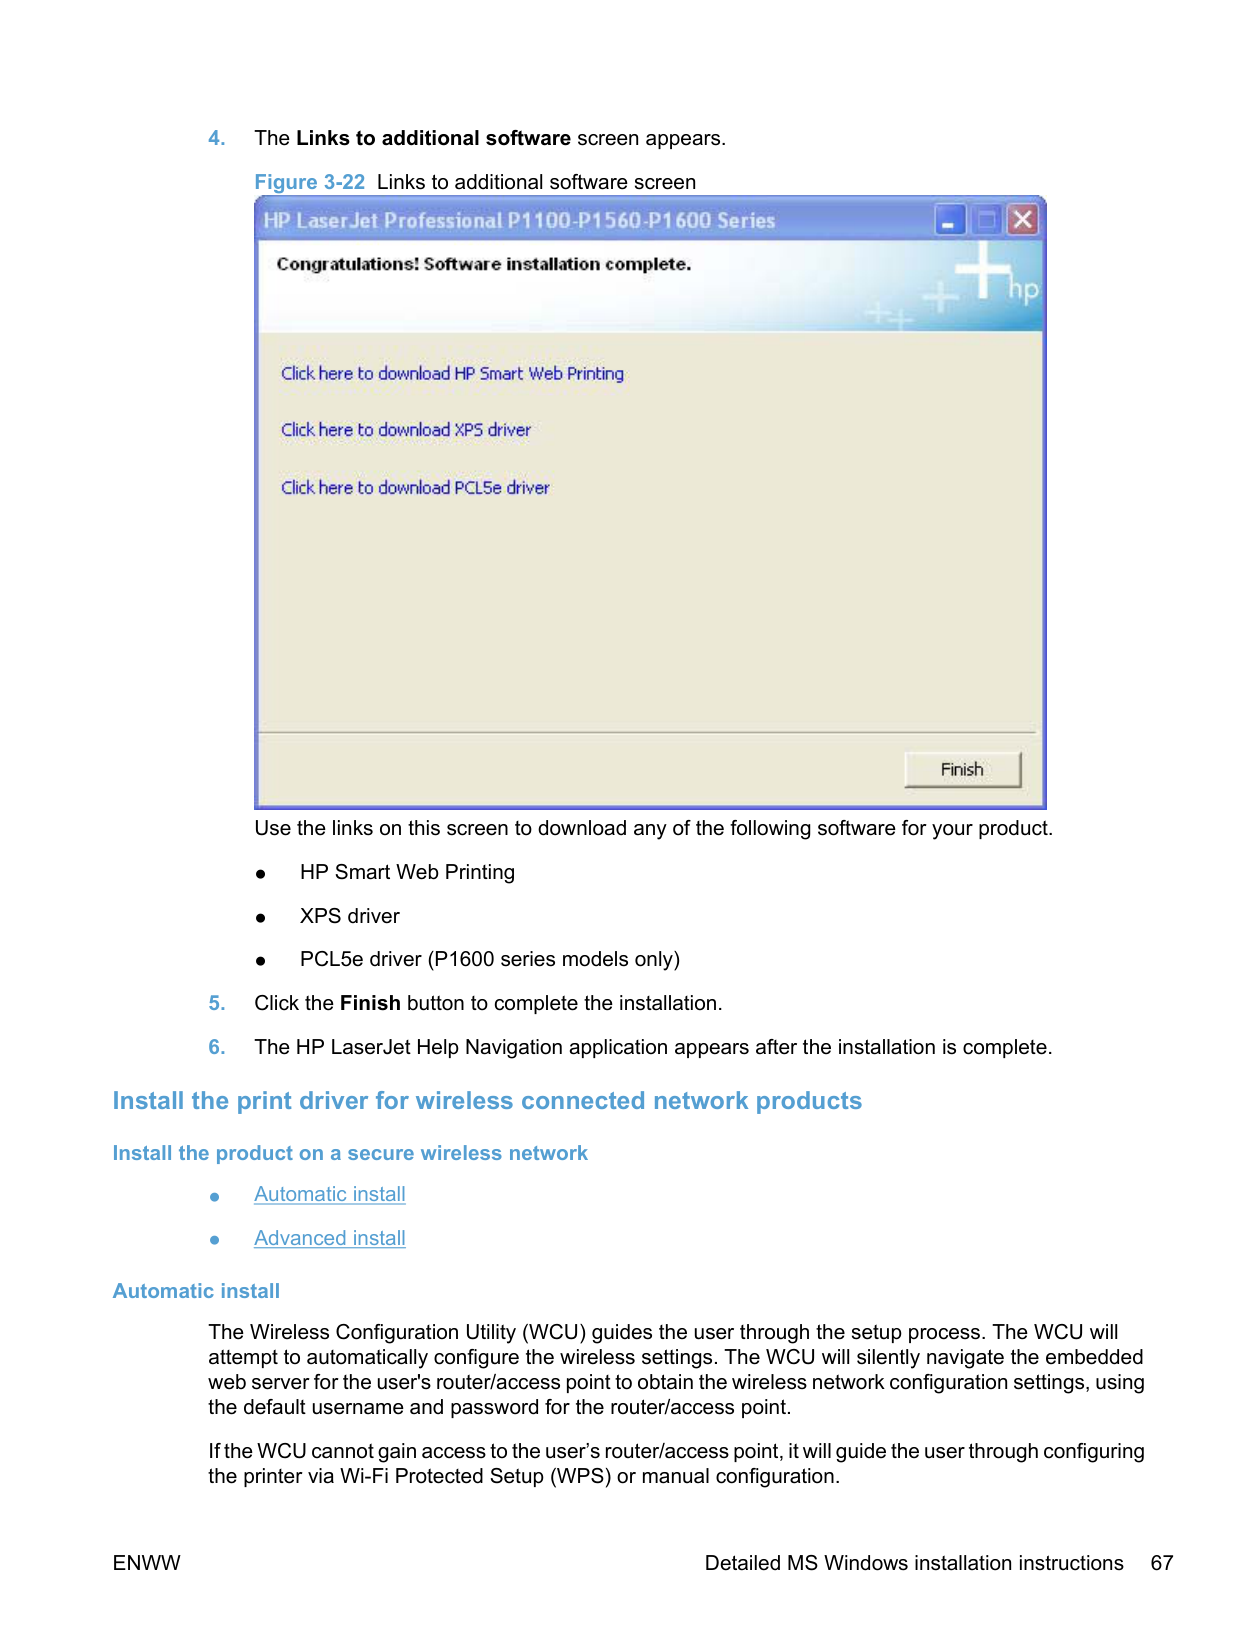
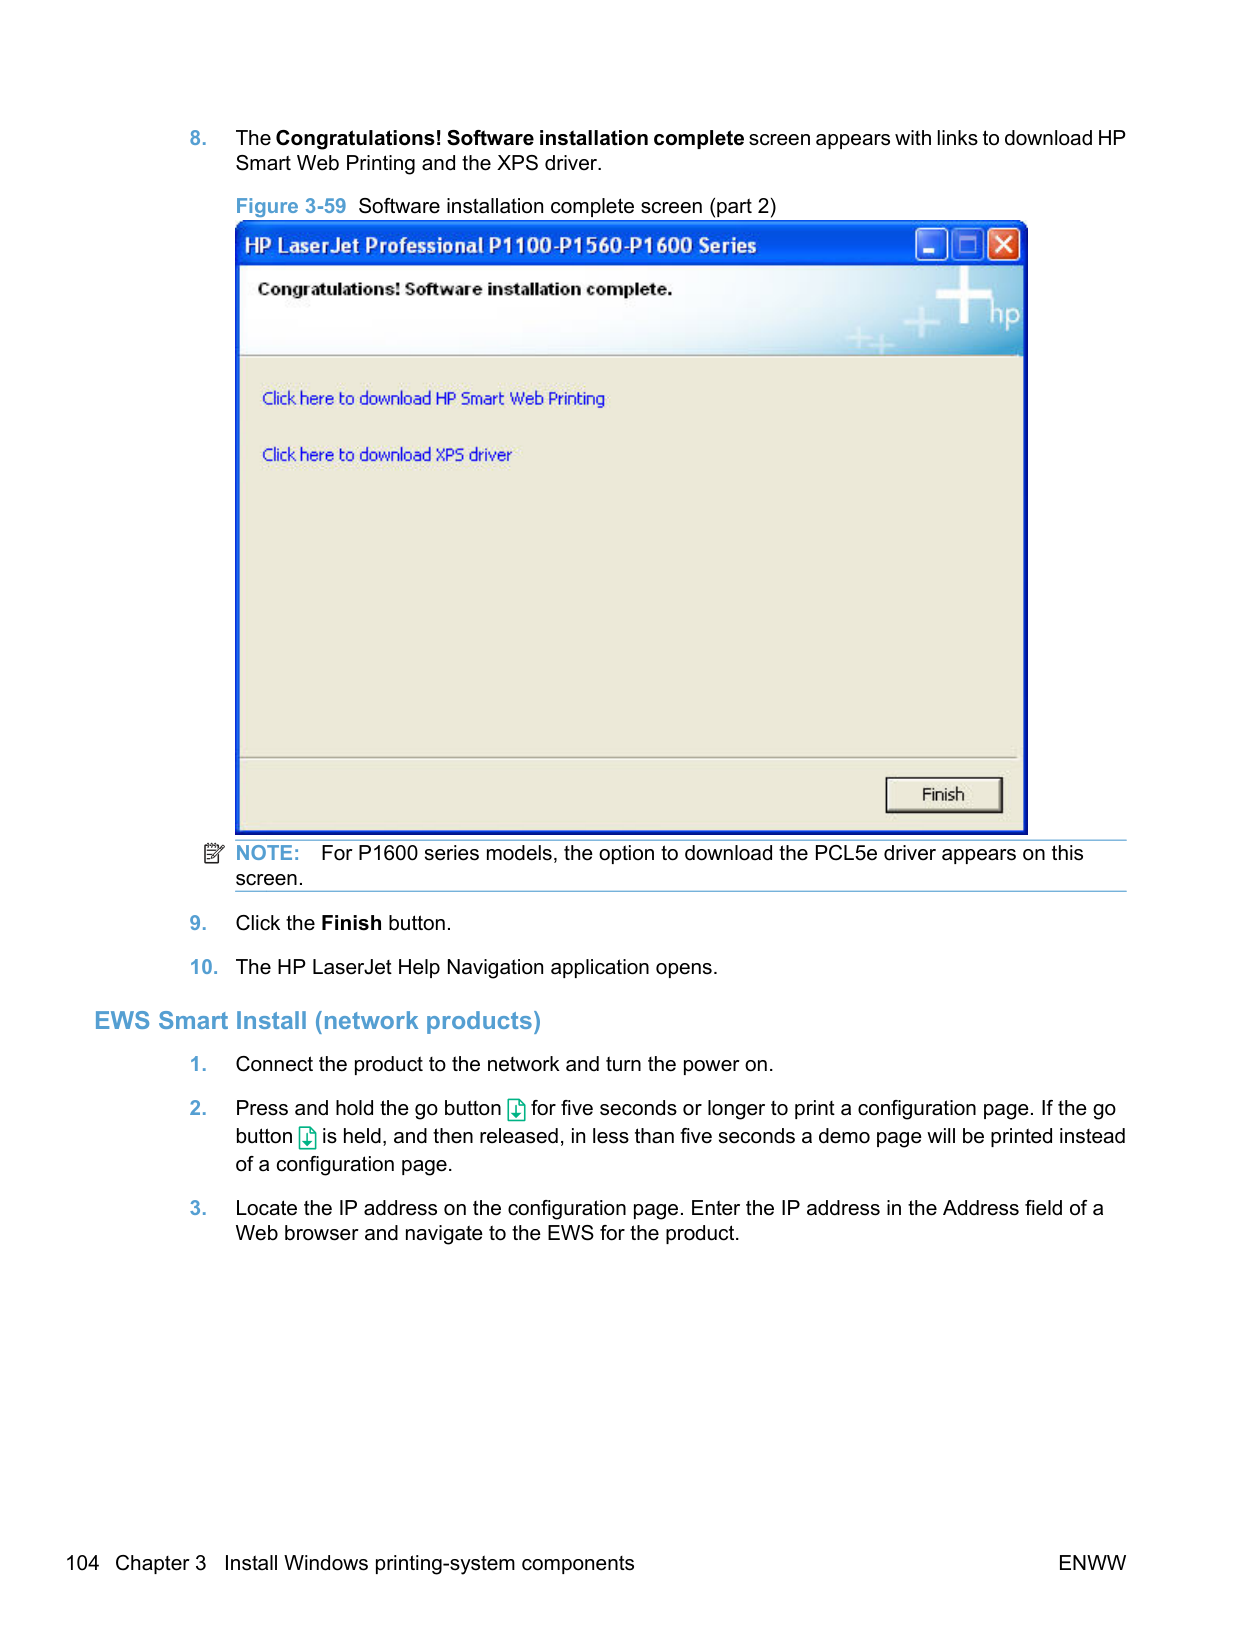
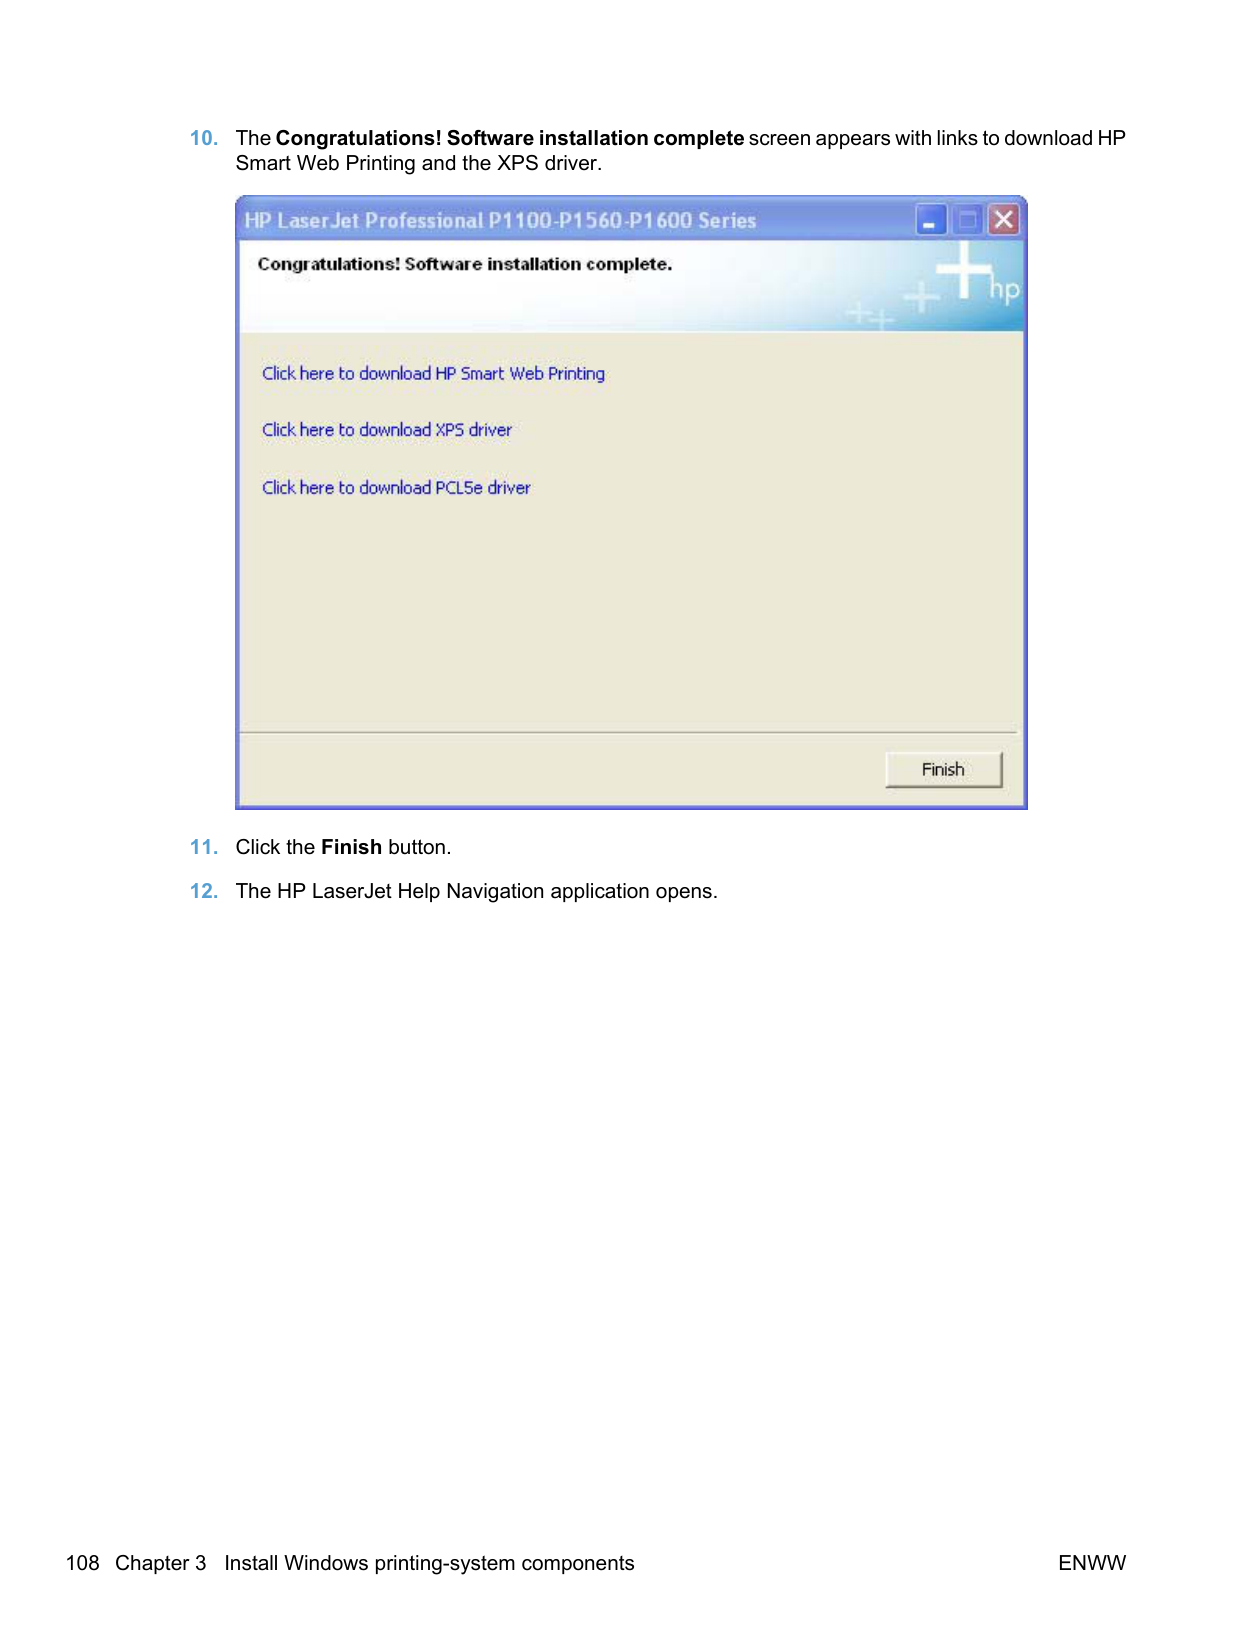
Use the links on this screen to download any of the following software for your product.
######## Install the print driver for wireless connected network products Install the product on a secure wireless network
######### Automatic install
The Wireless Configuration Utility (WCU) guides the user through the setup process. The WCU will attempt to automatically configure the wireless settings. The WCU will silently navigate the embedded web server for the user's router/access point to obtain the wireless network configuration settings, using the default username and password for the router/access point.
If the WCU cannot gain access to the user’s router/access point, it will guide the user through configuring the printer via Wi-Fi Protected Setup (WPS) or manual configuration.
| | |---|
NOTE: Silent configuration of wireless settings is supported on the wireless router/access points listed in Supported routers for wireless products that support automatic configuration. on page 254 A series of dialog boxes appear during installation of the HP LaserJet Professional P1100/P1560/P1600 Series Printer printing-system software in Windows environments.
| | |---|
NOTE: You can return to the previous dialog box by clicking Back or exit the HP LaserJet Professional P1100/P1560/P1600 Series Printer printing-system software installation by clicking Cancel wherever these options appear in the installation sequence.


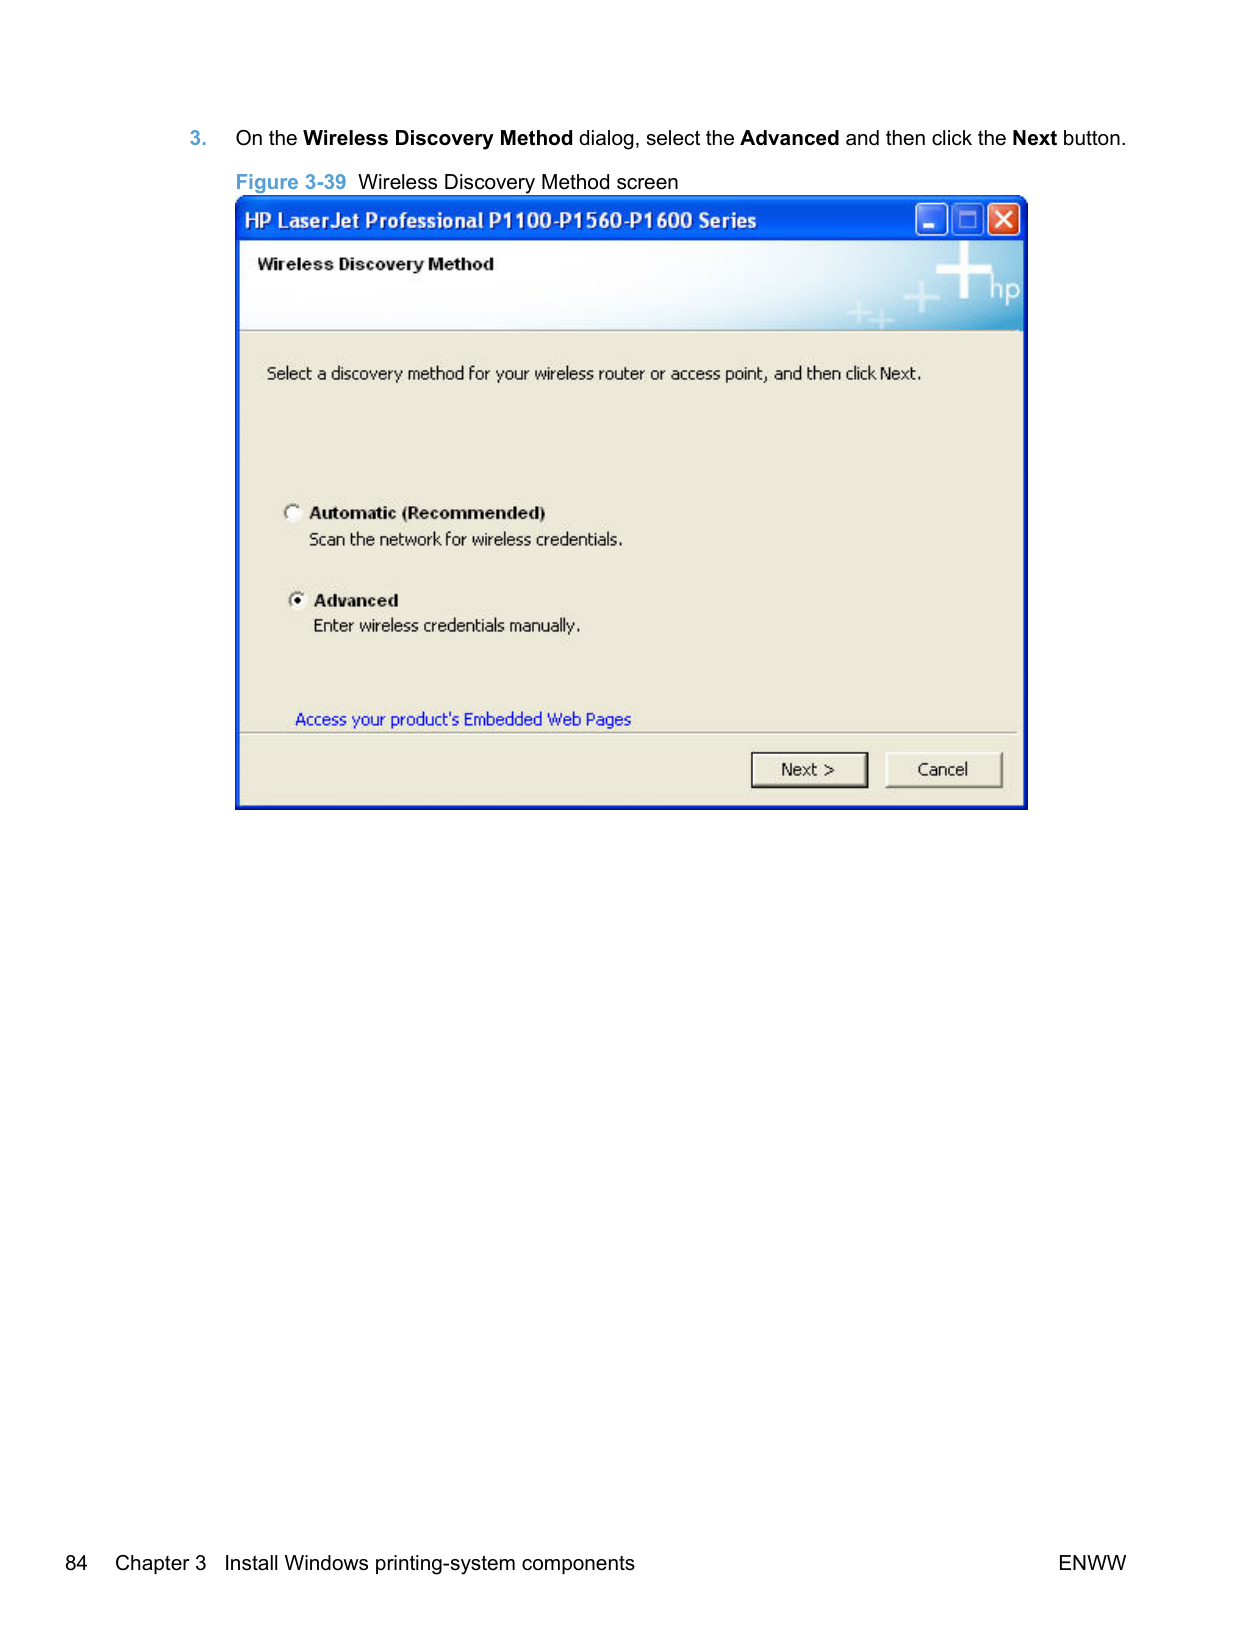
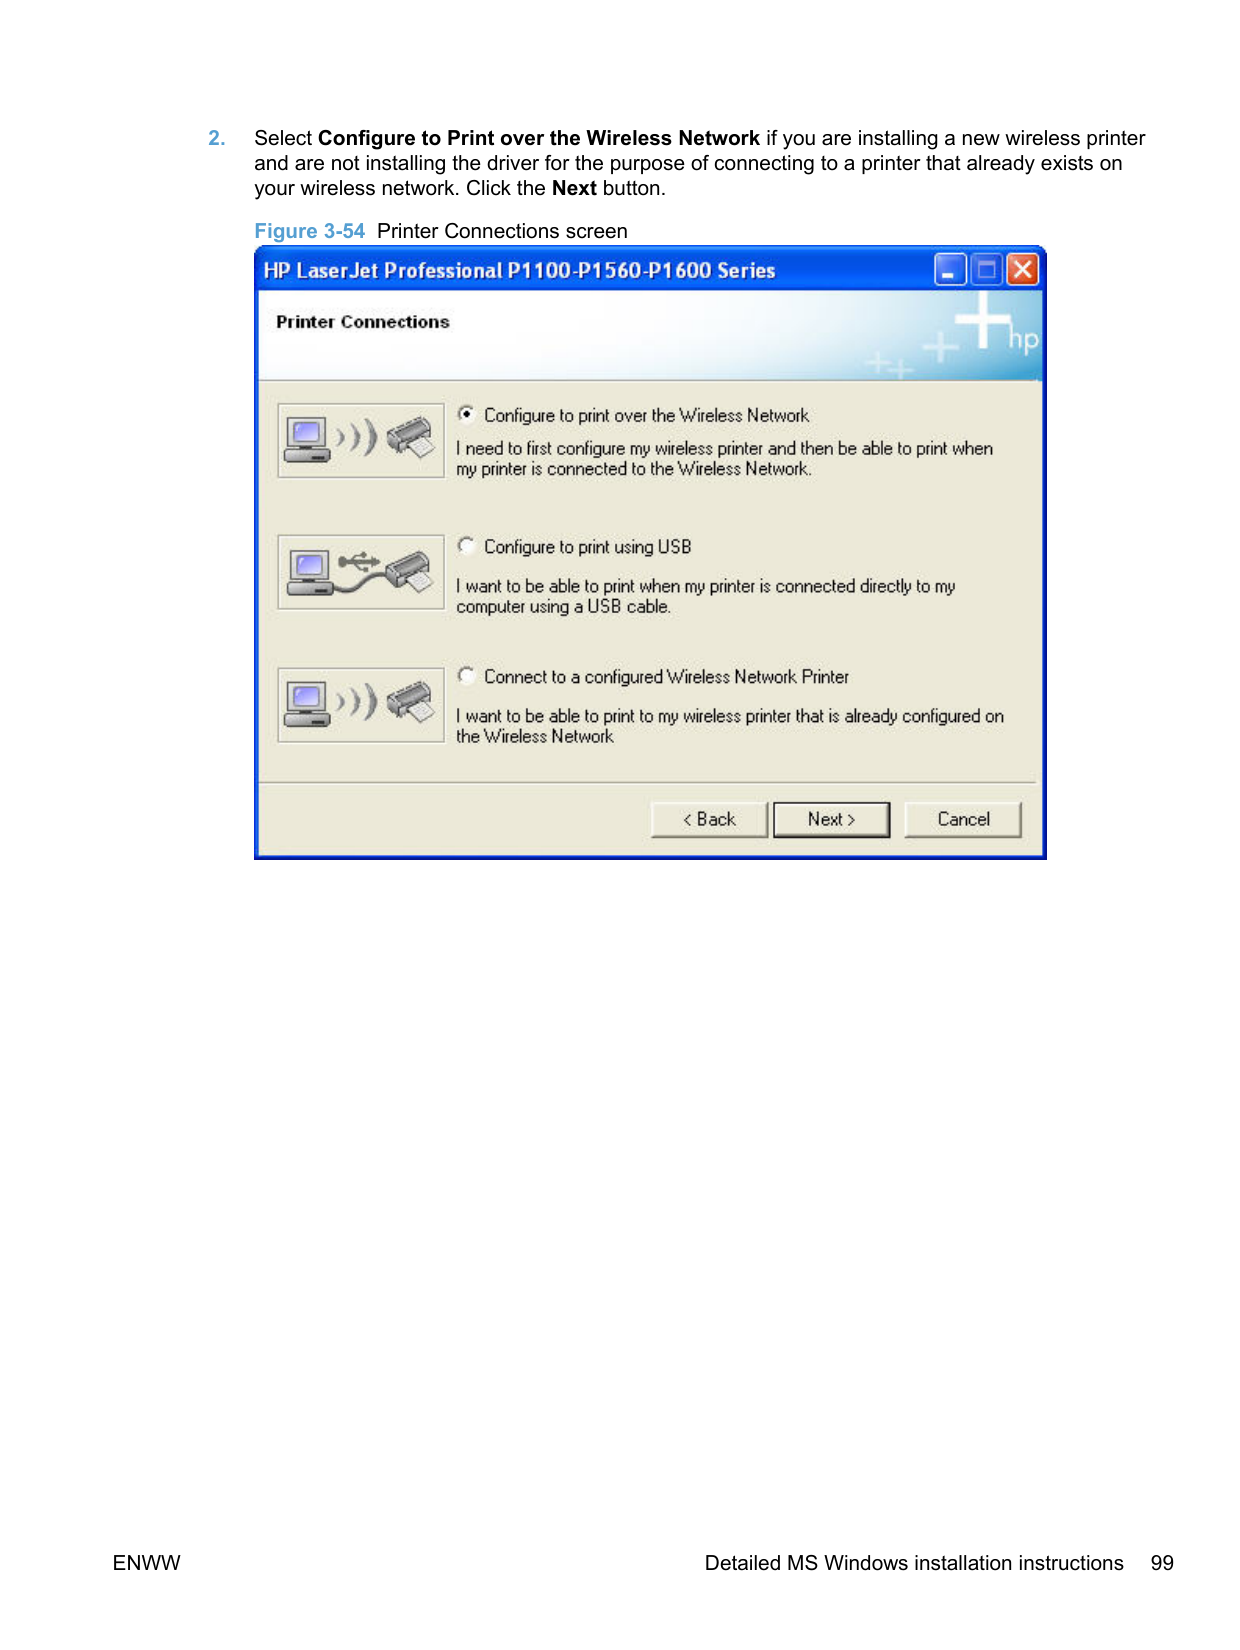
######### 2. Select Configure to Print over the Wireless Network and then click the Next button.

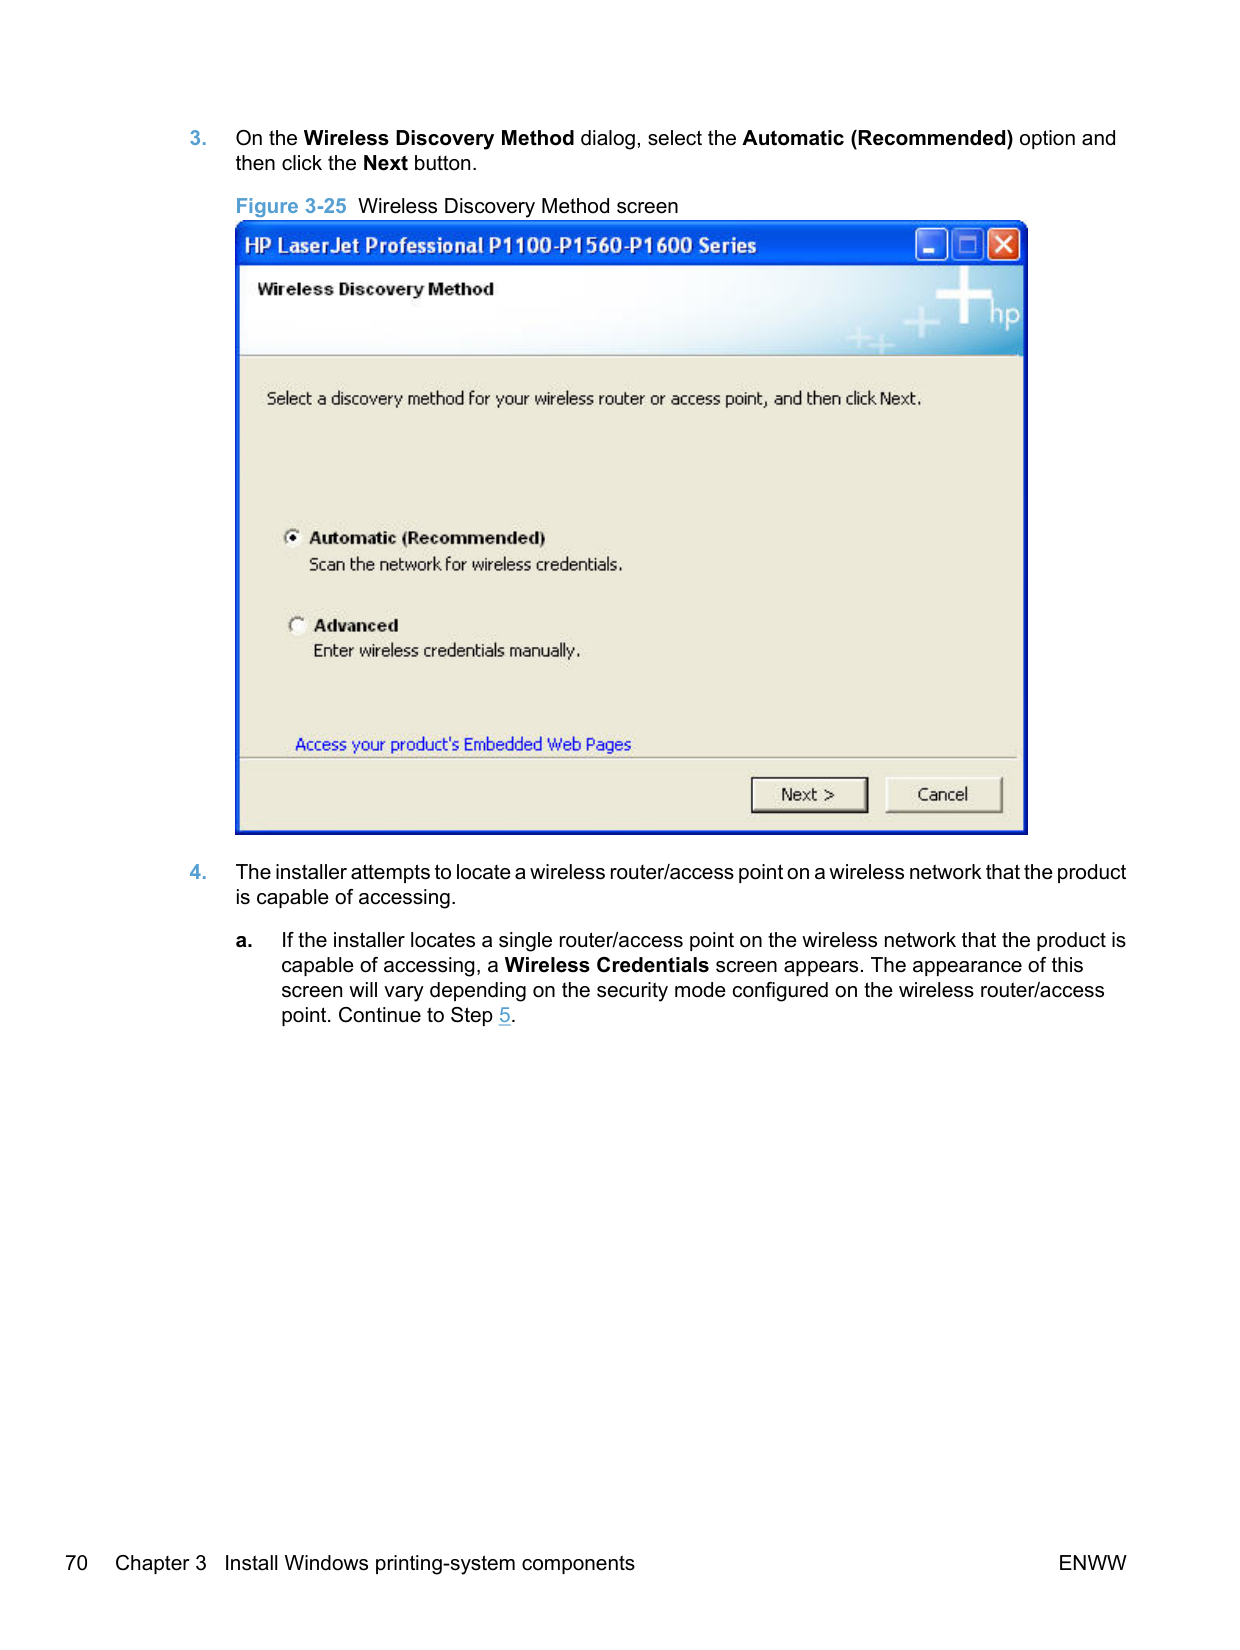
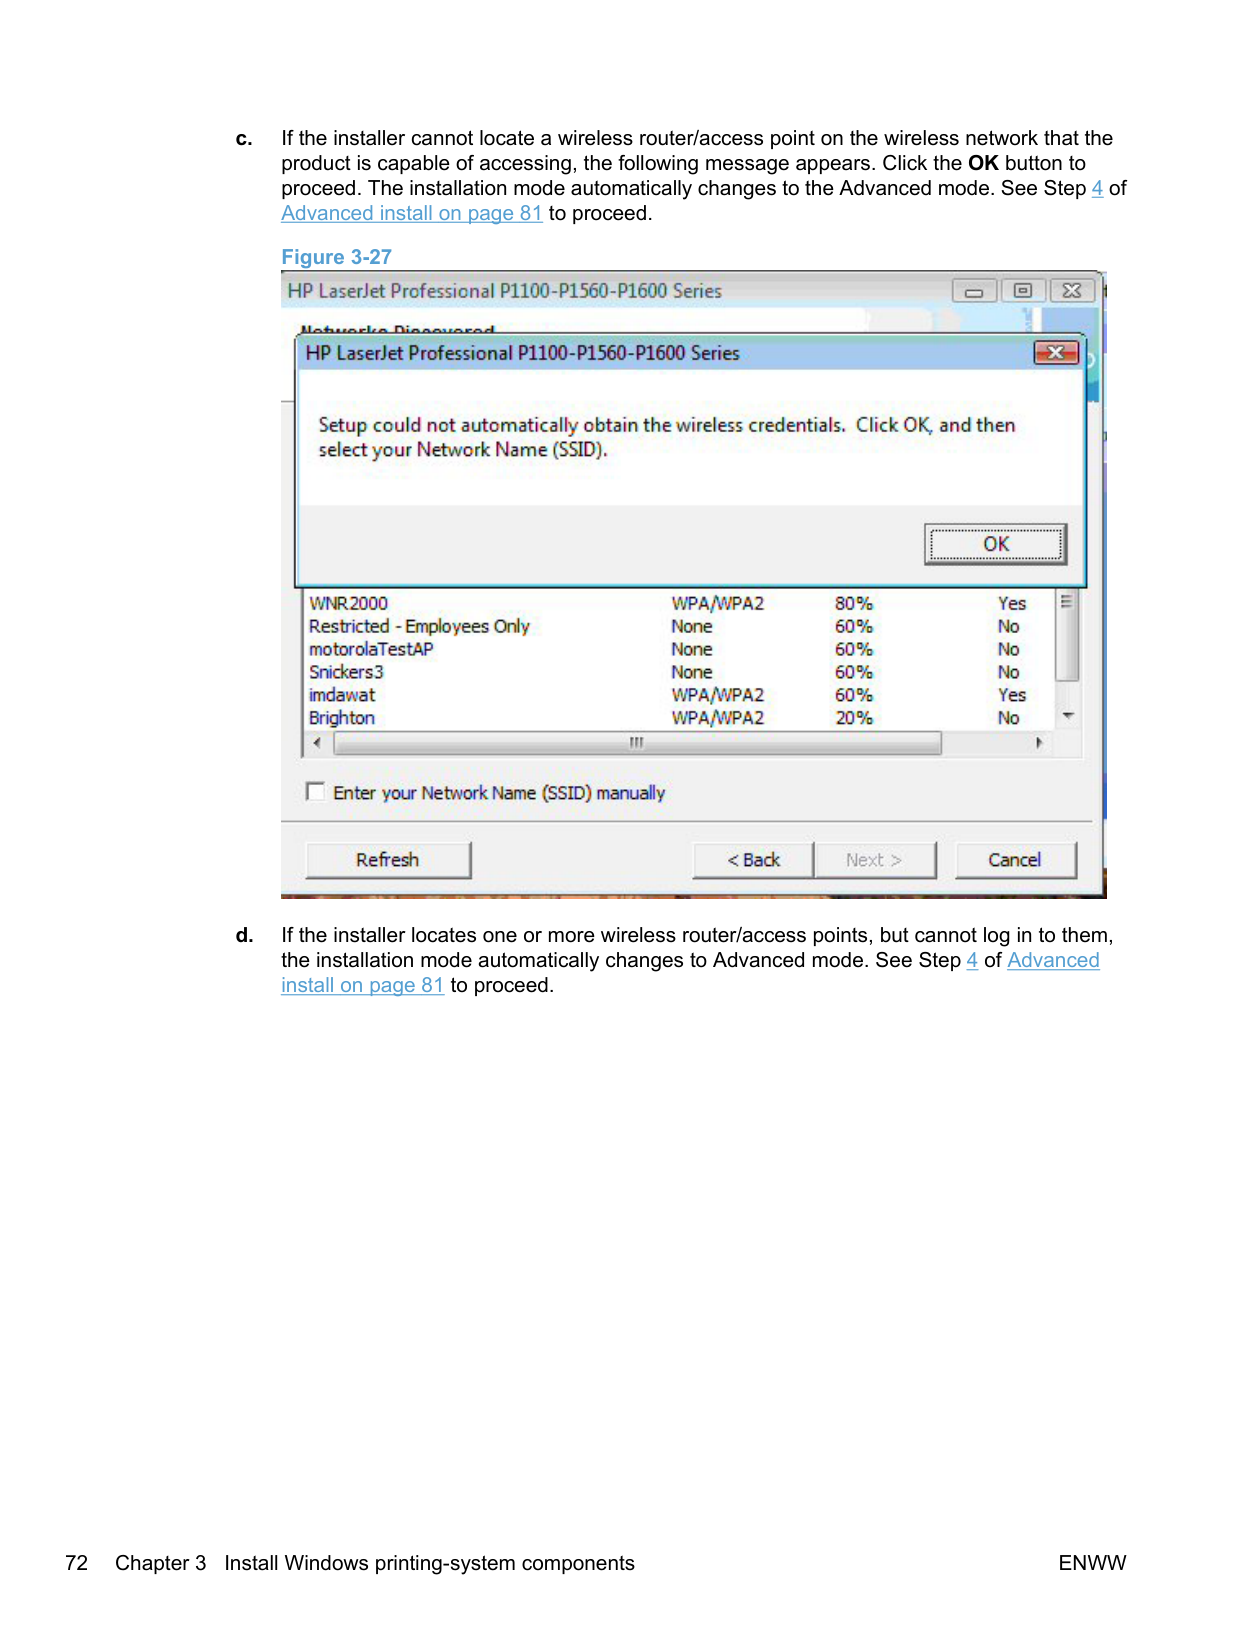
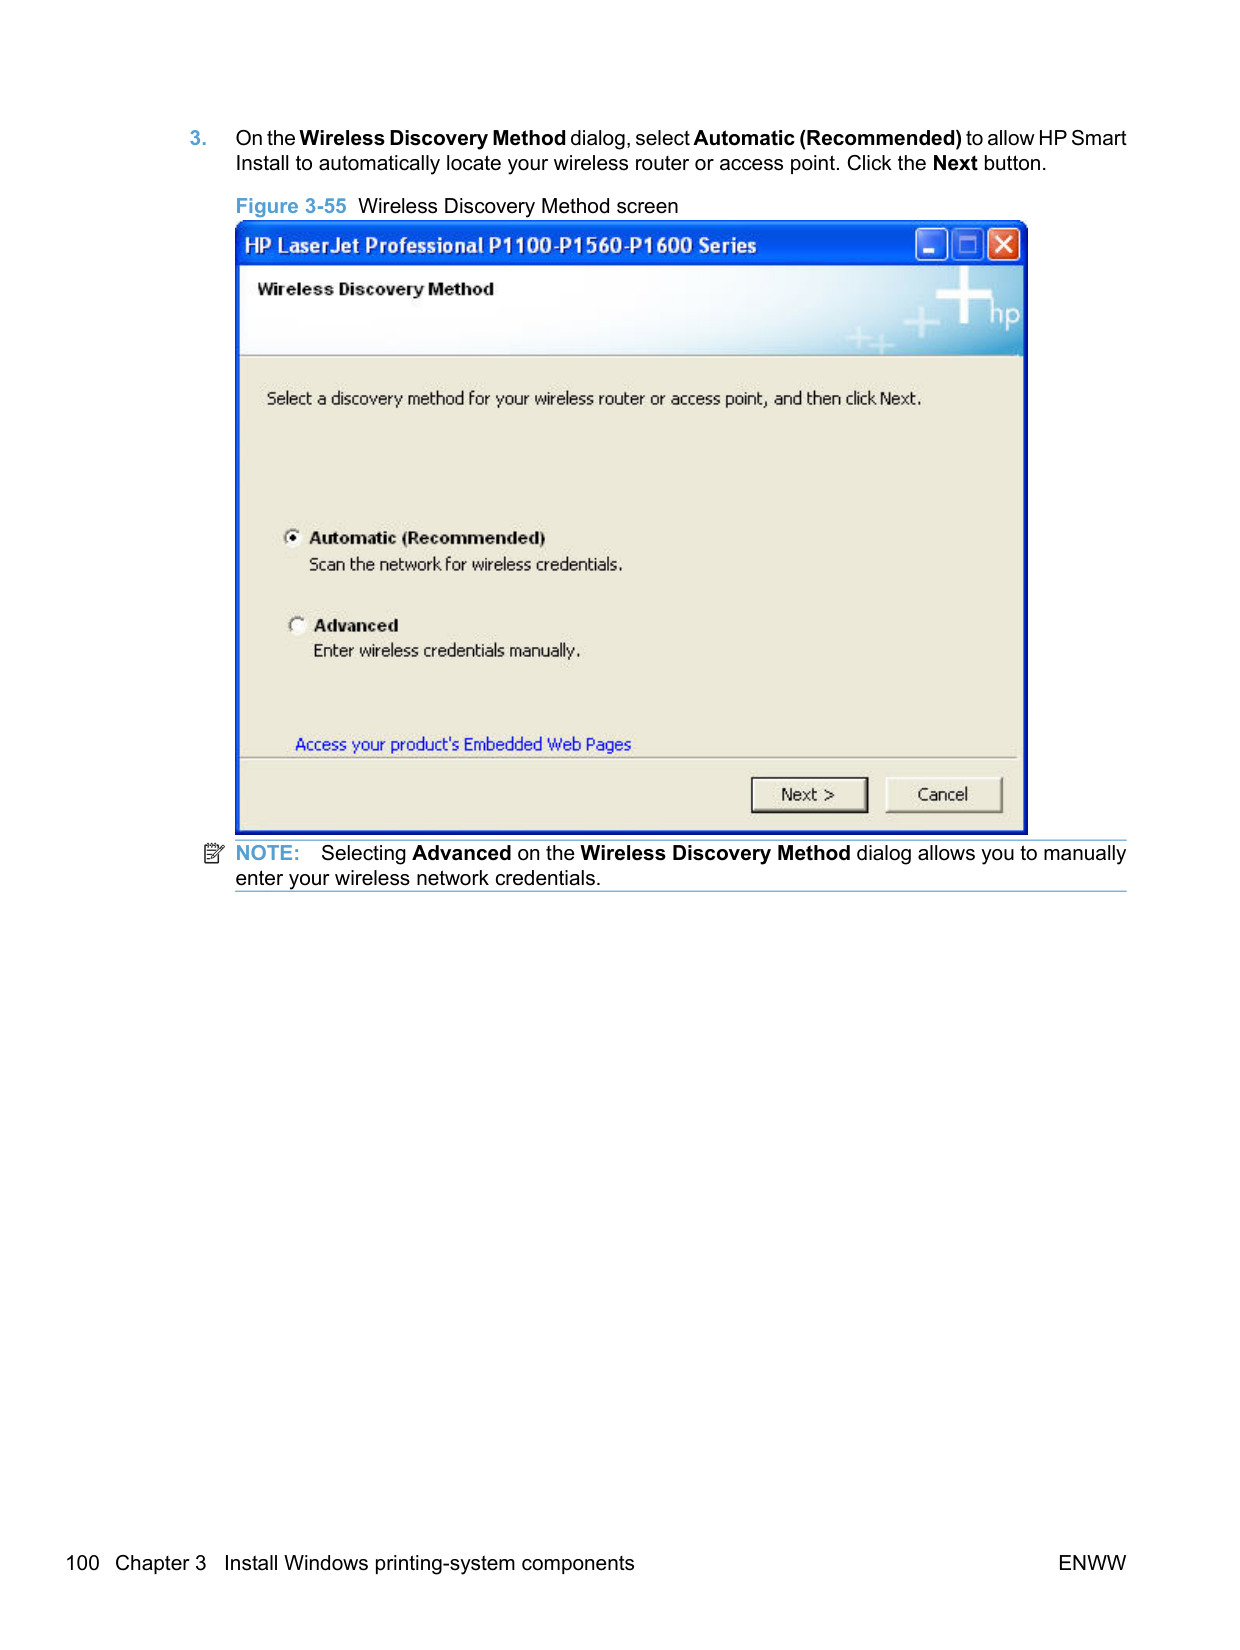
######### 3. On the Wireless Discovery Method dialog, select the Automatic (Recommended) option andthen click the Next button.

########## 4. The installer attempts to locate a wireless router/access point on a wireless network that the productis capable of accessing.


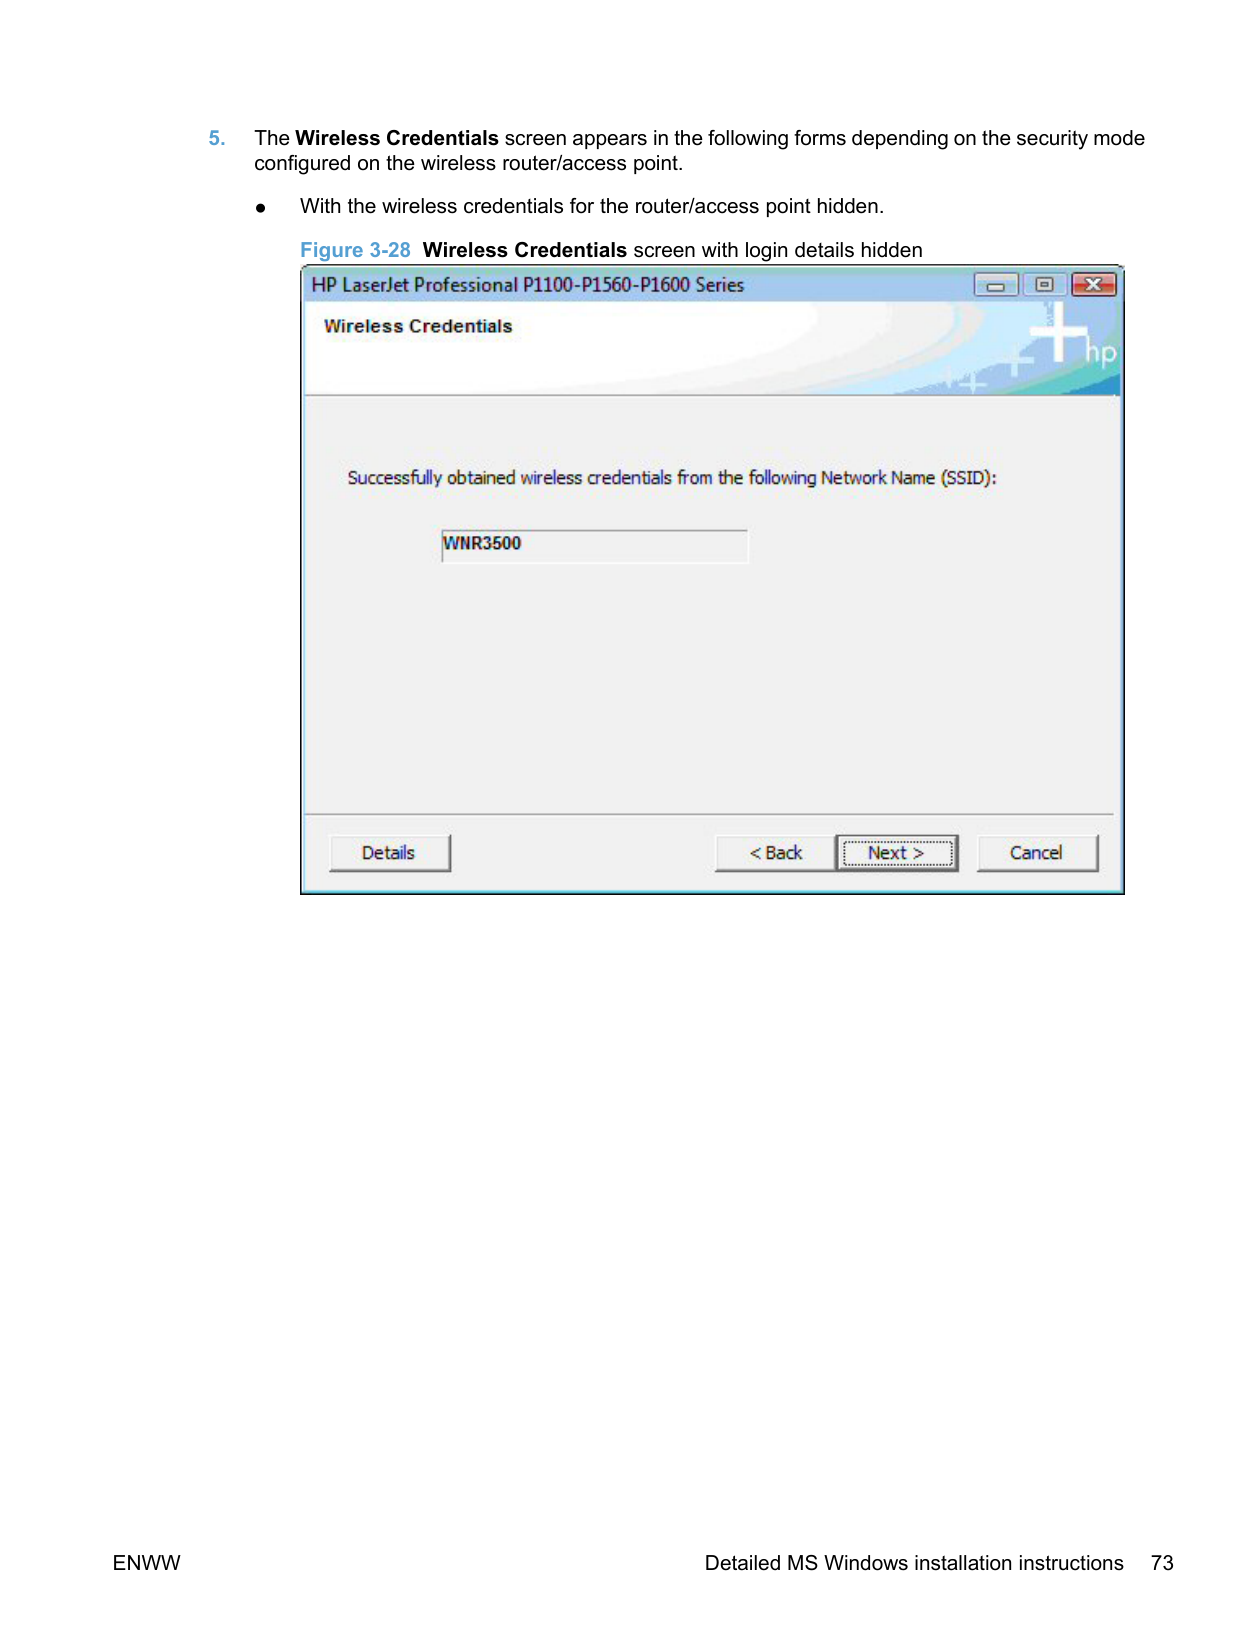
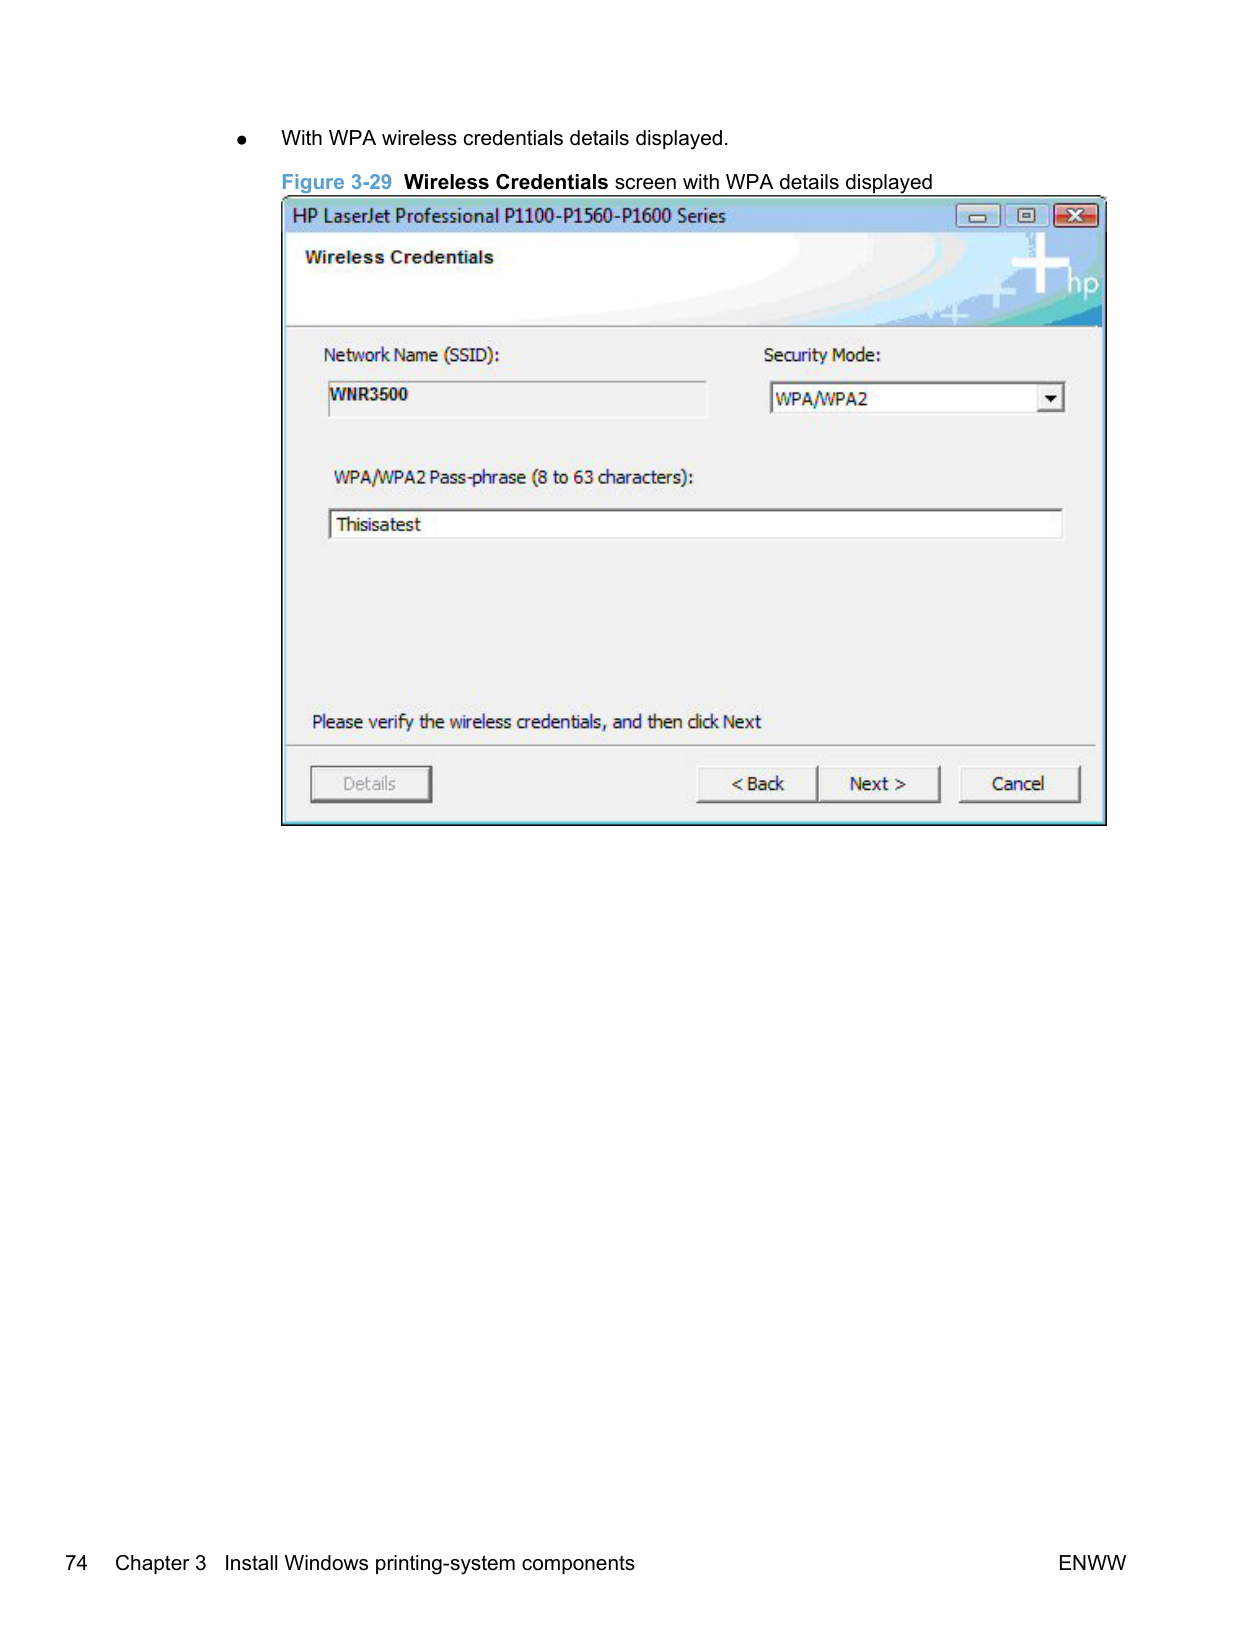
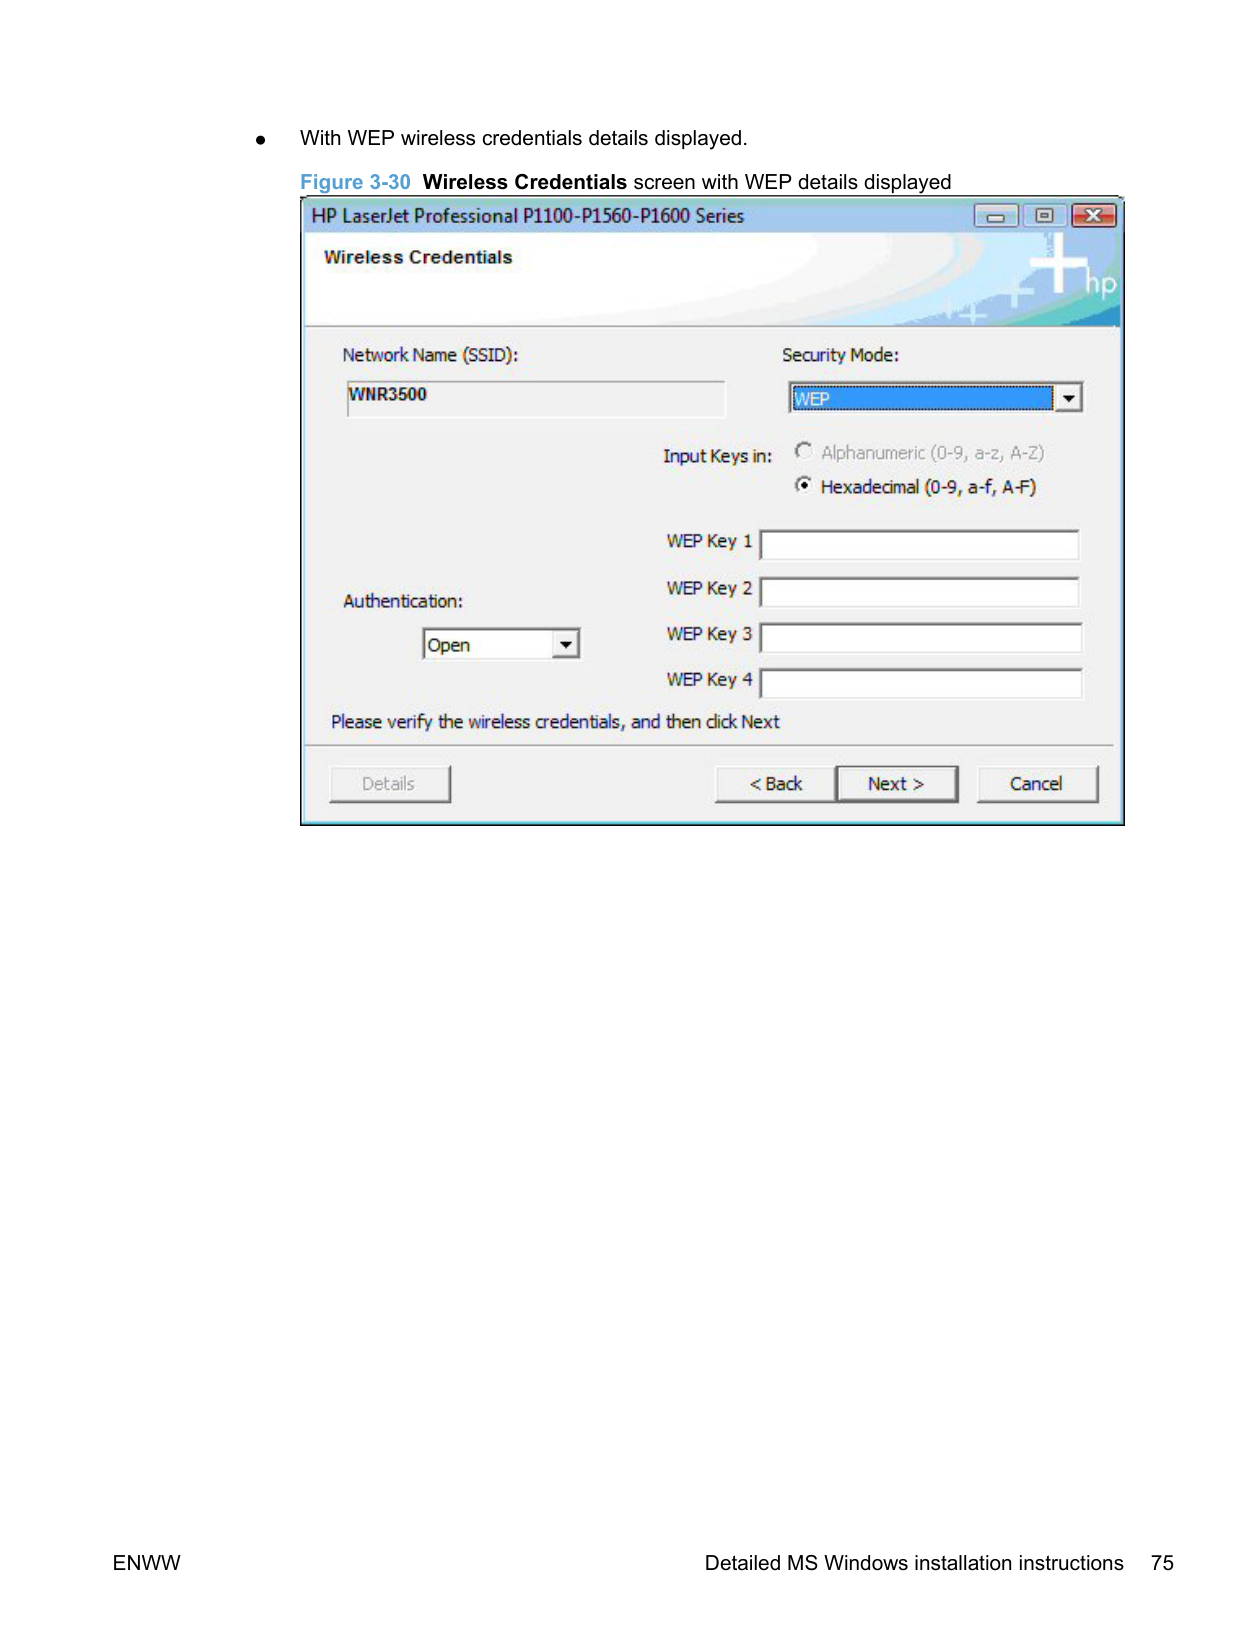
######### Figure 3-28 Wireless Credentials screen with login details hidden


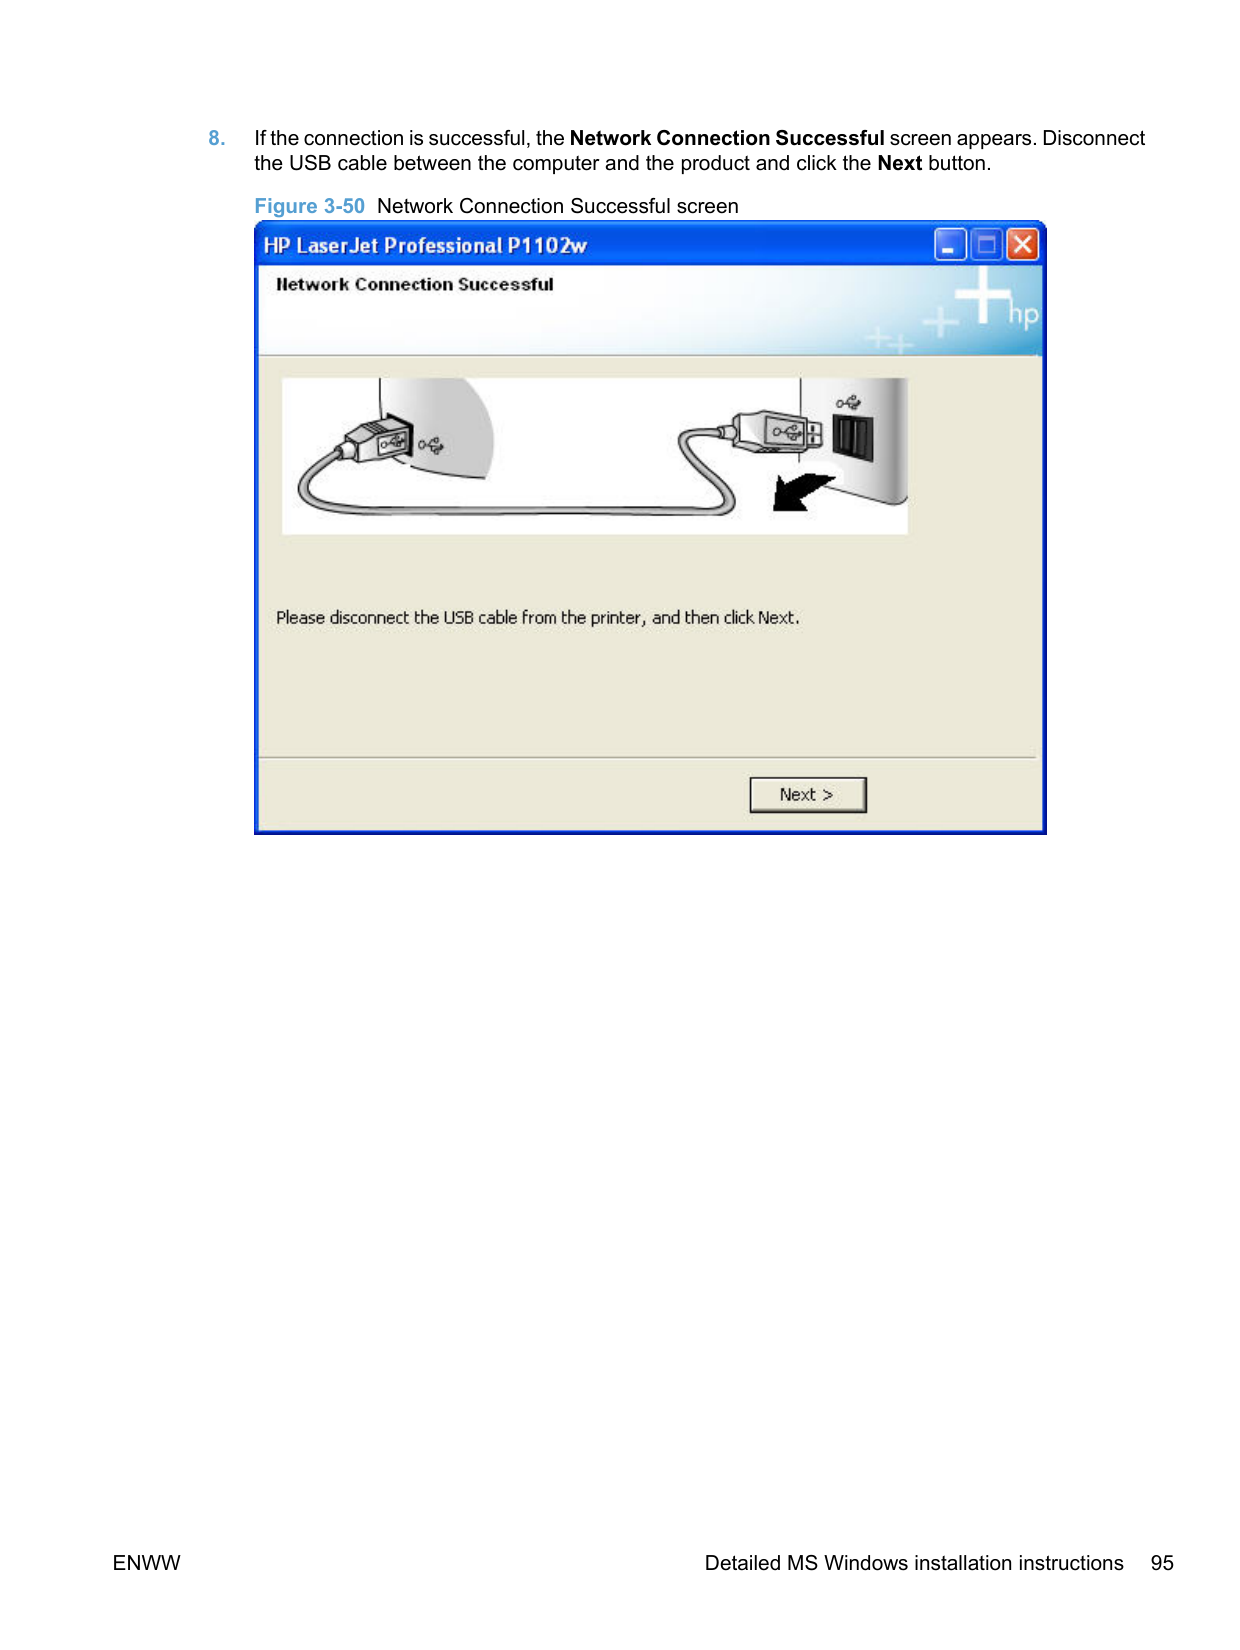
########## 7. If the connection is successful, the Network Connection Successful screen appears. Disconnectthe USB cable between the computer and the product and click the Next button to proceed to Step8.Figure 3-32 Network Connection Successful screen


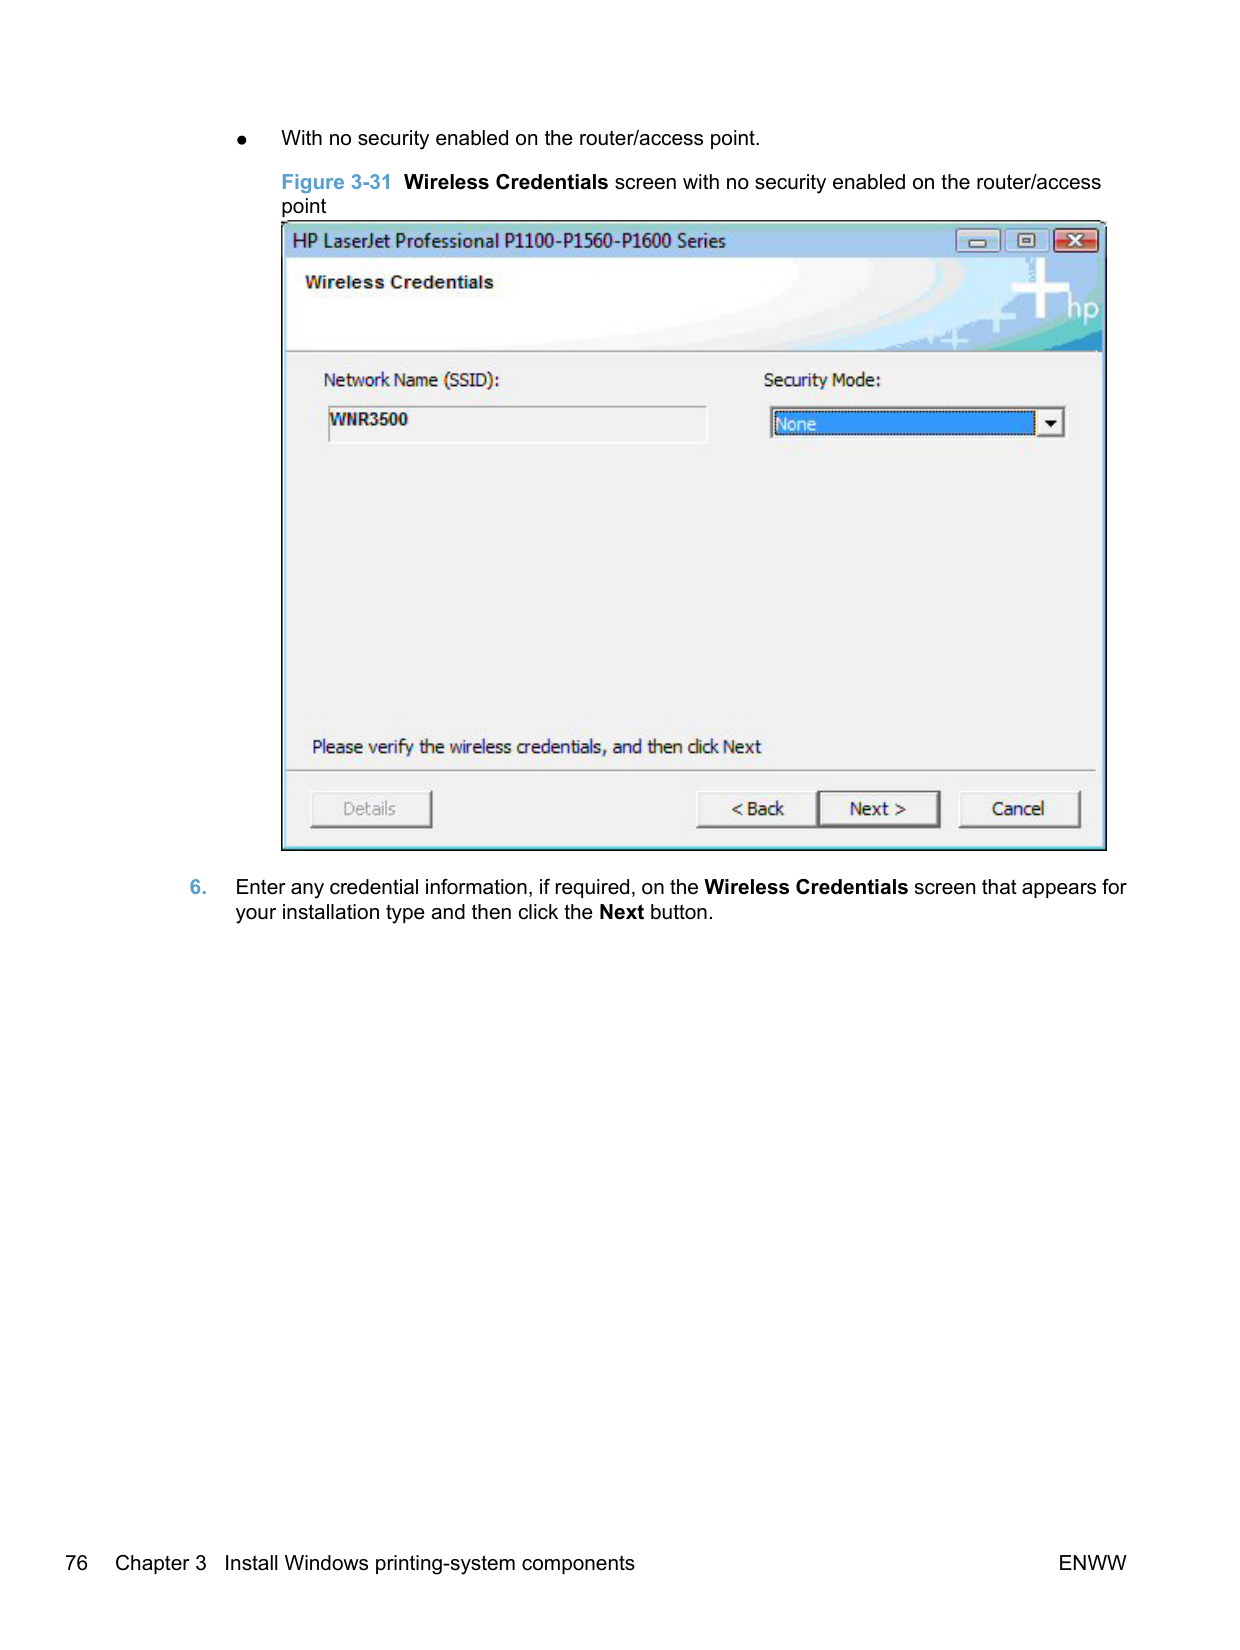
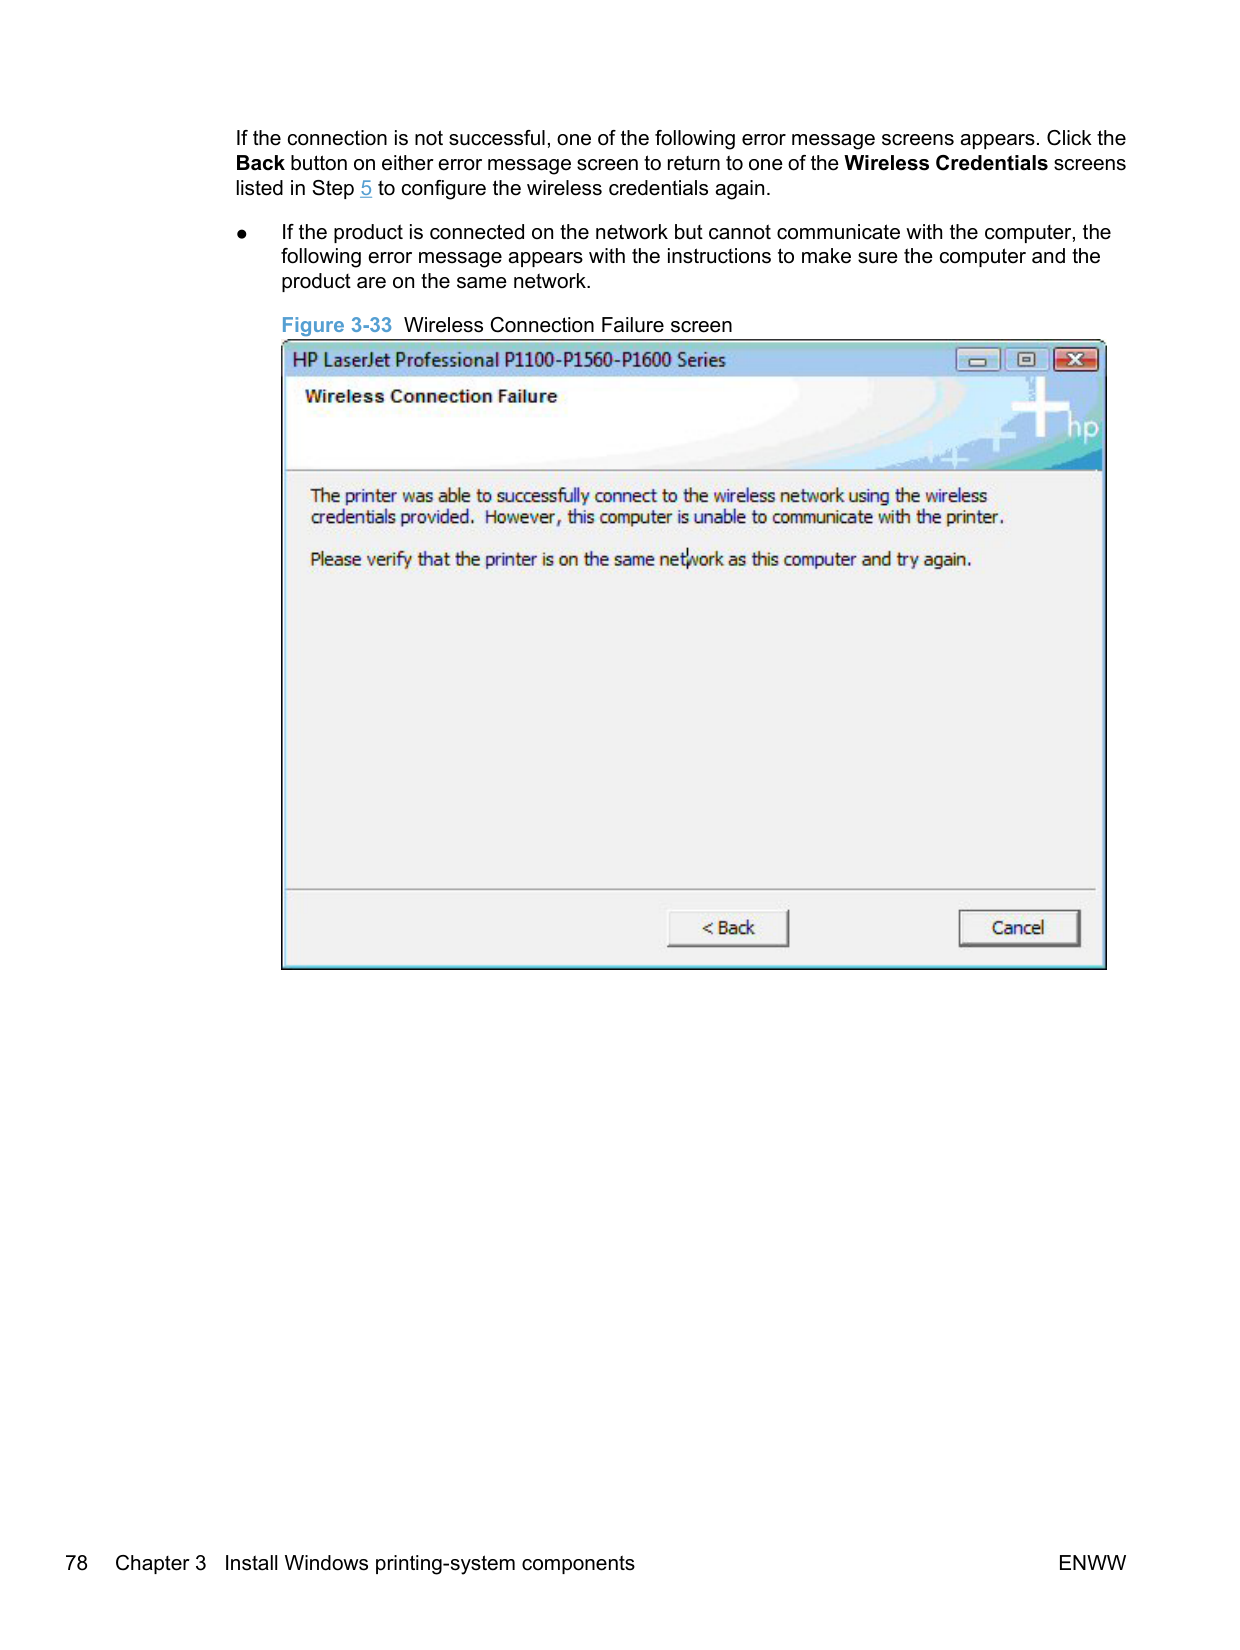
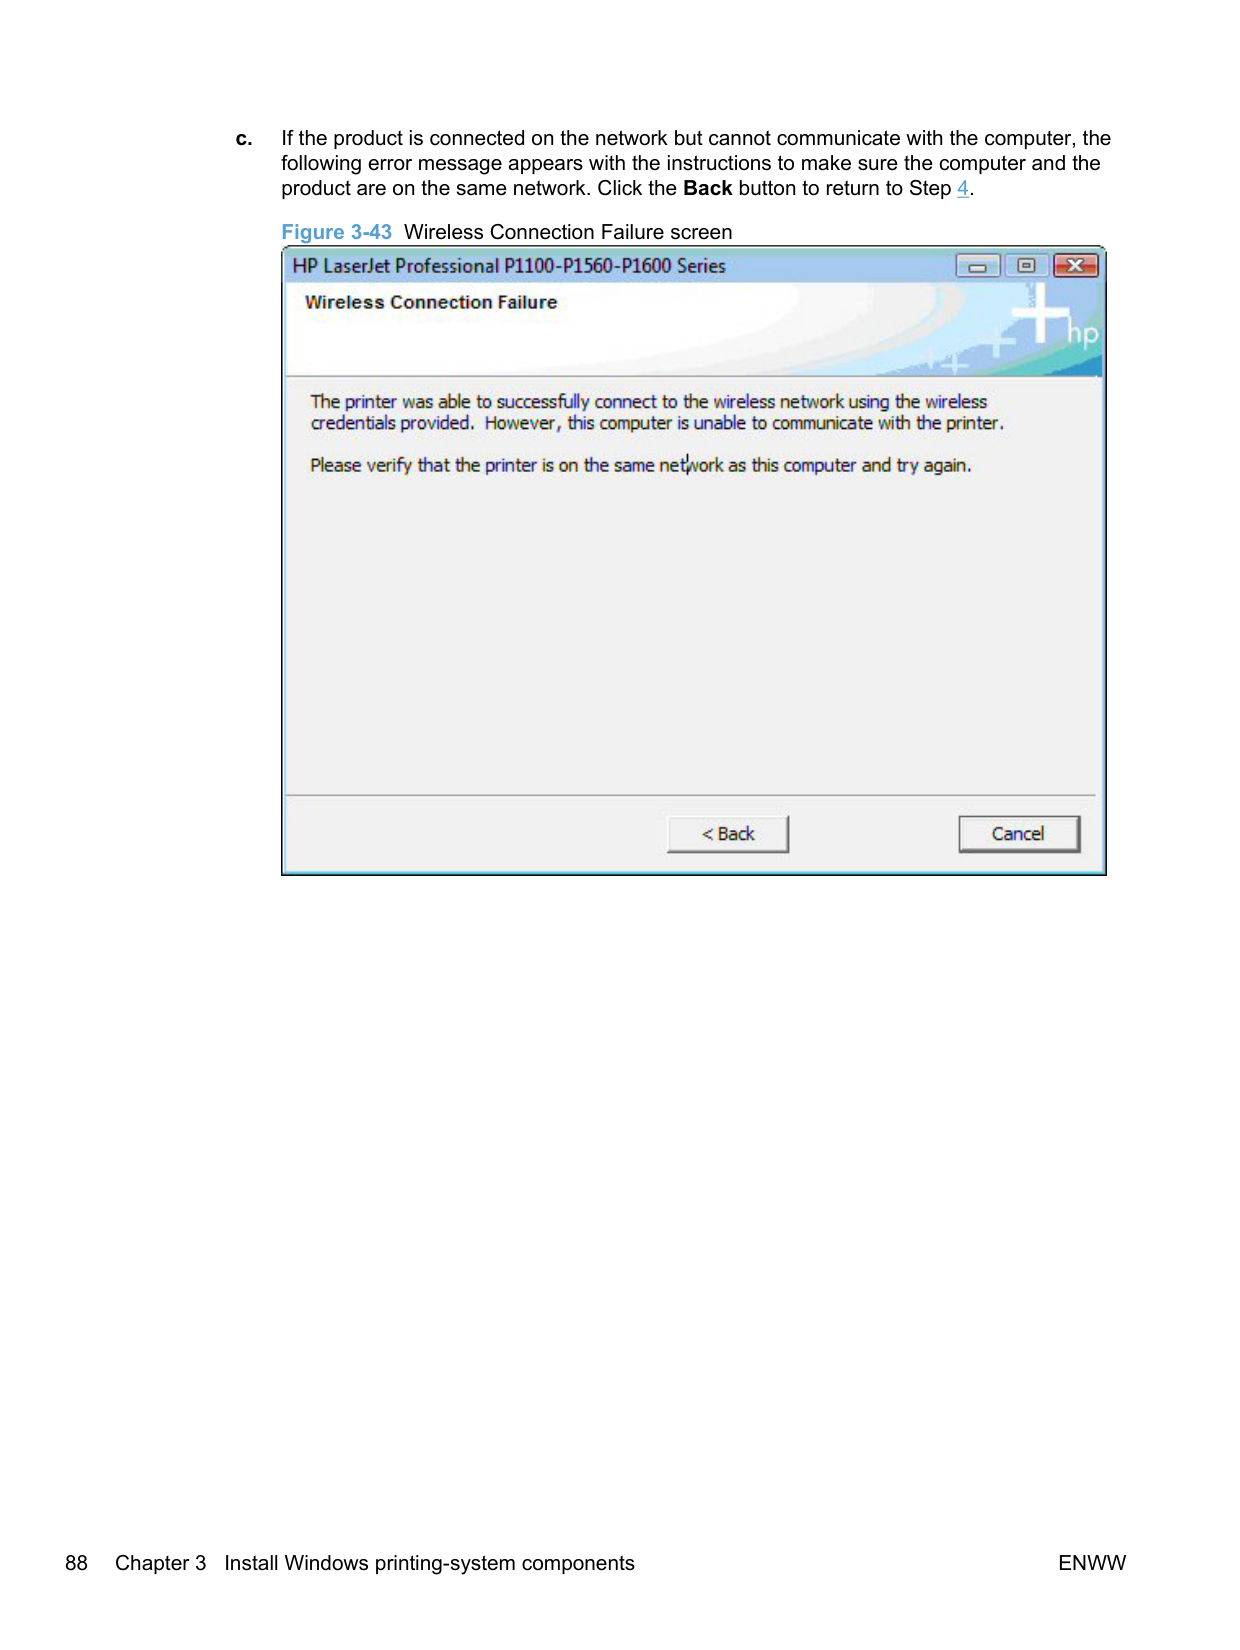
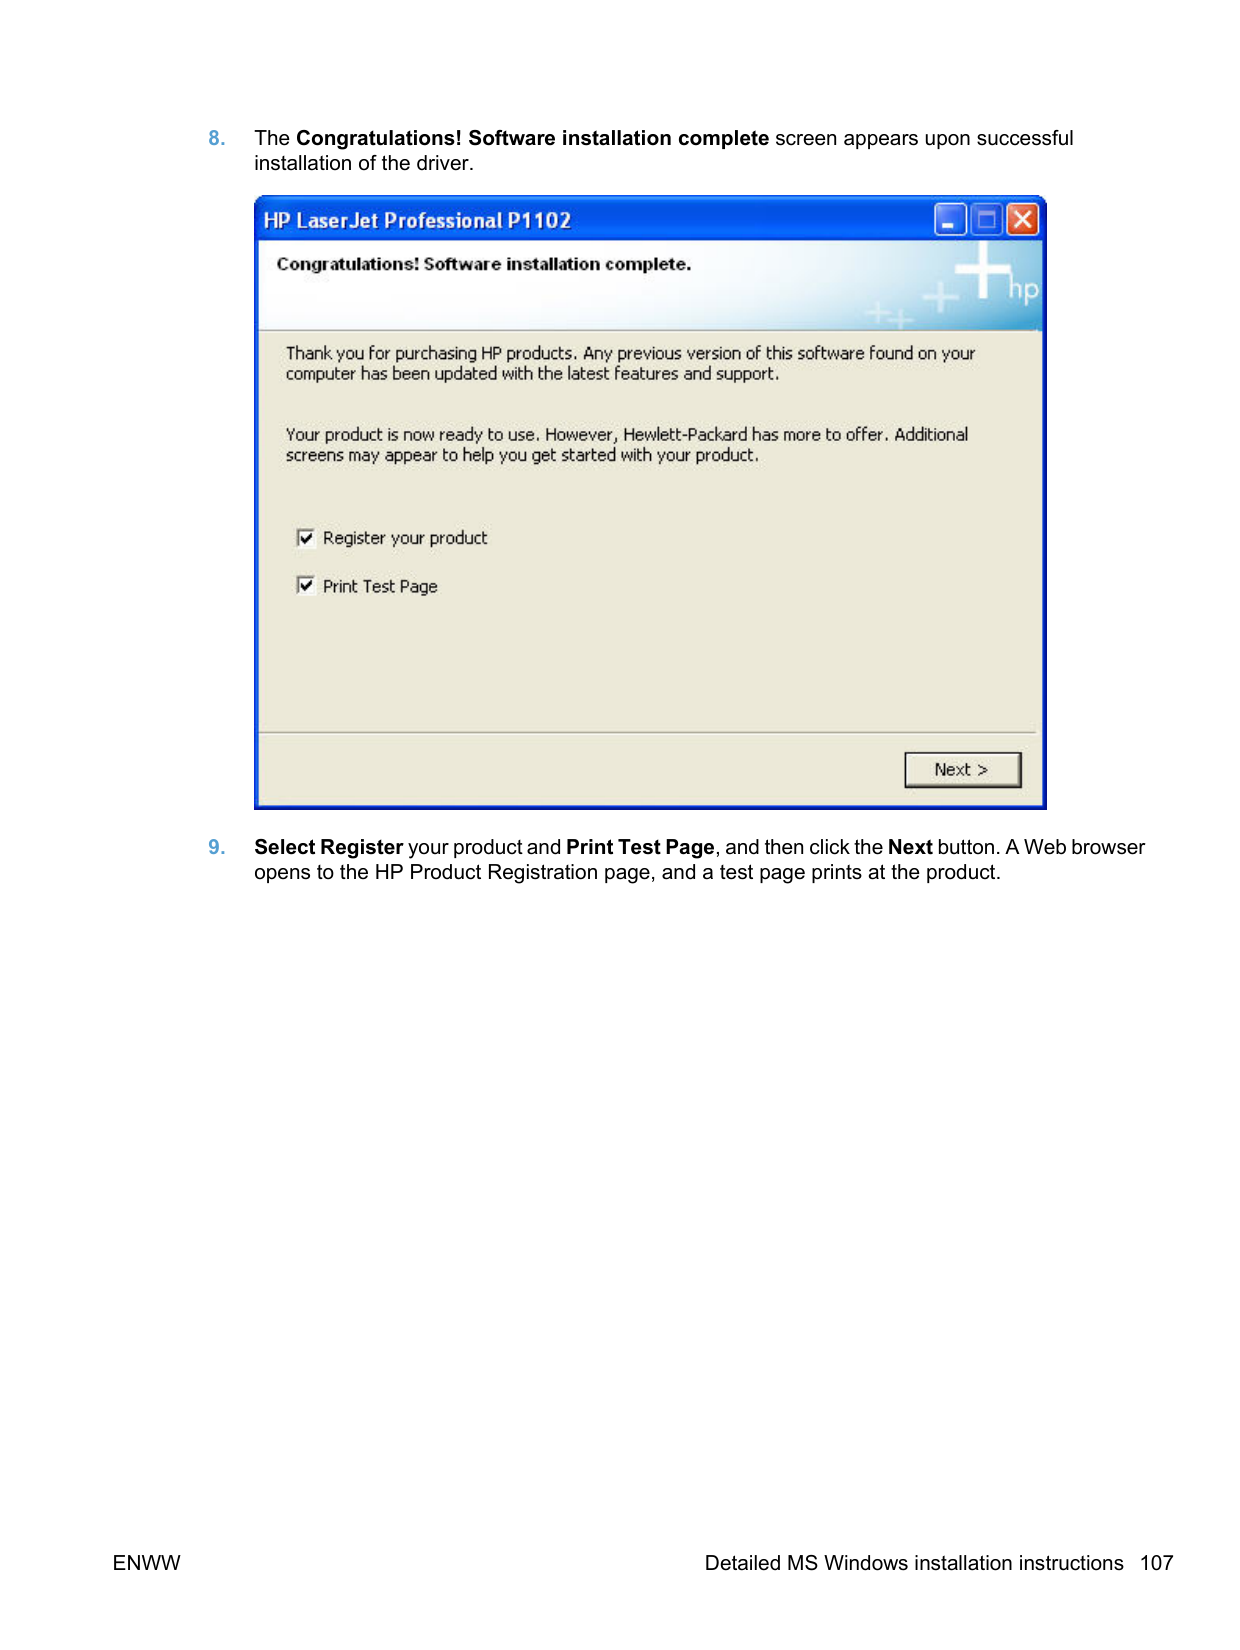
If the connection is not successful, one of the following error message screens appears. Click the Back button on either error message screen to return to one of the Wireless Credentials screens listed in Step 5 to configure the wireless credentials again.


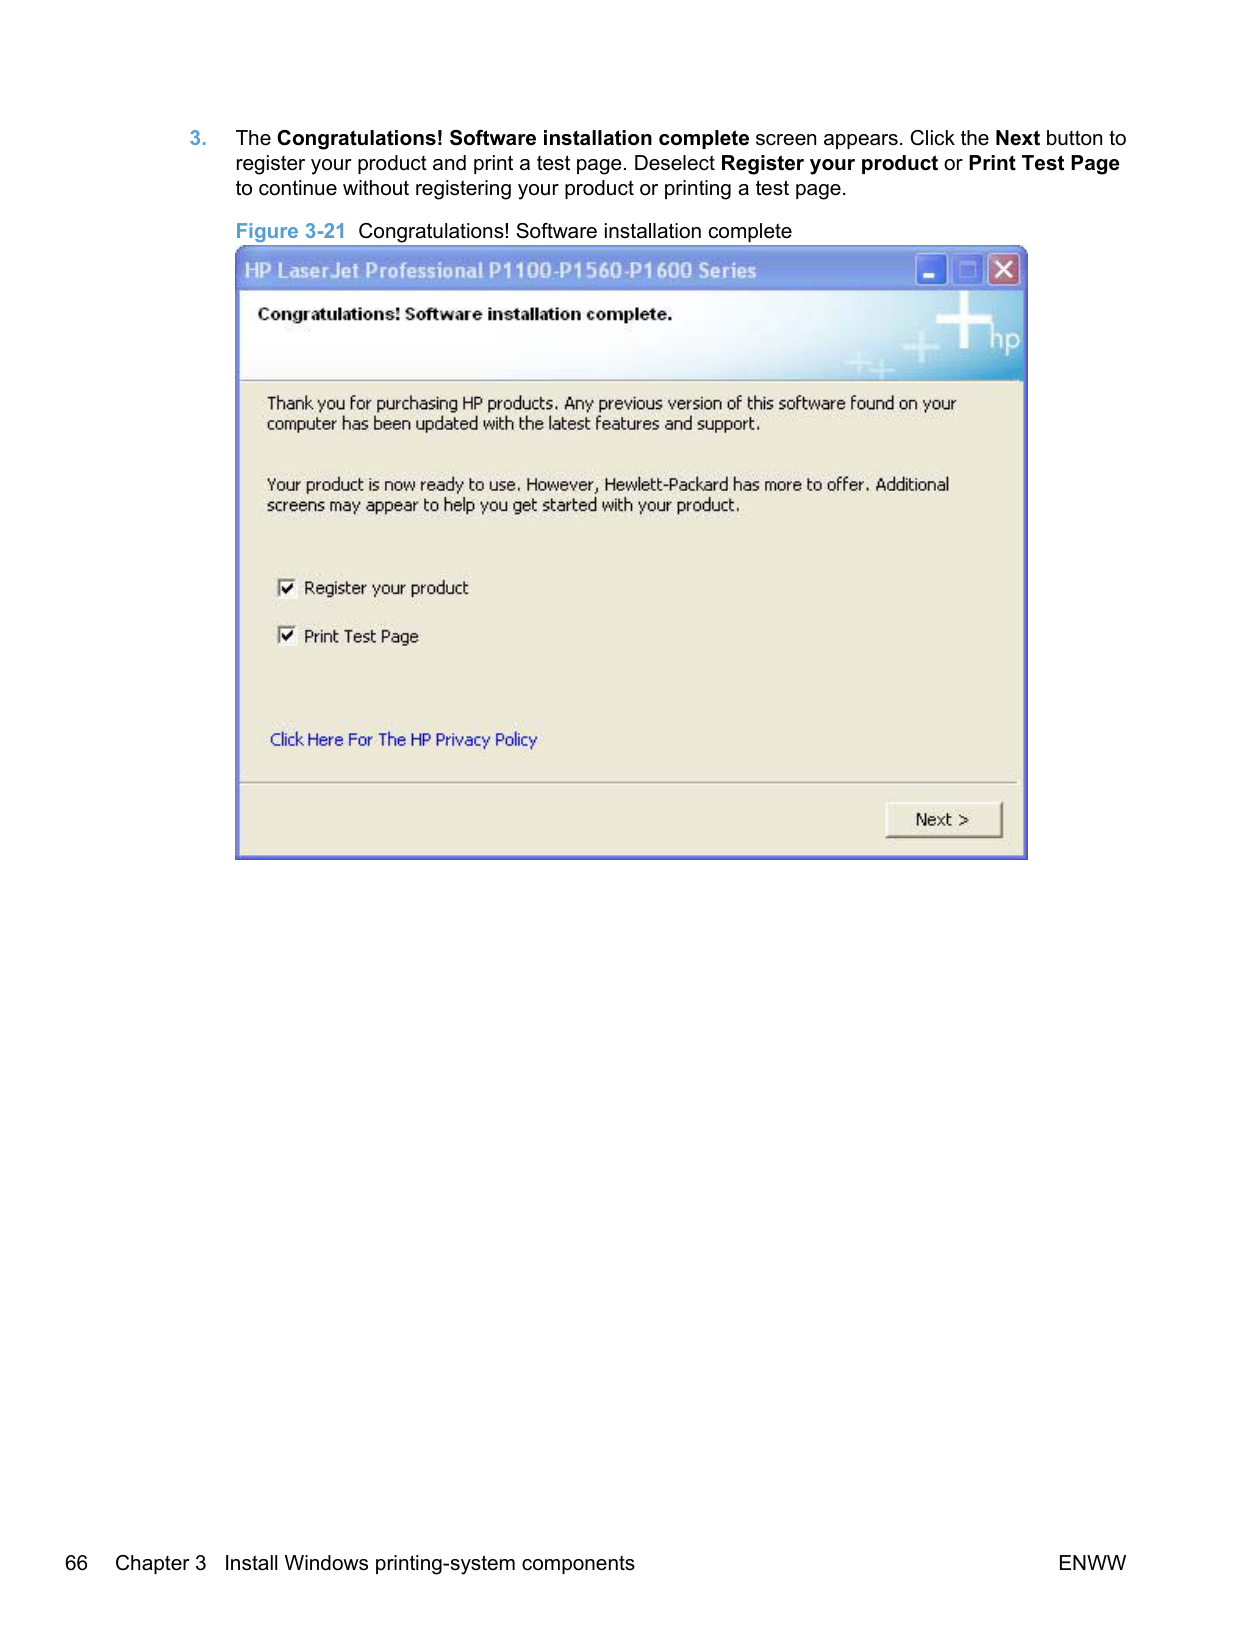
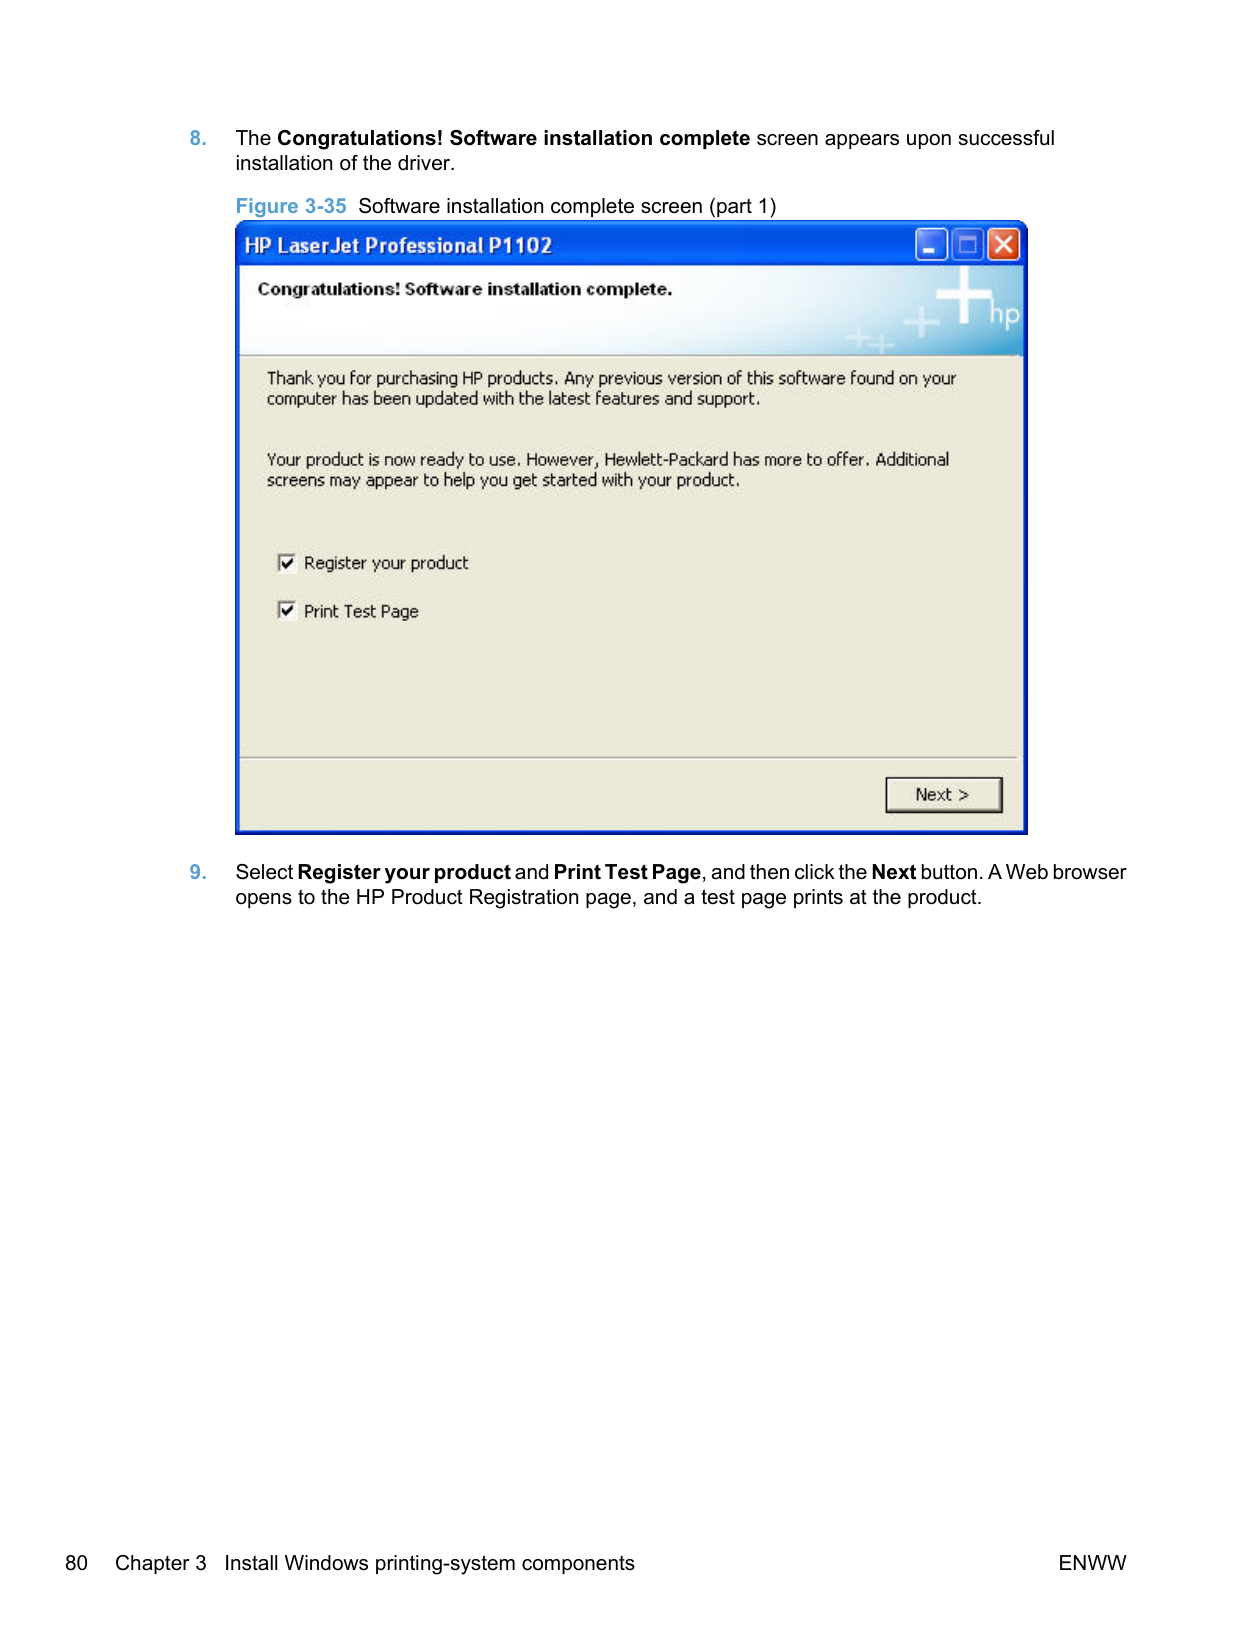
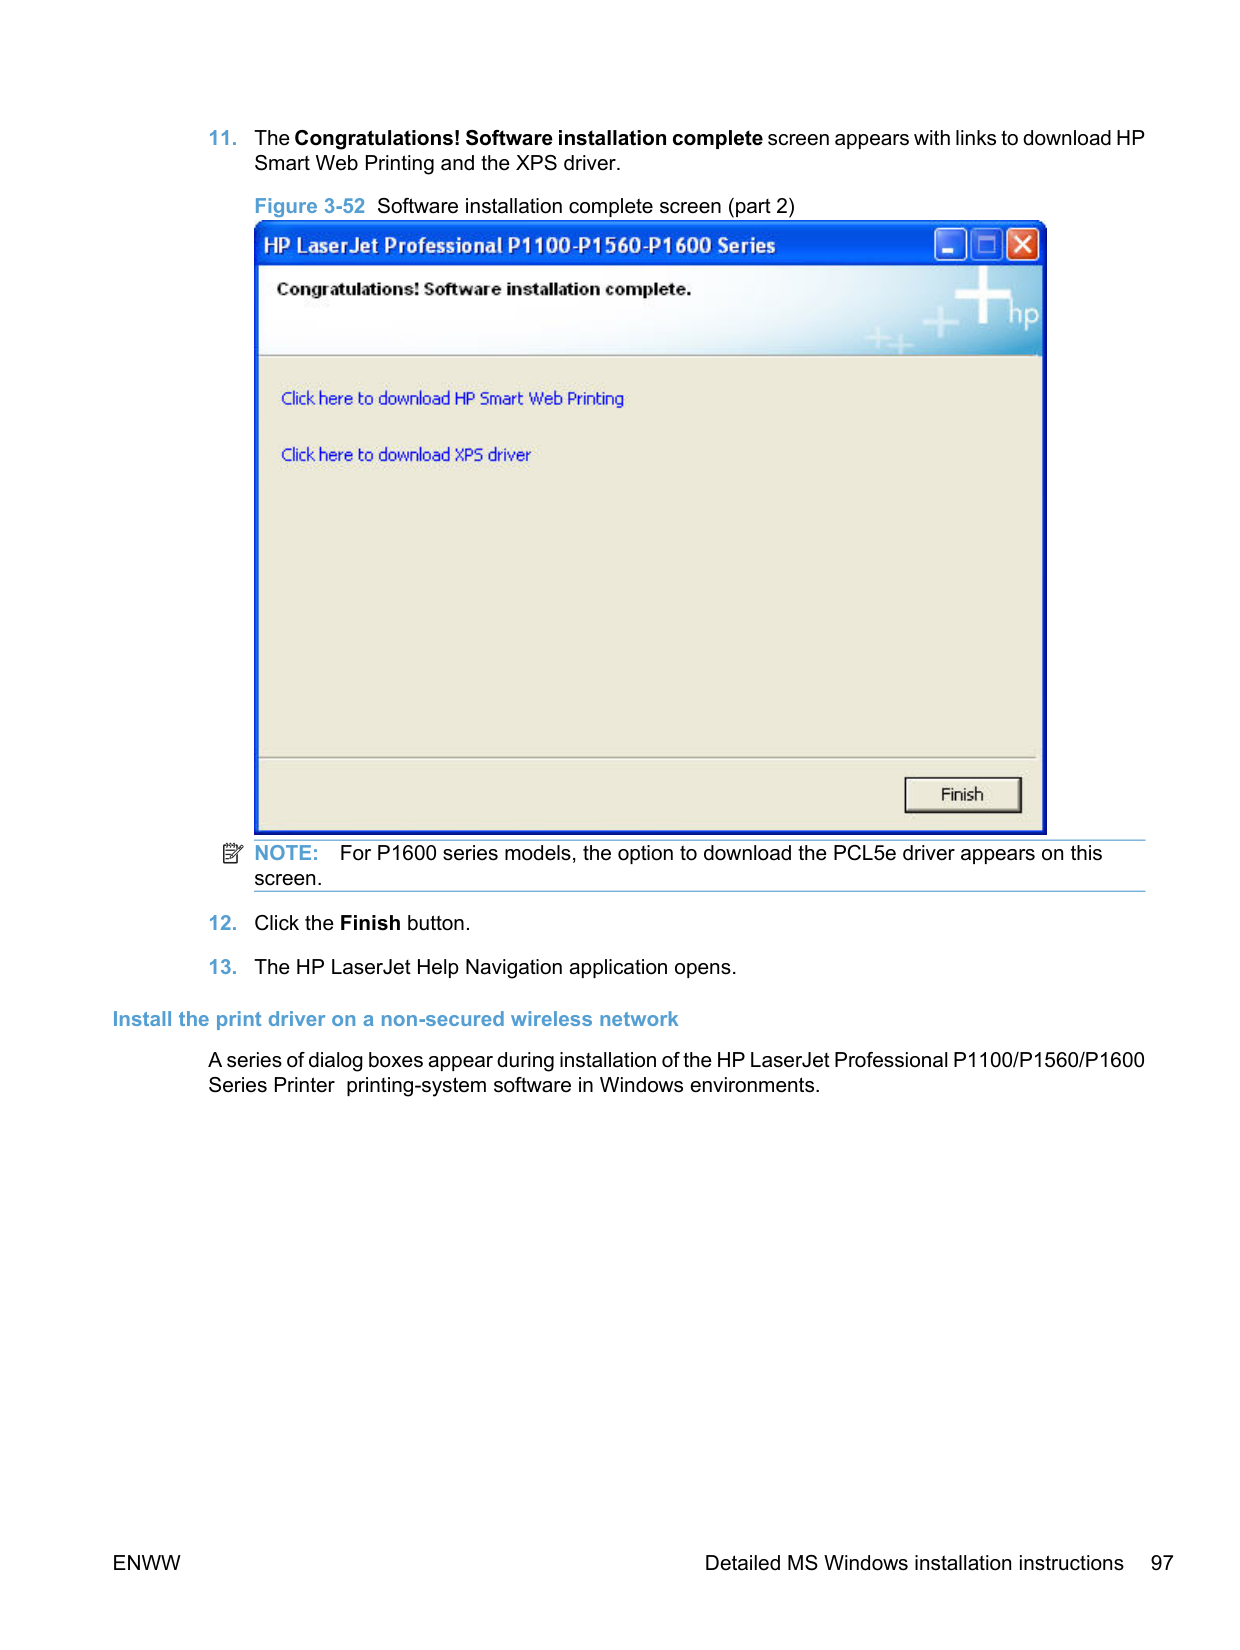
########## 8. The Congratulations! Software installation complete screen appears upon successfulinstallation of the driver.Figure 3-35 Software installation complete screen (part 1)
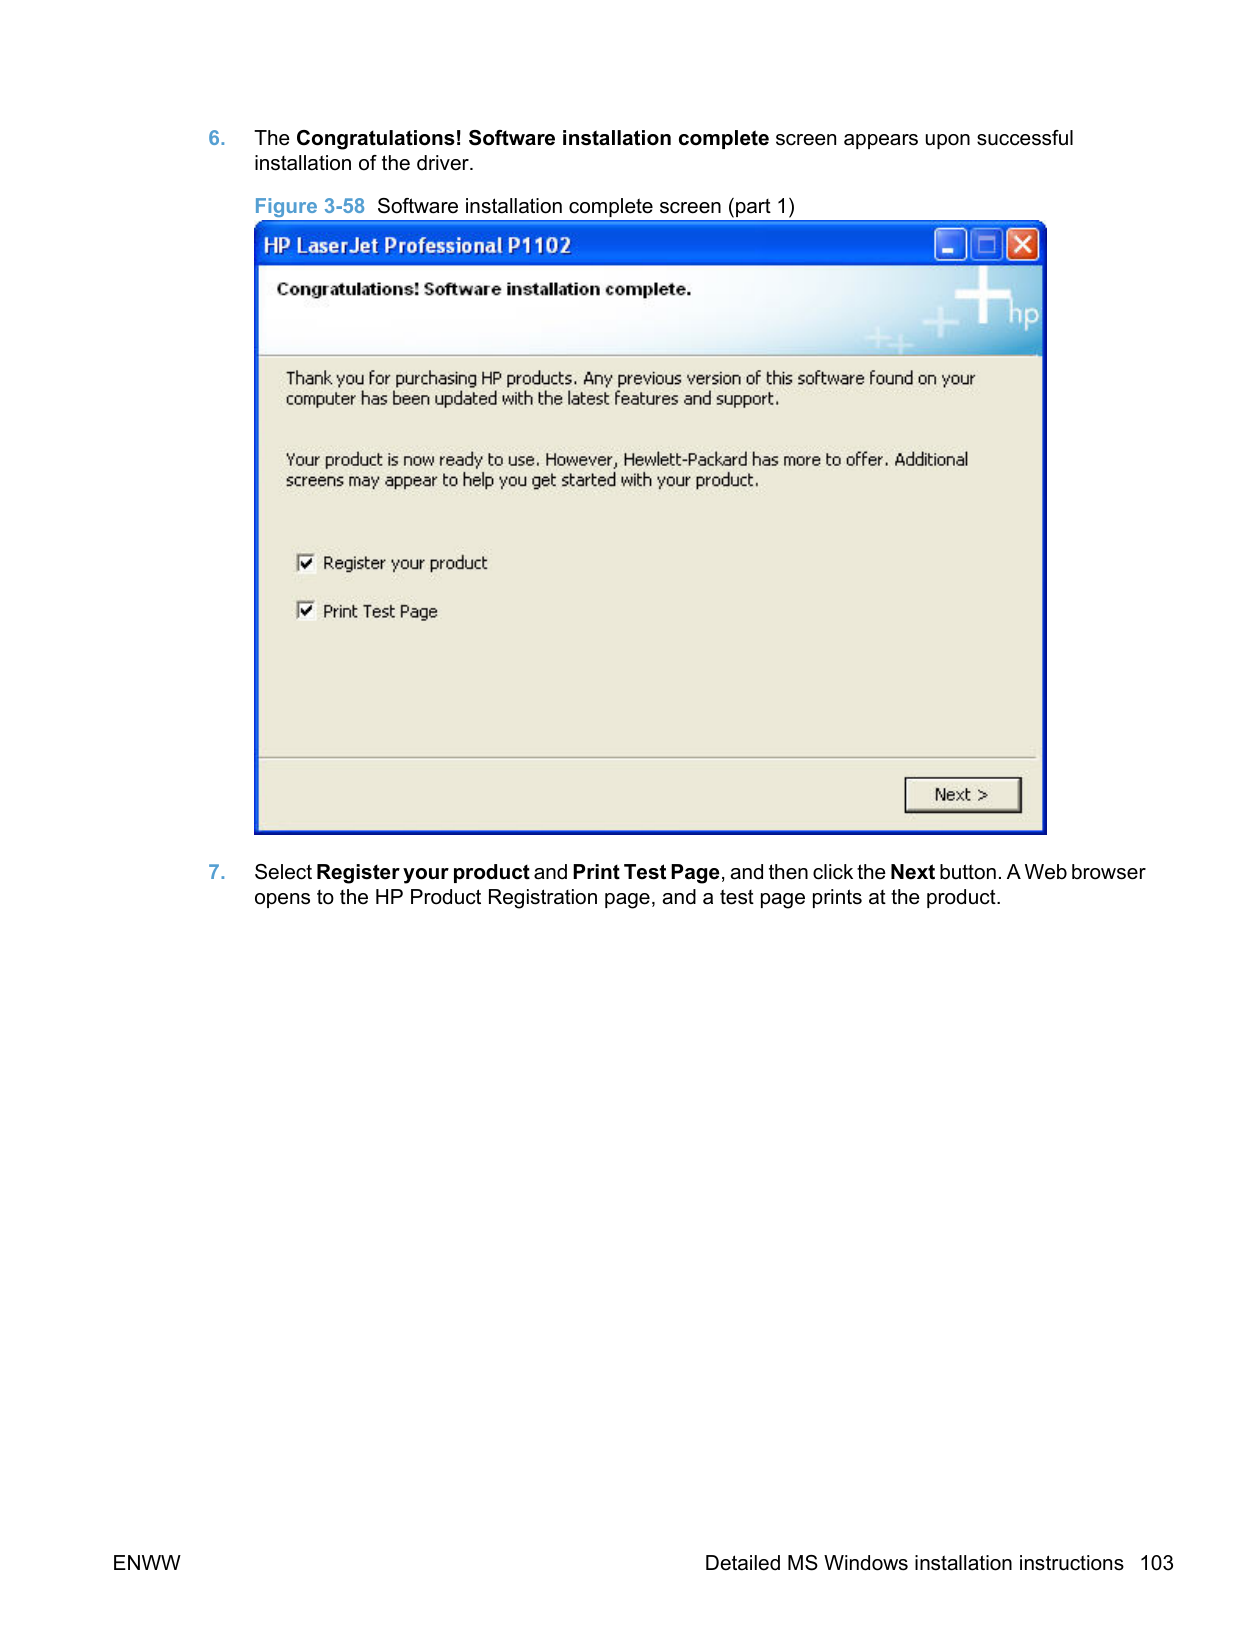

########## 9. Select Register your product and Print Test Page, and then click the Next button. A Web browseropens to the HP Product Registration page, and a test page prints at the product.

| | |---|
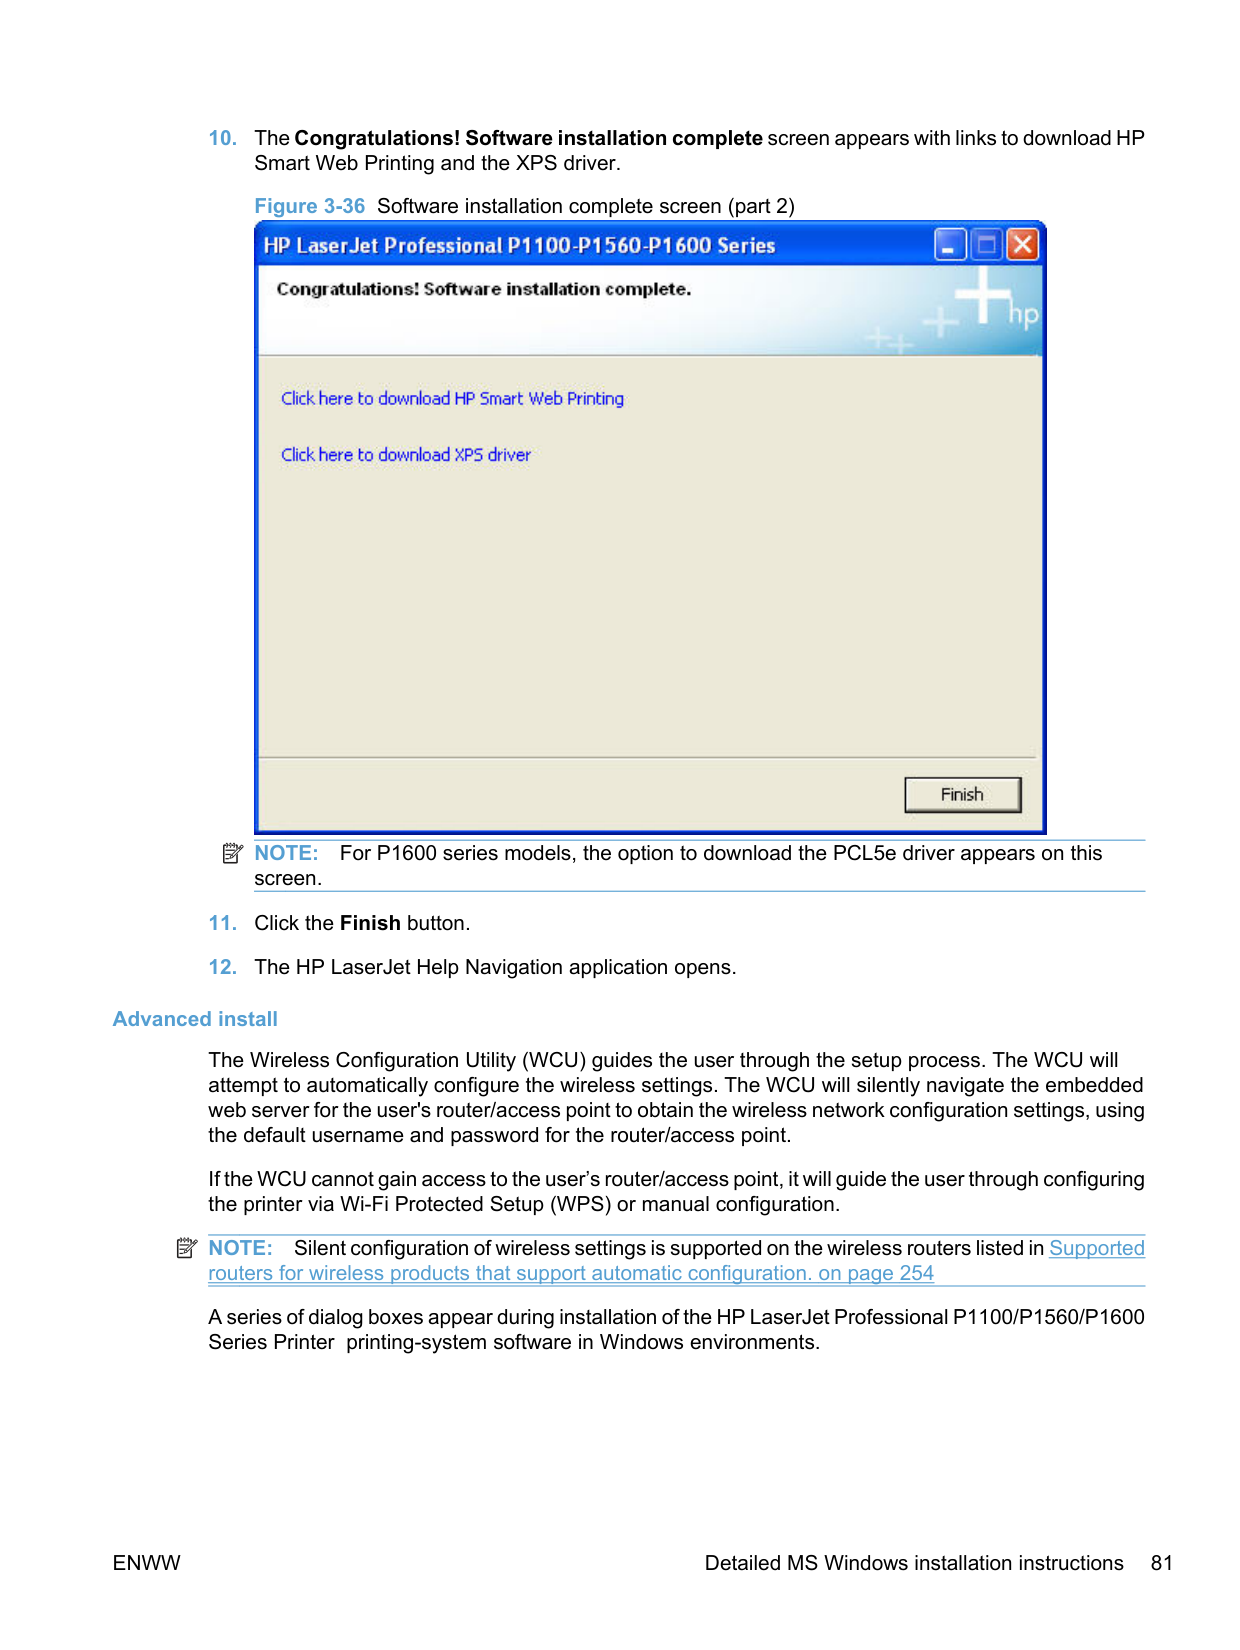
NOTE: For P1600 series models, the option to download the PCL5e driver appears on this screen.
######### Advanced install
The Wireless Configuration Utility (WCU) guides the user through the setup process. The WCU will attempt to automatically configure the wireless settings. The WCU will silently navigate the embedded web server for the user's router/access point to obtain the wireless network configuration settings, using the default username and password for the router/access point.
If the WCU cannot gain access to the user’s router/access point, it will guide the user through configuring the printer via Wi-Fi Protected Setup (WPS) or manual configuration.
| | |---|
NOTE: Silent configuration of wireless settings is supported on the wireless routers listed in Supported routers for wireless products that support automatic configuration. on page 254
A series of dialog boxes appear during installation of the HP LaserJet Professional P1100/P1560/P1600 Series Printer printing-system software in Windows environments.
| | |---|
NOTE: You can return to the previous dialog box by clicking Back or exit the HP LaserJet Professional P1100/P1560/P1600 Series Printer printing-system software installation by clicking Cancel wherever these options appear in the installation sequence.

######### 2. Select Configure to Print over the Wireless Network and then click the Next button.


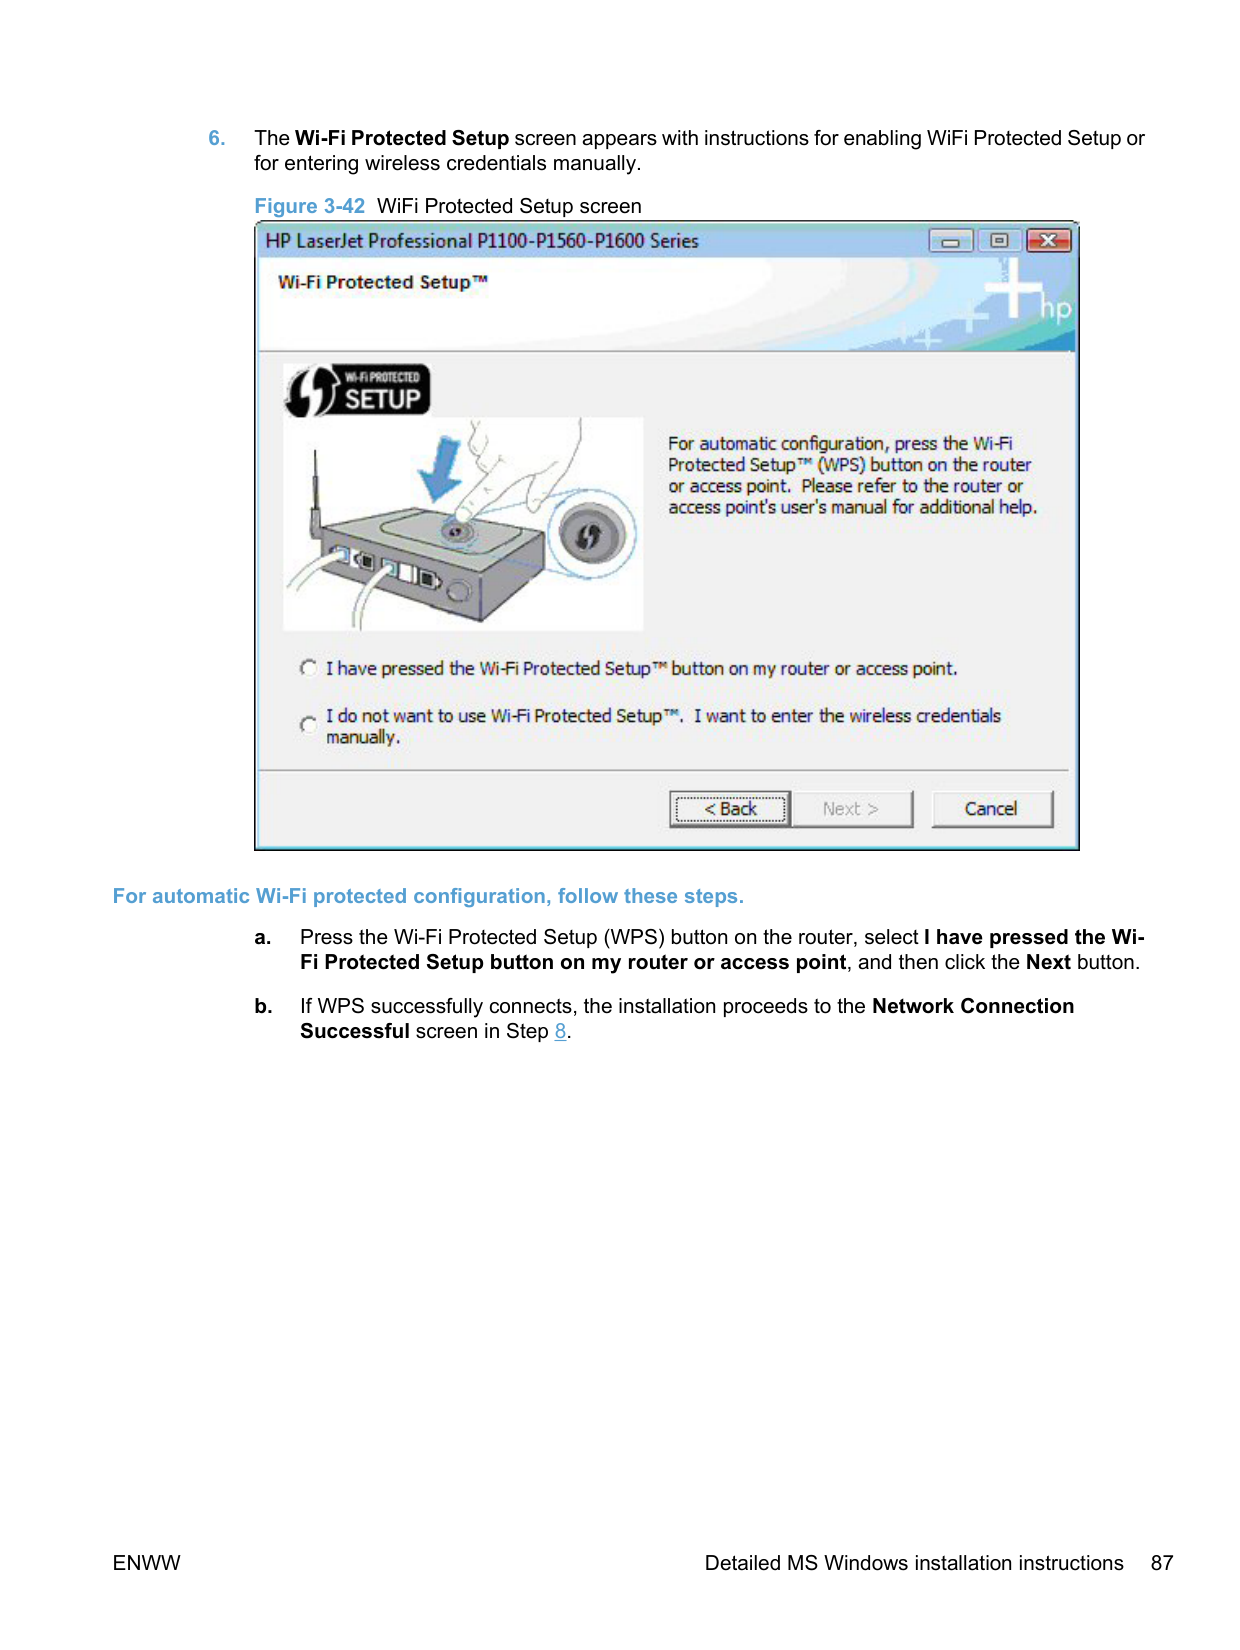
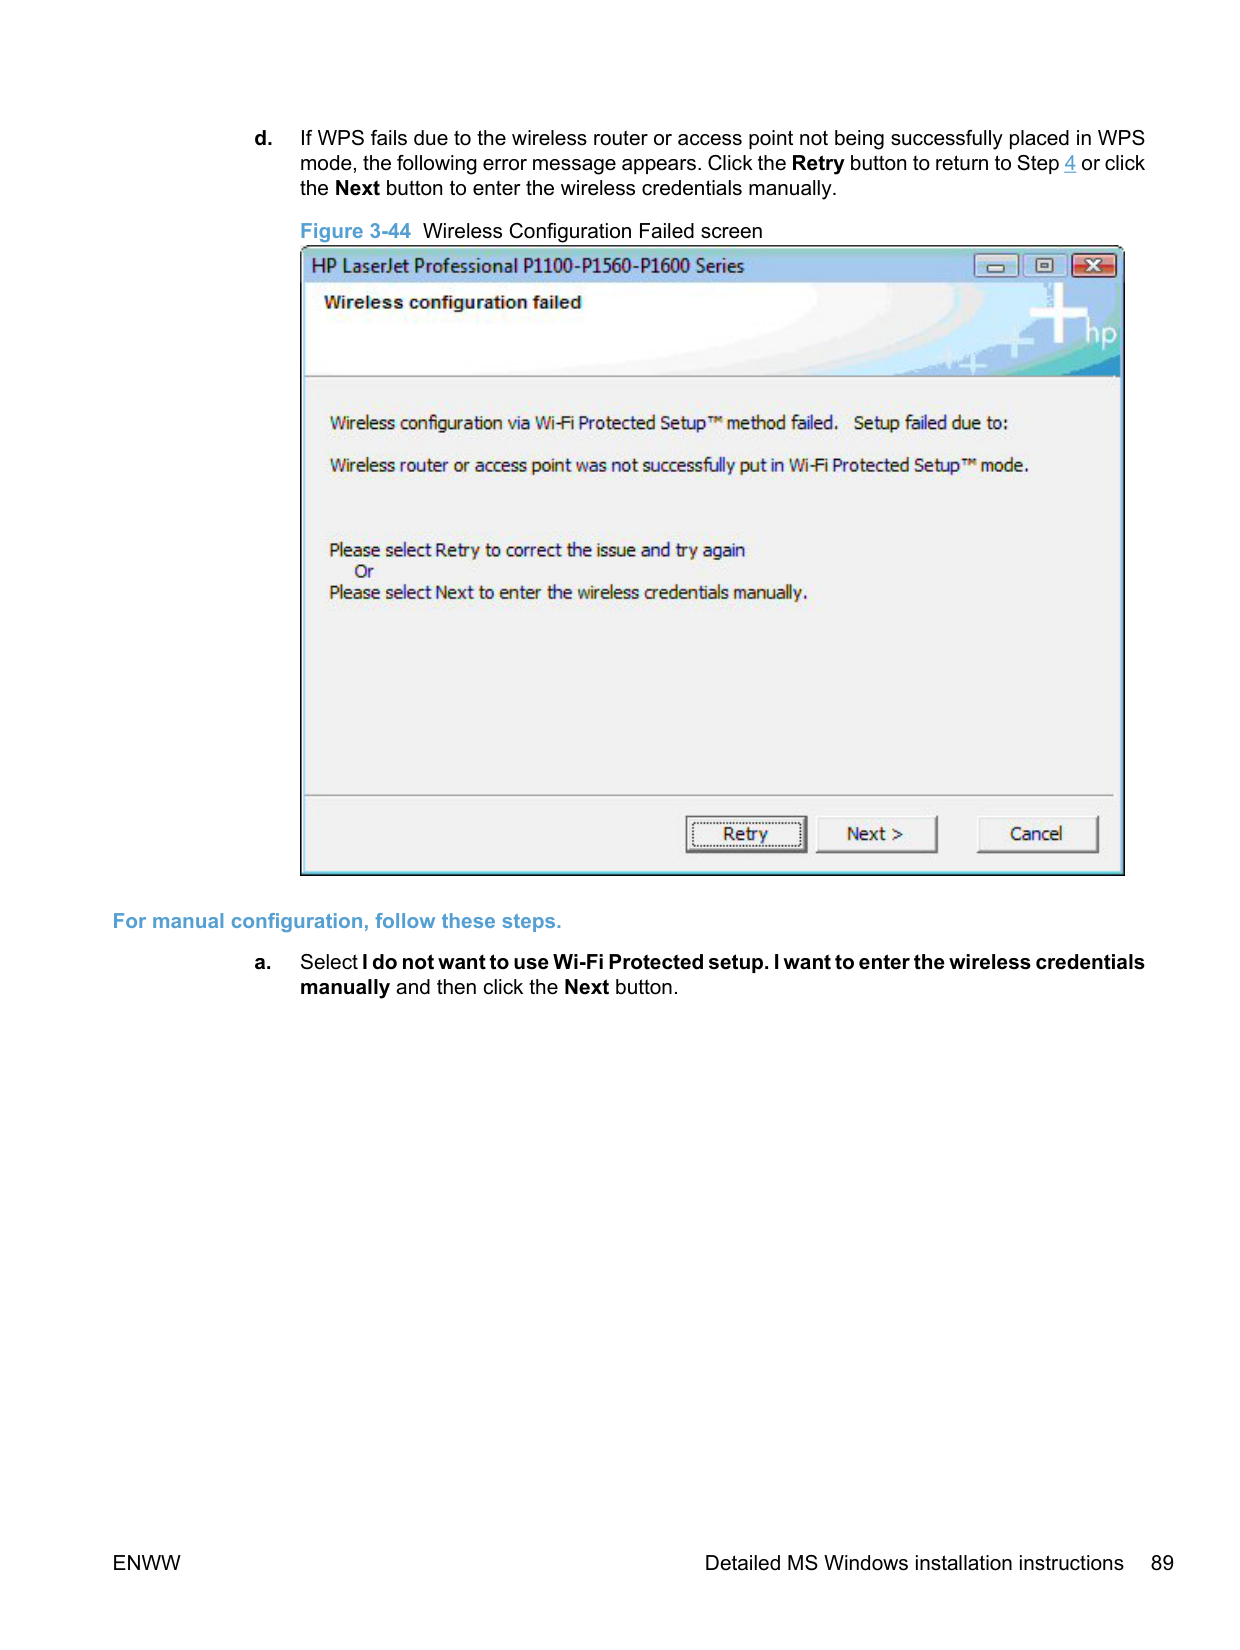
######### For automatic Wi-Fi protected configuration, follow these steps.


For manual configuration, follow these steps.
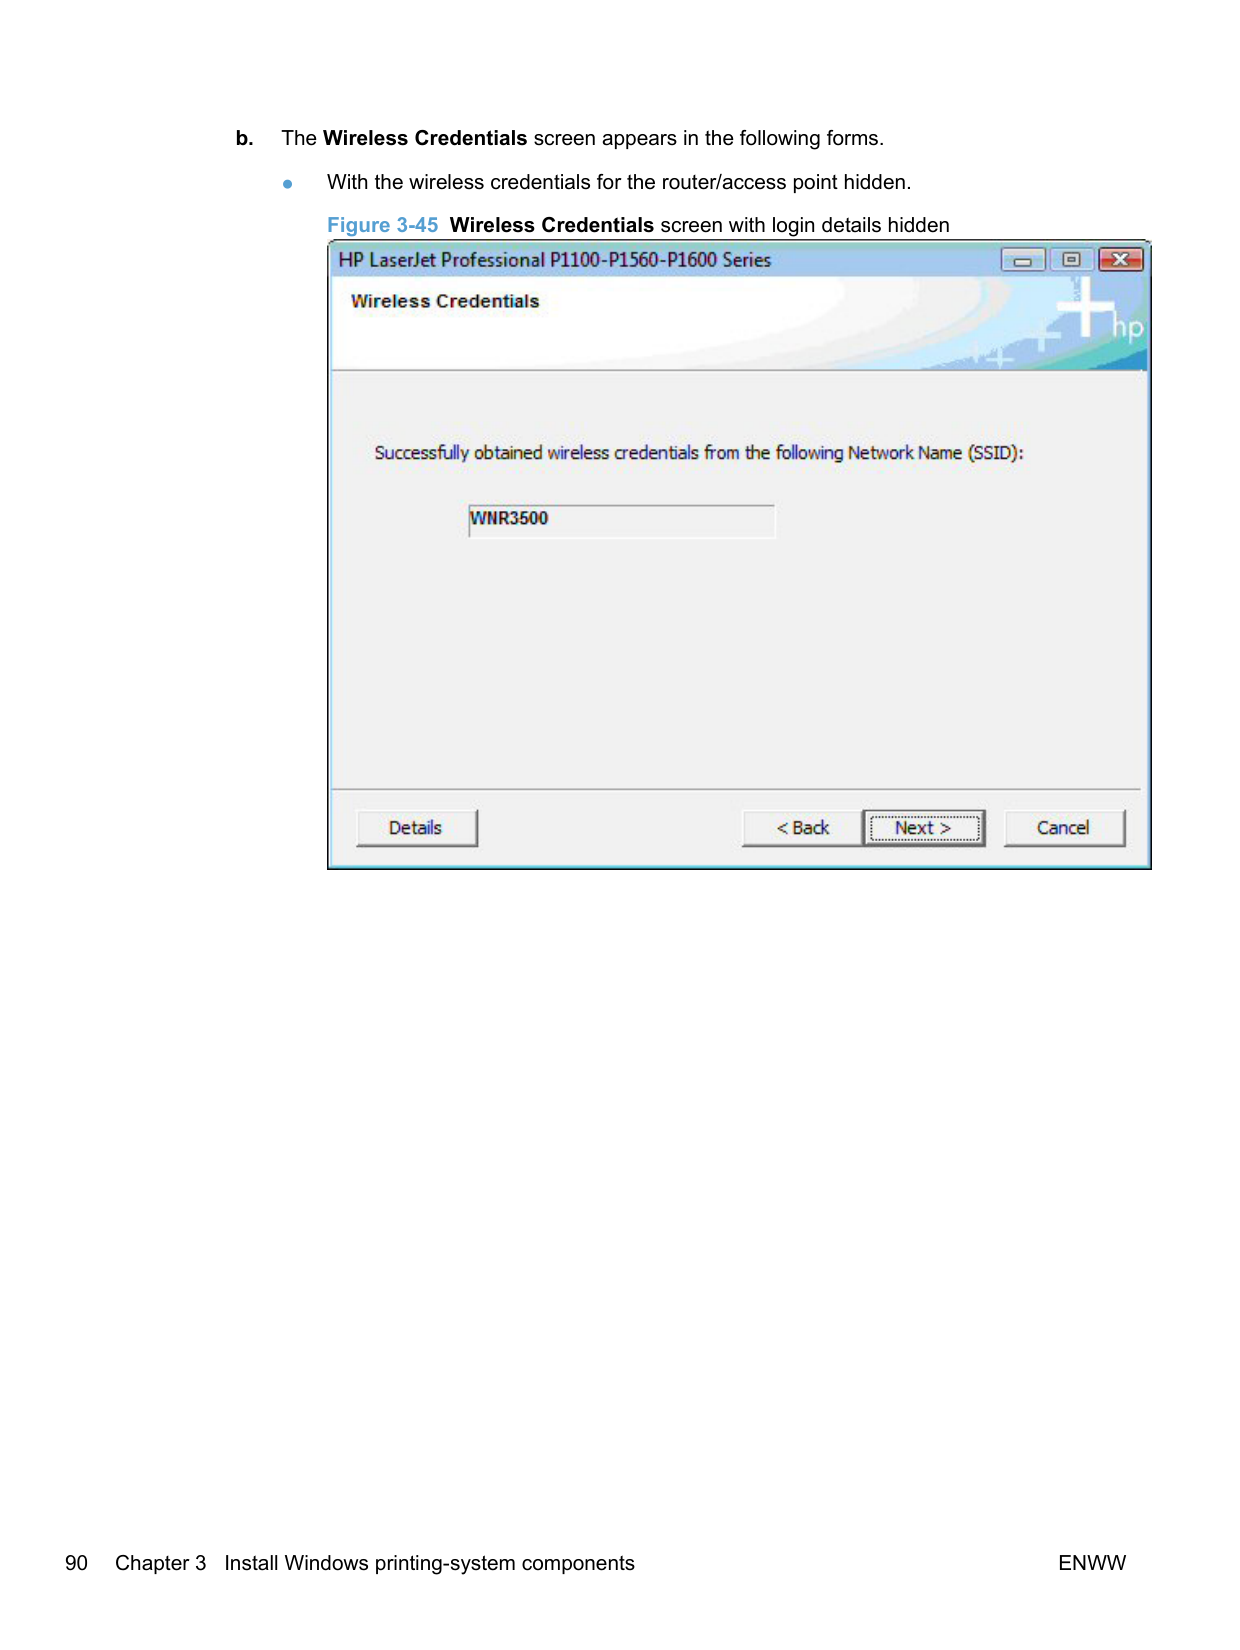
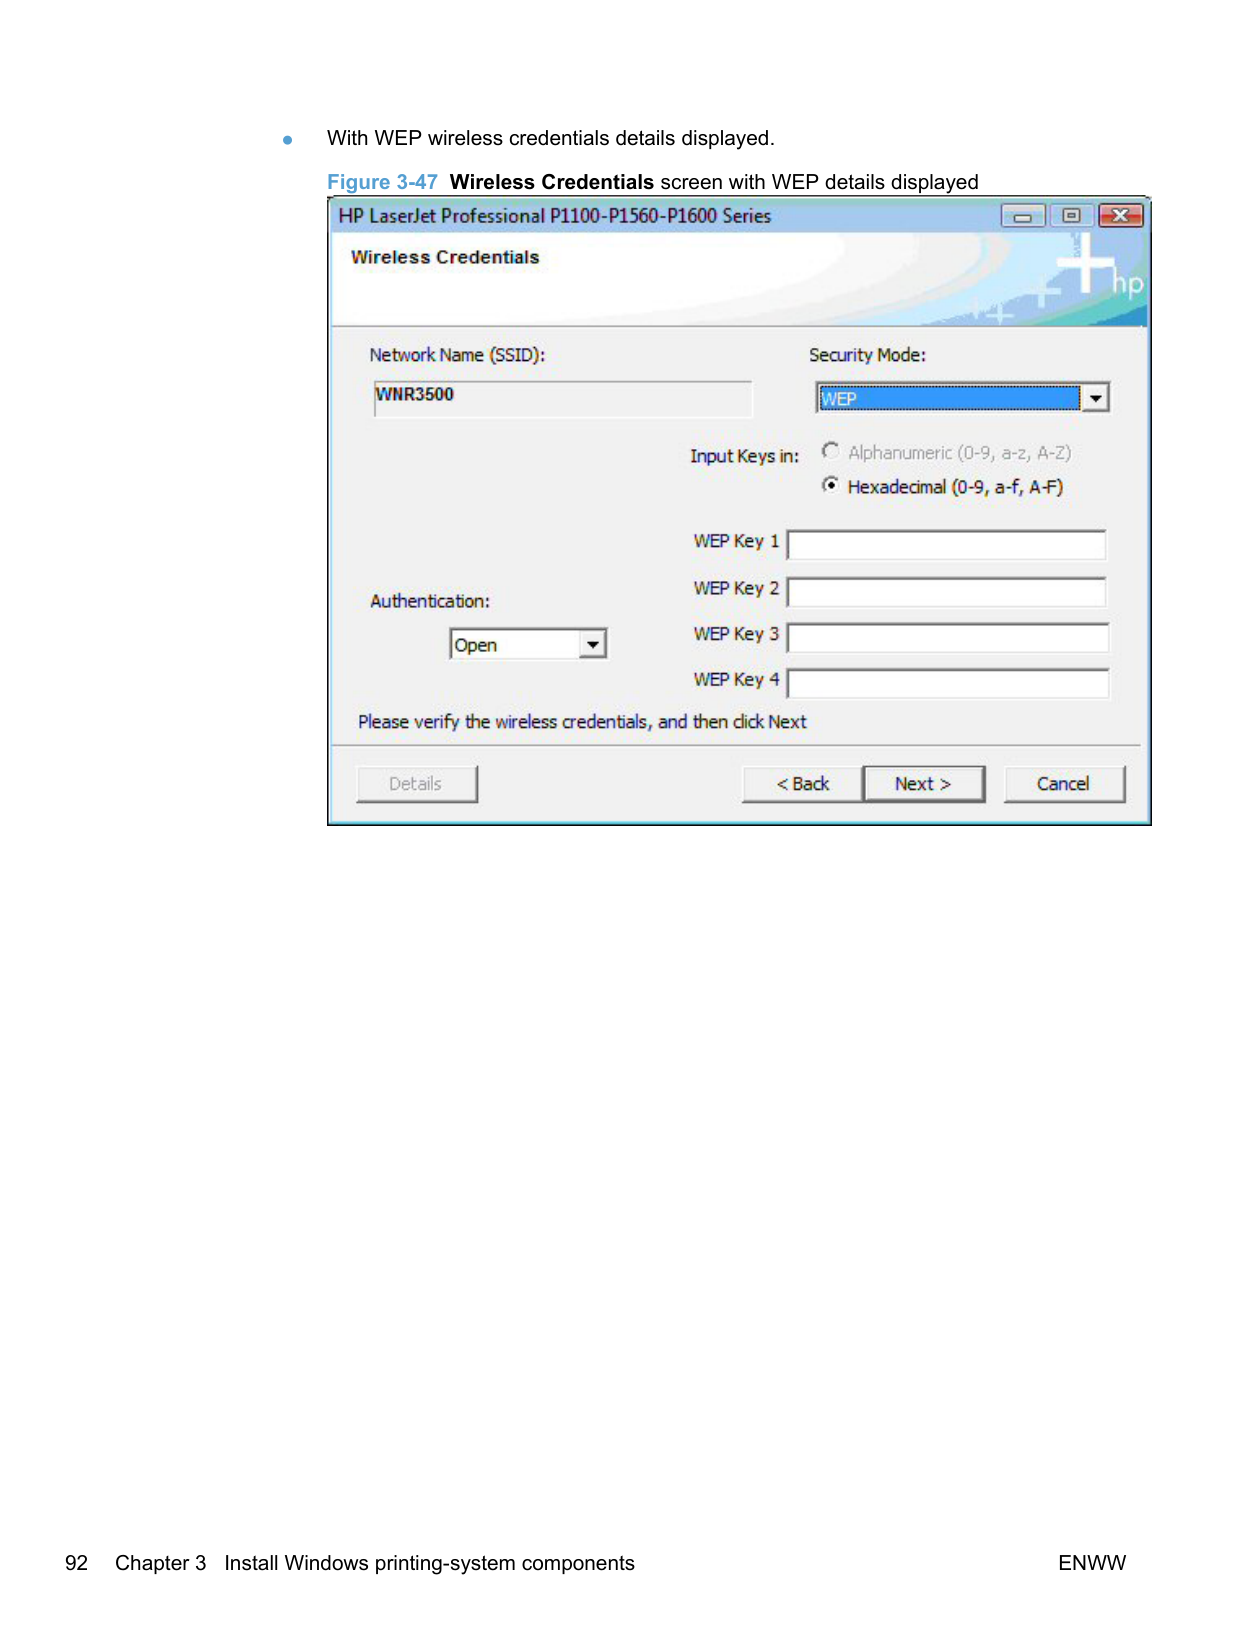
######### Figure 3-45 Wireless Credentials screen with login details hidden


########## 9. The Congratulations! Software installation complete screen appears upon successfulinstallation of the driver.

########## 10. Select Register your product and Print Test Page, and then click the Next button. A Web browseropens to the HP Product Registration page, and a test page prints at the product.

| | |---|
NOTE: For P1600 series models, the option to download the PCL5e driver appears on this screen.
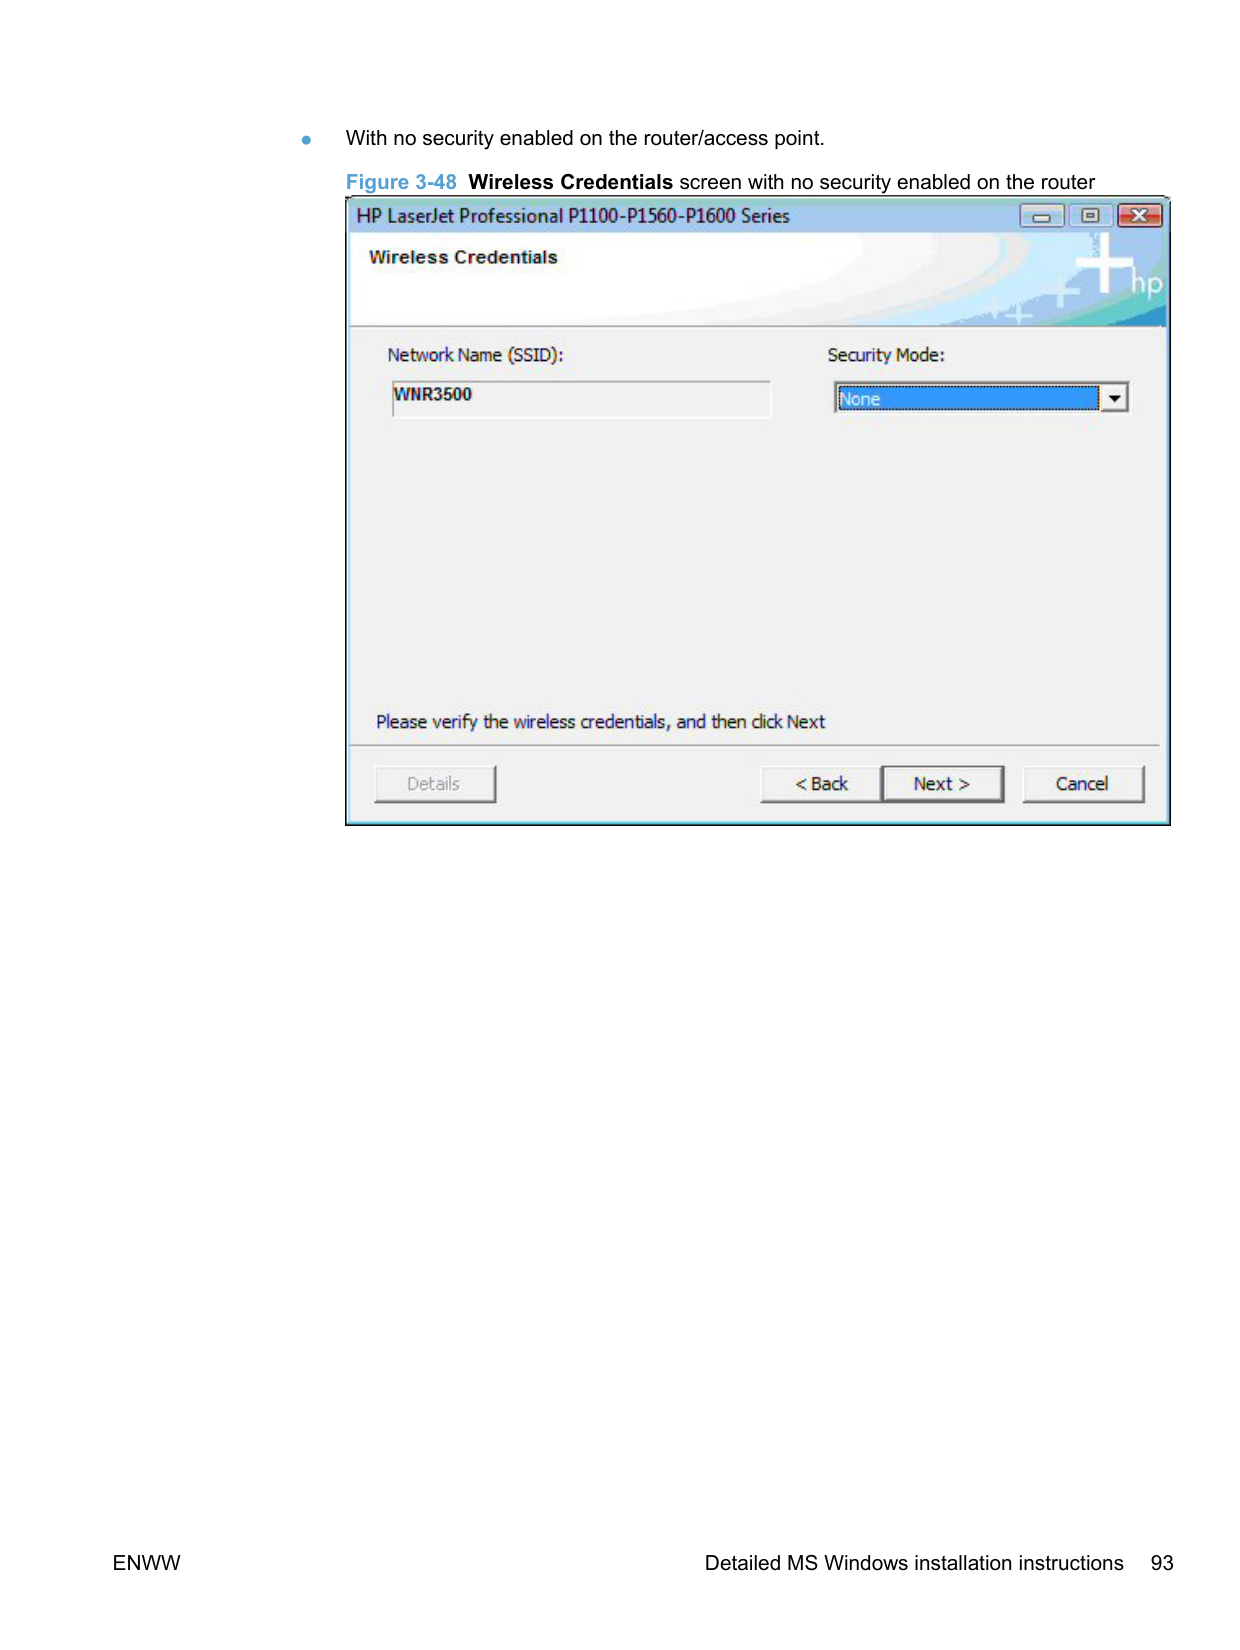
######### Install the print driver on a non-secured wireless network
A series of dialog boxes appear during installation of the HP LaserJet Professional P1100/P1560/P1600 Series Printer printing-system software in Windows environments.
| | |---|
NOTE: You can return to the previous dialog box by clicking Back or exit the HP LaserJet Professional P1100/P1560/P1600 Series Printer printing-system software installation by clicking Cancel wherever these options appear in the installation sequence.


| | |---|


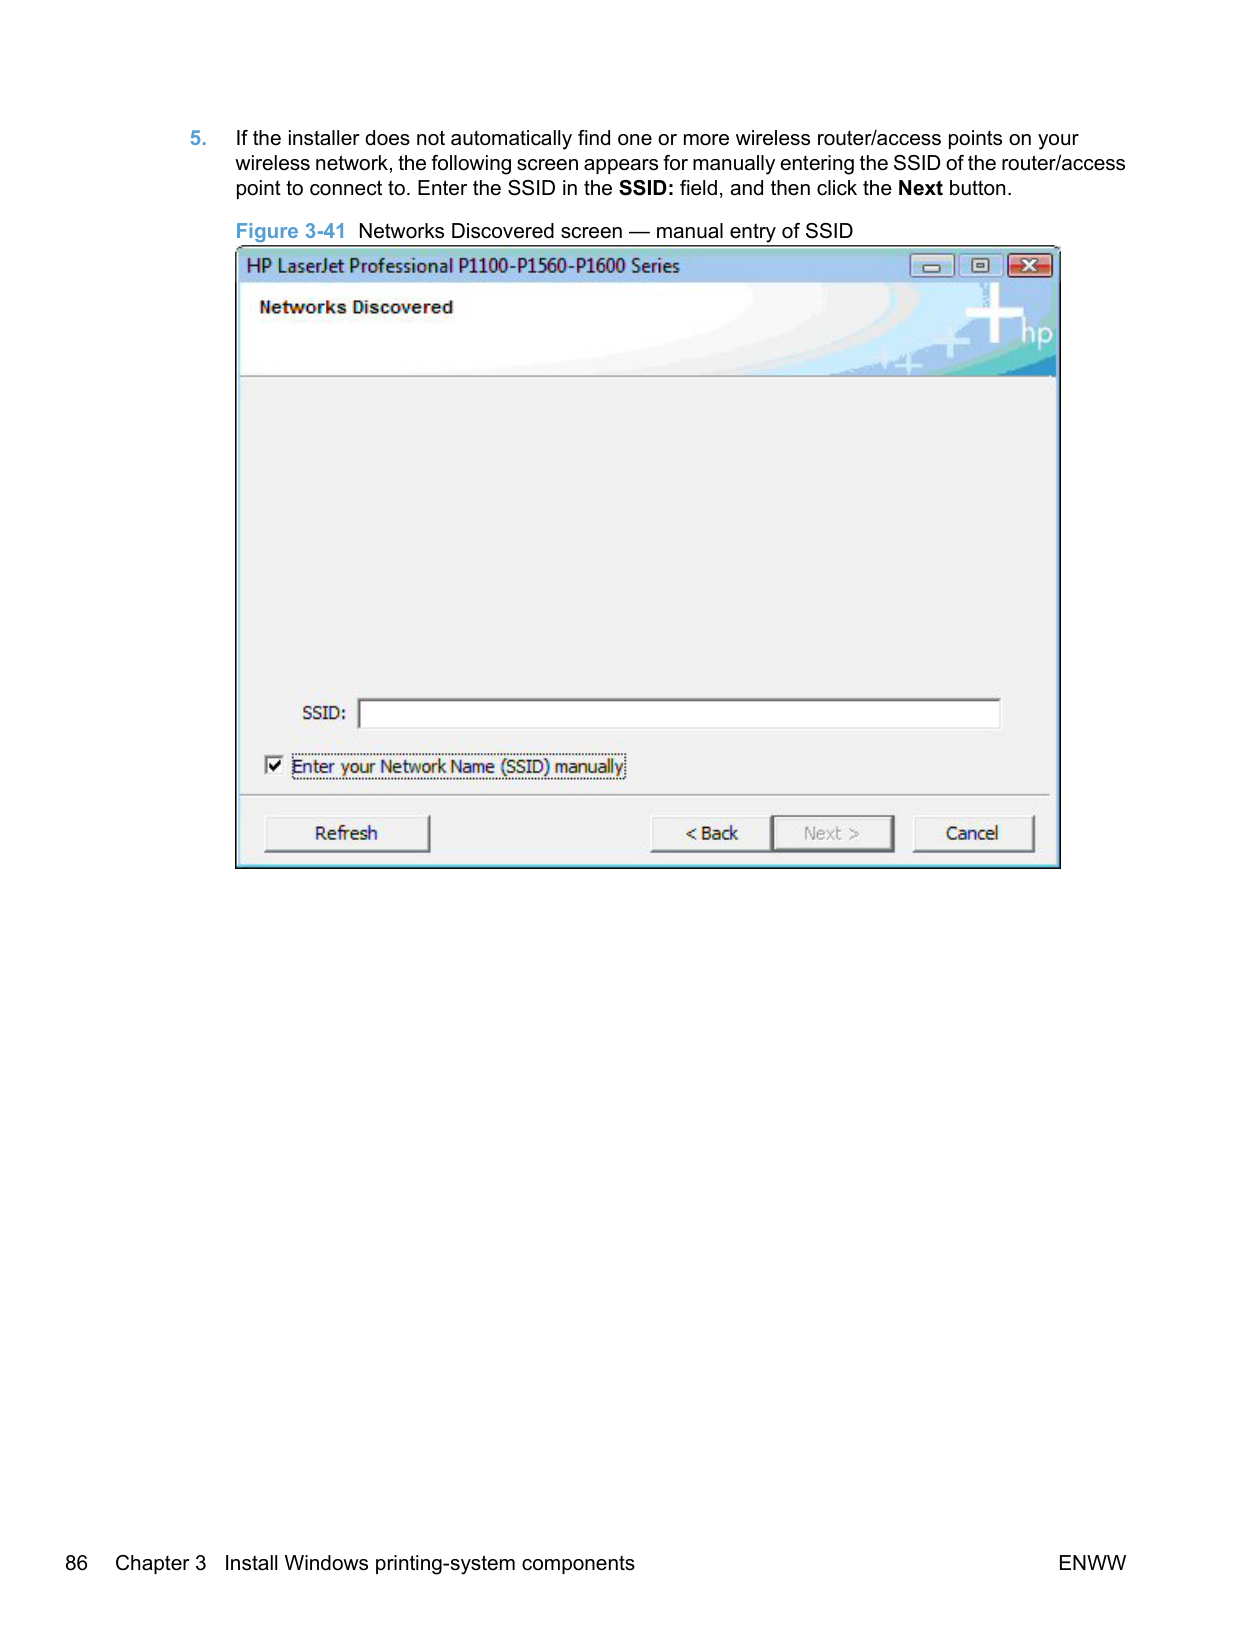
NOTE: Selecting Advanced on the Wireless Discovery Method dialog allows you to manually enter your wireless network credentials.
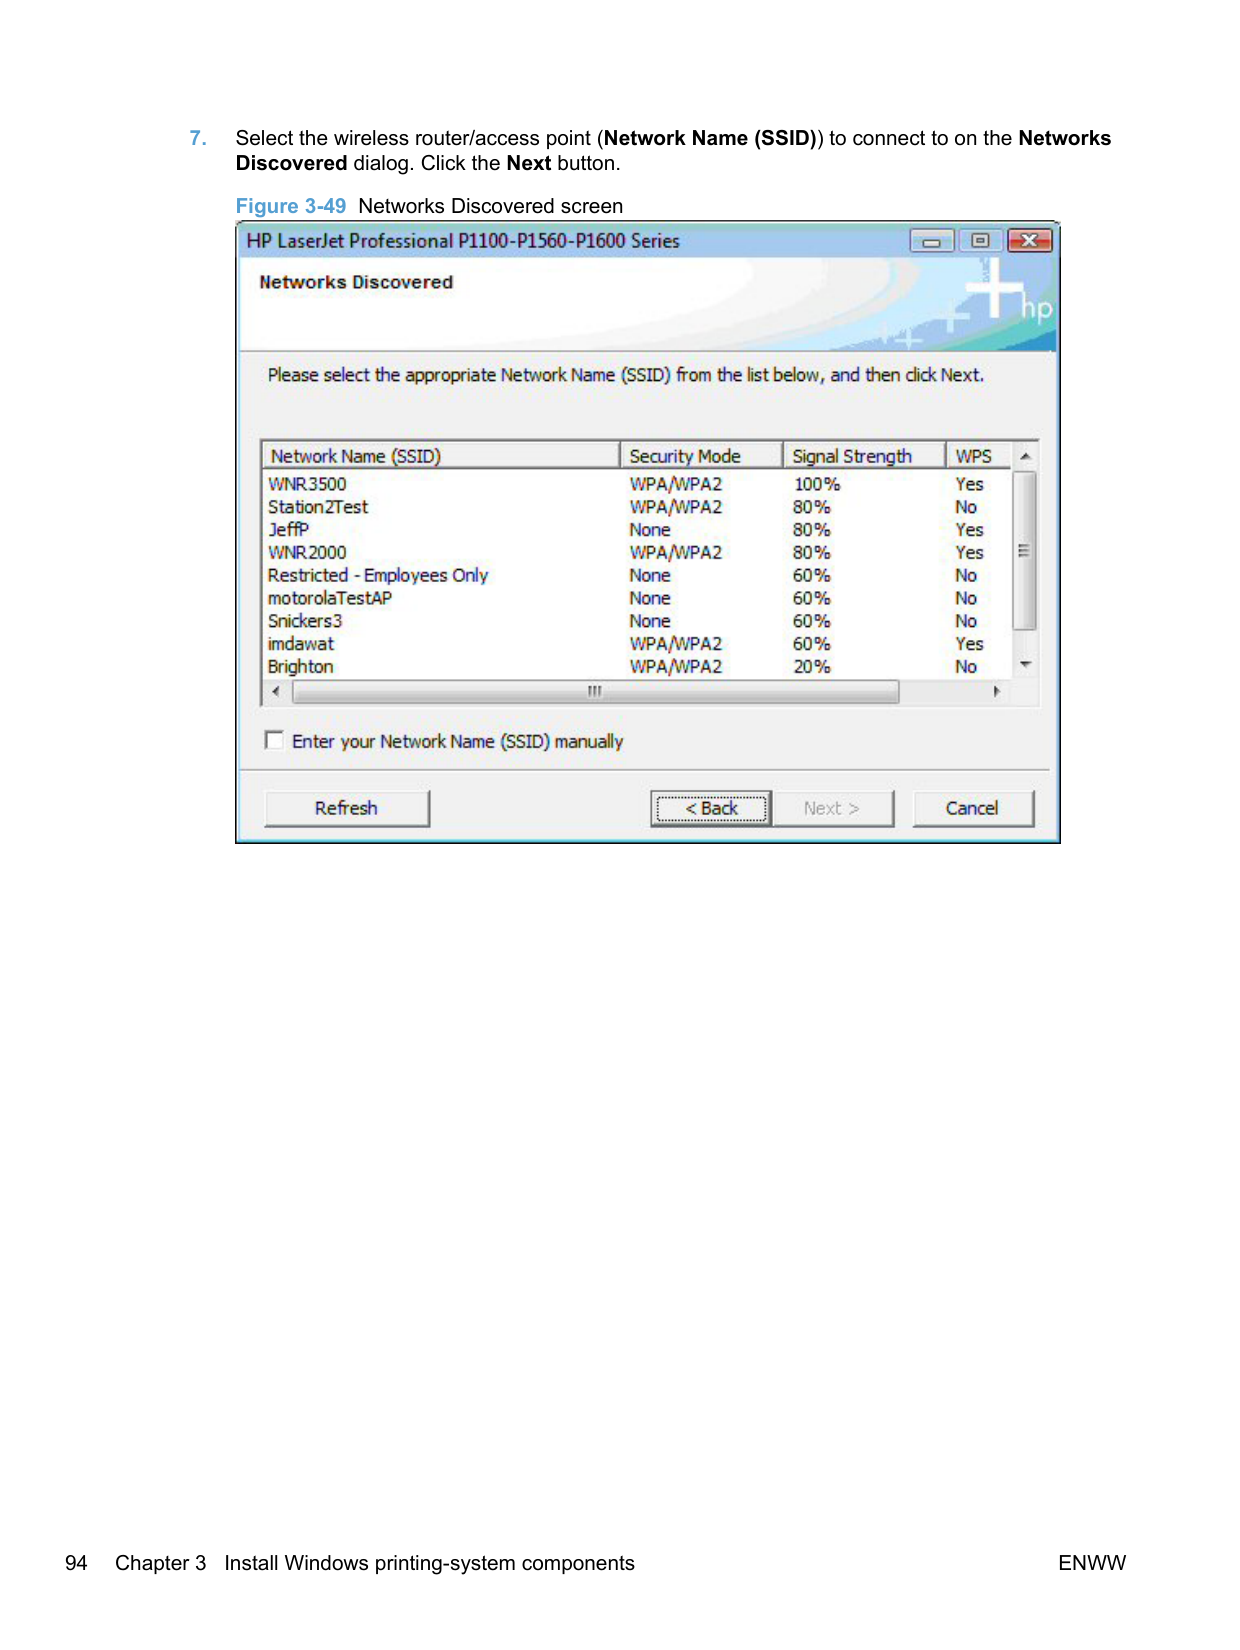
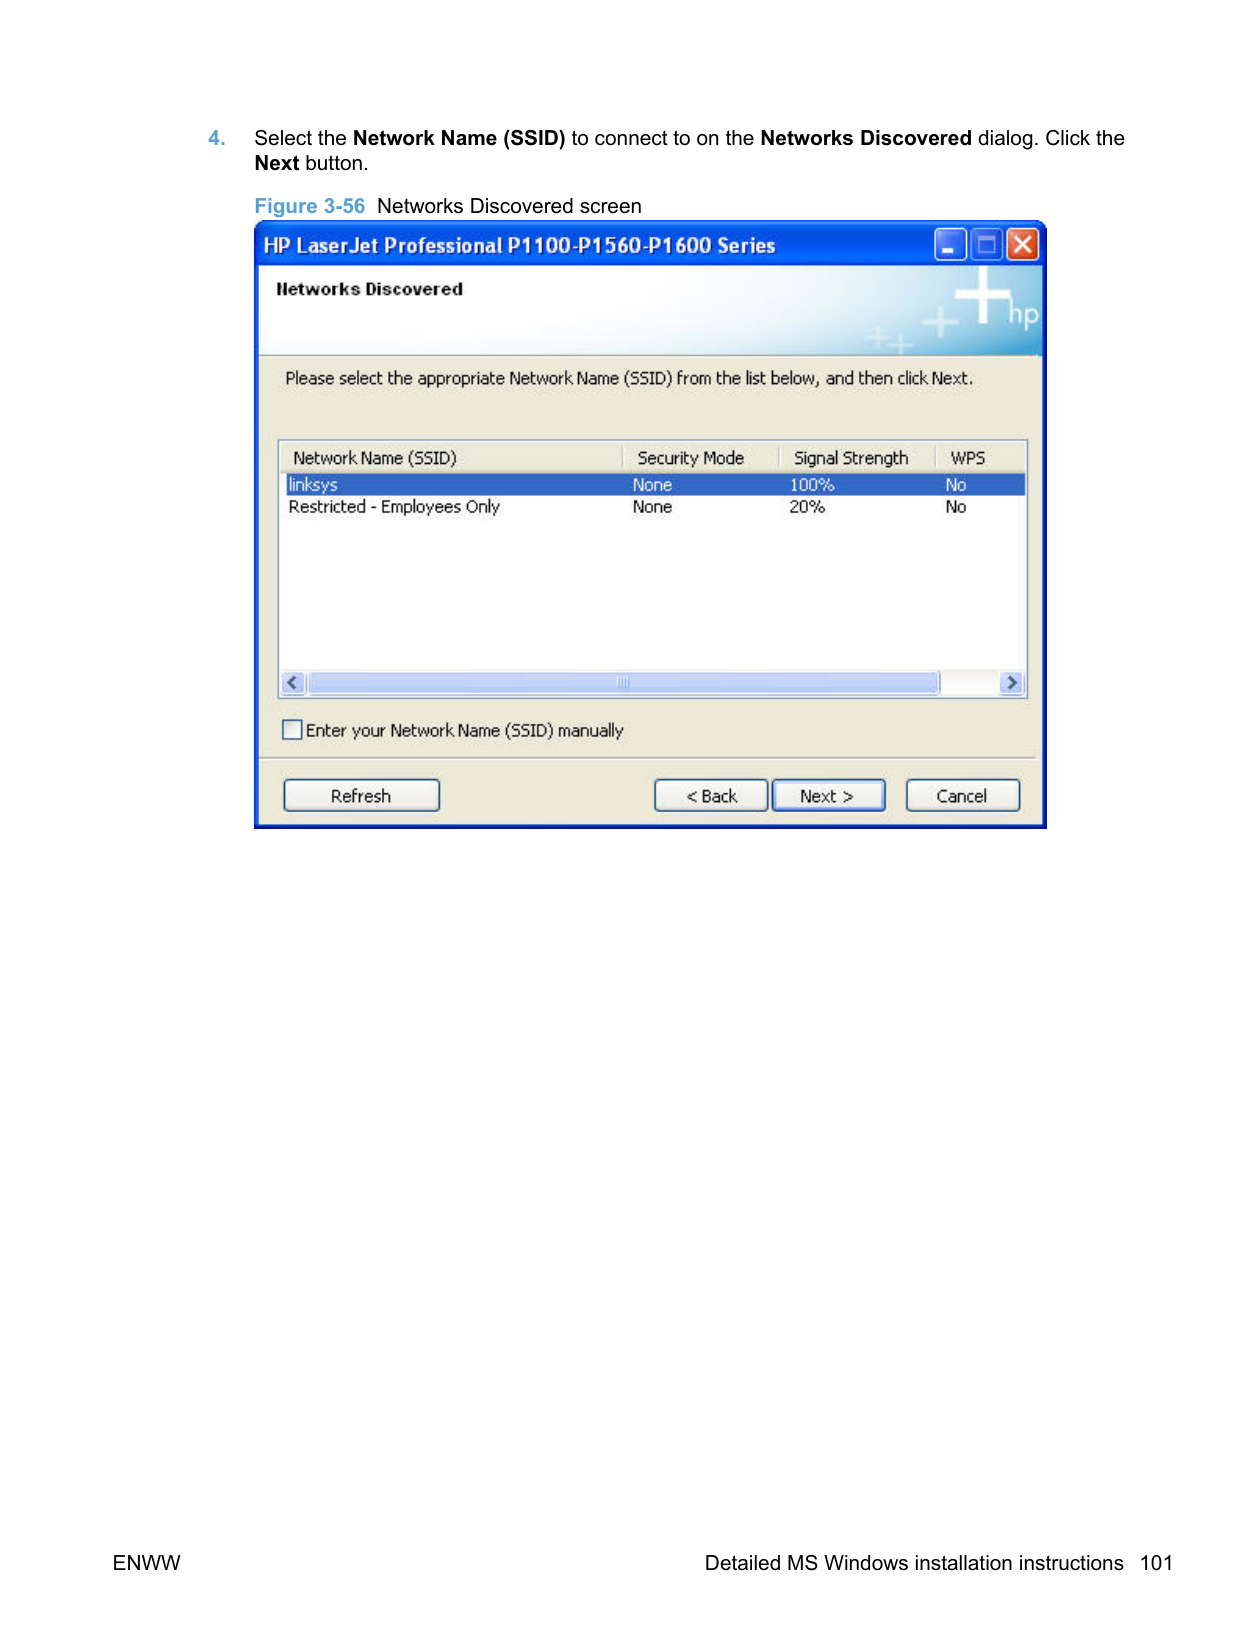
######### 4. Select the Network Name (SSID) to connect to on the Networks Discovered dialog. Click theNext button.


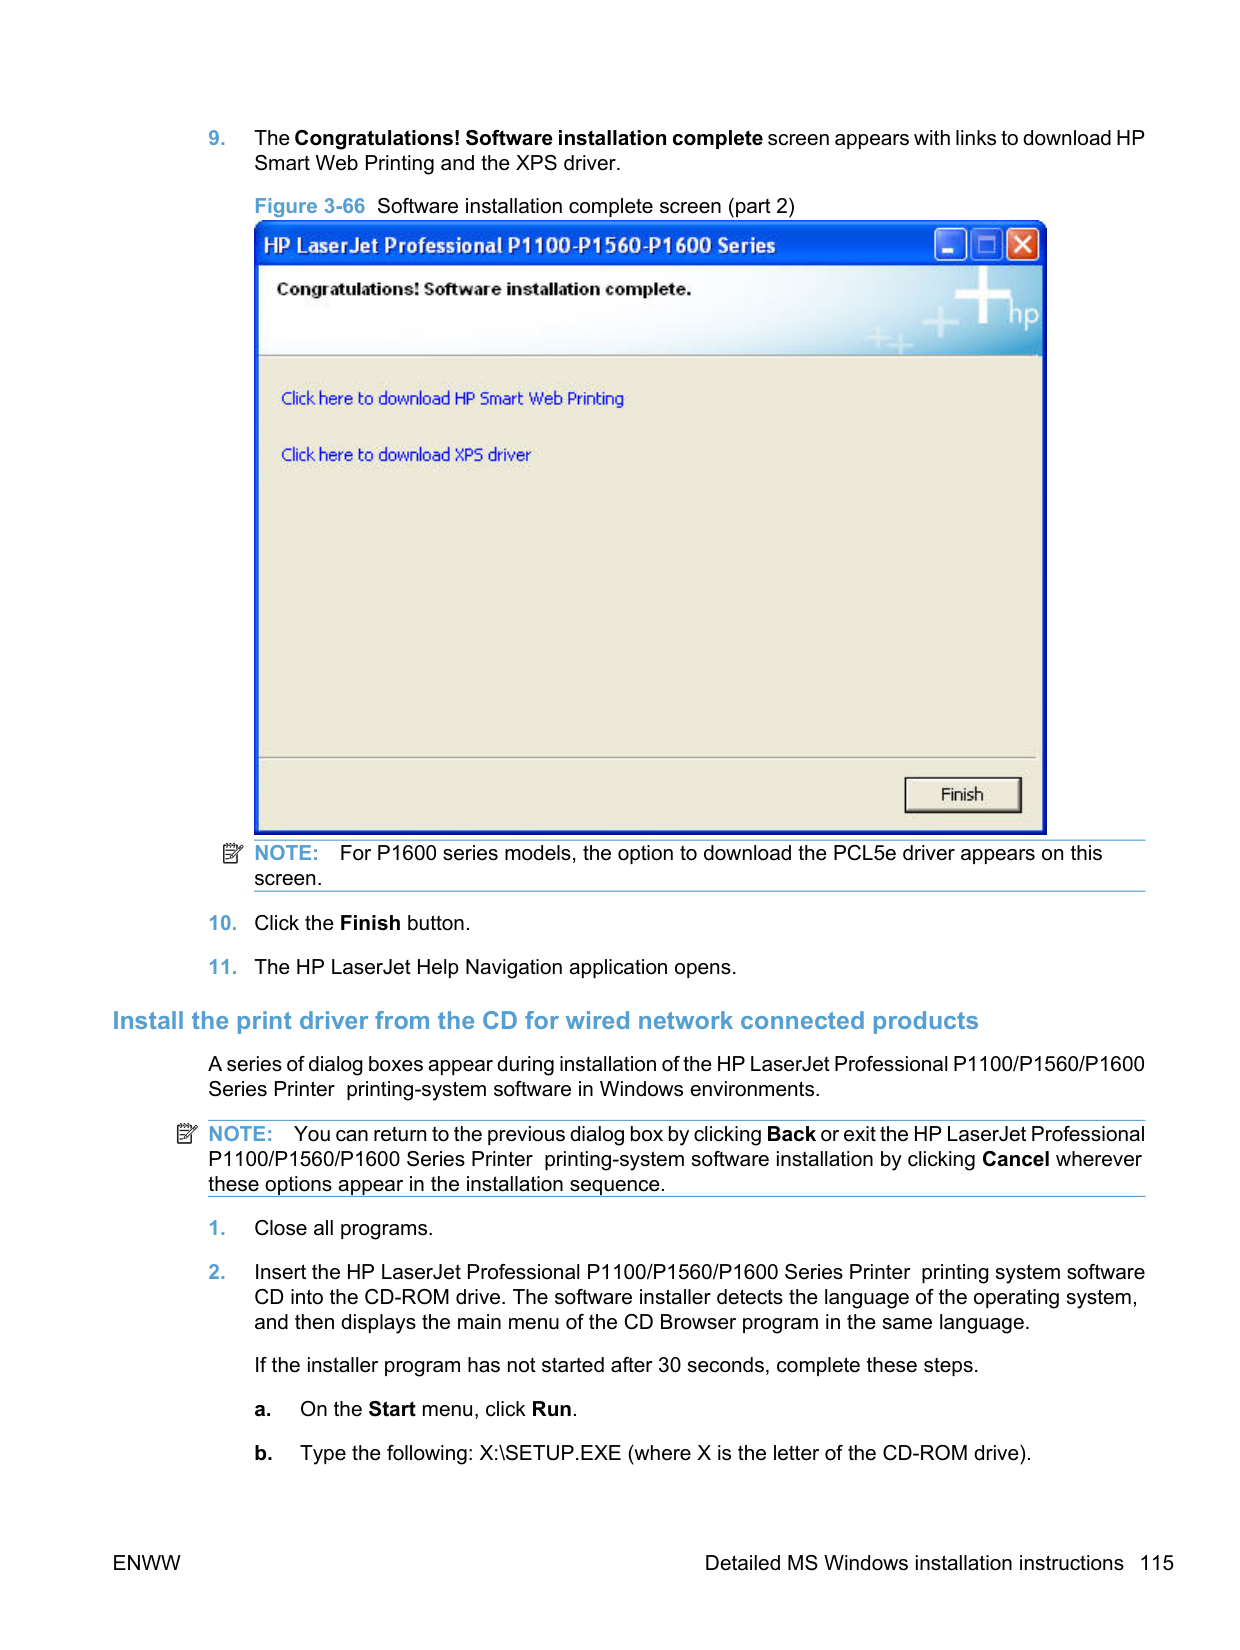
########## 6. The Congratulations! Software installation complete screen appears upon successfulinstallation of the driver.

########## 7. Select Register your product and Print Test Page, and then click the Next button. A Web browseropens to the HP Product Registration page, and a test page prints at the product.

| | |---|
NOTE: For P1600 series models, the option to download the PCL5e driver appears on this screen.
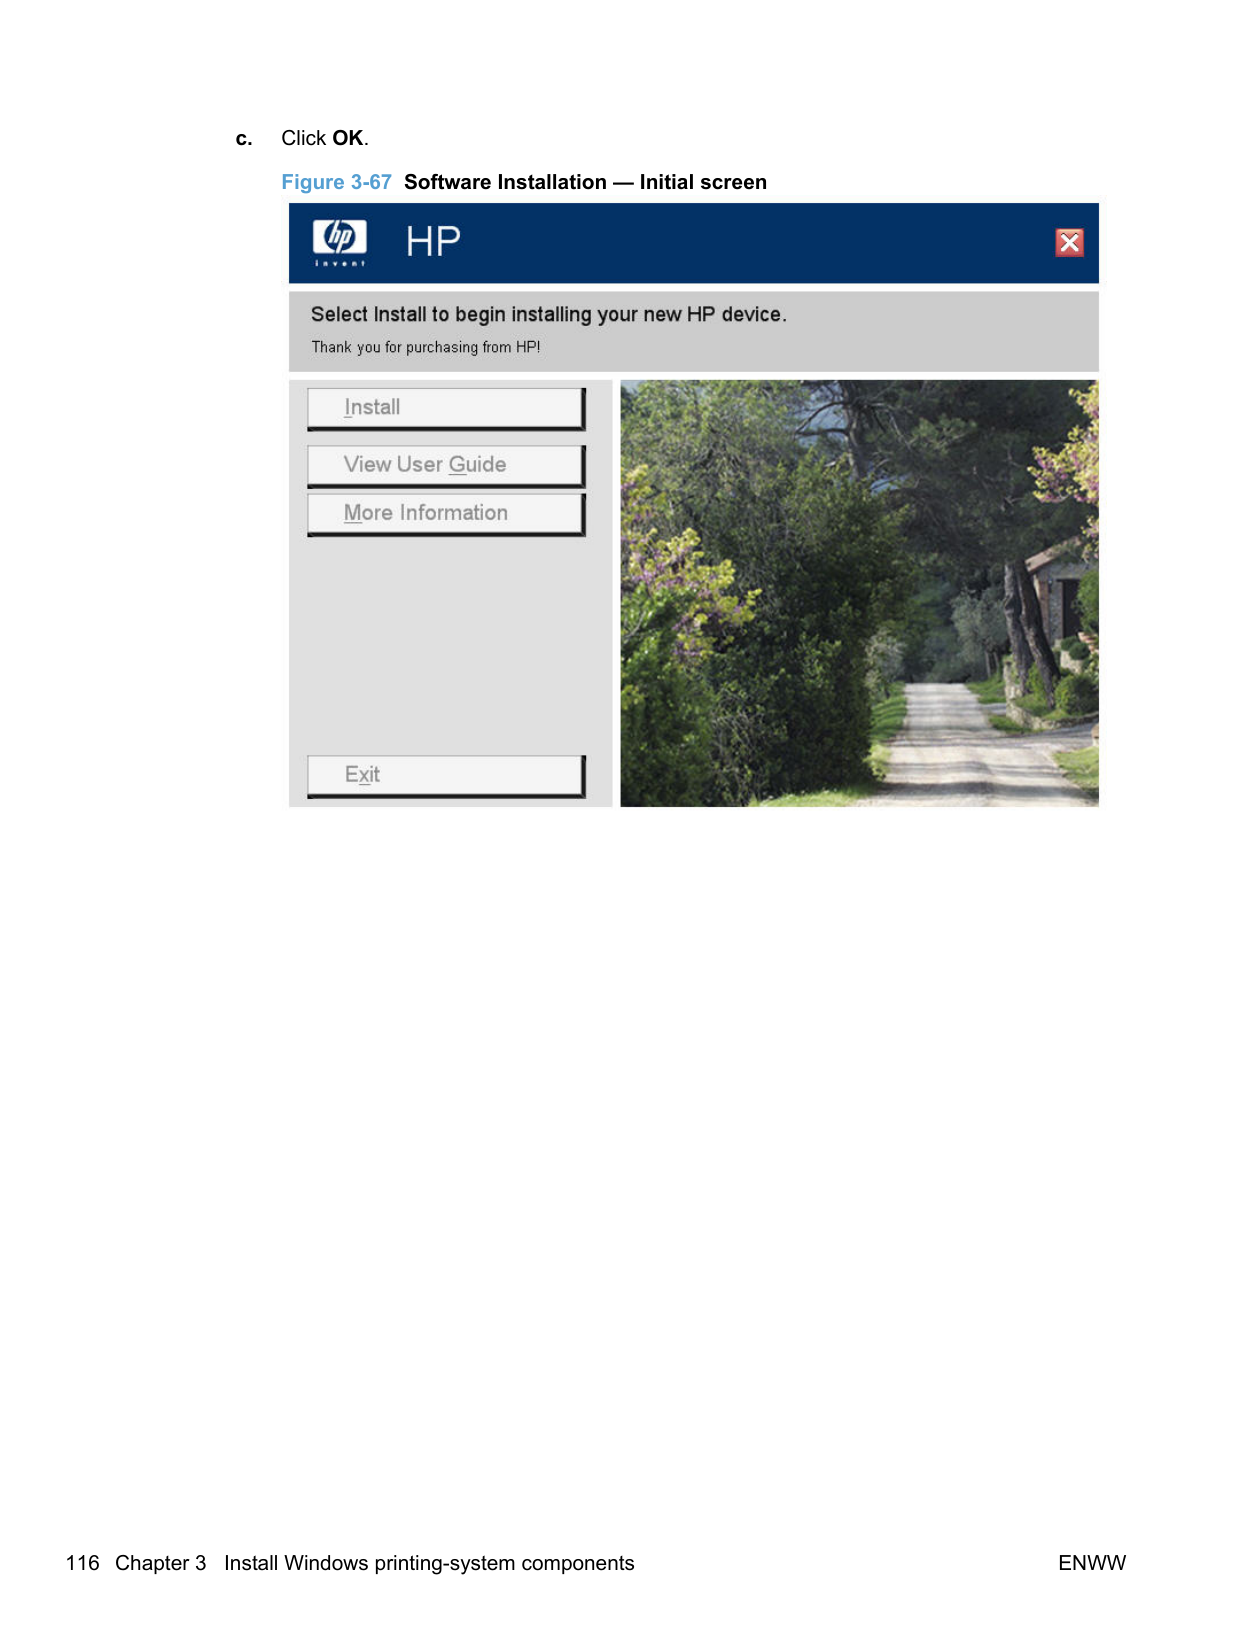
######## EWS Smart Install (network products)
########## 4. Click the HP Smart Install tab on the EWS, and then click the Download button.


########## 5. A download dialog window for the setup opens. Click Save File.


########## 6. Click the Run button on the dialog window that appears.

######### 7. The License Agreement screen appears. Select I accept the terms of the license agreementand then click the Next button.

########## 8. The Congratulations! Software installation complete screen appears upon successfulinstallation of the driver.

########## 9. Select Register your product and Print Test Page, and then click the Next button. A Web browseropens to the HP Product Registration page, and a test page prints at the product.

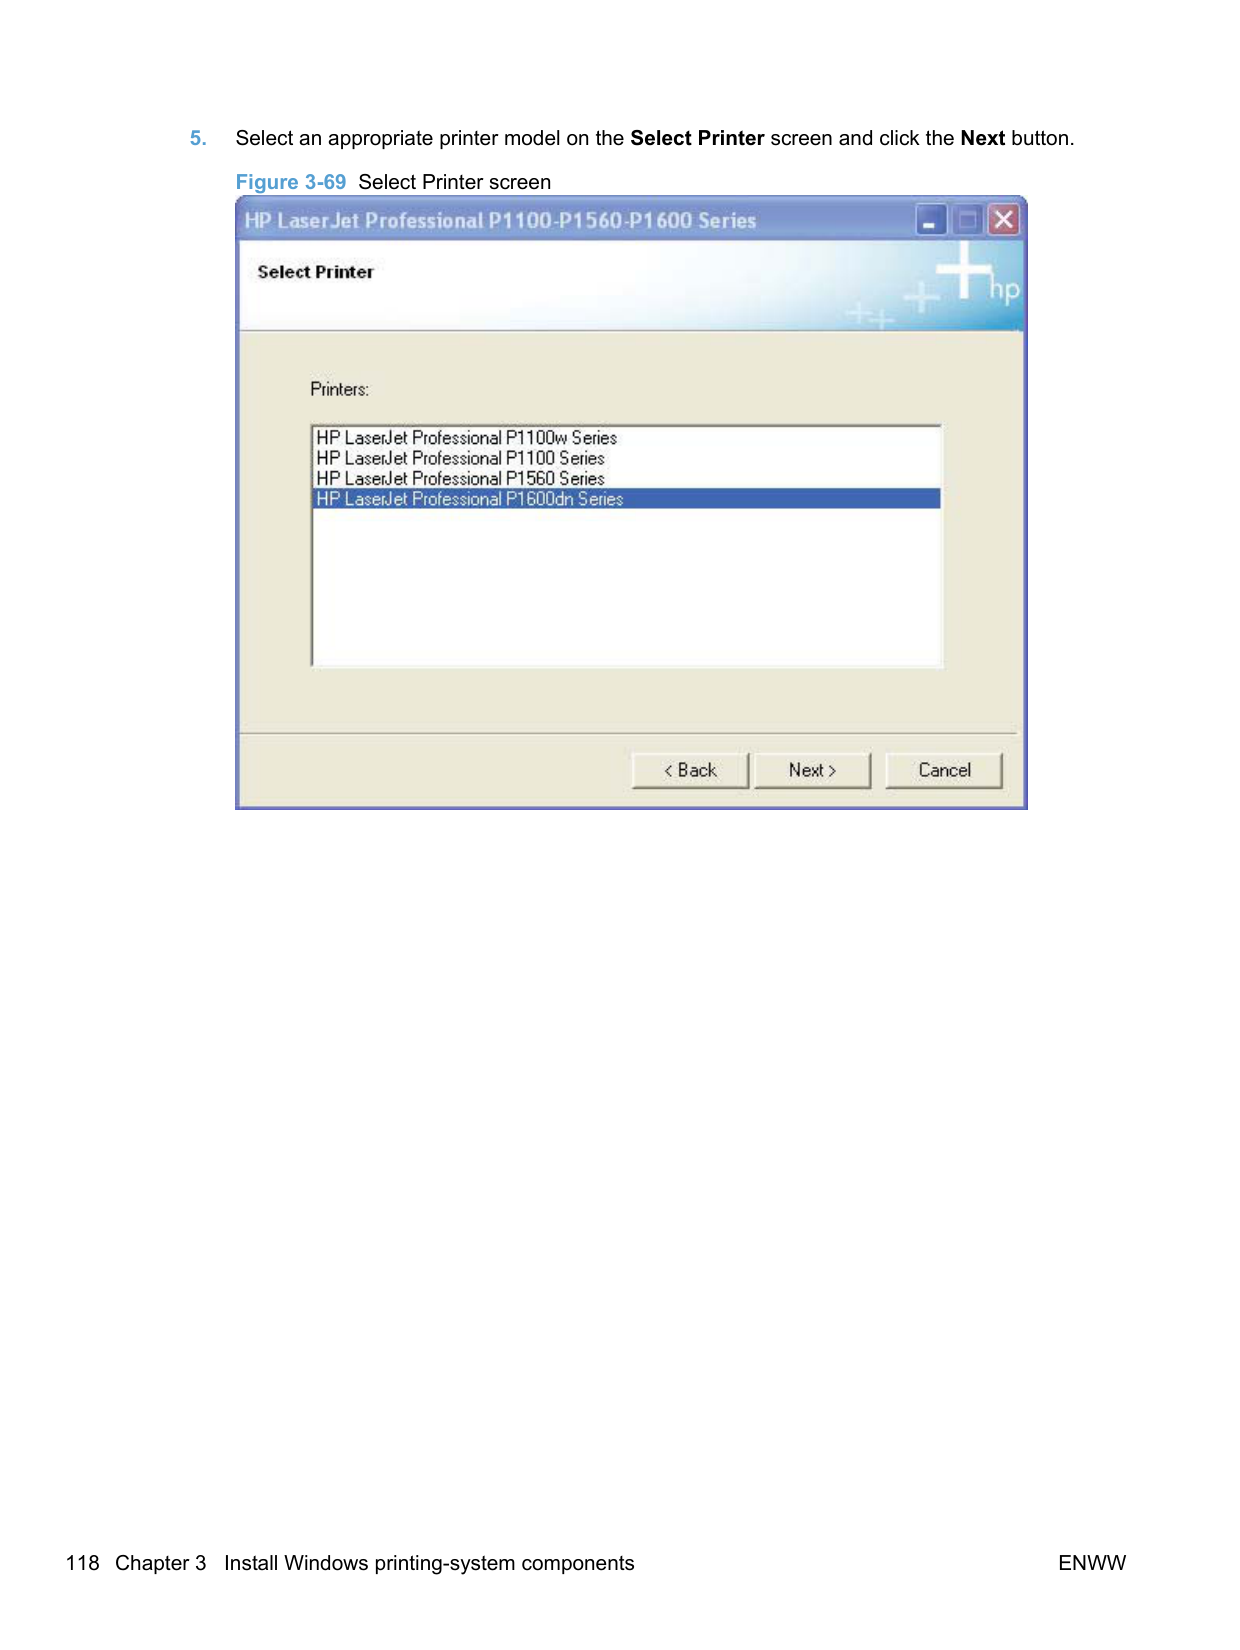
##### Install the Host-based driver from the CD
######## Install the print driver from the CD for USB connected products
A series of dialog boxes appear during installation of the HP LaserJet Professional P1100/P1560/P1600 Series Printer printing-system software in Windows environments.
| |

|---|
NOTE: You can return to the previous dialog box by clicking Back or exit the HP LaserJet Professional P1100/P1560/P1600 Series Printer printing-system software installation by clicking Cancel wherever these options appear in the installation sequence.
NOTE: Make sure the product is not connected to the computer with a USB cable when you begin the installation.
######### c. Click OK.Figure 3-60 Software Installation — Initial screen

########## 3. Click Install to begin the installation process. The Choose Easy Install or Advanced Installscreen appears.Figure 3-61 Choose Easy Install or Advanced Install screen
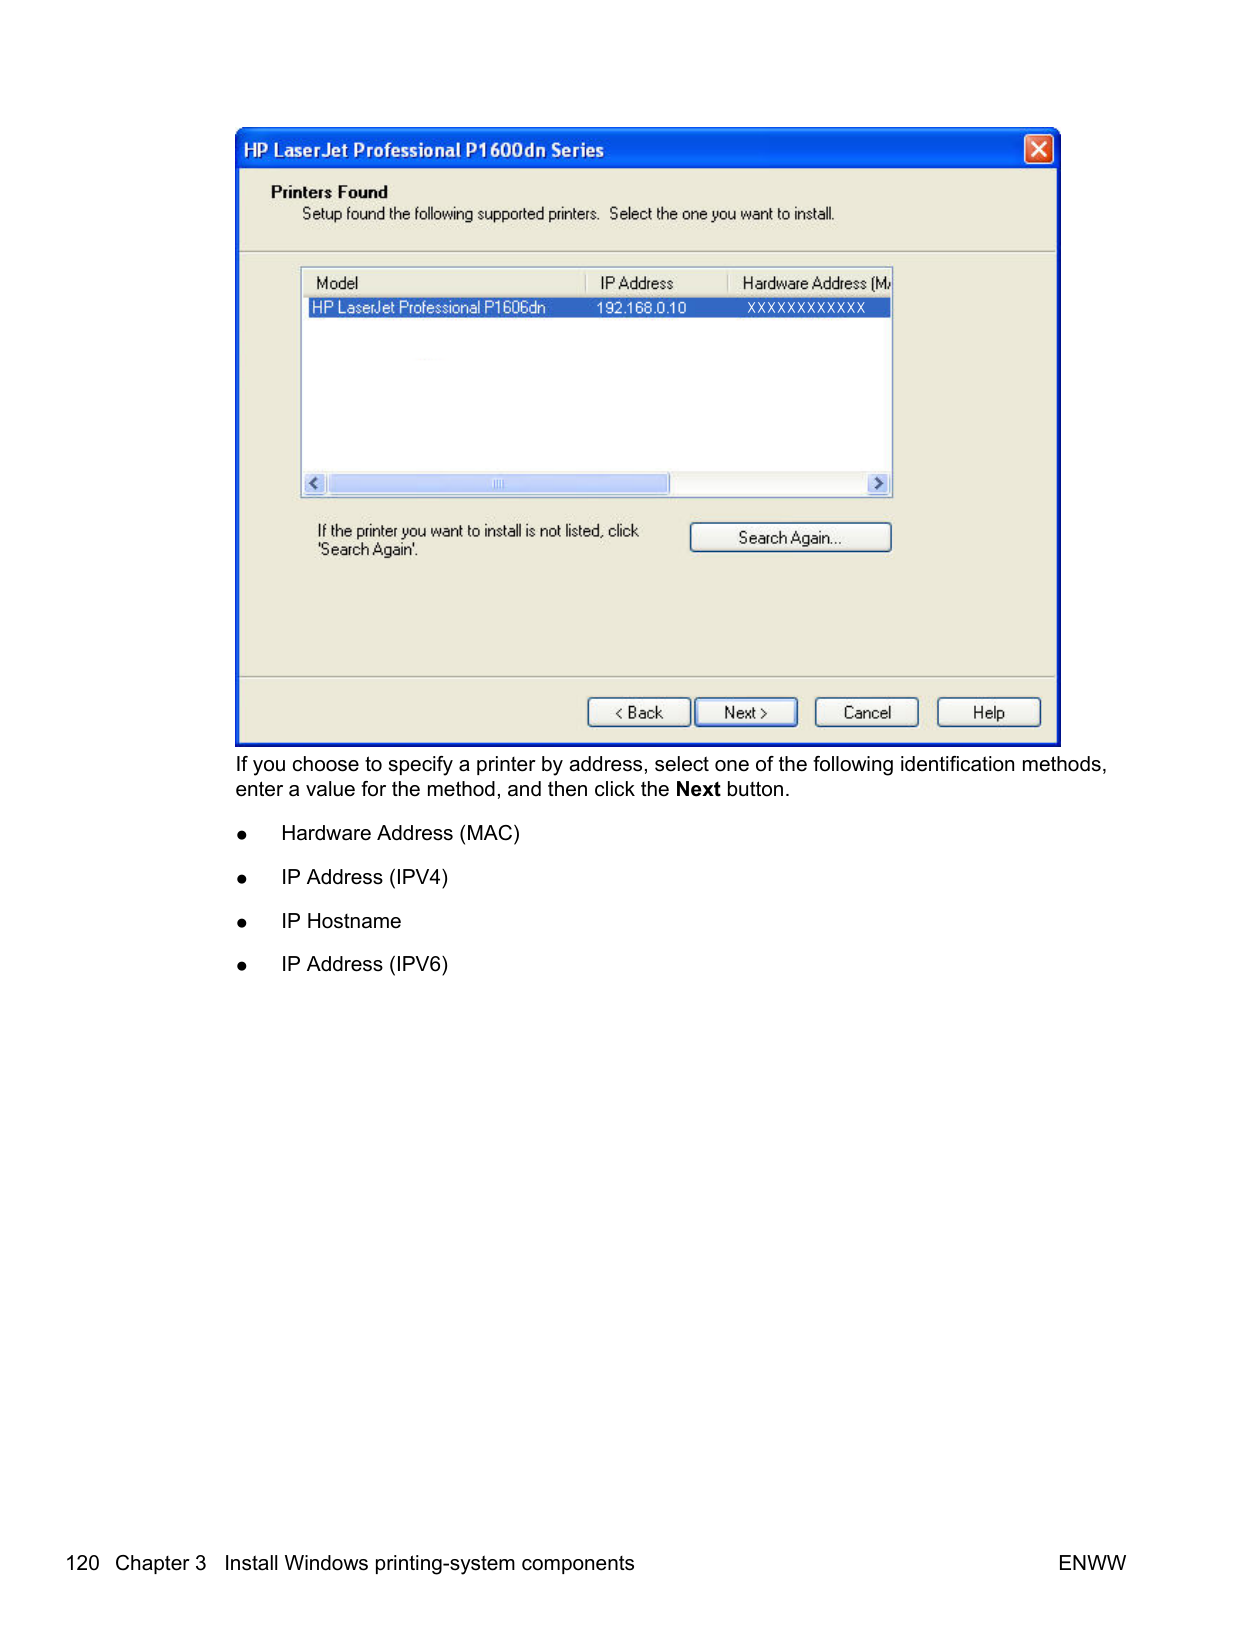

The Choose Easy Install or Advanced Install screen contains links to the following information.
########## 4. Select Easy Install (recommended). Using Easy Install (recommended) allows the installationagreements and default settings to be accepted without being prompted for them during theinstallation. Advanced Install allows you to read, and manually accept, each of the installationagreements. Click the Next button to continue the installation.

NOTE: In the preceding figure, "HP LaserJet Professional P1100w Series" denotes the P1100 series wireless model.
| |
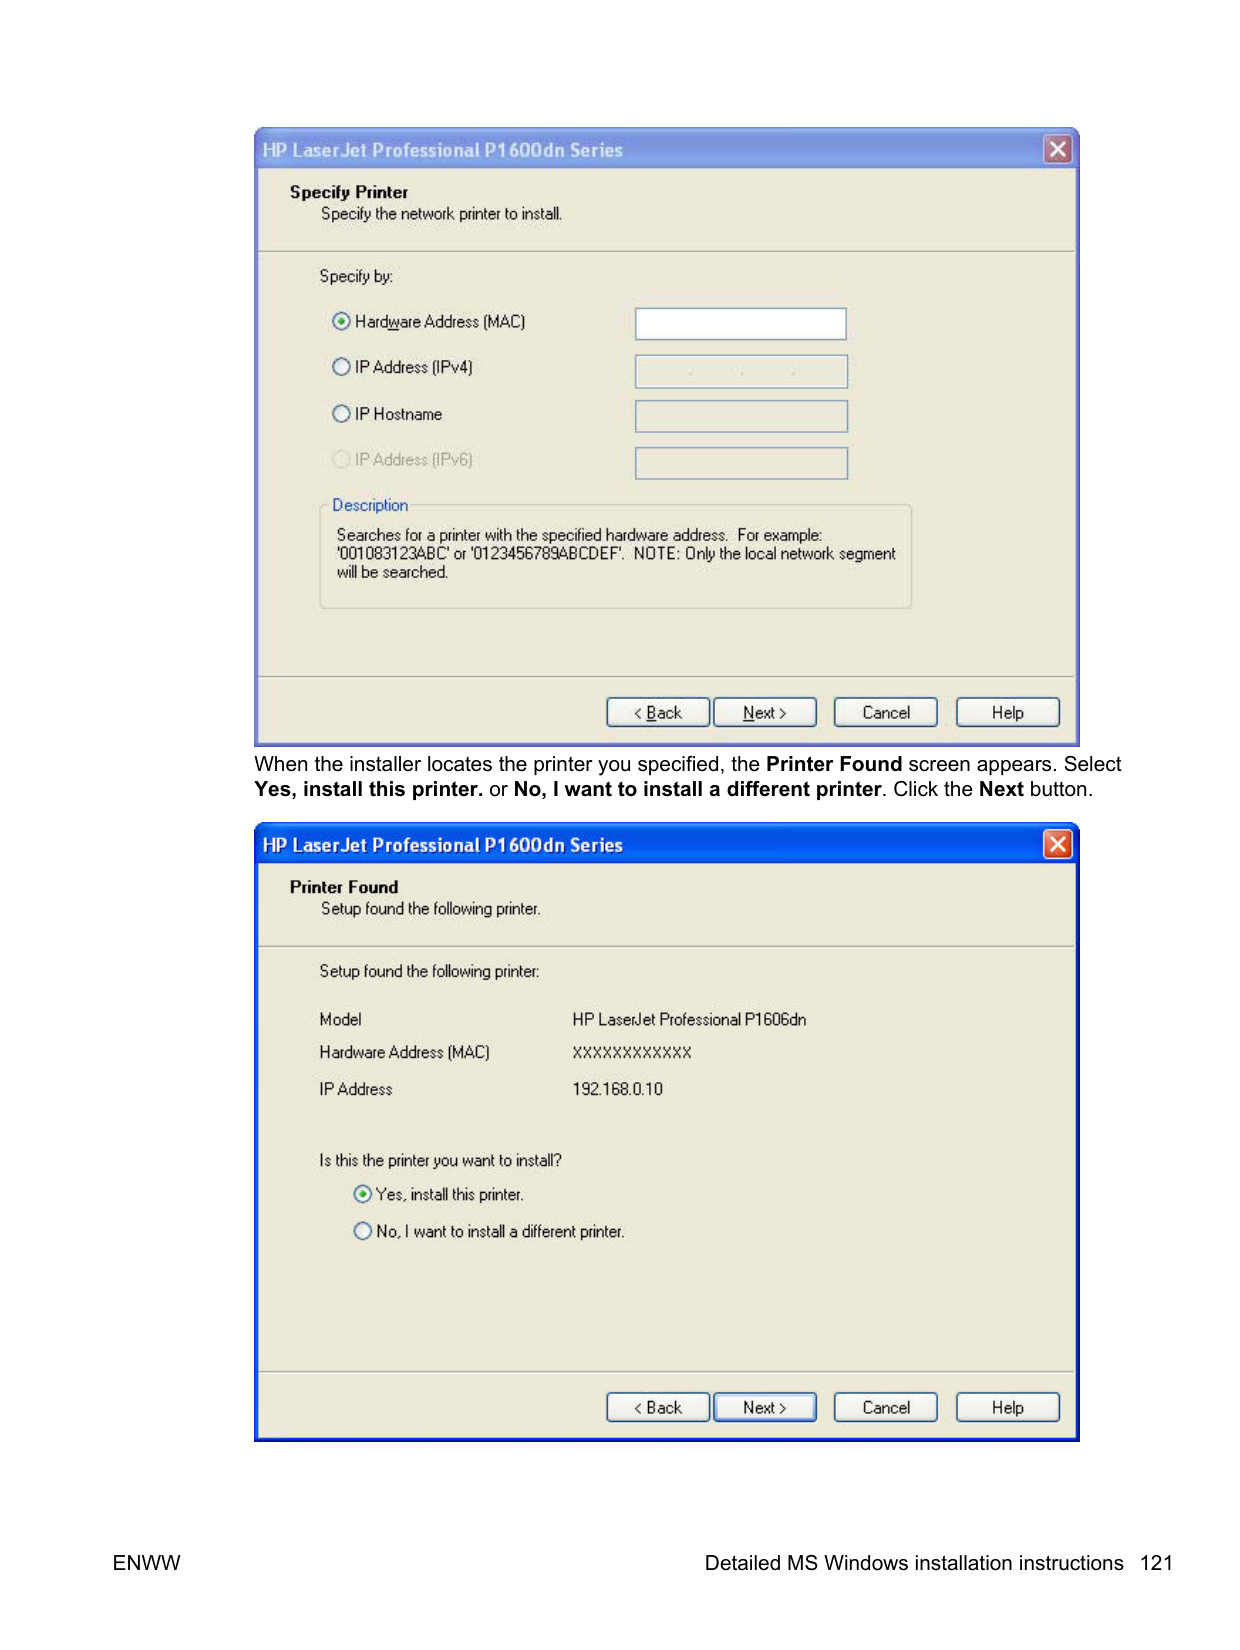
|---|

When the device (product) is sensed by the installer, the Configure to print using USB screen changes to display the following.

########## 7. The Congratulations! Software installation complete screen appears upon successfulinstallation of the driver.
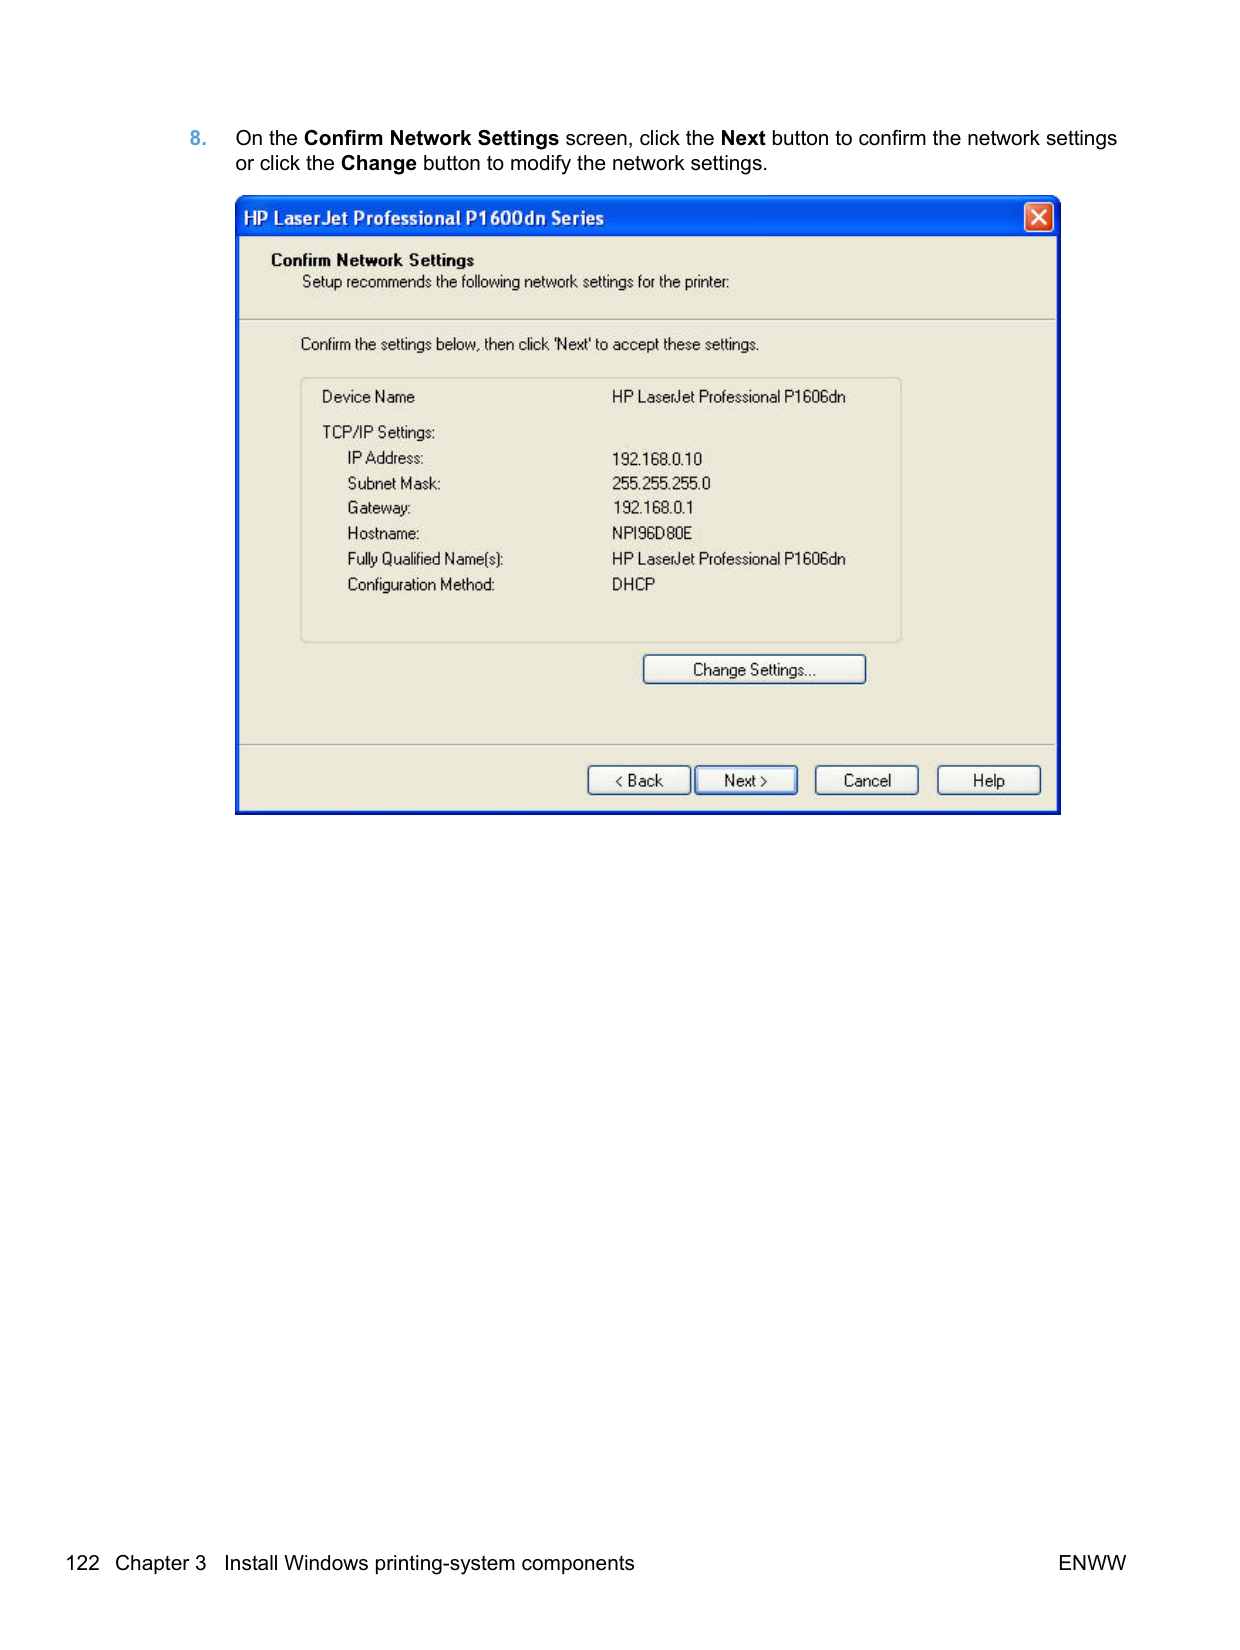

########## 8. Select Register your product and Print Test Page, and then click the Next button. A Web browseropens to the HP Product Registration page, and a test page prints at the product.

| | |---|
NOTE: For P1600 series models, the option to download the PCL5e driver appears on this screen.

######## Install the print driver from the CD for wired network connected products
A series of dialog boxes appear during installation of the HP LaserJet Professional P1100/P1560/P1600 Series Printer printing-system software in Windows environments.
| | |---|
NOTE: You can return to the previous dialog box by clicking Back or exit the HP LaserJet Professional P1100/P1560/P1600 Series Printer printing-system software installation by clicking Cancel wherever these options appear in the installation sequence.
######### c. Click OK.Figure 3-67 Software Installation — Initial screen
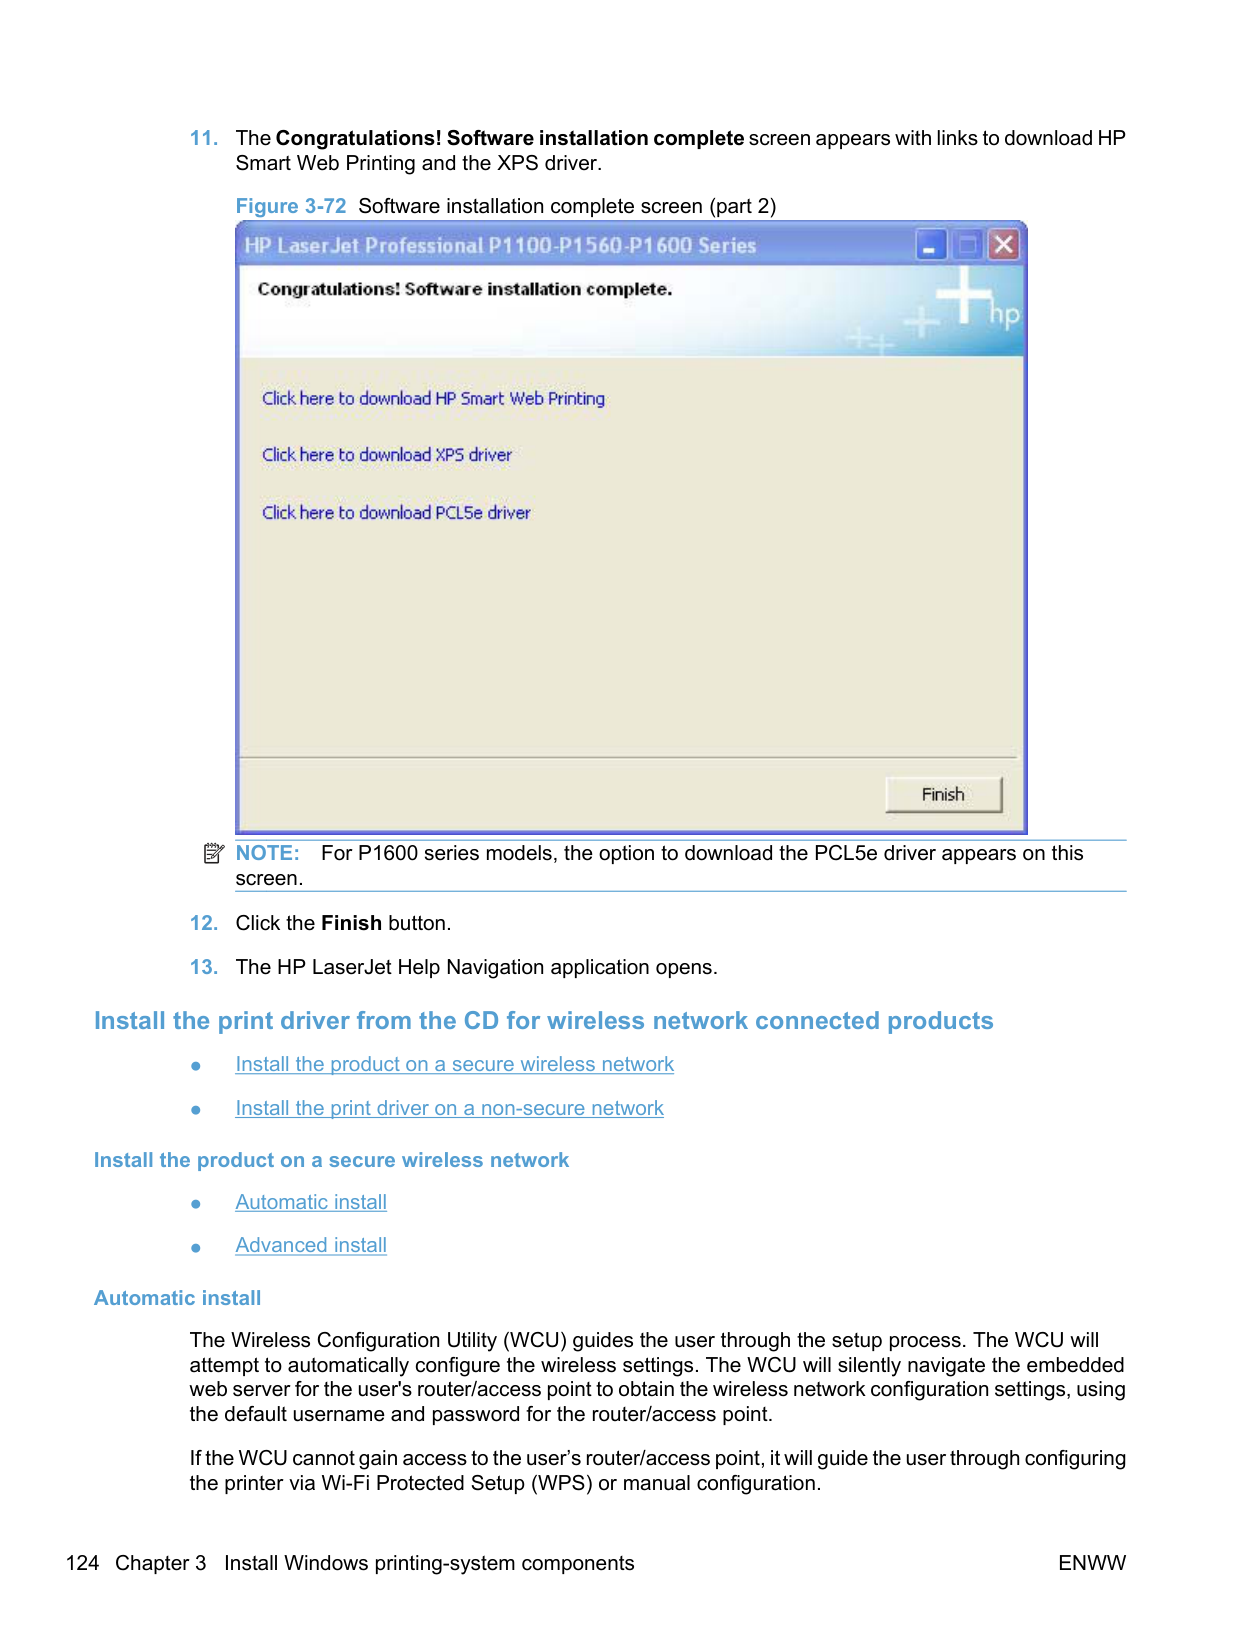

########## 3. Click Install to begin the installation process. The Choose Easy Install or Advanced Installscreen appears.Figure 3-68 Choose Easy Install or Advanced Install screen

The Choose Easy Install or Advanced Install screen contains links to the following information.
########## 4. Select Easy Install (recommended). Using Easy Install (recommended) allows the installationagreements and default settings to be accepted without being prompted for them during theinstallation. Advanced Install allows you to read, and manually accept, each of the installationagreements. Click the Next button to continue the installation.
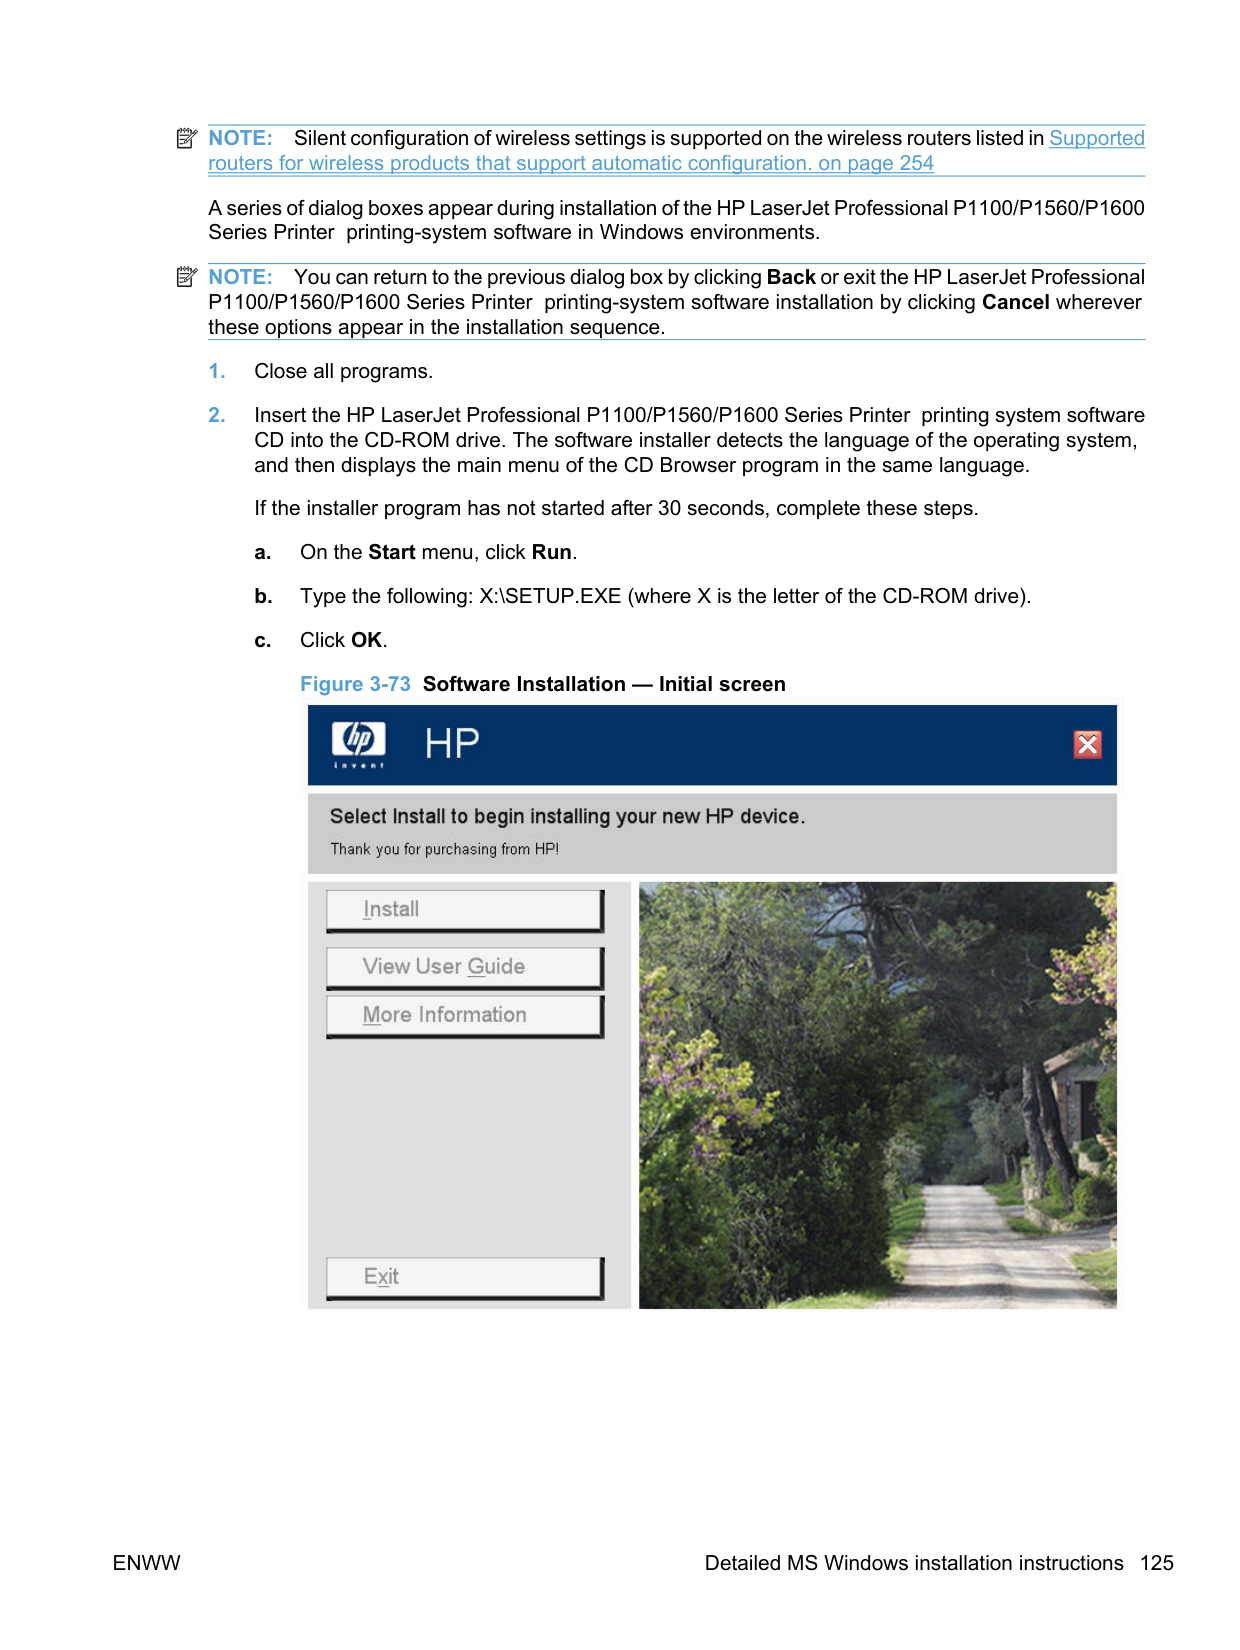

######### 6. Select Configure to print over the Network and then click the Next button.

######### 7. Select either Select from a list of detected printers (Recommended) or Specify a printer byaddress, and then click the Next button.
If you choose to select from a list of detected printers, the installer will search your network for an HP LaserJet Professional P1600 Series Printer series printer to install and then display the Printers Found screen. Select your product and then click the Next button.


If you choose to specify a printer by address, select one of the following identification methods, enter a value for the method, and then click the Next button.
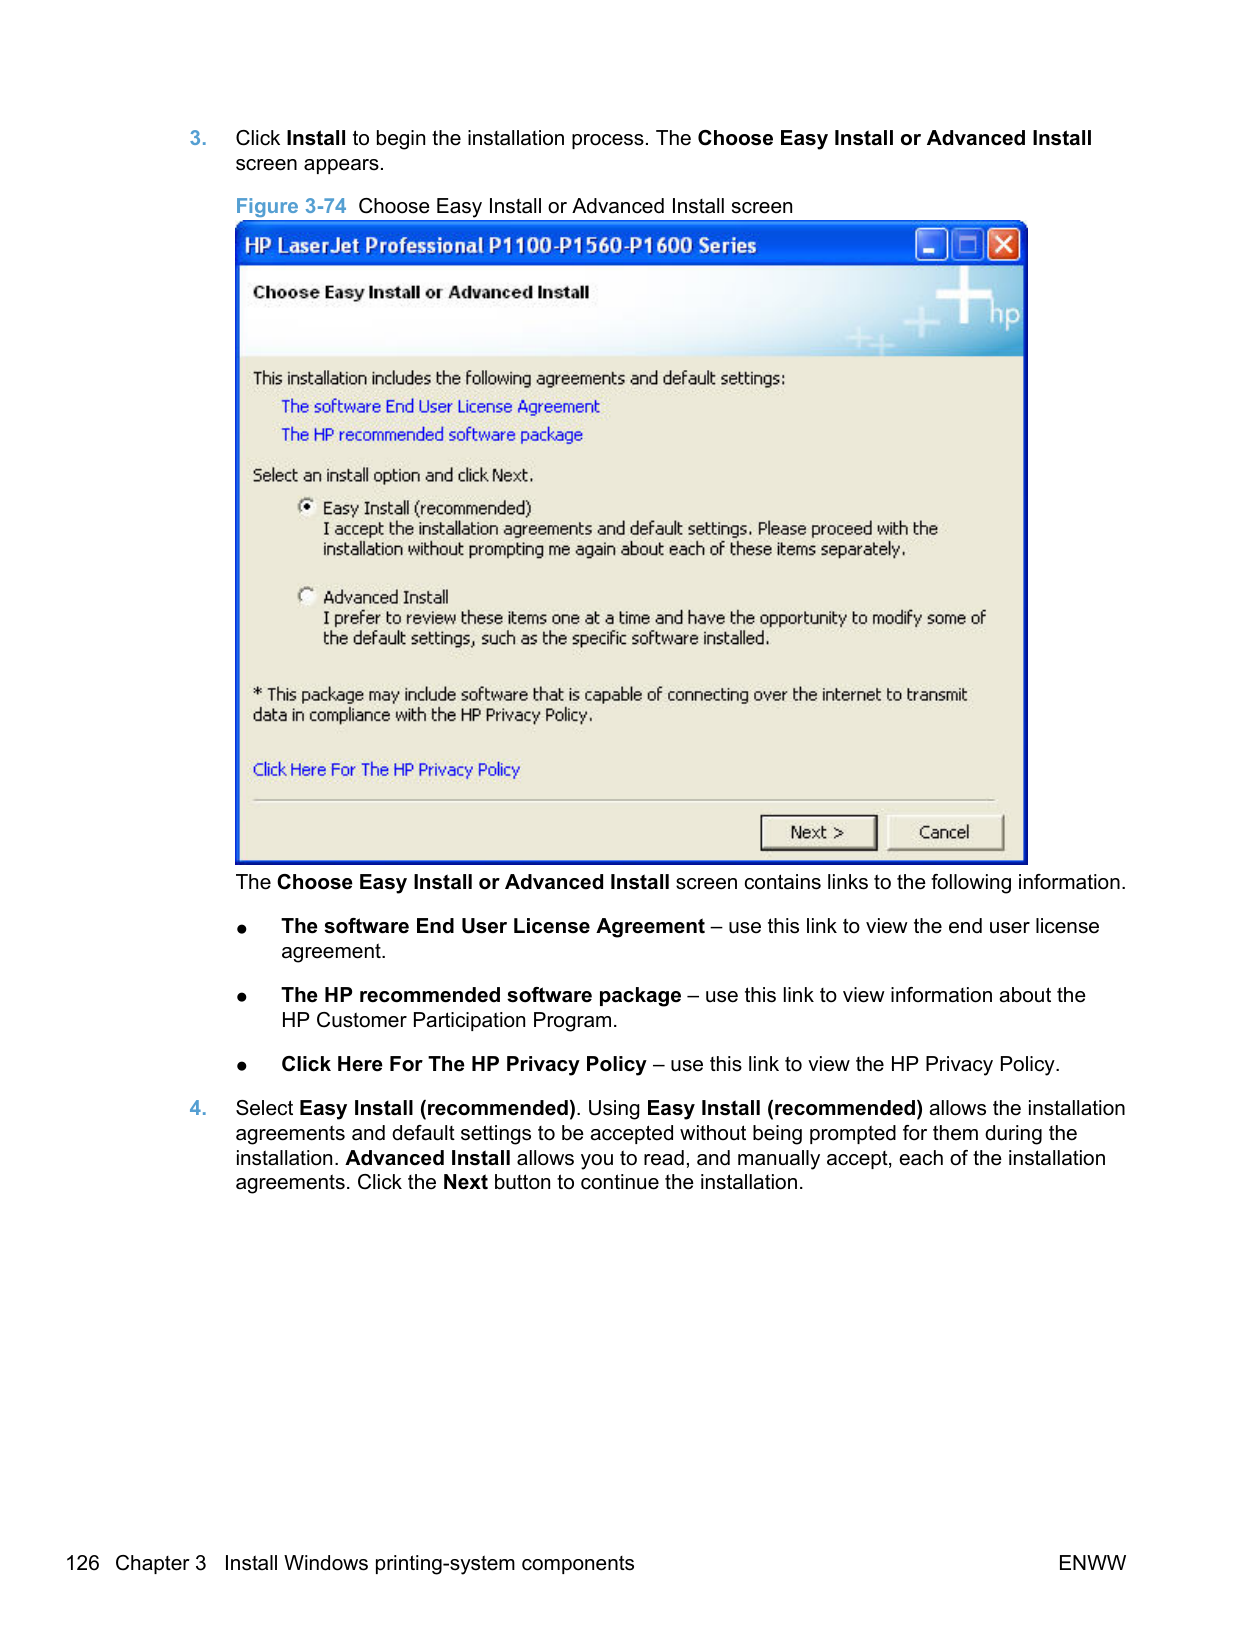

########## When the installer locates the printer you specified, the Printer Found screen appears. Select Yes, install this printer. or No, I want to install a different printer. Click the Next button.

########## 8. On the Confirm Network Settings screen, click the Next button to confirm the network settingsor click the Change button to modify the network settings.

########## 9. The Congratulations! Software installation complete screen appears after successfulinstallation of the driver.Figure 3-71 Software installation complete screen (part 1)


########## 10. Select Register your product and Print Test Page, and then click the Next button. A Web browseropens to the HP Product Registration page, and a test page prints at the product.

| | |---|
NOTE: For P1600 series models, the option to download the PCL5e driver appears on this screen.
######## Install the print driver from the CD for wireless network connected products

######### Install the product on a secure wireless network
######### Automatic install
The Wireless Configuration Utility (WCU) guides the user through the setup process. The WCU will attempt to automatically configure the wireless settings. The WCU will silently navigate the embedded web server for the user's router/access point to obtain the wireless network configuration settings, using the default username and password for the router/access point.
If the WCU cannot gain access to the user’s router/access point, it will guide the user through configuring the printer via Wi-Fi Protected Setup (WPS) or manual configuration.
| | |---|
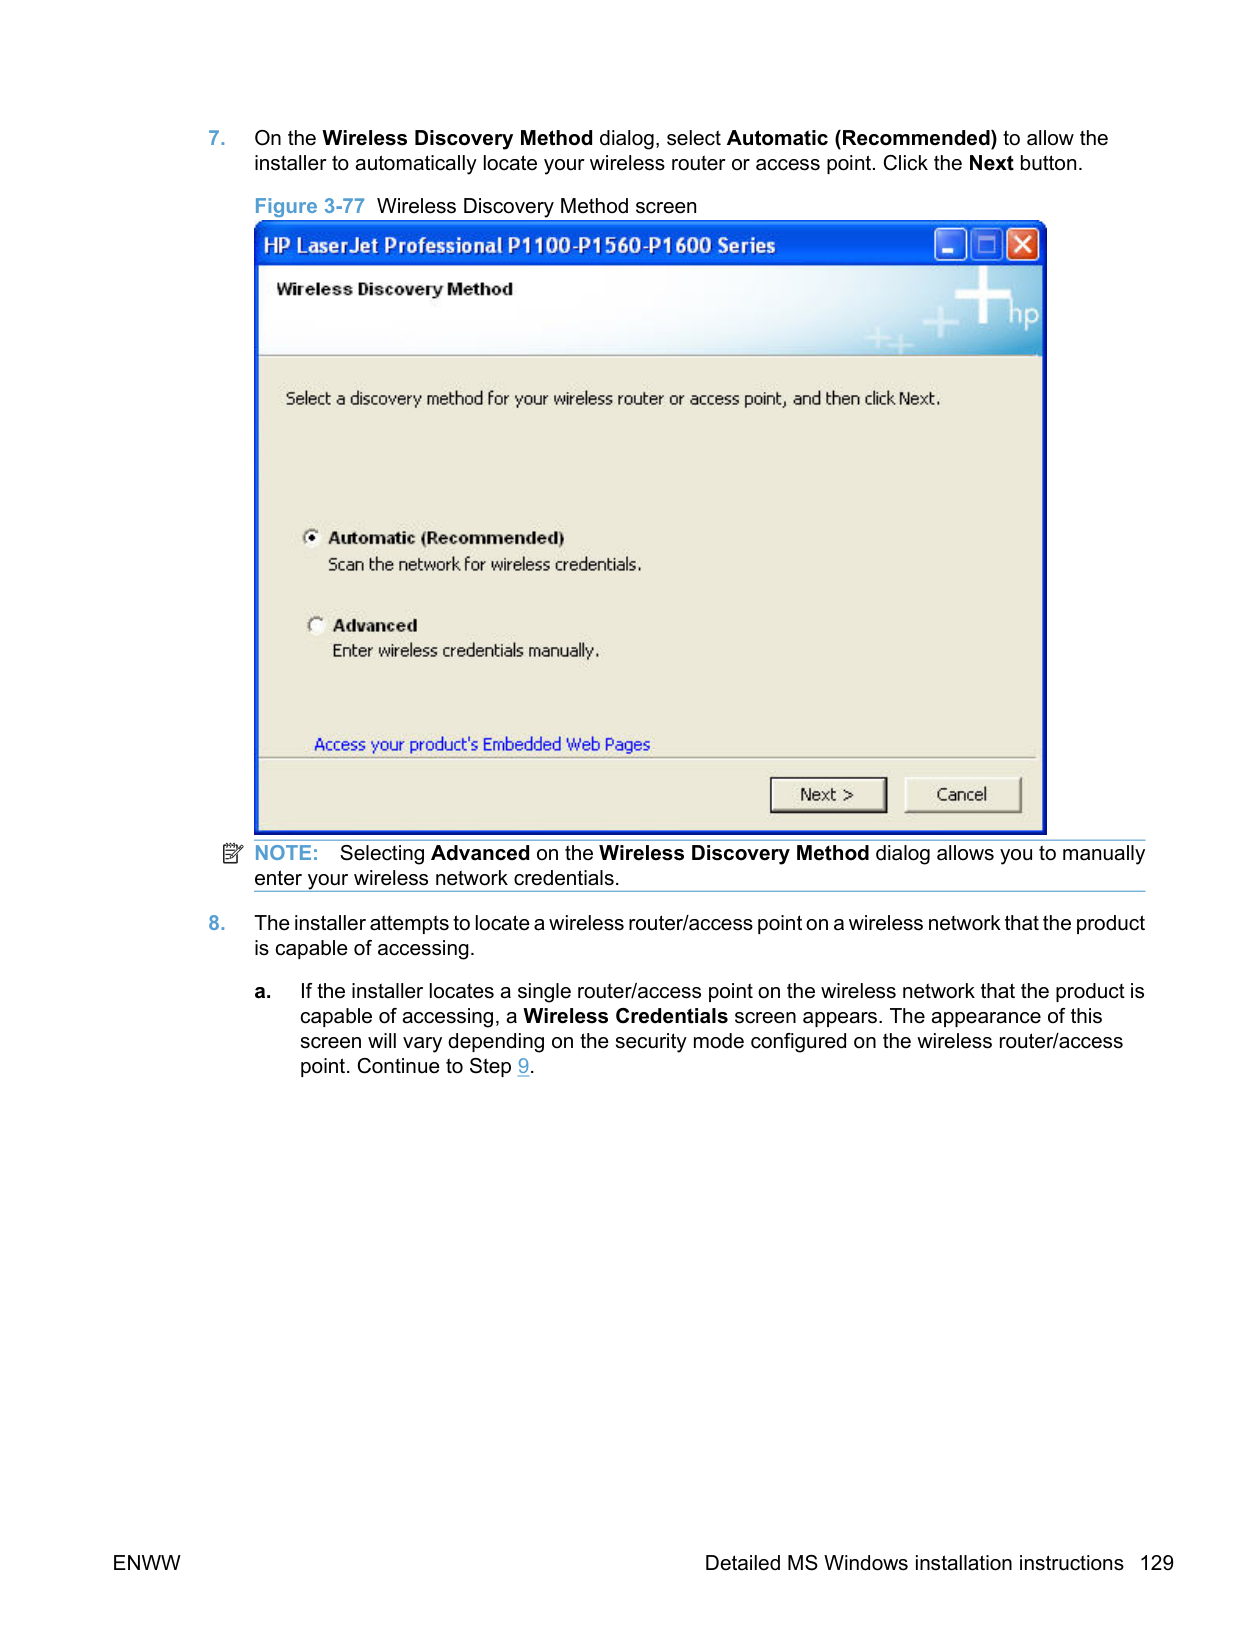
NOTE: Silent configuration of wireless settings is supported on the wireless routers listed in Supported routers for wireless products that support automatic configuration. on page 254
A series of dialog boxes appear during installation of the HP LaserJet Professional P1100/P1560/P1600 Series Printer printing-system software in Windows environments.
| | |---|
NOTE: You can return to the previous dialog box by clicking Back or exit the HP LaserJet Professional P1100/P1560/P1600 Series Printer printing-system software installation by clicking Cancel wherever these options appear in the installation sequence.

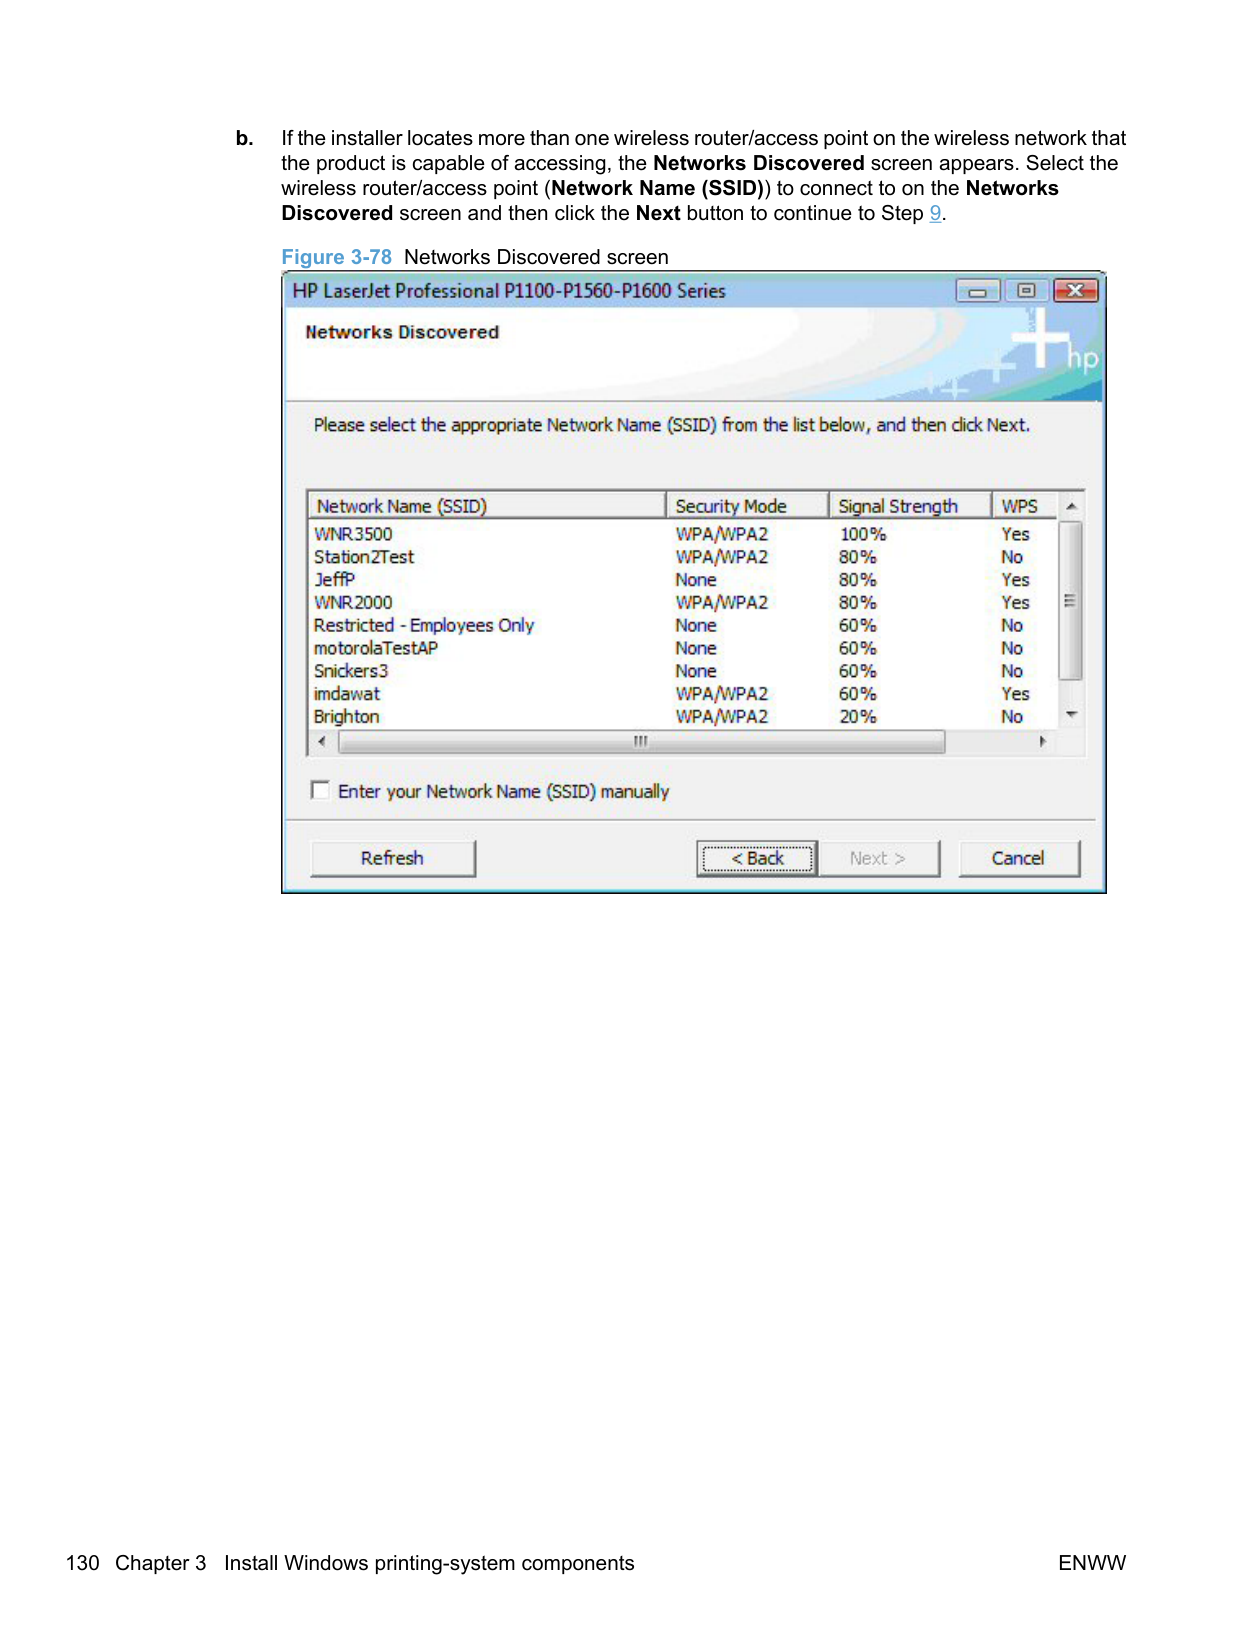
########## 3. Click Install to begin the installation process. The Choose Easy Install or Advanced Installscreen appears.Figure 3-74 Choose Easy Install or Advanced Install screen

The Choose Easy Install or Advanced Install screen contains links to the following information.
########## 4. Select Easy Install (recommended). Using Easy Install (recommended) allows the installationagreements and default settings to be accepted without being prompted for them during theinstallation. Advanced Install allows you to read, and manually accept, each of the installationagreements. Click the Next button to continue the installation.
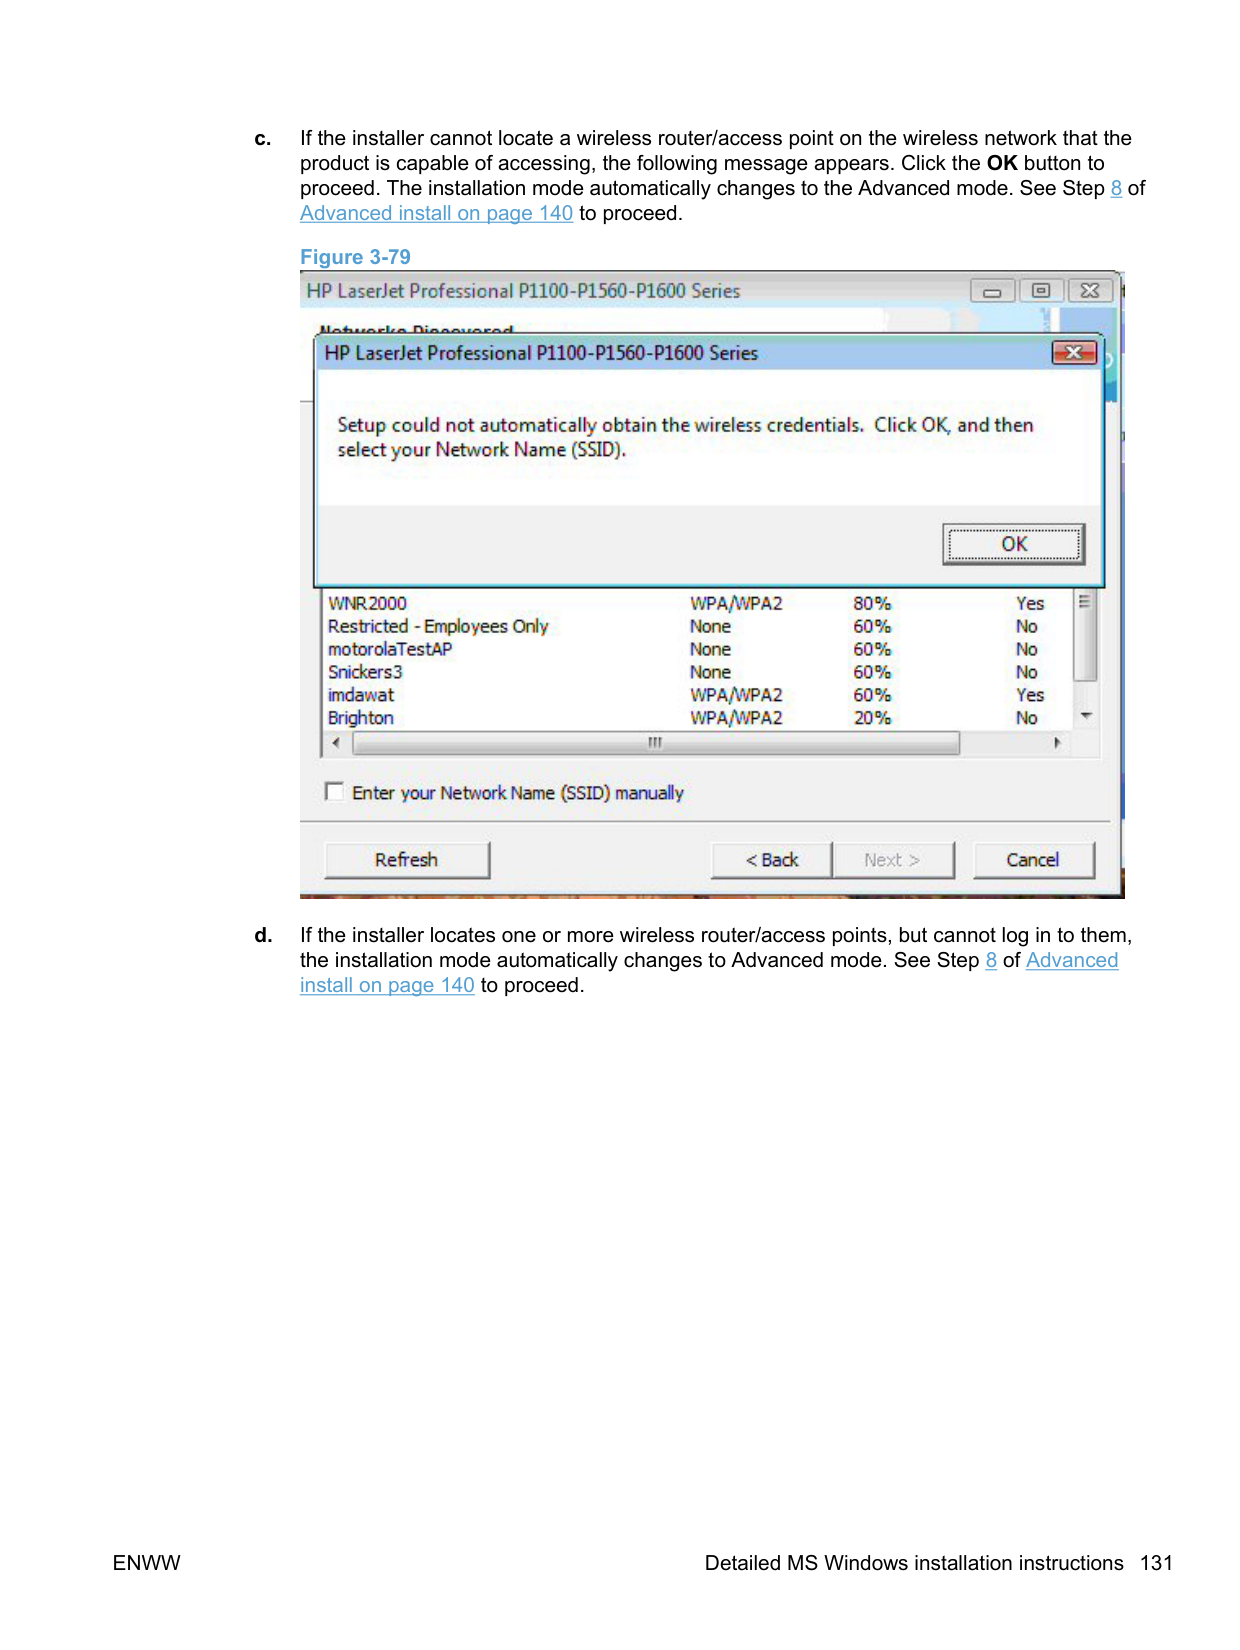


| | |---|
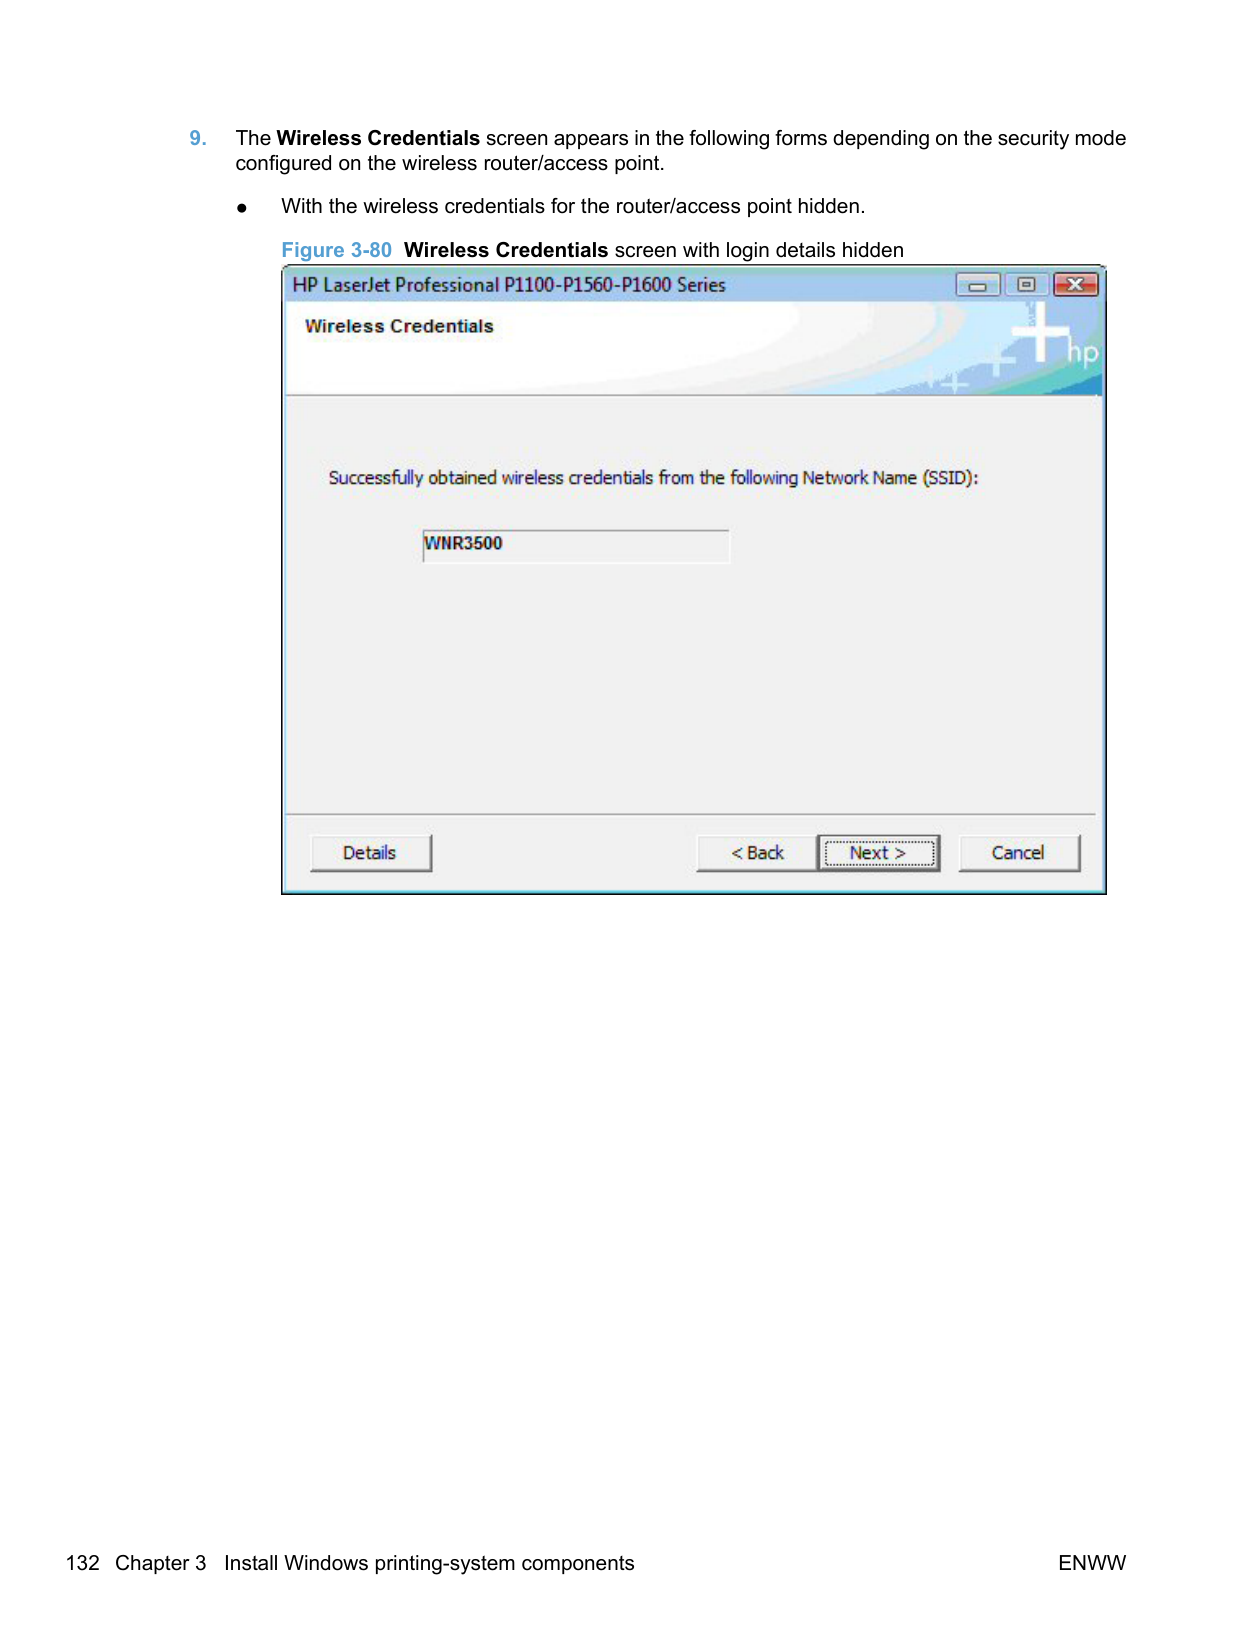
NOTE: Selecting Advanced on the Wireless Discovery Method dialog allows you to manually enter your wireless network credentials.


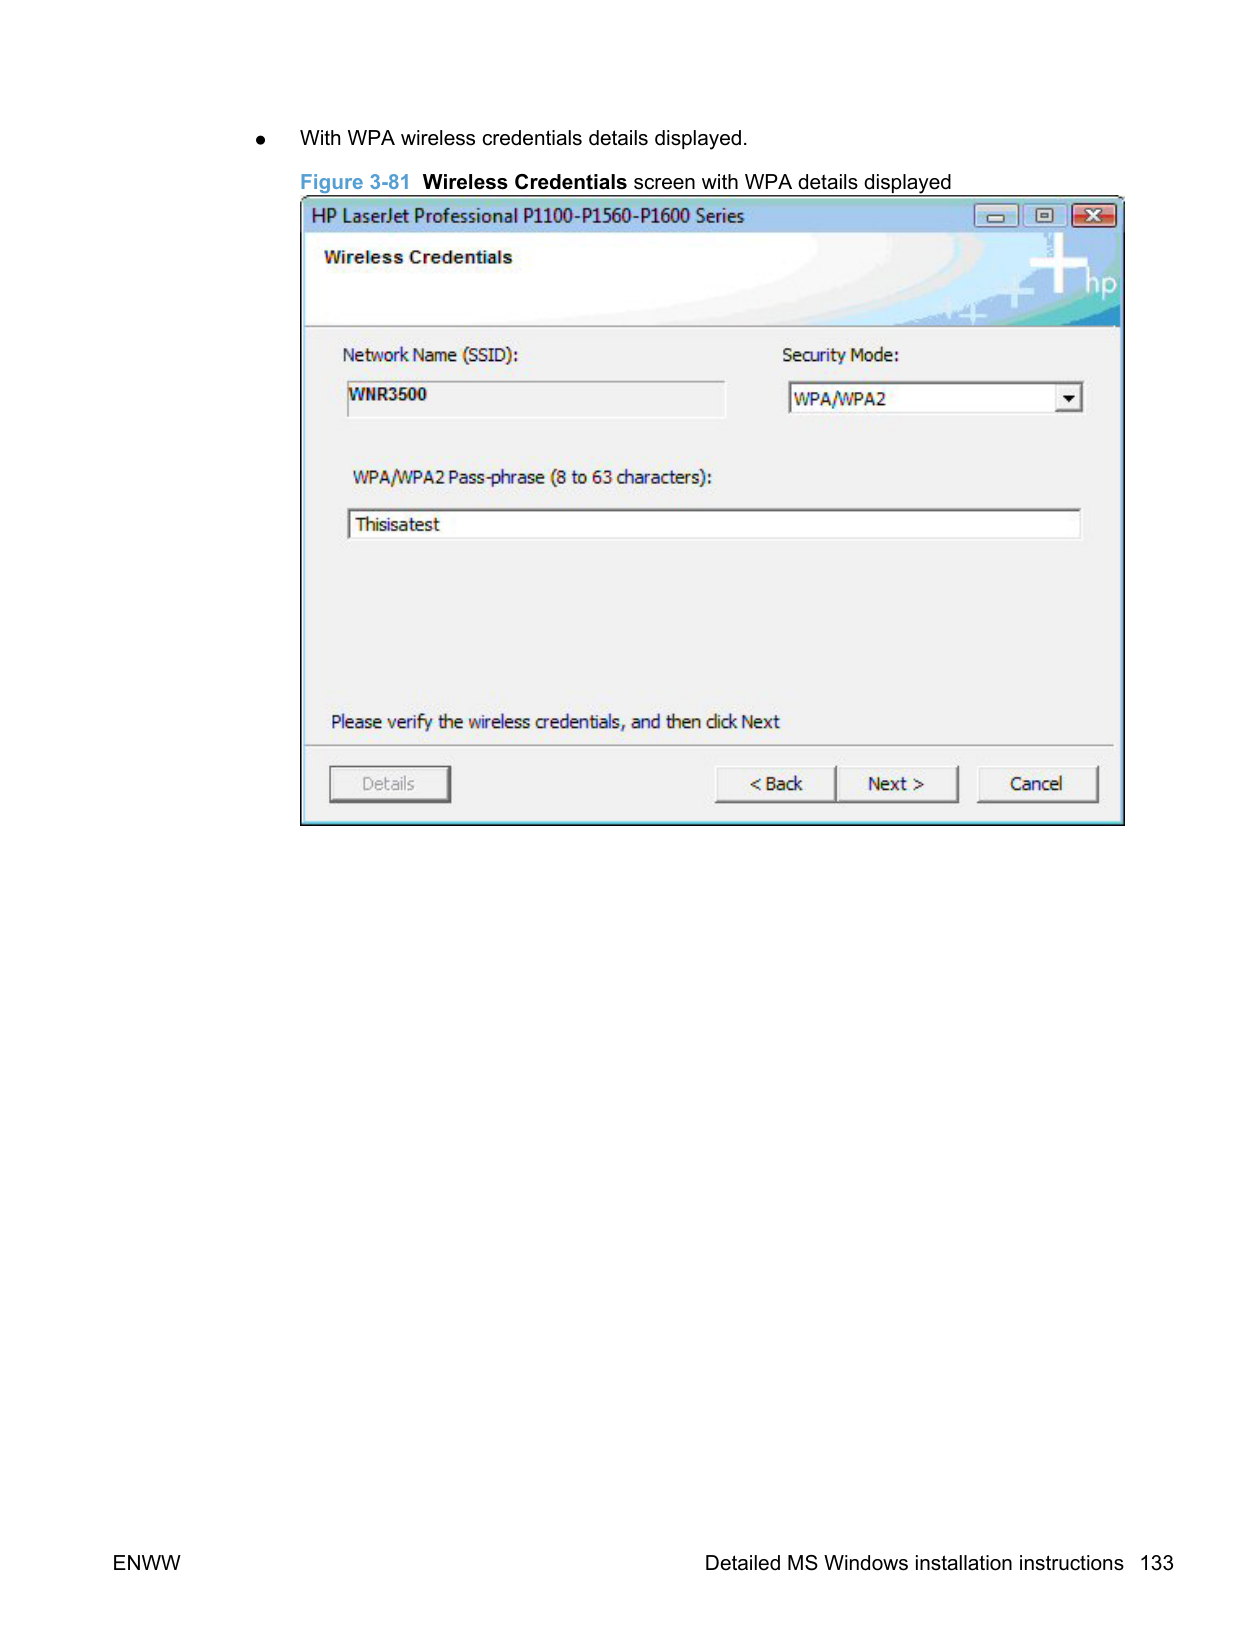
● With the wireless credentials for the router/access point hidden.
######### Figure 3-80 Wireless Credentials screen with login details hidden

● With WPA wireless credentials details displayed.
Figure 3-81 Wireless Credentials screen with WPA details displayed

● With WEP wireless credentials details displayed.
Figure 3-82 Wireless Credentials screen with WEP details displayed
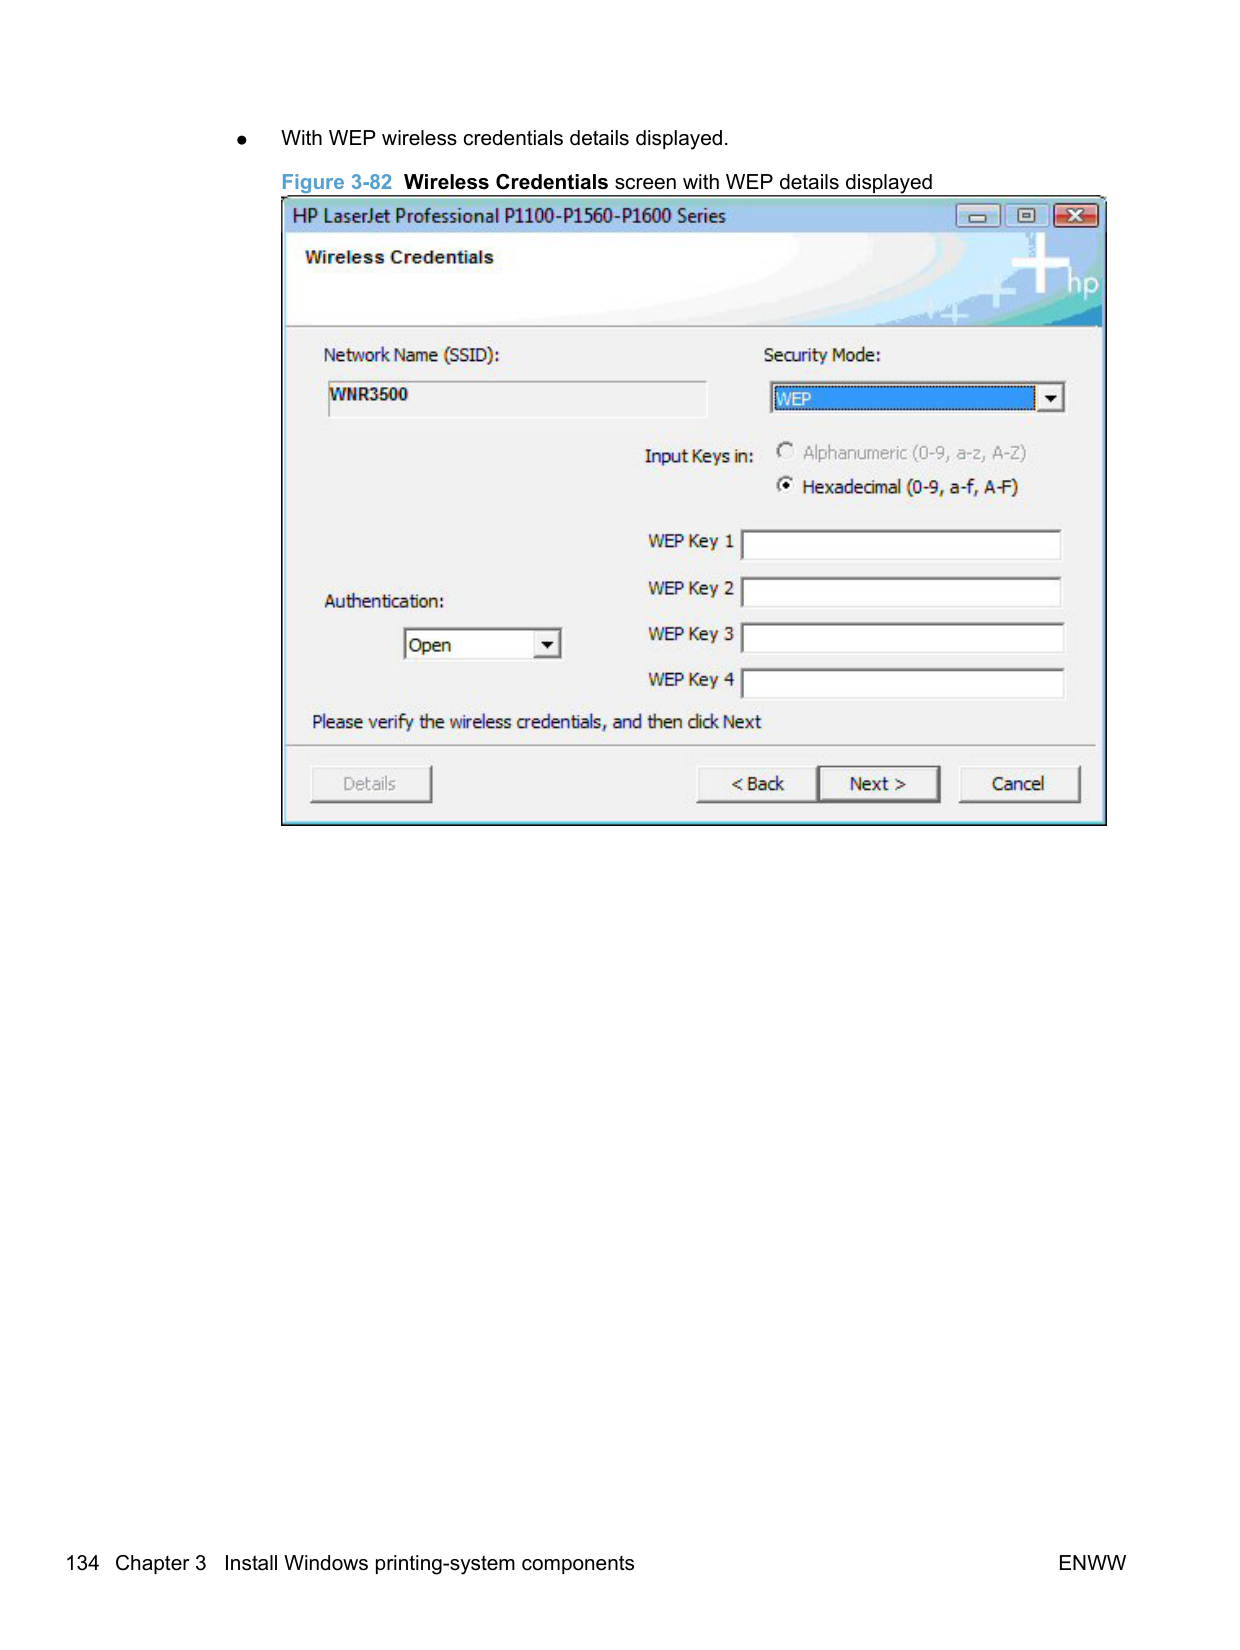

● With no security enabled on the router/access point.
Figure 3-83 Wireless Credentials screen with no security enabled on the router/access point

########## 11. If the connection is successful, the Network Connection Successful screen appears. Disconnectthe USB cable between the computer and the product and click the Next button to proceed to Step12.Figure 3-84 Network Connection Successful screen

If the connection is not successful, one of the following error message screens appears. Click the Back button on either error message screen to return to one of the Wireless Credentials screens listed in Step 9 and to configure the wireless credentials again.
● If the product is connected on the network but cannot communicate with the computer, the following error message appears with the instructions to make sure the computer and the product are on the same network.
Figure 3-85 Wireless Connection Failure screen
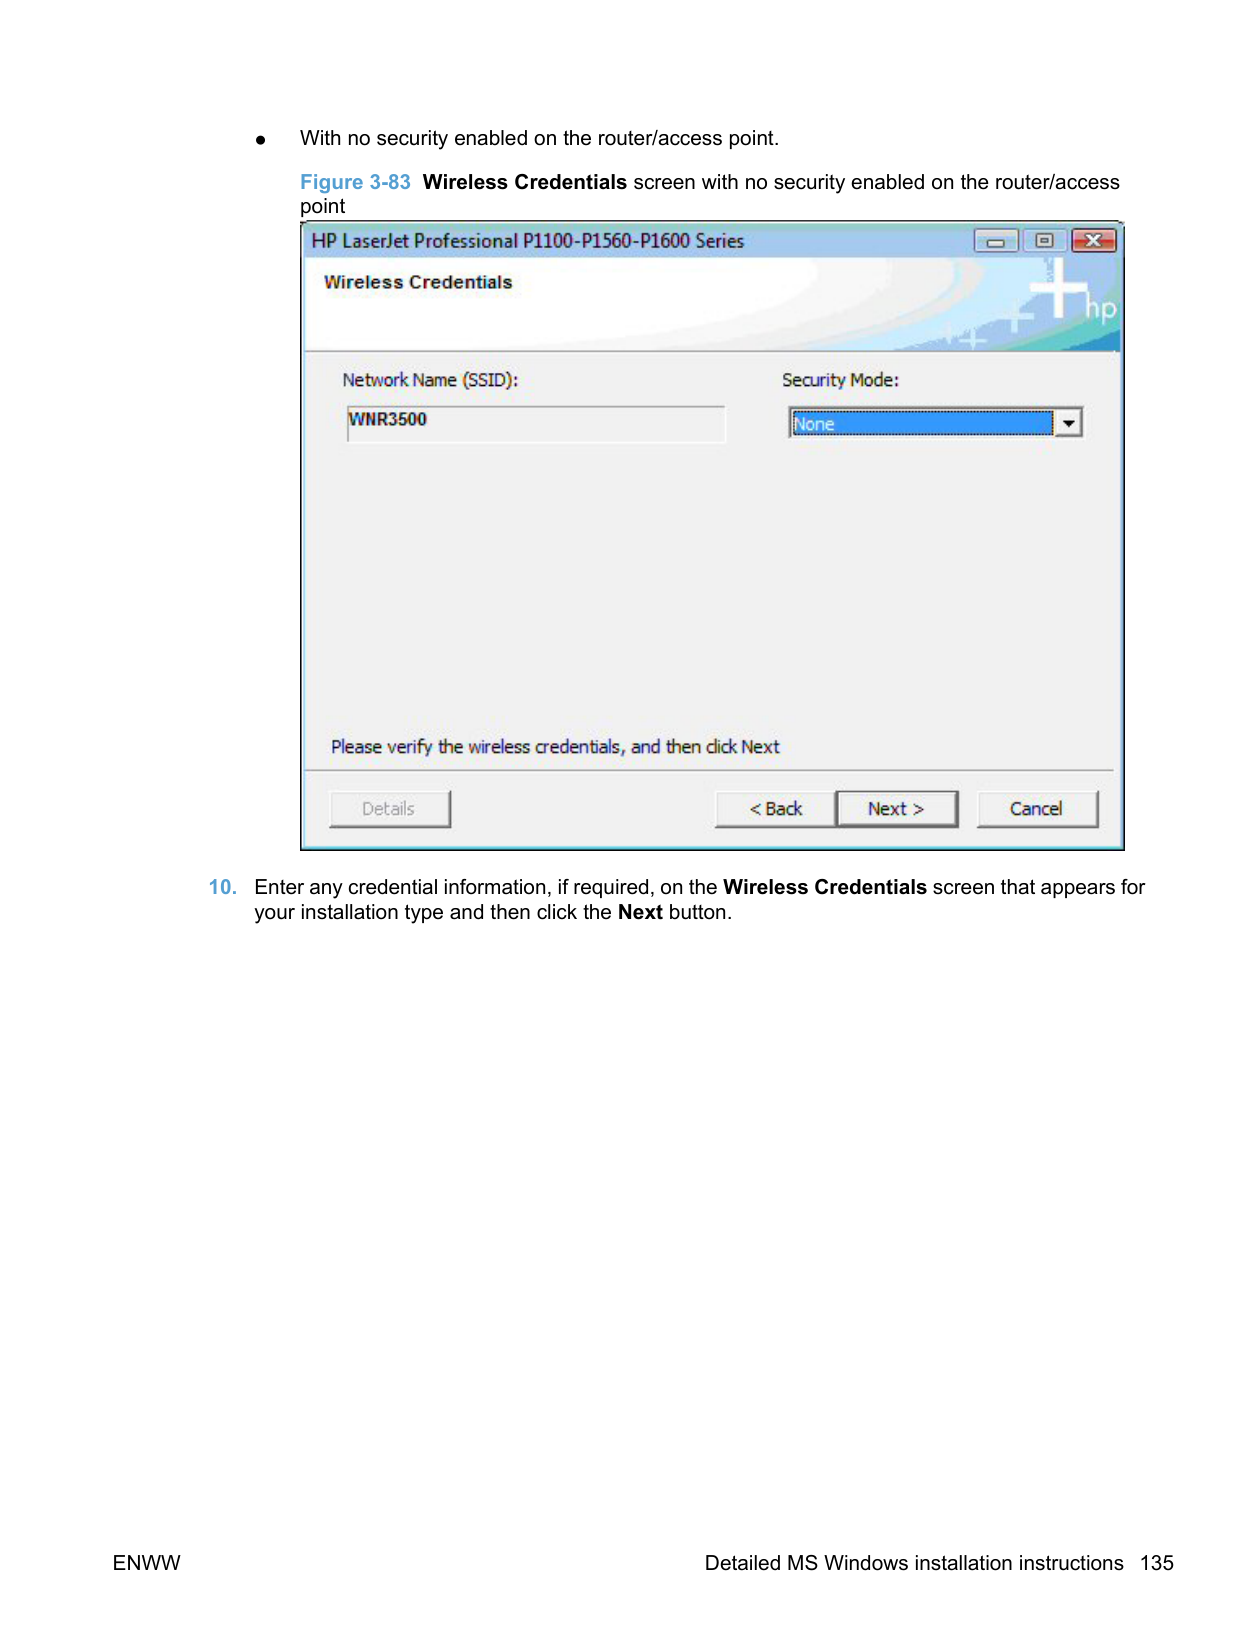

########## ● If wireless credentials are used that the product cannot connect with, the following error message appears. Figure 3-86 Wireless Connection Failure screen

########## 12. The Congratulations! Software installation complete screen appears upon successfulinstallation of the driver.Figure 3-87 Software installation complete screen (part 1)

########## 13. Select Register your product and Print Test Page, and then click the Next button. A Web browseropens to the HP Product Registration page, and a test page prints at the product.

| | |---|
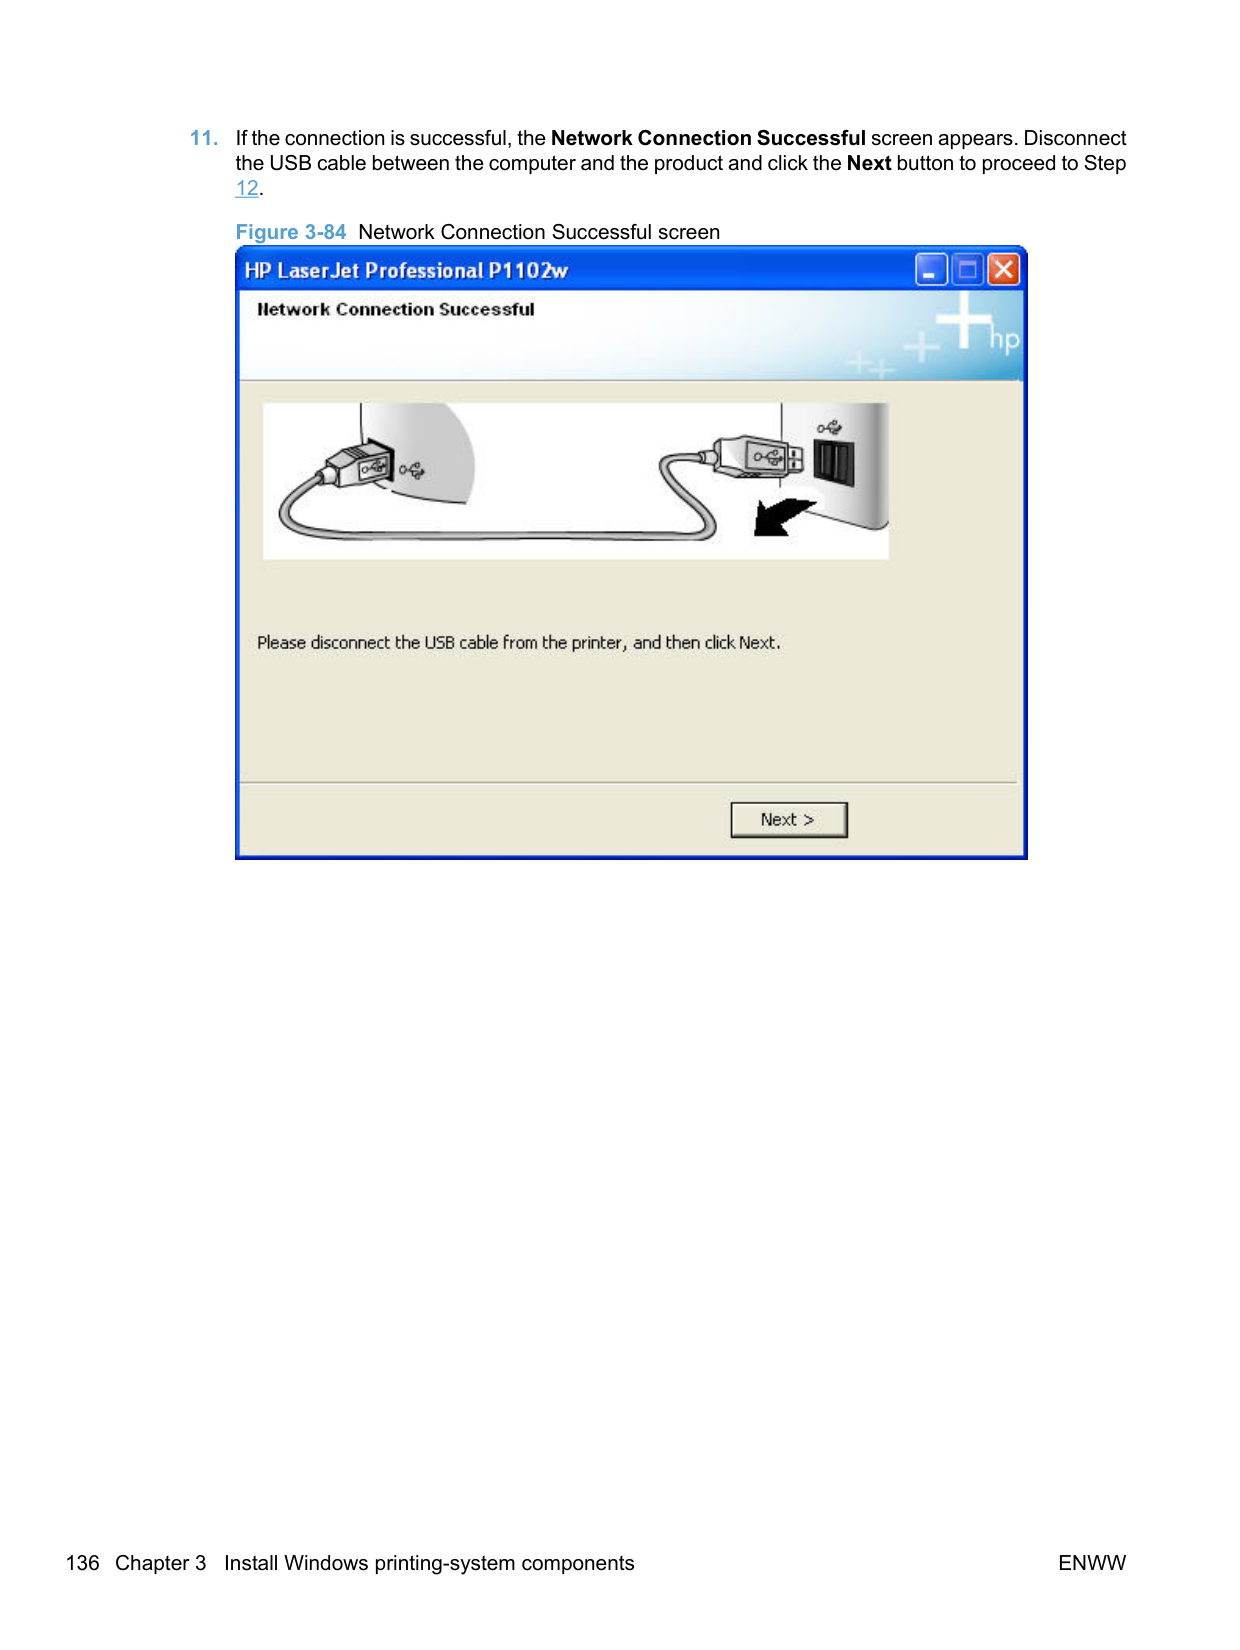
NOTE: For P1600 series models, the option to download the PCL5e driver appears on this screen.
######### Advanced install
The Wireless Configuration Utility (WCU) guides the user through the setup process. The WCU will attempt to automatically configure the wireless settings. The WCU will silently navigate the embedded web server for the user's router/access point to obtain the wireless network configuration settings, using the default username and password for the router/access point.
If the WCU cannot gain access to the user’s router/access point, it will guide the user through configuring the printer via Wi-Fi Protected Setup (WPS) or manual configuration.
| | |---|
NOTE: Silent configuration of wireless settings is supported on the wireless routers listed in Supported routers for wireless products that support automatic configuration. on page 254
A series of dialog boxes appear during installation of the HP LaserJet Professional P1100/P1560/P1600 Series Printer printing-system software in Windows environments.
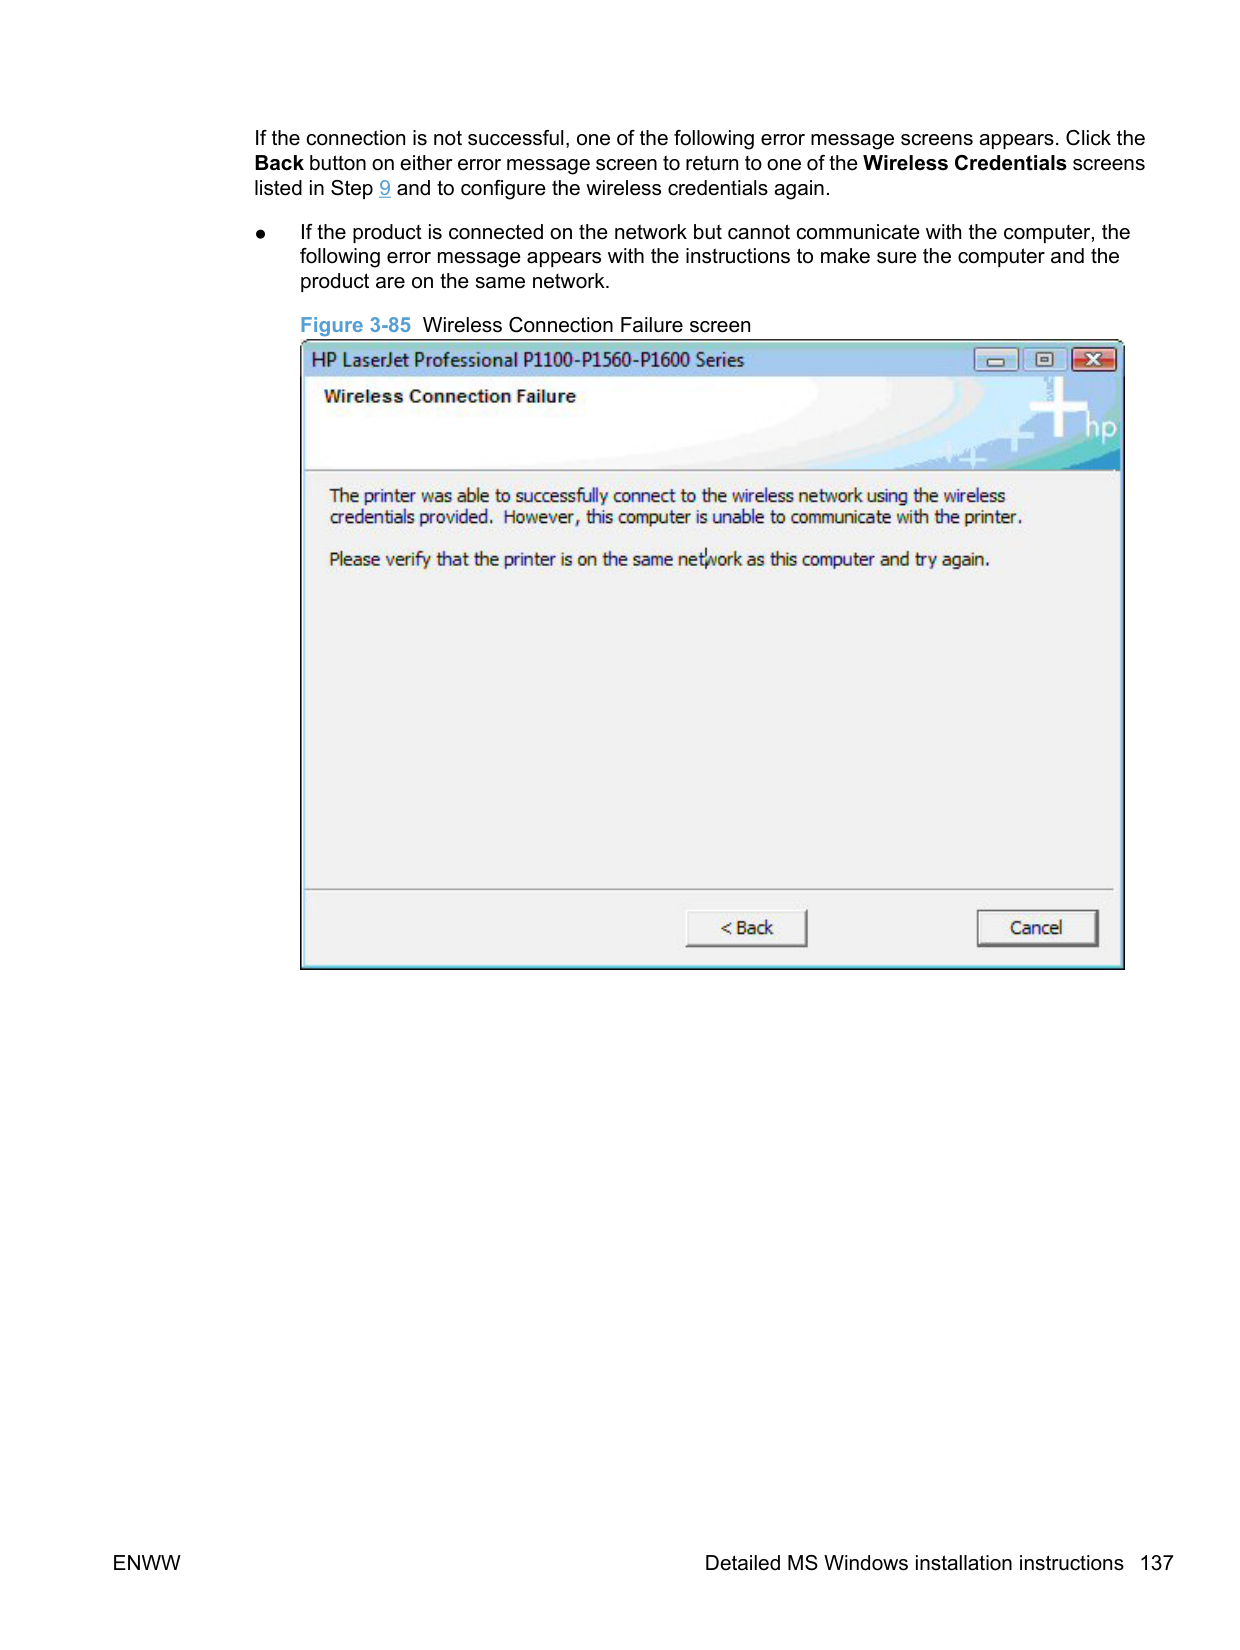
| | |---|
NOTE: You can return to the previous dialog box by clicking Back or exit the HP LaserJet Professional P1100/P1560/P1600 Series Printer printing-system software installation by clicking Cancel wherever these options appear in the installation sequence.
######### Figure 3-89 Software Installation — Initial screen

########## 3. Click Install to begin the installation process. The Choose Easy Install or Advanced Installscreen appears.Figure 3-90 Choose Easy Install or Advanced Install screen

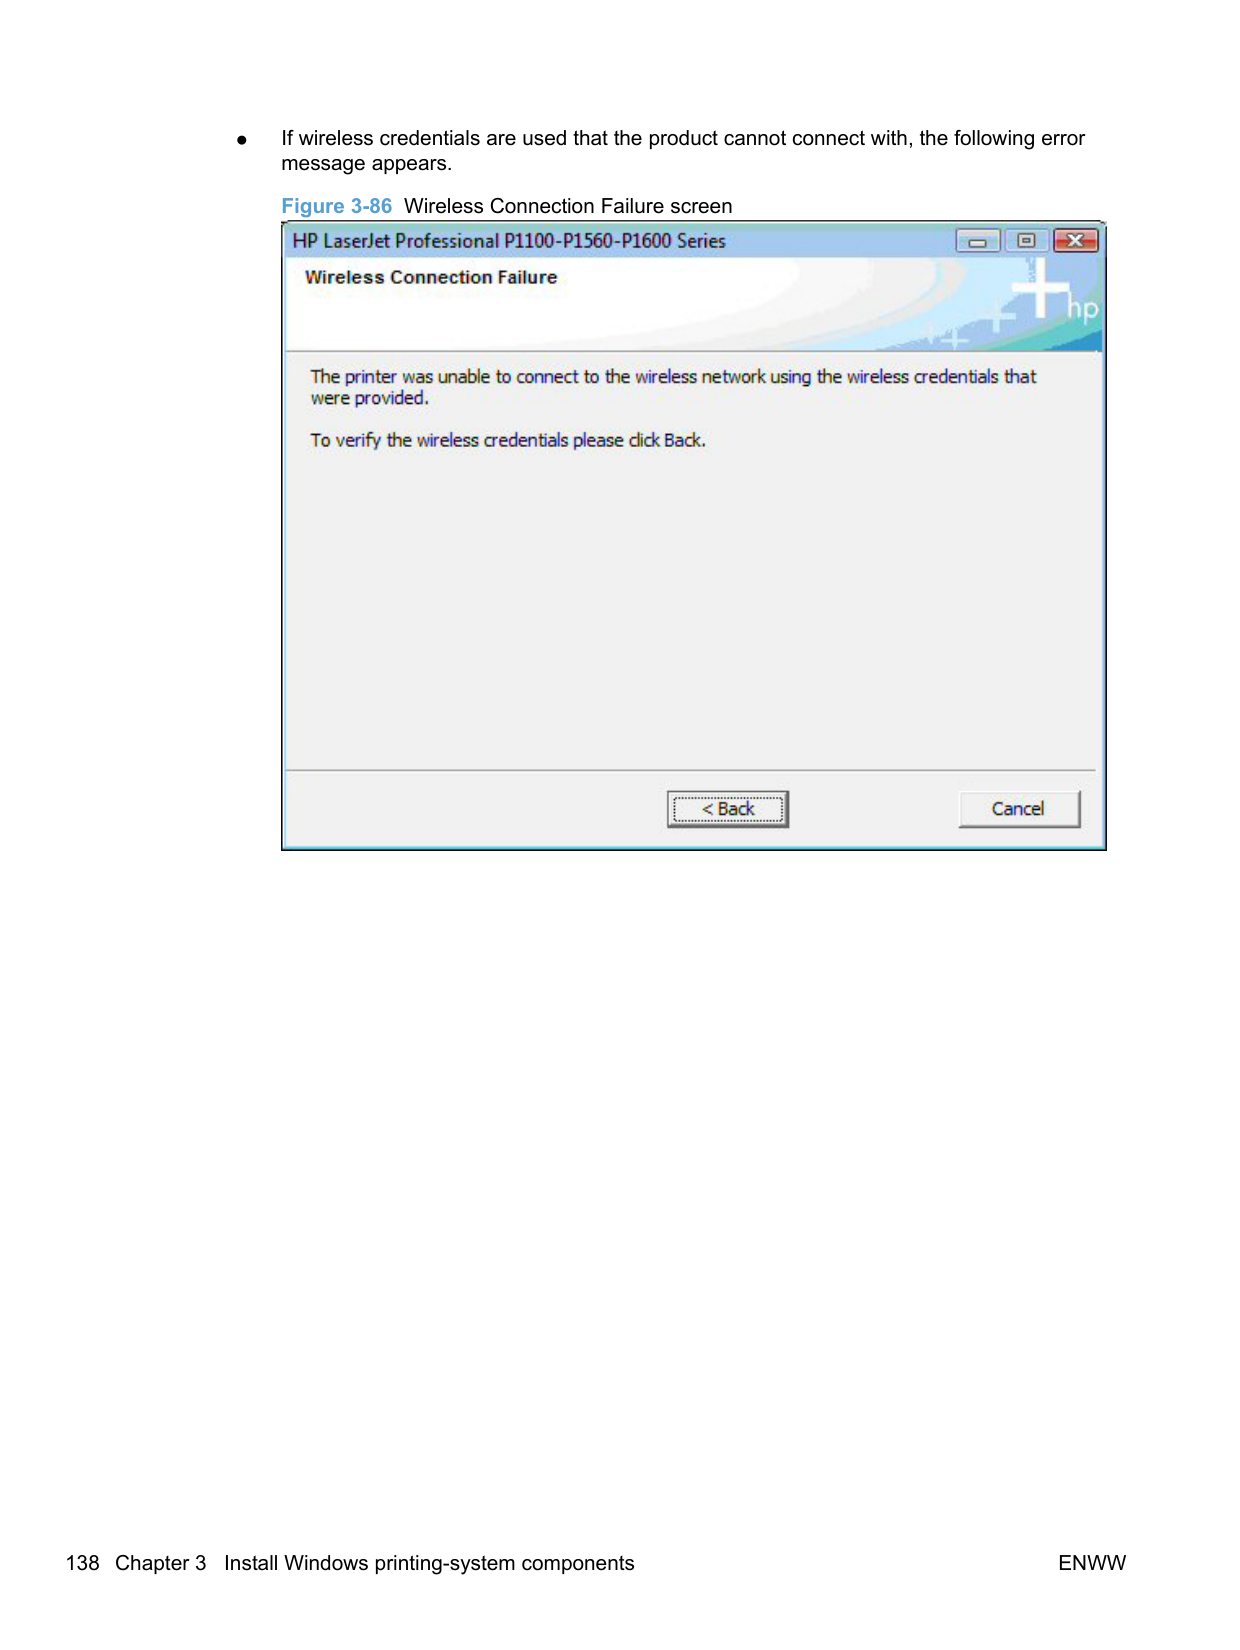
The Choose Easy Install or Advanced Install screen contains links to the following information.
########## 4. Select Easy Install (recommended). Using Easy Install (recommended) allows the installationagreements and default settings to be accepted without being prompted for them during theinstallation. Advanced Install allows you to read, and manually accept, each of the installationagreements. Click the Next button to continue the installation.


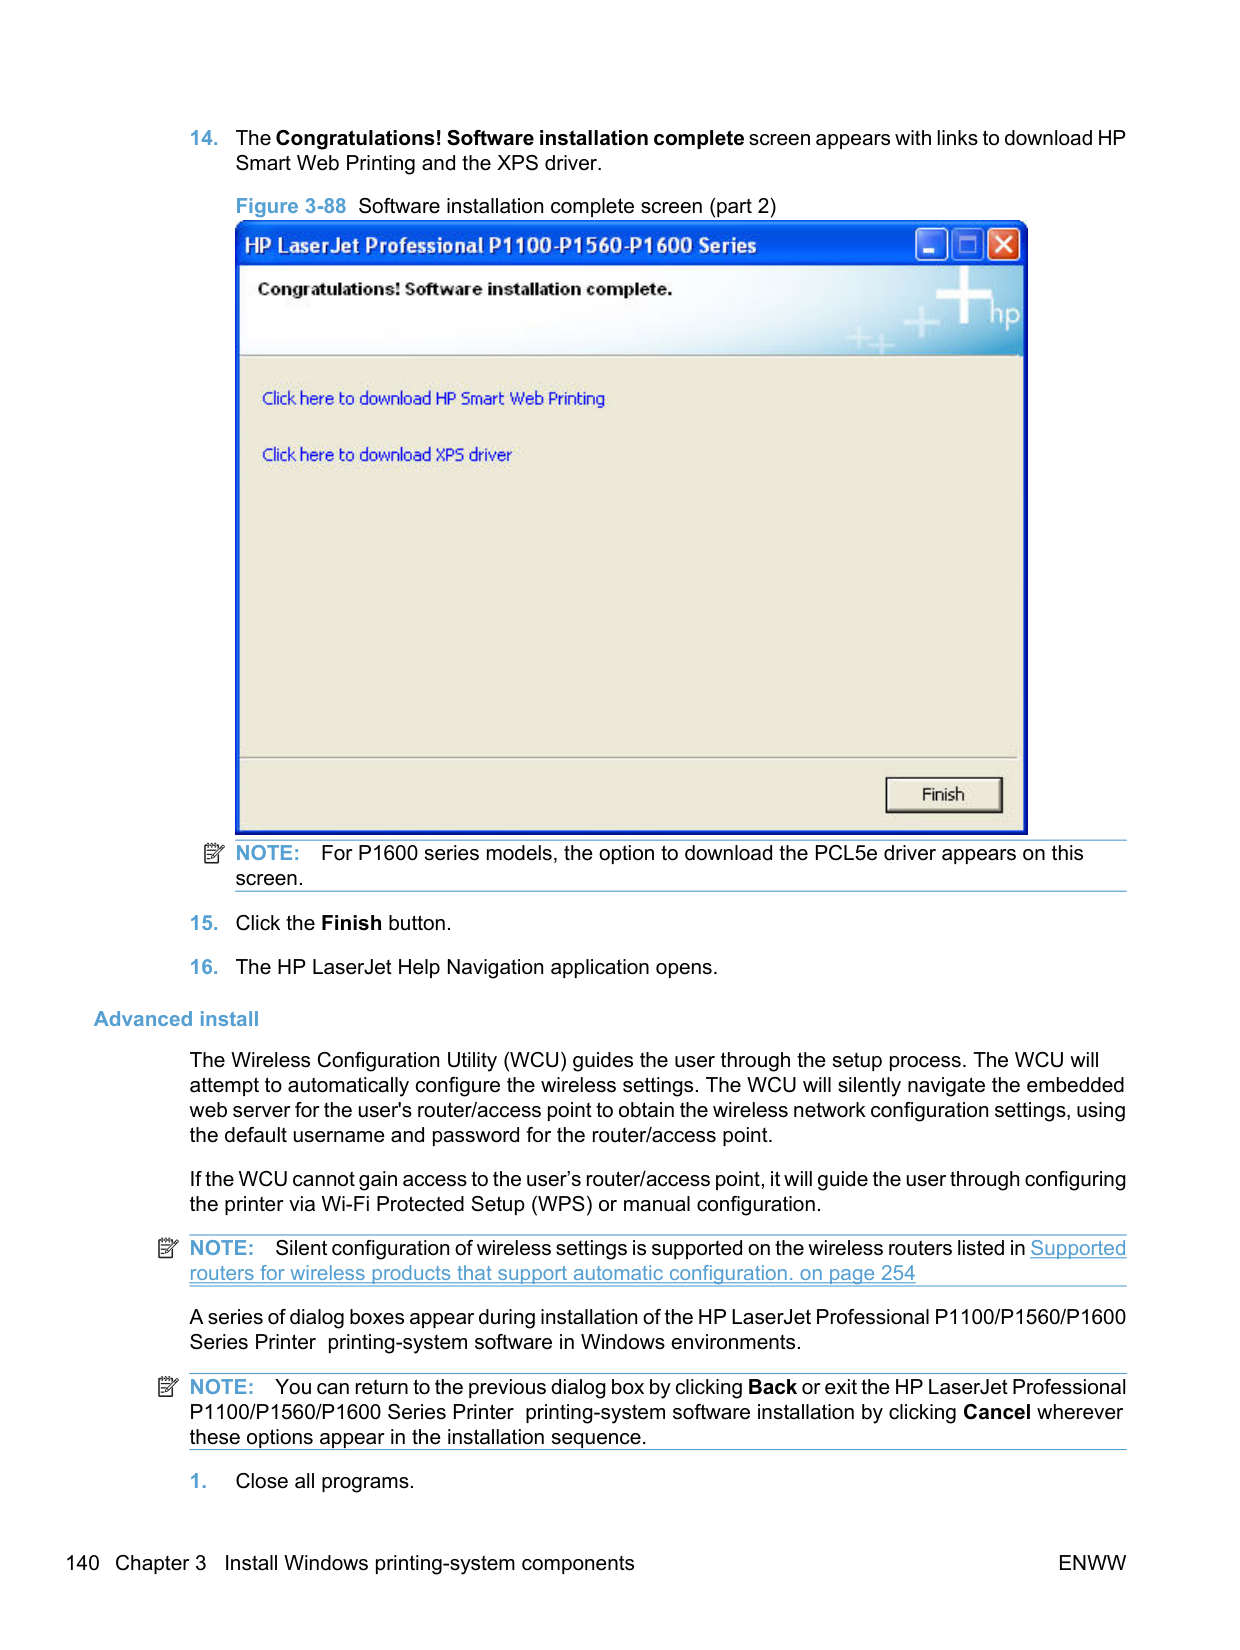


For automatic Wi-Fi protected configuration, follow these steps. a. Press the Wi-Fi Protected Setup (WPS) button on the router, select I have pressed the Wi-
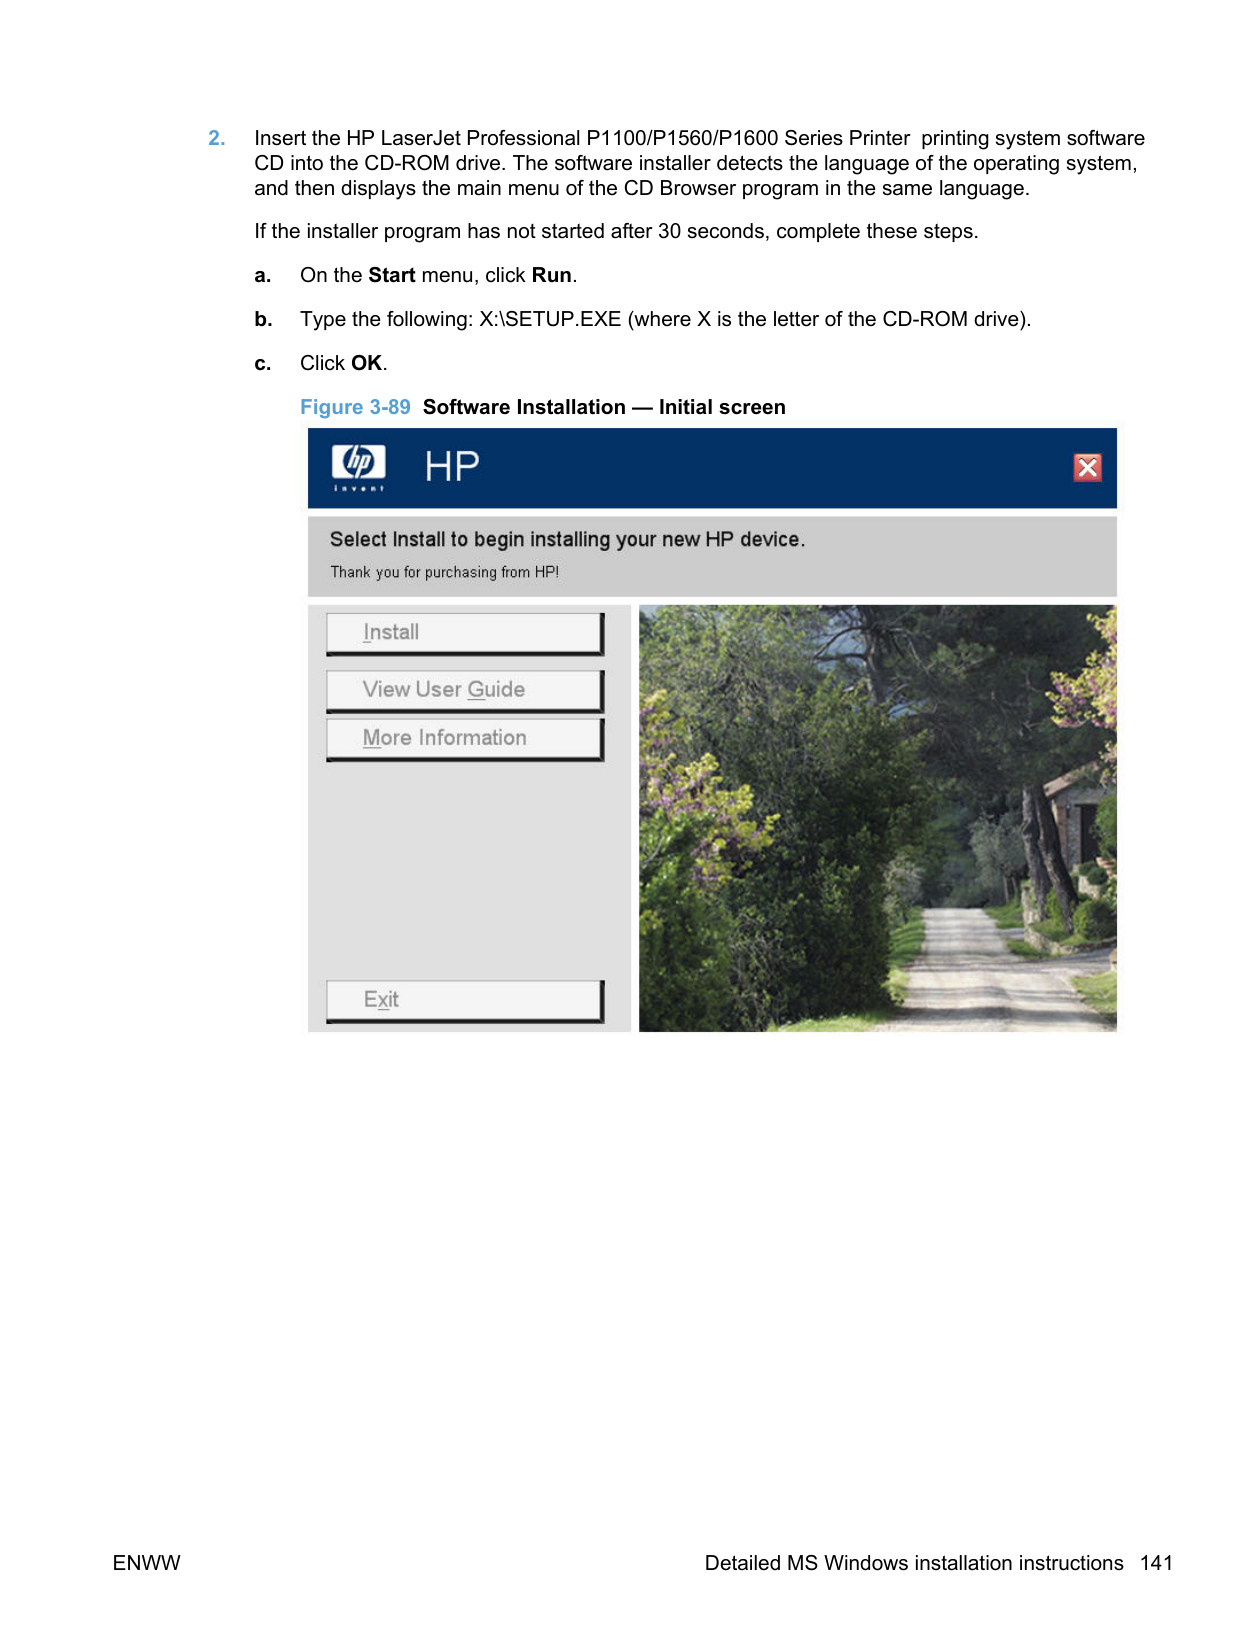
Fi Protected Setup button on my router or access point, and then click the Next button. b. If WPS successfully connects, the installation proceeds to the Network Connection
Successful screen in Step 12.
c. If the product is connected on the network but cannot communicate with the computer, the following error message appears with the instructions to make sure the computer and the product are on the same network. Click the Back button to return to Step 8.
Figure 3-97 Wireless Connection Failure screen

d. If WPS fails due to the wireless router or access point not being successfully placed in WPS mode, the following error message appears. Click the Retry button to return to Step 8 or click the Next button to enter the wireless credentials manually.
Figure 3-98 Wireless Configuration Failed screen

######### For manual configuration, follow these steps. a. Select I do not want to use WiFi Protected setup. I want to enter the wireless credentials manually and then click the Next button.
b. The Wireless Credentials screen appears in the following forms.
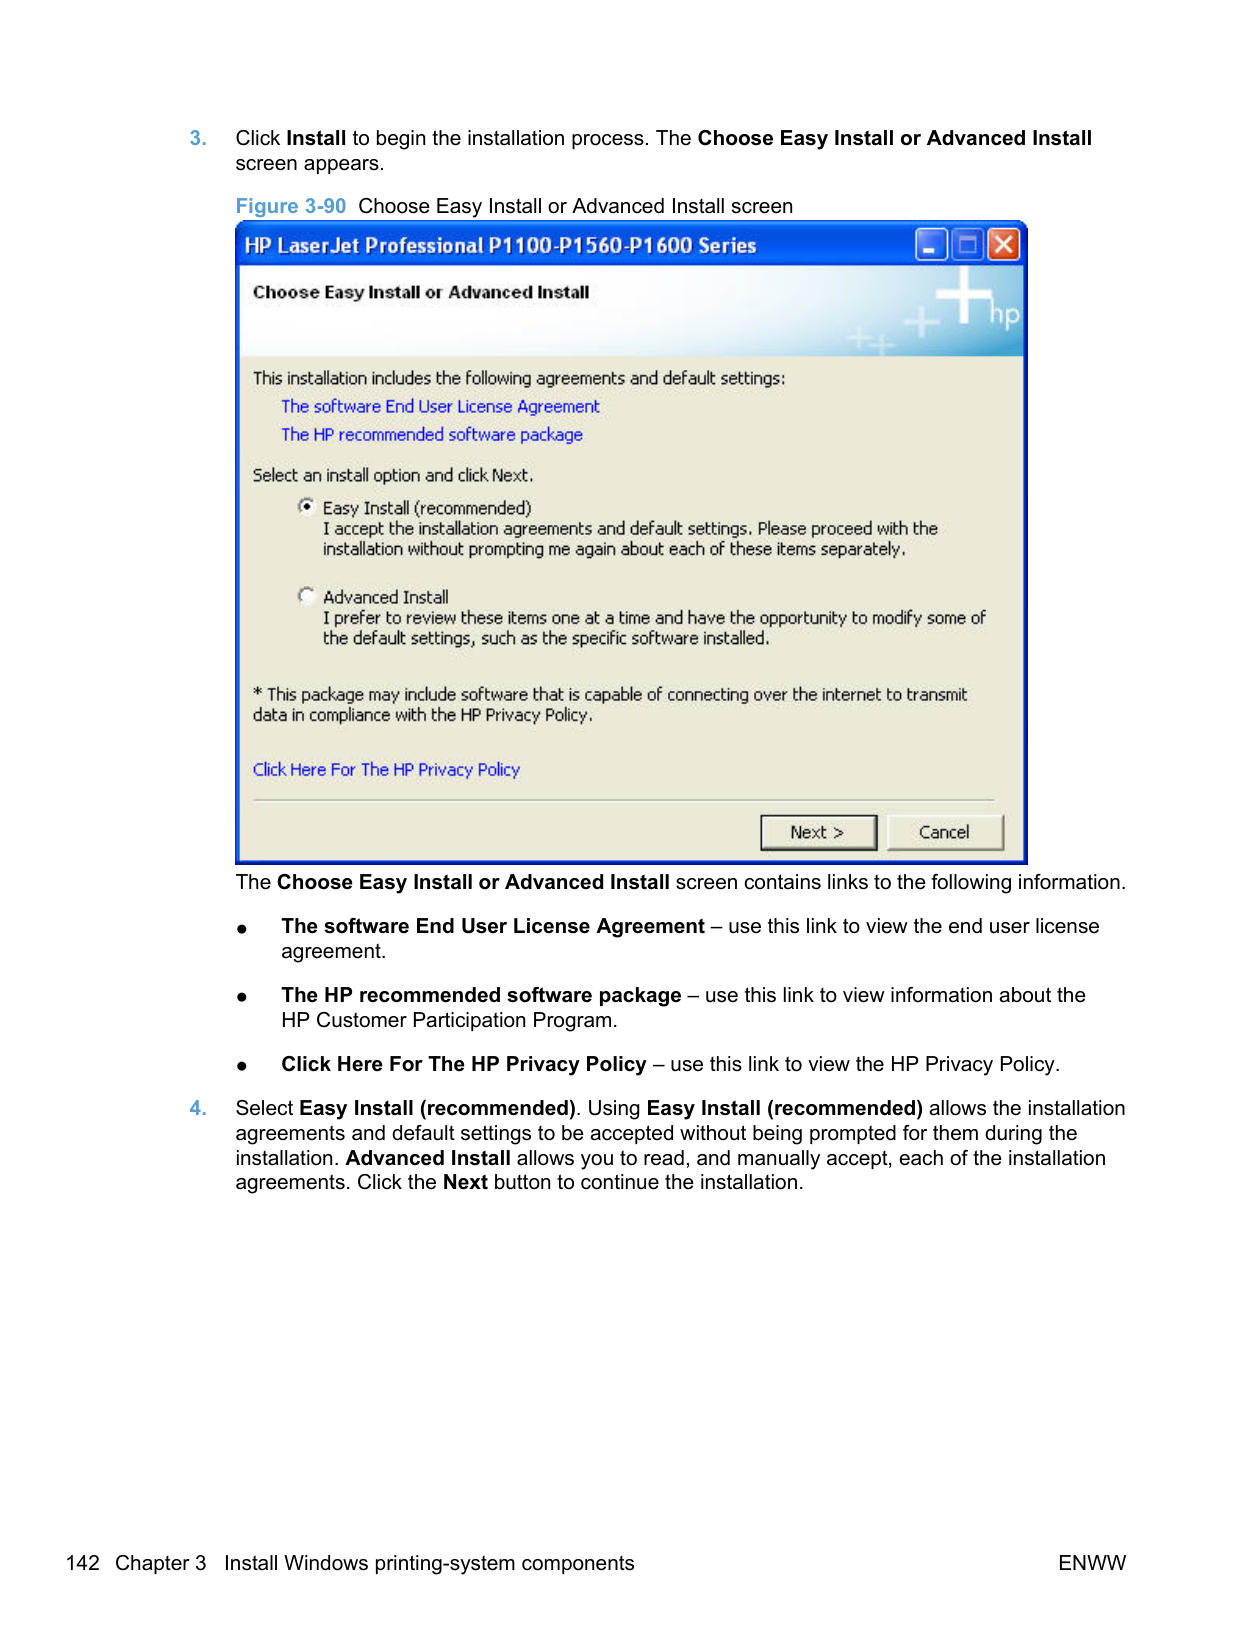
● With the wireless credentials for the router/access point hidden.
######### Figure 3-99 Wireless Credentials screen with login details hidden

● With WPA wireless credentials details displayed.
######### Figure 3-100 Wireless Credentials screen with WPA details displayed

● With WEP wireless credentials details displayed.
######### Figure 3-101 Wireless Credentials screen with WEP details displayed

● With no security enabled on the router/access point.
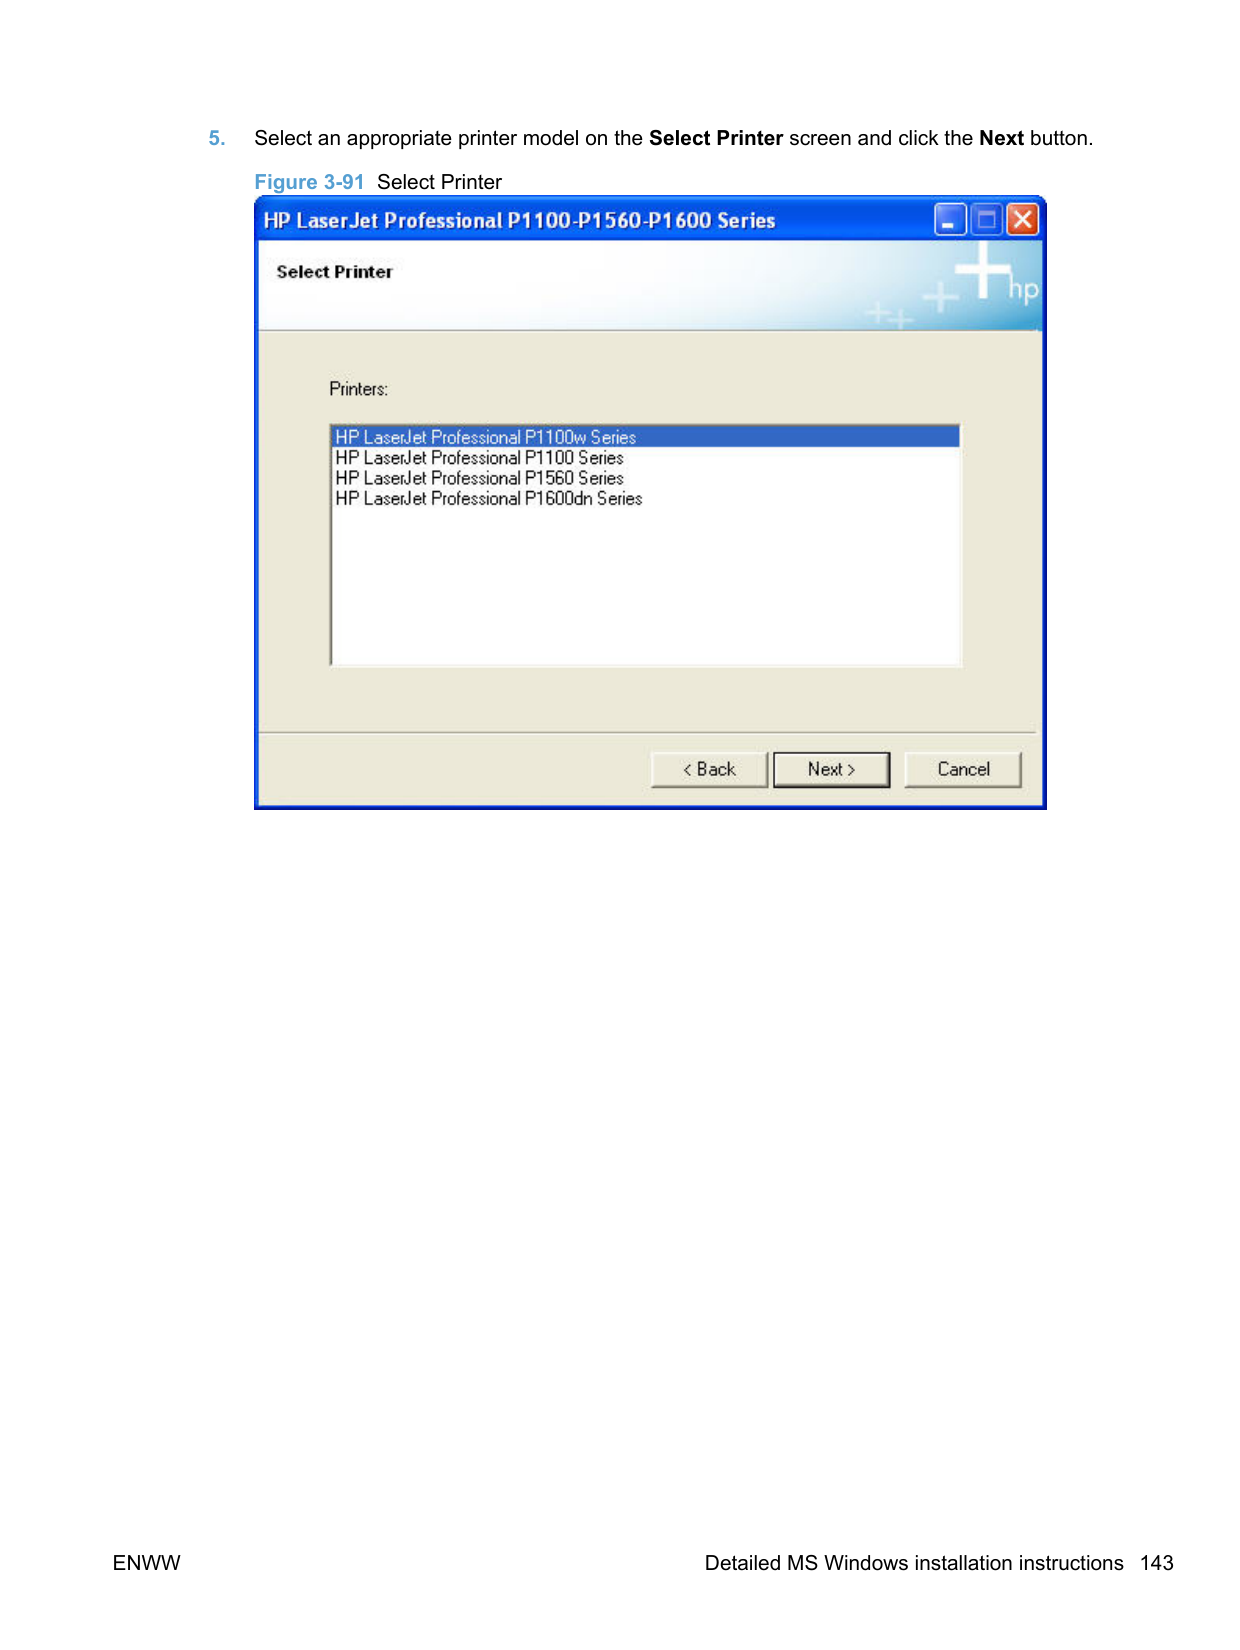
Figure 3-102 Wireless Credentials screen with no security enabled on the router

########## 11. Select the wireless router/access point (Network Name (SSID)) to connect to on the Networks Discovered dialog. Click the Next button. Figure 3-103 Networks Discovered screen

########## 12. If the connection is successful, the Network Connection Successful screen appears. Disconnect the USB cable between the computer and the product and click the Next button. Figure 3-104 Network Connection Successful screen


opens to the HP Product Registration page, and a test page prints at the product.


NOTE: For P1600 series models, the option to download the PCL5e driver appears on this screen.
| | |---|
######### Install the print driver on a non-secure network
A series of dialog boxes appear during installation of the HP LaserJet Professional P1100/P1560/P1600 Series Printer printing-system software in Windows environments.
| |
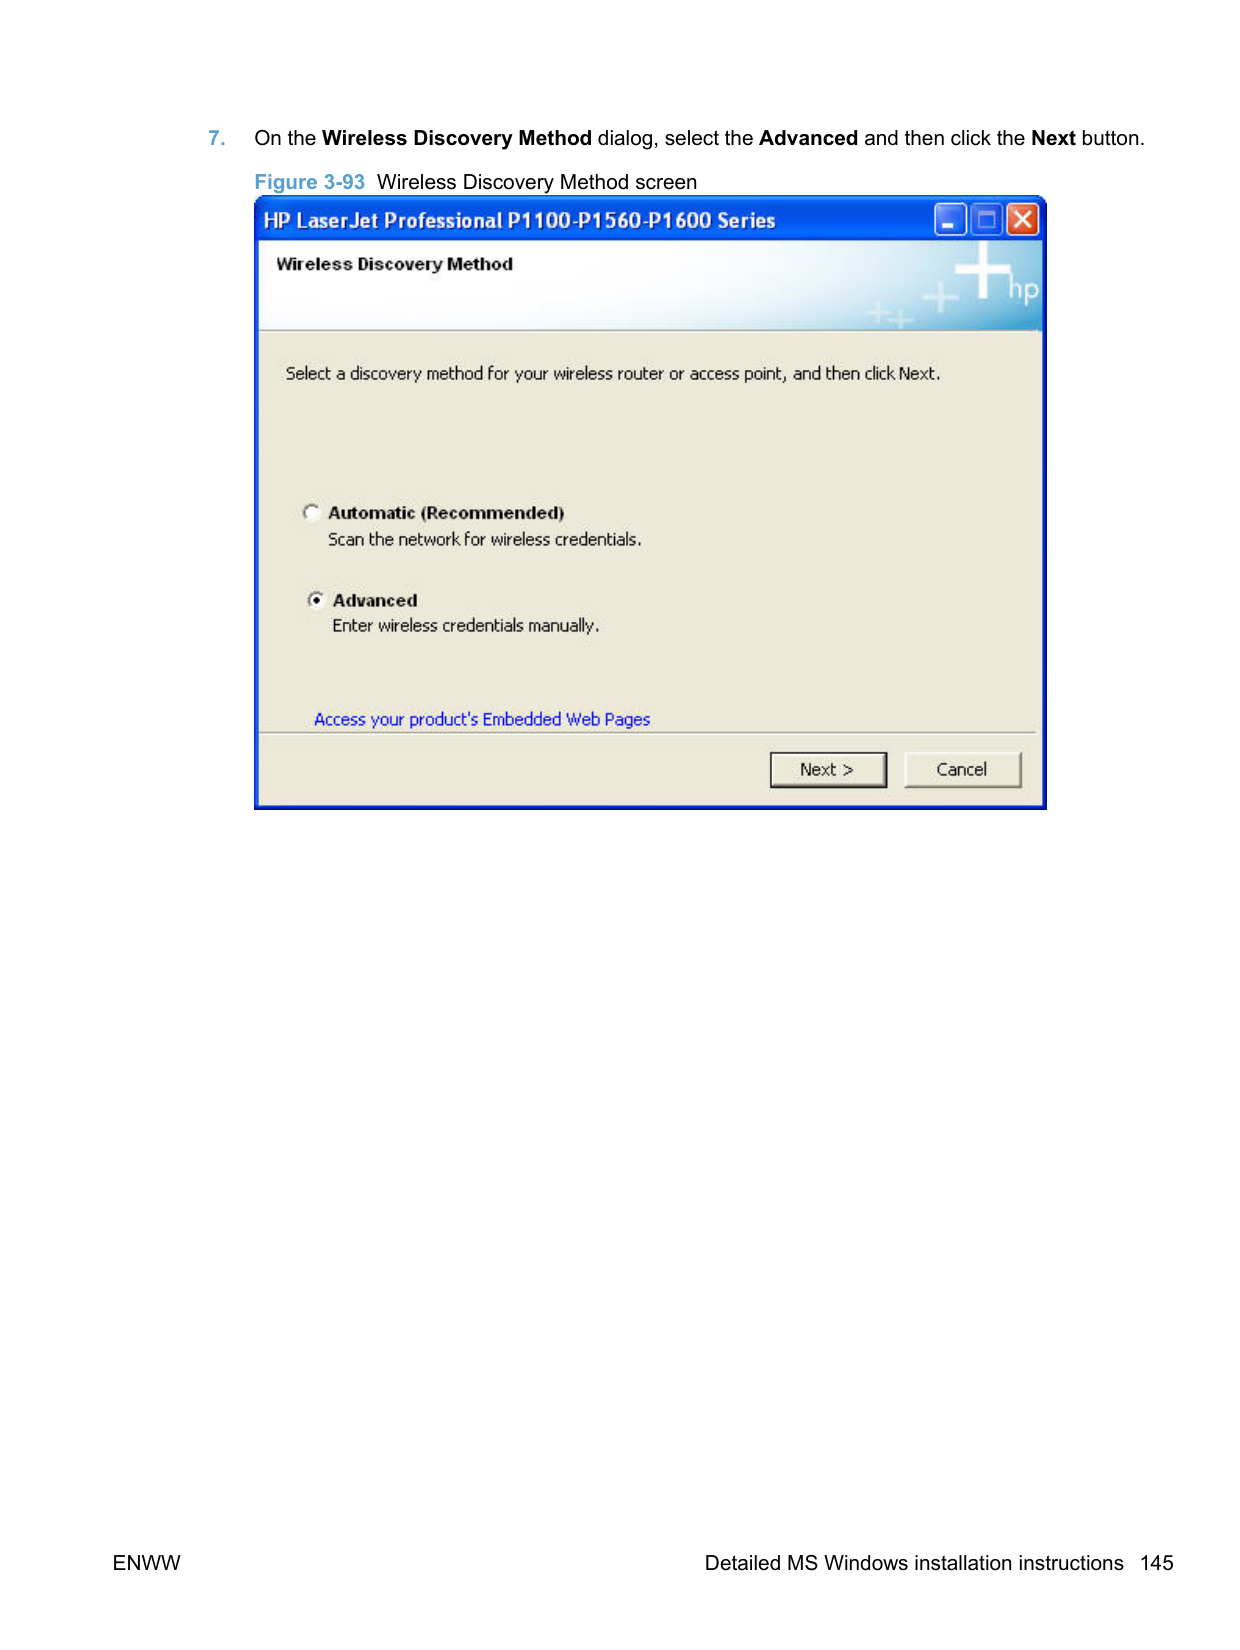
|---|
NOTE: You can return to the previous dialog box by clicking Back or exit the HP LaserJet Professional P1100/P1560/P1600 Series Printer printing-system software installation by clicking Cancel wherever these options appear in the installation sequence.
######### c. Click OK. Figure 3-107 Software Installation — Initial screen

########## 3. Click Install to begin the installation process. The Choose Easy Install or Advanced Installscreen appears.Figure 3-108 Choose Easy Install or Advanced Install screen

The Choose Easy Install or Advanced Install screen contains links to the following information.
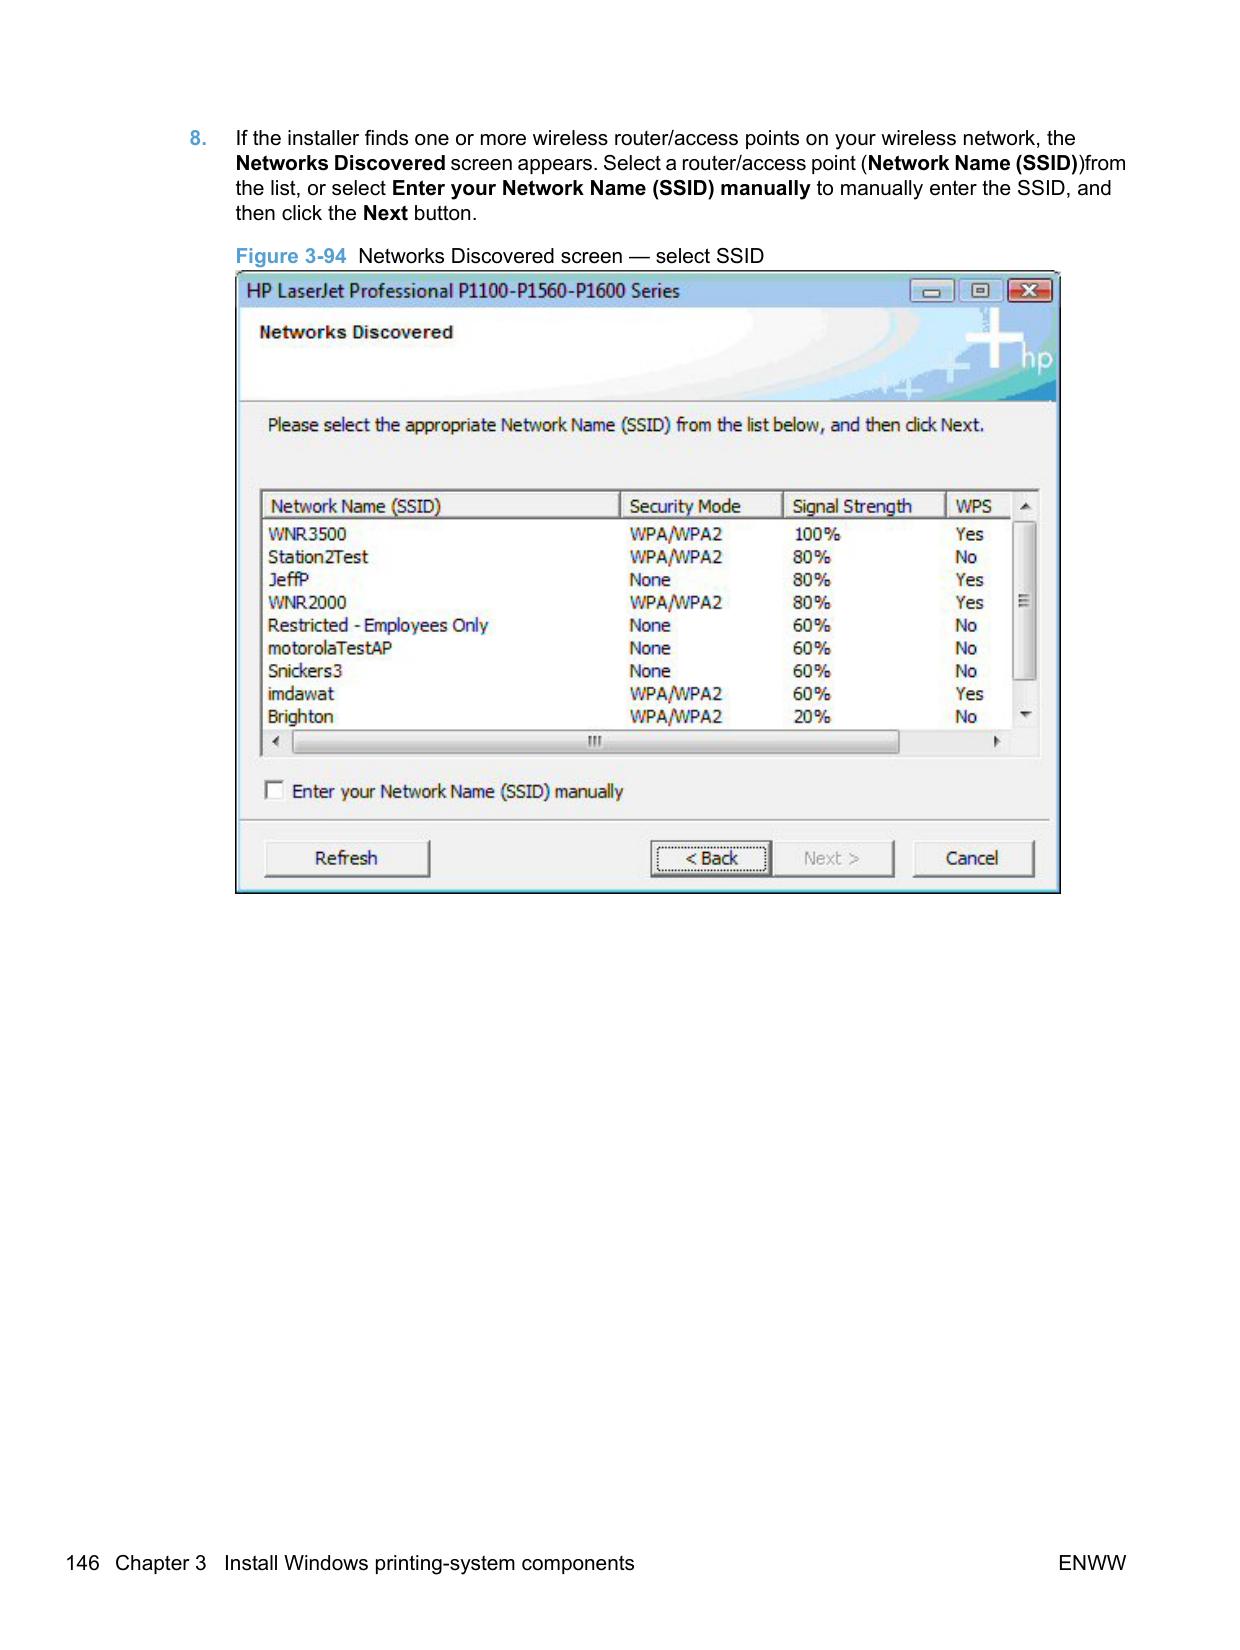
########## 4. Select Easy Install (recommended). Using Easy Install (recommended) allows the installationagreements and default settings to be accepted without being prompted for them during theinstallation. Advanced Install allows you to read, and manually accept, each of the installationagreements. Click the Next button to continue the installation.
########## 5. Select an appropriate printer model on the Select Printer screen and click the Next button.Figure 3-109 Select Printer

########## 6. Select Configure to Print over the Wireless Network if you are installing a new wireless printerand are not installing the driver for the purpose of connecting to a printer that already exists onyour wireless network. Click the Next button.Figure 3-110 Printer Connections screen


NOTE: Selecting Advanced on the Wireless Discovery Method dialog allows you to manually enter your wireless network credentials.
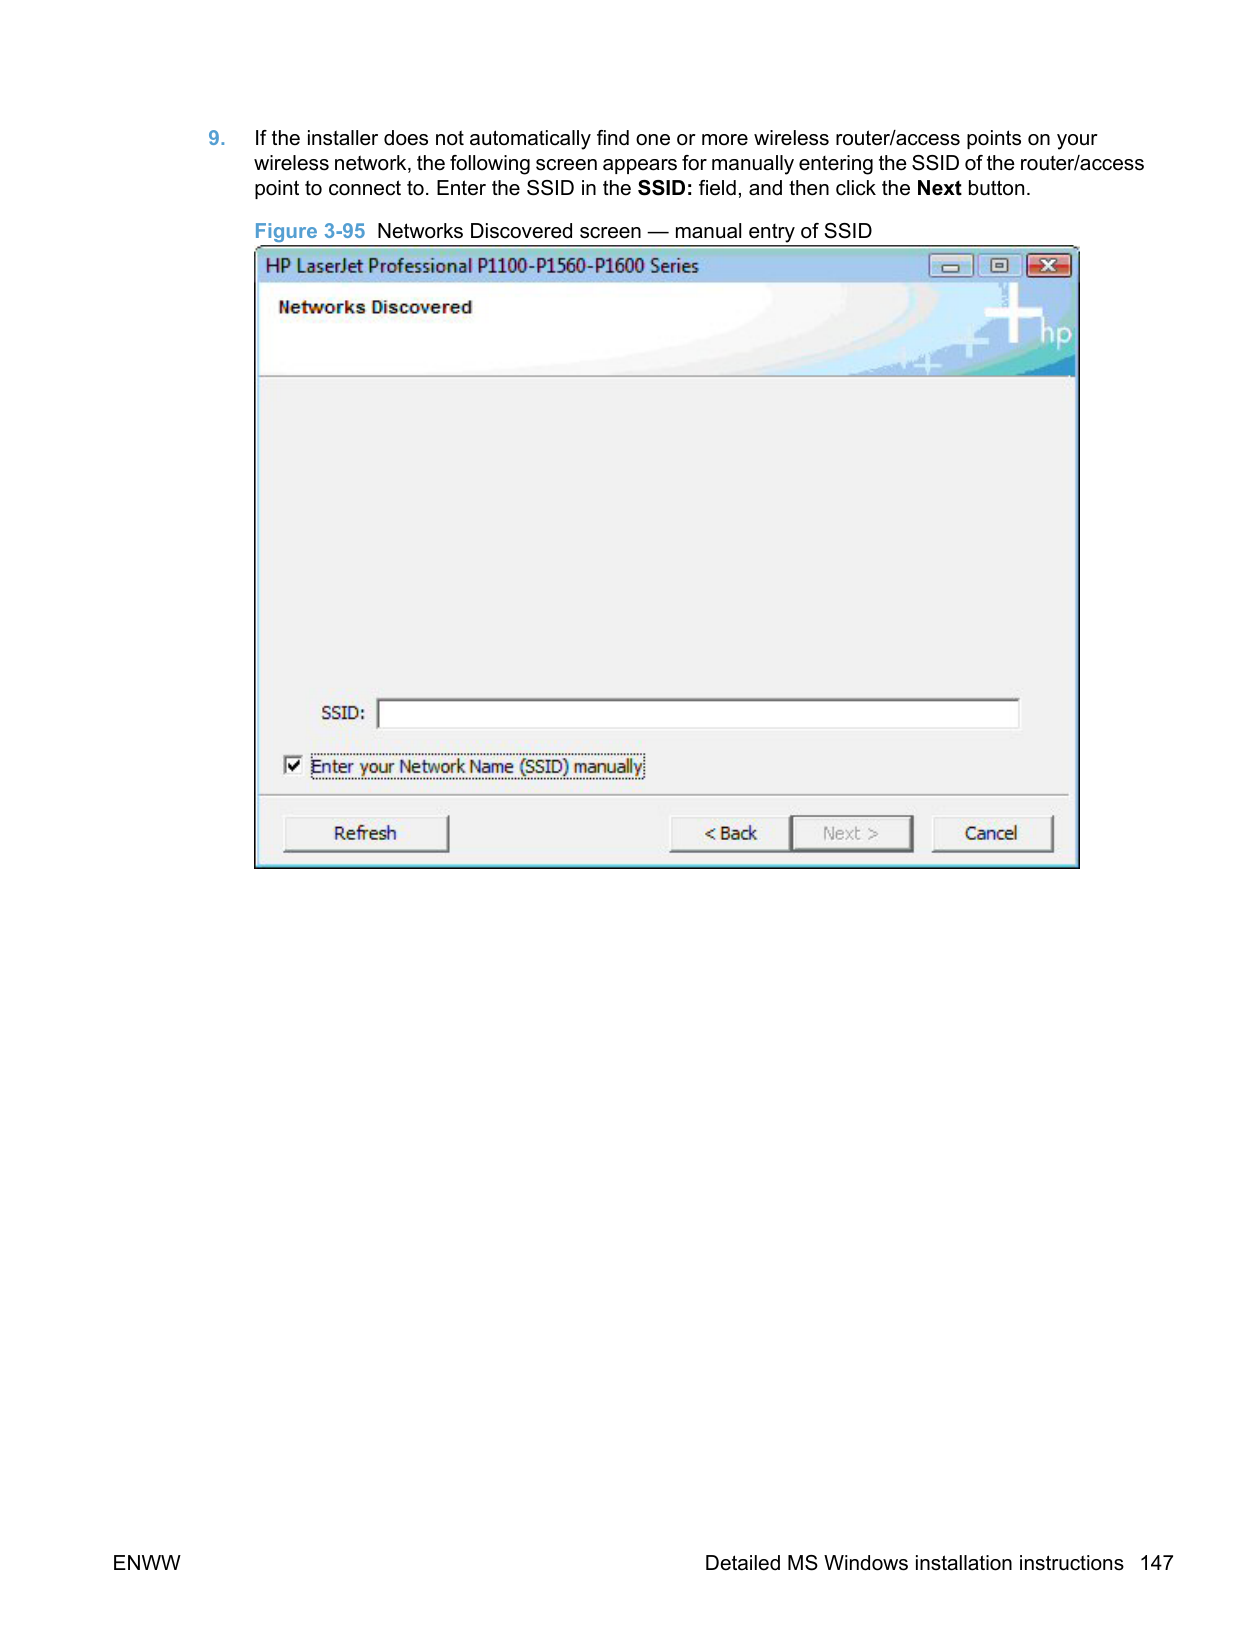
| | |---|
########## 8. Select the Network Name (SSID) to connect to on the Networks Discovered dialog. Click theNext button.Figure 3-112 Networks Discovered screen

########## 9. When the installer and the product connect via the wireless network, the Network ConnectionSuccessful screen appears. Disconnect the USB cable between the computer and the productand click the Next button.Figure 3-113 Network Connection Successful screen

########## 10. The Congratulations! Software installation complete screen appears upon successfulinstallation of the driver.Figure 3-114 Software installation complete screen (part 1)

########## 11. Select Register your product and Print Test Page, and then click the Next button. A Web browseropens to the HP Product Registration page, and a test page prints at the product.
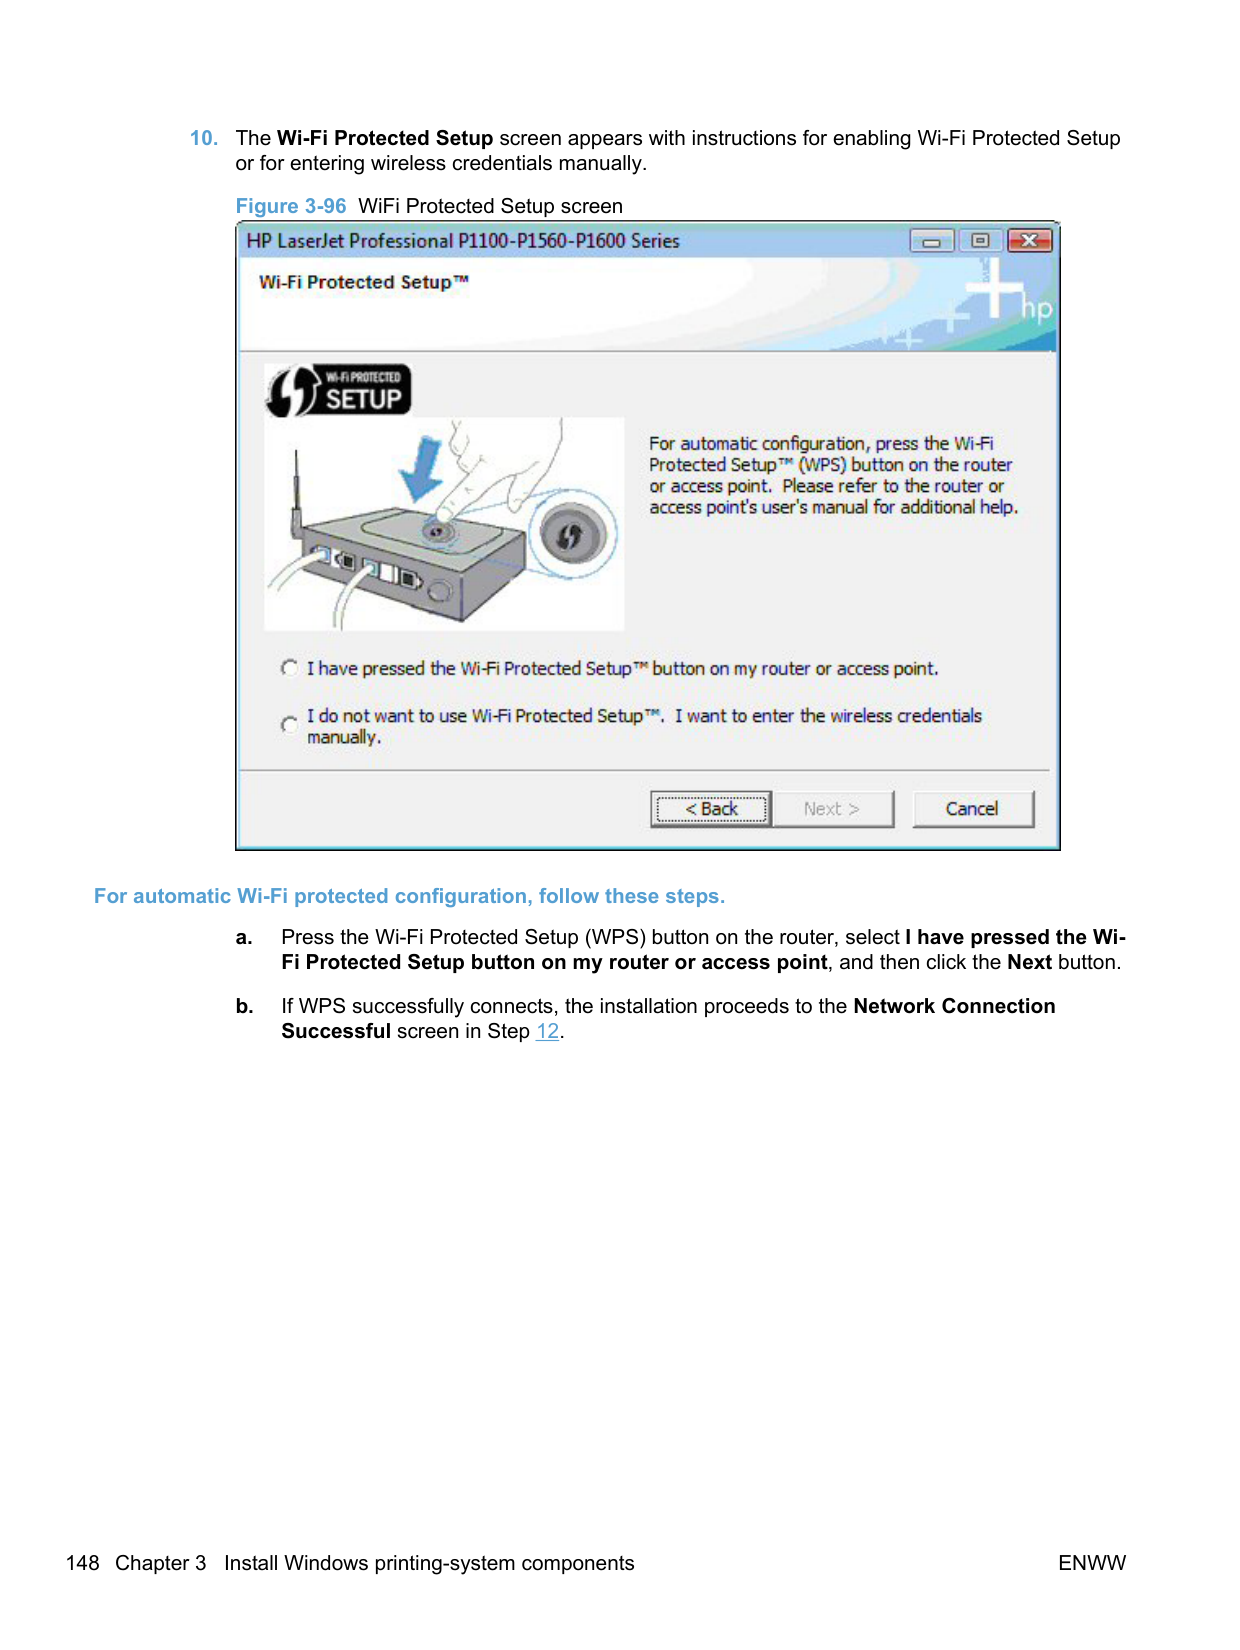

| | |---|
NOTE: For P1600 series models, the option to download the PCL5e driver appears on this screen.
######## Install the print driver from the CD to print to a previously configured wireless network printer
Follow these instructions if you have previously configured a HP LaserJet Professional P1100 Series Printer (wireless) on your wireless network and want to use the HP LaserJet Professional P1100/P1560/ P1600 Series Printer Host-based driver to print to that product.

######### c. Click OK.Figure 3-116 Software Installation — Initial screen

########## 3. Click Install to begin the installation process. The Choose Easy Install or Advanced Installscreen appears.Figure 3-117 Choose Easy Install or Advanced Install screen

The Choose Easy Install or Advanced Install screen contains links to the following information.
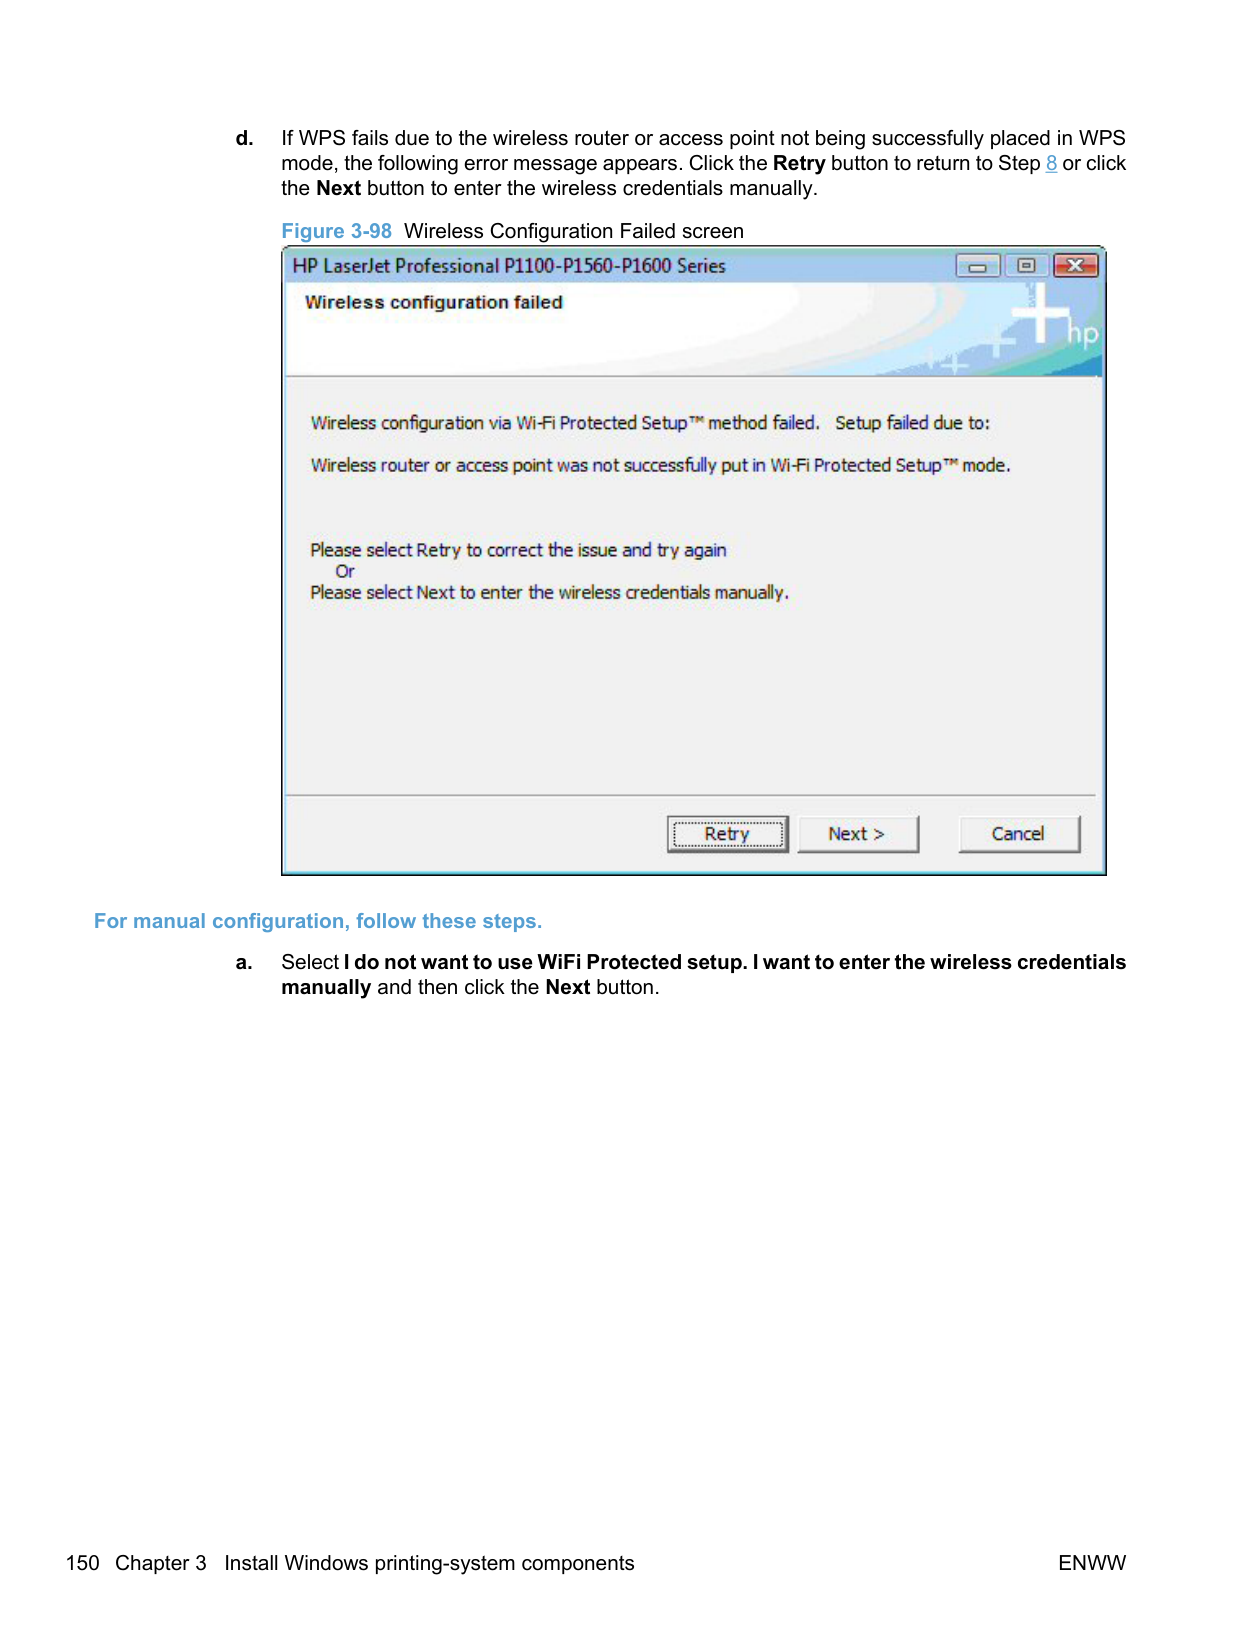
########## 4. Select Easy Install (recommended). Using Easy Install (recommended) allows the installationagreements and default settings to be accepted without being prompted for them during theinstallation. Advanced Install allows you to read, and manually accept, each of the installationagreements. Click the Next button to continue the installation.

######### 6. Select Connect to a configured Wireless Network Printer. Click the Next button.

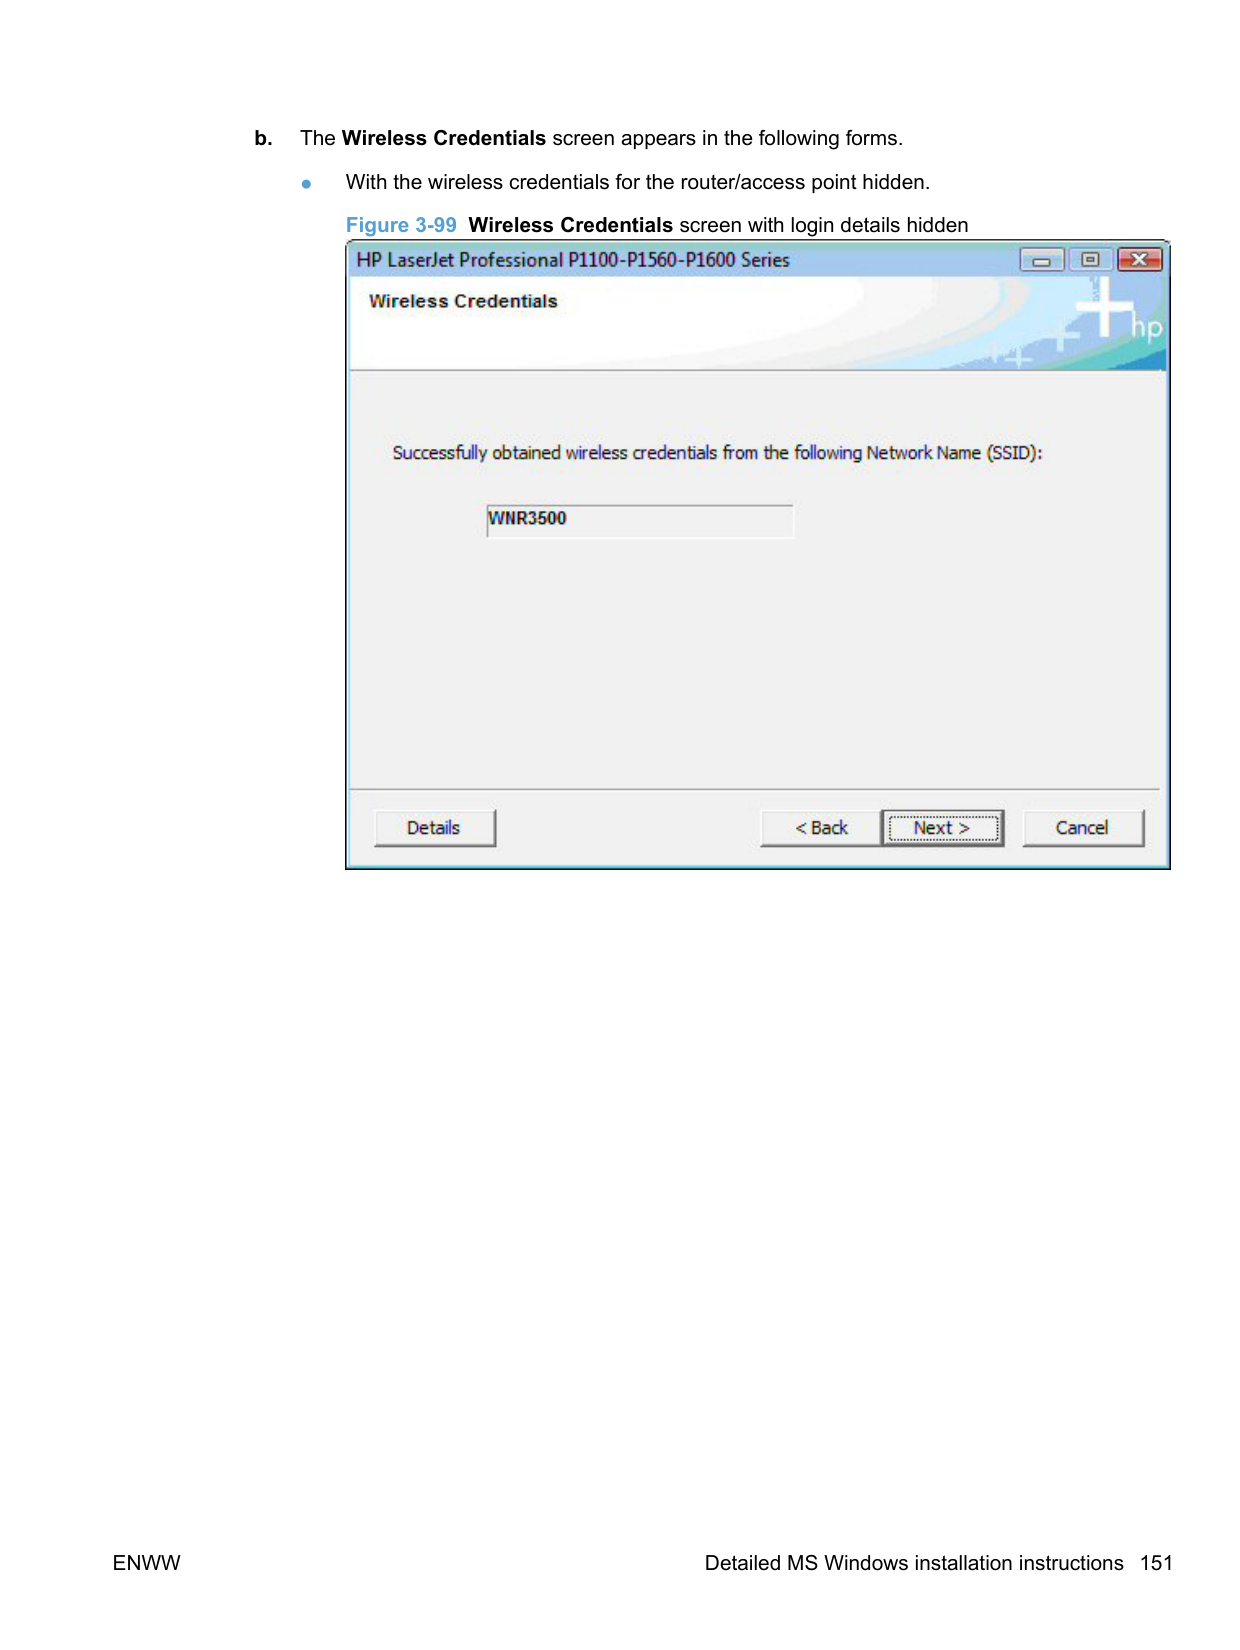

If you choose to select Specify a printer by address, you will be required to identify the product by selecting and entering a value for one of the following printer identification methods.
Figure 3-121 Specify Printer screen

Select a method to identify your product, enter a value for the selected identification method, and then click the Next button.


Select Yes, install this printer and then click the Next button to install the printer found by the installer. Click No, I want to install a different printer and then click the Next button to return to the Identify Printer screen (Figure 3-120 Identify Printer screen on page 172) to search for a different printer.

Click the Next button to confirm the network settings and continue the installation, or click the Change Settings button to edit the network settings.
########## 10. The Congratulations! Software installation complete screen appears upon successfulinstallation of the driver.Figure 3-124 Software installation complete screen (part 1)

########## 11. Select Register your product and Print Test Page, and then click the Next button. A Web browseropens to the HP Product Registration page, and a test page prints at the product.
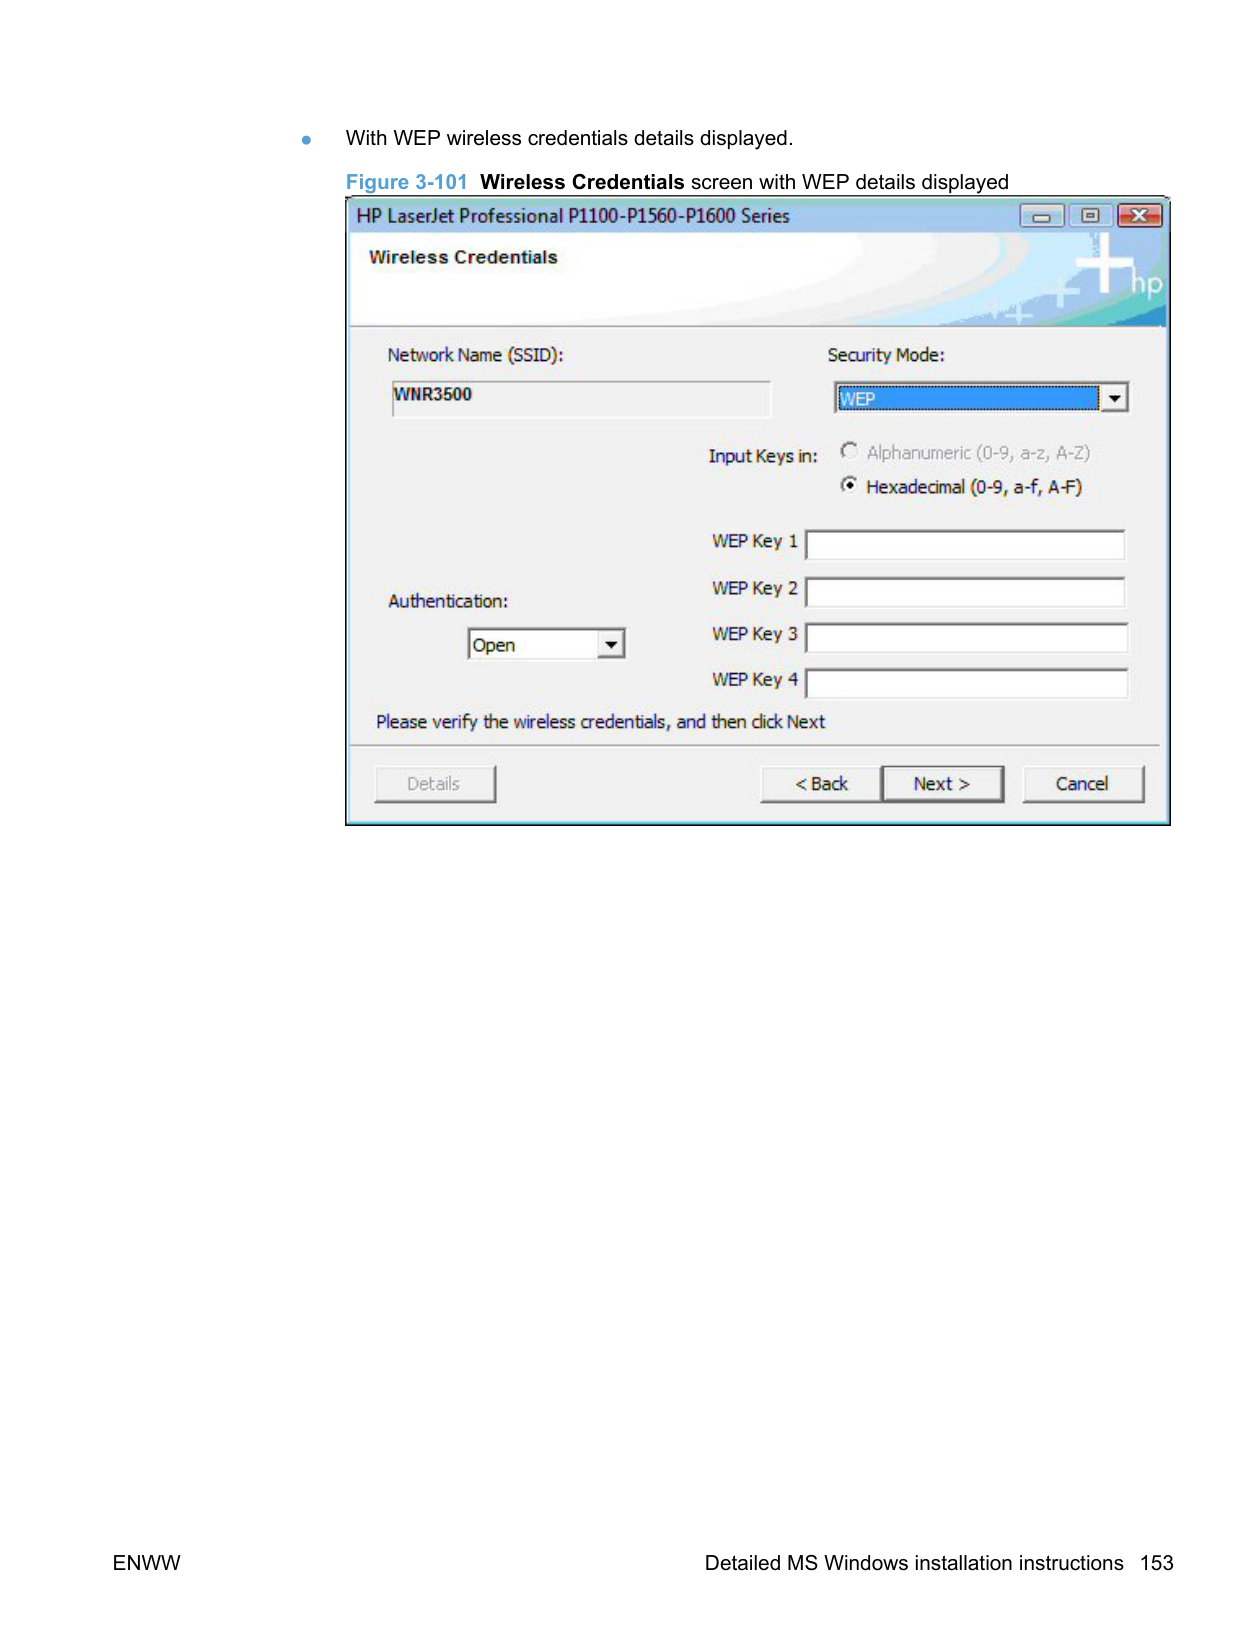

| | |---|
NOTE: For P1600 series models, the option to download the PCL5e driver appears on this screen.
##### Install the HP LaserJet Professional P1100/P1560/P1600 Series Printer XPS driver
######## New driver install
Use the following procedure to install the XPS driver when no instances of the HP LaserJet Professional P1100/P1560/P1600 Series Printer driver are installed.
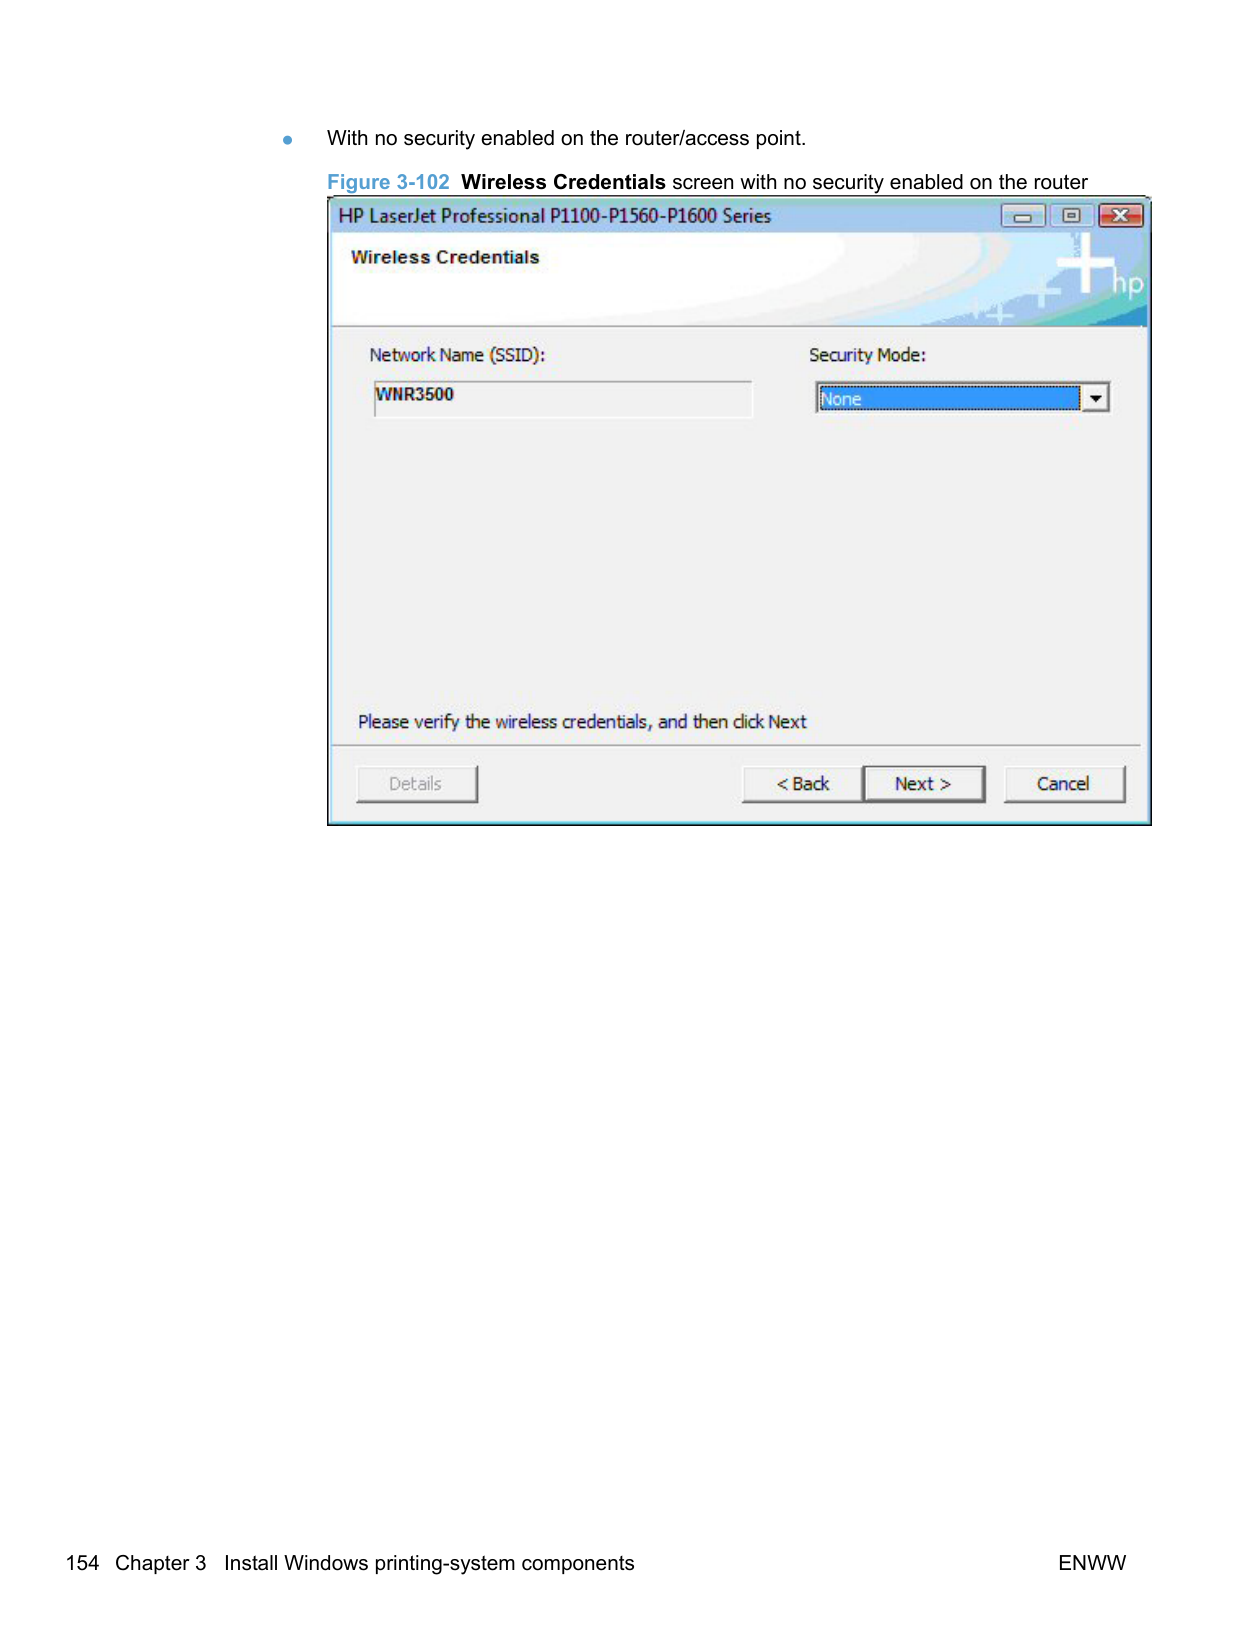
If HP Smart Install is enabled for the product, it will start automatically when the USB connection is made between the product and the computer and prevent the Windows Add New Hardware wizard from starting.
Disable HP Smart Install for the product using the following steps.

########## c. Select the printer from the list and then click the Next button.
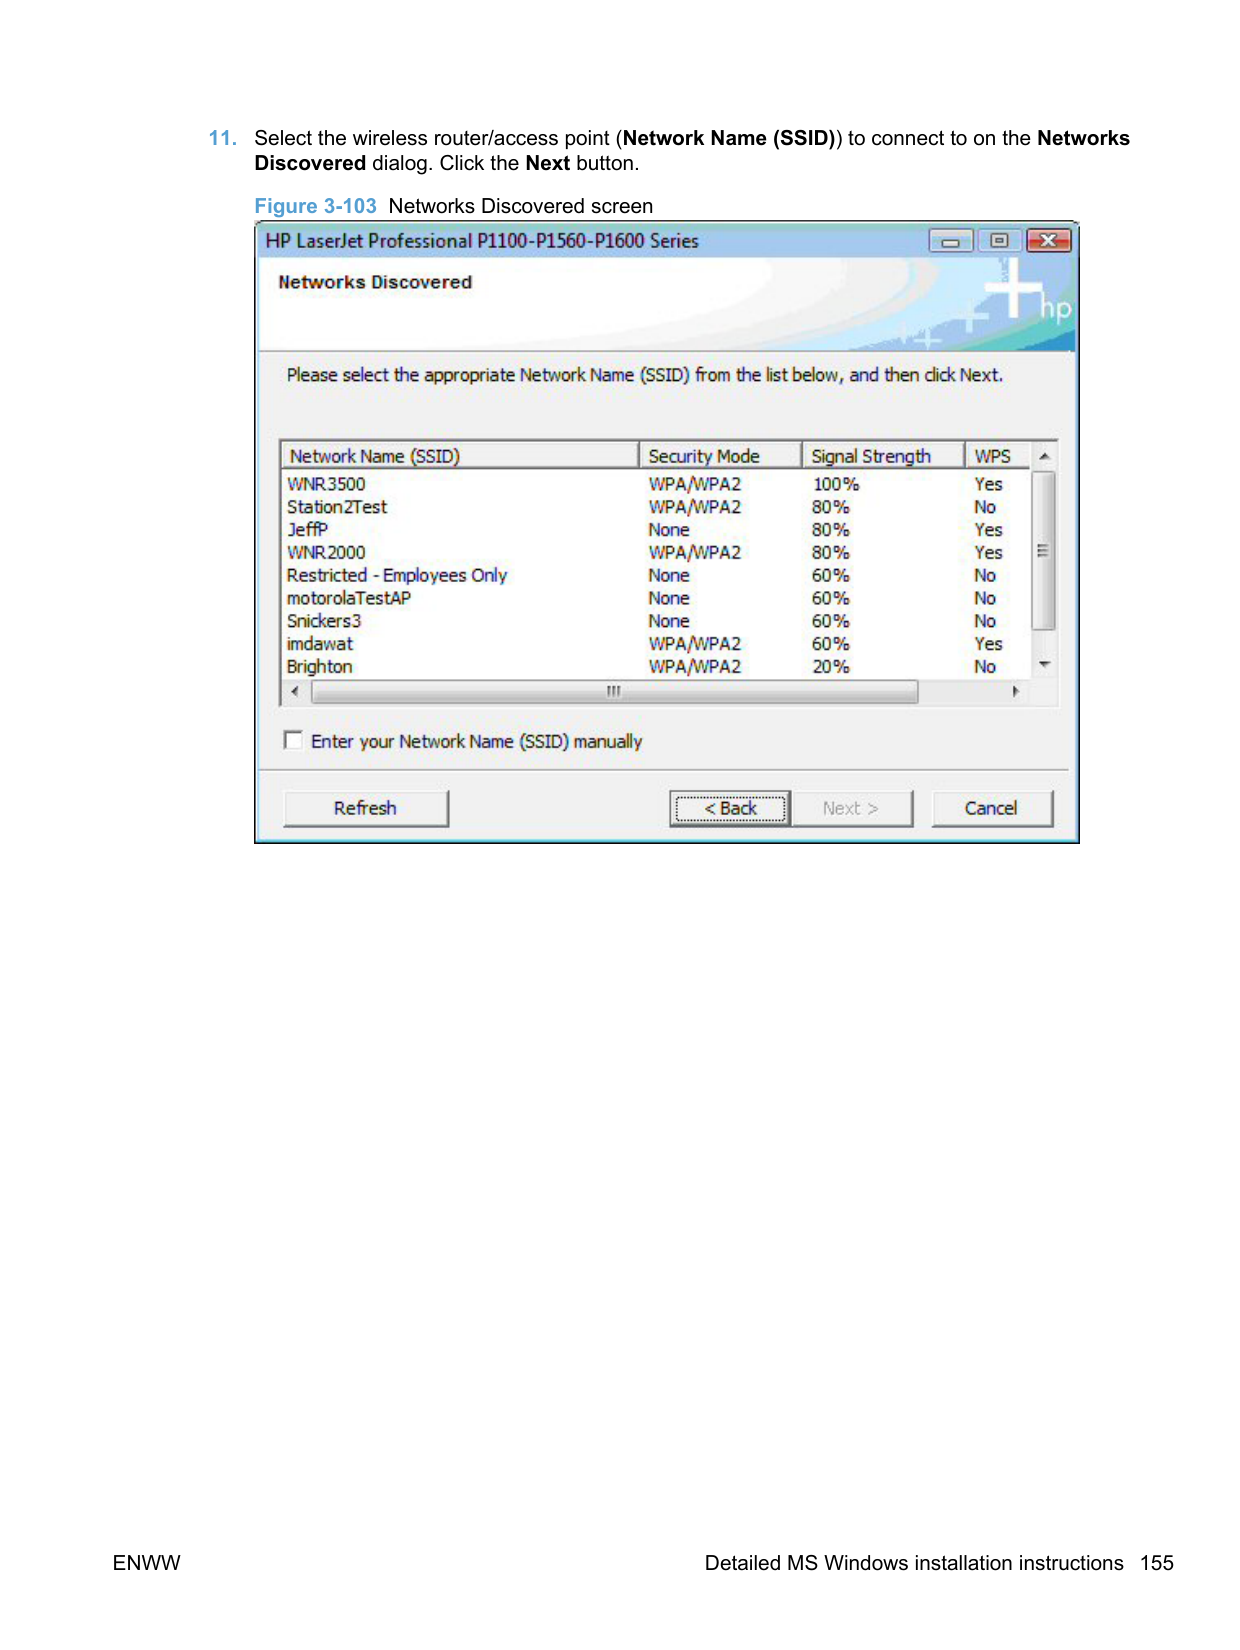

d. On the This Printer's HP Smart Install is currently Enabled dialog click the Disable HP Smart Install on the selected Printer button.

########## e. On the message box that appears, click Yes to confirm the disabling ofHP Smart Install.


######### 4. On the Welcome to the Found New Hardware Wizard screen, select No beneath Can Windowsconnect to Windows Update to search for software?.Figure 3-130 Welcome to the Found New Hardware Wizard screen

########## 5. On the next Found New Hardware Wizard screen, select Install from a specific location(Advanced) and then click the Next button.

######### 6. Select Don't search, I will choose the driver to install. and then click the Next button.

########## 7. Ensure that Show compatible hardware is selected. Select your printer in the Printers list, andthen click the Have Disk... button.


| | |---|

NOTE: The Found New Hardware Wizard will run twice for a new driver installation; once for the XPS HP LaserJet Professional Printer driver and once for the USB EWS Device Driver.
######## Existing driver install
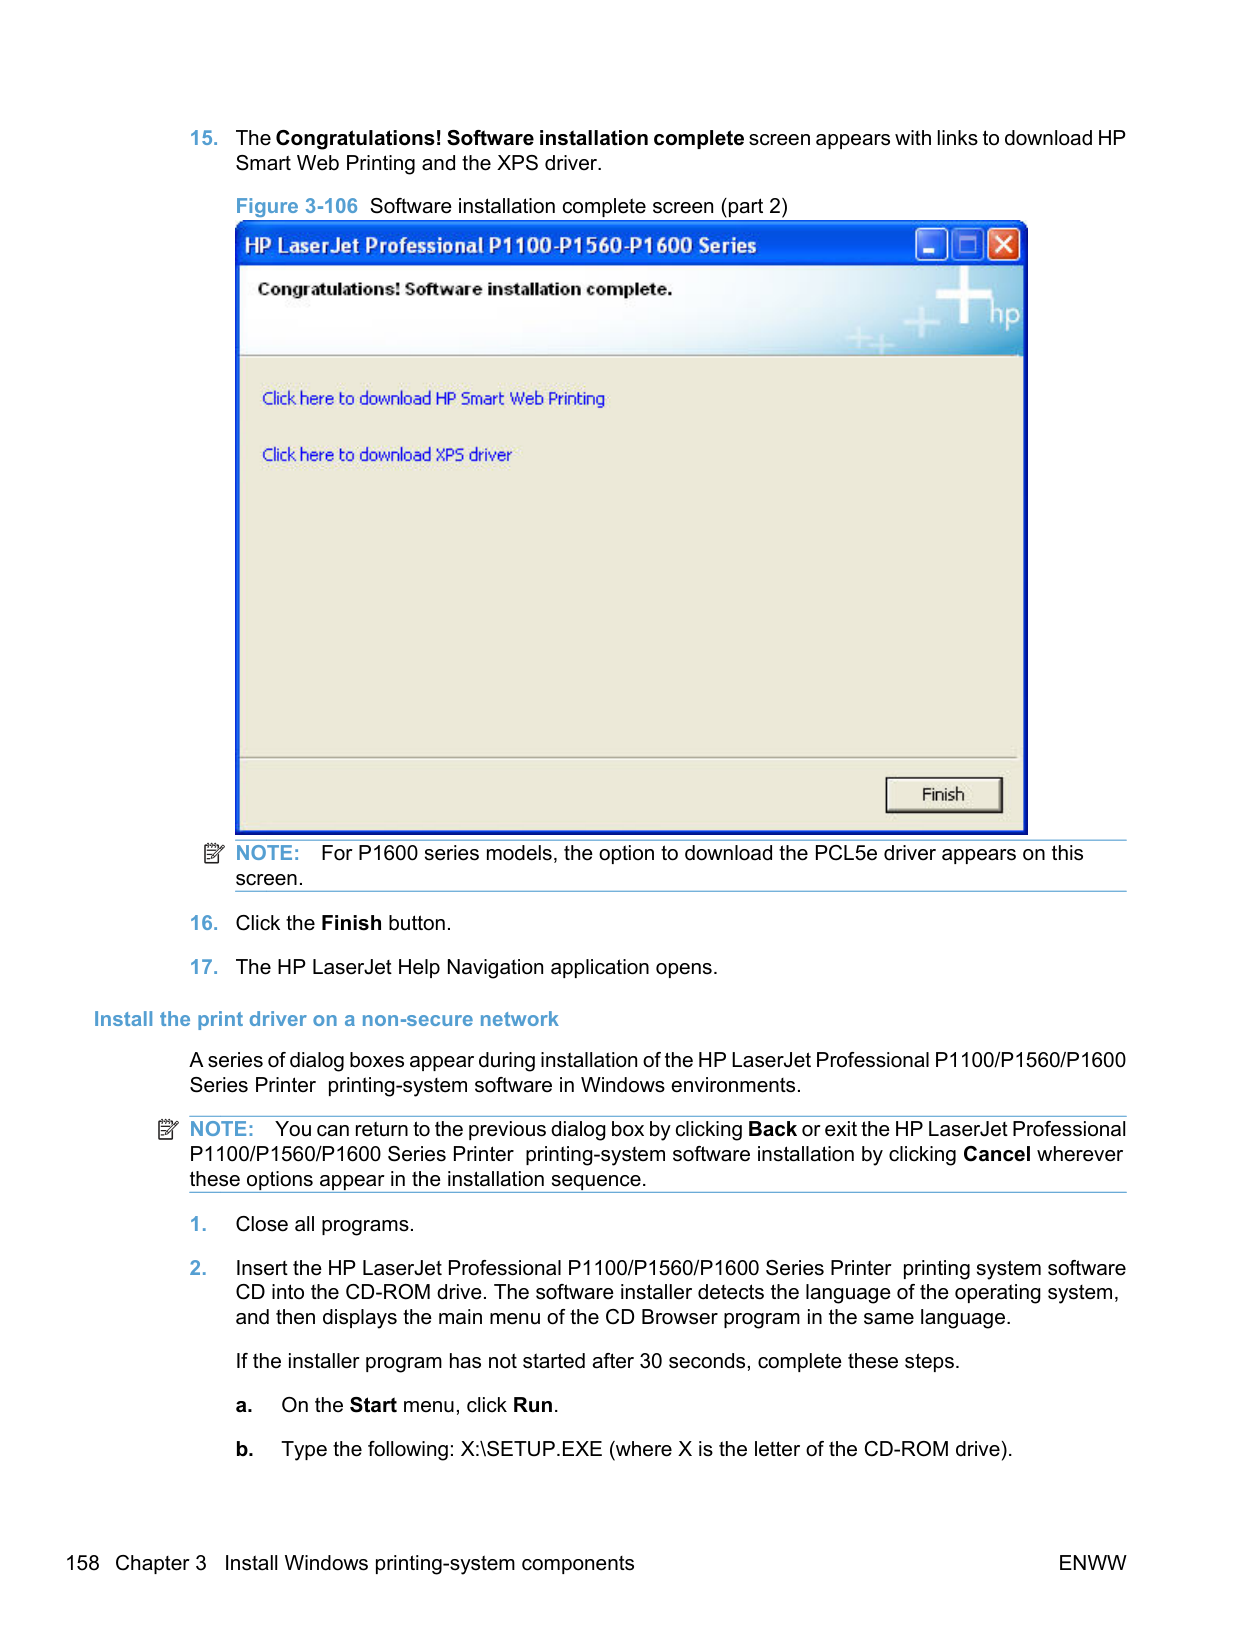
Use the following procedure to install the XPS driver when an instance of the HP LaserJet Professional P1100/P1560/P1600 Series Printer driver is installed.
Windows Server 2003 and Windows XP Professional: Select Settings, and then select Printers and Faxes.
######### 3. Right click in the Printers and Faxes window and select Add Printer. The Add Printer Wizardscreen opens.
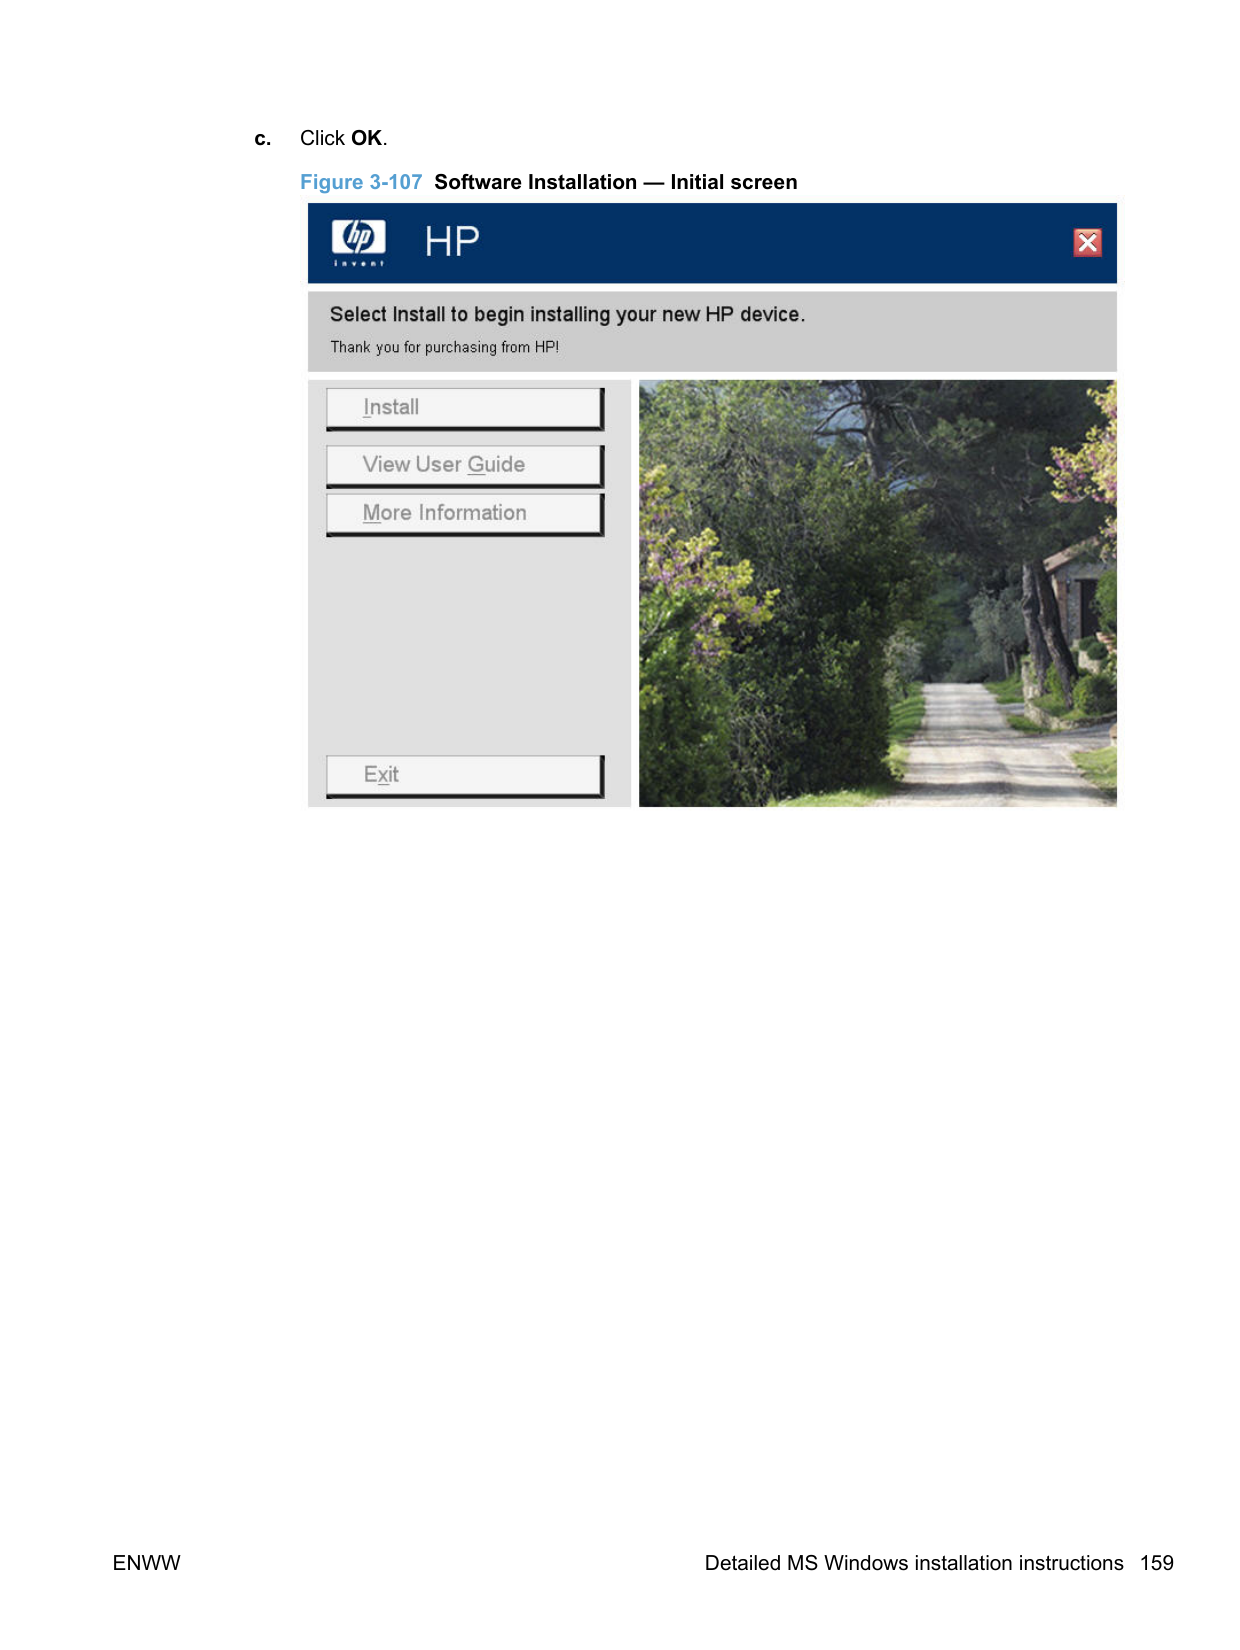

######### 4. On the Local or Network Printer screen, select Local printer attached to this computer, andthen click the Next button.


########## 7. Navigate to the location of the XPS .inf file, select the XPS .inf file (example: HP1100XPS.INF),and then click the Open button.

########## 8. Click the OK button on the Install From Disk dialog and then click the Next button.
######### 9. On the Use Existing Driver screen, select Keep existing driver (recommended) and then clickthe Next button.
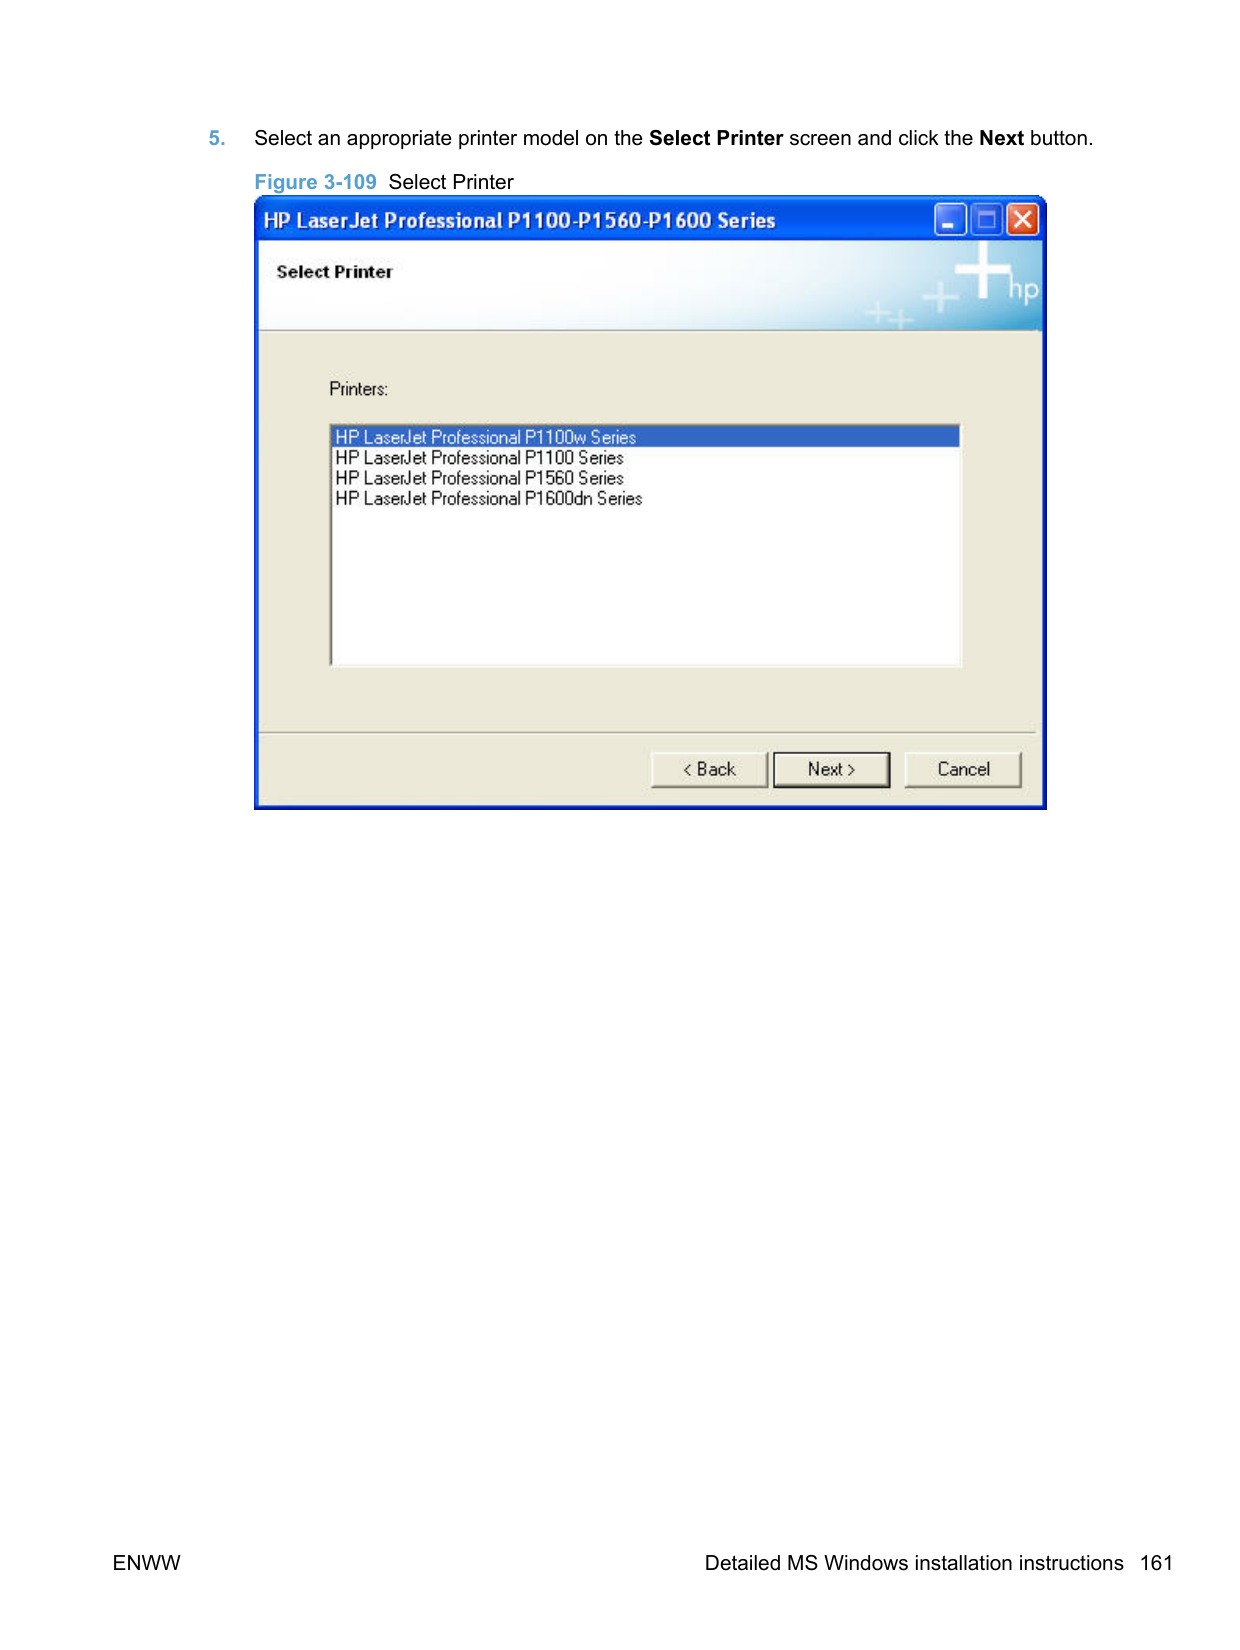


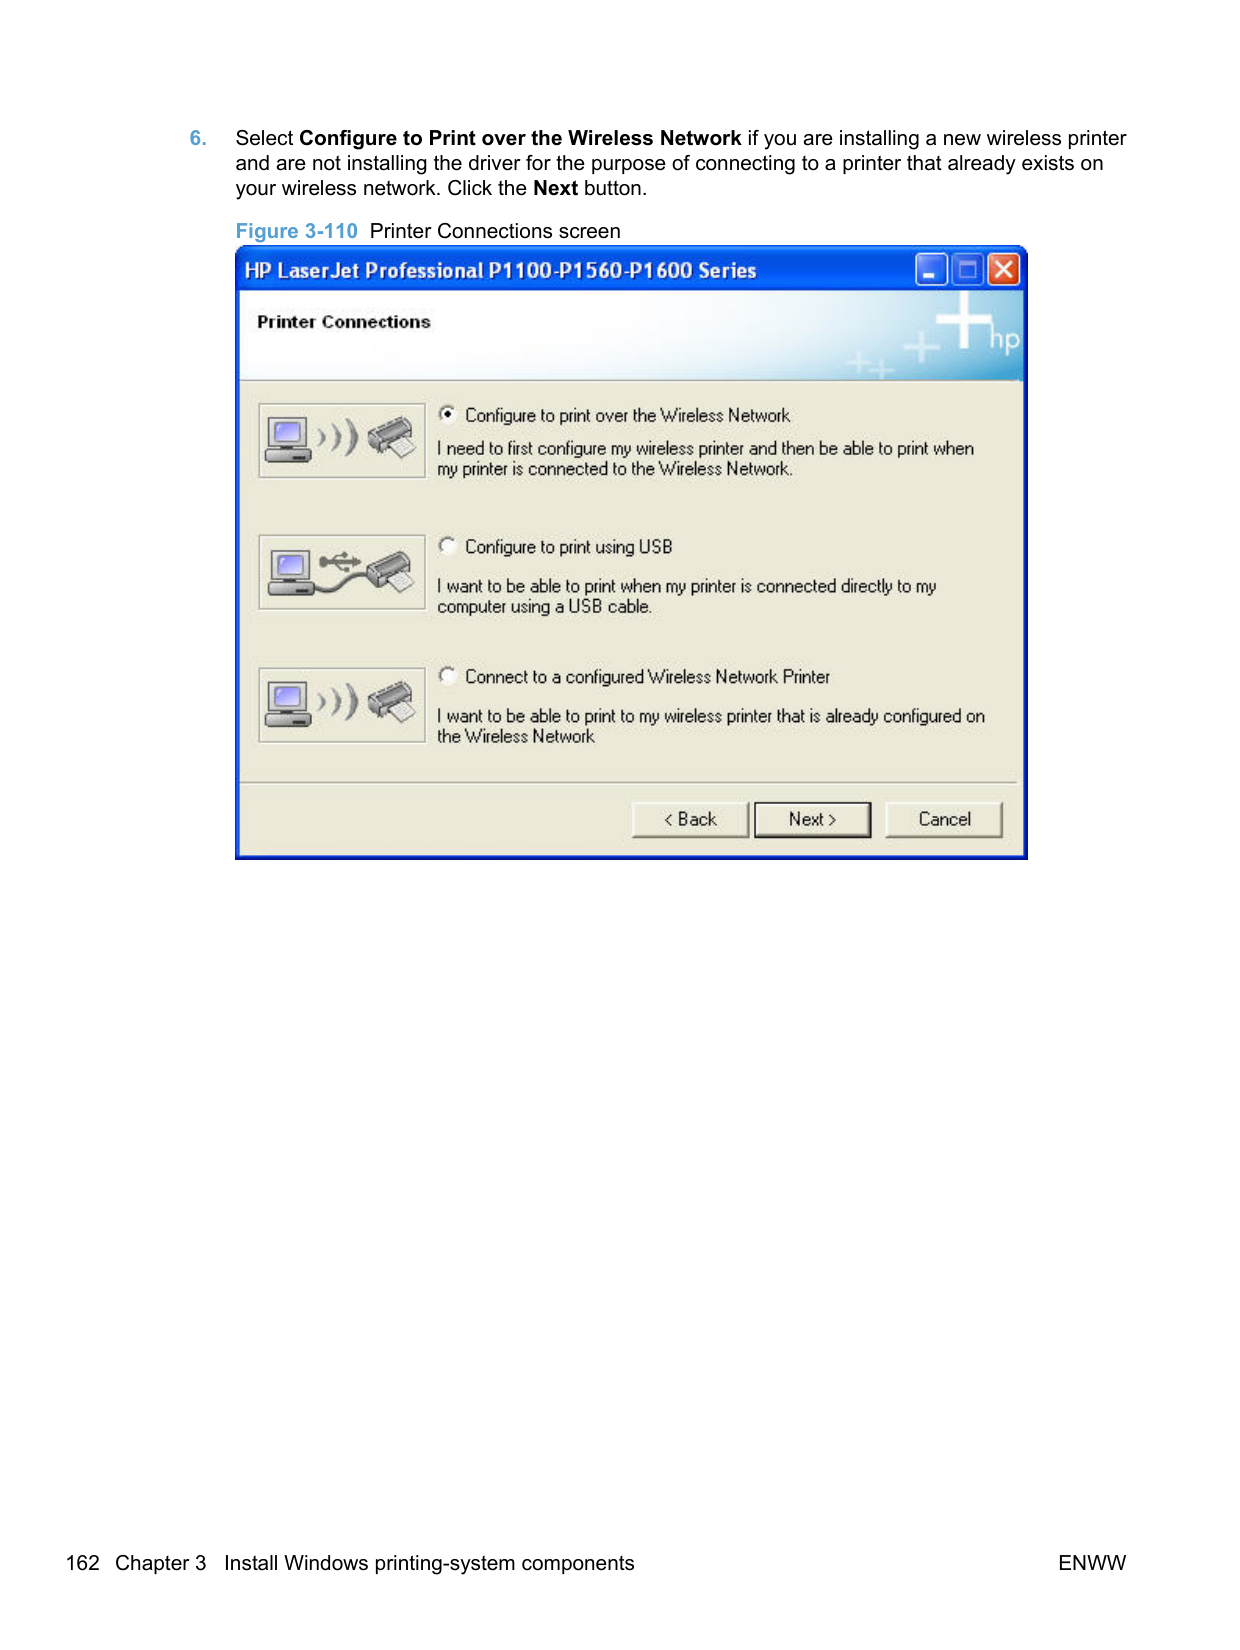
##### Additional installation information
######### CD Re-launch Pad
After a HP LaserJet Professional P1100/P1560/P1600 Series Printer series printer driver is installed, running setup.exe from the product CD starts the CD-Relaunch Pad.
Figure 3-140 CD Re-launch Pad screen

Use the CD Re-launch Pad for the following.
The following installation information applies for P1102 (wireless) and P1606dn (auto-duplexing, network) products.
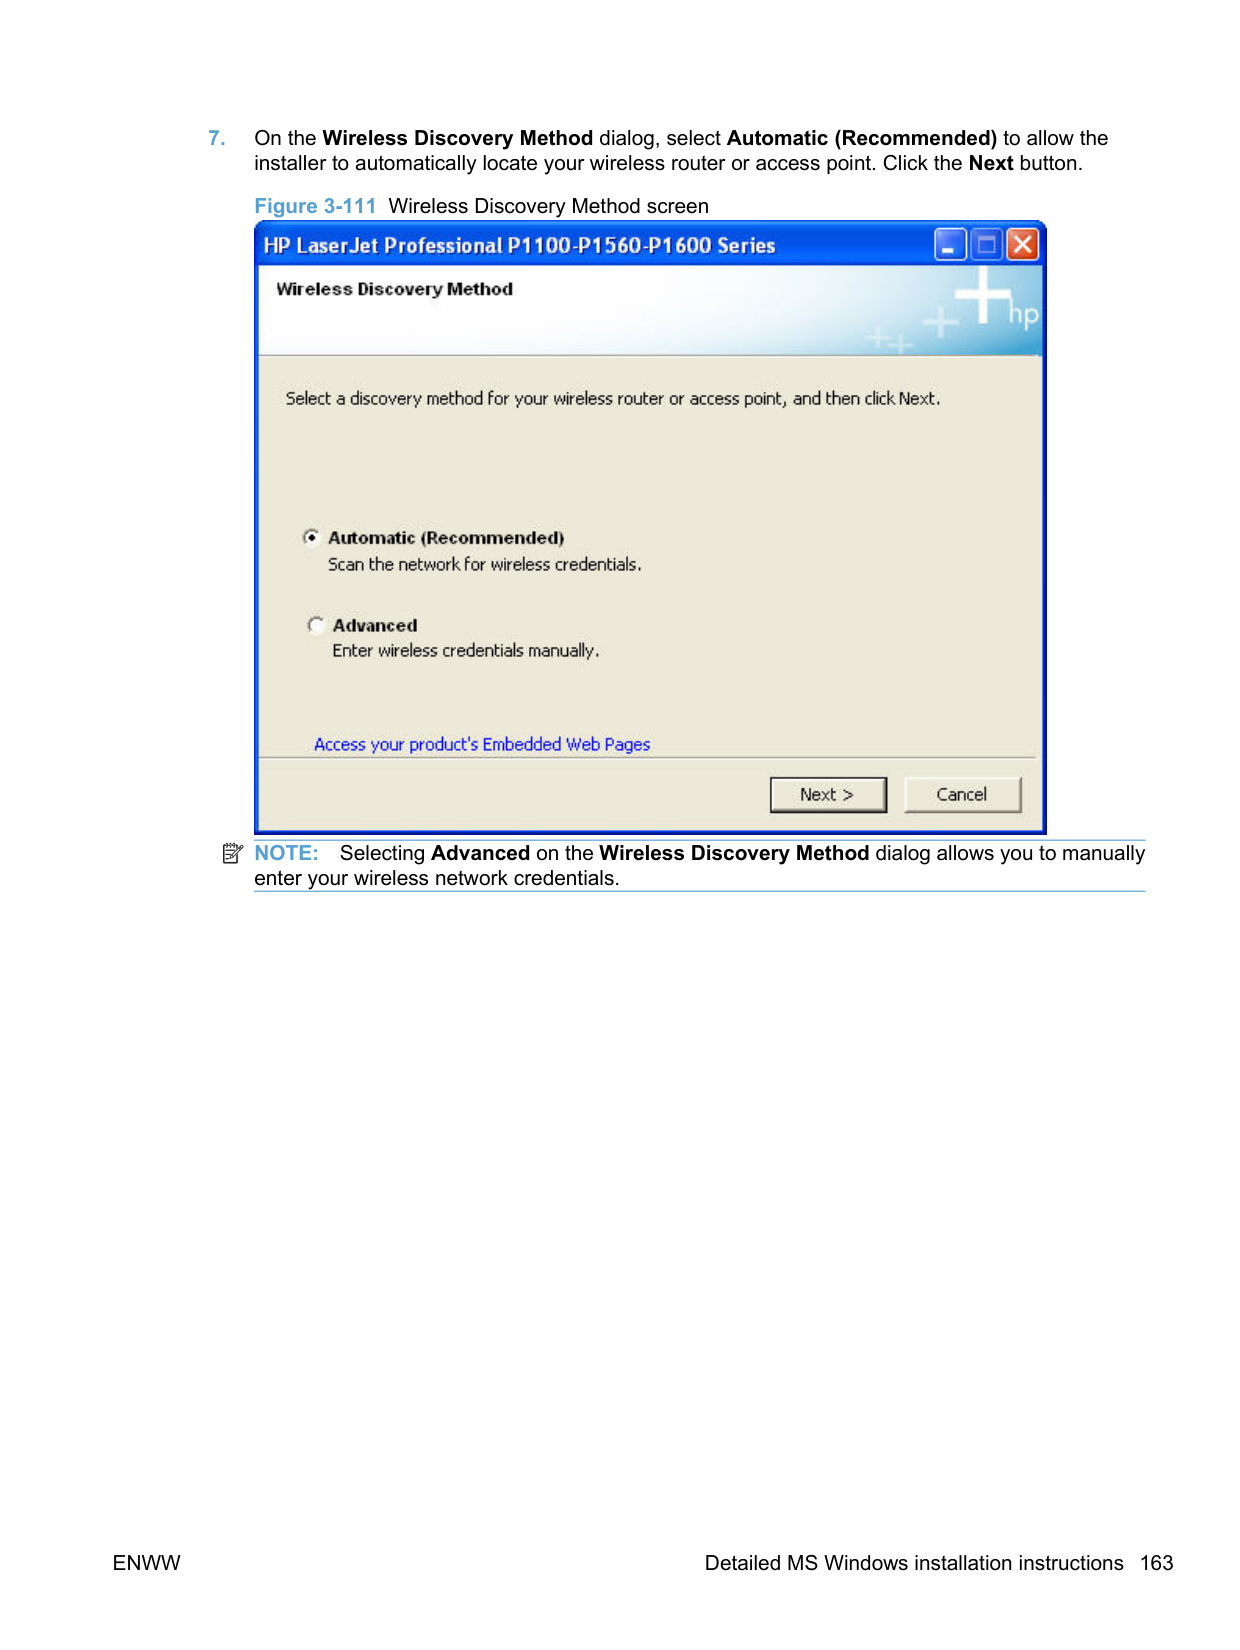
############# Task/issue P1102 (wireless) P1606dn (auto-duplexing, network)
Install the same printer on a USB port and on a network
############# Recommended method
Recommended method
############# Optional method
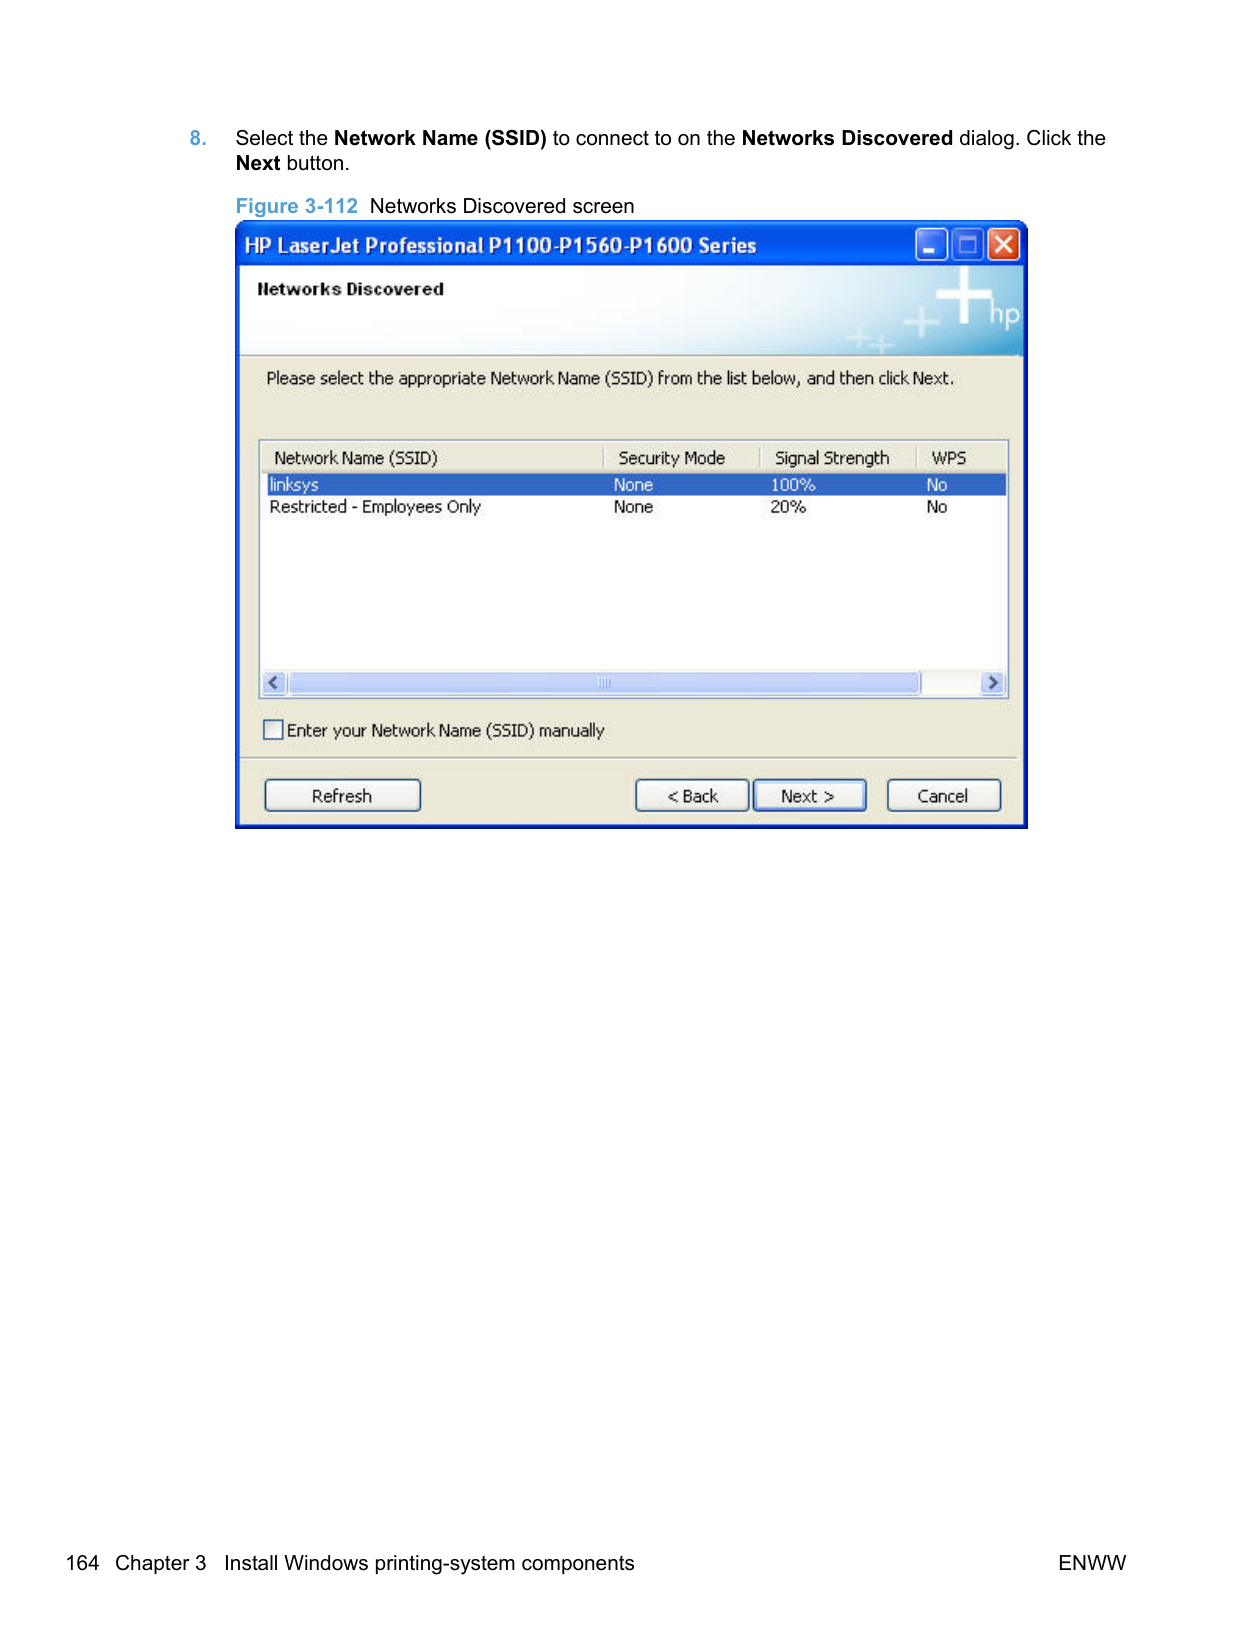
############# Optional method
############# -or-
Run setup.exe from the CD, select Add another printer as the install type, and then select P1600dn Series as the printer to install.
-or-
Run the Wireless Configuration Utility by clicking Start, All Programs, HP, HP LaserJet Professional 1100 Series
Change a printer installed on a USB port to a network install.
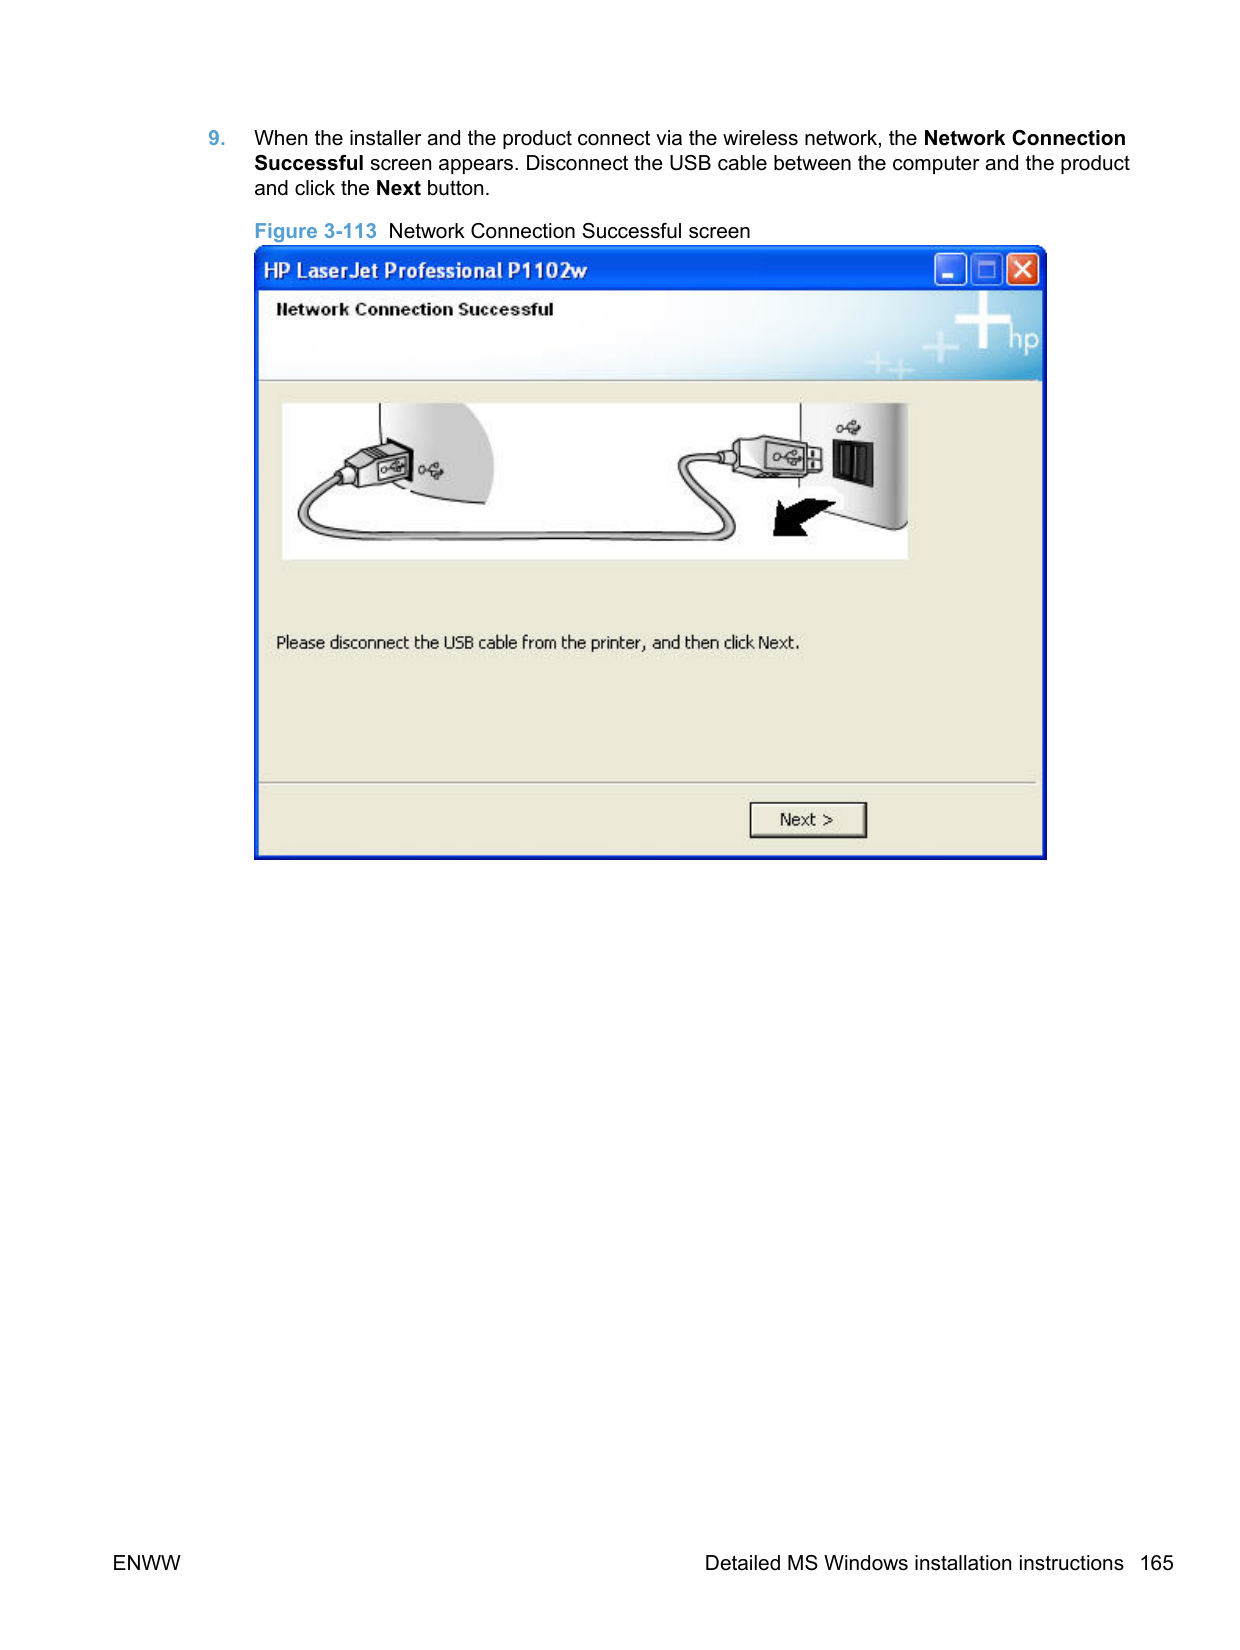
Do one of the following.
Uninstall the USB installed printer. Reinstall the printer as a network configured printer.
After installing the printer on the network, the USB cable is not unplugged, and the printer turns off, then on.
The drivers are already installed on the computer and are detected and automatically installed for the USB printer.
The drivers are already installed on the computer and are detected and automatically installed for the USB printer.
##### Use the Back, Next, Finish, and Cancel buttons
The following buttons appear on various dialog boxes during the installation process.


Click Finish to close the installer.
##### Set a default printer
In Windows XP, Windows Server 2003, and Windows Server 2008, click Start, click Control Panel, and then click Printers and Faxes (Windows XP Professional) or Printers and other hardware devices (Windows XP Home).
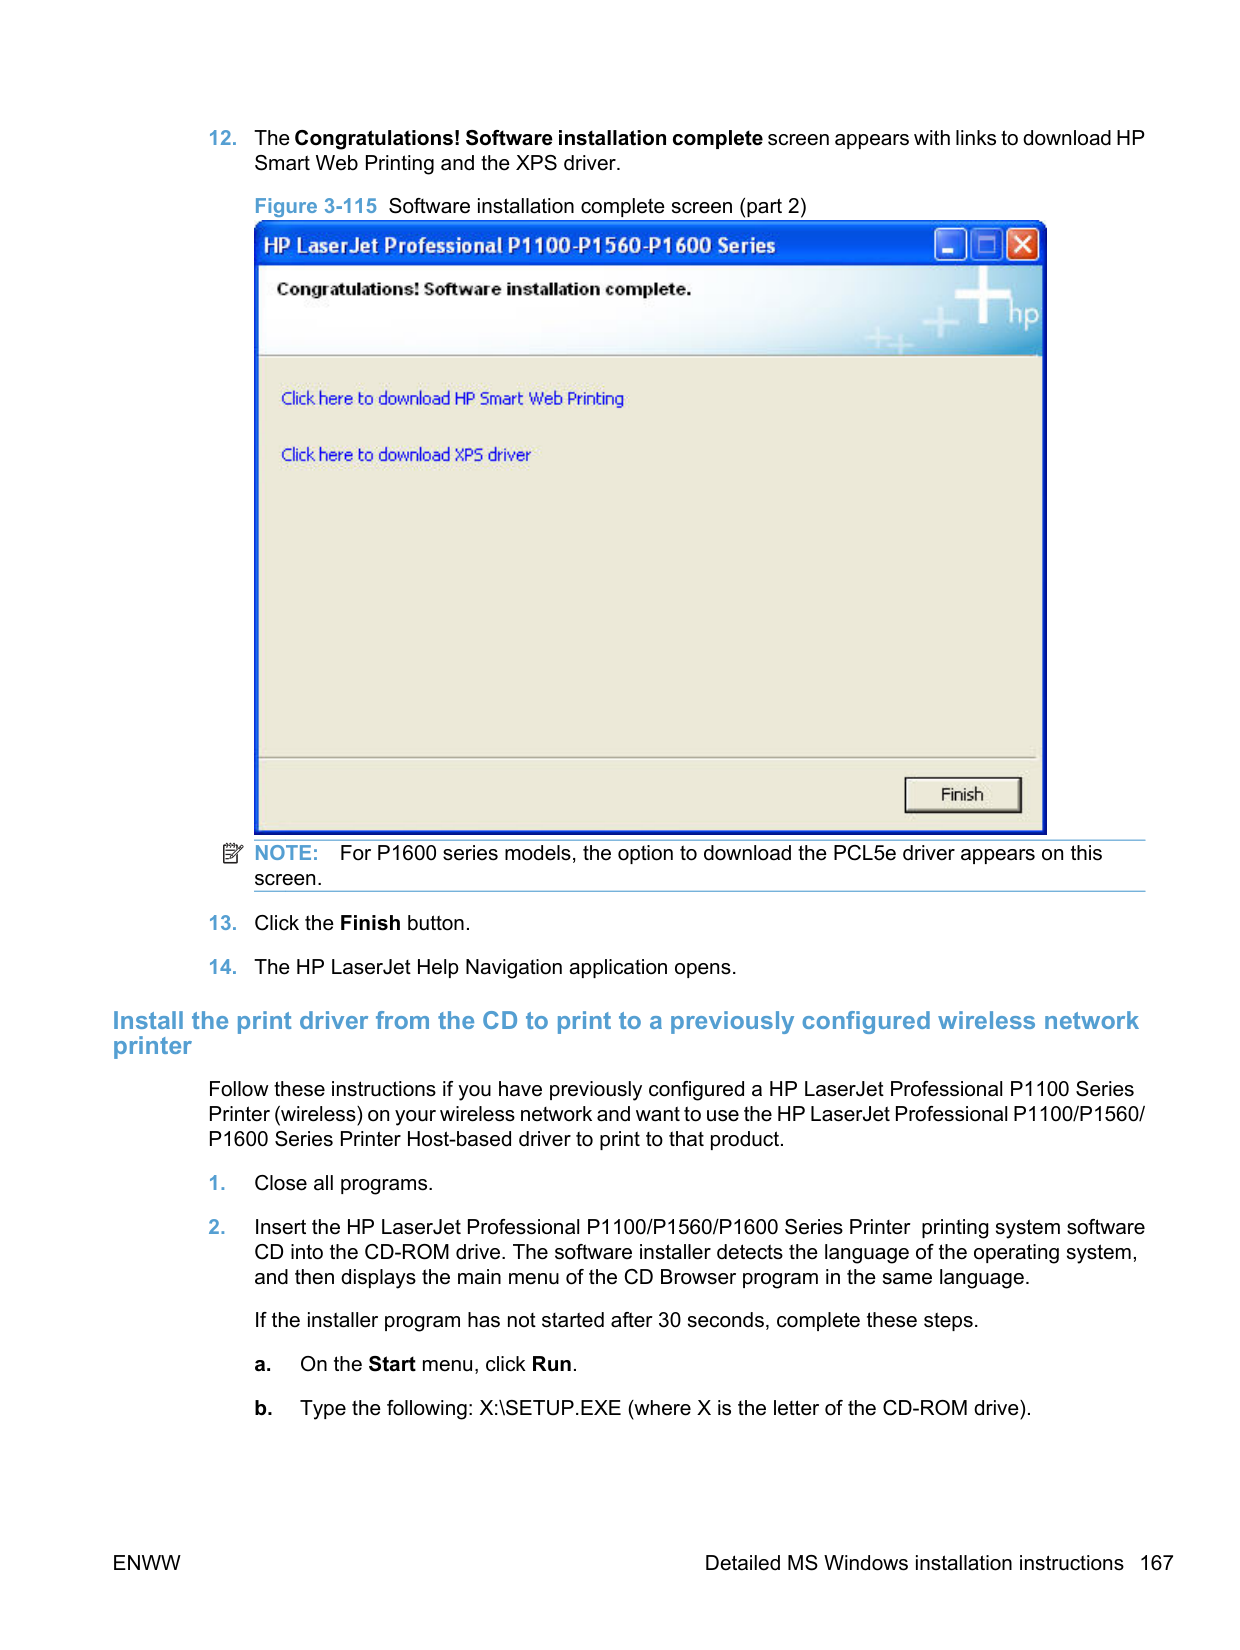
#### Uninstall software
######### the Uninstall utility.
click Remove One or Remove All to initiate the uninstall process.
Use Windows Add or Remove Programs feature Use these instructions to uninstall the product using the Windows Add or Remove Programs feature. NOTE: You must have Administrator privileges to uninstall the product using Add or Remove Programs.
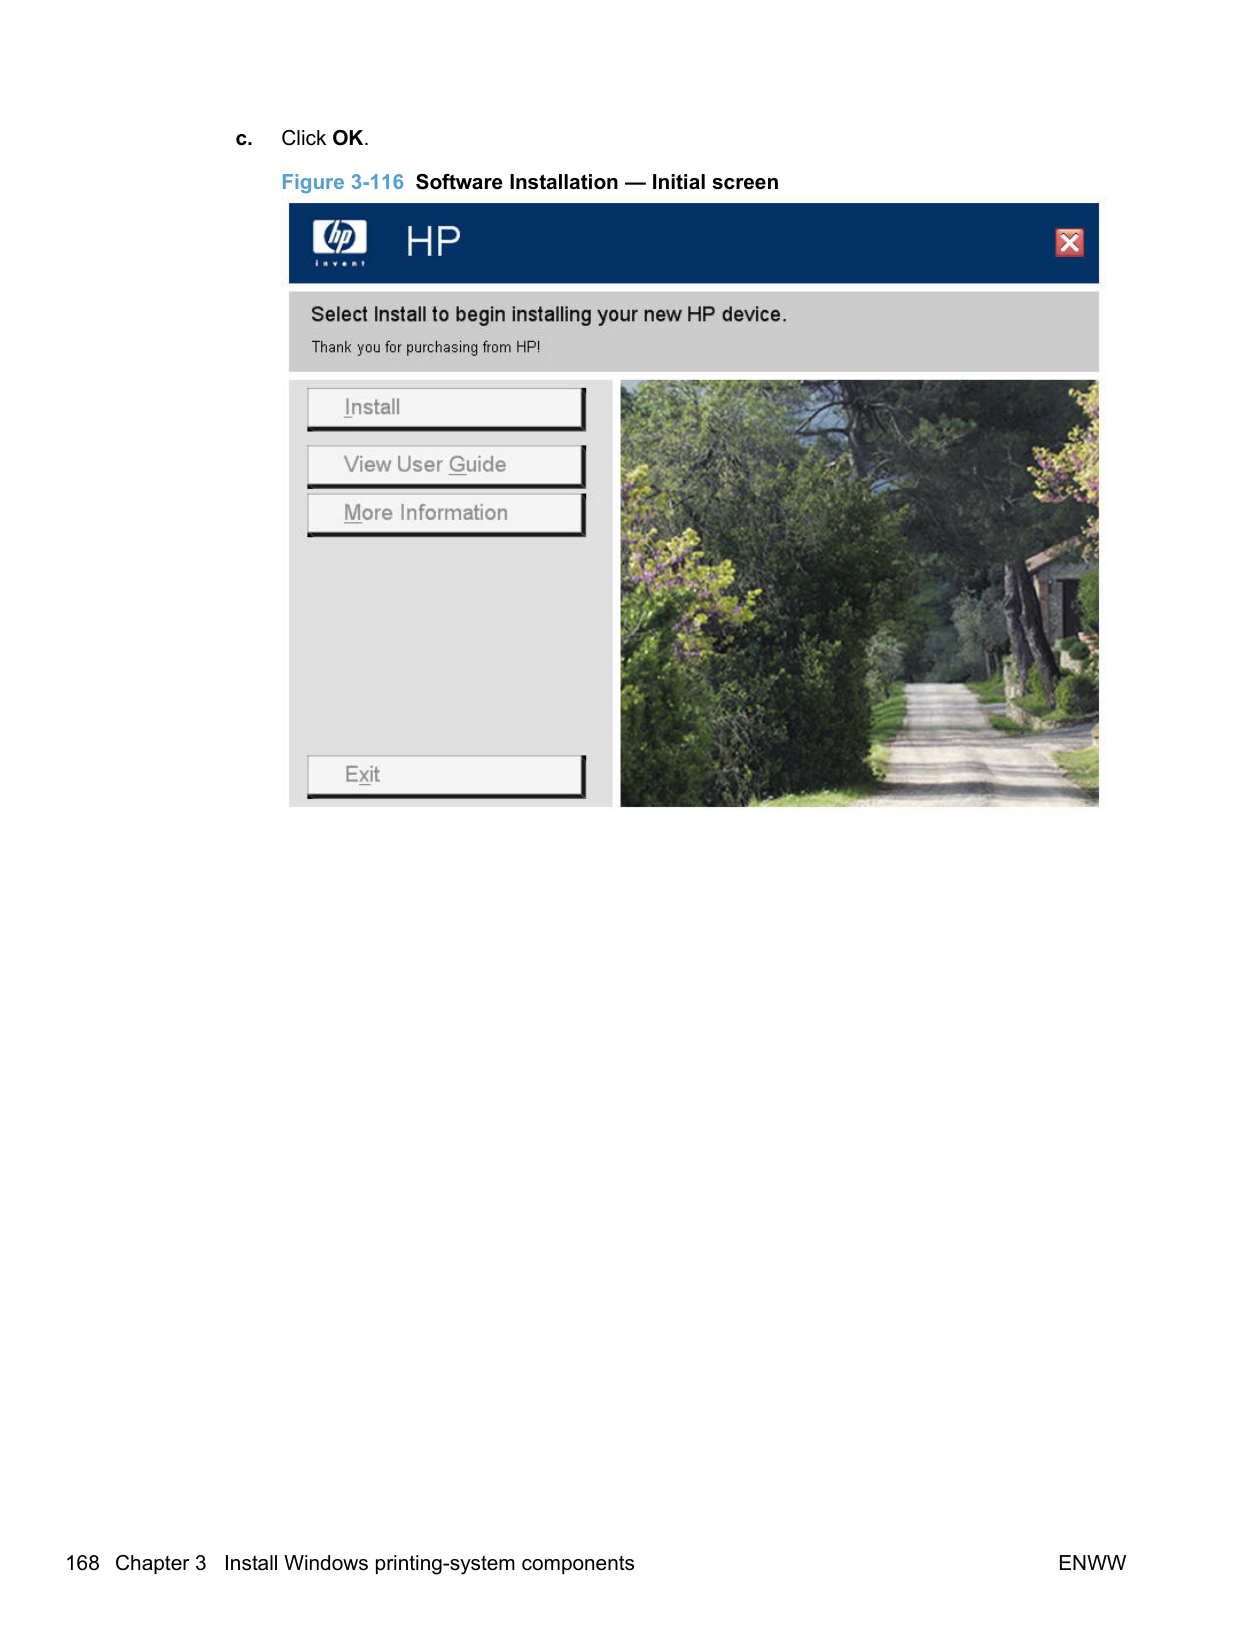
| | |---|
ENWW Uninstall software 197

Select the product, or products, to uninstall and then click Remove One or Remove All to initiate the uninstall process.
##### Uninstall the XPS driver

In Windows XP, Windows Server 2003, and Windows Server 2008, click Start, click Control Panel, and then click Printers and Faxes (Windows XP Professional) or Printers and other hardware devices (Windows XP Home).
4 HP Host-based print driver for Windows
#### Introduction
This chapter describes the features of the HP LaserJet Professional P1100/P1560/P1600 Series Printer Host-based Print Driver for Windows XP (32-bit and 64-bit), Windows Server 2003 (32-bit and 64-bit), Windows Vista (32-bit and 64-bit), Windows Server 2008 (32-bit and 64-bit), and Windows 7 (32-bit and 64-bit).
You can control print jobs from several places:
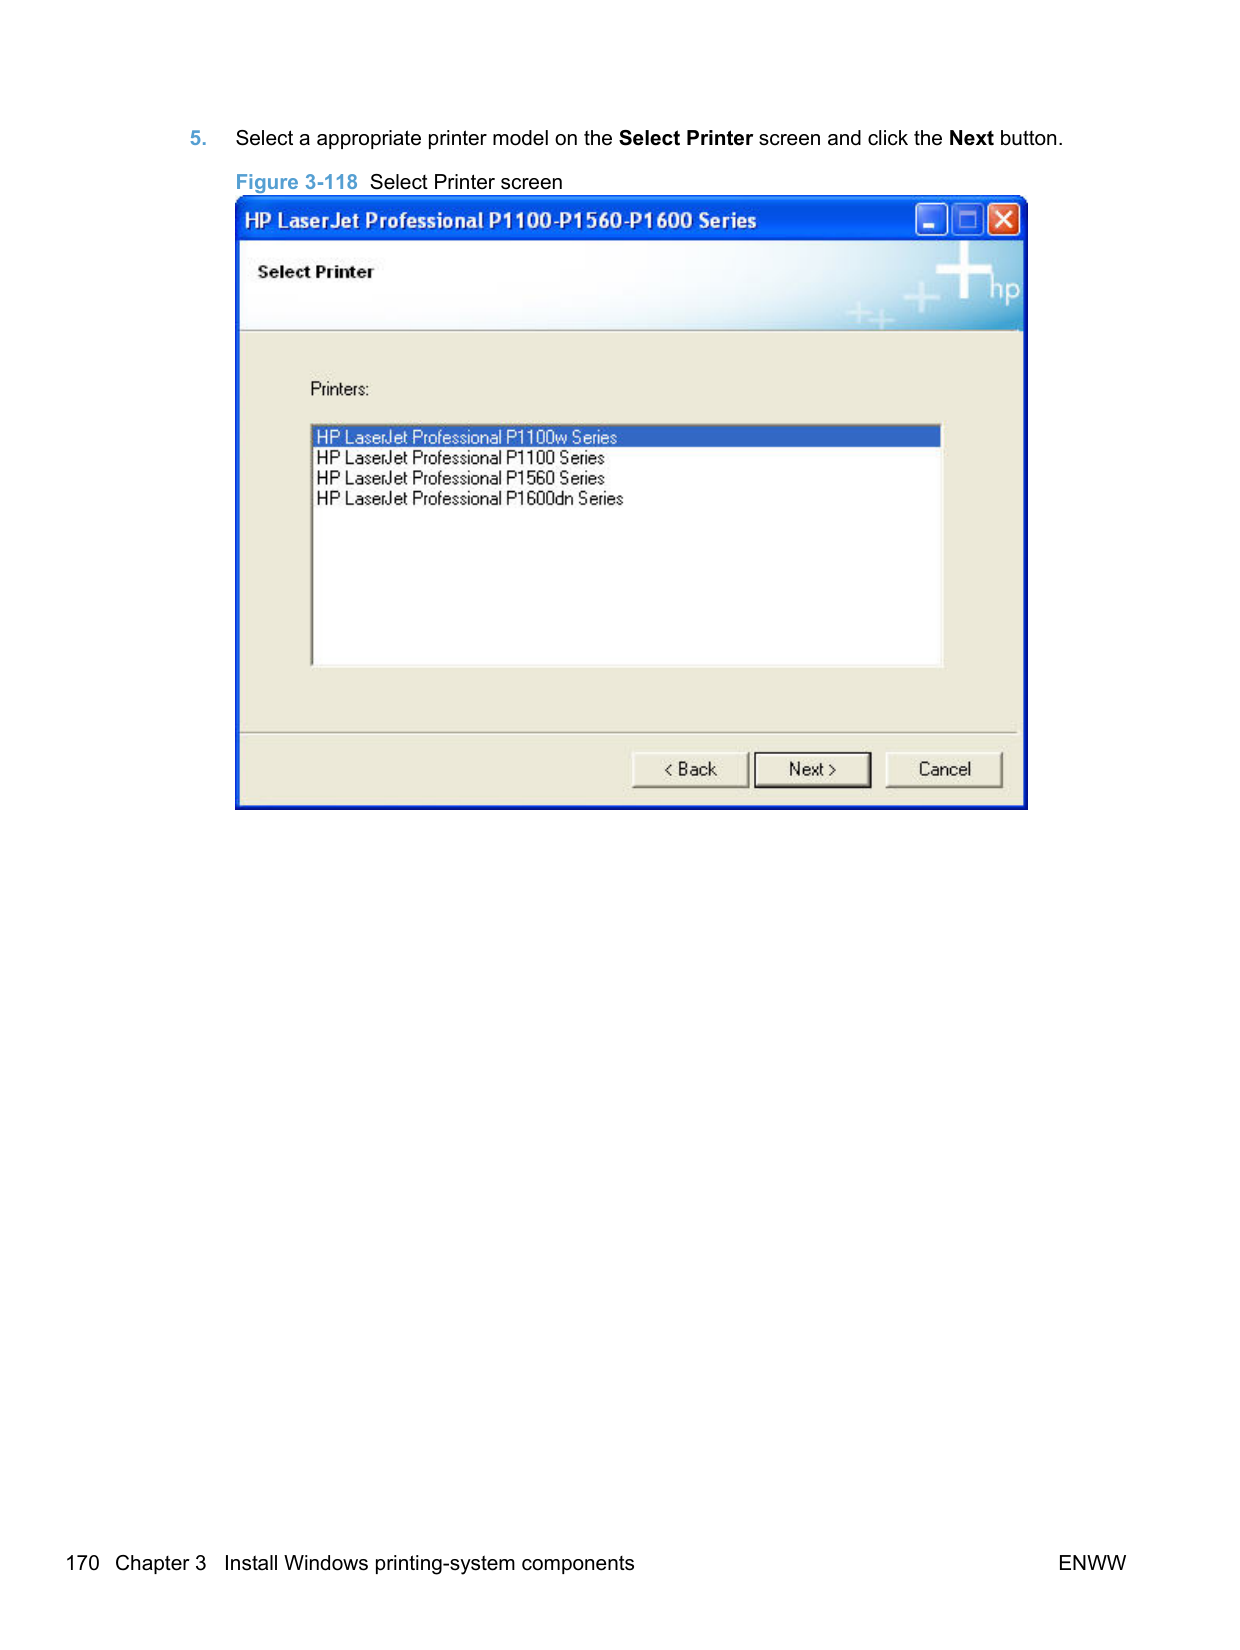
Generally, for features that are duplicated in more than one location (for instance, you can select the paper input tray from any of them), settings that are established in the software program take precedence over print-driver settings.
When you install the printing-system software in Microsoft Windows XP, Microsoft Windows Server 2003, Microsoft Windows Vista, Windows Server 2008, or Windows 7, the HP Hostbased Print Driver is the recommended driver and installs by default from HP Smart Install. The HP PCL 5e Universal Print Driver (P1606dn model only) and HP XPS driver can be installed by download from hp.com.
Topics:
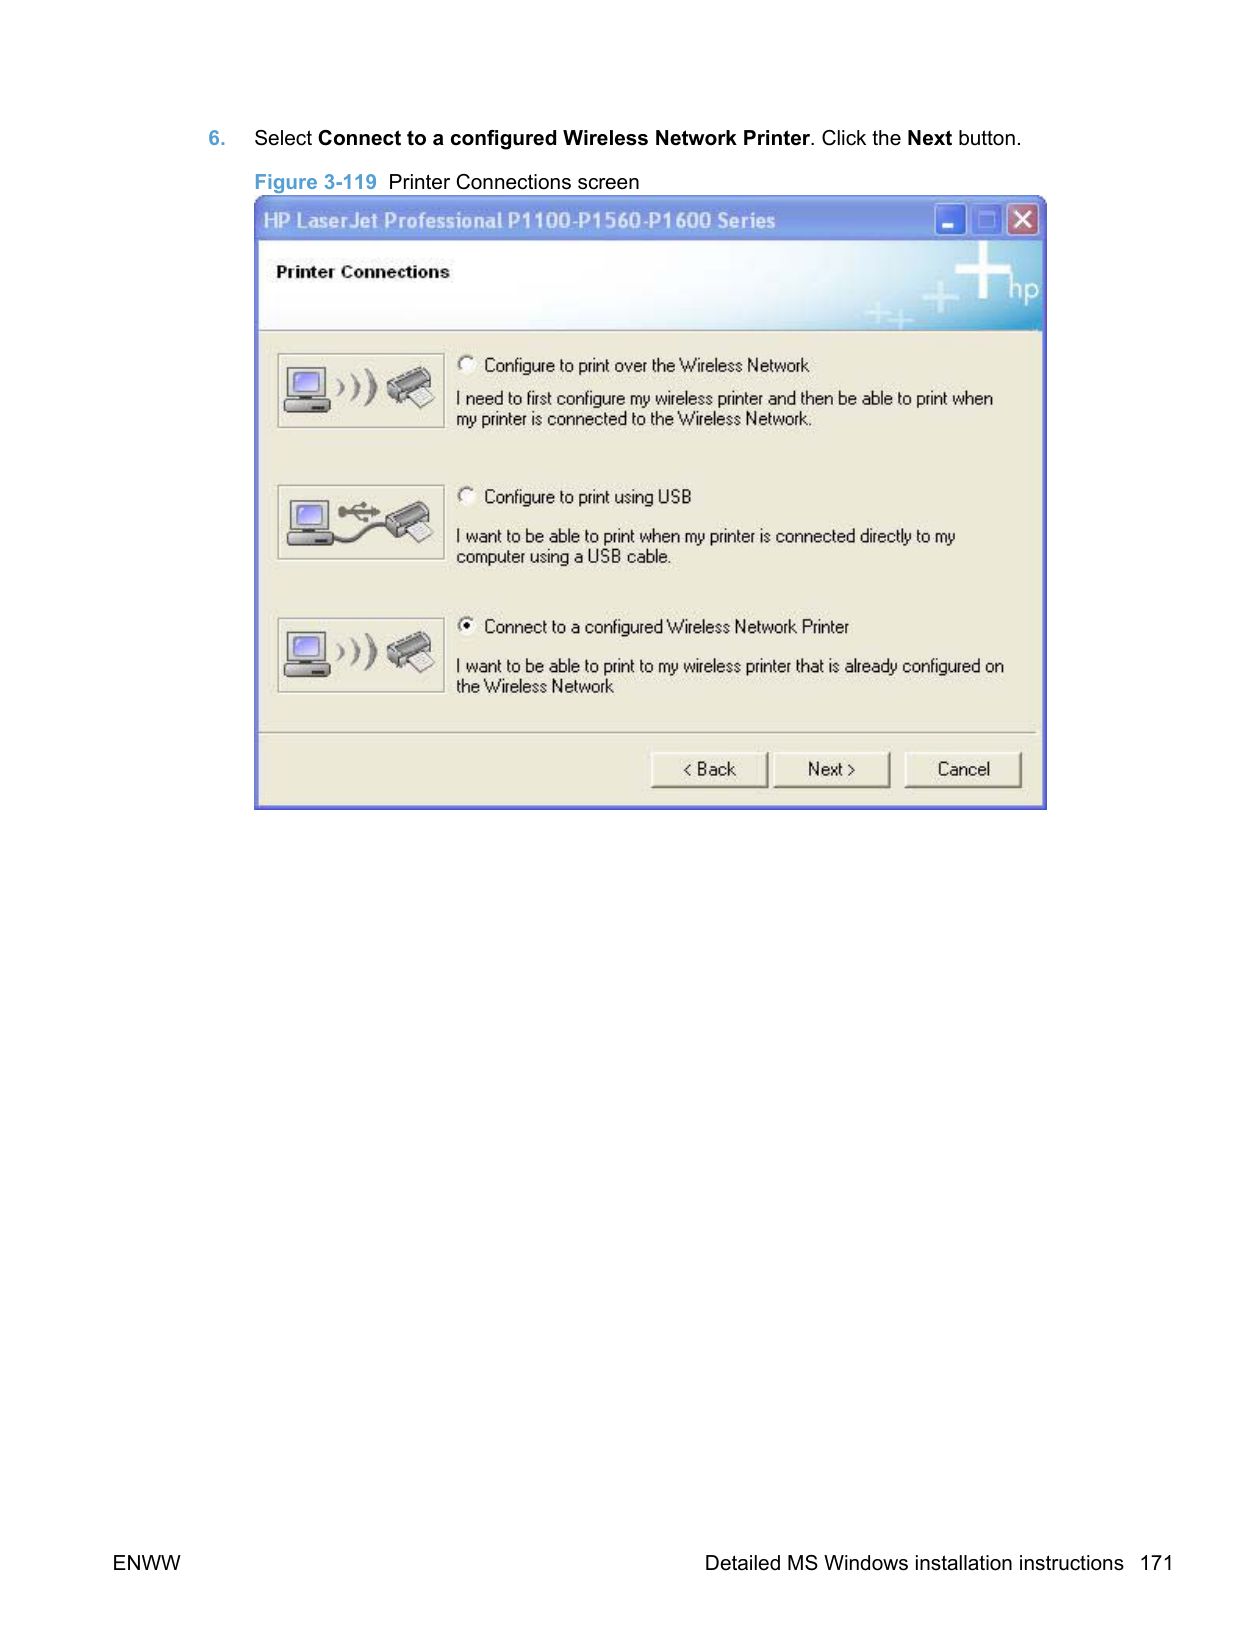
ENWW Introduction 199
#### Gain access to print drivers
Depending on the operating system on which you are installing the print drivers, you can gain access to the print drivers and different print-driver interfaces in several ways.
To gain access to the print-driver settings from within most software programs, follow these steps:
The appearance and names of the driver tabs can vary, depending on the operating system. These driver settings apply only while that software program is open.
You can control the drivers directly from the Printers folder. Here you have access to two sets of driver tabs: the Printing Preferences tabs and the Properties tabs. The settings that you make on the Printing Preferences driver tabs control the driver default settings for each user's profile. Installable options can be configured in the Properties driver tabs.
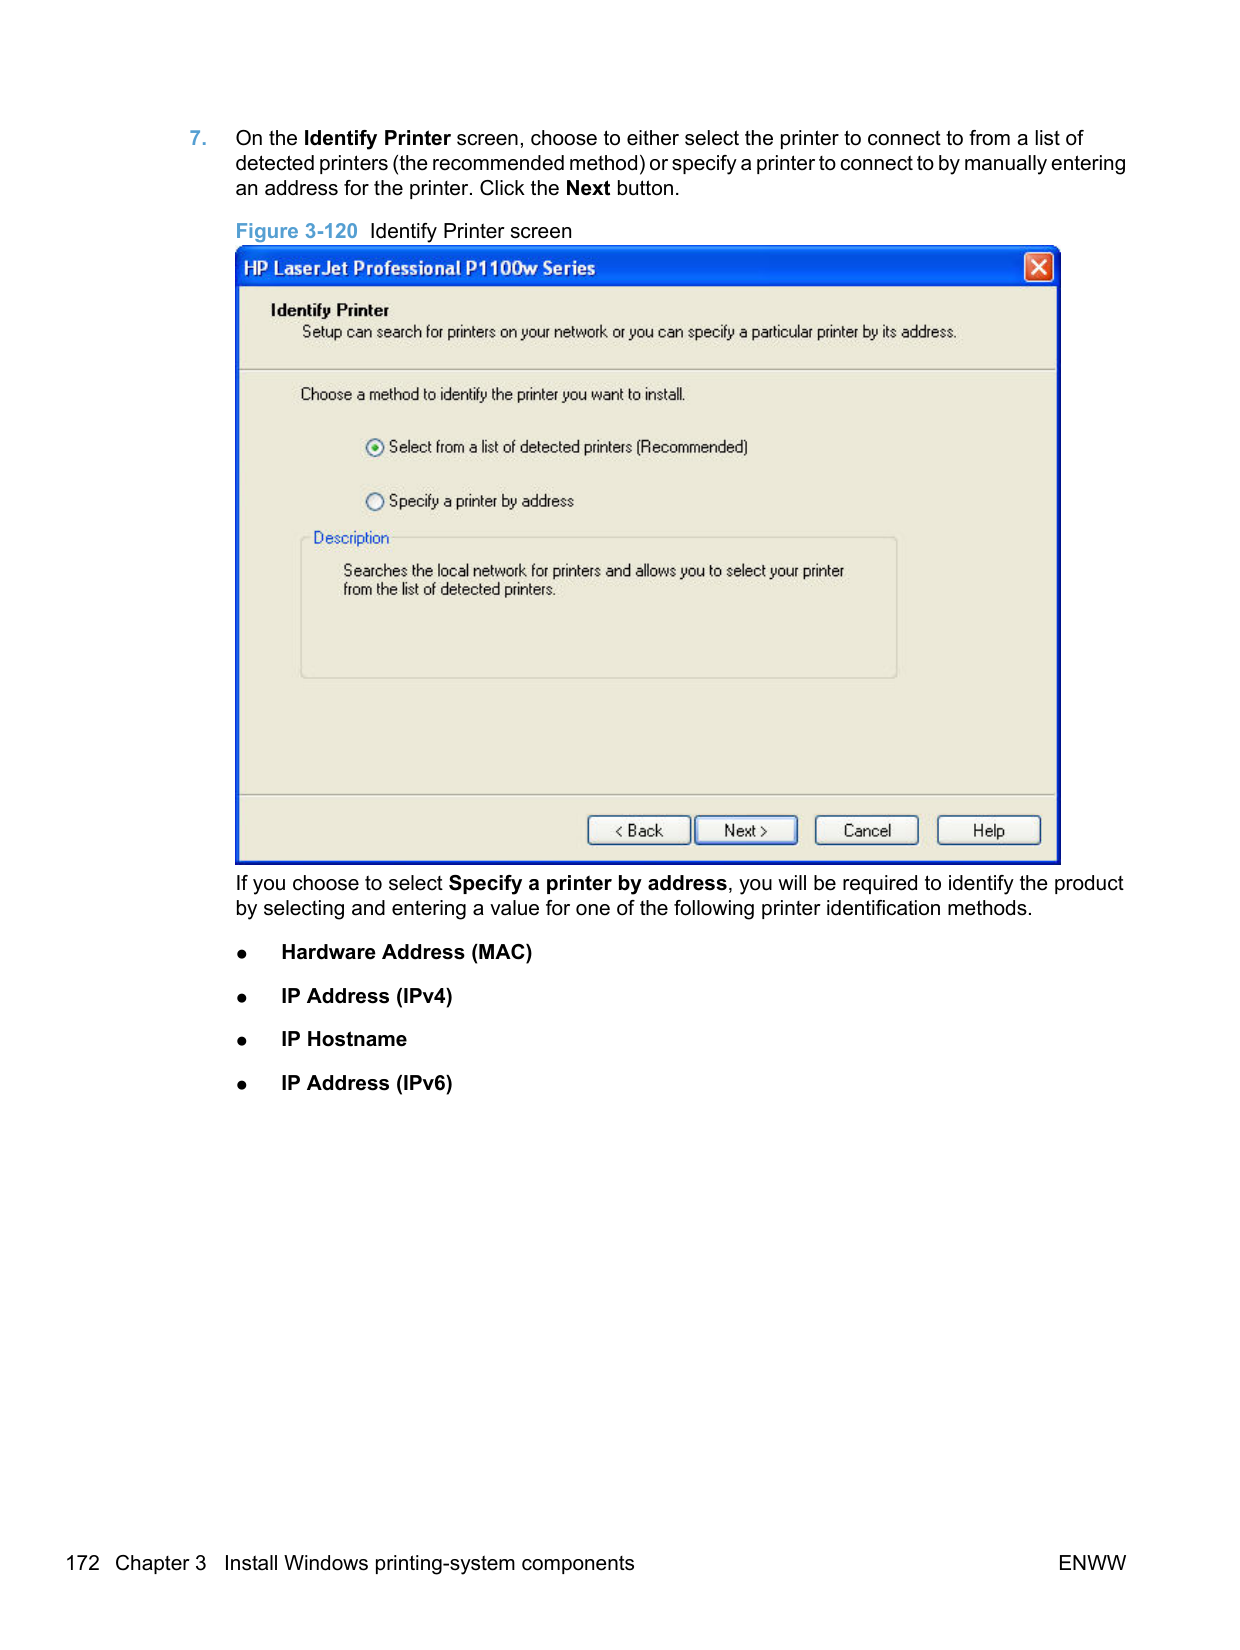
##### Printing Preferences driver tabs
The Printing Preferences driver tabs change the default settings that are used across all software programs. To gain access to these tabs, follow these steps:
Windows XP and Windows Server 2003: Click Start, click Settings, and then click Printers and Faxes.
Windows Server 2008: Click Start, click Control Panel, and then open the Printers folder. Windows 7: Click Start, click Control Panel, and then click Devices and Printers.
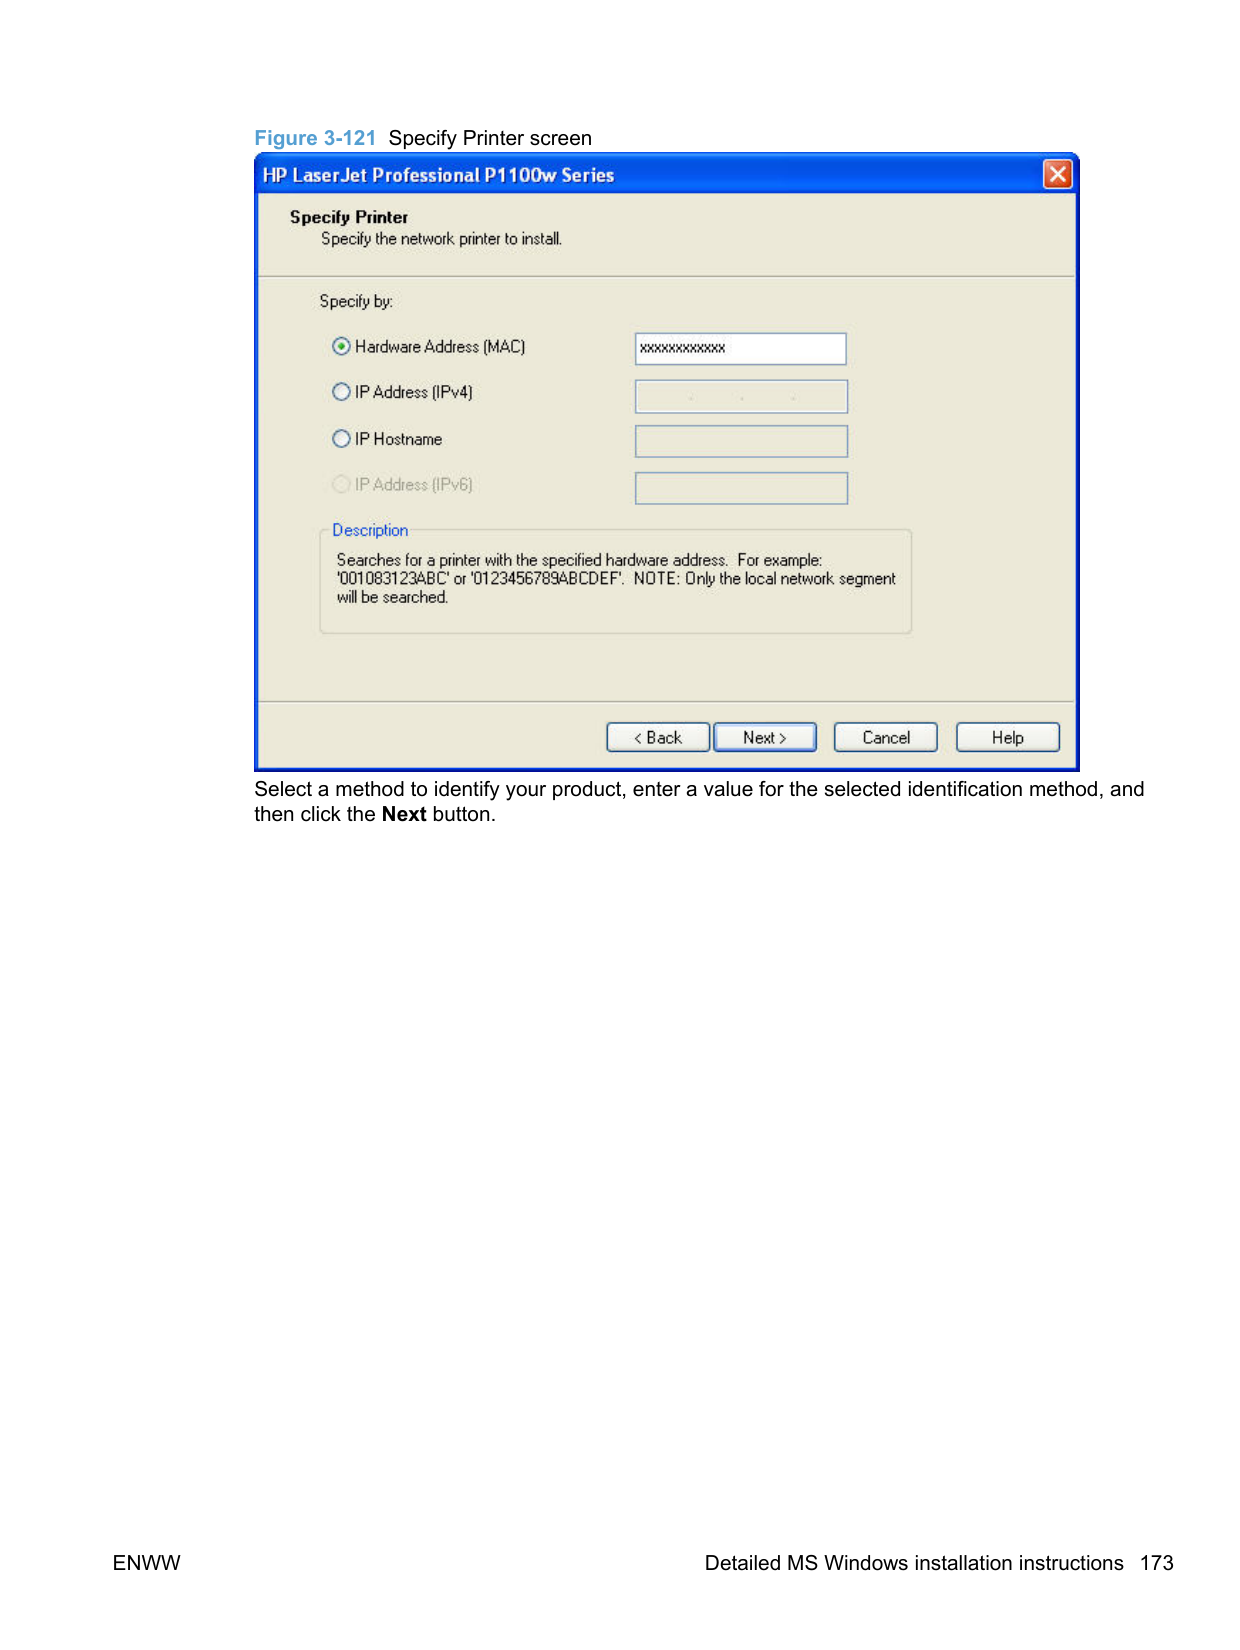
##### Properties driver tabs
This set of tabs controls the driver behavior and driver connections. To gain access to the Properties tabs, follow these steps:
Windows XP and Windows Server 2003: Click Start, click Settings, and then click Printers and Faxes.
Windows Server 2008: Click Start, click Control Panel, and then open the Printers folder. Windows 7: Click Start, click Control Panel, and then click Devices and Printers.
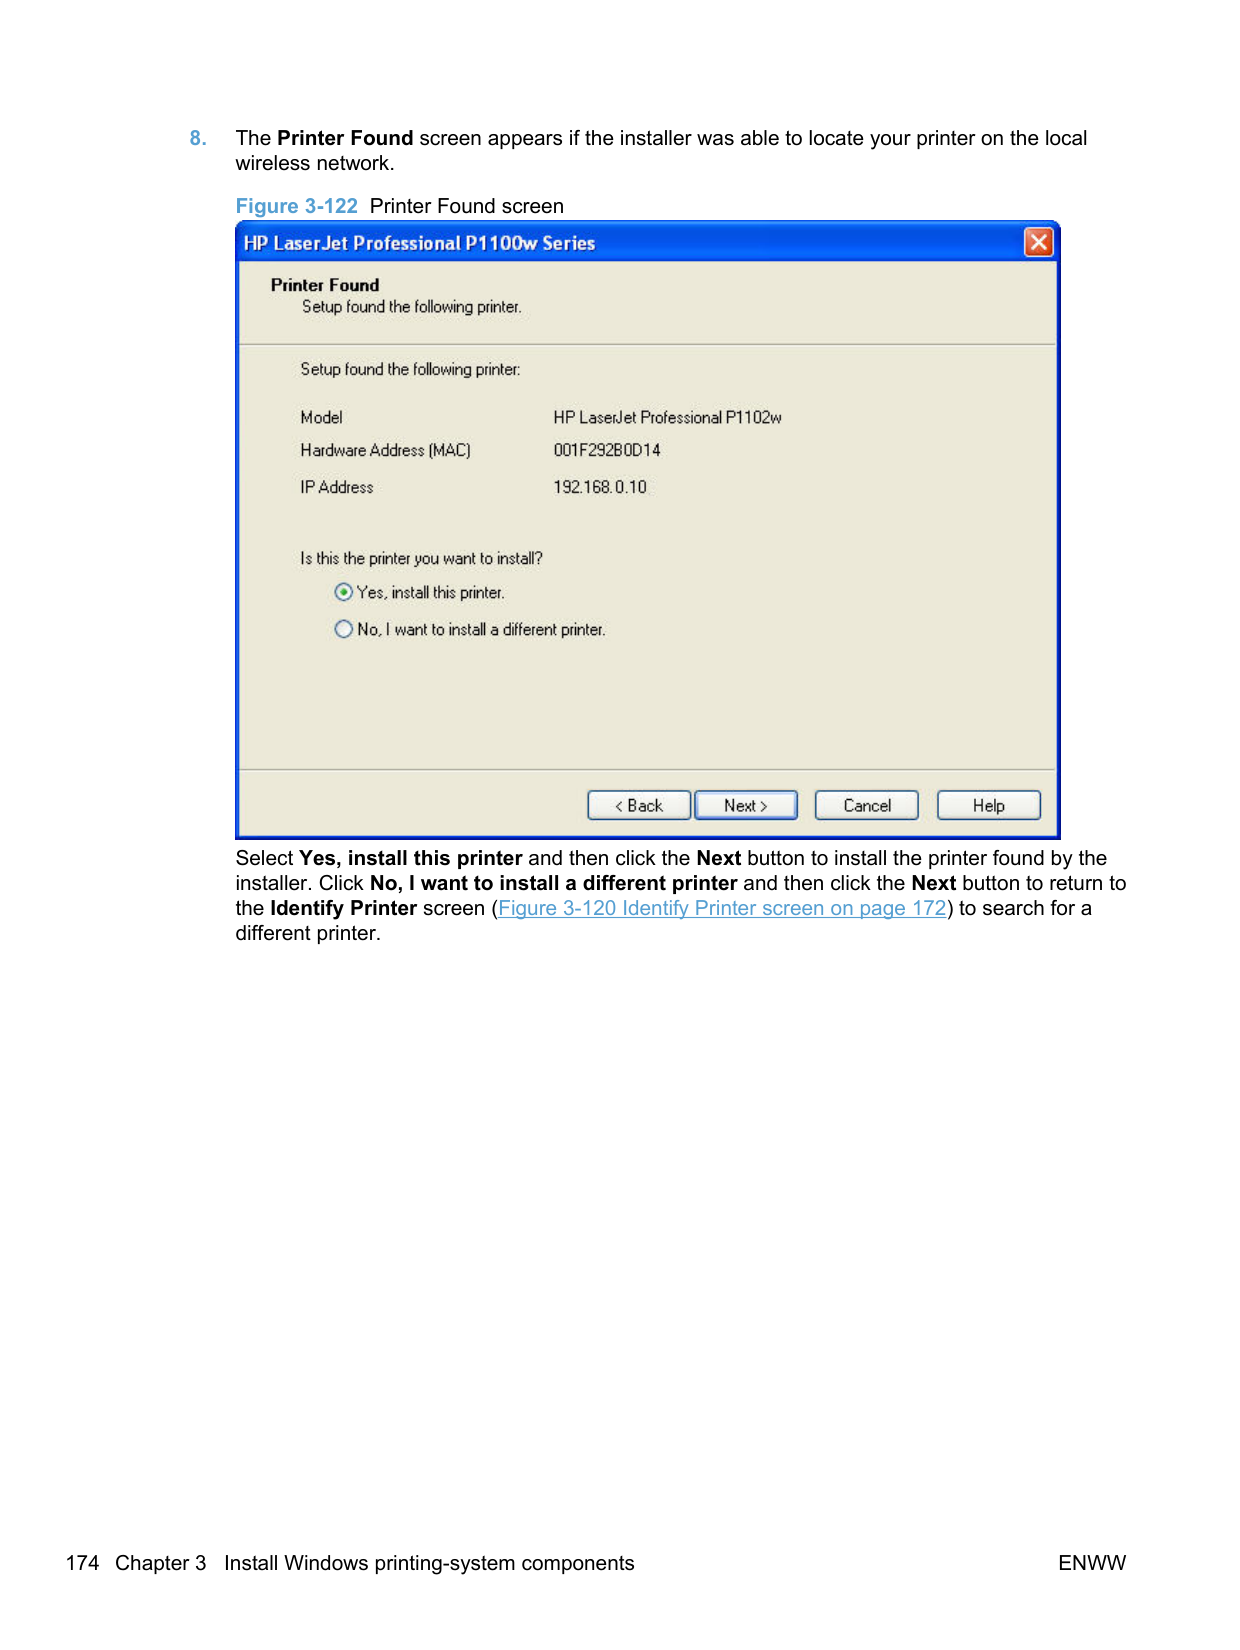
ENWW Gain access to print drivers 201
#### Help system
The HP Host-based print driver includes a full-featured Help system to provide assistance with printing and configuration options.
##### “What's this?” Help
Windows XP, Windows Server 2003, Windows Server 2008, Windows Vista, and Windows 7 support What's this? Help. You can gain access to What's this? Help messages in any of the following ways:
##### Incompatible Print Settings messages
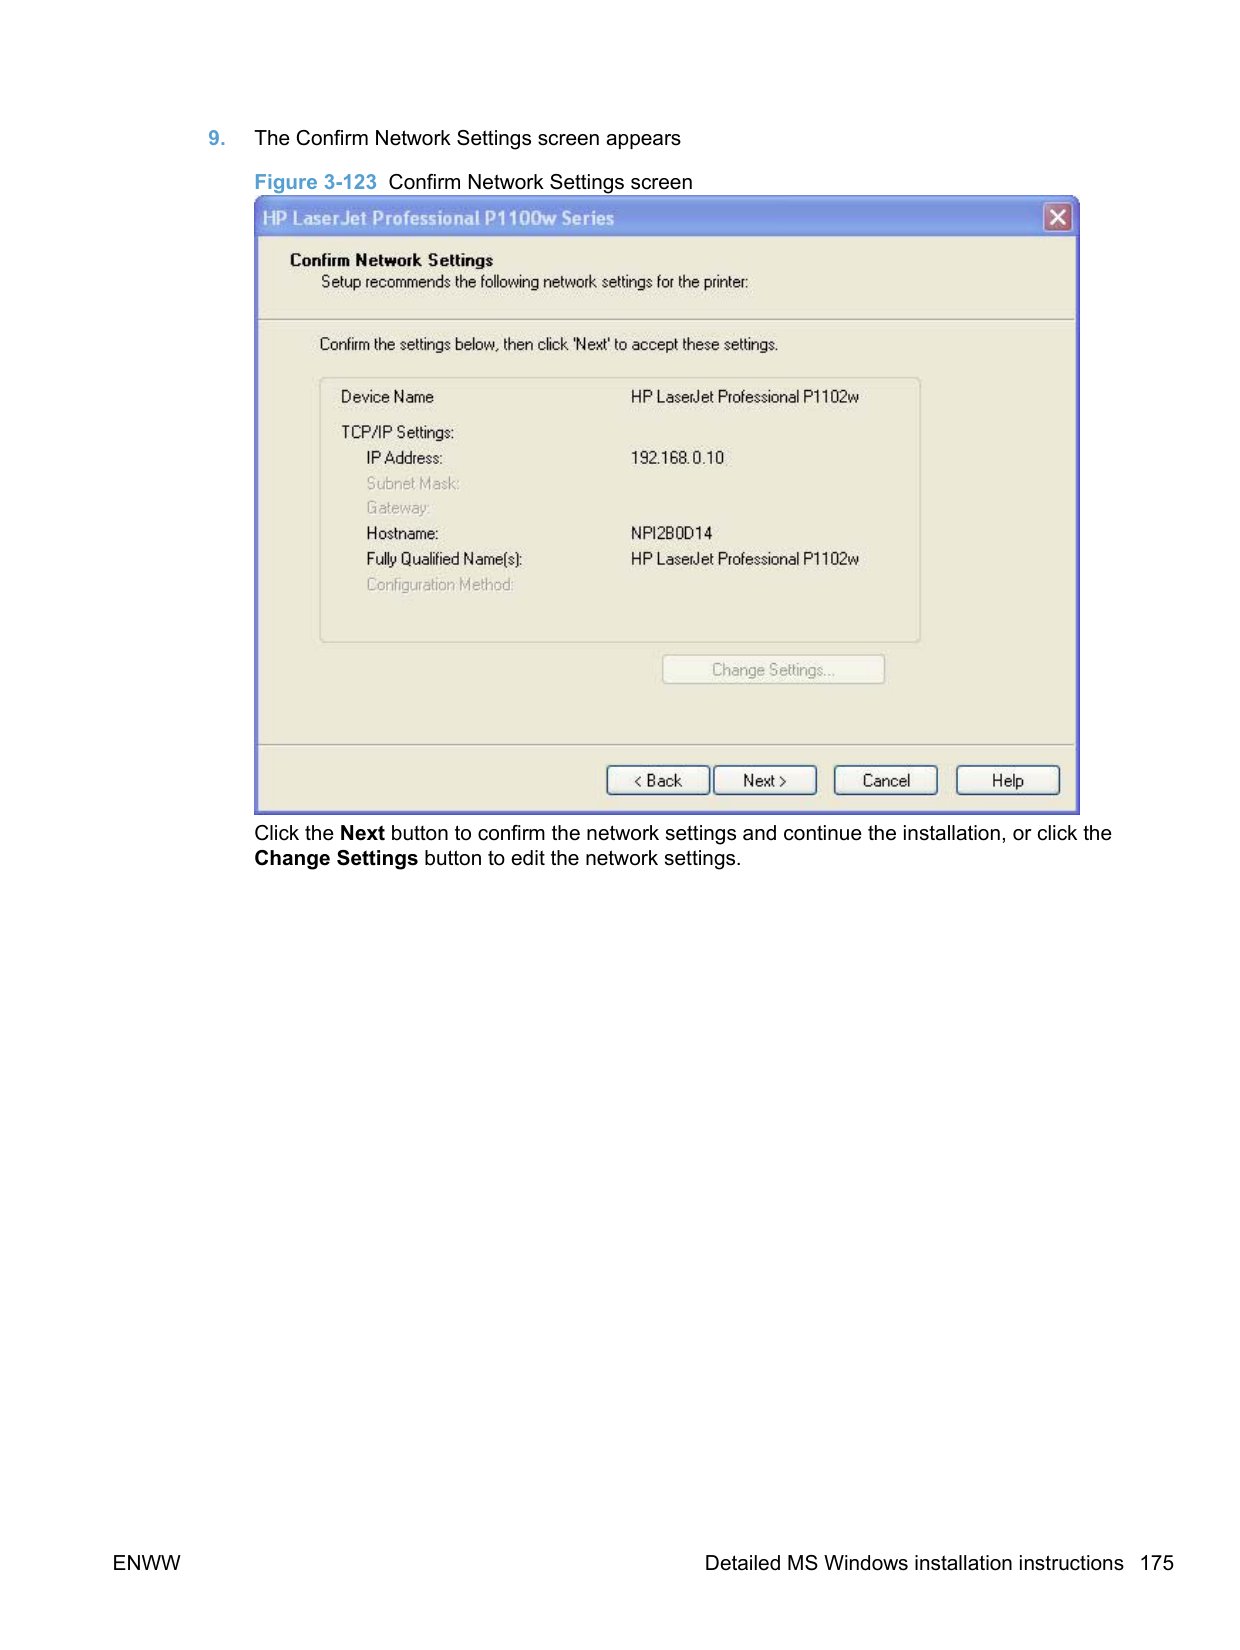
Incompatible Print Settings (constraint) messages are unsolicited messages that appear in response to specific print-driver selections. These messages alert you to selections that are illogical or impossible given the product capabilities or the current settings of other controls.
| | |---|
NOTE: Constraint messages are limited, and the underlying software architecture might accept some settings that are illogical or impossible for the product to perform. Sending a job with incompatible settings can lead to unexpected results. If print jobs do not print as expected, check the product documentation for the product capabilities.
In supported Windows operating environments, some technically invalid print-driver configurations result in warning messages. Duplexing, for example, is not possible when the Transparency paper type is selected. The following figure shows an Incompatible Print Settings message.
######### Figure 4-1 An Incompatible Print Settings message

To resolve the conflicting settings, click Restore my previous settings. and then click OK. The driver resets the conflicting control back to its previous state.
If you want to keep the conflicting setting, click Keep this setting, and I will change it later. and then click OK.
| |

|---|
NOTE: In this example, the conflict can be resolved manually. If the conflict is not resolved when the driver is closed, then the same message appears again when a print job is sent to the product.
#### Advanced tab features
| | |---|
NOTE: The Advanced tab is in the Printing Preferences tab set. For information about how to gain access to these tabs, see Printing Preferences driver tabs on page 200.
Use the Advanced tab to change the layout of printed pages. Use this tab to configure special controls that are not commonly used, as well as to control features such as paper size and copies in the driver (although most current software programs support these features in the Print dialog box or through the page settings in the software program). The following figure shows the Advanced tab.
Figure 4-2 The default appearance of the Advanced tab

The Advanced tab contains the following controls:
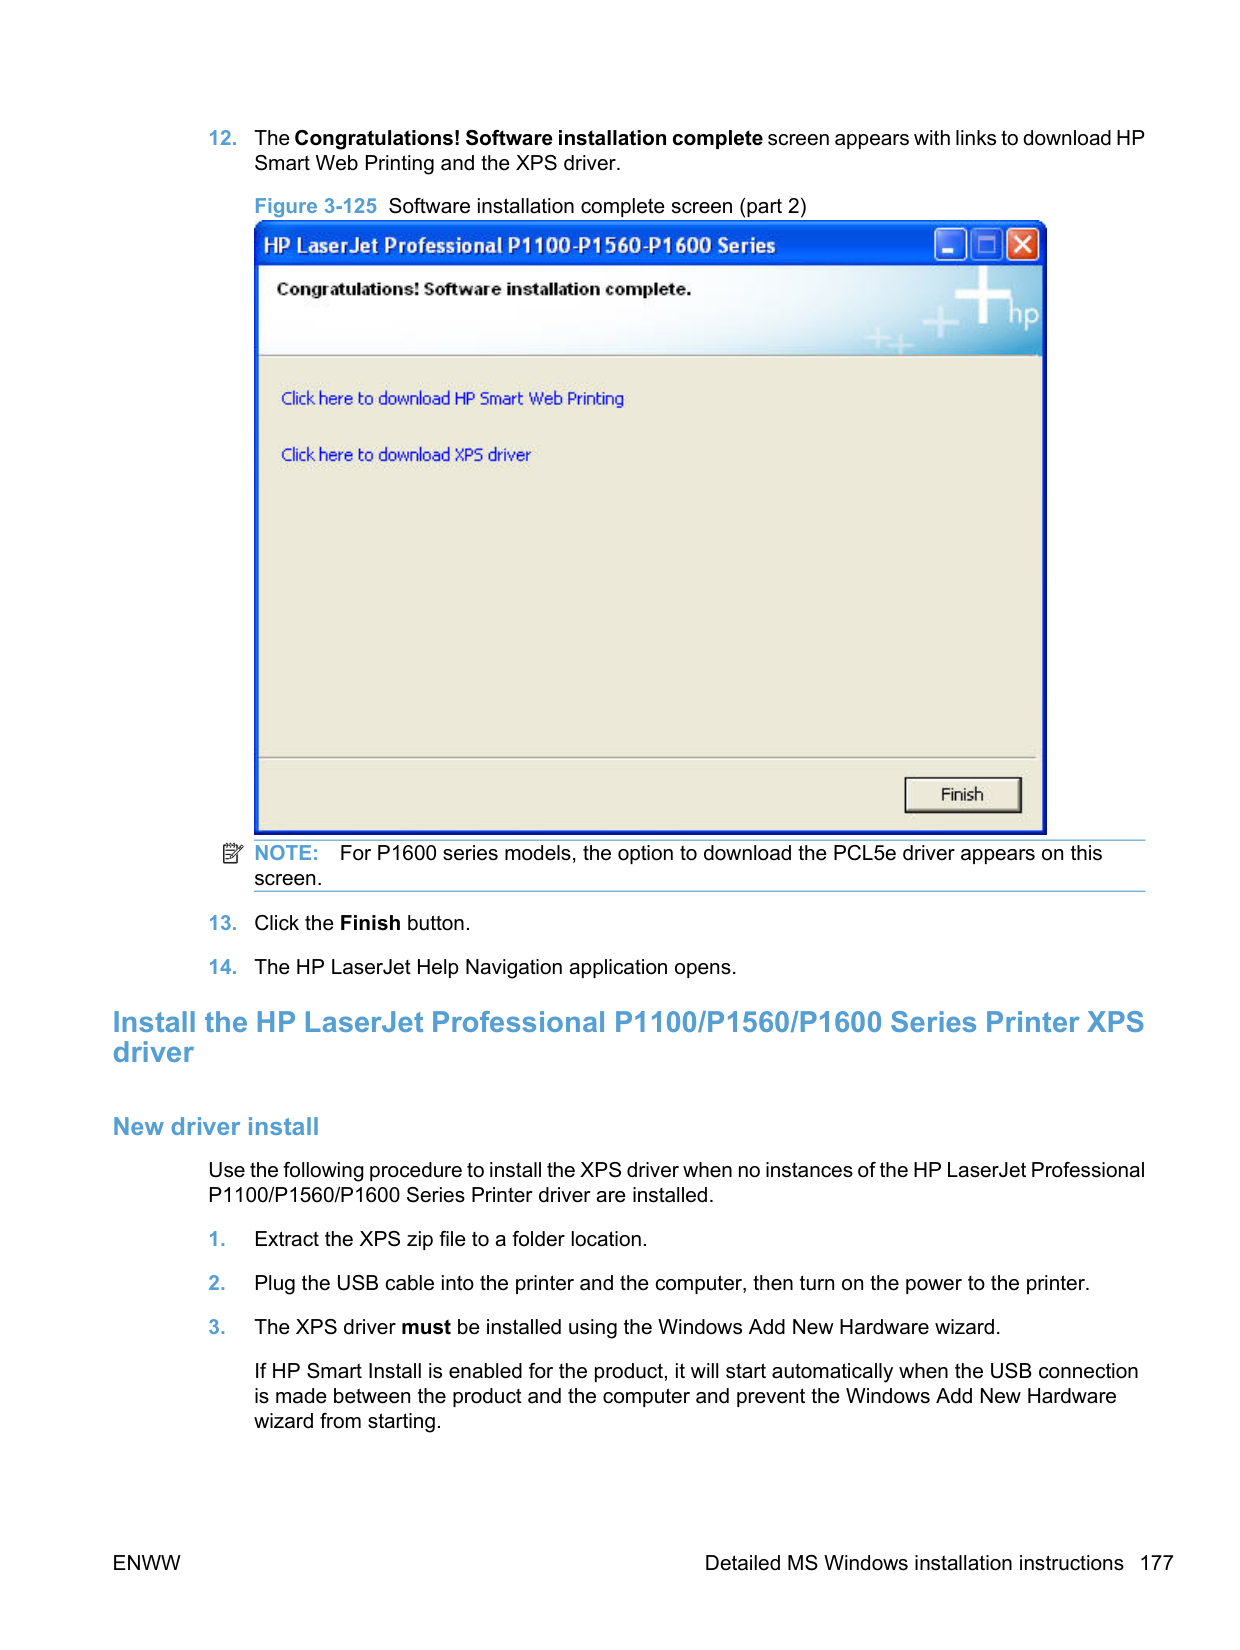
Print Tasks Quick Sets The Print Tasks Quick Sets drop-down list appears on all tabs except the Services tab. Print Tasks Quick Sets allow separate groups of print settings to be saved under specified names for reuse.
######### Follow these steps to create a Print Task Quick Set.
######### Follow these steps to use a Print Tasks Quick Set.
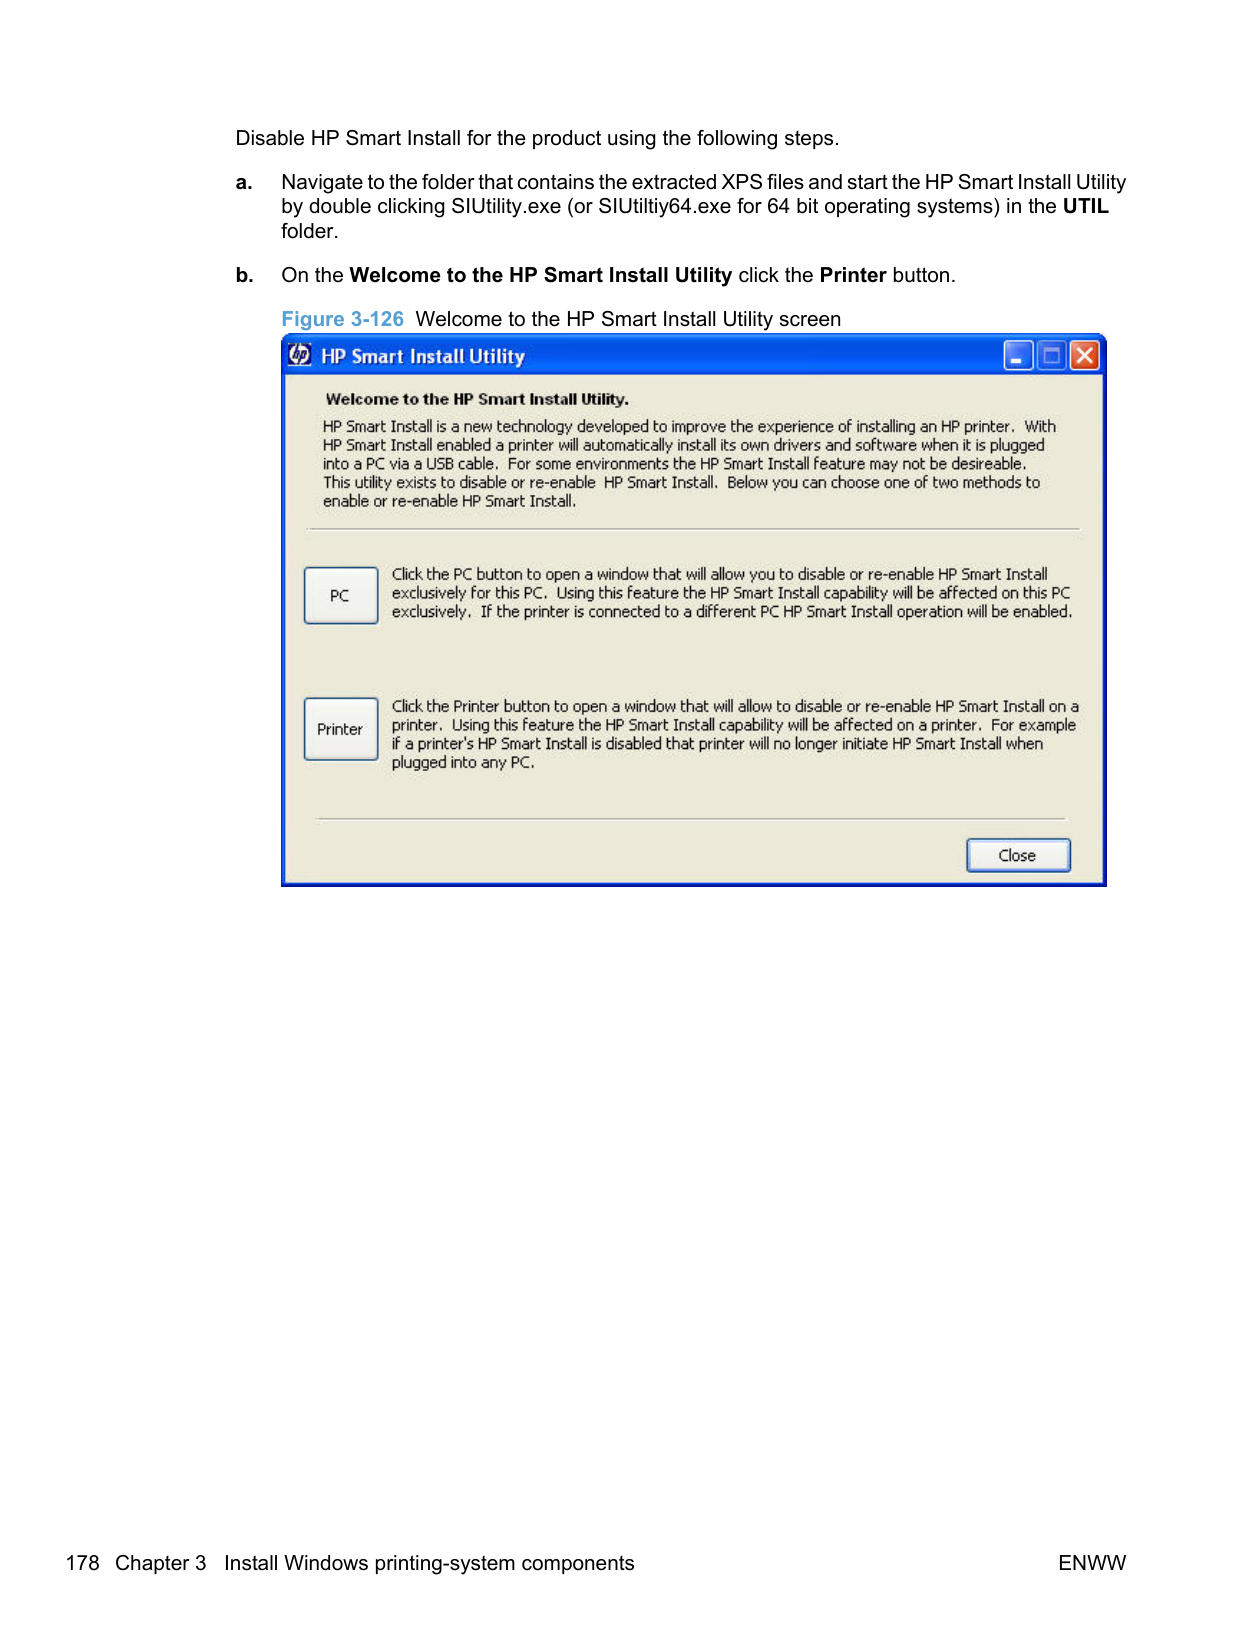
##### Copies
The Copies control contains the Copies setting. Copies
Copies: Specifies the number of copies to print. This driver setting is useful for software programs that do not provide a copy count. If a copies setting is available in the software program, set the copy count in the software program.
The number of copies that you request appears in the Copies option. You can select the number by typing in the text box or by using the up and down arrows to the right of the text box. Valid entries are numbers from 1 to 999. The copies value will not advance from the maximum number (999) to 1 when the up arrow is used, or change from 1 to the maximum number (999) when the down arrow is used. When you click another group box or leave the Advanced tab, invalid entries into the text box (such as non-numerical input, numbers less than 1, or numbers greater than the maximum allowed) are changed to the last valid value that appeared in the text box. The default number of copies is 1.
Because you can set the number of copies that you want from some software programs, conflicts between the software program you are using and the driver can arise. In most cases, the software program and the driver communicate, so that the number of copies set in one location (such as the program) will appear in the other (such as the driver). For some programs, this communication does not take place, and the copies values are treated independently. For these programs, setting 10 copies in the program and then setting 10 copies in the driver will result in 100 copies (10 x 10) being printed. It is recommended that you set the number of copies in the program, whenever possible.
##### Printer Features
The Printer Features control contains a checkbox for activating the Print All Text as Black feature.
##### Document preview image
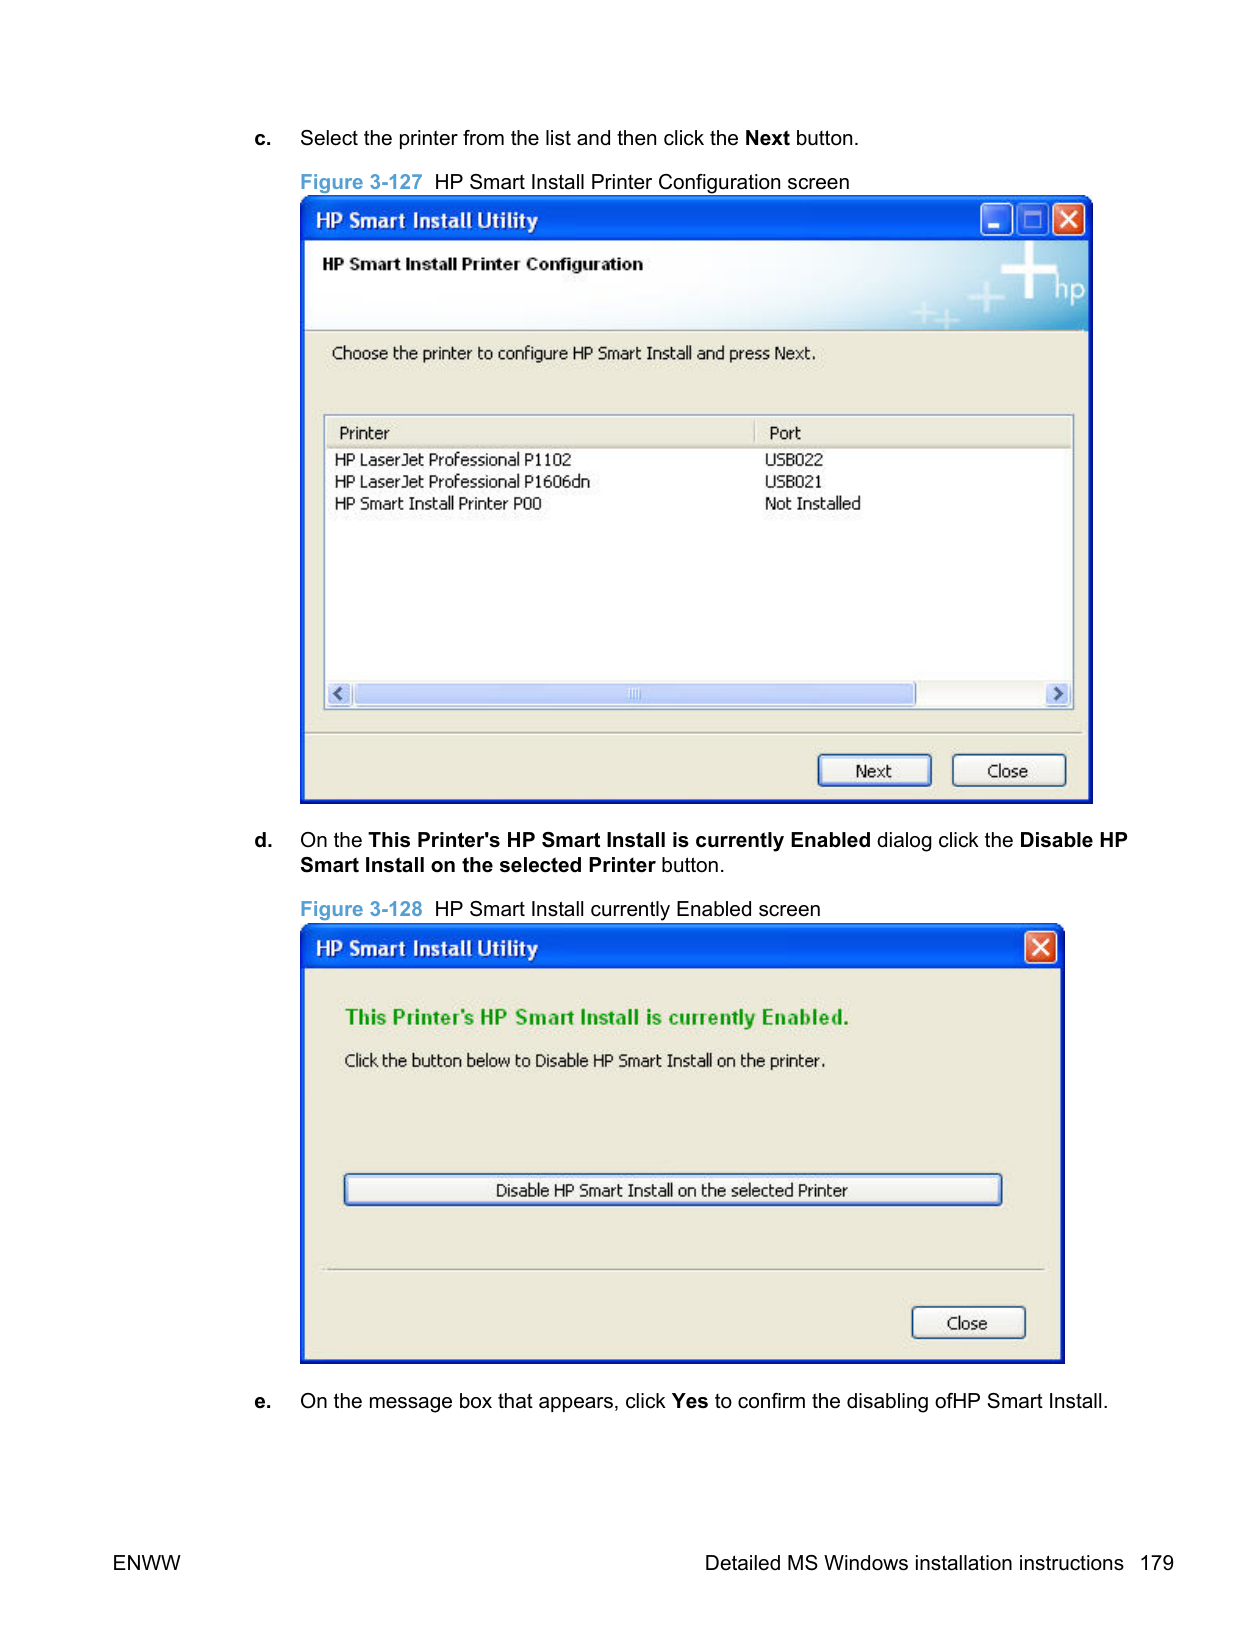
The document preview image is a line-drawn image of a page that represents graphics and text. The document preview image is always oriented so that the contents of the page are right-side-up. The document preview image appears in the upper-right corner of the following Printing Preferences driver tabs:
Switching between tabs does not change the location or appearance of the document preview image. When you move the mouse over the document preview image, the mouse cursor changes from an arrow to a gloved hand. You can toggle between portrait and landscape page orientation by clicking the image.
Paper/Quality tab features NOTE: The Paper/Quality tab is in the Printing Preferences tab set. For information about how to gain access to these tabs, see Printing Preferences driver tabs on page 200. Use the Paper/Quality tab to specify paper size, type, and source. You can also use this tab to specify different paper selections for the front cover, first page, other pages, last page, and back cover of the document. The following figure shows the Paper/Quality tab. Figure 4-3 Paper/Quality tab
| | |---|


The Paper/Quality tab contains the following control sets:
Print Tasks Quick Sets The Print Tasks Quick Sets drop-down list appears on all tabs except the Services tab. Print Tasks Quick Sets allow separate groups of print settings to be saved under specified names for reuse.
######### Follow these steps to create a Print Task Quick Set.
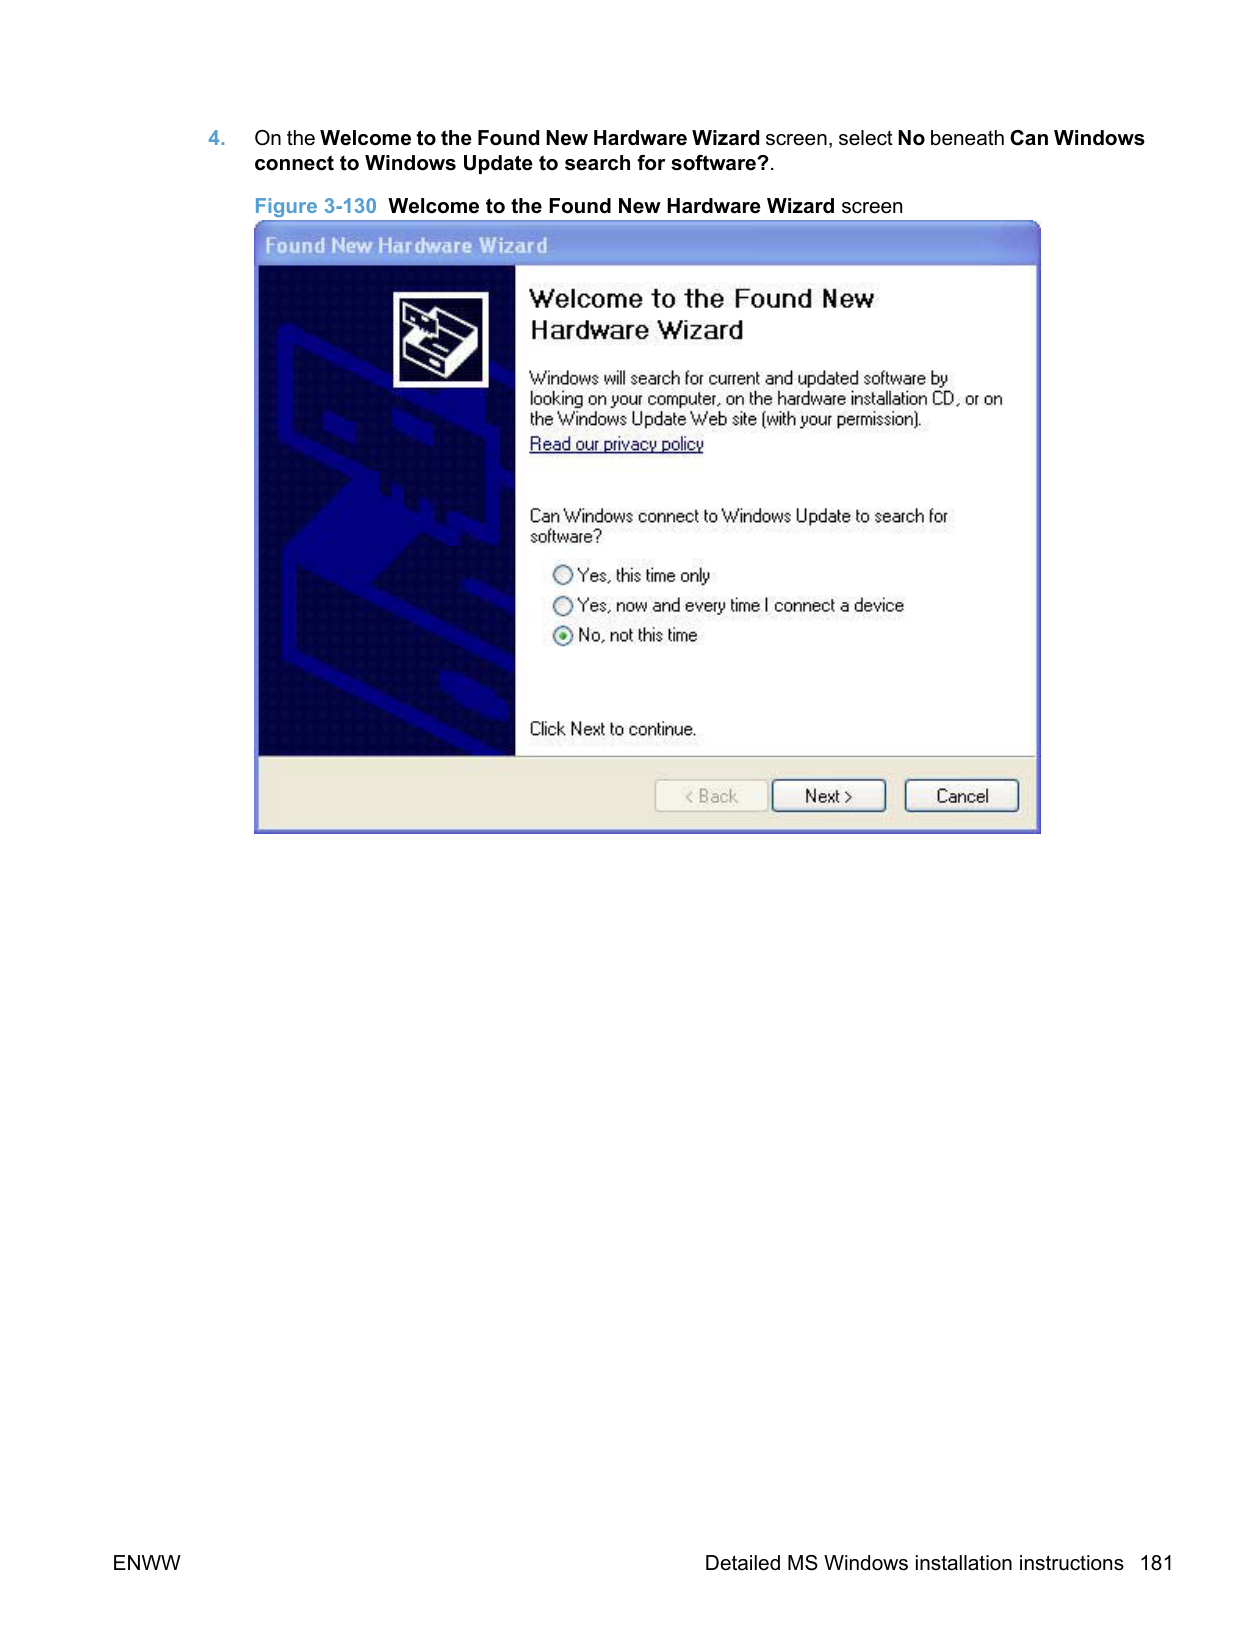
##### Paper Options
The settings in the Paper Options group box on the Paper/Quality tab apply to all of the pages of the document. The following figure shows the Paper Options group box and the selections that are available by default.
######### Figure 4-4 Paper Options group box

The settings in the Paper Options group box are described in the following order:
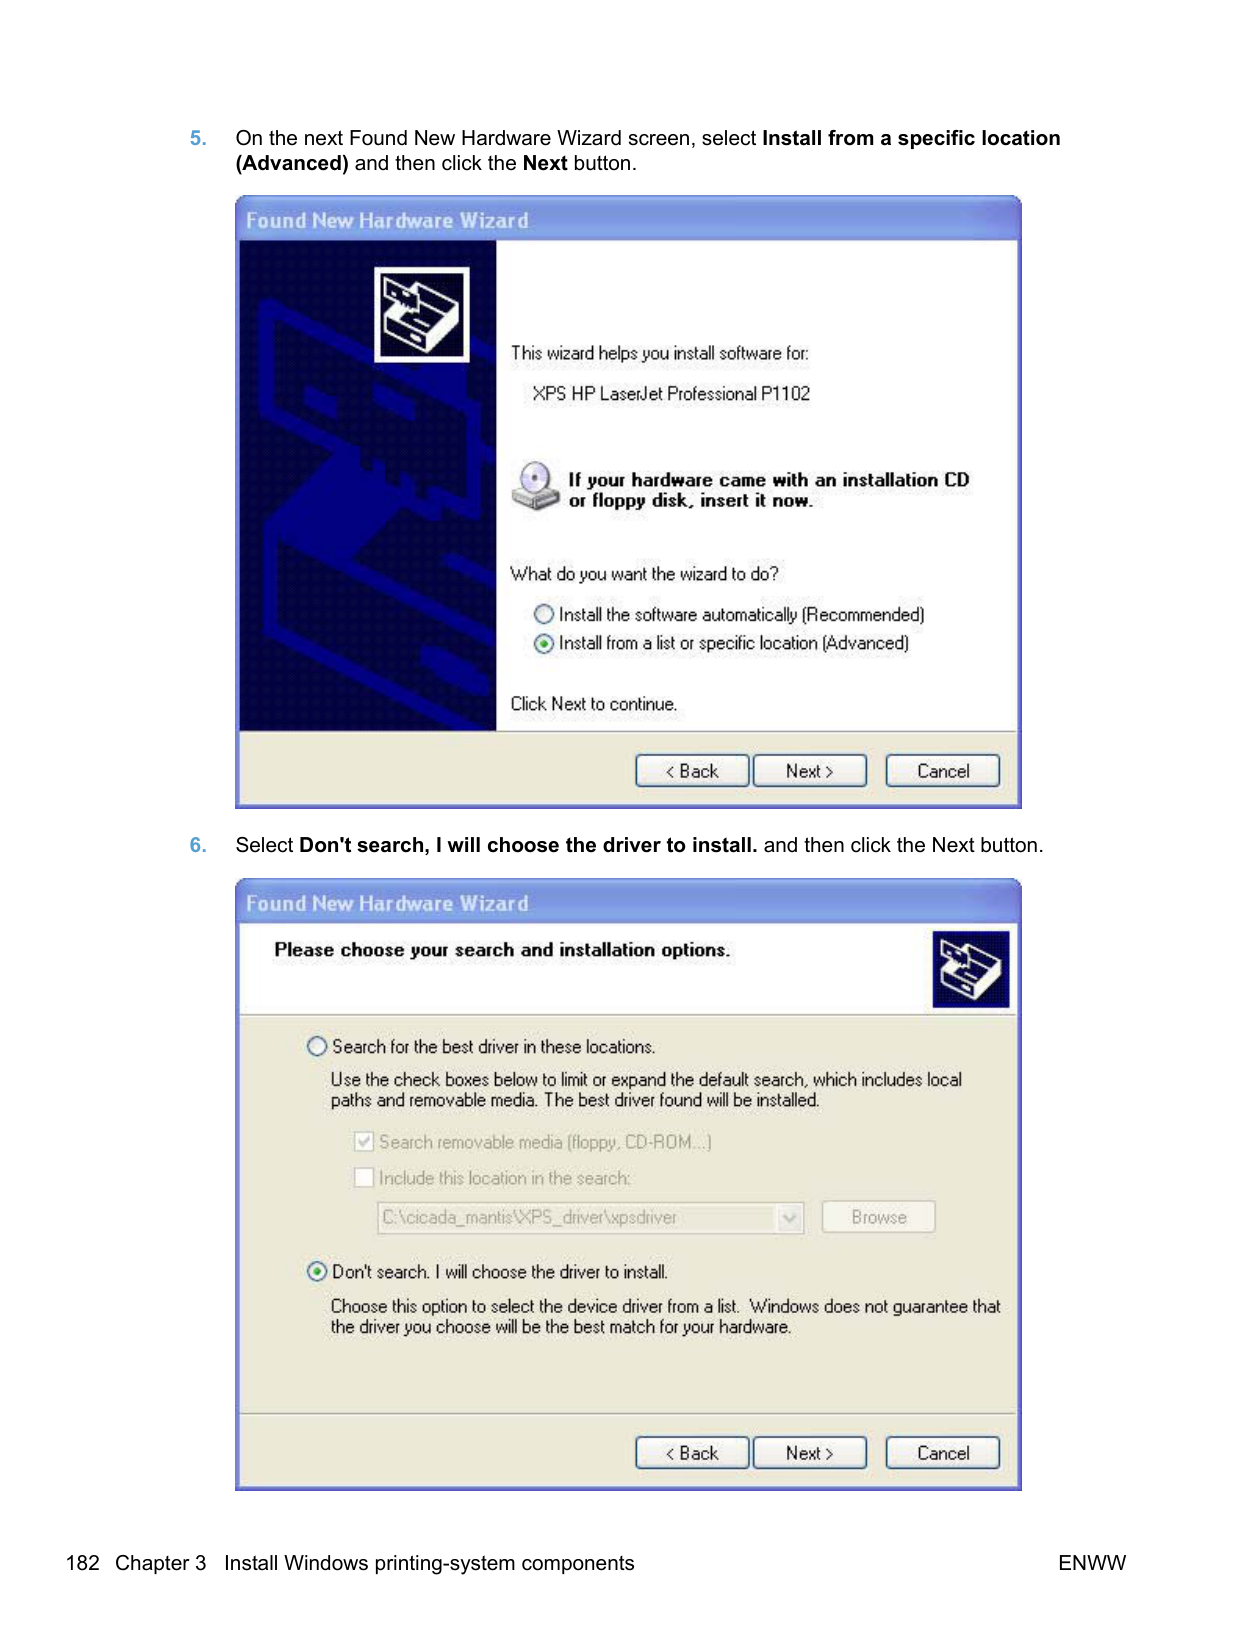
######## Size is
The Size is: drop-down menu lists all of the supported paper sizes. Because paper-size settings in most software programs override driver settings, it is generally best to use the driver to set the paper size only when you are printing from software programs that do not include a paper-size setting, such as NotePad, or when you are producing a book or a booklet that does not require different paper sizes.
| | |---|
NOTE: Certain software programs can override the size command and specify different paper sizes within a single document. For information about paper sizes, see Engineering Details on page 247.
| | |---|
NOTE: Several paper sizes are listed in the paper size drop-down menu that are physically too large for the product, such as 16k. These sizes are included for scaling purposes– the product scales down the printed output from a larger original size used by a software program.
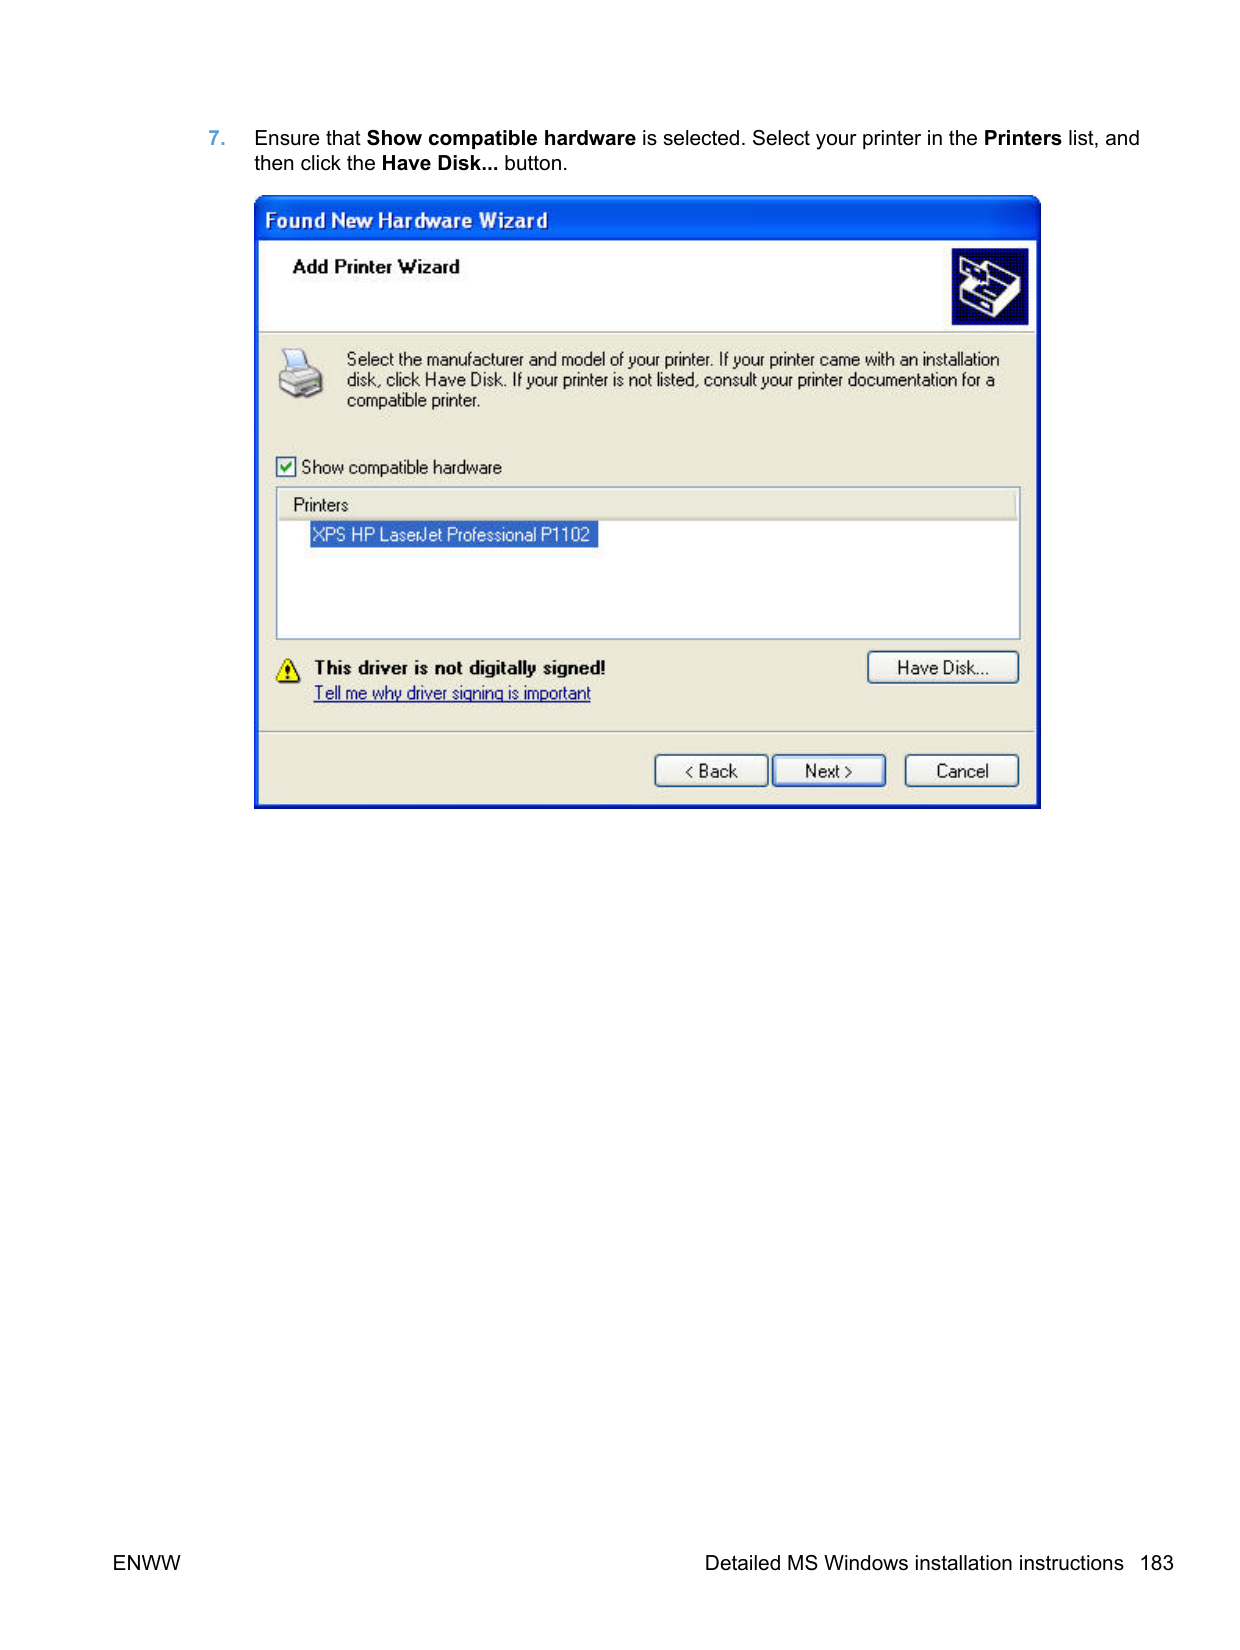
######## Custom Paper Size
The Custom Paper Size dialog box appears when you click Custom… on the Paper/Quality tab. The following figure shows the initial appearance of the Custom Paper Size dialog box.
Figure 4-5 Custom Paper Size dialog box

Name
Use the Name text box to type a name for a new custom paper size or to rename an existing paper size. The text that appears in the Name text box is one of the following::
If you type a new name into the Name text box but then do not click Save, you can change the Width: and Length: values without losing the name. However, if you close the dialog box without clicking Save, any unsaved name or size values are lost without warning.
######### Size
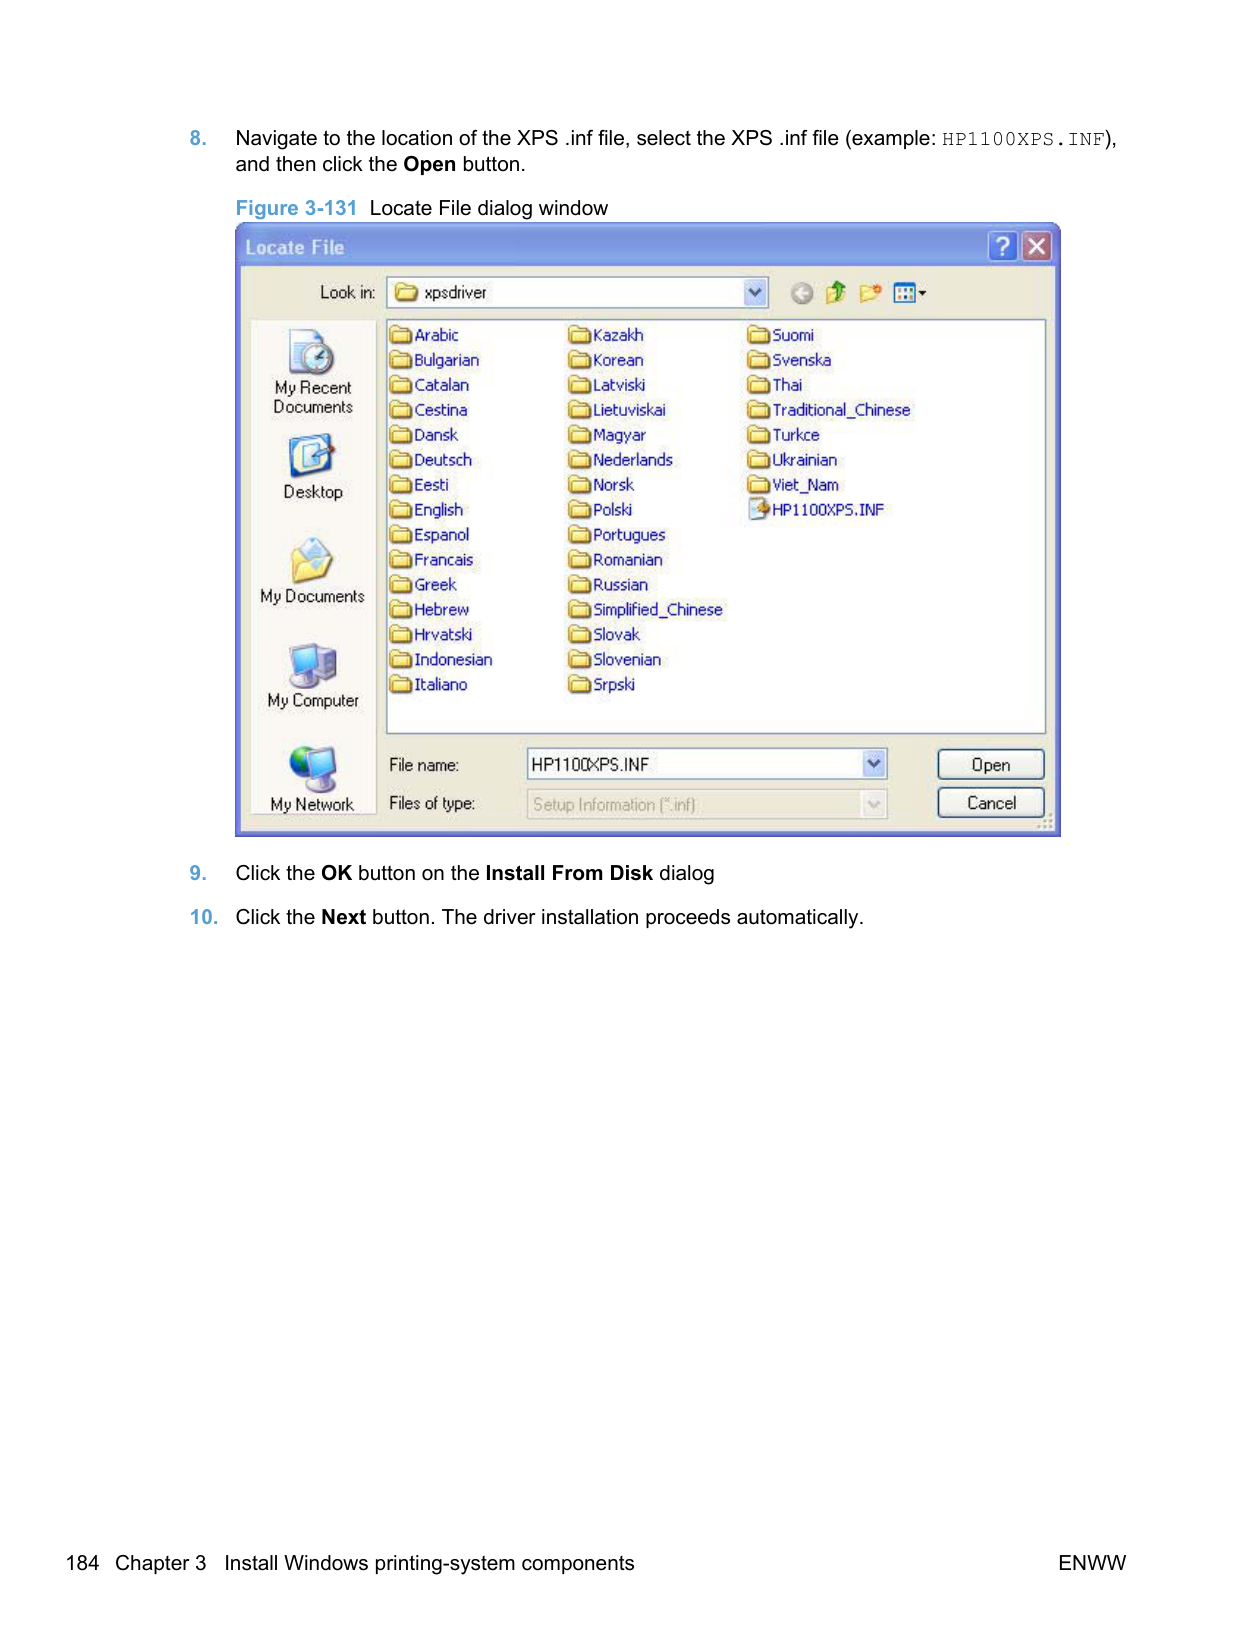
The Width: and Length: values can be changed by typing numeric strings into the edit boxes. Any entry that is too large is rounded down to the maximum valid entry, while any entry that is too small is rounded up to the minimum valid entry.
If units are in millimeters, the custom paper-size range minimum is the limit rounded up to the nearest whole millimeter. The custom paper-size range maximum is the limit rounded down to the nearest whole millimeter. Any non-numerical entry reverts to the last valid entry. Width and length entries are validated when the focus changes.
The resolution of each control is 1/100 of a millimeter or 1/100 of an inch, depending on the current measurement units.
######### Units
To change measurement units, click the button which displays either Use Inches or Use Millimeters.
######### Custom width and height control limits
The minimum paper size for this product is 98.4 x 148.0 mm (3.87 x 5.83 in) and the maximum is 215.9 x 355.6 mm (8.5 x 14.0 inches). The following table summarizes paper size limits for each paperhandling device.
Table 4-1 Host-based driver custom paper sizes
Tray Dimensions Minimum Maximum
Tray 1 (150-sheet multipurpose)
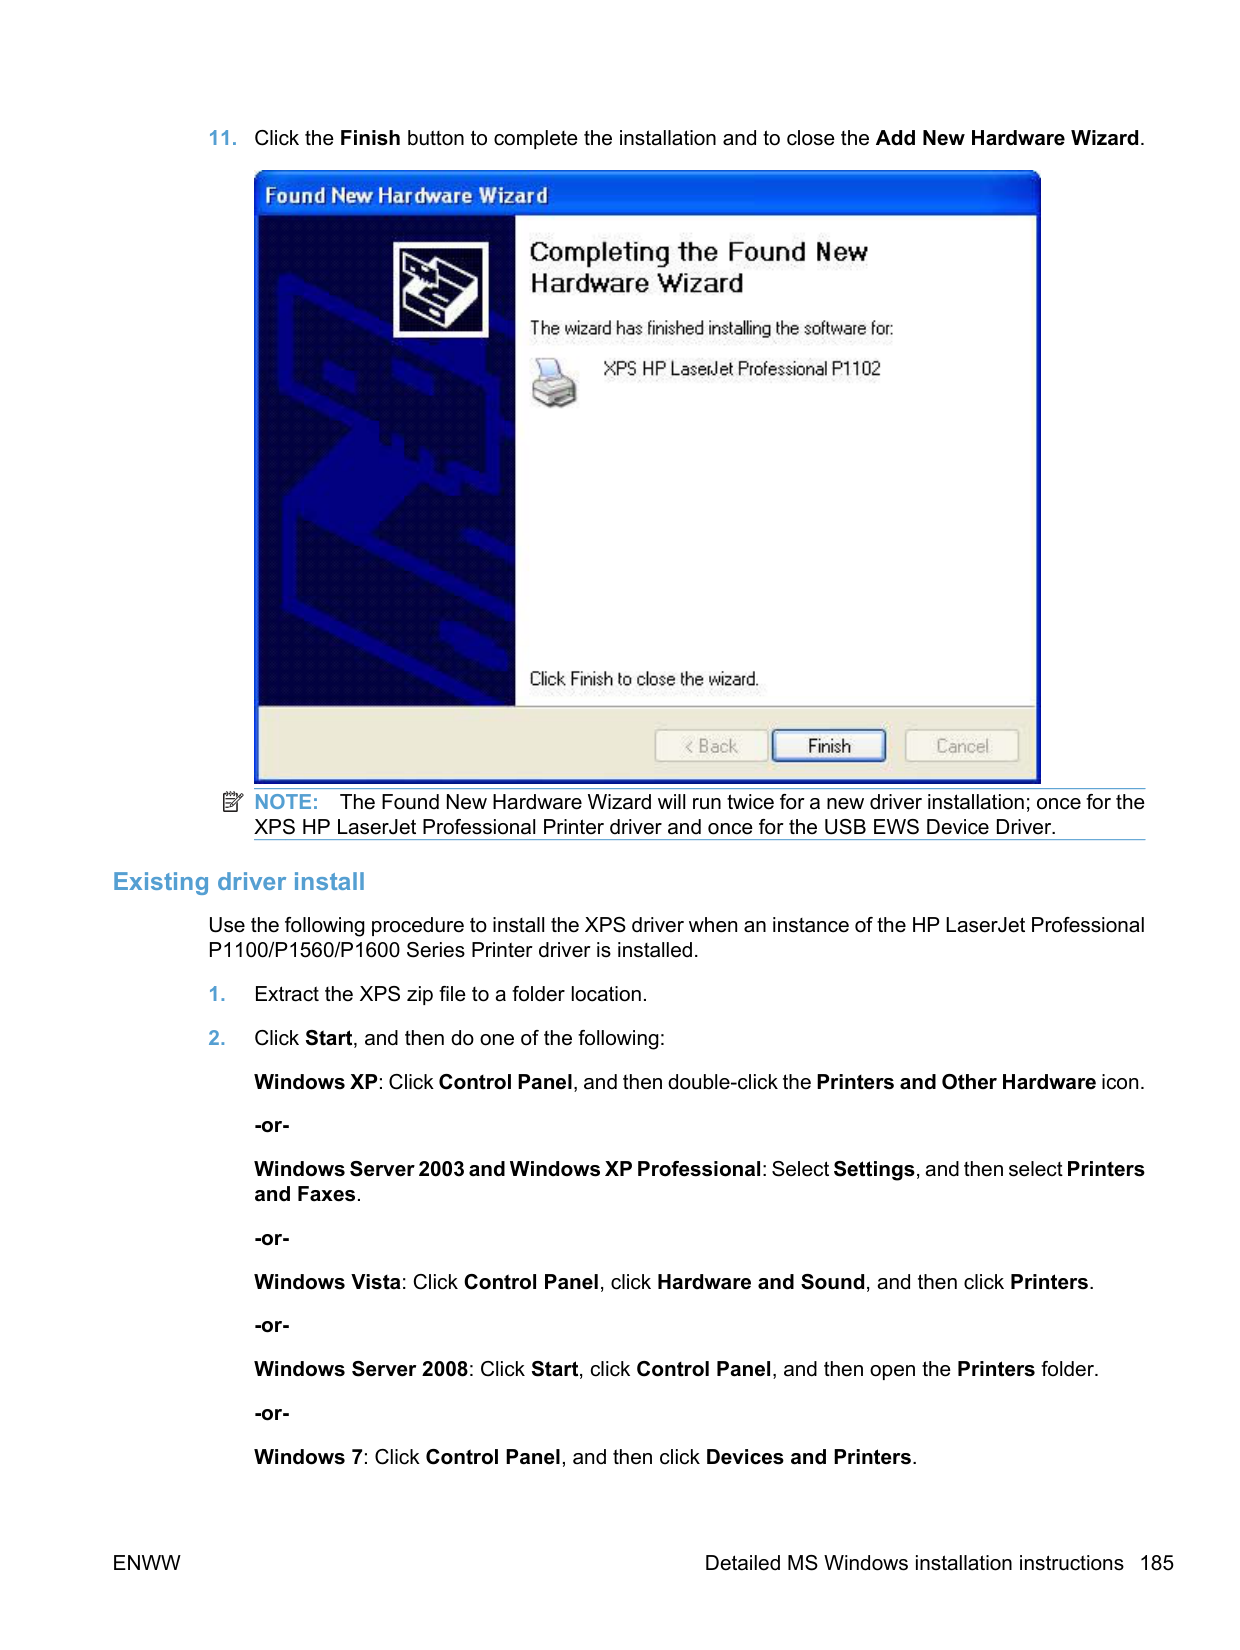
Width 98.4 mm (3.87 inches) 215.9 mm (8.5 inches) Height 148.0 mm (5.83 inches) 355.6 mm (14.0 inches)
######### Show important instructions for printing on short media (P1100 base model only)
Select Show important instructions for printing on short media to display a video on using the short media extender tool to load and print on short media. This video plays automatically when a selection is made from the Size is: drop-down list that qualifies as short media.
######## Use Different Paper/Covers
Select User Different Paper/Covers to assign different paper types for the pages in your printed document.

The following page or cover selections, and their paper source and type or cover type, are available.
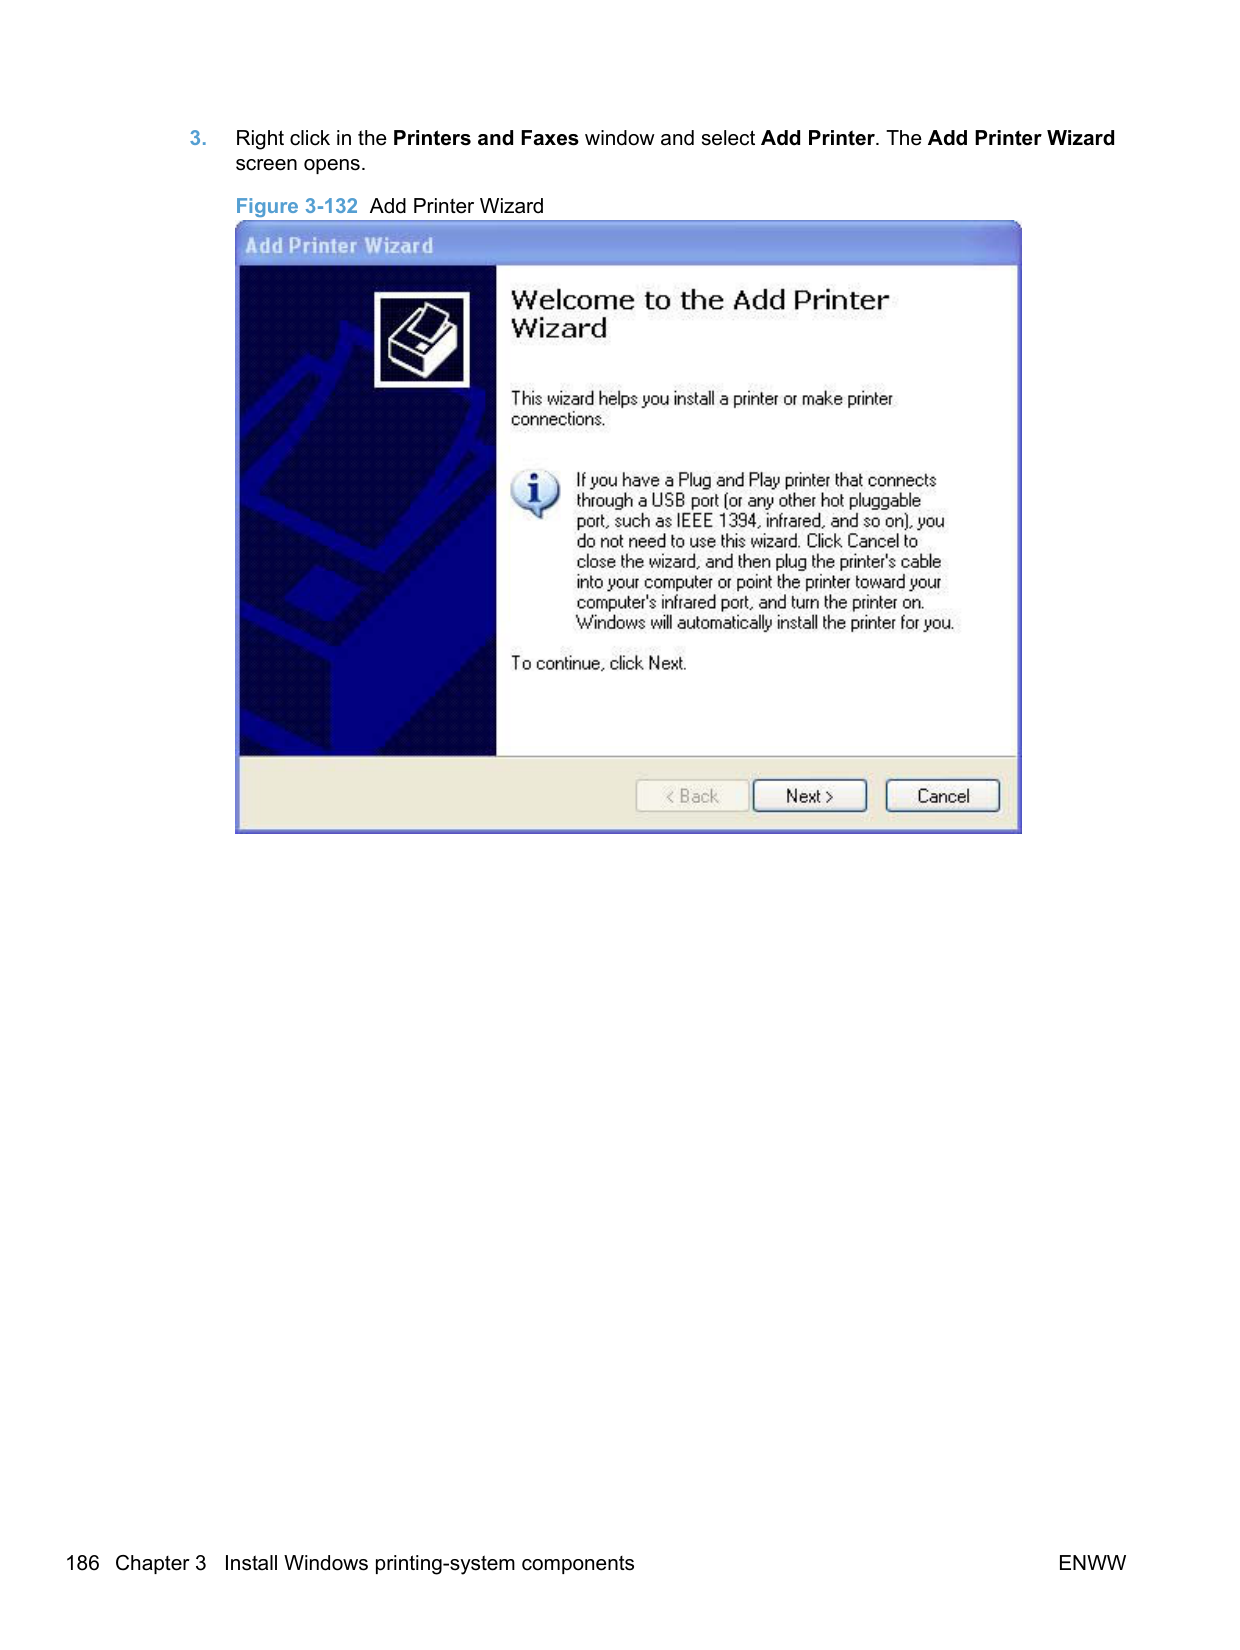
Source is The Source Is: setting specifies the source tray to use for printing a document. The Source Is: drop-down menu can contain the following options, depending on what has been installed on the product:
The default setting is Auto Select. When this setting is selected, the product uses the priority input slot by default. If Auto Select is selected and there is no paper in the priority input slot, the product will use
paper from the main input tray. For information about paper sources, see Engineering Details on page 247.
If Manual Feed is selected, the product will display a status message to load paper. Type Is
The Type Is: drop-down menu contains the paper types the product is capable of processing. The Type is: dialog box contains the following paper types:
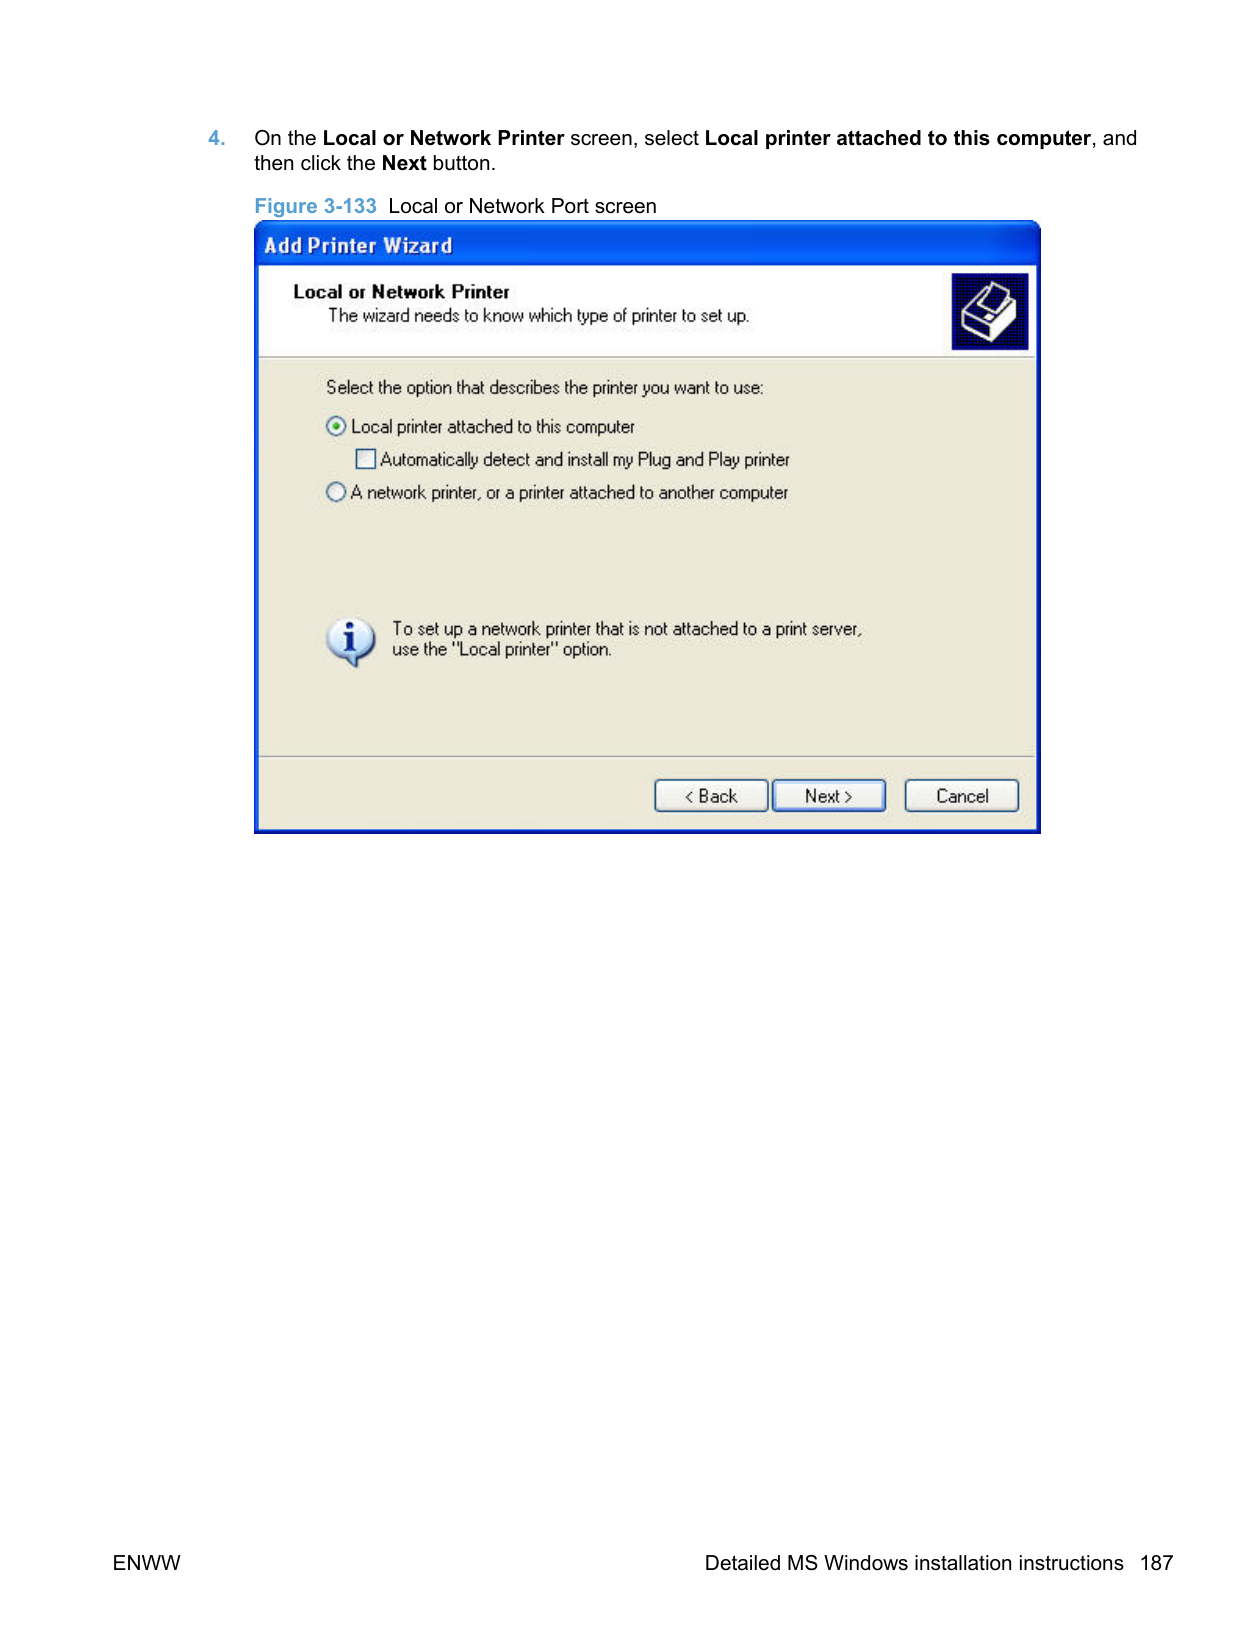
The default setting is Plain Paper, and the program selects the paper type. If you select a different setting, make sure that the correct paper type is loaded in the input tray. For more information about paper types, see Engineering Details on page 247.
##### Document preview image
The document preview image is a line-drawn image of a page that represents graphics and text. The document preview image is always oriented so that the contents of the page are right-side-up. The document preview image appears in the upper-right corner of the following Printing Preferences driver tabs:

Switching between tabs does not change the location or appearance of the document preview image. When you move the mouse over the document preview image, the mouse cursor changes from an arrow to a gloved hand. You can toggle between portrait and landscape page orientation by clicking the image.
##### Print Quality
The Print Quality section contains the following controls:
Print Quality drop-down menu Use this control to select a print quality. Numeric values are in dots per inch (dpi). The Print Quality drop-down menu contains the following resolution options.
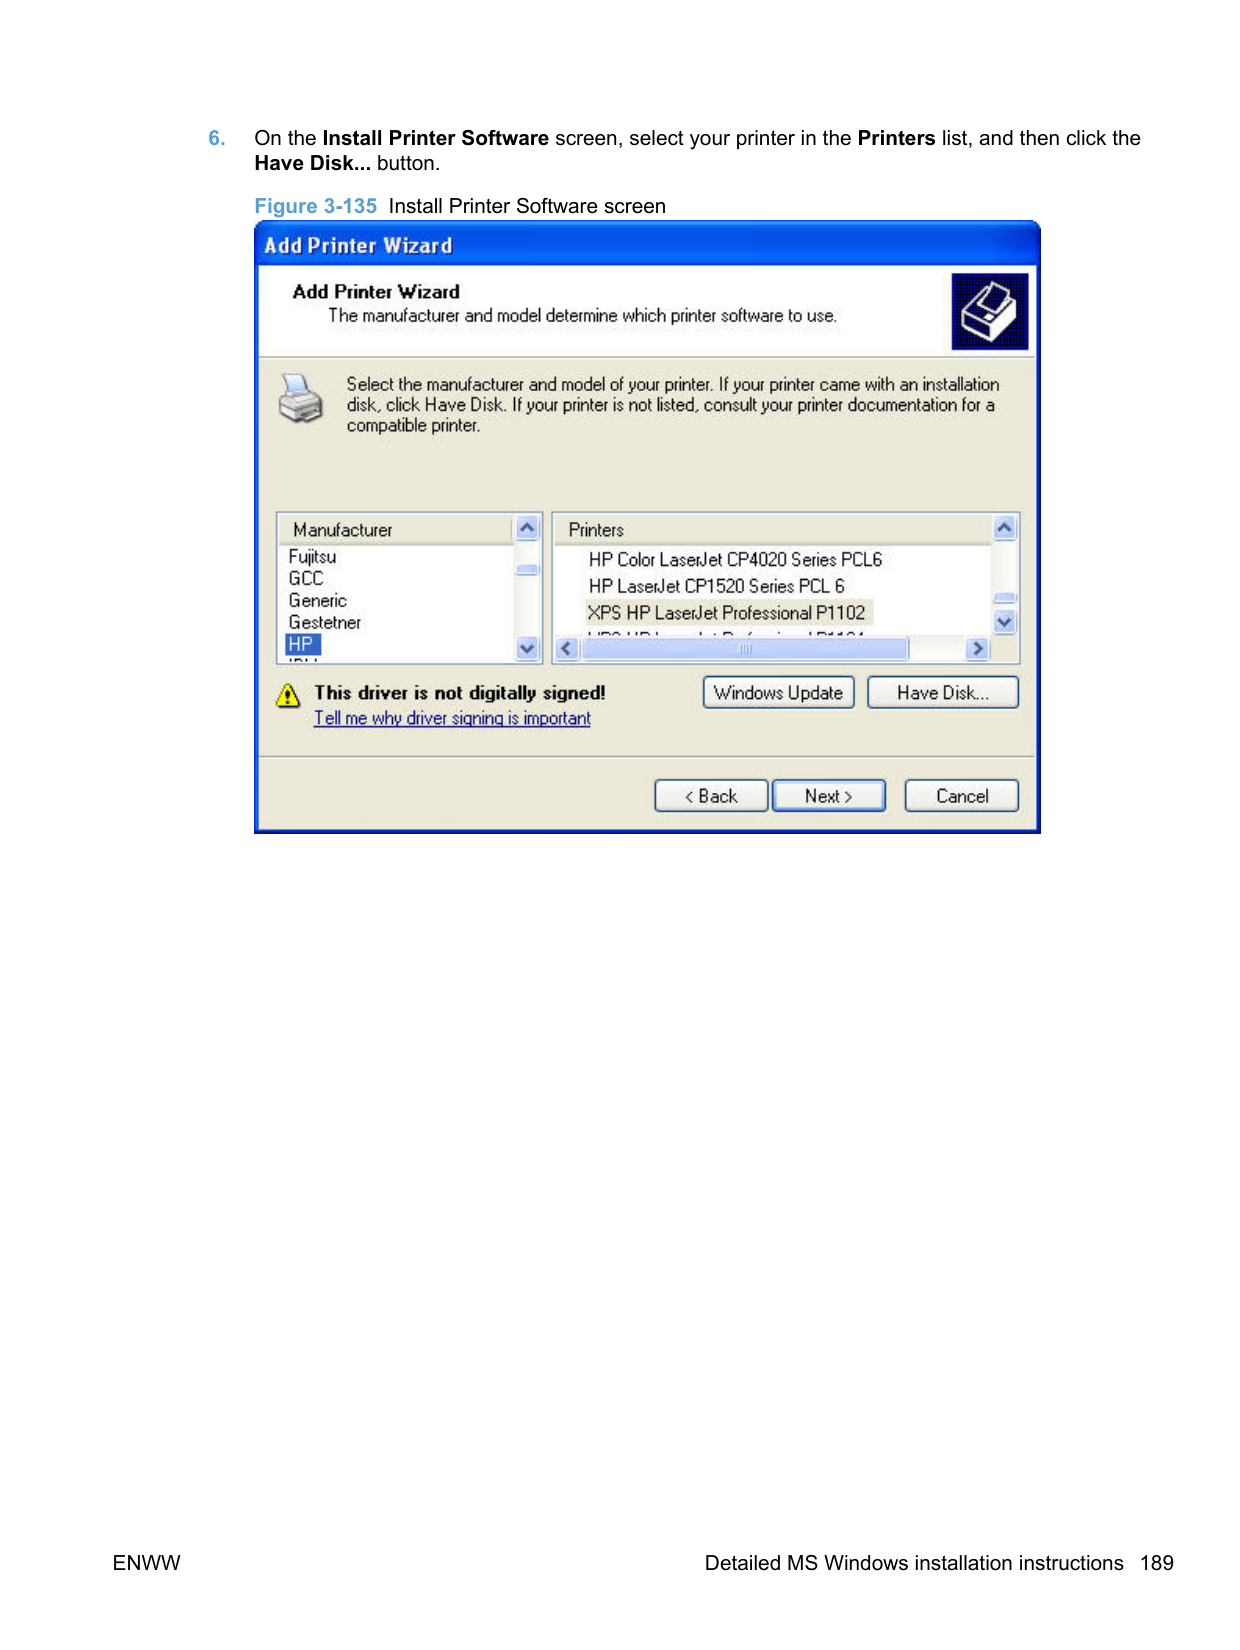
######### HP LaserJet Professional P1100 Series Printer printer series
######### HP LaserJet Professional P1560 Series Printer and HP LaserJet Professional P1600 Series Printer printer series
######## EconoMode check box
Click the EconoMode check box to allow the product to use less toner on each page. This extends the life of your print cartridge and reduces your cost per page, but it reduces print quality. This option might work only if a genuine HP print cartridge is installed. HP print cartridges are able to measure the life of the mechanical parts as well as the toner. When Economode is used frequently, the mechanical parts might wear out before the toner does. This might result in toner spillage, which could damage the product. Using genuine HP print cartridges avoids this problem.
Effects tab features NOTE: The Effects tab is in the Printing Preferences tab set. For information about how to gain access to these tabs, see Printing Preferences driver tabs on page 200. Use the Effects tab to create unique paper effects such as scaling and watermarks. The following figure shows the Effects tab. Figure 4-6 Effects tab
| |
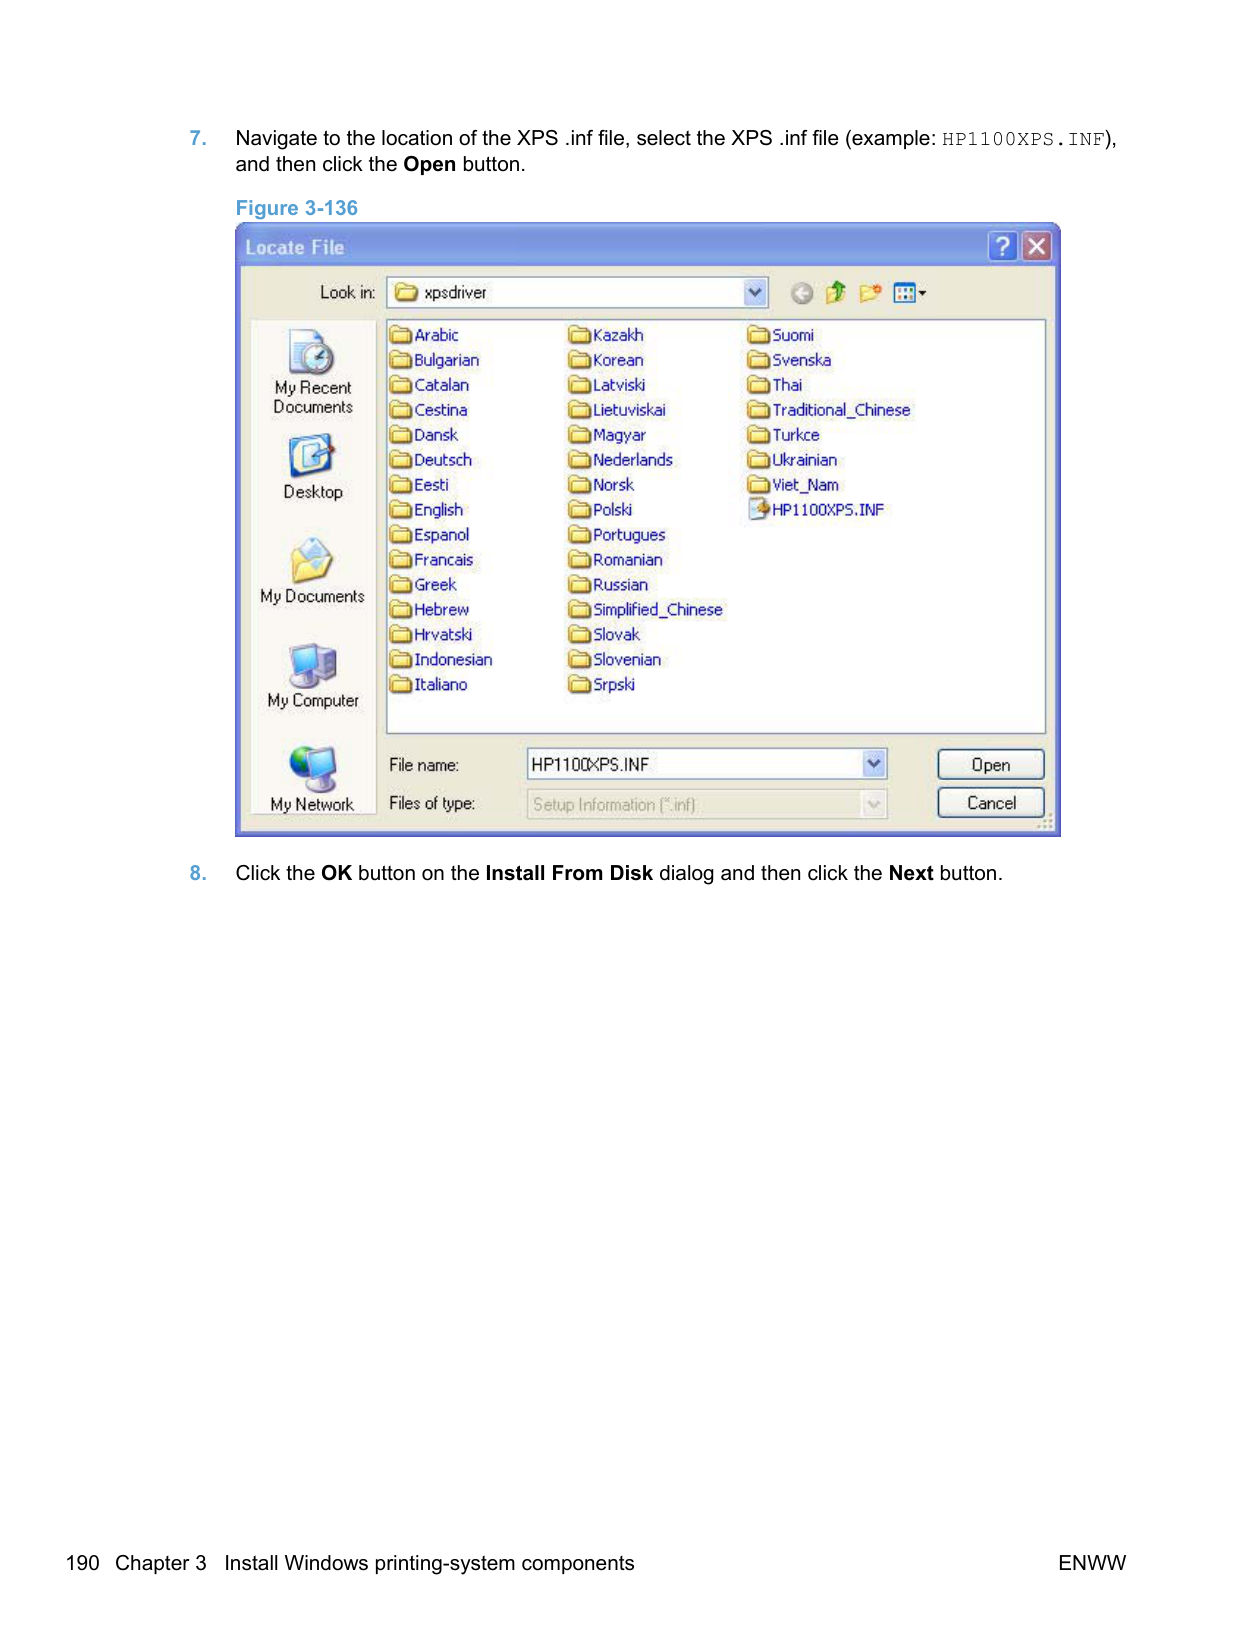
|---|

The Effects tab contains the following controls:
Print Tasks Quick Sets The Print Tasks Quick Sets drop-down list appears on all tabs except the Services tab. Print Tasks Quick Sets allow separate groups of print settings to be saved under specified names for reuse.
######### Follow these steps to create a Print Task Quick Set.

##### Resizing Options
The Resizing Options group box consists of the following controls:
Actual Size is the default setting. It prints the document without changing the document size. Print document on
Click the Print Document On: option to format the document for one paper size and then print the document on a different paper size, with or without scaling the image to fit the new paper size.
Print Document On: control is disabled by either of the following conditions:
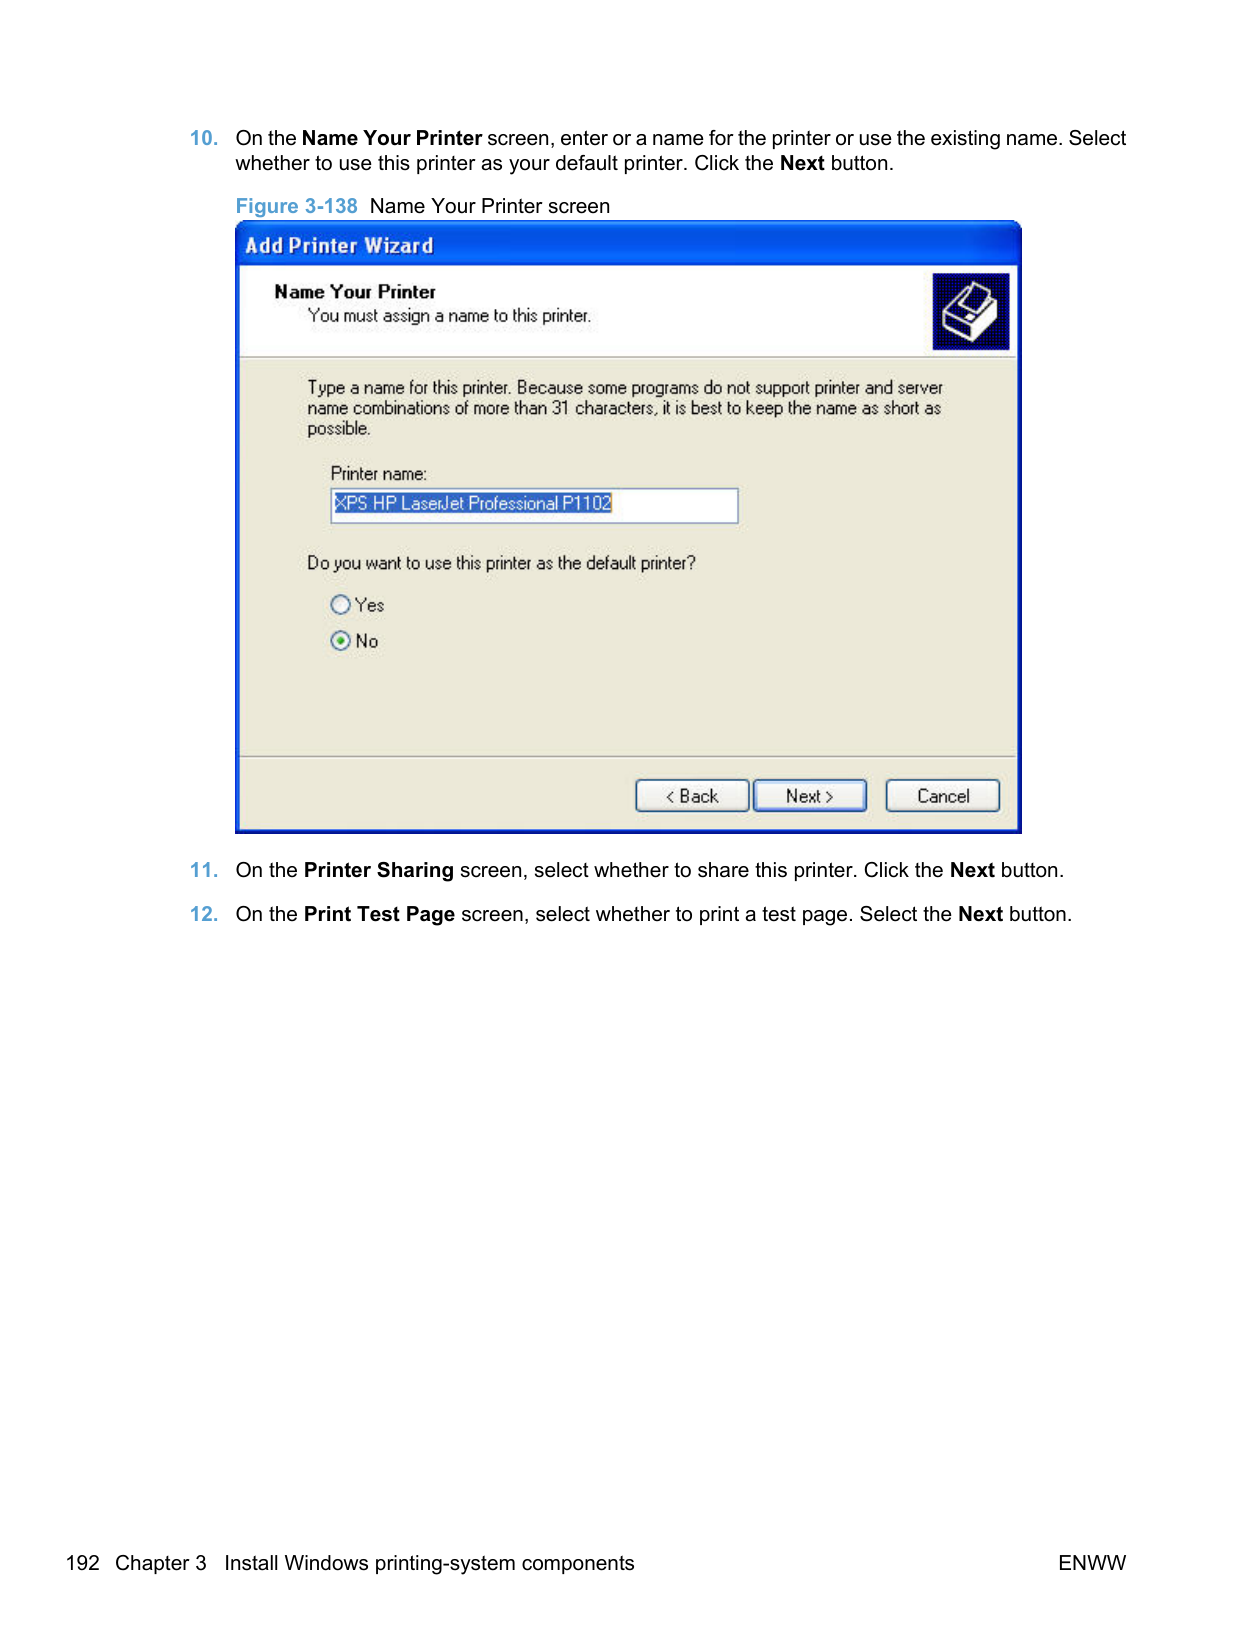
When Print Document On: is selected, the drop-down menu shows the paper sizes on which you can print. The list contains all of the standard paper sizes that the selected paper source supports and any custom sizes that you have created. When Print document on: is selected, Scale to fit is automatically selected. Clear this check box if you do not want your document reduced or enlarged to fit on the selected paper.
######## Scale to fit
The Scale To Fit option box specifies whether each formatted document page image is scaled to fit the target paper size. By default, Scale To Fit is selected when Print document on: is selected. If the setting is turned off, then the document page images will not be scaled and are instead centered at full size on the target paper. If the document size is larger than the target paper size, then the document
image is clipped. If it is smaller, then it is centered within the target paper. The following figure shows the effect that Scale To Fit has on a document formatted for Legal-size paper but printed on Letter.
Figure 4-7 Preview images – Legal on Letter; Scale to Fit off (left) and on (right)

When the size for which the document is formatted (that is, the logical size) differs from the target size, the preview image uses a dashed gray line to show the boundaries of the logical page in relation to the target paper size.
######## % of normal size
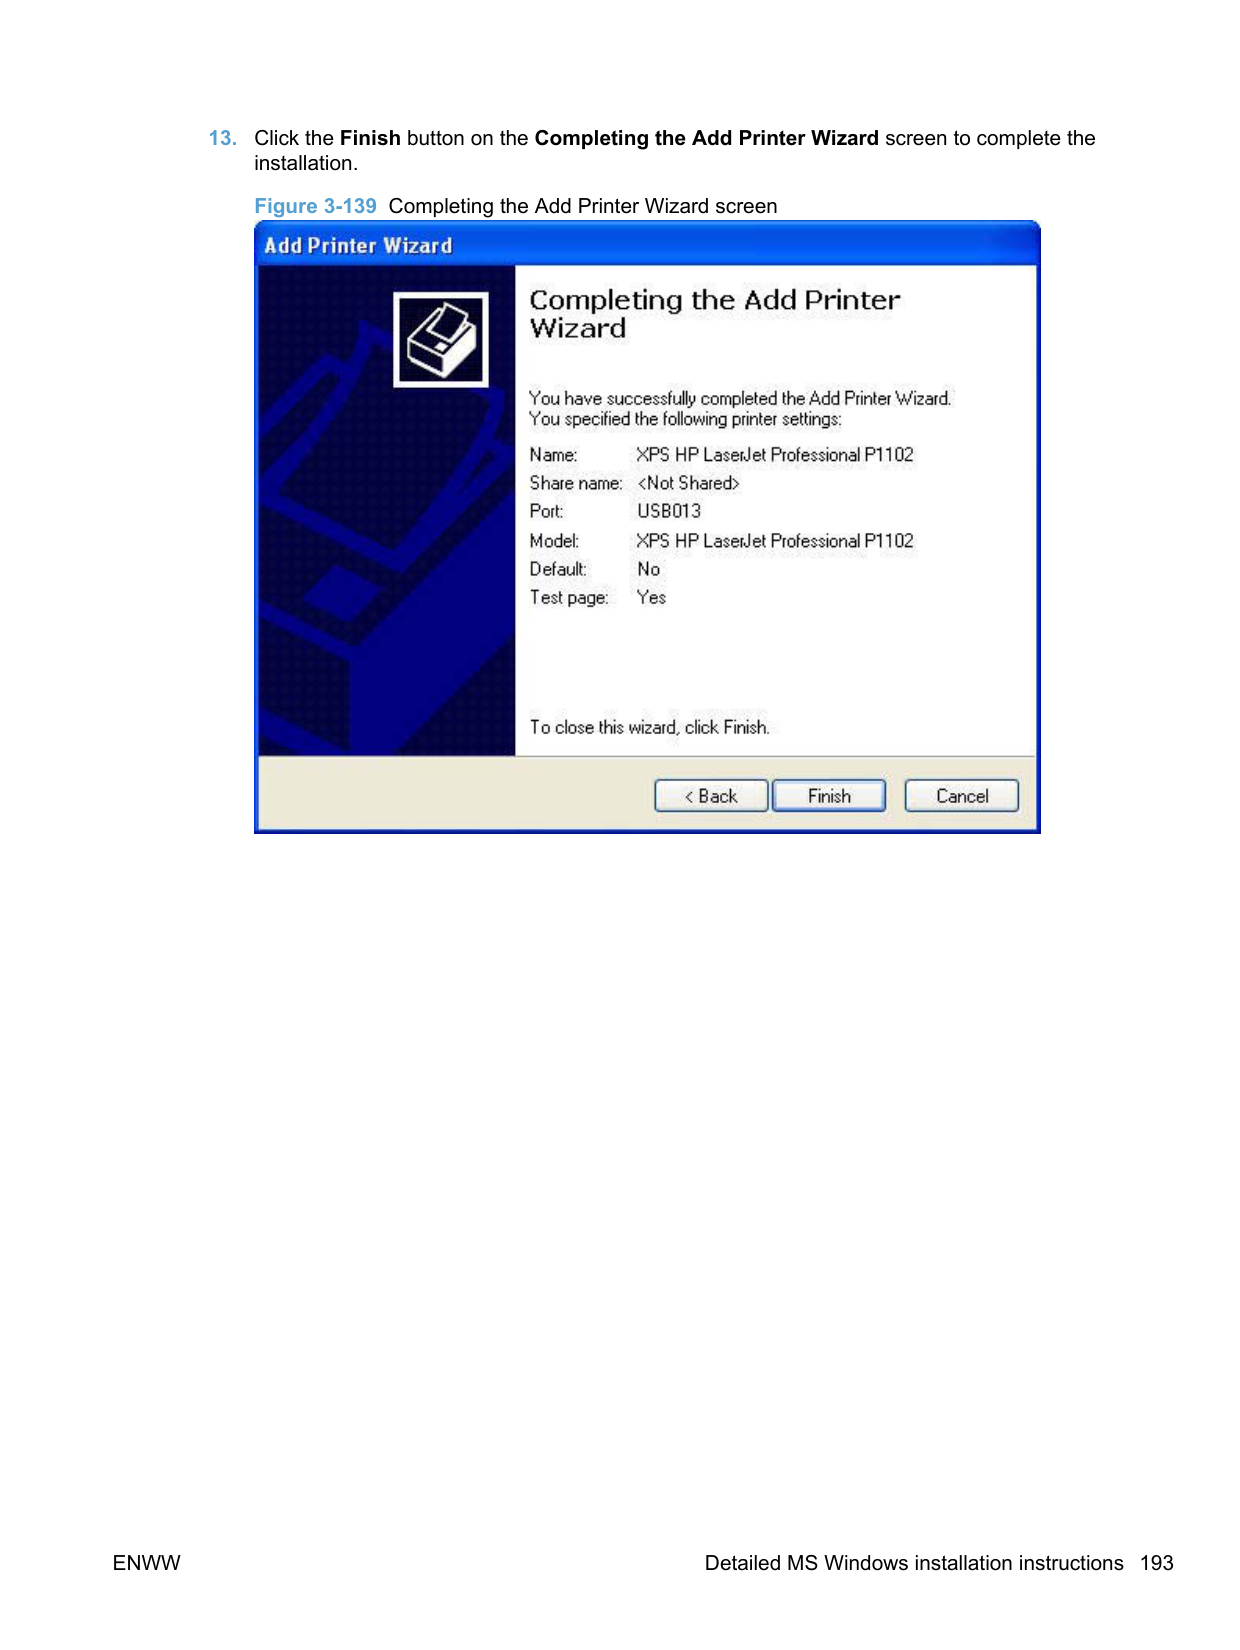
The % of Normal Size: option provides a slider bar for scaling the percentage setting. The default setting is 100%. Actual size is defined as the paper size that is selected within the driver or the size that the driver receives from the software program (if the software program does not negotiate the paper size with the driver). The driver scales the page by the appropriate factor and sends it to the product.
The limits of the range are from 25% to 400%, and any values outside the range are adjusted to those limits as soon as the focus is removed from the control (that is, when the Tab key is pressed or another control is selected).
Any change to the scale also changes the page preview, which increases or decreases from the upperleft corner of the preview.
The slider bar controls the scale directly. The value in the edit box changes as the slider bar is dragged, and the document preview image is updated to the new image scale. Each click on the arrows increases or decreases the scale by 1%. Each click on the slider bar affects the scale by 10%.
To achieve an exact scaling value, either use the slider bar to approximate the value that you want and then use the arrows to refine the value, or type the value into the edit box.
The following settings disable % of Normal Size:
##### Document preview image
The document preview image is a line-drawn image of a page that represents graphics and text. The document preview image is always oriented so that the contents of the page are right-side-up. The document preview image appears in the upper-right corner of the following Printing Preferences driver tabs:
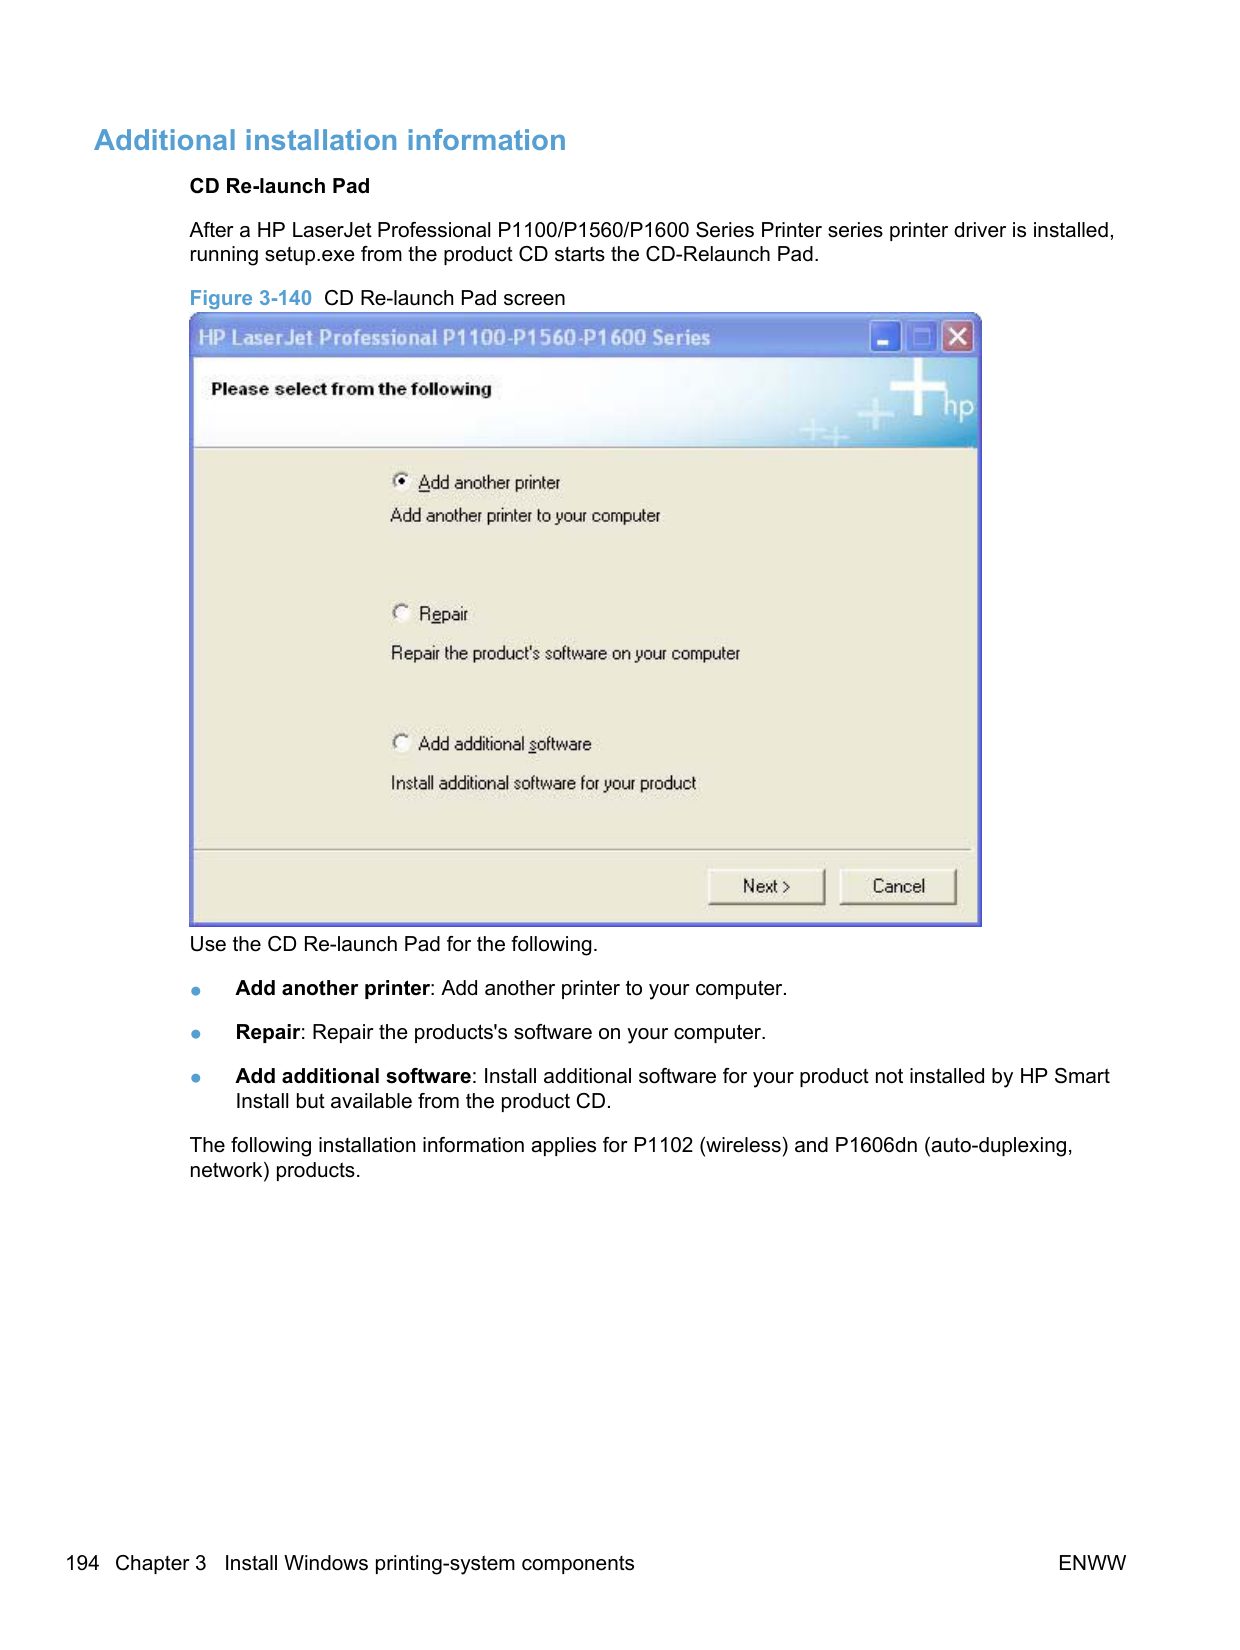
Switching between tabs does not change the location or appearance of the document preview image. When you move the mouse over the document preview image, the mouse cursor changes from an arrow to a gloved hand. You can toggle between portrait and landscape page orientation by clicking the image.
##### Watermarks
Use the Watermarks feature to select a watermark, create a new watermark (text only), or edit an existing watermark. The following watermarks are preset in the driver:
The drop-down menu shows alphabetically sorted watermarks that are currently available on the system, plus (none) which indicates that no watermark is selected. This is the default setting. Any watermark that is selected from this list appears in the preview image.
When the First page only check box is selected, the watermark is printed only on the first page of the document. The First page only check box is disabled when the current watermark selection is (none).
Watermarks are applied to logical pages. For example, when Pages per sheet: is set to 4 and First page only is turned off, four watermarks appear on the physical page (one on each logical page).
######## Watermark Details Click Edit, and the Watermark Details dialog box appears. Figure 4-8 Watermark Details dialog box

The dialog box shows a preview image and provides options for creating a new watermark and controlling the message angle and font attributes.
Click OK to accept all of the changes that are made in the Watermark Details dialog box. However, clicking Cancel does not cancel all of the changes. If you make changes to a watermark and then select a different watermark or click New, all of the changes are saved, and only the current, unsaved changes can be canceled.
######### Current Watermarks
The Current Watermarks group box contains a list of available watermarks, both predefined watermarks that are available in the driver and any new watermarks that you have created.
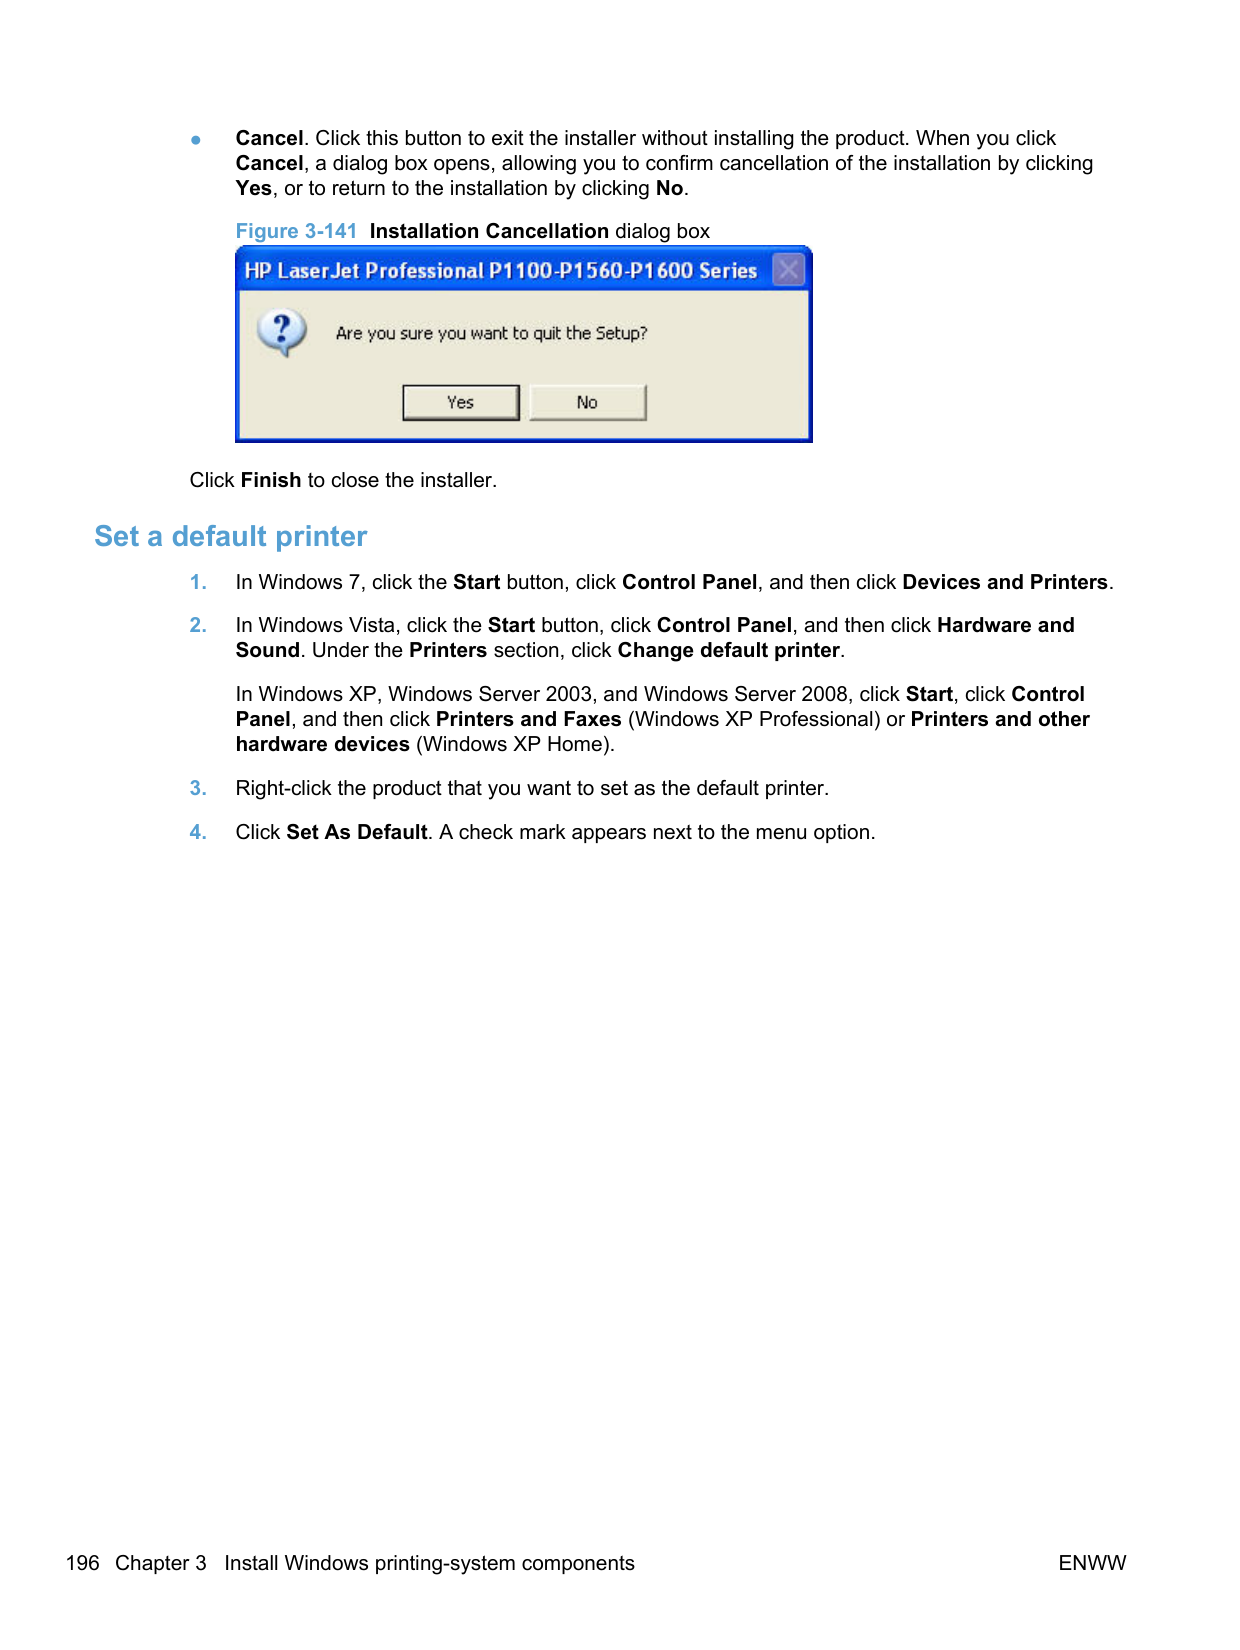
To create a new watermark, click New. The new watermark appears in the Current Watermarks list and in the Watermark Message edit box as "Untitled" until you type a new name in the Watermark Message edit box. The new name then appears in the Current Watermarks group box, in the Watermark Details dialog box, and in the Watermarks group box on the Effects tab.
To delete a watermark, select the watermark in the Current Watermarks list and click Delete. At the warning that appears, click Cancel to keep the watermark, or click OK to delete it.
| | |---|
NOTE: When you reach the limit of 30 watermarks in the Current Watermarks list at one time, the New button is disabled.
To edit an existing watermark, select the watermark in the Current Watermarks list. If you change the Watermark Message for that watermark, you are, in effect, creating a new watermark.
######### Watermark Message
The Watermark Message is also the name that identifies the watermark in the Current Watermarks list, except when more than one watermark has the same message. For example, you can have several different watermarks with the message DRAFT, each with a different typeface or font size. When this occurs, the string is appended with a space, a pound sign, and a number (for example, Draft #2). When a number is added, the number 2 is used first, but if the resulting name is also in the list, then the number increases until the name is unique (Draft #3, Draft #4, and so on).
######### Message Angle
Use the controls in the Message Angle group box to print the watermark in different orientations on the page. All settings center the watermark string within the page; the selection of a particular setting affects only the angle of the string placement. The following settings are available:
######### Font Attributes
Use the controls in the Font Attributes group box to change the font and the shading, size, and style of the font.
The Font Attributes group box contains the following controls:
######### ● Name
The Name: drop-down menu lists fonts that are currently installed on the system. The default is language dependent.
######### ● Color
Sets the color of the watermark. The only watermark color option available on this product is Gray.
######### ● Shading
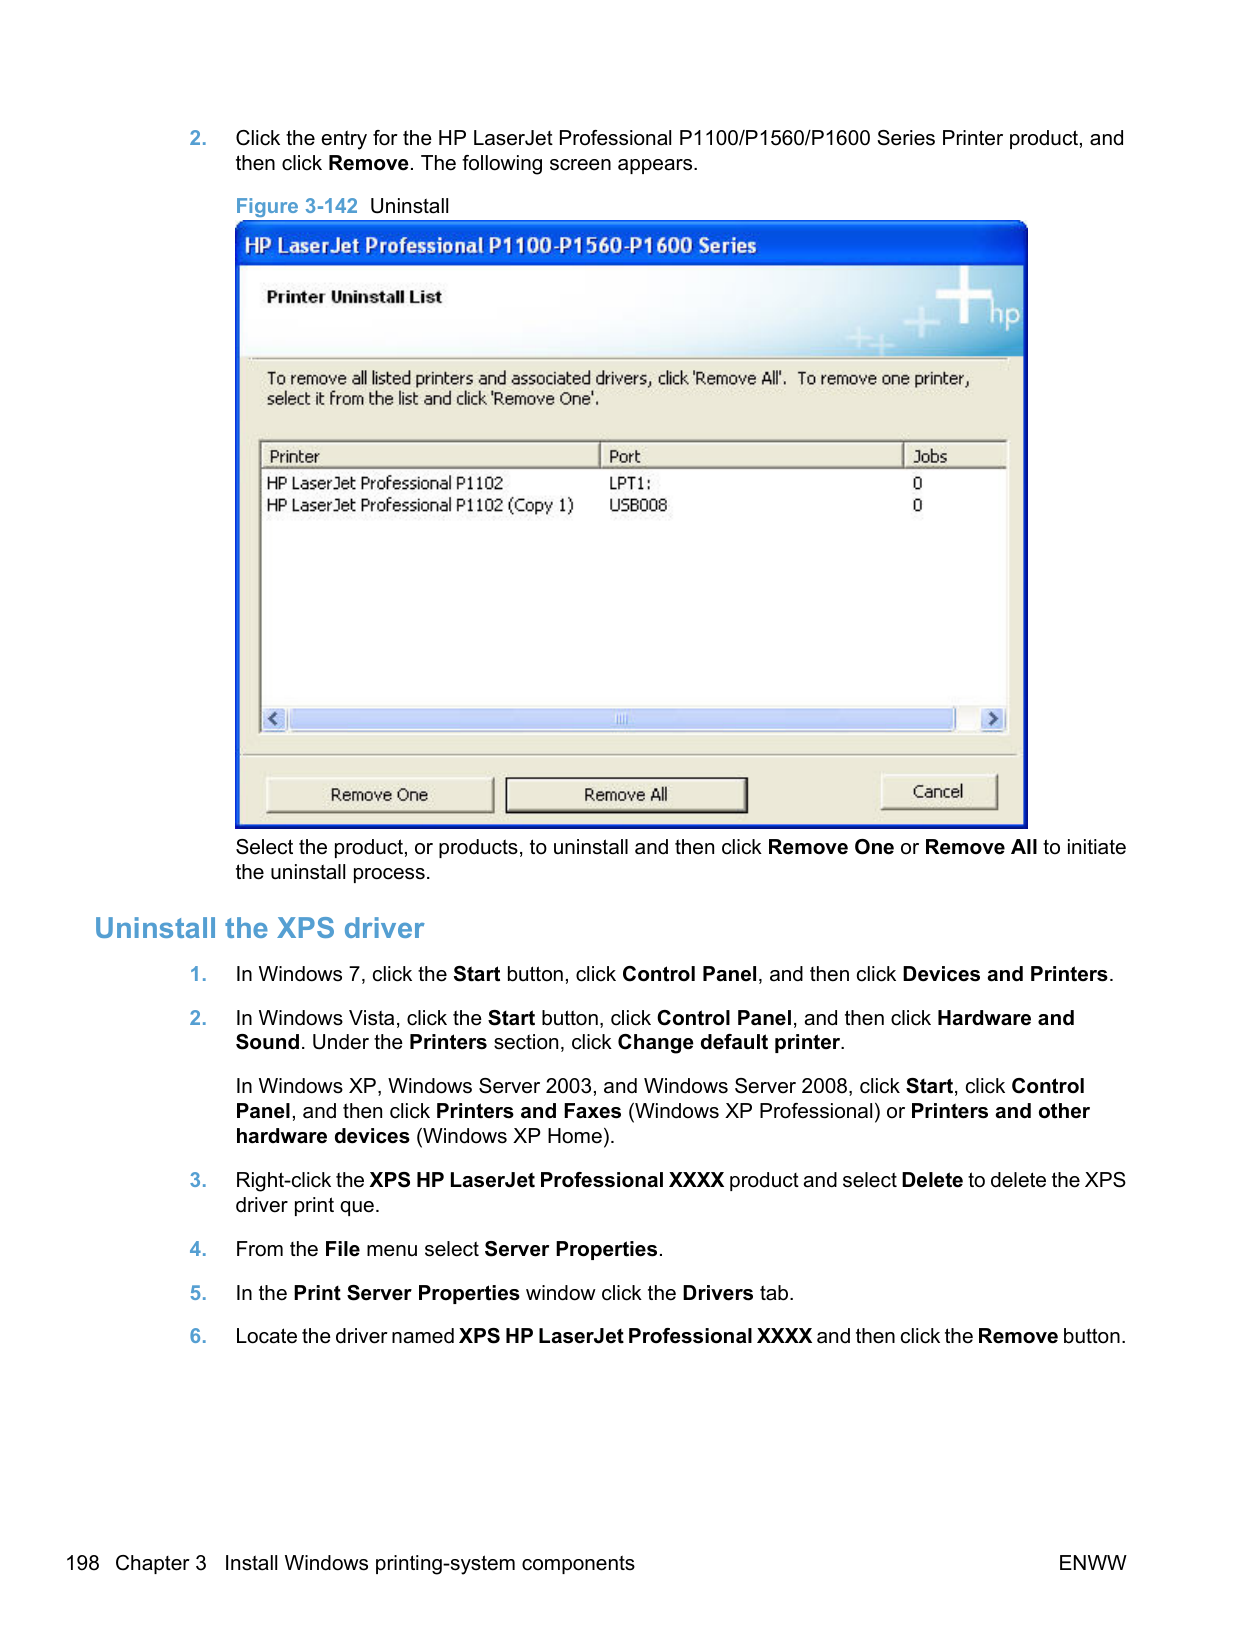
The default Shading: setting for new and preset watermarks is Very light. The following range of shades is available from the Shading drop-down menu:
These values represent the intensity of the gray that is used. Light produces a lightly saturated gray watermark, Lightest produces the lightest shade of watermark, and Darkest produces a black watermark.
Font sizes from 1 to 999 points are available from the Size menu. The default point size is language dependent.
Default watermark settings The following table shows Font Attribute settings for new and preset watermarks. Table 4-2 Font Attribute settings for new and preset watermarks
Setting New watermark Preset watermark Name Arial Varies by language Shading Very light Very light Size 90 Varies by language Style Bold Regular
Click OK to accept all of the changes that have been made in the Watermark Details dialog box. Clicking Cancel does not cancel all of the changes. If you make changes to a watermark and then select a different watermark or click New, all of the changes are saved, and only the current, unsaved changes can be canceled.
Finishing tab features NOTE: The Finishing tab is on the Printing Preferences tab set. For information about how to gain access to these tabs, see Printing Preferences driver tabs on page 200. Use the Finishing tab to print booklets and control the paper output. The following figure shows the Finishing tab. Figure 4-9 Finishing tab
| |
|---|

The Finishing tab contains the following controls:
Print Tasks Quick Sets The Print Tasks Quick Sets drop-down list appears on all tabs except the Services tab. Print Tasks Quick Sets allow separate groups of print settings to be saved under specified names for reuse.
######### Follow these steps to create a Print Task Quick Set.
##### Document Options
The Document Options group box contains the following controls:
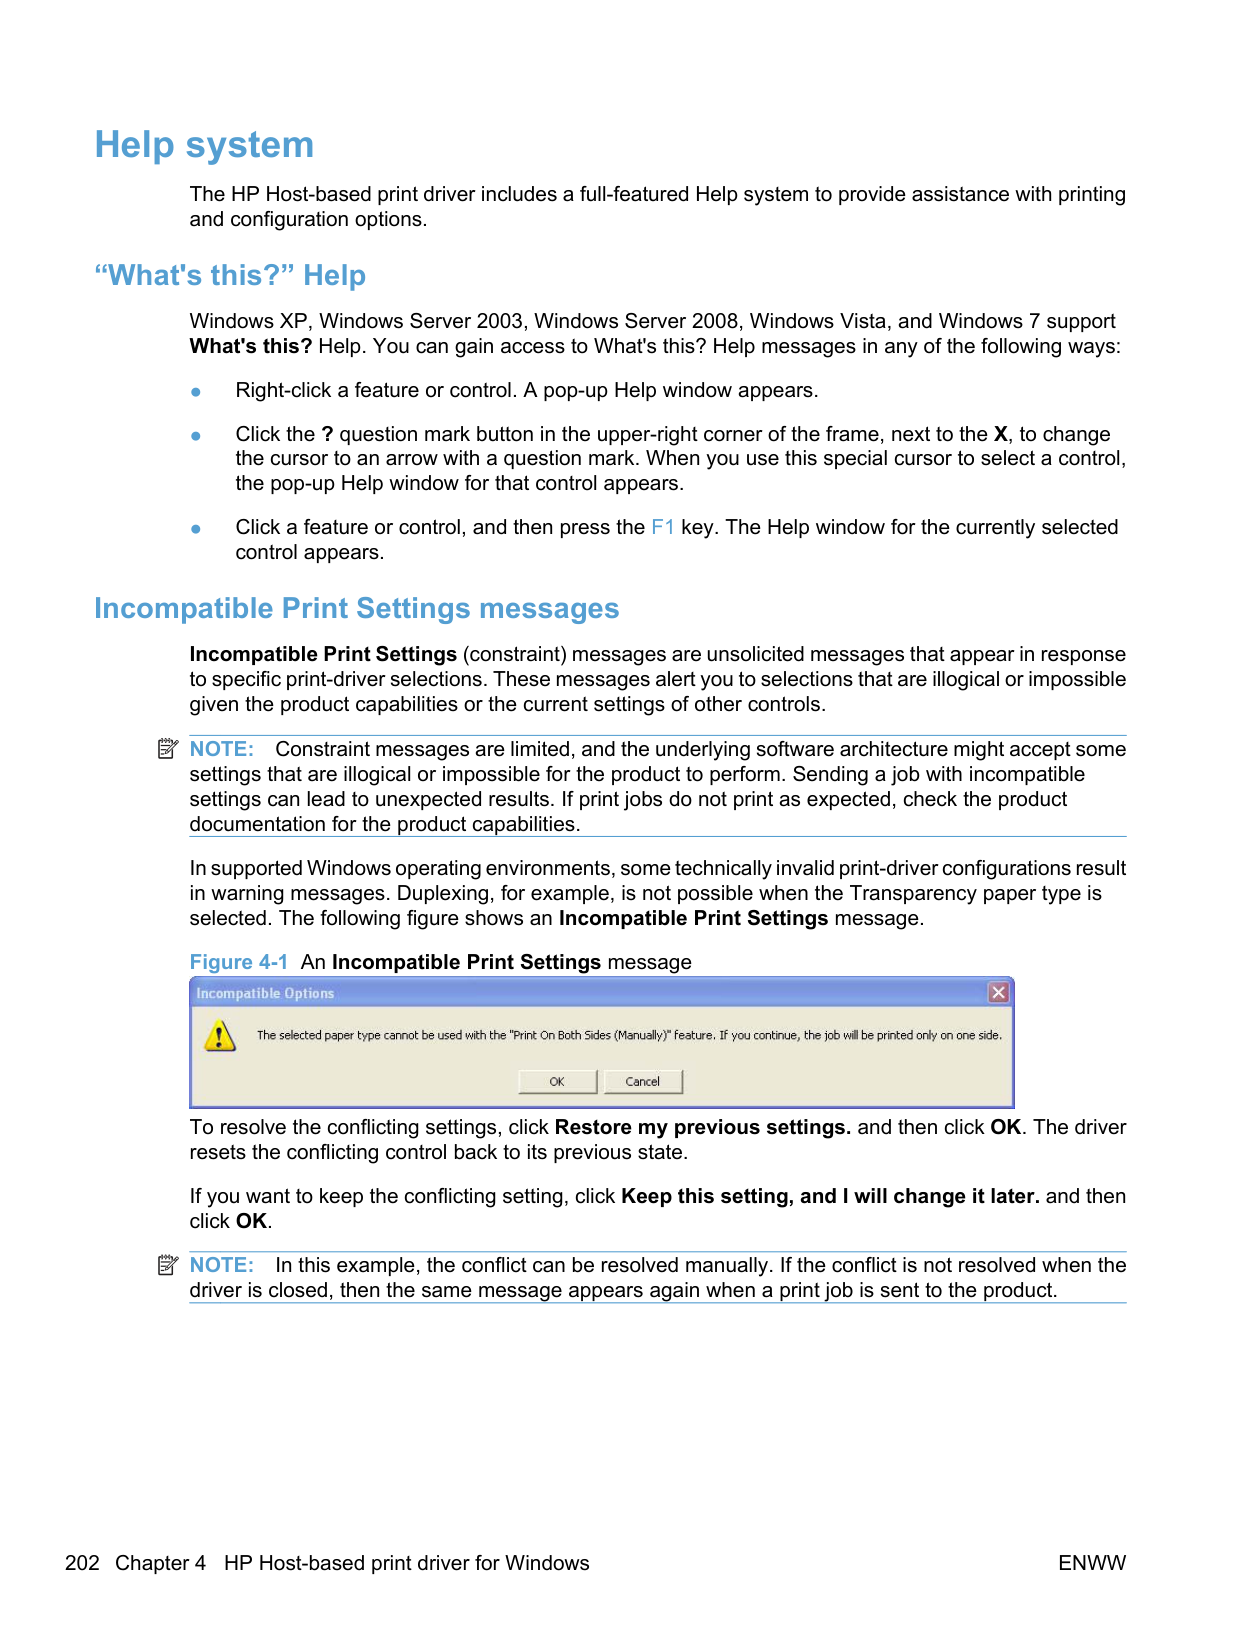
######## Print On Both Sides
| | |---|
NOTE: This feature is called Print on Both Sides (manually) for the HP LaserJet Professional P1100 Series Printer, the HP LaserJet Professional P1100w Series Printer,, and the HP LaserJet Professional P1560 Series Printer, because these models do not include an automatic duplex unit. For all other product models, this feature is called Print on Both Sides.
The default setting for Print on both sides is off (not selected). Print on both sides is available when the following conditions exist:
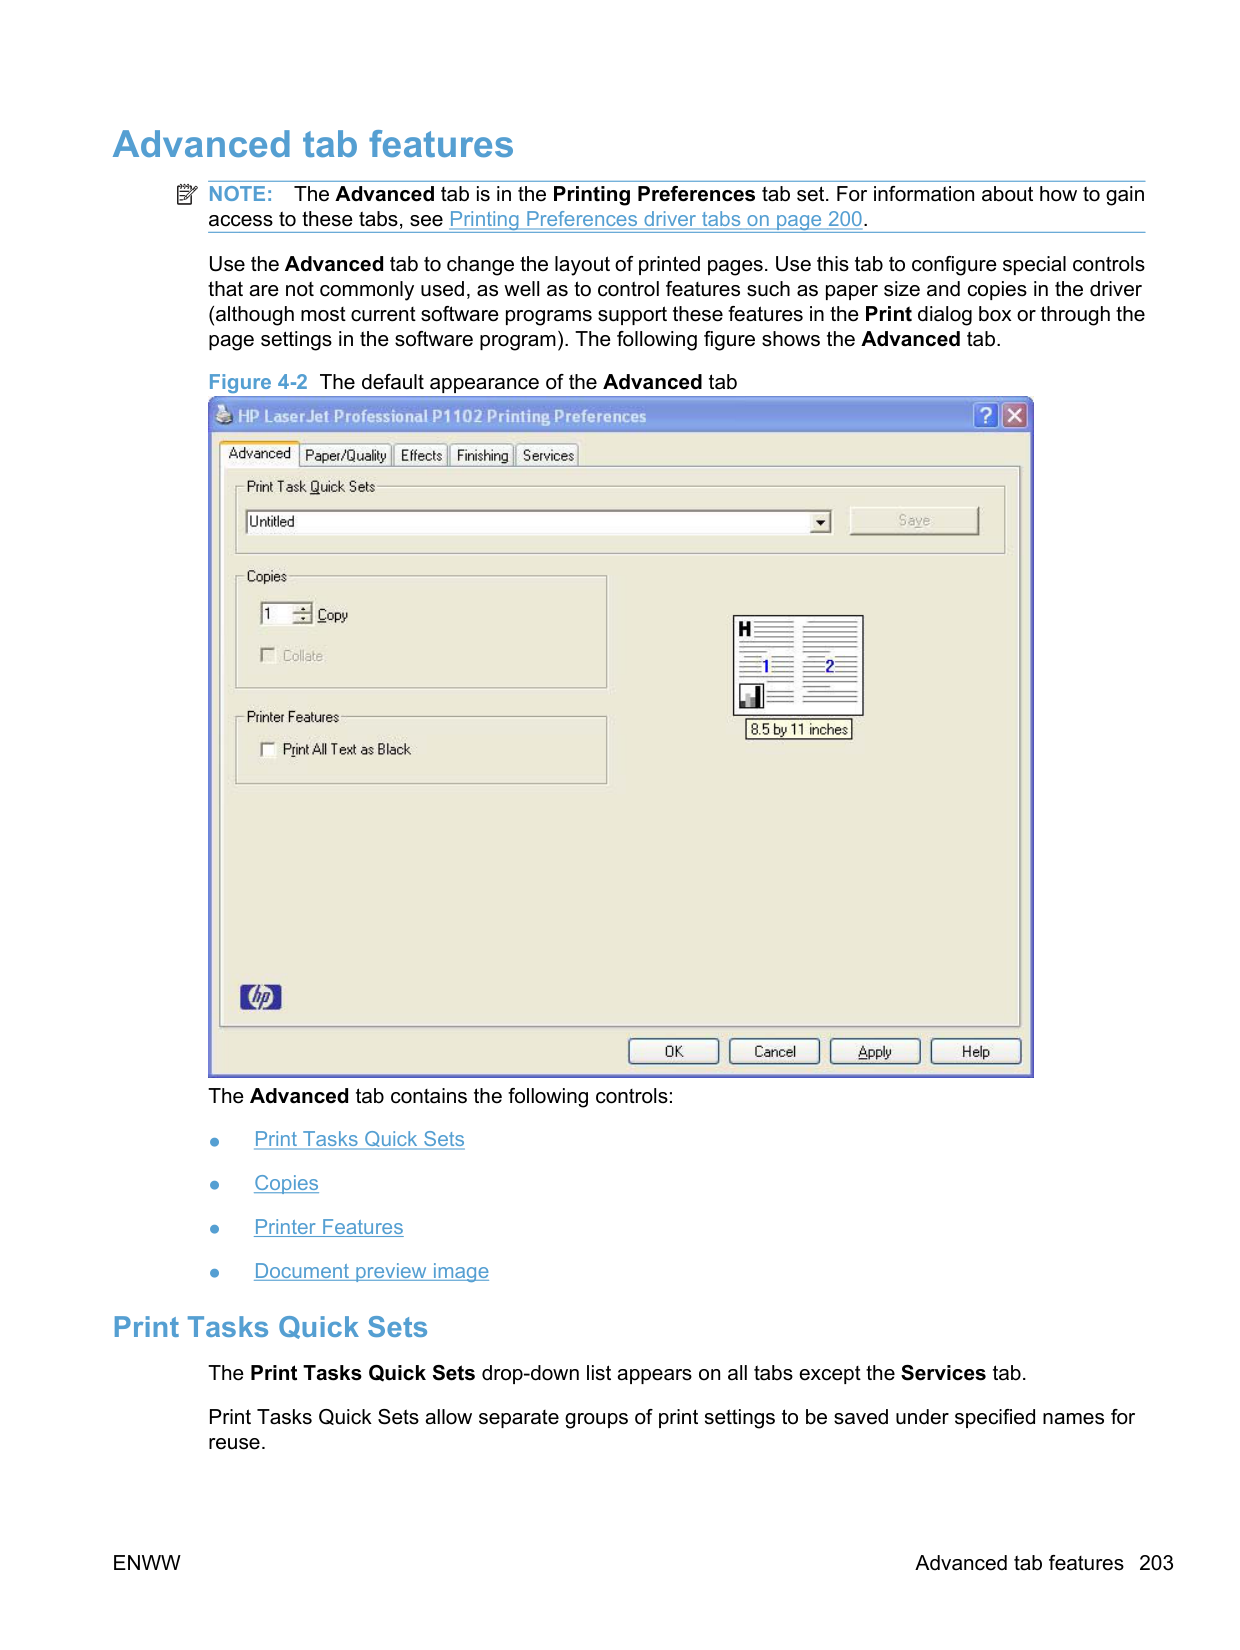
| | |---|
NOTE: The check box for Print on both sides (manually) is not disabled if paper types or sizes that are not allowed for duplexing are selected. However, on the Paper/Quality tab next to the paper type or size setting, a caution symbol shows if a selection is not supported by the printer.
######### Print on both sides manually
Select the Print on Both Sides (Manually) check box to print on the second side of the paper for the HP LaserJet Professional P1100 Series Printer, the HP LaserJet Professional P1100w Series Printer,, and the HP LaserJet Professional P1560 Series Printer, because these models do not include an automatic duplex unit. Also, select Print on Both Sides (Manually) on the HP LaserJet Professional P1600 Series Printer for paper types that are not available when using the automatic duplexing unit, such as cardstock and thick paper.
If a duplexing unit is installed and manual duplexing is enabled in the driver, the product automatically prints on both sides of paper types that are supported for automatic duplexing (Letter, A4, Legal, and 8.5 x 11 only). For paper types that are not supported for automatic duplexing, a Help message appears prompting you to configure the driver settings for manual printing on both sides. Manual printing on both sides does not occur automatically.
Select the paper type that corresponds to the paper that you are using for the print job. The following paper types have a different print modes when you manually print on the second side:

Cardstock paper can be manually printed on the second side, but no change occurs to the print mode. Transparencies and labels should never be manually printed on the second side.
To print a multiple-page document on a product that supports manual duplex only, follow these steps.

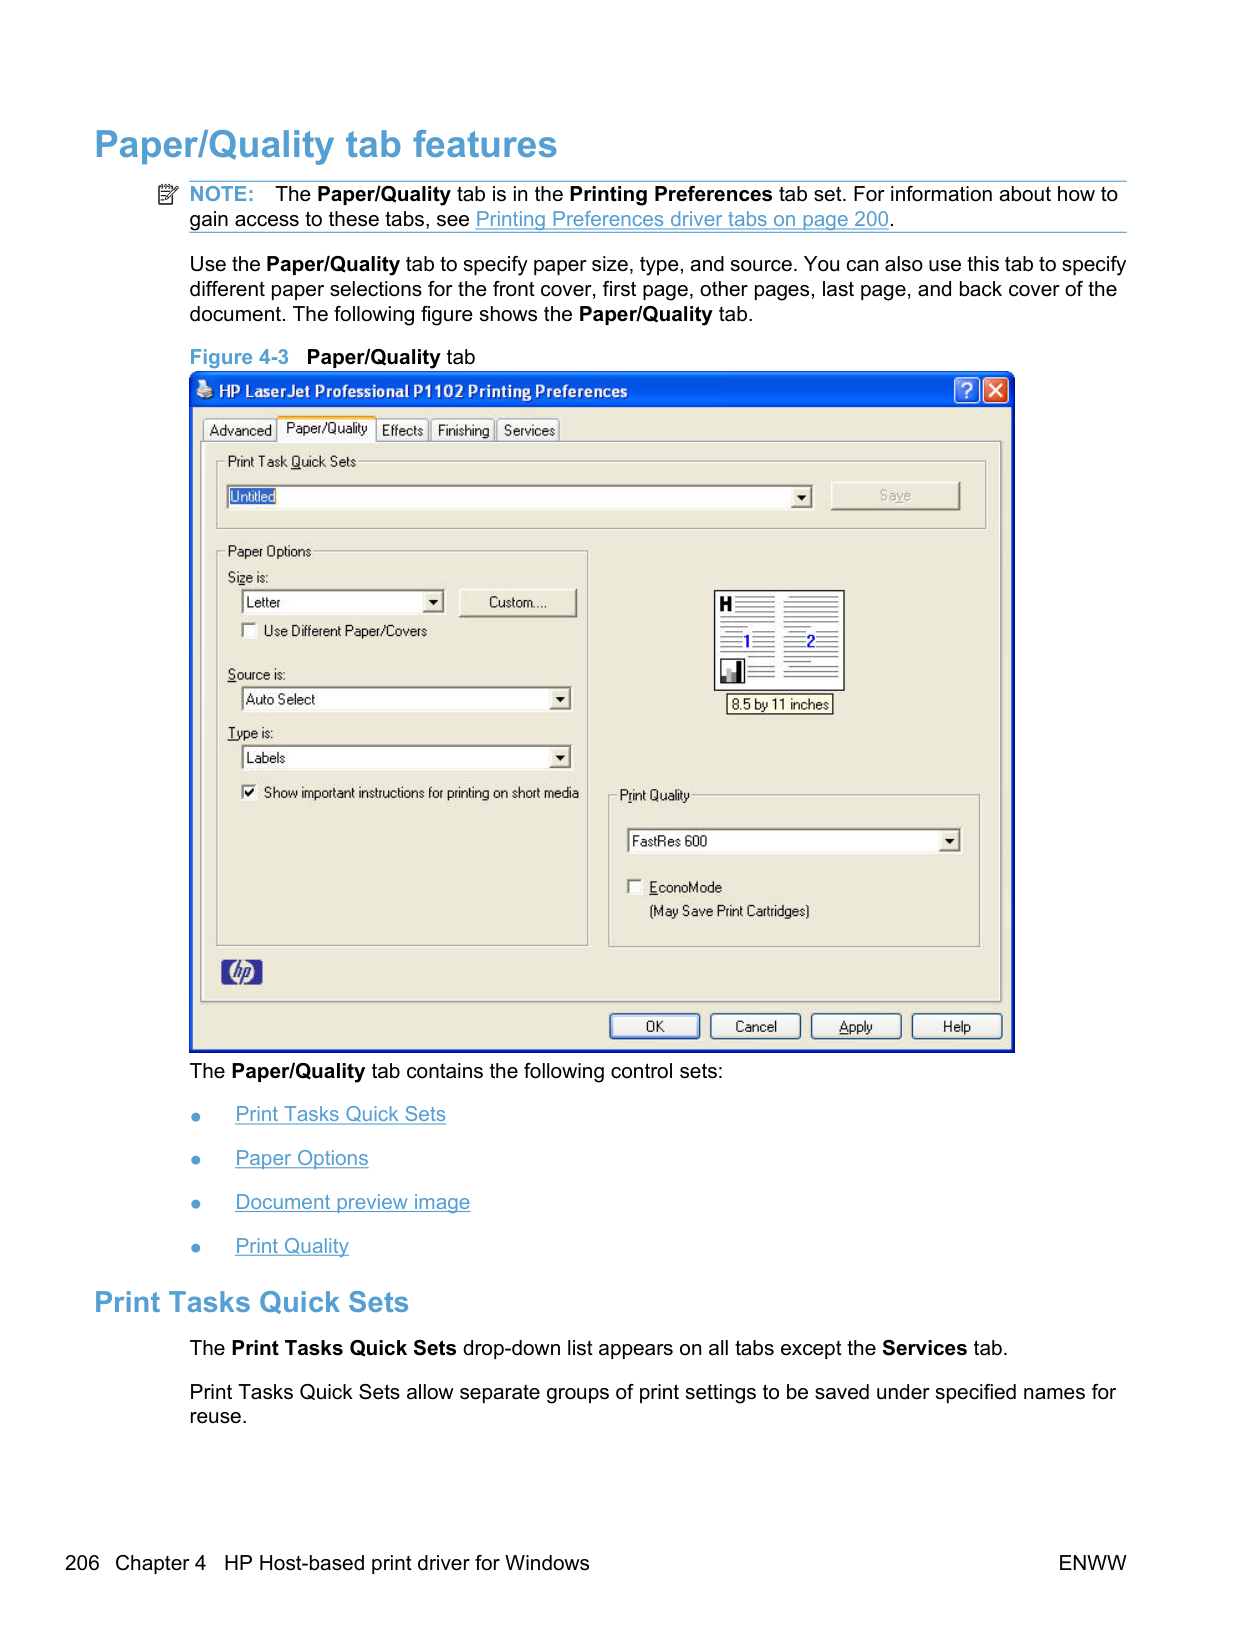
When you have completed the steps that appear in the dialog box, the second half of the print job prints on the back side of the stack of paper. The driver does not require the program to specifically support odd- and even-page printing, because the driver coordinates this function.
For paper types that are not supported for automatic duplexing, on products with an automatic duplexer, follow these steps to print a multiple-page document.
######### Figure 4-11 Print on Both Sides Instructions dialog box

When you have completed the steps that appear in the dialog box, the second half of the print job prints on the back side of the stack of paper. The driver does not require the program to specifically support odd- and even-page printing, because the driver coordinates this function.
######### Print on both side automatically (P1600 series products)
For paper types that are supported for automatic duplexing, follow these steps to print a multiple-page document.
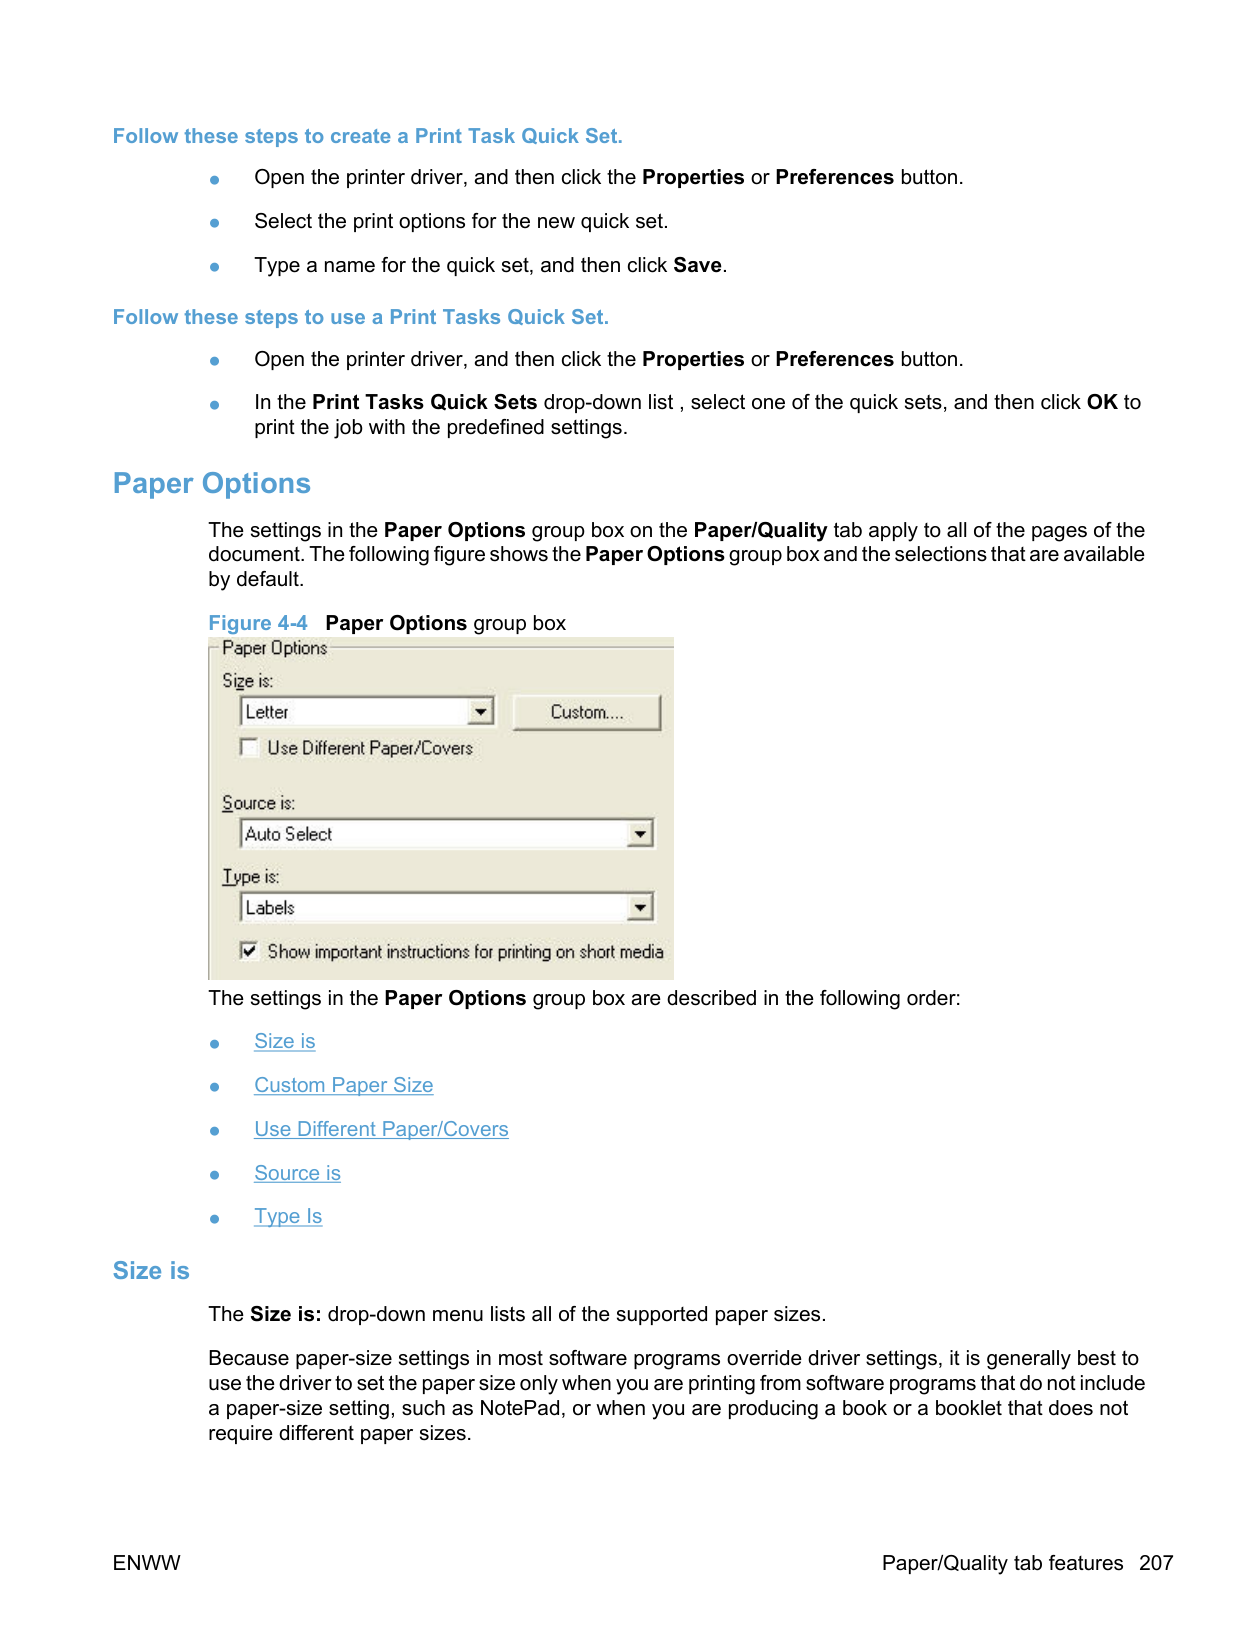
The following paper types are not supported for automatic duplexing. These paper types can be duplexed manually.
| | |---|
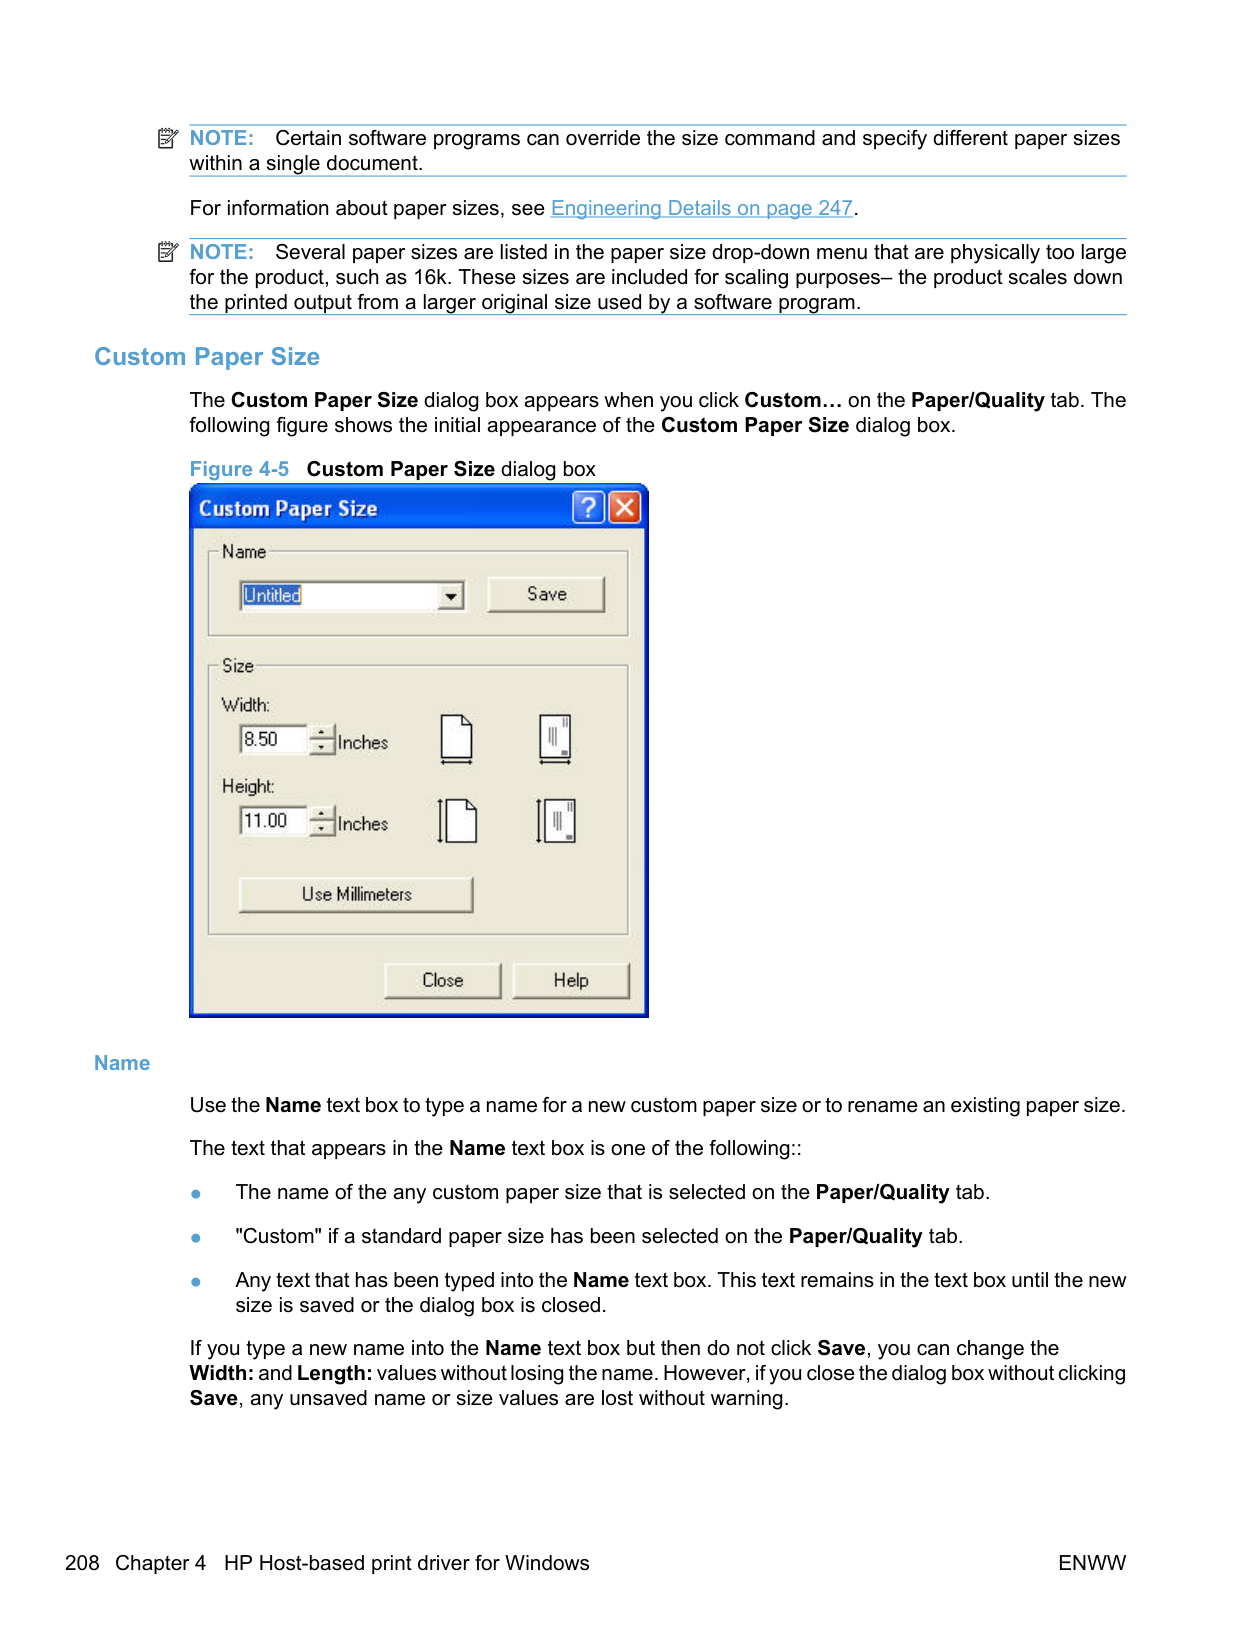
NOTE: Transparency, Labels, Envelope, and Vellum paper types cannot be duplexed with P1600 series products, either automatically or manually. Selecting any of these paper types makes the Print on both sides option unavailable on the Finishing tab.
######## Flip pages up
Use the Flip pages up check box to specify the duplex-binding option. By default, the Flip pages up check box is not available. It is available only when Print on both sides is selected. The following table demonstrates the results of selecting this check box, depending on the paper orientation selected on the Finishing tab.
Table 4-3 Page orientation
Orientation (Finishing tab) Flip pages up selected Flip pages up not selected
Portrait Short-edge binding Long-edge binding Landscape Long-edge binding Short-edge binding
When Print on both sides is selected, the document preview image changes to show a spiral binding along either the left edge or the top edge of the page. In addition, a folded-over corner appears in the lower-right portion of the preview image, indicating that printing occurs on the back side. An arrow on the folded-over corner points in the direction that the pages would be flipped if they were bound together.
Short-edge binding is for print jobs with pages that read by flipping over like the pages of a calendar. Long-edge binding is for print jobs with pages that read by turning like the pages of a book.
######## Booklet Printing
The Booklet Printing: drop-down menu, visible when Print on both sides is selected, offers choices that are based on the current paper size. The default setting for the Booklet Printing: drop-down menu is Off. The other settings have the following format, where [paper size] depends on the paper size that is set on the Paper/Quality tab:
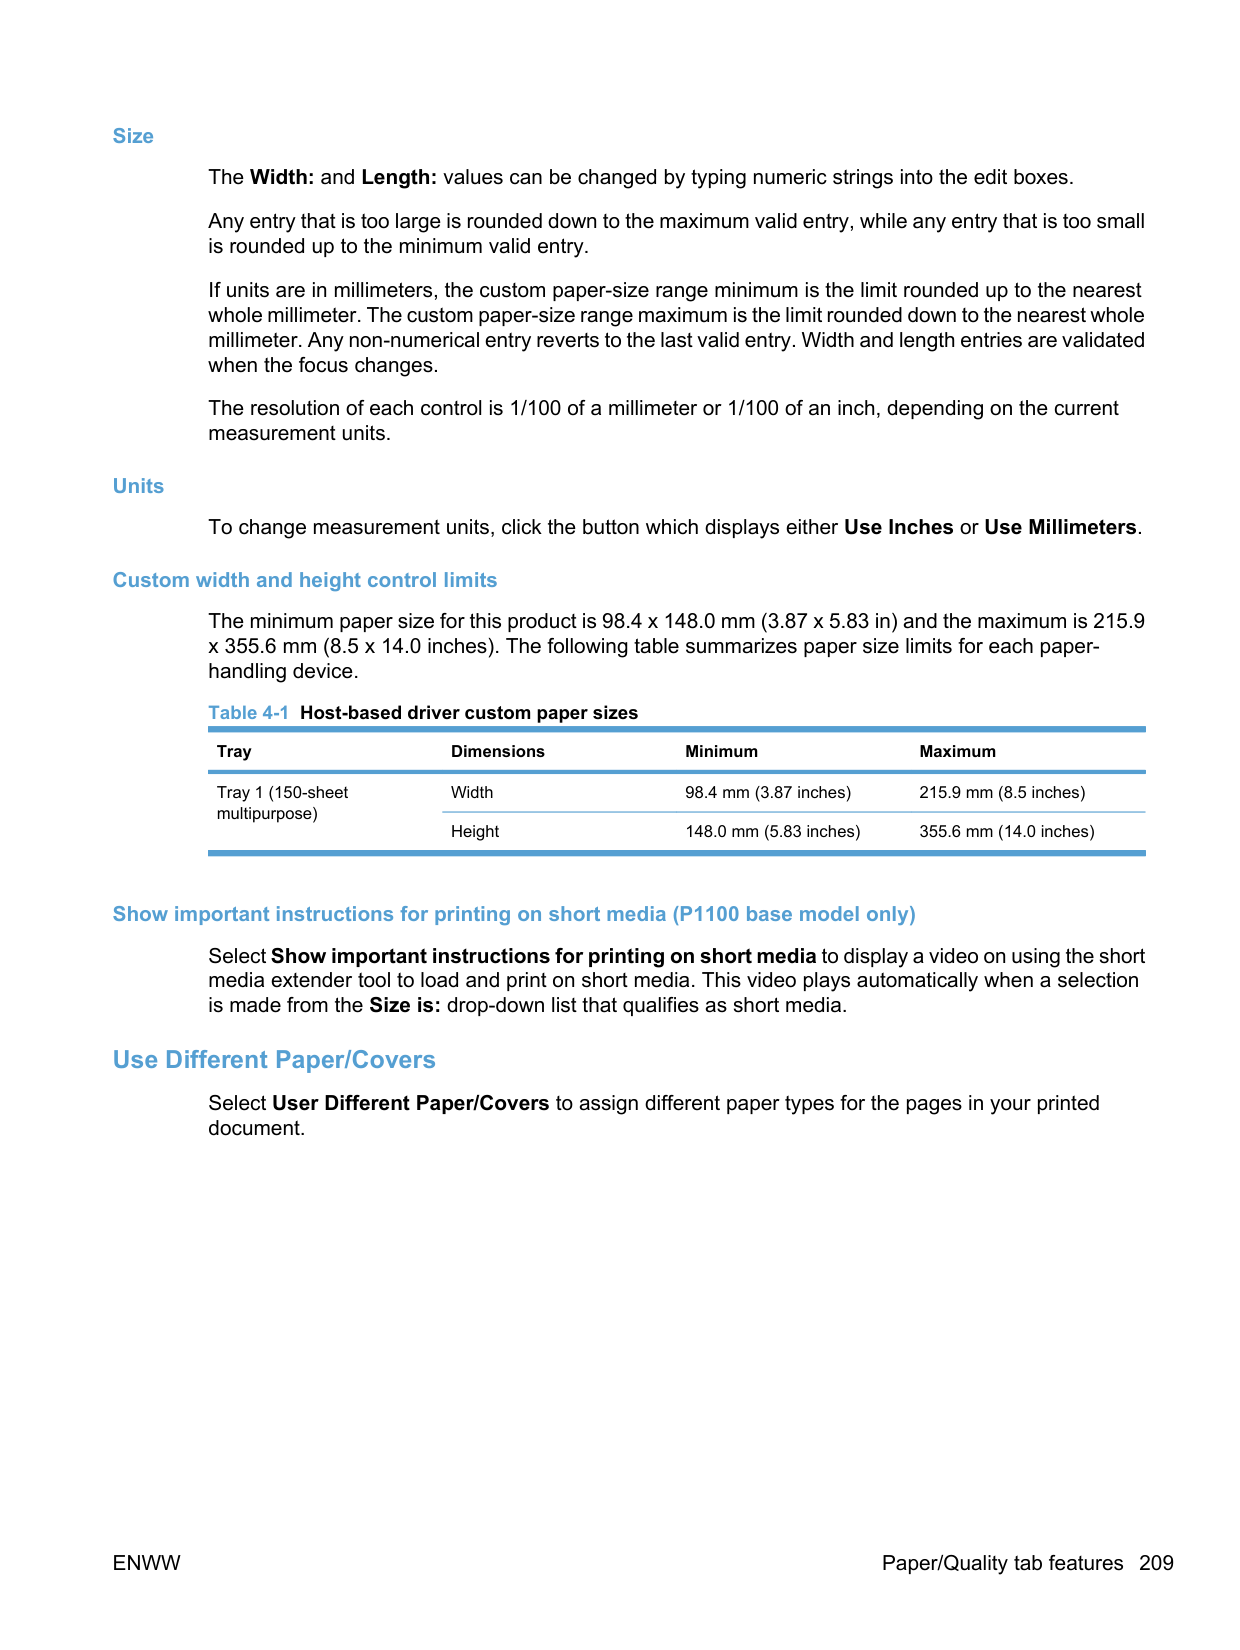
When you select Left Edge Binding or Right Edge Binding, the document preview image changes to show the location of the binding. If the Pages per sheet: setting is on the default setting of 1, it automatically changes to 2 pages per sheet. If you manually change the Pages per Sheet setting to 4, 6, 9, or 16 pages per sheet, the Booklet Printing: is disabled. See Pages per sheet on page 226 for more information.
Book and booklet printing The product supports book and booklet printing. A booklet is a print job that places two pages on each side of a sheet that can then be folded into a booklet that is half the size of the paper. Use the Booklet Printing: drop-down menu on the Finishing tab to control booklet settings. NOTE: Booklet folding is a manual process. The product does not fold.
| | |---|
######## Pages per sheet
Use the Pages per sheet: option to select the number of pages that you want to print on a single sheet of paper. If you choose to print more than one page per sheet, the pages appear smaller and are arranged on the sheet in the order that they would otherwise be printed. The Pages per sheet: dropdown menu provides the following settings:
| | |---|
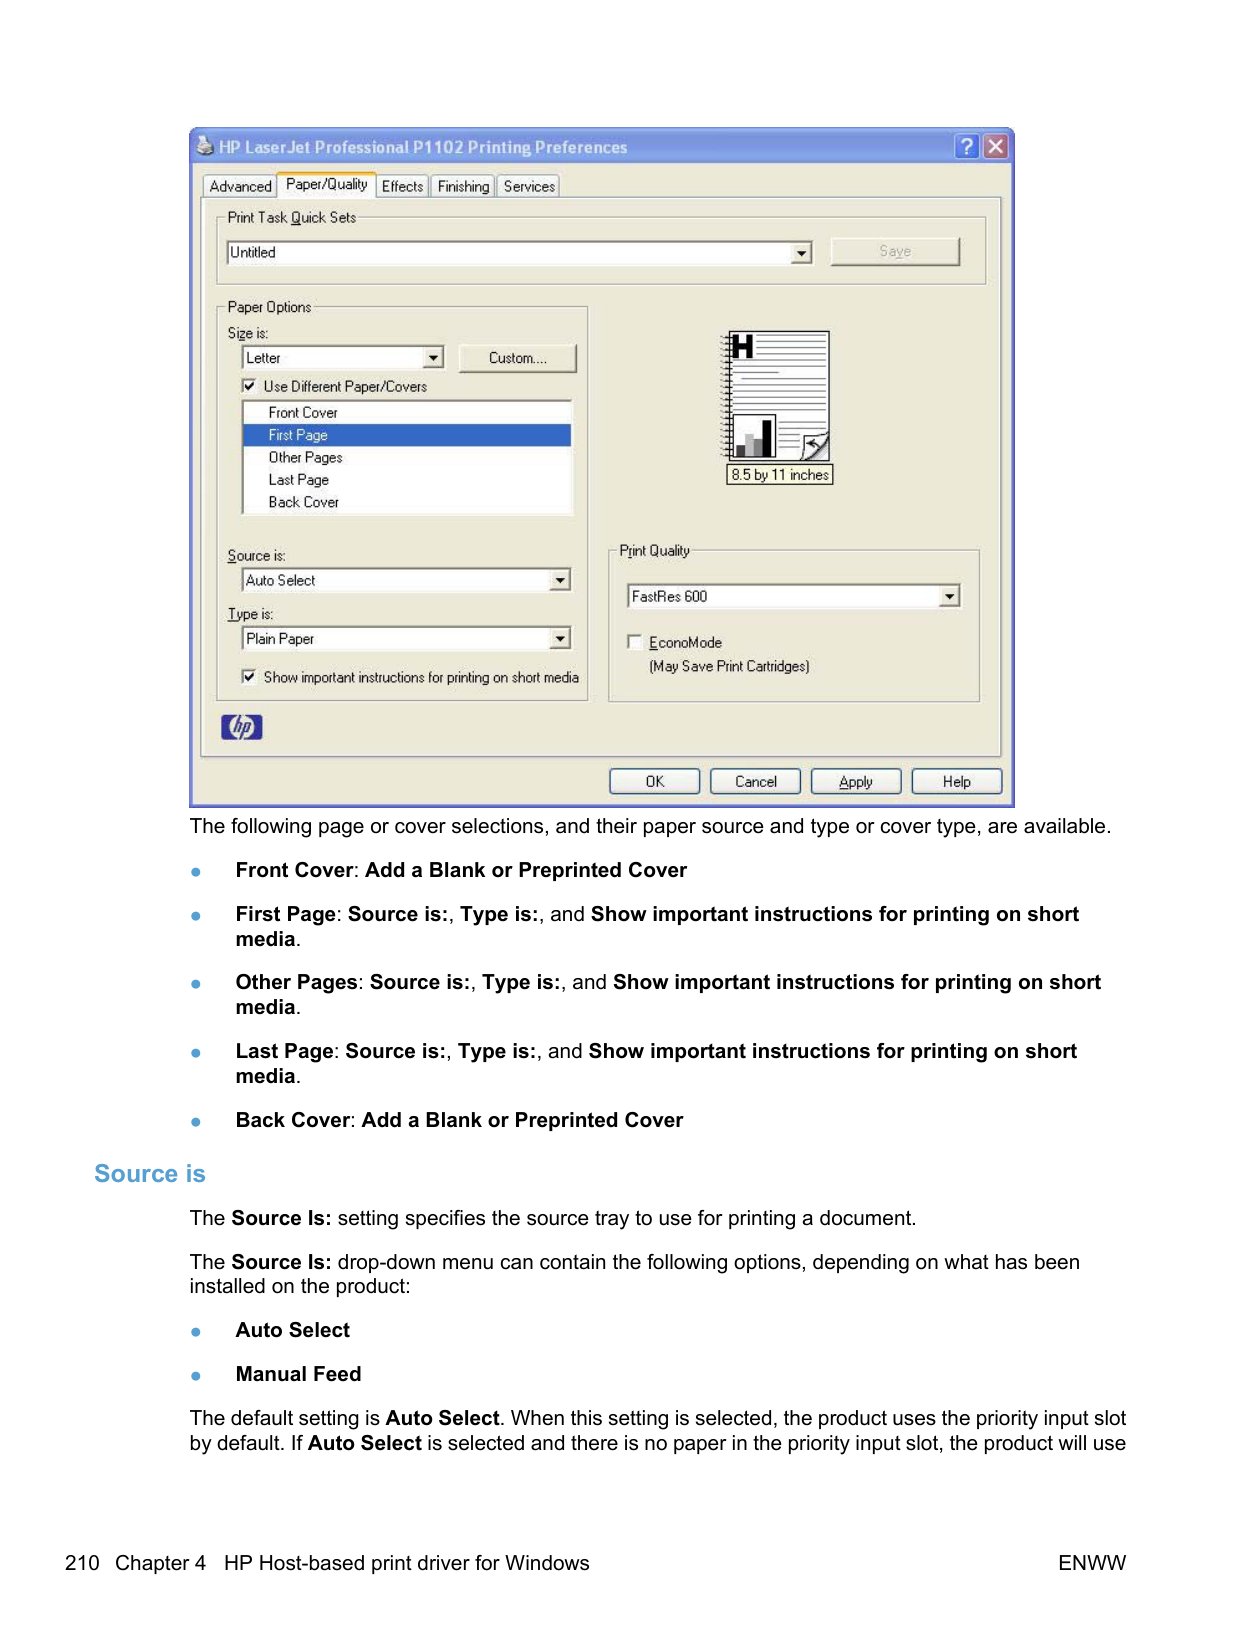
######## Print page borders
Related controls indented beneath Pages per sheet: are Print page borders and Page order:, which become active when Pages per sheet: is greater than 1.
Print page borders sets a line around each page image on a printed sheet to help visually define the borders of each logical page.
######## Page order
The Page order: drop-down menu contains the following options:

The preview document image reflects changes in these settings, as shown by the examples in the following figure.
Figure 4-12 Page-order preview images

##### Document preview image
The document preview image is a line-drawn image of a page that represents graphics and text. The document preview image is always oriented so that the contents of the page are right-side-up. The document preview image appears in the upper-right corner of the following Printing Preferences driver tabs:
Switching between tabs does not change the location or appearance of the document preview image. When you move the mouse over the document preview image, the mouse cursor changes from an arrow to a gloved hand. You can toggle between portrait and landscape page orientation by clicking the image.
##### Orientation
Orientation refers to the layout of the image on the page and does not affect the way that paper feeds into the product. The orientations that you can specify are portrait, landscape, and rotated. The default orientation is Portrait.
| | |---|
NOTE: Because nearly all software programs establish orientation the page orientation in the driver is useful only for the few software programs that do not set it. The Orientation group box contains the following options:
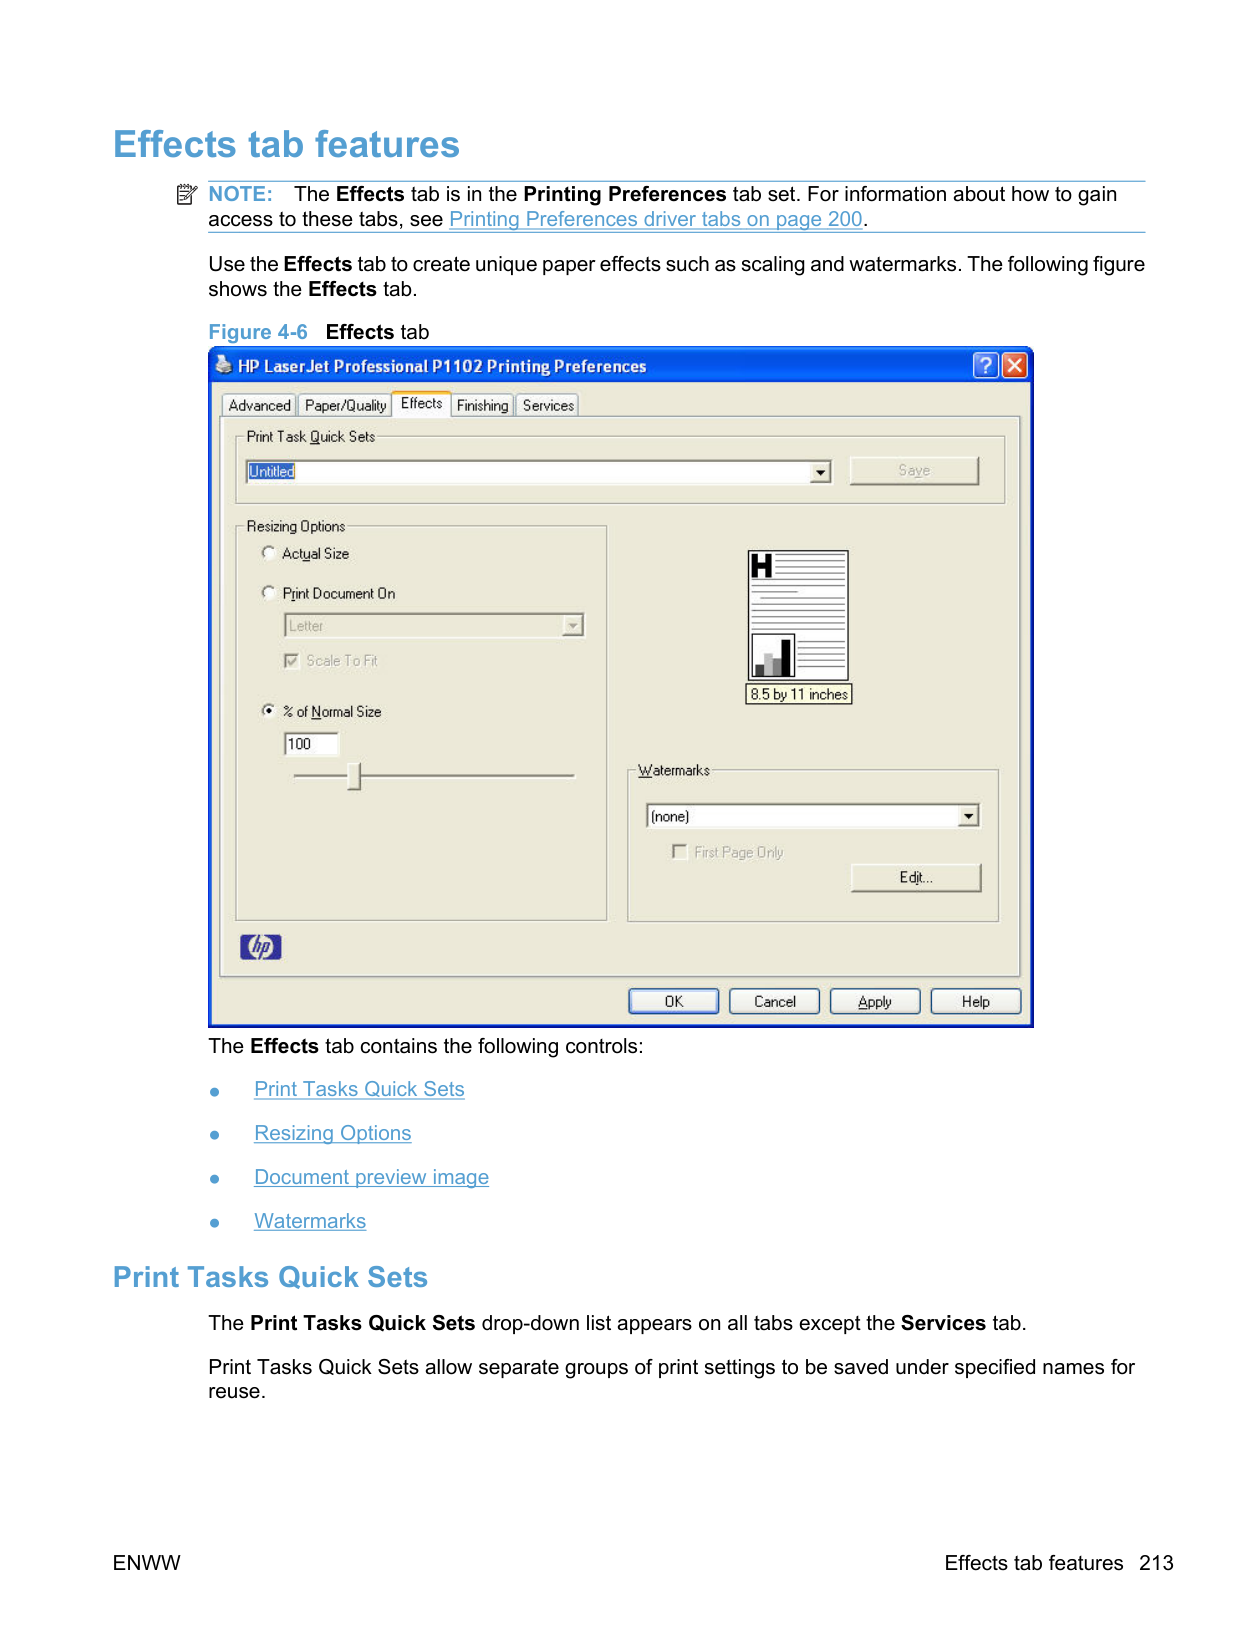
You can toggle orientation between portrait and landscape by clicking the document preview image. If you select the Rotate by 180 degrees check box, no change occurs in the document preview image.
Services tab features NOTE: The Services tab is on the Printing Preferences tab set. For information about how to gain access to these tabs, see Printing Preferences driver tabs on page 200. The Services tab is shown in the following figure. Figure 4-13 Services tab
| | |---|

The Services tab contains the following group boxes:
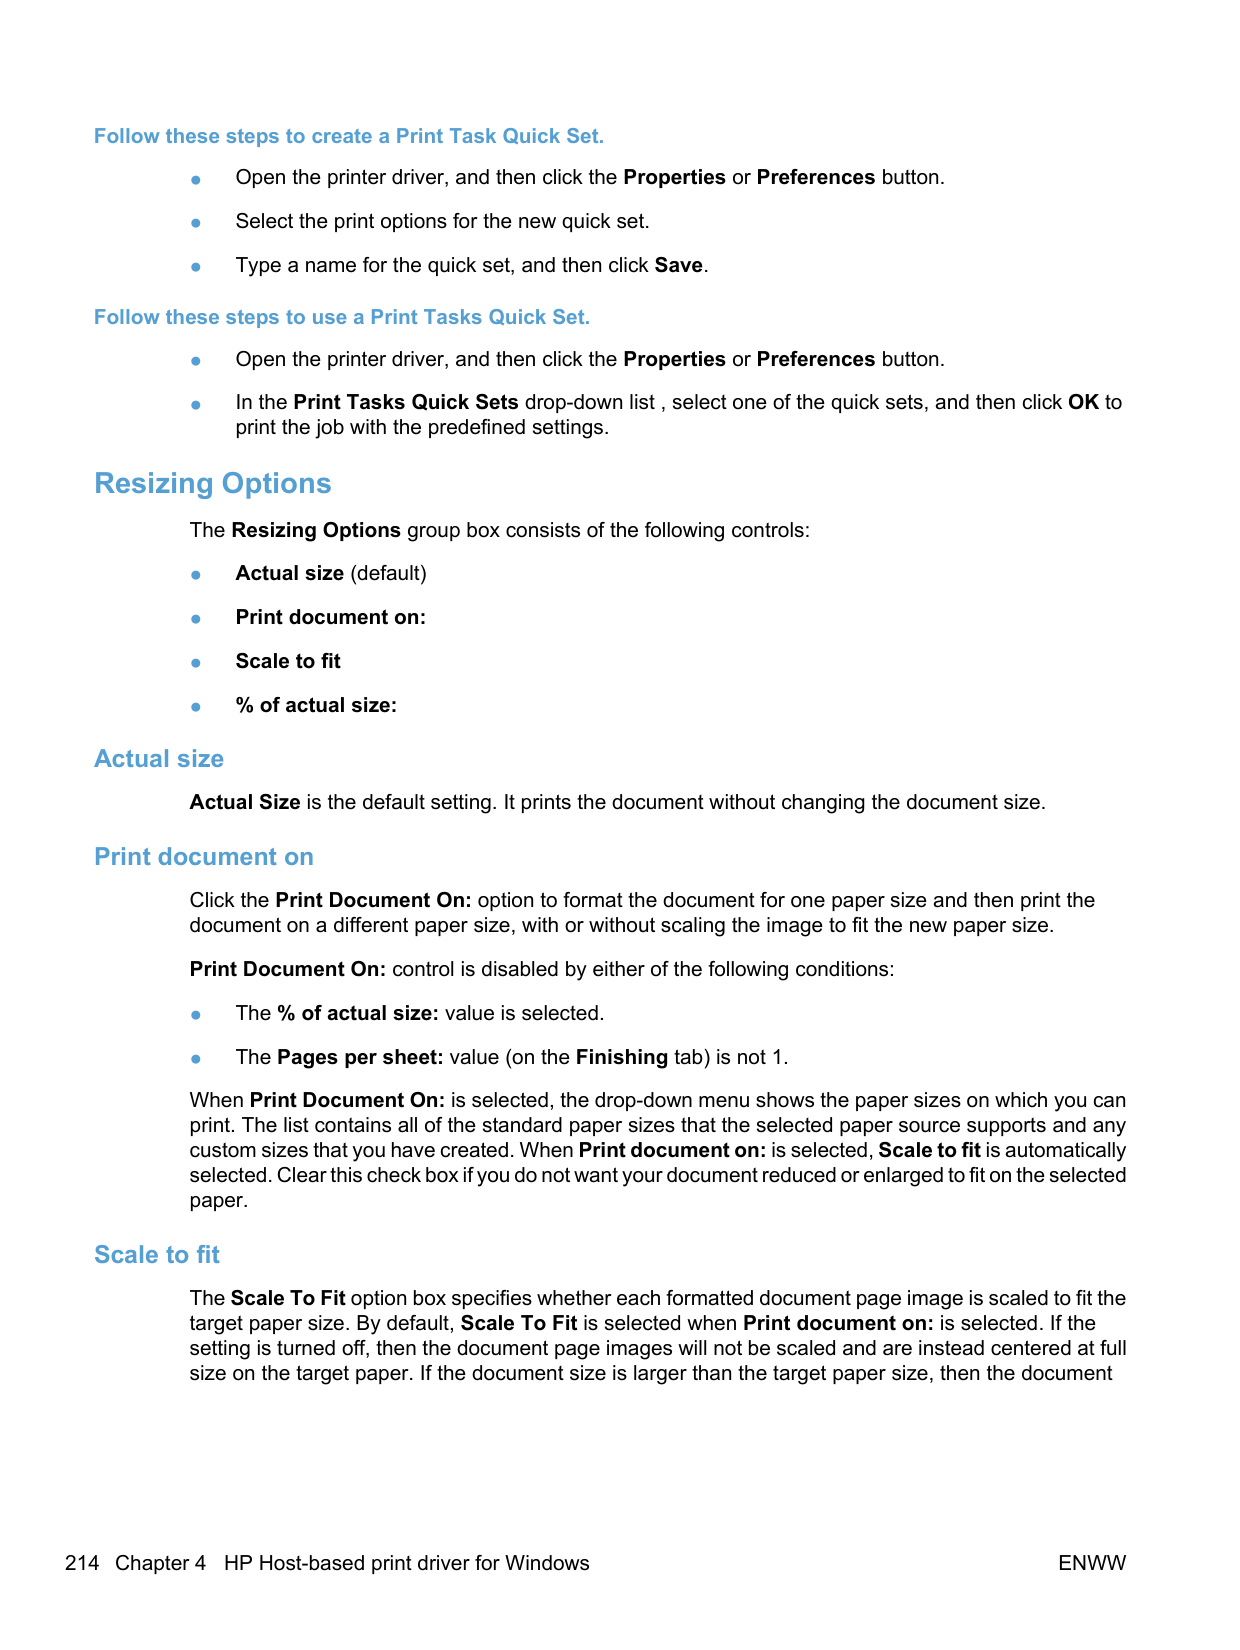
##### Internet Services
The Internet Services group box contains the Select a destination drop-down menu with the following options:
If you have Internet access, select any of these items and then click Go! to open the corresponding HP Web page.
##### Print Information Pages
Use the Print Information Pages section of the Services tab to print the following information pages.
ENWW Services tab features 229
#### Device Settings
Gain access to the product's Device Settings by following these steps.
Windows XP, Windows Server 2003, and Windows Server 2008 (using the default Start menu view): Click Start, and then click Printers and Faxes.
Windows XP, Windows Server 2003, and Windows Server 2008 (using the Classic Start menu view): Click Start, click Settings, and then click Printers.


The following settings can be configured on the Device Settings tab.
| | |---|
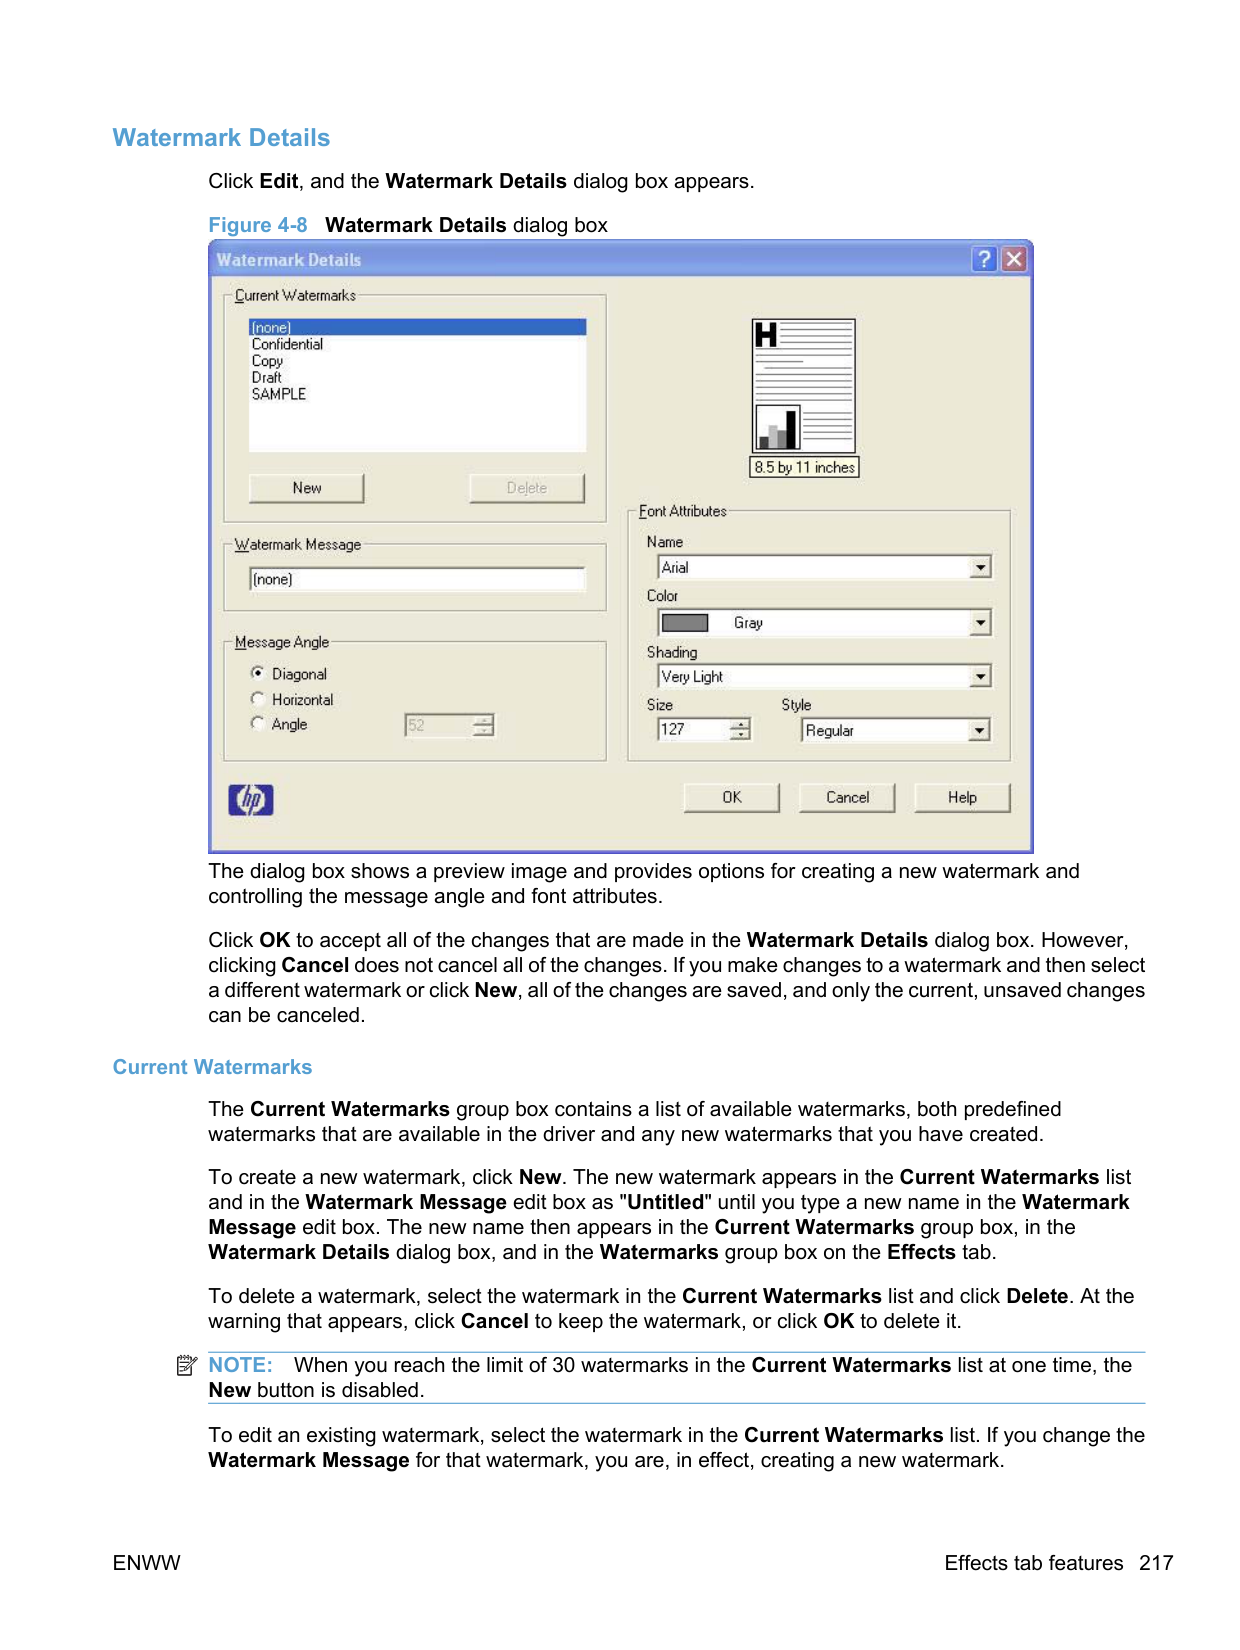
##### Jam Recovery
When the Jam Recovery feature is turned on, the product reprints any pages that are damaged during a jam. The default setting for Jam Recovery is Off.
##### Status Messages
When the Status Messages feature is turned on, status messages related to the operation of the product appear. The default, and recommended, setting for Status Messages is On.
For example, if the front door of the product is open when a print job is sent to the product, the following message appears.
######### Figure 4-16 FRONT DOOR IS OPEN status message

##### Cleaning Page
Use the Cleaning Page feature to remove excess toner and paper particles that accumulate on the fuser assembly and rollers.
Follow these steps to print a Cleaning Page.

surface.
##### Quiet Mode (P1560/P1600 series only)
P1560/P1600 series products have a quiet mode that reduces noise during printing. When quiet mode is turned on, the product prints at a slower speed. The default setting for Quiet Mode is Disable.
##### Duplex Mode
Use the Duplex Mode section to set duplex settings.
● P1100/P1560 series products have the option to Allow Manual Duplexing. Allow Manual
Duplexing is the default setting for P1100/P1560 series products.
######### ● P1606dn models have options to Allow Automatic Duplexing and Allow Manual Duplexing.
Allow Automatic Duplexing is the default setting for P1606dn models.
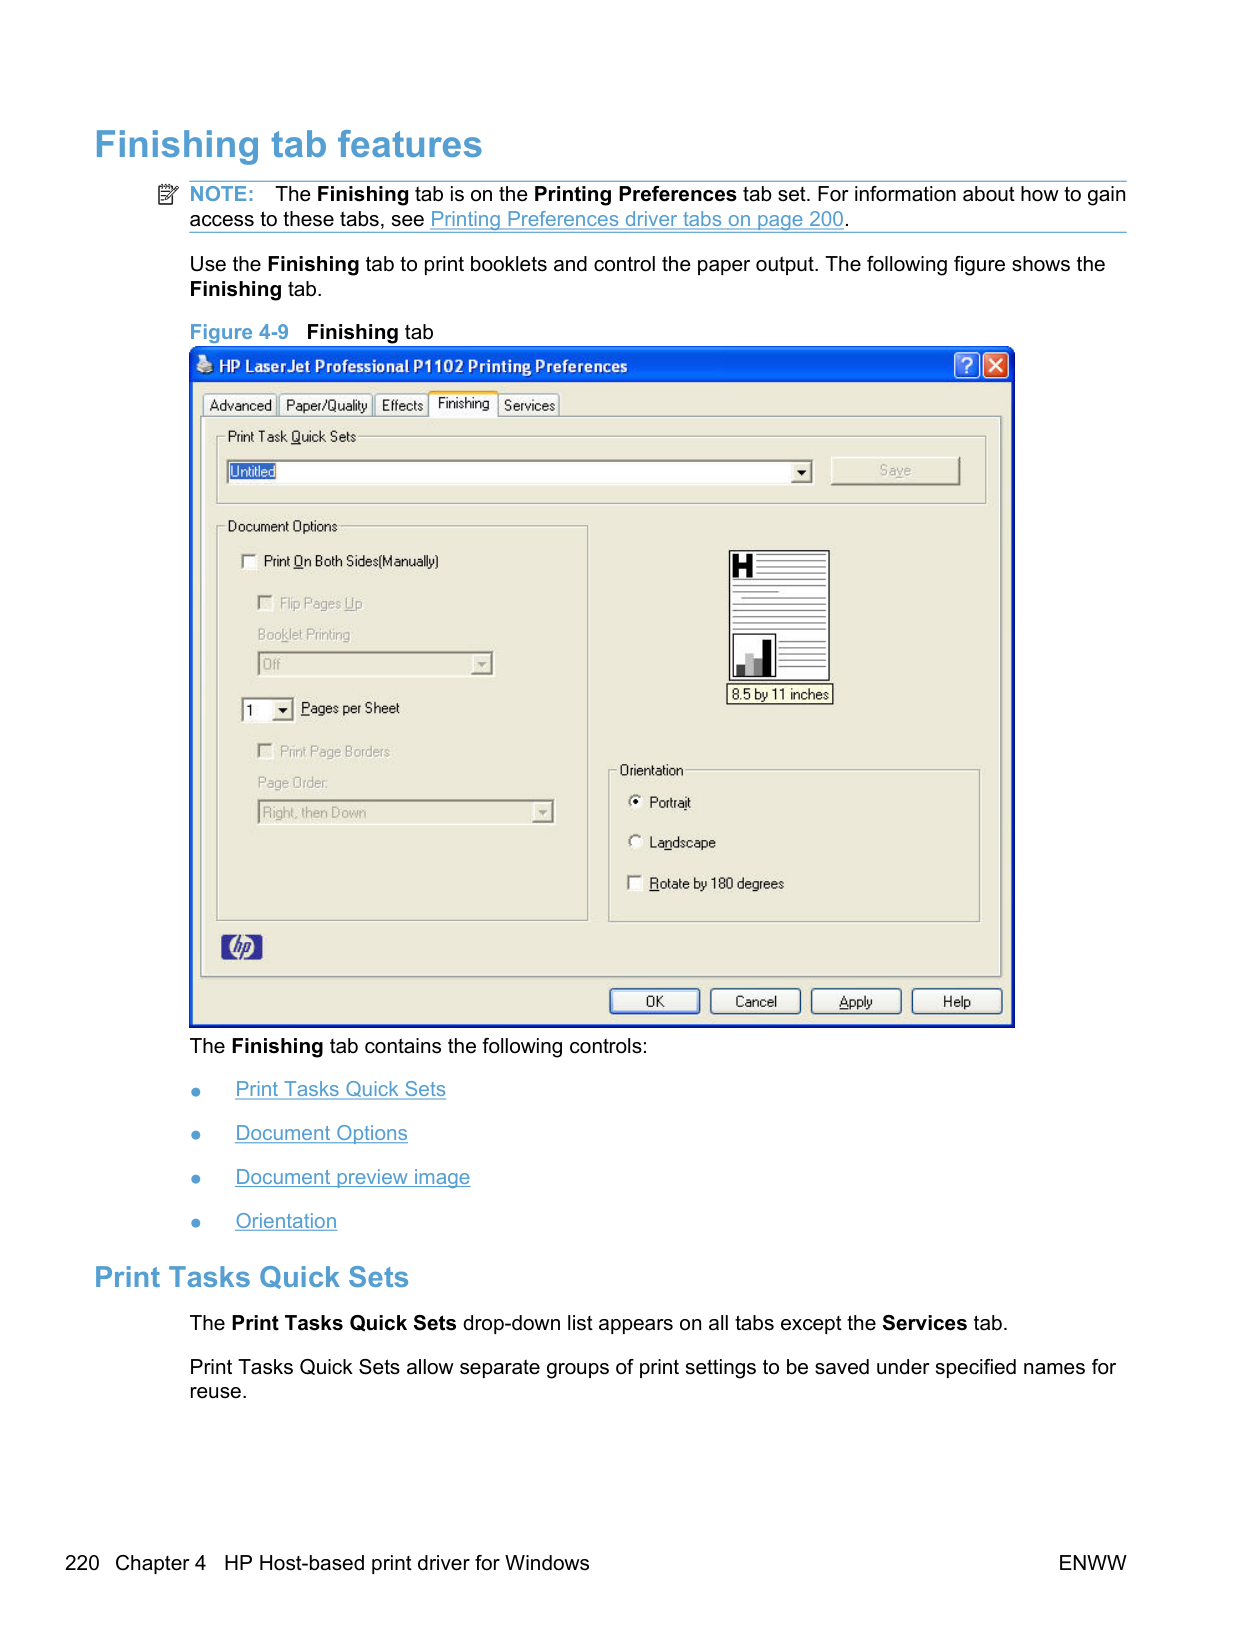
##### Print Density
Use the Print Density setting to optimize and improve image quality. The default setting for Print Density is 3.
##### Auto-Off Console
Auto-Off is an energy-saving feature of this product. After a user-specified time period, the product automatically reduces its power consumption (Auto-Off). The product returns to the ready state when a button is pressed or a print job is received. When the product is in Auto-Off mode, all of the control-panel LEDs and the power button backlight LED are off.
Auto-Off is enabled by default and the default time interval setting is five minutes. Change Auto-Off settings by selecting a time interval in the Auto-off after: drop-down menu. Disable Auto-Off by deselecting Automatically turn off device after inactivity.
| | |---|
NOTE: Although the product lights are off in Auto-Off mode, the product will work normally when it receives a print job.
5 Macintosh software and utilities
#### Introduction
The HP LaserJet Professional P1100/P1560/P1600 Series Printer comes with software and installers for Apple, Inc. Macintosh systems.
This chapter provides procedures for installing and removing the HP LaserJet Professional P1100/ P1560/P1600 Series Printer printing-system software for Macintosh operating systems, as well as descriptions about the software and utilities. The chapter provides information about these topics:
ENWW Introduction 235
#### Supported operating systems for Macintosh
The product supports the following Mac operating systems:
| |
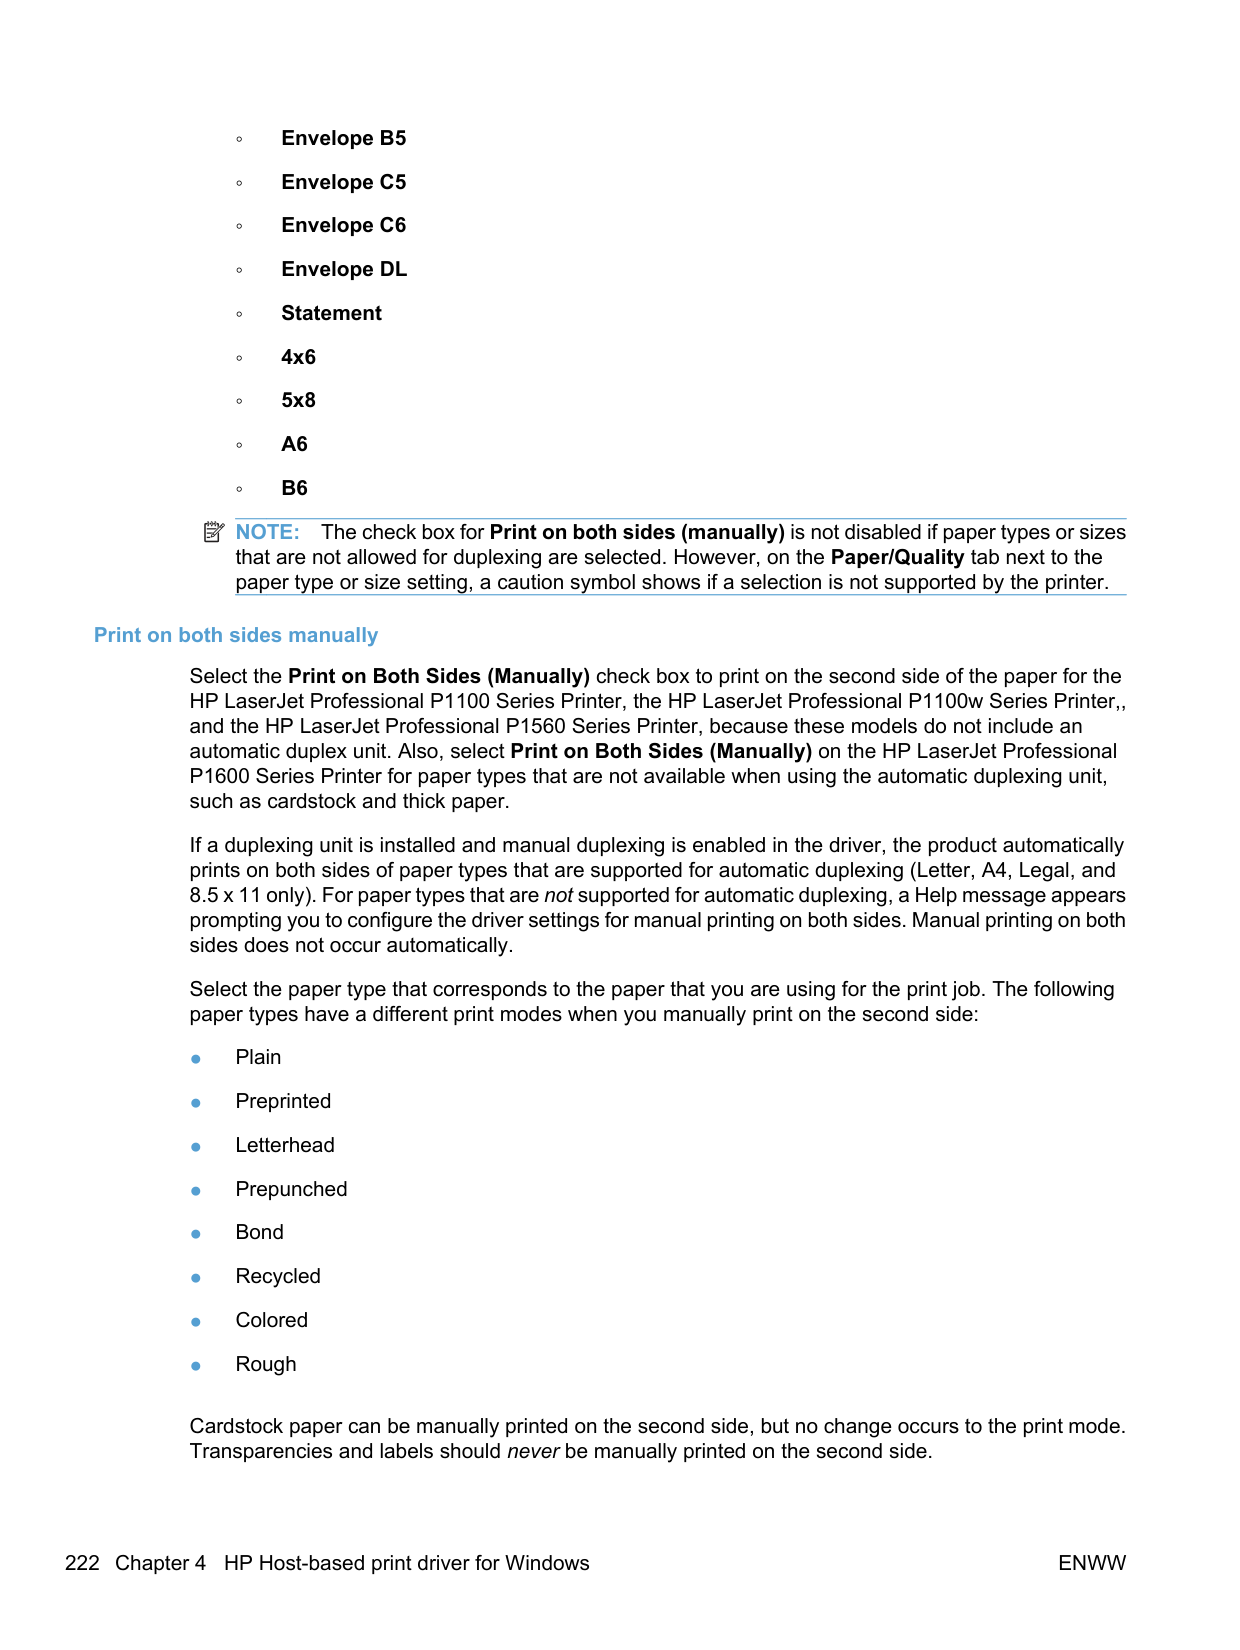
|---|
● Mac OS X 10.4, 10.5, 10.6, and later NOTE: For Mac OS X 10.4 and later, PPC and Intel® Core™ Processor Macs are supported.
##### Macintosh system requirements Hardware requirements
##### Supported printer drivers for Mac
The HP LaserJet software installer provides PostScript® Printer Description (PPD) files, Printer Dialog Extensions (PDEs), and the HP LaserJet Utility for use with Mac OS X computers. The HP printer PPD and PDE files, in combination with the built-in Apple PostScript printer drivers, provide full printing functionality and access to specific HP printer features.
##### Change printer-driver settings for Mac
Change the settings for all print jobs until the software program is closed
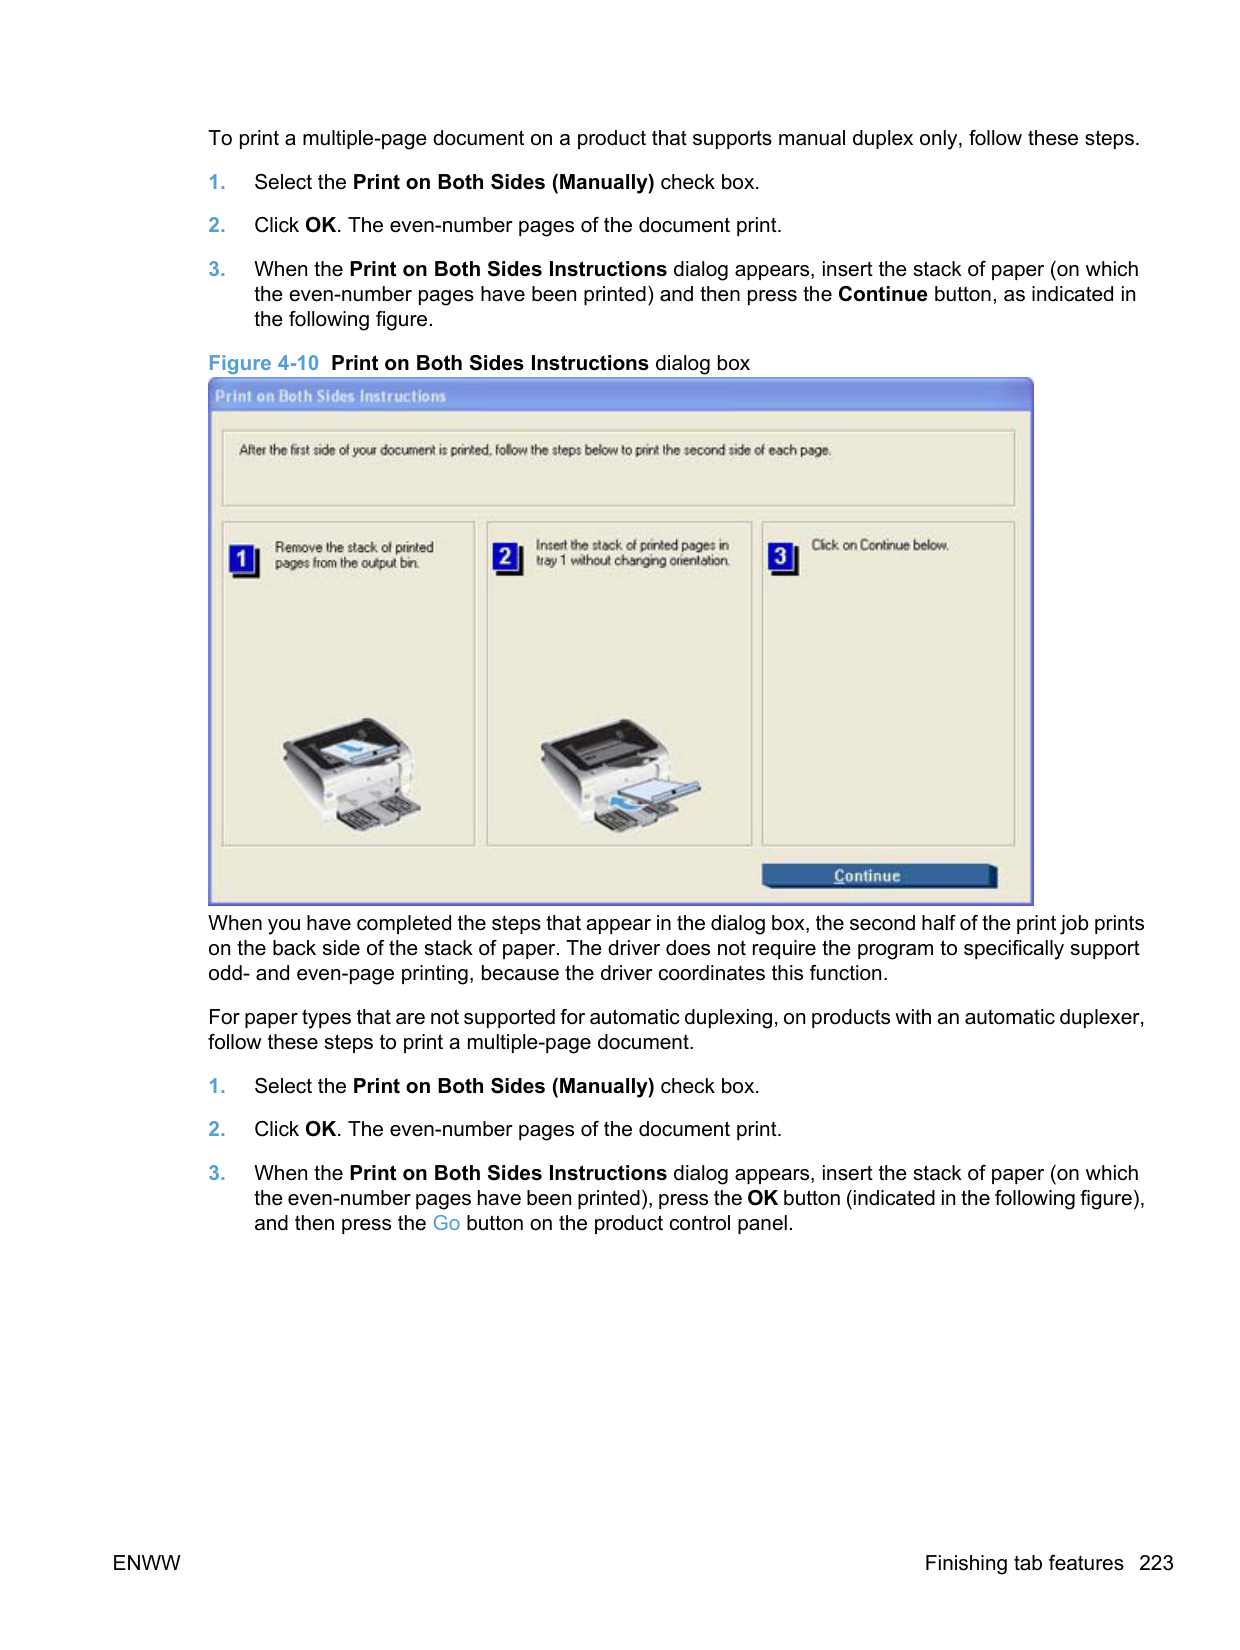
Change the default settings for all print jobs
Change the product configuration settings
System Preferences menu and then click the Print & Fax icon.
These settings are saved in the
Presets menu. To use the new settings, you must select the saved preset option every time you open a program and print.
#### Printing-system software
The product includes the following software for Macintosh computers:
● PDEs for Mac OS X only (v10.4, v10.5, and later)
##### PDEs
Printer Dialog Extensions (PDEs) are code plug-ins that provide access to product features, such as number of copies, duplexing, and quality settings. The PDEs are HP additions to Apple's print driver.
##### HP Embedded Web Server
Mac OS X v10.4 and later support the HP Embedded Web Server (HP EWS) on wireless and network capable models. Use the HP LaserJet Utility to control features that are not available in the driver. Use the HP EWS to perform the following tasks:
##### Install notes
This text file contains important information about product features, instructions for installing the printingsystem software, and technical assistance.
##### Online help
This HTML-based help system replaces the Apple Guide help system that was provided with Mac OS 9.x HP products. The help system is in English only, and can be viewed through a browser or in the Macintosh OS Help Center.
##### Screen fonts
The printing-system software for Macintosh operating systems no longer includes a font installer. The HP LaserJet Professional P1100/P1560/P1600 Series Printer product uses previously installed system fonts when it is installed on a Macintosh computer.
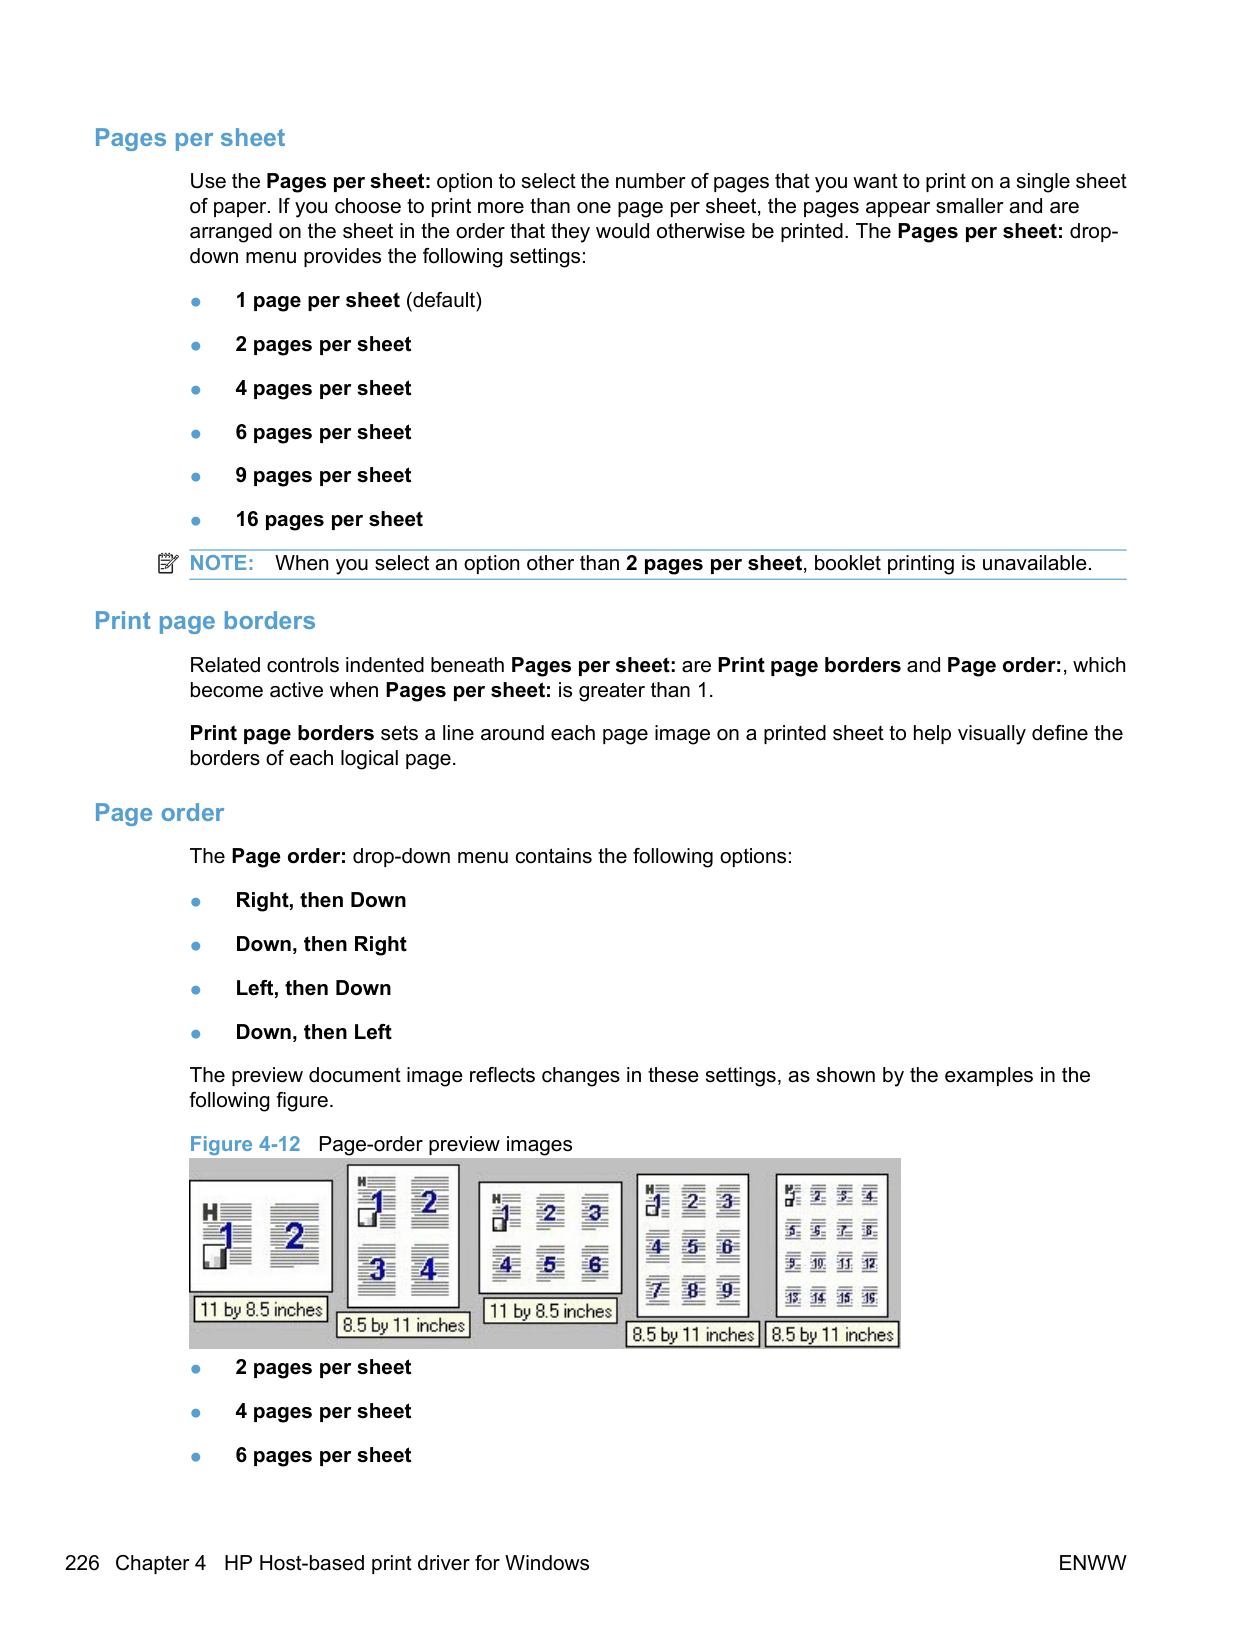
ENWW Printing-system software 237
#### Macintosh installation instructions
On a Macintosh computer, the installation procedures are basically the same for a network administrator, a network client, and a single user. Install the software on any computer that has save rights to the product. Users must have Administrator rights to install the software.
| | |---|
NOTE: If the computer is connected to the product by a LocalTalk (printer port) connection, you must configure the AppleTalk (or network) control panel for the correct connection to communicate with the product. You must set up the HP LaserJet Professional P1100/P1560/P1600 Series Printer , connect it to the computer or network, and turn it on before the software is installed. Macintosh operating systems do not support parallel connections.
The Macintosh partition contains an installer program for each language. Find the appropriate language for the operating system that is being used, and then use the installer program for that language.
| | |---|
NOTE: Detailed installation steps can be found in Mac OS X installation on page 239.
##### HP LaserJet software CD, Macintosh partition
The files contained in the Macintosh partition of the HP LaserJet software CD are grouped by language and reside in the following directory.
##### Install the HP LaserJet printing-system software for the Macintosh OS
Topics:
######## General installation instructions
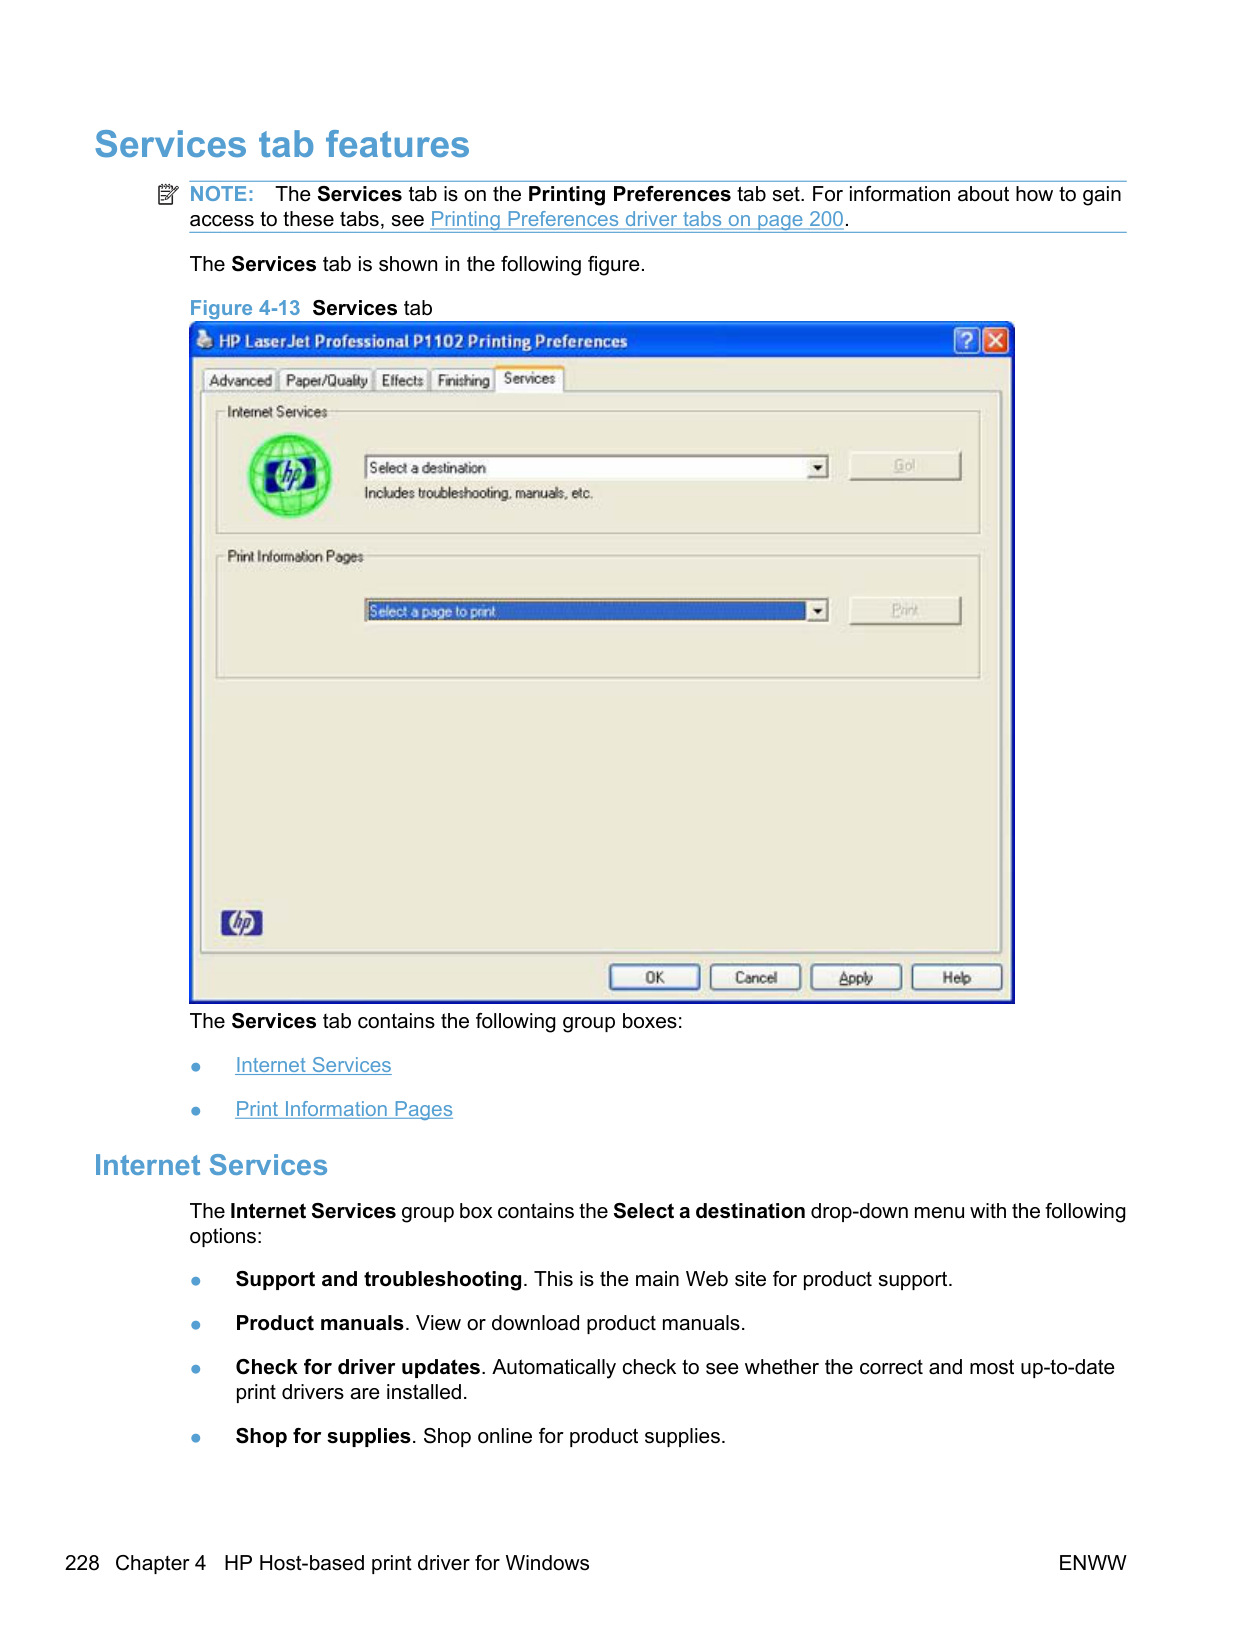
| | |---|
NOTE: If the CD screen does not open automatically, double-click the CD-ROM icon on the desktop to open the CD-ROM window.
| | |---|
NOTE: If you are installing the printing-system software on a Macintosh OS X system, be patient. The installer must perform an initial search of the computer for up to 1 minute. During this time the installer might appear to be stalled.

######## Mac OS X installation
This section provides information about the various installation dialog-box sequences for the Mac OS X operating system.
######### Main Install dialog box sequence
| | |---|
NOTE: Turn on the power to the product and connect the USB cable between the product and the computer before inserting the HP LaserJet Professional P1100/P1560/P1600 Series Printer printingsystem software CD in the CD-ROM drive.
| | |---|
NOTE: If the CD screen does not open automatically when the CD is put into the CD-ROM drive, double-click the CD-ROM icon on the desktop to open the installer folder.
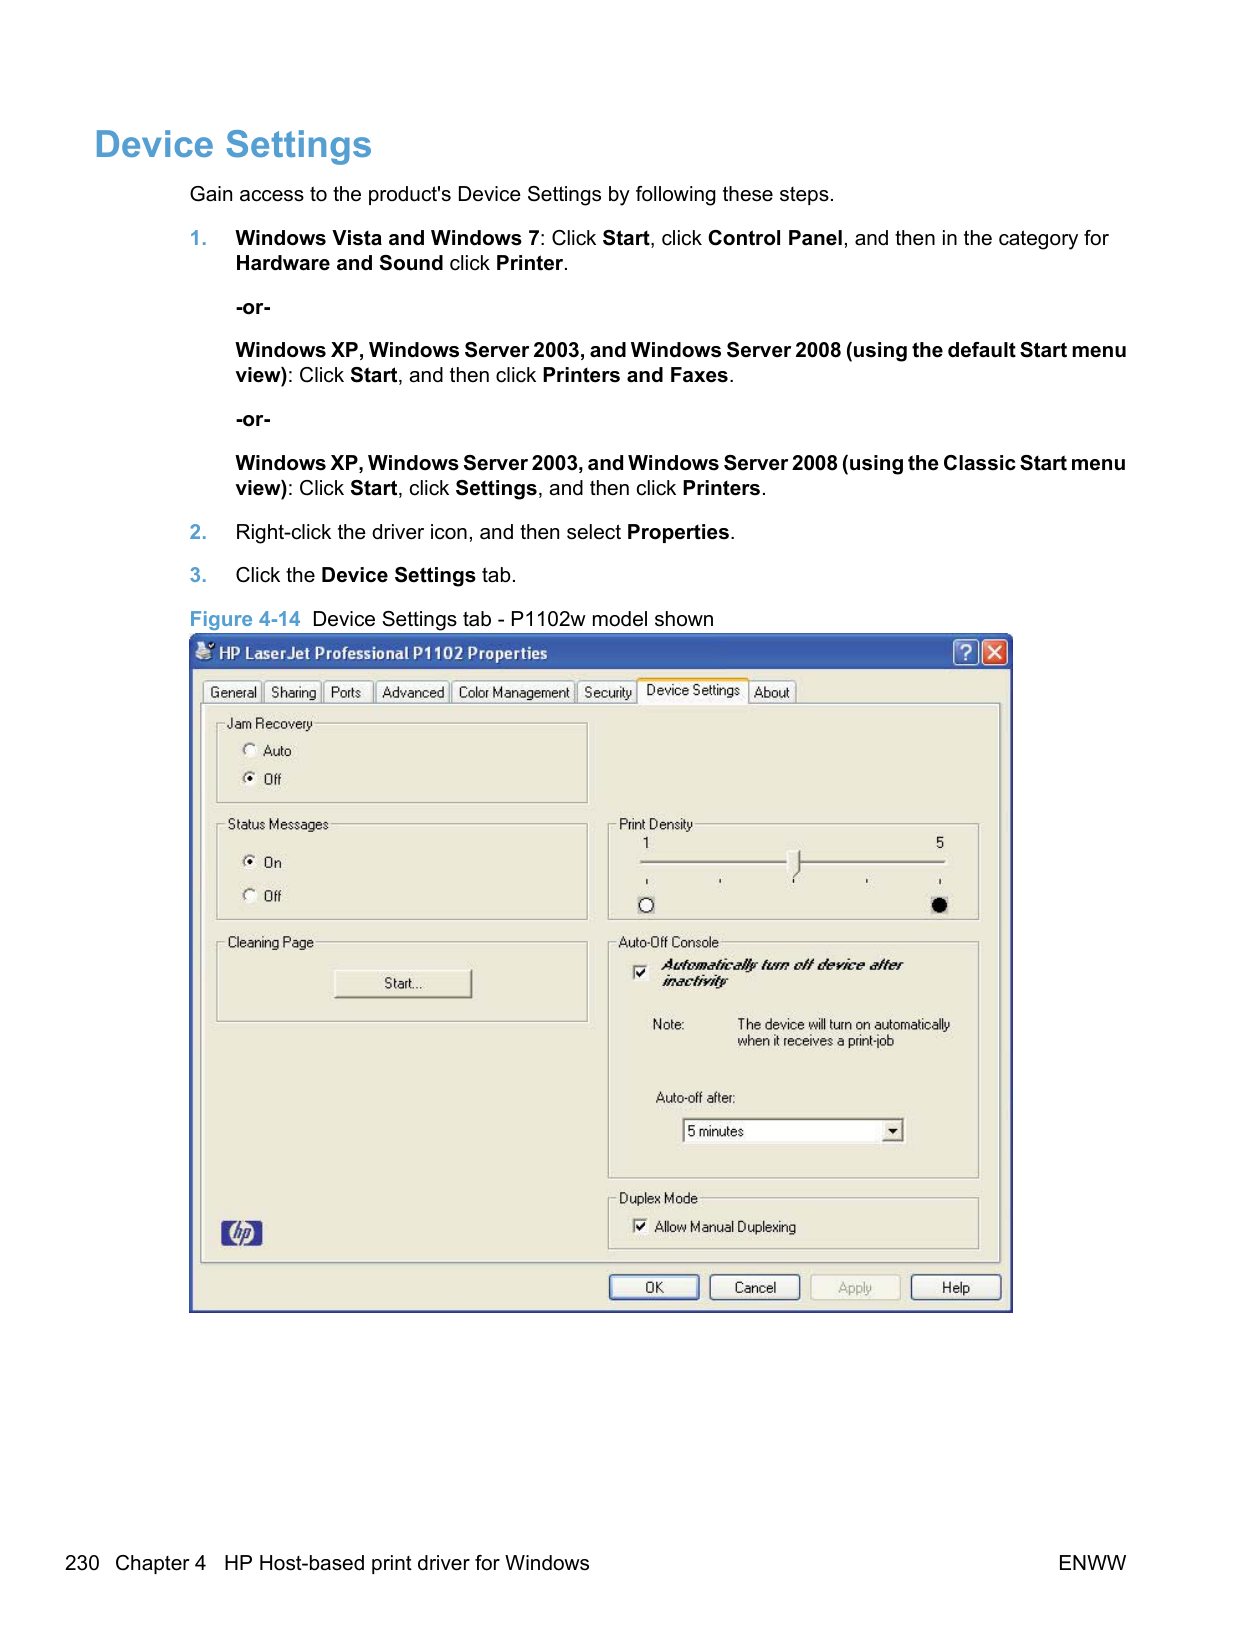

NOTE: In the HP LaserJet installer browser screen, double-click the Documentation icon to gain access to the product manuals. Select a language folder and locate the available guides which are in .PDF format. The user guide is a .PDF file that is named LJP1100_use_enww.pdf or LJP1560_LJP1600_use_enww.pdf.
| | |---|
########## 3. In the HP LaserJet installer browser screen, double-click the HP LaserJet Professional P1100/P1560/P1600 Series Printer icon to open the installer program Introduction dialog.

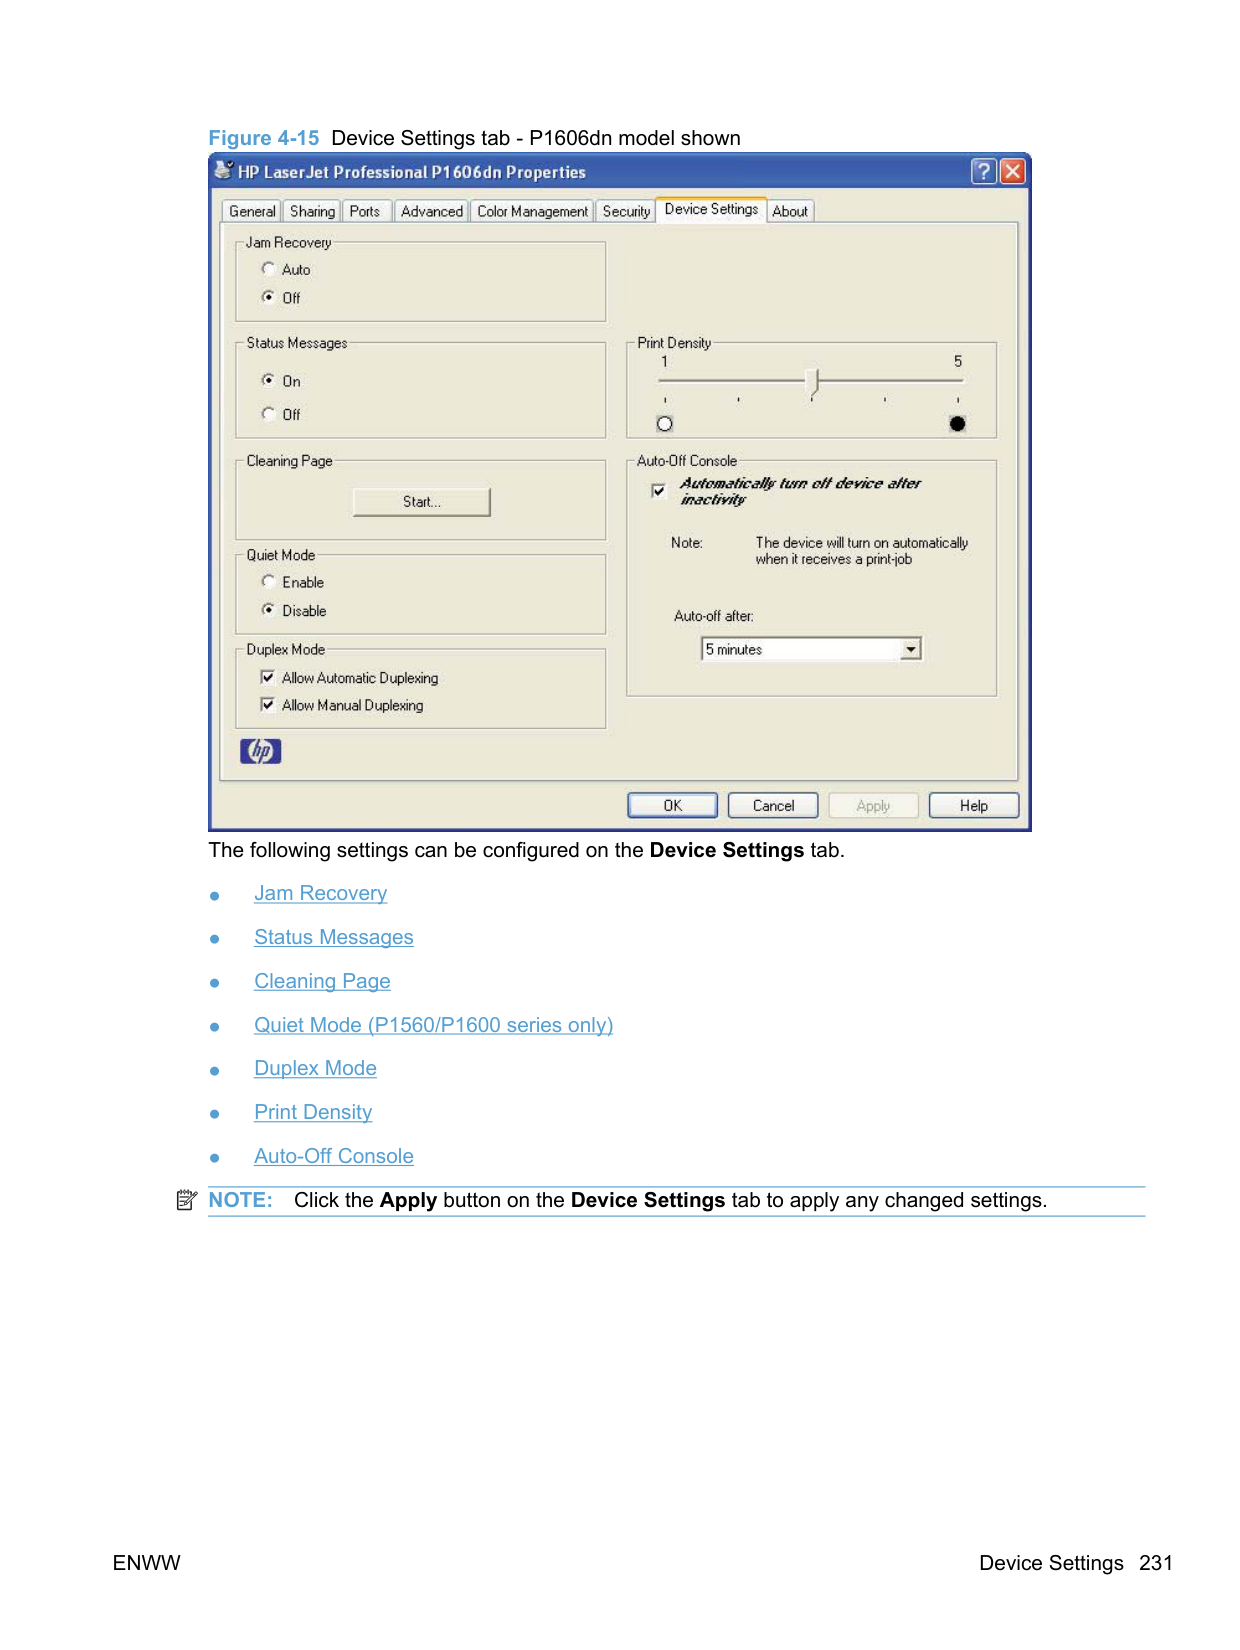


to continue the installation. The Select a Destination dialog appears.
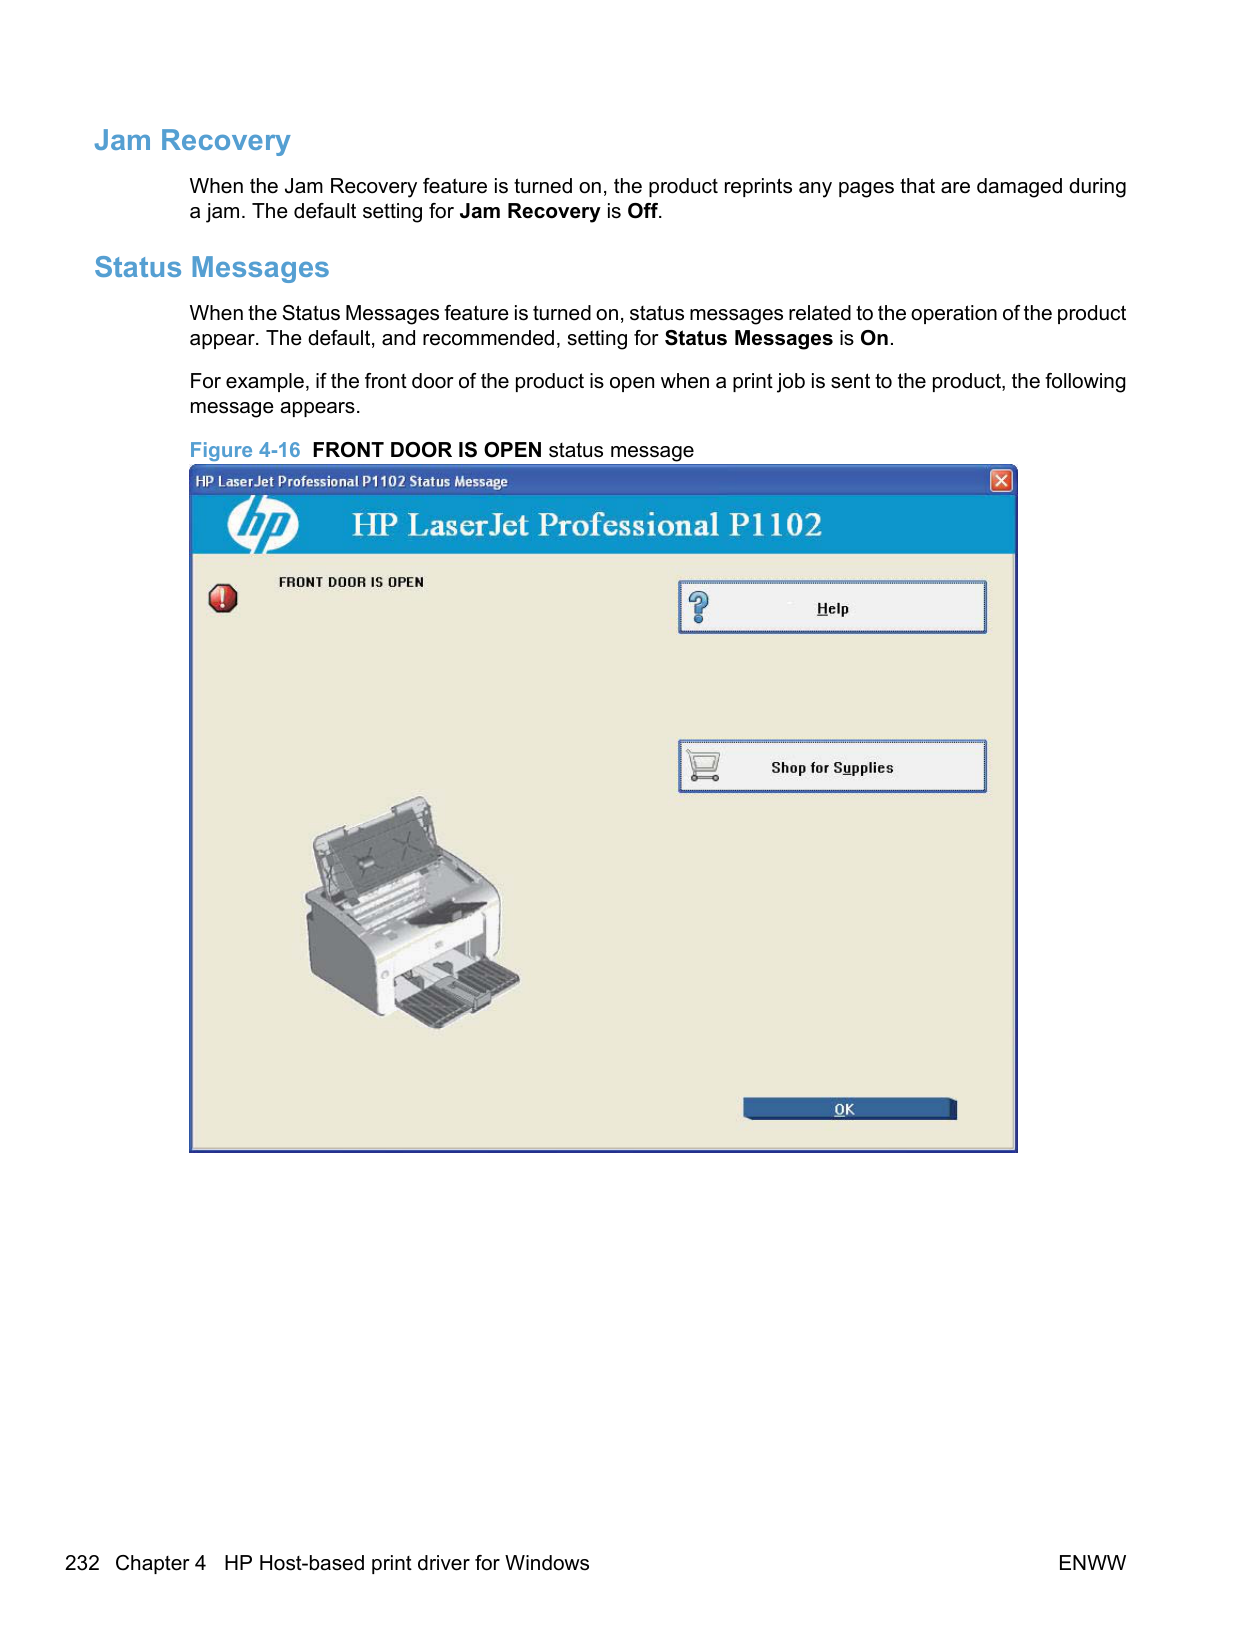

########## 8. Click the name of the volume to install the software and then click the Continue button. TheStandard install on “Macintosh HD” dialog appears.

########## 9. Click the Install button to start the installation. To change the installation location, click the ChangeInstall Location... button to return to the Select a Destination dialog.


Select USB Printers for products that will be used with USB connections. Select Network Printers for nettwork connected products. Click the OK button.

Click the Close button to exit the installer.
| | |---|
NOTE: Complete the instructions for Mac OS X v10.4 in Setup instructions on page 244 to set up a printer queue for your HP LaserJet Professional P1100/P1560/P1600 Series Printer product.
######## Setup instructions
This section contains information about the following topics:

######### Wireless setup
Complete these steps after completing the printing-system software installation.
▲ In Finder, click System Preferences, and then click the Print & Fax icon.
######### Troubleshooting the product setup
######### If the product does not appear in the printer list after an installation:
Complete each one of these solutions in the order given, and restart the setup process after each one to see if the issue has been resolved.
If these steps do not resolve the problem, delete the incorrect print queue, click Add, choose the product from the list, and then browse manually for the product PPD.
Wireless products If the print queue reports that the product is offline when trying to print.
#### Remove the printing-system software from Macintosh operating systems
ENWW Remove the printing-system software from Macintosh operating systems 245
6 Engineering Details
#### Introduction
This chapter presents engineering detail for the following topics:
ENWW Introduction 247
#### Remote firmware update
The HP LaserJet Professional P1100/P1560/P1600 Series Printer products may require periodic updates to their firmware.
The process for updating firmware involves three steps:
Determining the current level of firmware To determine the current level of firmware, view the configuration page. On the printed Configuration Page, look in the section marked "Product Information" for the firmware date code. It will look similar to this: Firmware Datecode = 20091029.
######### To print a configuration page, follow these instructions.
On P1560/P1600 series models, follow these instructions to print a configuration page from the control panel.
▲ Press and hold the go button for five seconds or longer to print a configuration page. If the go button is held, and then released, in less than five seconds a demo page will be printed instead of a configuration page.
On P1102w models, follow these instructions to print a configuration page from the control panel.
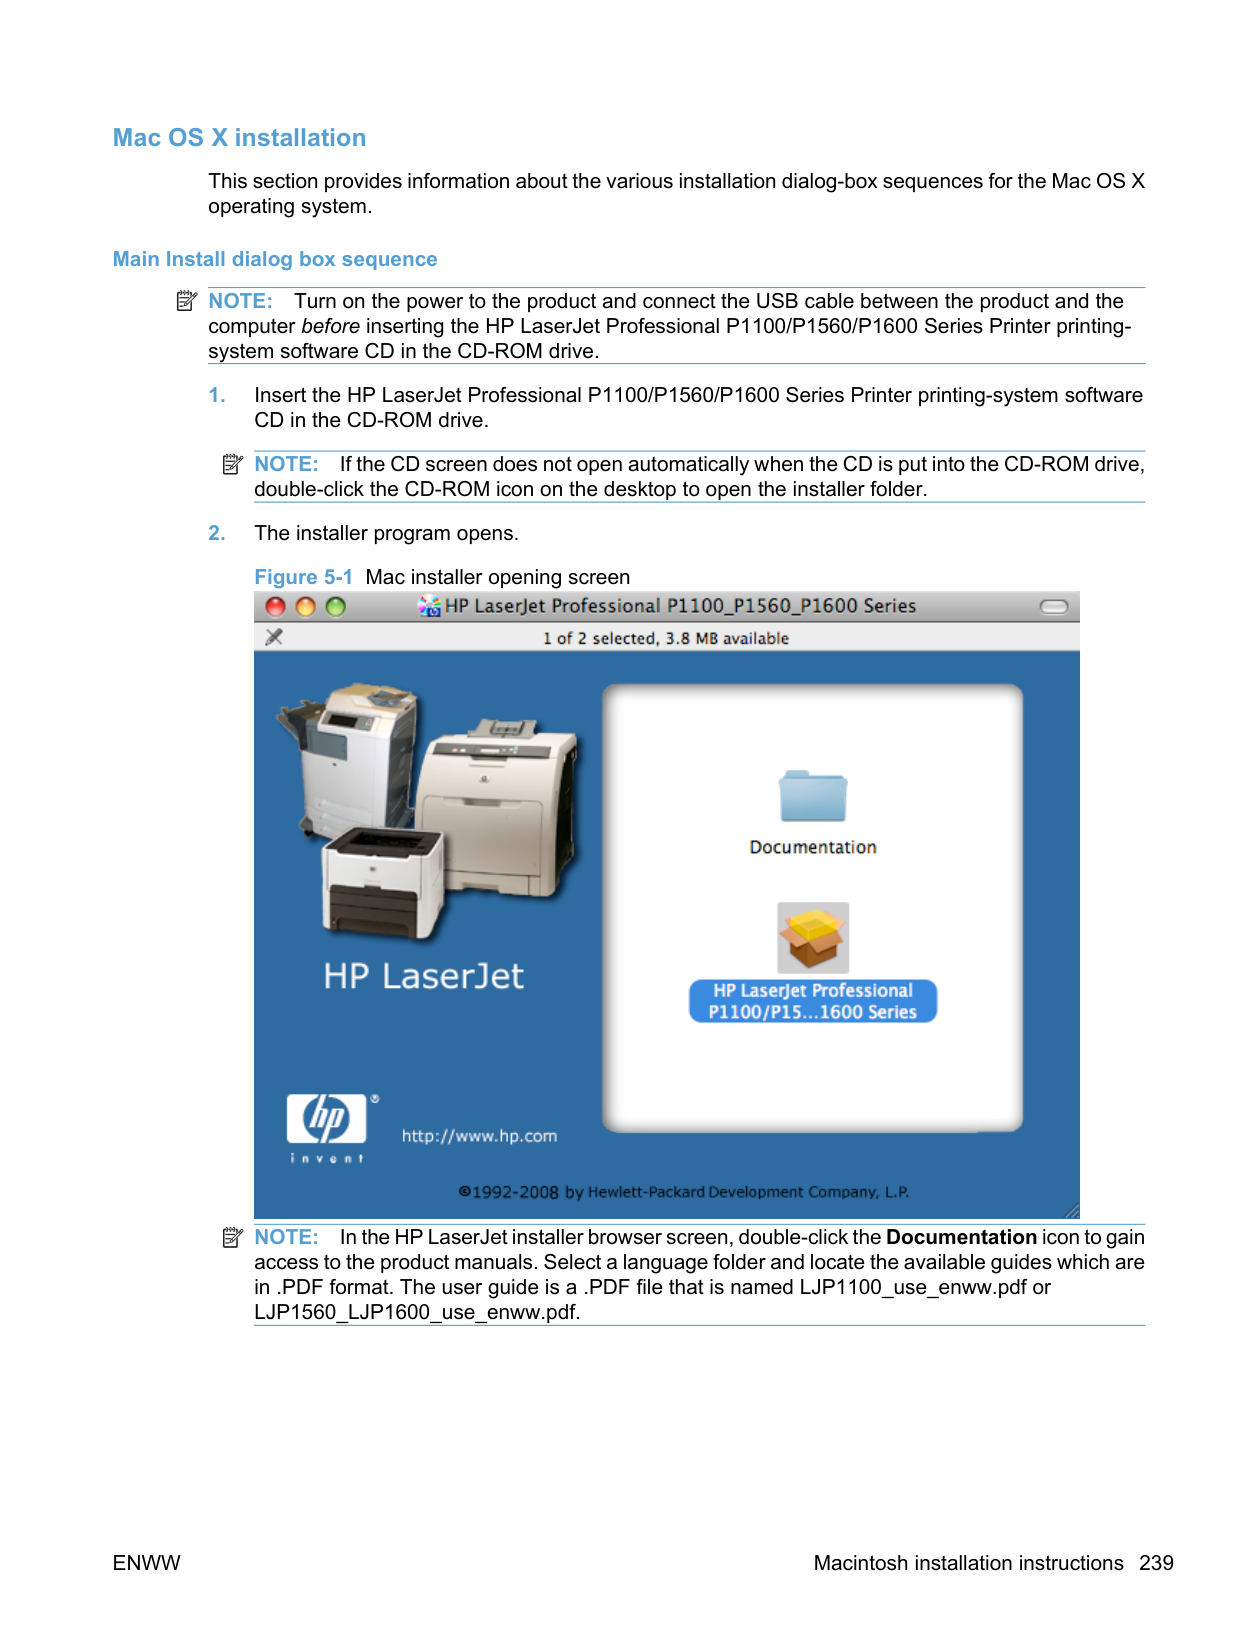
▲ Press and hold the cancel button for five seconds or longer.
Download the firmware update utility from the HP Web site To download the firmware update utility, go to one of the following URLs: www.hp.com/support/ljp1100series www.hp.com/support/ljp1560series or www.hp.com/go/ljp1600series
##### Run the firmware update utility

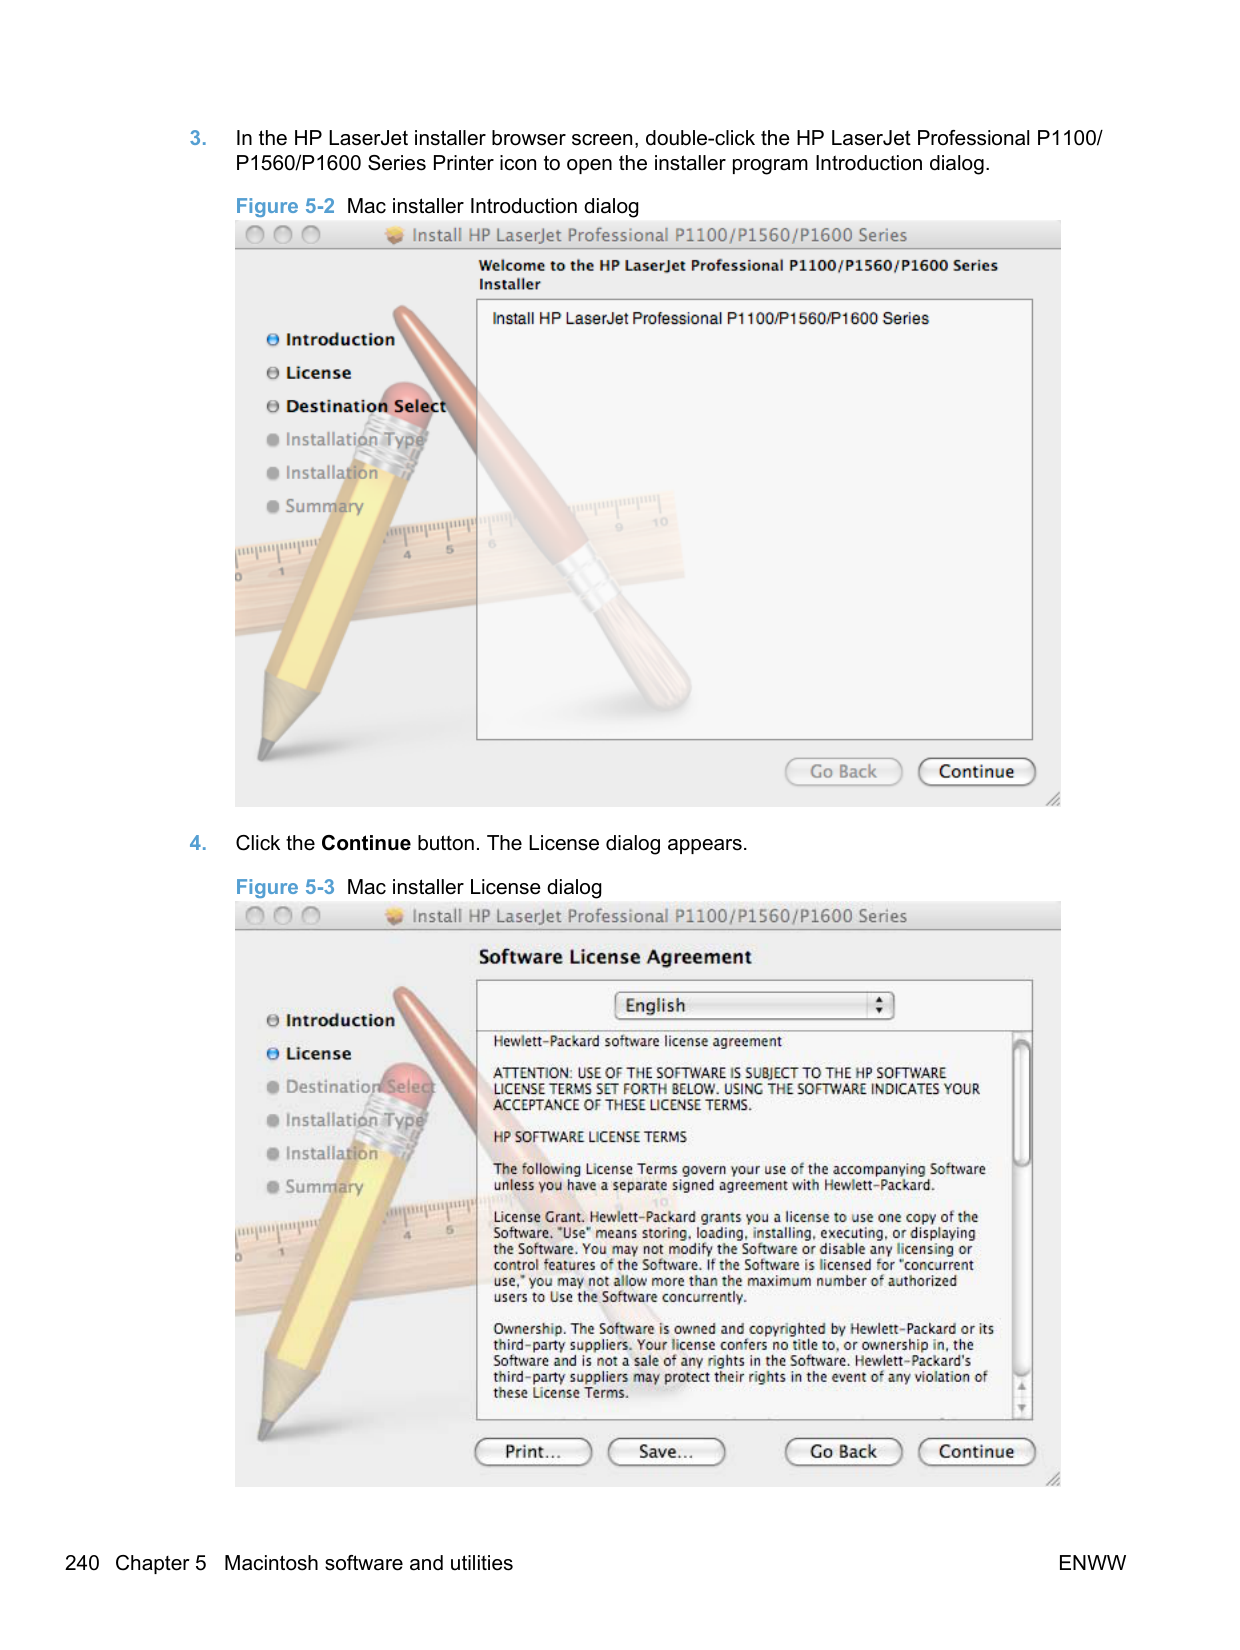

ENWW Remote firmware update 249
#### Media attributes
This section includes the following information about paper attributes:
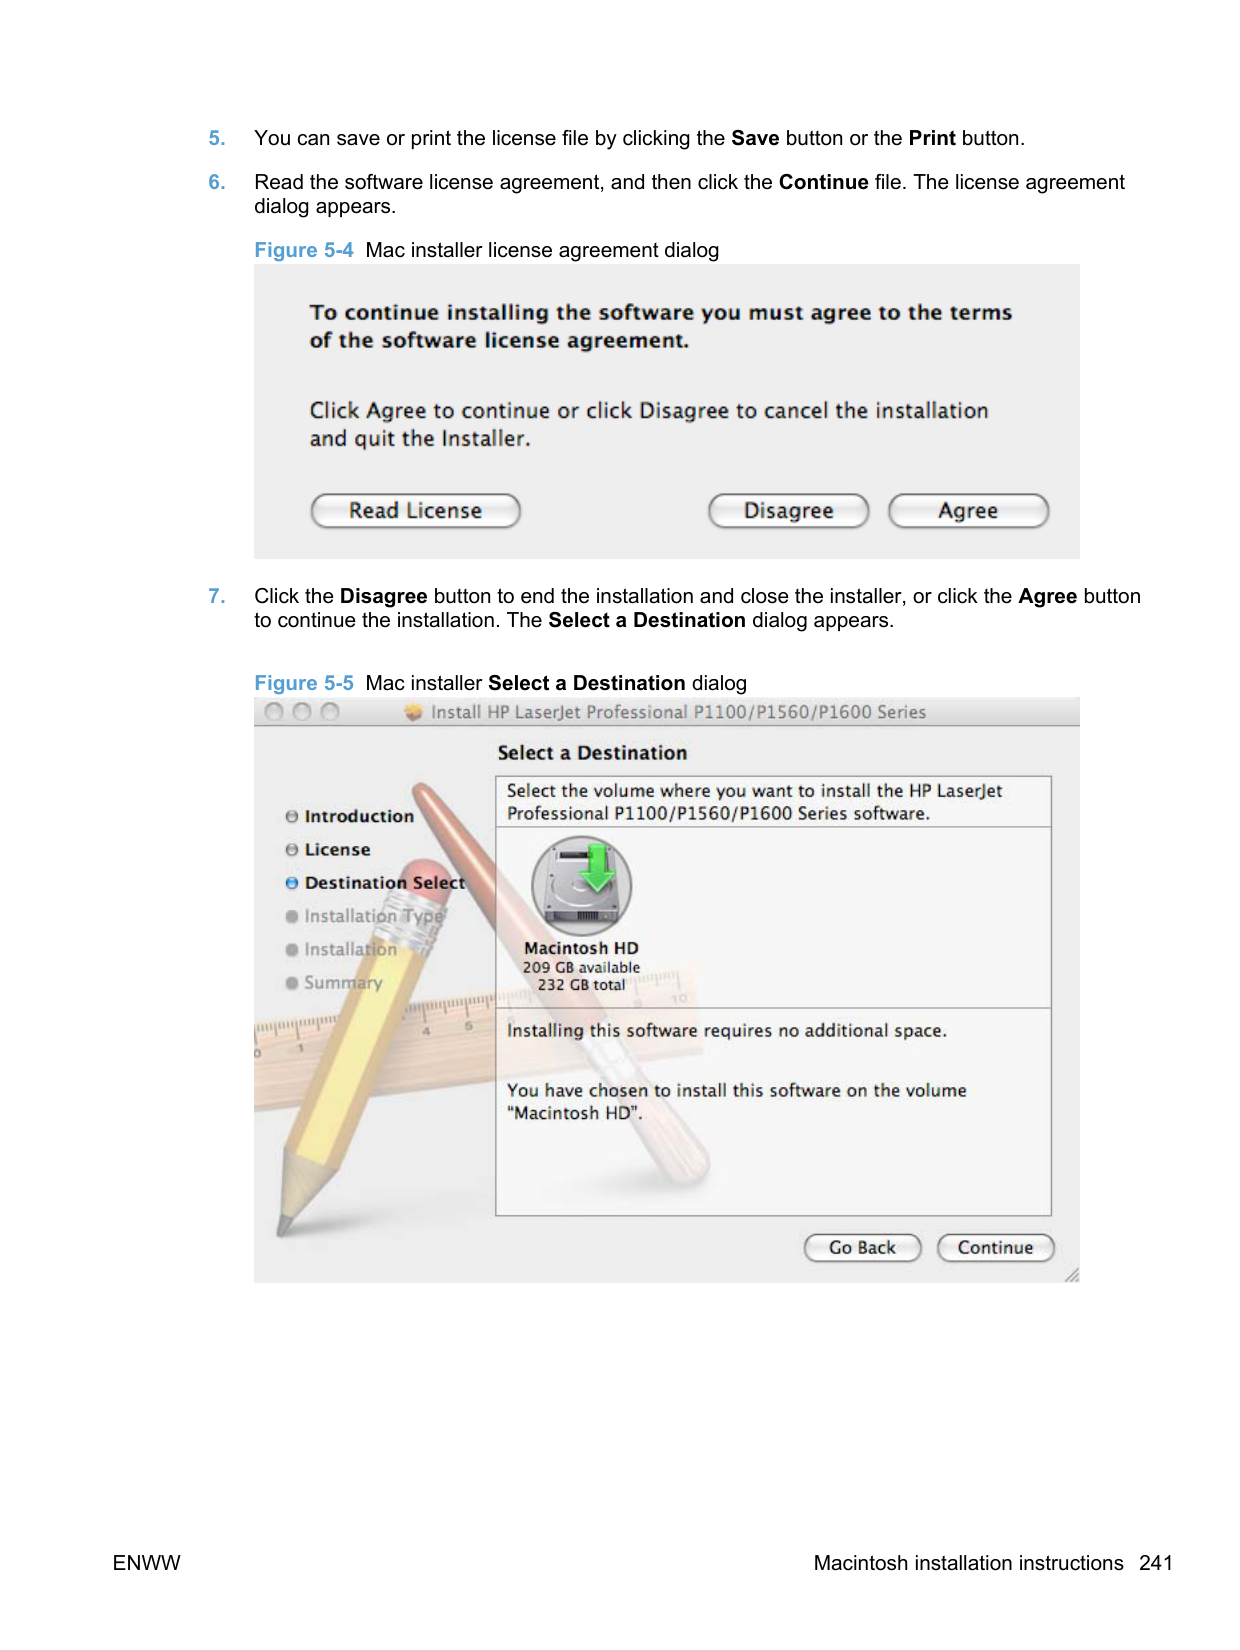
##### Paper sources and destinations
The following table indicates the standard and optional paper sources and destinations for the HP LaserJet Professional P1100/P1560/P1600 Series Printer product.
Table 6-1 HP LaserJet Professional P1100/P1560/P1600 Series Printer paper sources and destinations
Paper sources 150-sheet input tray Standard
A 10-sheet priority input slot Wireless models only Paper destinations 125-sheet output bin Standard
##### Paper-source commands
The PCL 5 print driver escape sequence for paper source is Esc&l#H (the "l" is a lowercase "L" rather than the numeral "1"). See the following table for values of #. For example, Esc&l1H is the command for Tray 2.
| | |---|
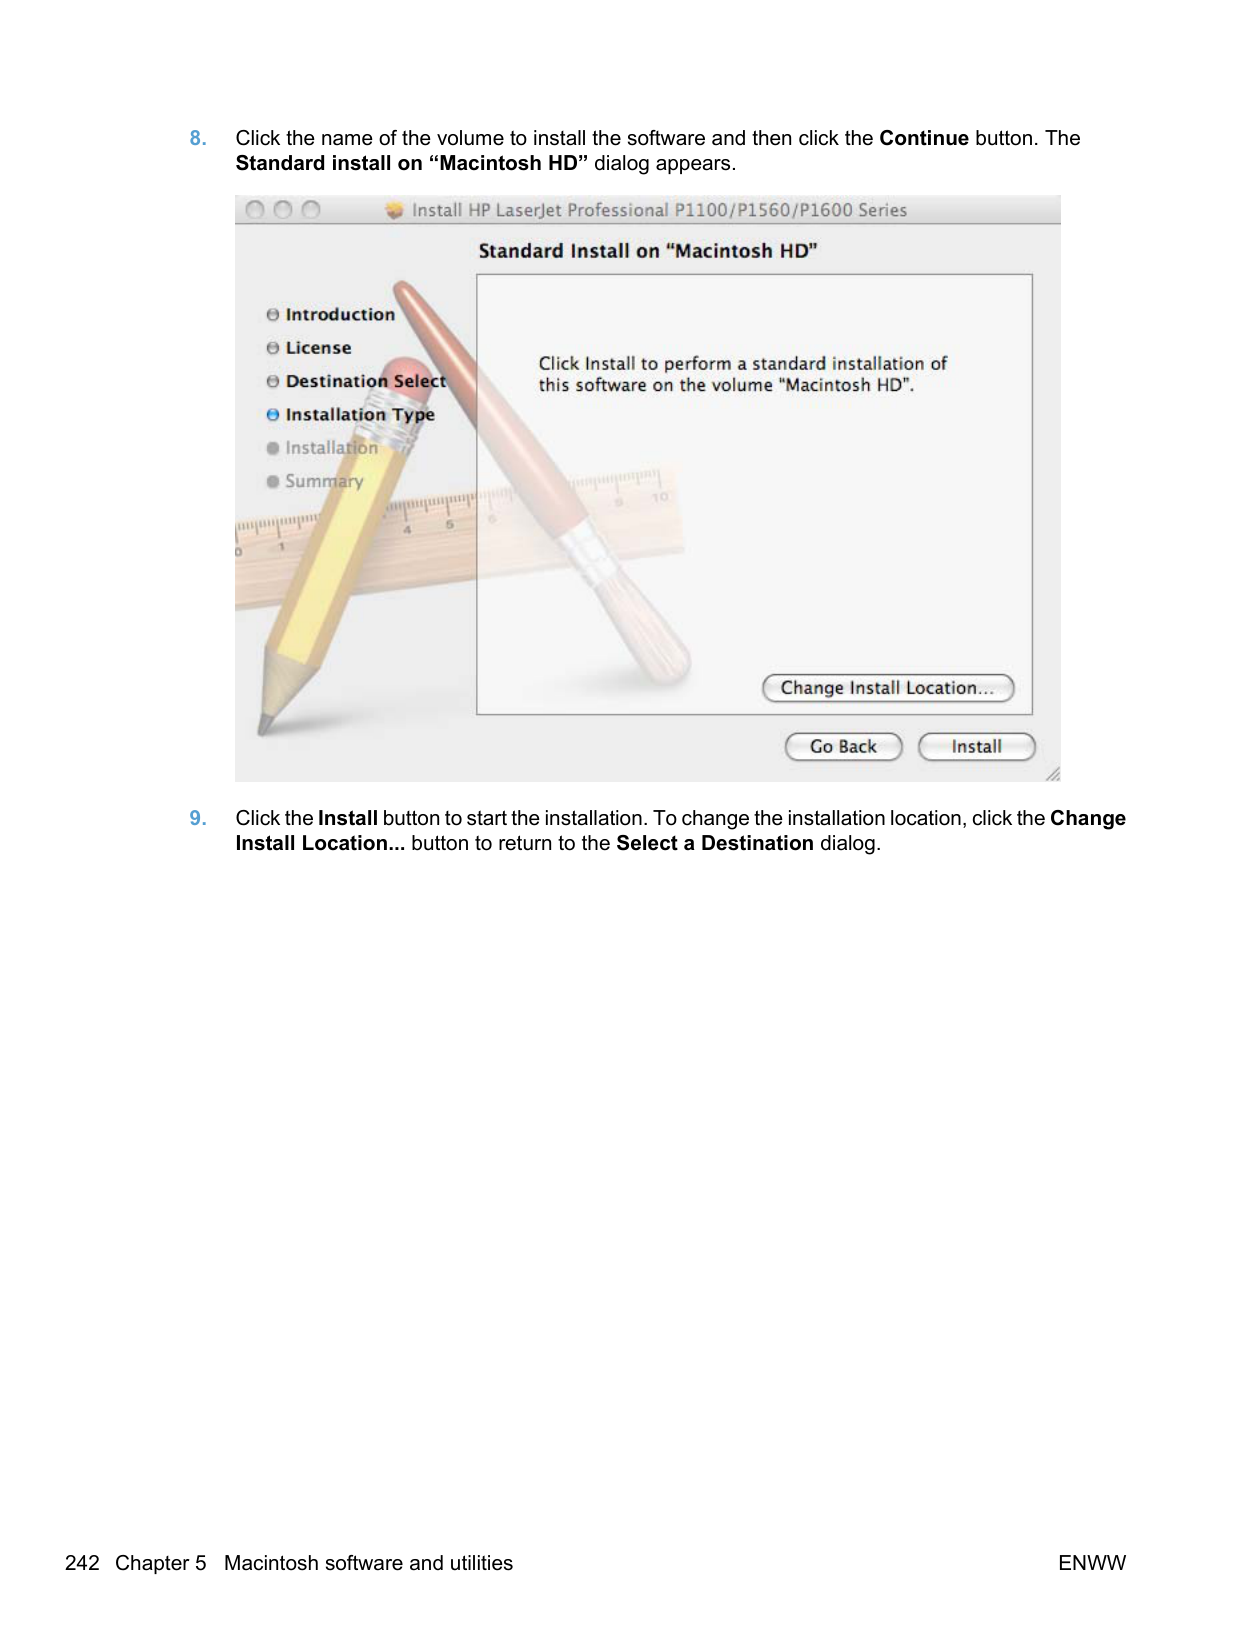
NOTE: The HP LaserJet Professional P1100/P1560/P1600 Series Printer products support Tray 1 only.
Table 6-2 Paper-source commands
Input source PCL 5
Host-based driver ubyte # MediaSource
XPS
Esc&l#H
ubyte_array "string" MediaSource
Automatically select NA NA NA Printer auto select 7 1 AUTOSELECT Manual feed in tray 1 2 2 MANUALFEED Tray 1 (100-sheet) 4 3 TRAY1
##### Driver-supported paper sizes
The following tables list the features and attributes of various paper listed under the Size Is: drop-down menu on the Paper/Quality tab. The list order can vary, depending on the product and operating system. The list contains all of the following sizes, and might contain sizes from other drivers.
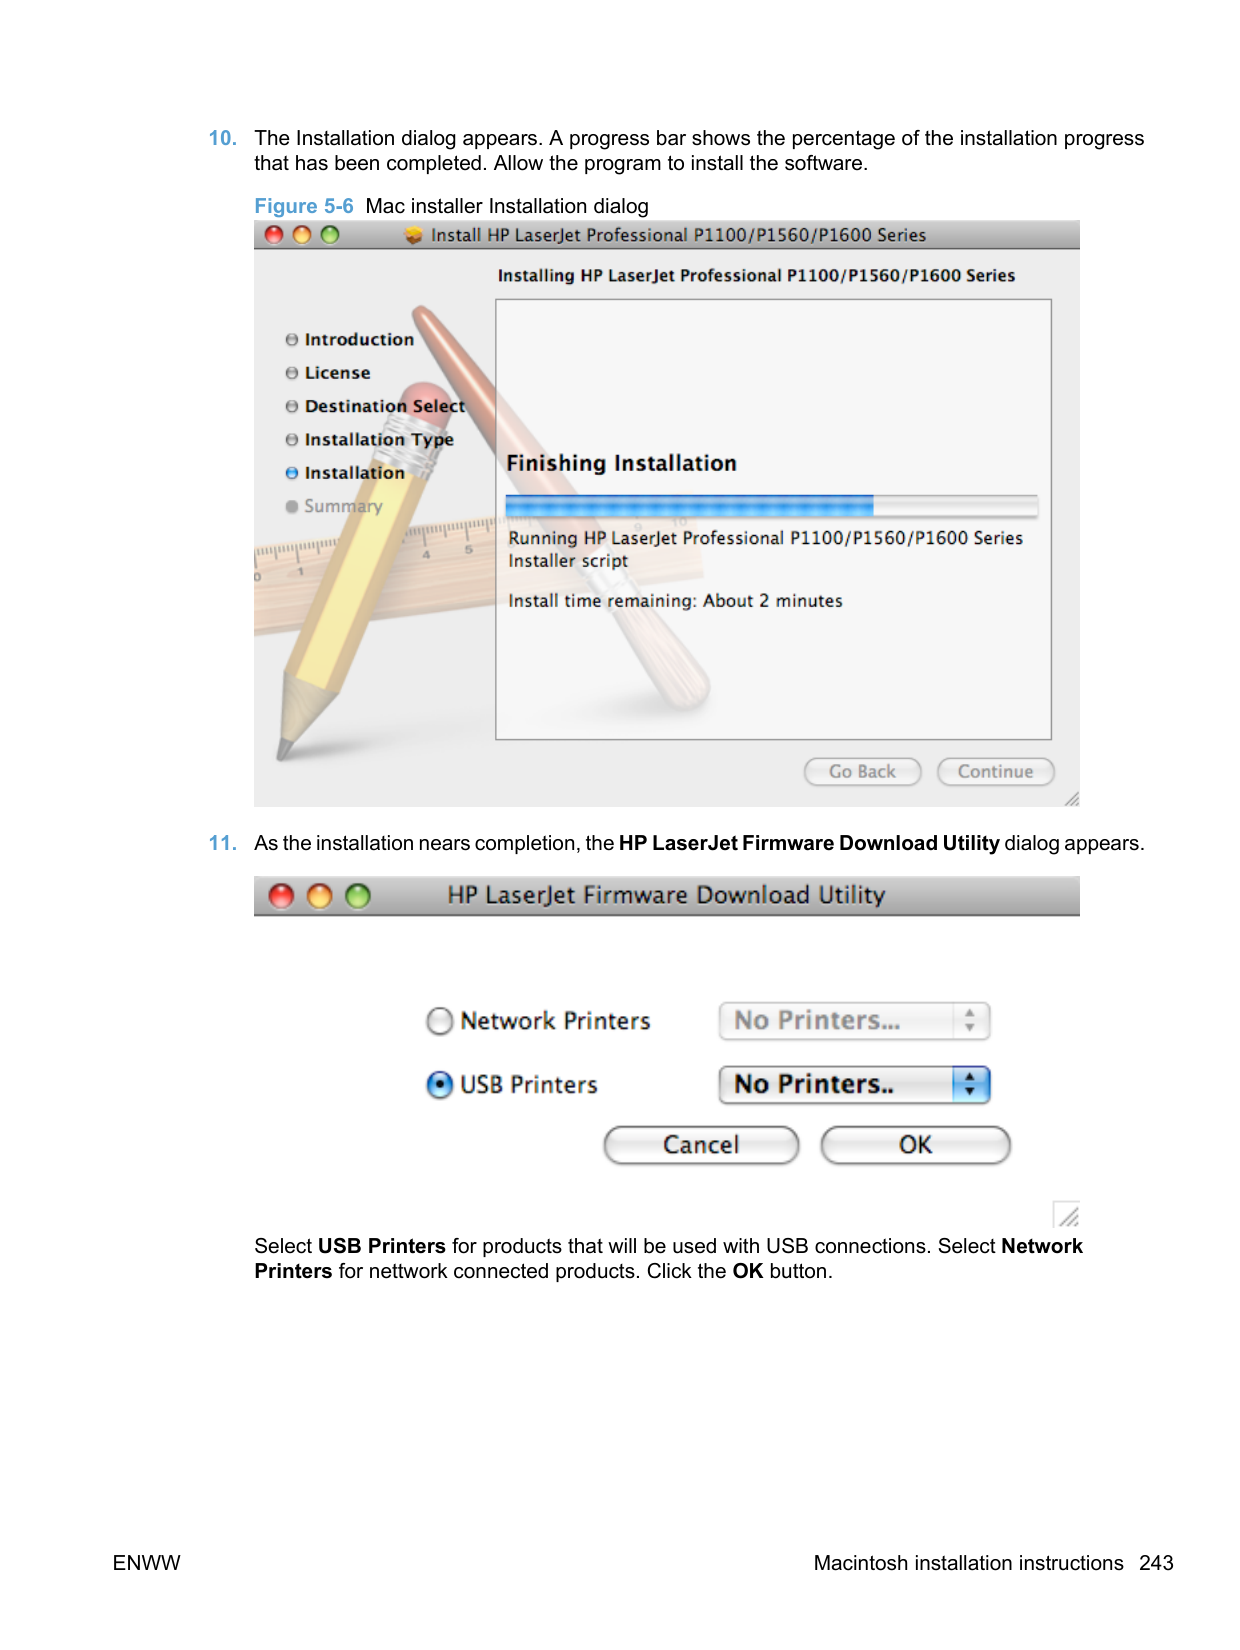
########### Table 6-3 Supported paper and print media sizesSize Dimensions Input tray Document feeder
Letter 216 x 279 mm (8.5 x 11 in)
Legal 216 x 356 mm (8.5 x 14 in)
Executive 184 x 267 mm (7.25 x 10.5 in)
8.5 x 13 216 x 330 mm (8.5 x 13 in)
16k 195 x 270 mm (7.68 x 10.62 in) 184 x 260 mm (7.24 x 10.23 in) 195 x 270 mm (7.68 x 10.62 in) 197 x 273 mm (7.75 x 10.75 in)
B5 (JIS) 182 x 257 mm (7.17 x 10.12 in)
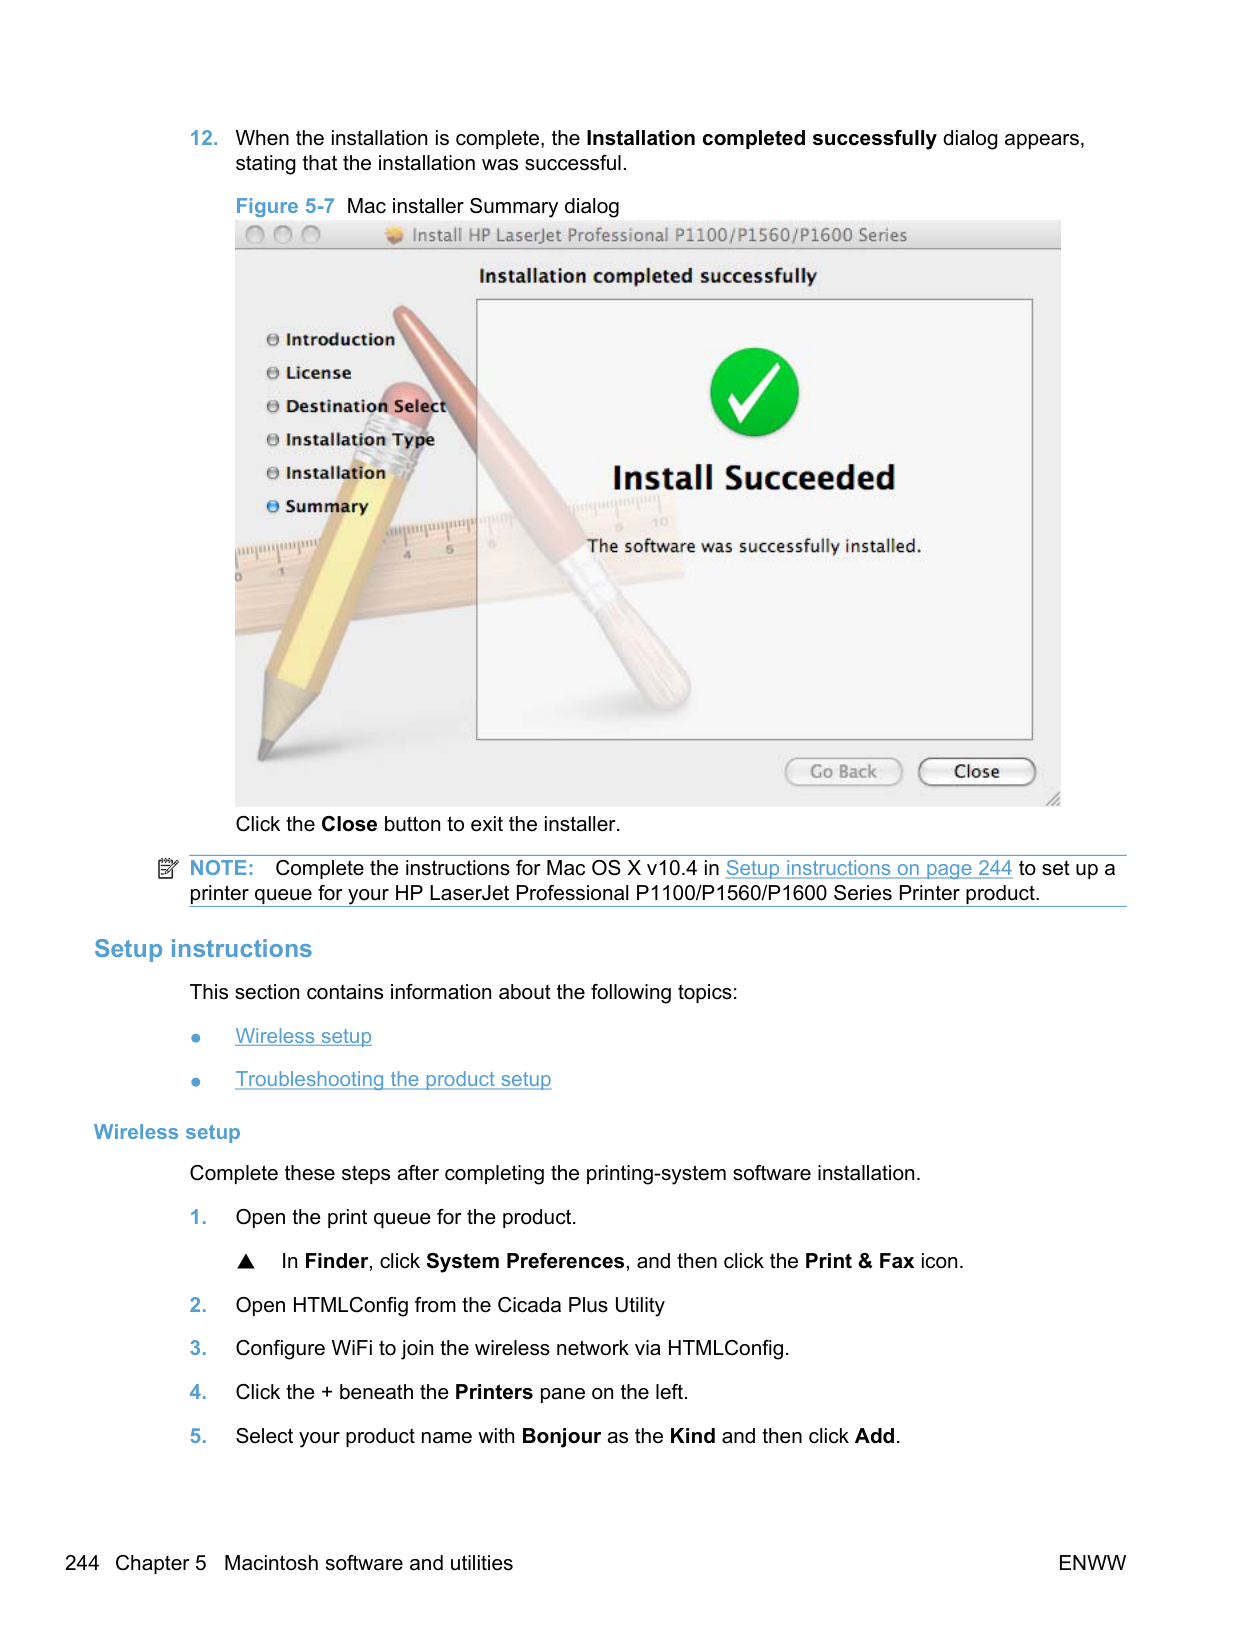
Custom Minimum: 76 x 127 mm (3 x 5 in) Maximum: 216 x 356 mm (8.5 x 14.0 in)
Minimum: 147 x 211 mm (5.8 x 8.3 in)
Maximum: 216 x 356 mm (8.5 x 14.0 in)
########### Table 6-4 Supported envelopes and postcardsSize Dimensions Input tray
Japanese Postcard 100 x 148 mm (3.94 x 5.83 in)
Double Japan Postcard Rotated
148 x 200 mm (5.83 x 7.87 in)
Envelope #10 105 x 241 mm (4.13 x 9.49 in)
Envelope Monarch 98 x 191 mm (3.9 x 7.5 in)

Envelope DL 110 x 220 mm (4.33 x 8.66 in)
##### Driver-supported paper types
The following table shows the paper types that the HP LaserJet Professional P1100/P1560/P1600 Series Printer print-drivers support.
Input tray The input tray supports the following paper types:

Document feeder The document feeder supports paper types that are within the following weight range:
● 60-90 g/m2 (16-24 lb bond)
| | |---|
NOTE: For a complete list of specific HP-brand paper that this product supports, go to www.hp.com/ sbso/product/supplies.

##### Custom paper sizes
The following table shows custom paper sizes that are available for the HP LaserJet Professional P1100/ P1560/P1600 Series Printer product.
Table 6-5 HP PCL 5 print driver custom paper sizes
Tray Dimensions Minimum Maximum
Tray 1 (150-sheet multipurpose)
Width 98.4 mm (3.9 in) 216 mm (8.5 in) Length 148 mm (5.8 in) 356 mm (14.0 in)
##### Paper-type commands (HP LaserJet Professional P1600 Series Printer only)
The PCL 5 print driver escape sequence for paper type is "Esc&n#Wdpapertype", where "n#" is the number of characters in the paper type plus 1. For example, in the sequence "Esc&n6WdPlain", "Plain" has 5 letters plus 1, for a total of 6.
Table 6-6 paper-type commands
Esc& n# Wd Paper type
Esc& 7 Wd Labels
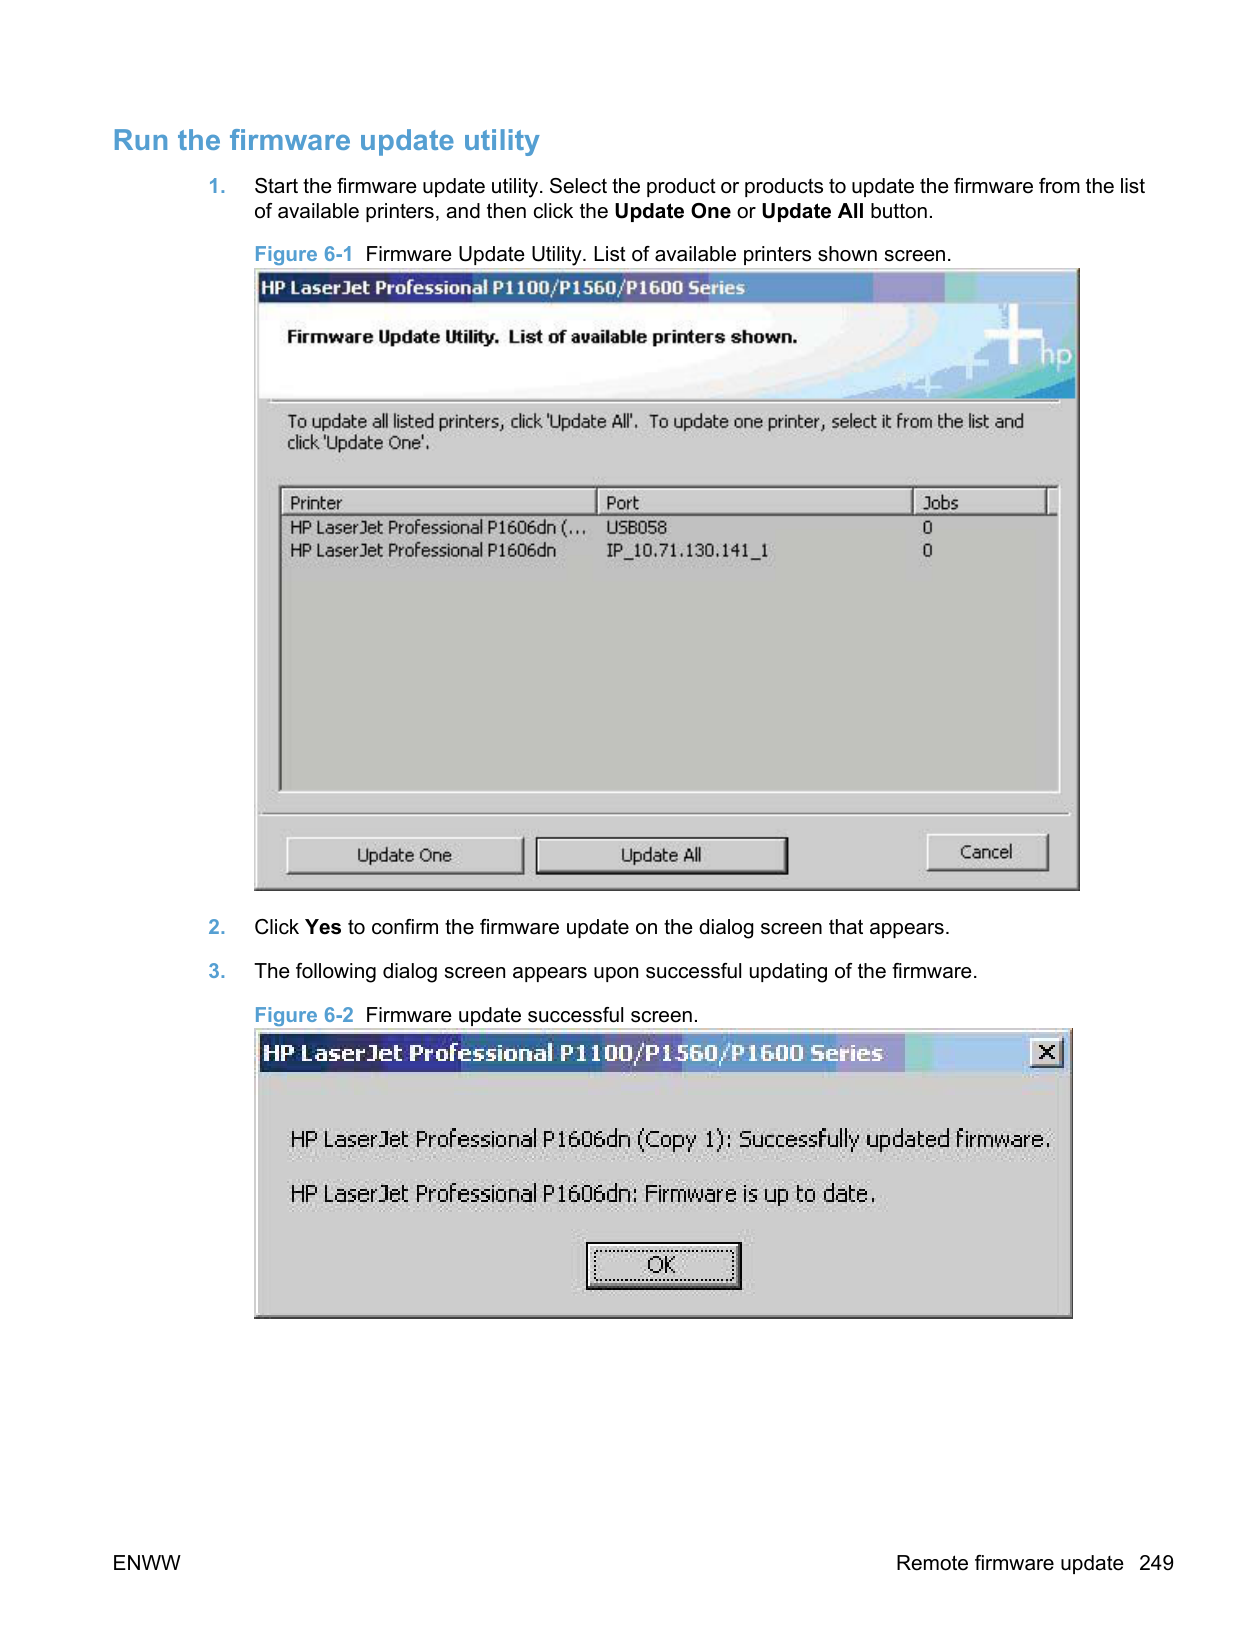
#### Supported routers for wireless products that support automatic configuration.
| | |---|
NOTE: Other wireless routers that do not support automatic configuration or provide a secure wireless environment maybe supported for this product but are not listed here.
Wireless versions of this product support the following routers.
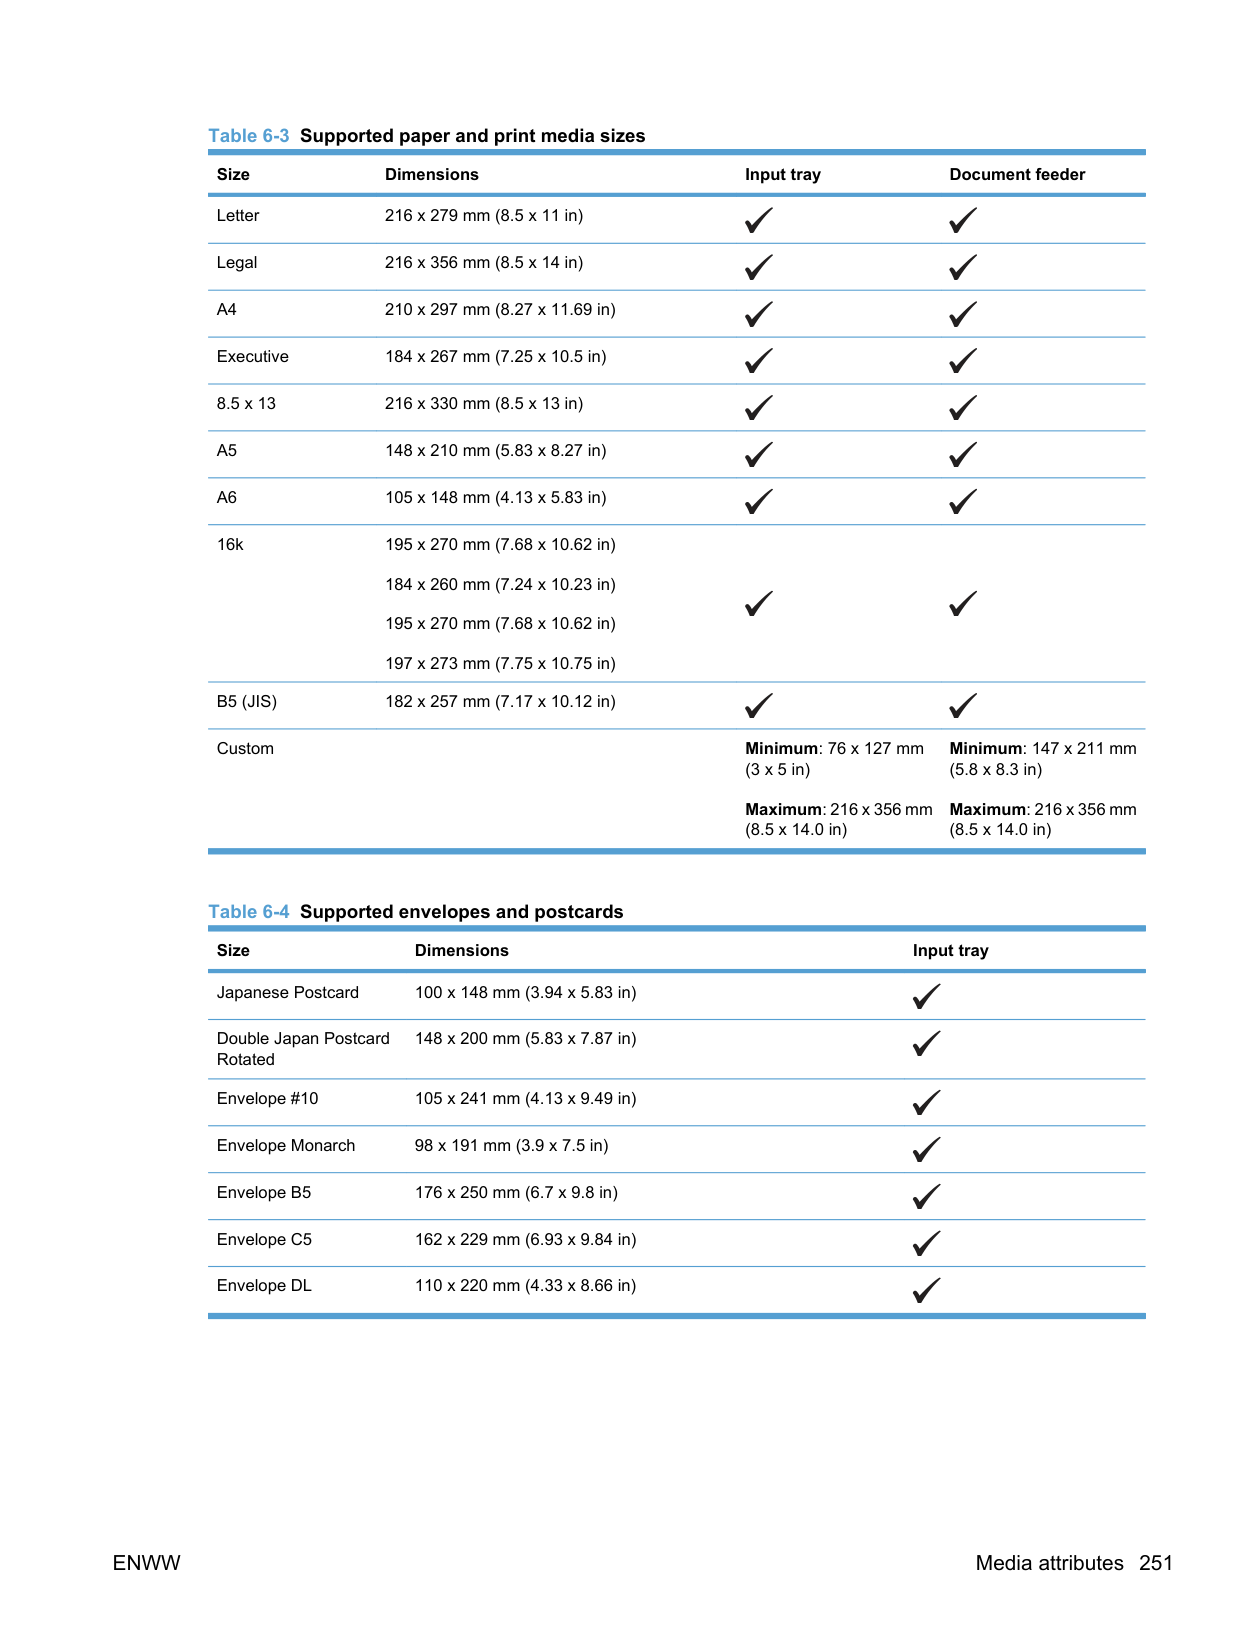
######### ● Netgear
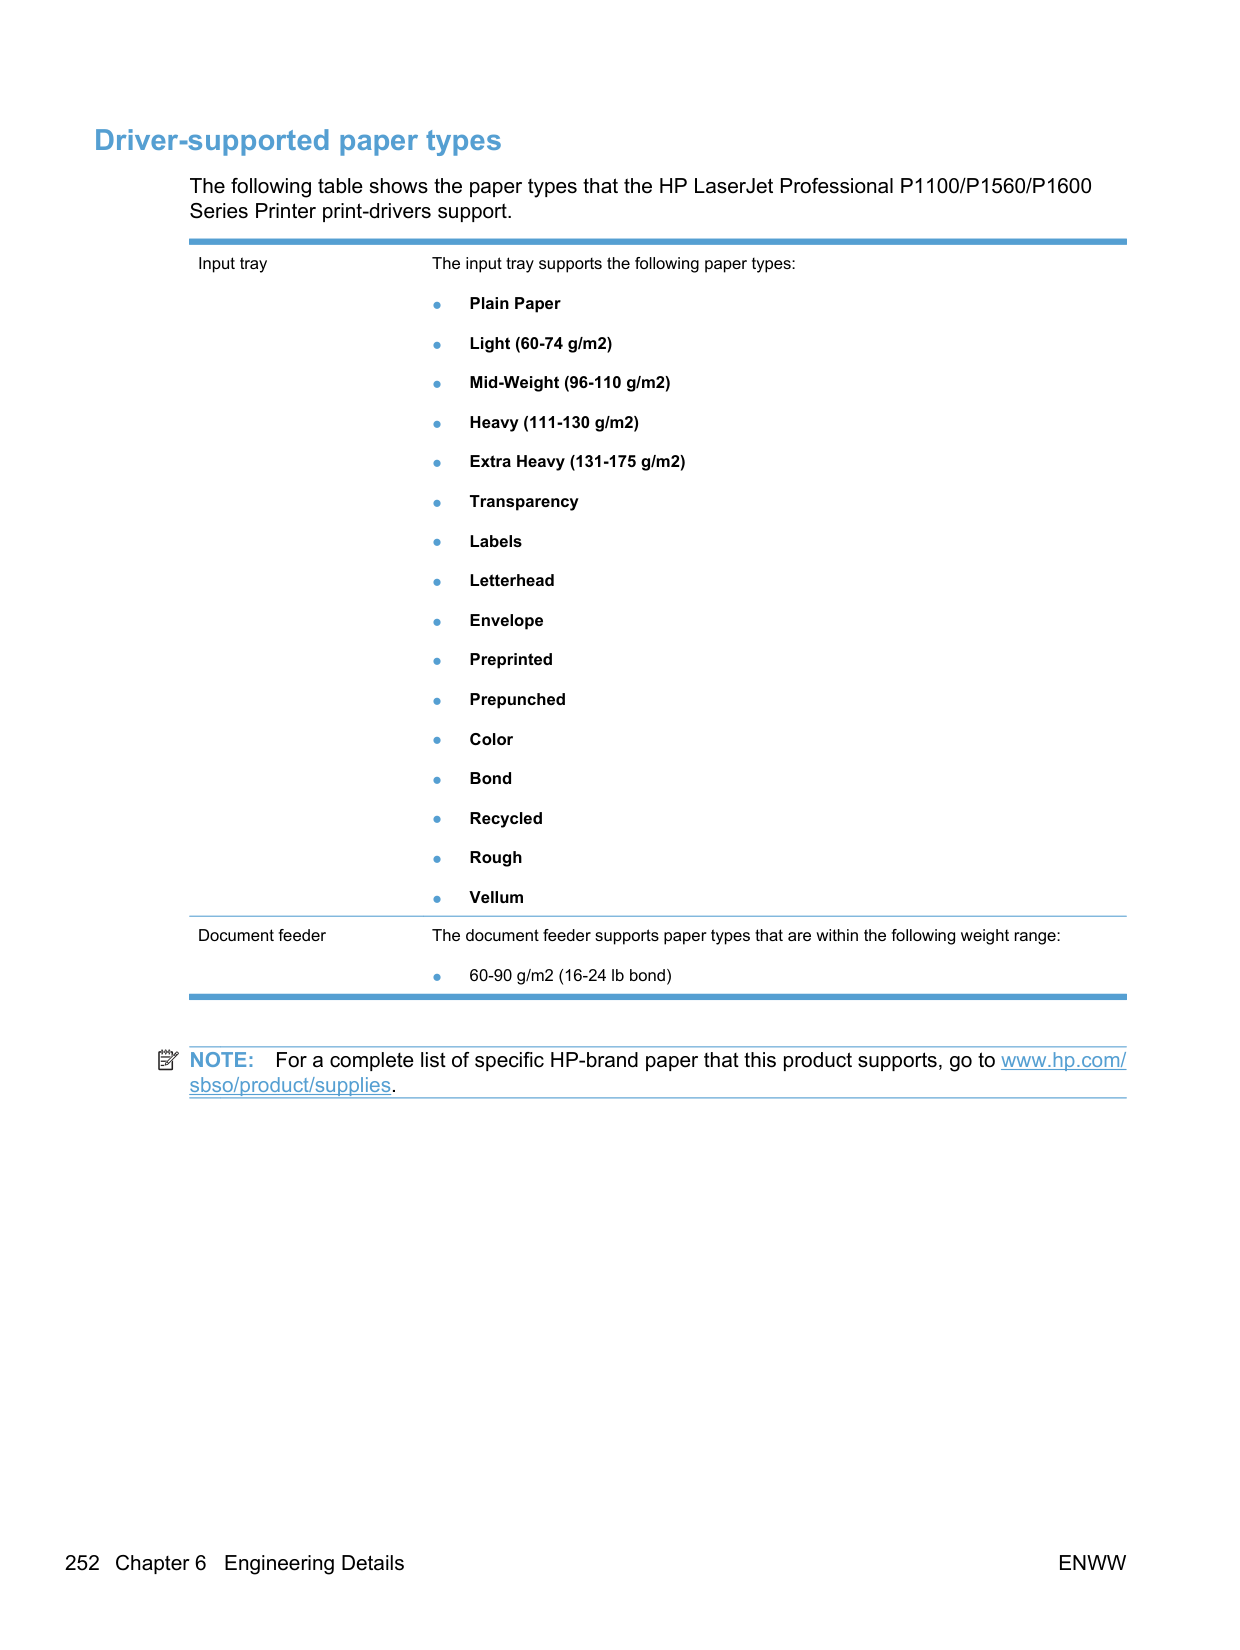
######### ● Huawei
◦ Huawei WBR204g
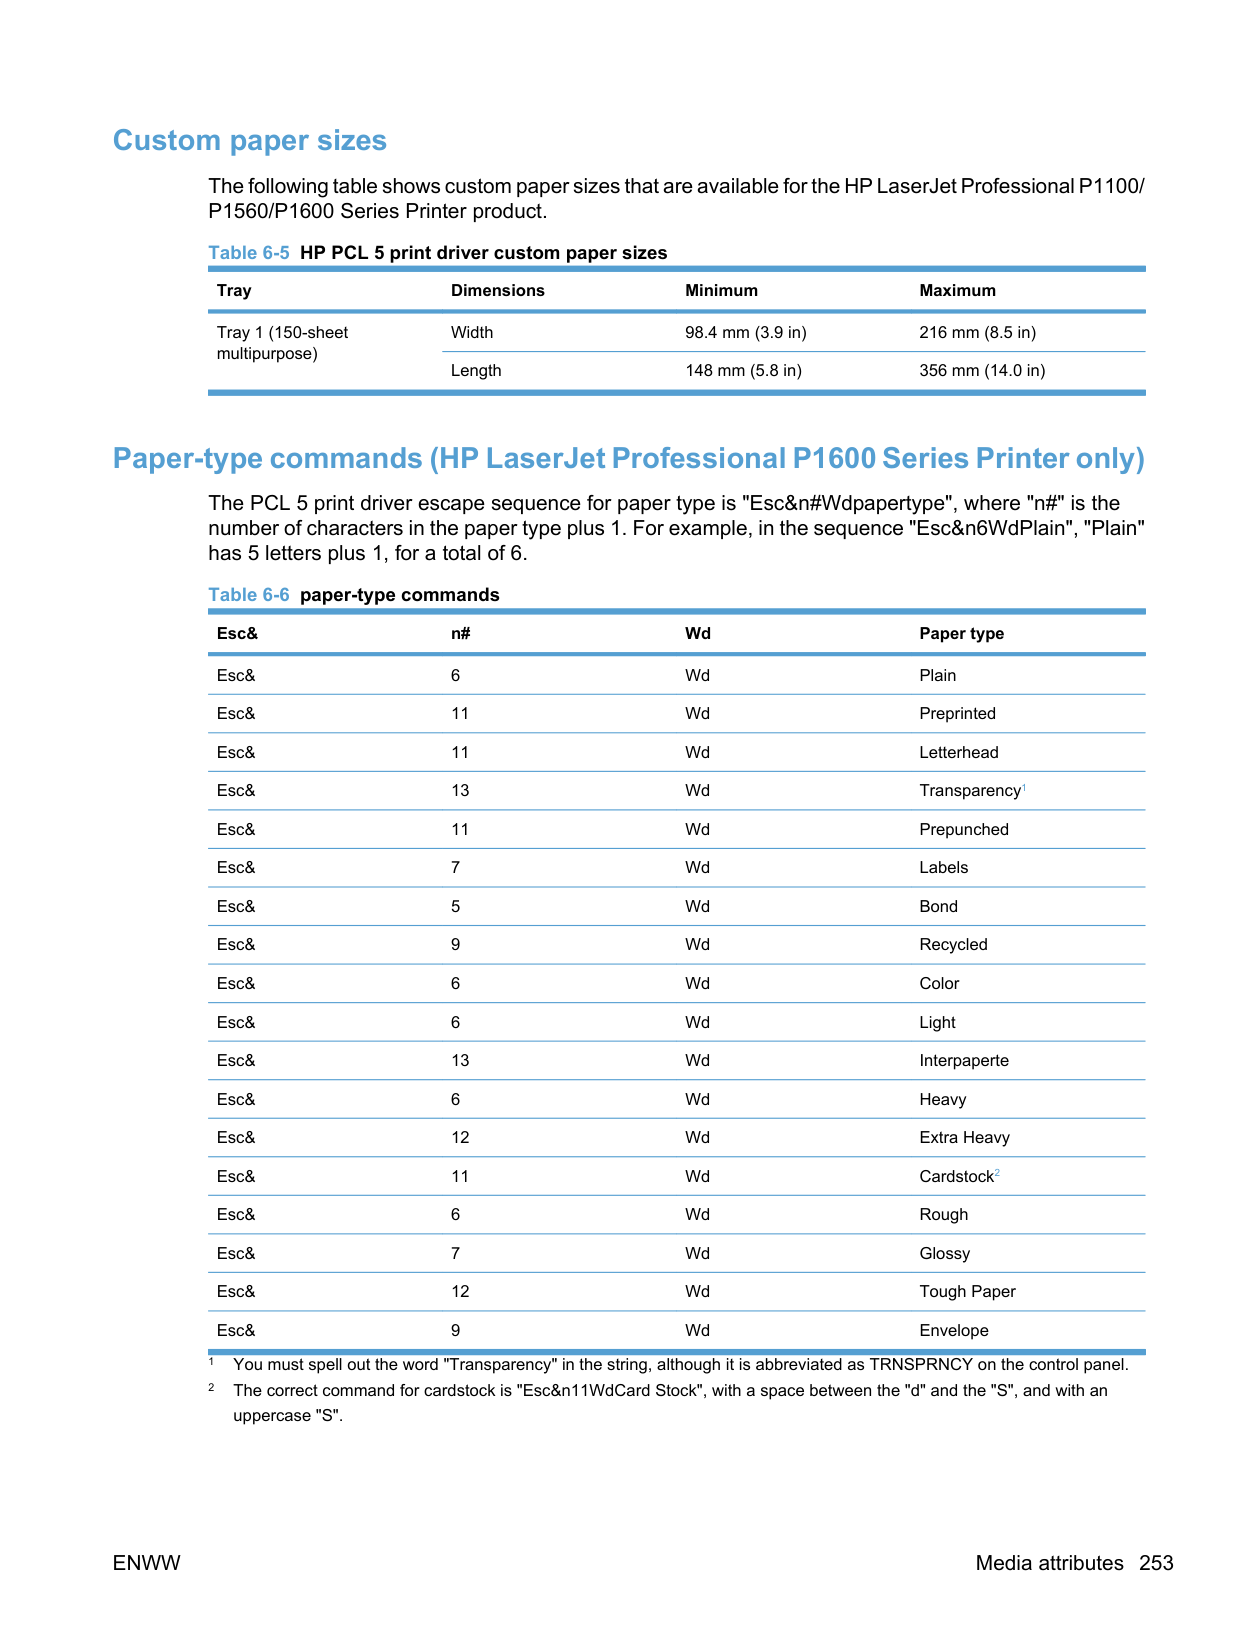
######### ● Adtran
◦ Adtran NetVanta 150
######### ● Belkin

######### ● Linksys
######### ● TRENDnet
######### ● SMC Networks
######### ● Motorola
######### ● Dell
◦ Dell 2300 ◦ Dell 2350 ◦ Dell 4350
######### ● Asus
######### ● Kyocera
Index

viewing documentation 23 ADA (Americans with Disabilities
Act) compliance 34 Add Printer installation 49 Add Printer Wizard, detailed install
existing port for a direct
connection, using 51 print server connection 50 TCP/IP port for direction
connection, creating 51 Adobe Acrobat Reader
viewing documentation 23 Americans with Disabilities Act
(ADA) compliance 34 autorun CD-ROM, Windows 42, 48
dialog boxes 195 Basic Installation
choosing 42 bin, output
features 5 booklet printing Booklet Printing settings 225
dialog boxes 195 cardstock, paper type
commands 253
Macintosh 238 Install 48
install Windows printing-system
software from 48 languages, CD 19 Macintosh printing-system
software installation 238 User CD 19 Windows installation from 24
CD-ROM installer, Windows printingsystem software 41
components, software Macintosh 17, 236 Windows 17
configuration page
Macintosh 17 constraint messages
print drivers 202 control panel
settings 40
D default printer, setting 196 diagnostics
troubleshoot 228 dialog boxes, printing-system
software installation Mac OS X 238 directory structure
Admin CD 19 directory structure, software CD Macintosh 238
disk space requirements Macintosh 236 Windows 38, 46
documentation User Guide 34 viewing 23 dots per inch (dpi)
specifications 5
download
firmware 248 downloading
printing-system software 18 dpi (dots per inch)
specifications 5
drivers Add Printer installation 49 changing settings (Mac) 236 quick sets (Windows) 203,
206, 213, 220 settings 40
drivers, install HP Privacy Policy 111, 117, 126, 142, 160, 169 license agreement 111, 117, 126, 142, 160, 169
recommended software 111, 117, 126, 142, 160, 169
commands 253
escape sequences paper source 250 paper type 253
determine current level 248 download firmware update
utility 248
update remotely 248 firmware updates
downloading 248 fonts
Macintosh 237 Full Installation

choosing 42
commands 253 Help
print drivers 202 help
Macintosh 237 Help button, Windows installation dialog boxes 195
HP Embedded Web Server Macintosh support 237
HP EWS (wireless models only) about 44 HP Host-based Print Driver
features 199 settings 199
HP LaserJet Utility, Macintosh about 17 Configuration Settings list 17 open 17
HP PCL 5 Universal Print Driver about 15 See also printer drivers

HP PostScript Universal Print Driver about 15 See also printer drivers
HP Smart Install 109, 115, 124 HTML files, viewing 23
messages. See constraint messages
input tray
features 5 input trays. See trays installation
Add Printer 49 dialog boxes, Mac OS X 238 HP Smart Install 109, 115,
124 Macintosh printing-system
software 238 options 47 system requirements for
Macintosh 236 system requirements for
Windows 38, 46 troubleshooting
Macintosh 245
Windows CD-ROM 24 Windows printing-system
software 46, 47 installers
Windows 41, 48 interface ports
types included 5
L languages
CD 19
M Mac
driver settings 236
Macintosh hardware requirements 236 software components 236 supported operating
systems 236
Macintosh operating systems HP LaserJet Utility 17 support 14 supported versions 16
Macintosh OS
dialog boxes, Mac OS X printingsystem software installation 238
directory structure, software
CD 238 fonts supported 237 HP EWS 237 install notes 237 network setup 238 online help 237 PDEs 237 printing-system software
installation 238
troubleshooting setup 245 manuals. See documentation memory
installation requirements for Windows operating systems 38, 46
Macintosh requirements 236 messages
constraint, print drivers 202 Microsoft Windows. See Windows
operating systems model number 11
Macintosh setup 238
availability of software
components 17 supported 14, 38, 39 supported for Macintosh 16
operating systems Windows,
supported 15 output bin
features 5
custom sizes 253, ix duplex binding settings, print
drivers 225 orientation 227 settings, print drivers 207 source commands 250 sources and destinations 250 type commands 253 types and sizes
supported 250 paper input tray
features 5 paper output bin features 5
PDEs (Printer Dialog Extensions) 237 PDF files
viewing 23 ports
types included 5 PPDs, Macintosh
troubleshooting 245
print drivers custom paper sizes 253 Macintosh 236 paper source commands 250 paper supported 250 paper type commands 253
print on both sides
manually 222 print quality
specifications 5
Printer Dialog Extensions (PDEs) 237
printer drivers Advanced tab content 203 Advanced tab contents 203 Booklet Printing settings,
Finishing tab 225 Copies settings, Advanced tab 204 Document Options settings, Finishing tab 221 document preview image 204,
211, 215, 227 Effects tab content 213 Finishing tab contents 220 Flip Pages Up setting, Finishing
tab 225 gain access to settings 200 Help system 202 incompatible print settings
messages 202 Internet Services options, Services tab 228 Orientation settings, Finishing tab 227 Page Order settings, Finishing tab 226 Pages per Sheet setting, Finishing tab 225, 226 Paper Options settings, Paper/ Quality tab 207 Paper source setting, Paper/
Paper type setting, Paper/
Paper/Quality tab contents 206
print information pages, Services tab 229 Print on Both Sides settings,
Finishing tab 221 Printer features content 204 Printing Preferences tab, driver
Properties tab, driver
Resizing Options settings,
Effects tab 214 Services tab content 228 settings 40
supported for Windows 15,
39 universal 15 version numbers for
Windows 43 Watermarks settings, Effects tab 216
What's this? Help 202 See also HP PostScript
Universal Print Driver; HP PCL 5 Universal Print Driver
printer drivers (Mac)
changing settings 236 printer, setting default 196 Printing Preferences
driver tabs 200 printing-system software
installation, Macintosh 238 printing-system software,
HP Privacy Policy HP Privacy Policy 111, 117, 126, 142, 160, 169 printing-system software, install license agreement 111, 117,
126, 142, 160, 169 printing-system software,
recommended
recommended software 111, 117, 126, 142, 160, 169 priority, settings 40 product
view 7 Properties driver tabs gain access to 201
specifications 5 quick sets 203, 206, 213, 220
about 248 determine current firmware
level 248 resolution
specifications 5
documentation 34
serial number 11 settings
drivers 40 drivers (Mac) 236 priority 40
software availability of components 17 embedded Web server 16 HP Embedded Web
Server 44 HP LaserJet Utility 17 settings 40 supported operating
systems 38 supported Windows operating
systems 15 Windows 38
specifications
device features 5 status
HP Printer Utility,
Macintosh 17 supplies
status, viewing with HP LaserJet Utility 17
supported operating systems 14 utilities for Macintosh 17
system requirements Windows 38, 46
commands 253 tray
features 5
trays included 250 paper source commands 250 paper type commands 253
troubleshooting diagnostics 228 Macintosh setup 245
products 197 universal print drivers 15
See also HP PCL 5 Universal Print Driver; HP PostScript Universal Print Driver
updating firmware remotely. See
remote firmware update USB port
type included 5 User Guide 34
drivers 43
view HP Privacy Policy 111, 117, 126, 142, 160, 169
view recommended software 111, 117, 126, 142, 160, 169
view software license agreement 111, 117, 126, 142, 160, 169
view, product 7
settings 216
Web sites downloading software 18 firmware update utility 248 Internet Services options,
Services tab 228
universal print drivers 15 Windows
driver settings 40
Windows operating systems Add Printer installation 49 CD for 24 CD-ROM, print system 41, 48 default printer, setting 196 documentation 23 driver versions 43 drivers supported 15 HP Host-based Print Driver
features 199 installation options 47 installation overview 48 installing printing-system 46 support 14 supported 46 supported versions 38
system requirements 38, 46 universal print drivers 15
############ © 2010 Hewlett-Packard Development Company, L.P. www.hp.com
