Ask AI
— answers from the official manualAnswers from the official manual.
Common questions
Common Questions
9 totalHow do I change maintenance settings on the front panel?
Press Setup > Front Panel Options from the home screen. Navigate through options like sleep mode wait time, display brightness, and speaker volume using the touch screen.
How do I check print job status on the embedded web server?
From any internet browser, enter the printer’s IP address in the address bar. Navigate to Main > History tab for a list of recent printing jobs and details including ink usage data.
How do I load a substrate into the printer?
Insert one end of the substrate roll into the spindle lock lever; place the other end on the pinch roller behind the printhead carriage, then insert another support from across the back of the printing surface.
What is the setup process for loading ink cartridges?
Ensure the printer is turned off. Open the ink cartridge access doors located on either side of the printhead compartment, grasp each ink cartridge by its handle and pull it out straight away from the printer. Insert new ink cartridges according to alignment marks, then press each one down until you hear a click.
What do error codes E50 and E60 mean?
Error code E50 indicates a problem with substrate loading or misalignment. Error code E60 indicates improper substrate width settings leading to an overhang condition.
How do I set up the printer with RIP software?
Follow setup instructions provided by your RIP software provider. Typically involves installing the software on a separate computer and configuring it for network connection to the HP Latex.
Full Manual
192 pages


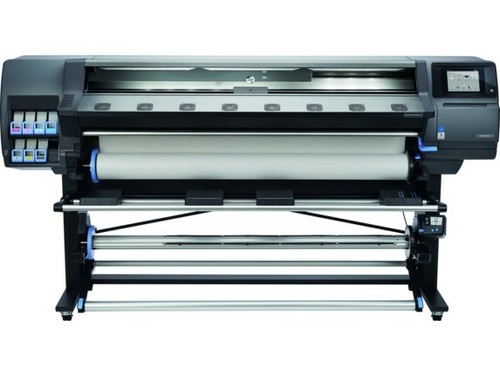
HP Latex 300 Printer Series
User Guide
Edition 5 © 2016–2020 HP Development Company, L.P.
######### Legal notices
The information contained herein is subject to change without notice.
The only warranties for HP products and services are set forth in the express warranty statements accompanying such products and services. Nothing herein should be construed as constituting an additional warranty. HP shall not be liable for technical or editorial errors or omissions contained herein.
######### Trademarks
Microsoft® and Windows® are U.S. registered trademarks of Microsoft Corporation.
Table of contents
ENWW iii
Bypass job start safety .......................................................................................................................................................... 80 Store the substrate ................................................................................................................................................................ 80 Substrate cannot be loaded successfully ........................................................................................................................... 80 Substrate is mispositioned ................................................................................................................................................... 81 Substrate has jammed .......................................................................................................................................................... 81 Substrate is deformed or wrinkled ...................................................................................................................................... 84 Substrate has shrunk or expanded ..................................................................................................................................... 84 Substrate has bow deformation .......................................................................................................................................... 85 Substrate is sticky and causes smears and crashes ........................................................................................................ 86 Automatic cutter does not work .......................................................................................................................................... 86 Take-up reel substrate jam ................................................................................................................................................... 86 Take-up reel does not wind .................................................................................................................................................. 86

ENWW v
Environmental specifications ............................................................................................................................................. 176 Acoustic specifications ........................................................................................................................................................ 177
Appendix A Summary of common printing problems ....................................................................................................................... 178
Glossary ..................................................................................................................................................................................................... 181
Index ........................................................................................................................................................................................................... 184
1 Introduction
ENWW 1
Welcome to your printer
Your printer is a color inkjet printer designed for printing high-quality images on flexible substrates. Some major features of the printer are shown below:
To send print jobs to your printer, you will need Raster Image Processor (RIP) software, which should be run on a separate computer. RIP software is available from various different companies.
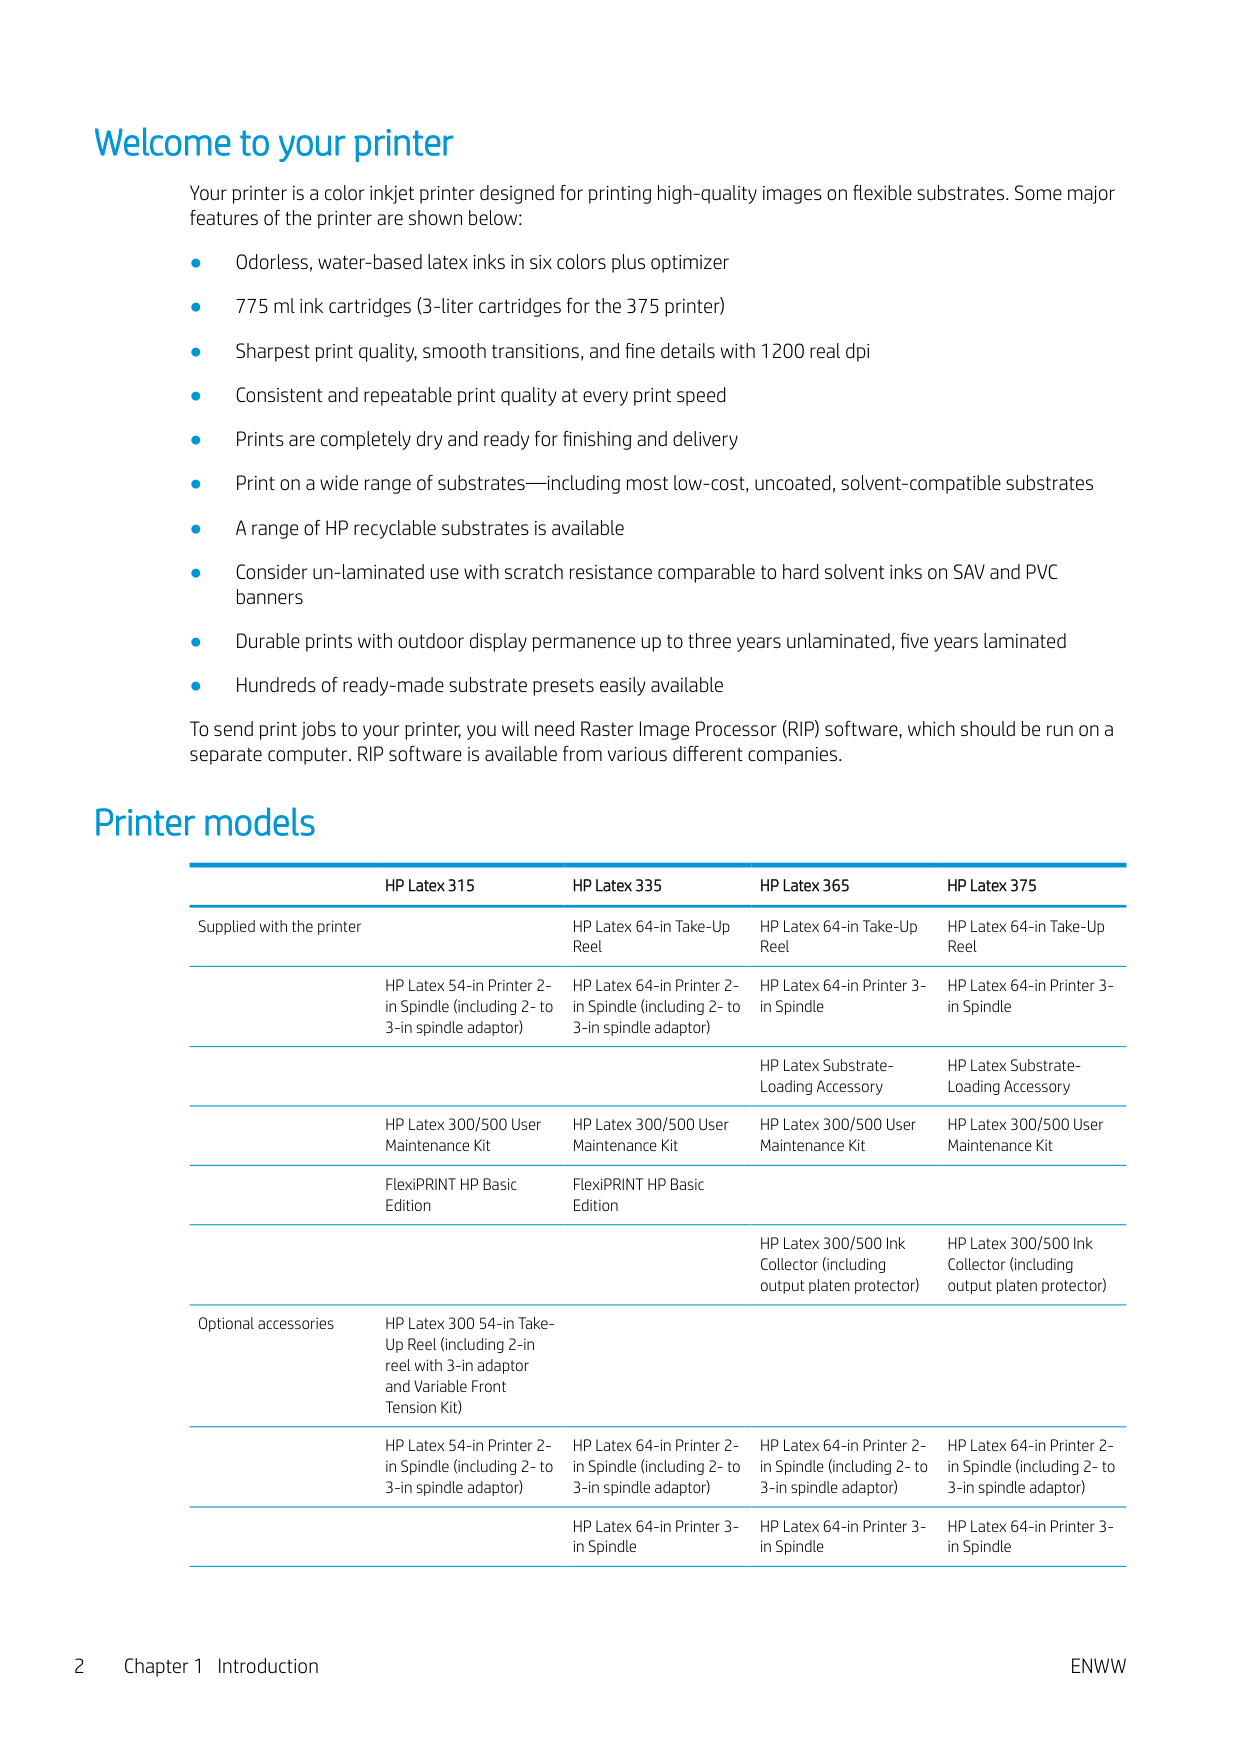
Printer models
######### HP Latex 315 HP Latex 335 HP Latex 365 HP Latex 375 Supplied with the printer HP Latex 64-in Take-Up
HP Latex 64-in Take-Up Reel
HP Latex 64-in Take-Up Reel
Reel
HP Latex 54-in Printer 2in Spindle (including 2- to 3-in spindle adaptor)
HP Latex 64-in Printer 2in Spindle (including 2- to 3-in spindle adaptor)
HP Latex 64-in Printer 3in Spindle
HP Latex 64-in Printer 3in Spindle
HP Latex SubstrateLoading Accessory
HP Latex SubstrateLoading Accessory
HP Latex 300/500 User Maintenance Kit
HP Latex 300/500 User Maintenance Kit
HP Latex 300/500 User Maintenance Kit
HP Latex 300/500 User Maintenance Kit
FlexiPRINT HP Basic Edition
FlexiPRINT HP Basic Edition
HP Latex 300/500 Ink Collector (including output platen protector)
HP Latex 300/500 Ink Collector (including output platen protector)
Optional accessories HP Latex 300 54-in TakeUp Reel (including 2-in reel with 3-in adaptor and Variable Front Tension Kit)
HP Latex 54-in Printer 2in Spindle (including 2- to 3-in spindle adaptor)
HP Latex 64-in Printer 2in Spindle (including 2- to 3-in spindle adaptor)
HP Latex 64-in Printer 2in Spindle (including 2- to 3-in spindle adaptor)
HP Latex 64-in Printer 3in Spindle
HP Latex 64-in Printer 3in Spindle
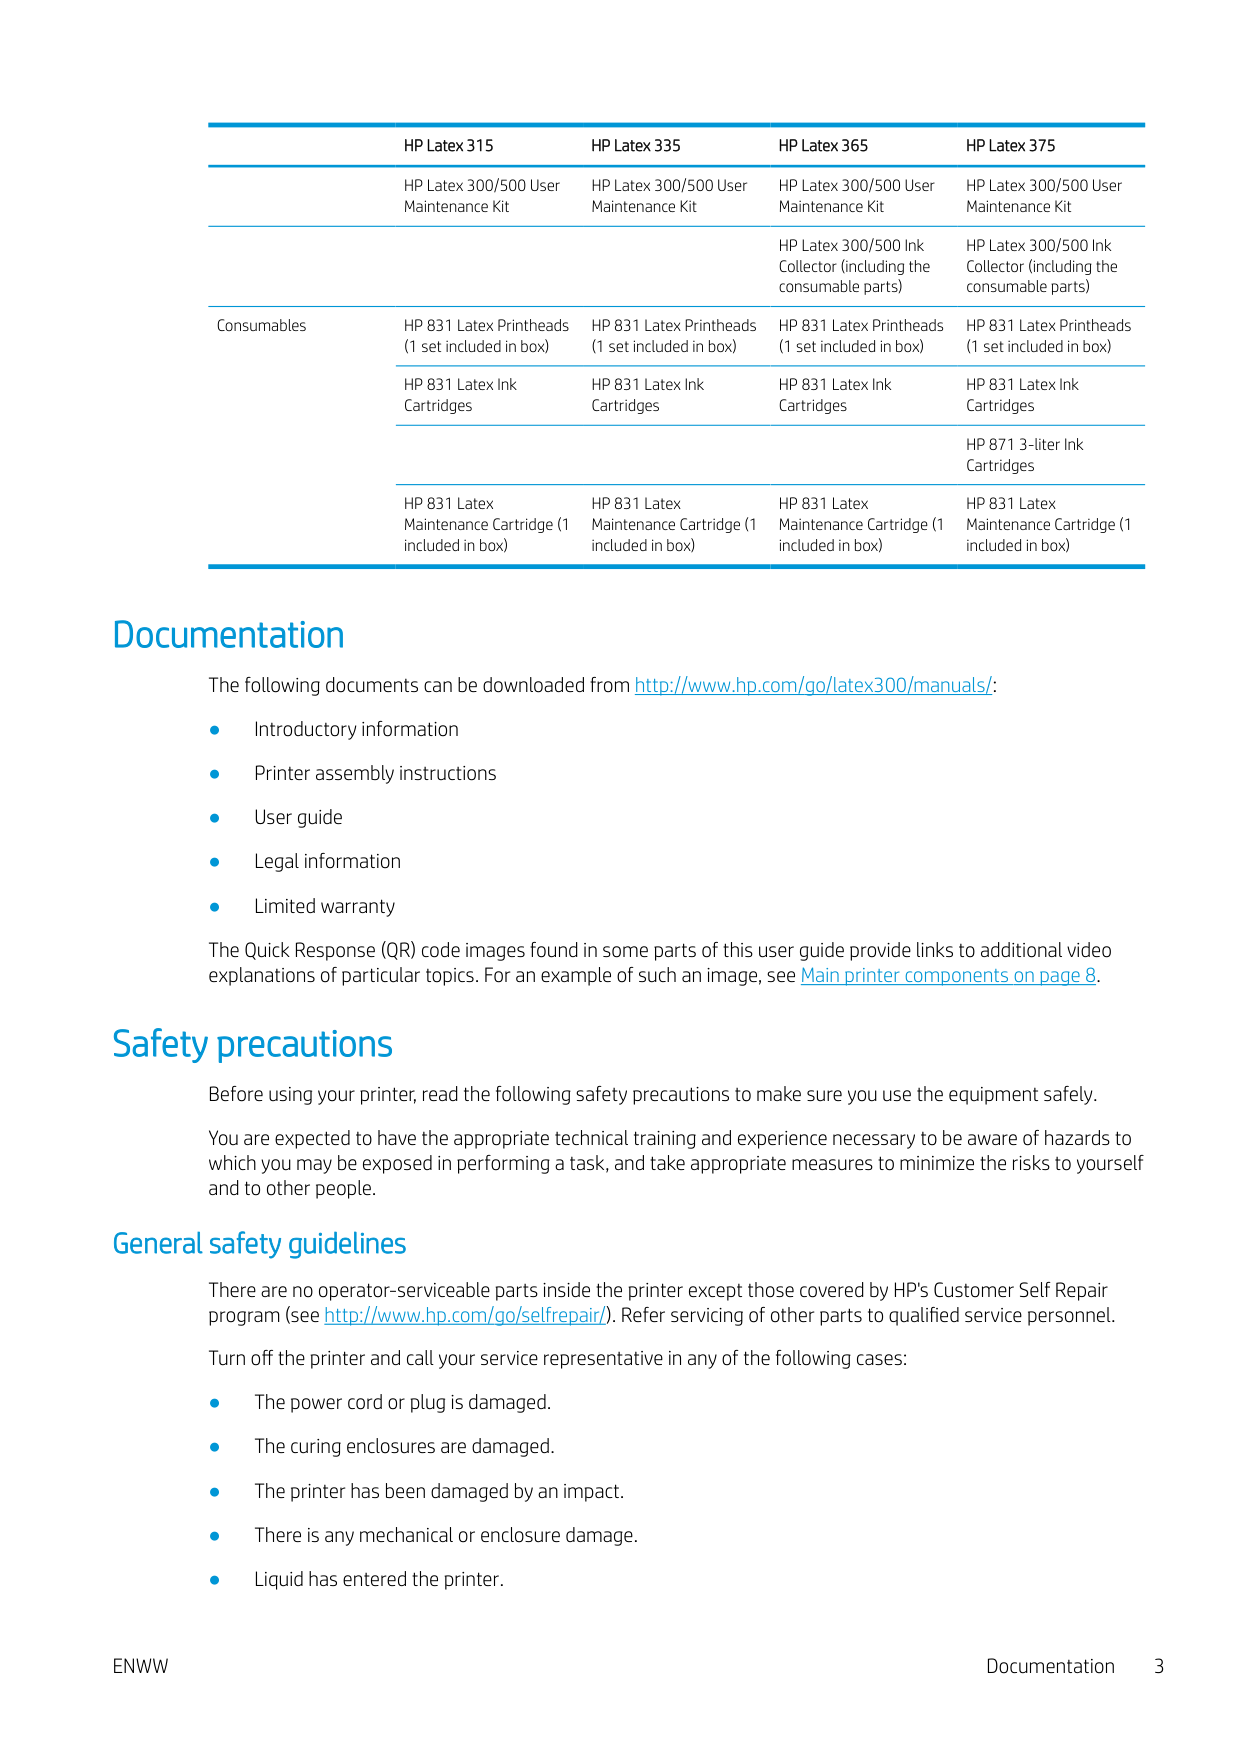
######### HP Latex 315 HP Latex 335 HP Latex 365 HP Latex 375

HP Latex 300/500 User Maintenance Kit
HP Latex 300/500 User Maintenance Kit
HP Latex 300/500 User Maintenance Kit
HP Latex 300/500 User Maintenance Kit
HP Latex 300/500 Ink Collector (including the consumable parts)
HP Latex 300/500 Ink Collector (including the consumable parts)
Consumables HP 831 Latex Printheads (1 set included in box)
HP 831 Latex Printheads (1 set included in box)
HP 831 Latex Printheads (1 set included in box)
HP 831 Latex Printheads (1 set included in box)
HP 831 Latex Ink Cartridges
HP 831 Latex Ink Cartridges
HP 831 Latex Ink Cartridges
HP 831 Latex Ink Cartridges
HP 871 3-liter Ink Cartridges

HP 831 Latex Maintenance Cartridge (1 included in box)
HP 831 Latex Maintenance Cartridge (1 included in box)
HP 831 Latex Maintenance Cartridge (1 included in box)
HP 831 Latex Maintenance Cartridge (1 included in box)
Documentation
The following documents can be downloaded from http://www.hp.com/go/latex300/manuals/:
The Quick Response (QR) code images found in some parts of this user guide provide links to additional video explanations of particular topics. For an example of such an image, see Main printer components on page 8.
Safety precautions Before using your printer, read the following safety precautions to make sure you use the equipment safely. You are expected to have the appropriate technical training and experience necessary to be aware of hazards to which you may be exposed in performing a task, and take appropriate measures to minimize the risks to yourself and to other people.
#### General safety guidelines
There are no operator-serviceable parts inside the printer except those covered by HP's Customer Self Repair program (see http://www.hp.com/go/selfrepair/). Refer servicing of other parts to qualified service personnel.
Turn off the printer and call your service representative in any of the following cases:
ENWW Documentation 3
Electrical shock hazard WARNING! The internal circuits of curing zones, output drier, print-zone heaters, and built-in power supplies operate at hazardous voltages capable of causing death or serious personal injury. The printer uses two power cords. Unplug both power cords before servicing the printer. To avoid the risk of electric shock:
#### Heat hazard
The curing subsystems of the printer operate at high temperatures and can cause burns if touched. To avoid personal injury, take the following precautions.
Fire hazard The curing subsystems of the printer operate at high temperatures. To avoid the risk of fire, take the following precautions.
| | |---|
NOTE: Test method based on EN ISO 6942:2002; Evaluation of materials and material assemblies when exposed to a source of radiant heat, method B. The test conditions, to determine the temperature when the substrate starts ignition (either flame or glow), were: Heat flux density 30 kW/m², copper calorimeter, K type thermocouple.
#### Mechanical hazard
The printer has moving parts that could cause injury. To avoid personal injury, take the following precautions when working close to the printer.
#### Light radiation hazard
Light radiation is emitted from the illumination of the print zone. This illumination is in compliance with the requirements of the exempt group of IEC 62471:2006, Photobiological safety of lamps and lamp systems. However, you are recommended not to look directly at the LEDs while they are on. Do not modify the module.
#### Chemical hazard
See the safety data sheets available at http://www.hp.com/go/msds to identify the chemical ingredients of your consumables. Sufficient ventilation should be provided to ensure that potential airborne exposure to these substances is adequately controlled. Consult your usual air-conditioning or EHS specialist for advice on the appropriate measures for your location. For more detailed information, see the “Ventilation” and “Air conditioning” sections of the site preparation guide, available from http://www.hp.com/go/latex300/manuals/.
#### Ventilation
Ensure that the room in which the system is installed meets local environmental, health, and safety (EHS) guidelines and regulations.
Adequate ventilation needs to be provided to ensure that potential exposure is adequately controlled. Consult the Safety Data Sheets available at http://www.hp.com/go/msds to identify chemical ingredients of your ink consumables. Levels of certain substances in your environment are dependent on workspace variables you control, such as room size, ventilation performance, and duration of equipment use. Consult your EHS specialist for advice on the appropriate measures for your location.
#### Air conditioning
In addition to fresh air ventilation, to avoid health hazards, consider maintaining workplace ambient levels by ensuring the climatic operating conditions specified in this document (see Environmental specifications on page 176) to avoid operator discomfort and equipment malfunction. Air conditioning in the work area should take into account that the equipment produces heat. Typically, the printer's power dissipation is:
#### Heavy substrate hazard
Special care must be taken to avoid personal injury when handling heavy substrates.

#### Ink handling
HP recommends that you wear gloves when handling ink system components.
#### Warnings and cautions
The following symbols are used in this manual to ensure the proper use of the printer and to prevent the printer from being damaged. Follow the instructions marked with these symbols.
WARNING! Failure to follow the guidelines marked with this symbol could result in serious personal injury or death.
CAUTION: Failure to follow the guidelines marked with this symbol could result in minor personal injury or damage to the printer.
#### Warning labels
######### Label Explanation
Printer label. To identify the printer’s power cord.

Curing label. To identify the curing power cord.

Electric shock hazard. Heating modules operate at hazardous voltages. Disconnect power source before servicing.

CAUTION: Double pole. Neutral fusing.
Equipment to be connected to earthed mains outlet only. Refer servicing to qualified service personnel. Disconnect all power cords before servicing. No operator serviceable parts inside the printer.
Before starting, read and follow the operating and safety instructions. Ensure that the input voltage is within the printer's rated voltage range. The printer requires up to two dedicated lines.
This label is located on the e-box.
Risk of burns. Do not touch the curing zone or the output platen of the printer: they could be hot.

This label is located on the front of the curing module.
Risk of trapped fingers. Do not touch moving gears. These labels are located at the rear of the printer, one on the substrate input gear and one on the take-up reel gear (335, 365, and 375 only).

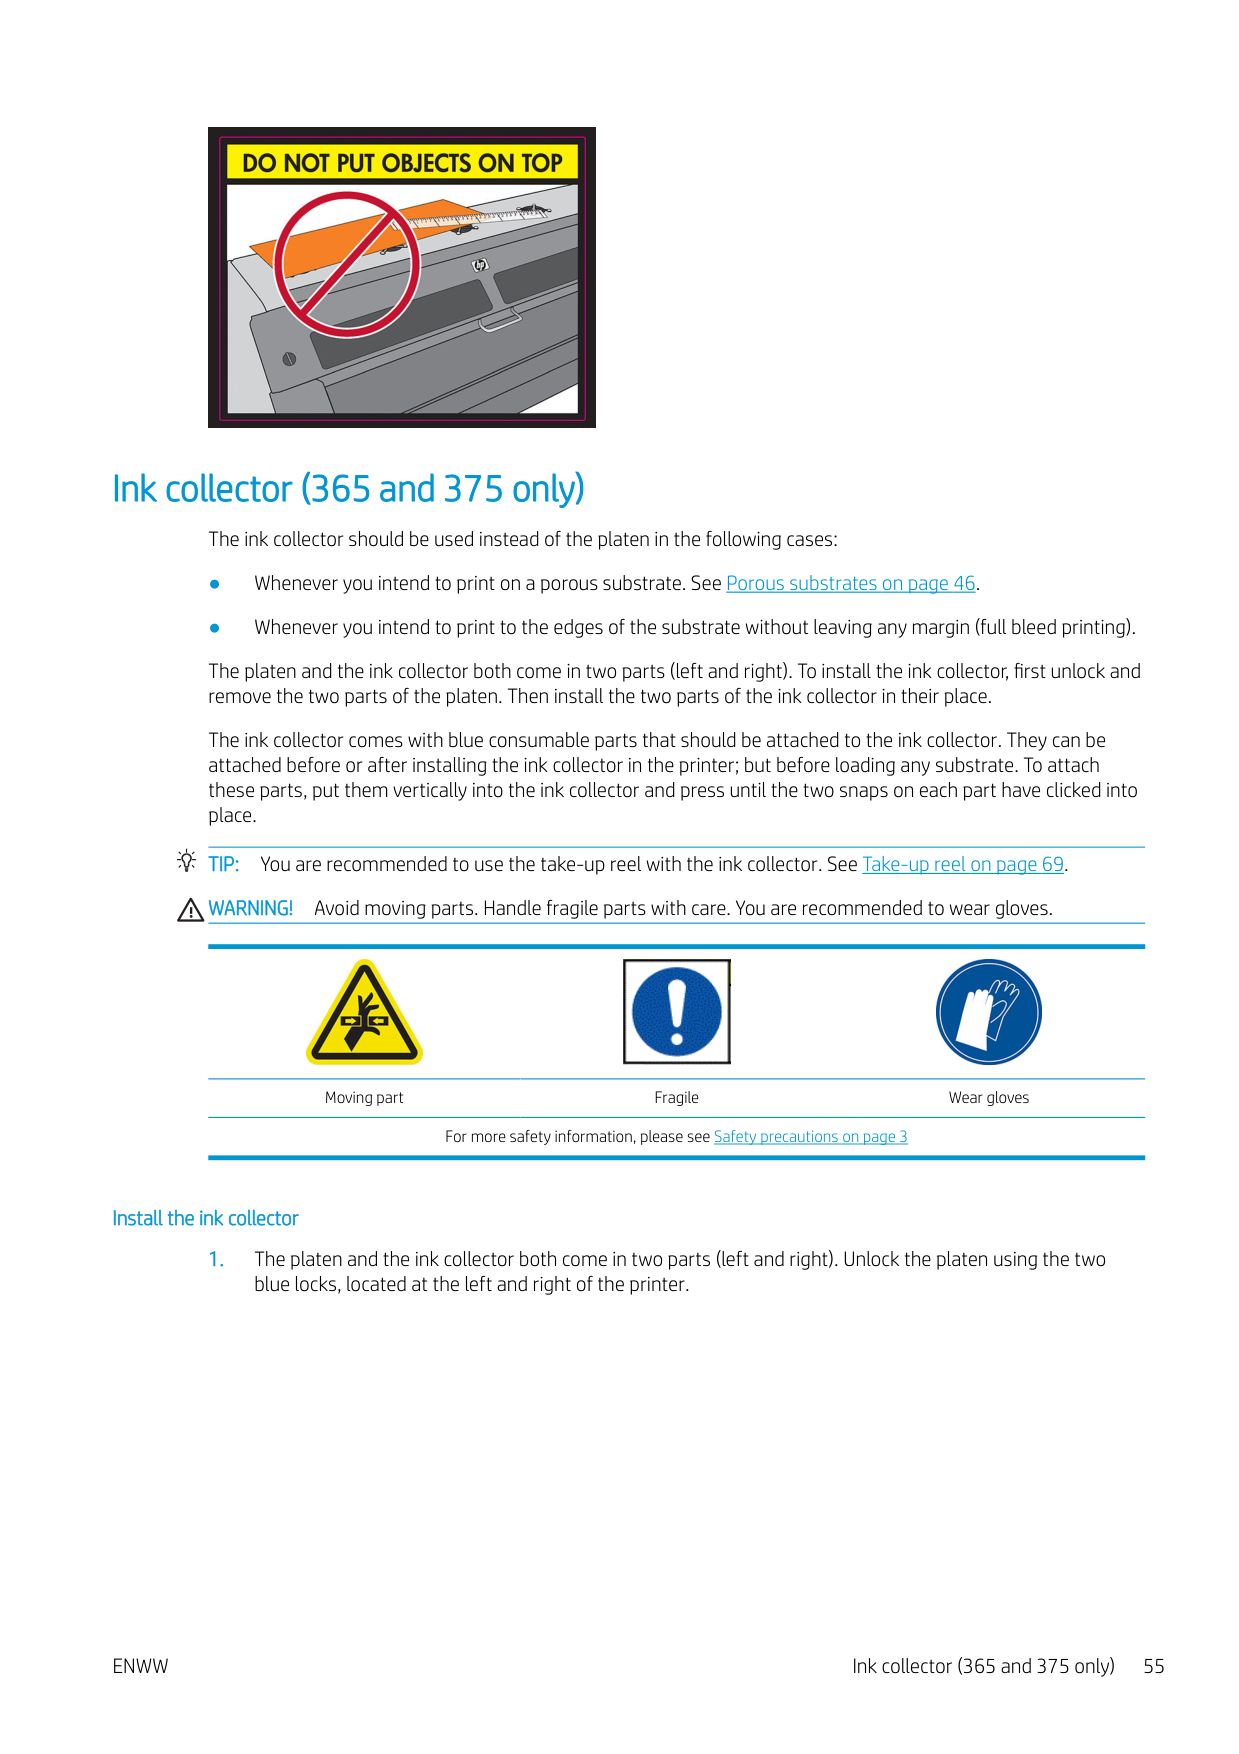
Moving part. Keep away from the moving printhead carriage. When printing, the printhead carriage travels back and forth across the substrate.

This label is located on the rear of the scan axis window, behind the plastic.
You are recommended to wear gloves when handling the maintenance cartridge, the platen, or the ink collector.

This label is located on the maintenance cartridge.
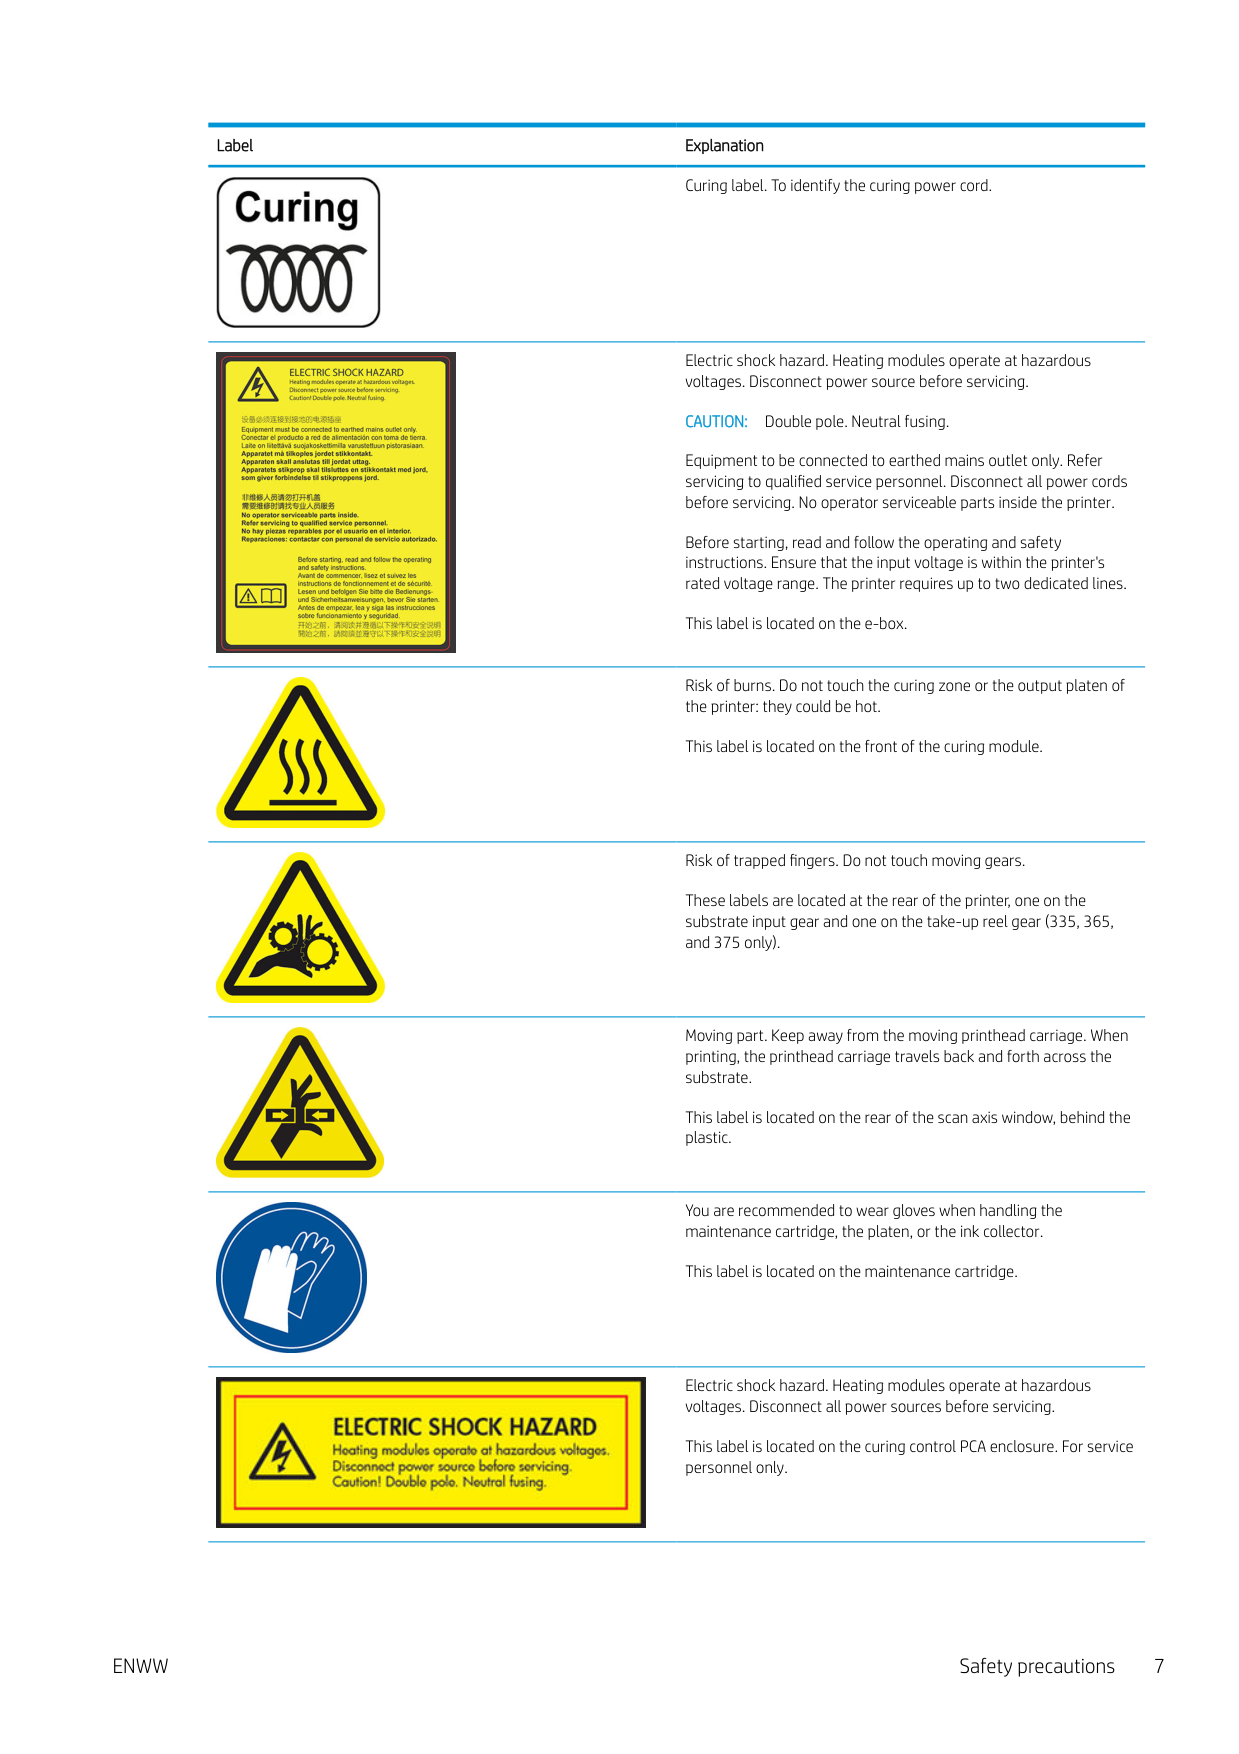
Electric shock hazard. Heating modules operate at hazardous voltages. Disconnect all power sources before servicing.

This label is located on the curing control PCA enclosure. For service personnel only.
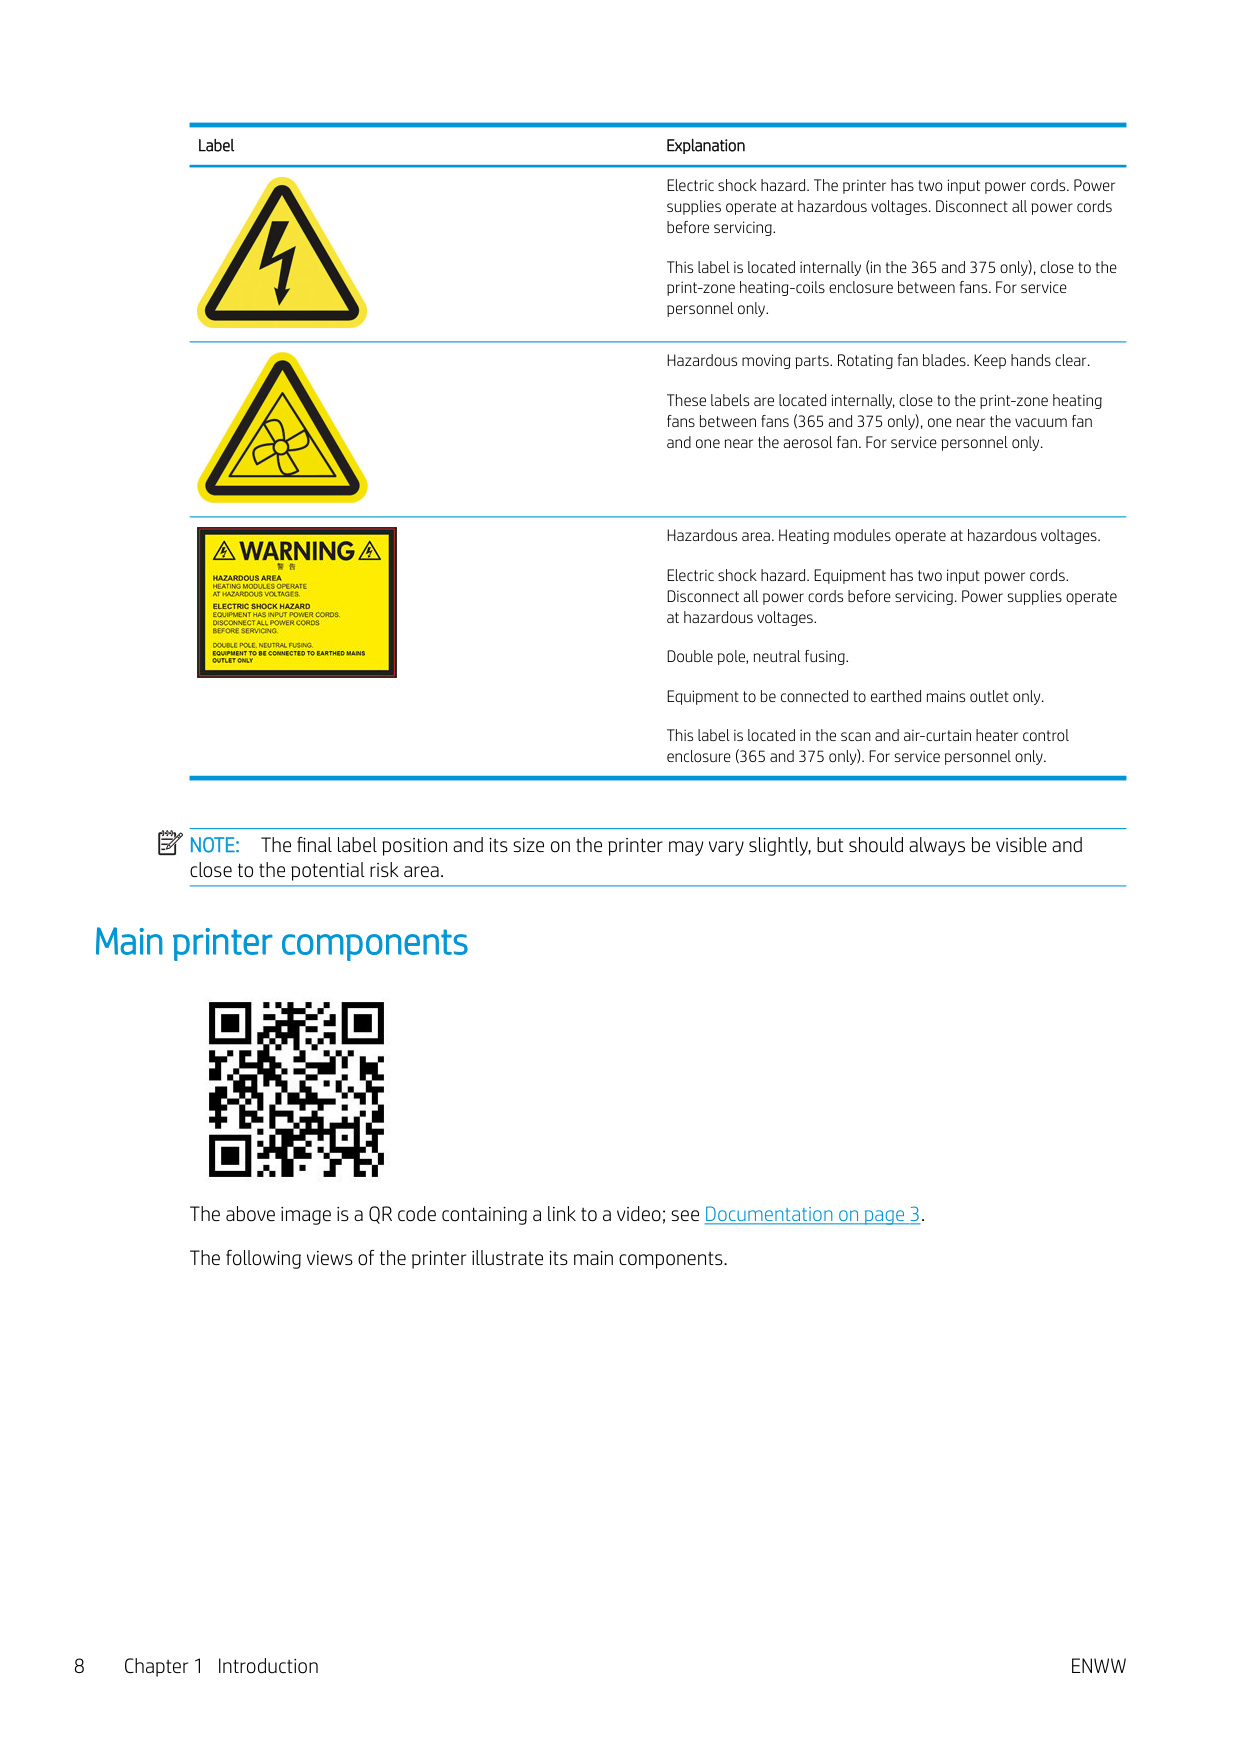
Electric shock hazard. The printer has two input power cords. Power supplies operate at hazardous voltages. Disconnect all power cords before servicing.

This label is located internally (in the 365 and 375 only), close to the print-zone heating-coils enclosure between fans. For service personnel only.
Hazardous moving parts. Rotating fan blades. Keep hands clear. These labels are located internally, close to the print-zone heating fans between fans (365 and 375 only), one near the vacuum fan and one near the aerosol fan. For service personnel only.

Hazardous area. Heating modules operate at hazardous voltages. Electric shock hazard. Equipment has two input power cords. Disconnect all power cords before servicing. Power supplies operate at hazardous voltages. Double pole, neutral fusing. Equipment to be connected to earthed mains outlet only. This label is located in the scan and air-curtain heater control enclosure (365 and 375 only). For service personnel only.

| | |---|
NOTE: The final label position and its size on the printer may vary slightly, but should always be visible and close to the potential risk area.
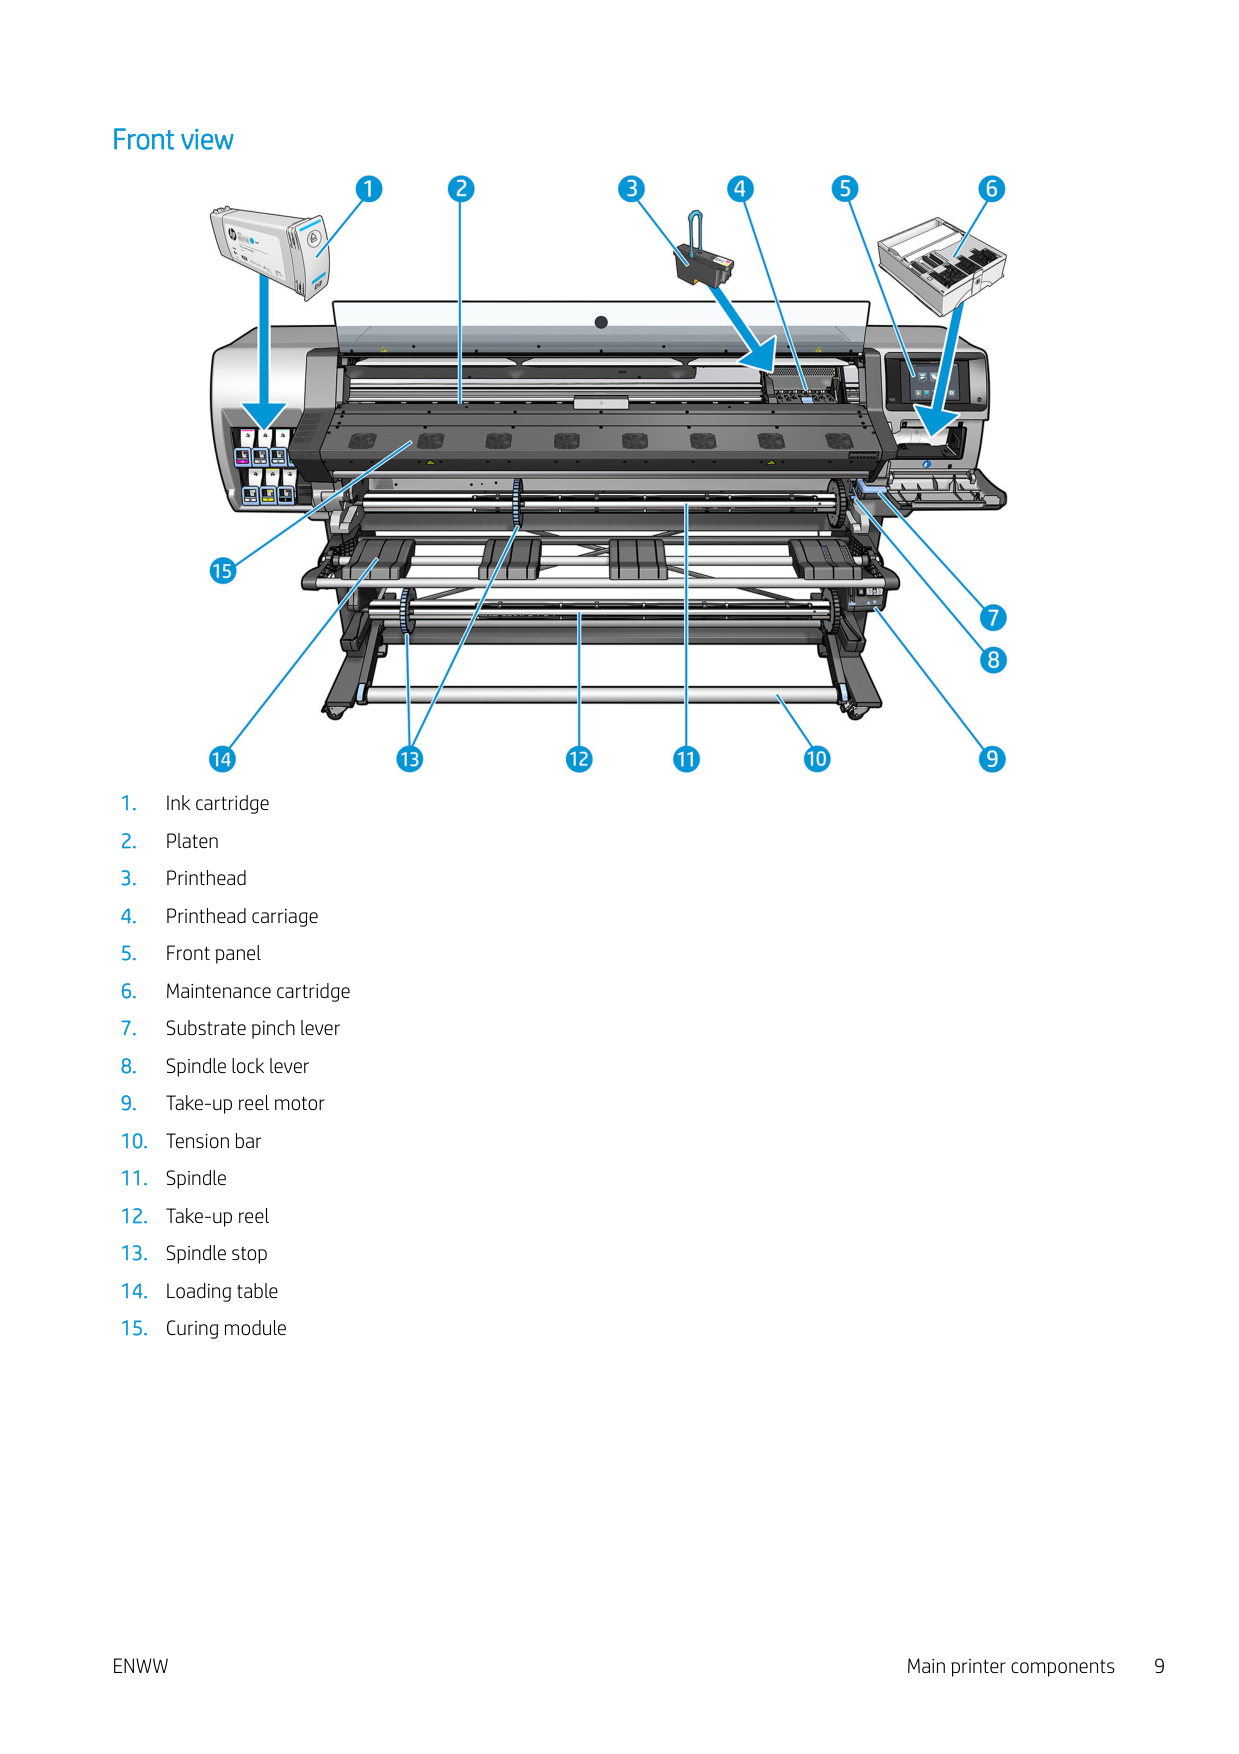
Main printer components

The above image is a QR code containing a link to a video; see Documentation on page 3. The following views of the printer illustrate its main components.
#### Front view

ENWW Main printer components 9
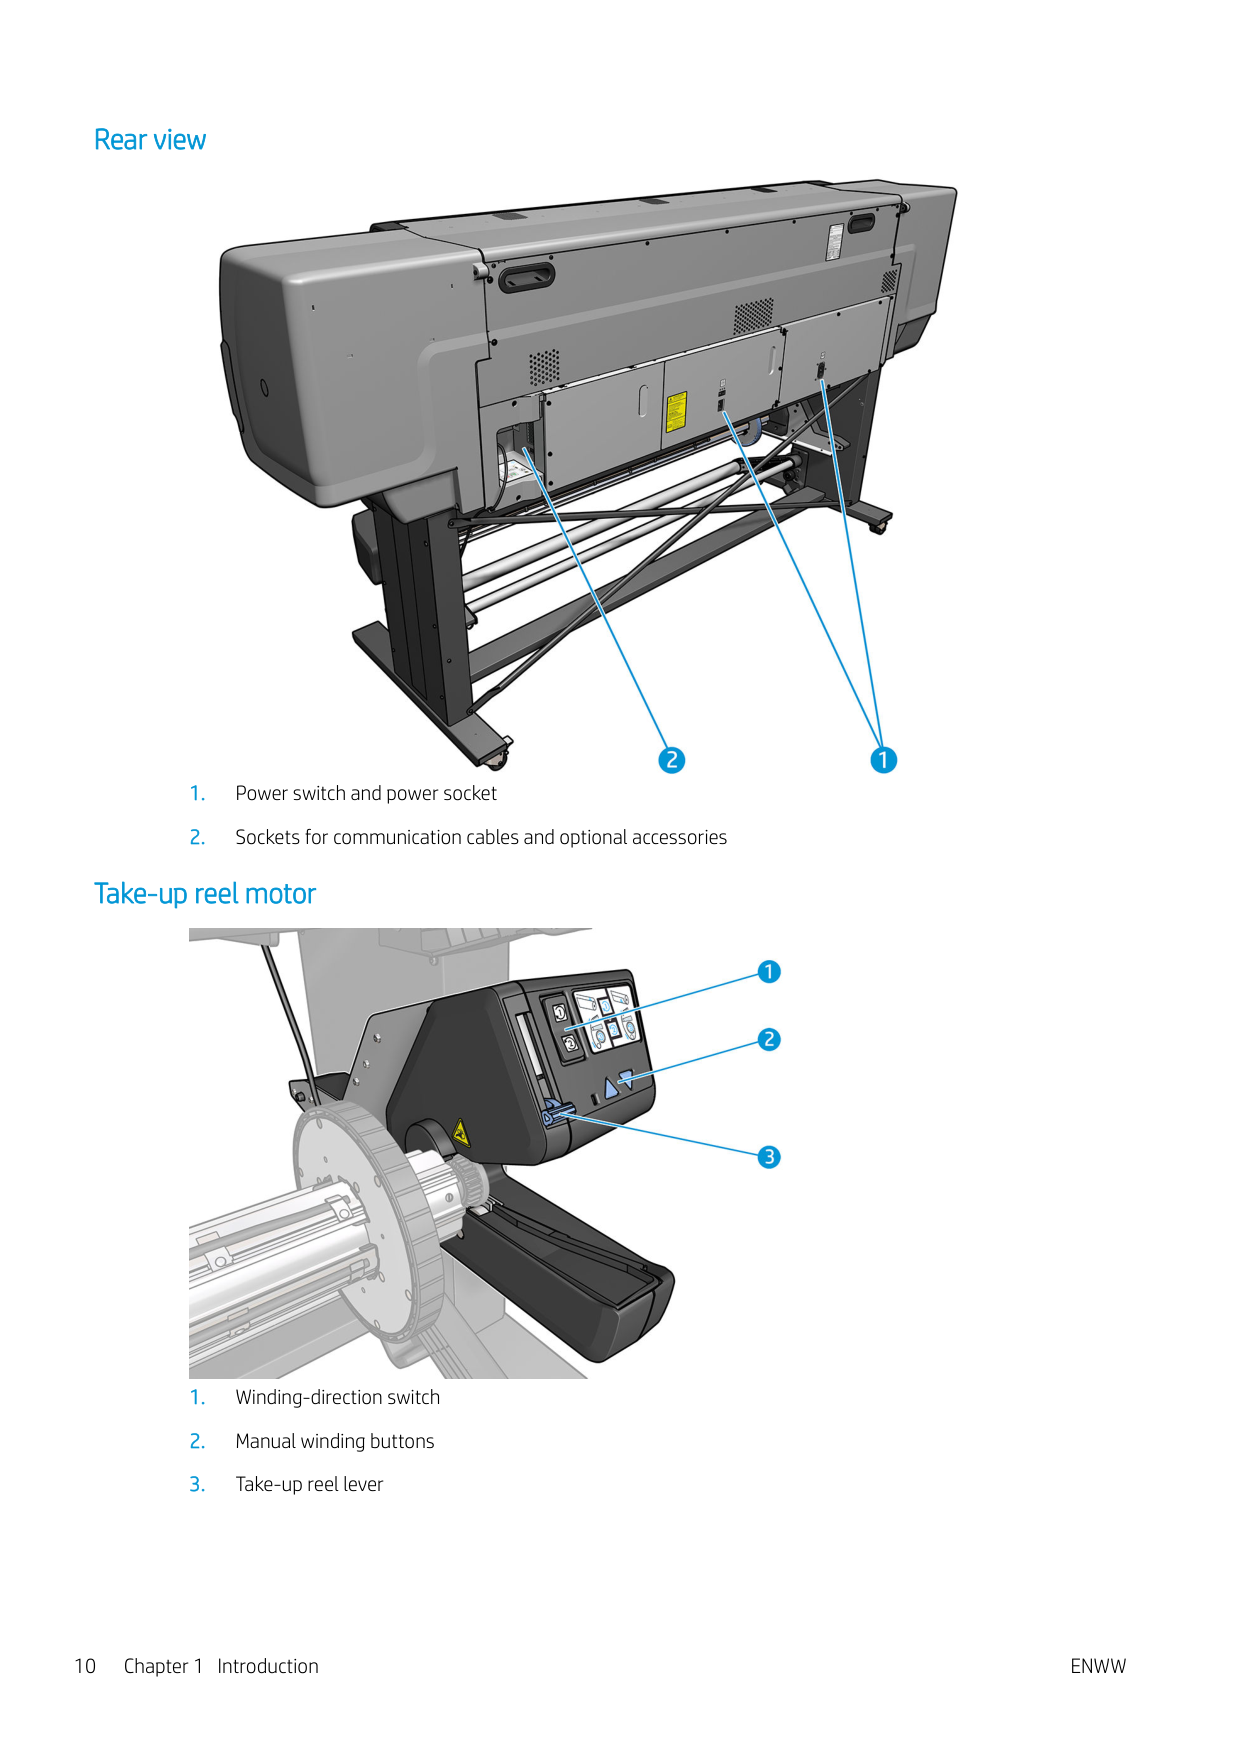
#### Rear view

#### Take-up reel motor

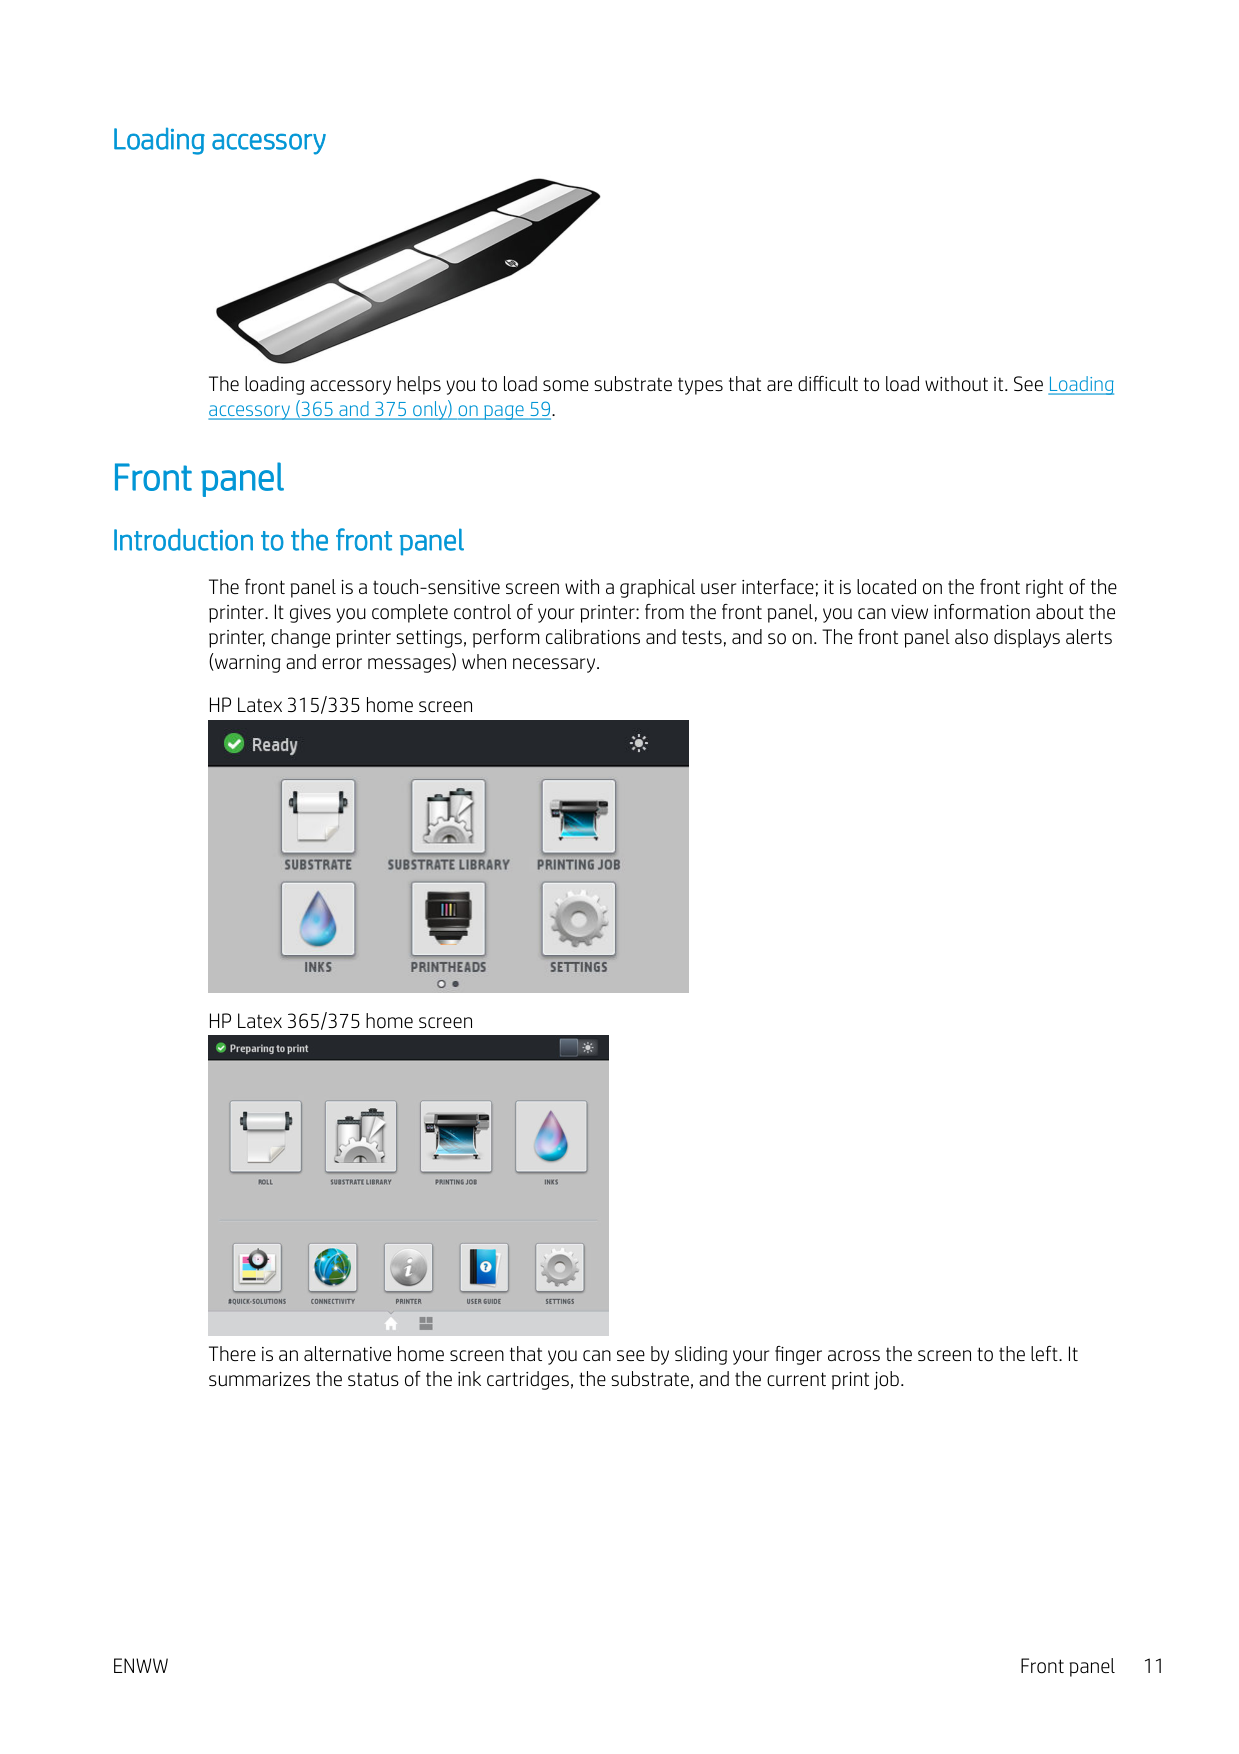
#### Loading accessory

The loading accessory helps you to load some substrate types that are difficult to load without it. See Loading accessory (365 and 375 only) on page 59.
Front panel
#### Introduction to the front panel
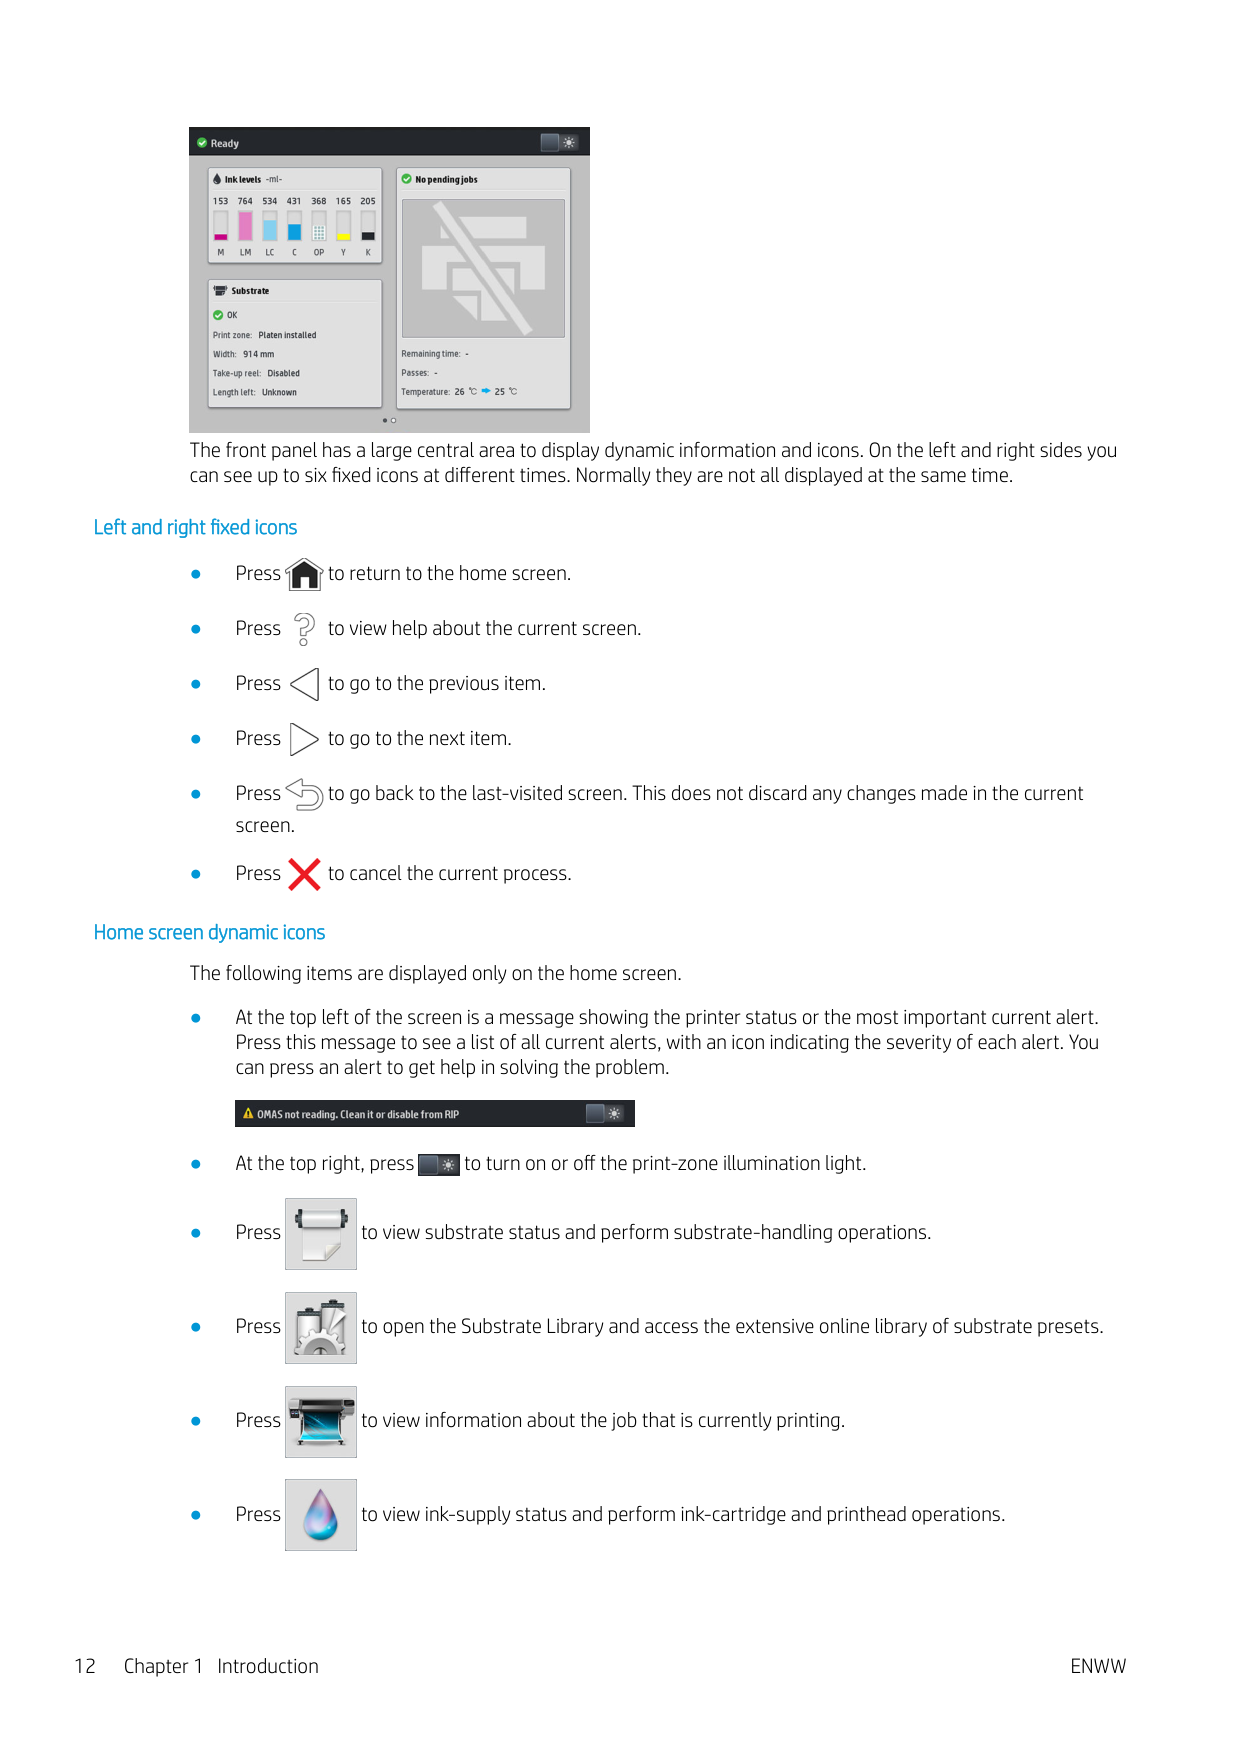
The front panel is a touch-sensitive screen with a graphical user interface; it is located on the front right of the printer. It gives you complete control of your printer: from the front panel, you can view information about the printer, change printer settings, perform calibrations and tests, and so on. The front panel also displays alerts (warning and error messages) when necessary.
HP Latex 315/335 home screen

HP Latex 365/375 home screen

There is an alternative home screen that you can see by sliding your finger across the screen to the left. It summarizes the status of the ink cartridges, the substrate, and the current print job.

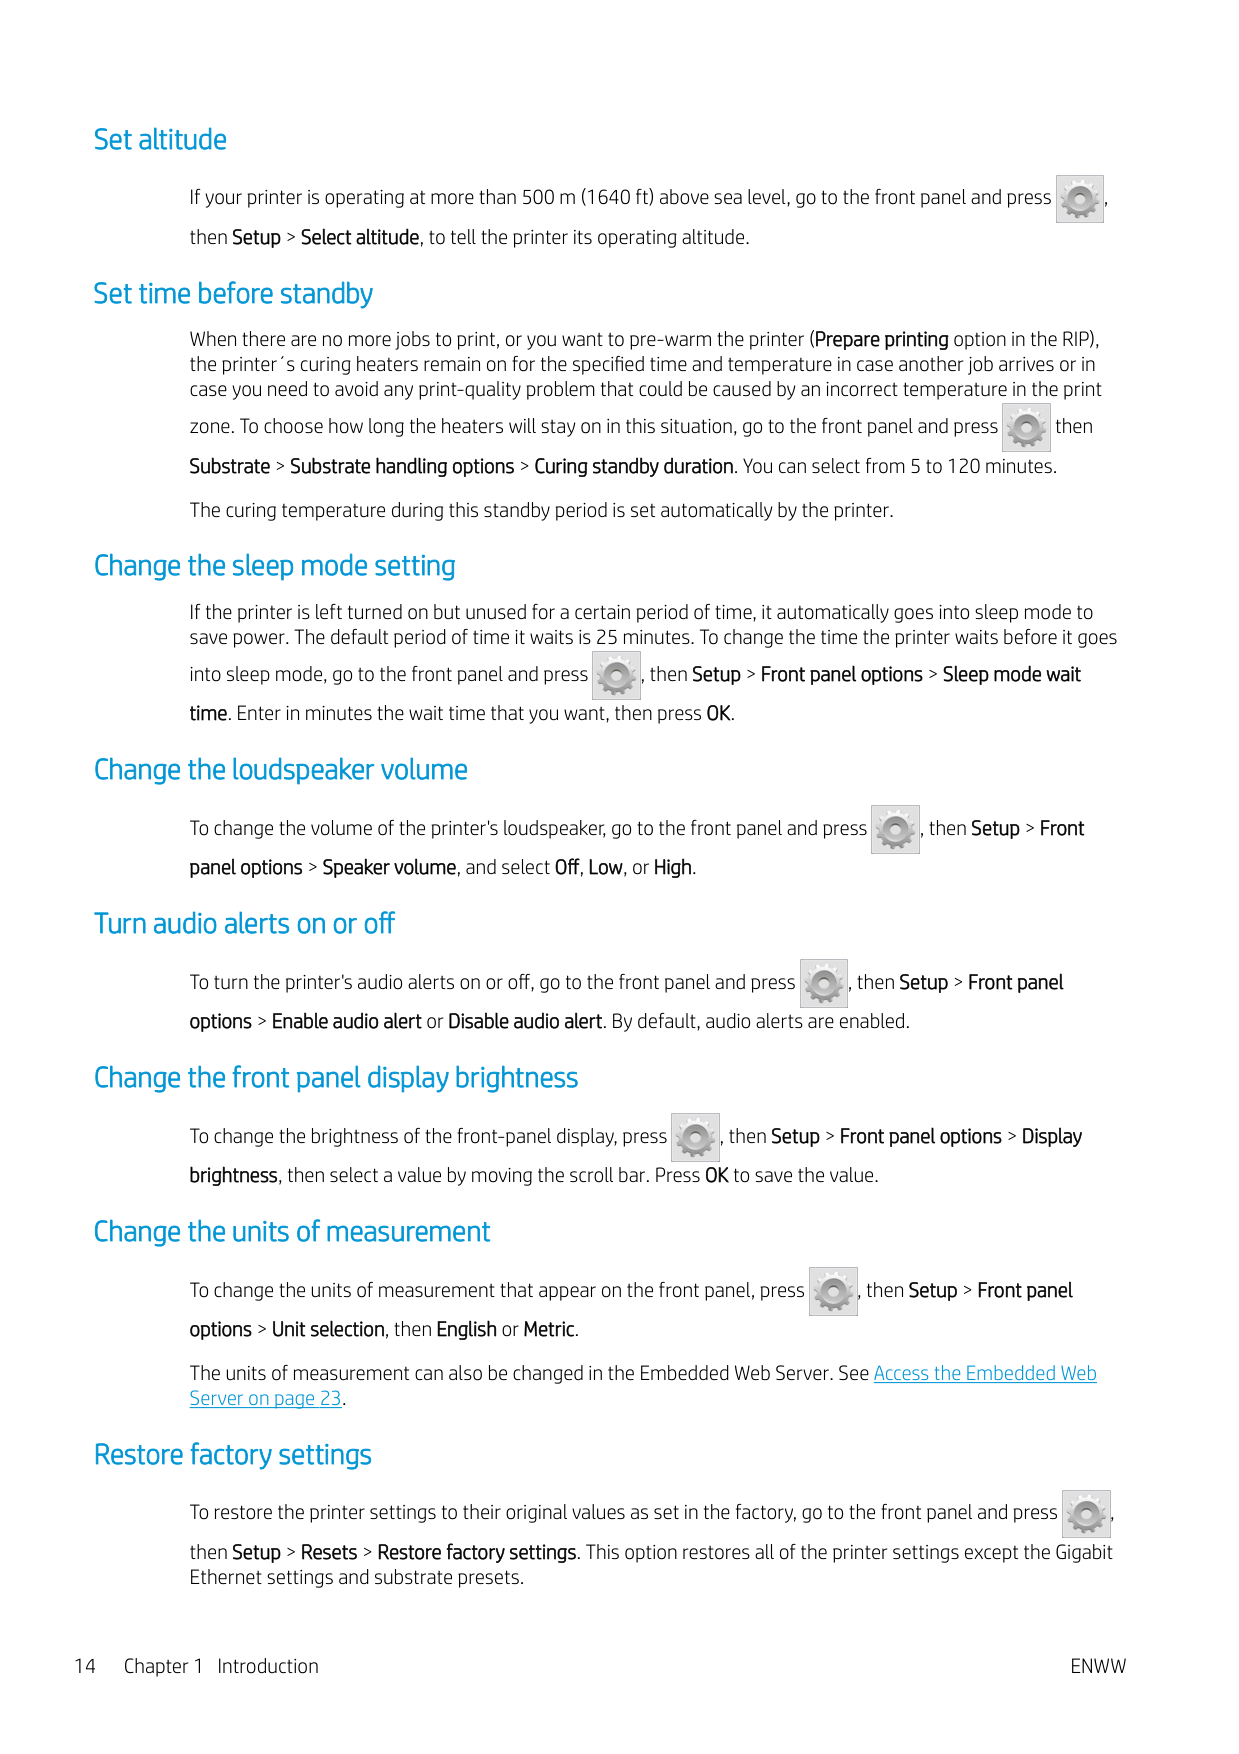
The front panel has a large central area to display dynamic information and icons. On the left and right sides you can see up to six fixed icons at different times. Normally they are not all displayed at the same time.
###### Left and right fixed icons


###### Home screen dynamic icons
The following items are displayed only on the home screen.


If the printer is left idle for some time, it goes into sleep mode and switches off the front-panel display. To change the time that elapses before sleep mode, press , then Setup > Front panel options > Sleep mode wait time. You can set a time between 5 and 240 minutes; the default is 25 minutes.

The printer wakes from sleep mode and switches on the front-panel display whenever there is some external interaction with it.
Information about specific uses of the front panel can be found throughout this guide.
#### Change the language of the front panel
Two methods are available to change the language that is used for the front-panel menus and messages.


Whichever method you used, the language selection menu should now appear on the front panel.

Press the name of your preferred language.
#### View or set the date and time

To view or set the printer's date and time, go to the front panel and press , then Setup > Front panel options > Date and time options.
#### Set altitude

If your printer is operating at more than 500 m (1640 ft) above sea level, go to the front panel and press , then Setup > Select altitude, to tell the printer its operating altitude.
#### Set time before standby
When there are no more jobs to print, or you want to pre-warm the printer (Prepare printing option in the RIP), the printer´s curing heaters remain on for the specified time and temperature in case another job arrives or in case you need to avoid any print-quality problem that could be caused by an incorrect temperature in the print

zone. To choose how long the heaters will stay on in this situation, go to the front panel and press then Substrate > Substrate handling options > Curing standby duration. You can select from 5 to 120 minutes. The curing temperature during this standby period is set automatically by the printer.
#### Change the sleep mode setting
If the printer is left turned on but unused for a certain period of time, it automatically goes into sleep mode to save power. The default period of time it waits is 25 minutes. To change the time the printer waits before it goes

into sleep mode, go to the front panel and press , then Setup > Front panel options > Sleep mode wait time. Enter in minutes the wait time that you want, then press OK.
#### Change the loudspeaker volume

To change the volume of the printer's loudspeaker, go to the front panel and press , then Setup > Front panel options > Speaker volume, and select Off, Low, or High.
#### Turn audio alerts on or off

To turn the printer's audio alerts on or off, go to the front panel and press , then Setup > Front panel options > Enable audio alert or Disable audio alert. By default, audio alerts are enabled.
#### Change the front panel display brightness

To change the brightness of the front-panel display, press , then Setup > Front panel options > Display brightness, then select a value by moving the scroll bar. Press OK to save the value.
Change the units of measurement To change the units of measurement that appear on the front panel, press , then Setup > Front panel options > Unit selection, then English or Metric. The units of measurement can also be changed in the Embedded Web Server. See Access the Embedded Web Server on page 23.

#### Restore factory settings

To restore the printer settings to their original values as set in the factory, go to the front panel and press , then Setup > Resets > Restore factory settings. This option restores all of the printer settings except the Gigabit Ethernet settings and substrate presets.
#### Check printer status
The front panel and the Embedded Web Server both display the status of the printer, the loaded substrate, and the ink system.
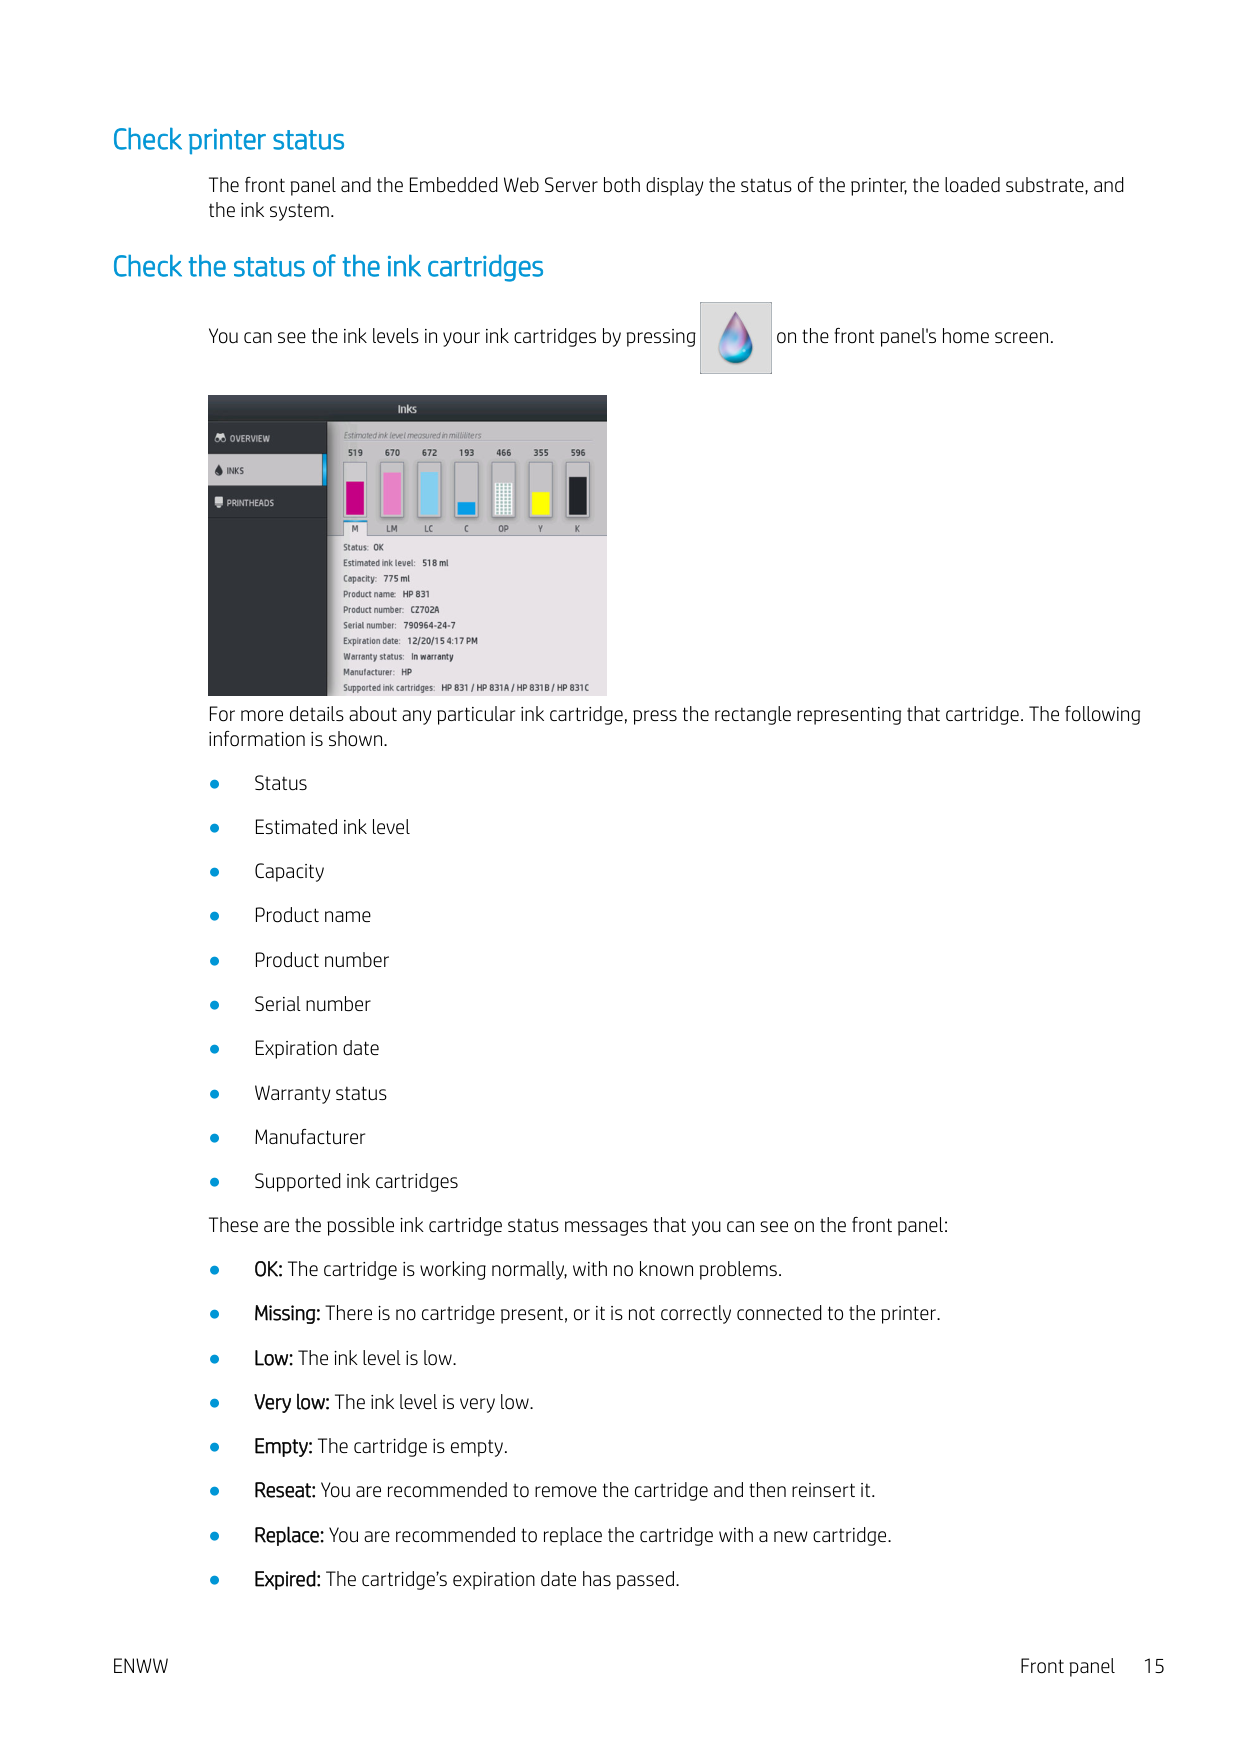
#### Check the status of the ink cartridges

You can see the ink levels in your ink cartridges by pressing on the front panel's home screen.

For more details about any particular ink cartridge, press the rectangle representing that cartridge. The following information is shown.
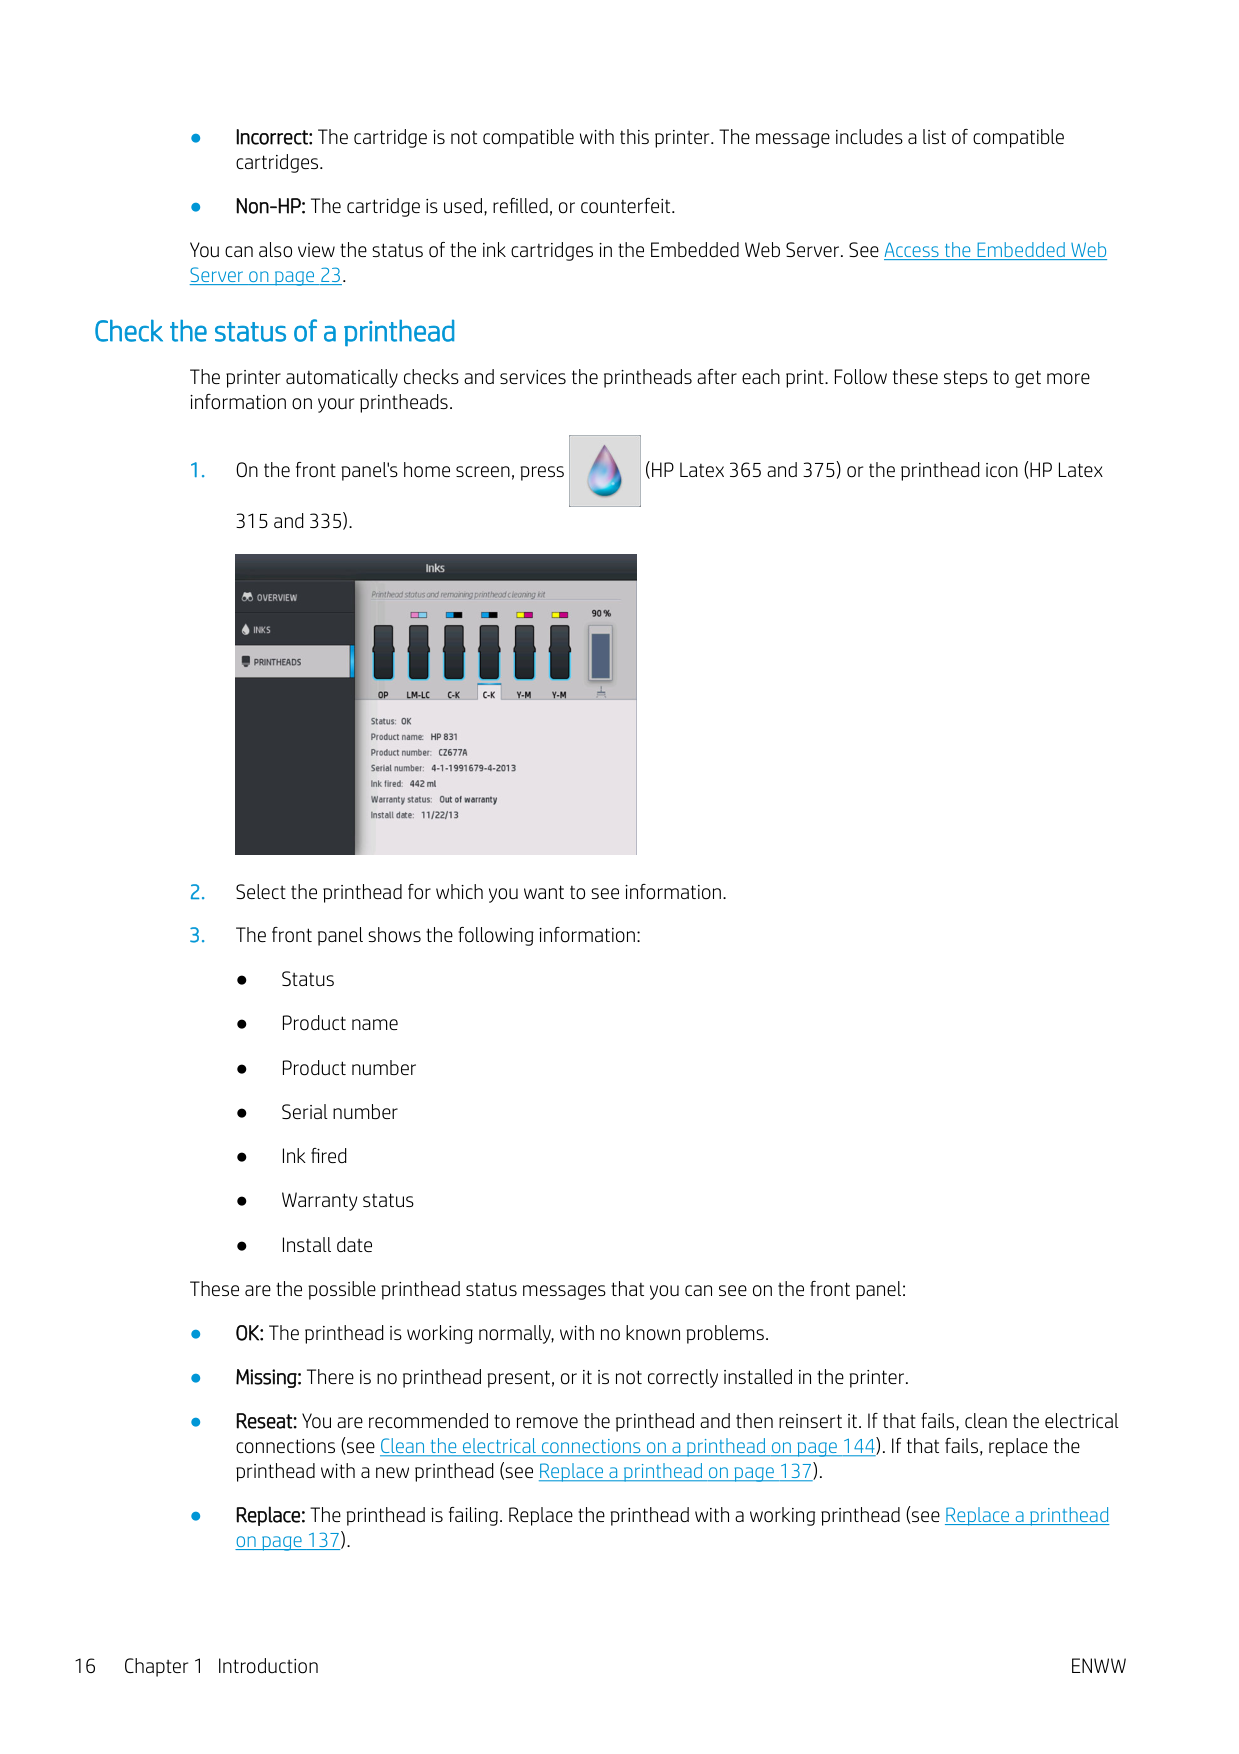
You can also view the status of the ink cartridges in the Embedded Web Server. See Access the Embedded Web Server on page 23.
#### Check the status of a printhead
The printer automatically checks and services the printheads after each print. Follow these steps to get more information on your printheads.


These are the possible printhead status messages that you can see on the front panel:
You can also use the Embedded Web Server to check the printhead status and the warranty status. See Access the Embedded Web Server on page 23.
#### Check the file system

It is possible to check the integrity of the file system on the printer's hard disk, and automatically correct any errors. You are recommended to do this about once every six months, or if you notice any trouble in accessing files on the hard disk.

To execute the file system check, go to the front panel and press , then Preventive maint. tasks > File system check.
If the printer is aware of damage to the file system, for instance after a severe software problem, it may start a file system check automatically. This can take about ten minutes.
#### Printer alerts
The printer can communicate two types of alerts:

Only one alert is shown at a time. If you press the notification bar, all the current printer alerts are shown. The list of alerts can be folded back by pressing or sliding up the bottom row of the list.

Clicking an alert opens the application that could help to resolve it. Firmware update advice is dismissed when entering the Printer application. Once dismissed, there won’t be any reminder later on about the same advice (in the case of firmware updates, a new notification appears when there a new firmware release becomes available).
An alert may require you to perform a maintenance operation; see Hardware maintenance on page 129. The following alerts require a service engineer:
#### Printer states
The printer may be in any one of the following states; some of them require waiting.
You can select continuous printing using certified RIP software. Without continuous printing, the printer cures each job separately and then winds the substrate back into the print zone before starting to print the next job in the queue. This adds time to the printing process. Continuous printing saves time by continuing to print the next job in the queue without stopping (tailgating), if it uses the same print mode and resolution.
| | |---|
NOTE: The same print mode and resolution must be used for all jobs in the RIP queue selected for continuous printing, to optimize the overall curing time.
| | |---|

NOTE: When continuous printing is enabled, canceling a job could also cancel the subsequent job.
#### Change margins
The printer margins determine the area between the edges of your image and the edges of the substrate. The 365 or 375 printer with ink collector is capable of printing with no side margins (full bleed).
The side margins for a particular print job are selected in the RIP software; if the job exceeds the substrate width, it will be clipped.
The front panel offers additional settings for the top and bottom margins: see Margins on page 175. These settings apply only to single prints when the cutter is not in use. The top and bottom margins are not applied during double-sided printing.

To set the top margin at the front panel, press , then Substrate > Substrate handling options > Extra top margin.
| | |---|
| | |---|

To set the bottom margin at the front panel, press , then Substrate > Substrate handling options > Extra bottom margin. NOTE: The extra top/bottom margin set in the front panel is applied in addition to the top/bottom margin selected in the RIP. NOTE: The side margins can be adjusted in the RIP.
#### Request the printer’s internal prints
The internal prints provide various kinds of information about your printer. Request these prints from the front panel, without using a computer.
Before requesting any internal print, make sure that substrate is loaded and that the Ready message appears on the front-panel display.

To print an internal print, press , then Setup > Internal prints, then select the type of internal print that you want. The following internal prints are available:
Check lifetime usage statistics There are two ways of checking your printer's usage statistics. NOTE: The accuracy of the usage statistics is not guaranteed.
| | |---|

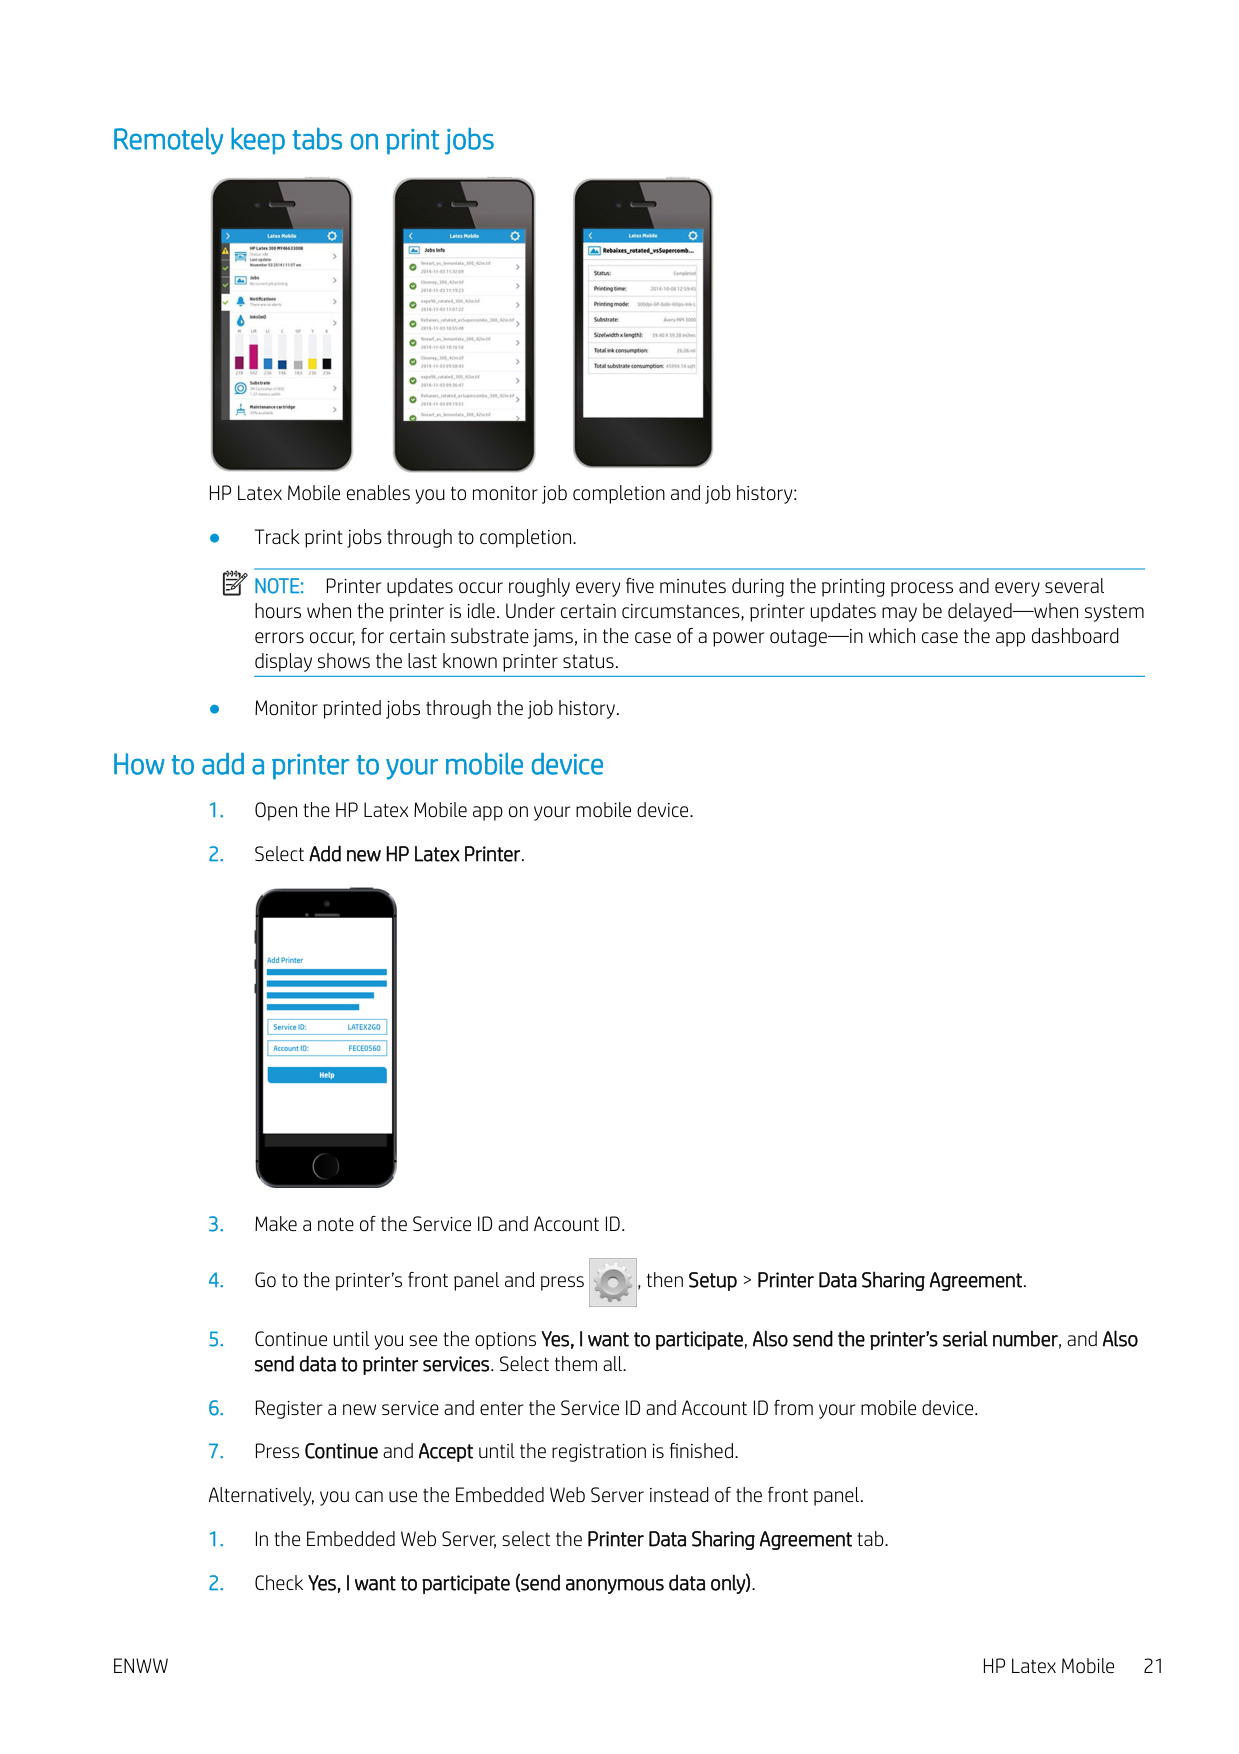
HP Latex Mobile
Your printer supports a new application called HP Latex Mobile, which marks a new era of smart printers. This app enables you to receive helpful consumables alerts while remotely monitoring your printer and job status on your smartphone or tablet. It also compiles metrics related to ink and substrate usage and productivity that you can view from your tablet. Print with greater confidence, especially as you no longer have to worry about the status of print jobs while you’re away from the printer.
| | |---|

NOTE: HP Latex Mobile is compatible with Android 4.1.2 or later and iOS 7 or later, and requires the printer and the smartphone or tablet to be connected to the Internet.
| | |---|
NOTE: Metrics are available on tablets but not on smartphones.
#### Rely on alerts to tell you when attention is needed

No more wondering what’s going on with your printer while you’re away:
#### Know the status of your printer while you’re away from it

HP Latex Mobile offers insight into printer activity and ink and substrate usage:
#### Remotely keep tabs on print jobs


HP Latex Mobile enables you to monitor job completion and job history:
NOTE: Printer updates occur roughly every five minutes during the printing process and every several hours when the printer is idle. Under certain circumstances, printer updates may be delayed—when system errors occur, for certain substrate jams, in the case of a power outage—in which case the app dashboard display shows the last known printer status.
| | |---|
#### How to add a printer to your mobile device


ENWW HP Latex Mobile 21
Embedded Web Server


#### Introduction to the Embedded Web Server
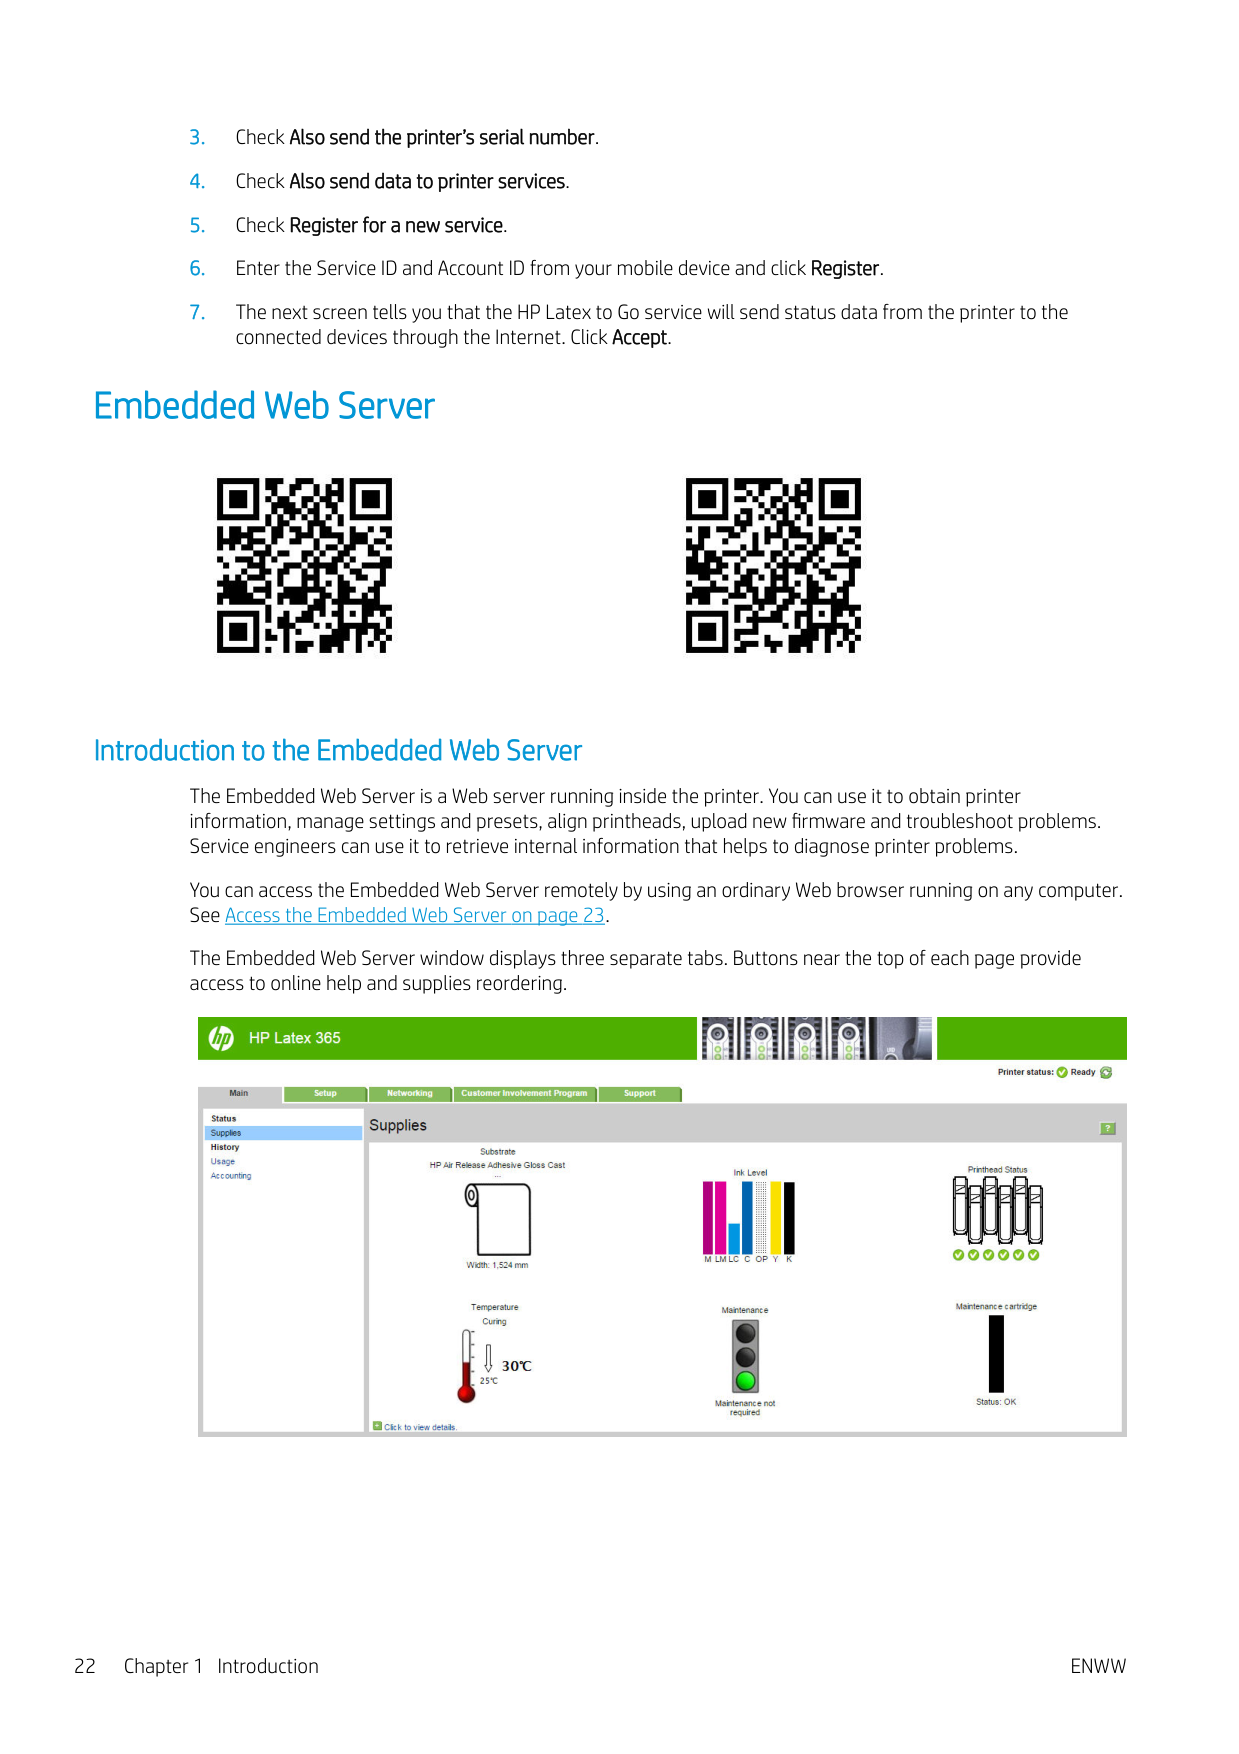
The Embedded Web Server is a Web server running inside the printer. You can use it to obtain printer information, manage settings and presets, align printheads, upload new firmware and troubleshoot problems. Service engineers can use it to retrieve internal information that helps to diagnose printer problems.
You can access the Embedded Web Server remotely by using an ordinary Web browser running on any computer. See Access the Embedded Web Server on page 23.
The Embedded Web Server window displays three separate tabs. Buttons near the top of each page provide access to online help and supplies reordering.

#### Main tab
The Main tab provides information about the following items.
#### Setup tab
The Setup tab enables you to complete these tasks.
#### Networking tab
The Networking tab enables you to change the printer’s networking configuration.
#### Printer Data Sharing Agreement tab
The Printer Data Sharing Agreement tab enables you to sign the Printer Data Sharing Agreement and configure your participation.
#### Support tab
The Support tab offers various kinds of help with your printer.
#### Access the Embedded Web Server
Use the Embedded Web Server to view printer information remotely through an ordinary Web browser running on any computer.
The following browsers are known to be compatible with the Embedded Web Server:
To use the Embedded Web Server on any computer, open your Web browser and type the printer's IP address in the browser's address bar. The printer's IP address appears on the printer’s front panel, after pressing the icon. If you follow these instructions but fail to open the Embedded Web Server, see Cannot access the Embedded Web Server on page 164.

#### Change the language of the Embedded Web Server
The Embedded Web Server functions in the following languages: English, Portuguese, Spanish, Catalan, French, Italian, German, Simplified Chinese, Traditional Chinese, Korean, and Japanese. It uses the language that you specified in your Web browser options. If you specify a language that it cannot support, it functions in English.
To change the language, change your Web browser's language setting. For example, in Chrome, Settings, Language (in the advanced settings view), make sure that the language you want is at the top of the list in the dialog box; or, in Internet Explorer version 8, go to the Tools menu and select Internet Options > Languages. Make sure that the language you want is at the top of the list in the dialog box.

To complete the change, close and reopen your Web browser.
#### Restrict access to the printer
From the Embedded Web Server, you can select Setup > Security to set an administrator password. Once set, this password must be given in order to perform the following printer functions.

If you forget the administrator password, you can delete the current password from the front panel: press , then Setup > Connectivity > Advanced > Embedded Web Server > Reset EWS password.
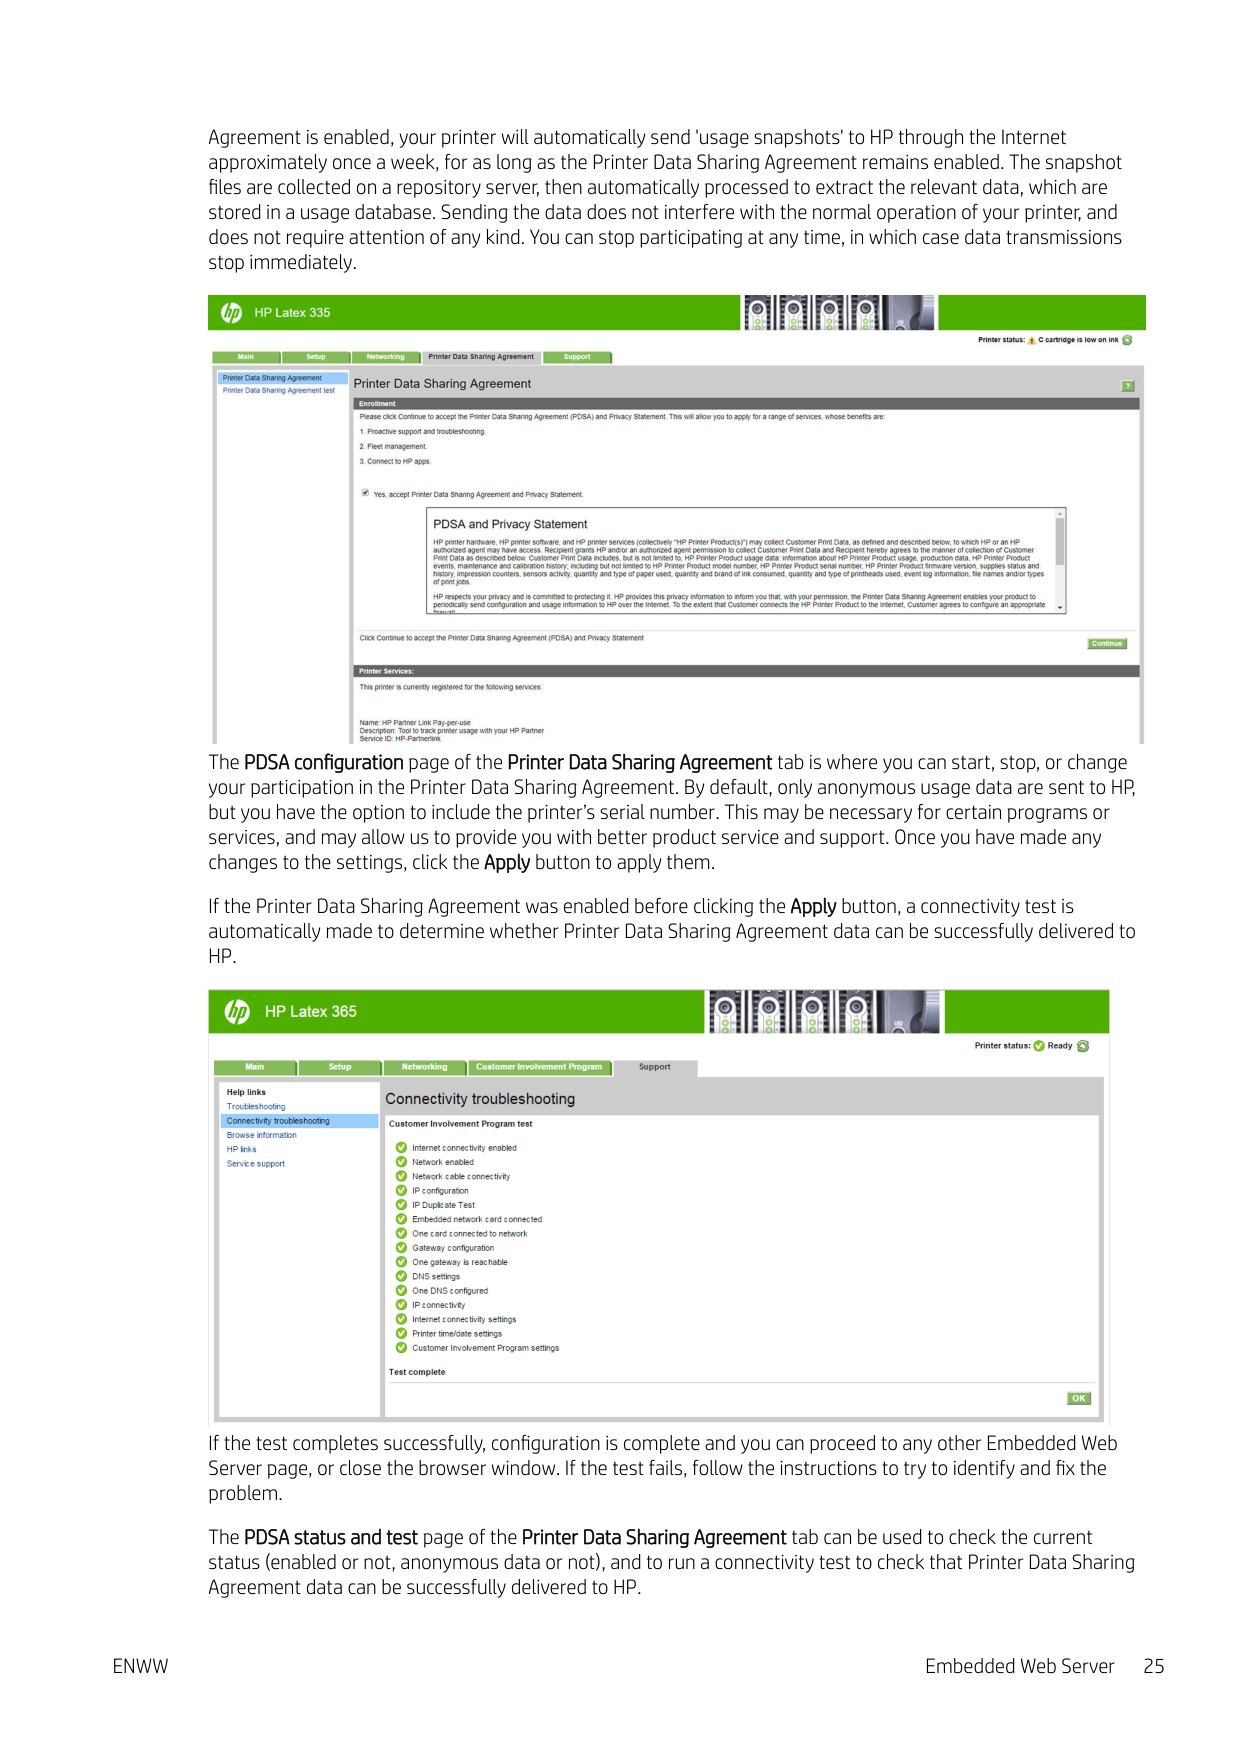
#### Join the Printer Data Sharing Agreement
You can activate or deactivate the Printer Data Sharing Agreement from the Embedded Web Server or from the printer's front panel.
| | |---|

###### NOTE: From the front panel, press , then Setup > Printer Data Sharing Agreement.
The Printer Data Sharing Agreement is a statistical printer-usage tracking system. It may also be used to determine eligibility for certain usage-based reward programs, or to monitor the device in connection with optional services such as proactive cartridge replacement, pay-per-use contracts, or support agreements (availability varies by product, region, and country). See the Printer Data Sharing Agreement tab of the Embedded Web Server for details on the data collected and HP’s use of the data. Once the Printer Data Sharing
Agreement is enabled, your printer will automatically send 'usage snapshots' to HP through the Internet approximately once a week, for as long as the Printer Data Sharing Agreement remains enabled. The snapshot files are collected on a repository server, then automatically processed to extract the relevant data, which are stored in a usage database. Sending the data does not interfere with the normal operation of your printer, and does not require attention of any kind. You can stop participating at any time, in which case data transmissions stop immediately.

The PDSA configuration page of the Printer Data Sharing Agreement tab is where you can start, stop, or change your participation in the Printer Data Sharing Agreement. By default, only anonymous usage data are sent to HP, but you have the option to include the printer’s serial number. This may be necessary for certain programs or services, and may allow us to provide you with better product service and support. Once you have made any changes to the settings, click the Apply button to apply them.
If the Printer Data Sharing Agreement was enabled before clicking the Apply button, a connectivity test is automatically made to determine whether Printer Data Sharing Agreement data can be successfully delivered to HP.

If the test completes successfully, configuration is complete and you can proceed to any other Embedded Web Server page, or close the browser window. If the test fails, follow the instructions to try to identify and fix the problem.
The PDSA status and test page of the Printer Data Sharing Agreement tab can be used to check the current status (enabled or not, anonymous data or not), and to run a connectivity test to check that Printer Data Sharing Agreement data can be successfully delivered to HP.
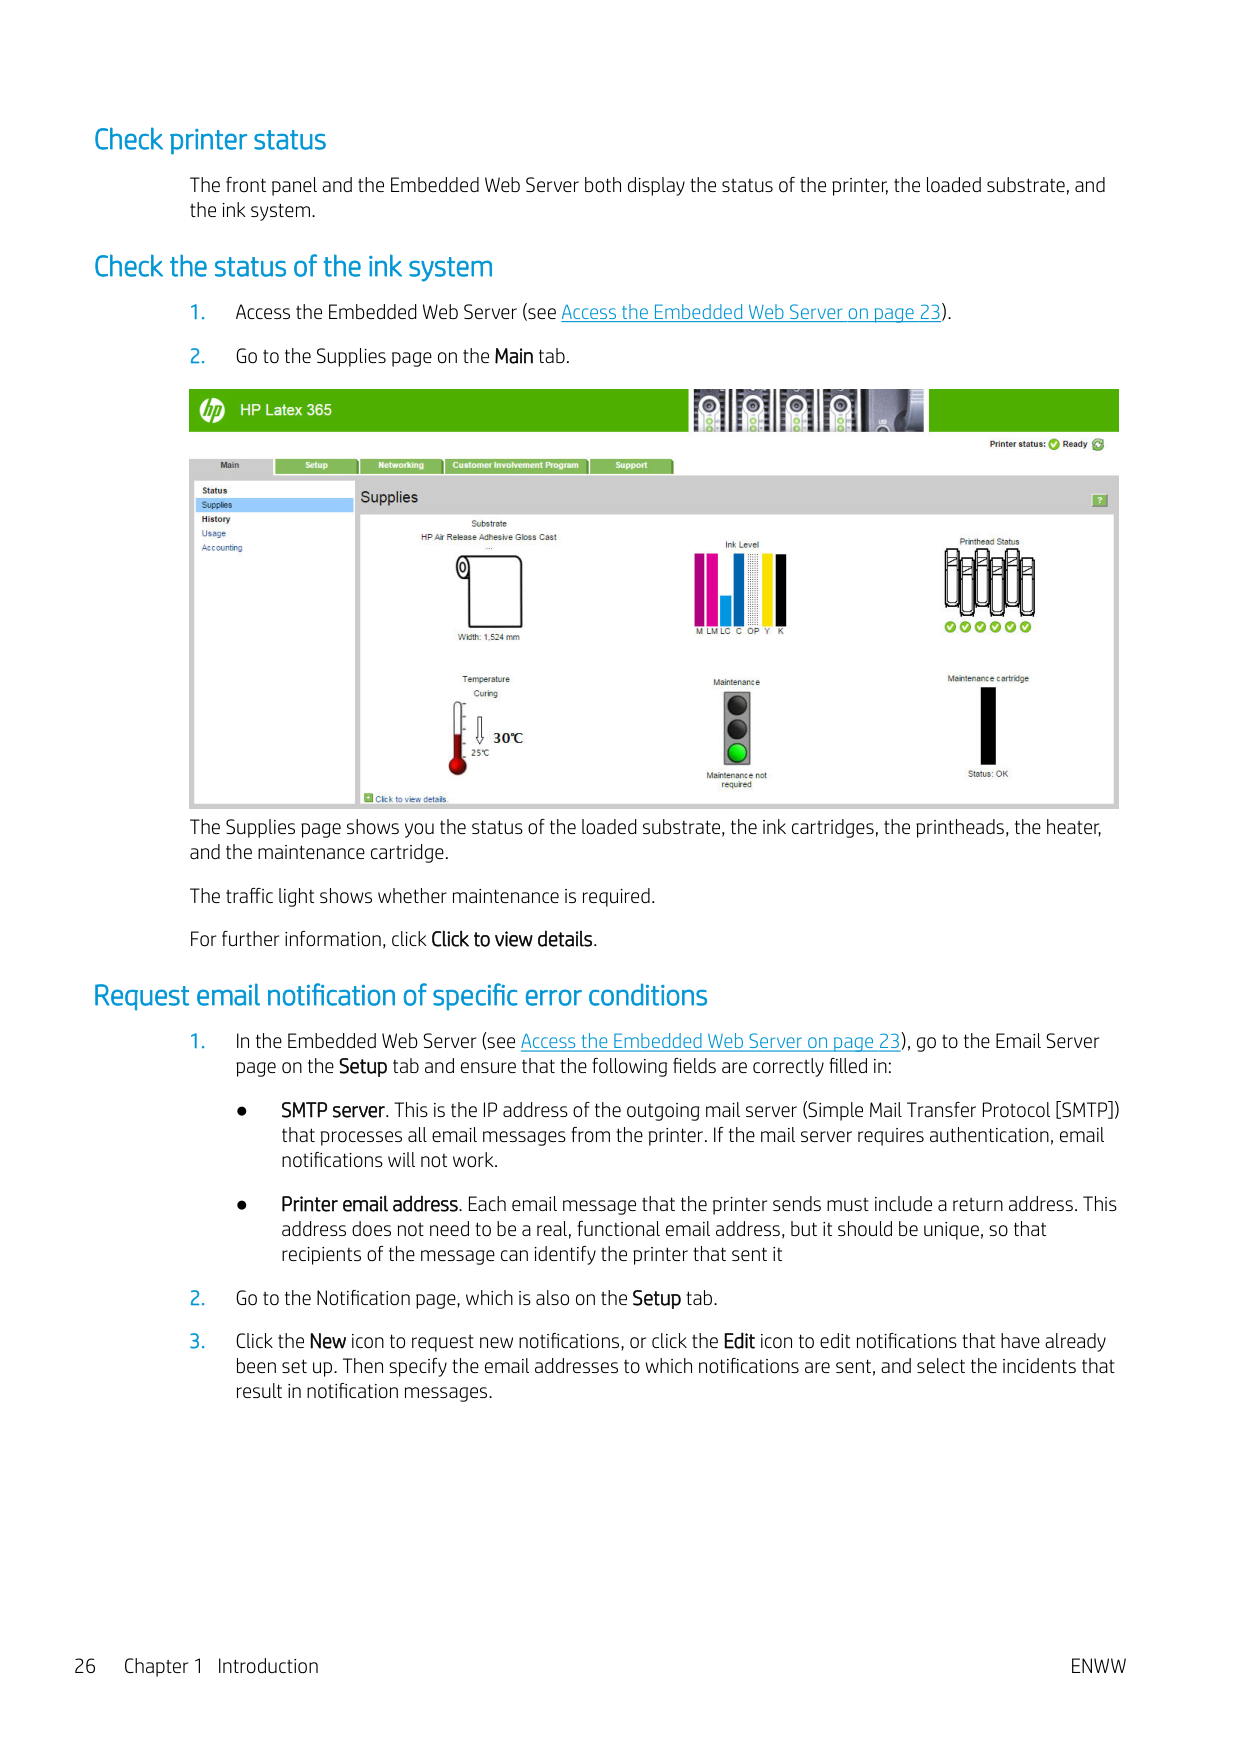
#### Check printer status
The front panel and the Embedded Web Server both display the status of the printer, the loaded substrate, and the ink system.
#### Check the status of the ink system

The Supplies page shows you the status of the loaded substrate, the ink cartridges, the printheads, the heater, and the maintenance cartridge.
The traffic light shows whether maintenance is required. For further information, click Click to view details.
#### Request email notification of specific error conditions
#### Get accounting information
There are various different ways of getting accounting information from your printer.
By default, user names are not included in accounting information. If you would like to include them, check the box Show user name in job accounting in the Security menu.
#### Check usage statistics for a job

You can use the Embedded Web Server to check usage statistics for a particular job: go to the Main tab and select History > Accounting.
| | |---|
NOTE: The accuracy of the usage statistics is not guaranteed.
Check lifetime usage statistics There are two ways of checking your printer's usage statistics. NOTE: The accuracy of the usage statistics is not guaranteed.
| | |---|

#### Request accounting data by email
When you have completed the above steps, the printer will send accounting data by email with the frequency that you specified. The data are provided in XML and can easily be interpreted by a third-party program. The data provided on each print job include when the job was submitted, when the job was printed, the printing time, the type of image, the number of pages, the number of copies, the paper type and size, the amount of each color of ink used and various other attributes of the job.
You can download an HP DesignJet Accounting Tool from HP's Web site (http://www.hp.com/go/designjet/ accounting/) that will enable you to display the XML data more readably in the form of a spreadsheet.
Analysis of the accounting data will enable you to bill customers precisely and flexibly for the use of your printer. You can, for instance:
Connectivity and software instructions
#### Connection method
Your printer can be connected in the following way.
Connection type Speed Maximum cable length Other factors Gigabit Ethernet Fast; varies according to
Long (100 m=328 ft) Requires extra equipment (switches)
network traffic
| | |---|
NOTE: The speed of any network connection depends on all the components that are used in the network, which can include network interface cards, hubs, routers, switches, and cables. If any one of these components cannot operate at high speed, you will have a low-speed connection. To get the expected performance from your printer, you should use equipment that supports 1000TX Full Gigabit. The speed of your network connection can also be affected by the total amount of traffic from other devices on the network.
#### Connect the printer to your network
The printer is able to configure itself automatically for most networks, in a similar way to any computer in the same network. The first time you connect it to a network, this process may take a few minutes. If necessary, see Advanced network configuration on page 30.
Once the printer has a working network configuration, you can check its network address from the front panel: press .

##### Network configuration

For more details about the current network configuration, go to the front panel and press , then
Connectivity > Network connectivity > Gigabit Ethernet > Modify configuration. From here it is possible, though not normally necessary, to change the settings manually; this can also be done remotely using the Embedded Web Server.
TIP: You may find it helpful to print out the full printer network configuration on paper. This can be done from the front panel: press , then Internal prints > Service information prints > Print connectivity configuration. If you do not print out the full network configuration, consider making a note of the printer's IP address and network name. If you accidentally misconfigure the printer’s network settings, you can restore the network settings to their factory values from the front panel: press , then Connectivity > Network connectivity > Advanced > Restore factory settings. Then you must restart the printer. This automatically provides a working network configuration for most networks. The printer’s other settings remain unchanged.


##### Using IPv6

Your printer supports almost all network connectivity features using IPv6, just as it does using IPv4. To make full use of IPv6, you may need to connect your printer to an IPv6 network in which there are IPv6 routers and servers.
In most IPv6 networks, the printer will configure itself automatically as follows, and no user configuration is necessary:
The stateless and DHCPv6 IPv6 addresses can be used to access the printer, and in most IPv6 networks this will be appropriate.
The link-local IPv6 address works only in the local subnet. Although it is possible to access the printer using this address, it is not recommended.
It is possible to assign a manual IPv6 address to the printer, using the front panel or the Embedded Web Server. It is also possible to disable IPv6 completely in the printer. However, it is not possible to disable IPv4 in the printer, and therefore it is not possible to configure the printer as IPv6-only.
| | |---|
NOTE: In typical IPv6 use, your printer will have multiple IPv6 addresses, although it has only one IPv4 address. TIP: You are recommended to give a name to the printer. You can do this from the front panel or (more easily) from the Embedded Web Server. TIP: You will generally find it easier to use IPv4 unless you have a specific need to use IPv6.
Microsoft Windows Vista, Microsoft Windows Server 2008, later versions of Windows, and the new HP Printing and Imaging devices have IPv6 enabled by default. For further information on IPv6, see http://h20000.www2.hp.com/bc/docs/support/SupportManual/c00840100/c00840100.pdf. This document discusses how name resolution plays a fundamental role in Dual-Stack transition methods. Using the name resolution algorithm in Windows, the document goes through various network environments and studies how the introduction of routable IPv6 addresses will affect network applications. It also discusses DHCPv6, SLAAC and the impact to DNS, and makes some recommendations.
ENWW Connectivity and software instructions 29
#### Connect the printer to the Internet


To connect to the Internet, go to the front panel and press , then Connectivity > Connectivity wizard. The connectivity wizard also checks that the printer’s firmware is up to date. Normally you need to run the wizard only once, when first setting up the printer. An Internet connection is needed for various printer functions described in this guide, such as the Embedded Web Server.
#### RIP software installation

Install the RIP software by following the instructions provided with the software.
Advanced network configuration You will probably not need to read this section, but the information is provided as it may be useful in some cases. The printer provides a single RJ-45 connector port for a network connection. In order to meet Class B limits, the use of shielded I/O cables is required. The embedded Jetdirect print server supports connection to IEEE 802.3 10Base-T Ethernet, IEEE 802.3u 100Base-TX Fast Ethernet and 802.3ab 1000Base-T Gigabit Ethernet compliant networks. When connected and powered on, the printer auto-negotiates with your network to operate with a link speed of 10, 100, or 1000 Mbps, and to communicate using full- or half-duplex mode. However, you can manually configure the link using the printer's front panel, or through other configuration tools once network communication is established. The printer can support multiple network protocols simultaneously, including TCP/IPv4 and TCP/IPv6. For security, it includes features to control IP traffic to and from the printer.
#### Verify correct operation
If a message other than I/O Card Ready appears, try the following:
| | |---|
See the HP Jetdirect Print Servers Administrator’s Guide for your print server model to interpret and troubleshoot other messages.
#### Preconfigure network settings if required
If your network requires that you configure network settings before you add the printer to your network systems, you can do so now.
However, in most cases, you can skip this section. Instead, you can proceed directly to the next section to install the printer on your network computer systems. The network installation software will allow you to configure basic network settings and add the printer to your system configuration.
##### Tools for preconfiguration
The following tools can be used to preconfigure your network settings.
After the printer is configured with network settings, the configuration values are saved and maintained even after it is turned off and on again.
#### Troubleshooting IO Configuration page
The IO Configuration page provides comprehensive print server status. It is an important diagnostic tool, especially if network communications are not available. For a description of messages that may appear on the IO Configuration page, see the HP Jetdirect Print Servers Administrator’s Guide for your print server model.
##### LEDs
The printer has status lights (LEDs) that indicate the link status and network activity.
If the printer does not successfully connect to the network:
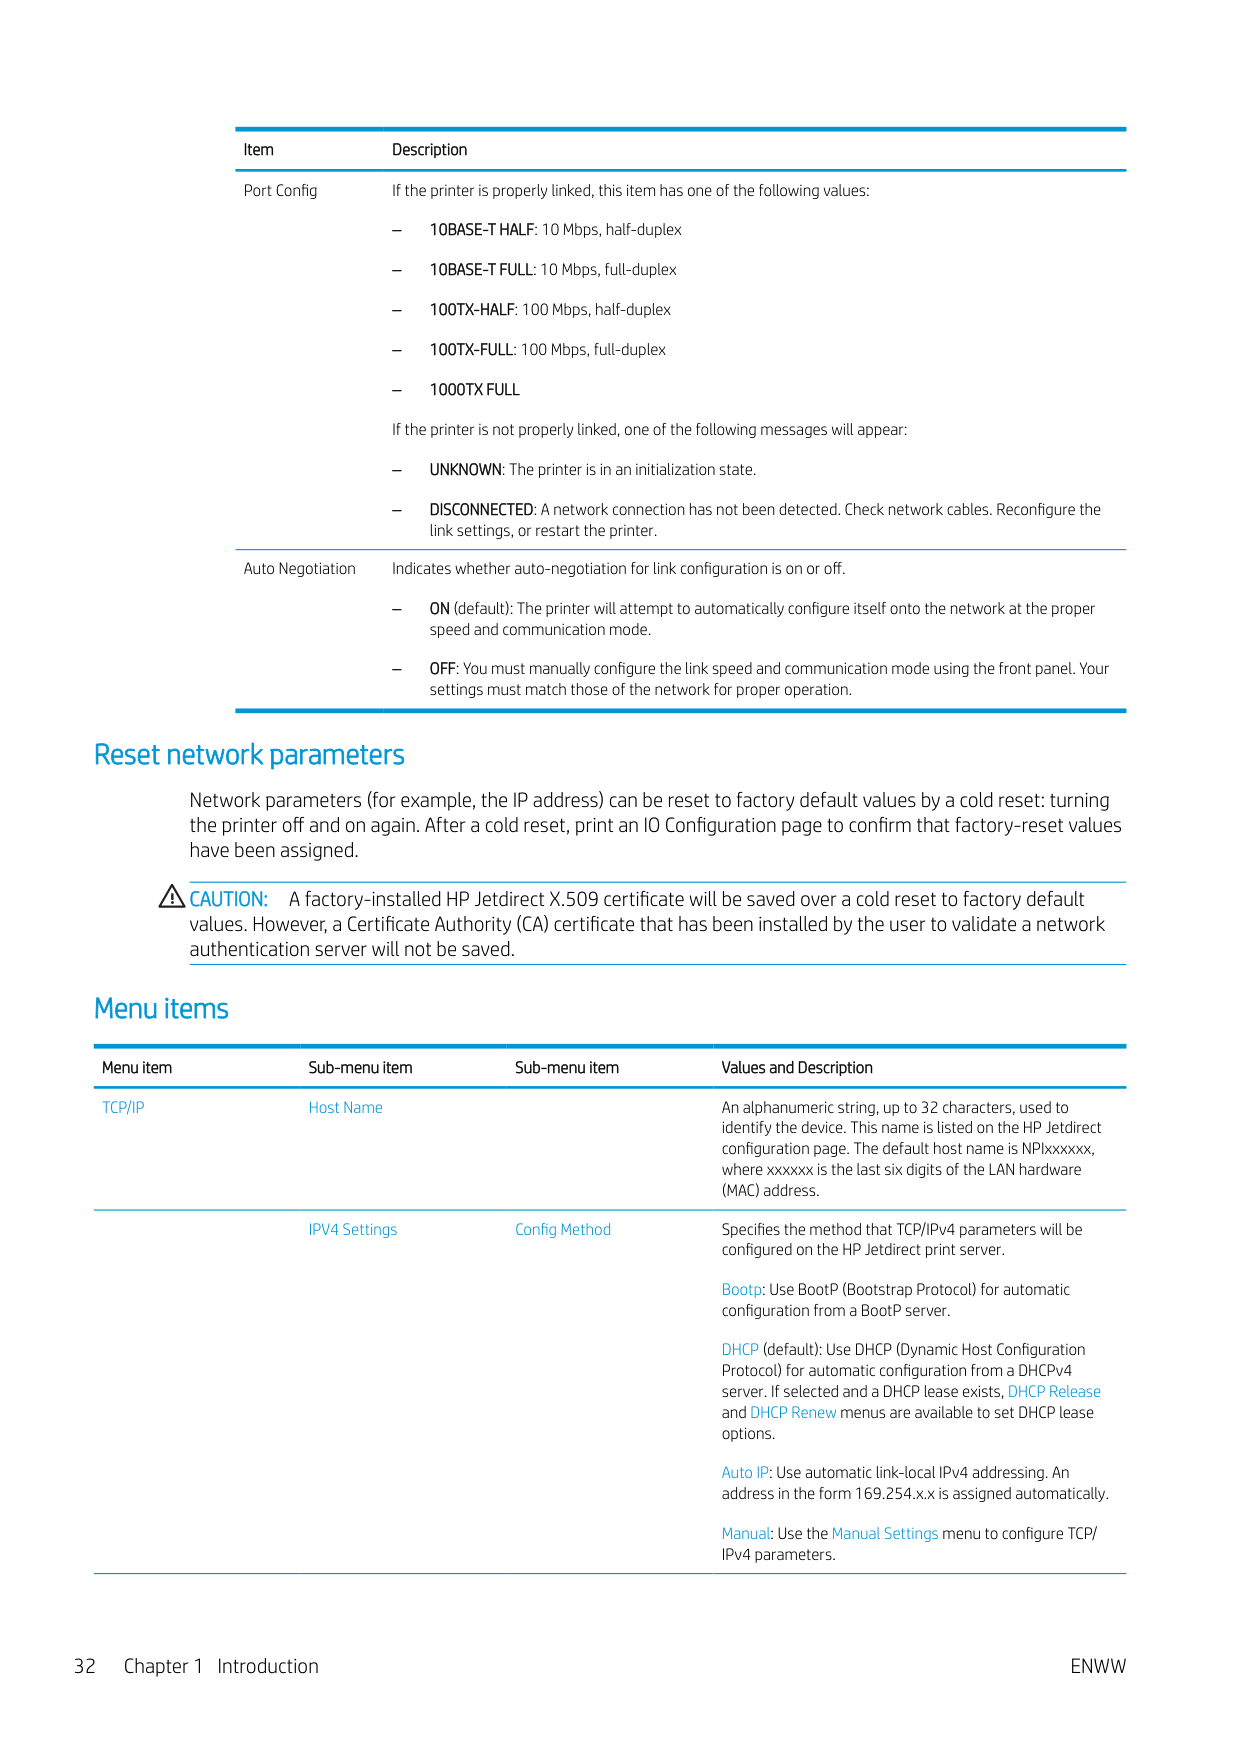
Item Description Port Config If the printer is properly linked, this item has one of the following values:
Auto Negotiation Indicates whether auto-negotiation for link configuration is on or off.
#### Reset network parameters
Network parameters (for example, the IP address) can be reset to factory default values by a cold reset: turning the printer off and on again. After a cold reset, print an IO Configuration page to confirm that factory-reset values have been assigned.
CAUTION: A factory-installed HP Jetdirect X.509 certificate will be saved over a cold reset to factory default values. However, a Certificate Authority (CA) certificate that has been installed by the user to validate a network authentication server will not be saved.
#### Menu items
Menu item Sub-menu item Sub-menu item Values and Description TCP/IP Host Name An alphanumeric string, up to 32 characters, used to
identify the device. This name is listed on the HP Jetdirect configuration page. The default host name is NPIxxxxxx, where xxxxxx is the last six digits of the LAN hardware (MAC) address.
IPV4 Settings Config Method Specifies the method that TCP/IPv4 parameters will be configured on the HP Jetdirect print server. Bootp: Use BootP (Bootstrap Protocol) for automatic configuration from a BootP server. DHCP (default): Use DHCP (Dynamic Host Configuration Protocol) for automatic configuration from a DHCPv4 server. If selected and a DHCP lease exists, DHCP Release and DHCP Renew menus are available to set DHCP lease options. Auto IP: Use automatic link-local IPv4 addressing. An address in the form 169.254.x.x is assigned automatically. Manual: Use the Manual Settings menu to configure TCP/ IPv4 parameters.
DHCP Release This menu appears if Config Method was set to DHCP and a DHCP lease for the print server exists. No (default): The current DHCP lease is saved. Yes: The current DHCP lease and the leased IP address are released.
DHCP Renew This menu appears if Config Method was set to DHCP and a DHCP lease for the print server exists. No (default): The print server does not request to renew the DHCP lease. Yes: The print server requests to renew the current DHCP lease.
Manual Settings (Available only if Config Method is set to Manual) Configure parameters directly from the printer control panel: IP Address: The unique IP address of the printer (n.n.n.n). Subnet Mask: The subnet mask for the printer (n.n.n.n). Syslog Server: The IP address of the syslog server (n.n.n.n) used to receive and log syslog messages. Default Gateway: The IP address (n.n.n.n) of the gateway or router used for communications with other networks. Idle Timeout: The time period, in seconds, after which an idle TCP print data connection is closed (default is 270 seconds, 0 disables the timeout).
Default IP Specify the IP address to default to when the print server is unable to obtain an IP address from the network during a forced TCP/IP reconfiguration (for example, when manually configured to use BootP or DHCP).
Auto IP: A link-local IP address 169.254.x.x is set. Legacy: The address 192.0.0.192 is set, consistent with older HP Jetdirect devices.
Primary DNS Specify the IP address (n.n.n.n) of a Primary DNS Server.
NOTE: This item appears only if Manual configuration is a higher priority than DHCP in the Config. Precedence table, configured through the embedded Web server.
Secondary DNS Specify the IP address (n.n.n.n) of a Secondary Domain Name System (DNS) Server. NOTE: This item will appear only if Manual configuration is a higher priority than DHCP in the Config. Precedence table, configured through the embedded Web server.
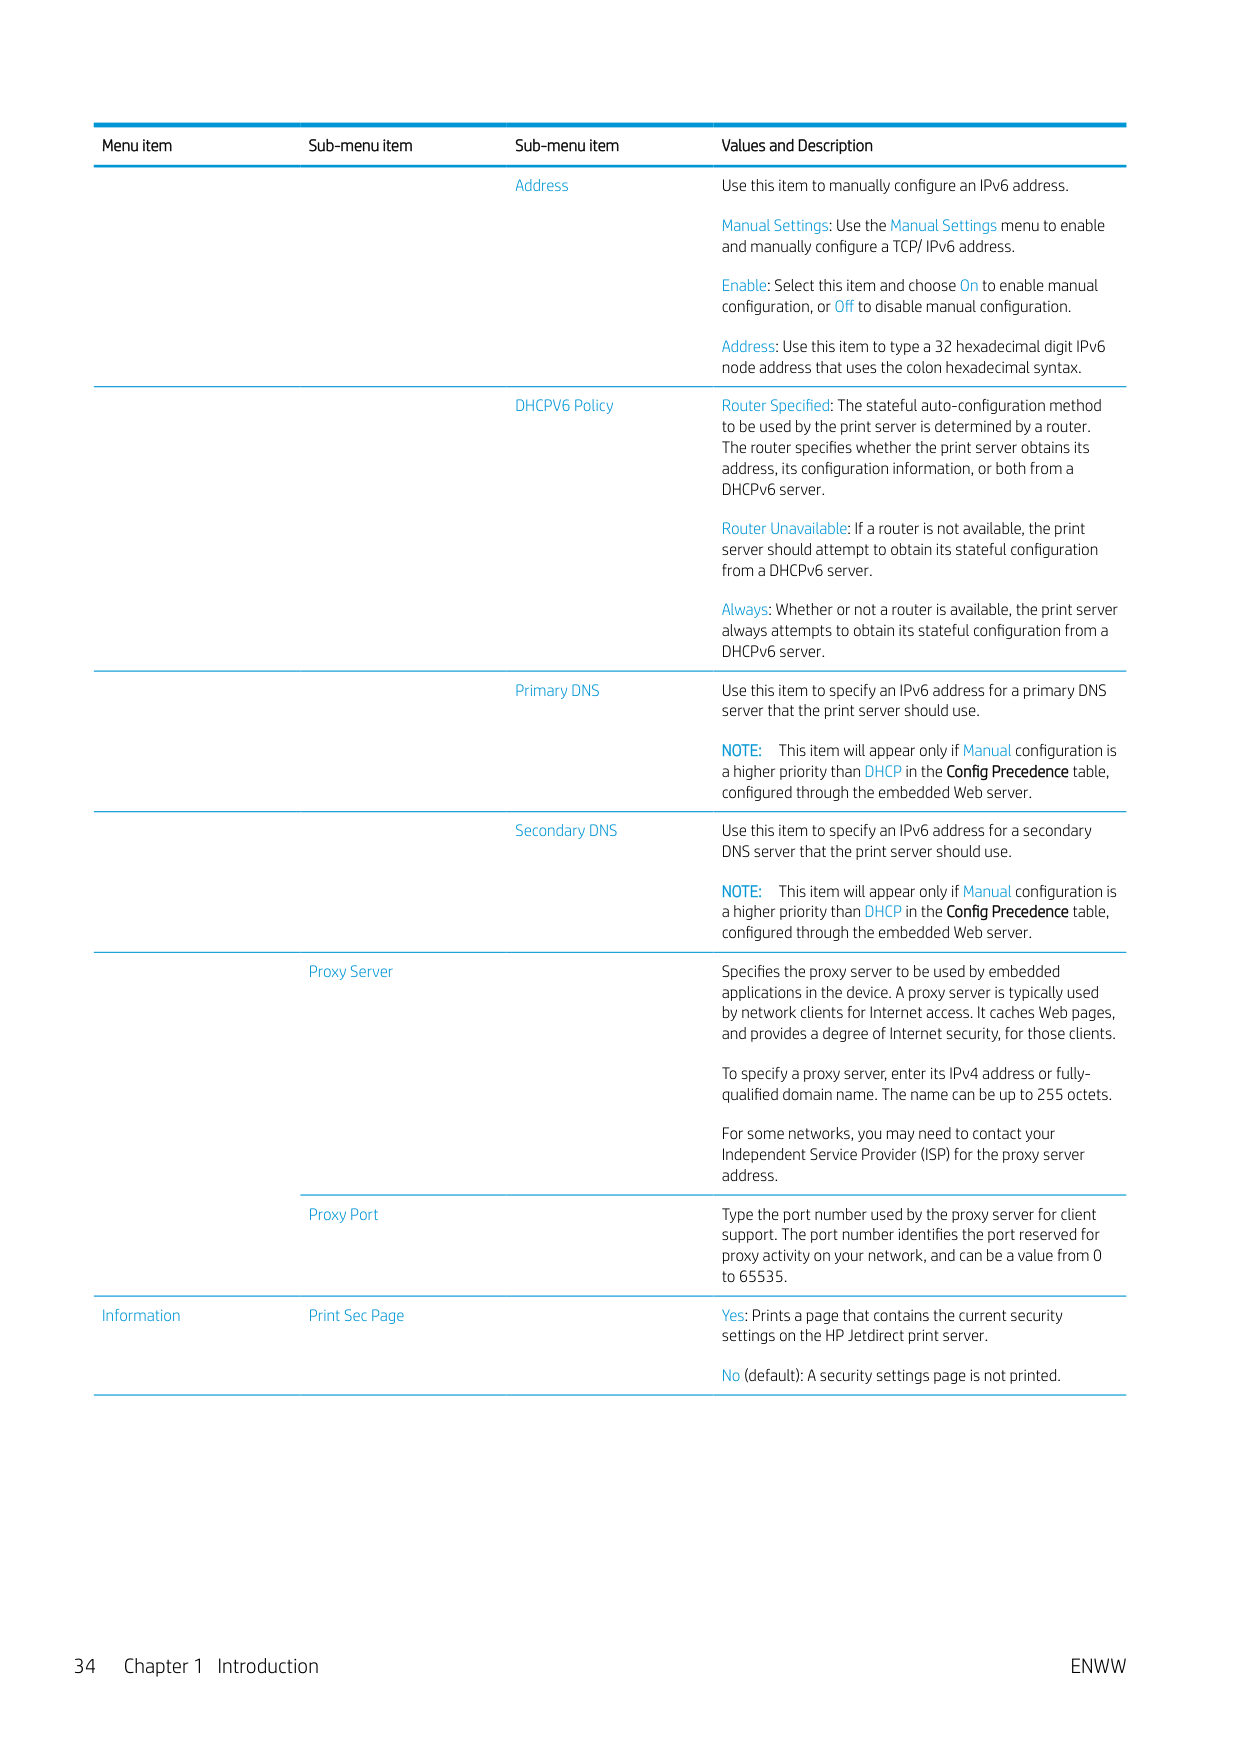
IPV6 Settings Enable Use this item to enable or disable IPv6 operation on the print server. Off: IPv6 is disabled. On (default): IPv6 is enabled.
Address Use this item to manually configure an IPv6 address.
Manual Settings: Use the Manual Settings menu to enable and manually configure a TCP/ IPv6 address.
Enable: Select this item and choose On to enable manual configuration, or Off to disable manual configuration.
Address: Use this item to type a 32 hexadecimal digit IPv6 node address that uses the colon hexadecimal syntax.

DHCPV6 Policy Router Specified: The stateful auto-configuration method to be used by the print server is determined by a router. The router specifies whether the print server obtains its address, its configuration information, or both from a DHCPv6 server.
Router Unavailable: If a router is not available, the print server should attempt to obtain its stateful configuration from a DHCPv6 server.
Always: Whether or not a router is available, the print server always attempts to obtain its stateful configuration from a DHCPv6 server.
Primary DNS Use this item to specify an IPv6 address for a primary DNS server that the print server should use. NOTE: This item will appear only if Manual configuration is a higher priority than DHCP in the Config Precedence table, configured through the embedded Web server.
Secondary DNS Use this item to specify an IPv6 address for a secondary DNS server that the print server should use. NOTE: This item will appear only if Manual configuration is a higher priority than DHCP in the Config Precedence table, configured through the embedded Web server.
Proxy Server Specifies the proxy server to be used by embedded applications in the device. A proxy server is typically used by network clients for Internet access. It caches Web pages, and provides a degree of Internet security, for those clients.
To specify a proxy server, enter its IPv4 address or fullyqualified domain name. The name can be up to 255 octets.
For some networks, you may need to contact your Independent Service Provider (ISP) for the proxy server address.
Proxy Port Type the port number used by the proxy server for client support. The port number identifies the port reserved for proxy activity on your network, and can be a value from 0 to 65535.
Information Print Sec Page Yes: Prints a page that contains the current security settings on the HP Jetdirect print server. No (default): A security settings page is not printed.
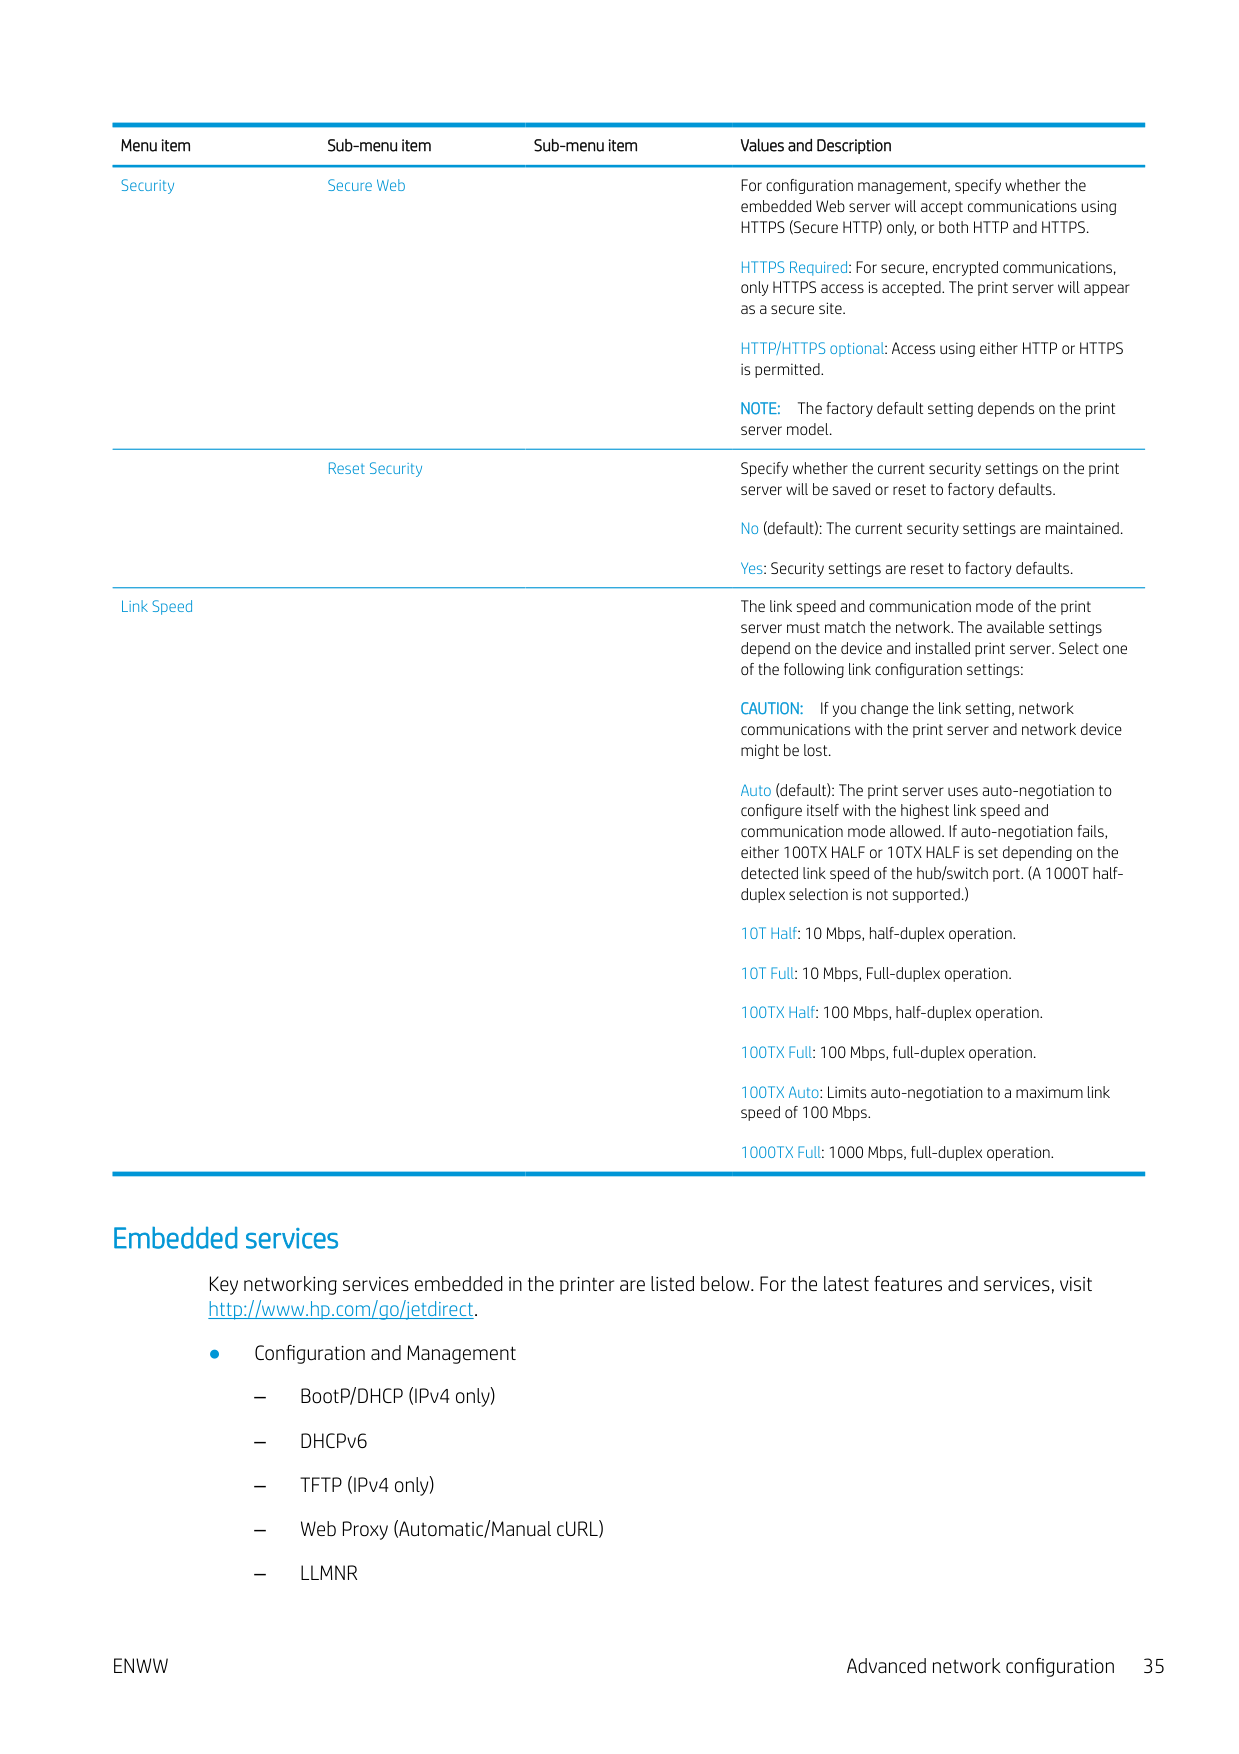
Security Secure Web For configuration management, specify whether the embedded Web server will accept communications using HTTPS (Secure HTTP) only, or both HTTP and HTTPS.
HTTPS Required: For secure, encrypted communications, only HTTPS access is accepted. The print server will appear as a secure site.
HTTP/HTTPS optional: Access using either HTTP or HTTPS is permitted.
NOTE: The factory default setting depends on the print server model.
Reset Security Specify whether the current security settings on the print server will be saved or reset to factory defaults. No (default): The current security settings are maintained. Yes: Security settings are reset to factory defaults.
Link Speed The link speed and communication mode of the print server must match the network. The available settings depend on the device and installed print server. Select one of the following link configuration settings:

CAUTION: If you change the link setting, network communications with the print server and network device might be lost.
Auto (default): The print server uses auto-negotiation to configure itself with the highest link speed and communication mode allowed. If auto-negotiation fails, either 100TX HALF or 10TX HALF is set depending on the detected link speed of the hub/switch port. (A 1000T halfduplex selection is not supported.)
10T Half: 10 Mbps, half-duplex operation. 10T Full: 10 Mbps, Full-duplex operation. 100TX Half: 100 Mbps, half-duplex operation. 100TX Full: 100 Mbps, full-duplex operation. 100TX Auto: Limits auto-negotiation to a maximum link speed of 100 Mbps. 1000TX Full: 1000 Mbps, full-duplex operation.
#### Embedded services
Key networking services embedded in the printer are listed below. For the latest features and services, visit http://www.hp.com/go/jetdirect.
– Raw IP printing (HP-proprietary TCP ports 9100, 9101, 9102)
Turn the printer on and off
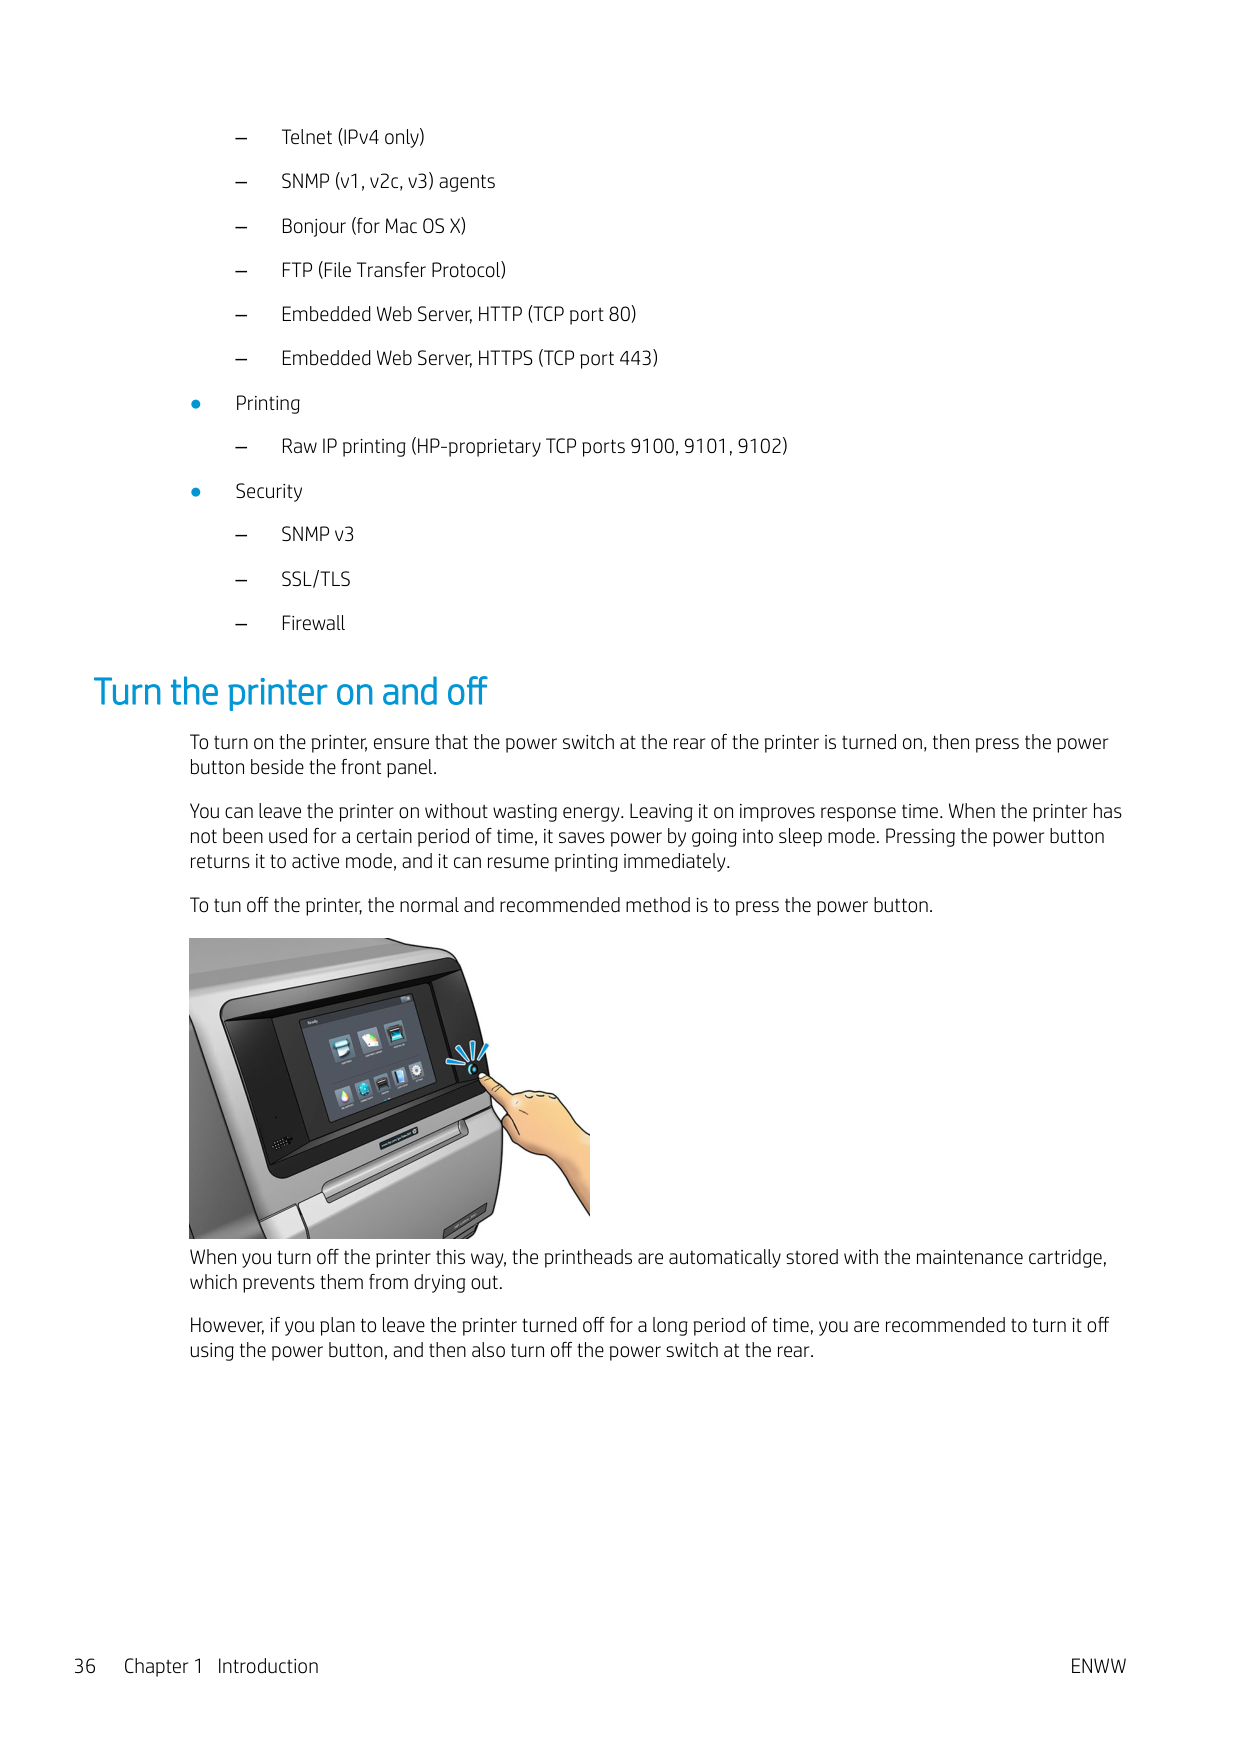
To turn on the printer, ensure that the power switch at the rear of the printer is turned on, then press the power button beside the front panel.
You can leave the printer on without wasting energy. Leaving it on improves response time. When the printer has not been used for a certain period of time, it saves power by going into sleep mode. Pressing the power button returns it to active mode, and it can resume printing immediately.
To tun off the printer, the normal and recommended method is to press the power button.

When you turn off the printer this way, the printheads are automatically stored with the maintenance cartridge, which prevents them from drying out.
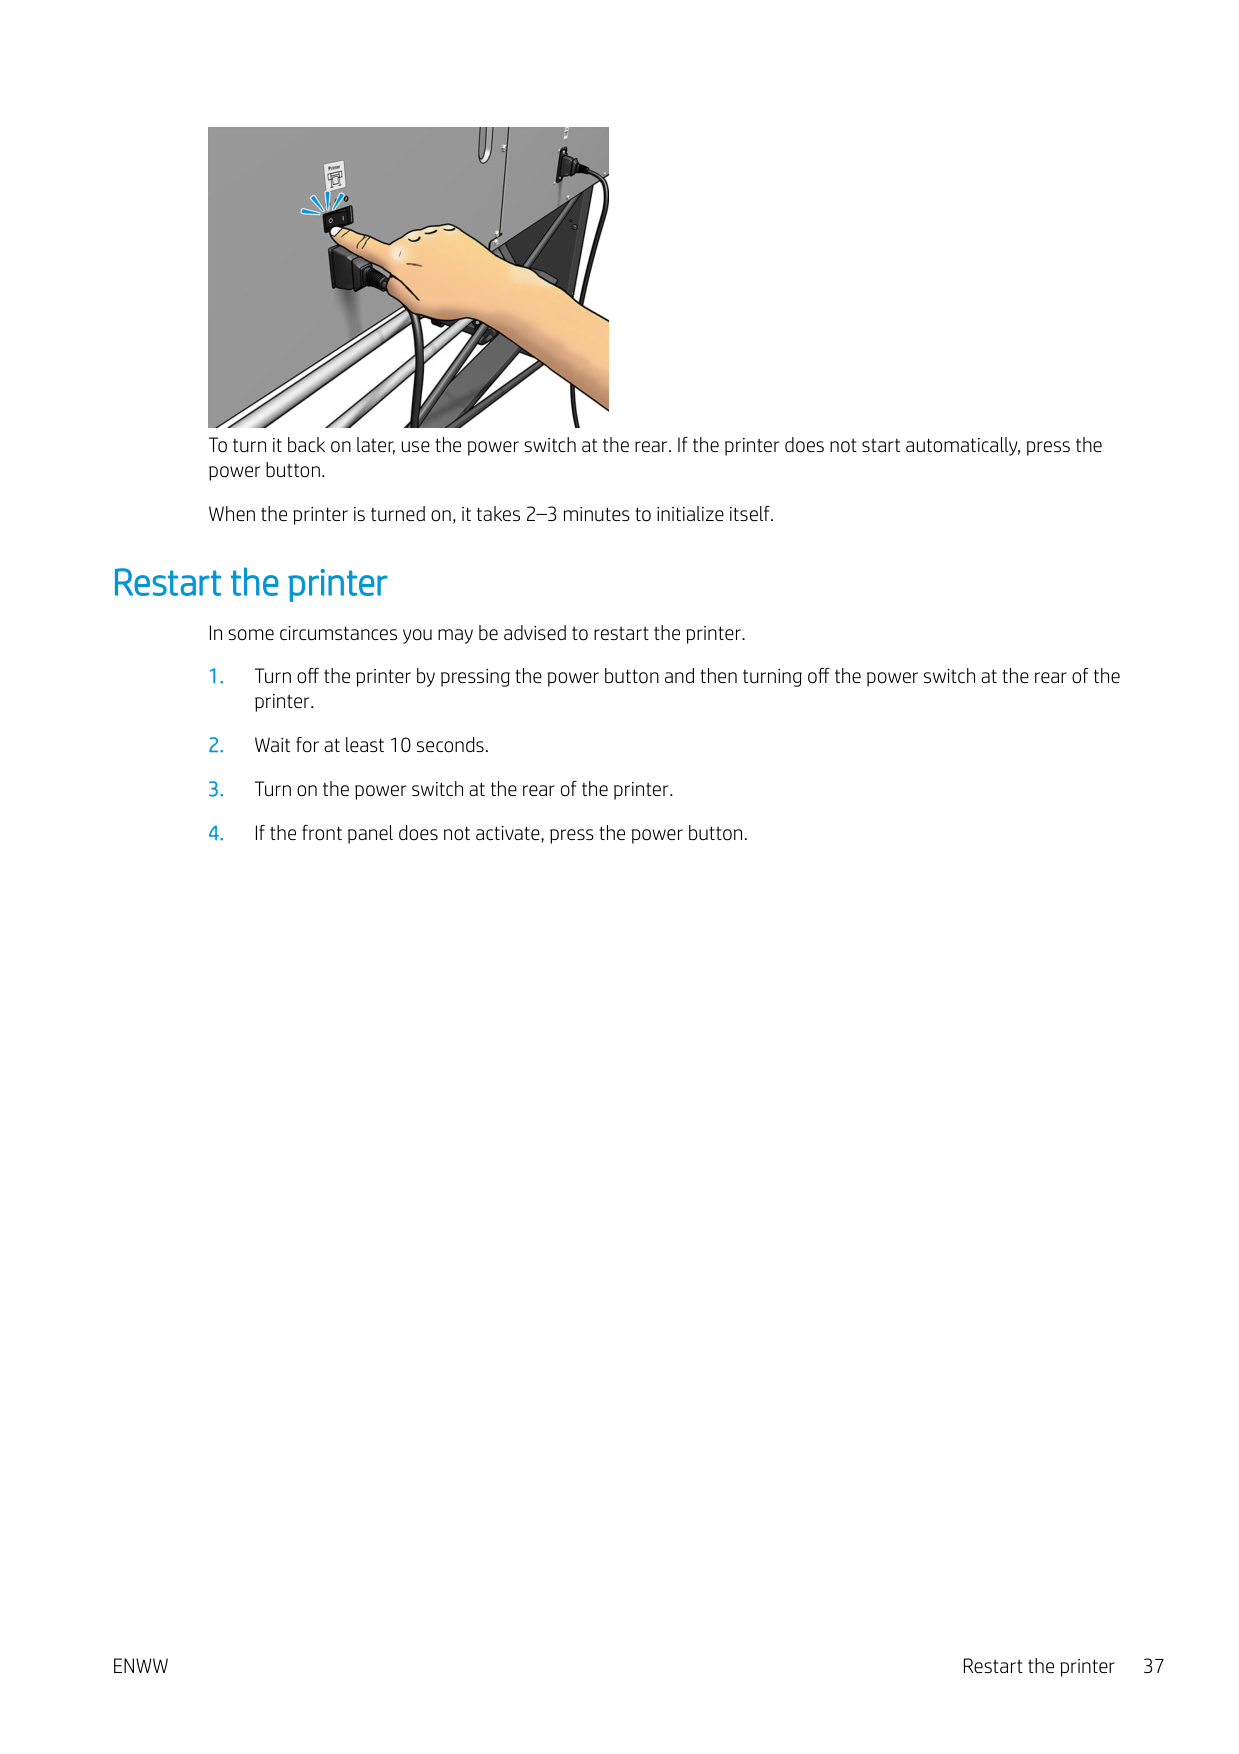
However, if you plan to leave the printer turned off for a long period of time, you are recommended to turn it off using the power button, and then also turn off the power switch at the rear.

To turn it back on later, use the power switch at the rear. If the printer does not start automatically, press the power button.
When the printer is turned on, it takes 2–3 minutes to initialize itself.
Restart the printer

In some circumstances you may be advised to restart the printer.
ENWW Restart the printer 37
2 Useful links
Visit the HP Latex Knowledge Center at http://www.hp.com/communities/HPLatex, where you can find detailed information about our HP Latex products and applications, and use the forum to discuss anything related to the business.
Product documentation: http://www.hp.com/go/latex300/manuals/ User training (quick guide) is already installed in your computer. To reinstall: http://www.hp.com/go/latex300/ quickguide/ Videos about how to use the printer: http://www.hp.com/supportvideos/ or http://www.youtube.com/ HPSupportAdvanced Information about software RIPs, applications, solutions, inks, and substrates: http://www.hp.com/go/latex300/ solutions/ Substrate presets: http://www.hp.com/go/mediasolutionslocator (see HP Media Locator on page 91) HP Support: http://www.hp.com/go/latex300/support/ Embedded Web Server: Use the printer’s IP address (see Access the Embedded Web Server on page 23) Registration and communication with HP: http://www.hp.com/communities/HPLatex/.
When you need help
In most countries, support is provided by HP support partners (usually the company that sold you the printer). If this is not the case in your country, contact HP Support on the Web as shown above.
Help is also available to you by telephone. What to do before you call:
NOTE: This information is available from the front panel: press . You may also find it on a label at the rear of the printer.

| | |---|
38 Chapter 2 Useful links ENWW
#### Telephone number
Your HP Support telephone number is available on the Web: please visit http://welcome.hp.com/country/us/en/ wwcontact_us.html.
#### Customer Self Repair
HP's Customer Self Repair program offers our customers the fastest service under either warranty or contract. It enables HP to ship replacement parts directly to you (the end user) so that you can replace them. Using this program, you can replace parts at your own convenience.
###### Convenient, easy to use
#### Service information
The printer can produce on request a list of many aspects of its current status, some of which may be useful to a service engineer trying to fix a problem. There are two different ways to request this list:
If you need to send the list by email, you can save the page as a file from your Web browser, and later send the file. Alternatively, from Internet Explorer you can send the page directly: select File > Send > Page by email.
ENWW When you need help 39
3 Handle the substrate and troubleshoot substrate issues
ENWW 41
Overview
You can print on a wide variety of printing materials, all of which are referred to in this guide as substrates.
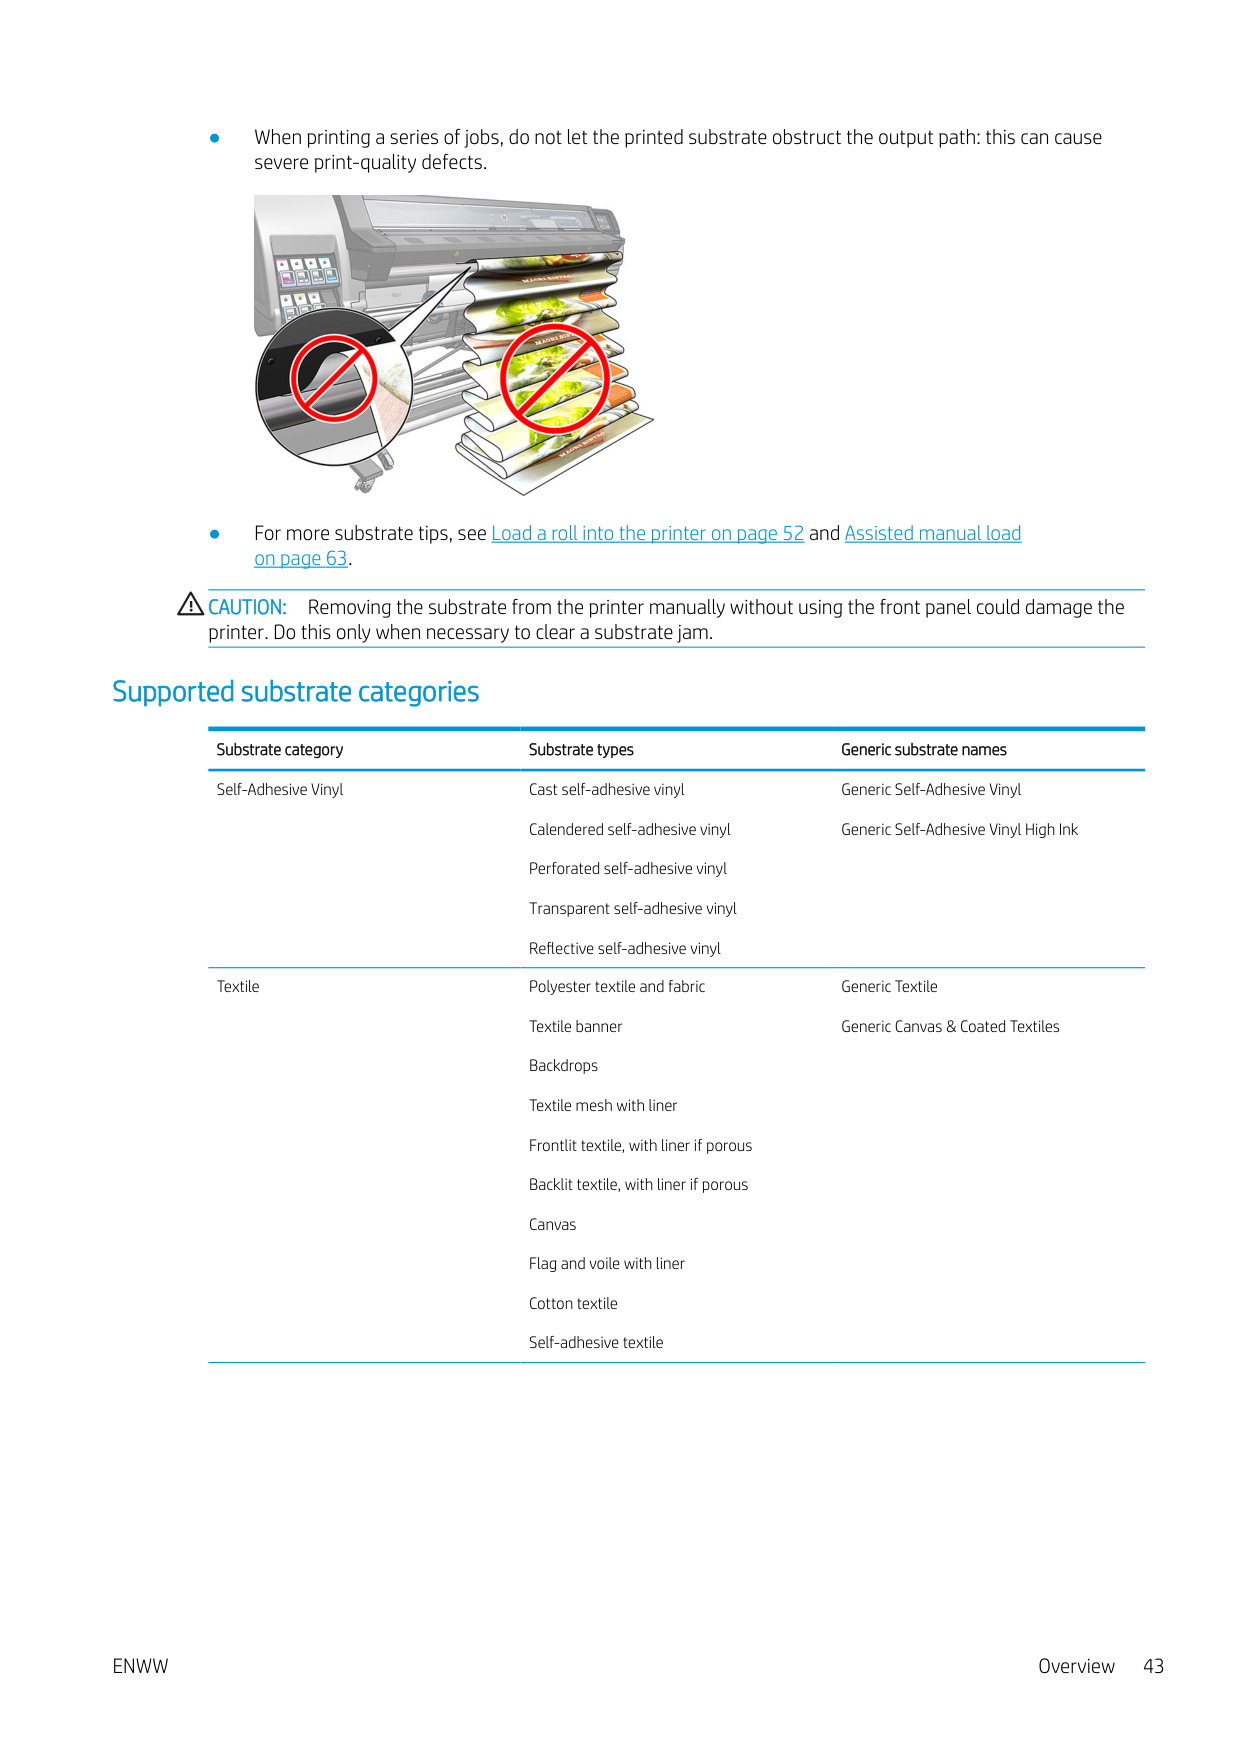
Substrate tips Choosing the correct substrate for your needs is an essential step in ensuring good print quality. Here are some tips about substrate usage.
NOTE: The use of tape to stick the leading edge of the roll to the core is especially important for heavy substrates, because the inherent stiffness of the substrate can cause it to loosen and unwind from the core.
If the names are not the same, press on the front panel, then Substrate > Change loaded substrate; or change the substrate in the RIP.

| | |---|


CAUTION: Removing the substrate from the printer manually without using the front panel could damage the printer. Do this only when necessary to clear a substrate jam.
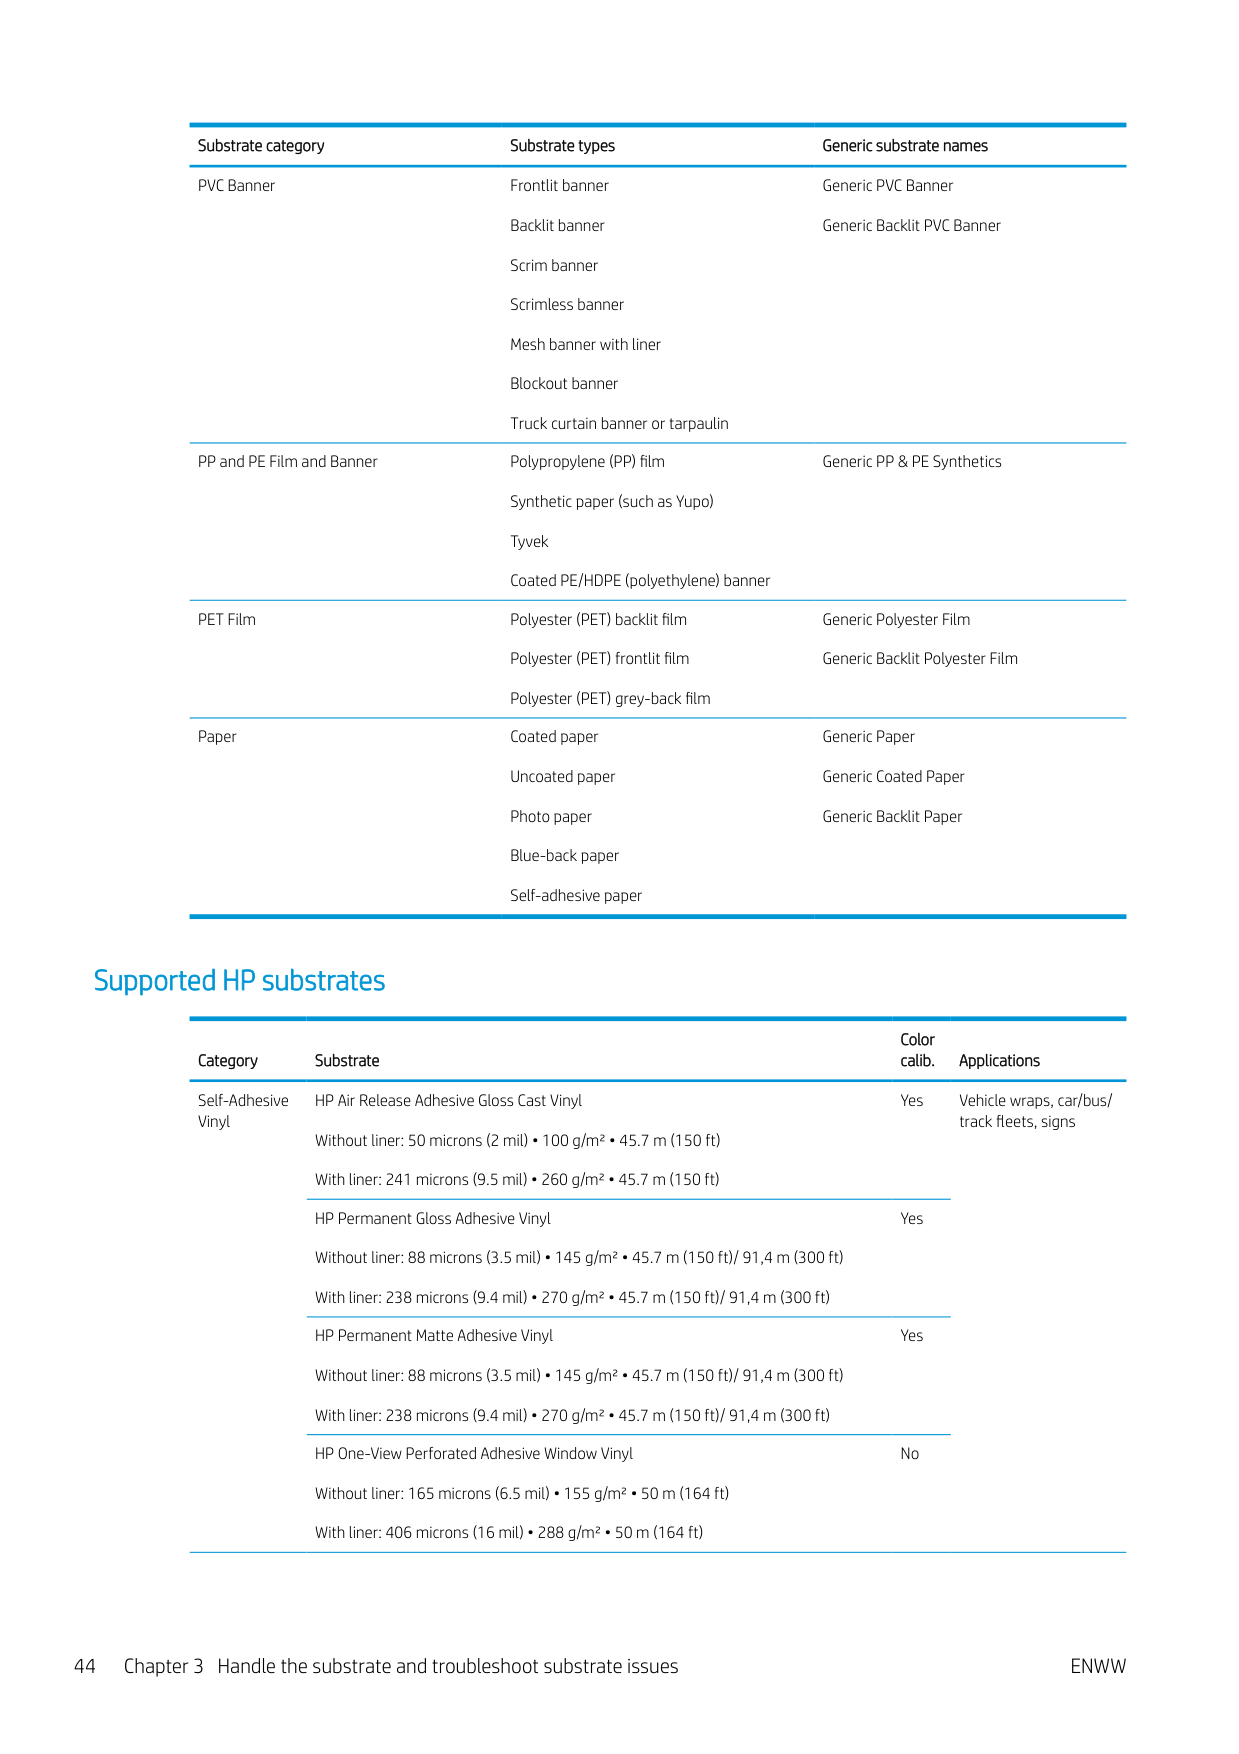
#### Supported substrate categories
######### Substrate category Substrate types Generic substrate names Self-Adhesive Vinyl Cast self-adhesive vinyl
Generic Self-Adhesive Vinyl Generic Self-Adhesive Vinyl High Ink
Calendered self-adhesive vinyl Perforated self-adhesive vinyl Transparent self-adhesive vinyl Reflective self-adhesive vinyl
Textile Polyester textile and fabric Textile banner Backdrops Textile mesh with liner Frontlit textile, with liner if porous Backlit textile, with liner if porous Canvas Flag and voile with liner Cotton textile Self-adhesive textile
Generic Textile Generic Canvas & Coated Textiles
######### Substrate category Substrate types Generic substrate names PVC Banner Frontlit banner
Generic PVC Banner Generic Backlit PVC Banner
Backlit banner Scrim banner Scrimless banner Mesh banner with liner Blockout banner Truck curtain banner or tarpaulin
PP and PE Film and Banner Polypropylene (PP) film Synthetic paper (such as Yupo) Tyvek Coated PE/HDPE (polyethylene) banner
Generic PP & PE Synthetics
PET Film Polyester (PET) backlit film Polyester (PET) frontlit film Polyester (PET) grey-back film
Generic Polyester Film Generic Backlit Polyester Film
Paper Coated paper Uncoated paper Photo paper Blue-back paper Self-adhesive paper
Generic Paper Generic Coated Paper Generic Backlit Paper
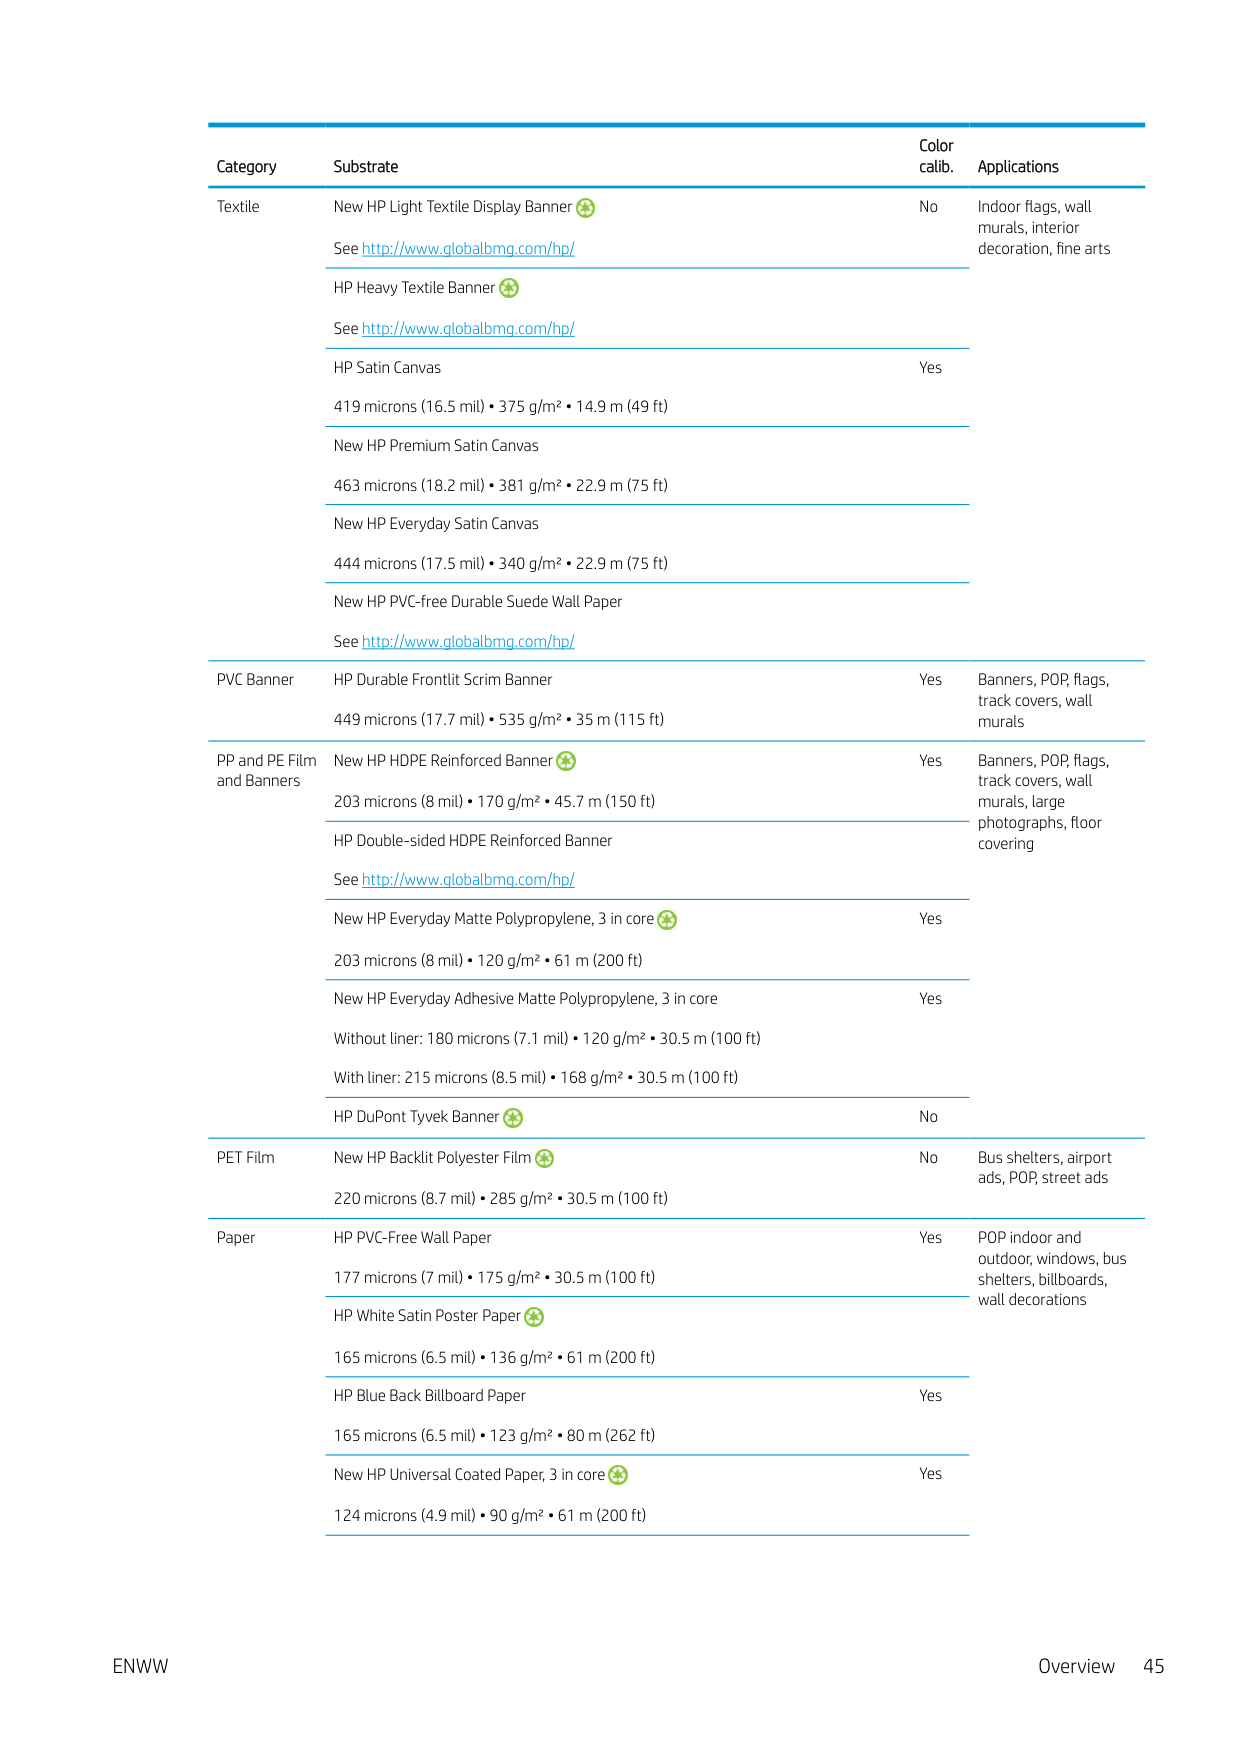
#### Supported HP substrates
Color calib. Applications
Category Substrate
Self-Adhesive Vinyl
HP Air Release Adhesive Gloss Cast Vinyl Without liner: 50 microns (2 mil) • 100 g/m² • 45.7 m (150 ft) With liner: 241 microns (9.5 mil) • 260 g/m² • 45.7 m (150 ft)
Yes Vehicle wraps, car/bus/ track fleets, signs
HP Permanent Gloss Adhesive Vinyl Without liner: 88 microns (3.5 mil) • 145 g/m² • 45.7 m (150 ft)/ 91,4 m (300 ft) With liner: 238 microns (9.4 mil) • 270 g/m² • 45.7 m (150 ft)/ 91,4 m (300 ft)
Yes
HP Permanent Matte Adhesive Vinyl Without liner: 88 microns (3.5 mil) • 145 g/m² • 45.7 m (150 ft)/ 91,4 m (300 ft) With liner: 238 microns (9.4 mil) • 270 g/m² • 45.7 m (150 ft)/ 91,4 m (300 ft)
Yes
HP One-View Perforated Adhesive Window Vinyl Without liner: 165 microns (6.5 mil) • 155 g/m² • 50 m (164 ft) With liner: 406 microns (16 mil) • 288 g/m² • 50 m (164 ft)
No
Textile New HP Light Textile Display Banner
No Indoor flags, wall murals, interior decoration, fine arts
See http://www.globalbmg.com/hp/
HP Heavy Textile Banner See http://www.globalbmg.com/hp/ HP Satin Canvas 419 microns (16.5 mil) • 375 g/m² • 14.9 m (49 ft)
Yes
New HP Premium Satin Canvas 463 microns (18.2 mil) • 381 g/m² • 22.9 m (75 ft) New HP Everyday Satin Canvas 444 microns (17.5 mil) • 340 g/m² • 22.9 m (75 ft) New HP PVC-free Durable Suede Wall Paper See http://www.globalbmg.com/hp/
PVC Banner HP Durable Frontlit Scrim Banner 449 microns (17.7 mil) • 535 g/m² • 35 m (115 ft)
Yes Banners, POP, flags, track covers, wall murals
PP and PE Film and Banners
Yes Banners, POP, flags, track covers, wall murals, large photographs, floor
New HP HDPE Reinforced Banner
203 microns (8 mil) • 170 g/m² • 45.7 m (150 ft)
coveringHP Double-sided HDPE Reinforced Banner See http://www.globalbmg.com/hp/ New HP Everyday Matte Polypropylene, 3 in core 203 microns (8 mil) • 120 g/m² • 61 m (200 ft)
Yes
New HP Everyday Adhesive Matte Polypropylene, 3 in core Without liner: 180 microns (7.1 mil) • 120 g/m² • 30.5 m (100 ft) With liner: 215 microns (8.5 mil) • 168 g/m² • 30.5 m (100 ft)
Yes
HP DuPont Tyvek Banner No PET Film New HP Backlit Polyester Film
No Bus shelters, airport ads, POP, street ads
220 microns (8.7 mil) • 285 g/m² • 30.5 m (100 ft)
Paper HP PVC-Free Wall Paper 177 microns (7 mil) • 175 g/m² • 30.5 m (100 ft)
Yes POP indoor and outdoor, windows, bus shelters, billboards, wall decorations
HP White Satin Poster Paper 165 microns (6.5 mil) • 136 g/m² • 61 m (200 ft) HP Blue Back Billboard Paper 165 microns (6.5 mil) • 123 g/m² • 80 m (262 ft)
Yes
Yes
New HP Universal Coated Paper, 3 in core
124 microns (4.9 mil) • 90 g/m² • 61 m (200 ft)
Yes
New HP Coated Paper, 3 in core
114 microns (4.5 mil) • 90 g/m² • 61 m (200 ft)
Yes
New HP Universal Heavyweight Coated Paper, 3 in core
165 microns (6.5 mil) • 125 g/m² • 61 m (200 ft)
Yes
New HP Heavyweight Coated Paper, 3 in core
167 microns (6.6 mil) • 130 g/m² • 61 m (200 ft)
Yes
New HP Super Heavyweight Plus Matte Paper, 3 in core
259 microns (10.2 mil) • 210 g/m² • 61 m (200 ft)
New HP Professional Gloss Photo Paper See http://www.globalbmg.com/hp/ New HP Professional Satin Photo See http://www.globalbmg.com/hp/ New HP Everyday Satin Photo Paper See http://www.globalbmg.com/hp/
HP large-format substrate take-back program availability varies. Some recyclable HP substrates can be recycled through commonly available recycling programs. Recycling programs may not exist in your area. See http://www.hp.com/recycle/ for details.

Porous substrates
Porous substrates may be used with the 365 or 375 printer and the ink collector, with which you must use the take-up reel.
The 315 and 335 printers are not designed to be used with porous substrates, and could be damaged by them, requiring a service repair not covered by your warranty.
To check the porosity of your substrate, proceed as follows.


Load a roll onto the spindle
TIP: As an alternative to the description here, you can see an animation of this procedure in the front panel: press , then Substrate > Substrate load > Learn how to load spindle.

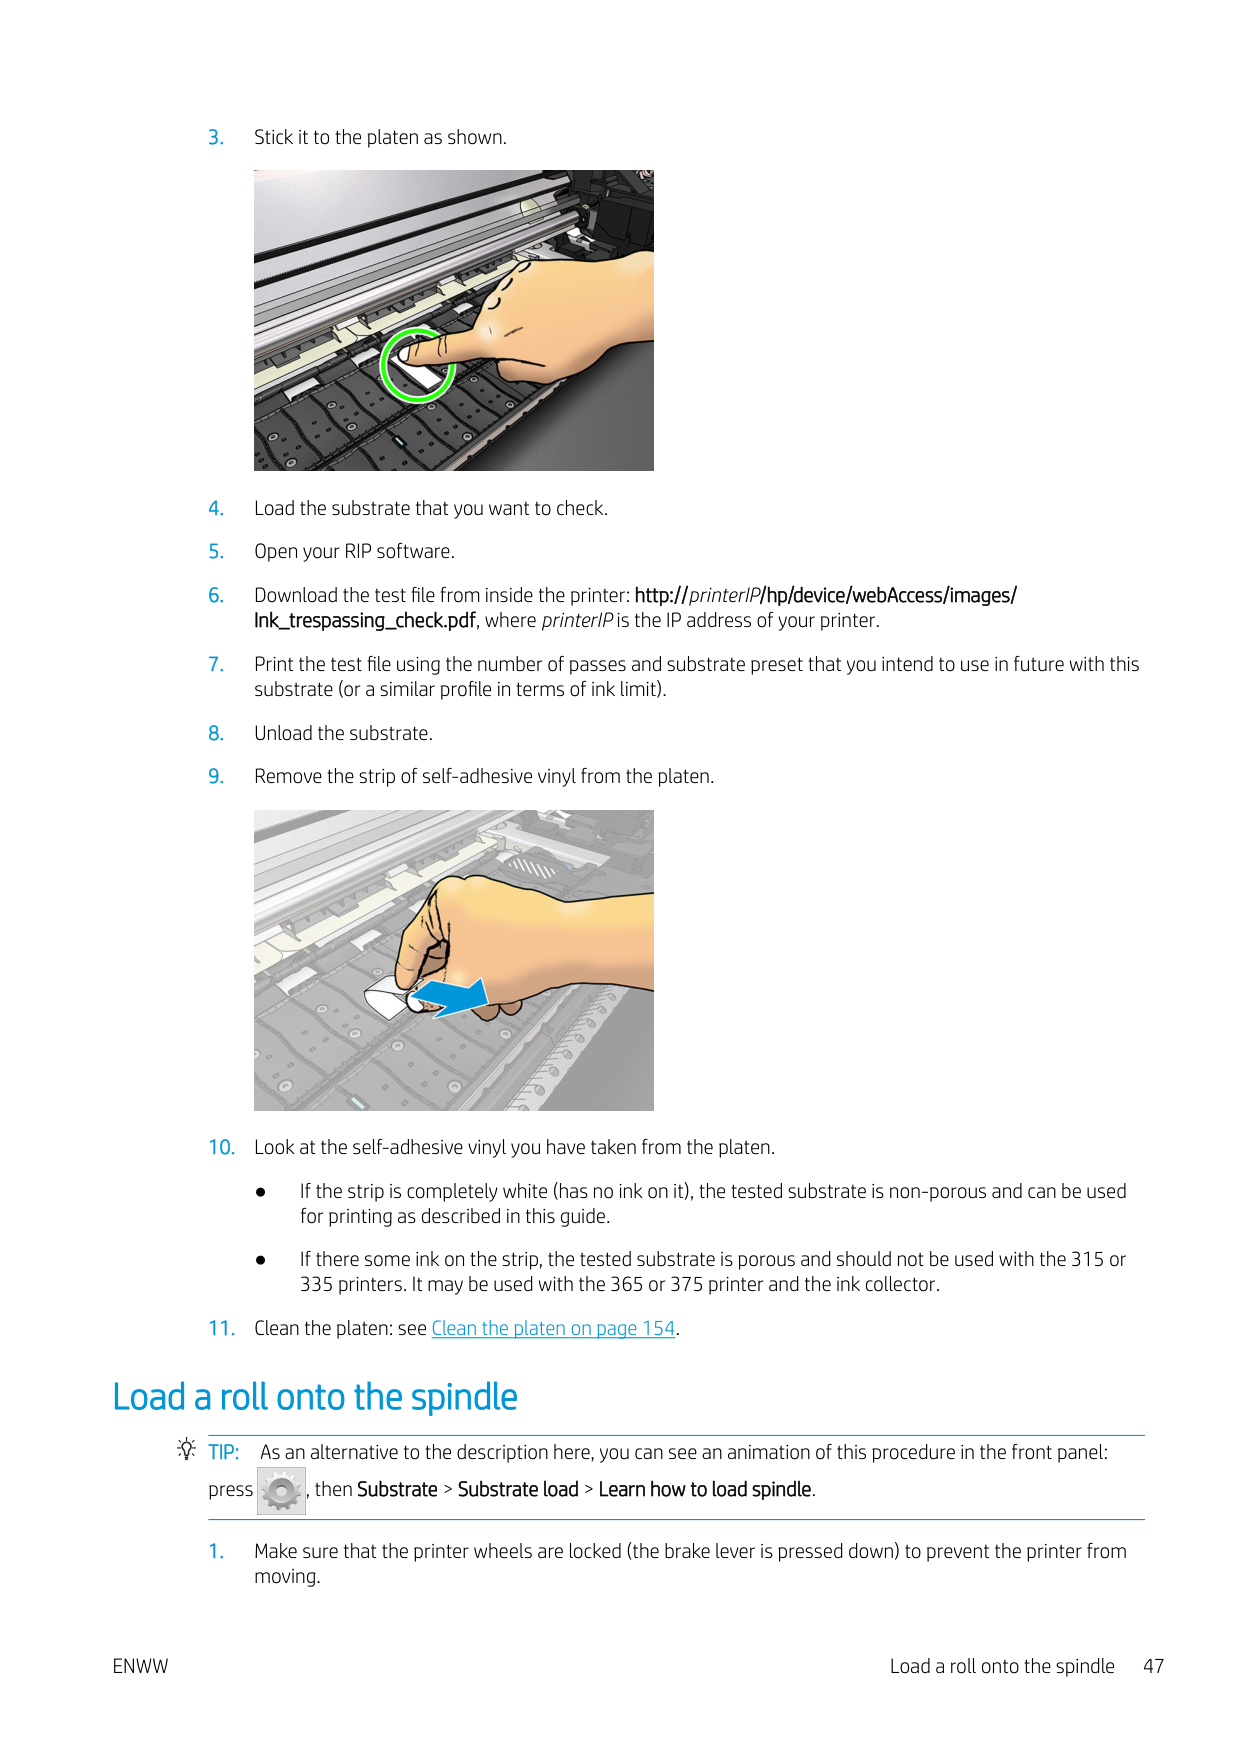
####### 2. Lift the spindle lock lever to disengage the spindle.

####### 3. Remove the spindle from the printer.CAUTION: Do not insert your fingers into the spindle supports.

The spindle has a stop at each end to keep the roll in position. Remove the blue stop at the left end to mount a new roll (the stop at the other end of a 76 mm (3 in) diameter spindle can also be removed, if you wish). The stop slides along the spindle to hold rolls of different widths.
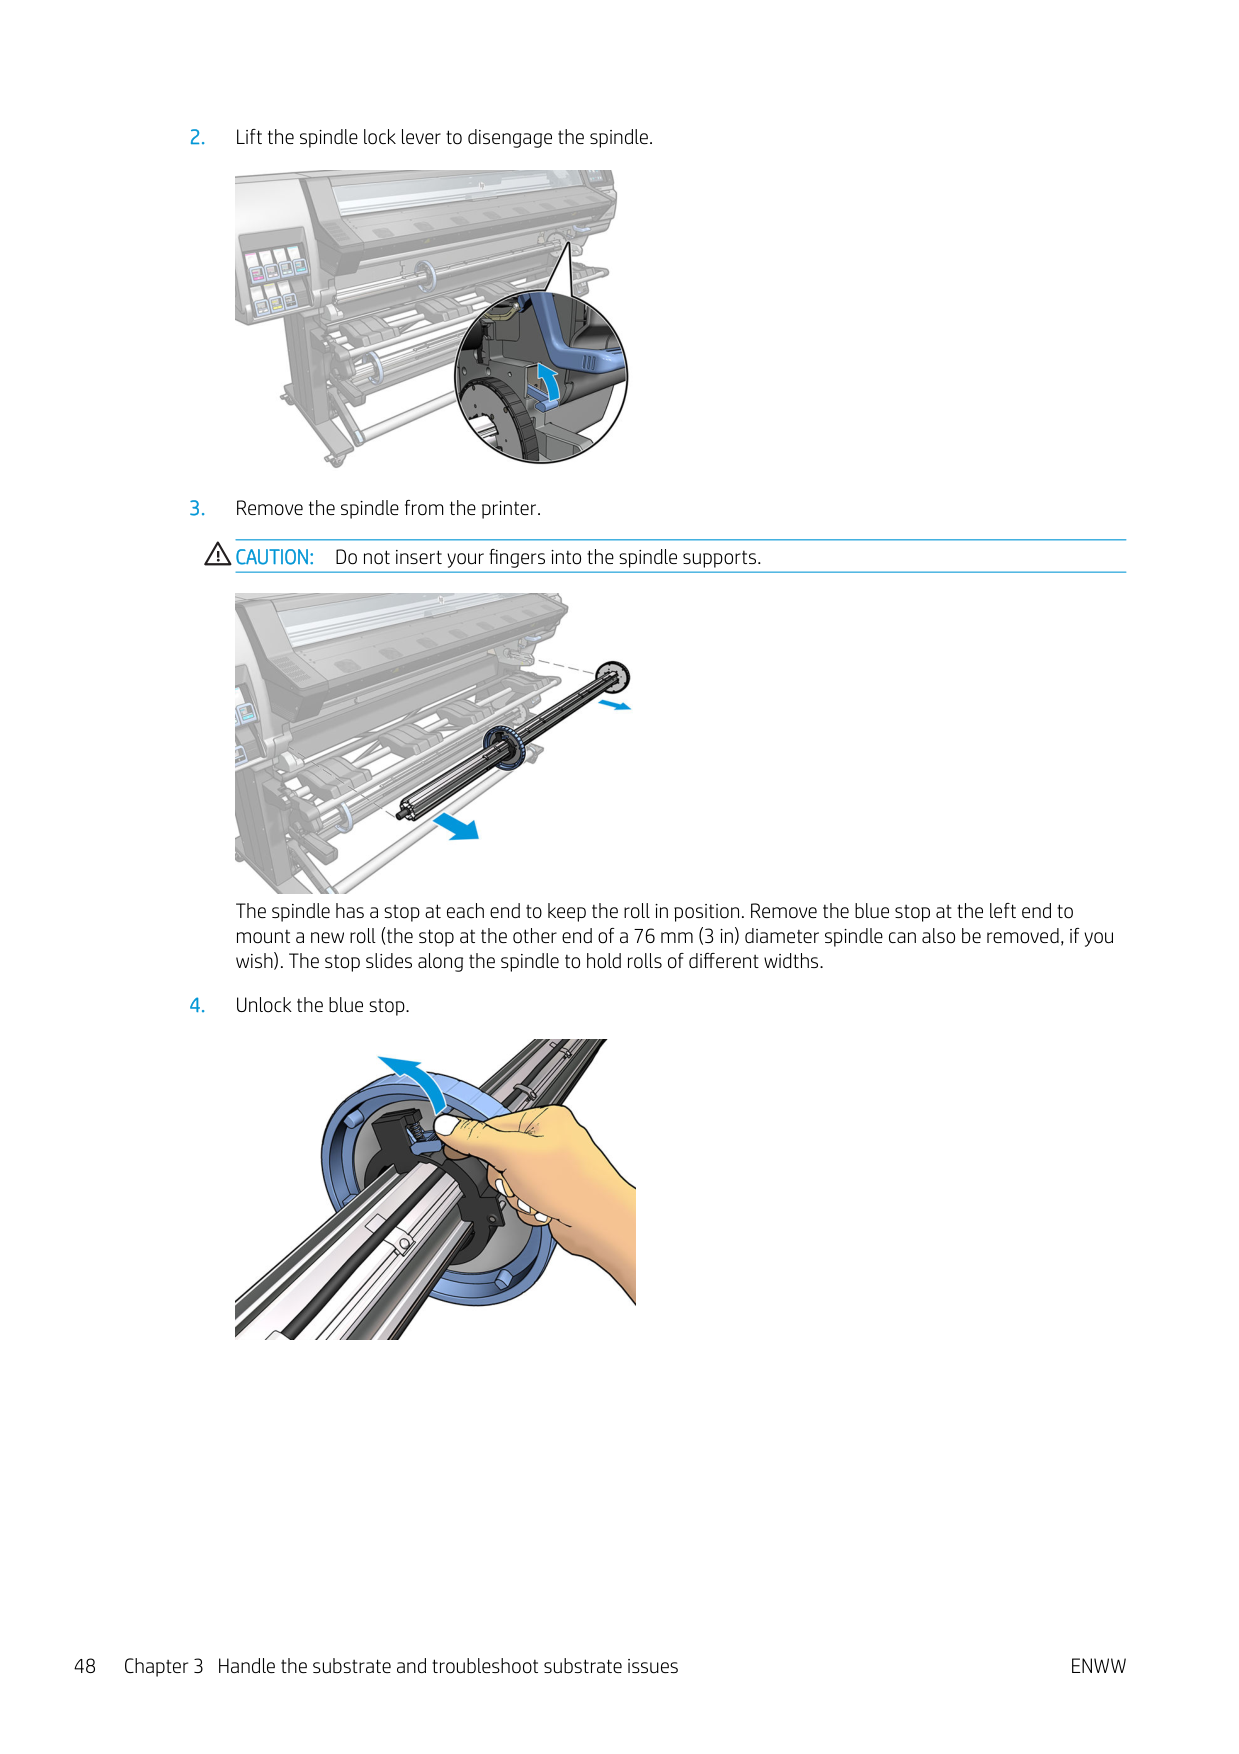
####### 4. Unlock the blue stop.

####### 5. Remove the stop from the left end of the spindle.

####### 6. Place the roll onto the loading table.

####### 7. Slide the spindle into the roll.

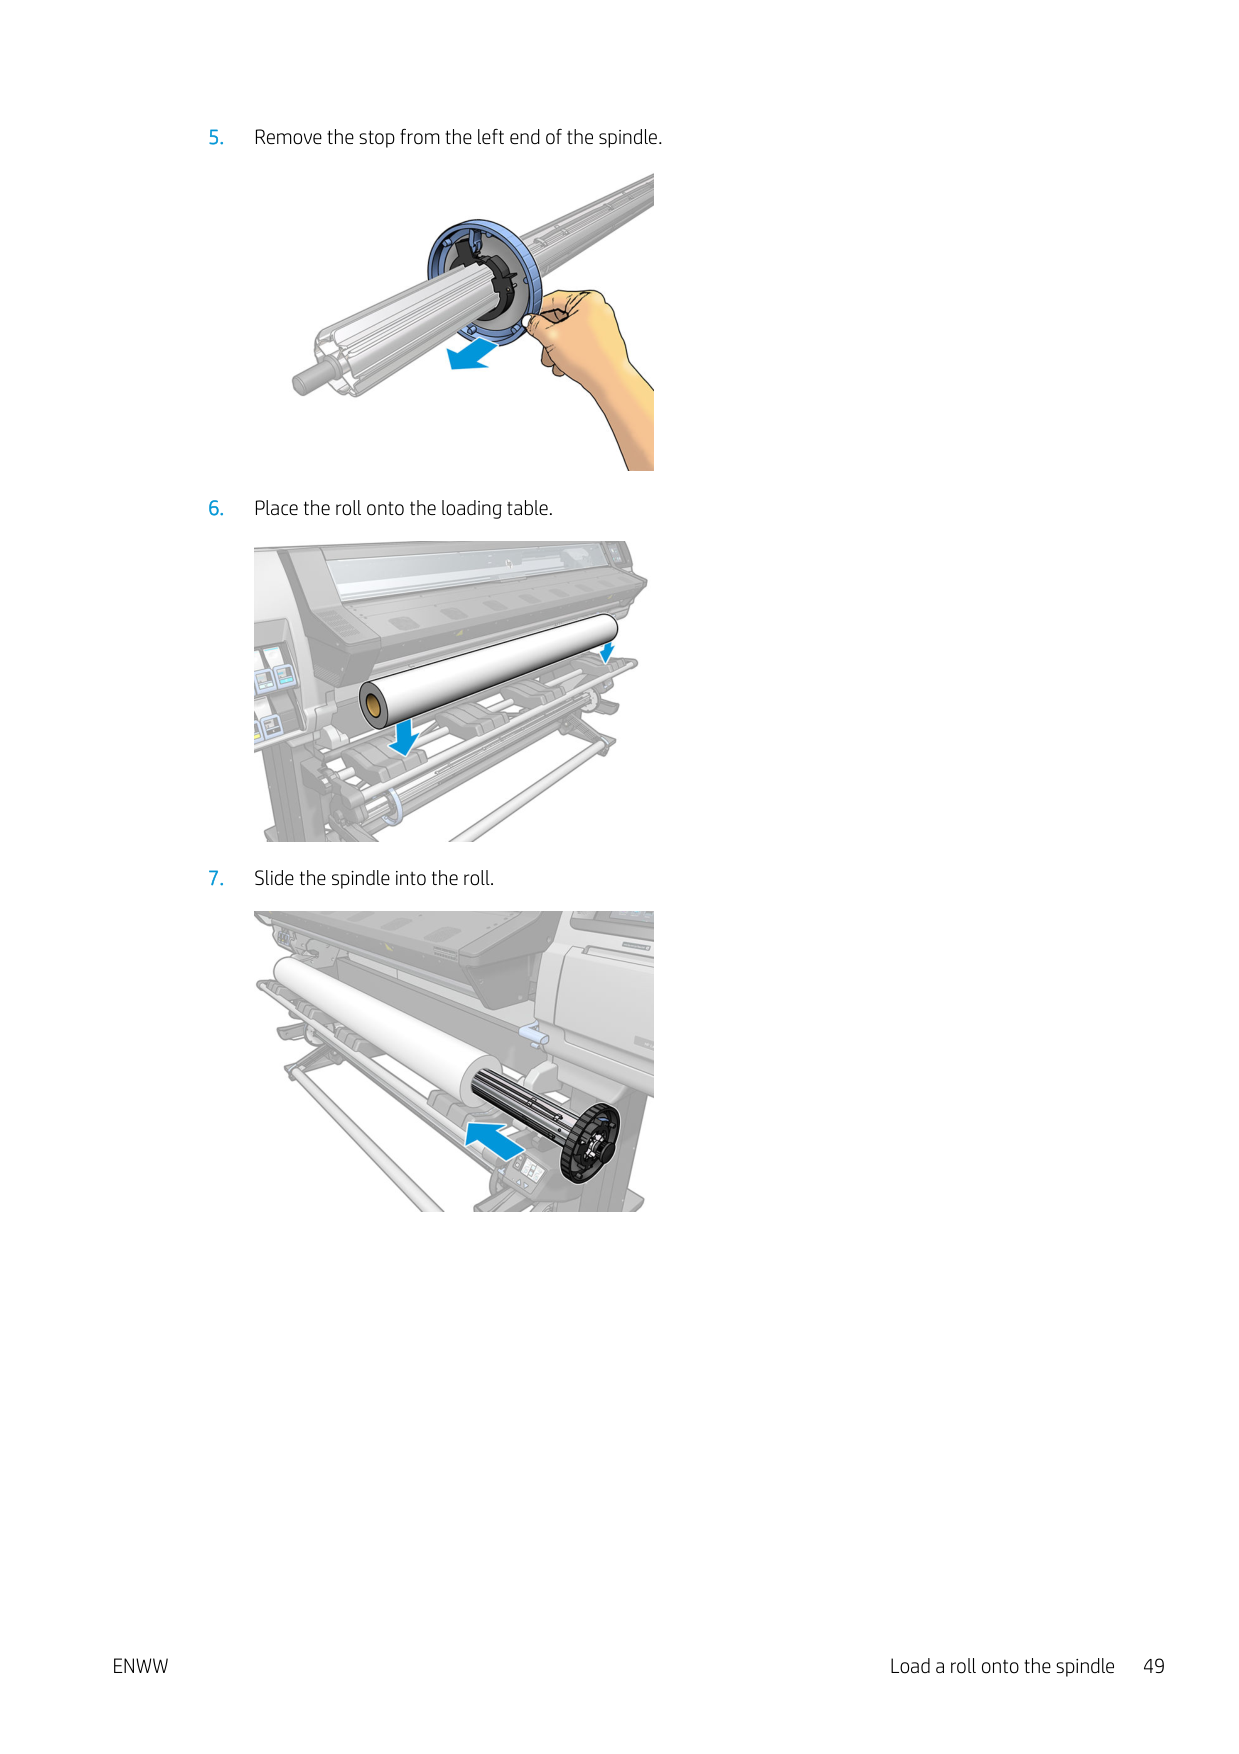
####### 8. The right stop of the 76 mm (3 in) diameter spindle has two positions: one for rolls of the printer'smaximum width, and another for narrower rolls. Remember to use the second position for narrower rolls,which improves the curing process and allows higher printing speeds.
| | |---|

NOTE: The 76 mm (3 in) diameter spindle is supplied with the 365 and 375 printers and is available as an accessory for the 335 printer.
| | |---|
NOTE: The 51 mm (2 in) diameter spindle supplied with the 315 and 335 printers has only one position for the right stop. There are blue lines on the loading table corresponding to two positions, but when using this spindle you can use only the outer position.

####### 9. Put the blue stop on to the upper end of the spindle, and push it towards the end of the roll.

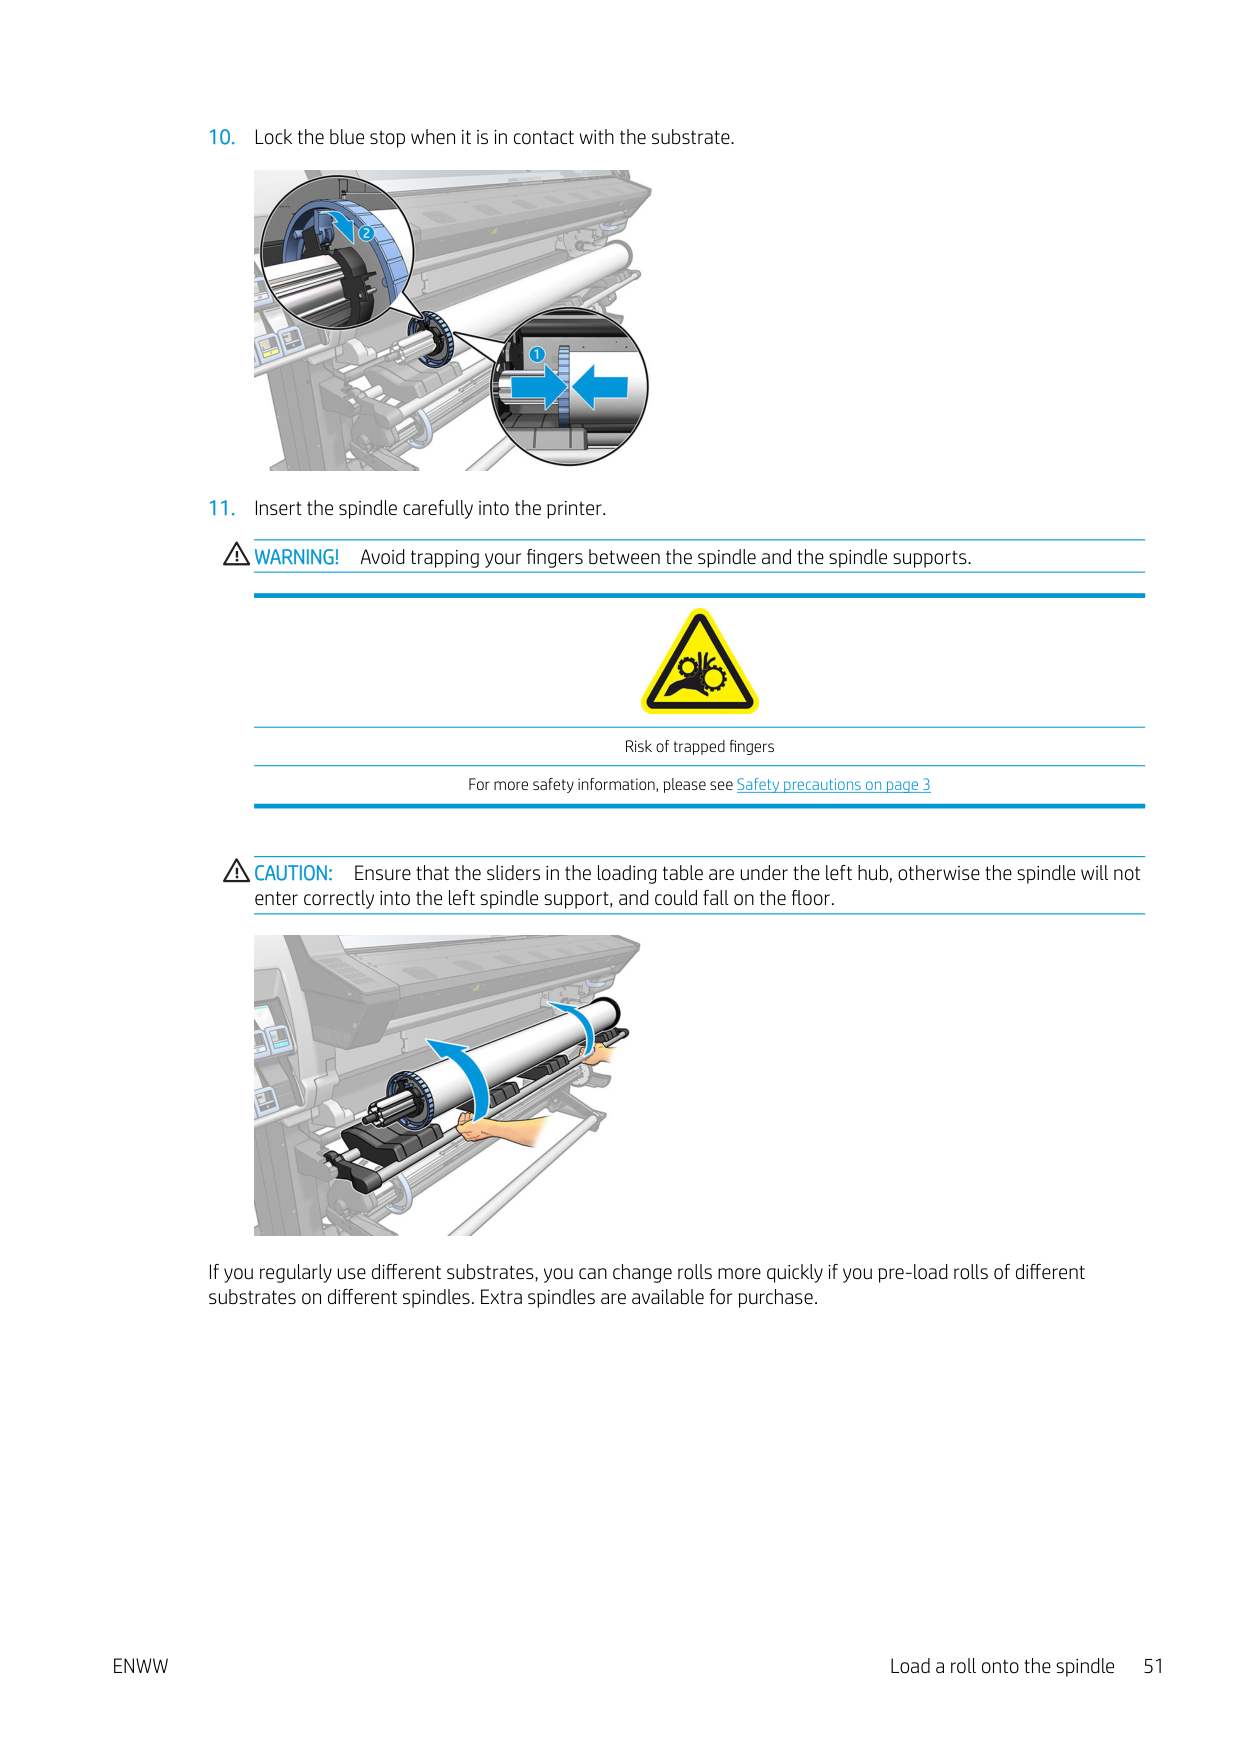
####### 10. Lock the blue stop when it is in contact with the substrate.

####### 11. Insert the spindle carefully into the printer.WARNING! Avoid trapping your fingers between the spindle and the spindle supports.

Risk of trapped fingers For more safety information, please see Safety precautions on page 3
CAUTION: Ensure that the sliders in the loading table are under the left hub, otherwise the spindle will not enter correctly into the left spindle support, and could fall on the floor.

If you regularly use different substrates, you can change rolls more quickly if you pre-load rolls of different substrates on different spindles. Extra spindles are available for purchase.
Load a roll into the printer

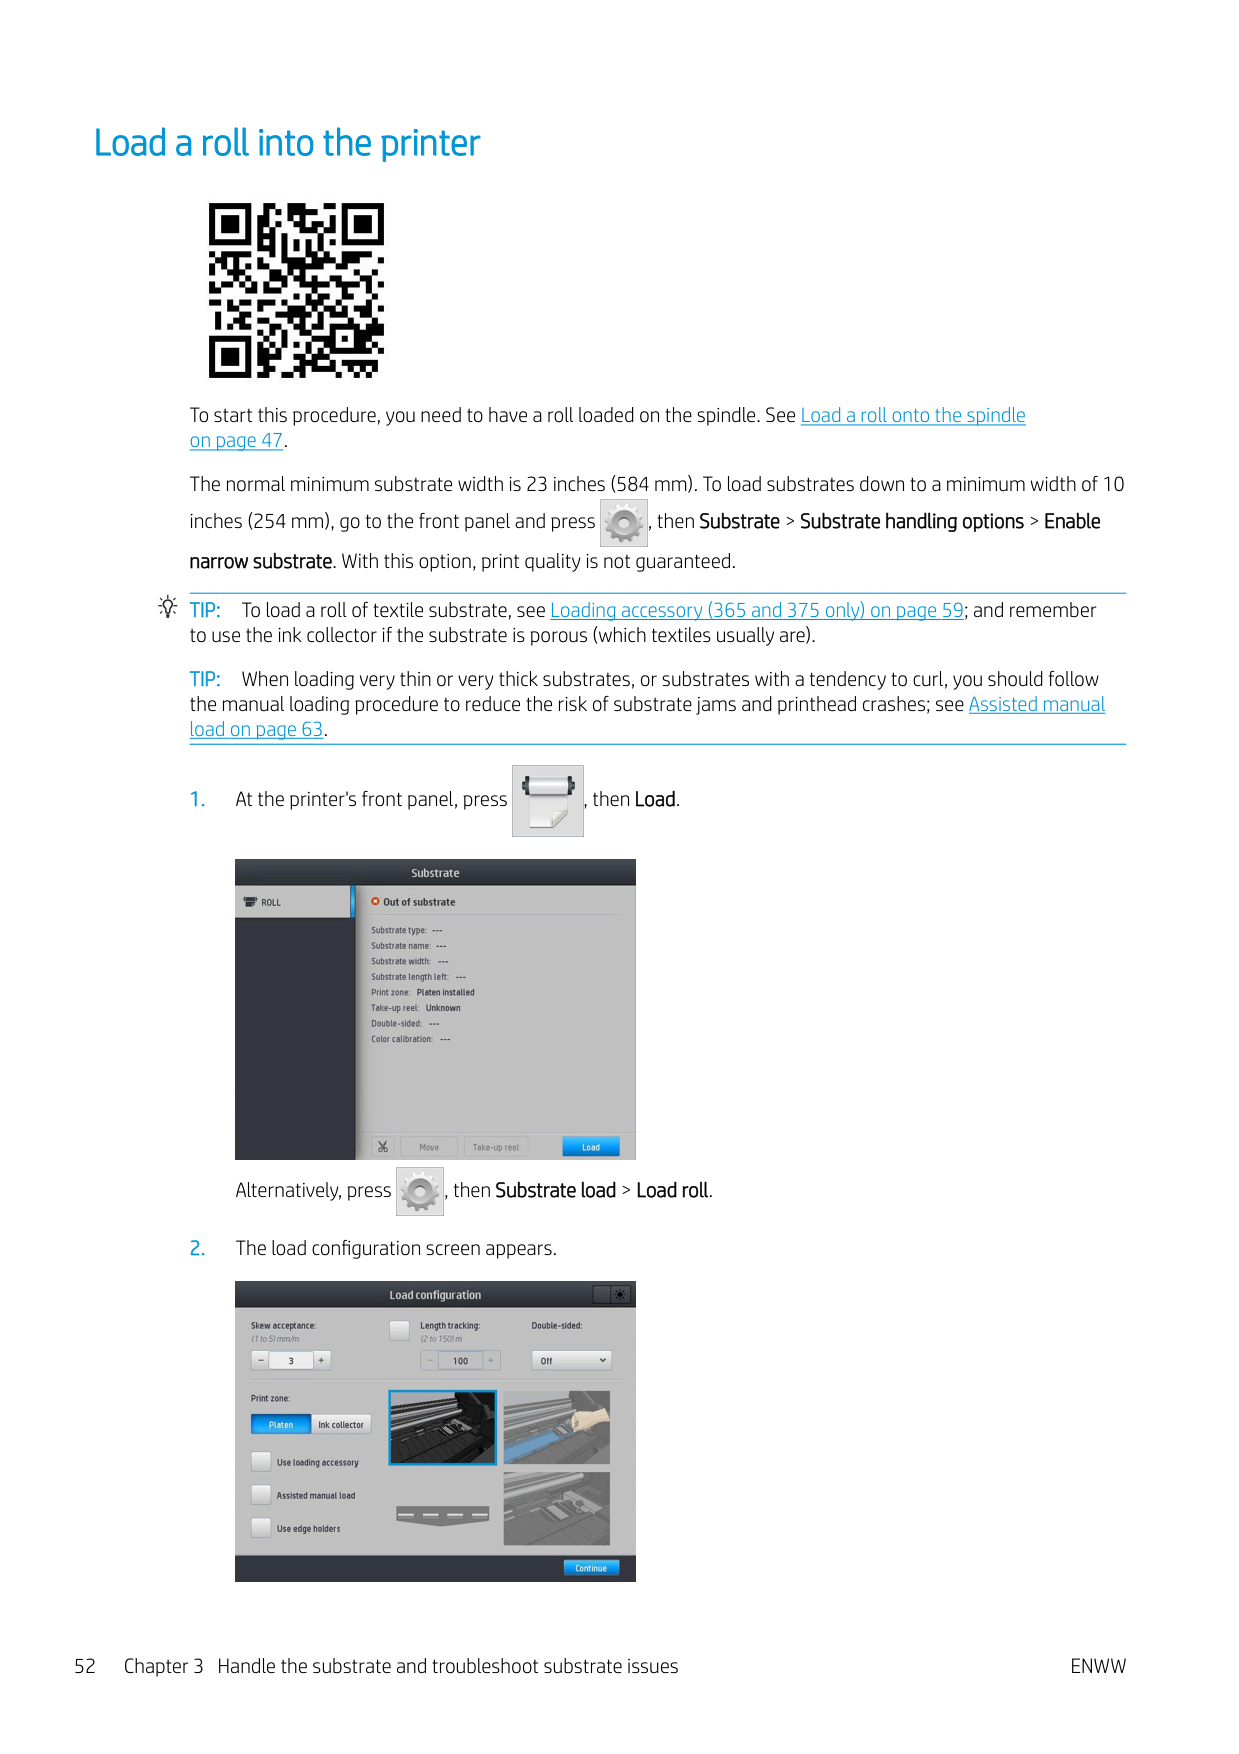
To start this procedure, you need to have a roll loaded on the spindle. See Load a roll onto the spindle on page 47.
The normal minimum substrate width is 23 inches (584 mm). To load substrates down to a minimum width of 10 inches (254 mm), go to the front panel and press , then Substrate > Substrate handling options > Enable narrow substrate. With this option, print quality is not guaranteed. TIP: To load a roll of textile substrate, see Loading accessory (365 and 375 only) on page 59; and remember to use the ink collector if the substrate is porous (which textiles usually are). TIP: When loading very thin or very thick substrates, or substrates with a tendency to curl, you should follow the manual loading procedure to reduce the risk of substrate jams and printhead crashes; see Assisted manual load on page 63.


Alternatively, press , then Substrate load > Load roll.


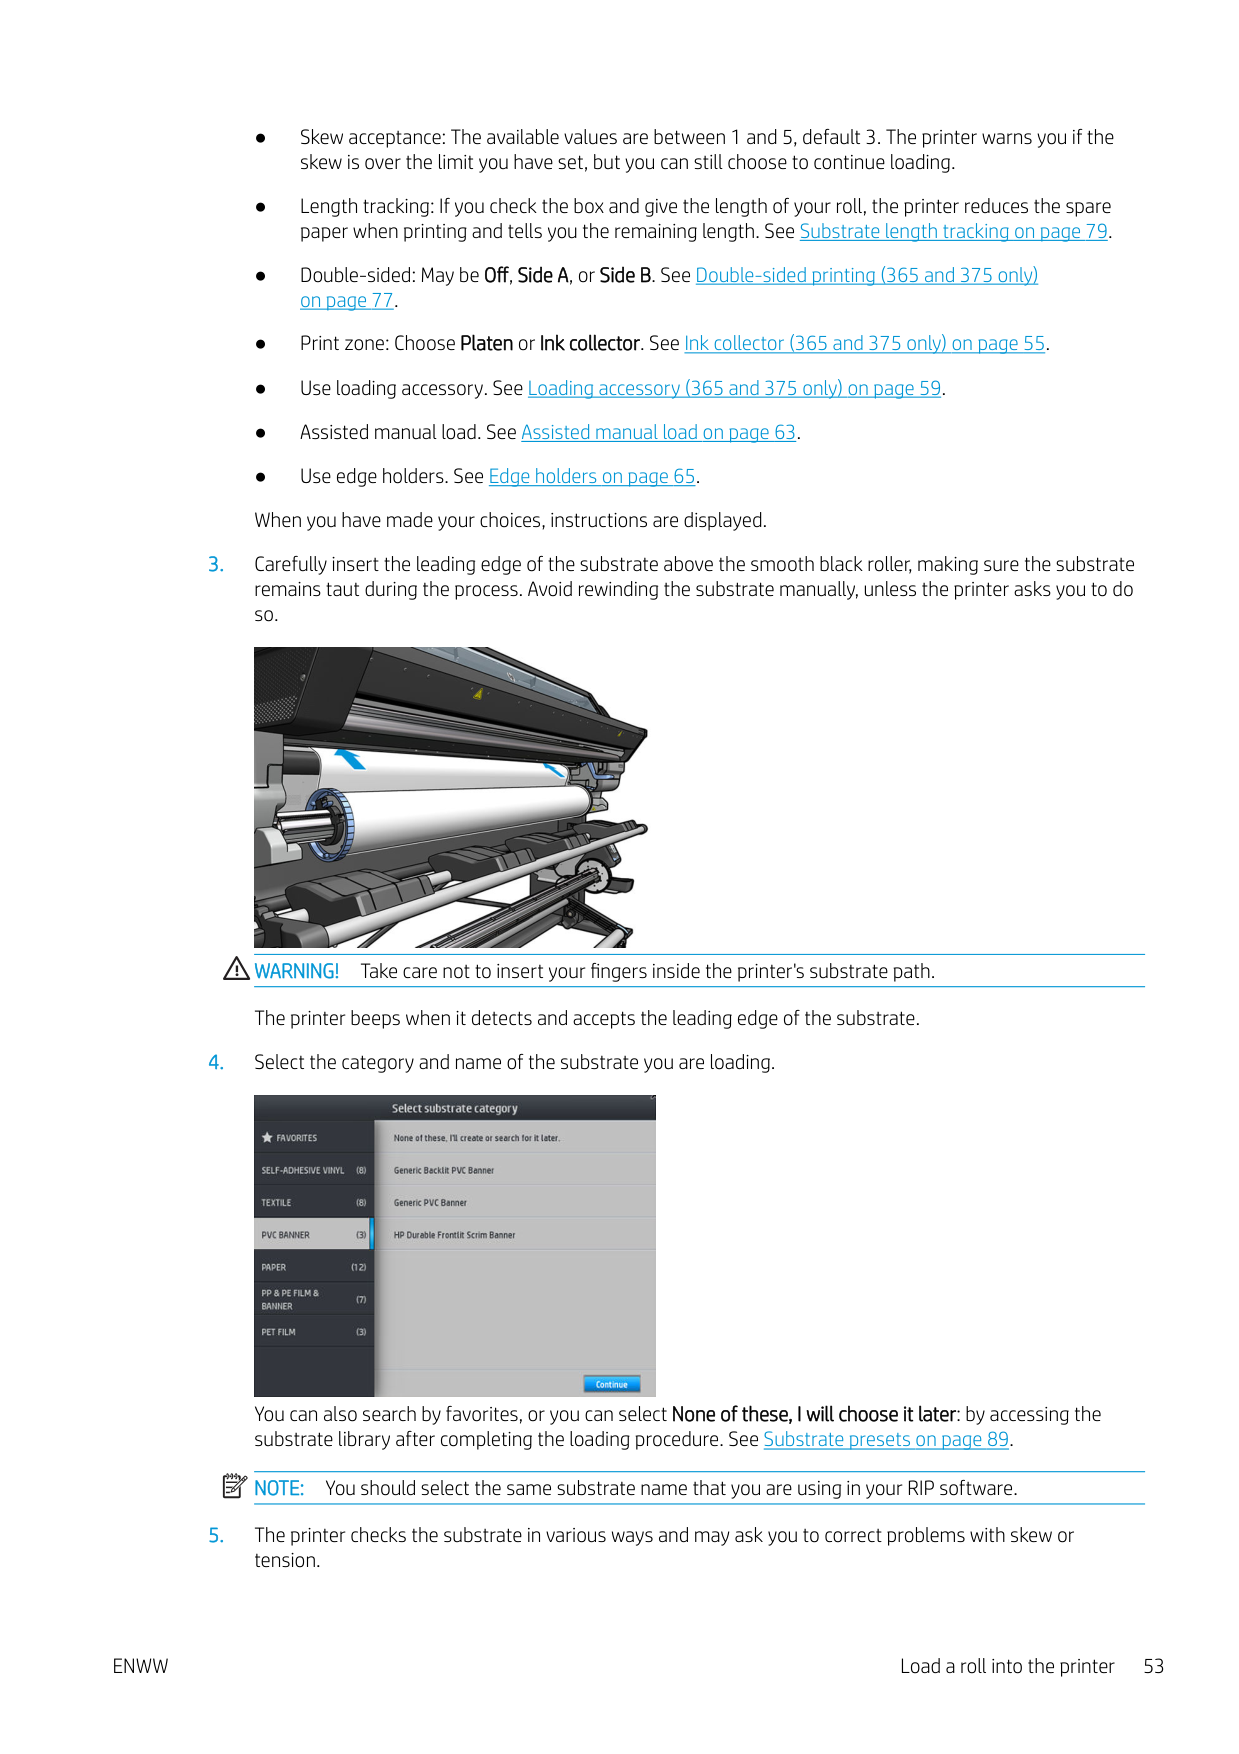
WARNING! Take care not to insert your fingers inside the printer's substrate path. The printer beeps when it detects and accepts the leading edge of the substrate.

You can also search by favorites, or you can select None of these, I will choose it later: by accessing the substrate library after completing the loading procedure. See Substrate presets on page 89. NOTE: You should select the same substrate name that you are using in your RIP software.
| | |---|
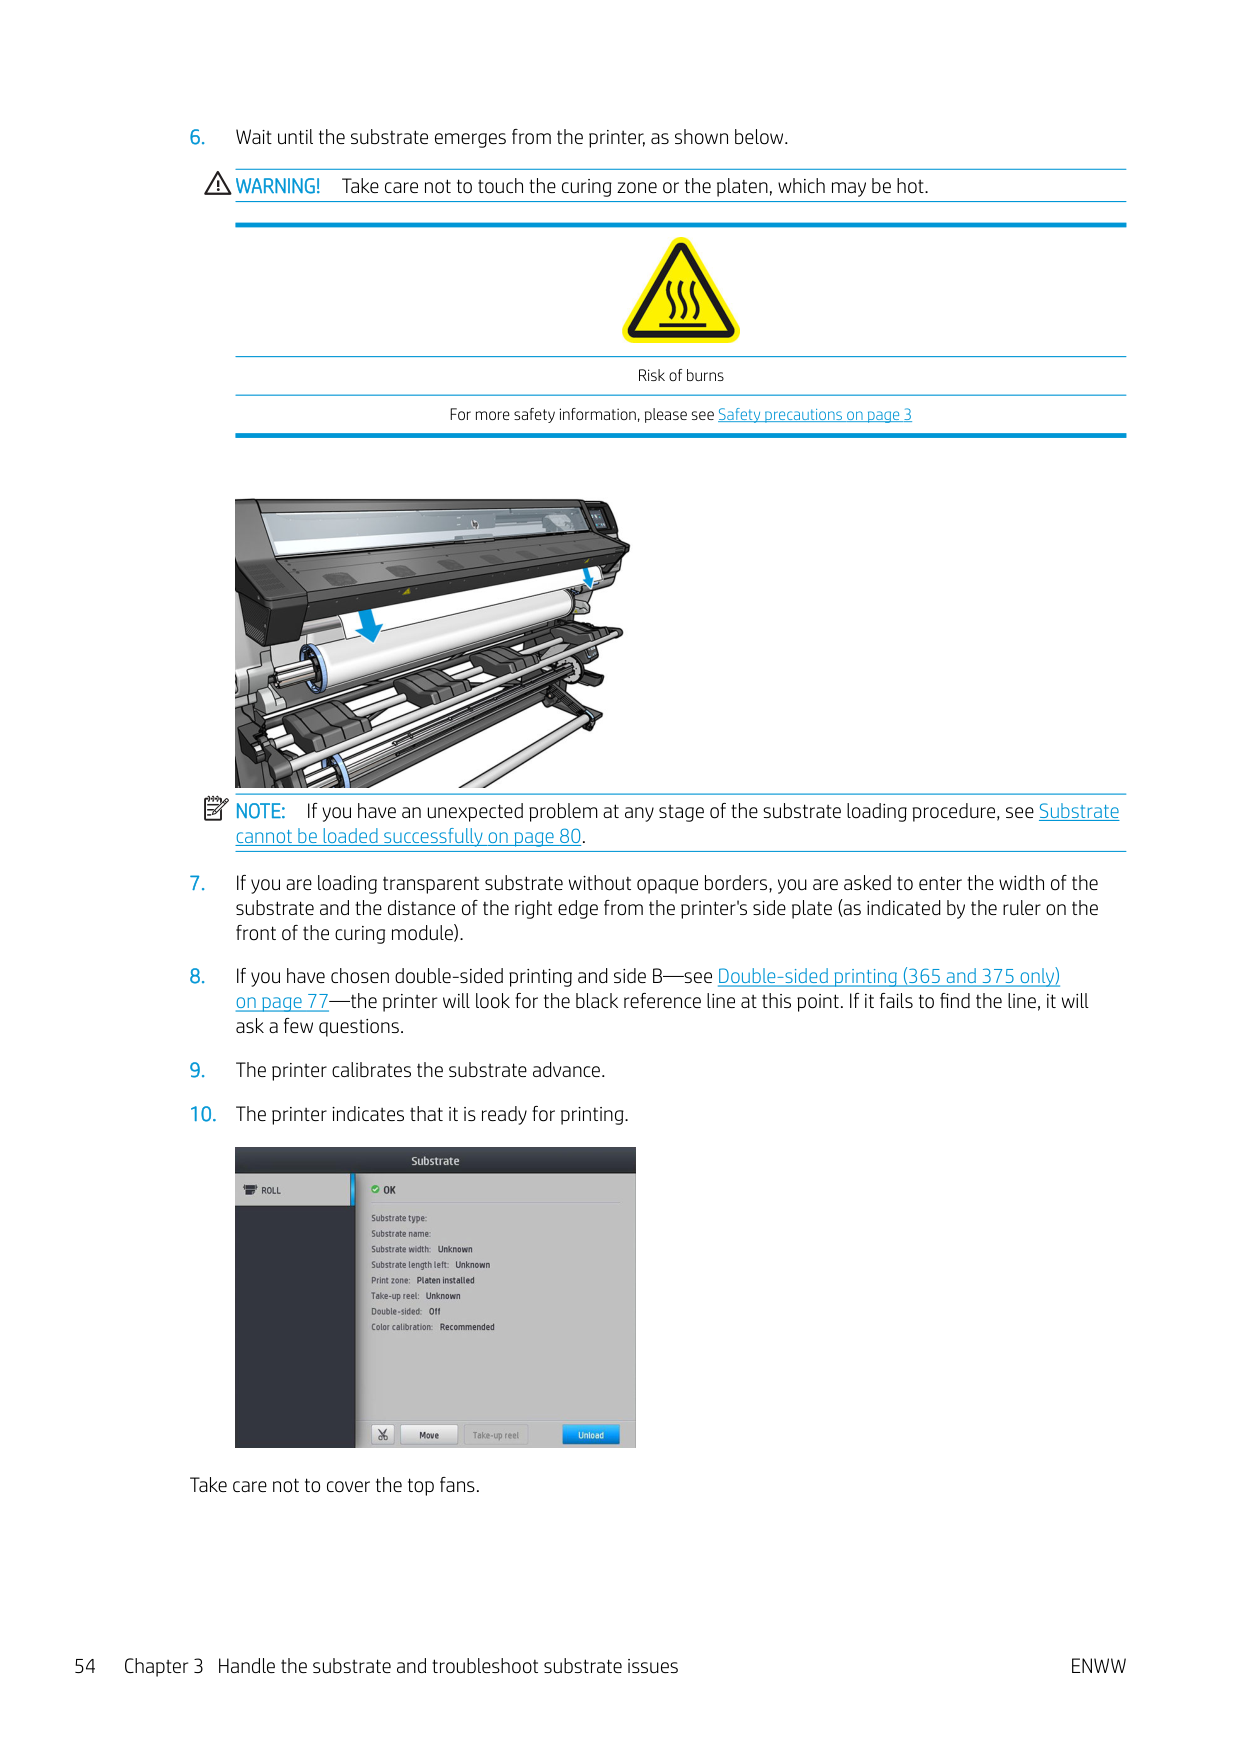
ENWW Load a roll into the printer 53

Risk of burns For more safety information, please see Safety precautions on page 3

NOTE: If you have an unexpected problem at any stage of the substrate loading procedure, see Substrate cannot be loaded successfully on page 80.
| | |---|

Take care not to cover the top fans.

Ink collector (365 and 375 only)
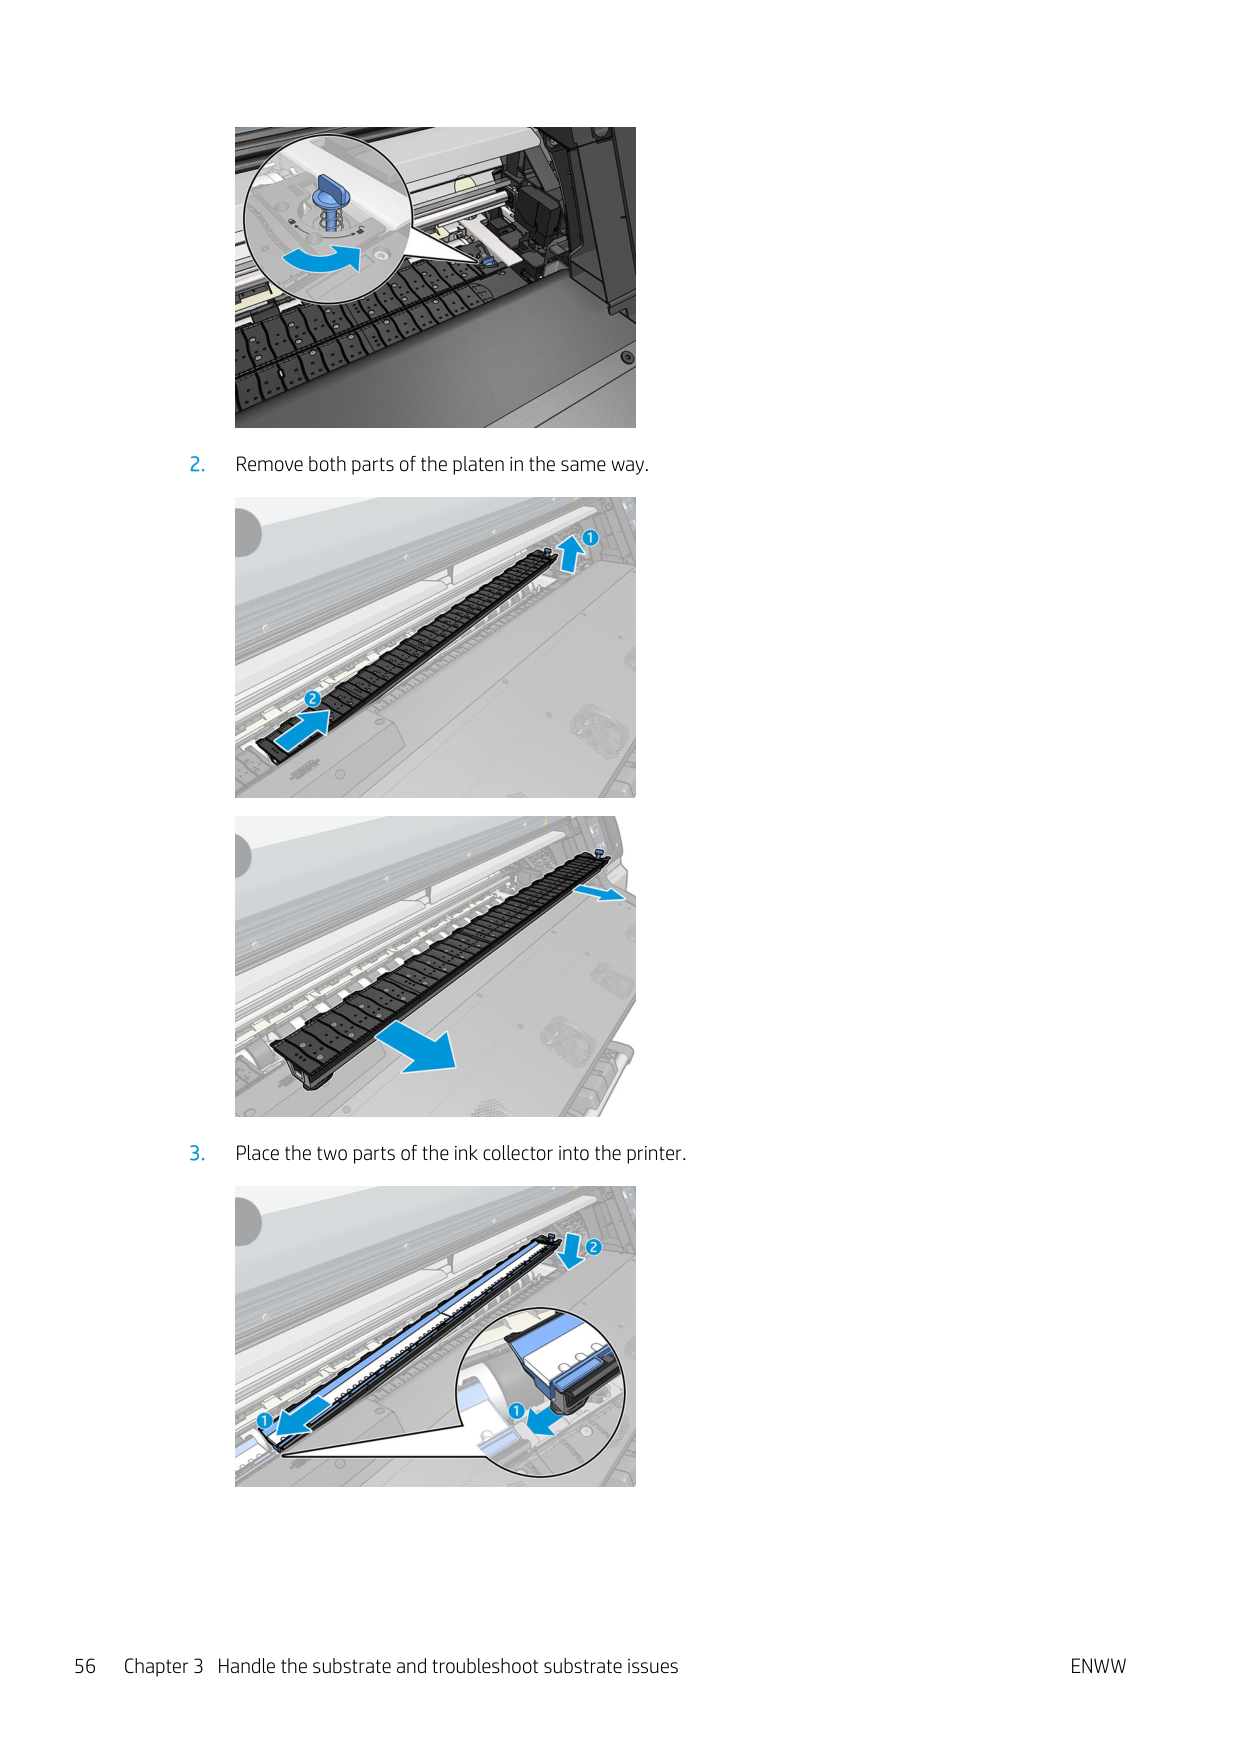
The ink collector should be used instead of the platen in the following cases:
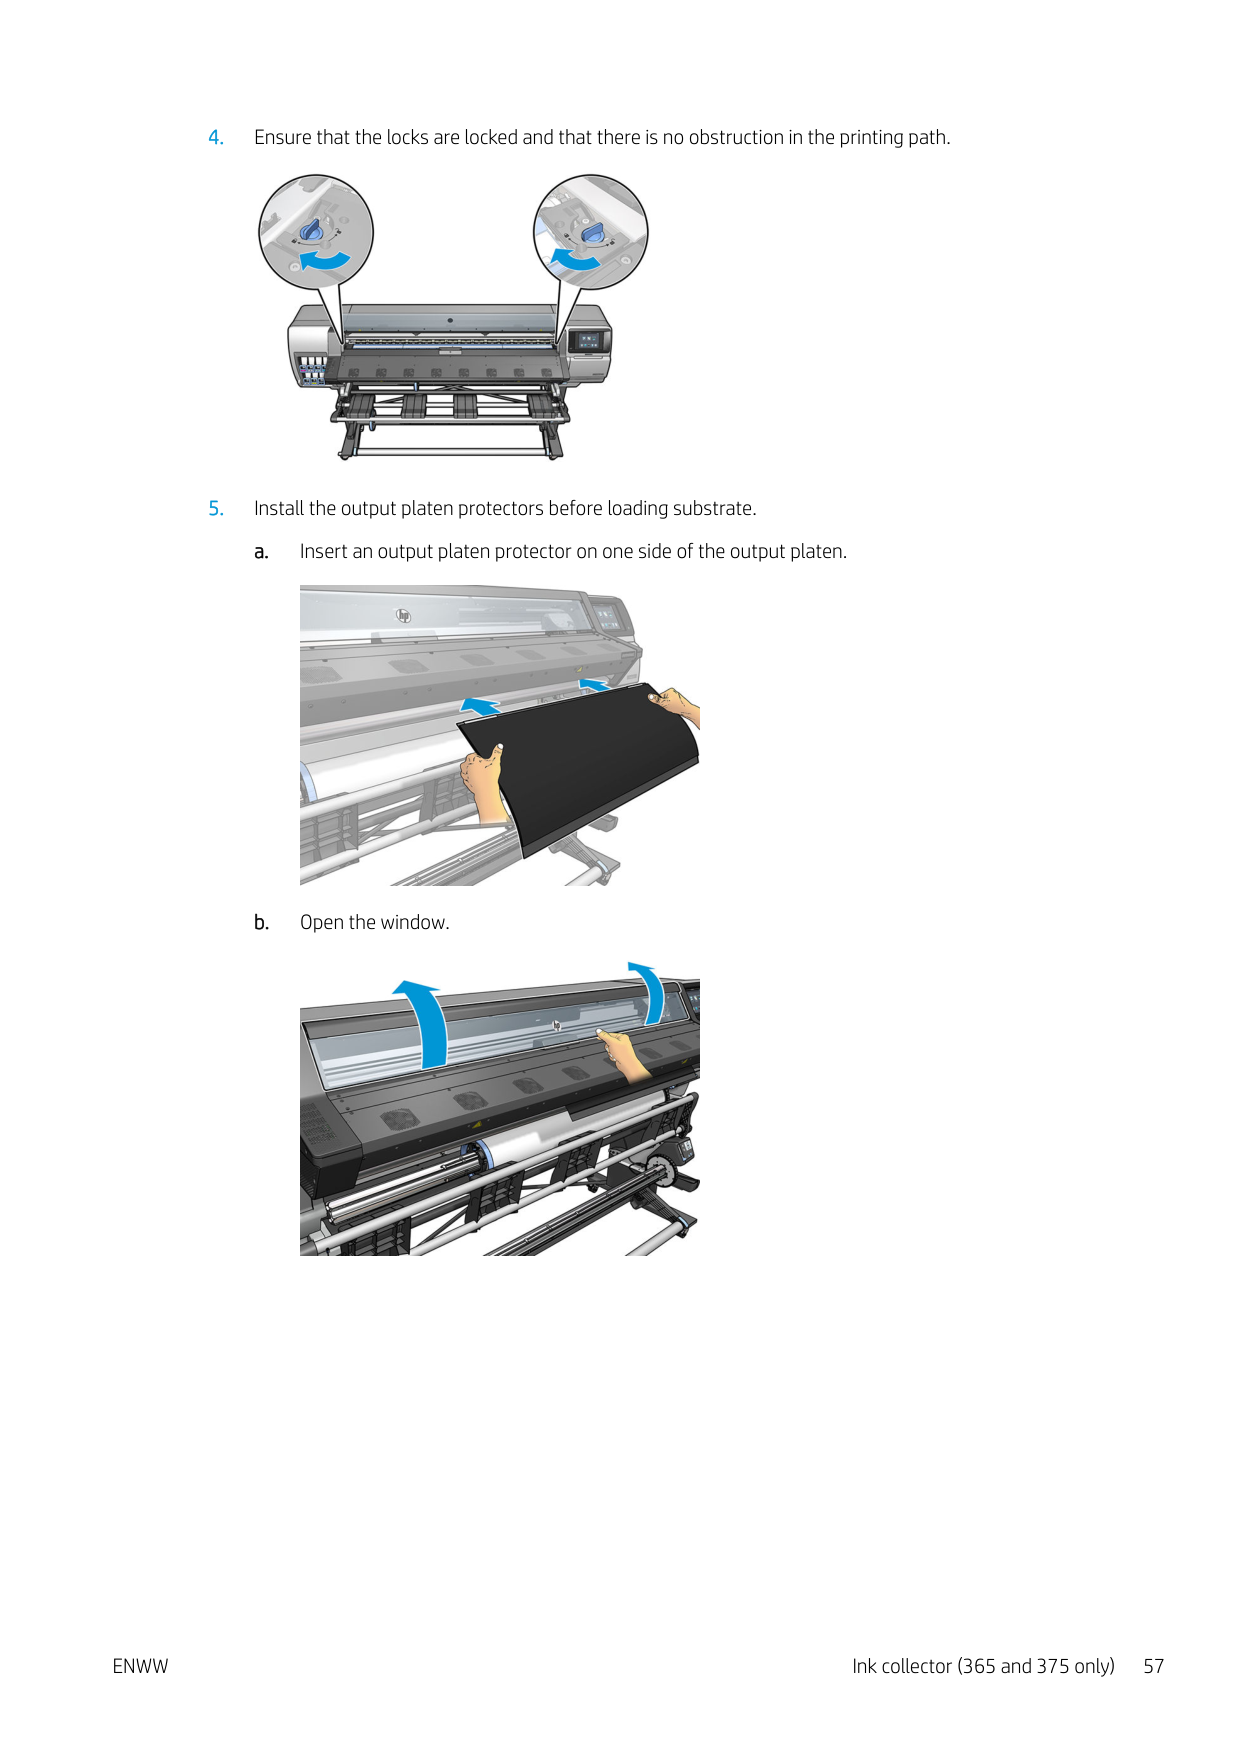
The platen and the ink collector both come in two parts (left and right). To install the ink collector, first unlock and remove the two parts of the platen. Then install the two parts of the ink collector in their place.
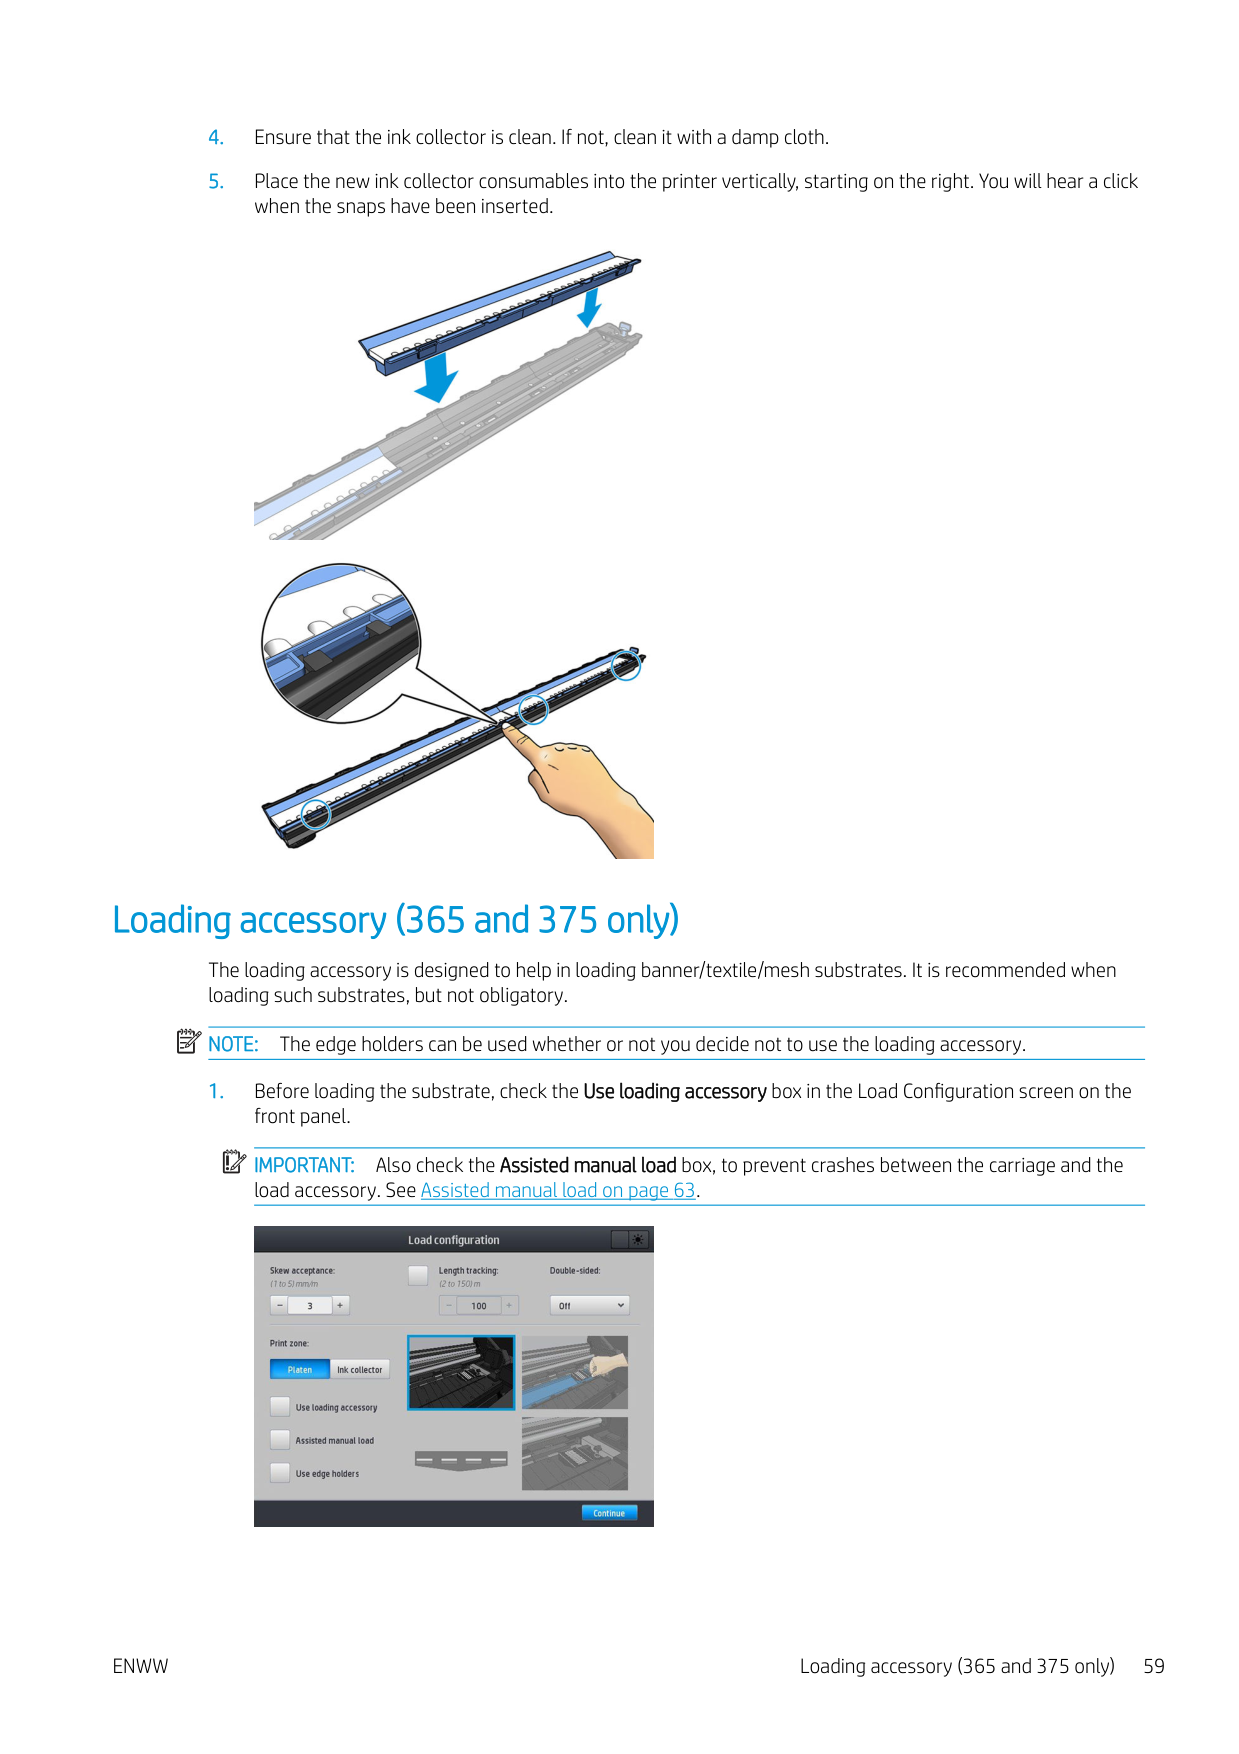
The ink collector comes with blue consumable parts that should be attached to the ink collector. They can be attached before or after installing the ink collector in the printer; but before loading any substrate. To attach these parts, put them vertically into the ink collector and press until the two snaps on each part have clicked into place.
TIP: You are recommended to use the take-up reel with the ink collector. See Take-up reel on page 69. WARNING! Avoid moving parts. Handle fragile parts with care. You are recommended to wear gloves.


Moving part Fragile Wear gloves For more safety information, please see Safety precautions on page 3
###### Install the ink collector

####### 2. Remove both parts of the platen in the same way.


####### 3. Place the two parts of the ink collector into the printer.


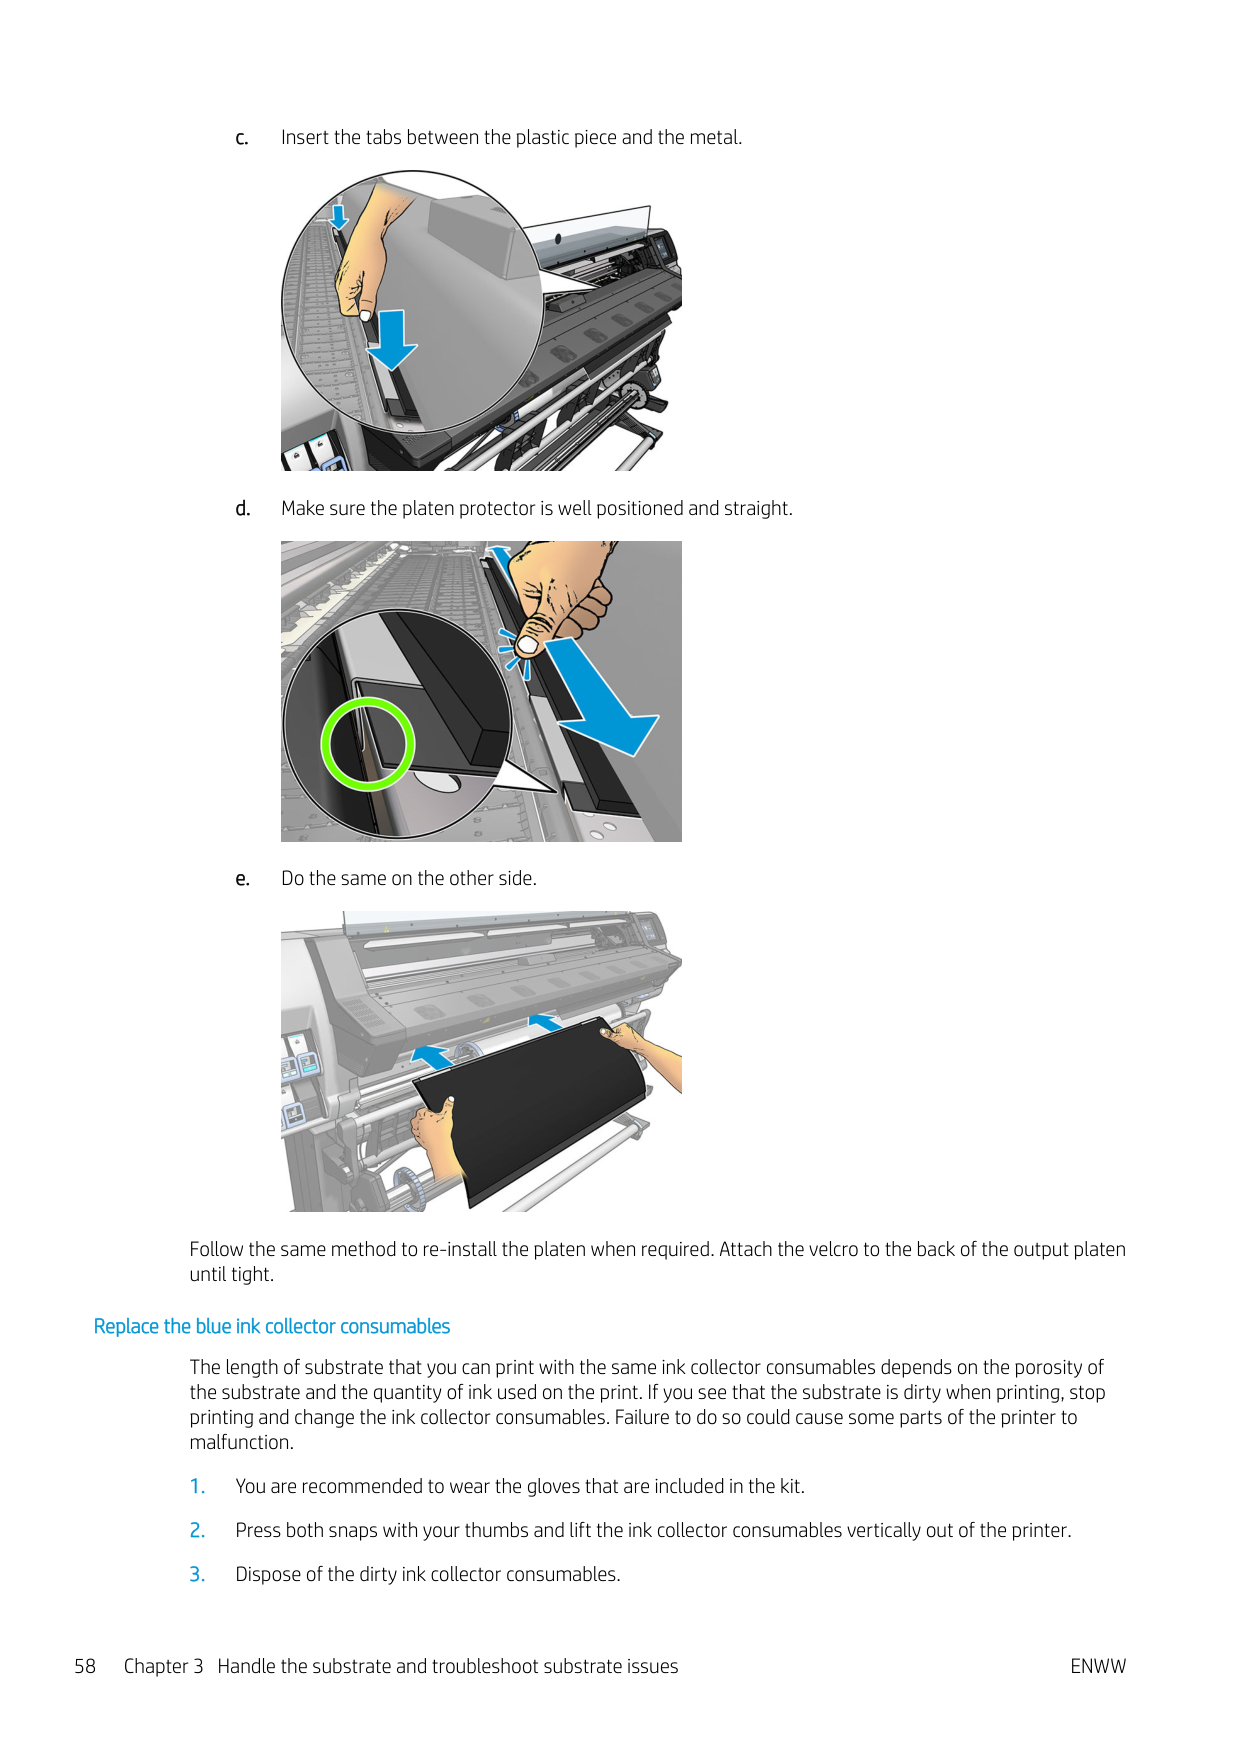
Follow the same method to re-install the platen when required. Attach the velcro to the back of the output platen until tight.
###### Replace the blue ink collector consumables
The length of substrate that you can print with the same ink collector consumables depends on the porosity of the substrate and the quantity of ink used on the print. If you see that the substrate is dirty when printing, stop printing and change the ink collector consumables. Failure to do so could cause some parts of the printer to malfunction.


Loading accessory (365 and 375 only)
The loading accessory is designed to help in loading banner/textile/mesh substrates. It is recommended when loading such substrates, but not obligatory.
| | |---|
NOTE: The edge holders can be used whether or not you decide not to use the loading accessory.
| |
|---|
IMPORTANT: Also check the Assisted manual load box, to prevent crashes between the carriage and the load accessory. See Assisted manual load on page 63.

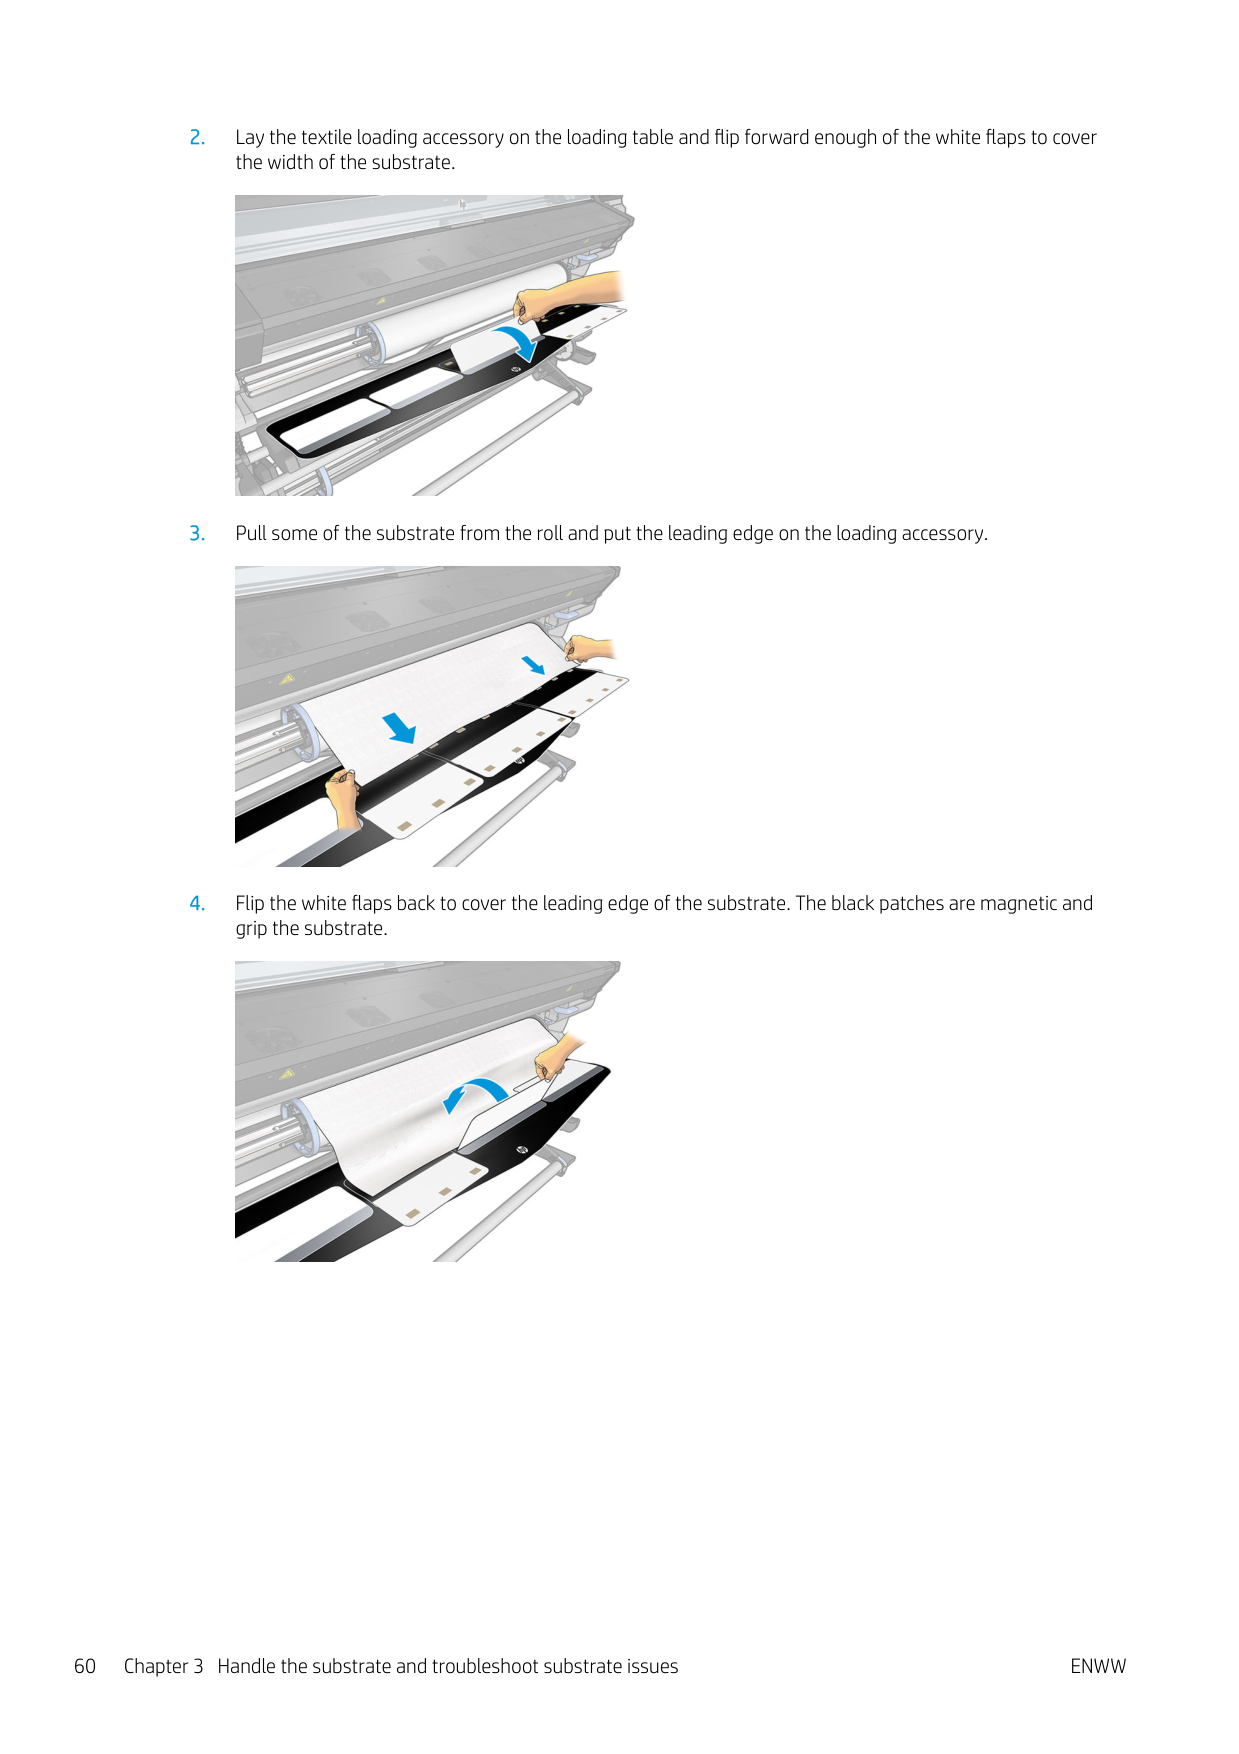
####### 2. Lay the textile loading accessory on the loading table and flip forward enough of the white flaps to coverthe width of the substrate.

####### 3. Pull some of the substrate from the roll and put the leading edge on the loading accessory.

####### 4. Flip the white flaps back to cover the leading edge of the substrate. The black patches are magnetic andgrip the substrate.

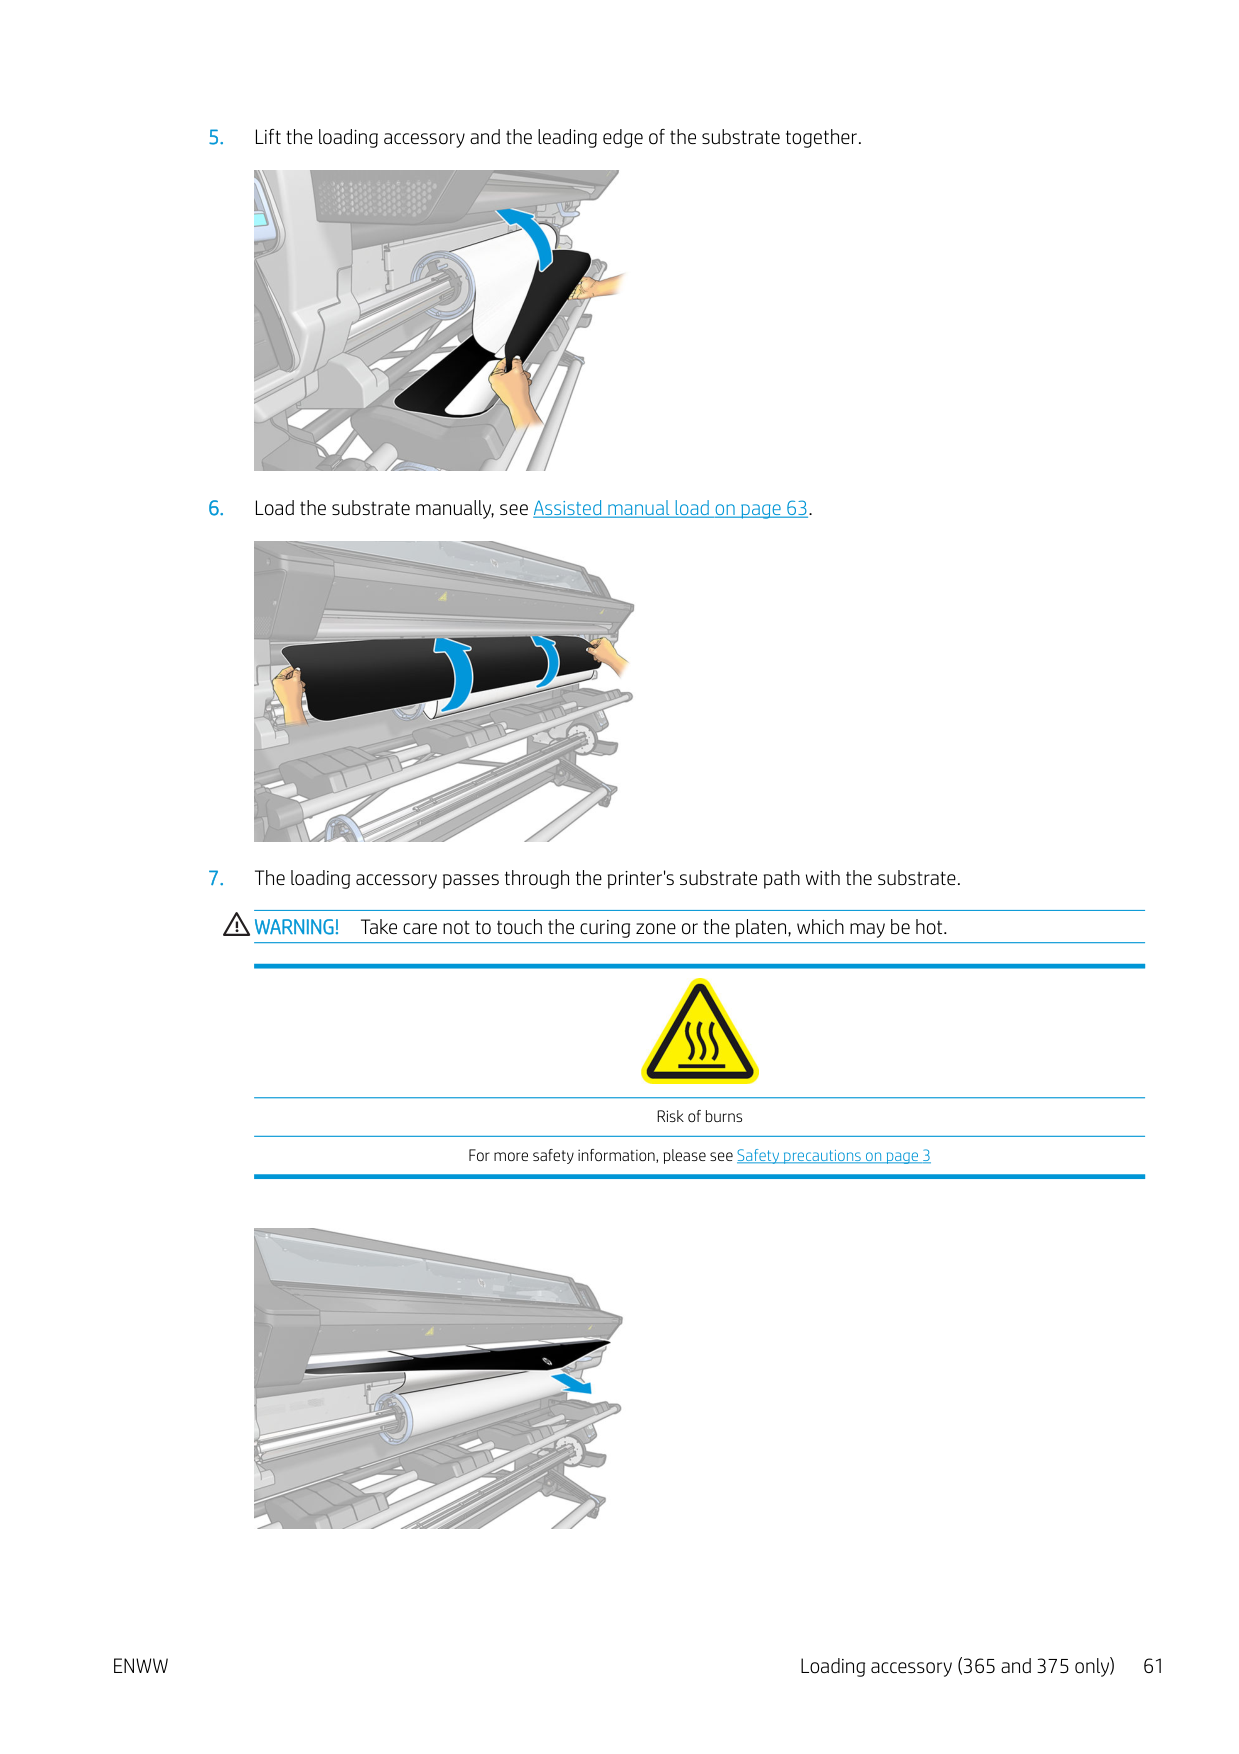
####### 5. Lift the loading accessory and the leading edge of the substrate together.

####### 6. Load the substrate manually, see Assisted manual load on page 63.

####### 7. The loading accessory passes through the printer's substrate path with the substrate.WARNING! Take care not to touch the curing zone or the platen, which may be hot.

Risk of burns For more safety information, please see Safety precautions on page 3


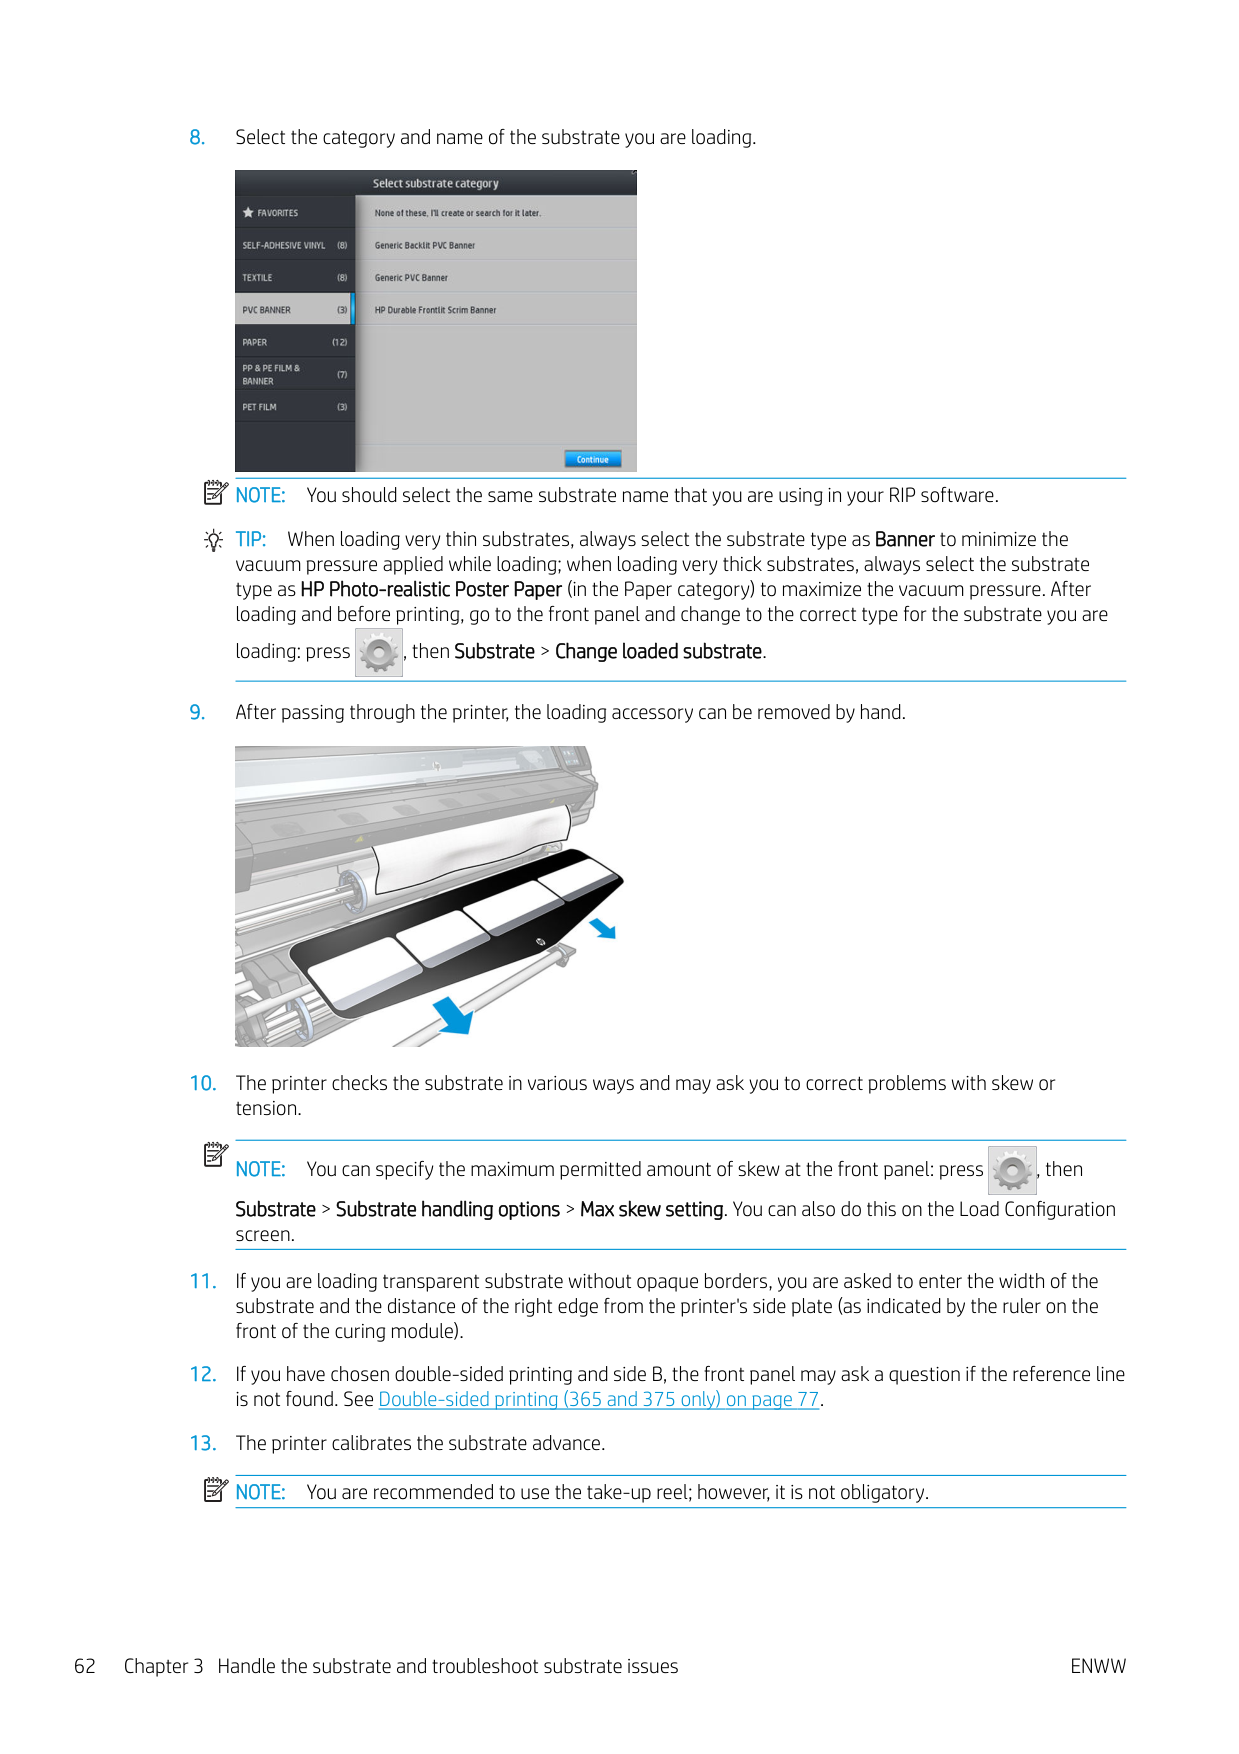
NOTE: You should select the same substrate name that you are using in your RIP software. TIP: When loading very thin substrates, always select the substrate type as Banner to minimize the
vacuum pressure applied while loading; when loading very thick substrates, always select the substrate type as HP Photo-realistic Poster Paper (in the Paper category) to maximize the vacuum pressure. After loading and before printing, go to the front panel and change to the correct type for the substrate you are
loading: press , then Substrate > Change loaded substrate.


NOTE: You can specify the maximum permitted amount of skew at the front panel: press , then Substrate > Substrate handling options > Max skew setting. You can also do this on the Load Configuration screen.

| | |---|
| | |---|
| | |---|
Assisted manual load
The assisted manual load procedure should be used in the following cases:
In other cases, you are recommended to use the normal loading procedure. See Load a roll into the printer on page 52.
To start the assisted manual load procedure, you need to have a roll loaded on the spindle. See Load a roll onto the spindle on page 47.
The normal minimum substrate width is 23 inches (584 mm). To load substrates down to a minimum width of 10 inches (254 mm), go to the front panel and press , then Substrate > Substrate handling options > Enable narrow substrate. With this option, print quality is not guaranteed.


You can alternatively begin at step 2, in which case the load configuration screen will appear with this checkbox checked after you lift the pinch lever. Press Continue before taking the next step.

ENWW Assisted manual load 63
WARNING! Do not touch the printer's curing enclosure. Even after you have opened the window latch, which disconnects the power to the curing modules, the internal surfaces could be hot. Also beware of getting your fingers trapped in the substrate path.


Risk of burns Risk of trapped fingers For more safety information, please see Safety precautions on page 3
TIP: If the substrate you are using tends to curl, keep feeding the substrate until the edge is out of the printer. You are also recommended to use the take-up reel, or to disable the cutter from the front panel if not using the take-up reel.


The rest of the assisted load procedure is the same as in the normal load procedure. See Load a roll into the printer on page 52.
Edge holders
The edge holders are designed to prevent the edges of the substrate from rising while printing is in progress. They are recommended only when the edges of the substrate tend to lift up and touch or damage the printheads. They can be used with the platen or with the ink collector. When not in use, they should be stored outside the printer.
If they are needed often, they can be stored inside the printer, to the left and right of the print platen, to avoid substrate jams when loading the next substate.
| | |---|
NOTE: The edge holders extend 7 mm over the edge of the substrate. You should set a minimum left and right margin of 7 mm (0.3 in) in the RIP when using edge holders, otherwise the printer could try to print on the edge holders.
If you choose to use them, you should move them into position when prompted by the front panel (this prompt appears when the Use edge holders checkbox has been checked). Open the window, place the edge holders, then close the window.
The edge holders should be placed on the platen so that they slightly overlap the left and right edges of the substrate. There are marks on the printer to show where to place them.
The edge holders for each printer model are the same, but they are installed in different ways. WARNING! Avoid moving parts. Handle fragile parts with care. You are recommended to wear gloves.


Moving part Fragile Wear gloves For more safety information, please see Safety precautions on page 3
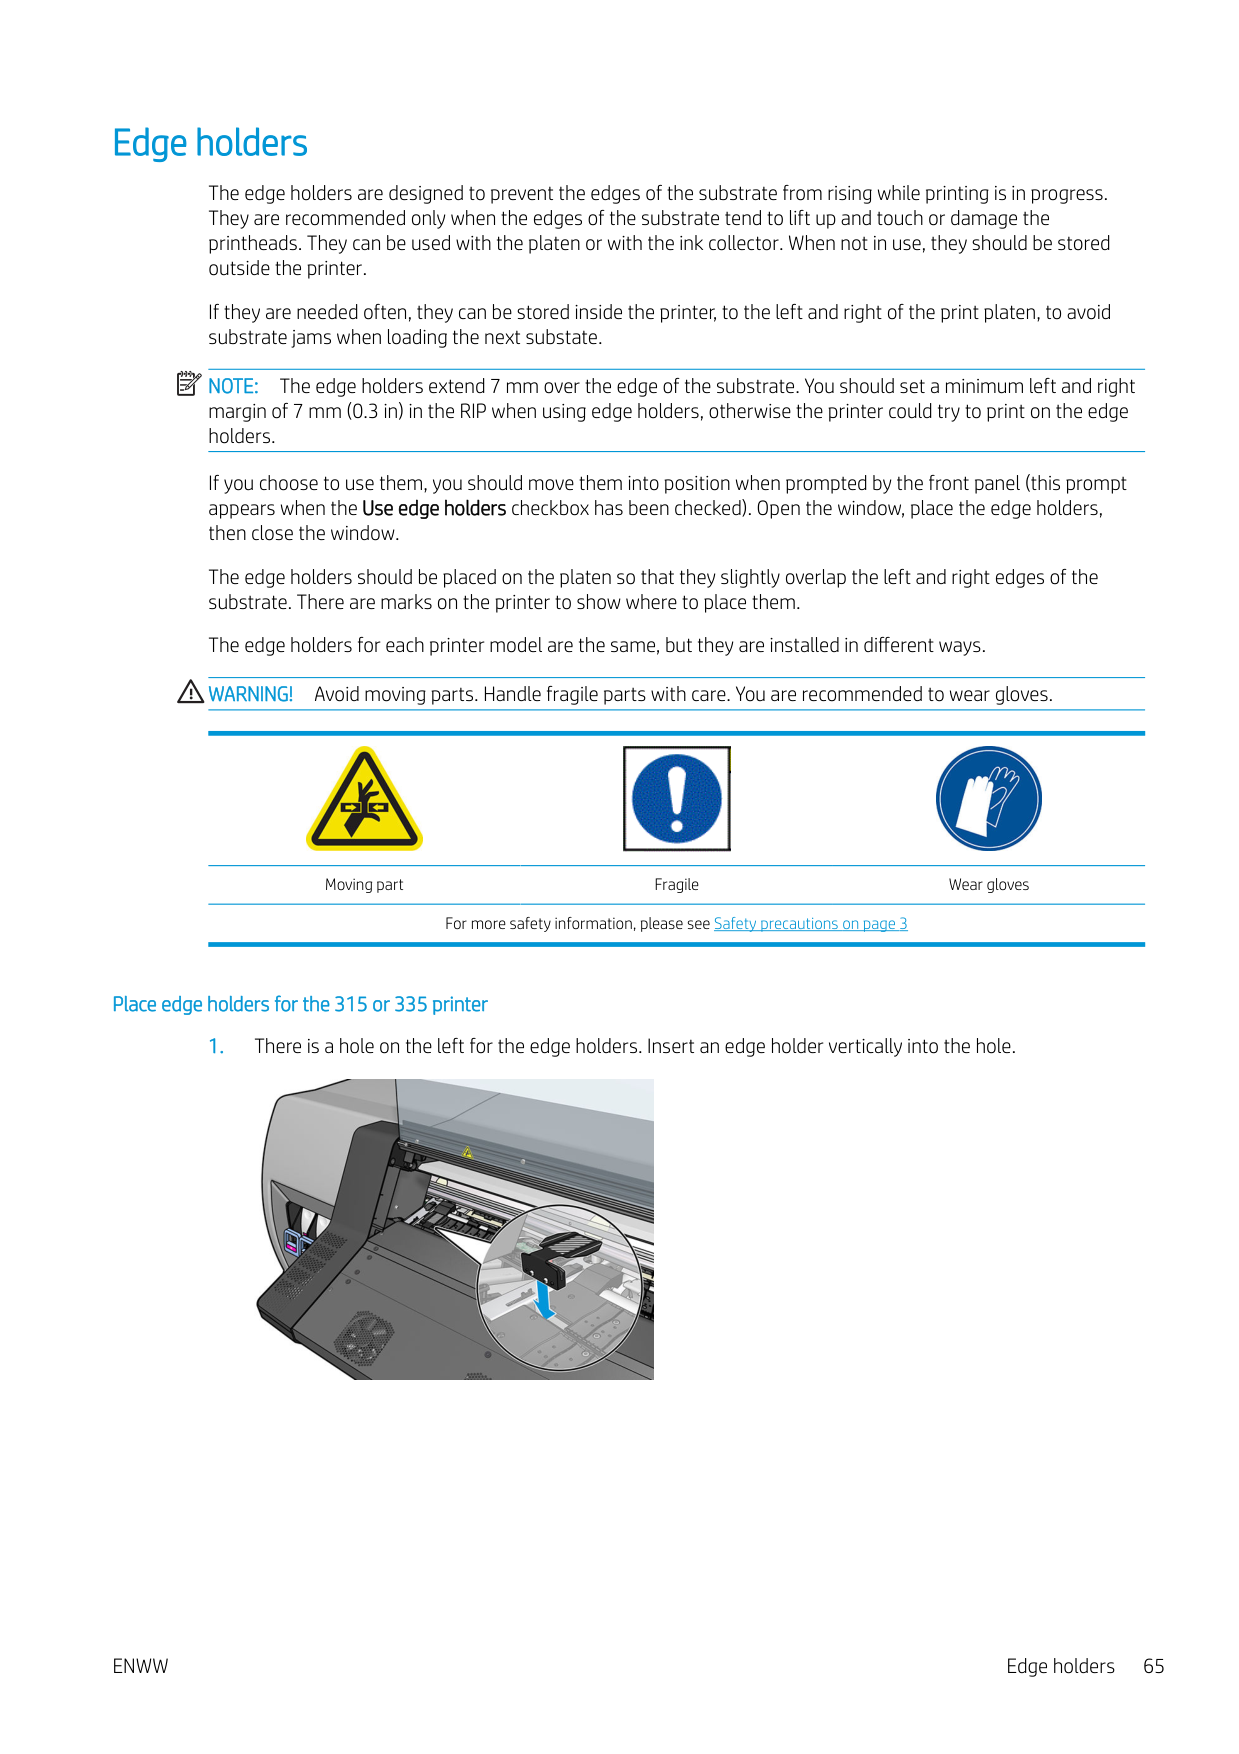
###### Place edge holders for the 315 or 335 printer

ENWW Edge holders 65

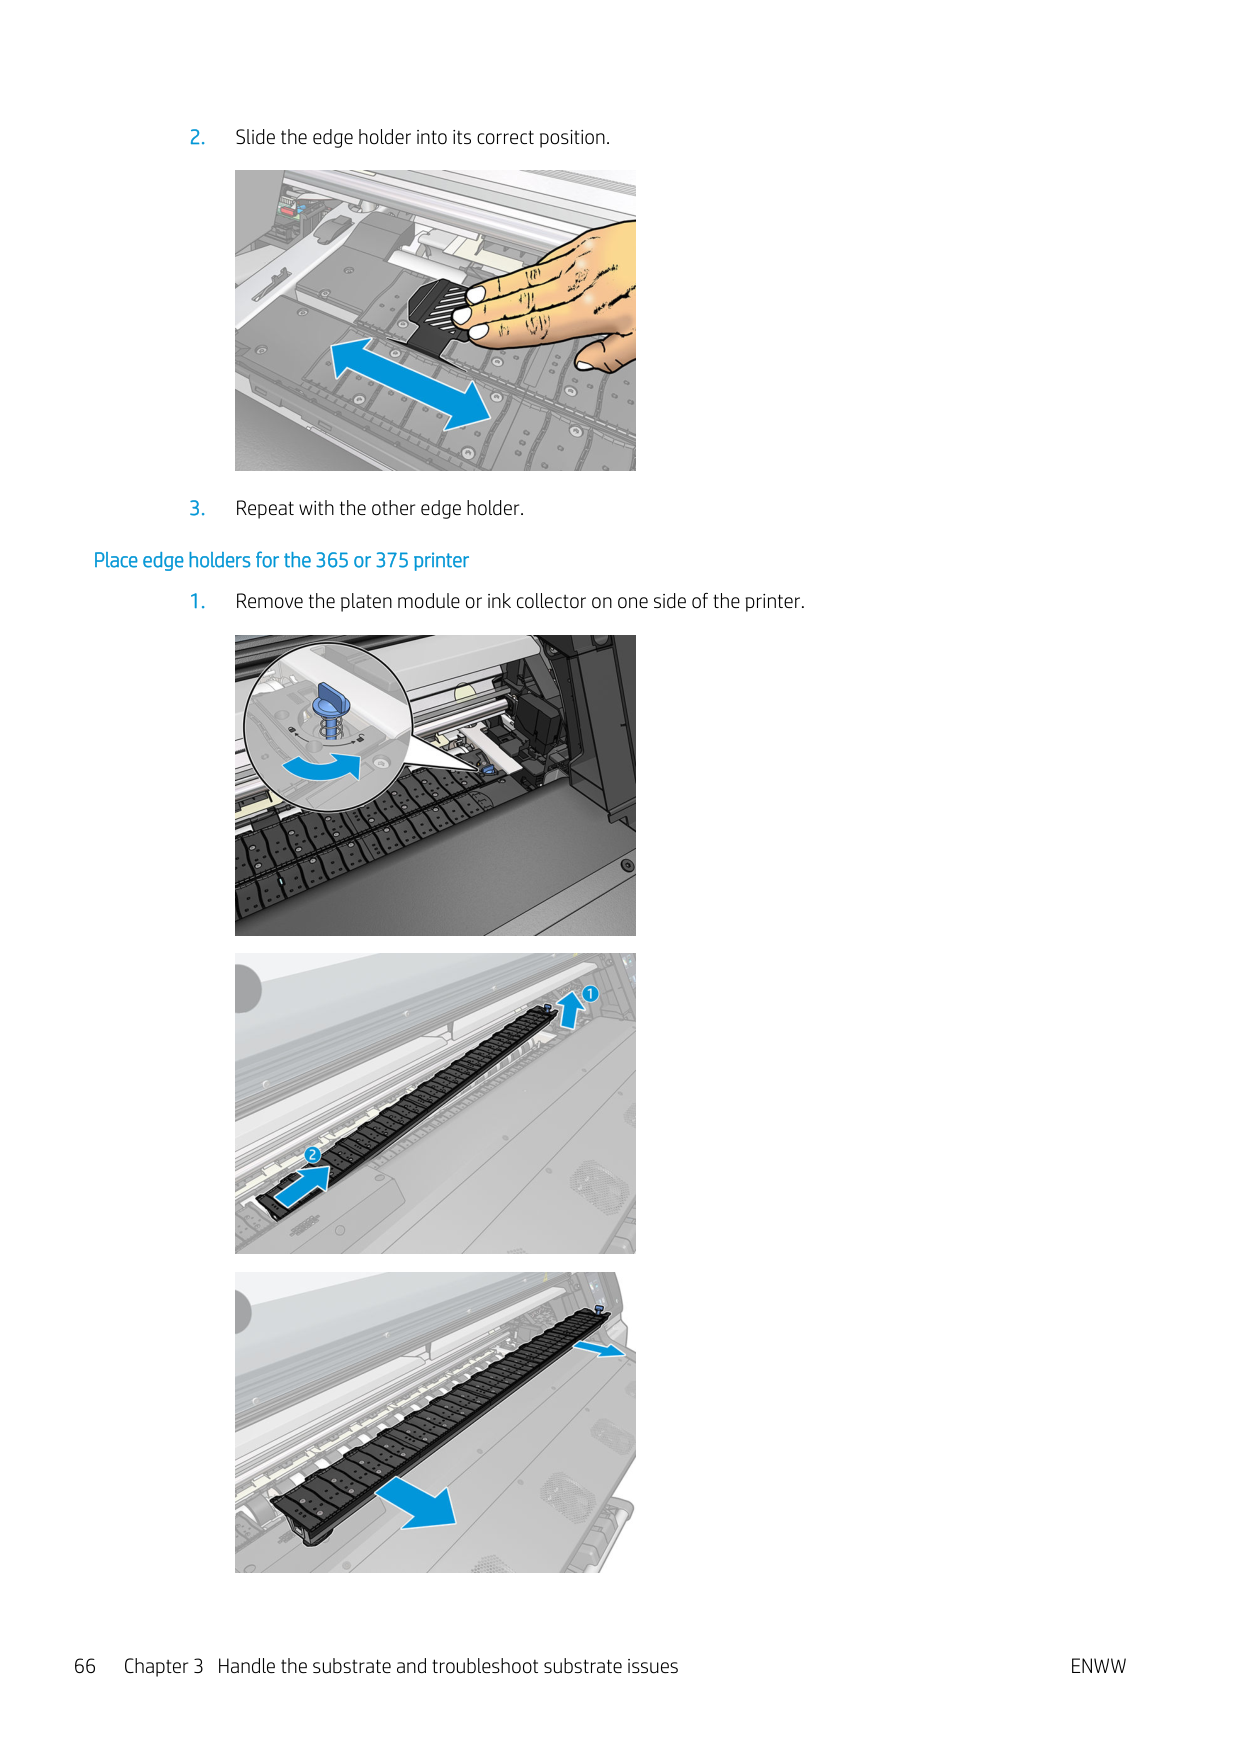
###### Place edge holders for the 365 or 375 printer


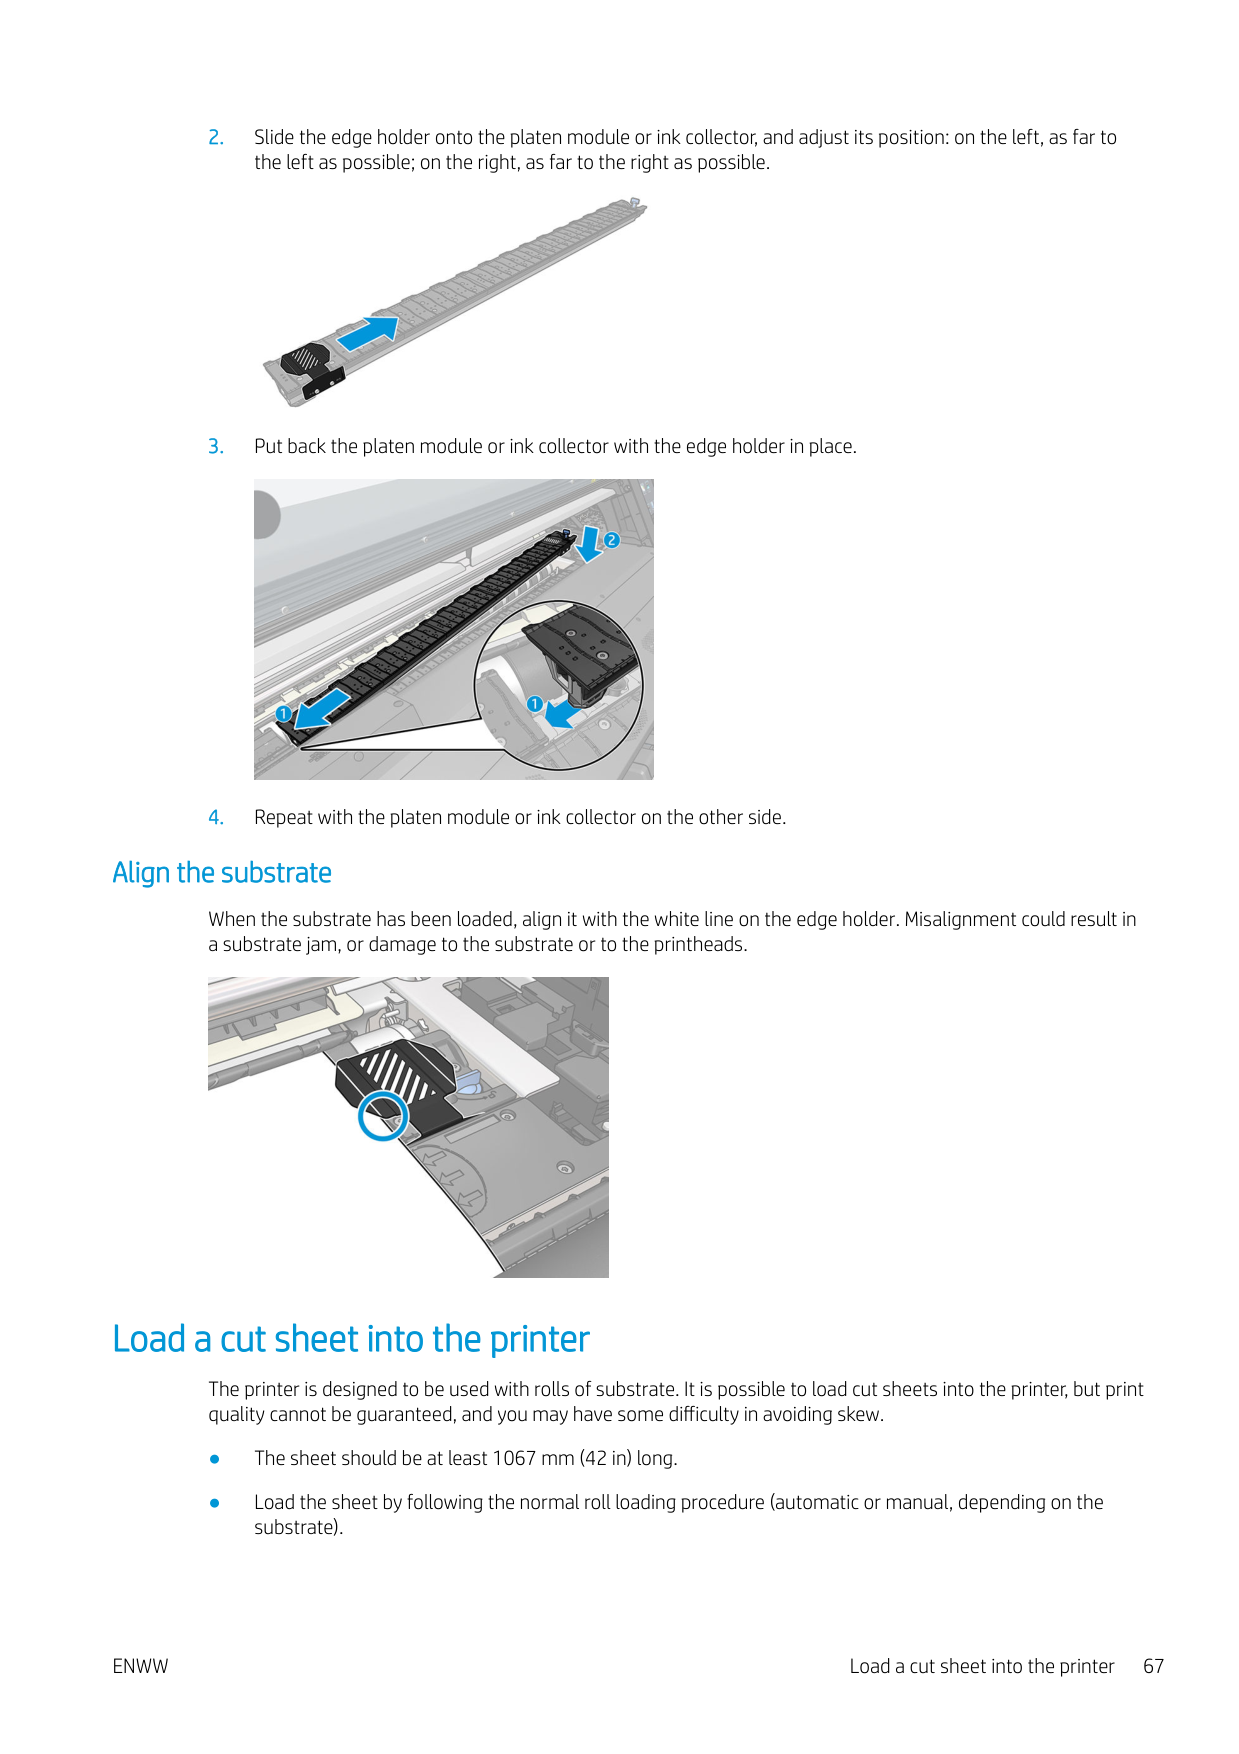


#### Align the substrate
When the substrate has been loaded, align it with the white line on the edge holder. Misalignment could result in a substrate jam, or damage to the substrate or to the printheads.

Load a cut sheet into the printer
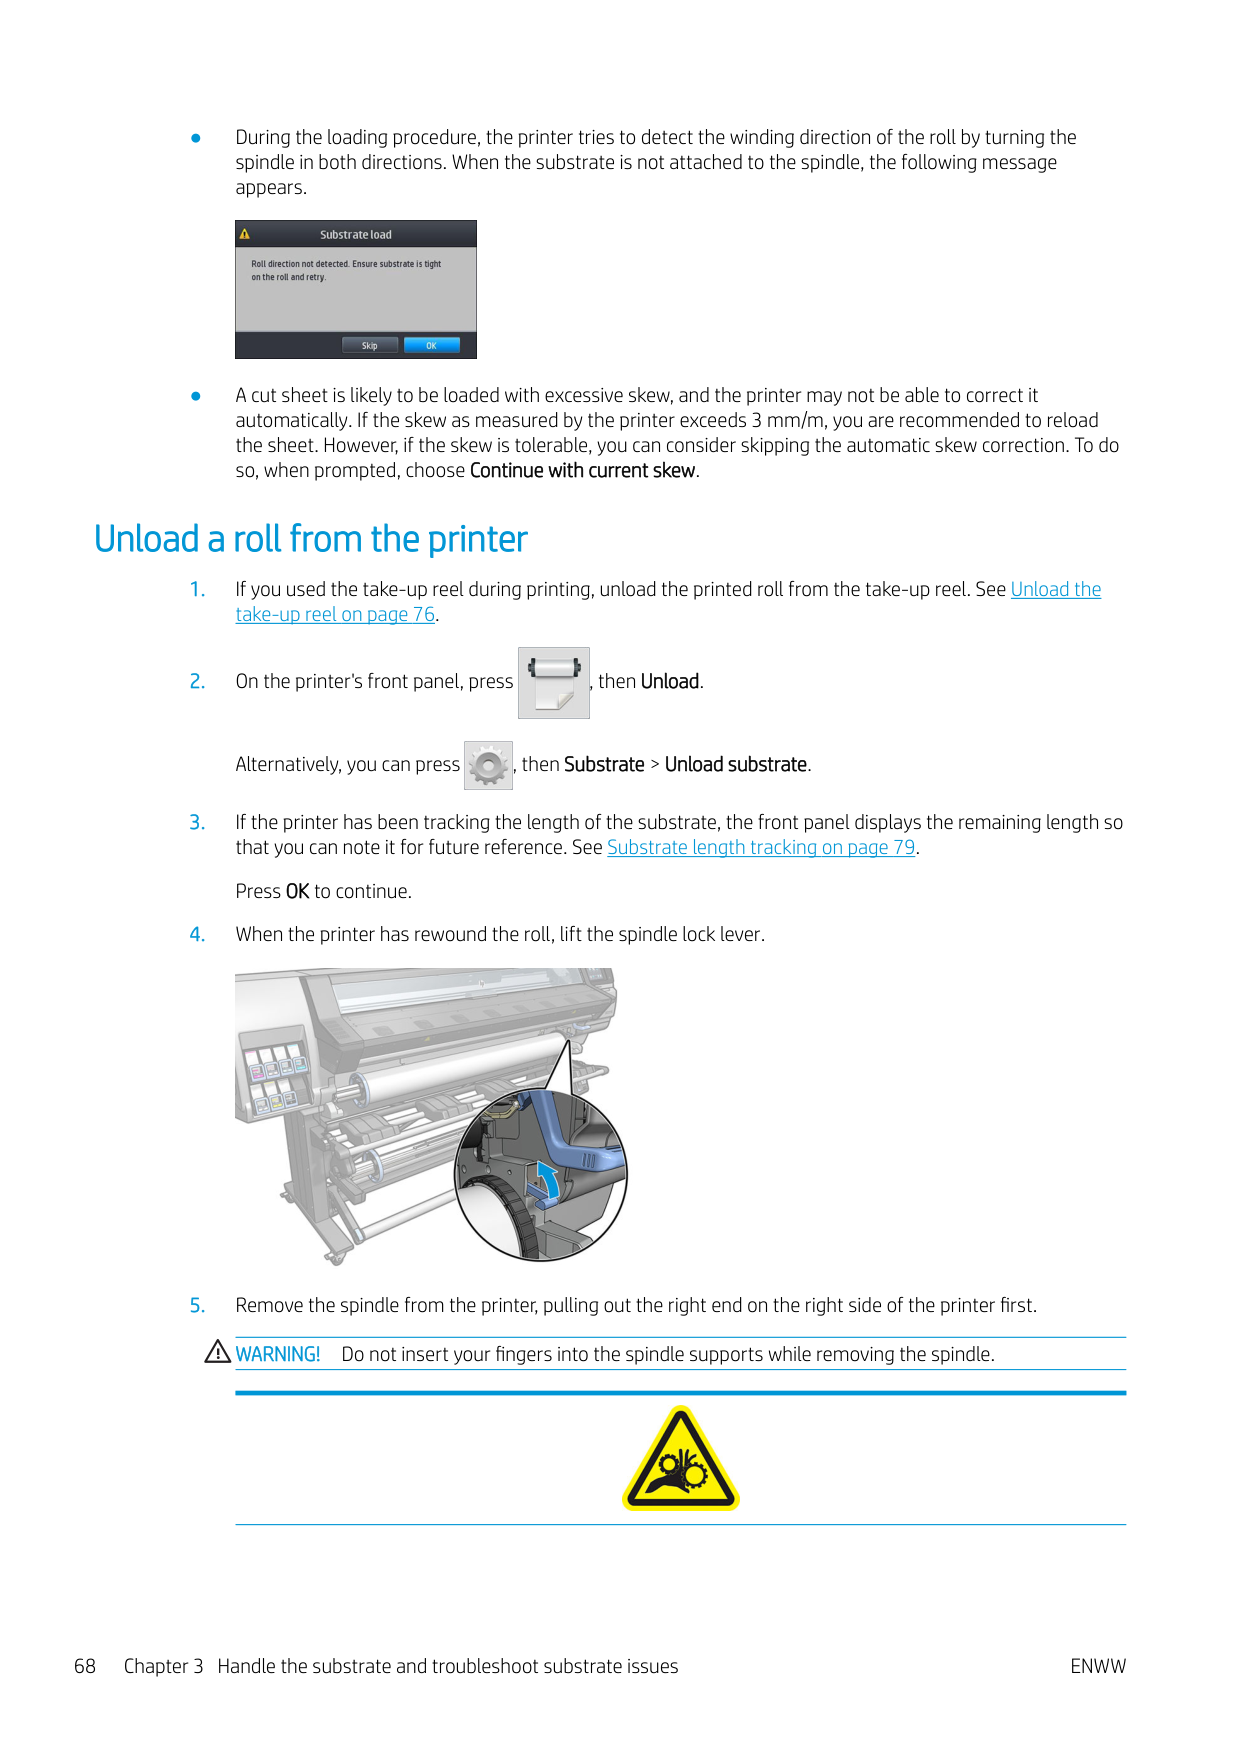
The printer is designed to be used with rolls of substrate. It is possible to load cut sheets into the printer, but print quality cannot be guaranteed, and you may have some difficulty in avoiding skew.
ENWW Load a cut sheet into the printer 67

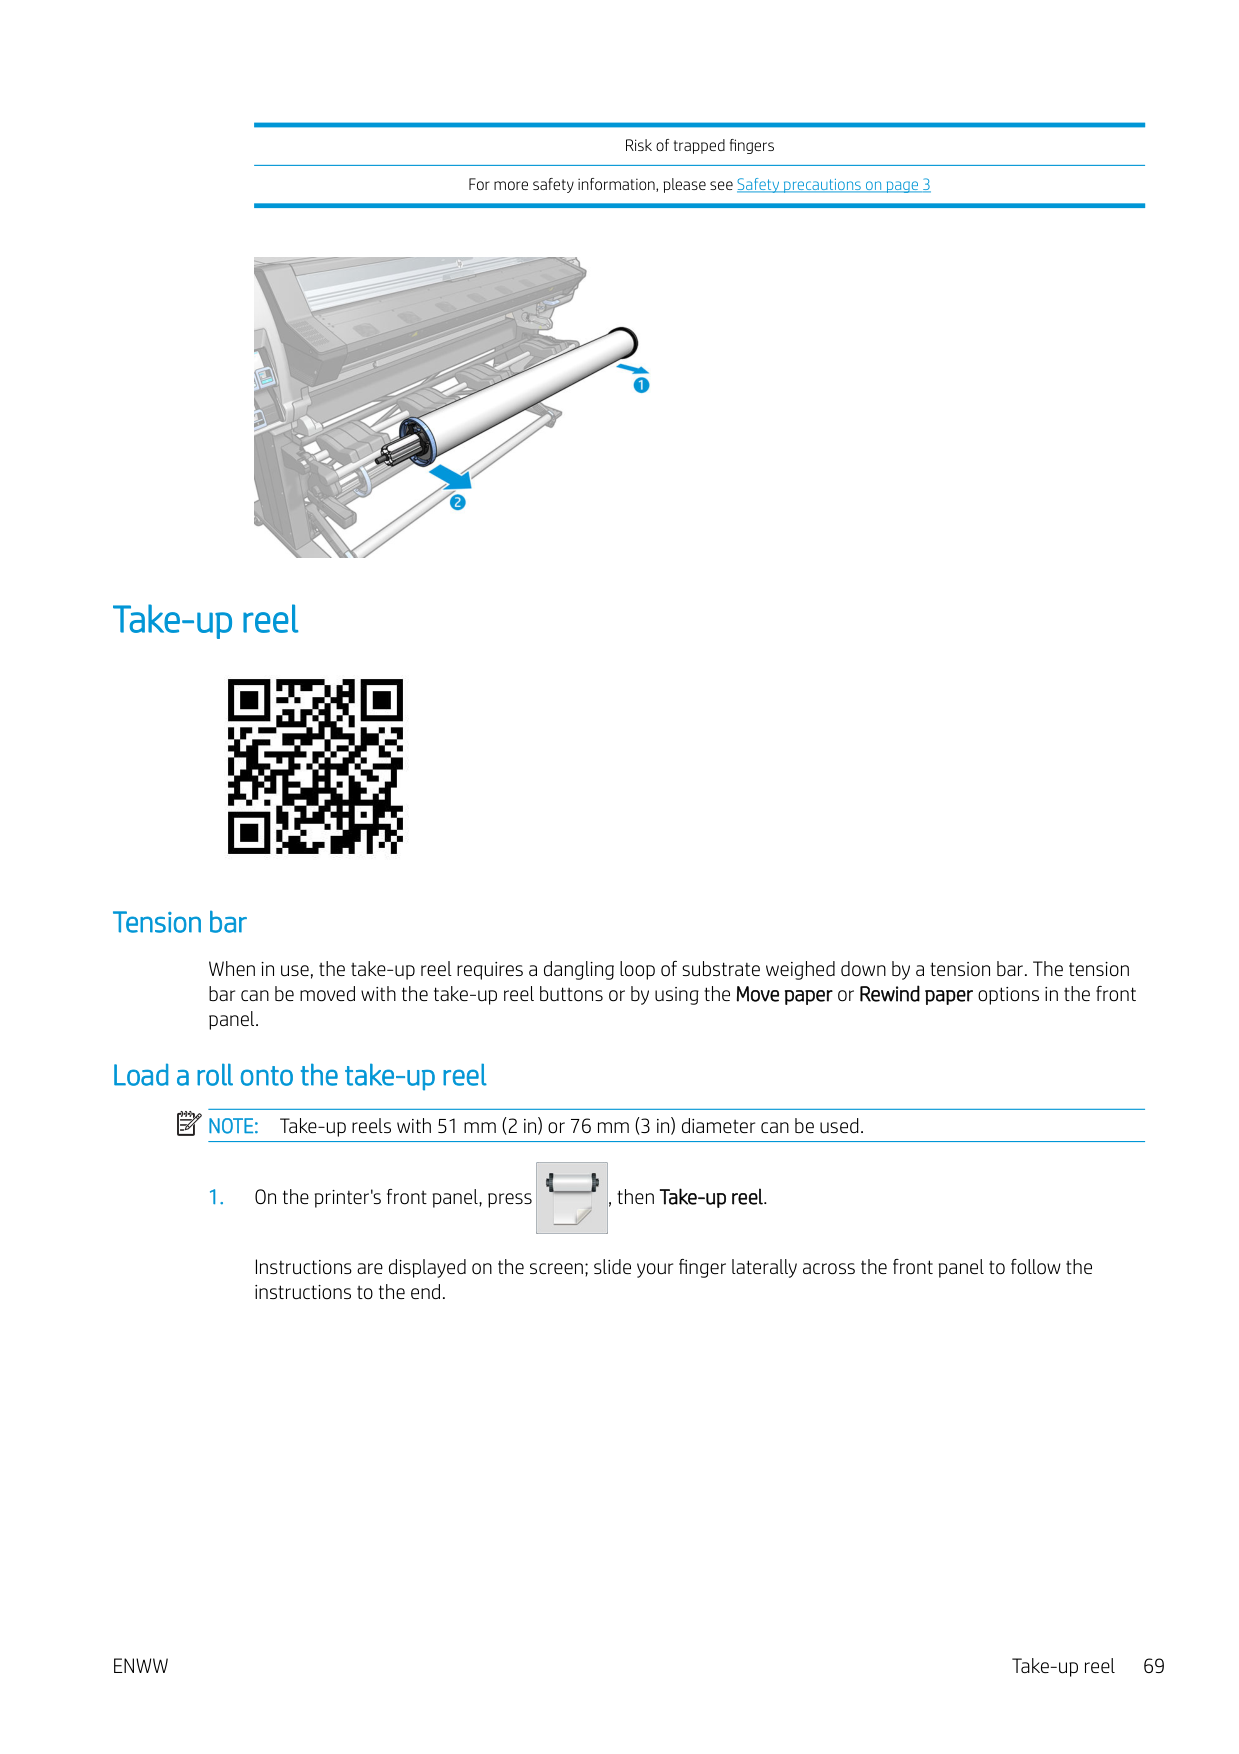
Unload a roll from the printer

Alternatively, you can press , then Substrate > Unload substrate.


Risk of trapped fingers For more safety information, please see Safety precautions on page 3

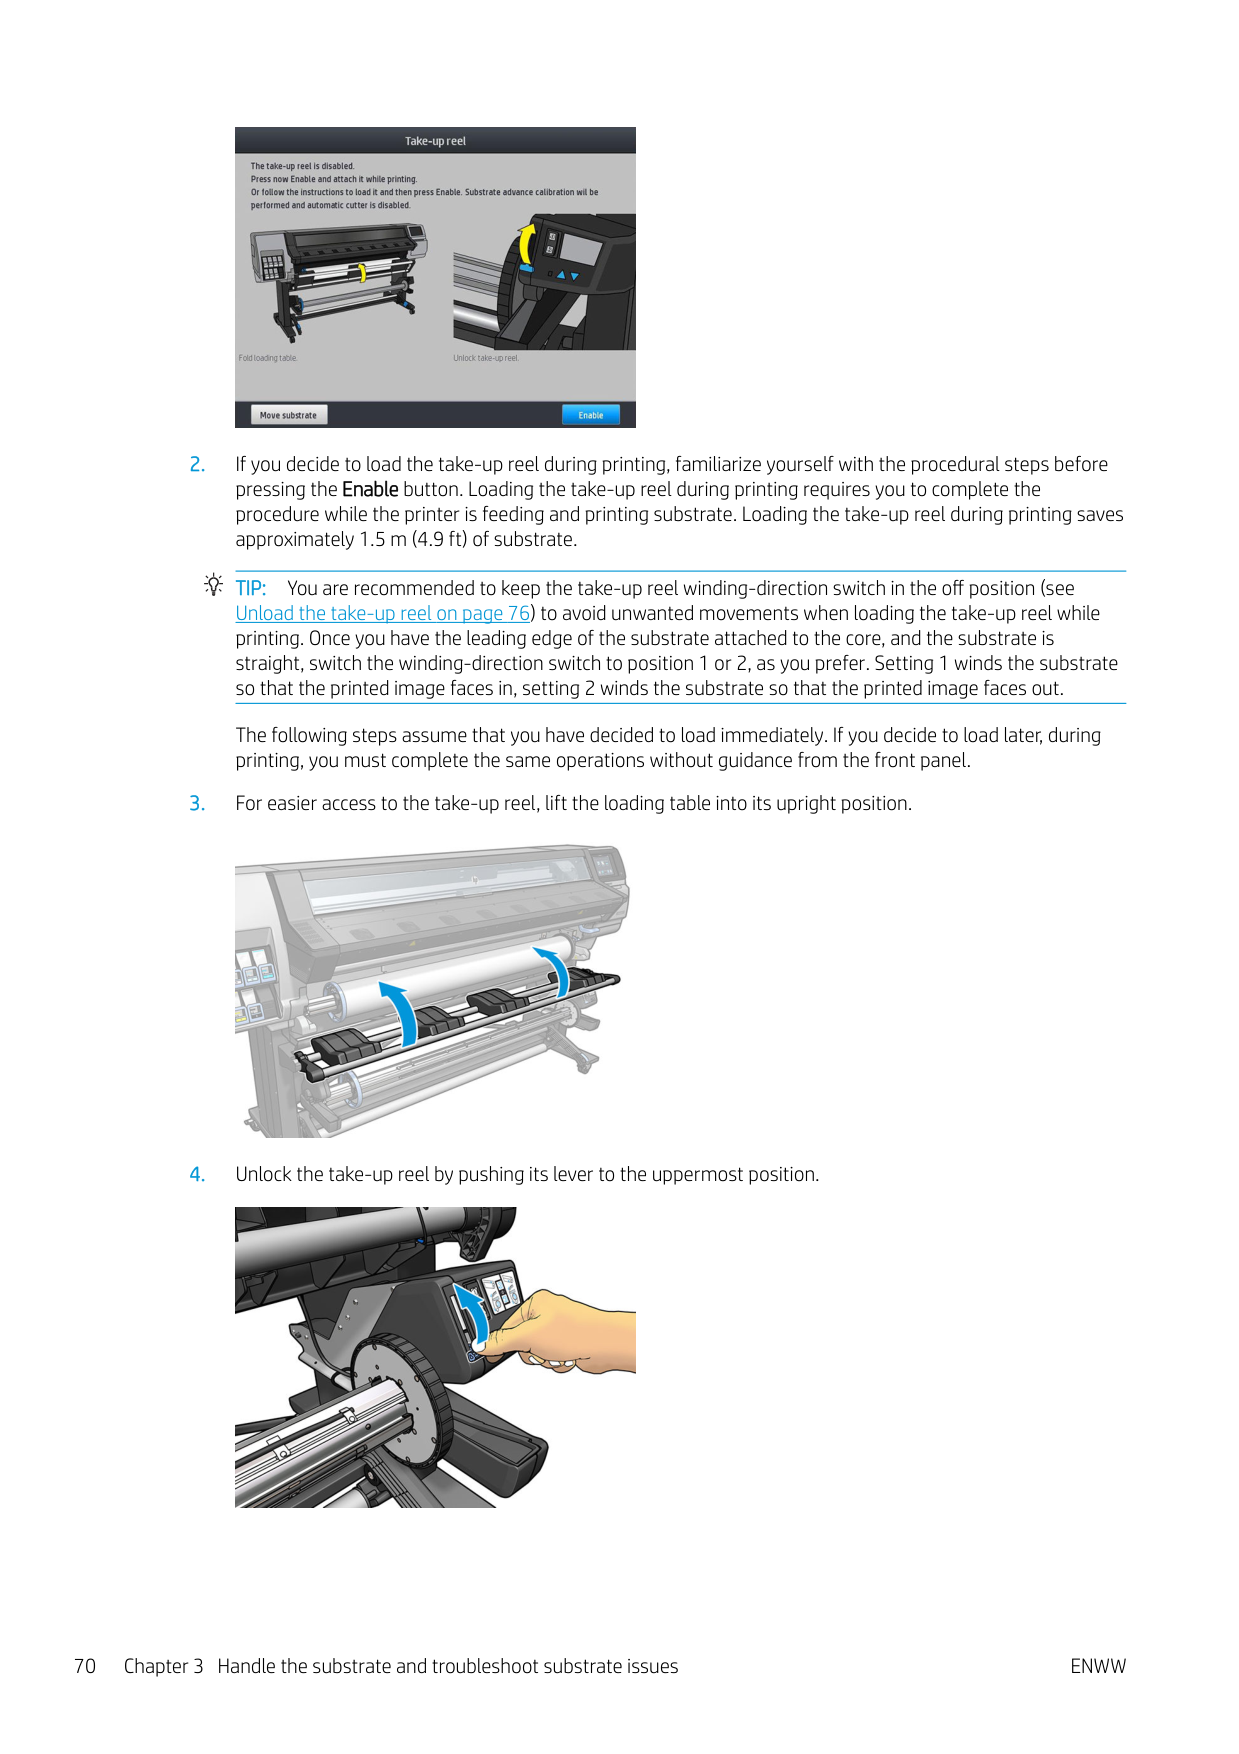
Take-up reel

#### Tension bar
When in use, the take-up reel requires a dangling loop of substrate weighed down by a tension bar. The tension bar can be moved with the take-up reel buttons or by using the Move paper or Rewind paper options in the front panel.
#### Load a roll onto the take-up reel
| | |---|
NOTE: Take-up reels with 51 mm (2 in) or 76 mm (3 in) diameter can be used.

Instructions are displayed on the screen; slide your finger laterally across the front panel to follow the instructions to the end.

The following steps assume that you have decided to load immediately. If you decide to load later, during printing, you must complete the same operations without guidance from the front panel.


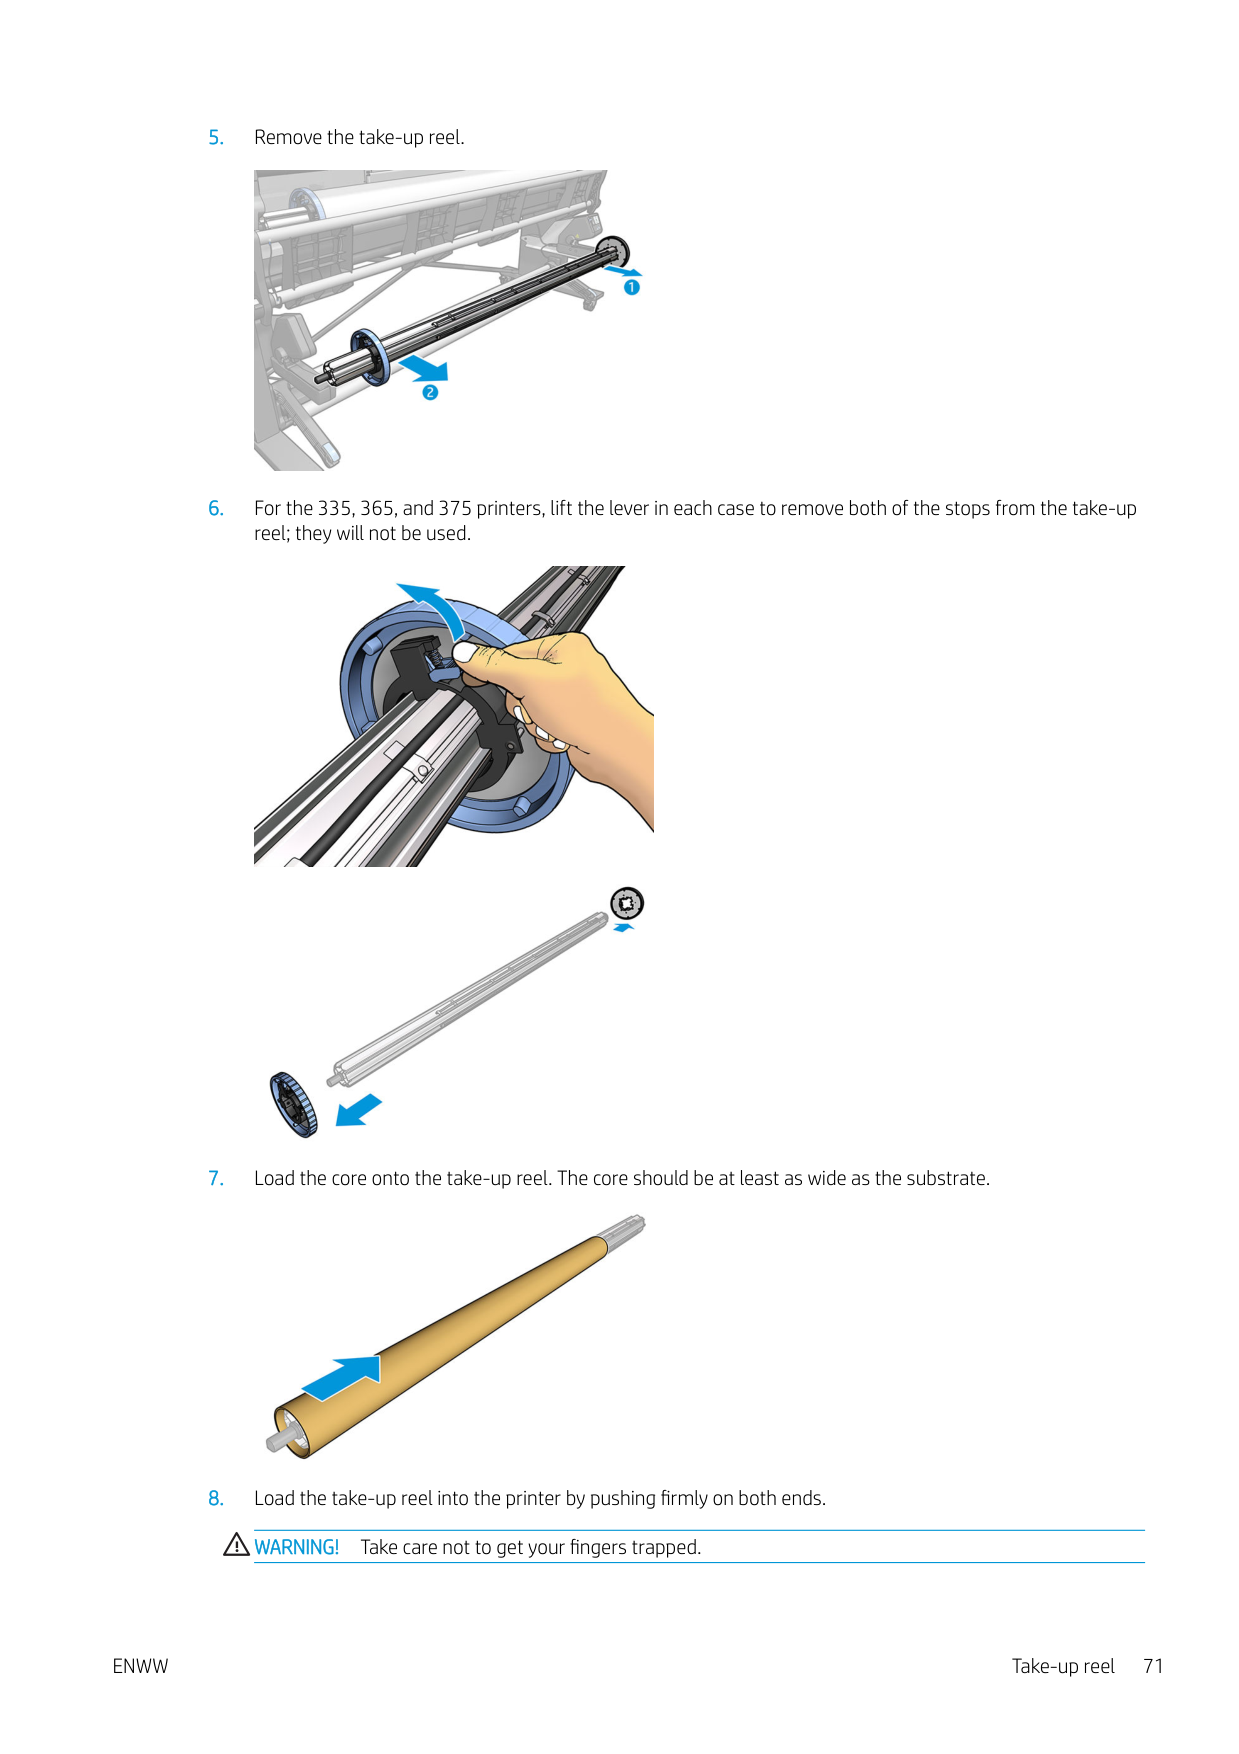
####### 5. Remove the take-up reel.

####### 6. For the 335, 365, and 375 printers, lift the lever in each case to remove both of the stops from the take-upreel; they will not be used.


####### 7. Load the core onto the take-up reel. The core should be at least as wide as the substrate.

####### 8. Load the take-up reel into the printer by pushing firmly on both ends.WARNING! Take care not to get your fingers trapped.

Risk of trapped fingers For more safety information, please see Safety precautions on page 3

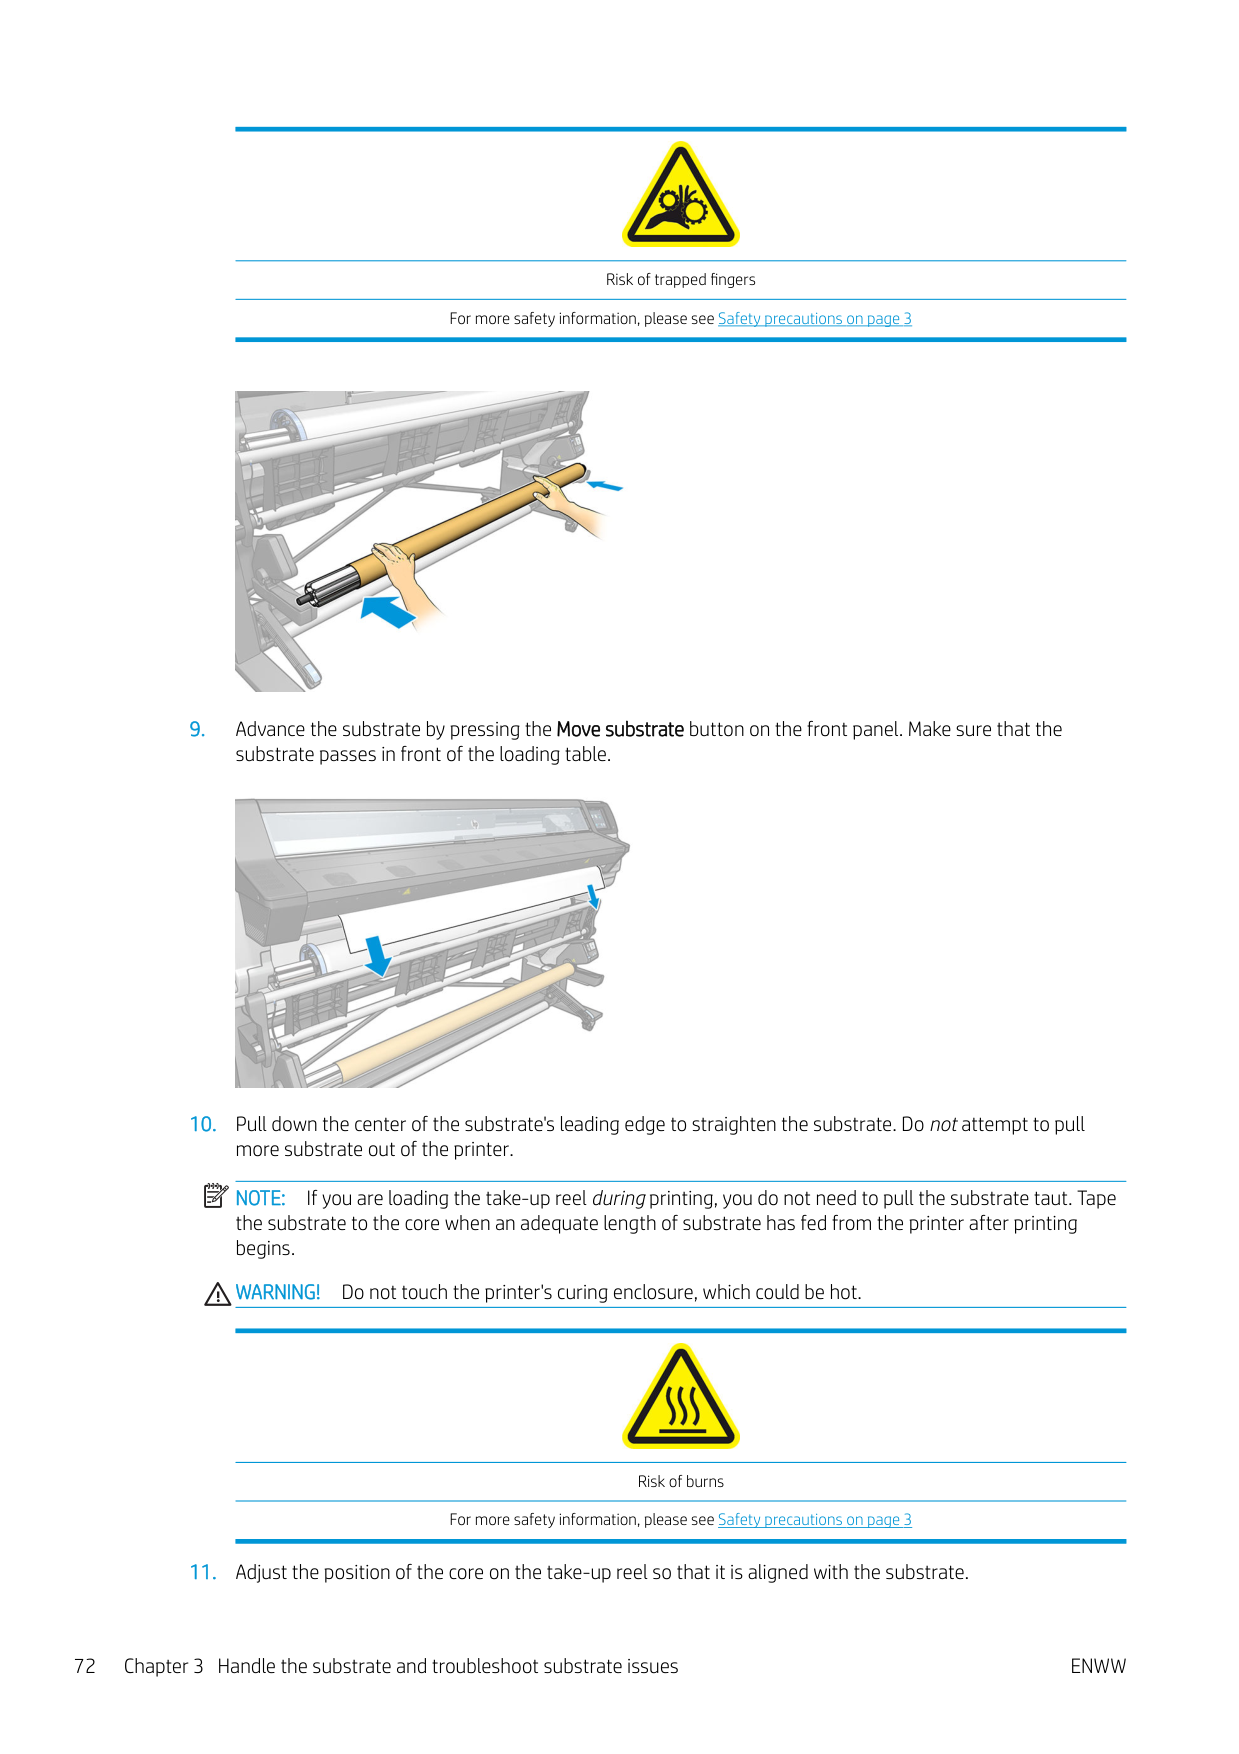
####### 9. Advance the substrate by pressing the Move substrate button on the front panel. Make sure that thesubstrate passes in front of the loading table.

####### 10. Pull down the center of the substrate's leading edge to straighten the substrate. Do not attempt to pullmore substrate out of the printer.
| | |---|
NOTE: If you are loading the take-up reel during printing, you do not need to pull the substrate taut. Tape the substrate to the core when an adequate length of substrate has fed from the printer after printing begins.
WARNING! Do not touch the printer's curing enclosure, which could be hot.

Risk of burns For more safety information, please see Safety precautions on page 3
####### 11. Adjust the position of the core on the take-up reel so that it is aligned with the substrate.
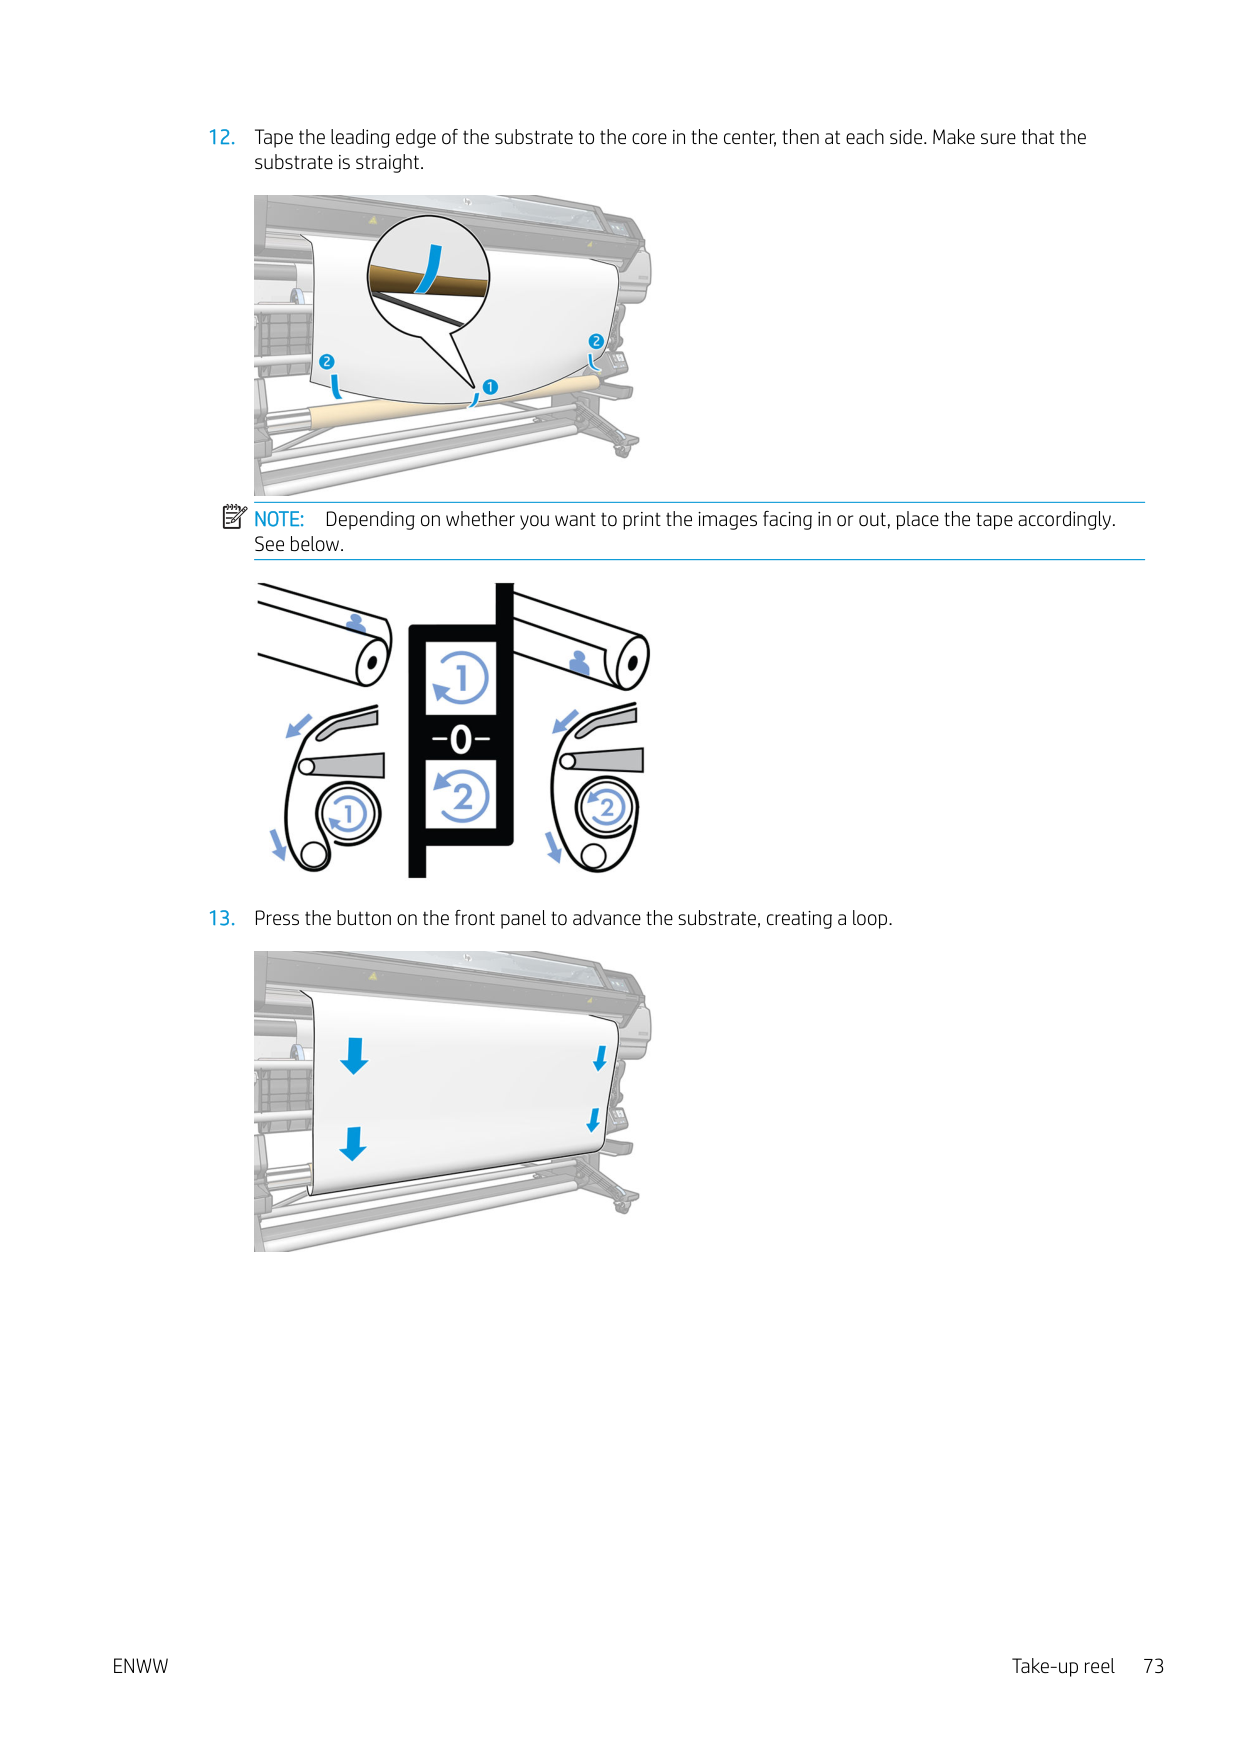
####### 12. Tape the leading edge of the substrate to the core in the center, then at each side. Make sure that thesubstrate is straight.
| | |---|

NOTE: Depending on whether you want to print the images facing in or out, place the tape accordingly. See below.

####### 13. Press the button on the front panel to advance the substrate, creating a loop.

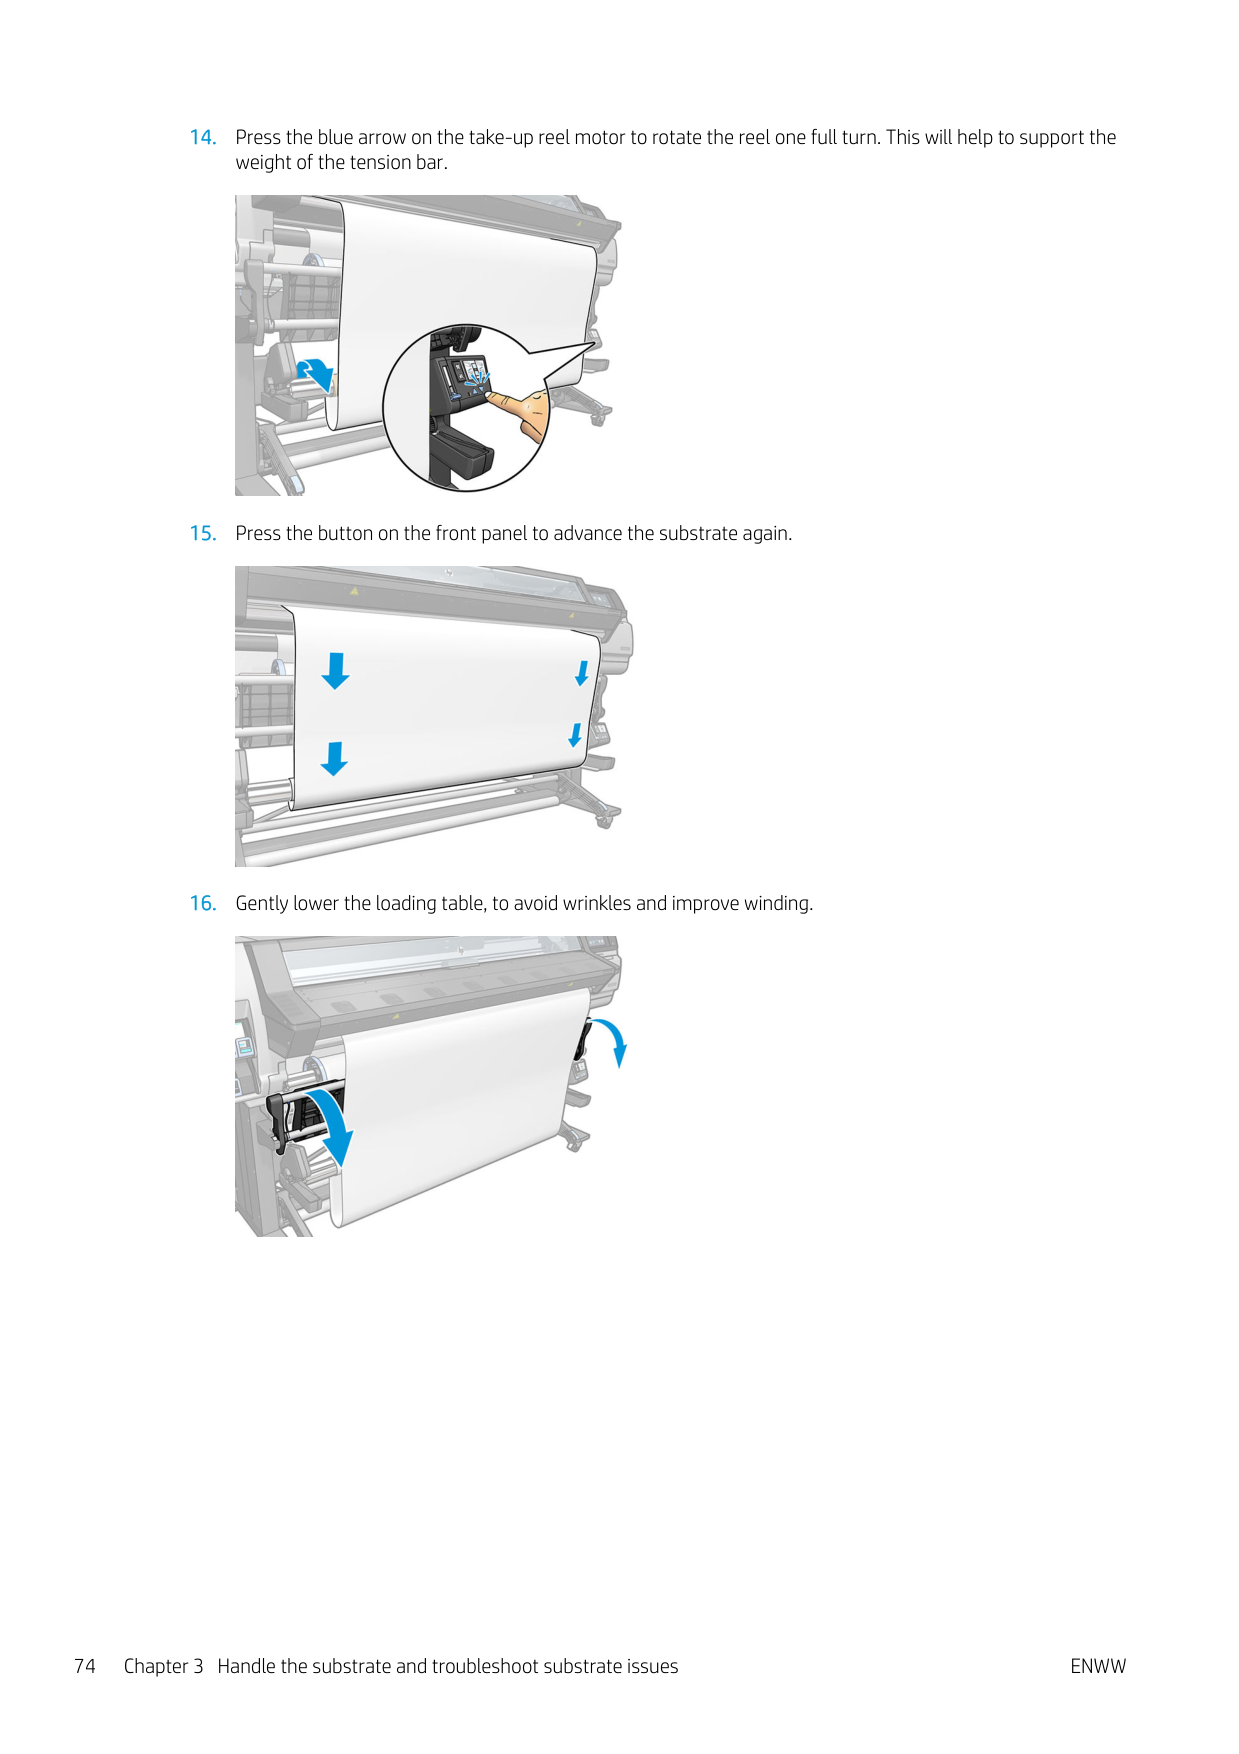
####### 14. Press the blue arrow on the take-up reel motor to rotate the reel one full turn. This will help to support theweight of the tension bar.

####### 15. Press the button on the front panel to advance the substrate again.

####### 16. Gently lower the loading table, to avoid wrinkles and improve winding.

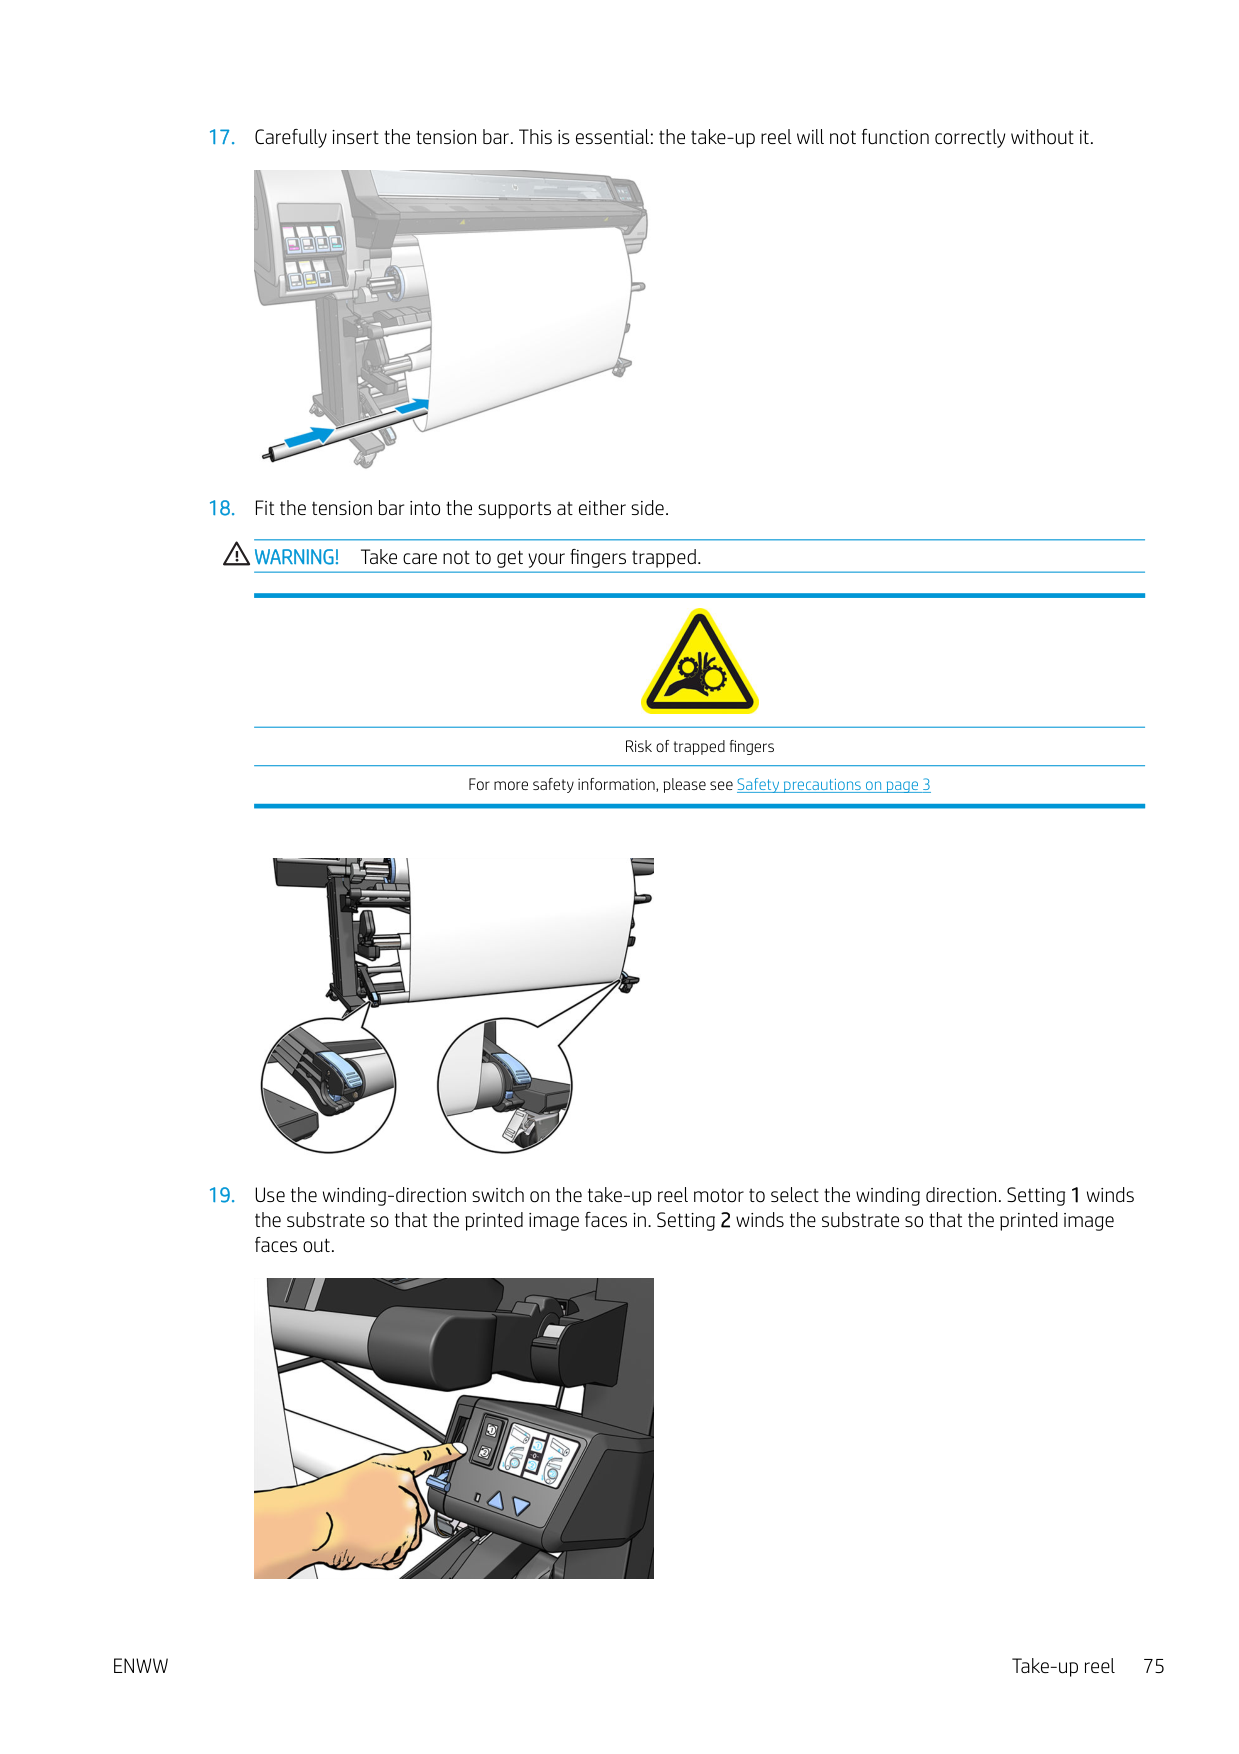
####### 17. Carefully insert the tension bar. This is essential: the take-up reel will not function correctly without it.

####### 18. Fit the tension bar into the supports at either side.WARNING! Take care not to get your fingers trapped.

Risk of trapped fingers For more safety information, please see Safety precautions on page 3

####### 19. Use the winding-direction switch on the take-up reel motor to select the winding direction. Setting 1 windsthe substrate so that the printed image faces in. Setting 2 winds the substrate so that the printed imagefaces out.


| | |---|
| | |---|
NOTE: When the take-up reel is in use, the substrate is not automatically cut after each print. NOTE: For the 335, 365, or 375 printer: If the take-up reel is loaded during printing, recalibrate the substrateadvance sensor for optimal print quality. At the front panel, press , then Image quality maintenance > Substrate advance calibration > OMAS calibration.

#### Unload the take-up reel
WARNING! Take care not to get your fingers trapped.

Risk of trapped fingers For more safety information, please see Safety precautions on page 3

The printer allows you to move the substrate to facilitate cutting.
Double-sided printing (365 and 375 only) The printer can be used to print on both sides of the substrate, in the following way. NOTE: The print should be at least 28 cm (11 in) wide, otherwise the printer will not be able to find the reference line when printing the second side.
| | |---|
###### Outline
Double-sided printing can be selected in your RIP software or at the printer's front panel. The RIP setting takes precedence: if double-sided printing is explicitly turned on or off in the RIP software, the front panel setting is ignored.
| | |---|
NOTE: If you try to move the substrate while printing on either side, the front panel asks for confirmation, because any such movement prevents correct alignment between the two sides.
###### Double-sided printing in detail
NOTE: The automatic cutter and the extra top/bottom margin are both disabled during double-sided printing.
NOTE: The chance of visible misalignment between the two sides increases with the length of the job. For this reason, in double-sided printing you are recommended not to print any single job that is longer than 3 m (10 ft). Visible misalignment may also be caused by skew.
| | |---|
| | |---|

ENWW Double-sided printing (365 and 375 only) 77
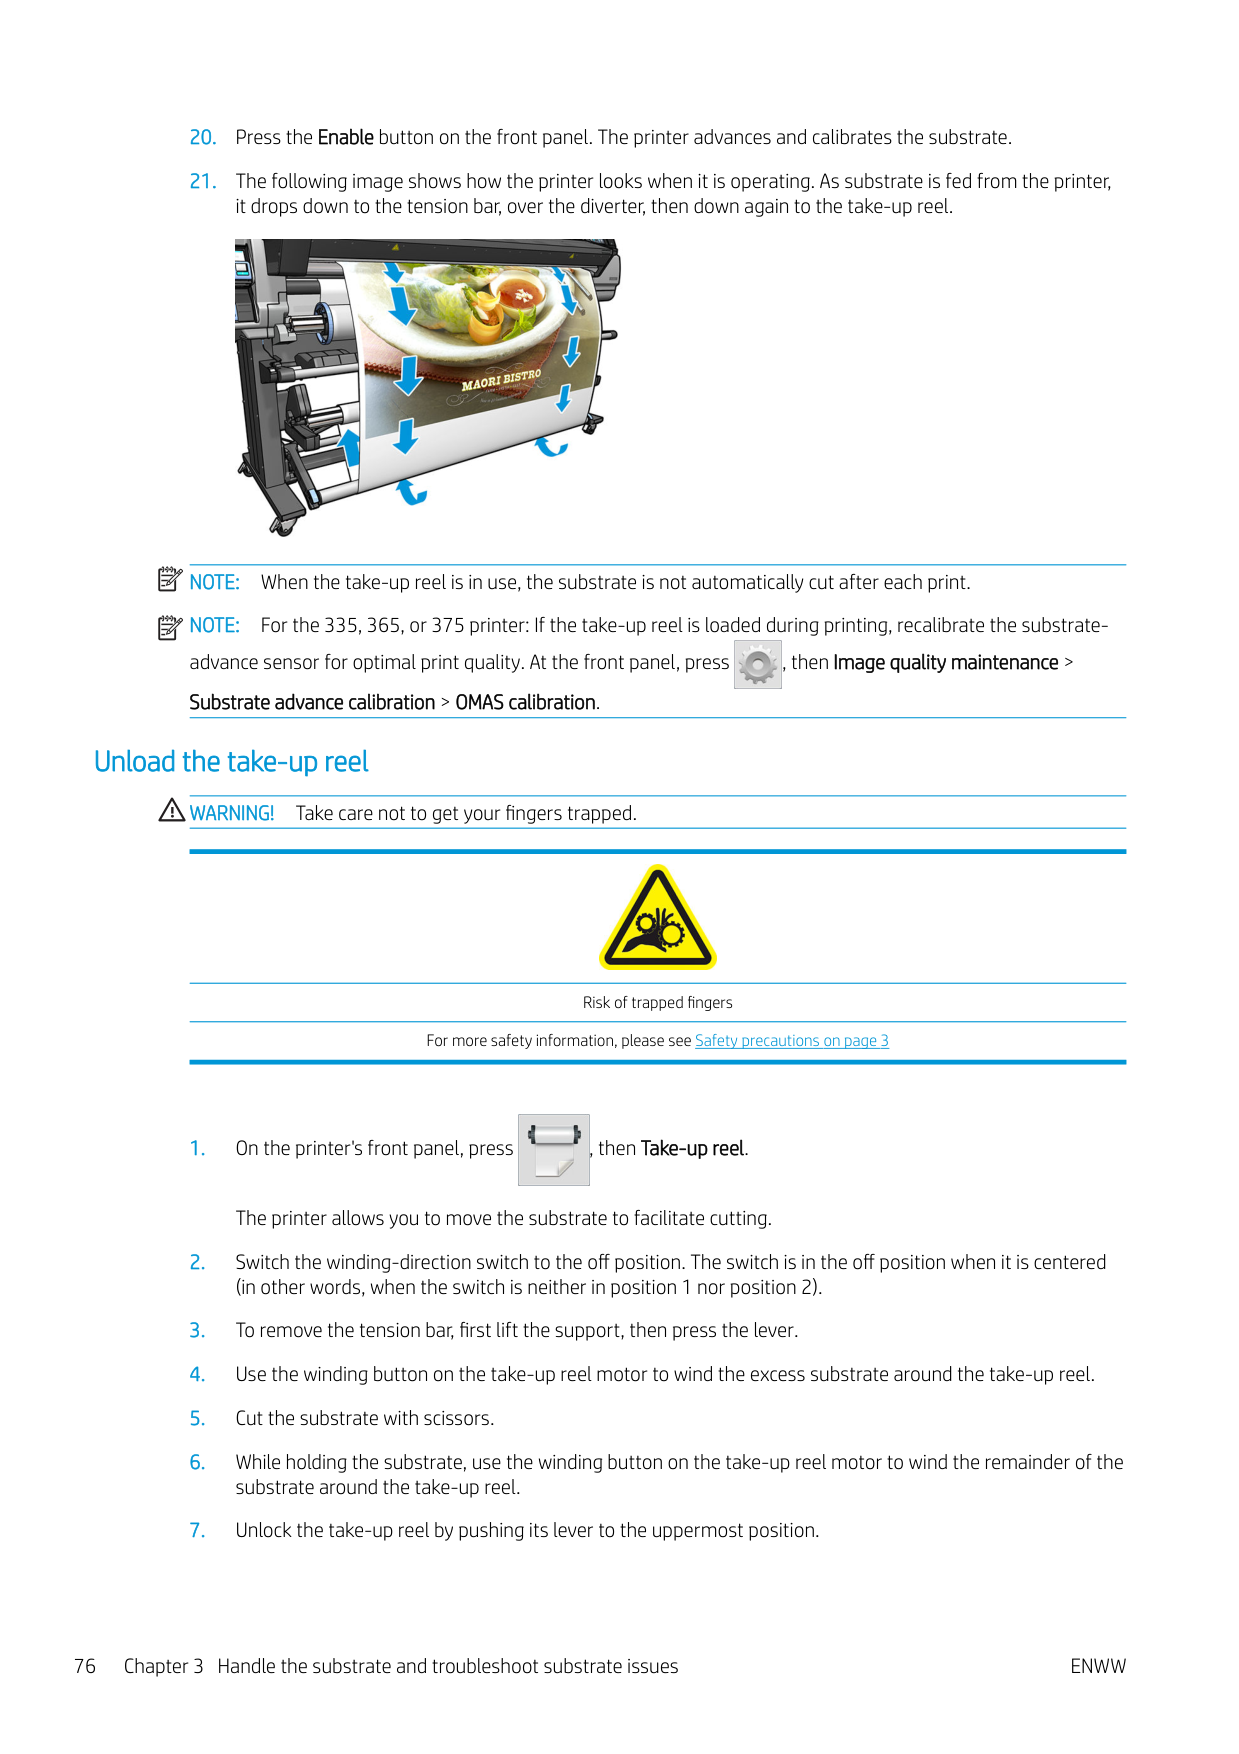

cutting, ensure that the total length of the cut substrate is more than 2 m (6 ft 7 in), otherwise you may be unable to load it successfully.
NOTE: The Cut command will not work if the cutter is disabled: that is, if , Substrate > Substrate handling options > Cutter is set to Off.


TIP: Although it is not strictly necessary, you may find it quicker to use the manual loading procedure as
an initial approximation, and then allow the printer to find the reference line more accurately. See Assisted manual load on page 63. If you use only the automatic loading procedure, the printer may take some time to find the reference line.
NOTE: If enable autoline detection is off, the automatic search is disabled, and the printer asks you to find the correct position manually.
| |
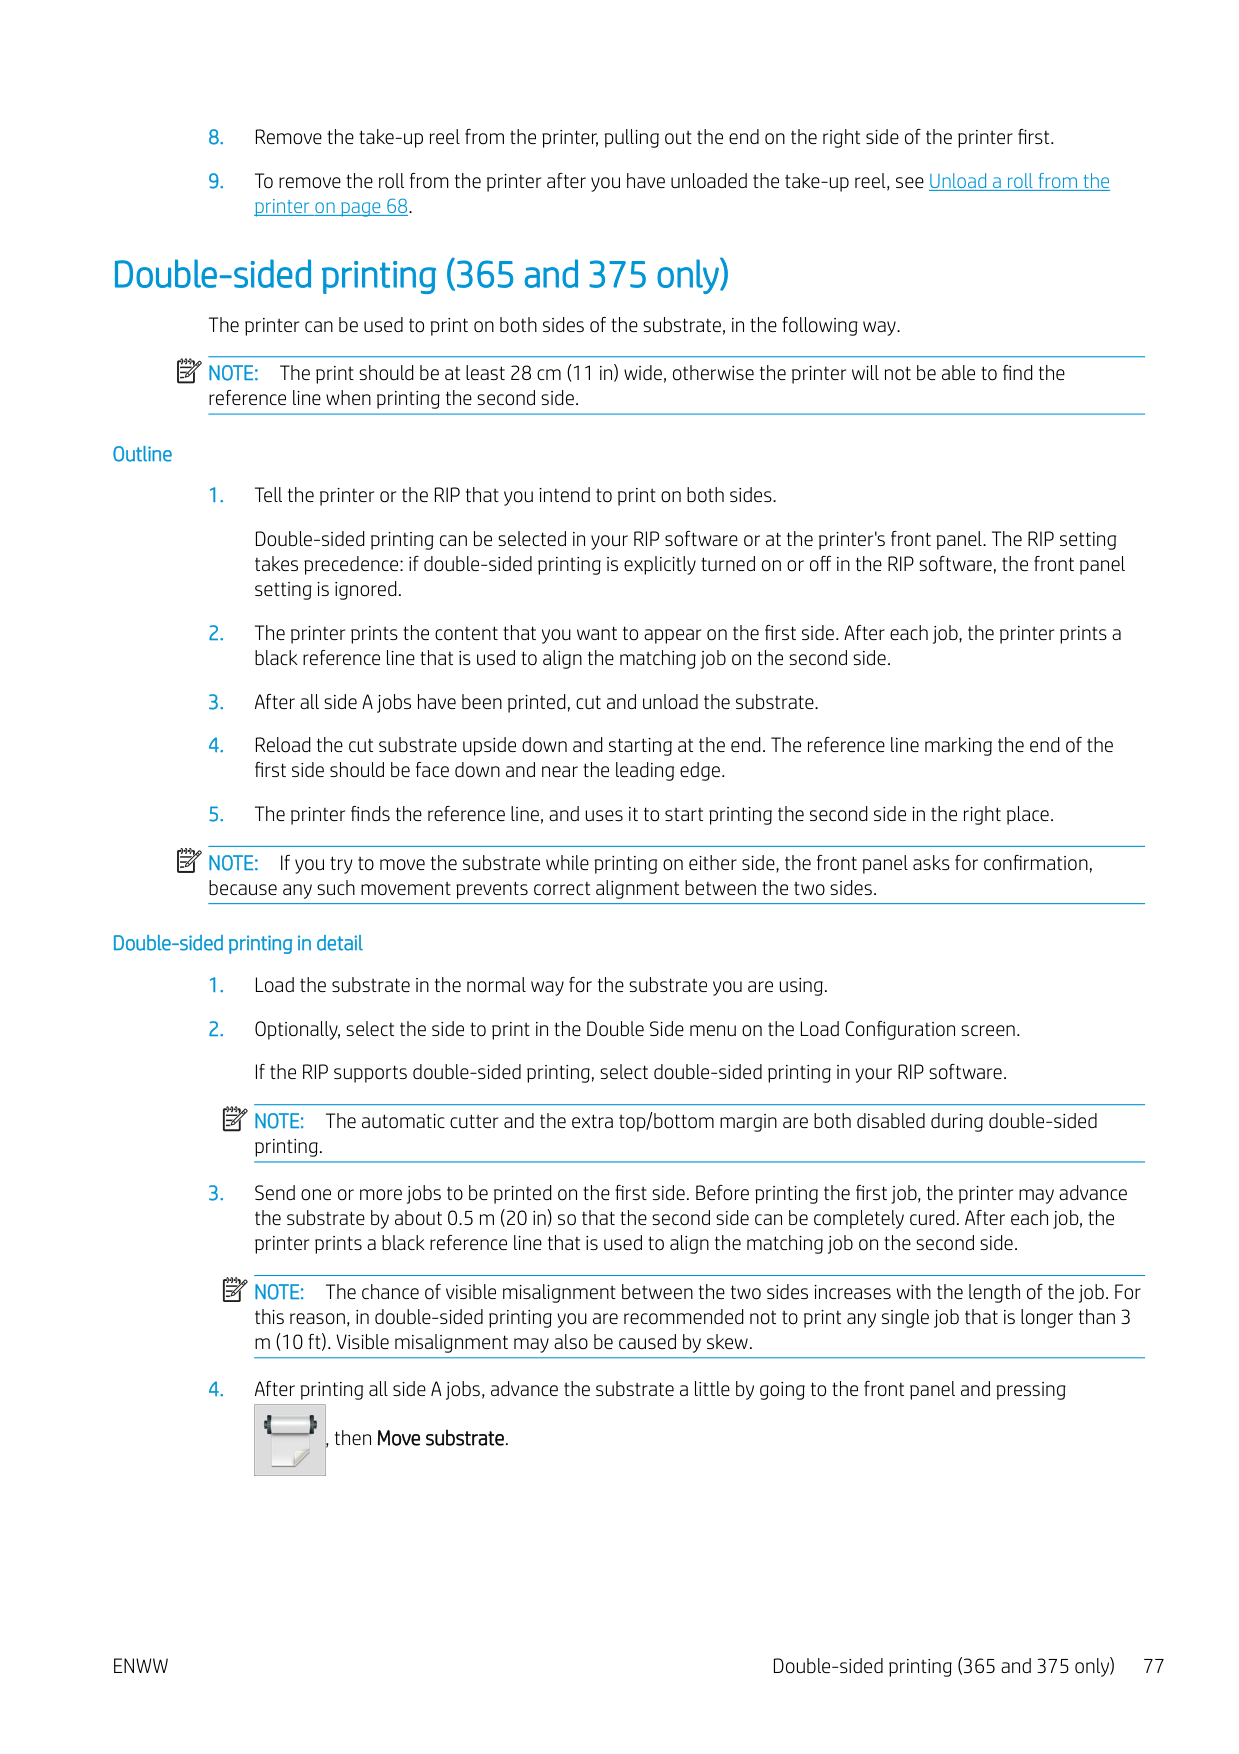
|---|
| | |---|


View information about the substrate

On the front panel's home screen, press .
The following information appears on the front panel, if any substrate is loaded:
Change substrate width and right edge position If the substrate edges are not correctly found by the printer, they can be changed from the front panel by pressing , then Substrate > Substrate handling options > Substrate width or Right edge position.

TIP: Bear in mind that automatic edge detection will not be attempted again until the next substrate load.
Substrate length tracking
The substrate length tracking feature enables you to keep track of how much substrate remains on the roll.

The remaining length of substrate is always displayed in the Substrate area of the front panel. This information may also be displayed in your RIP.
Cut substrate

This option is available from the printer's front panel. If you press , then the scissors icon, the printer
normally advances the substrate 10 cm (3.9 in) and cuts it.
ENWW Change substrate width and right edge position 79
| | |---|
| |
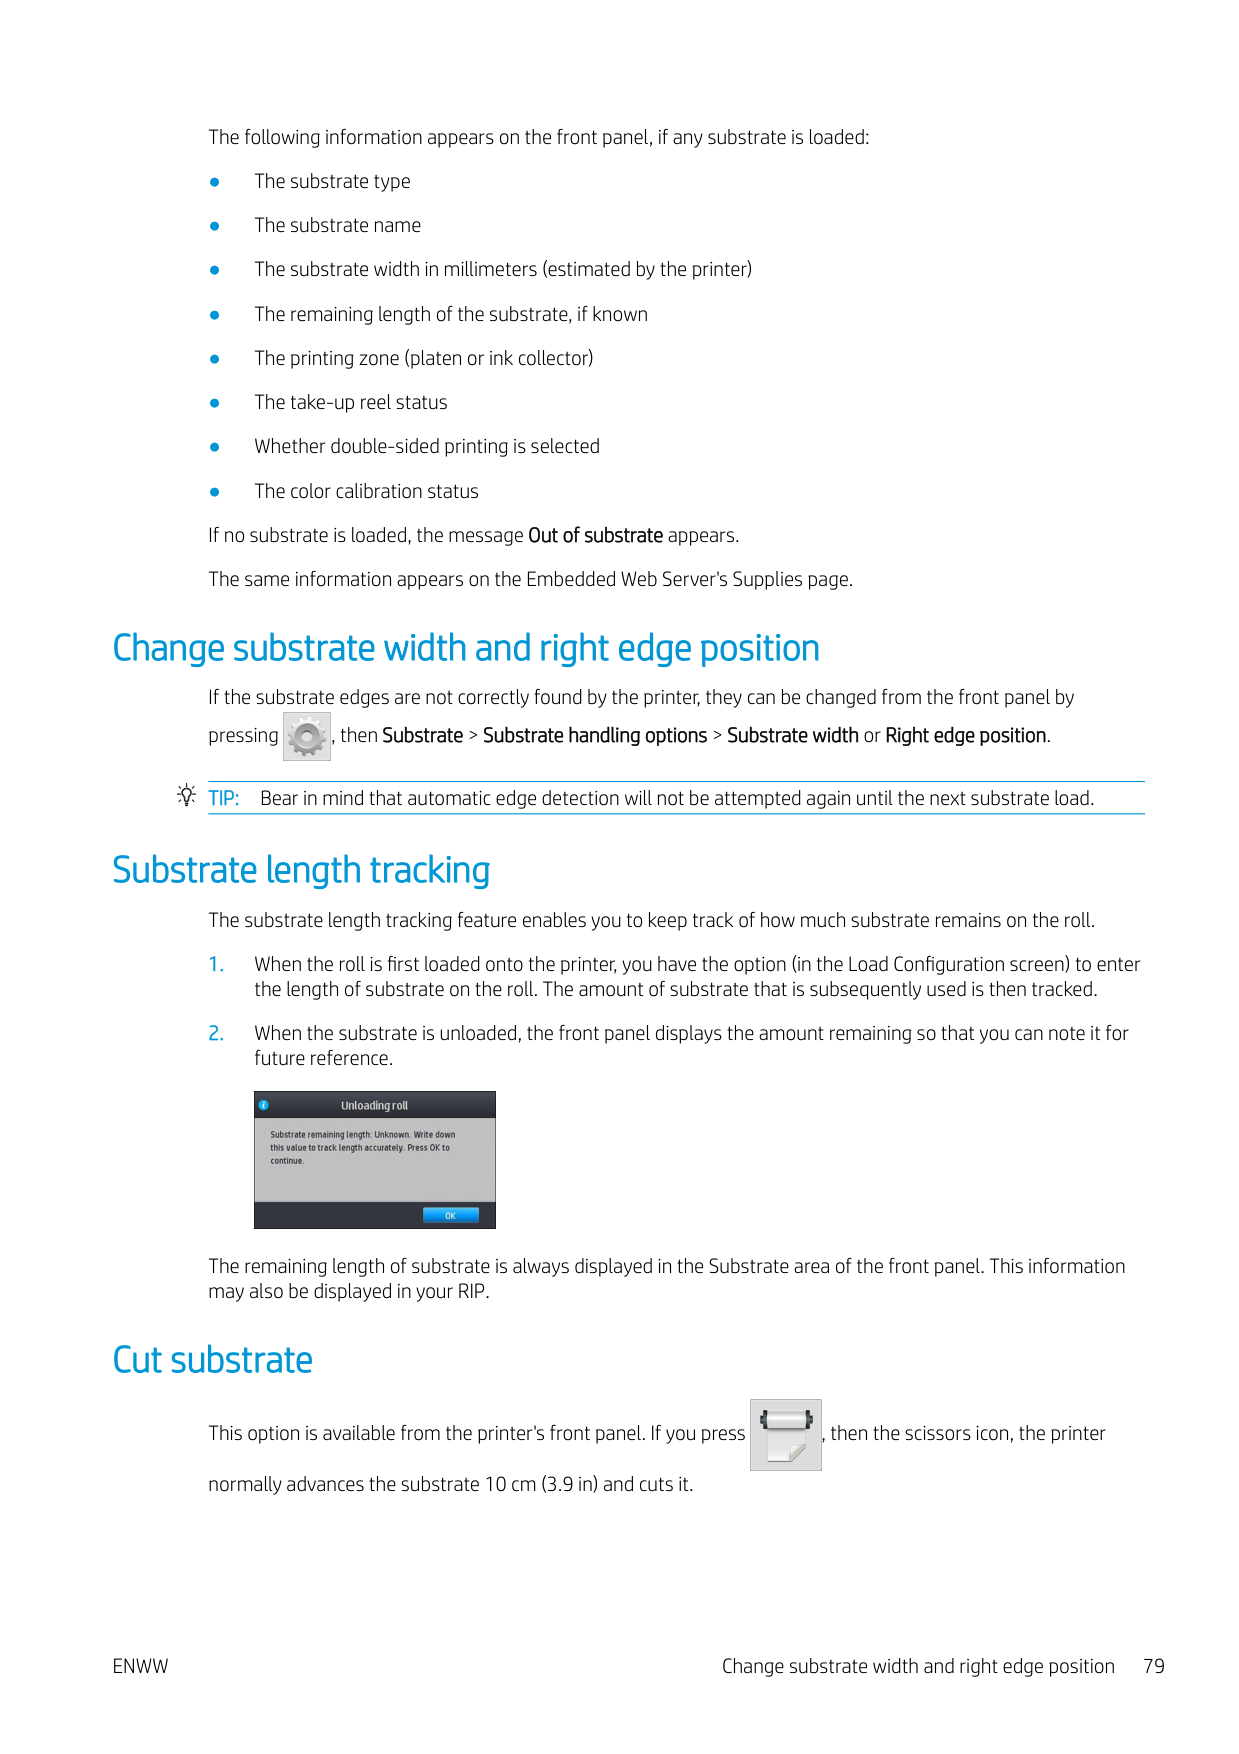
|---|

NOTE: If the cutter is disabled ( , then Substrate handling options > Cutter > Off), the printer advances the substrate but does not cut it. NOTE: Some banners and textiles cannot be cut.
Bypass job start safety
The job start safety mode is activated by default so that the leading edge of the substrate does not crash under the curing system.
If you print with the substrate hanging from the front of the printer, or using the take-up reel, you may want to deactivate this option to improve throughput (not recommended). To do that, press , then Substrate > Substrate handling options > Bypass job start safety.

Store the substrate
The following are tips for storing substrate:
Substrate cannot be loaded successfully
Here are some suggestions to try if you cannot load the substrate successfully.

Substrate is mispositioned

If you see the above display on the front panel, proceed as follows.
Substrate has jammed


When a jam occurs, the Possible substrate jam message usually appears in the front panel, with one of several error codes (see Front-panel error codes on page 167).

If you are trying to load a very thin or very thick substrate, or a textile, remember to follow the special procedure for loading such substrates. See Loading accessory (365 and 375 only) on page 59.
ENWW Substrate is mispositioned 81
#### Check the substrate path
This problem can occur when a roll has finished and the end of the roll is stuck to the cardboard core. If this has happened, cut the end of the roll away from the core. Then feed the substrate through the printer, and load a new roll.
Otherwise:


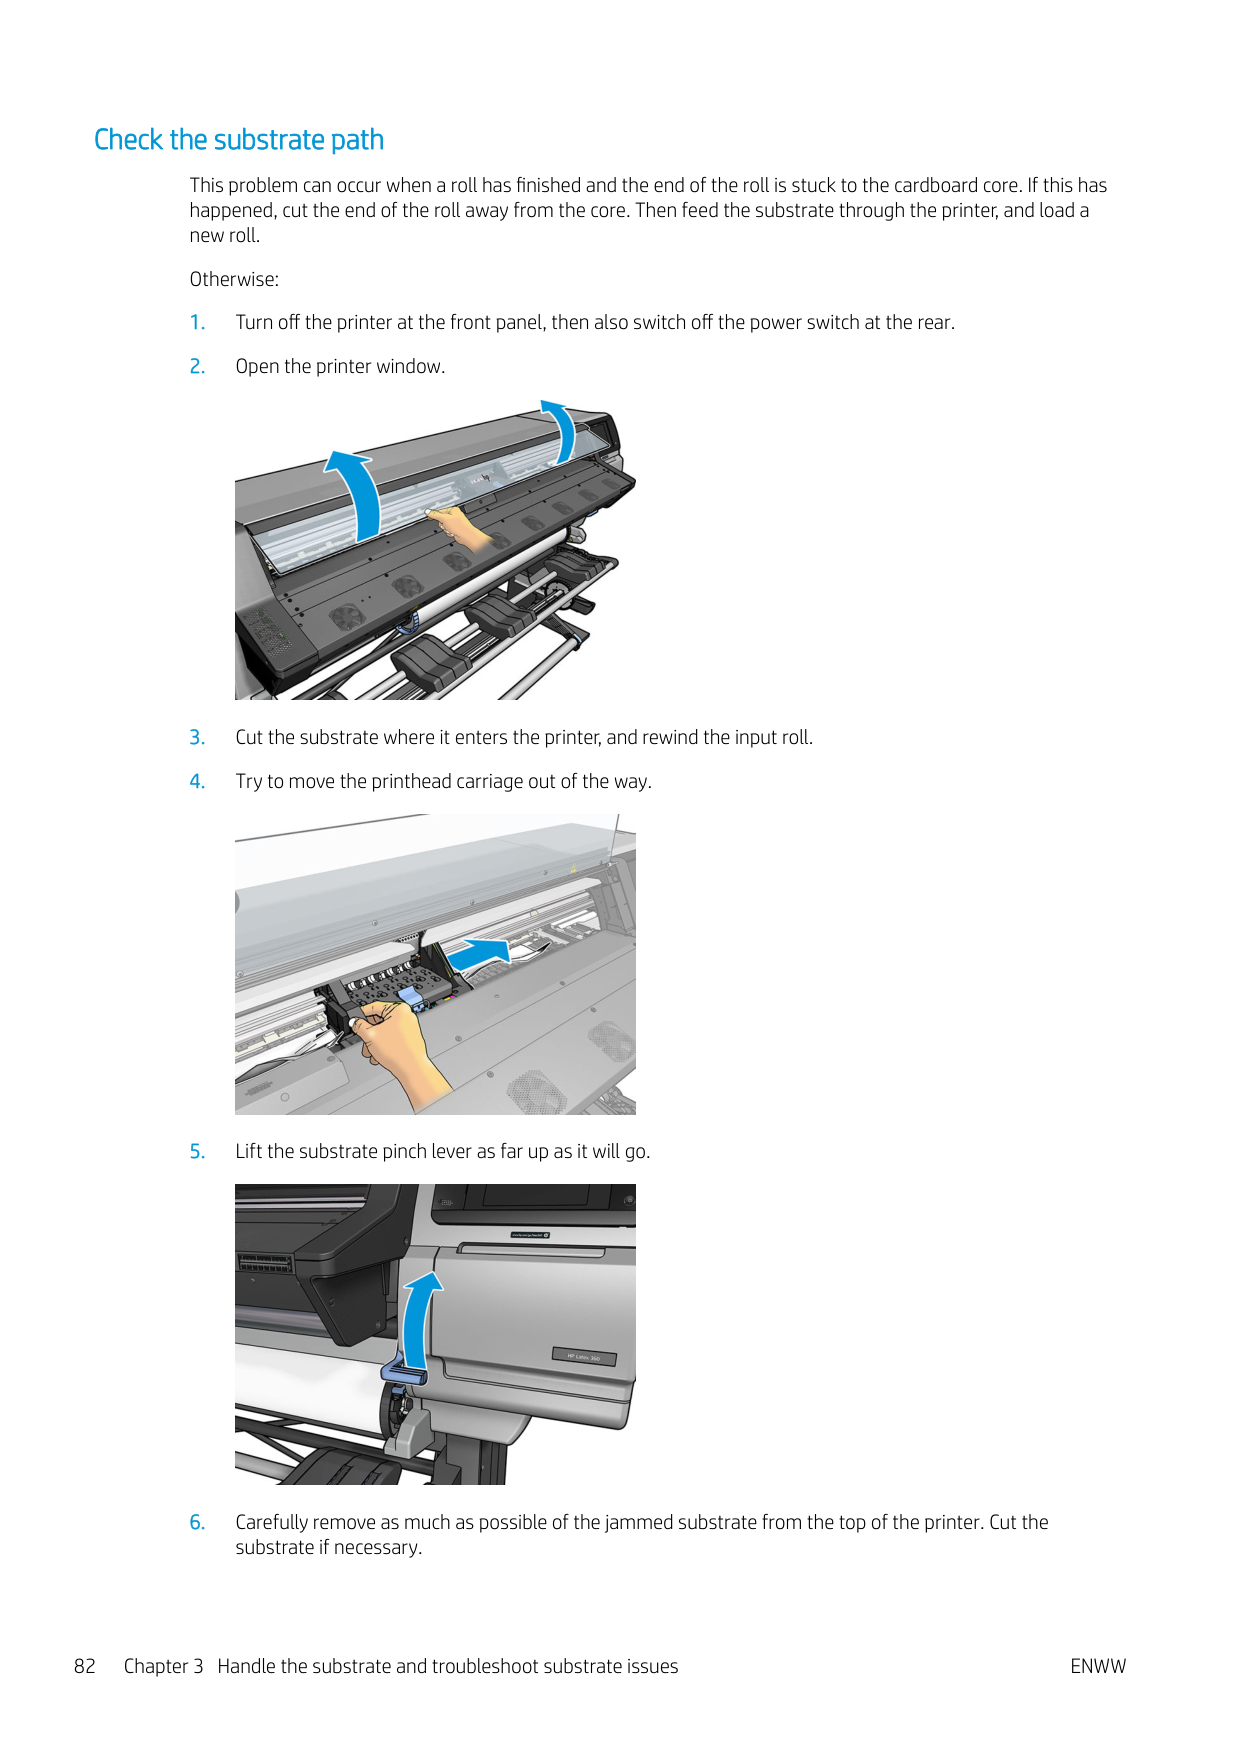

CAUTION: Try to avoid pulling the substrate out through the input path, because this reverses the normal direction of movement, and could damage printer parts.
WARNING! Do not touch the printer's curing enclosure, which could be hot.

Risk of burns For more safety information, please see Safety precautions on page 3
#### Avoiding substrate jams while printing
Substrate jams may be caused by loading the substrate with too much skew: do not ignore the warning message that appears during the loading procedure in this case.
They may also be caused by not enough vacuum suction in the printing zone. If you decide to increase the suction, do not exceed the following limits: 20 mmH2O for banners, 35 mmH2O for vinyl, and 50 mmH2O for other substrate families.
If you experience jams only at the beginning of a print, try the following suggestions.
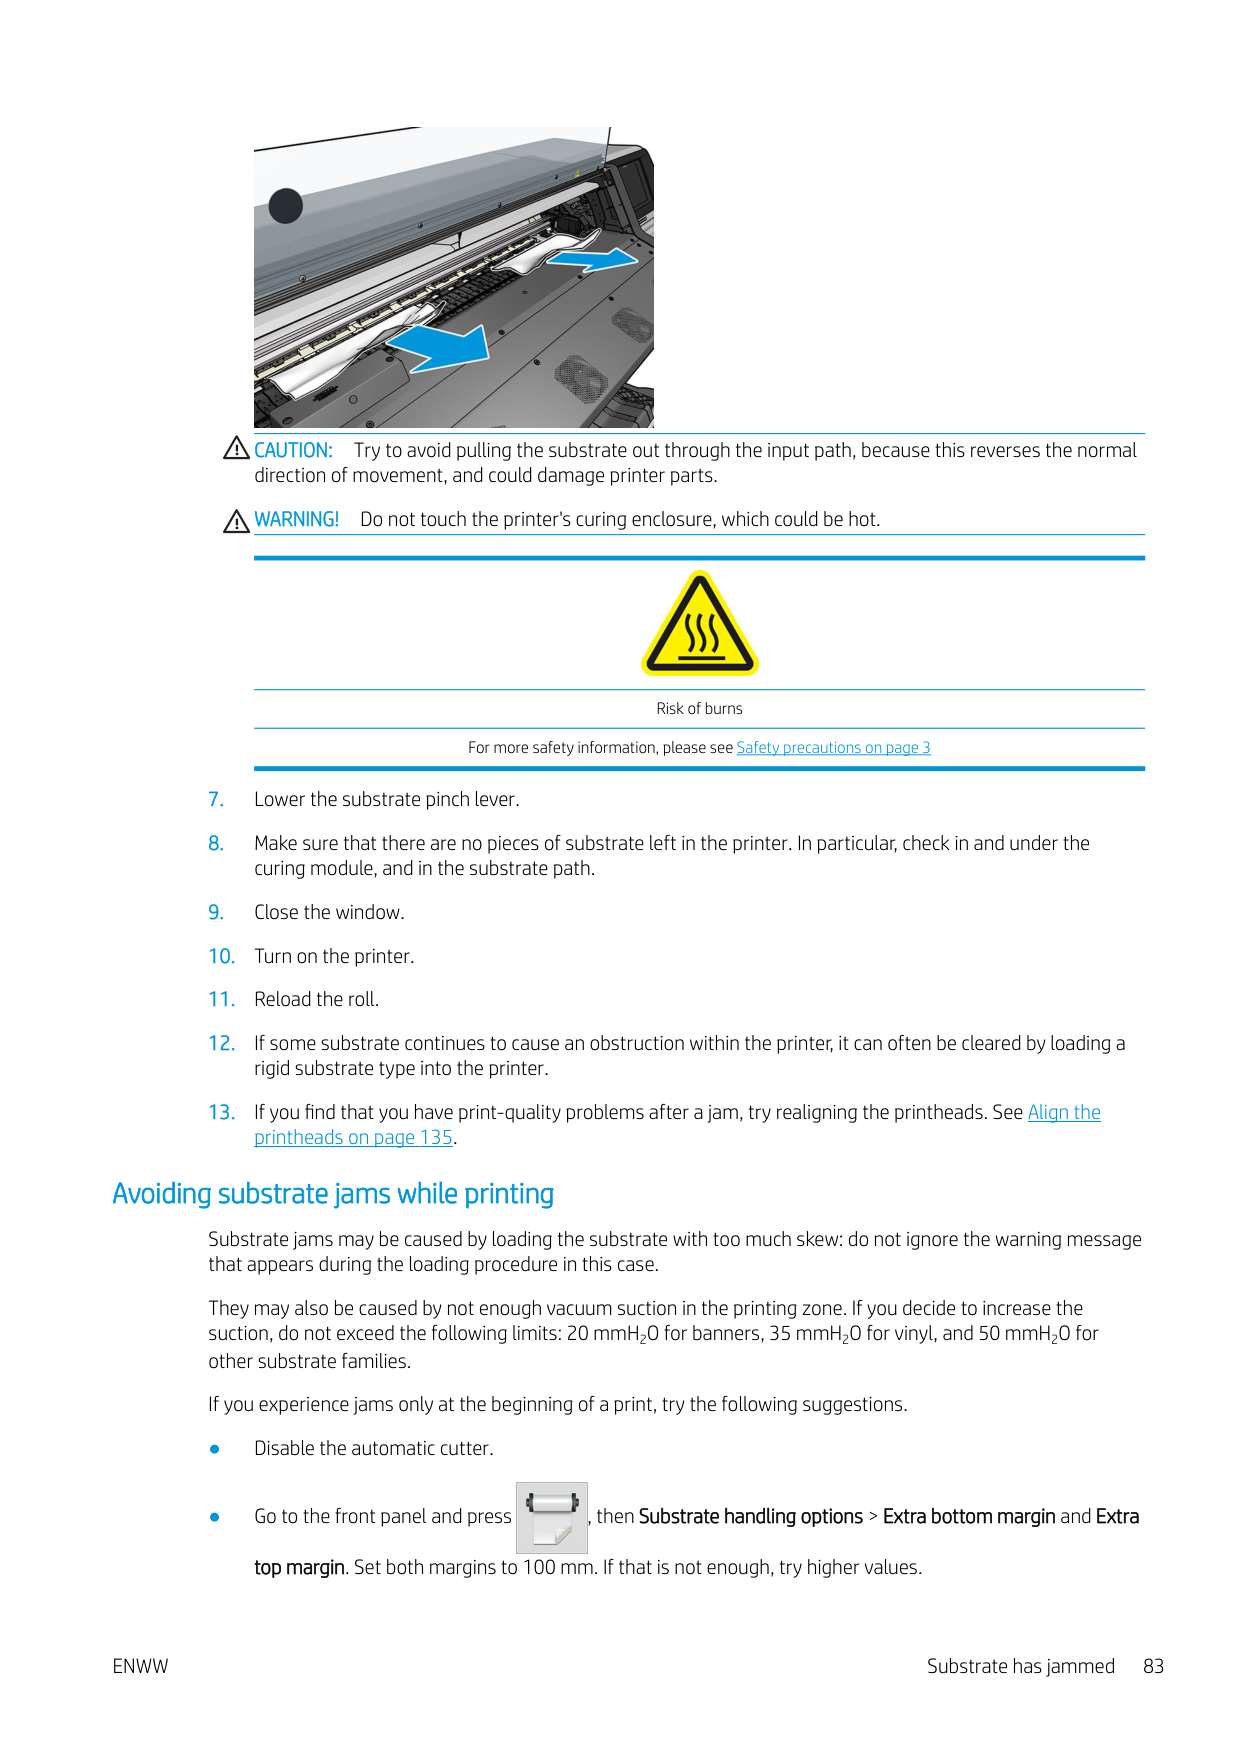

ENWW Substrate has jammed 83
Substrate is deformed or wrinkled
If your substrate is deformed or wrinkled by the curing process, change the temperature settings before printing the next job, and advance the substrate, using the Move substrate option in the front panel's Substrate menu, so that the next job will be printed on undamaged substrate.
If the problem appears only at the beginning of the print, try the following suggestions.

Substrate has shrunk or expanded
During the printing process, some substrates may shrink, while others may expand. If this happens, the dimensions of the print will not be correct.
As a general rule, you can expect the following percentages of shrinkage:
The framing problem may be solved by printing a sample and adjusting the size of the image in the RIP. You may reuse this value for all your future prints with the same substrate, although special care must be taken when using banners, as the shrinkage may vary up to 1% depending on the amount of ink used in the print.
You can expect the following variations from one print to another:
To solve the tiling problem and improve the repeatability of the printed size, you are recommended to ensure that the substrate-advance sensor is enabled in the RIP's substrate preset, as this will improve the stability of the prints over time. You are also recommended to tile together areas with similar amounts of ink. If this is not possible, print the areas with different amounts of ink as different jobs and modify the length of the job with less ink in the RIP to match its size with the job with high ink content.
Some RIPs may provide a scaling option that allows you to compensate easily for substrate shrinkage or expansion; see your RIP documentation.
See also Variable Front Tension Kit on page 121.
Substrate has bow deformation
The following substrates may suffer from bow deformation during printing, as a result of which the print will appear curved.
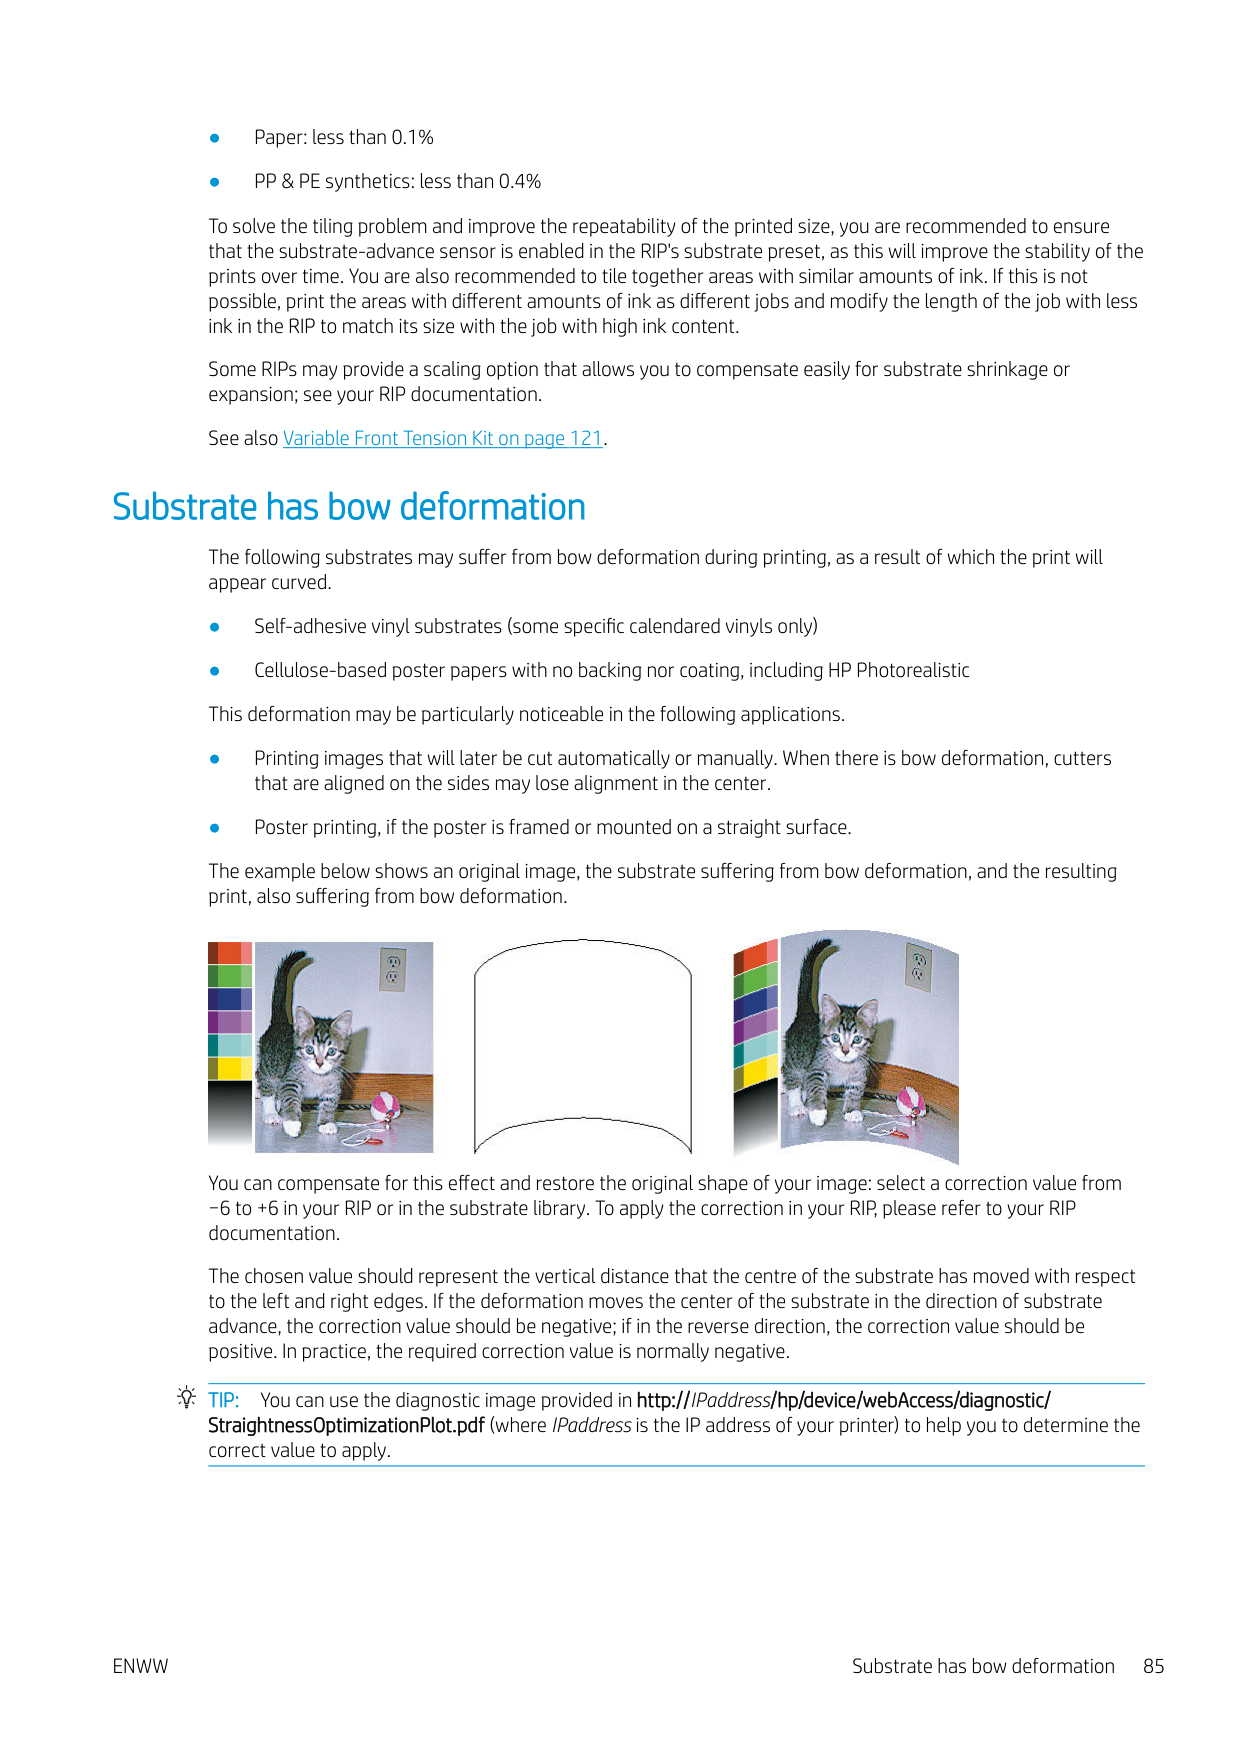
The example below shows an original image, the substrate suffering from bow deformation, and the resulting print, also suffering from bow deformation.

You can compensate for this effect and restore the original shape of your image: select a correction value from −6 to +6 in your RIP or in the substrate library. To apply the correction in your RIP, please refer to your RIP documentation.
The chosen value should represent the vertical distance that the centre of the substrate has moved with respect to the left and right edges. If the deformation moves the center of the substrate in the direction of substrate advance, the correction value should be negative; if in the reverse direction, the correction value should be positive. In practice, the required correction value is normally negative.
TIP: You can use the diagnostic image provided in http://IPaddress/hp/device/webAccess/diagnostic/ StraightnessOptimizationPlot.pdf (where IPaddress is the IP address of your printer) to help you to determine the correct value to apply.
ENWW Substrate has bow deformation 85
Substrate is sticky and causes smears and crashes
Some substrates may become sticky when heated by the curing system; especially banners and double-sided banners under high temperatures. To avoid the problem, HP recommends reducing the curing temperature as much as possible and reducing the front tension (avoid using the take-up reel if possible).
The ink collector included in the 365 and 375 printers is designed both to collect ink from textiles and porous substrates and to reduce the friction of the substrate against the output platen. Install the ink collector as described in Ink collector (365 and 375 only) on page 55 before printing on a sticky substrate.
Automatic cutter does not work
The automatic cutter is turned off in any of the following cases.

TIP: You can disable the take-up reel from the front panel by pressing , then Take-up reel >

Enable take-up reel.
Take-up reel substrate jam
If the substrate is severely damaged on the take-up reel, do not use the printer's cutter to cut and remove the substrate. Instead, cut the substrate manually as close as possible to the printer window, then remove the roll.
If the problem remains after removing the substrate jam, unload the take-up reel from the front panel and load it again.
Take-up reel does not wind
Predictably, if the take-up reel is not winding as anticipated, the printed output is likely to end up on the floor. If the printer recognizes a problem with the take-up reel, it interrupts the print job until the issue is corrected. If the printer does not recognize a problem, the job continues to print. The following table highlights possible issues and solutions.
Take-up reel LED status Issue Print job interrupted? Possible cause Possible solution Blinking quickly Take-up reel is not
Yes The tension bar is in its lower position because the winding direction is not correct.
Change the winding direction using the winding-direction switch on the take-up reel motor. You may need to use the blue arrow buttons to collect substrate from the floor.

winding
######### Take-up reel LED status Issue Print job interrupted? Possible cause Possible solution Blinking slowly Take-up reel is not
No The sensor cables are loose or unplugged.
Ensure that the sensor cables are correctly secured.
winding
Solid red Take-up reel is not winding
No There is too much resistance on the take-up reel motor.
Ensure that nothing is blocking the substrate path or the tension bar.
Solid green Take-up reel is not winding
No The winding-direction switch on the take-up reel motor is Off or in the wrong position.
Ensure that the switch is On, and select the correct winding direction (1 or 2).
Solid green Take-up reel is winding in the wrong direction
No The winding-direction switch on the take-up reel motor is in the wrong position.
Change the switch to the correct position.
ENWW Take-up reel does not wind 87
4 Substrate settings
Substrate presets
Each substrate type has its own characteristics. To obtain the best print quality, the printer has to adapt its printing parameters to each different substrate type. For example, some may need more ink and some may require higher temperatures for curing. A specification of the correct printing parameters for a particular substrate type is called a substrate preset.

The substrate preset contains a color profile in International Color Consortium (ICC) format, which describes the color characteristics of the combination of printer, inks, and substrate. It also contains information about other parameters (such as curing temperature, vacuum pressure, and substrate-advance compensation) that are not directly related to color. Substrate presets (also known as Open Media System or OMES packages) are installed in the printer, and automatically copied to supported RIP software whenever it is connected to the printer.
The printer comes with substrate presets for the most commonly used generic substrates. Some presets may come preinstalled in your printer (such as HP Vinyl presets); use them only with the substrates for which they were created. For other substrates, presets named Generic are recommended over other preinstalled presets. However, the best performance can be achieved only with presets made specifically for your substrate. There are various ways to obtain more presets:
Online search


You can search online for a substrate preset by using the Online search function within the Substrate Library front-panel menu. The printer connects to the HP Media Locator database on the Internet and allows you to search all available substrate presets for your particular printer model, including HP and third-party substrate brands. Hundreds of different substrate presets may be available, and the database of substrate presets is continuously updated and expanded. You will always get the most up-to-date content in this way.
ENWW Substrate presets 89

When the printer is connected to the database (this may take a few seconds), a list of all available substrate presets for your printer model is displayed. You can browse the list by scrolling it, and get details on any preset by pressing its name. Besides browsing, there are two additional ways to look for presets: free-text search and filters.

Once you have located the substrate preset of your choice, pressing its download icon will queue it for automatic download and installation in the background. You can select as many substrate presets as you want for download and installation (they will be processed in the order that they were selected). You can return to another part of the Media Manager or another front panel screen at any time after queuing presets for download, and this will not interrupt the download and installation process.

Once a substrate preset has been downloaded in the background, it is checked and installed on the printer's hard disk. During checking and installation, a full-screen message is shown on the front panel. This message disappears when checking and installation is complete.
The new substrate preset now appears in the Substrate Library together with all previously installed and factoryprovided presets, and is ready for use.
Some supported RIPs may implement a similar online substrate-preset search function accessing the same HP Media Locator database. Whether you use the printer's front panel search or RIP-based search does not matter: the end result is the same. Supported RIP software synchronizes its substrate preset list with the printer, so that printer and RIP will always have the same list.
HP Media Locator The HP Media Locator database of substrate presets can also be accessed from a Web browser by visiting http://www.hp.com/go/mediasolutionslocator. This provides access to the database for different regions, printer models, applications, suppliers, substrate types, and so on. When you have located the substrate preset of your choice, you can download it to your computer. To install the preset into the printer with which you want to use it, use the printer's Embedded Web Server. Navigate to the Setup > Substrate presets management > Import screen.

Click Browse to browse to the substrate preset file that you have previously downloaded to your computer, then click Update to install the preset in your printer.
The Embedded Web Server also allows you to export substrate presets from your printer for use with another printer of the same model. When importing a previously exported substrate preset, you may see a message warning you that the package is not signed (only packages downloaded from the HP Media Locator internet database are digitally signed, as a form of authentication); you can then ignore the warning and continue with the installation, or abort the installation.
ENWW HP Media Locator 91

Generic presets

Generic presets are each designed for a whole substrate category, rather than for a particular substrate type. They cannot be edited, erased, saved, color-calibrated or ICC profiled; but they can be cloned. Therefore, if you would like to modify a generic preset in any way, you should first clone it and then work on the clone, which is fully editable.
The printer provides generic presets for the supported substrate categories: see Supported substrate categories on page 43.
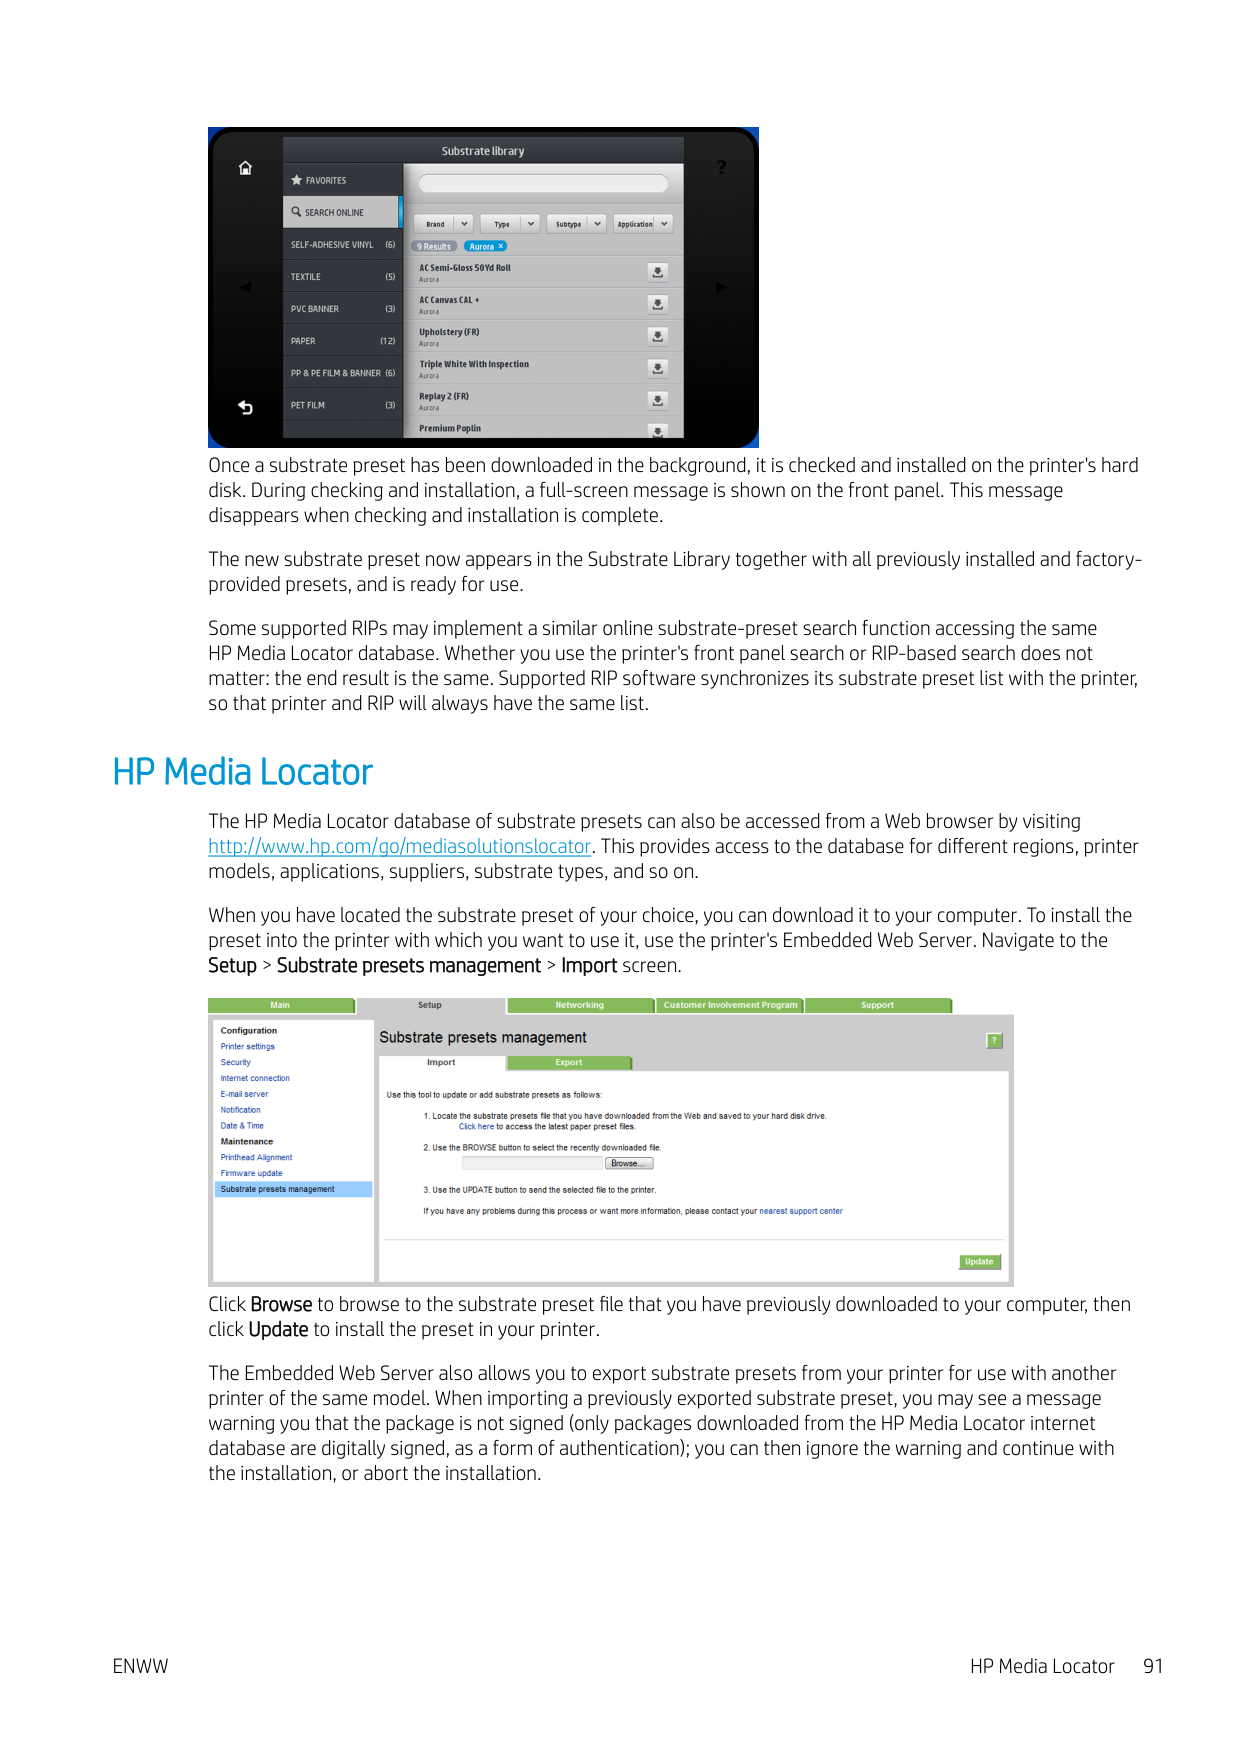
Clone a substrate preset

You may wish to clone and edit a preset for various reasons:
To clone a substrate preset, follow these steps:

Modify a substrate preset You can modify a preset by pressing Modify. Then click the icon of the print mode that you want to modify; or click Add new print mode. You can delete or change the name of any print mode; although you should keep at least one print mode.

| | |---|
| | |---|
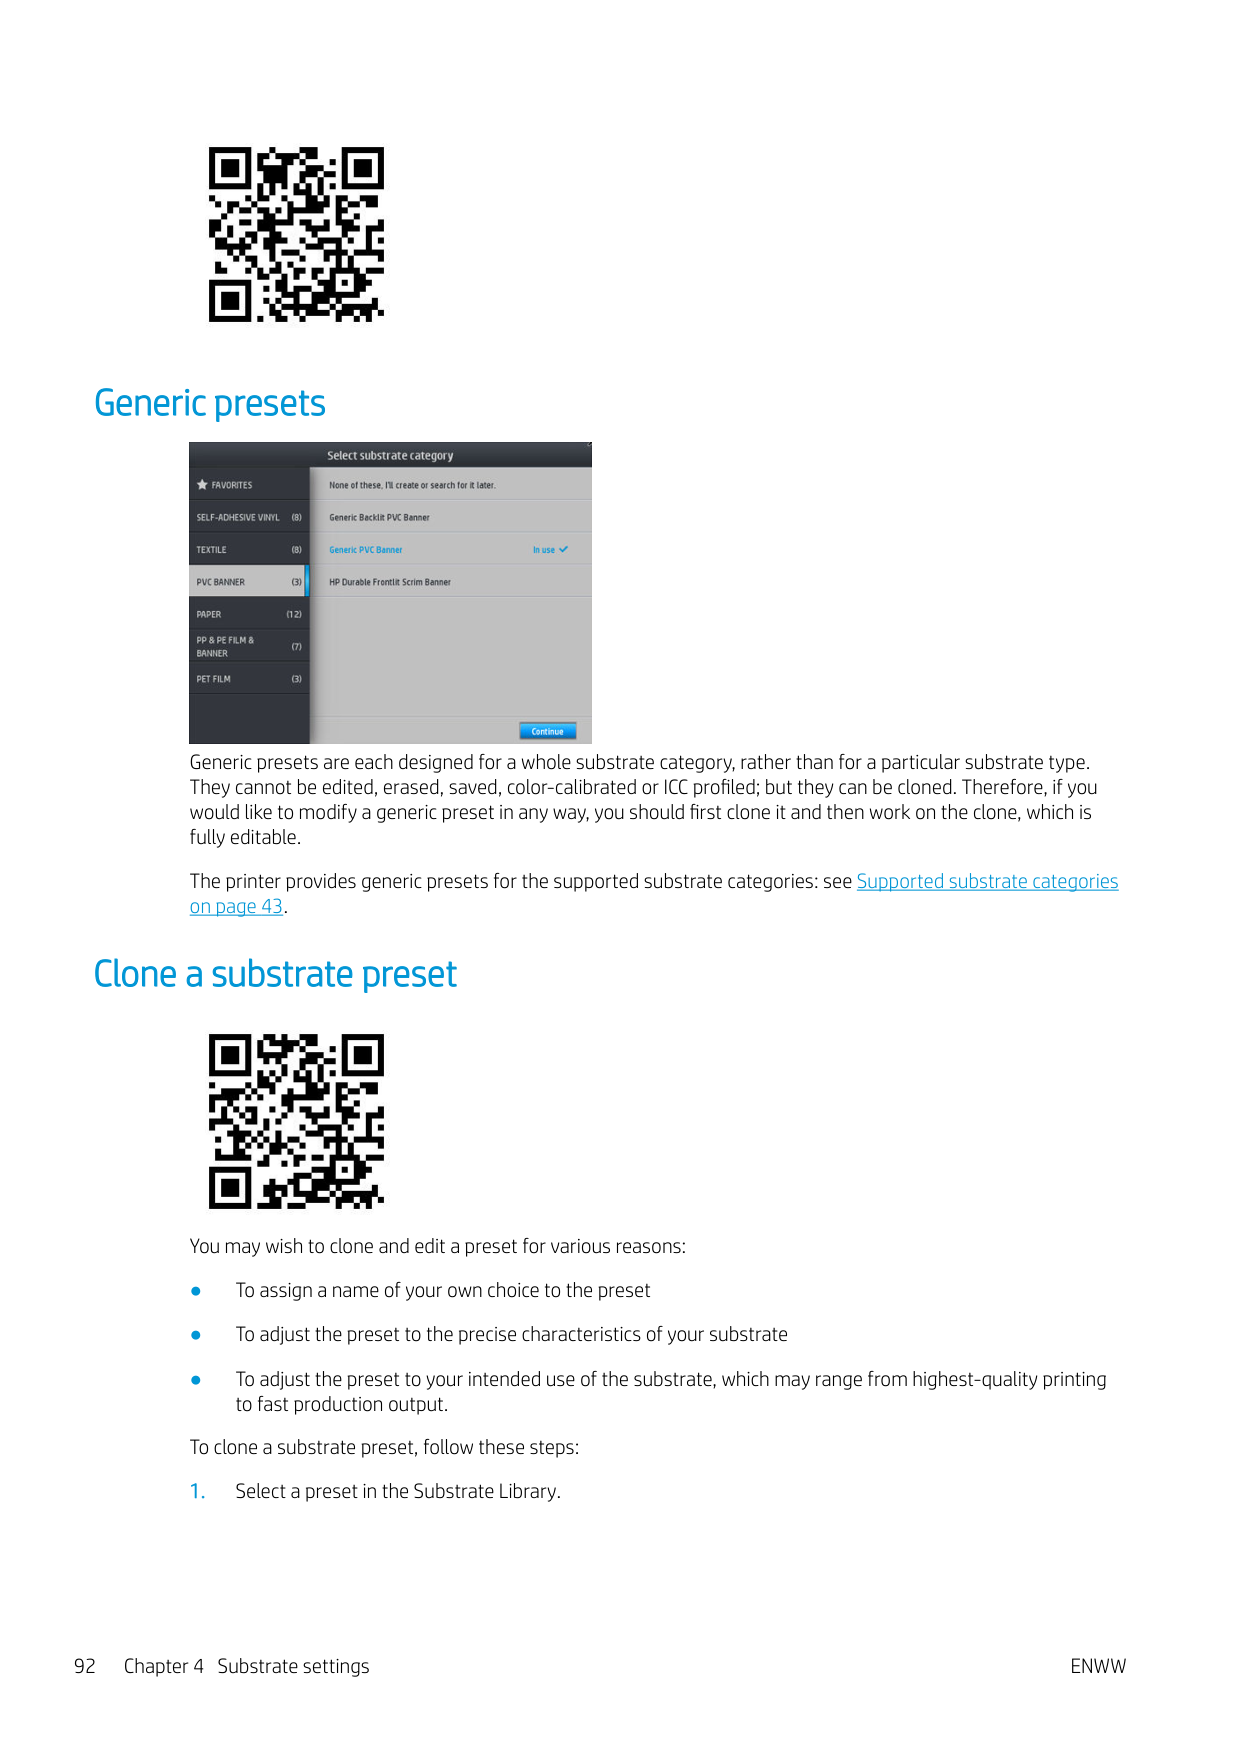
| | |---|

NOTE: You can define up to six print modes. NOTE: The number of passes in an existing print mode cannot be changed. If you want to change the number of passes, create a new print mode. NOTE: You are not allowed to create two print modes with the same number of passes, the same efficiency mode, and the same color saturation. To change the values, you must print a test plot. Check it and choose the number in the pull-down colorsaturation menu that matches your preferences in terms of curing and drying. If none of the options are good enough, try changing the temperature and reprint. You can also change the substrate advance settings.

ENWW Modify a substrate preset 93
Add a new substrate
If you cannot find a ready-made preset for your substrate, and prefer not to use a generic preset or edit an existing preset, you can make your own preset from scratch.
The Add New Substrate wizard guides you to work out the best settings for your substrate. It first requests some information about the substrate and your intended use of it, then prints some test prints and asks you to evaluate them. From this information, it creates the new preset.


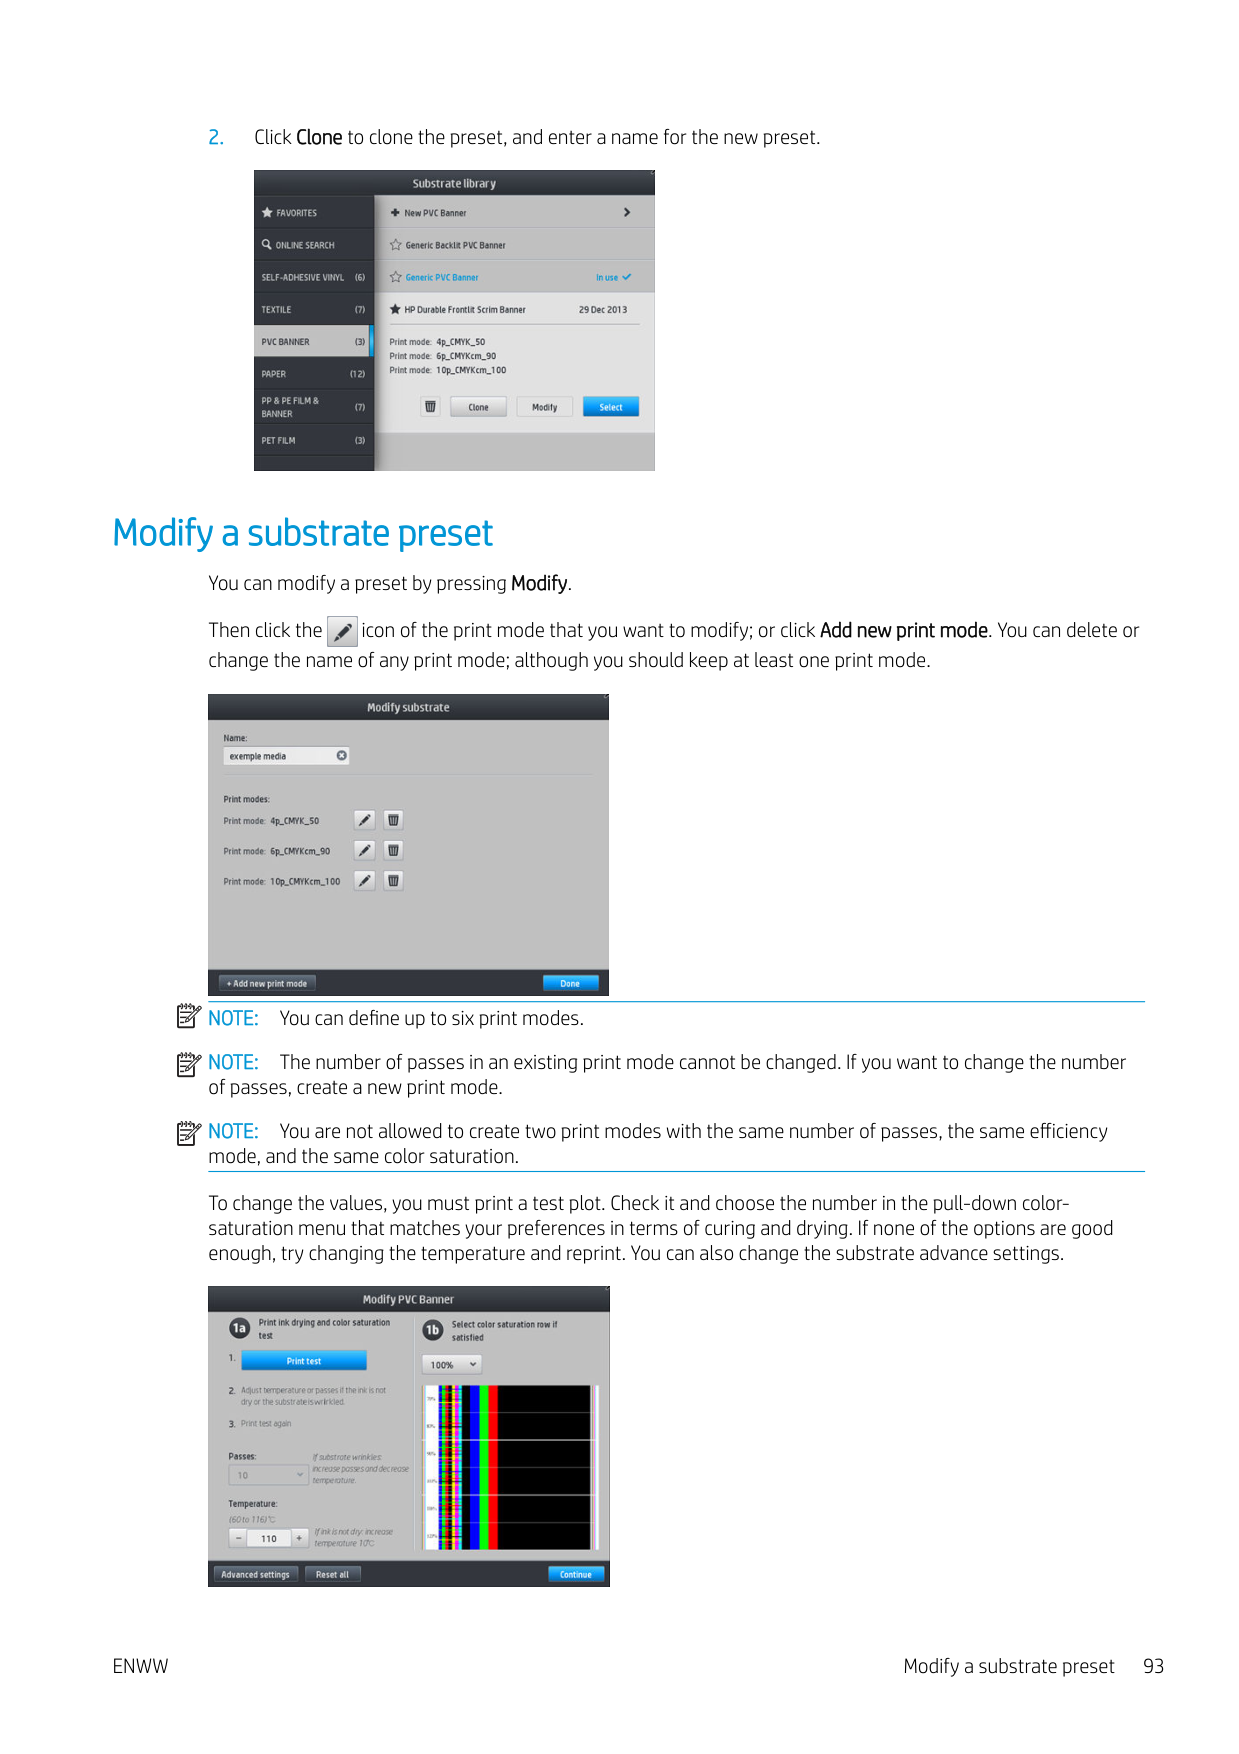

| | |---|


| | |---|
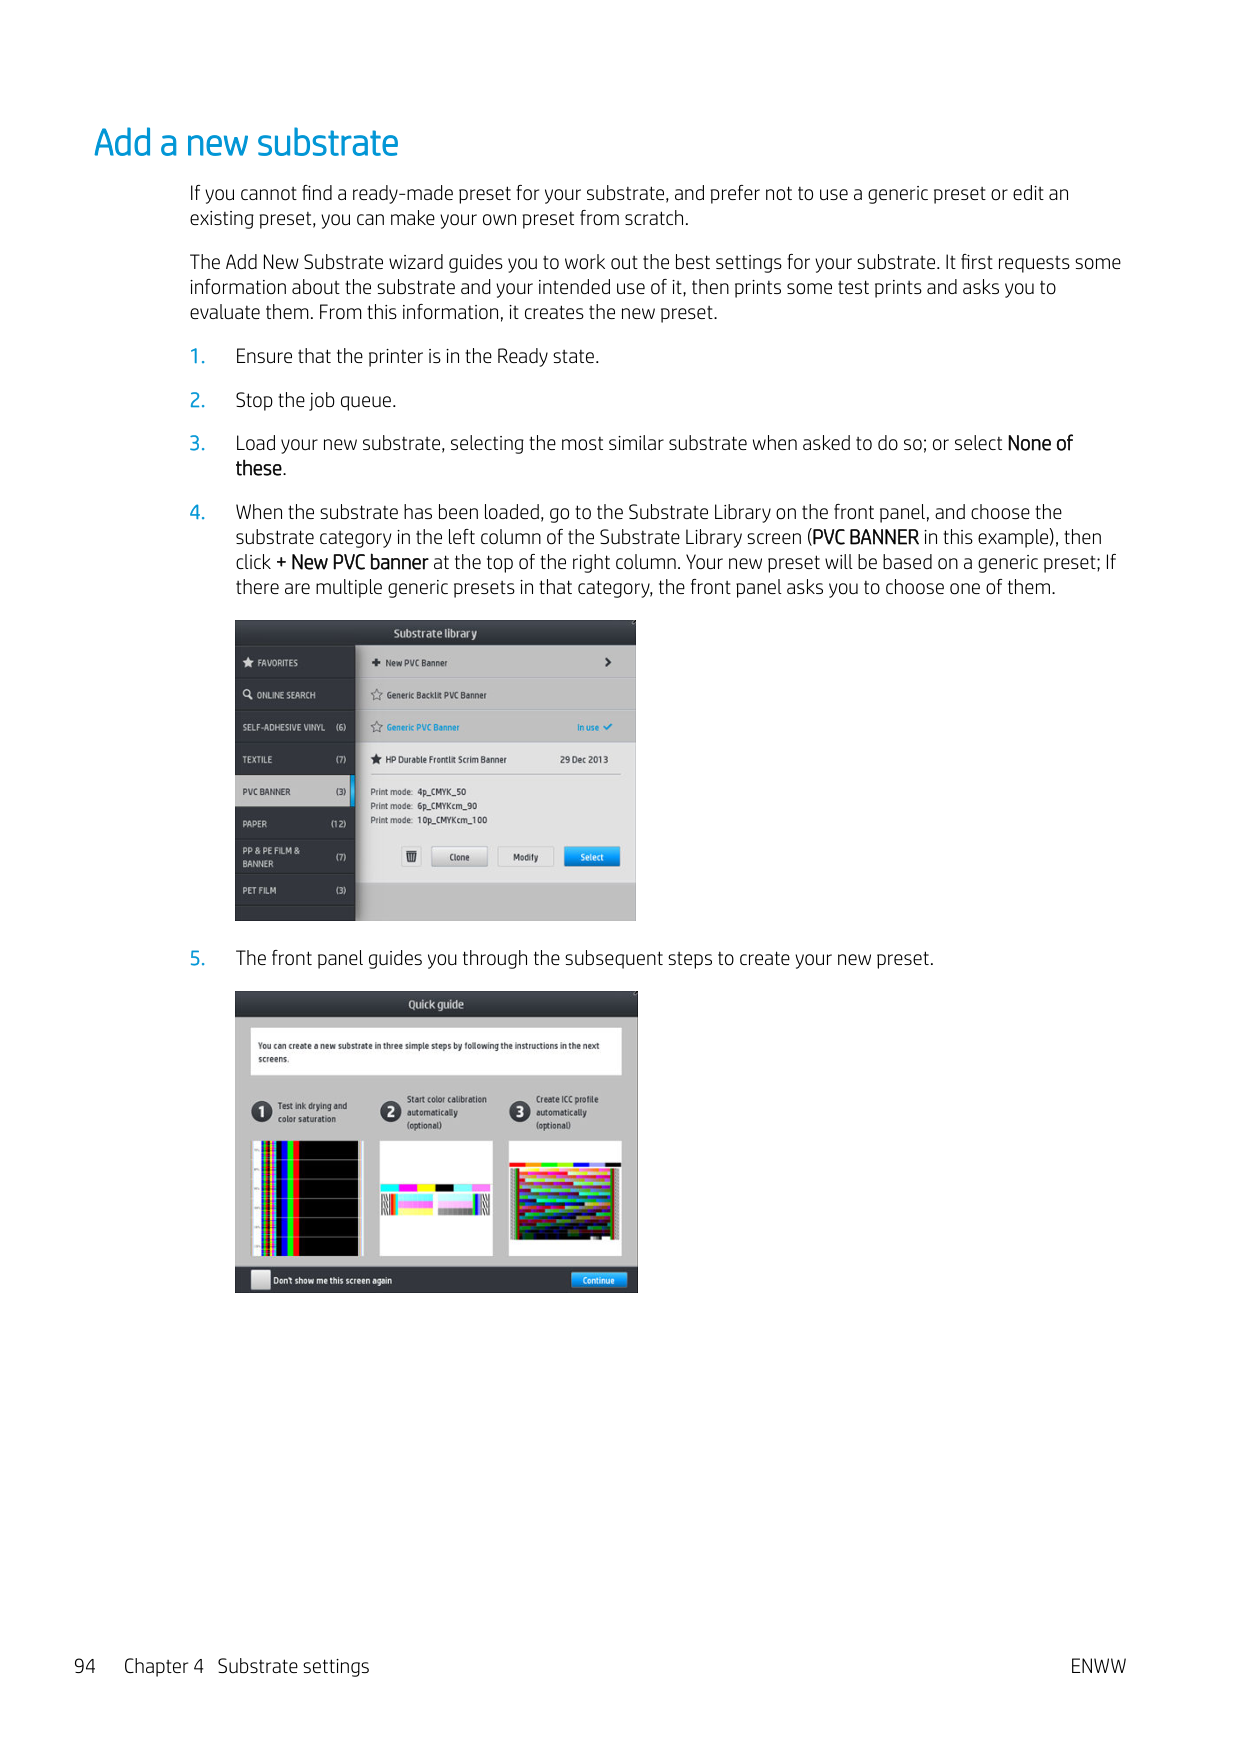

| | |---|
#### Change settings while printing
You can use the front panel to adjust the following settings while printing.

| | |---|
#### Temperature profile
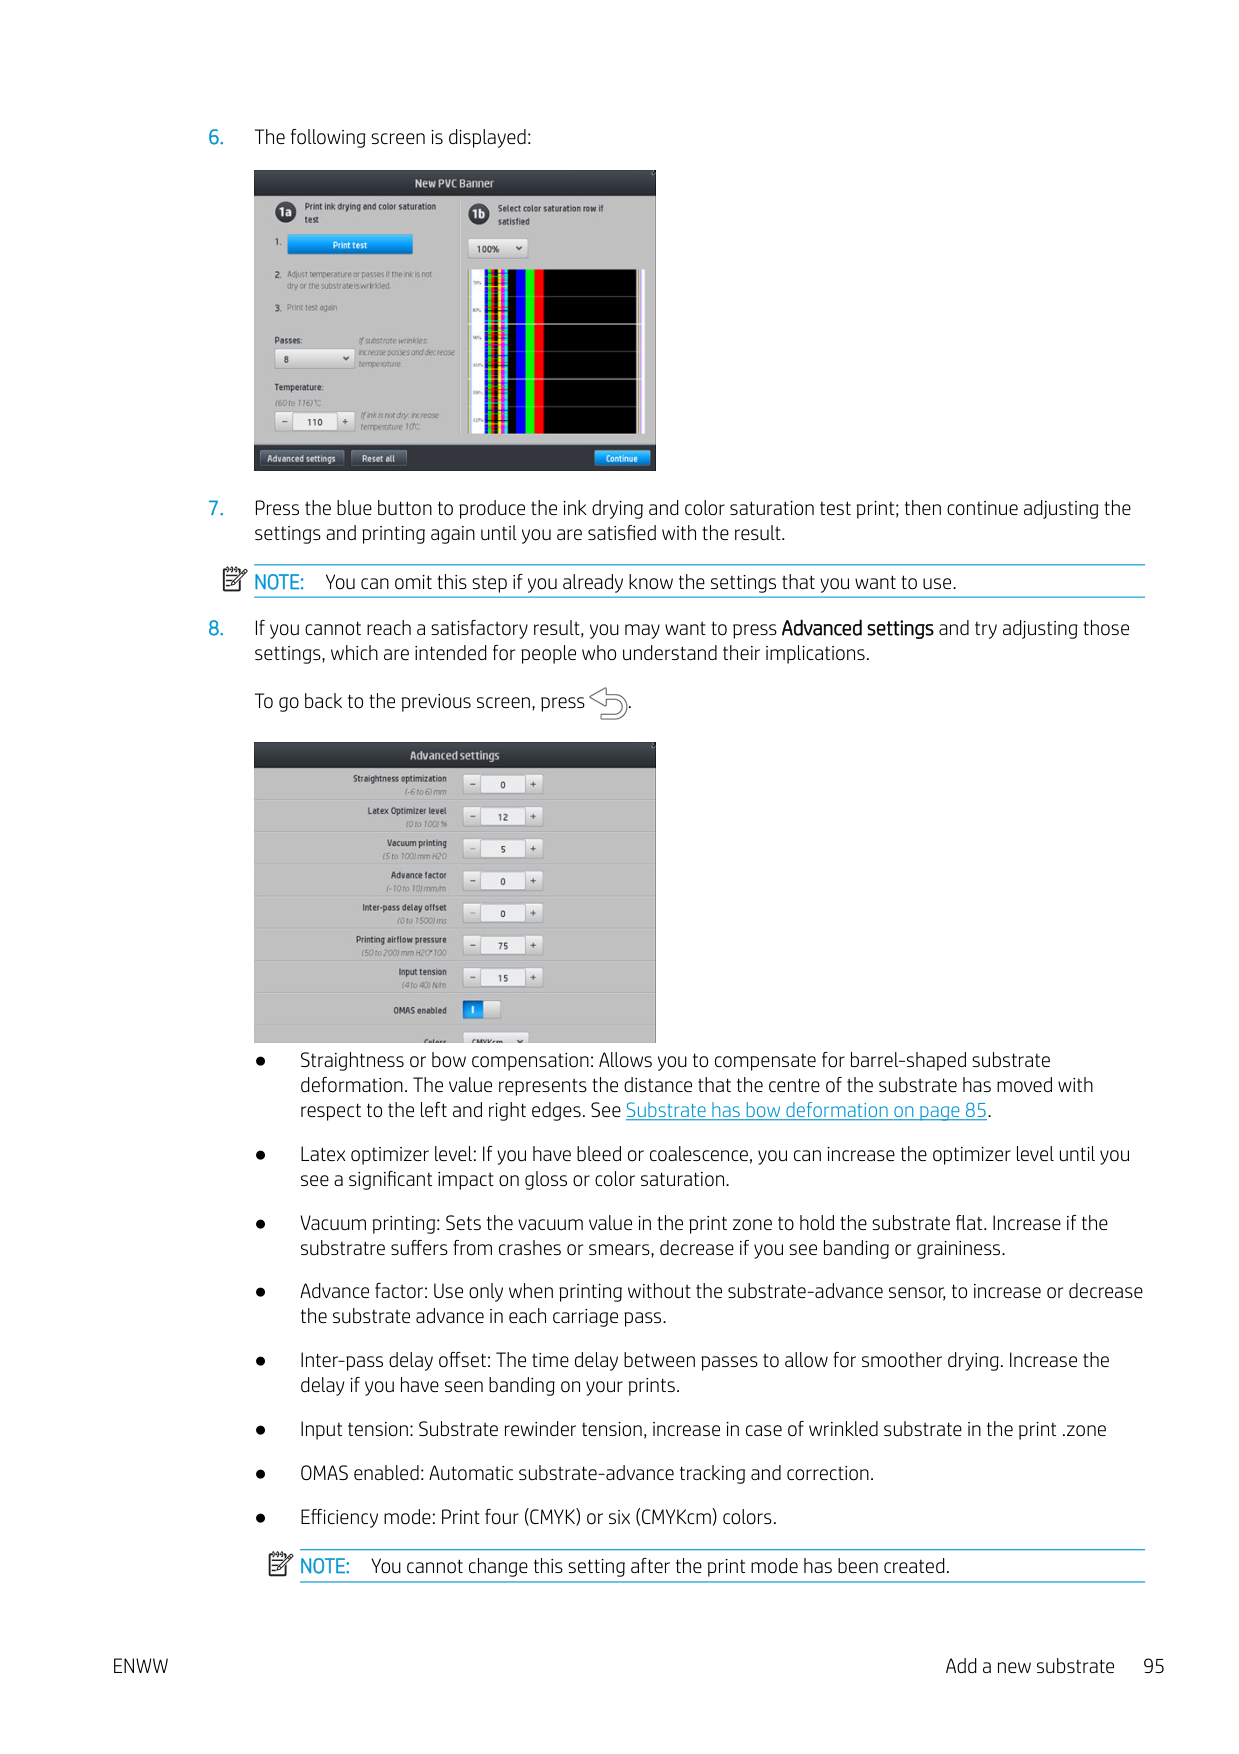
Many of the main and advanced substrate settings are related to temperature control, since this is a critical area for correct printing results with latex inks on a wide variety of substrates.
| | |---|
NOTE: There is a delay between making a change and seeing the results. See the front panel for actual temperature checking.
| | |---|
NOTE: If you selected English units of measurement, you may notice some discrepancies, as the printer works in Celsius and makes the conversion.
Select the number of passes Increasing the number of passes will tend to improve the print quality but reduce the speed of printing. NOTE: The following table is for the normal ink limit unless otherwise indicated.
| | |---|
|Category|Substrate name|Available print modes|Available print modes|Available print modes| |---|---|---|---|---| |Banner|Generic PVC Banner|4p_4C_80|6p_6C_100|10p_6C_110| | |Generic Backlit PVC Banner|12p_6C_200|16p_6C_200|20p_6C_200| |Self-adhesive vinyl|Generic Self-Adhesive Vinyl|6p_4C_80|8p_6C_100|10p_6C_110| | |Generic Backlit Self-Adhesive Vinyl|12p_6C_130|16p_6C_150|20p_6C_200| |Paper|Generic Paper|6p_4C_80|8p_6C_100|10p_6C_110| | |Generic Coated Paper|8p_6C_90|10p_6C_100| | | |Generic Backlit Paper|12p_6C_130|16p_6C_150|20p_6C_150| |PP & PE film & banner|Generic PP & PE Synthetics|12p_6C_80|16p_6C_80|20p_6C_90|
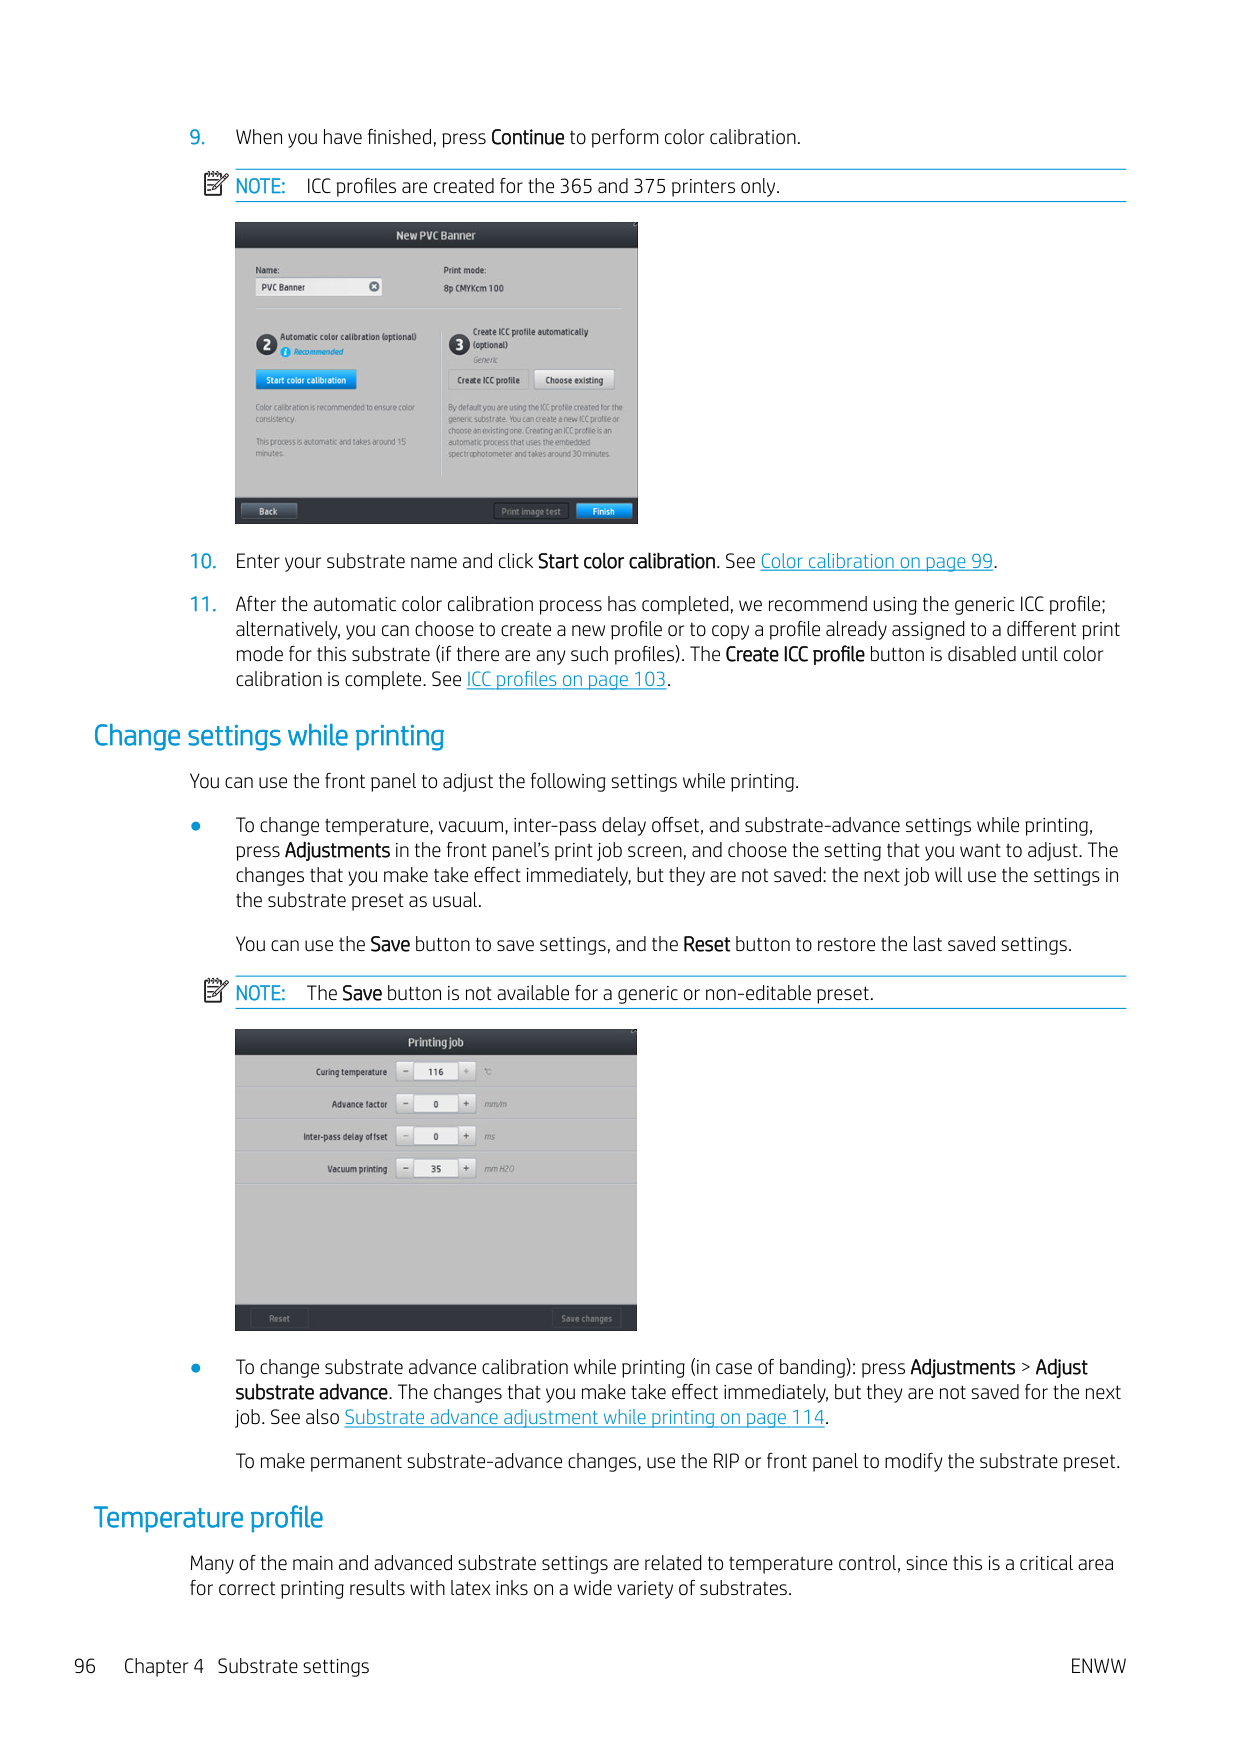
| |Generic Backlit PP & PE Synthetics|12p_6C_130|16p_6C_130|20p_6C_150| |PET film|Generic Polyester Film|6p_4C_80|8p_6C_100|10p_6C_110| | |Generic Backlit Polyester Film|12p_6C_170|16p_6C_185|20p_6C_200| |Textile|Generic Textile|12p_6C_200|16p_6C_200|20p_6C_230| | |Generic Canvas & Coated Textile|10p_6C_110|12p_6C_110| |
###### Key
| | |---|
| | |---|
###### Tips
Delete a substrate preset You can delete substrate presets that you have added yourself, but not those that were supplied with the printer. To do so, just press the icon in the Substrate Library screen.
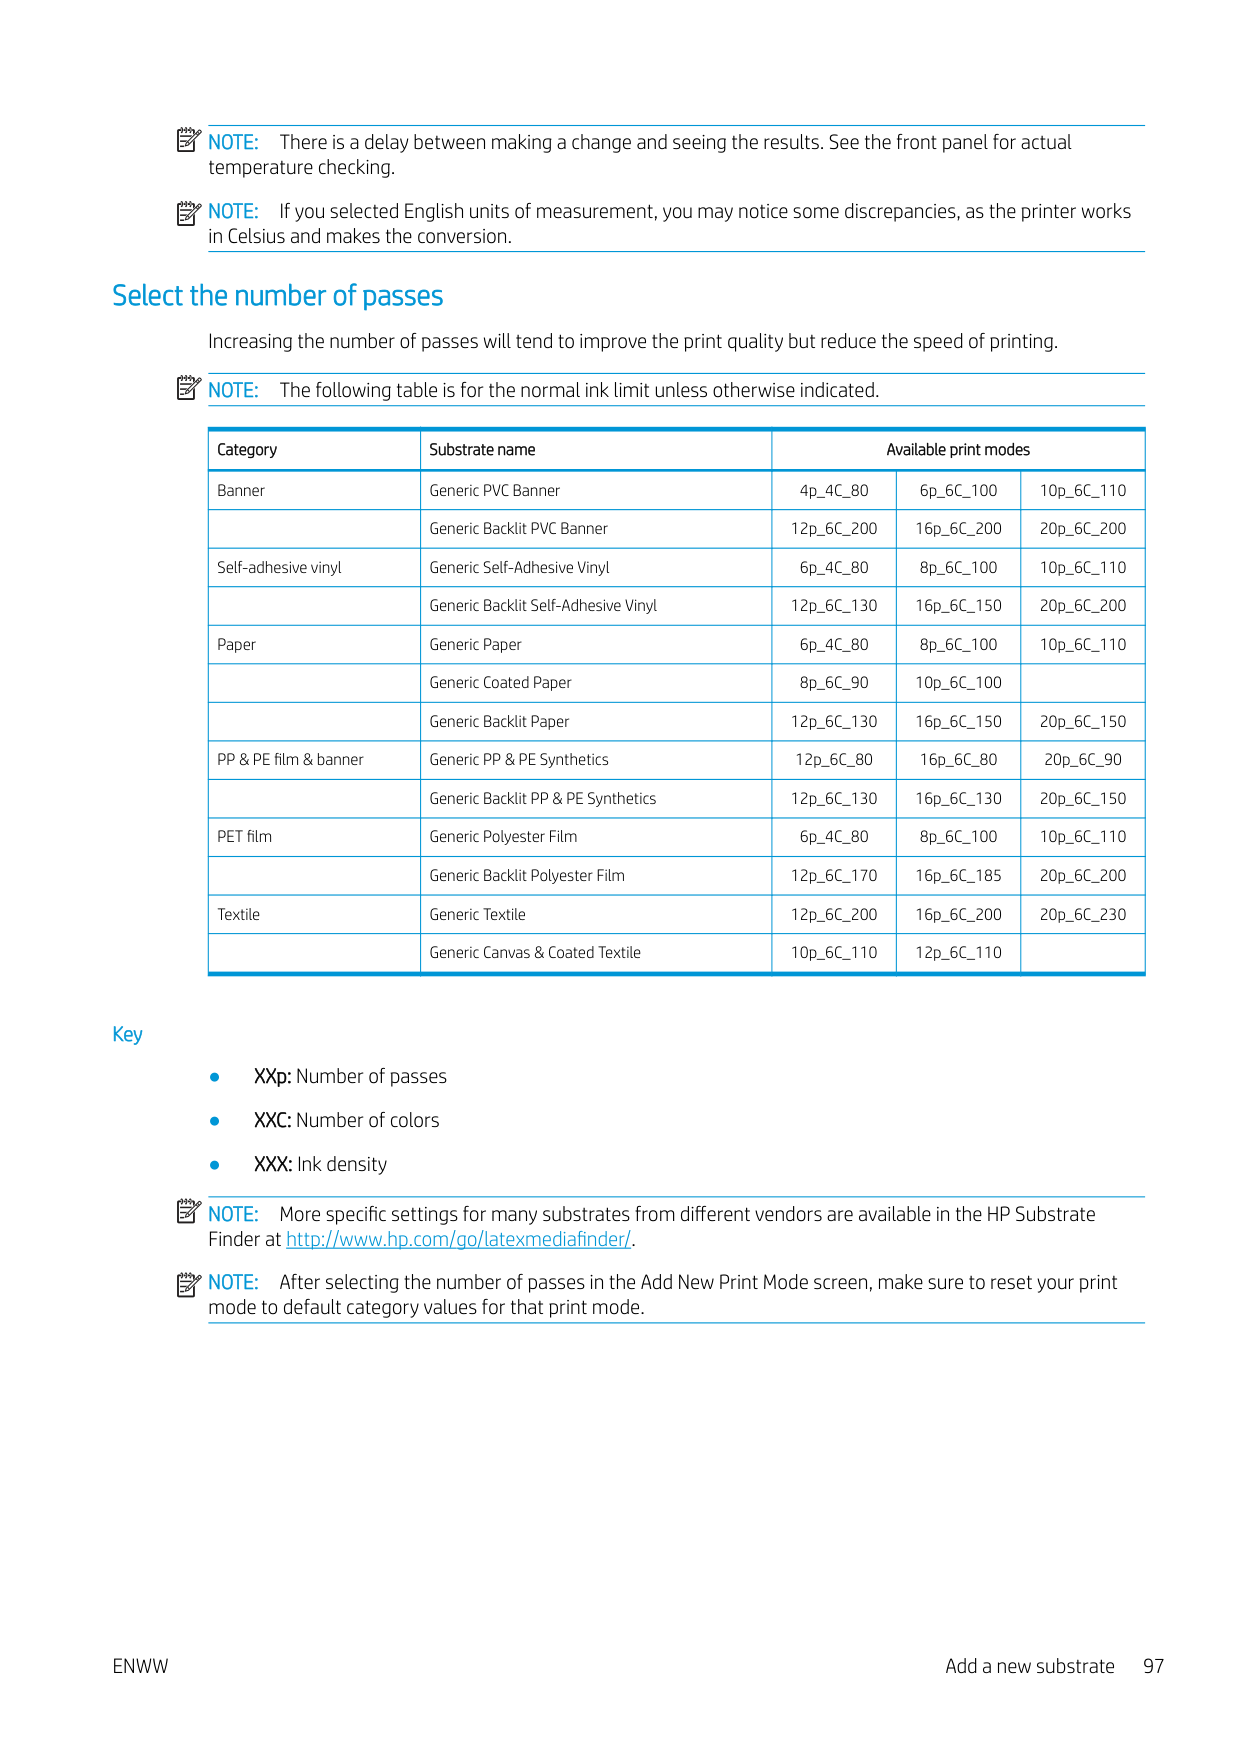


If you delete a preset, you will lose the reference to that substrate in the usage and accounting information. Instead of the name of the substrate, from that moment on you will see “Deleted substrate” in the usage and accounting information.
Faster printing
The obvious way to increase speed is to reduce the number of print passes, although this will tend to reduce print quality. Bear in mind the following considerations.

With most substrates, this saves some time at the end of the printing process. Remember to re-enable the cutter later.
| | |---|
NOTE: Printing a single job for more than 2 hours can reduce the life of the printheads.
See also Printer seems slow on page 165.
Color calibration
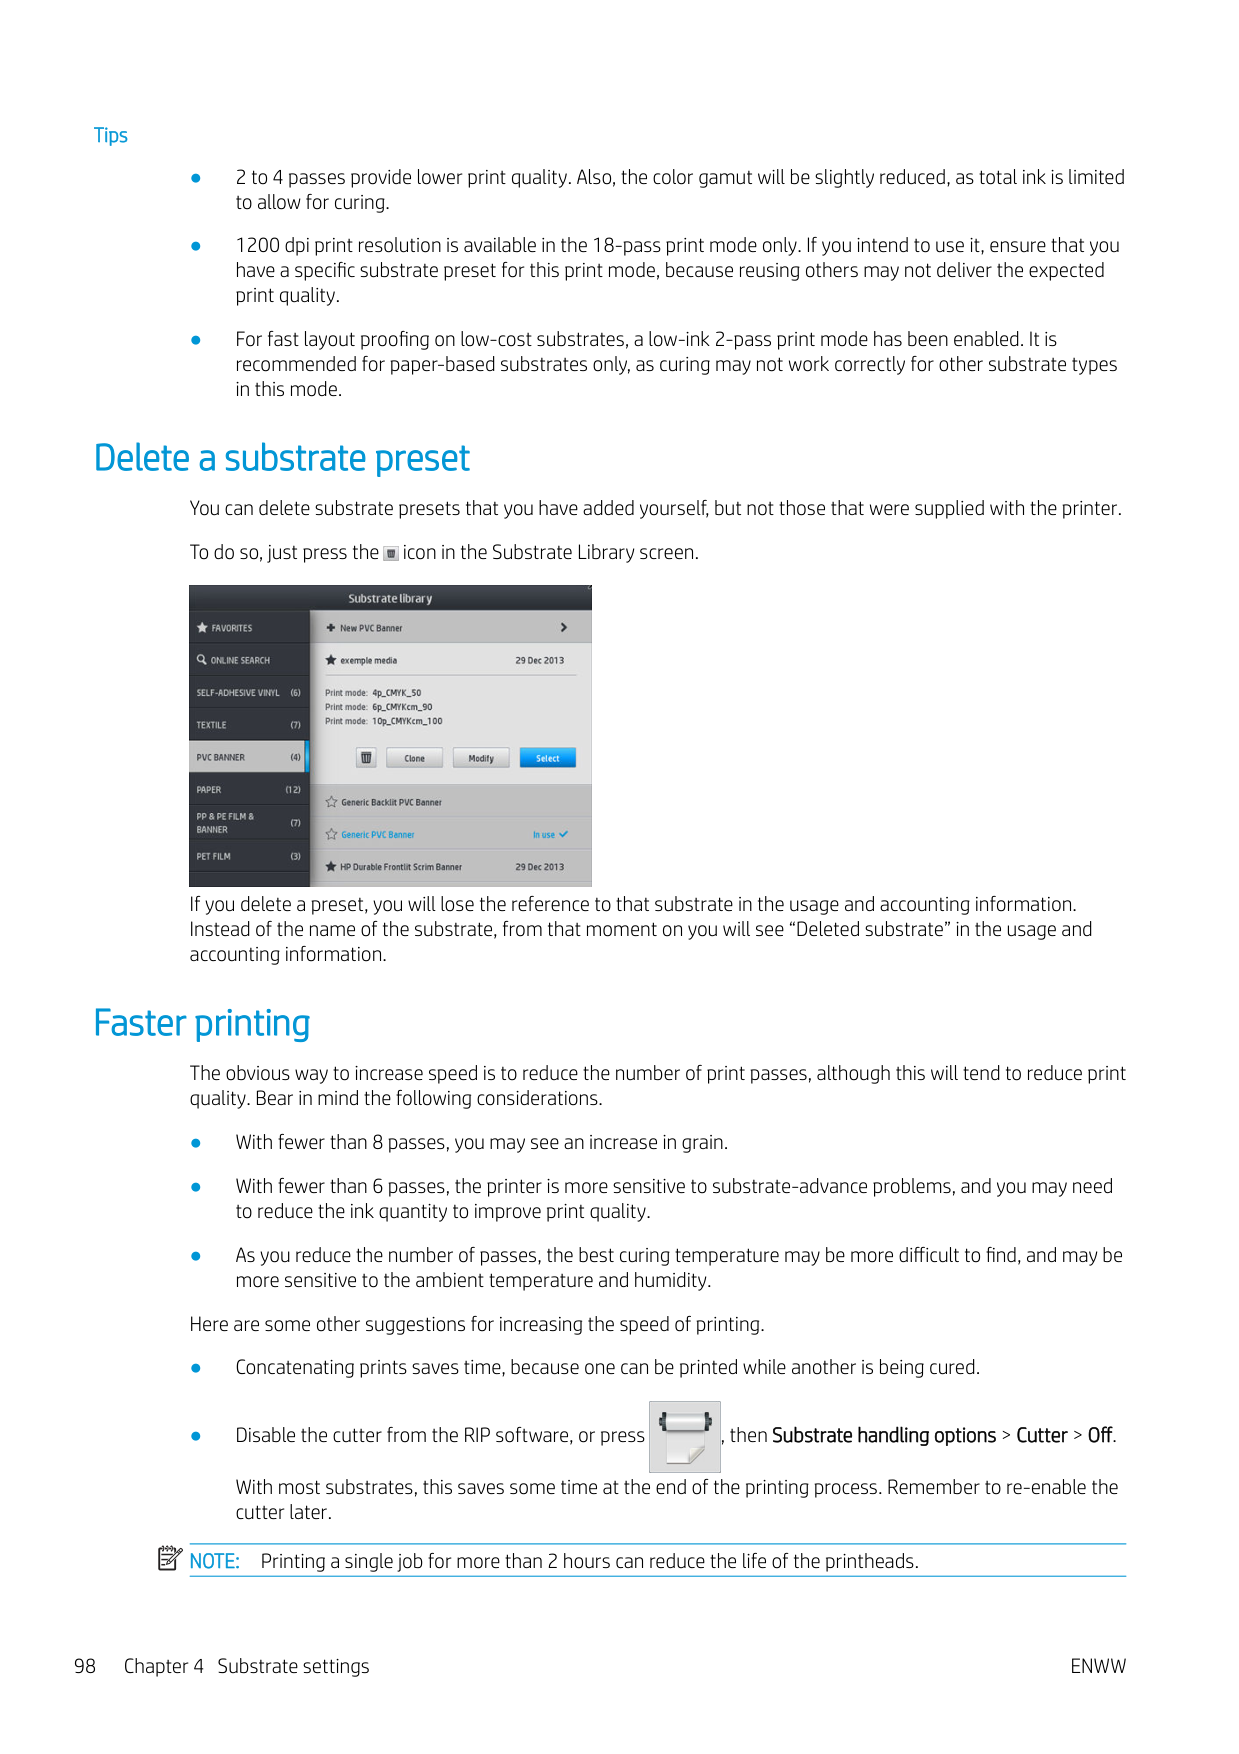
The purpose of color calibration is to produce consistent colors with the specific printheads, inks, and substrate that you are using, and in your particular environmental conditions. After color calibration, you can expect to get very similar prints from your printer on different occasions.
| | |---|
Each substrate must be calibrated independently. NOTE: Color calibration may not work correctly with non-HP ink.
There are cases in which a substrate may not be calibrated, in which cases the Calibrate and Reset options are not available:
Color calibration can be launched from the front panel, after pressing Modify preset, or when adding a new substrate.
In outline, the process consists of the following steps.
Factory default calibration tables are used whenever color calibration has never been run. The first time color calibration is run, the current printing color is taken as a reference, and factory default calibration tables continue to be used. This means that, after the first color calibration, the printed colors do not change, but are recorded as the reference for future calibrations. Subsequent color calibrations compare calibration target colors with the recorded reference, in order to calculate new calibration tables for consistent color printing on that particular substrate type.
From the front panel, you can delete the current calibration table, leaving the factory default calibration table active, as if that particular substrate had never been calibrated. Press , then Image quality maintenance > Color calibration > Reset to factory.

Color calibration as described above is not recommended for the following substrate types. It may be possible to calibrate some of these substrates by using an external color measurement device, driven by an external RIP.
Substrates suitable for color calibration include even-surfaced adhesive vinyls (neither punched nor perforated), PVC banners, and papers.
Some substrates require the take-up reel for successful printing. However, the take-up reel may fail to cope with the backward movement of the substrate between the printing and scanning phases of color calibration. To perform color calibration when the take-up reel is in use, proceed as follows:

#### Color calibration for the 315 or 335 printer
The color calibration test chart is printed using a fixed print mode with a high number of passes and fixed curing and drying settings to ensure printing consistency. However, parameters affecting substrate advance should be fine-tuned, and printheads should be aligned, before starting color calibration for the first time.
| | |---|

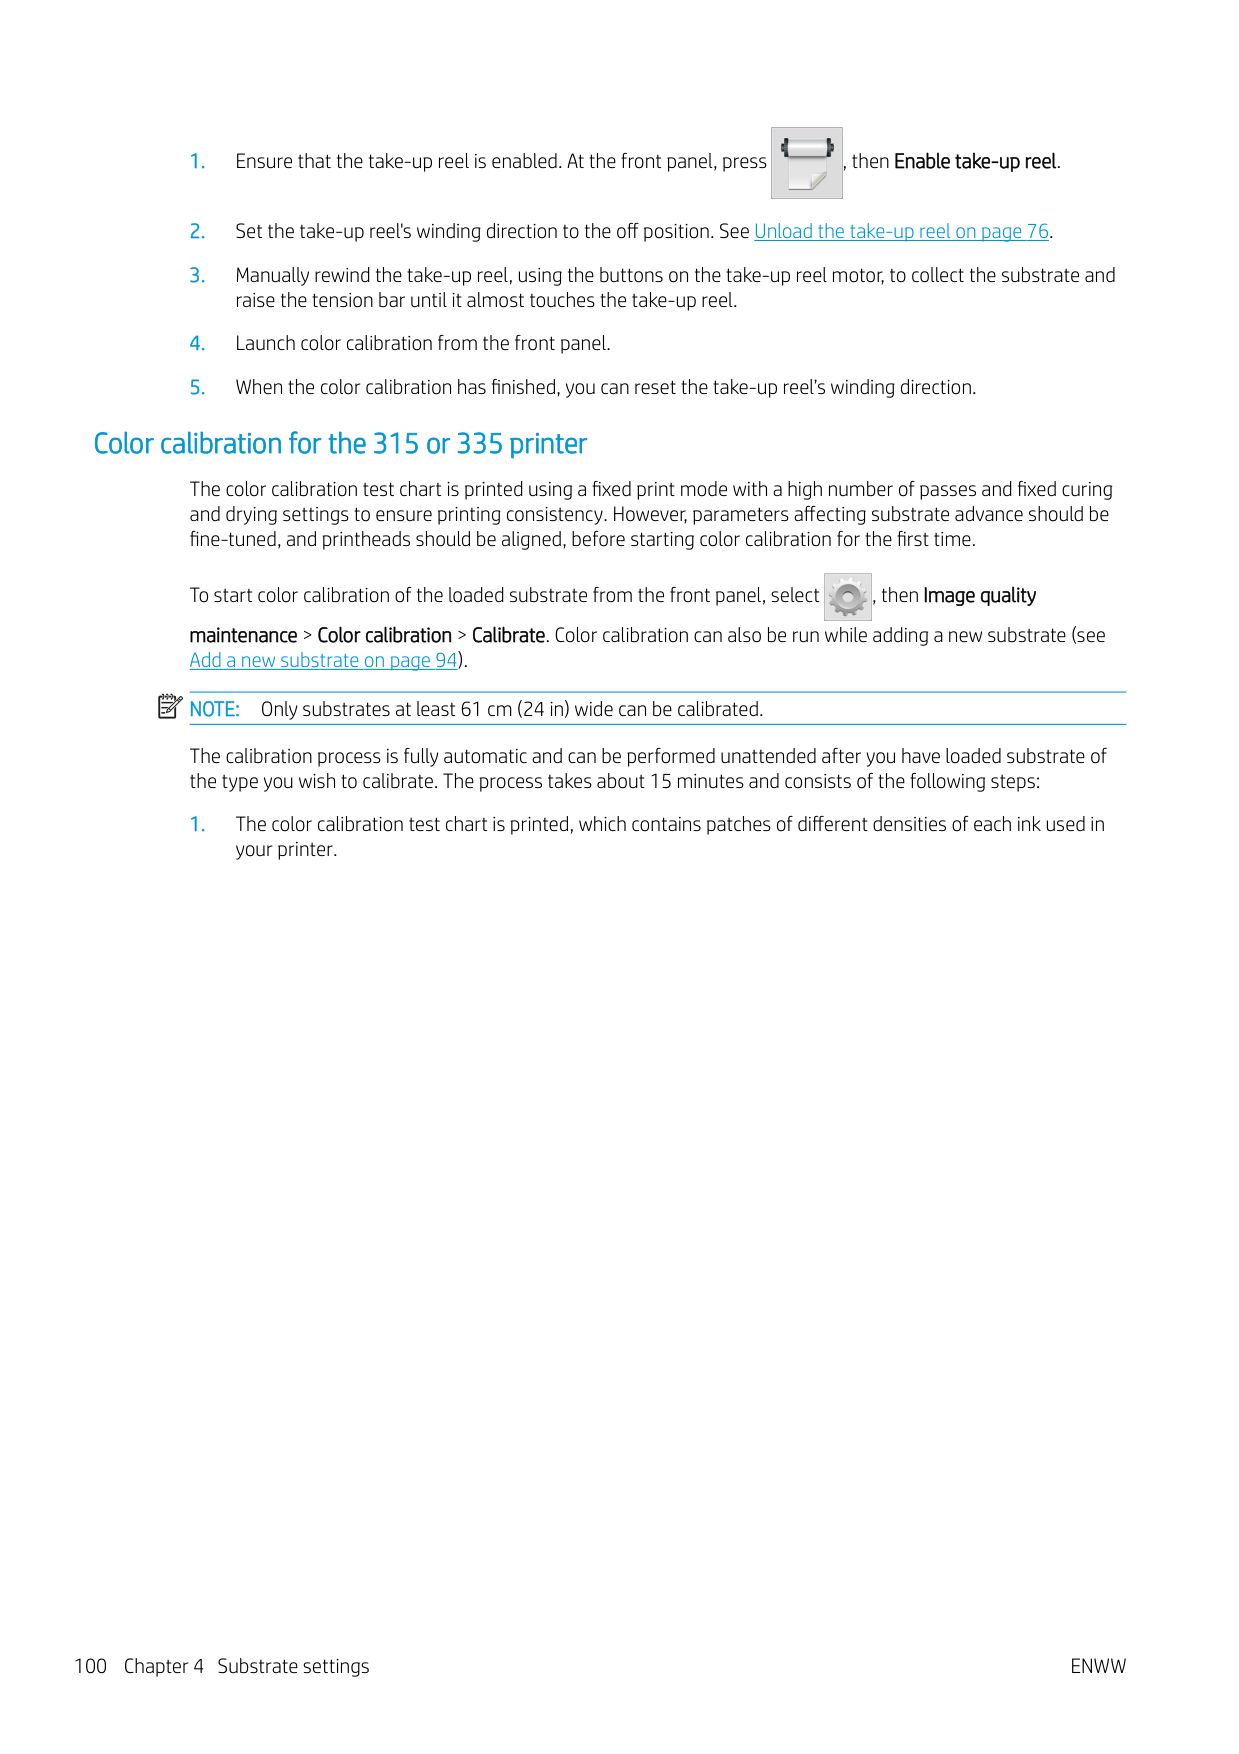
To start color calibration of the loaded substrate from the front panel, select , then Image quality maintenance > Color calibration > Calibrate. Color calibration can also be run while adding a new substrate (see Add a new substrate on page 94). NOTE: Only substrates at least 61 cm (24 in) wide can be calibrated.
The calibration process is fully automatic and can be performed unattended after you have loaded substrate of the type you wish to calibrate. The process takes about 15 minutes and consists of the following steps:

Calibration should be done in any of the following circumstances:

You can check the color calibration status of your substrate by pressing on the front panel.
| |
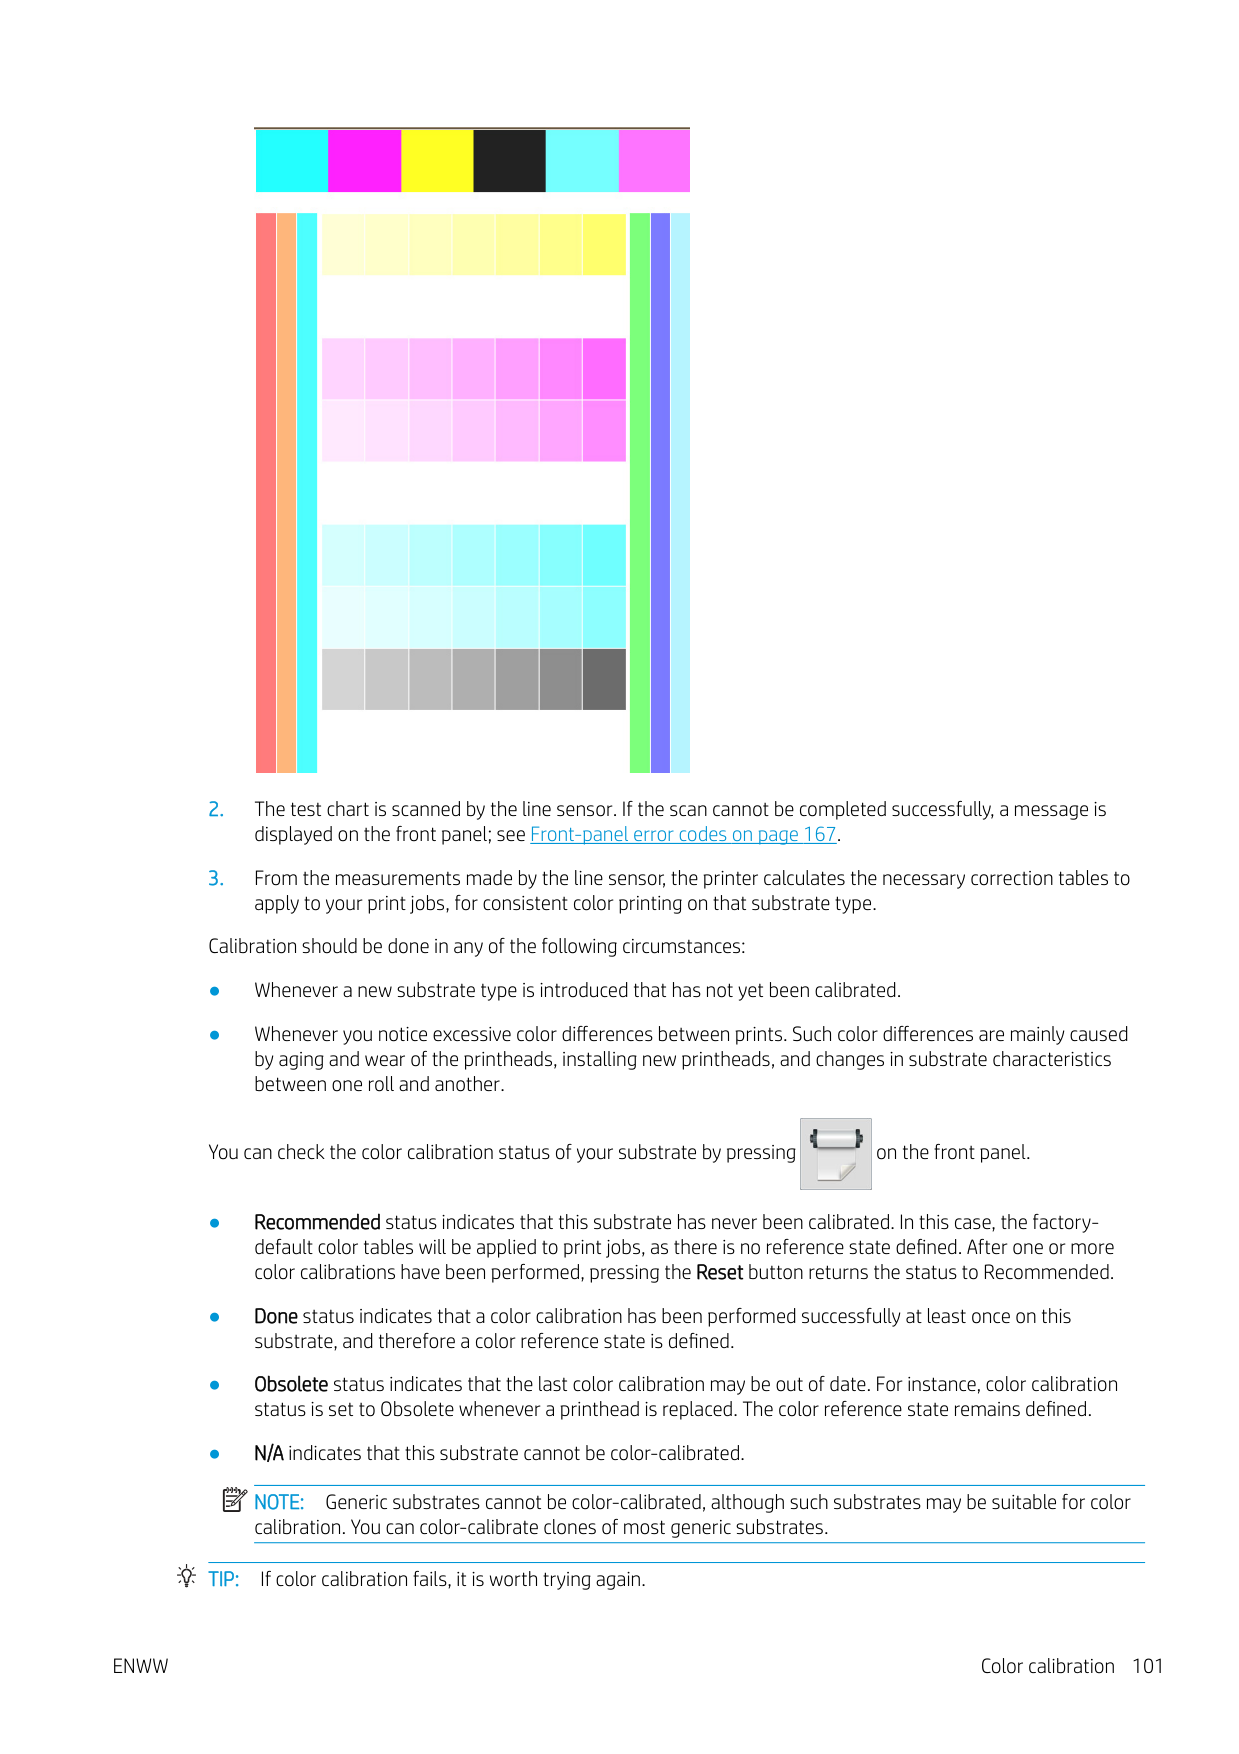
|---|
NOTE: Generic substrates cannot be color-calibrated, although such substrates may be suitable for color calibration. You can color-calibrate clones of most generic substrates.
TIP: If color calibration fails, it is worth trying again.
TIP: If the first color calibration of a new substrate fails, press the Reset button before trying again.
#### Color calibration for the 365 or 375 printer
The color calibration test chart is printed using a fixed print mode with a high number of passes and fixed curing and drying settings to ensure printing consistency. However, parameters affecting substrate advance should be fine-tuned, and printheads should be aligned, before starting color calibration for the first time.
| | |---|

To start color calibration of the loaded substrate from the front panel, select , then Image quality maintenance > Color calibration > Calibrate. Color calibration can also be run while adding a new substrate (see Add a new substrate on page 94). NOTE: Only substrates at least 61 cm (24 in) wide can be calibrated.
The calibration process is fully automatic and can be performed unattended after you have loaded substrate of the type you wish to calibrate. The process takes about 15 minutes and consists of the following steps:

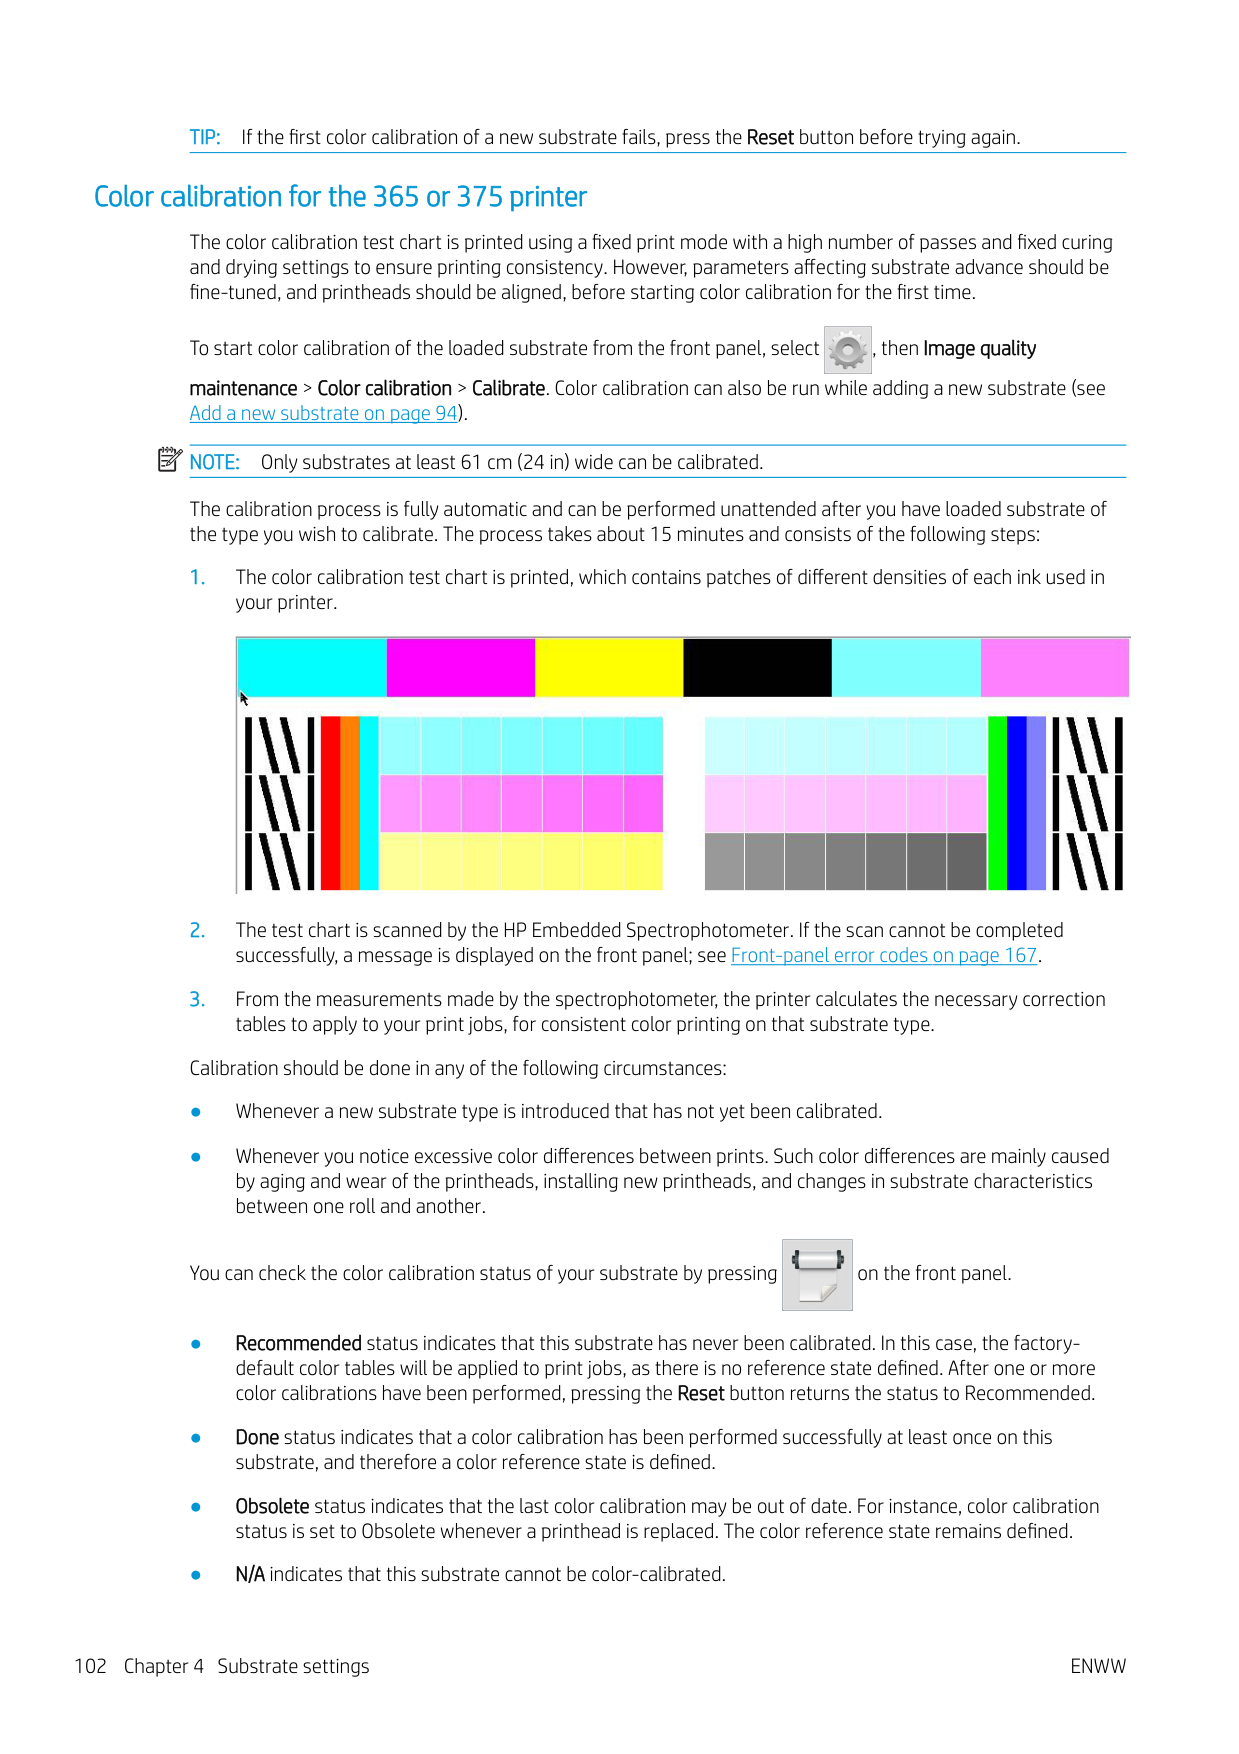
Calibration should be done in any of the following circumstances:

You can check the color calibration status of your substrate by pressing on the front panel.
| | |---|
NOTE: Generic substrates cannot be color-calibrated, although such substrates may be suitable for color calibration. You can color-calibrate clones of most generic substrates.
TIP: If color calibration fails, it is worth trying again. TIP: If the first color calibration of a new substrate fails, press the Reset button before trying again.
Color consistency between different printers (365, 375)

It is possible to cross-calibrate color between two or more printers for particular substrates. After crosscalibrating a given substrate, you can expect to get very similar prints from either printer when using the same substrate.

ICC profiles
Color calibration provides consistent colors, but consistent colors are not necessarily accurate. For instance, if your printer prints all colors as black, its colors may be consistent but they are not accurate.
In order to print accurate colors, it is necessary to convert the color values in your files to the color values that will produce the correct colors from your printer, your inks, your print mode, and your substrate. An ICC profile is a description of a printer, ink, print mode, and substrate combination that contains all the information needed for these color conversions.
These color conversions may be performed by your Raster Image Processor (RIP), if it offers that possibility; they are not performed by the printer. For further information on the use of ICC profiles, see the documentation for your application software and for your RIP.
In addition to the ICC profiles used for printing, you may wish to calibrate and profile your monitor (display device), so that the colors you see on the screen relate more closely to those that you see on your prints.
#### Generating color profiles with the 365 or 375 printer
It is possible to create an ICC profile automatically for a given substrate and print mode, when adding or editing a substrate. See Add a new substrate on page 94 and Modify a substrate preset on page 93.
After pressing the Create ICC profile button the following process takes place:
ENWW Color consistency between different printers (365, 375) 103
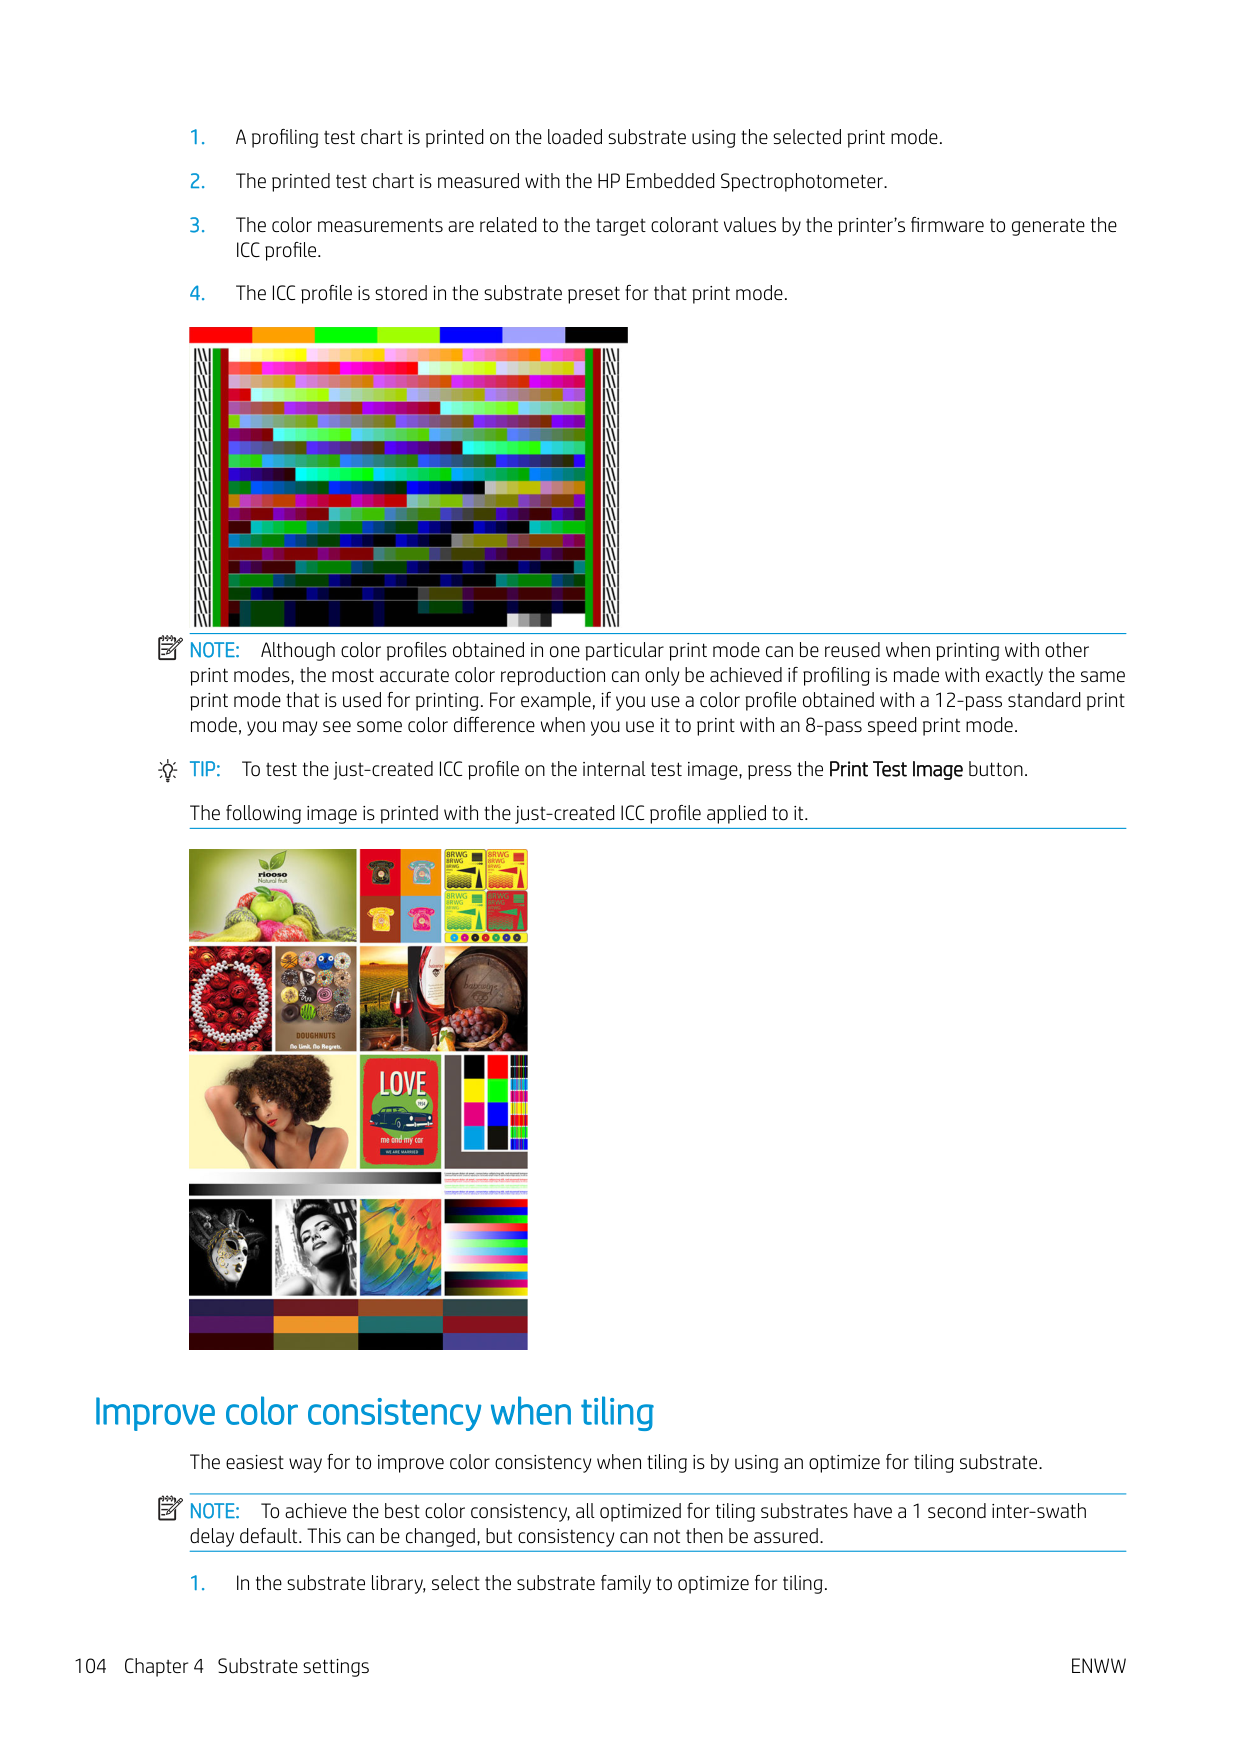
| | |---|

NOTE: Although color profiles obtained in one particular print mode can be reused when printing with other
print modes, the most accurate color reproduction can only be achieved if profiling is made with exactly the same print mode that is used for printing. For example, if you use a color profile obtained with a 12-pass standard print mode, you may see some color difference when you use it to print with an 8-pass speed print mode.
TIP: To test the just-created ICC profile on the internal test image, press the Print Test Image button. The following image is printed with the just-created ICC profile applied to it.

Improve color consistency when tiling The easiest way for to improve color consistency when tiling is by using an optimize for tiling substrate. NOTE: To achieve the best color consistency, all optimized for tiling substrates have a 1 second inter-swath delay default. This can be changed, but consistency can not then be assured.
| | |---|
| | |---|

NOTE: This option is only available for substrate families that can support it (SAV, Banner and WallPaper).


| | |---|
NOTE: The number of passes cannot be lower than 8, only profiles higher than 8 will appear. If none of your profiles has 8 or higher, a default appears.

ENWW Improve color consistency when tiling 105
####### 5. Set the color reference and create the ICC profile.
| | |---|
| | |---|


IMPORTANT: Color calibration is mandatory for this kind of print mode. NOTE: A Tiling suffix is added to the name of the substrate, you edit the name, but cannot erase the suffix.
####### 6. Substrate can be exported from one printer to another. For using the imported profile, we recommend yourun a color calibration in the new printer.IMPORTANT: Tiling substrates may not import with old firmware.
| | |---|
5 Troubleshoot print-quality issues
ENWW 107
General printing advice

Use the following approach when you have any print-quality problem:

CAUTION: If you have the wrong substrate type selected, you could experience poor print quality and incorrect colors, and perhaps even damage to the printheads.
Quick Solutions application (365 and 375 only)
The Quick Solutions application can help you to adjust the printer when it is not performing as expected.

You can start the application by pressing on the front panel.
The application has four sections with different purposes:
Improve print quality


#### Improve print quality (315, 335)

As a first step, you may be able to improve print quality with a single command. At the front panel, press , then Image-quality maintenance > Optimize print quality.
This performs printhead recovery, alignment, and color calibration routines, in order to optimize your print quality automatically in a single step. Allow up to 30 minutes for the printer to perform the whole process.
If you still experience print-quality problems, you can follow a more hands-on print-quality troubleshooting procedure, by printing, interpreting, and performing corrective actions.
You can print all the test plots at once for complete debugging of your print-quality problem. At the front panel, press , then Image-quality maintenance > Print all test plots.

Alternatively, you can print the test plots individually for specific debugging of nozzle health, alignment, optimizer, or substrate-advance print-quality issues as described below.
#### Improve print quality (365, 375)

As a first step, you may be able to improve print quality with a single command. At the front panel, press .
You will see the option Optimize print quality. This performs printhead recovery, alignment, and color-calibration routines, in order to optimize your print quality automatically in a single step. Allow up to 30 minutes for the printer to perform the whole process.
In the same quick solutions application, in the section Generic solutions, you can Print all test plots at once for complete debugging of your print-quality problem. Alternatively, in the Test plots section, you can print the test plots individually for specific attention to nozzle health, alignment, or substrate-advance issues (see later in this chapter). Also explore the sections Maintenance routines and Image problems.
If you still experience print-quality problems, you can follow a more hands-on print-quality troubleshooting procedure, by printing, interpreting, and performing corrective actions.
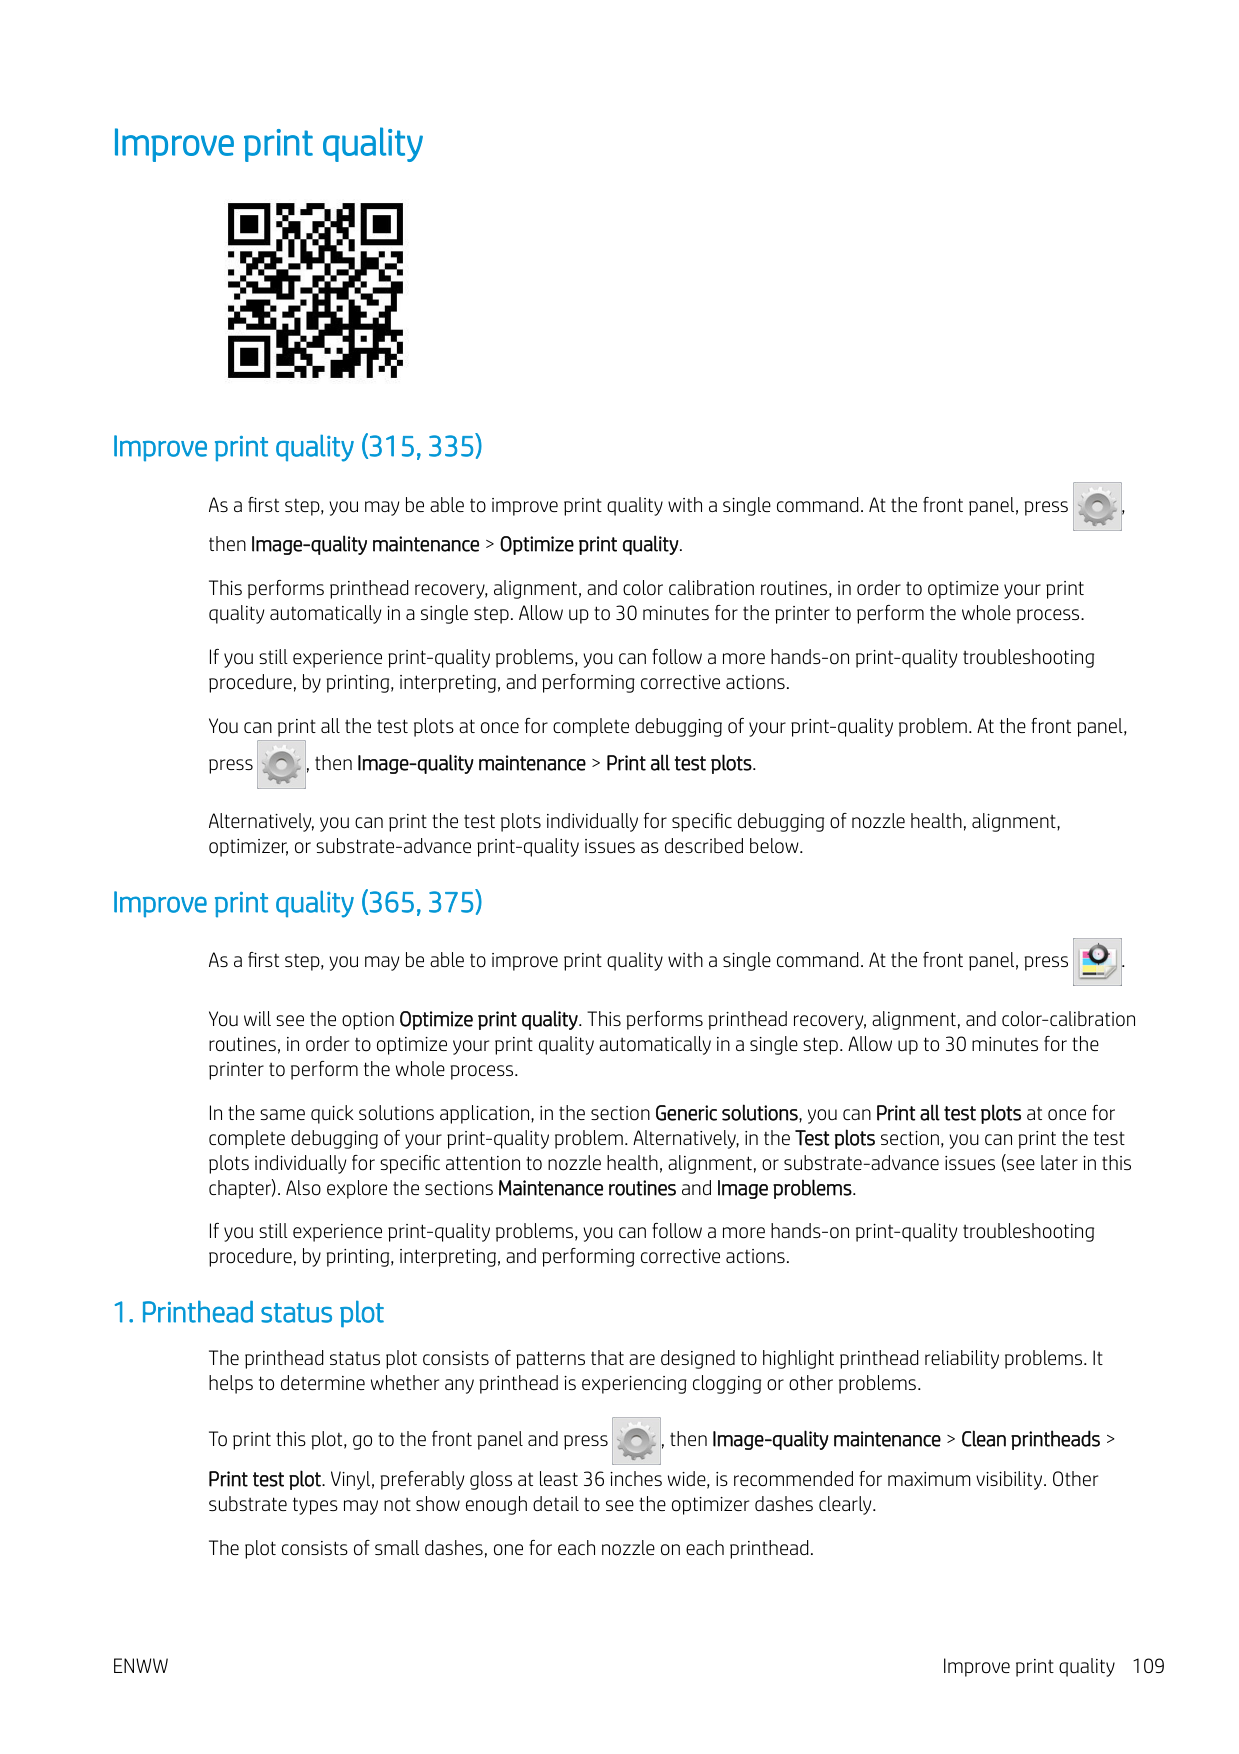
#### 1. Printhead status plot
The printhead status plot consists of patterns that are designed to highlight printhead reliability problems. It helps to determine whether any printhead is experiencing clogging or other problems.

To print this plot, go to the front panel and press , then Image-quality maintenance > Clean printheads > Print test plot. Vinyl, preferably gloss at least 36 inches wide, is recommended for maximum visibility. Other substrate types may not show enough detail to see the optimizer dashes clearly. The plot consists of small dashes, one for each nozzle on each printhead.

For each individual colored pattern, make sure that most of the dashes are present.
###### Corrective action
#### 2. Optimizer check plot
To print the optimizer check plot:

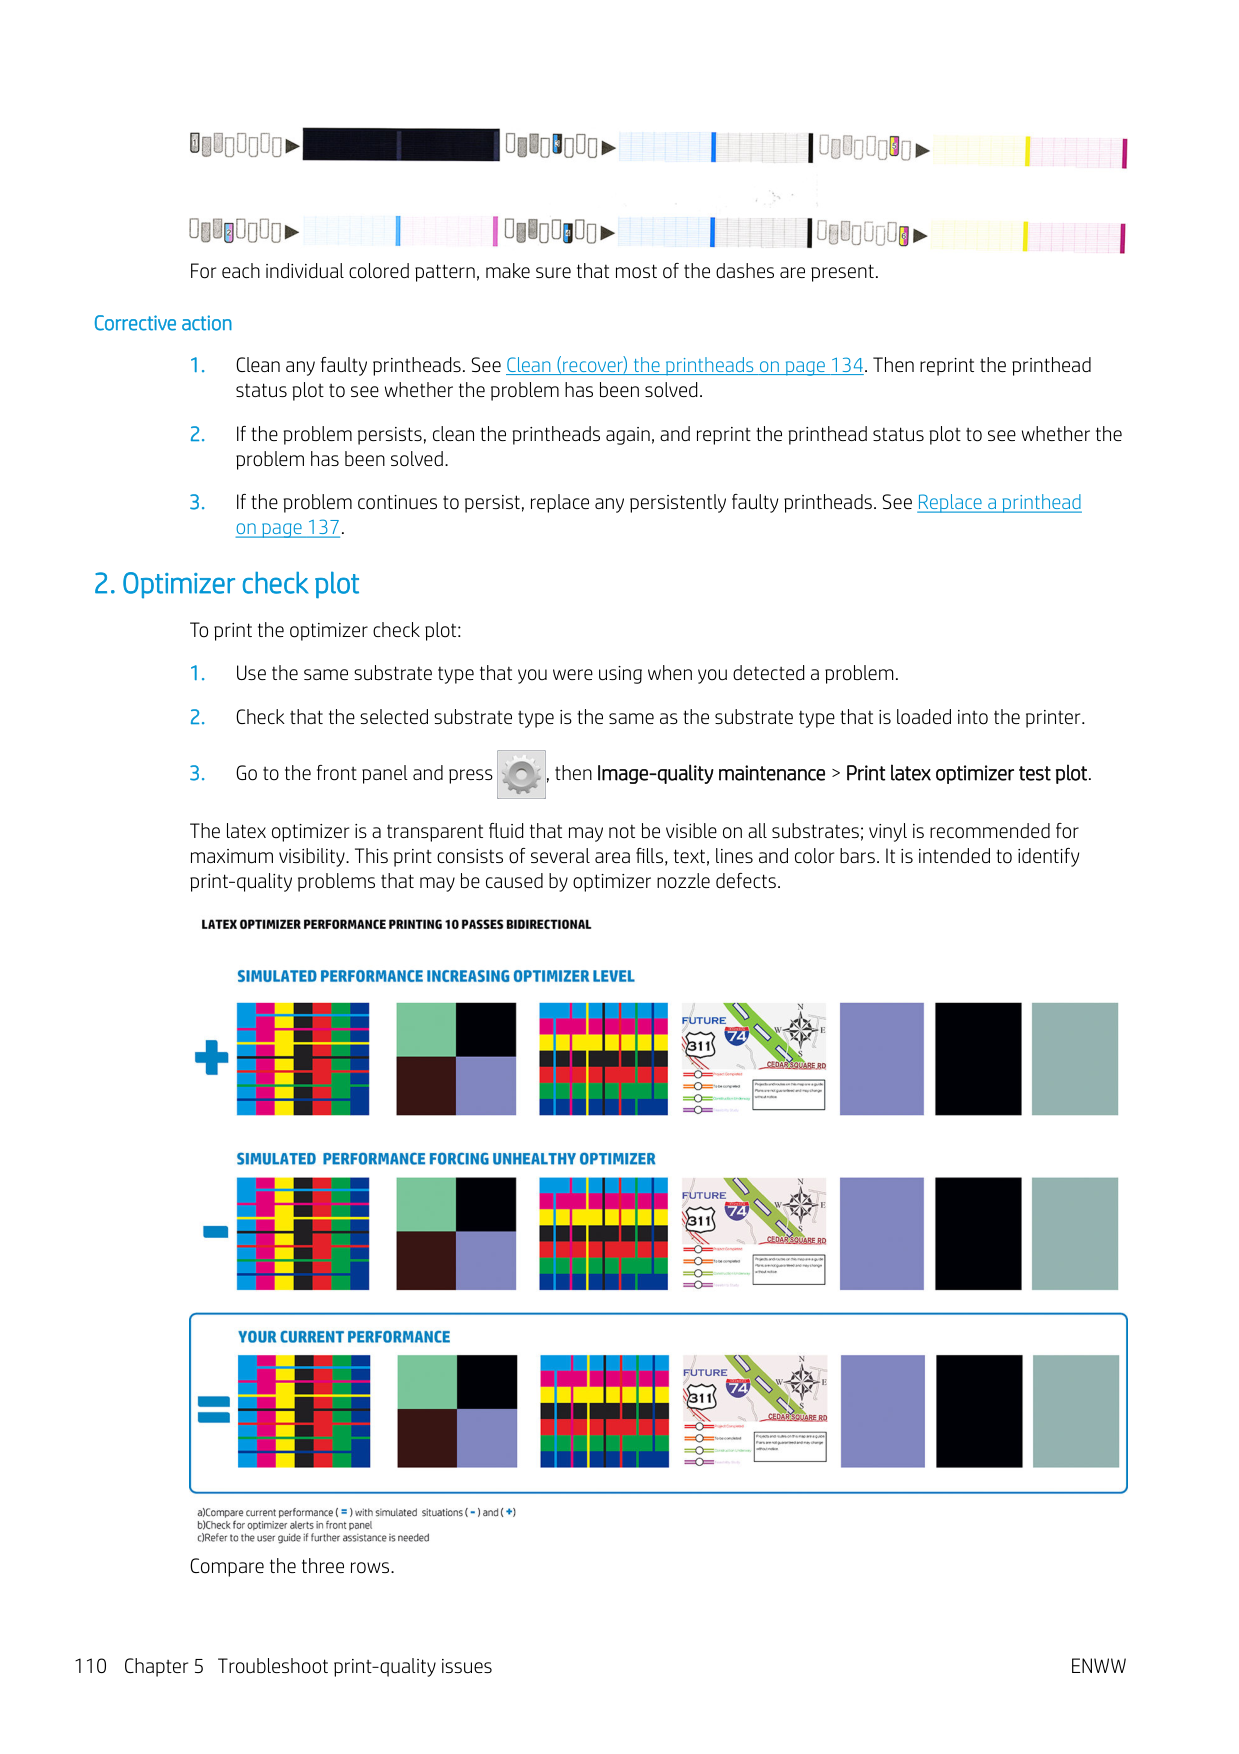
The latex optimizer is a transparent fluid that may not be visible on all substrates; vinyl is recommended for maximum visibility. This print consists of several area fills, text, lines and color bars. It is intended to identify print-quality problems that may be caused by optimizer nozzle defects.

Compare the three rows.

Look for differences in performance between the images, such as bleeding in the color bars, graininess in the area fills, blurred text, and overall print quality.
If there is little difference in quality between the rows, there are at least two possible explanations:
| | |---|
NOTE: The front panel shows an advisory message if abnormal optimizer performance has been detected.


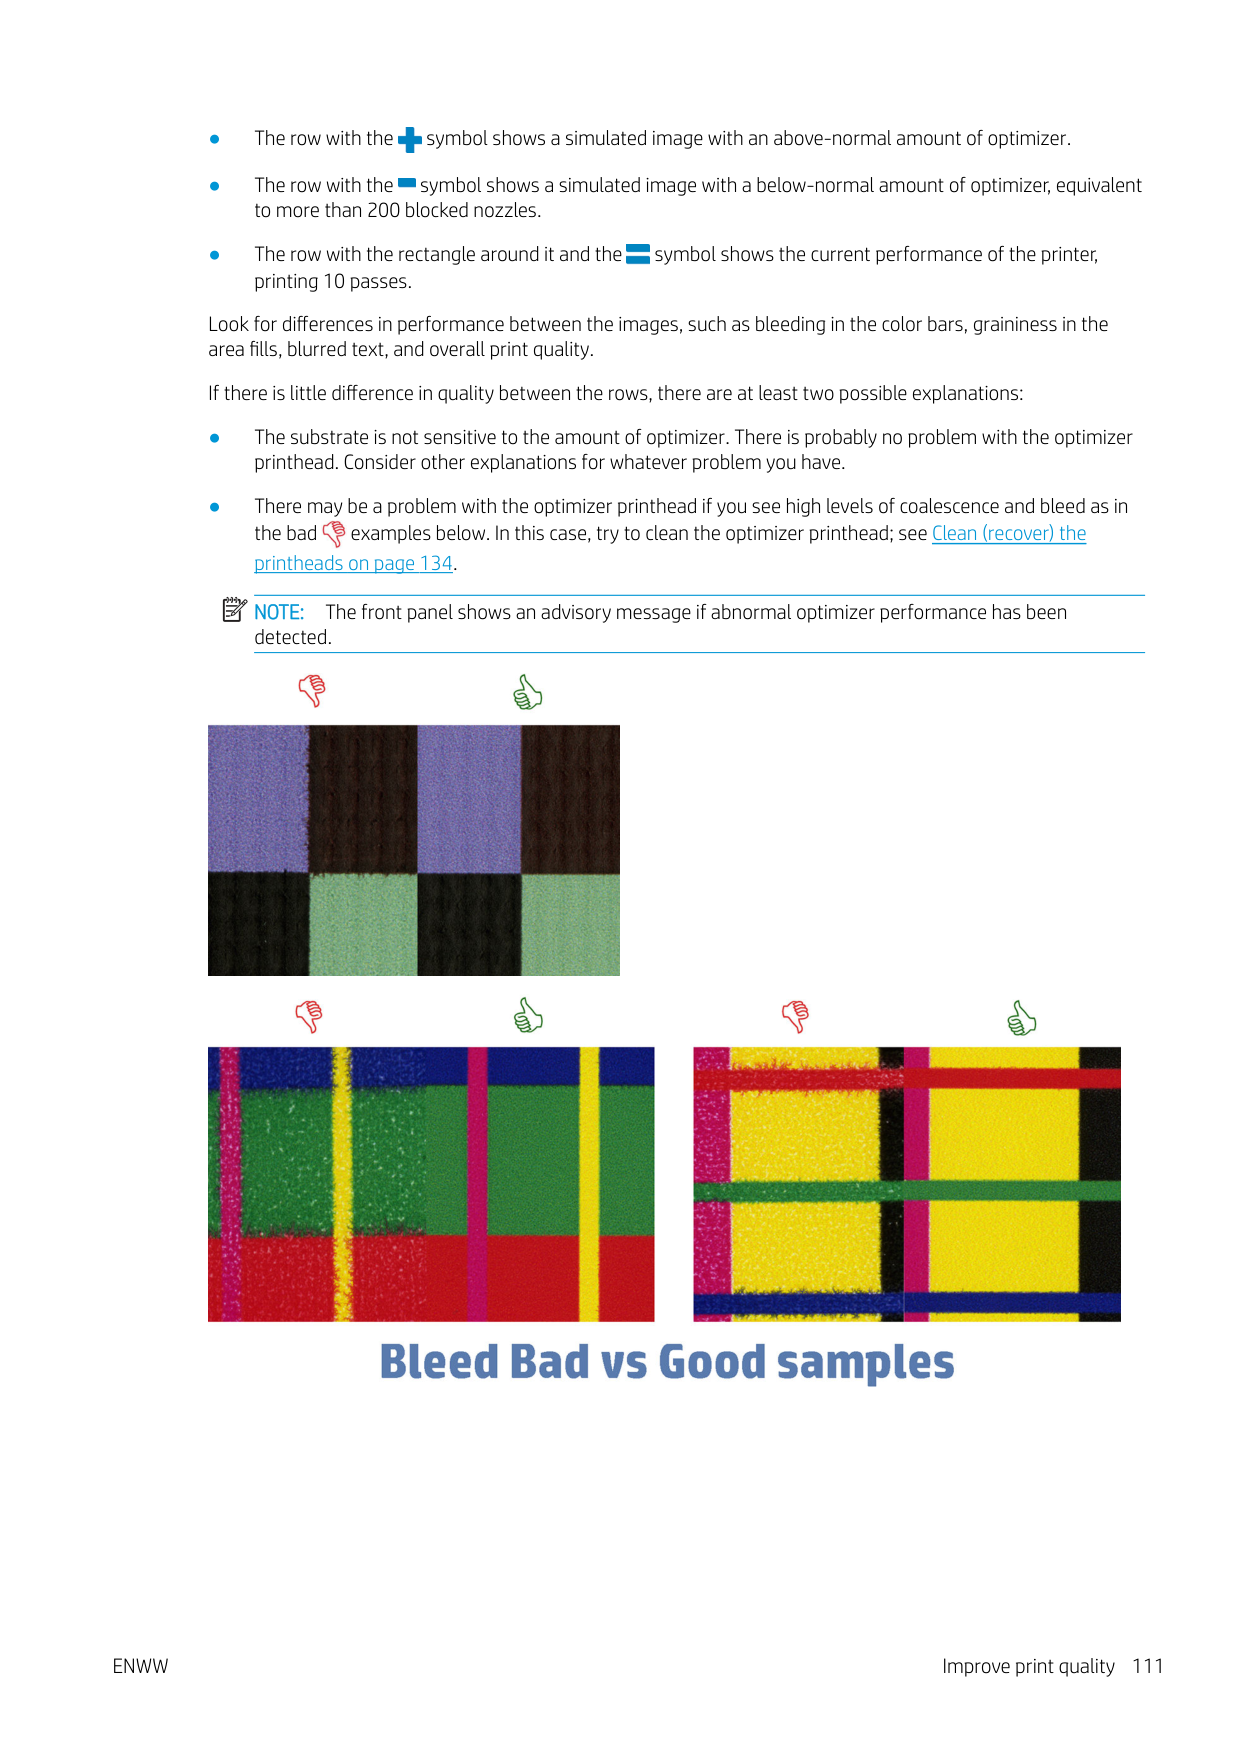

If there is a clear difference in quality between the rows, there are at least two possible explanations:

#### 3. Printhead alignment status plot
To print the printhead alignment status plot:


Check the continuity of the thin diagnostic lines on the alignment status plot. In one section, colored lines are printed in line with black lines to test the alignment from one color to another. In a another section, colored lines are printed such that one half is made with a forward pass and one half is made with a reverse pass to test the alignment between the two directions. In both sets of patterns, printhead misalignment will be visible as a step in the line at its center (marked with a short black line).

Bear in mind that small misalignments may not cause any print-quality defects. The printing process is designed to hide the effects of small amounts of misalignment. The reference scale can be used to quantify the amount of misalignment; errors below 4/600 inch are unlikely to cause print-quality defects.
The optimizer fluid is transparent and cannot usually be seen directly. The fluid can be seen on some substrates (such as self-adhesive vinyl) when printed in conjunction with the colored inks. The cross pattern that is printed above the reference scale is printed in this way and can be used to evaluate the alignment of the optimizer on some substrates. In a well-aligned system, the light-colored cross at the center of the pattern will be aligned with the four black lines at the sides of the pattern. The following figure shows how this pattern will appear on the substrates on which it is visible. This sample is slightly misaligned.
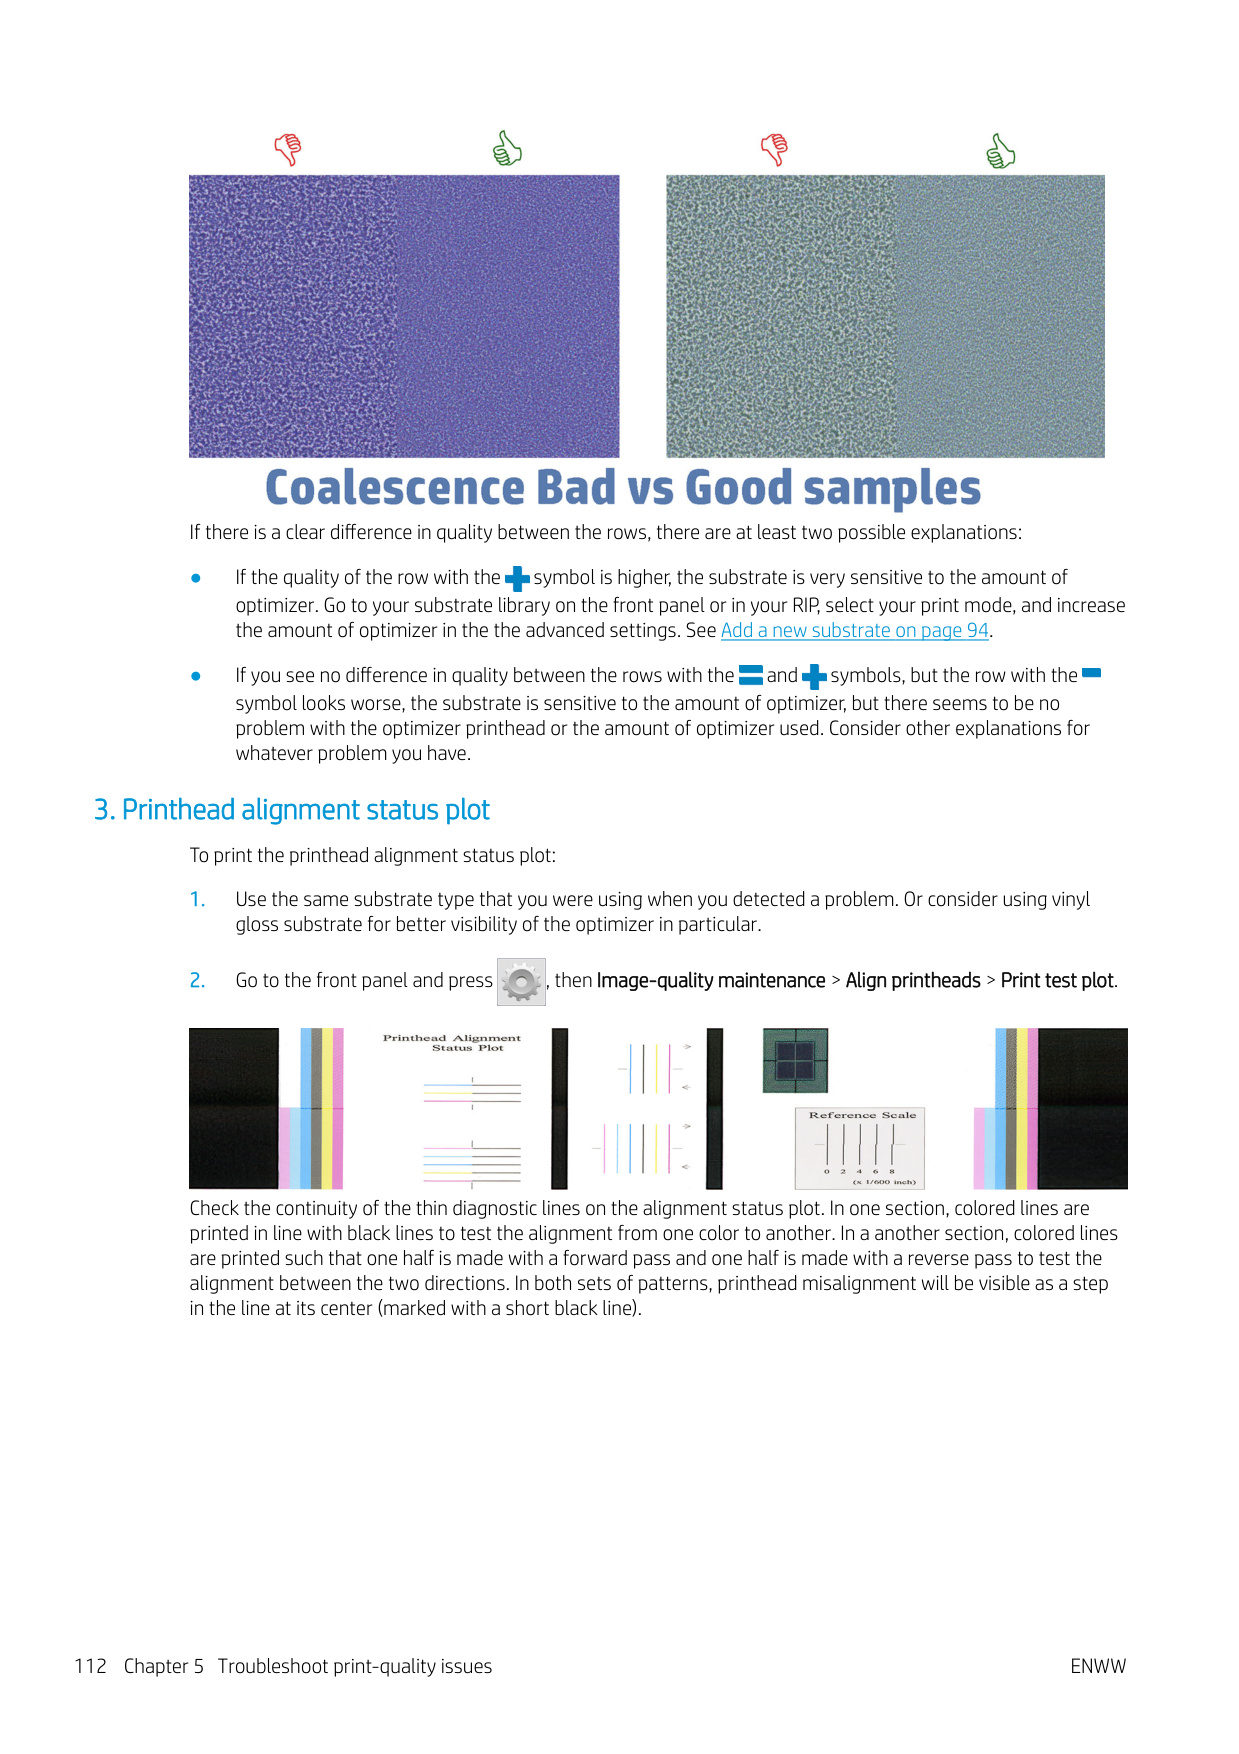


If the printheads are misaligned or you feel unsure about them—for example, because a substrate crash occurred—then align the printheads. See Align the printheads on page 135.
#### 4. Substrate-advance check plot
To fine-tune the quality of your print, you may need to adjust the rate at which the substrate advances. The substrate advance determines the placement of dots on the substrate. If the substrate is not advanced correctly, light or dark bands appear in the printed image and the grain in the print may increase.
You can modify the substrate advance from the RIP or front panel with the Substrate Advance parameter in the substrate preset.
To print the substrate-advance check plot:

The substrate-advance check plot consists of several columns with a number at the bottom of each one. Locate the lightest of the columns and enter its number into the Substrate Advance parameter for the current substrate preset. The value chosen in this example should be “−6”.
| | |---|

NOTE: Minor substrate-advance problems (±2 around the 0 value) are unlikely to result in any print-quality problem, especially with print modes of more than 8 passes.
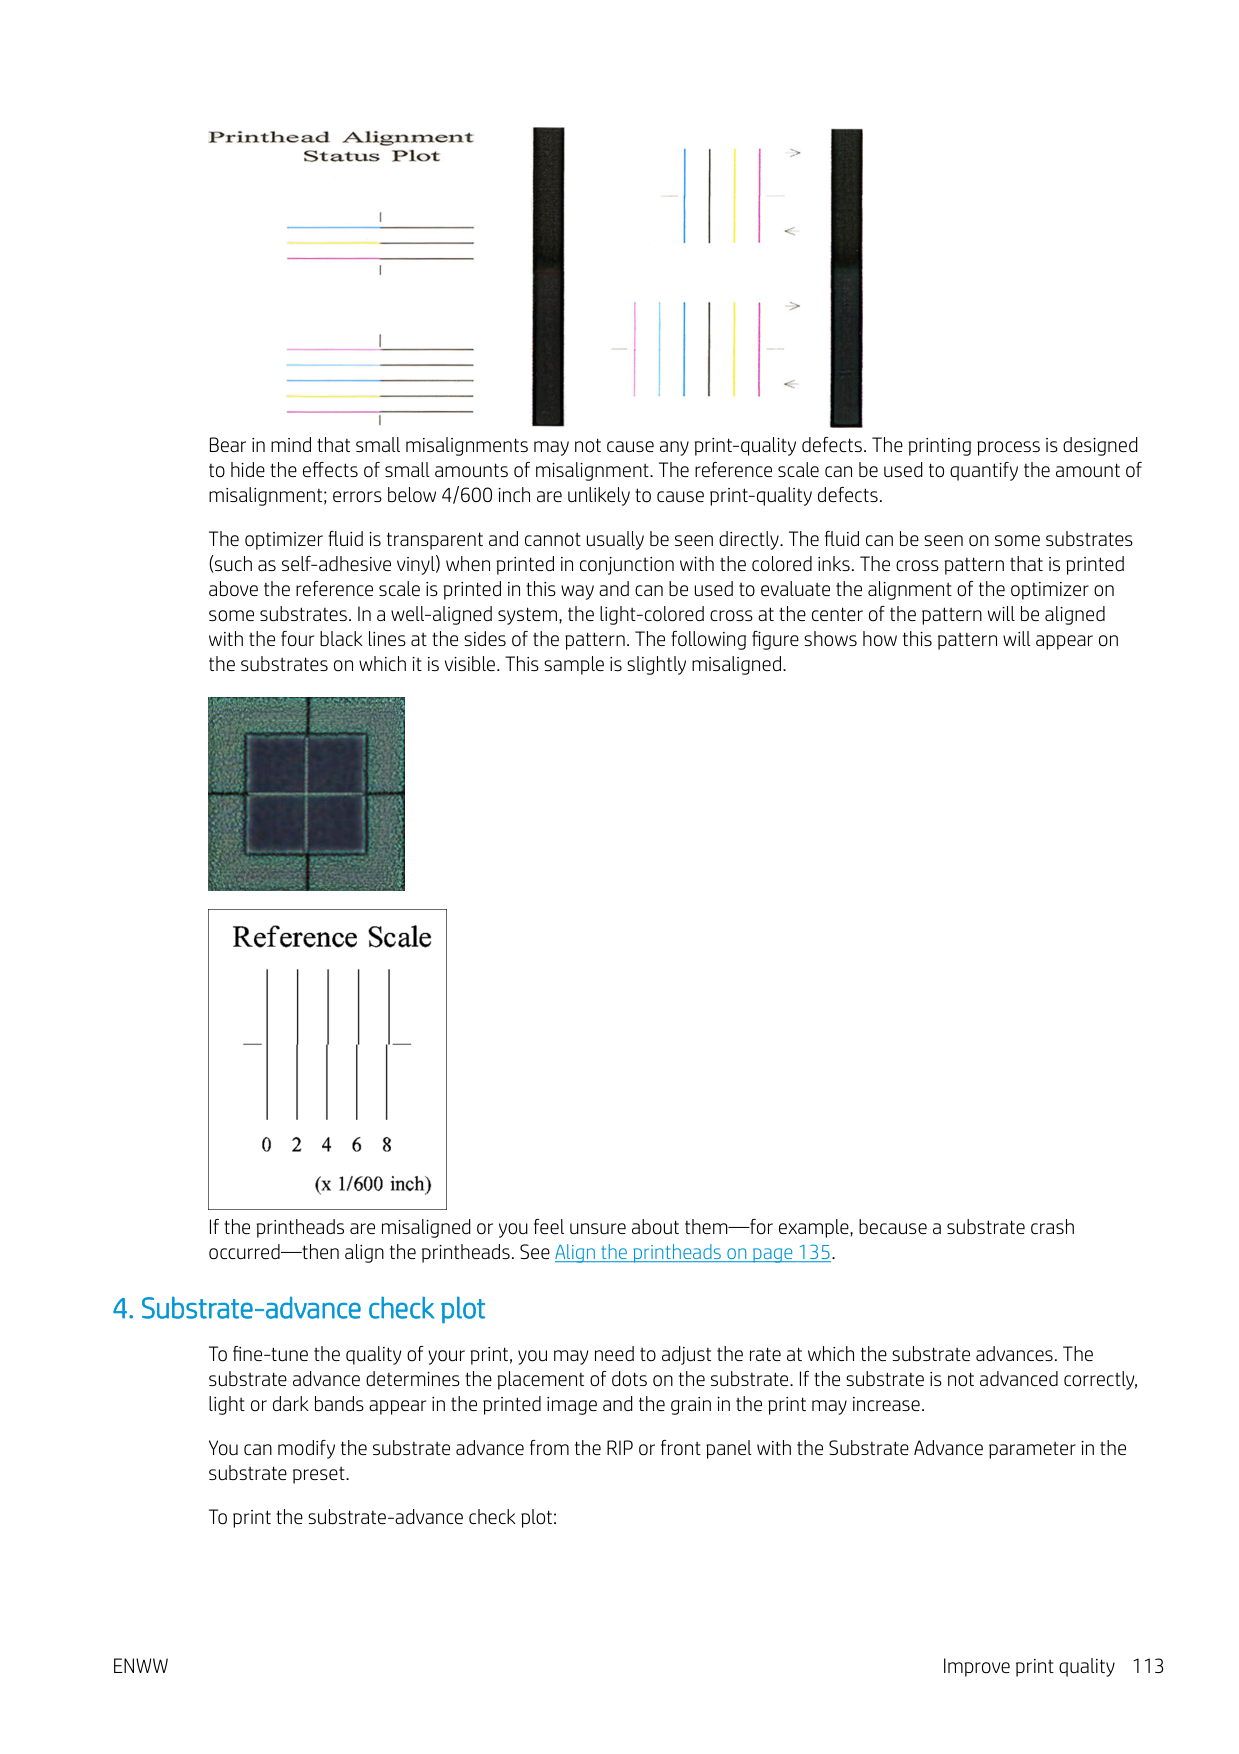
#### Substrate advance adjustment while printing

If you are using no more than six passes, you can fine-tune the substrate advance while printing: press ,
then Adjustments > Adjust substrate advance. Select a value of change from −10 mm/m to +10 mm/m (or mils/ inch). To correct light banding, decrease the value. To correct dark banding, increase the value.
If you are using eight passes or more, a wrong advance adjustment will not produce banding but graininess, which is harder to assess visually. Therefore, in this case you are recommended to use only the adjustment plot.
When you have chosen a value and pressed OK, the rest of your job will be printed with that value, but it will be reset to zero at the end of the job. Add the value found to the Substrate Advance value in the preset to print all future jobs with the new setting.
#### What to do if problems persist
If you still experience print-quality problems after applying the advice in this chapter, here are some additional tips to consider:
Most-common print-quality problems
#### Graininess

If you see this kind of problem:
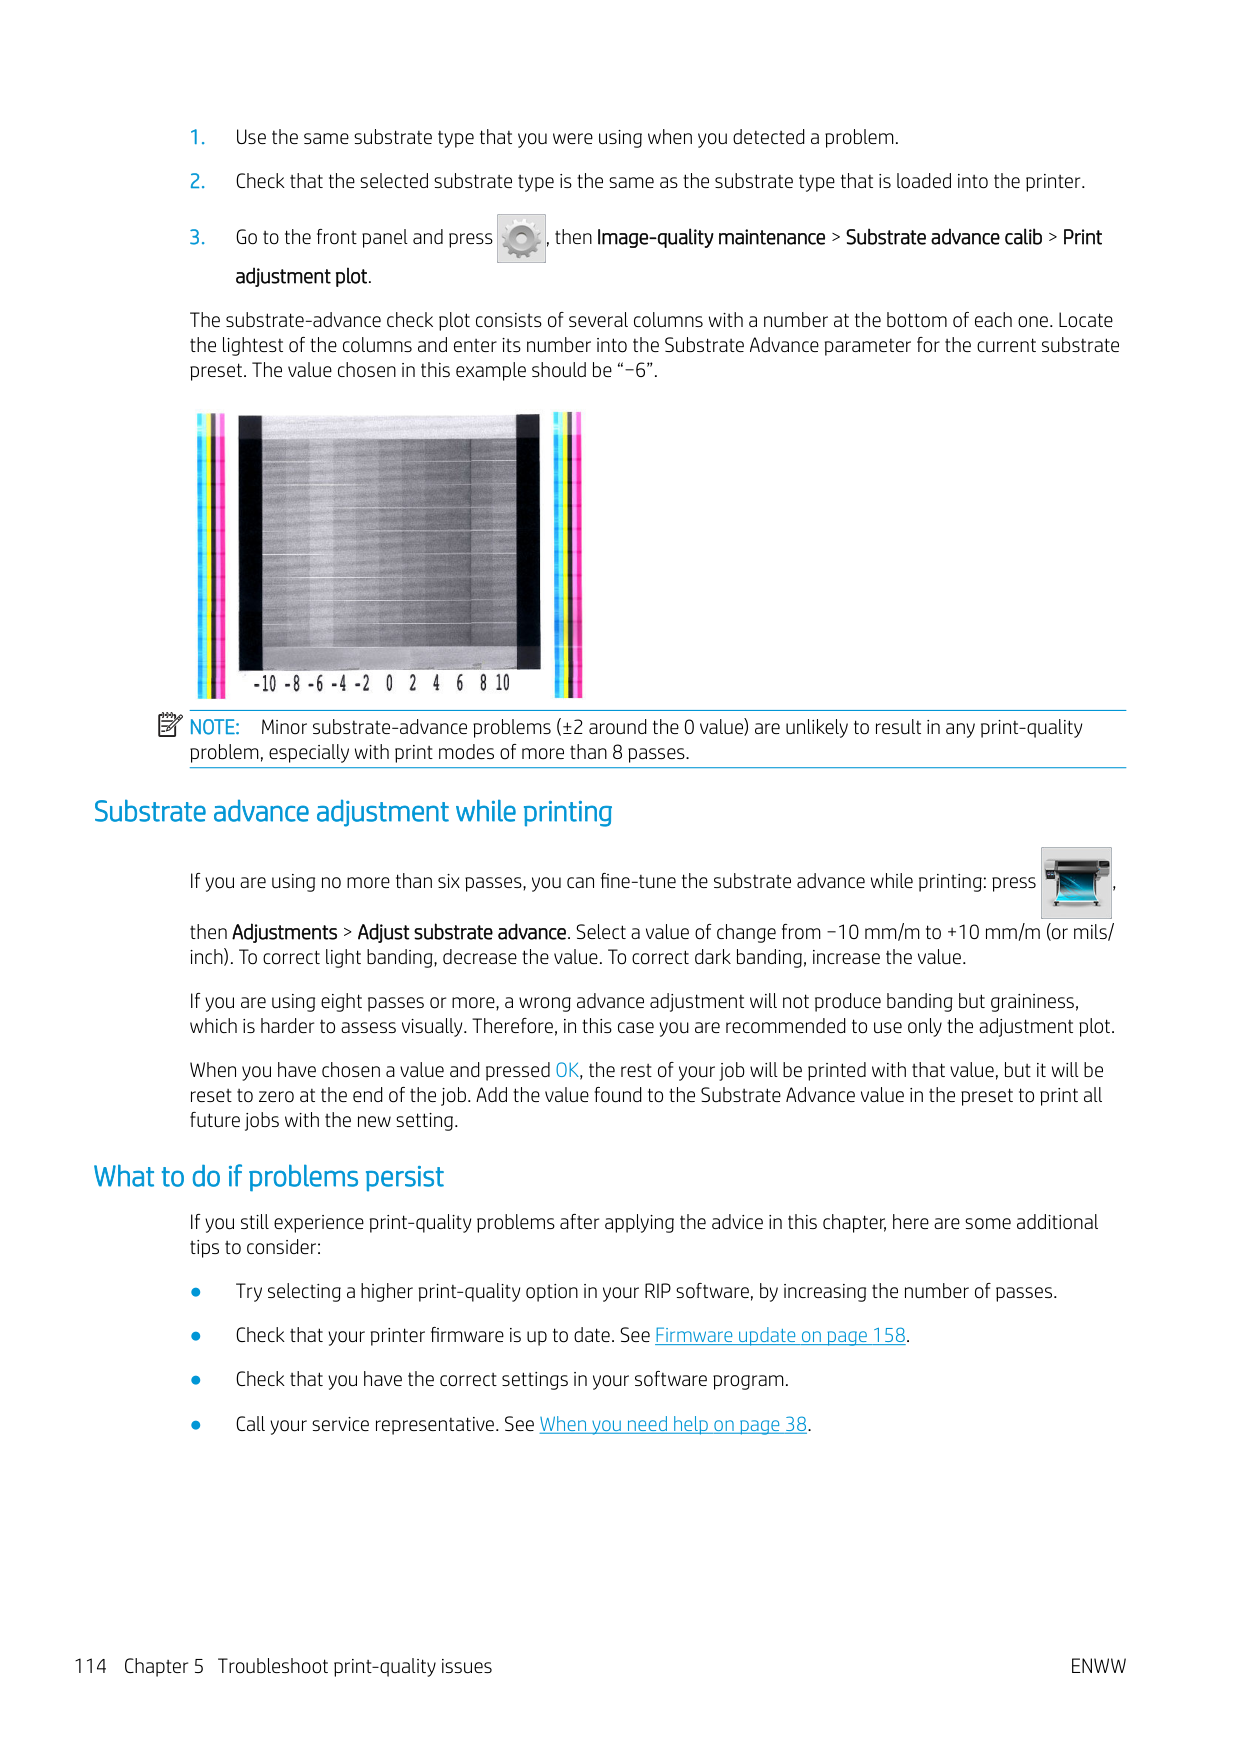

| | |---|
NOTE: A small change in overall graininess (but not coalescence) may be perceived in some areas because the light-colored inks, which are not used in Economode, help to provide smooth transitions.
#### Horizontal banding
Try the following remedies if your printed image suffers from added horizontal lines as shown (the color may vary).


Another cause could be a fiber attached to one of the printheads. Turn off the printer, then remove the printheads one at a time and remove any fibers that you see attached to them.
| | |---|
If the problem persists, call your service representative (see When you need help on page 38).
#### Vertical banding
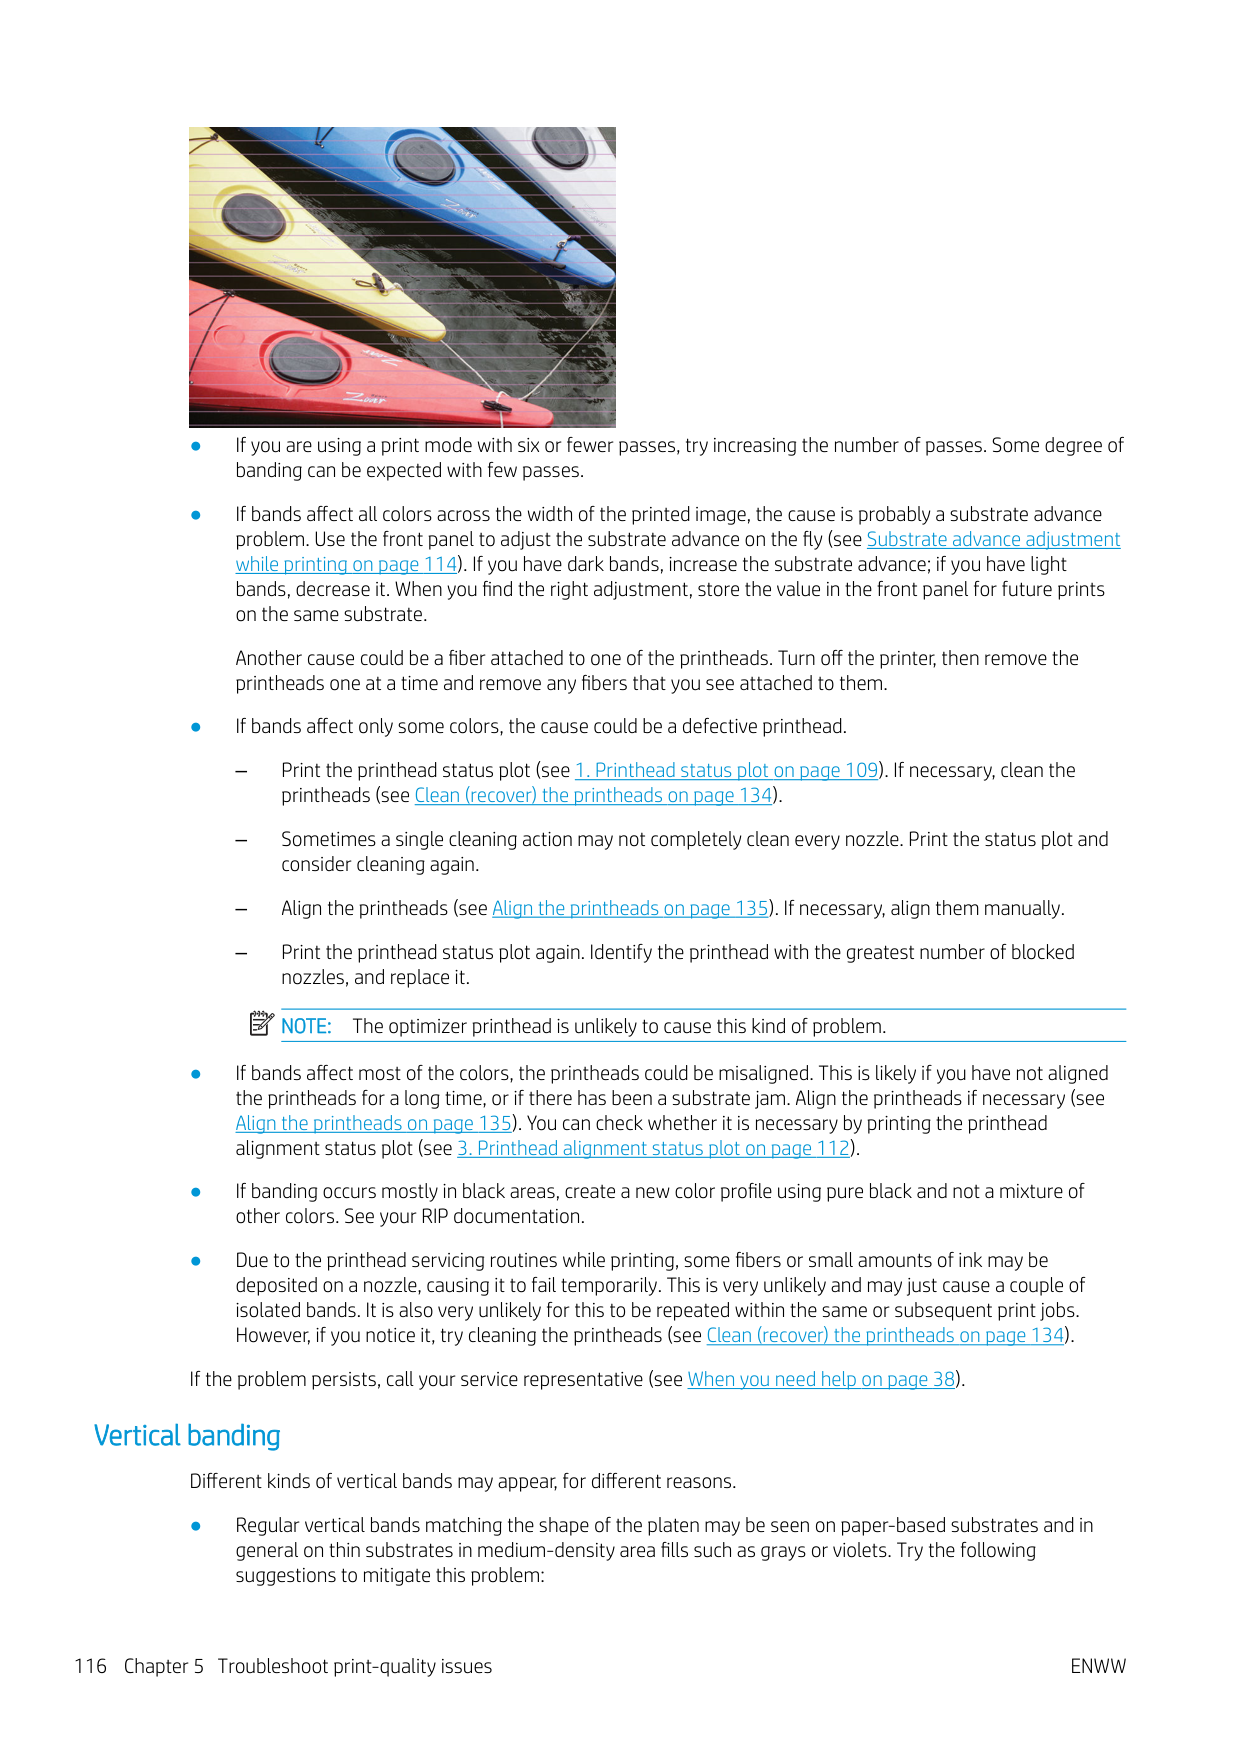
Different kinds of vertical bands may appear, for different reasons.
Some particular colors (usually tertiary colors) may present vertical banding when printing at very high densities and with many passes. This is due to differential ink drying in the print zone. Try the following suggestions to fix the problem:
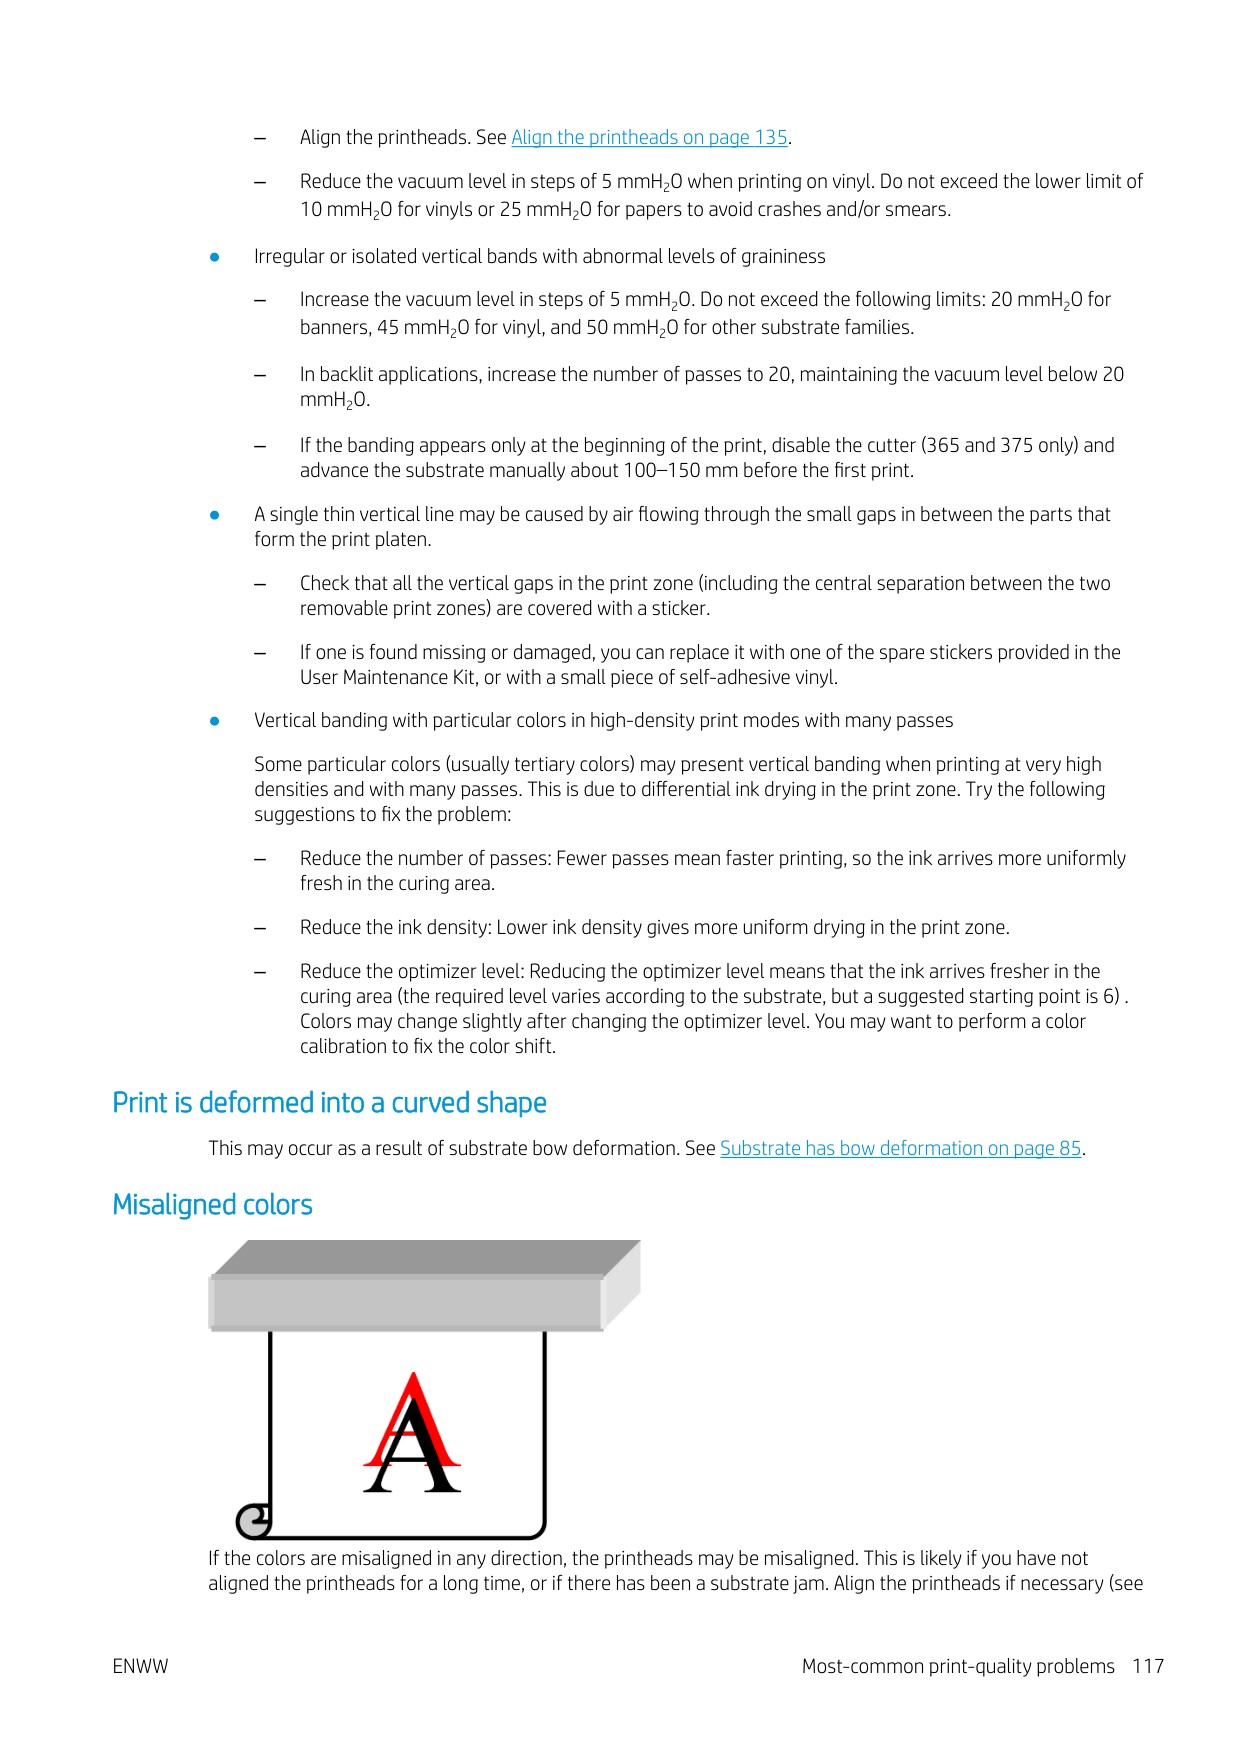
#### Print is deformed into a curved shape
This may occur as a result of substrate bow deformation. See Substrate has bow deformation on page 85.
#### Misaligned colors

If the colors are misaligned in any direction, the printheads may be misaligned. This is likely if you have not aligned the printheads for a long time, or if there has been a substrate jam. Align the printheads if necessary (see
Align the printheads on page 135). You can check whether it is necessary by printing the printhead alignment status plot (see 3. Printhead alignment status plot on page 112).
#### Color variation and text-line correction
If some printhead nozzles are in use while others in the same printhead are not, water evaporates slowly from the ink in the unused nozzles, making the color more intense. Thus, in such cases you may notice variations in color intensity in areas where the color of the image should be constant.

If you notice such a problem, there are various possible solutions.

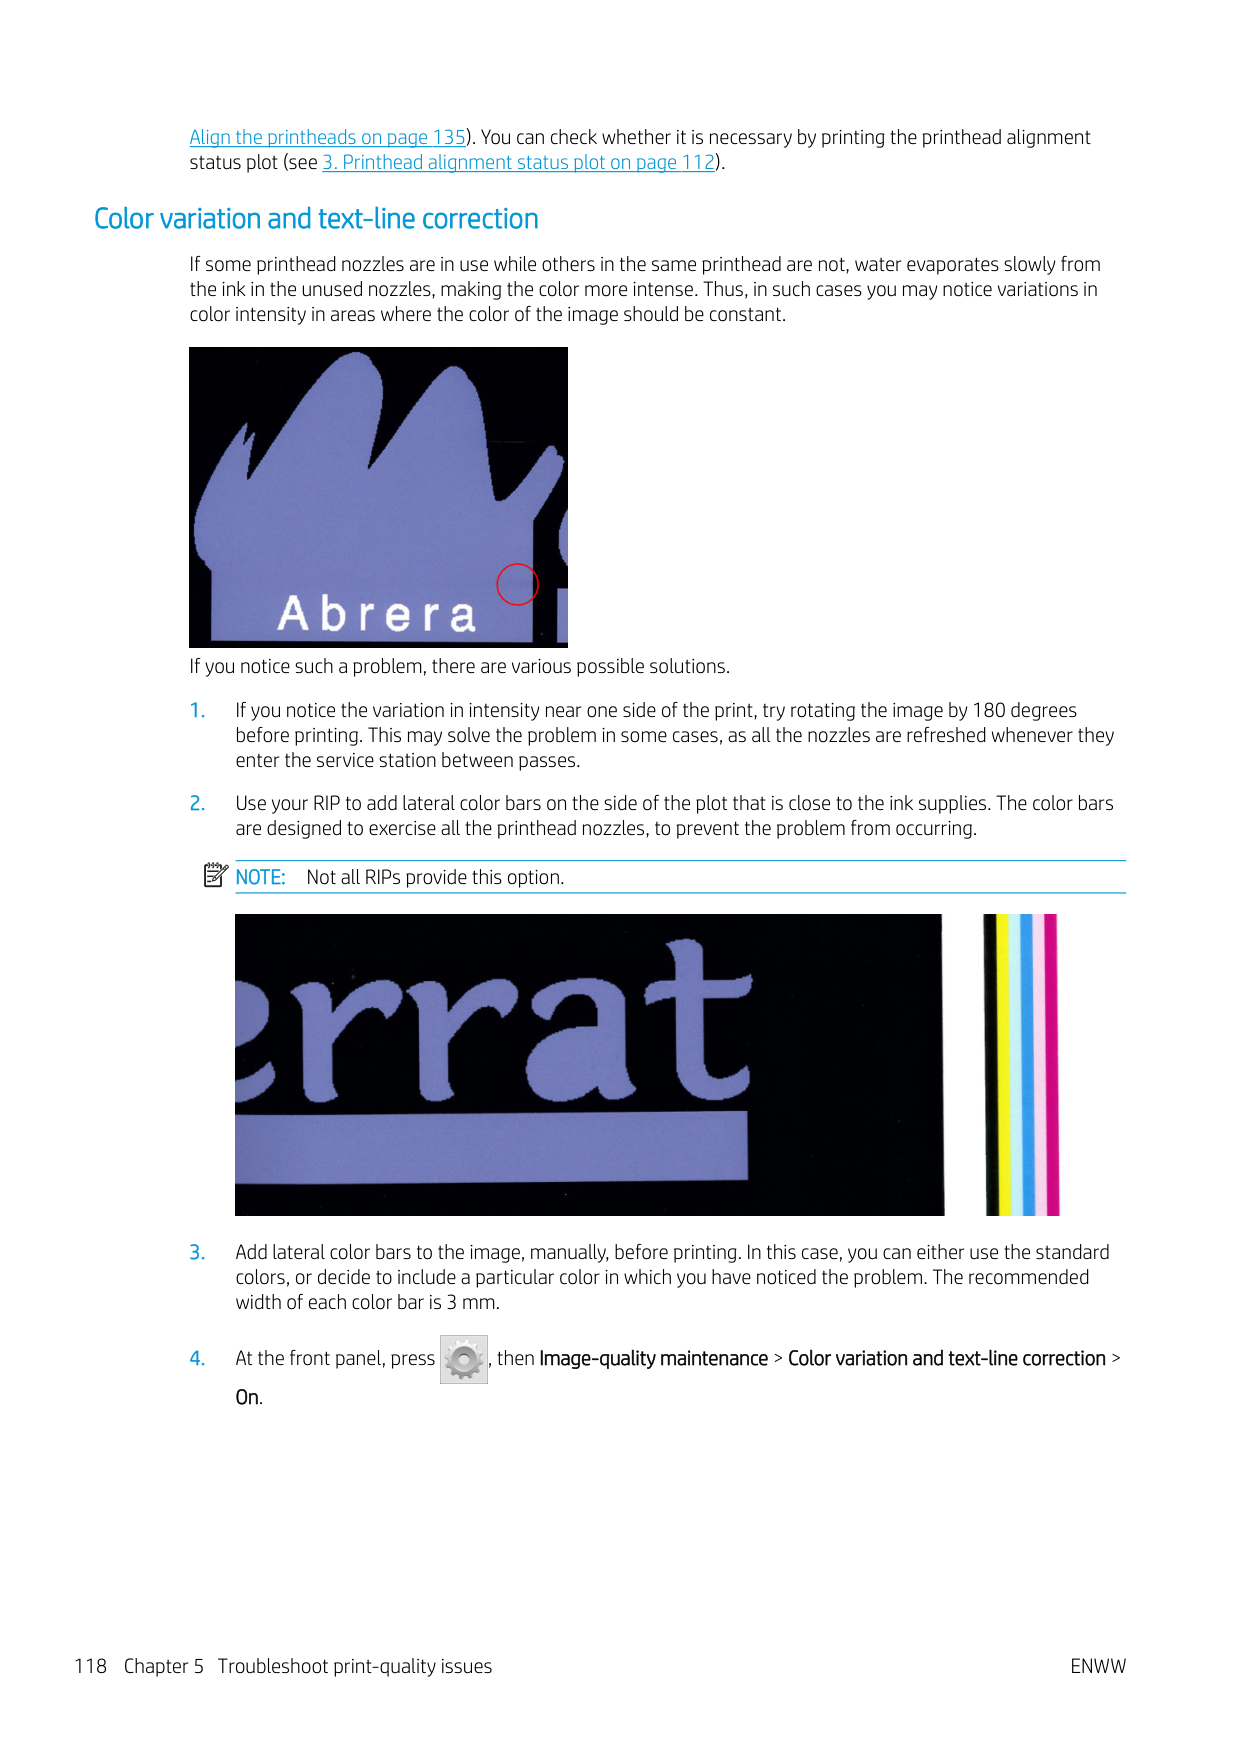
| | |---|

If text, lines, or light solid areas are rough or blurred, try the following suggestions:
#### Black areas look hazy
If black areas look hazy or not sufficiently black, try these suggestions.
#### Ink smears
Ink smears may be seen on the print for the following reasons.

If the problem appears only at the sides of the print, because the edges are uneven or the substrate is curled upward at the sides, consider using the edge holders (see Edge holders on page 65).
If the problem appears only at the beginning of the print, try the following suggestions.
| | |---|
NOTE: Several substrates are sensitive to ambient conditions (temperature and humidity): if the ambient conditions are outside the recommended range, this may affect loading and printing.
#### Uneven appearance in area fill
Subtle color differences may be seen in high-density area fills on some substrates if they are stored partially covered after printing. In the period immediately after printing, such substrates should be stored either totally covered or totally uncovered. It may be advisable to avoid prolonged face-to-face contact between two prints. This problem tends to disappear if the substrate is left uncovered for some time.
Alternatively, especially with vinyls and banners, some individual rolls may have a defective coating; for instance, the coating may have aged. This can cause uneven area fills in light areas. In this case, try a new roll.
#### Ink is oily or smudges when touched
There are various different circumstances in which these symptoms can be seen.
This may be just a temporary problem: try reprinting, and perhaps slightly reduce the ink limits. It may be worth adjusting the print queue so that the first job is not difficult to cure (uses a lot of ink).
Increase the curing temperature, decrease the overall ink quantity, increase the number of passes, and/or modify the inter-path delay offset (in the RIP or front panel) to allow better drying on consecutive passes.
Increase the curing temperature, decrease the overall ink quantity, and/or modify the inter-path delay offset (in the RIP or front panel) to allow better drying on consecutive passes.
| | |---|
NOTE: If you decrease the overall ink quantity, you may notice less color saturation.
#### Print dimensions are wrong
As the substrate is heated during the curing process, some substrates will shrink (and some may expand) after the image has been printed. This may be inconvenient if the print has to be framed or if several prints are to be to be tiled one next to the other.
See Substrate has shrunk or expanded on page 84.
#### Tiling issues

The most common problems when printing tiles are as follows.
In some cases, contiguous tiles with the same background solid color may show differences in color between the right side of the first tile and the left side of the second tile. This is a common issue of inkjet printers (both thermal inkjet and piezo inkjet), where there are slight color variations as the swath advances.
To improve color consistency side-to-side and tile-to-tile, try adding color bars at the side of the print. These can be set from the RIP.
Since the biggest color differences are between the left edge and the right edge, the effect may sometimes be seen when putting two tiles together. This issue can easily be overcome by inverting alternate tiles, which has the effect of placing the right side of the first tile next to the right side of the second tile and the left side of the second tile next to the left side of the third, so all contiguous areas have been printed in the same point of the swath and, hence, have the same color. This is a feature that all RIPs have available.
This happens because the drying times are not the same across the scan axis. Adding a small inter-path delay offset of about 0.5–1 second may give better results.
##### Variable Front Tension Kit
Depending on the loaded substrate, length inconsistency may be observed when comparing left- and right-side measurements in tiling applications using the take-up reel: measurements on the left being more inconsistent than on the right. This behavior is due to the front tension applied by the tension bar.
The Variable Front Tension Kit contains a pair of counterweights that you can attach to the arms of the tension bar, thus reducing the front tension and improving length consistency in tiling applications when printing with certain substrates (such as self-adhesive vinyl and wallpapers). Other applications and substrates, such as textiles and banners, will work better without these counterweights, therefore HP strongly recommends uninstalling the Variable Front Tension Kit when it is not needed.
The Variable Front Tension Kit can be used with both 54- and 64-inch printers, but with different adjustments.
###### Installation
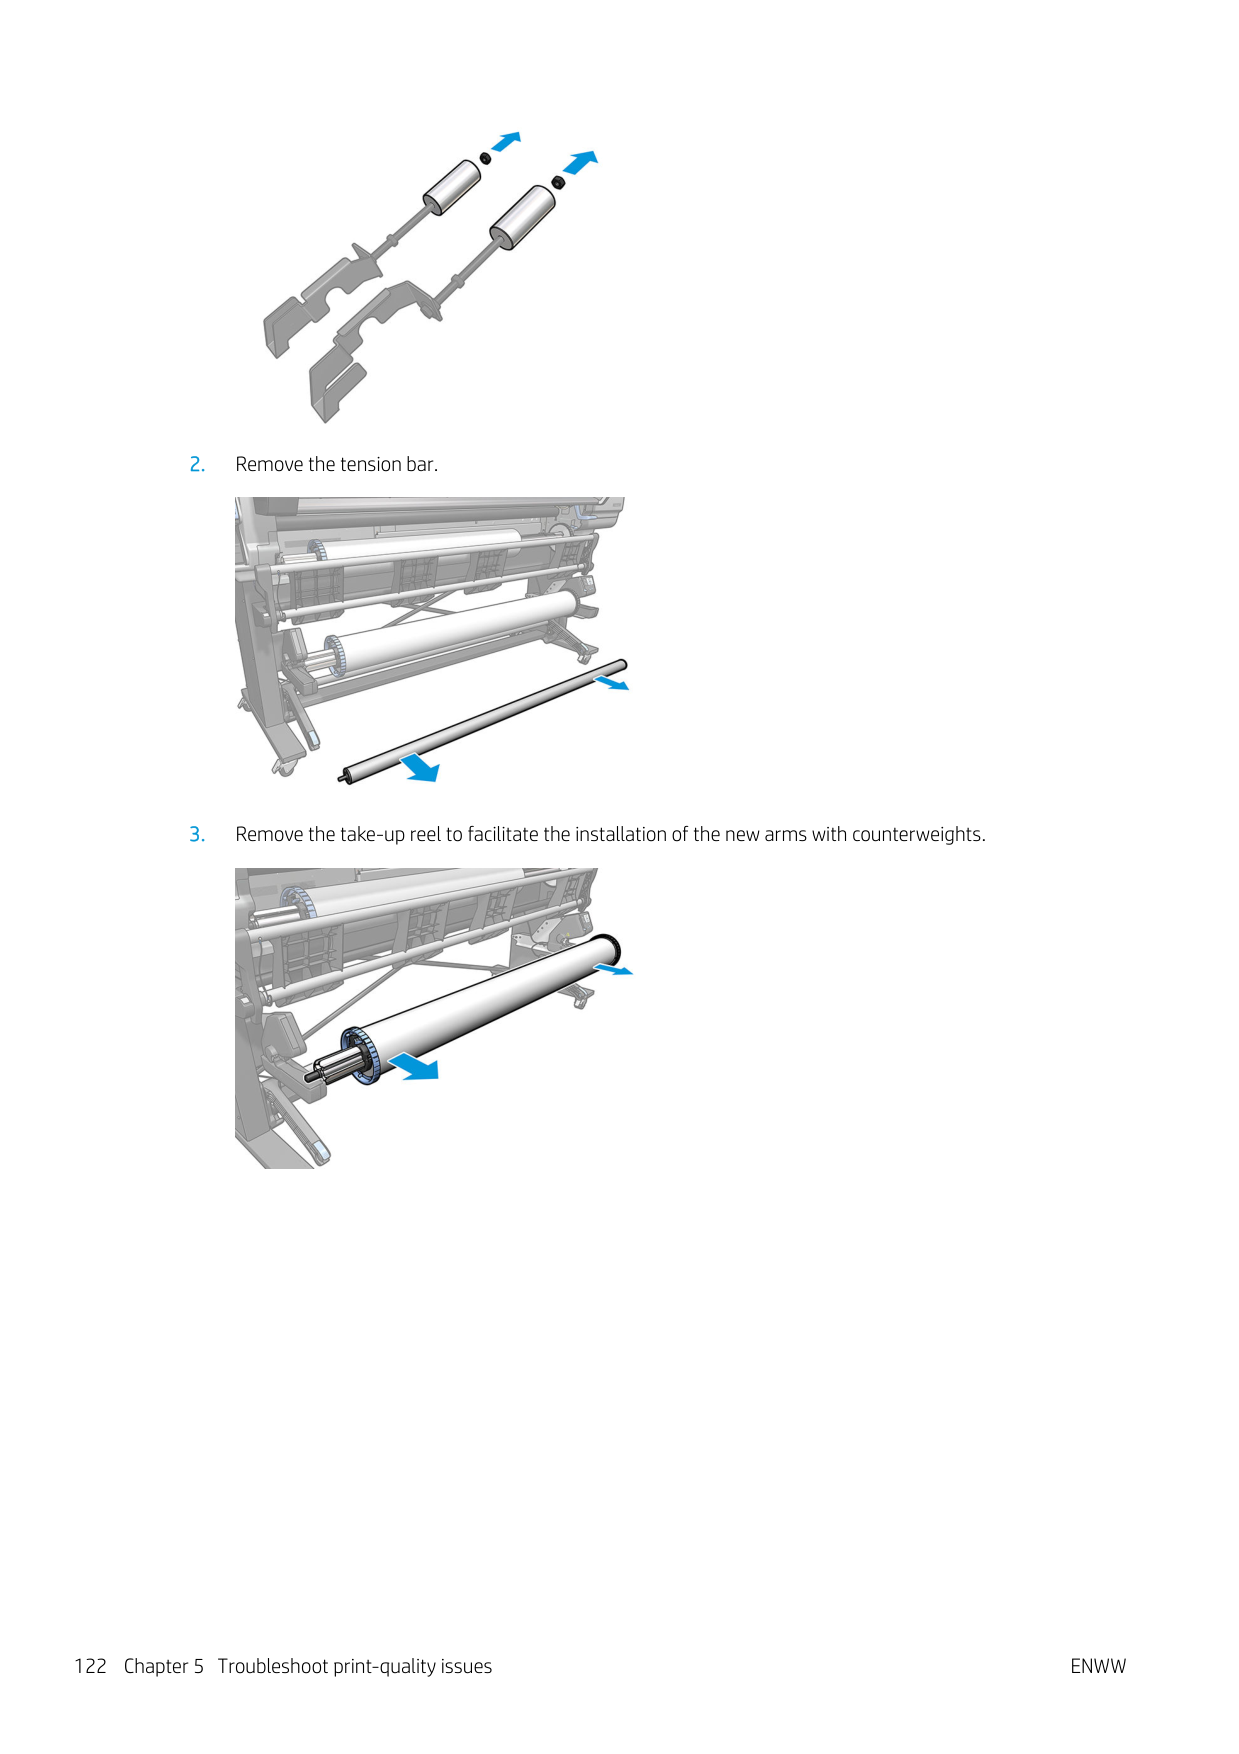
The Variable Front Tension Kit consists of left and right arms, two weights, two M10×180mm screws, six M10 nuts, and four washers.
Each arm and each counterweight weighs 1.4 kg.

####### 2. Remove the tension bar.

####### 3. Remove the take-up reel to facilitate the installation of the new arms with counterweights.

####### 4. Install the subassembly on the left arm of the tension bar, by moving the arms upwards.


####### 5. Install the subassembly on the right arm of the tension bar, by moving the arms upwards.


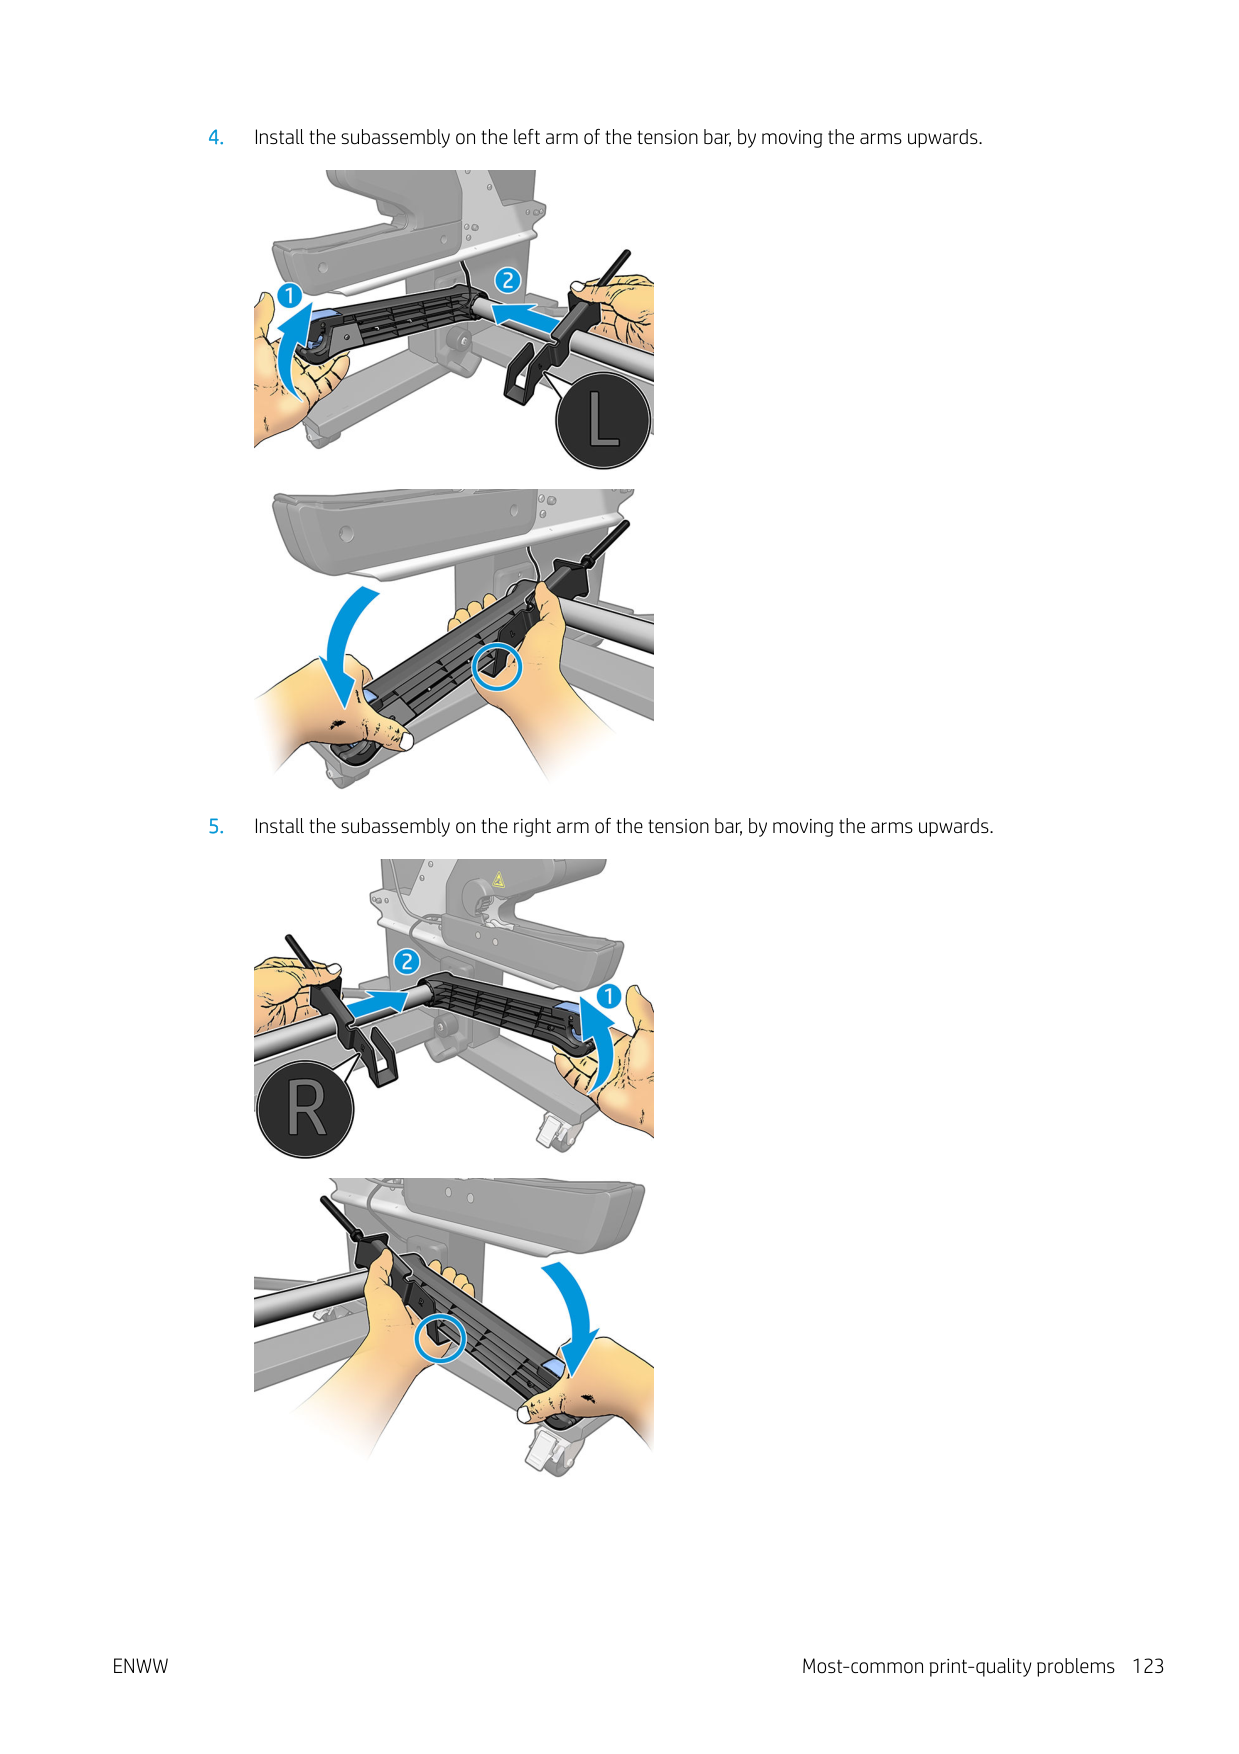


| | |---|
NOTE: If you have an HP Latex 375 printer, you will probably need to move the ink tanks slightly to allow free movement of the arm.
6 Ink system
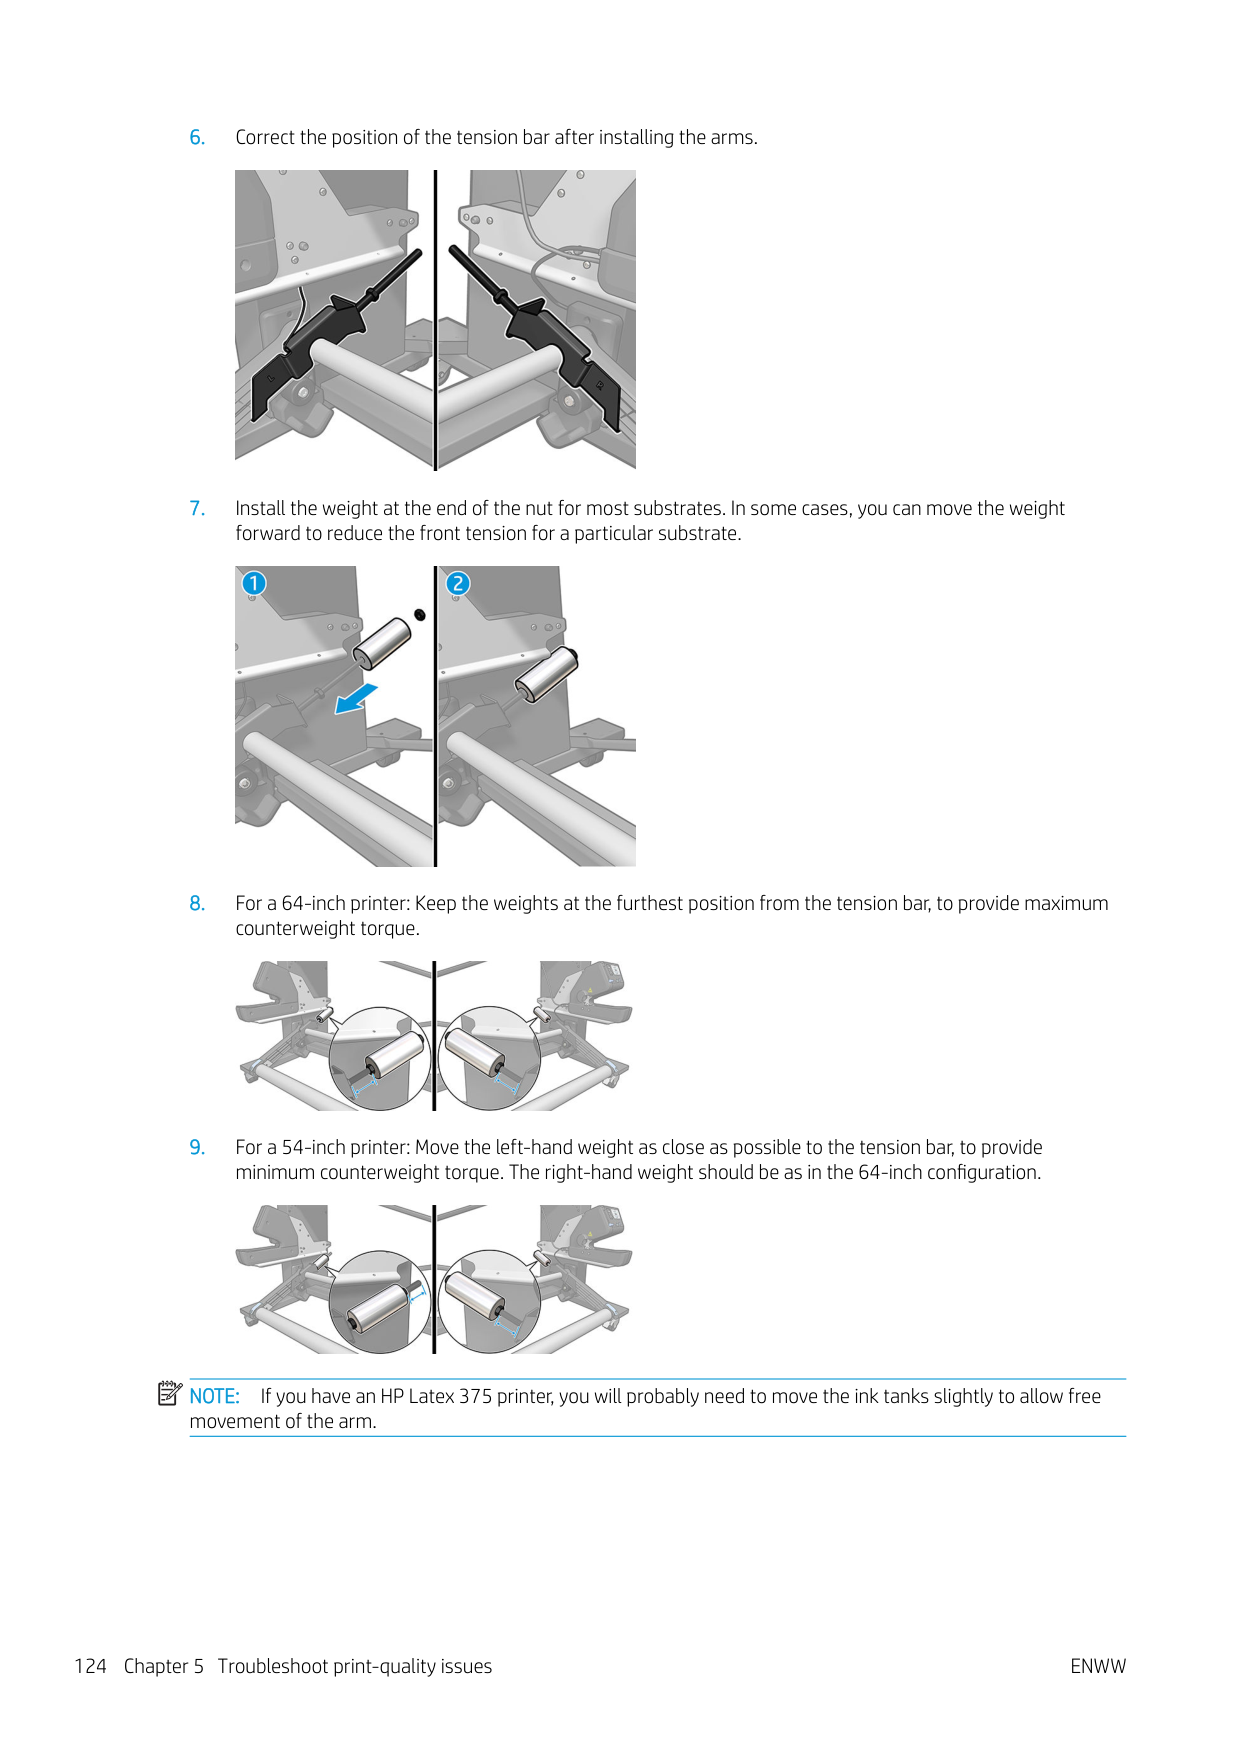
ENWW 125
Ink cartridges
The printer's seven ink cartridges provide magenta, light magenta, black, yellow, light cyan, cyan, and optimizer ink to the printheads. Each cartridge has a capacity of 775 ml.

Ink cartridges require no maintenance or cleaning, but must be shaken before installation. High-quality printing results continue even when the ink levels are getting low.
HP Latex Optimizer enables high quality at high speed. HP Latex Optimizer consists of positively-charged (cationic) polymers suspended in a colorless, water-based ink vehicle. It reacts with the ink pigments, which are negatively-charged (anionic), to immobilize them rapidly on the print surface. This produces sharp text and image detail by suppressing feathering and color bleed especially at high productivity levels.
HP Latex Optimizer also enables the drying and curing process of the HP Latex inks to operate at lower temperatures and to be more energy-efficient, which has the additional benefits of allowing wide substrate support and reduced power consumption.
CAUTION: Avoid touching pins, leads, and circuitry when handling ink cartridges because these elements are sensitive to electrostatic discharge. Such devices are called ESD-sensitive devices. See Glossary on page 181. Electrostatic discharges are one of the main hazards to electronics products. This type of damage can reduce the life expectancy of the device.
Printheads
The printheads deposit ink on the substrate. Each printhead, except the optimizer printhead, is connected to two ink cartridges.

The printheads are extremely durable and do not need to be replaced every time an ink cartridge is replaced. They provide excellent results even when the ink cartridges contain a low level of ink.
To maintain optimum print quality, the printheads are automatically tested at regular intervals, and automatically serviced when necessary. This takes a little time and can occasionally delay printing.
When a printhead eventually needs to be replaced, the front panel will display a message.
CAUTION: Avoid touching pins, leads, and circuitry when handling printheads because these elements are sensitive to electrostatic discharge. Such devices are called ESD-sensitive devices. See Glossary on page 181. Electrostatic discharges are one of the main hazards to electronics products. This type of damage can reduce the life expectancy of the device.

CAUTION: If you want to remove a printhead from the printer and preserve it for later use, reinstall the cap and plug, but never install a clear optimizer cap or white plug on a non-optimizer printhead. Optimizer printheads have clear caps and white plugs, while the other printheads have orange caps and plugs. Installing the wrong cap and plug can cause irrecoverable printhead damage.
Maintenance cartridge
The maintenance cartridge cleans and maintains the printheads, and seals the printheads when they are not in use to prevent them from drying out. It is also used to store waste ink.
| | |---|
IMPORTANT: Keep the maintenance cartridge horizontal when removing it, to avoid spilling ink.

The cartridge contains a roll of cloth, which is used to clean the printheads. You are notified when 92% of the roll has been used, after which the cartridge should continue to function for about another 140 m² (1500 ft²) of printed area. A new roll lasts for about 1850 m² (20000 ft²) of printed area.
| | |---|
NOTE: These figures can vary considerably depending on the image density, the print mode, and the ambient temperature. The cloth will be exhausted much faster with a high-density print, many passes, and a hot environment.
| | |---|
NOTE: The maintenance cartridge is checked to detect end of roll when the printer is turned on and at the end of each print job. The printer will refuse to start a print job if it detects the end of the cleaning roll. You should then replace the maintenance cartridge with a new one.
Safe mode
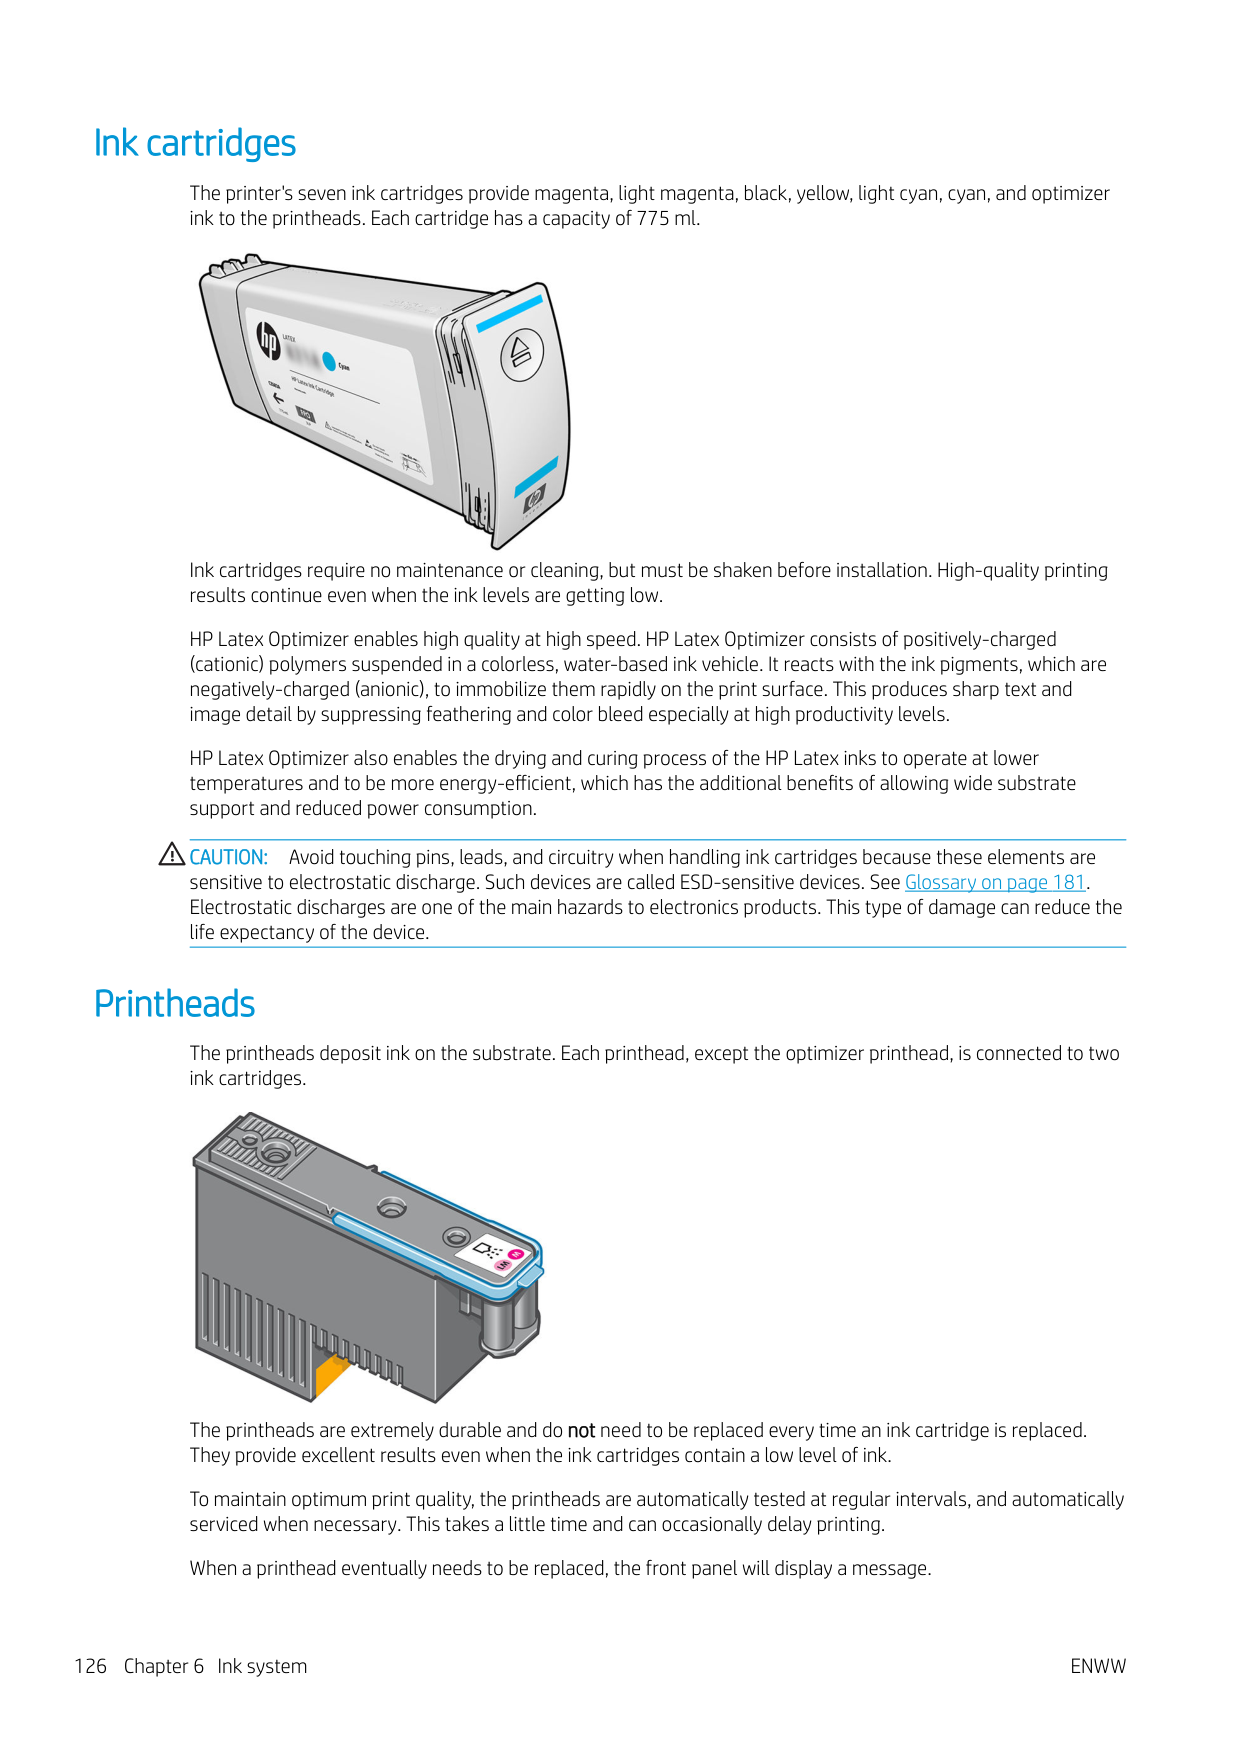
Under certain conditions, including printer operation outside of environmental specifications, and when a used, refilled, or counterfeit ink cartridge has been detected, the printer will operate in ‘safe’ mode. HP is unable to warrant the performance of the printing system when operated outside of environmental specifications or when a used, refilled, or counterfeit ink cartridge is installed. Safe mode is designed to protect the printer and the

printheads from damage due to unexpected conditions, and is in operation when the icon is displayed on the front panel. For optimal performance, use Original HP ink cartridges. HP Latex printing systems, including Original HP inks and printheads, are designed and engineered together to provide uncompromising print quality, consistency, performance, durability, and value—with every print.
| | |---|
NOTE: This printer is not designed to use continuous ink systems. To resume printing, remove the continuous ink system and install genuine HP (or compatible) ink cartridges.
ENWW Maintenance cartridge 127
| | |---|
####### NOTE: The printer’s ink cartridges are designed to be used until they are empty. Refilling cartridges before they are empty could cause the printer to fail. If this happens, insert a new cartridge (genuine HP or compatible) to continue printing.
7 Hardware maintenance
For the tasks in this chapter, you may need the User Maintenance Kit that was provided with your printer.
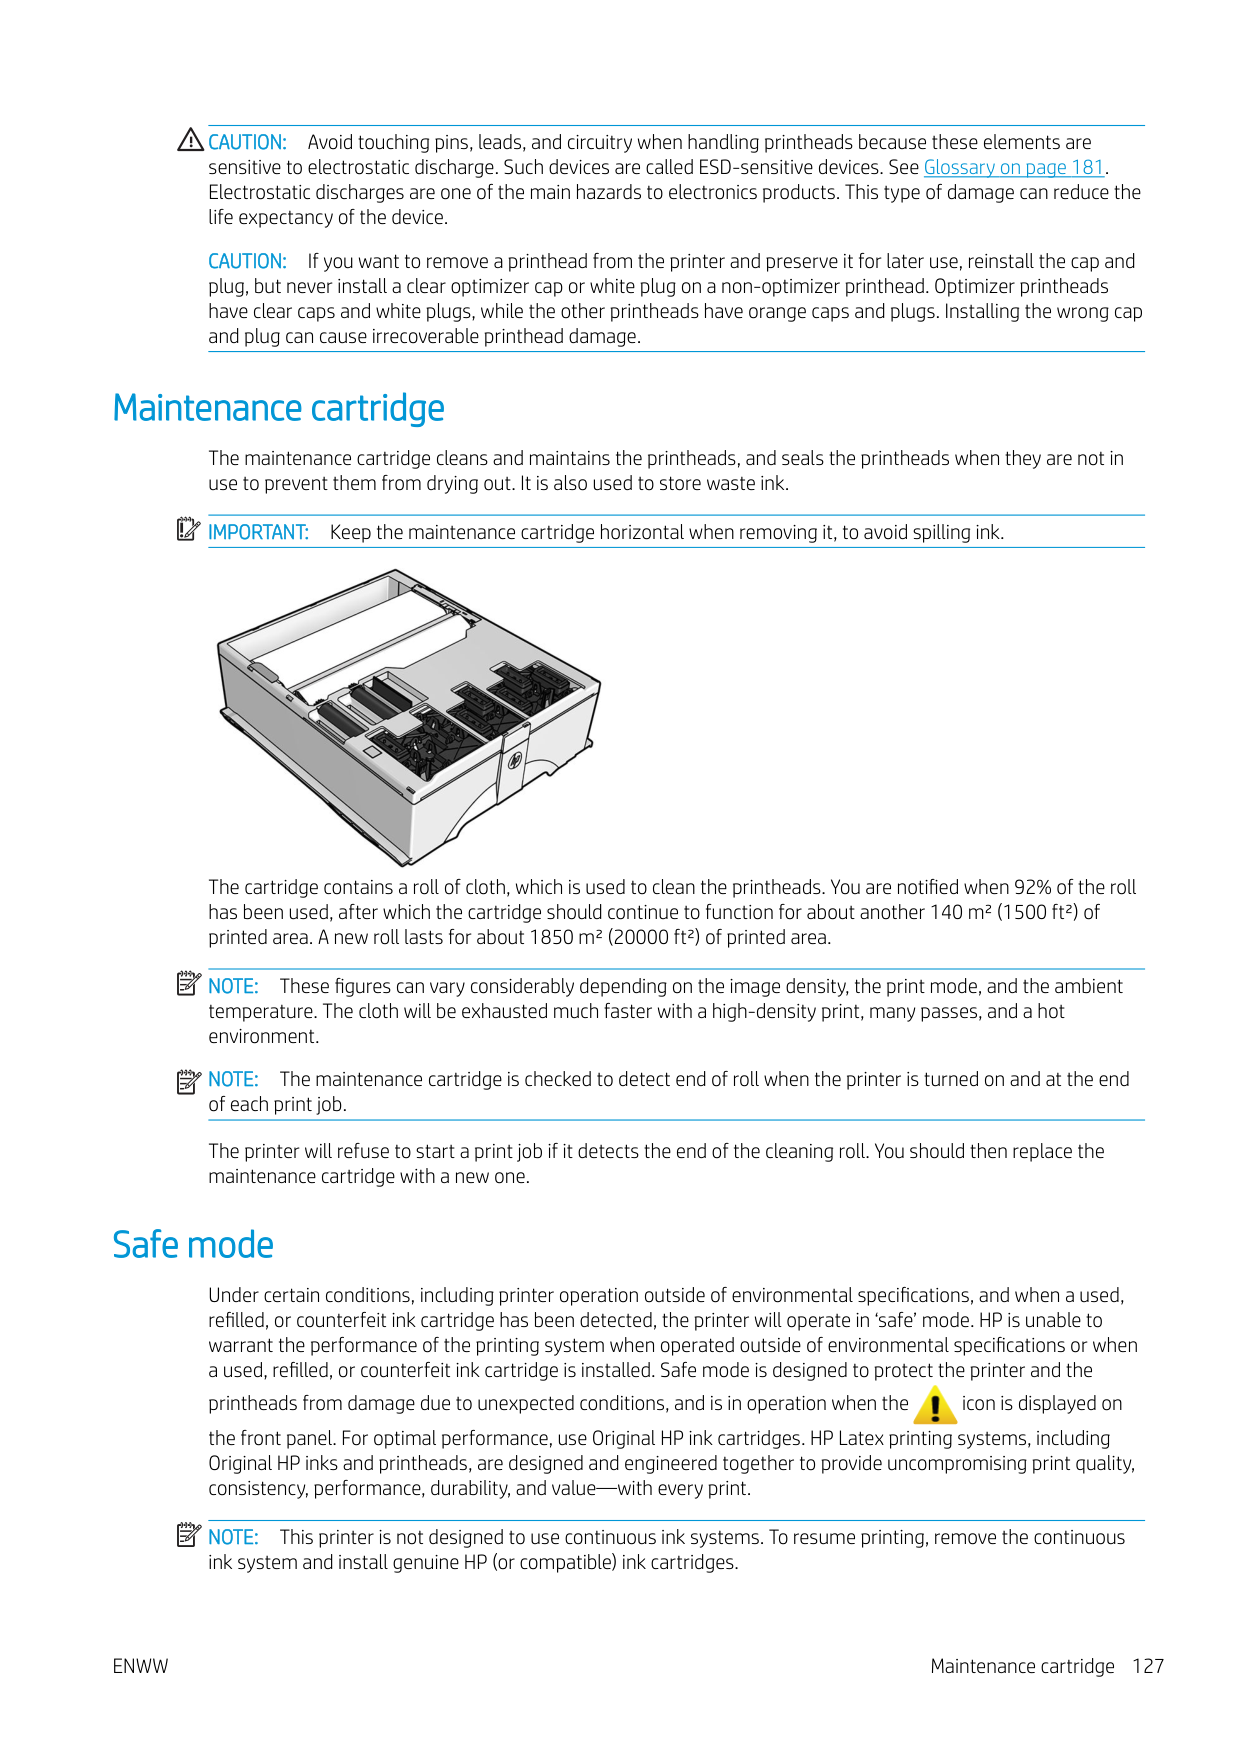

ENWW 129
Ink system tips
For best results, always follow these guidelines:
| | |---|
NOTE: Shake the ink cartridges and printheads vigorously before installing them.
Maintain the ink cartridges
During the normal lifetime of a cartridge, no specific maintenance is required. You should replace a cartridge when it has reached its expiration date. See the ink cartridge information on the front panel for the expiration date.
Replace an ink cartridge

Ink cartridges should be replaced for the following two reasons:

| | |---|
###### Remove an ink cartridge

Alternatively, press , then Ink > Replace ink cartridges.


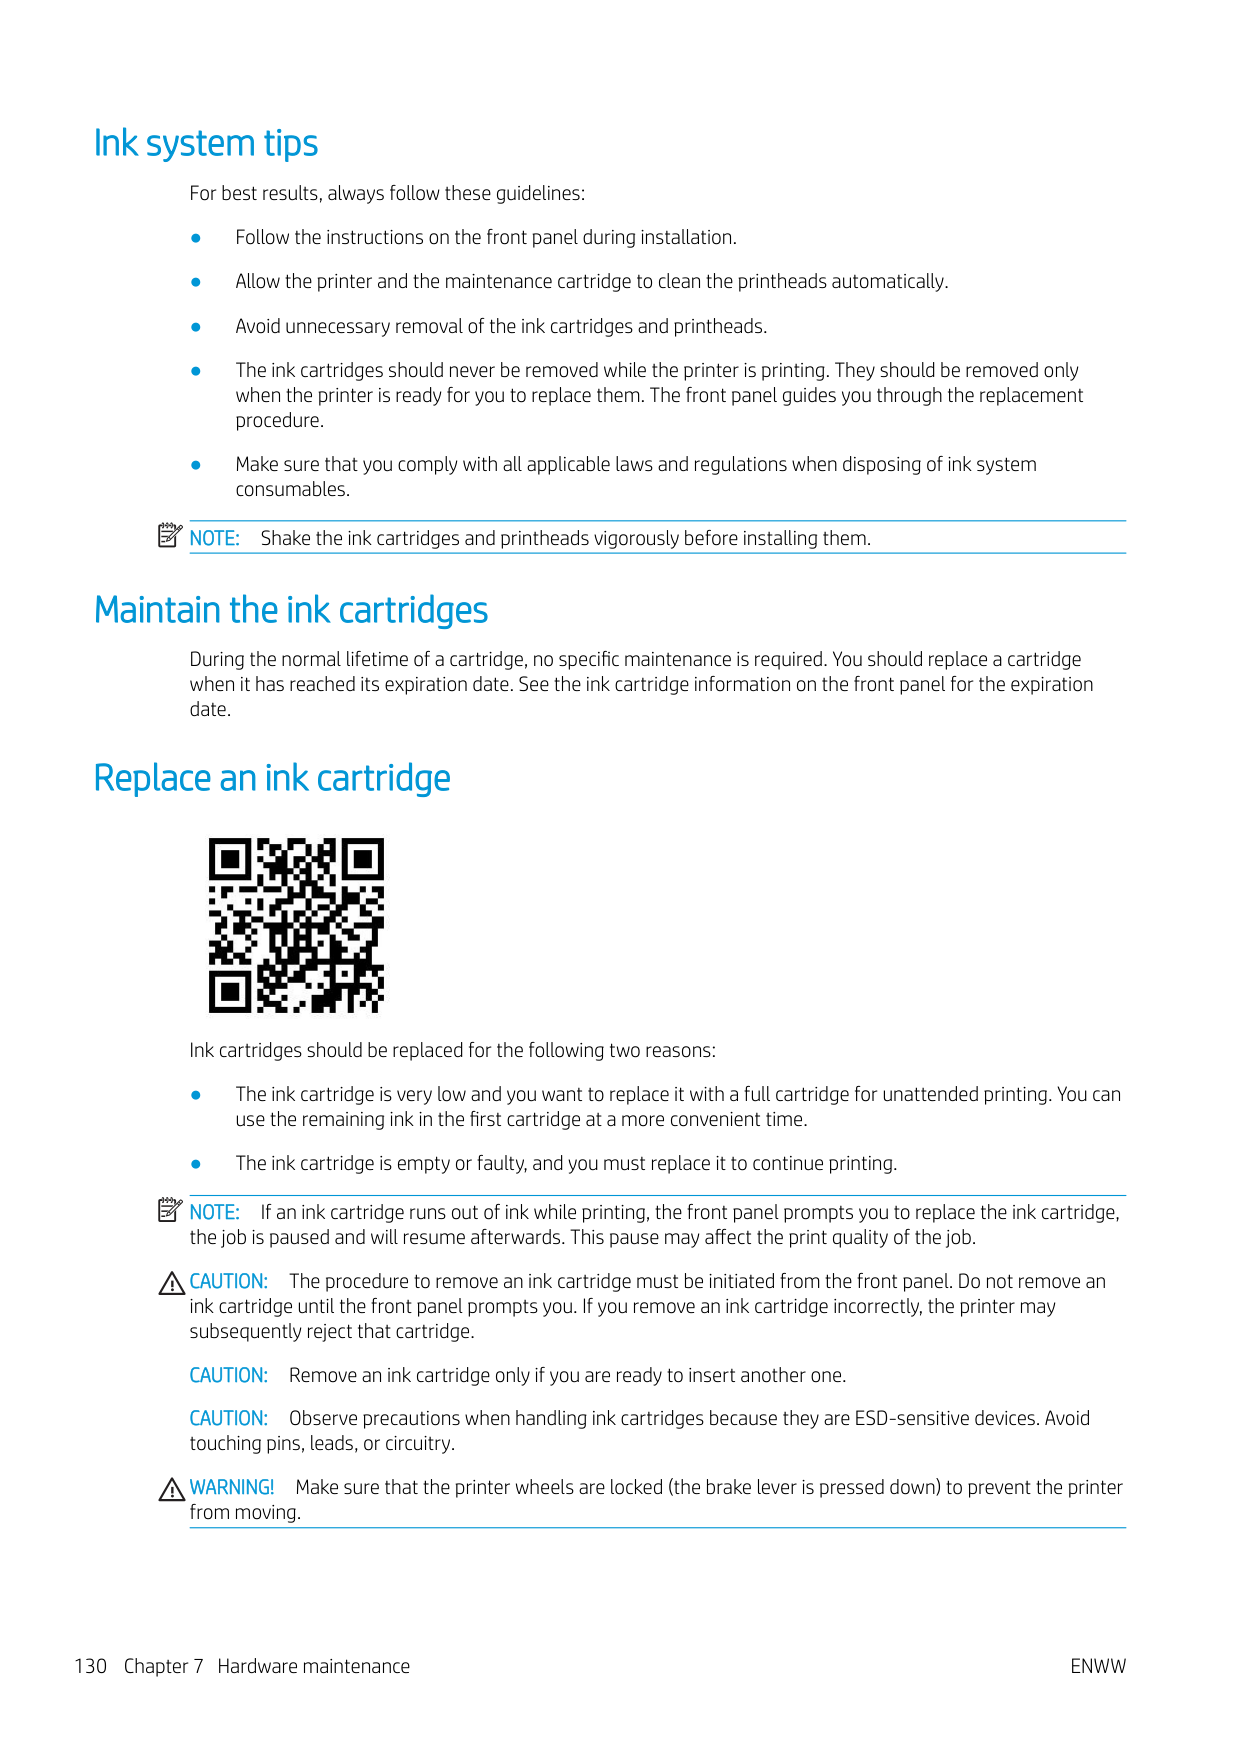

NOTE: Avoid touching the end of the cartridge that is inserted into the printer, because the connection might be coated with ink.
NOTE: If necessary, store a partially-used ink cartridge in the same position as if it were inserted in the printer. Avoid using a partially-used cartridge that has been stored on its end.
| | |---|
| | |---|

###### Insert an ink cartridge

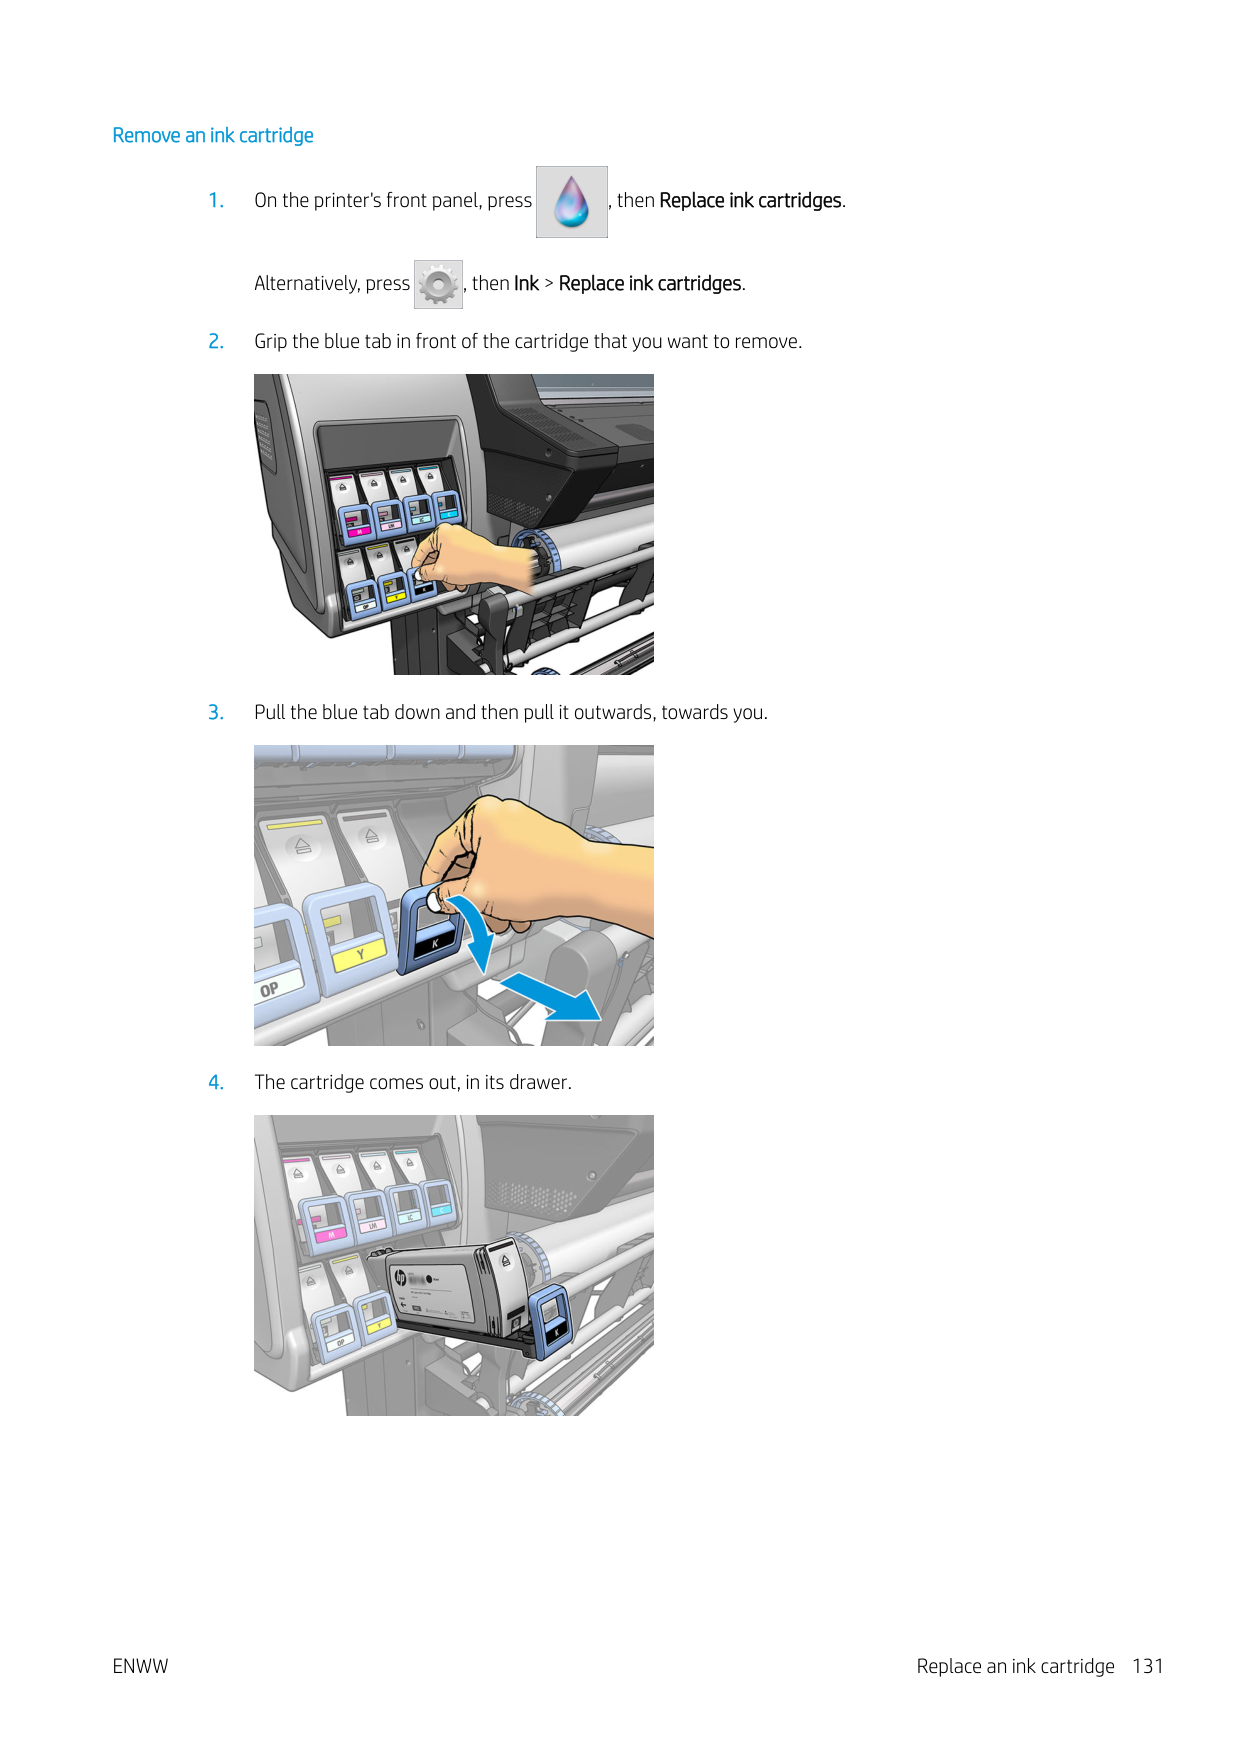


Refilled and non-HP ink cartridges HP recommends that you replace an empty cartridge with a new HP cartridge. The use of refilled or non-HP ink cartridges has several disadvantages:
If you decide to use refilled or non-HP ink cartridges, you will need to follow these instructions to make the printer use a cartridge that it believes to be empty.
CAUTION: Running completely out of ink can damage the printheads. Damage attributable to printing with empty ink cartridges is not covered under the warranty. Forcing the printer to accept empty cartridges will empty the ink delivery system as well. Once emptied, ink must be used to refill the system and reprime the printhead when a new ink cartridge is installed.

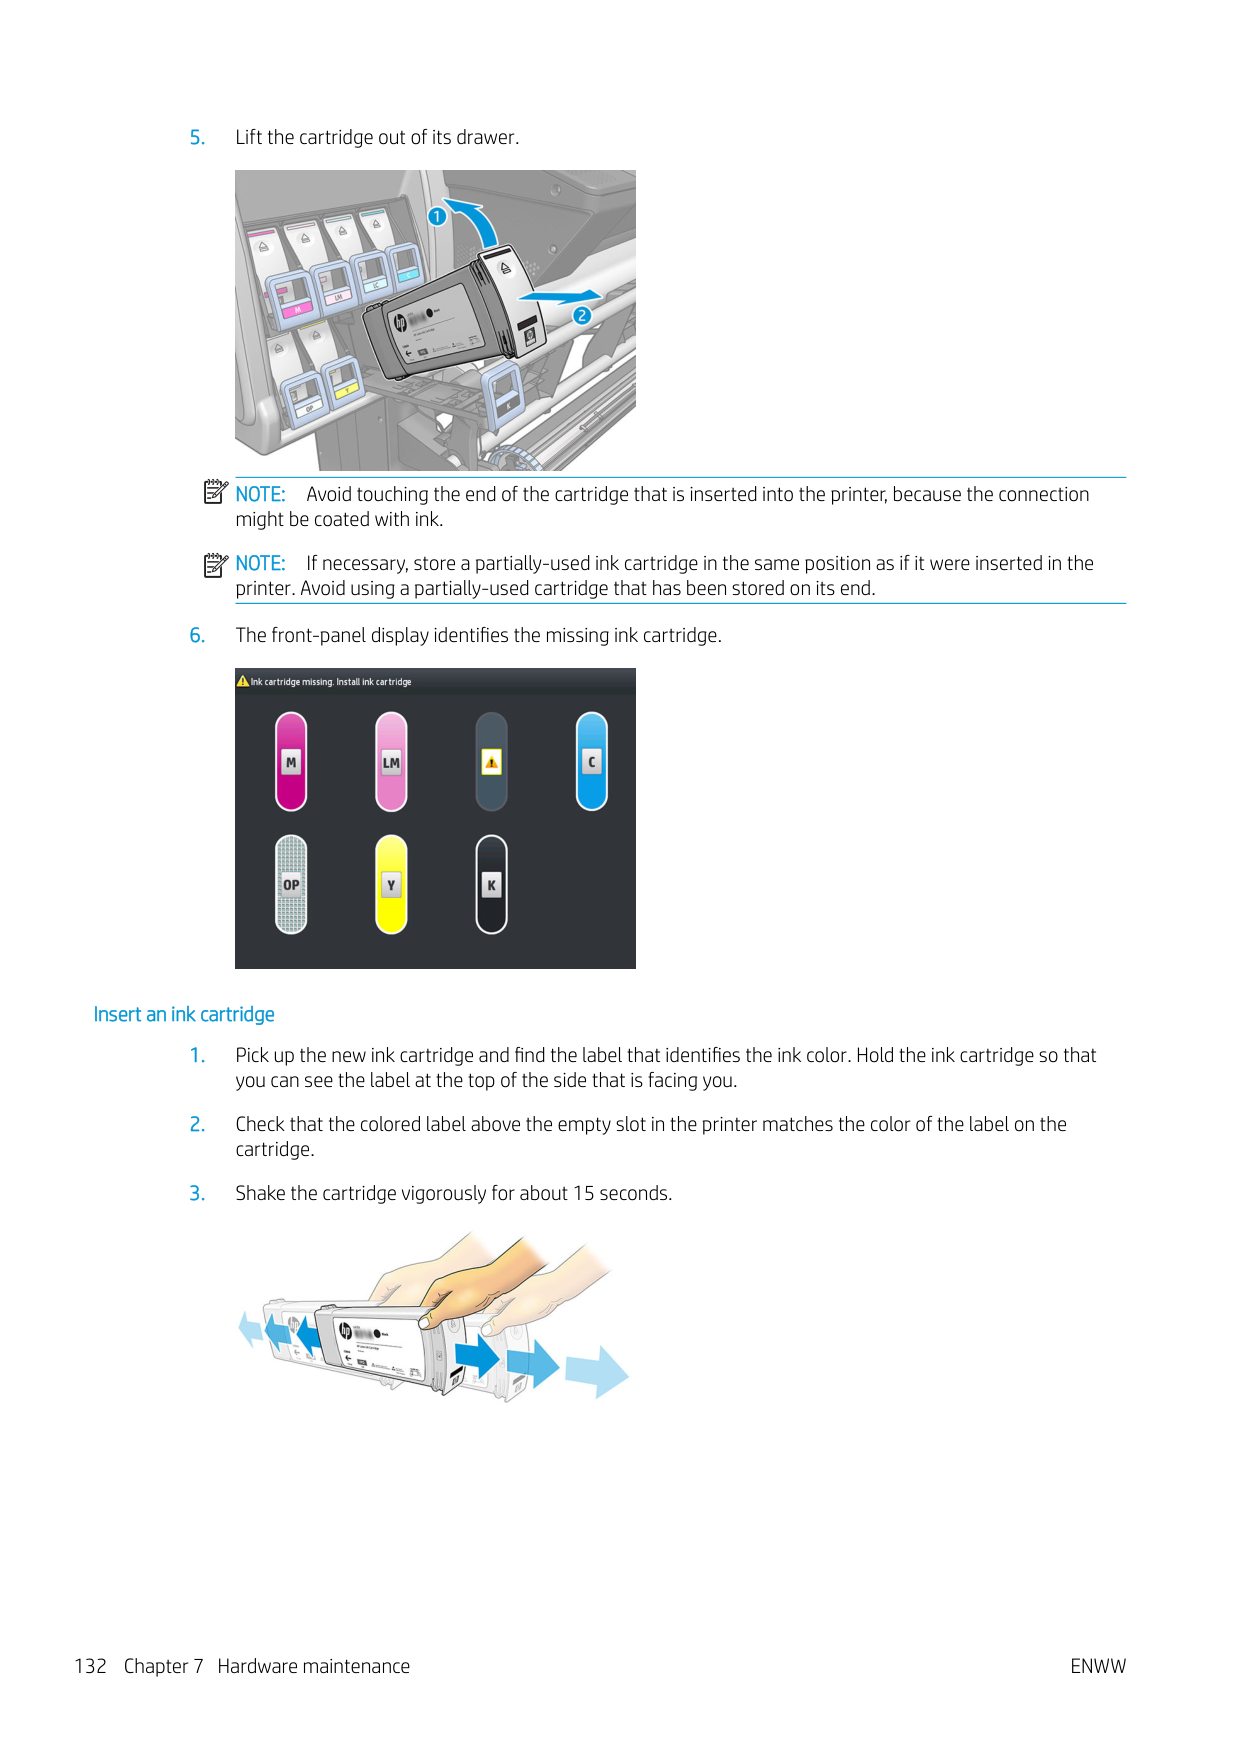


are not illuminated; but, if you press them successfully, the front panel displays a series of warning messages. In response to each message, press Cancel to cancel the process, or OK to confirm that you wish to continue.
Cannot insert an ink cartridge
CAUTION: Never clean inside the ink cartridge slots.
Clean (recover) the printheads

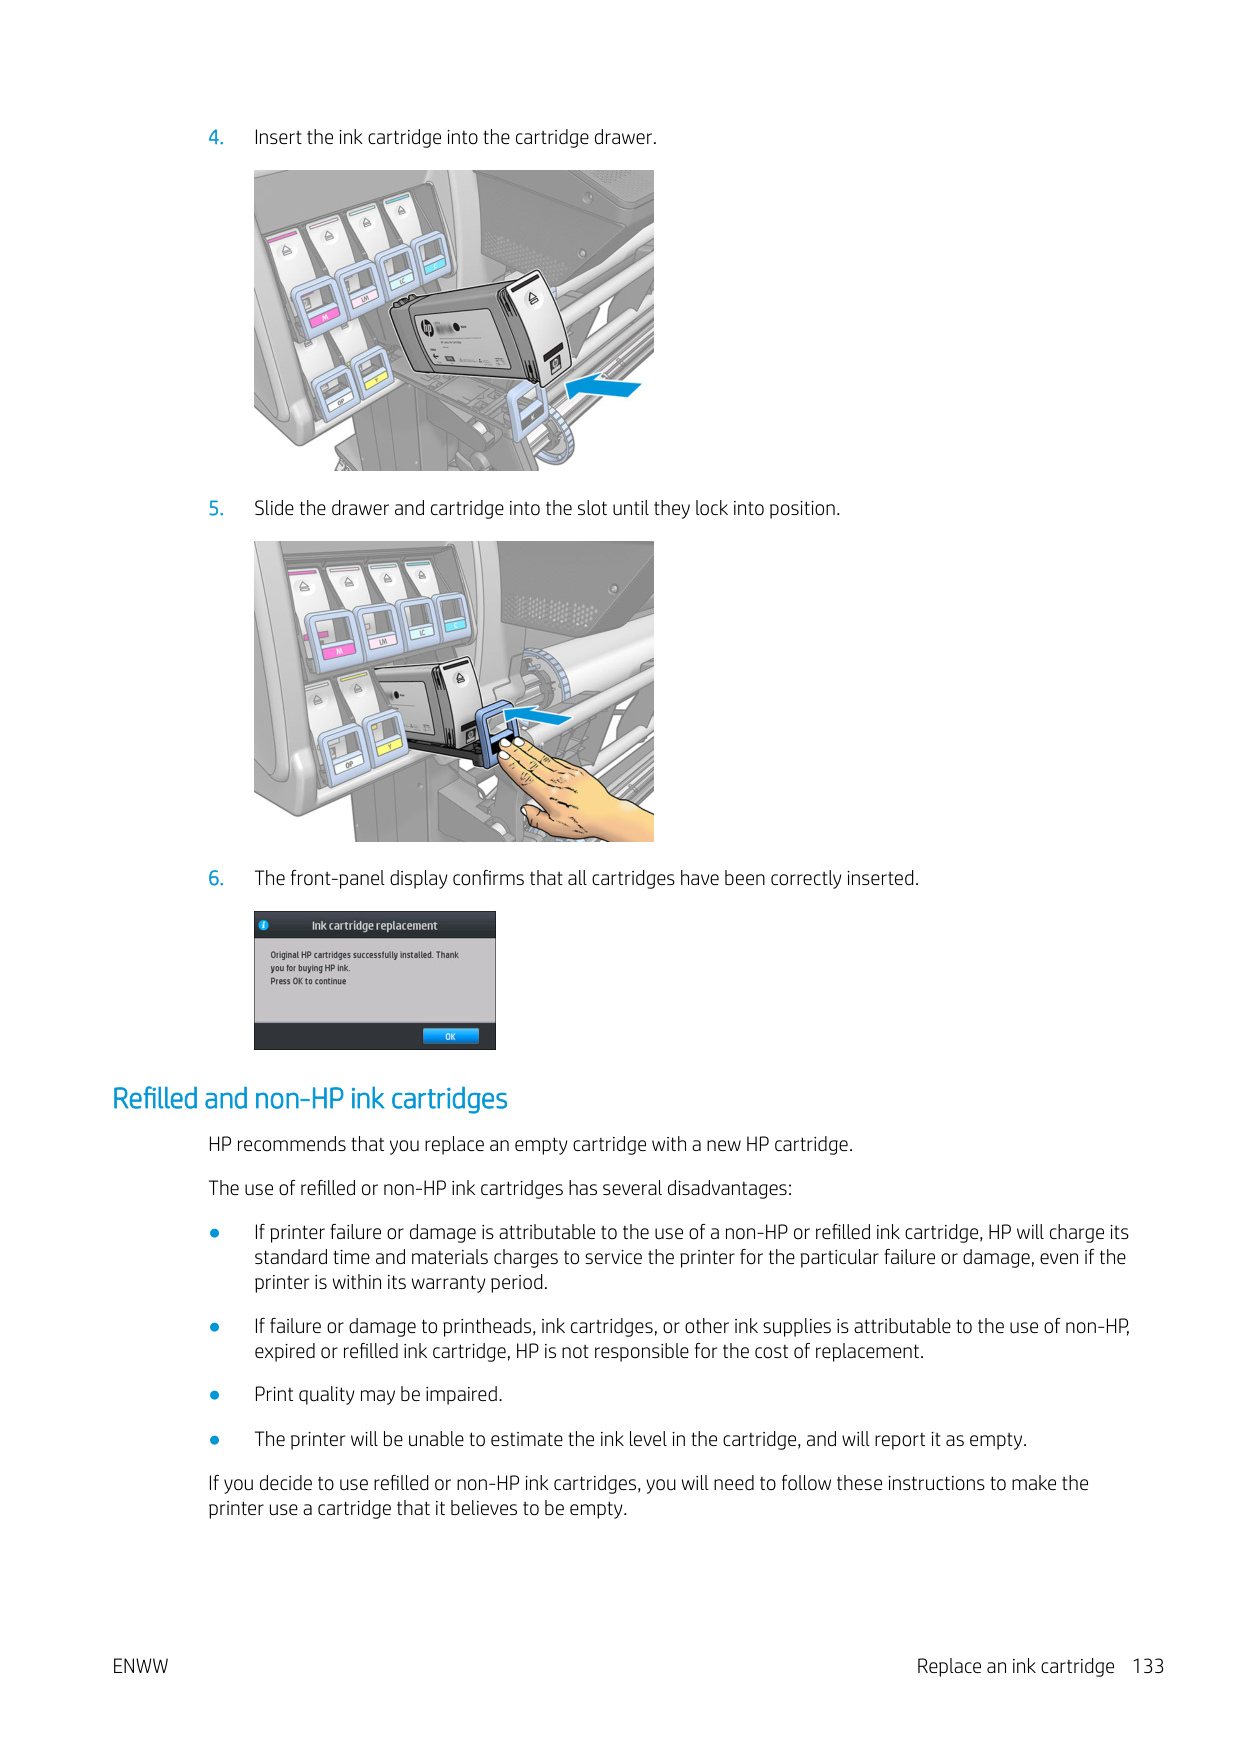
Periodic printhead cleaning is performed automatically, as long as the printer is kept turned on. However, you should clean the printheads if you are experiencing poor print quality and cannot resolve the issues by other methods. This ensures that there is fresh ink in the nozzles and helps to prevents nozzle clogs.
If you have printed the printhead status plot (see 1. Printhead status plot on page 109), you know which colors are failing. Clean any printhead that is not performing adequately. If you are not sure which printheads to clean, clean all of the printheads.
| | |---|
NOTE: A small number of blocked nozzles are unlikely to have any visible effect on your prints, as the printer has been designed to compensate for this problem during multi-pass printing. To clean the printheads (which often enables them to recover from problems), go to the printer's front panel and press , then Image-quality maintenance > Clean printheads, then select which printheads you want to clean. You can clean all of the printheads or only some of them. Select from the following options:

| | |---|
Align the printheads
The printer performs printhead alignment whenever printheads are replaced. If no substrate is loaded when a printhead is replaced, the printer will perform the alignment the next time you load substrate.
You may also be recommended to align the printheads to solve a print-quality problem.
#### Automatic alignment
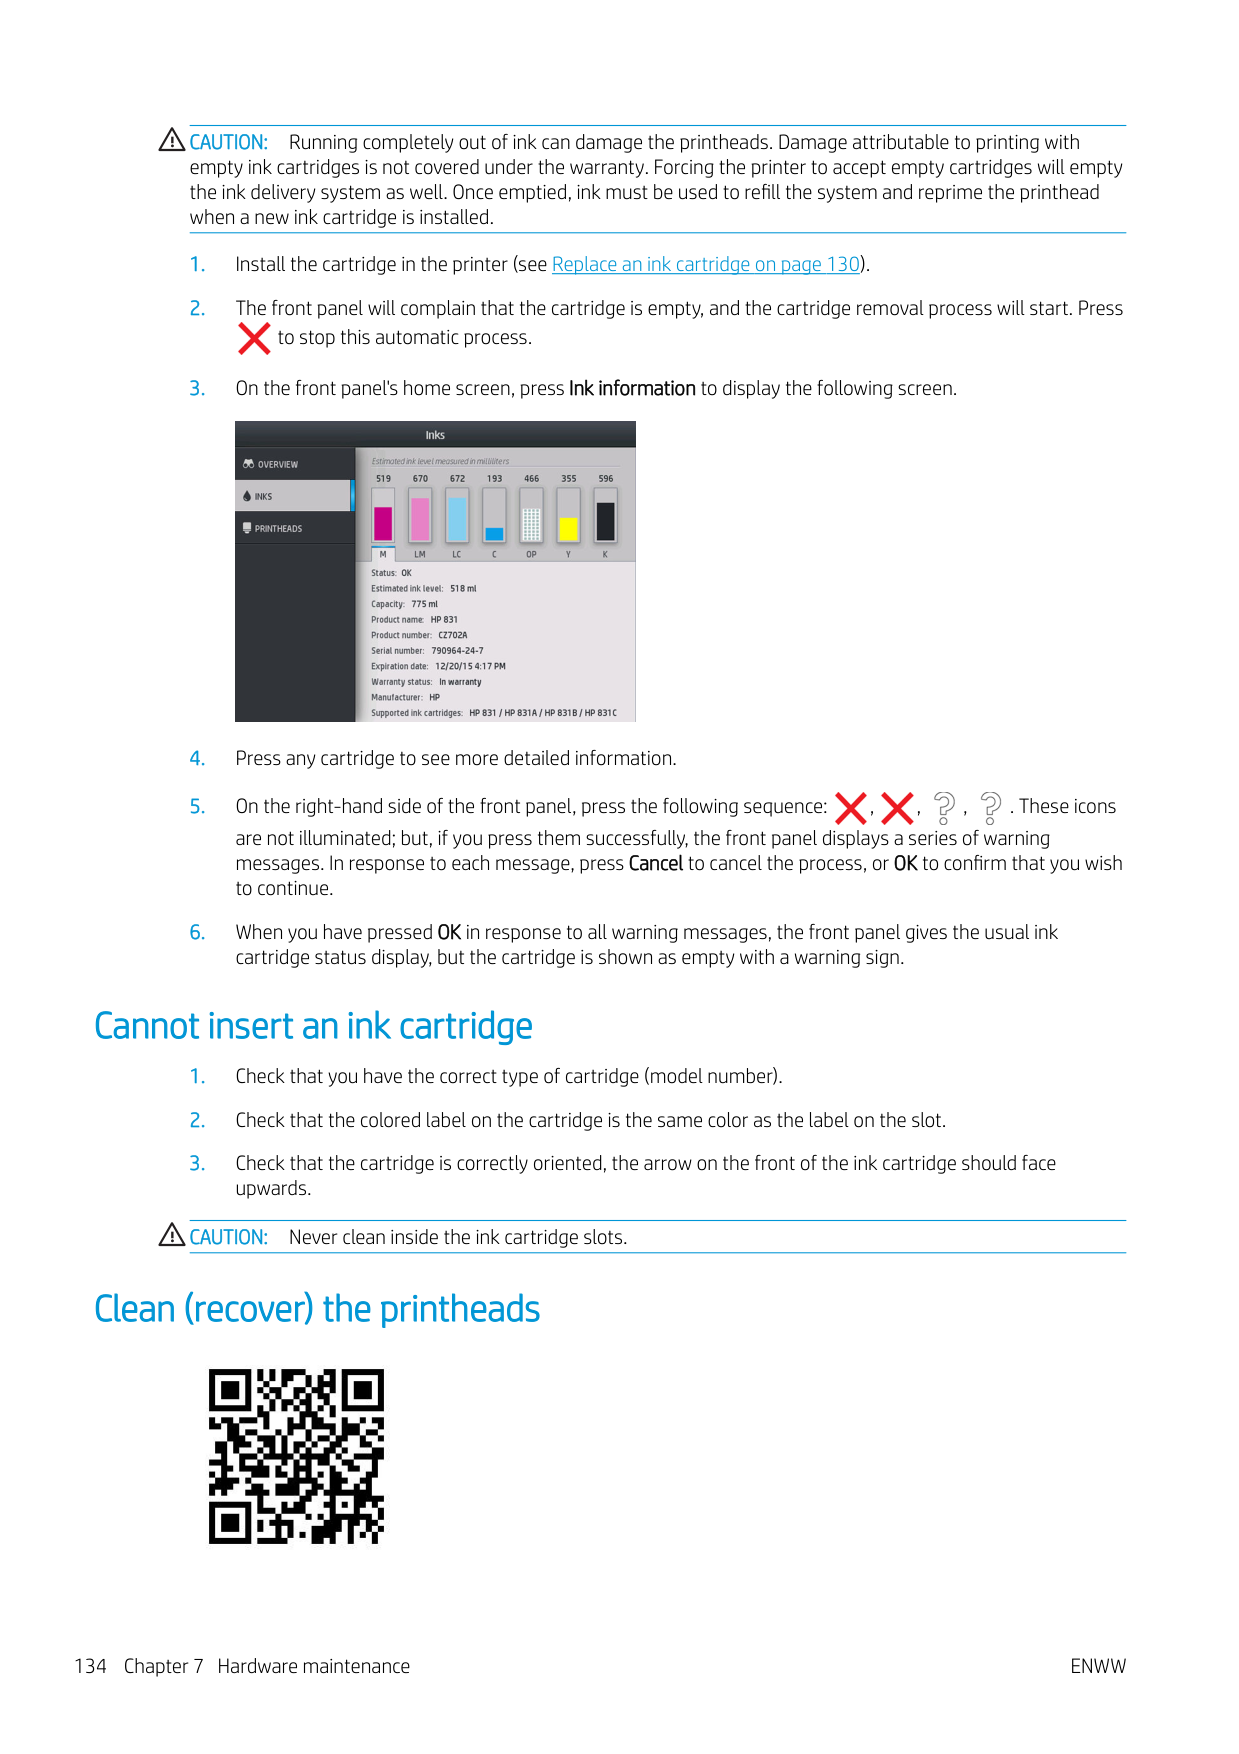
First make sure that you have a roll of opaque, white substrate loaded in the printer. Colored substrates, glossy canvas, coarse textiles, and transparent materials such as translucent bond, clear film, tracing substrate and vellum are not suitable for automatic printhead alignment. For these substrates, you should align the printheads manually (see Manual alignment on page 136) or perform the automatic alignment on a supported substrate first, then change to the special substrate. Alignment settings are retained through substrate changes until a new printhead alignment is performed.
The HP Latex Optimizer can be aligned only on certain substrates such as self-adhesive vinyl. The pattern varies according to the substrate.
To request printhead alignment from the front panel (if the alignment is not performed automatically), press , then Image-quality maintenance > Align printheads > Auto printhead alignment.

To request printhead alignment from the Embedded Web Server, select the Setup tab, then select Printhead alignment > Automatic printhead alignment > Print.
The process takes about 10 minutes and starts immediately, unless an image is currently being printed. If a print job is in progress, the alignment will be done as soon as the current print job is finished.
ENWW Align the printheads 135
Manual alignment To request a manual printhead alignment from the front panel, press , then Image-quality maintenance > Align printheads > Manual printhead alignment > Print alignment pattern. To request manual printhead alignment from the Embedded Web Server, select the Setup tab, then select Printhead alignment > Manual printhead alignment > Print.


The printer prints 16 rows labelled from A to P. Inspect the print and write down the number of the straightest line in each row (for example, A:9).
Patterns A and B are used to align the HP Latex Optimizer. These will be visible only on certain substrates, such as self-adhesive vinyl. If the best alignment pattern cannot be determined, the default value of 10 should be used.
Detail of pattern A

Detail of pattern B

When you have made notes on each row, enter the correction values into the front panel or the Embedded Web Server.

To enter the correction values in the front panel, press , then Image-quality maintenance > Align printheads > Manual printhead alignment > Enter correction values. Enter each value into the window labelled with the same letter as the corresponding pattern.
To enter the correction values in the Embedded Web Server, select the Setup tab, then select Printhead alignment > Manual printhead alignment, and enter each value into the window labelled with the same letter as the corresponding pattern.
Front panel recommends reseating or replacing a printhead
Replace a printhead

###### Remove a printhead

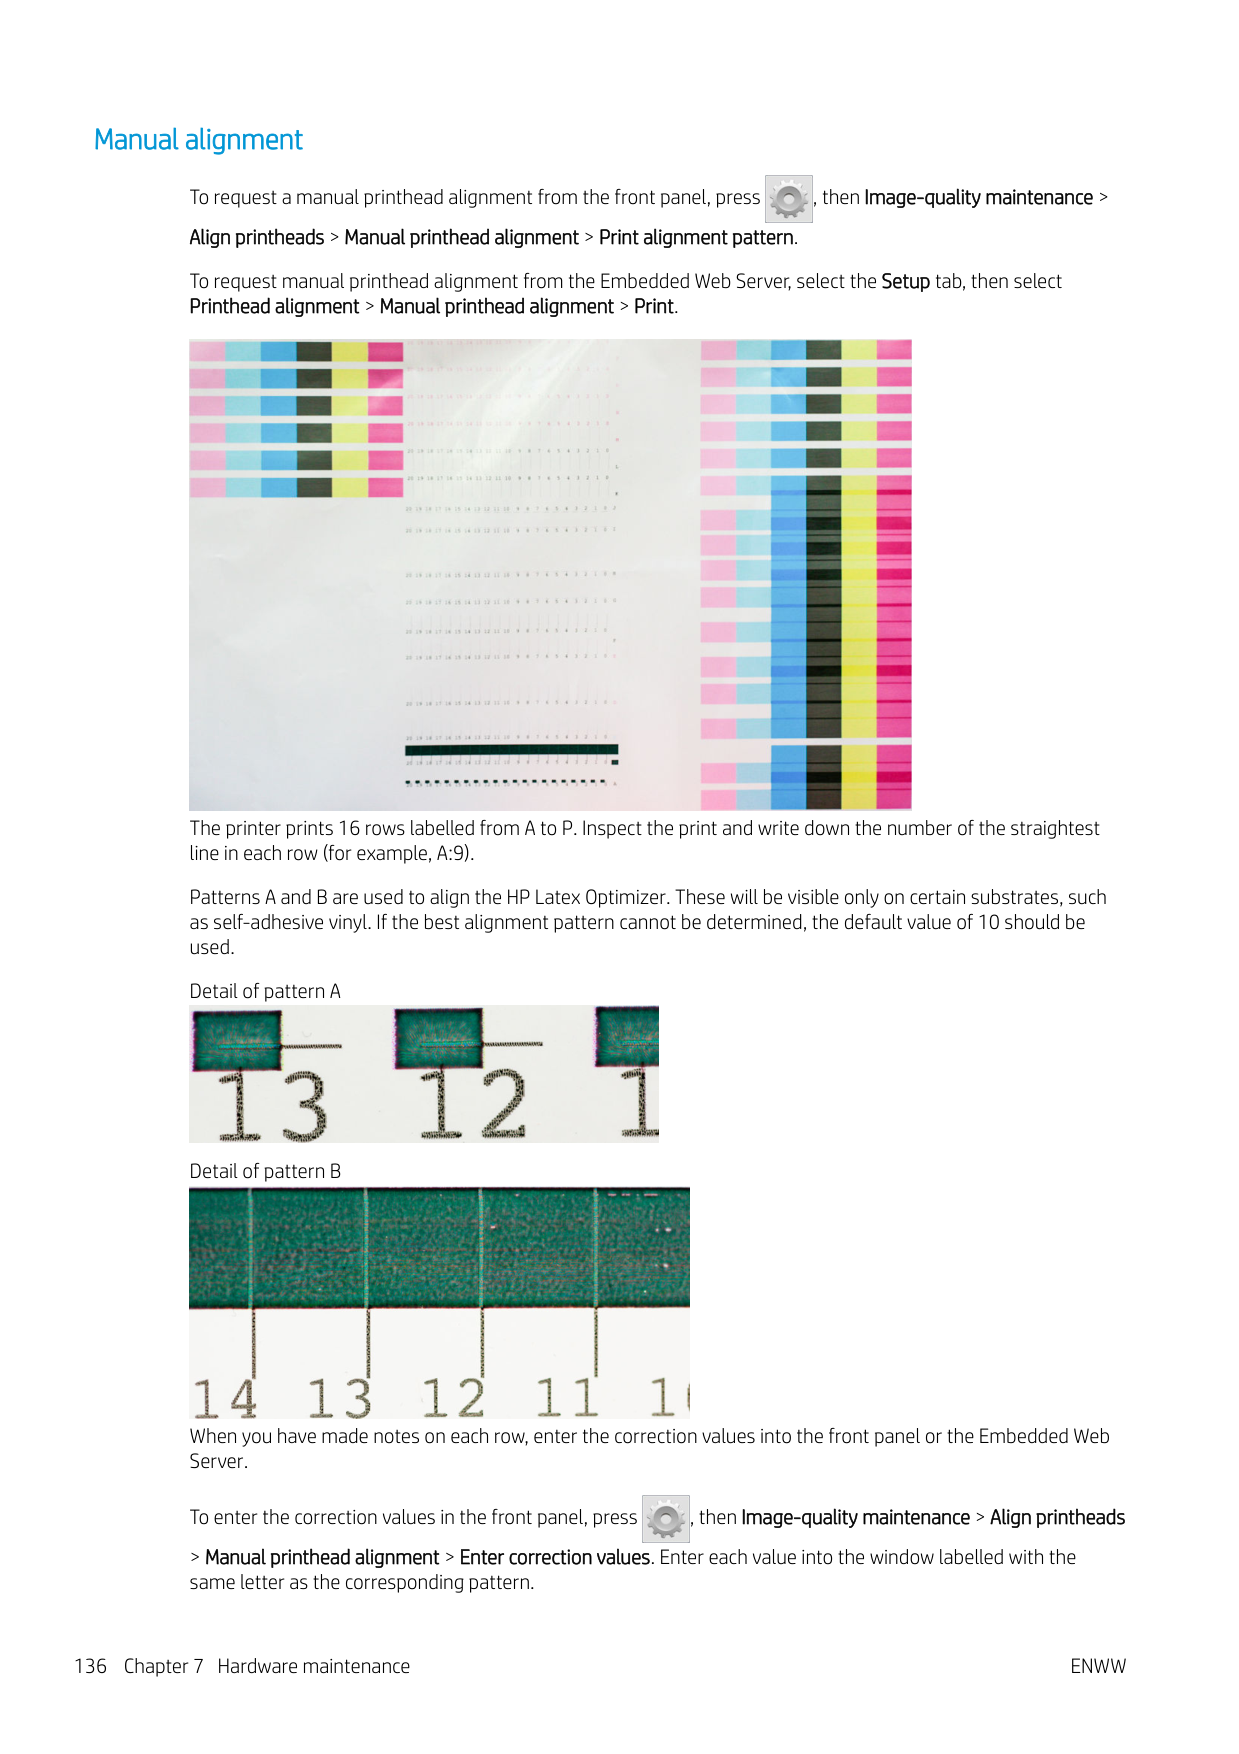
CAUTION: If the carriage remains in the removal position for more than 3 minutes without inserting or removing any printheads, it will attempt to return back to its home position to the right.
CAUTION: Observe precautions when handling printheads because they are ESD-sensitive devices. Avoid touching pins, leads, or circuitry.

ENWW Front panel recommends reseating or replacing a printhead 137
####### 4. Locate the carriage on the right side of the printer.

CAUTION: Avoid touching the printer's curing enclosure, which may be hot.
####### 5. Pull up and release the latch on top of the carriage.

####### 6. Lift up the cover. This provides access to the printheads.


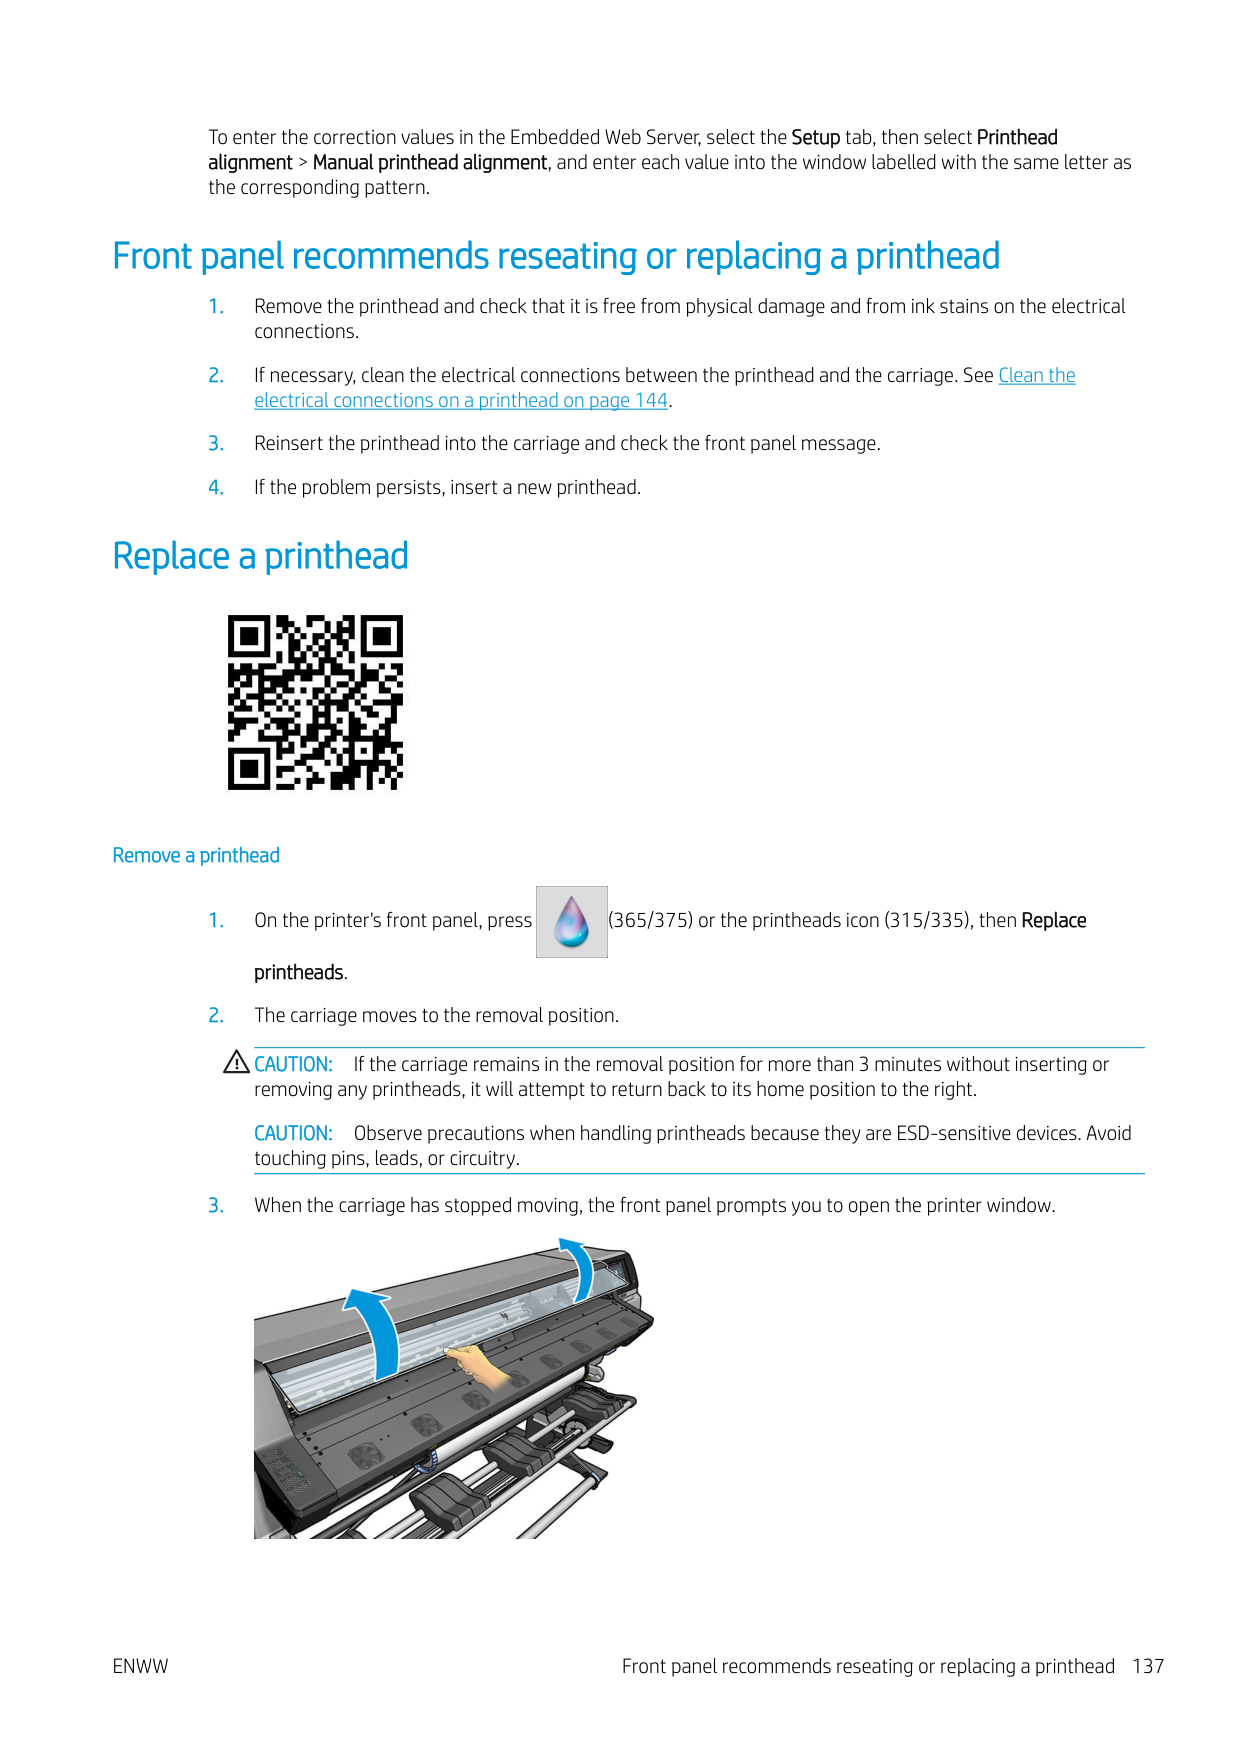


CAUTION: If you want to preserve the old printhead for later use, reinstall the cap and plug, but never install a clear optimizer cap or white plug on a non-optimizer printhead. Optimizer printheads have clear caps and white plugs, while the other printheads have orange caps and plugs. Installing the wrong cap and plug can cause irrecoverable printhead damage.

###### Insert a printhead
| | |---|
NOTE: Be careful not to strike the printhead against anything while shaking it, because this could cause damage.


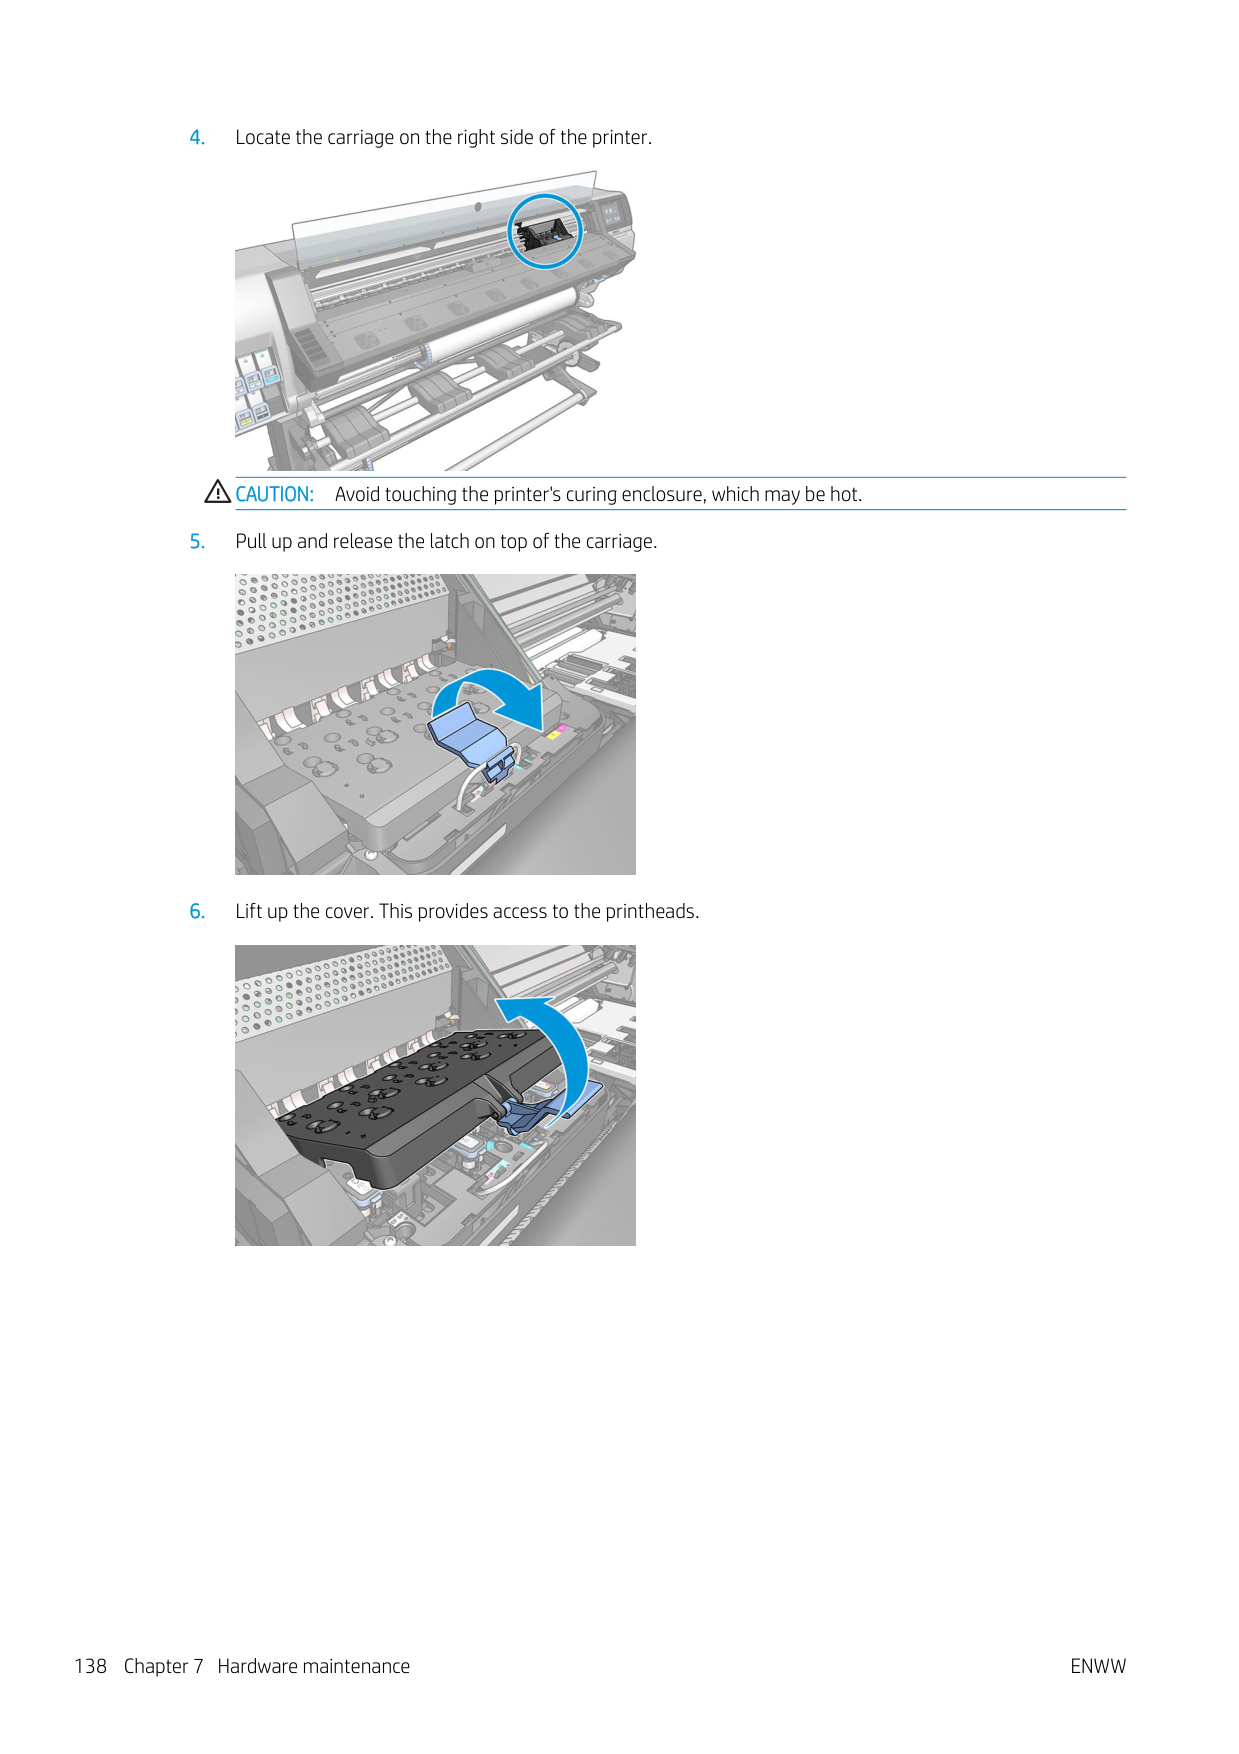
NOTE: The optimizer protective caps are white or transparent.

| | |---|
CAUTION: Insert the printhead slowly and vertically, straight down. It can be damaged if you insert it too quickly, or at an angle, or if you rotate it as you insert it.

####### 5. Push down as indicated by the arrow.

CAUTION: You might feel some resistance when installing the new printhead, so you need to press it down firmly but smoothly. You should hear a beep and see confirmation on the front-panel display that the printhead has been inserted.
####### 6. Insert all of the other printheads that need to be installed, and close the carriage cover.

####### 7. Make sure that the end of the latch catches the wire loop on the near side of the carriage.

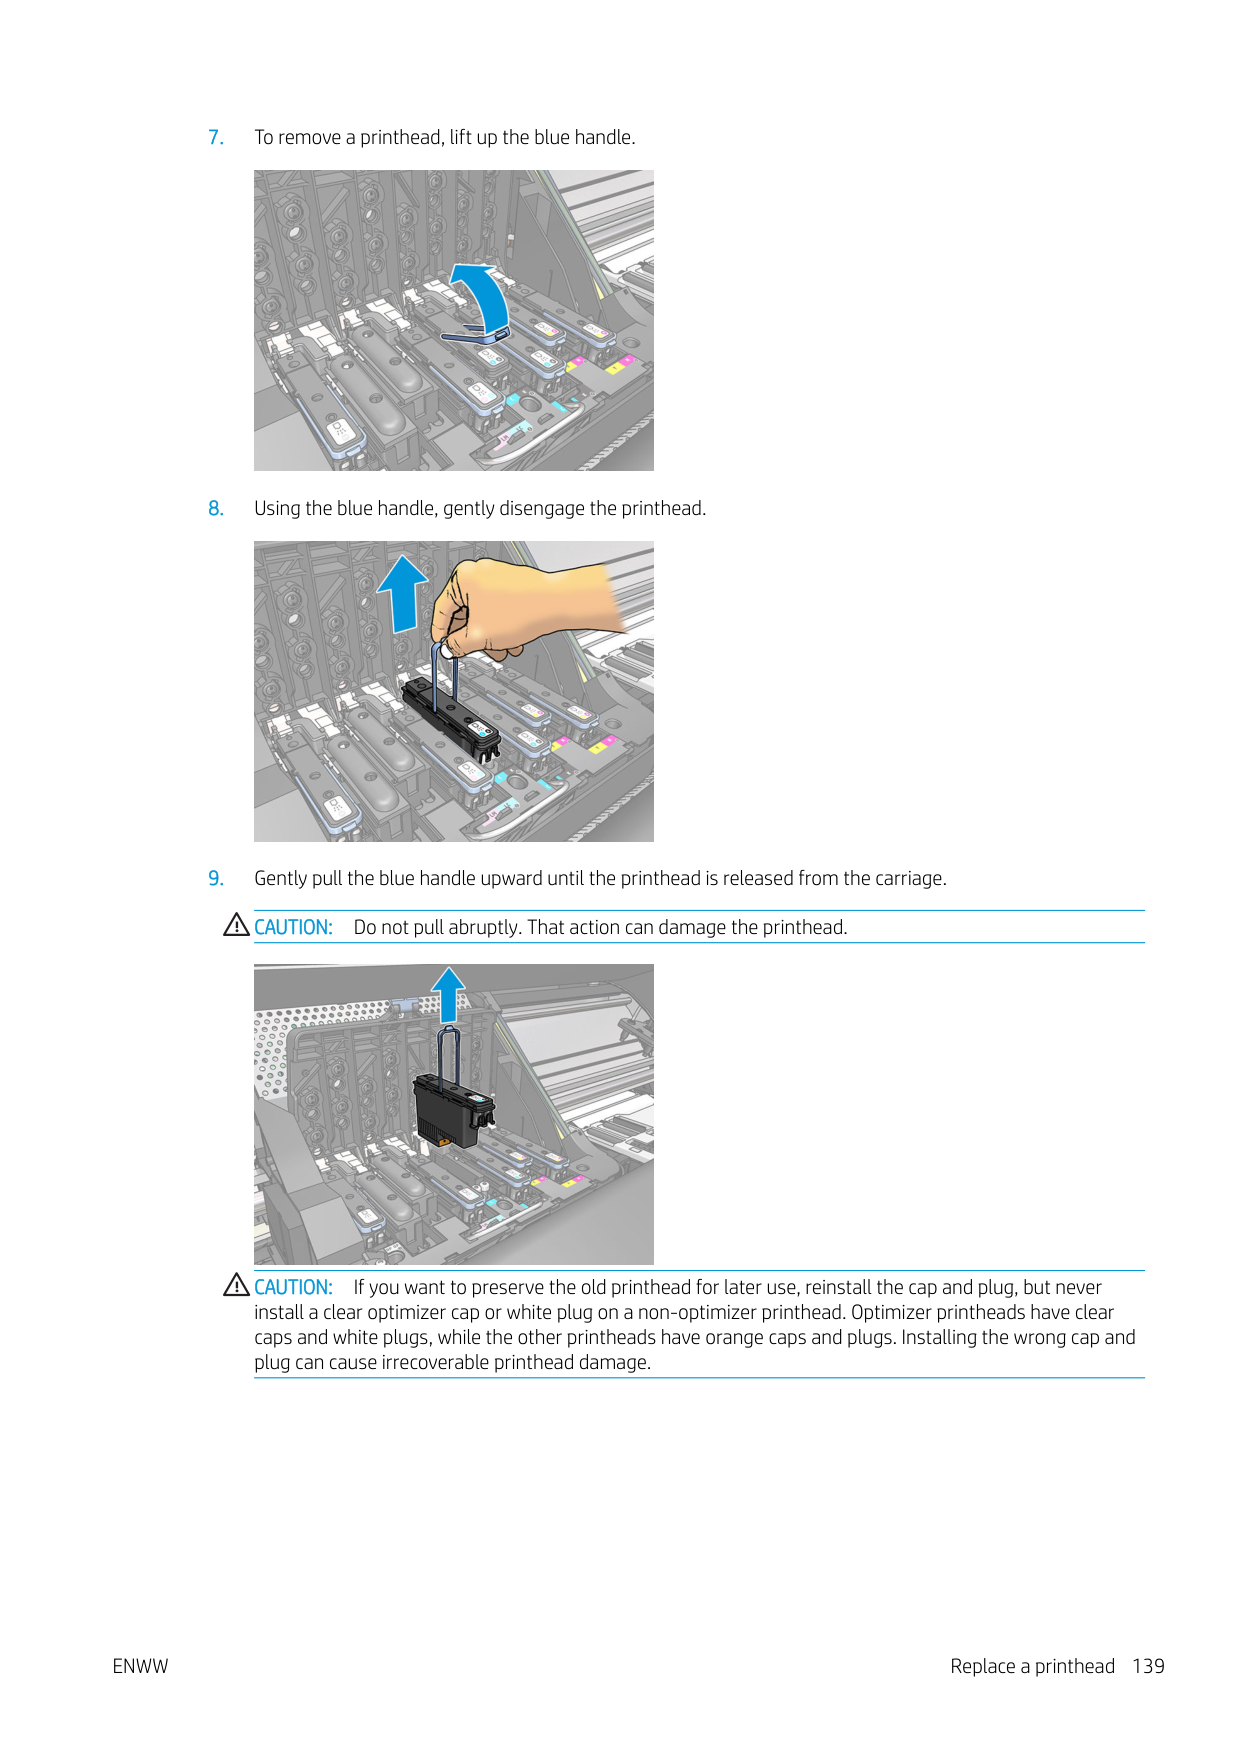

When all of the printheads have been inserted correctly and the printer has accepted them, the printer beeps.
NOTE: If the printer does not beep when you insert the printhead and the Replace message appears on the front-panel display, you might need to reinsert the printhead.

| | |---|
Cannot insert a printhead
| | |---|
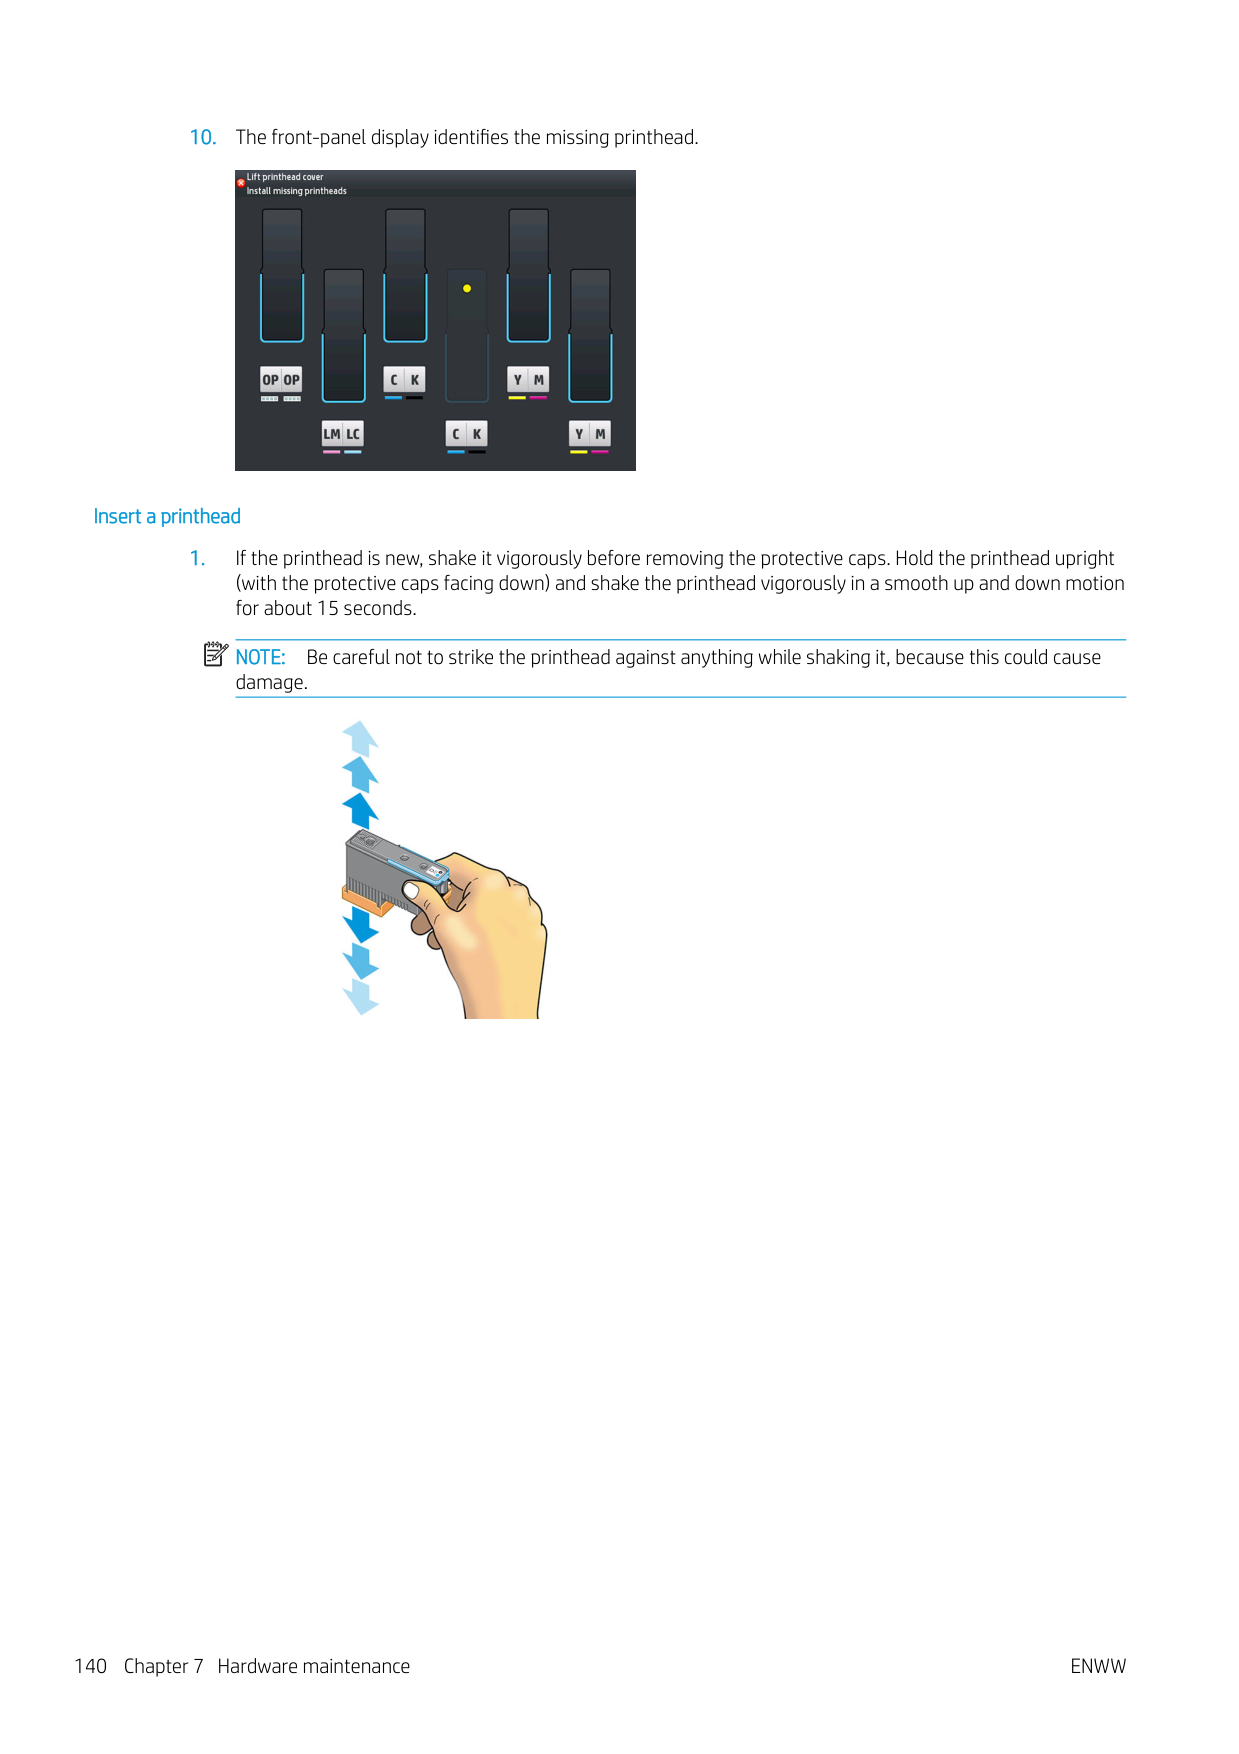
ENWW Cannot insert a printhead 143
Clean the electrical connections on a printhead
It is possible that the printer will not recognize a printhead after it has been installed. This can happen when ink builds up on the electrical connections between the printhead and the printhead carriage. Under these circumstances, HP recommends that you clean the electrical connections on the printhead. However, routine cleaning of the connections when no problems are apparent is not recommended.
A carriage interconnect wiper is included with your printer in the User Maintenance Kit.

Use this to clean the electrical interconnects on both the printhead carriage and the printhead if the Reseat or Replace message persists next to the printhead on the front-panel display.
TIP: You are recommended to wear gloves.


A supply of sponges is included in the box with the wiper. If all sponges have been used, more can be obtained by calling your service representative.
####### 2. Open the carriage interconnect wiper.

####### 3. Load the sponge by positioning the sponge on the face of the carriage interconnect wiper with the shortertab in the locating slot.

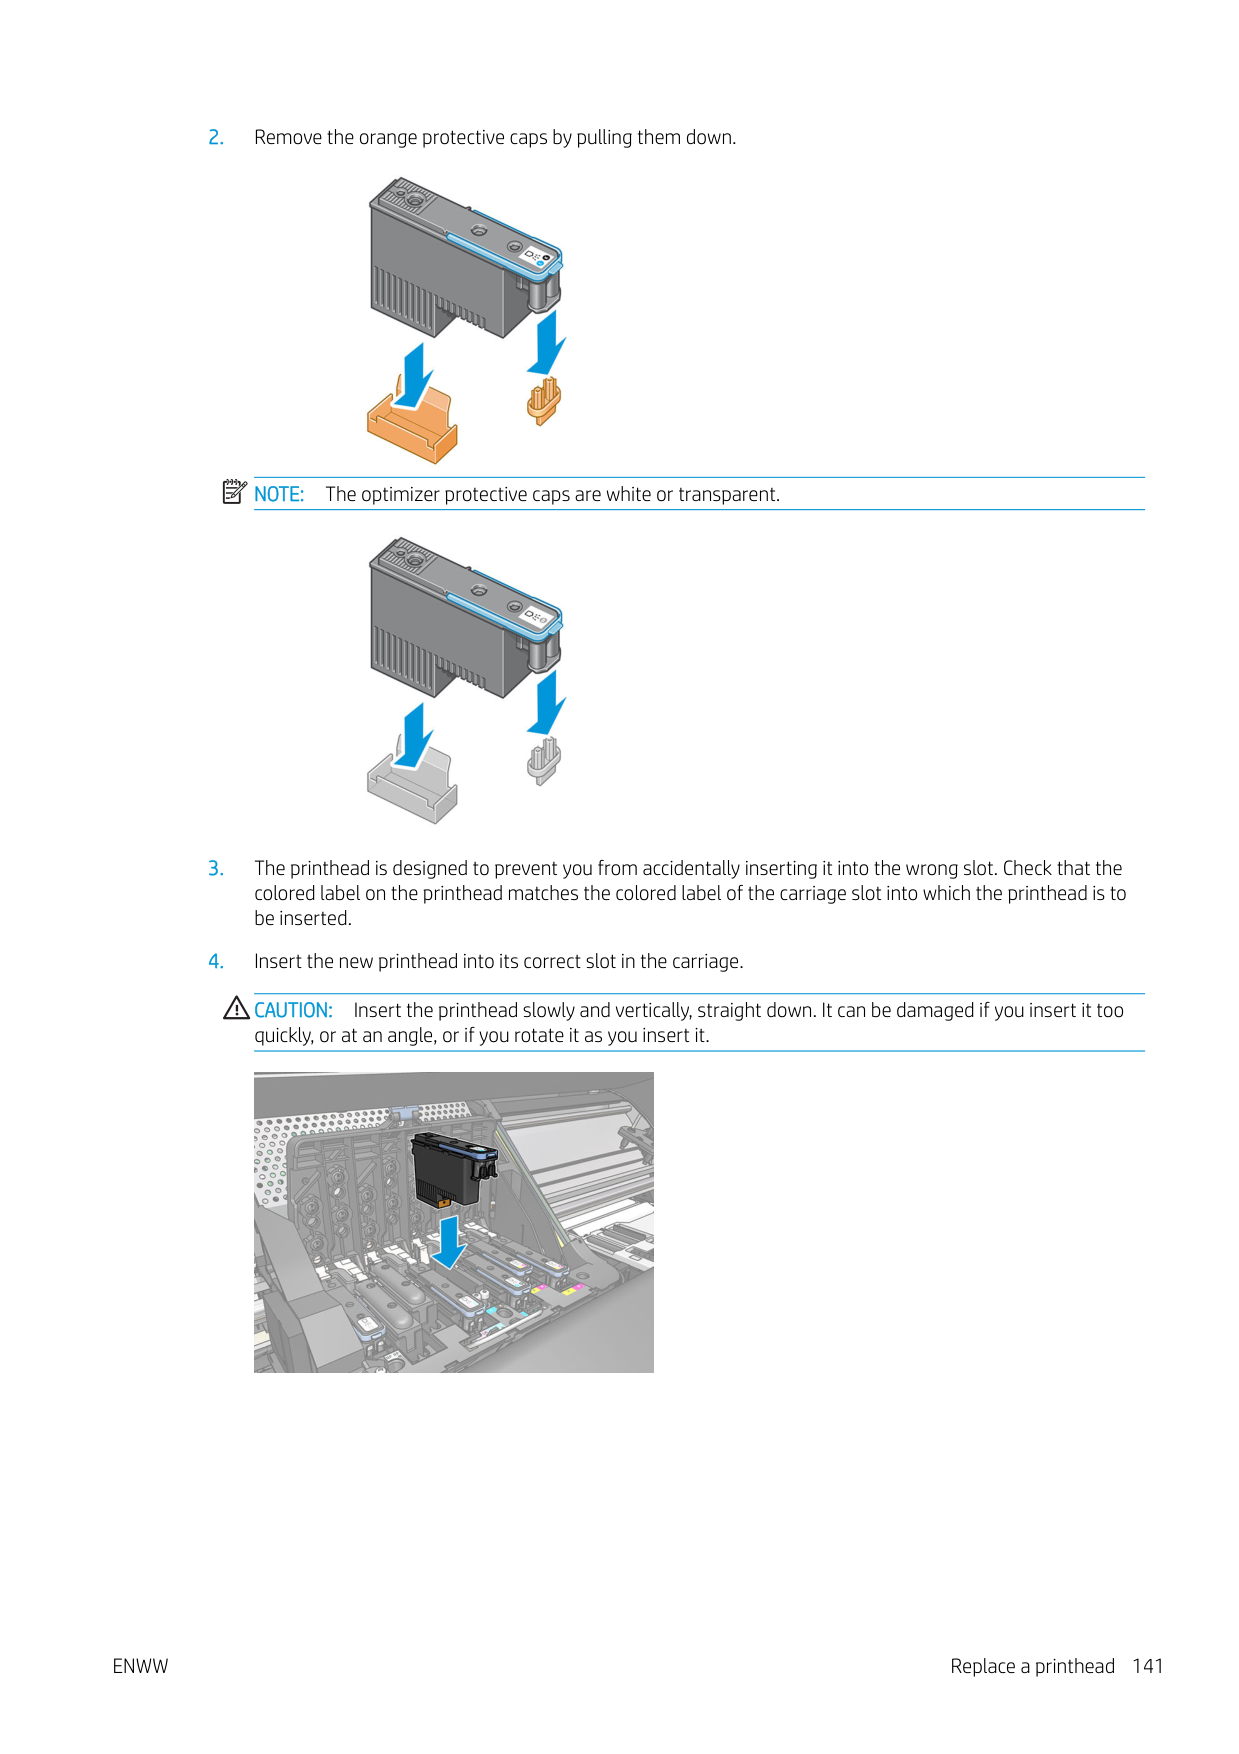
####### 4. Close the carriage interconnect wiper, trapping the sponge in place.

####### 5. Open the printhead carriage latch and extract the printhead that is causing the problem, as indicated on thefront panel. See Replace a printhead on page 137.
####### 6. Insert the carriage interconnect wiper into the printhead slot at the back. Wipe the electrical contacts byinserting the tool between the electrical connections at the back of the slot and the steel spring, with thesponge facing away from you and towards the electrical contacts. Try to avoid picking up any ink depositthat may have accumulated on the bottom surface of the slot.
CAUTION: If the carriage remains in the central part of the printer for more than 7 minutes, it attempts to return to its home position to the right.

####### 7. Rub the sponge against the contacts with a light force along the entire depth of the flex connector, insertingthe wiper as far as allowed by the mechanical stop on the tool.

####### 8. Take special care to clean all contacts thoroughly, including the ones at the lowest point of the connector.


CAUTION: Do not touch the surface of the printhead that contains the nozzles, because the nozzles are easily damaged.
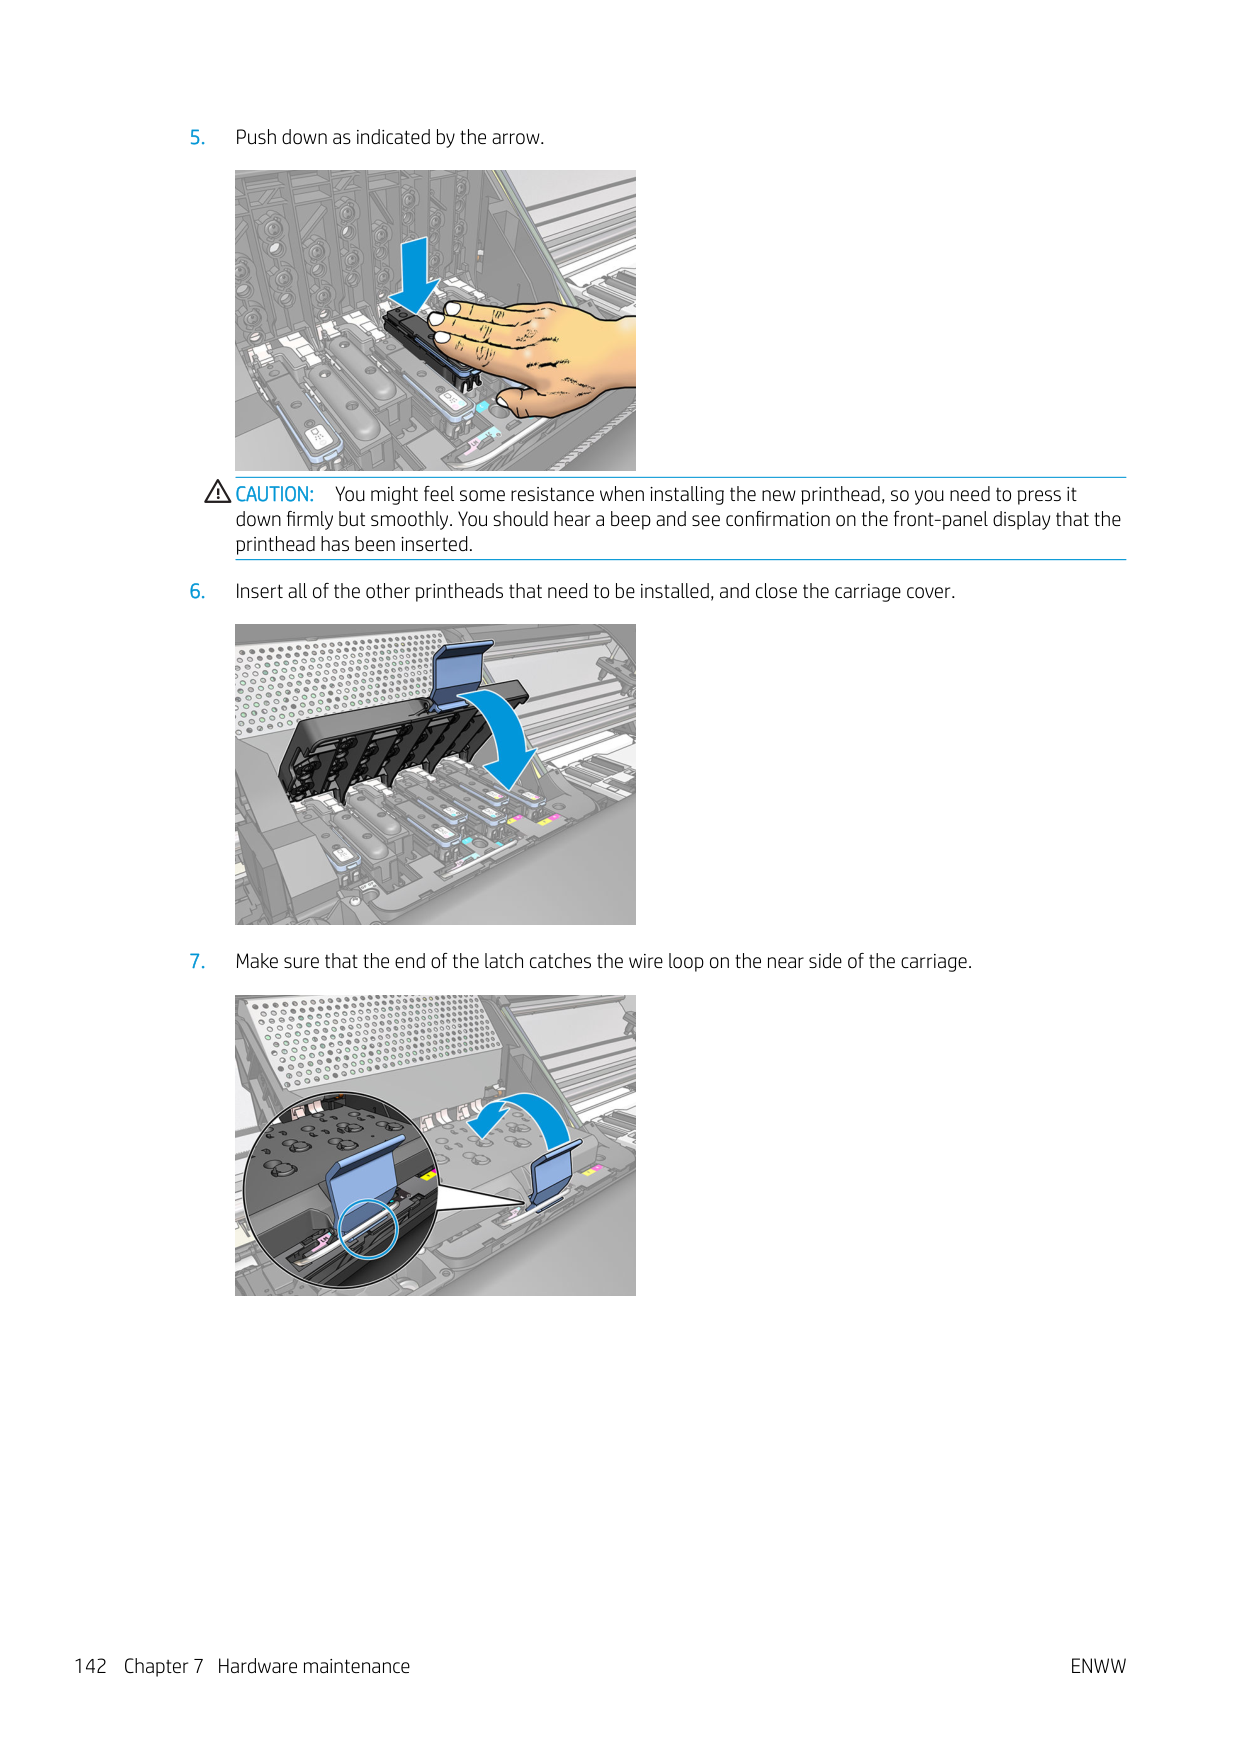


If the front panel continues to show the Reseat or Replace message, replace the printhead or call your service representative.
Replace the maintenance cartridge

You should replace the maintenance cartridge when prompted to do so by the front panel. TIP: If you want to remove and inspect the maintenance cartridge at any time, you can start the following procedure. If you put the old maintenance cartridge back into the printer after inspecting it, the procedure ends at that point.


| | |---|
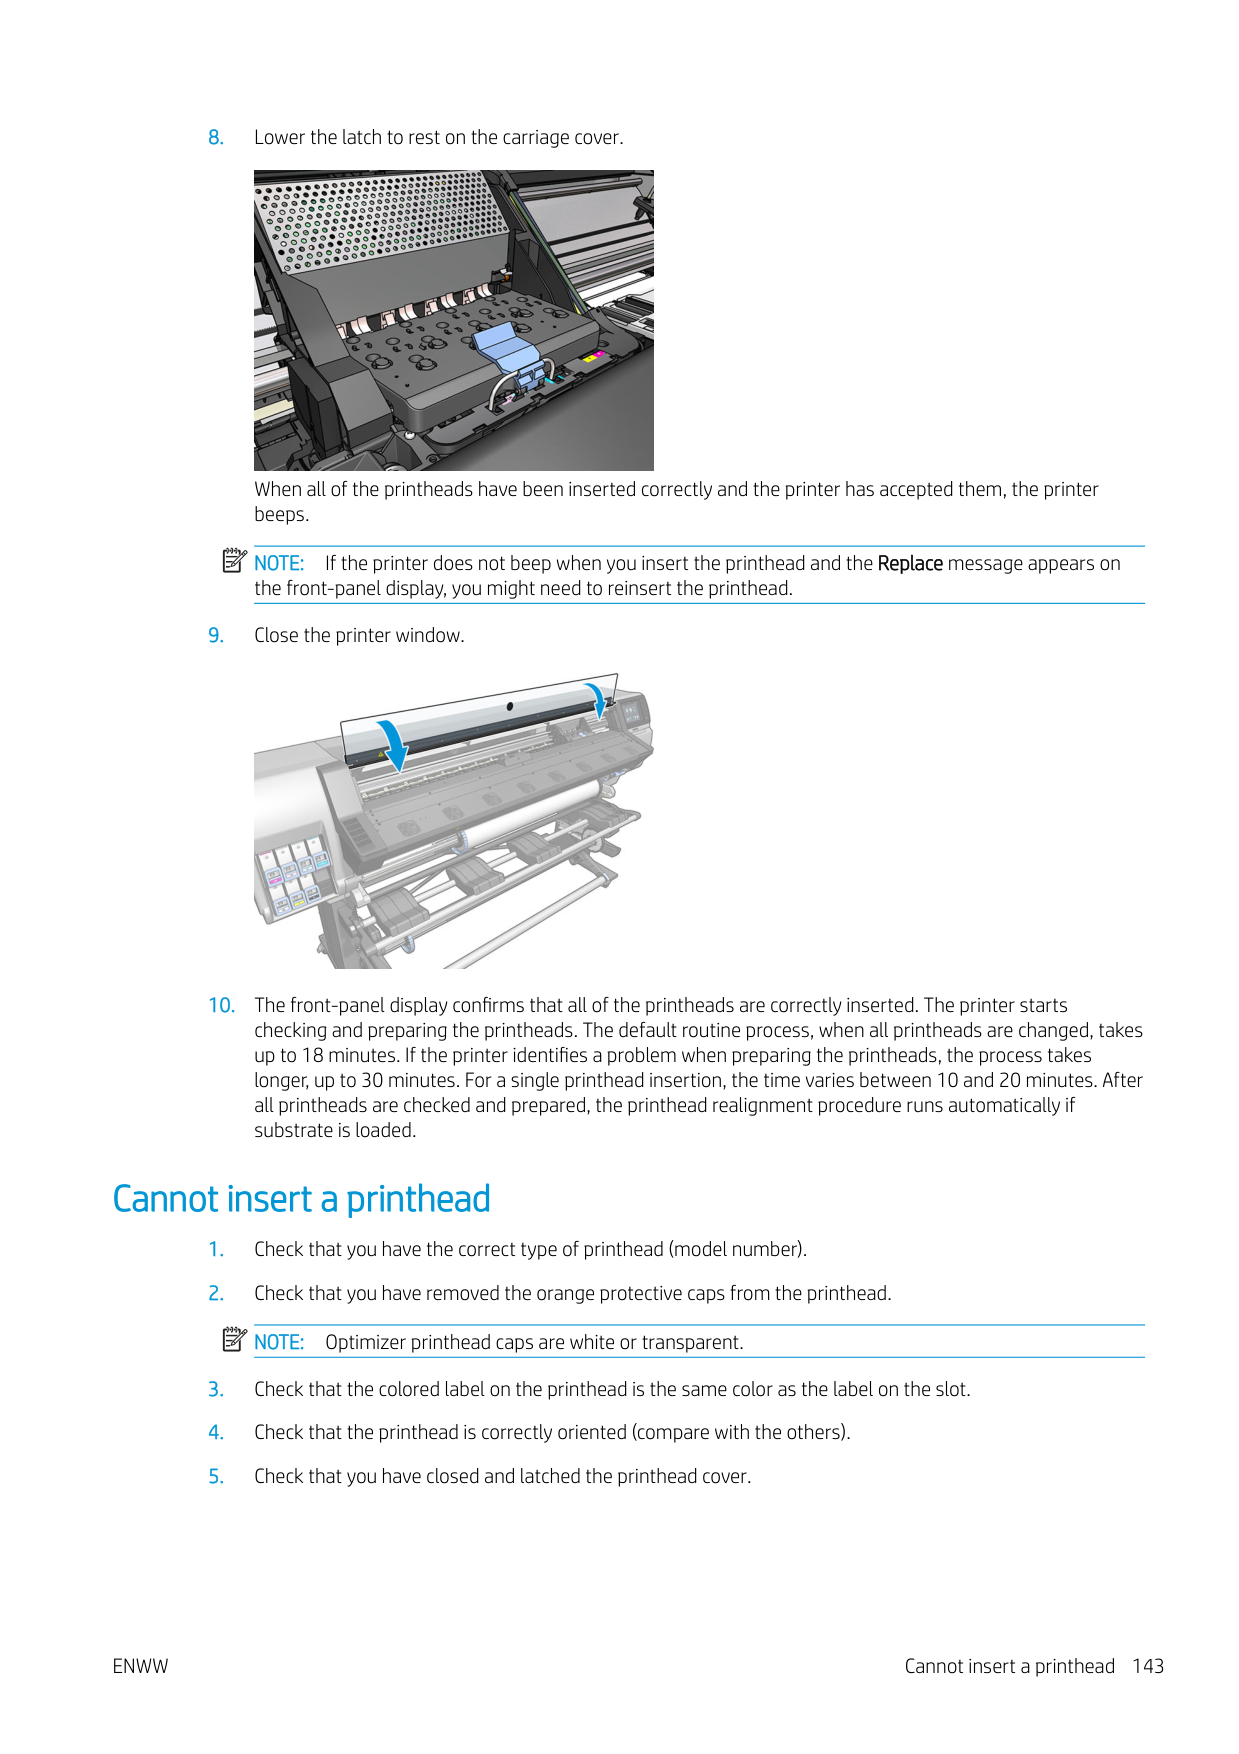

IMPORTANT: When removing a maintenance cartridge, remember that it is full of ink. Therefore:

WARNING! Make sure that the printer wheels are locked (the brake lever is pressed down) to prevent the printer from moving.

ENWW Replace the maintenance cartridge 149
####### 4. When you have slid it out partway, hold it on each side with both hands: it is heavy.
| | |---|

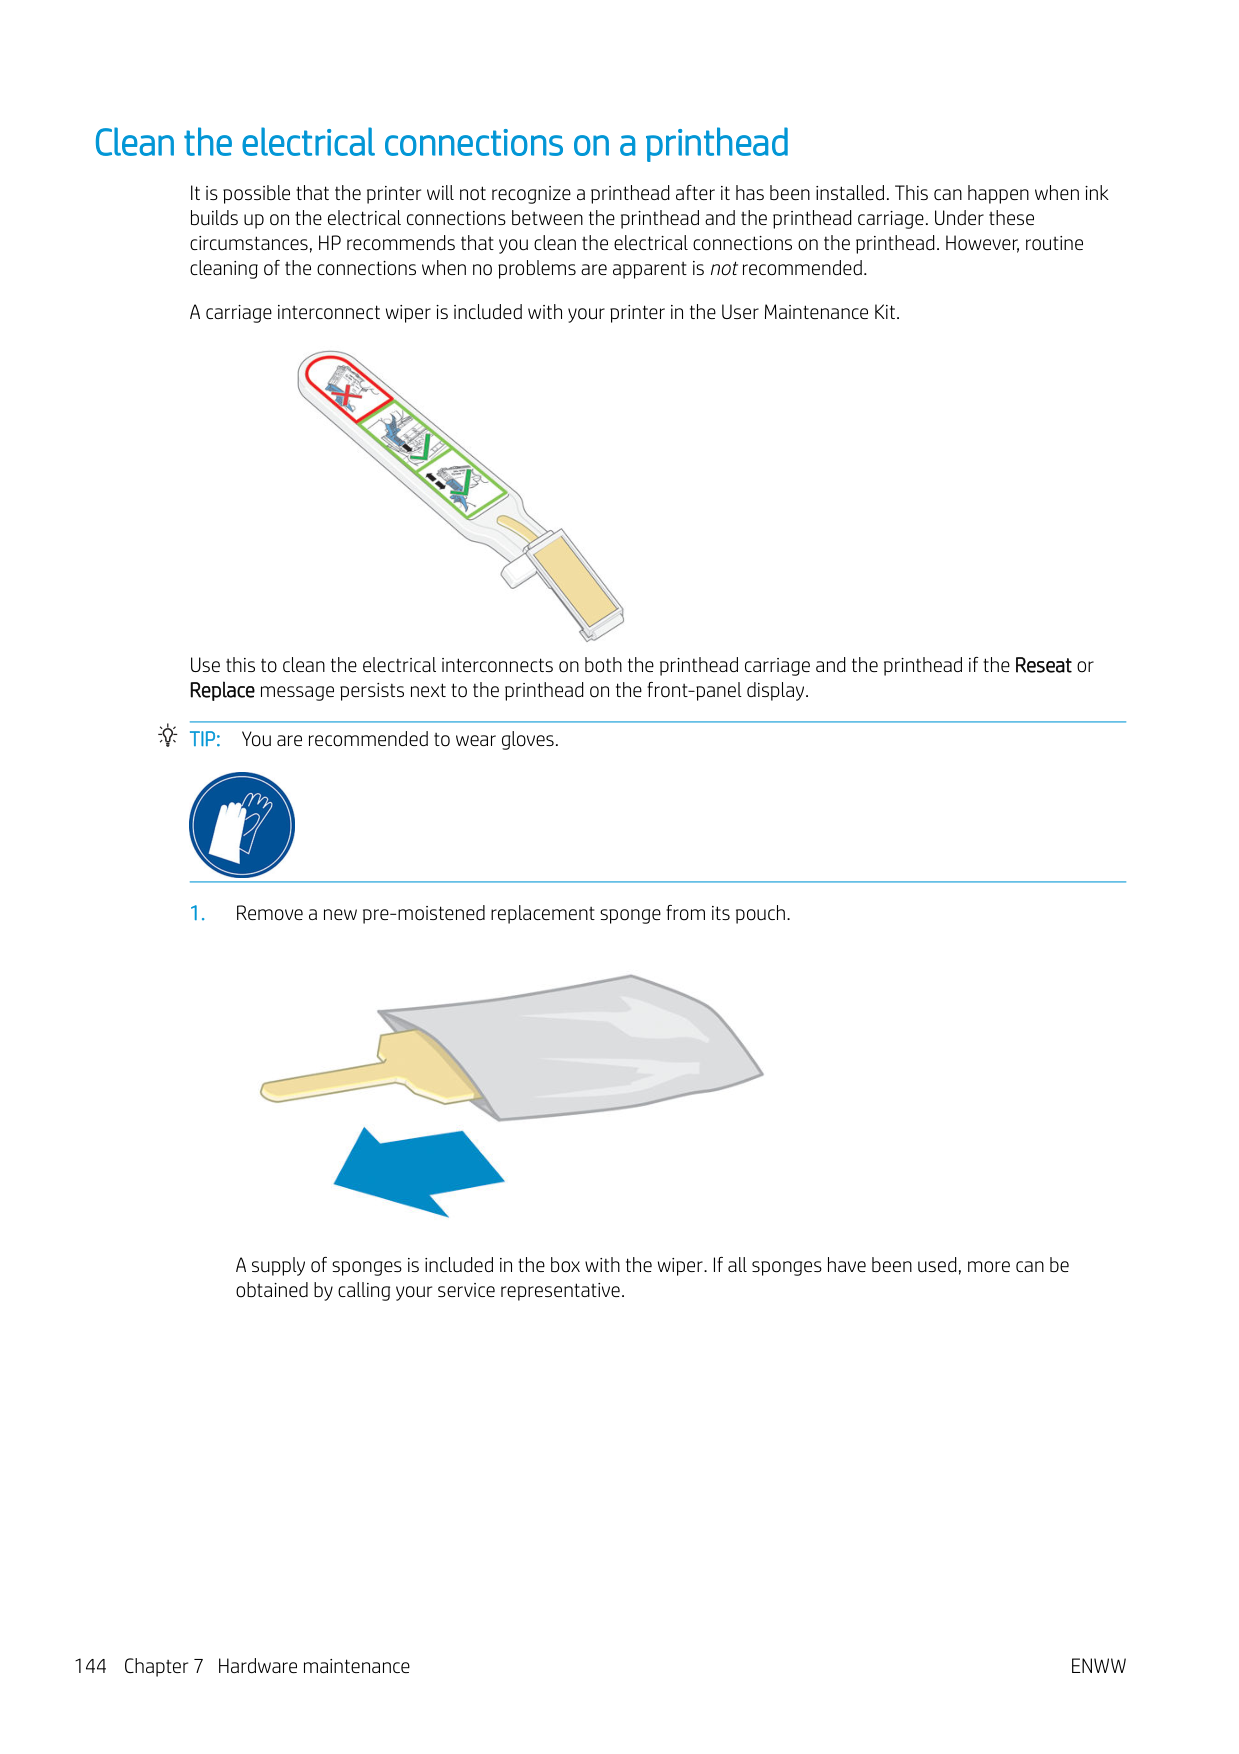
IMPORTANT: Slide it out horizontally to avoid spills, as it is full of ink.

####### 5. Remove the plastic cover from the new maintenance cartridge.

####### 6. Insert the maintenance cartridge into the slot, in the direction indicated by the arrow.

| | |---|

| | |---|
NOTE: Before it can resume printing, the printer needs all the ink cartridges, printheads, and maintenance cartridge to be installed, and the printer window and maintenance cartridge door to be closed.
Cannot insert the maintenance cartridge
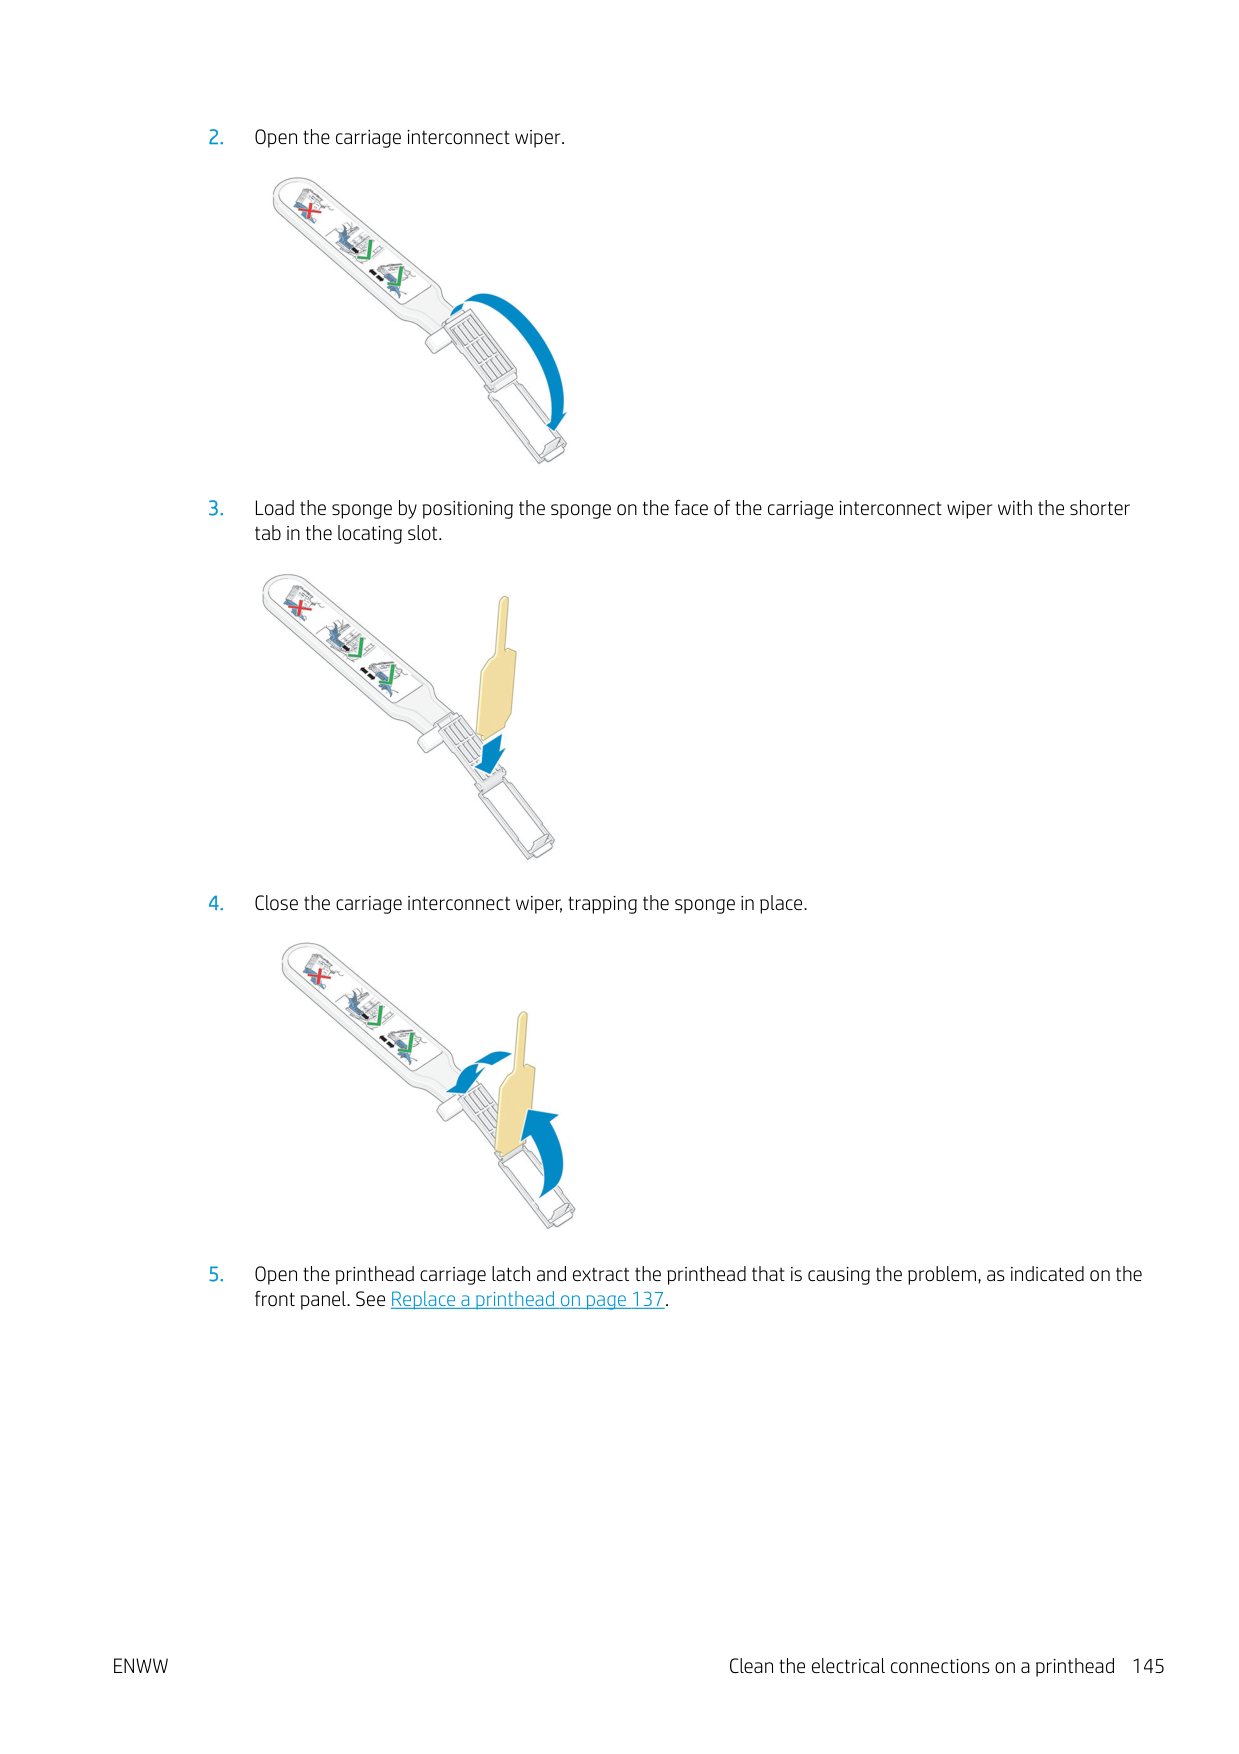
Check that the maintenance cartridge has the correct model number and is correctly oriented.
Clean and lubricate the carriage rod
| | |---|

NOTE: In some circumstances, such as in ambient temperatures above the printer's operational specification (see Environmental specifications on page 176), or if there is a significant amount of dust in the air, the lubrication of the slider rods may be impaired, which can affect the performance of the printer.
The following procedure can also be found as a video here: http://www.hp.com/go/latex300/videos.

| | |---|
ENWW Cannot insert the maintenance cartridge 151
WARNING! Avoid moving parts. You are recommended to wear gloves.

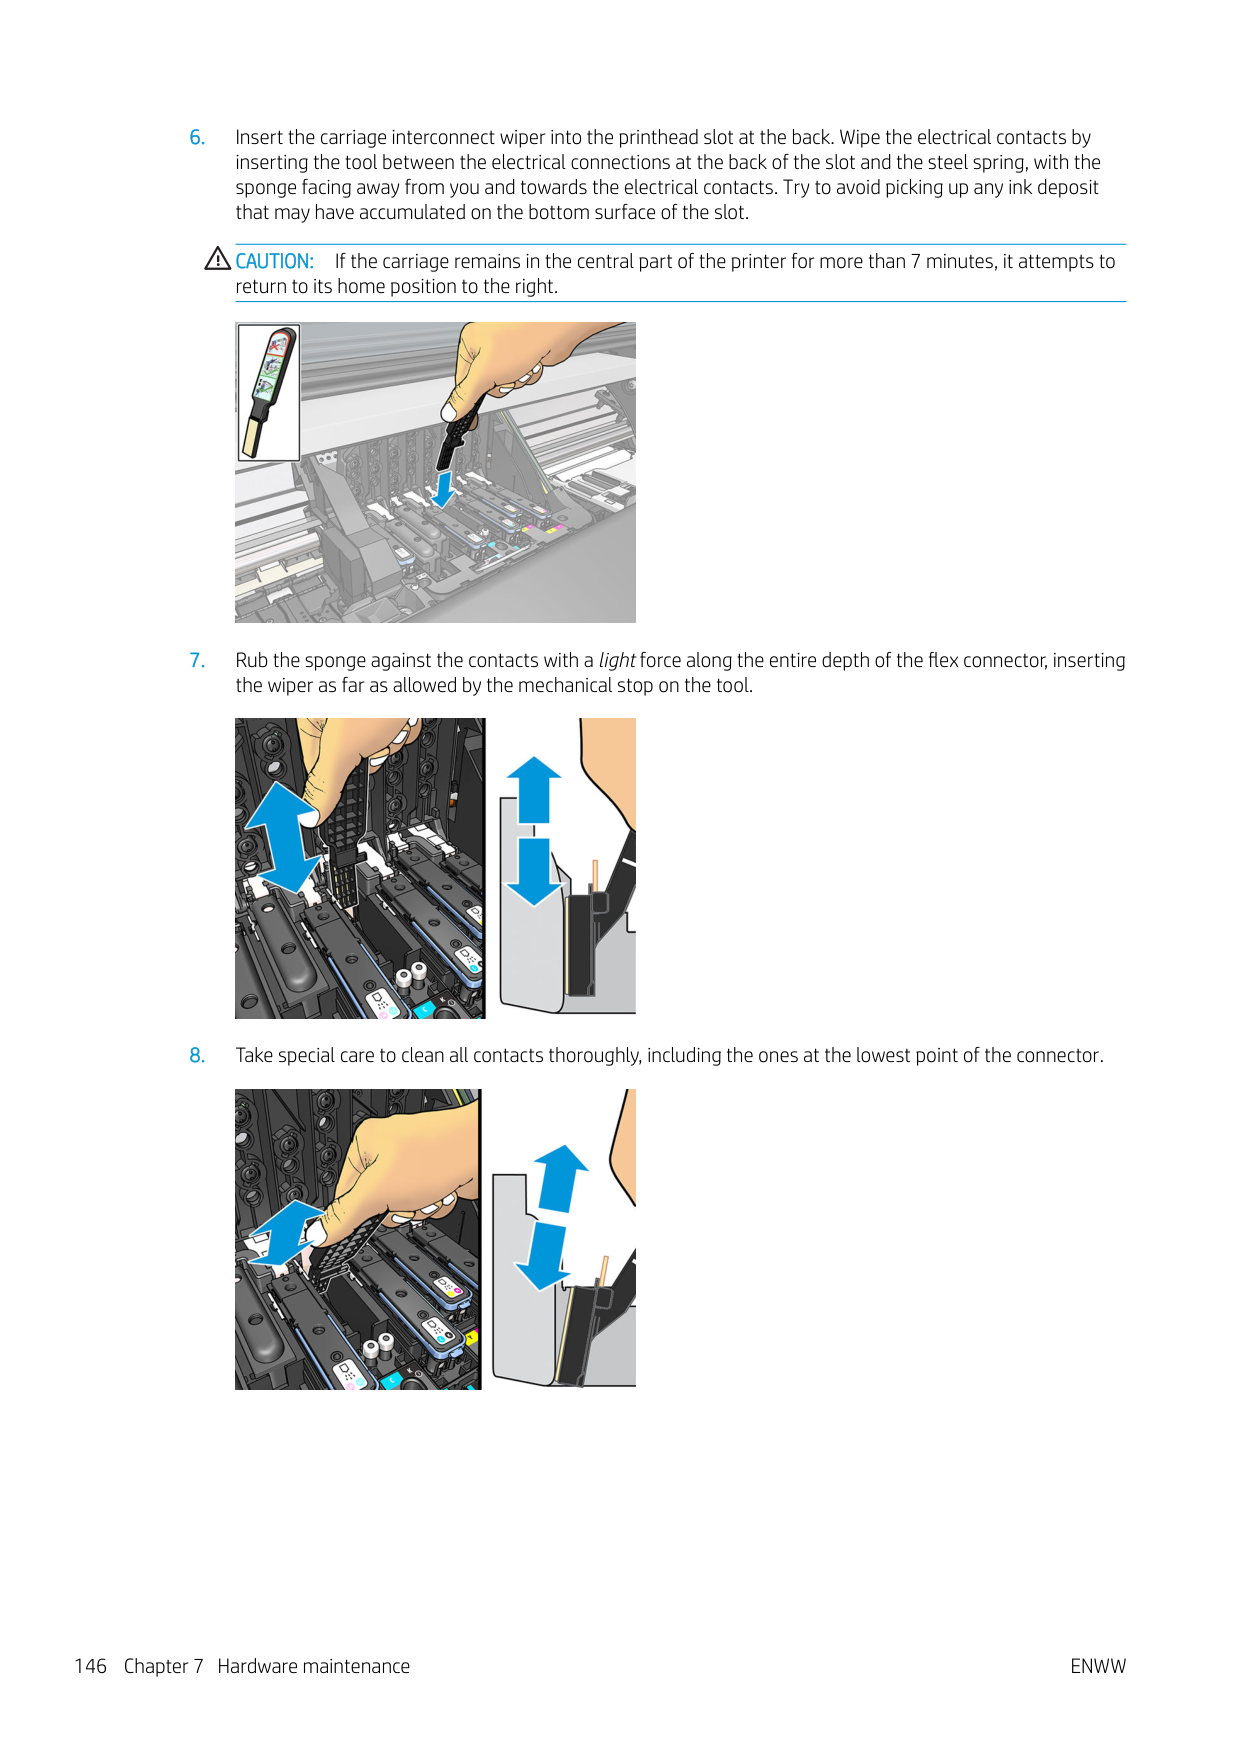

Moving part Wear gloves For more safety information, please see Safety precautions on page 3

CAUTION: While cleaning, be careful not to damage the plastic encoder strip located on top of the rod.


NOTE: While lubricating, be careful not to drop oil on the encoder strip located on top of the rod.
| | |---|
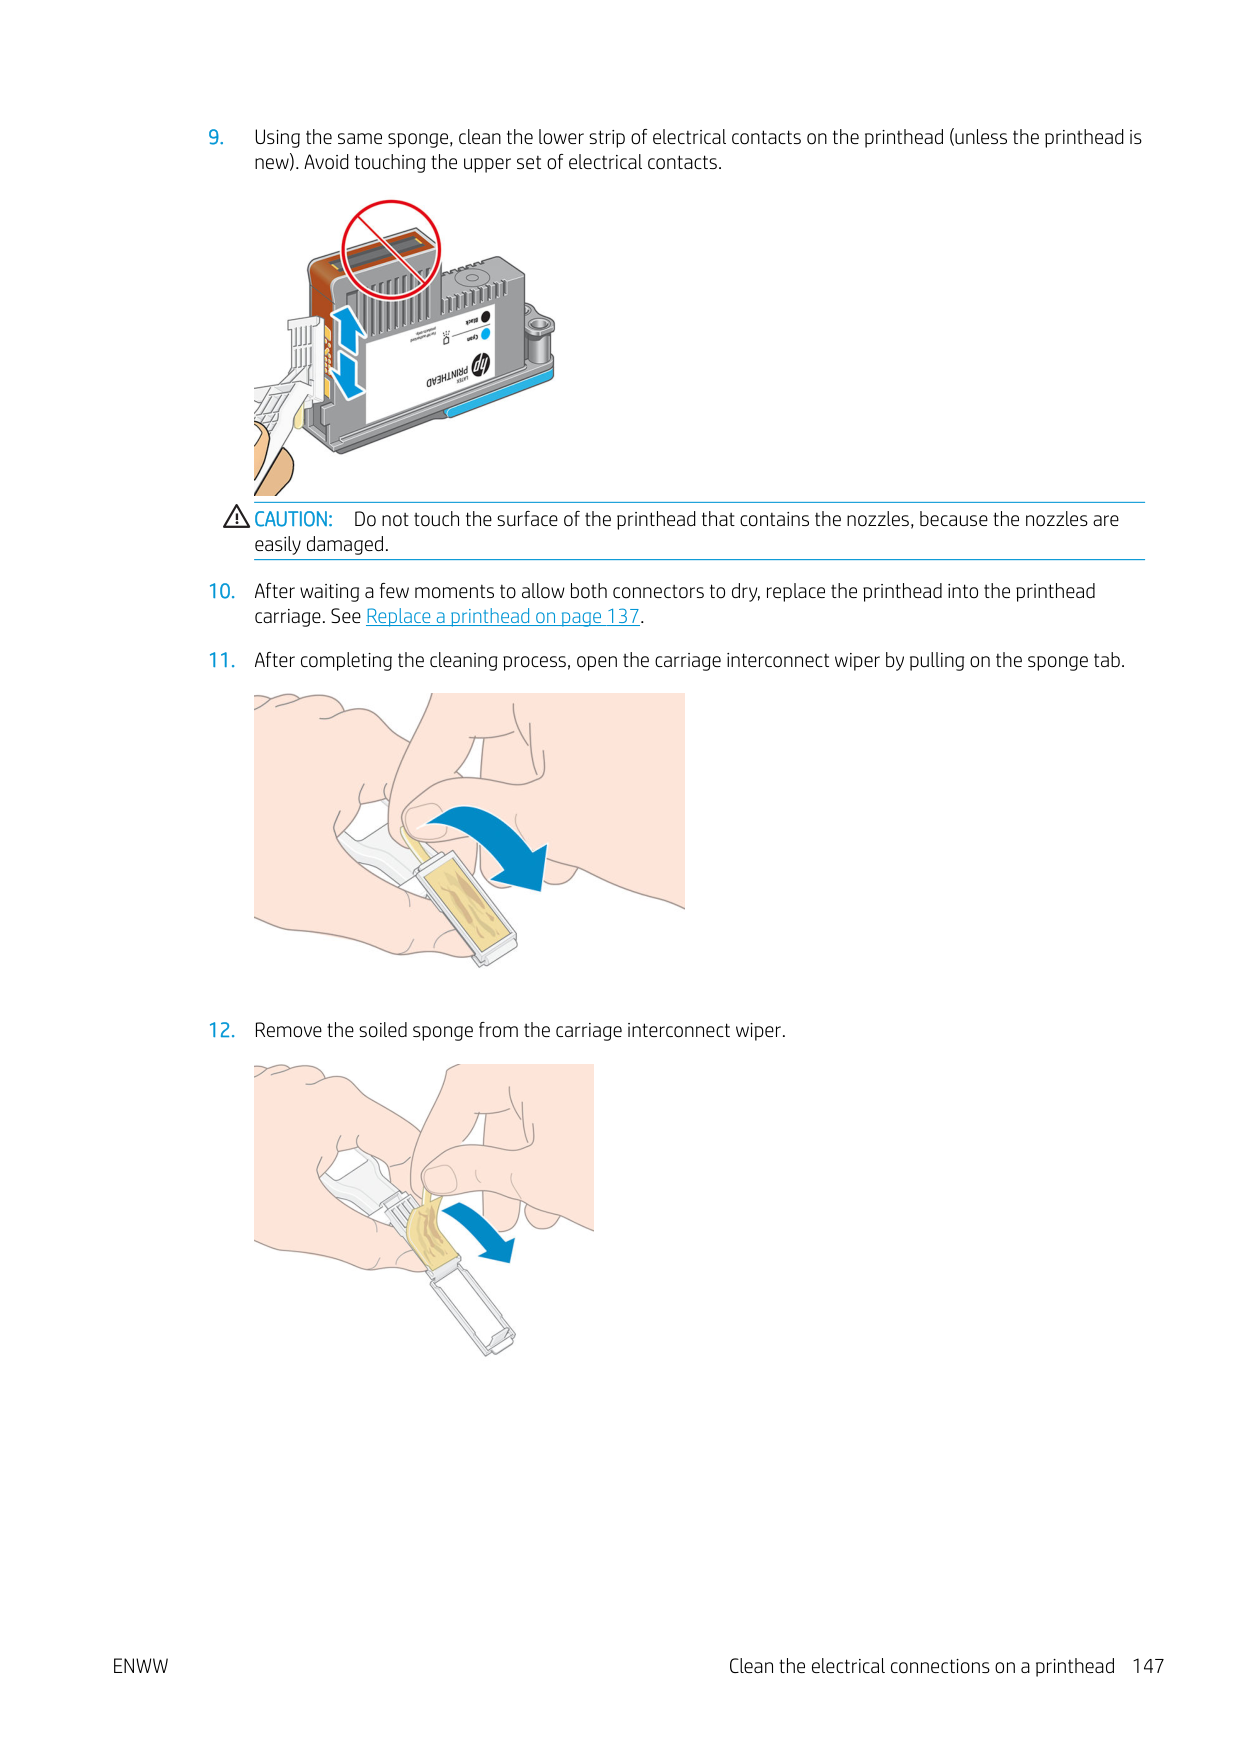
Clean the encoder strip

Cleaning the encoder strip is a vital part of the printer’s maintenance and can clear a variety of system errors:
The encoder strip should be cleaned when requested by the printer. The front panel displays a message when cleaning is required: For optimal printer performance follow the Clean the encoder strip process as described in the User’s Guide.
| | |---|
NOTE: When the message is displayed on the front panel, a silent warning message is added within the system error log ‘8:01’. This helps when reviewing the error log history.
Cleaning procedure

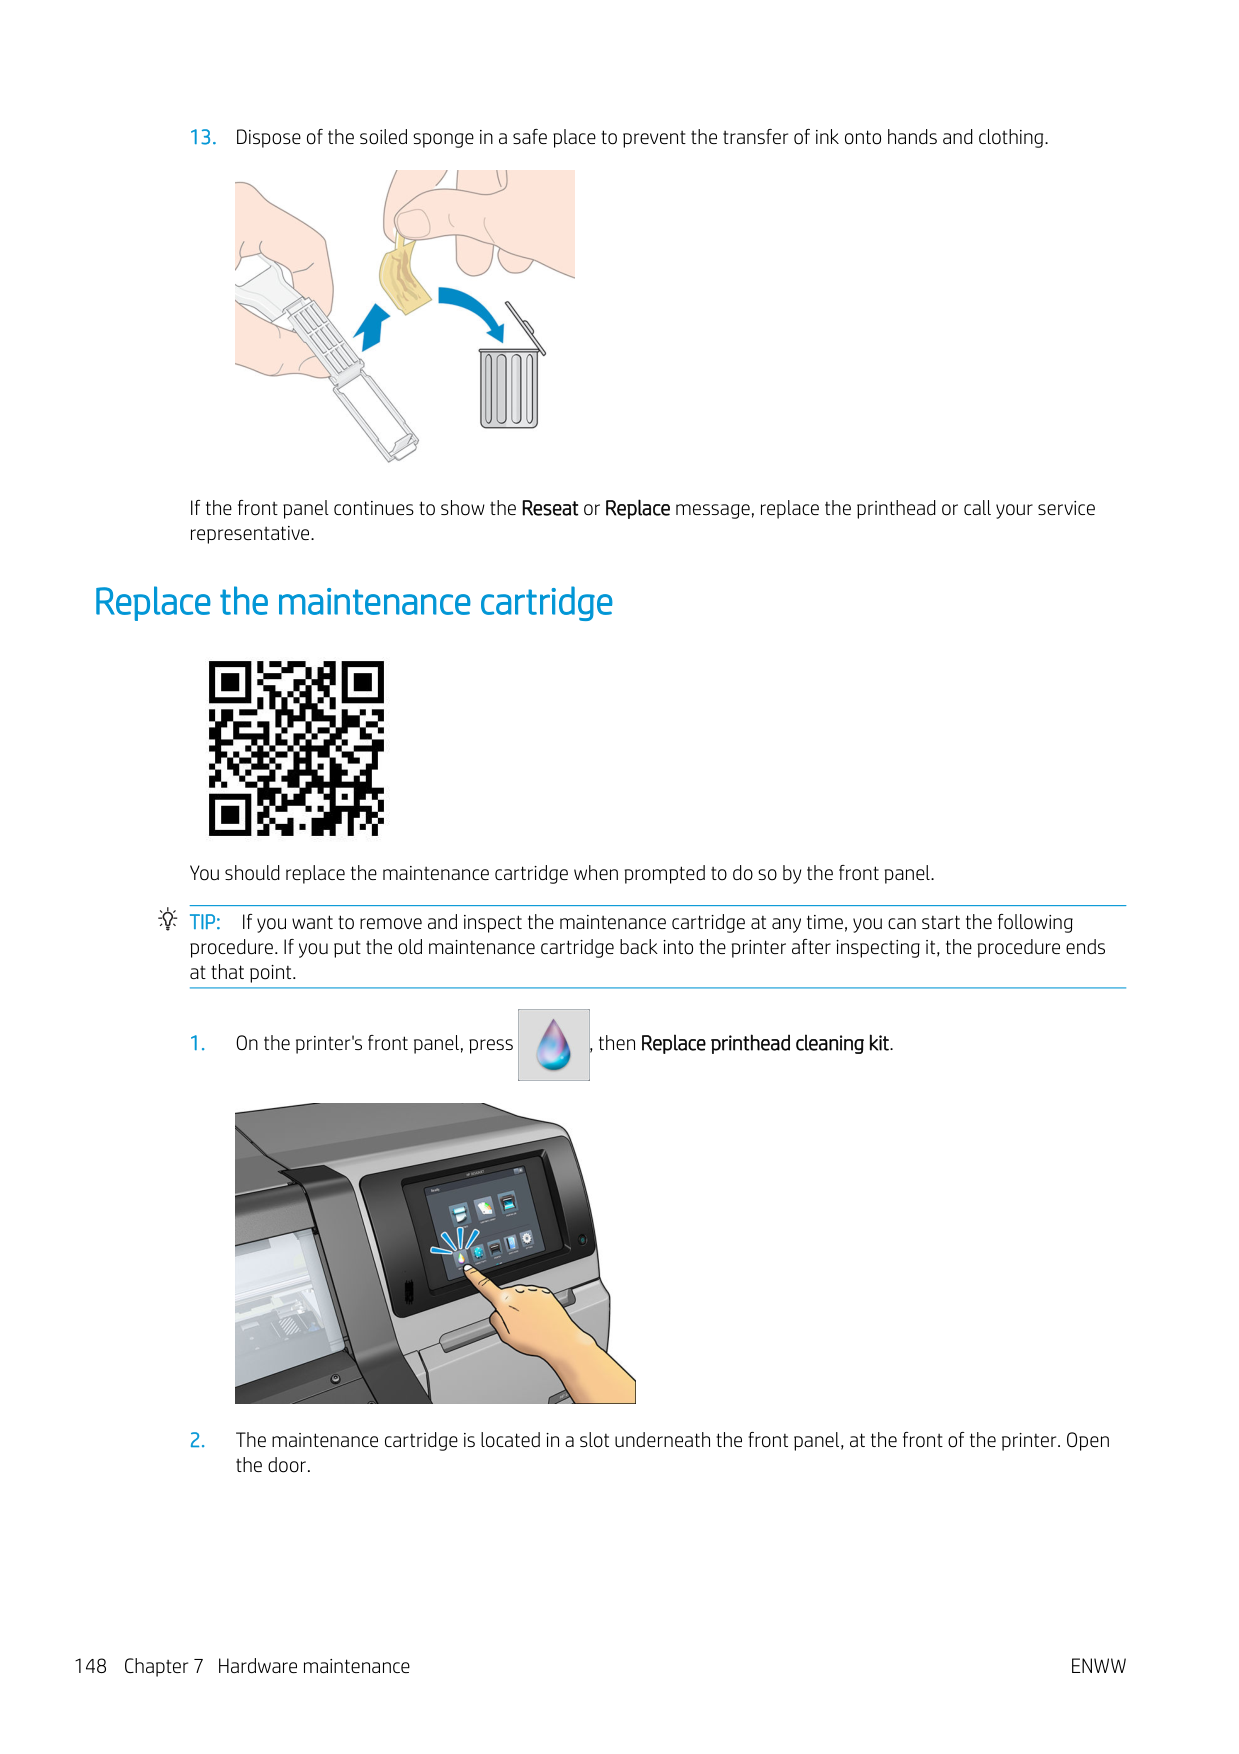
ENWW Clean the encoder strip 153
Clean the platen
You should clean your print platen after every 40 liters of ink used (the front panel will remind you with an alert), and additionally when you notice any of the following symptoms:
| | |---|
NOTE: If you print on wide substrate after having printed on narrower substrate, you may find that the left side of the platen has become dirty. If this contaminated section of the platen is not cleaned, it could leave marks on the back of the substrate.
| | |---|
NOTE: Do not print on porous substrates when using the platen, as it will get dirty. Use the ink collector for porous substrates.
| |

|---|
NOTE: If, when cleaning the platen, you see that any sticker is missing or out of place, you can replace it with one of the spare stickers provided in the User Maintenance Kit.
CAUTION: Be careful not to damage the substrate-advance sensor when cleaning the platen. The sensor is the very small rectangular window (less than 1 cm²) found close to the third pinchwheel from the right. See Clean the substrate-advance sensor window on page 155.
TIP: You are recommended to wear gloves.

Follow these instructions to clean the platen.
If you find ink stains on the back of your prints or have trouble with the substrate-advance sensor, continue with the following steps:

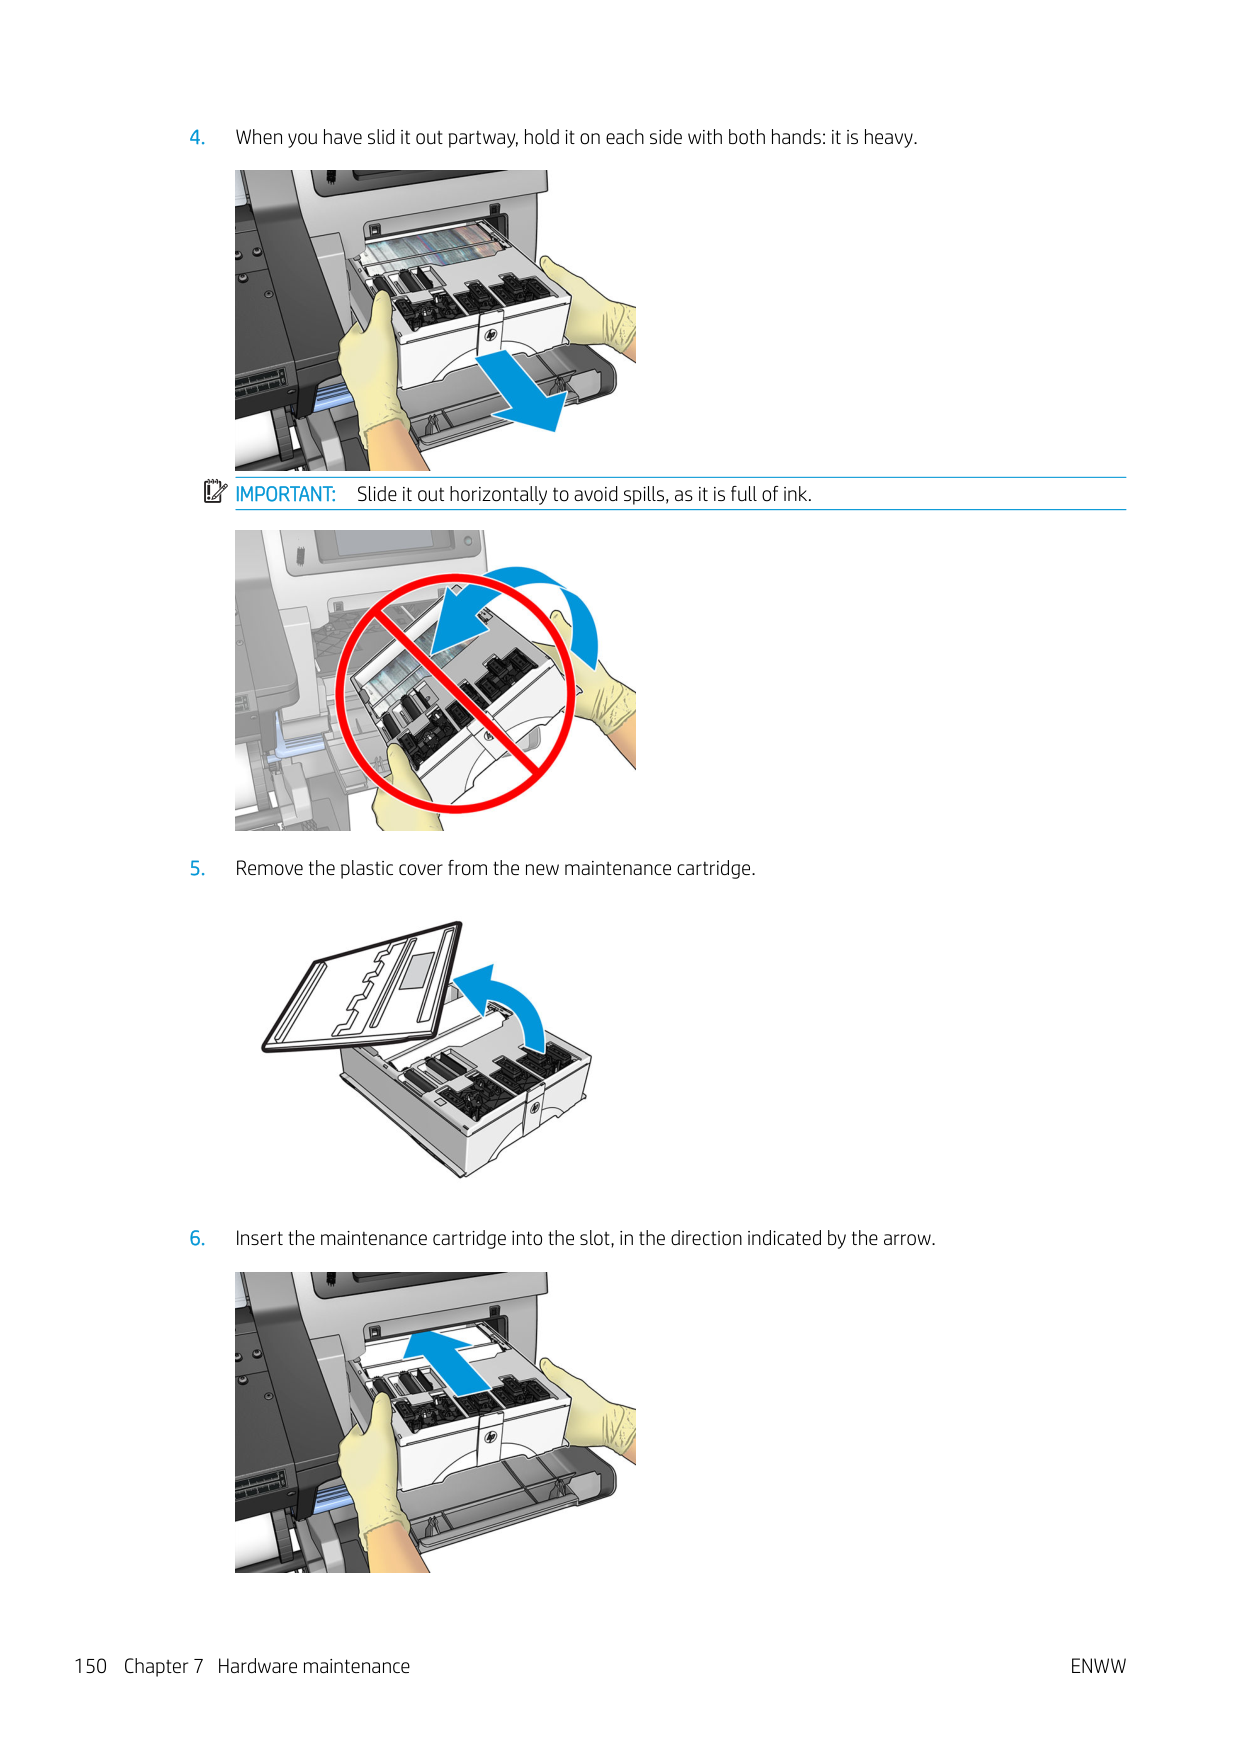

CAUTION: Do not use commercial cleaners or abrasive cleaners. Do not wet the platen directly, because you will leave too much moisture behind, which could damage the substrate advance sensor.
| | |---|
| | |---|
Clean the substrate-advance sensor window
The substrate-advance sensor is the very small rectangular window (less than 1 square centimeter in size) close to the third pinchwheel from the right.
HP recommends that you clean the substrate-advance sensor window whenever you clean the print platen and if you are experiencing print quality issues.
ENWW Clean the substrate-advance sensor window 155
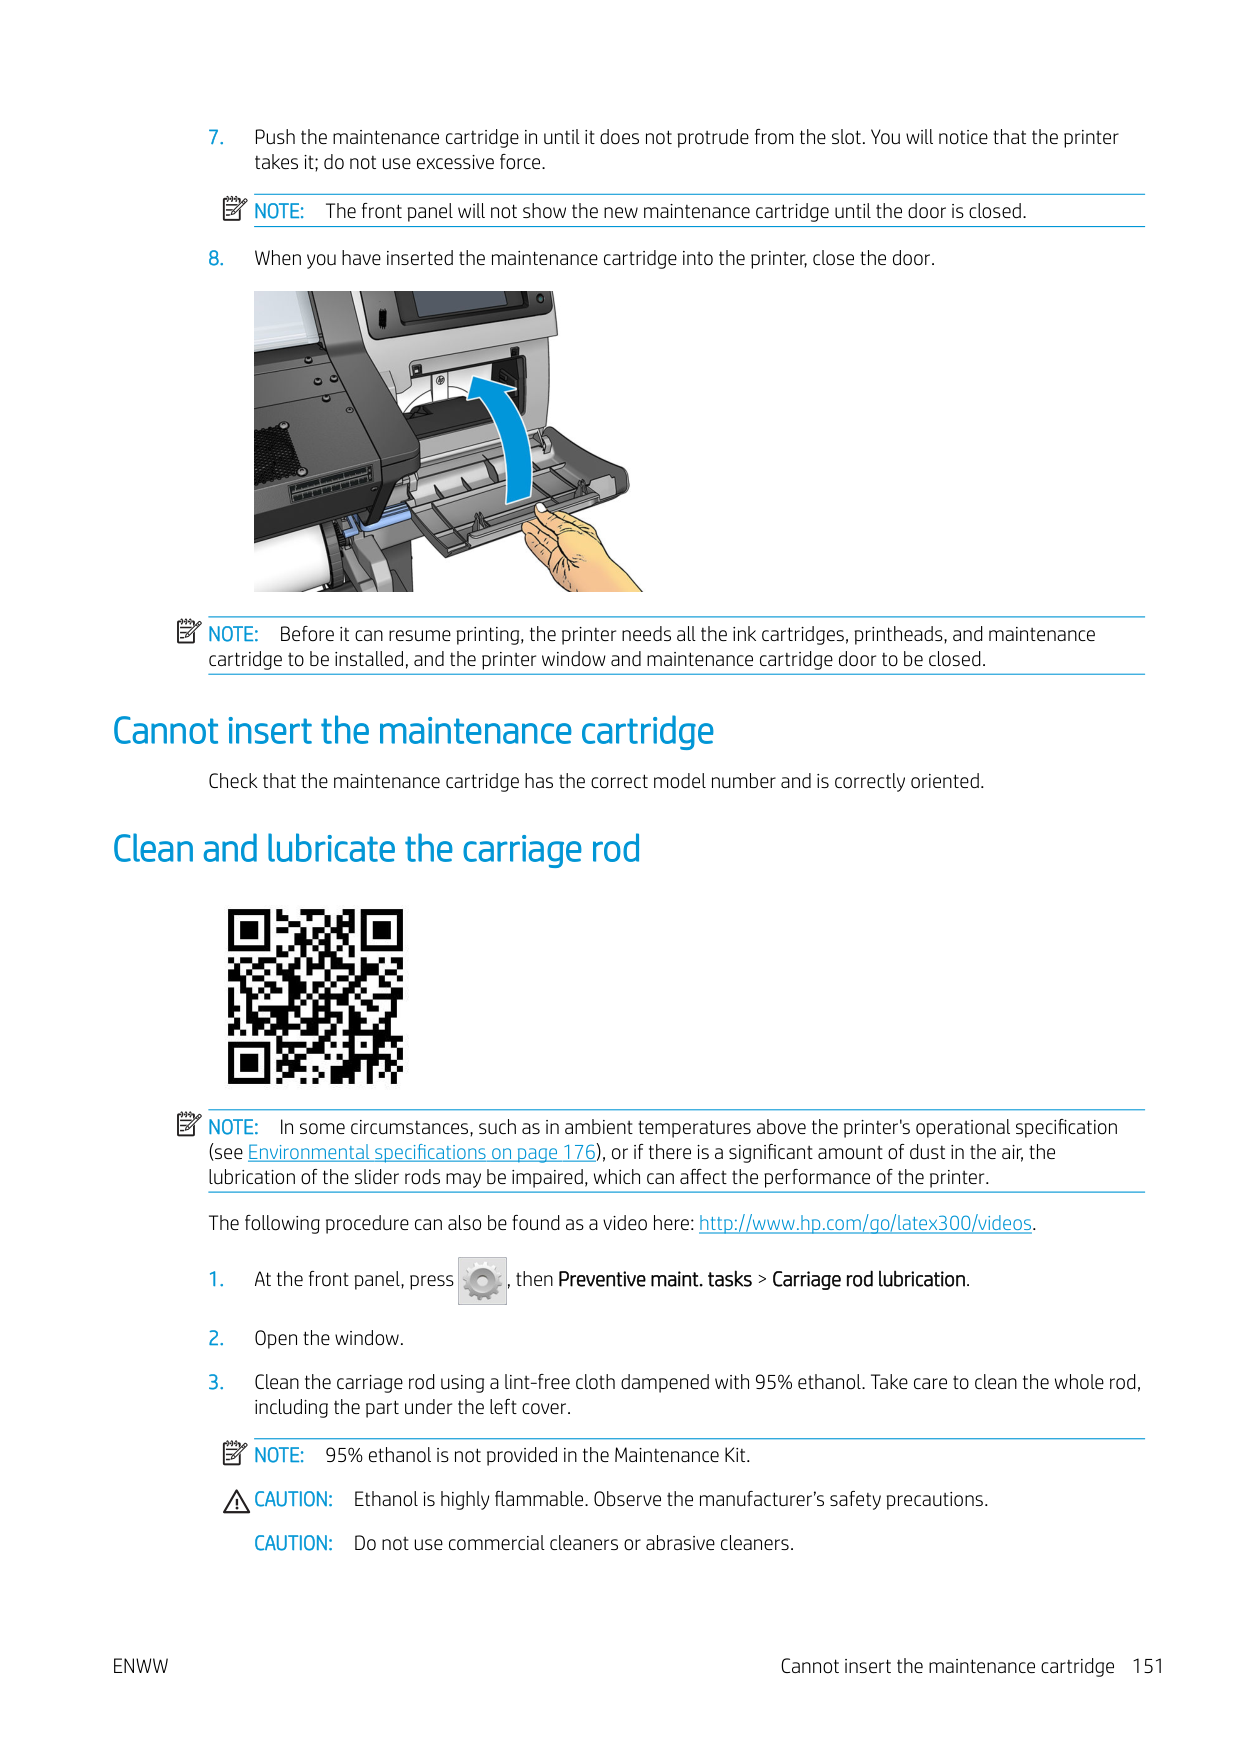

NOTE: 95% ethanol is not provided in the User Maintenance Kit. Please follow the manufacturer's safety precautions when handling ethanol. If the sensor window is heavily coated with dried ink, you may need to apply some pressure while wiping, helping the cotton to absorb the ink. Continue cleaning with fresh swabs until the cotton stays clean and the sensor window looks clean. When reflecting ambient light, a clean sensor shows a blue-colored reflection that should extend uniformly across its whole surface. You can see this reflection by moving closer and slightly changing your angle of view.
| | |---|
Clean the exterior of the printer
Use a damp sponge or a soft cloth and a mild household cleaner such as non-abrasive liquid soap to clean the outside of the printer and all other parts of the printer that you regularly touch as part of normal operation.
There may be some dampness from condensation under the fans of the curing module, which should be wiped with a dry cloth.
WARNING! To avoid an electric shock, make sure that the printer is turned off and unplugged before you clean it. Do not let water get inside the printer.
CAUTION: Do not use abrasive cleaners on the printer.
Move or store the printer
If you need to move your printer or store it for an extended period of time, prepare it correctly to avoid possible damage.
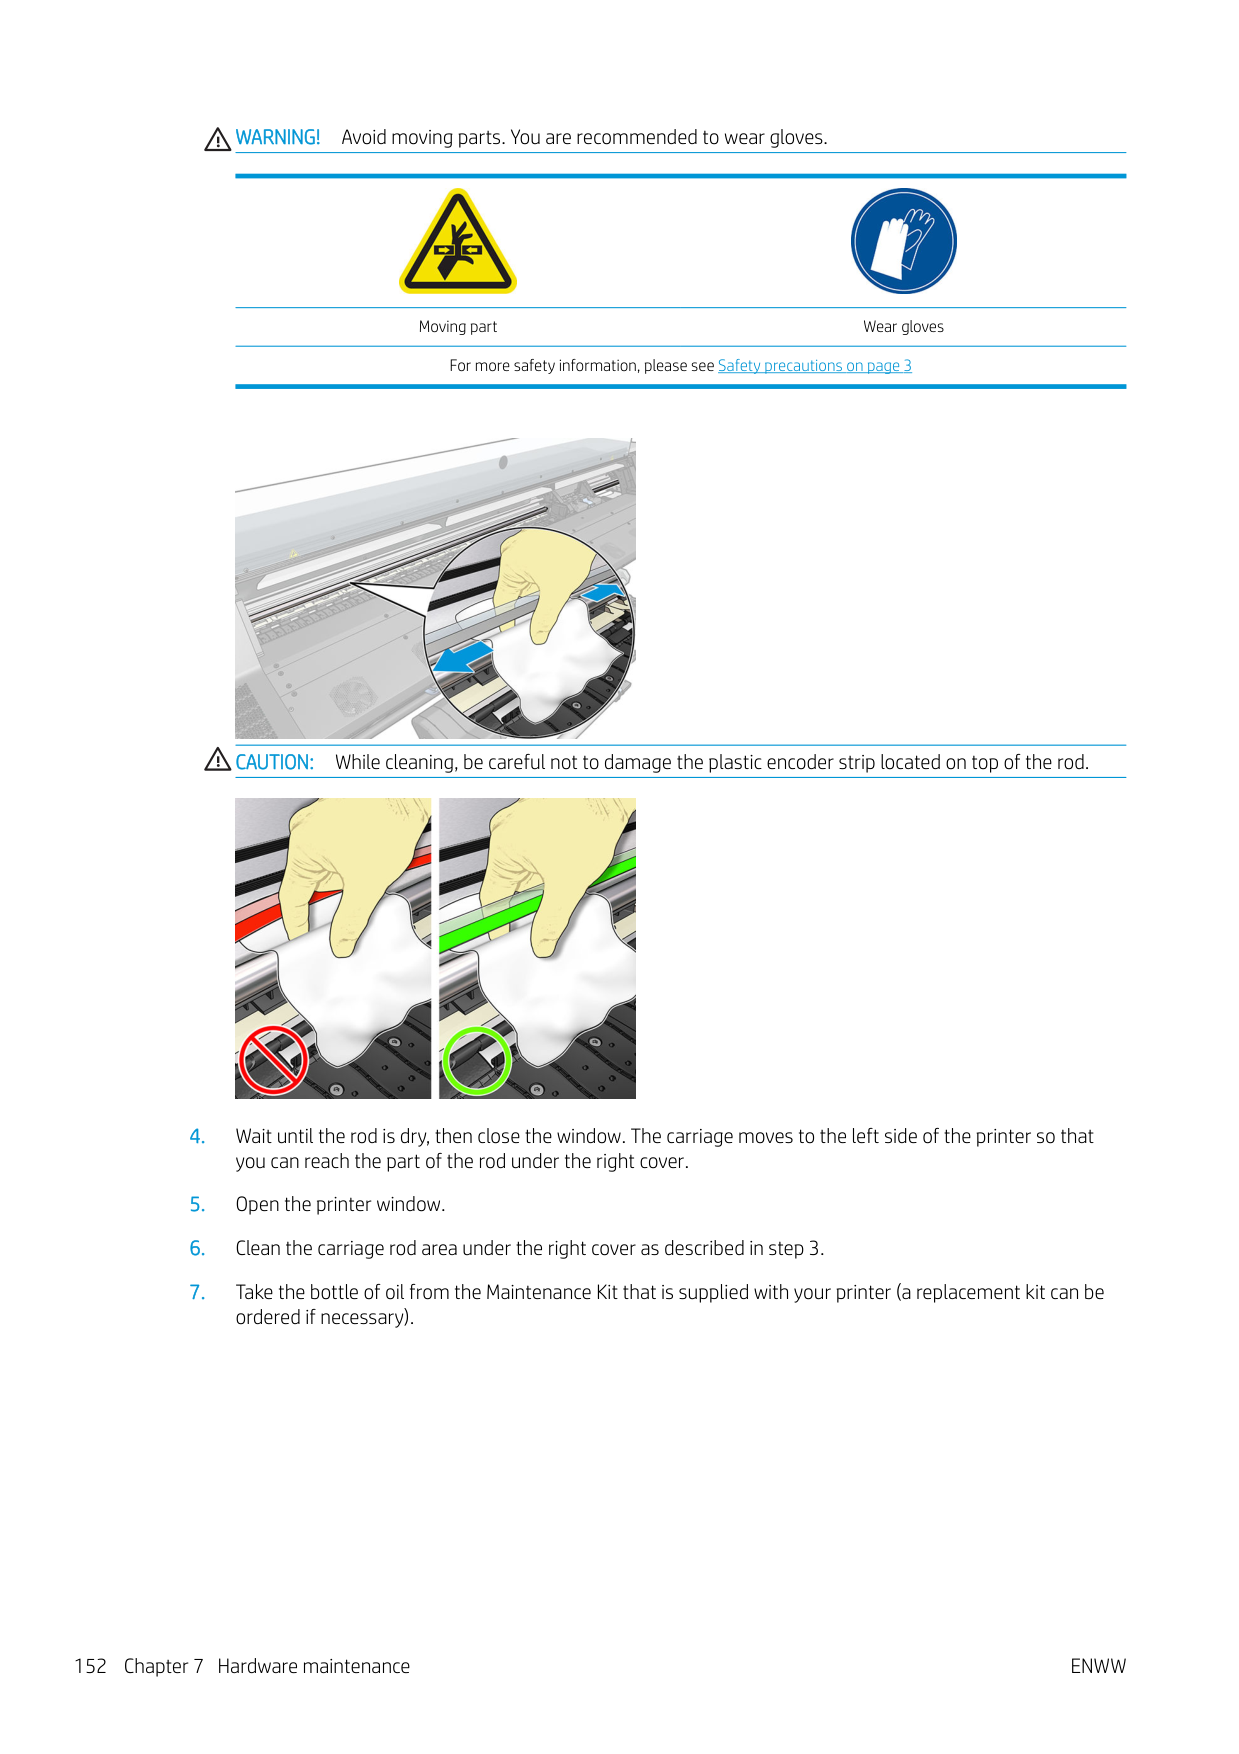
| | |---|
NOTE: If the printer or ink cartridges are moved from a cold location to a warm and humid location, water from the atmosphere can condensate on the printer parts and cartridges and can result in ink leaks and printer errors. In this case, HP recommends that you wait at least 3 hours before turning on the printer or installing the ink cartridges, to allow the condensate to evaporate.
Service maintenance During the life of your printer, components that are used constantly can wear out. To avoid having these components degrade to the point that the printer breaks down, the printer keeps track of various parameters such as the line sensor degradation, the number of cycles that the carriage makes across the axis of the printer, and the total quantity of ink used. The printer uses these numbers to track the need for service maintenance, and displays one of the following messages on the front panel:
These messages mean that some components are nearing the end of their lives. You can continue printing for quite some time, depending on your use of the printer. However, HP strongly recommends that you call your service representative and arrange for a service maintenance visit. The service engineer can then replace the worn parts on-site, which will prolong the life of the printer.
The benefits of arranging a service engineer's visit when these messages appear on the front panel are two-fold:
ENWW Service maintenance 157
8 Firmware update

The printer's various functions are controlled by software that resides in the printer, also known as firmware. From time to time, firmware updates from HP become available. These updates increase the printer's functionality and enhance its features.
Firmware update using a USB flash drive
When installing the printer for the first time you may be asked to update the firmware. For this purpose, you need a USB flash drive with the following specifications:
###### Perform the firmware update
IMPORTANT: The USB flash drive should contain only one firmware file (.fmw) in the drive's root folder, and no other files.
| | |---|
Subsequent firmware updates can be installed in your printer in the same way, or by using the printer's Embedded Web Server.
158 Chapter 8 Firmware update ENWW
Firmware update using the Embedded Web Server
If you experience very slow progress while uploading the firmware file to the printer, the reason could be that you are using a proxy server. In that case, try bypassing the proxy server and accessing the Embedded Web Server directly.
Automatic firmware updates
Automatic firmware updates are a convenience that is possible with Web-connected printers. Your printer can automatically download the latest firmware release and install it for you.
###### Important notes

ENWW Firmware update using the Embedded Web Server 159
9 Accessories

There are two alternative ways to order supplies or accessories:
The rest of this chapter lists the available supplies and accessories, and their part numbers, at the time of writing.
Order ink supplies You can order the following ink supplies for your printer. Ink cartridges
Cartridge
HP 831A 775 ml Black Latex Ink Cartridge HP 831B 775 ml Black Latex Ink Cartridge HP 831C 775 ml Black Latex Ink Cartridge HP 831A 775 ml Cyan Latex Ink Cartridge HP 831B 775 ml Cyan Latex Ink Cartridge HP 831C 775 ml Cyan Latex Ink Cartridge
######## Ink cartridges (continued)
######### Cartridge
HP 831A 775 ml Light Cyan Latex Ink Cartridge HP 831B 775 ml Light Cyan Latex Ink Cartridge HP 831C 775 ml Light Cyan Latex Ink Cartridge
HP Latex 3-liter ink cartridges (375 only) Cartridge HP 871A 3-liter Black Latex Ink Cartridge HP 871B 3-liter Black Latex Ink Cartridge HP 871C 3-liter Black Latex Ink Cartridge HP 871A 3-liter Cyan Latex Ink Cartridge HP 871B 3-liter Cyan Latex Ink Cartridge HP 871C 3-liter Cyan Latex Ink Cartridge HP 871A 3-liter Magenta Latex Ink Cartridge HP 871B 3-liter Magenta Latex Ink Cartridge HP 871C 3-liter Magenta Latex Ink Cartridge HP 871A 3-liter Yellow Latex Ink Cartridge HP 871B 3-liter Yellow Latex Ink Cartridge HP 871C 3-liter Yellow Latex Ink Cartridge
Printheads Printhead Part number HP 831 Cyan/Black Latex Printhead CZ677A
ENWW Order ink supplies 161
######## Printheads (continued)
######### Printhead Part number
HP 831 Yellow/Magenta Latex Printhead CZ678A HP 831 Light Magenta/Light Cyan Latex Printhead CZ679A HP 831 Latex Optimizer Printhead CZ680A
Other supplies Kit Part number HP 831 Latex Maintenance Cartridge CZ681A
Order accessories
The following accessories can be ordered for your printer, depending on which printer model you have: see Printer models on page 2.
TIP: Spare spindles ease the process of switching between different substrates.
Accessories
Name Part number
HP Latex 54-in Printer 2-in Spindle F0M55A HP Latex 64-in Printer 2-in Spindle F0M56A HP Latex 64-in Printer 3-in Spindle F0M58A HP Latex 300 54-in Take-Up Reel W5A60A HP Latex 300/500 User Maintenance Kit F0M59A HP Latex 300/500 Ink Collector T7U74A
10 Troubleshoot other issues
ENWW 163
Printer cannot get an IP address
If your network has no DHCP server, the printer cannot automatically retrieve an IP address. In this case, you must set the printer's IP address manually, in the following way.

Cannot access the Embedded Web Server
If you have not done so already, please read the instructions in Access the Embedded Web Server on page 23.

###### 1. Go to the front panel and press , then Connectivity > Network Connectivity > Advanced > Allow EWS >On.

###### 2. Press , then Connectivity > Network information.
####### 3. The information should read: IP enabled: Yes. If it does not, you might need to use a different connection.
If you still cannot access the Embedded Web Server, turn the printer off with the Power button on the front panel and then turn it on again.
If you experience very slow progress while trying to access the Embedded Web Server, the problem could be that you are using a proxy server. Try bypassing the proxy server and accessing the Embedded Web Server directly.
Printer is not printing

If a file you have sent from your computer is not printing when expected, the possible reasons include the following:

The software program slows down or stalls while generating the print job
Large quantities of data might be necessary to generate a high-quality large-format print job. This can cause your software to slow down significantly or stall. Lowering the print resolution may help to avoid this problem; however, lowering the print resolution reduces print quality. See your software documentation.
Printer seems slow
Here are some possible explanations.

ENWW The software program slows down or stalls while generating the print job 165
Communication failures between computer and printer
Some symptoms are:
Cannot connect to services such as firmware update, online search, or the Printer Data Sharing Agreement
If your printer has difficulty in connecting to the Internet, it may start the Connectivity Wizard automatically. You can also start the wizard manually at any time.

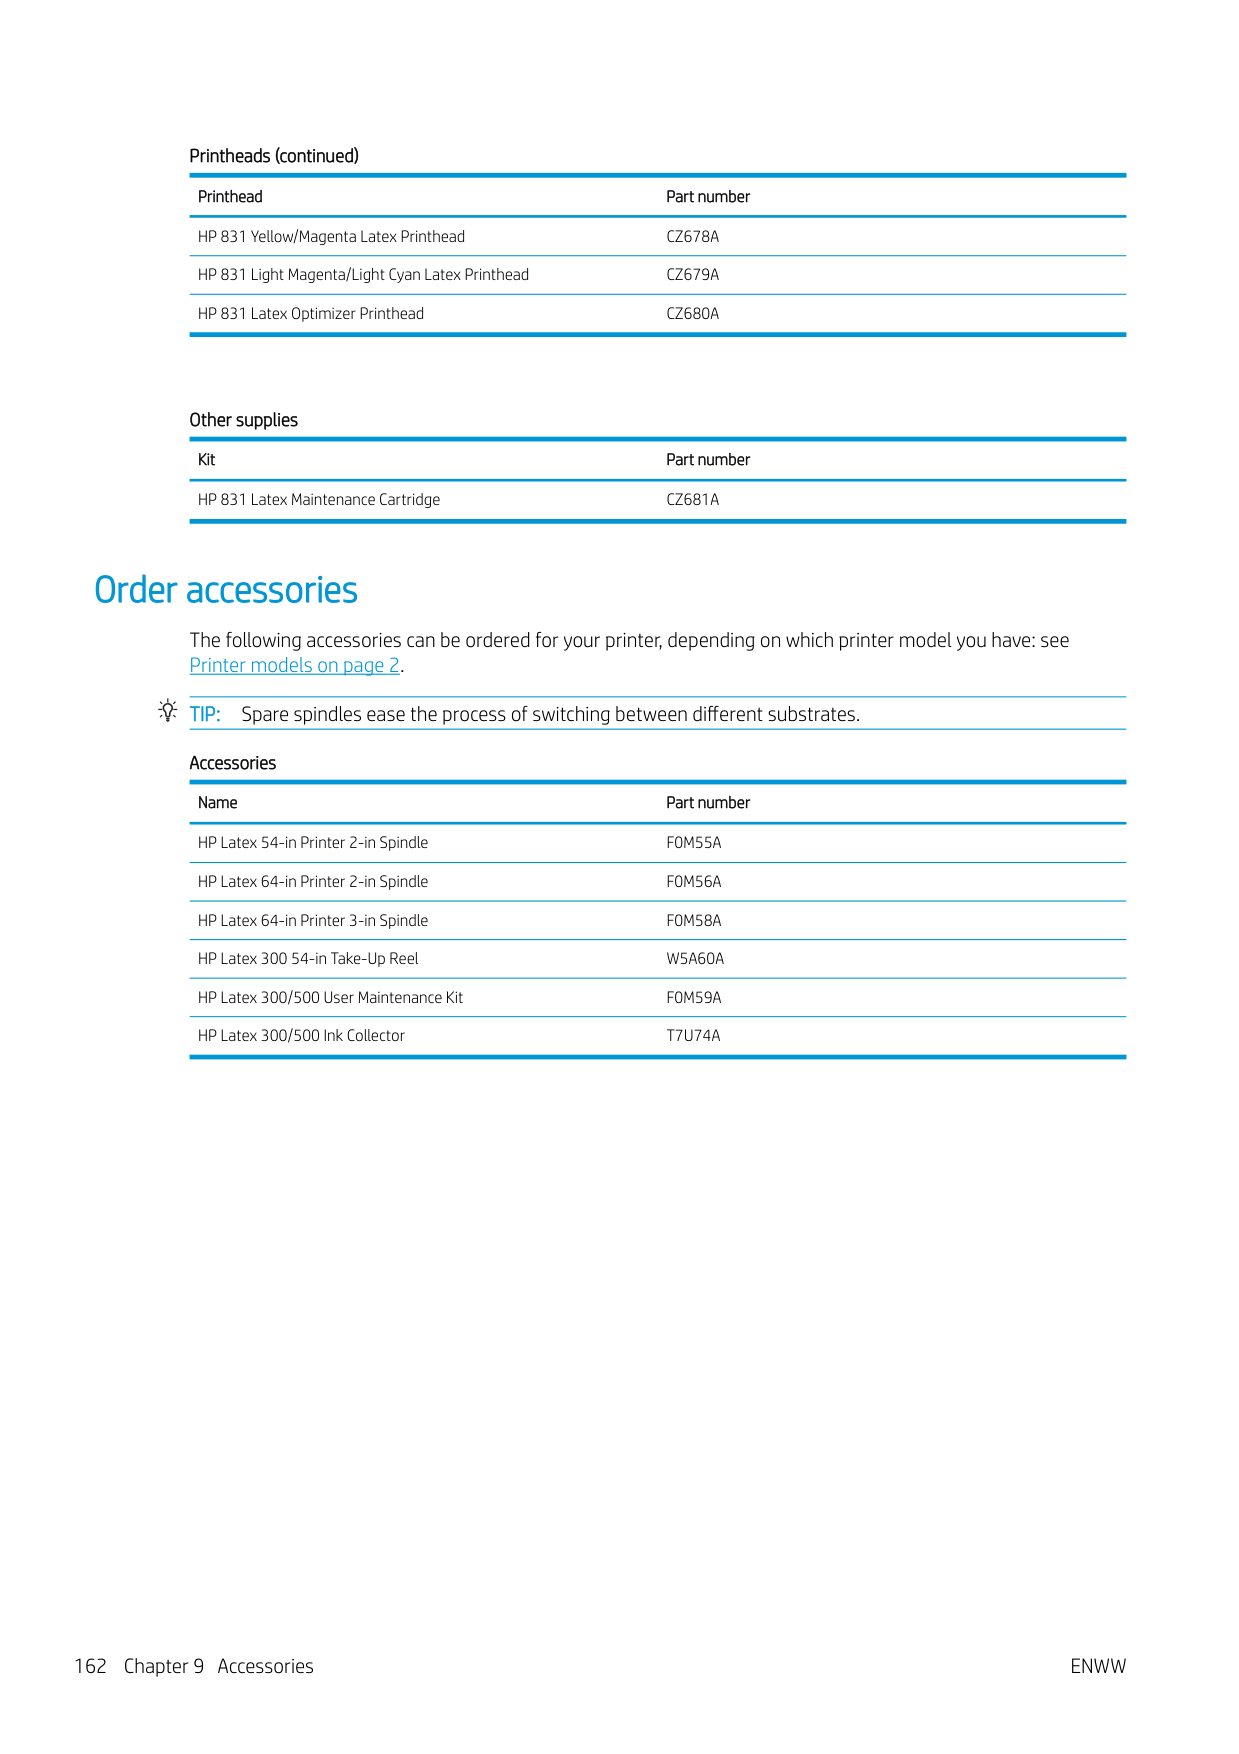

| | |---|
NOTE: The results printed out are from the last run of the Connectivity wizard, so you must already have run the Connectivity wizard in order to get any results.
The Connectivity Wizard performs a series of tests automatically. You can also choose to perform individual tests. From the front panel, press , then Connectivity > Diagnostics & troubleshooting. The following options are available.

Alternatively, these tests can be launched from the Embedded Web Server: select Support > Connectivity troubleshooting.
If any test fails, the printer describes the problem and recommends how to solve it.
Front-panel error codes


Under certain circumstances, a numeric error code appears on the front panel. Follow the advice in the Recommendation column to resolve the error. If the recommendation does not seem to solve the problem, call your service representative. See When you need help on page 38.
If an error code appears on the front panel that is not included in this list, turn off the printer and then turn it back on. If the problem persists, call your service representative.
Error code Recommendation
14.87:10 Curing power regulator overtemperature detected.
16.84:03, 16.85:03 Air curtain resistor out of range. Check that the air curtain fans (at the front of the curing module) are working and unblocked.
21:13 Unable to move the maintenance cartridge along its whole path.
21.2:10 Maintenance cartridge error.
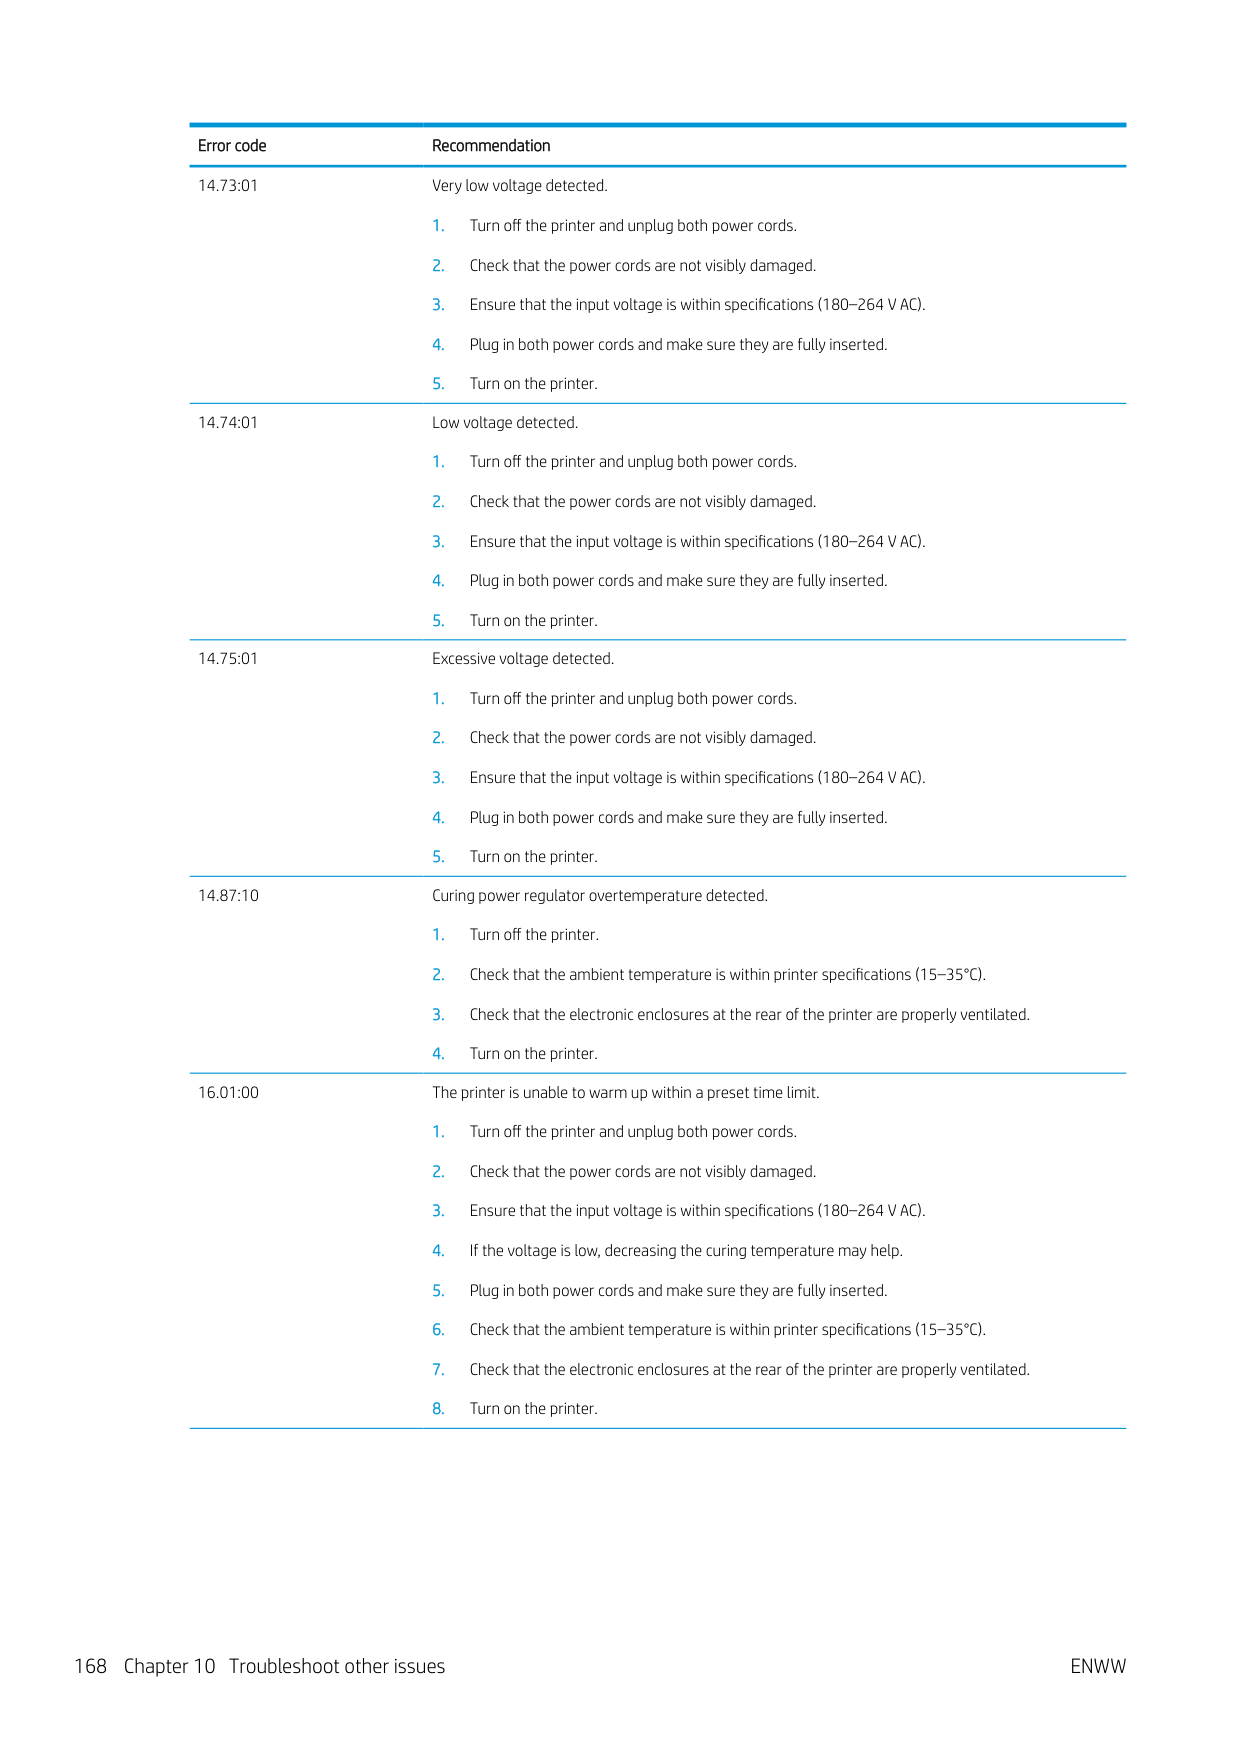
21.5:03 The part that advances the printhead maintenance cartridge web wipe is blocked.
25.n:10 (where n = the ink cartridge number)
A possible error in the ink cartridge pressure sensor has been detected. The ink level reported may not be accurate. Call your service representative if feasible.
27.1:00 Several blocked nozzles have been detected in the optimizer printhead. If print quality is not acceptable, clean or replace the printhead.
27.n:01 (where n = the printhead slot number)
A large number of blocked nozzles have been detected in one or more printheads. Calibration may have failed due to low printhead performance. Clean all the printheads and check their status.
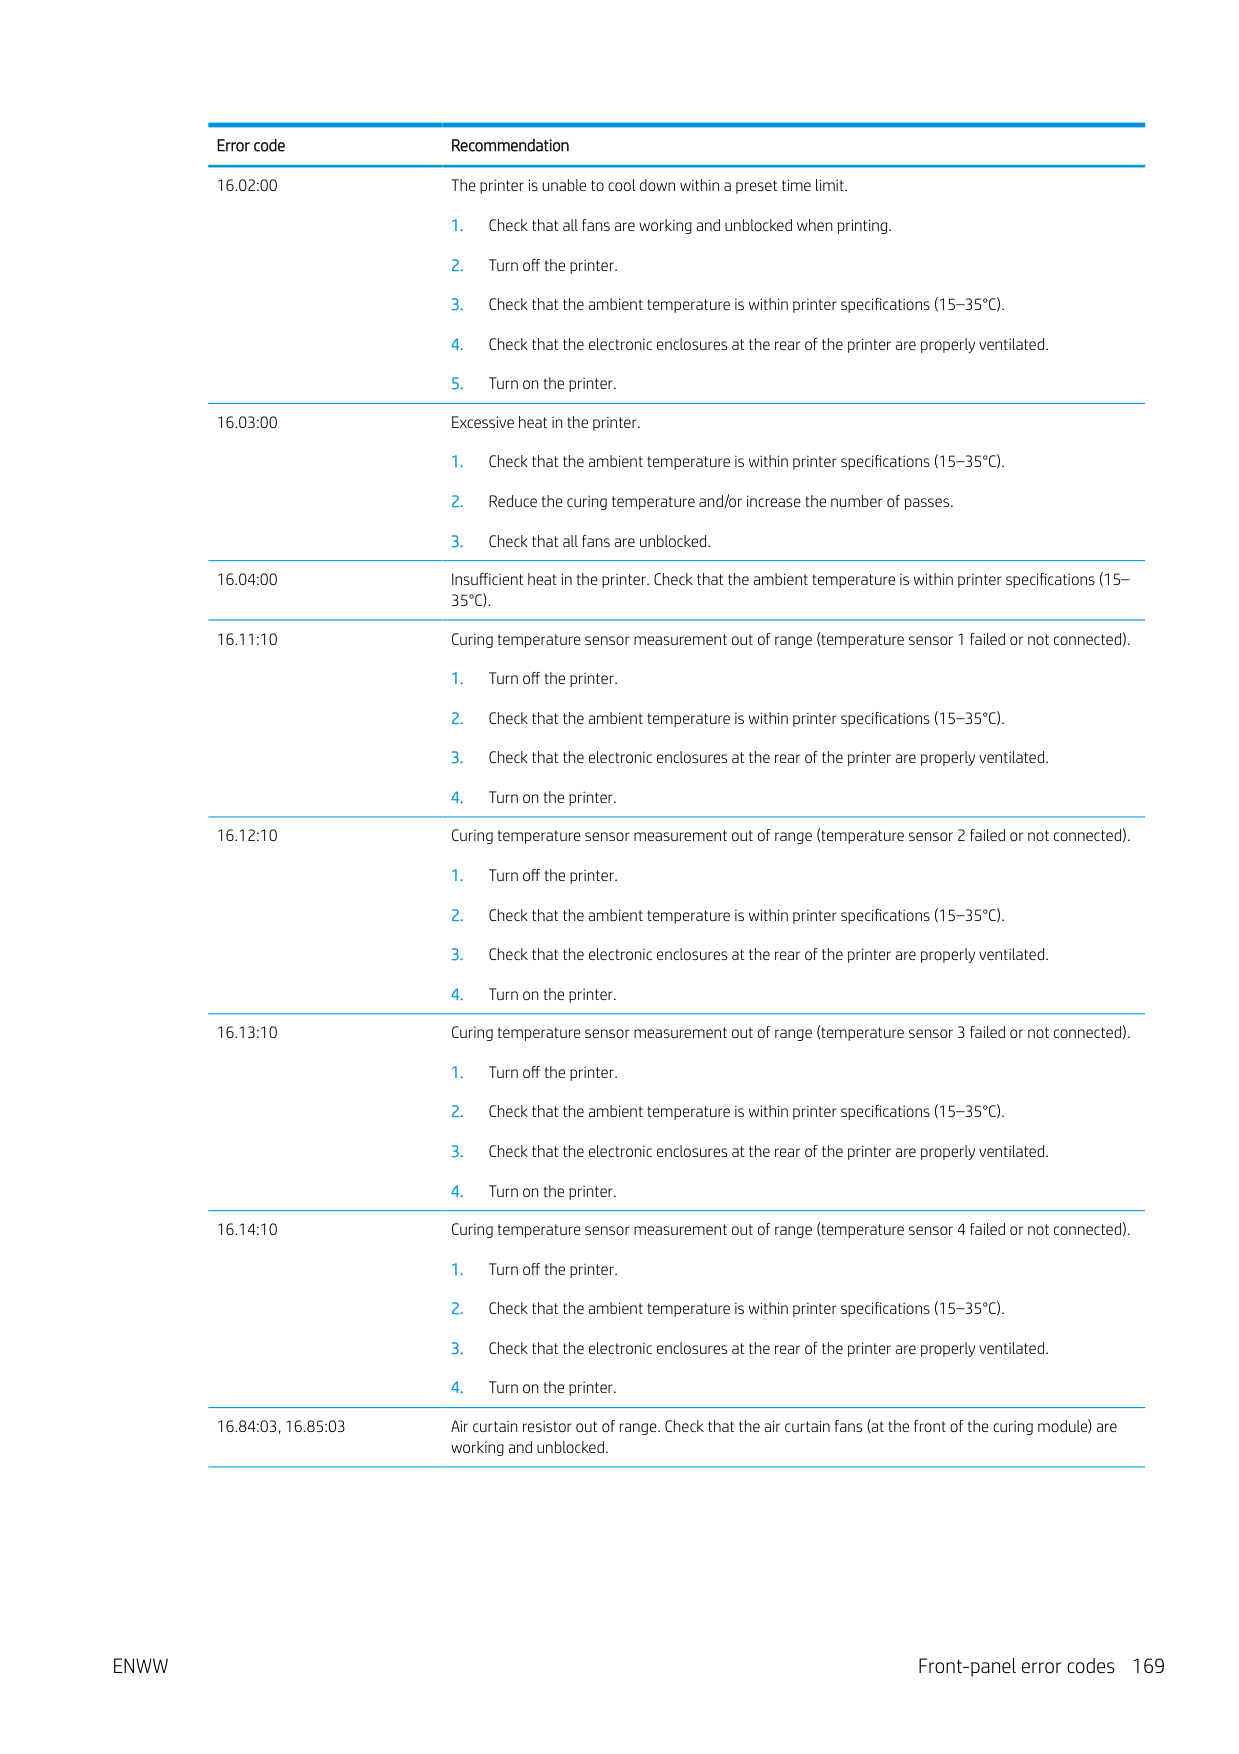
32:01.1, 32:01.2 This error occurs when the tension bar stays in one of its sensor trigger positions for more than 8 seconds. The most likely causes of this error are as follows:
CAUTION: Try to avoid pulling the substrate out from the input path, because this reverses the normal direction of movement, and could damage printer parts.
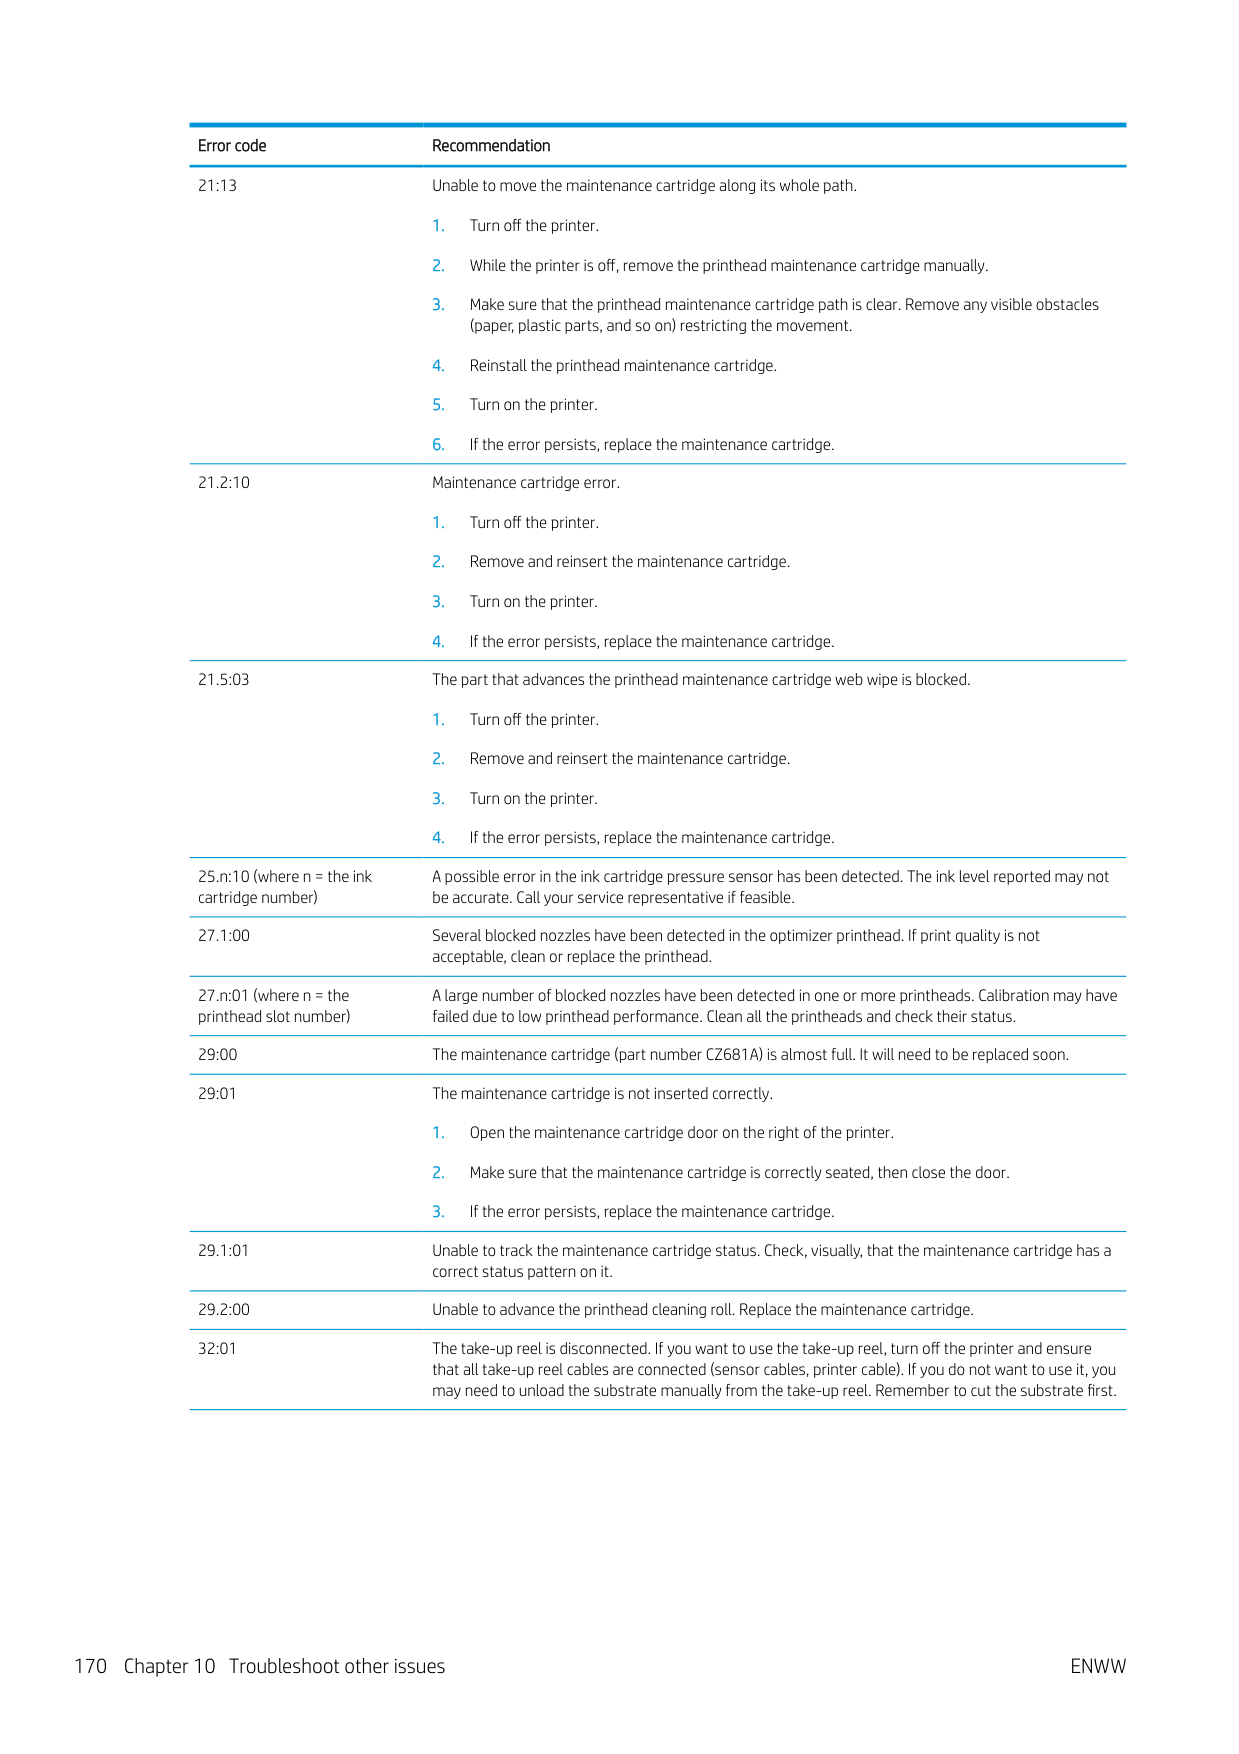
68:03 There has been a loss of permanent data, such as configuration or accounting data. This can happen after a firmware update with a data structure not compatible with the older version.
74:01 An error occurred when uploading the firmware update file.
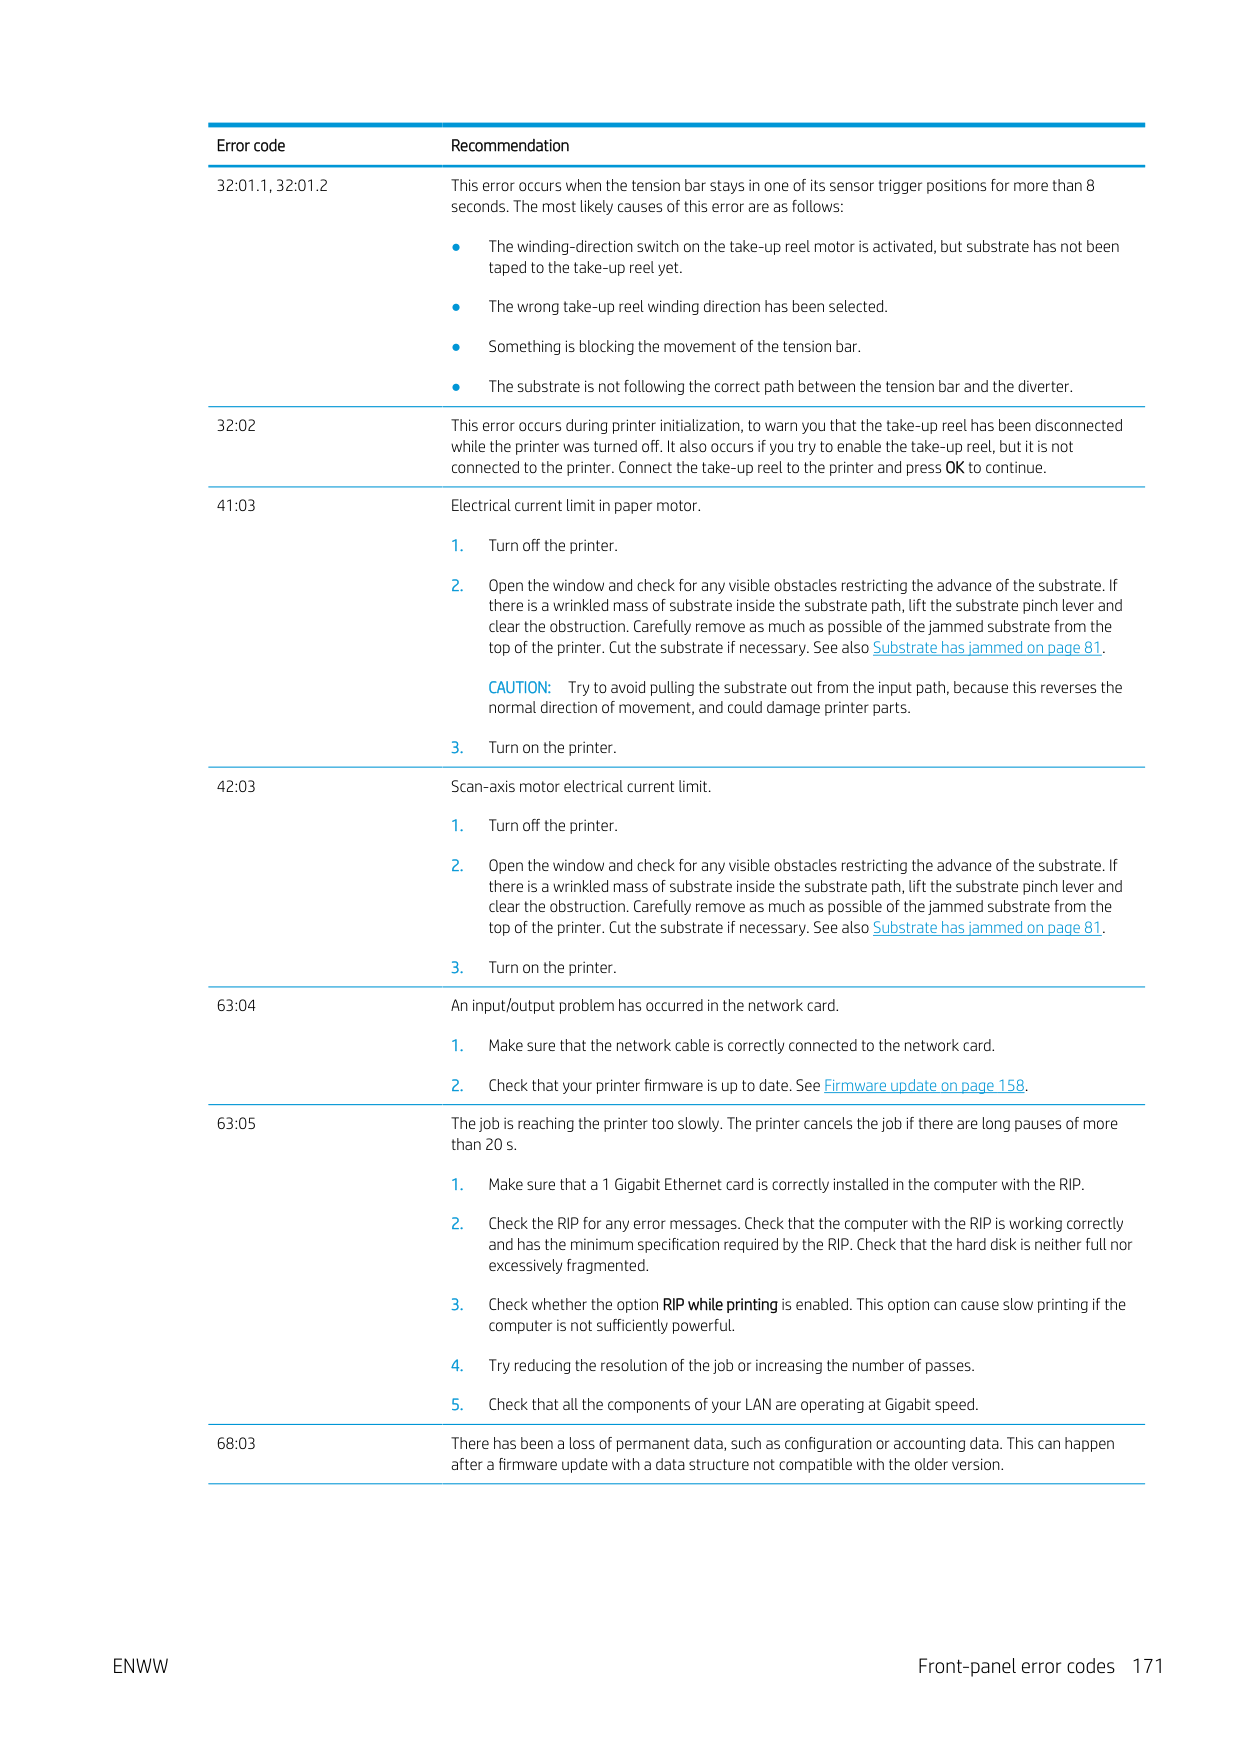
89:11, 89.1:10, 89.2:10 The interior-light PCA may be failing or disconnected. The printer will continue operating normally, with only this functionality affected.
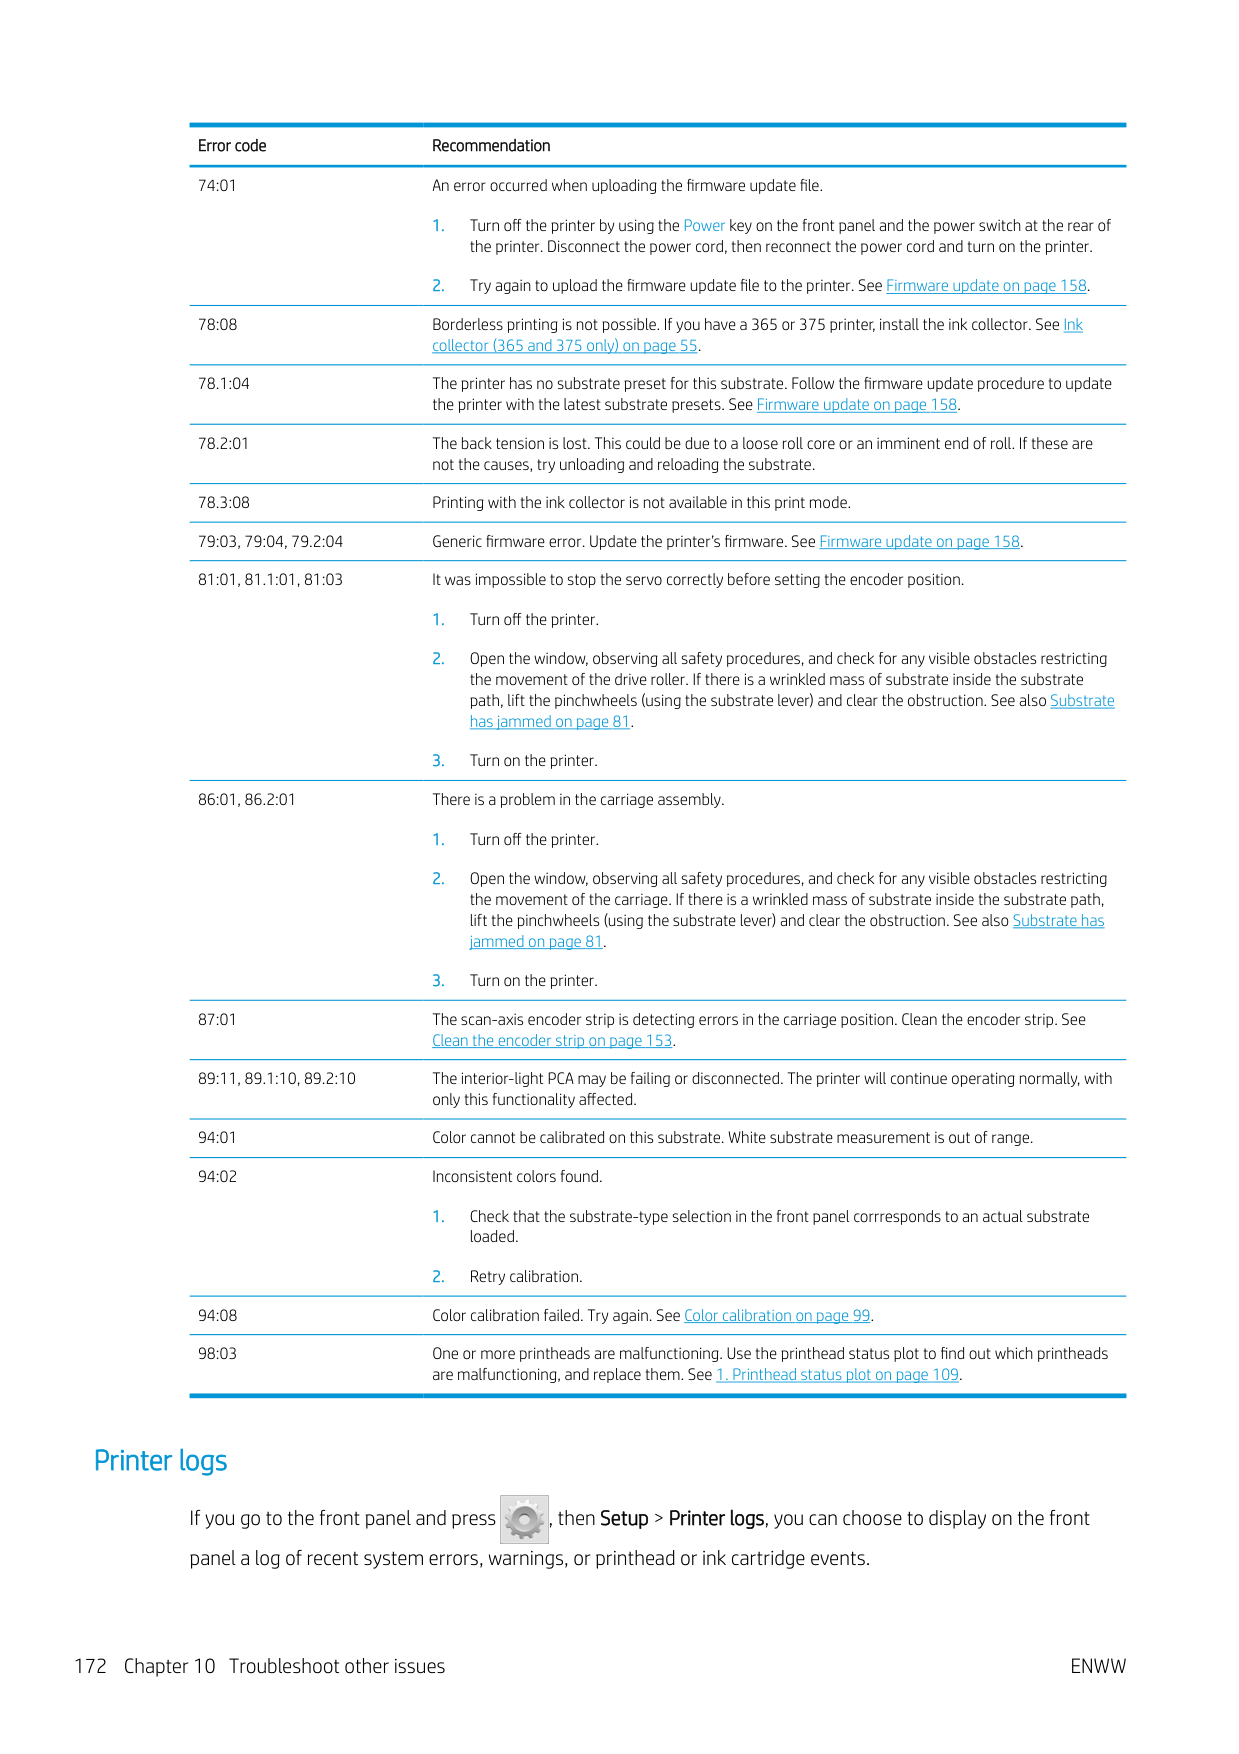
94:08 Color calibration failed. Try again. See Color calibration on page 99. 98:03 One or more printheads are malfunctioning. Use the printhead status plot to find out which printheads
are malfunctioning, and replace them. See 1. Printhead status plot on page 109.
#### Printer logs

If you go to the front panel and press , then Setup > Printer logs, you can choose to display on the front panel a log of recent system errors, warnings, or printhead or ink cartridge events.
11 Printer specifications
ENWW 173
Functional specifications
HP No. 831 ink supplies Printheads Cyan/black, yellow/magenta, light magenta/light cyan, and optimizer Ink cartridges Yellow, black, magenta, light magenta, cyan, light cyan, and optimizer; all
cartridges contain 775 ml of ink (3 liters for the 375 printer) Maintenance cartridge Non-color-specific
######## Substrate sizes (315 printer)
Minimum Maximum Width 584 mm (23 in)
1372 mm (54 in)
Narrow substrate: 254 mm (10 in)
Length 1.5 m (59 in) Roll with maximum external diameter of 180 mm (7.1 in)
Weight 25 kg (55 lb)
######## Substrate sizes (335, 365, 375 printers)
Minimum Maximum Width 584 mm (23 in)
1626 mm (64 in)
Narrow substrate: 254 mm (10 in)
Length 1.5 m (59 in) Roll with maximum external diameter of 250 mm (9.8 in)
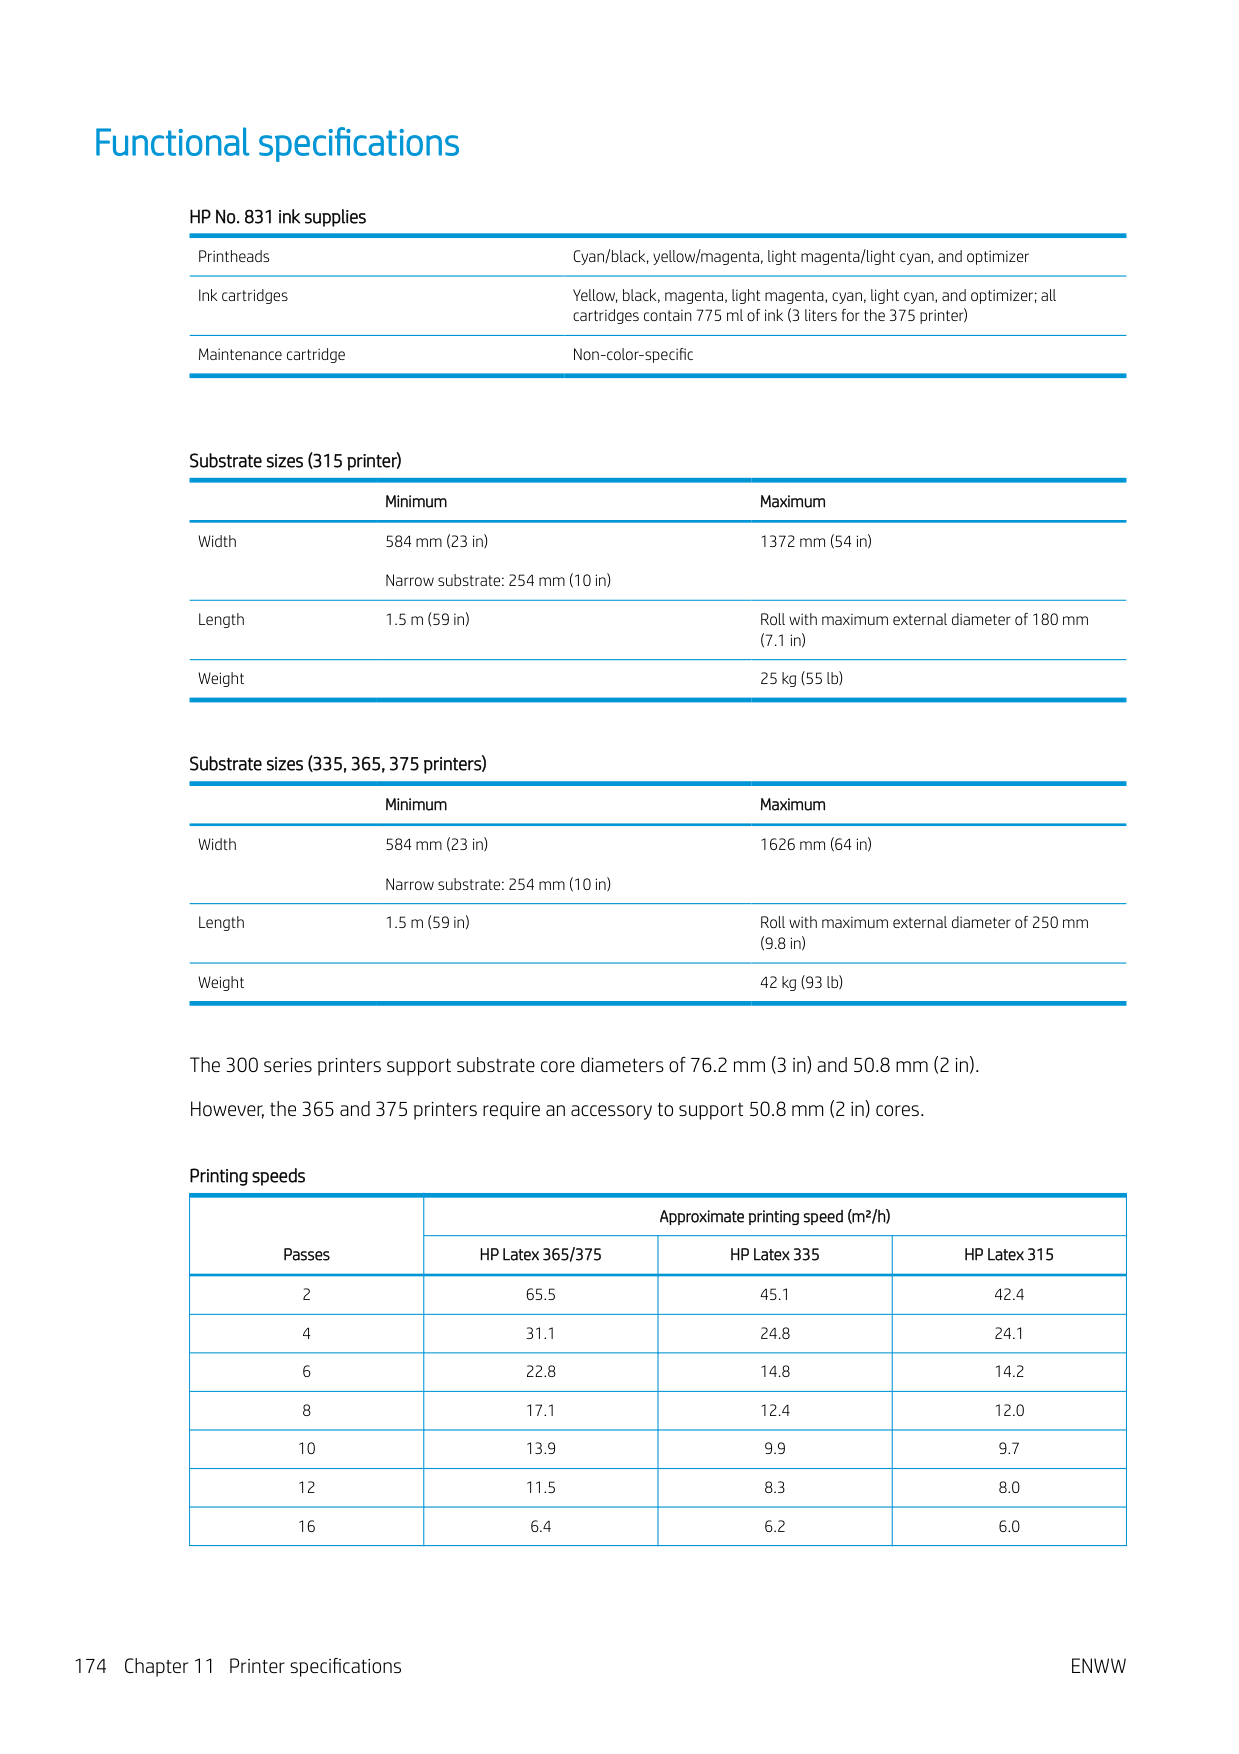
Weight 42 kg (93 lb)
The 300 series printers support substrate core diameters of 76.2 mm (3 in) and 50.8 mm (2 in). However, the 365 and 375 printers require an accessory to support 50.8 mm (2 in) cores.
Printing speeds
|Passes|Approximate printing speed (m²/h)|Approximate printing speed (m²/h)|Approximate printing speed (m²/h)| |---|---|---|---| |Passes|HP Latex 365/375|HP Latex 335|HP Latex 315| |2|65.5|45.1|42.4| |4|31.1|24.8|24.1| |6|22.8|14.8|14.2| |8|17.1|12.4|12.0| |10|13.9|9.9|9.7| |12|11.5|8.3|8.0| |16|6.4|6.2|6.0|
Printing speeds (continued)
|Passes|Approximate printing speed (m²/h)|Approximate printing speed (m²/h)|Approximate printing speed (m²/h)| |---|---|---|---| |Passes|HP Latex 365/375|HP Latex 335|HP Latex 315| |18|5.7|5.0|4.7| |20|5.0|4.5|4.2|
| | |---|
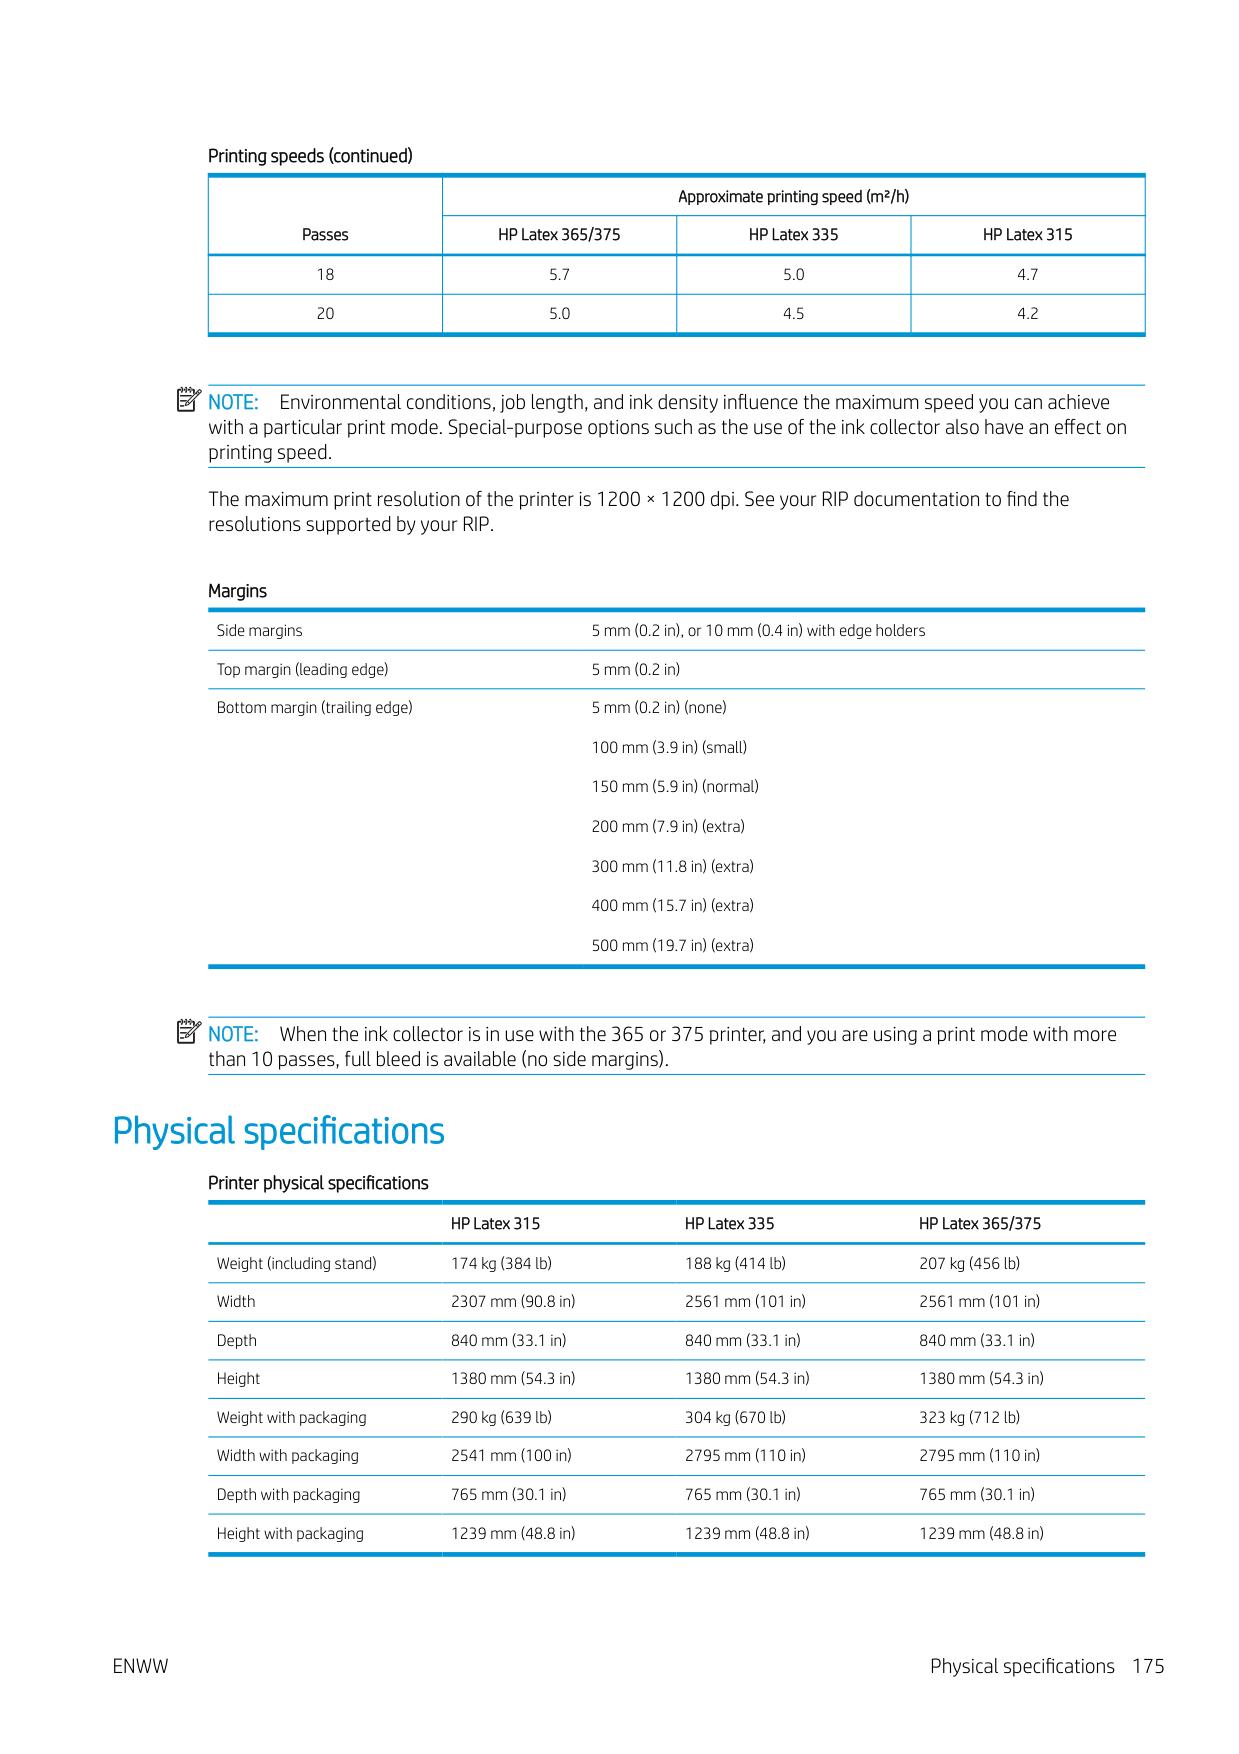
NOTE: Environmental conditions, job length, and ink density influence the maximum speed you can achieve with a particular print mode. Special-purpose options such as the use of the ink collector also have an effect on printing speed.
The maximum print resolution of the printer is 1200 × 1200 dpi. See your RIP documentation to find the resolutions supported by your RIP.
Margins Side margins 5 mm (0.2 in), or 10 mm (0.4 in) with edge holders Top margin (leading edge) 5 mm (0.2 in) Bottom margin (trailing edge) 5 mm (0.2 in) (none)
100 mm (3.9 in) (small) 150 mm (5.9 in) (normal) 200 mm (7.9 in) (extra) 300 mm (11.8 in) (extra) 400 mm (15.7 in) (extra) 500 mm (19.7 in) (extra)
| | |---|
NOTE: When the ink collector is in use with the 365 or 375 printer, and you are using a print mode with more than 10 passes, full bleed is available (no side margins).
Physical specifications
######## Printer physical specifications
HP Latex 315 HP Latex 335 HP Latex 365/375 Weight (including stand) 174 kg (384 lb) 188 kg (414 lb) 207 kg (456 lb) Width 2307 mm (90.8 in) 2561 mm (101 in) 2561 mm (101 in) Depth 840 mm (33.1 in) 840 mm (33.1 in) 840 mm (33.1 in) Height 1380 mm (54.3 in) 1380 mm (54.3 in) 1380 mm (54.3 in) Weight with packaging 290 kg (639 lb) 304 kg (670 lb) 323 kg (712 lb) Width with packaging 2541 mm (100 in) 2795 mm (110 in) 2795 mm (110 in) Depth with packaging 765 mm (30.1 in) 765 mm (30.1 in) 765 mm (30.1 in) Height with packaging 1239 mm (48.8 in) 1239 mm (48.8 in) 1239 mm (48.8 in)
ENWW Physical specifications 175
Memory specifications
Memory specifications Physical memory (DRAM) 1 GB Hard disk 16 GB
Power specifications
######## Single phase line specifications
######### HP Latex 365/375 HP Latex 335 HP Latex 315
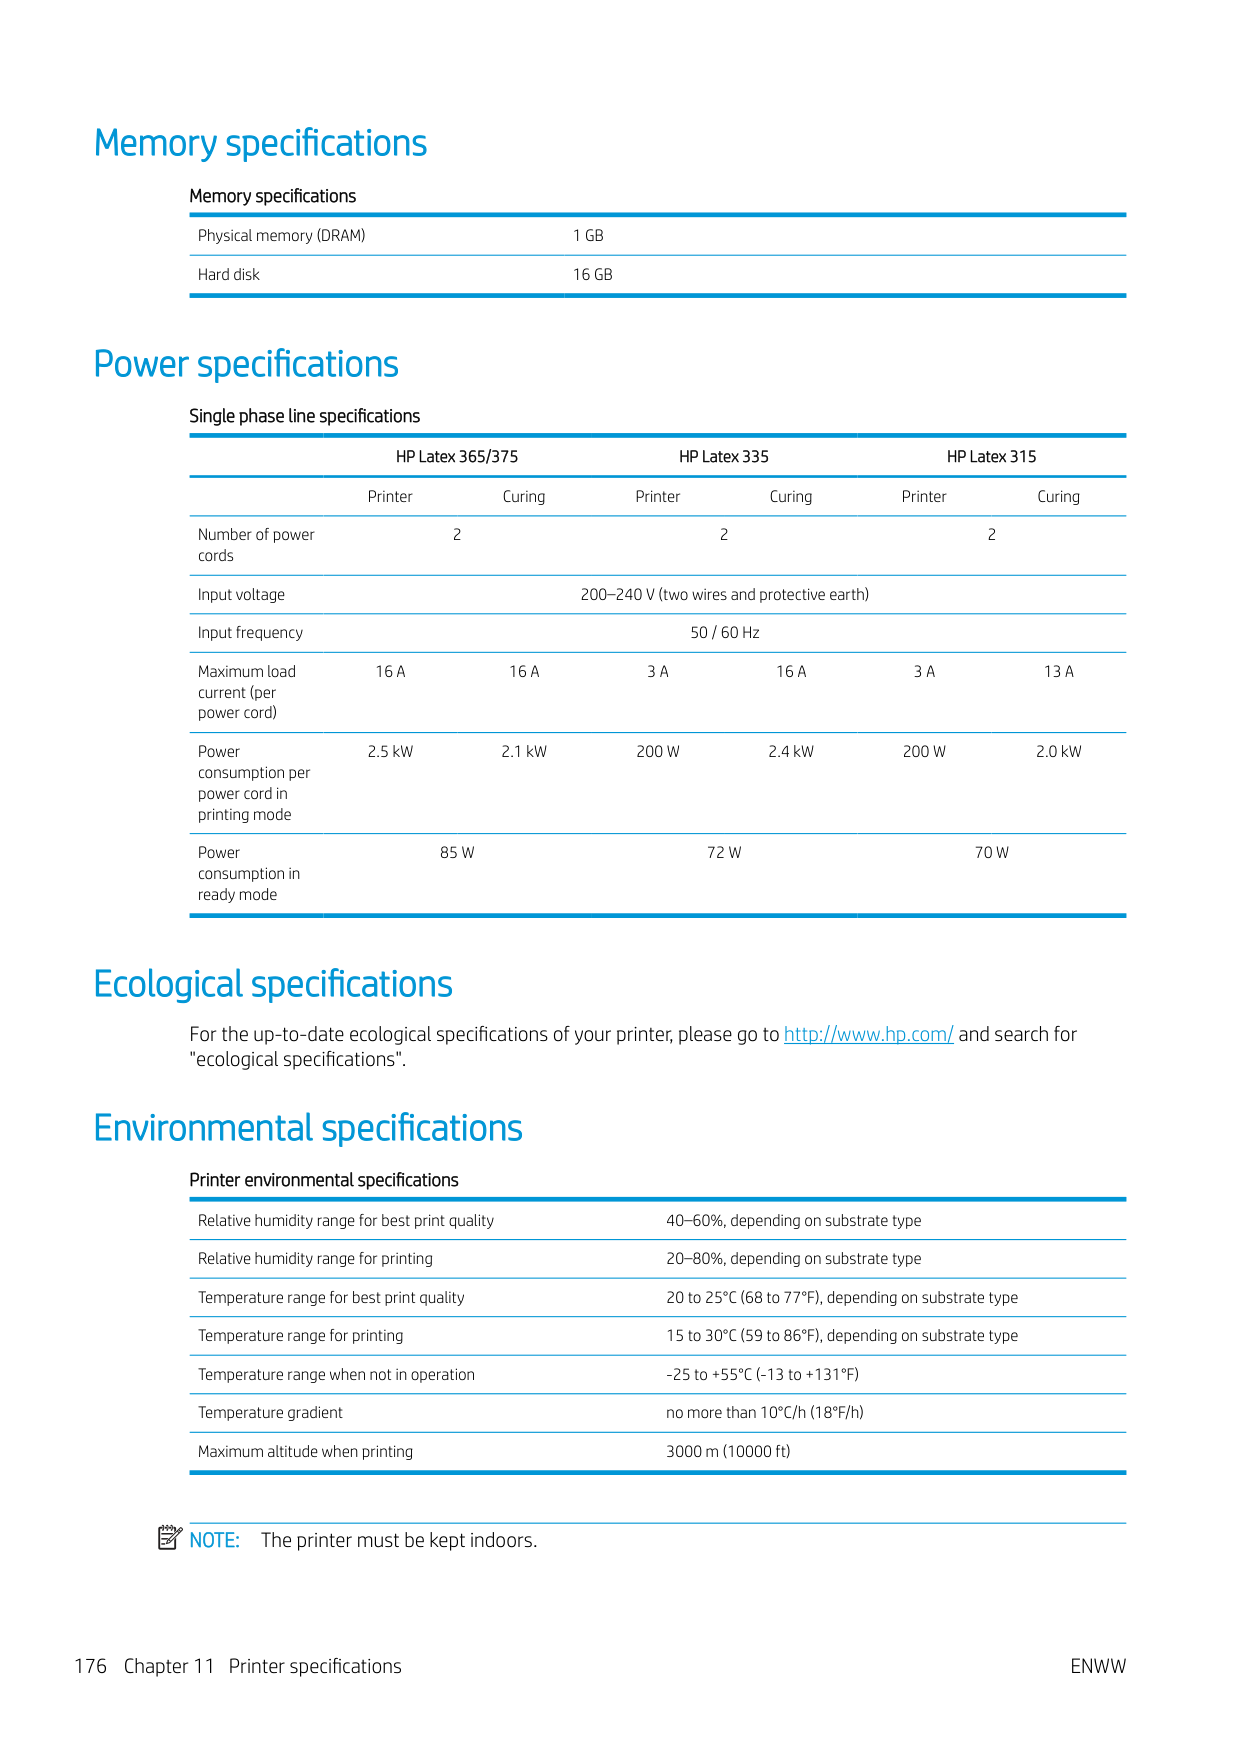
Printer Curing Printer Curing Printer Curing
Number of power cords
2 2 2
Input voltage 200–240 V (two wires and protective earth) Input frequency 50 / 60 Hz Maximum load current (per power cord)
16 A 16 A 3 A 16 A 3 A 13 A
Power consumption per power cord in printing mode
2.5 kW 2.1 kW 200 W 2.4 kW 200 W 2.0 kW
Power consumption in ready mode
85 W 72 W 70 W
Ecological specifications
For the up-to-date ecological specifications of your printer, please go to http://www.hp.com/ and search for "ecological specifications".
Environmental specifications
Printer environmental specifications Relative humidity range for best print quality 40–60%, depending on substrate type Relative humidity range for printing 20–80%, depending on substrate type Temperature range for best print quality 20 to 25°C (68 to 77°F), depending on substrate type Temperature range for printing 15 to 30°C (59 to 86°F), depending on substrate type Temperature range when not in operation -25 to +55°C (-13 to +131°F) Temperature gradient no more than 10°C/h (18°F/h) Maximum altitude when printing 3000 m (10000 ft)
| | |---|
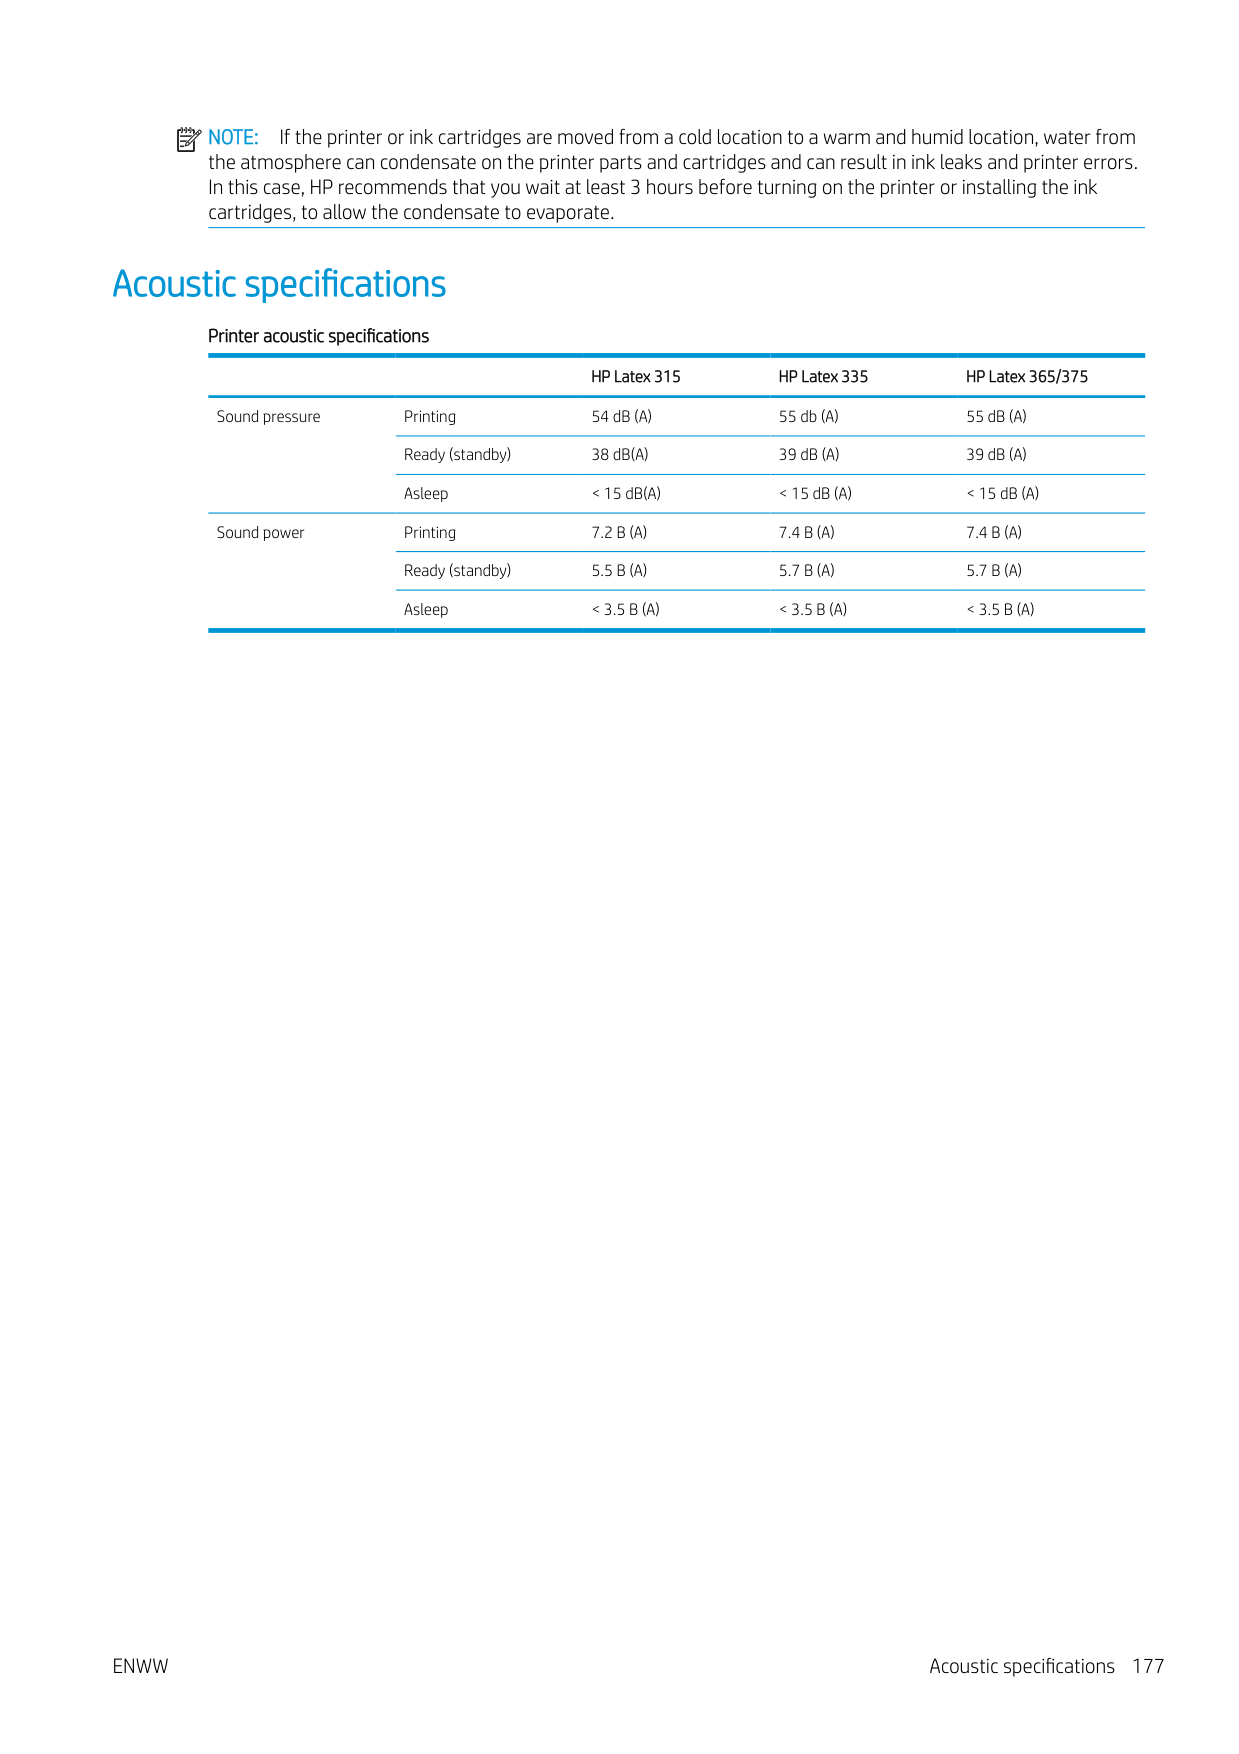
NOTE: The printer must be kept indoors.
| | |---|
NOTE: If the printer or ink cartridges are moved from a cold location to a warm and humid location, water from the atmosphere can condensate on the printer parts and cartridges and can result in ink leaks and printer errors. In this case, HP recommends that you wait at least 3 hours before turning on the printer or installing the ink cartridges, to allow the condensate to evaporate.
Acoustic specifications
######## Printer acoustic specifications
######### HP Latex 315 HP Latex 335 HP Latex 365/375
Sound pressure Printing 54 dB (A) 55 db (A) 55 dB (A) Ready (standby) 38 dB(A) 39 dB (A) 39 dB (A) Asleep < 15 dB(A) < 15 dB (A) < 15 dB (A)
Sound power Printing 7.2 B (A) 7.4 B (A) 7.4 B (A) Ready (standby) 5.5 B (A) 5.7 B (A) 5.7 B (A) Asleep < 3.5 B (A) < 3.5 B (A) < 3.5 B (A)
ENWW Acoustic specifications 177
A Summary of common printing problems
This is a table of common problems and the parameters that can be changed in order to solve the problem. Some possible side-effects are also shown. For a more detailed treatment of any particular problem, please see the relevant chapter in this guide.
|Problem|Parameter|Change|Possible side-effects| |---|---|---|---| |Durability problems, ink smudges, or oily finish|Curing temperature|Increase|Substrate jam, substrate damage, ink smears| |Durability problems, ink smudges, or oily finish|Number of passes|Increase|Slower printing| |Durability problems, ink smudges, or oily finish|Inter-path delay offset|Increase|Slower printing| |Substrate jam, substrate damage, ink smears|Curing temperature|Decrease|Less durability (smudges), oily finish| |Substrate jam, substrate damage, ink smears|Vacuum|Increase|Substrate skew, vertical banding if increased too much|
|Substrate jam, substrate damage, ink smears|Top and/or bottom margins|Increase|Waste of substrate| |Substrate jam, substrate damage, ink smears|Edge holders|Use|The minimum side margins increase slightly, reducing the maximum width of the printed image| |Vertical banding in saturated area fills|Ink limits|Decrease|Reduced color gamut| |Vertical banding in saturated area fills|Inter-path delay offset|Increase|Slower printing| |Vertical banding in saturated area fills|Number of passes|Increase|Slower printing| |Vertical banding in saturated area fills|Cutter|Disable|Manual substrate advance may be needed to avoid crashes with some substrates| |Vertical banding in saturated area fills|Group jobs together|Yes|Avoids white space between prints| |Vertical banding in saturated area fills|Modify the print queue|Avoid printing difficult jobs (using a lot of ink) at the beginning of the queue|Avoid printing difficult jobs (using a lot of ink) at the beginning of the queue| |Horizontal banding in saturated area fills|Ink limits|Decrease|Reduced color gamut| |Horizontal banding in saturated area fills|Inter-path delay offset|Increase|Slower printing| |Horizontal banding in saturated area fills|Number of passes|Increase|Slower printing| |Horizontal banding in saturated area fills|Modify color separations and dark color generation| | | |Horizontal banding in saturated area fills|Align printheads| | | |Horizontal banding in saturated area fills|Clean substrate-advance sensor| | | |Horizontal banding in saturated area fills|Clean printheads| | | |Vertical banding in low-to-medium area fills|Align printheads| | | |Vertical banding in low-to-medium area fills|Ink limits|Increase| |
|Problem|Parameter|Change|Possible side-effects| |---|---|---|---| | |Inter-path delay offset|Increase|Slower printing| | |Vertical correction|Activate|Grainy aspect| | |Take-up reel (335, 365, and 375)|Use| | | |Number of passes|Increase|Slower printing| | |Modify the print queue|Avoid printing difficult jobs (using a lot of ink) at the beginning of the queue|Avoid printing difficult jobs (using a lot of ink) at the beginning of the queue| | |Roll-back tension|Increase|Grain and/or horizontal banding may appear if too high| | |Warm up printer|Activate in RIP|Delays the start of printing, without reducing printing speed| |Coalescence graininess in low-tomedium area fills|Align printheads| | | |Coalescence graininess in low-tomedium area fills|Ink limits|Increase| | |Coalescence graininess in low-tomedium area fills|Inter-path delay offset|Increase|Slower printing|
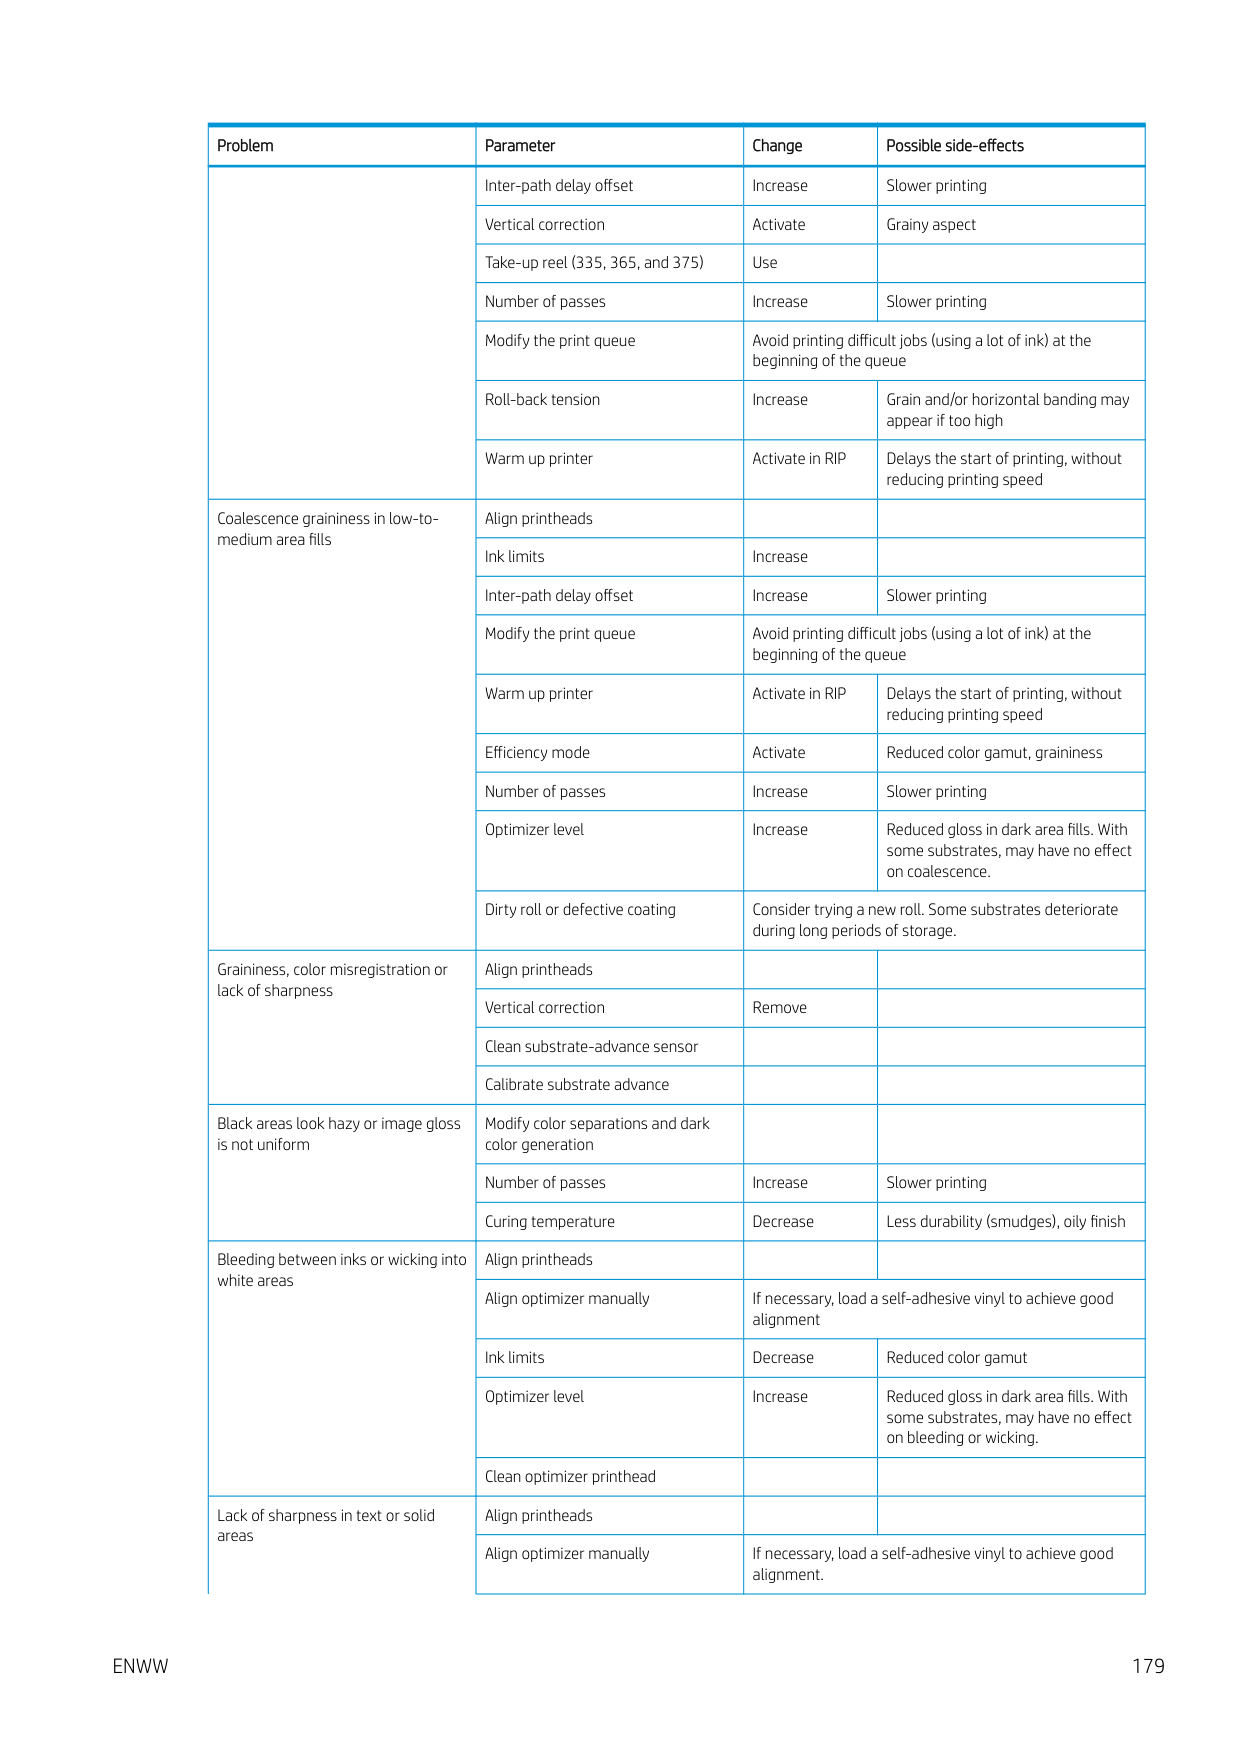
|Coalescence graininess in low-tomedium area fills|Modify the print queue|Avoid printing difficult jobs (using a lot of ink) at the beginning of the queue|Avoid printing difficult jobs (using a lot of ink) at the beginning of the queue| |Coalescence graininess in low-tomedium area fills|Warm up printer|Activate in RIP|Delays the start of printing, without reducing printing speed| |Coalescence graininess in low-tomedium area fills|Efficiency mode|Activate|Reduced color gamut, graininess| |Coalescence graininess in low-tomedium area fills|Number of passes|Increase|Slower printing| |Coalescence graininess in low-tomedium area fills|Optimizer level|Increase|Reduced gloss in dark area fills. With some substrates, may have no effect on coalescence.| |Coalescence graininess in low-tomedium area fills|Dirty roll or defective coating|Consider trying a new roll. Some substrates deteriorate during long periods of storage.|Consider trying a new roll. Some substrates deteriorate during long periods of storage.| |Graininess, color misregistration or lack of sharpness|Align printheads| | | |Graininess, color misregistration or lack of sharpness|Vertical correction|Remove| | |Graininess, color misregistration or lack of sharpness|Clean substrate-advance sensor| | | |Graininess, color misregistration or lack of sharpness|Calibrate substrate advance| | | |Black areas look hazy or image gloss is not uniform|Modify color separations and dark color generation| | | |Black areas look hazy or image gloss is not uniform|Number of passes|Increase|Slower printing| |Black areas look hazy or image gloss is not uniform|Curing temperature|Decrease|Less durability (smudges), oily finish| |Bleeding between inks or wicking into white areas|Align printheads| | | |Bleeding between inks or wicking into white areas|Align optimizer manually|If necessary, load a self-adhesive vinyl to achieve good alignment|If necessary, load a self-adhesive vinyl to achieve good alignment| |Bleeding between inks or wicking into white areas|Ink limits|Decrease|Reduced color gamut| |Bleeding between inks or wicking into white areas|Optimizer level|Increase|Reduced gloss in dark area fills. With some substrates, may have no effect on bleeding or wicking.| |Bleeding between inks or wicking into white areas|Clean optimizer printhead| | | |Lack of sharpness in text or solid areas|Align printheads| | | |Lack of sharpness in text or solid areas|Align optimizer manually|If necessary, load a self-adhesive vinyl to achieve good alignment.|If necessary, load a self-adhesive vinyl to achieve good alignment.|
####### ENWW 179
|Problem|Parameter|Change|Possible side-effects| |---|---|---|---| | |Color bars|Add, manually or in RIP|Some waste of substrate and ink| | |Color-variation and text-line correction|Apply|White areas may appear slightly different.| |Subtle color variations in solid areas|Color bars|Add, manually or in RIP|Some waste of substrate and ink| |Subtle color variations in solid areas|Color-variation and text-line correction|Apply|White areas may appear slightly different.|

Glossary
Airflow Air is blown through the printing zone to speed up the drying process.
Back tension The backwards tension applied to the substrate by the input spindle, which must be constant across the width of the substrate. Too much or too little tension may cause substrate deformation and print quality defects.
Bidirectional Bidirectional printing means that the printheads print while moving in both directions. This increases the speed of printing.
Bleeding A print-quality defect that occurs when the ink spreads on the substrate across areas of different colors.
Coalescence A print-quality defect that occurs when the ink coalesces on the substrate within an area of the same color.
Cockle A substrate condition in which it is not lying perfectly flat, but rises and falls slightly in shallow waves.
Color accuracy The ability to print colors that match the original image as closely as possible, given the fact that all devices have a limited color gamut and might not be able to match certain colors precisely.
Color consistency The ability to print the same colors in a particular print job, from print to print and from printer to printer.
Curing The substrate is heated in the curing zone to coalesce the latex, creating a polymeric film which acts as a protective layer, while at the same time removing the remaining co-solvents from the print. Curing is vital to ensure the durability of the printed images. Too high or too low a curing temperature may cause print quality defects.
Cutter A printer component that slides from left to right across the platen to cut the substrate.
Edge holder A metal piece designed to prevent the edge of the substrate from rising while printing is in progress.
ESD ElectroStatic Discharge. Static electricity is common in daily life. It is the spark when touching the car door, or the cling of clothing. Although controlled static electricity has some useful applications, uncontrolled electrostatic discharges are one of the main hazards to electronic products. Therefore, to prevent damage some precautions are needed when setting up the product, or handling ESD-sensitive devices. This type of damage may reduce the life expectancy of the device. One way to minimize uncontrolled ESDs, and therefore to reduce this type of damage, is by touching any exposed grounded part of the product (mainly metal parts) before handling ESD-sensitive devices, such as the printheads or ink cartridges. To reduce the generation of electrostatic charge in your body, try to avoid working in a carpeted area, keep your body movements to a minimum when handling ESD-sensitive devices, and avoid working in low-humidity environments.
Firmware Software that controls your printer's functionality and is stored semi-permanently in the printer (it can be updated).
Gamut The range of colors and density values reproducible on an output device, such as a printer or monitor.
HDPE High Density Polyethylene.
I/O Input/Output: this term describes the passing of data between one device and another.
ICC The International Color Consortium, a group of companies that have agreed on a common standard for color profiles.
Ink density The relative amount of ink that is deposited on the substrate per unit of area.
IP address A unique identifier that identifies a particular node on a TCP/IP network. It consists of four integers separated by dots.
LED Light-Emitting Diode: a semiconductor device that emits light when electrically stimulated.
Loading accessory A flexible plastic accessory that fits over the leading edge of the substrate while it is being loaded into the printer. Some substrates are difficult to load without this accessory.
Nozzle One of many tiny holes in a printhead through which ink is deposited onto the substrate.
OMAS The Optical Media Advance Sensor, otherwise known as the substrate-advance sensor. The sensor located in the print platen that tracks the substrate movement and increases its accuracy.
Passes The number of print passes specifies how many times the printheads will print on the same area of substrate. A higher number of passes tends to improve print quality and printhead health, but reduces the speed of printing.
PC Polycarbonate.
PE Polyethylene.
PET Polyethylene Terephthalate (polyester).
PLA Polylactic Acid.
Platen The flat surface within the printer over which the substrate passes while it is being printed on.
PP Polypropylene.
Printhead A removable printer component that takes ink of one or more colors from the corresponding ink cartridge(s) and deposits it on the substrate, through a cluster of nozzles.
PVC Polyvinyl Chloride.
Spindle A rod that supports a roll of substrate while it is being used for printing.
182 Glossary ENWW
Substrate A thin, flat material designed to be printed on, made of paper or other materials.
###### Substrate preset
The substrate preset contains the ICC color profile, which describes the color characteristics of the substrate. It also contains information about other characteristics (RIP and printer settings, such as drying and curing temperatures, vacuum pressure, and substrate-advance compensation) and requirements of the substrate that are not directly related to color.
Substrate-advance compensation A slight adjustment to the amount of substrate advance between print passes, to compensate for the characteristics of different substrate types. The printer normally performs this adjustment automatically, but may need to be recalibrated for substrates not supported by HP, or for an unusual ambient temperature or humidity. Incorrect substrate-advance compensation may cause banding with fewer than 8 passes, or graininess with 8 passes or more.
Substrate-advance sensor The sensor located in the print platen that tracks the substrate movement and increases its accuracy. Also known as OMAS (Optical Media Advance Sensor).
Tension bar A cylindrical weight inserted into the loop of substrate required by the take-up reel.
Vacuum pressure The substrate is held flat against the platen by vacuum suction. Too much or too little suction may cause print quality defects. Too little suction may also cause a substrate jam or damage the printheads.
Index
order 162 accounting 27 acoustic specifications 177 alerts
by email 26 altitude 14 application hangs up 165 audio alerts on/off 14

color 99 cannot load substrate 80 carriage rod
clean and lubricate 151 caution 6 color calibration 99 color consistency 104 color consistency between printers
103 color profiles 103 communication problems 166 components of printer 8 connect the printer
connection method 28 general 28
connect to the Internet 30 curve deformation 85 Customer Care 38 Customer Self Repair 39 cutter
disable 98 cutter does not work 86
access 23 cannot access 164 ink system status 26 language 24
encoder strip clean 153 environmental specifications 176
language 13 front view 9 front-panel error codes 167 front-panel options
adjust substrate advance 96, 114 adjustments 96 allow EWS 164 audio alert 14 auto printhead alignment 135 change loaded substrate 62 clean printheads 135 connectivity wizard 30, 166 curing standby duration 14 cutter 86, 98 date and time options 13 enable narrow substrate 52, 63
enable take-up reel 86 extra bottom margin 19, 83, 84 extra top margin 19, 83, 84 feed and cut 79 file system check 17 form feed and cut 78 internal prints 19 language 13 load 52 load roll 52 manual printhead alignment 136 max skew setting 62 modify configuration 164 move substrate 77 network information 164 print connectivity config. 166 print usage report 19 printer logs 172 replace ink cartridges 131 replace PH cleaning kit 148 replace printheads 137 reset EWS password 24 restore factory settings 14 select altitude 14 select display contrast 14 sleep mode wait time 13, 14 speaker volume 14 substrate advance calib 114 substrate unload 78 take-up reel 69, 76 unit selection 14 unload 68 unload substrate 68 use loading accessory 59 view printer information 38

functional specifications 174
about 126 cannot insert 134 maintenance 130 non-HP 133 ordering 160 refill 133 replace 130 specification 174 status 15
ink collector 55 ink system status 26 ink system tips 130 internal prints 19 Internet connection 30
troubleshooting 166 IP address 33 IP address, set manually 164 IPv6 29 IPV6 settings 33
about 127 cannot insert 151 replace 148
maintenance, service 157 manuals 3 margins
changing 19

memory specifications 176 mobile app 20
advanced 30 network troubleshooting 31 networks
link speed 35 protocols 32 security settings 35 non-HP ink cartridges 133
about 126
order accessories 162 ink cartridges 160 printhead cleaning kit 162 printheads 161
clean 154 porous substrates 46 power specifications 176 print quality, improve 109 print-quality problems
black areas look hazy 119 color variation 118 general 108 graininess 115 horizontal banding 115 ink smears 119 ink smudges 120 misaligned colors 117 oily ink 120 text-line correction 118 tiling 121 uneven area fill 120 vertical banding 116 wrong size 120
printer
clean 156 move 156 store 156
Printer Data Sharing Agreement 24 printer does not print 164 printer logs 172 printer models 2 printer states 18 printer status 26 printer usage statistics 27 printer's main components 8 printer's main features 2
printhead about 126 align 135 alignment status plot 112 cannot insert 143 clean 134 cleaning connections 144 optimizer check plot 110 ordering 161 recover 134 replace 137 reseat 137 specification 174 status 16 status plot 109

printing delays 18 printing faster 98 printing speeds 174 protocols, network 32 Proxy Server settings 34
network settings 35 service information print 39 service maintenance 157 sleep mode wait time 14 slow printing 165 specifications
acoustic 177 ecological 176 environmental 176 functional 174 hard disk 176 ink supplies 174 margins 175 memory 176 physical 175 power 176
ENWW Index 185
printing speeds 174 substrate size 174
straightness optimization 85 substrate
advance 113 assisted manual load 63 bow deformation 85 cannot load 80 categories 43 change settings while printing 96 check path 82 displaying information 78 edge holders 65 edge position, change 79 expansion 84 feed and cut 79 ink collector 55 jam 81 jam, take-up reel 86 length tracking 79 load 52 load cut sheet 67 load onto spindle 47 loading accessory 59 manual load 63 mispositioned 81 overview 42 porous 46 print on both sides 77 shrinkage 84 sizes (max & min) 174 sticky 86 storage 80 take-up reel 69 tips 42 unload 68 width, change 79 wrinkled 84
substrate presets 89 clone 92 create 94 delete 98 generic 92 HP Media Locator 91 modify 93 online search 89
substrate-advance adjustment 113 substrate-advance check plot 113 substrate-advance sensor window
clean 155 support services HP Customer Care 38
doesn't rewind 86 jam 86 motor 10 using 69
TCP/IP settings 32 telephone number 39 telephone support 38 tension bar 69 tiling 104 time before standby 14 turn the printer on/off 36
W warning 6 warning labels 6 welcome to your printer 2