
HP Samsung Proxpress SL M4020 Laser Printer Series
Ask AI
— answers from the official manualAnswers from the official manual.
Common questions
Common Questions
9 totalHow do I create a new scan profile in Easy Printer Manager?
Navigate to the Scan to PC Settings tab. Click Add and then type a name for your profile; click OK, make any necessary adjustments, and finally click Save.
What is required to enable email alerts in Easy Printer Manager?
To set up email alerts, go to Alert Settings > Email Alert. Enable the On option under Status Setup, provide server information and enter valid email addresses, then click Send Test E-mail button.
Is it possible to add a watermark when scanning using Easy Printer Manager?
To enable watermarks during scans, go to Scan to PC Settings > Image tab and check Watermark. Select either Text or Image type of watermark, configure settings according to your needs and save.
How do I troubleshoot a printer error using Easy Printer Manager?
In the contents area, click Troubleshooting to open another window with information related to the current device error. Then, click 'Troubleshooting Guide' in the pop-up to see more detailed information about resolving the specific issue.
What does a warning icon indicate on the Easy Printer Manager interface?
A warning icon indicates that the device is in a state where an error may occur in the future. For example, it might be showing toner low status.
How can I add devices to Easy Printer Manager's printer list?
Use the Add button on the home page and select one of three discovery methods: Broadcast to find all network-connected printers, IP Address for specific device lookup by IPv4 address, or IP Range to search within a subset of IPv4 addresses.
Full Manual
17 pages
Samsung Laser Printers – Easy Printer Manager (White paper)

###### Table of Contents
How to use this guide 2 Intended audience 2 Terminology used in this guide 2 Acronyms 2 Product support information 2
Introduction 3 Benefits of using Easy Printer Manager (EPM) 3 Easy Printer Manager overview 3
###### Easy Printer Manager 4
Layout of the User Interface (UI) 4 Page overview 4 Application Information overview 4 Contents Area overview 5
Advanced Settings 6 Advanced Settings overview 6 Layout of the Advanced Settings UI 6
Page overview 6 Application Information overview 7 Icon overview 8
Incompatible Devices 9 Saving Settings 9 Device Discovery 9 Home 10
Ordering Supplies 10 Device Settings 10 Scan to PC Settings 12
Scan to PC overview 12 Scan profiles 12
Fax to PC Settings 16 Alert Settings 16 Job Accounting 17
How to use this guide
The Easy Printer Manager User Guide is intended to be used to learn how to use the Easy Printer Manager application. To assist you in acclimating to the EPM environment, this guide provides instructional screen images, easy-to-read tables, and step-by-step instructions where necessary. The chapters of this guide are arranged according to the page view, moving from left to right and top to bottom. Each main menu’s and submenu’s functionality and screen layout is described in detail to ensure a complete understanding of the environment.
#### Intended audience
The expected user for this guide is a general user or the device/network manager in a small business environment.
Terminology used in this guide The following terms are used throughout this guide in examples, instructions, and descriptions:
||Term| |---|
|Meaning| |---|
|Main Menu| |---|
|Refers to the primary list of options located at the top of the screen in the application. The sub-menu options available will vary based on the main menu selection.| |---|
|Sub-Menu| |---|
|Refers to the options available after selecting a main menu option. The information presented in the contents area will vary based on this selection.| |---| | |---|
Acronyms The following acronyms are used throughout this guide in examples, instructions, and descriptions:
||Acronyms| |---|
|Meaning| |---|
|BOOTP|
|---|
|Bootstrap Protocol| |---|
|DHCP| |---|
|Dynamic Host Configuration Protocol| |---|
|IP| |---|
|Internet Protocol| |---|
|IPv4| |---|
|Internet Protocol version 4 Address| |---|
|IPv6| |---|
|Internet Protocol version 6Address| |---|
|LCD| |---|
|Liquid Crystal Display| |---|
|SMTP| |---|
|Simple Mail Transfer Protocol| |---|
|SNMP| |---|
|Simple Network Management Protocol| |---| | |---|
Product support information Contact Samsung’s printer service: http://www.samsungprinter.com
Introduction
This chapter gives an overview of Easy Printer Manager (EPM) including major features and benefits. This will include the basic UI and the advanced UI.
This chapter includes:
Benefits of using Easy Printer Manager (EPM) With Easy Printer Manager (EPM), you can perform the following tasks:
#### Easy Printer Manager overview
Easy Printer Manager (EPM) is a Windows-based application that combines Samsung device settings into one location. EPM combines device settings as well as printing/scanning environments, settings/actions, scan2pc, fax2pc, and launching applications. These features provide a gateway to conveniently use Samsung devices.
Easy Printer Manager provides two different user interfaces for the user to choose from: the default user interface and the advanced settings user interface. Switching between the two interfaces is easy: just click a button. The default UI is primarily used for monitoring purposes by general device users (see Easy Printer Manager). The advanced settings UI is used by the network or printer manager to adjust a multitude of device settings on network or local devices from one application (see Advanced Settings).
Easy Printer Manager This chapter gives an overview of the Easy Printer Manager (EPM) default user interface and its features. This chapter includes:
• Layout of the User Interface
#### Layout of the User Interface (UI)
This section describes the EPM user interface to familiarize you with the application’s layout. This interface is intended to be used by general device users in a small business or small home office environment.
Page overview The EPM interface is comprised of four basic sections as described in the following table:
||Area| |---|
|Description| |---|
|Application Information| |---|
|Includes links for changing to the advanced UI, Help, and About.| |---|
|Contents Area| |---|
|Displays information about the selected device, supplies, paper, and quick links. The information will vary based on the printer selected.| |---|
|Quick Links| |---|
|Displays “quick links” to device specific functions. This section also includes links to applications in the advanced settings UI’s.| |---|
|Printer List| |---|
|Includes lists of all active and inactive local or network devices.| |---| | |---|
##### Application Information overview
The following are menu items that provide basic information about EPM.
||Refresh Click to refresh the device information.| |---|---| ||Preference Click to open the preference dialog for EPM.| ||Help Click to open the offline help file.| ||About Click to open the EPM information window.|
Contents Area overview The contents area displays device information about the selected printer, toner and paper information, and quick links to device functionalities.
||Area| |---|
|Description| |---|
|Device Information| |---|
|Displays an image of the printer and the printer’s model name, IP address, status, and current LCD message.| |---|
|Supplies Information| |---|
|Displays toner information for the selected printer.| |---| | |---|
Advanced Settings
This chapter gives an overview of the Easy Printer Manager (EPM) advanced settings user interface and its features.
This chapter includes:
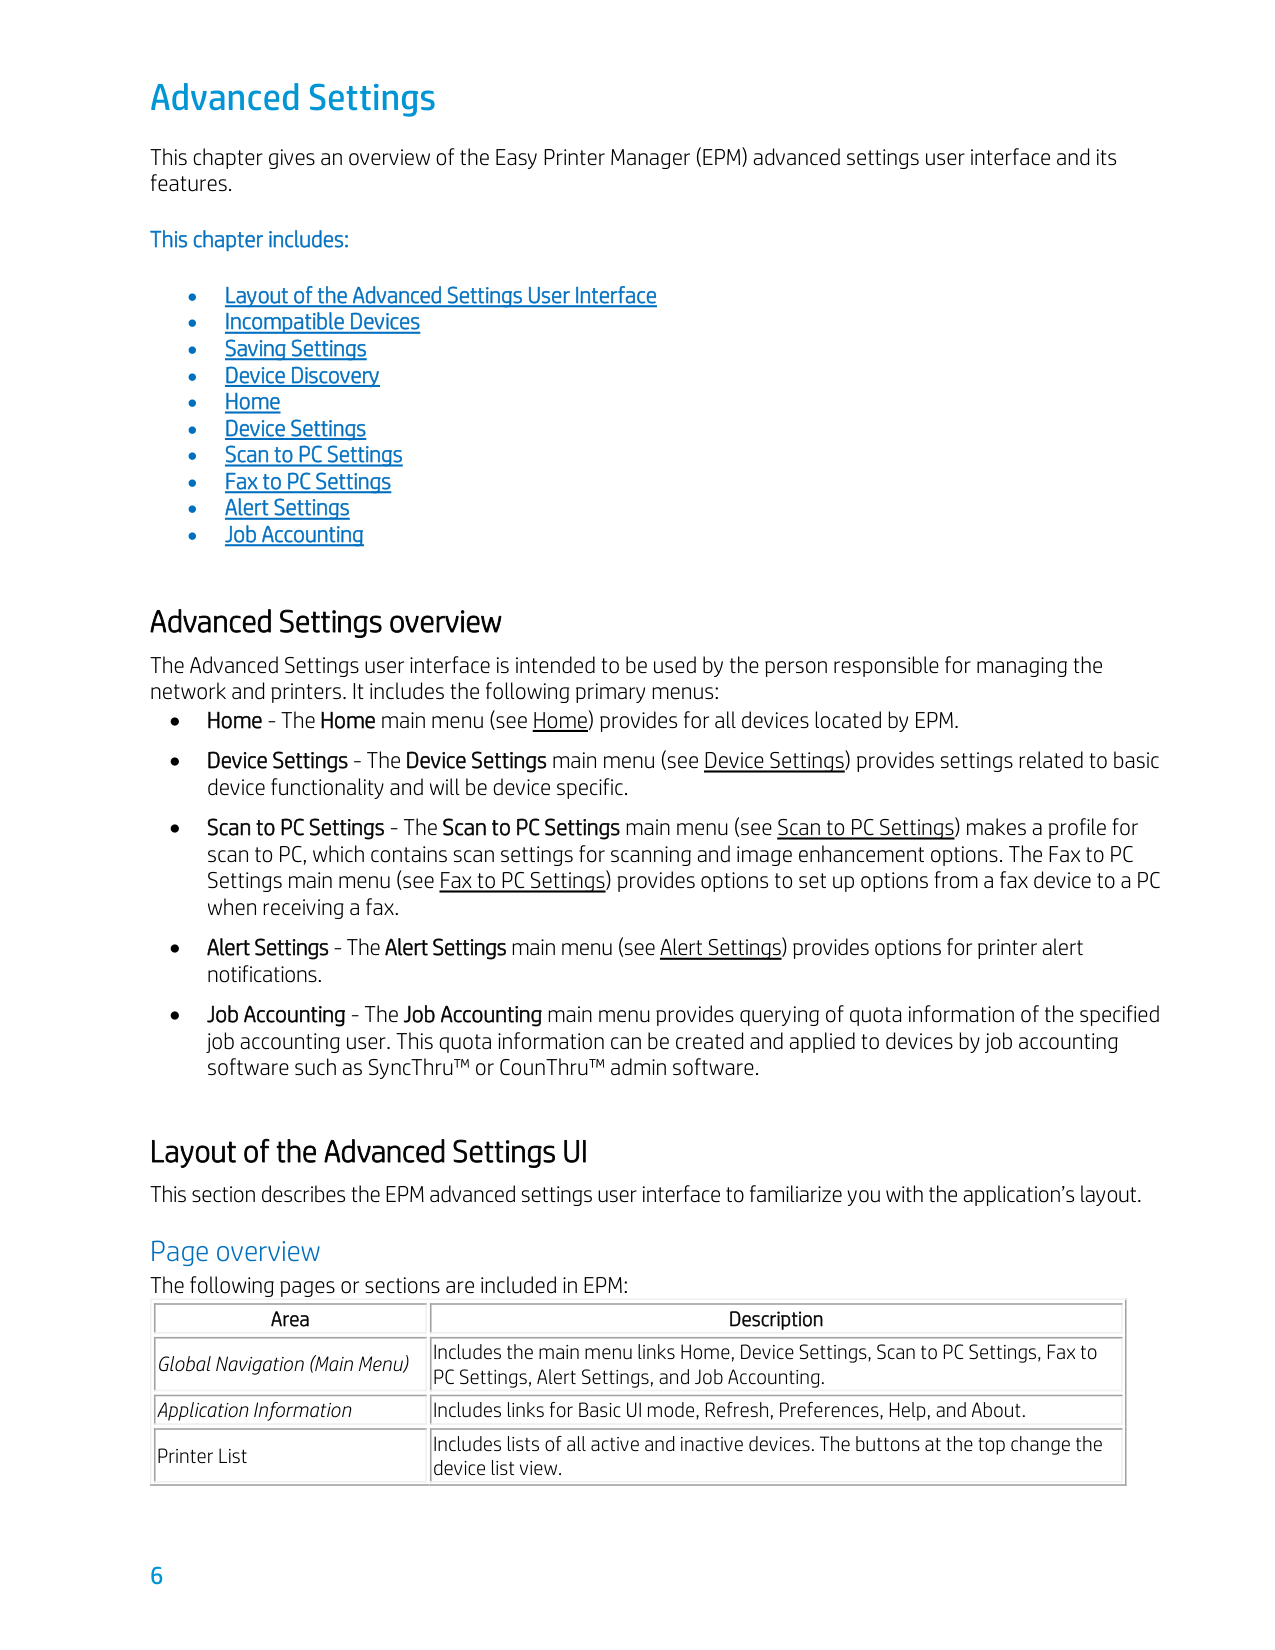
#### Advanced Settings overview
The Advanced Settings user interface is intended to be used by the person responsible for managing the network and printers. It includes the following primary menus:
Layout of the Advanced Settings UI This section describes the EPM advanced settings user interface to familiarize you with the application’s layout.

Page overview The following pages or sections are included in EPM:
||Area| |---|
|Description| |---|
|Global Navigation (Main Menu)| |---|
|Includes the main menu links Home, Device Settings, Scan to PC Settings, Fax to PC Settings, Alert Settings, and Job Accounting.| |---|
|Application Information| |---|
|Includes links for Basic UI mode, Refresh, Preferences, Help, and About.| |---|
|Printer List| |---|
|Includes lists of all active and inactive devices. The buttons at the top change the device list view.| |---| | |---|
||Area| |---|
|Description| |---|
|Contents Area| |---|
|Displays information about devices, sub-menus, and settings. The information will vary based on the main menu selection.| |---| | |---|
NOTE: Layout style depends on the menu selected. These sections include the following menu options:
Application Information overview The following menu items provide basic information about EPM:
||Area| |---|
|Description| |---|
|Options|
|---|
|Tray Icon settings| |---|
|Tray icon settings is used to configure which items are displayed in the menu of tray icon of EPM.| |---|
|• Samsung Easy Printer Manager: Launches EPM.
• Order Supplies: Launch Order Supplies.
• Alert List: Launch Alert List.
• Smart Screen Print: Launch Smart Screen Print.
| |---|
|Save button| |---|
|Click to save the settings.| |---|
|NA| |---|
|Cancel button| |---|
|Click to cancel any changes made.| |---|
|NA| |---|
| |---|
||Area| |---|
|Description| |---|
|Add button| |---|
|Click to discovery devices (see Device Discovery).
| |---|
|Delete button| |---|
|Click to remove the selected device from the device list.| |---| | |---|
||Area| |---|
|Association| |---|
|Description| |---|
|Scan| |---|
|Click this button to open the scan application.| |---|
|Fax| |---|
|Click this button to open the fax application.| |---|
|ECM| |---|
|Click this button to open the Easy Color Manager.| |---|
|SyncThru| |---|
|Click this button to open SyncThruTM Web Service.| |---|
|Printer web| |---|
|Click this button to open web link for printer’s details.| |---|
|| |---|
|| |---|
|| |---|
|| |---|
|| |---| | |---|
Icon overview The following tables show icons/buttons used in EPM and their meanings:
Button Icons These icons display on buttons throughout EPM.
||Icon| |---|
|Name| |---|
|Description| |---|
|Refresh| |---|
|Refresh the information in the corresponding area with this button.| |---|
|Add| |---|
|Adds a new scan profile.| |---|
|Subtract| |---|
|Removes a scan profile.| |---|
|| |---|
|| |---|
|| |---| | |---|
Device Status Icons These icons display in the Printer List area in the Printer Information part of the Home page’s contents.
||Icon| |---|
|Name| |---|
|Description| |---|
|Normal| |---|
|The device is in ready mode and experiencing no errors or warnings.| |---|
|Warning| |---|
|The device is in a state where an error might occur in the future. For example, it might be in toner low status, which may lead to toner empty status.| |---|
|Error| |---|
|The device has at least one error.| |---|
|Off/ Disconnected| |---|
|The device is turned off or experiencing connection problems.| |---|
|| |---|
|| |---|
|| |---|
|| |---| | |---|
#### Incompatible Devices
Not all devices are compatible with EPM. If a device is not compatible with the protocols used in EPM, warning message will display in the contents area.
If this page is encountered from the Device Settings menu, the Link to Program button will open SyncThru™ Web Service if the device is a network device and to Printer Settings Utility (PSU) (if installed) if the device is a local device. If this page is encountered from the Scan to PC Settings menu, the Link to Program button will open Scan Assistant. If this page is encountered from the Fax to PC Settings menu, the Link to Program button will open the fax application.
Saving Settings Located at the bottom of every main menu’s page are a Save button and a Default button. To save any setting changes made, click the Save button; to restore the device’s default settings, click the Default button. To save changes or restore defaults, you are required to login if the SWS ID is locked. Device Discovery
Before you can take advantage of the benefits offered by EPM, you must add devices to the device list. EPM offers three types of device discovery:
Find the printer using Broadcast The broadcast method of device discovery will search the entire network for connected devices. Follow these steps to use this method:
NOTE: If an error occurs while trying to connect to a device, error window will display. Click OK to close the window and check the printer. The window will close automatically after printers are added.
Find the printer using IP Address (IPv4) The IP Address method of device discovery will search the entire network for the given IP address. Follow these steps to use this method:
NOTE: If an error occurs while trying to connect to a device, error window will display. Click OK to close the window and check the printer. The window will close automatically after printers are added.
Find the printer using IP Range The IP range method of device discovery will search the given range of IPv4 addresses for devices. Follow these steps to use this method:
NOTE: If an error occurs while trying to connect to a device, error window will display. Click OK to close the window and check the printer. The window will close automatically after printers are added.
#### Home
The Home menu displays basic information about the device. This includes information about the device itself, supplies, paper, and the network.
Ordering Supplies To order supplies, follow these steps:
#### Device Settings
The Device Settings main menu includes sub-menu items used to adjust settings concerning the basic operation of the device. Users can confirm settings in EPM; administrators can make changes to settings.
If the SyncThru™ Web Services homepage is not locked to admin, users can also make changes to settings without authentication. The settings presented under Device Settings in EPM™ vary depending on the specific device. Refer to the device’s manual for information on settings and available options.
Machine The Machine sub-menu offers settings related to hardware and display settings.
Paper The Paper sub-menu contains options related to paper type and tray usage. The information in this section will vary based on the trays available on your device. Includes the following sub-menus:
Layout The Layout sub-menu includes options related to page orientation and margin settings.
Graphic The Graphic sub-menu includes options related Graphic settings like resolution, darkness etc.

Emulation The Emulation sub-menu provides settings related to various printer emulation settings. The options available in this section will vary based on the printer emulation selected.
• Memory Information – This section provides information related to the device’s hard drive.
Copy The Copy sub-menu contains settings related to a copy job’s default settings.
Fax The Fax sub-menu contains settings related to the fax device’s default settings. Includes the following submenus:
Scan The Scan sub-menu contains options related to default scan settings.
Address Book The Address Book sub-menu provides a way to store and manage fax numbers and email addresses of recipients. Includes the following sub-menus:
Print Info The Print Info sub-menu provides a way to print lists of the devices supported emulated fonts and will vary based on the selected device.
#### Scan to PC Settings
The Scan to PC Settings main menu includes tabs used to create or delete scan to PC profiles. General users and administrators can make new profiles.
Scan to PC overview The Scan to PC Settings options are used to create or edit Scan to PC profiles. The contents section of the Scan to PC Settings screen contains two tabs: Basic and Image: The Basic tab will be used to adjust the scanner’s settings while the Image tab will be used to adjust the Scan to PC profile. Upon clicking on Save, the user will be prompted for an ID and password. This ID and password are used to create user IDs for the device. Users can then select a user ID on the device’s LCD and, if authenticated, scanning will begin.
||Information| |---|
|Description| |---|
|Scan Activation| |---|
|This setting determines whether scanning is enabled on the device.| |---|
|Profiles| |---|
|This section displays the scanning profiles saved on the selected device.| |---|
|Basic tab| |---|
|The Basic tab contains settings related general scan and device settings.| |---|
|Image tab| |---|
|The Image tab contains settings related to image altering.| |---|
|Save button| |---|
|Click the Save button to save any changes made to settings. Login is required to save changes.| |---|
|Default button| |---|
|Click the Default button to return the settings to the system defaults.| |---| | |---|
Scan profiles
Profiles are settings pre-configured with a specific scan type in mind.
||Information| |---|
|Description| |---|
|Profiles| |---|
|This section displays the scanning profiles saved on the selected device.| |---|
|Click this button to move the selected profile upwards| |---|
|Click this button to move the selected profile downwards| |---|
|Add button| |---|
|Click this button to create a new profile.| |---|
|Delete button| |---|
|Click this button to delete the selected profile.| |---|
|| |---|
|| |---| | |---|
Creating a New Profile To create a new profile, follow these steps:
Deleting a Profile To delete a saved profile, follow these steps: NOTE: ‘Default’ cannot be deleted.
Basic tab The Basic tab contains options related to creating a scan to PC profile.
Image tab The Image tab contains settings related to image manipulation and quality including the following options:
Image Enhancement The Image Enhancement section contains settings related to the image’s quality and color.
||Setting| |---|
|Description| |---|
|De-screen| |---|
|This option is used to eliminate moiré (dotted or striped) patterning in a scanned image.| |---|
|Fringe Removal| |---|
|This option is used to remove fringes (visual noise) from the scanned image.| |---|
|Auto Exposure| |---|
|This option is used to automatically adjust the scanned image’s lighting exposure.| |---|
|Auto Color Balance| |---|
|This option is used to automatically adjust the intensity of the scanned image’s colors.| |---|
|Background Removal| |---|
|This option is used to remove un-necessary background coloring. This can be done automatically or manually (based on percentage) with the slider or up/down arrows.| |---| | |---|
Image Adjustment The Image Adjustment section contains options related to the scanned image’s orientation and sizing.
||Option| |---|
|Description| |---|
|Options| |---|
|Auto Crop| |---|
|If selected, the scanned image will automatically be cropped.| |---|
|N/A| |---|
|Auto Straighten| |---|
|If selected, the scanned image will be aligned to 90 degrees vertically automatically.| |---|
|N/A| |---|
| |---|
||Option| |---|
|Description| |---|
|Options| |---|
|Auto Rotation| |---|
|If selected, the scanned image will be rotated based on the selection.| |---|
|• Auto - Rotates the image based on any text found in the image.
• Portrait/Landscape - Rotates the image from one to the other.
| |---|
|Blank Page Detection| |---|
|If selected, when multiple pages are being scanned, the scanner will detect a blank page and perform the selected action.| |---|
|• Delete Page - Blank pages will be deleted.
• b - Blank pages will be used to separate scanned pages into separate files.
| |---|
|Watermark| |---|
|If selected, a watermark will be added to the scanned image.| |---|
|See Adding a Watermark.
| |---|
| |---|
######## Adding a Watermark Two kinds of watermarks can be added to scanned images: Textual or graphic.
||Setting| |---|
|Description| |---|
|Options| |---|
|Text| |---|
|Selecting this will enable the options for a textual watermark.| |---|
|N/A| |---|
|Textbox/Pulldown menu| |---|
|The textbox/pull-down menu holds the saved watermark text and allows for entry of new watermark text.| |---|
|User entered.| |---|
|Add Button| |---|
|Clicking on this button saves the typed text to the list of watermark text.| |---|
|N/A| |---|
|Delete Button|
|---|
|Clicking on this button removes the selected text from the list of watermark text.| |---|
|N/A| |---|
|Font| |---|
|A pull-down menu to select the font used for the watermark.| |---|
|Varies based on system fonts.| |---|
|Size| |---|
|A pull-down menu to select the font size used for the watermark.| |---|
|Varies based on system settings.| |---|
|Color| |---|
|A pull-down menu to select the color used for the watermark.| |---|
|Varies.| |---|
|Style| |---|
|A pull-down menu to select the text’s style.| |---|
|• Normal
• Bold
• Italic
• Bold Italic
| |---|
|Opacity| |---|
|A pull-down menu to select to select how light/dark the watermark will be.| |---|
|• 0 Lightest (not visible)
• 10
• 20
• 30
• 40
• 50
• 60
• 70
• 80
• 90
• 100 Darkest
| |---| | |---|
||Setting| |---|
|Description| |---|
|Options| |---|
|Angle| |---|
|A pull-down menu to select at what angle the watermark will display on the scanned image.| |---|
|• Horizontal - The watermark will be at a 0-degree angle horizontally across the image.
• Vertical - The watermark will be at a 180-degree angle vertically across the image.
• Defined - The watermark will be slanted at the selected angle across the image.
| |---|
|Image| |---|
|Select this will enable the options for a graphic watermark.| |---|
|N/A| |---|
|... button| |---|
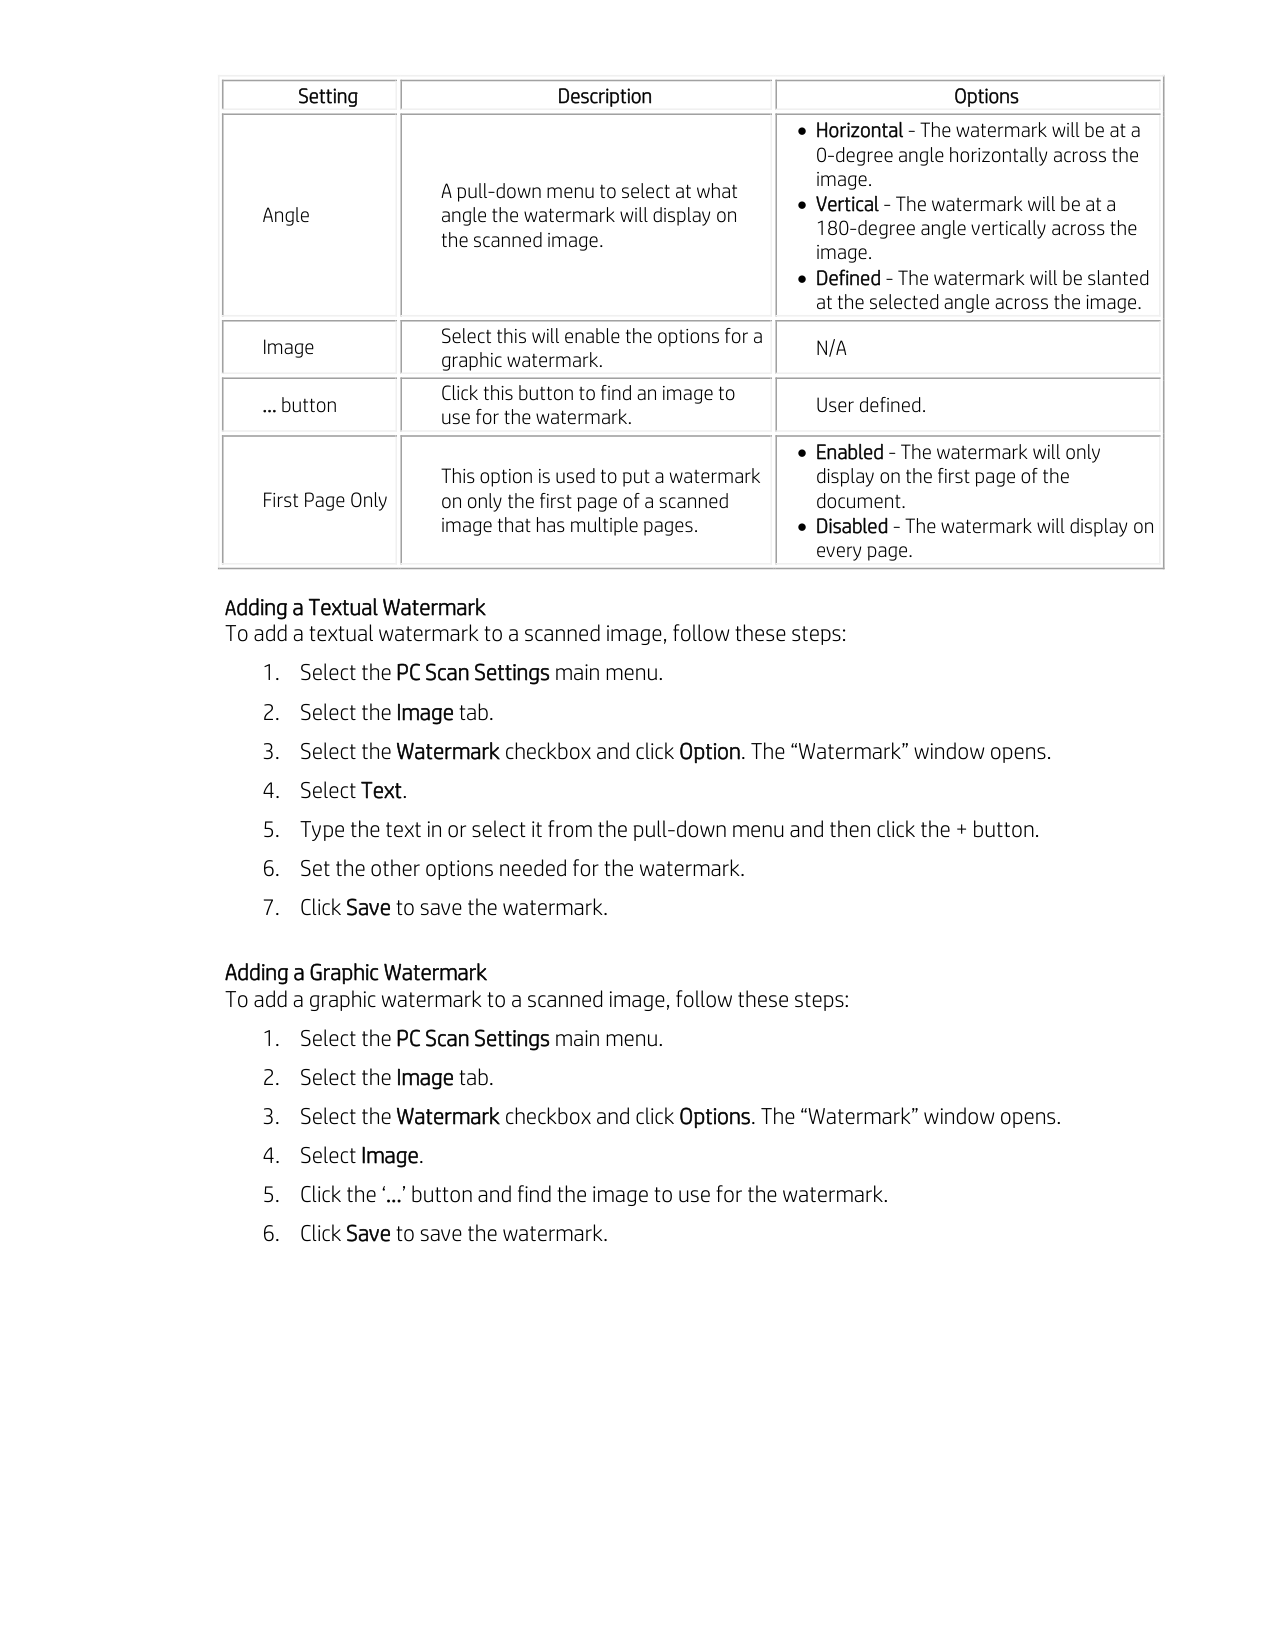
|Click this button to find an image to use for the watermark.| |---|
|User defined.| |---|
|First Page Only| |---|
|This option is used to put a watermark on only the first page of a scanned image that has multiple pages.| |---|
|• Enabled - The watermark will only display on the first page of the document.
• Disabled - The watermark will display on every page.
| |---|
| |---|
Adding a Textual Watermark To add a textual watermark to a scanned image, follow these steps:
Adding a Graphic Watermark To add a graphic watermark to a scanned image, follow these steps:
Fax to PC Settings The Fax to PC Settings main menu includes settings related to the basic fax functionality of the selected device.
Overview The Fax to PC Settings options are used to adjust the options for a fax to PC profile. The contents section of the Fax to PC Settings screen contains two options: Disable and Enable Fax Receiving from Device. If “Disable” is selected, incoming faxes will not be received on this device. If “Enable Fax Receiving from Device” is selected, other options related to basic fax receiving functionality are enabled.
Alert Settings The Alert Settings main menu includes settings related to error alerting.
Overview The Alert Settings options are used to adjust when alerts are received. Three sub-menus are available under the Alert Settings main menu: Printer Alert, Email Alert, and Alert History.
The Printer Alert sub-menu provides settings related to when alerts will be received. The Email Alert sub-menu provides options relating to receiving alerts via email.
The Alert History sub-menu provides a history of device and toner related alerts. To save any changes made, the Save button must be clicked and you must login.
||Information| |---|
|Description| |---|
|Printer Alert Tab| |---|
|This sub-menu provides settings related to when alerts will be received.| |---|
|Email Alert Tab| |---|
|This sub-menu provides options relating to receiving alerts via email.| |---|

|Alert History Tab| |---|
|This sub-menu provides a history of device and toner related alerts.| |---|
|Save Button| |---|
|Click the Save button to save any changes made to settings. Login is required to save changes.| |---| | |---|
Printer Alert The Printer Alert sub-menu provides settings related to when alerts will be received.
Printing Job Alert The Printing Job Alert section contains an option used to set when error alerts are sent.
||Option| |---|
|Description| |---|
|When printing is in progress| |---|
|If selected, alerts will be sent when the device is being used.| |---|
| |---|
Printer Status Alert The Printer Status Alert section contains options used to determine specifically when error alerts are sent.
||Option| |---|
|Description| |---|
|When the printer has a problem but can continue| |---|
|If selected, alerts will be sent when the printer has a problem but is still able to print.| |---|
|When the printer cannot print| |---|
|If selected, alerts will be sent when the printer has a problem and is unable to continue printing.| |---| | |---|
Email Alert The Email Alert sub-menu provides options relating to receiving alerts via email.
Status Setup The “Status Setup” section of the Email Alert sub-menu determines whether email alerts are turned on.
||Option| |---|
|Description| |---|
|On| |---|
|If selected, email alerts will be enabled.| |---|
|Off|
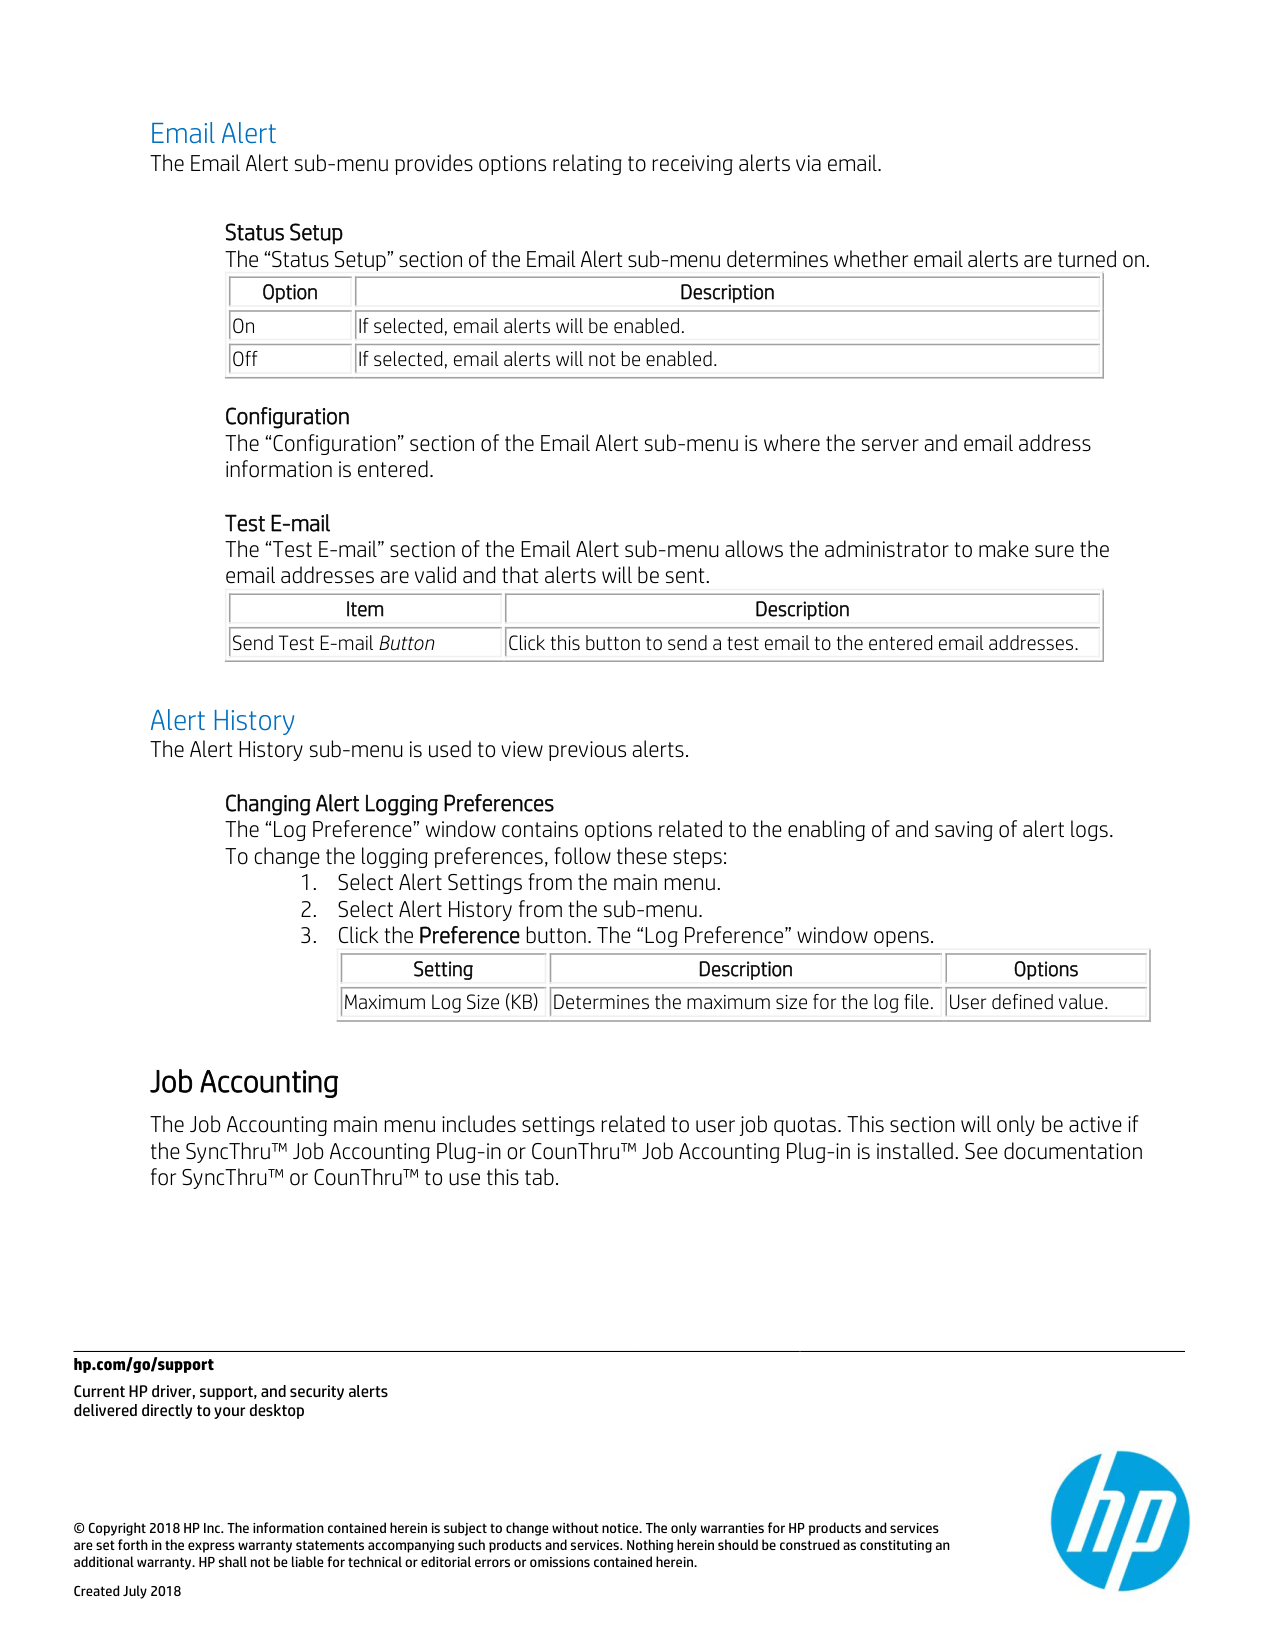
|---|
|If selected, email alerts will not be enabled.| |---| | |---|
Configuration The “Configuration” section of the Email Alert sub-menu is where the server and email address information is entered.
Test E-mail The “Test E-mail” section of the Email Alert sub-menu allows the administrator to make sure the email addresses are valid and that alerts will be sent.
||Item| |---|
|Description| |---|
|Send Test E-mail Button| |---|
|Click this button to send a test email to the entered email addresses.| |---|
| |---|
Alert History The Alert History sub-menu is used to view previous alerts.
Changing Alert Logging Preferences The “Log Preference” window contains options related to the enabling of and saving of alert logs. To change the logging preferences, follow these steps:
||Setting| |---|
|Description| |---|
|Options| |---|
|Maximum Log Size (KB)| |---|
|Determines the maximum size for the log file.| |---|
|User defined value.| |---|
| |---|
#### Job Accounting
The Job Accounting main menu includes settings related to user job quotas. This section will only be active if the SyncThru™ Job Accounting Plug-in or CounThru™ Job Accounting Plug-in is installed. See documentation for SyncThru™ or CounThru™ to use this tab.
hp.com/go/support
Current HP driver, support, and security alerts delivered directly to your desktop
© Copyright 2018 HP Inc. The information contained herein is subject to change without notice. The only warranties for HP products and services are set forth in the express warranty statements accompanying such products and services. Nothing herein should be construed as constituting an additional warranty. HP shall not be liable for technical or editorial errors or omissions contained herein.
Created July 2018
