Ask AI
— answers from the official manualAnswers from the official manual.
Common questions
Common Questions
10 totalWhat do the different LED status colors mean on the Samsung Xpress SL M2020?
A solid green LED means the machine is on-line and ready to use, while a blinking green LED indicates data is being received or printed. A solid red LED means the cover is open, there is no paper in the tray, or a major error has occurred. An orange LED means a paper jam has occurred, and a blinking orange LED indicates a firmware upgrade is in progress.
How do I clear a paper jam inside the Samsung Xpress SL M2020?
Close the output support first, then open the top cover — the jammed paper may be removed automatically. If the paper is not visible, open the tray and top cover, remove the toner cartridge, open the fuser unit cover, and gently pull the jammed paper straight out. Note that the fuser unit area is hot, so take care when removing paper from that area.
What does error code U1-2320, U1-2330, or U1-2340 mean and how do I fix it?
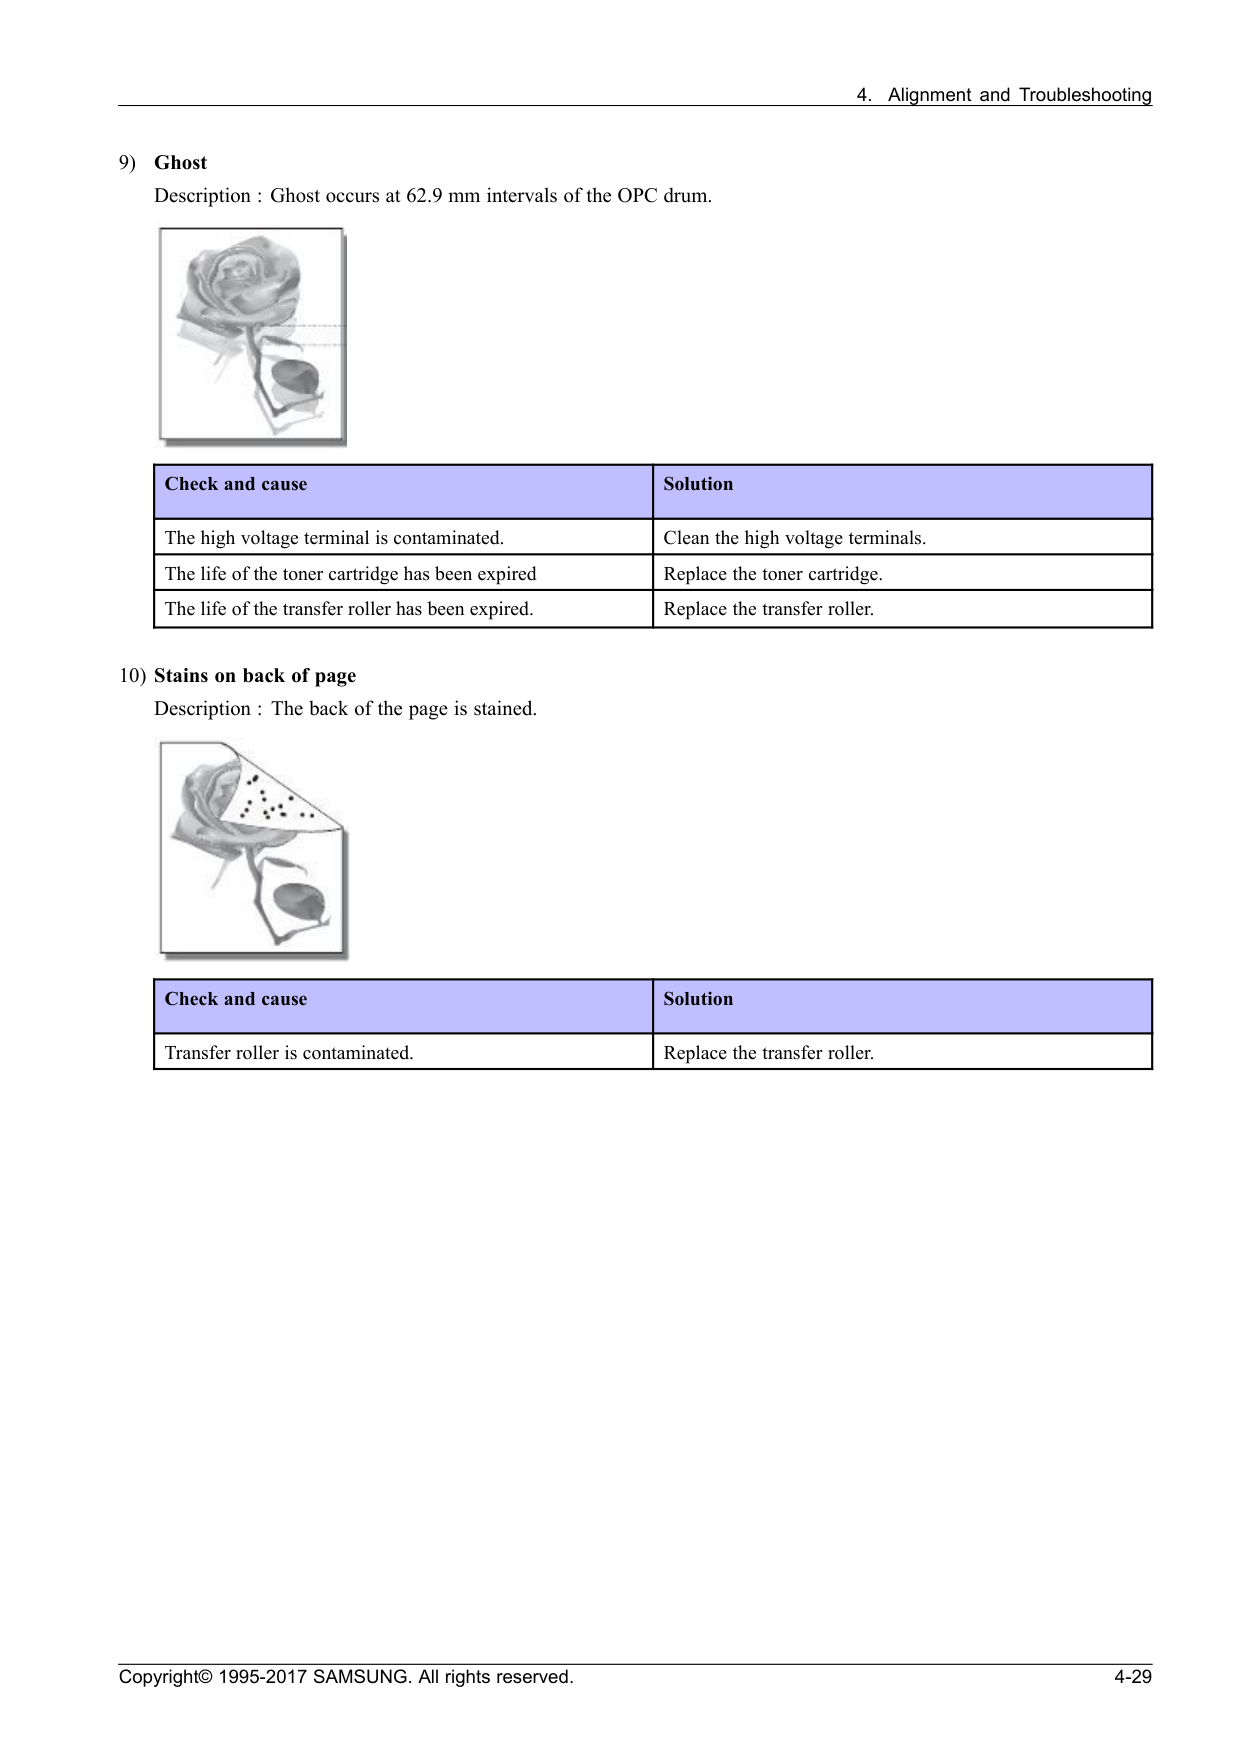
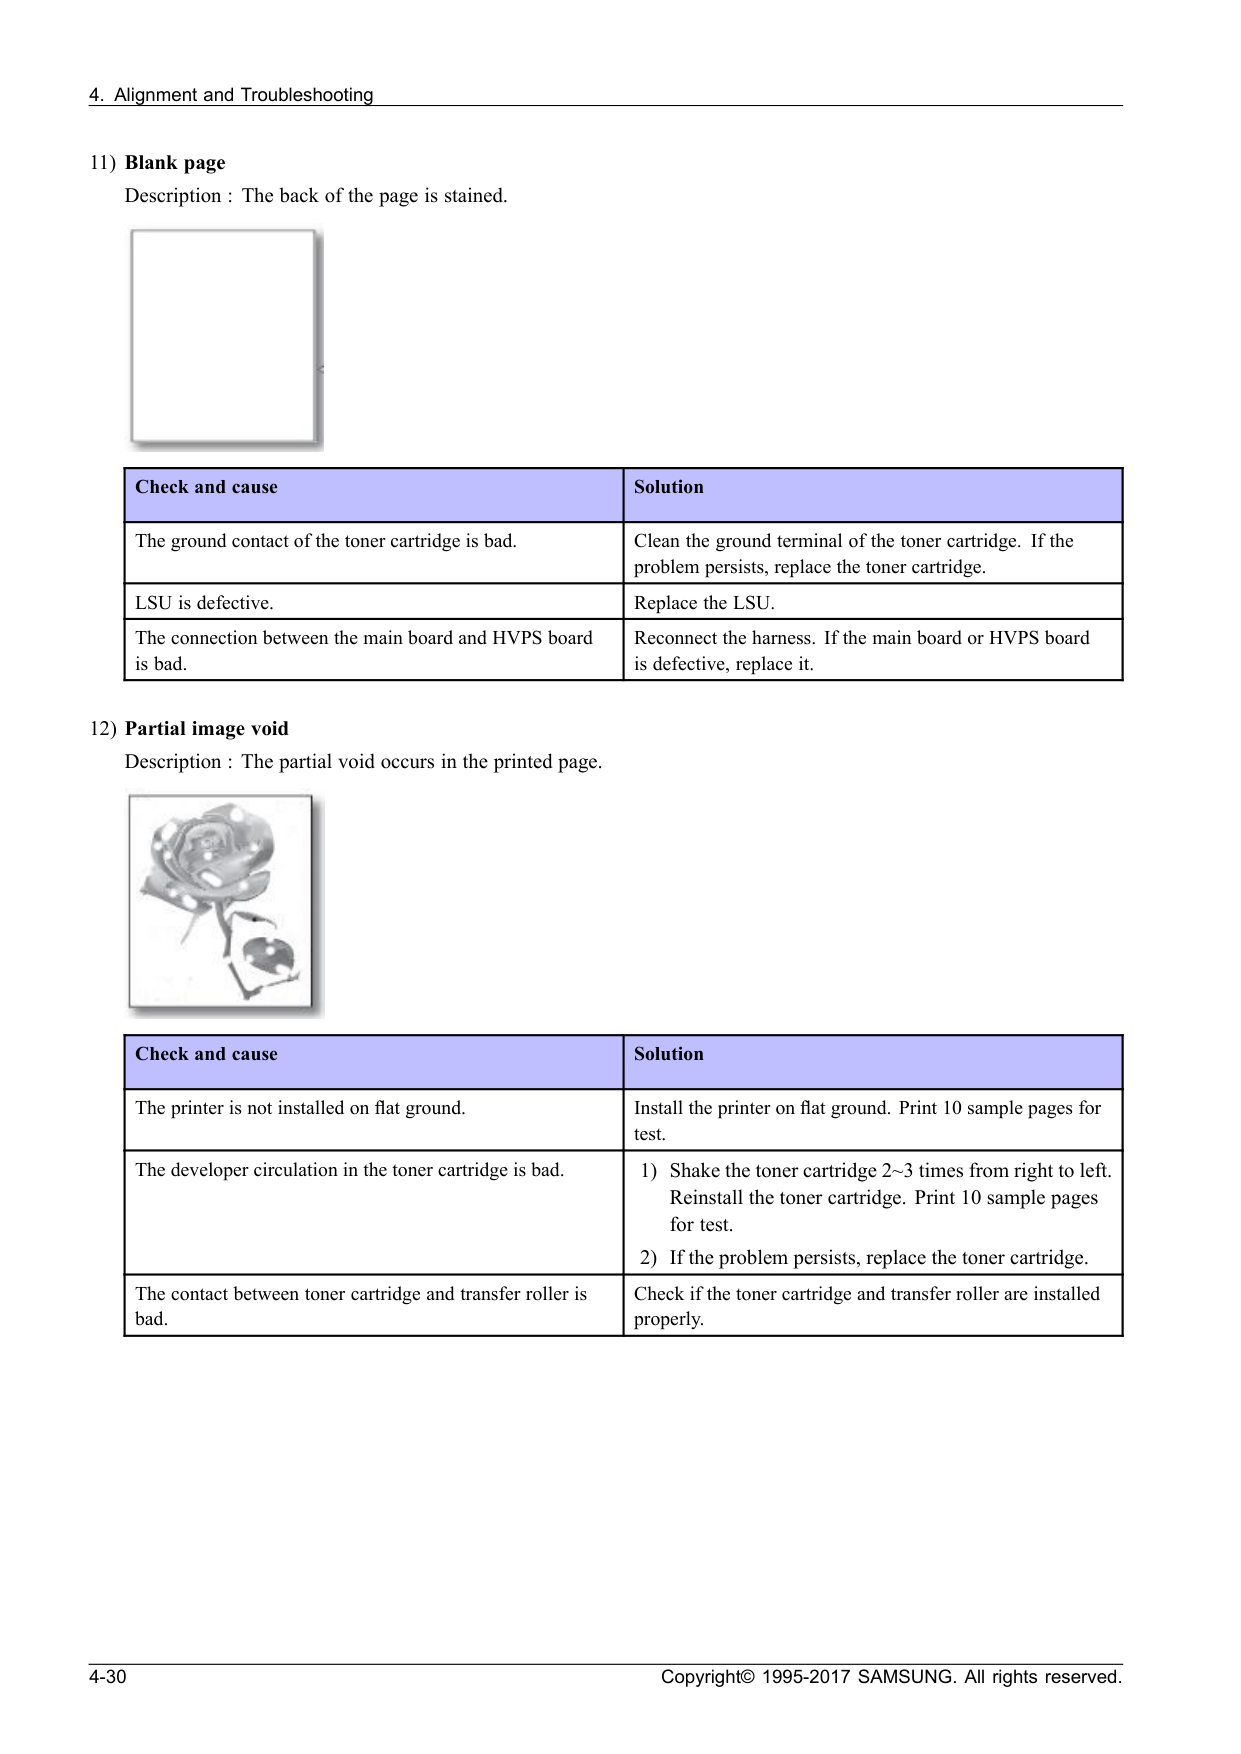
These error codes indicate a Fuser Unit Failure. The recommended troubleshooting action is to turn the machine off and then back on. If the issue persists, further service inspection of the fuser unit is required.
How do I update the firmware on the Samsung Xpress SL M2020 using a USB port?
Turn the machine off, connect the USB cable, then turn the machine on and confirm it is in ready status. Drag and drop the firmware file onto the usblist2.exe tool, and the firmware update will start automatically. When the upgrade is completed, the machine will automatically reboot.
What should I do when error code C2-1410 or C2-1711 appears indicating a toner cartridge problem?
First, check that the toner cartridge is properly installed, then turn the machine off and back on. If the error persists, remove the cartridge and roll it five or six times to distribute the toner evenly, then reinstall it. If the problem continues, check whether the CRUM contact area is contaminated and clean it, or replace the toner cartridge with a new one.
What are the operating temperature and humidity requirements for the Samsung Xpress SL M2020?
The printer must be operated at a temperature between 10°C and 32°C (50°F to 90°F) and a relative humidity between 10% and 80%. If the machine has been stored below zero Celsius for a long time, it should be allowed to return to room temperature before use to avoid malfunction.
Show 4 more questions
What is the print speed and maximum print resolution of the Samsung Xpress SL M2020?
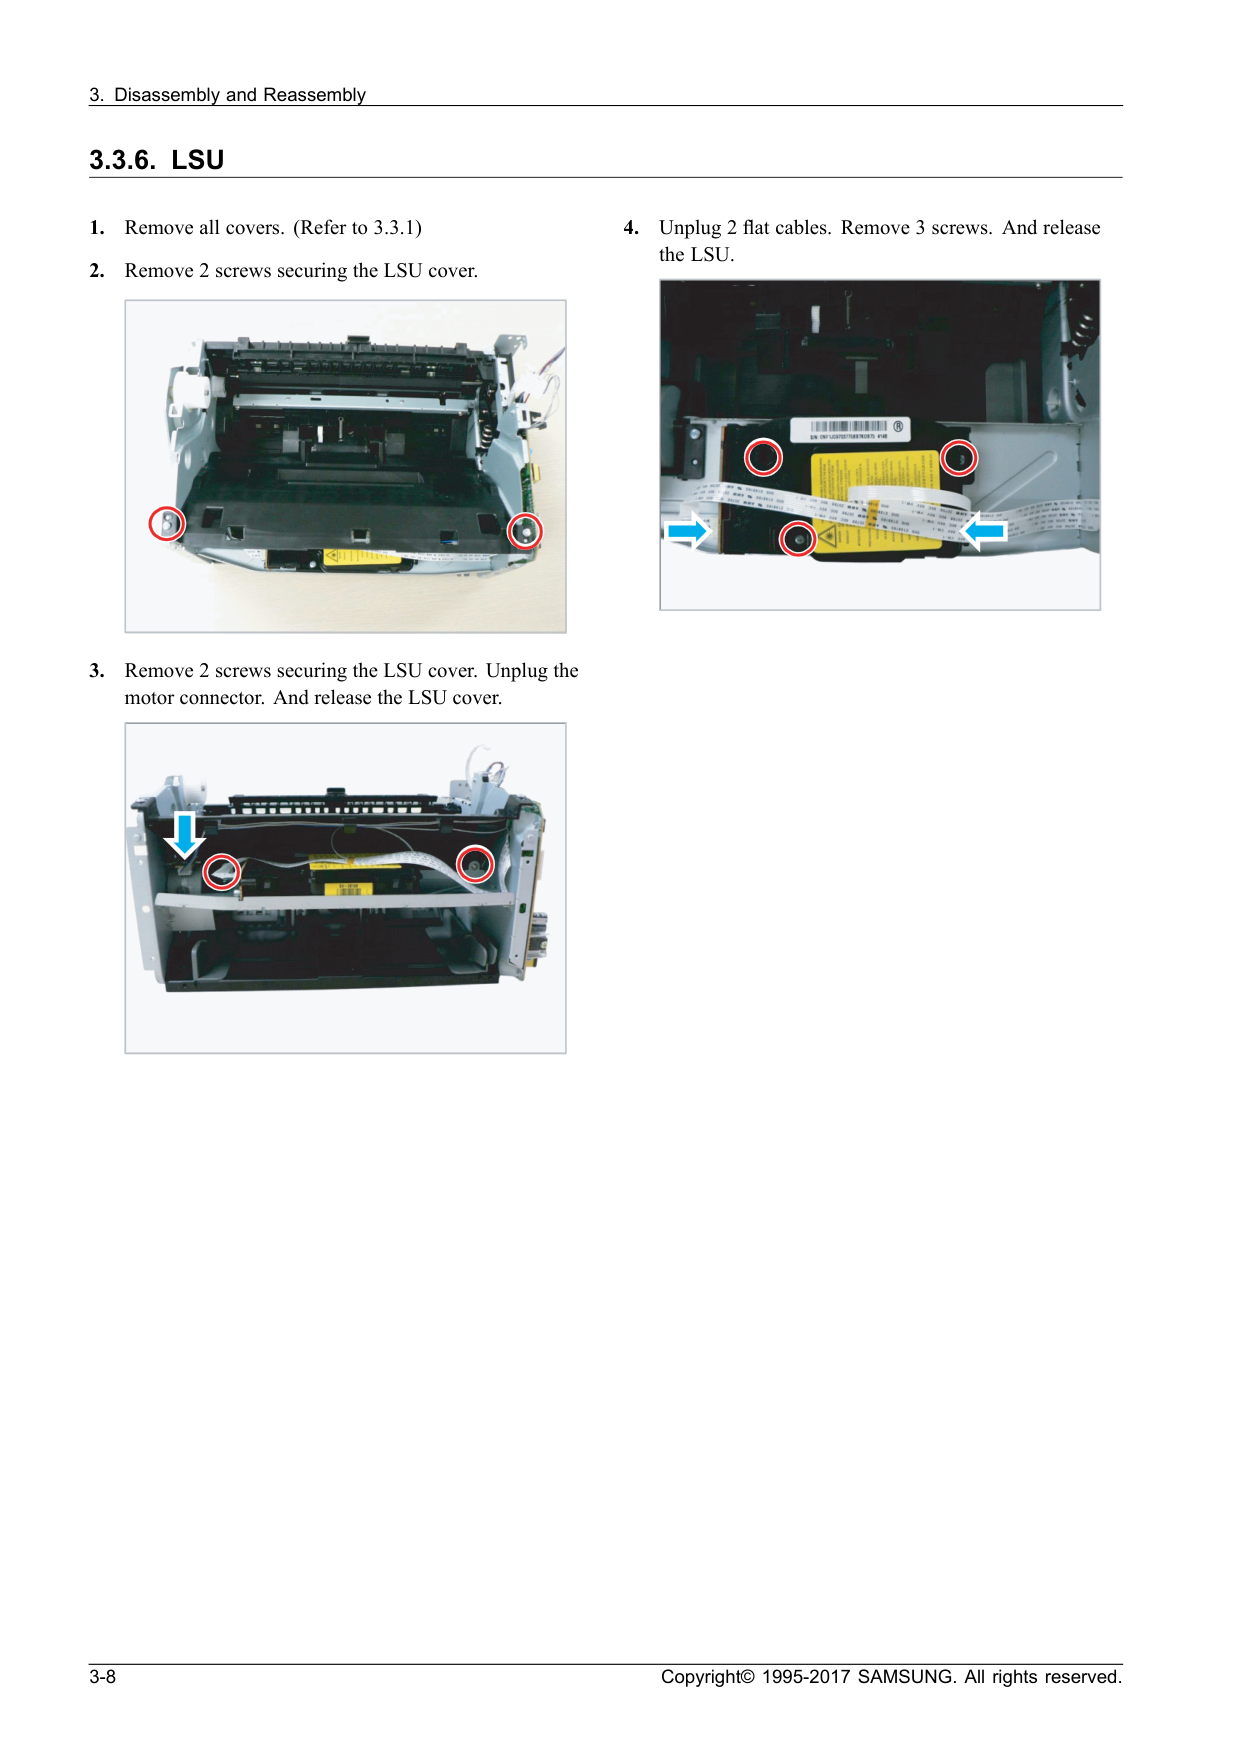
How do I print a configuration sheet or supplies information report on the Samsung Xpress SL M2020?
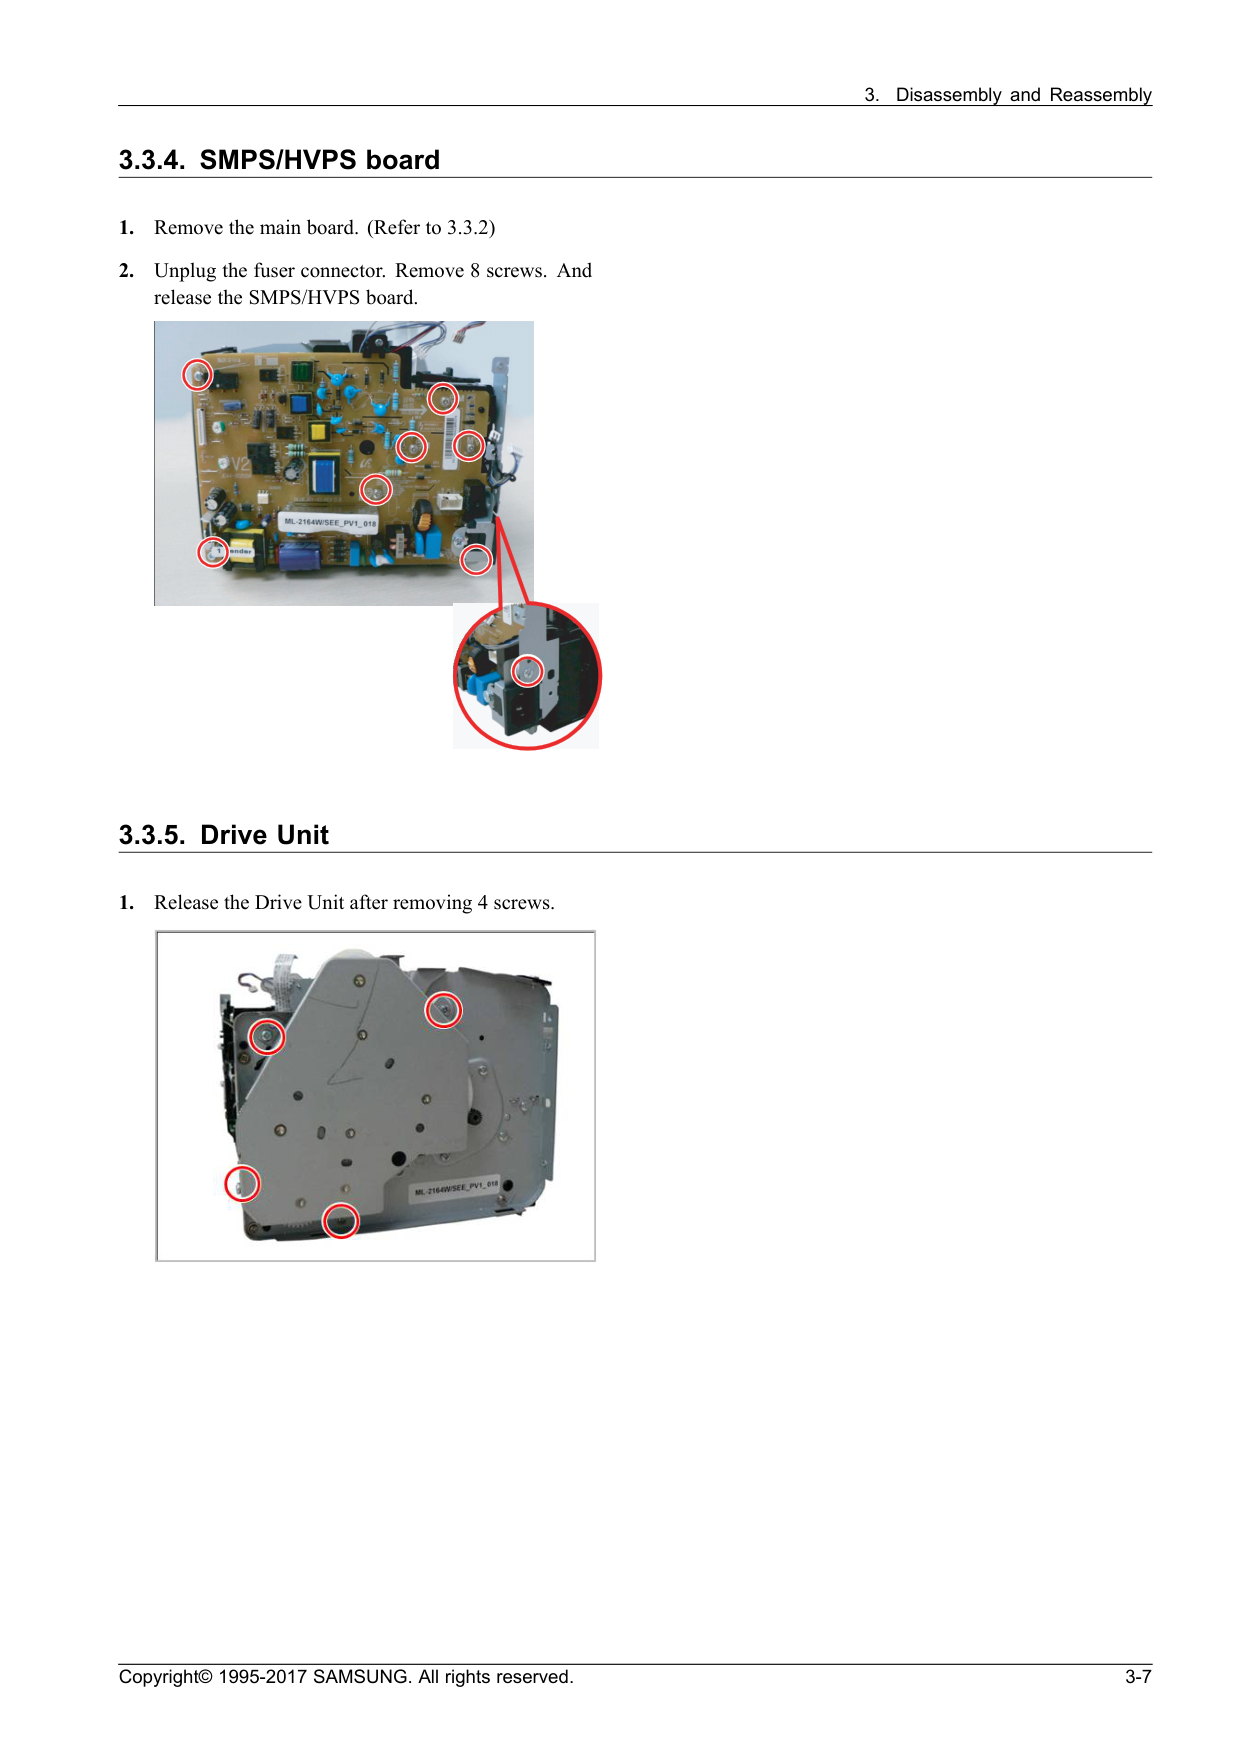
What safety precautions should I follow when replacing the SMPS board on the Samsung Xpress SL M2020?
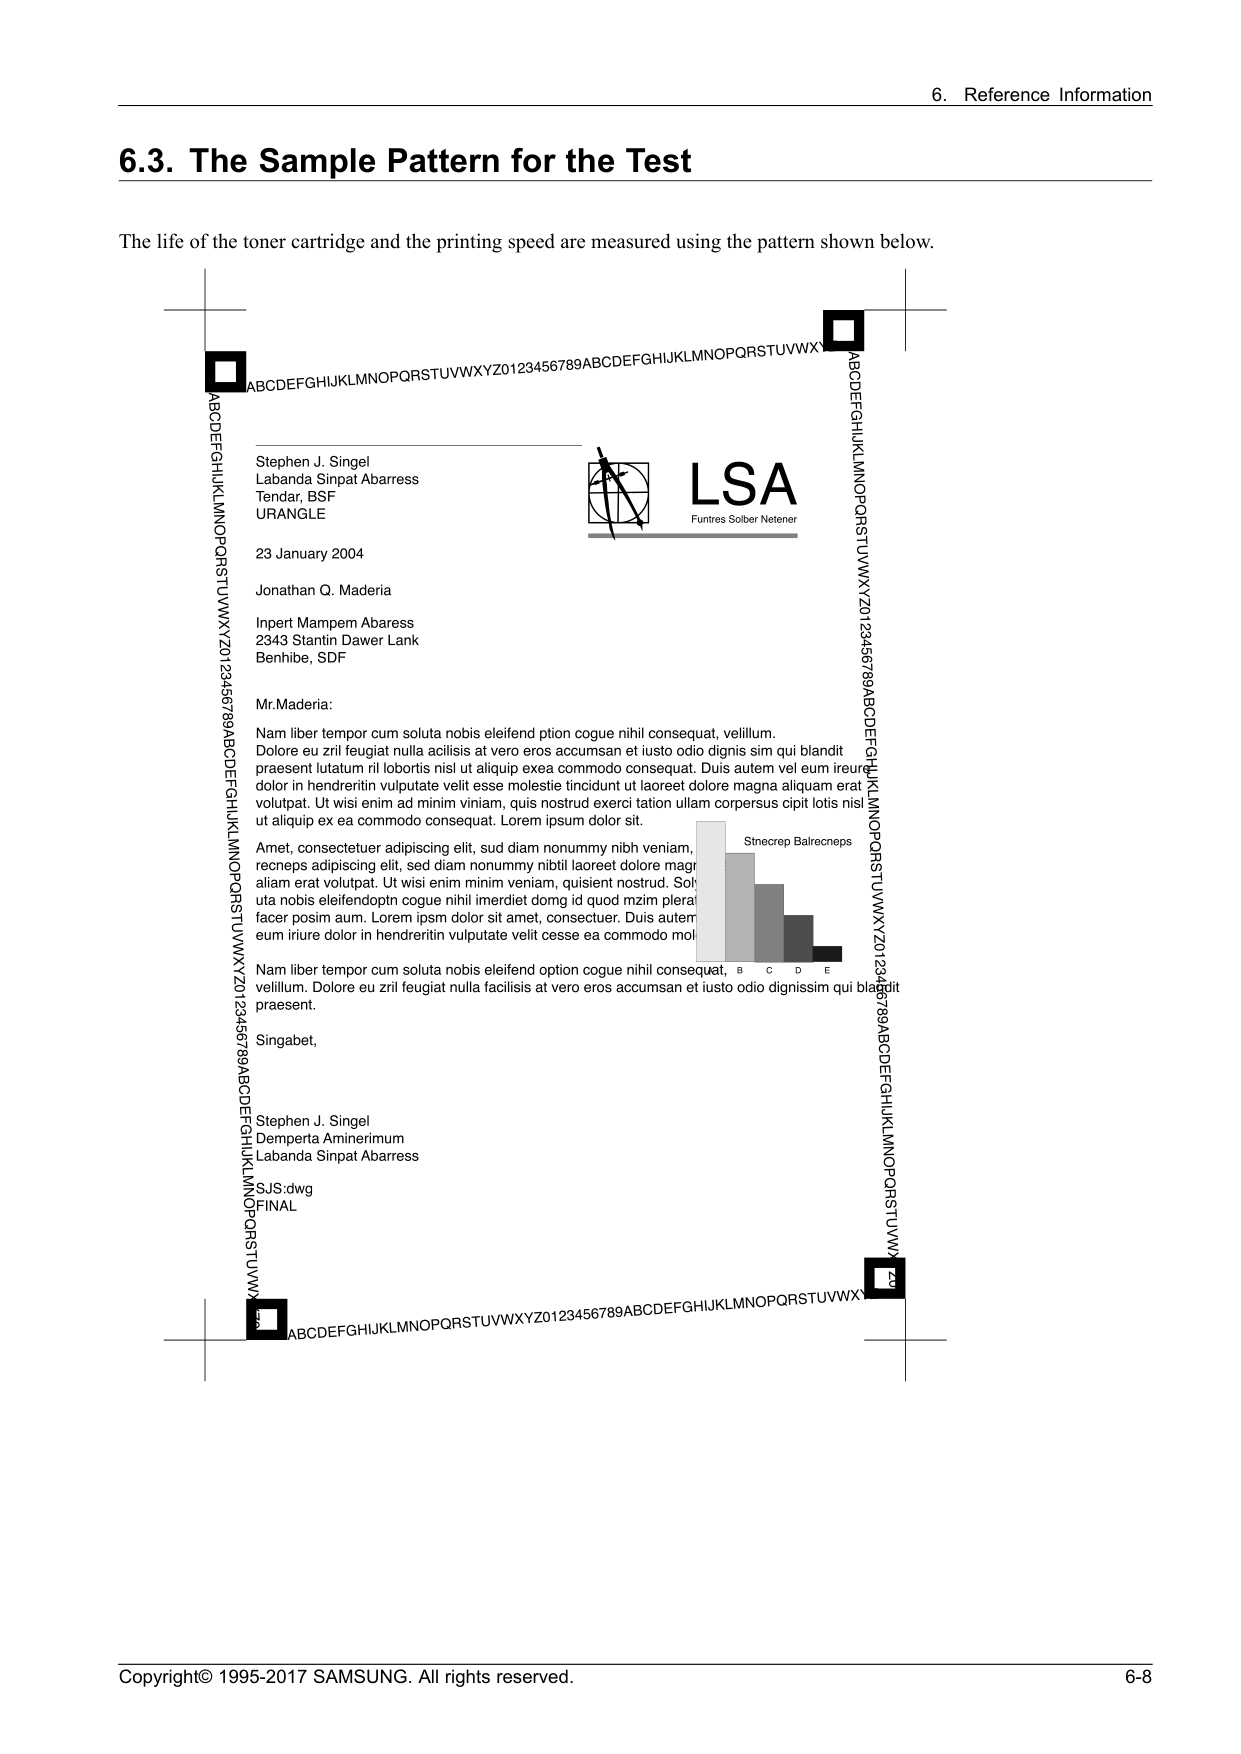
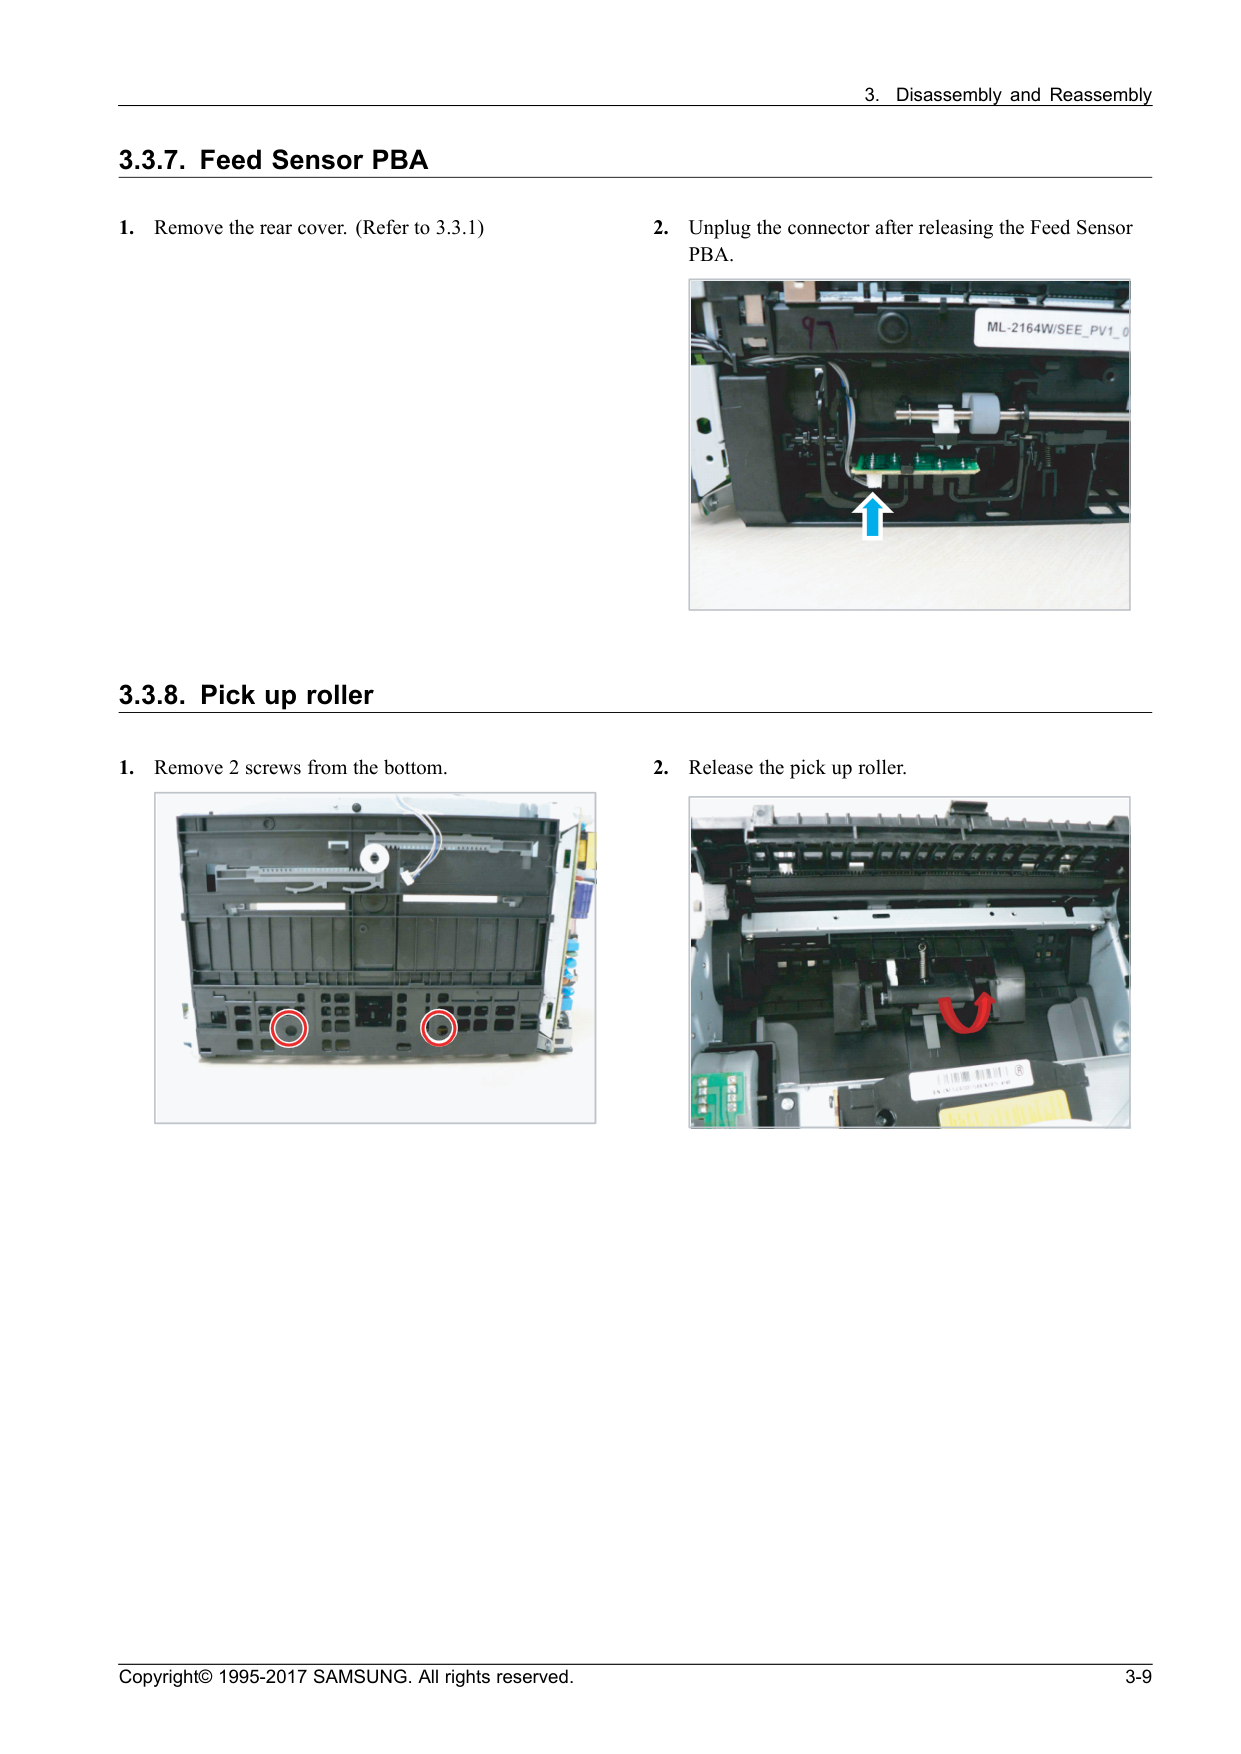
What is the expected lifespan of the maintenance parts such as the fuser unit, transfer roller, and pick-up roller?
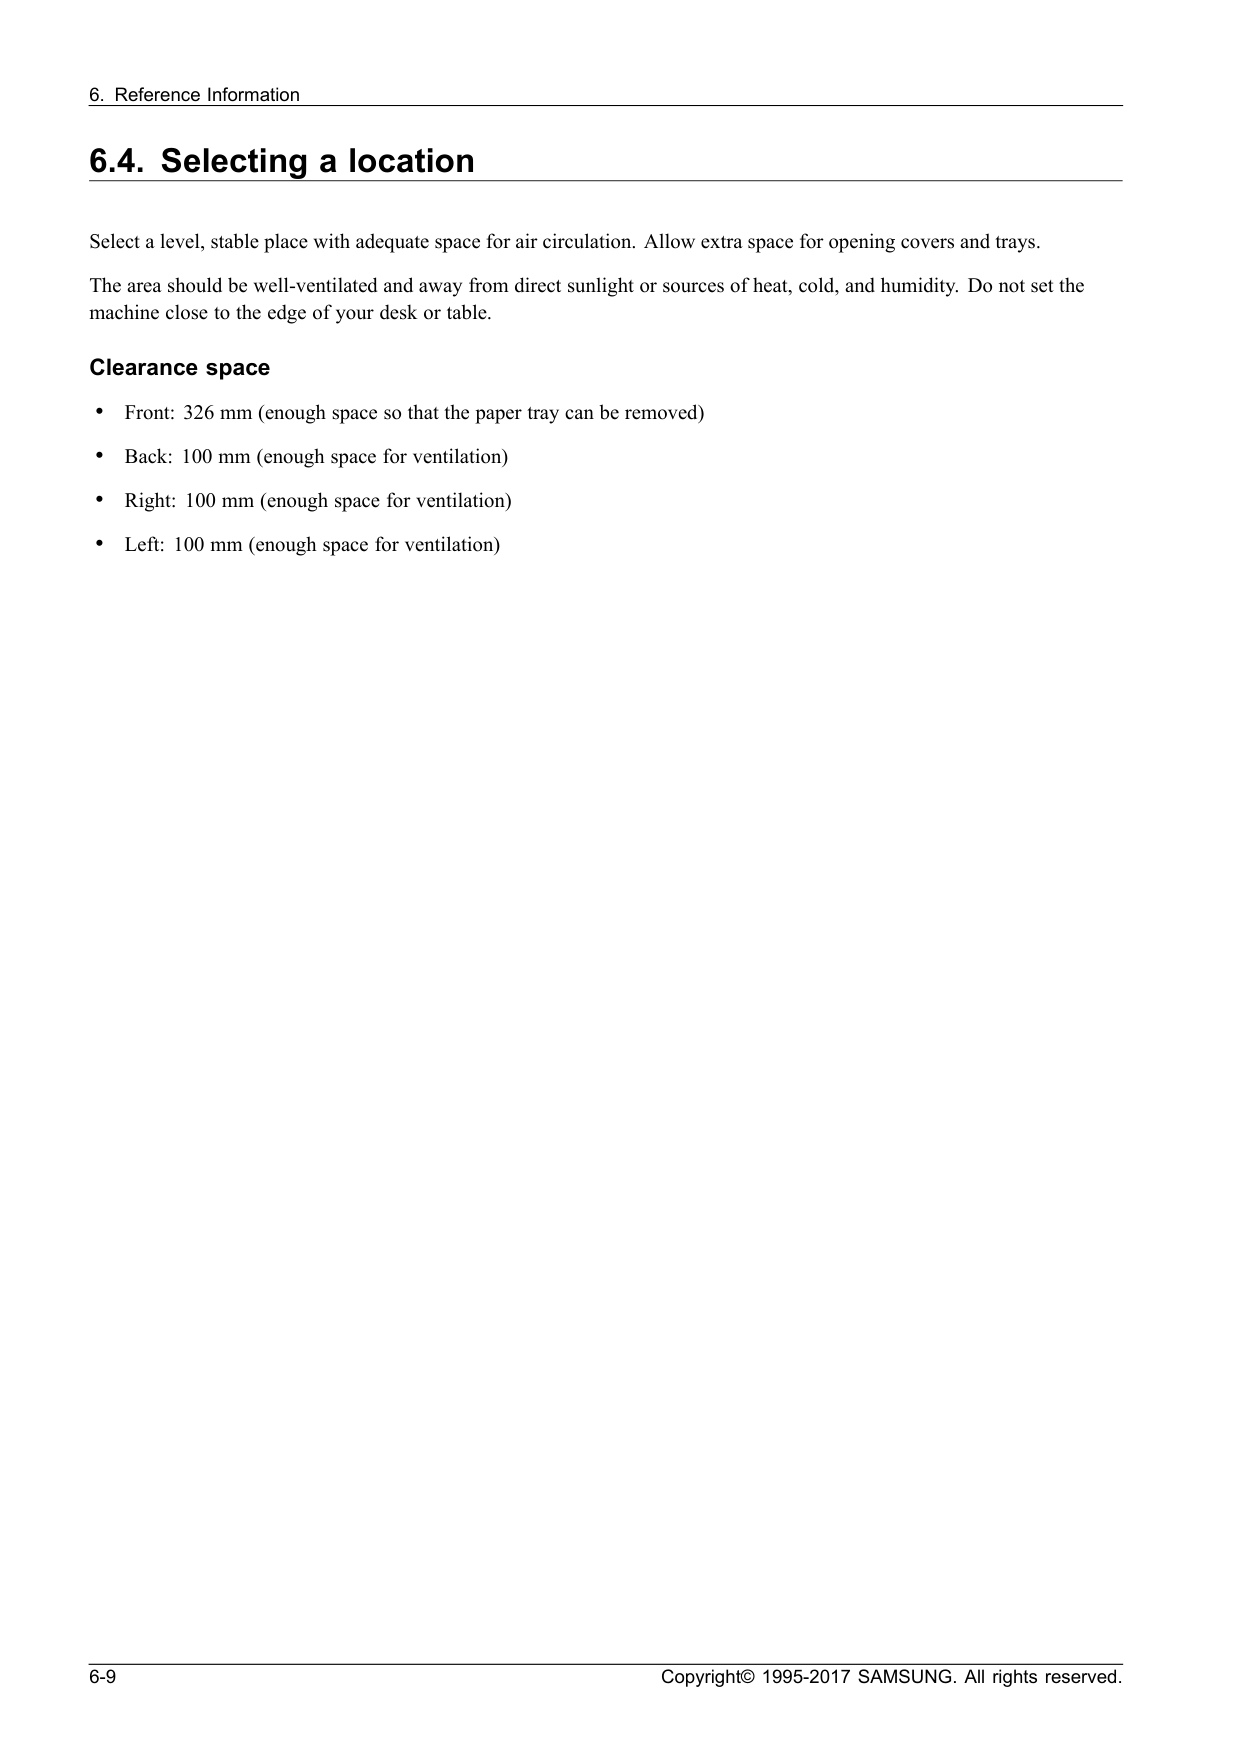
Full Manual
97 pages
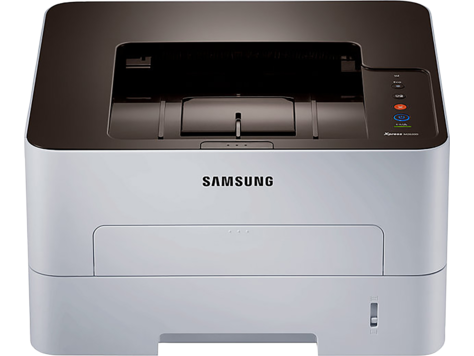
Mono Laser Printer Xpress M202x series
M2020 / M2020W / M2022 /
M2022W
(Ver1.0)Service Manual
Mono Laser Printer Contents
Contents Contents
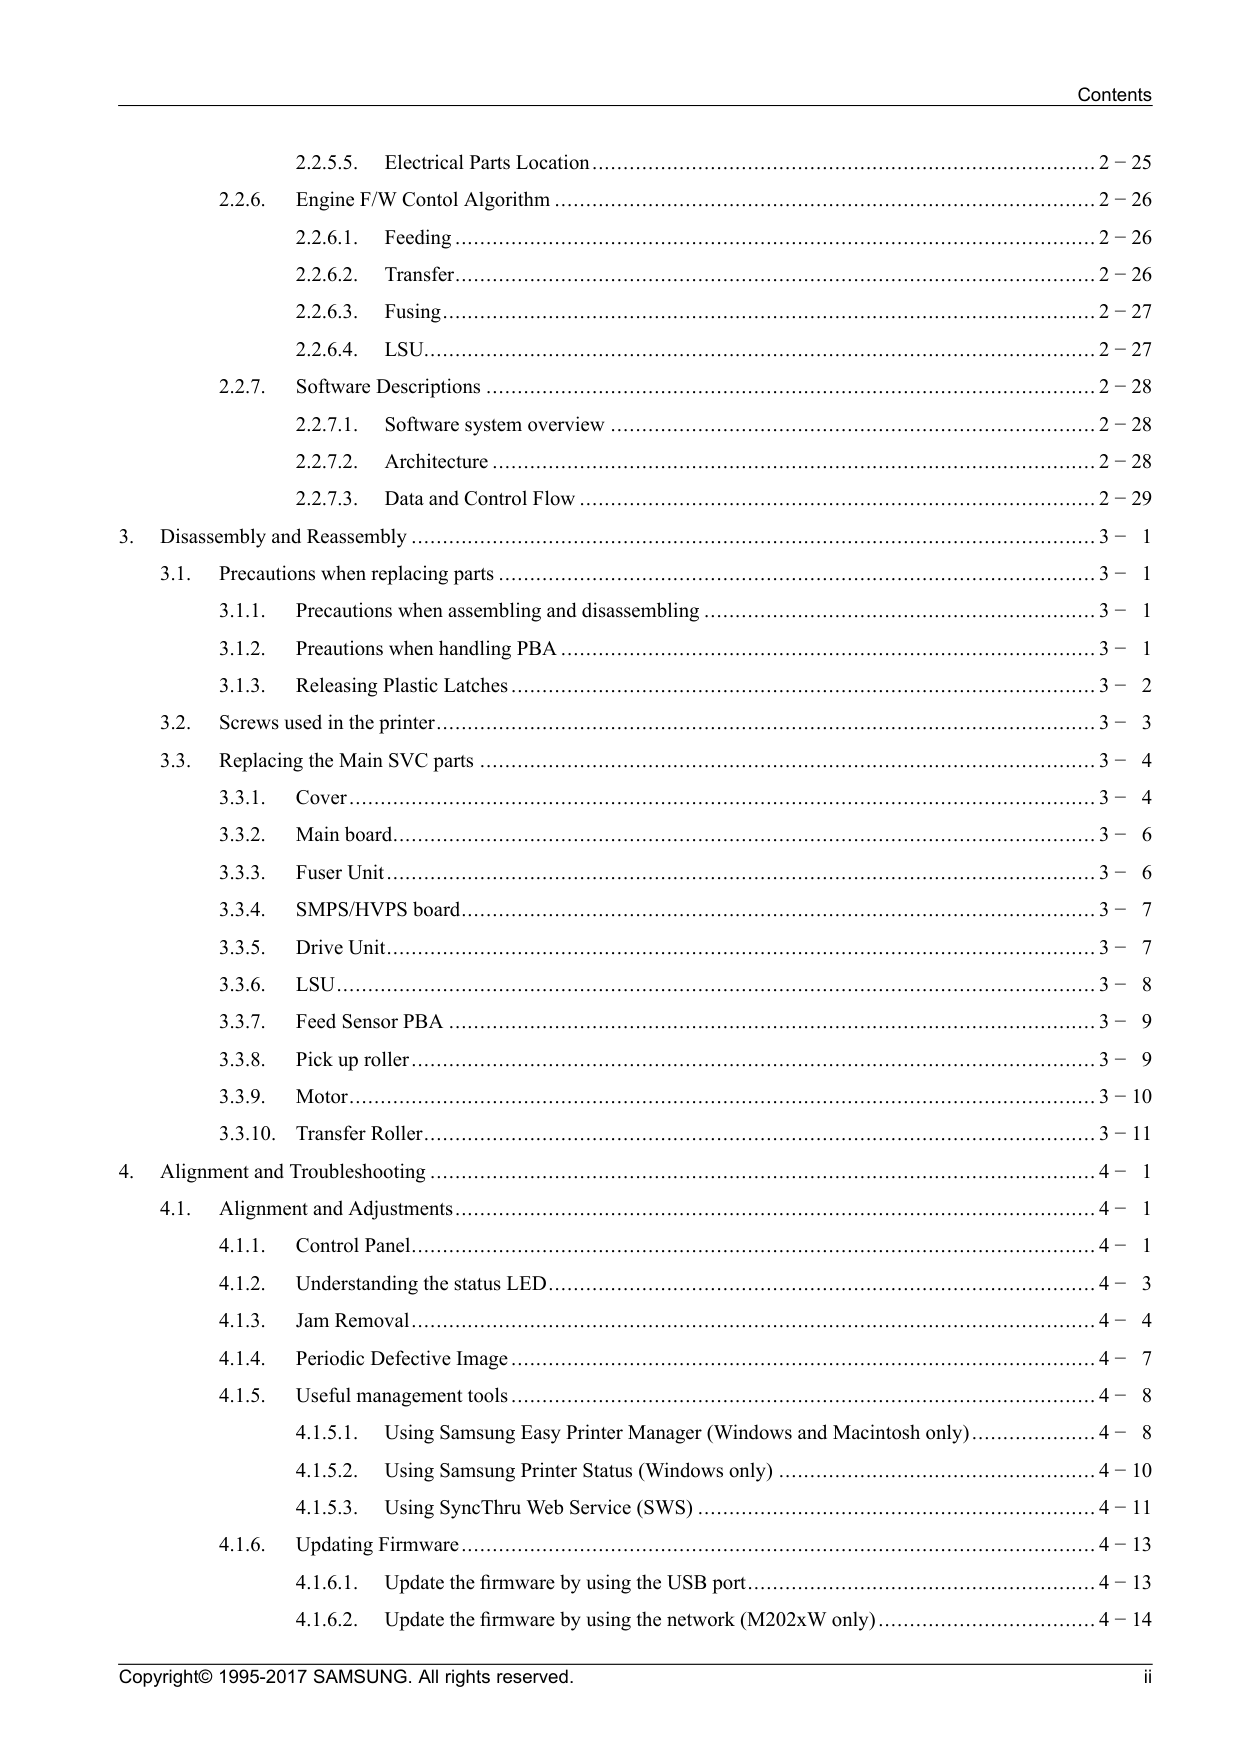
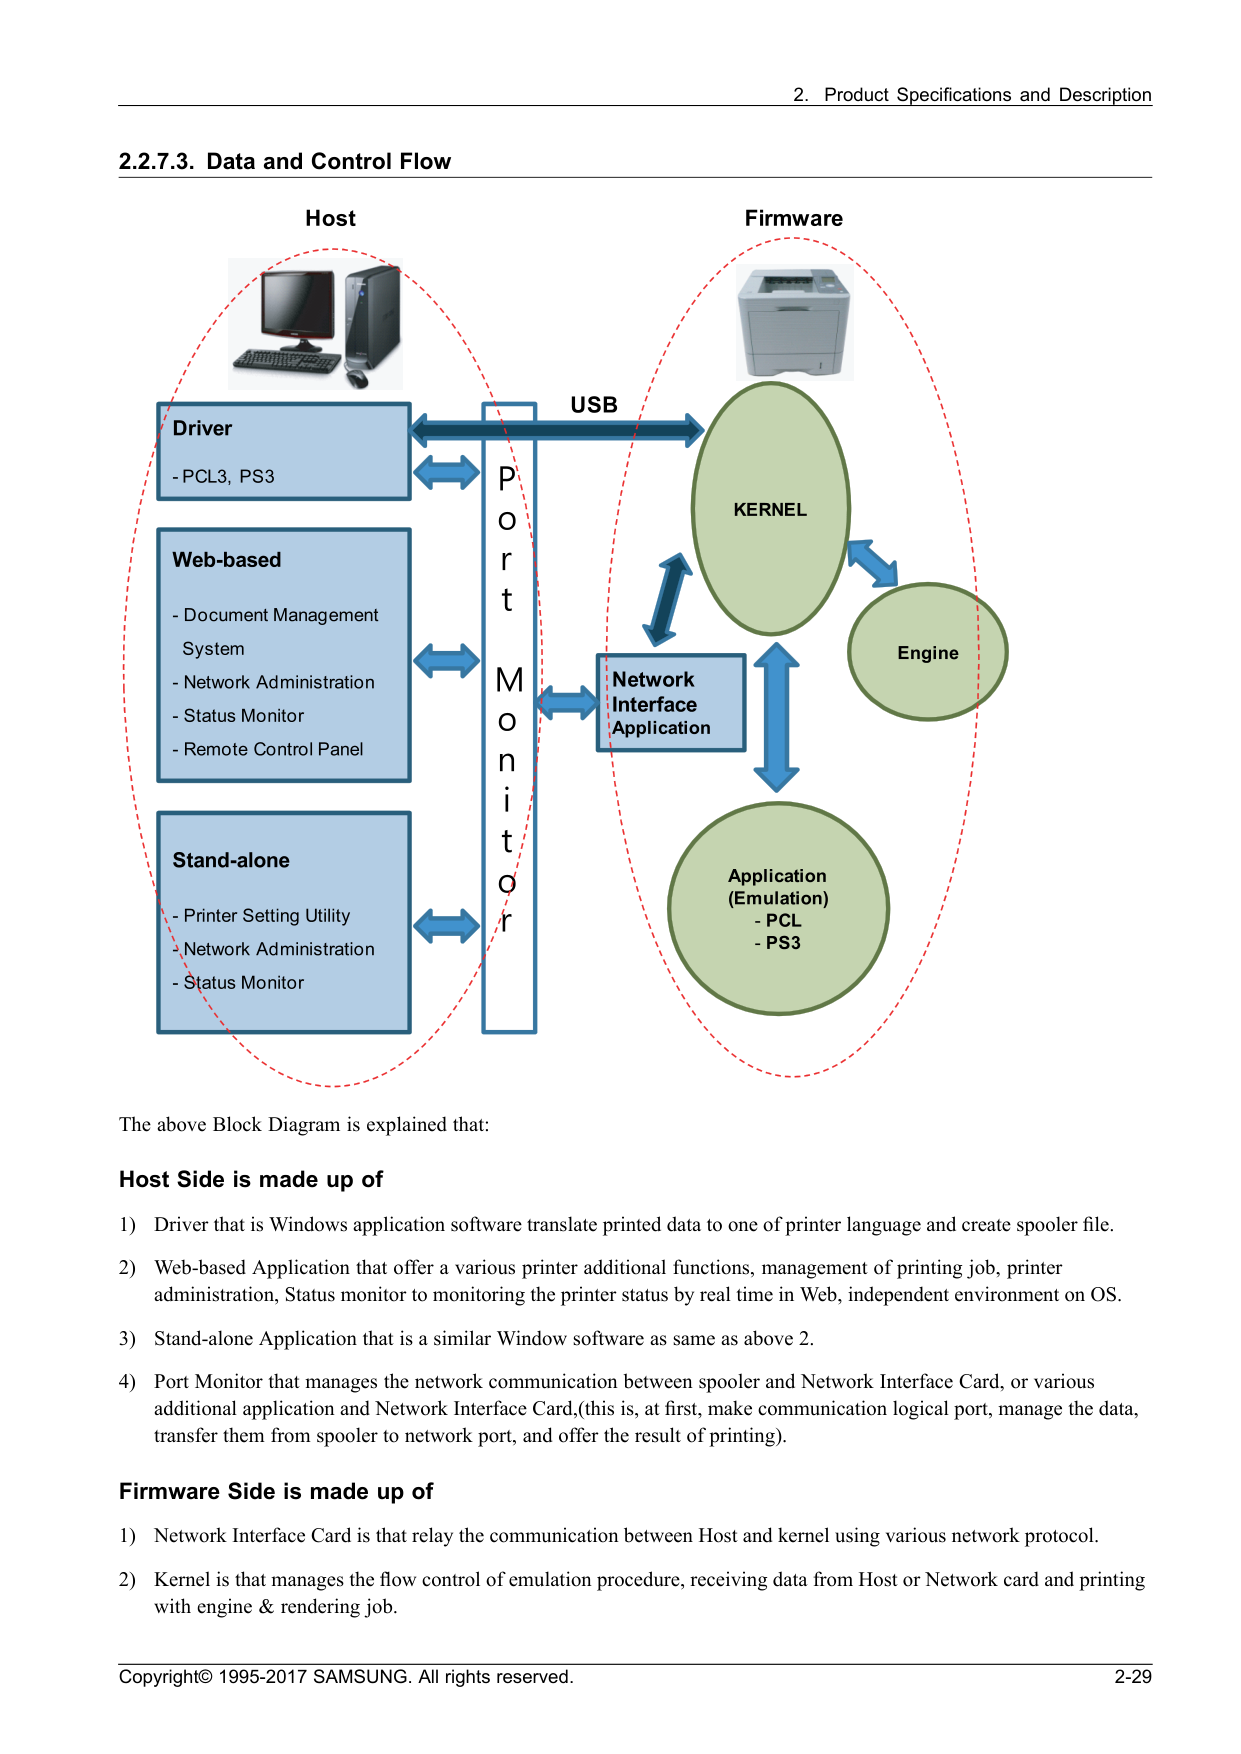
Contents 2.2.5.5. Electrical Parts Location................................................................................. 2 −25 2.2.6. Engine F/W Contol Algorithm ....................................................................................... 2 −26 2.2.6.1. Feeding ....................................................................................................... 2 −26 2.2.6.2. Transfer....................................................................................................... 2 −26 2.2.6.3. Fusing......................................................................................................... 2 −27 2.2.6.4. LSU............................................................................................................ 2 −27 2.2.7. Software Descriptions .................................................................................................. 2 −28 2.2.7.1. Software system overview .............................................................................. 2 −28 2.2.7.2. Architecture ................................................................................................. 2 −28 2.2.7.3. Data and Control Flow ................................................................................... 2 −29
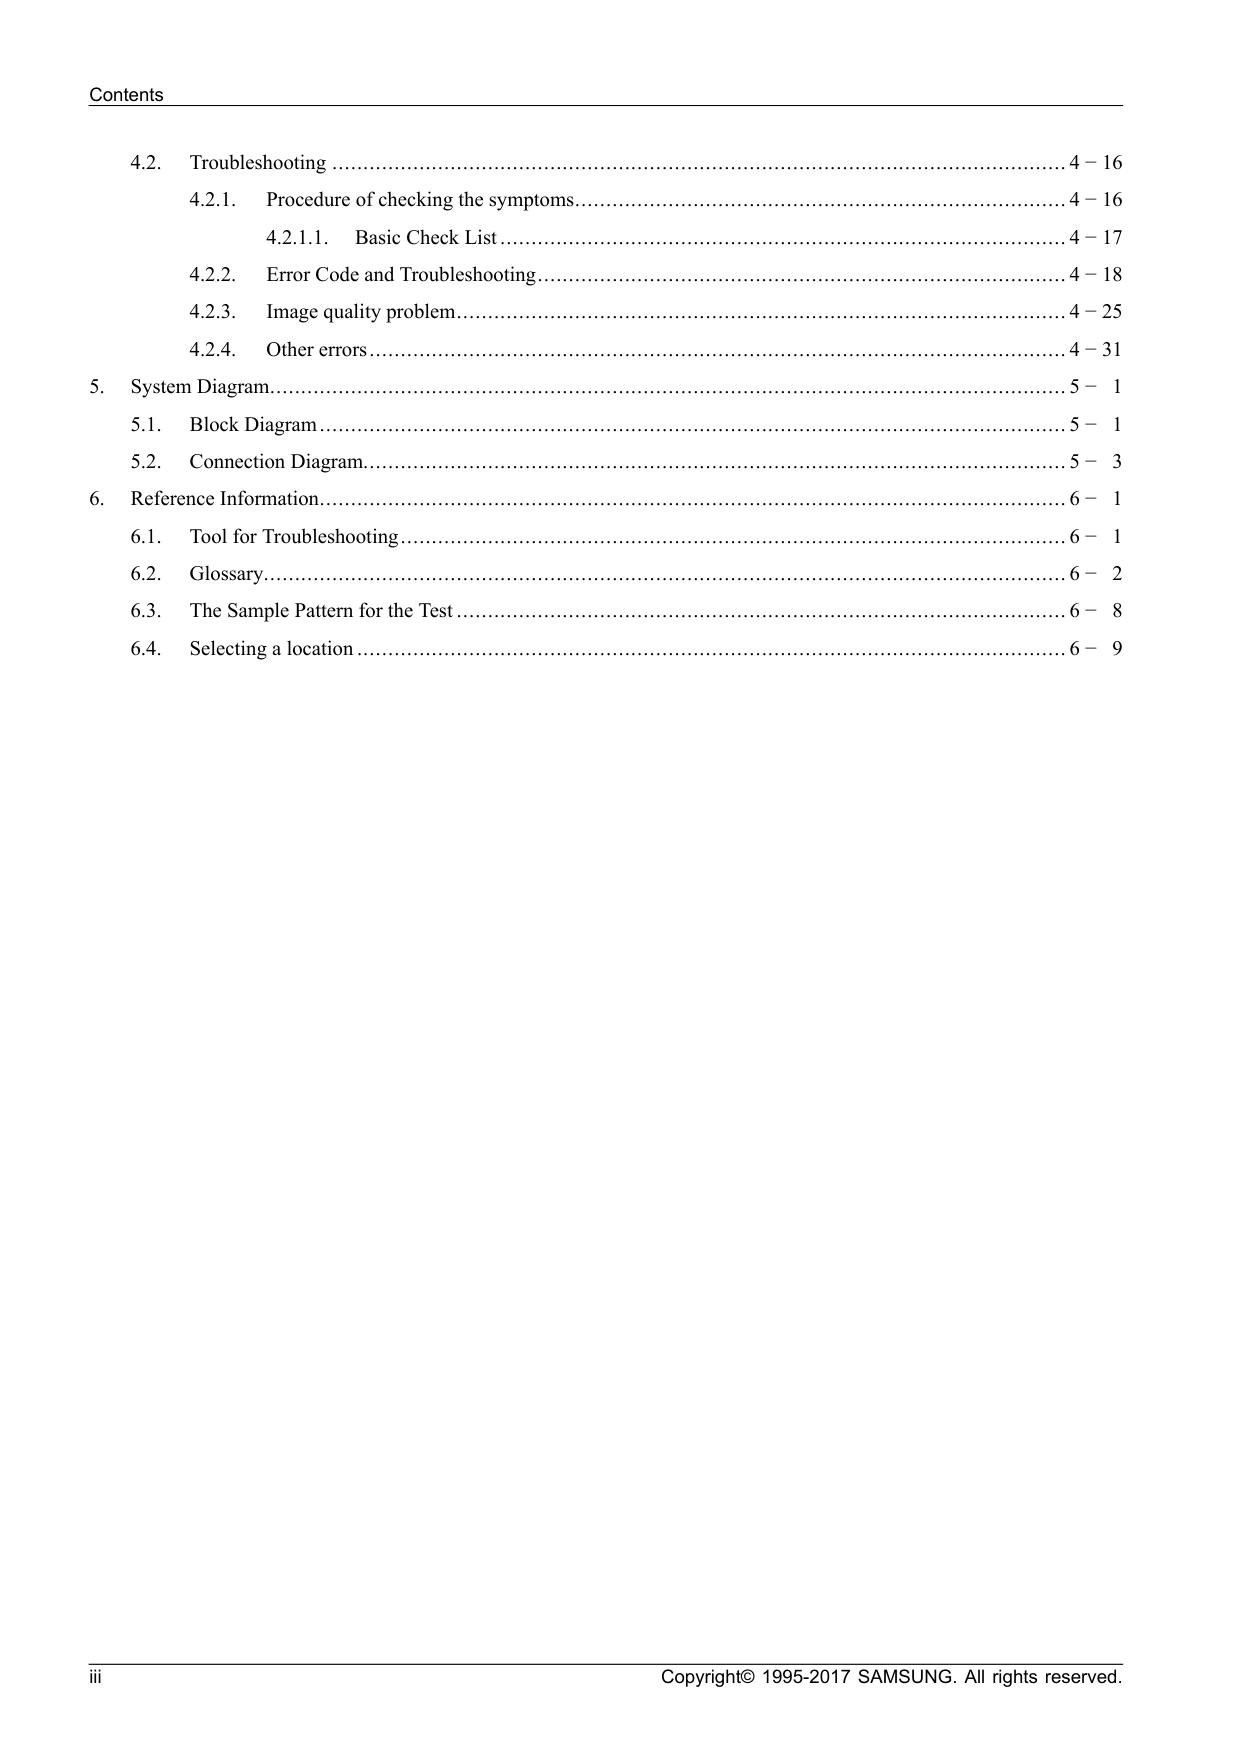
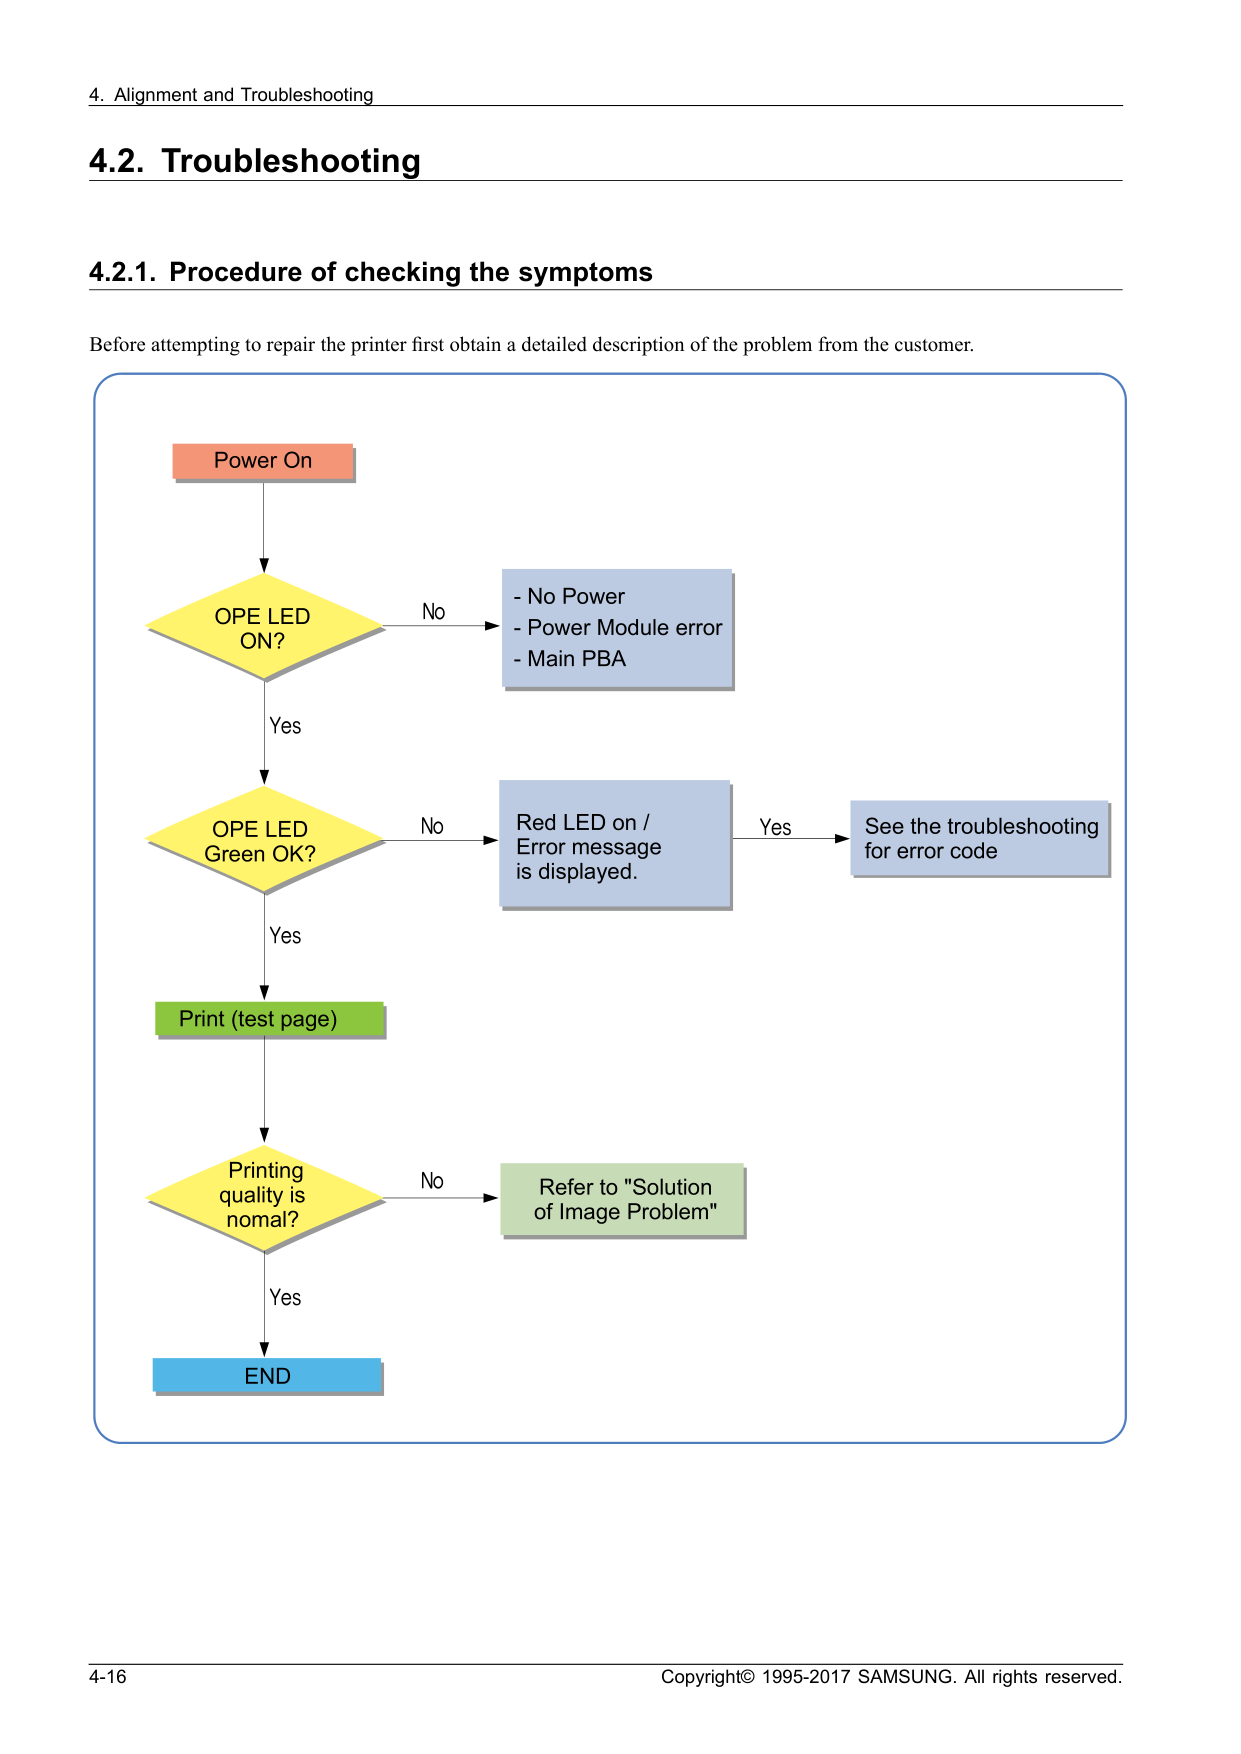
Contents 4.2. Troubleshooting ...................................................................................................................... 4 −16 4.2.1. Procedure of checking the symptoms............................................................................... 4 −16 4.2.1.1. Basic Check List ........................................................................................... 4 −17 4.2.2. Error Code and Troubleshooting..................................................................................... 4 −18 4.2.3. Image quality problem.................................................................................................. 4 −25 4.2.4. Other errors................................................................................................................ 4 −31
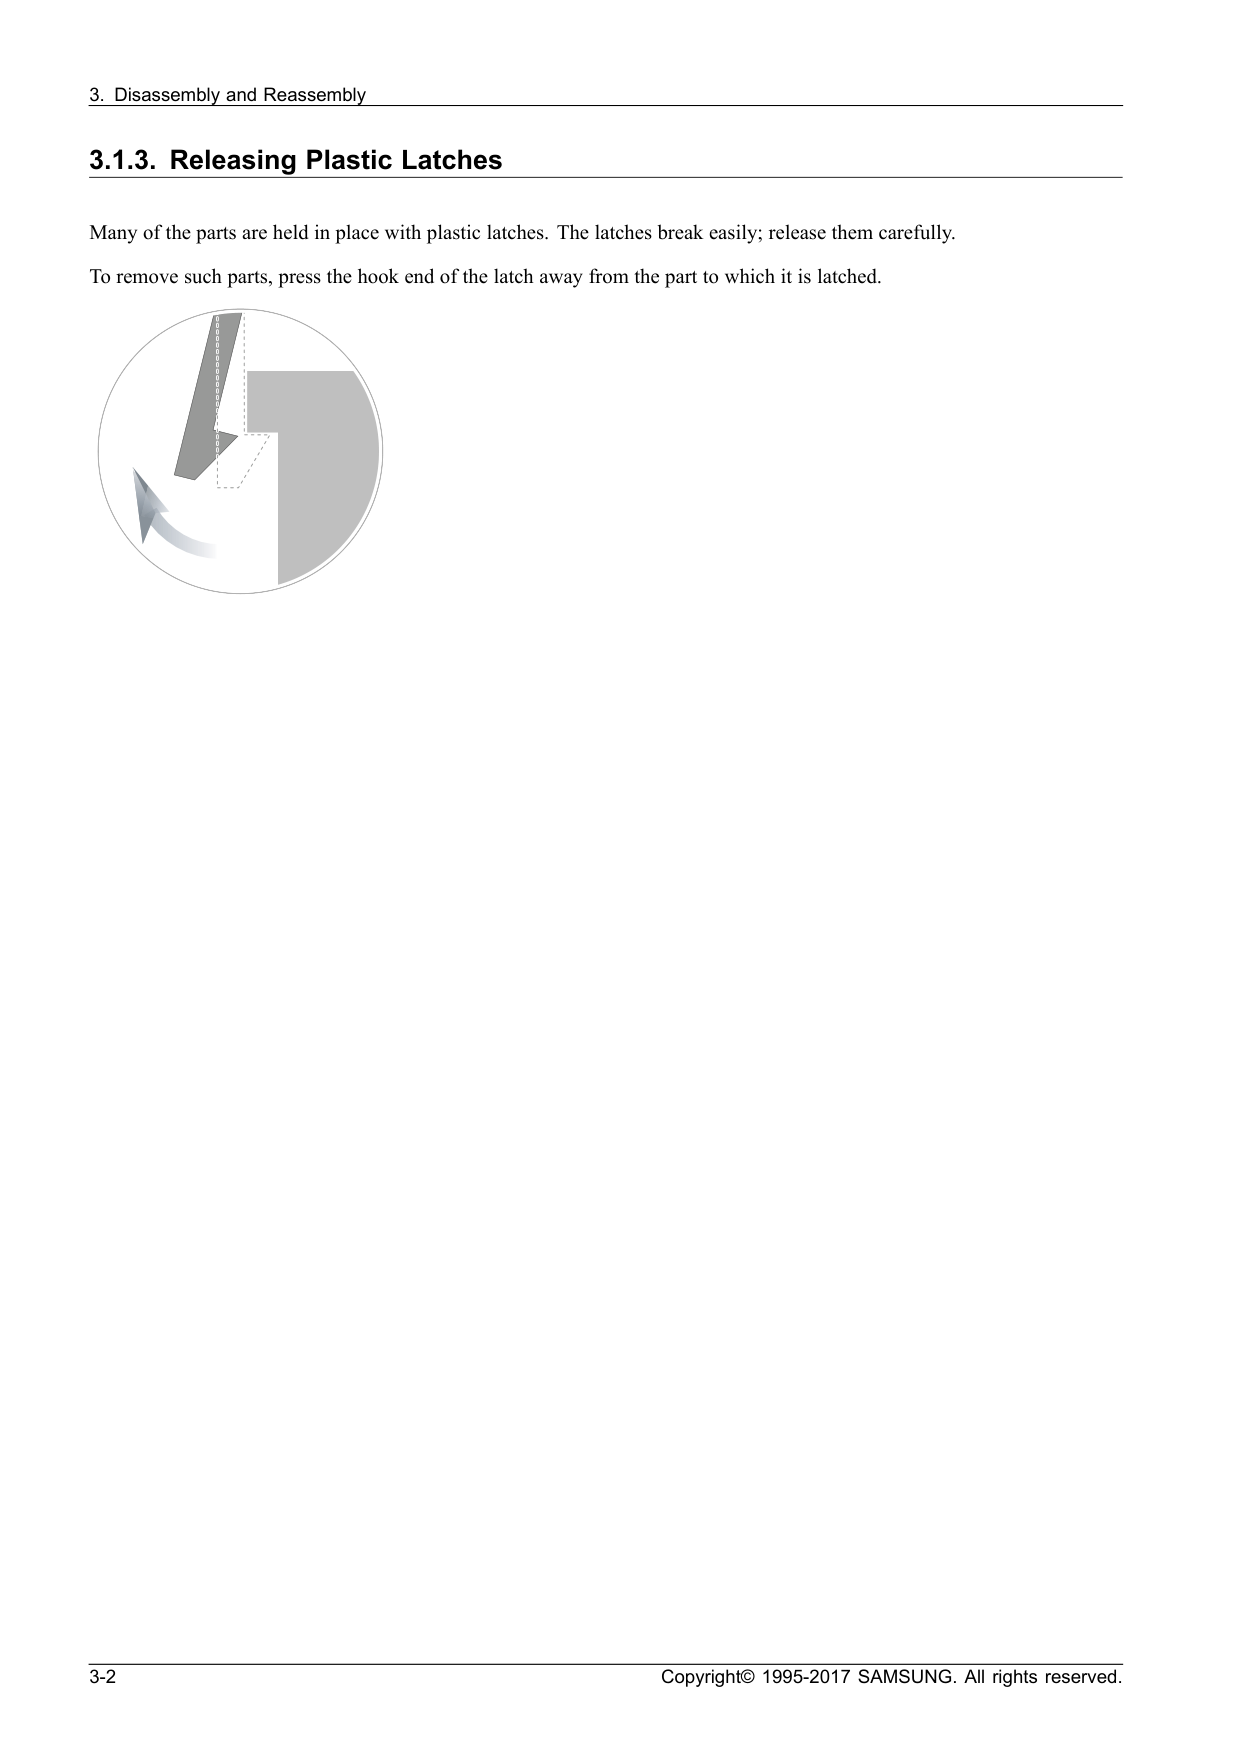
Warning
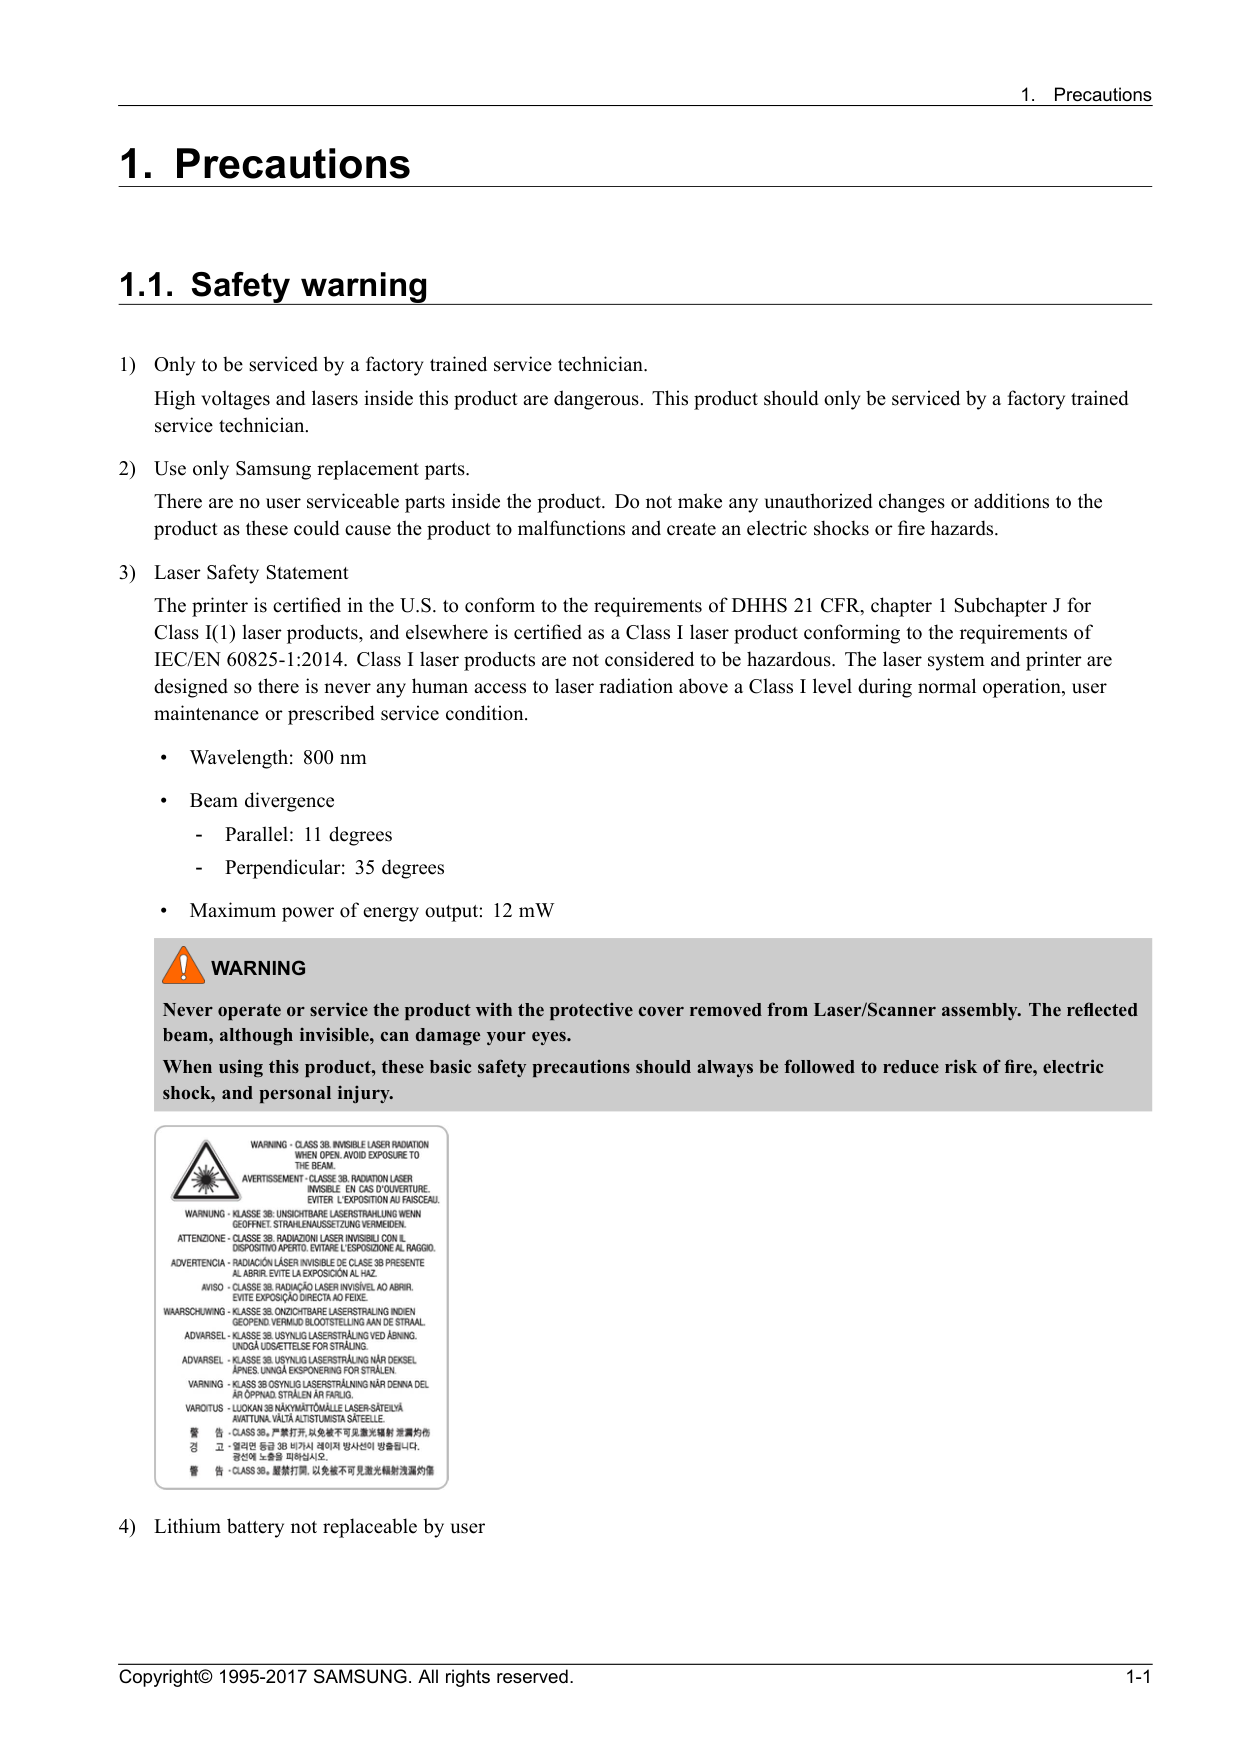
Never operate or service the product with the protective cover removed from Laser/Scanner assembly. The reflected beam, although invisible, can damage your eyes. When using this product, these basic safety precautions should always be followed to reduce risk of fire, electric shock, and personal injury. 4) Lithium battery not replaceable by user Copyright© 1995-2017 SAMSUNG. All rights reserved. 1-1
Caution
Be sure no power is applied to the chassis or circuit, and observe all other safety precautions. 1) Immediately before handling a semiconductor component or semiconductor-equipped assembly, drain off any electrostatic charge on your body by touching a known earth ground. Alternatively, employ a commercially available wrist strap device, which should be removed for your personal safety reasons prior to applying power to the unit under test. 2) After removing an electrical assembly equipped with ESDs, place the assembly on a conductive surface, such as aluminum or copper foil, or conductive foam, to prevent electrostatic charge buildup in the vicinity of the assembly. 3) Use only a grounded tip soldering iron to solder or desolder ESDs. 4) Use only an “anti-static” solder removal device. Some solder removal devices not classified as “anti-static” can generate electrical charges sufficient to damage ESDs. 5) Do not use Freon-propelled chemicals. When sprayed, these can generate electrical charges sufficient to damage ESDs. 6) Do not remove a replacement ESD from its protective packaging until immediately before installing it. Most replacement ESDs are packaged with all leads shorted together by conductive foam, aluminum foil, or a comparable conductive material. 7) Immediately before removing the protective shorting material from the leads of a replacement ESD, touch the protective material to the chassis or circuit assembly into which the device will be installed. 8) Maintain continuous electrical contact between the ESD and the assembly into which it will be installed, until completely plugged or soldered into the circuit. 9) Minimize bodily motions when handling unpackaged replacement ESDs. Normal motions, such as the brushing together of clothing fabric and lifting one’s foot from a carpeted floor, can generate static electricity sufficient to damage an ESD. 1-6 Copyright© 1995-2017 SAMSUNG. All rights reserved.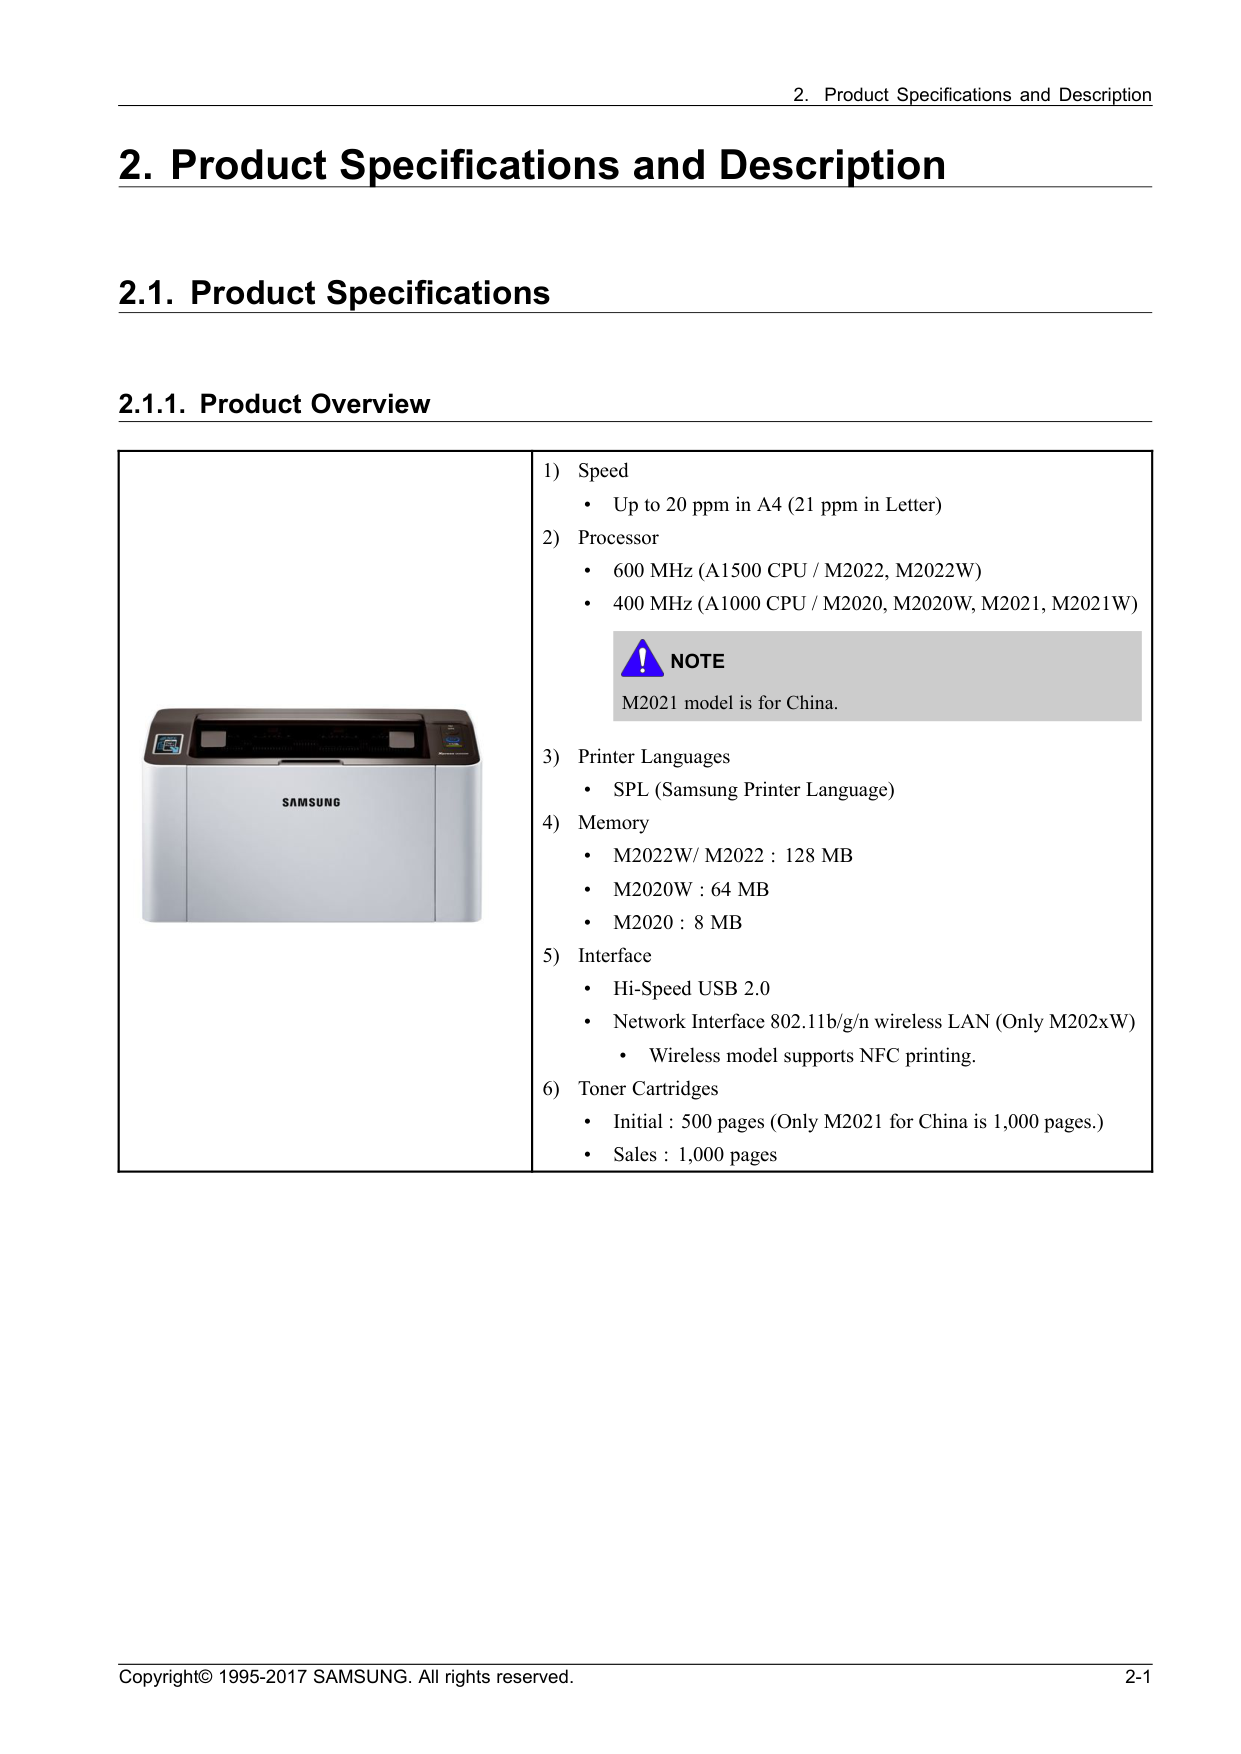
Note
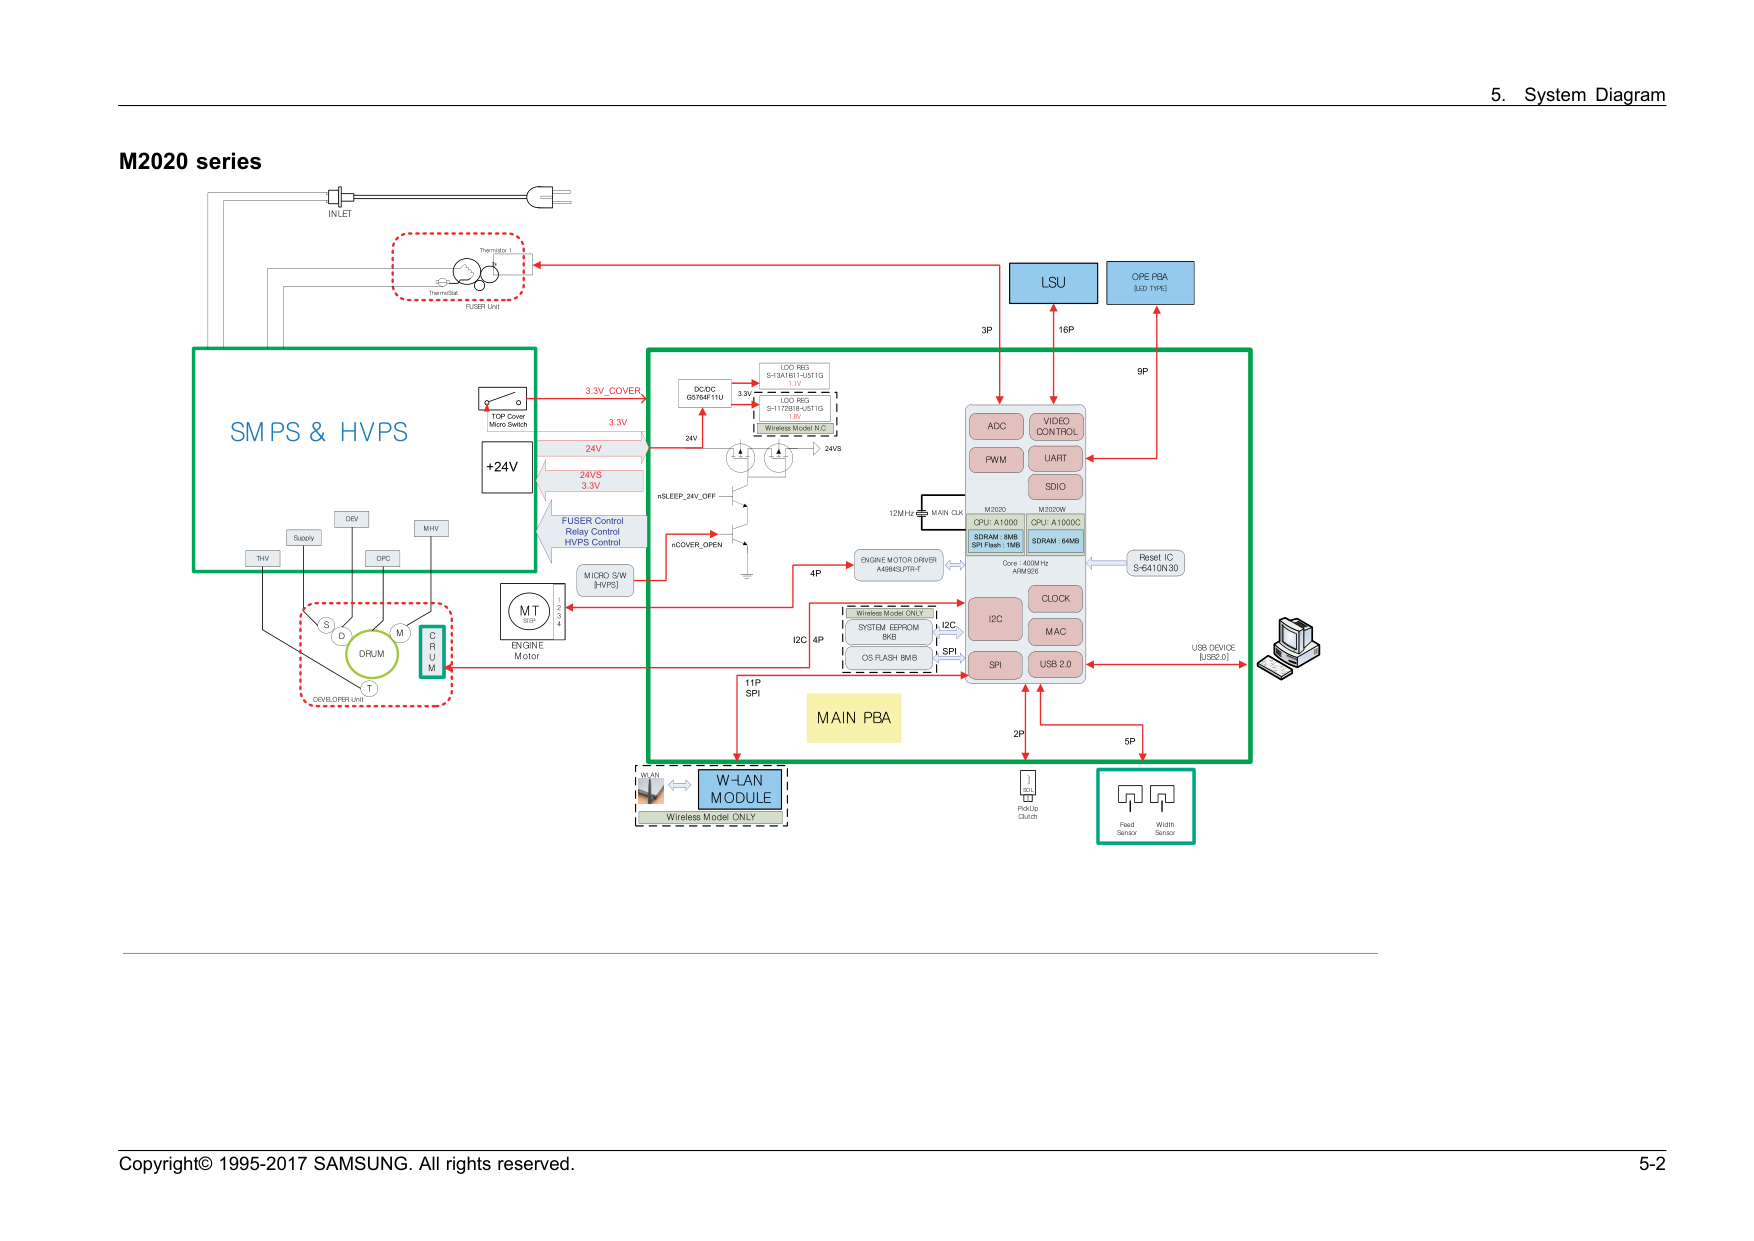
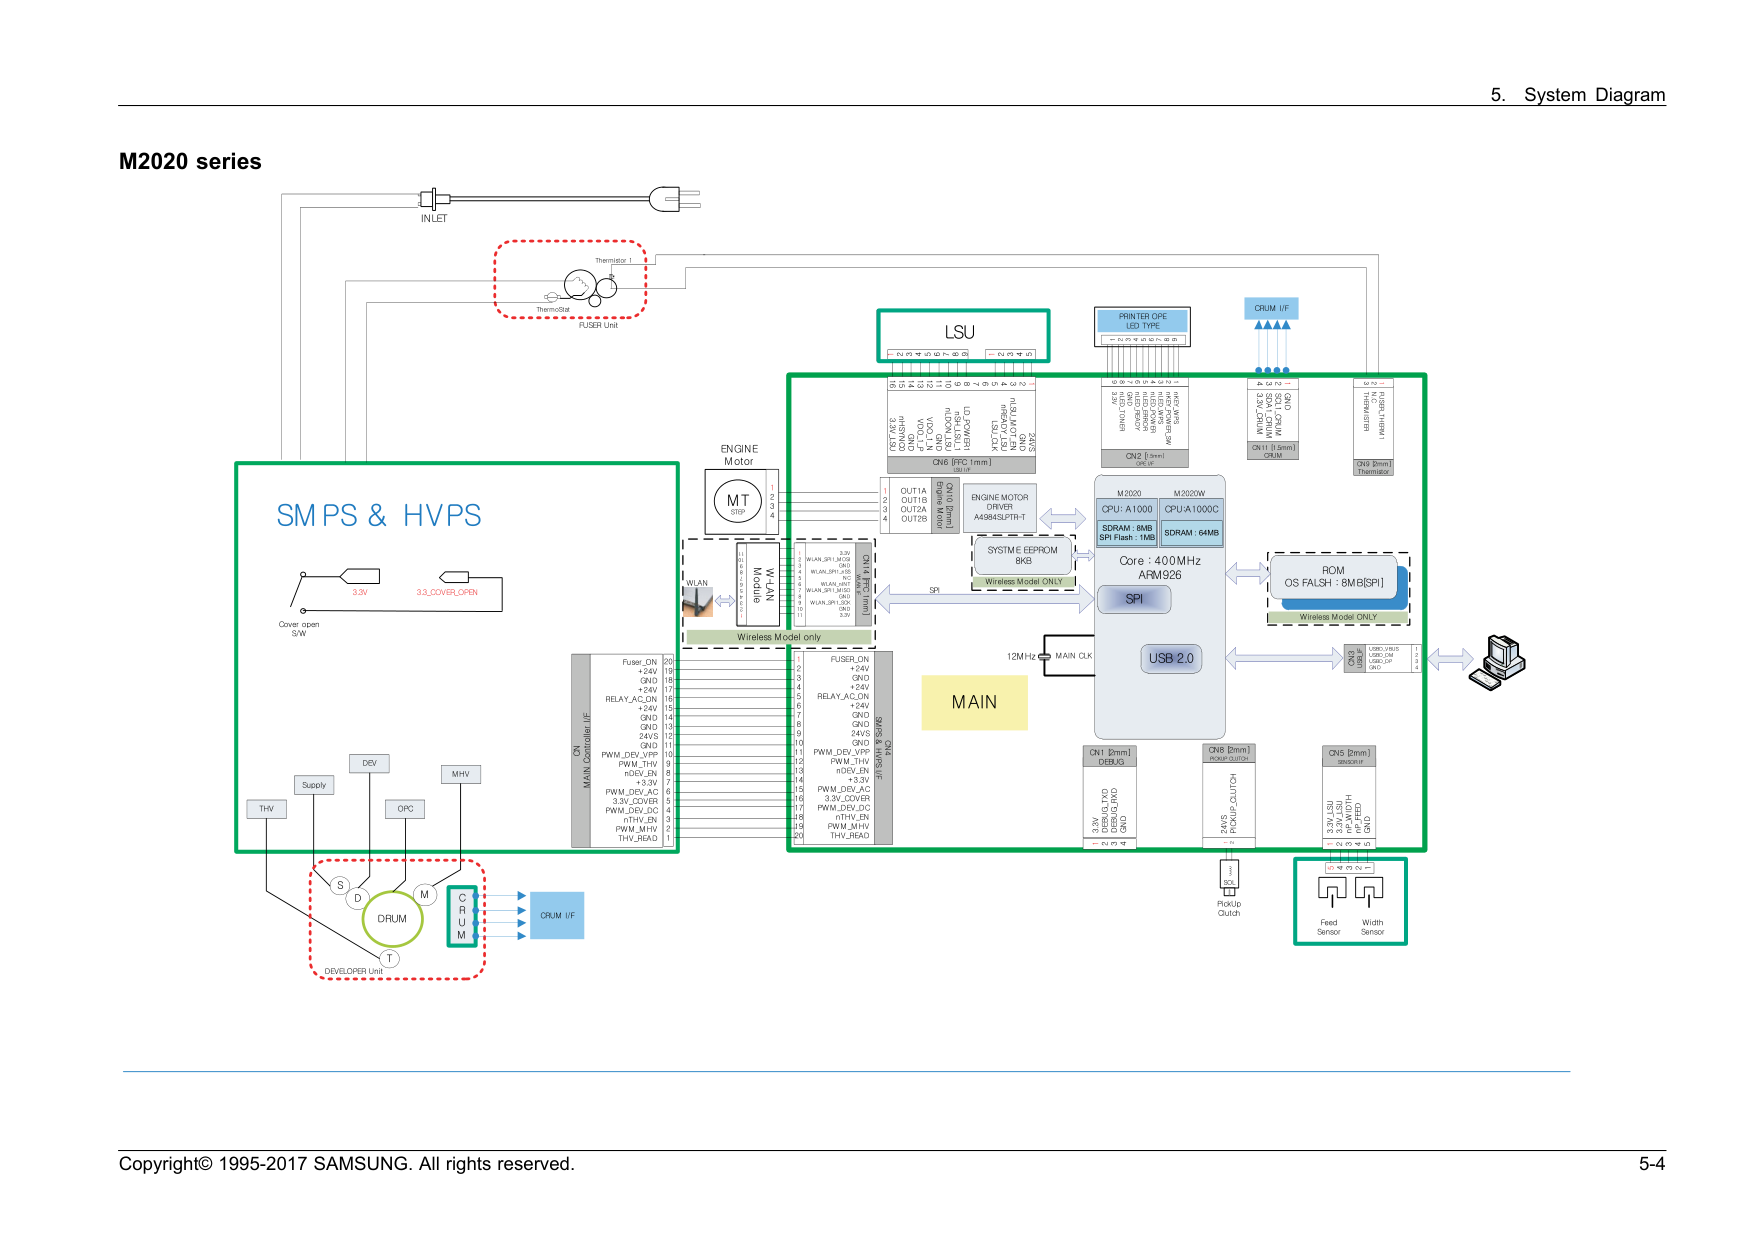
M2021 model is for China. 3) Printer Languages • SPL (Samsung Printer Language) 4) Memory •M2022W/ M2022 : 128 Mb
•M2020W : 64 Mb
•M2020 : 8 Mb
5) Interface • Hi-Speed USB 2.0 • Network Interface 802.11b/g/n wireless LAN (Only M202xW) • Wireless model supports NFC printing. 6) Toner Cartridges • Initial : 500 pages (Only M2021 for China is 1,000 pages.) • Sales : 1,000 pages Copyright© 1995-2017 SAMSUNG. All rights reserved. 2-1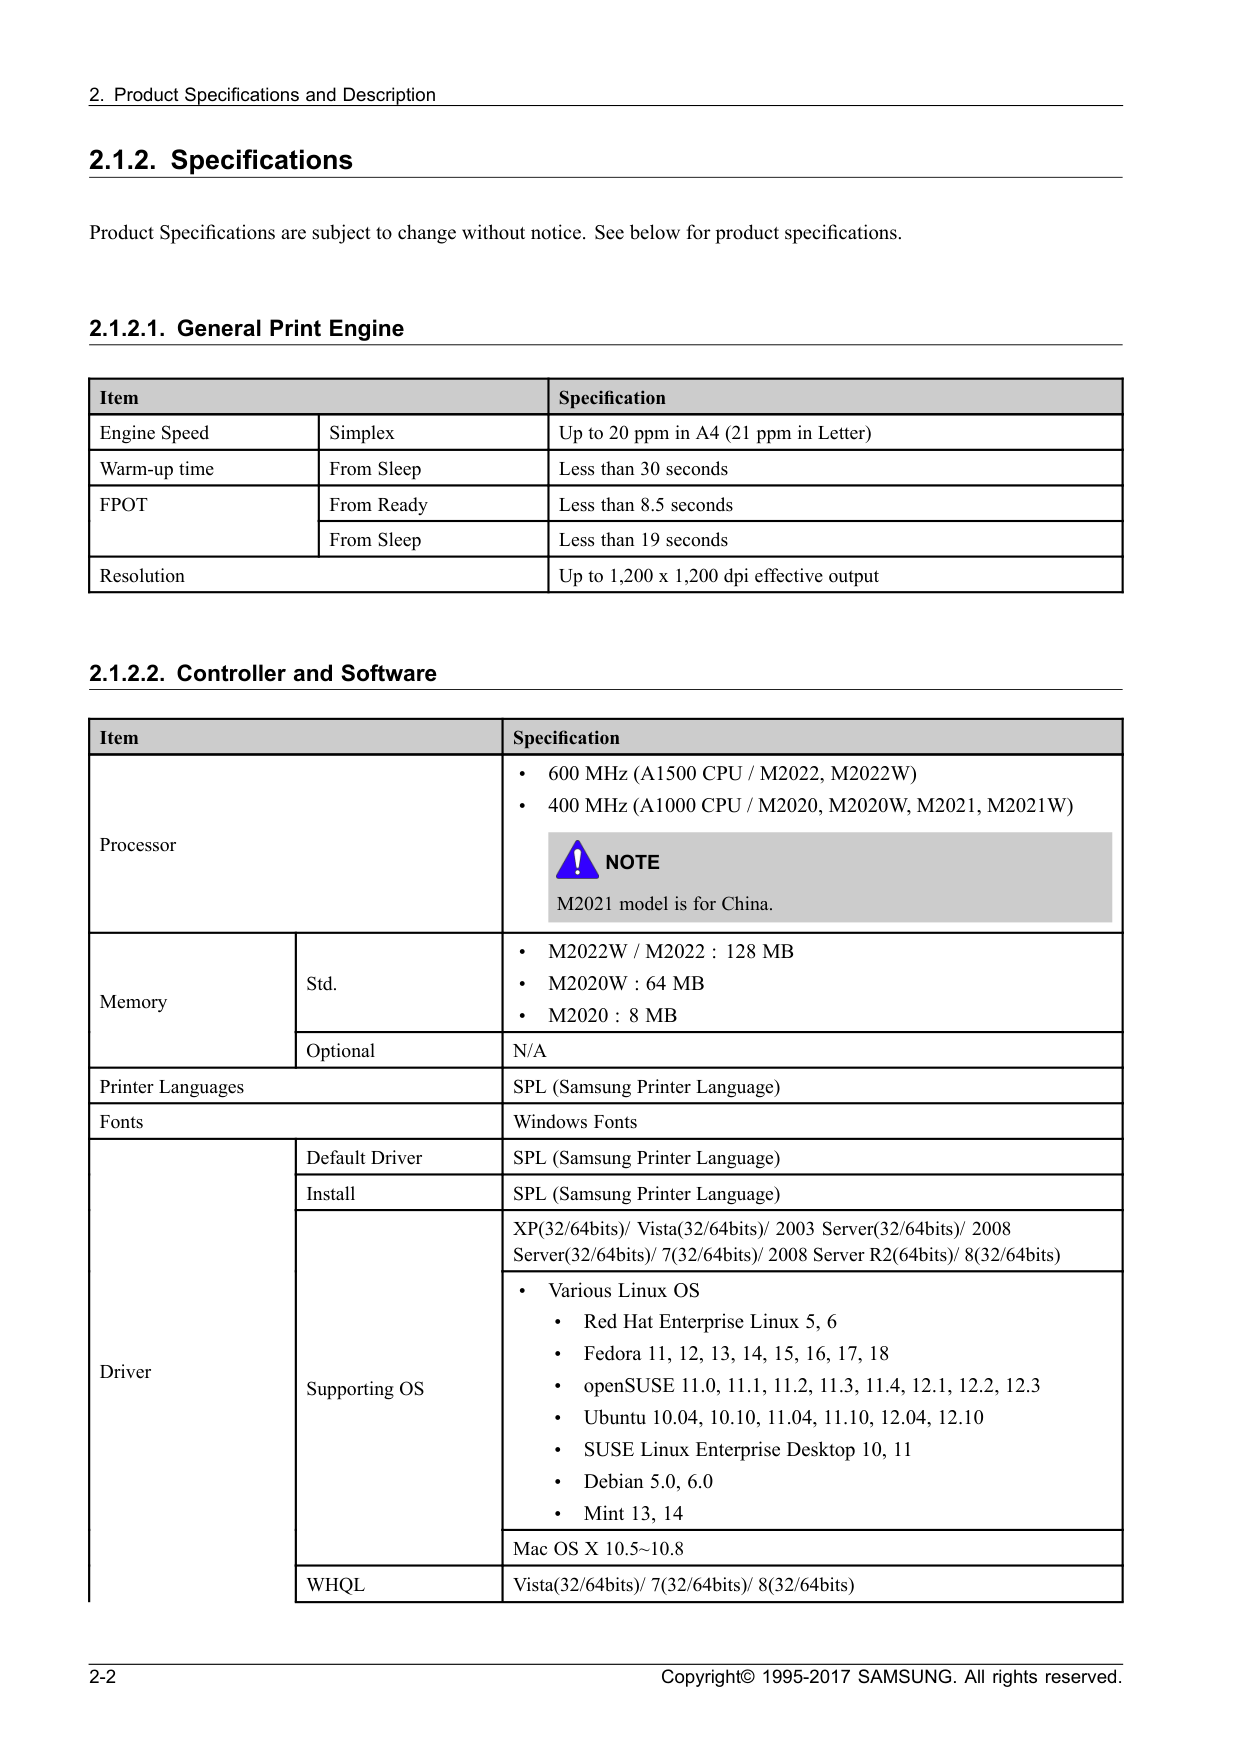
Fpot
From Sleep Less than 19 seconds Resolution Up to 1,200 x 1,200 dpi effective output 2.1.2.2. Controller and Software Item Specification Processor • 600 MHz (A1500 CPU / M2022, M2022W) • 400 MHz (A1000 CPU / M2020, M2020W, M2021, M2021W)Note
M2021 model is for China. Std. •M2022W / M2022 : 128 Mb
•M2020W : 64 Mb
•M2020 : 8 Mb
Memory OptionalN/A
Printer Languages SPL (Samsung Printer Language) Fonts Windows Fonts Default Driver SPL (Samsung Printer Language) Install SPL (Samsung Printer Language) XP(32/64bits)/ Vista(32/64bits)/ 2003 Server(32/64bits)/ 2008 Server(32/64bits)/ 7(32/64bits)/ 2008 Server R2(64bits)/ 8(32/64bits) • Various Linux OS • Red Hat Enterprise Linux 5, 6 • Fedora 11, 12, 13, 14, 15, 16, 17, 18 • openSUSE 11.0, 11.1, 11.2, 11.3, 11.4, 12.1, 12.2, 12.3 • Ubuntu 10.04, 10.10, 11.04, 11.10, 12.04, 12.10 • SUSE Linux Enterprise Desktop 10, 11 • Debian 5.0, 6.0 • Mint 13, 14 Supporting OS Mac OS X 10.5~10.8Whql
Vista(32/64bits)/ 7(32/64bits)/ 8(32/64bits) Driver 2-2 Copyright© 1995-2017 SAMSUNG. All rights reserved.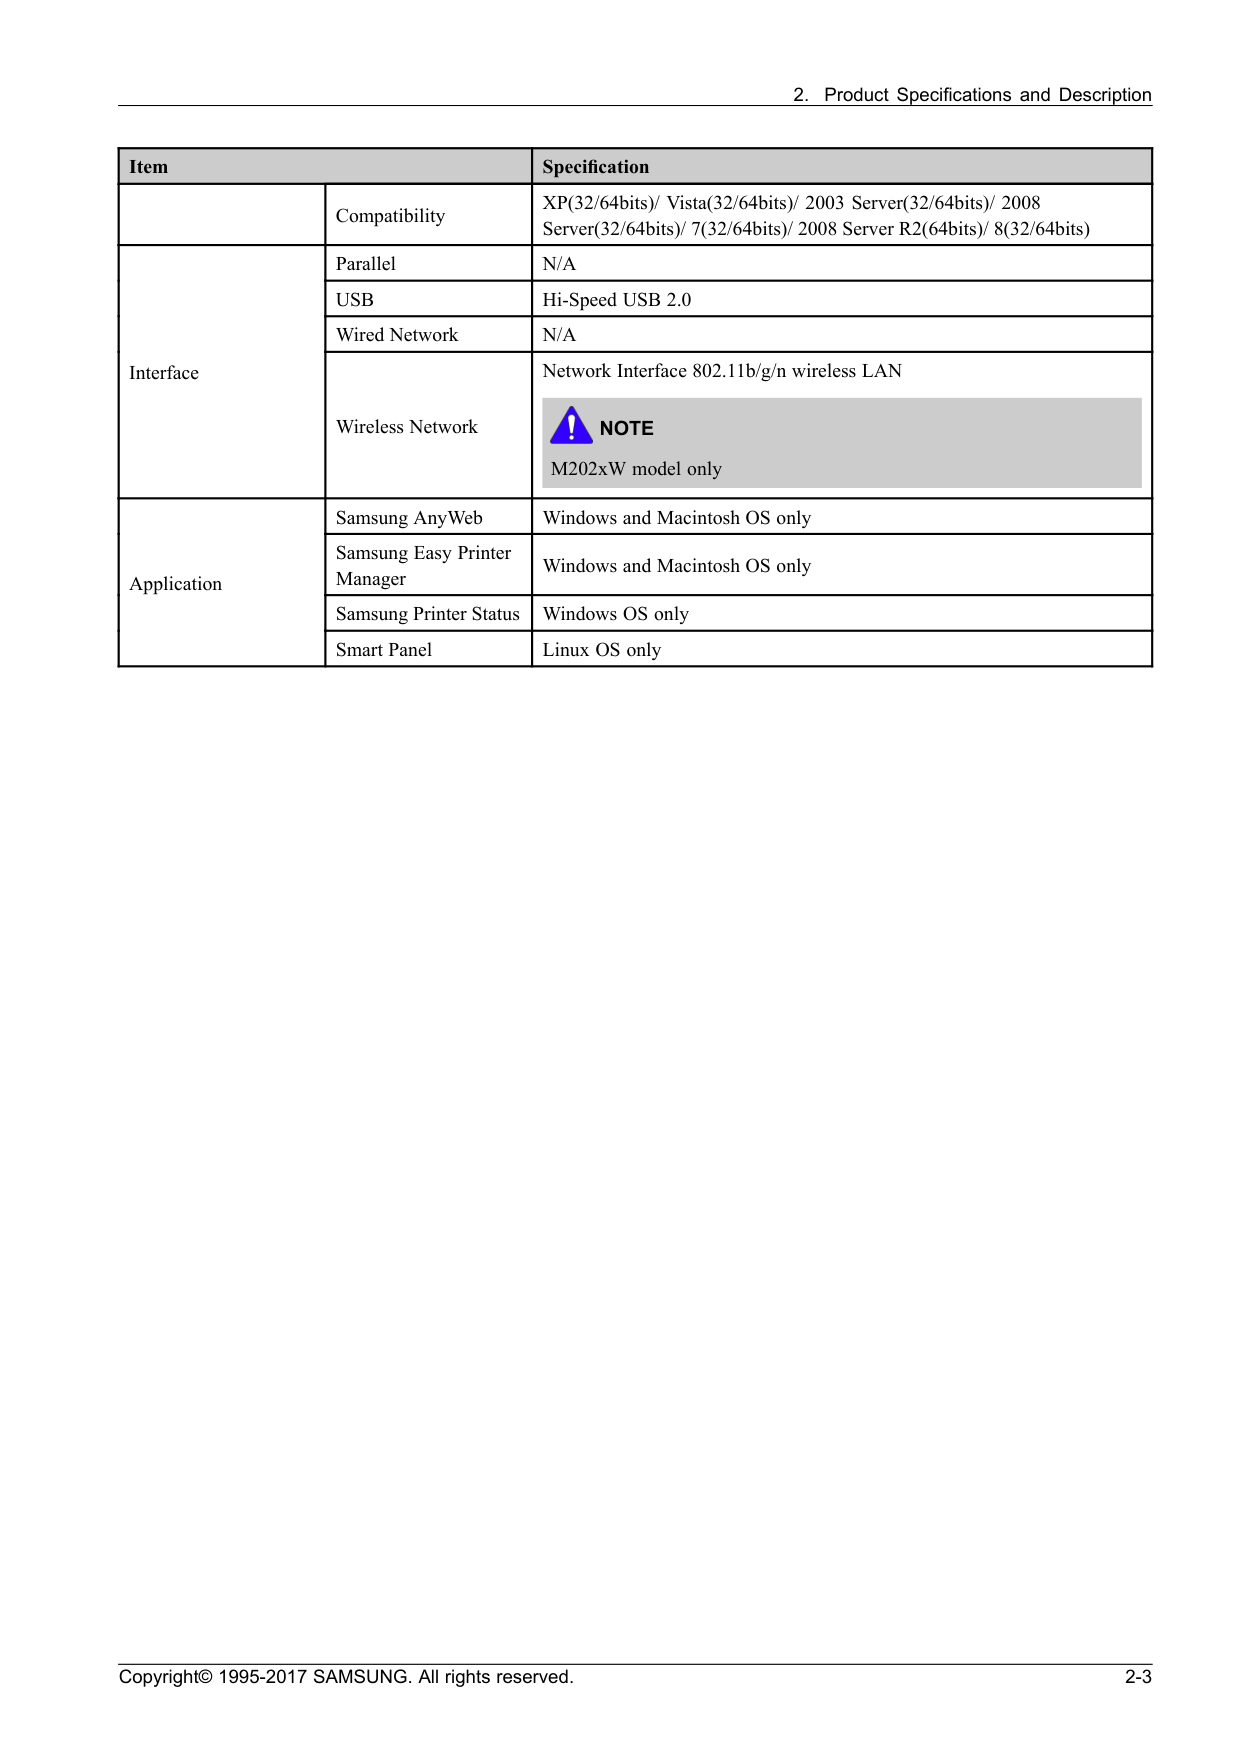
N/A
Usb
Hi-Speed USB 2.0 Wired NetworkN/A
Interface Wireless Network Network Interface 802.11b/g/n wireless LANNote
M202xW model only Samsung AnyWeb Windows and Macintosh OS only Samsung Easy Printer Manager Windows and Macintosh OS only Samsung Printer Status Windows OS only Application Smart Panel Linux OS only Copyright© 1995-2017 SAMSUNG. All rights reserved. 2-3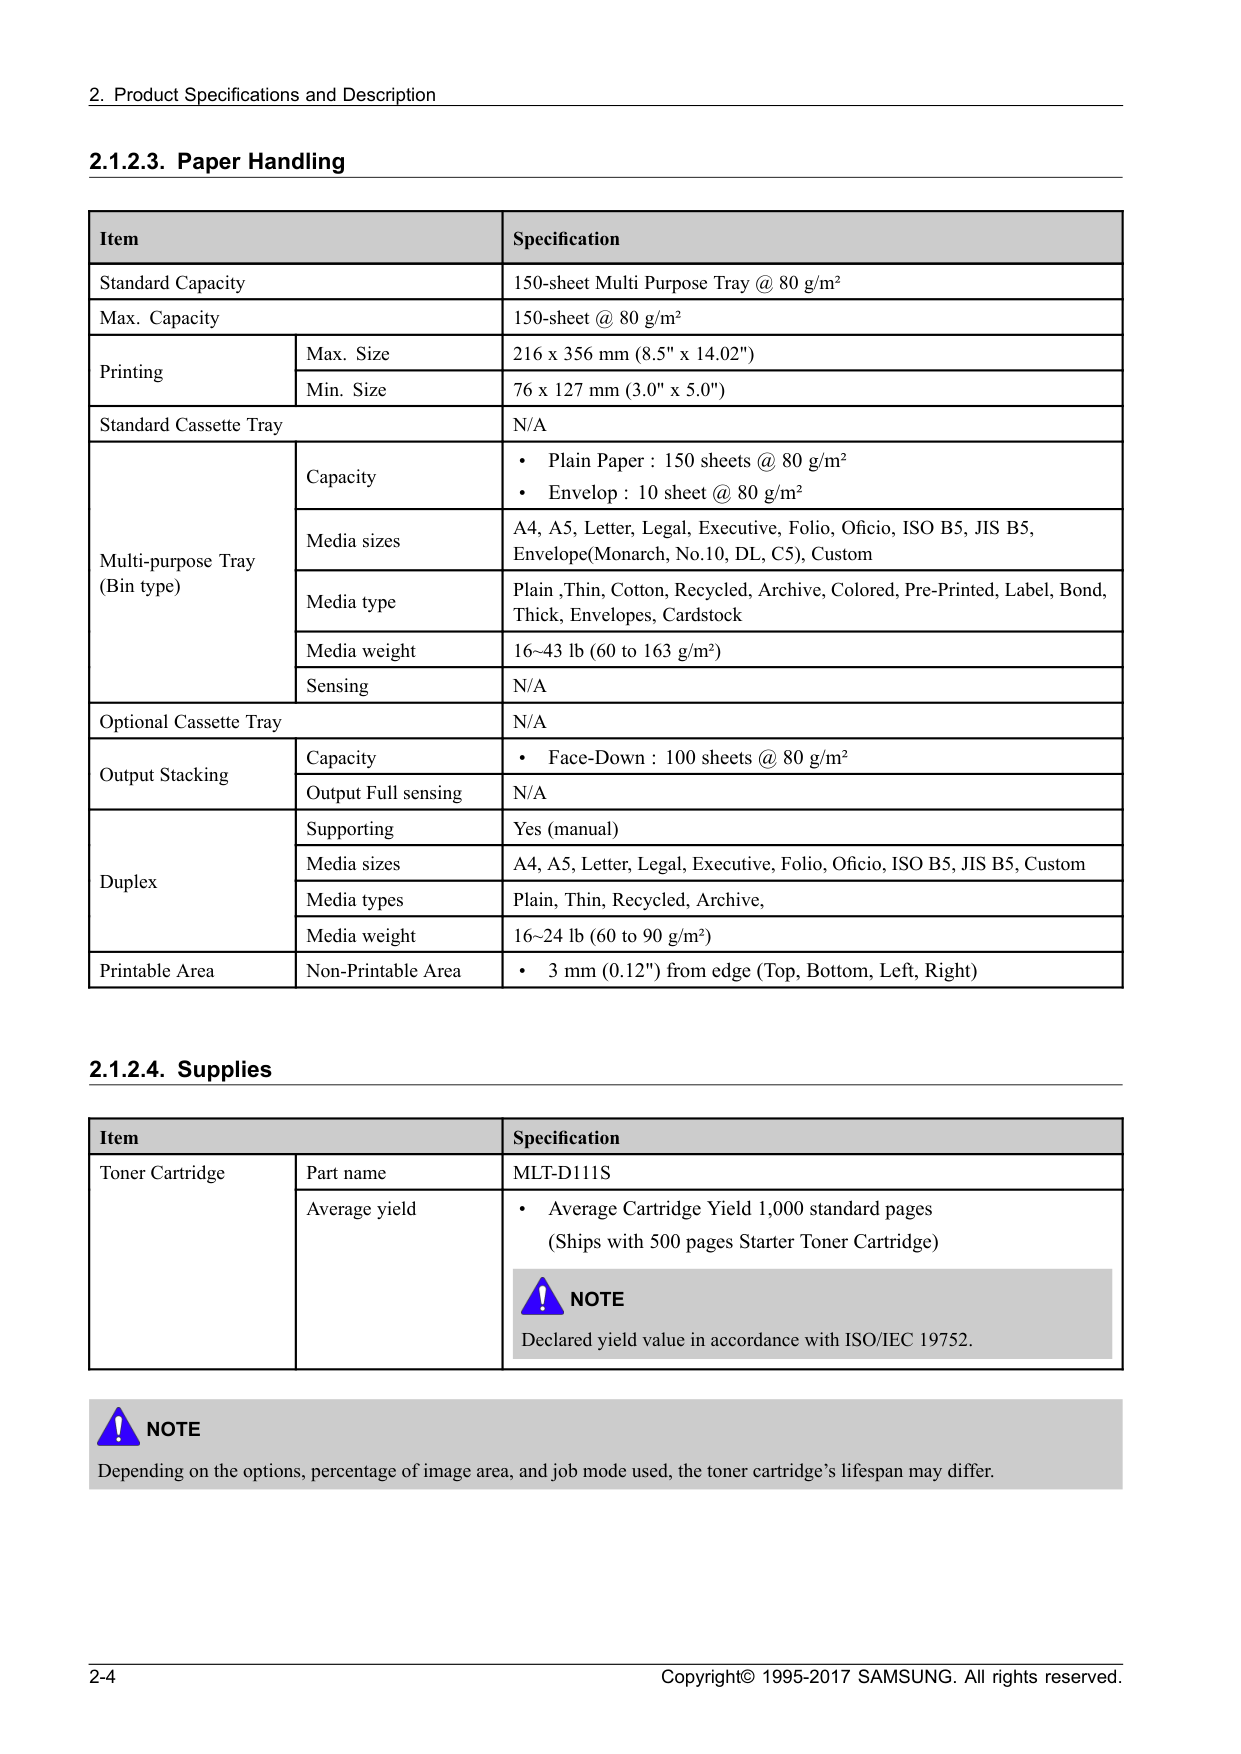
N/A
Capacity • Plain Paper : 150 sheets @ 80 g/m² • Envelop : 10 sheet @ 80 g/m² Media sizes A4, A5, Letter, Legal, Executive, Folio, Oficio, ISO B5, JIS B5, Envelope(Monarch, No.10, DL, C5), Custom Media type Plain ,Thin, Cotton, Recycled, Archive, Colored, Pre-Printed, Label, Bond, Thick, Envelopes, Cardstock Media weight 16~43 lb (60 to 163 g/m²) Multi-purpose Tray (Bin type) SensingN/A
Optional Cassette TrayN/A
Capacity • Face-Down : 100 sheets @ 80 g/m² Output Stacking Output Full sensingN/A
Supporting Yes (manual) Media sizes A4, A5, Letter, Legal, Executive, Folio, Oficio, ISO B5, JIS B5, Custom Media types Plain, Thin, Recycled, Archive, Duplex Media weight 16~24 lb (60 to 90 g/m²) Printable Area Non-Printable Area • 3 mm (0.12") from edge (Top, Bottom, Left, Right) 2.1.2.4. Supplies Item Specification Part nameMlt-D111S
Toner Cartridge Average yield • Average Cartridge Yield 1,000 standard pages (Ships with 500 pages Starter Toner Cartridge)Note
Declared yield value in accordance with ISO/IEC 19752.Note
Depending on the options, percentage of image area, and job mode used, the toner cartridge’s lifespan may differ. 2-4 Copyright© 1995-2017 SAMSUNG. All rights reserved.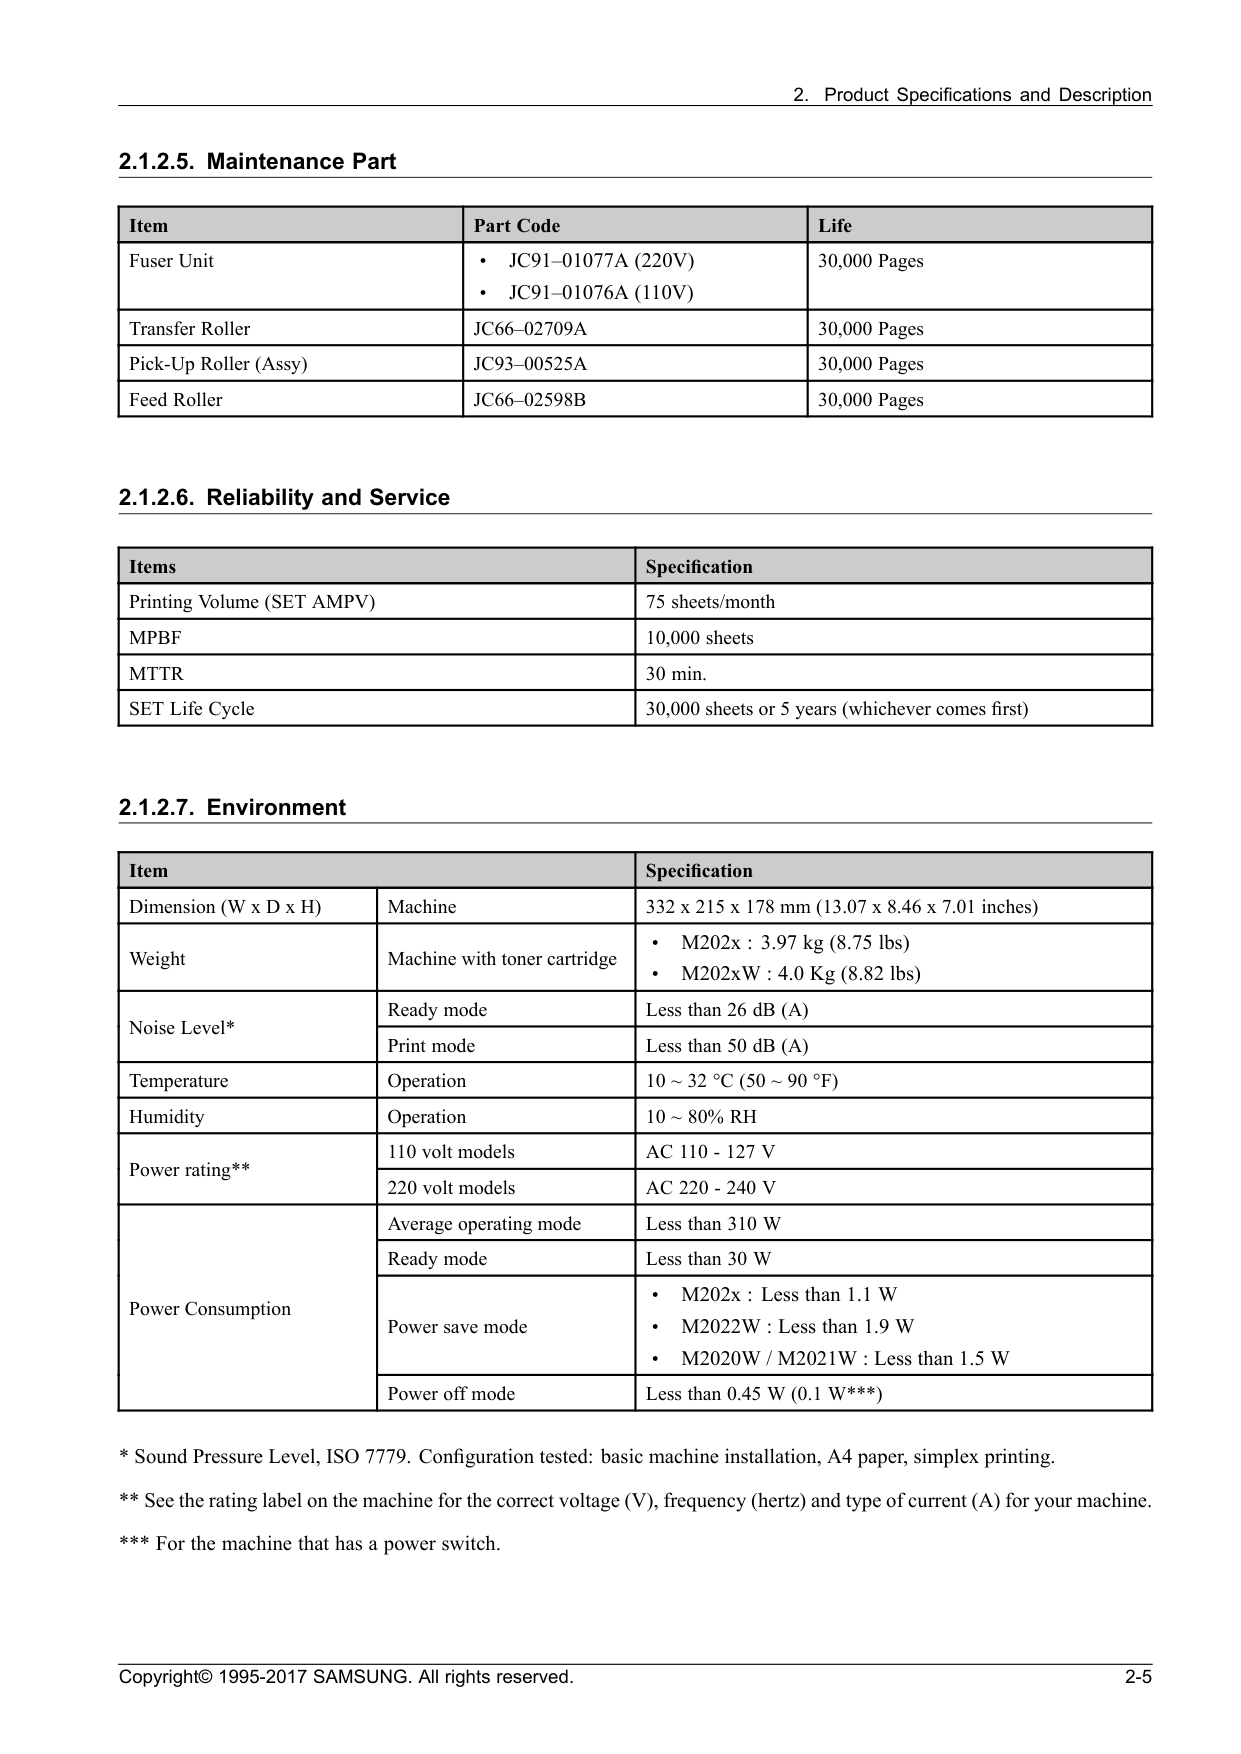
Jc91–01077A (220V)
•Jc91–01076A (110V)
30,000 Pages Transfer RollerJc66–02709A
30,000 Pages Pick-Up Roller (Assy)Jc93–00525A
30,000 Pages Feed RollerJc66–02598B
30,000 Pages 2.1.2.6. Reliability and Service Items Specification Printing Volume (SET AMPV) 75 sheets/monthMpbf
10,000 sheetsMttr
30 min. SET Life Cycle 30,000 sheets or 5 years (whichever comes first) 2.1.2.7. Environment Item Specification Dimension (W x D x H) Machine 332 x 215 x 178 mm (13.07 x 8.46 x 7.01 inches) Weight Machine with toner cartridge • M202x : 3.97 kg (8.75 lbs) • M202xW : 4.0 Kg (8.82 lbs) Ready mode Less than 26 dB (A) Noise Level* Print mode Less than 50 dB (A) Temperature Operation10 ~ 32 °C (50 ~ 90 °F)
Humidity Operation10 ~ 80% Rh
110 volt modelsAc 110 - 127 V
Power rating** 220 volt modelsAc 220 - 240 V
Average operating mode Less than 310 W Ready mode Less than 30 W Power save mode • M202x : Less than 1.1 W • M2022W : Less than 1.9 W • M2020W / M2021W : Less than 1.5 W Power Consumption Power off mode Less than 0.45 W (0.1 W***)
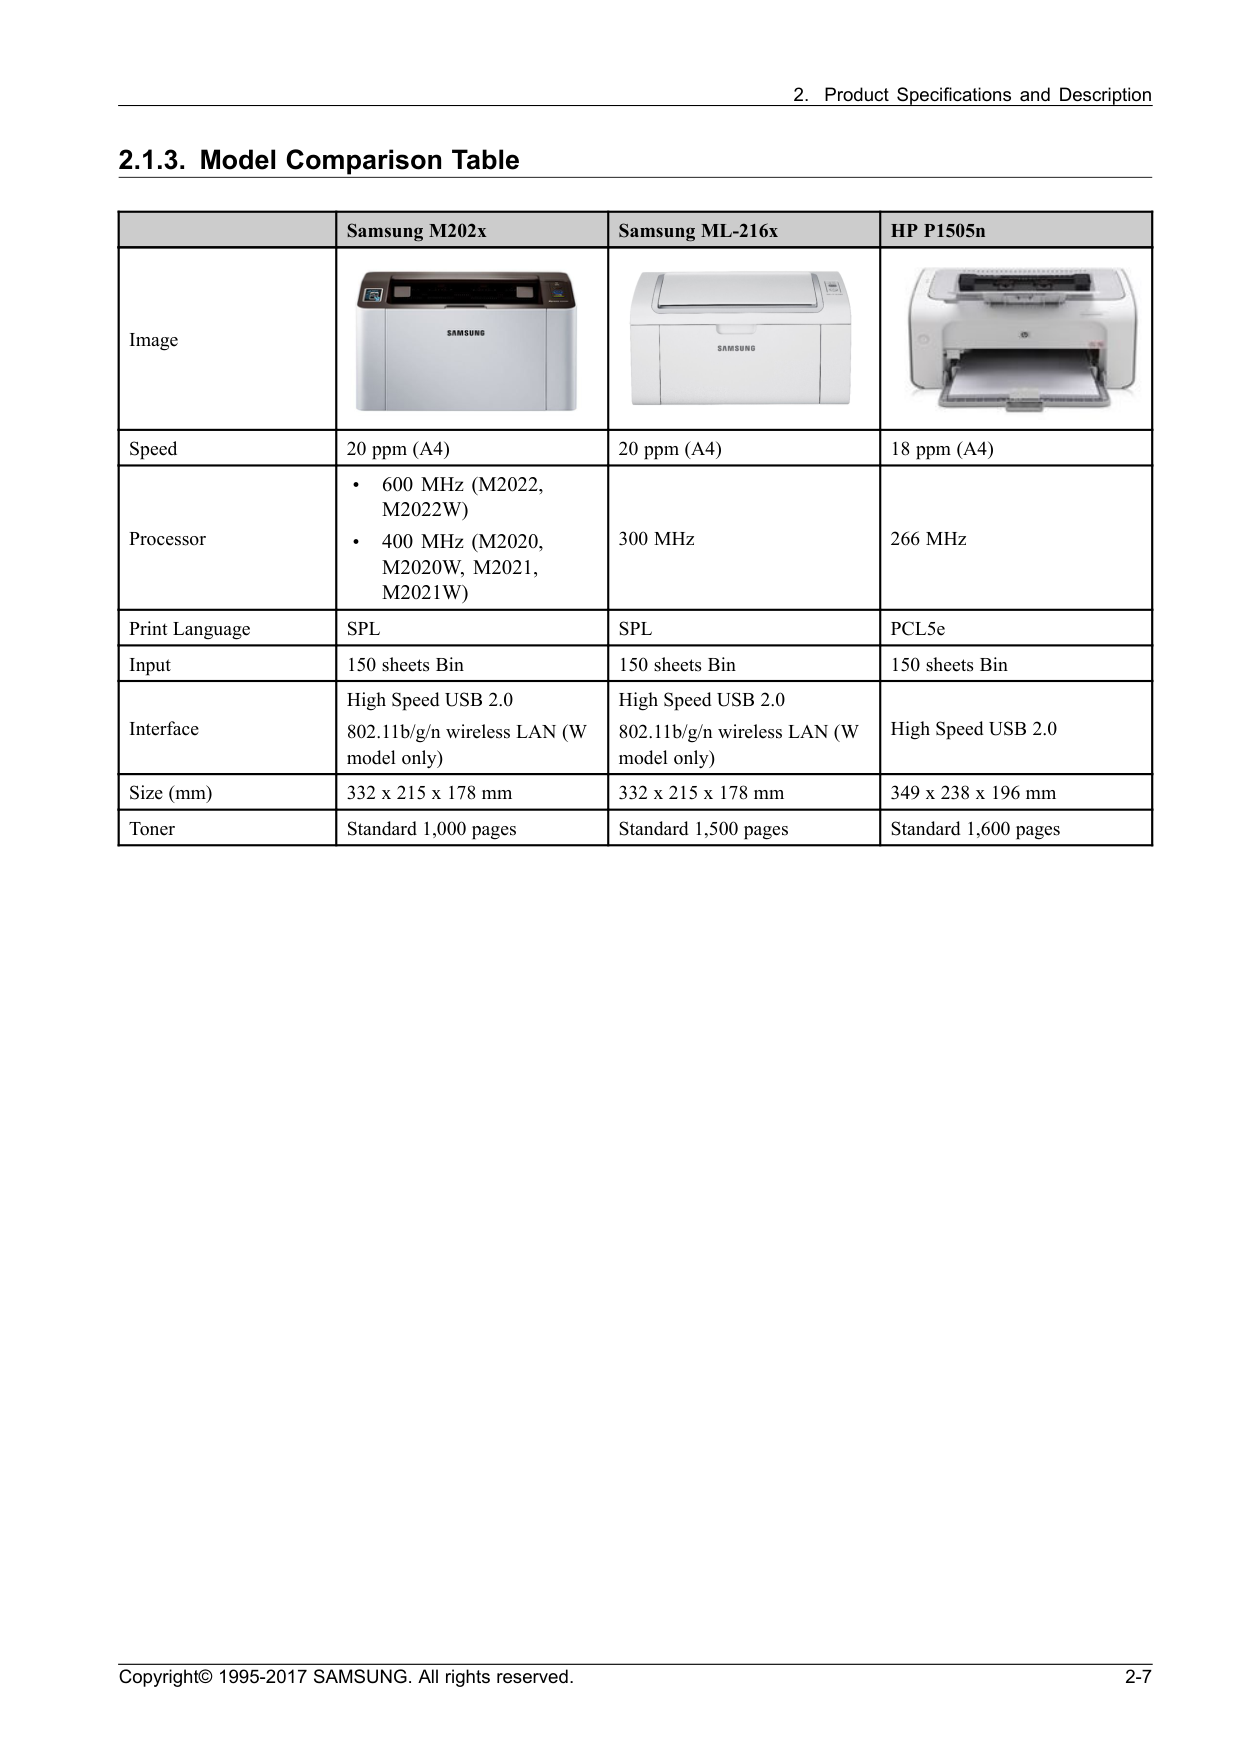
M2022W)
• 400 MHz (M2020,M2020W, M2021,
M2021W)
300 MHz 266 MHz Print LanguageSpl
Spl
PCL5e Input 150 sheets Bin 150 sheets Bin 150 sheets Bin Interface High Speed USB 2.0 802.11b/g/n wireless LAN (W model only) High Speed USB 2.0 802.11b/g/n wireless LAN (W model only) High Speed USB 2.0 Size (mm) 332 x 215 x 178 mm 332 x 215 x 178 mm 349 x 238 x 196 mm Toner Standard 1,000 pages Standard 1,500 pages Standard 1,600 pages Copyright© 1995-2017 SAMSUNG. All rights reserved. 2-7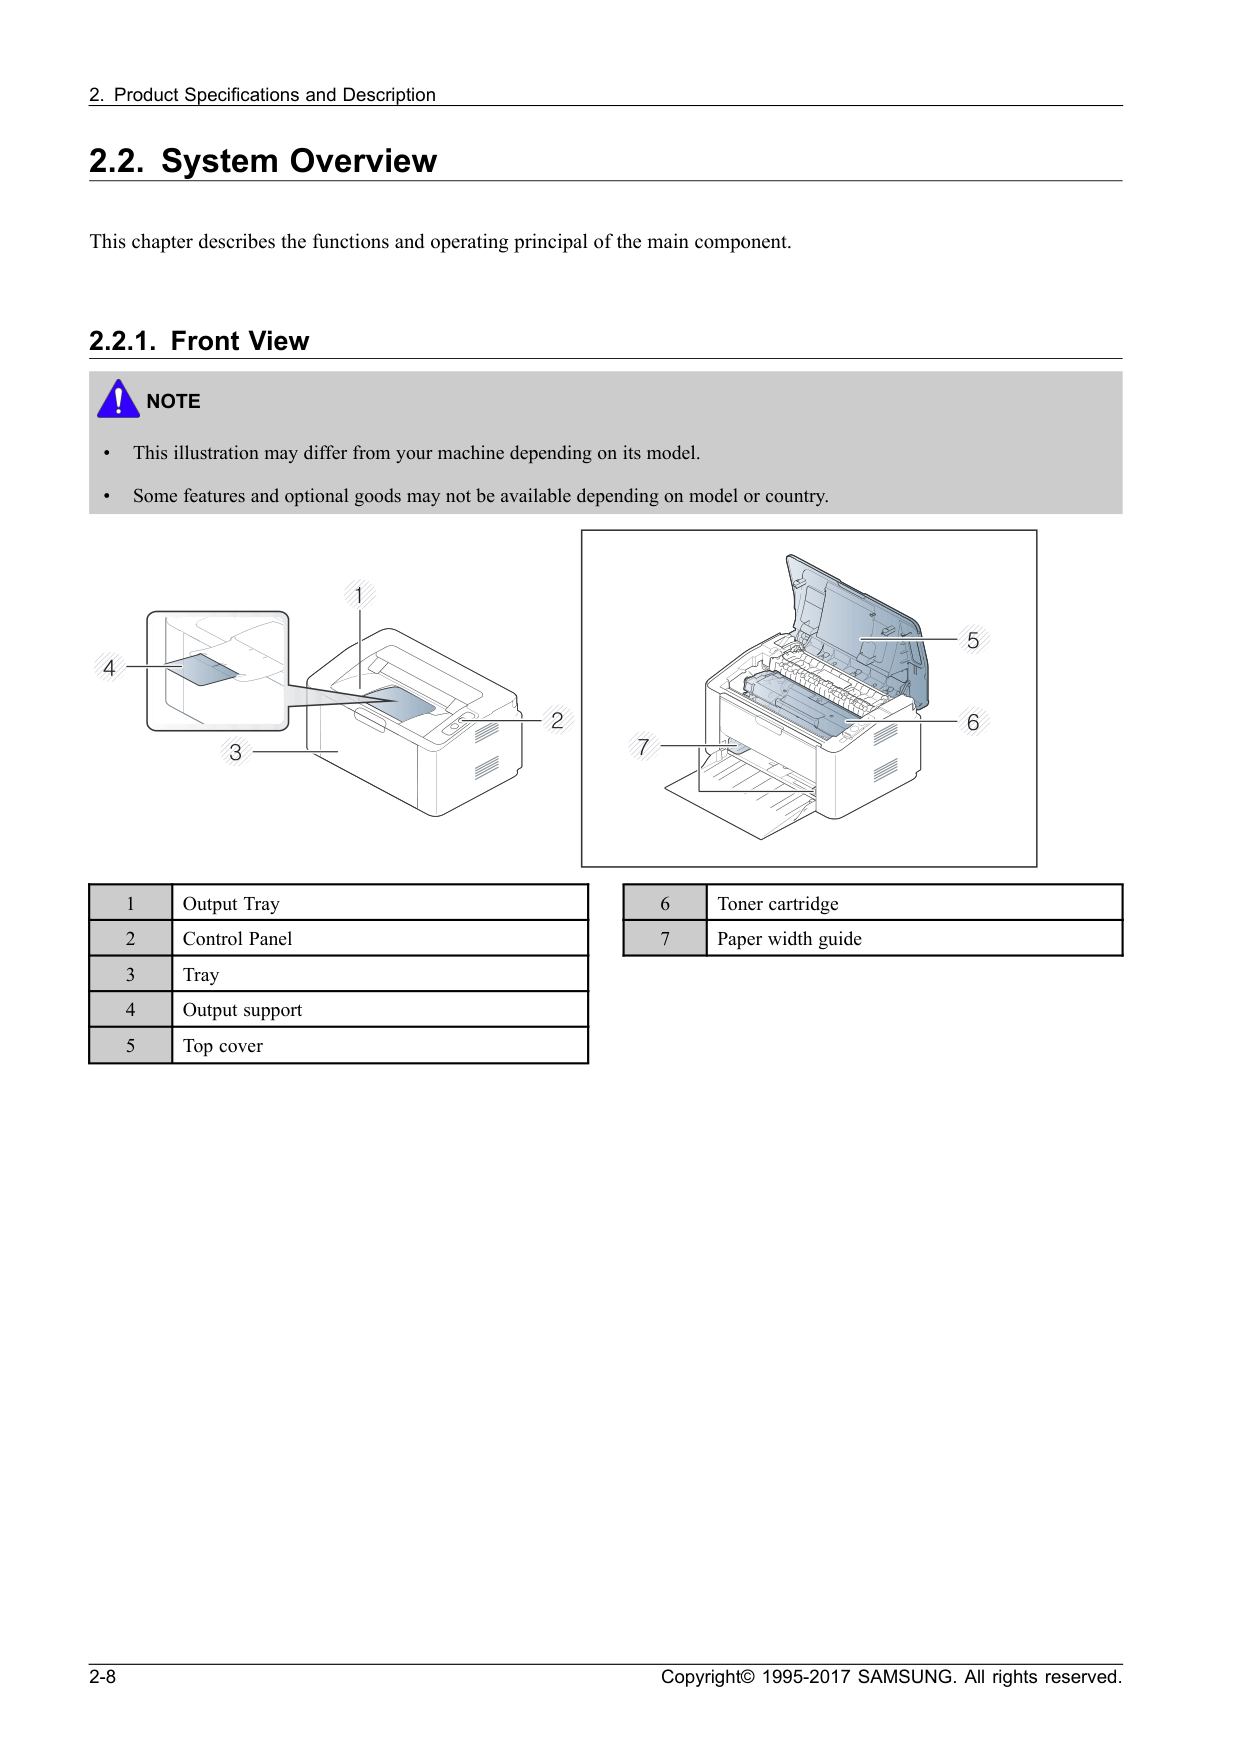
Note
• This illustration may differ from your machine depending on its model. • Some features and optional goods may not be available depending on model or country. 1 Output Tray 2 Control Panel 3 Tray 4 Output support 5 Top cover 6 Toner cartridge 7 Paper width guide 2-8 Copyright© 1995-2017 SAMSUNG. All rights reserved.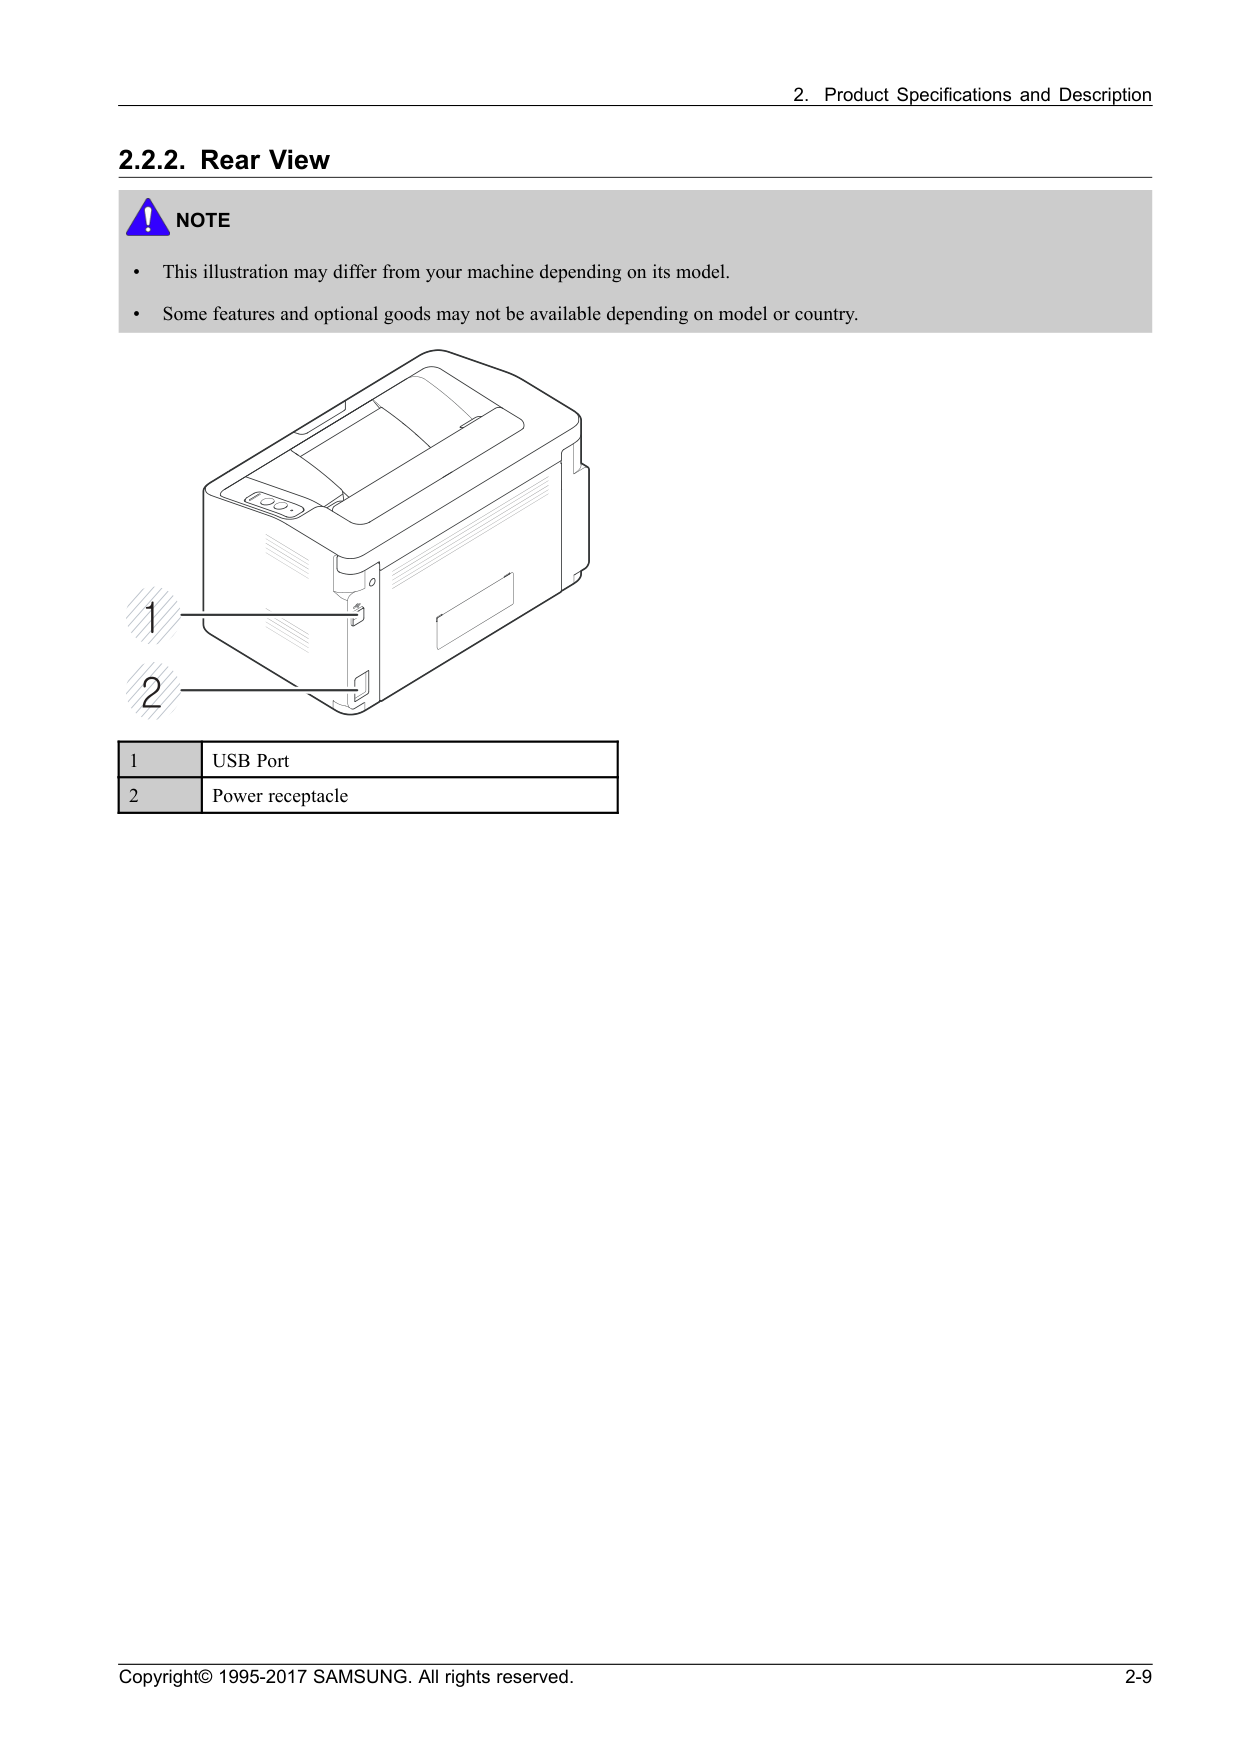
Note
• This illustration may differ from your machine depending on its model. • Some features and optional goods may not be available depending on model or country. 1 USB Port 2 Power receptacle Copyright© 1995-2017 SAMSUNG. All rights reserved. 2-9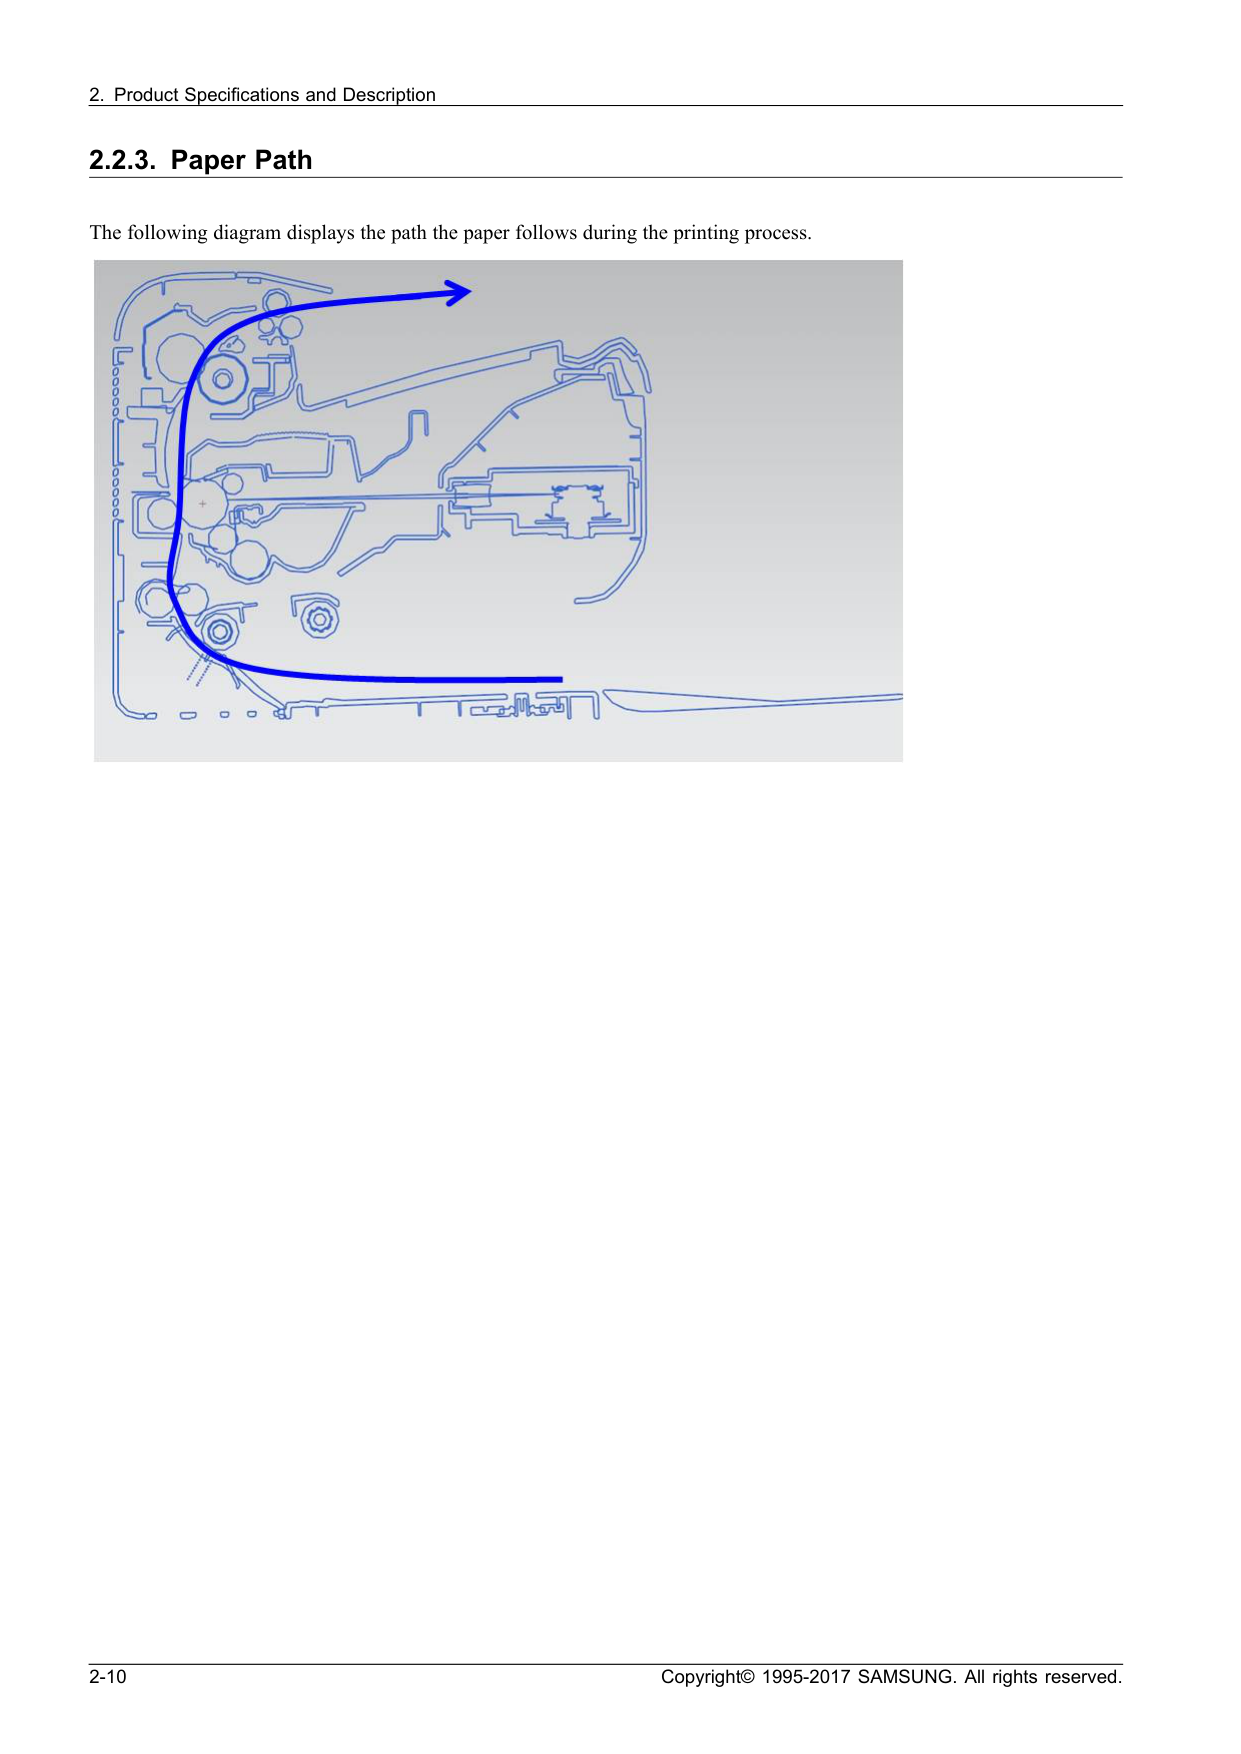
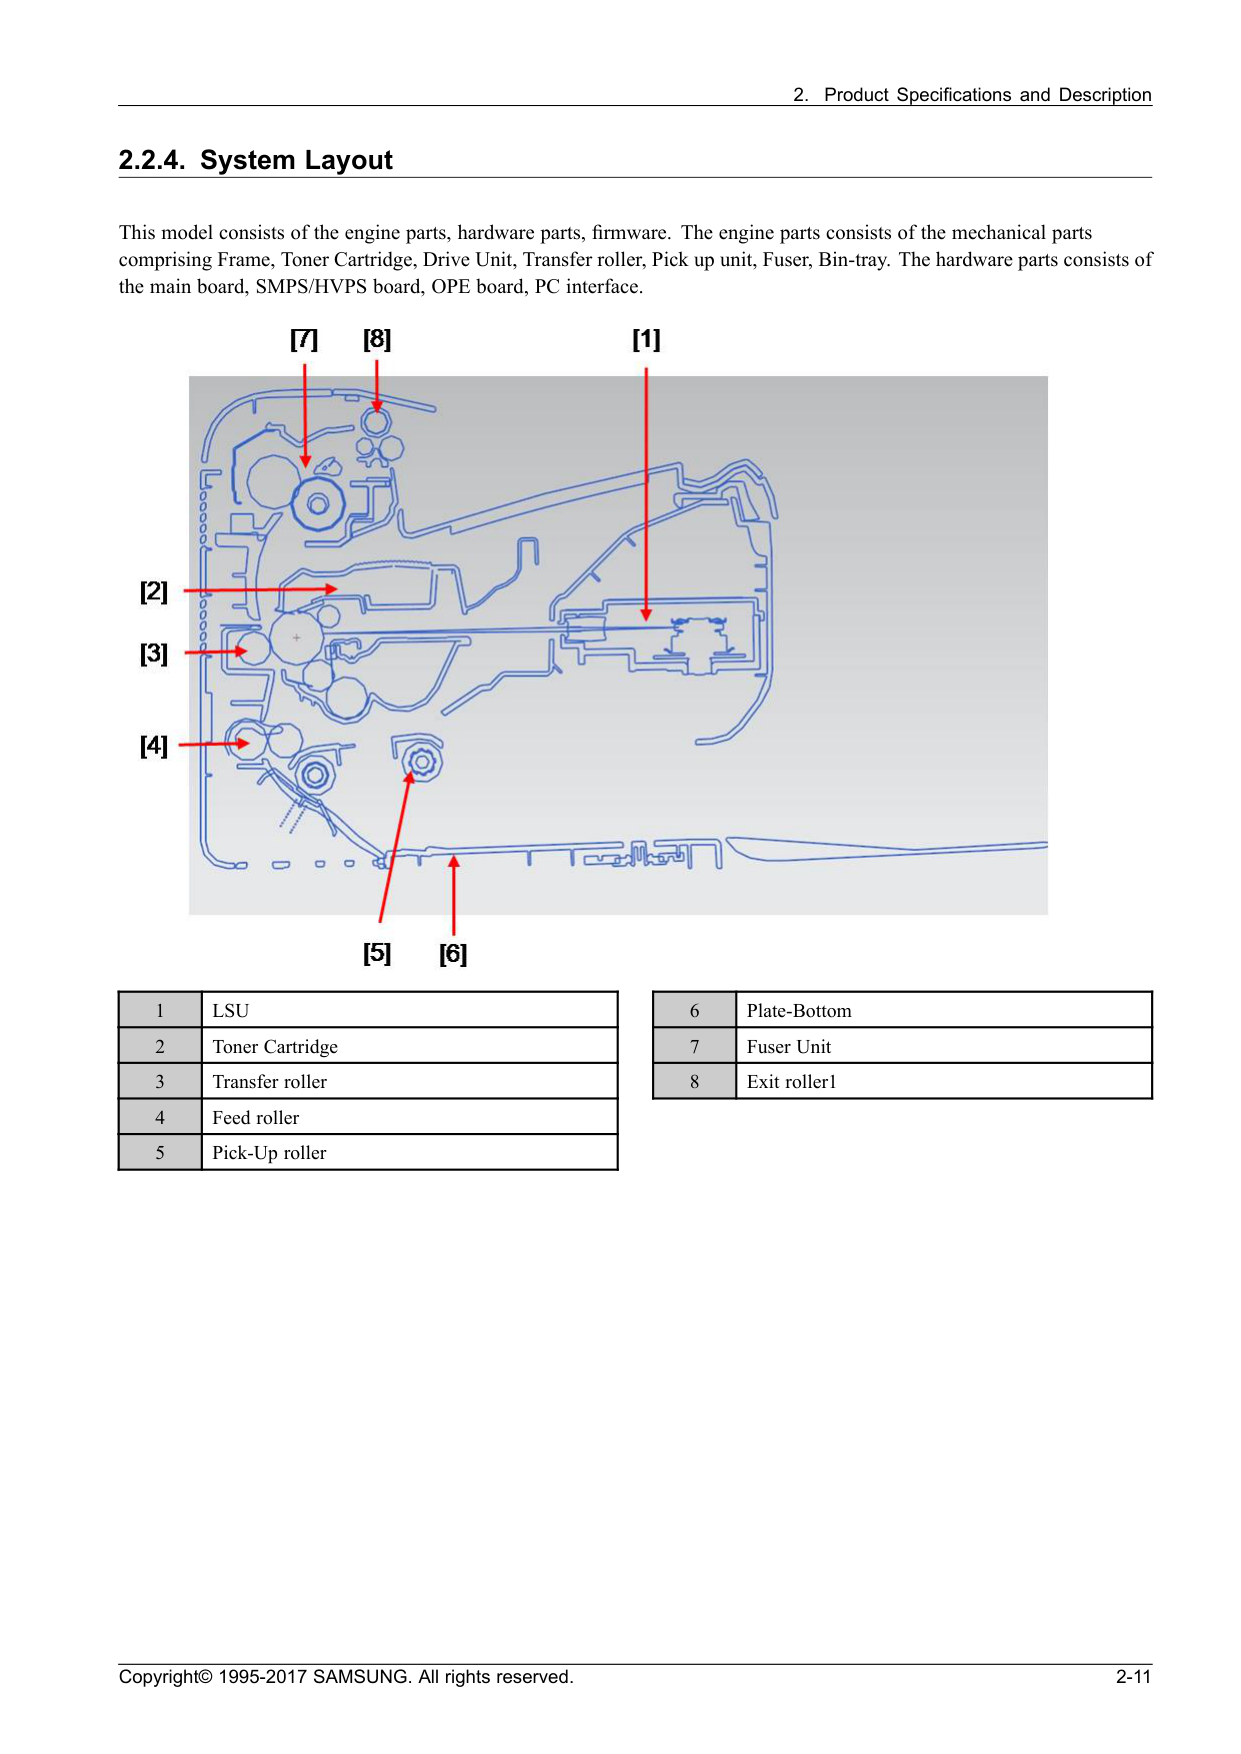
Lsu
2 Toner Cartridge 3 Transfer roller 4 Feed roller 5 Pick-Up roller 6 Plate-Bottom 7 Fuser Unit 8 Exit roller1 Copyright© 1995-2017 SAMSUNG. All rights reserved. 2-11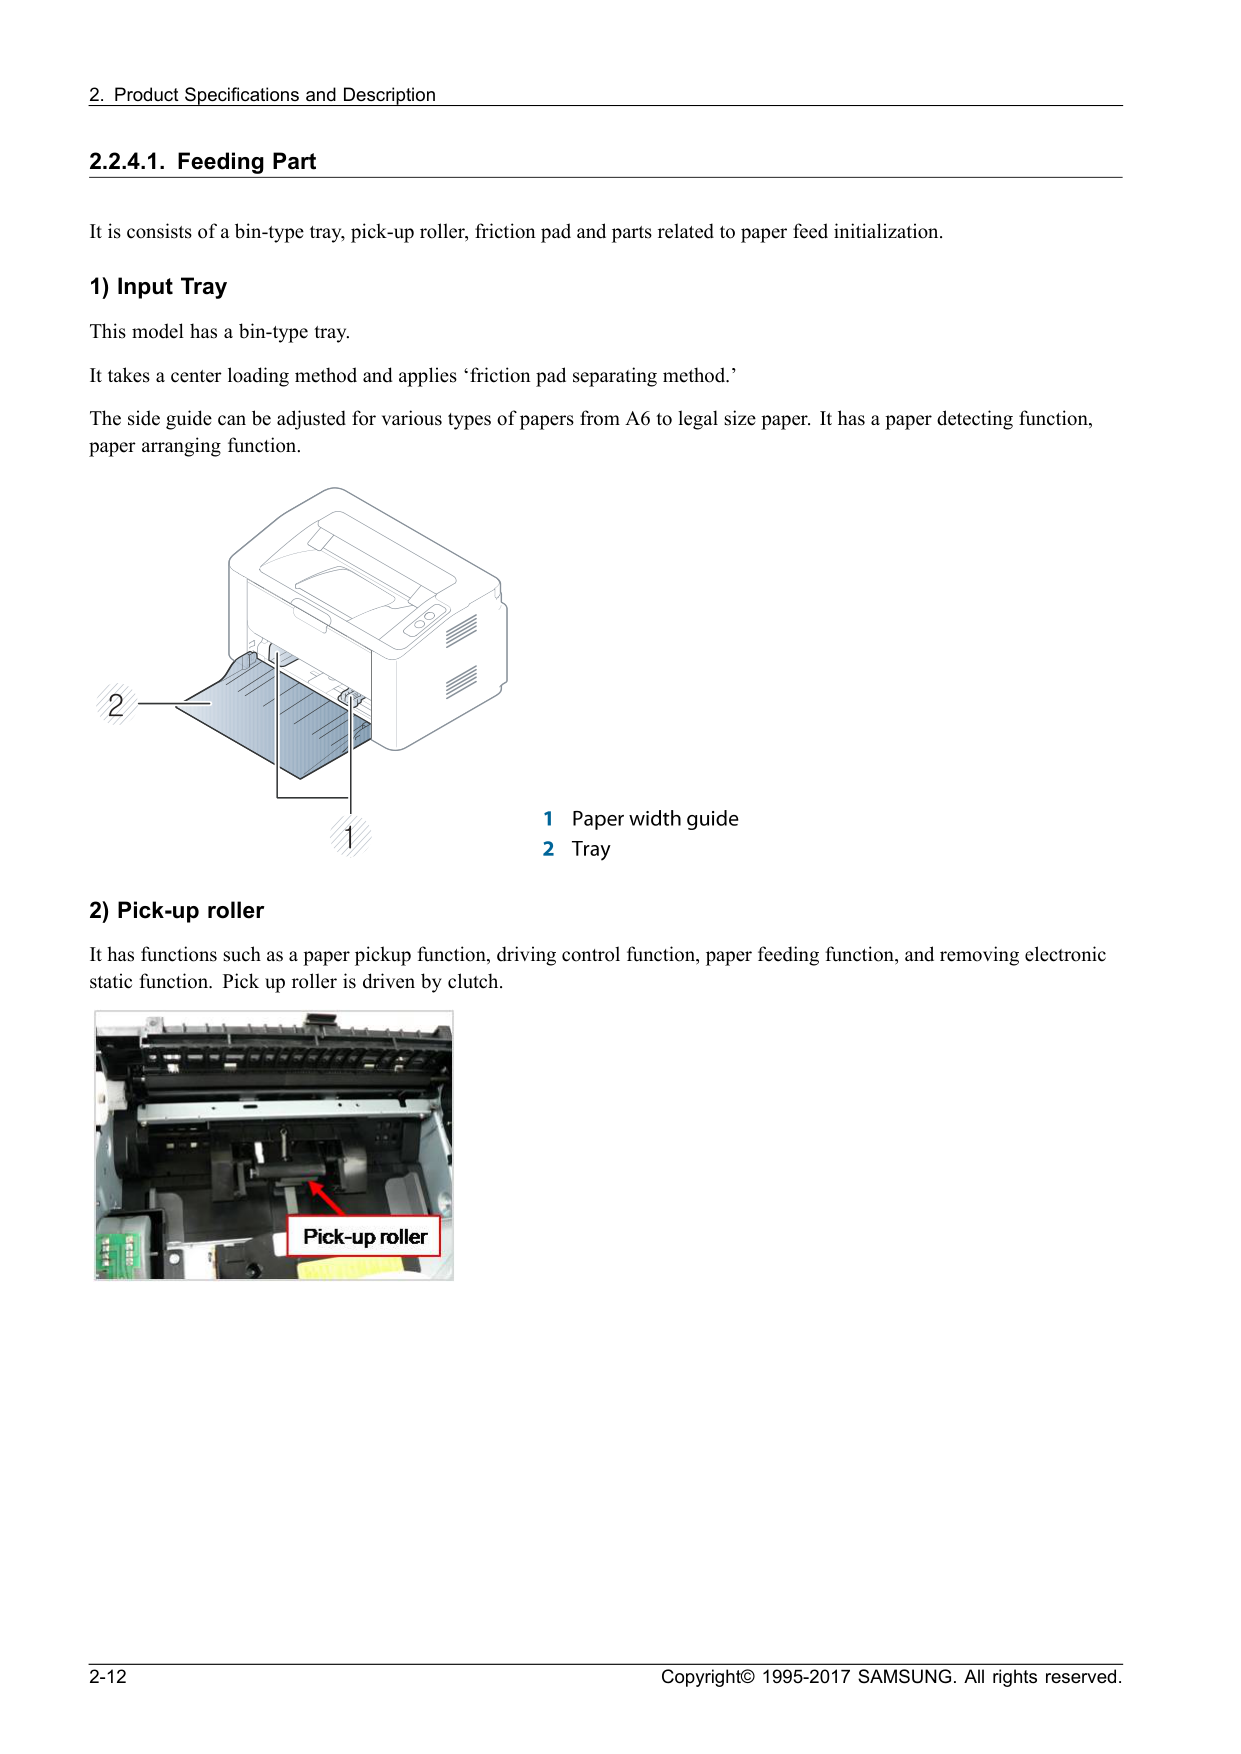

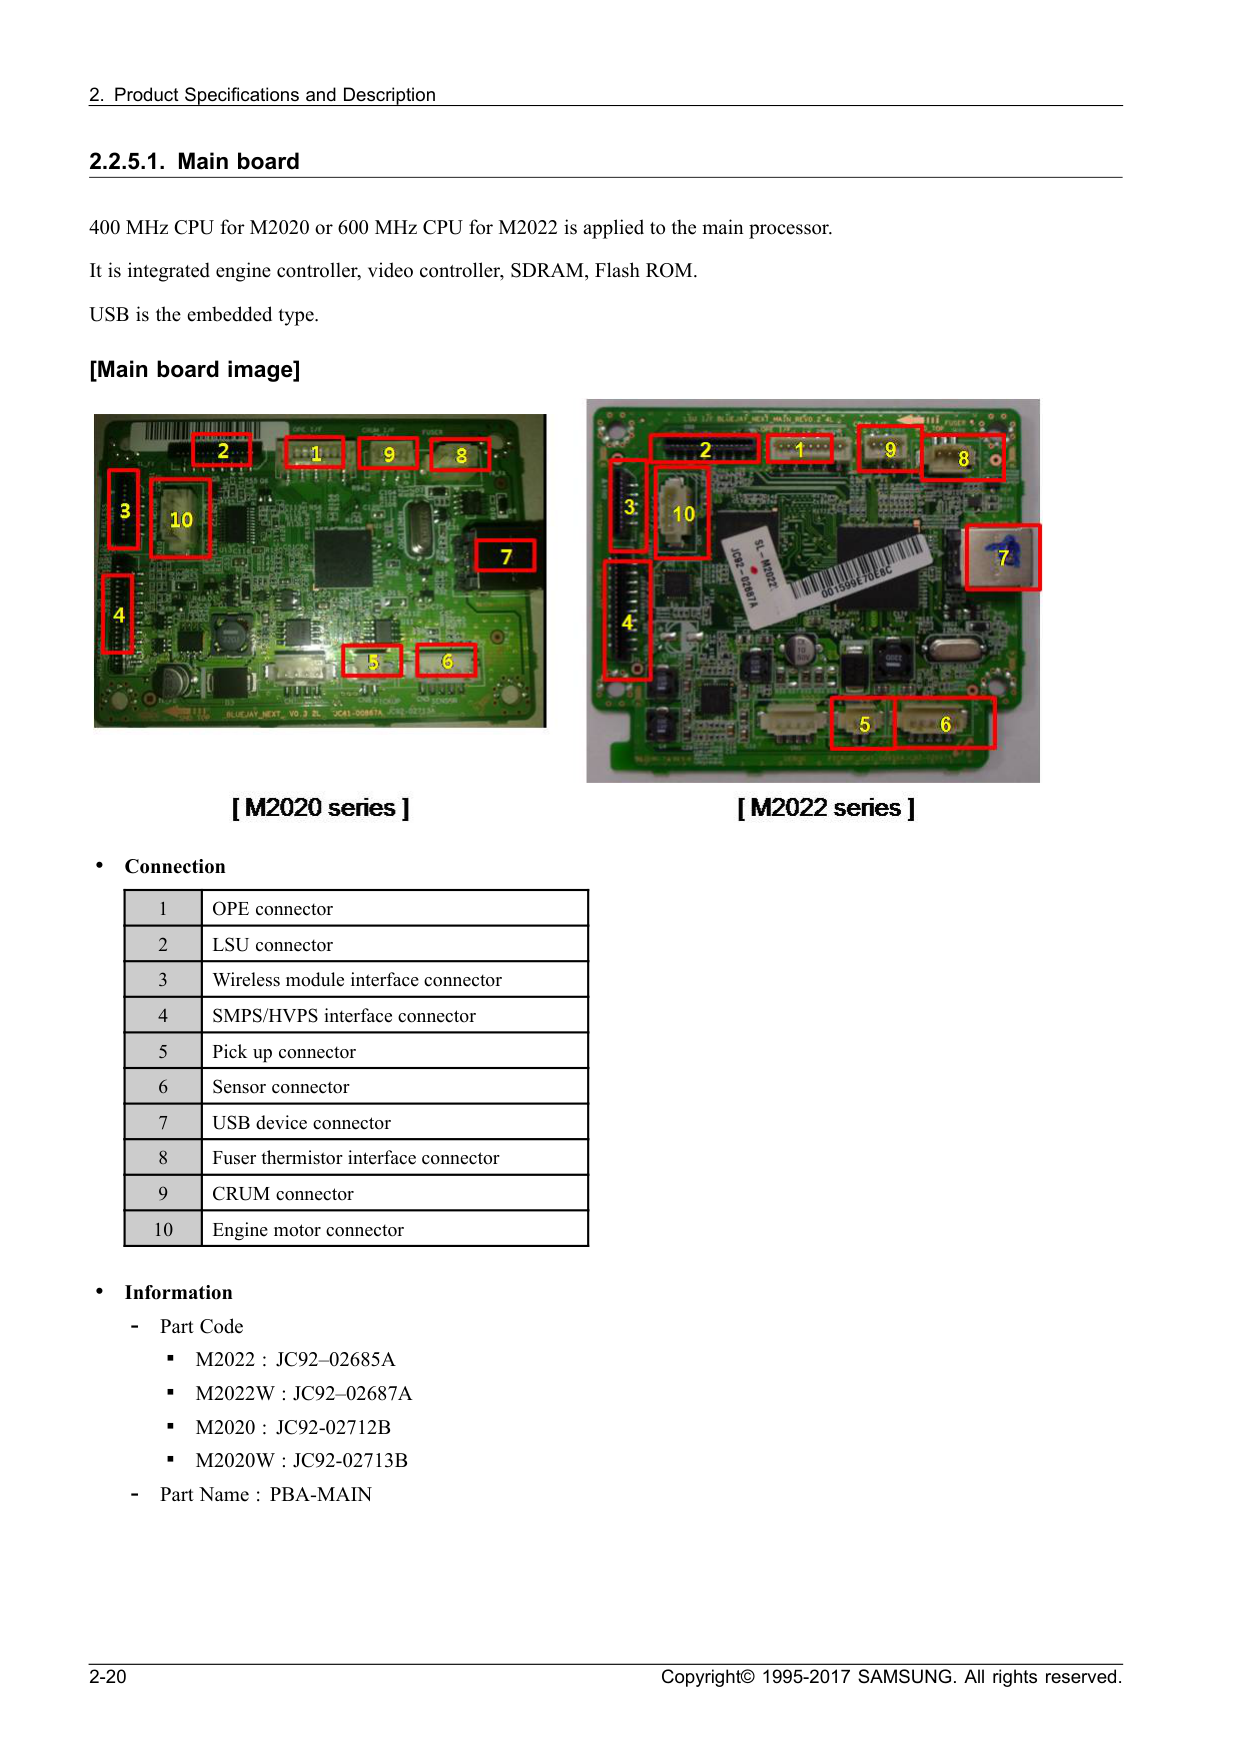
M2022 : Jc92–02685A
▪M2022W : Jc92–02687A
▪M2020 : Jc92-02712B
▪M2020W : Jc92-02713B
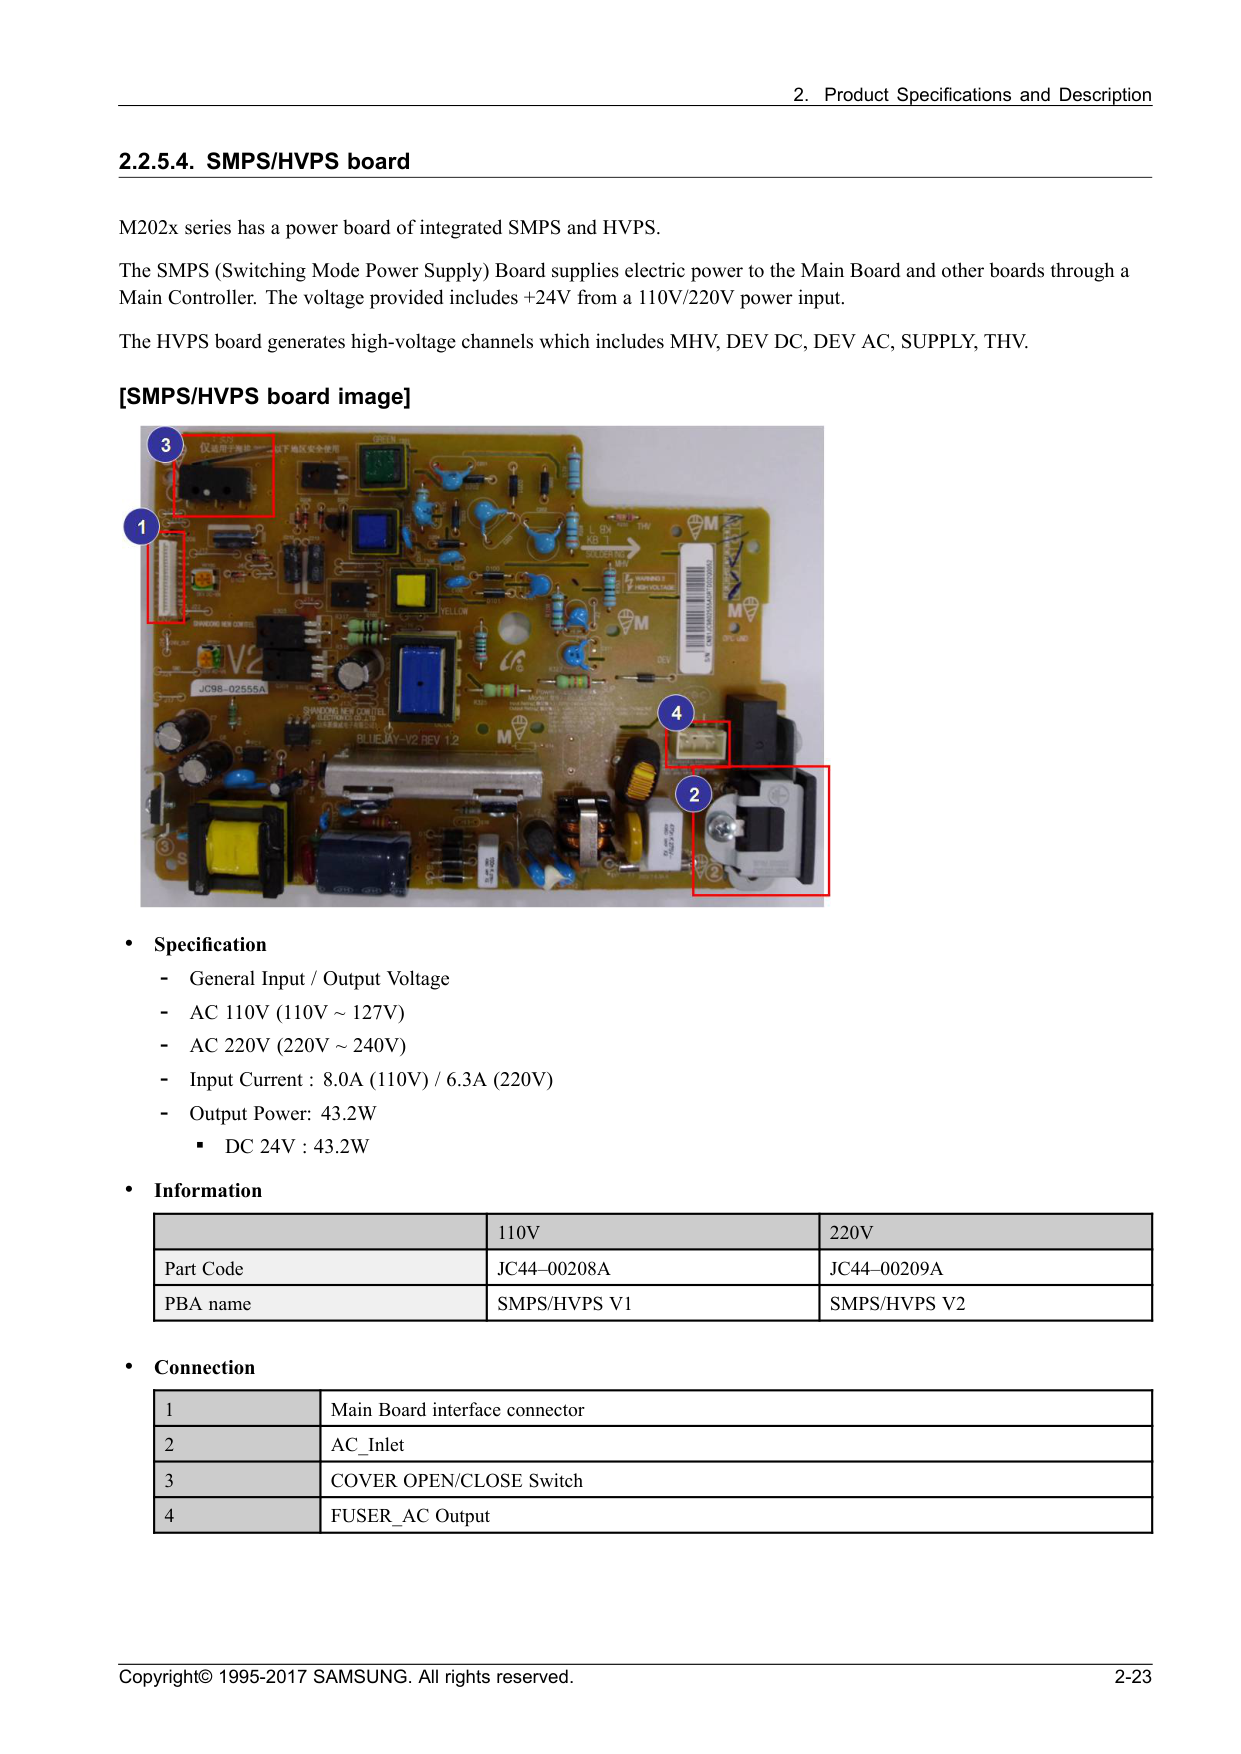
Ac 110V (110V ~ 127V)
Ac 220V (220V ~ 240V)
Dc 24V : 43.2W
• Information110V
220V
Part CodeJc44–00208A
Jc44–00209A
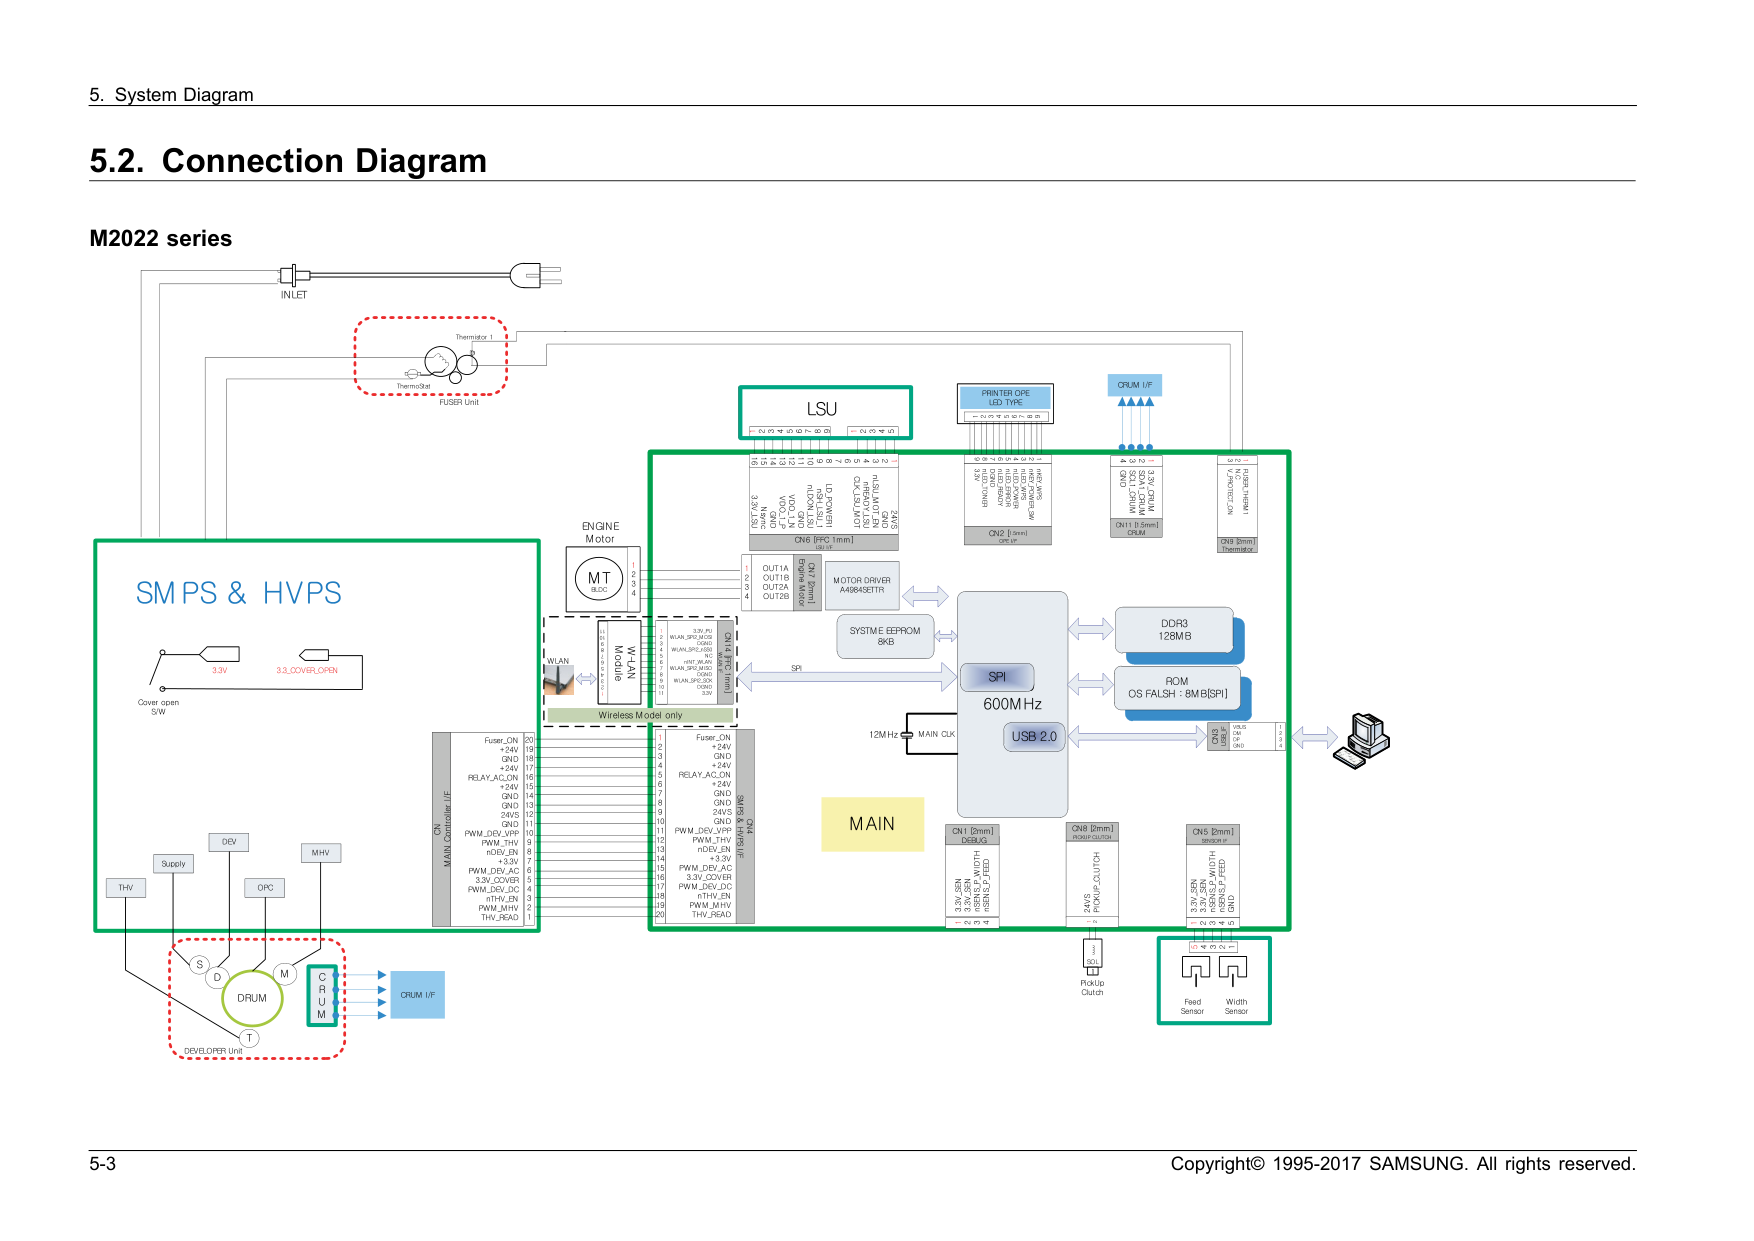
PBA nameSmps/Hvps V1
Smps/Hvps V2
• Connection 1 Main Board interface connector 2 AC_Inlet 3 COVER OPEN/CLOSE Switch 4 FUSER_AC Output Copyright© 1995-2017 SAMSUNG. All rights reserved. 2-23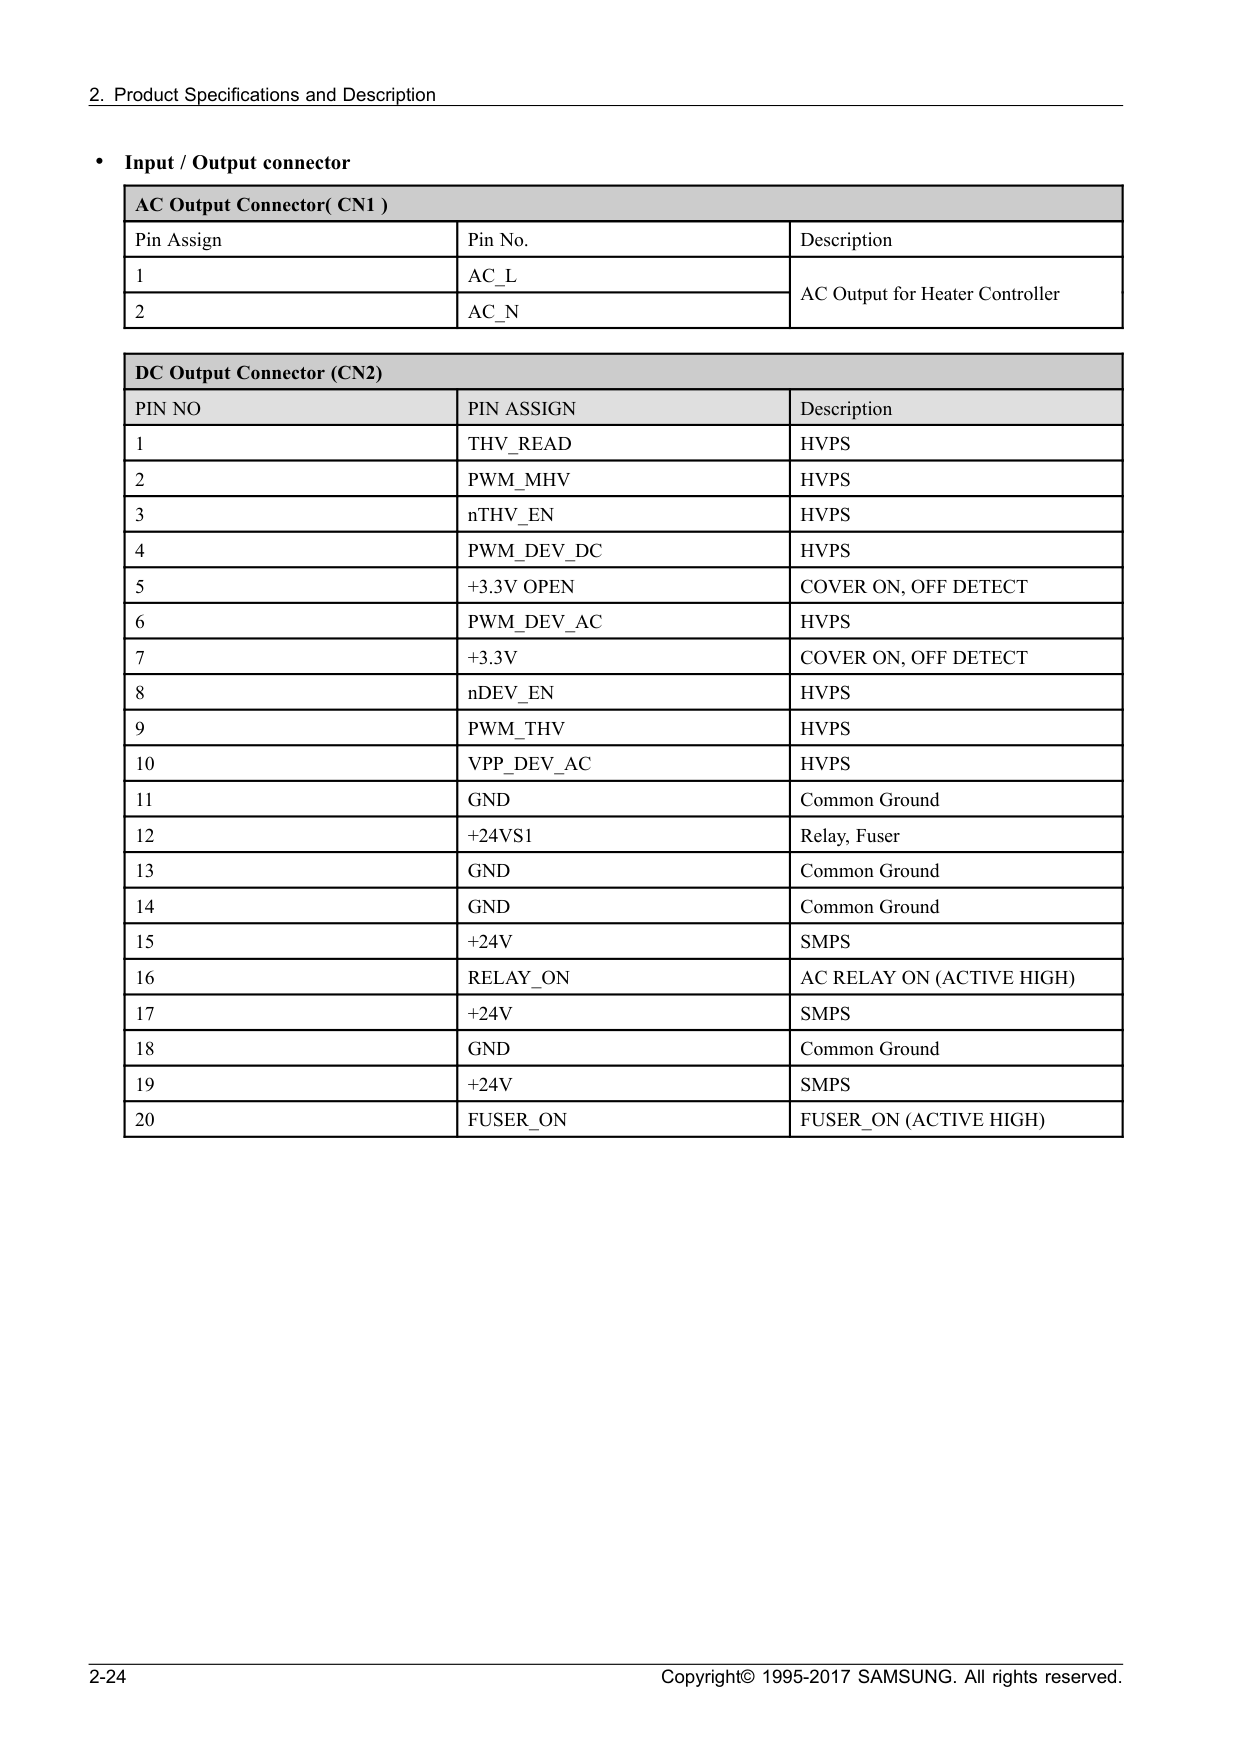
Ac_L
2Ac_N
AC Output for Heater Controller DC Output Connector (CN2)Pin No
Pin Assign
Description 1Thv_Read
Hvps
2Pwm_Mhv
Hvps
3 nTHV_ENHvps
4Pwm_Dev_Dc
Hvps
5+3.3V Open
Cover On, Off Detect
6Pwm_Dev_Ac
Hvps
7+3.3V
Cover On, Off Detect
8 nDEV_ENHvps
9Pwm_Thv
Hvps
10Vpp_Dev_Ac
Hvps
11Gnd
Common Ground 12+24Vs1
Relay, Fuser 13Gnd
Common Ground 14Gnd
Common Ground 15+24V
Smps
16Relay_On
Ac Relay On (Active High)
17+24V
Smps
18Gnd
Common Ground 19+24V
Smps
20Fuser_On
Fuser_On (Active High)
2-24 Copyright© 1995-2017 SAMSUNG. All rights reserved.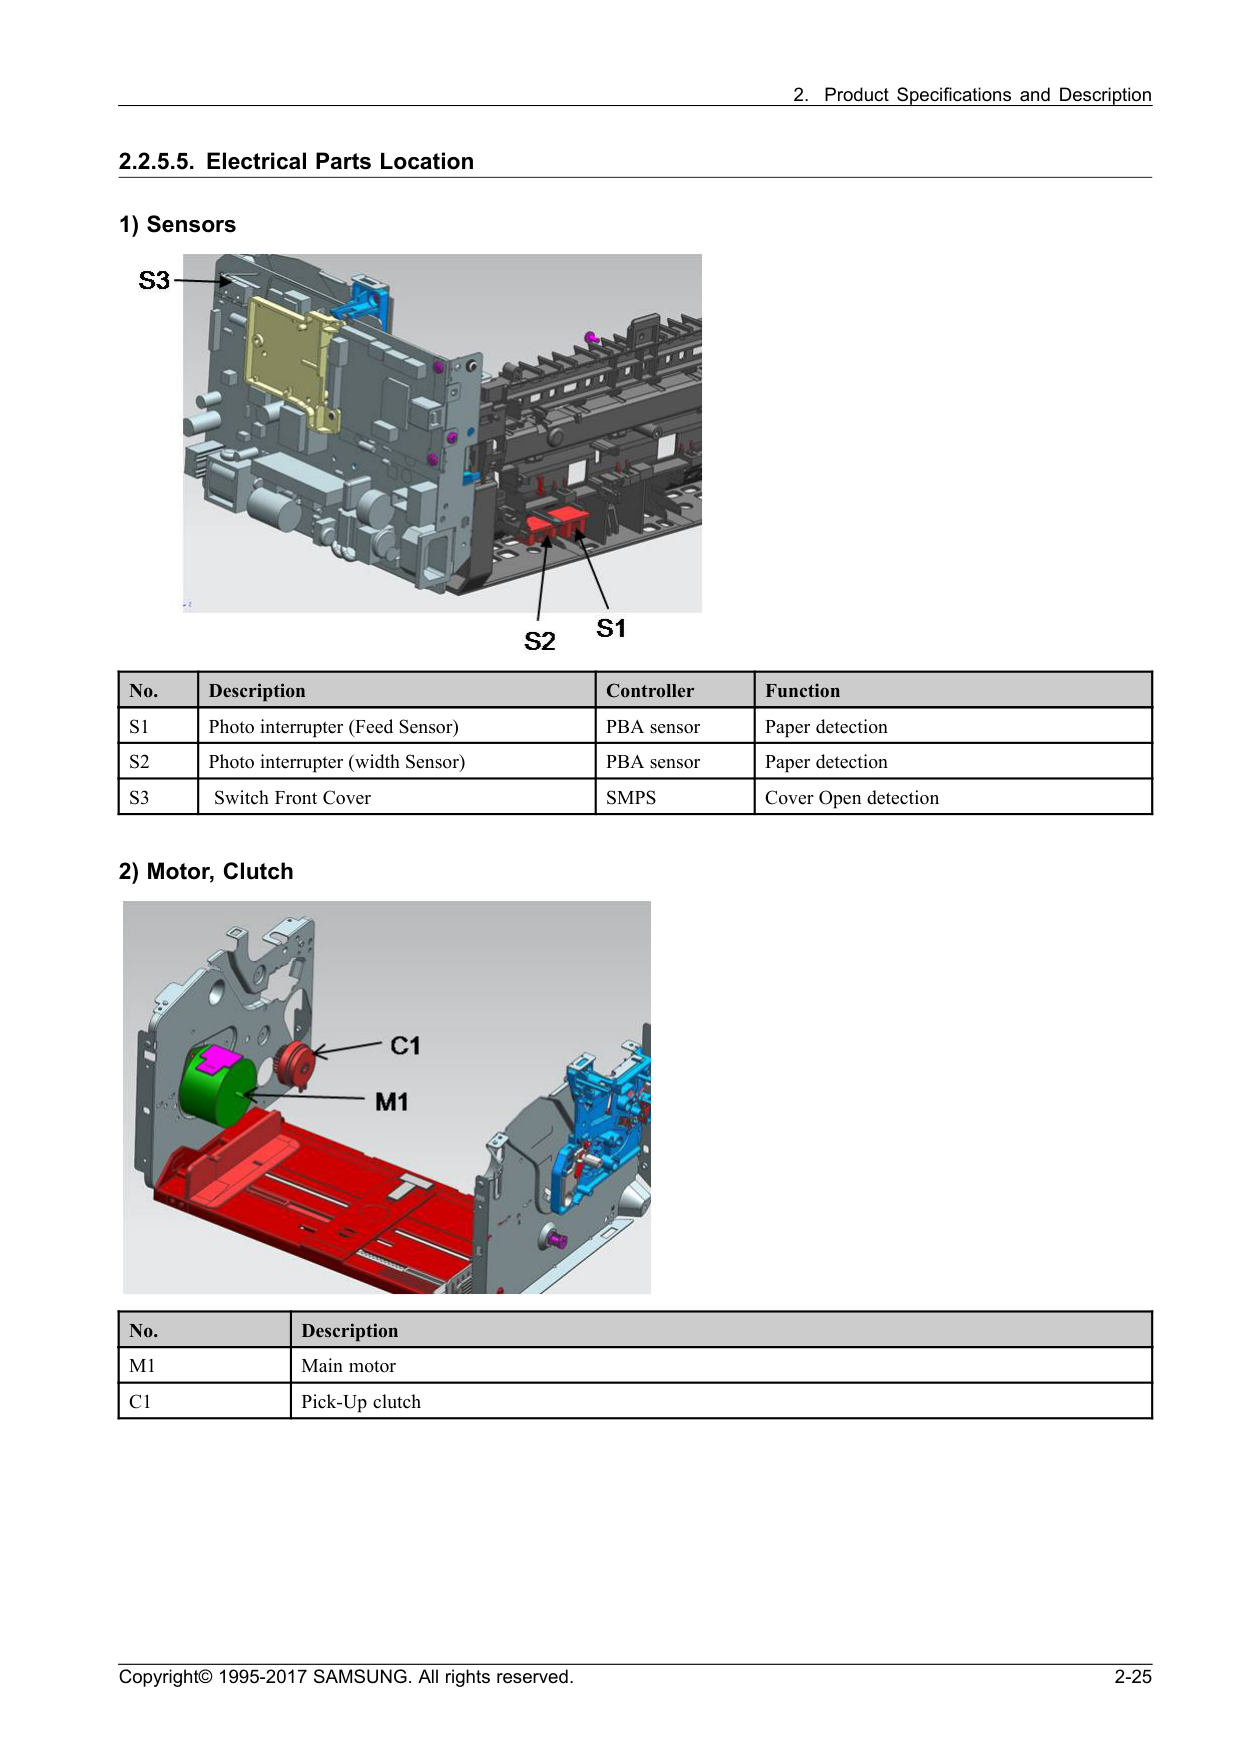
S1
Photo interrupter (Feed Sensor) PBA sensor Paper detectionS2
Photo interrupter (width Sensor) PBA sensor Paper detectionS3
Switch Front CoverSmps
Cover Open detection 2) Motor, Clutch No. DescriptionM1
Main motorC1
Pick-Up clutch Copyright© 1995-2017 SAMSUNG. All rights reserved. 2-25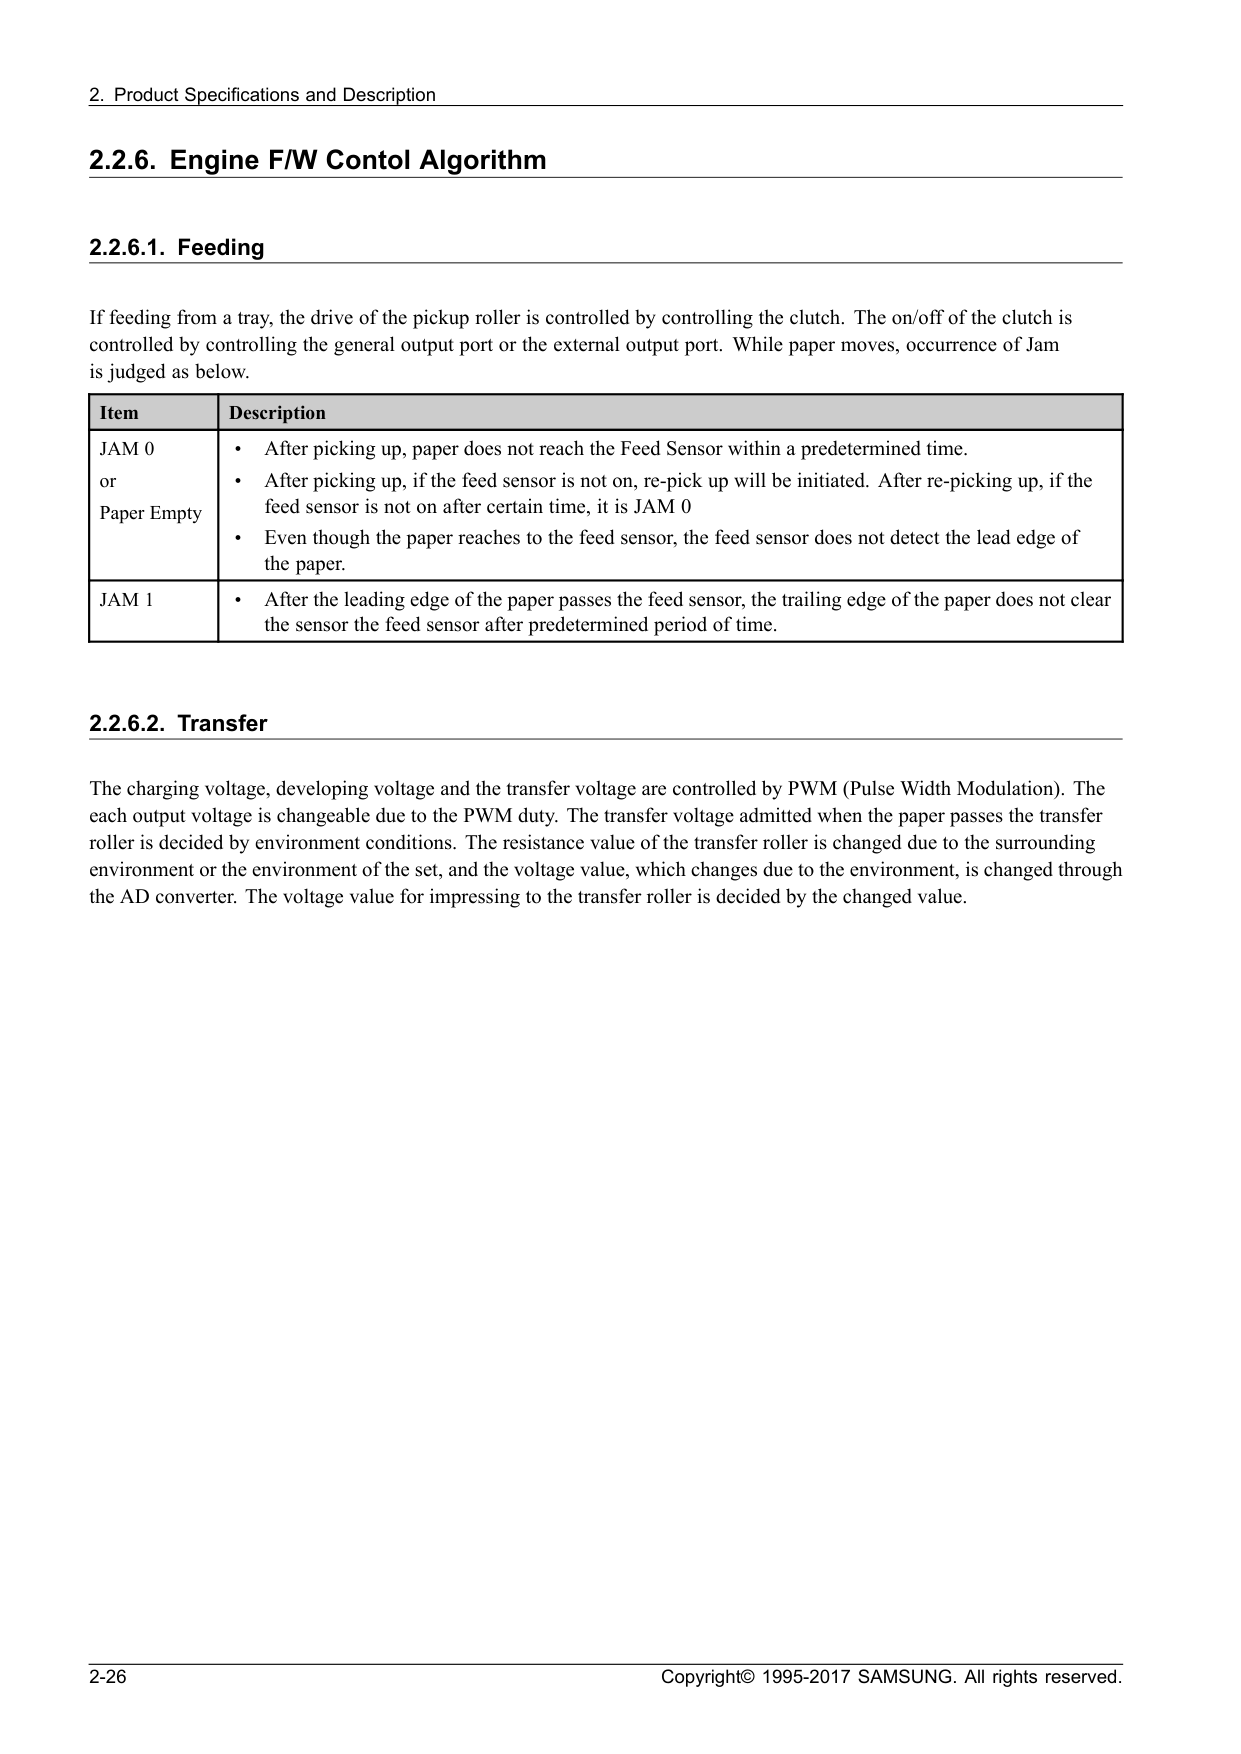
Jam 0
or Paper Empty • After picking up, paper does not reach the Feed Sensor within a predetermined time. • After picking up, if the feed sensor is not on, re-pick up will be initiated. After re-picking up, if the feed sensor is not on after certain time, it is JAM 0 • Even though the paper reaches to the feed sensor, the feed sensor does not detect the lead edge of the paper.Jam 1
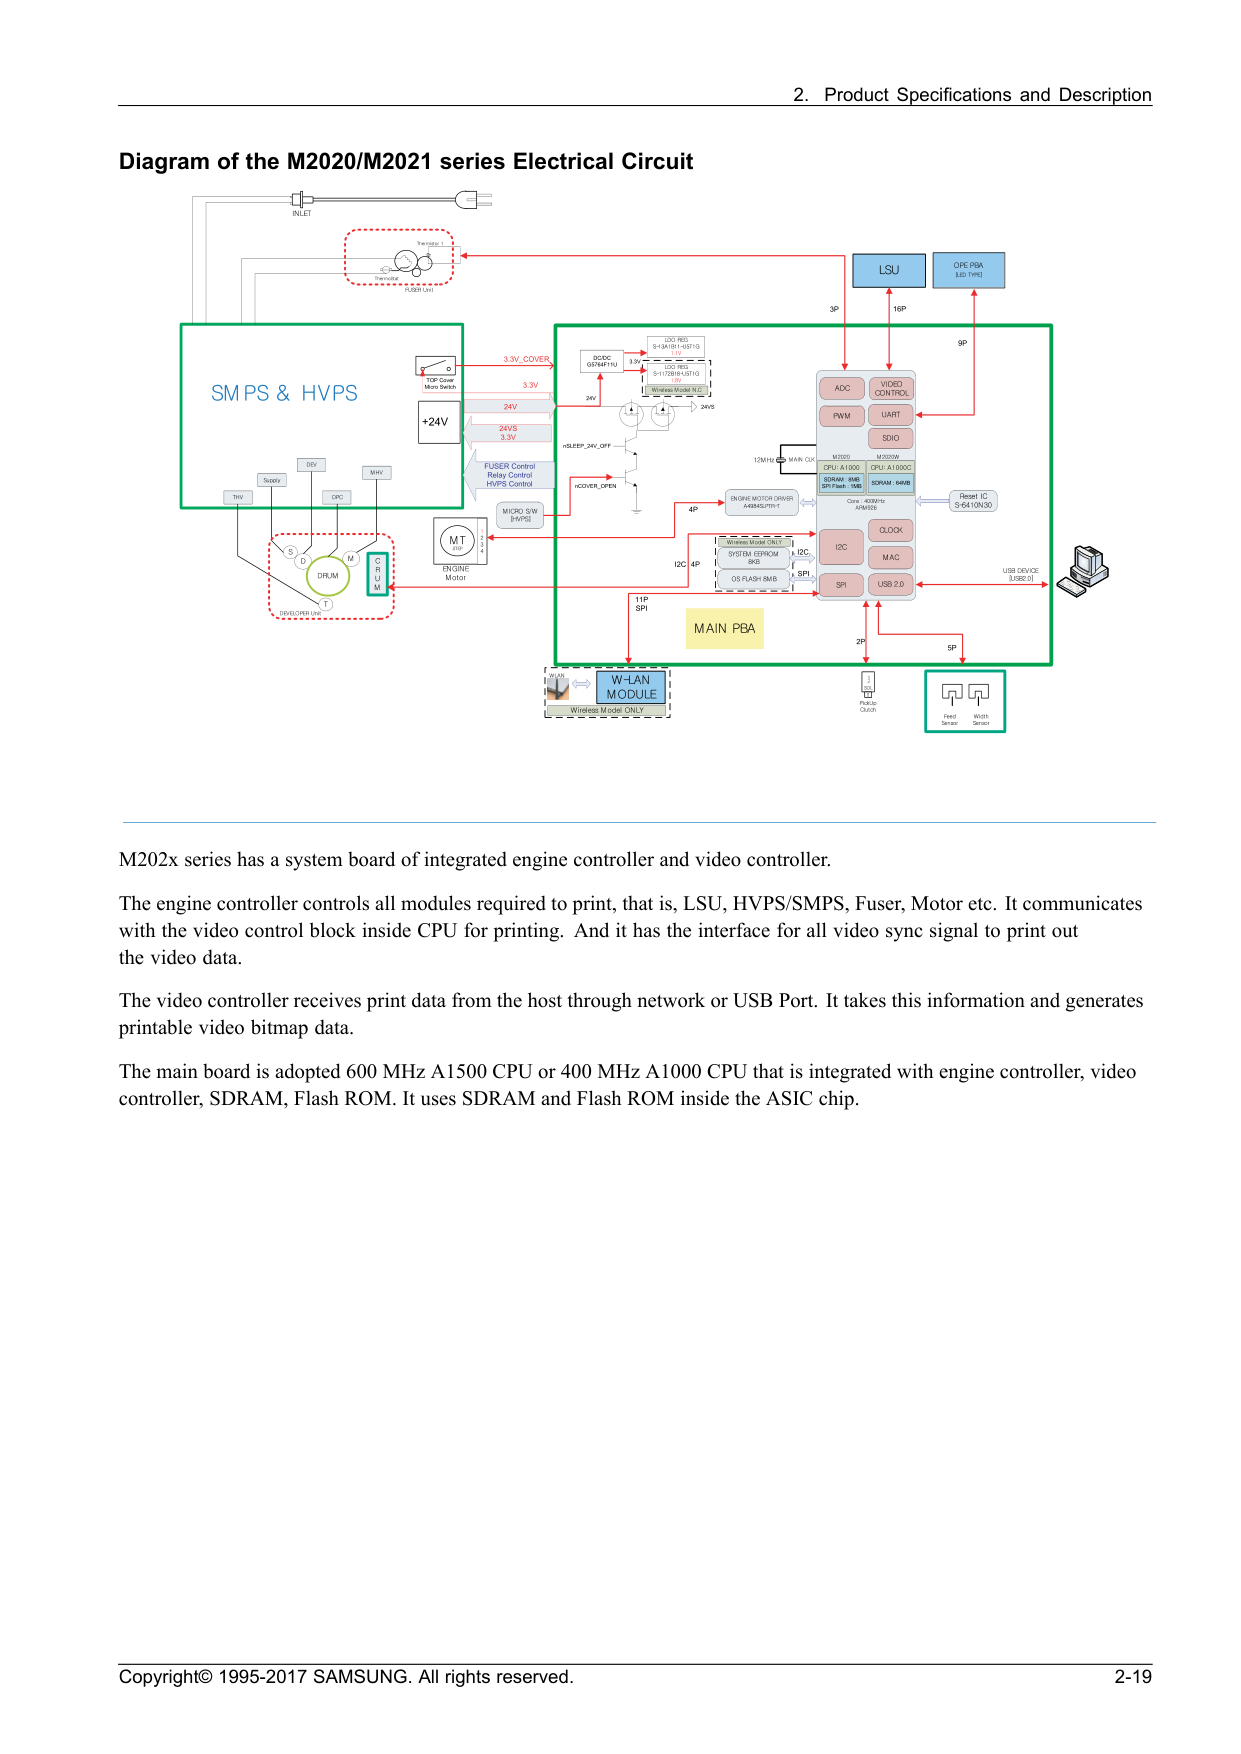
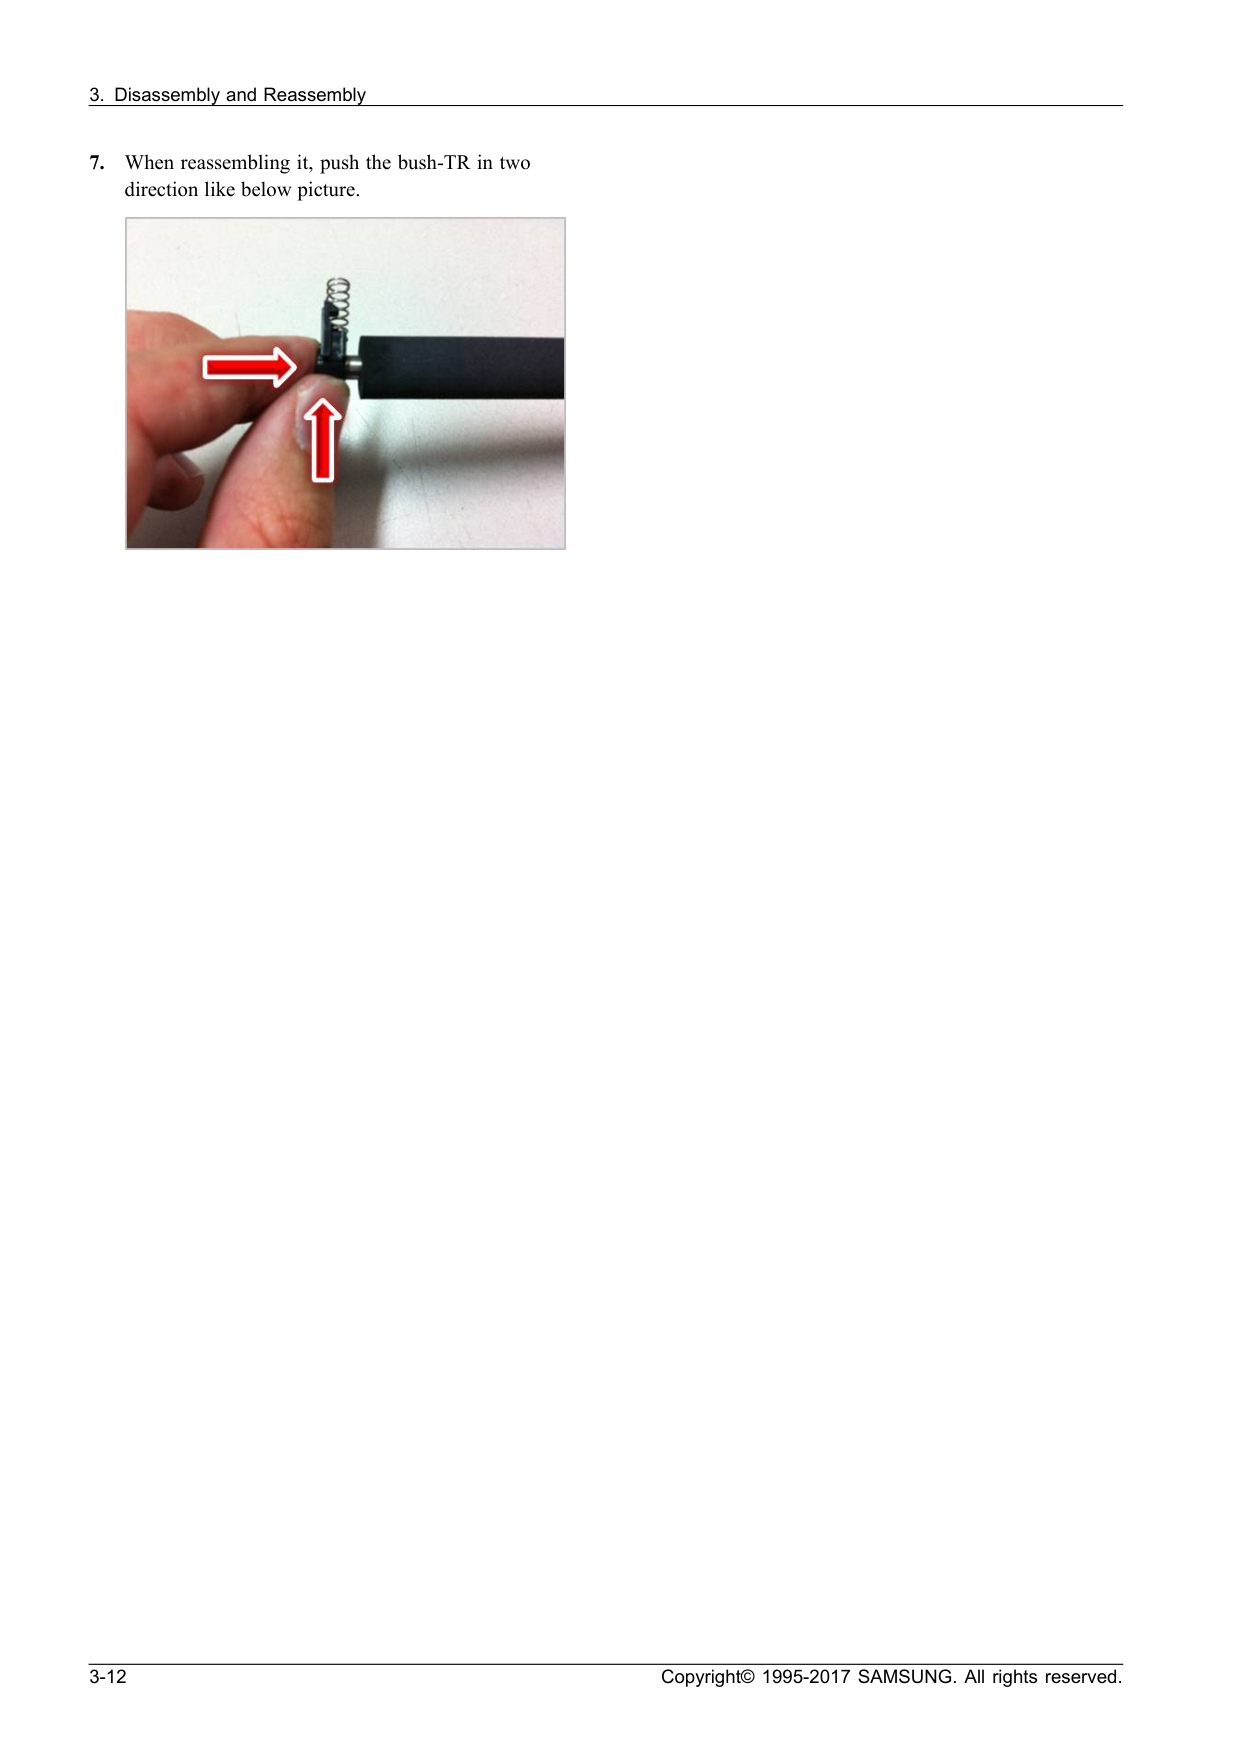
• After the leading edge of the paper passes the feed sensor, the trailing edge of the paper does not clear the sensor the feed sensor after predetermined period of time. 2.2.6.2. Transfer The charging voltage, developing voltage and the transfer voltage are controlled by PWM (Pulse Width Modulation). The each output voltage is changeable due to the PWM duty. The transfer voltage admitted when the paper passes the transfer roller is decided by environment conditions. The resistance value of the transfer roller is changed due to the surrounding environment or the environment of the set, and the voltage value, which changes due to the environment, is changed through the AD converter. The voltage value for impressing to the transfer roller is decided by the changed value. 2-26 Copyright© 1995-2017 SAMSUNG. All rights reserved.
2.2.6.4. Lsu
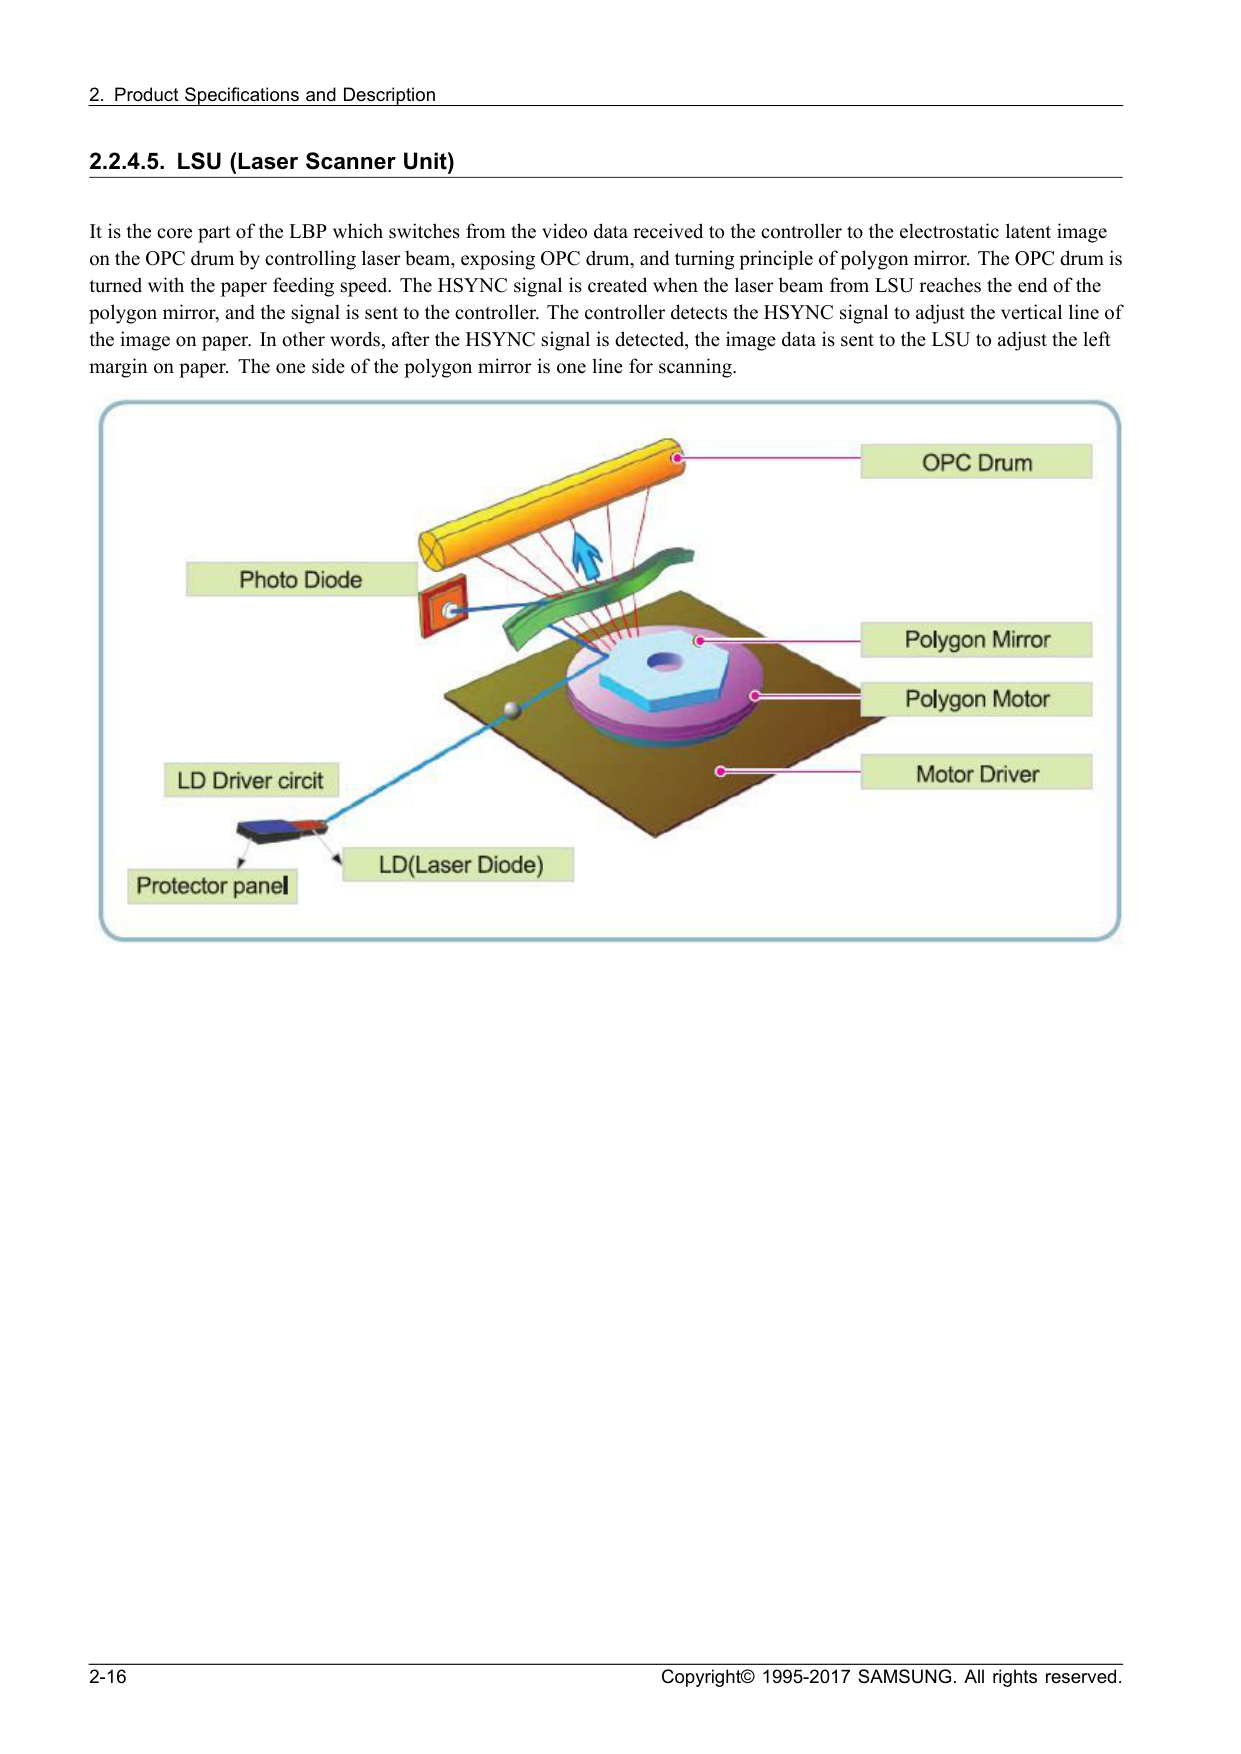
LSU receives the image data from PVC or HPVC and make the latent image on OPC surface. It uses the single beam, LD. The errors related to LSU are as follows: • By Lready When the printing is started, the engine drives the polygon motor of LSU. After the specified time is elapsed, if the motor is not in a ready status, the engine detects the error that the polygon motor is not in a ready status. If this error happens, the engine stops all functions and keeps it at the error state. Also, the engine informs the error status of the main system and the error message is displayed at LCD window or LED informing the error status of the user. • By Hsync When the polygon motor is ready, the LSU sends out the signal called Hsync and used to synchronize with each image line. So, if the engine does not detect consecutively the signal for a fixed time, it defines the Hsync Error. If this error happens, the engine stops all functions and keeps it at the error state. Also, the engine informs the error status of the main system and then the error message is displayed at LCD window or LED informing the error status of the user. LSU Error Recovery: If the LReady or Hsync error happens, the paper is exited before the error code is initiated. The engine mode is changed to recovery mode and the engine informs the main system of the engine mode. The engine rechecks the LSU error, if the error does not reoccur printing is resumed. Copyright© 1995-2017 SAMSUNG. All rights reserved. 2-27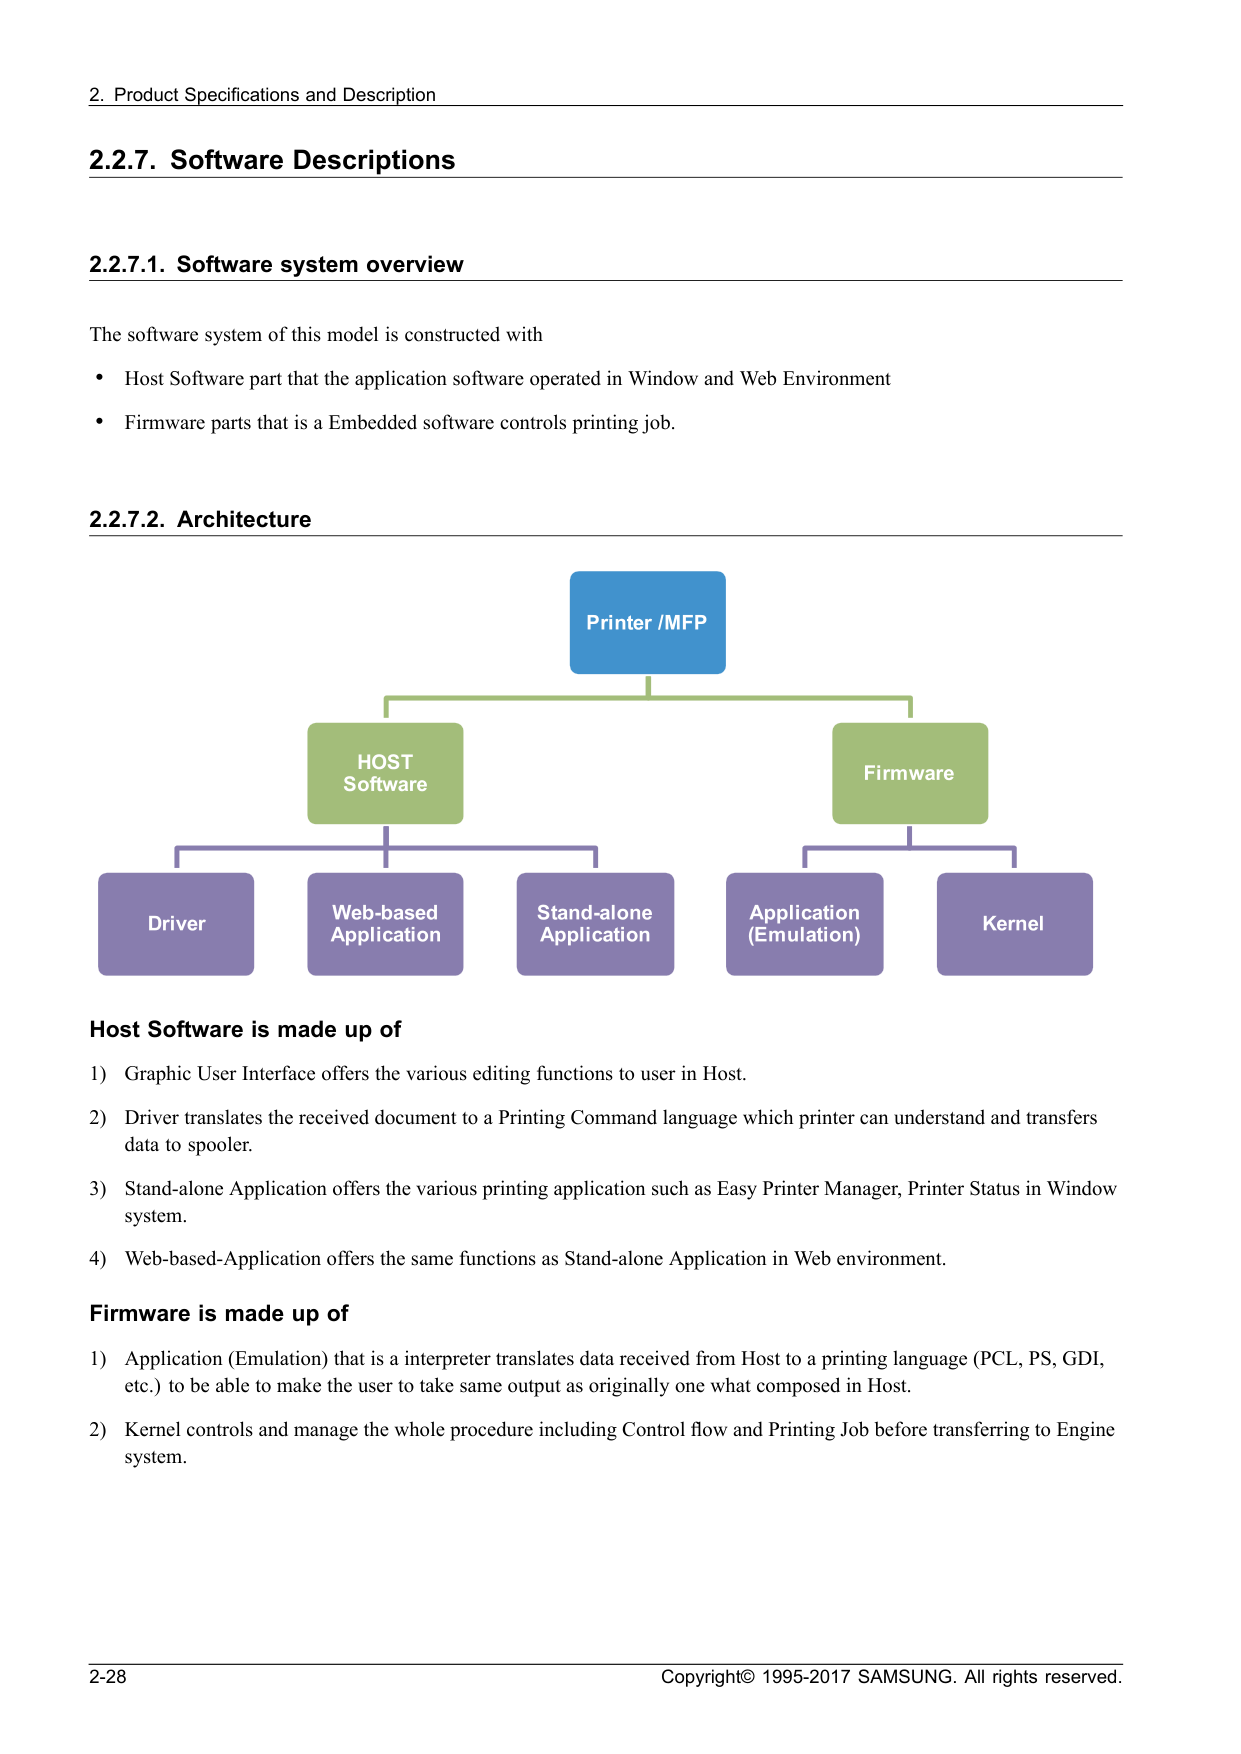

Frame
Pwh,+,B,M3,L10,Ni Plt,Swrch18A
20 6003-000269Frame
Bh,+,-,S,M3,L6,Zpc(Wht),Swrch18A,-
13 6006-001078Fuser
Ph,+,Wsp,B,M3,L10,Zpc(Wht),Swrch18A
1 6003-000269Fuser-Lower
Bh,+,-,S,M3,L6,Zpc(Wht),Swrch18A,-
2 6003-000196Fuser-Upper
Pwh,+,B,M3,L10,Ni Plt,Swrch18A
1 6003-000264Fuser-Upper
Pwh,+,-,B,M3,L6,Zpc(Wht),Swrch18A,-
2 6003-000283Fuser-Upper
Bh,+,-,B,M3,L8,Zpc(Wht),Swrch18A,-
5 6003-000269Frame-Main
Left
Bh,+,-,S,M3,L6,Zpc(Wht),Swrch18A,-
6 6003-000283Frame-Main
Left
Bh,+,-,B,M3,L8,Zpc(Wht),Swrch18A,-
2 6002-000308Frame
Main-Right
Ph,+,-,B,M2.6,L6,Zpc(Wht),Swrch18A,-
4 6003-000269Frame
Main-Right
Bh,+,-,S,M3,L6,Zpc(Wht),Swrch18A,-
2 6003-000269Frame
Main-Middle
Bh,+,-,S,M3,L6,Zpc(Wht),Swrch18A,-
5 6003-000283Lsu
Bh,+,-,B,M3,L8,Zpc(Wht),Swrch18A,-
5 6003-000269Frame-Feed Idle
Bh,+,-,S,M3,L6,Zpc(Wht),Swrch18A,-
2 6003-000283Cover-Top
Bh,+,-,B,M3,L8,Zpc(Wht),Swrch18A,-
1 6003-000196Mainline
Pwh,+,B,M3,L10,Ni Plt,Swrch18A
5 6003-000269Mainline
Bh,+,-,S,M3,L6,Zpc(Wht),Swrch18A,-
4 Copyright© 1995-2017 SAMSUNG. All rights reserved. 3-3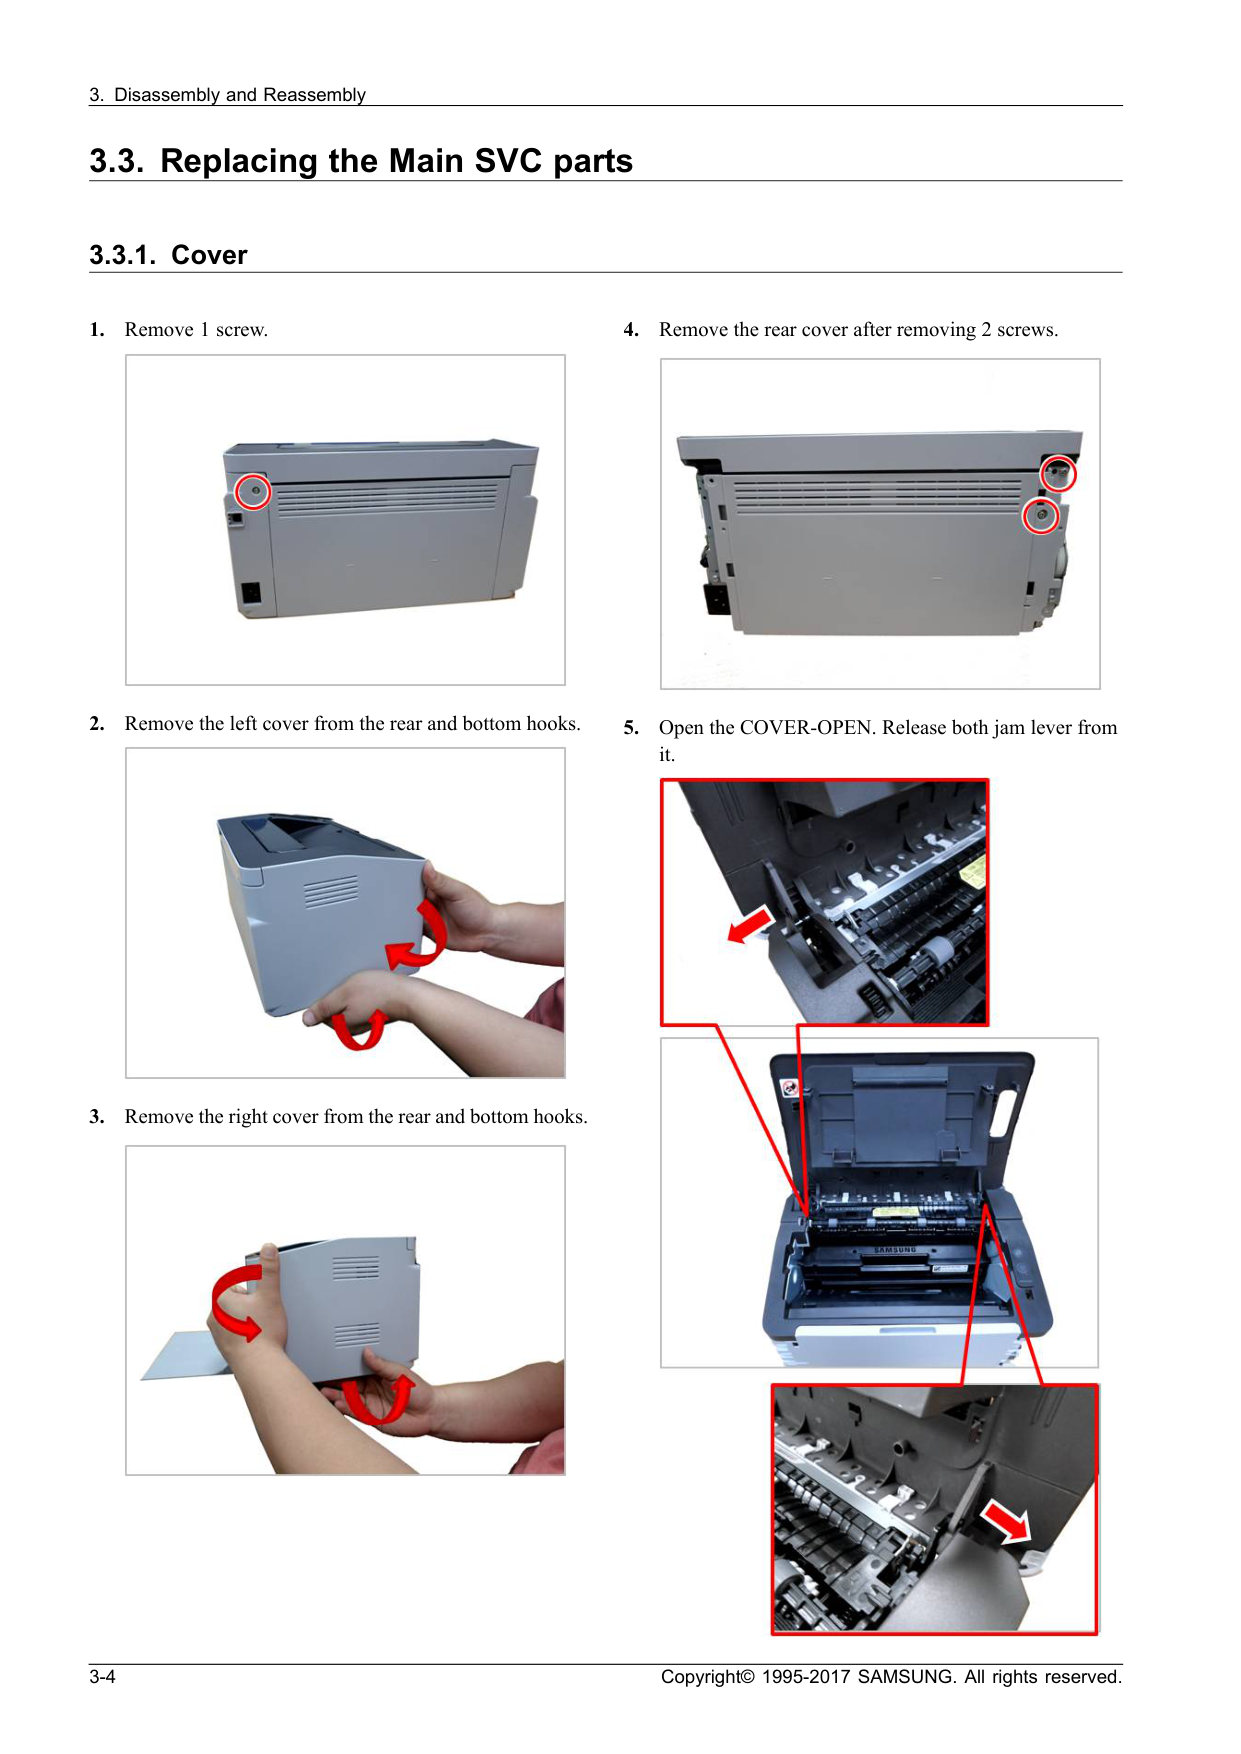
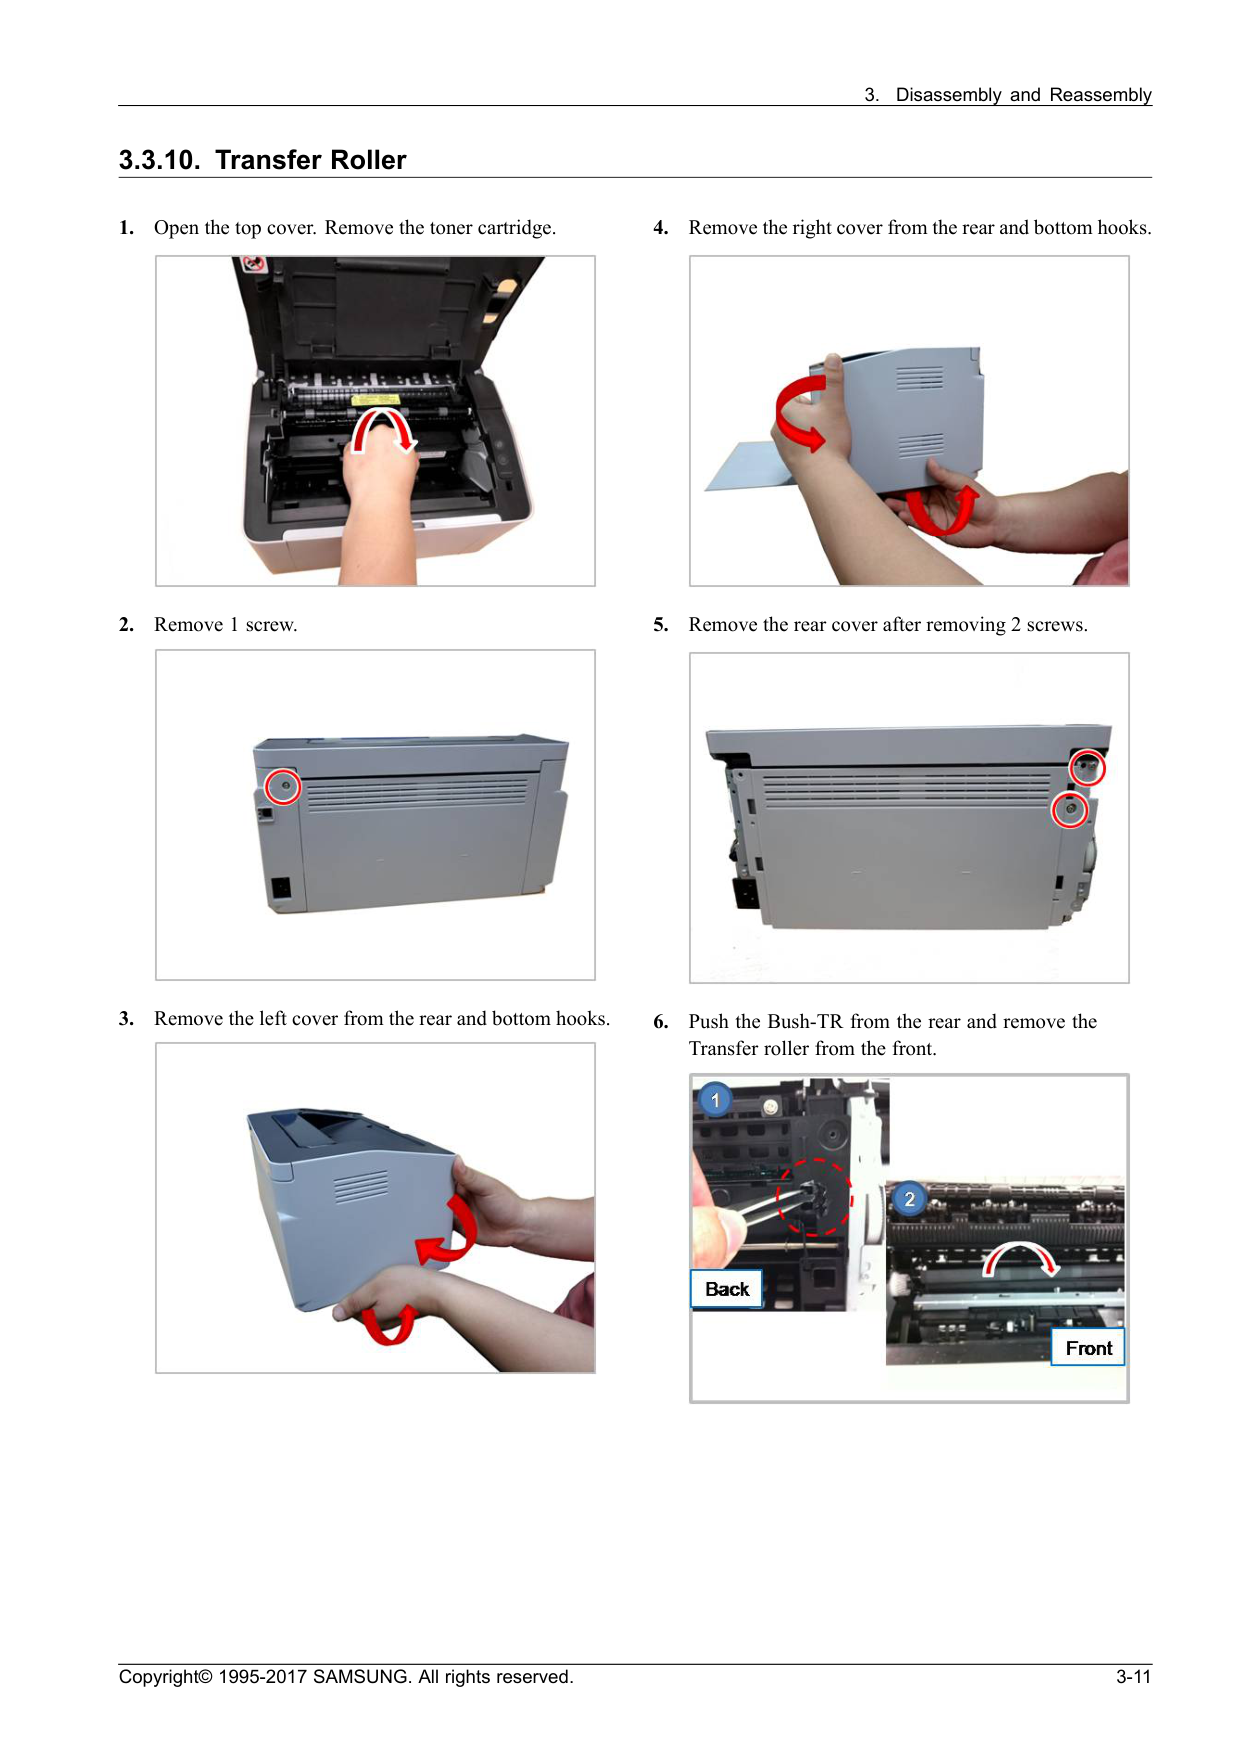
Cover-Top.
3.3.6. Lsu
Pba.
3.3.8. Pick up roller
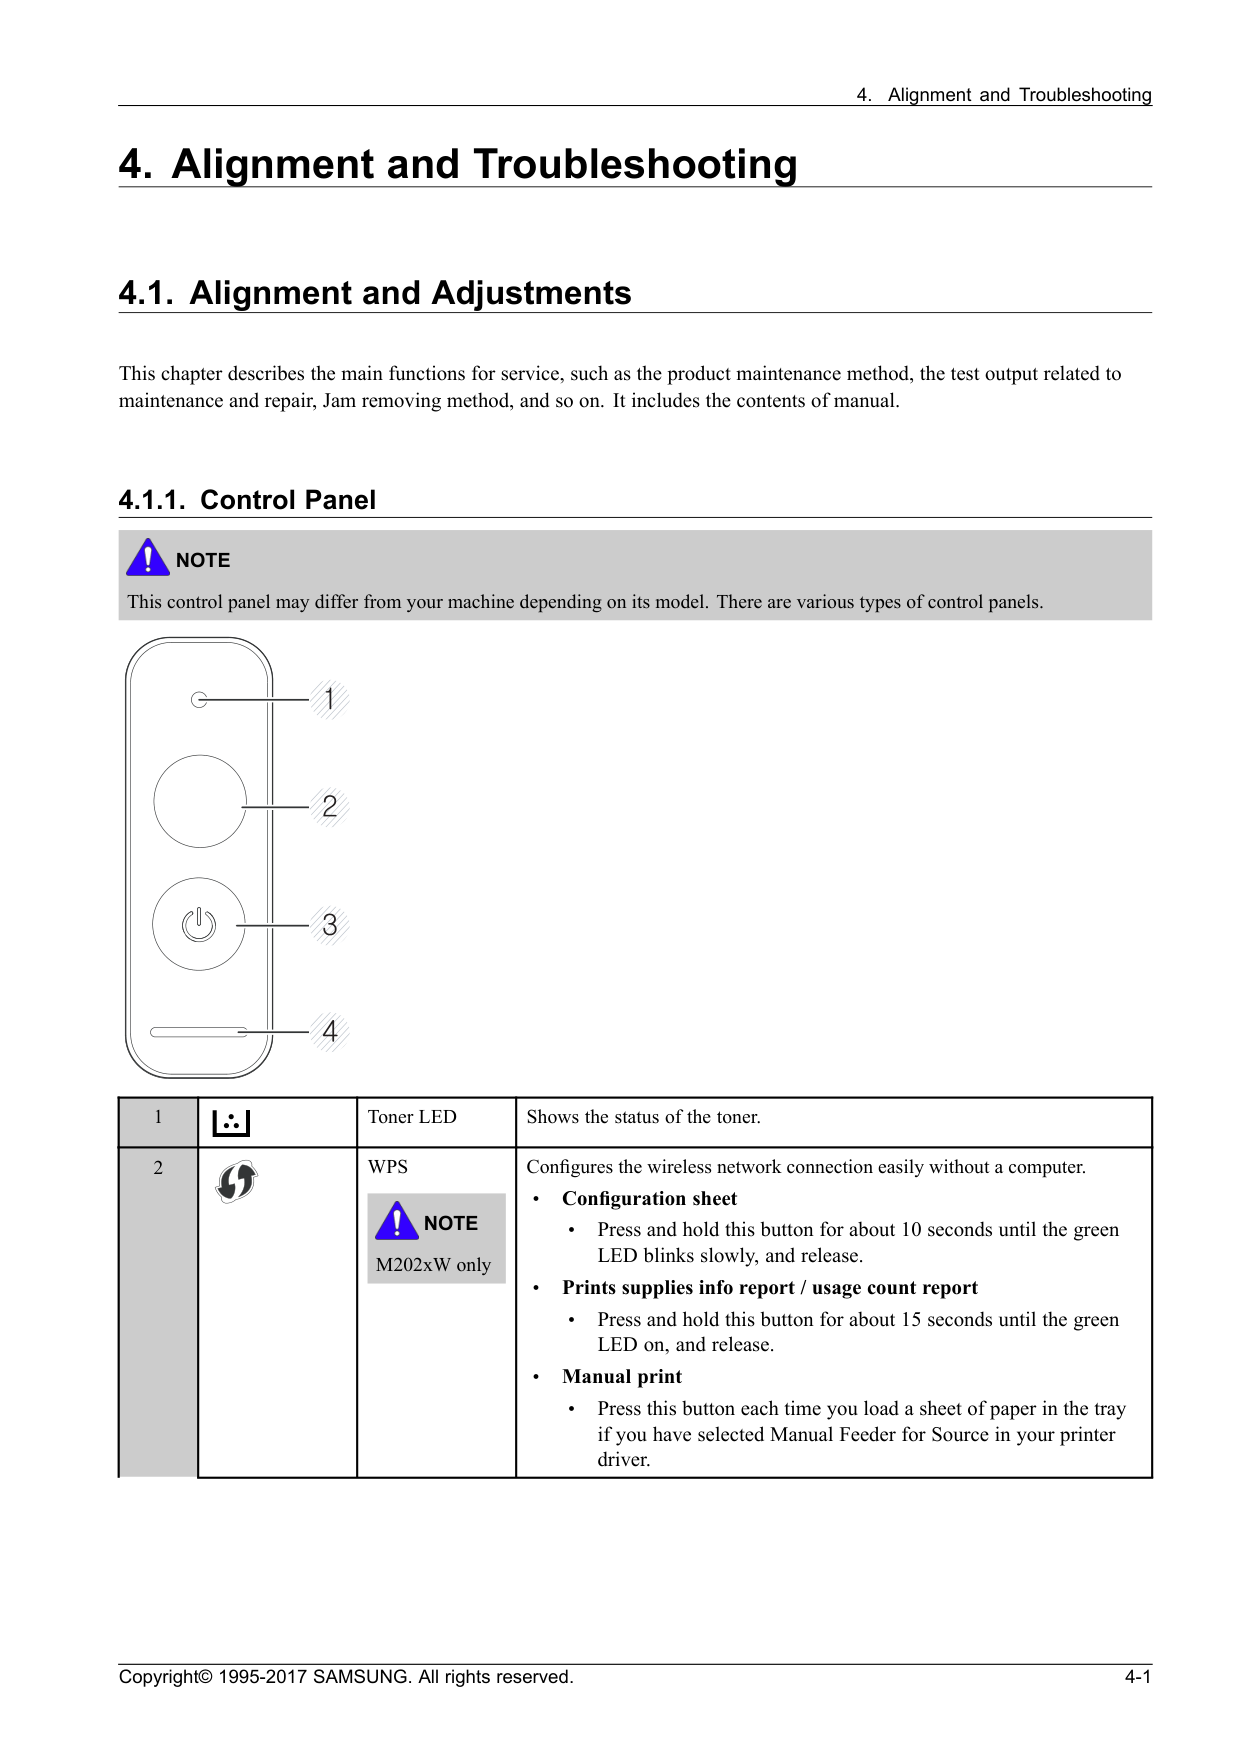
Note
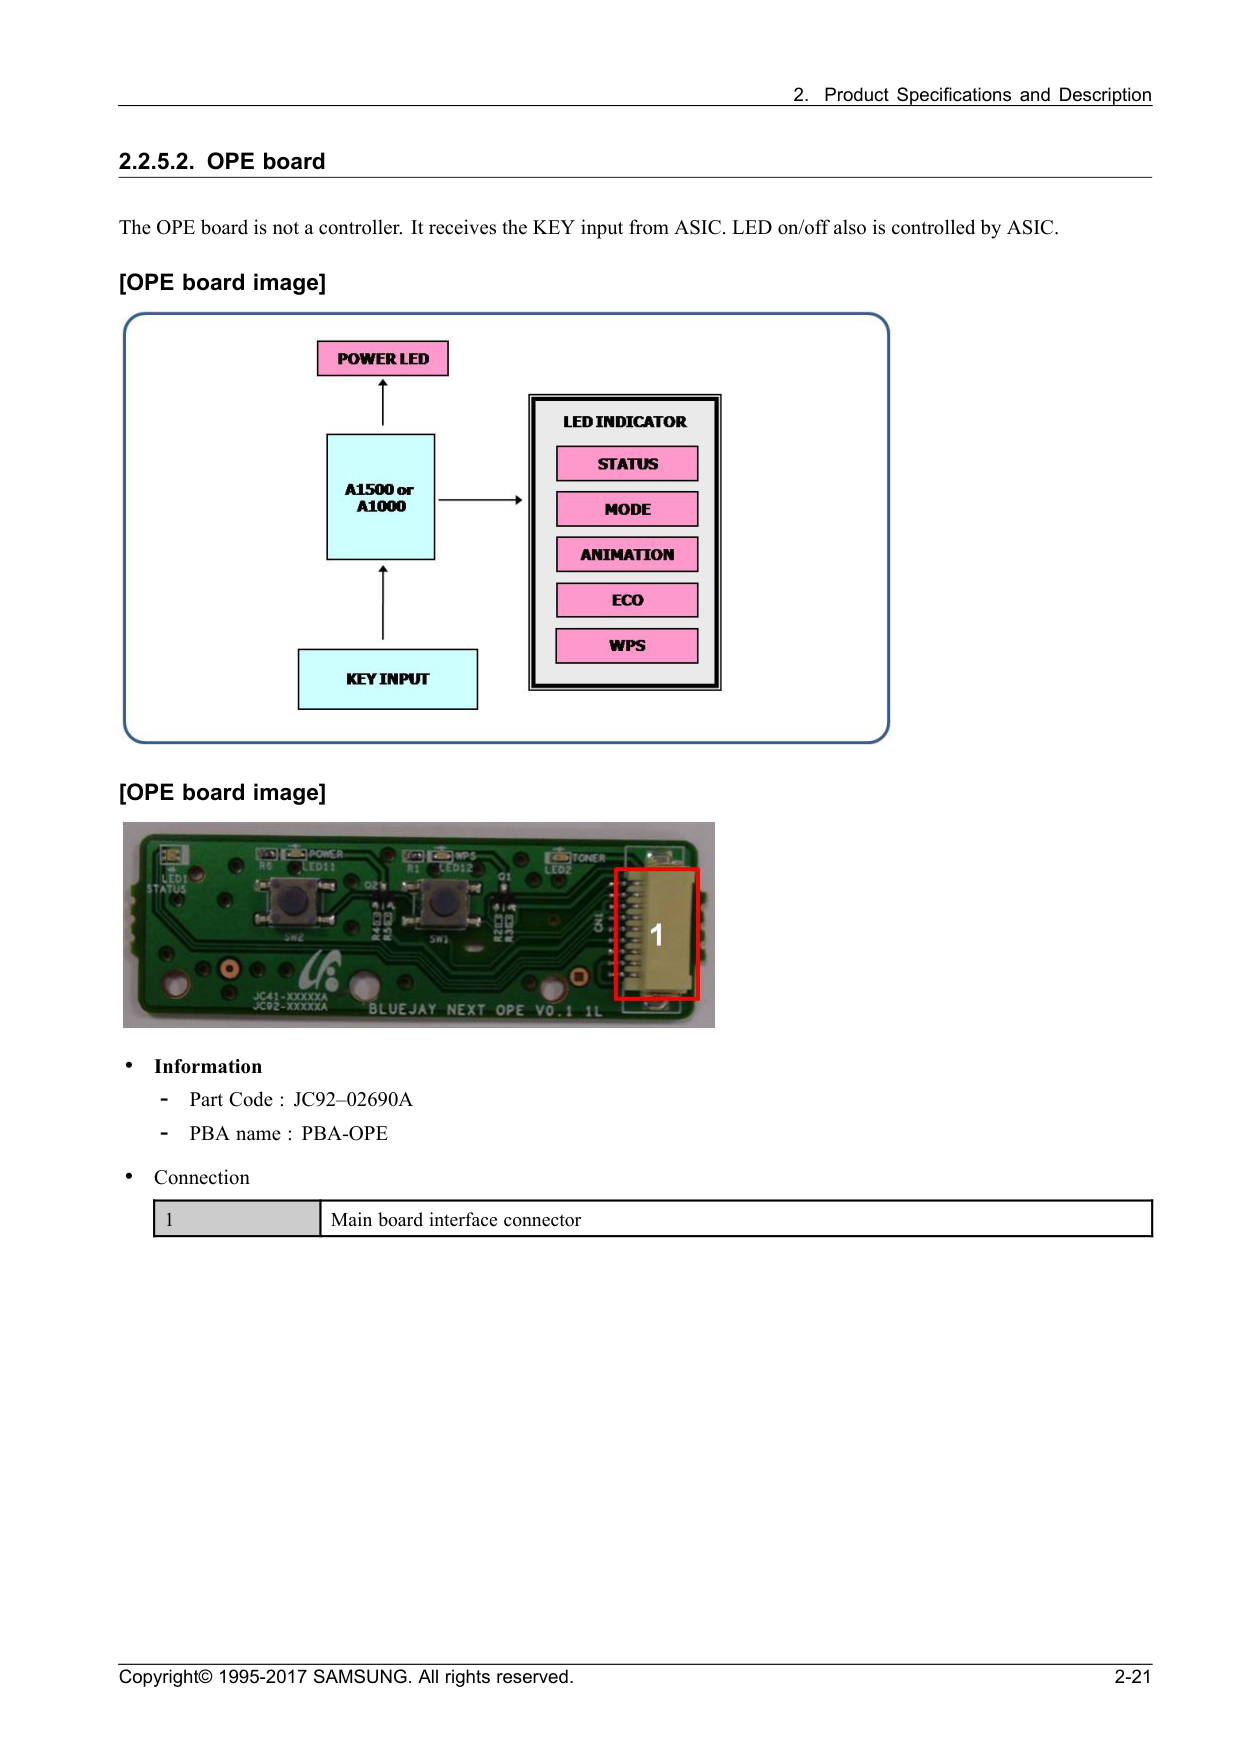
This control panel may differ from your machine depending on its model. There are various types of control panels. 1 Toner LED Shows the status of the toner.Wps
Note
M202xW only Configures the wireless network connection easily without a computer. • Configuration sheet • Press and hold this button for about 10 seconds until the green LED blinks slowly, and release. • Prints supplies info report / usage count report • Press and hold this button for about 15 seconds until the green LED on, and release. • Manual print • Press this button each time you load a sheet of paper in the tray if you have selected Manual Feeder for Source in your printer driver. 2 Copyright© 1995-2017 SAMSUNG. All rights reserved. 4-1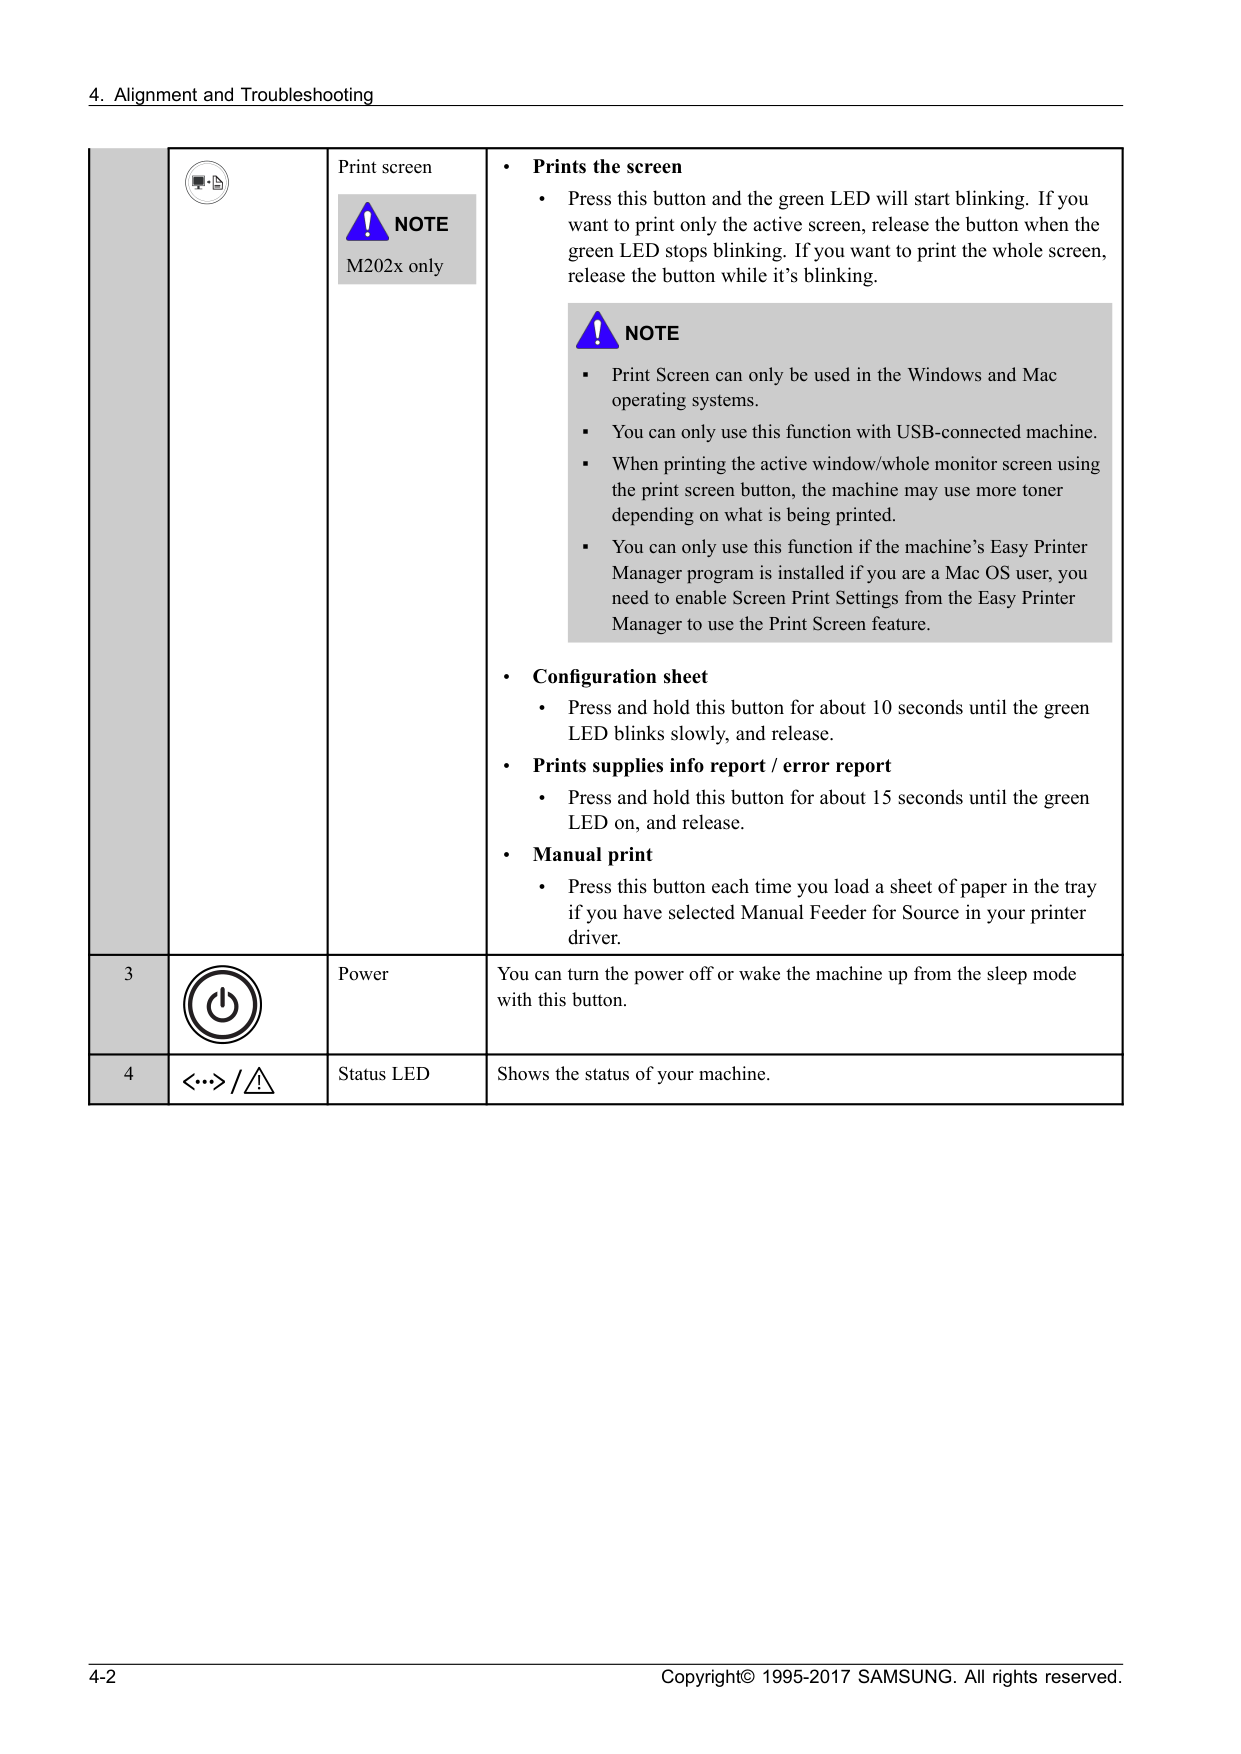
Note
M202x only • Prints the screen • Press this button and the green LED will start blinking. If you want to print only the active screen, release the button when the green LED stops blinking. If you want to print the whole screen, release the button while it’s blinking.Note
▪ Print Screen can only be used in the Windows and Mac operating systems. ▪ You can only use this function with USB-connected machine. ▪ When printing the active window/whole monitor screen using the print screen button, the machine may use more toner depending on what is being printed. ▪ You can only use this function if the machine’s Easy Printer Manager program is installed if you are a Mac OS user, you need to enable Screen Print Settings from the Easy Printer Manager to use the Print Screen feature. • Configuration sheet • Press and hold this button for about 10 seconds until the green LED blinks slowly, and release. • Prints supplies info report / error report • Press and hold this button for about 15 seconds until the green LED on, and release. • Manual print • Press this button each time you load a sheet of paper in the tray if you have selected Manual Feeder for Source in your printer driver. 3 Power You can turn the power off or wake the machine up from the sleep mode with this button. 4 Status LED Shows the status of your machine. 4-2 Copyright© 1995-2017 SAMSUNG. All rights reserved.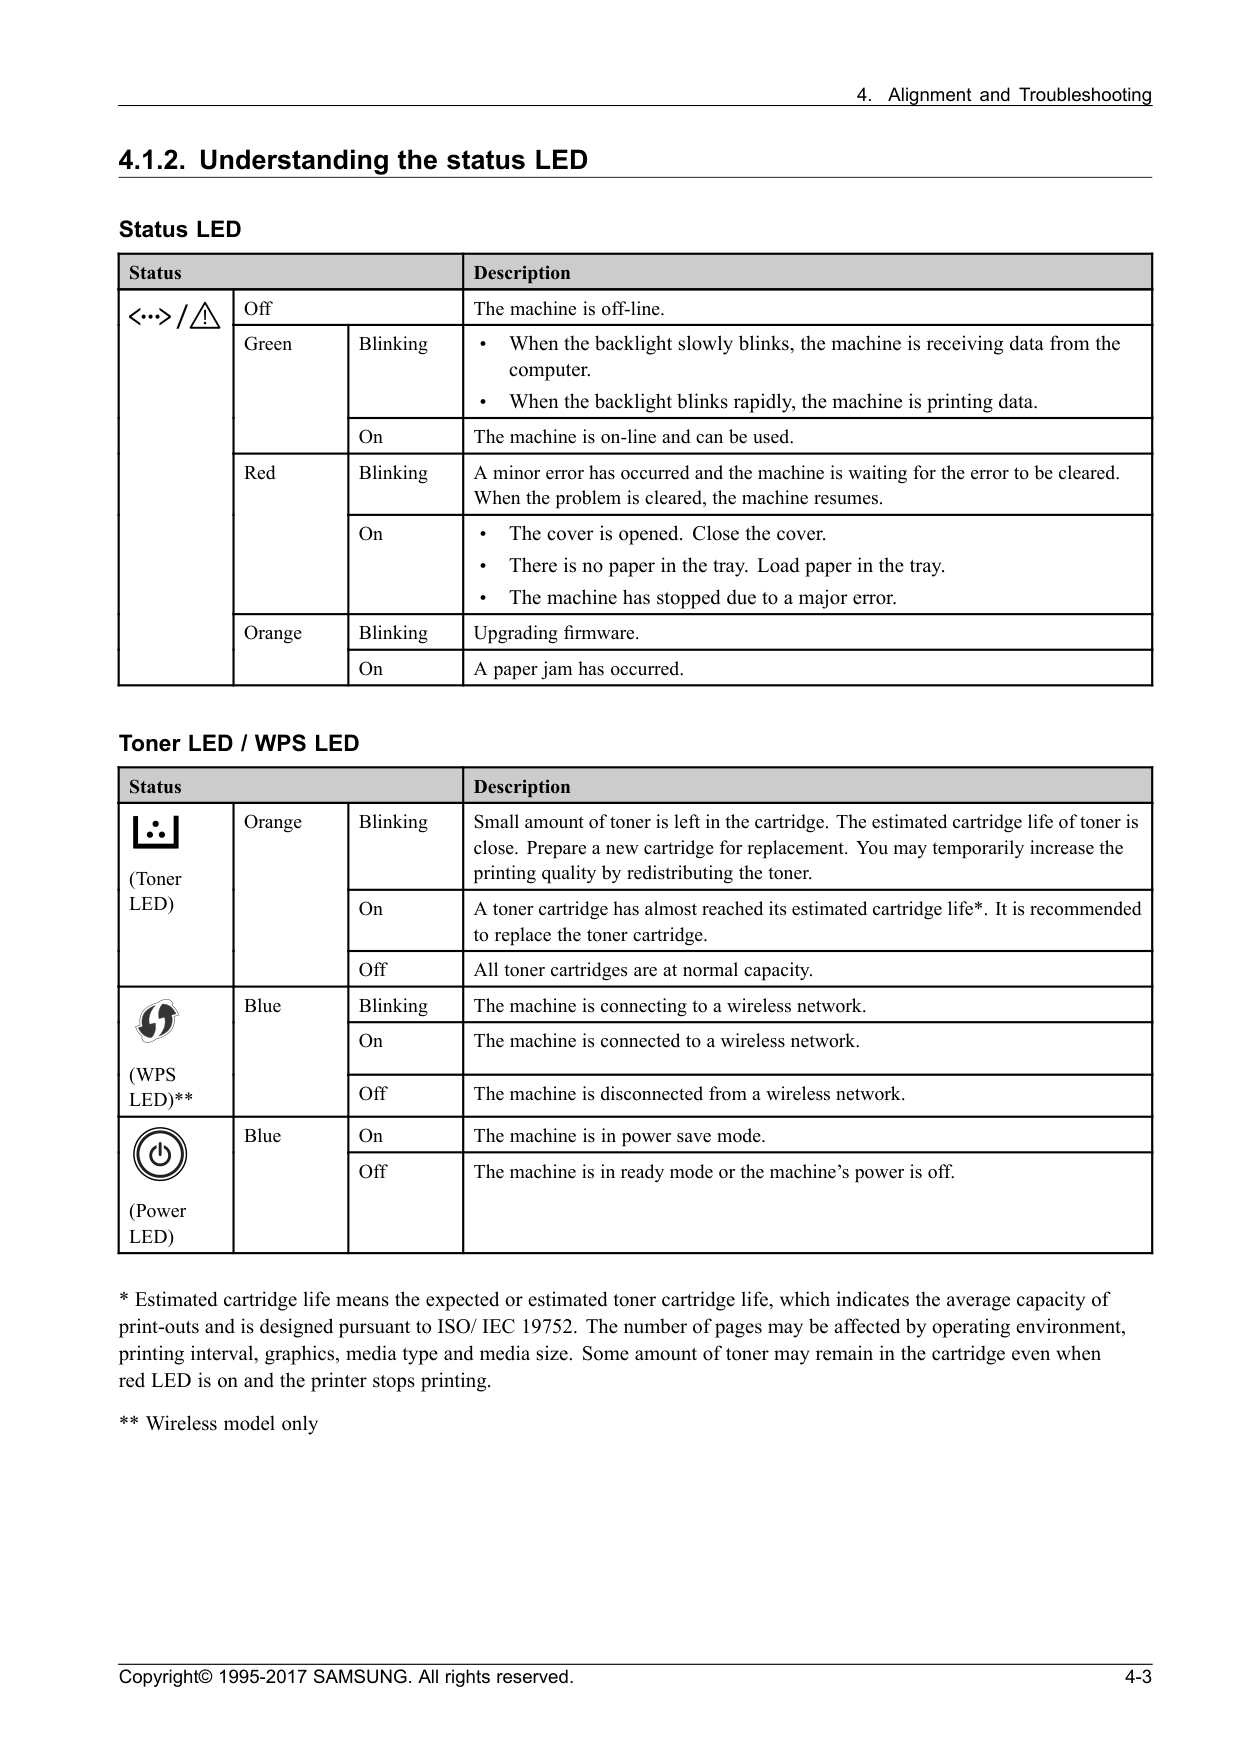
Led)
Orange Off All toner cartridges are at normal capacity. Blinking The machine is connecting to a wireless network. On The machine is connected to a wireless network.(Wps
Led)**
Blue Off The machine is disconnected from a wireless network. On The machine is in power save mode. (PowerLed)
Blue Off The machine is in ready mode or the machine’s power is off.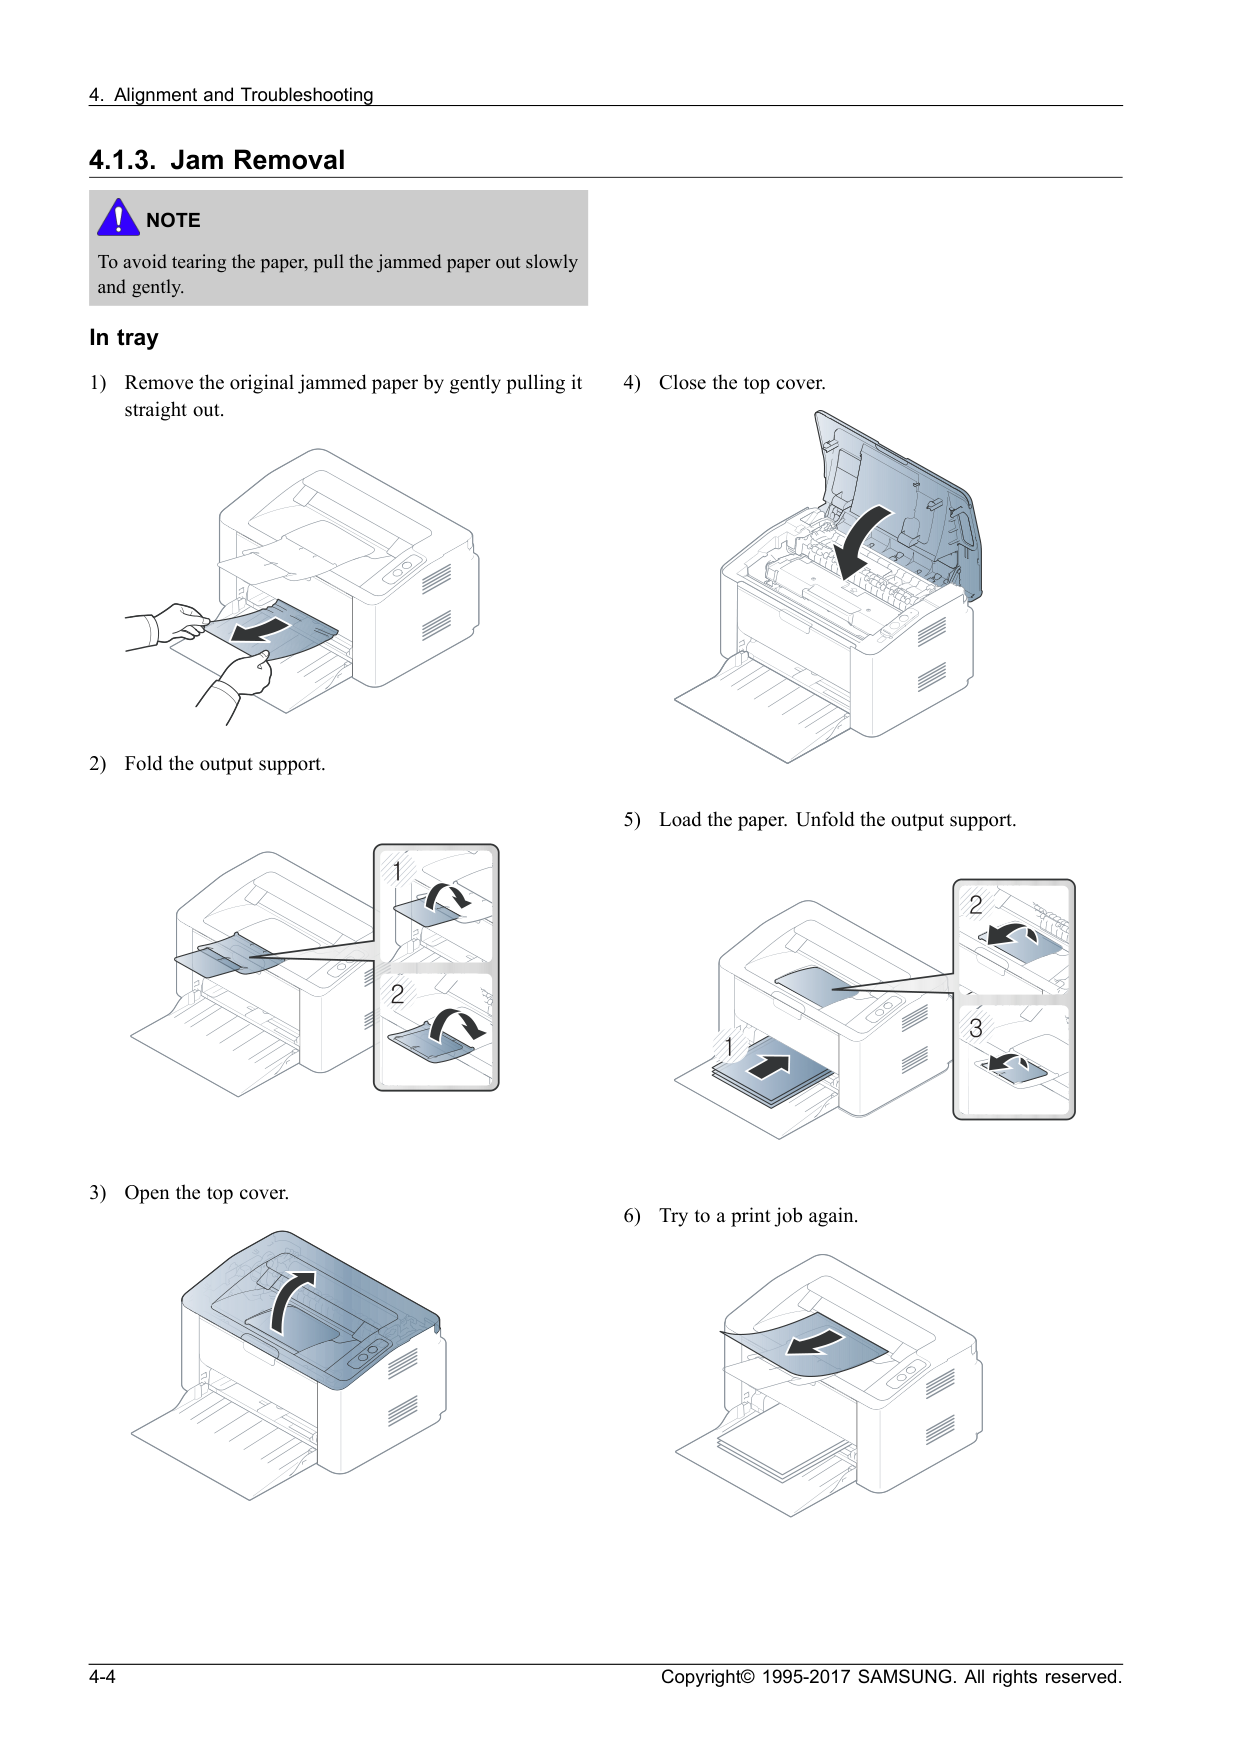
Note
To avoid tearing the paper, pull the jammed paper out slowly and gently. In tray 1) Remove the original jammed paper by gently pulling it straight out. 2) Fold the output support. 3) Open the top cover. 4) Close the top cover. 5) Load the paper. Unfold the output support. 6) Try to a print job again. 4-4 Copyright© 1995-2017 SAMSUNG. All rights reserved.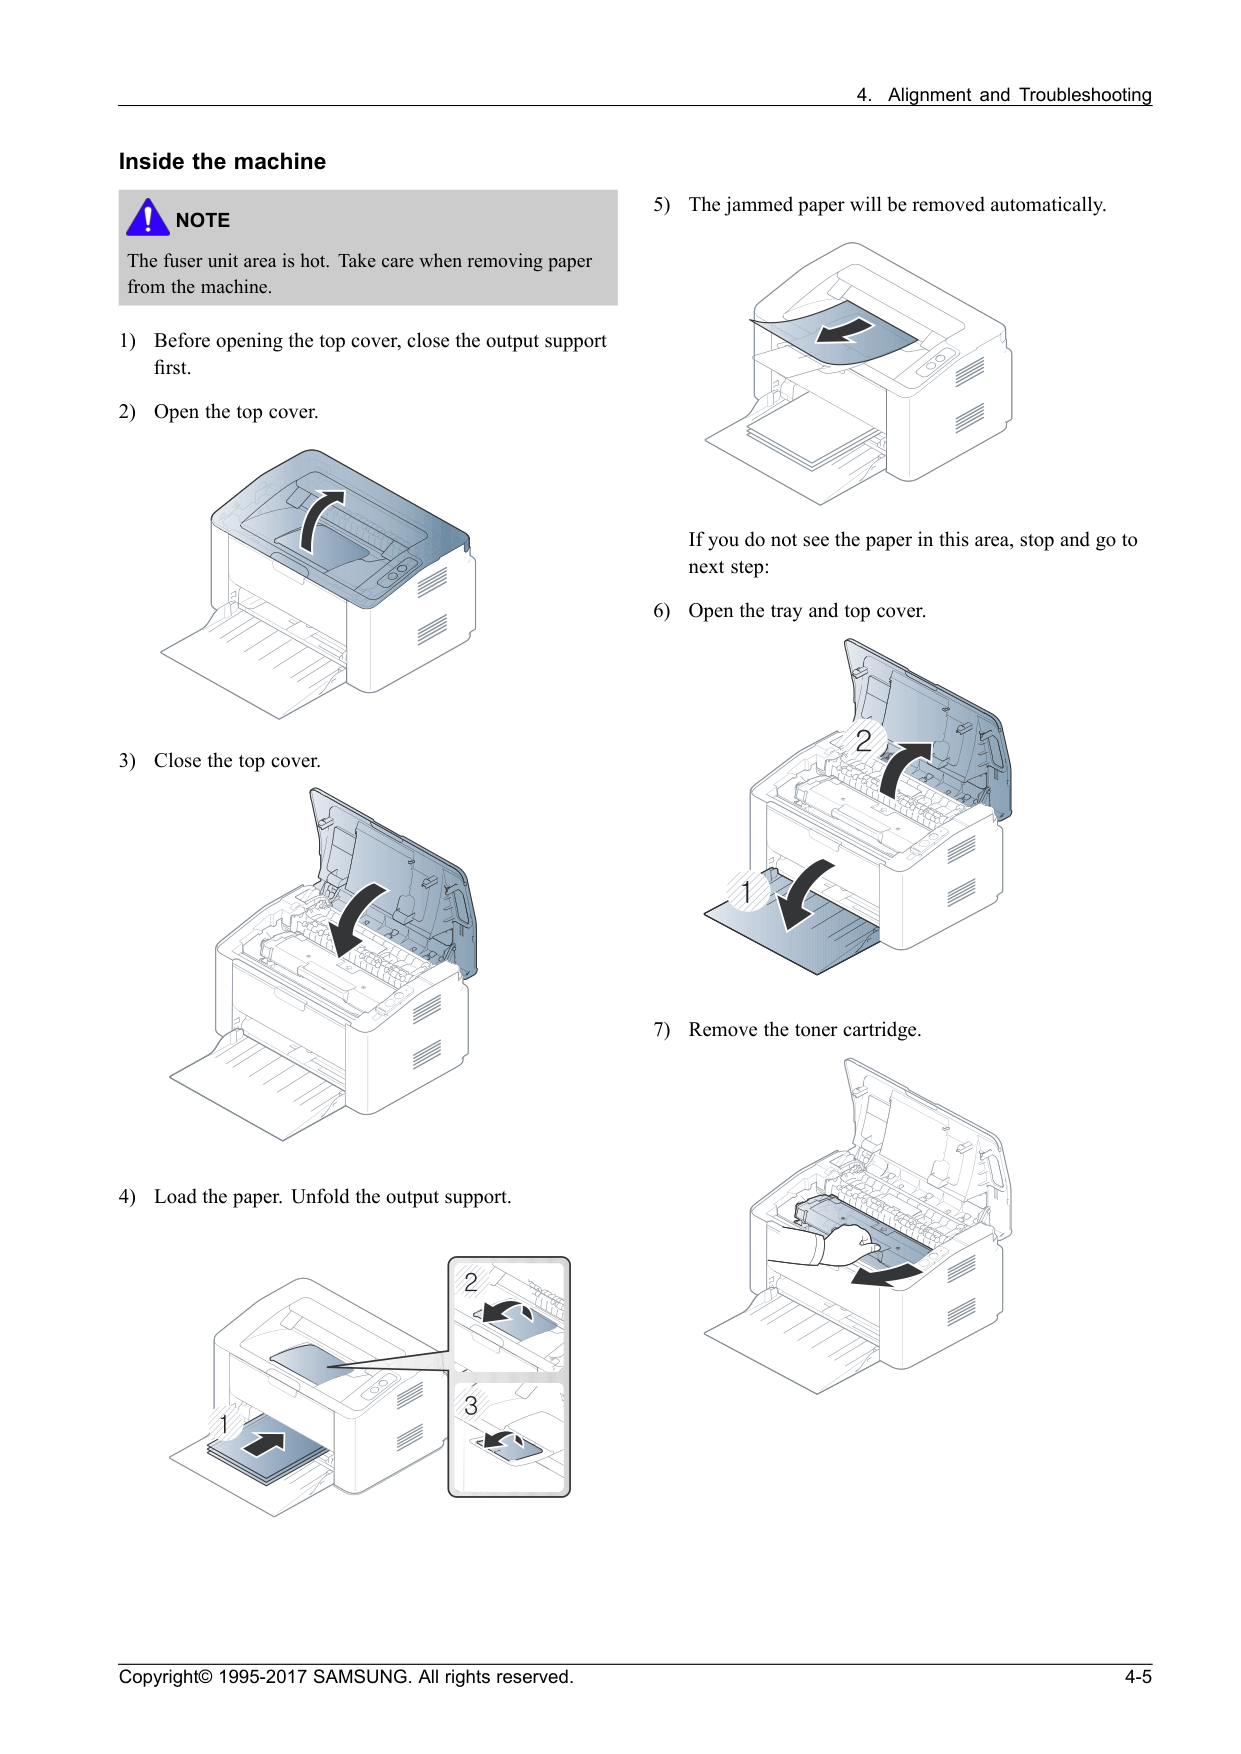
Note
The fuser unit area is hot. Take care when removing paper from the machine. 1) Before opening the top cover, close the output support first. 2) Open the top cover. 3) Close the top cover. 4) Load the paper. Unfold the output support. 5) The jammed paper will be removed automatically. If you do not see the paper in this area, stop and go to next step: 6) Open the tray and top cover. 7) Remove the toner cartridge. Copyright© 1995-2017 SAMSUNG. All rights reserved. 4-5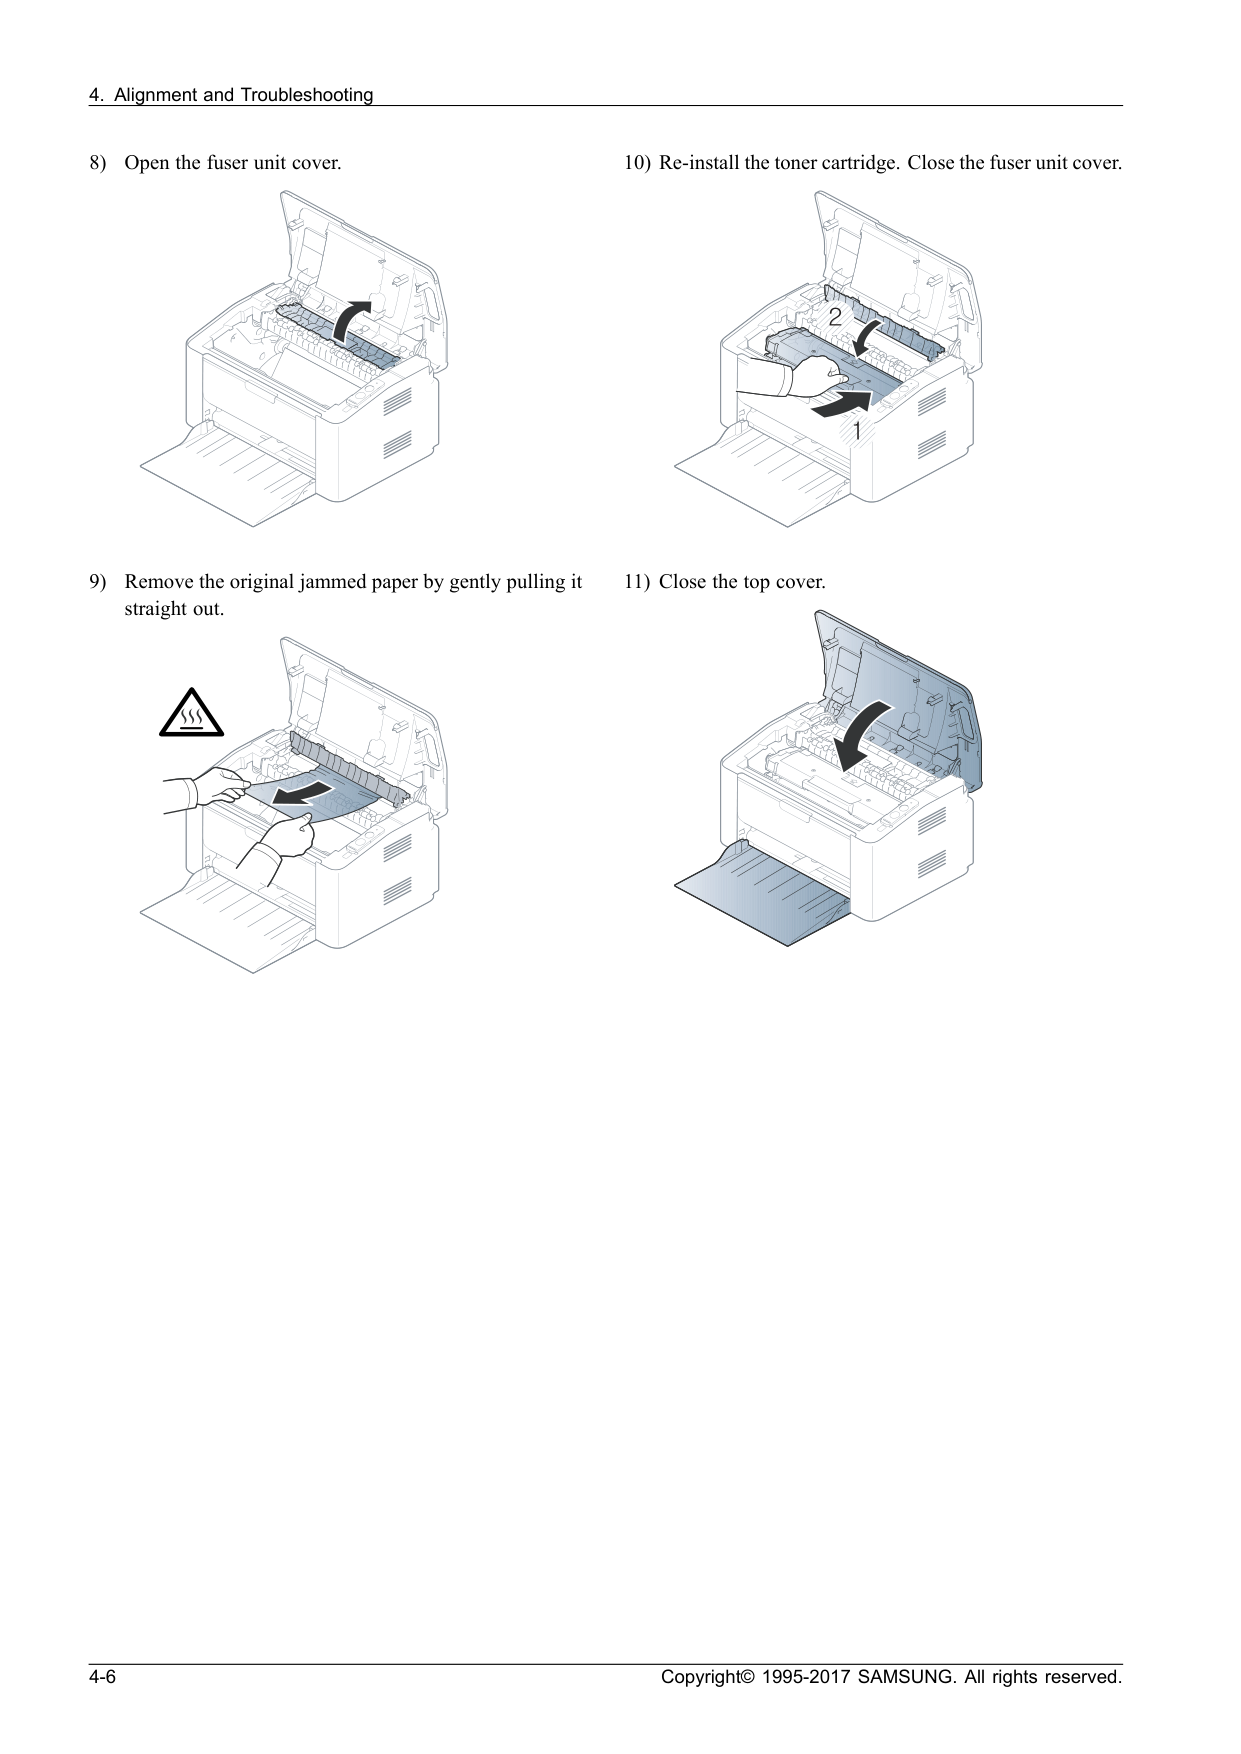

Note
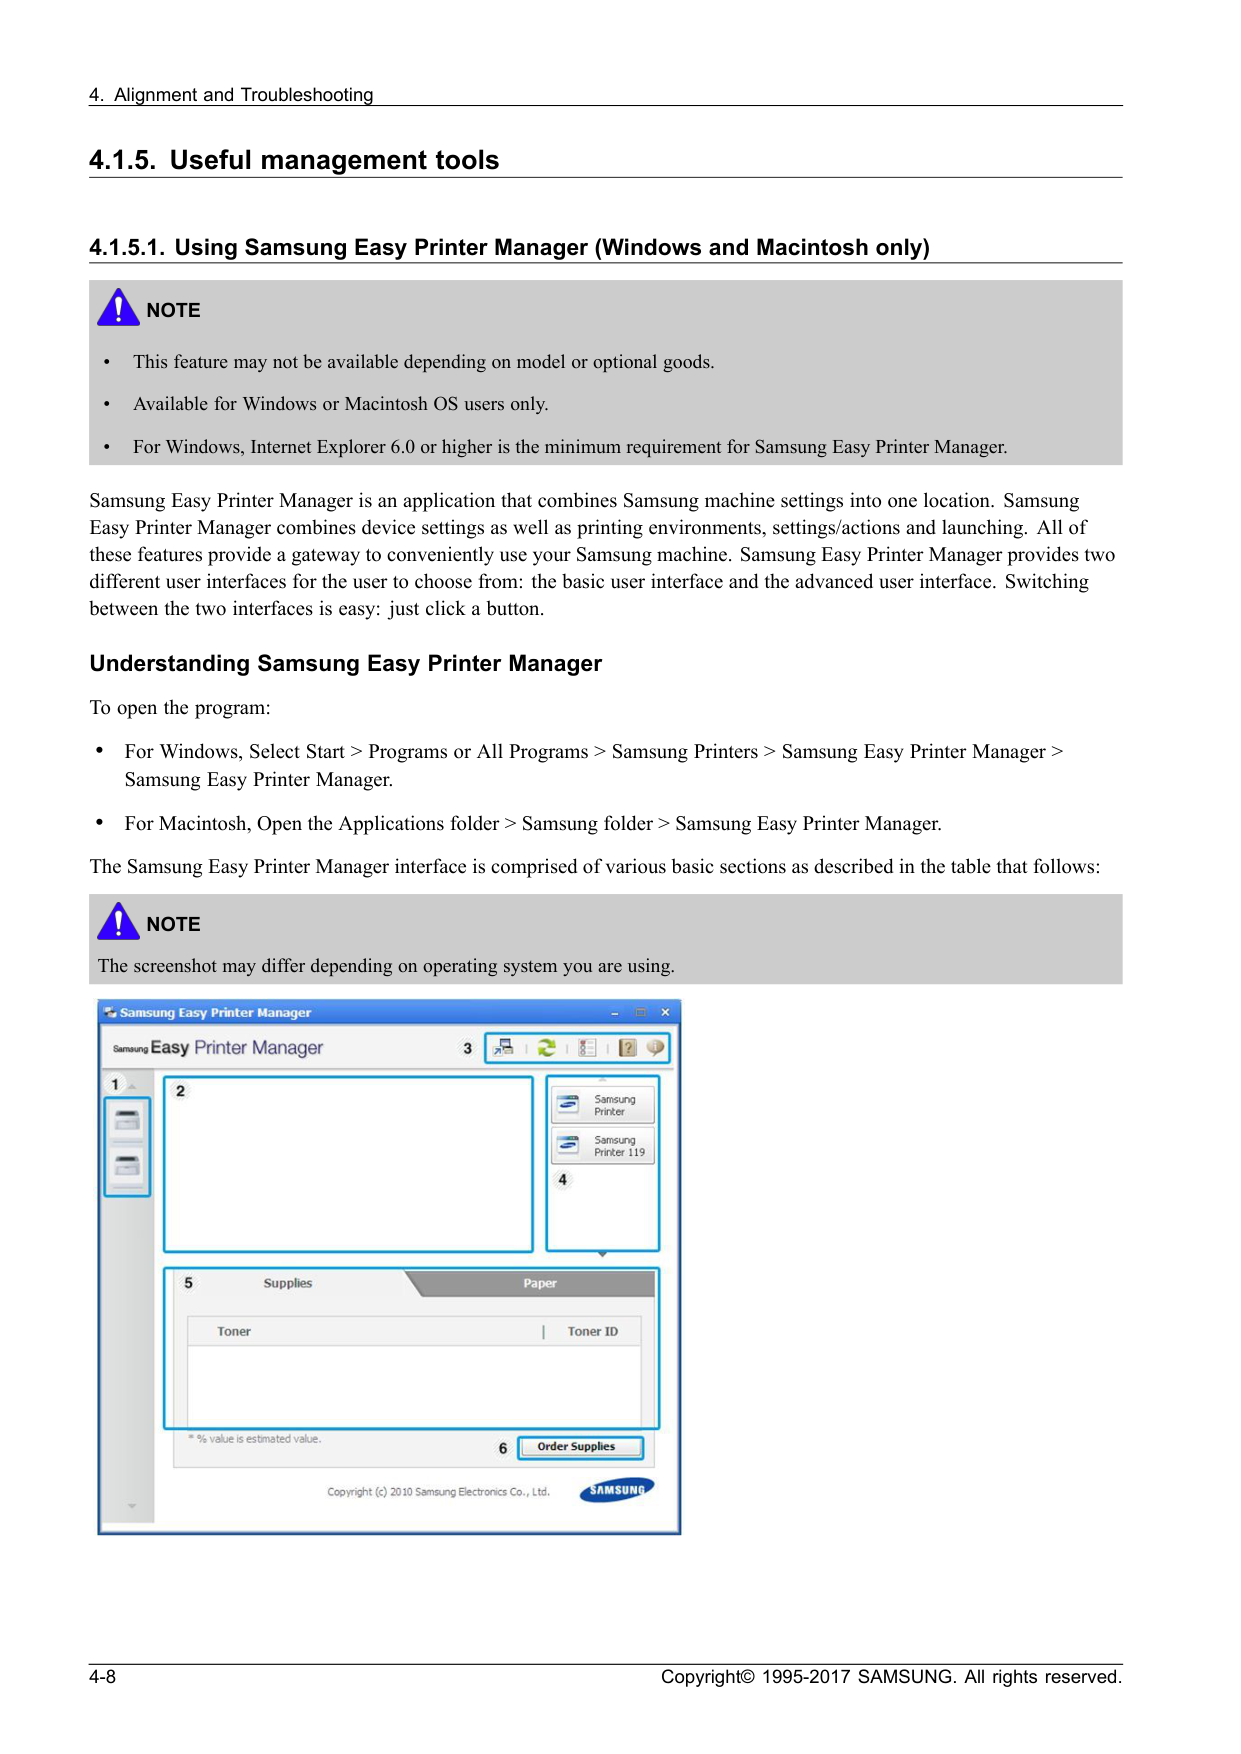
• This feature may not be available depending on model or optional goods. • Available for Windows or Macintosh OS users only. • For Windows, Internet Explorer 6.0 or higher is the minimum requirement for Samsung Easy Printer Manager. Samsung Easy Printer Manager is an application that combines Samsung machine settings into one location. Samsung Easy Printer Manager combines device settings as well as printing environments, settings/actions and launching. All of these features provide a gateway to conveniently use your Samsung machine. Samsung Easy Printer Manager provides two different user interfaces for the user to choose from: the basic user interface and the advanced user interface. Switching between the two interfaces is easy: just click a button. Understanding Samsung Easy Printer Manager To open the program: • For Windows, Select Start > Programs or All Programs > Samsung Printers > Samsung Easy Printer Manager > Samsung Easy Printer Manager. • For Macintosh, Open the Applications folder > Samsung folder > Samsung Easy Printer Manager. The Samsung Easy Printer Manager interface is comprised of various basic sections as described in the table that follows:Note
The screenshot may differ depending on operating system you are using. 4-8 Copyright© 1995-2017 SAMSUNG. All rights reserved.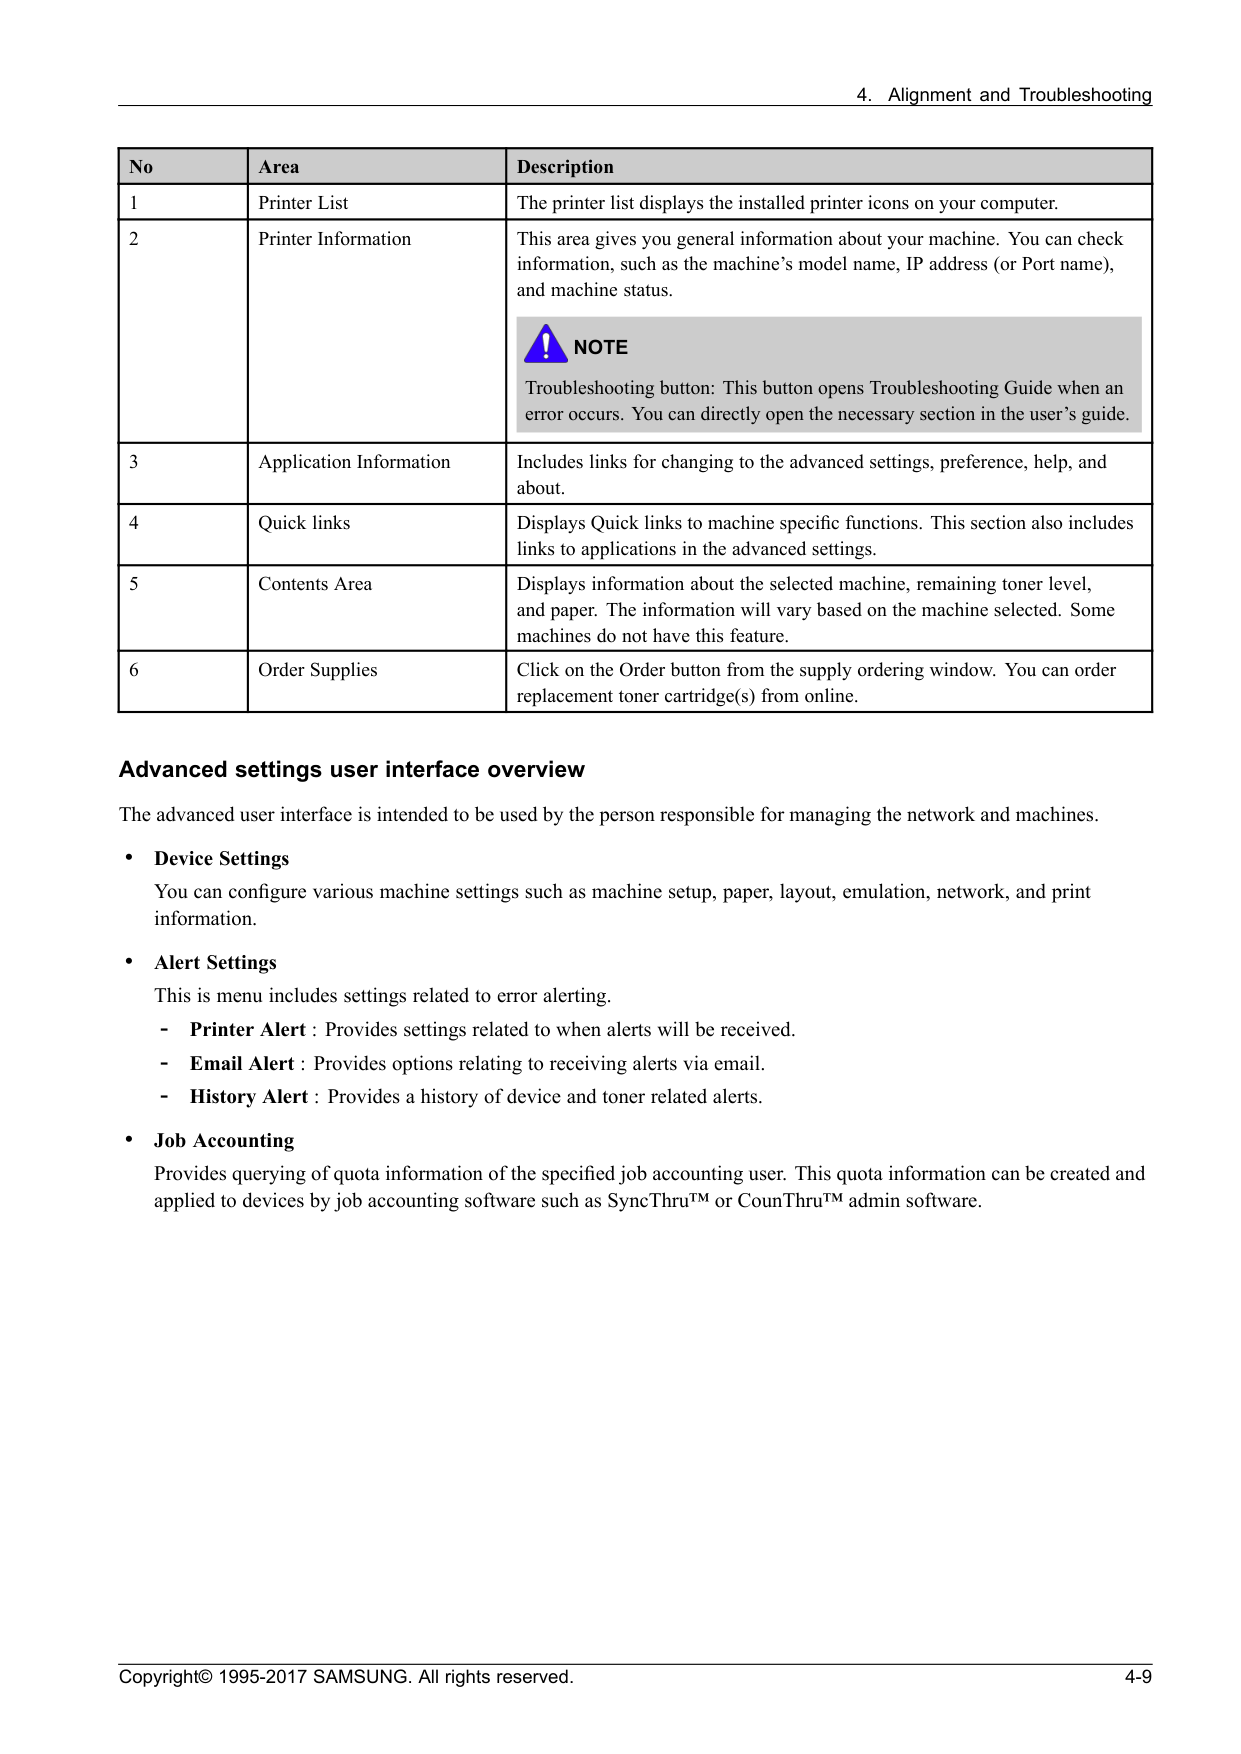
Note
Troubleshooting button: This button opens Troubleshooting Guide when an error occurs. You can directly open the necessary section in the user’s guide. 3 Application Information Includes links for changing to the advanced settings, preference, help, and about. 4 Quick links Displays Quick links to machine specific functions. This section also includes links to applications in the advanced settings. 5 Contents Area Displays information about the selected machine, remaining toner level, and paper. The information will vary based on the machine selected. Some machines do not have this feature. 6 Order Supplies Click on the Order button from the supply ordering window. You can order replacement toner cartridge(s) from online. Advanced settings user interface overview The advanced user interface is intended to be used by the person responsible for managing the network and machines. • Device Settings You can configure various machine settings such as machine setup, paper, layout, emulation, network, and print information. • Alert Settings This is menu includes settings related to error alerting.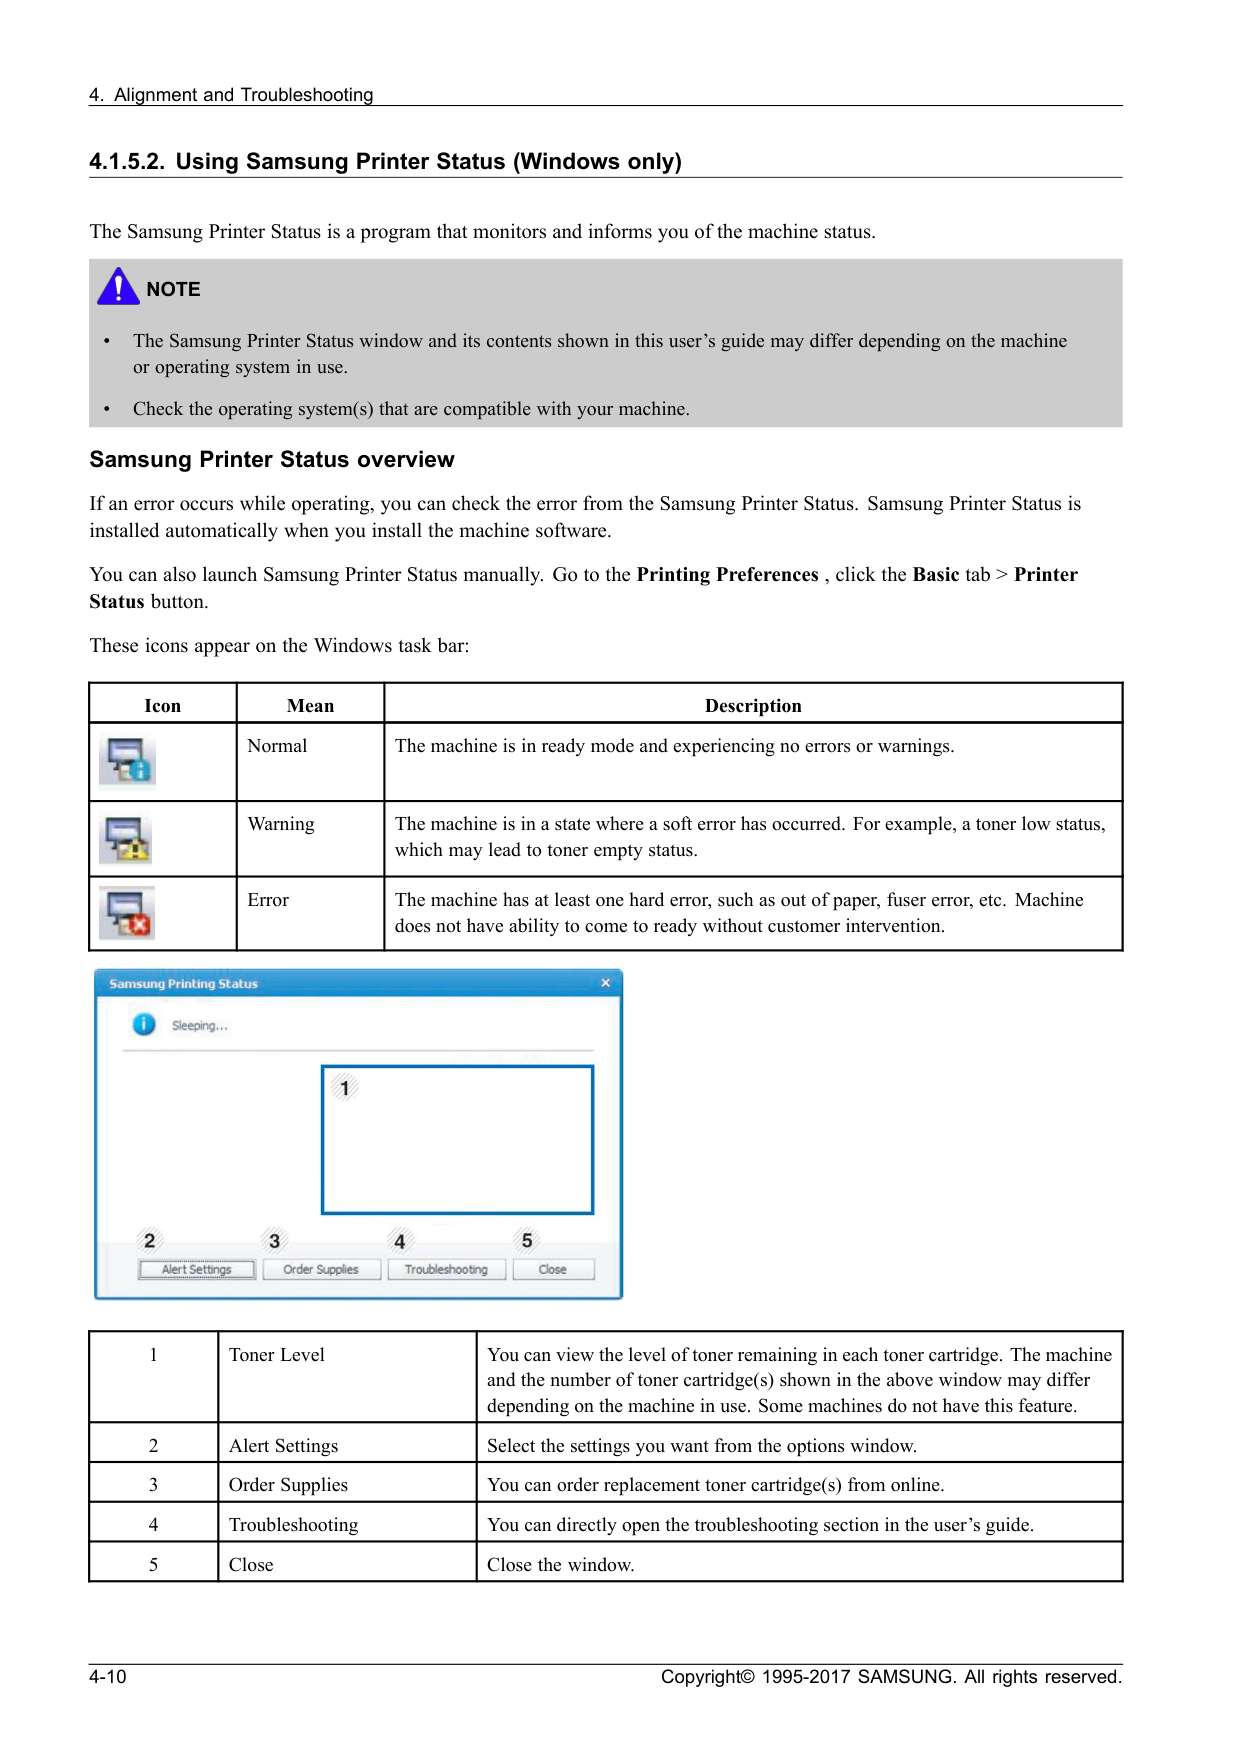
Note
• The Samsung Printer Status window and its contents shown in this user’s guide may differ depending on the machine or operating system in use. • Check the operating system(s) that are compatible with your machine. Samsung Printer Status overview If an error occurs while operating, you can check the error from the Samsung Printer Status. Samsung Printer Status is installed automatically when you install the machine software. You can also launch Samsung Printer Status manually. Go to the Printing Preferences , click the Basic tab > Printer Status button. These icons appear on the Windows task bar: Icon Mean Description Normal The machine is in ready mode and experiencing no errors or warnings. Warning The machine is in a state where a soft error has occurred. For example, a toner low status, which may lead to toner empty status. Error The machine has at least one hard error, such as out of paper, fuser error, etc. Machine does not have ability to come to ready without customer intervention. 1 Toner Level You can view the level of toner remaining in each toner cartridge. The machine and the number of toner cartridge(s) shown in the above window may differ depending on the machine in use. Some machines do not have this feature. 2 Alert Settings Select the settings you want from the options window. 3 Order Supplies You can order replacement toner cartridge(s) from online. 4 Troubleshooting You can directly open the troubleshooting section in the user’s guide. 5 Close Close the window. 4-10 Copyright© 1995-2017 SAMSUNG. All rights reserved.
Caution
Please, change SWS Default ID and Password for system security in case of your first connection. Copyright© 1995-2017 SAMSUNG. All rights reserved. 4-11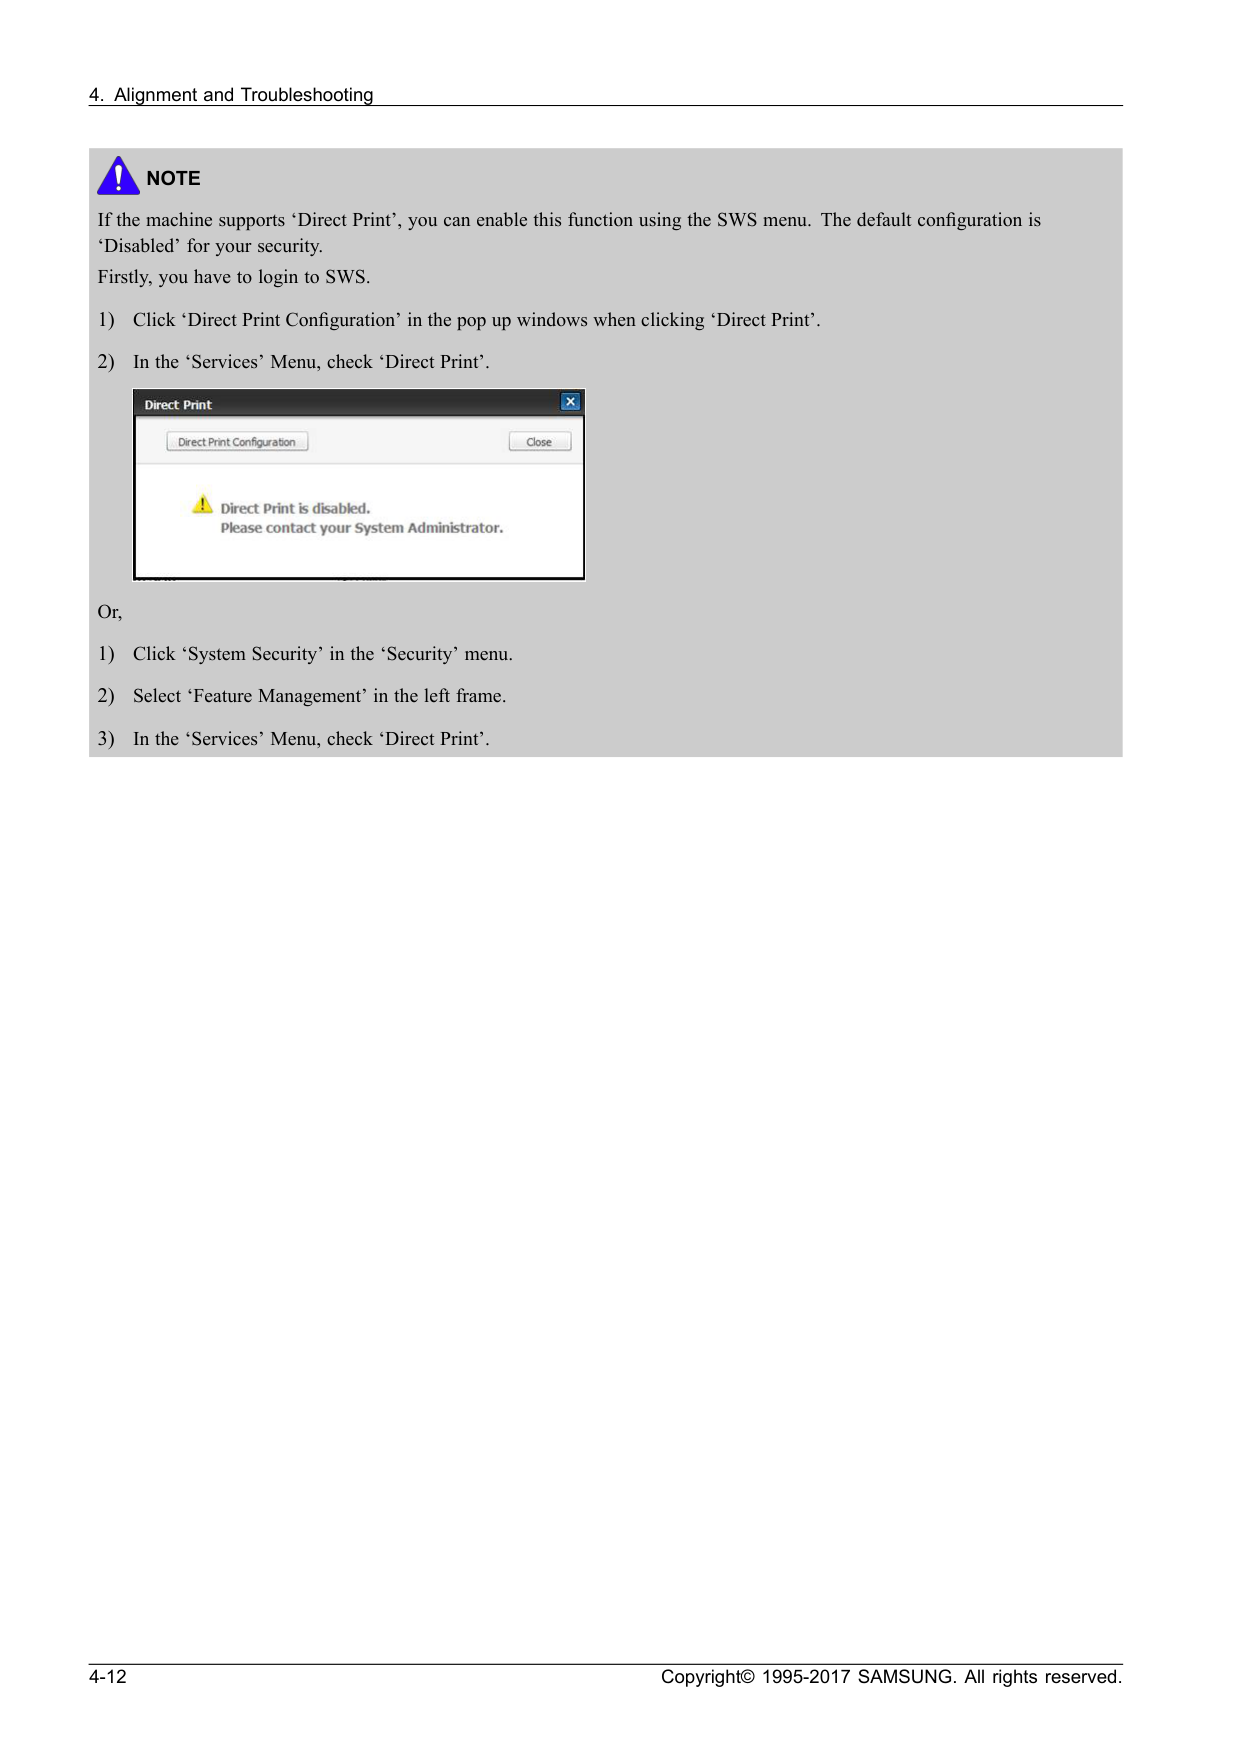
Note
If the machine supports ‘Direct Print’, you can enable this function using the SWS menu. The default configuration is ‘Disabled’ for your security. Firstly, you have to login to SWS. 1) Click ‘Direct Print Configuration’ in the pop up windows when clicking ‘Direct Print’. 2) In the ‘Services’ Menu, check ‘Direct Print’. Or, 1) Click ‘System Security’ in the ‘Security’ menu. 2) Select ‘Feature Management’ in the left frame. 3) In the ‘Services’ Menu, check ‘Direct Print’. 4-12 Copyright© 1995-2017 SAMSUNG. All rights reserved.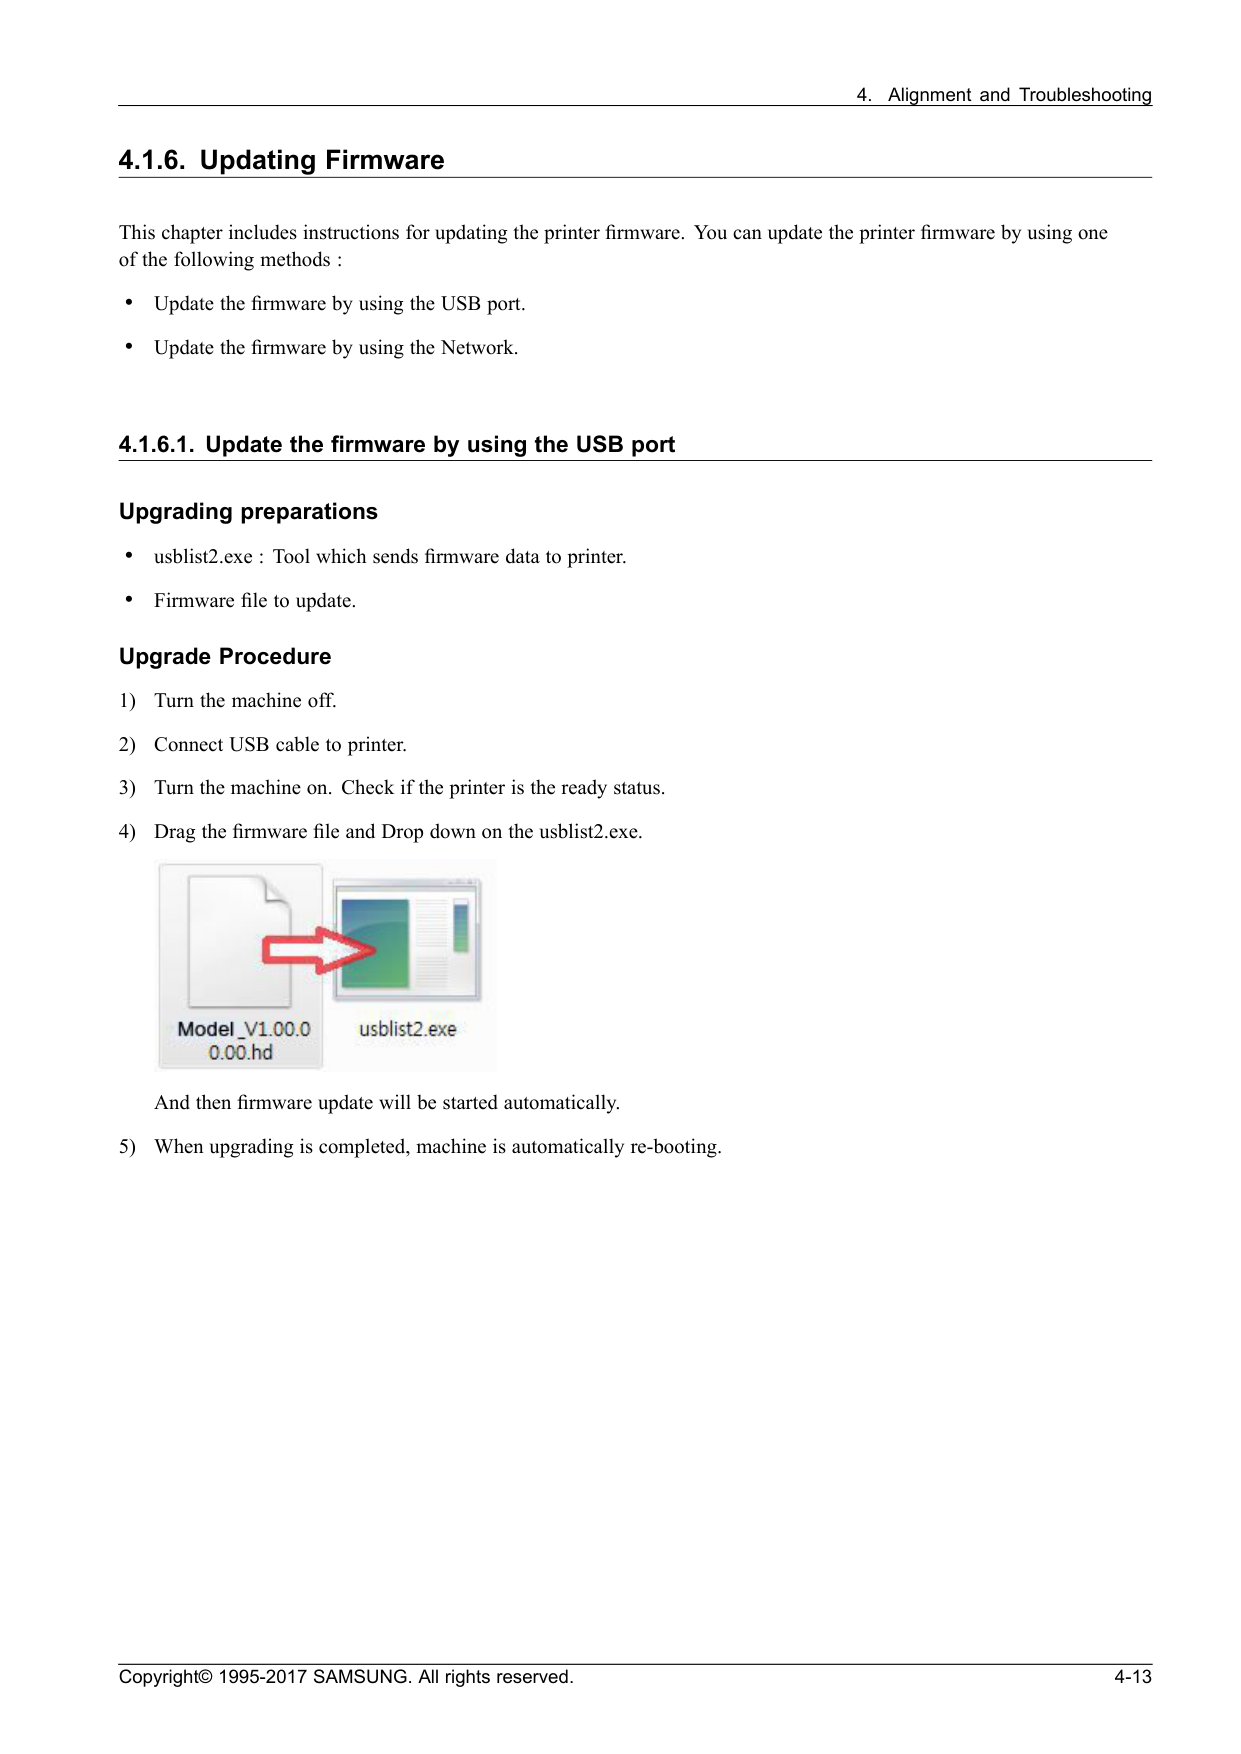
C2-1110
Prepare new toner cartridge. Page 4–19C2-1150
Replace with new toner cartridge. Page 4–19C2-1410
Toner cartridge is not installed. Install the cartridge. Page 4–19C2-1510
Toner cartridge is not compatible. Check user's guide. Page 4–20C2–1711
Toner Cartridge Failure: #C2-1711. Call for service Page 4–19C2–1712
Toner Cartridge Failure: #C2-1712. Call for service Page 4–19M2-1110
Paper jam inside of machine. Page 4–20M2–1116
Paper jam or empty in tray Page 4–20M2–1317
Paper jam inside of machine Page 4–21S2-4110
Door is open. Close it. Page 4–22S6-3123
This IP address conflicts with that of other system. Check it. Page 4–22U1-2320
Fuser Unit Failure #U1-2320. Turn off then on. Page 4–23U1-2330
Fuser Unit Failure #U1-2330. Turn off then on. Page 4–23U1-2340
Fuser Unit Failure #U1-2340. Turn off then on. Page 4–23U2-1112
LSU Unit Failure: #U2-1112. Turn off then on. Page 4–24U2-1113
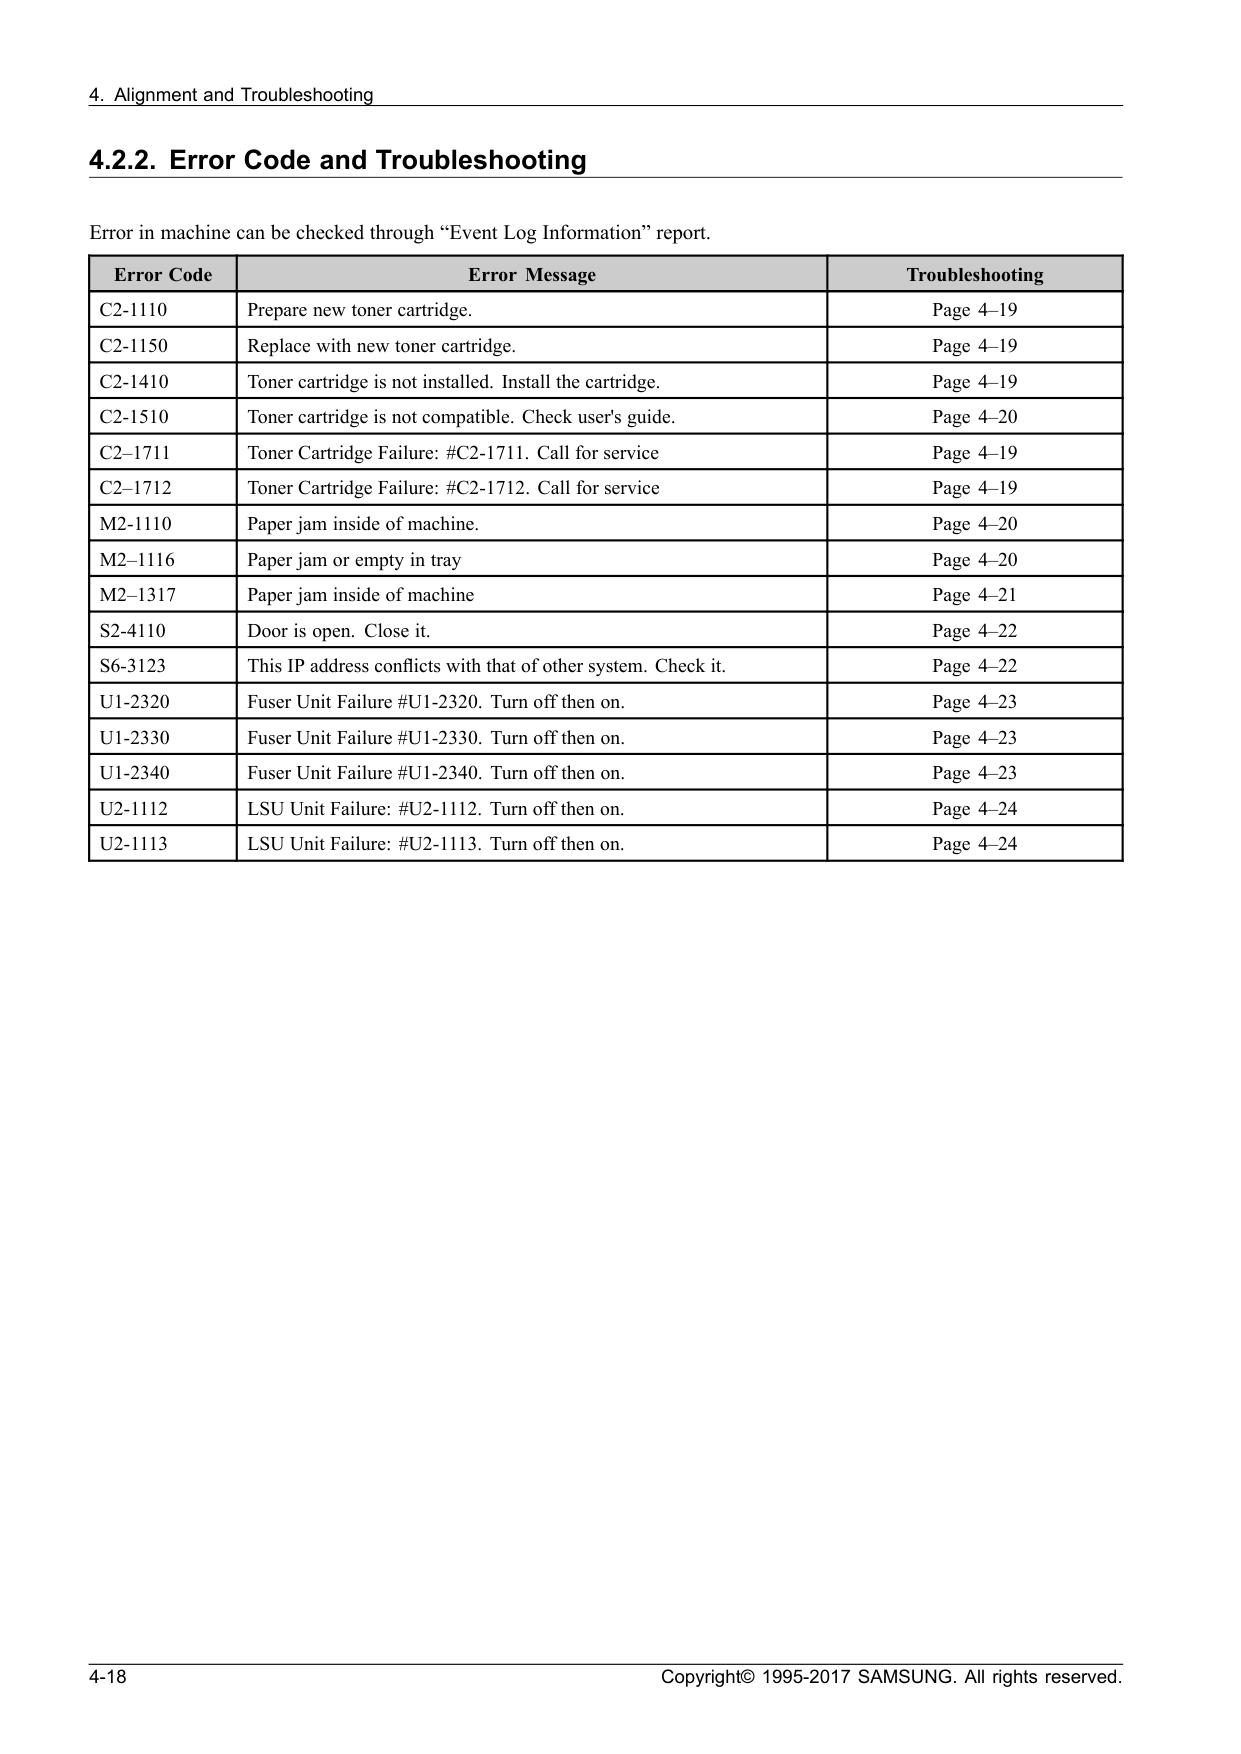
LSU Unit Failure: #U2-1113. Turn off then on. Page 4–24 4-18 Copyright© 1995-2017 SAMSUNG. All rights reserved.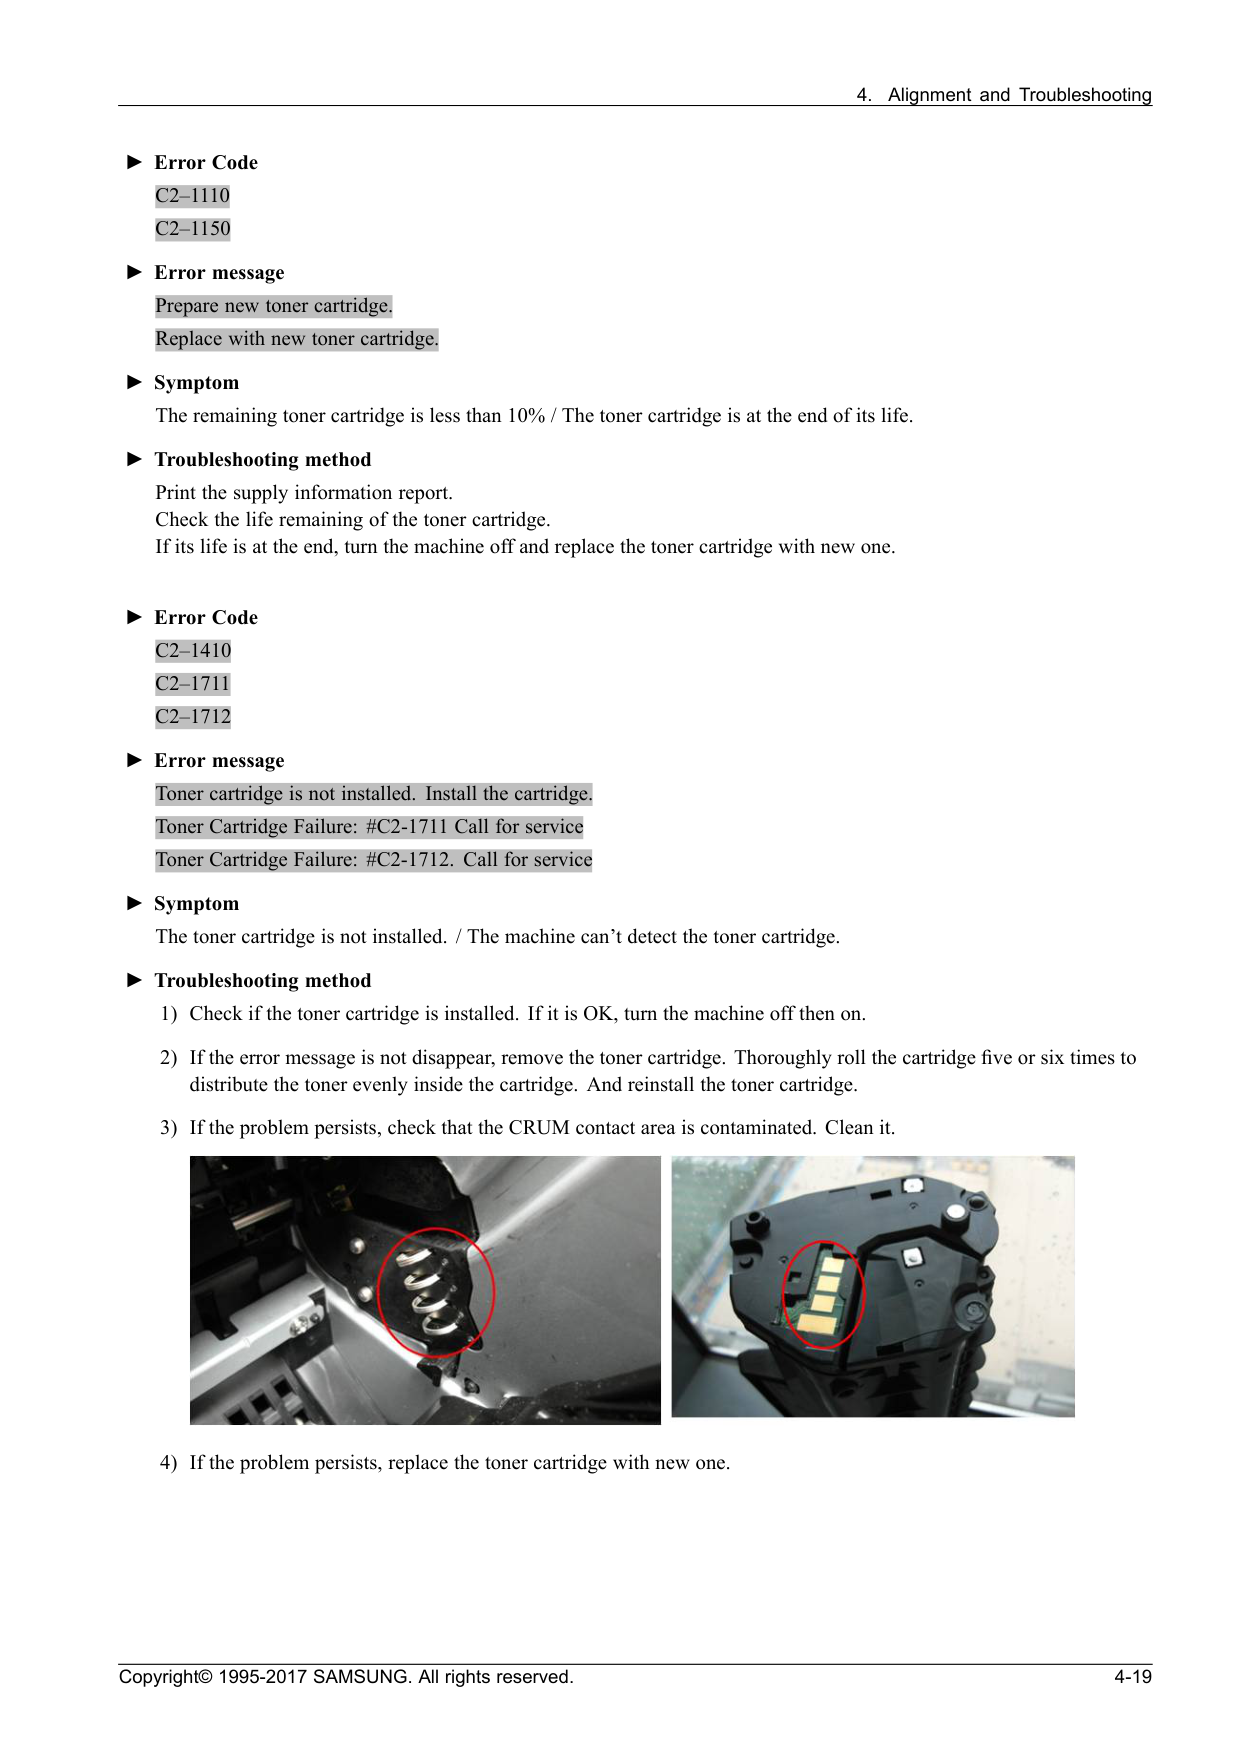
C2–1110
C2–1150
►Error message Prepare new toner cartridge. Replace with new toner cartridge. ►Symptom The remaining toner cartridge is less than 10% / The toner cartridge is at the end of its life. ►Troubleshooting method Print the supply information report. Check the life remaining of the toner cartridge. If its life is at the end, turn the machine off and replace the toner cartridge with new one. ►Error CodeC2–1410
C2–1711
C2–1712
►Error message Toner cartridge is not installed. Install the cartridge. Toner Cartridge Failure: #C2-1711 Call for service Toner Cartridge Failure: #C2-1712. Call for service ►Symptom The toner cartridge is not installed. / The machine can’t detect the toner cartridge. ►Troubleshooting method 1) Check if the toner cartridge is installed. If it is OK, turn the machine off then on. 2) If the error message is not disappear, remove the toner cartridge. Thoroughly roll the cartridge five or six times to distribute the toner evenly inside the cartridge. And reinstall the toner cartridge. 3) If the problem persists, check that the CRUM contact area is contaminated. Clean it. 4) If the problem persists, replace the toner cartridge with new one. Copyright© 1995-2017 SAMSUNG. All rights reserved. 4-19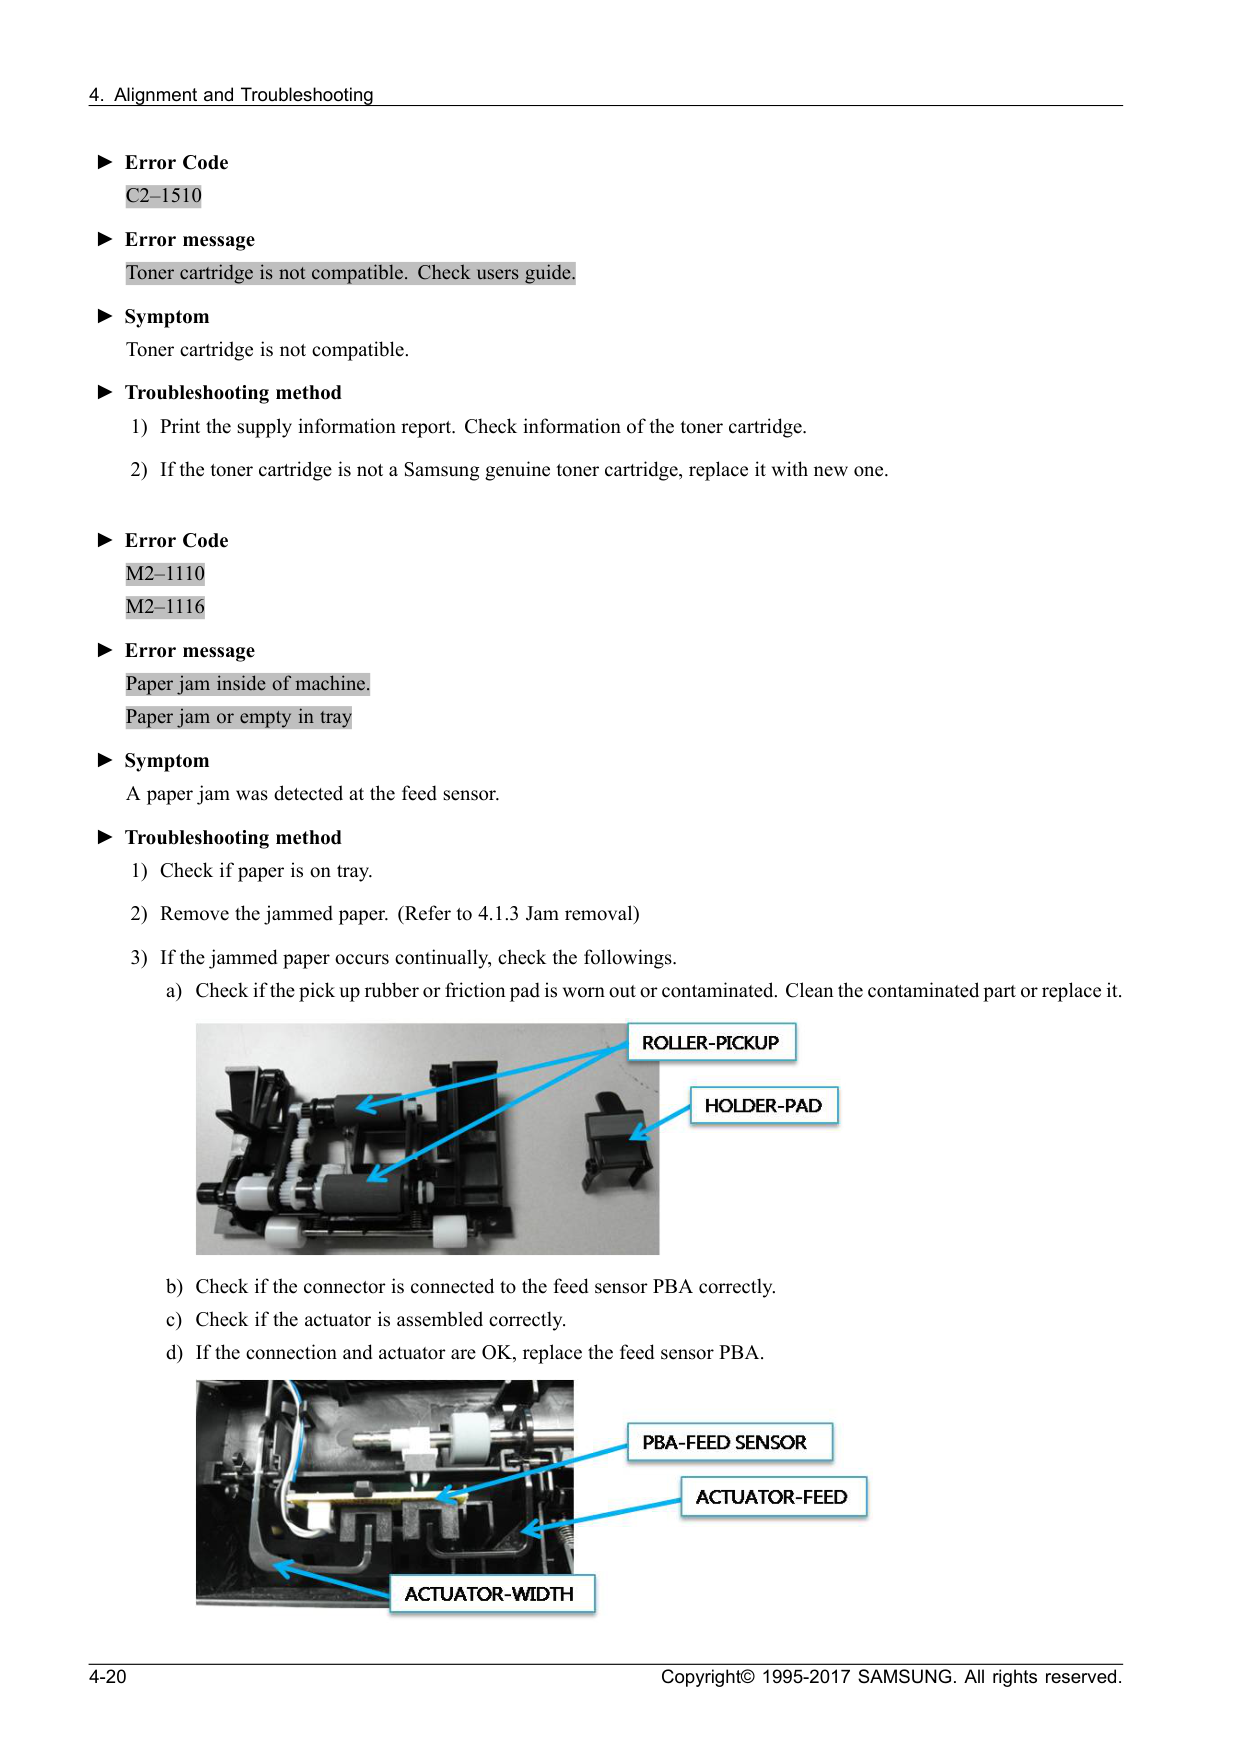
C2–1510
►Error message Toner cartridge is not compatible. Check users guide. ►Symptom Toner cartridge is not compatible. ►Troubleshooting method 1) Print the supply information report. Check information of the toner cartridge. 2) If the toner cartridge is not a Samsung genuine toner cartridge, replace it with new one. ►Error CodeM2–1110
M2–1116
►Error message Paper jam inside of machine. Paper jam or empty in tray ►Symptom A paper jam was detected at the feed sensor. ►Troubleshooting method 1) Check if paper is on tray. 2) Remove the jammed paper. (Refer to 4.1.3 Jam removal) 3) If the jammed paper occurs continually, check the followings. a) Check if the pick up rubber or friction pad is worn out or contaminated. Clean the contaminated part or replace it. b) Check if the connector is connected to the feed sensor PBA correctly. c) Check if the actuator is assembled correctly. d) If the connection and actuator are OK, replace the feed sensor PBA. 4-20 Copyright© 1995-2017 SAMSUNG. All rights reserved.
M2–1317
►Error message Paper jam inside of machine. ►Symptom A paper jam was detected in the fuser unit area. ►Troubleshooting method 1) Open the top cover. Remove the jammed paper. 2) Turn the machine off. 3) Turn the machine on while pushing the print screen button. (wireless model : WPS button) Wait for rebooting the machine. Copyright© 1995-2017 SAMSUNG. All rights reserved. 4-21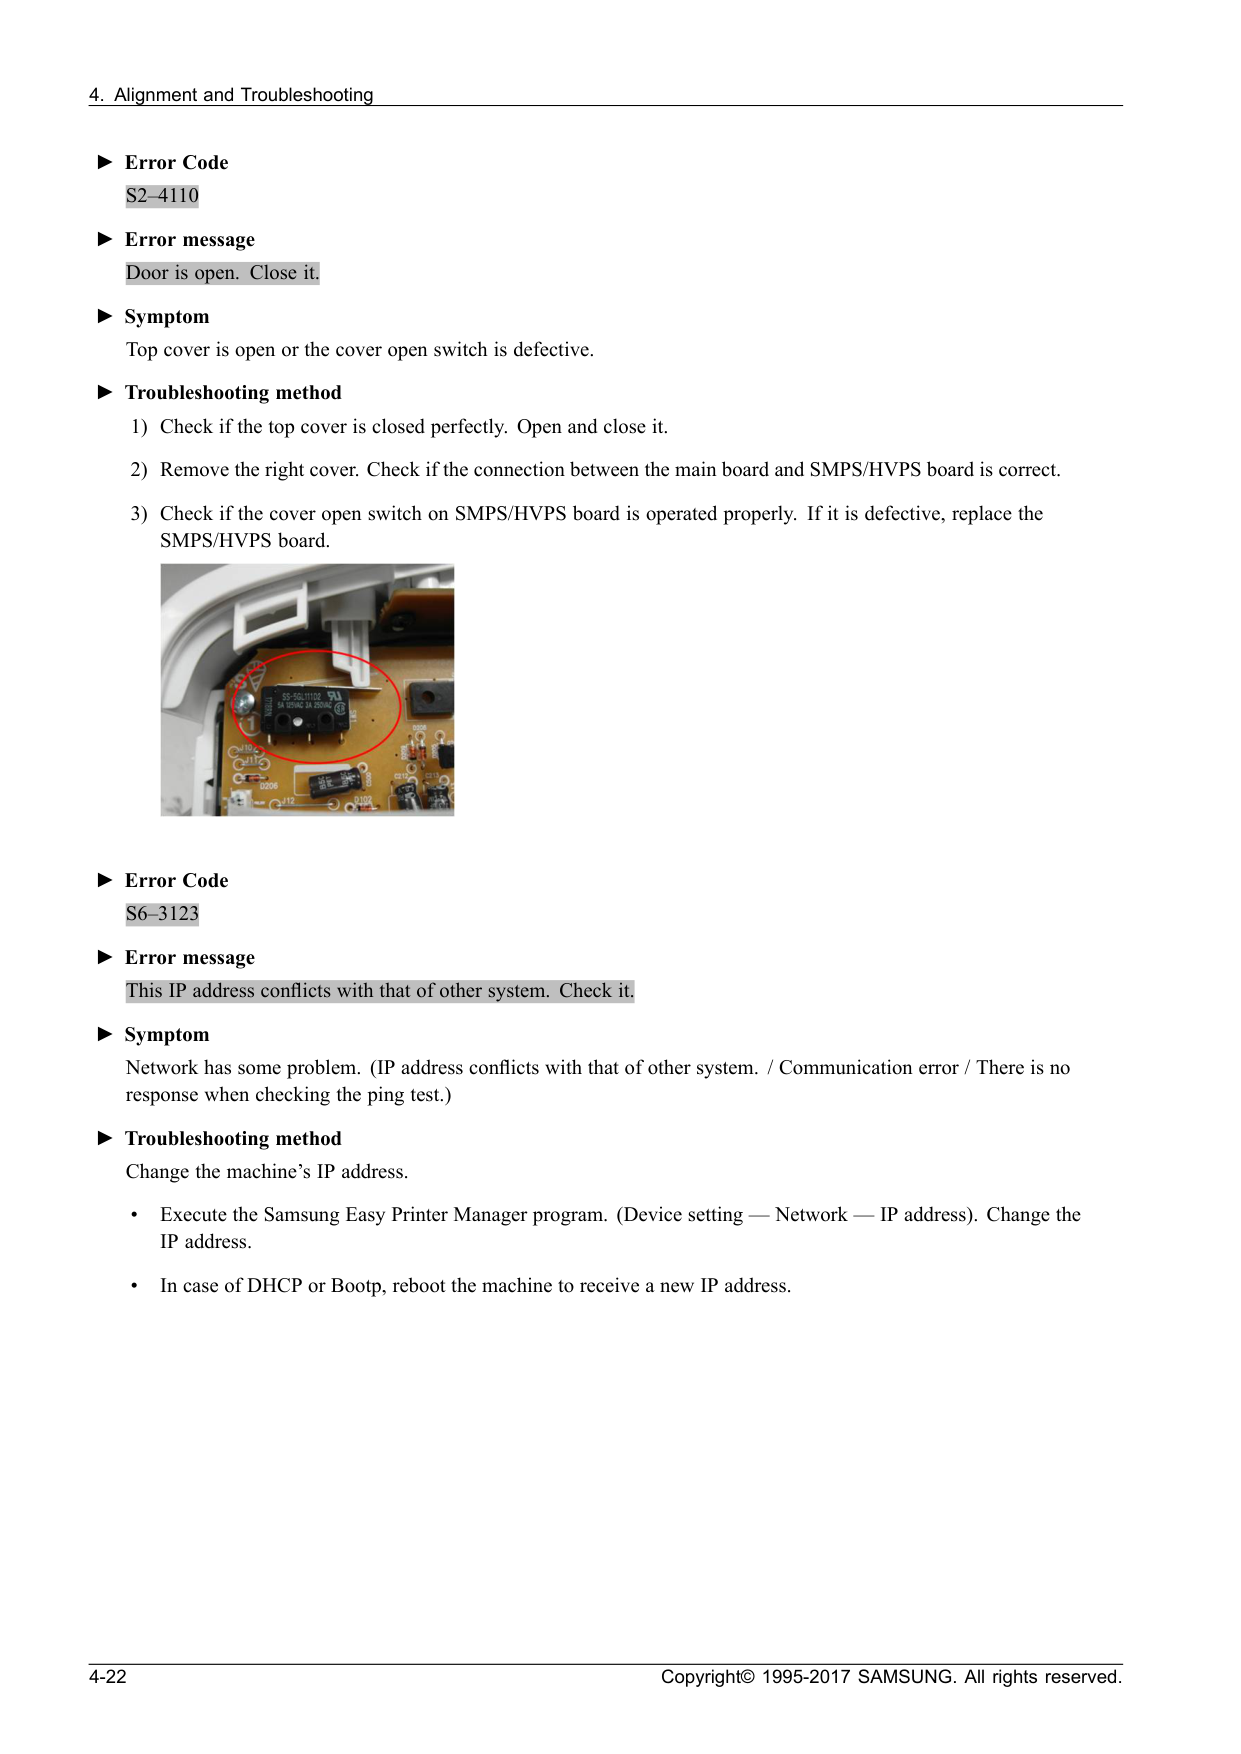
S2–4110
►Error message Door is open. Close it. ►Symptom Top cover is open or the cover open switch is defective. ►Troubleshooting method 1) Check if the top cover is closed perfectly. Open and close it. 2) Remove the right cover. Check if the connection between the main board and SMPS/HVPS board is correct. 3) Check if the cover open switch on SMPS/HVPS board is operated properly. If it is defective, replace the SMPS/HVPS board. ►Error CodeS6–3123
►Error message This IP address conflicts with that of other system. Check it. ►Symptom Network has some problem. (IP address conflicts with that of other system. / Communication error / There is no response when checking the ping test.) ►Troubleshooting method Change the machine’s IP address. • Execute the Samsung Easy Printer Manager program. (Device setting — Network — IP address). Change the IP address. • In case of DHCP or Bootp, reboot the machine to receive a new IP address. 4-22 Copyright© 1995-2017 SAMSUNG. All rights reserved.
U1–2320
U1–2330
U1–2340
►Error message Fuser Unit Failure #U1-2320 : Turn off then on. Fuser Unit Failure #U1-2330 : Turn off then on. Fuser Unit Failure #U1-2340 : Turn off then on. ►Symptom The temperature control of fuser unit is abnormal. (U1–2320 : Open Heat Error / U1–2330 : Low Heat Error / U1–2340 : Over Heat Error) ►Troubleshooting method 1) Turn the machine off. Re-install the fuser unit. Then turn the machine on. Is the error message is disappeared? 2) If the problem persists, turn the machine off and remove the fuser unit. a) Check if the fuser connector is connected properly. b) Check if the input voltage is normal. c) Check if the thermistor is twisted or contaminated. 3) After confirming continuity in the fuser connector and the problem still exists; order an SMPS/HVPS and Fuser Unit and install as is necessary. Copyright© 1995-2017 SAMSUNG. All rights reserved. 4-23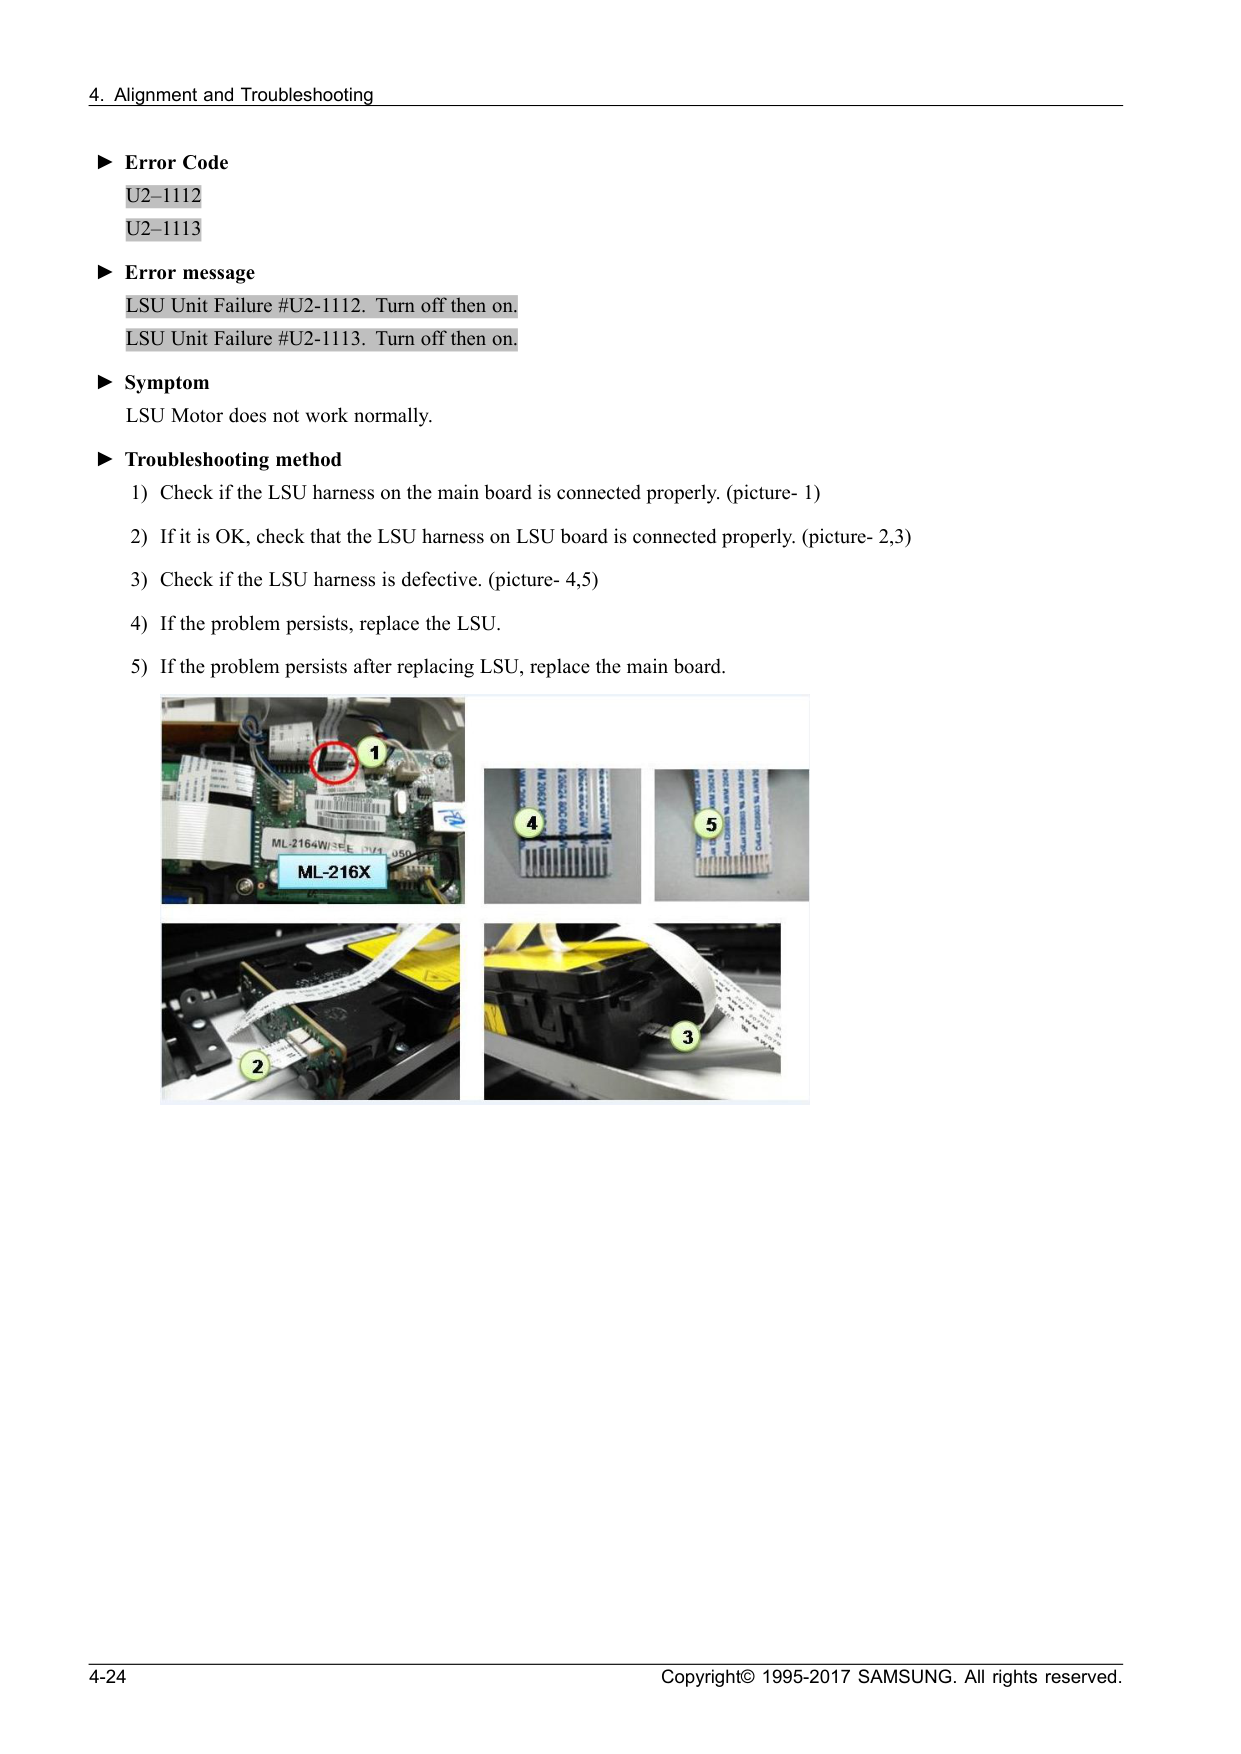
U2–1112
U2–1113
►Error message LSU Unit Failure #U2-1112. Turn off then on. LSU Unit Failure #U2-1113. Turn off then on. ►Symptom LSU Motor does not work normally. ►Troubleshooting method 1) Check if the LSU harness on the main board is connected properly. (picture- 1) 2) If it is OK, check that the LSU harness on LSU board is connected properly. (picture- 2,3) 3) Check if the LSU harness is defective. (picture- 4,5) 4) If the problem persists, replace the LSU. 5) If the problem persists after replacing LSU, replace the main board. 4-24 Copyright© 1995-2017 SAMSUNG. All rights reserved.

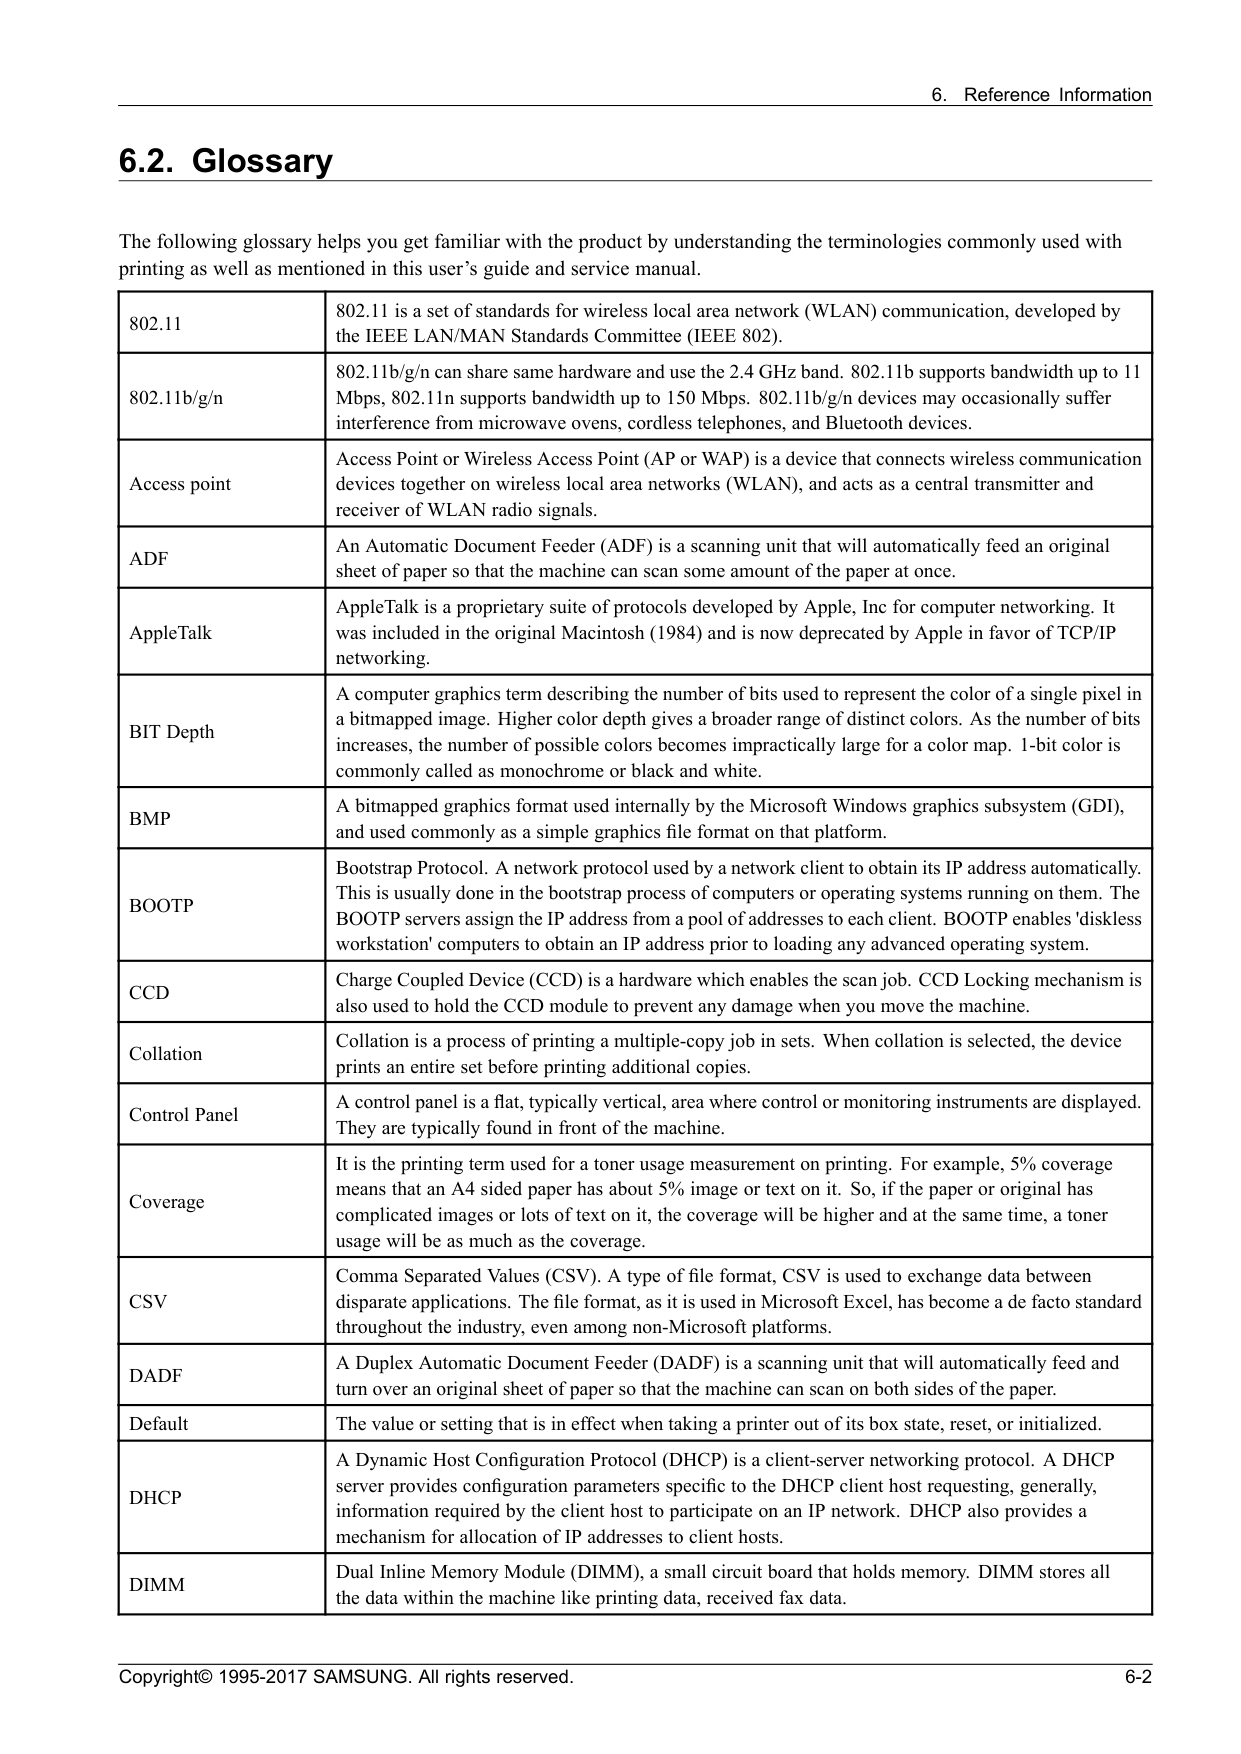
Adf
An Automatic Document Feeder (ADF) is a scanning unit that will automatically feed an original sheet of paper so that the machine can scan some amount of the paper at once. AppleTalk AppleTalk is a proprietary suite of protocols developed by Apple, Inc for computer networking. It was included in the original Macintosh (1984) and is now deprecated by Apple in favor of TCP/IP networking. BIT Depth A computer graphics term describing the number of bits used to represent the color of a single pixel in a bitmapped image. Higher color depth gives a broader range of distinct colors. As the number of bits increases, the number of possible colors becomes impractically large for a color map. 1-bit color is commonly called as monochrome or black and white.Bmp
A bitmapped graphics format used internally by the Microsoft Windows graphics subsystem (GDI), and used commonly as a simple graphics file format on that platform.Bootp
Bootstrap Protocol. A network protocol used by a network client to obtain its IP address automatically. This is usually done in the bootstrap process of computers or operating systems running on them. The BOOTP servers assign the IP address from a pool of addresses to each client. BOOTP enables 'diskless workstation' computers to obtain an IP address prior to loading any advanced operating system.Ccd
Charge Coupled Device (CCD) is a hardware which enables the scan job. CCD Locking mechanism is also used to hold the CCD module to prevent any damage when you move the machine. Collation Collation is a process of printing a multiple-copy job in sets. When collation is selected, the device prints an entire set before printing additional copies. Control Panel A control panel is a flat, typically vertical, area where control or monitoring instruments are displayed. They are typically found in front of the machine. Coverage It is the printing term used for a toner usage measurement on printing. For example, 5% coverage means that an A4 sided paper has about 5% image or text on it. So, if the paper or original has complicated images or lots of text on it, the coverage will be higher and at the same time, a toner usage will be as much as the coverage.Csv
Comma Separated Values (CSV). A type of file format, CSV is used to exchange data between disparate applications. The file format, as it is used in Microsoft Excel, has become a de facto standard throughout the industry, even among non-Microsoft platforms.Dadf
A Duplex Automatic Document Feeder (DADF) is a scanning unit that will automatically feed and turn over an original sheet of paper so that the machine can scan on both sides of the paper. Default The value or setting that is in effect when taking a printer out of its box state, reset, or initialized.Dhcp
A Dynamic Host Configuration Protocol (DHCP) is a client-server networking protocol. A DHCP server provides configuration parameters specific to the DHCP client host requesting, generally, information required by the client host to participate on an IP network. DHCP also provides a mechanism for allocation of IP addresses to client hosts.Dimm
Dual Inline Memory Module (DIMM), a small circuit board that holds memory. DIMM stores all the data within the machine like printing data, received fax data. Copyright© 1995-2017 SAMSUNG. All rights reserved. 6-2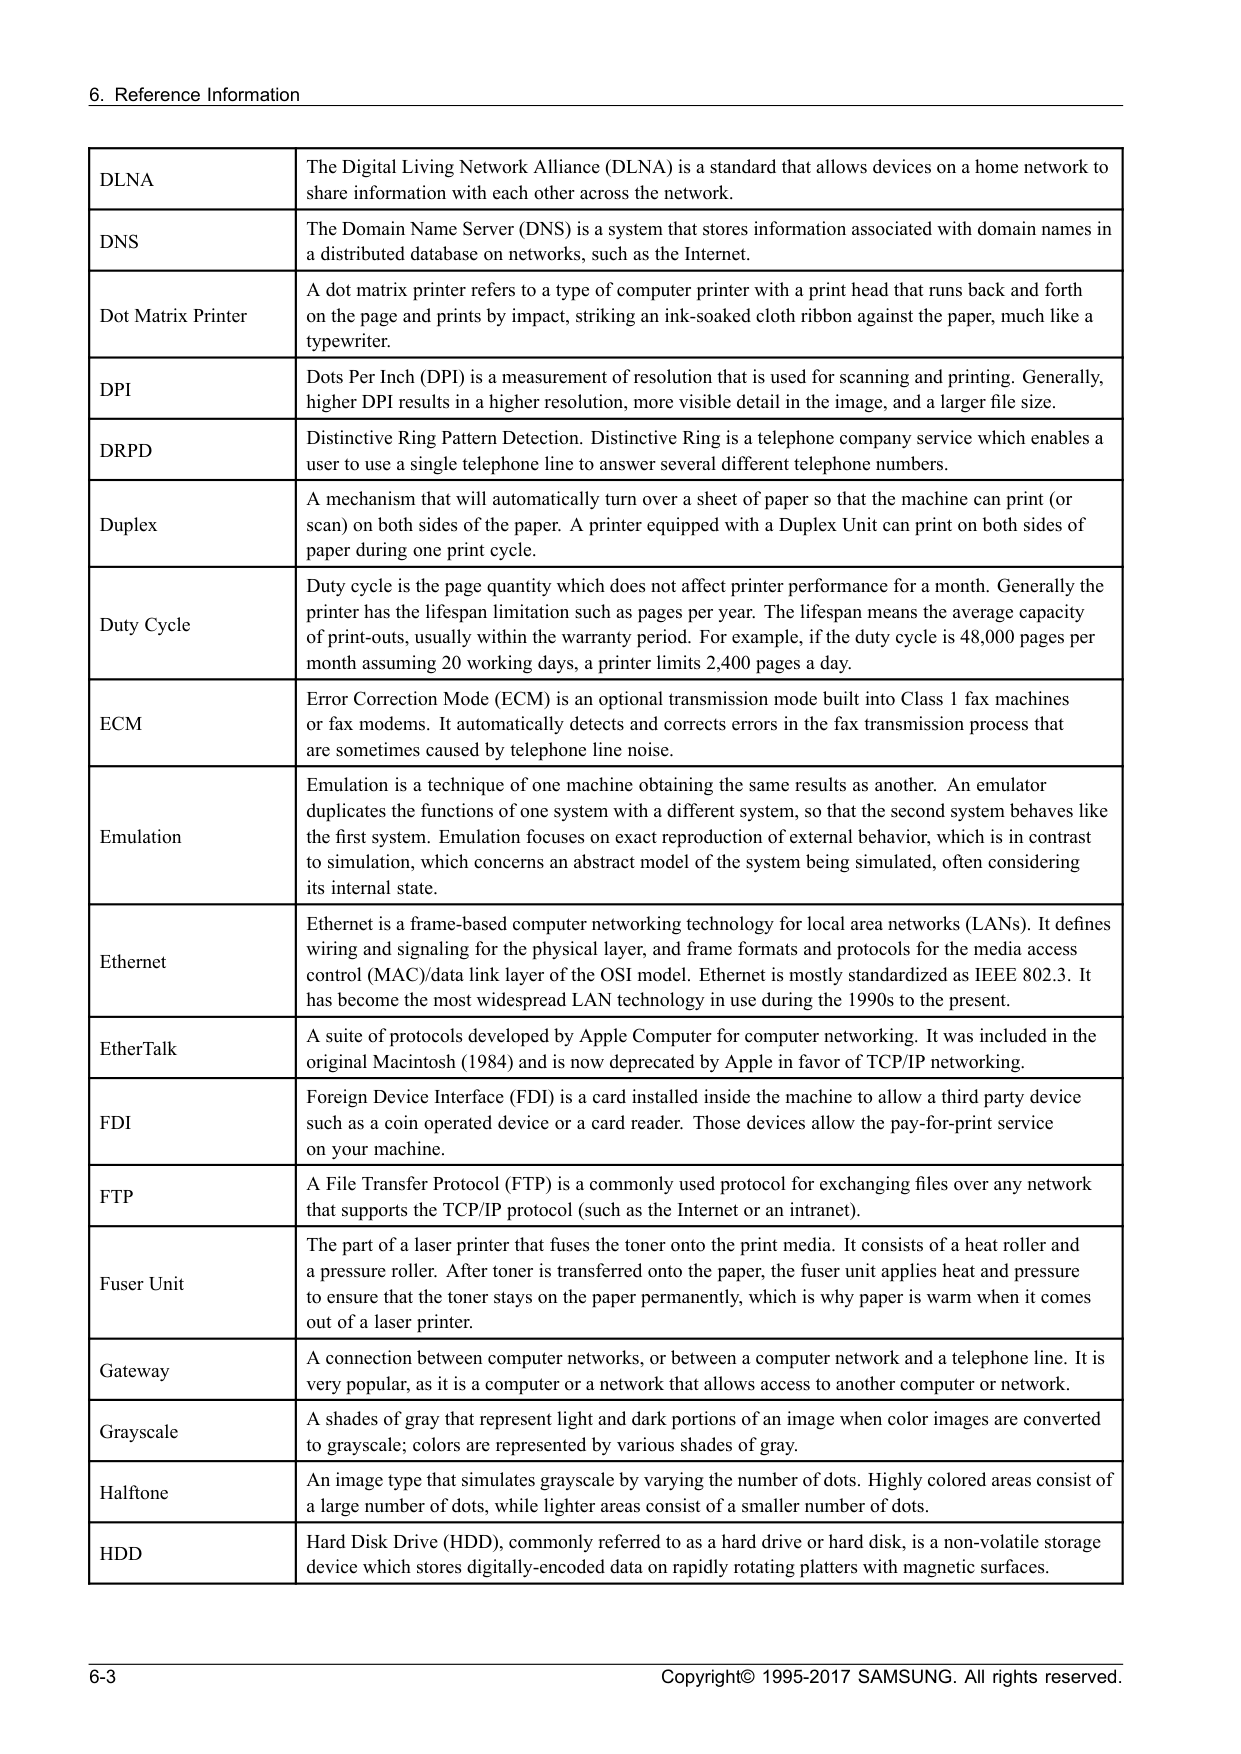
Dlna
The Digital Living Network Alliance (DLNA) is a standard that allows devices on a home network to share information with each other across the network.Dns
The Domain Name Server (DNS) is a system that stores information associated with domain names in a distributed database on networks, such as the Internet. Dot Matrix Printer A dot matrix printer refers to a type of computer printer with a print head that runs back and forth on the page and prints by impact, striking an ink-soaked cloth ribbon against the paper, much like a typewriter.Dpi
Dots Per Inch (DPI) is a measurement of resolution that is used for scanning and printing. Generally, higher DPI results in a higher resolution, more visible detail in the image, and a larger file size.Drpd
Distinctive Ring Pattern Detection. Distinctive Ring is a telephone company service which enables a user to use a single telephone line to answer several different telephone numbers. Duplex A mechanism that will automatically turn over a sheet of paper so that the machine can print (or scan) on both sides of the paper. A printer equipped with a Duplex Unit can print on both sides of paper during one print cycle. Duty Cycle Duty cycle is the page quantity which does not affect printer performance for a month. Generally the printer has the lifespan limitation such as pages per year. The lifespan means the average capacity of print-outs, usually within the warranty period. For example, if the duty cycle is 48,000 pages per month assuming 20 working days, a printer limits 2,400 pages a day.Ecm
Error Correction Mode (ECM) is an optional transmission mode built into Class 1 fax machines or fax modems. It automatically detects and corrects errors in the fax transmission process that are sometimes caused by telephone line noise. Emulation Emulation is a technique of one machine obtaining the same results as another. An emulator duplicates the functions of one system with a different system, so that the second system behaves like the first system. Emulation focuses on exact reproduction of external behavior, which is in contrast to simulation, which concerns an abstract model of the system being simulated, often considering its internal state. Ethernet Ethernet is a frame-based computer networking technology for local area networks (LANs). It defines wiring and signaling for the physical layer, and frame formats and protocols for the media access control (MAC)/data link layer of the OSI model. Ethernet is mostly standardized as IEEE 802.3. It has become the most widespread LAN technology in use during the 1990s to the present. EtherTalk A suite of protocols developed by Apple Computer for computer networking. It was included in the original Macintosh (1984) and is now deprecated by Apple in favor of TCP/IP networking.Fdi
Foreign Device Interface (FDI) is a card installed inside the machine to allow a third party device such as a coin operated device or a card reader. Those devices allow the pay-for-print service on your machine.Ftp
A File Transfer Protocol (FTP) is a commonly used protocol for exchanging files over any network that supports the TCP/IP protocol (such as the Internet or an intranet). Fuser Unit The part of a laser printer that fuses the toner onto the print media. It consists of a heat roller and a pressure roller. After toner is transferred onto the paper, the fuser unit applies heat and pressure to ensure that the toner stays on the paper permanently, which is why paper is warm when it comes out of a laser printer. Gateway A connection between computer networks, or between a computer network and a telephone line. It is very popular, as it is a computer or a network that allows access to another computer or network. Grayscale A shades of gray that represent light and dark portions of an image when color images are converted to grayscale; colors are represented by various shades of gray. Halftone An image type that simulates grayscale by varying the number of dots. Highly colored areas consist of a large number of dots, while lighter areas consist of a smaller number of dots.Hdd
Hard Disk Drive (HDD), commonly referred to as a hard drive or hard disk, is a non-volatile storage device which stores digitally-encoded data on rapidly rotating platters with magnetic surfaces. 6-3 Copyright© 1995-2017 SAMSUNG. All rights reserved.
Ieee
The Institute of Electrical and Electronics Engineers (IEEE) is an international non-profit, professional organization for the advancement of technology related to electricity.Ieee 1284
The 1284 parallel port standard was developed by the Institute of Electrical and Electronics Engineers (IEEE). The term "1284-B" refers to a specific connector type on the end of the parallel cable that attaches to the peripheral (for example, a printer). Intranet A private network that uses Internet Protocols, network connectivity, and possibly the public telecommunication system to securely share part of an organization's information or operations with its employees. Sometimes the term refers only to the most visible service, the internal website. IP address An Internet Protocol (IP) address is a unique number that devices use in order to identify and communicate with each other on a network utilizing the Internet Protocol standard.Ipm
The Images Per Minute (IPM) is a way of measuring the speed of a printer. An IPM rate indicates the number of single-sided sheets a printer can complete within one minute.Ipp
The Internet Printing Protocol (IPP) defines a standard protocol for printing as well as managing print jobs, media size, resolution, and so forth. IPP can be used locally or over the Internet to hundreds of printers, and also supports access control, authentication, and encryption, making it a much more capable and secure printing solution than older ones.Ipx/Spx
IPX/SPX stands for Internet Packet Exchange/Sequenced Packet Exchange. It is a networking protocol used by the Novell NetWare operating systems. IPX and SPX both provide connection services similar to TCP/IP, with the IPX protocol having similarities to IP, and SPX having similarities to TCP. IPX/SPX was primarily designed for local area networks (LANs), and is a very efficient protocol for this purpose (typically its performance exceeds that of TCP/IP on a LAN).Iso
The International Organization for Standardization (ISO) is an international standard-setting body composed of representatives from national standards bodies. It produces world-wide industrial and commercial standards.Itu-T
The International Telecommunication Union is an international organization established to standardize and regulate international radio and telecommunications. Its main tasks include standardization, allocation of the radio spectrum, and organizing interconnection arrangements between different countries to allow international phone calls. A -T out of ITU-T indicates telecommunication. ITU-T No. 1 chart Standardized test chart published by ITU-T for document facsimile transmissions.Jbig
Joint Bi-level Image Experts Group (JBIG) is an image compression standard with no loss of accuracy or quality, which was designed for compression of binary images, particularly for faxes, but can also be used on other images.Jpeg
Joint Photographic Experts Group (JPEG) is a most commonly used standard method of lossy compression for photographic images. It is the format used for storing and transmitting photographs on the World Wide Web.Ldap
The Lightweight Directory Access Protocol (LDAP) is a networking protocol for querying and modifying directory services running over TCP/IP.Led
A Light-Emitting Diode (LED) is a semiconductor device that indicates the status of a machine. MAC address Media Access Control (MAC) address is a unique identifier associated with a network adapter. MAC address is a unique 48-bit identifier usually written as 12 hexadecimal characters grouped in pairs (e. g., 00-00-0c-34-11-4e). This address is usually hard-coded into a Network Interface Card (NIC) by its manufacturer, and used as an aid for routers trying to locate machines on large networks.Mfp
Multi Function Peripheral (MFP) is an office machine that includes the following functionality in one physical body, so as to have a printer, a copier, a fax, a scanner and etc.Mh
Modified Huffman (MH) is a compression method for decreasing the amount of data that needs to be transmitted between the fax machines to transfer the image recommended by ITU-T T.4. MH is a codebook-based run-length encoding scheme optimized to efficiently compress white space. As most faxes consist mostly of white space, this minimizes the transmission time of most faxes.Mmr
Modified Modified READ (MMR) is a compression method recommended by ITU-T T.6. Copyright© 1995-2017 SAMSUNG. All rights reserved. 6-4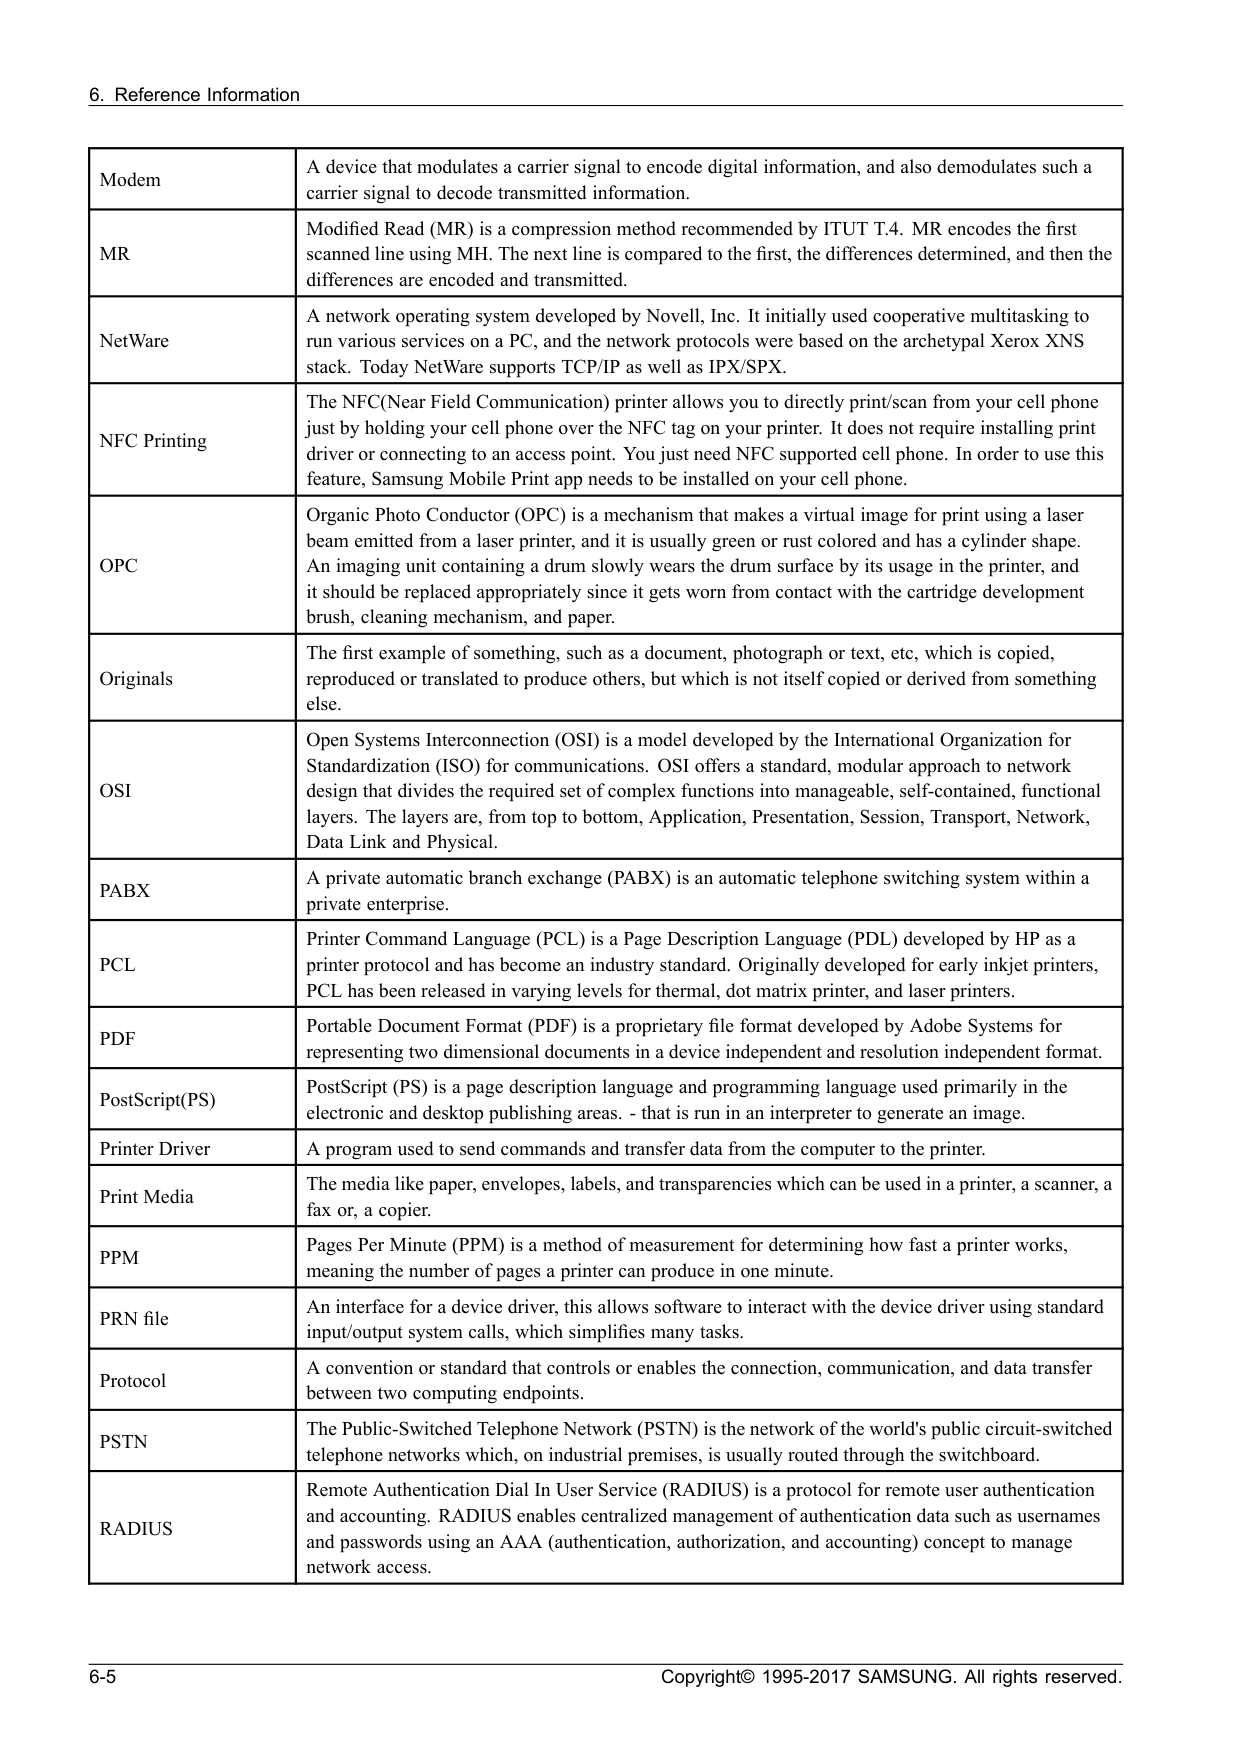
Mr
Modified Read (MR) is a compression method recommended by ITUT T.4. MR encodes the first scanned line using MH. The next line is compared to the first, the differences determined, and then the differences are encoded and transmitted. NetWare A network operating system developed by Novell, Inc. It initially used cooperative multitasking to run various services on a PC, and the network protocols were based on the archetypal Xerox XNS stack. Today NetWare supports TCP/IP as well as IPX/SPX. NFC Printing The NFC(Near Field Communication) printer allows you to directly print/scan from your cell phone just by holding your cell phone over the NFC tag on your printer. It does not require installing print driver or connecting to an access point. You just need NFC supported cell phone. In order to use this feature, Samsung Mobile Print app needs to be installed on your cell phone.Opc
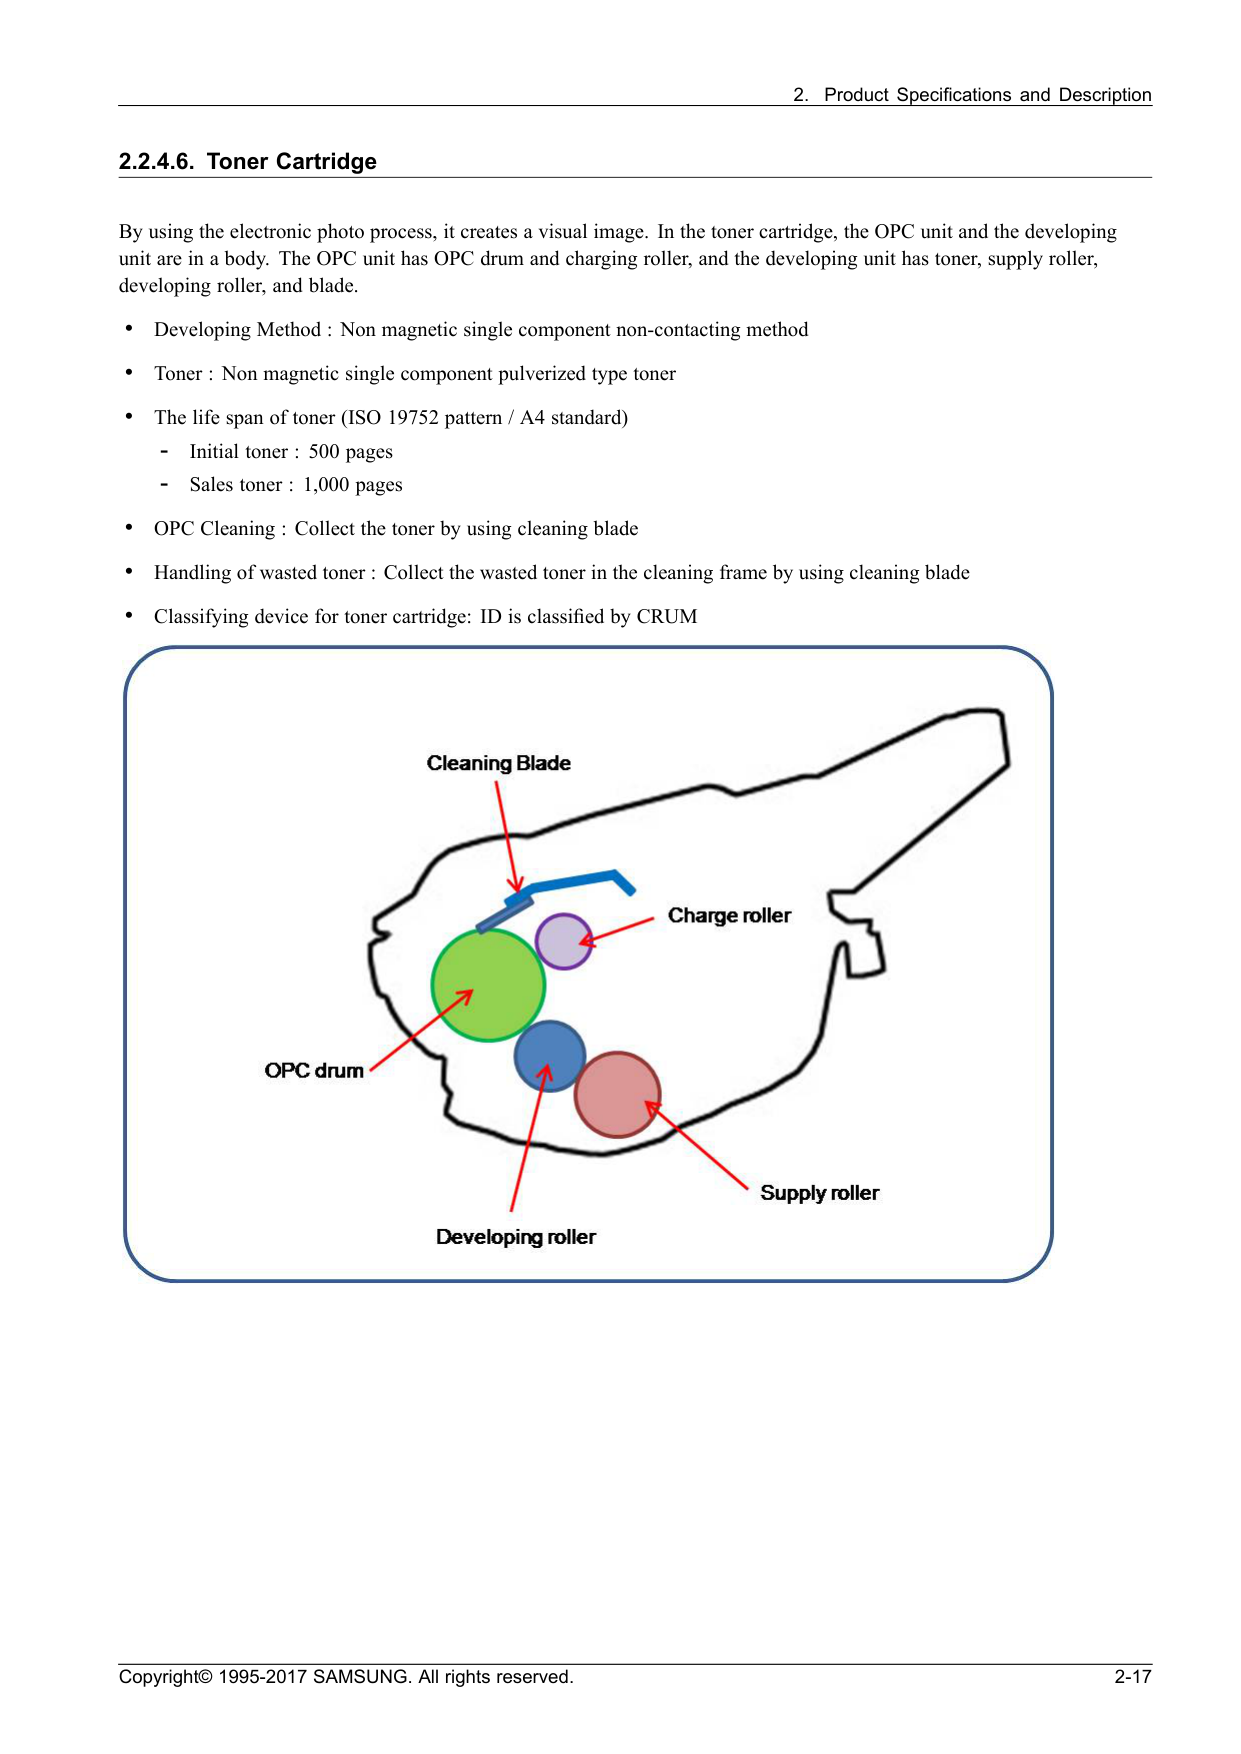
Organic Photo Conductor (OPC) is a mechanism that makes a virtual image for print using a laser beam emitted from a laser printer, and it is usually green or rust colored and has a cylinder shape. An imaging unit containing a drum slowly wears the drum surface by its usage in the printer, and it should be replaced appropriately since it gets worn from contact with the cartridge development brush, cleaning mechanism, and paper. Originals The first example of something, such as a document, photograph or text, etc, which is copied, reproduced or translated to produce others, but which is not itself copied or derived from something else.Osi
Open Systems Interconnection (OSI) is a model developed by the International Organization for Standardization (ISO) for communications. OSI offers a standard, modular approach to network design that divides the required set of complex functions into manageable, self-contained, functional layers. The layers are, from top to bottom, Application, Presentation, Session, Transport, Network, Data Link and Physical.Pabx
A private automatic branch exchange (PABX) is an automatic telephone switching system within a private enterprise.Pcl
Printer Command Language (PCL) is a Page Description Language (PDL) developed by HP as a printer protocol and has become an industry standard. Originally developed for early inkjet printers, PCL has been released in varying levels for thermal, dot matrix printer, and laser printers.Ppm
Pages Per Minute (PPM) is a method of measurement for determining how fast a printer works, meaning the number of pages a printer can produce in one minute. PRN file An interface for a device driver, this allows software to interact with the device driver using standard input/output system calls, which simplifies many tasks. Protocol A convention or standard that controls or enables the connection, communication, and data transfer between two computing endpoints.Pstn
The Public-Switched Telephone Network (PSTN) is the network of the world's public circuit-switched telephone networks which, on industrial premises, is usually routed through the switchboard.Radius
Remote Authentication Dial In User Service (RADIUS) is a protocol for remote user authentication and accounting. RADIUS enables centralized management of authentication data such as usernames and passwords using an AAA (authentication, authorization, and accounting) concept to manage network access. 6-5 Copyright© 1995-2017 SAMSUNG. All rights reserved.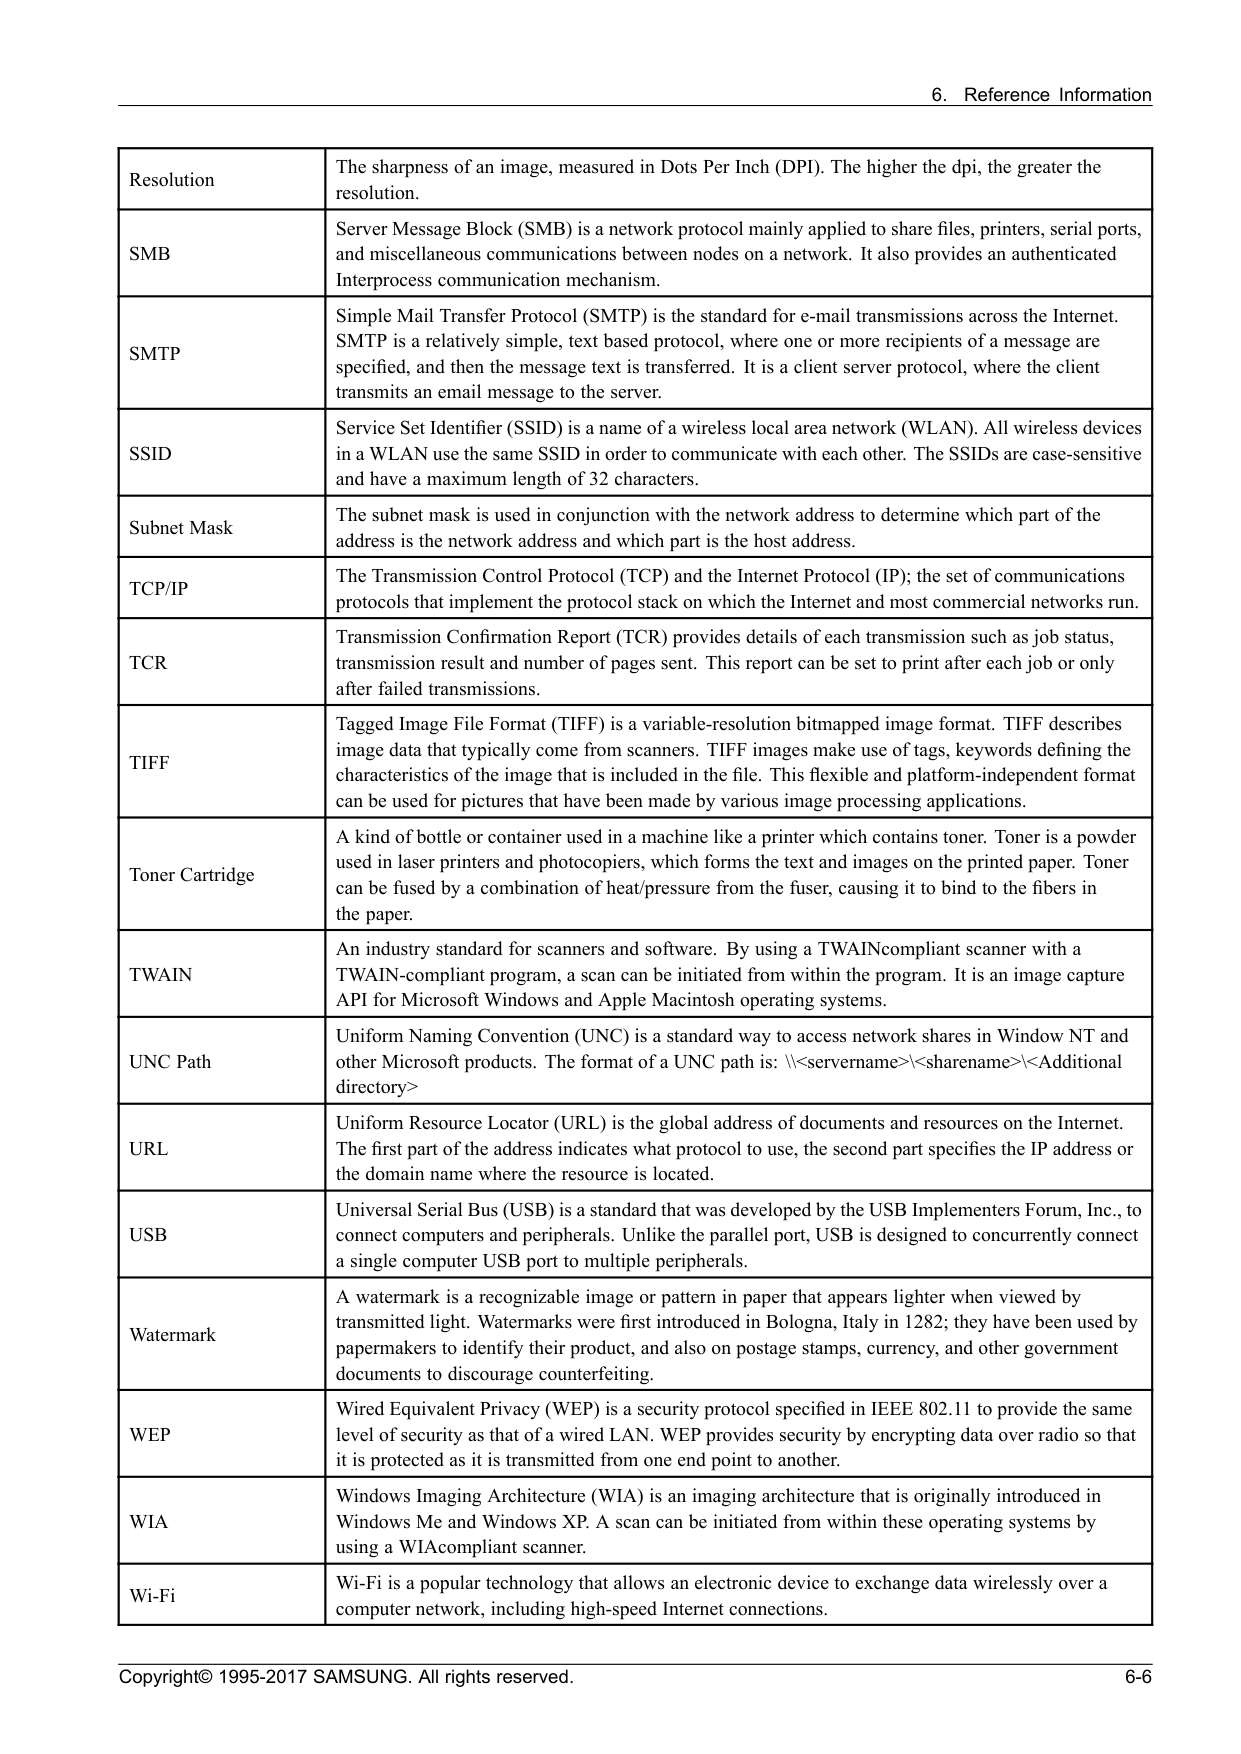
Smb
Server Message Block (SMB) is a network protocol mainly applied to share files, printers, serial ports, and miscellaneous communications between nodes on a network. It also provides an authenticated Interprocess communication mechanism.Smtp
Simple Mail Transfer Protocol (SMTP) is the standard for e-mail transmissions across the Internet. SMTP is a relatively simple, text based protocol, where one or more recipients of a message are specified, and then the message text is transferred. It is a client server protocol, where the client transmits an email message to the server.Ssid
Service Set Identifier (SSID) is a name of a wireless local area network (WLAN). All wireless devices in a WLAN use the same SSID in order to communicate with each other. The SSIDs are case-sensitive and have a maximum length of 32 characters. Subnet Mask The subnet mask is used in conjunction with the network address to determine which part of the address is the network address and which part is the host address.Tcp/Ip
The Transmission Control Protocol (TCP) and the Internet Protocol (IP); the set of communications protocols that implement the protocol stack on which the Internet and most commercial networks run.Tcr
Transmission Confirmation Report (TCR) provides details of each transmission such as job status, transmission result and number of pages sent. This report can be set to print after each job or only after failed transmissions.Tiff
Tagged Image File Format (TIFF) is a variable-resolution bitmapped image format. TIFF describes image data that typically come from scanners. TIFF images make use of tags, keywords defining the characteristics of the image that is included in the file. This flexible and platform-independent format can be used for pictures that have been made by various image processing applications. Toner Cartridge A kind of bottle or container used in a machine like a printer which contains toner. Toner is a powder used in laser printers and photocopiers, which forms the text and images on the printed paper. Toner can be fused by a combination of heat/pressure from the fuser, causing it to bind to the fibers in the paper.Twain
An industry standard for scanners and software. By using a TWAINcompliant scanner with a TWAIN-compliant program, a scan can be initiated from within the program. It is an image capture API for Microsoft Windows and Apple Macintosh operating systems. UNC Path Uniform Naming Convention (UNC) is a standard way to access network shares in Window NT and other Microsoft products. The format of a UNC path is: \\Url
Uniform Resource Locator (URL) is the global address of documents and resources on the Internet. The first part of the address indicates what protocol to use, the second part specifies the IP address or the domain name where the resource is located.Usb
Universal Serial Bus (USB) is a standard that was developed by the USB Implementers Forum, Inc., to connect computers and peripherals. Unlike the parallel port, USB is designed to concurrently connect a single computer USB port to multiple peripherals. Watermark A watermark is a recognizable image or pattern in paper that appears lighter when viewed by transmitted light. Watermarks were first introduced in Bologna, Italy in 1282; they have been used by papermakers to identify their product, and also on postage stamps, currency, and other government documents to discourage counterfeiting.Wep
Wired Equivalent Privacy (WEP) is a security protocol specified in IEEE 802.11 to provide the same level of security as that of a wired LAN. WEP provides security by encrypting data over radio so that it is protected as it is transmitted from one end point to another.Wia
Windows Imaging Architecture (WIA) is an imaging architecture that is originally introduced in Windows Me and Windows XP. A scan can be initiated from within these operating systems by using a WIAcompliant scanner. Wi-Fi Wi-Fi is a popular technology that allows an electronic device to exchange data wirelessly over a computer network, including high-speed Internet connections. Copyright© 1995-2017 SAMSUNG. All rights reserved. 6-6
Wpa
Wi-Fi Protected Access (WPA) is a class of systems to secure wireless (Wi-Fi) computer networks, which was created to improve upon the security features of WEP.Wpa-Psk
WPA-PSK (WPA Pre-Shared Key) is special mode of WPA for small business or home users. A shared key, or password, is configured in the wireless access point (WAP) and any wireless laptop or desktop devices. WPA-PSK generates a unique key for each session between a wireless client and the associated WAP for more advanced security.Wps
The Wi-Fi Protected Setup (WPS) is a standard for establishing a wireless home network. If your wireless access point supports WPS, you can configure the wireless network connection easily without a computer.Xps
XML Paper Specification (XPS) is a specification for a Page Description Language (PDL) and a new document format, which has benefits for portable document and electronic document, developed by Microsoft. It is an XML-based specification, based on a new print path and a vector-based device-independent document format. 6-7 Copyright© 1995-2017 SAMSUNG. All rights reserved.