HP Samsung Xpress SL M2071 Laser Multifunction Printer Series
Ask AI
— answers from the official manualAnswers from the official manual.
Common questions
Common Questions
9 totalHow do I clean the machine when there is a paper jam?
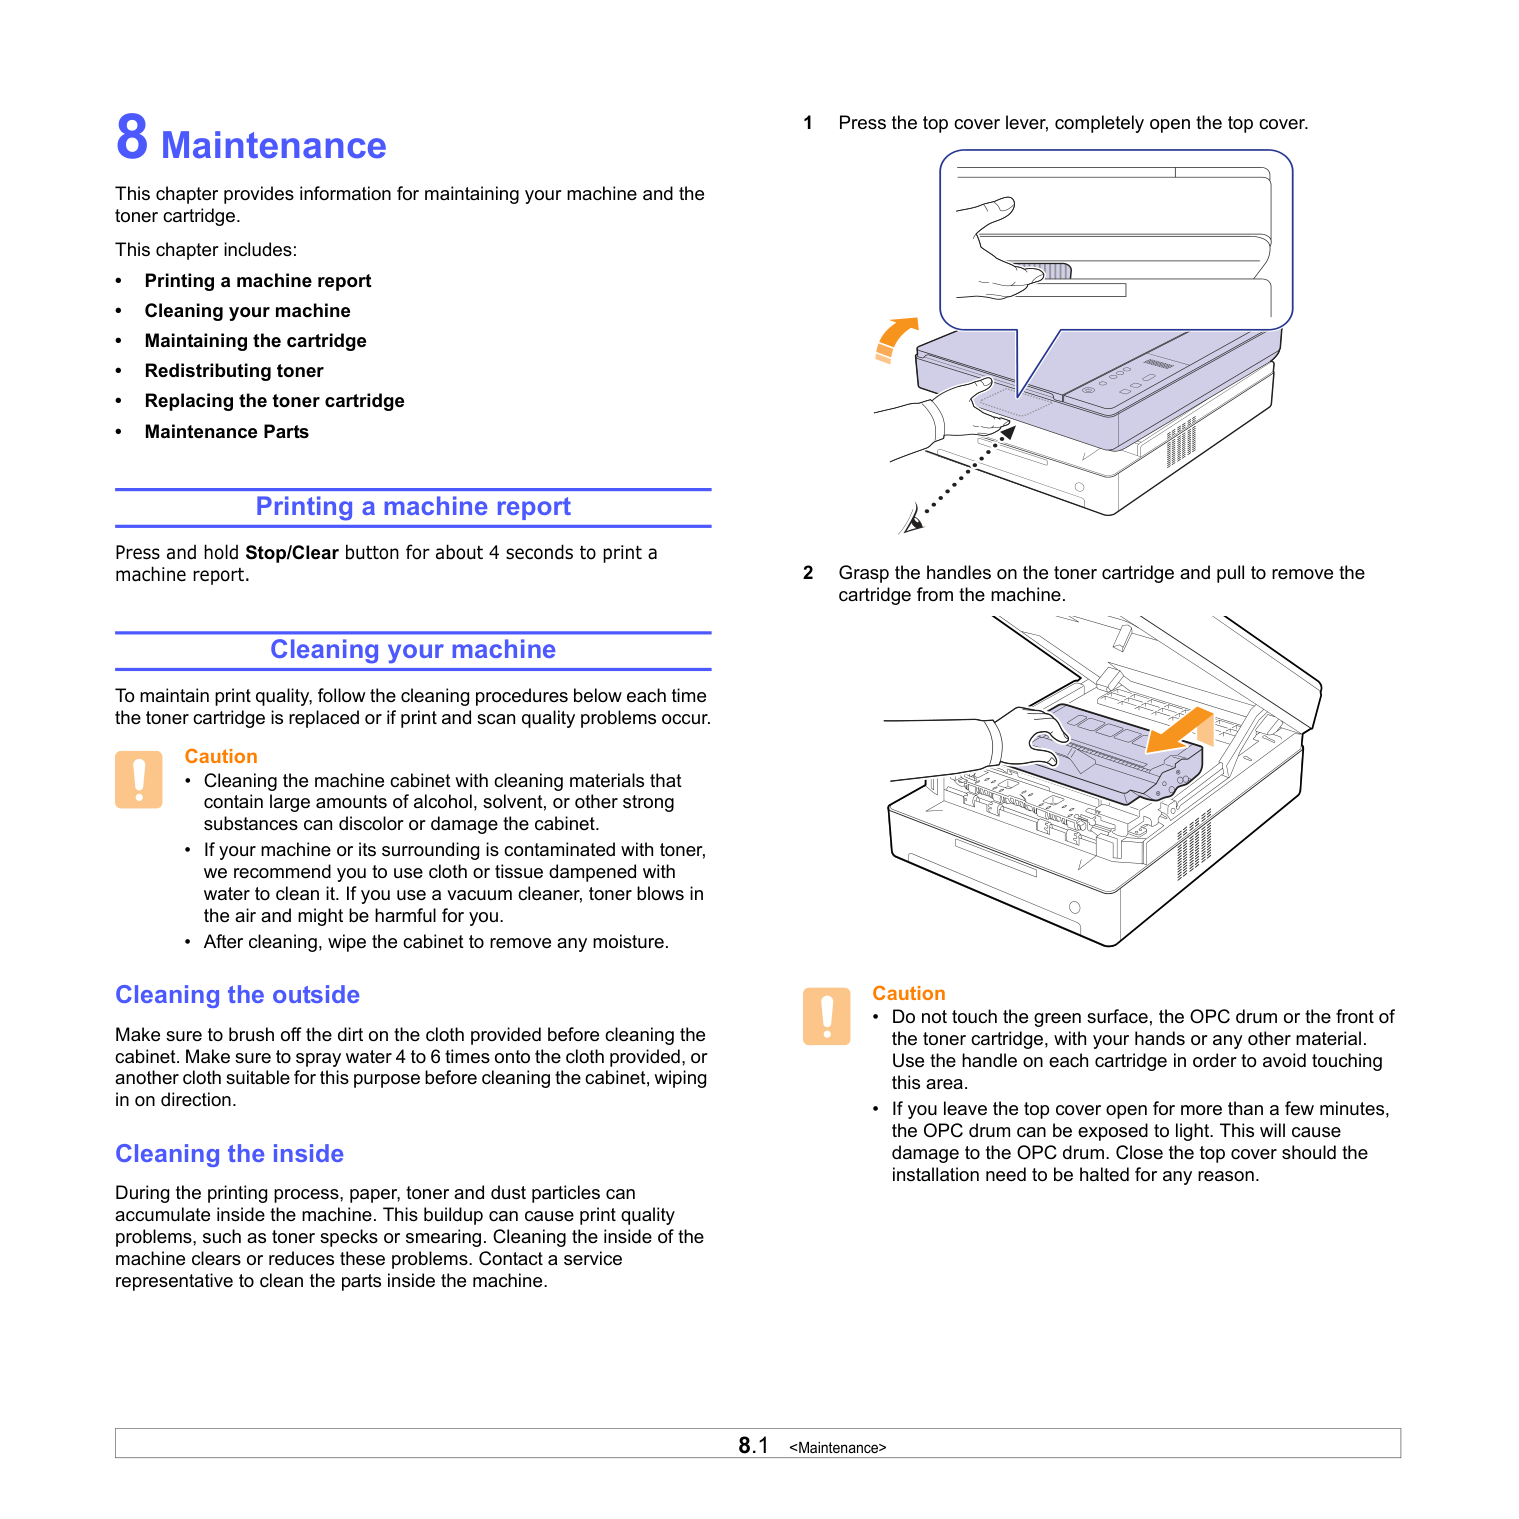
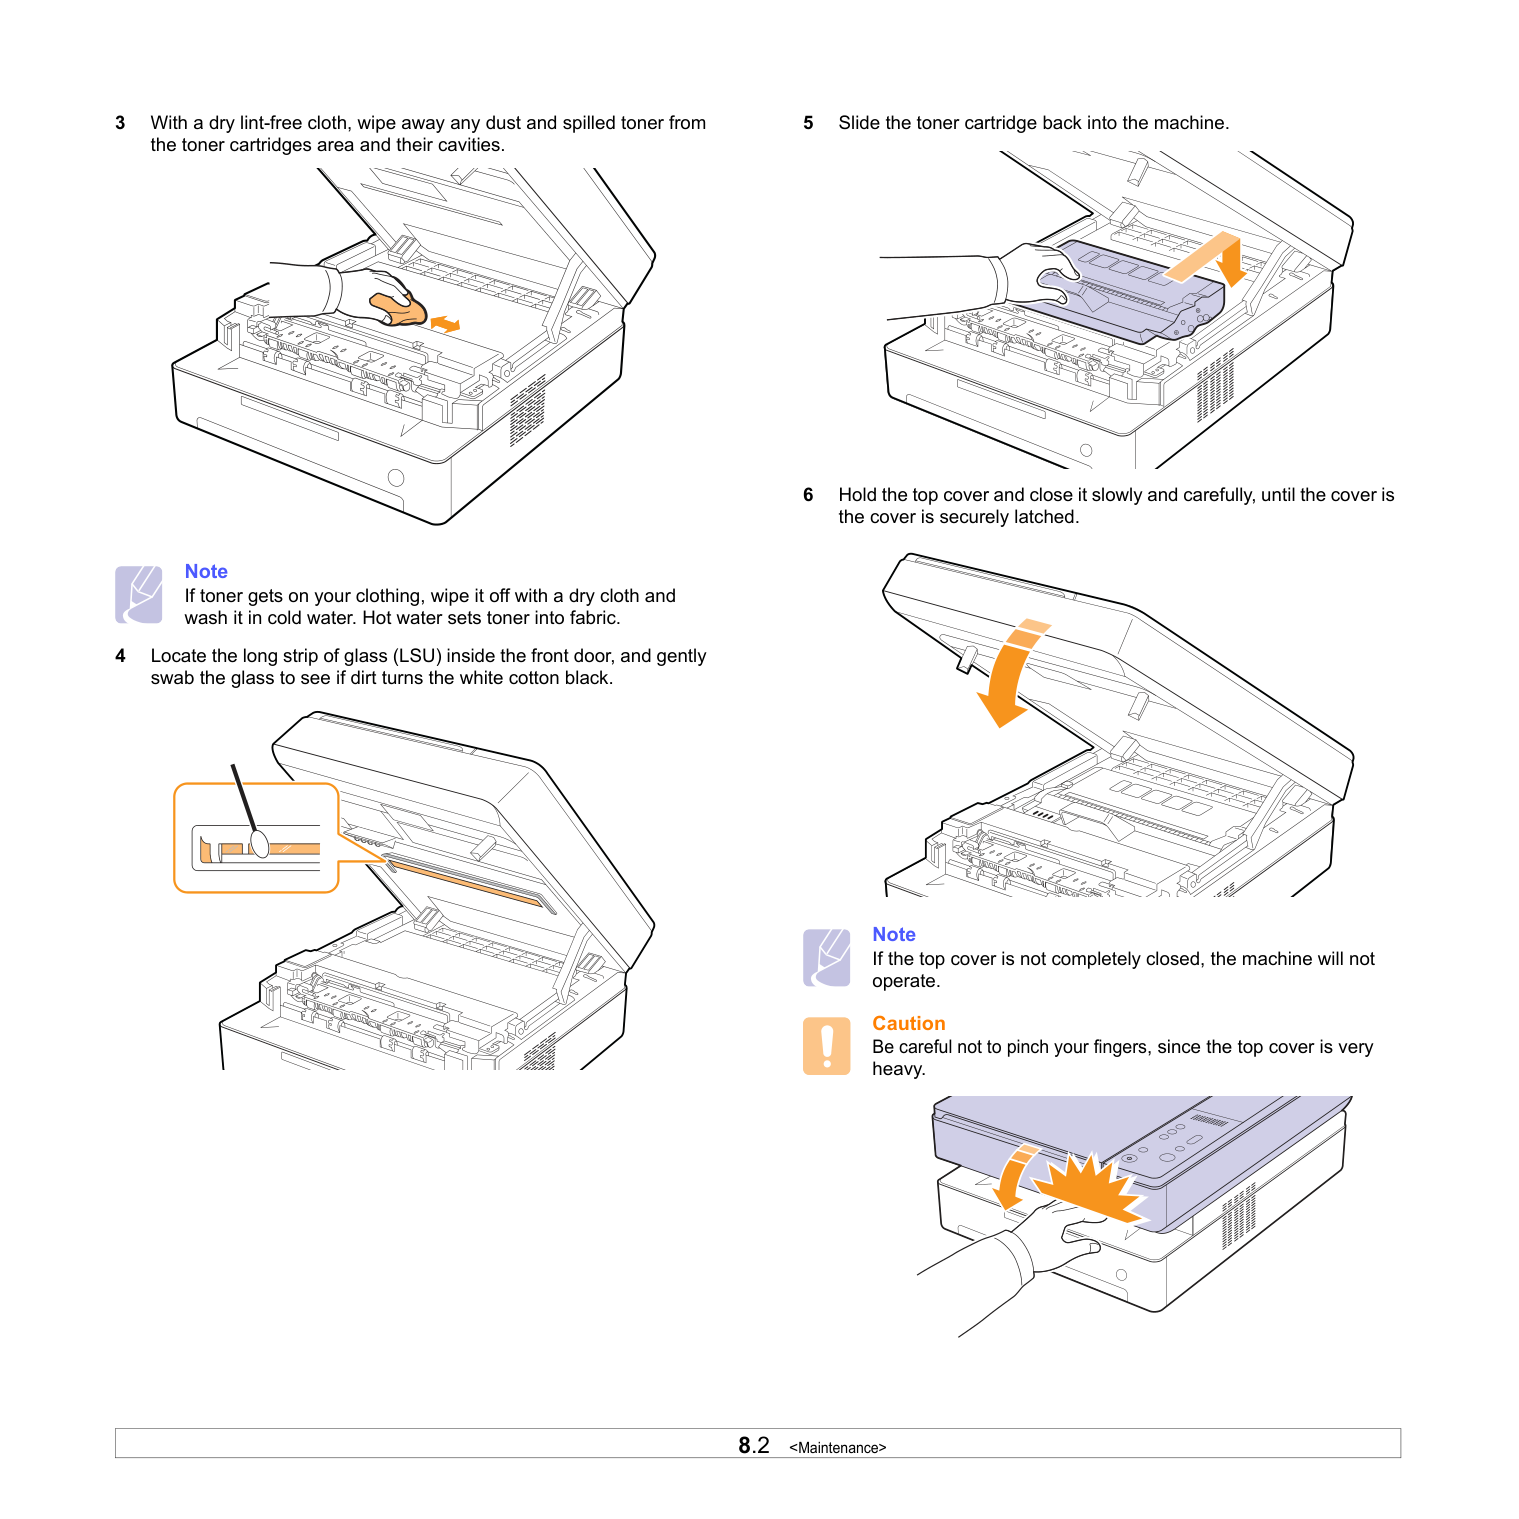
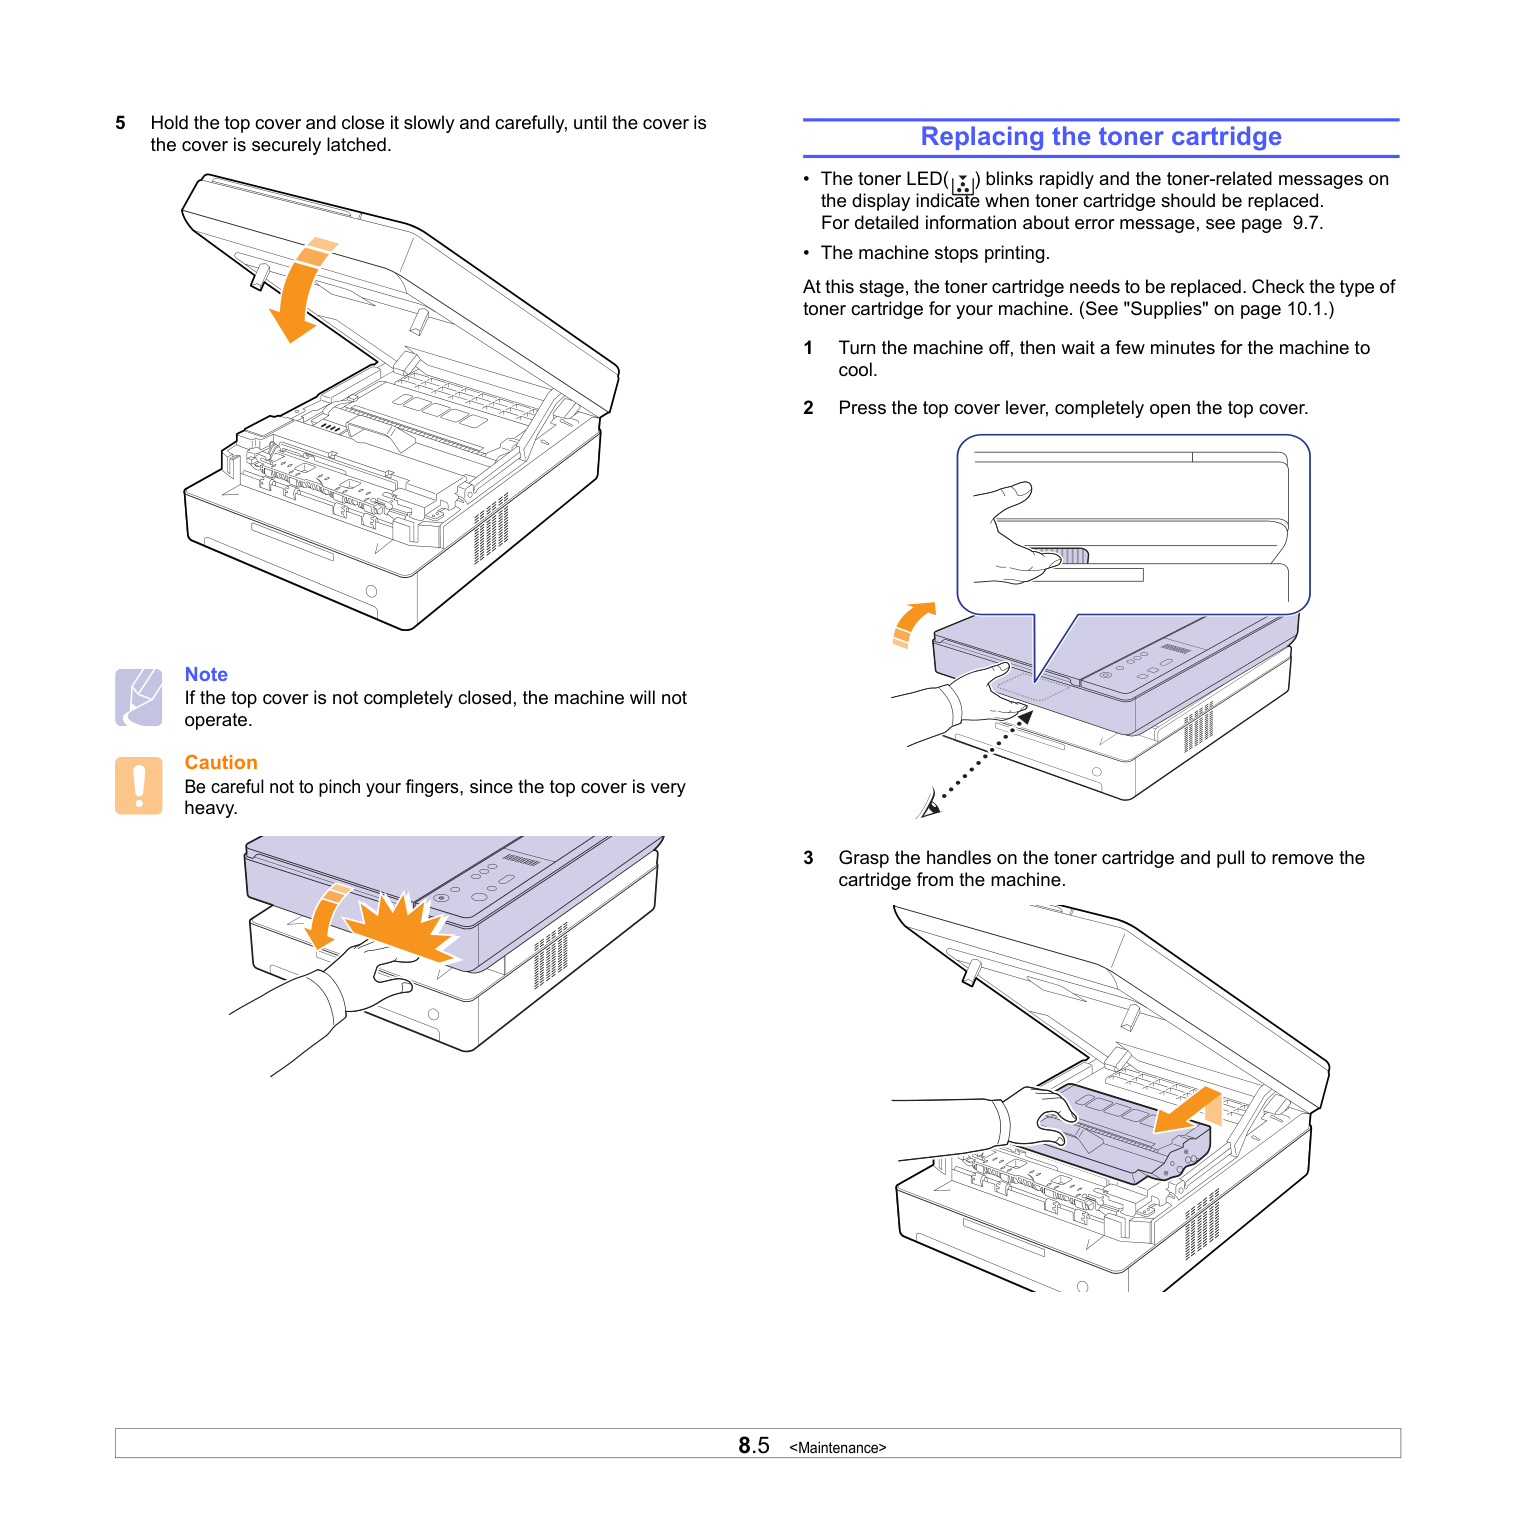
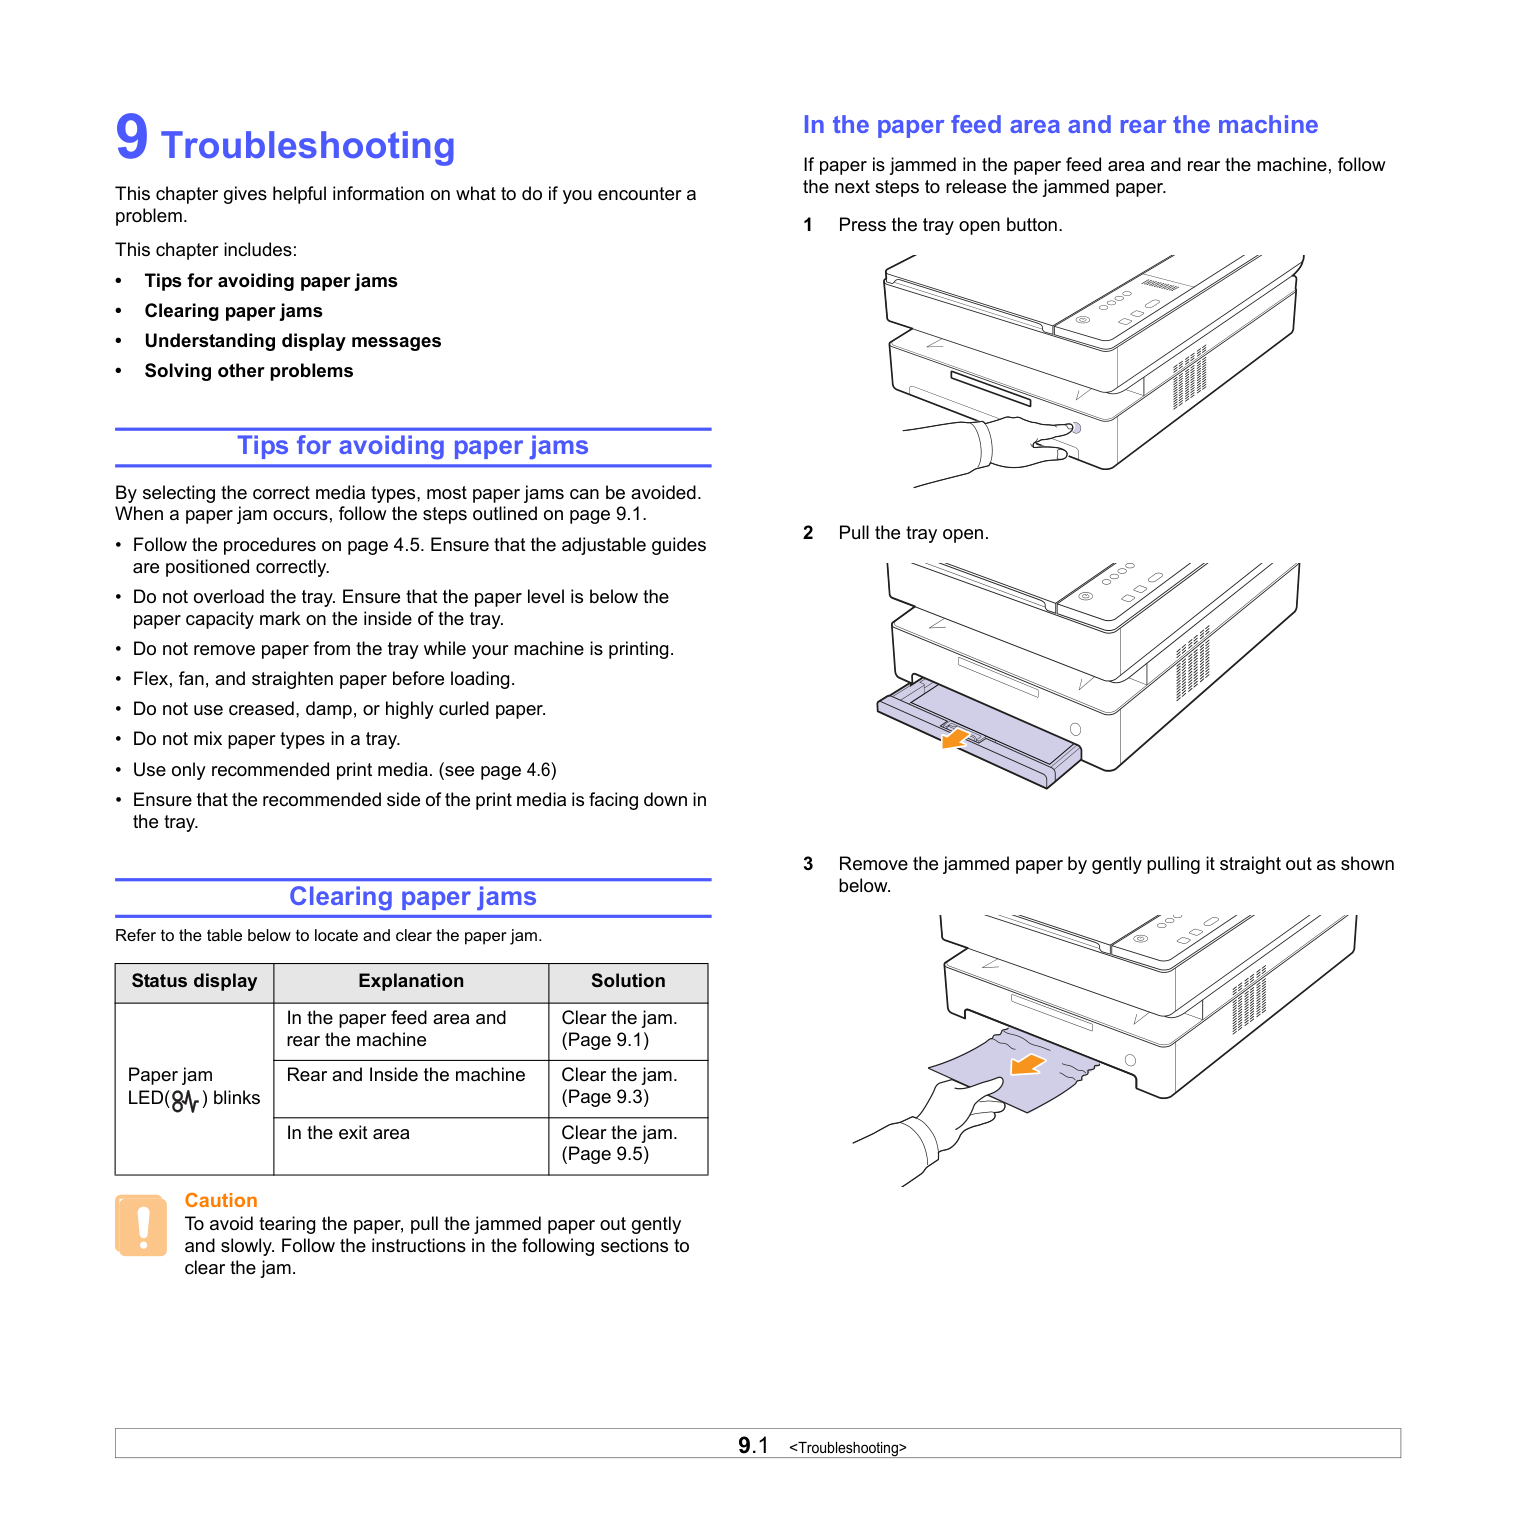
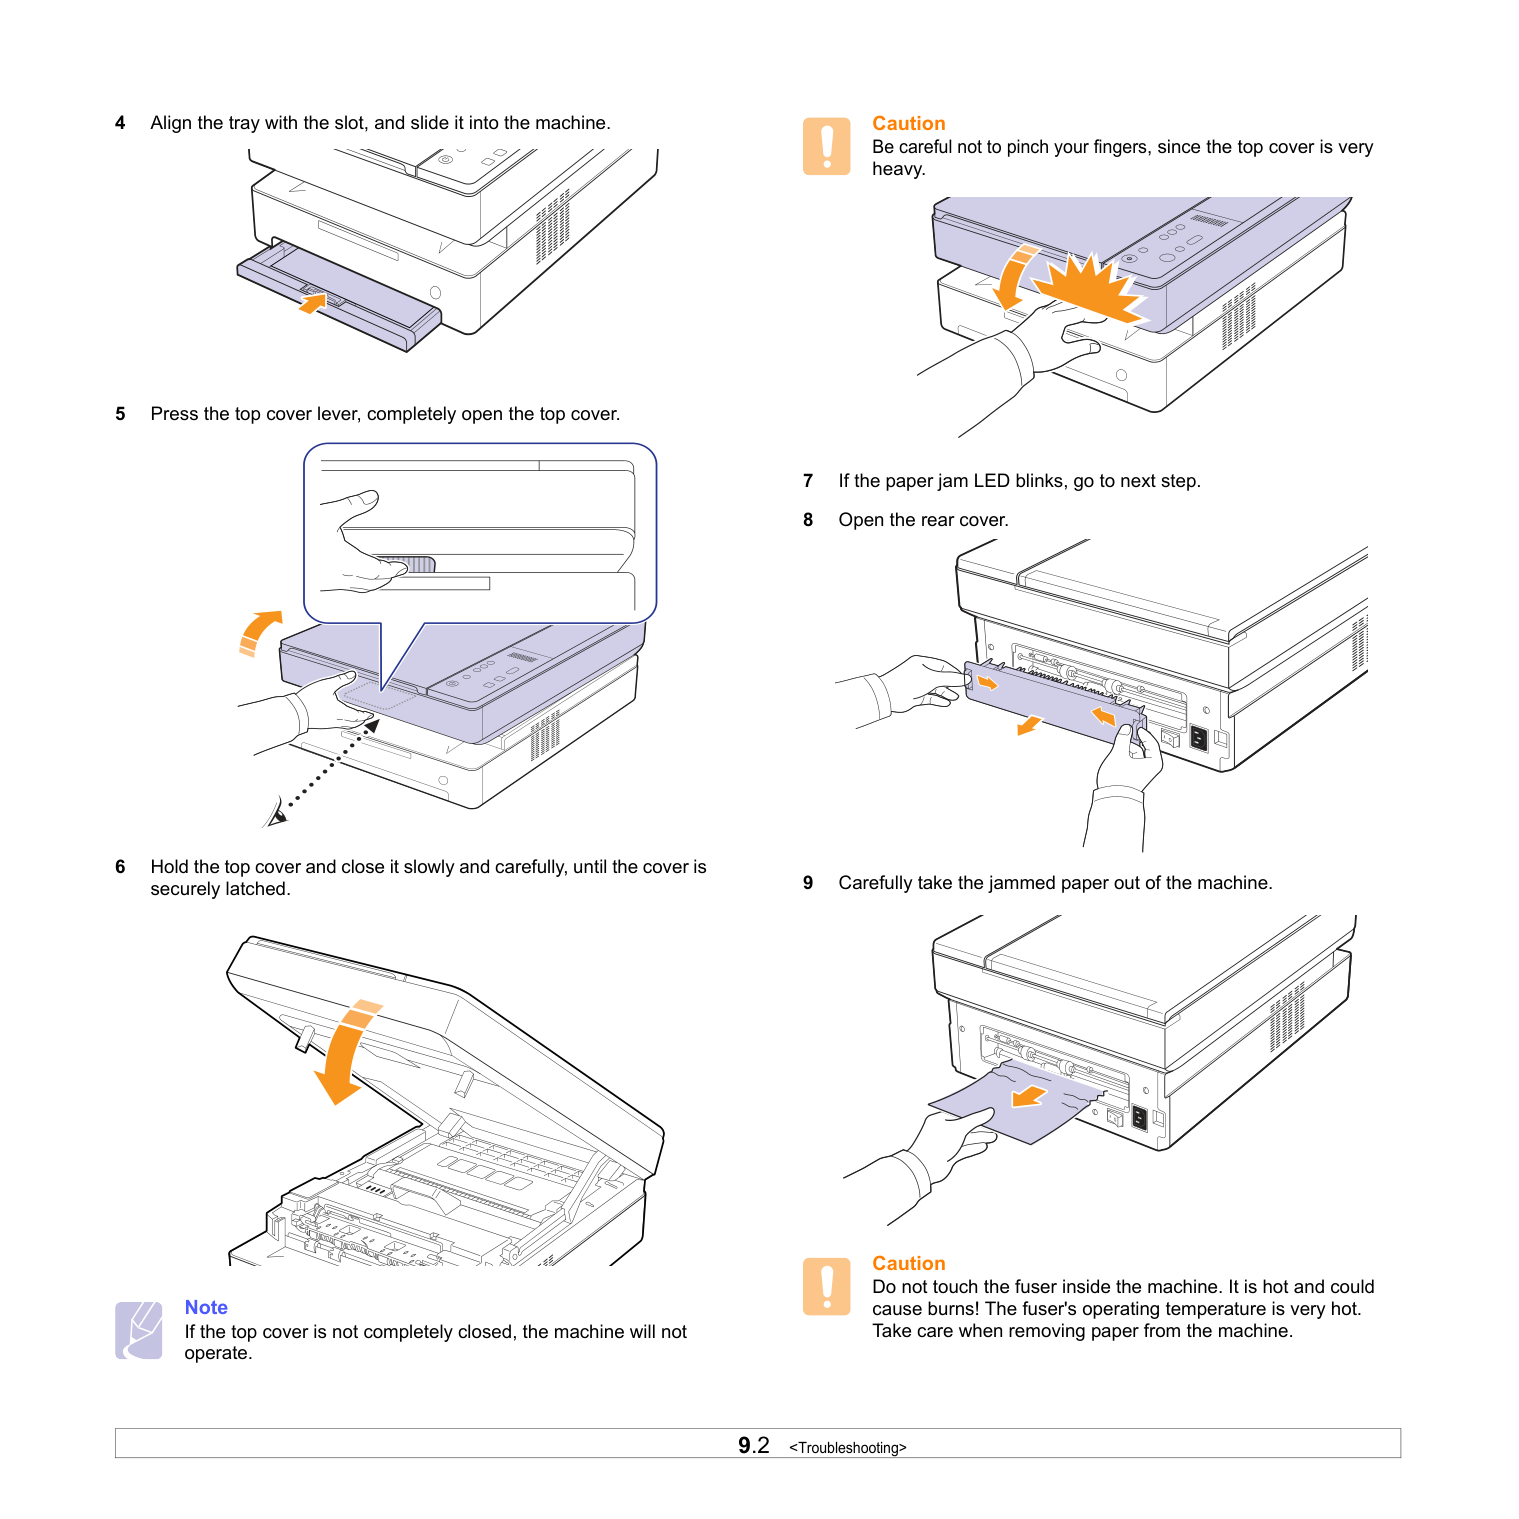
To clear a paper jam: Press and open the tray, pull out any visible paper, straighten it if needed, then slide the tray back into place (page 9.1). If still jammed, press the top cover lever to fully open it, carefully remove any papers, and ensure that both covers are securely closed before the machine resumes printing.
What types of media can I use with my machine?
Supported print media includes plain paper (A4, Letter sizes), transparencies, cardstock, and labels but excludes envelopes due to potential jamming issues as specified in guidelines on page 4.3.
How do I load paper into the printer tray?
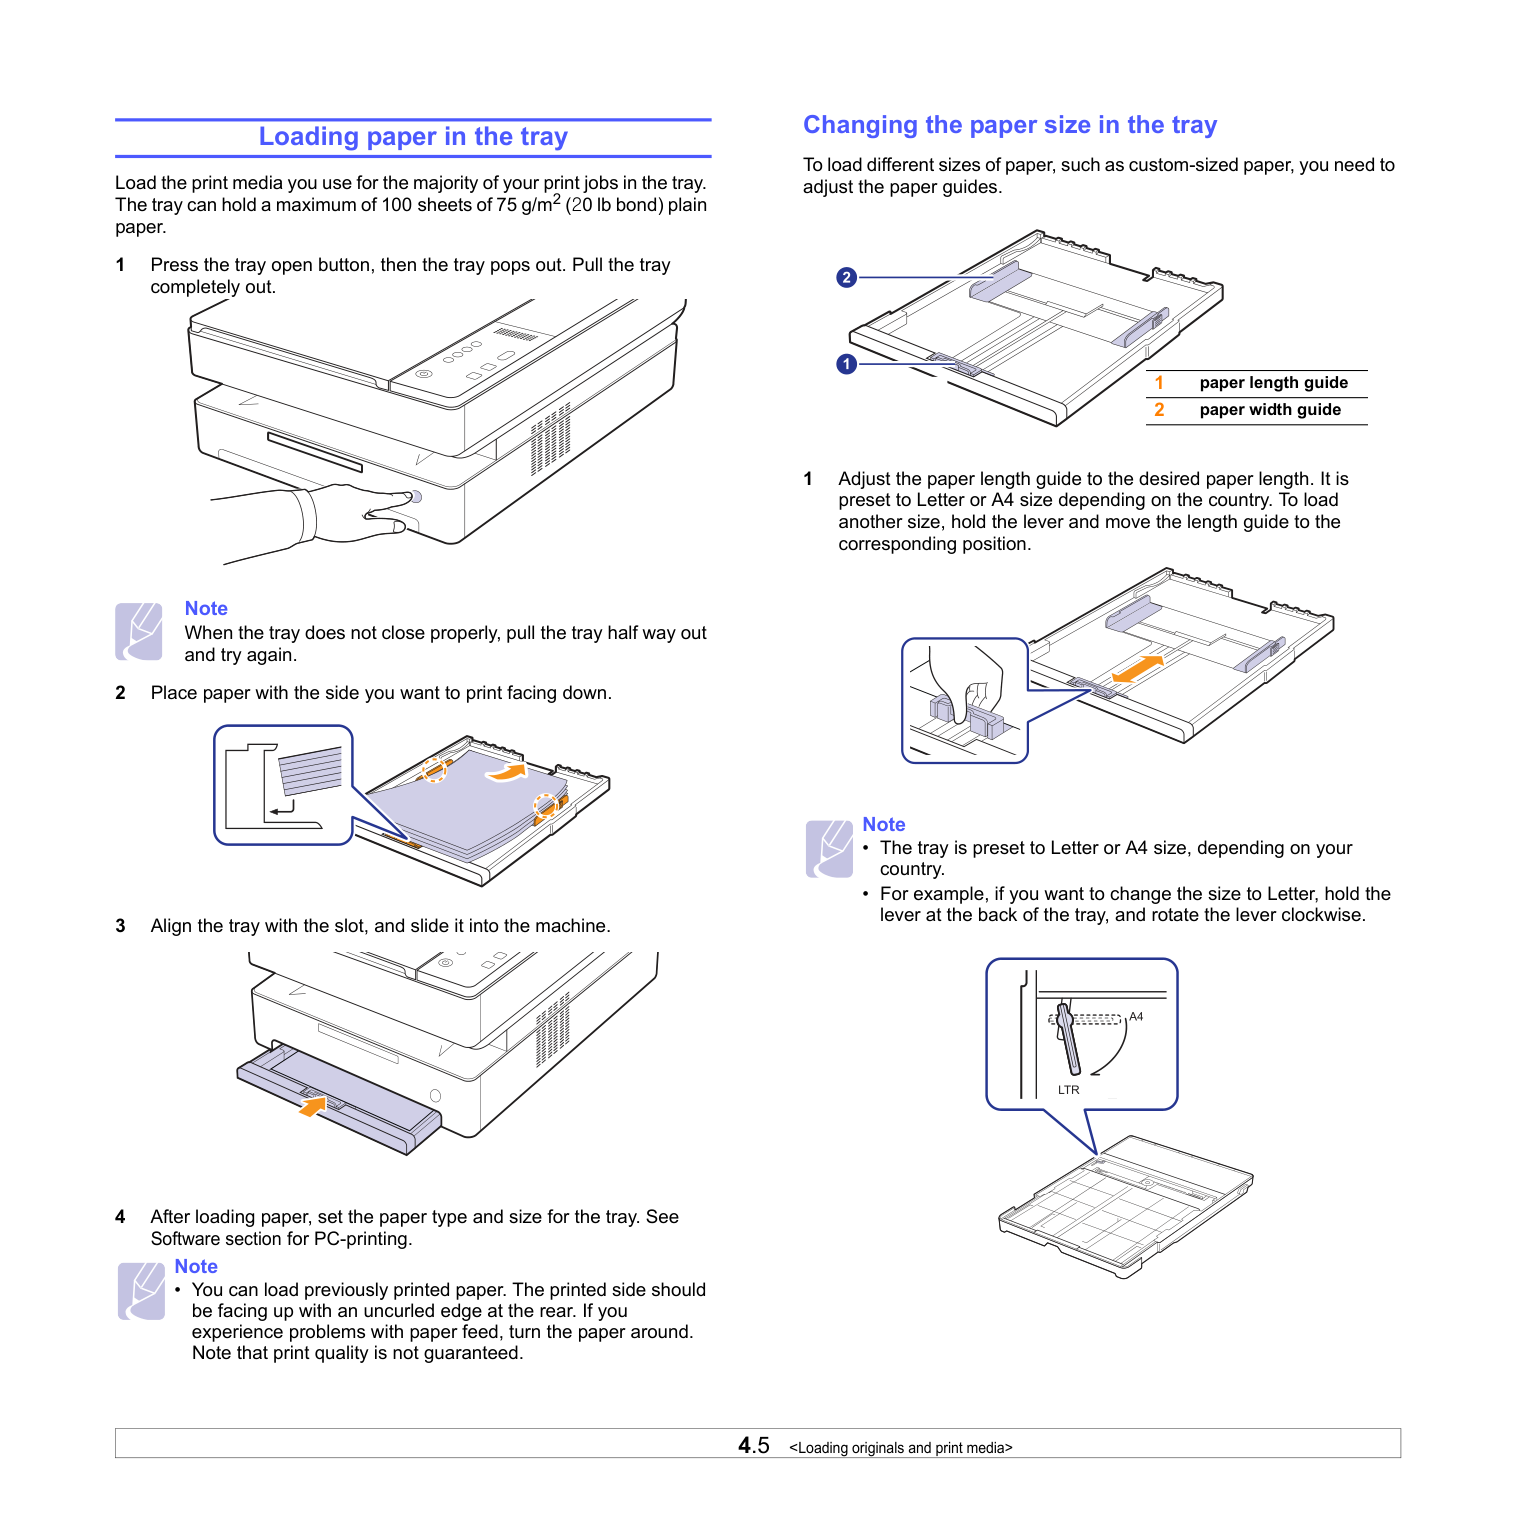
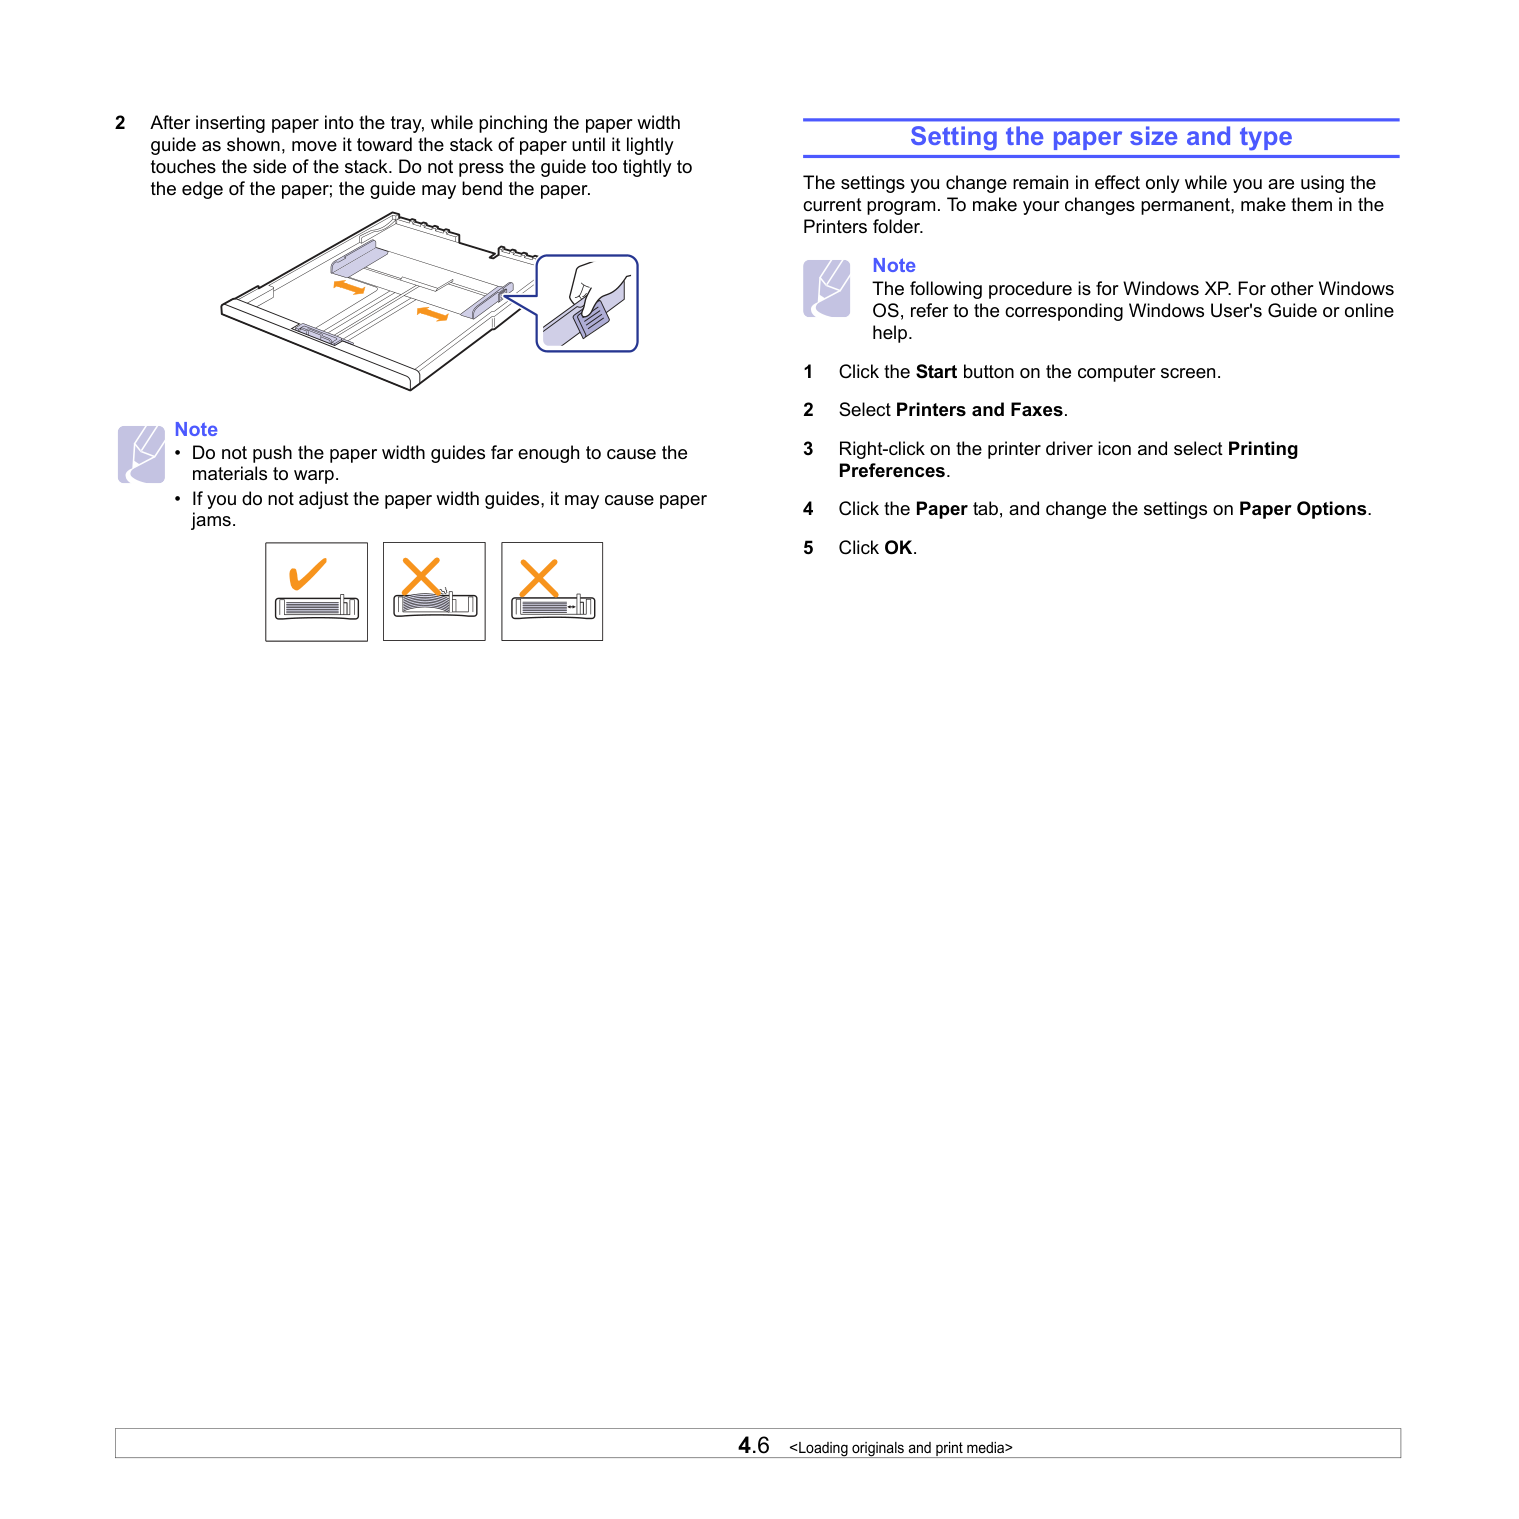
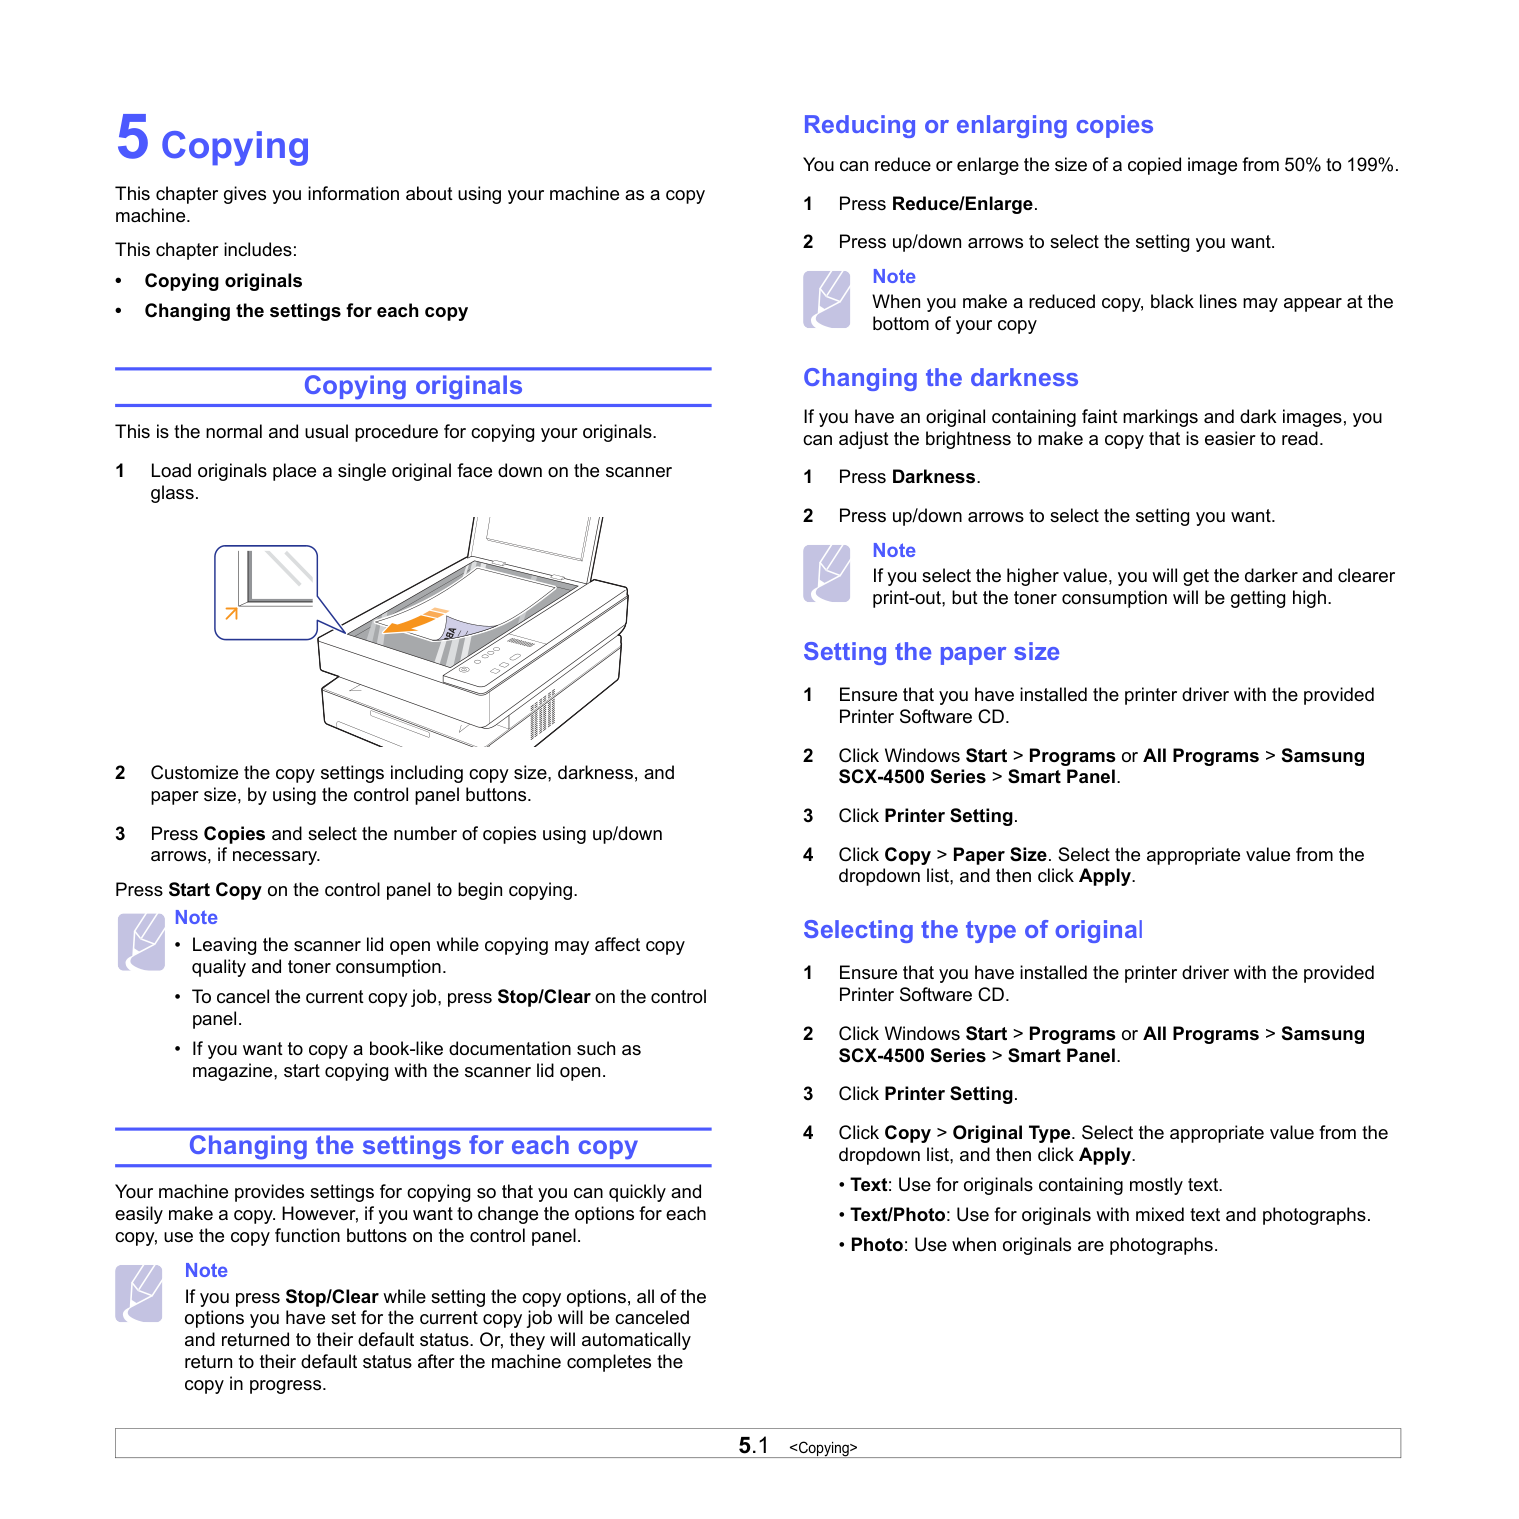
To load paper, press the tray open button to pop out the tray. Place the paper with the print side facing down and align it properly. Slide the tray back into place after loading. Ensure that you adjust the paper guides based on your media type following pages 4.5-4.6.
What should I do if the toner cartridge is empty?
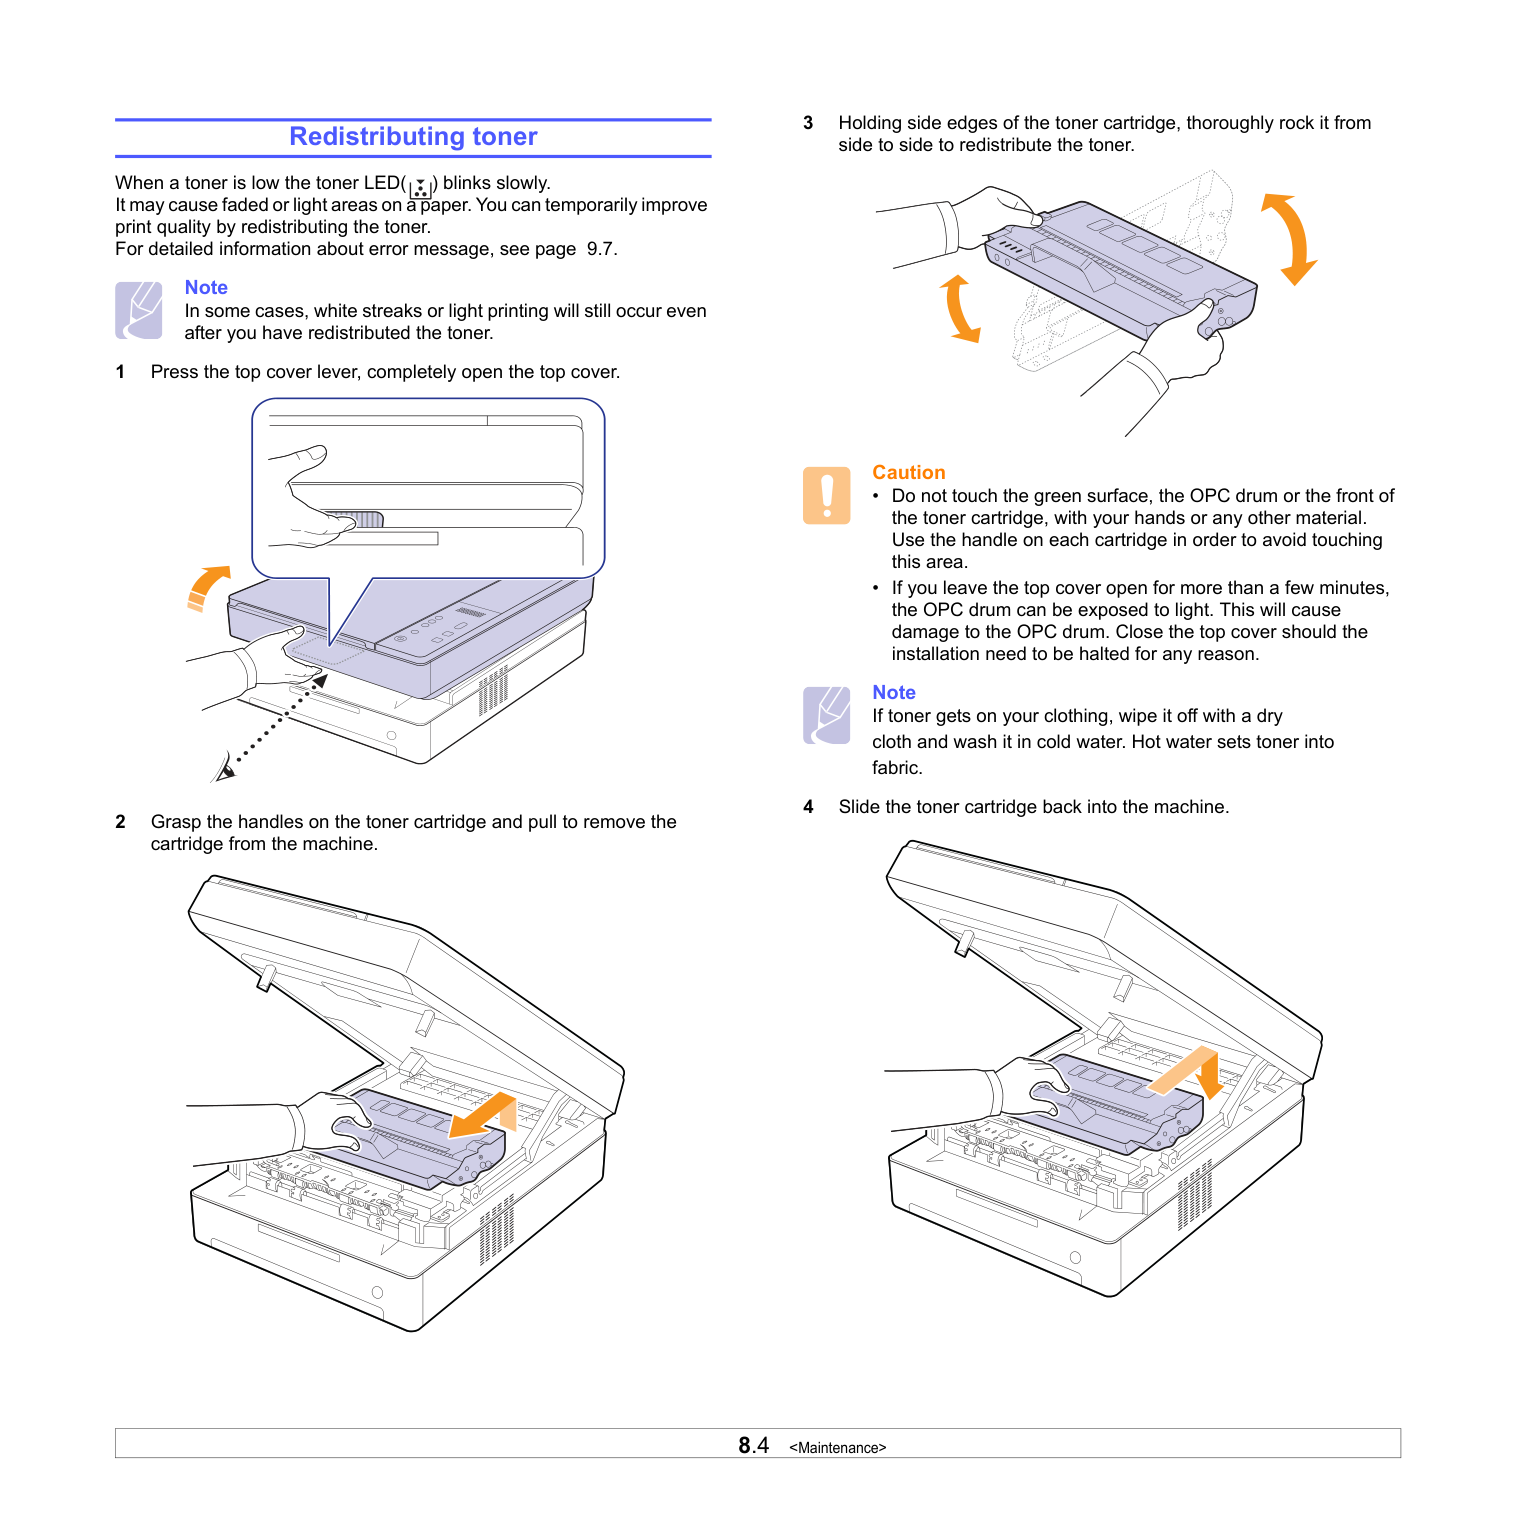
If the toner LED blinks rapidly, it indicates that the toner cartridge needs to be replaced (refer to page 8.5). Turn off the printer, wait a few minutes for it to cool down, and then replace the old cartridge with a new one by following step-by-step instructions provided in the manual.
What is the correct procedure for replacing a toner cartridge?
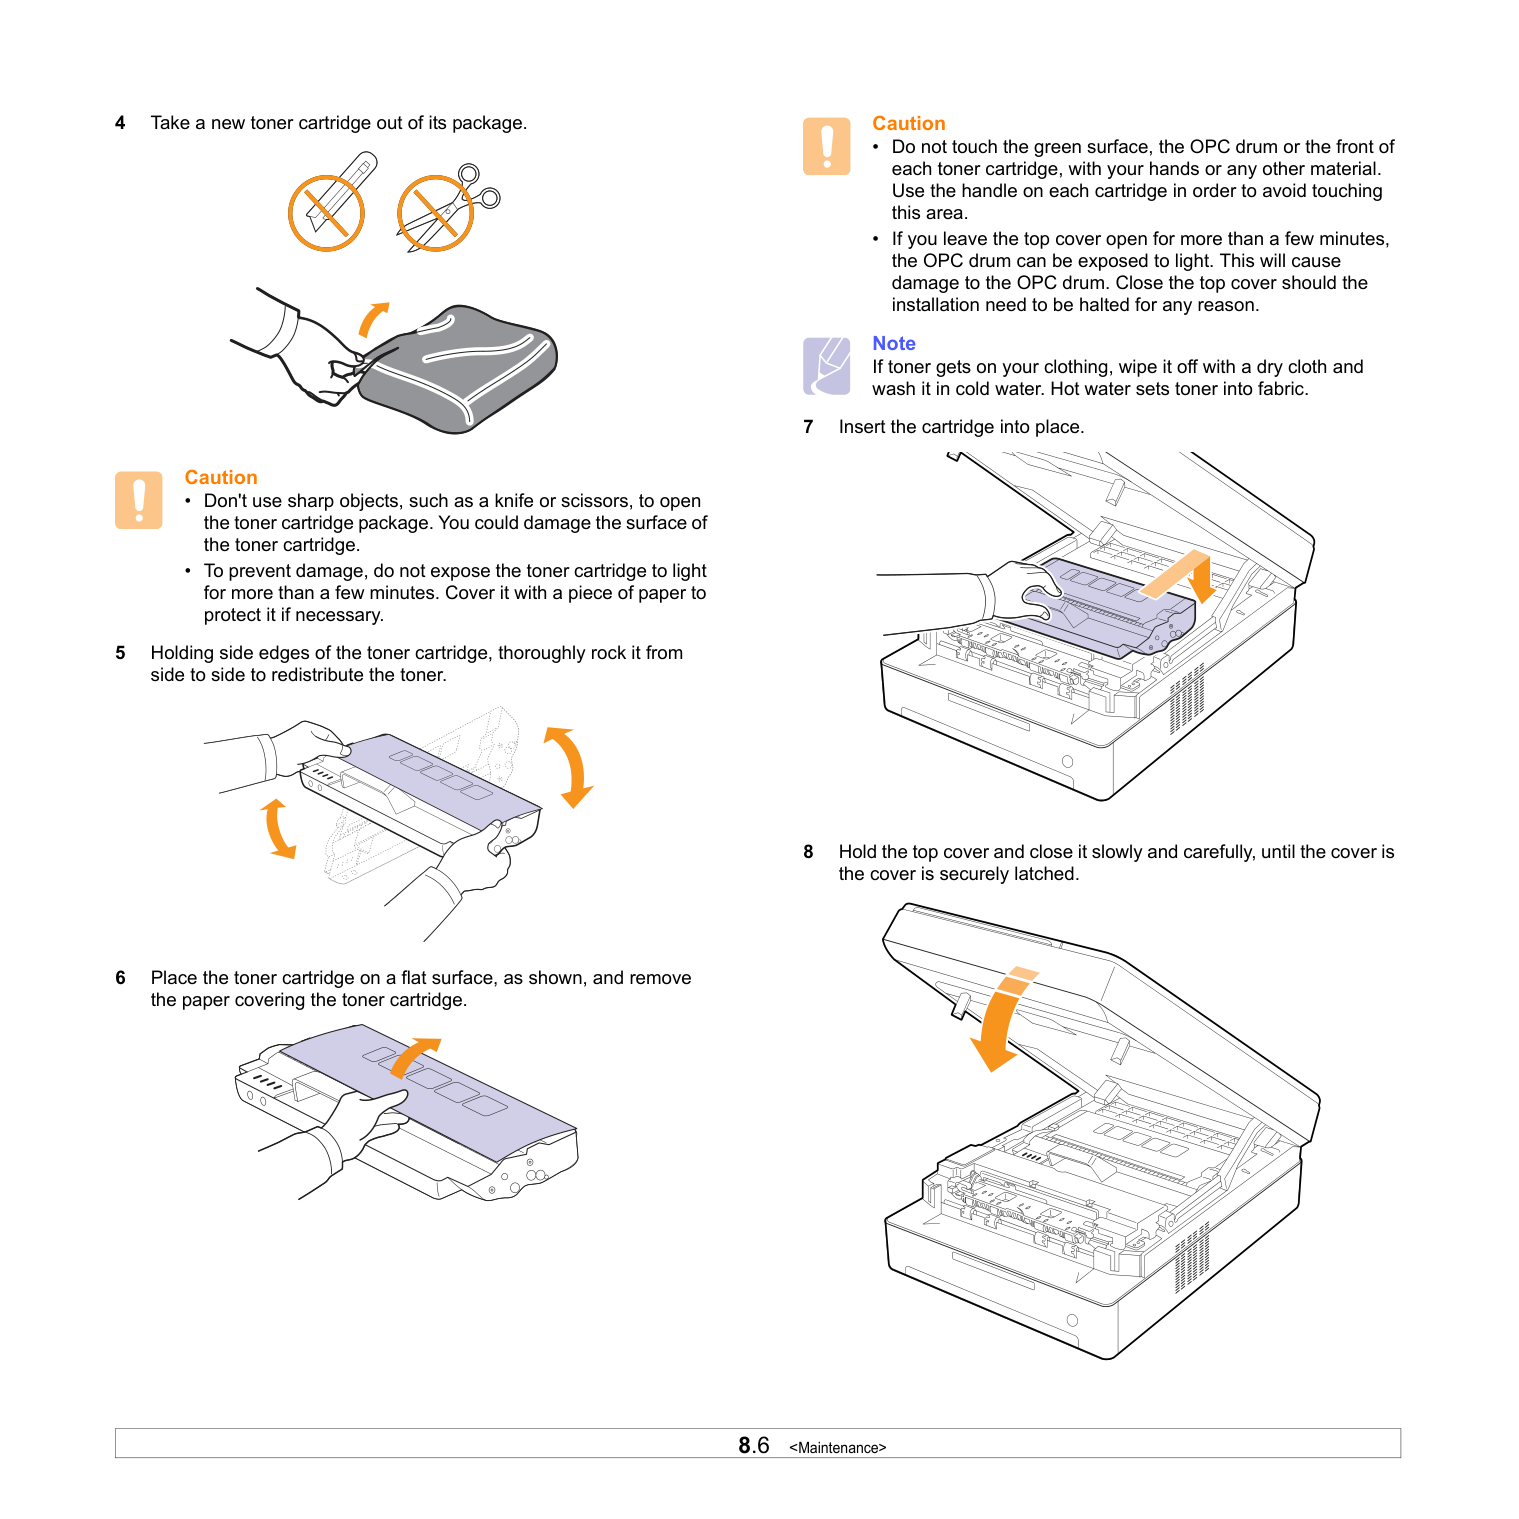
First turn off the printer and wait until it cools down (page 8.5). Open the top cover, remove old toner using handles on the cartridge. Insert new toner by removing protective packaging and gently shaking to redistribute toner inside; then install into place. Close the cover securely before turning printer back on.
How do I reset the printer settings in Windows?
To change default paper size and type, click Start > Printers and Faxes, right-click your machine icon, select Printing Preferences, go to Paper tab, and adjust options accordingly (page 4.6).
Full Manual
94 pages
User’s Guide Monochrome Laser Multifunction

© 2007 Samsung Electronics Co., Ltd. All rights reserved. This user’s guide is provided for information purposes only. All information included herein is subject to change without notice. Samsung Electronics is not responsible for any changes, direct or indirect damages, arising from or related to use of this user’s guide.
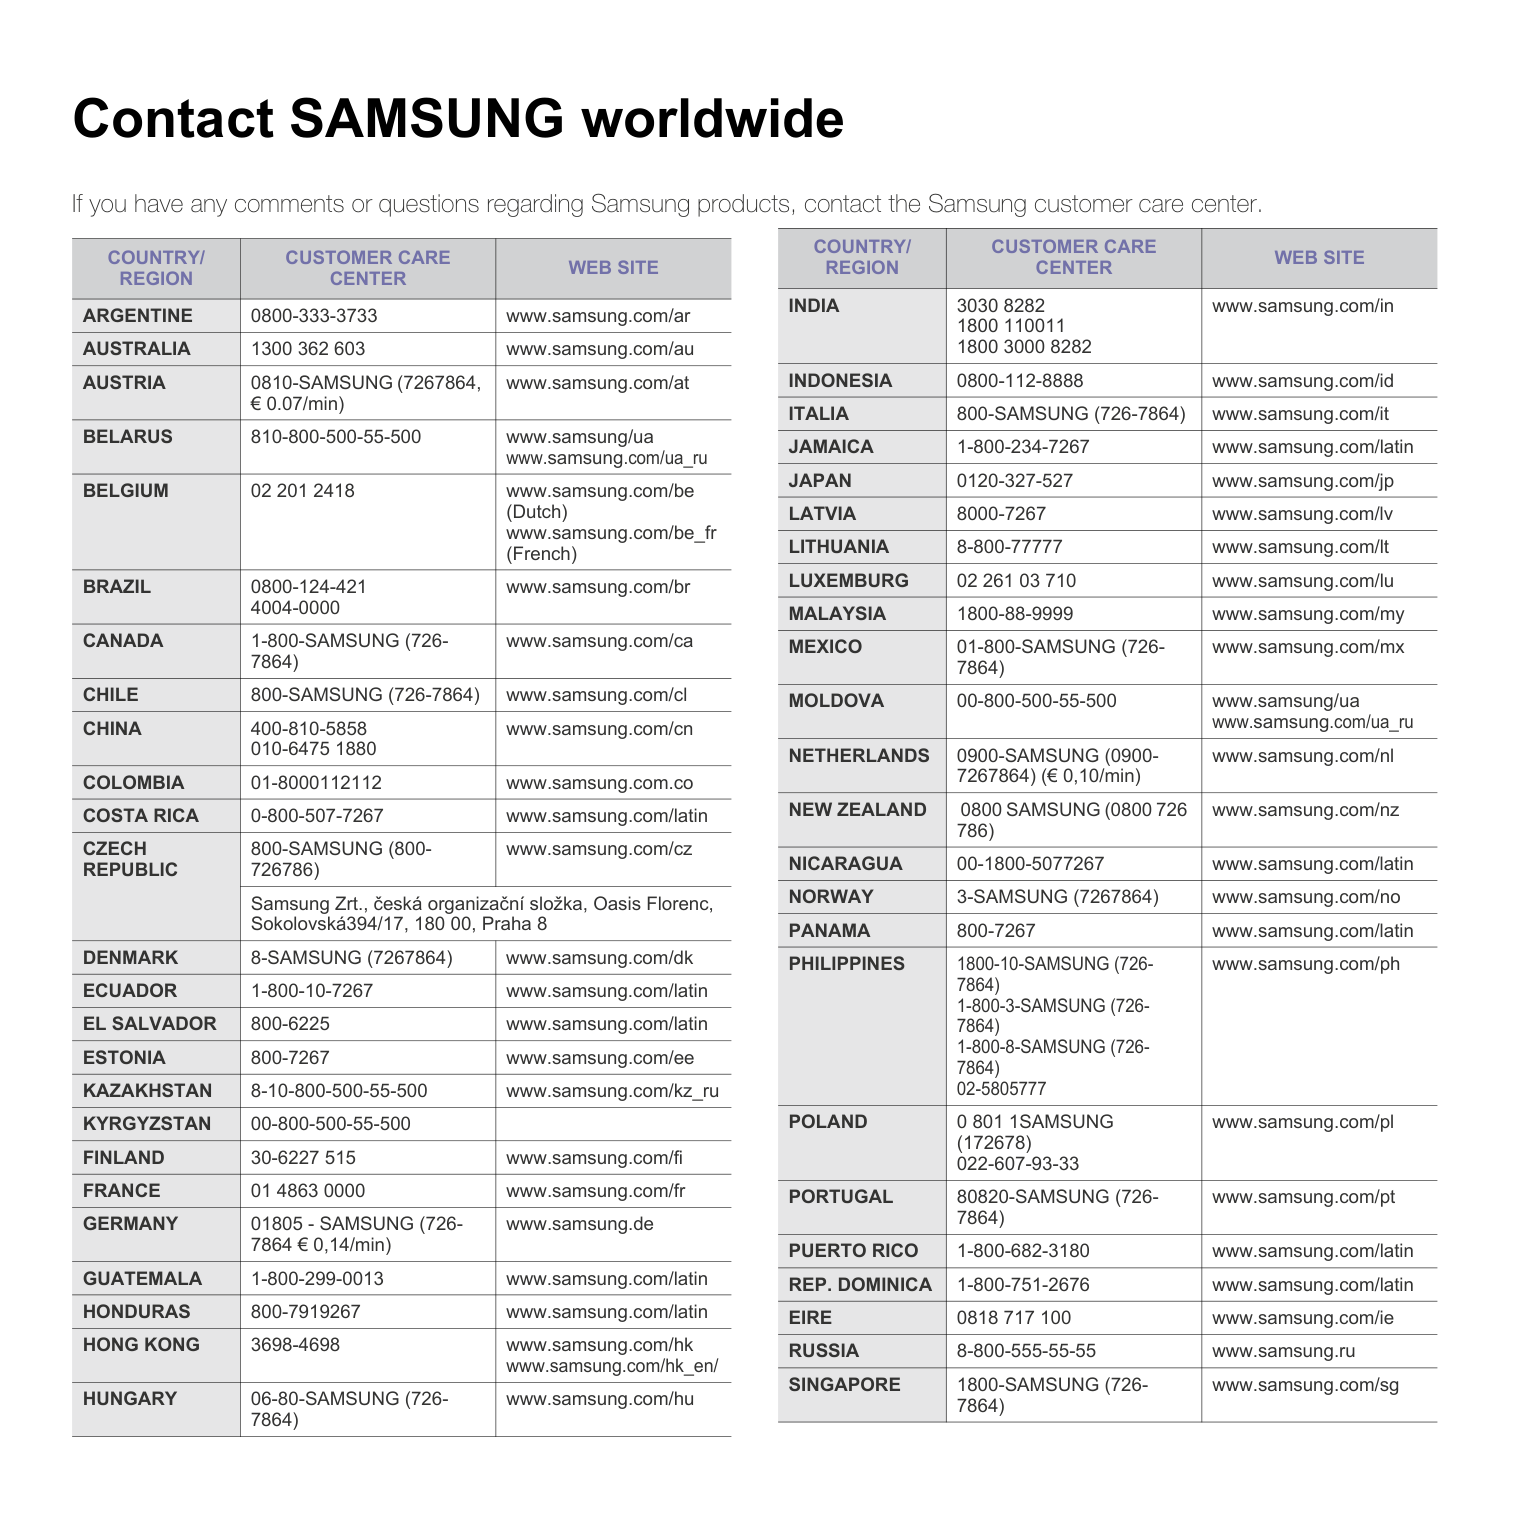
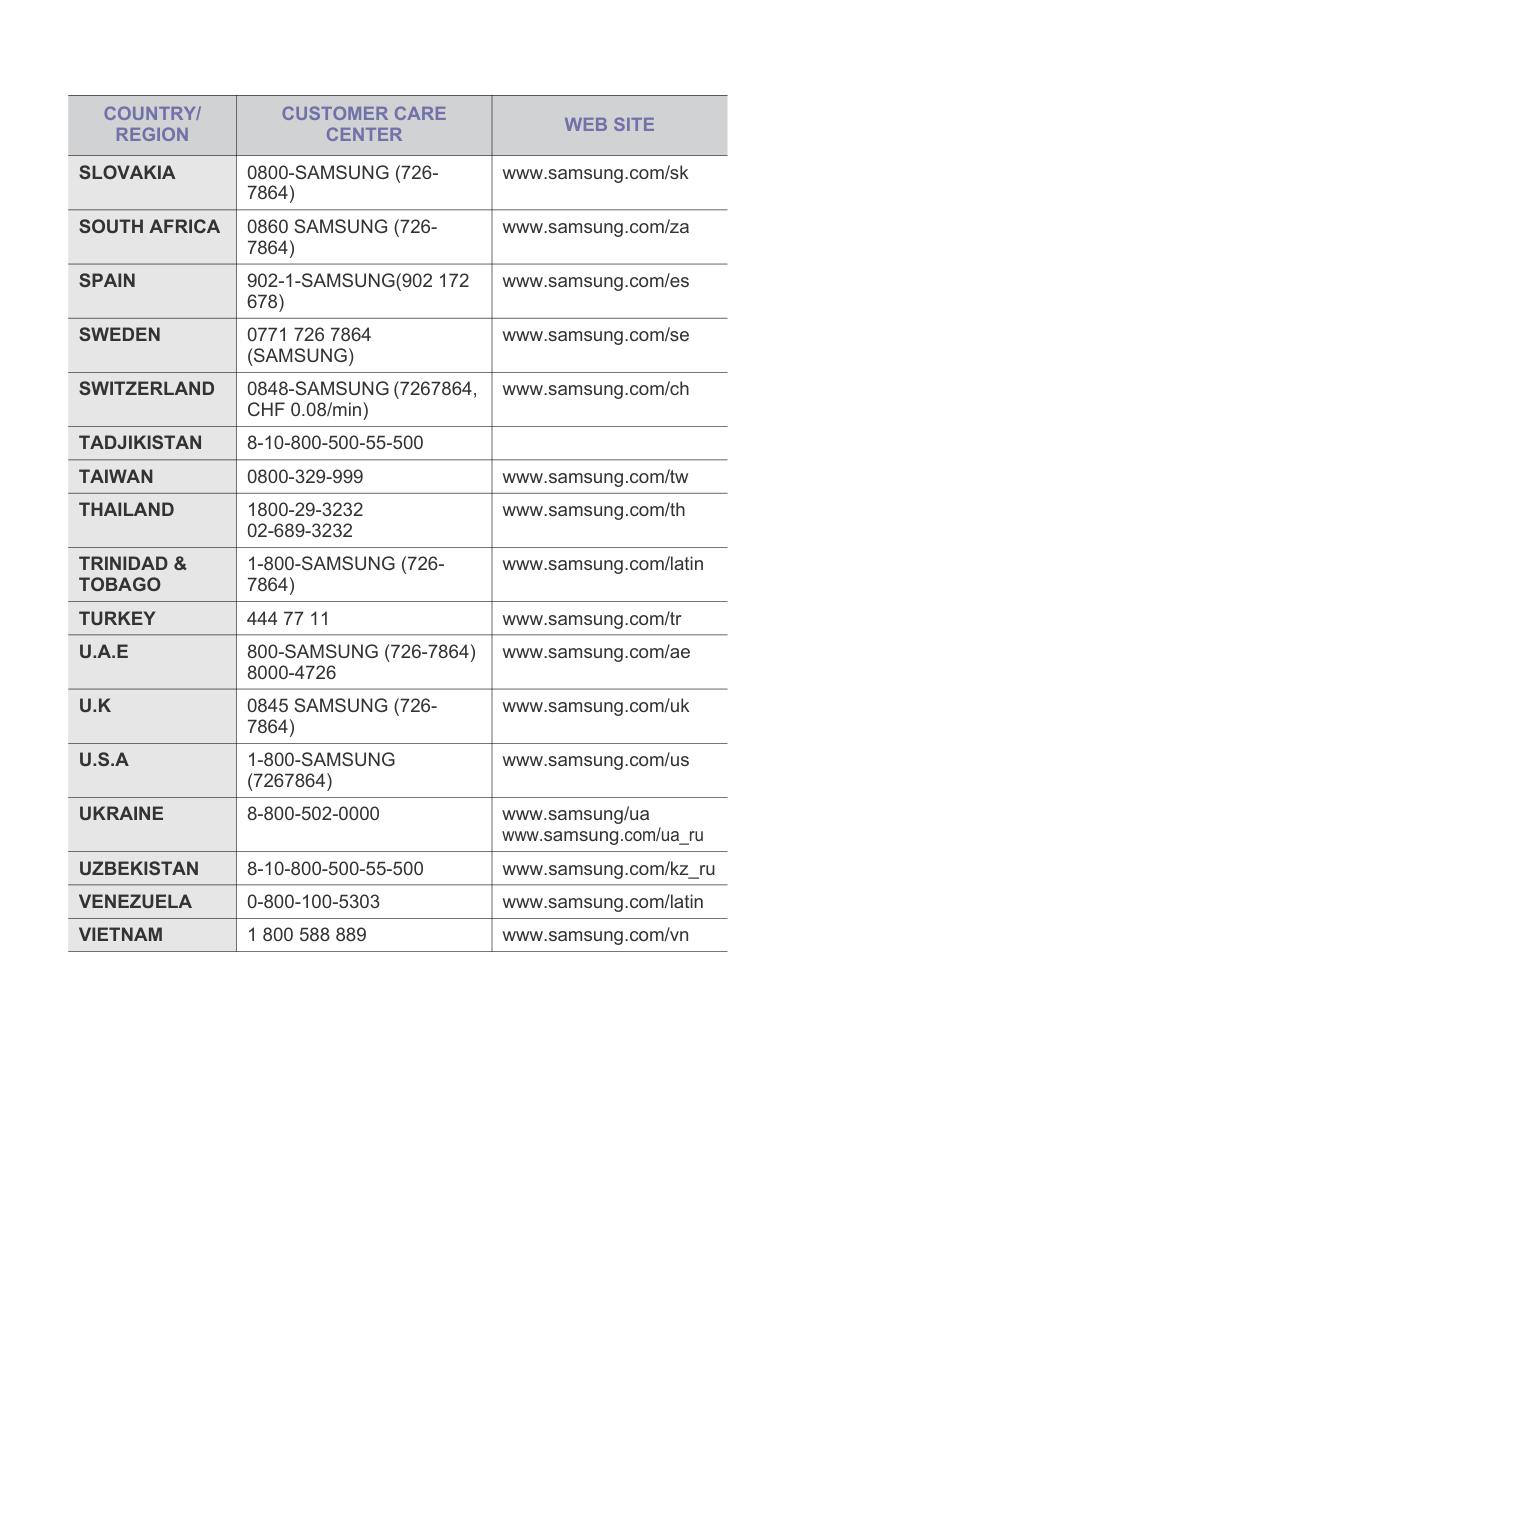
Contact SAMSUNG worldwide If you have any comments or questions regarding Samsung products, contact the Samsung customer care center.
Country/
Region
Customer Care
Center
Web Site
Argentine
0800-333-3733 www.samsung.com/arAustralia
1300 362 603 www.samsung.com/auAustria
0810-Samsung (7267864,
€ 0.07/min) www.samsung.com/atBelarus
810-800-500-55-500 www.samsung/ua www.samsung.com/ua_ruBelgium
02 201 2418 www.samsung.com/be (Dutch) www.samsung.com/be_fr (French)Brazil
0800-124-421 4004-0000 www.samsung.com/brCanada
1-800-Samsung (726-
7864) www.samsung.com/caChile
800-Samsung (726-7864)
www.samsung.com/clChina
400-810-5858 010-6475 1880 www.samsung.com/cnColombia
01-8000112112 www.samsung.com.coCosta Rica
0-800-507-7267 www.samsung.com/latinCzech
Republic
800-Samsung (800-
726786) www.samsung.com/cz Samsung Zrt., česká organizační složka, Oasis Florenc, Sokolovská394/17, 180 00, Praha 8Denmark
8-Samsung (7267864)
www.samsung.com/dkEcuador
1-800-10-7267 www.samsung.com/latinEl Salvador
800-6225 www.samsung.com/latinEstonia
800-7267 www.samsung.com/eeKazakhstan
8-10-800-500-55-500 www.samsung.com/kz_ruKyrgyzstan
00-800-500-55-500Finland
30-6227 515 www.samsung.com/fiFrance
01 4863 0000 www.samsung.com/frGermany
01805 - Samsung (726-
7864 € 0,14/min) www.samsung.deGuatemala
1-800-299-0013 www.samsung.com/latinHonduras
800-7919267 www.samsung.com/latinHong Kong
3698-4698 www.samsung.com/hk www.samsung.com/hk_en/Hungary
06-80-Samsung (726-
7864) www.samsung.com/huIndia
3030 8282 1800 110011 1800 3000 8282 www.samsung.com/inIndonesia
0800-112-8888 www.samsung.com/idItalia
800-Samsung (726-7864)
www.samsung.com/itJamaica
1-800-234-7267 www.samsung.com/latinJapan
0120-327-527 www.samsung.com/jpLatvia
8000-7267 www.samsung.com/lvLithuania
8-800-77777 www.samsung.com/ltLuxemburg
02 261 03 710 www.samsung.com/luMalaysia
1800-88-9999 www.samsung.com/myMexico
01-800-Samsung (726-
7864) www.samsung.com/mxMoldova
00-800-500-55-500 www.samsung/ua www.samsung.com/ua_ruNetherlands
0900-Samsung (0900-
7267864) (€ 0,10/min) www.samsung.com/nlNew Zealand
0800 Samsung (0800 726
786) www.samsung.com/nzNicaragua
00-1800-5077267 www.samsung.com/latinNorway
3-Samsung (7267864)
www.samsung.com/noPanama
800-7267 www.samsung.com/latinPhilippines
1800-10-Samsung (726-
7864)1-800-3-Samsung (726-
7864)1-800-8-Samsung (726-
7864) 02-5805777 www.samsung.com/phPoland
0 801 1Samsung
(172678) 022-607-93-33 www.samsung.com/plPortugal
80820-Samsung (726-
7864) www.samsung.com/ptPuerto Rico
1-800-682-3180 www.samsung.com/latinRep. Dominica
1-800-751-2676 www.samsung.com/latinEire
0818 717 100 www.samsung.com/ieRussia
8-800-555-55-55 www.samsung.ruSingapore
1800-Samsung (726-
7864) www.samsung.com/sgCountry/
Region
Customer Care
Center
Web Site
Slovakia
0800-Samsung (726-
7864) www.samsung.com/skSouth Africa
0860 Samsung (726-
7864) www.samsung.com/zaSpain
902-1-Samsung(902 172
678) www.samsung.com/esSweden
0771 726 7864(Samsung)
www.samsung.com/seSwitzerland
0848-Samsung (7267864,
CHF 0.08/min) www.samsung.com/chTadjikistan
8-10-800-500-55-500Taiwan
0800-329-999 www.samsung.com/twThailand
1800-29-3232 02-689-3232 www.samsung.com/thTrinidad &
Tobago
1-800-Samsung (726-
7864) www.samsung.com/latinTurkey
444 77 11 www.samsung.com/trU.A.E
800-Samsung (726-7864)
8000-4726 www.samsung.com/aeU.K
0845 Samsung (726-
7864) www.samsung.com/ukU.S.A
1-800-Samsung
(7267864) www.samsung.com/usUkraine
8-800-502-0000 www.samsung/ua www.samsung.com/ua_ruUzbekistan
8-10-800-500-55-500 www.samsung.com/kz_ruVenezuela
0-800-100-5303 www.samsung.com/latinVietnam
1 800 588 889 www.samsung.com/vnCountry/
Region
Customer Care
Center
Web Site
Contents
About this user’s guide .................................................................................................................................................i Finding more information .............................................................................................................................................i Safety and Regulatory Information ..............................................................................................................................ii
Printing a document ................................................................................................................................................ 7.1 Canceling a print job ............................................................................................................................................... 7.1
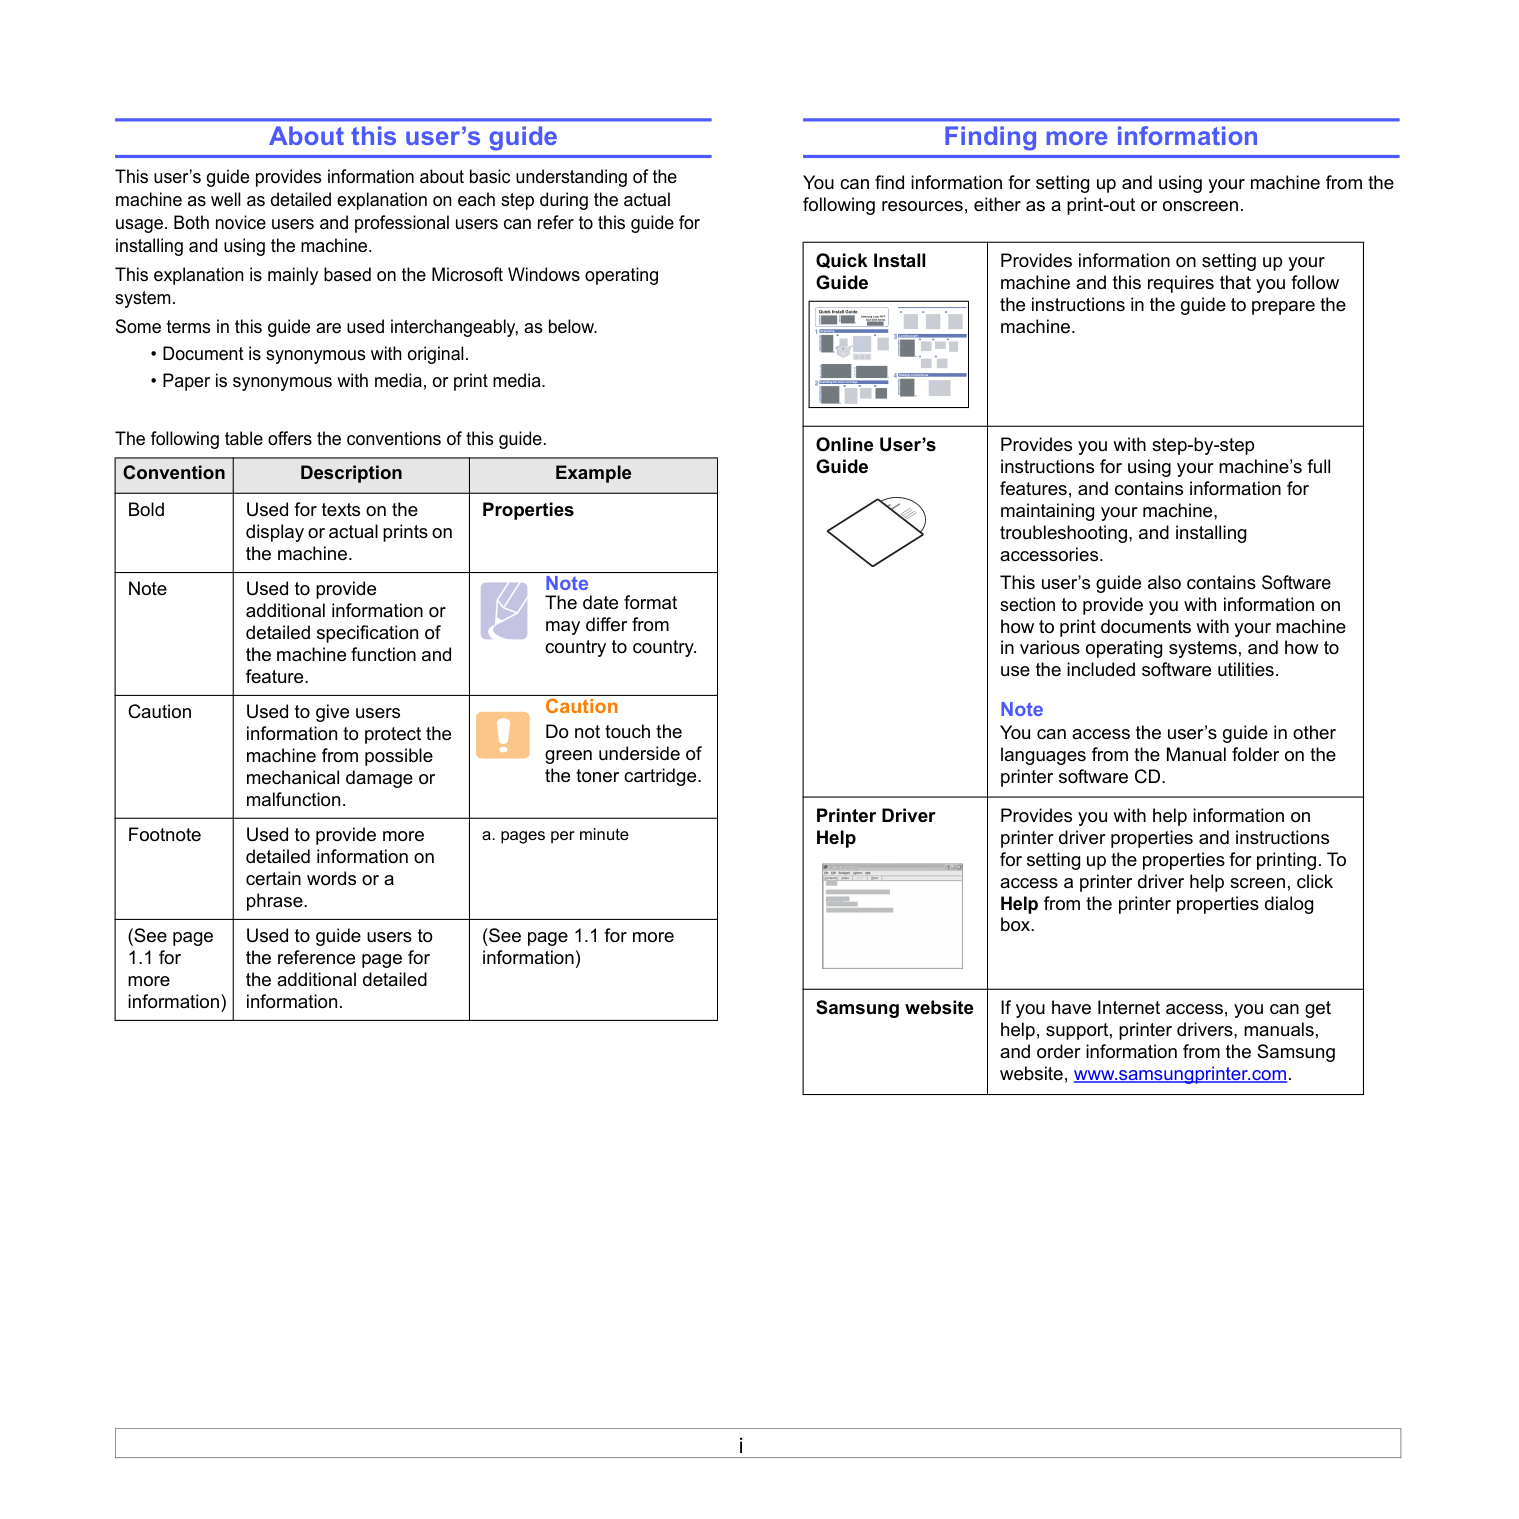
i About this user’s guide This user’s guide provides information about basic understanding of the machine as well as detailed explanation on each step during the actual usage. Both novice users and professional users can refer to this guide for installing and using the machine. This explanation is mainly based on the Microsoft Windows operating system. Some terms in this guide are used interchangeably, as below.
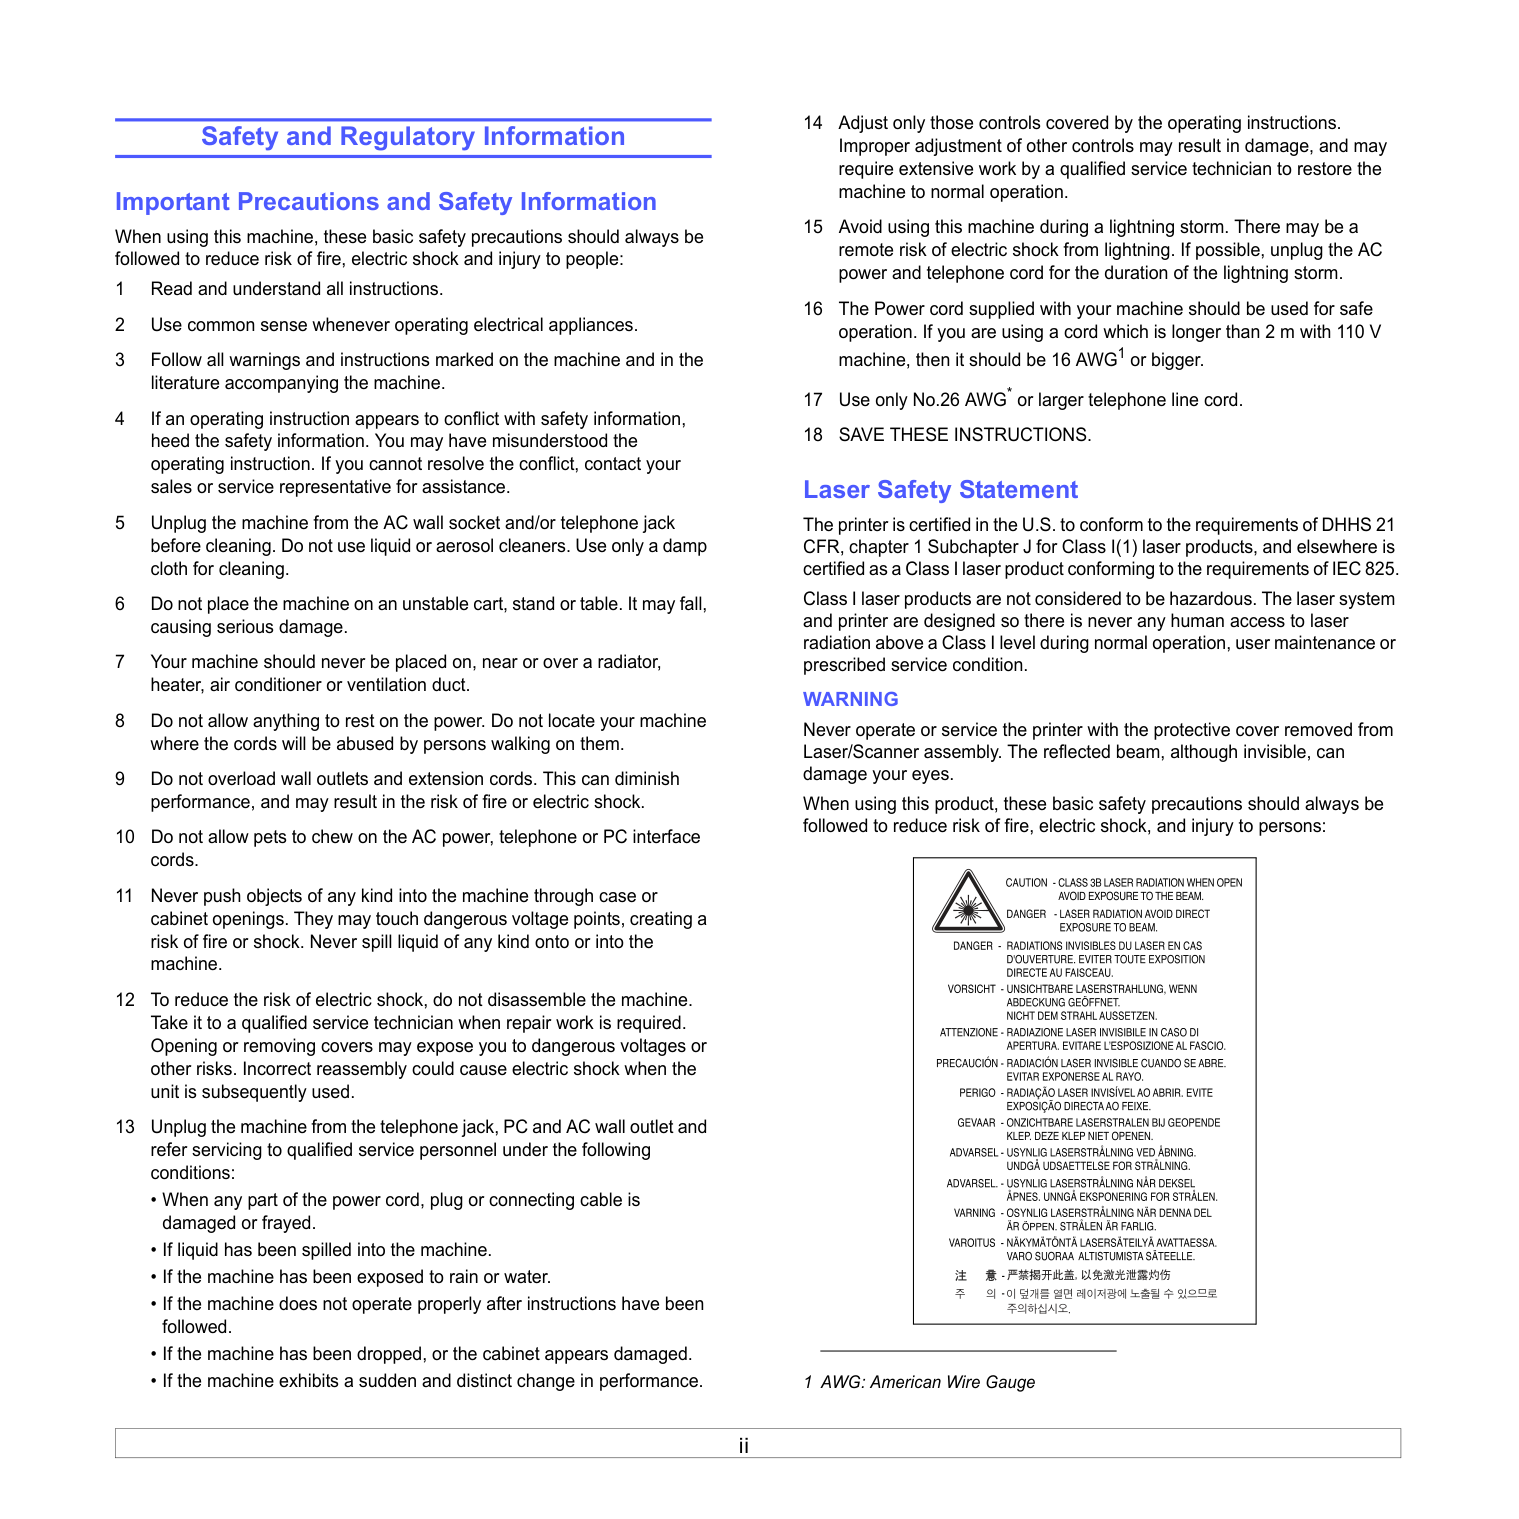
ii Safety and Regulatory Information Important Precautions and Safety Information When using this machine, these basic safety precautions should always be followed to reduce risk of fire, electric shock and injury to people: 1 Read and understand all instructions. 2 Use common sense whenever operating electrical appliances. 3 Follow all warnings and instructions marked on the machine and in the literature accompanying the machine. 4 If an operating instruction appears to conflict with safety information, heed the safety information. You may have misunderstood the operating instruction. If you cannot resolve the conflict, contact your sales or service representative for assistance. 5 Unplug the machine from the AC wall socket and/or telephone jack before cleaning. Do not use liquid or aerosol cleaners. Use only a damp cloth for cleaning. 6 Do not place the machine on an unstable cart, stand or table. It may fall, causing serious damage. 7 Your machine should never be placed on, near or over a radiator, heater, air conditioner or ventilation duct. 8 Do not allow anything to rest on the power. Do not locate your machine where the cords will be abused by persons walking on them. 9 Do not overload wall outlets and extension cords. This can diminish performance, and may result in the risk of fire or electric shock. 10 Do not allow pets to chew on the AC power, telephone or PC interface cords. 11 Never push objects of any kind into the machine through case or cabinet openings. They may touch dangerous voltage points, creating a risk of fire or shock. Never spill liquid of any kind onto or into the machine. 12 To reduce the risk of electric shock, do not disassemble the machine. Take it to a qualified service technician when repair work is required. Opening or removing covers may expose you to dangerous voltages or other risks. Incorrect reassembly could cause electric shock when the unit is subsequently used. 13 Unplug the machine from the telephone jack, PC and AC wall outlet and refer servicing to qualified service personnel under the following conditions:
Save These Instructions.
Laser Safety Statement The printer is certified in the U.S. to conform to the requirements of DHHS 21 CFR, chapter 1 Subchapter J for Class I(1) laser products, and elsewhere is certified as a Class I laser product conforming to the requirements of IEC 825. Class I laser products are not considered to be hazardous. The laser system and printer are designed so there is never any human access to laser radiation above a Class I level during normal operation, user maintenance or prescribed service condition.Warning
Never operate or service the printer with the protective cover removed from Laser/Scanner assembly. The reflected beam, although invisible, can damage your eyes. When using this product, these basic safety precautions should always be followed to reduce risk of fire, electric shock, and injury to persons: 1 AWG: American Wire Gauge
iii Ozone Safety During normal operation, this machine produces ozone. The ozone produced does not present a hazard to the operator. However, it is advisable that the machine be operated in a well ventilated area. If you need additional information about ozone, please request your nearest Samsung dealer. California USA Only This Perchlorate warning applies only to primary CR (Manganese Dioxide) Lithium coin cells in the product sold or distributed ONLY in California USA. Perchlorate Material - special handling may apply. See www.dtsc.ca.gov/hazardouswaste/perchlorate. Power Saver This printer contains advanced energy conservation technology that reduces power consumption when it is not in active use. When the printer does not receive data for an extended period of time, power consumption is automatically lowered. ENERGY STAR and the ENERGY STAR mark are registered U.S. marks. For more information on the ENERGY STAR program see http://www.energystar.gov. Recycling Please recycle or dispose of the packaging material for this product in an environmentally responsible manner. Correct Disposal of This Product (Waste Electrical & Electronic Equipment) (Applicable in the European Union and other European countries with separate collection systems) This marking on the product, accessories or literature indicates that the product and its electronic accessories (e.g. charger, headset, USB cable) should not be disposed of with other household waste at the end of their working life. To prevent possible harm to the environment or human health from uncontrolled waste disposal, please separate these items from other types of waste and recycle them responsibly to promote the sustainable reuse of material resources. Household users should contact either the retailer where they purchased this product, or their local government office, for details of where and how they can take these items for environmentally safe recycling. Business users should contact their supplier and check the terms and conditions of the purchase contract. This product and its electronic accessories should not be mixed with other commercial wastes for disposal. Radio Frequency Emissions FCC Information to the User This device complies with Part 15 of the FCC Rules. Operation is subject to the following two conditions:
iv Fax Branding The Telephone Consumer Protection Act of 1991 makes it unlawful for any person to use a computer or other electronic device to send any message via a telephone facsimile machine unless such message clearly contains in a margin at the top or bottom of each transmitted page or on the first page of the transmission the following information: (1) the date and time of transmission (2) identification of either business, business entity or individual sending the message; and (3) telephone number of either the sending machine, business, business entity or individual. The Telephone Company may make changes in its communications facilities, equipment operations or procedures where such action is reasonably required in the operation of its business and is not inconsistent with the rules and regulations in FCC Part 68. If such changes can be reasonably expected to render any customer terminal equipment incompatible with telephone company communications facilities, or require modification or alteration of such terminal equipment, or otherwise materially affect its use or performance, the customer shall be given adequate notice in writing, to allow the customer an opportunity to maintain uninterrupted service. Ringer Equivalence Number The Ringer Equivalence Number and FCC Registration Number for this machine may be found on the label located on the bottom or rear of the machine. In some instances you may need to provide these numbers to the telephone company. The Ringer Equivalence Number (REN) is a measure of the electrical load placed on the telephone line, and is useful for determining whether you have “overloaded” the line. Installing several types of equipment on the same telephone line may result in problems making and receiving telephone calls, especially ringing when your line is called. The sum of all Ringer Equivalence Numbers of the equipment on your telephone line should be less than five in order to assure proper service from the telephone company. In some cases, a sum of five may not be usable on your line. If any of your telephone equipment is not operating properly, you should immediately remove it from your telephone line, as it may cause harm to the telephone network.
Warning:
FCC Regulations state that changes or modifications to this equipment not expressly approved by the manufacturer could void the user’s authority to operate this equipment. In the event that terminal equipment causes harm to the telephone network, the telephone company should notify the customer that service may be stopped. However, where prior notice is impractical, the company may temporarily cease service, providing that they: a) promptly notify the customer. b) give the customer an opportunity to correct the equipment problem. c) inform the customer of the right to bring a complaint to the Federal Communication Commission pursuant to procedures set out in FCC Rules and Regulations Subpart E of Part 68. You should also know that:
v Declaration of Conformity (European Countries) Approvals and Certifications The CE marking applied to this product symbolizes Samsung Electronics Co., Ltd. Declaration of Conformity with the following applicable 93/68/EEC Directives of the European Union as of the dates indicated: The declaration of conformity may be consulted at www.samsung.com/ printer, go to Support > Download center and enter your printer name to browse the EuDoC. January 1, 1995: Council Directive 73/23/EEC Approximation of the laws of the member states related to low voltage equipment. January 1, 1996: Council Directive 89/336/EEC (92/31/EEC), approximation of the laws of the Member States related to electromagnetic compatibility. March 9, 1999: Council Directive 1999/5/EC on radio equipment and telecommunications terminal equipment and the mutual recognition of their conformity. A full declaration, defining the relevant Directives and referenced standards can be obtained from your Samsung Electronics Co., Ltd. representative. EC Certification Certification to 1999/5/EC Radio Equipment & Telecommunications Terminal Equipment Directive (FAX) This Samsung product has been self-certified by Samsung for pan-European single terminal connection to the analogue public switched telephone network (PSTN) in accordance with Directive 1999/5/EC. The product has been designed to work with the national PSTNs and compatible PBXs of the European countries: In the event of problems, you should contact the Euro QA Lab of Samsung Electronics Co., Ltd. in the first instance. The product has been tested against TBR21. To assist in the use and application of terminal equipment which complies with this standard, the European Telecommunication Standards Institute (ETSI) has issued an advisory document (EG 201 121) which contains notes and additional requirements to ensure network compatibility of TBR21 terminals. The product has been designed against, and is fully compliant with, all of the relevant advisory notes contained in this document. Replacing the Fitted Plug (for UK Only) Important The mains lead for this machine is fitted with a standard (BS 1363) 13 amp plug and has a 13 amp fuse. When you change or examine the fuse, you must re-fit the correct 13 amp fuse. You then need to replace the fuse cover. If you have lost the fuse cover, do not use the plug until you have another fuse cover. Please contact the people from you purchased the machine. The 13 amp plug is the most widely used type in the UK and should be suitable. However, some buildings (mainly old ones) do not have normal 13 amp plug sockets. You need to buy a suitable plug adaptor. Do not remove the moulded plug. Warning If you cut off the moulded plug, get rid of it straight away. You cannot rewire the plug and you may receive an electric shock if you plug it into a socket. Important warning: You must earth this machine. The wires in the mains lead have the following color code:
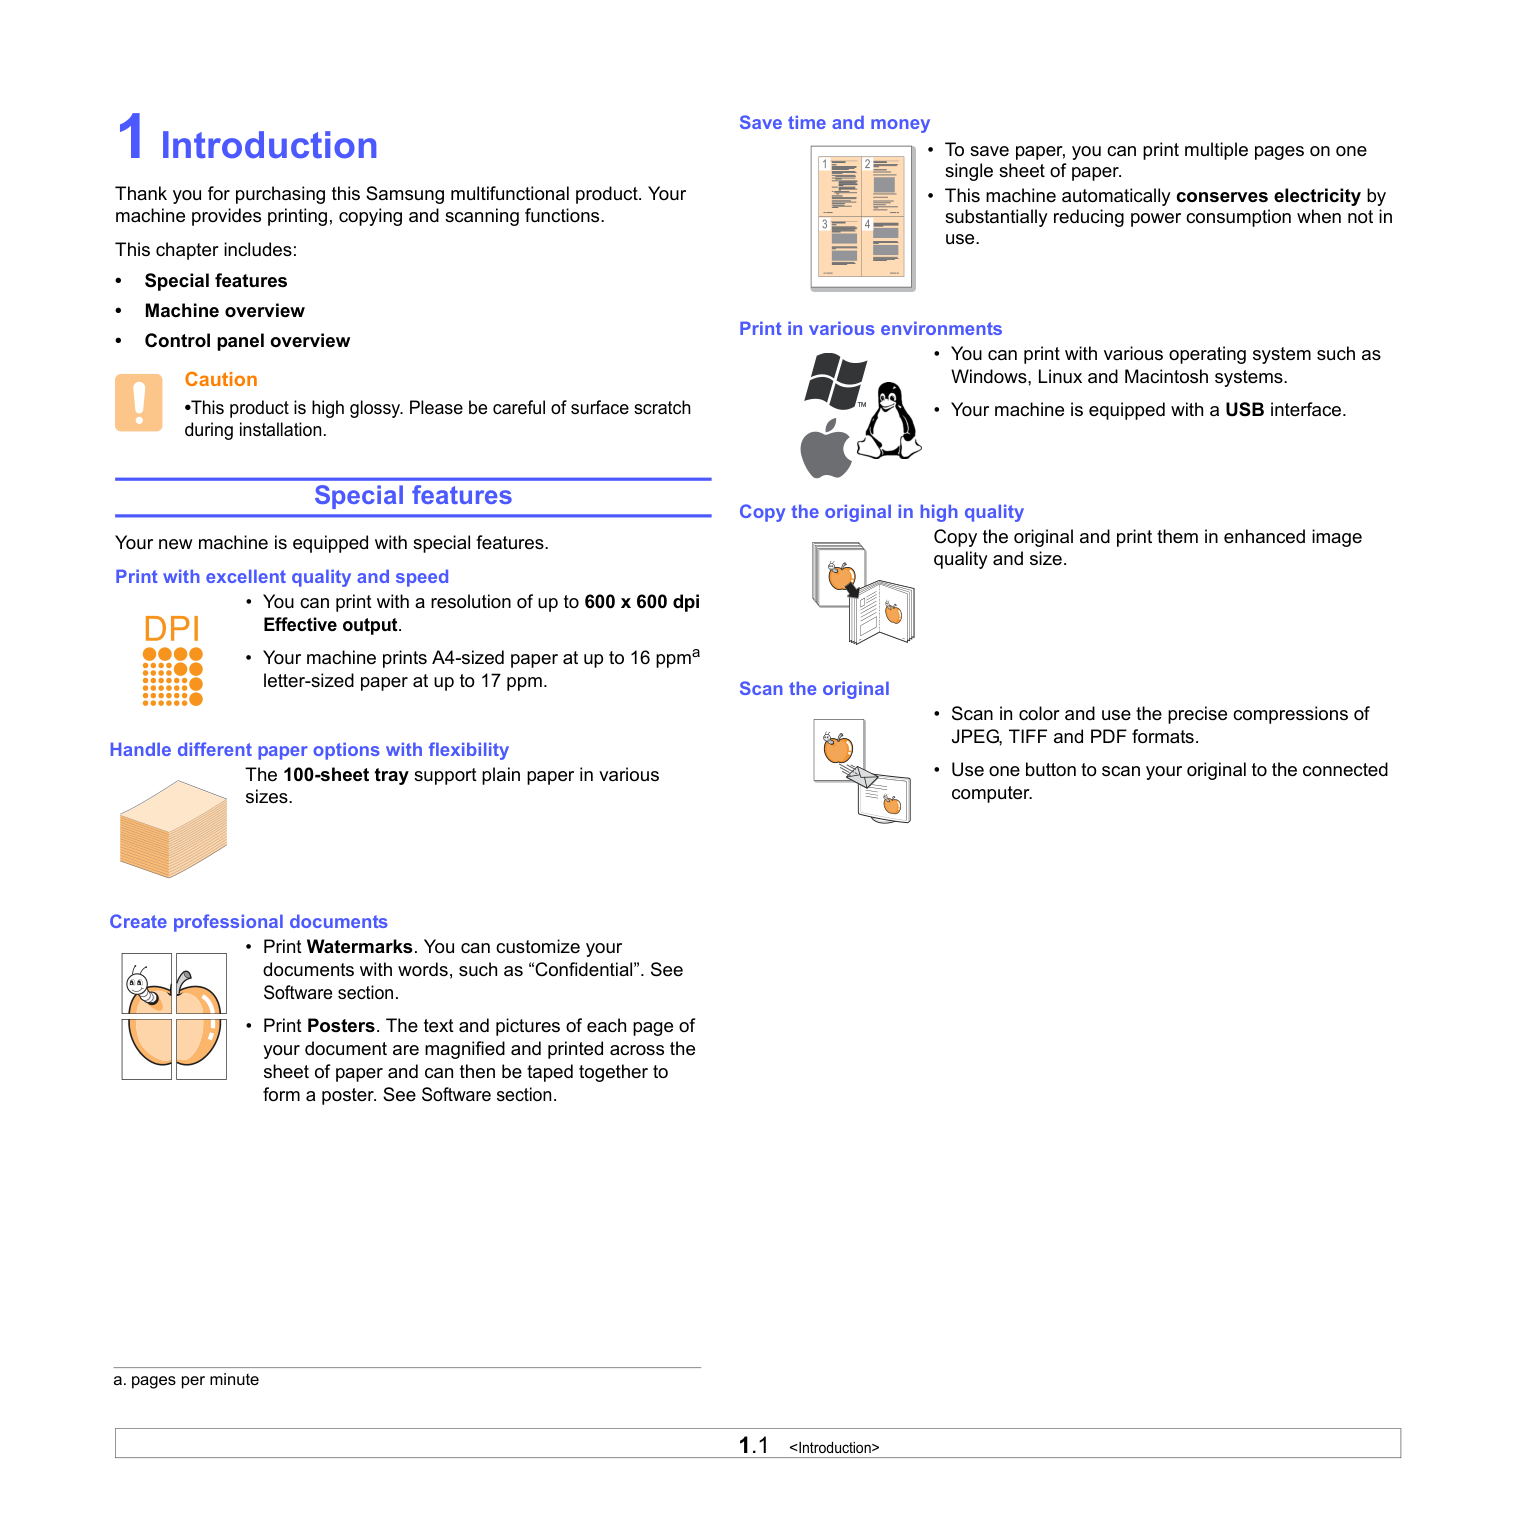
1.1
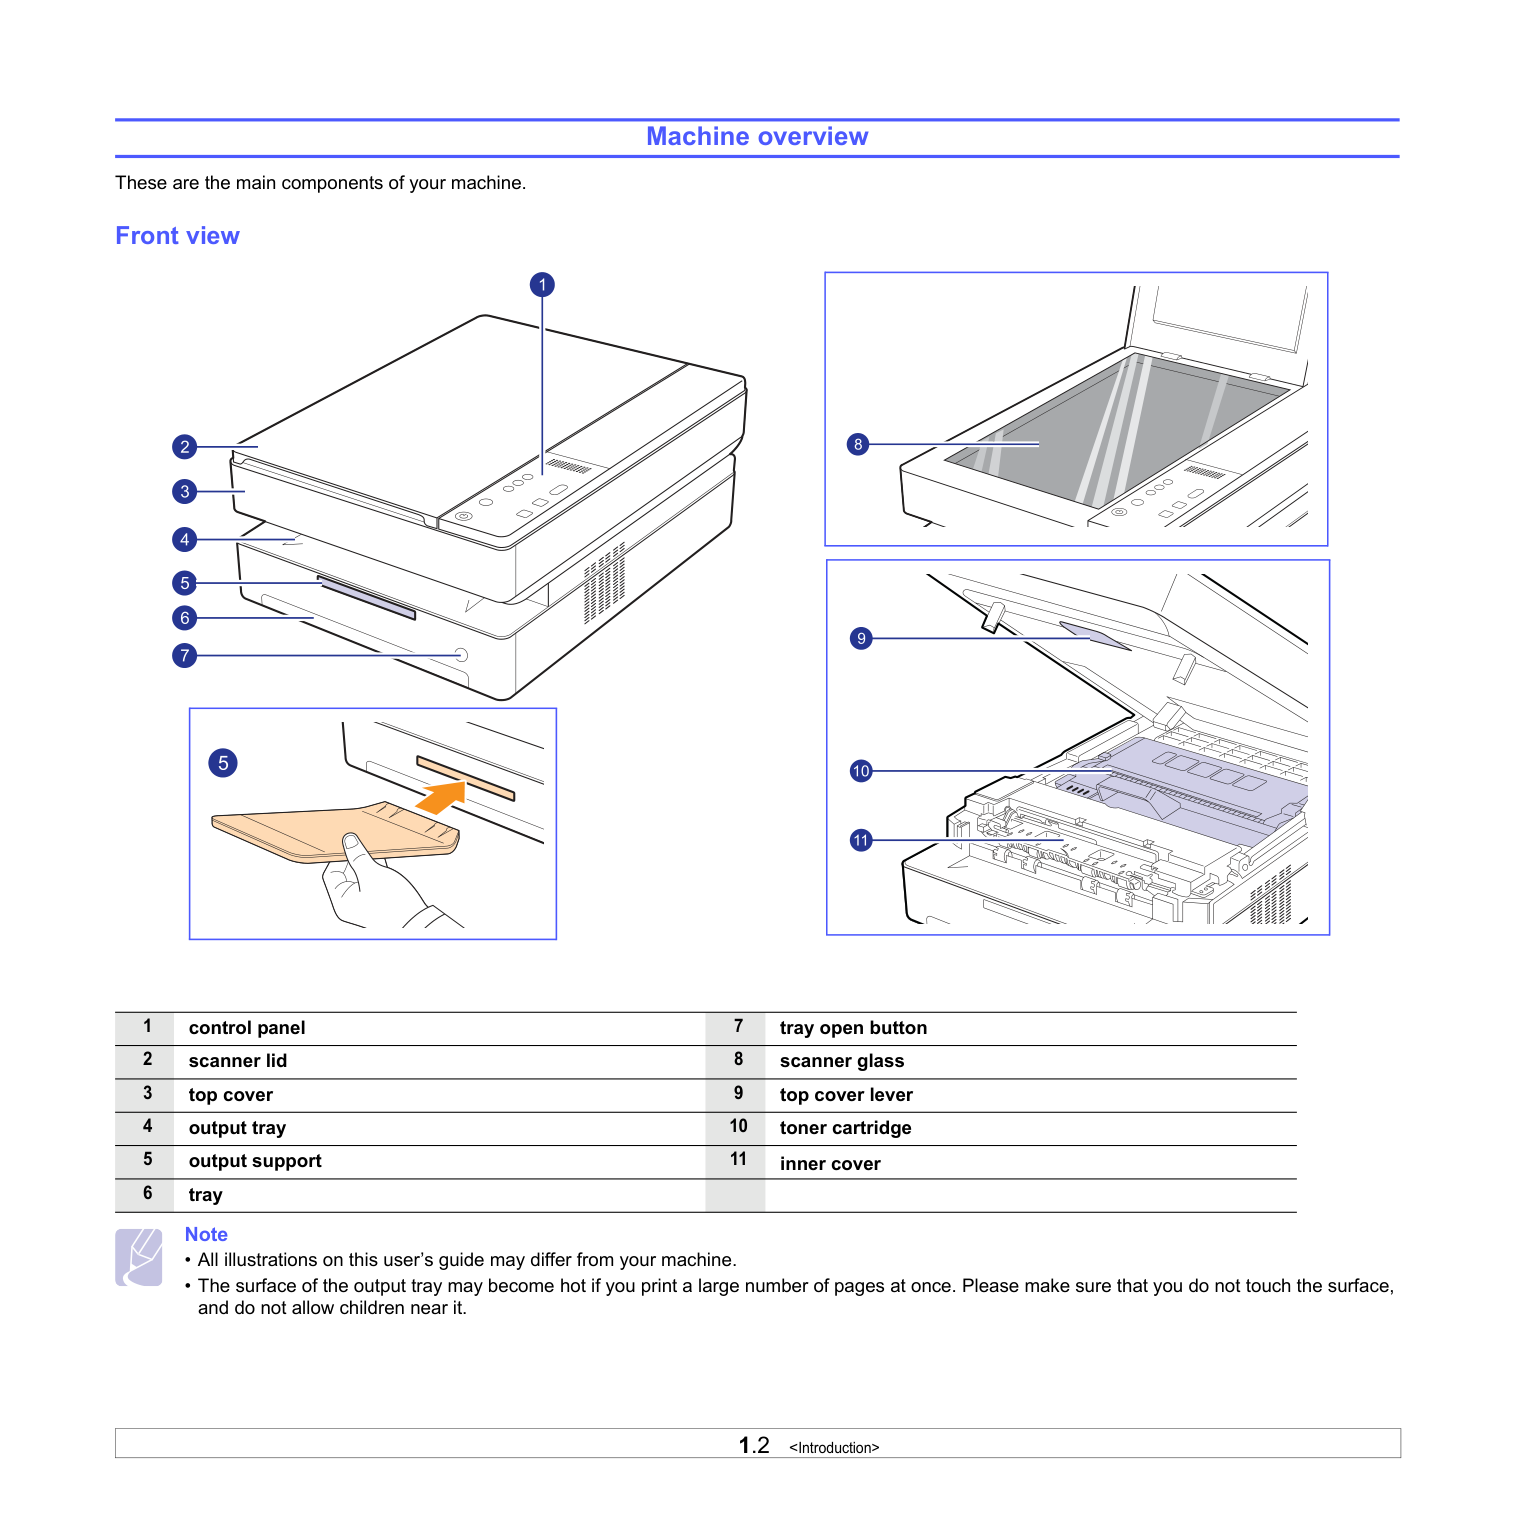
1.2
Note
1.3
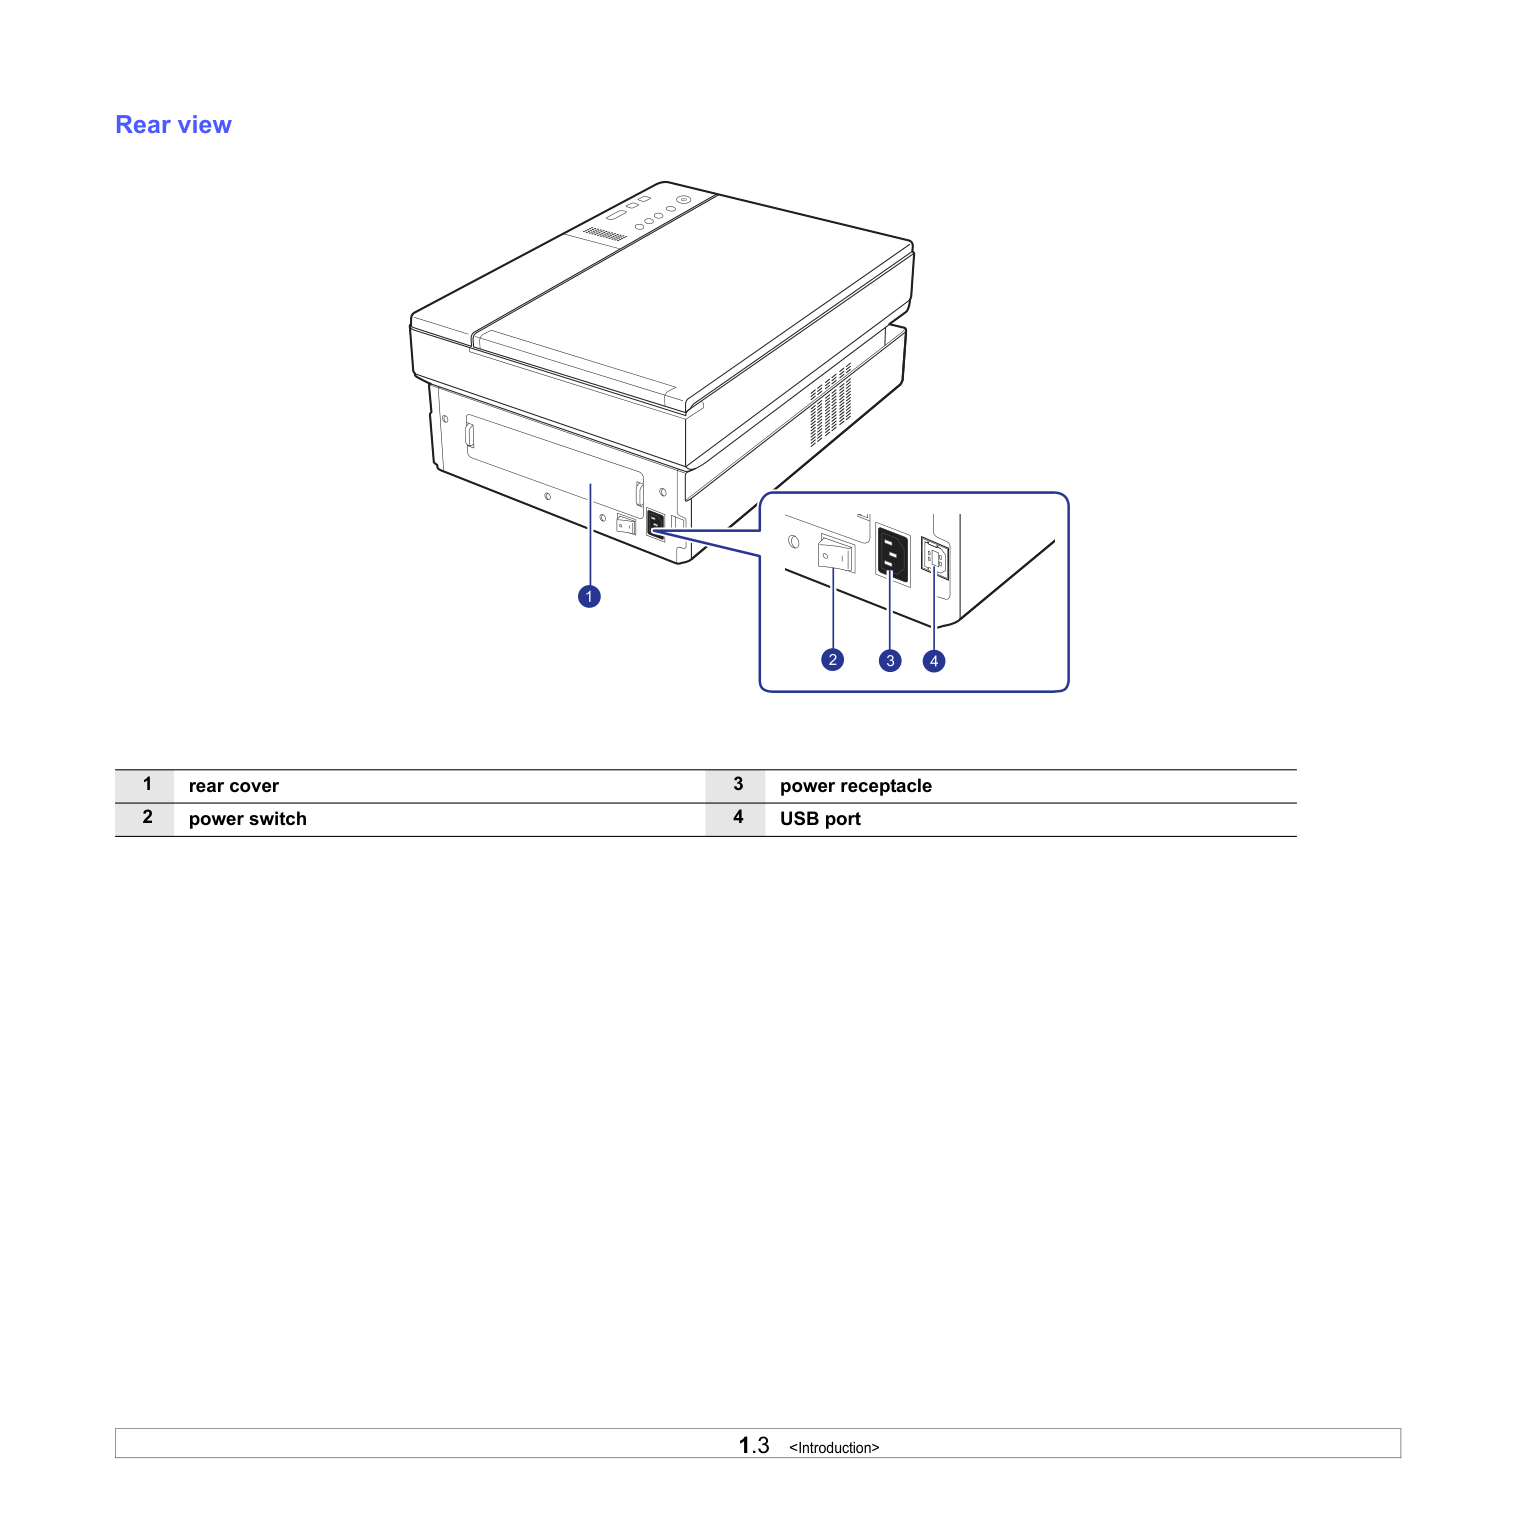
1 rear cover 3 power receptacle 2 power switch 4 USB port
1.4
2.1 Os
Contents Windows
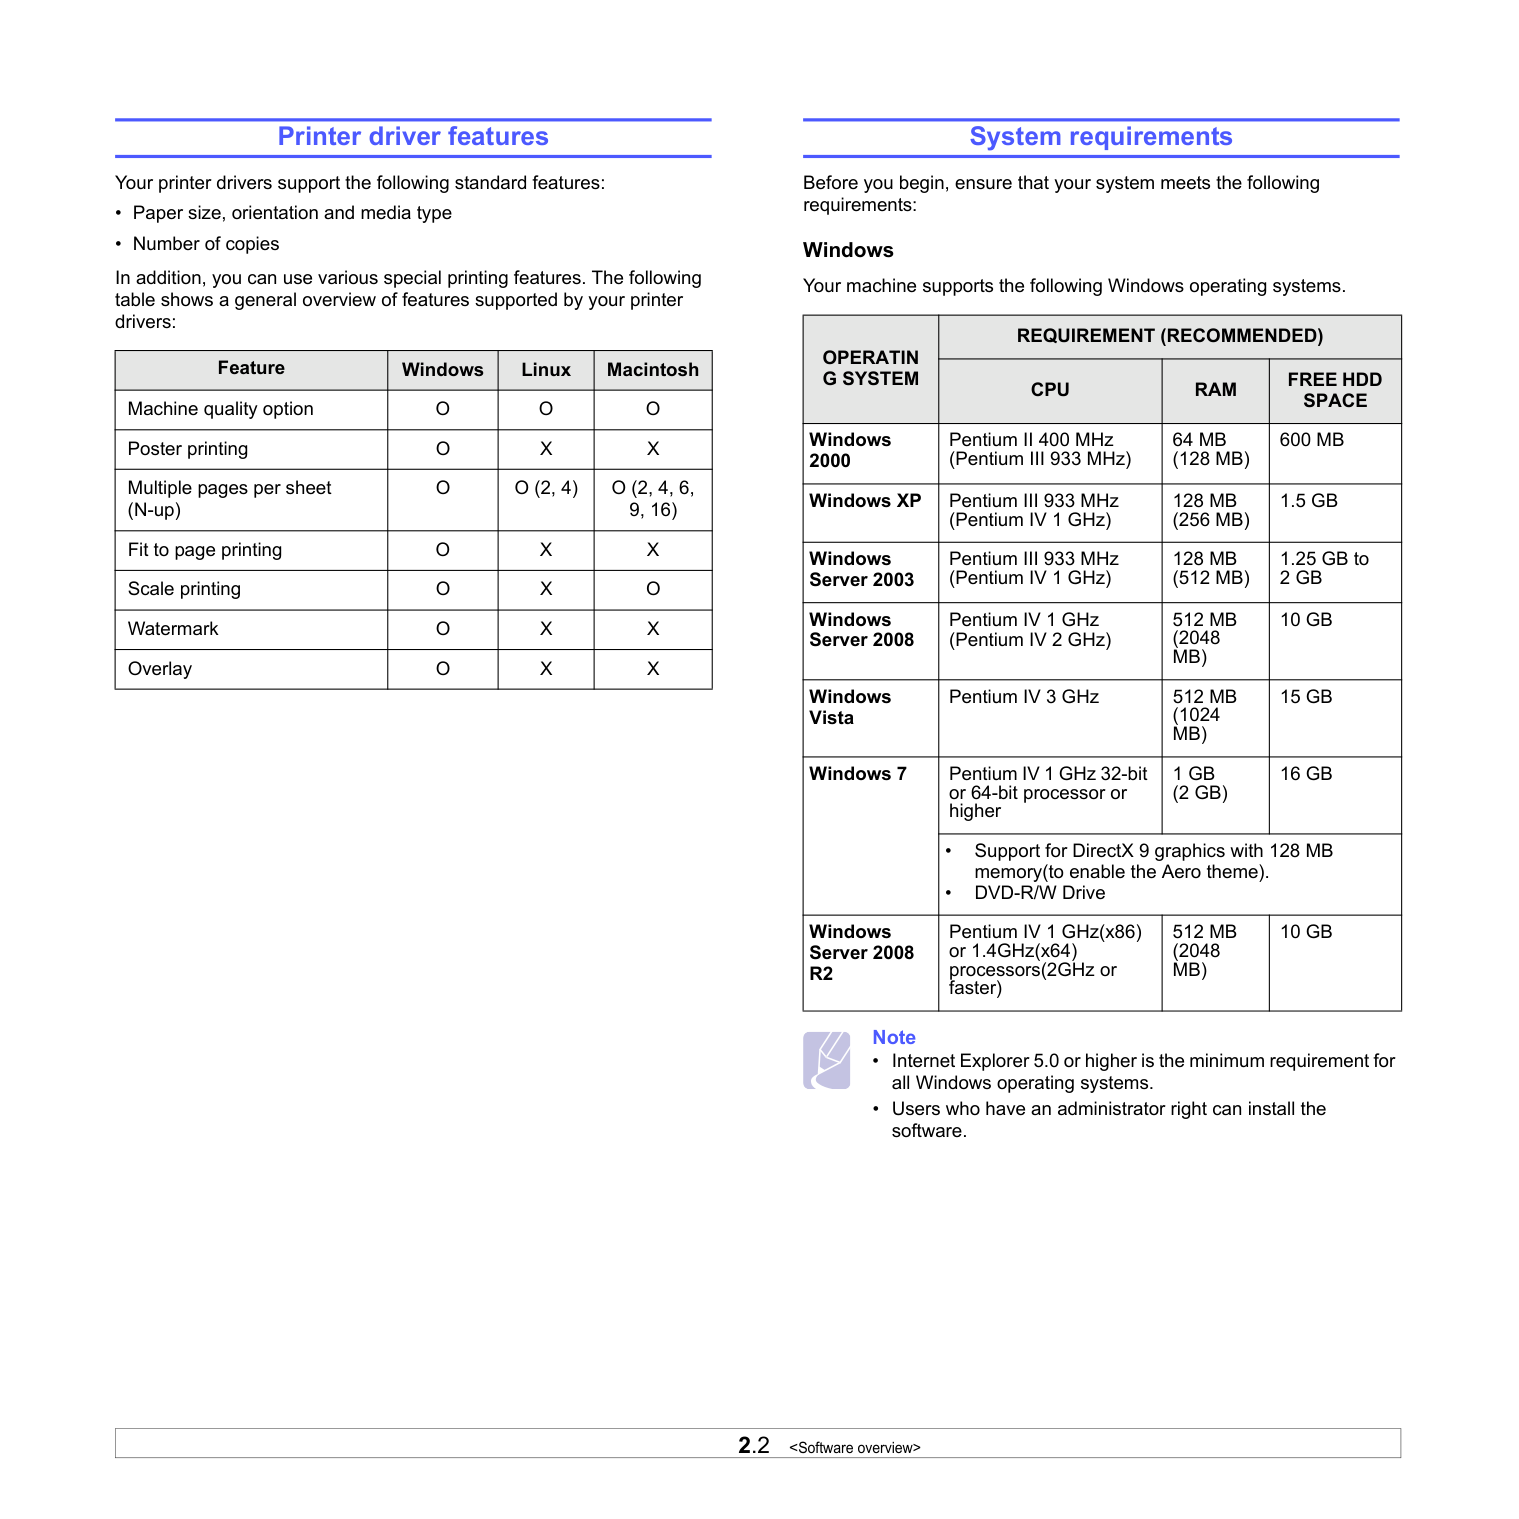
2.2 O
O
O
Poster printing O
X
X
Multiple pages per sheet (N-up) O
O (2, 4)
O (2, 4, 6,
9, 16) Fit to page printing O
X
X
Scale printing O
X
O
Watermark O
X
X
Overlay O
X
X
System requirements Before you begin, ensure that your system meets the following requirements: Windows Your machine supports the following Windows operating systems. Note Operatin
G System
Requirement (Recommended)
Cpu
Ram
Free Hdd
Space
Windows 2000 Pentium II 400 MHz (Pentium III 933 MHz) 64 Mb
(128 Mb)
600 Mb
Windows XP Pentium III 933 MHz (Pentium IV 1 GHz) 128 Mb
(256 Mb)
1.5 Gb
Windows Server 2003 Pentium III 933 MHz (Pentium IV 1 GHz) 128 Mb
(512 Mb)
1.25 GB to 2 Gb
Windows Server 2008 Pentium IV 1 GHz (Pentium IV 2 GHz) 512 Mb
(2048 Mb)
10 Gb
Windows Vista Pentium IV 3 GHz 512 Mb
(1024 Mb)
15 Gb
Windows 7 Pentium IV 1 GHz 32-bit or 64-bit processor or higher 1 Gb
(2 Gb)
16 Gb
• Support for DirectX 9 graphics with 128 MB memory(to enable the Aero theme). • DVD-R/W Drive Windows Server 2008 R2
Pentium IV 1 GHz(x86) or 1.4GHz(x64) processors(2GHz or faster) 512 Mb
(2048 Mb)
10 Gb
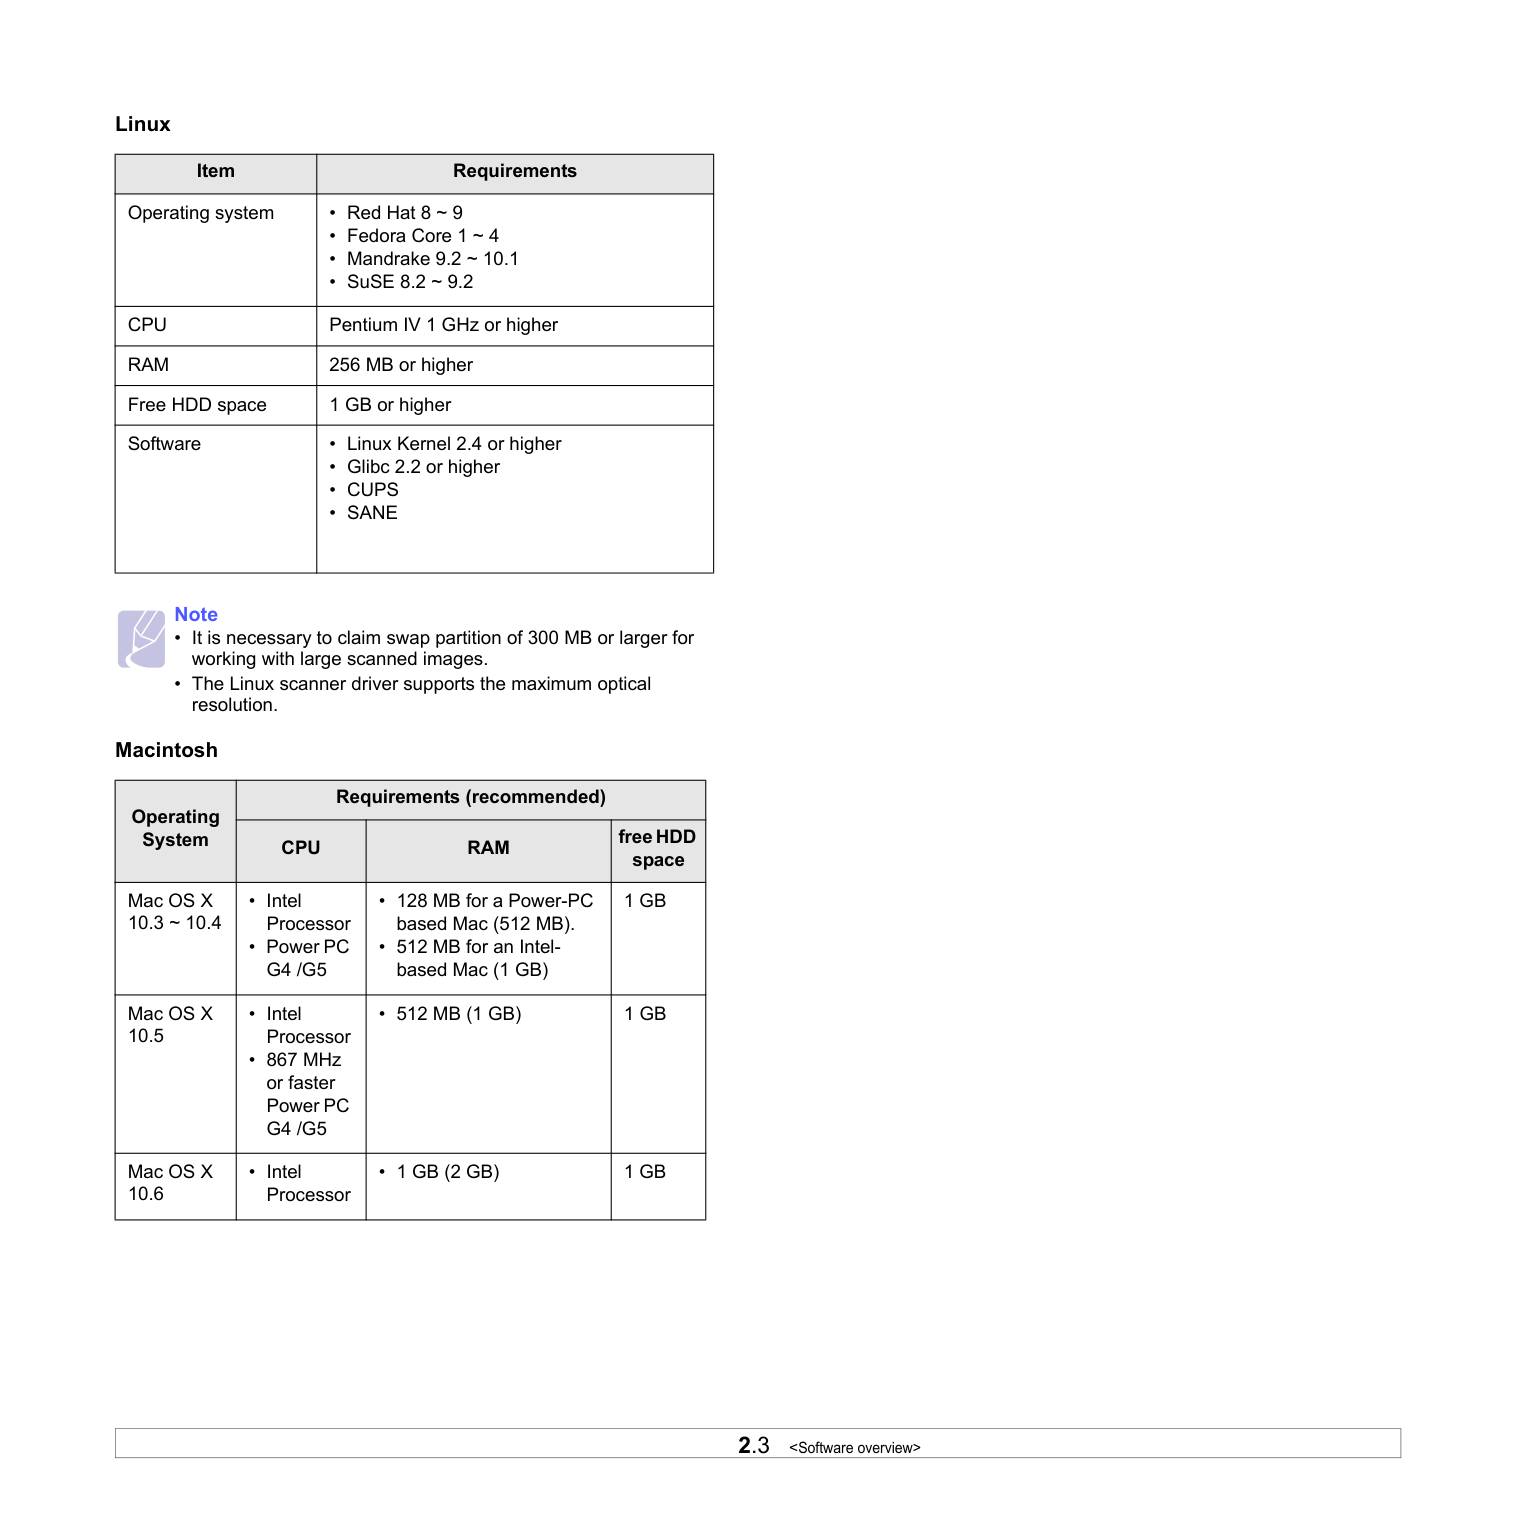
2.3 Cpu
Pentium IV 1 GHz or higher Ram
256 MB or higher Free HDD space 1 GB or higher Software • Cups
• Sane
Note Cpu
Ram
free HDD space Mac OS X 10.3 ~ 10.4 G4 /G5
1 Gb
Mac OS X 10.5 G4 /G5
• 512 Mb (1 Gb)
1 Gb
Mac OS X 10.6 • 1 Gb (2 Gb)
1 Gb
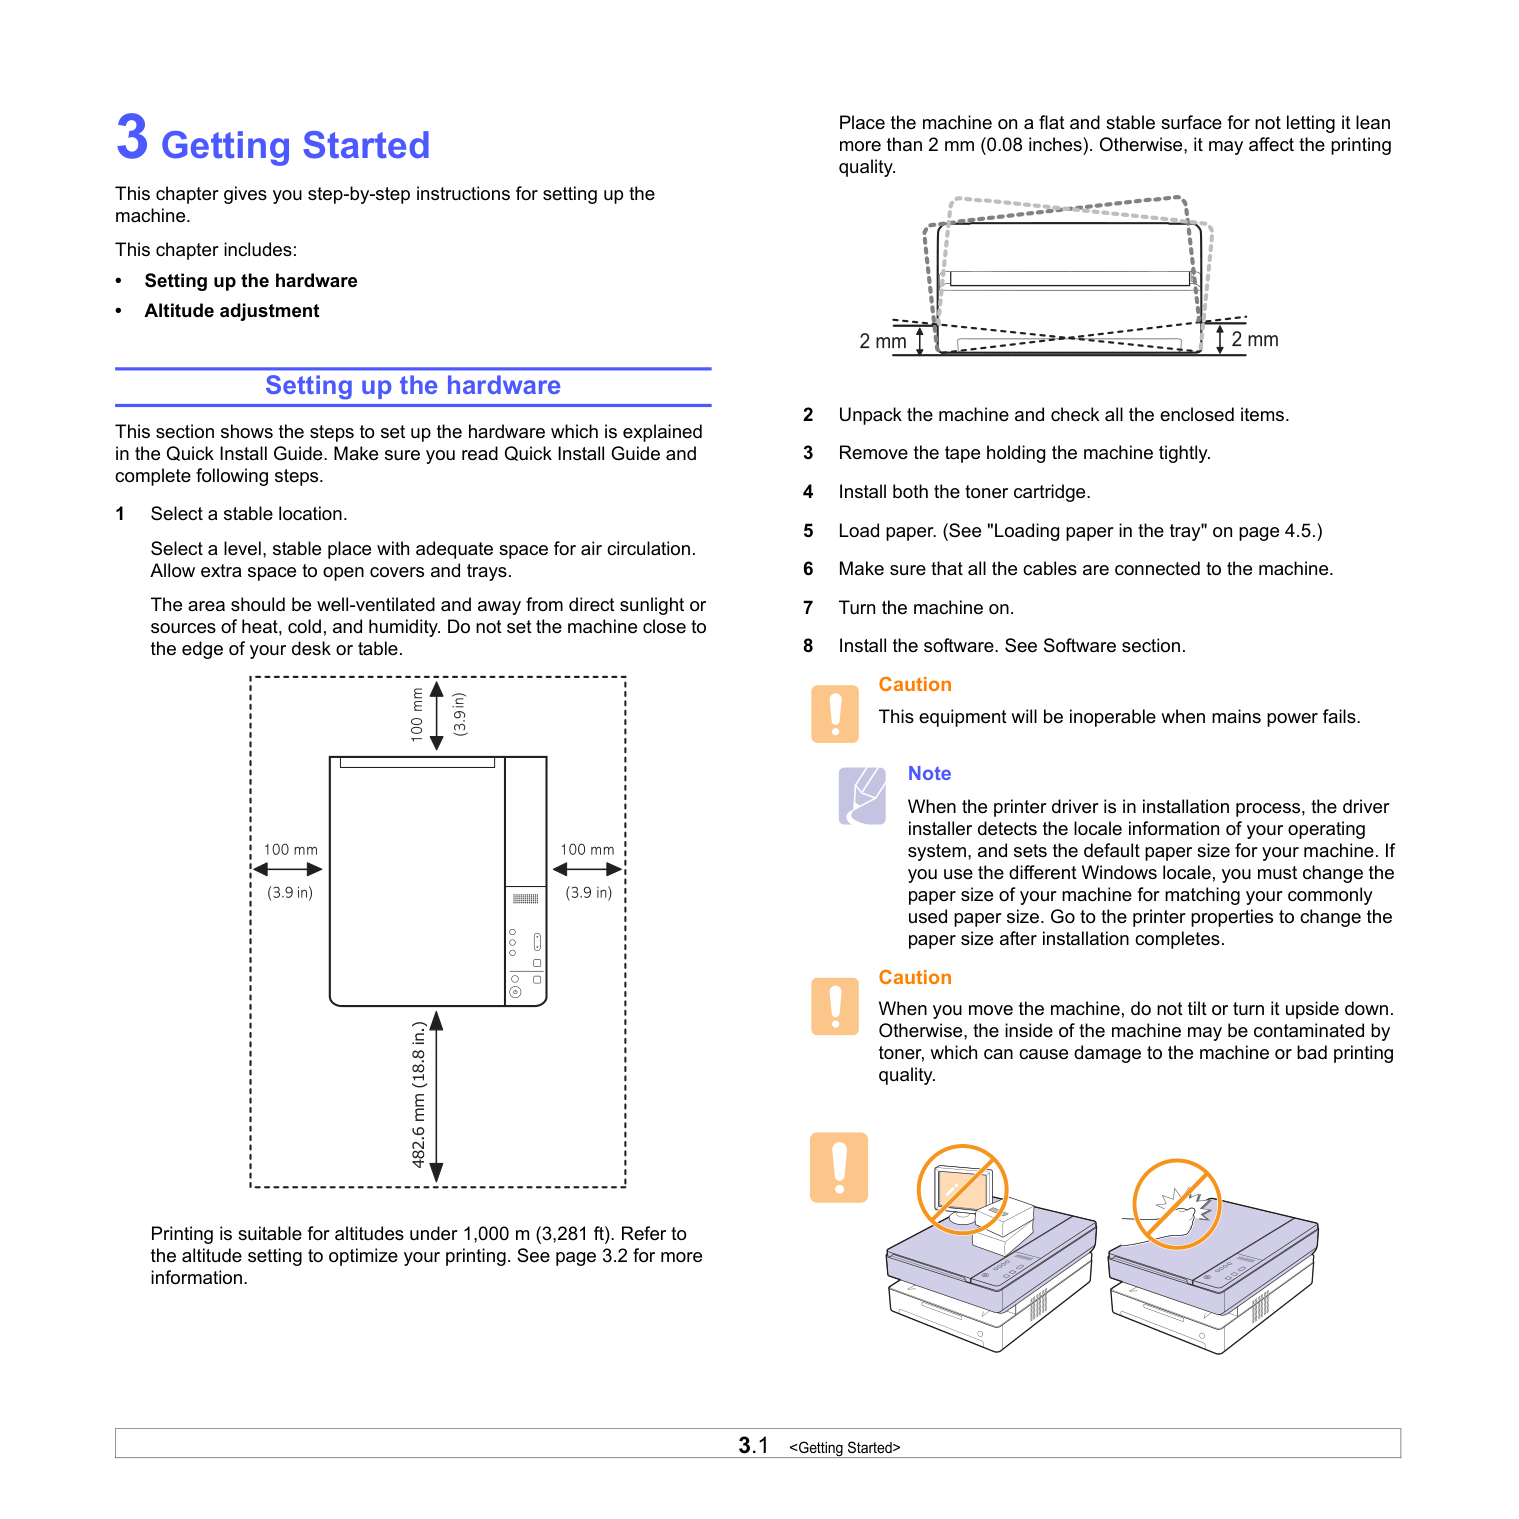
3.1
3.2

4.1
4.2
4.3
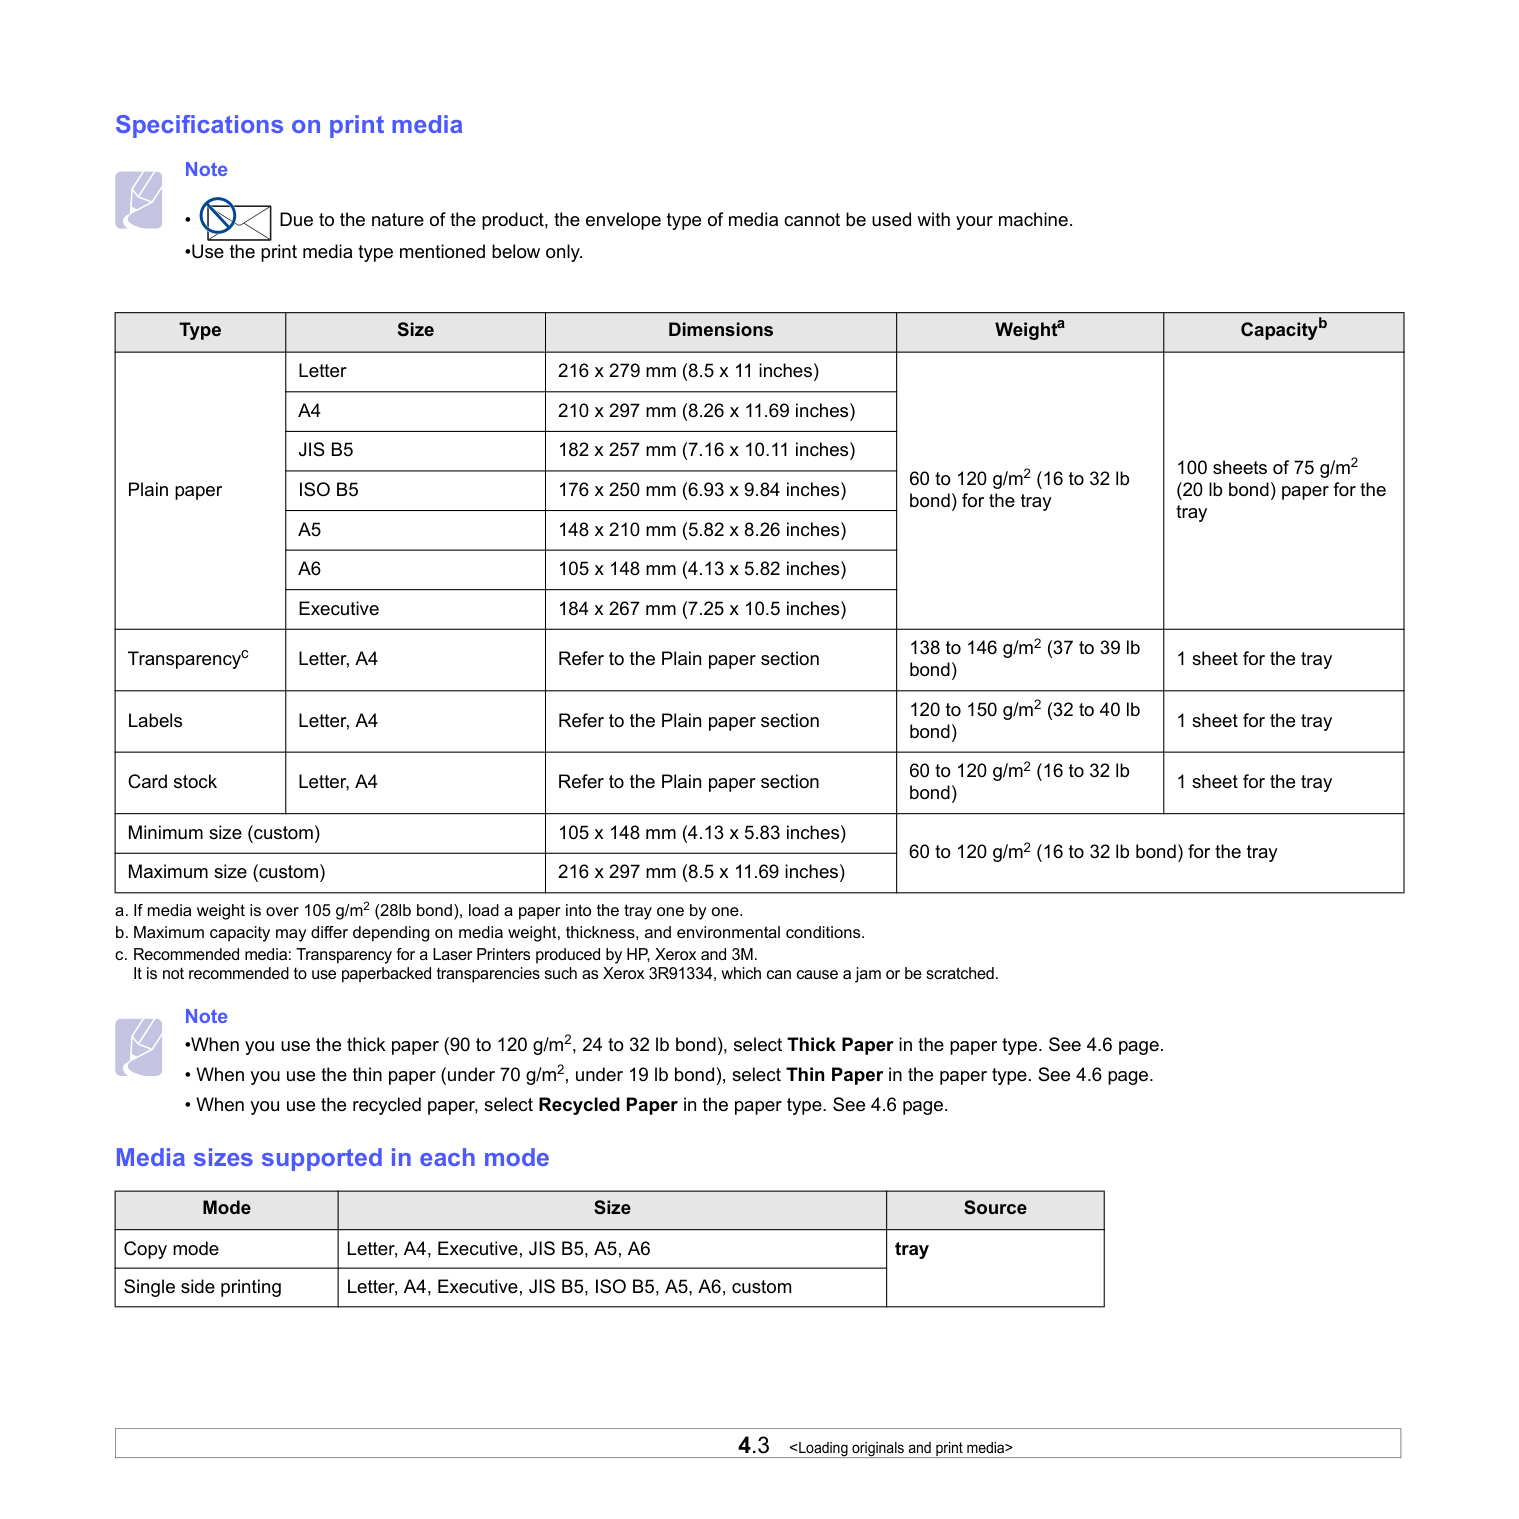
Note •When you use the thick paper (90 to 120 g/m2, 24 to 32 lb bond), select Thick Paper in the paper type. See 4.6 page.
A4
210 x 297 mm (8.26 x 11.69 inches)Jis B5
182 x 257 mm (7.16 x 10.11 inches)Iso B5
176 x 250 mm (6.93 x 9.84 inches)A5
148 x 210 mm (5.82 x 8.26 inches)A6
105 x 148 mm (4.13 x 5.82 inches) Executive 184 x 267 mm (7.25 x 10.5 inches) Transparencyc c. Recommended media: Transparency for a Laser Printers produced by HP, Xerox and 3M. It is not recommended to use paperbacked transparencies such as Xerox 3R91334, which can cause a jam or be scratched. Letter, A4 Refer to the Plain paper section 138 to 146 g/m2 (37 to 39 lb bond) 1 sheet for the tray Labels Letter, A4 Refer to the Plain paper section 120 to 150 g/m2 (32 to 40 lb bond) 1 sheet for the tray Card stock Letter, A4 Refer to the Plain paper section 60 to 120 g/m2 (16 to 32 lb bond) 1 sheet for the tray Minimum size (custom) 105 x 148 mm (4.13 x 5.83 inches) 60 to 120 g/m2 (16 to 32 lb bond) for the tray Maximum size (custom) 216 x 297 mm (8.5 x 11.69 inches) Mode Size Source Copy mode Letter, A4, Executive, JIS B5, A5, A6 tray Single side printing Letter, A4, Executive, JIS B5, ISO B5, A5, A6, custom
4.4
4.5
4.6
5.1
6.1
7.1
8.1
8.2
8.3
8.4
8.5
8.6

8.7
9.1 Led(
) blinks In the paper feed area and rear the machine Clear the jam. (Page 9.1) Rear and Inside the machine Clear the jam. (Page 9.3) In the exit area Clear the jam. (Page 9.5) In the paper feed area and rear the machine If paper is jammed in the paper feed area and rear the machine, follow the next steps to release the jammed paper. 1 Press the tray open button. 2 Pull the tray open. 3 Remove the jammed paper by gently pulling it straight out as shown below.
9.2
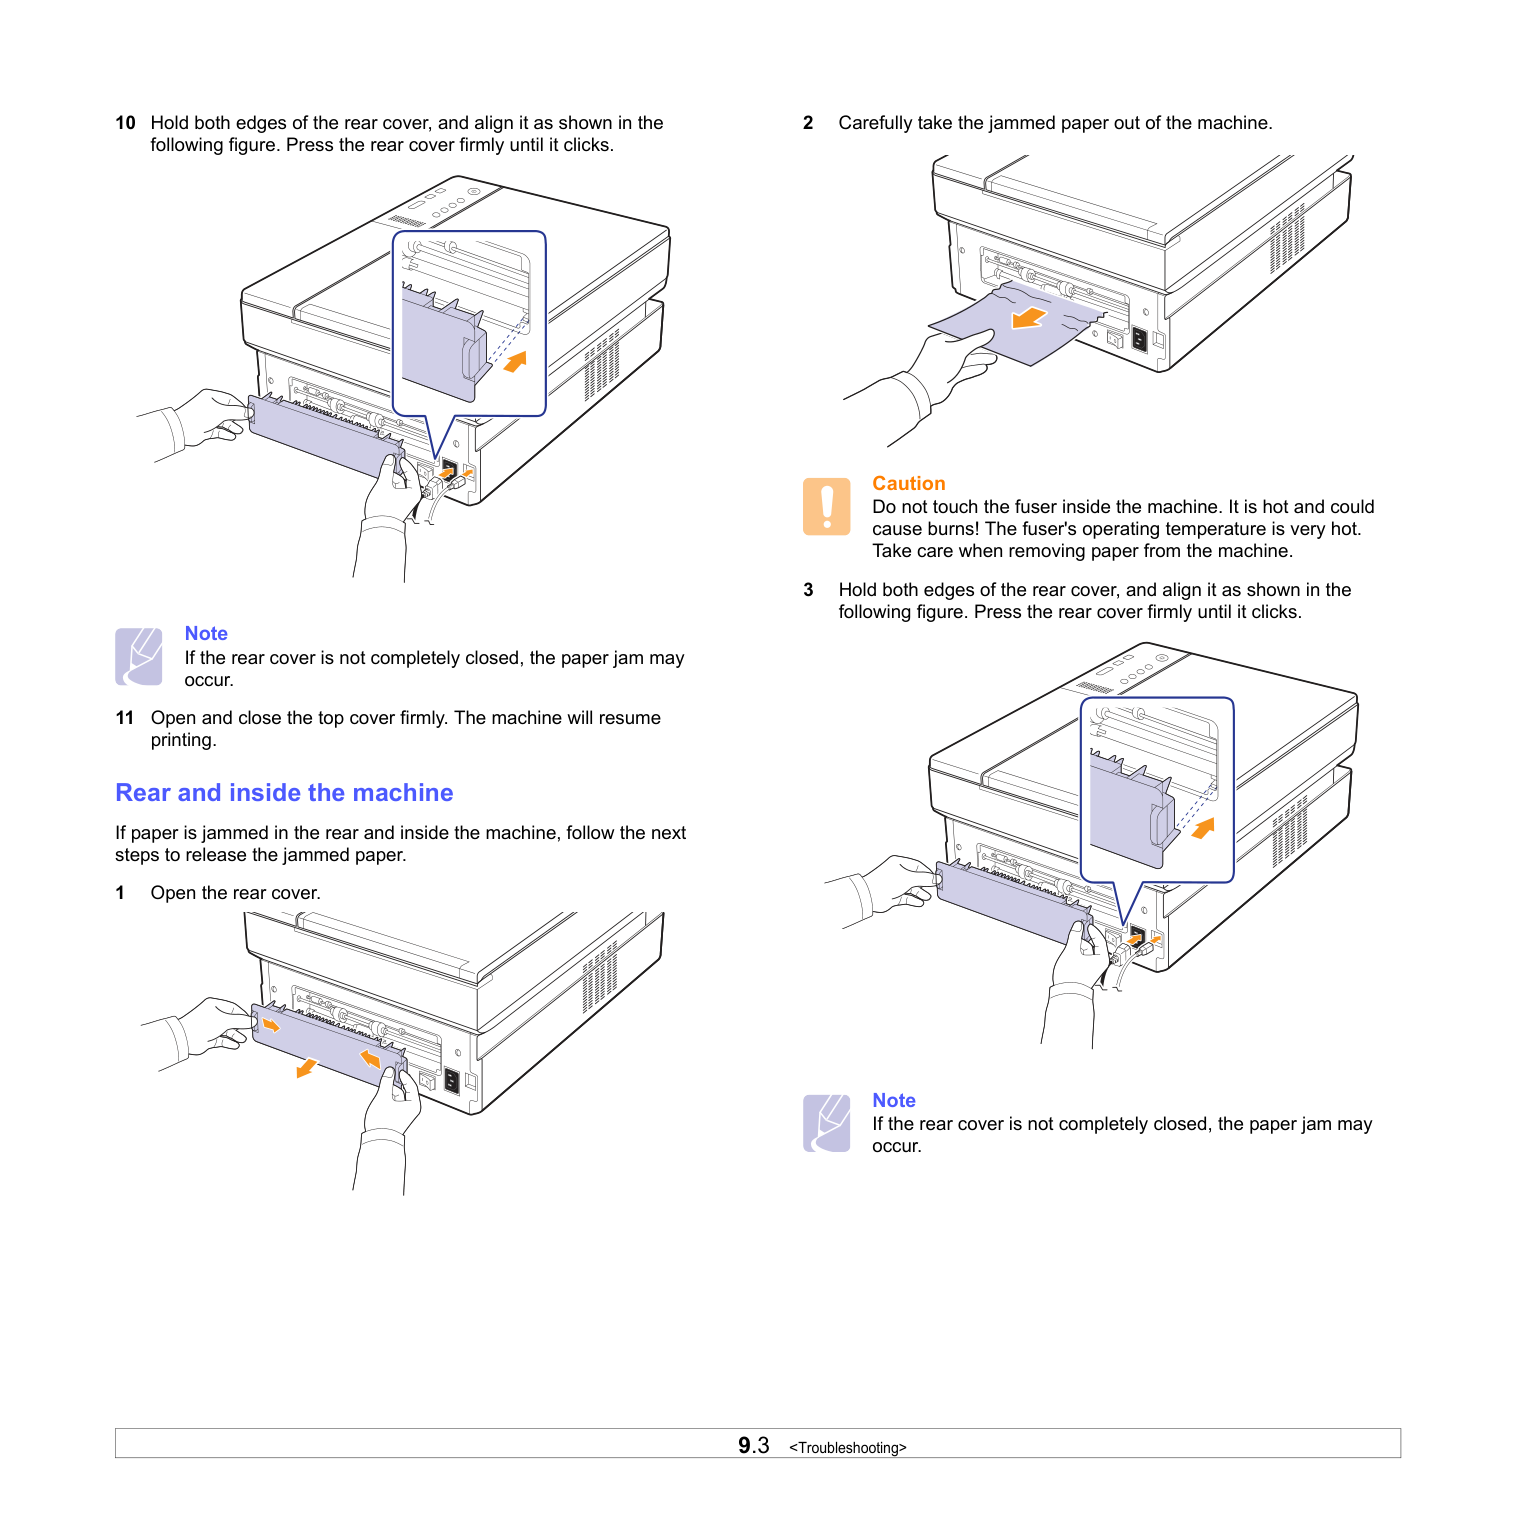
9.3
9.4

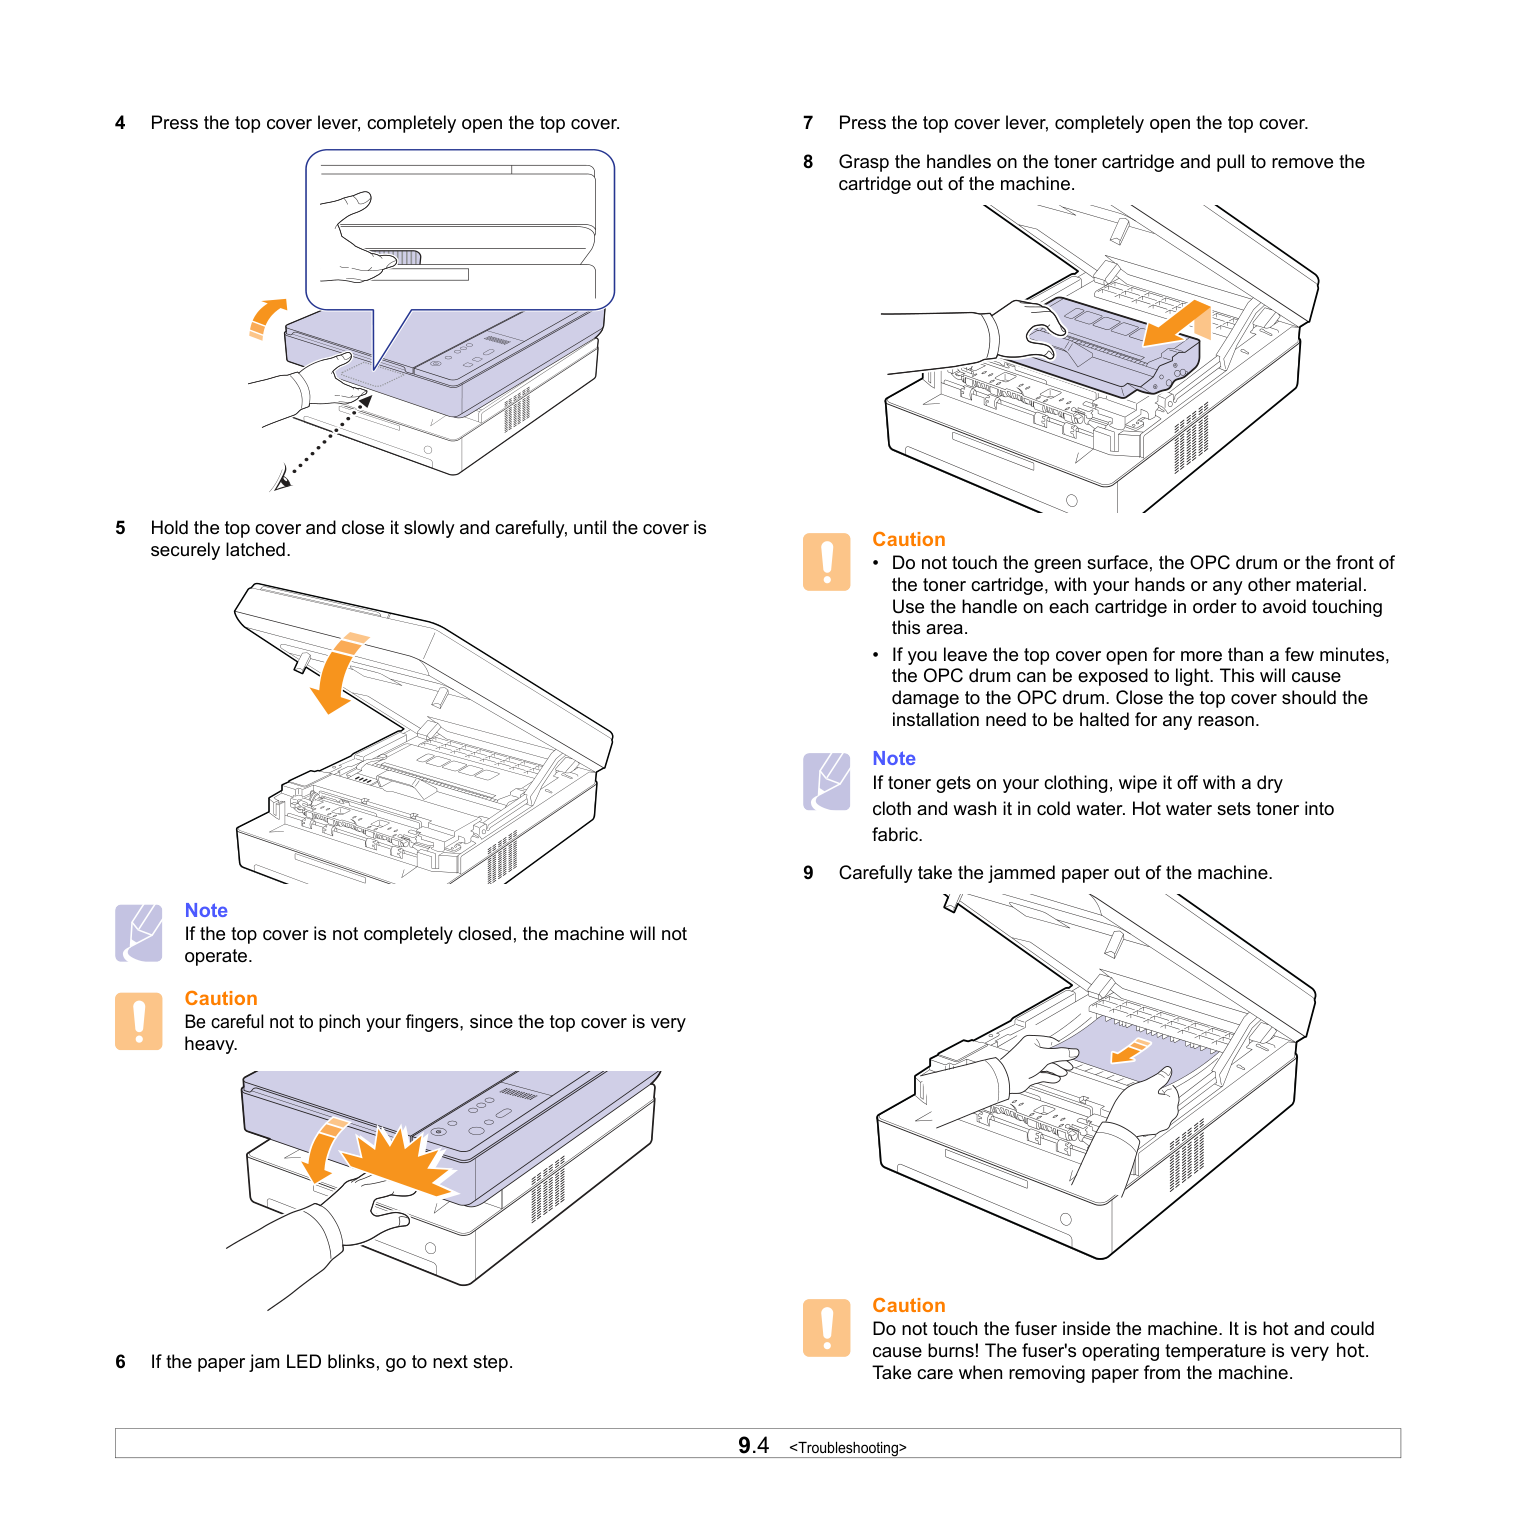
9.5
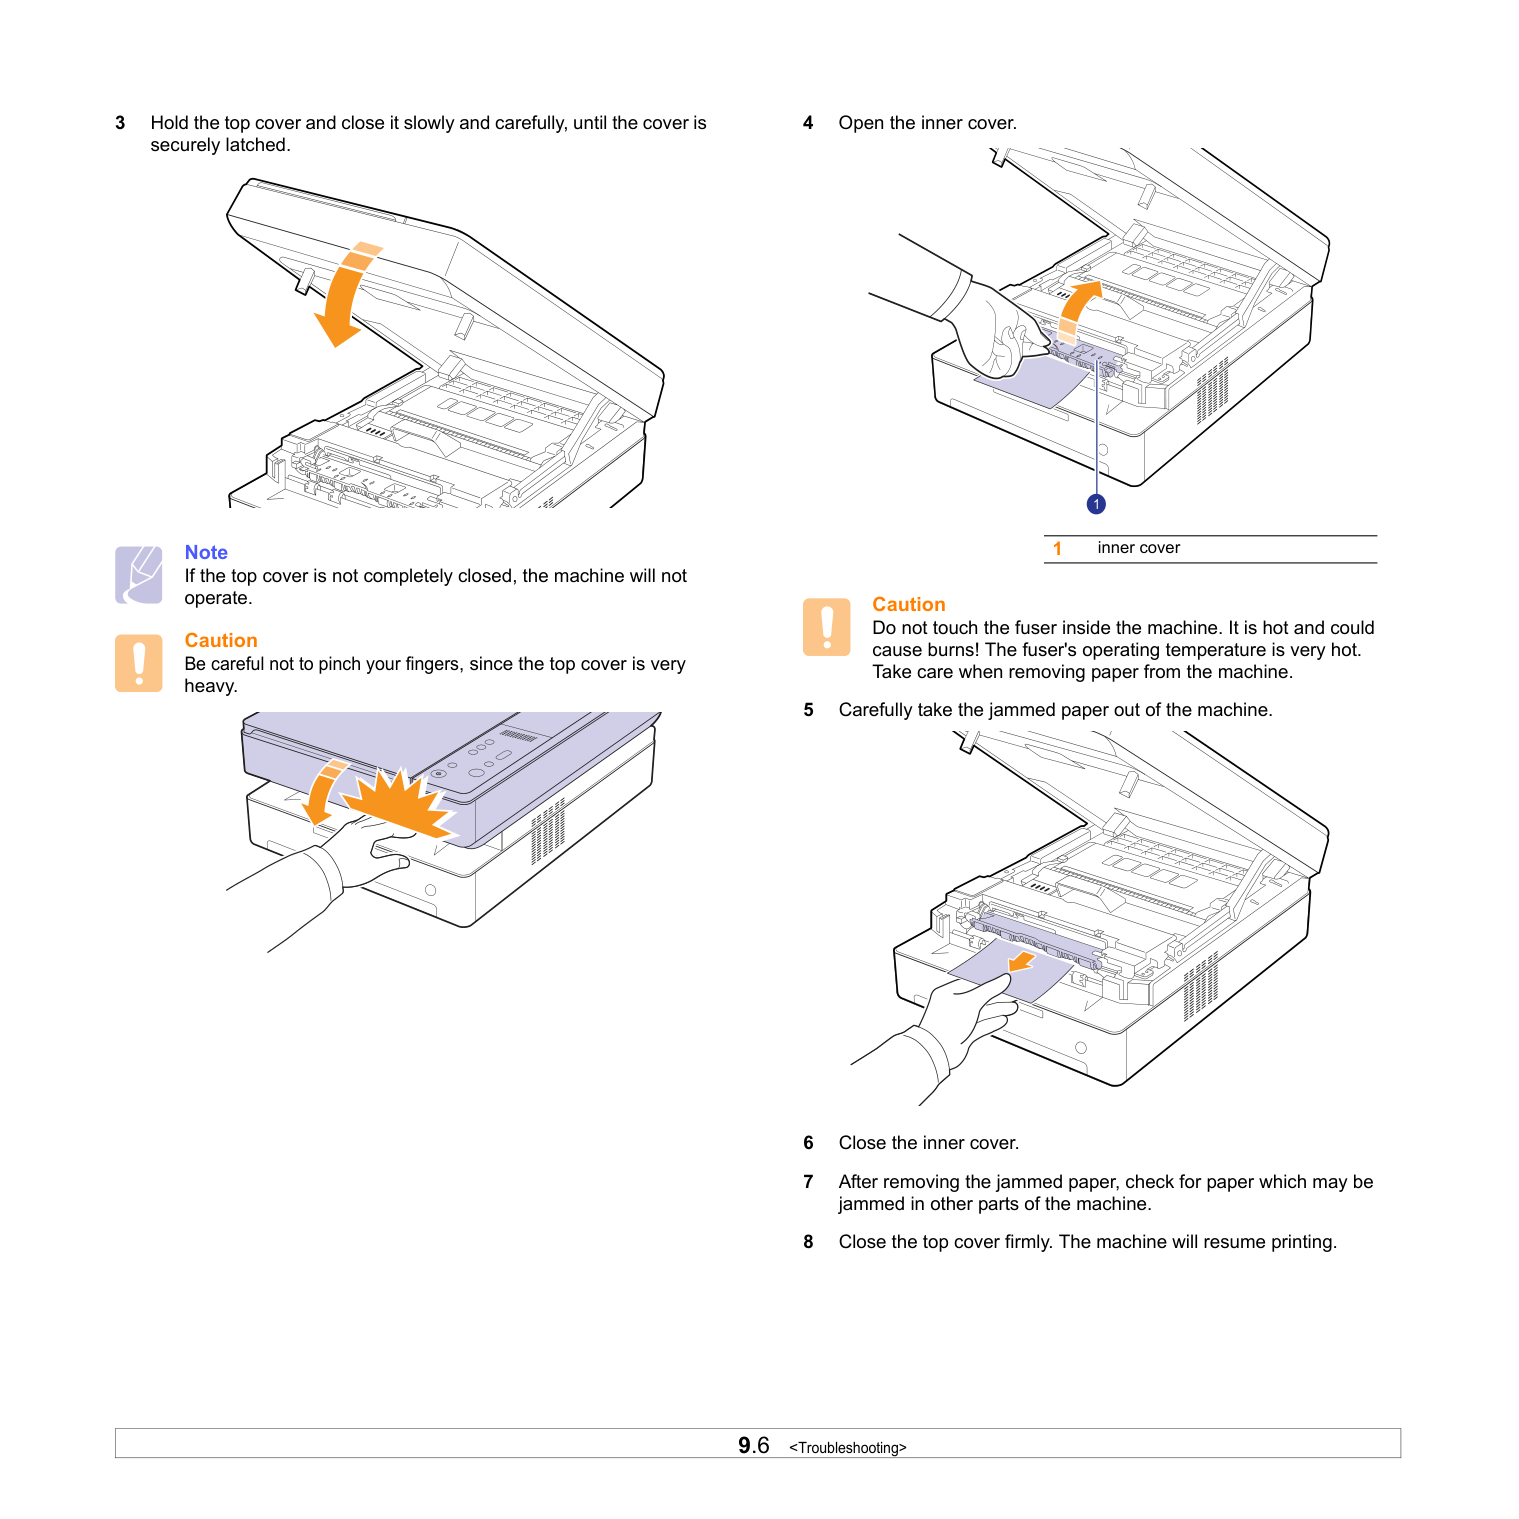
9.6
9.7
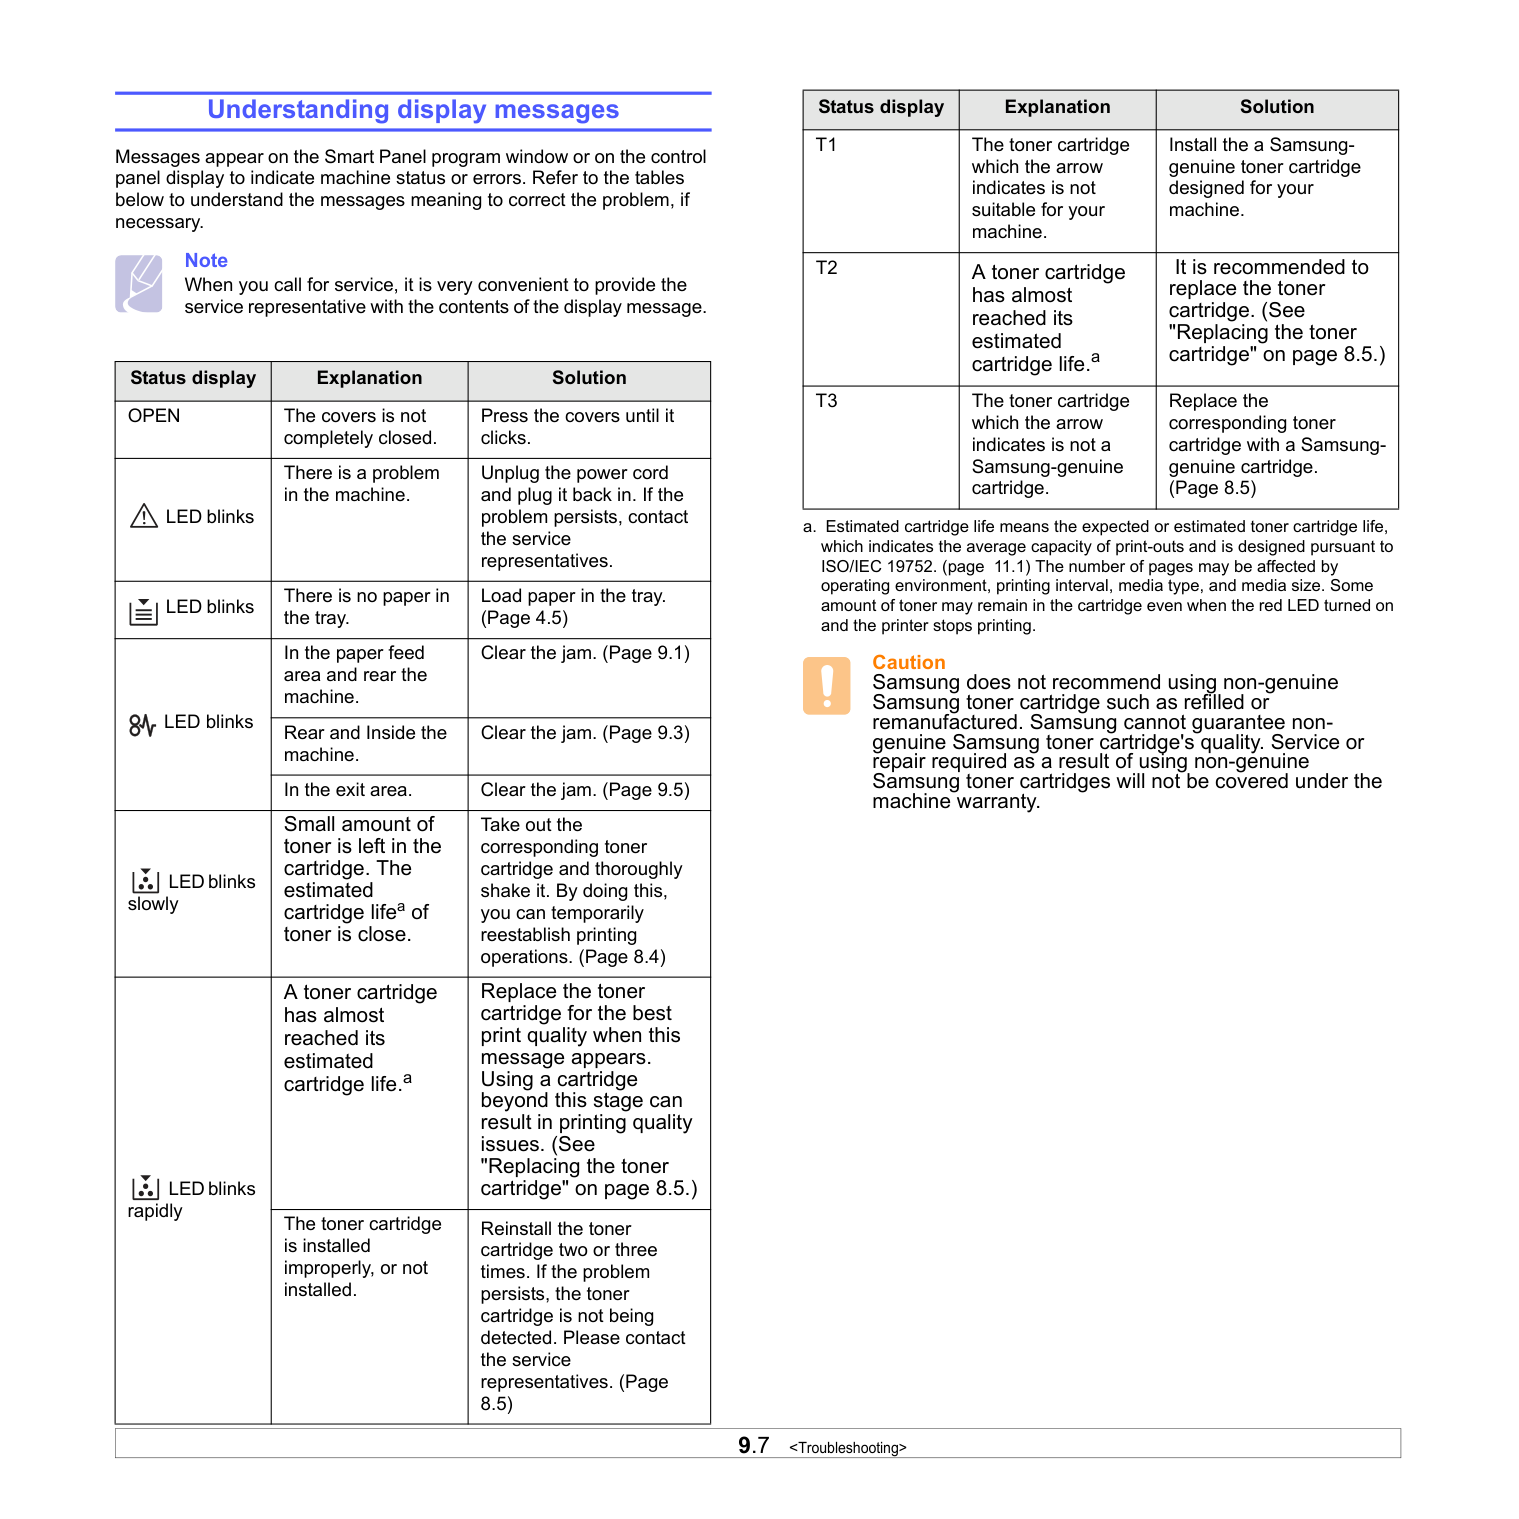
Status display Explanation Solution
Open
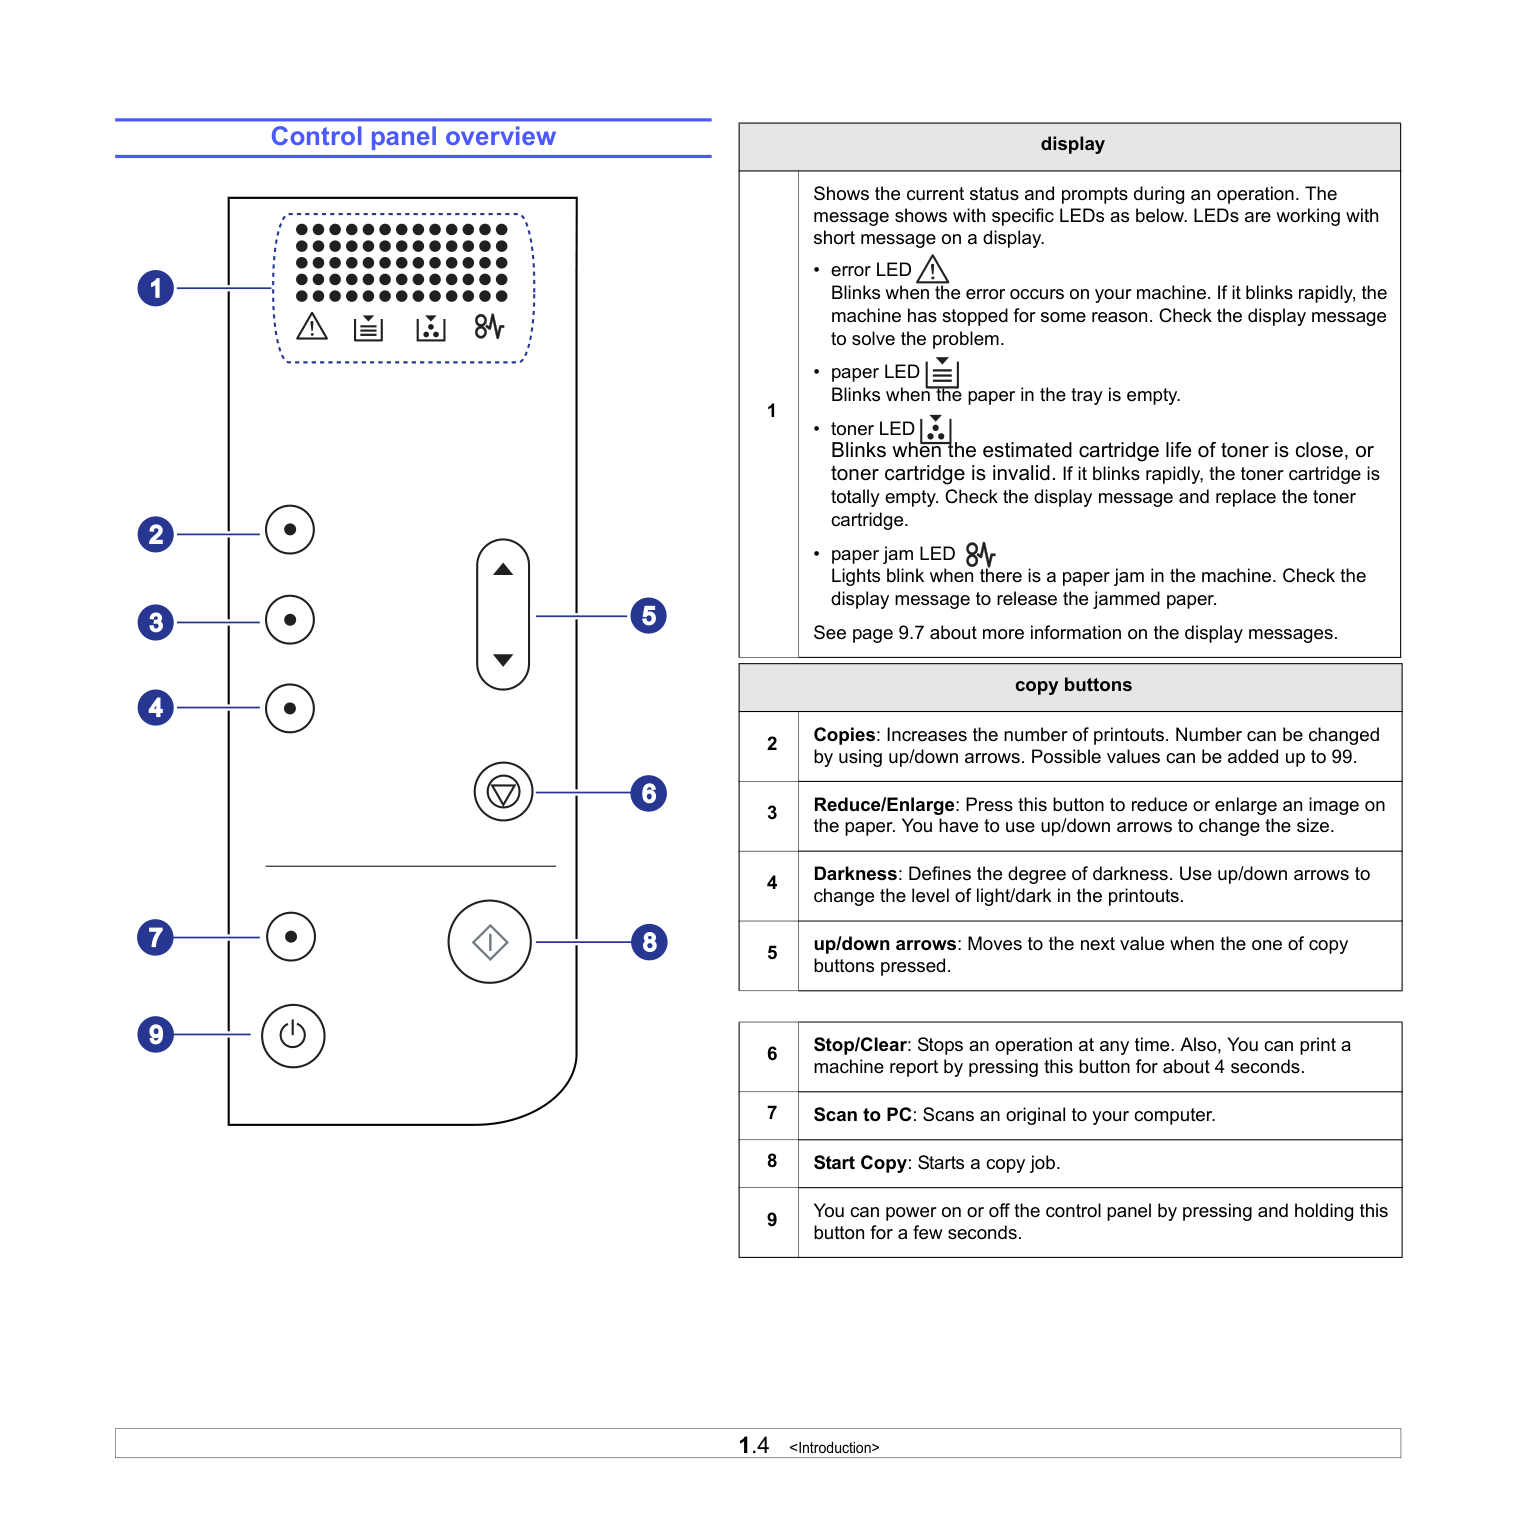
The covers is not completely closed. Press the covers until it clicks. LED blinks There is a problem in the machine. Unplug the power cord and plug it back in. If the problem persists, contact the service representatives. LED blinks There is no paper in the tray. Load paper in the tray. (Page 4.5) LED blinks In the paper feed area and rear the machine. Clear the jam. (Page 9.1) Rear and Inside the machine. Clear the jam. (Page 9.3) In the exit area. Clear the jam. (Page 9.5) LED blinks slowly Small amount of toner is left in the cartridge. The estimated cartridge lifea of toner is close. Take out the corresponding toner cartridge and thoroughly shake it. By doing this, you can temporarily reestablish printing operations. (Page 8.4) LED blinks rapidly A toner cartridge has almost reached its estimated cartridge life.a Replace the toner cartridge for the best print quality when this message appears. Using a cartridge beyond this stage can result in printing quality issues. (See "Replacing the toner cartridge" on page 8.5.) The toner cartridge is installed improperly, or not installed. Reinstall the toner cartridge two or three times. If the problem persists, the toner cartridge is not being detected. Please contact the service representatives. (Page 8.5)T1
The toner cartridge which the arrow indicates is not suitable for your machine. Install the a Samsung- genuine toner cartridge designed for your machine.T2
A toner cartridge has almost reached its estimated cartridge life.a It is recommended to replace the toner cartridge. (See "Replacing the toner cartridge" on page 8.5.)T3
The toner cartridge which the arrow indicates is not a Samsung-genuine cartridge. Replace the corresponding toner cartridge with a Samsung- genuine cartridge. (Page 8.5) a. Estimated cartridge life means the expected or estimated toner cartridge life, which indicates the average capacity of print-outs and is designed pursuant to ISO/IEC 19752. (page 11.1) The number of pages may be affected by operating environment, printing interval, media type, and media size. Some amount of toner may remain in the cartridge even when the red LED turned on and the printer stops printing. Caution Samsung does not recommend using non-genuine Samsung toner cartridge such as refilled or remanufactured. Samsung cannot guarantee non- genuine Samsung toner cartridge's quality. Service or repair required as a result of using non-genuine Samsung toner cartridges will not be covered under the machine warranty. Status display Explanation Solution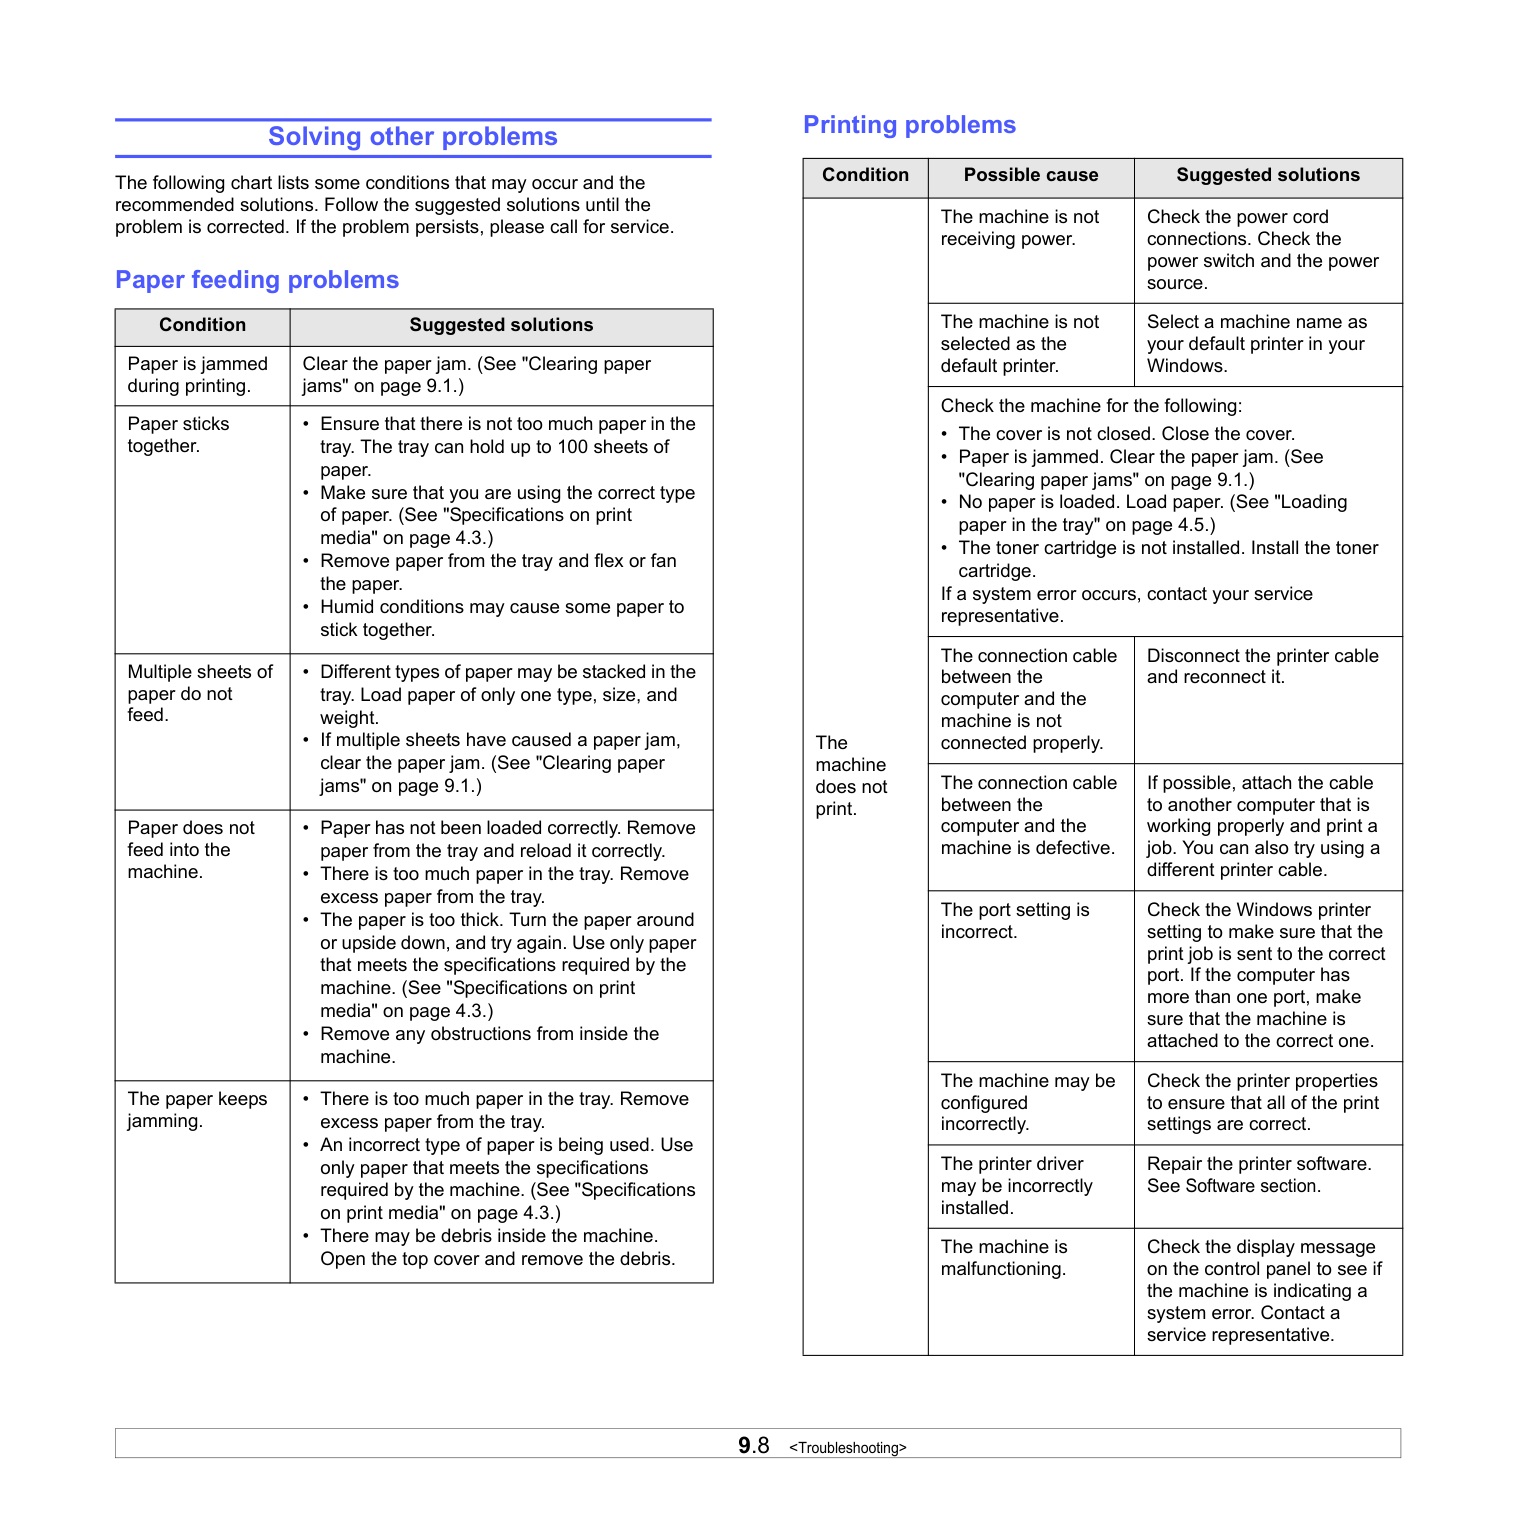
9.8
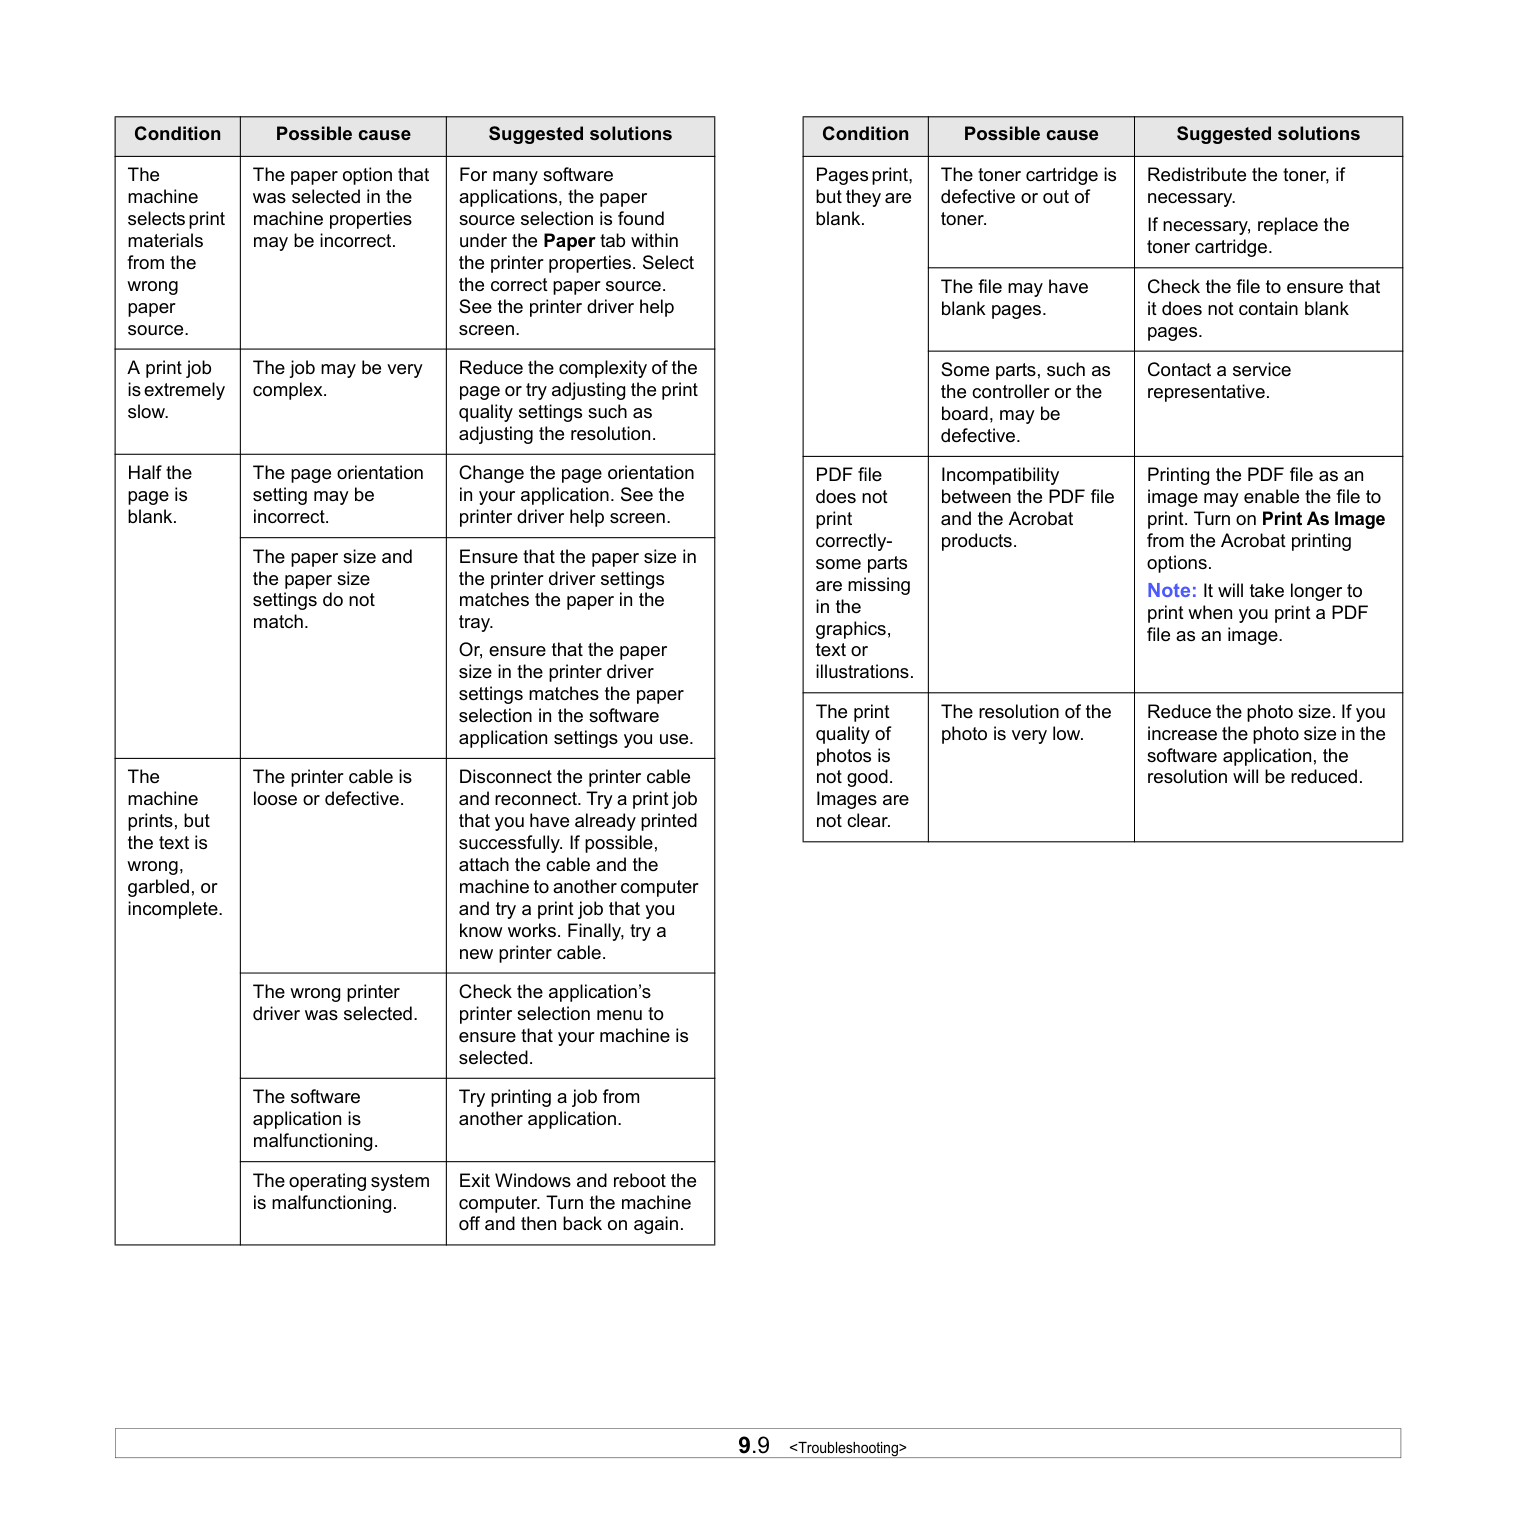
9.9
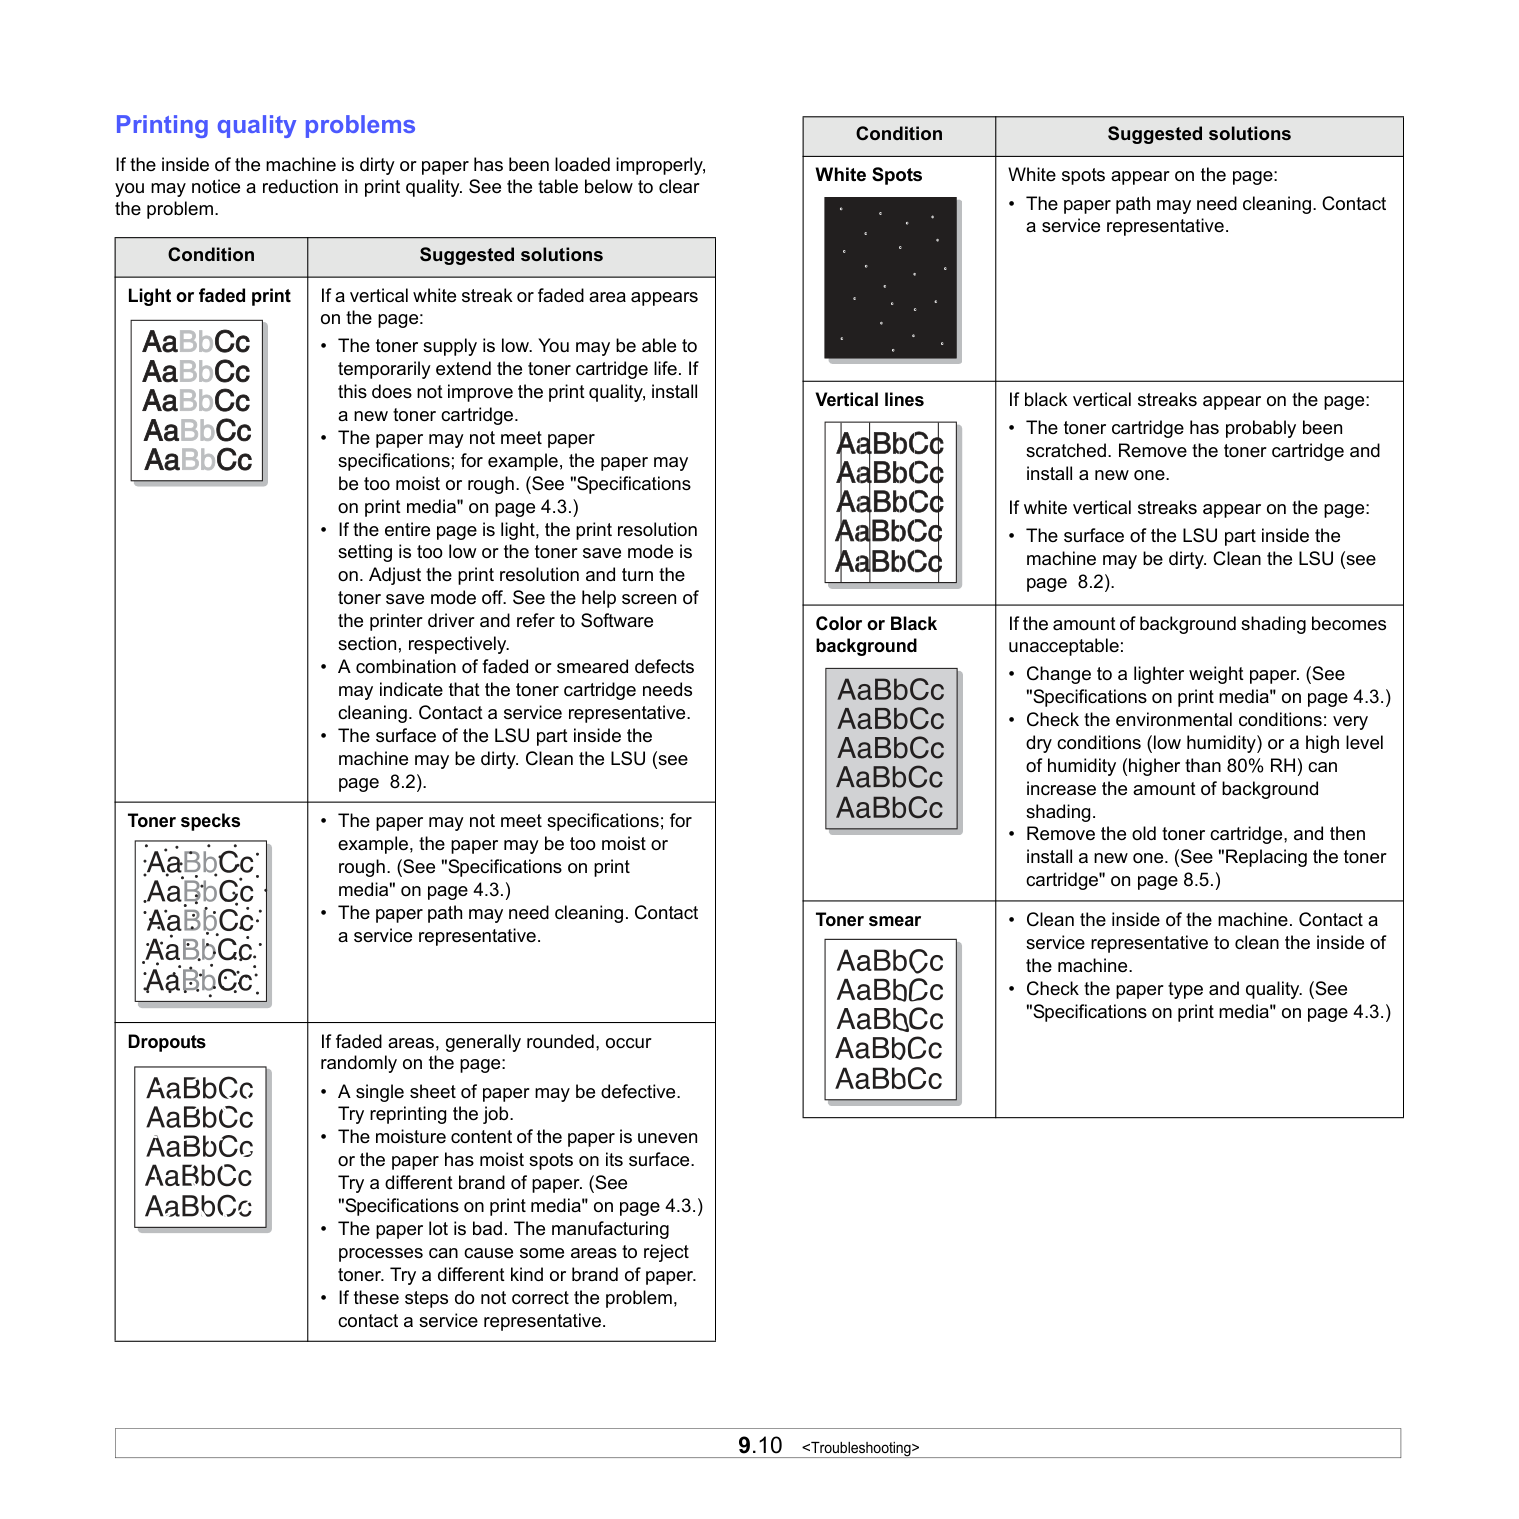
9.10
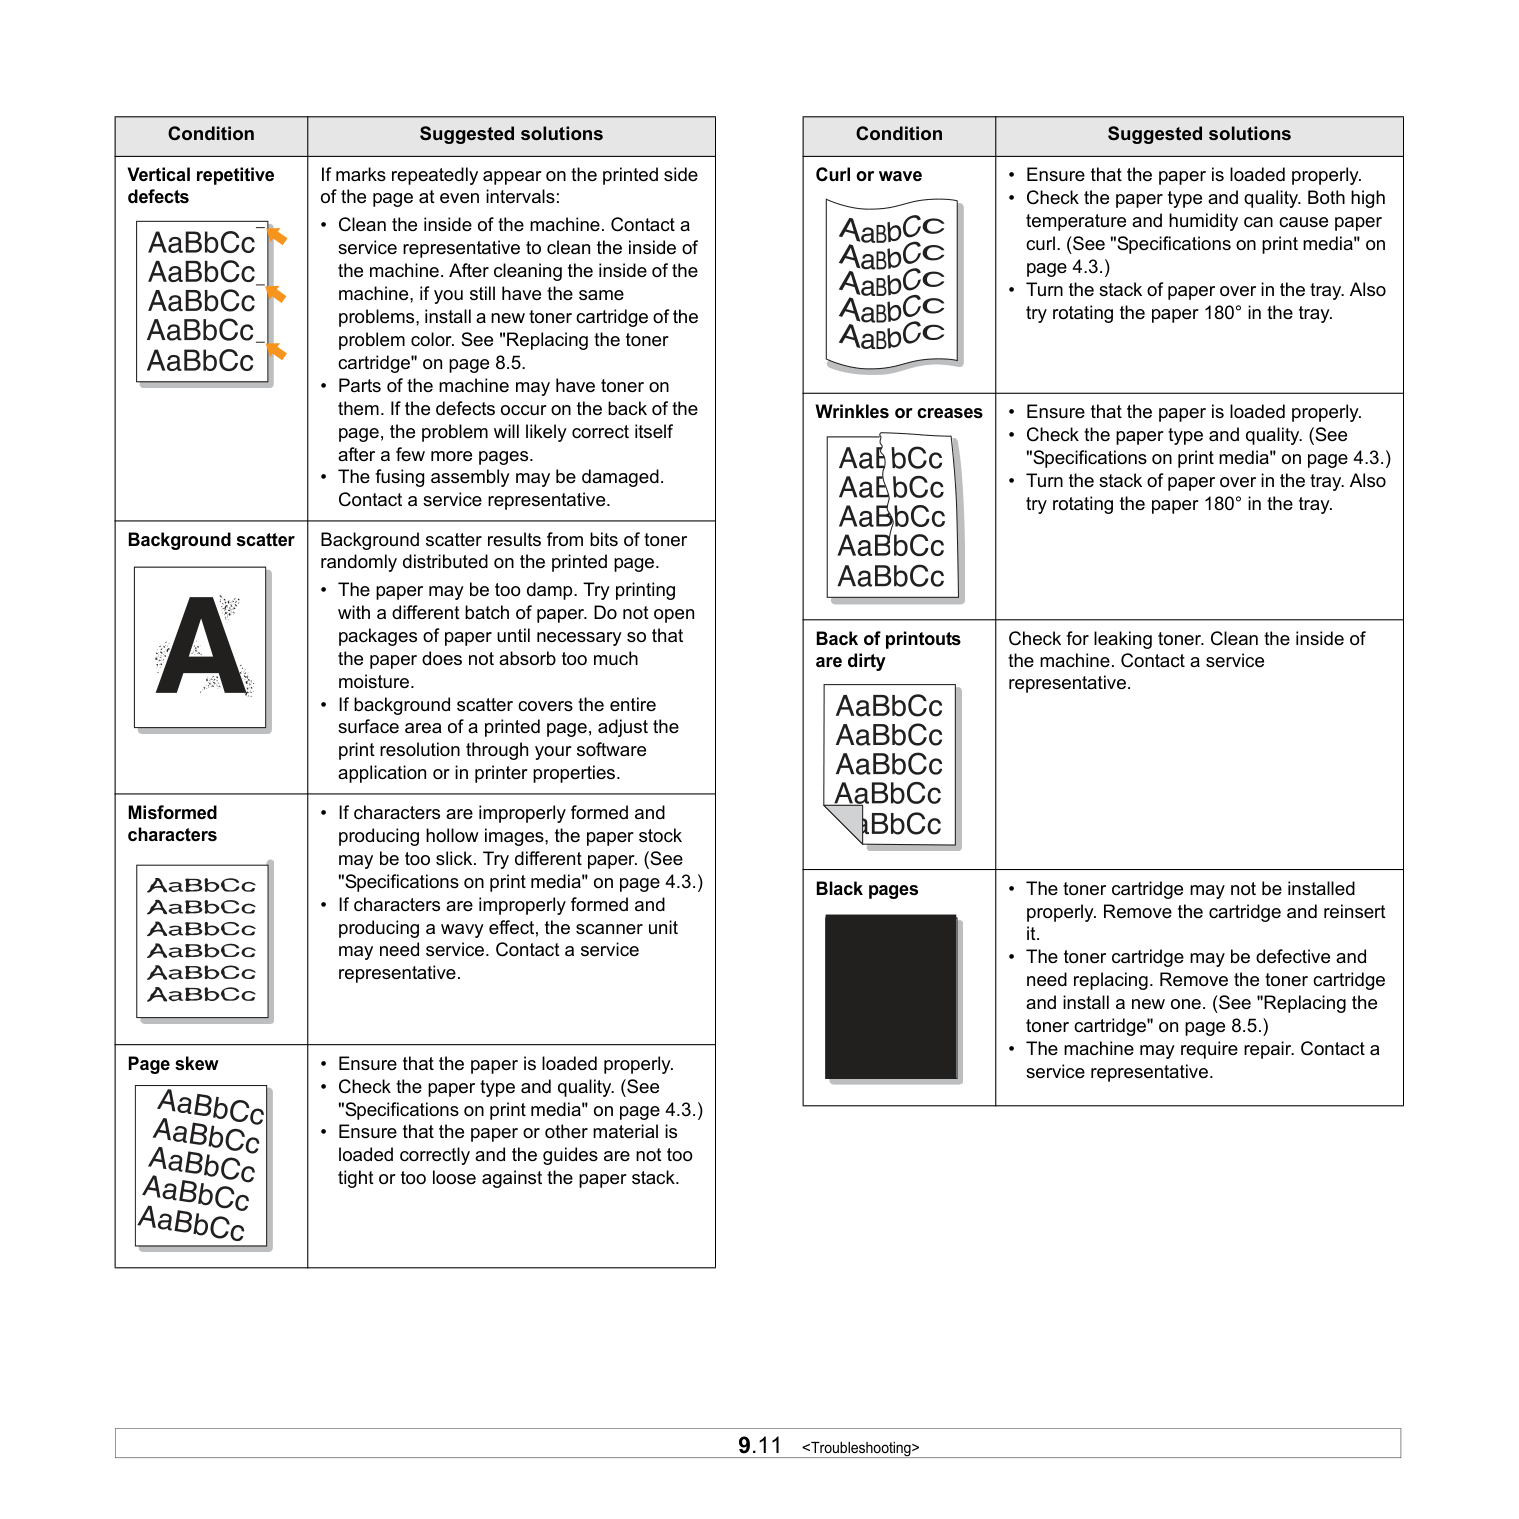
9.11
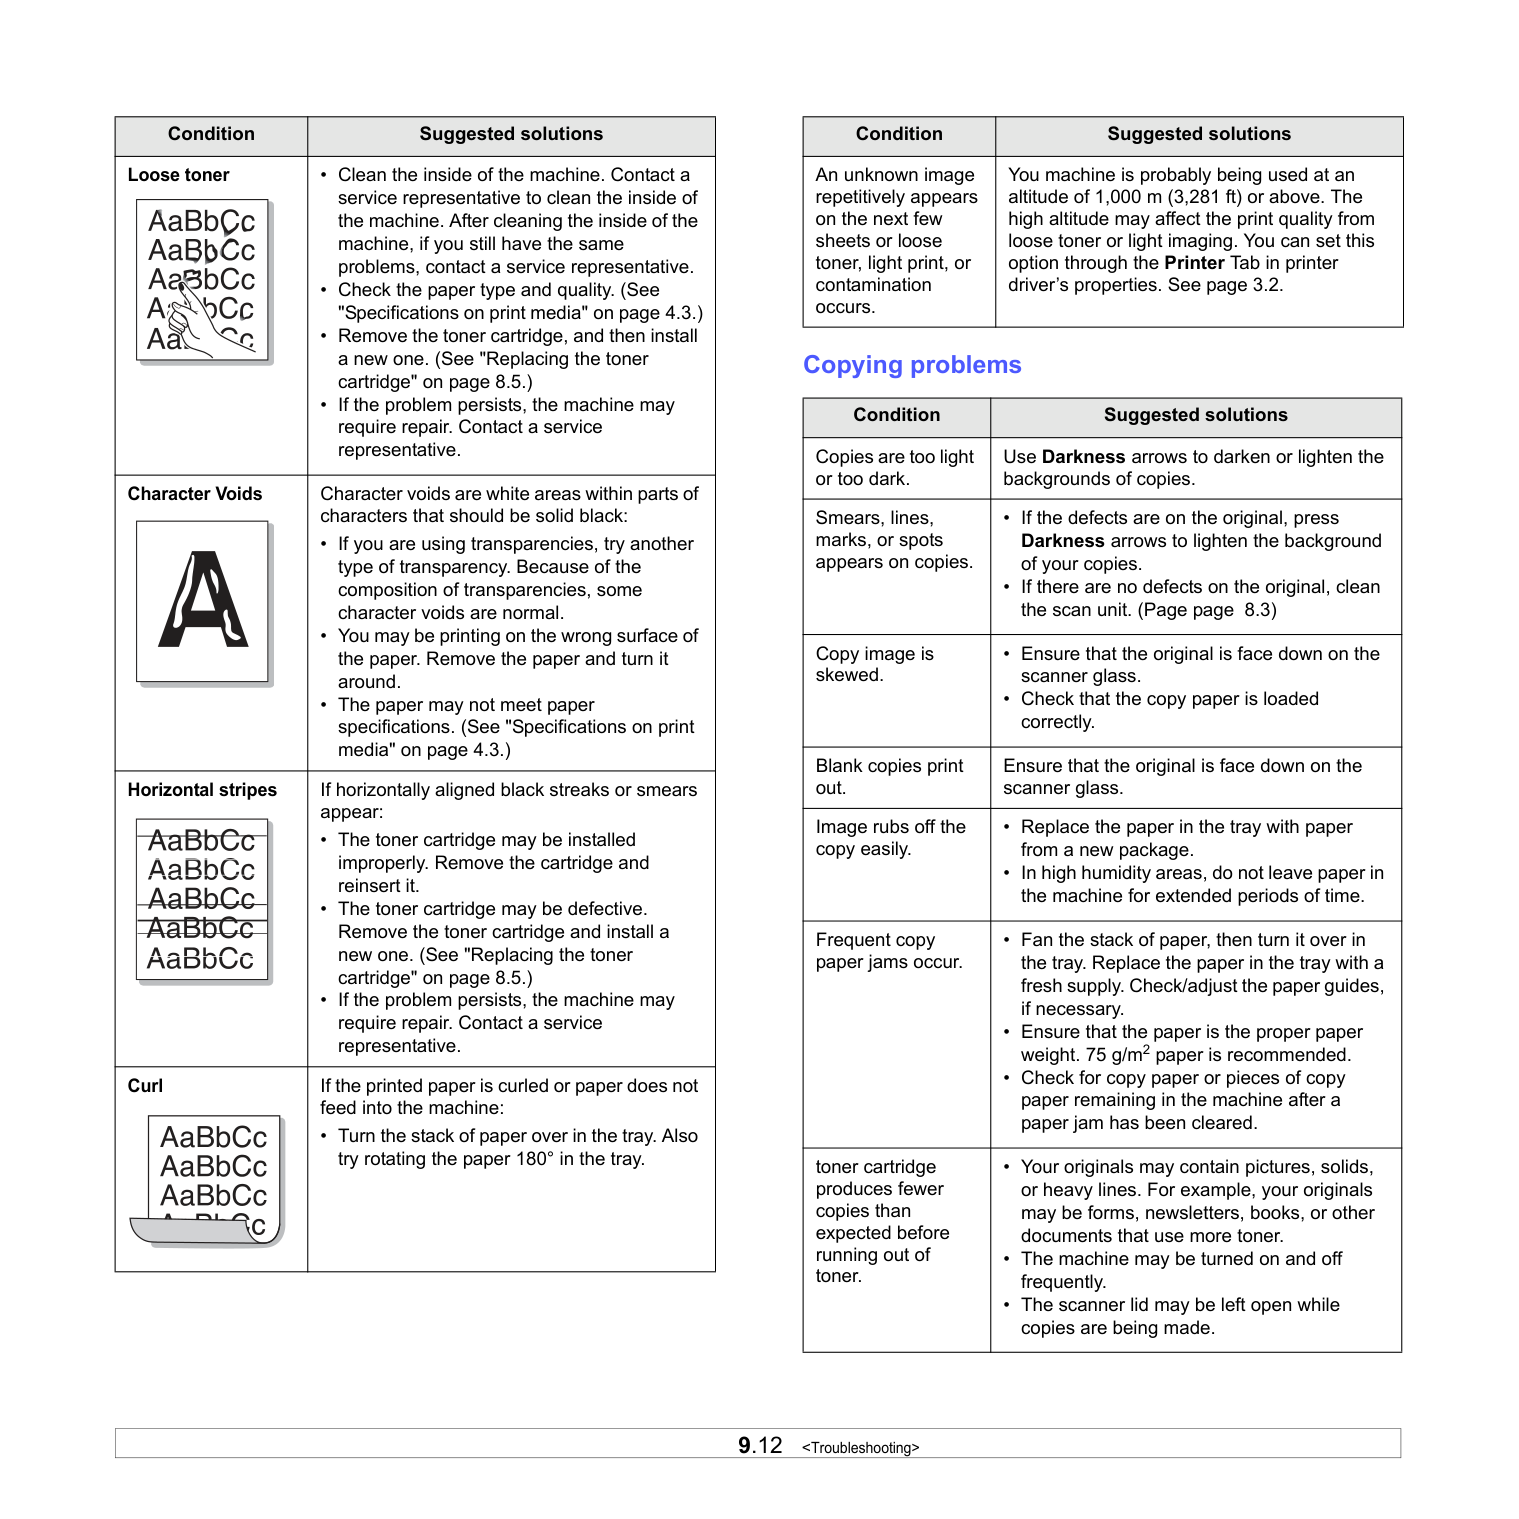
9.12
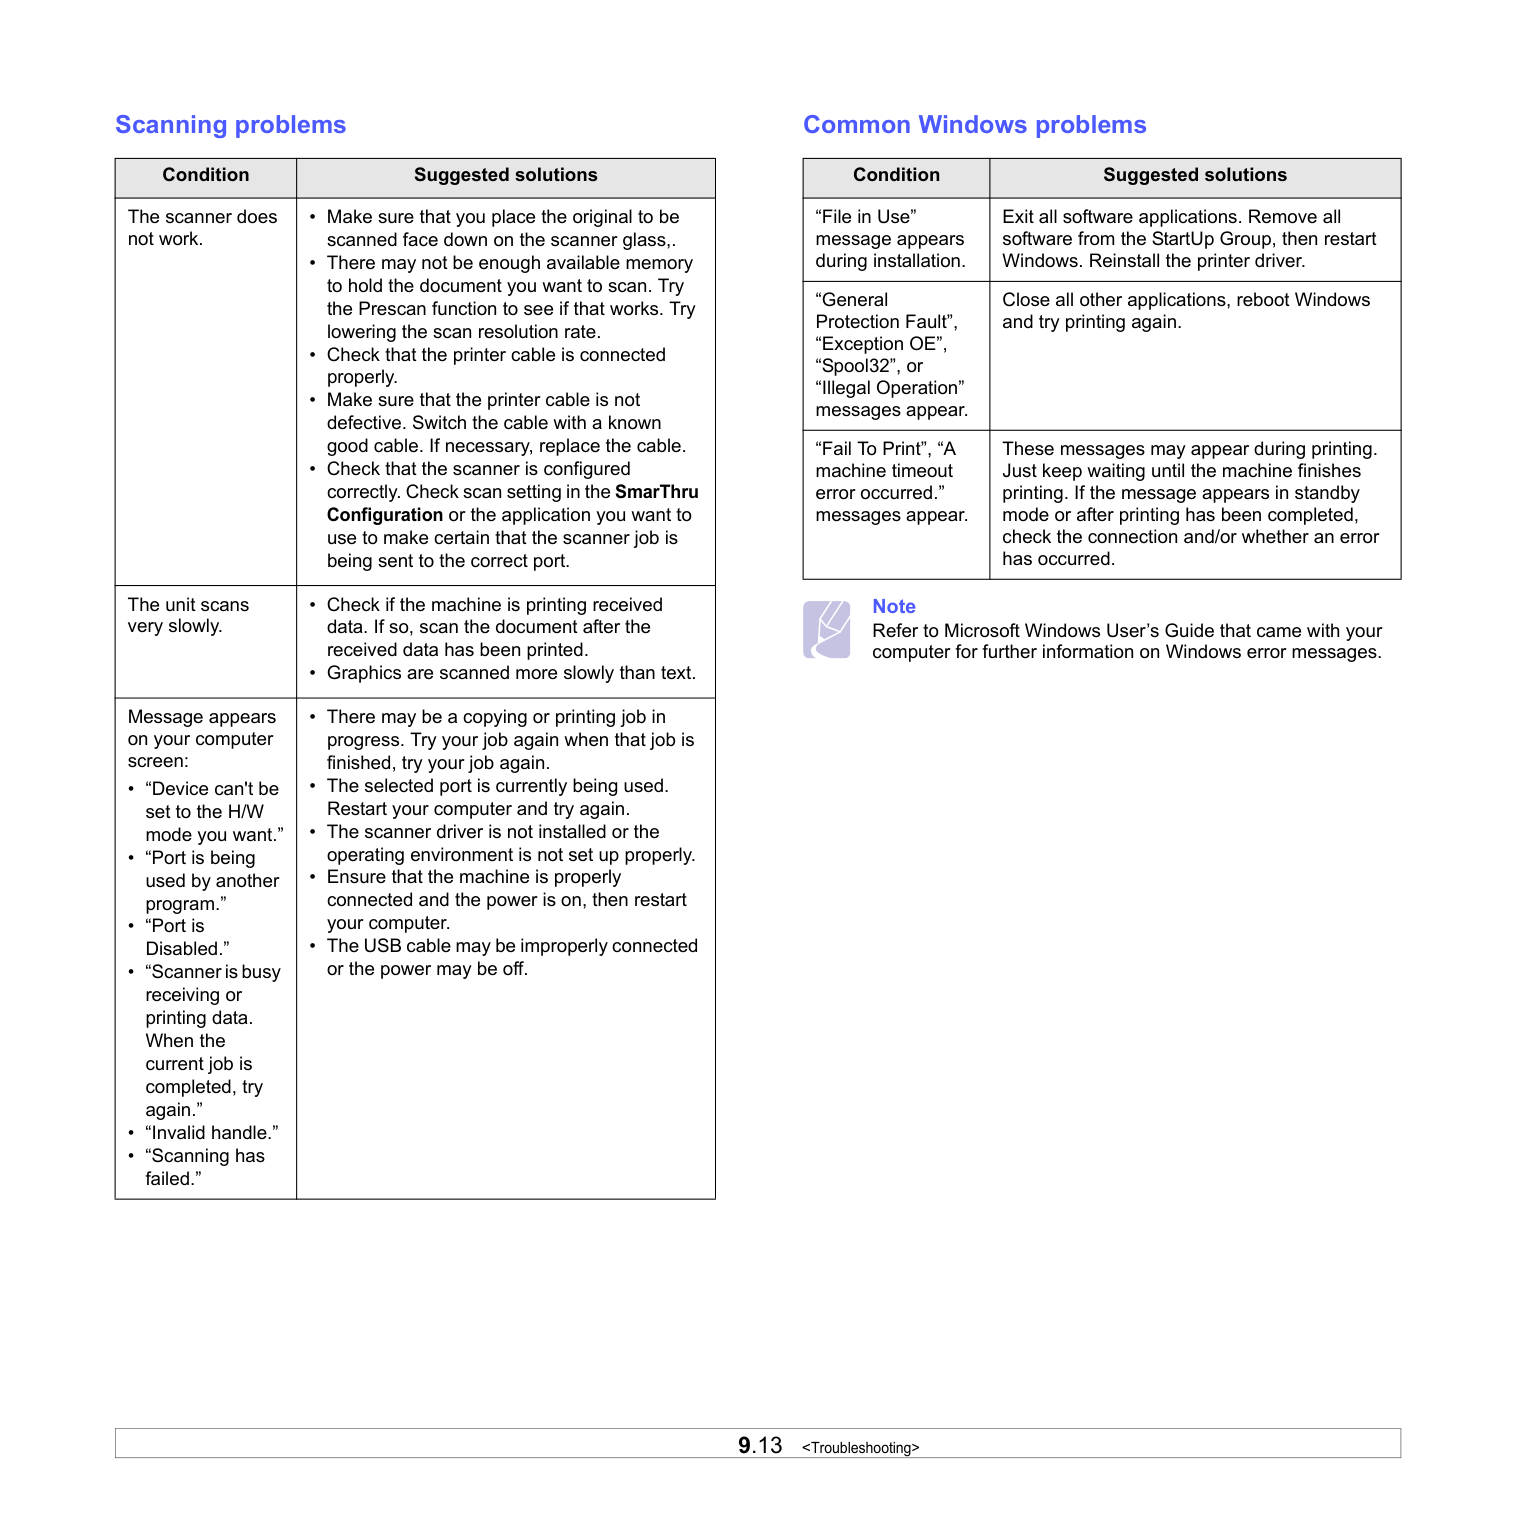
9.13
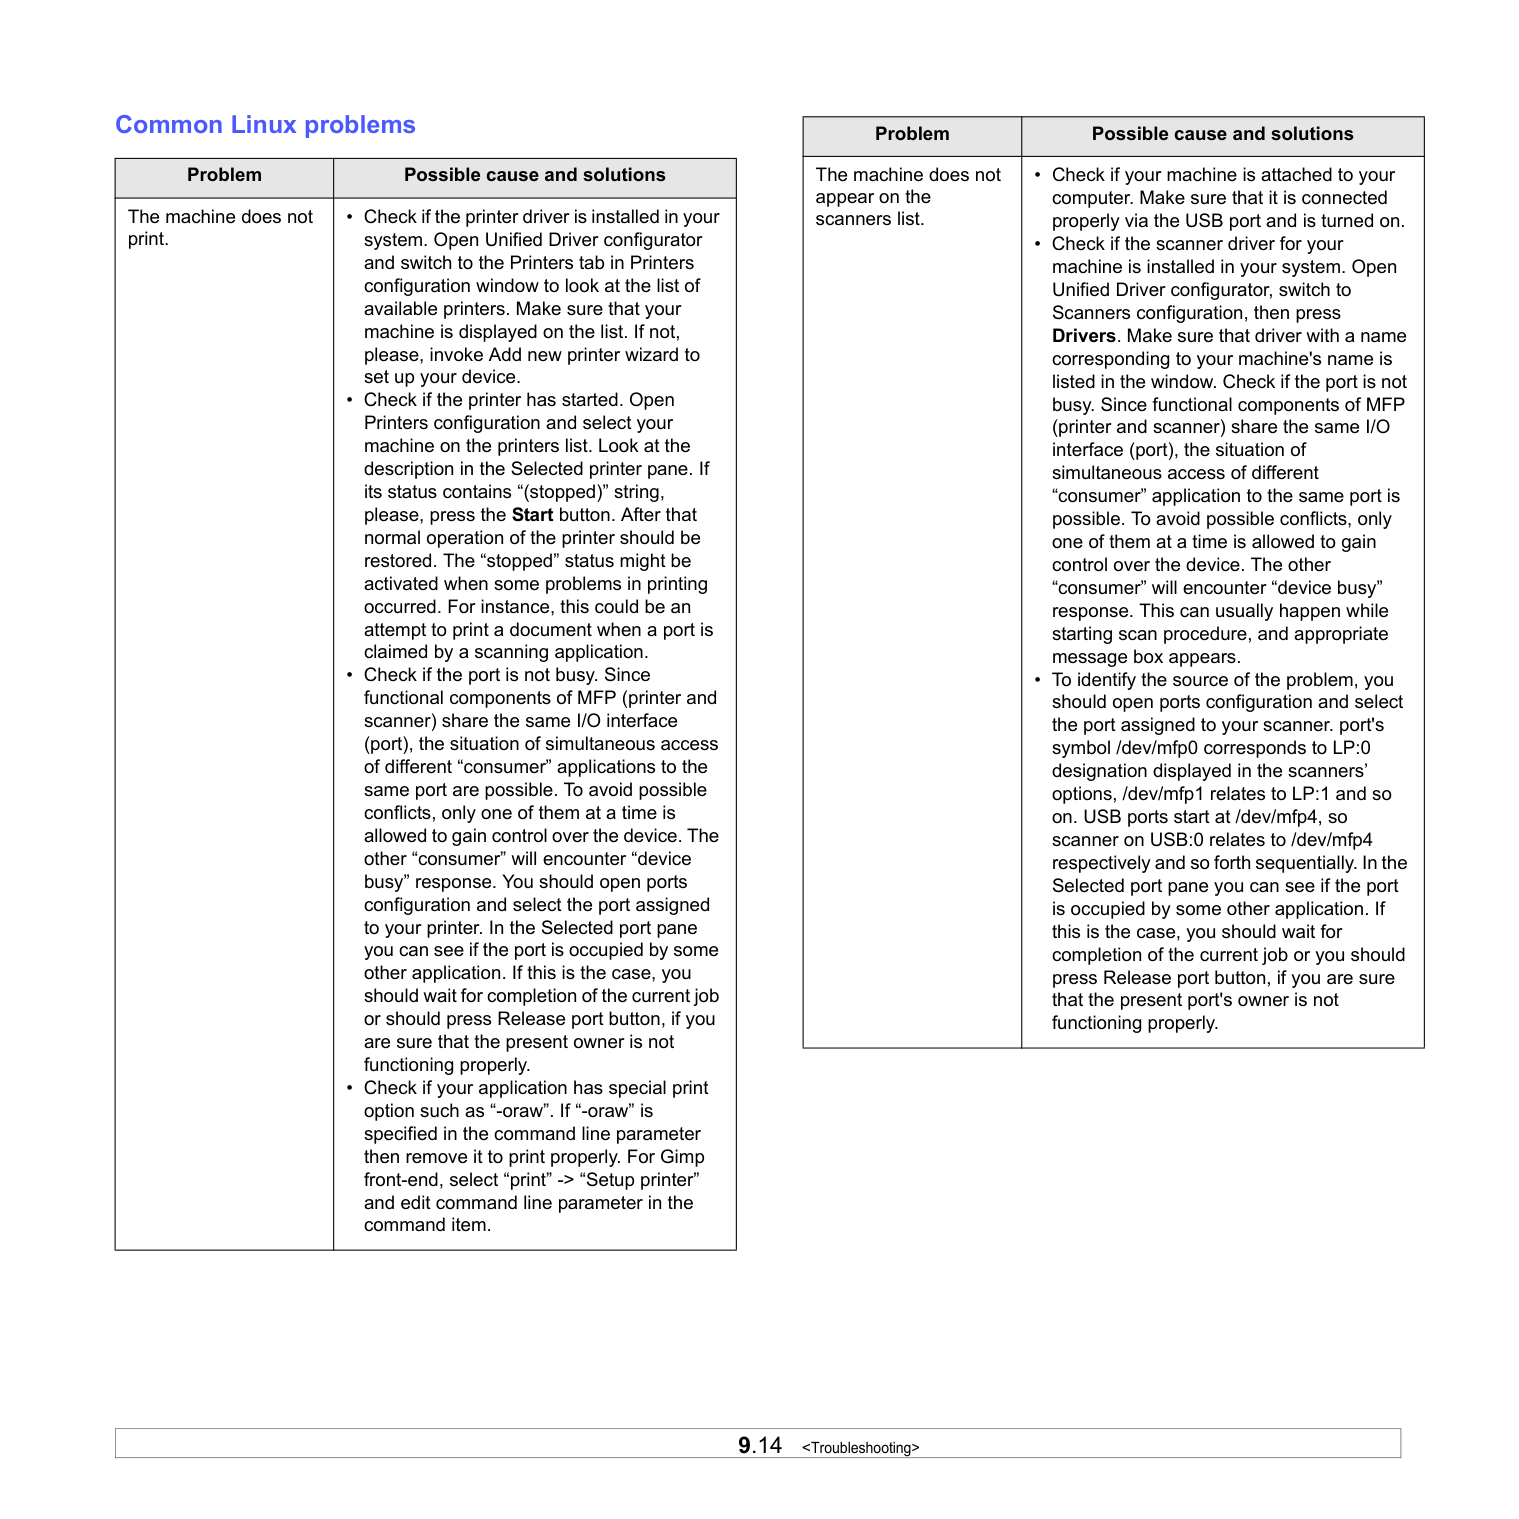
9.14
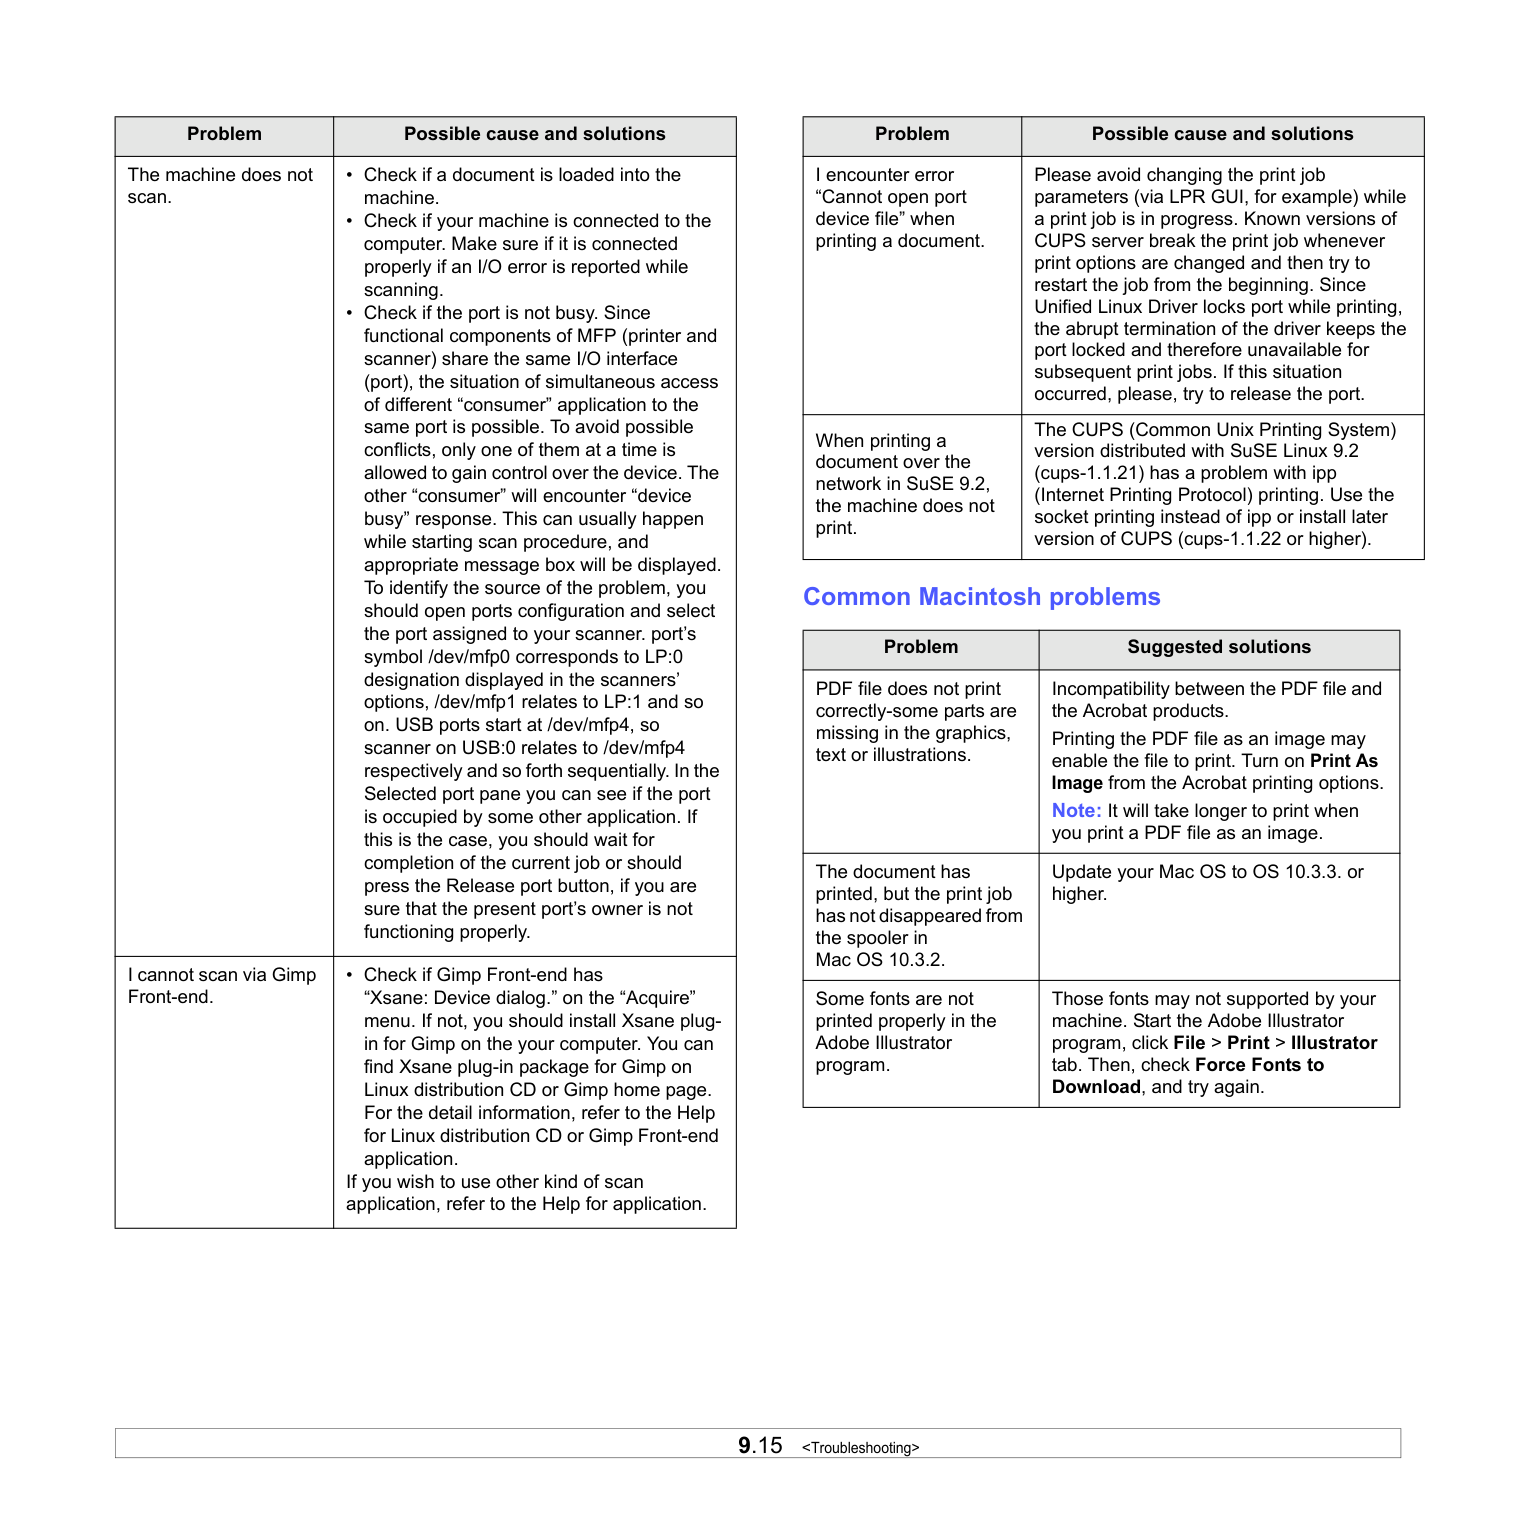
9.15
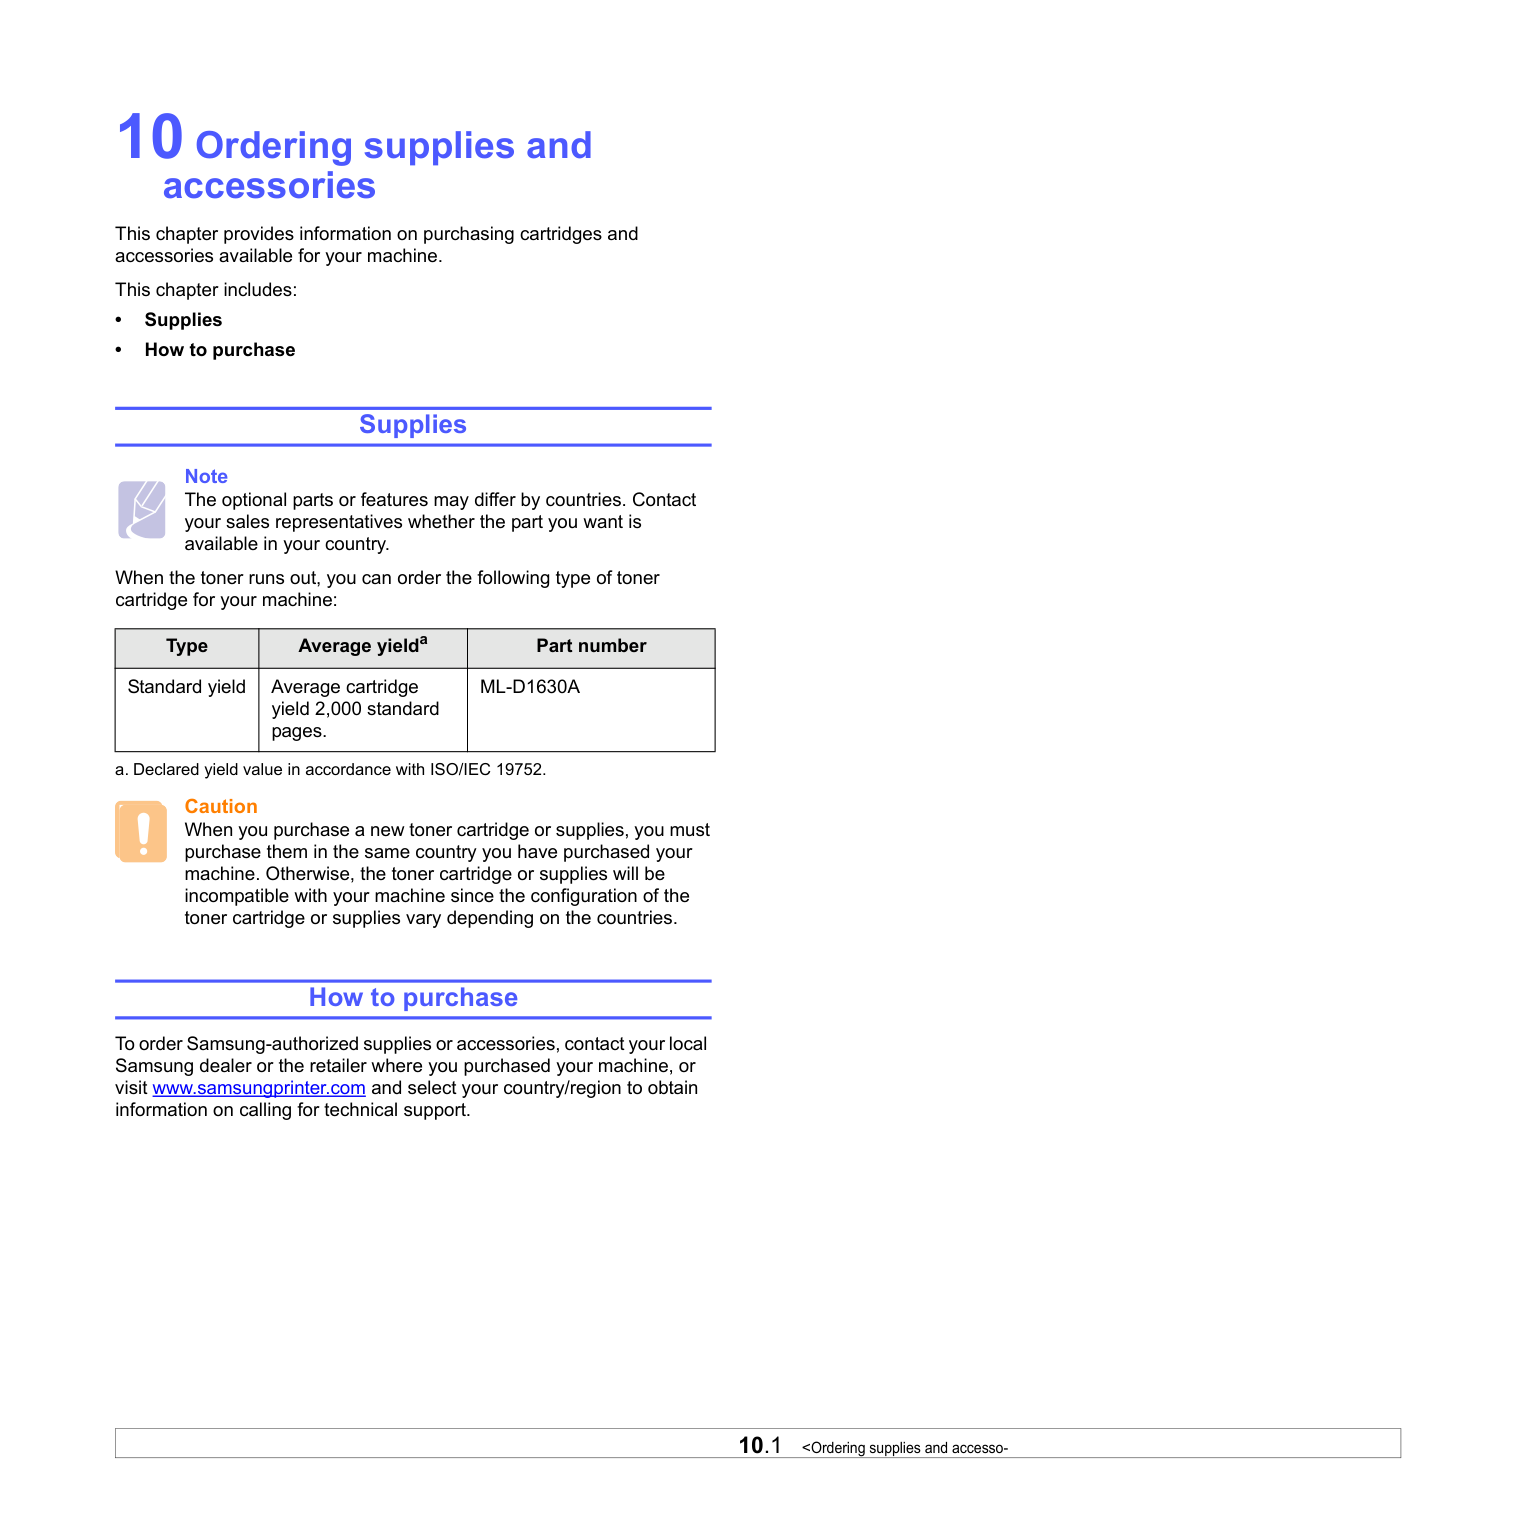
10.1
11.1 Iso/Iec 19752.
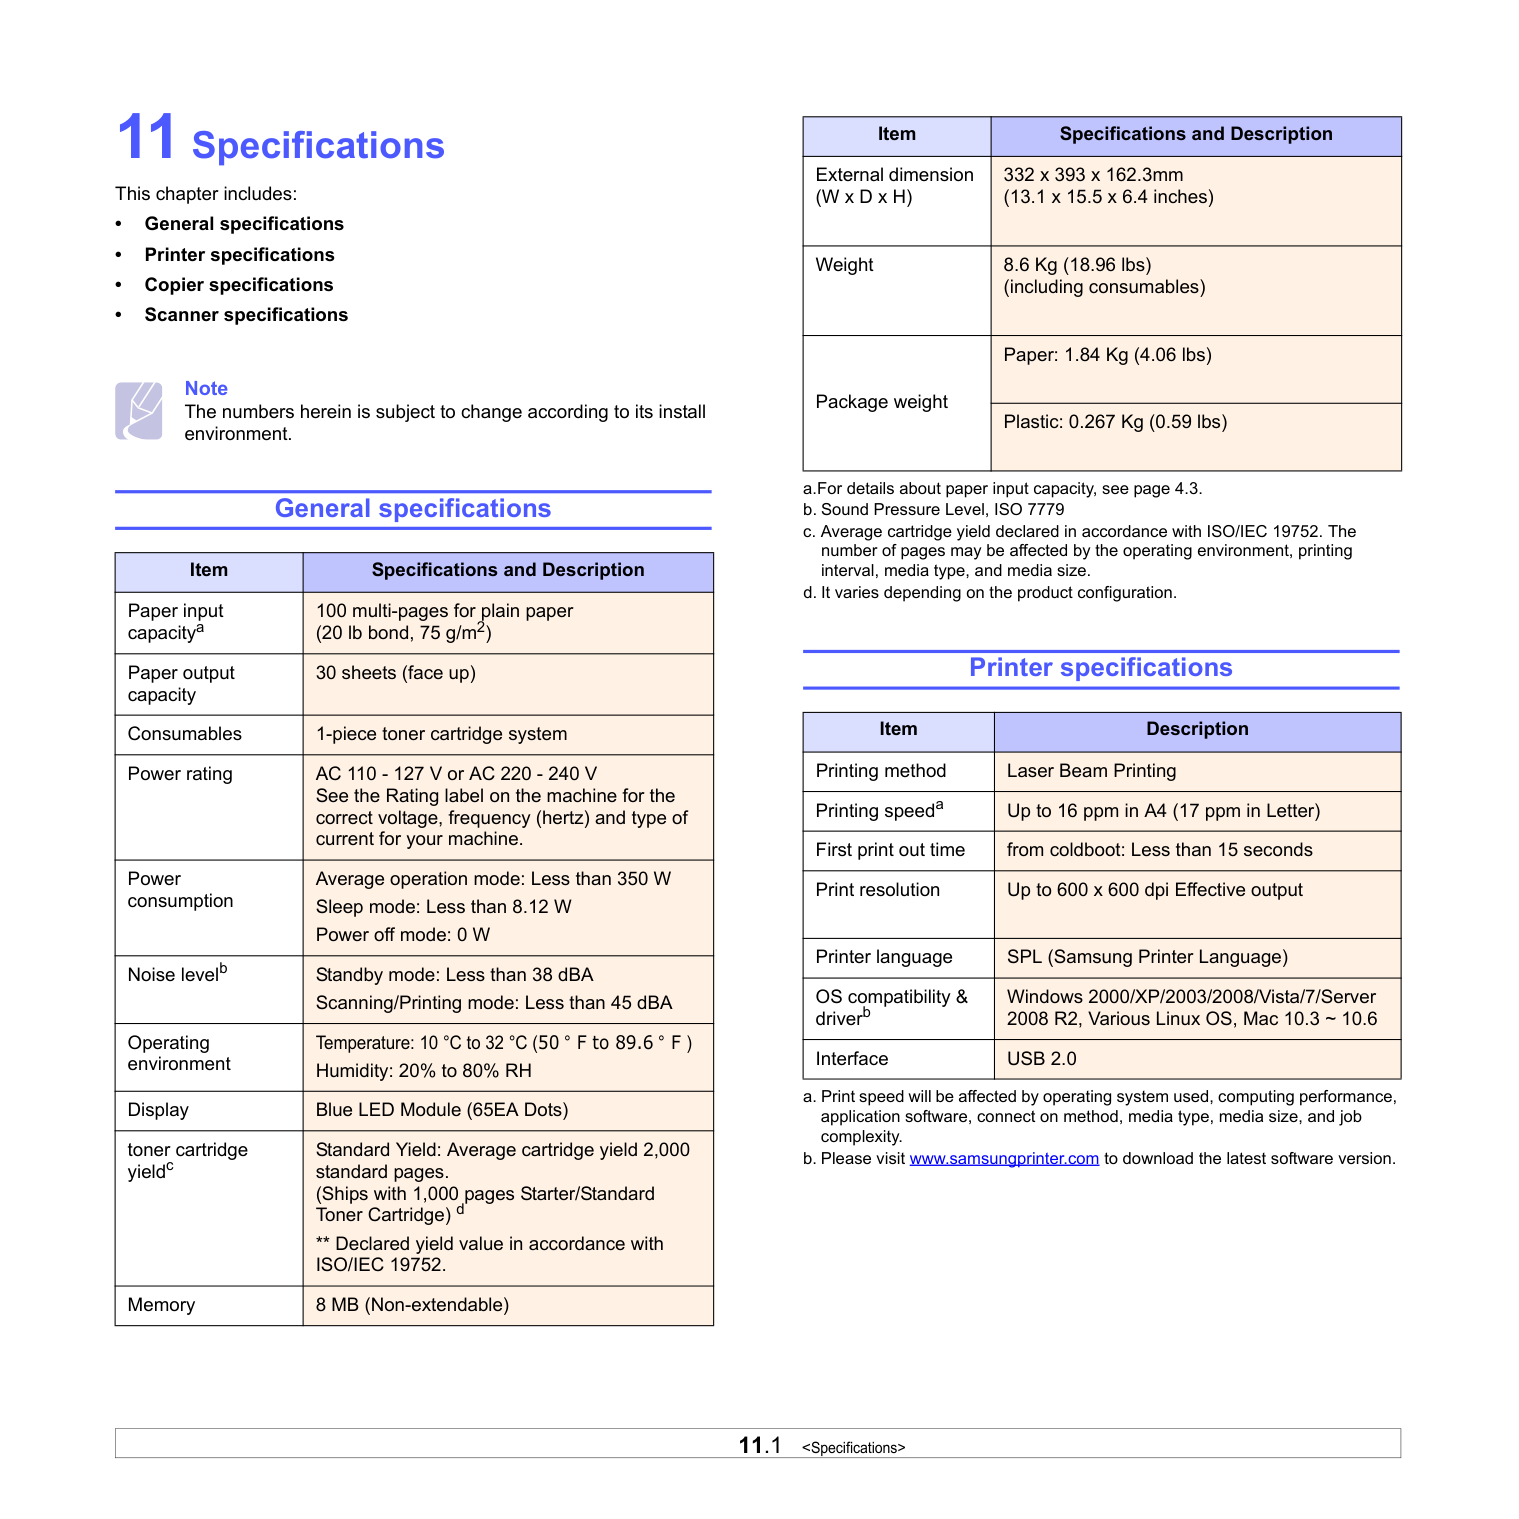
Memory 8 MB (Non-extendable) Printer specifications External dimension (W x D x H) 332 x 393 x 162.3mm (13.1 x 15.5 x 6.4 inches) Weight 8.6 Kg (18.96 lbs) (including consumables) Package weight Paper: 1.84 Kg (4.06 lbs) Plastic: 0.267 Kg (0.59 lbs) a.For details about paper input capacity, see page 4.3. b. Sound Pressure Level, ISO 7779 c. Average cartridge yield declared in accordance with ISO/IEC 19752. The number of pages may be affected by the operating environment, printing interval, media type, and media size. d. It varies depending on the product configuration. Item Description Printing method Laser Beam Printing Printing speeda a. Print speed will be affected by operating system used, computing performance, application software, connect on method, media type, media size, and job complexity. Up to 16 ppm in A4 (17 ppm in Letter) First print out time from coldboot: Less than 15 seconds Print resolution Up to 600 x 600 dpi Effective output Printer language SPL (Samsung Printer Language) OS compatibility & driverb b. Please visit www.samsungprinter.com to download the latest software version. Windows 2000/XP/2003/2008/Vista/7/Server 2008 R2, Various Linux OS, Mac 10.3 ~ 10.6 Interface Usb 2.0
Item Specifications and Description
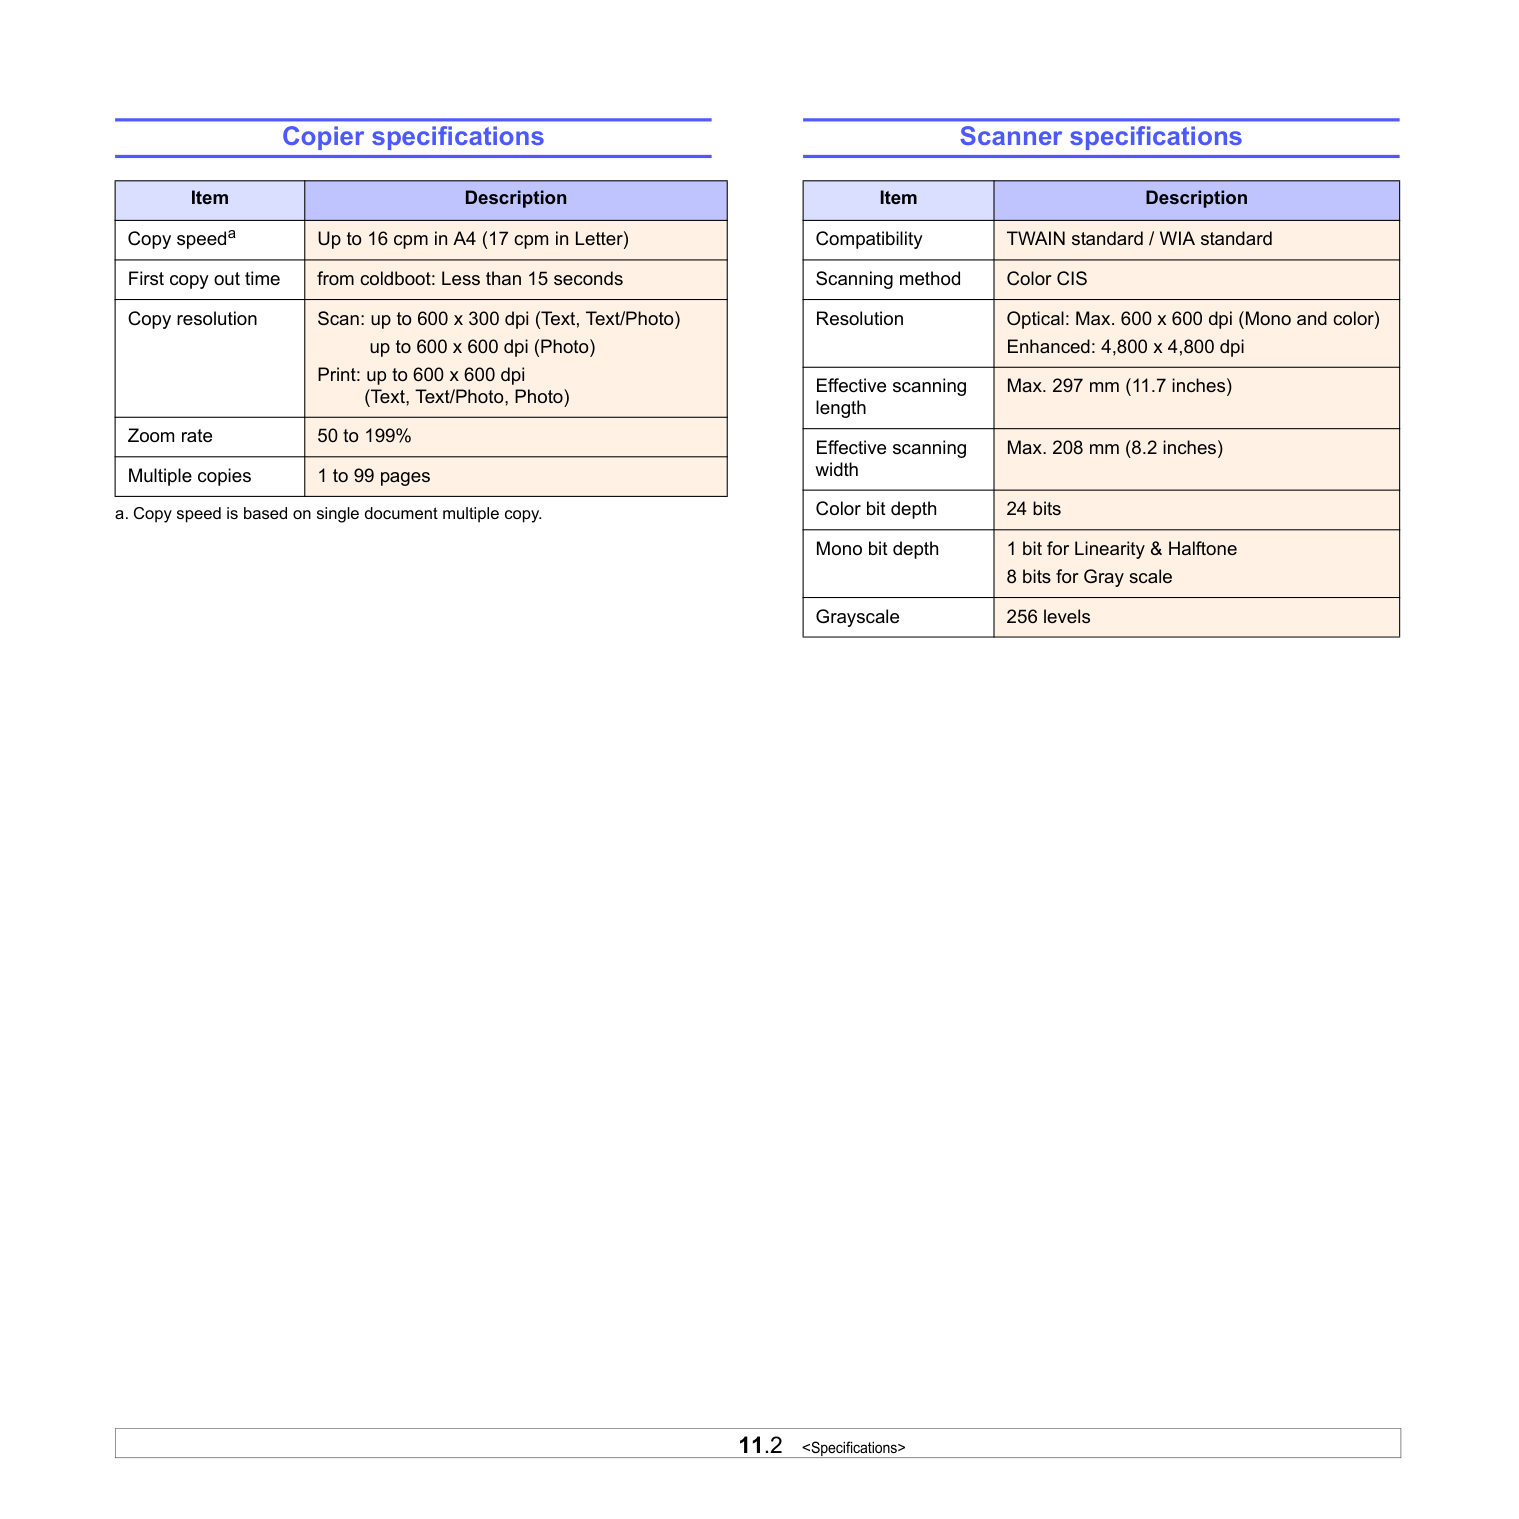
11.2
12.1 Dpi
This is the measurement of resolution which is used for printing or scanning. Generally, more dots per inch result in a higher resolution, more visible detail in the image, and a larger file size. Duty Cycle Duty cycle is the page quantity which does not affect printer performance for a month. Generally the printer has the lifespan limitation such as pages per year. The lifespan means the average capacity of print-outs, usually within the warranty period. For example, if the duty cycle is 48,000 pages per month assuming 20 working days, a printer limits 2,400 pages a day, which is not small amount. Fuser Unit This is the part of a laser printer that melts the toner onto the print media. It consists of two hot rollers. After toner is transferred onto the paper, the fuser unit applies heat and pressure to ensure that the toner stays on the paper permanently, which is why paper is warm when it comes out of a laser printer. Grayscale Shades of gray that represent light and dark portions of an image when color images are converted to grayscale; colors are represented by various shades of gray. Halftone This is an image type that simulates grayscale by varying the number of dots. Highly colored areas consist of a large number of dots, while lighter areas consist of a smaller number of dots. Iso
The International Organization for Standardization (ISO) is an international standard-setting body composed of representatives from national standards bodies. It produces world-wide industrial and commercial standards. Led
A light-emitting diode (LED) is a semiconductor device that indicates the status of a machine. Print Media Media such as papers, labels, and transparencies which can be used on a printer, a scanner, a fax or, a copier. OPC Drum A mechanism that makes a virtual image for print using a laser beam emitted from a laser printer, and it is usually green or gray-colored and cylinder-shaped. An exposing unit of a drum is slowly worn away by its usage of the printer, and it should be replaced appropriately since it becomes scratched from grit in paper. Pdf
Portable Document Format (PDF) is a proprietary file format developed by Adobe Systems for representing two-dimensional documents in a device-independent and resolution-independent format. Ppm
Pages Per Minute. PPM shows the printer's speed, how many pages a printer can actually print per minute. PRN file An interface for a device driver, this allows software to interact with the device driver using standard input/output system calls, which simplifies many tasks. Resolution The sharpness of an image, measured in dots per inch (dpi). The higher the dpi, the greater the resolution. Toner cartridge It is a kind of bottle within a machine like a printer which contains toner. Toner is a powder used in laser printers and photocopiers which forms the text and images on the printed paper. Toner can be melted by the heat of the fuser, causing it to bind to the fibers in the paper. Url
Uniform Resource Locator (URL) is the global address of documents and resources on the Internet. The first part of the address indicates what protocol to use, the second part specifies the IP address or the domain name where the resource is located. Usb
Universal serial bus (USB) is a standard that was developed by the USB Implementers Forum, Inc., to connect computers and peripherals. Unlike the parallel port, USB is designed to concurrently connect a single computer USB port to multiple peripherals.
1
C
cleaning inside 8.1 outside 8.1 scan unit 8.3 control panel 1.2, 1.4 Copies 1.4 Darkness 1.4 Reduce/Enlarge 1.4 Scan to PC 1.4 Start Copy 1.4 Stop/Clear 1.4 Up/Down arrows 1.4 copy copying 5.1 darkness 5.1 original type 5.1 paper size 5.1 reduce/enlarge 5.1 solving copy problems 9.12D
driver feature 2.2E
error message 9.7J
jam clearing paper from the tray 9.1 tips for avoiding paper jams 9.1L
Linux requirements 2.3 Linux problems 9.14M
Macintosh problems 9.15 requirements 2.3 Maintenance 8.1 maintenance parts 8.7 toner cartridge 8.3 message on the display screen 9.7O
ordering supplies 10.1 originals 4.1 loading on the scanner glass 4.1 output support 1.2 output tray 1.2P
paper changing the size 4.5 clearing jam 9.1 paper feeding problems 9.8 setting the paper size of the tray 4.6 Power switch 1.3 print media guidelines 4.2 media sizes 4.3 selecting print media 4.2 specification 4.3 Printer software CD 2.1 printing 7.1 problem solving 9.8 printing report 8.1 problem, solve Linux 9.14 problems copying 9.12 display message 9.7 Macintosh 9.15 paper feeder 9.8 printing 9.8 printing quality 9.10 scanning 9.13 Windows 9.13Q
quality solving the printing problem 9.10R
Reduce 1.4 replacing components toner cartridge 8.5S
scanner glass 1.2 scanner lid 1.2 scanning solving scanning problems 9.13 to application 6.1 specifications 11.1, 12.1 supplied software 2.1 supplies expected toner cartridge life 8.3 ordering supplies 10.1T
toner cartridge 1.2 top cover 1.2 top cover lever 1.2 tray 1.2 adjusting the width and length 4.5 tray open button 1.2 troubleshooting 9.1U
Usb
port 1.3W
Windows problems 9.13 requirements 2.2Index
Samsung Printer Software section
1
Software Section
Contents
Chapter 1: INSTALLING PRINTER SOFTWARE IN WINDOWS Installing Printer Software ........................................................................................................ 4 Changing the Software Language .............................................................................................. 5 Reinstalling Printer Software ..................................................................................................... 6 Removing Printer Software ....................................................................................................... 6 Chapter 2: BASIC PRINTING Printing a Document ................................................................................................................ 7 Printing to a file (PRN) ............................................................................................................ 8 Printer Settings ....................................................................................................................... 8 Layout Tab .................................................................................................................... 9 Paper Tab ...................................................................................................................... 9 Graphics Tab ............................................................................................................... 10 Extras Tab ................................................................................................................... 11 About Tab ................................................................................................................... 11 Printer Tab .................................................................................................................. 11 Using a Favorite Setting ................................................................................................ 12 Using Help ................................................................................................................... 12
2 Chapter 3: ADVANCED PRINTING Printing Multiple Pages on One Sheet of Paper (N-Up Printing) ..................................................... 13 Printing Posters ..................................................................................................................... 14 Printing a Reduced or Enlarged Document ................................................................................ 14 Fitting Your Document to a Selected Paper Size ......................................................................... 14 Using Watermarks ................................................................................................................. 15 Using an Existing Watermark ......................................................................................... 15 Creating a Watermark ................................................................................................... 15 Editing a Watermark ..................................................................................................... 15 Deleting a Watermark ................................................................................................... 15 Using Overlays ...................................................................................................................... 16 What is an Overlay? ...................................................................................................... 16 Creating a New Page Overlay ......................................................................................... 16 Using a Page Overlay .................................................................................................... 16 Deleting a Page Overlay ................................................................................................ 16 Chapter 4: SHARING THE PRINTER LOCALLY Setting Up a Host Computer ................................................................................................... 17 Setting Up a Client Computer .................................................................................................. 17 Chapter 5: SCANNING Scanning Using Samsung SmarThru ......................................................................................... 18 Uninstalling Samsung SmarThru ..................................................................................... 18 Using Samsung SmarThru ............................................................................................. 18 Using Onscreen Help File ............................................................................................... 19 Scanning Process with TWAIN-enabled Software ........................................................................ 19 Scanning Using the WIA Driver ................................................................................................ 20 Windows XP ................................................................................................................. 20 Windows Vista ............................................................................................................. 20 Windows 7 .................................................................................................................. 20
3 Chapter 6: USING SMART PANEL Understanding Smart Panel .................................................................................................... 21 Opening the Troubleshooting Guide ......................................................................................... 22 Using Printer Settings Utility ................................................................................................... 22 Using Onscreen Help File ............................................................................................... 22 Changing the Smart Panel Program Settings ............................................................................. 22 Chapter 7: USING YOUR PRINTER IN LINUX Getting Started ..................................................................................................................... 23 Installing the Unified Linux Driver ............................................................................................ 23 Installing the Unified Linux Driver ................................................................................... 23 Uninstalling the Unified Linux Driver ............................................................................... 24 Using the Unified Driver Configurator ....................................................................................... 25 Opening the Unified Driver Configurator .......................................................................... 25 Printers Configuration ................................................................................................... 25 Scanners Configuration ................................................................................................. 26 Ports Configuration ....................................................................................................... 26 Configuring Printer Properties ................................................................................................. 27 Printing a Document .............................................................................................................. 27 Printing from Applications .............................................................................................. 27 Printing Files ................................................................................................................ 28 Scanning a Document ............................................................................................................ 28 Using the Image Manager .............................................................................................. 29 Chapter 8: USING YOUR PRINTER WITH A MACINTOSH Installing Software ................................................................................................................ 31 Uninstalling software ............................................................................................................. 31 Setting Up the Printer ............................................................................................................ 32 For a USB-connected .................................................................................................... 32 Printing ................................................................................................................................ 33 Printing a Document ..................................................................................................... 33 Changing Printer Settings .............................................................................................. 33 Printing Multiple Pages on One Sheet of Paper .................................................................. 34 Scanning .............................................................................................................................. 35 Scanning with USB ....................................................................................................... 35
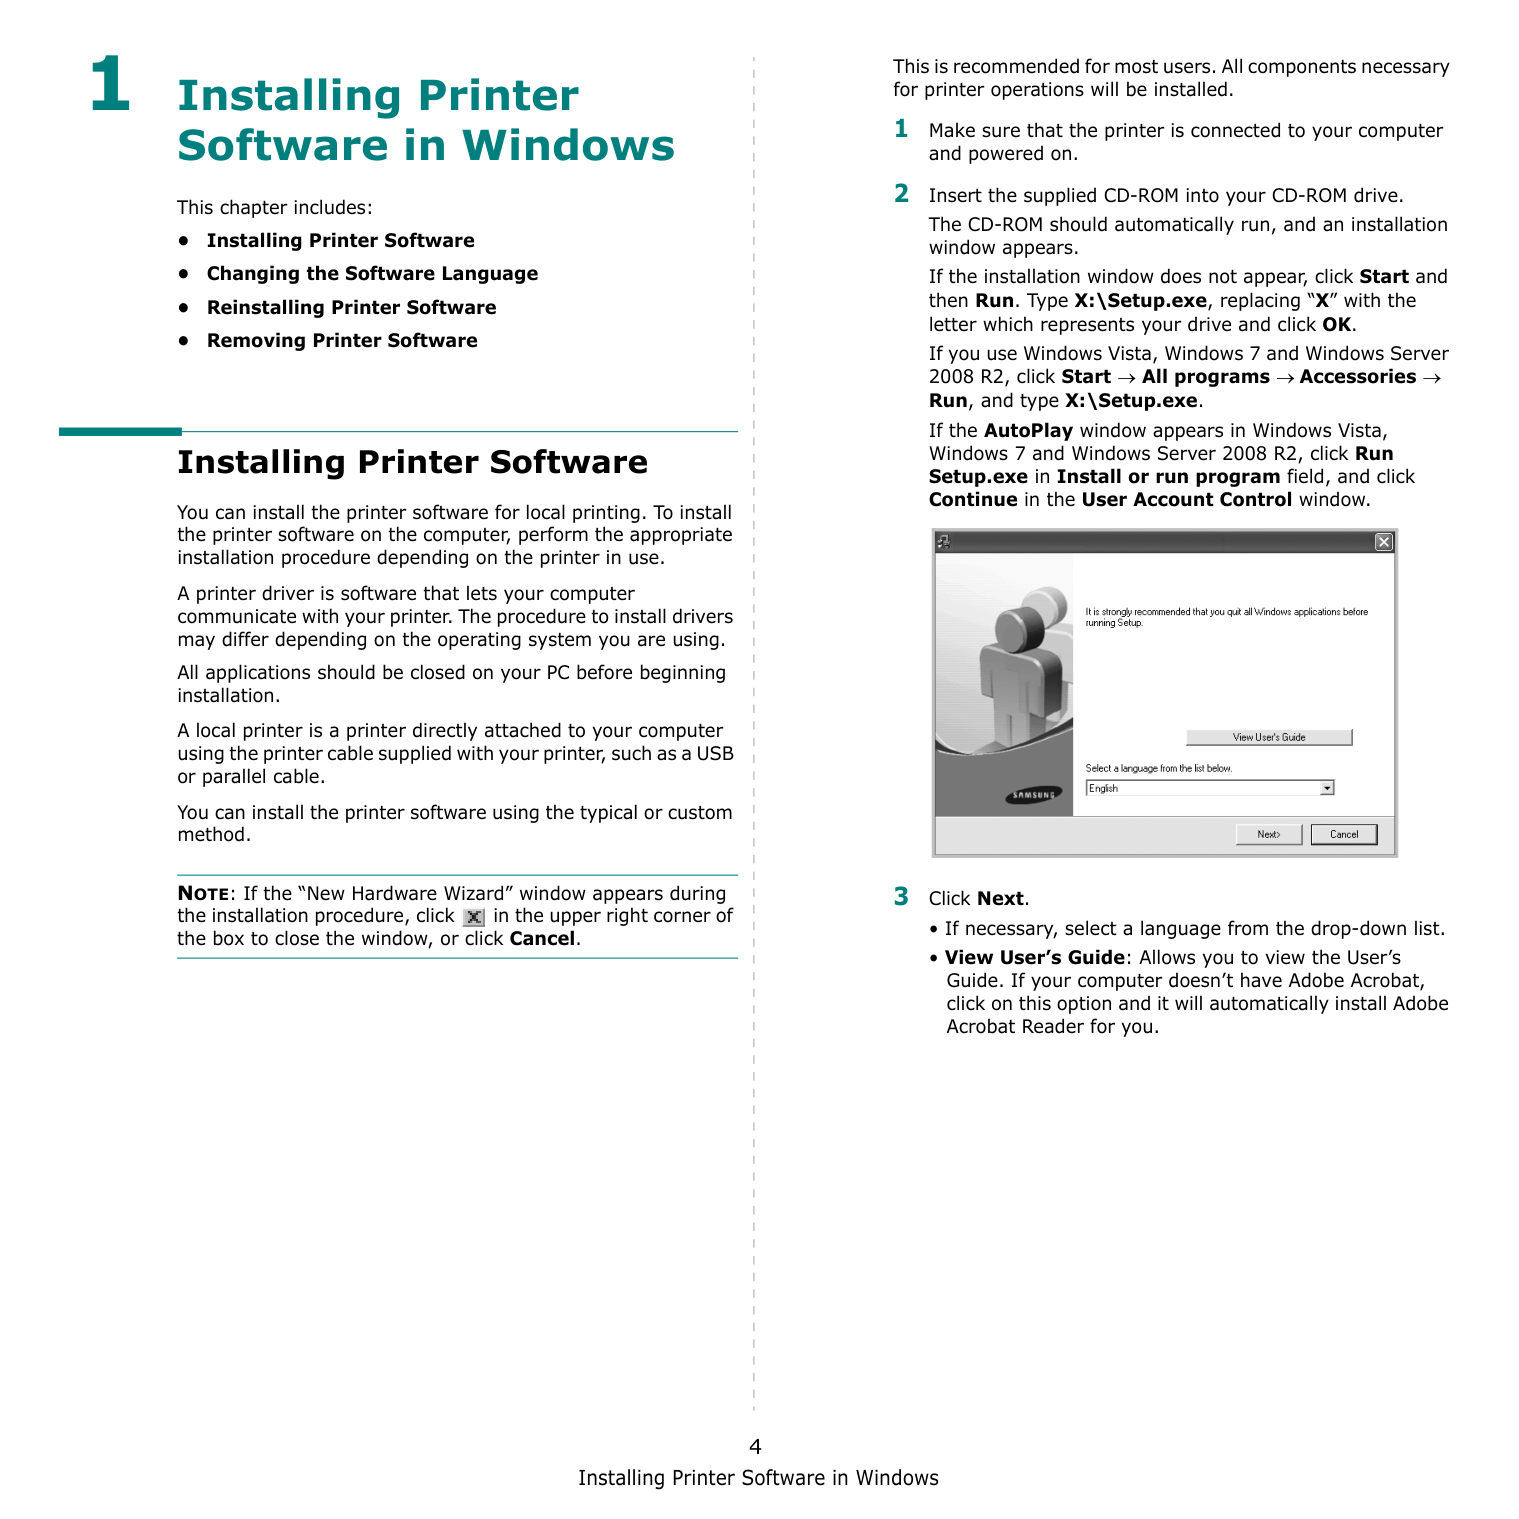
Installing Printer Software in Windows 4 1 Installing Printer Software in Windows This chapter includes: • Installing Printer Software • Changing the Software Language • Reinstalling Printer Software • Removing Printer Software Installing Printer Software You can install the printer software for local printing. To install the printer software on the computer, perform the appropriate installation procedure depending on the printer in use. A printer driver is software that lets your computer communicate with your printer. The procedure to install drivers may differ depending on the operating system you are using. All applications should be closed on your PC before beginning installation. A local printer is a printer directly attached to your computer using the printer cable supplied with your printer, such as a USB or parallel cable. You can install the printer software using the typical or custom method. NOTE: If the “New Hardware Wizard” window appears during the installation procedure, click in the upper right corner of the box to close the window, or click Cancel. This is recommended for most users. All components necessary for printer operations will be installed. 1 Make sure that the printer is connected to your computer and powered on. 2 Insert the supplied CD-ROM into your CD-ROM drive. The CD-ROM should automatically run, and an installation window appears. If the installation window does not appear, click Start and then Run. Type X:\Setup.exe, replacing “X” with the letter which represents your drive and click OK. If you use Windows Vista, Windows 7 and Windows Server 2008 R2, click Start → All programs → Accessories → Run, and type X:\Setup.exe. If the AutoPlay window appears in Windows Vista, Windows 7 and Windows Server 2008 R2, click Run Setup.exe in Install or run program field, and click Continue in the User Account Control window. 3 Click Next.
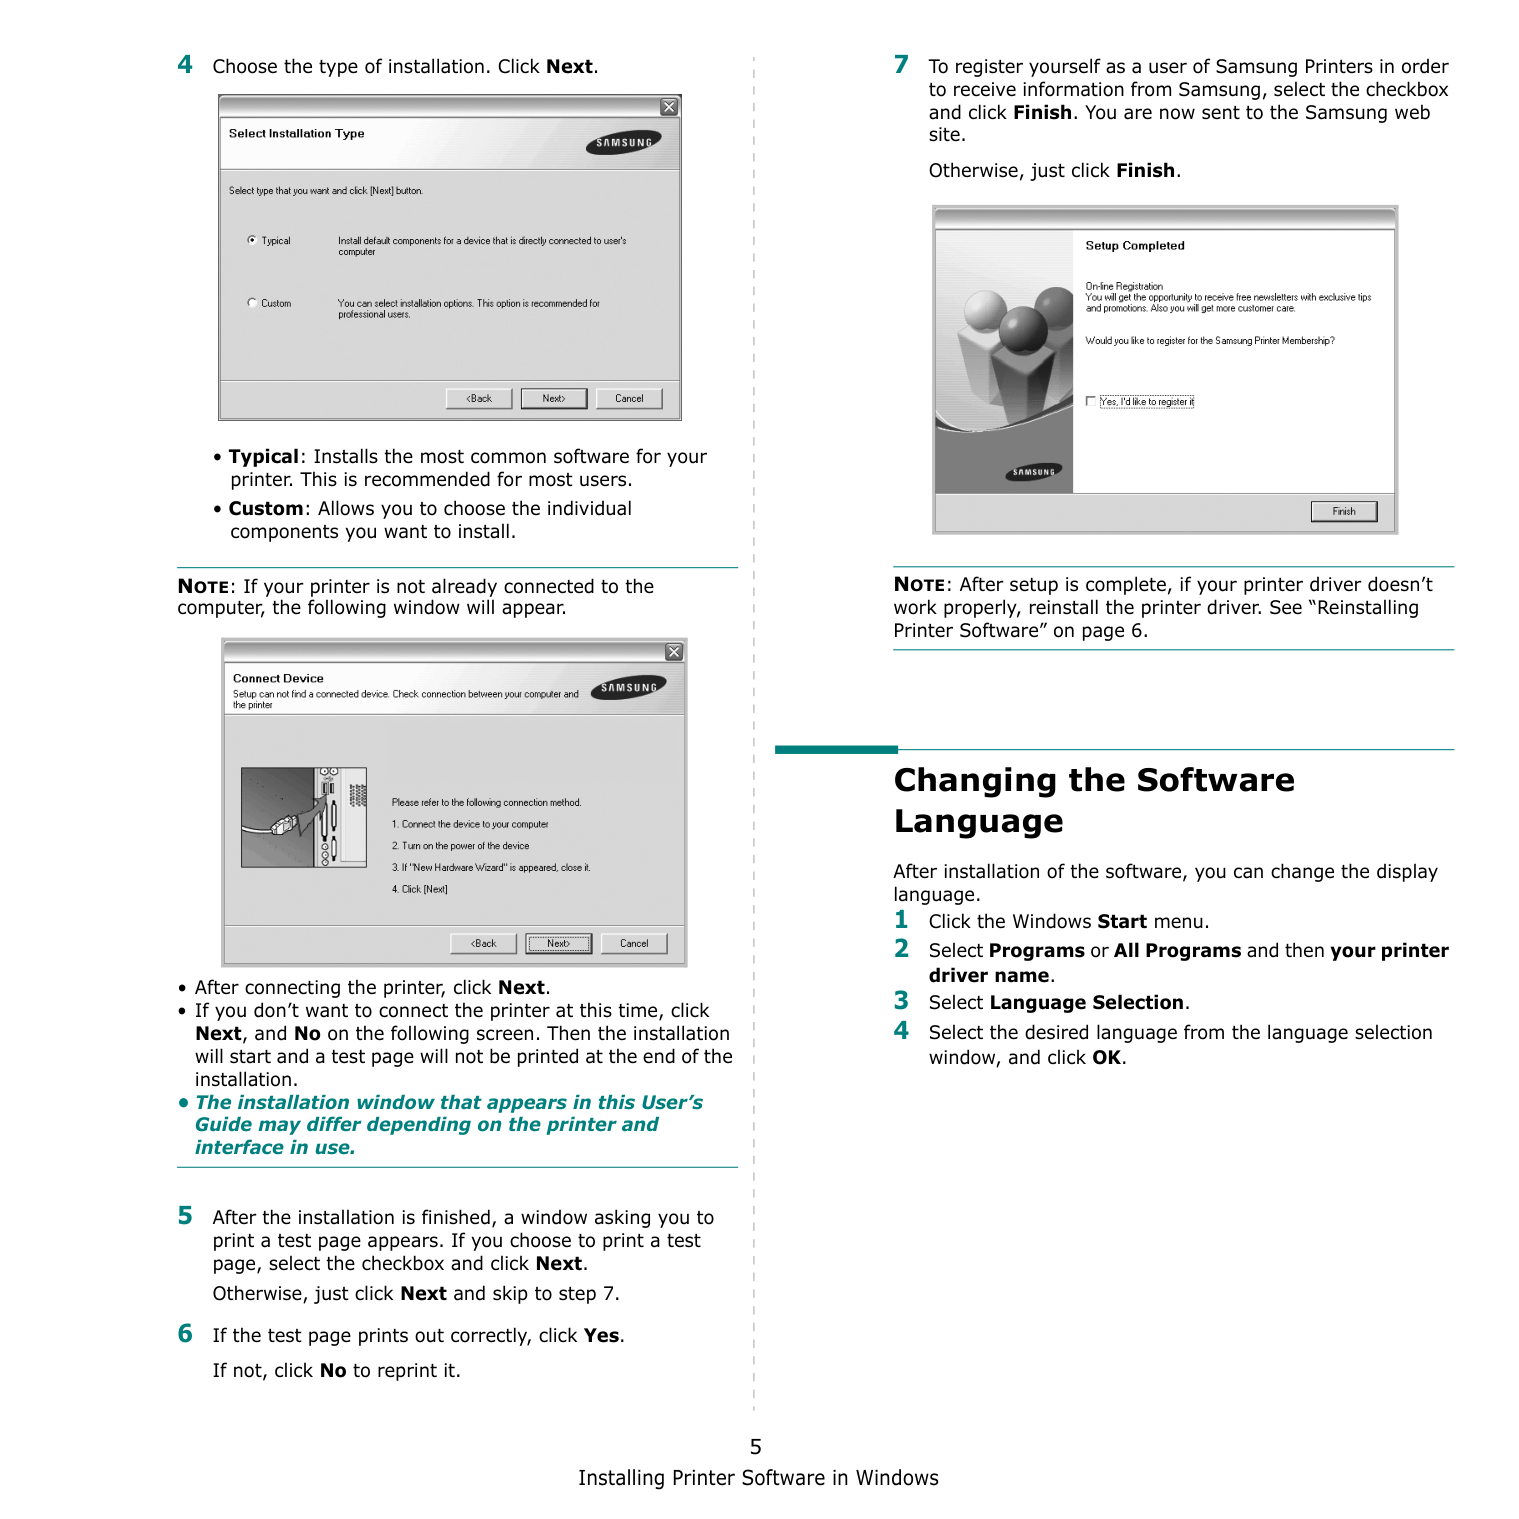
Installing Printer Software in Windows 5 4 Choose the type of installation. Click Next.
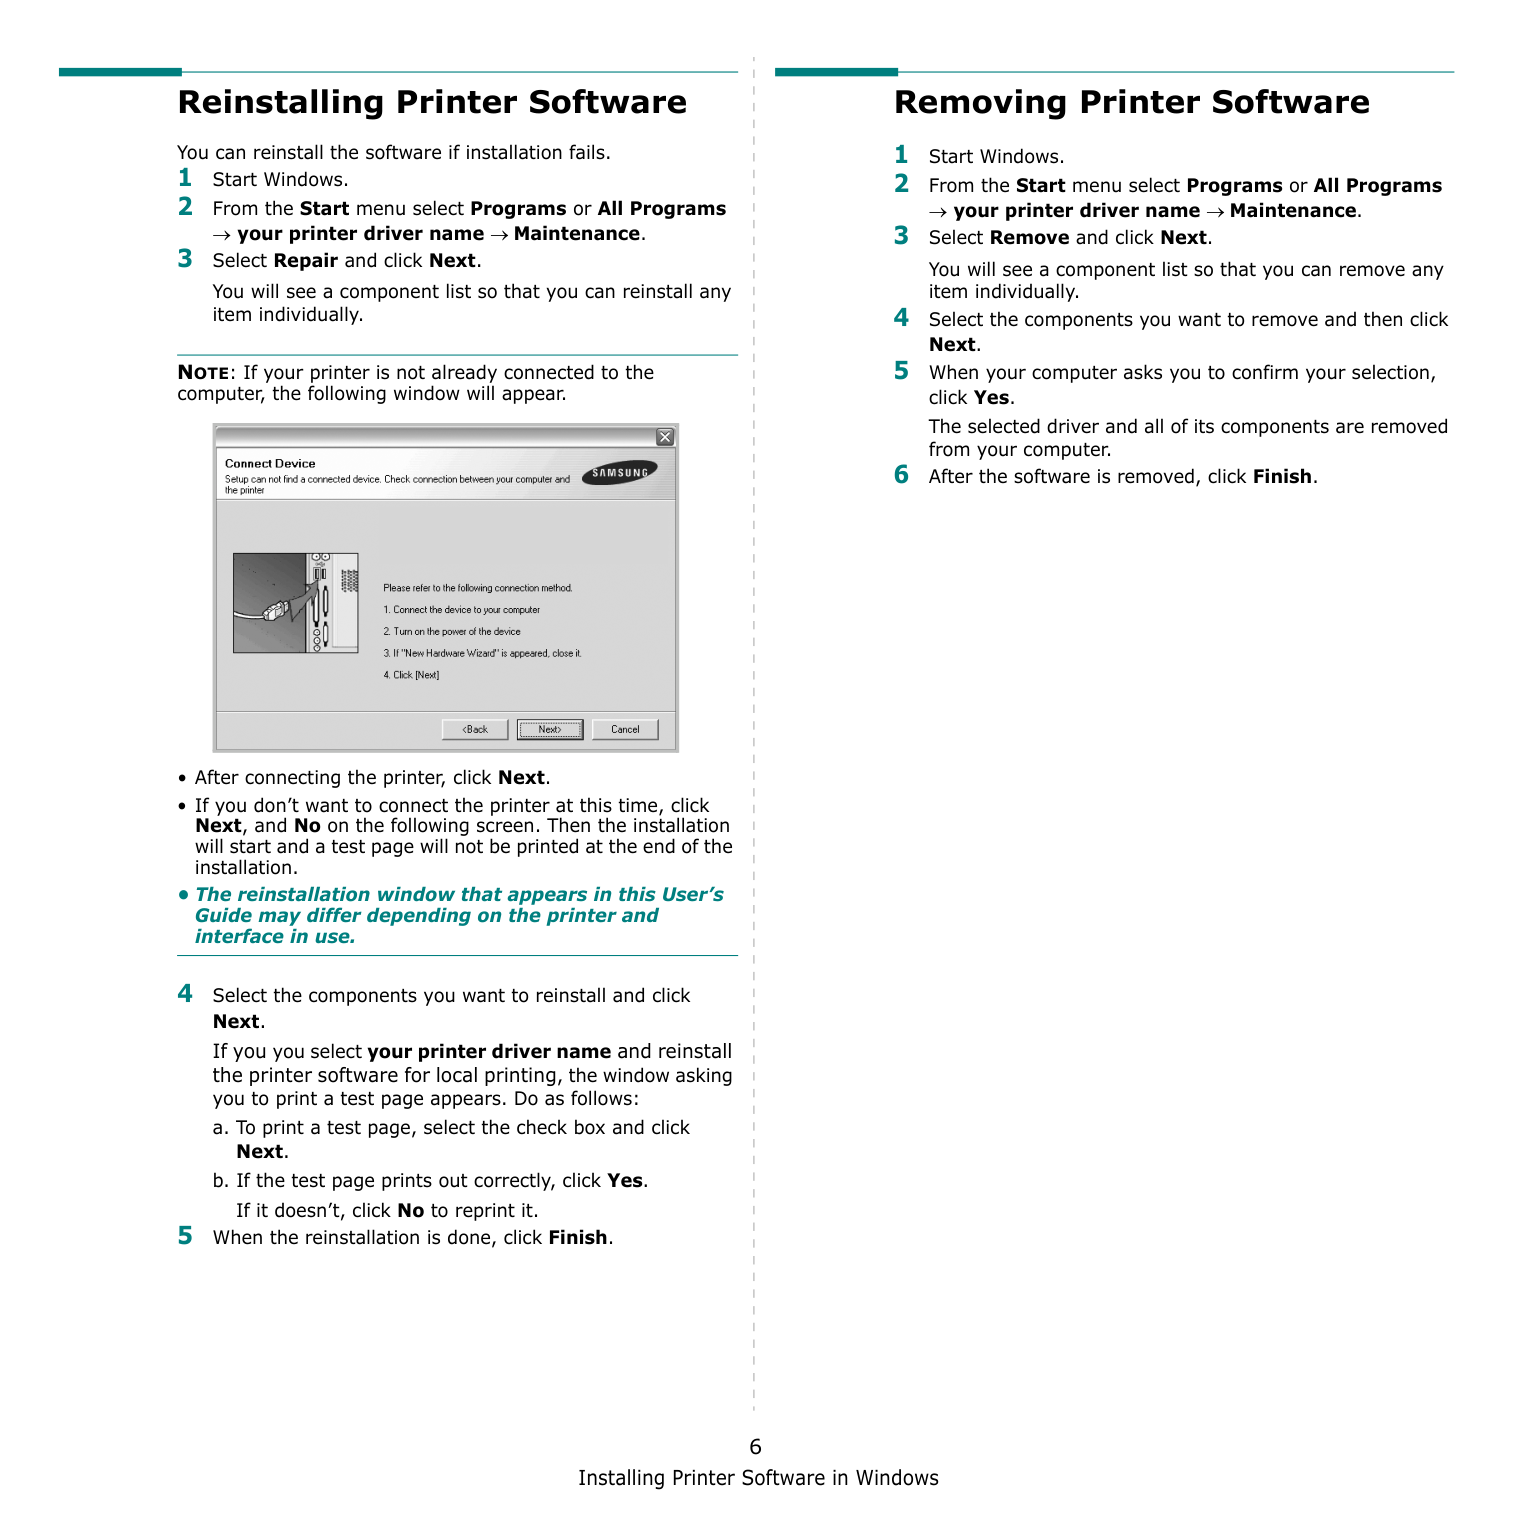
Installing Printer Software in Windows 6 Reinstalling Printer Software You can reinstall the software if installation fails. 1 Start Windows. 2 From the Start menu select Programs or All Programs → your printer driver name → Maintenance. 3 Select Repair and click Next. You will see a component list so that you can reinstall any item individually. NOTE: If your printer is not already connected to the computer, the following window will appear.
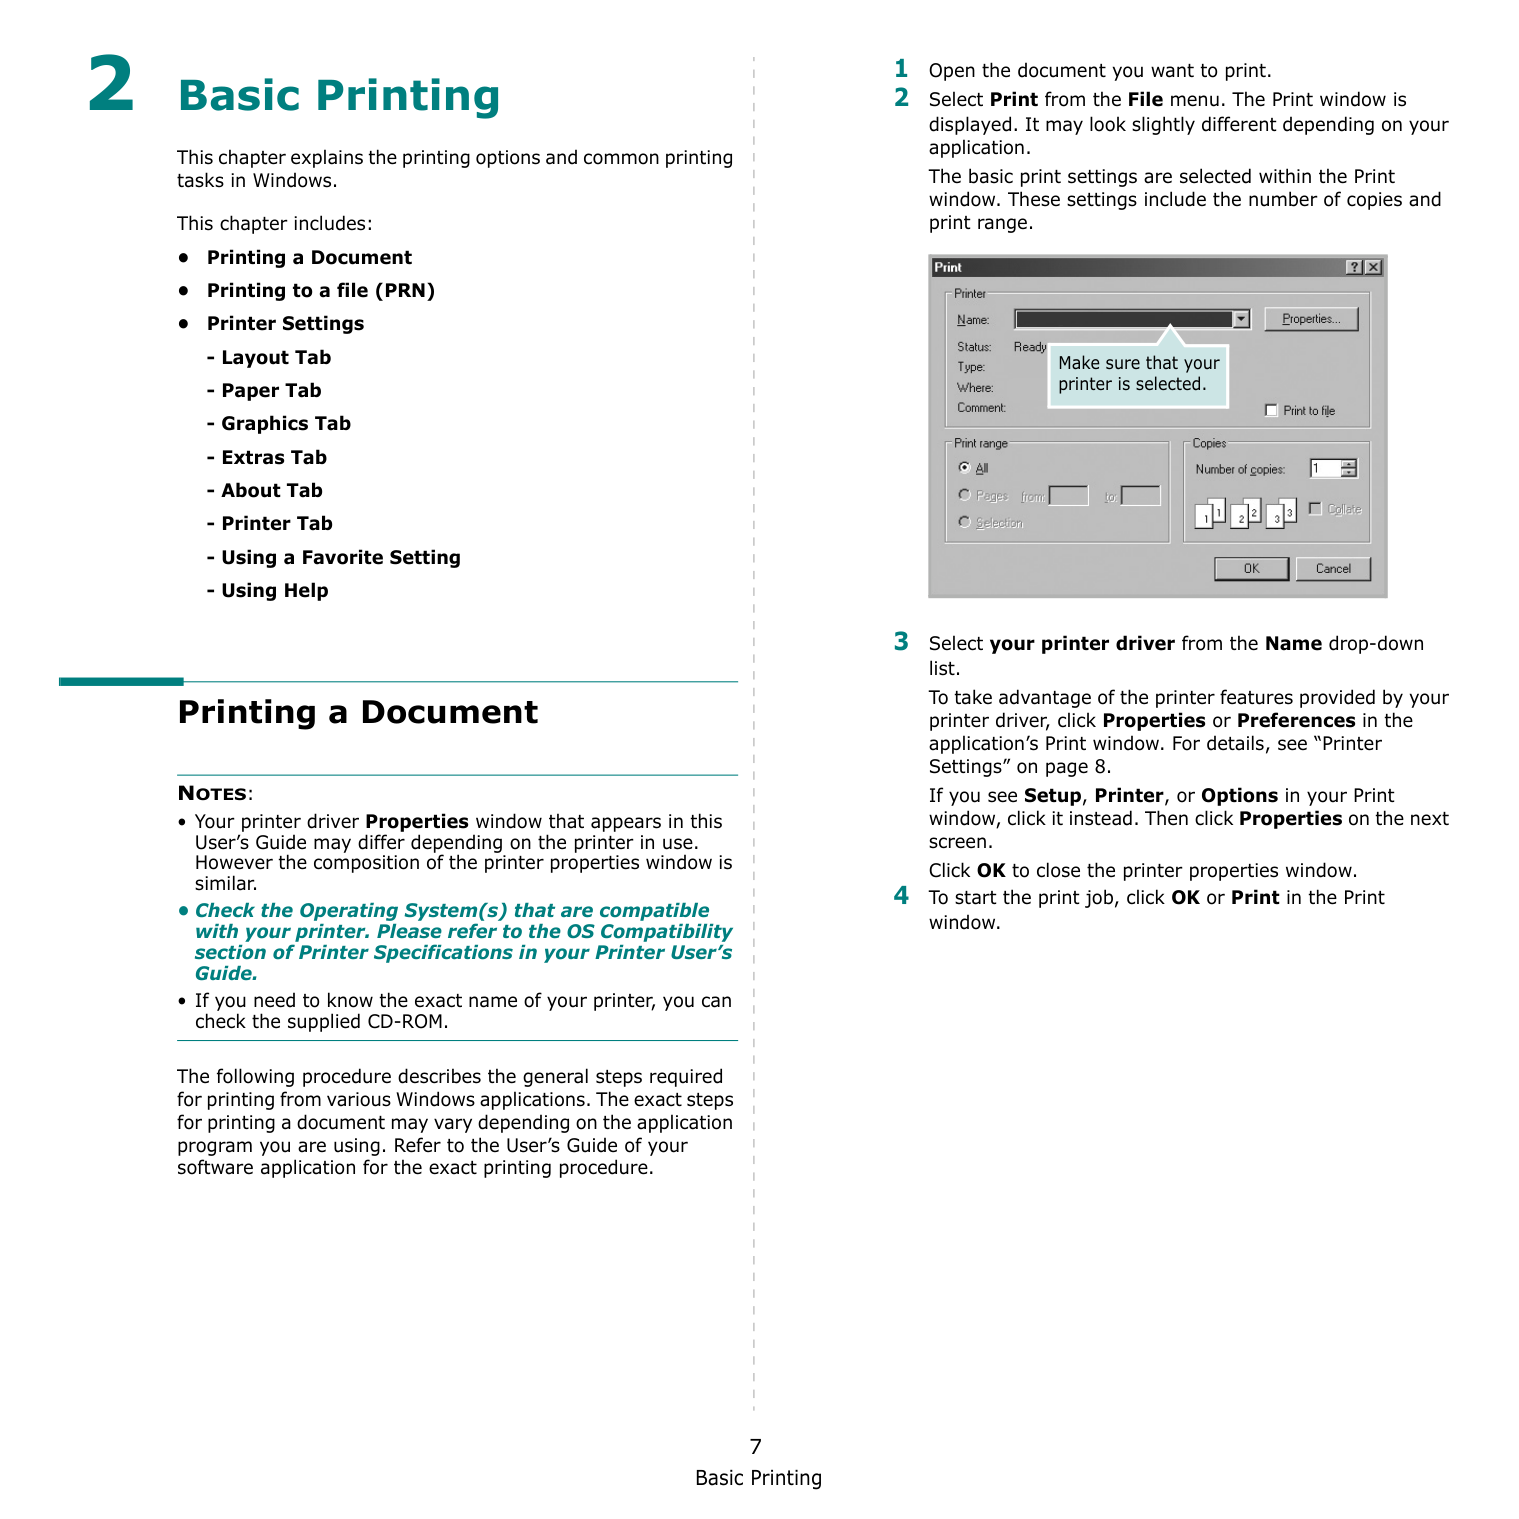
Basic Printing 7 2 Basic Printing This chapter explains the printing options and common printing tasks in Windows. This chapter includes: • Printing a Document • Printing to a file (PRN) • Printer Settings
Notes:
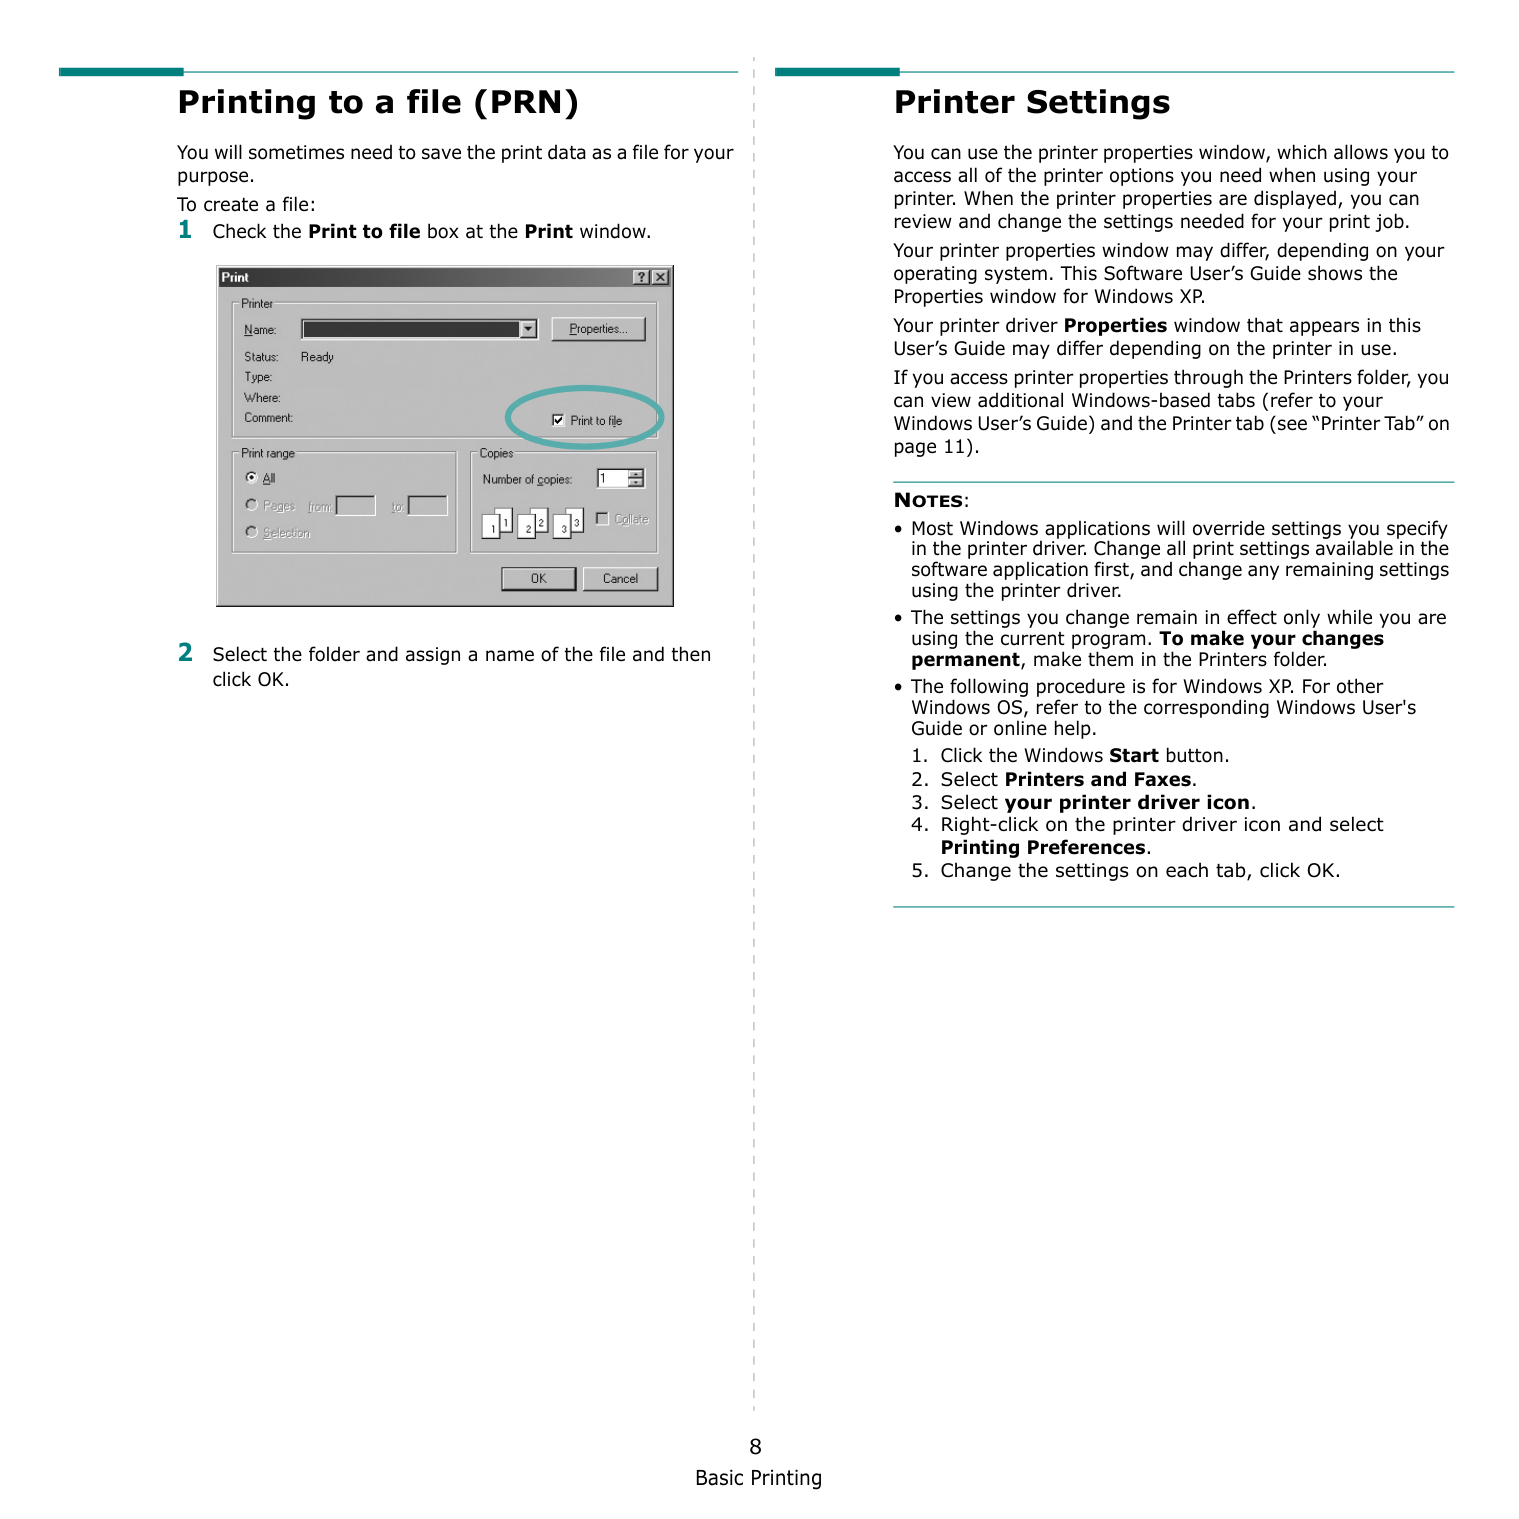
Basic Printing 8 Printing to a file (PRN) You will sometimes need to save the print data as a file for your purpose. To create a file: 1 Check the Print to file box at the Print window. 2 Select the folder and assign a name of the file and then click OK. Printer Settings You can use the printer properties window, which allows you to access all of the printer options you need when using your printer. When the printer properties are displayed, you can review and change the settings needed for your print job. Your printer properties window may differ, depending on your operating system. This Software User’s Guide shows the Properties window for Windows XP. Your printer driver Properties window that appears in this User’s Guide may differ depending on the printer in use. If you access printer properties through the Printers folder, you can view additional Windows-based tabs (refer to your Windows User’s Guide) and the Printer tab (see “Printer Tab” on page 11).
Notes:
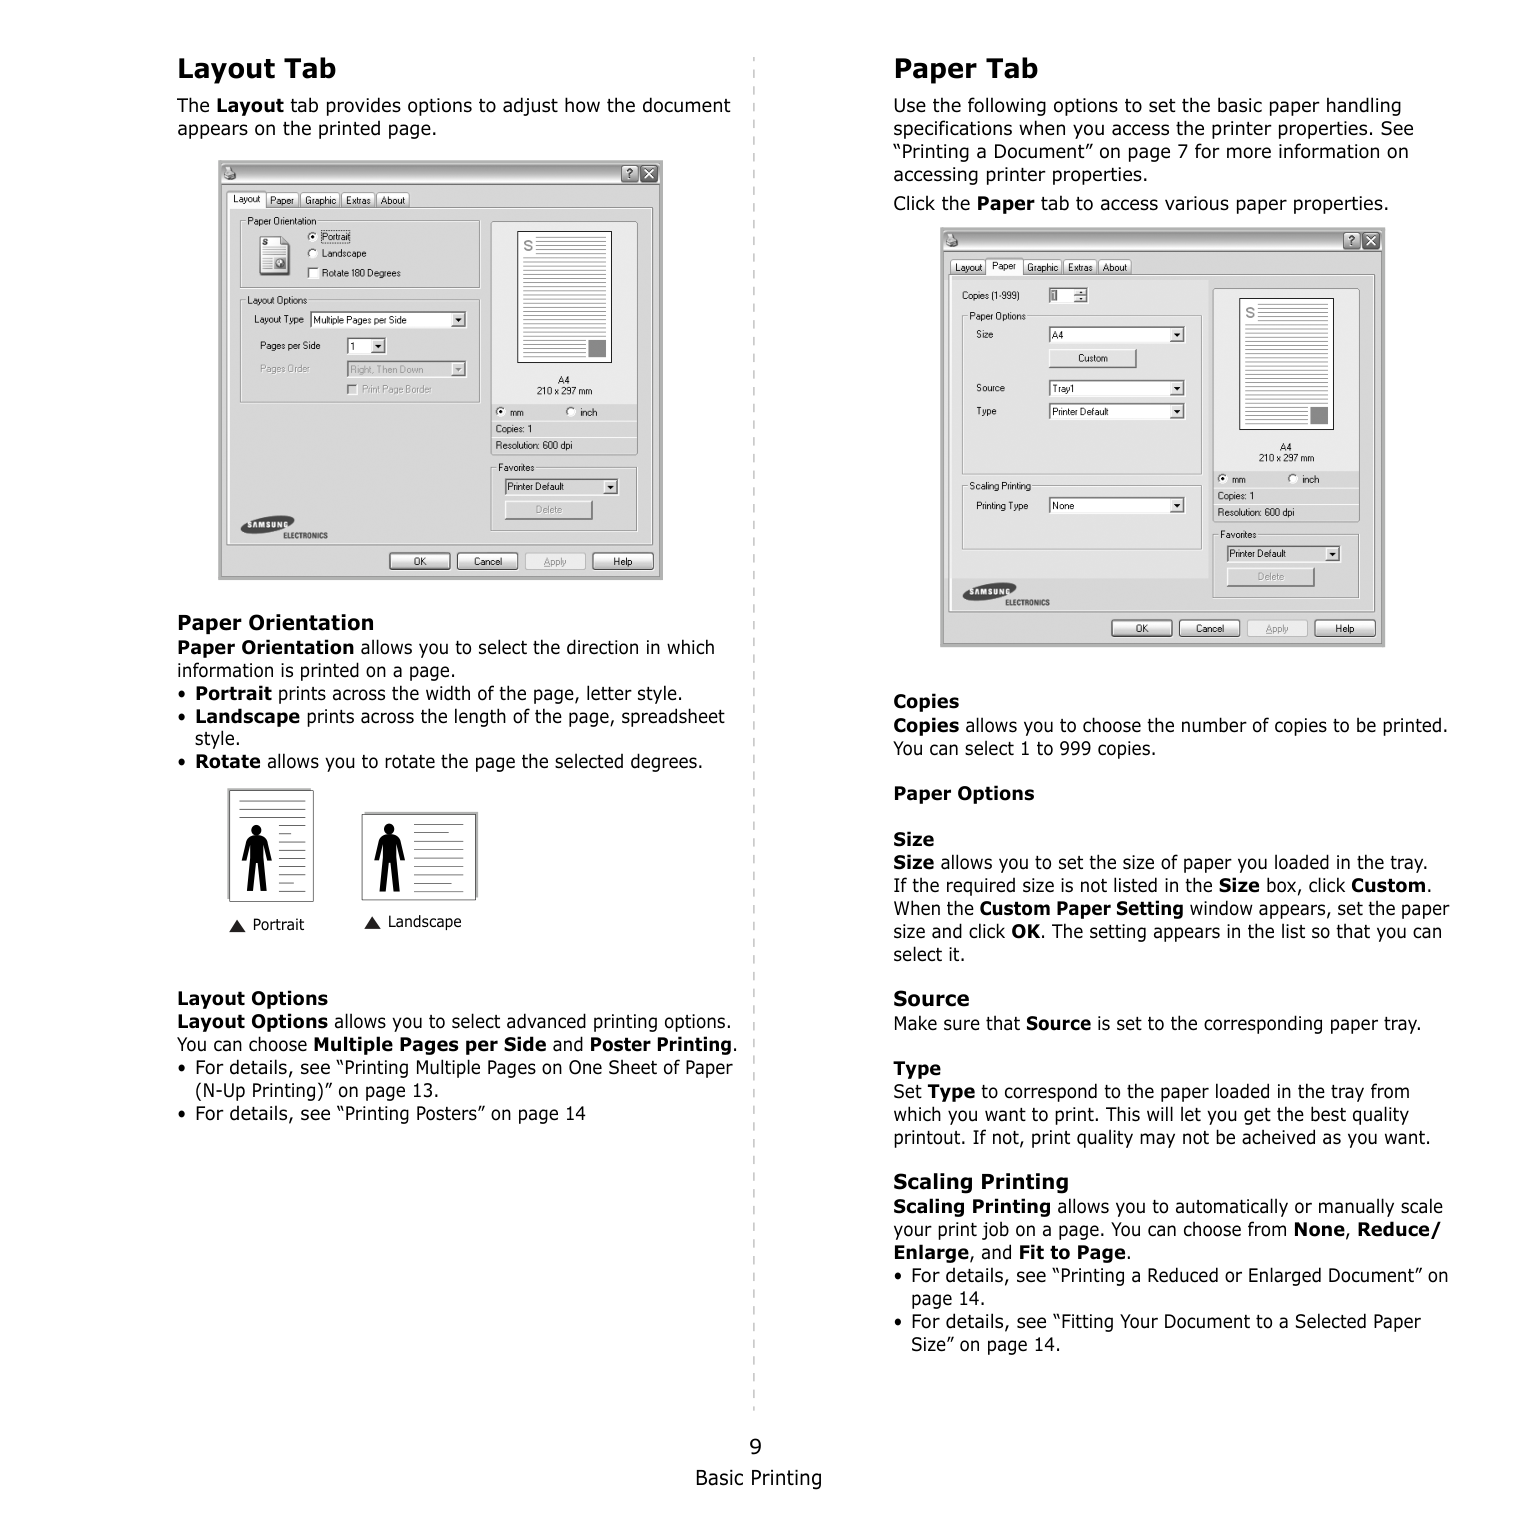
Basic Printing 9 Layout Tab The Layout tab provides options to adjust how the document appears on the printed page. Paper Orientation Paper Orientation allows you to select the direction in which information is printed on a page.
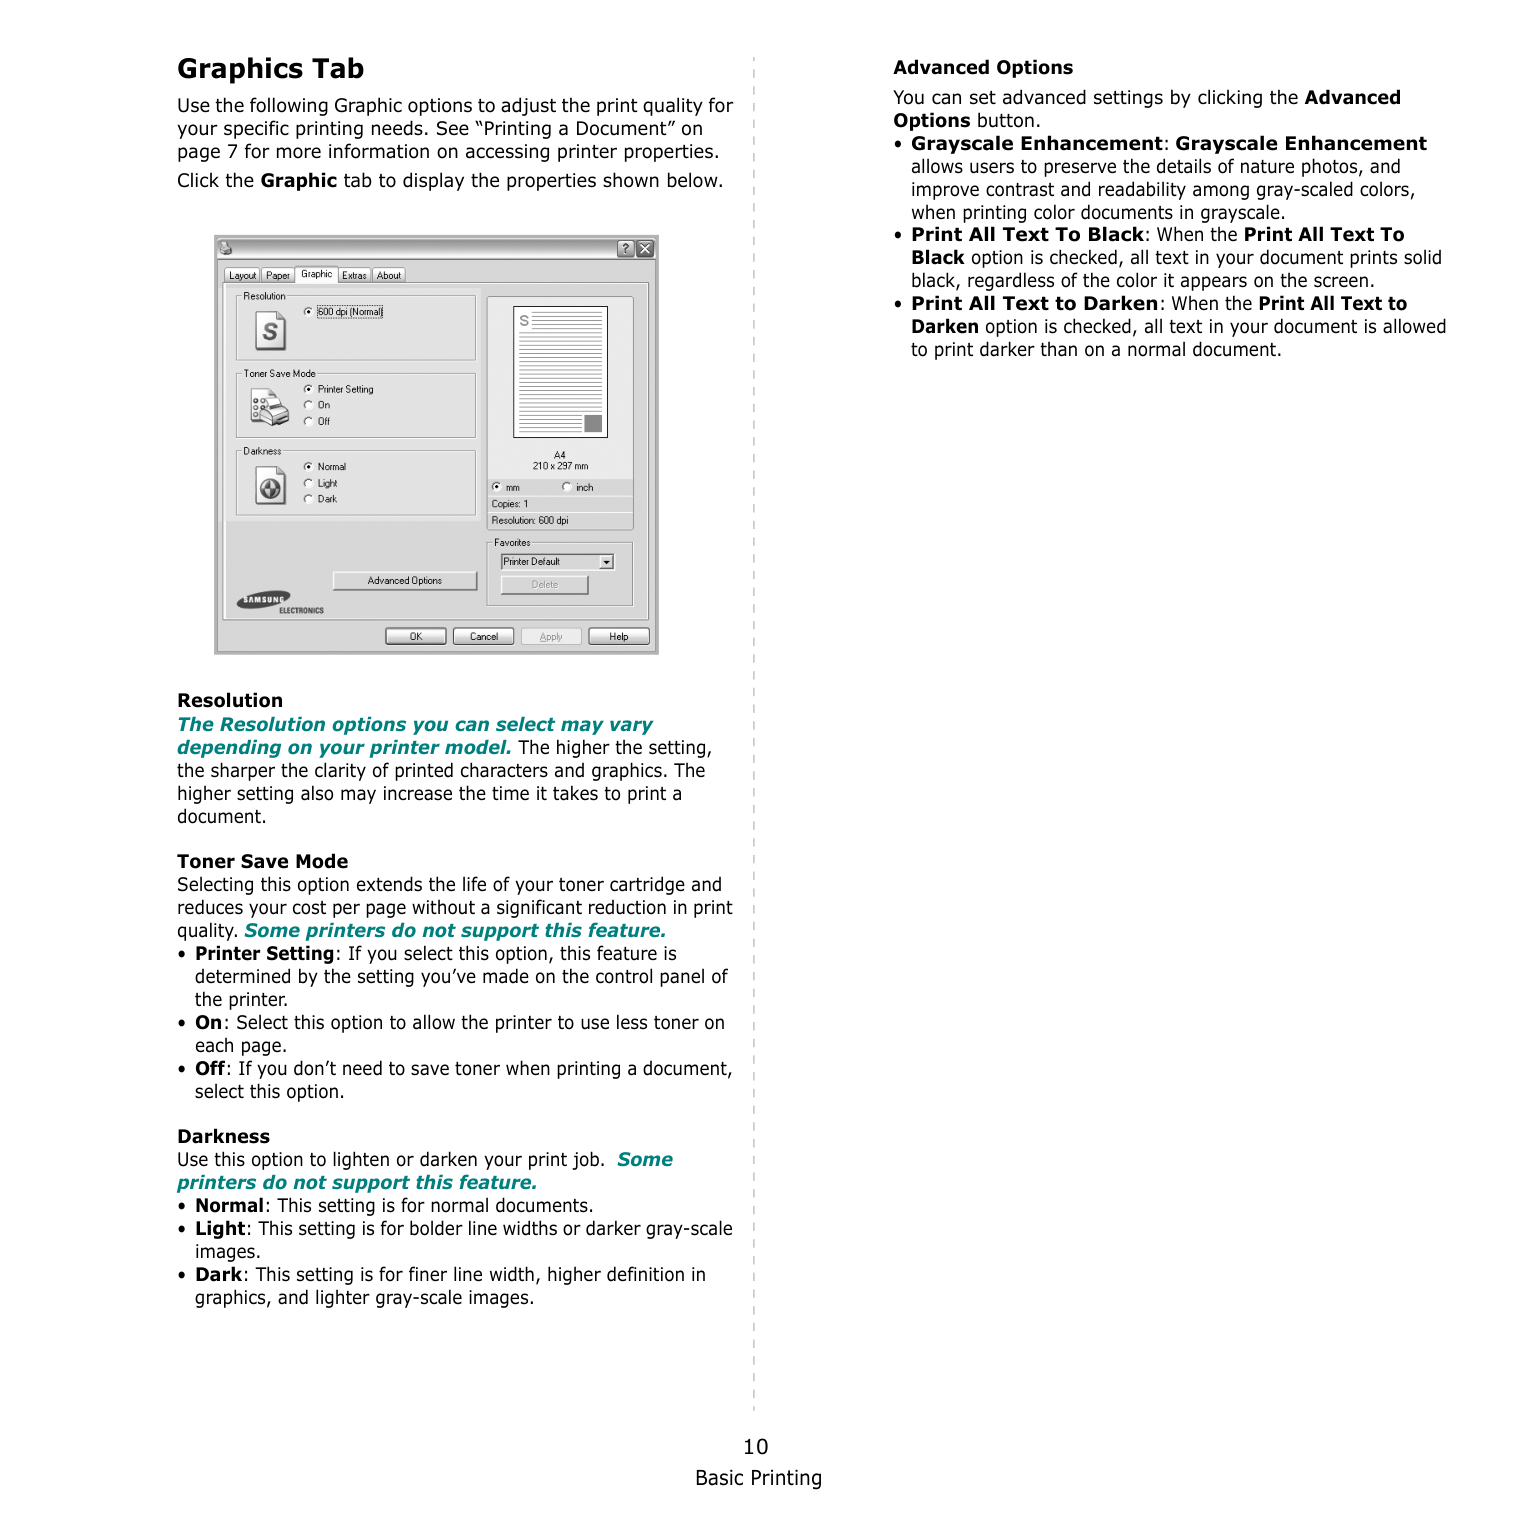
Basic Printing 10 Graphics Tab Use the following Graphic options to adjust the print quality for your specific printing needs. See “Printing a Document” on page 7 for more information on accessing printer properties. Click the Graphic tab to display the properties shown below.
Resolution The Resolution options you can select may vary depending on your printer model. The higher the setting, the sharper the clarity of printed characters and graphics. The higher setting also may increase the time it takes to print a document. Toner Save Mode Selecting this option extends the life of your toner cartridge and reduces your cost per page without a significant reduction in print quality. Some printers do not support this feature.

Basic Printing 11 Extras Tab You can select output options for your document. See “Printing a Document” on page 7 for more information about accessing the printer properties. Click the Extras tab to access the following feature: Watermark You can create a background text image to be printed on each page of your document. For details, see “Using Watermarks” on page 15. Overlay Overlays are often used to take the place of preprinted forms and letterhead paper. For details, see “Using Overlays” on page 16. Output Options
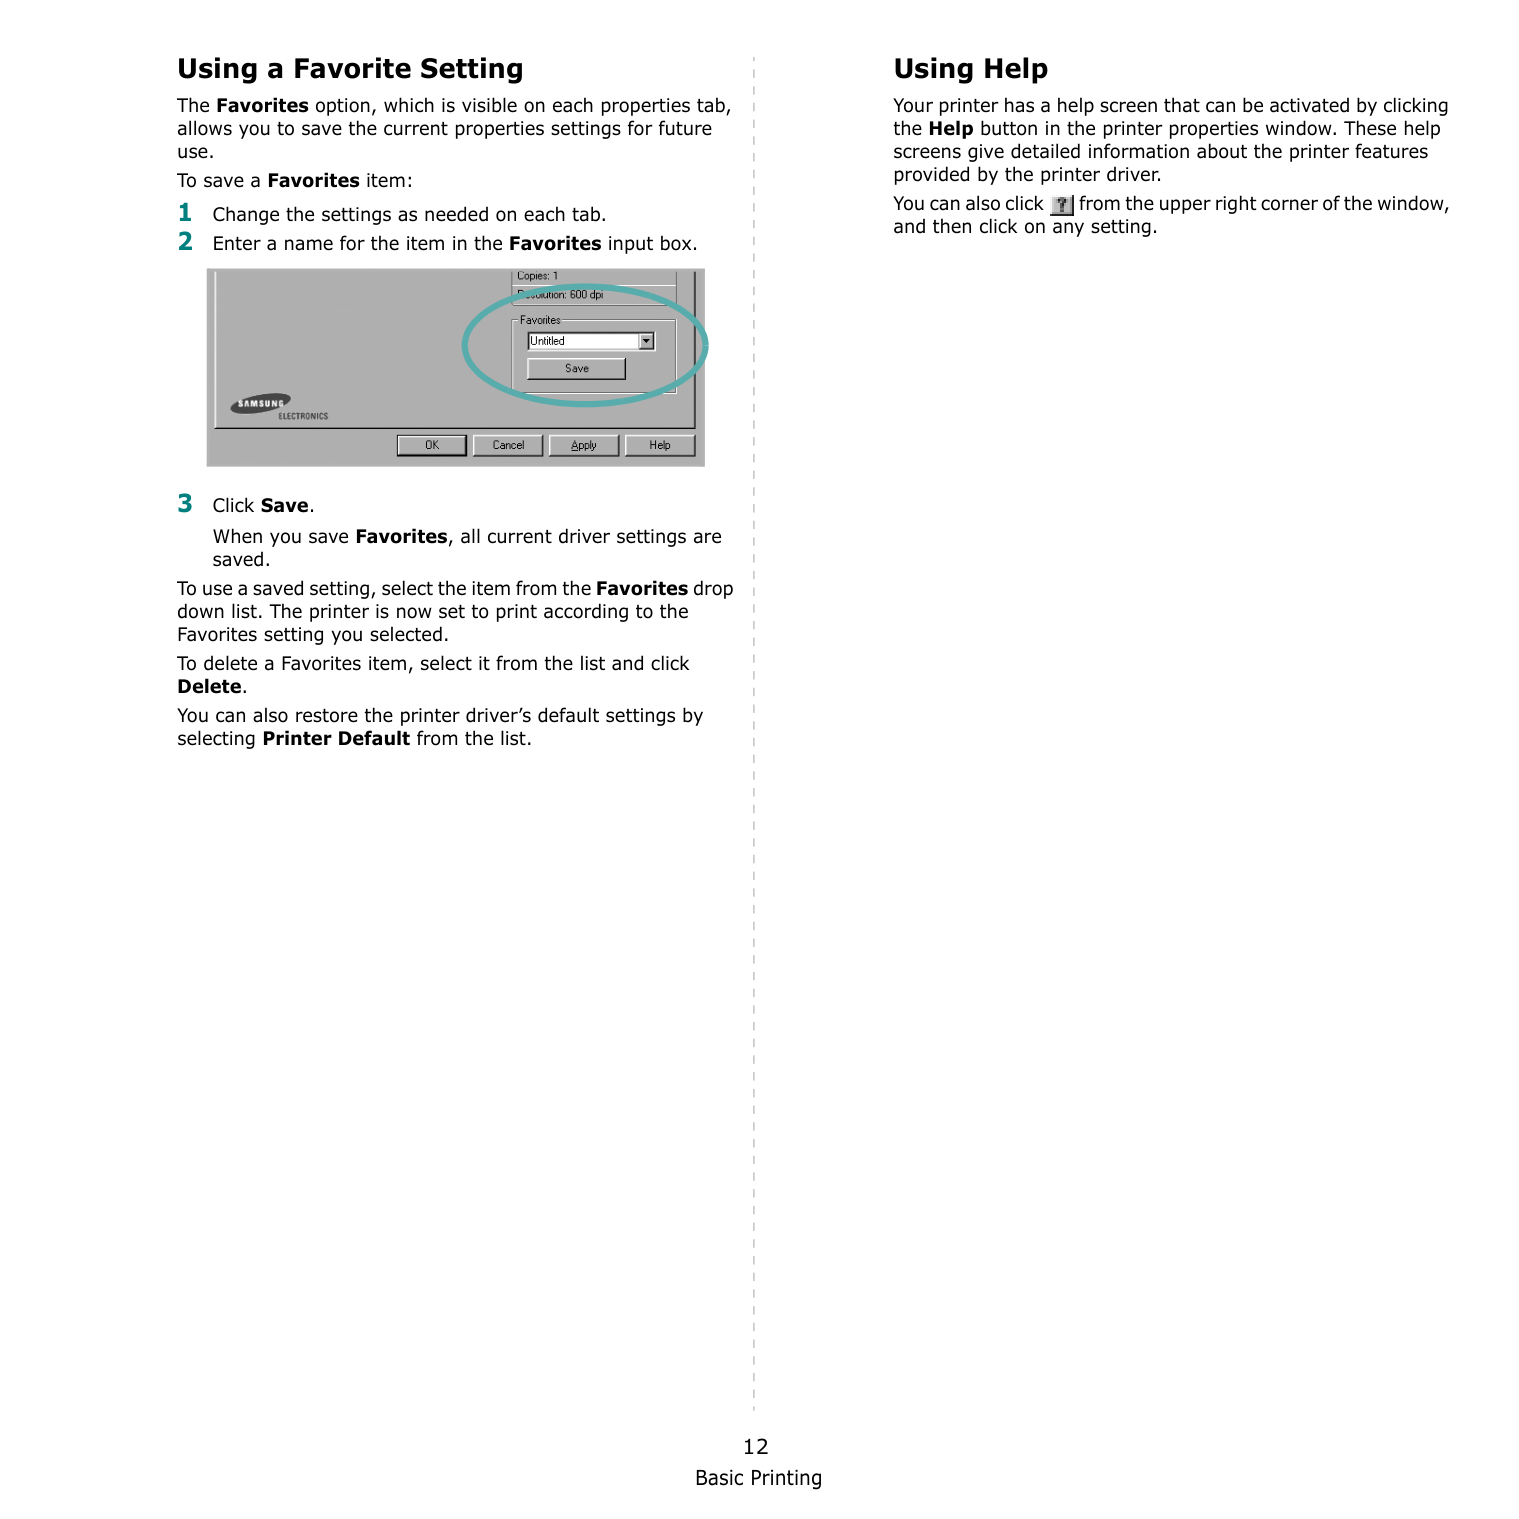
Basic Printing 12 Using a Favorite Setting The Favorites option, which is visible on each properties tab, allows you to save the current properties settings for future use. To save a Favorites item: 1 Change the settings as needed on each tab. 2 Enter a name for the item in the Favorites input box. 3 Click Save. When you save Favorites, all current driver settings are saved. To use a saved setting, select the item from the Favorites drop down list. The printer is now set to print according to the Favorites setting you selected. To delete a Favorites item, select it from the list and click Delete. You can also restore the printer driver’s default settings by selecting Printer Default from the list. Using Help Your printer has a help screen that can be activated by clicking the Help button in the printer properties window. These help screens give detailed information about the printer features provided by the printer driver. You can also click from the upper right corner of the window, and then click on any setting.
Advanced Printing 13 3 Advanced Printing This chapter explains printing options and advanced printing tasks.
Note:
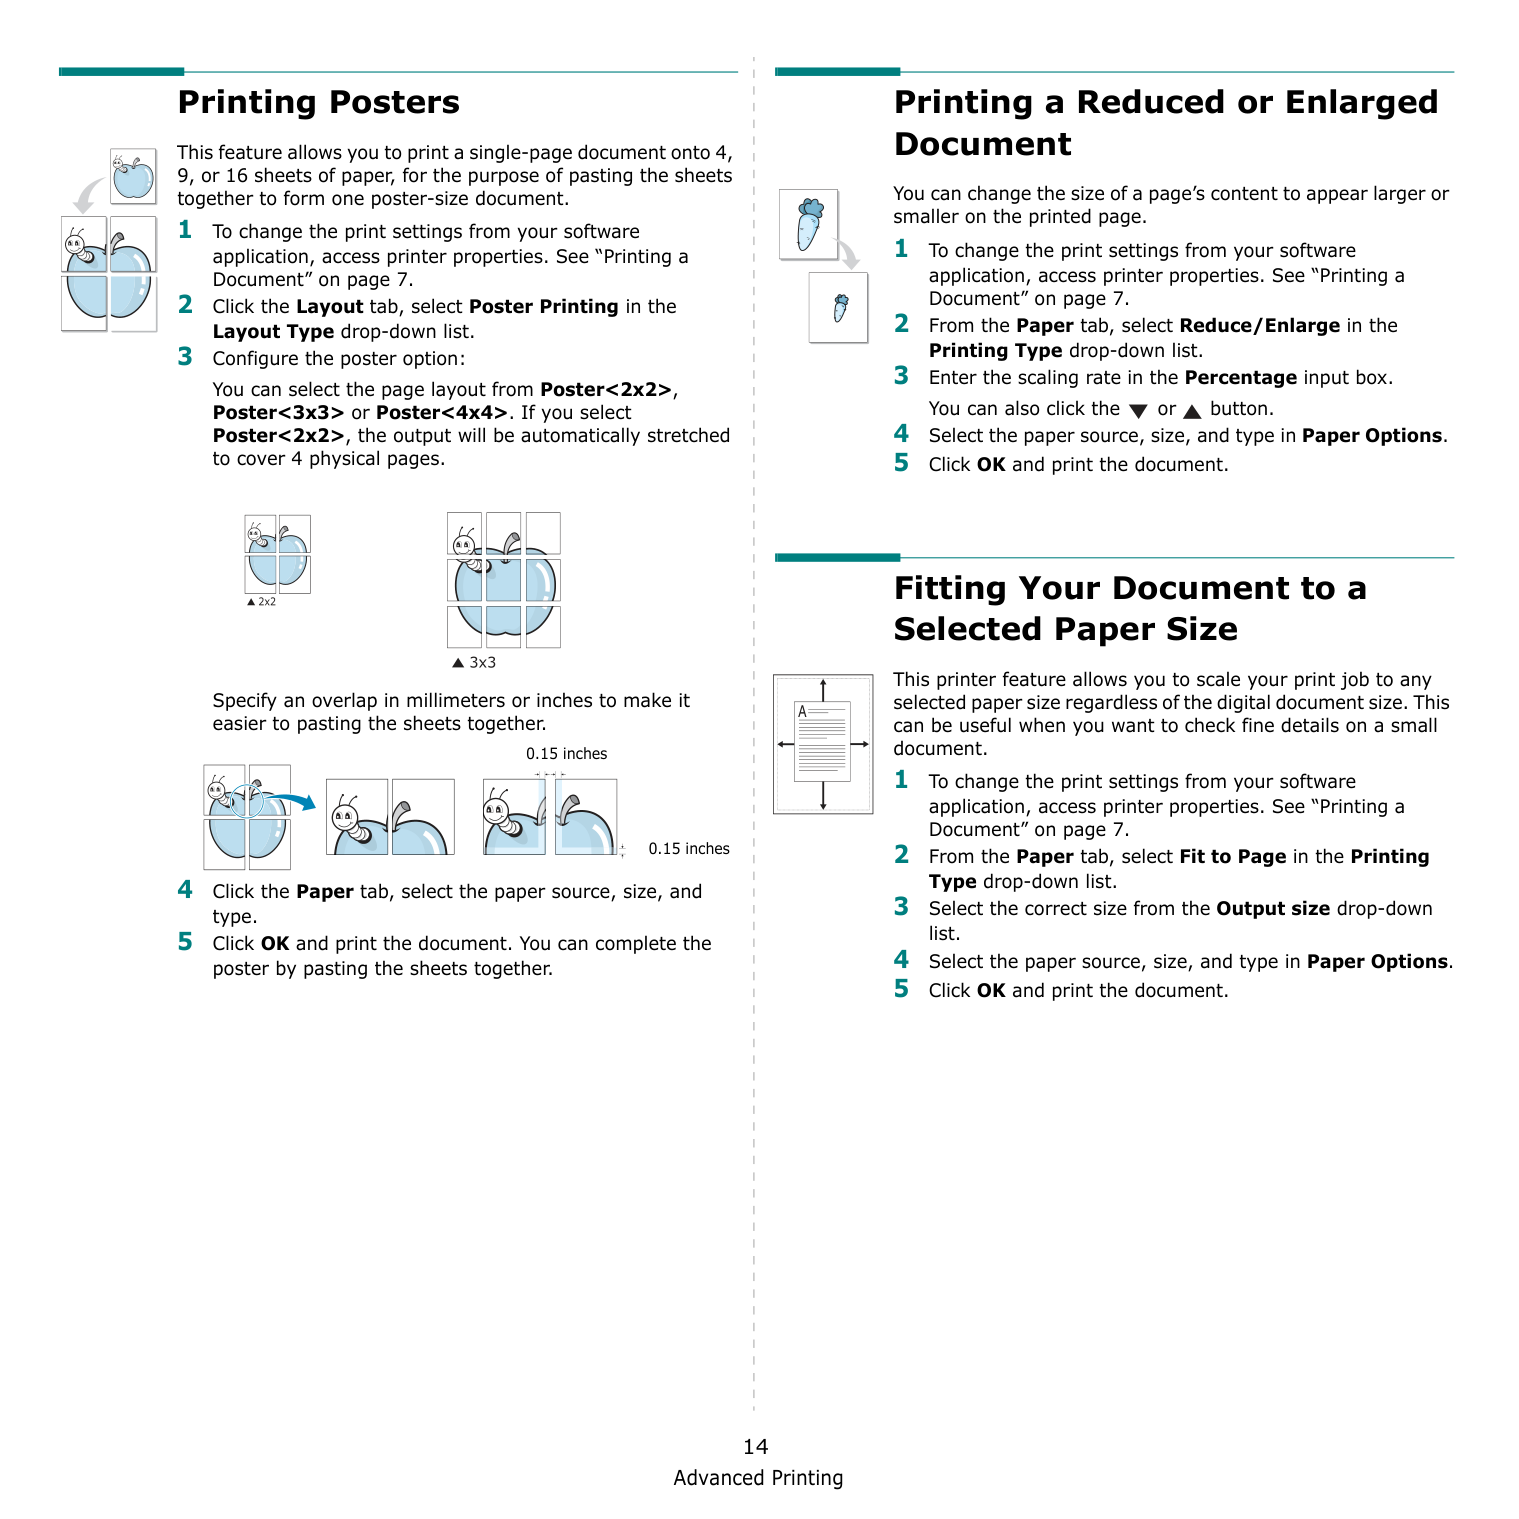
Advanced Printing 14 Printing Posters This feature allows you to print a single-page document onto 4, 9, or 16 sheets of paper, for the purpose of pasting the sheets together to form one poster-size document. 1 To change the print settings from your software application, access printer properties. See “Printing a Document” on page 7. 2 Click the Layout tab, select Poster Printing in the Layout Type drop-down list. 3 Configure the poster option: You can select the page layout from Poster<2x2>, Poster<3x3> or Poster<4x4>. If you select Poster<2x2>, the output will be automatically stretched to cover 4 physical pages.
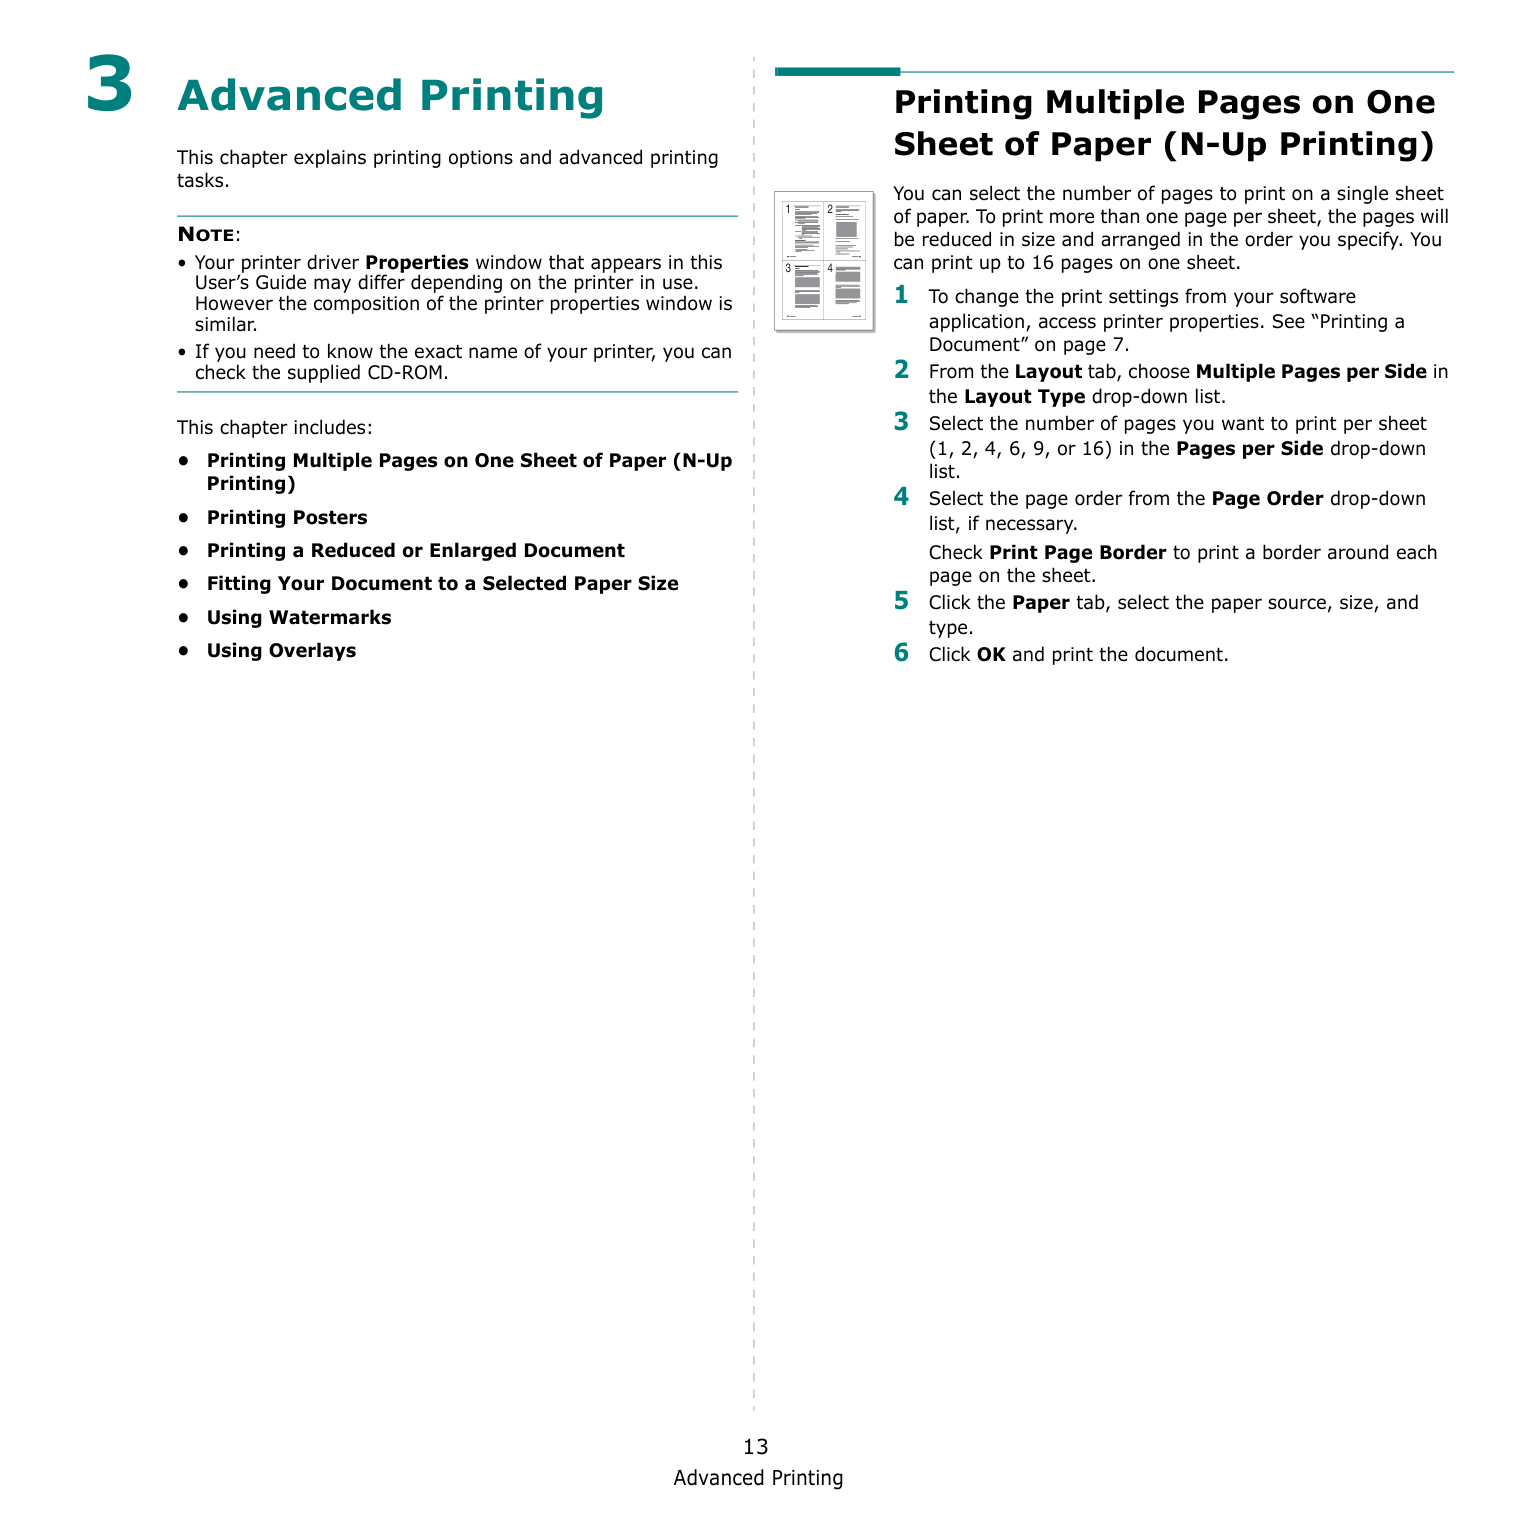
Specify an overlap in millimeters or inches to make it easier to pasting the sheets together. 4 Click the Paper tab, select the paper source, size, and type. 5 Click OK and print the document. You can complete the poster by pasting the sheets together. 0.15 inches 0.15 inches Printing a Reduced or Enlarged Document You can change the size of a page’s content to appear larger or smaller on the printed page. 1 To change the print settings from your software application, access printer properties. See “Printing a Document” on page 7. 2 From the Paper tab, select Reduce/Enlarge in the Printing Type drop-down list. 3 Enter the scaling rate in the Percentage input box. You can also click the or button. 4 Select the paper source, size, and type in Paper Options. 5 Click OK and print the document. Fitting Your Document to a Selected Paper Size This printer feature allows you to scale your print job to any selected paper size regardless of the digital document size. This can be useful when you want to check fine details on a small document. 1 To change the print settings from your software application, access printer properties. See “Printing a Document” on page 7. 2 From the Paper tab, select Fit to Page in the Printing Type drop-down list. 3 Select the correct size from the Output size drop-down list. 4 Select the paper source, size, and type in Paper Options. 5 Click OK and print the document.
A
Advanced Printing 15 Using Watermarks The Watermark option allows you to print text over an existing document. For example, you may want to have large gray letters reading “DRAFT” or “CONFIDENTIAL” printed diagonally across the first page or all pages of a document. There are several predefined watermarks that come with the printer, and they can be modified, or you can add new ones to the list. Using an Existing Watermark 1 To change the print settings from your software application, access printer properties. See “Printing a Document” on page 7. 2 Click the Extras tab, and select the desired watermark from the Watermark drop-down list. You will see the selected watermark in the preview image. 3 Click OK and start printing. NOTE: The preview image shows how the page will look when it is printed. Creating a Watermark 1 To change the print settings from your software application, access printer properties. See “Printing a Document” on page 7. 2 Click the Extras tab, and click the Edit button in the Watermark section. The Edit Watermark window appears. 3 Enter a text message in the Watermark Message box. You can enter up to 40 characters. The message displays in the preview window. When the First Page Only box is checked, the watermark prints on the first page only. 4 Select watermark options. You can select the font name, style, size, or grayscale level from the Font Attributes section and set the angle of the watermark from the Message Angle section. 5 Click Add to add a new watermark to the list. 6 When you have finished editing, click OK and start printing. To stop printing the watermark, select (No Watermark) from the Watermark drop-down list. Editing a Watermark 1 To change the print settings from your software application, access printer properties. See “Printing a Document” on page 7. 2 Click the Extras tab and click the Edit button in the Watermark section. The Edit Watermark window appears. 3 Select the watermark you want to edit from the Current Watermarks list and change the watermark message and options. 4 Click Update to save the changes. 5 Click OK until you exit the Print window. Deleting a Watermark 1 To change the print settings from your software application, access printer properties. See “Printing a Document” on page 7. 2 From the Extras tab, click the Edit button in the Watermark section. The Edit Watermark window appears. 3 Select the watermark you want to delete from the Current Watermarks list and click Delete. 4 Click OK until you exit the Print window.
Advanced Printing 16 Using Overlays What is an Overlay? An overlay is text and/or images stored in the computer hard disk drive (HDD) as a special file format that can be printed on any document. Overlays are often used to take the place of preprinted forms and letterhead paper. Rather than using preprinted letterhead, you can create an overlay containing the exact same information that is currently on your letterhead. To print a letter with your company’s letterhead, you do not need to load preprinted letterhead paper in the printer. You need only tell the printer to print the letterhead overlay on your document. Creating a New Page Overlay To use a page overlay, you must create a new page overlay containing your logo or image. 1 Create or open a document containing text or an image for use in a new page overlay. Position the items exactly as you wish them to appear when printed as an overlay. 2 To save the document as an overlay, access printer properties. See “Printing a Document” on page 7. 3 Click the Extras tab, and click Edit button in the Overlay section. 4 In the Edit Overlay window, click Create Overlay. 5 In the Create Overlay window, type a name of up to eight characters in the File name box. Select the destination path, if necessary. (The default is C:\Formover). 6 Click Save. The name appears on the Overlay List box. 7 Click OK or Yes to finish creating. The file is not printed. Instead it is stored on your computer hard disk drive. NOTE: The overlay document size must be the same as the documents you print with the overlay. Do not create an overlay with a watermark.
World Best
Dear ABC RegardsWorld Best
Using a Page Overlay After an overlay has been created, it is ready to be printed with your document. To print an overlay with a document: 1 Create or open the document you want to print. 2 To change the print settings from your software application, access printer properties. See “Printing a Document” on page 7. 3 Click the Extras tab. 4 Select the desired overlay from the Overlay drop-down list box. 5 If the overlay file you want does not appear in the Overlay list, click Edit button and Load Overlay, and select the overlay file. If you have stored the overlay file you want to use in an external source, you can also load the file when you access the Load Overlay window. After you select the file, click Open. The file appears in the Overlay List box and is available for printing. Select the overlay from the Overlay List box. 6 If necessary, click Confirm Page Overlay When Printing. If this box is checked, a message window appears each time you submit a document for printing, asking you to confirm your wish to print an overlay on your document. If this box is not checked and an overlay has been selected, the overlay automatically prints with your document. 7 Click OK or Yes until printing begins. The selected overlay downloads with your print job and prints on your document. NOTE: The resolution of the overlay document must be the same as that of the document you will print with the overlay. Deleting a Page Overlay You can delete page overlays that you no longer use. 1 In the printer properties window, click the Extras tab. 2 Click the Edit button in the Overlay section. 3 Select the overlay you want to delete from the Overlay List box. 4 Click Delete Overlay. 5 When a confirming message window appears, click Yes. 6 Click OK until you exit the Print window.
Sharing the Printer Locally 17 4 Sharing the Printer Locally You can connect the printer directly to a selected computer, which is called “host computer,” on the network. The following procedure is for Windows XP. For other Windows OS, refer to the corresponding Windows User's Guide or online help.
Notes:
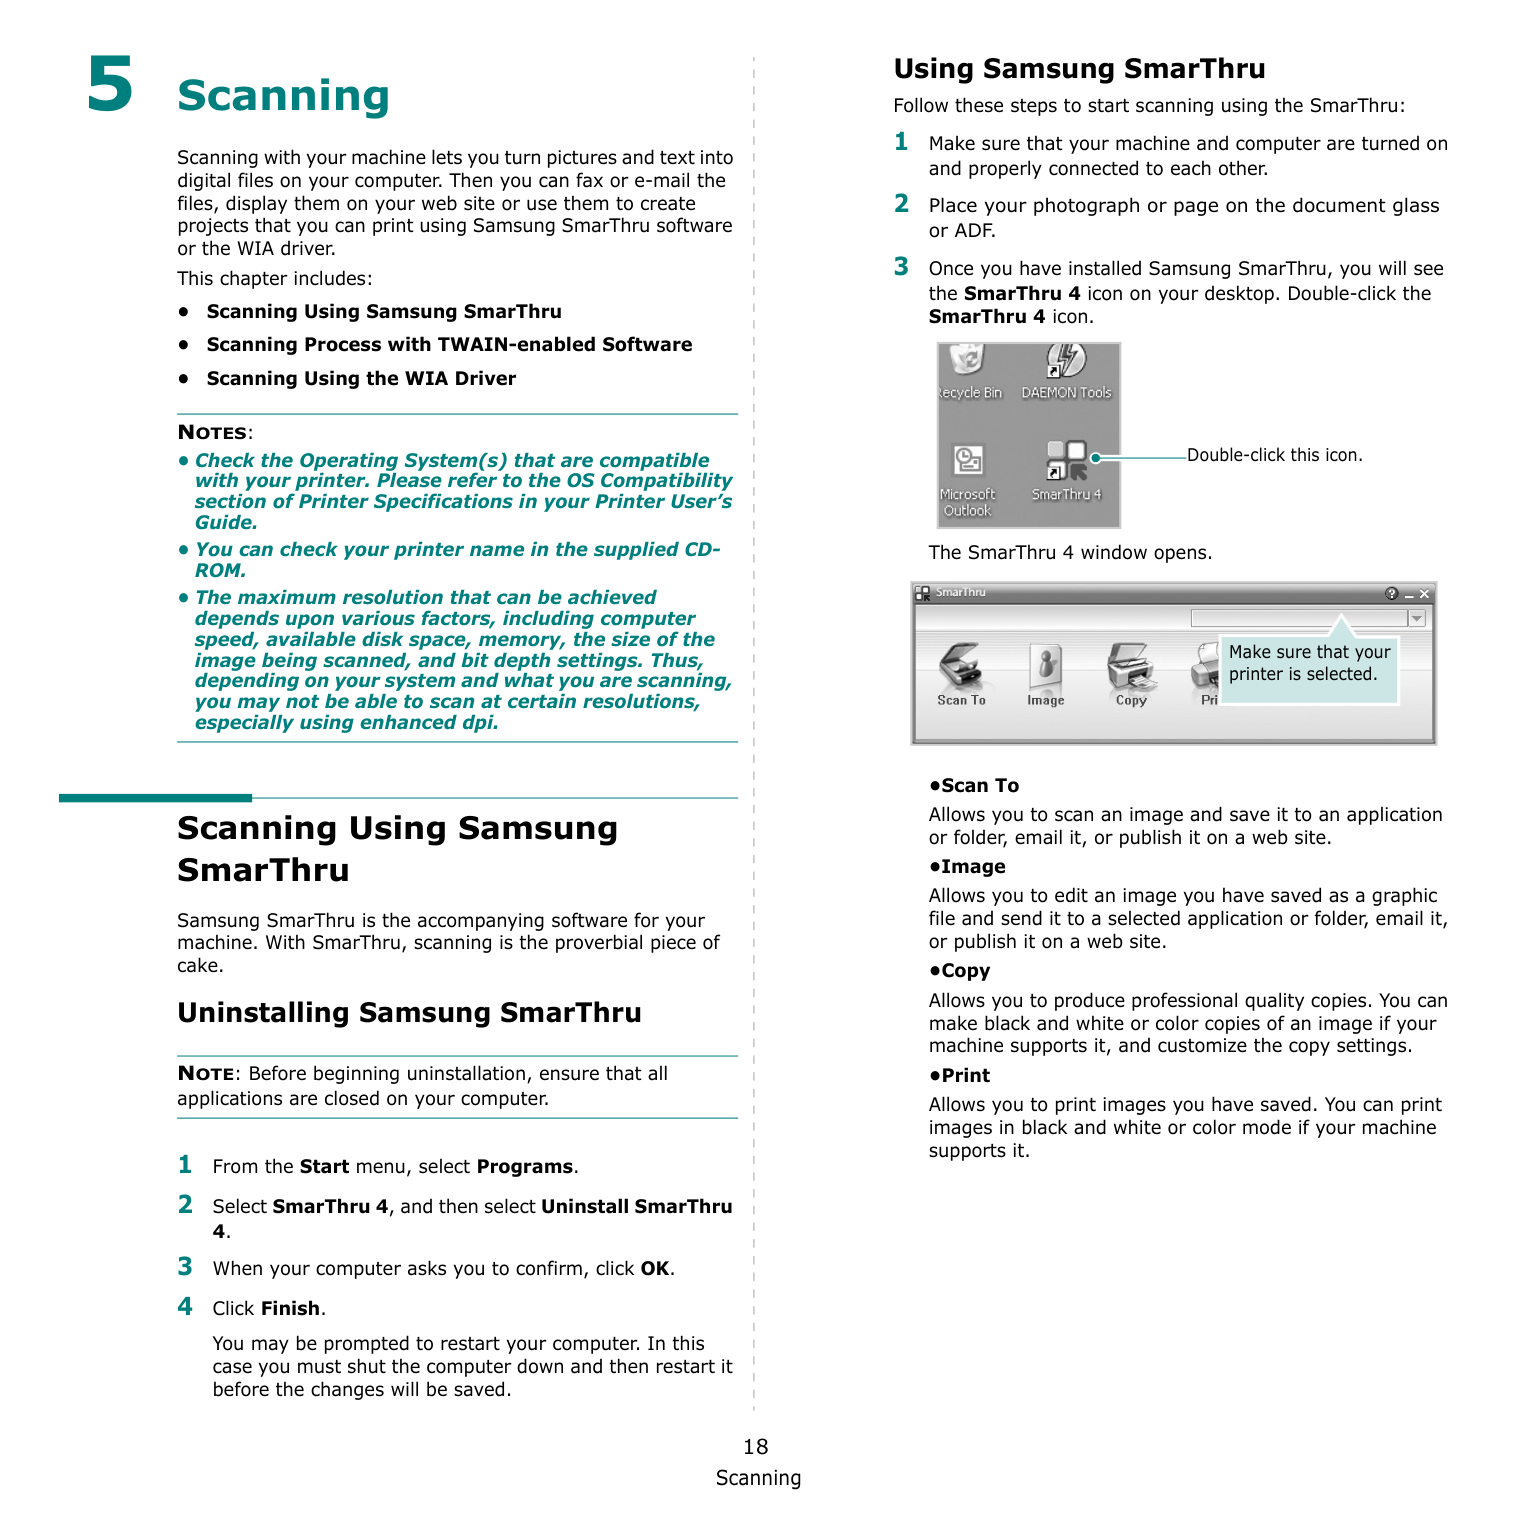
Scanning 18 5 Scanning Scanning with your machine lets you turn pictures and text into digital files on your computer. Then you can fax or e-mail the files, display them on your web site or use them to create projects that you can print using Samsung SmarThru software or the WIA driver. This chapter includes: • Scanning Using Samsung SmarThru • Scanning Process with TWAIN-enabled Software • Scanning Using the WIA Driver
Notes:
Rom.
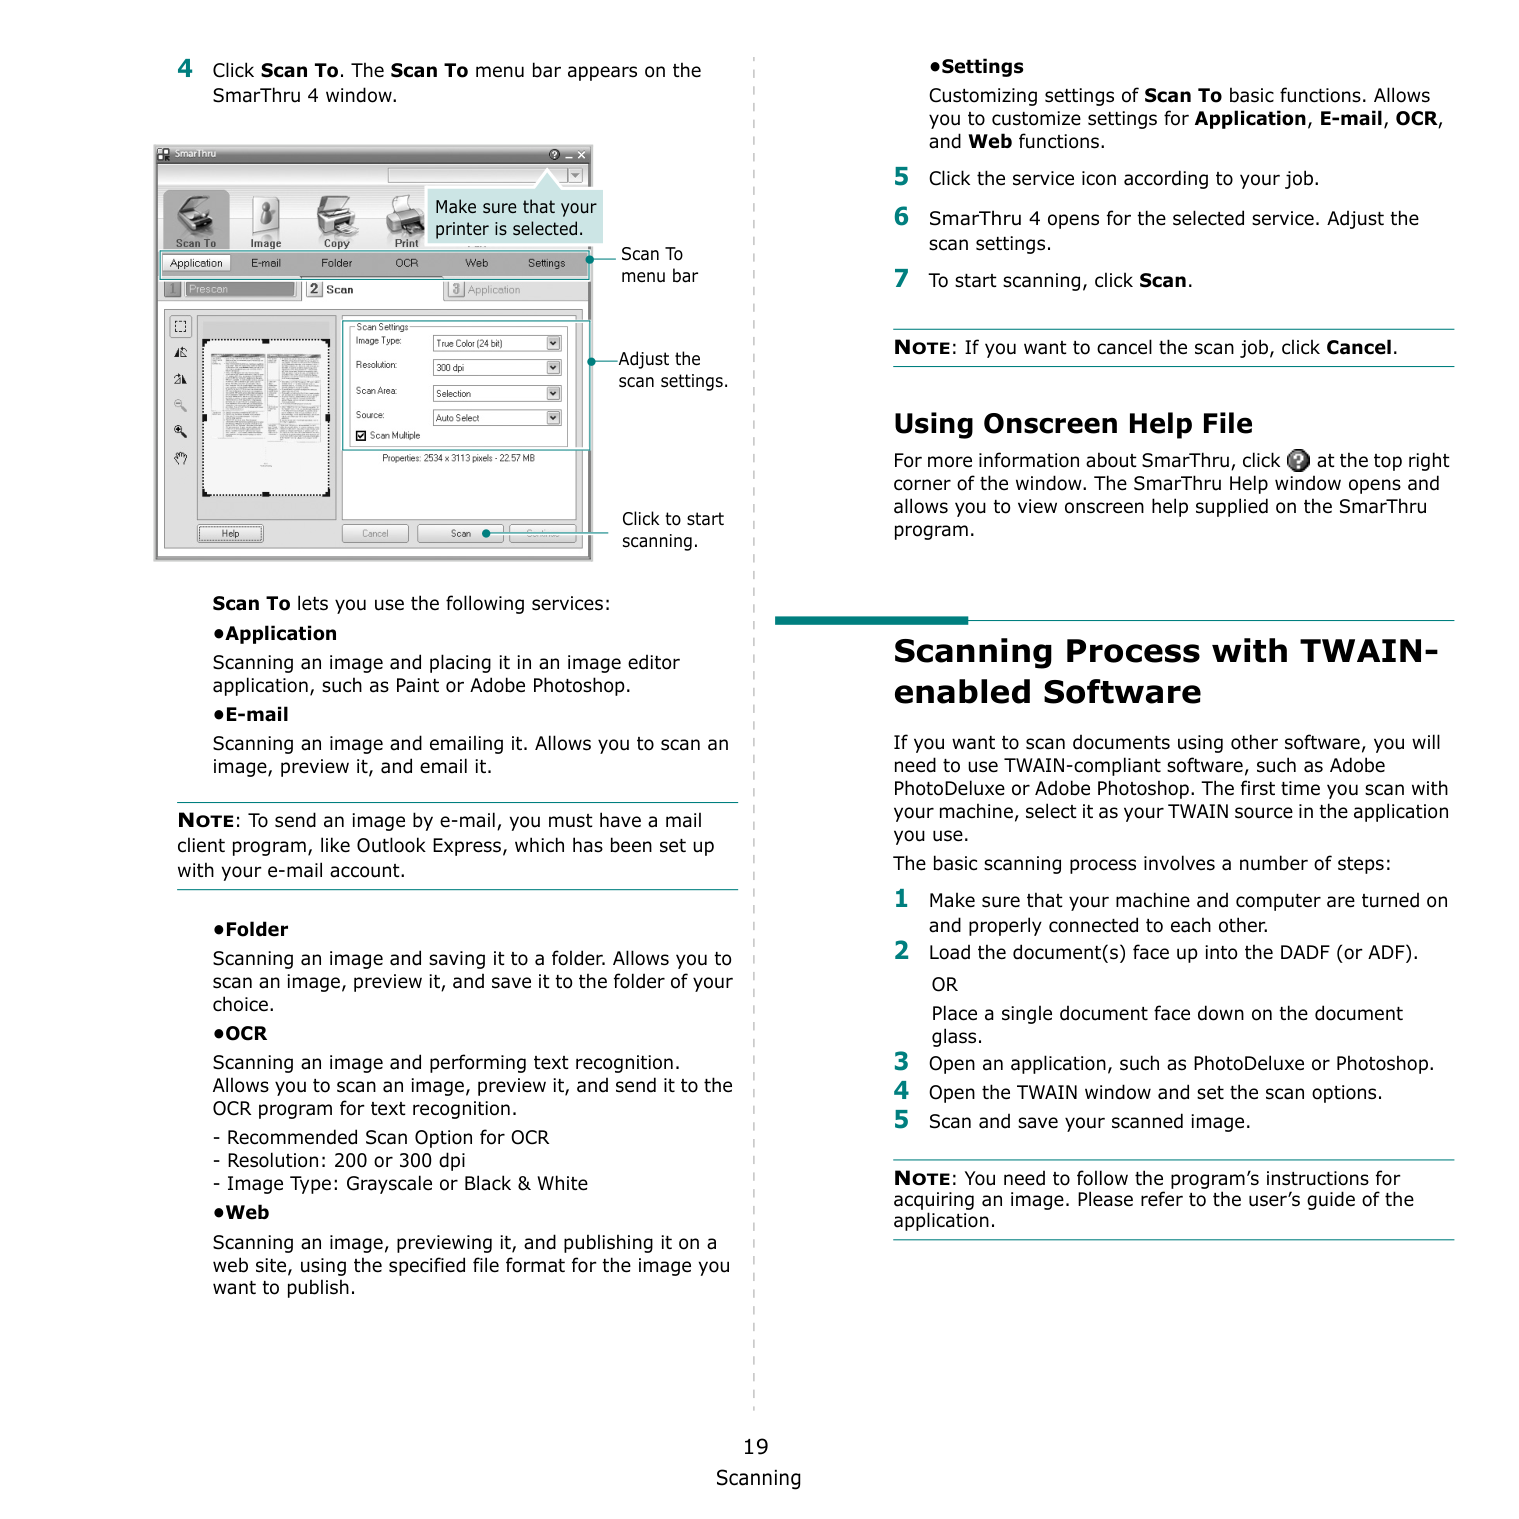
Scanning 19 4 Click Scan To. The Scan To menu bar appears on the SmarThru 4 window. Scan To lets you use the following services: •Application Scanning an image and placing it in an image editor application, such as Paint or Adobe Photoshop. •E-mail Scanning an image and emailing it. Allows you to scan an image, preview it, and email it. NOTE: To send an image by e-mail, you must have a mail client program, like Outlook Express, which has been set up with your e-mail account. •Folder Scanning an image and saving it to a folder. Allows you to scan an image, preview it, and save it to the folder of your choice.
•Ocr
Scanning an image and performing text recognition. Allows you to scan an image, preview it, and send it to the OCR program for text recognition.Or
Place a single document face down on the document glass. 3 Open an application, such as PhotoDeluxe or Photoshop. 4 Open the TWAIN window and set the scan options. 5 Scan and save your scanned image. NOTE: You need to follow the program’s instructions for acquiring an image. Please refer to the user’s guide of the application.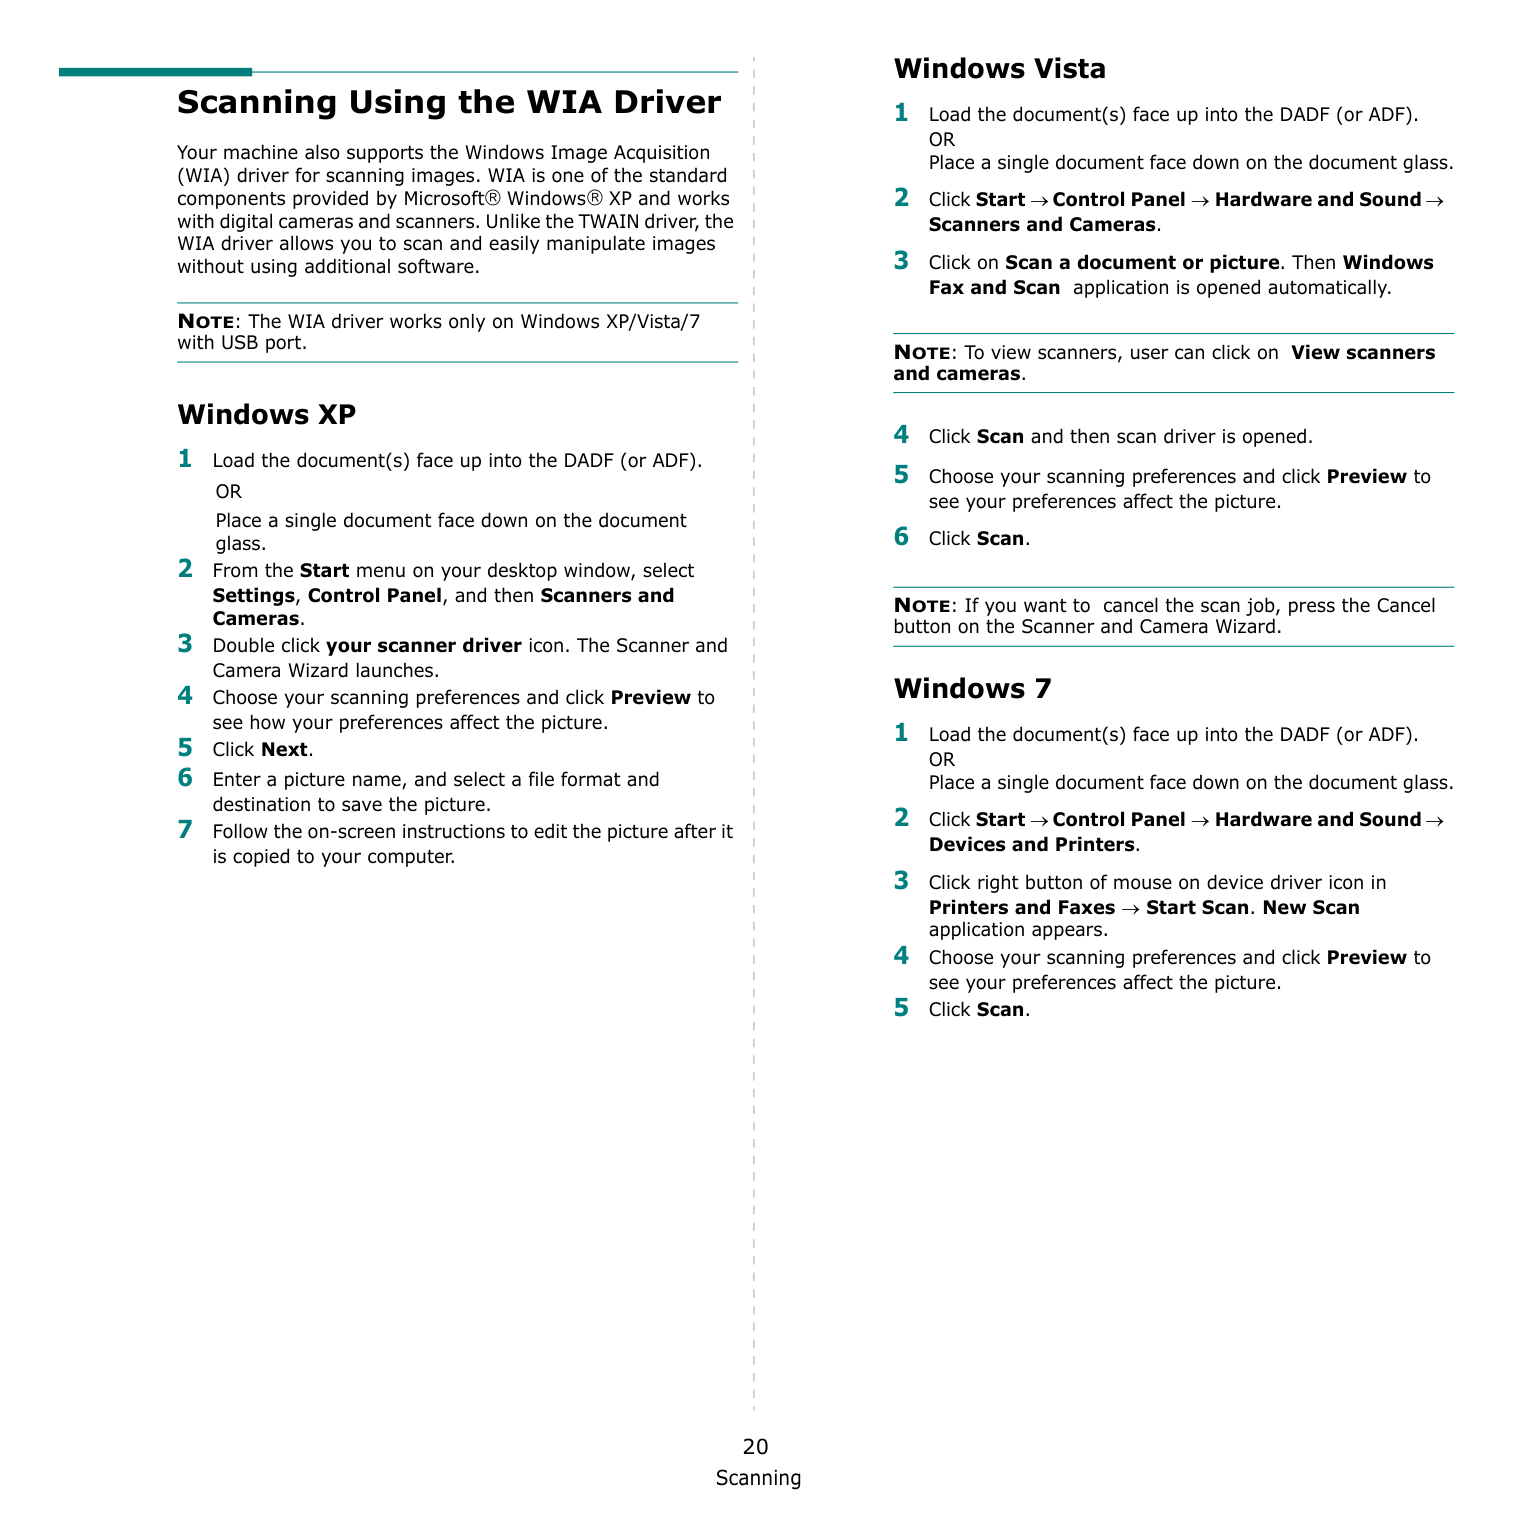
Scanning 20 Scanning Using the WIA Driver Your machine also supports the Windows Image Acquisition (WIA) driver for scanning images. WIA is one of the standard components provided by Microsoft® Windows® XP and works with digital cameras and scanners. Unlike the TWAIN driver, the WIA driver allows you to scan and easily manipulate images without using additional software. NOTE: The WIA driver works only on Windows XP/Vista/7 with USB port. Windows XP 1 Load the document(s) face up into the DADF (or ADF).
Or
Place a single document face down on the document glass. 2 From the Start menu on your desktop window, select Settings, Control Panel, and then Scanners and Cameras. 3 Double click your scanner driver icon. The Scanner and Camera Wizard launches. 4 Choose your scanning preferences and click Preview to see how your preferences affect the picture. 5 Click Next. 6 Enter a picture name, and select a file format and destination to save the picture. 7 Follow the on-screen instructions to edit the picture after it is copied to your computer. Windows Vista 1 Load the document(s) face up into the DADF (or ADF).Or
Place a single document face down on the document glass. 2 Click Start → Control Panel → Hardware and Sound → Scanners and Cameras. 3 Click on Scan a document or picture. Then Windows Fax and Scan application is opened automatically. NOTE: To view scanners, user can click on View scanners and cameras. 4 Click Scan and then scan driver is opened. 5 Choose your scanning preferences and click Preview to see your preferences affect the picture. 6 Click Scan. NOTE: If you want to cancel the scan job, press the Cancel button on the Scanner and Camera Wizard. Windows 7 1 Load the document(s) face up into the DADF (or ADF).Or
Place a single document face down on the document glass. 2 Click Start → Control Panel → Hardware and Sound → Devices and Printers. 3 Click right button of mouse on device driver icon in Printers and Faxes → Start Scan. New Scan application appears. 4 Choose your scanning preferences and click Preview to see your preferences affect the picture. 5 Click Scan.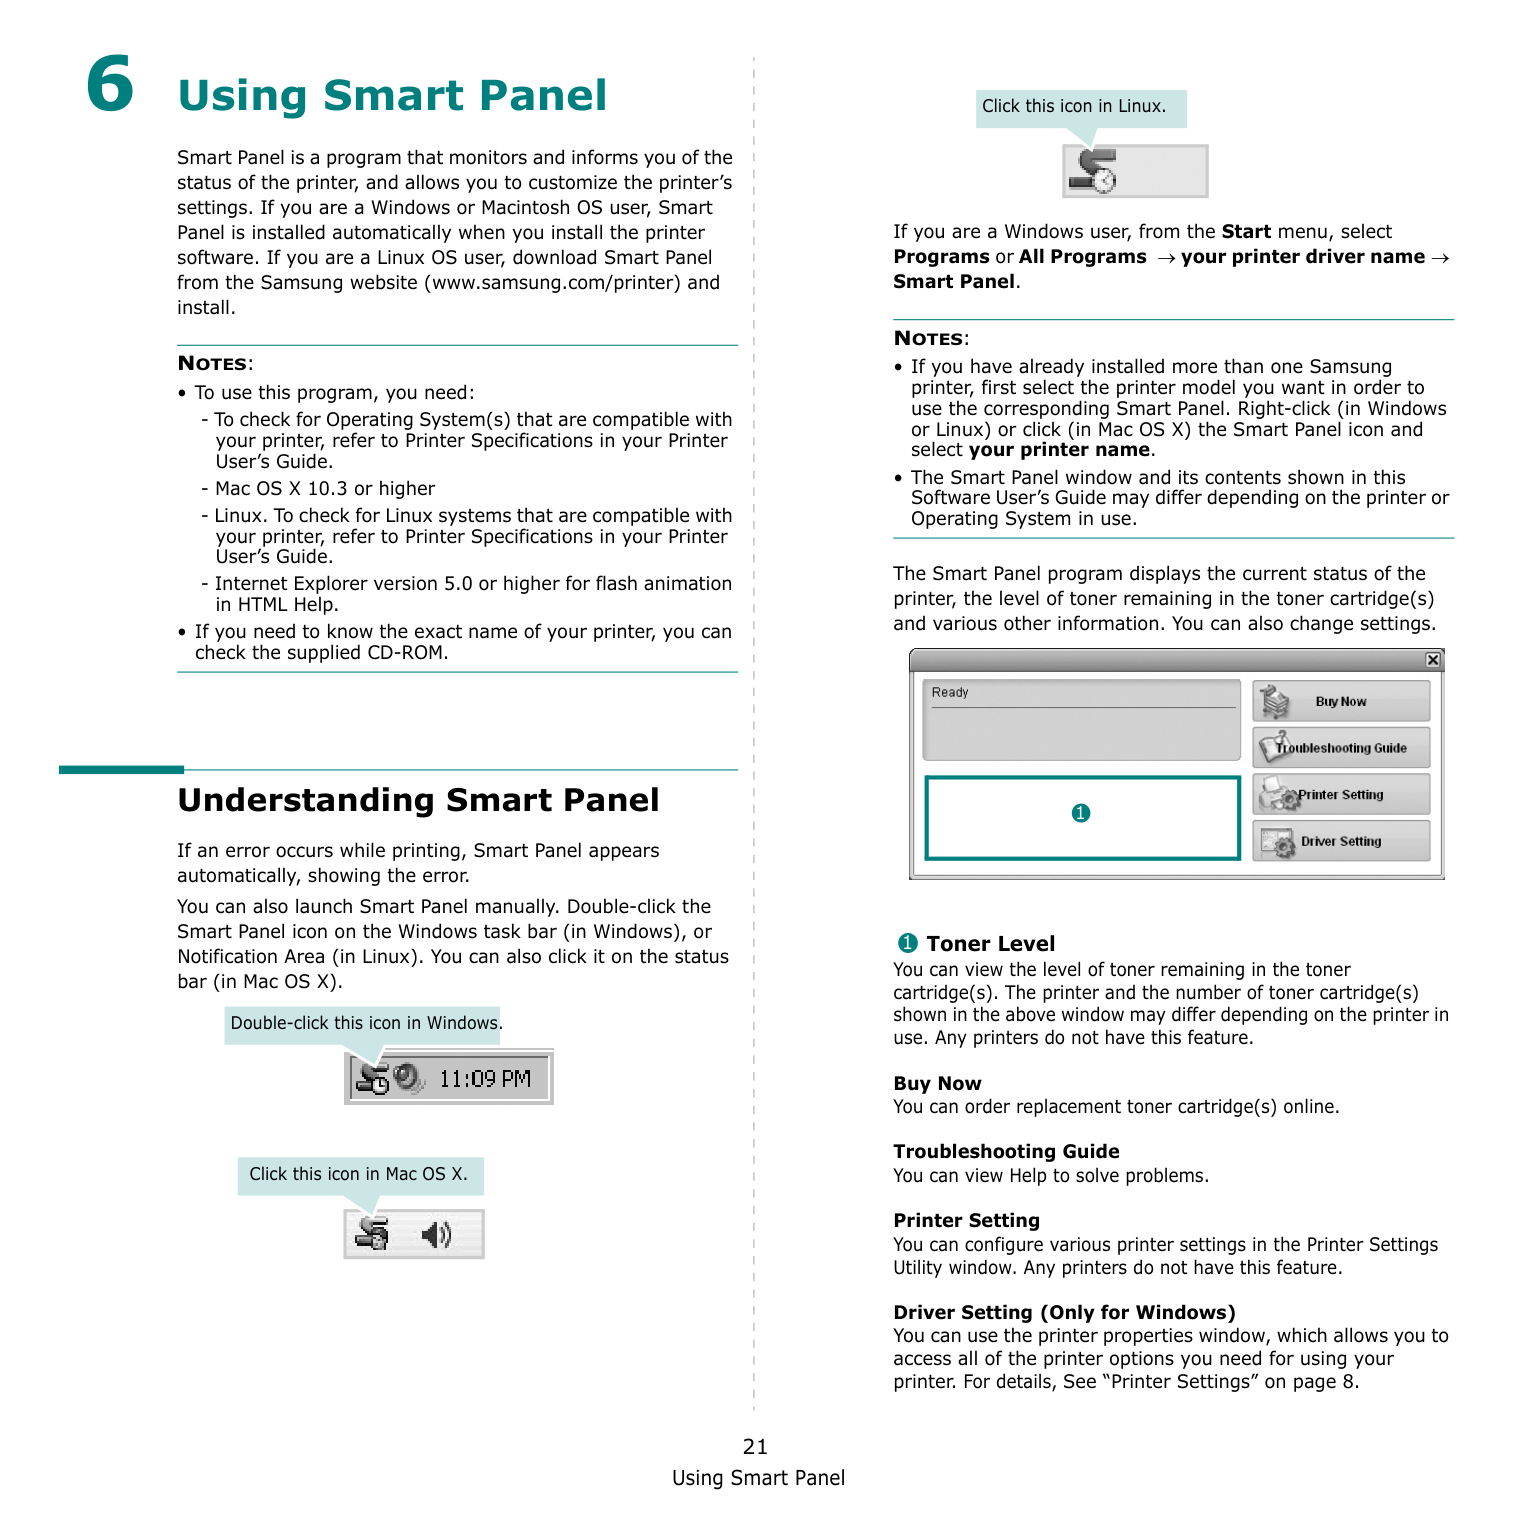
Using Smart Panel 21 6 Using Smart Panel Smart Panel is a program that monitors and informs you of the status of the printer, and allows you to customize the printer’s settings. If you are a Windows or Macintosh OS user, Smart Panel is installed automatically when you install the printer software. If you are a Linux OS user, download Smart Panel from the Samsung website (www.samsung.com/printer) and install.
Notes:
Notes:
Using Smart Panel 22 Opening the Troubleshooting Guide Using the troubleshooting guide, you can view solutions for error status problems. Right-click (in Windows or Linux) or click (in Mac OS X) the Smart Panel icon and select Troubleshooting Guide. Using Printer Settings Utility Using the Printer Settings Utility, you can configure and check print settings. 1 Right-click the Smart Panel icon and select Printer Setting. 2 Change the settings. 3 To send the changes to the printer, click the Apply button. Using Onscreen Help File For more information about Printer Settings Utility, click . Changing the Smart Panel Program Settings Right-click (in Windows or Linux) or click (in Mac OS X) the Smart Panel icon and select Options. Select the settings you want from the Options window.
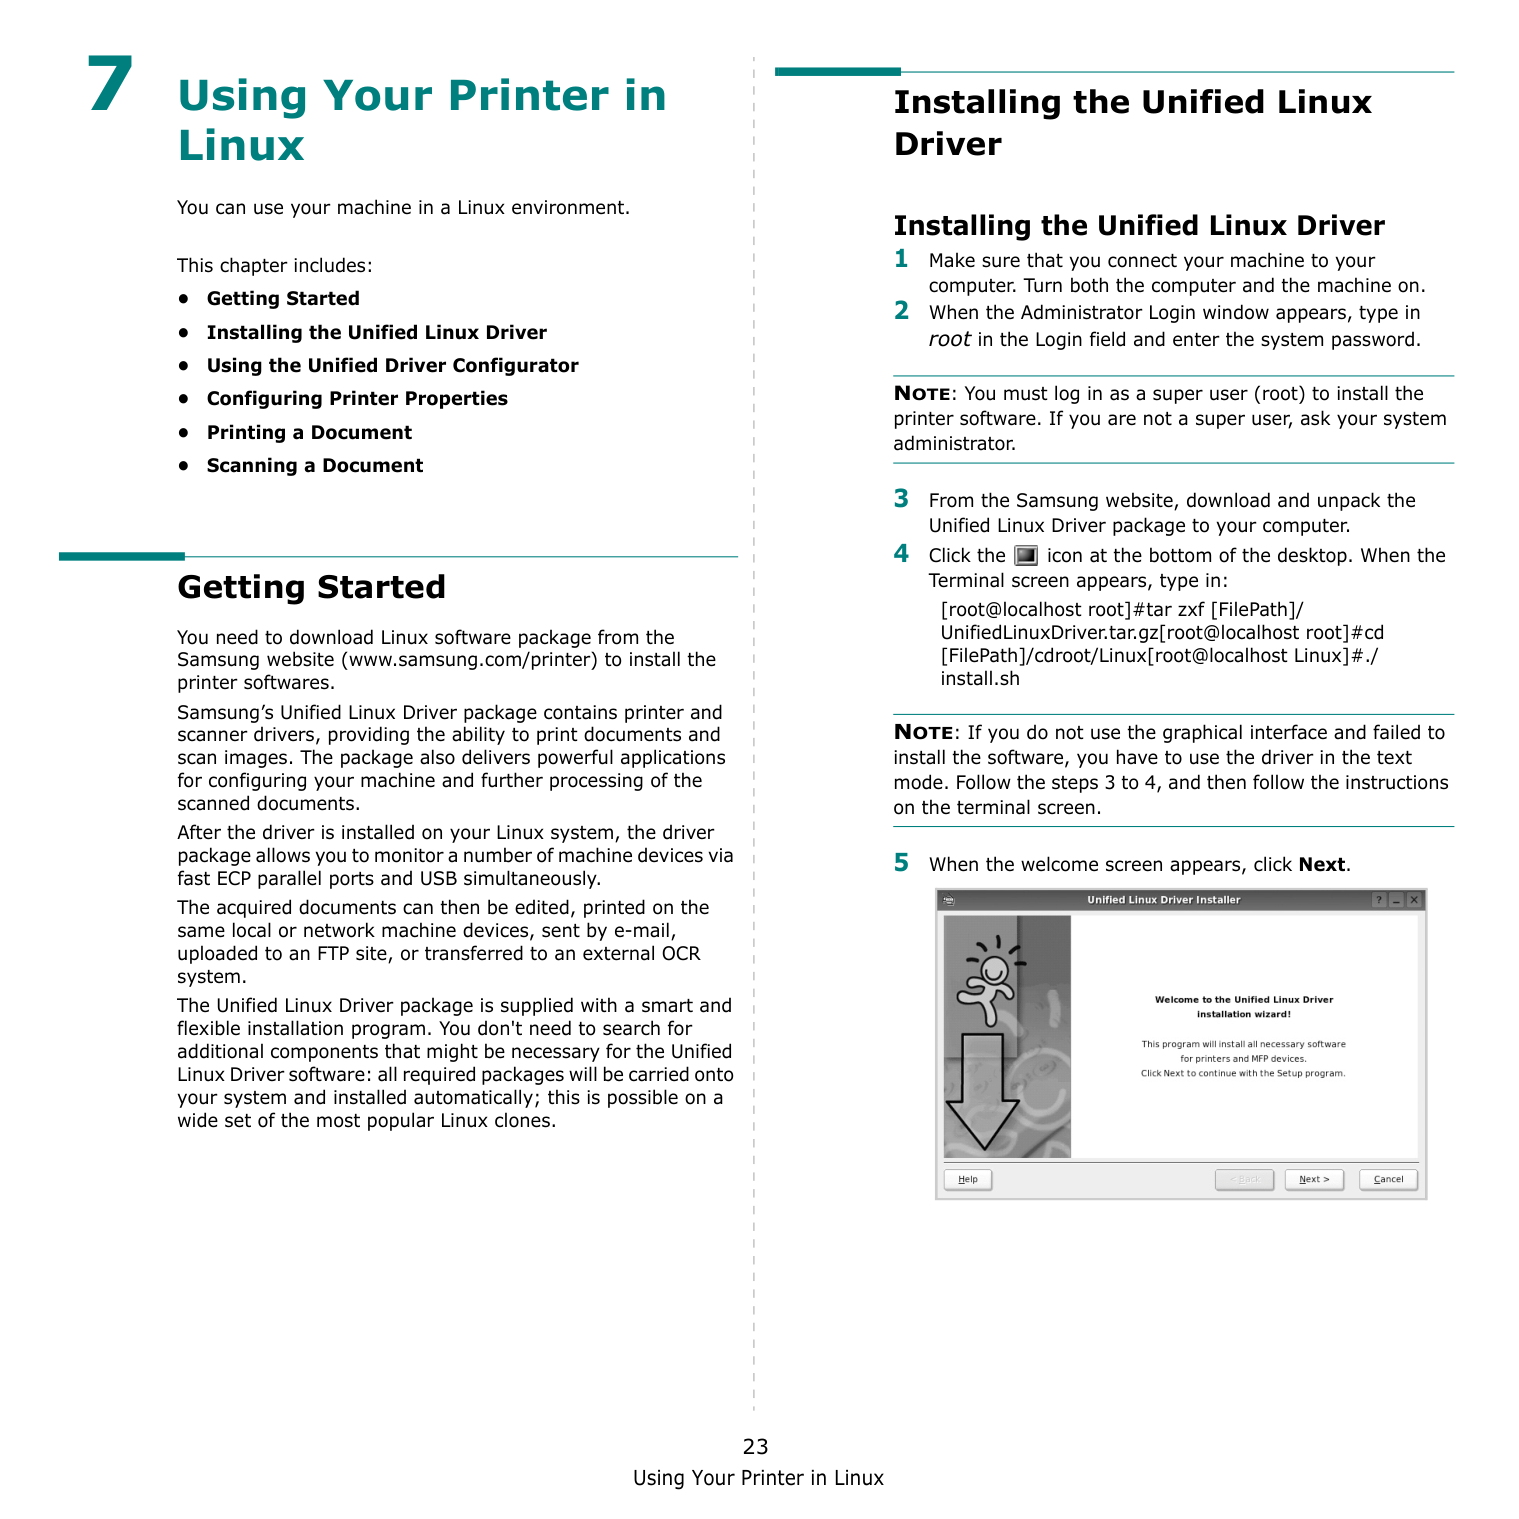
Using Your Printer in Linux 23 7 Using Your Printer in Linux You can use your machine in a Linux environment. This chapter includes: • Getting Started • Installing the Unified Linux Driver • Using the Unified Driver Configurator • Configuring Printer Properties • Printing a Document • Scanning a Document Getting Started You need to download Linux software package from the Samsung website (www.samsung.com/printer) to install the printer softwares. Samsung’s Unified Linux Driver package contains printer and scanner drivers, providing the ability to print documents and scan images. The package also delivers powerful applications for configuring your machine and further processing of the scanned documents. After the driver is installed on your Linux system, the driver package allows you to monitor a number of machine devices via fast ECP parallel ports and USB simultaneously. The acquired documents can then be edited, printed on the same local or network machine devices, sent by e-mail, uploaded to an FTP site, or transferred to an external OCR system. The Unified Linux Driver package is supplied with a smart and flexible installation program. You don't need to search for additional components that might be necessary for the Unified Linux Driver software: all required packages will be carried onto your system and installed automatically; this is possible on a wide set of the most popular Linux clones. Installing the Unified Linux Driver Installing the Unified Linux Driver 1 Make sure that you connect your machine to your computer. Turn both the computer and the machine on. 2 When the Administrator Login window appears, type in root in the Login field and enter the system password. NOTE: You must log in as a super user (root) to install the printer software. If you are not a super user, ask your system administrator. 3 From the Samsung website, download and unpack the Unified Linux Driver package to your computer. 4 Click the icon at the bottom of the desktop. When the Terminal screen appears, type in: [root@localhost root]#tar zxf [FilePath]/ UnifiedLinuxDriver.tar.gz[root@localhost root]#cd [FilePath]/cdroot/Linux[root@localhost Linux]#./ install.sh NOTE: If you do not use the graphical interface and failed to install the software, you have to use the driver in the text mode. Follow the steps 3 to 4, and then follow the instructions on the terminal screen. 5 When the welcome screen appears, click Next.
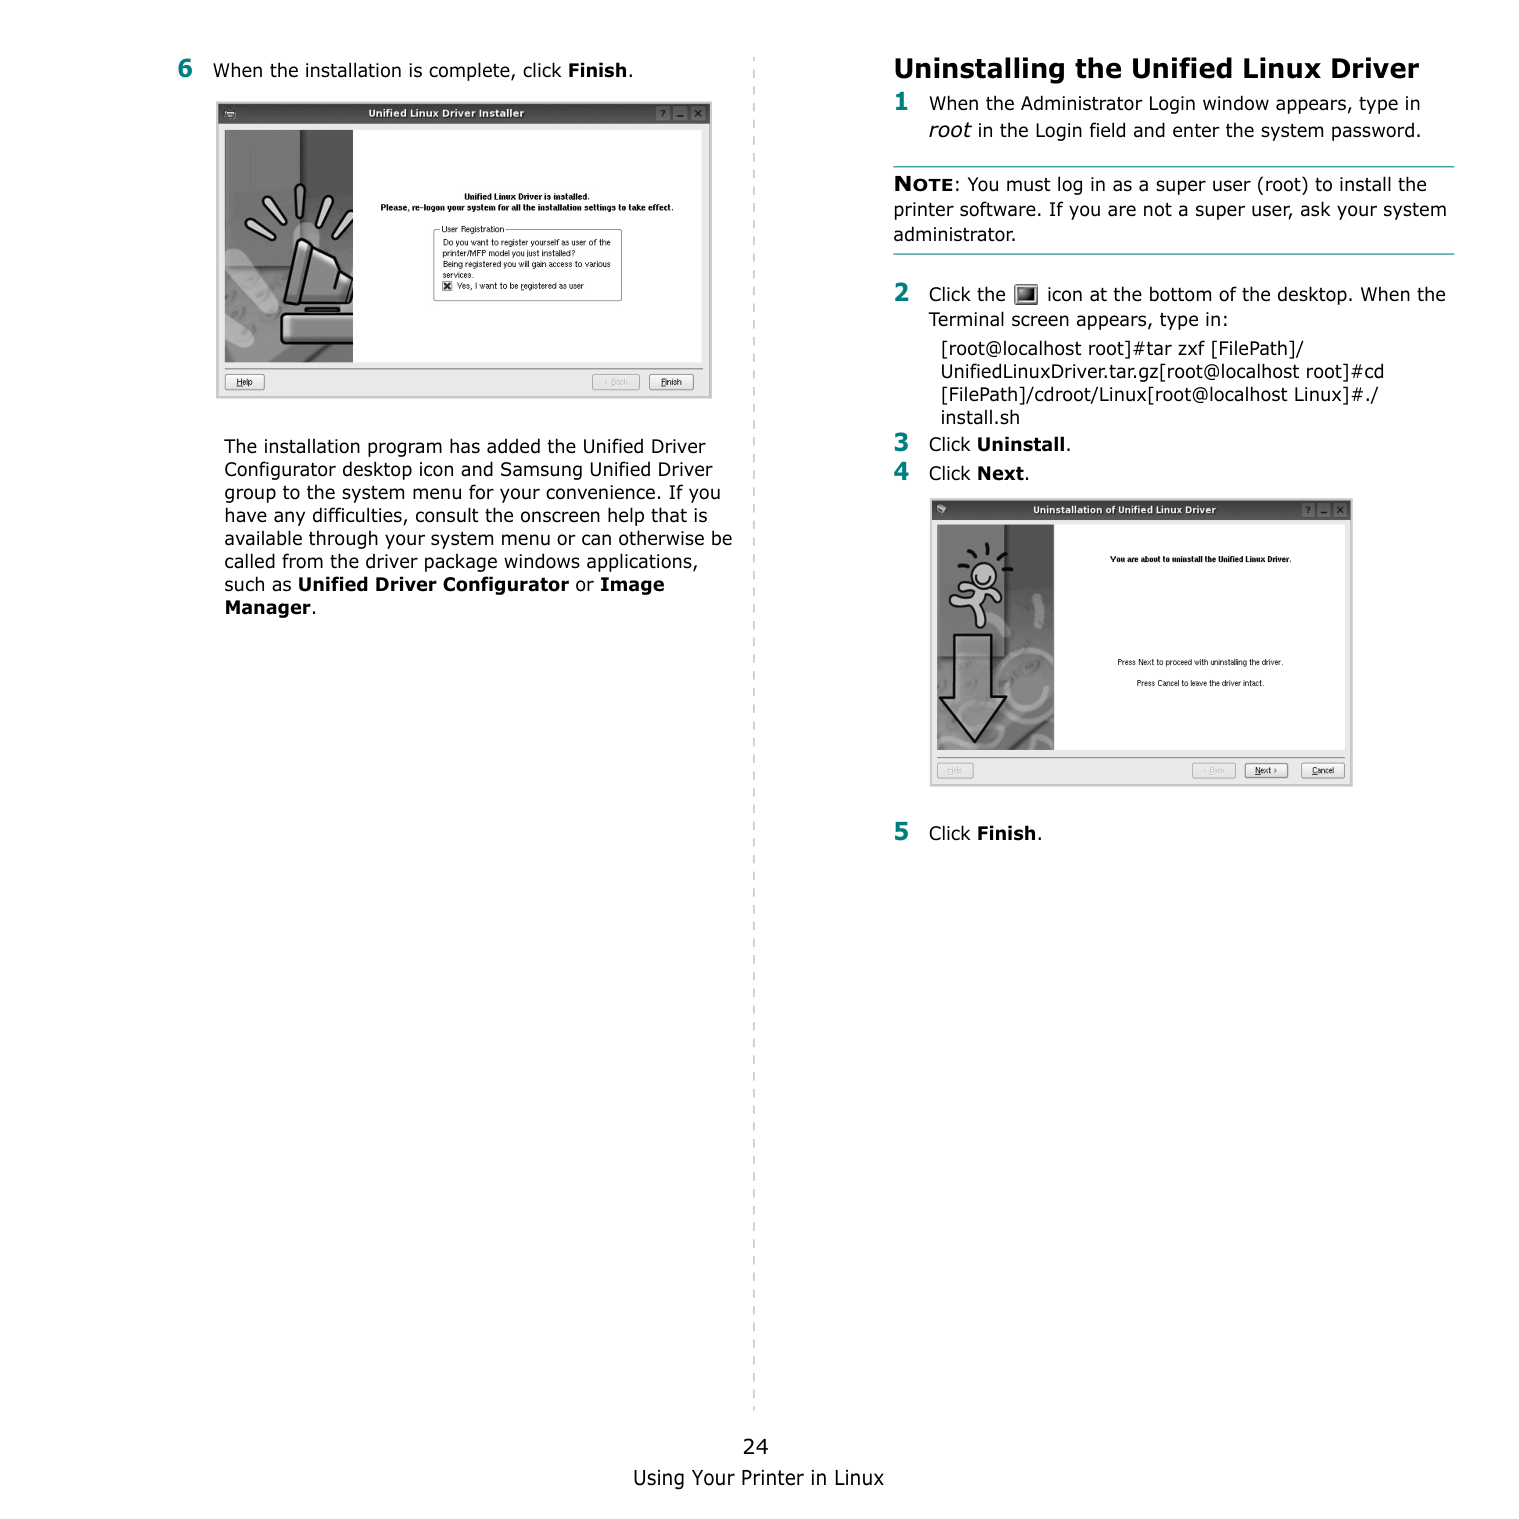
Using Your Printer in Linux 24 6 When the installation is complete, click Finish. The installation program has added the Unified Driver Configurator desktop icon and Samsung Unified Driver group to the system menu for your convenience. If you have any difficulties, consult the onscreen help that is available through your system menu or can otherwise be called from the driver package windows applications, such as Unified Driver Configurator or Image Manager. Uninstalling the Unified Linux Driver 1 When the Administrator Login window appears, type in root in the Login field and enter the system password. NOTE: You must log in as a super user (root) to install the printer software. If you are not a super user, ask your system administrator. 2 Click the icon at the bottom of the desktop. When the Terminal screen appears, type in: [root@localhost root]#tar zxf [FilePath]/ UnifiedLinuxDriver.tar.gz[root@localhost root]#cd [FilePath]/cdroot/Linux[root@localhost Linux]#./ install.sh 3 Click Uninstall. 4 Click Next. 5 Click Finish.
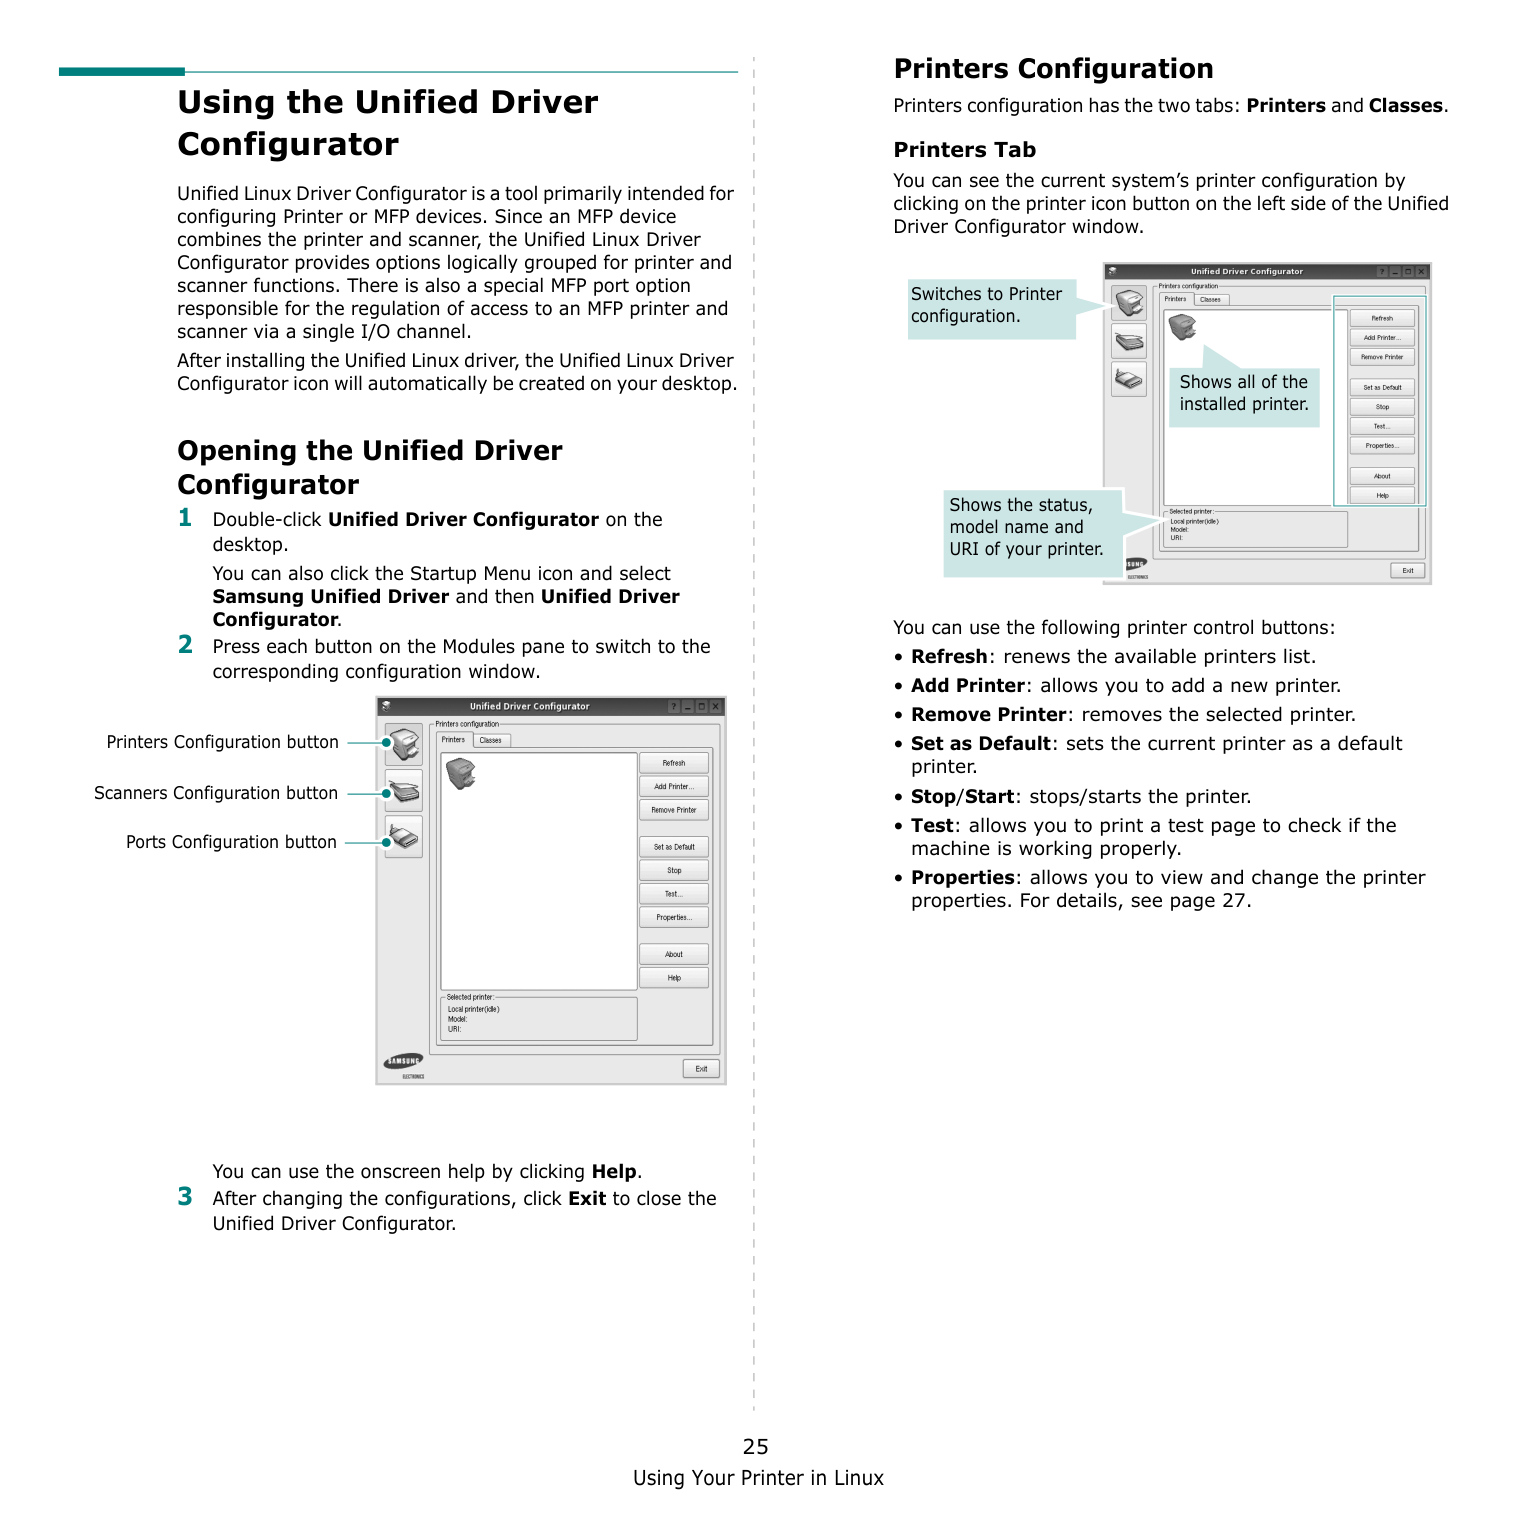
Using Your Printer in Linux 25 Using the Unified Driver Configurator Unified Linux Driver Configurator is a tool primarily intended for configuring Printer or MFP devices. Since an MFP device combines the printer and scanner, the Unified Linux Driver Configurator provides options logically grouped for printer and scanner functions. There is also a special MFP port option responsible for the regulation of access to an MFP printer and scanner via a single I/O channel. After installing the Unified Linux driver, the Unified Linux Driver Configurator icon will automatically be created on your desktop. Opening the Unified Driver Configurator 1 Double-click Unified Driver Configurator on the desktop. You can also click the Startup Menu icon and select Samsung Unified Driver and then Unified Driver Configurator. 2 Press each button on the Modules pane to switch to the corresponding configuration window. You can use the onscreen help by clicking Help. 3 After changing the configurations, click Exit to close the Unified Driver Configurator. Printers Configuration button Scanners Configuration button Ports Configuration button Printers Configuration Printers configuration has the two tabs: Printers and Classes. Printers Tab You can see the current system’s printer configuration by clicking on the printer icon button on the left side of the Unified Driver Configurator window. You can use the following printer control buttons:
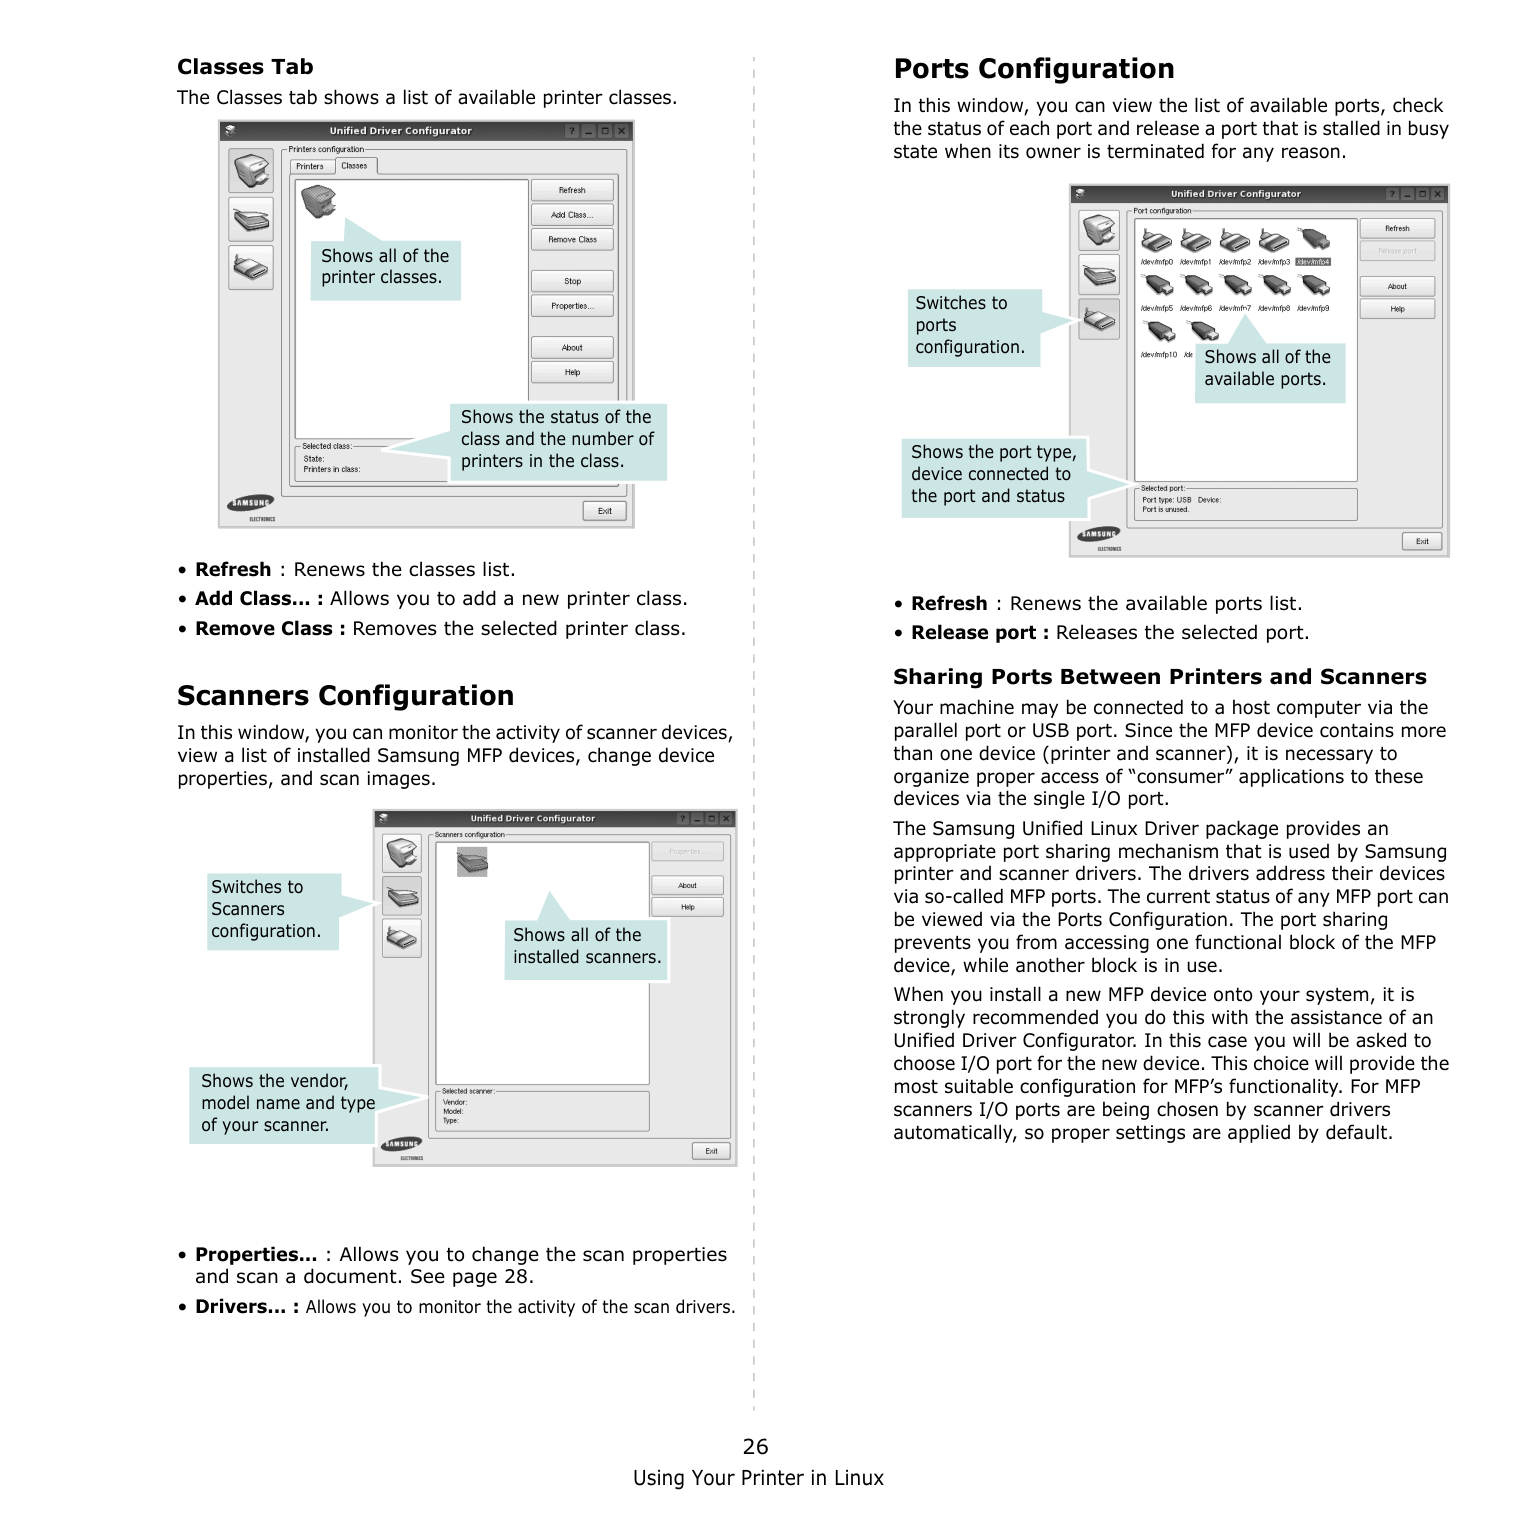
Using Your Printer in Linux 26 Classes Tab The Classes tab shows a list of available printer classes.
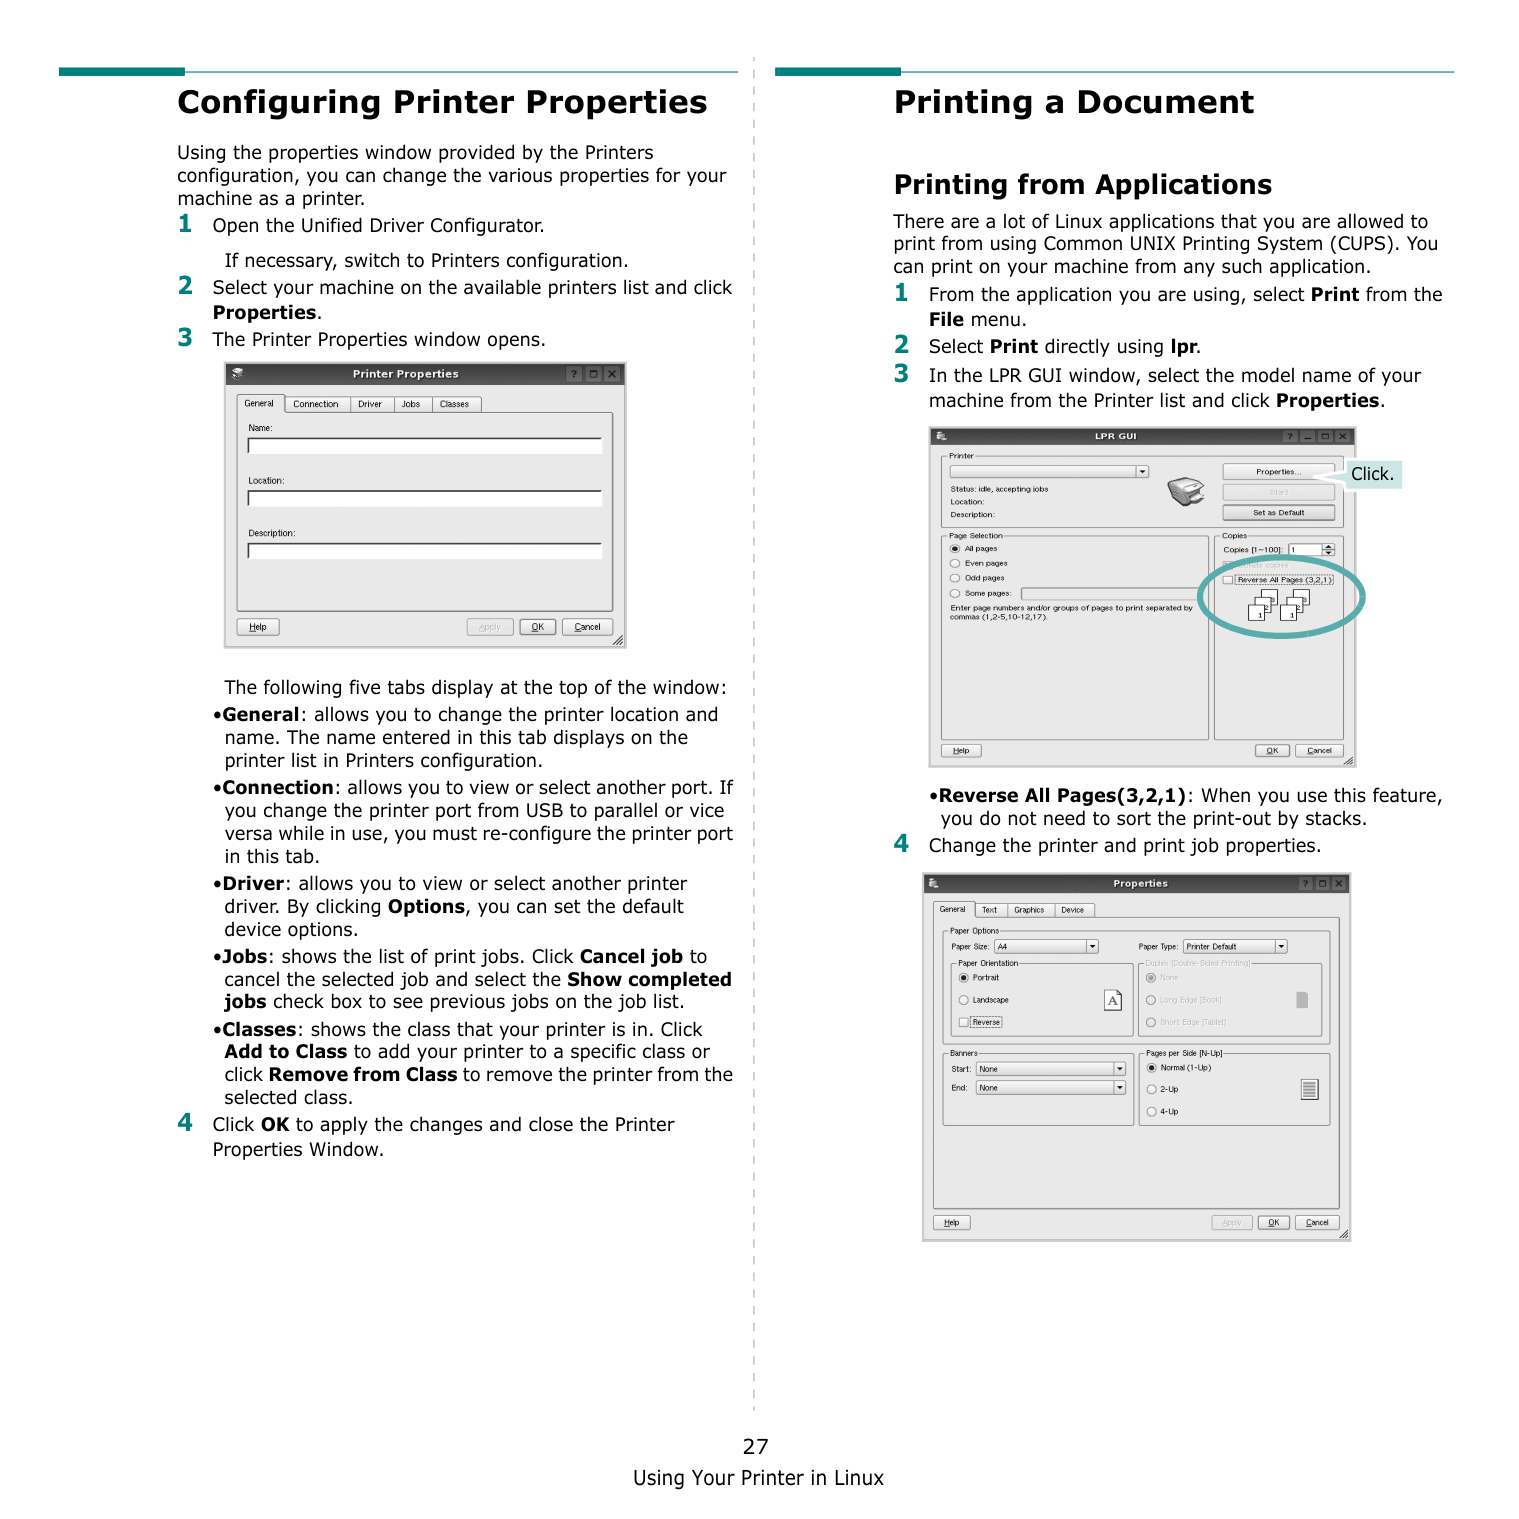
Using Your Printer in Linux 27 Configuring Printer Properties Using the properties window provided by the Printers configuration, you can change the various properties for your machine as a printer. 1 Open the Unified Driver Configurator. If necessary, switch to Printers configuration. 2 Select your machine on the available printers list and click Properties. 3 The Printer Properties window opens. The following five tabs display at the top of the window: •General: allows you to change the printer location and name. The name entered in this tab displays on the printer list in Printers configuration. •Connection: allows you to view or select another port. If you change the printer port from USB to parallel or vice versa while in use, you must re-configure the printer port in this tab. •Driver: allows you to view or select another printer driver. By clicking Options, you can set the default device options. •Jobs: shows the list of print jobs. Click Cancel job to cancel the selected job and select the Show completed jobs check box to see previous jobs on the job list. •Classes: shows the class that your printer is in. Click Add to Class to add your printer to a specific class or click Remove from Class to remove the printer from the selected class. 4 Click OK to apply the changes and close the Printer Properties Window. Printing a Document Printing from Applications There are a lot of Linux applications that you are allowed to print from using Common UNIX Printing System (CUPS). You can print on your machine from any such application. 1 From the application you are using, select Print from the File menu. 2 Select Print directly using lpr. 3 In the LPR GUI window, select the model name of your machine from the Printer list and click Properties. •Reverse All Pages(3,2,1): When you use this feature, you do not need to sort the print-out by stacks. 4 Change the printer and print job properties. Click.
Using Your Printer in Linux 28 The following four tabs display at the top of the window. •General - allows you to change the paper size, the paper type, and the orientation of the documents, enables the duplex feature, adds start and end banners, and changes the number of pages per sheet. •Text - allows you to specify the page margins and set the text options, such as spacing or columns. •Graphics - allows you to set image options that are used when printing images/files, such as color options, image size, or image position. •Device: allows you to set the print resolution, paper source, and destination. 5 Click Apply to apply the changes and close the Properties window. 6 Click OK in the LPR GUI window to start printing. 7 The Printing window appears, allowing you to monitor the status of your print job. To abort the current job, click Cancel. Printing Files You can print many different types of files on the Samsung machine device using the standard CUPS way - directly from the command line interface. The CUPS lpr utility allows you do that. But the drivers package replaces the standard lpr tool by a much more user-friendly LPR GUI program. To print any document file: 1 Type lpr
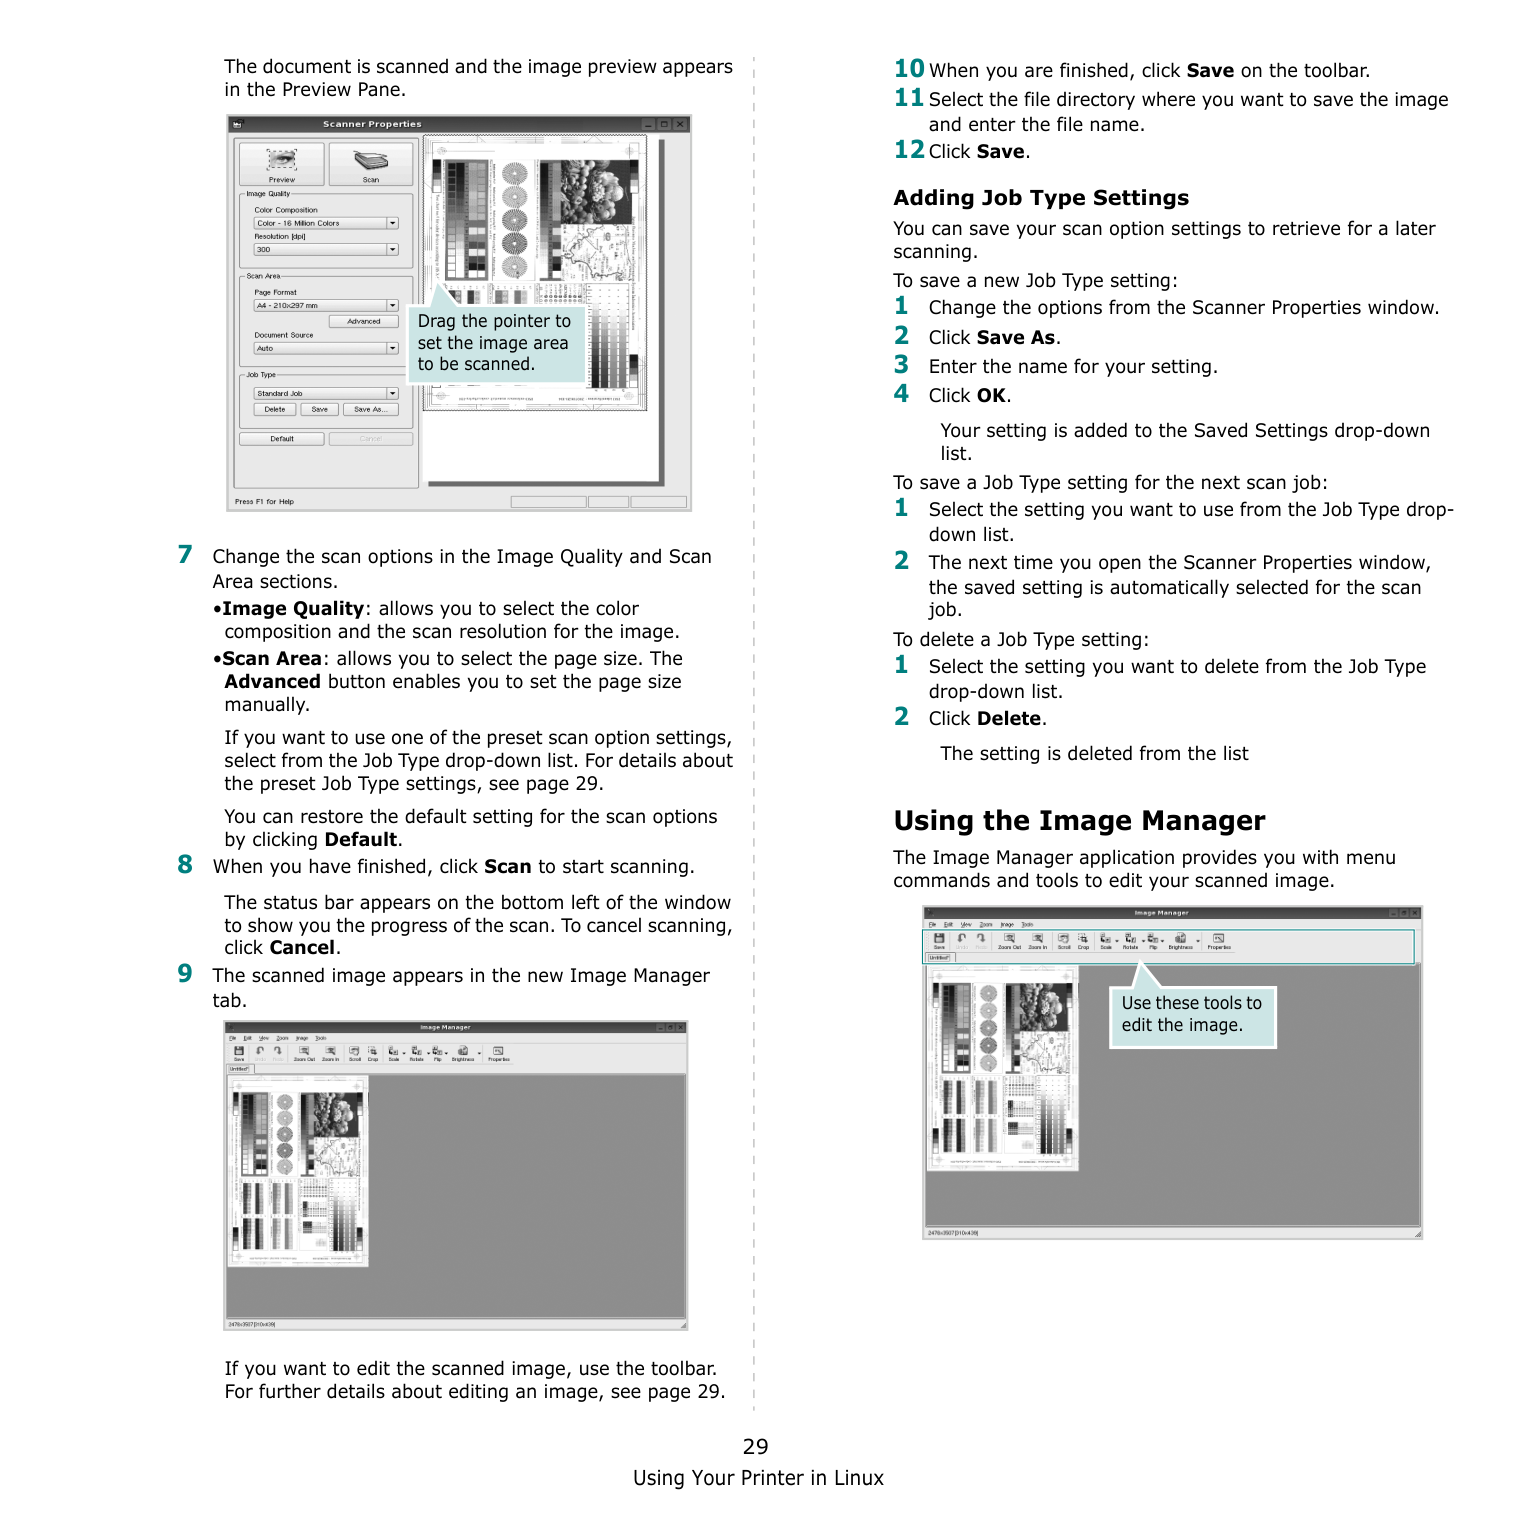
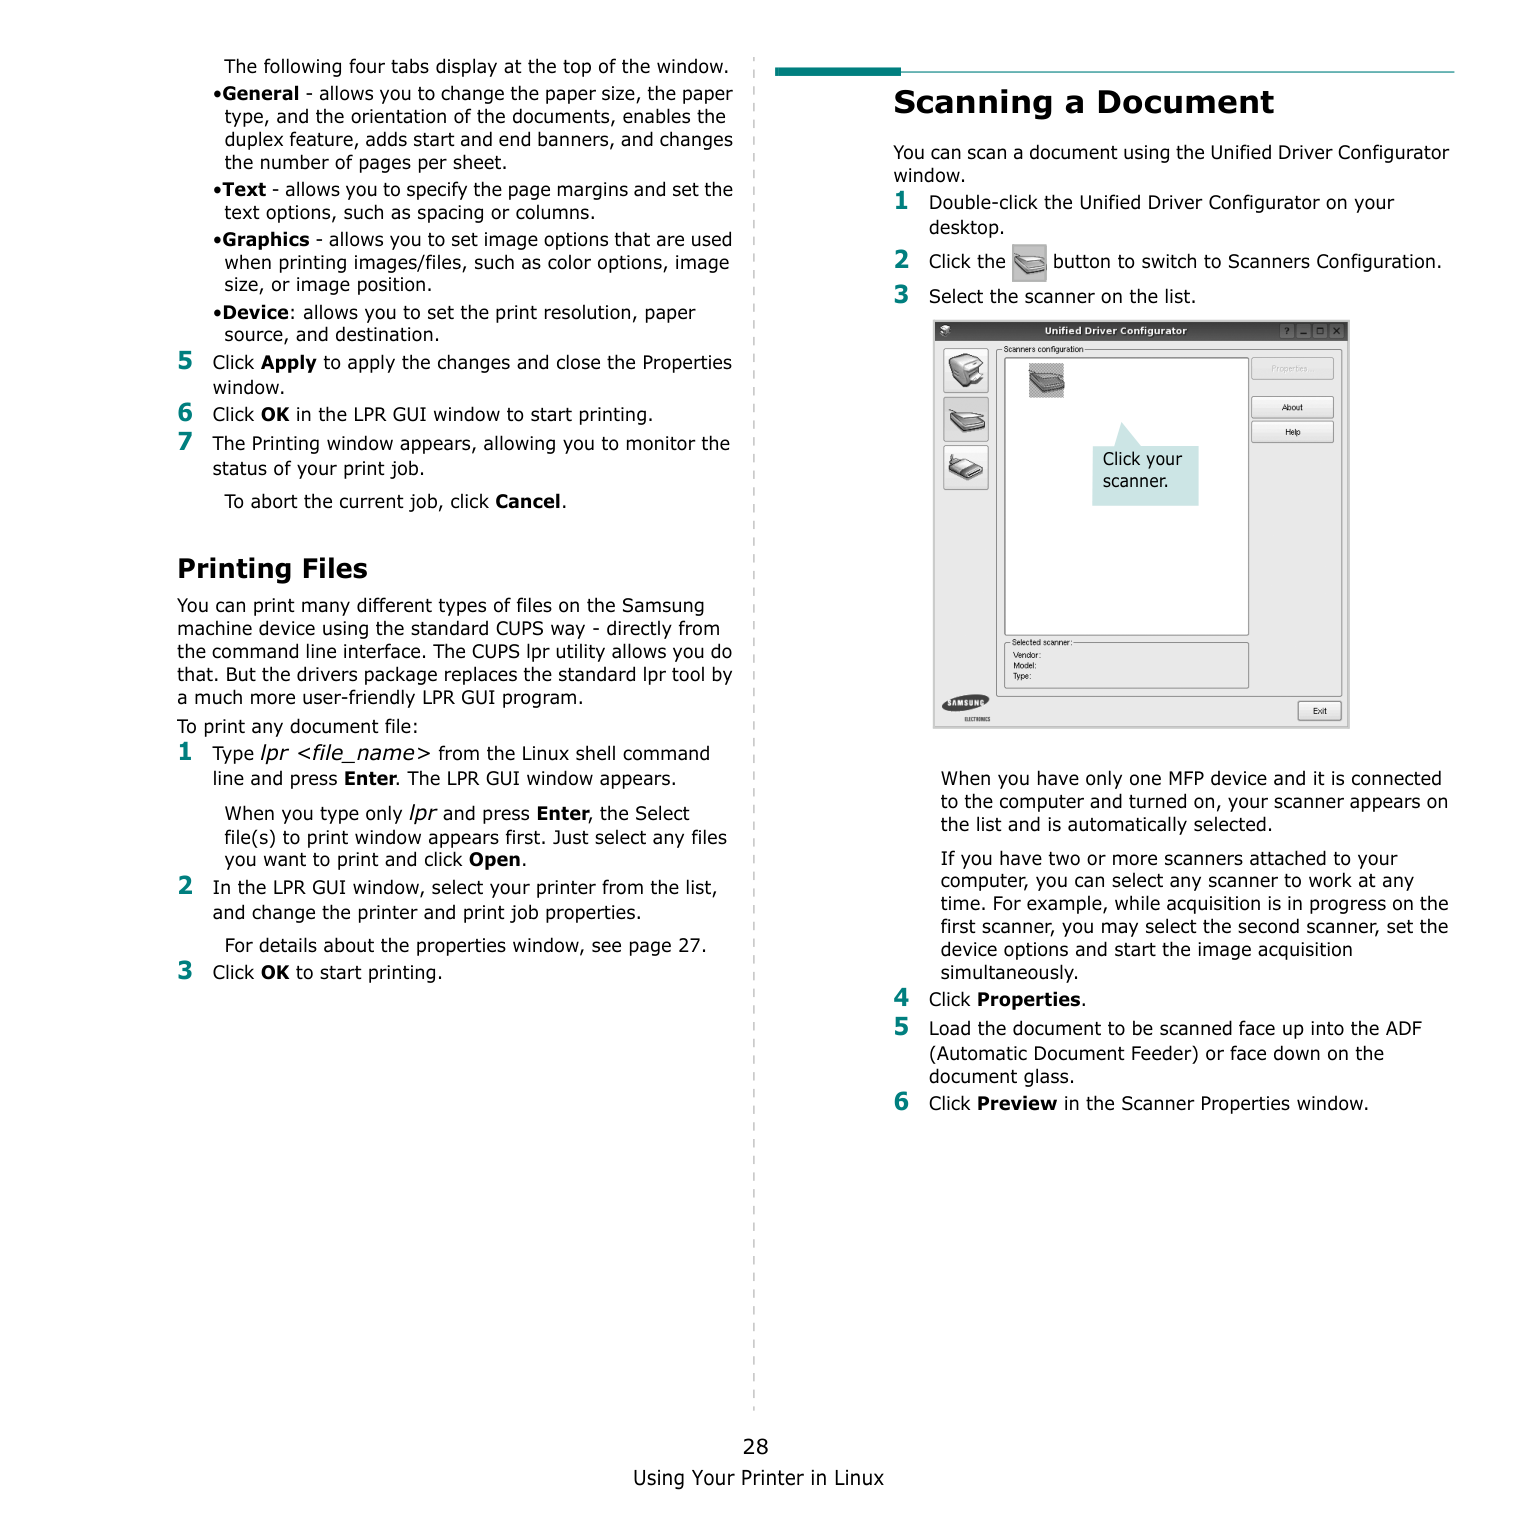
Using Your Printer in Linux 29 The document is scanned and the image preview appears in the Preview Pane. 7 Change the scan options in the Image Quality and Scan Area sections. •Image Quality: allows you to select the color composition and the scan resolution for the image. •Scan Area: allows you to select the page size. The Advanced button enables you to set the page size manually. If you want to use one of the preset scan option settings, select from the Job Type drop-down list. For details about the preset Job Type settings, see page 29. You can restore the default setting for the scan options by clicking Default. 8 When you have finished, click Scan to start scanning. The status bar appears on the bottom left of the window to show you the progress of the scan. To cancel scanning, click Cancel. 9 The scanned image appears in the new Image Manager tab. If you want to edit the scanned image, use the toolbar. For further details about editing an image, see page 29. Drag the pointer to set the image area to be scanned. 10 When you are finished, click Save on the toolbar. 11 Select the file directory where you want to save the image and enter the file name. 12 Click Save. Adding Job Type Settings You can save your scan option settings to retrieve for a later scanning. To save a new Job Type setting: 1 Change the options from the Scanner Properties window. 2 Click Save As. 3 Enter the name for your setting. 4 Click OK. Your setting is added to the Saved Settings drop-down list. To save a Job Type setting for the next scan job: 1 Select the setting you want to use from the Job Type drop- down list. 2 The next time you open the Scanner Properties window, the saved setting is automatically selected for the scan job. To delete a Job Type setting: 1 Select the setting you want to delete from the Job Type drop-down list. 2 Click Delete. The setting is deleted from the list Using the Image Manager The Image Manager application provides you with menu commands and tools to edit your scanned image. Use these tools to edit the image.
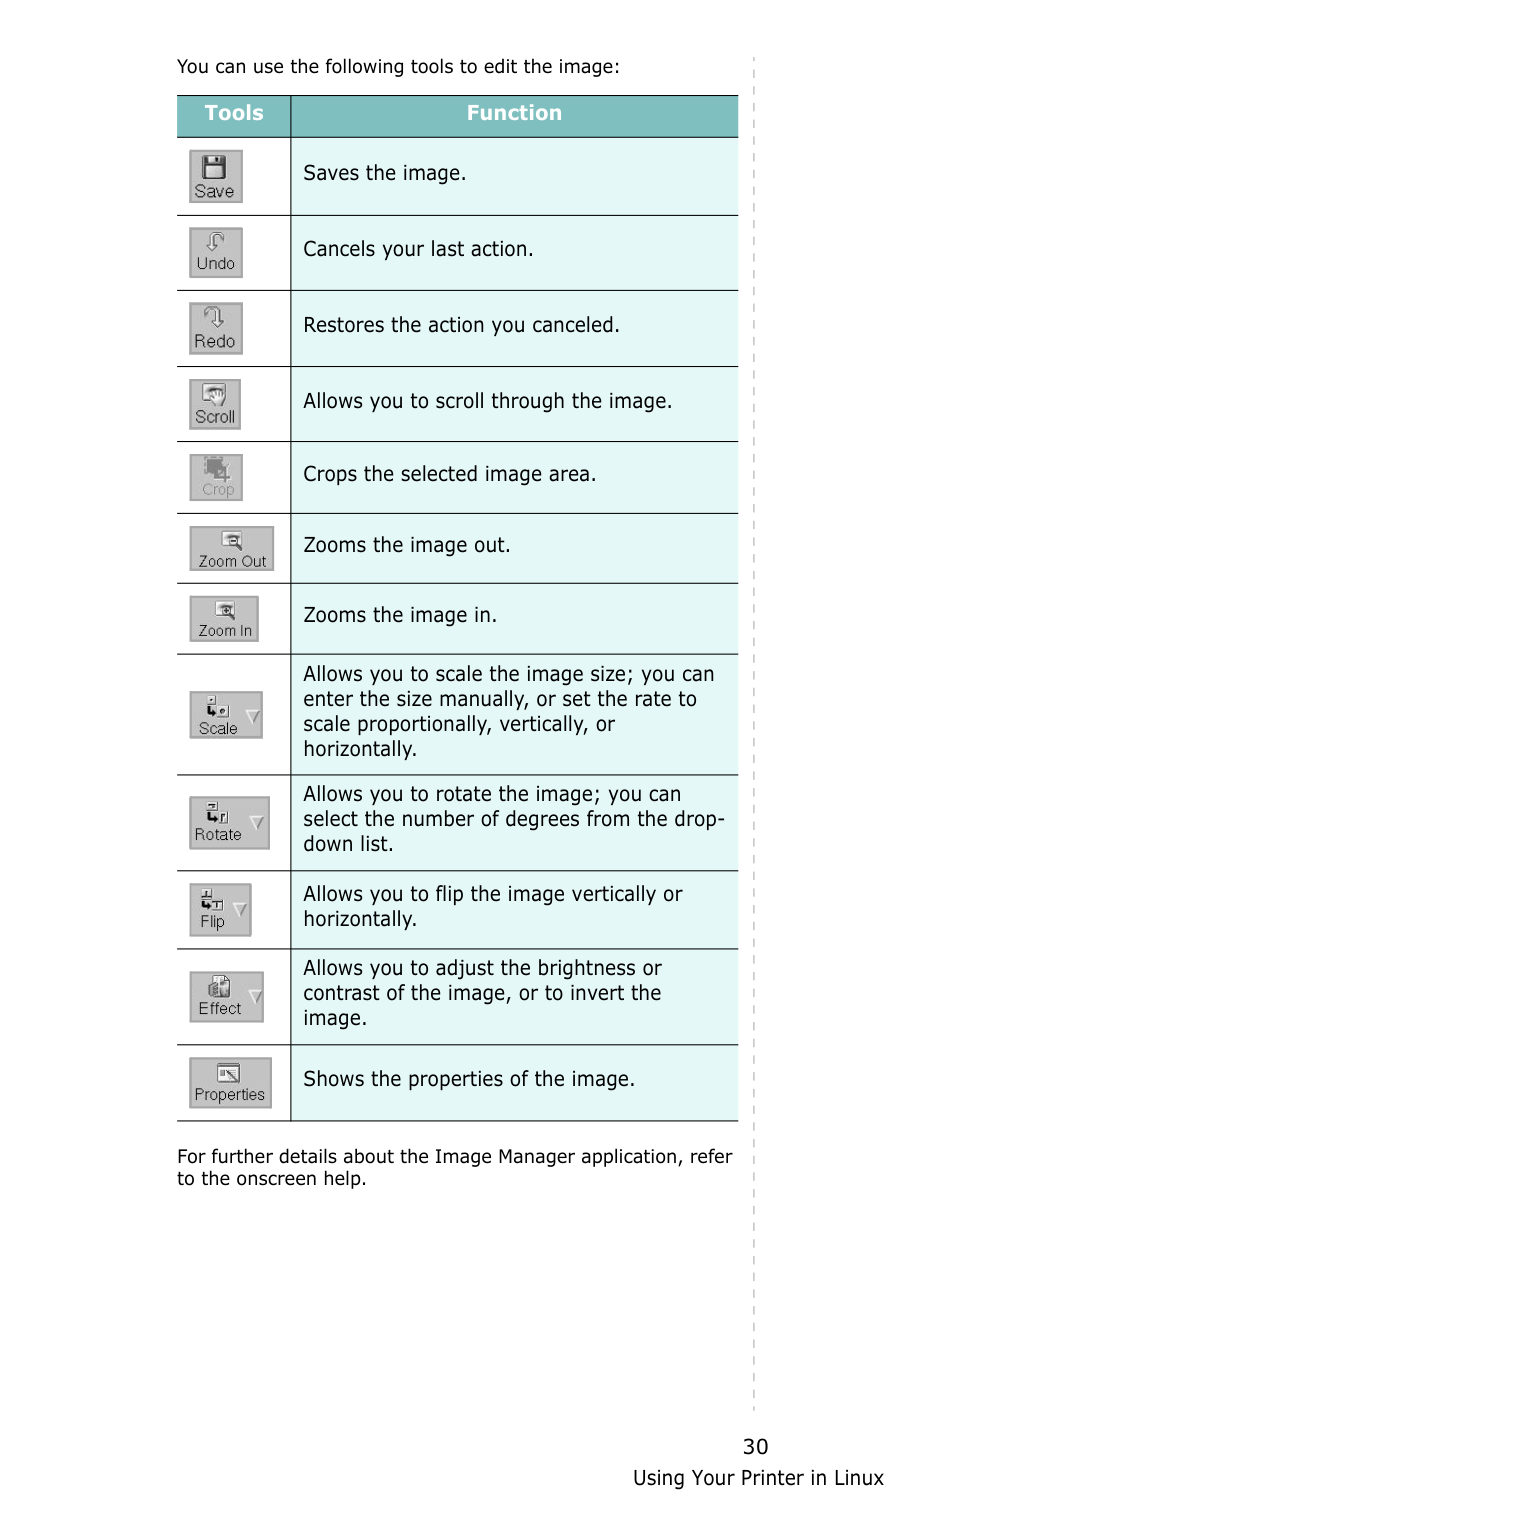
Using Your Printer in Linux 30 You can use the following tools to edit the image: For further details about the Image Manager application, refer to the onscreen help. Tools Function Saves the image. Cancels your last action. Restores the action you canceled. Allows you to scroll through the image. Crops the selected image area. Zooms the image out. Zooms the image in. Allows you to scale the image size; you can enter the size manually, or set the rate to scale proportionally, vertically, or horizontally. Allows you to rotate the image; you can select the number of degrees from the drop- down list. Allows you to flip the image vertically or horizontally. Allows you to adjust the brightness or contrast of the image, or to invert the image. Shows the properties of the image.
Using Your Printer with a Macintosh 31 8 Using Your Printer with a Macintosh Your printer supports Macintosh systems with a built-in USB interface or 10/100 Base-TX network interface card. When you print a file from a Macintosh computer, you can use the CUPS driver by installing the PPD file. NOTE: Some printers do not support a network interface. Make sure that your printer supports a network interface by referring to Printer Specifications in your Printer User’s Guide. This chapter includes: • Installing Software • Setting Up the Printer • Printing • Scanning Installing Software The CD-ROM that came with your printer provides you with the PPD file that allows you to use the CUPS driver or Apple LaserWriter driver (only available when you use a printer which supports the PostScript driver), for printing on a Macintosh computer. Also, it provides you with the Twain driver for scanning on a Macintosh computer. 1 Make sure that you connect your printer to the computer. Turn on your computer and printer. 2 Insert the CD-ROM which came with your printer into the CD-ROM drive. 3 Double-click CD-ROM icon that appears on your Macintosh desktop. 4 Double-click the MAC_Installer folder. 5 Double-click the Installer icon. 6 Enter the password and click OK. 7 The Samsung Installer window opens. Click Continue 8 Select Easy Install and click Install. Easy Install is recommended for most users. All components necessary for printer operations will be installed. If you select Custom Install, you can choose individual components to install. 9 The message which warns all application will close on your computer appears, Click Continue. 10 After the installation is finished, click Quit.
Note:
Using Your Printer with a Macintosh 32 Setting Up the Printer Set up for your printer will be different depending on which cable you use to connect the printer to your computer—the network cable or the USB cable. For a USB-connected 1 Follow the instructions on “Installing Software” on page 31 to install the PPD and Filter files on your computer. 2 Open the Applications folder → Utilities, and Print Setup Utility. •For MAC OS 10.5~10.6, open System Preferences from the Applications folder, and click Printer & Fax. 3 Click Add on the Printer List. •For MAC OS 10.5~10.6, press the “+” icon then a display window will pop up. 4 For MAC OS 10.3, select the USB tab. •For MAC OS 10.4, click Default Browser and find the USB connection. •For MAC OS 10.5~10.6, click Default and find the USB connection 5 Select Samsung in Printer Model and your printer in Model Name. 6 Click Add. Your printer appears on the Printer List, and is set as the default printer.
33 Printing
Notes:
Rom.
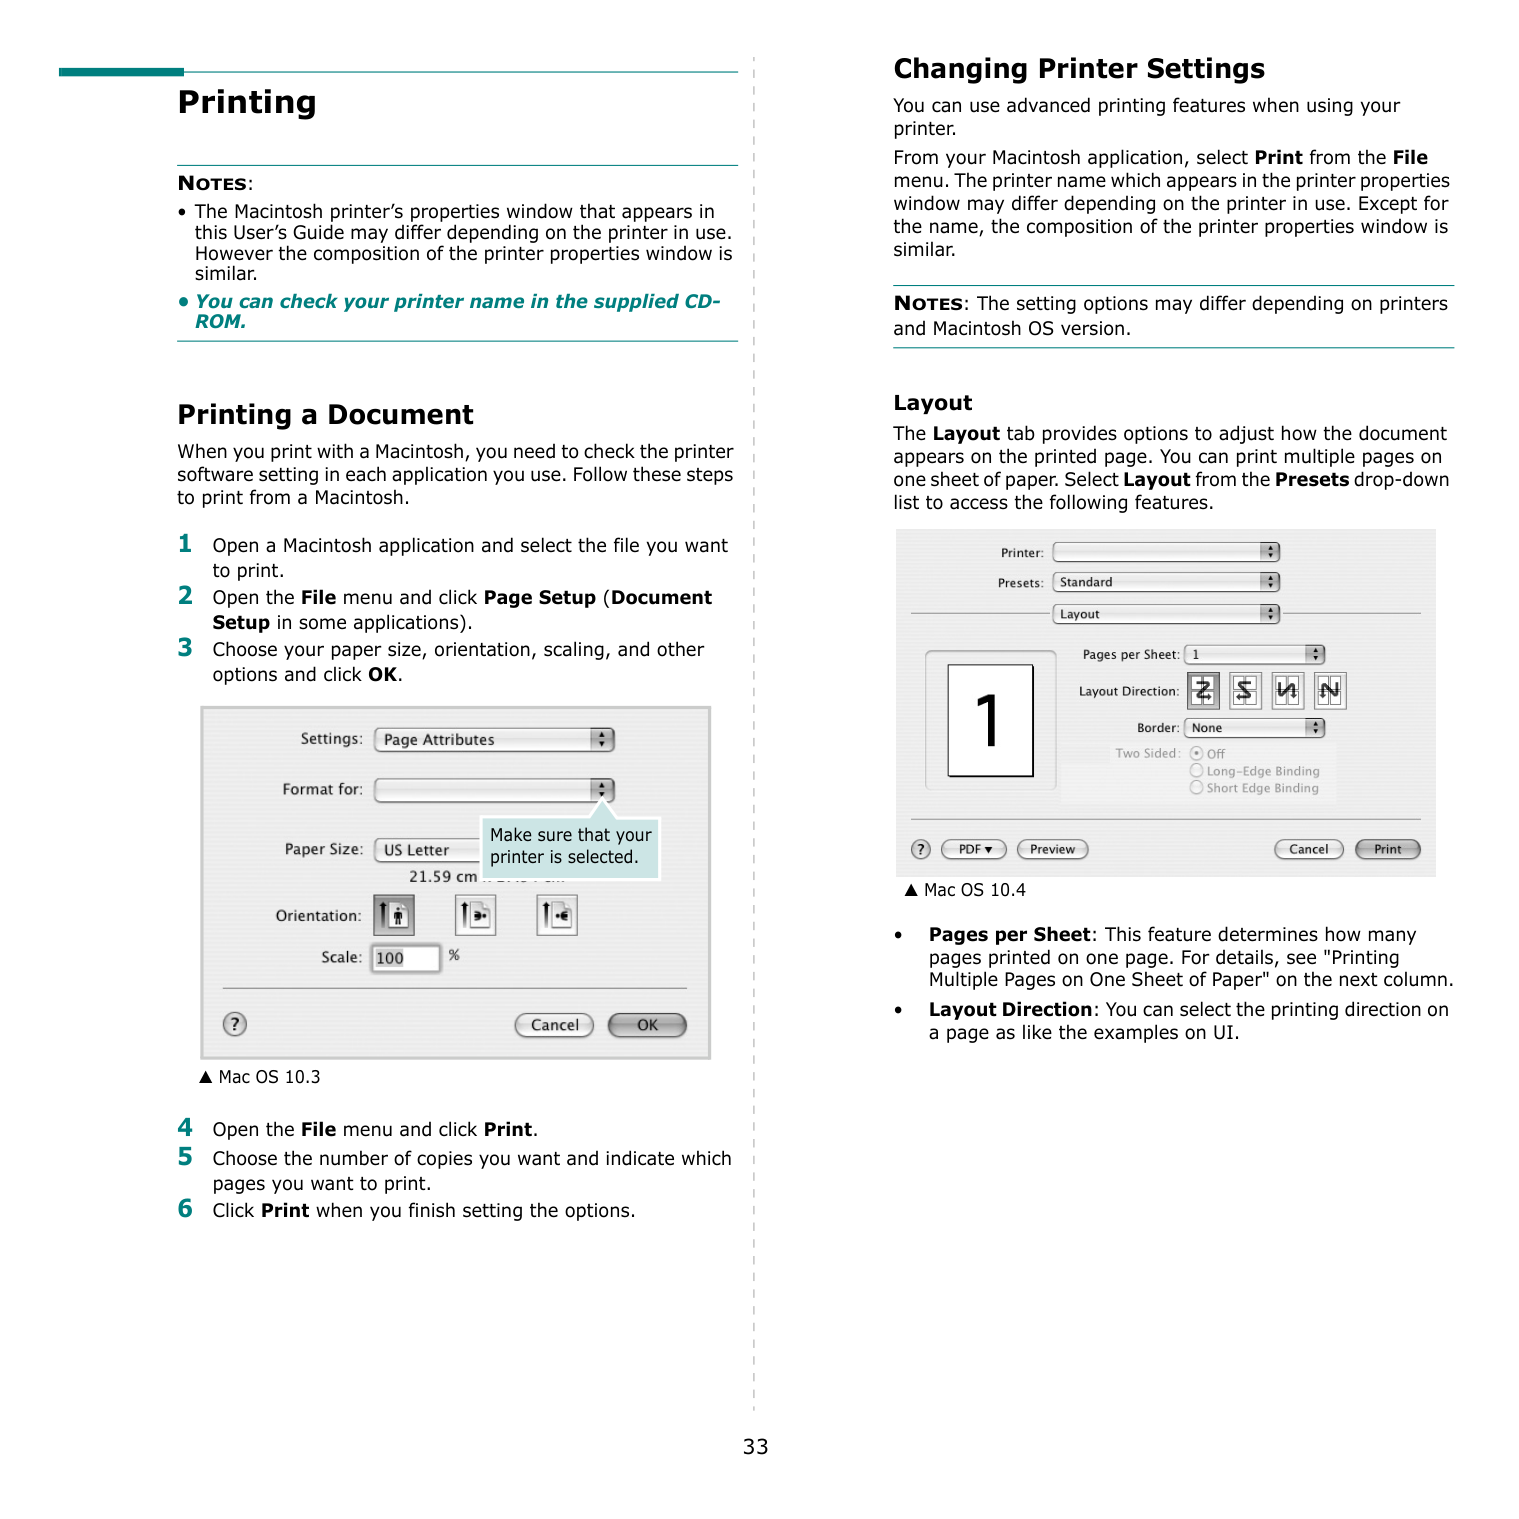
Printing a Document When you print with a Macintosh, you need to check the printer software setting in each application you use. Follow these steps to print from a Macintosh. 1 Open a Macintosh application and select the file you want to print. 2 Open the File menu and click Page Setup (Document Setup in some applications). 3 Choose your paper size, orientation, scaling, and other options and click OK. 4 Open the File menu and click Print. 5 Choose the number of copies you want and indicate which pages you want to print. 6 Click Print when you finish setting the options. ▲ Mac OS 10.3 Make sure that your printer is selected. Changing Printer Settings You can use advanced printing features when using your printer. From your Macintosh application, select Print from the File menu. The printer name which appears in the printer properties window may differ depending on the printer in use. Except for the name, the composition of the printer properties window is similar. NOTES: The setting options may differ depending on printers and Macintosh OS version. Layout The Layout tab provides options to adjust how the document appears on the printed page. You can print multiple pages on one sheet of paper. Select Layout from the Presets drop-down list to access the following features. • Pages per Sheet: This feature determines how many pages printed on one page. For details, see "Printing Multiple Pages on One Sheet of Paper" on the next column. • Layout Direction: You can select the printing direction on a page as like the examples on UI. ▲ Mac OS 10.4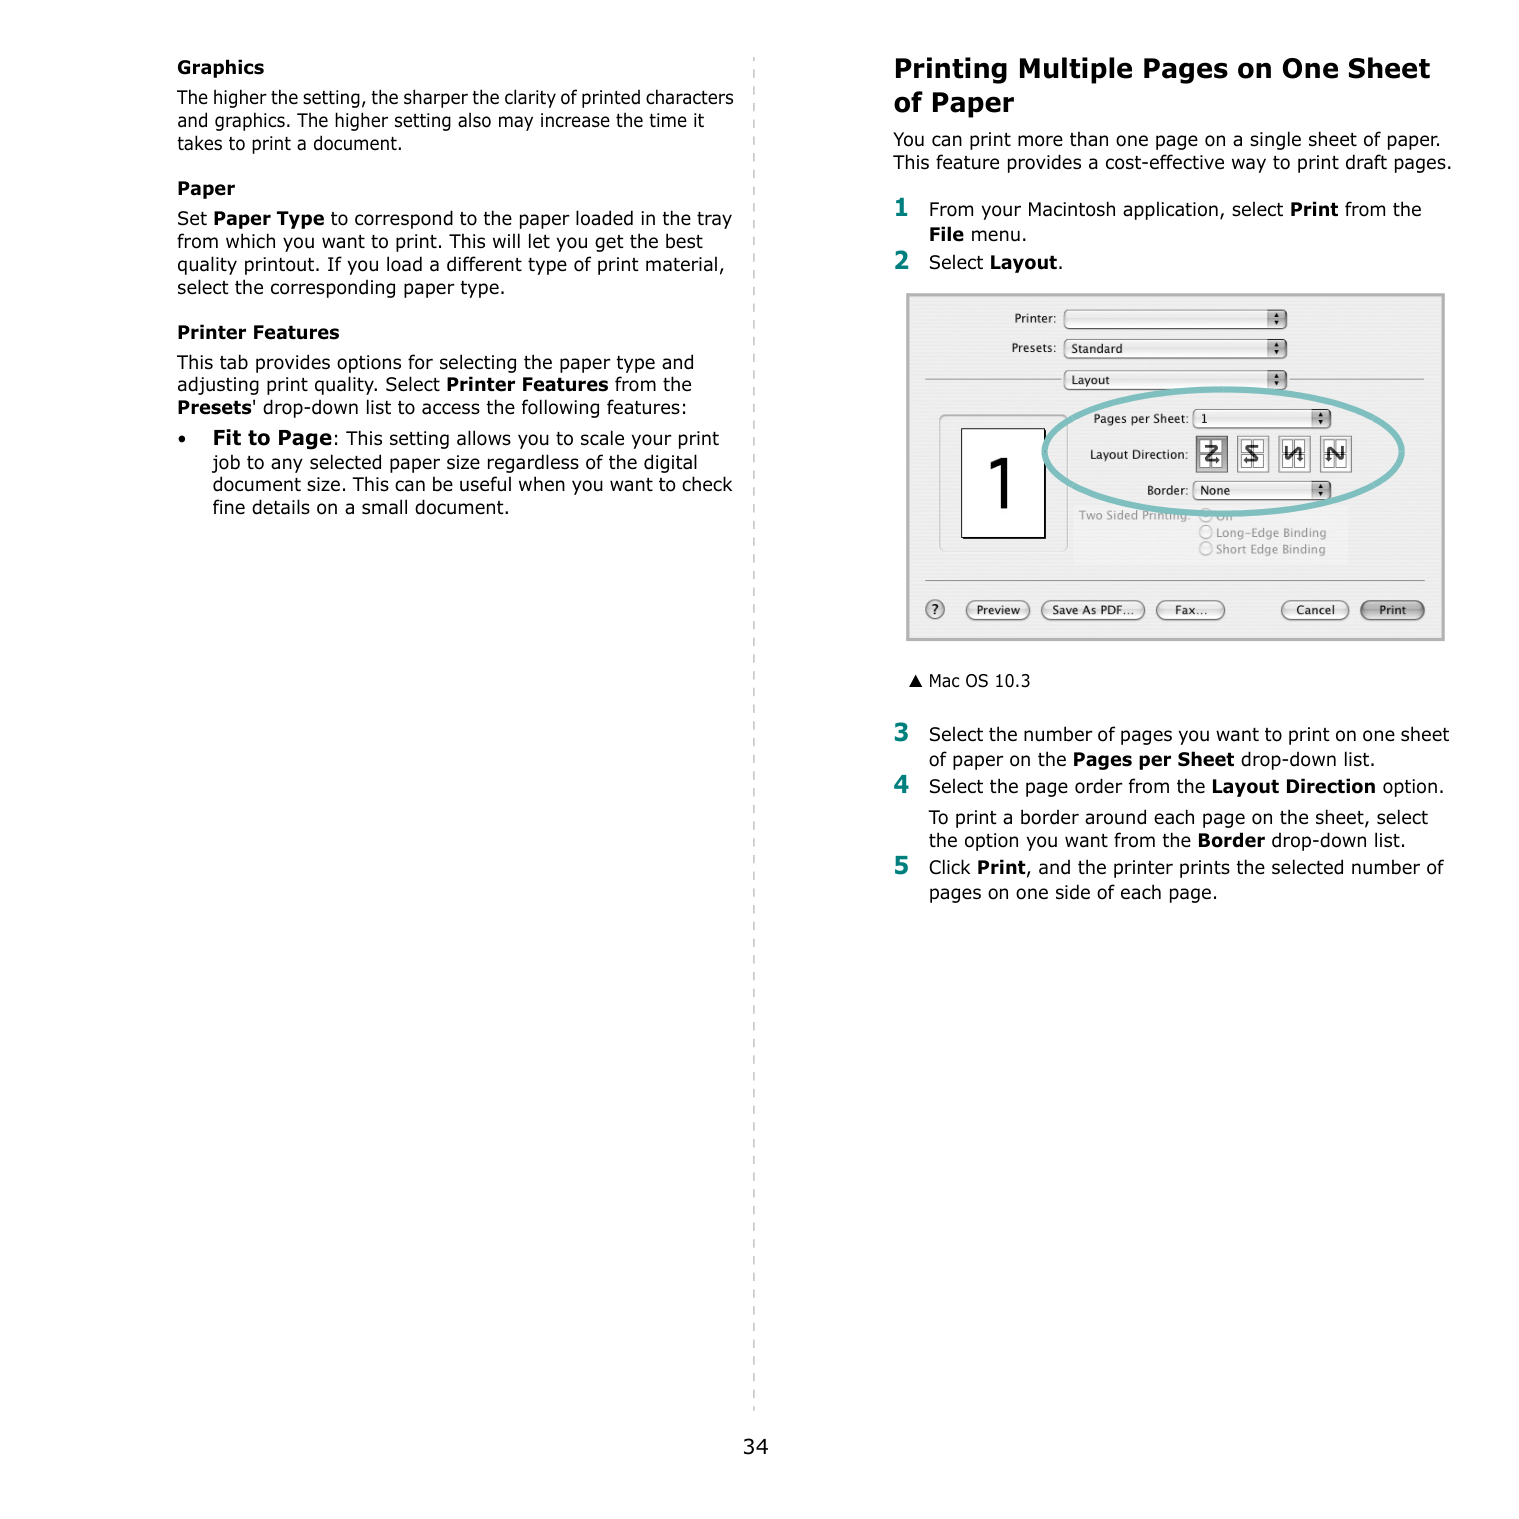
34 Graphics The higher the setting, the sharper the clarity of printed characters and graphics. The higher setting also may increase the time it takes to print a document. Paper Set Paper Type to correspond to the paper loaded in the tray from which you want to print. This will let you get the best quality printout. If you load a different type of print material, select the corresponding paper type. Printer Features This tab provides options for selecting the paper type and adjusting print quality. Select Printer Features from the Presets' drop-down list to access the following features: • Fit to Page: This setting allows you to scale your print job to any selected paper size regardless of the digital document size. This can be useful when you want to check fine details on a small document. Printing Multiple Pages on One Sheet of Paper You can print more than one page on a single sheet of paper. This feature provides a cost-effective way to print draft pages. 1 From your Macintosh application, select Print from the File menu. 2 Select Layout. 3 Select the number of pages you want to print on one sheet of paper on the Pages per Sheet drop-down list. 4 Select the page order from the Layout Direction option. To print a border around each page on the sheet, select the option you want from the Border drop-down list. 5 Click Print, and the printer prints the selected number of pages on one side of each page. ▲ Mac OS 10.3
35 Scanning You can scan documents using Image Capture program. Macintosh OS offers Image Capture program. Scanning with USB 1 Make sure that your machine and computer are turned on and properly connected to each other. 2 Place a single document face down on the document glass. OR load the document(s) face up into the ADF (or DADF). 3 Start Applications and click Image Capture. NOTE: If No Image Capture device connected message appears, disconnect the USB cable and reconnect it. If the problem persists, please refer to the Image Capture’s help. 4 Set the scan options on this program. 5 Scan and save your scanned image.
Note:
36
Software Section
Index
A
advanced printing, use 13C
canceling scan 20D
document, print Macintosh 33 Windows 7E
Extras properties, set 11F
favorites settings, use 12G
Graphics properties, set 10H
help, use 12I
install printer driver Macintosh 31 Windows 4 installing Linux software 23L
language, change 5 Layout properties, set Windows 9 Linux driver, install 23 printer properties 27 printing 27 scanning 28M
Macintosh driver install 31 uninstall 31 printing 33 scanning 35 setting up the printer 32 MFP driver, install Linux 23N
n-up printing Macintosh 34 Windows 13O
orientation, print 28 Windows 9 overlay create 16 delete 16 print 16P
Paper properties, set 9 paper size, set 9 print 28 paper source, set 28 Windows 9 paper type, set print 28 poster, print 14 print document 7 fit to page 14 from Macintosh 33 from Windows 7 N-up Macintosh 34 Windows 13 overlay 16 poster 15Prn 8
scaling 14 watermark 15 print resolution 28 printer driver, install Linux 23 printer properties Linux 27 printer properties, set Macintosh 33 Windows 8 printer resolution, set Windows 10 printer software install Macintosh 31 Windows 4 uninstall Macintosh 31 Windows 6 printing from Linux 27R
resolution printing 28S
scanning Linux 28 SmarThru 18Twain 19
WIA driver 20
37 scanning from Macintosh 35 setting darkness 10 favorites 12 image mode 10 resolution Windows 10 toner save 10 true-type option 10 software install Macintosh 31 Windows 4 reinstall Windows 6 system requirements Macintosh 31 uninstall Macintosh 31 Windows 6 status monitor, use 21