Ask AI
— answers from the official manualAnswers from the official manual.
Common questions
Common Questions
18 totalWhat is the model number of this HP scanner?
The scanner model is the HP Scanjet G2410. This is a flatbed scanner produced by Hewlett-Packard Development Company, L.P. (Page 1)
Where can I find support information for the HP Scanjet G2410?
Support information for the HP Scanjet G2410 can be found at www.hp.com/support. Additional information is also available at www.hp.com. (Page 1)
What is the part number for the HP Scanjet G2410?
The part number for the HP Scanjet G2410 is L2694-80006. This number is listed on the product documentation. (Page 1)
Where can I find the HP Scanjet G2410 product homepage?
The HP Scanjet G2410 product information can be found at www.hp.com. This website provides access to product resources and information from Hewlett-Packard. (Page 1)
What year was the HP Scanjet G2410 manual published?
The HP Scanjet G2410 manual is copyrighted 2007, indicating it was published in 2007. It was produced by Hewlett-Packard Development Company, L.P. (Page 1)
Is there an official HP website I can visit for the Scanjet G2410?
Yes, the official HP website at www.hp.com provides information about the Scanjet G2410. Additionally, www.hp.com/support is available specifically for product support. (Page 1)
Show 12 more questions
What subsections are included under Section 1 of the HP Scanjet G2410 manual?
What subsections are included under Section 2 of the HP Scanjet G2410 manual?
Who manufactures the HP Scanjet G2410?
How do I install the HP Scanjet G2410 on my computer?
What are the compatibility details for the HP Scanjet G2410?
How can I check the firmware of my HP Scanjet G2410 scanner?
How do I fix an Error Code 37 on my HP Scanjet G2410?
What should I do if I receive an Error Code 46 while scanning?
How do I clean my HP Scanjet G2410 scanner?
What safety instructions are important for using an HP Scanjet G2410?
How do I scan a document with color preferences set to grayscale on an HP Scanjet G2410?
What is the maximum resolution that the HP Scanjet G2410 can achieve?
Full Manual
30 pages

HP Scanjet G2410/G2710
User Guide
Contents
Accessing the user guide with screen reader software .......................................................3 Button Disable Utility ............................................................................................................4
How to use the HP Photosmart software ...................................................................................4 Front panel and accessories overview ......................................................................................4
Front-panel buttons .............................................................................................................5 Transparent materials adapter (TMA) ..................................................................................5
Scanning overview ....................................................................................................................5 Scan from the scanner front-panel buttons .........................................................................5 Scan from the HP Solution Center ......................................................................................5 Scan from other software programs ....................................................................................6 Preview a scanned image ...................................................................................................6
Change scan settings ................................................................................................................6 Scan pictures and documents ...................................................................................................6
Select original type — document or picture .........................................................................7 Scan pictures .......................................................................................................................7 Scan multiple pictures with one scan ..................................................................................7 Scan documents ..................................................................................................................8 Scan to a PDF file ................................................................................................................8 E-mail a document or picture ...............................................................................................9
Make copies ...............................................................................................................................9 Scan film ..................................................................................................................................10
Scan positives (such as 35 mm slides) or negatives .........................................................10 Tips for scanning transparent items ..................................................................................12
Reset the scanner .............................................................................................................15 Test the scanner hardware ................................................................................................15 Scanner has stopped working properly .............................................................................16 Additional troubleshooting information ..............................................................................16
1
Scanner operation problems ...................................................................................................16 Scanner will not turn on .....................................................................................................17 Scanner does not scan right away ....................................................................................17 Buttons appear not to work ................................................................................................17 Issues with scanning documents or text (OCR) ................................................................18 Scanned image is fuzzy .....................................................................................................18 Scanner is scanning items very slowly ..............................................................................18 Scanner glass needs to be cleaned ..................................................................................18
Slides, negatives, and TMA issues ..........................................................................................19 The image cannot be enlarged ..........................................................................................19 Incorrect colors print, or the image is too light or dark .......................................................19 Dots or streaks appear in the scanned image ...................................................................19 The scanned images are dark ...........................................................................................19 The TMA does not work at all ............................................................................................19 No light or only dim light is visible in the TMA after selecting slides or negatives in the Scan dialog box .................................................................................................................20
Scanner installation troubleshooting ........................................................................................20 Uninstall and reinstall the software ....................................................................................20 Check the cables ...............................................................................................................21

Recycling ...........................................................................................................................23 Product restricted material .................................................................................................23
Disposal of Waste Equipment by Users in Private Households in the European Union .........24
Index..............................................................................................................................................29
2
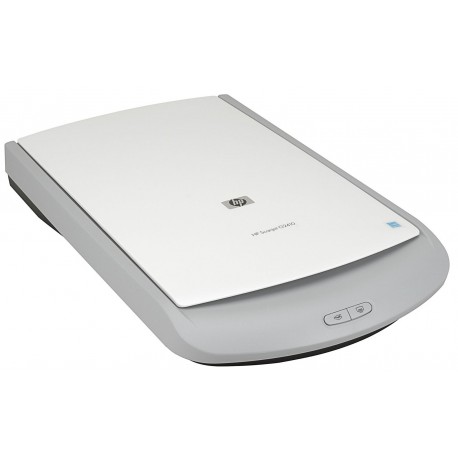
1 How to use the scanner
This manual describes how to use the HP Scanjet G2410 Flatbed Scanner and the HP Scanjet G2710 Photo Scanner.
This section presents an overview of the scanner and how to use it.
Where to get additional information
To access an online version of the scanner user guide, click Start, point to Programs or All Programs, point to HP, Scanjet, G2410or G2710, and then click User Guide.
You can get additional information about using this product from the HP Solution Center. If you have installed the HP Photosmart software that came with the scanner, doubleclick the HP Solution Center icon on your desktop, and then click Help. Under the Documentation section, click Product Help.
Accessibility
This section describes the accessibility options available with this scanner.
#### Accessing the user guide with screen reader software
There is an online Help version of this User Guide on the software CD. This format can be used with most screen reader software programs. To find this guide on the CD, do the following:
| | |---|
NOTE: If the installation dialog box does not display, double-click the scanner.htm file on the root of the installation CD.
How to use the scanner 3
#### Button Disable Utility
To prevent buttons from being accidentally pushed, you can use the Button Disable Utility to disable the buttons. You can use the same utility to re-enable the buttons.
To use the Button Disable Utility, complete the following steps:
How to use the HP Photosmart software
When you install the HP Photosmart software, two icons are added to your desktop. These icons open programs for scanning and editing your scans.


HP Solution Center is the program that gets you started scanning pictures and documents. Use the HP Solution Center for all of the following:
The HP Photosmart software is the program to use for manipulating, printing, archiving, and sharing your images after they have been scanned. You can get to the HP Photosmart software from the desktop icon or through HP Solution Center.
To start a scan: Double-click the HP Solution Center icon on the desktop, click the icon for your device, and then click the task you want to perform.
| |
|---|
NOTE: If the HP Solution Center icon is not available on the desktop, click Start, point to Programs or All Programs, point to HP, and then click HP Solution Center.
Front panel and accessories overview
This section presents an overview of the scanner front panel and the transparent materials adapter (TMA).
Front-panel buttons
|Icon|Feature name|Description
| |---|---|---| ||Scan button|Scans pictures, graphics, documents, or objects.| ||Copy button|Scans the item and sends it to the printer to make a copy.| |
|Scan to PDF button (G2710 model only)|Scans one or more pages and saves them as a PDF file for sharing or storing.|
Transparent materials adapter (TMA)
NOTE: This section applies to the HP Scanjet G2710 Scanner only.
You can use the transparent materials adapter (TMA) to scan 35 mm slides or negatives. For more information about the TMA, see Scan film.
Scanning overview
Start scanning in one of these ways:
#### Scan from the scanner front-panel buttons
Use the front-panel buttons on the scanner for basic scanning functions, such as scanning pictures and documents. Instructions for using the front-panel buttons are located in this manual.
For more information about how to use the front-panel buttons, see the following topics:
#### Scan from the HP Solution Center
Scan from the HP Solution Center when you want more control during the scanning process, such as when you want to preview the image before the final scan, use more advanced features, or change scan settings.
Scanning overview 5
To start the HP Solution Center:
#### Scan from other software programs
You can scan an image directly into one of your software programs if the program is TWAIN compliant. Generally, the program is compliant if it has a menu option such as Acquire, Scan, or Import New Object. If you are unsure whether the program is compliant or what the option is, see the documentation for that program.
#### Preview a scanned image
If you want to preview the scanned image, either begin the scan from the HP Solution Center, or click Show Preview in the What are you scanning? dialog box.
To change the button settings for the scanner so that the software always prompts you with a preview of the picture or document, see the Change scan settings section.
Change scan settings
You can change many scan settings from the HP Solution Center, including:
To view or change the scan settings, open the HP Solution Center and select the device. Click Settings, point to Scan Settings, and then select the type of settings you want to view or change. To get help with settings, click Help.
Scan pictures and documents
Use the Scan button to scan pictures or documents quickly.
#### Select original type — document or picture
You have two choices for original type: Document or Picture. The scanner optimizes settings based on your choice. Use the following guidelines to determine the best original type for your needs.
|If your original consists of|Select this original type| |---|---| |Text, or both text and graphics|Document
| |A printed photograph or graphic|Picture|
Scan pictures Use the Scan button ( ) to scan photos and graphics. For scanning slides or negatives, see Scan film.

NOTE: If you want to preview scans before they are sent to their destination, select Show Preview in the What are you scanning? dialog box. Also see Preview a scanned image.
| | |---|

| | |---|
NOTE: If Show Preview was selected, you must click the Accept button in the preview screen to initiate the scan. When prompted, click Yes to scan additional pictures, or click No to send the scanned image(s) to the specified location.
TIP: The HP Scanning software can automatically correct your pictures or restore faded colors in old pictures. To turn picture correction on or off, select Auto Correct Photos from the Basic menu of the HP Scanning software, and then choose the options you want. To use this feature, Show Preview must be selected.
Scan multiple pictures with one scan You can scan multiple pictures at the same time from the scanner glass. Arrange the pictures that you want to scan on the HP scanning device glass. For the best results, leave at least 0.25 inches (6 mm) of space between the edges of the pictures. Then follow the steps for scanning a picture. For more information, see Scan pictures. For more information, go to the Index tab in the onscreen Help. Type multiple in the keyword field and click multiple items, scan in the list.
Scan pictures and documents 7
Scan documents Use the Scan button ( ) to scan documents. The scanner scans an original document to the destination that is selected in the HP Scanning dialog box.

NOTE: If you want to preview scans before they are sent to their destination, select Show Preview in the What are you scanning? dialog box, or begin your scan from the HP Solution Center. Also see Preview a scanned image.
| | |---|

| | |---|
NOTE: If Show Preview was selected, you must click the Accept button in the preview screen to initiate the scan. When prompted, click Yes to scan additional pages, or click No to send the scanned page(s) to the specified location.
#### Scan to a PDF file
NOTE: This section applies to HP Scanjet G2710 Photo Scanner only.
| | |---|

Use the Scan to PDF button ( ) to scan a document or picture and save it as a PDF file.

#### E-mail a document or picture
Follow these instructions to scan pictures or documents from the scanner glass and send the scans to a supported e-mail program as an attachment.

| | |---|
NOTE: If Show Preview was selected, you must click the Accept button in the preview screen to initiate the scan. When prompted, click Yes to scan additional pages, or click No to send the scanned page(s) to the specified location.
| | |---|
NOTE: To change the e-mail program, open the HP Solution Center software from your desktop icon or from the Start menu, click the scanner icon, click the Settings button, and then select E-mail Settings. The E-mail Settings dialog
box appears. Select the e-mail program that you want to use, and then click OK.
Make copies
Use the Copy button ( ) to scan an original and send it to a printer.
The front-panel Copy button is optimized to scan and print a duplicate of what is on the scanner glass. If you want to change the image, such as to lighten or darken it, or to adjust its size, click Cancel in the copy progress dialog box. Adjust the settings, and then complete the scan. If you use the HP Solution Center, you can also click the Make Copies button and adjust the settings in the preview screen.
| | |---|
Make copies 9
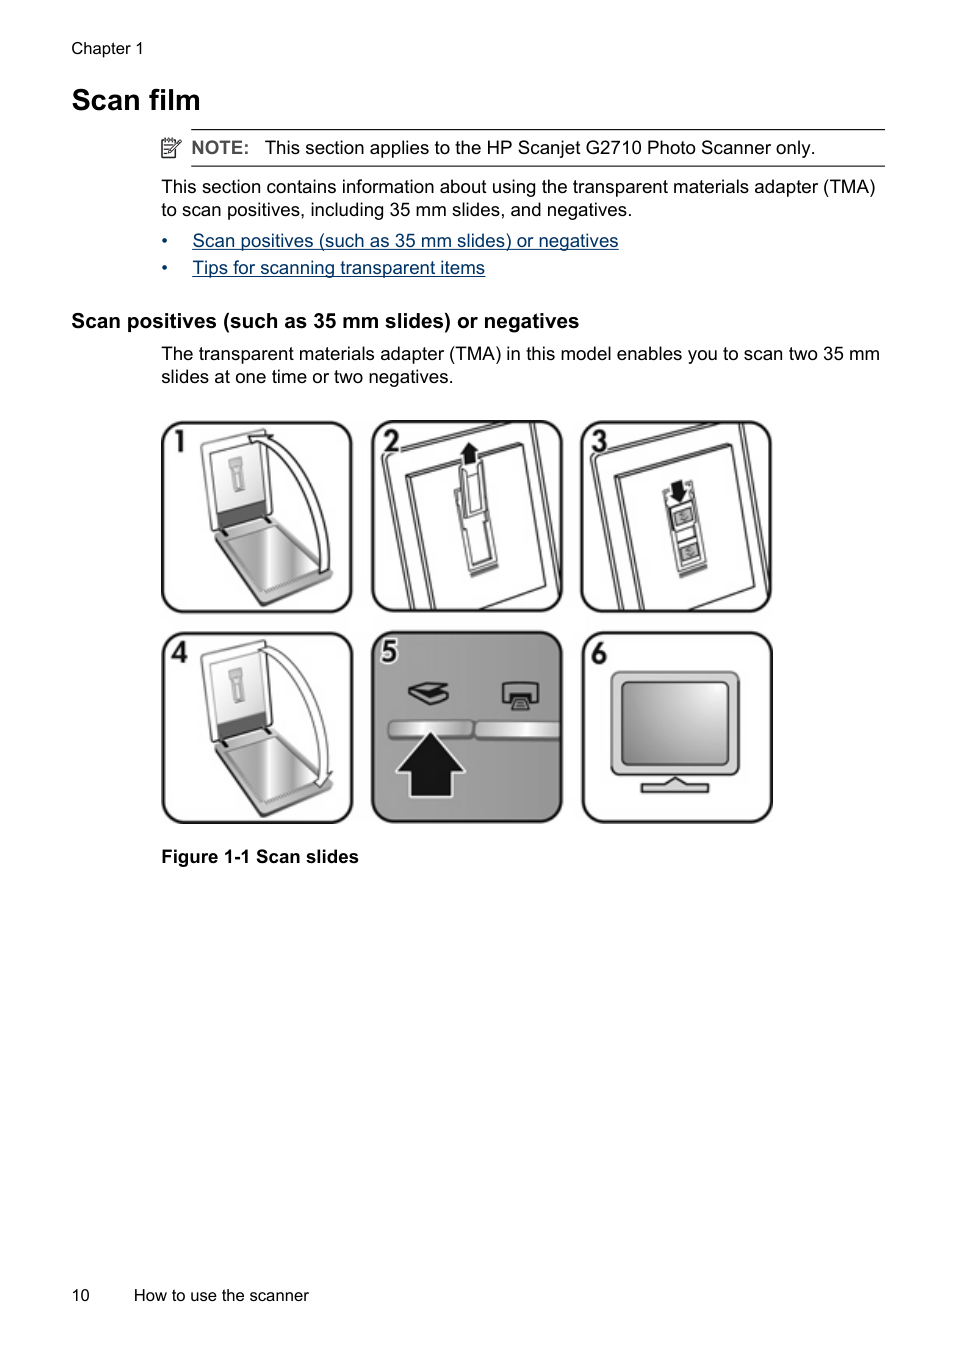
Scan film
NOTE: This section applies to the HP Scanjet G2710 Photo Scanner only.
| | |---|
This section contains information about using the transparent materials adapter (TMA) to scan positives, including 35 mm slides, and negatives.
#### Scan positives (such as 35 mm slides) or negatives
The transparent materials adapter (TMA) in this model enables you to scan two 35 mm slides at one time or two negatives.

##### Figure 1-1 Scan slides

##### Figure 1-2 Scan negatives
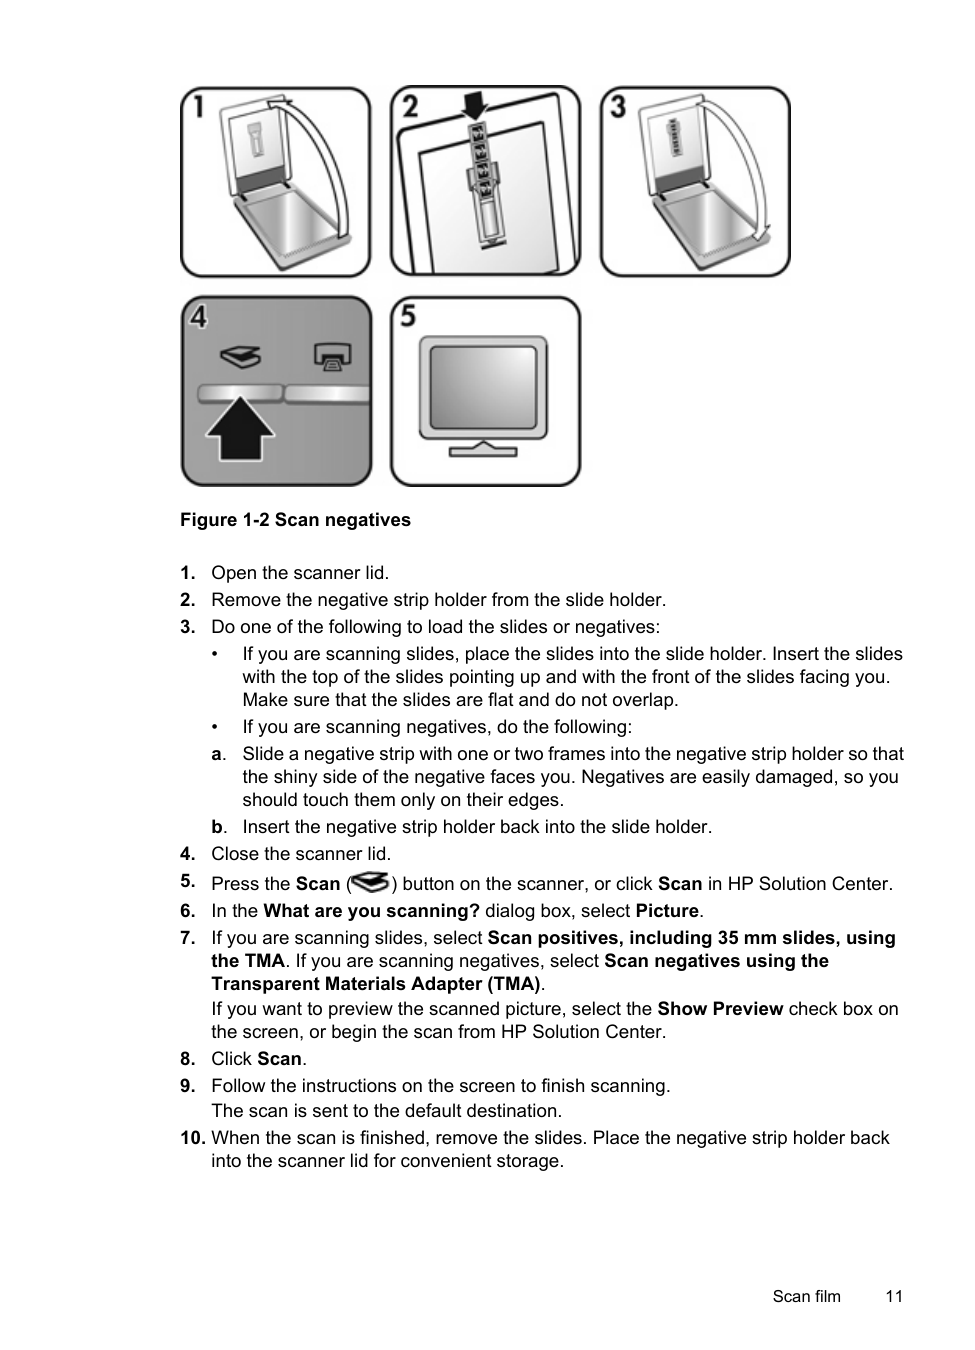

Scan film 11
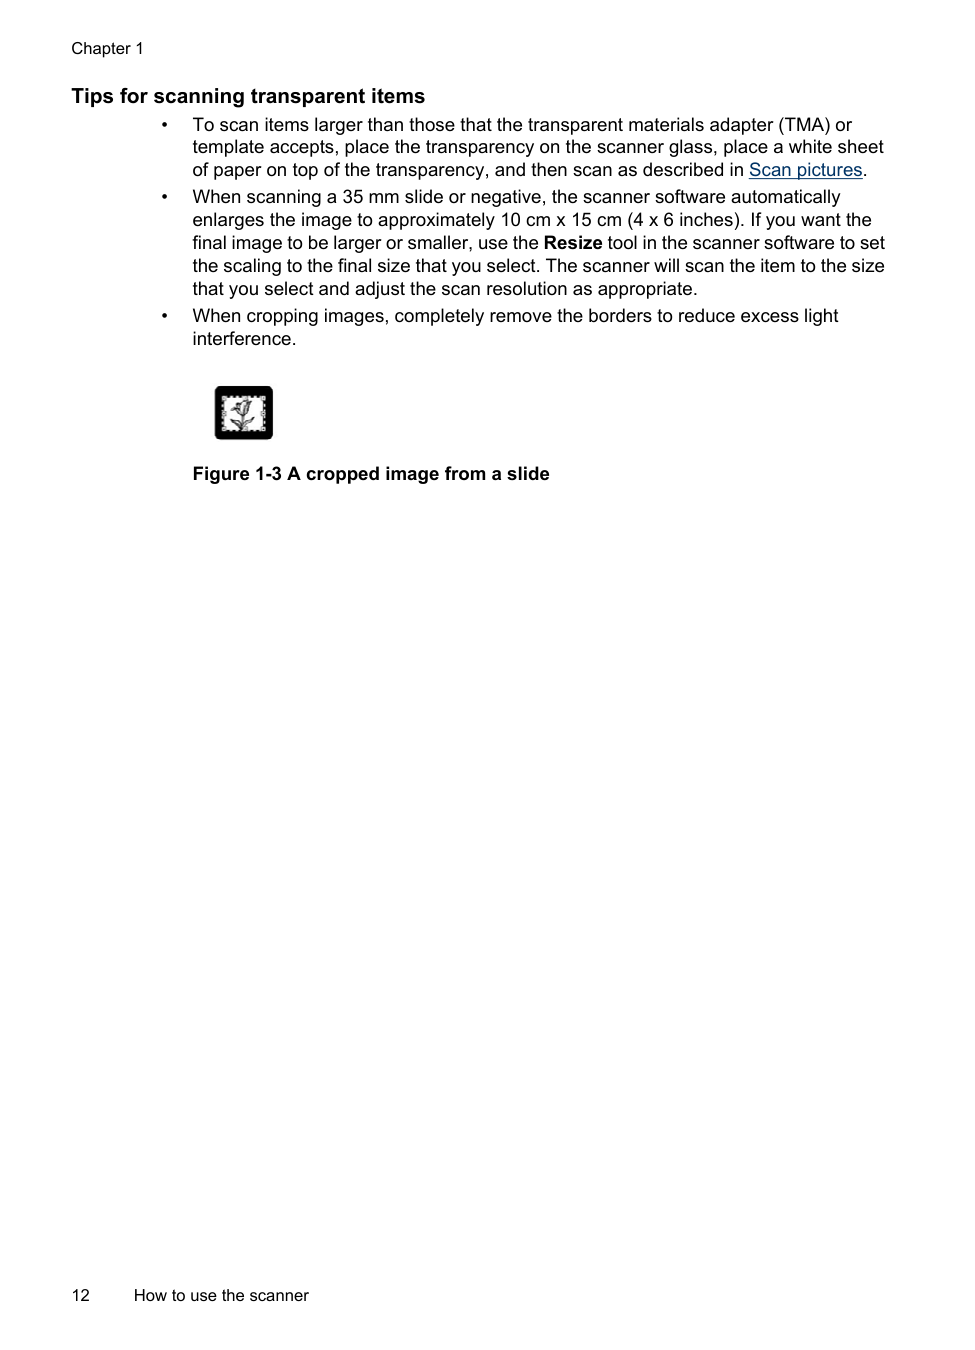
#### Tips for scanning transparent items

##### Figure 1-3 A cropped image from a slide
2 Care and maintenance
This section presents information about how to care for and maintain the scanner.
Occasional cleaning of your scanner helps ensure higher-quality scans. The amount of care necessary depends upon several factors, including the amount of use and the environment. You should perform routine cleaning as necessary.
For all care and maintenance procedures required for the scanner, please see the Care and maintenance section for your scanner in the onscreen Help. In the HP Solution Center, click Help, and then select the Help section for your scanner model.
Routine cleaning and maintenance should include cleaning the scanner glass and the transparent materials adapter (TMA).
CAUTION: Avoid placing items that have sharp edges in the scanner. Doing so can damage the scanner. Before placing an item on the scanner glass, make sure that the item does not contain wet glue, correction fluid, or other substances that can be transferred to the glass.
Clean the scanner glass
CAUTION: Use only glass cleaner. Avoid abrasives, acetone, benzene, and carbon tetrachloride, all of which can damage the scanner glass. Avoid isopropyl alcohol because it can leave streaks on the glass.
Do not spray the glass cleaner directly on the glass. If too much glass cleaner is applied, the cleaner could run to the edges and damage the scanner.
| | |---|
NOTE: For instructions about how to clean the underside of the scanner glass, visit www.hp.com/support.
Clean the transparent materials adapter (TMA) — HP Scanjet G2710 Photo Scanner
Clean the TMA with a dry, soft cloth. If necessary, lightly spray the cloth with glass cleaner and wipe the TMA.
Care and maintenance 13
Chapter 2
Order maintenance and scanner supplies
You can purchase maintenance parts online at the scanner support Web site at www.hp.com/buy/parts or from your local HP dealer.
14 Care and maintenance
3 Troubleshooting
This section contains solutions for common problems with the scanner and the transparent materials adapter (TMA).
Scanner initialization or hardware problems
This section contains solutions for initialization and hardware problems.
#### Reset the scanner
If you receive an error message similar to “Scanner initialization failed” or “Scanner not found” when trying to use the scanner, use the following procedure:

#### Test the scanner hardware
If you think that the scanner has a hardware problem, verify that the cables are firmly connected to the scanner, the computer, and the power source. If the cables are correctly connected, verify that the scanner is turned on, and then test the scanner by using the following procedure:
The carriage on the scanner will move forward and backward approximately 25 mm (1 inch), and the lamp will turn on.
If the carriage does not move and the scanner lamp does not turn on, a problem might exist with the scanner hardware. See Scanner has stopped working properly.
Troubleshooting 15
#### Scanner has stopped working properly
If the scanner stops scanning, complete the following steps, in order. After each step, start a scan to see if the scanner is working. If the problem continues, proceed with the next step.
If the scanner still does not work, visit www.hp.com/support or contact HP Customer Support.
#### Additional troubleshooting information
If you have the HP Photosmart software installed, you can use the onscreen Help to solve other problems with the scanner. To gain access to the Help, double-click the HP Solution Center icon on your desktop, and then click Help. Under the Documentation section, click Product Help. The Help system provides information about the scanner hardware as well as information about the HP Photosmart software and HP Scanning software. Also, see Scan troubleshooting in the general Troubleshooting and support section of the Help.
Scanner operation problems
#### Scanner will not turn on
If the scanner will not turn on when you press the front-panel scanner buttons, check for these possible problems:
• The scanner might have been unplugged. Check to see that the power cable has not
become disconnected from the scanner or unplugged from the power source. • The scanner might be turned off. Check to see that the scanner power switch is in
the on position.
• Check to see that the TMA cable has not become disconnected from the scanner.
#### Scanner does not scan right away
If the scanner has not been used for a while, the scanner lamp might need to go through a warm-up period before scanning can begin. If the scanner lamp needs to warm up, it takes a moment after starting the software or pressing a scanner button for scanning to begin.
To change the lamp warm-up setting, open the HP Solution Center, click Settings, and then click Scan Preferences.
#### Buttons appear not to work
After each step, start a scan to see if the buttons are working. If not, proceed with the next step.
Scanner operation problems 17
#### Issues with scanning documents or text (OCR)
The scanner uses optical character recognition (OCR) to convert text on a page to text that you can edit on your computer.
| | |---|
NOTE: If you select Save to File, select a text file type from the File Type drop-down list.
#### Scanned image is fuzzy
It is important that the item you scan comes in close contact with the scanner glass. If the resulting scanned image is not clear, check to see that the item is in full contact with the scanner glass.
#### Scanner is scanning items very slowly
#### Scanner glass needs to be cleaned
Clean the scanner glass under the following conditions:
For more details, see Care and maintenance.
Slides, negatives, and TMA issues
NOTE: This section applies to HP Scanjet G2710 Photo Scanner only.
| | |---|
Use this section to help resolve issues with 35 mm slides or 35 mm negatives that have been scanned by using the TMA.
#### The image cannot be enlarged
You might have used Zoom in, which only changes the view on the screen. Use Resize to change the size of the final scanned image. For more information, go to the Index tab in the onscreen Help. Type resize in the keyword field and click images in HP Scanning software in the list.
#### Incorrect colors print, or the image is too light or dark
#### Dots or streaks appear in the scanned image
#### The scanned images are dark
#### The TMA does not work at all
The cable might not be connected correctly. Ensure that the TMA cable is connected securely to the TMA port on the back of the scanner.
Slides, negatives, and TMA issues 19
#### No light or only dim light is visible in the TMA after selecting slides or negatives in the Scan dialog box
After each step, start a scan to see if the scanner is working. If not, proceed with the next step.

Scanner installation troubleshooting
This section contains solutions for installation and setup problems.
#### Uninstall and reinstall the software
An incomplete software installation could cause the scanner not to be recognized or the software not to launch correctly. Try uninstalling and then reinstalling the HP Scanning software. To reinstall the HP Scanning software, you must have the HP Photosmart software CD.
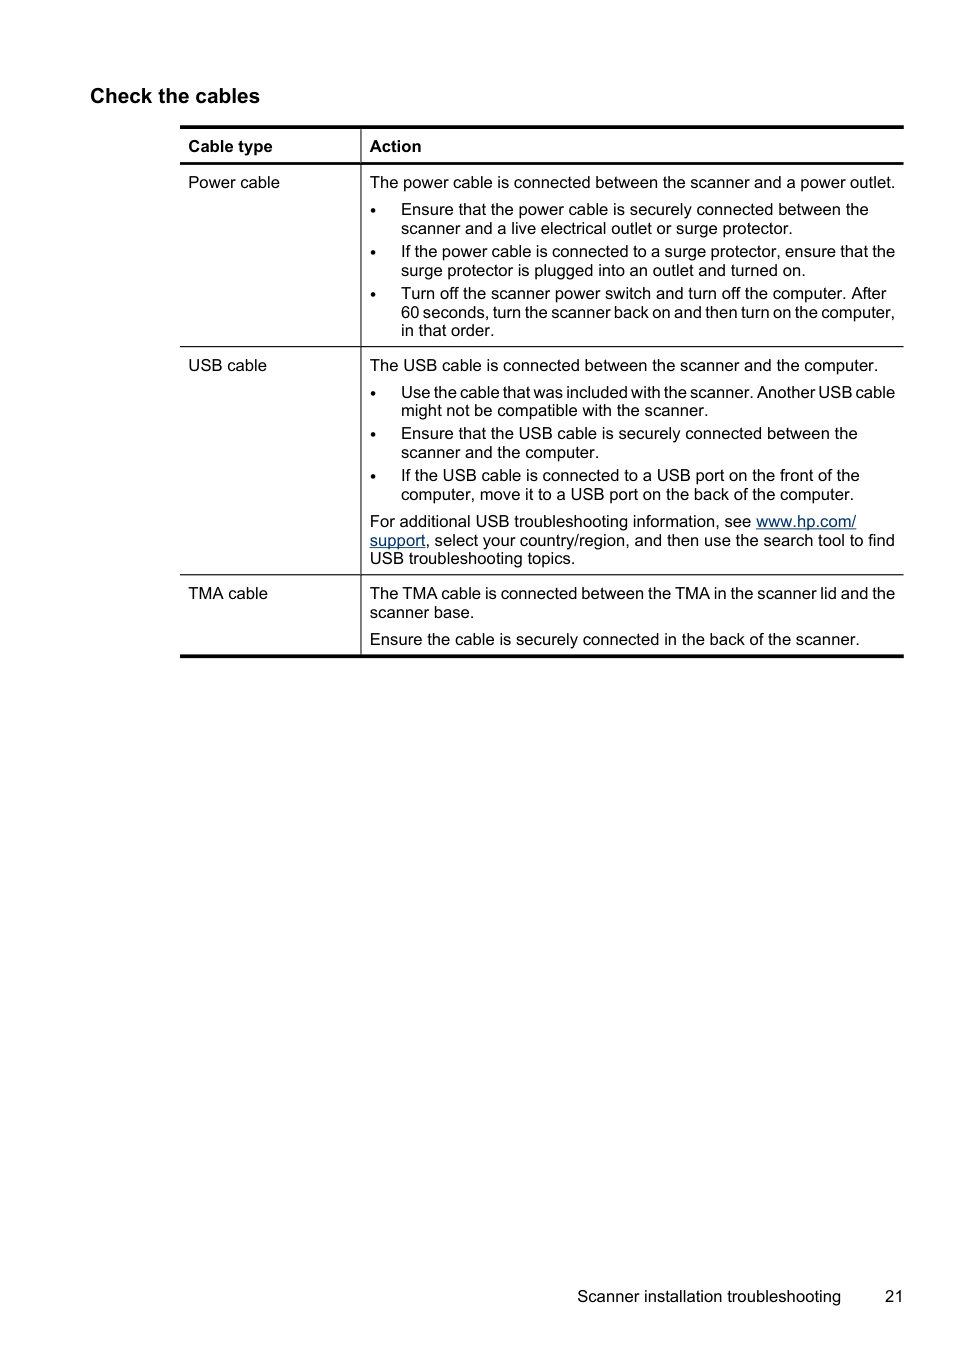
#### Check the cables
|Cable type|Action
| |---|---| |Power cable|The power cable is connected between the scanner and a power outlet.
• Ensure that the power cable is securely connected between the scanner and a live electrical outlet or surge protector.
• If the power cable is connected to a surge protector, ensure that the surge protector is plugged into an outlet and turned on.
• Turn off the scanner power switch and turn off the computer. After 60 seconds, turn the scanner back on and then turn on the computer, in that order.
| |USB cable|The USB cable is connected between the scanner and the computer.
• Use the cable that was included with the scanner. Another USB cable might not be compatible with the scanner.
• Ensure that the USB cable is securely connected between the scanner and the computer.
• If the USB cable is connected to a USB port on the front of the computer, move it to a USB port on the back of the computer.
For additional USB troubleshooting information, see www.hp.com/ support, select your country/region, and then use the search tool to find USB troubleshooting topics.
| |TMA cable|The TMA cable is connected between the TMA in the scanner lid and the scanner base.
Ensure the cable is securely connected in the back of the scanner.|
Scanner installation troubleshooting 21
4 Regulatory information andproduct specifications
This section contains regulatory information and product specifications for the HP Scanjet G2410/G2710 scanners and accessories.
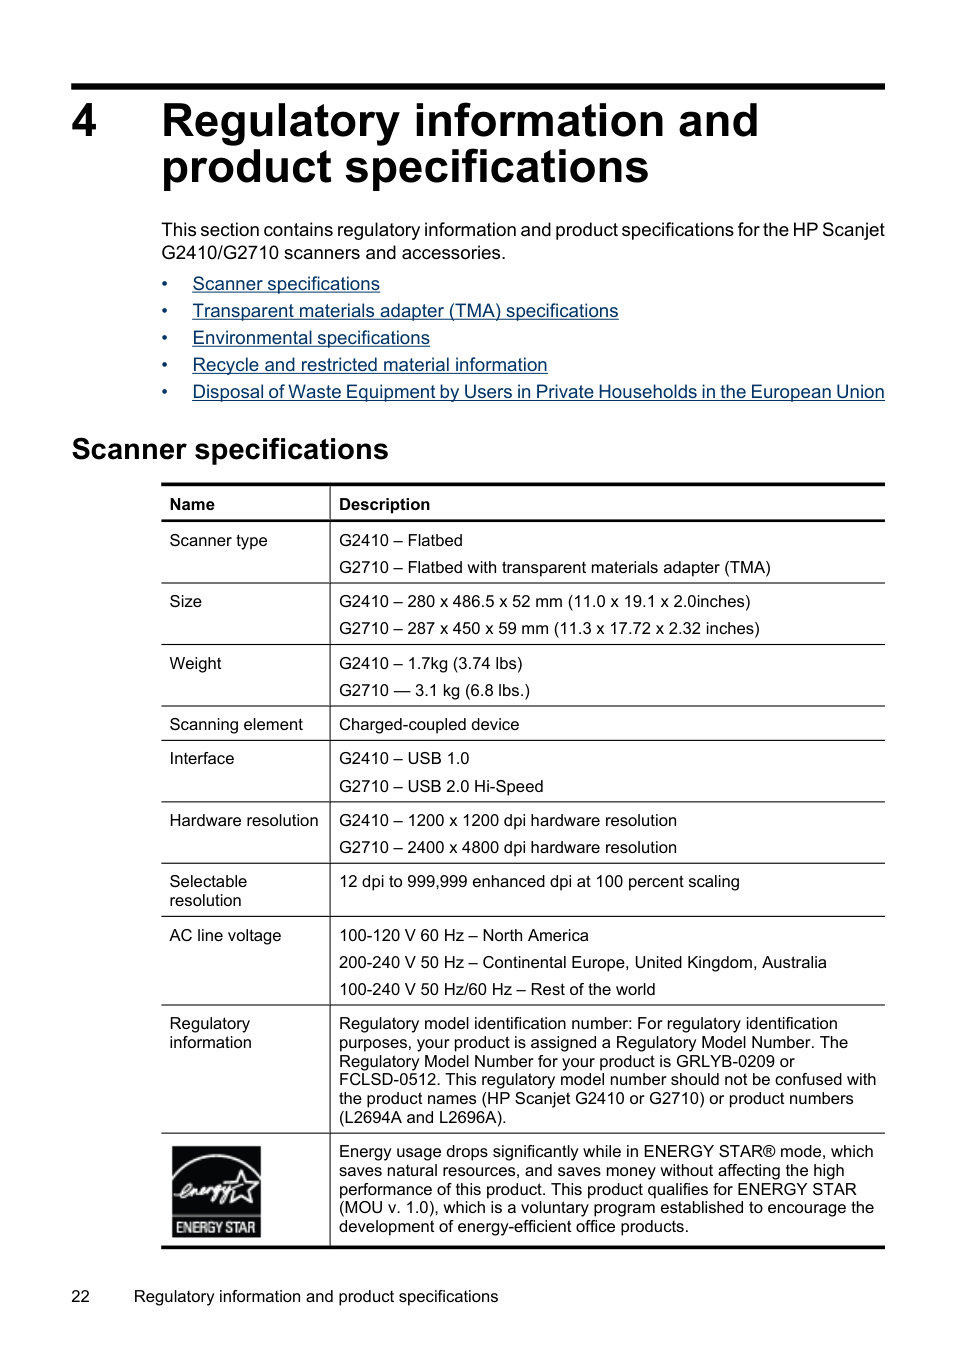
Scanner specifications
|Name|Description
| |---|---| |Scanner type|G2410 – Flatbed G2710 – Flatbed with transparent materials adapter (TMA)
| |Size|G2410 – 280 x 486.5 x 52 mm (11.0 x 19.1 x 2.0inches) G2710 – 287 x 450 x 59 mm (11.3 x 17.72 x 2.32 inches)
| |Weight|G2410 – 1.7kg (3.74 lbs) G2710 — 3.1 kg (6.8 lbs.)
| |Scanning element|Charged-coupled device
| |Interface|G2410 – USB 1.0 G2710 – USB 2.0 Hi-Speed|
|Hardware resolution|G2410 – 1200 x 1200 dpi hardware resolution G2710 – 2400 x 4800 dpi hardware resolution
| |Selectable resolution|12 dpi to 999,999 enhanced dpi at 100 percent scaling
| |AC line voltage|100-120 V 60 Hz – North America 200-240 V 50 Hz – Continental Europe, United Kingdom, Australia 100-240 V 50 Hz/60 Hz – Rest of the world| |Regulatory information|Regulatory model identification number: For regulatory identification purposes, your product is assigned a Regulatory Model Number. The Regulatory Model Number for your product is GRLYB-0209 or FCLSD-0512. This regulatory model number should not be confused with the product names (HP Scanjet G2410 or G2710) or product numbers (L2694A and L2696A).| |
|Energy usage drops significantly while in ENERGY STAR® mode, which saves natural resources, and saves money without affecting the high performance of this product. This product qualifies for ENERGY STAR (MOU v. 1.0), which is a voluntary program established to encourage the development of energy-efficient office products.|
(continued)
|Name|Description| |---|---| | |ENERGY STAR is a U.S. registered service mark of the U.S. EPA. As an ENERGY STAR partner, HP has determined that this product meets ENERGY STAR guidelines for energy efficiency. For more information on ENERGY STAR guidelines, go to the following Web site: www.energystar.gov
|
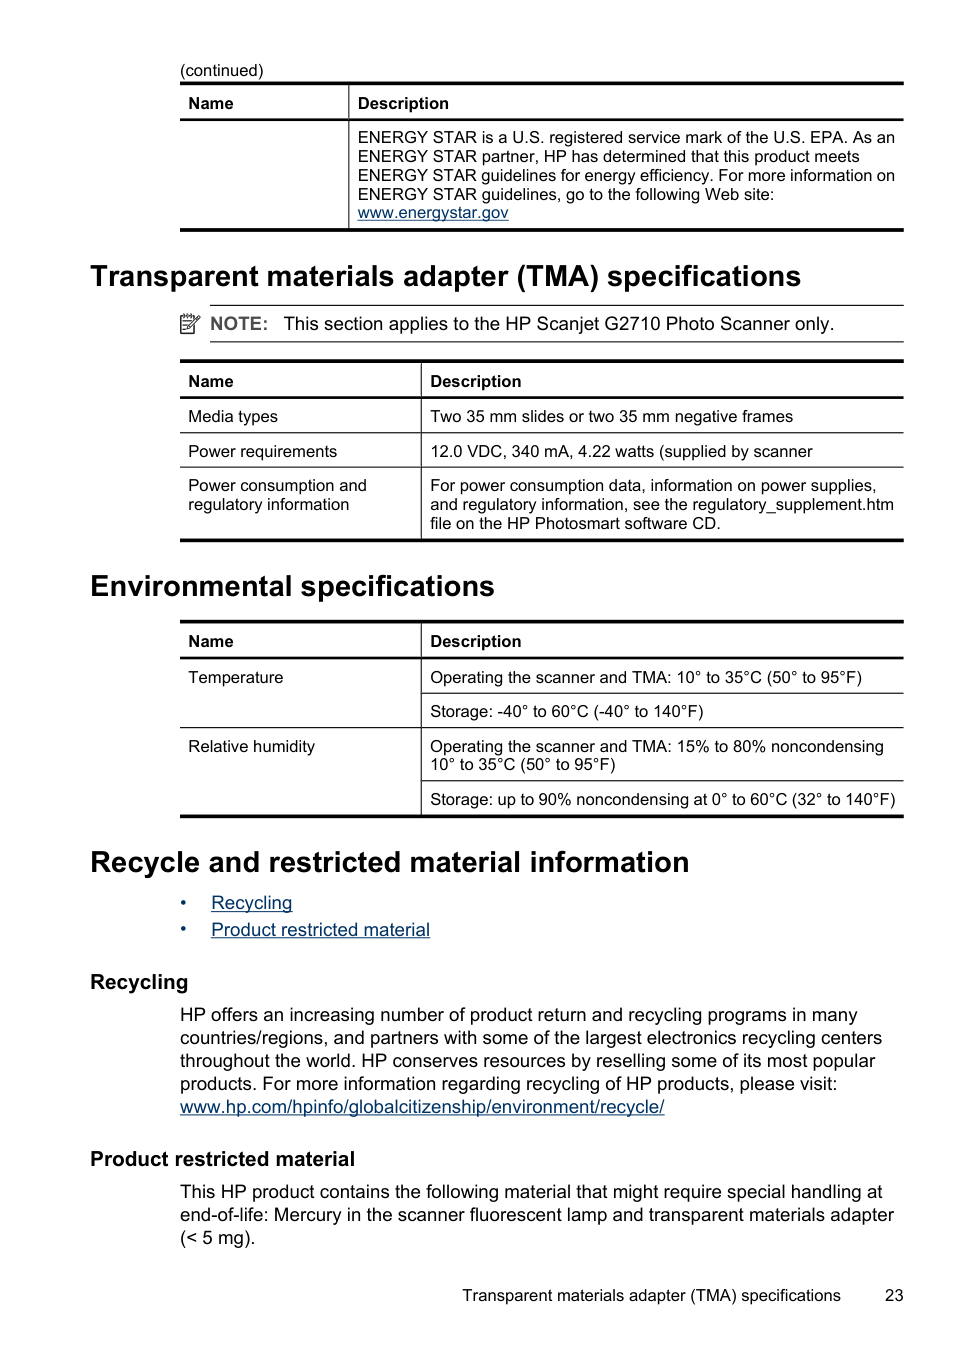
Transparent materials adapter (TMA) specifications
NOTE: This section applies to the HP Scanjet G2710 Photo Scanner only.
|Name|Description
| |---|---| |Media types|Two 35 mm slides or two 35 mm negative frames
| |Power requirements|12.0 VDC, 340 mA, 4.22 watts (supplied by scanner
| |Power consumption and regulatory information
|For power consumption data, information on power supplies, and regulatory information, see the regulatory_supplement.htm file on the HP Photosmart software CD.|
Environmental specifications
|Name|Description
| |---|---| |Temperature
|Operating the scanner and TMA: 10° to 35°C (50° to 95°F)| |Temperature
|Storage: -40° to 60°C (-40° to 140°F)| |Relative humidity|Operating the scanner and TMA: 15% to 80% noncondensing 10° to 35°C (50° to 95°F)| |Relative humidity|Storage: up to 90% noncondensing at 0° to 60°C (32° to 140°F)|
Recycle and restricted material information
#### Recycling
HP offers an increasing number of product return and recycling programs in many countries/regions, and partners with some of the largest electronics recycling centers throughout the world. HP conserves resources by reselling some of its most popular products. For more information regarding recycling of HP products, please visit: www.hp.com/hpinfo/globalcitizenship/environment/recycle/
#### Product restricted material
This HP product contains the following material that might require special handling at end-of-life: Mercury in the scanner fluorescent lamp and transparent materials adapter (< 5 mg).
Transparent materials adapter (TMA) specifications 23
For recycling information, contact www.hp.com/go/recycle, your local authorities, or the Electronic Industries Alliance at www.eiae.org.
Disposal of Waste Equipment by Users in Private Households in the European Union


This symbol on the product or on its packaging indicates that this product must not be disposed of with your other household waste. Instead, it is your responsibility to dispose of your waste equipment by handing it over to a designated collection point for the recycling of waste electrical and electronic equipment. The separate collection and recycling of your waste equipment at the time of disposal will help to conserve natural resources and ensure that it is recycled in a manner that protects human health and the environment. For more information about where you can drop off your waste equipment for recycling, please contact your local city office, your household waste disposal service, or the shop where you purchased the product.
5 Product support
This section describes the options for product support.
Accessibility The following accessibility options are available on this scanner: Windows environment:
Customers with disabilities can get help by visiting www.hp.com/hpinfo/community/ accessibility/prodserv/ (English only).
HP Scanjet Web site
Visit www.hp.com and select your country/language at the top of the page. On the country page, select scanners from the list of products. Use this site for a variety of information:
Product support 25
Getting assistance
In order to get the best from your HP product, please consult the following standard HP support offerings:

26 Product support
Index
about 4 scan from 5 settings 6 troubleshoot 17
troubleshoot 21 Care Pack Services 28 clean
scanner glass 13 TMA 13
color Auto Correct Photos 7 document scan options 8
copy
from scanner glass 9 Copy button 4, 9 crop images 12 customer support
Web sites 25
customers with 25 disable buttons 4 disposal of waste 24 documents
e-mail 9 scan 8
drawings original types 7 scan 7
#### E
enable buttons 4 Energy Star 22 environmental specifications 23
F film, scan
crop images 12 models, scanner 10 tips 12
settings 6 start 4 uninstall 20
HP Scanjet Web site 25 HP Solution Center
Help 3 scan from 5 start 4
humidity specifications 23
front panel buttons about 4 scan from 5 settings 6 troubleshoot 17
fuzzy images, troubleshoot 18
troubleshoot 20
L languages, user guide 3 localized user guides 3
crop images 12 models, scanner 10 tips 12 troubleshoot 19 with HP Scanjet G4010 10
troubleshoot 18 onscreen Help 3 operating environment specifications 23 order maintenance supplies 14 originals
types of 7
color correction 7 original types 7 scan 7
Photosmart settings 6 start 4 uninstall 20
physical specifications 22 pictures
color correction 7 e-mail 9 original types 7 scan 7 scan multiple 7
29
power supply
troubleshoot cable 21 power-on, troubleshoot 17 preview image 6
documents 8 e-mail 9 from front panel buttons 5 from the HP Solution
Center 5 from TWAIN software 6 models, scanner 10 multiple pictures 7 original types 7 pictures 7 preview image 6 slides or negatives with HP
Scanjet G4010 10
transparent items 12 Scan button 4, 7, 8 Scan Film button 4 Scan to PDF button 8 Scan to Share button 4 scanner
hardware test 15 reset 15 troubleshoot 16 scanner glass, clean 13 scanner specifications 22 screen reader software 3 settings, scan 6 size specifications, scanner 22 slides, scan
crop images 12 models, scanner 10 tips 12 troubleshoot 19 with HP Scanjet G4010 10
software Help 3 scan from 6 settings 6
troubleshoot installation 20 uninstall 20
Solution Center Help 3 scan from 5 settings 6 start 4 specifications environmental 23 scanner 22 TMA 23
speed
troubleshoot 17, 18 storage specifications 23 supplies, maintenance 14 support
Web sites 25
T temperature specifications 23 test scanner hardware 15 text, editable
TMA clean 13 crop images 12 models, scanner 10 scan slides or negatives 12 scan slides or negatives with
HP Scanjet G4010 10 specifications 23
TMA cable troubleshoot 21 transparent materials adapter
(TMA) clean 13 crop images 12 models, scanner 10 scan slides or negatives with
HP Scanjet G4010 10 specifications 23 troubleshoot 19
troubleshoot buttons 17 cables 21 customer support 25 fuzzy images 18 installation 20 negatives 19 power 17 reset scanner 15 scanner 16
slides 19 speed 17, 18 test scanner hardware 15 TMA 19
turn on, troubleshoot 17 TWAIN
scan from 6
troubleshoot 21
extended 28 waste disposal 24 Web sites
accessibility 25 Energy Star 22 order maintenance
supplies 14 recycling information 23 support 25 waste disposal
information 24 Windows
accessibility features 25
30