Ask AI
— answers from the official manualAnswers from the official manual.
Common questions
Common Questions
18 totalHow do I set up audio on the dock?
To connect headphones or speakers: Plug them directly into the audio-out/headphone jack. Ensure that the docking station is configured as the default device in your computer's sound settings.
What does the LED on my HP Thunderbolt Dock G2 indicate?
If connected to an HP Commercial notebook, the dock’s LED reflects the host system's status. For non-HP notebooks or Chrome systems, this functionality is not supported.
How do I handle error code issues with my USB Type-C PD Controller?
To resolve errors, unplug the dock from your system and wait up to 20 seconds before reconnecting. If this doesn’t fix the issue, undock and reboot the system.
Can I use the ThunderboltTM port of my HP Thunderbolt Dock G2 in multi-function mode?
In multi-function mode, the ThunderboltTM port on your dock will degrade to only USB2 functionality when not connected to a ThunderboltTM host system. The number of independent video streams is also decreased.
What is the power requirement for charging my device with the HP Thunderbolt Dock G2?
For non-HP notebook systems, your dock needs a minimum AC adapter that is 19.5 volts and supplies at least 120 watts; otherwise, the white LED in back will stay off and the dock won't function properly.
How do I install audio drivers on my HP Thunderbolt Dock G2?
Install version v10.21.1012.2017 of the Realtek USB Audio driver for optimal performance with the echo cancelling speakerphone add-on module.
Show 12 more questions
How do I set up MAC Address Pass Through on my HP Thunderbolt Dock G2?
What video resolution capabilities does my HP Thunderbolt Dock G2 support?
How do I flash firmware on my HP Thunderbolt Dock G2?
How do I approve a new ThunderboltTM device on my system?
How do I reset my HP Thunderbolt Dock G2?
How do I connect the HP Thunderbolt Dock to a computer?
What is the setup process for connecting an external monitor?
What do I need to know about connecting a Thunderbolt device?
How do I disconnect the dock from my computer?
What is the process for installing an optional audio module?
What is an option for troubleshooting video problems?
How do I configure a security level for DMA protection?
Full Manual
35 pages


User Guide
© Copyright 2017, 2018 HP Development Company, L.P.
Intel, Thunderbolt, the Thunderbolt logo, and vPro are trademarks of Intel Corporation in the U.S. and/or other countries. NVIDIA is a trademark and/or registered trademark of NVIDIA Corporation in the United States and other countries. Windows is either a registered trademark or trademark of Microsoft Corporation in the United States and/or other countries.
The information contained herein is subject to change without notice. The only warranties for HP products and services are set forth in the express warranty statements accompanying such products and services. Nothing herein should be construed as constituting an additional warranty. HP shall not be liable for technical or editorial errors or omissions contained herein.
Second Edition: September 2018 First Edition: November 2017 Document Part Number: L05326-002
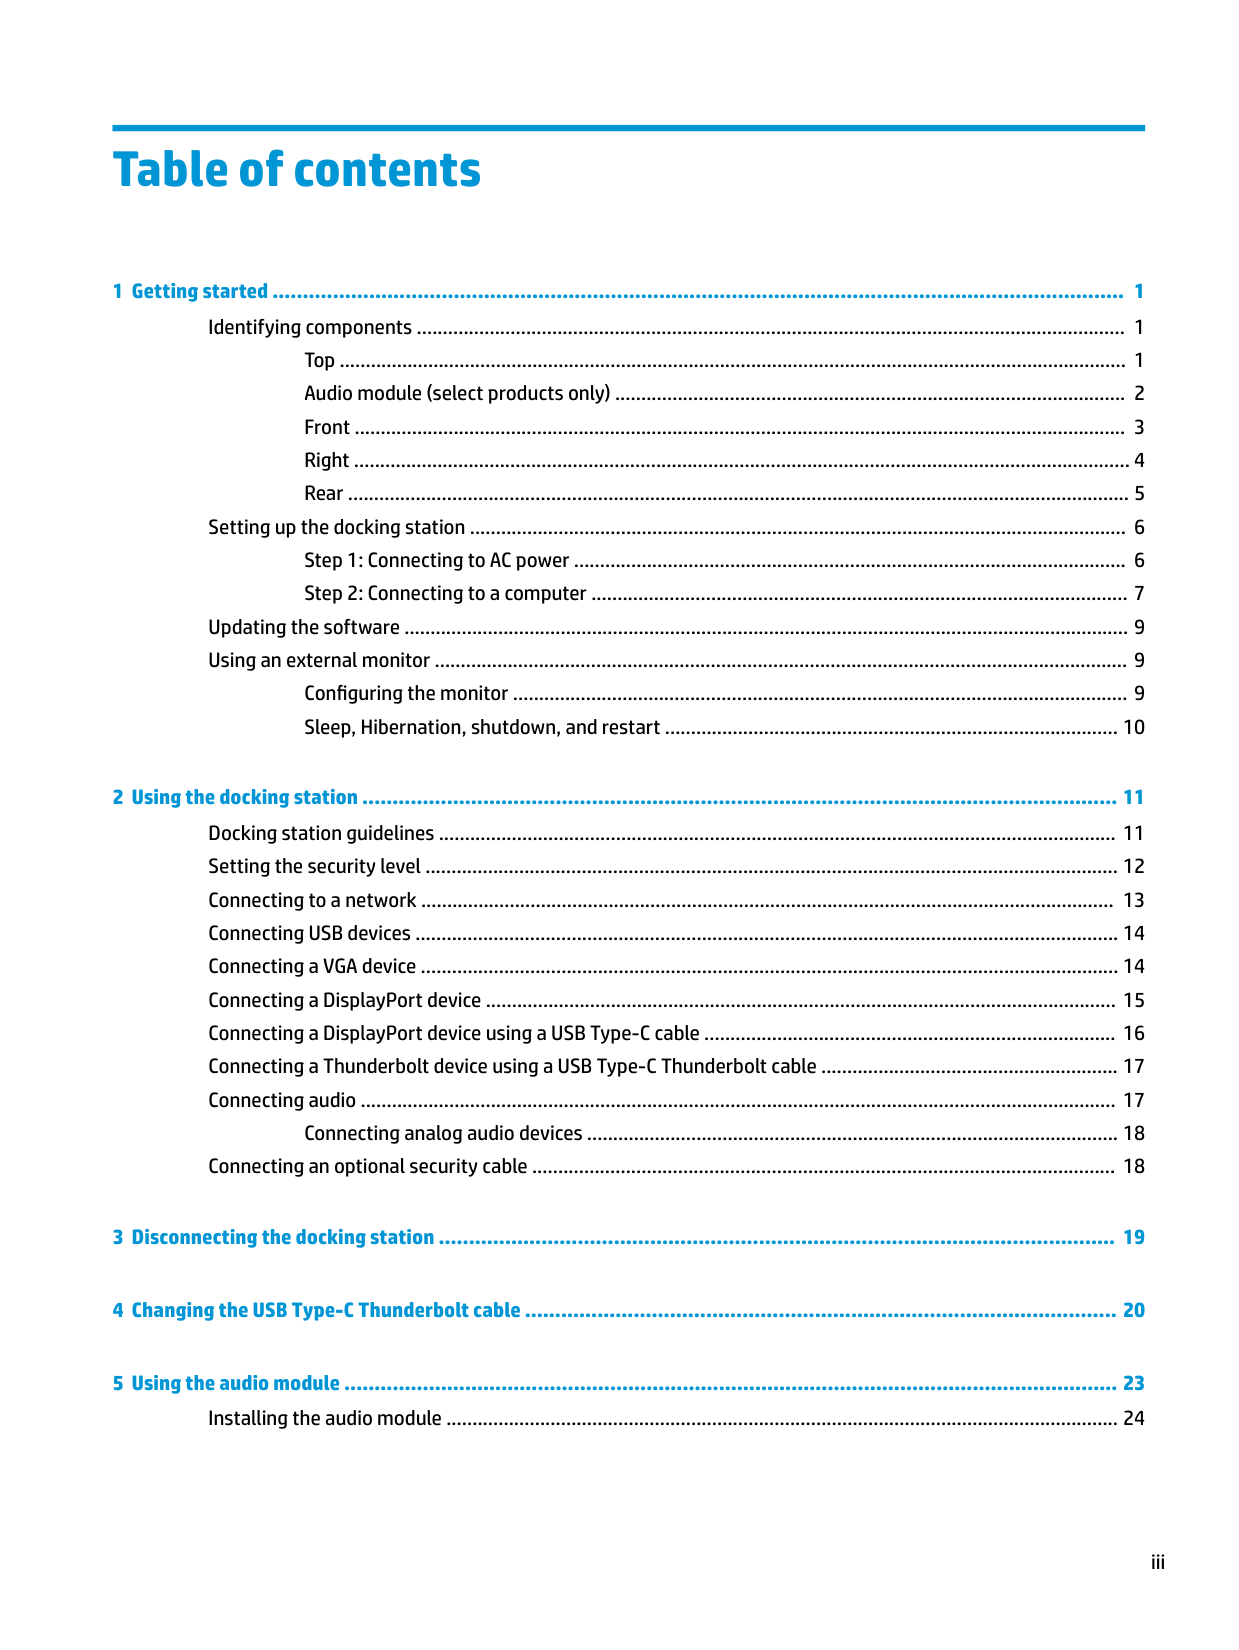
Table of contents
Top ....................................................................................................................................................... 1 Audio module (select products only) .................................................................................................. 2 Front .................................................................................................................................................... 3 Right ..................................................................................................................................................... 4 Rear ...................................................................................................................................................... 5
Setting up the docking station .............................................................................................................................. 6
Updating the software ........................................................................................................................................... 9 Using an external monitor ..................................................................................................................................... 9
Configuring the monitor ...................................................................................................................... 9 Sleep, Hibernation, shutdown, and restart ....................................................................................... 10
Connecting analog audio devices ...................................................................................................... 18 Connecting an optional security cable ................................................................................................................ 18
iii
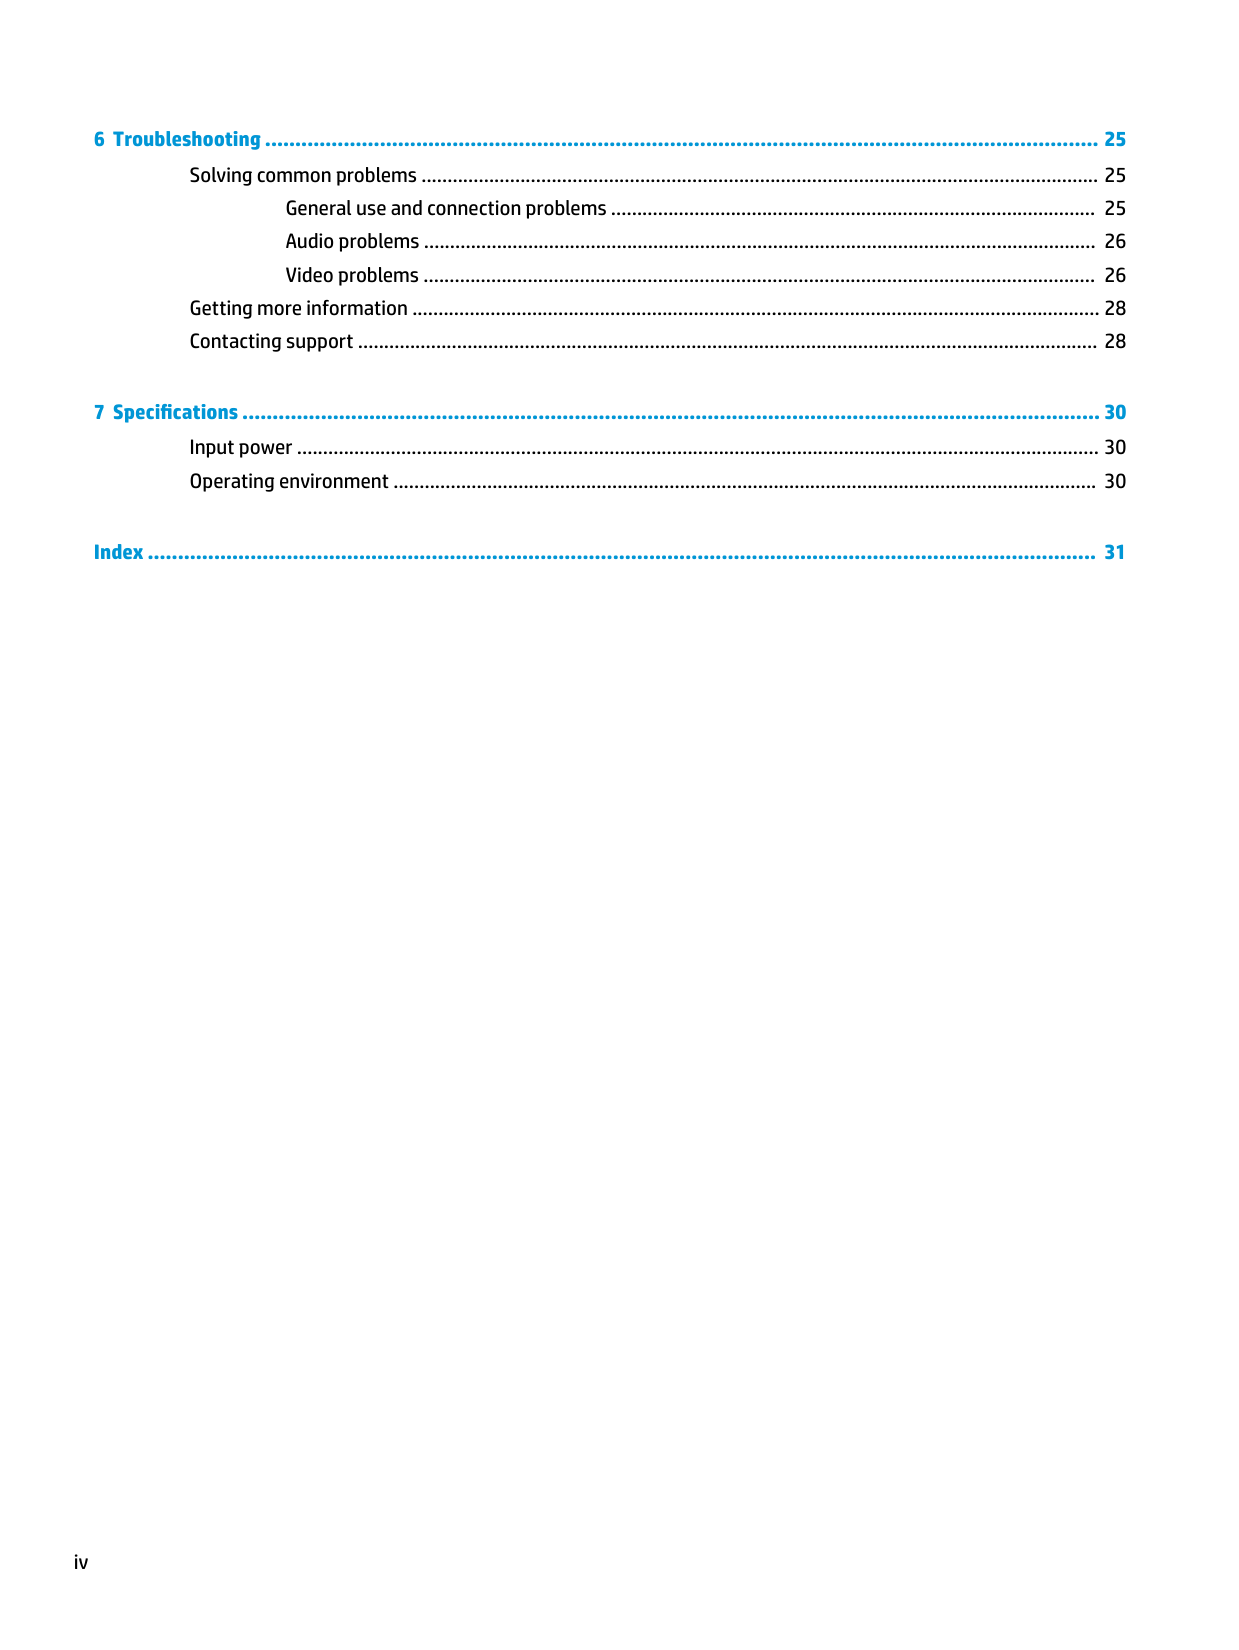
General use and connection problems ............................................................................................. 25 Audio problems ................................................................................................................................. 26 Video problems ................................................................................................................................. 26
Getting more information .................................................................................................................................... 28 Contacting support .............................................................................................................................................. 28
Index ............................................................................................................................................................. 31
iv
1 Getting started
Identifying components
| | |---|
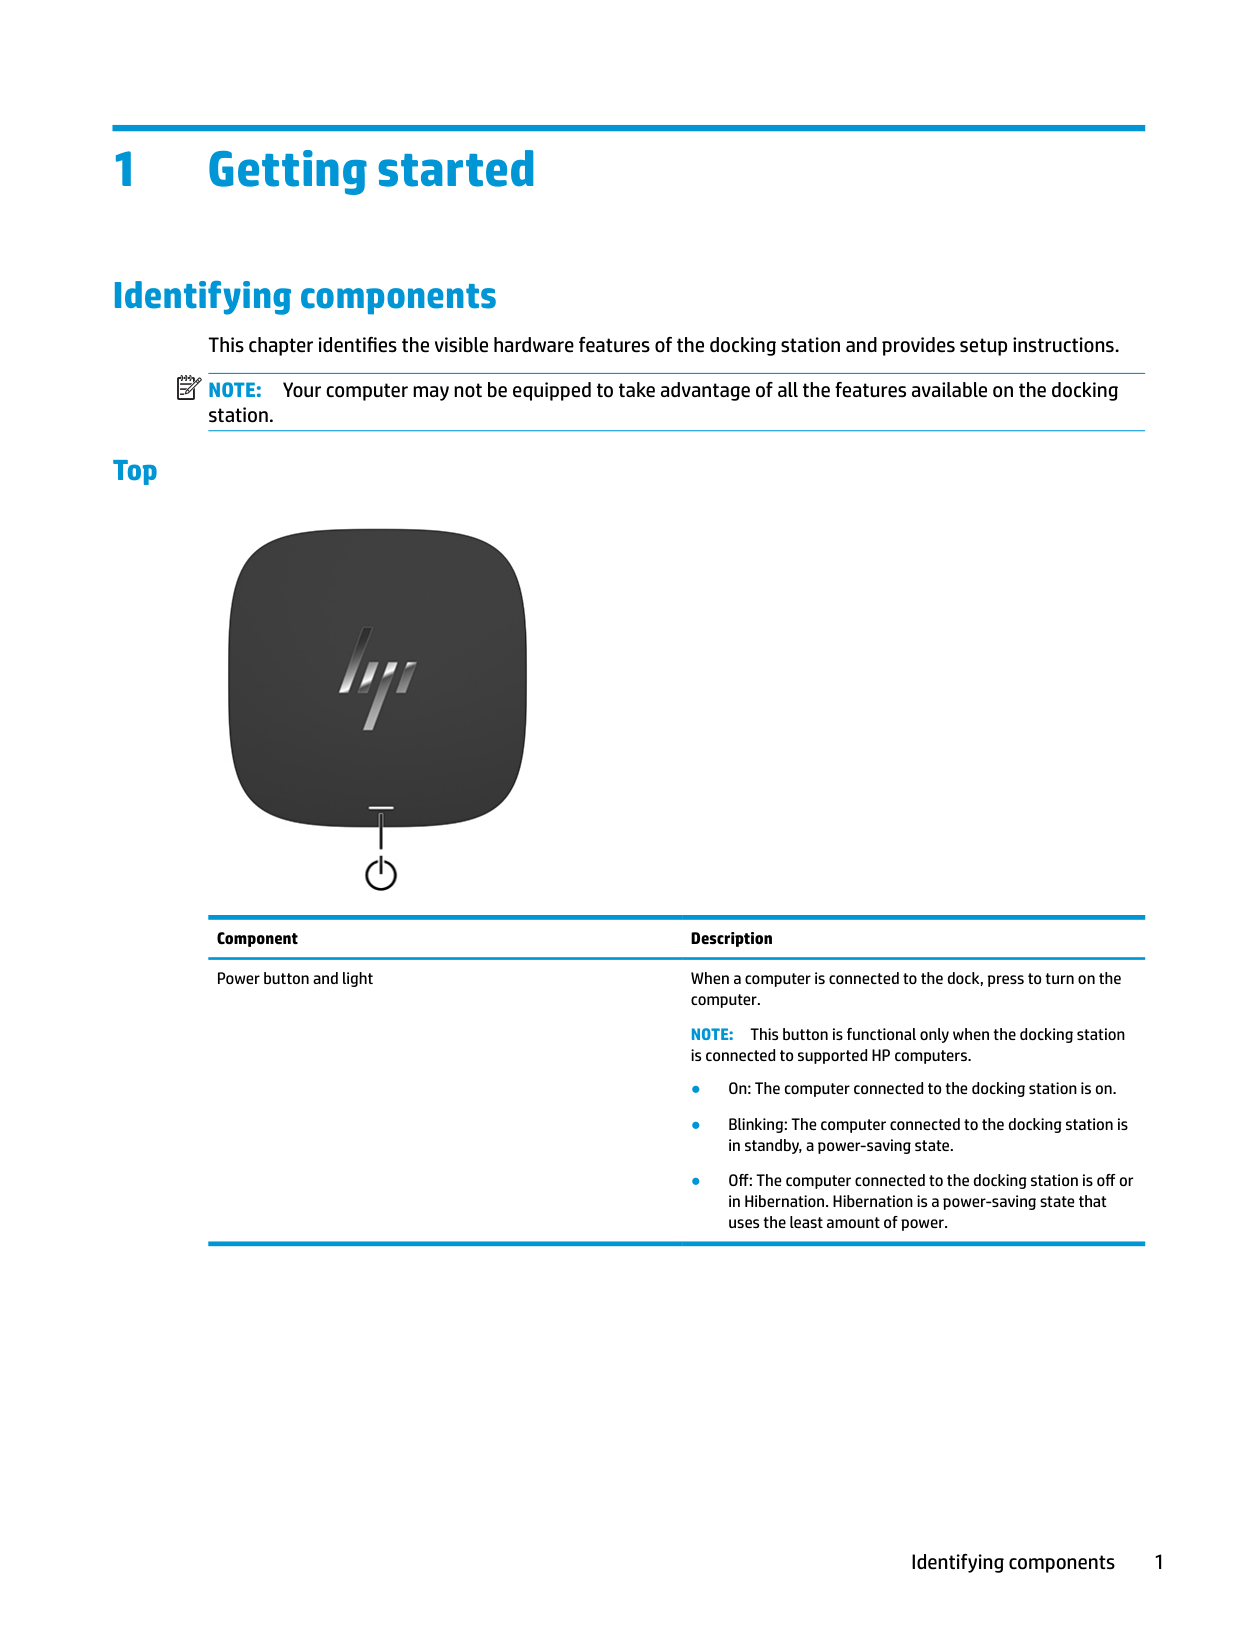
This chapter identifies the visible hardware features of the docking station and provides setup instructions. NOTE: Your computer may not be equipped to take advantage of all the features available on the docking station.
#### Top

Component Description Power button and light When a computer is connected to the dock, press to turn on the
computer. NOTE: This button is functional only when the docking station is connected to supported HP computers.
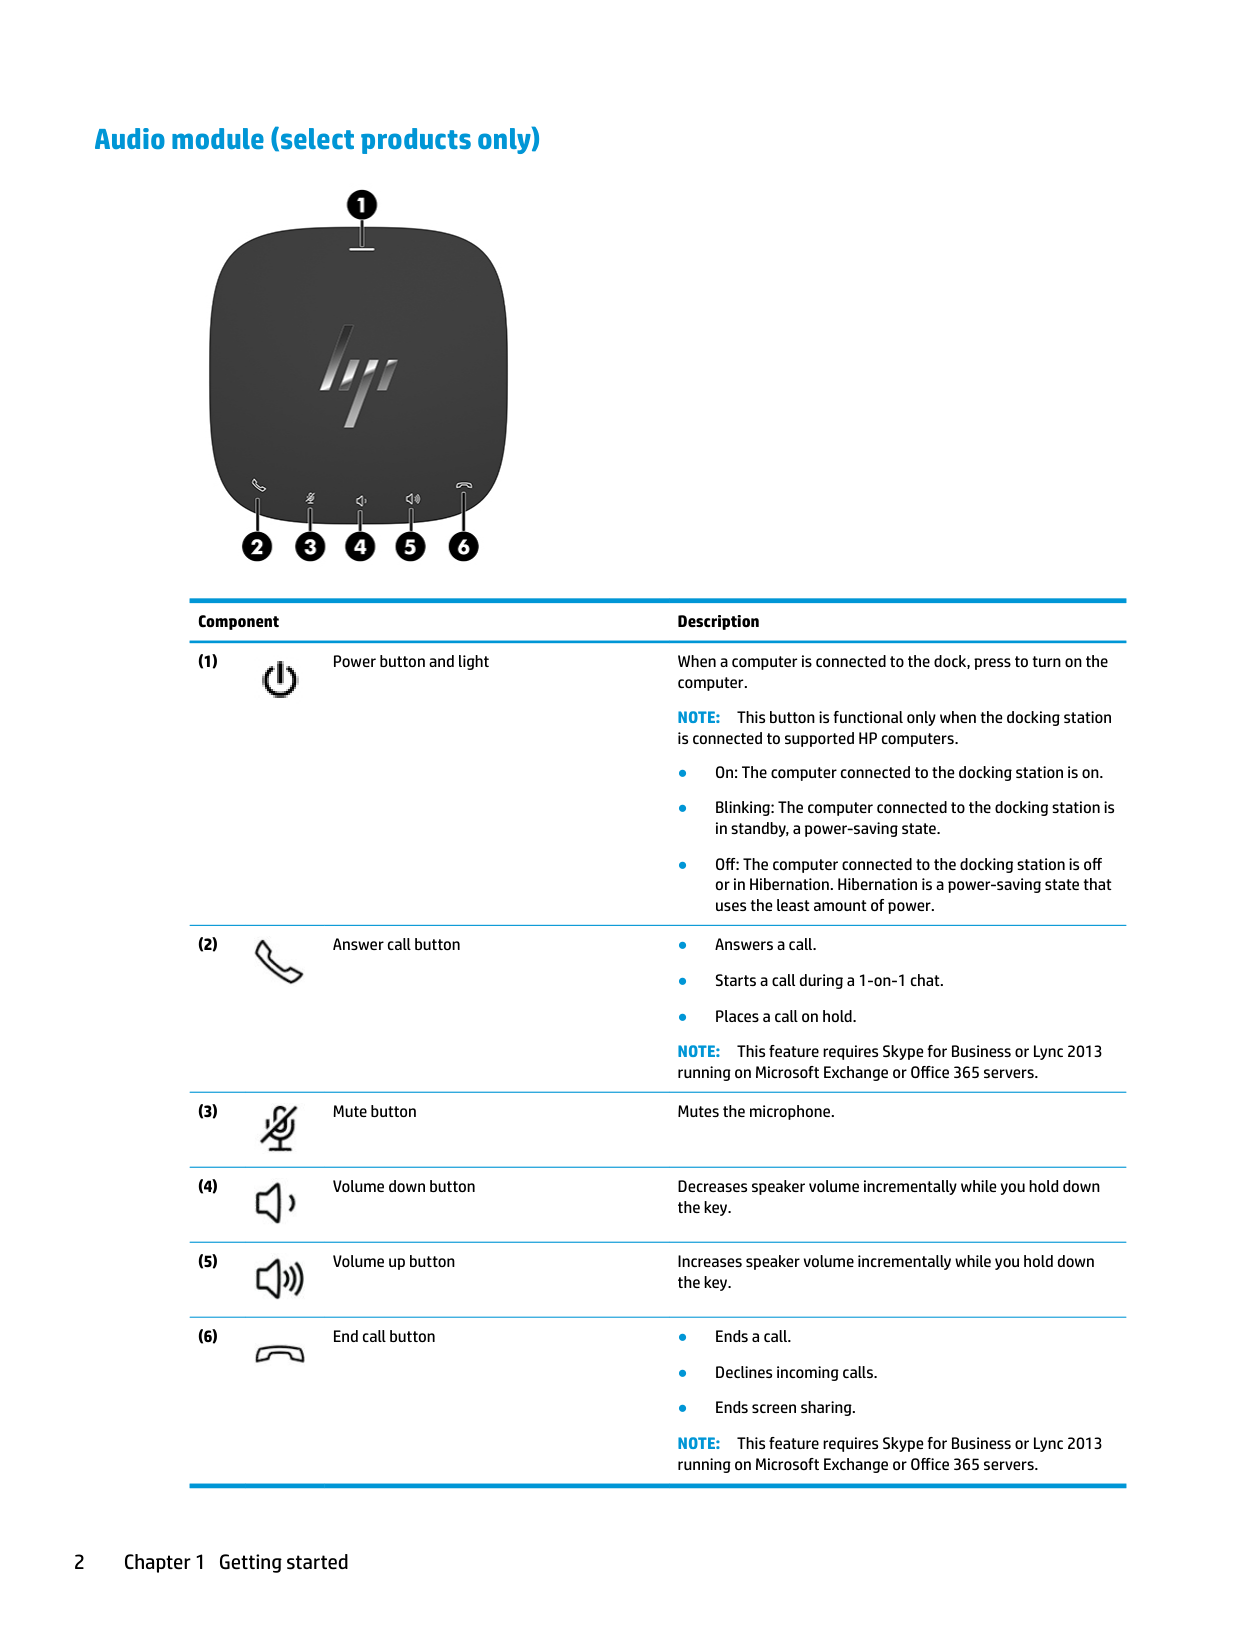
#### Audio module (select products only)

####### Component Description

NOTE: This button is functional only when the docking station is connected to supported HP computers.

NOTE: This feature requires Skype for Business or Lync 2013 running on Microsoft Exchange or Office 365 servers.


NOTE: This feature requires Skype for Business or Lync 2013 running on Microsoft Exchange or Office 365 servers.
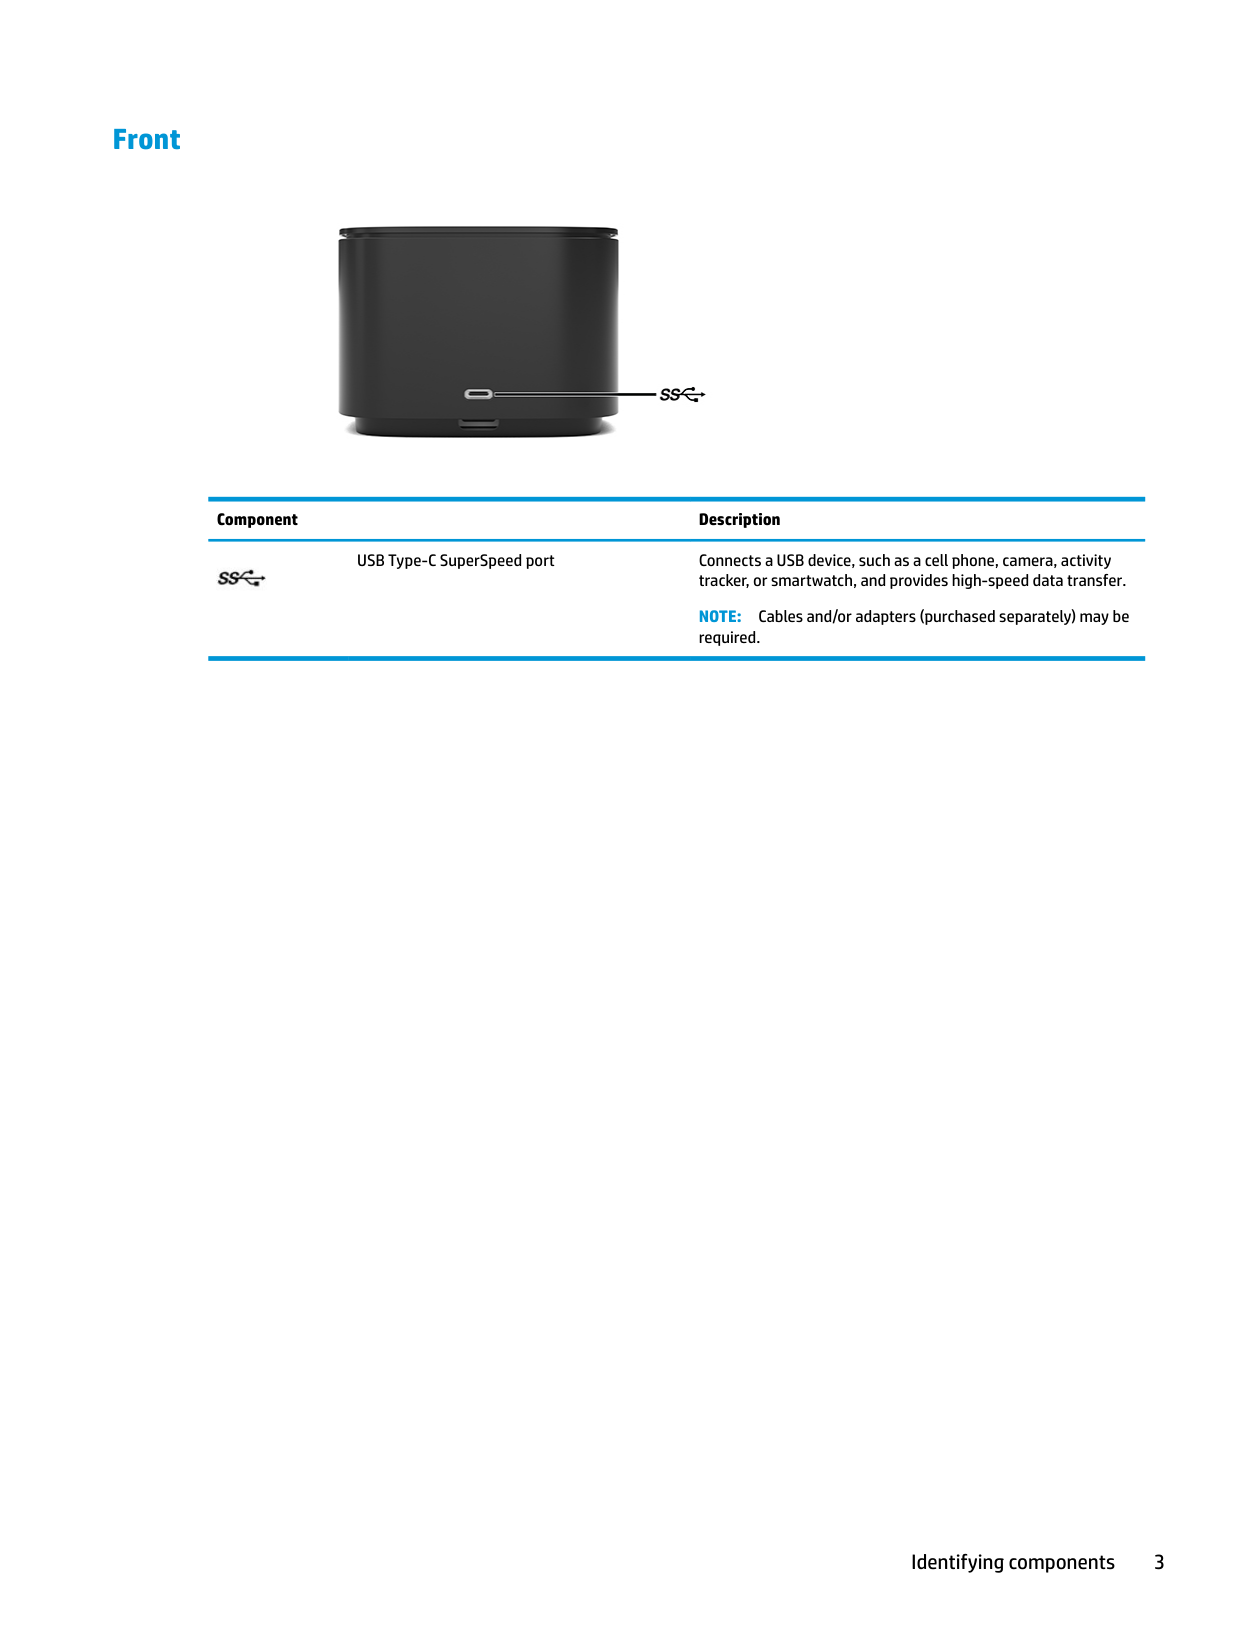
#### Front

####### Component Description
USB Type-C SuperSpeed port Connects a USB device, such as a cell phone, camera, activity

tracker, or smartwatch, and provides high-speed data transfer. NOTE: Cables and/or adapters (purchased separately) may be required.
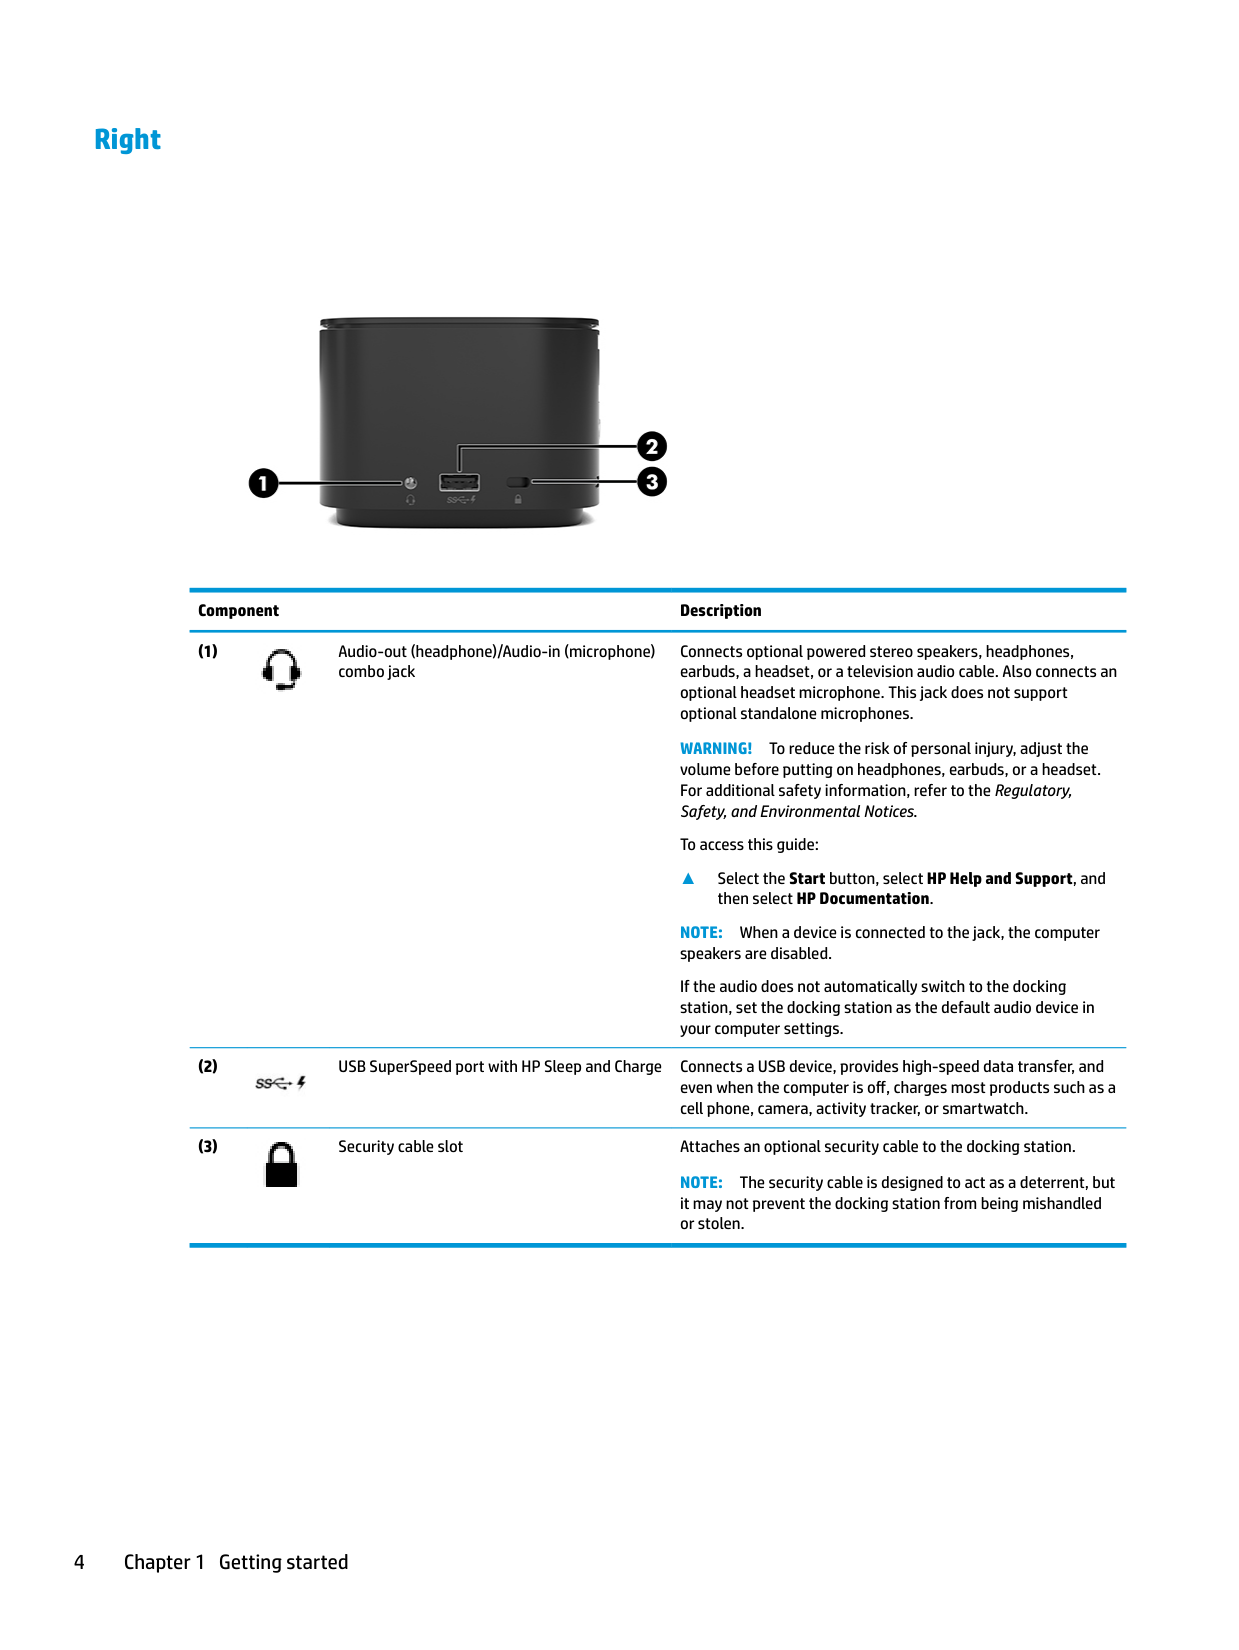
#### Right

####### Component Description

Connects optional powered stereo speakers, headphones, earbuds, a headset, or a television audio cable. Also connects an optional headset microphone. This jack does not support optional standalone microphones.
WARNING! To reduce the risk of personal injury, adjust the volume before putting on headphones, earbuds, or a headset. For additional safety information, refer to the Regulatory, Safety, and Environmental Notices.
To access this guide:
▲ Select the Start button, select HP Help and Support, and
then select HP Documentation. NOTE: When a device is connected to the jack, the computer speakers are disabled. If the audio does not automatically switch to the docking station, set the docking station as the default audio device in your computer settings.


NOTE: The security cable is designed to act as a deterrent, but it may not prevent the docking station from being mishandled or stolen.
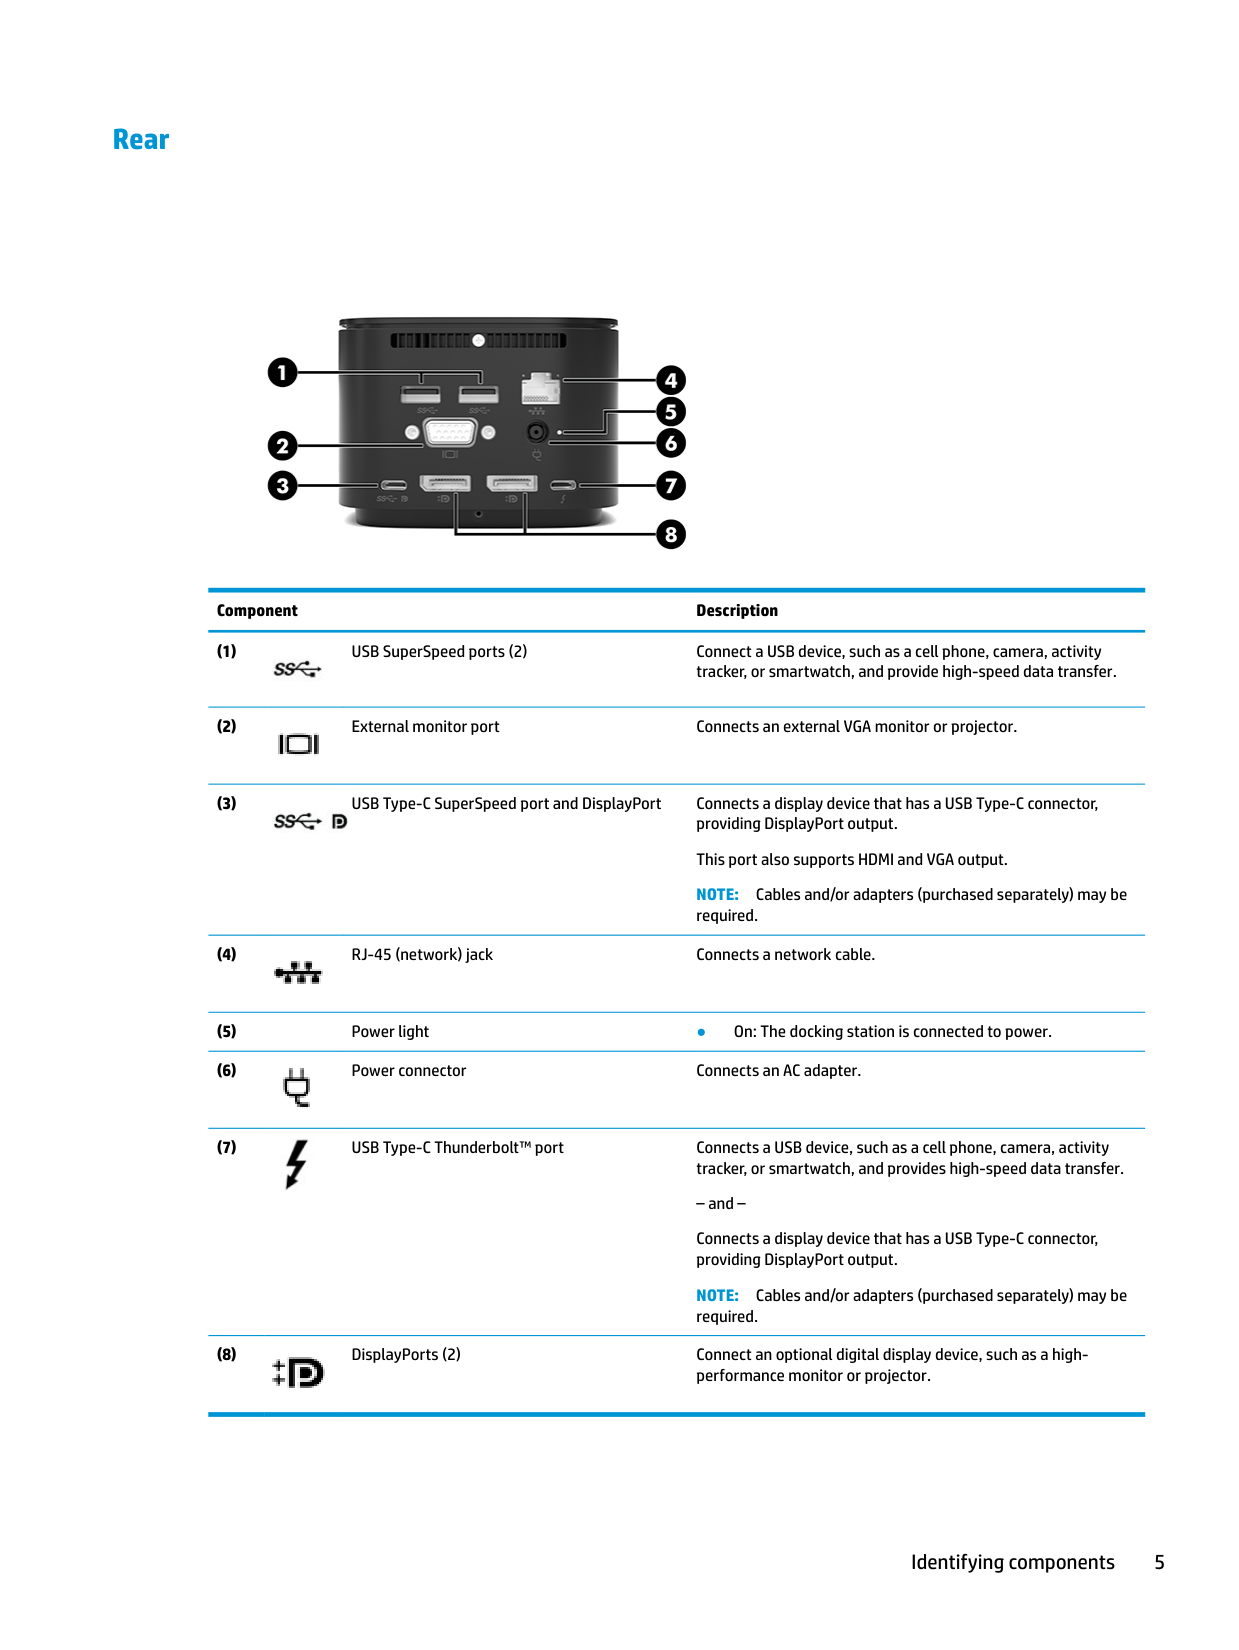
#### Rear

####### Component Description


NOTE: Cables and/or adapters (purchased separately) may be required.


– and – Connects a display device that has a USB Type-C connector, providing DisplayPort output. NOTE: Cables and/or adapters (purchased separately) may be required.

Setting up the docking station
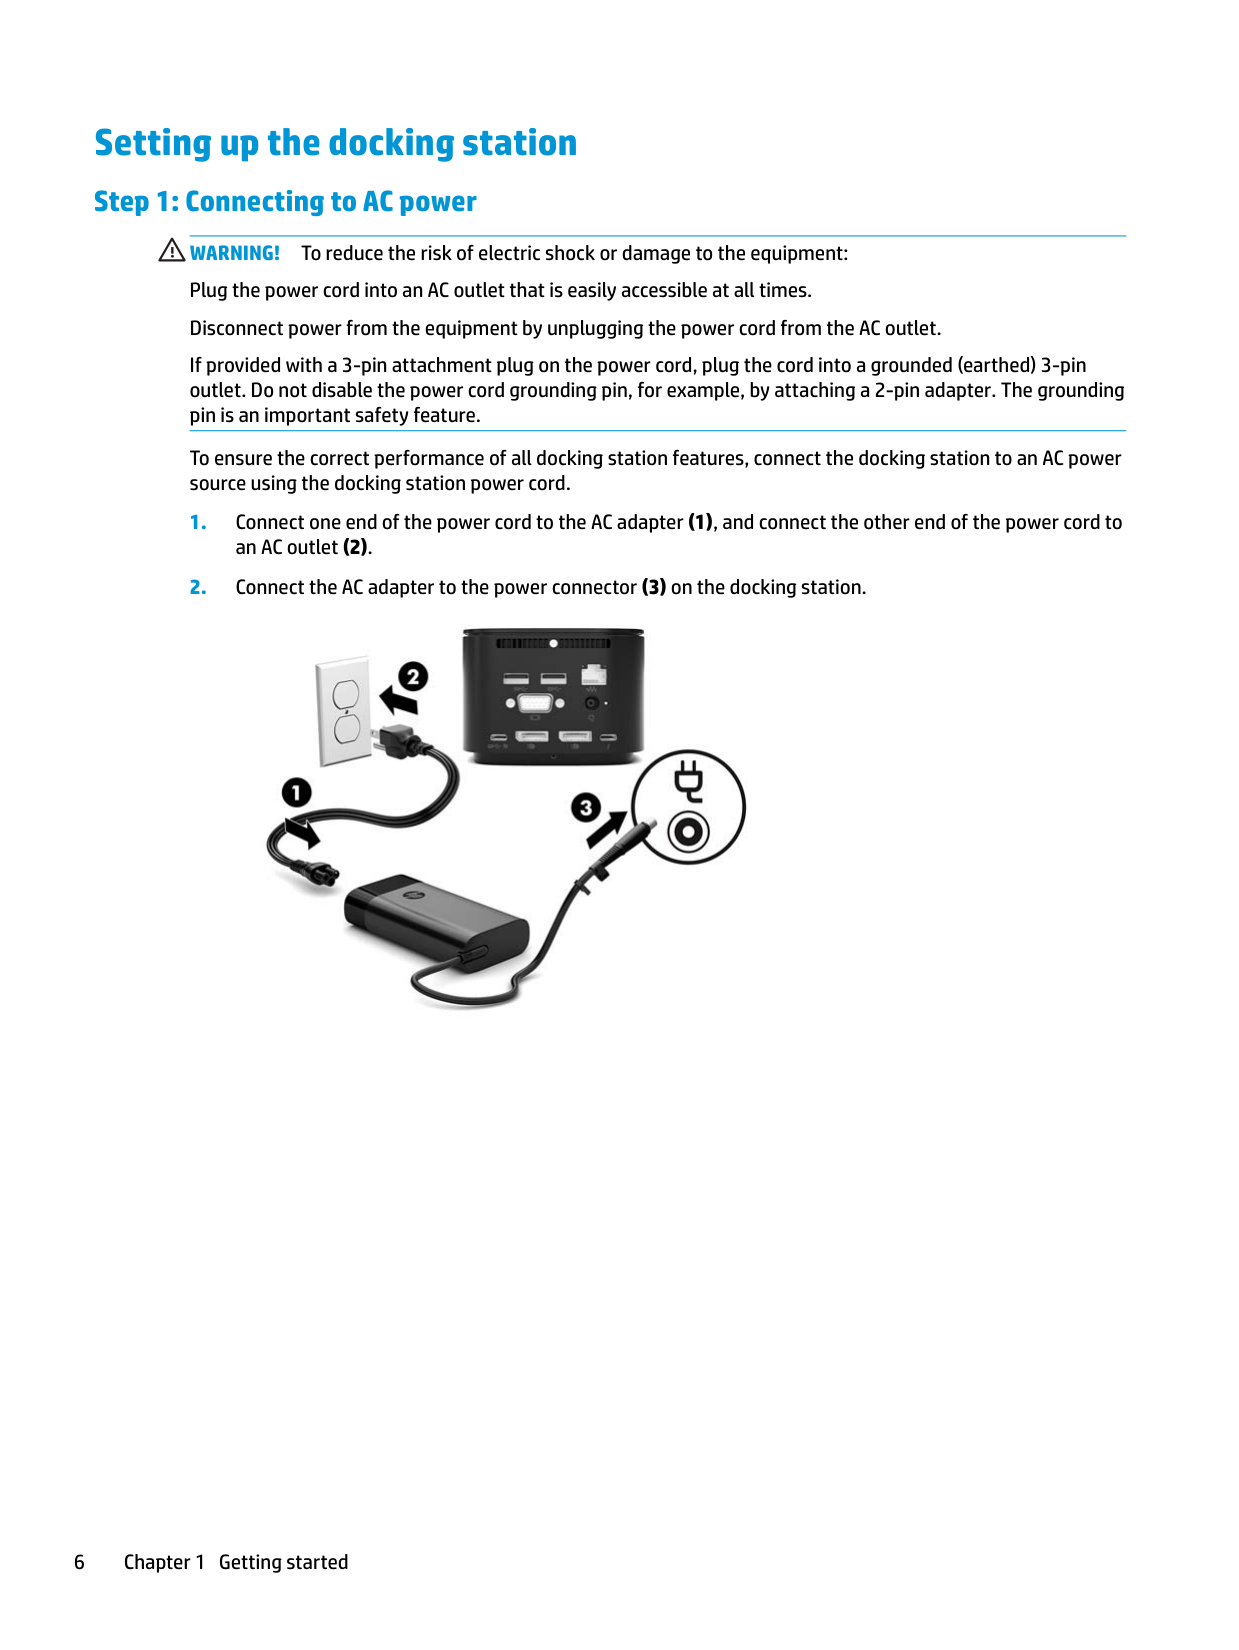
#### Step 1: Connecting to AC power
WARNING! To reduce the risk of electric shock or damage to the equipment: Plug the power cord into an AC outlet that is easily accessible at all times. Disconnect power from the equipment by unplugging the power cord from the AC outlet. If provided with a 3-pin attachment plug on the power cord, plug the cord into a grounded (earthed) 3-pin outlet. Do not disable the power cord grounding pin, for example, by attaching a 2-pin adapter. The grounding pin is an important safety feature. To ensure the correct performance of all docking station features, connect the docking station to an AC power source using the docking station power cord.

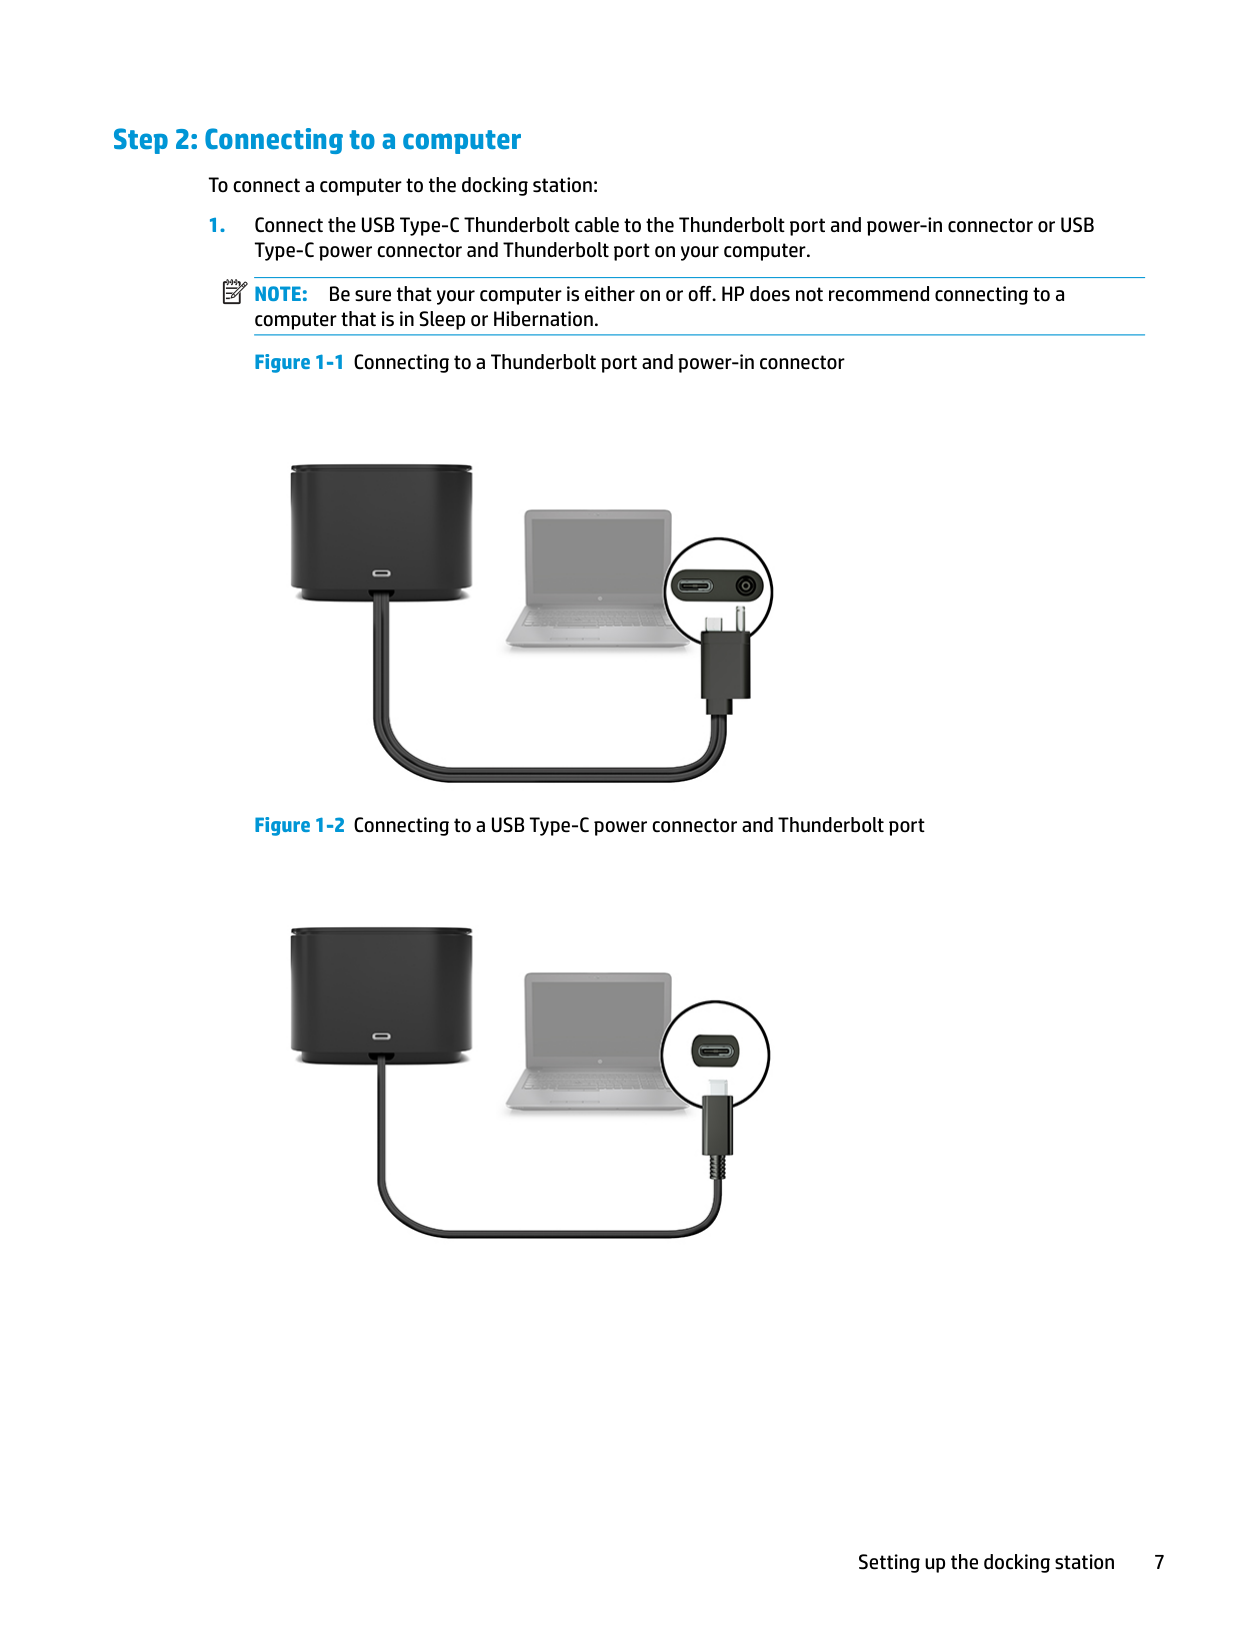
#### Step 2: Connecting to a computer
To connect a computer to the docking station:
| | |---|
NOTE: Be sure that your computer is either on or off. HP does not recommend connecting to a computer that is in Sleep or Hibernation.


Setting up the docking station 7


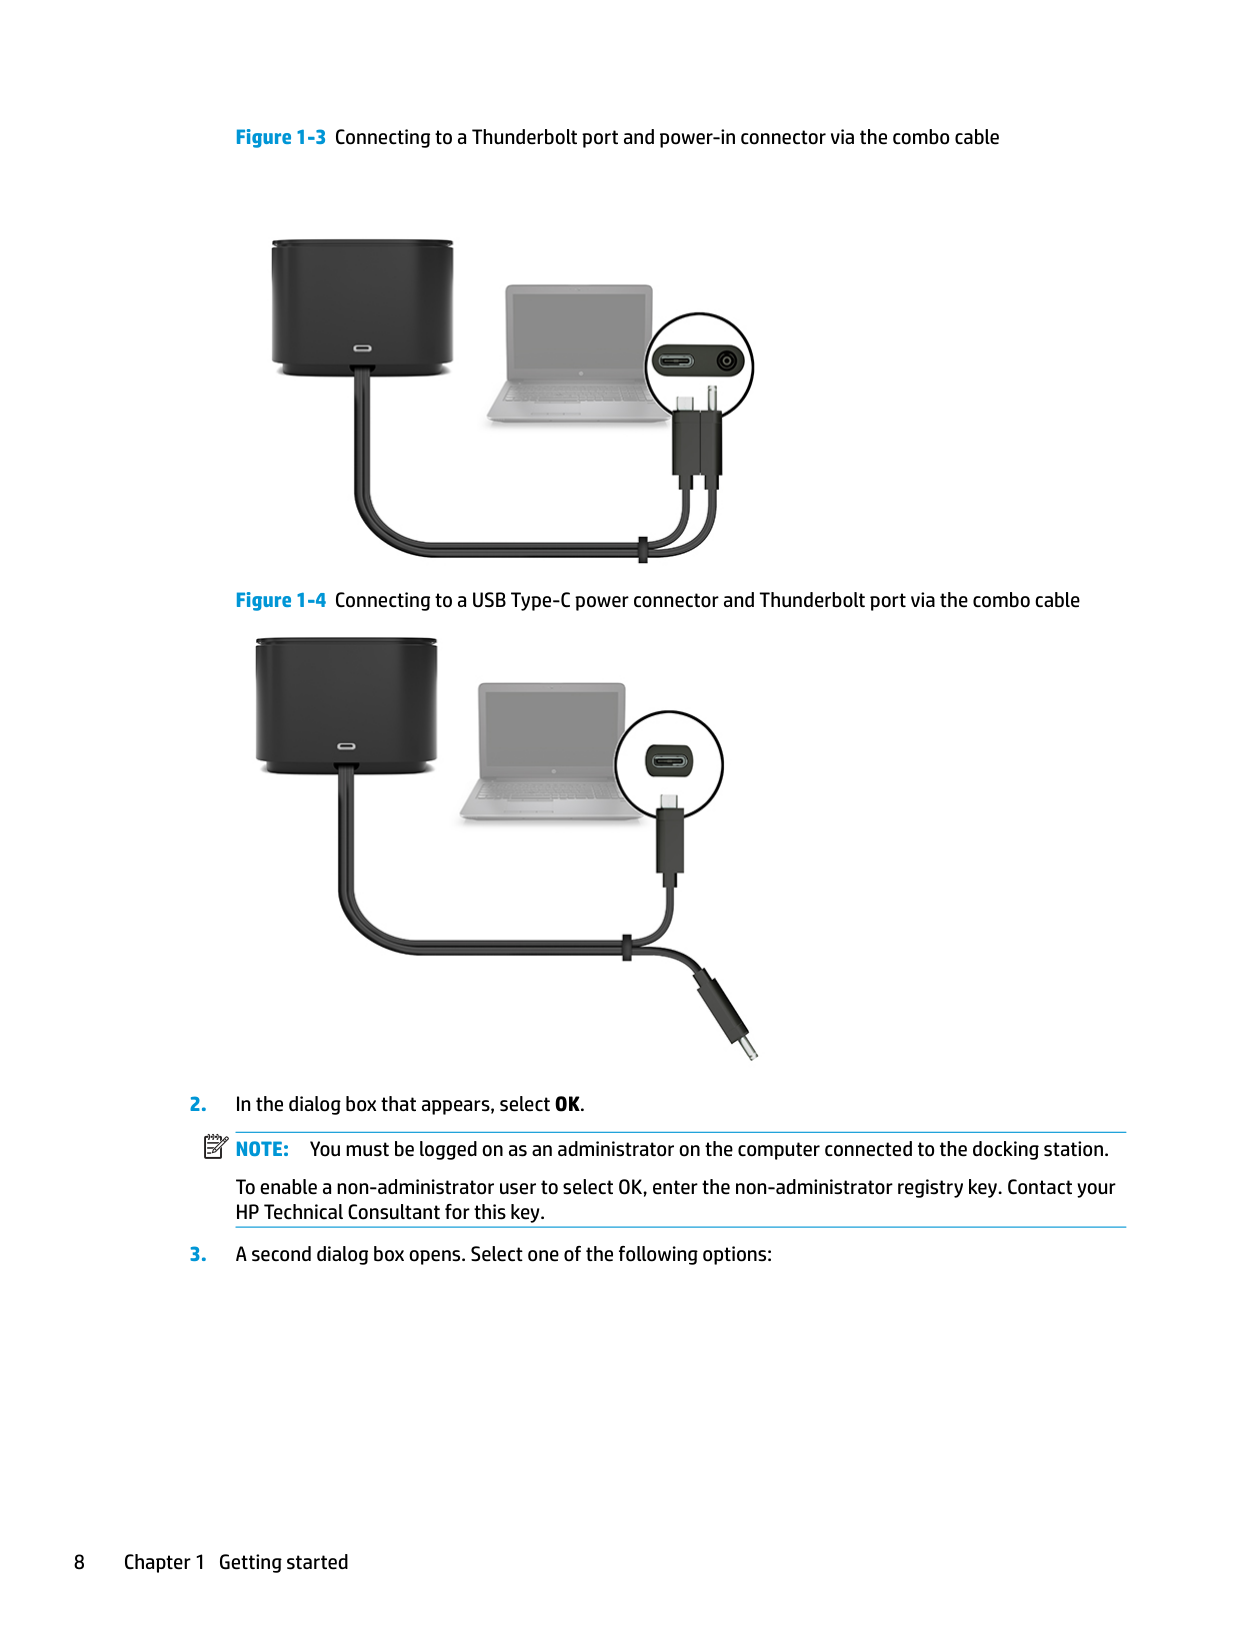
To enable a non-administrator user to select OK, enter the non-administrator registry key. Contact your HP Technical Consultant for this key.
| | |---|

While the docking station is connected to the computer, a Thunderbolt icon is displayed in the notification area, at the far right of the taskbar. TIP: There might be a slight delay before devices connected to the docking station are ready to use.
Updating the software
This section describes how to update the docking station software on a computer running the Windows® 10 operating system.
Using an external monitor
#### Configuring the monitor
Use Windows to configure the display of a monitor attached to the docking station.
To view the screen image extended across both the computer and the monitor, select Extend these displays.
To view the screen image simultaneously on both the computer and the monitor, select Duplicate these displays.
You can also access the following display settings by pressing the Windows key+p:
For more information about using multiple monitors, see the “Display Capabilities” section of the HP Thunderbolt Dock G2 Features and Troubleshooting white paper. Go to http://www8.hp.com/h20195/v2/ GetPDF.aspx/4AA7-3384ENW.pdf.
Updating the software 9
Monitors cannot be simultaneously connected to the VGA port and either the USB Type-C SuperSpeed port and DisplayPort or the USB Type-C Thunderbolt port.
If a monitor is connected to your computer HDMI or USB Type-C port, the number of monitors you can connect to the docking station might be fewer than four.
Depending on your screen resolution, the number of monitors you can connect to the docking station might be fewer than four.
#### Sleep, Hibernation, shutdown, and restart
If the computer initiates Sleep or Hibernation, the monitor turns off. When the computer exits Sleep or Hibernation, the connected monitor returns to the previous monitor settings.
If you restart or shut down the computer and then turn it back on, the connected monitor returns to the previous monitor settings.
2 Using the docking station
Docking station guidelines
NOTE: HP does not recommend connecting or disconnecting from a computer that is in either Sleep or Hibernation.
| | |---|
Docking station guidelines 11
Setting the security level
The docking station supports Direct Memory Access (DMA), a feature that requires a specific Thunderbolt Security Level.
| | |---|
NOTE: Check with your IT administrator before you attempt the following procedure. To configure this setting:
– or – On tablets without keyboards, turn off the tablet. Press the power button in combination with the volume down button until the Startup menu is displayed, and then tap F10 to enter Computer Setup.
| | |---|
NOTE: Security level 4 is supported only on select fifth-generation HP mobile workstations. If you set a computer that does not support Security level 4 to this level, the computer defaults to Security level 3.
Connecting to a network
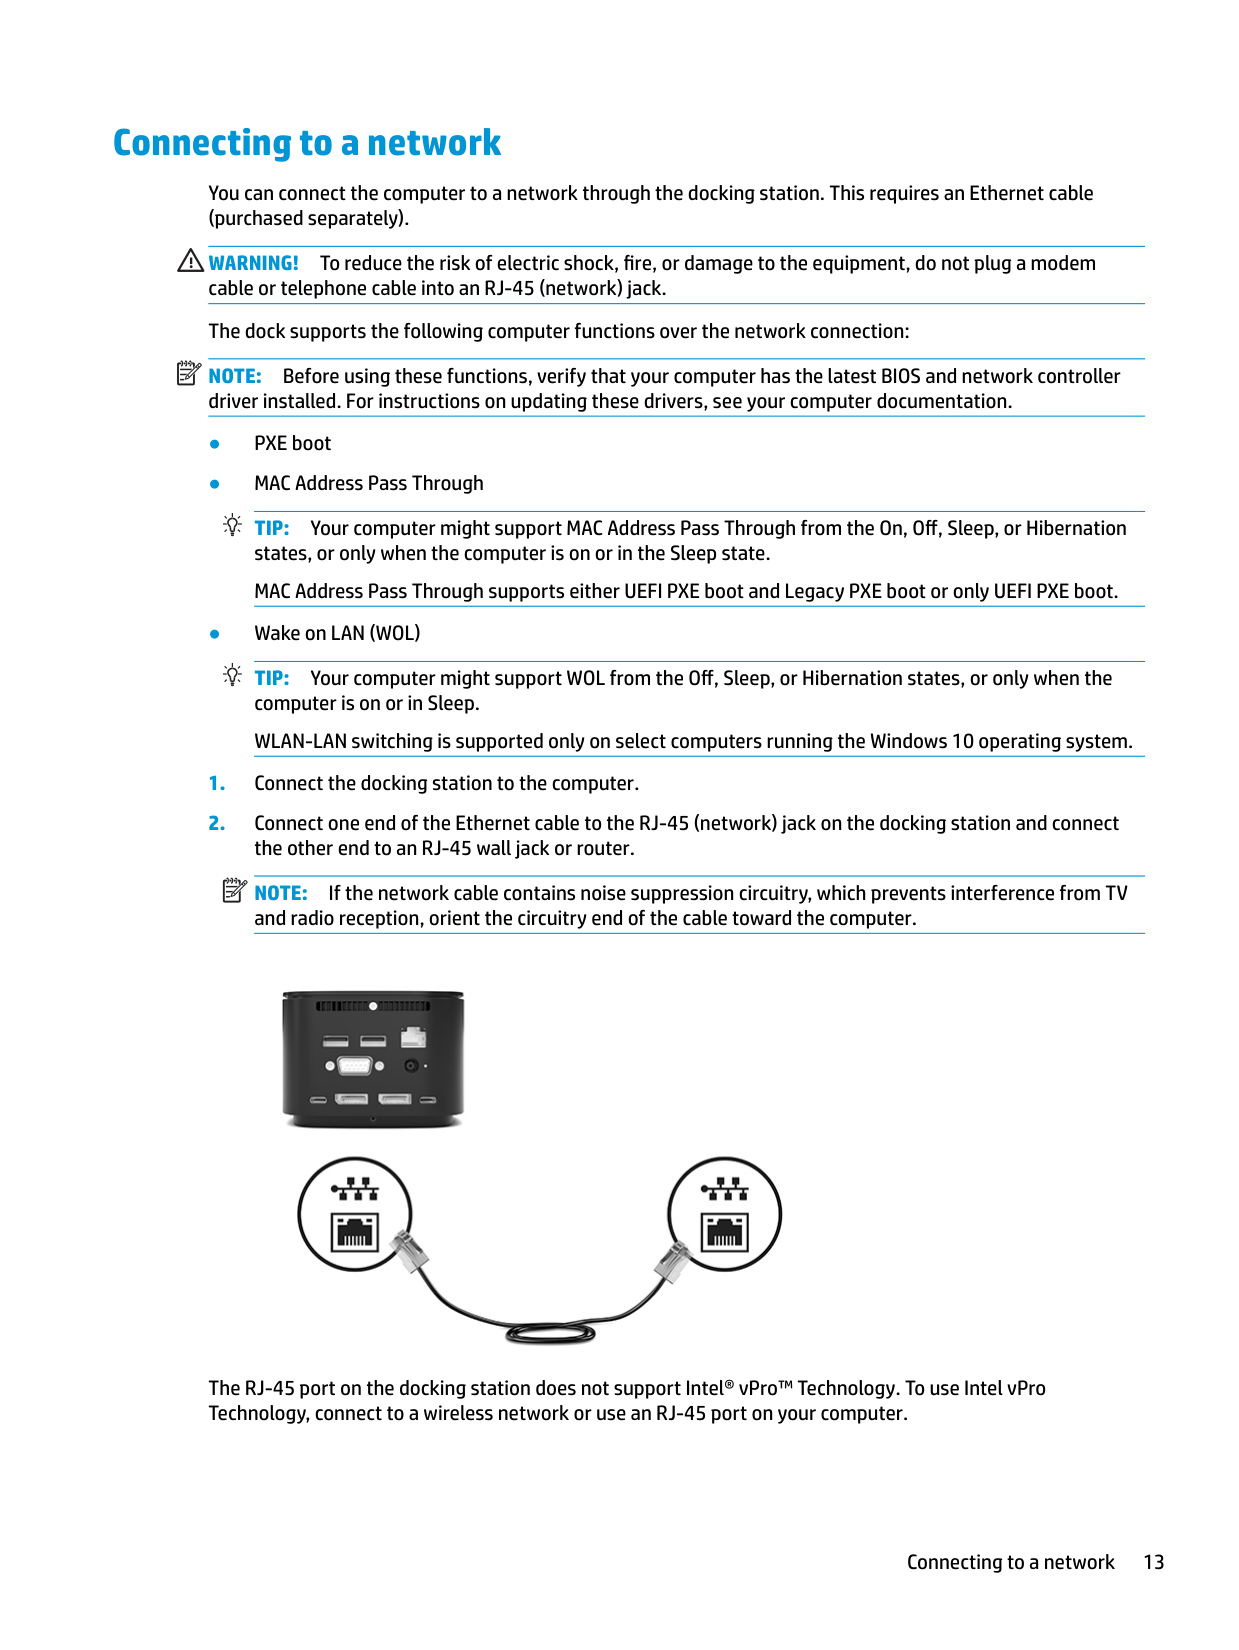
You can connect the computer to a network through the docking station. This requires an Ethernet cable (purchased separately).
WARNING! To reduce the risk of electric shock, fire, or damage to the equipment, do not plug a modem cable or telephone cable into an RJ-45 (network) jack. The dock supports the following computer functions over the network connection: NOTE: Before using these functions, verify that your computer has the latest BIOS and network controller driver installed. For instructions on updating these drivers, see your computer documentation.
| | |---|
TIP: Your computer might support MAC Address Pass Through from the On, Off, Sleep, or Hibernation states, or only when the computer is on or in the Sleep state. MAC Address Pass Through supports either UEFI PXE boot and Legacy PXE boot or only UEFI PXE boot.
TIP: Your computer might support WOL from the Off, Sleep, or Hibernation states, or only when the computer is on or in Sleep. WLAN-LAN switching is supported only on select computers running the Windows 10 operating system.
| | |---|
NOTE: If the network cable contains noise suppression circuitry, which prevents interference from TV and radio reception, orient the circuitry end of the cable toward the computer.

The RJ-45 port on the docking station does not support Intel® vPro™ Technology. To use Intel vPro Technology, connect to a wireless network or use an RJ-45 port on your computer.
Connecting to a network 13
Connecting USB devices
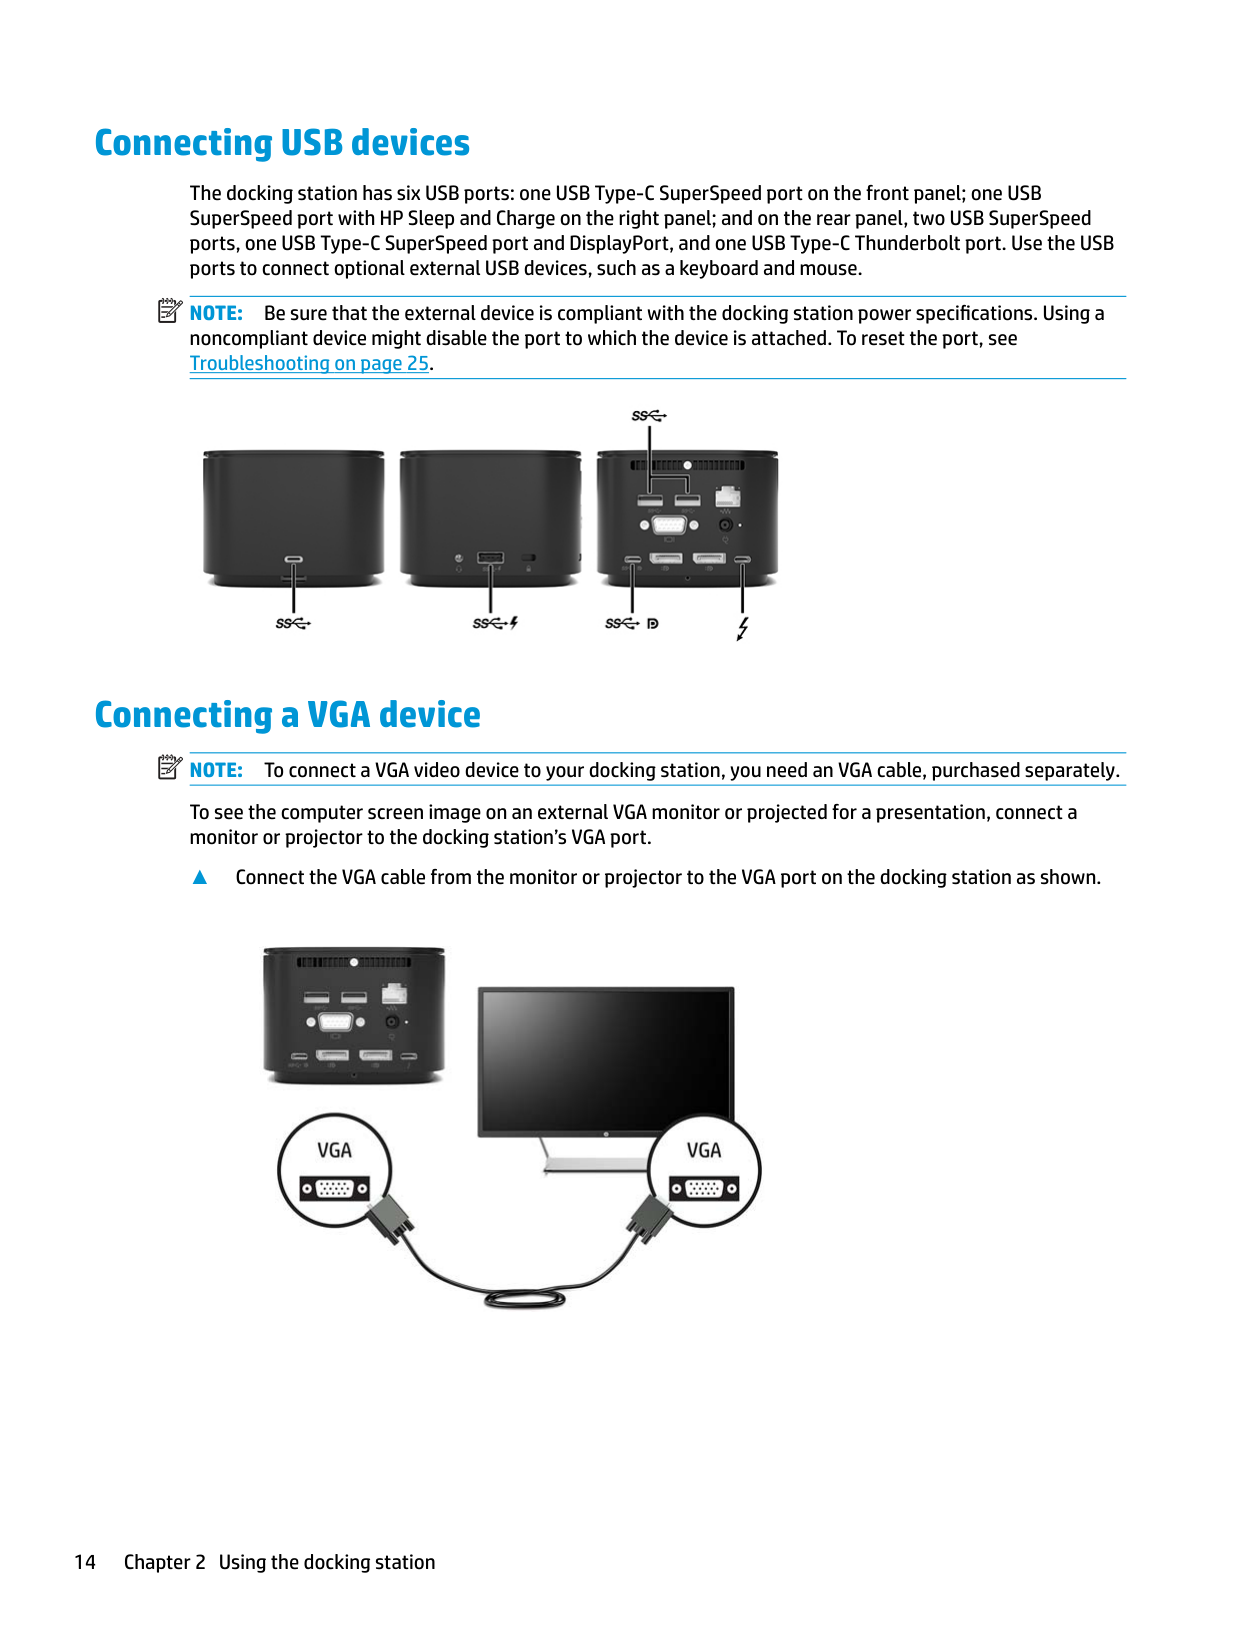
The docking station has six USB ports: one USB Type-C SuperSpeed port on the front panel; one USB SuperSpeed port with HP Sleep and Charge on the right panel; and on the rear panel, two USB SuperSpeed ports, one USB Type-C SuperSpeed port and DisplayPort, and one USB Type-C Thunderbolt port. Use the USB ports to connect optional external USB devices, such as a keyboard and mouse.
| | |---|
NOTE: Be sure that the external device is compliant with the docking station power specifications. Using a noncompliant device might disable the port to which the device is attached. To reset the port, see Troubleshooting on page 25.

Connecting a VGA device
| | |---|
NOTE: To connect a VGA video device to your docking station, you need an VGA cable, purchased separately.
To see the computer screen image on an external VGA monitor or projected for a presentation, connect a monitor or projector to the docking station’s VGA port.
▲ Connect the VGA cable from the monitor or projector to the VGA port on the docking station as shown.

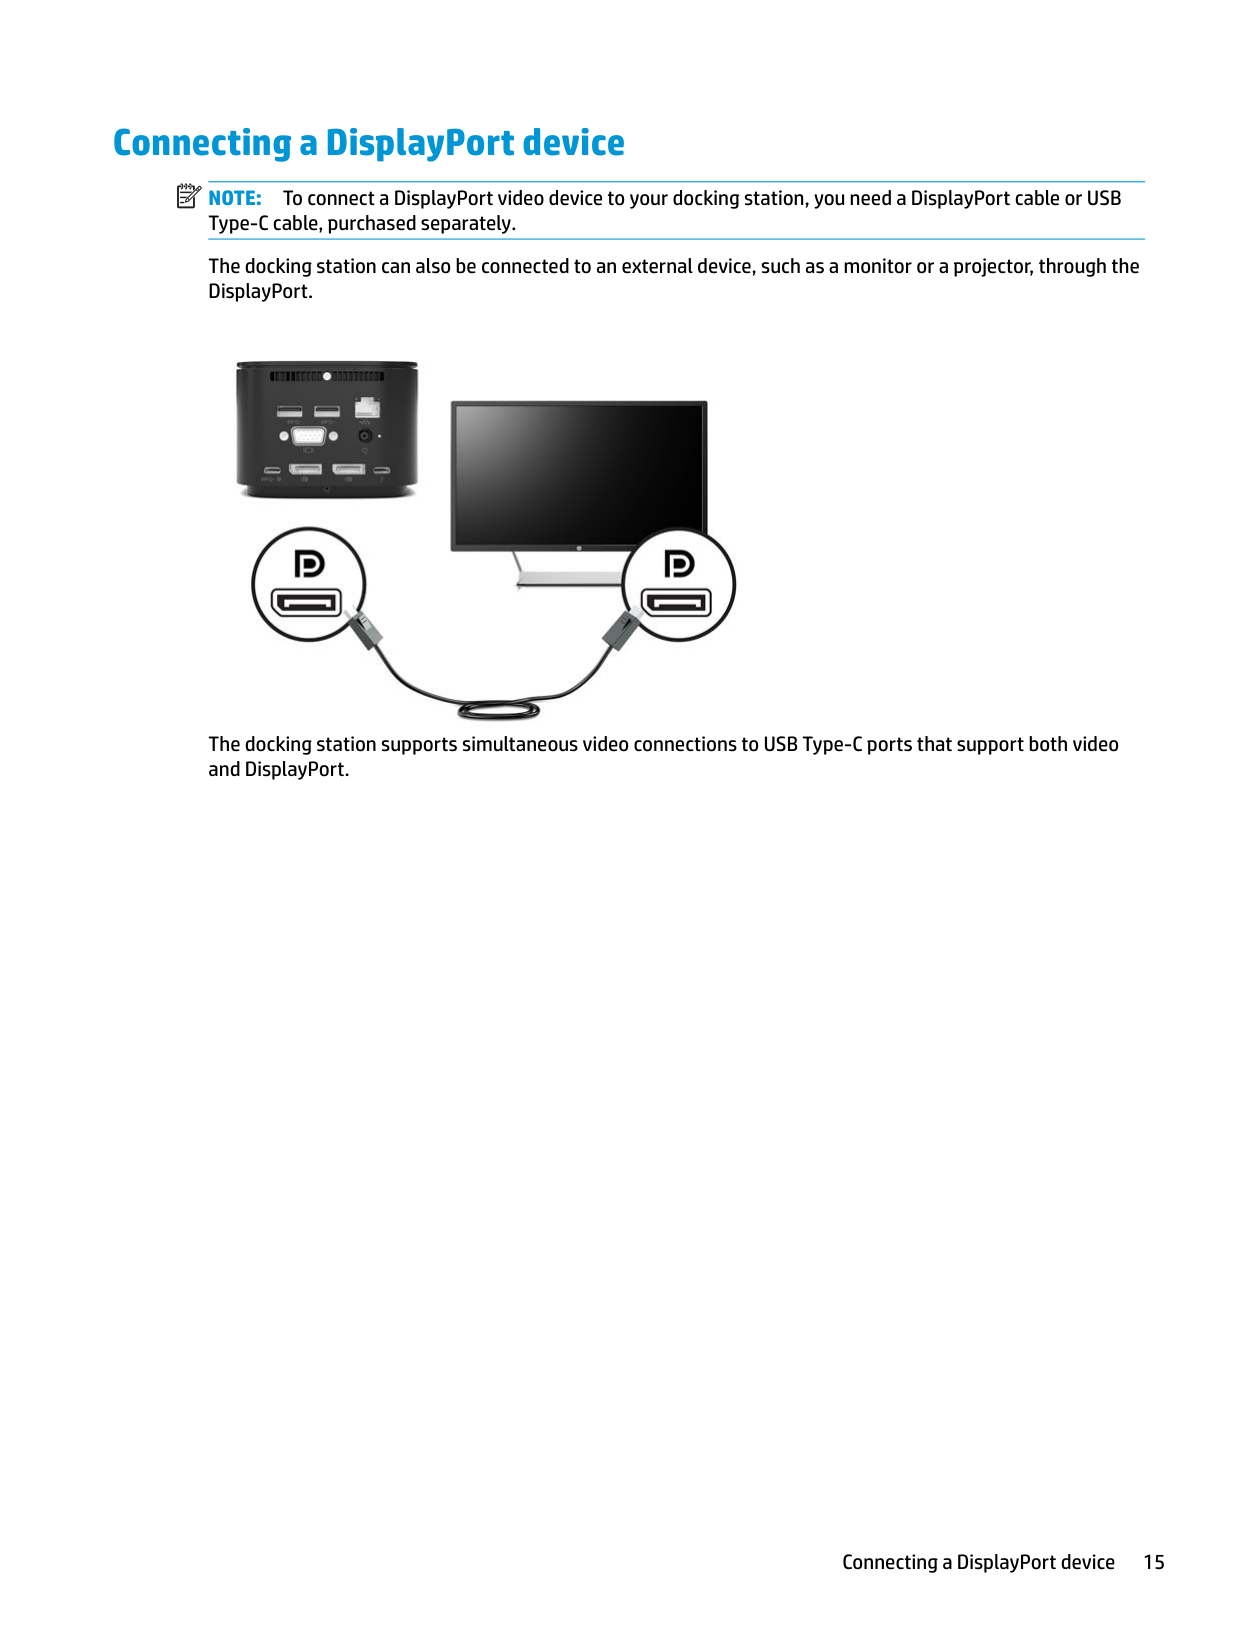
Connecting a DisplayPort device NOTE: To connect a DisplayPort video device to your docking station, you need a DisplayPort cable or USB Type-C cable, purchased separately. The docking station can also be connected to an external device, such as a monitor or a projector, through the DisplayPort.
| |
|---|

The docking station supports simultaneous video connections to USB Type-C ports that support both video and DisplayPort.
Connecting a DisplayPort device 15
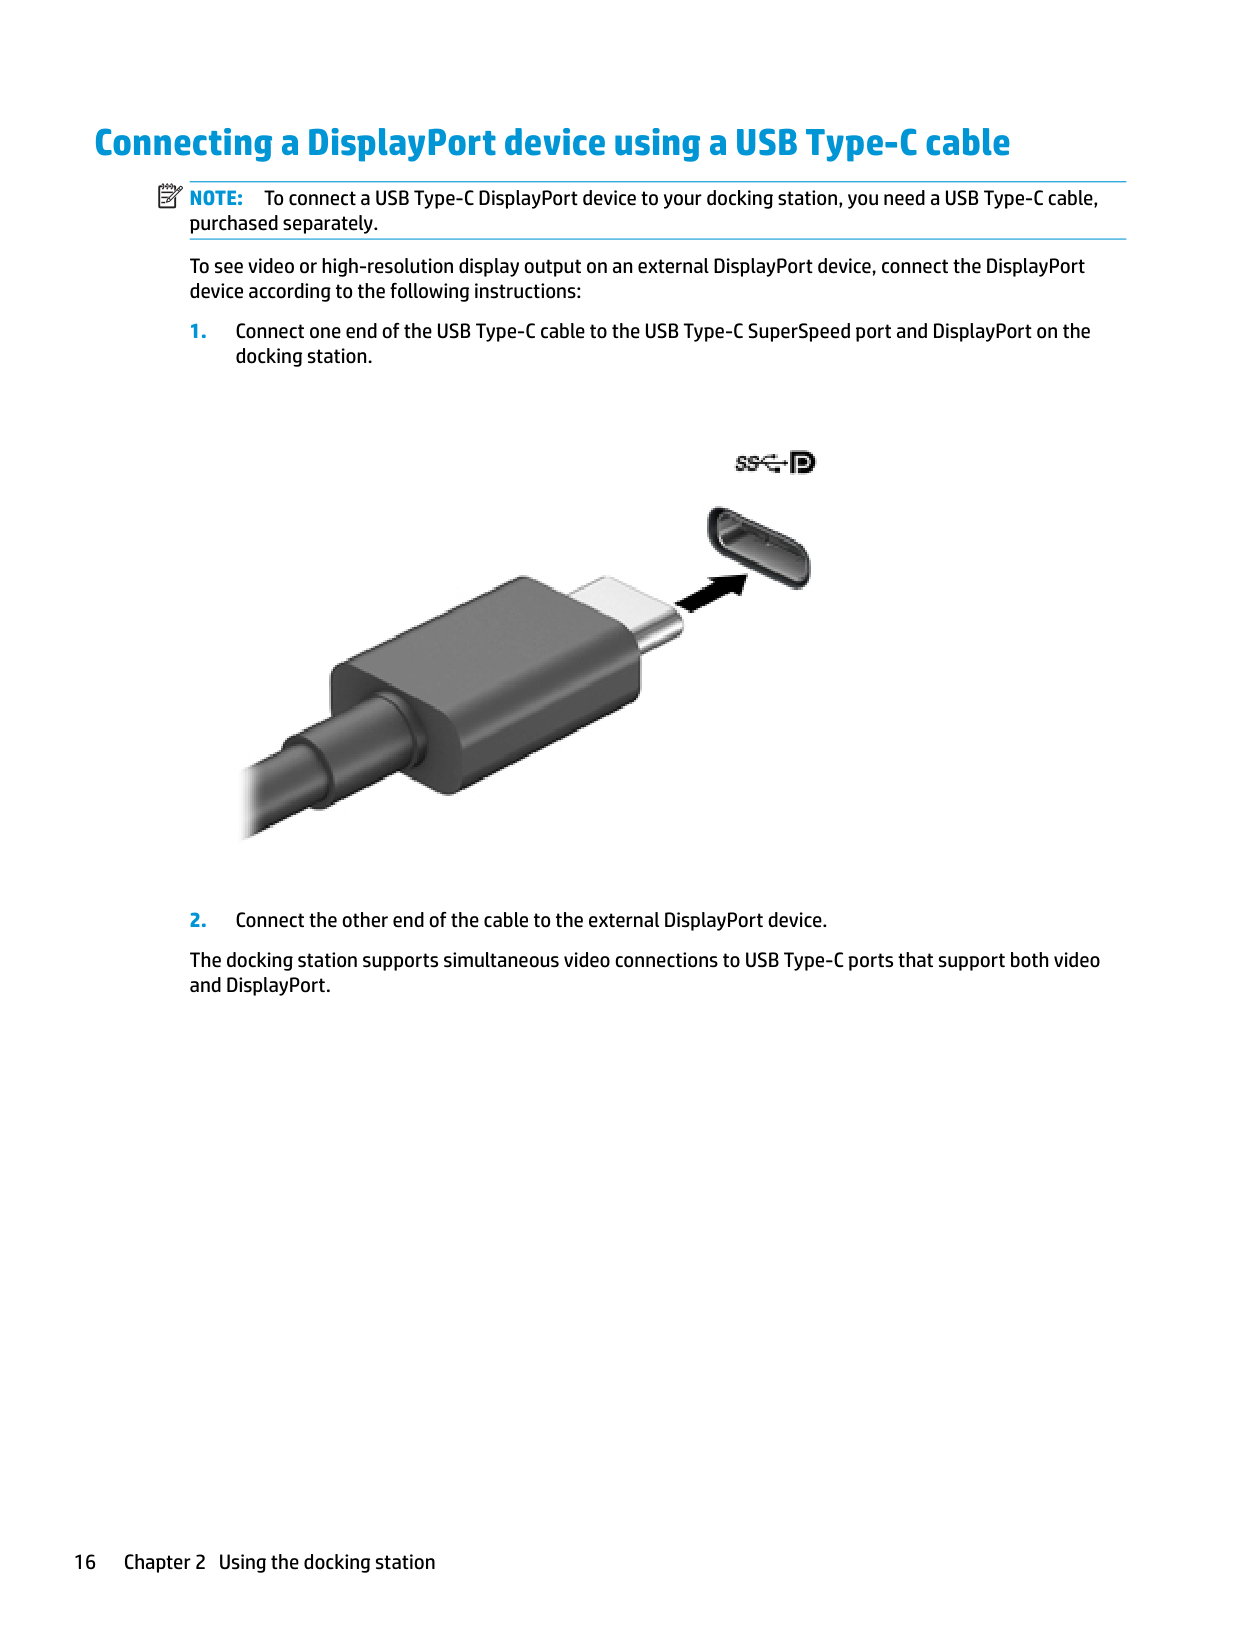
Connecting a DisplayPort device using a USB Type-C cable NOTE: To connect a USB Type-C DisplayPort device to your docking station, you need a USB Type-C cable, purchased separately. To see video or high-resolution display output on an external DisplayPort device, connect the DisplayPort device according to the following instructions:
| | |---|

The docking station supports simultaneous video connections to USB Type-C ports that support both video and DisplayPort.
Connecting a Thunderbolt device using a USB Type-C Thunderbolt cable
| | |---|
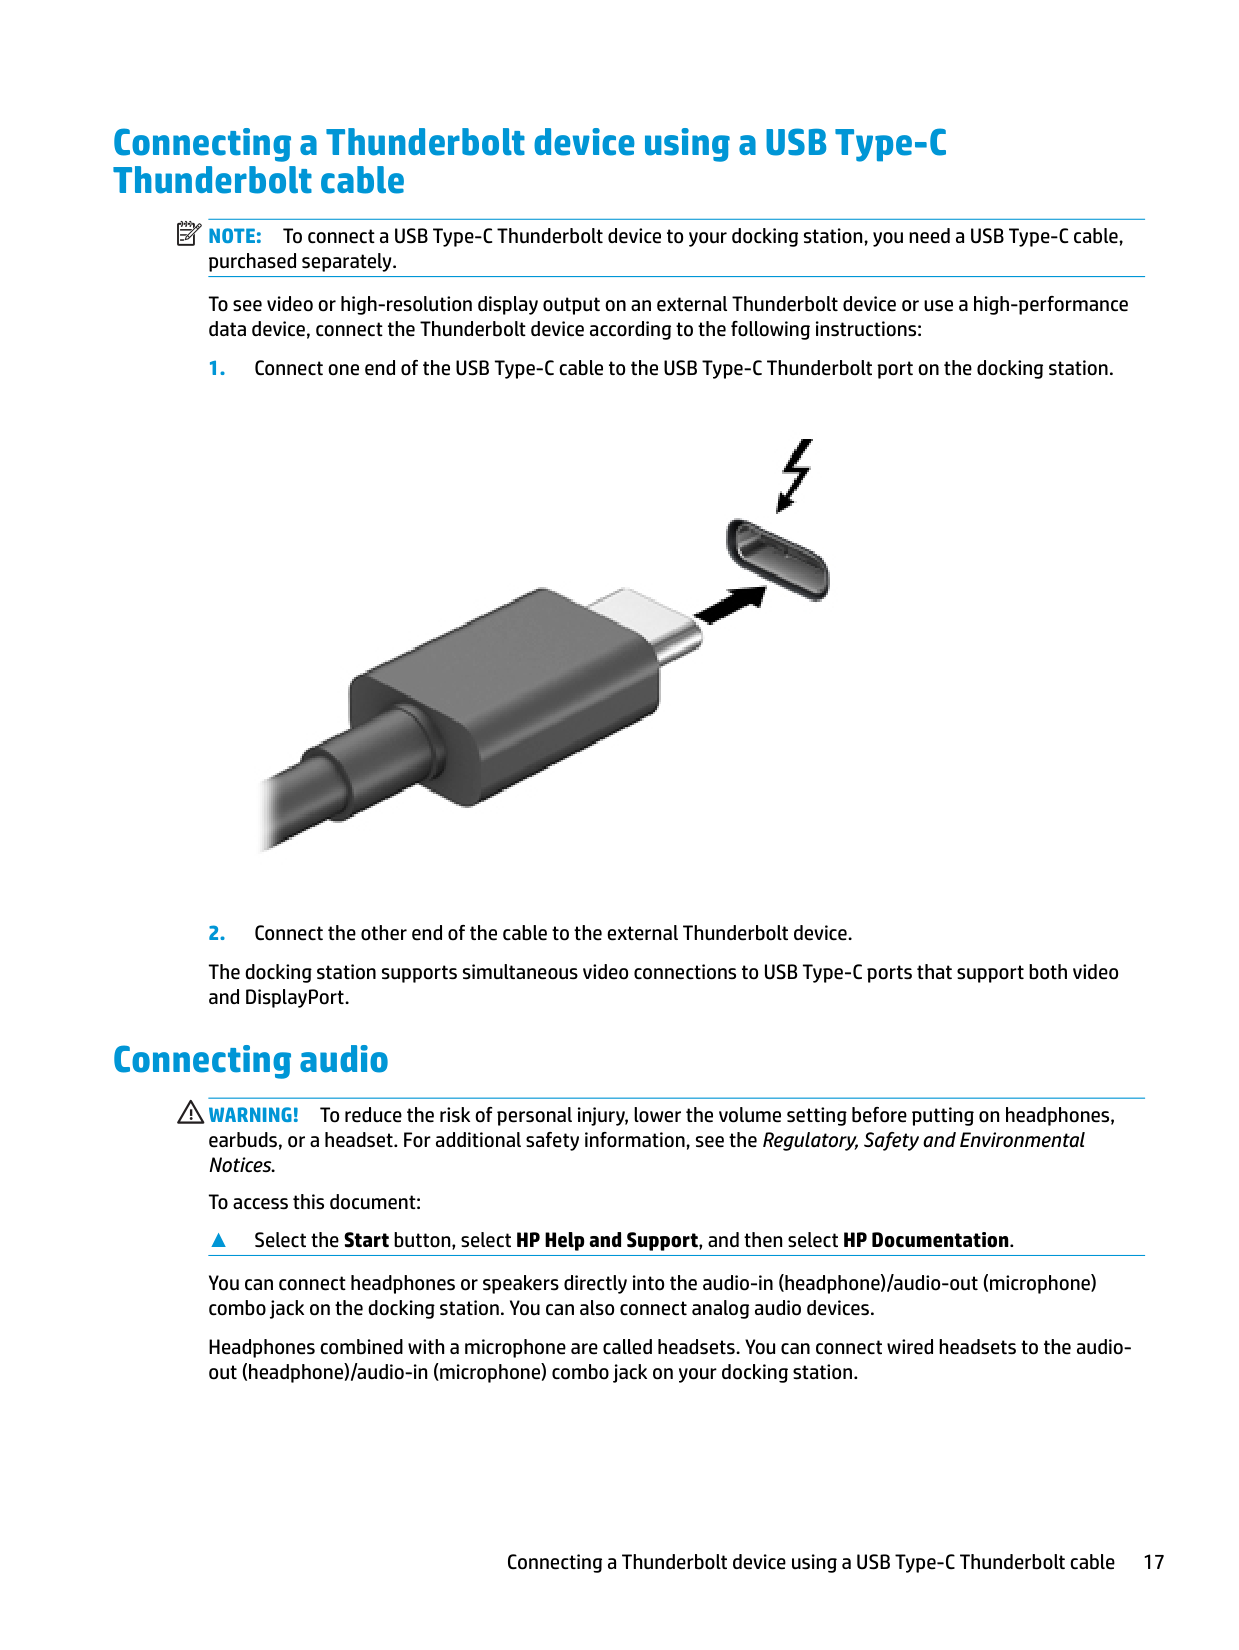
NOTE: To connect a USB Type-C Thunderbolt device to your docking station, you need a USB Type-C cable, purchased separately. To see video or high-resolution display output on an external Thunderbolt device or use a high-performance data device, connect the Thunderbolt device according to the following instructions:

The docking station supports simultaneous video connections to USB Type-C ports that support both video and DisplayPort.
Connecting audio
WARNING! To reduce the risk of personal injury, lower the volume setting before putting on headphones, earbuds, or a headset. For additional safety information, see the Regulatory, Safety and Environmental Notices.
To access this document:
##### ▲ Select the Start button, select HP Help and Support, and then select HP Documentation.
You can connect headphones or speakers directly into the audio-in (headphone)/audio-out (microphone) combo jack on the docking station. You can also connect analog audio devices.
Headphones combined with a microphone are called headsets. You can connect wired headsets to the audioout (headphone)/audio-in (microphone) combo jack on your docking station.
Connecting a Thunderbolt device using a USB Type-C Thunderbolt cable 17
#### Connecting analog audio devices
To connect analog audio:
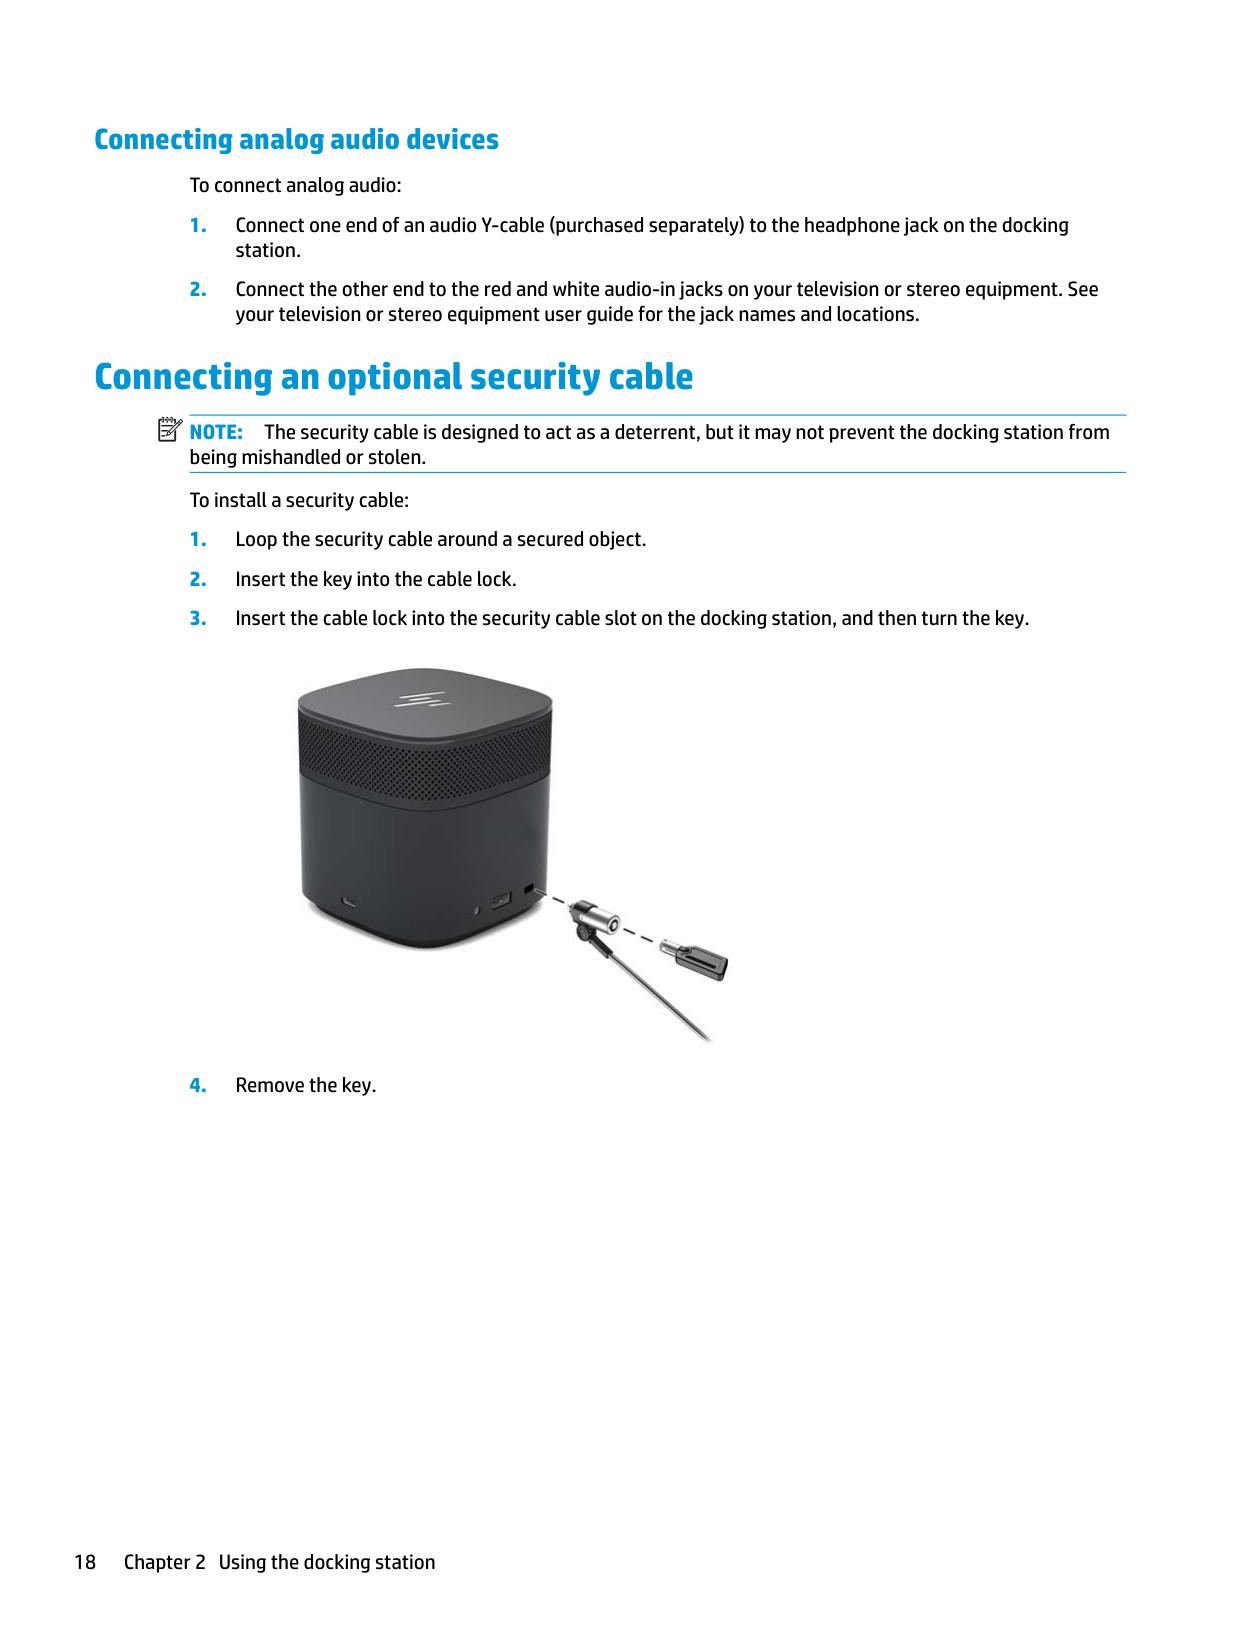
Connecting an optional security cable NOTE: The security cable is designed to act as a deterrent, but it may not prevent the docking station from being mishandled or stolen. To install a security cable:
| | |---|

3 Disconnecting the docking station
To disconnect the docking station from the computer, follow these steps:
▲ Disconnect the cable from the computer.
| | |---|

When the docking station has successfully disconnected from the computer, the Thunderbolt icon no longer appears in the notification area. NOTE: Do not restart or shut down your computer, or initiate Sleep or Hibernation, until the Thunderbolt icon disappears from the notification area.
4 Changing the USB Type-C Thunderbolt cable
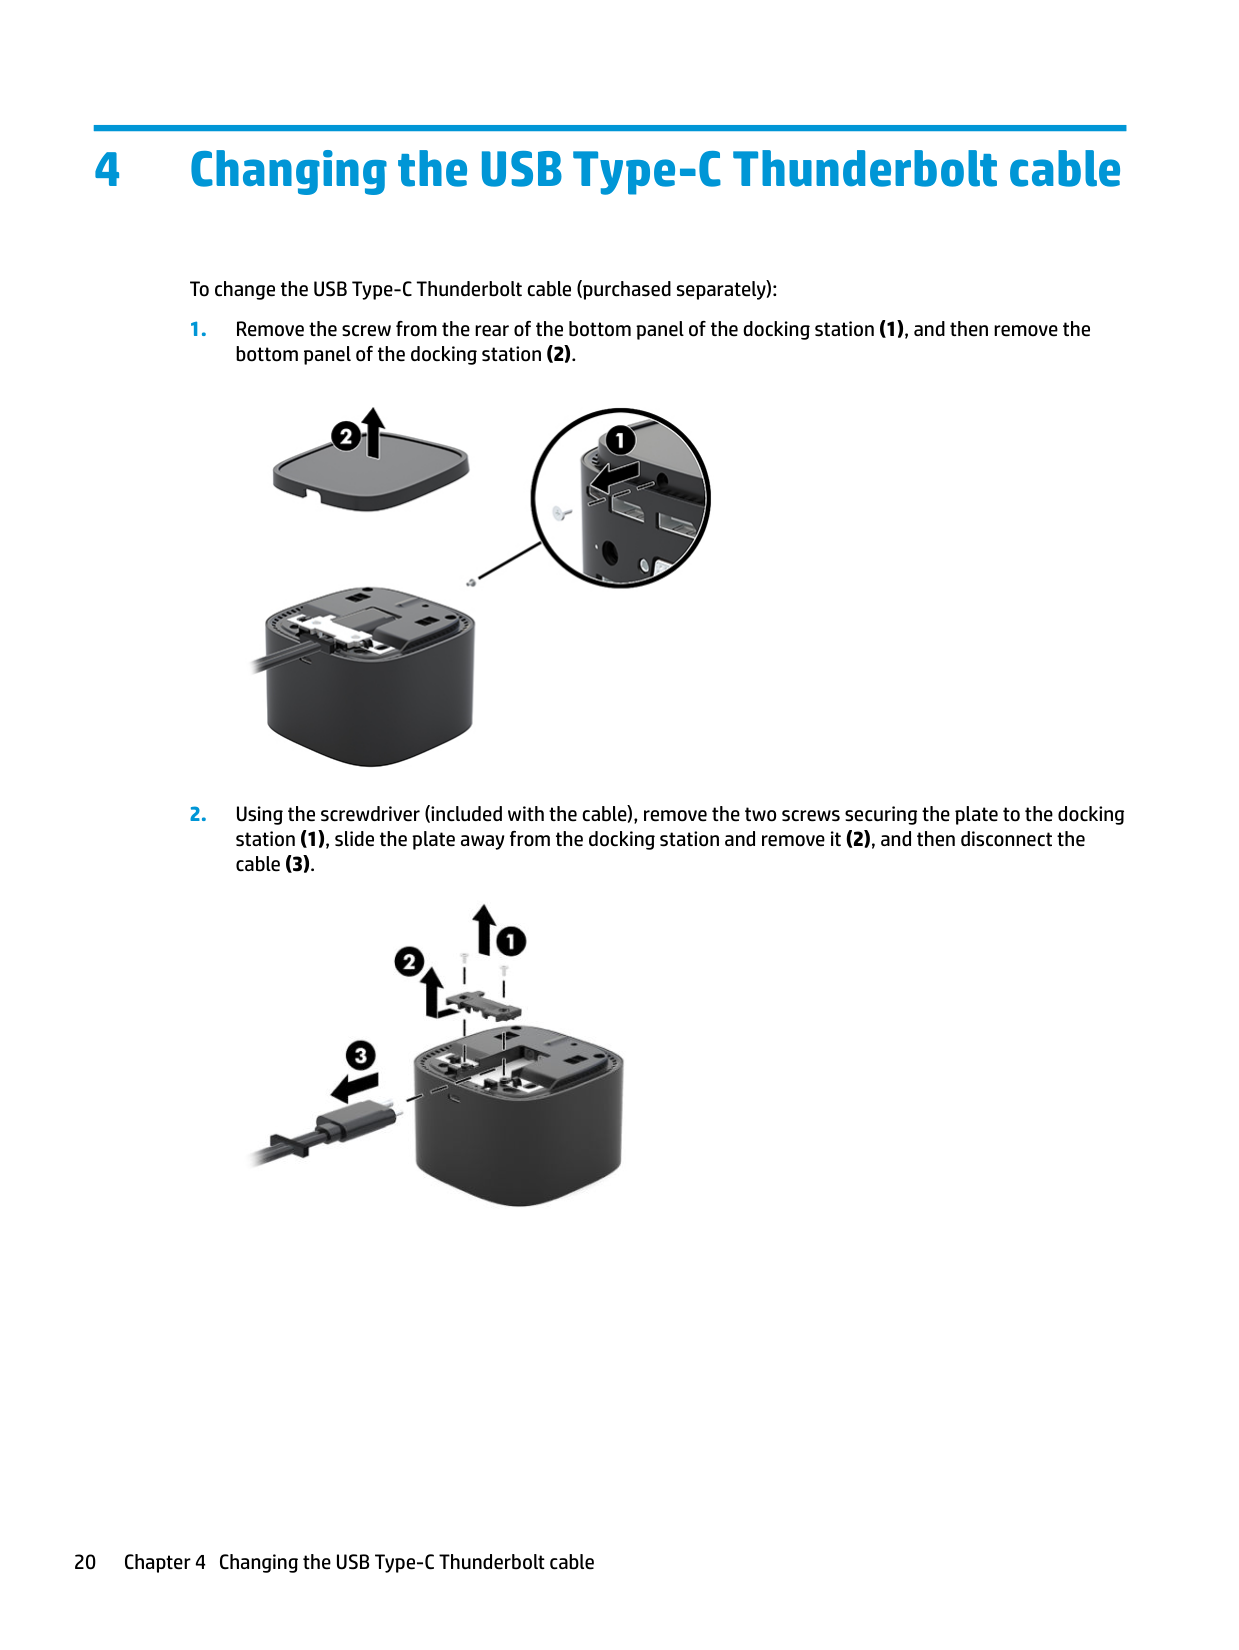
To change the USB Type-C Thunderbolt cable (purchased separately):


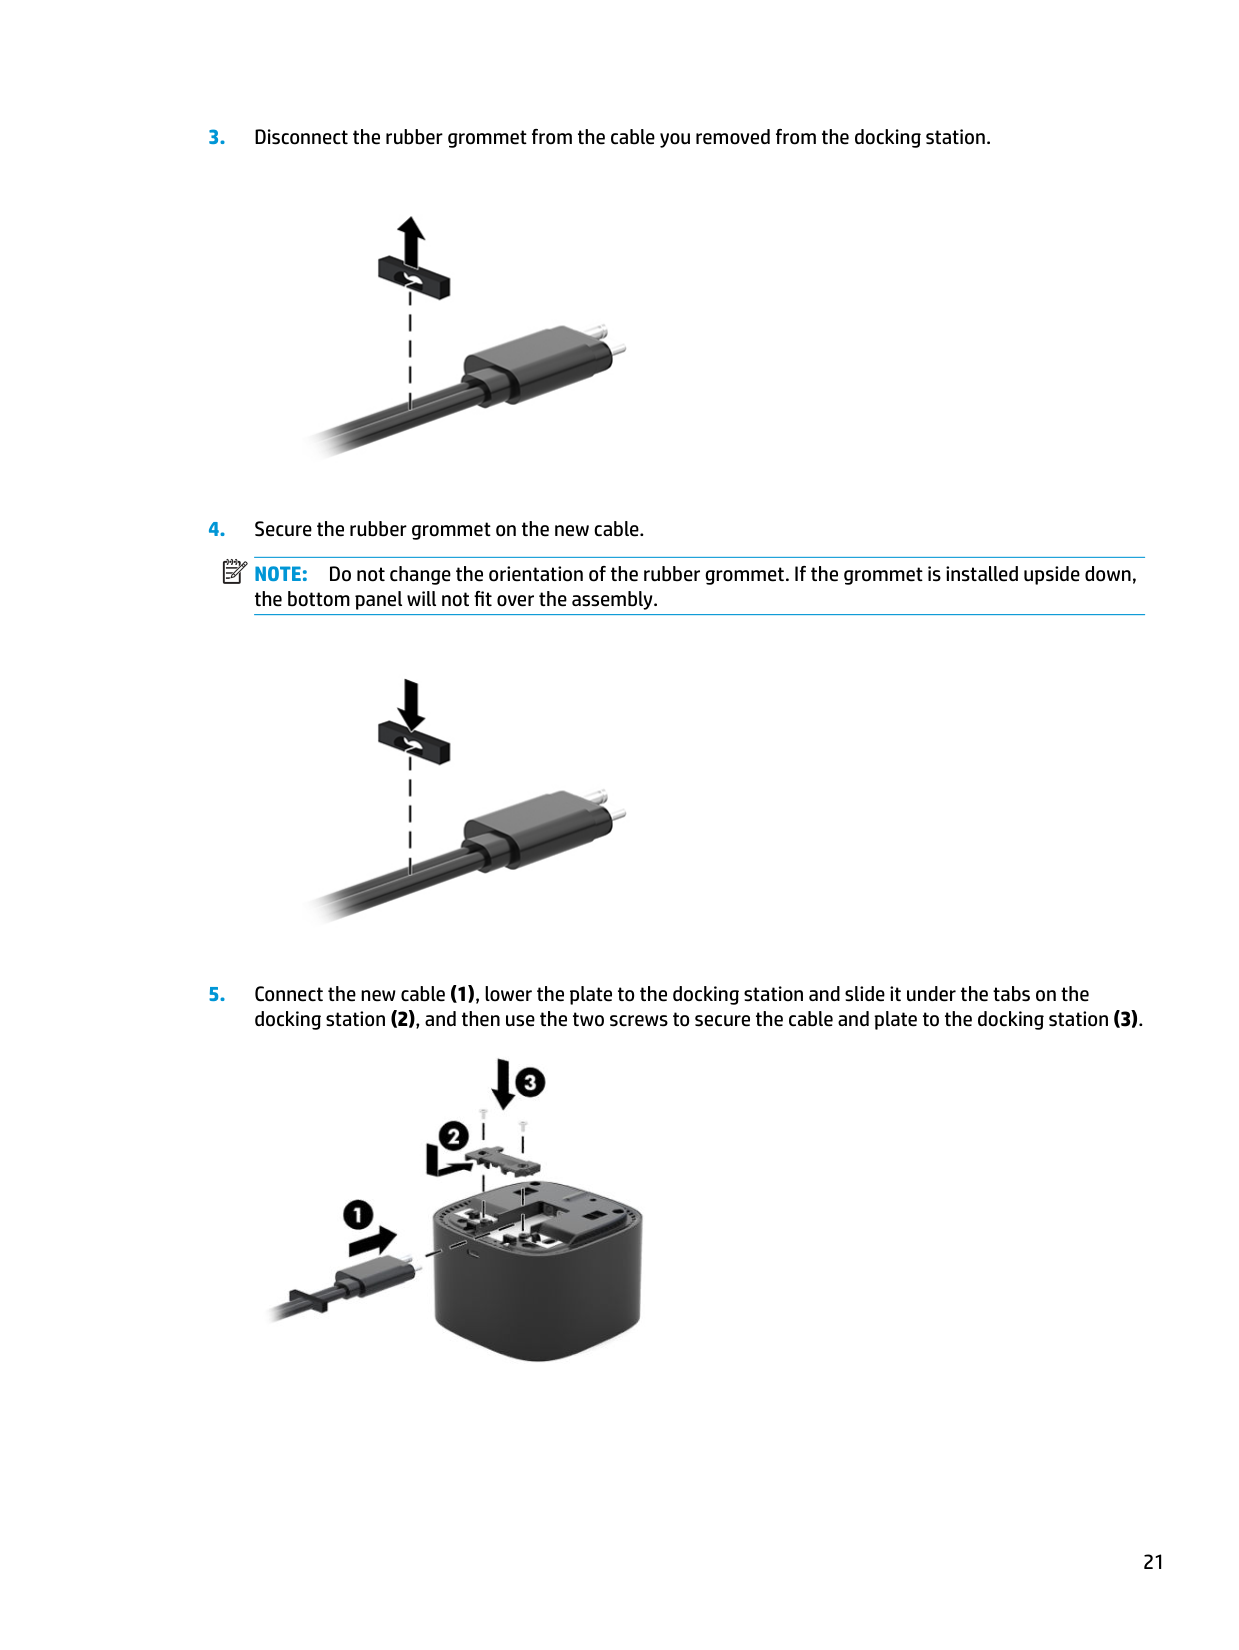
###### 3. Disconnect the rubber grommet from the cable you removed from the docking station.

###### 4. Secure the rubber grommet on the new cable.
| | |---|
NOTE: Do not change the orientation of the rubber grommet. If the grommet is installed upside down, the bottom panel will not fit over the assembly.

###### 5. Connect the new cable (1), lower the plate to the docking station and slide it under the tabs on thedocking station (2), and then use the two screws to secure the cable and plate to the docking station (3).

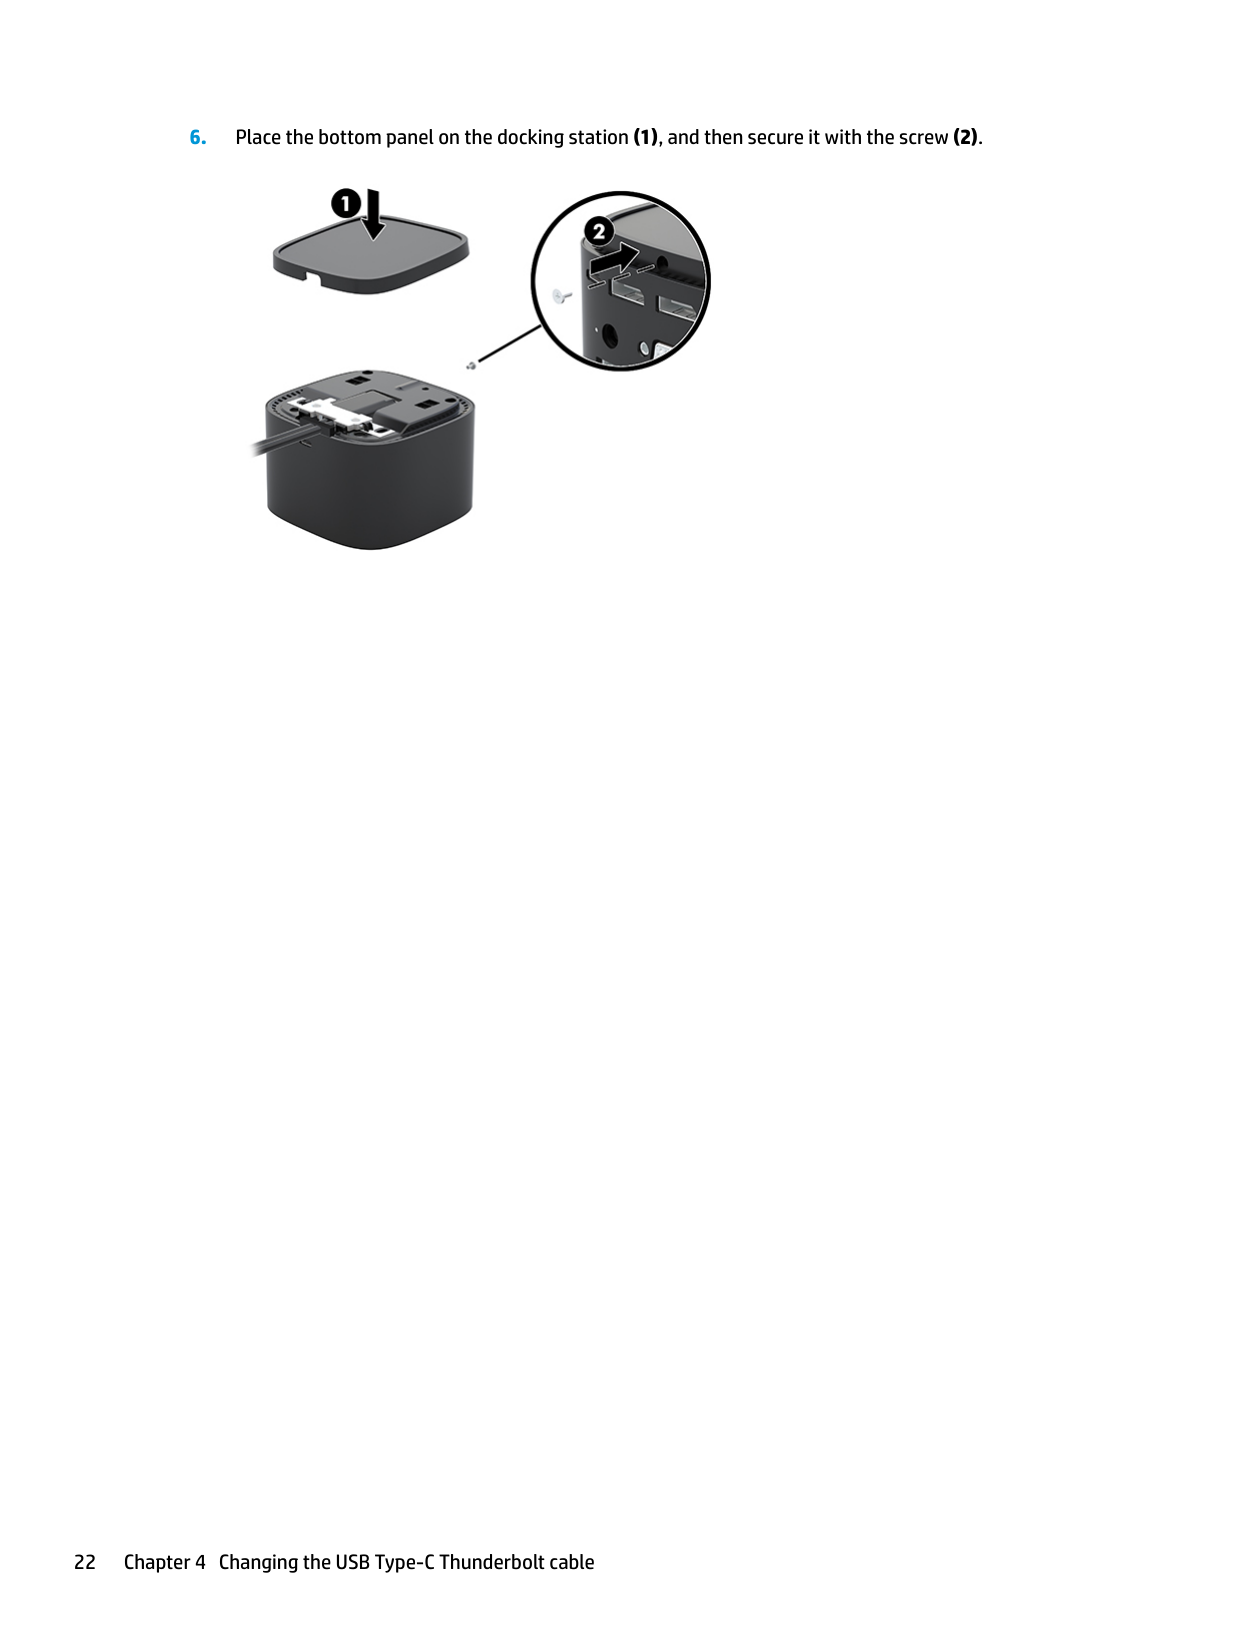
###### 6. Place the bottom panel on the docking station (1), and then secure it with the screw (2).

5 Using the audio module
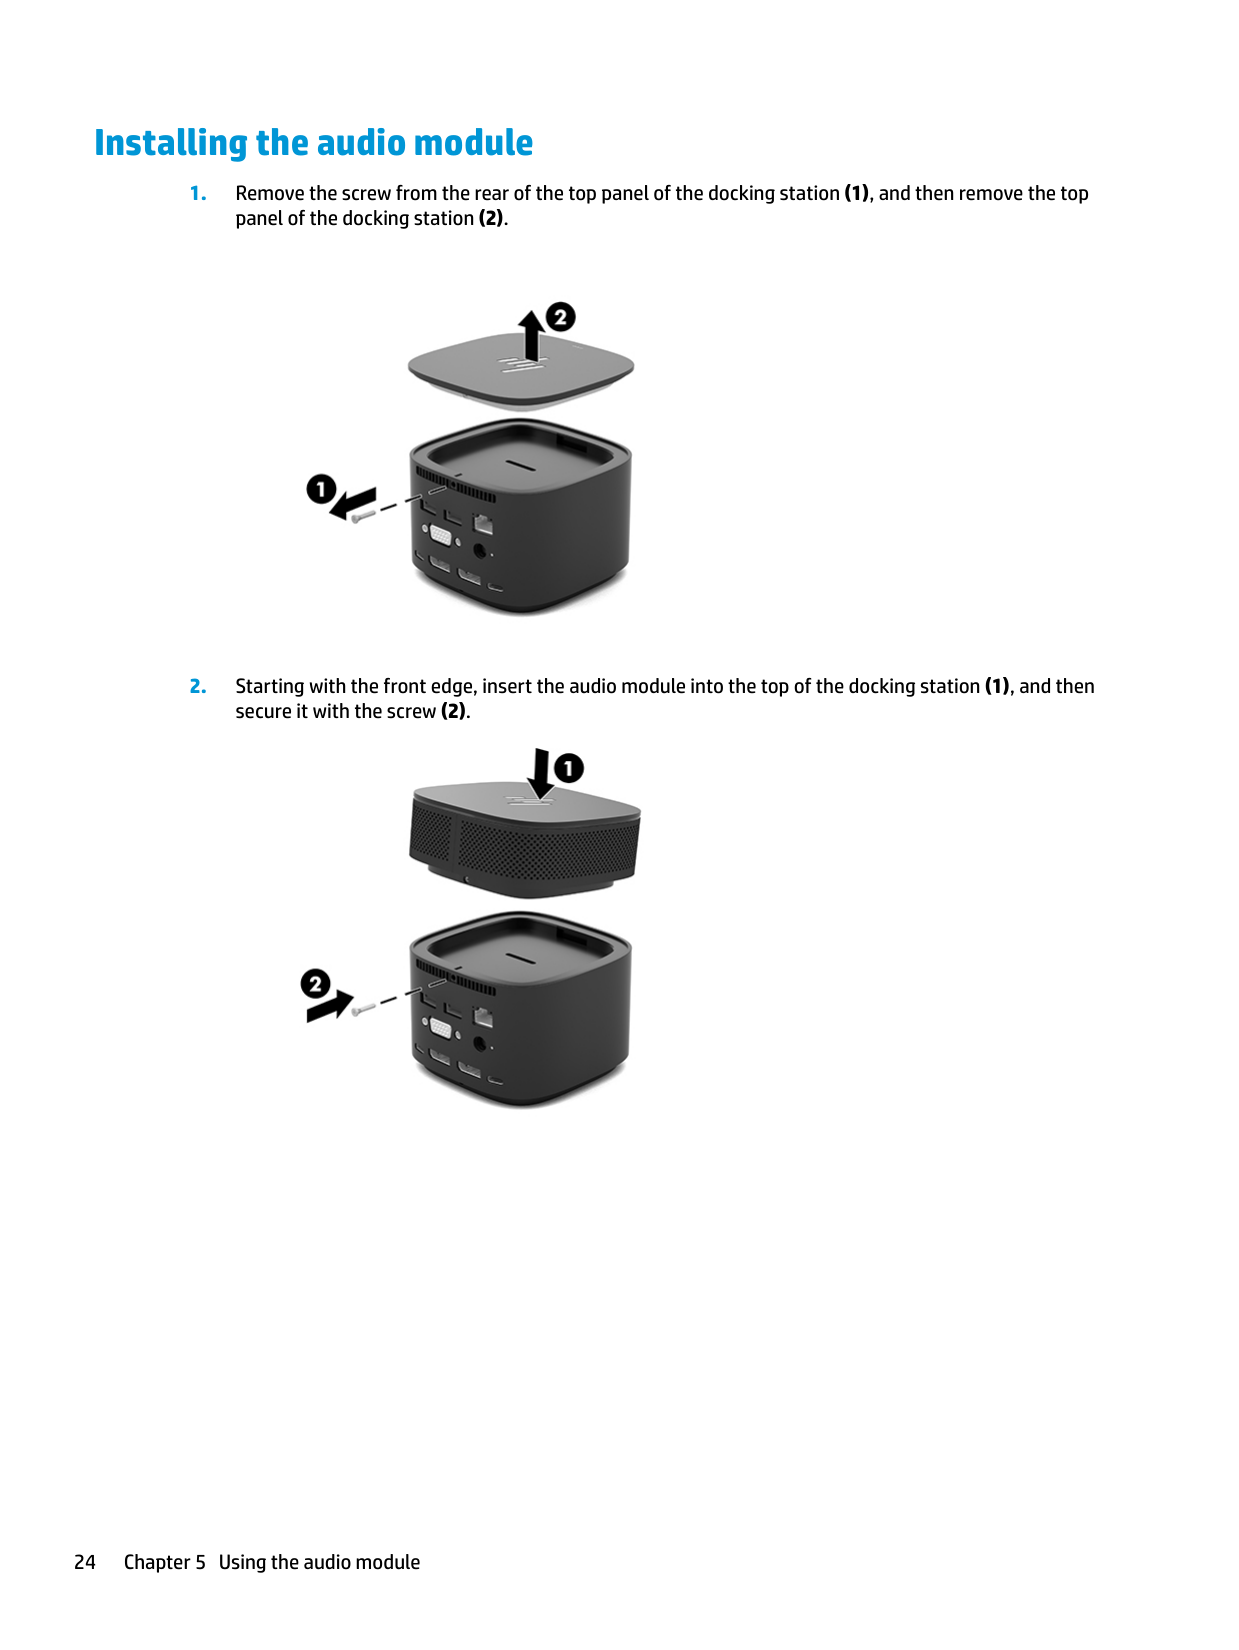
An audio module can be preinstalled (select products only) or purchased separately and installed on the docking station.
Installing the audio module


24 Chapter 5 Using the audio module
6 Troubleshooting
Solving common problems
The following tables list possible problems and the recommended solutions.
#### General use and connection problems
Problem Possible cause Solution The power light is off. The docking station is not connected to AC
Connect the power cord to the docking station and to an AC outlet.
power.
NOTE: Be sure that you are using the power cord included with the docking station.
No devices connected to the docking station are working.
When a device is connected to a USB port on the docking station, the device does not work.
A device connected to a USB port on the docking station stops working.
The docking station is not connected to AC power.
Connect the power cord to the docking station and to an AC outlet.
The docking station is not connected to the computer correctly.
Disconnect the docking station cable from the computer, and then reconnect it.
The USB device may not be compliant with the docking station power specifications and is using too much power.
Reset the port:
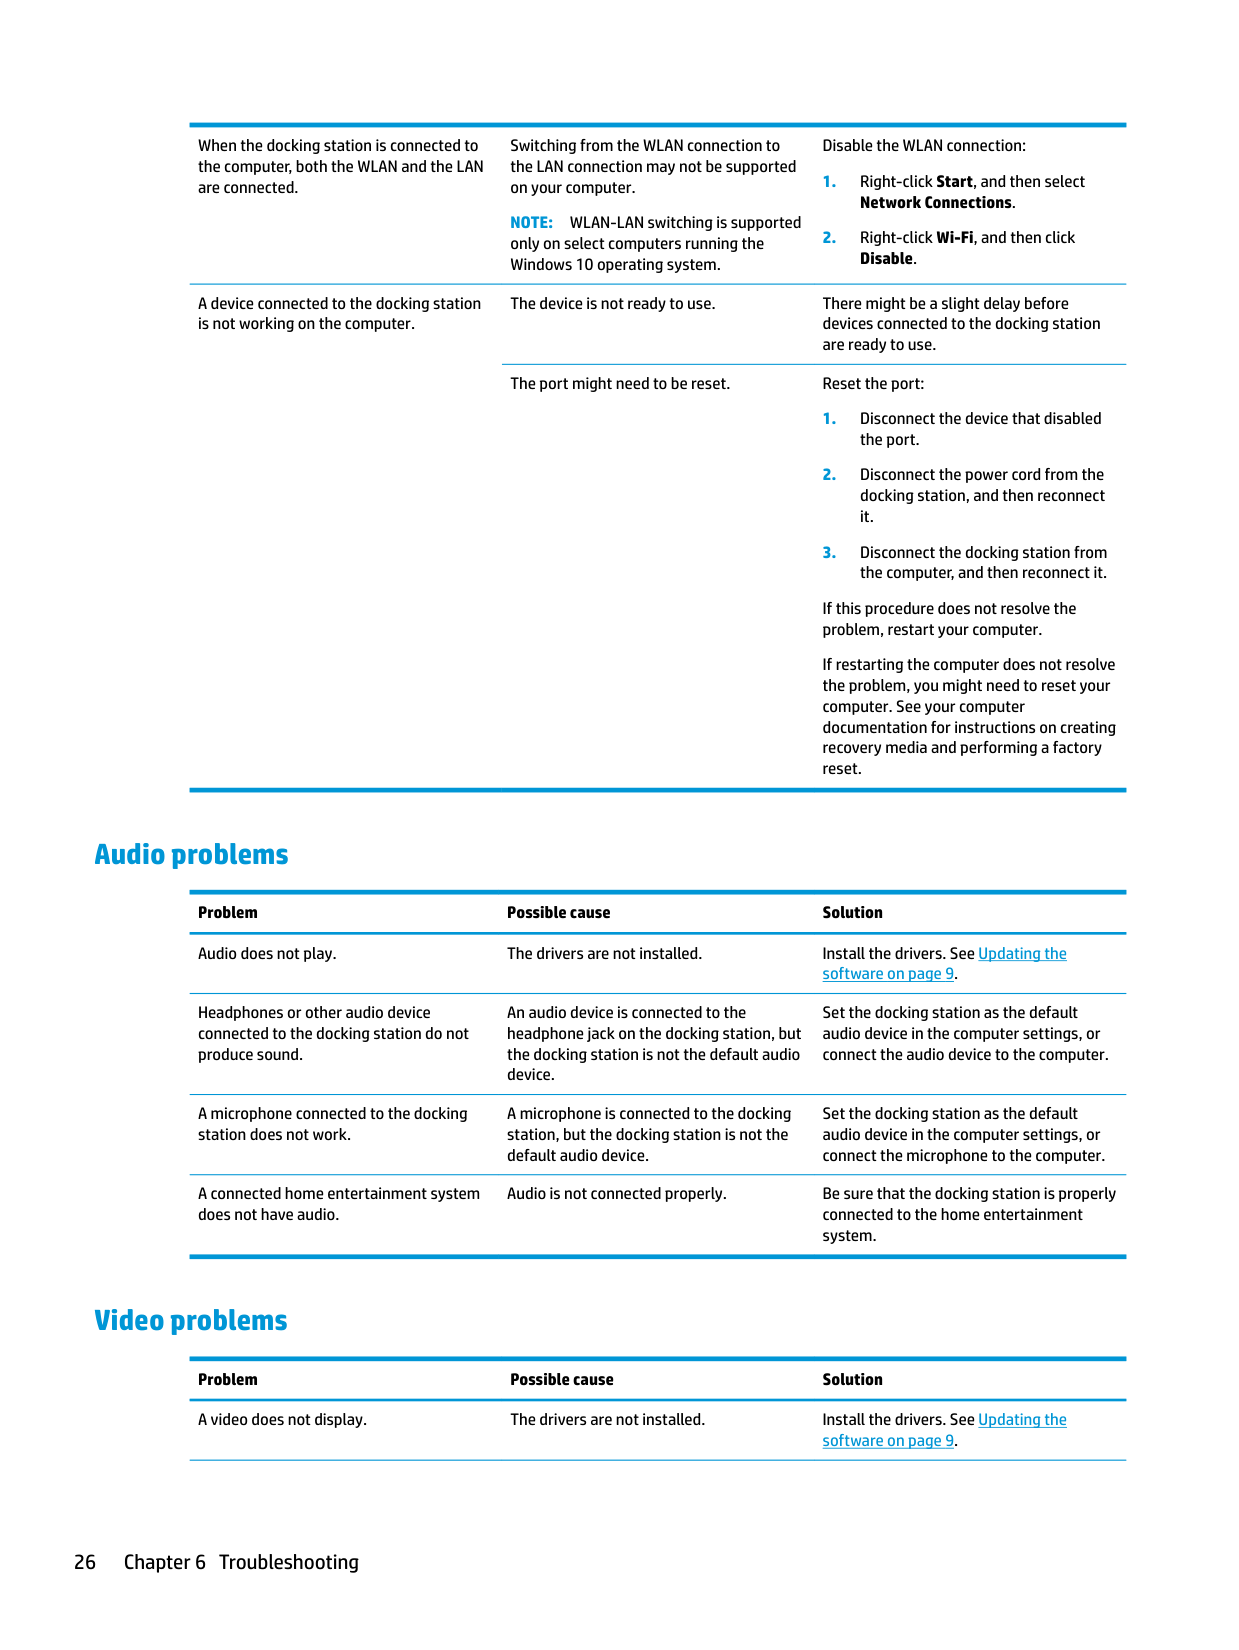
The port might need to be reset. Reset the port:
If this procedure does not resolve the problem, restart your computer.
If restarting the computer does not resolve the problem, you might need to reset your computer. See your computer documentation for instructions on creating recovery media and performing a factory reset.
When the docking station is connected to the computer, both the WLAN and the LAN are connected.
A device connected to the docking station is not working on the computer.
Switching from the WLAN connection to the LAN connection may not be supported on your computer.
NOTE: WLAN-LAN switching is supported only on select computers running the Windows 10 operating system.
Disable the WLAN connection:
The device is not ready to use. There might be a slight delay before devices connected to the docking station are ready to use.
The port might need to be reset. Reset the port:
If this procedure does not resolve the problem, restart your computer.
If restarting the computer does not resolve the problem, you might need to reset your computer. See your computer documentation for instructions on creating recovery media and performing a factory reset.
#### Audio problems
Problem Possible cause Solution Audio does not play. The drivers are not installed. Install the drivers. See Updating the
software on page 9.
Headphones or other audio device connected to the docking station do not produce sound.
A microphone connected to the docking station does not work.
A connected home entertainment system does not have audio.

An audio device is connected to the headphone jack on the docking station, but the docking station is not the default audio device.
Set the docking station as the default audio device in the computer settings, or connect the audio device to the computer.
A microphone is connected to the docking station, but the docking station is not the default audio device.
Set the docking station as the default audio device in the computer settings, or connect the microphone to the computer.
Audio is not connected properly. Be sure that the docking station is properly connected to the home entertainment system.
#### Video problems
Problem Possible cause Solution A video does not display. The drivers are not installed. Install the drivers. See Updating the
software on page 9.
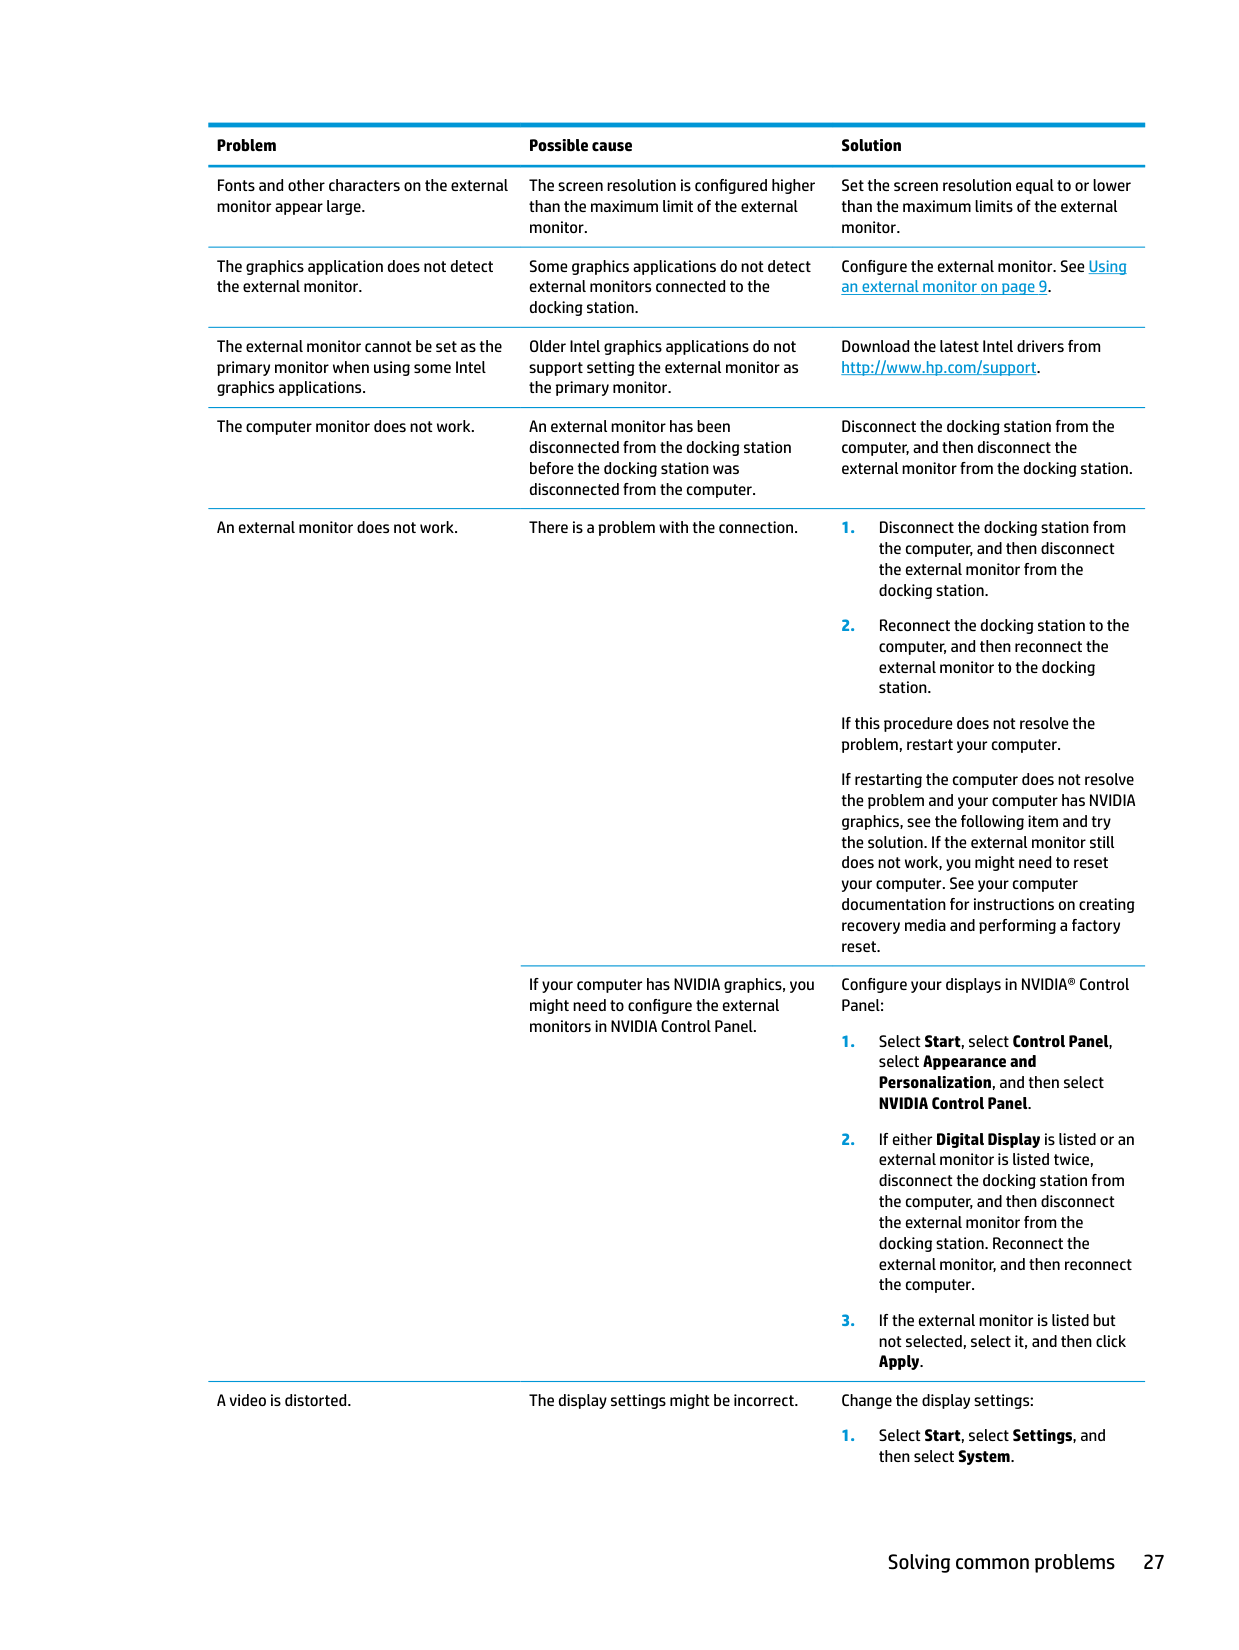
Fonts and other characters on the external monitor appear large.
The screen resolution is configured higher than the maximum limit of the external monitor.
Set the screen resolution equal to or lower than the maximum limits of the external monitor.
The graphics application does not detect the external monitor.
Some graphics applications do not detect external monitors connected to the docking station.
Configure the external monitor. See Using an external monitor on page 9.
The external monitor cannot be set as the primary monitor when using some Intel graphics applications.
Older Intel graphics applications do not support setting the external monitor as the primary monitor.
Download the latest Intel drivers from http://www.hp.com/support.
The computer monitor does not work. An external monitor has been disconnected from the docking station before the docking station was disconnected from the computer.
Disconnect the docking station from the computer, and then disconnect the external monitor from the docking station.
An external monitor does not work. There is a problem with the connection. 1. Disconnect the docking station from the computer, and then disconnect the external monitor from the docking station.
If this procedure does not resolve the problem, restart your computer.
If restarting the computer does not resolve the problem and your computer has NVIDIA graphics, see the following item and try the solution. If the external monitor still does not work, you might need to reset your computer. See your computer documentation for instructions on creating recovery media and performing a factory reset.
If your computer has NVIDIA graphics, you might need to configure the external monitors in NVIDIA Control Panel.
Configure your displays in NVIDIA® Control Panel:
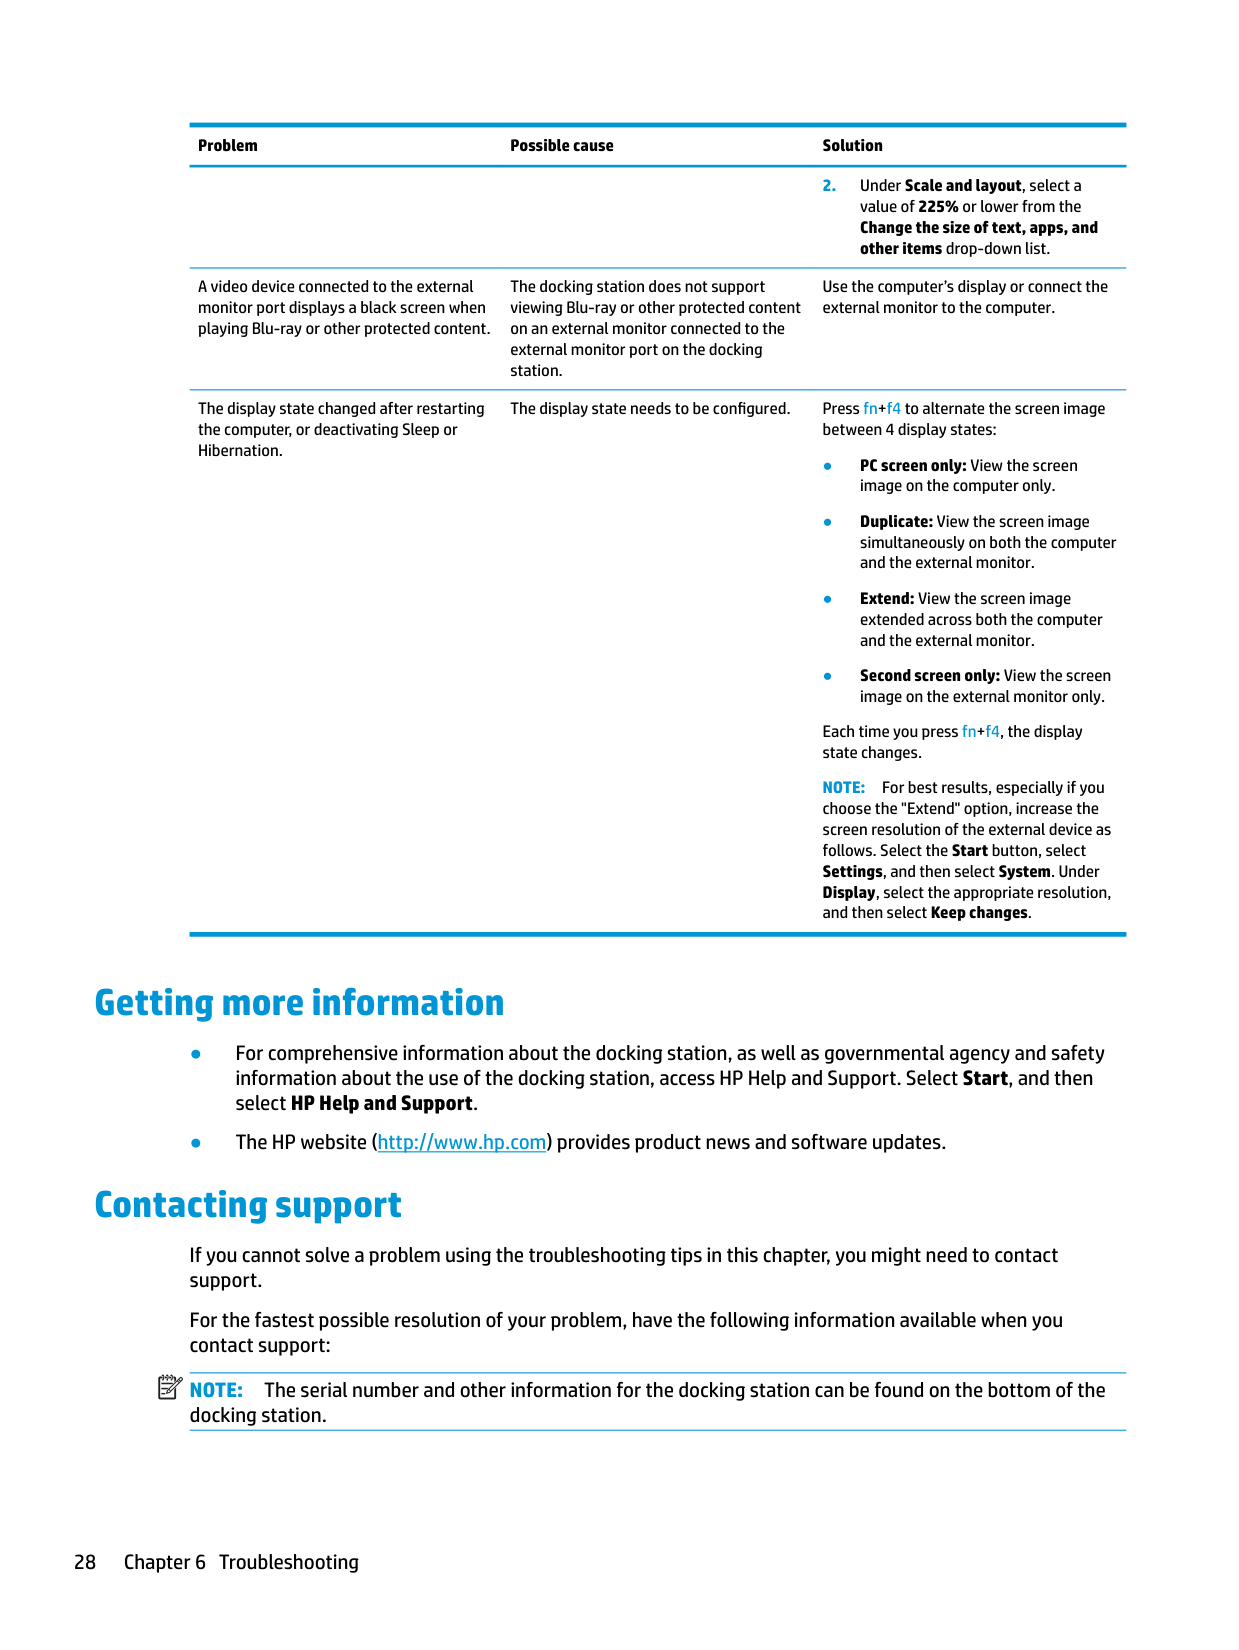
A video is distorted. The display settings might be incorrect. Change the display settings:
A video device connected to the external monitor port displays a black screen when playing Blu-ray or other protected content.
The display state changed after restarting the computer, or deactivating Sleep or Hibernation.
The docking station does not support viewing Blu-ray or other protected content on an external monitor connected to the external monitor port on the docking station.
Use the computer’s display or connect the external monitor to the computer.
The display state needs to be configured. Press fn+f4 to alternate the screen image between 4 display states:
Each time you press fn+f4, the display state changes.
NOTE: For best results, especially if you choose the "Extend" option, increase the screen resolution of the external device as follows. Select the Start button, select Settings, and then select System. Under Display, select the appropriate resolution, and then select Keep changes.
Getting more information
Contacting support
If you cannot solve a problem using the troubleshooting tips in this chapter, you might need to contact support.
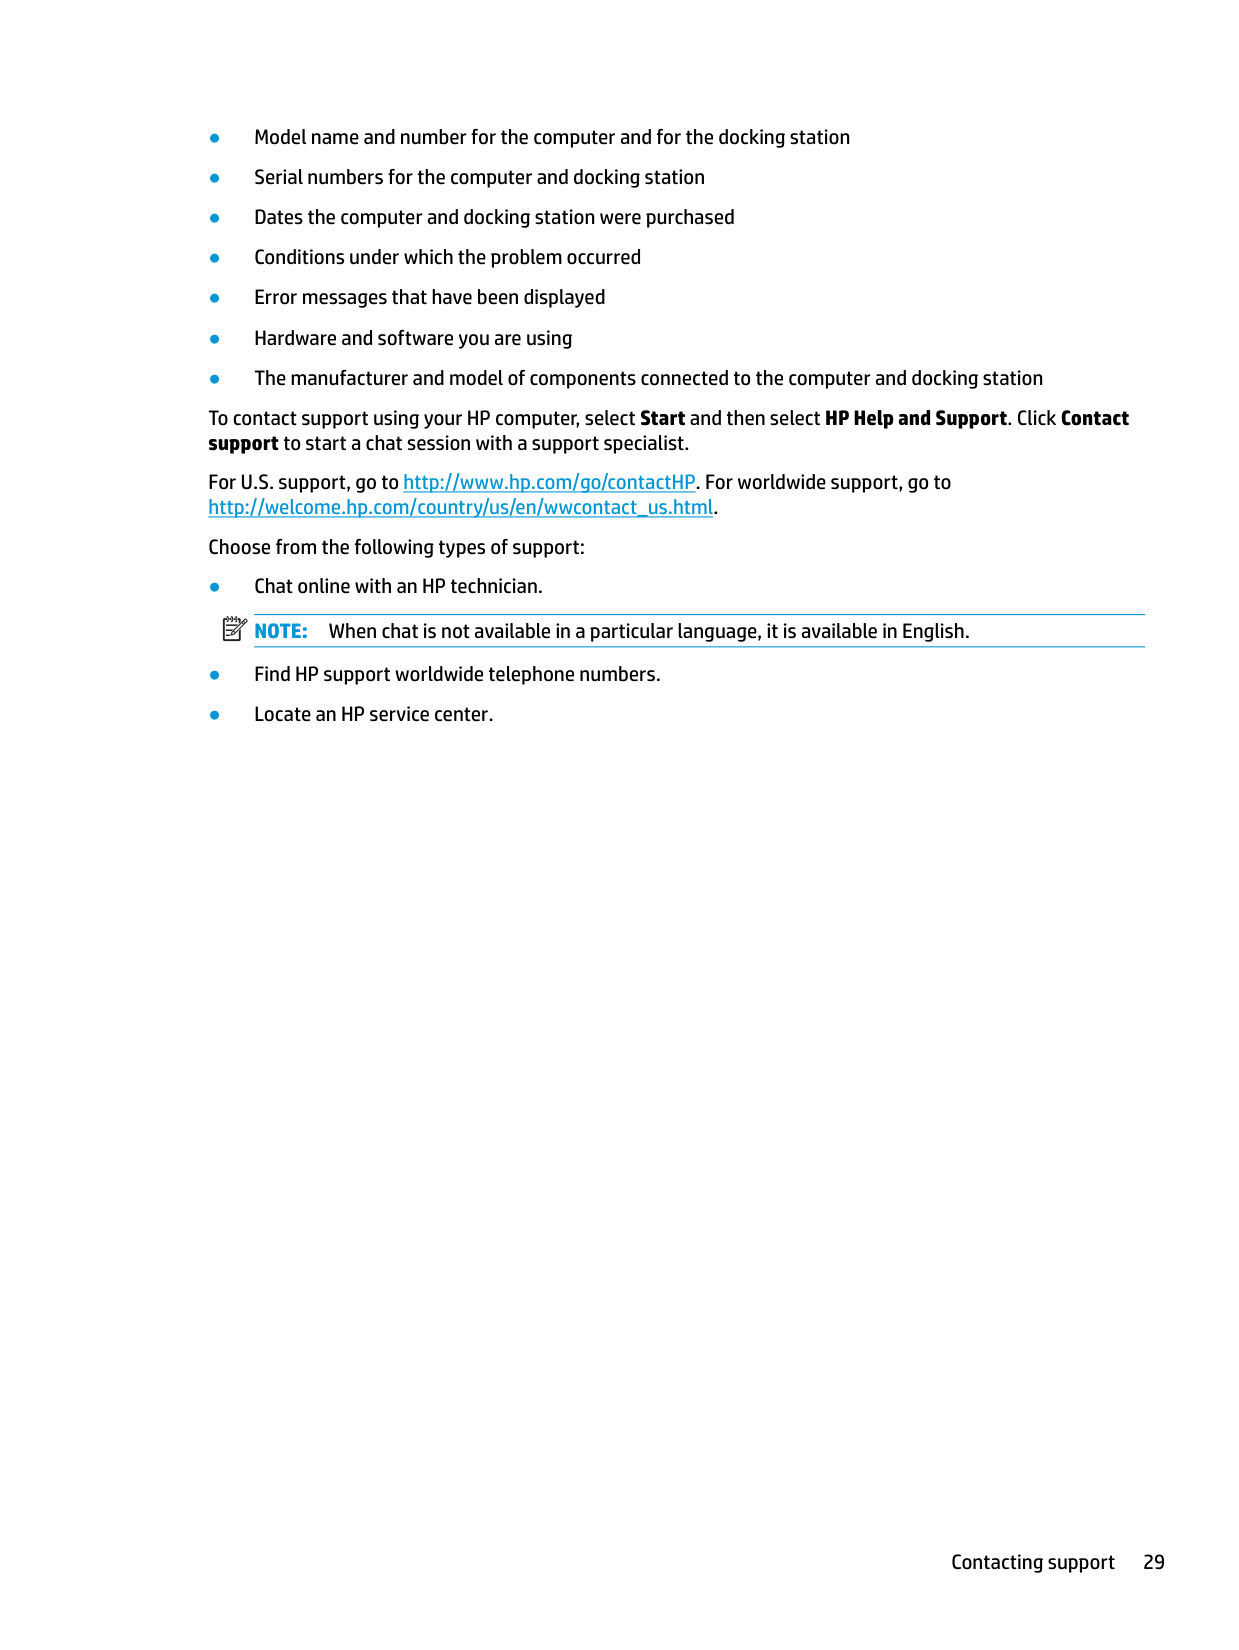
For the fastest possible resolution of your problem, have the following information available when you contact support:
| | |---|
NOTE: The serial number and other information for the docking station can be found on the bottom of the docking station.
To contact support using your HP computer, select Start and then select HP Help and Support. Click Contact support to start a chat session with a support specialist.
For U.S. support, go to http://www.hp.com/go/contactHP. For worldwide support, go to http://welcome.hp.com/country/us/en/wwcontact_us.html.
Choose from the following types of support:
| | |---|
Contacting support 29
7 Specifications
Input power
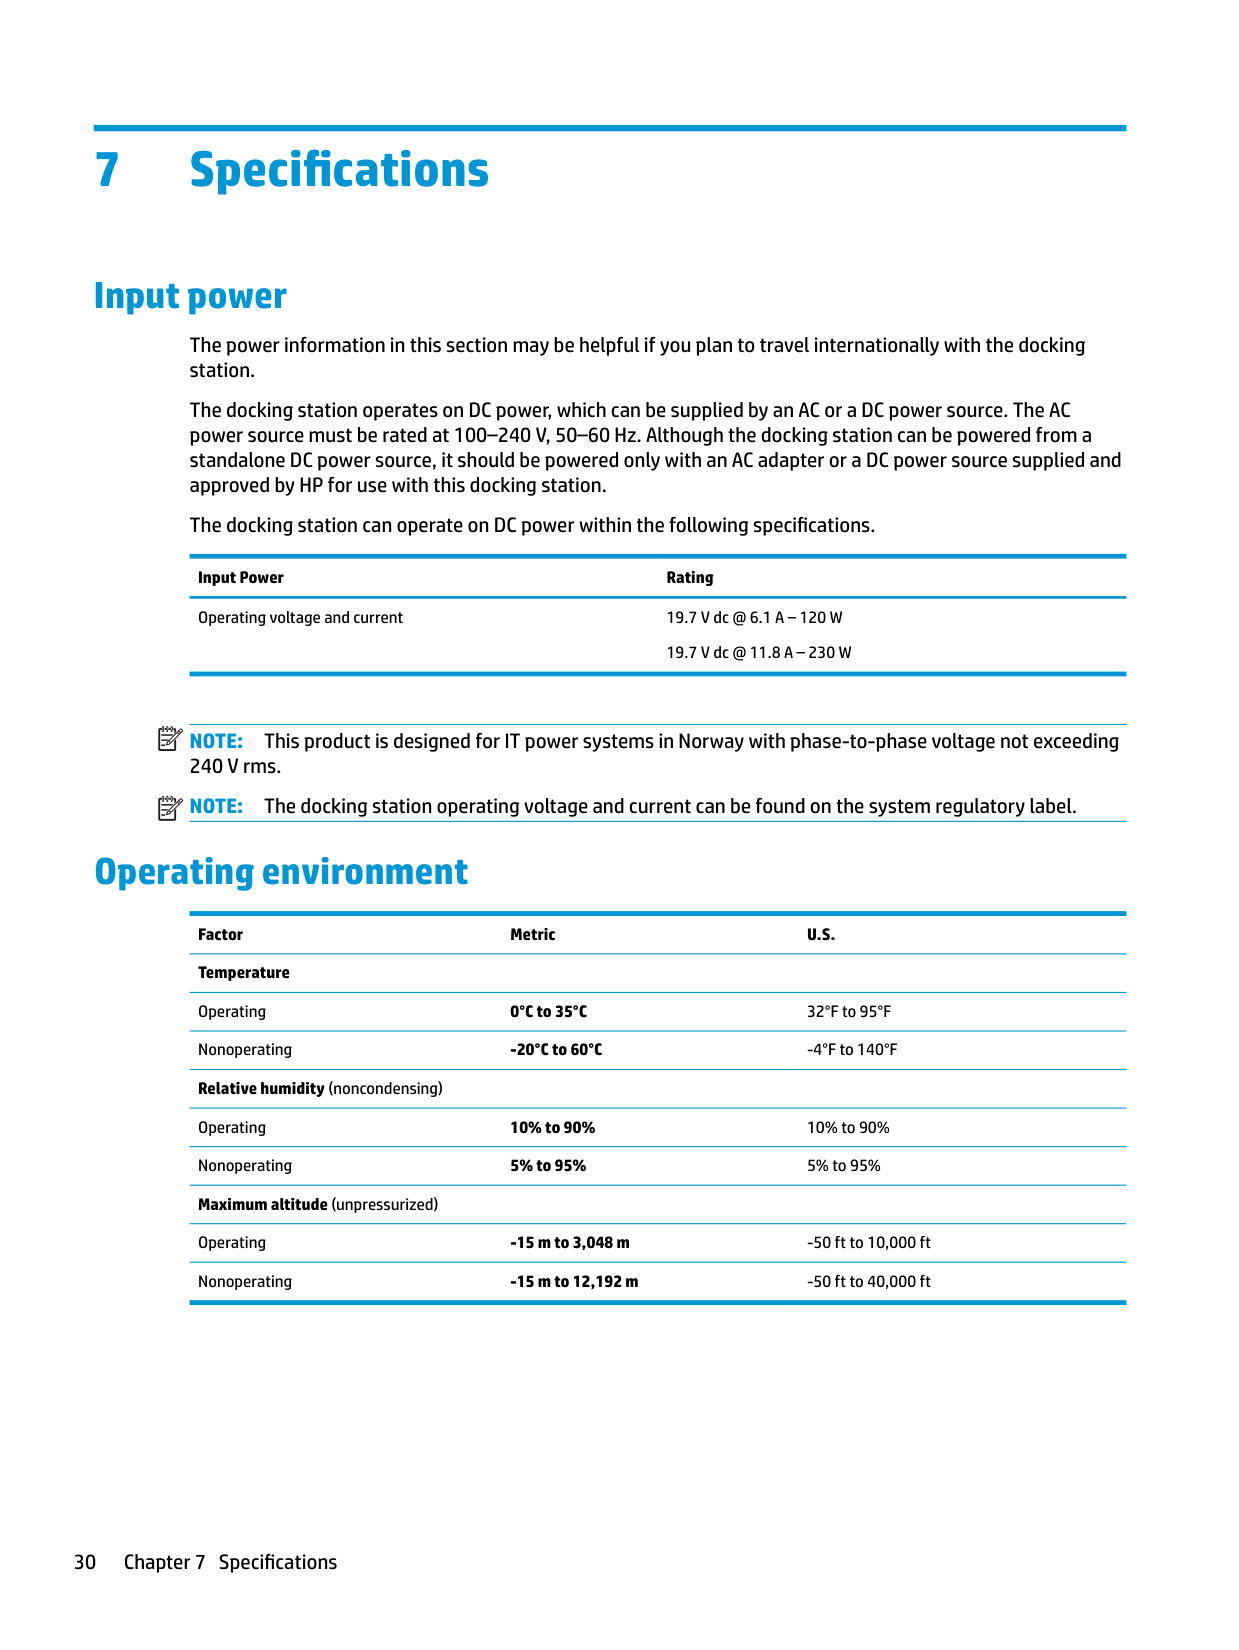
The power information in this section may be helpful if you plan to travel internationally with the docking station.
The docking station operates on DC power, which can be supplied by an AC or a DC power source. The AC power source must be rated at 100–240 V, 50–60 Hz. Although the docking station can be powered from a standalone DC power source, it should be powered only with an AC adapter or a DC power source supplied and approved by HP for use with this docking station.
The docking station can operate on DC power within the following specifications. Input Power Rating Operating voltage and current 19.7 V dc @ 6.1 A – 120 W
19.7 V dc @ 11.8 A – 230 W
| | |---|
| | |---|
NOTE: This product is designed for IT power systems in Norway with phase-to-phase voltage not exceeding 240 V rms.
NOTE: The docking station operating voltage and current can be found on the system regulatory label.
Operating environment
Factor Metric U.S. Temperature Operating 0°C to 35°C 32°F to 95°F Nonoperating -20°C to 60°C -4°F to 140°F Relative humidity (noncondensing) Operating 10% to 90% 10% to 90% Nonoperating 5% to 95% 5% to 95% Maximum altitude (unpressurized)
Operating -15 m to 3,048 m -50 ft to 10,000 ft Nonoperating -15 m to 12,192 m -50 ft to 40,000 ft
30 Chapter 7 Specifications
Index
adjusting volume 2 connecting 17
audio connection, analog 18 audio module 23 audio-out (headphone) jack 18 audio-out (headphone)/audio-in
(microphone) combo jack, identifying 4
power 2 speaker volume 2
front 3 rear 5 right side 4 top 1
computer, connecting 7 connector, power 5, 6
connecting 15 identifying 5
connecting 14 identifying 5
microphone mute 2 HP Help and Support 28
J jacks
audio-out (headphone) 18 audio-out (headphone)/audio-in
(microphone) combo 4 RJ-45 (network) 5, 13
L light, power 1, 2, 5 lock, security cable 18
connecting 13 network jack, identifying 5
DisplayPort 5 external monitor 5, 14 USB 14 USB SuperSpeed 5 USB SuperSpeed charging
(powered) 4 USB Type-C SuperSpeed 3 USB Type-C SuperSpeed port and
DisplayPort 5, 16 USB Type-C Thunderbolt 5, 17 VGA 14
power docking station, connecting 6 guidelines 11
power connector
connecting 6 identifying 5
power light 1, 2, 5
connecting 13 identifying 5
identifying 4 using 18
security cable, connecting 18 security level 12 slot, security cable 4, 18 support, contacting 28
connecting 17 identifying 5
troubleshooting audio problems 26 connection problems 25 general use problems 25 video problems 26
port, identifying 4
USB SuperSpeed port, identifying 5 USB Type-C port, connecting 16, 17 USB Type-C SuperSpeed port and
DisplayPort connecting USB Type-C 16 identifying 5
USB Type-C SuperSpeed port, identifying 3 USB Type-C Thunderbolt port identifying 5
Index 31