HP Usb C Docking Station
Adapters · 19 Q&As

HP Usb C Docking Station

Ask AI

— answers from the official manual

Answers from the official manual.

Common questions

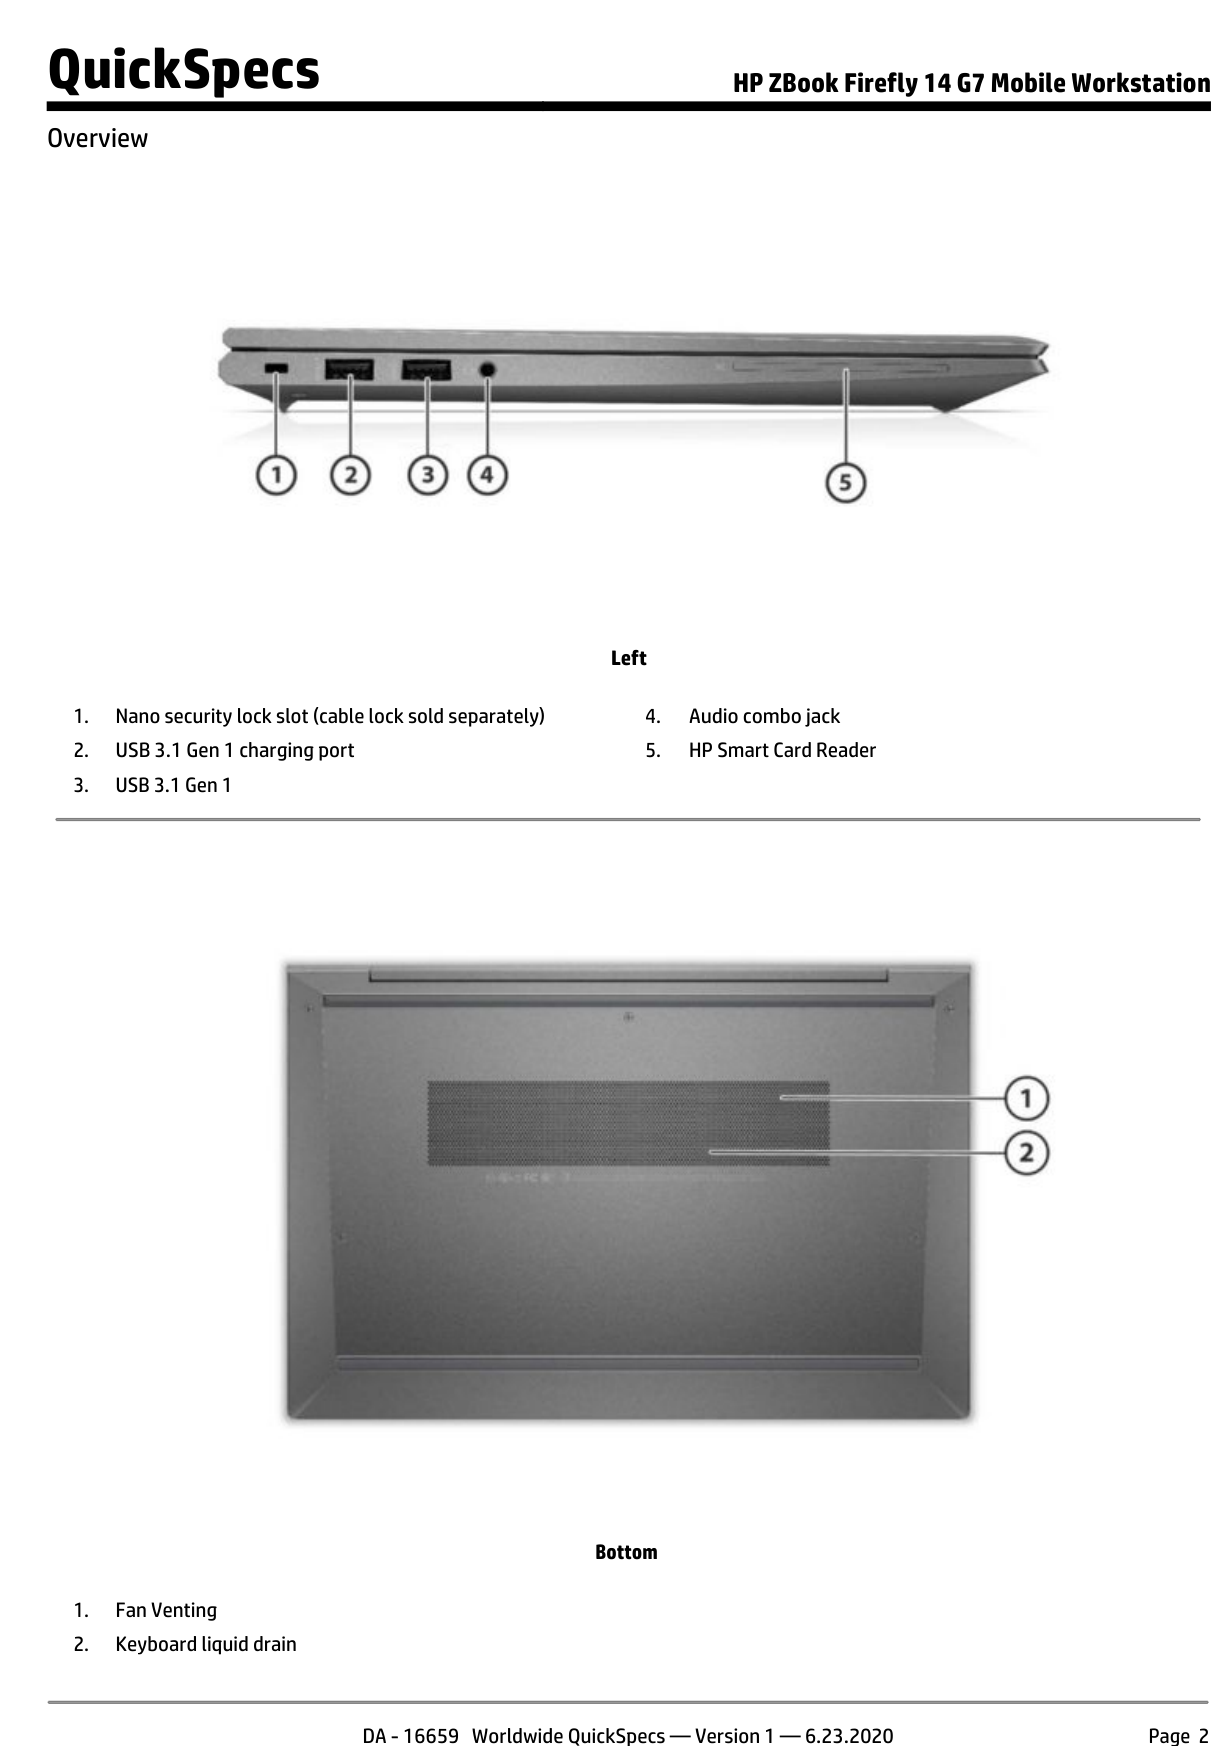
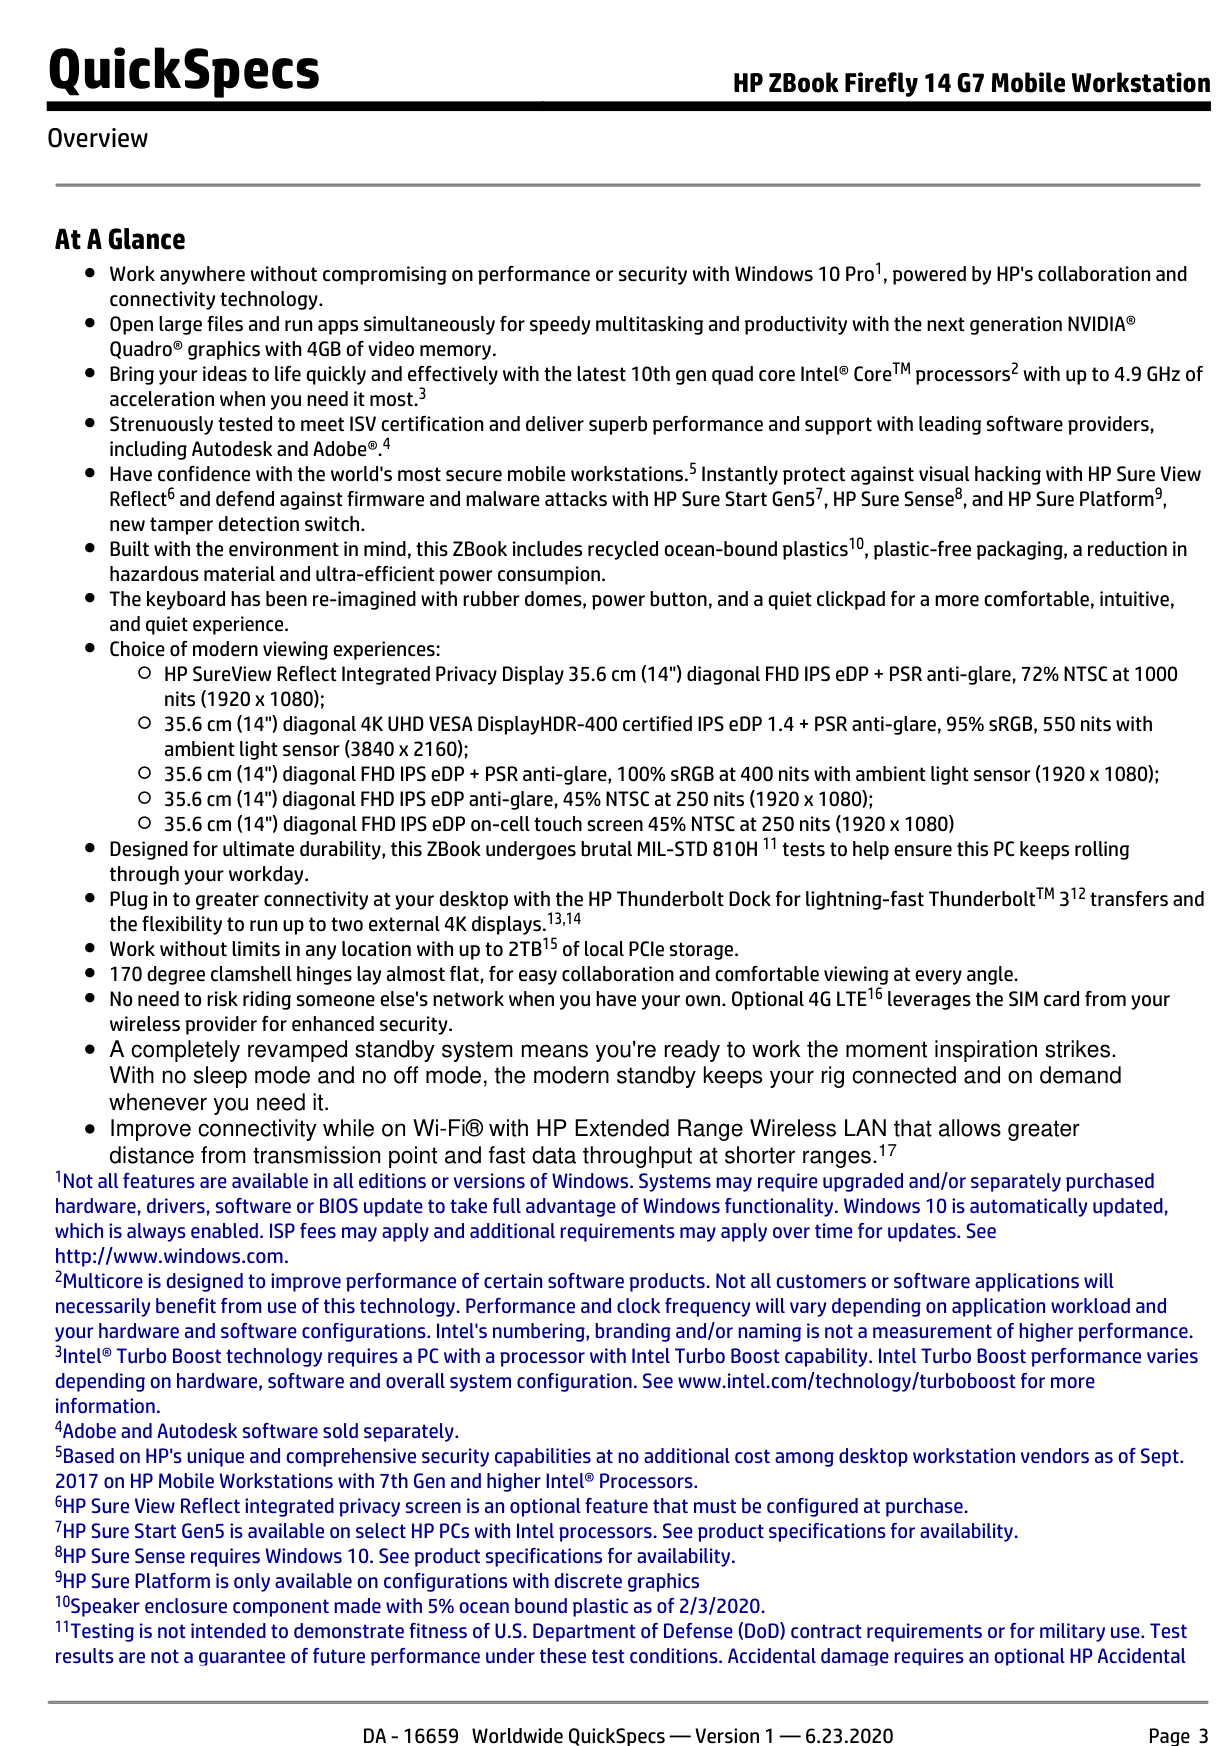
This is the 2016-vintage HP USB-C Docking Station, part number 903765-001 if you're matching firmware revisions or spare PSUs. It's the dock that shipped alongside the EliteBook G3 and ZBook G3 generation as the "single cable to your desk" answer when USB-C with DisplayPort Alt Mode was still new. A lot of these are still in service. The reason 1,400 people search for it monthly is that they're trying to figure out what works with what.

For an accessory, the only question that matters is compatibility. So that's what this page leads with.

Will it work with my laptop?

The dock connects via a single USB-C cable, and what you get out of that connection depends entirely on what your laptop's USB-C port supports. There are two things to check on your laptop's spec sheet:

  1. DisplayPort Alt Mode over USB-C — required for the dock's HDMI and DisplayPort outputs to work. Without it, you'll get USB hub functionality but no external displays.
  2. USB-C Power Delivery (PD) — required if you want the dock to charge the laptop. The dock provides power to the laptop only if the laptop supports PD over USB-C.

Both of these were inconsistent in 2016-2018 USB-C laptops. Some had data only. Some had data + DisplayPort. Some had everything. Cables also matter — a USB-C cable that only does USB 2.0 won't carry DisplayPort even if both ends support it. The cable HP shipped with this dock is the right one. If you're using a generic replacement cable, double-check it's a "full-feature" Type-C cable.

If the laptop doesn't do PD, you can still use the dock. You'll just need to charge the laptop separately with its own adapter while the dock handles displays and peripherals.

Setup, in order

Power first, then the laptop. Plug the AC adapter into the dock's power-in connector and into a grounded outlet. Then connect the USB-C cable to your laptop. The order matters because some laptops won't enumerate the dock correctly if it's connected before it has power.

If you're driving external monitors with DisplayLink (HP's software approach for older laptops without DisplayPort Alt Mode, or for adding a third monitor), install the DisplayLink driver before you connect anything. Click the DisplayLink icon in the taskbar after install — Extend makes the external monitor an extension of your primary, Mirror copies it.

Source: pages 6 and 9 of the user guide

Display outputs

The dock has both HDMI and DisplayPort. You can run both simultaneously, with one caveat: each output caps at 2560 × 1600 when both are active. Single-output, you can push higher. The dock supports up to 4K on a single output but the manual hedges on simultaneous 4K — assume one 4K + one 1440p, or two 1440p.

Blu-ray and other HDCP-protected content does not work through the external monitor outputs. If you're trying to play protected video and it's failing, that's not a driver issue — the dock doesn't support HDCP passthrough on this generation. Watch on the laptop's built-in display.

Source: pages 15 and 20 of the user guide

When a USB port stops working

This is the most common support call on this dock. A USB device that draws too much power can disable the port it's plugged into — the dock's power budget is finite, and the firmware shuts down a port that exceeds spec to protect the others.

Two ways to recover. Easier: unplug the offending device, then unplug and replug the dock from the laptop. The ports re-enumerate. More aggressive: power-cycle the dock entirely (pull the AC, wait 10 seconds, plug back in).

If the same port keeps disabling itself with the same device, the device is the problem, not the dock. Powered USB hubs on the dock work for high-draw peripherals — the hub provides its own power, the dock only handles data.

Source: pages 13 and 19 of the user guide

Disconnecting cleanly

Click the Safely Remove Hardware icon (notification area, far right of the taskbar), select USB Docking Station, click Safely Remove. Wait for the system to acknowledge, then unplug the USB-C cable.

You can pull the cable without doing this and Windows usually handles it. But if you're in the middle of writing to a USB drive plugged into the dock, you'll corrupt the drive. The discipline is worth keeping.

Source: page 18 of the user guide

Specs that come up

  • Operating temperature: 0°C to 40°C (32°F to 104°F)
  • Storage temperature: -20°C to 60°C
  • AC power: 100-240V, 50-60Hz
  • Document part number: 903765-001 (first edition June 2016)
  • Security slot: standard Kensington-compatible cable lock
Source: pages 17 and 22 of the user guide

When to replace it

If the dock is randomly losing display signal, intermittently dropping USB devices that worked yesterday, or running warm to the touch even when idle, the internal power regulation has likely degraded. The 2016 generation is around 8-10 years old now, and replacement is more economical than diagnosis. HP's current docking station lineup uses Thunderbolt 4 and is significantly more capable.

Compatible HP laptops (commonly)

HP laptops contemporary with this 2016 dock that shipped with USB-C ports supporting DisplayPort Alt Mode include the EliteBook 840 G3 and broader 800-series G3 line, and the ZBook 15u G3 and other ZBook G3 mobile workstations. Both have verified USB-C with DisplayPort Alt Mode per HP's QuickSpecs.

If your laptop's USB-C port lacks DisplayPort Alt Mode, the dock works as a USB hub only — DisplayLink can drive displays via software, but with bandwidth and refresh-rate limitations.

Full Manual

26 pages
Page 2

© Copyright 2016 HP Development Company,

L.P.

Windows is either a registered trademark or trademark of Microsoft Corporation in the United States and/or other countries. Plug and Display™ DisplayLink™ is an official software development partner. The information contained herein is subject to change without notice. The only warranties for HP products and services are set forth in the express warranty statements accompanying such products and services. Nothing herein should be construed as constituting an additional warranty. HP shall not be liable for technical or editorial errors or omissions contained herein. First Edition: June 2016 Document Part Number: 903765-001

Page 3

Table of contents 1 Getting started ............................................................................................................................................. 1 Identifying components ........................................................................................................................................ 1 Top component .................................................................................................................................... 1 Right components ............................................................................................................................... 2 Front components ............................................................................................................................... 3 Rear components ................................................................................................................................ 4 Adapter components ........................................................................................................................... 5 Setting up the USB docking station ....................................................................................................................... 6 Step 1: Connecting to AC power .......................................................................................................... 6 Step 2: Connecting to a computer ....................................................................................................... 7 Step 3: Prevent Sleep or Hibernation .................................................................................................. 7 Using the tether ..................................................................................................................................................... 8 Setting up the software ......................................................................................................................................... 8 Configuring an external monitor ........................................................................................................................... 9 Using DisplayLink ................................................................................................................................ 9 Using Windows .................................................................................................................................... 9 Using additional software features .................................................................................................. 10 Sleep, Hibernation, shutdown, and restart ....................................................................................... 10 2 Using the docking station ............................................................................................................................. 11 Docking station guidelines .................................................................................................................................. 11 Connecting to a network ..................................................................................................................................... 12 Connecting USB devices ....................................................................................................................................... 13 Connecting to a DisplayPort device ..................................................................................................................... 14 Connecting to an HDMI device ............................................................................................................................. 15 Connecting audio ................................................................................................................................................. 16 Connecting analog audio devices ...................................................................................................... 16 Connecting an optional security cable ................................................................................................................ 17 3 Disconnecting the docking station ................................................................................................................ 18 4 Troubleshooting .......................................................................................................................................... 19 Solving common problems .................................................................................................................................. 19 General use and connection problems ............................................................................................. 19 Audio problems ................................................................................................................................. 20 Video problems ................................................................................................................................. 20 iii

Page 4

Getting more information .................................................................................................................................... 21 Contacting support .............................................................................................................................................. 21 5 Specifications .............................................................................................................................................. 22 Input power .......................................................................................................................................................... 22 Operating environment ....................................................................................................................................... 22 Index ............................................................................................................................................................. 23 iv

Page 5

1 Getting started Identifying components This chapter identifies the visible hardware features of the docking station and provides setup instructions.

Note:

Some features of the docking station may not be available on your computer. Top component Component Description Power light ● On: The docking station is on. ● Pulsing: The docking station is in the standby state, a power-saving state. The docking station enters standby if no devices are connected or if all devices have been idle for more than 10 minutes. Identifying components 1

Page 6

Right components Component Description (1) USB Type-C cable Connects the docking station to a notebook or tablet.

Note:

If a computer does not support power over USB Type-C connections, power is not provided to the computer through the docking station. So you must use the AC adapter included with the computer to power or charge the computer. (2) Security cable slot Attaches an optional security cable to the docking station.

Note:

The security cable is designed to act as a deterrent, but it may not prevent the docking station from being mishandled or stolen. 2 Chapter 1 Getting started

Page 7

Front components Component Description (1) Audio-out (headphone)/Audio-in (microphone) combo jack Connects optional powered stereo speakers, headphones, earbuds, a headset, or a television audio cable. Also connects an optional headset microphone. This jack does not support optional standalone microphones.

Warning!

To reduce the risk of personal injury, adjust the volume before putting on headphones, earbuds, or a headset. For additional safety information, see the Regulatory, Safety, and Environmental Notices. To access this guide: Windows® 10 Select the Start button, select All apps, select HP Help and Support, and then select HP Documentation. Windows 8 Select the HP Support Assistant app on the Start screen, select My computer, and then select User guides. Windows 7 Select Start, select All Programs, select HP Help and Support, and then select HP Documentation.

Note:

When a device is connected to the jack, the computer speakers are disabled. If the audio does not automatically switch to the docking station, set the docking station as the default audio device in your computer settings. (2)

USB Type-C port Connects any USB device with a Type-C connector.

Note:

Adapters (purchased separately) may be required. (3) USB 2.0 port Connects an optional USB device, such as a keyboard, mouse, external drive, printer, scanner, or USB hub. Identifying components 3

Page 8

Rear components Component Description (1) Power connector Connects an AC adapter. (2) USB 3.0 charging (powered) port Connects an optional USB device, such as a keyboard, mouse, external drive, printer, scanner or USB hub. Standard USB ports will not charge all USB devices or will charge using a low current. Some USB devices require power and require you to use a powered port.

Note:

USB charging ports can also charge select models of cell phones and MP3 players, even when the computer is off. (3) USB 2.0 ports (2) Connect optional USB devices, such as a keyboard, mouse, external drive, printer, scanner, or USB hub. (4) RJ-45 (network) jack Connects a network cable. (5) HDMI port Connects an optional video or audio device, such as a high- definition television, any compatible digital or audio component, or a high-speed High Definition Multimedia Interface (HDMI) device. (6) Dual-Mode DisplayPort Connects an optional digital display device, such as a high- performance monitor or projector. 4 Chapter 1 Getting started

Page 9

Adapter components Component Description (1) USB Type-C port Connects the adapter to the docking station. (2) USB 3.0 connector Connects the docking station to a USB 3.0 port on a notebook or tablet.

Note:

Power is not provided to the computer through the docking station when you connect the computer to the docking station via USB. So you must use the AC adapter included with the computer to power or charge the computer. Identifying components 5

Page 10

Setting up the USB docking station Step 1: Connecting to AC power

Warning!

To reduce the risk of electric shock or damage to your equipment: Plug the power cord into a grounded (earthed) outlet that is easily accessible at all times. Disconnect power from the equipment by unplugging the power cord from the electrical outlet. Do not disable the power cord grounding plug. The grounding plug is an important safety feature. To ensure the correct performance of all docking station features, connect the docking station to an AC power source using the docking station power cord.
  • Connect one end of the power cord to the AC adapter (1), and connect the other end of the power cord to
  • an electrical outlet (2).
  • Connect the AC adapter to the power-in connector (3) on the docking station.
  • 6 Chapter 1 Getting started

    Page 11

    Step 2: Connecting to a computer To connect a computer to the docking station via USB Type-C: ▲ Connect the USB Type-C cable to a USB Type-C port on your computer.

    Note:

    If a computer does not support power over USB Type-C connections, power is not provided to the computer through the docking station. So you must use the AC adapter included with the computer to power or charge the computer. To connect a computer to the docking station via USB, use the included USB-Type-C-to-USB adapter: ▲ Connect the docking station cable to the USB Type-C end of the adapter, and then connect the USB end of the adapter to a USB port on your computer.

    Note:

    Power is not provided to the computer through the docking station when you connect the computer to the docking station via USB. So you must use the AC adapter included with the computer to power or charge the computer. Step 3: Prevent Sleep or Hibernation When using an external monitor, you might want to close the computer. For more information on configuring

    an external monitor, see Configuring an external monitor on page 9. To ensure that the computer does not initiate Sleep or Hibernation when it is closed:

  • Open the Control Panel and select the Power Options page.
  • Click Choose what closing the lid does. Click Do nothing, and then click OK.
  • Under Plugged in, select Do nothing, and then click Save changes.
  • Note:

    For instructions on accessing the Power Options page, see Help and Support on the computer. Setting up the USB docking station 7

    Page 12

    Using the tether Depending on the external devices you want to connect to the computer, you might want to switch between connecting the docking station to the computer via USB Type-C and connecting the docking station via USB. To help you organize the cables, a tether is included with the docking station. To use the tether: ▲ Connect the included adapter to the docking station. Then fasten one end of the tether around the docking station cable next to the USB Type-C connector and the other end of the tether around the adapter cable next to the USB Type-C connector. You can either keep the cable and adapter connected or disconnect the cable and adapter without removing the tether. Setting up the software This section describes how to install the HP Elite USB-C Docking Station software on a computer running the Windows 10, Windows 8, or Windows 7 operating system. The software is preinstalled in flash memory on the docking station. 8 Chapter 1 Getting started

    Page 13

  • With the computer on, Windows running, and the Internet connected, connect the USB cable from the
  • docking station to the computer.
  • If the device flash drive does not open automatically, open File Explorer, and then select HP USB-C
  • Dock.
  • Double-click HP Elite USB-C Docking Station Installer.
  • Follow the on-screen instructions.
  • A welcome screen appears. Click Next.
  • When the End User License Agreement appears, accept and then click Next.
  • Click Install.
  • Choose to restart now or later. The docking station might not work until the next restart. If you choose
  • to restart the computer, first remove any disks from the computer’s drives. Click Finish.
  • Be sure that you have the latest drivers installed. Go to http://www.hp.com/support and select your
  • country or region. Select Software and Drivers, type the dock model number (located on the bottom of the docking station), and then select Find my product. Click the link for your specific docking station, and then download the latest drivers. Configuring an external monitor Using DisplayLink Use DisplayLink to configure the display of a monitor attached to the docking station:
  • Click the DisplayLink icon in the taskbar.
  • To set the external monitor as an extension of the primary monitor, click Extend.
  • – or – To set the external monitor as a copy of the primary monitor, click Mirror. – or – To set the external monitor to be the only display, click Notebook monitor off. – or – To set the external monitor to be the primary display, click Set as main monitor. DisplayLink allows you to optimize the display for video, check for updates, and configure advanced settings. DisplayLink options might vary, depending on the operating system. For instructions on configuring the external monitor using Windows, see Using Windows on page 9. Using Windows Use Windows to configure the display of a monitor attached to the docking station.

    Note:

    When you first connect the docking station to a computer using Windows 7, the Windows properties screen appears, and the external display is automatically configured in Mirror mode as the default.
  • If the computer is running Windows 10, type control panel in the taskbar search box, and then
  • select Control Panel. Select Appearance and Personalization. – or – Configuring an external monitor 9

    Page 14

    If the computer is running Windows 8, move the pointer down from the upper-right corner of the screen, and then click Devices. Click Second screen. – or – If the computer is running Windows 7, right-click on the desktop, and then select Screen Resolution.

  • To set the external monitor as the primary monitor on computers running Windows 10 or Windows 8,
  • select Second screen only. To set the external monitor as the primary monitor on computers running Windows 7, select Make this my main display. – or – To set the external monitor as an extension of the primary monitor on computers running Windows 10 or Windows 8, select Extend. To set the external monitor as an extension of the primary monitor on computers running Windows 7, select Extend these displays. – or – To set the external monitor as a copy of the primary monitor on computers running Windows 10 or Windows 8, select Duplicate. To set the external monitor as a copy of the primary monitor on computers running Windows 7, select Duplicate these displays. You can also access the display settings by pressing the Windows key +p. Using additional software features The DisplayLink software offers additional features for configuring monitors attached to the docking station: ● Screen Resolution—Changes the resolution of the external monitor. ● Screen rotation—Rotates the display of the external monitor 90, 180, or 270 degrees. ● Off—Turns the external monitor off. ● Advanced—Opens the Windows properties box. Sleep, Hibernation, shutdown, and restart If the computer initiates Sleep or Hibernation, the monitor turns off. When the computer exits Sleep or Hibernation, the connected monitor returns to the previous monitor settings. If you restart or shut down the computer and then turn it back on, the connected monitor returns to the previous monitor settings. 10 Chapter 1 Getting started

    Page 15

    2 Using the docking station Docking station guidelines ● Operating systems—For optimal performance, use the docking station with a computer running the Windows 10, Windows 8, or Windows 7 operating system. ● Power—To use docking station features, AC power must be connected to the docking station. ● Connecting and disconnecting—The docking station can be connected to or disconnected from the computer whether the computer is on or off. (See Step 2: Connecting to a computer on page 7 and Disconnecting the docking station on page 18.) ● External devices—When the docking station is connected to the computer, external devices can be connected to the ports on the docking station or to the ports on the computer. Docking station guidelines 11

    Page 16

    Connecting to a network You can connect the computer to a network through the docking station. This requires an Ethernet cable (purchased separately).

  • Connect the docking station to the computer.
  • Connect one end of the Ethernet cable to the RJ-45 (network) jack on the docking station and connect
  • the other end to an RJ-45 wall jack or router. 12 Chapter 2 Using the docking station

    Page 17

    Connecting USB devices The docking station has five USB ports: one USB 3.0 and two USB 2.0 ports on the rear panel and one USB Type-C and one USB 2.0 port on the front panel. Use the USB ports to connect optional external USB devices, such as a keyboard and mouse.

    Note:

    Be sure that the external device is compliant with the docking station power specifications. Using a noncompliant device might disable the port to which the device is attached. To reset the port, see Troubleshooting on page 19. Connecting USB devices 13

    Page 18

    Connecting to a DisplayPort device The docking station can also be connected to an external device, such as a monitor or a projector, through the DisplayPort. The docking station supports video connections to the HDMI port and the DisplayPort at the same time, as long as screen resolutions are 2048 ×1152 or less. For resolutions greater than 2048 ×1152, only single display mode can be used. 14 Chapter 2 Using the docking station

    Page 19

    Connecting to an HDMI device You can connect the docking station to an external video or audio device, such as a high-definition television, or to any digital audio components, through the HDMI port. The docking station supports video connections to the HDMI port and the DisplayPort at the same time, as long as screen resolutions are 2560 x 1600 or less. For resolutions greater than 2560 x 1600, only single display mode can be used.

    Note:

    To transmit video signals through the HDMI port, you need an HDMI cable (purchased separately). Connecting to an HDMI device 15

    Page 20

    Connecting audio You can connect headphones or speakers directly into the audio-out (headphone)/audio-in (microphone) combo jack on the docking station. You can also connect analog audio devices.

    Note:

    If the audio does not automatically switch to the docking station, set the docking station as the default audio device in your computer settings. Connecting analog audio devices To connect analog audio:
  • Connect one end of an audio Y-cable (purchased separately) to the audio-out (headphone)/audio-in
  • (microphone) combo jack on the docking station.
  • Connect the other end to the red and white audio-in jacks on your television or stereo equipment. See
  • your television or stereo equipment user guide for the jack names and locations. 16 Chapter 2 Using the docking station

    Page 21

    Connecting an optional security cable

    Note:

    The security cable is designed to act as a deterrent, but it may not prevent the docking station from being mishandled or stolen. To install a security cable:
  • Loop the security cable around a secured object.
  • Insert the key into the cable lock (1).
  • Insert the cable lock into the security cable slot on the docking station (2), and then turn the key.
  • Remove the key.
  • Connecting an optional security cable 17

    Page 22

    3 Disconnecting the docking station To disconnect the docking station from the computer, follow these steps:

  • Click the Safely Remove Hardware icon in the notification area, at the far right of the taskbar.
  • Click Safely Remove USB Docking Station. The Safe to Remove Hardware message is displayed.
  • Disconnect the attached USB Type-C cable from the computer.
  • 18 Chapter 3 Disconnecting the docking station

    Page 23

    4 Troubleshooting Solving common problems The following tables list possible problems and the recommended solutions. General use and connection problems Problem Possible cause Solution The power light is off. The docking station is not connected to AC power. Connect the power cord to the docking station and to an electrical outlet. The ports or jacks on the docking station are not working. The docking station is not connected to AC power. Connect the power cord to the docking station and to an electrical outlet.

    The docking station is not connected to the computer correctly. Disconnect the USB cable from the computer, and then reconnect it. A USB port on the docking station is disabled. The USB device attached to the port may not be compliant with the docking station power specifications and is using too much power. Reset the port:

  • Disconnect the device that disabled
  • the port.
  • Disconnect the power cord from the
  • docking station, and then reconnect it. – or – Disconnect the docking station from the computer, and then reconnect it. When the docking station is connected to the computer, both the WLAN and the LAN are connected. Switching from the WLAN connection to the LAN connection is not supported. Disable the WLAN connection: If you are using Windows 10:
  • Right-click Start, and then select
  • Network Connections.
  • Right-click Wi-Fi, and then click
  • Disable. If you are using Windows 8:
  • Move the pointer down from the
  • upper-right corner of the screen, select Settings, and then select Change PC settings.
  • Select Wireless, and be sure that
  • your wireless device is set to Off. If you are using Windows 7: ● Select Start, select Control Panel, select Hardware and Sound, and then select Windows Mobility Center. Click Turn wireless off. – or – Solving common problems 19

    Page 24

    ● Click the Show hidden icons arrow in the notification area, and then click the HP Connection Manager icon. In the HP Connection Manager window, click the WLAN power icon to turn it off. Cannot uninstall DisplayLink core software using Uninstall in Windows 10 or Windows 8 or Uninstall a program in Windows 7.

    Uninstall DisplayLink Core Software. This automatically uninstalls DisplayLink. In Windows 10 or Windows 8, use Uninstall. In Windows 7 or Vista, use Uninstall a program. Audio problems Problem Possible cause Solution Audio does not play. The drivers are not installed. Install the drivers. See Setting up the software on page 8. Headphones or other audio device connected to the docking station do not produce sound. An audio device is connected to the headphone jack on the docking station, but the docking station is not the default audio device. Set the docking station as the default audio device in the computer settings, or connect the audio device to the computer. A microphone connected to the docking station does not work. A microphone is connected to the docking station, but the docking station is not the default audio device. Set the docking station as the default audio device in the computer settings, or connect the microphone to the computer. A connected home entertainment system does not have audio. Audio is not connected properly. Be sure that the docking station is properly connected to the home entertainment system. Video problems Problem Possible cause Solution A video does not display. The drivers are not installed. Install the drivers. See Setting up the software on page 8. Fonts and other characters on the external monitor appear large. The external monitor screen resolution is higher than the maximum limit of 2560 x

  • Set the screen resolution equal to or lower
  • than the maximum limit. The graphics application does not detect the external monitor. Some graphics applications do not detect external monitors connected to the docking station. Using the DisplayLink software, configure

    the external monitor. See Configuring an external monitor on page 9. The external monitor cannot be set as the primary monitor when using some Intel graphics applications. Older Intel graphics applications do not support setting the external monitor as the primary monitor. Download the latest Intel drivers from http://www.hp.com/support. The computer monitor does not work. The external monitor has been disconnected from the docking station Disconnect the docking station from the computer, and then disconnect the external monitor from the docking station. 20 Chapter 4 Troubleshooting

    Page 25

    Problem Possible cause Solution before the docking station was disconnected from the computer. A video device connected to the external monitor port displays a black screen when playing Blu-ray or other protected content. The docking station does not support viewing Blu-ray or other protected content on an external display device connected to the external monitor port on the docking station. Use the computer’s display or connect the external display device to the computer. Getting more information ● For comprehensive information about the docking station, as well as governmental agency and safety information about the use of the docking station, access Help and Support. ● The HP website (http://www.hp.com) provides product news and software updates. Contacting support If you cannot solve a problem using the troubleshooting tips in this chapter, you might need to contact support. For the fastest possible resolution of your problem, have the following information available when you contact support:

    Note:

    The serial number and other information for the docking station can be found on the service label located on the bottom of the docking station. ● Model name and number for the computer and for the docking station ● Serial numbers for the computer and docking station ● Dates the computer and docking station were purchased ● Conditions under which the problem occurred ● Error messages that have been displayed ● Hardware and software you are using ● The manufacturer and model of components connected to the computer and docking station To contact support using your HP computer, select Start and then select Help and Support. Click Contact support to start a chat session with a support specialist. For U.S. support, go to http://www.hp.com/go/contactHP. For worldwide support, go to http://welcome.hp.com/country/us/en/wwcontact_us.html. Choose from the following types of support: ● Chat online with an HP technician.

    Note:

    When chat is not available in a particular language, it is available in English. ● Find HP support worldwide telephone numbers. ● Locate an HP service center. Getting more information 21

    Page 26

    5 Specifications Input power The power information in this section may be helpful if you plan to travel internationally with the dock. The dock operates on DC power, which can be supplied by an AC or a DC power source. The AC power source must be rated at 100–240 V, 50–60 Hz. Although the dock can be powered from a standalone DC power source, it should be powered only with an AC adapter or a DC power source supplied and approved by HP for use with this dock. The dock can operate on DC power within the following specifications. Input Power Rating Operating voltage and current 19.5 V dc @ 3.33 A – 65 W

    Note:

    This product is designed for IT power systems in Norway with phase-to-phase voltage not exceeding 240 V rms.

    Note:

    The dock operating voltage and current can be found on the dock’s regulatory label. Operating environment Factor Metric

    U.S.

    Temperature Operating (writing to optical disc) 0°C to 40°C 32°F to 104°F Nonoperating -40°C to 70°C -40°F to 158°F Relative humidity (noncondensing) Operating 5% to 95% 5% to 95% Nonoperating 5% to 90% 5% to 90% Maximum altitude (unpressurized) Operating -15 m to 3,048 m -50 ft to 10,000 ft Nonoperating -15 m to 9,144 m -50 ft to 30,000 ft 22 Chapter 5 Specifications

    Page 27

    Index

    A

    analog audio 16 audio connection, analog 16 audio, connecting 16 audio-out (headphone)/audio-in (microphone) combo jack 16 audio-out (headphone)/audio-in (microphone) combo jack, identifying 3

    C

    cable, identifying 2 computer connecting 7 sleeping 7 connector, power 4 connectors power 6

    D

    DisplayPort device, connecting 14 Dual-Mode DisplayPort identifying 4

    E

    external devices 11

    H

    HDMI device, connecting 15 HDMI port, identifying 4 Help and Support 21

    I

    input power 22

    J

    jacks audio-out (headphone)/audio-in (microphone) combo 3 audio-out (headphone)/audio-in (microphone) combo jack 16 network 4 RJ-45 (network) 4, 12

    L

    lights, power 1 lock, security cable 17

    N

    network (RJ-45) jack 12 network jack, identifying 4

    O

    operating environment 22 operating systems supported 11

    P

    ports Dual-Mode DisplayPort 4

    Hdmi

    4

    Usb

    3, 4, 5, 13 USB 3.0 charging (powered) 4 USB Type-C 3 power docking station, connecting 6 guidelines 11 power connector 6 power connector, identifying 4 power light, identifying 1

    R

    RJ-45 (network) jack 12 RJ-45 (network) jack, identifying 4 RJ-45 (network) lights, identifying 4

    S

    security cable slot 17 security cable slot, identifying 2 security cable, connecting 17 slots security cable 2, 17 support, contacting 21

    T

    Troubleshooting 19

    U

    USB 3.0 charging (powered), identifying 4 USB devices, connecting 13 USB ports, identifying 3, 4, 5 USB Type-C port, identifying 3 Index 23

    More from HP

    Similar Adapters