
Mam Electric Steriliser And Express Bottle Warmer
Ask AI
— answers from the official manualAnswers from the official manual.
Common questions
Common Questions
29 totalHow much water do I need to add when using the Electric Steriliser?
Pour exactly 200ml (7 fl oz) of tap water directly into the Base before each sterilising cycle. Using too much or too little water can result in incomplete sterilising and can damage the device. Always ensure the sealing ring is firmly pressed into place before adding water. (Page 4)
How long does the electric sterilising programme take, and how will I know it has finished?
The sterilising programme runs for 7 minutes and then automatically stops, signalled by 3 long beeps and the light stopping its flashing. After the programme ends, a 4-minute cooling down period begins with all 4 LEDs lit, which also ends with 3 long beeps. You should allow the Steriliser to cool before removing the lid. (Page 4)
How long will items stay sterile inside the Electric Steriliser?
Sterilised products kept in an unopened Steriliser stay disinfected for up to 48 hours. To maintain this disinfection period, the number of items sterilised together must not exceed the maximum quantities listed in the product charts. For a 24-hour disinfection effect, higher quantities of bottles can be sterilised at once. (Pages 3–4)
How do I use the Express Bottle Warming programme?
Select the Express Warming programme using the selection button and press it for about 2 seconds to start; a long beep will sound and the light will flash while running. Use the Bottle & Food Warmer Chart to determine the correct water quantity based on bottle size and initial temperature — for example, a 130ml plastic bottle at room temperature requires approximately 35ml of water. The programme automatically stops at the end of the heating cycle with 2 long beeps. (Pages 5–6)
What is the 'keep warm' function and how long does it last?
All three warmer programmes have an integrated 'keep warm' function that automatically starts at the end of the heating cycle or after manually stopping the programme. The keep warm function stops automatically after 45 minutes, signalled by 3 long beeps. When using this function, the Bottle Warmer Basket and Bottle Warmer Cover should be left in place. (Page 7)
How do I descale and clean the Electric Steriliser & Bottle Warmer?
After every use, unplug the appliance and wipe it with a damp cloth to avoid limescale build-up. At regular intervals, descale the base using household vinegar or a commercially available decalcifying agent according to the manufacturer's instructions. Never place the appliance in a dishwasher or immerse it in water, and do not use strong or abrasive cleaning agents. (Page 7)
Show 23 more questions
What is the warranty period for the Electric Steriliser & Express Bottle Warmer?
What are the power requirements for the Electric Steriliser & Express Bottle Warmer?
Is it safe for children to use the Electric Steriliser & Express Bottle Warmer?
How do I clean and maintain my MAM Electric Steriliser & Express Bottle Warmer?
What should I do if my MAM Electric Steriliser doesn't appear to be working at all?
How often do I need to descale my MAM Electric Steriliser & Express Bottle Warmer?
Why does my MAM Easy Start bottle feel loose after filling it with boiled water?
What safety precautions should I follow when opening the Steriliser after a cycle?
How do I warm a bottle with the Bottle Warmer?
How do I clean the Electric Steriliser and Bottle Warmer?
How long should I boil milk storage containers to sterilize them?
What are key maintenance practices needed for the MAM Easy Start bottle?
What is the process to factory reset my device?
How do I properly set up and assemble my electric breast pump?
What is the recommended frequency for descaling my electric appliances?
What is the cooling period after using my MAM Electric Steriliser?
How do I correctly assemble the MAM Electric Steriliser?
What should I do if there's leftover water after using my MAM Electric Steriliser?
How hot does the bottle warmer get during use?
What are the sterilizing times for different wattages of microwave?
How do I safely store sterilized bottles to ensure they remain disinfected?
How do I sterilize bottles using the Electric Steriliser?
What are some safety precautions when using the Electric Steriliser?
Full Manual
36 pages

Online Shop Electrical Products English
Content
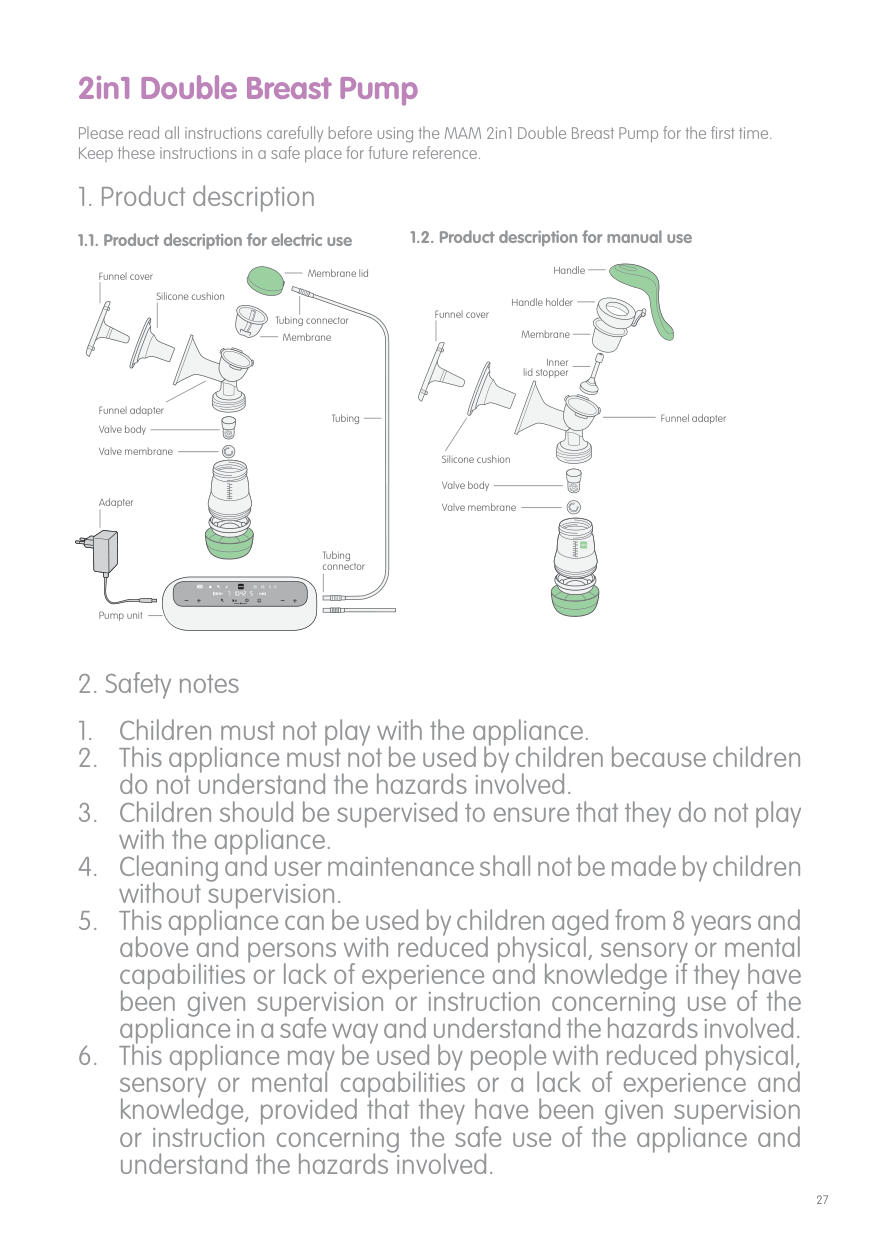
####### Electric Steriliser & Express Bottle Warmer


Electric Steriliser & Express Bottle Warmer
Please read all instructions carefully before using the MAM Electric Steriliser & Express Bottle Warmer for the first time. Keep these instructions for future reference. MAM Electric Steriliser & Express Bottle Warmer allows you to warm, defrost and sterilise all MAM and common Bottles and Milk Storages, as well as baby food safely and quickly.
####### Interface display guide
ON/OFF Programme
Sterilising Programme
Express Warming Programme
Selection & Start Programme
Defrosting & Food Warming Programme
Gentle Warming Programme
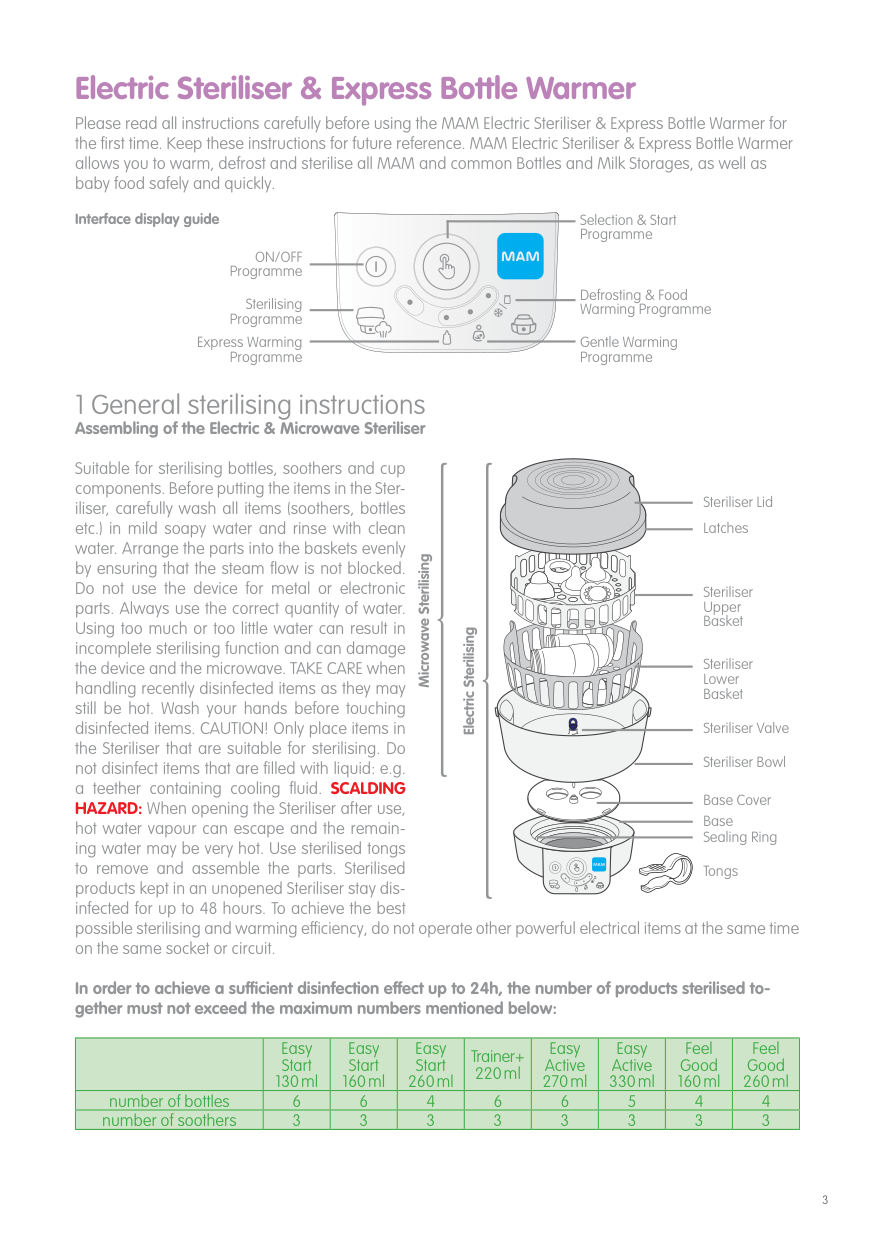
Assembling of the Electric & Microwave Steriliser
Suitable for sterilising bottles, soothers and cup components. Before putting the items in the Steriliser, carefully wash all items (soothers, bottles etc.) in mild soapy water and rinse with clean water. Arrange the parts into the baskets evenly by ensuring that the steam flow is not blocked. Do not use the device for metal or electronic parts. Always use the correct quantity of water. Using too much or too little water can result in incomplete sterilising function and can damage the device and the microwave. TAKE CARE when handling recently disinfected items as they may still be hot. Wash your hands before touching disinfected items. CAUTION! Only place items in the Steriliser that are suitable for sterilising. Do not disinfect items that are filled with liquid: e.g. a teether containing cooling fluid.
Steriliser Lid
Latches
Microwave Sterilising
Steriliser Upper Basket
Electric Sterilising
Steriliser Lower Basket
Steriliser Valve
Steriliser Bowl
Base Cover Base Sealing Ring
SCALDING HAZARD: When opening the Steriliser after use, hot water vapour can escape and the remaining water may be very hot. Use sterilised tongs to remove and assemble the parts. Sterilised products kept in unopened Steriliser stay disinfected for up to 48 hours. To achieve the best possible sterilising and warming efficiency, do not operate other powerful electrical items at the same time on the same socket or circuit.
Tongs
###### In order to achieve a sufficient disinfection effect up to 24h, the number of products sterilised together must not exceed the maximum numbers mentioned below:
| |Easy Start 130 ml|Easy Start 160 ml|Easy Start 260 ml|Easy Start 320 ml|Trainer+ 220 ml|Easy Active 270 ml|Easy Active 330 ml|Feel Good 160 ml|Feel Good 260 ml| |---|---|---|---|---|---|---|---|---|---| |number of bottles|6|6|4|4|6|6|5|4|4| |number of pacifiers|3|3|3|3|3|3|3|3|3|
###### To achieve a disinfection effect up to 48h, the maximum number of products sterilised together shall not exceed:
| |Easy Start 130 ml|Easy Start 160 ml|Easy Start 260 ml|Easy Start 320 ml|Trainer+ 220 ml|Easy Active 270 ml|Easy Active 330 ml|Feel Good 160 ml|Feel Good 260 ml| |---|---|---|---|---|---|---|---|---|---| |number of bottles|4|4|3|3|6|5|4|3|3| |number of pacifiers|7|5|10|8|5|5|10|5|5|
#### 1.1. Using the Electric Steriliser
Fig. 1 Fig. 2
Fig. 4
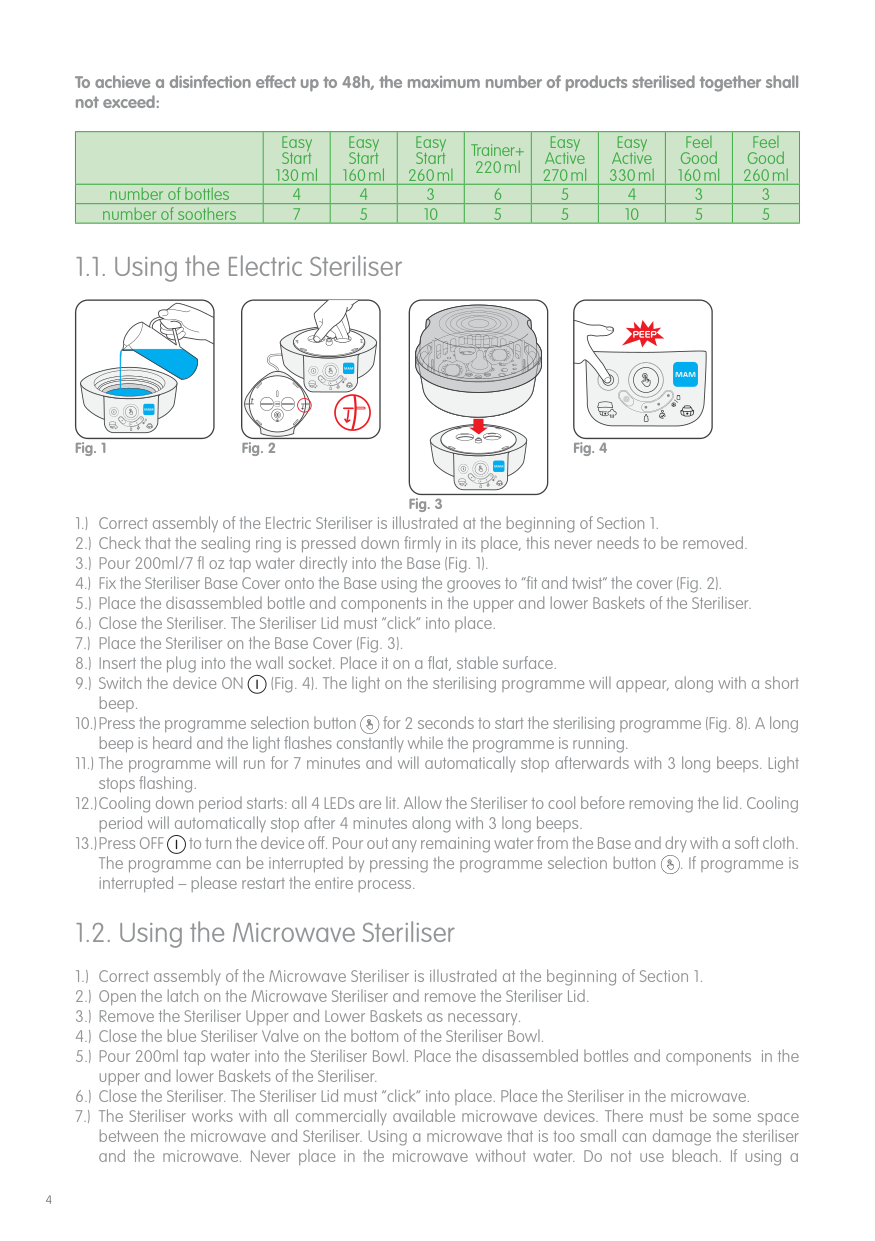
Fig. 3
#### 1.2. Using the Microwave Steriliser
and the microwave. Never place in the microwave without water. Do not use bleach. If using a combination microwave oven, ensure that the Microwave Steriliser is not exposed to the heat of the grill because this could damage steriliser, products and microwave.
|Power|Time|Cooling time| |---|---|---| |650 – 1000 W:|11 min|3 min| |1050 – 1800 W:|6 min|3 min| |1850 W:|5 min|3 min|
Fig. 5
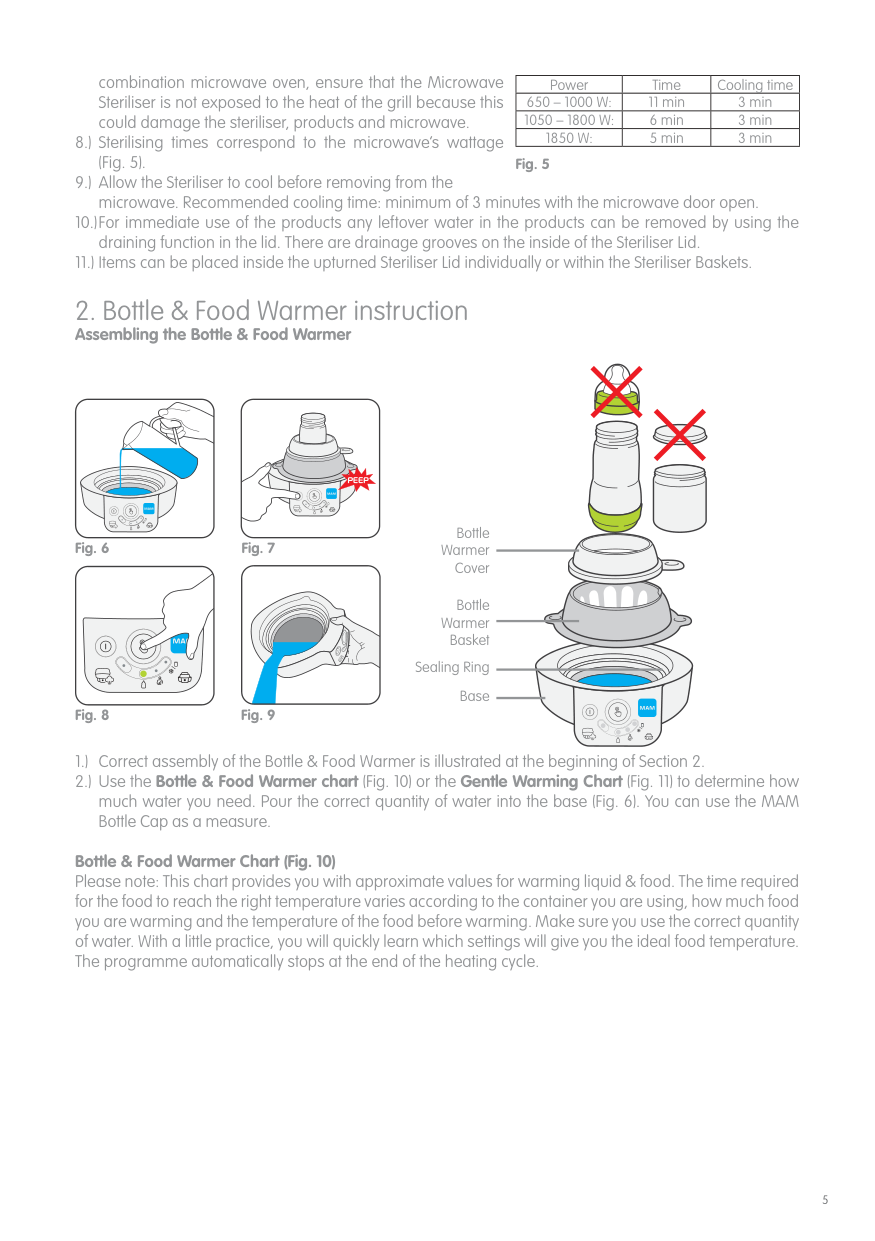
Assembling the Bottle & Food Warmer
Bottle Warmer
Fig. 6 Fig. 7
Cover
Bottle Warmer
Basket
Sealing Ring
Base
Fig. 8 Fig. 9
###### Bottle & Food Warmer Chart (Fig. 10)
Please note: This chart provides you with approximate values for warming liquid & food. The time required for the food to reach the right temperature varies according to the container you are using, how much food you are warming and the temperature of the food before warming. Make sure you use the correct quantity of water. With a little practice, you will quickly learn which settings will give you the ideal food temperature. The programme automatically stops at the end of the heating cycle.
|Programme|Container|Volume|Initial temperature|Water quantity approx.|app. Time| |---|---|---|---|---|---| |Express Warming|Plastic Bottle|130ml|Room temperature|35ml|Minimum of 2.30 min.| |Express Warming|Plastic Bottle|130ml|Refrigerator temperature|45ml|Minimum of 2.30 min.| |Express Warming|Plastic Bottle|160ml|Room temperature|35ml|Minimum of 2.30 min.| |Express Warming|Plastic Bottle|160ml|Refrigerator temperature|45ml|Minimum of 2.30 min.| |Express Warming|Plastic Bottle|260ml|Room temperature|45ml|Minimum of 2.30 min.| |Express Warming|Plastic Bottle|260ml|Refrigerator temperature|75ml|Minimum of 2.30 min.| |Express Warming|Glass Bottle|170ml|Room temperature|15ml|Minimum of 1.50 min.| |Express Warming|Glass Bottle|170ml|Refrigerator temperature|20ml|Minimum of 1.50 min.| |Express Warming|Glass Bottle|260ml|Room temperature|15ml|Minimum of 1.50 min.| |Express Warming|Glass Bottle|260ml|Refrigerator temperature|20ml|Minimum of 1.50 min.| |Defrosting and Food Warming|Milk Storage
|60ml|Freezer temperature|50ml|Minimum of 10.10 min.| |Defrosting and Food Warming|Milk Storage
|90ml|Freezer temperature|65ml|Minimum of 10.10 min.| |Defrosting and Food Warming|Milk Storage
|120ml|Freezer temperature|75ml|Minimum of 10.10 min.| |Defrosting and Food Warming|Baby Food|190g|Room temperature|40ml|Minimum of 9.30 min.| |Defrosting and Food Warming|Baby Food|190g|Refrigerator temperature|60ml|Minimum of 9.30 min.|
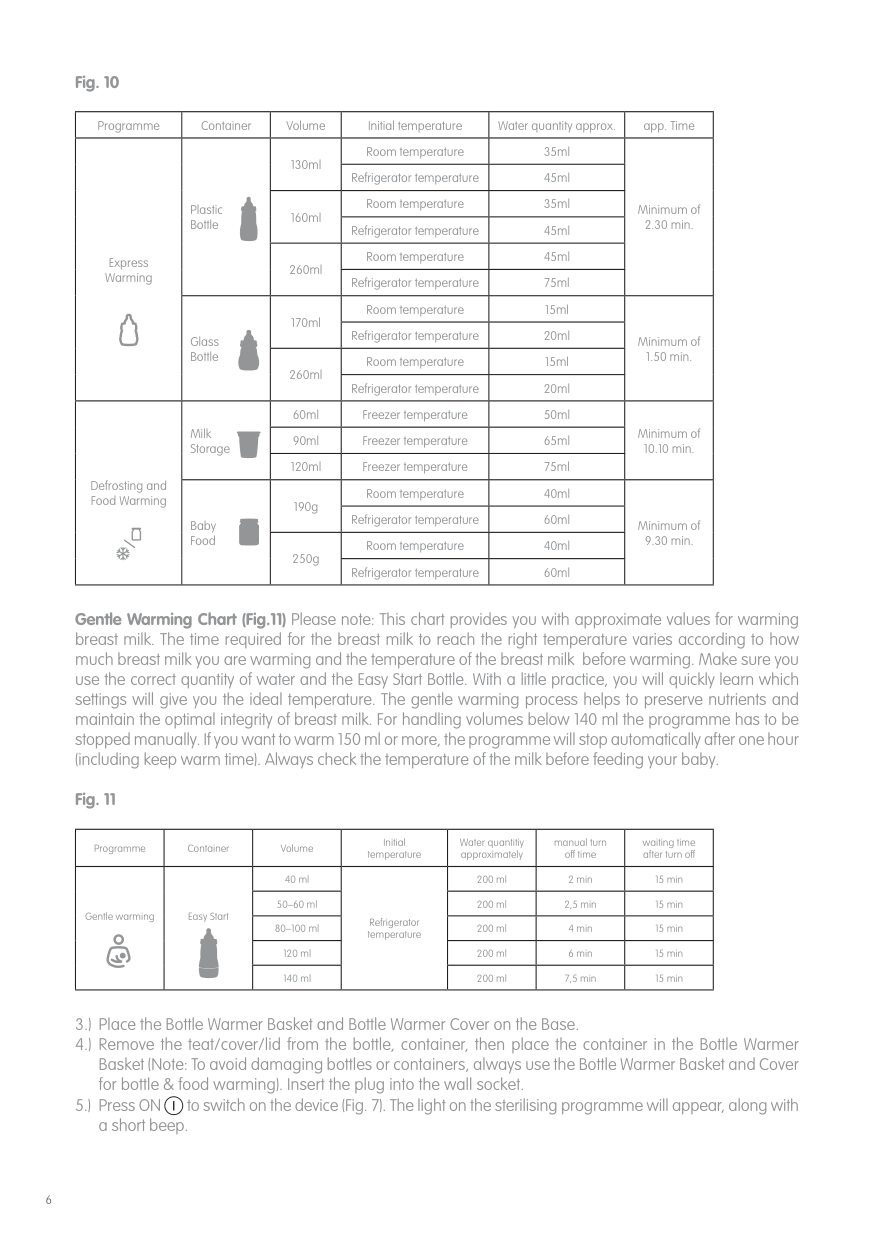
|Defrosting and Food Warming|Baby Food|250g|Room temperature|40ml|Minimum of 9.30 min.| |Defrosting and Food Warming|Baby Food|250g|Refrigerator temperature|60ml|Minimum of 9.30 min.|
Gentle Warming Chart (Fig.11) Please note: This chart provides you with approximate values for warming breast milk. The time required for the breast milk to reach the right temperature varies according to how much breast milk you are warming and the temperature of the breast milk before warming. Make sure you use the correct quantity of water and the Easy Start Bottle. With a little practice, you will quickly learn which settings will give you the ideal temperature. The gentle warming process helps to preserve nutrients and maintain the optimal integrity of breast milk. For handling volumes below 140 ml the programme has to be stopped manually. If you want to warm 150 ml or more, the programme will stop automatically after one hour. Always check the temperature of the milk before feeding your baby.
|Programme|Container|Volume|Initial temperature|Water quantitiy approximately|manual turn off time|waiting time after turn off| |---|---|---|---|---|---|---| |Gentle warming|Easy Start
|40 ml|Refrigerator temperature|200 ml|2 min|15 min| |Gentle warming|Easy Start
|50–60 ml|Refrigerator temperature|200 ml|2,5 min|15 min| |Gentle warming|Easy Start
|80–100 ml|Refrigerator temperature|200 ml|4 min|15 min| |Gentle warming|Easy Start
|120 ml|Refrigerator temperature|200 ml|6 min|15 min| |Gentle warming|Easy Start
|140 ml|Refrigerator temperature|200 ml|7,5 min|15 min|
| |Express Bottle Warming: Quick warming of all bottles up to drinking temperature.| |---|---| | |Gentle Warming: for breast milk| | |Defrosting and Food Warming: frozen milk can be defrosted and warmed up. Baby food in containers can also be warmed up.|
#### 3. Cleaning & maintaining the appliance
Never place it in a dishwasher. Always unplug the appliance from the mains before cleaning & descaling. Do not clean or descale the appliance when it is hot. Do not use strong or abrasive cleaning or scouring agents, as these could attack the appliance’s surface. After every use, unplug the appliance and wipe it with a damp cloth to avoid any build up of limescale. Caution: during cleaning and maintenance, the sealing ring may become loose or separated from the electric device. Check to ensure that the ring is correctly seated. If necessary, press it firmly into place. The wider part of the ring should be outside and the thicker part inside the base. As shown on the sticker on the electric device, please descale the base at regular intervals. Use household vinegar or a commercially available decalcifying agent for this purpose according the manufacturers instructions. If the appliance ever needs repairing, under no circumstances attempt to open it. Instead, contact the address shown in these instructions. The appliance must never be immersed in water.
#### 4. Environment/Disposal
Do not throw away the appliance with the normal household waste at the end of its life, but hand it in at an official collection point for recycling. By doing this, you help to preserve the environment. Please contact your local authority for further details of your nearest collection point for WEEE.
In addition to the seller’s warranty obligations arising from the contract to purchase, we as the manufacturers provide a warranty of 24 months from purchase of the appliance so as long as the appliance has been used properly and the operating instructions have been followed. Evidence of the date of purchase and the type of appliance should be provided by means of a receipt. The purchaser’s statutory rights are unaffected by this manufacturer warranty. During the warranty period, we undertake to remedy any defects attributable to poor materials or workmanship. This does not include damage that is attributable to normal wear and tear, improper use and insufficient or incorrect maintenance.
The appliance should never be opened by anyone other than properly trained and certified personnel within MAM Baby. Otherwise the warranty will be invalidated. Improper repairs or tampering can result in significant safety hazards for users. If the supply cord is damaged, it must be replaced by the manufacturer, its service agent or similarly qualified persons in order to avoid a hazard.
EU: Voltage: 220–240 V; 50–60 Hz / Power consumption: 1000–1200 Watts. The product is fitted with a CEE 7/7 mains plug. UK/IRL: Voltage: Type:112, 220–240 V; 50–60 Hz / Power consumption: 1000–1200 Watts. The product is fitted with a BS 1363 mains plug containing a 13A fuse. If it ever becomes necessary to replace the fuse, only use fuses that are marked BS 1362, and rated at 13A.
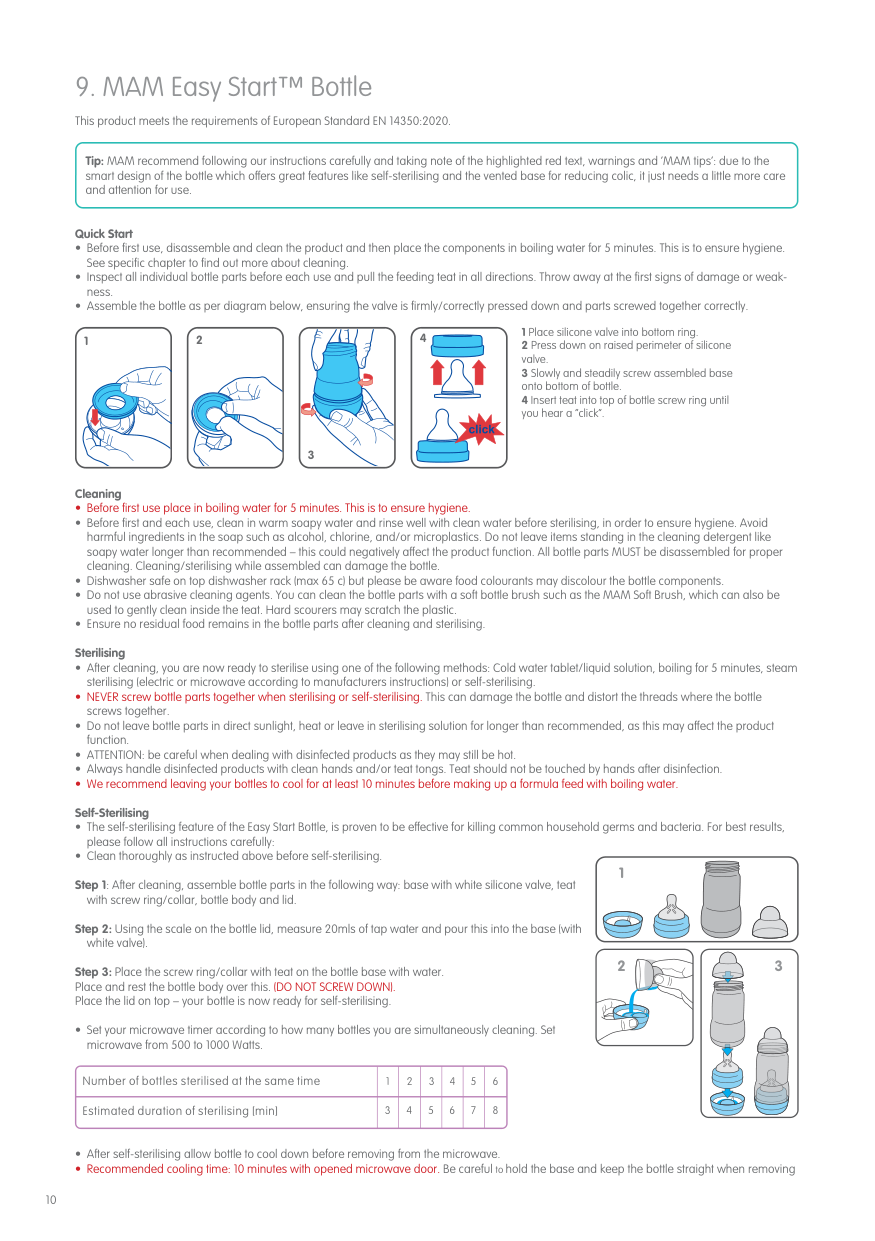
Easy Start™ Anti-Colic
Instructions for use:
Clean before first and each subsequent use.
Before first use separate all 6 parts and place them in boiling water for 5 minutes. This is to ensure hygiene.
Inspect all individual bottle parts before each use and pull the feeding teat in all directions. Throw away at the first signs of damage or weakness.
To ensure proper cleaning/sterilising all bottle parts MUST be disassembled.

Cleaning/sterilising while assembled can damage the bottle.
1 Place silicone valve into bottom ring.
2 Press down on raised perimeter of silicone valve.
Dishwasher safe on top dishwasher rack (max. 65° C / 149 F) but food colourings may discolour components.
Do not use abrasive cleaning agents. Only soft bristle brushes or soft sponges should be used. Hard scourers may scratch the plastic.
Sterilising using one of the following methods: steam sterilising (electric or microwave according to manufacturer’s instructions), boiling in water for at least 5 minutes or immersing in a liquid sterilising solution.
Do not leave items standing in any cleaning solution for longer than recommended - this could negatively affect the product function.
The bottle is made of polypropylene which is hygienic, easy to clean and relatively soft. Avoid any heavy pressure on it, as this could affect the function.
######## 3
4 Insert teat into top of bottle screw ring until you hear a ”click“.
Screw assembled base onto bottom of bottle in slow steady manner.
Do not use pin or sharp object to enlarge feeding hole of teat.
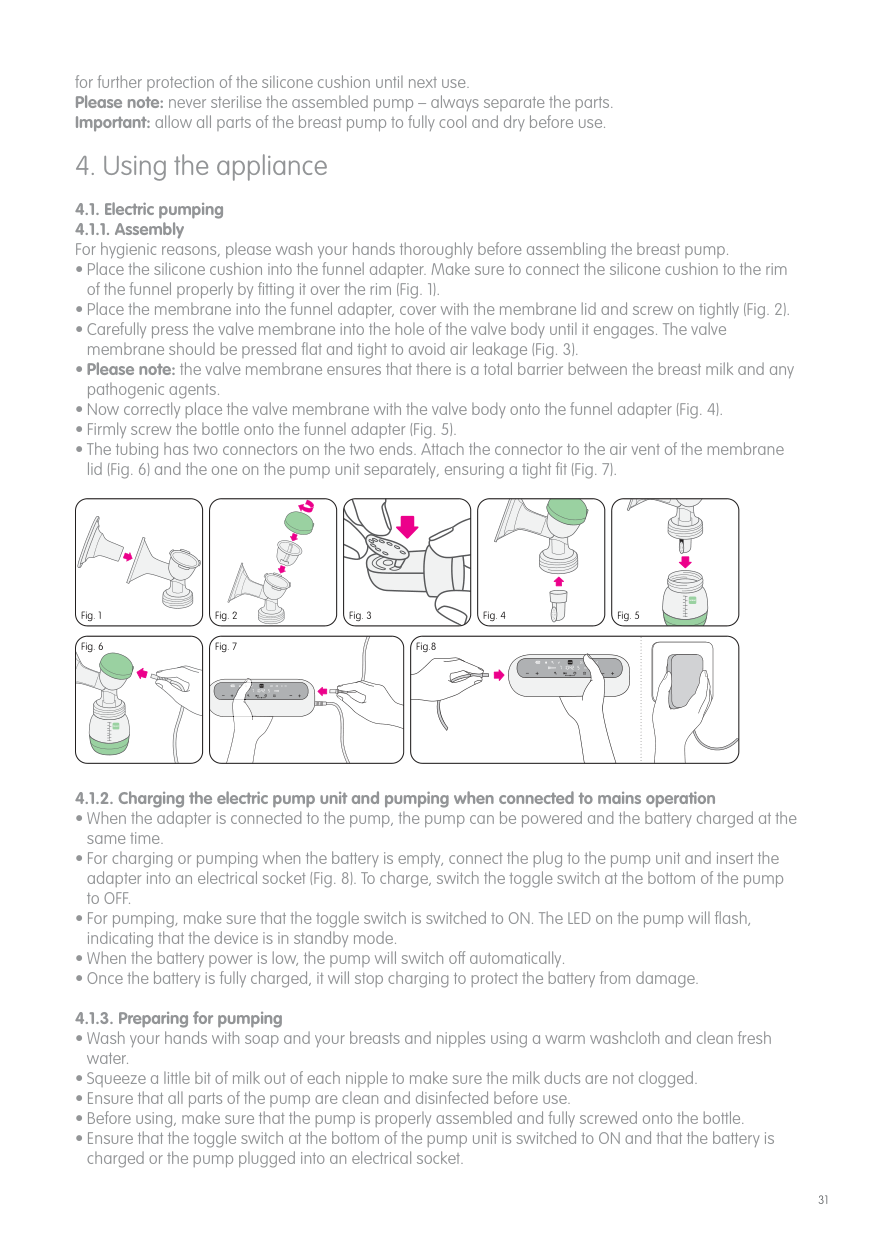
When first used and sometimes during use, the ventilation slit (in the raised bubble on the underside of the teat base) can stick together. This will prevent air from entering the bottle during feeding and as a result, cause the teat to collapse. Slowly brush over the bubble (ventilation) a few times with your thumb or fingers to re-open the slit.
Ensure valve is assembled correctly and the base of the bottle is firmly attached prior to filling bottle with liquid (see figure 1, 2 &3).
Do not let babies self-feed.
Store teats and valves in a dry sealed container.
Do not leave single bottle parts in direct sunlight or heat.
Always use only MAM Teats with the MAM Bottles.
Use sugar free food or liquids only.
To avoid injury, do not let baby walk with bottle.
Do not put your baby to bed with bottle. Prolonged contact with liquids may cause severe tooth decay.
Bottle teat fits all MAM Bottles and the Trainer+.
##### HEATING Instructions:
NEVER pour boiling water into the bottle.
Place in a bottle warmer, under hot running water or in a container of heated water.
NEVER heat or cool a sealed bottle. Remove the protective cap and teat (with screw ring) before heating, especially before bottle warmer and microwave heating. Do not overheat as this may
damage the bottle.
Take extra care when heating in the microwave.
Stir thoroughly after heating to evenly distribute heat. Allow the standing time recommended by the microwave manufacturer. Test the temperature before serving.
Wrap cloth or towel around bottom of bottle and shake to absorb any excess water after warming in a bottle warmer, under hot running or in heated water.
After warming the bottle in a bottle warmer, under hot running or in heated water it is recommended to tighten the bottom of the bottle.
Do not place bottle in heated oven.
##### For your child’s safety and health WARNING!
Always use this product with adult supervision.
Never use feeding teats as a soother.
Continuous and prolonged sucking of fluids will cause tooth decay.
Always check food temperature before feeding.
Keep all components not in use out of the reach of children.
Start
##### Instructions for use:
Before first use boil in water for 5 minutes. Allow to stand for a further 5 minutes before giving it to the baby.
During cleaning a small amount of water may enter the teat. This can be expelled by squeezing the teat. This is to ensure hygiene.
Clean before each use.
Do not use aggressive cleaning agents.
Never dip the teat in sweet substances or medication. This can cause tooth decay.
To ensure safety and hygiene replace the soother every 1–2 months.
Do not worry if the soother becomes lodged in the mouth. It can not be swallowed and is designed to cope with such an event. Remove as gently as possible.
MAM recommends giving up soother usage at 3 years of age.
##### For your child’s safety WARNING!
Inspect carefully before each use. Pull the soother in all directions. Throw away at the first signs of damage or weakness.
Only use dedicated soother holders tested to EN 12586. Never attach other ribbons or cords to a soother, your child may be strangled by them.
Do not leave a soother in direct sunlight or near a source of heat or leave in sterilising solution for longer than recommended, as this may weaken the teat.
2in1 Single Breast Pump/Upgrade Set
Please read all instructions carefully before using the MAM 2in1 Single Breast Pump for the first time. Keep these instructions in a safe place for future reference.
Membrane capFunnel cover
Silicone cushion
Tubing connector
Membrane
Funnel adapter Valve body Valve membrane
Tubing
Adapter
| | | |---|---| | | | | | | | | | | | |
Tubing connector
Pump unit
###### 1.2. Product description for manual use
Handle
Handle holder
Funnel cover
Membrane
Inner cap stopper
Funnel adapter
Silicone cushion
Valve body
Valve membrane
| | | |---|---| | | | | | | | | | | | |
Before using your MAM 2in1 Single Breast Pump for the first time and after each use, all parts that come into contact with the breast and breast milk must be separated, cleaned and sterilised.

| | | |---|---| | | | | | | | | | | | | | | | | | | | | |
Fig. 6 Fig. 7 Fig. 8
| | | |---|---| | | | | | | | | | | | | | | | | | | | | |
Fig. 1 Fig. 3Fig. 2 Fig. 4 Fig. 5

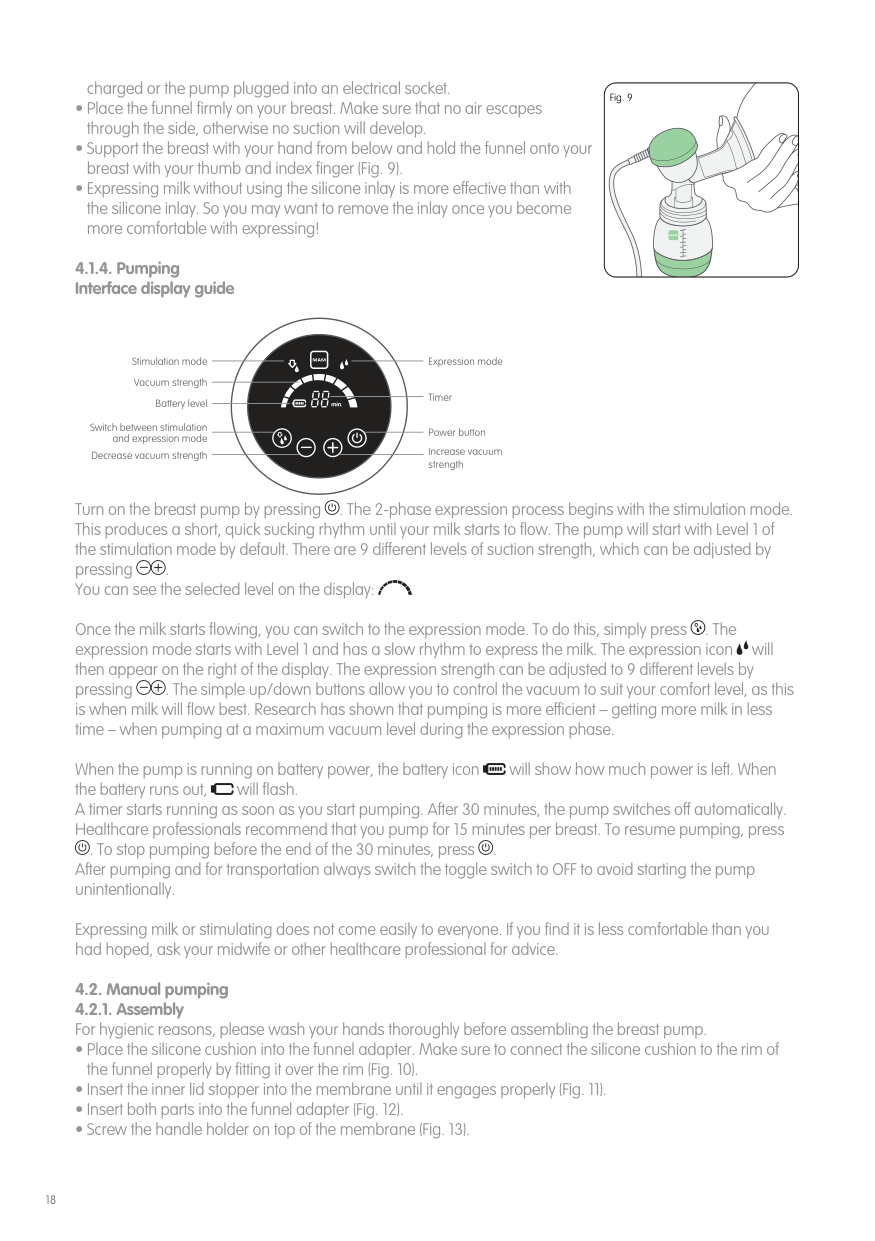
Fig. 9
###### 4.1.4. PumpingInterface display guide
| | | |---|---| | | | | | | | | | | | | | | | | | | | | |
Stimulation mode
Expression mode
Vacuum strength Battery level
Timer
Switch between stimulation and expression mode
Power button
Increase vacuum strength
Decrease vacuum strength
Turn on the breast pump by pressing . The 2-phase expression process begins with the stimulation mode. This produces a short, quick sucking rhythm until your milk starts to flow. The pump will start with Level 1 of the stimulation mode by default. There are 9 different levels of suction strength, which can be adjusted by pressing . You can see the selected level on the display:
Once the milk starts flowing, you can switch to the expression mode. To do this, simply press . The expression mode starts with Level 1 and has a slow rhythm to express the milk. The expression icon will then appear on the right of the display. The expression strength can be adjusted to 9 different levels by pressing . The simple up/down buttons allow you to control the vacuum to suit your comfort level, as this is when milk will flow best. Research has shown that pumping is more efficient – getting more milk in less time – when pumping at a maximum vacuum level during the expression phase.
When the pump is running on battery power, the battery icon will show how much power is left. When the battery runs out, will flash. A timer starts running as soon as you start pumping. After 30 minutes, the pump switches off automatically. Healthcare professionals recommend that you pump for 15 minutes per breast. To resume pumping, press . To stop pumping before the end of the 30 minutes, press . After pumping and for transportation always switch the toggle switch to OFF to avoid starting the pump unintentionally.
Expressing milk or stimulating does not come easily to everyone. If you find it is less comfortable than you had hoped, ask your midwife or other healthcare professional for advice.
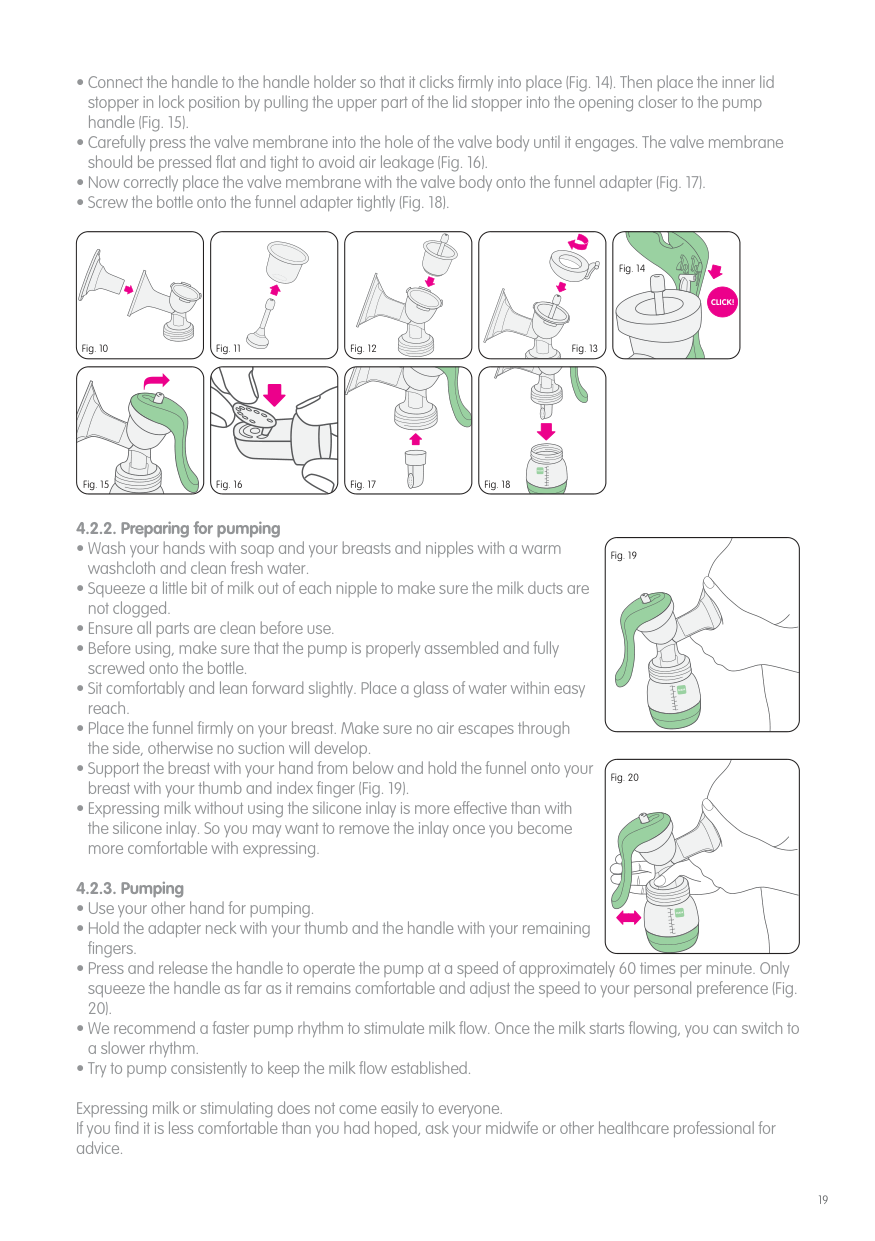
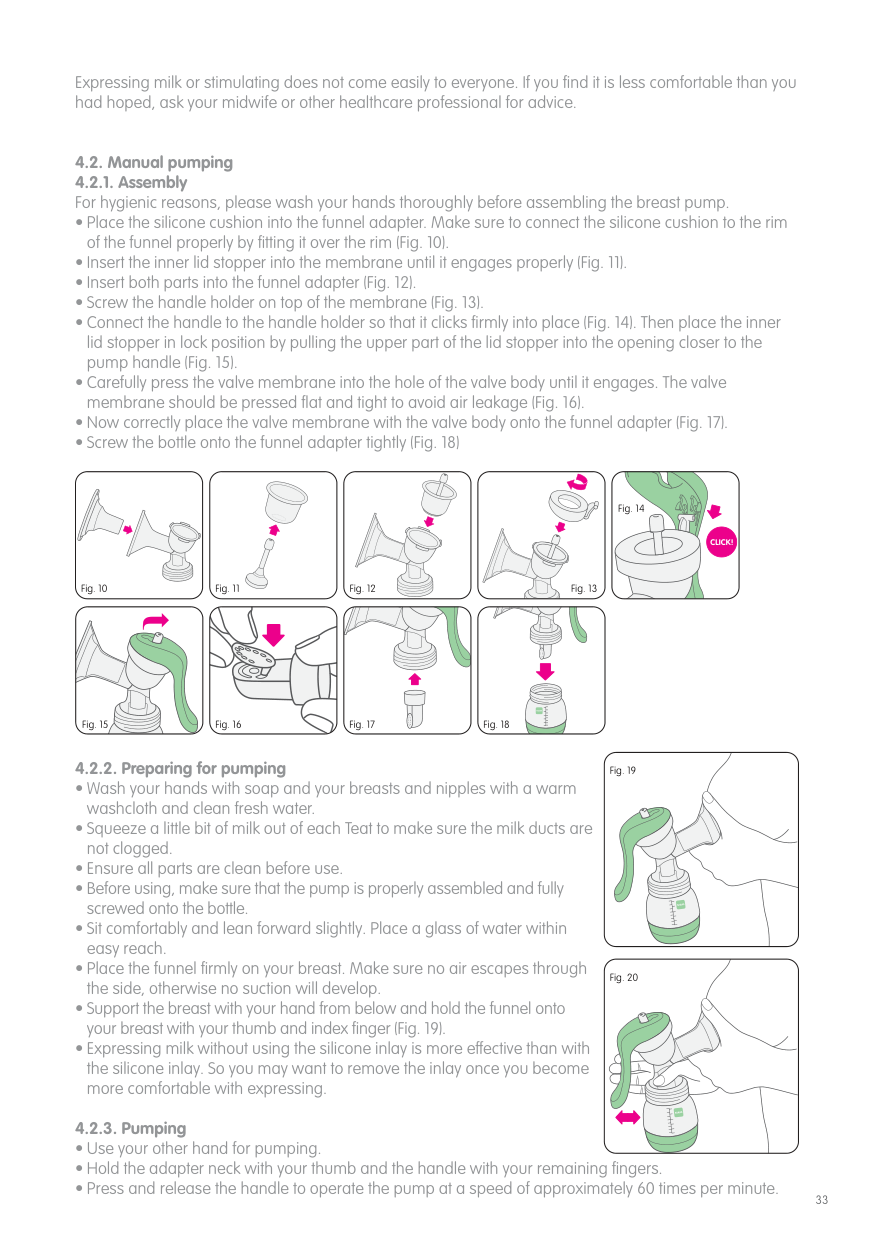
###### 4.2. Manual pumping
Fig. 14
########## CLICK!
Fig. 10
Fig. 11 Fig. 12
Fig. 13
| | | |---|---| | | | | | | | | | | | | | | | | | | | | |
Fig. 16Fig. 15
Fig. 17 Fig. 18
###### 4.2.2. Preparing for pumping
Fig. 19
###### 4.2.3. Pumping
Fig. 20
Expressing milk or stimulating does not come easily to everyone. If you find it is less comfortable than you had hoped, ask your midwife or other healthcare professional for advice.
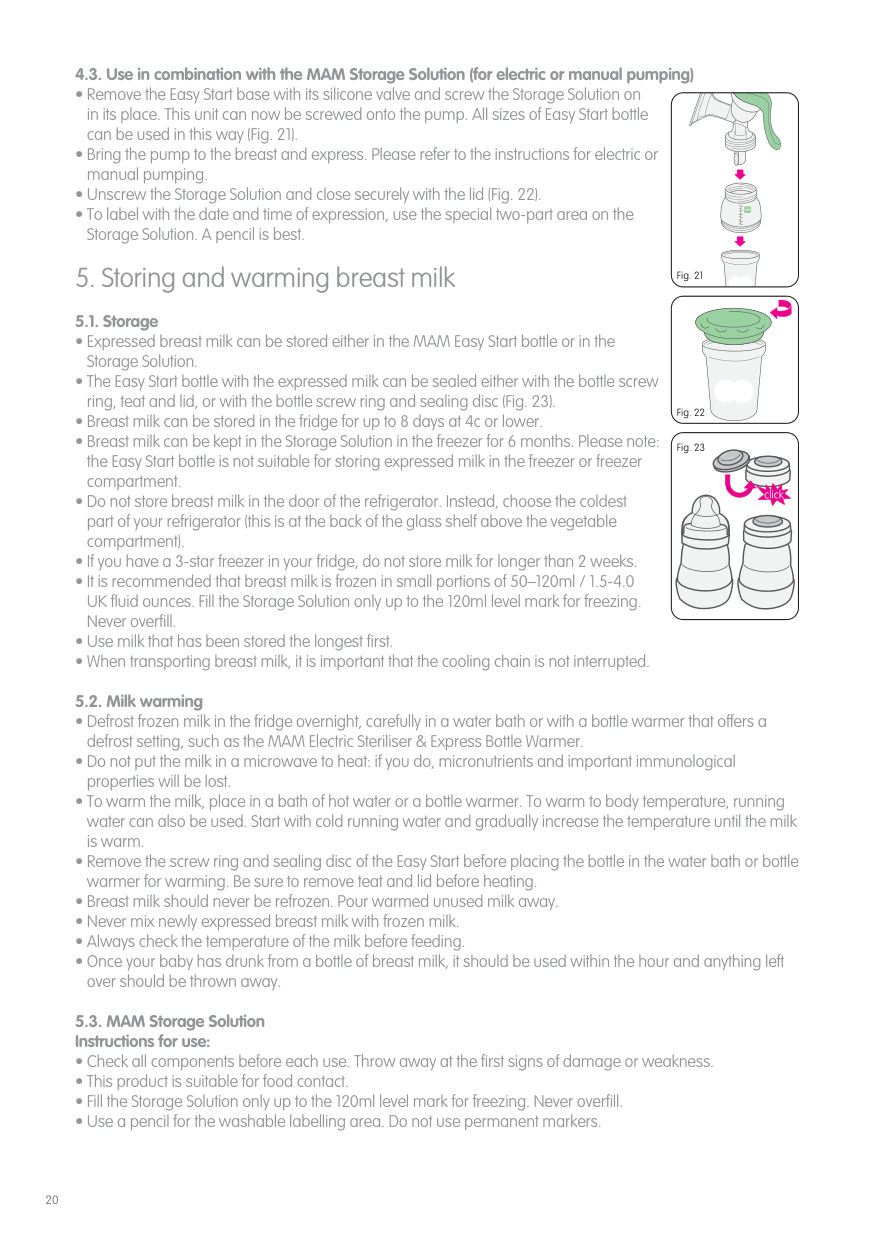
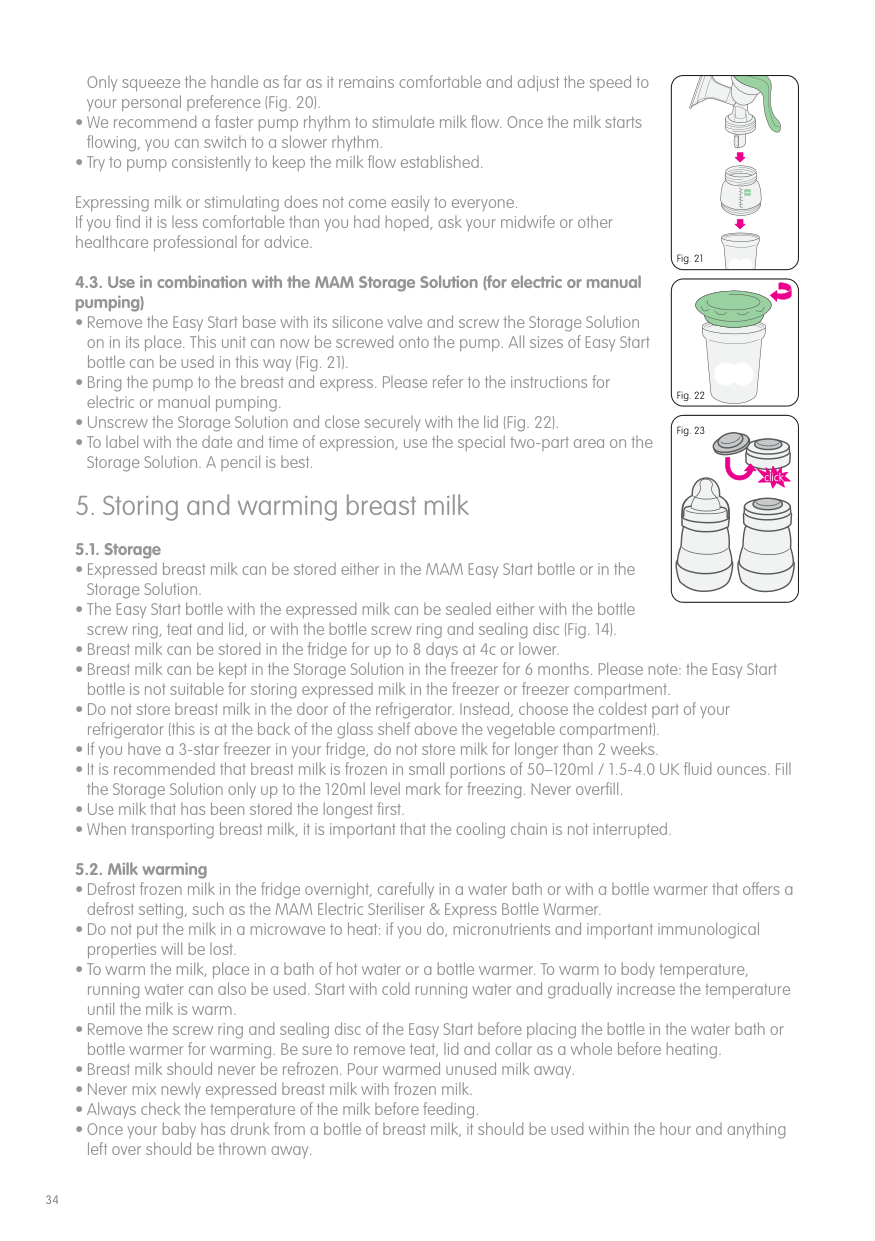
###### 4.3. Use in combination with the MAM Storage Solution (for electric or manual pumping)

| | | |---|---| | | | | | | | | | | | | | | | | | | | | | | | |
For your child’s safety and health: WARNING!
#### 6. Feeding
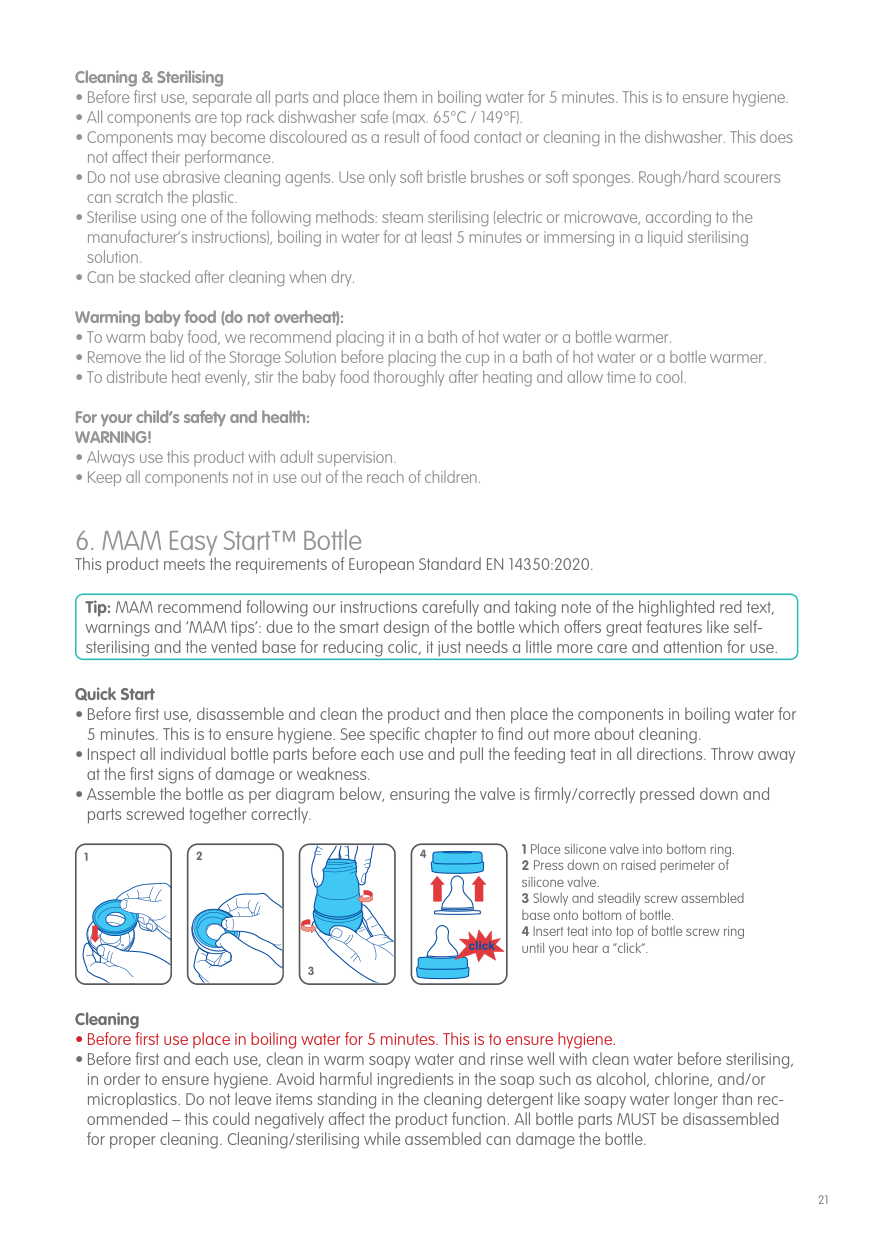
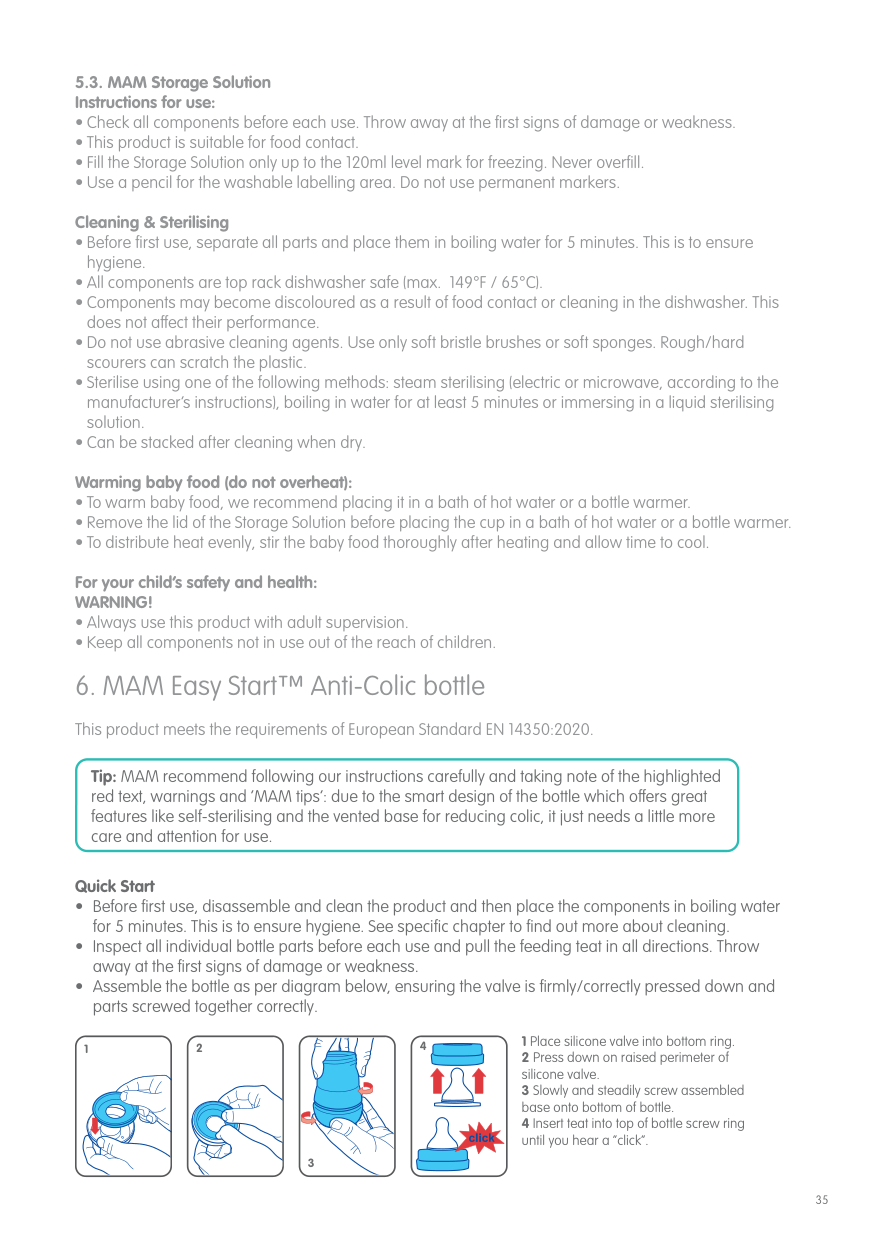
MAM recommends the MAM Easy Start™ Anti-Colic Bottle for feeding breast milk.
1 Place silicone valve into bottom ring.
2 Press down on raised perimeter of silicone valve.
######## 3
4 Insert teat into top of bottle screw ring until you hear a ”click“.
Screw assembled base onto bottom of bottle in slow steady manner.
is firmly attached prior to filling bottle with liquid (see figure 1, 2 &3).
For your child’s safety and health: WARNING!
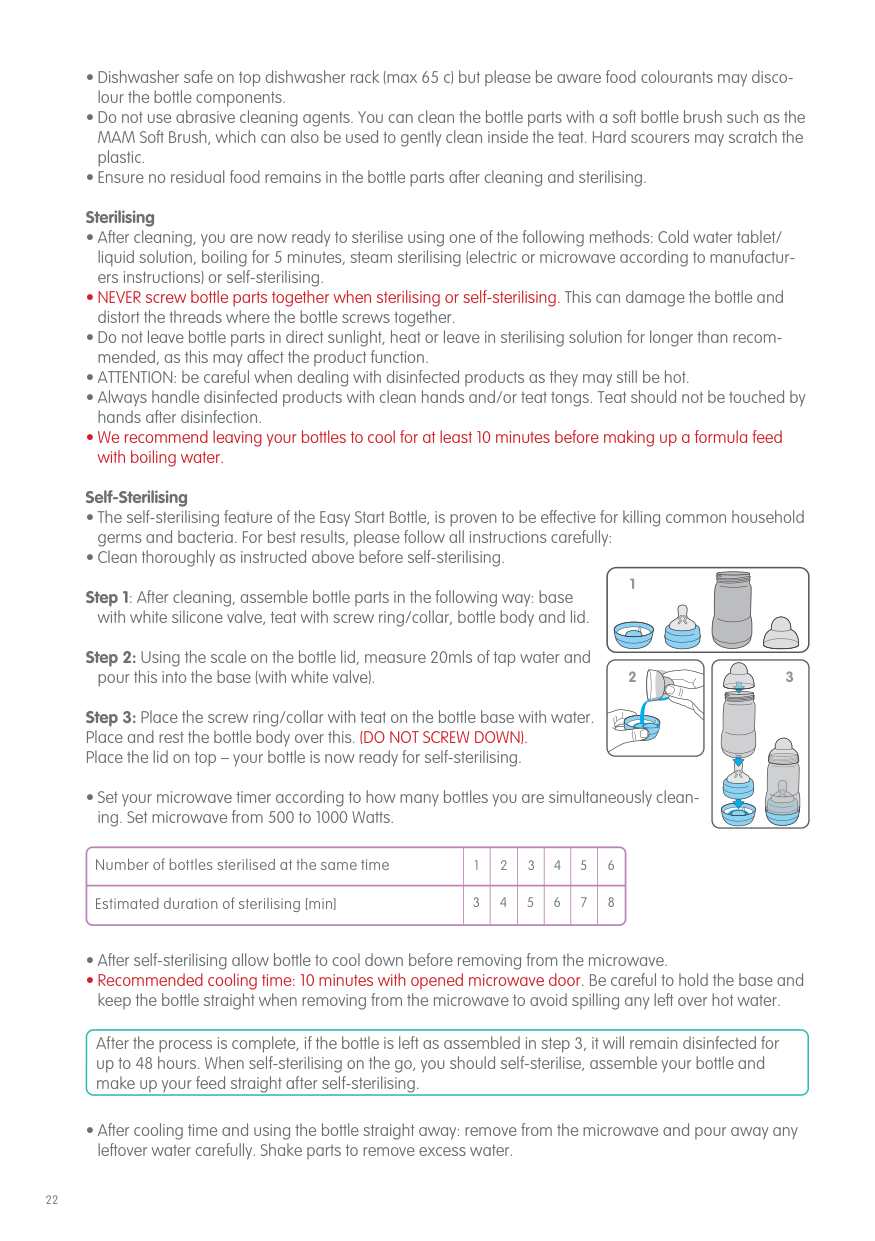
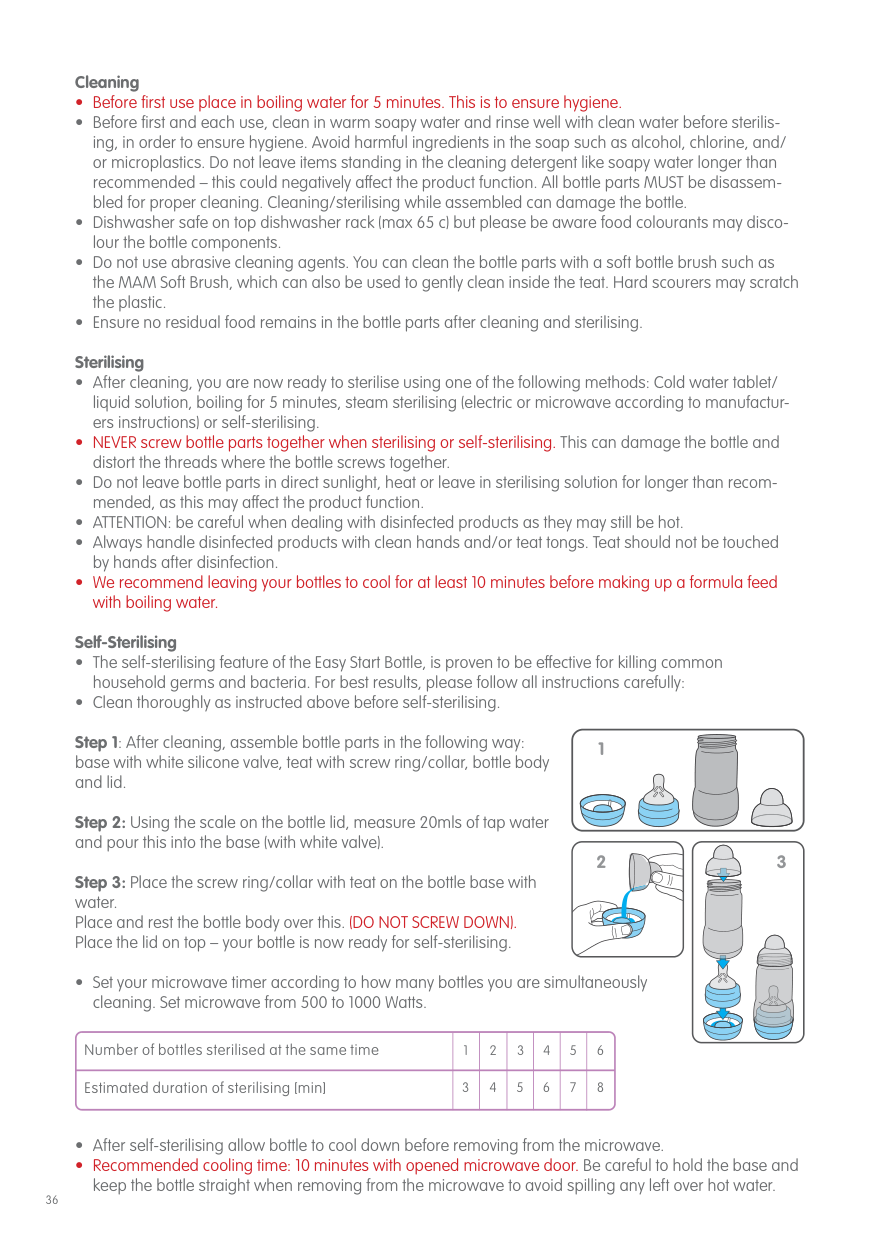
Self-sterilising function of Easy Start: The self-sterilising function of the Easy Start is proven to be effective for killing common household germs and bacteria. This method is completely sufficient and safe. For the best results, please follow all instructions carefully and use only as directed. This practical and time-saving function can be achieved in 3 simple steps. Always thoroughly clean individual bottle parts before beginning this process!
###### Sterilising in the microwave:
|Number of bottles sterilised at the same time|1|2|3|4|5|6| |---|---|---|---|---|---|---| |Estimated duration of sterilising [min]|3|4|5|6|7|8|
After the process is complete, the Easy Start bottle remains disinfected up to 48 hours after self-sterilising in the microwave, provided that it stays assembled as shown on Step 3.
If the monitor is not running
#### 8. Environment/Disposal
This product contains rechargeable batteries. In the interests of protecting the environment, please do not dispose of the product in household waste at the end of its useful life. Disposal should take place at an approved recycling location. A lithium-ion battery is built in: DO NOT remove the battery yourself. As the battery needs to be collected, please ask for help to remove the battery from the appliance at the recycling location.
#### 9. Warranty
This appliance is covered by a statutory 2-year warranty period from the date of purchase upon presentation of proof of purchase. This does not include damage that is attributable to natural wear and tear, improper use and insufficient or incorrect maintenance. If handled carefully and in accordance with the instruction manual, the manufacturer provides a 2-year warranty from the date of purchase. The power cord and electric adapter are excluded from the warranty in cases of normal wear and tear. When returning the appliance under warranty, always be sure to enclose proof of purchase.
#### 10. Repair notes
If the appliance ever needs repairing, under no circumstances attempt to open it. The appliance cannot be opened. In the event of a malfunction or if the power cord and adapter develops a fault, please send the appliance directly to the MAM Customer Service department. Important: improper repairs can make the appliance extremely dangerous to use.
#### 11. Technical data !
Power adapter: Power input: 100–240 V; 50–60 Hz / Power output: 10V 1,5A Power rating: 15W
Pump unit Lithium battery: 1750mAh Stimulation speed: 100CPM Stimulation vacuum: –0,002MPa to –0,018MPa Expression speed: 26 – 60 CPM Expression vacuum: –0,013 to –0,036MPa Timer: 30 min
###### Operation conditions:
+5°C to +40°C, relative humidity ≤ 90%
2in1 Double Breast Pump
Please read all instructions carefully before using the MAM 2in1 Double Breast Pump for the first time. Keep these instructions in a safe place for future reference.
Membrane capFunnel cover
Silicone cushion
Tubing connector
Membrane
Funnel adapter Valve body Valve membrane
Tubing
| | | |---|---| | | | | | | | | | | | |
Adapter
Tubing connector
Pump unit
###### 1.2. Product description for manual use
Handle
Handle holder
Funnel cover
Membrane
Inner cap stopper
Funnel adapter
Silicone cushion
Valve body
Valve membrane
| | | |---|---| | | | | | | | | | | | |
knowledge, provided that they have been given supervision or instruction concerning the safe use of the appliance and understand the hazards involved.
Before using your MAM 2in1 Double Breast Pump for the first time and after each use, all parts that come into contact with the breast and breast milk must be separated, cleaned and sterilised.
Please note: never sterilise the assembled pump – always separate the parts. Important: allow all parts of the breast pump to fully cool and dry before use.
| | | |---|---| | | | | | | | | | | | | | | | | | | | | |
Fig. 1 Fig. 3Fig. 2 Fig. 4 Fig. 5


Fig. 6
Fig.8Fig. 7


| | | |---|---| | | | | | | | | | | | | | | | | | | | | |


###### 4.1.2. Charging the electric pump unit and pumping when connected to mains operation
###### 4.1.3. Preparing for pumping
Fig. 9
###### 4.1.4. PumpingInterface display guide
Alternate modeExpression mode
Duet modeStimulation mode
L: Left mode, R: Right modeChild safety lock
Battery level
Decrease/Increase vacuum strength
Decrease/Increase vacuum strength
Press to switch modeStimulation mode/ Expression mode
Alarm ClockPause
Turn on the breast pump by pressing for two seconds. The 2-phase expression process begins with the stimulation mode. This produces a short, quick sucking rhythm until your milk starts to flow. The 30 minutes timer will start and the pump will start with Level 1 of the stimulation mode by default. Press to select the pump to operate either on the left or right side in duet or alternate mode. The alternate mode works from 30s left to 30s right. There are 9 different levels of suction strength, which can be adjusted by pressing –/+. You can see the selected level for each side on the display:
Once the milk starts flowing, you can switch to the expression mode. To do this, simply press . The expression mode starts with Level 1 and has a slow rhythm to express the milk. The expression icon will then appear on the top of the display. The expression strength can be adjusted for each side to 9 different levels by pressing –/+. The simple up/down buttons allow you to control the vacuum to suit your comfort level, as this is when milk will flow best. Research has shown that pumping is more efficient
– getting more milk in less time – when pumping at a maximum vacuum level during the expression phase.
When the pump is running on battery power, the battery icon will show how much power is left. When the battery runs out, will flash, the main pump unit will then shutdown. A timer starts running as soon as you start pumping. After 30 minutes, the pump switches off automatically. Healthcare professionals recommend that you pump for each breast 15 minutes. To resume pumping, press for 2 seconds. To stop pumping before the end of the 30 minutes, press for 2 seconds. After pumping and for transportation always switch the toggle switch to OFF to avoid starting the pump unintentionally. For Child safety lock press alarm clock and pause at the same time.
After pumping an alarm clock can be set to remind you on the next pumping session. In standby state, press to turn the alarm clock on, press +/– at left side to set hour, press +/– at right side to set minute, then wait for 4s (4times of flash), the setting is done and the alarm clock is activated.
Expressing milk or stimulating does not come easily to everyone. If you find it is less comfortable than you
had hoped, ask your midwife or other healthcare professional for advice. Switches to a manual pump in two easy steps


###### 4.2. Manual pumping
| | | |---|---| | | | | | | | | | | | | | | | | | | | | |
CLICK!
Fig. 10

Fig. 17 Fig. 18
Fig. 11 Fig. 12
Fig. 14
Fig. 13
Fig. 16Fig. 15
may want to remove the inlay once you become more comfortable with expressing.
###### 4.2.3. Pumping
Expressing milk or stimulating does not come easily to everyone. If you find it is less comfortable than you had hoped, ask your midwife or other healthcare professional for advice.
| | | |---|---| | | | | | | | | | | | | | | | | | | | | | | | |
###### 5.2. Milk warming
properties will be lost.
For your child’s safety and health: WARNING!
#### 6. Feeding
MAM recommends the MAM Easy Start™ Anti-Colic bottle for feeding breast milk.
For your child’s safety and health WARNING!
1 Place silicone valve into bottom ring.
2 Press down on raised perimeter of silicone valve.
######## 3
4 Insert teat into top of bottle screw ring until you hear a ”click“.
Screw assembled base onto bottom of bottle in slow steady manner.
Self-sterilising function of Easy Start: The self-sterilising function of the Easy Start is proven to be effective for killing common household germs and bacteria. This method is completely sufficient and safe. For the best results, please follow all instructions carefully and use only as directed. This practical and time-saving function can be achieved in 3 simple steps. Always thoroughly clean individual bottle parts before beginning this process!
|Number of bottles sterilised at the same time|1|2|3|4|5|6| |---|---|---|---|---|---|---| |Estimated duration of sterilising [min]|3|4|5|6|7|8|
After the process is complete, the Easy Start bottle remains disinfected up to 48 hours after self-sterilising in the microwave, provided that it stays assembled as shown on Step 3.
#### 7. Troubleshooting
If the monitor is not running
#### 8. Environment/Disposal
This product contains rechargeable batteries. In the interests of protecting the environment, please do not dispose of the product in household waste at the end of its useful life. Disposal should take place at an approved recycling location. A lithium-ion battery is built in: DO NOT remove the battery yourself. As the battery needs to be collected, please ask for help to remove the battery from the appliance at the recycling location.
#### 9. Warranty
This appliance is covered by a statutory 2-year warranty period from the date of purchase upon presentation of proof of purchase. This does not include damage that is attributable to natural wear and tear, improper use and insufficient or incorrect maintenance. If handled carefully and in accordance with the instruction manual, the manufacturer provides a 2-year warranty from the date of purchase. The power cord and electric adapter are excluded from the warranty in cases of normal wear and tear. When returning the appliance under warranty, always be sure to enclose proof of purchase.
#### 10. Repair notes
If the appliance ever needs repairing, under no circumstances attempt to open it. The appliance cannot be opened. In the event of a malfunction or if the power cord and adapter develops a fault, please send the appliance directly to the MAM Customer Service department. Important: improper repairs can make the appliance extremely dangerous to use.
#### 11. Technical data !
AC adapter: input 100–240, 50/60Hz, output 10V/1.5A Total power: 15W Battery: 7.4V 1750mAh Stimulating velocity: 100T/min, Stimulating intensity: ≤–0.018Mpa, 9 Ievels vacuum Sucking velocity, 26–60T/min, Stimulating intensity: ≤–0.036 Mpa, 9 levels vacuum. Timer 30 minutes. Overall noise: ≤60dB(A) Operating conditions: +5°C to 40°C, relative humidity ≤90% Electric shock protection: AC adapter Class II, host machine Class III
| |WEEE registration number| |---|---| |Austria|9008391885917| |Germany|DE 72007615| |Italy|EEE: IT19090000011715; Battery: IT19090P00005687| |Spain|EEE: 7040; Battery: 1912| |Ireland|02970WB| |Portugal|EEE: PT101327; Battery: PT06001436|
Bamed AG, Sihleggstrasse 15, CH – 8832 Wollerau Phone (German): +49 711 7252304 276 (English): +49 711 7252304 277
GGH1A9ZA001.AAR