
Siemens Iq300 Front Load Washing Machine
Ask AI
— answers from the official manualAnswers from the official manual.
Common questions
Common Questions
10 totalWhy does the washing machine door remain locked during a cycle?
For safety, the door remains locked when water level or temperature is high, while drum is rotating, or Rinse Stop function stops final spin (instructions on page 32).
How do I add or remove laundry during a cycle?
Press the 'I' button to pause the programme; if the 'Œ' symbol disappears, you can open the door and adjust laundry. Press 'I' again to resume (details on page 31).
What does a blinking or lit 'w' icon mean?
A blinking 'w' indicates an active childproof lock where the programme settings cannot be changed. A lit 'w' means the lock is active and still allows adjustments to program selections.
Why does the machine not fill with water or dispense detergent?
Check if tap is open, childproof lock 'w' is off, no filter blockage, supply hose isn't kinked/trapped. Clean any blocked filter according to maintenance instructions (page 37).
How do I change the temperature or spin settings in a programme?
Select the programme then press buttons repeatedly until desired setting is displayed on screen; press 'I' to confirm changes (page 26 outlines these settings).
What steps are involved to remove the transport locks?
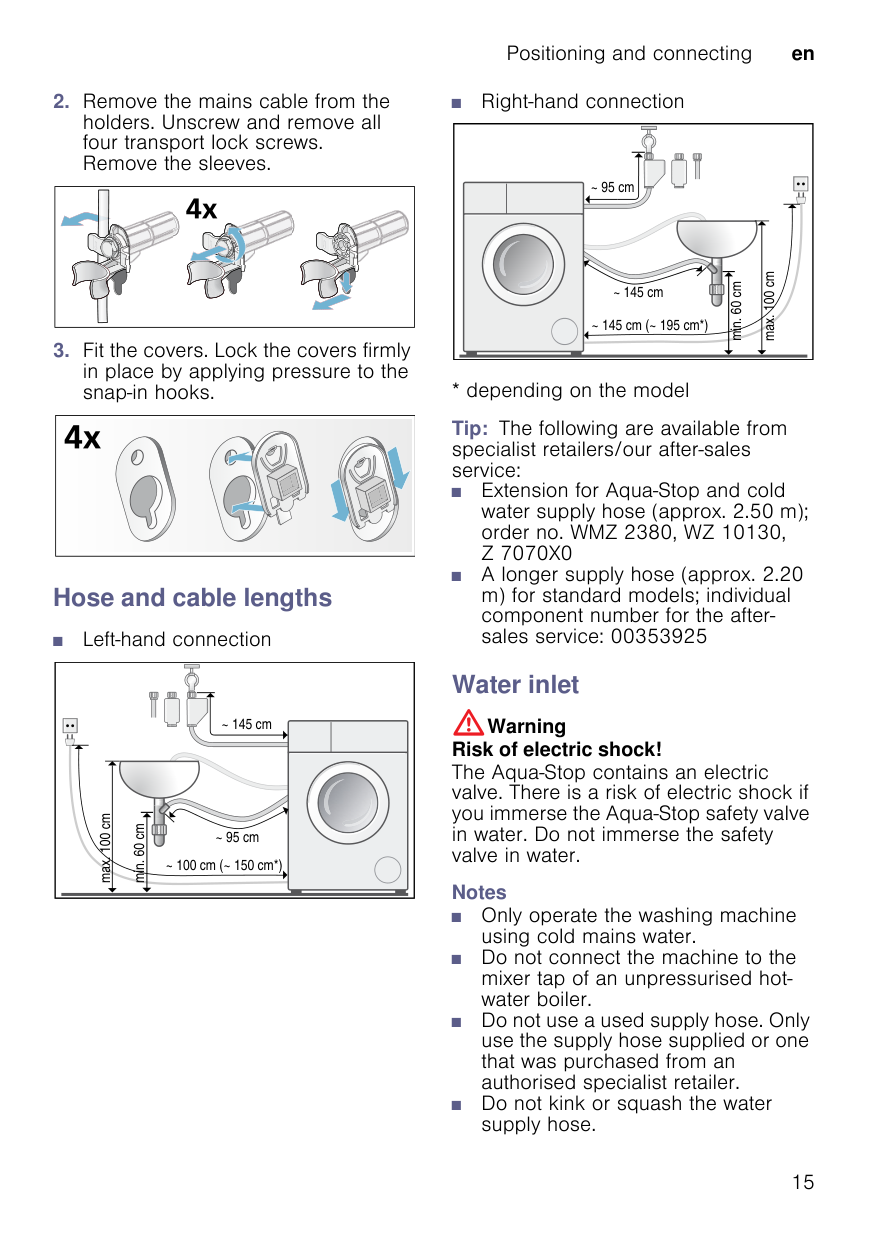
Remove covers and protect sleeves. Unscrew and detach transport lock screws then reinsert sleeves, secure mains cable in holders, and tighten securing screws again.
Full Manual
44 pages


Washing machine
WM..N...
#### siemens-home.bsh-group.com/welcome
en
Register your product online
##### Your new washing machine
You have chosen a Siemens washing machine.
Please take a few minutes to read and become familiar with the advantages of your washing machine.
To meet the high quality demands required by Siemens, every washing machine that leaves our factory is carefully checked to ensure that it functions correctly and is in perfect condition.
For more information on our products, accessories, replacement parts and services, see our website www.siemenshome.bsh-group.com or contact our after-sales service centres.
If the operating and installation instructions describe different models, any differences will be pointed out at the relevant points in the text.

Read these operating and installation instructions before switching on the washing machine.
Display rules : Warning!
This combination of symbol and signal word indicates a possibly dangerous situation. Not heeding the warning can cause death or injuries.
###### Caution!
This signal word indicates a possibly dangerous situation. Not heeding the caution can cause property and/or environmental damage.
###### Note/tip
Information about the optimum use of the appliance/any other useful information.
###### 1. 2. 3. / a) b) c)
The steps are represented by numbers or letters.
■ / -
Lists are represented by a small box or a dash.
Contents
8Intended use. . . . . . . . . . . . . . . . .4 (Safety instructions . . . . . . . . . . .5 Children/people/pets . . . . . . . . . . . . . 5 Installation. . . . . . . . . . . . . . . . . . . . . . 6 Operation . . . . . . . . . . . . . . . . . . . . . . 9 Cleaning/Maintenance . . . . . . . . . . . 10 7Environmental protection . . . . .11 Packaging/used appliance. . . . . . . . 11 Tips on economical use . . . . . . . . . . 11 5Positioning and connecting . . .12 Included with the appliance . . . . . . . 12 Safety instructions. . . . . . . . . . . . . . . 13 Installation surface . . . . . . . . . . . . . . 13 Installation on a base or a wooden joist floor. . . . . . . . . . . . . . . . . . . . . . 14 Installation on a platform with drawer14 Installing the appliance in a kitchenette . . . . . . . . . . . . . . . . . . . 14 Removing the transport locks. . . . . . 14 Hose and cable lengths . . . . . . . . . . 15 Water inlet. . . . . . . . . . . . . . . . . . . . . 15 Water outlet . . . . . . . . . . . . . . . . . . . 16 Levelling . . . . . . . . . . . . . . . . . . . . . . 17 Electrical connection. . . . . . . . . . . . . 17 Before washing for the first time. . . . 18 Transportation. . . . . . . . . . . . . . . . . . 19
*Getting to know the appliance 20
Washing machine . . . . . . . . . . . . . . . 20 Control panel . . . . . . . . . . . . . . . . . . 21 Display panel . . . . . . . . . . . . . . . . . . 21
ZLaundry. . . . . . . . . . . . . . . . . . . .23
Preparing the laundry . . . . . . . . . . . . 23 Sorting laundry . . . . . . . . . . . . . . . . . 23 Starching . . . . . . . . . . . . . . . . . . . . . 24 Dyeing/bleaching . . . . . . . . . . . . . . . 24 Soaking . . . . . . . . . . . . . . . . . . . . . . 24
en
CDetergent . . . . . . . . . . . . . . . . . .25
Correct selection of detergent. . . . . .25 Saving energy and detergent . . . . . .25
0Programme default settings. . .26
Temperature . . . . . . . . . . . . . . . . . . .26 Spin speed . . . . . . . . . . . . . . . . . . . .26 Ready in . . . . . . . . . . . . . . . . . . . . . .26
\Additional programme settings27
speed eco . . . . . . . . . . . . . . . . . . . . .27 Water Plus/Rinse Plus. . . . . . . . . . . .28 Less Ironing. . . . . . . . . . . . . . . . . . . .28 Prewash . . . . . . . . . . . . . . . . . . . . . .28
1Operating the appliance . . . . . .28
Preparing the washing machine . . . .28 Switching on the appliance/ selecting a programme . . . . . . . . . . .28 Changing the programme default settings . . . . . . . . . . . . . . . . . . . . . . .29 Selecting additional programme settings . . . . . . . . . . . . . . . . . . . . . . .29 Placing laundry into the drum . . . . . .29 Measuring and adding detergent and care products. . . . . . . . . . . . . . .30 Starting the programme . . . . . . . . . .31 Childproof lock . . . . . . . . . . . . . . . . .31 Adding/removing laundry . . . . . . . . .31 Changing the programme . . . . . . . . .31 Cancelling the programme . . . . . . . .32 Programme end during Rinse Stop. .32 Programme end . . . . . . . . . . . . . . . .32 Removing laundry/switching off the appliance. . . . . . . . . . . . . . . . . . . . . .32
HSensors . . . . . . . . . . . . . . . . . . .33
Automatic load sensing. . . . . . . . . . .33 Unbalanced load detection system . .33
QAppliance settings . . . . . . . . . .33
en Intended use
2Cleaning and maintenance . . . 34
Machine housing/control panel . . . . 34 Drum . . . . . . . . . . . . . . . . . . . . . . . . 34 Descaling. . . . . . . . . . . . . . . . . . . . . 35 Detergent drawer and housing . . . . 35 Drain pump is blocked . . . . . . . . . . 36 Drain hose at the siphon is blocked 37 Filter in the water supply is blocked 37
3Faults and what to do about
them . . . . . . . . . . . . . . . . . . . . . 38 Emergency release . . . . . . . . . . . . . 38 Information on the display panel . . . 39 Faults and what to do about them. . 40
4After-sales service . . . . . . . . . . 42 JTechnical data. . . . . . . . . . . . . . 42 rAqua-Stop warranty . . . . . . . . . 43
8 Intended use
Intened use■ This appliance is intended for private domestic use only.
###### Before you switch on the appliance:
Check that there is no visible damage to the appliance. Do not operate the appliance if it is damaged. Should you have any problems, please contact your specialist dealer or our customer service.
Read and follow the operating and installation instructions and all other information provided with this appliance.
Retain the documents for subsequent use or for subsequent owners.
(Safety instructions
Safety instructionsThe following safety information and warnings are provided to protect you from injury and to prevent material damage to your surroundings.
It is nevertheless important to take the necessary precautions and to proceed with care when installing, maintaining, cleaning and operating the appliance.
:Warning Risk of death!
Children/people/pets :Warning Risk of death!
Children may lock themselves inside appliances and find themselves in a life-threatening situation.
Children and other people who are unable to assess the risks involved when using the appliance may injure themselves or may find themselves in life-threatening situations. Therefore please note:
Risk of suffocation! If allowed to play with the packaging/plastic film or packing components, children may become caught in these or pull them over their heads and suffocate. Keep packaging, plastic film and packing components away from children.
:Warning Risk of poisoning!
Detergents and care products may result in poisoning if consumed. If accidentally swallowed, seek medical advice. Keep detergents and care products out of the reach of children.
:Warning Risk of burns!
When washing at high temperatures, the glass in the appliance door becomes hot. Stop children from touching the appliance door when it is hot.
:Warning Eye/skin irritation!
Contact with detergents or care products may cause eye/skin irritation. Rinse eyes/skin thoroughly if they/it come(s) into contact with detergents or care products. Keep detergents and care products out of the reach of children.
Installation :Warning Risk of electric shock/fire/ material damage/damage to the appliance!
If the appliance is not installed properly, this may lead to a dangerous situation. Ensure the following:
:Warning Risk of electric shock/fire/ material damage/damage to the appliance!
If the appliance's mains cable is altered or damaged, this may result in electric shock, short circuiting or fire due to overheating. The mains cable must not be kinked, crushed or altered, and must not come into contact with any heat sources.
:Warning Risk of fire/material damage/ damage to the appliance!
The use of extension cords or power strips may result in fire due to overheating or short circuiting. Connect the appliance directly to an earthed socket that has been correctly installed. Do not use extension cords, power strips or multi-way couplers.
:Warning Risk of injury/material damage/damage to the appliance!
■ The appliance may vibrate or move when in operation, potentially resulting in injury or material damage. Place the appliance on a clean, even, solid surface and, using a spirit level to guide you, level it with the screw-in feet.
Risk of injury/material damage/damage to the appliance!■If you take hold of any of the appliance's protruding parts (e.g. the appliance door) in order to lift or move it, these parts may break off and cause injury. Do not take hold of any of the appliance's protruding parts in order to move the appliance.
##### Risk of injury!
■ The appliance is very heavy. Lifting it may result in injury. Do not lift the appliance on your own.
Risk of injury!■The appliance has sharp edges on which you could cut your hands. Do not take hold of the appliance by its sharp edges. Wear protective gloves to lift it.
Risk of injury!■If the hoses and mains cables are not correctly routed, they may constitute a tripping hazard, which may result in injury. Route hoses and cables such that they do not constitute a tripping hazard.
##### Caution! Material damage/damage to the appliance
■ If the water pressure is too high or too low, the appliance may not be able to operate properly, and it may also result in material damage or damage to the appliance. Make sure that the water pressure in the water supply facility is at least 100 kPa (1 bar), and does not exceed 1000 kPa (10 bar).
■ If the water hoses are altered or damaged, this may result in material damage or damage to the appliance. The water hoses must not be kinked, crushed, altered or severed.
Material damage/damage to the appliance■The use of hoses supplied by other brands to connect to the water supply may result in material damage or damage to the appliance. Use the hoses supplied with the appliance or genuine spare part hoses only.
Material damage/damage to the appliance■The appliance is secured for transportation by transport locking devices. If the transport locking devices are not removed before the appliance is operated, this may result in damage to the appliance. It is important to completely remove all transport locking devices before using the appliance for the first time. Make sure that you retain these transport locking devices separately. It is important to refit the transport locking devices if the appliance is to be transported, in order to prevent the appliance from being damaged in transit.
Operation :Warning Risk of explosions/fire!
Laundry that has been pretreated with cleaning agents that contain solvents, e.g. stain remover/cleaning solvent, may cause an explosion in the drum. Rinse the laundry thoroughly with water before washing it in the machine.
:Warning Risk of poisoning!
Poisonous fumes may be given off by cleaning agents that contain solvents, e.g. cleaning solvent. Do not use cleaning agents that contain solvents.
:Warning Risk of injury!
■ If you support your weight/sit on the appliance door when it is open, the appliance may tip over, which may result in injury. Do not support your weight on the appliance door when it is open.
Risk of injury!■If you climb onto the appliance, the worktop may break, which may result in injury. Do not climb onto the appliance.
■ If you reach into the drum while it is still rotating, you risk injuring your hands. Wait until the drum has stopped rotating.
:Warning Risk of scalding!
When washing at high temperatures, there is a risk of scalding if you come into contact with hot detergent solution (e.g. when draining hot detergent solution into a washbasin). Do not reach into the hot detergent solution.
:Warning Eye/skin irritation!
Detergent and care products may spray out if the detergent drawer is opened while the appliance is in operation. Rinse eyes/skin thoroughly if they/it come(s) into contact with detergents or care products. If accidentally swallowed, seek medical advice.
##### Caution! Material damage/damage to the appliance
■ If the amount of laundry in the appliance exceeds its maximum load capacity, it may not be able to operate properly, or this may result in material damage or damage to the appliance. Do not exceed the maximum load capacity of dry laundry. Make sure you comply with the maximum load capacities specified for each of the programs → Supplementary sheet for the operating and installation instructions.
Material damage/damage to the appliance■If you pour the wrong quantity of detergent or cleaning agent into the appliance, this may result in material damage or damage to the appliance. Use detergents/care products/cleaning agents and softeners in accordance with the manufacturers' instructions.
Cleaning/Maintenance :Warning Risk of death!
The appliance is powered by electricity. There is a risk of electric shock if you come into contact with live components. Therefore please note:
:Warning Risk of poisoning!
Poisonous fumes may be given off by cleaning agents that contain solvents, e.g. cleaning solvent. Do not use cleaning agents that contain solvents.
:Warning Risk of electric shock/material damage/damage to the appliance!
If moisture penetrates the appliance, this may cause it to short circuit.
Do not use a pressure washer, steam cleaner, hose or spray gun to clean your appliance.
:Warning Risk of injury/material damage/damage to the appliance!
The use of spare parts and accessories supplied by other brands is dangerous and may result in injury, material damage or damage to the appliance. For safety reasons, use genuine spare parts and accessories only.
##### Caution! Material damage/damage to the appliance
Cleaning agents and agents for pretreating laundry (e.g. stain removers, prewash sprays, etc.) may cause damage if they come into contact with the surfaces of the appliance. Therefore please note:
Environmental protection en
7Environmental
protection
Packaging/used appliance
) Dispose of packaging in anenvironmentally-responsible manner. This appliance is labelled in accordance with European Directive 2012/19/EU concerning used electrical and electronic appliances (Waste Electrical and Electronic Equipment - WEEE). This directive specifies the framework for the return and recycling of used appliances as applicable throughout the EU.
Tips on economical use
| | |---|
5Positioning and
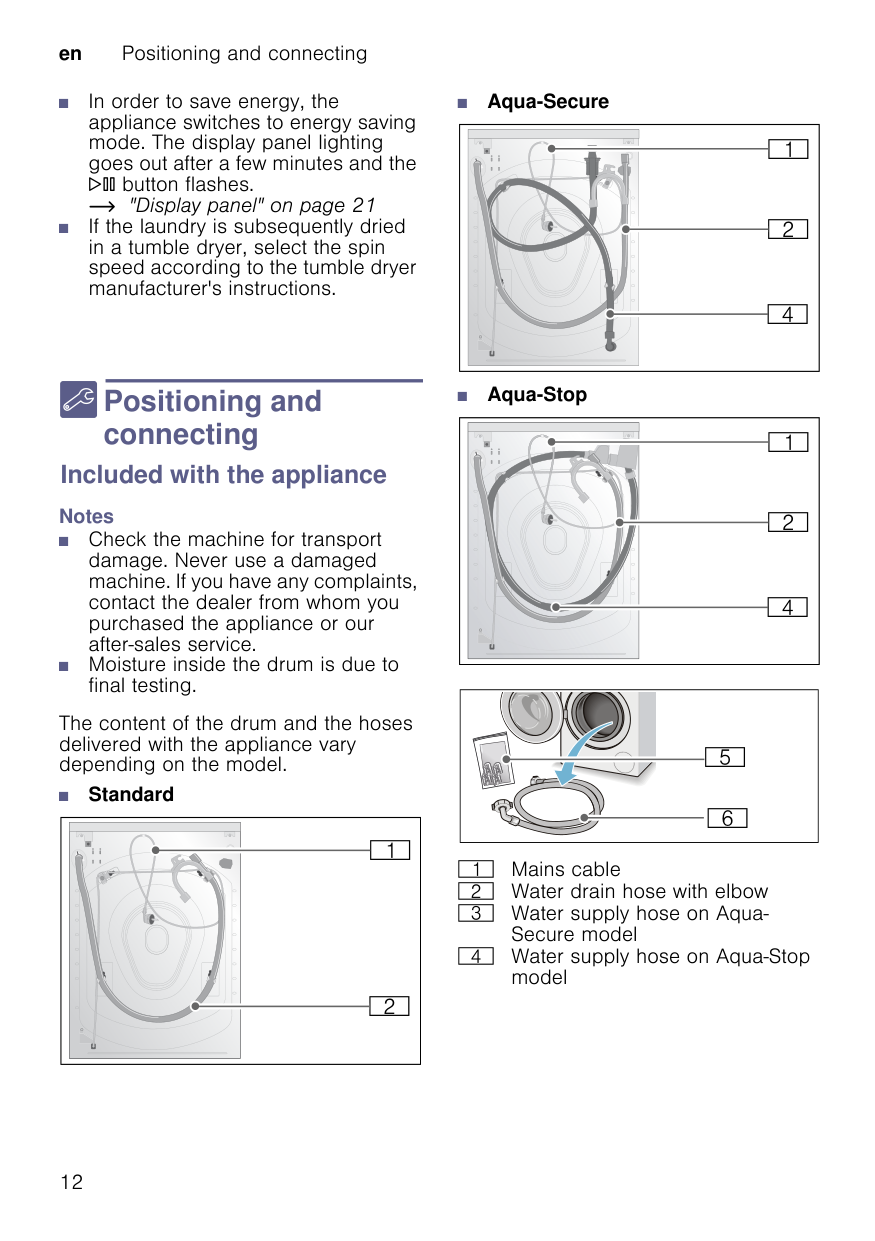
connecting Positioning and conectingIncluded with the appliance Notes


The content of the drum and the hoses delivered with the appliance vary depending on the model.


■ Standard
| | |---|
( Mains cable 0 Water drain hose with elbow 8 Water supply hose on Aqua-
Secure model @ Water supply hose on Aqua-Stop model
H Bag:
= ¾" * P Water supply hose on standard model
In addition, a hose clamp (24 - 40 mm diameter, available from specialist retailers) is required to connect the water drain hose to a siphon.
###### Useful tools
Safety instructions :Warning Risk of injury!
■ If the hose and mains cables are not routed properly, there is a risk of tripping and injury. Route hoses and cables in such a way that there is no risk of tripping.
###### Caution! Damage to the appliance
Frozen hoses may rip/burst. Do not install the washing machine in areas exposed to frost or outdoors.
###### Caution! Water damage
The connection points for the water supply hose and water drain hose are under high water pressure. To prevent leaks and water damage, you must follow the instructions in this section.
###### Notes
Installation surface Note: The washing machine must be aligned in a stable manner so that it does not move around.
##### Installation on a base or a wooden joist floor
###### Caution! Damage to the appliance
The washing machine may "wander" and tip/topple from the base when spinning. The feet of the appliance must be secured with holding brackets. Order no. WMZ 2200, WX 975600, Z 7080X0
Note: On wooden joist floors, install the washing machine:
##### Installation on a platform with drawer*
Platform order no.: WMZ 20490, WZ 20490, WZ 20520
##### Installing the appliance in a kitchenette
:Warning Risk of death! There is a risk of electric shock if you touch live components. Do not remove the appliance covering plate.
###### Notes
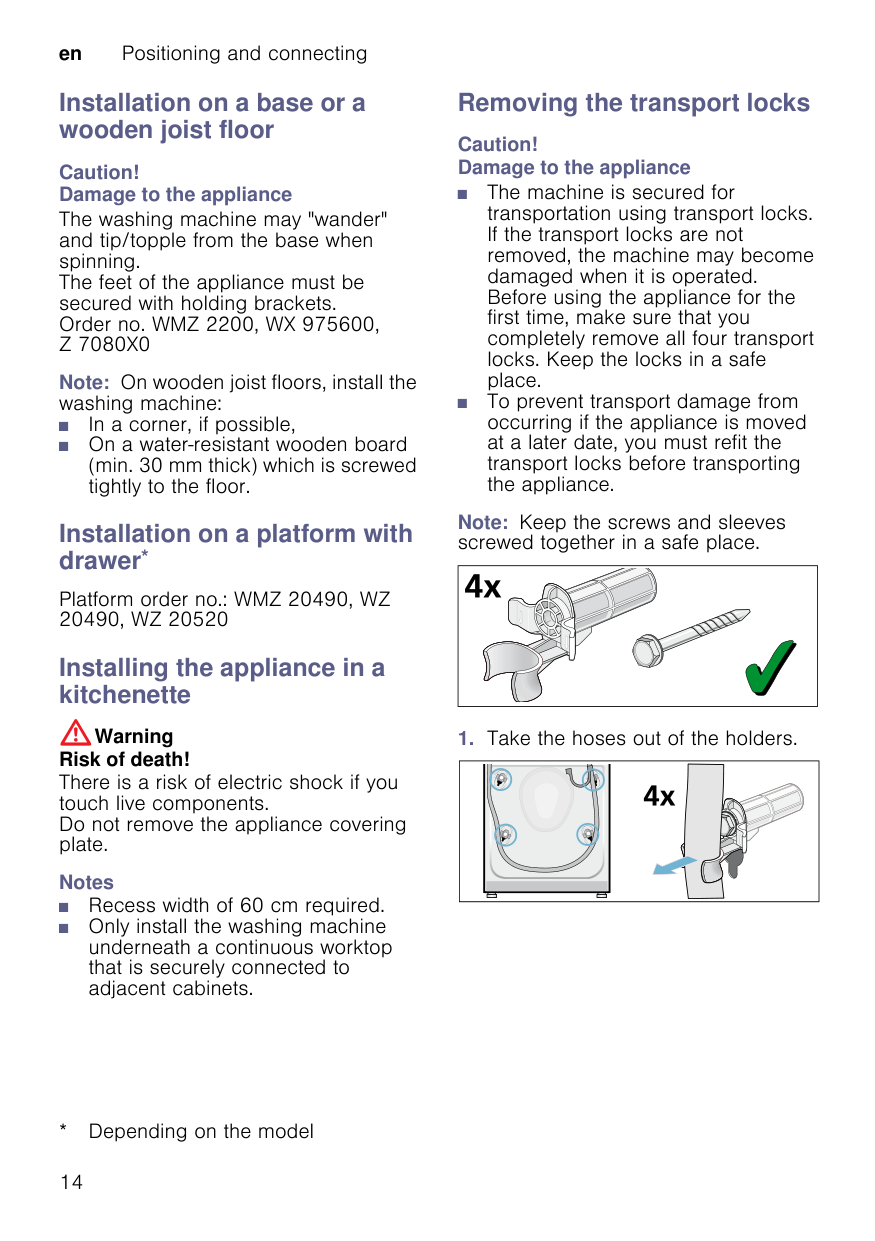
##### Removing the transport locks
###### Caution! Damage to the appliance
Note: Keep the screws and sleeves screwed together in a safe place.
| | |---|
|


| |---|
|

| |---|
| | |---|
##### Hose and cable lengths
|


| |---|
:Warning Risk of electric shock! The Aqua-Stop contains an electric valve. There is a risk of electric shock if you immerse the Aqua-Stop safety valve in water. Do not immerse the safety valve in water.
###### Notes
| | | |---|---| | | |
| | | | | | |---|---|---|---|---| | | | | | |
| | | | |---|---|---| | | | |
Optimum water pressure in the supply network
At least 100 kPa (1 bar) Maximum 1000 kPa (10 bar)
When the tap is open, the water flow is at least 8 l/min.
If the water pressure is higher than this, a pressure-reducing valve must be installed.
###### Connection
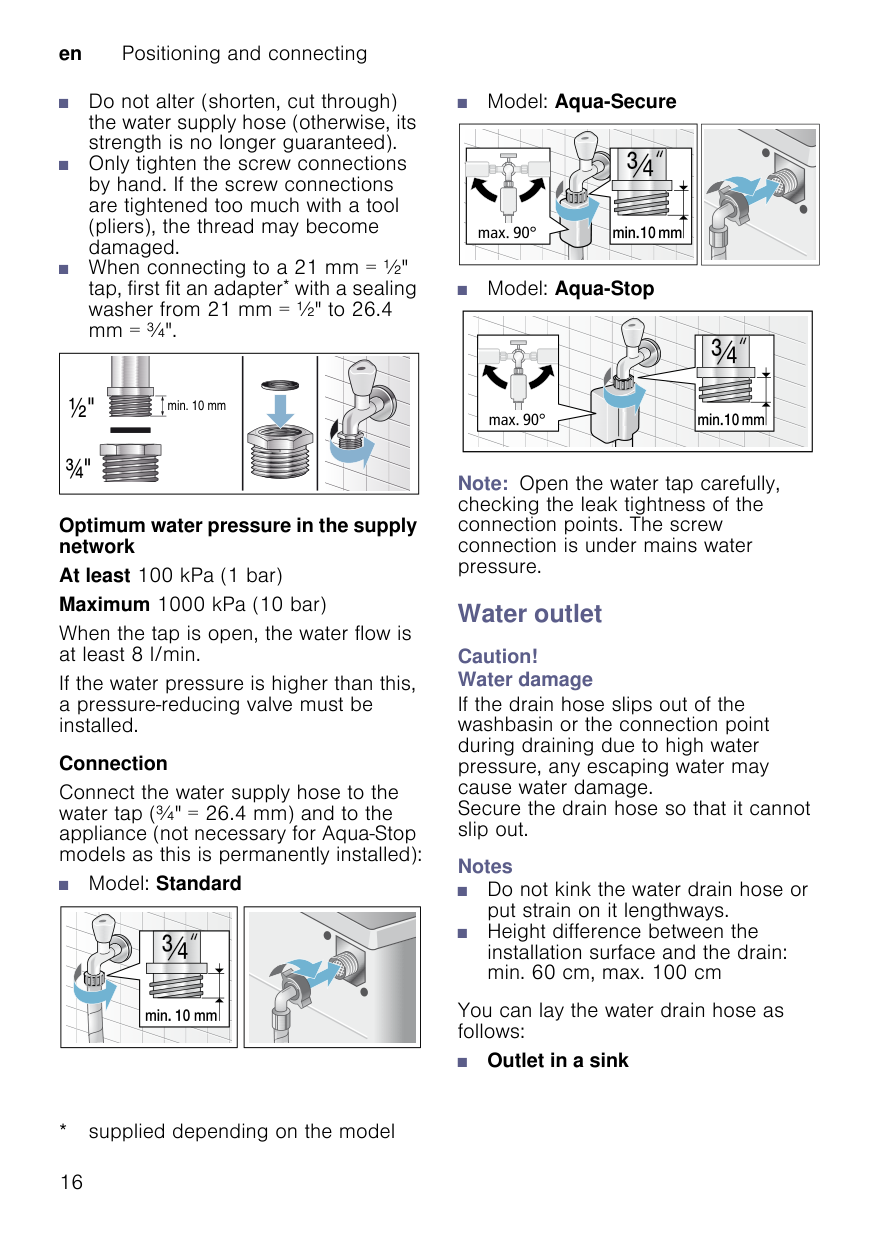
Connect the water supply hose to the water tap (¾" = 26.4 mm) and to the appliance (not necessary for Aqua-Stop models as this is permanently installed):
■ Model: Standard
Note: Open the water tap carefully, checking the leak tightness of the connection points. The screw connection is under mains water pressure.
Water outlet
Caution! Water damage
If the drain hose slips out of the washbasin or the connection point during draining due to high water pressure, any escaping water may cause water damage. Secure the drain hose so that it cannot slip out.
Notes
You can lay the water drain hose as follows:
###### ■ Outlet in a sink
:Warning Risk of scalding! When you are washing at high temperatures, there is a risk of scalding if you come into contact with hot water (e.g. when draining hot water into a washbasin). Do not reach into the hot water. Caution! Damage to the appliance/fabrics
If the end of the drain hose is immersed in the drained water, water may be sucked back into the appliance and may damage the appliance/fabrics. Make sure that:
■ Drainage into a siphon The connection point must be secured using a hose clamp with a diameter of 24-40 mm (available from specialist retailers).
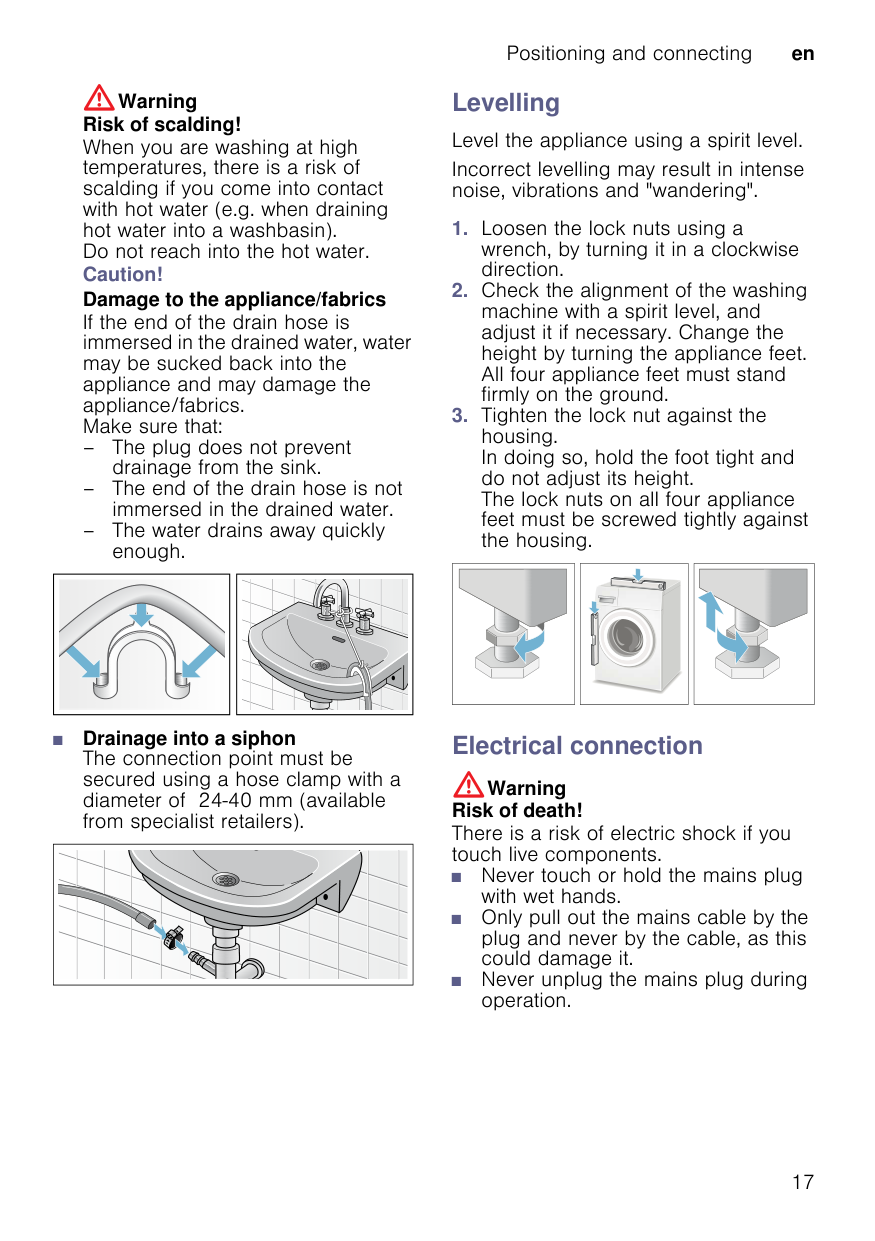
##### Levelling
Level the appliance using a spirit level. Incorrect levelling may result in intense noise, vibrations and "wandering".
|| |---|
Electrical connection :Warning Risk of death!
There is a risk of electric shock if you touch live components.
Observe the following information and ensure that:
###### Notes
##### Before washing for the first time
The washing machine was thoroughly tested before leaving the factory. To remove any residues from the product and to remove water that may be left over from the test, run the first wash cycle without any laundry.
Note: The washing machine must be correctly installed and connected. ~ Page 12
###### Your washing machine is now ready to use.
Transportation e.g. when moving home Preparatory work:
|
| |---|
Before switching on the appliance again: Notes
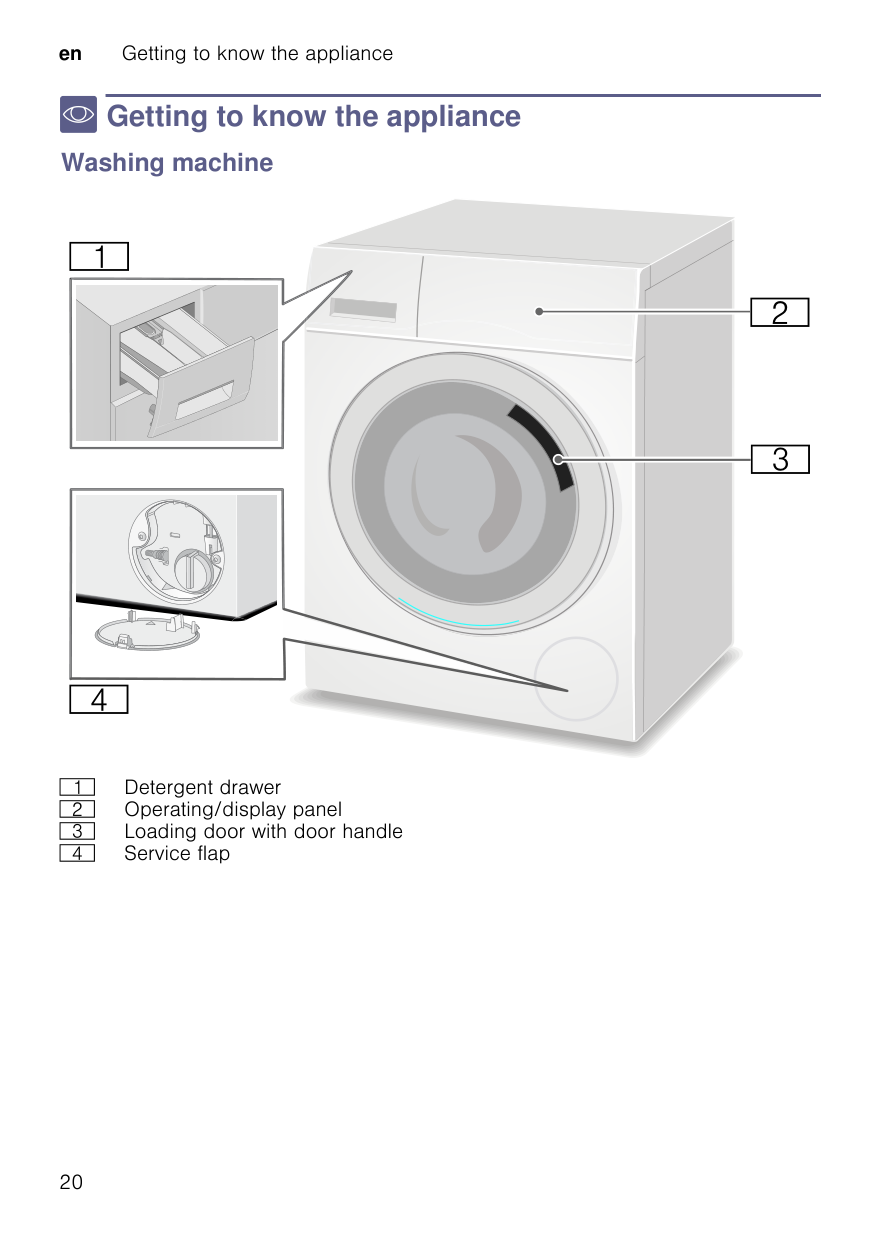
* Getting to know the appliance
##### Washing machine


( Detergent drawer
Getting to know the appliance en
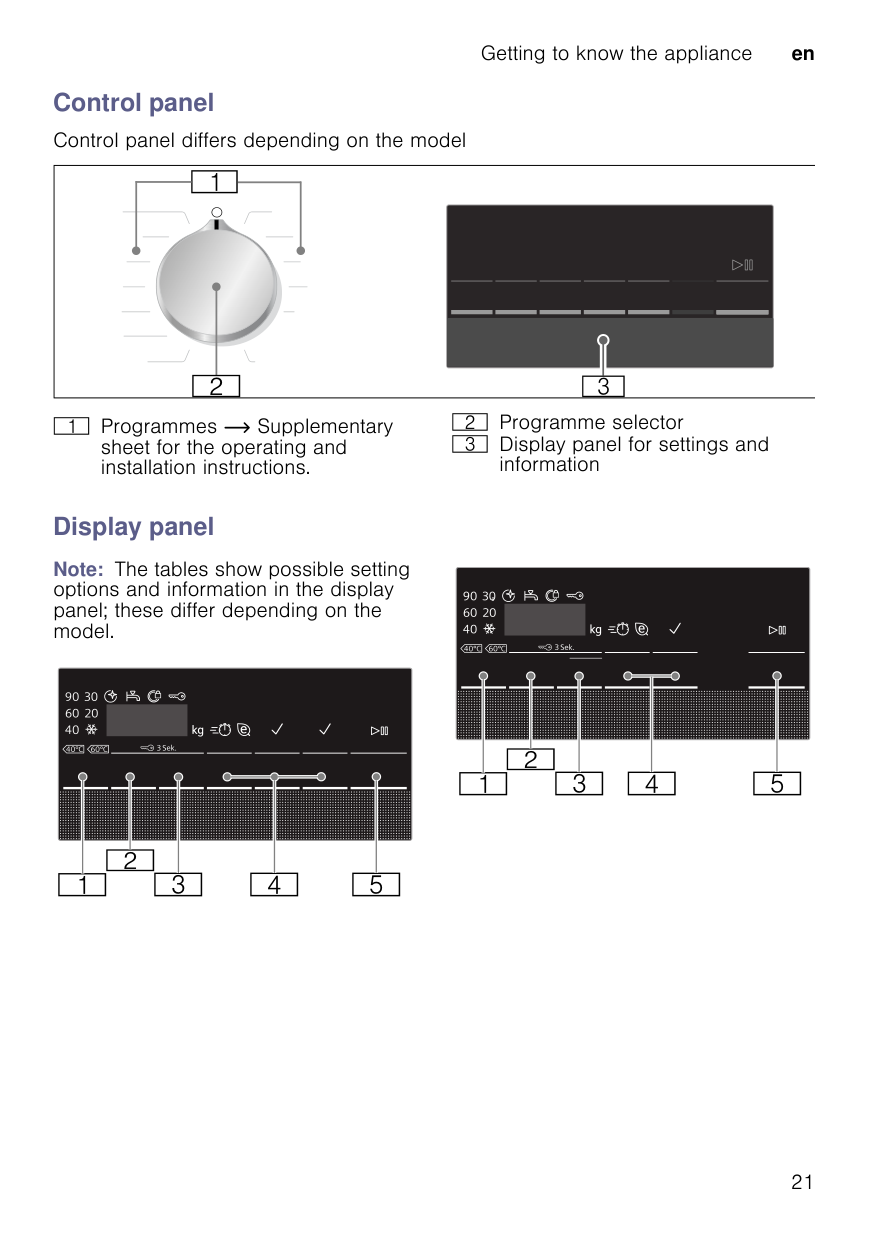
Control panel Control panel differs depending on the model
| | |---|
0 Programme selector 8 Display panel for settings and
( Programmes ~ Supplementary sheet for the operating and installation instructions.
information
Display panel Note: The tables show possible setting options and information in the display panel; these differ depending on the model.
| | | | | | | |---|---|---|---|---|---|
| | | | | | |
| | | | | | | |---|---|---|---|---|---| | | | | | | |
Buttons
Indicator/ symbol/information on the display panel
Description
( Selectable Tempera-
###### ture
Ž - Š‹ In °C; Ž = cold
In rpm; ‹ = no spin cycle, draining only; - - - = Rinse Stop
8 Ready in e.g. ƒ:„‹ Select the program dura-
tion in h:min (hours:minutes) after selecting the program
‚ - ƒ… h End of program ("Ready
in" time) after ...h (hours) @ Additional program
settings: ~ Page 27 ( ¦ speed eco è Less Ironing* è Prewash* è Water Plus/Rinse Plus*
Other information on the display panel
Indicator/ symbol/information on the display panel
Description
‰** kg Recommended load
Program progress: “Ÿš Program end
###### ΠWashing machine door
~ "Adding/removing laundry" on page 31
~ "Faults and what to do about them" on page 38
###### | Tap
~ "Faults and what to do about them" on page 38
###### w Childproof lock
~ "Childproof lock" on page 31
~ "Faults and what to do about them" on page 38
ä Indicator light for the Drum clean program* ~ "Information on the display panel" on page 39 ~ "Appliance settings" on page 33
###### “: - - Fault code
~ "Information on the display panel" on page 39
###### ‹ - … Signal setting
~ "Appliance settings" on page 33
Laundry en
Note: Energy saving mode In order to save energy, the appliance switches to energy saving mode. The display lighting goes out after a few minutes and the I button flashes. To activate the lighting, press any button. The energy saving mode is not activated if a programme is running.
##### Sorting laundry
Sort your laundry according to the care instructions and manufacturer's information on the care labels, depending on:
ZLaundry
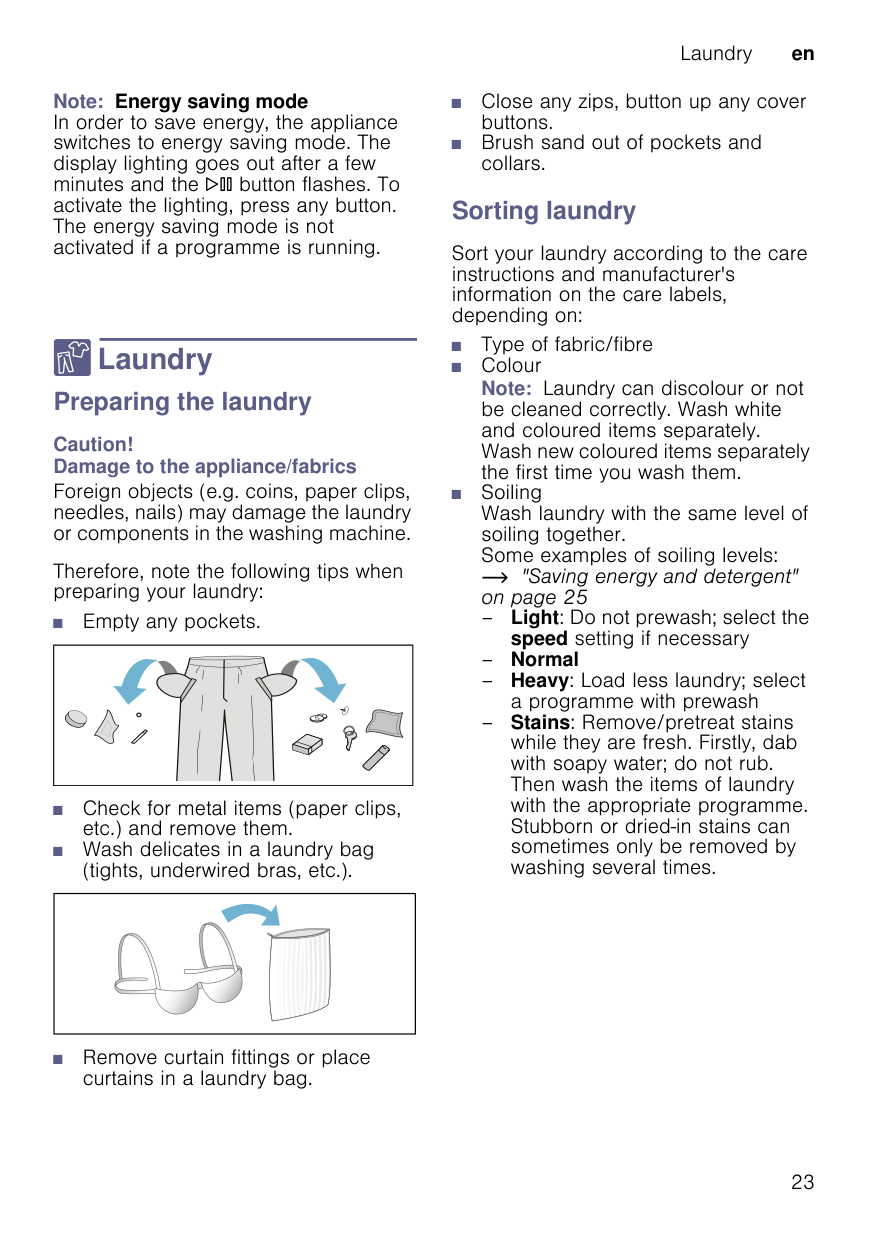
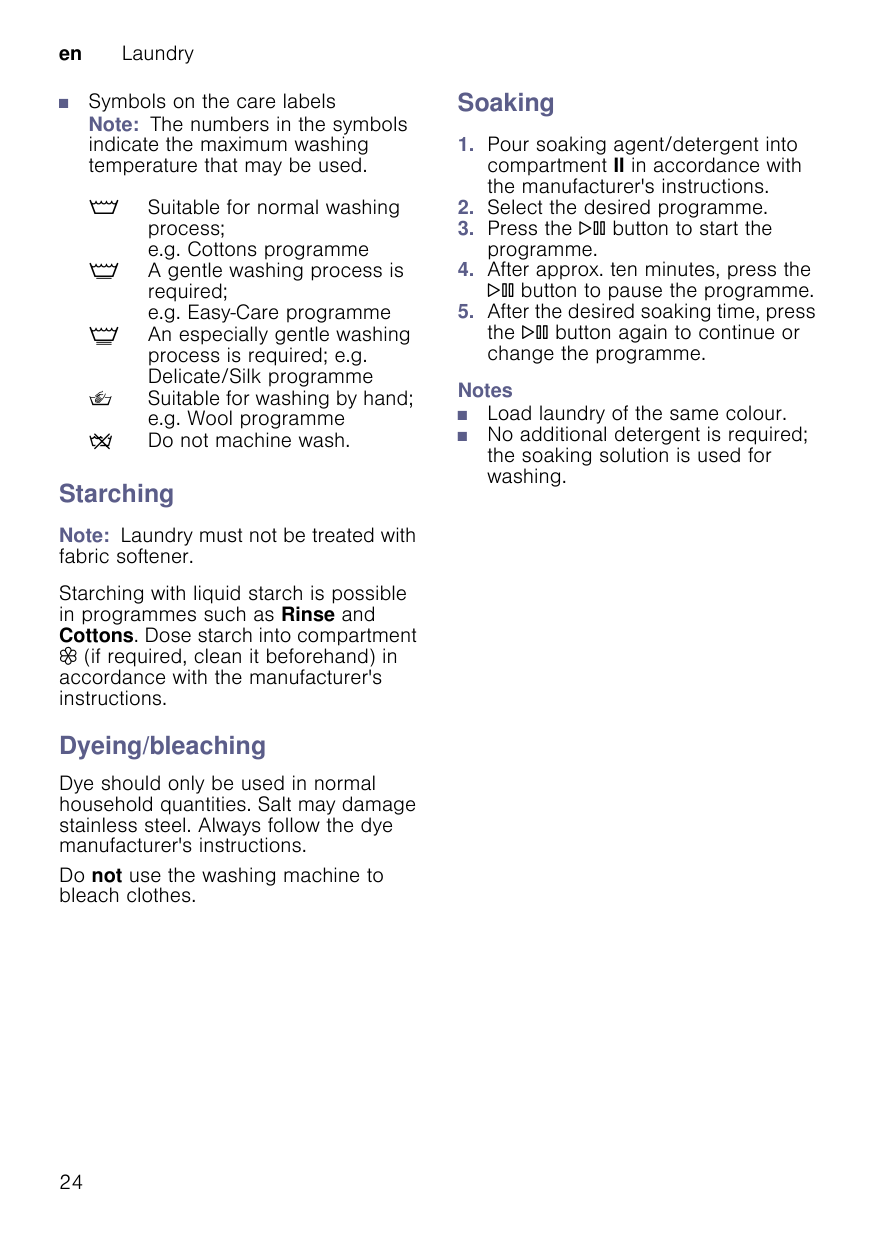
##### LaundryPreparing the laundry
###### Caution! Damage to the appliance/fabrics
Foreign objects (e.g. coins, paper clips, needles, nails) may damage the laundry or components in the washing machine.
Therefore, note the following tips when preparing your laundry:

| | |---|
en Laundry
■ Symbols on the care labels
Note: The numbers in the symbols
indicate the maximum washing temperature that may be used.
W Suitable for washing by hand; e.g. Wool programme Ž Do not machine wash.
Starching Note: Laundry must not be treated with fabric softener. Starching with liquid starch is possible in programmes such as Rinse and Cottons. Dose starch into compartment M (if required, clean it beforehand) in accordance with the manufacturer's instructions. Dyeing/bleaching
Dye should only be used in normal household quantities. Salt may damage stainless steel. Always follow the dye manufacturer's instructions.
Do not use the washing machine to bleach clothes.
##### Soaking
###### Notes
Detergent en
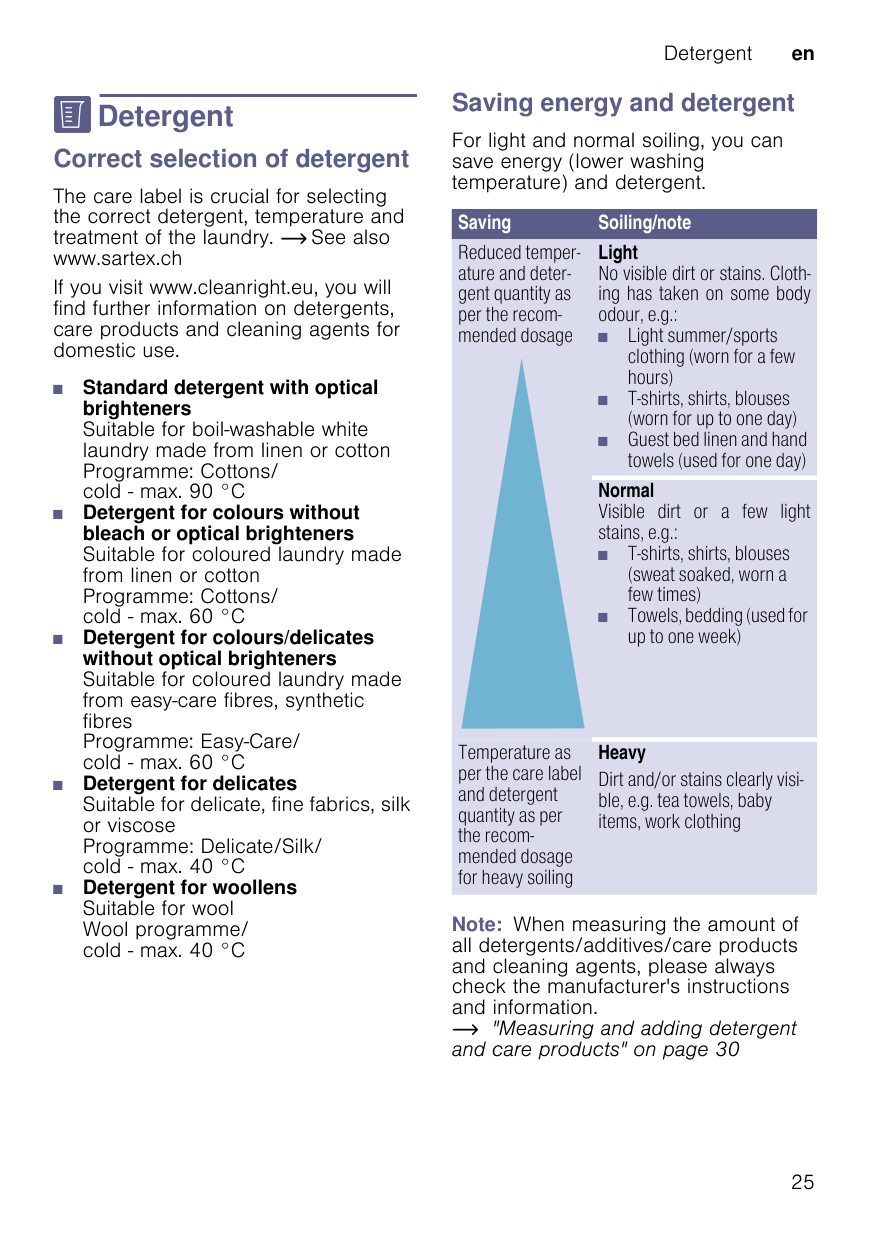
##### Saving energy and detergent
CDetergent
For light and normal soiling, you can save energy (lower washing temperature) and detergent.
##### DetergentCorrect selection of detergent
The care label is crucial for selecting the correct detergent, temperature and treatment of the laundry. ~ See also www.sartex.ch
###### Saving Soiling/note
Reduced temperature and detergent quantity as per the recommended dosage
###### Light
No visible dirt or stains. Clothing has taken on some body odour, e.g.:
If you visit www.cleanright.eu, you will find further information on detergents, care products and cleaning agents for domestic use.
Normal Visible dirt or a few light stains, e.g.:
Temperature as per the care label and detergent quantity as per the recommended dosage for heavy soiling
###### Heavy
Dirt and/or stains clearly visible, e.g. tea towels, baby items, work clothing
Note: When measuring the amount of all detergents/additives/care products and cleaning agents, please always check the manufacturer's instructions and information. ~ "Measuring and adding detergent and care products" on page 30
en Programme default settings
Spin speed (0, rpm 0, Spin speed) Depending on what stage the programme is in, you can change the spin speed (in rpm; revolutions per minute) before and during the programme.
0Programme default
settings
The programme default settings for all programmes are preset at the factory and are displayed in the display panel after the programme is selected.
Setting ‹: The rinsing water is drained but there is no spin. The laundry stays wet inside the drum, e.g. for items that should not be spun.
You can change the default settings by repeatedly pressing the corresponding buttons until the required settings are displayed in the display panel.
Setting - - -: (Rinse Stop) = no final spin. The laundry stays in the water after the final rinse.
Note: Pressing and holding the button automatically runs through the setting values until the last one. Press the button once more and you will be able to change the setting values again.
You can select "Rinse Stop" to prevent creasing if the laundry will not be taken out of the washing machine immediately after the programme has ended. ~ "Programme end during Rinse Stop" on page 32
The available settings vary depending on the model.
You can find an overview of all settings available for selection in each programme on the supplementary sheet for the operating and installation instructions.
Note: The maximum speed that can be set depends on the model and programme that has been selected.
Temperature (°C, °C Temp., Temperature) Depending on what stage the programme is in, you can change the set temperature before and at the beginning of the programme. Notes
Ready in (û, û Finished in, Finish in, Ready in) Before starting the programme, you can preselect the programme end ("Ready in" time) in hourly increments (h
= hour) up to a maximum of 24 hours. To do this:
During the timer count-down, you can change the preselected number of hours as follows:
During the timer count-down you can add or remove laundry as required.
Note: The length of the programme is automatically adjusted when the programme is running. Certain factors can affect the programme length, e.g.:
Additional programme settings en
\Additional programme
settings
The available settings vary depending on the model.
You can find an overview of all settings available for selection in each programme on the supplementary sheet for the operating and installation instructions.
##### speed eco
(( ¦, ( speedperfect, ¦ ecoperfect, speed eco)
Button with two possible settings for adapting the selected programme:
If you press the speed eco button once, you select the speed setting. If you press the button again, the eco setting is activated. The respective symbol is shown in the display when the setting is activated. If you press the button again, no setting is activated.
##### Water Plus/Rinse Plus
(l, Water+, Rinse+, Aqua Plus, Water Plus, Rinse Plus)
Setting depending on the model Increased water level and additional rinse cycle; extended washing time. For areas with very soft water or for further enhancing the spin result.
Less Ironing (æ, æ Easy-Iron, Less Ironing) Setting depending on the model Reduces creasing thanks to a special spin sequence followed by fluffing and reduced spin speed. Note: The laundry's residual moisture is increased.

Prewash (s, Prewash) Setting depending on the model For heavily soiled laundry. There will be a prewash cycle at a low temperature before the main wash cycle. Note: Pour detergent into compartment
1Operating the appliance
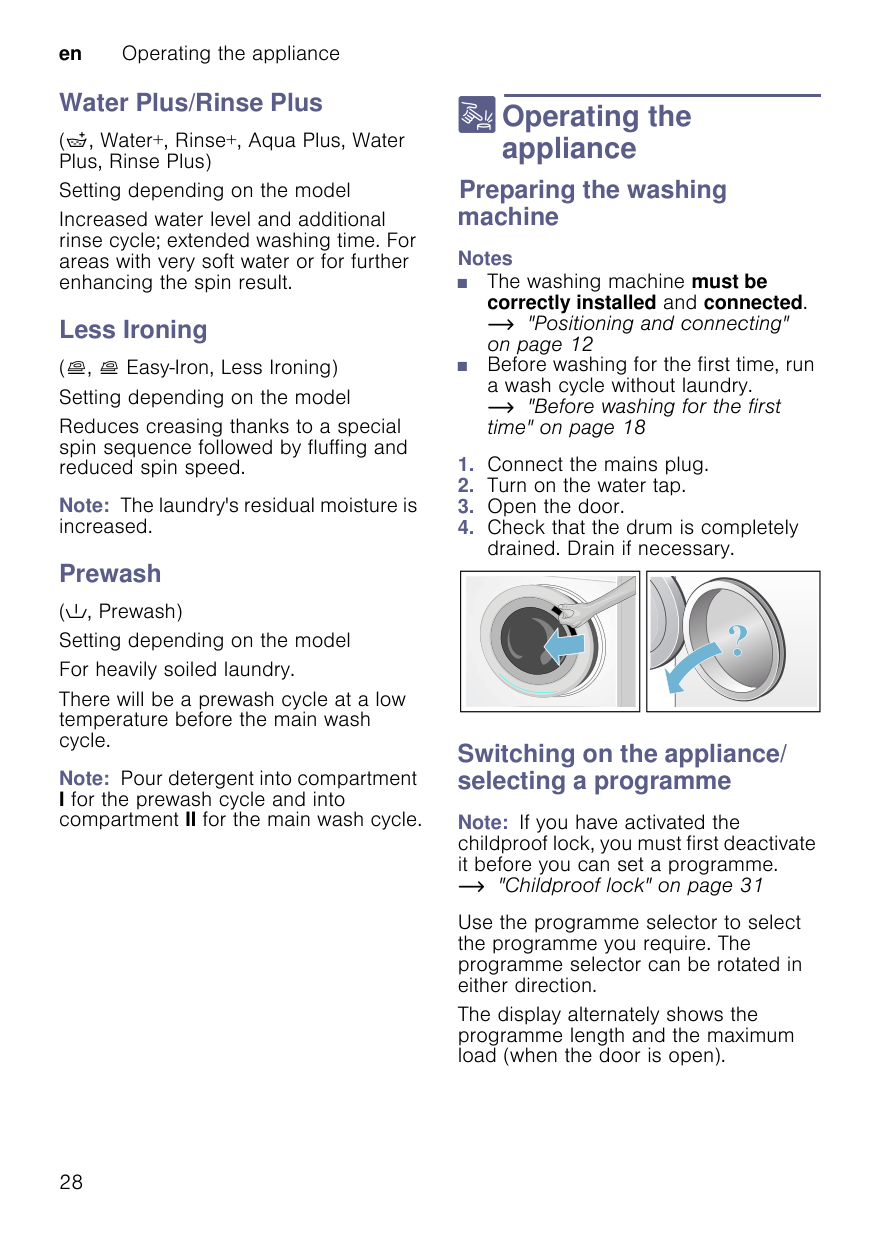
##### Operating the apliancePreparing the washing machine
###### Notes
| | | | |---|---|---| |

| | | | | | |


##### Switching on the appliance/ selecting a programme
Note: If you have activated the childproof lock, you must first deactivate it before you can set a programme. ~ "Childproof lock" on page 31
Use the programme selector to select the programme you require. The programme selector can be rotated in either direction.
The display alternately shows the programme length and the maximum load (when the door is open).
##### Changing the programme default settings
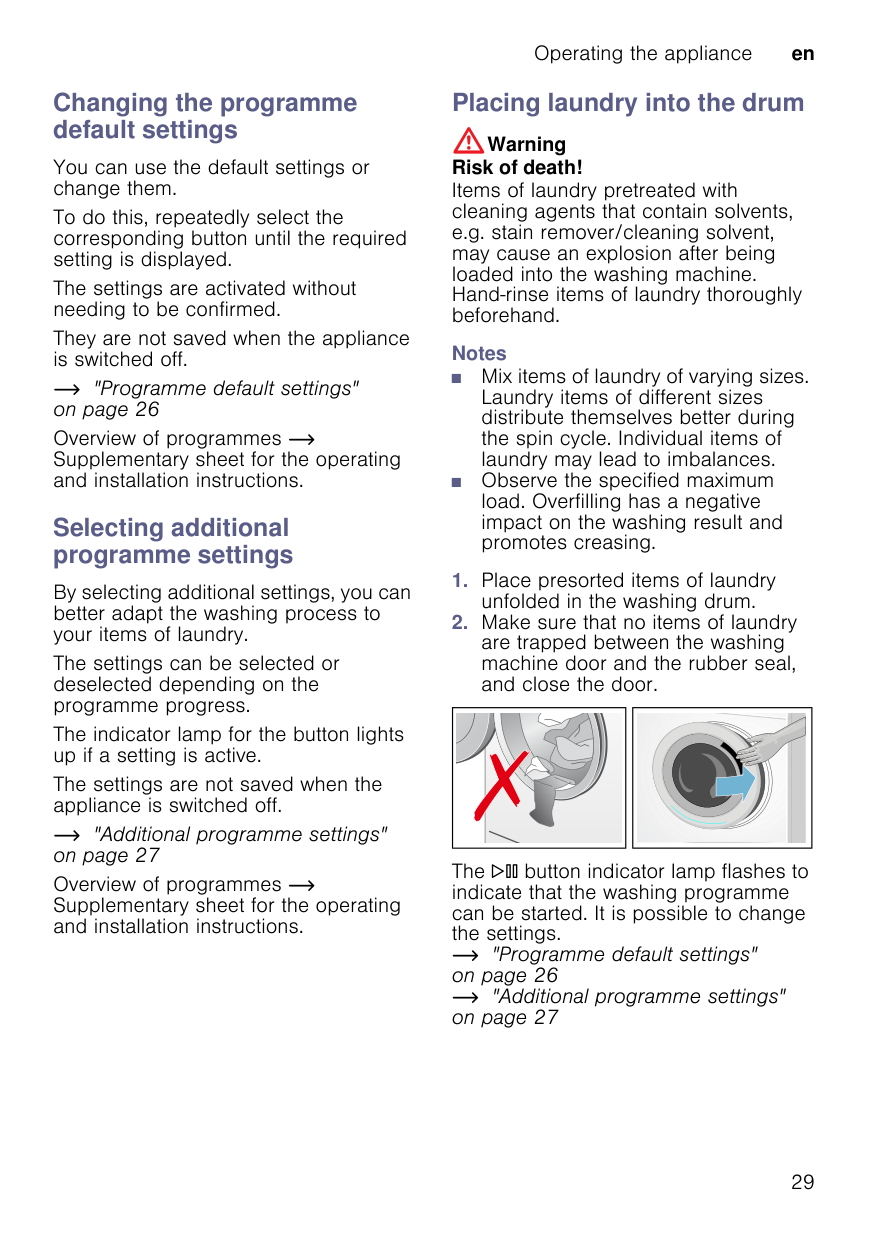
Placing laundry into the drum :Warning Risk of death!
You can use the default settings or change them.
Items of laundry pretreated with cleaning agents that contain solvents, e.g. stain remover/cleaning solvent, may cause an explosion after being loaded into the washing machine. Hand-rinse items of laundry thoroughly beforehand.
To do this, repeatedly select the corresponding button until the required setting is displayed.
The settings are activated without needing to be confirmed.
They are not saved when the appliance is switched off.
###### Notes
~ "Programme default settings"
Overview of programmes ~ Supplementary sheet for the operating and installation instructions.
Selecting additional programme settings
By selecting additional settings, you can better adapt the washing process to your items of laundry.
The settings can be selected or deselected depending on the programme progress.
The indicator lamp for the button lights up if a setting is active.
The settings are not saved when the appliance is switched off.
~ "Additional programme settings"
|a|nd close the|o| |---|---|---| | | | | |The|I| |


button indicator lamp flashes to indicate that the washing programme can be started. It is possible to change the settings. ~ "Programme default settings"
Overview of programmes ~ Supplementary sheet for the operating and installation instructions.
##### Measuring and adding detergent and care products
###### Caution! Damage to the appliance
Cleaning agents and agents for pretreating laundry (e.g. stain removers, prewash sprays, etc.) may cause damage if they come into contact with the surfaces of the washing machine. Do not allow these agents to come into contact with the surfaces of the washing machine. If necessary, immediately wipe away spray residue and other residues/ droplets with a damp cloth.
###### Dosing
Dose the detergents and care products according to:
:Warning Eye/skin irritation! Detergents and care products may spray out if the detergent drawer is opened while the machine is in operation. Open the drawer carefully. Rinse eyes/skin thoroughly if they come into contact with detergents or care products. If accidentally swallowed, seek medical advice.
Note: Dilute viscous fabric softener and fabric conditioner with a little water. This prevents blockages in the washing machine's piping.
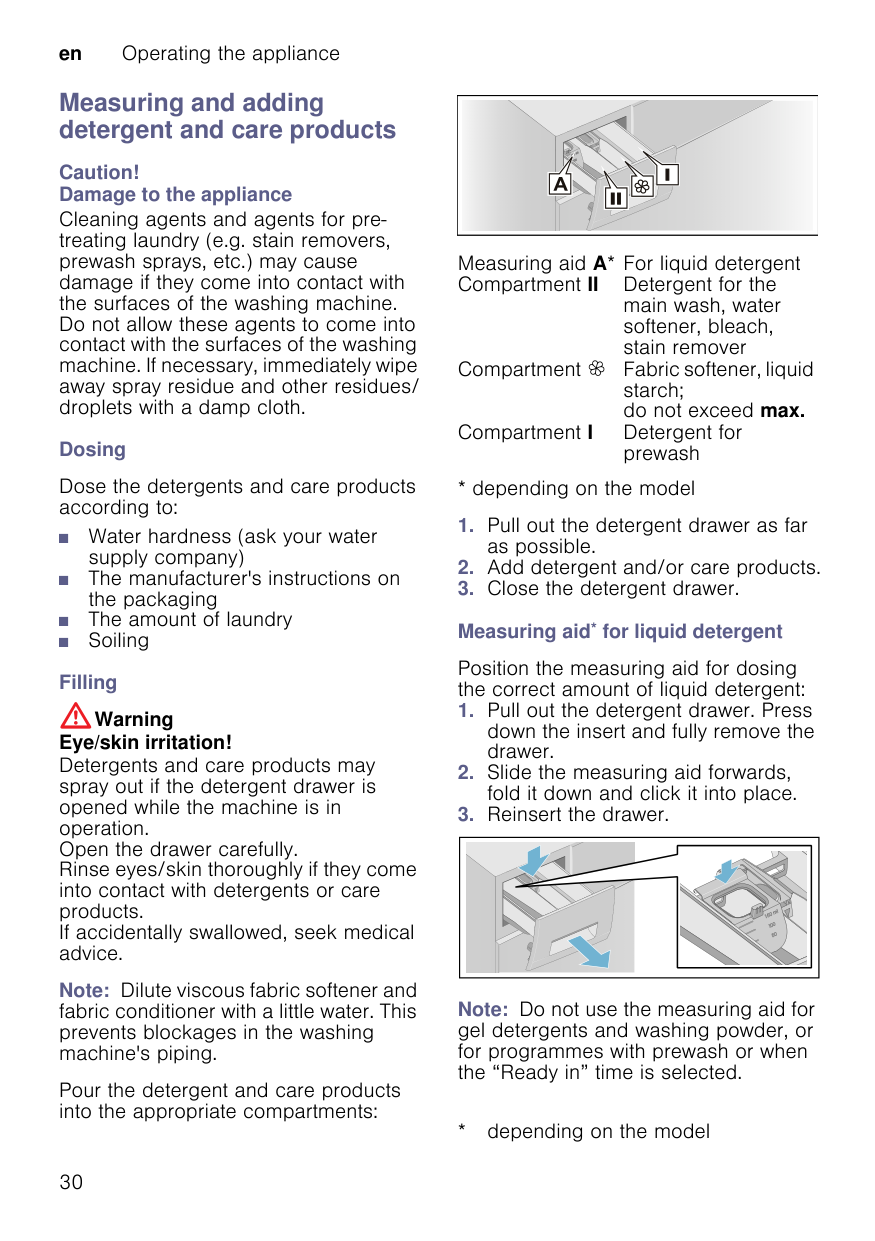
Pour the detergent and care products into the appropriate compartments:
Measuring aid A* For liquid detergent Compartment II Detergent for the
main wash, water softener, bleach, stain remover
Compartment i Fabric softener, liquid starch; do not exceed max.
Compartment I Detergent for prewash
Position the measuring aid for dosing the correct amount of liquid detergent:
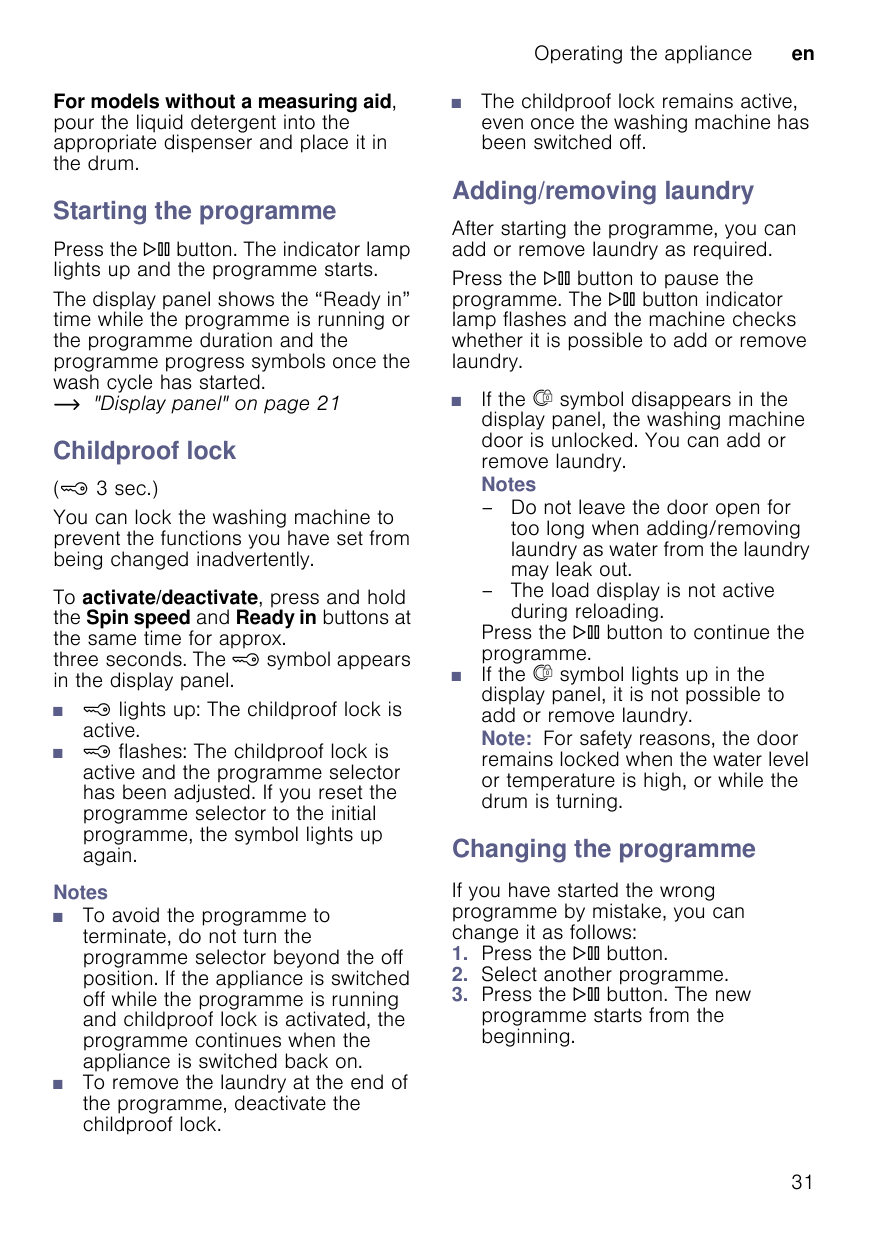
Note: Do not use the measuring aid for gel detergents and washing powder, or for programmes with prewash or when the “Ready in” time is selected.
For models without a measuring aid, pour the liquid detergent into the appropriate dispenser and place it in the drum.
##### Starting the programme
Press the I button. The indicator lamp lights up and the programme starts.
The display panel shows the “Ready in” time while the programme is running or the programme duration and the programme progress symbols once the wash cycle has started. ~ "Display panel" on page 21
Childproof lock (w 3 sec.) You can lock the washing machine to prevent the functions you have set from being changed inadvertently. To activate/deactivate, press and hold the Spin speed and Ready in buttons at the same time for approx. three seconds. The w symbol appears in the display panel.
###### Notes
■ The childproof lock remains active, even once the washing machine has been switched off.
##### Adding/removing laundry
After starting the programme, you can add or remove laundry as required.
Press the I button to pause the programme. The I button indicator lamp flashes and the machine checks whether it is possible to add or remove laundry.
Press the I button to continue the programme.
##### Changing the programme
If you have started the wrong programme by mistake, you can change it as follows:
Cancelling the programme For programmes at high temperature:
##### Programme end during Rinse Stop
Continue the programme by:
Programme end “Ÿš appears in the display panel and the indicator lamp of the I button goes out.
##### Removing laundry/switching off the appliance
###### Notes


Sensors en
HSensors
Q Appliance settings
##### SensorsAutomatic load sensing
Apliance settingsYou can change the following settings:
The automatic load-sensing function perfectly adapts the water consumption to each programme depending on the type of fabric and the load.
##### Unbalanced load detection system
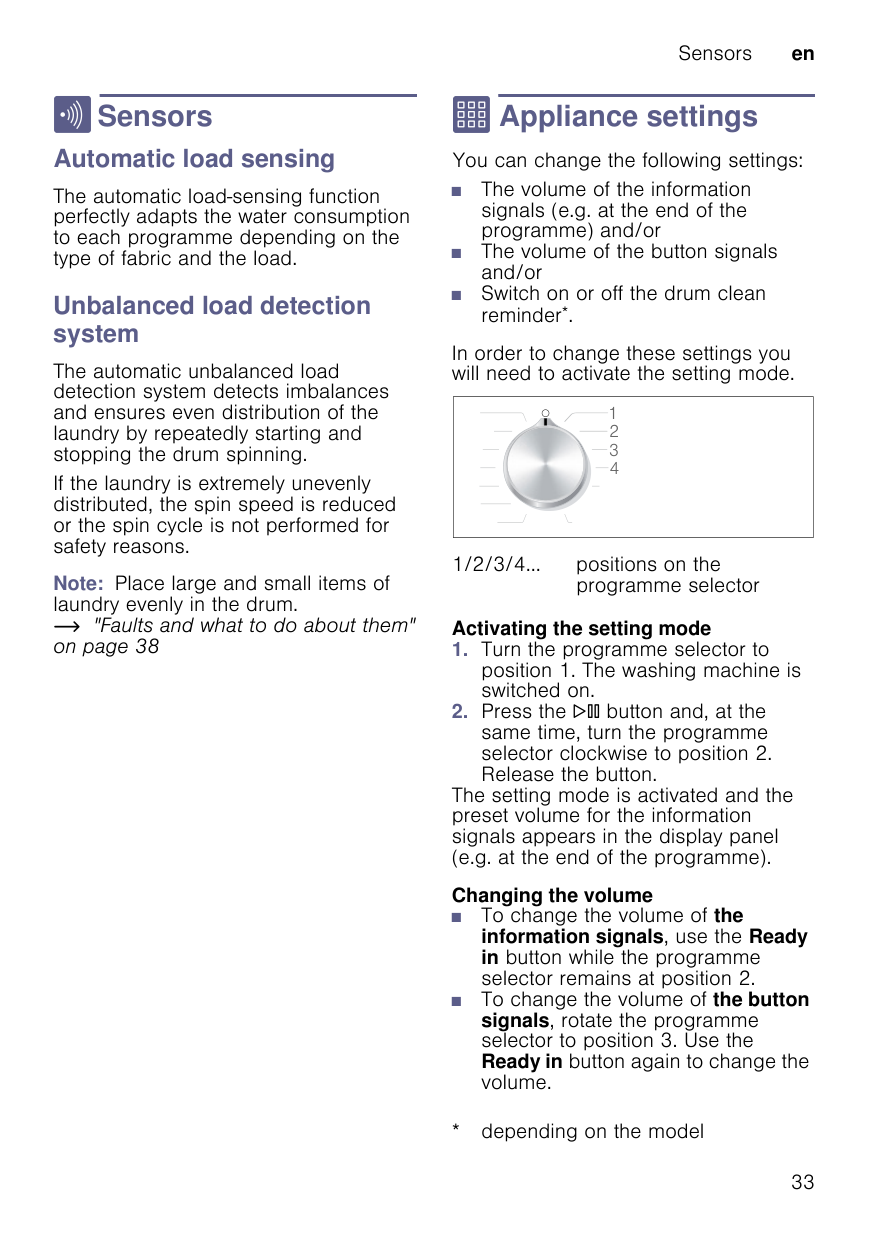
In order to change these settings you will need to activate the setting mode.
The automatic unbalanced load detection system detects imbalances and ensures even distribution of the laundry by repeatedly starting and stopping the drum spinning.
|

| |---|
If the laundry is extremely unevenly distributed, the spin speed is reduced or the spin cycle is not performed for safety reasons.
1/2/3/4... positions on the programme selector
Note: Place large and small items of laundry evenly in the drum. ~ "Faults and what to do about them" on page 38
###### Activating the setting mode
The setting mode is activated and the preset volume for the information signals appears in the display panel (e.g. at the end of the programme).
###### Changing the volume
‹ = off, ‚ = quiet, ƒ = medium, „ = loud, … = very loud

Switching on or off the drum clean reminder* To switch on/off the drum clean reminder, rotate the programme selector to position 4. Use the Ready in button to switch the reminder on or off.
If the setting is activated, an acoustic signal is heard.
Exiting setting mode You can now end the process and set the programme selector to the off position. The settings are saved.
###### Caution! Damage to the appliance
Cleaning agents that contain solvents, e.g. cleaning solvent, can damage surfaces and components in the machine. Do not use cleaning agents that contain solvents.
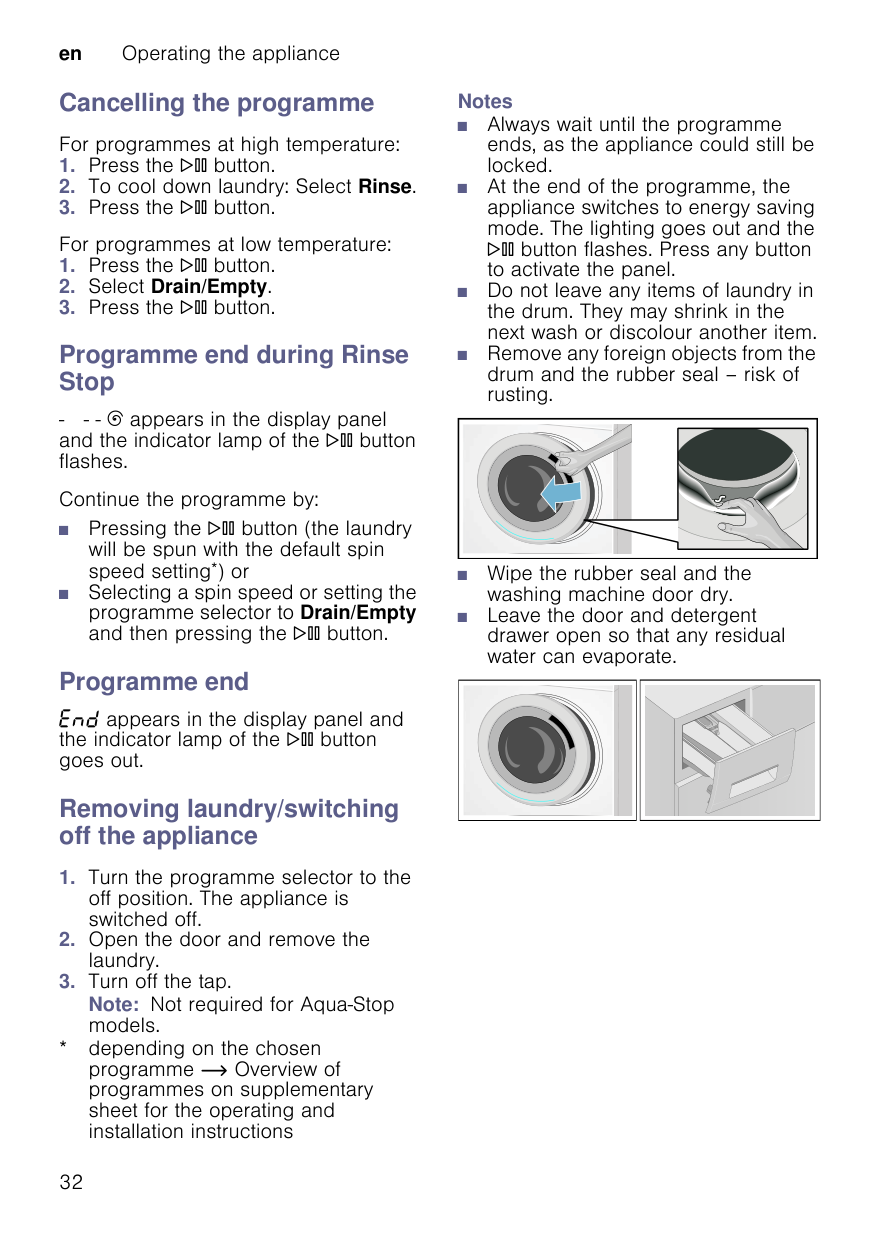
Prevent detergent residue from building up and odours from forming by following these instructions:
Notes
##### Machine housing/control panel
2Cleaning and maintenance
Cleaning and mainteance:Warning Risk of death! There is a risk of electric shock if you touch live components. Switch off the appliance and disconnect the mains plug.
##### Drum
Use chlorine-free cleaning agents, do not use steel wool.
If there are odours in the washing machine, or to clean the drum, run the
:Warning Risk of poisoning! Toxic vapours can be produced by cleaning agents that contain solvents, e.g. cleaning solvent. Do not use cleaning agents that contain solvents.
Drum clean programme** or Cottons 90 °C programme without laundry. Add washing powder.
##### Descaling
Descaling should not be necessary if the detergent is measured out correctly. However, if it is required, follow the manufacturer's instructions for the descaling agent. Suitable descalers can be obtained via our website or from our after-sales service. ~ Page 42
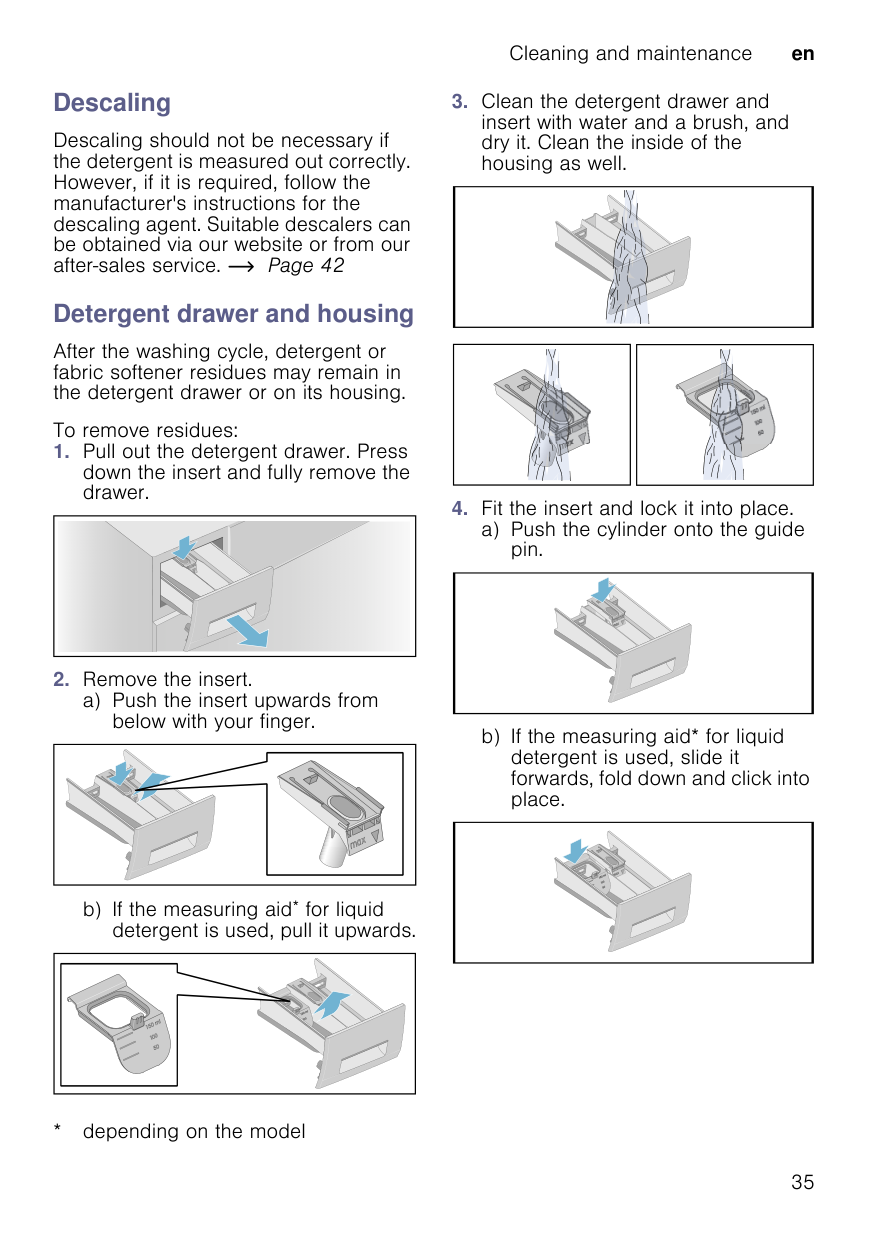
##### Detergent drawer and housing
After the washing cycle, detergent or fabric softener residues may remain in the detergent drawer or on its housing.
To remove residues:


| | | |---|---| | | |
Note: Leave the detergent drawer open so that any residual water can evaporate.


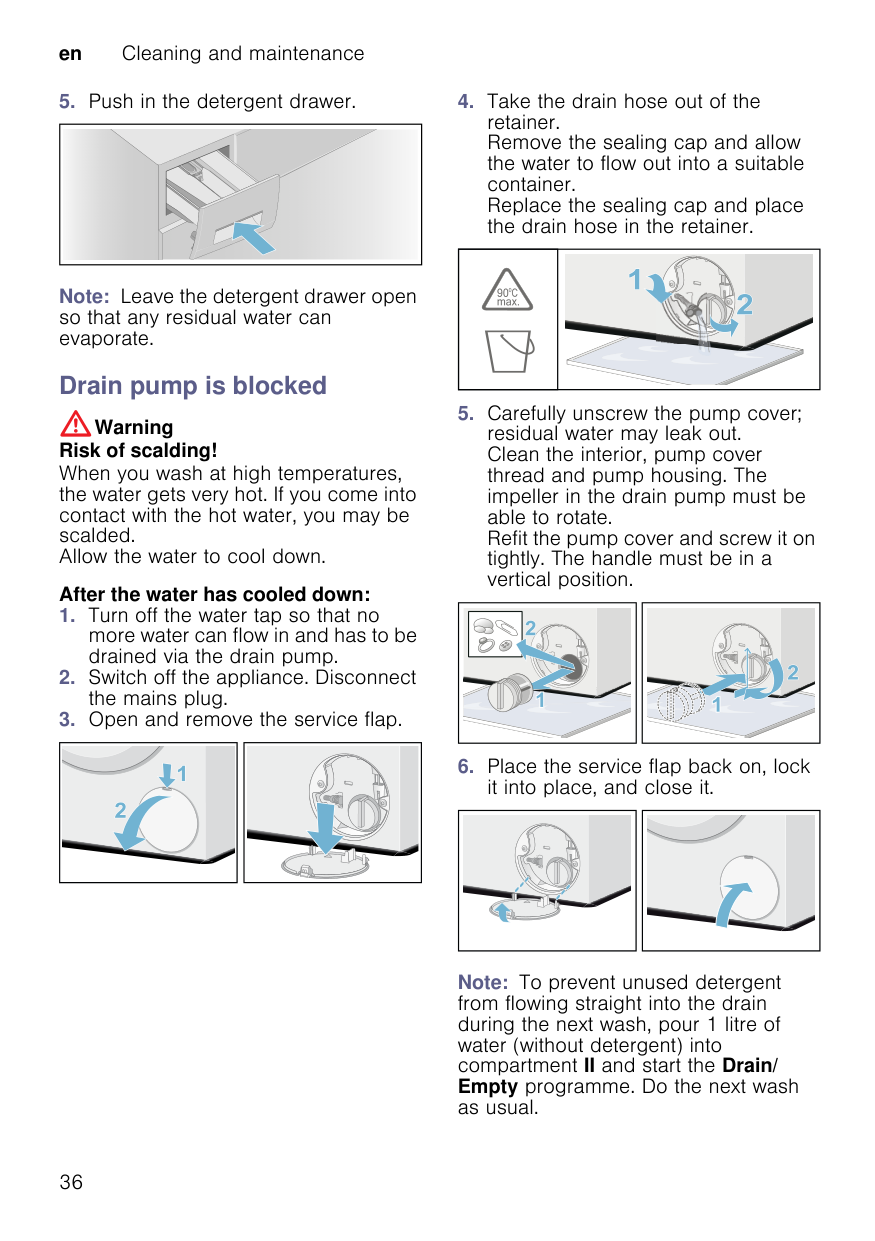
Drain pump is blocked :Warning Risk of scalding!
When you wash at high temperatures, the water gets very hot. If you come into contact with the hot water, you may be scalded. Allow the water to cool down.
###### After the water has cooled down:
Note: To prevent unused detergent from flowing straight into the drain during the next wash, pour 1 litre of water (without detergent) into compartment II and start the Drain/ Empty programme. Do the next wash as usual.
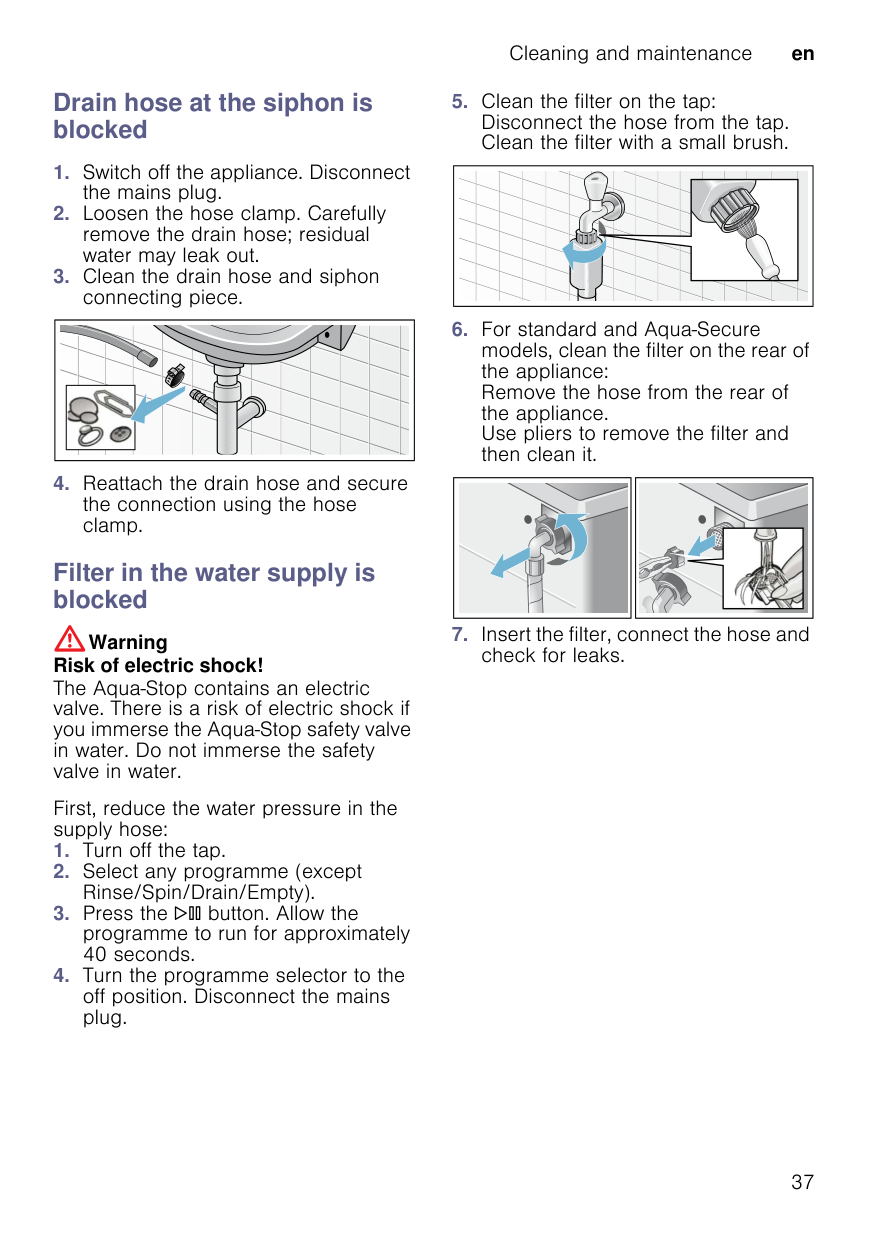
##### Drain hose at the siphon is blocked


##### Filter in the water supply is blocked
:Warning Risk of electric shock! The Aqua-Stop contains an electric valve. There is a risk of electric shock if you immerse the Aqua-Stop safety valve in water. Do not immerse the safety valve in water.
First, reduce the water pressure in the supply hose:
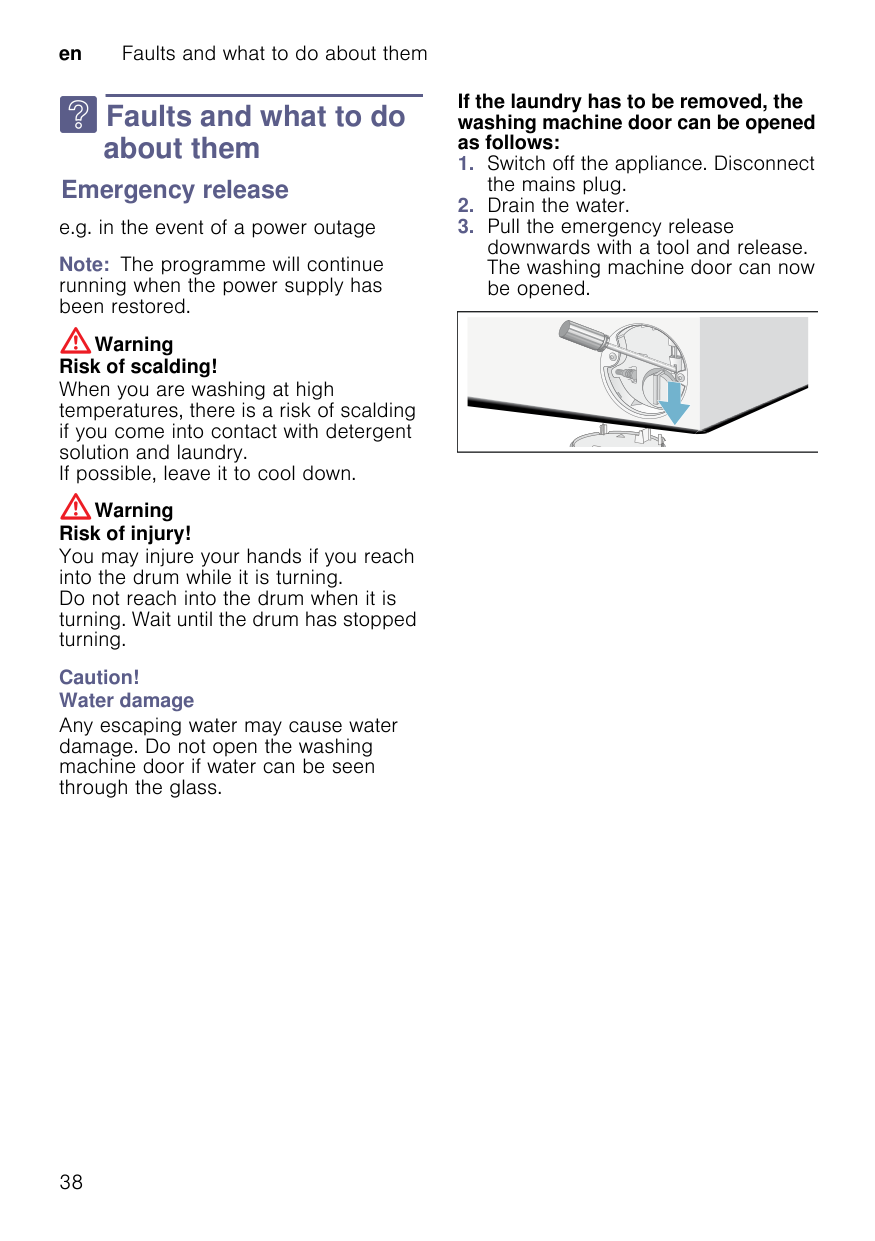
If the laundry has to be removed, the washing machine door can be opened as follows:
3 Faults and what to doabout them
Emergency release e.g. in the event of a power outage
Note: The programme will continue running when the power supply has been restored.
| | |---|
:Warning Risk of scalding! When you are washing at high temperatures, there is a risk of scalding if you come into contact with detergent solution and laundry. If possible, leave it to cool down.
:Warning Risk of injury! You may injure your hands if you reach into the drum while it is turning. Do not reach into the drum when it is turning. Wait until the drum has stopped turning.
###### Caution! Water damage
Any escaping water may cause water damage. Do not open the washing machine door if water can be seen through the glass.
##### Information on the display panel
Indicator/symbol Cause/remedy Œ has lit up ■ The temperature is too high. Wait until the temperature drops.
■ The water level is too high. It is not possible to add more laundry. Close the door immediately, if necessary. Press the I button to resume the program.
Œ is flashing ■ Laundry may be trapped. Open and close the door again and press the I button.
| has lit up ■ Turn on the cold water tap fully;
“: ‚‰ ■ The drain pump is blocked. Clean the drain pump. ~ Page 36
■ The drain hose/drain pipe is blocked. Clean the drain hose at the siphon. ~ Page 37
“: ƒ„ There is water in the base trough; the appliance is leaking. Turn off the tap. Call our after-sales service. ~ Page 42
“: „ƒ is flashing alternately with “Ÿš at the end of the program.
Not a fault – the unbalanced load detection system has interrupted the spin cycle because the laundry is unevenly distributed.
Distribute small and large items of laundry evenly in the drum. Run the spin cycle again, if necessary.
w The childproof lock is active – deactivate it. ~ Page 31
Theäindicator light for the Drum clean program* is flashing
Run the Drum clean* program or a 60 °C program to clean and care for the drum and the outer tub.
###### Notes
Other indicators and symbols
Switch off the appliance, wait for 5 seconds and then switch it back on. If the indicator/symbol appears again, call our after-sales service. ~ Page 42
##### Faults and what to do about them
###### Faults Cause/remedy
Water is leaking from the appliance.
The appliance is not filling with water.
Detergent is not being dispensed.
The door will not open. ■ The safety function is active. Note: For safety reasons, the washing machine door remains locked when the water level or temperature is high (see~ "Cancelling the programme" on page 32) or while the drum is rotating.
The program will not start.
The drum briefly jerks or judders after the program has started.
Not a fault – the internal motor test may cause the drum to jerk or judder briefly when the wash program starts.
The washing water is not being pumped away.
Water is not visible in the drum.
Not a fault – the water is below the visible area.
The spin result is not satisfactory.
Laundry wet/too damp.
The machine spins the drum back and forth several times.
Not a fault – the unbalanced load detection system is eliminating an imbalance.
The program is taking longer than usual.
The length of the program changes during the wash cycle.
Not a fault – the program sequence is optimised for the specific washing process. This may change the program duration shown on the display panel.
###### Faults Cause/remedy
Water remaining in the care product compartment i.
Odours or a greasy film in the washing machine.
Depending on the model, run the Drum clean* or Cottons 90 °C program without laundry.
Add standard washing powder or a detergent that contains a bleaching agent.
Note: To prevent foaming, only use half the amount of detergent recommended by the detergent manufacturer. Do not use detergents intended for woollens or delicates.
Foam is leaking from the detergent drawer.
Have you used too much detergent? Mix one tablespoon of fabric softener with 1/2 litre of water and pour it into compartment II.This solution is not suitable for outdoor clothing, sportswear or items stuffed with down. Note: To prevent the machine from producing too much foam, the next time you run a wash cycle, add less detergent for the same size load.
Loud noises, vibrations and machine "wandering" during the spin and/ or drain cycles.
The amount of noise generated during pumping is not the same as during washing.
The display panel/indicator lights do not work while the appliance is running.
There is detergent residue on the laundry.
The Πsymbol is lit on the display panel when the program is paused.
The Πsymbol is not lit on the display when the program is paused.
The door is unlocked. It is possible to add laundry.
If you cannot rectify a fault yourself (after switching the machine off and then on again) or a repair is required:
en After-sales service
4After-sales service
JTechnical data
After-sales serviceIf you cannot rectify a fault yourself, please contact our after-sales service. We will always find an appropriate solution to avoid unnecessary visits by engineers. Please provide the after-sales service with the product number (E no.) and the production number (FD) of the appliance.
| | |---|
E no. Product number FD Production number
You can find this information (depending on the model):
Technical dataDimensions: 850 x 600 x 550 mm (Height x width x depth) Weight 63-83 kg (depending on model) Mains connection: Mains voltage 220-240 V, 50 Hz Nominal current 10 A Nominal output 2300 W Water pressure: 100-1000 kPa (1-10 bar)
Power consumption when switched off: 0.12 W
Power consumption when ready for use (left-on mode): 0.50 W
Trust the expertise of the manufacturer. Contact us. By doing so, you can be sure that the repairs are carried out by trained service personnel using genuine spare parts.
Aqua-Stop warranty en
rAqua-Stop warranty Aqua-Stop warrantyOnly for appliances with Aqua-Stop In addition to warranty claims against the vendor based on the purchase agreement and to our appliance warranty, we will provide compensation under the following conditions:
###### Repair order and advice in the event of faults
GB 0344 892 8999 (Calls charged at local or mobile rate.) IE 01450 2655 (0.03 € per minute at peak. Off peak 0.0088 € per minute.)
You can find the contact information for all countries in the attached after-sales service directory.
BSH Hausgeräte GmbH Carl-Wery-Straße 34 81739 München GERMANY
siemens-home.bsh-group.com
*9001357356* 9001357356 (9711)