
Siemens Rdh100rfset Wireless Room Thermostat With Lcd
Ask AI
— answers from the official manualAnswers from the official manual.
Common questions
Common Questions
30 totalHow do I reset the RDH100RF transmitter and receiver to factory defaults?
To reset the transmitter, simultaneously press the TEST and LEARN buttons on the rear of the transmitter. To reset the receiver, simultaneously press the OVERRIDE and LEARN buttons. This resets all individual settings to their default values. (Page 9)
How do I enter parameter setting mode to change the control behavior?
Press LEARN on the rear of the transmitter for 5 seconds until 'P01' appears on the display. Press LEARN again so the parameter value flashes, then adjust it using the setting knob, and press LEARN once to confirm. Exit by rotating the knob clockwise to 'End' and pressing LEARN once. Note that the thermostat automatically exits parameter setting mode one minute after the last action. (Page 4)
What does the low battery symbol mean and what should I do?
If the battery symbol appears on the display, the batteries are almost empty and must be replaced. The transmitter is powered by 2 x 1.5 V AA alkaline batteries with an expected battery life of more than one year. When removing the batteries, setpoints and operating mode information are retained for a maximum of 2 minutes. (Pages 6, 9, 10)
What are the safety warnings when replacing the batteries?
Batteries can cause explosion due to fire or short-circuit, so you must not recharge, damage, disassemble, or heat batteries over 85°C, and prevent them from contacting water. If a battery leaks electrolyte, handle it only with suitable protective gloves, and if electrolyte contacts your eyes, rinse immediately with plenty of water and consult a doctor. Only use batteries of the same type and manufacturer, observe polarities, and do not mix new and used batteries. (Page 9)
What control behavior options are available and what is the factory setting?
The thermostat offers four control behavior options: 2-position with 1K switching hysteresis, 2-position with 0.5K switching hysteresis, PID slow, and PID fast, configured via parameter P01. The factory setting is PID slow (value 4), which is ideal for most heating systems. Important: PID fast must NOT be used for oil boilers or electric mechanical actuators. (Pages 3, 4)
What are the minimum and maximum temperature setpoint limits and how do I change them?
The maximum temperature range (P02) has a factory setting of 30°C with a range from P03 to 30°C, while the minimum temperature range (P03) has a factory setting of 5°C with a range from 5°C to P02. These limits apply to both the comfort and economy setpoints. Parameter settings are stored in non-volatile memory and are not erased when the battery is removed. (Page 4)
Show 24 more questions
Does the RDH100RF/Set require regular maintenance?
Where should I mount the thermostat transmitter for best performance?
What do the different RF LED states on the receiver mean?
How does the Override function work on the receiver?
How can I factory reset the Siemens Rdh100rf/set?
What are the safety warnings I need to be aware of when handling this device?
How can I set the heating system control behavior?
What is the recommended height for wall mounting of this device?
How often do I need to change the batteries in this thermostat?
What does the 'Rf Test' symbol indicate?
How do I adjust the comfort temperature setpoint of my Siemens Rdh100rf/set?
What is the resolution of temperature settings and displays?
In case I encounter an error during operation, how can I perform a software reset?
How do I mount the RCR100/433 receiver?
How do I change batteries in the RDH100RF room controller?
How do I learn a new transmitter address for the receiver?
What does the override button do?
How can I test the RF transmission between the transmitter and receiver?
How do I enter parameter setting mode for configuring advanced settings?
How do I select a new desired temperature using the setting knob?
What does an orange LED on the receiver indicate?
How do I perform a factory reset of the room controller?
How do I reset the receiver to clear all transmitter addresses?
What does it mean if the signal indicator on the receiver is red?
Full Manual
2 pages
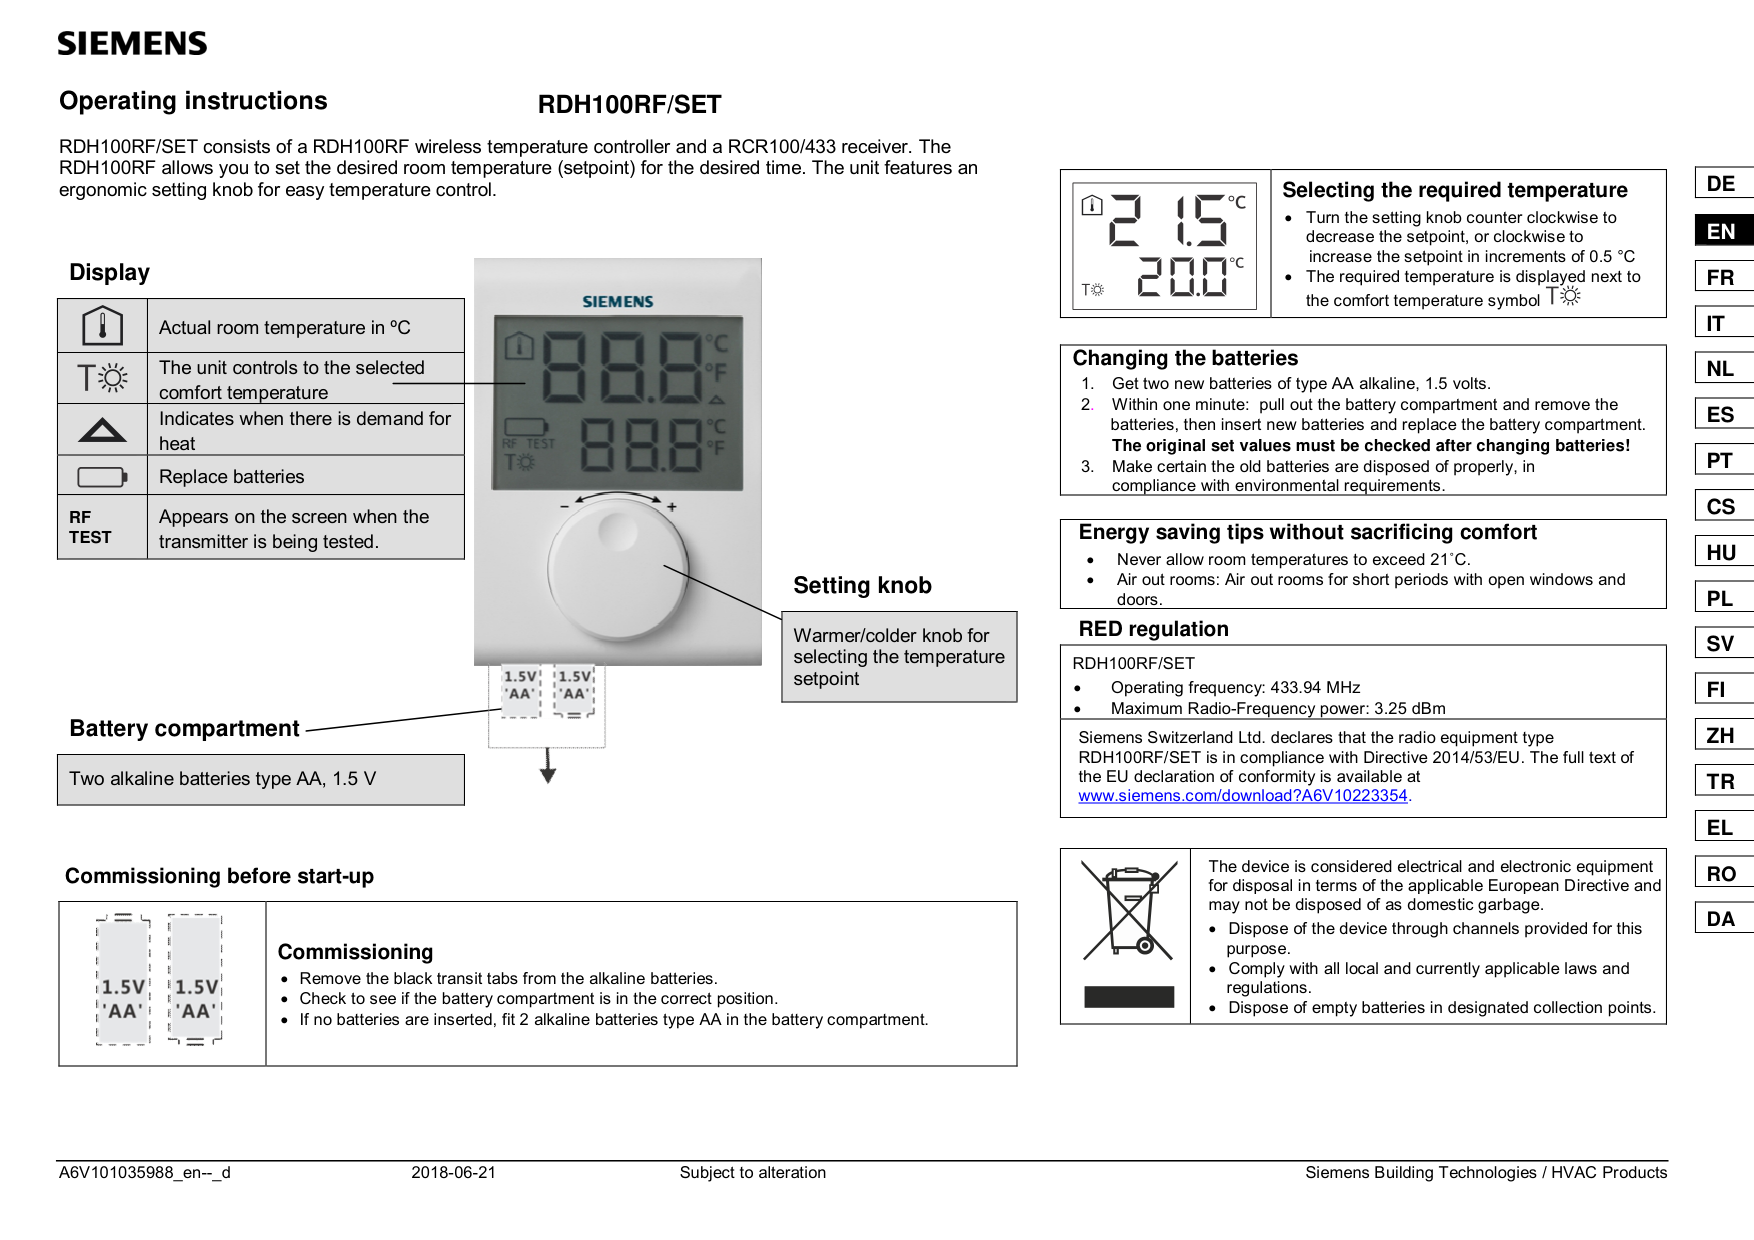

Operating instructions RDH100RF/SET
RDH100RF/SET consists of a RDH100RF wireless temperature controller and a RCR100/433 receiver. The RDH100RF allows you to set the desired room temperature (setpoint) for the desired time. The unit features an ergonomic setting knob for easy temperature control.
Display

Actual room temperature in ºC The unit controls to the selected comfort temperature Indicates when there is demand for heat Replace batteries
Appears on the screen when the transmitter is being tested.
RF TEST
Setting knob
|Warmer/colder knob for selecting the temperature setpoint
| |---|

Battery compartment
|Two alkaline batteries type AA, 1.5 V| |---|
Commissioning before start-up
||Commissioning Remove the black transit tabs from the alkaline batteries. Check to see if the battery compartment is in the correct position. If no batteries are inserted, fit 2 alkaline batteries type AA in the battery compartment.| |---|---|
| |Selecting the required temperature
Turn the setting knob counter clockwise to decrease the setpoint, or clockwise to
increase the setpoint in increments of 0.5 °C The required temperature is displayed next to the comfort temperature symbol| |---|---|
|Changing the batteries
1. Get two new batteries of type AA alkaline, 1.5 volts.
2 Within one minute: pull out the battery compartment and remove the batteries, then insert new batteries and replace the battery compartment. The original set values must be checked after changing batteries!
3. Make certain the old batteries are disposed of properly, in compliance with environmental requirements.
| |---|
|Energy saving tips without sacrificing comfort Never allow room temperatures to exceed 21 C. Air out rooms: Air out rooms for short periods with open windows and doors.| |---|
RED regulation
|RDH100RF/SET Operating frequency: 433.94 MHz Maximum Radio-Frequency power: 3.25 dBm| |---| |Siemens Switzerland Ltd. declares that the radio equipment type RDH100RF/SET is in compliance with Directive 2014/53/EU. The full text of the EU declaration of conformity is available at www.siemens.com/download?A6V10223354.
|
| |The device is considered electrical and electronic equipment for disposal in terms of the applicable European Directive and may not be disposed of as domestic garbage.
Dispose of the device through channels provided for this purpose. Comply with all local and currently applicable laws and regulations. Dispose of empty batteries in designated collection points.| |---|---|
DE EN FR IT NL ES PT CS HU PL SV FI ZH TR EL RO DA
DE EN FR
IT NL ES PT CS HU PL SV
FI ZH TR EL
RO DA
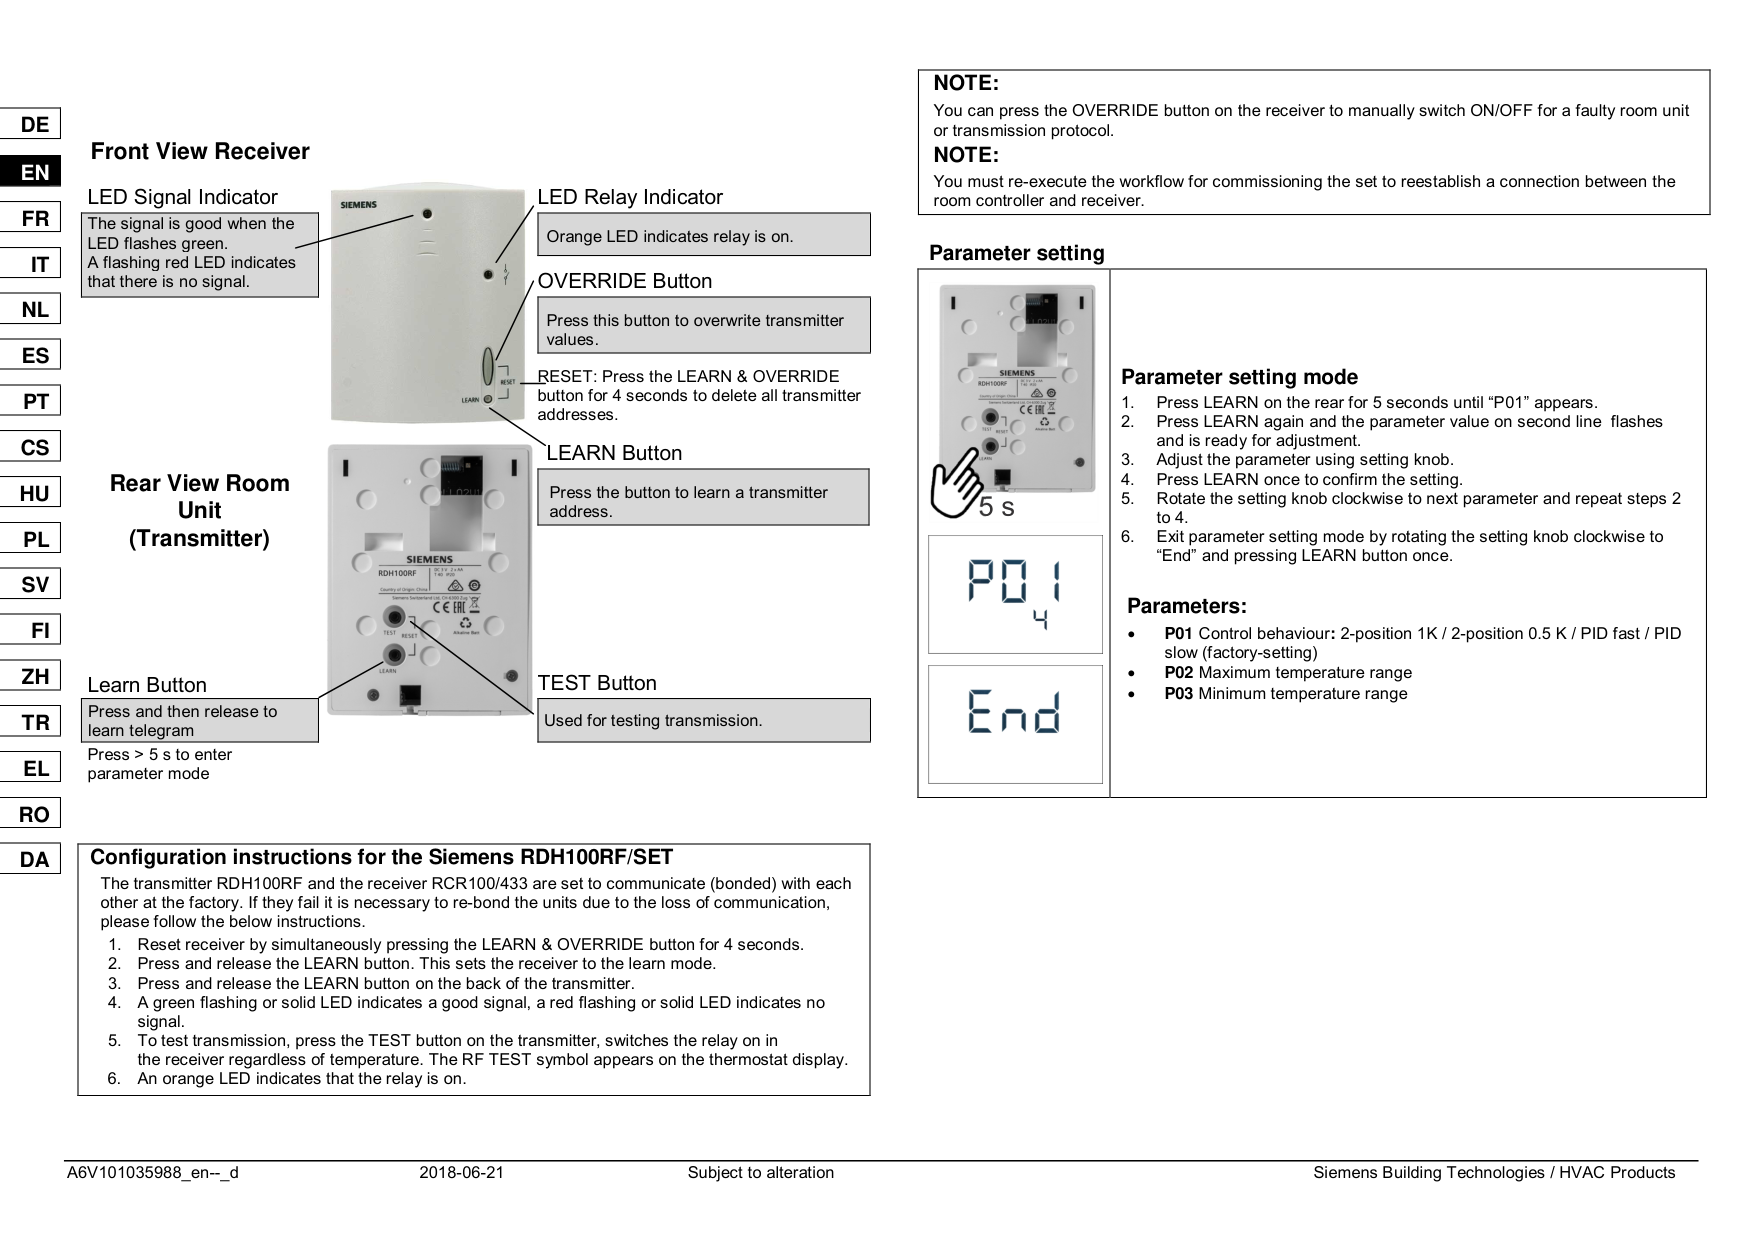
Front View Receiver LED Signal Indicator LED Relay Indicator

|The signal is good when the LED flashes green. A flashing red LED indicates that there is no signal.
| |---|
|Orange LED indicates relay is on.| |---|
OVERRIDE Button
|Press this button to overwrite transmitter values.
| |---|
RESET: Press the LEARN & OVERRIDE button for 4 seconds to delete all transmitter addresses.
LEARN Button Rear View Room Unit (Transmitter)

|Press the button to learn a transmitter address.
| |---|


Learn Button TEST Button

|Press and then release to learn telegram
| |---|
|Used for testing transmission.| |---|
Press > 5 s to enter parameter mode
|Configuration instructions for the Siemens RDH100RF/SET
The transmitter RDH100RF and the receiver RCR100/433 are set to communicate (bonded) with each other at the factory. If they fail it is necessary to re-bond the units due to the loss of communication, please follow the below instructions.
1. Reset receiver by simultaneously pressing the LEARN & OVERRIDE button for 4 seconds.
2. Press and release the LEARN button. This sets the receiver to the learn mode.
3. Press and release the LEARN button on the back of the transmitter.
4. A green flashing or solid LED indicates a good signal, a red flashing or solid LED indicates no signal.
5. To test transmission, press the TEST button on the transmitter, switches the relay on in the receiver regardless of temperature. The RF TEST symbol appears on the thermostat display.
6. An orange LED indicates that the relay is on.
| |---|
|NOTE:
You can press the OVERRIDE button on the receiver to manually switch ON/OFF for a faulty room unit or transmission protocol.
NOTE: You must re-execute the workflow for commissioning the set to reestablish a connection between the room controller and receiver.| |---|
Parameter setting
||
| |---|

|Parameter setting mode
1. Press LEARN on the rear for 5 seconds until “P01” appears.
2. Press LEARN again and the parameter value on second line flashes and is ready for adjustment.
3. Adjust the parameter using setting knob.
4. Press LEARN once to confirm the setting.
5. Rotate the setting knob clockwise to next parameter and repeat steps 2 to 4.
6. Exit parameter setting mode by rotating the setting knob clockwise to “End” and pressing LEARN button once.
Parameters:
P01 Control behaviour: 2-position 1K / 2-position 0.5 K / PID fast / PID slow (factory-setting)
P02 Maximum temperature range
P03 Minimum temperature range
| |---|---|