
Ask AI
— answers from the official manualAnswers from the official manual.
Common questions
Common Questions
10 totalHow do I access Telstra Internet Optimiser?
Open http://mymodem/ (or http://192.168.0.1) in your web browser and sign in with the username 'admin'. The default password is printed on the base of your Smart Modem or fridge magnet, usually the same as the WiFi password.
How can I enable Network Priority?
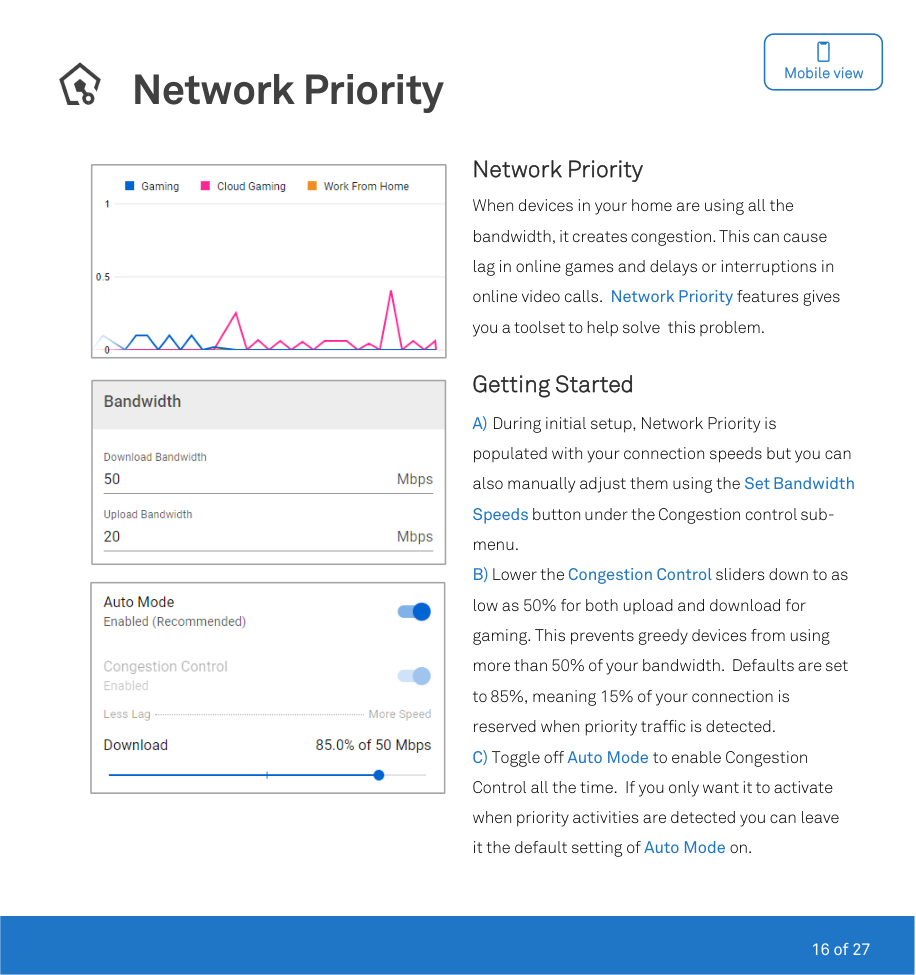
During initial setup, Network Priority is automatically populated with connection speeds. To manually adjust them, click Set Bandwidth Speeds under Congestion Control and lower the sliders down to as low as 50% for both upload and download for gaming.
What does it mean if Internet Optimiser is not showing as active?
If after 30 minutes, Internet Optimiser still doesn't show as Active on your Smart Modem login screen, try rebooting your device from the wall or via Advanced settings in the modem interface. If this doesn’t work, use MyTelstra to deactivate and reactivate Internet Optimiser.
How do I set up bandwidth allocation for a specific device?
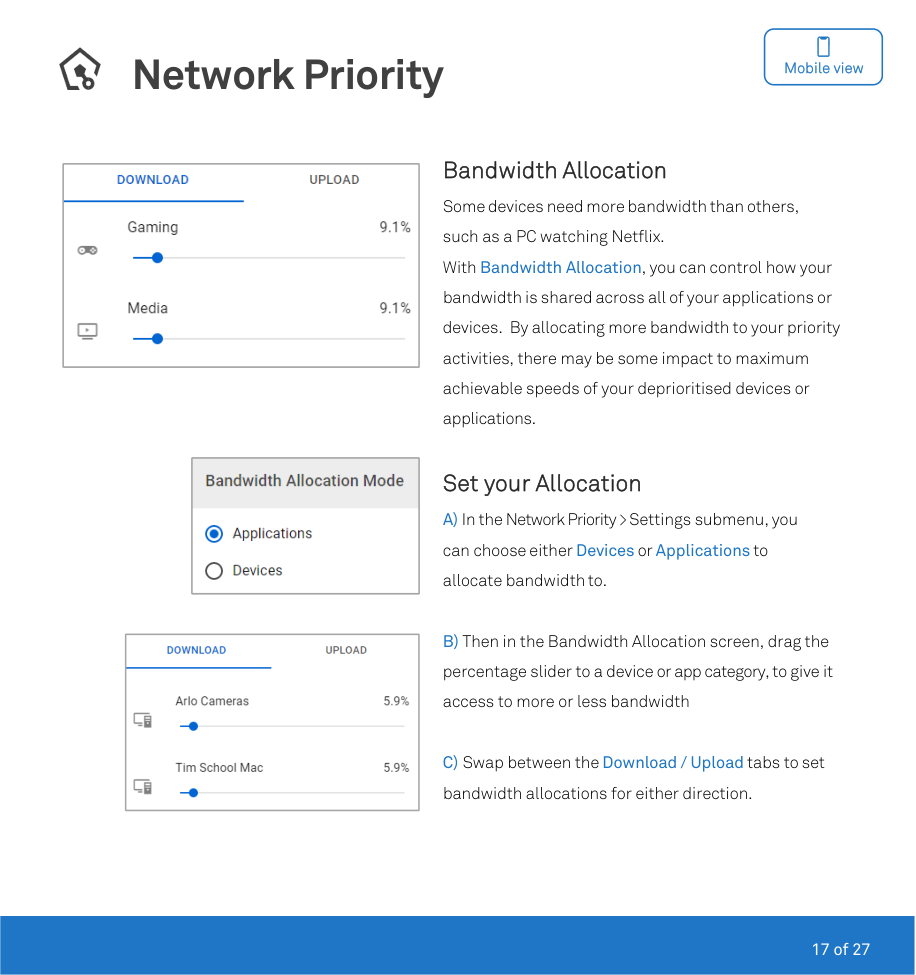
In Bandwidth Allocation submenu, select Devices or Applications. Drag the percentage node next to your device to give it access to more or less bandwidth as needed. Click Update Distribution to save the changes.
How do I create a Network Rule?
Start by clicking Add Rule in the Network Rules section, select the type of rule you are creating and target devices or applications. Choose specific hours and days for your rule to apply.
How do I use Gaming Geo-Filter?
To start, add your device under Add Device in the Gaming Geo-Filter menu, ensure it's properly connected to the Smart Modem. Set up home location on the map and adjust radius filter size or draw custom shapes.
Full Manual
27 pages
Telstra Internet Optimiser

|V250714| |---|
User Guide


Contents
Welcome to Internet Optimiser .................................................................... 3 Accessing Internet Optimiser....................................................................... 4 Desktop view................................................................................................ 5
Network Priority.........................................................................................5 Network Monitor........................................................................................8 Network Rules ...........................................................................................9 Device Manager ...................................................................................... 10 Connection Benchmark ........................................................................ 11 Gaming Geo-Filter .................................................................................. 12 Gaming Ping Map ................................................................................... 15
Mobile view ................................................................................................ 16 Network Priority...................................................................................... 16 Network Monitor..................................................................................... 19 Device Manager ...................................................................................... 20 Gaming Geo-Filter .................................................................................. 21 Gaming Ping Map ................................................................................... 24
Accessibility Features ................................................................................ 25 Other Features ........................................................................................... 25 Help & Support........................................................................................... 26

Welcome to Internet Optimiser
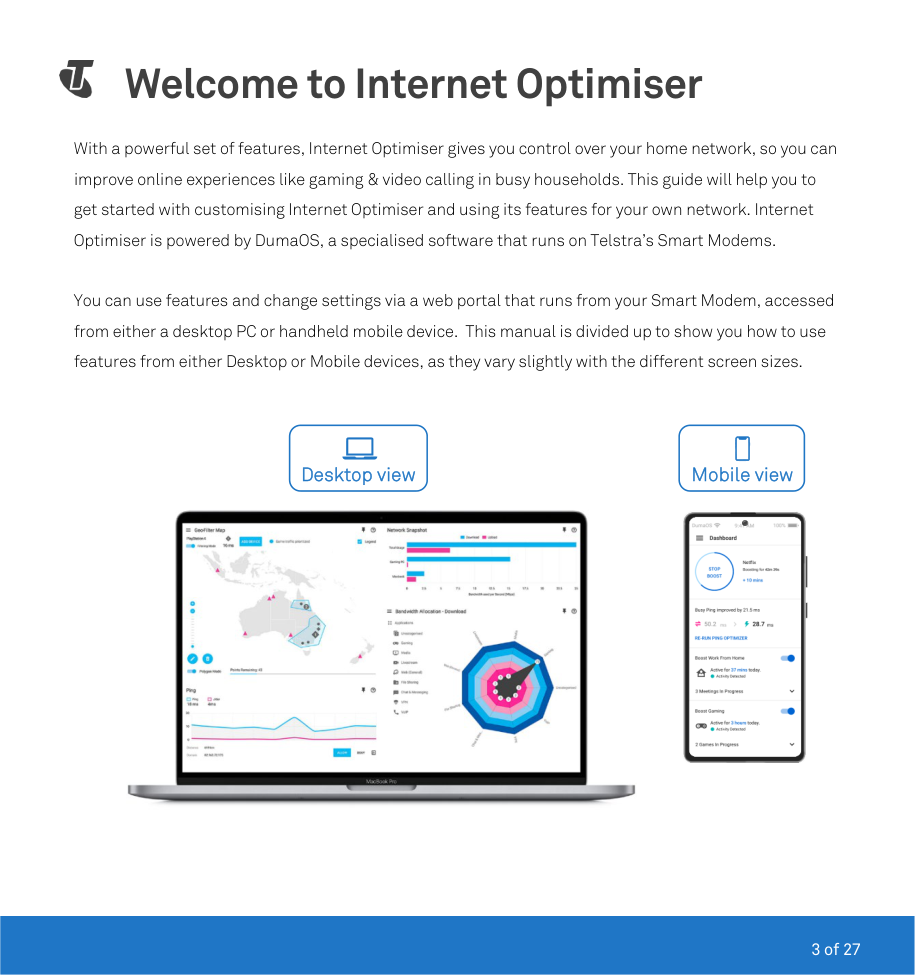
With a powerful set of features, Internet Optimiser gives you control over your home network, so you can improve online experiences like gaming & video calling in busy households. This guide will help you to get started with customising Internet Optimiser and using its features for your own network. Internet Optimiser is powered by DumaOS, a specialised software that runs on Telstra’s Smart Modems.
You can use features and change settings via a web portal that runs from your Smart Modem, accessed from either a desktop PC or handheld mobile device. This manual is divided up to show you how to use features from either Desktop or Mobile devices, as they vary slightly with the different screen sizes.


##### Desktop view Mobile view


Accessing Internet Optimiser
After adding Internet Optimiser in MyTelstra, DumaOS software is activated on your Telstra Smart Modem and can be customised using its web interface from desktop or mobile To access it:
Identify your modem type

##### or

Gen 2,3 & 4 Smart Modem Setup Gen 1 Smart Modem Setup
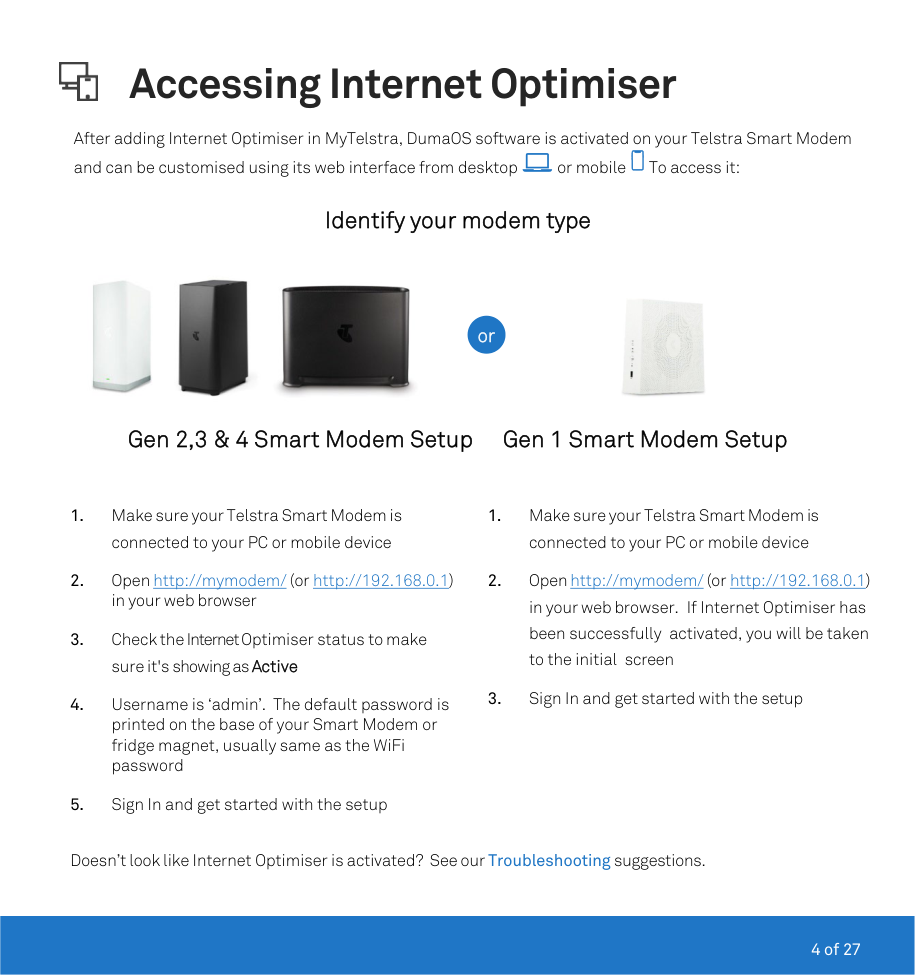
Doesn’t look like Internet Optimiser is activated? See our Troubleshooting suggestions.

Network Priority

Desktop view

|| |---|


Network Priority When devices in your home are using all the bandwidth, it creates congestion. This can cause lag in online games or interruptions to online video calls. Network Priority features gives you a toolset to help solve this problem.
#### Getting Started


Bandwidth Allocation Some devices need more bandwidth than others, such as a PC watching Netflix. With Bandwidth Allocation, you can control how your bandwidth is shared across all of your applications or devices. By allocating more bandwidth to your priority activities, there may be some impact to maximum achievable speeds of your deprioritised devices or applications.
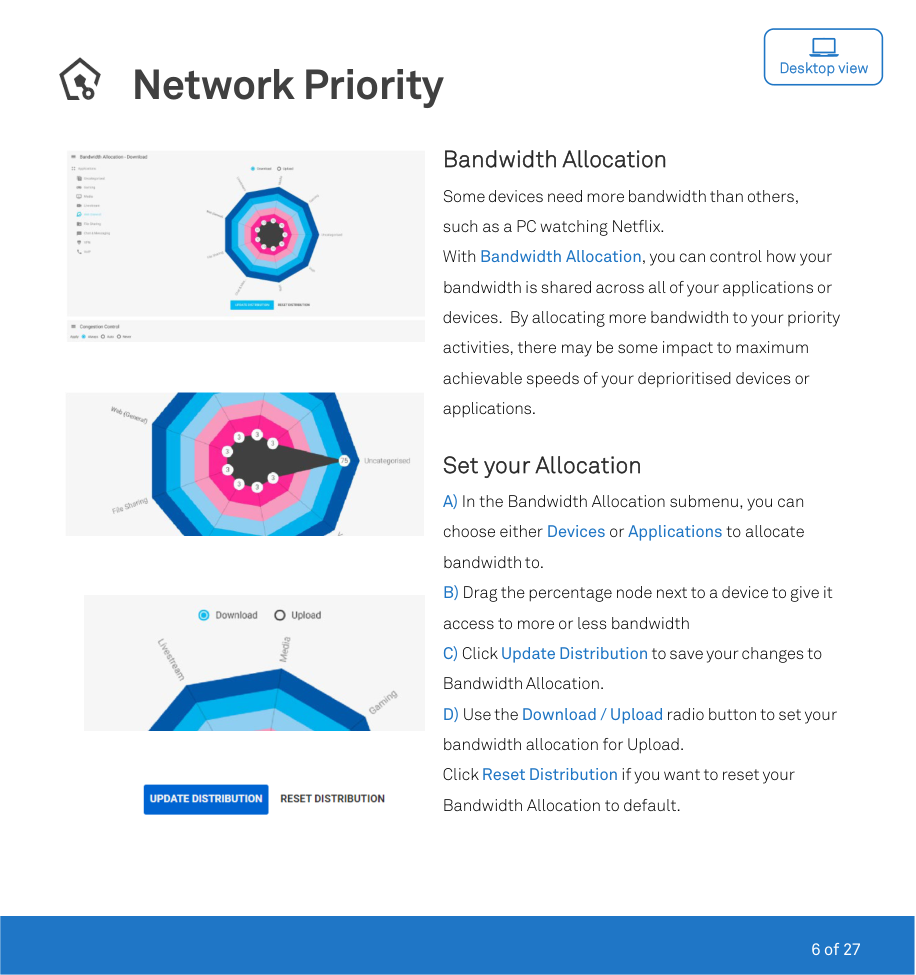
#### Set your Allocation

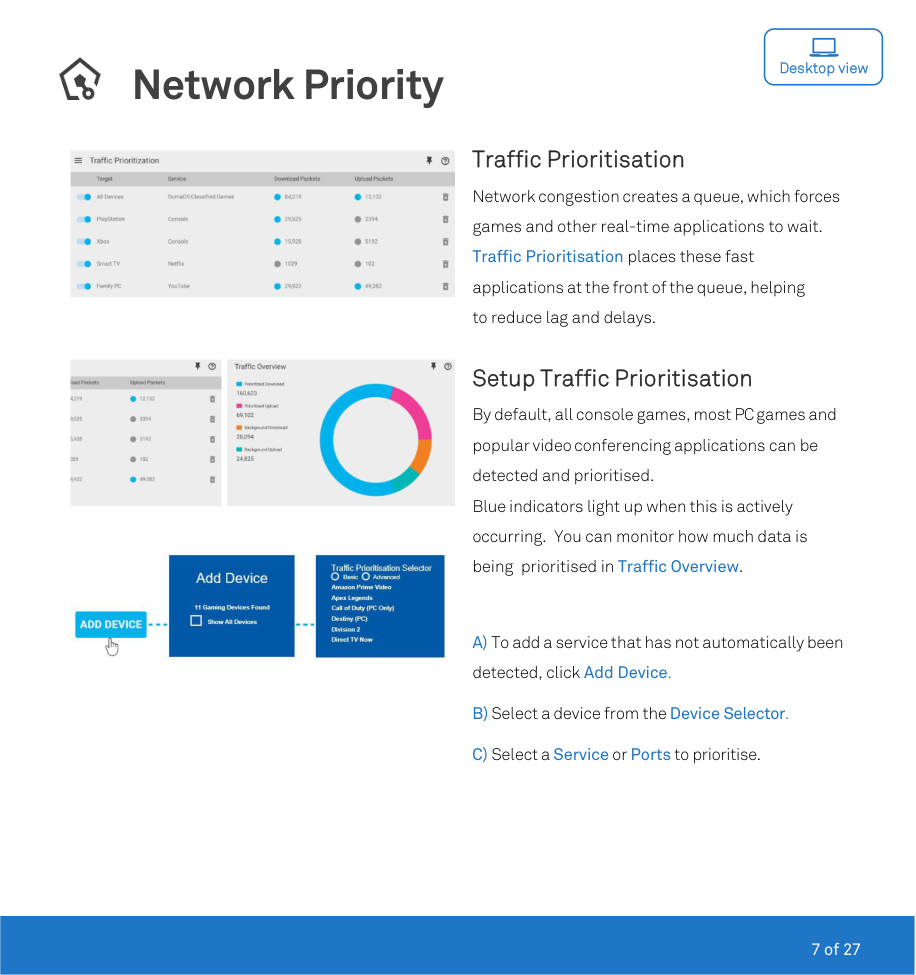
Traffic Prioritisation Network congestion creates a queue, which forces games and other real-time applications to wait. Traffic Prioritisation places these fast applications at the front of the queue, helping to reduce lag and delays.


Setup Traffic Prioritisation By default, all console games, most PC games and popular video conferencing applications can be detected and prioritised. Blue indicators light up when this is actively occurring. You can monitor how much data is being prioritised in Traffic Overview.
Network Monitor

Desktop view


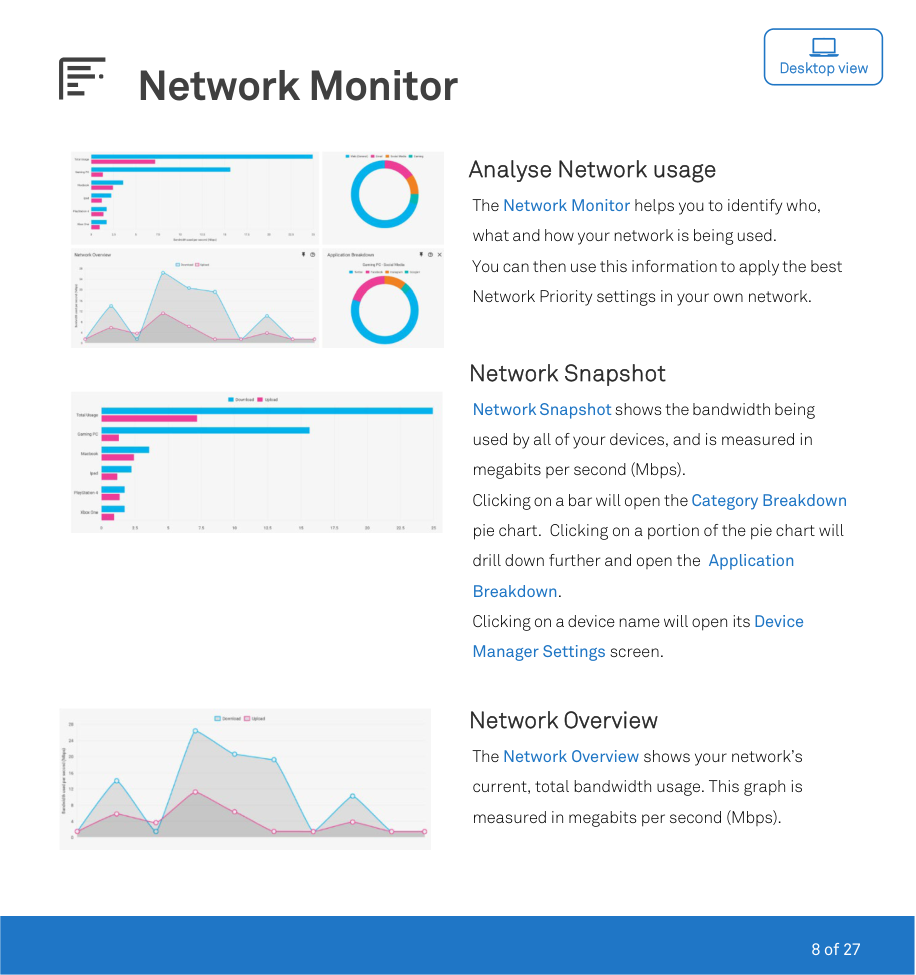
Analyse Network usage The Network Monitor helps you to identify who, what and how your network is being used. You can then use this information to apply the best Network Priority settings in your own network.
Network Snapshot Network Snapshot shows the bandwidth being used by all of your devices, and is measured in megabits per second (Mbps). Clicking on a bar will open the Category Breakdown pie chart. Clicking on a portion of the pie chart will drill down further and open the Application Breakdown. Clicking on a device name will open its Device Manager Settings screen.

#### Network Overview
The Network Overview shows your network’s current, total bandwidth usage. This graph is measured in megabits per second (Mbps).

Network Rules

Desktop view

Rules for Devices & Apps Network Rules blocks traffic by device or application, on a schedule. Making Rules lets you manage every aspect of your home network, like blocking Xbox online access after kids bed time. Note: Network Rules may override existing Parental Control or Firewall rules configured via your Smart Modem interface – be sure to test results if using a combination of the functions.


#### Create Rule
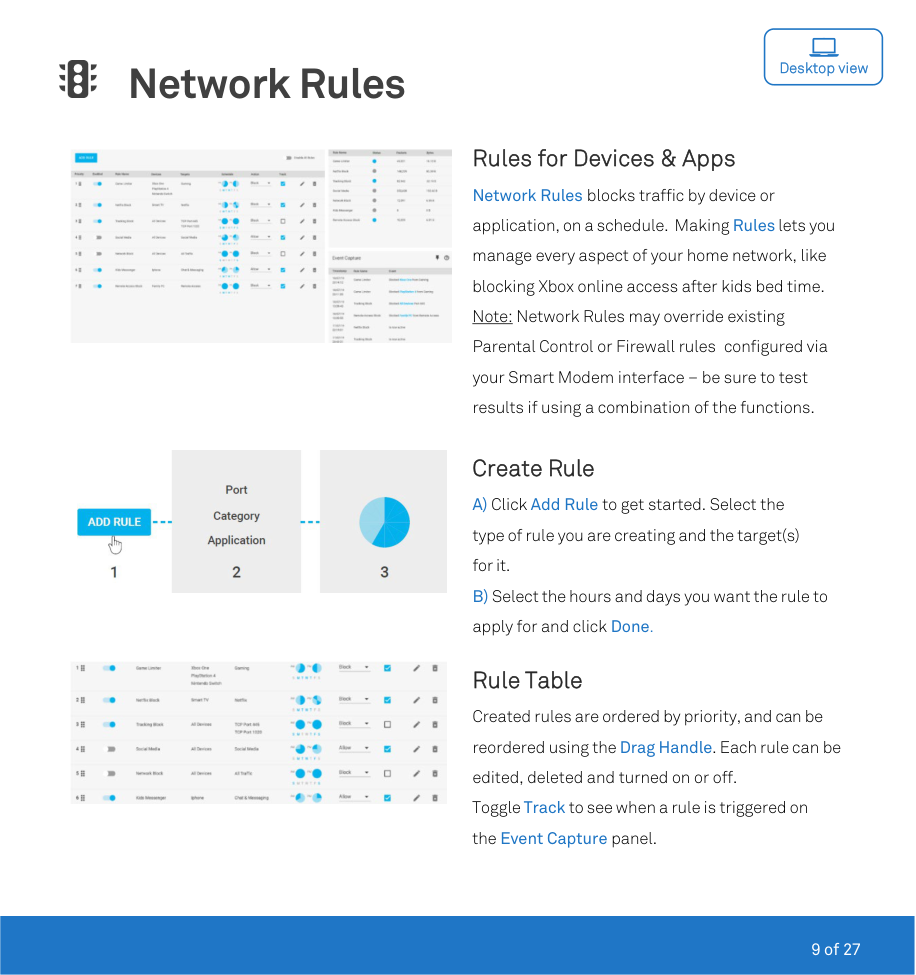
Rule Table Created rules are ordered by priority, and can be reordered using the Drag Handle. Each rule can be edited, deleted and turned on or off. Toggle Track to see when a rule is triggered on the Event Capture panel.

Device Manager

Desktop view

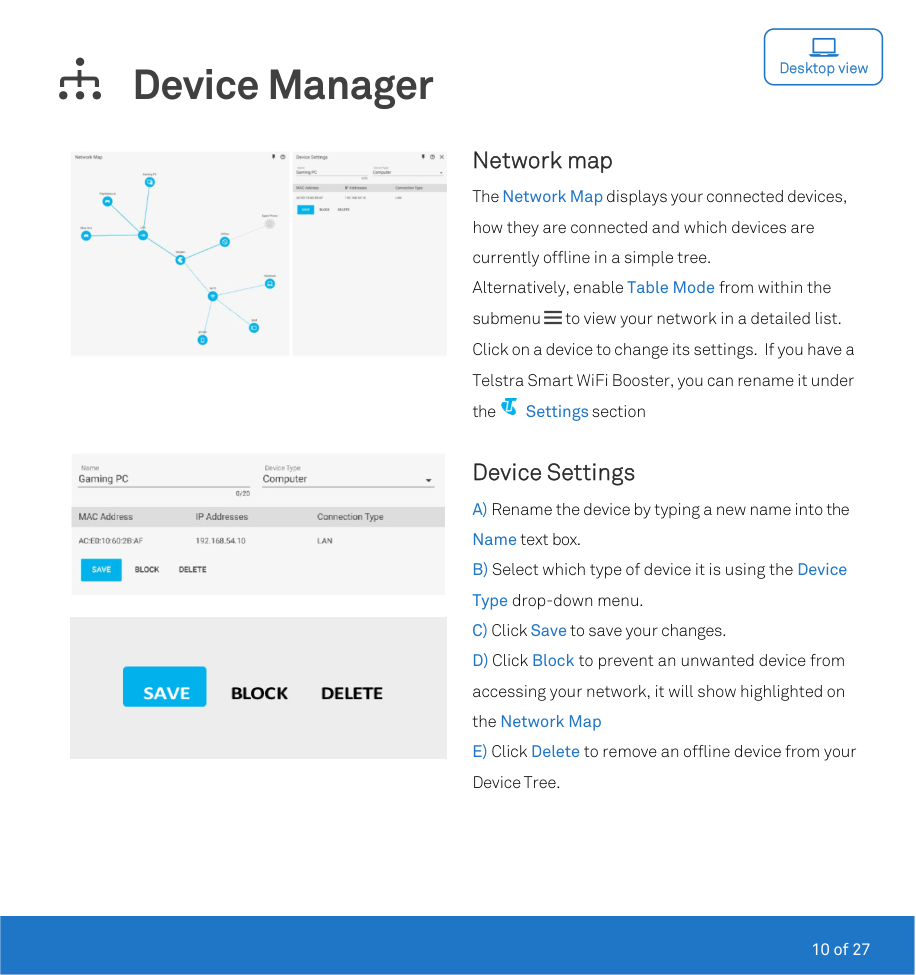
Network map The Network Map displays your connected devices, how they are connected and which devices are currently offline in a simple tree. Alternatively, enable Table Mode from within the submenu to view your network in a detailed list. Click on a device to change its settings. If you have a Telstra Smart WiFi Booster, you can rename it under the Settings section


#### Device Settings
Connection Benchmark

Desktop view

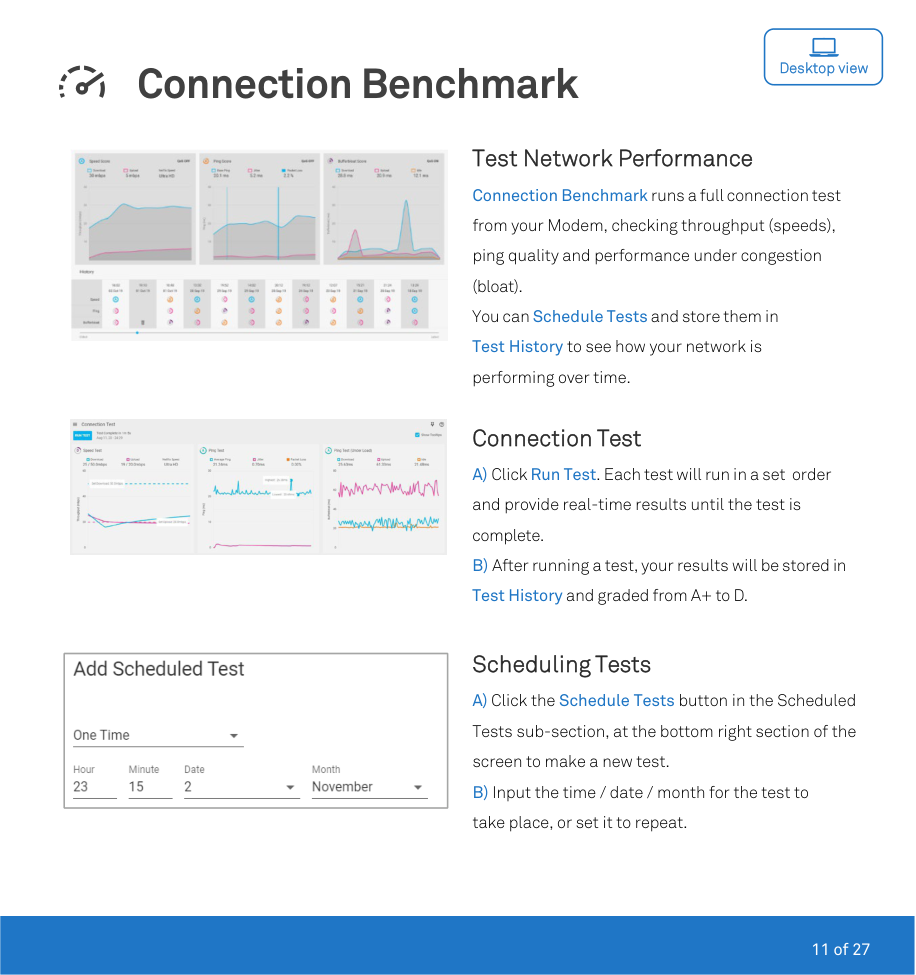
Test Network Performance Connection Benchmark runs a full connection test from your Modem, checking throughput (speeds), ping quality and performance under congestion (bloat). You can Schedule Tests and store them in Test History to see how your network is performing over time.

#### Connection Test
|| |---|
#### Scheduling Tests

Gaming Geo-Filter

Desktop view

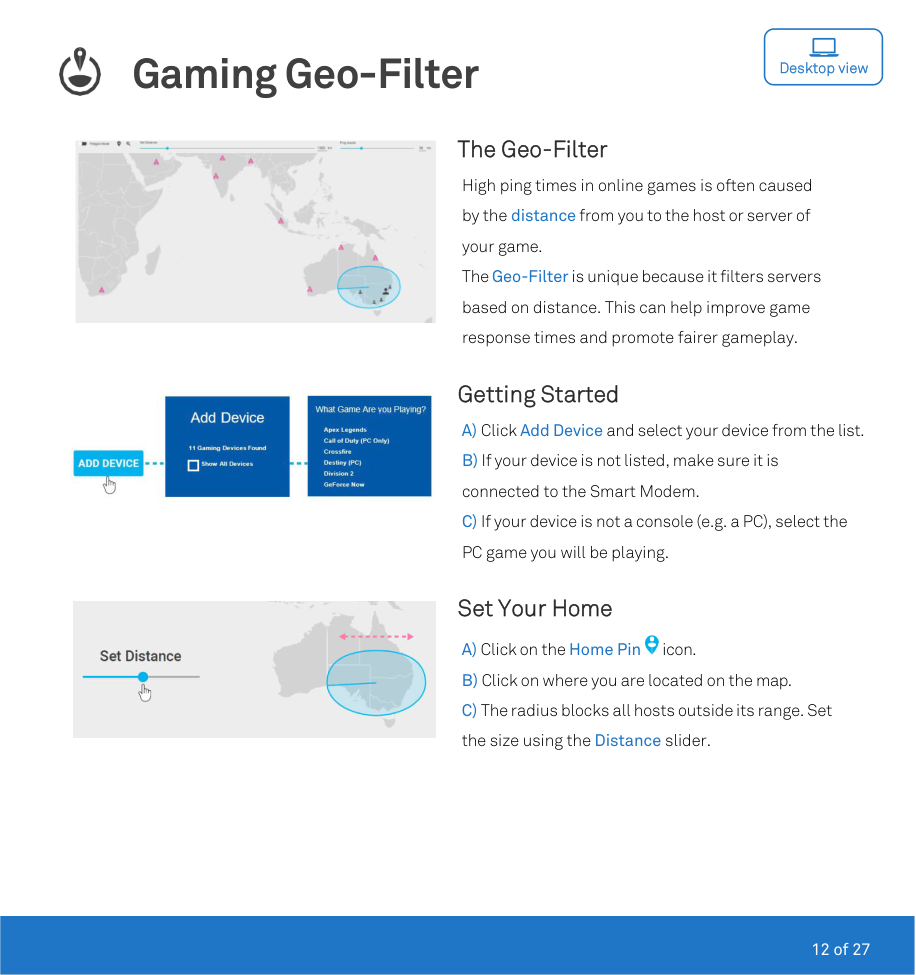
The Geo-Filter High ping times in online games is often caused by the distance from you to the host or server of your game. The Geo-Filter is unique because it filters servers based on distance. This can help improve game response times and promote fairer gameplay.

#### Getting Started

#### Set Your Home

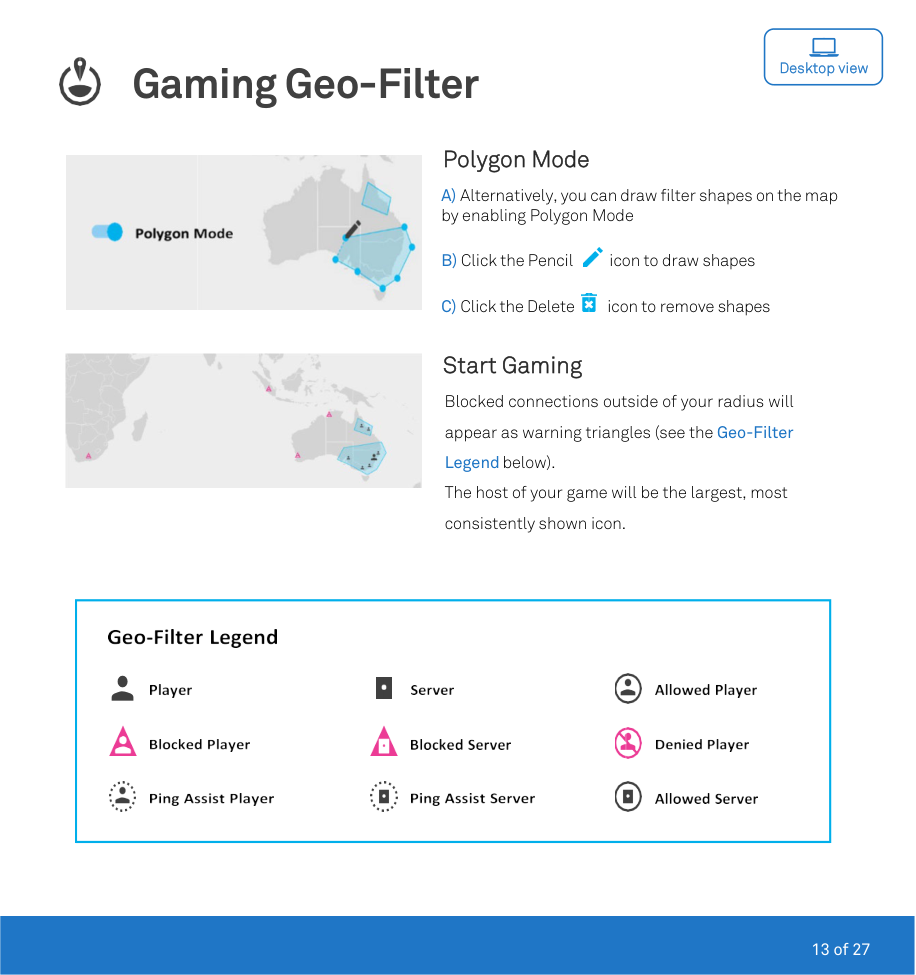

#### Polygon Mode


#### Start Gaming
Blocked connections outside of your radius will appear as warning triangles (see the Geo-Filter Legend below).
The host of your game will be the largest, most consistently shown icon.
|


| |---|

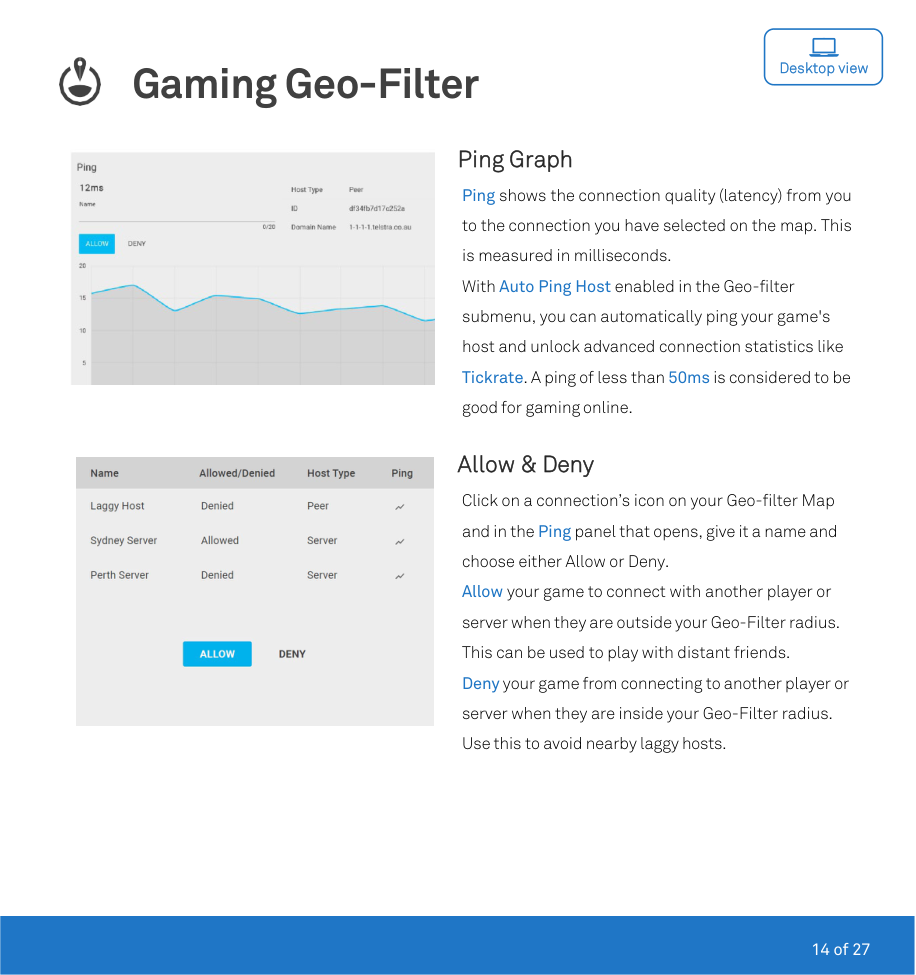
Ping Graph Ping shows the connection quality (latency) from you to the connection you have selected on the map. This is measured in milliseconds. With Auto Ping Host enabled in the Geo-filter submenu, you can automatically ping your game's host and unlock advanced connection statistics like Tickrate. A ping of less than 50ms is considered to be good for gaming online.

#### Allow & Deny
Click on a connection’s icon on your Geo-filter Map and in the Ping panel that opens, give it a name and choose either Allow or Deny.
Allow your game to connect with another player or server when they are outside your Geo-Filter radius. This can be used to play with distant friends. Deny your game from connecting to another player or server when they are inside your Geo-Filter radius. Use this to avoid nearby laggy hosts.

Gaming Ping Map

Desktop view

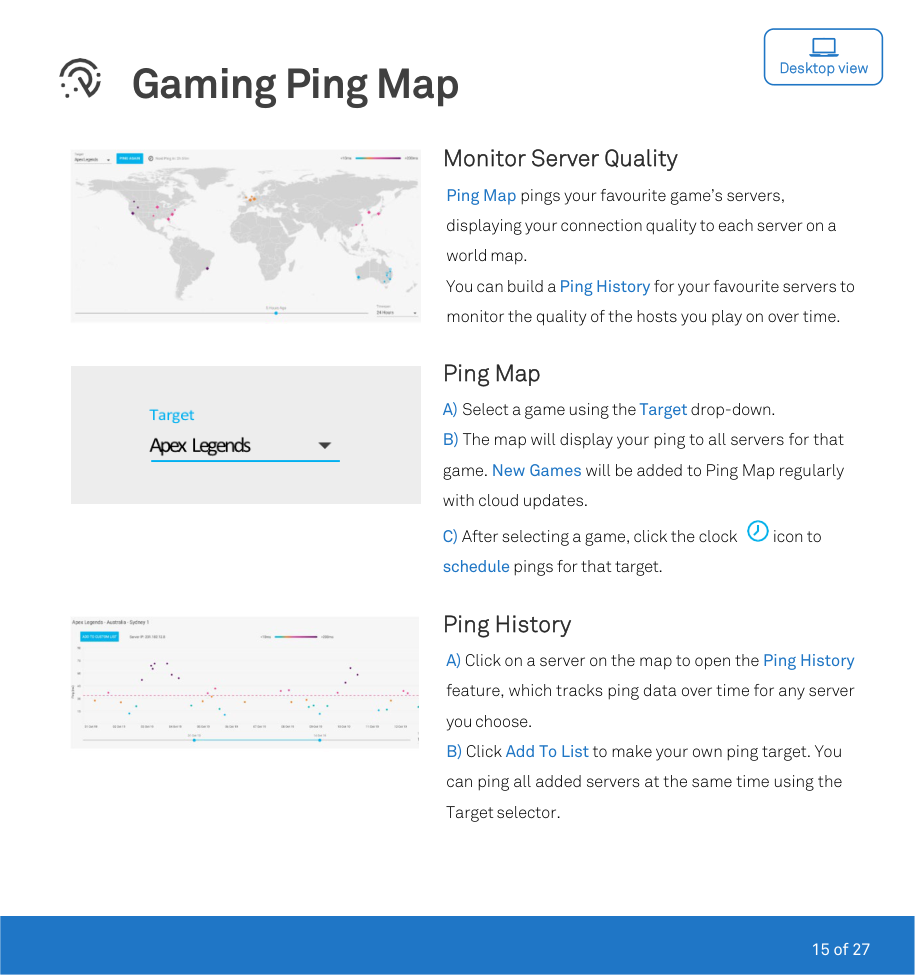
Monitor Server Quality Ping Map pings your favourite game’s servers, displaying your connection quality to each server on a world map. You can build a Ping History for your favourite servers to monitor the quality of the hosts you play on over time.

#### Ping Map


#### Ping History

Network Priority

Mobile view
|| |---|
|| |---|
|| |---|
Network Priority When devices in your home are using all the bandwidth, it creates congestion. This can cause lag in online games and delays or interruptions in online video calls. Network Priority features gives you a toolset to help solve this problem.
#### Getting Started
|| |---|
Bandwidth Allocation Some devices need more bandwidth than others, such as a PC watching Netflix. With Bandwidth Allocation, you can control how your bandwidth is shared across all of your applications or devices. By allocating more bandwidth to your priority activities, there may be some impact to maximum achievable speeds of your deprioritised devices or applications.
|| |---|
|| |---|
#### Set your Allocation
|| |---|
|| |---|
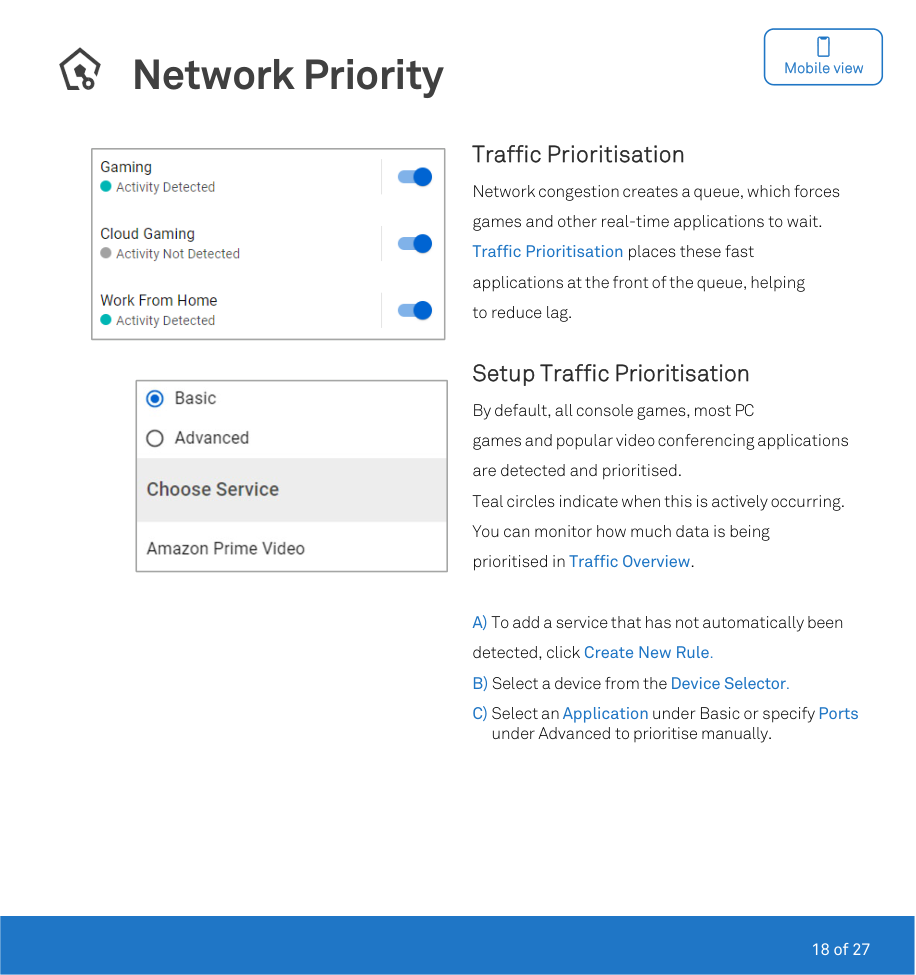
Traffic Prioritisation Network congestion creates a queue, which forces games and other real-time applications to wait. Traffic Prioritisation places these fast applications at the front of the queue, helping to reduce lag.
Setup Traffic Prioritisation By default, all console games, most PC games and popular video conferencing applications are detected and prioritised. Teal circles indicate when this is actively occurring. You can monitor how much data is being prioritised in Traffic Overview.
A) To add a service that has not automatically been detected, click Create New Rule. B) Select a device from the Device Selector. C) Select an Application under Basic or specify Ports
under Advanced to prioritise manually.
Network Monitor

Mobile view
|| |---|
|| |---|
|| |---|
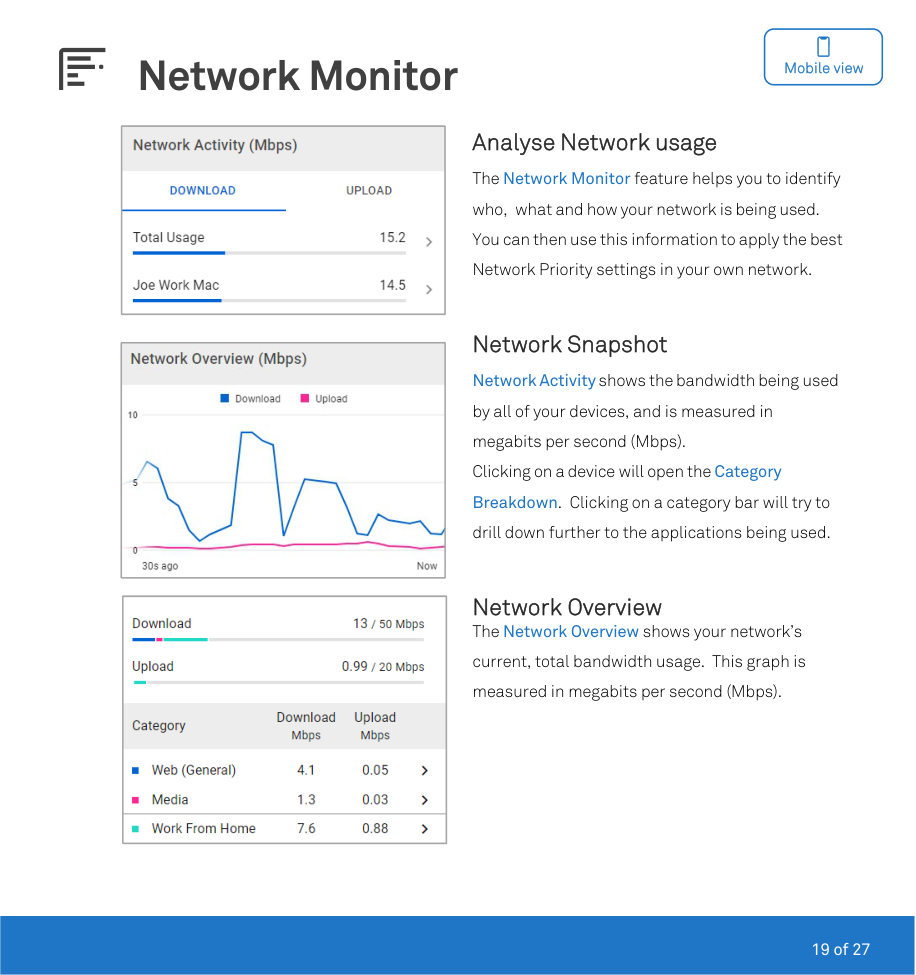
Analyse Network usage The Network Monitor feature helps you to identify who, what and how your network is being used. You can then use this information to apply the best Network Priority settings in your own network.
Network Snapshot Network Activity shows the bandwidth being used by all of your devices, and is measured in megabits per second (Mbps). Clicking on a device will open the Category
Breakdown. Clicking on a category bar will try to drill down further to the applications being used.
Network Overview The Network Overview shows your network’s current, total bandwidth usage. This graph is measured in megabits per second (Mbps).

Device Manager

Mobile view
|| |---|
|| |---|
|| |---|
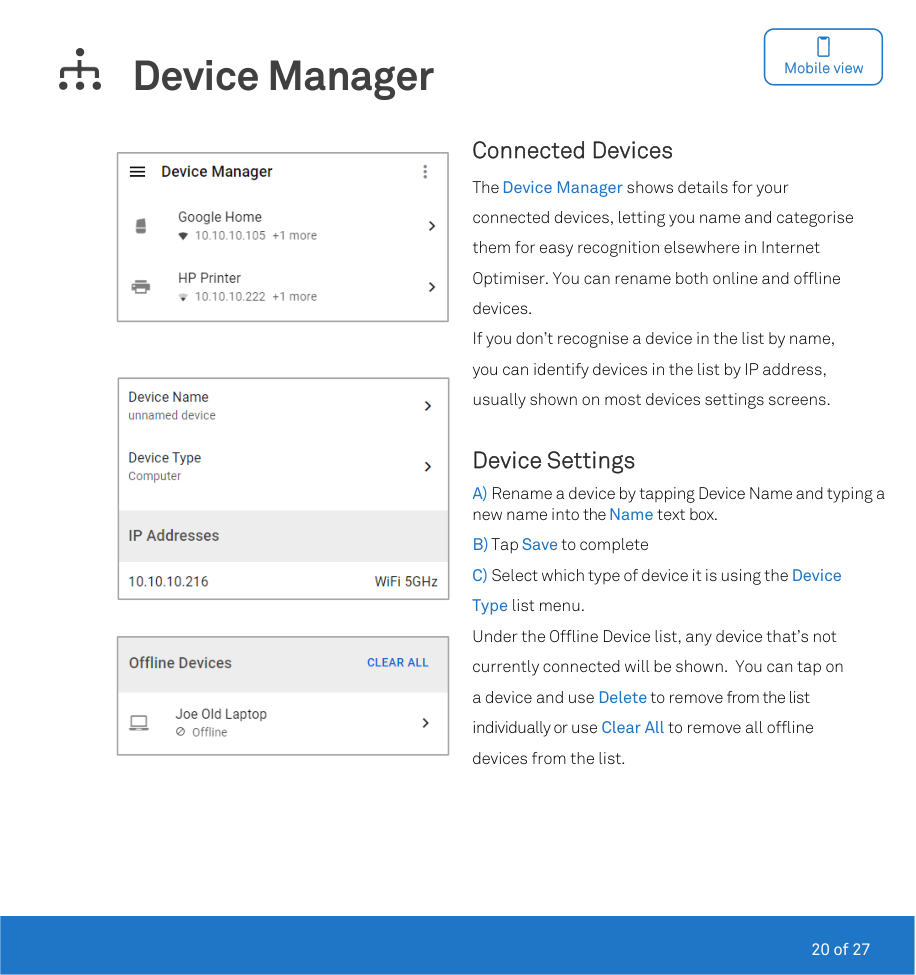
Connected Devices The Device Manager shows details for your connected devices, letting you name and categorise them for easy recognition elsewhere in Internet Optimiser. You can rename both online and offline devices. If you don’t recognise a device in the list by name, you can identify devices in the list by IP address, usually shown on most devices settings screens.
#### Device Settings
|| |---|
|| |---|
|| |---|
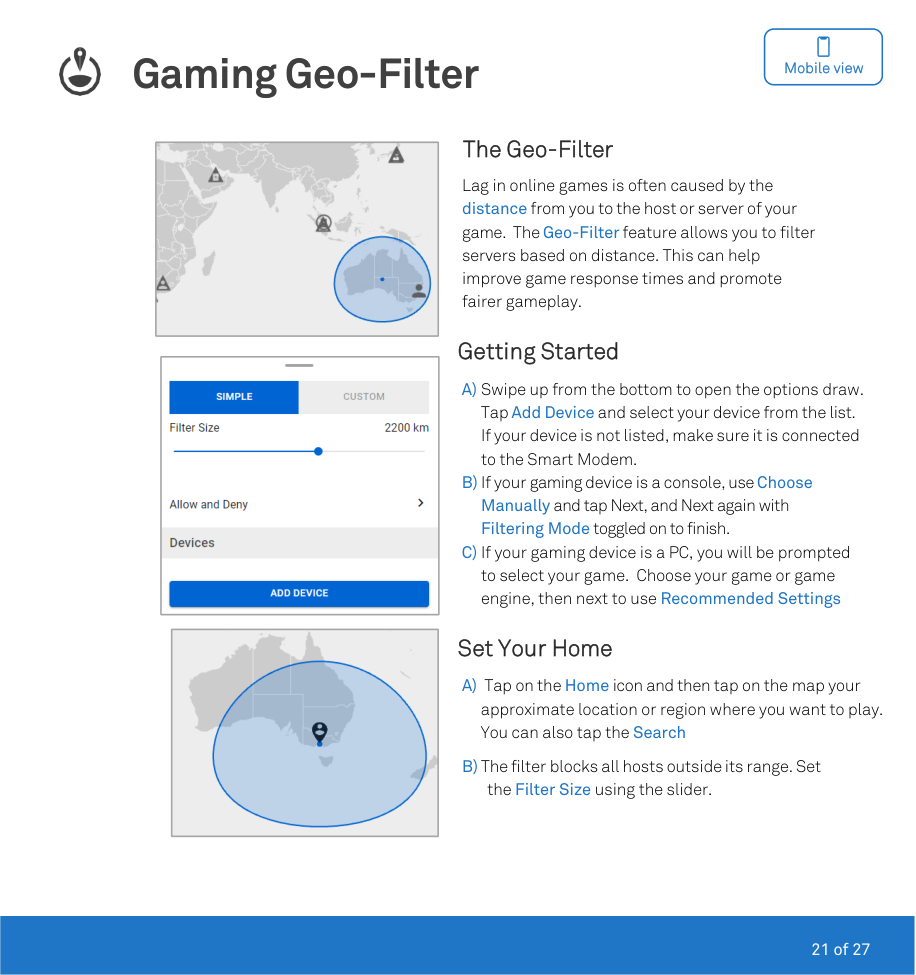
The Geo-Filter Lag in online games is often caused by the distance from you to the host or server of your game. The Geo-Filter feature allows you to filter servers based on distance. This can help improve game response times and promote fairer gameplay.
#### Getting Started
#### Set Your Home
|| |---|
|| |---|
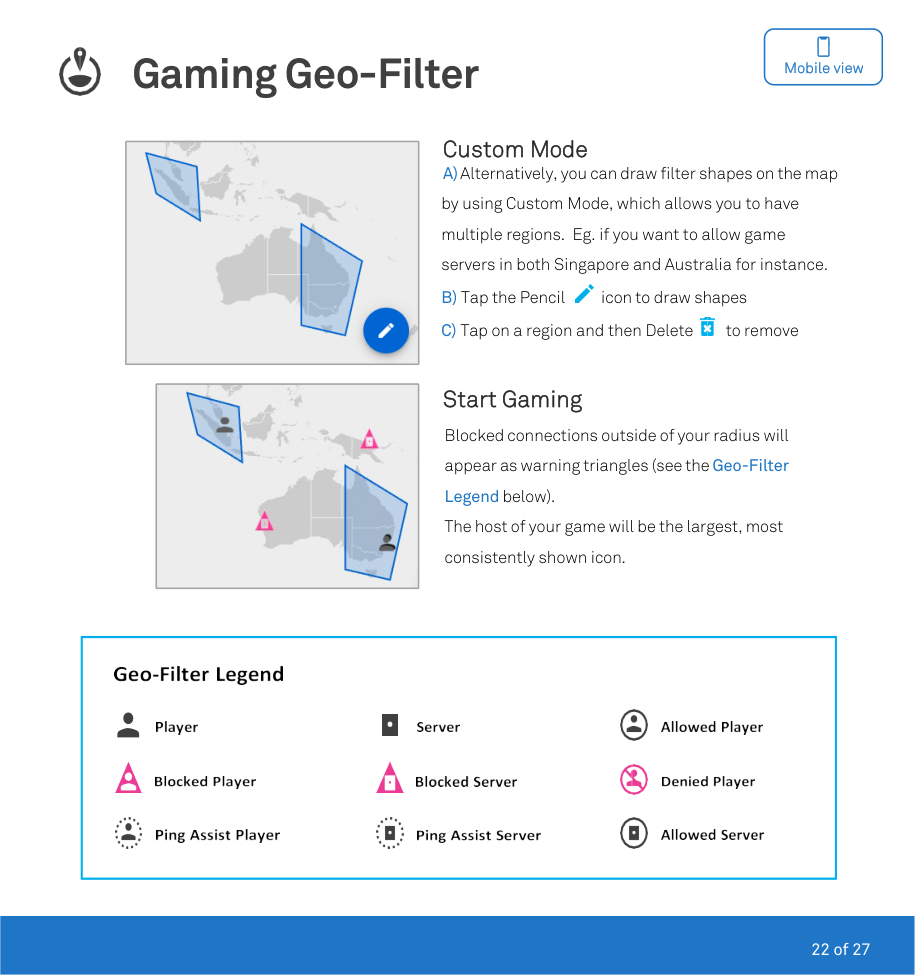
#### Custom Mode


#### Start Gaming
Blocked connections outside of your radius will appear as warning triangles (see the Geo-Filter Legend below).
The host of your game will be the largest, most consistently shown icon.
|


| |---|
|| |---|

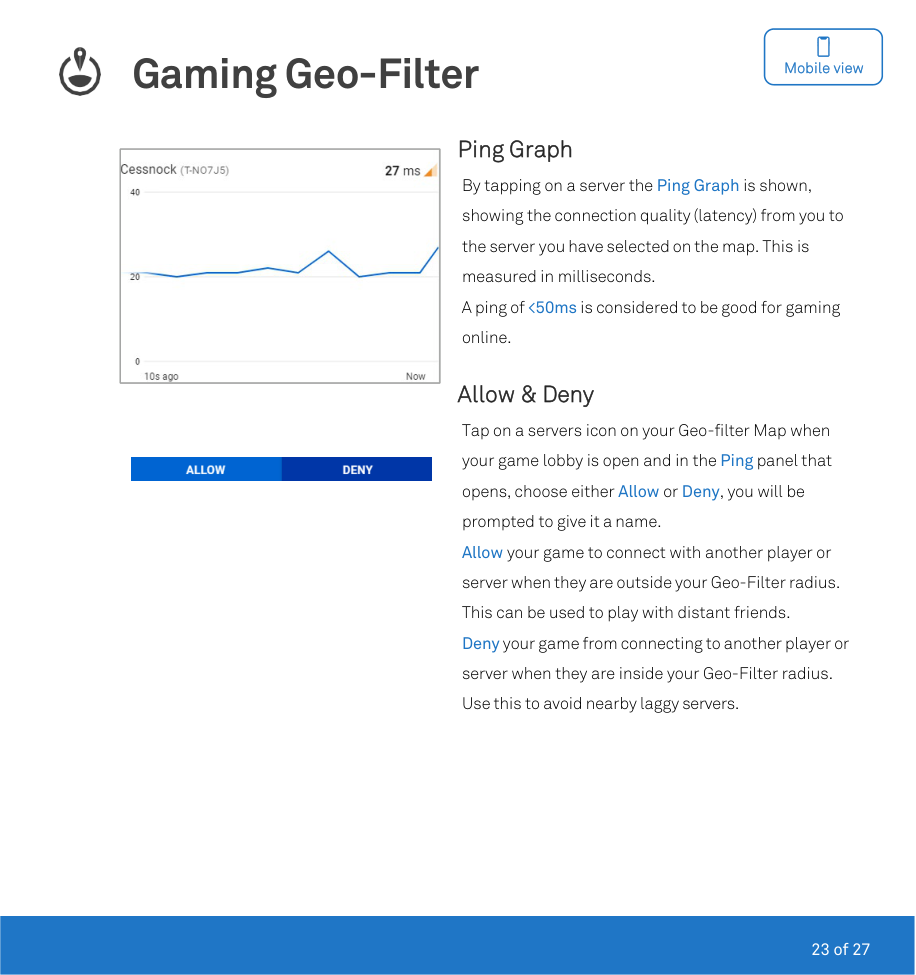
Ping Graph By tapping on a server the Ping Graph is shown, showing the connection quality (latency) from you to the server you have selected on the map. This is measured in milliseconds. A ping of <50ms is considered to be good for gaming online.
Allow & Deny Tap on a servers icon on your Geo-filter Map when your game lobby is open and in the Ping panel that opens, choose either Allow or Deny, you will be prompted to give it a name. Allow your game to connect with another player or server when they are outside your Geo-Filter radius. This can be used to play with distant friends. Deny your game from connecting to another player or server when they are inside your Geo-Filter radius. Use this to avoid nearby laggy servers.

Gaming Ping Map

Mobile view
|| |---|
|| |---|
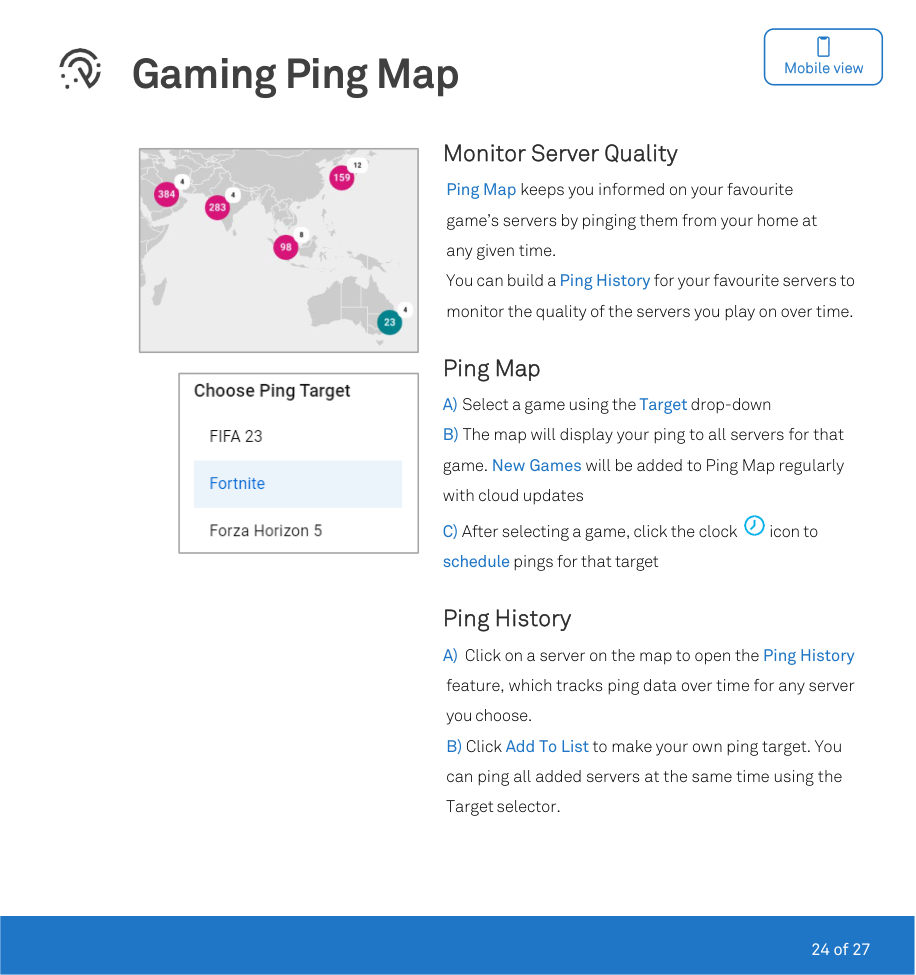
Monitor Server Quality Ping Map keeps you informed on your favourite game’s servers by pinging them from your home at any given time. You can build a Ping History for your favourite servers to monitor the quality of the servers you play on over time.
Ping Map A) Select a game using the Target drop-down B) The map will display your ping to all servers for that game. New Games will be added to Ping Map regularly with cloud updates

C) After selecting a game, click the clock icon to schedule pings for that target
#### Ping History
Accessibility Features


Desktop viewMobile view
To support those with accessibility needs, interface elements are navigatable through keyboard with screen reader support and two additional accessibility options are available. Navigate to DumaOS Settings and Accessibility to set these:
Accessibility Mode applies a high contrast theme and pattern overlays to increase clarity to graphs Charts to Tables converts all network graphs to tables with screen reader support

Other Features

Desktop view


System Information displays hardware statistics such as firmware version, uptime, CPU & memory usage. Smart Modem Settings portal contains UPnP, Port Forwarding, DHCP and other standard Telstra configuration tools. To reboot your device or factory reset the DumaOS settings, click on the Information icon at the top right of DumaOS. Doing a device Reboot takes approximately 2 mins to complete and you will need to login again. Under the Advanced menu, the Reset DumaOS option will erase your configured Internet Optimiser settings back to default, but your underlying Telstra Smart Modem settings will not be affected. Application Categories displays the list of different network traffic and application types that DumaOS recognises. If you cant find your favourite online game in this list, you can post to the forums to inquire about having it added.
Help & Support
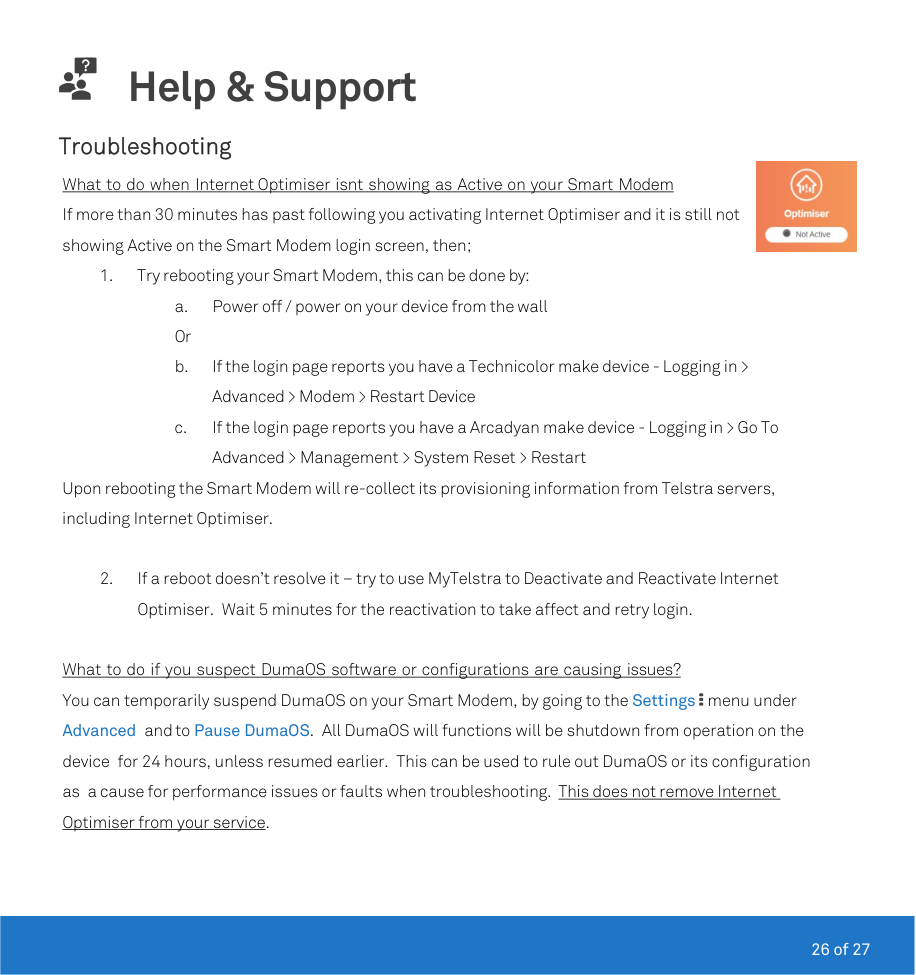
Troubleshooting What to do when Internet Optimiser isnt showing as Active on your Smart Modem If more than 30 minutes has past following you activating Internet Optimiser and it is still not showing Active on the Smart Modem login screen, then;

Upon rebooting the Smart Modem will re-collect its provisioning information from Telstra servers, including Internet Optimiser.
What to do if you suspect DumaOS software or configurations are causing issues? You can temporarily suspend DumaOS on your Smart Modem, by going to the Settings menu under Advanced and to Pause DumaOS. All DumaOS will functions will be shutdown from operation on the device for 24 hours, unless resumed earlier. This can be used to rule out DumaOS or its configuration as a cause for performance issues or faults when troubleshooting. This does not remove Internet Optimiser from your service.
What to do following a plan speed change? When Internet Optimiser is first activated it collects the line speeds of your broadband plan to pre-set its own Network Speed settings. Following an upgrade or downgrade of your broadband plan speed, go to the Settings menu under Advanced and Network Speeds option to confirm the setting has updated automatically.
What to do if Adblocker causes problems with websites AdBlocker is disabled by default. The feature works by not responding to known advertising platforms domain names, that are embedded within websites. Due to the huge variance of how different websites are designed, there may be adverse effects with Adblocker in combination with some sites or mobile apps that fetch website objects, either because:
If you or others in your household experience problems accessing a particular website, you can turn off Adblocker entirely by the Disable AdBlocker button. You can also exclude specific devices from the Adblocker feature toggling the Pause buttons next to the device.
#### Extra Resources