
Ask AI
— answers from the official manualAnswers from the official manual.
Common questions
Common Questions
20 totalWhat is the maximum weight the Mega Cyborg Hand can hold with a full grip?
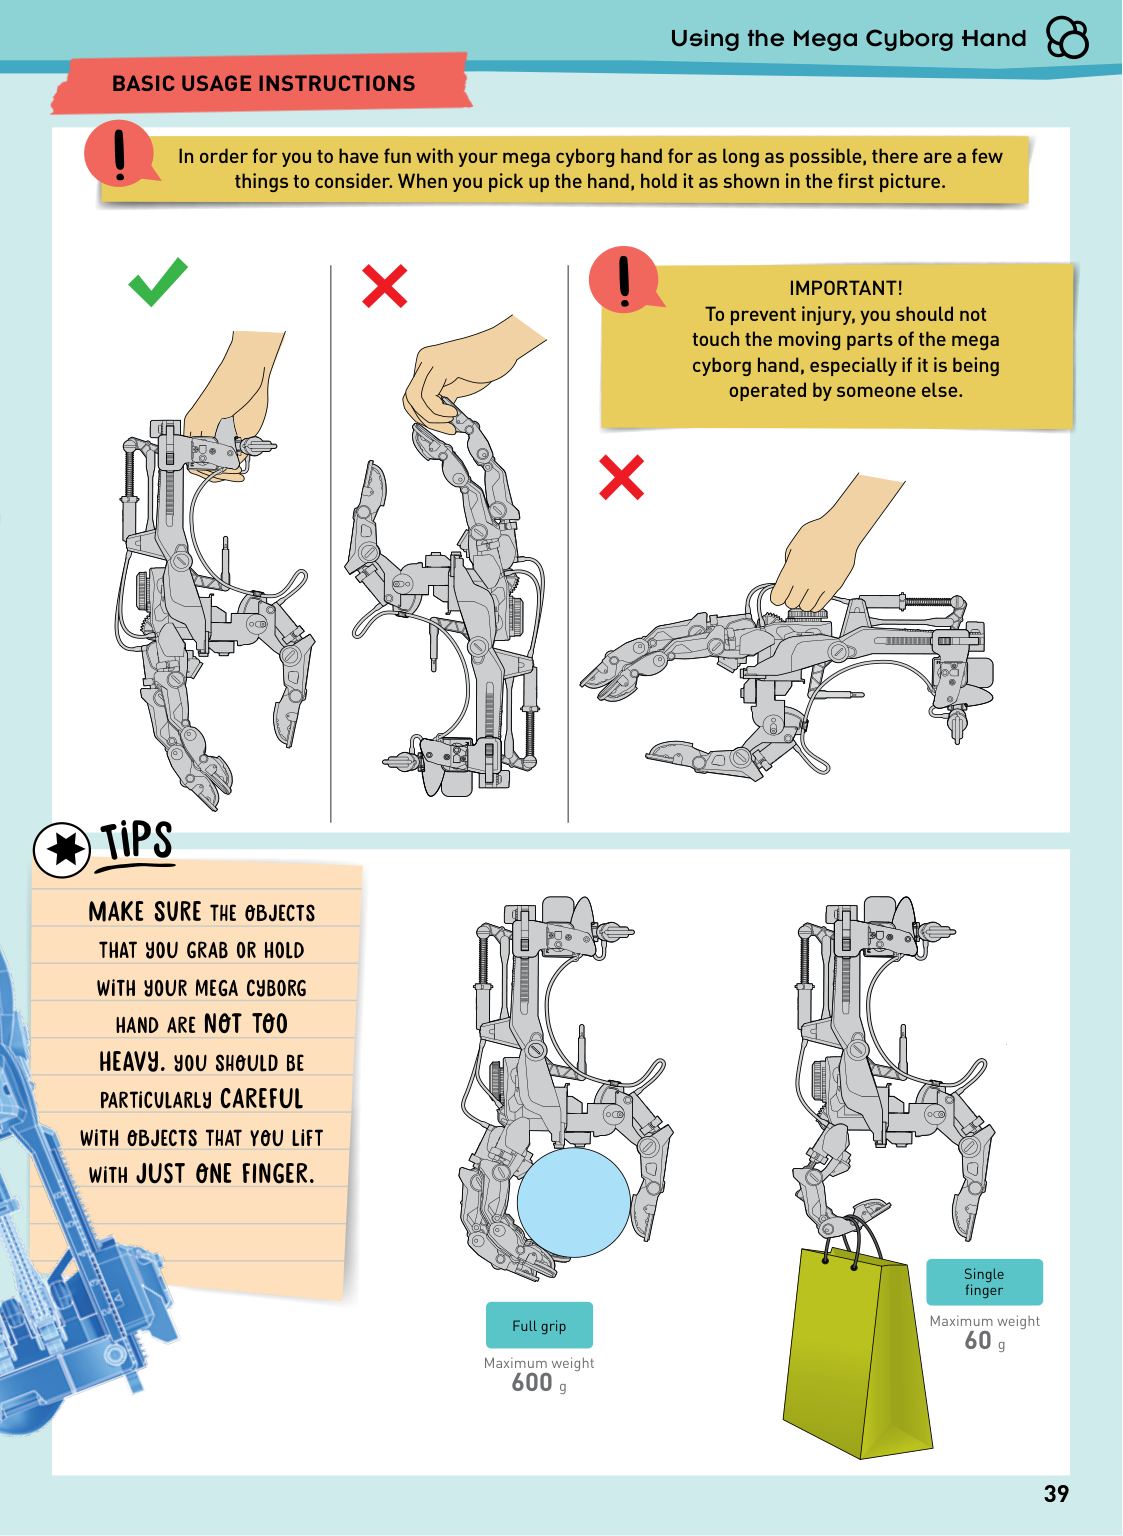
The maximum weight for a full grip is 600 g. For picking up objects with a single finger, the maximum weight is much lower at 60 g. You should be particularly careful with objects lifted with just one finger.
Why are the hydraulic cylinders filled with water instead of air?
The hydraulic cylinders are filled with water because the compressibility of water is lower than that of air, making the hand more powerful. When air is used, some force is lost because the air compresses. Water transmits force more efficiently between the cylinders.
What should I do if the fingers on my Mega Cyborg Hand are not working?
First, check if there is air in the G1 cylinder and follow the steps on page 49 to remove it if so. Then verify that the hydraulic cylinders are assembled correctly using pages 18–19, and check that the fingers are correctly assembled and connected as shown on pages 11–15. Air in the cylinders limits the function of the hydraulic system and will prevent the fingers from flexing and extending properly.
What should I do if the thumb on my Mega Cyborg Hand is not working properly?
Check if there is air in the G2 cylinder and follow the steps on page 51 to resolve it. Also check whether the hydraulic tube is twisted and blocked, verify the hydraulic cylinder is assembled correctly using pages 18, 19, and 23, and confirm the thumb is assembled correctly by reviewing pages 25–27.
How do I remove air pockets from the finger hydraulic system?
Partially submerge the G1 cylinder in water and push the piston completely into the cylinder, then hold the tube under water and push the piston all the way in. Pull the piston out and repeat the steps until the cylinder is completely filled with water. Push the piston all the way into the G3 cylinder to remove any excess air, then connect the tube.
What tools do I need to build the Mega Cyborg Hand?
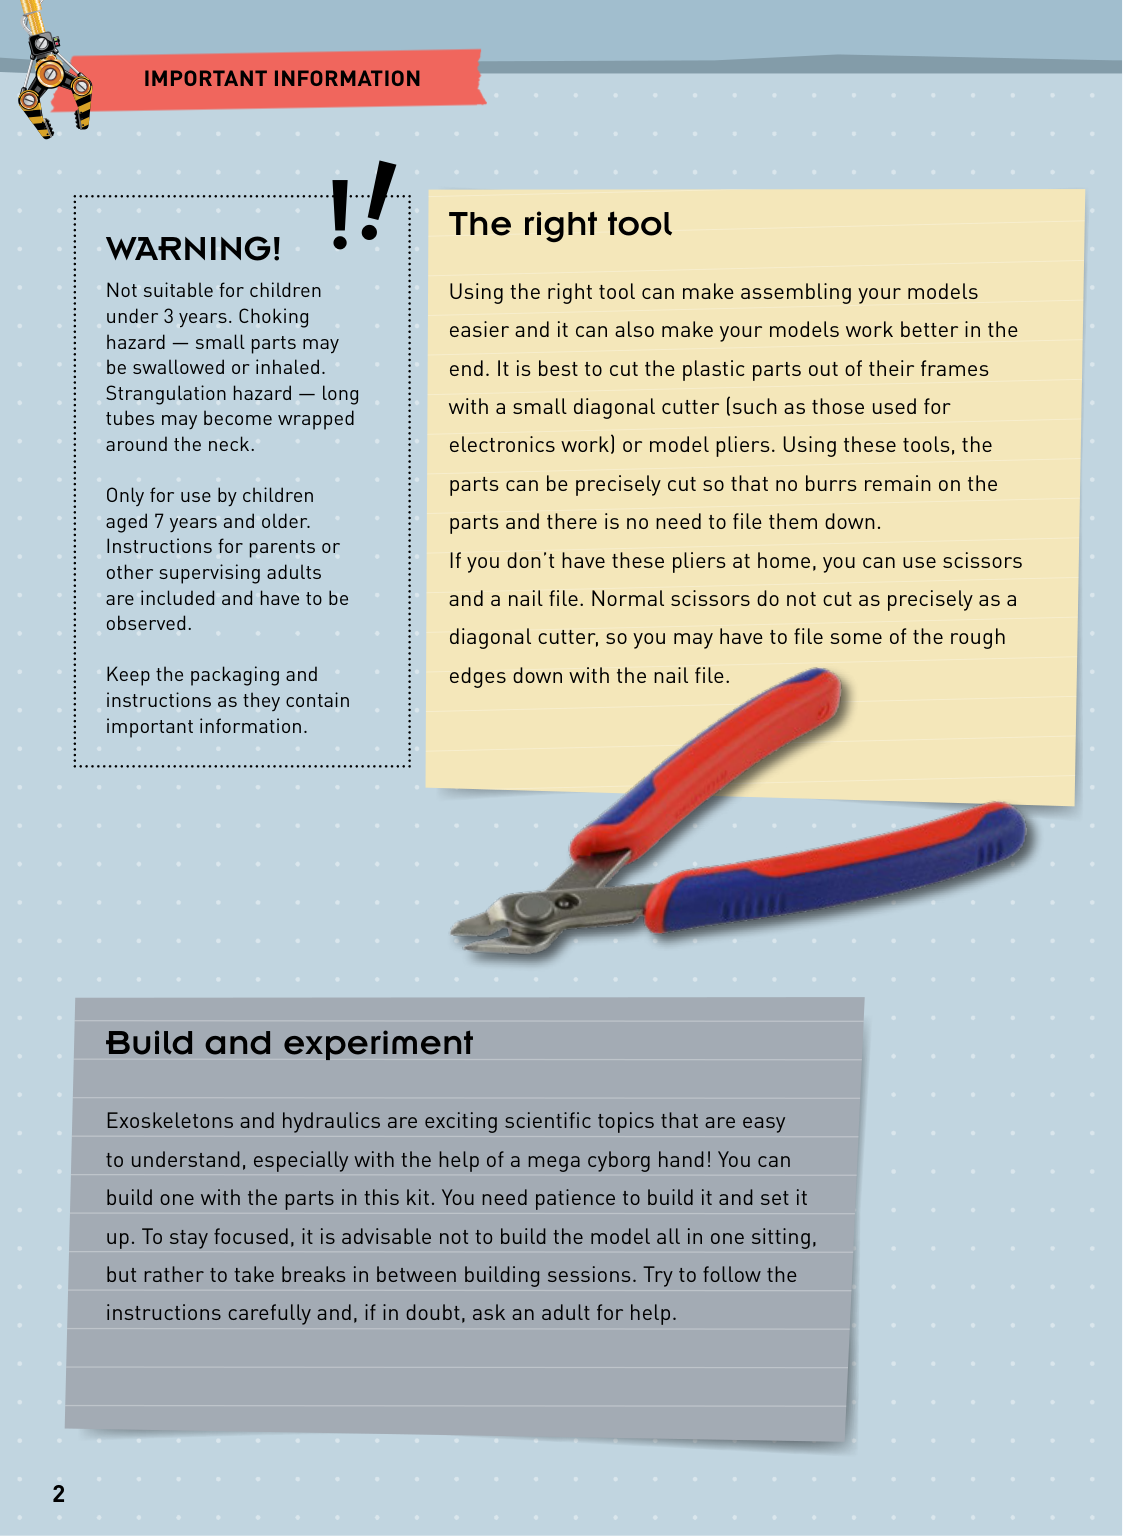
You will need scissors or diagonal cutters, a nail file, a Phillips-head screwdriver (PH1 size recommended), a ruler, a felt-tip marker, and a plastic cup or mug filled with tap water. A small diagonal cutter such as those used for electronics work is recommended for the most precise cuts.
Show 14 more questions
How do I adjust the Mega Cyborg Hand to fit my hand?
How far can the thumb on the Mega Cyborg Hand rotate?
Why is it important to oil the cylinders before assembly, and what oil should I use?
What is the maximum weight the cyborg hand can lift with a full grip?
What is the minimum age for using this product?
What are the age and safety warnings for the Mega Cyborg Hand?
How do I adjust the cyborg hand to fit my hand size?
What should I do if there is air in the G1 cylinder?
How do I oil the cylinders during assembly?
What are the different thumb rotation positions available?
How do I cut the tubing for the hydraulic systems?
What is the recommended tool for removing plastic parts from their frames?
How do I pick up small objects with the cyborg hand?
What should I do if the fingers are not working properly?
Full Manual
56 pages
Franckh-Kosmos Verlags-GmbH & Co. KG, Pfizerstr. 5-7, 70184 Stuttgart, Germany | +49 (0) 711 2191-0 | www.kosmos.de Thames & Kosmos, 89 Ship St., Providence, RI, 02903, USA | 1-800-587-2872 | www.thamesandkosmos.com Mega Cyborg Hand
Experiment Manual
A
B
C
D
E
F
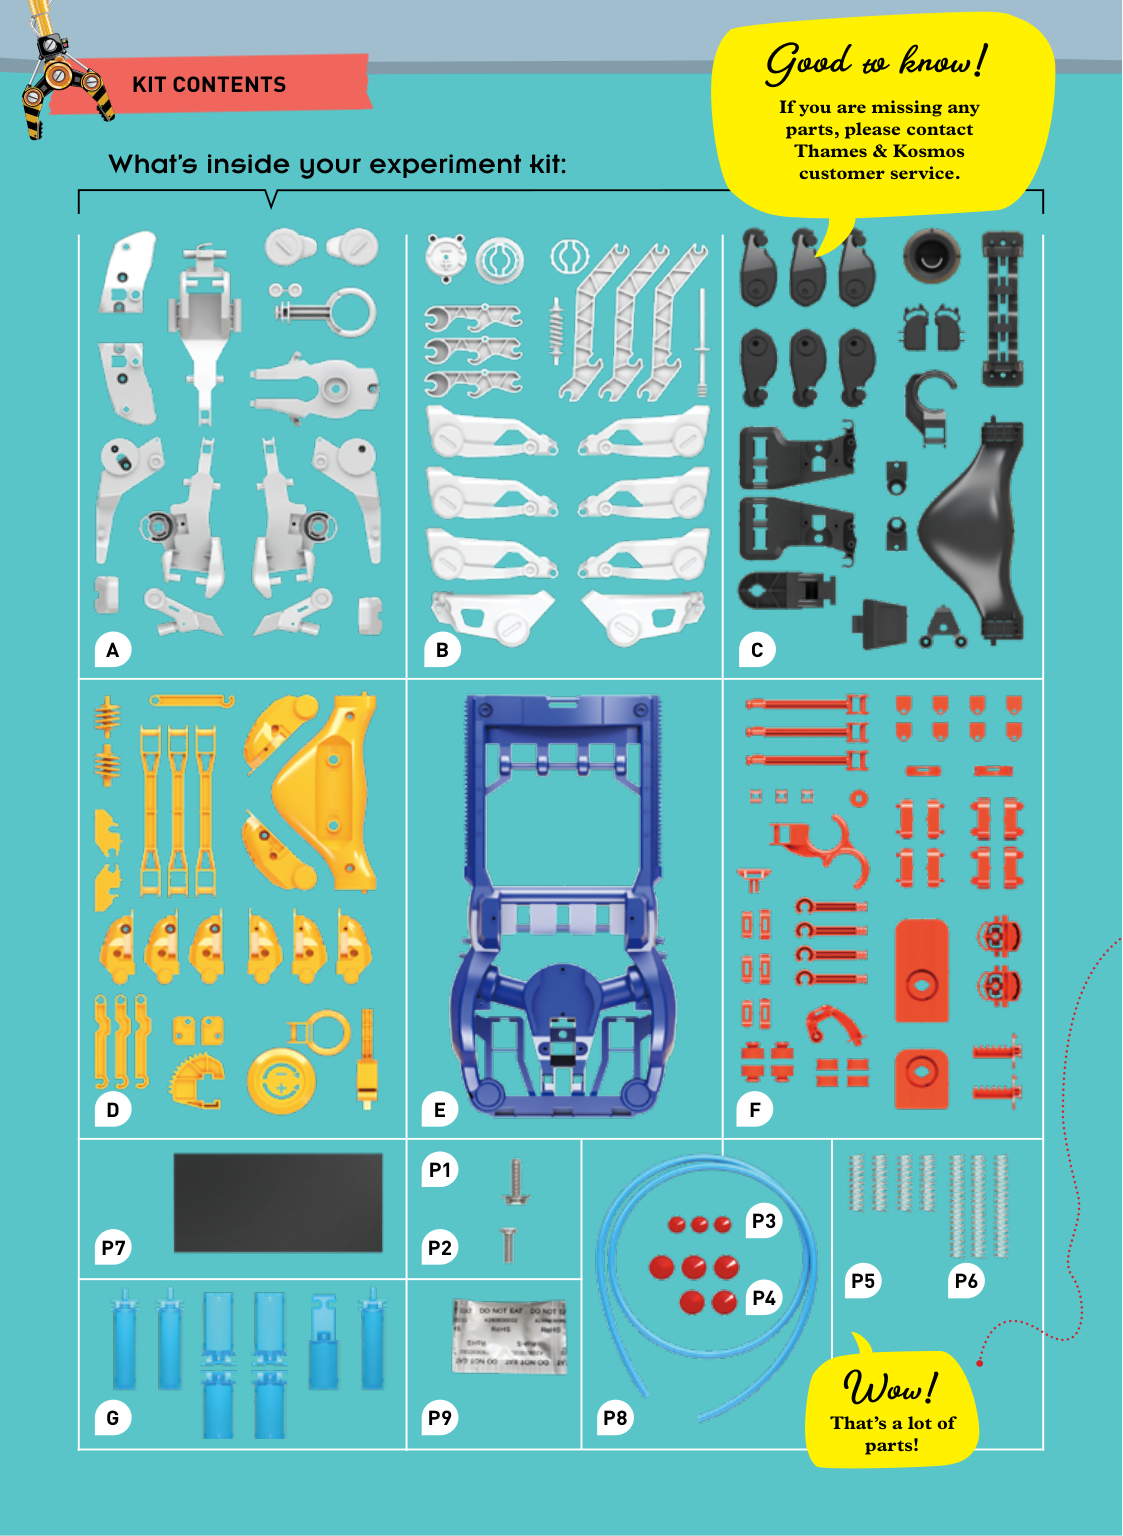
What’s inside your experiment kit: If you are missing any parts, please contact Thames & Kosmos customer service. Good to know!P7
G
P5
P6
P8
P3
P4
P9
P2
P1
Wow! That’s a lot of parts!Kit Contents
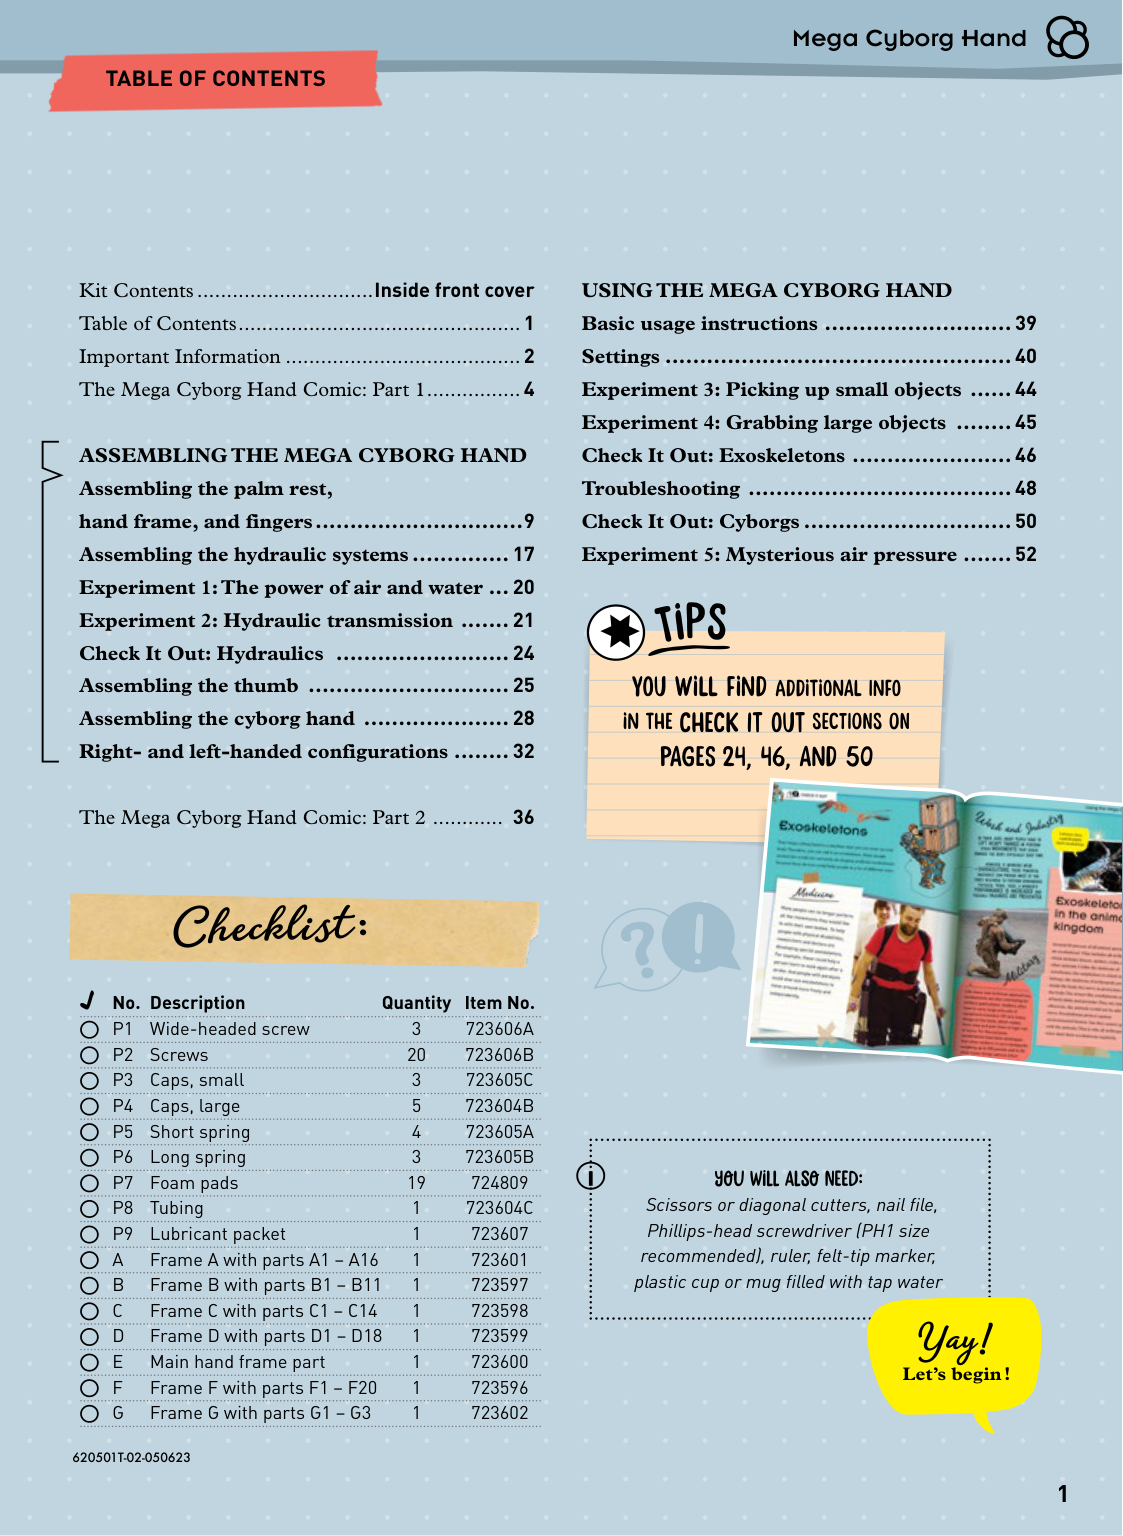
1 Kit Contents ..............................Inside front cover Table of Contents ................................................1 Important Information ........................................2 The Mega Cyborg Hand Comic: Part 1 ................4
Assembling The Mega Cyborg Hand
Assembling the palm rest, hand frame, and fingers ..............................9 Assembling the hydraulic systems .............. 17 Experiment 1: The power of air and water ... 20 Experiment 2: Hydraulic transmission ....... 21 Check It Out: Hydraulics ......................... 24 Assembling the thumb ............................. 25 Assembling the cyborg hand ..................... 28 Right- and left-handed configurations ........ 32 The Mega Cyborg Hand Comic: Part 2 ............ 36Using The Mega Cyborg Hand
Basic usage instructions ........................... 39 Settings .................................................. 40 Experiment 3: Picking up small objects ...... 44 Experiment 4: Grabbing large objects ........ 45 Check It Out: Exoskeletons ....................... 46 Troubleshooting ...................................... 48 Check It Out: Cyborgs .............................. 50 Experiment 5: Mysterious air pressure ....... 52 Checklist: No. Description Quantity Item No. P1 Wide-headed screw 3723606A
P2 Screws 20723606B
P3 Caps, small 3723605C
P4 Caps, large 5723604B
P5 Short spring 4723605A
P6 Long spring 3723605B
P7 Foam pads 19 724809 P8 Tubing 1723604C
P9 Lubricant packet 1 723607A
Frame A with parts A1 – A16 1 723601B
Frame B with parts B1 – B11 1 723597C
Frame C with parts C1 – C14 1 723598D
Frame D with parts D1 – D18 1 723599E
Main hand frame part 1 723600F
Frame F with parts F1 – F20 1 723596G
Frame G with parts G1 – G3 1 723602 you will also need: Scissors or diagonal cutters, nail file, Phillips-head screwdriver (PH1 size recommended), ruler, felt-tip marker, plastic cup or mug filled with tap waterT
i pS
You will find Additional Info in the check it out SECTIONS ON Pages 24, 46, and 50Table Of Contents
Mega Cyborg Hand Yay! Let’s begin ! 620501-02-020321620501T-02-050623
2
Important Information
Warning!
The right tool Build and experiment Not suitable for children under 3 years. Choking hazard — small parts may be swallowed or inhaled. Strangulation hazard — long tubes may become wrapped around the neck. Only for use by children aged 7 years and older. Instructions for parents or other supervising adults are included and have to be observed. Keep the packaging and instructions as they contain important information. Using the right tool can make assembling your models easier and it can also make your models work better in the end. It is best to cut the plastic parts out of their frames with a small diagonal cutter (such as those used for electronics work) or model pliers. Using these tools, the parts can be precisely cut so that no burrs remain on the parts and there is no need to file them down. If you don’t have these pliers at home, you can use scissors and a nail file. Normal scissors do not cut as precisely as a diagonal cutter, so you may have to file some of the rough edges down with the nail file. Exoskeletons and hydraulics are exciting scientific topics that are easy to understand, especially with the help of a mega cyborg hand! You can build one with the parts in this kit. You need patience to build it and set it up. To stay focused, it is advisable not to build the model all in one sitting, but rather to take breaks in between building sessions. Try to follow the instructions carefully and, if in doubt, ask an adult for help. ! !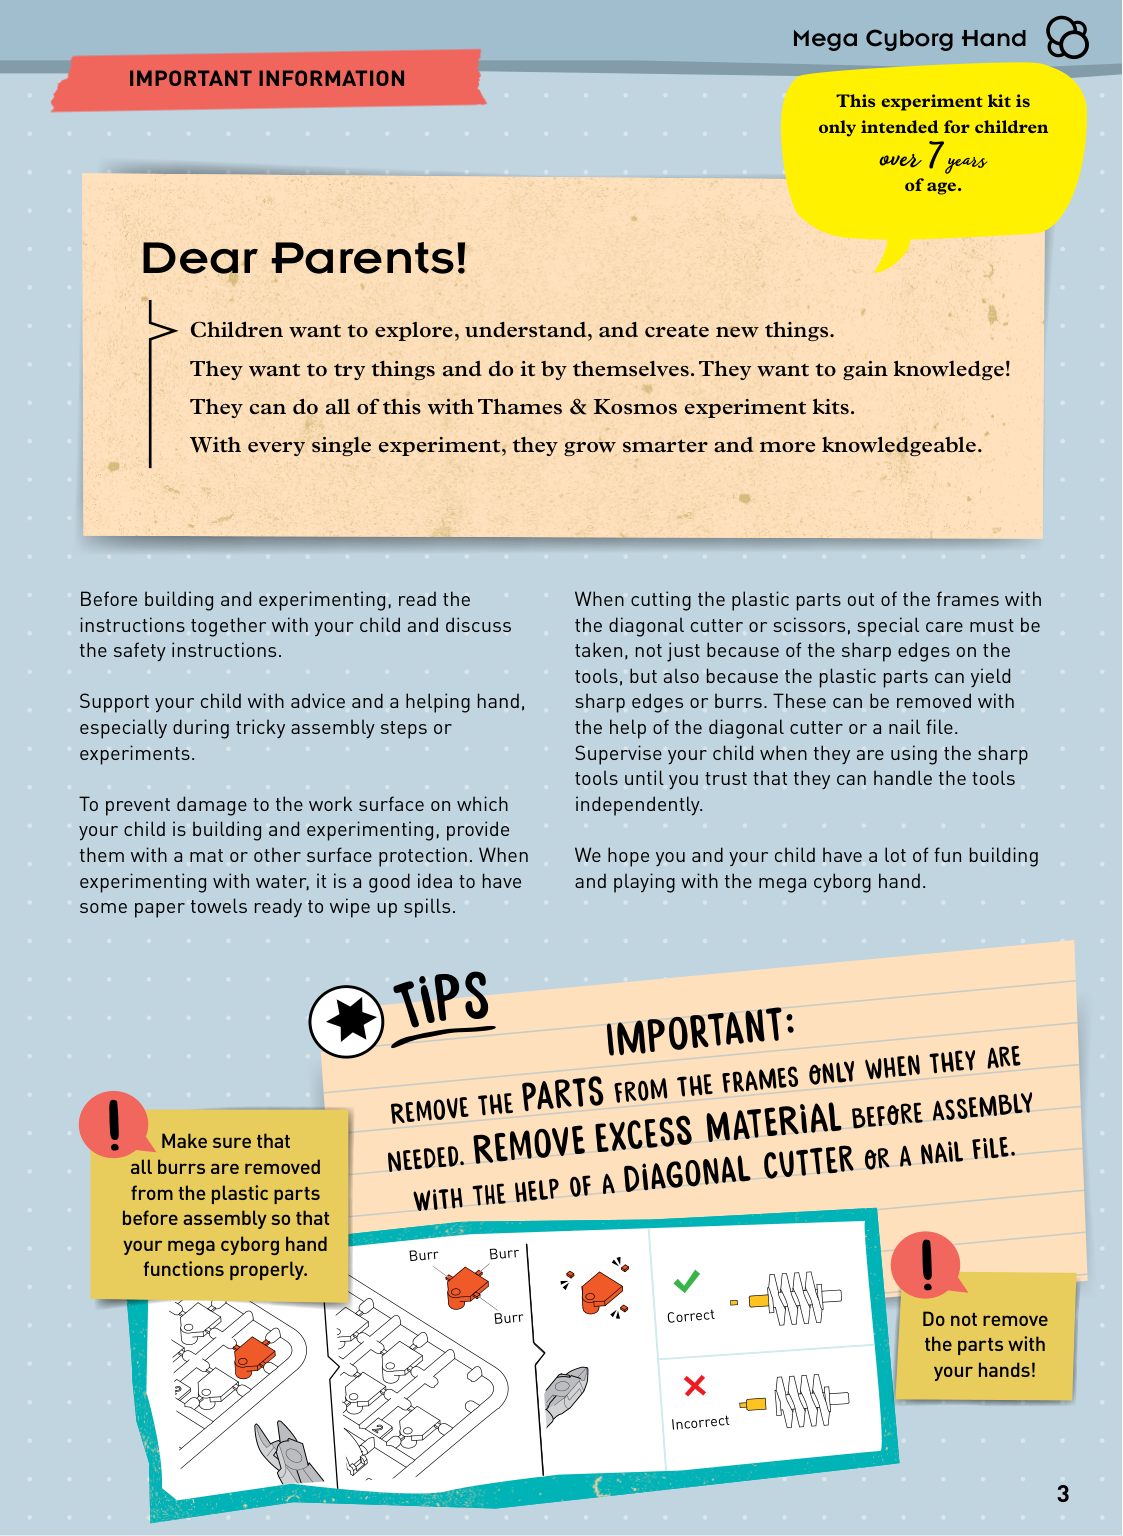
3 Mega Cyborg Hand
Important Information
Before building and experimenting, read the instructions together with your child and discuss the safety instructions. Support your child with advice and a helping hand, especially during tricky assembly steps or experiments. To prevent damage to the work surface on which your child is building and experimenting, provide them with a mat or other surface protection. When experimenting with water, it is a good idea to have some paper towels ready to wipe up spills. When cutting the plastic parts out of the frames with the diagonal cutter or scissors, special care must be taken, not just because of the sharp edges on the tools, but also because the plastic parts can yield sharp edges or burrs. These can be removed with the help of the diagonal cutter or a nail file. Supervise your child when they are using the sharp tools until you trust that they can handle the tools independently. We hope you and your child have a lot of fun building and playing with the mega cyborg hand. Children want to explore, understand, and create new things. They want to try things and do it by themselves. They want to gain knowledge! They can do all of this with Thames & Kosmos experiment kits. With every single experiment, they grow smarter and more knowledgeable. Dear Parents! This experiment kit is only intended for children over 7 years of age. ImpOrtaNt: RemOve ThE parTs froM thE frAmes onlY wHen They are neeDed. RemOve excEss mateRiAl beforE asSembLy witH thE heLp oF A DiagOnal cuTtEr or a nAil File.T
i pS
Burr Burr Burr Correct Incorrect Make sure that all burrs are removed from the plastic parts before assembly so that your mega cyborg hand functions properly. Do not remove the parts with your hands!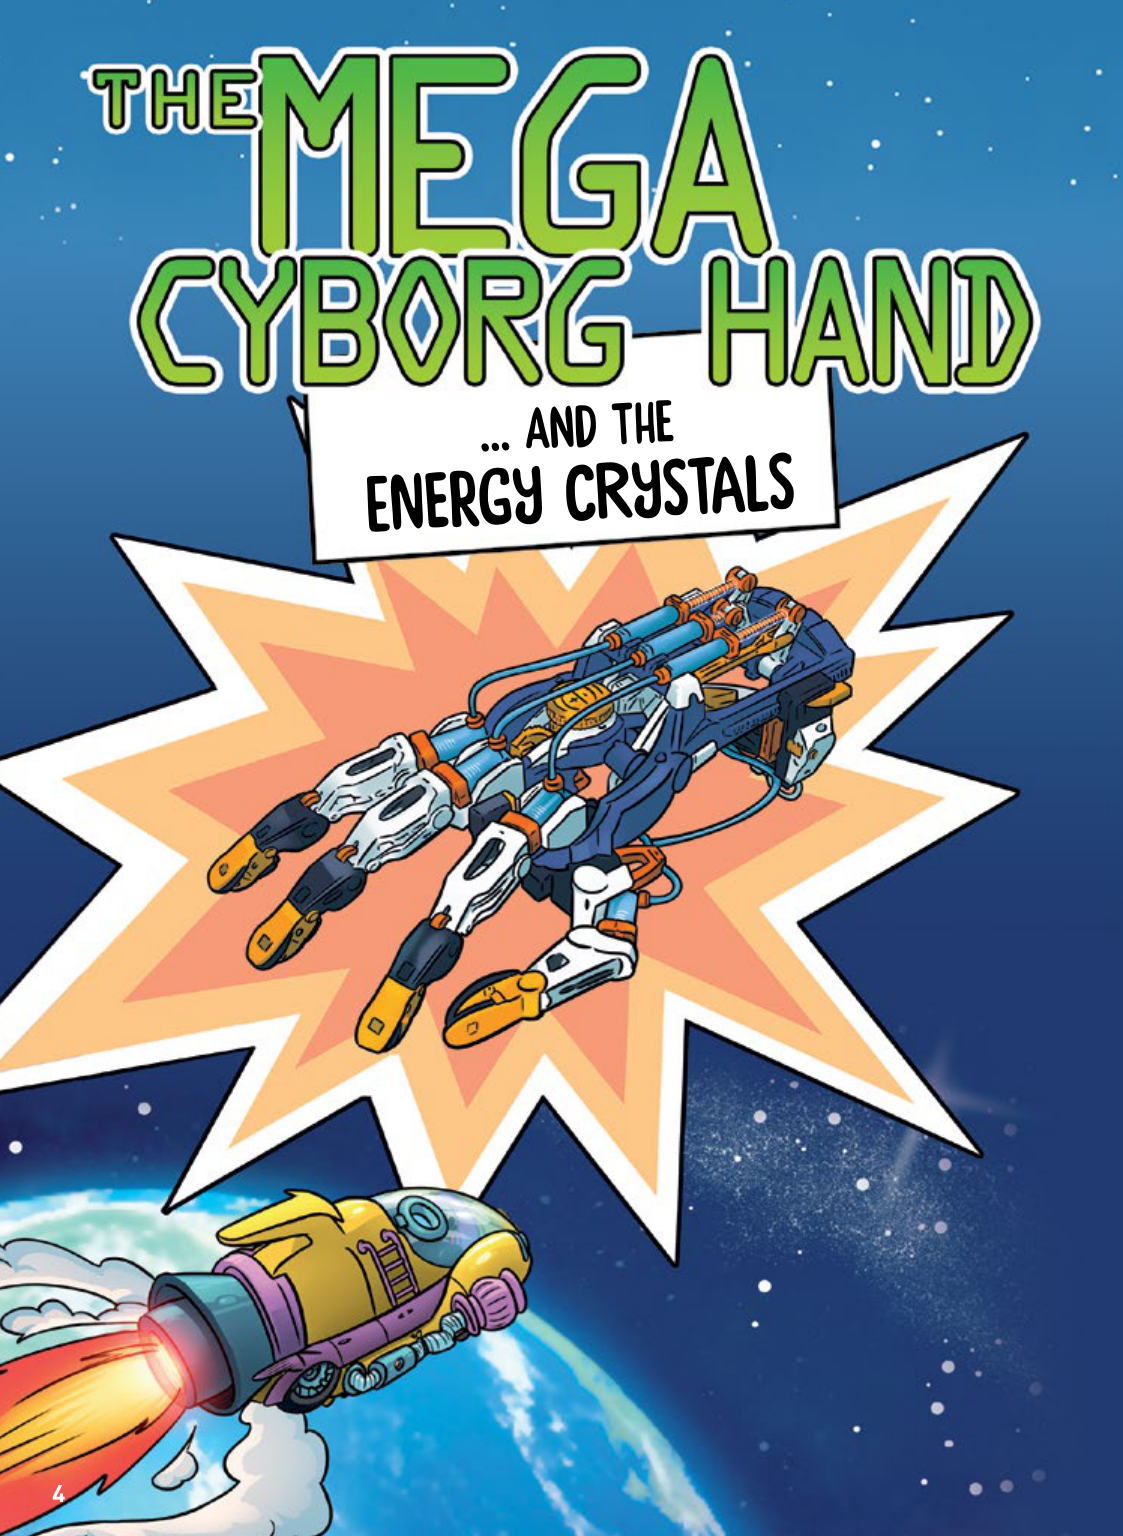
4 … and the EnerGy cRystAls

5
It’S Quiet In The Junkyard.
Everyone Has Gone To Sleep ...
... Except Tom And Izzy.
Here, Where Other People Just See Junk,
Our Heroes See Endless Possibilities.
The
Thrust Must
Be Increased
By A Factor
Of 10.
We
Need More
Thrust ...
… To Overcome
Gravity.
It’S The Piece
We Needed!
Hmm … That
Could Work.
... As Long
As It Isn’T
Broken.
Alright,
Let’S Get
To Work!
Don’T
Worry! This
Small Leak
Will Be Easy
To Plug.
I Found
Something!
6
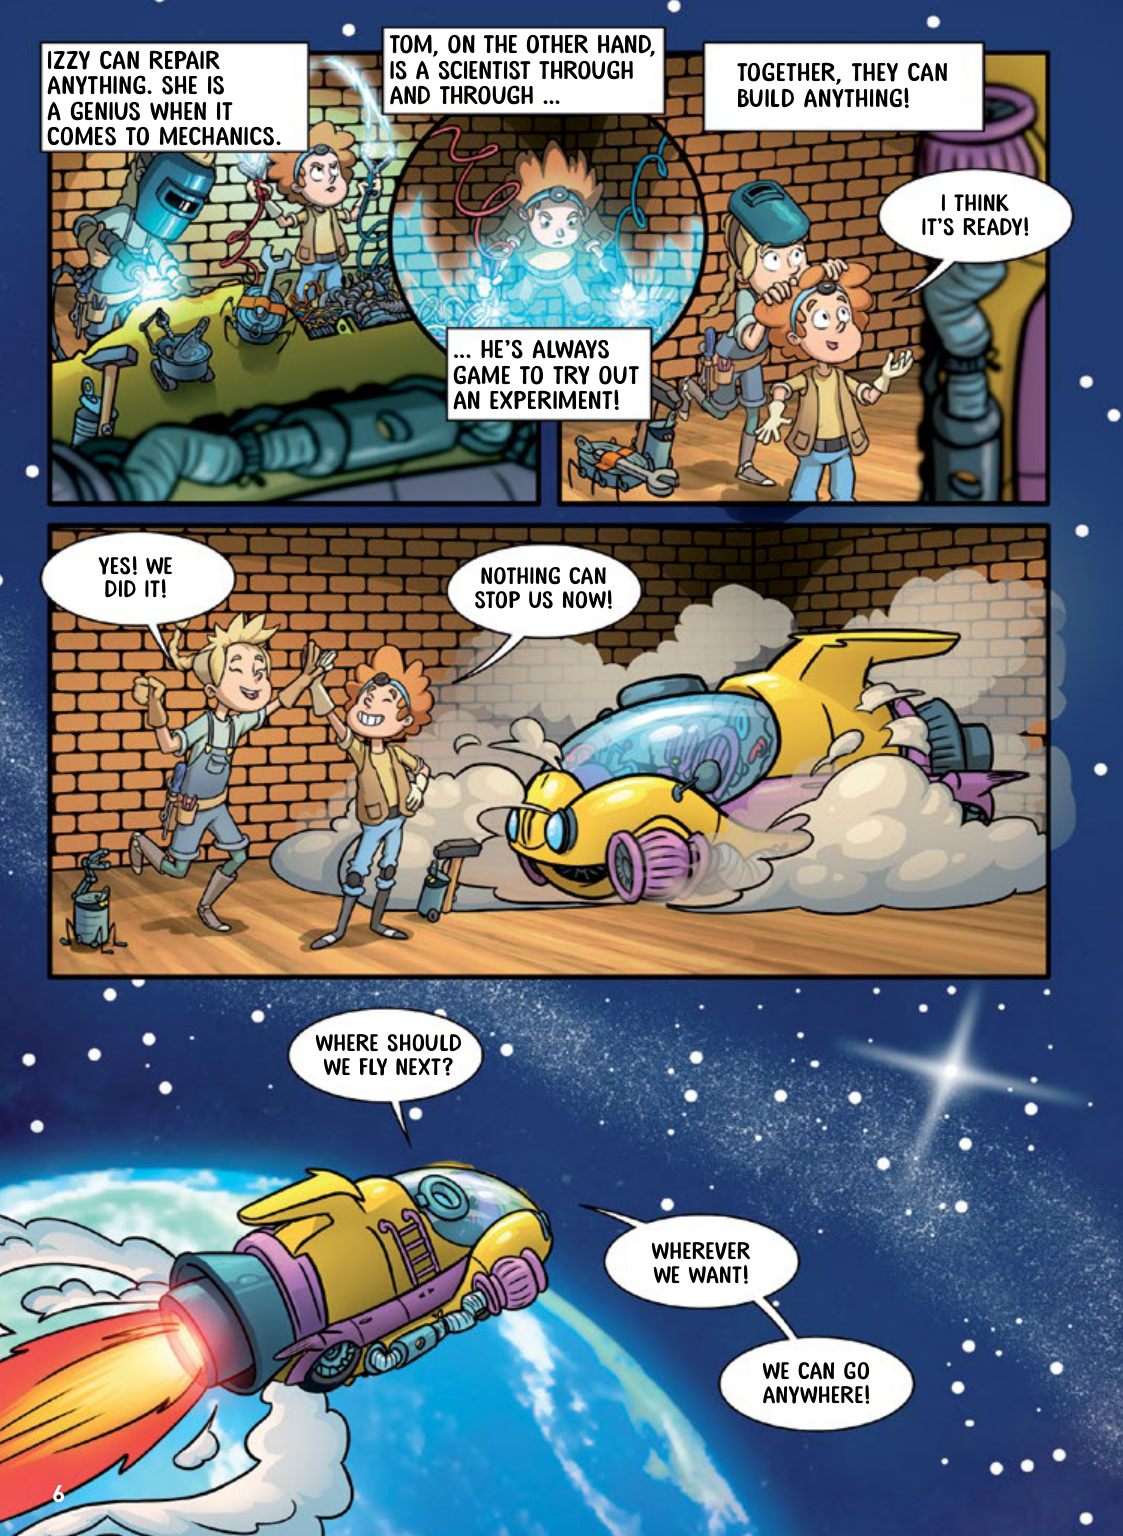
Izzy Can Repair
Anything. She Is
A Genius When It
Comes To Mechanics.
Tom, On The Other Hand,
Is A Scientist Through
And Through ...
Together, They Can
Build Anything!
... He’S Always
Game To Try Out
An Experiment!
I Think
It’S Ready!
Yes! We
Did It!
Nothing Can
Stop Us Now!
Where Should
We Fly Next?
Wherever
We Want!
We Can Go
Anywhere!
Continued on page 36
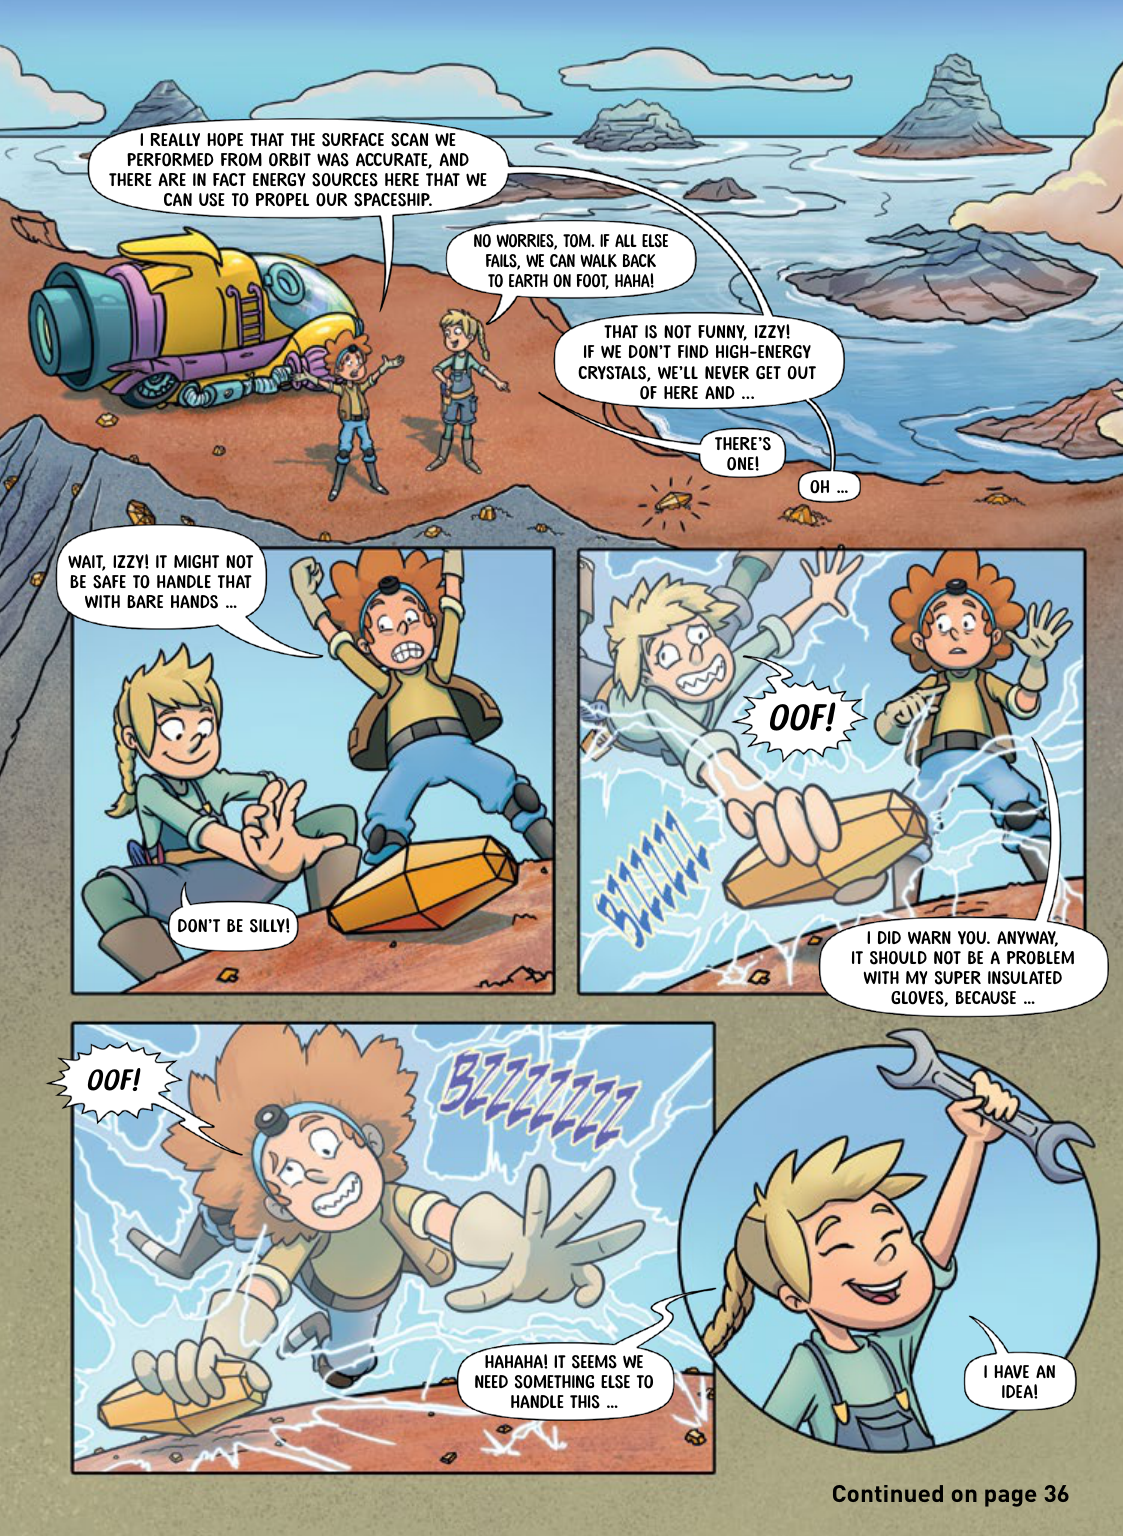
I Really Hope That The Surface Scan We
Performed From Orbit Was Accurate, And
There Are In Fact Energy Sources Here That We
Can Use To Propel Our Spaceship.
No Worries, Tom. If All Else
Fails, We Can Walk Back
To Earth On Foot, Haha!
That Is Not Funny, Izzy!
If We Don’T Find High-Energy
Crystals, We’Ll Never Get Out
Of Here And ...
Wait, Izzy! It Might Not
Be Safe To Handle That
With Bare Hands …
I Did Warn You. Anyway,
It Should Not Be A Problem
With My Super Insulated
Gloves, Because …
Hahaha! It Seems We
Need Something Else To
Handle This …
I Have An
Idea!
Don’T Be Silly!
Oof!
Oof!
There’S
One!
Oh …
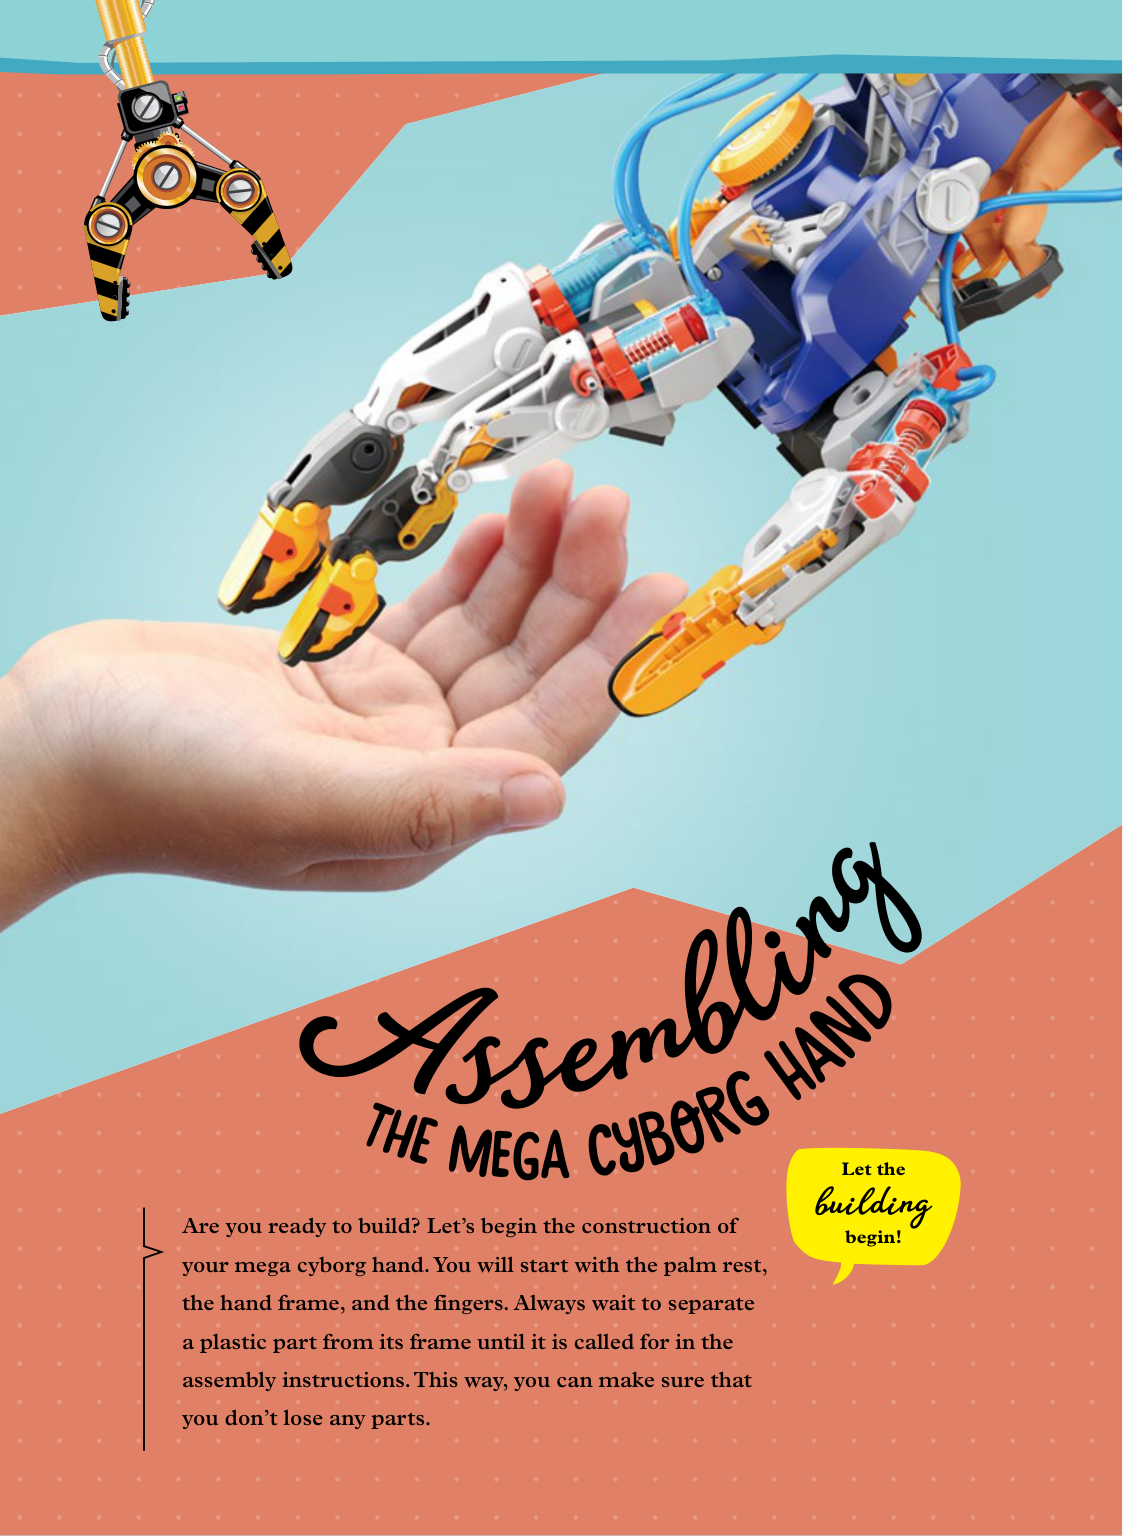
Are you ready to build? Let’s begin the construction of your mega cyborg hand. You will start with the palm rest, the hand frame, and the fingers. Always wait to separate a plastic part from its frame until it is called for in the assembly instructions. This way, you can make sure that you don’t lose any parts.
A
s s e m b l i n gt h e
m e g a
c y b o r g
h a n d Let the building begin!
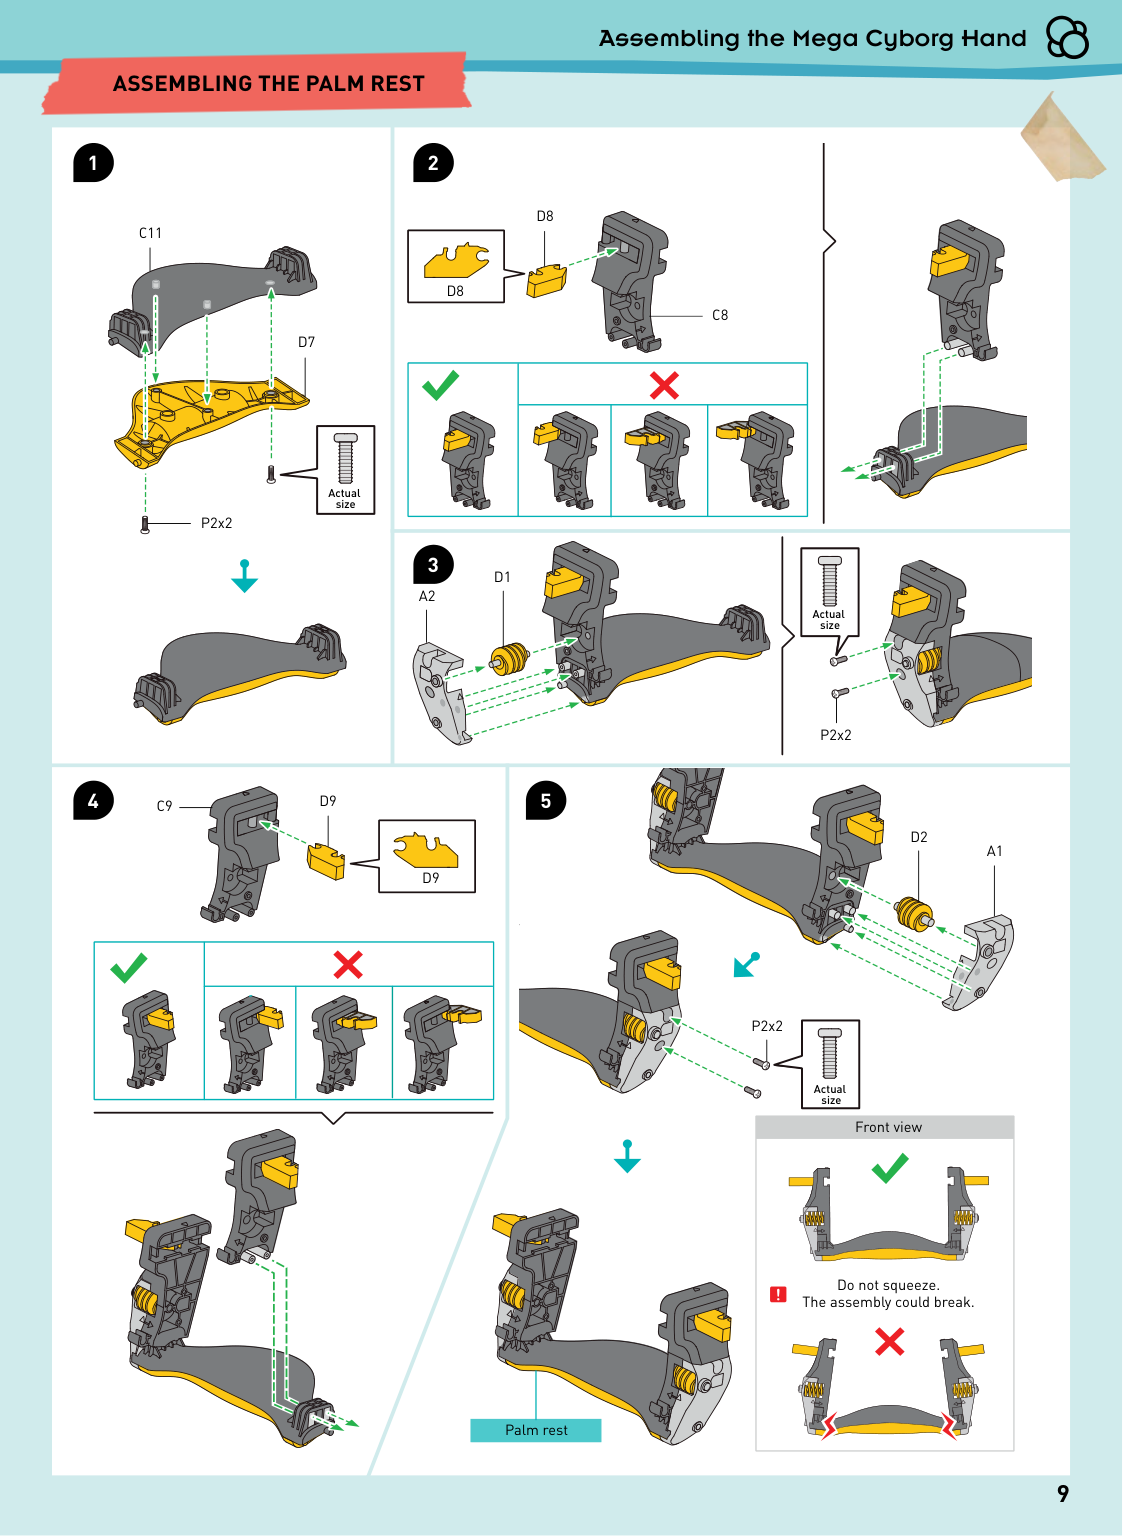
Front view Do not squeeze. The assembly could break. Actual size Palm rest Actual size Actual size 9 Assembling the Mega Cyborg Hand 1 2 4 3 5 P2x2 P2x2 P2x2
D8
D9
D2
A1
D9
C11
C8
C9
D7
A2
D1
D8
Assembling The Palm Rest
Actual size Actual size Actual size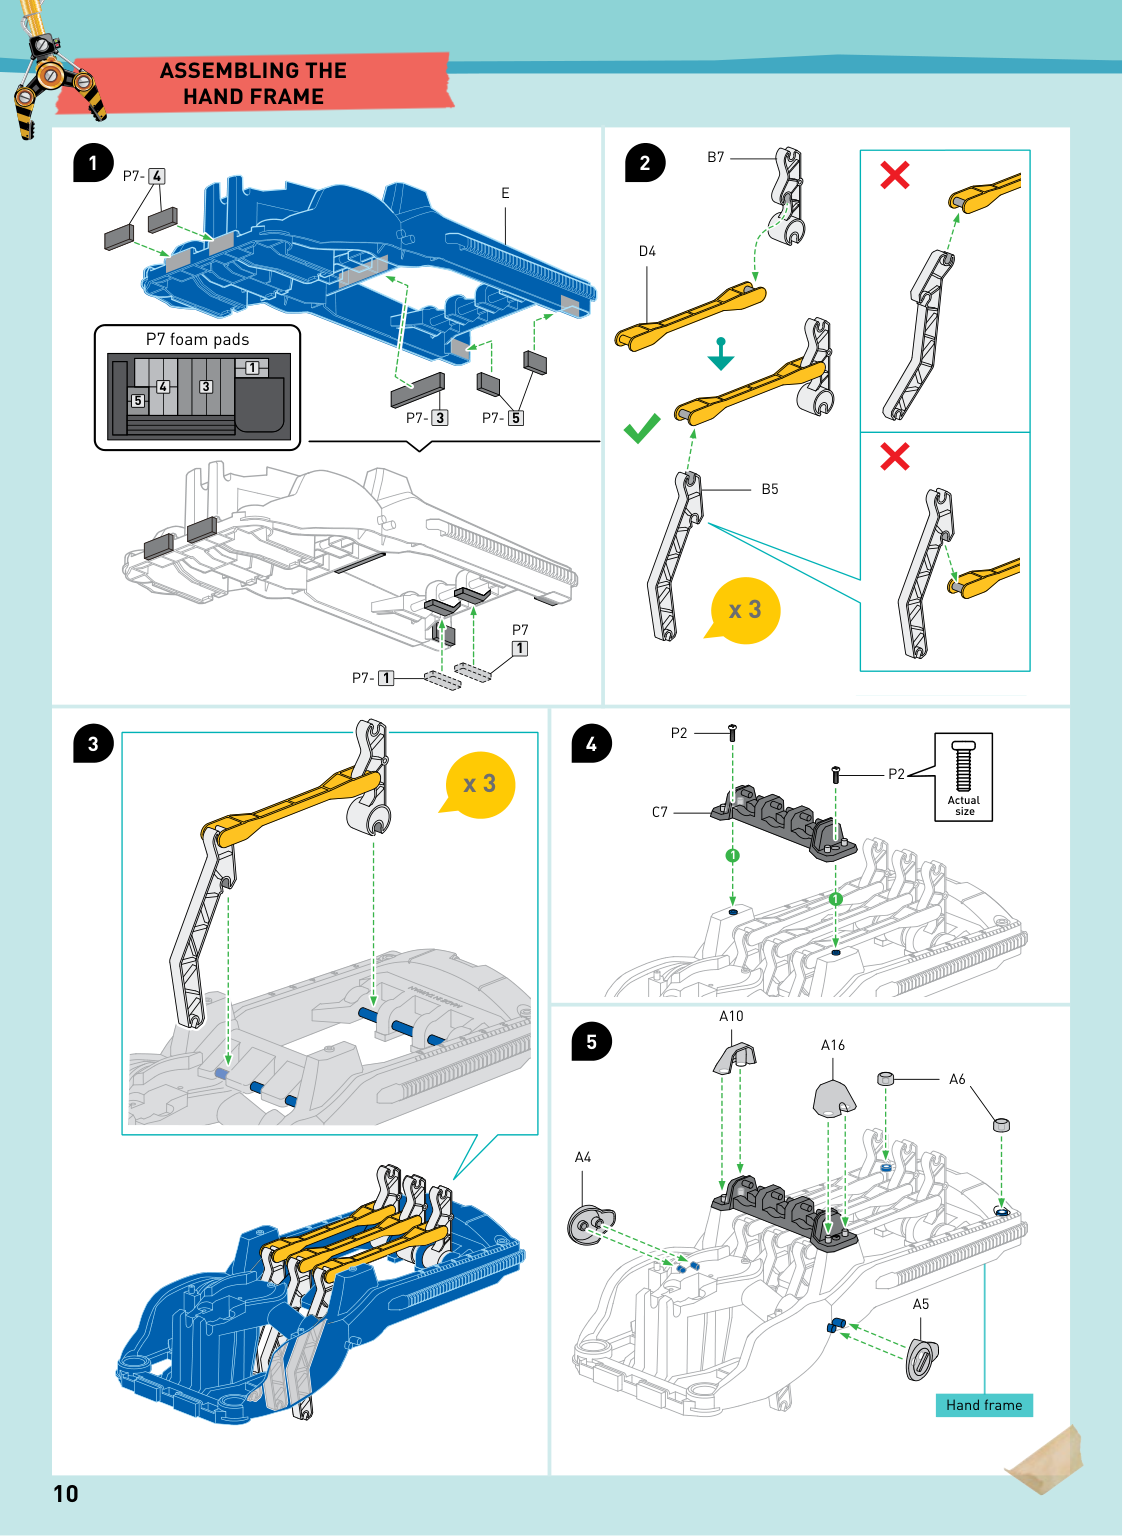
x 3 x 3
P7- 4
P7-
P7-
P7
P2
C7
P2
A6
A16
A10
A4
A5
3 1 1 1 1P7- 5
E
D4
B7
B5
5 4 3 1 Hand frame P7 foam pads Actual size 10 3 4 1 2 5Assembling The
Hand Frame
Actual size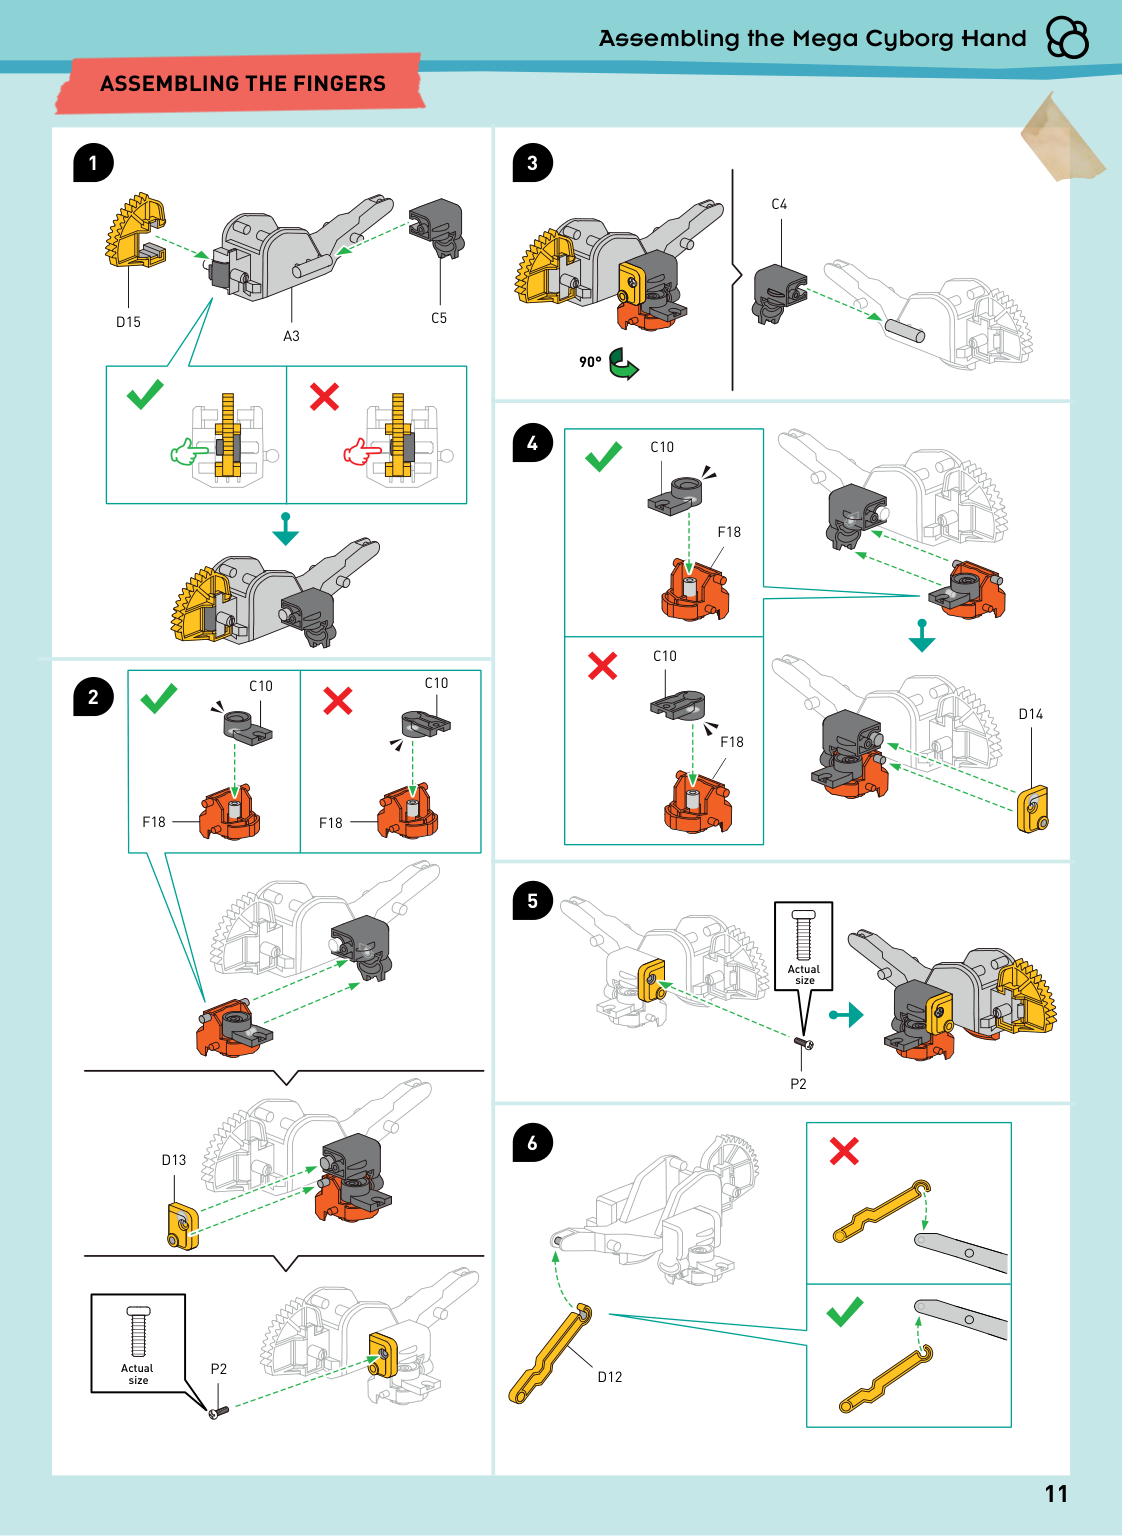
C4
D15
A3
C5
C10
C10
C10
C10
F18
F18
D13
P2
D12
P2
D14
F18
F18
90° Actual size Actual size Assembling the Mega Cyborg Hand 11 1 3 4 5 6 2Assembling The Fingers
Actual size Actual size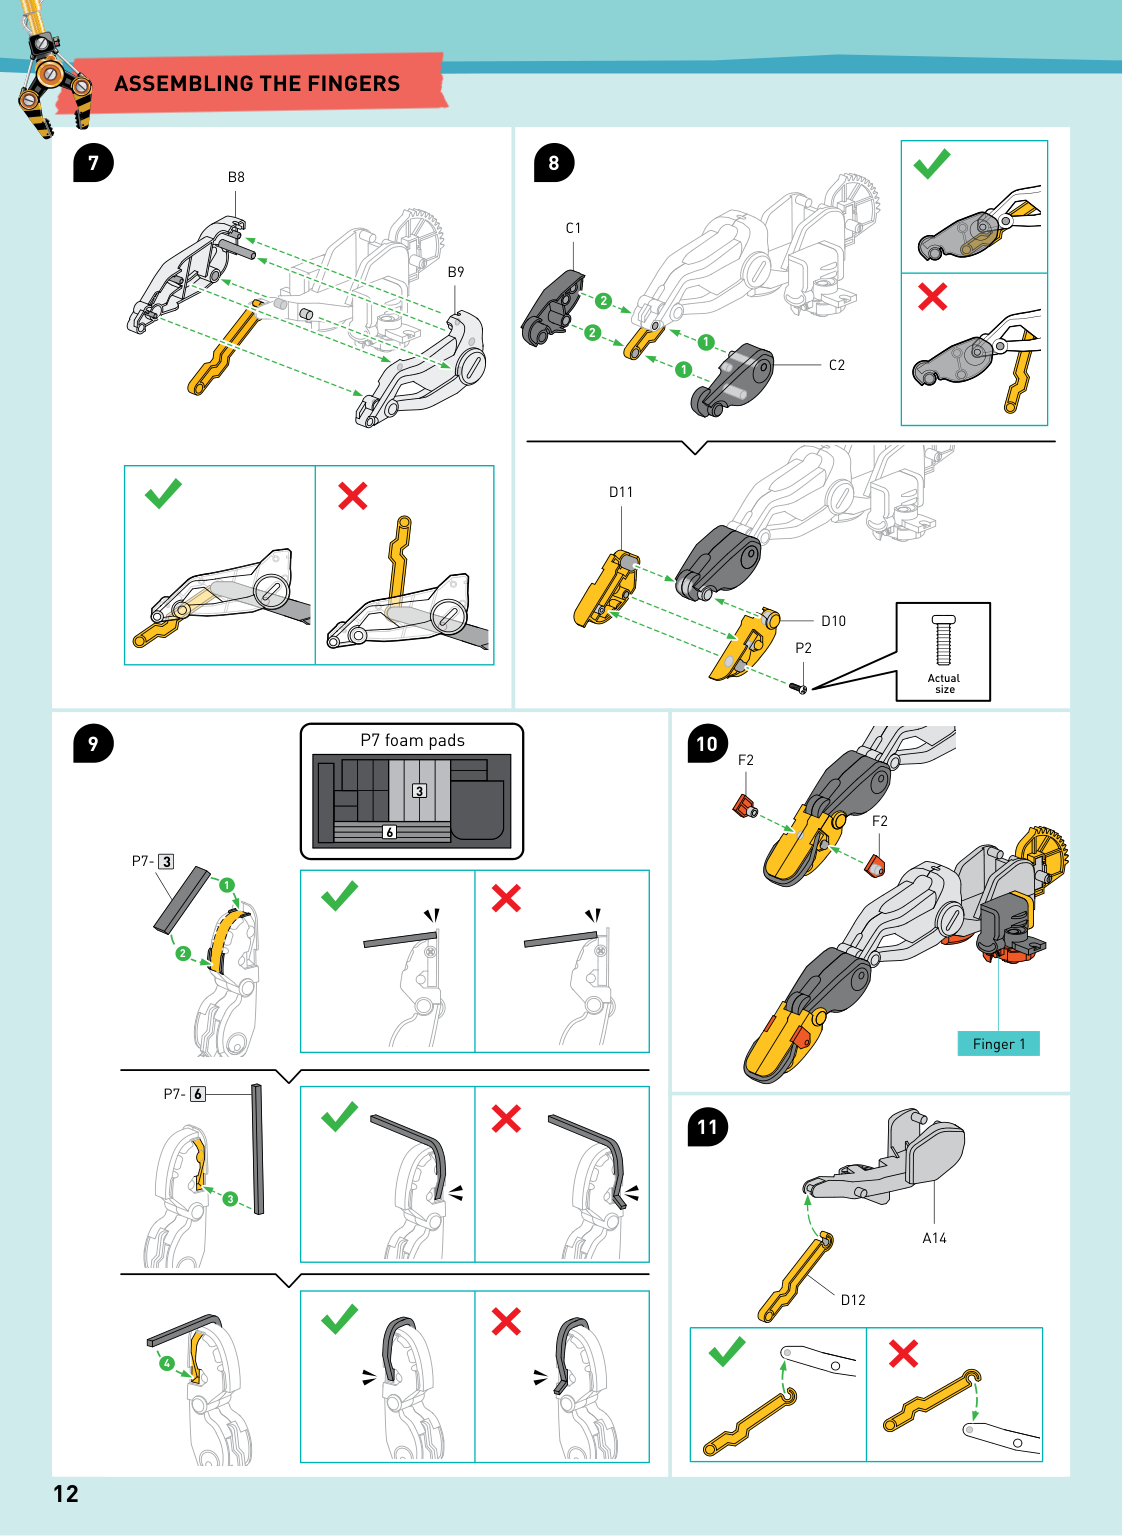
Actual size
A14
D12
2 2 1 1 3 6 1 2 3 4 P7 foam padsB9
B8
C1
D11
C2
P2
F2
F2
D10
Finger 1P7-
P7-
3 6 12Assembling The Fingers
7 9 8 10 11 Actual size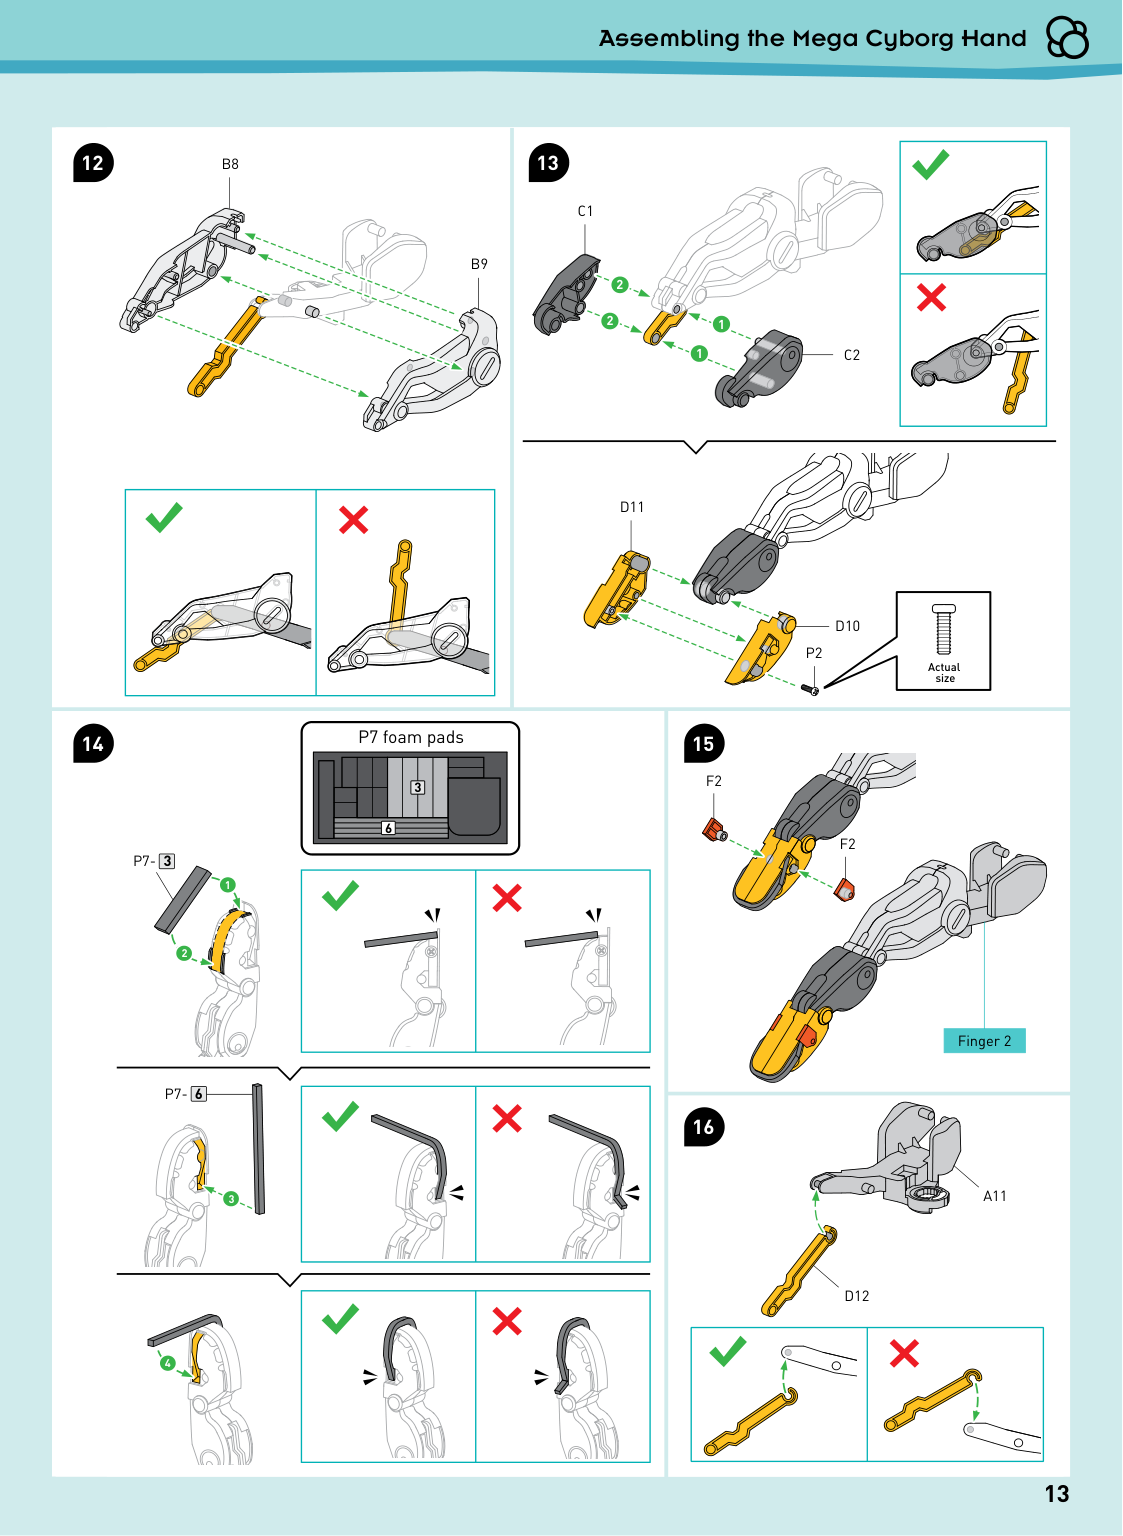
Actual size
A11
D12
2 2 1 1 3 6 1 2 3 4 P7 foam padsB9
B8
C1
D11
C2
P2
F2
F2
D10
Finger 2P7-
P7-
3 6 13 Assembling the Mega Cyborg Hand 15 16 14 12 13 Actual size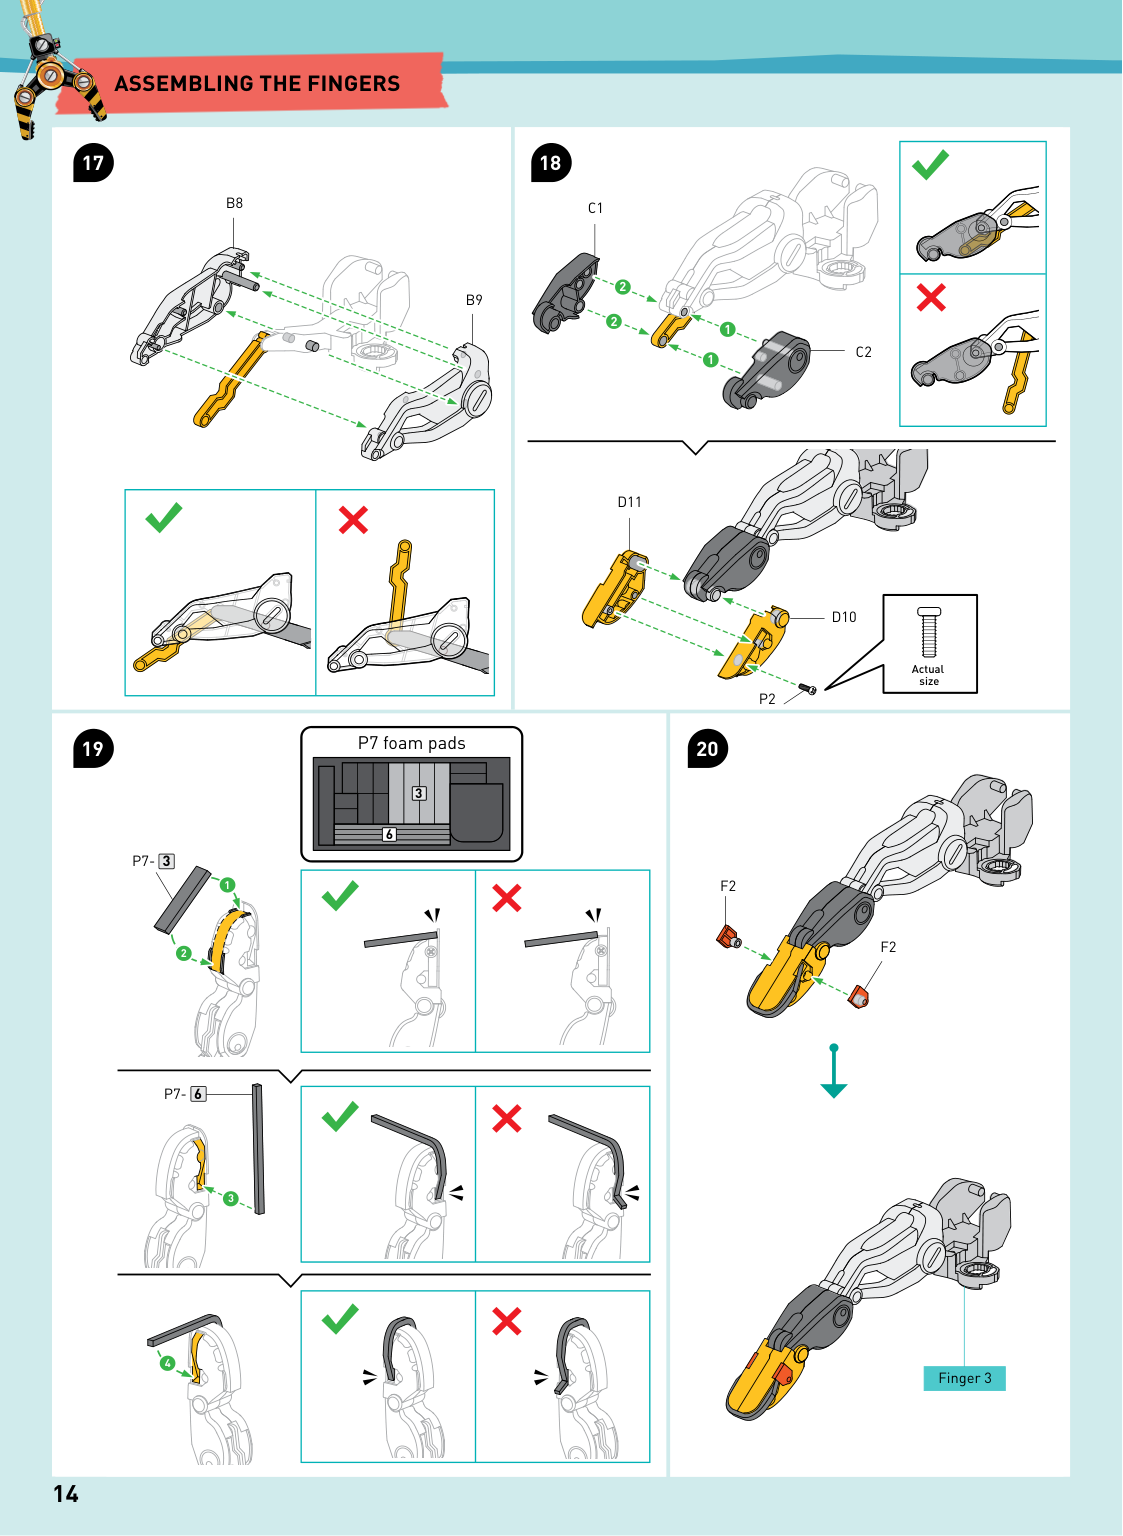
Actual size 2 2 1 1 3 6 1 2 3 4 P7 foam pads
B9
B8
C1
D11
C2
P2
F2
F2
D10
Finger 3P7-
P7-
3 6 14 17 19 18 20Assembling The Fingers
Actual size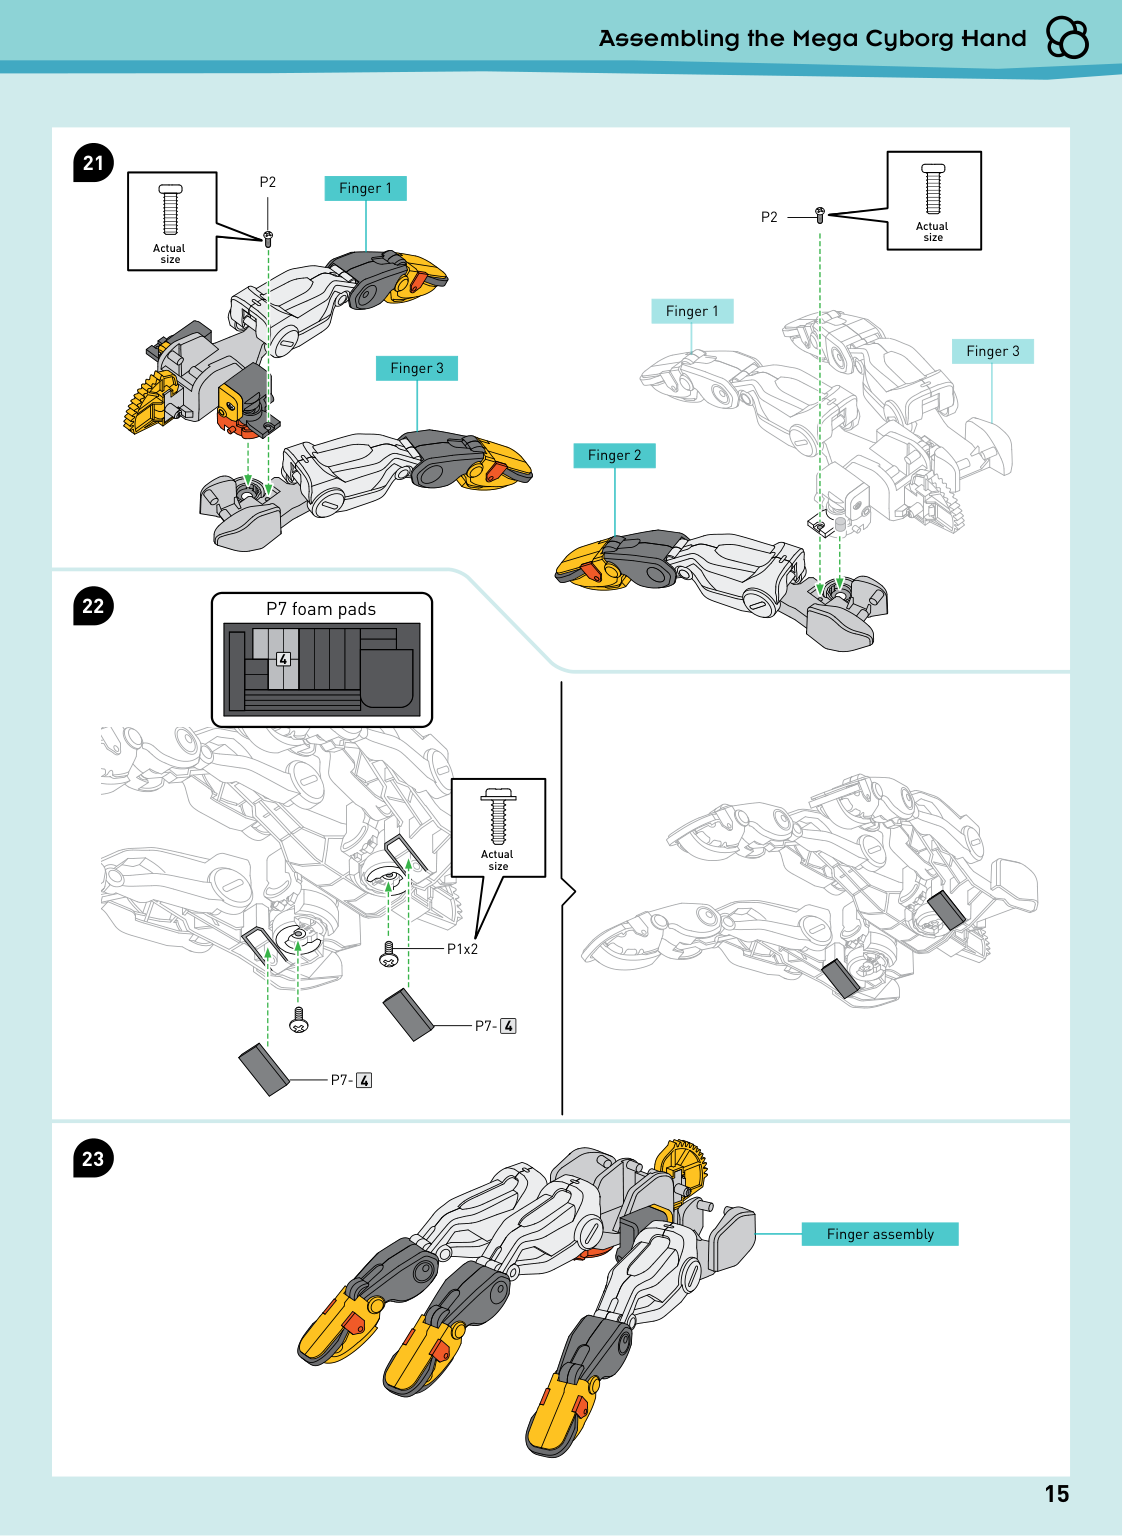
1:1 1:1 Actual size Actual size Actual size 4 P7 foam pads
P2
P2
P1x2 Finger 3 Finger 2 Finger assembly Finger 3 Finger 1 Finger 1P7-
P7-
4 4 15 Assembling the Mega Cyborg Hand 21 22 23 Actual size Actual size Actual size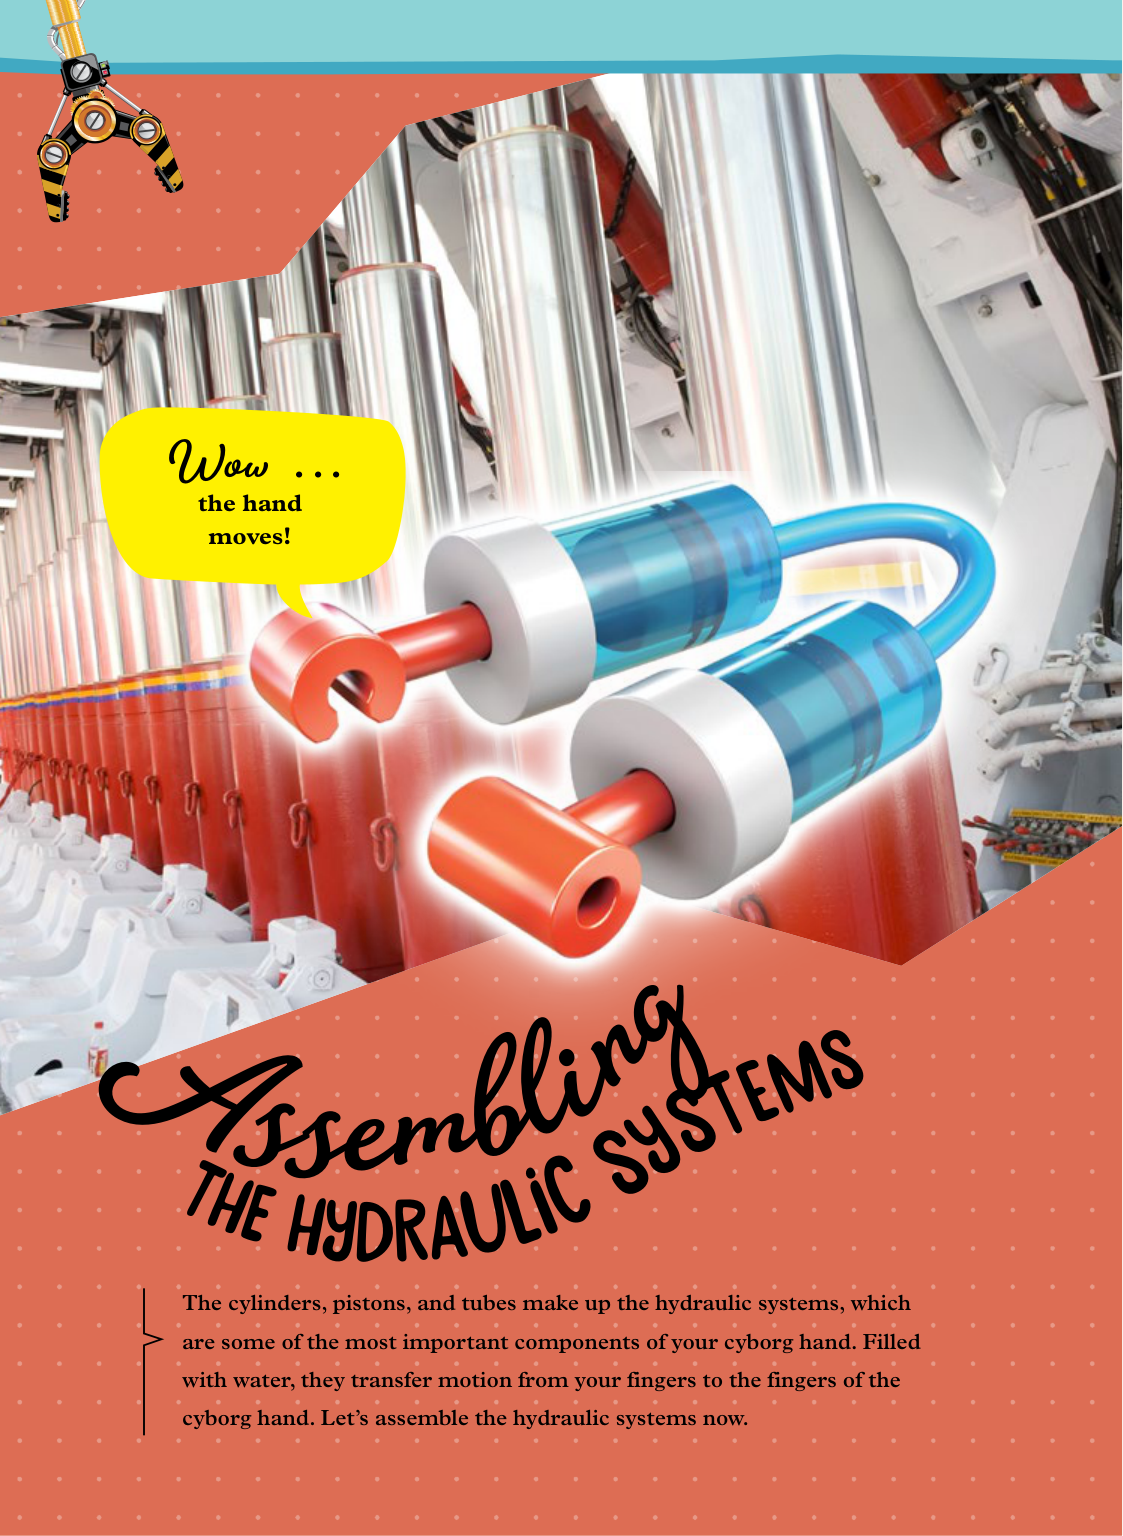
The cylinders, pistons, and tubes make up the hydraulic systems, which are some of the most important components of your cyborg hand. Filled with water, they transfer motion from your fingers to the fingers of the cyborg hand. Let’s assemble the hydraulic systems now.
A
s s e m b l i n gt h e
h y d r a u l i c
sy s tem s Wow ... the hand moves!
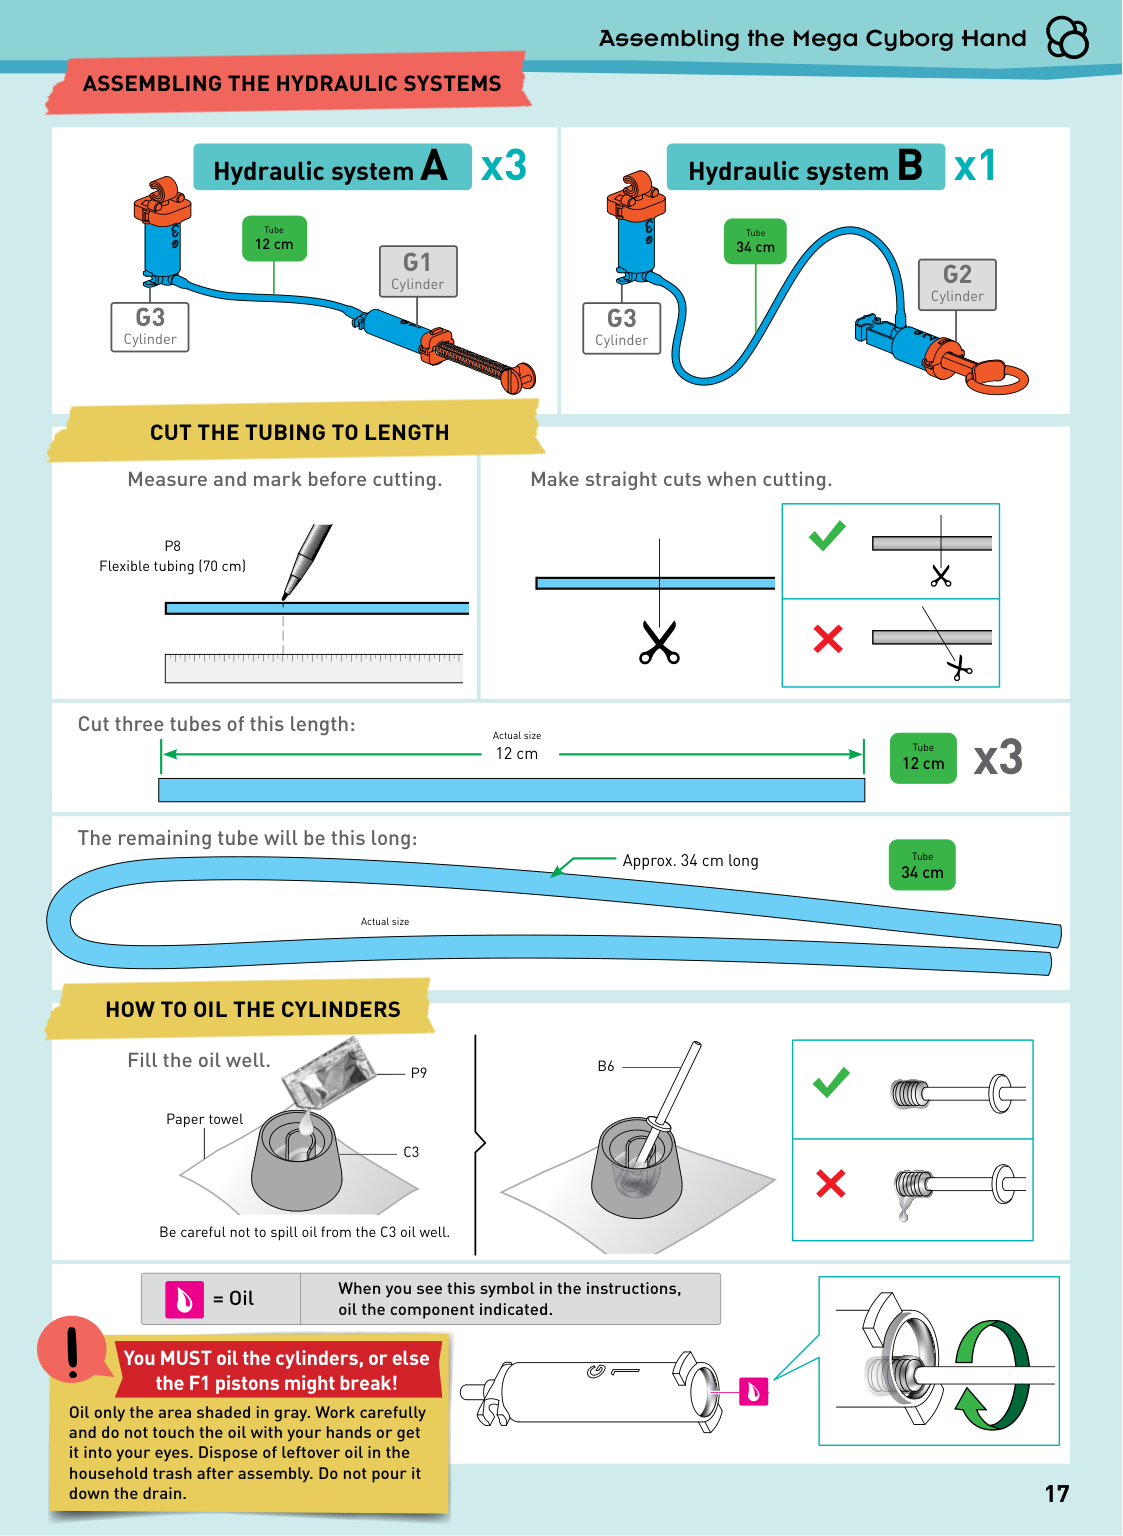
P8
Flexible tubing (70 cm)B6
P9
C3
Be careful not to spill oil from the C3 oil well. Paper towel Measure and mark before cutting. Cut three tubes of this length: The remaining tube will be this long: Fill the oil well. = Oil When you see this symbol in the instructions, oil the component indicated. Make straight cuts when cutting. You MUST oil the cylinders, or else the F1 pistons might break! Actual size Actual size Oil only the area shaded in gray. Work carefully and do not touch the oil with your hands or get it into your eyes. Dispose of leftover oil in the household trash after assembly. Do not pour it down the drain. 17 Assembling the Mega Cyborg HandG3
CylinderG3
Cylinder Hydraulic system A x3 x1 x3 Hydraulic system BG2
CylinderG1
Cylinder Tube 12 cm Tube 12 cm Tube 34 cm Tube 34 cm Approx. 34 cm long 12 cmHow To Oil The Cylinders
Cut The Tubing To Length
Assembling The Hydraulic Systems
Cut three tubes of this length: The remaining tube will be this long: Actual size Actual size x3 Tube 12 cm Tube 34 cm Approx. 34 cm long 12 cm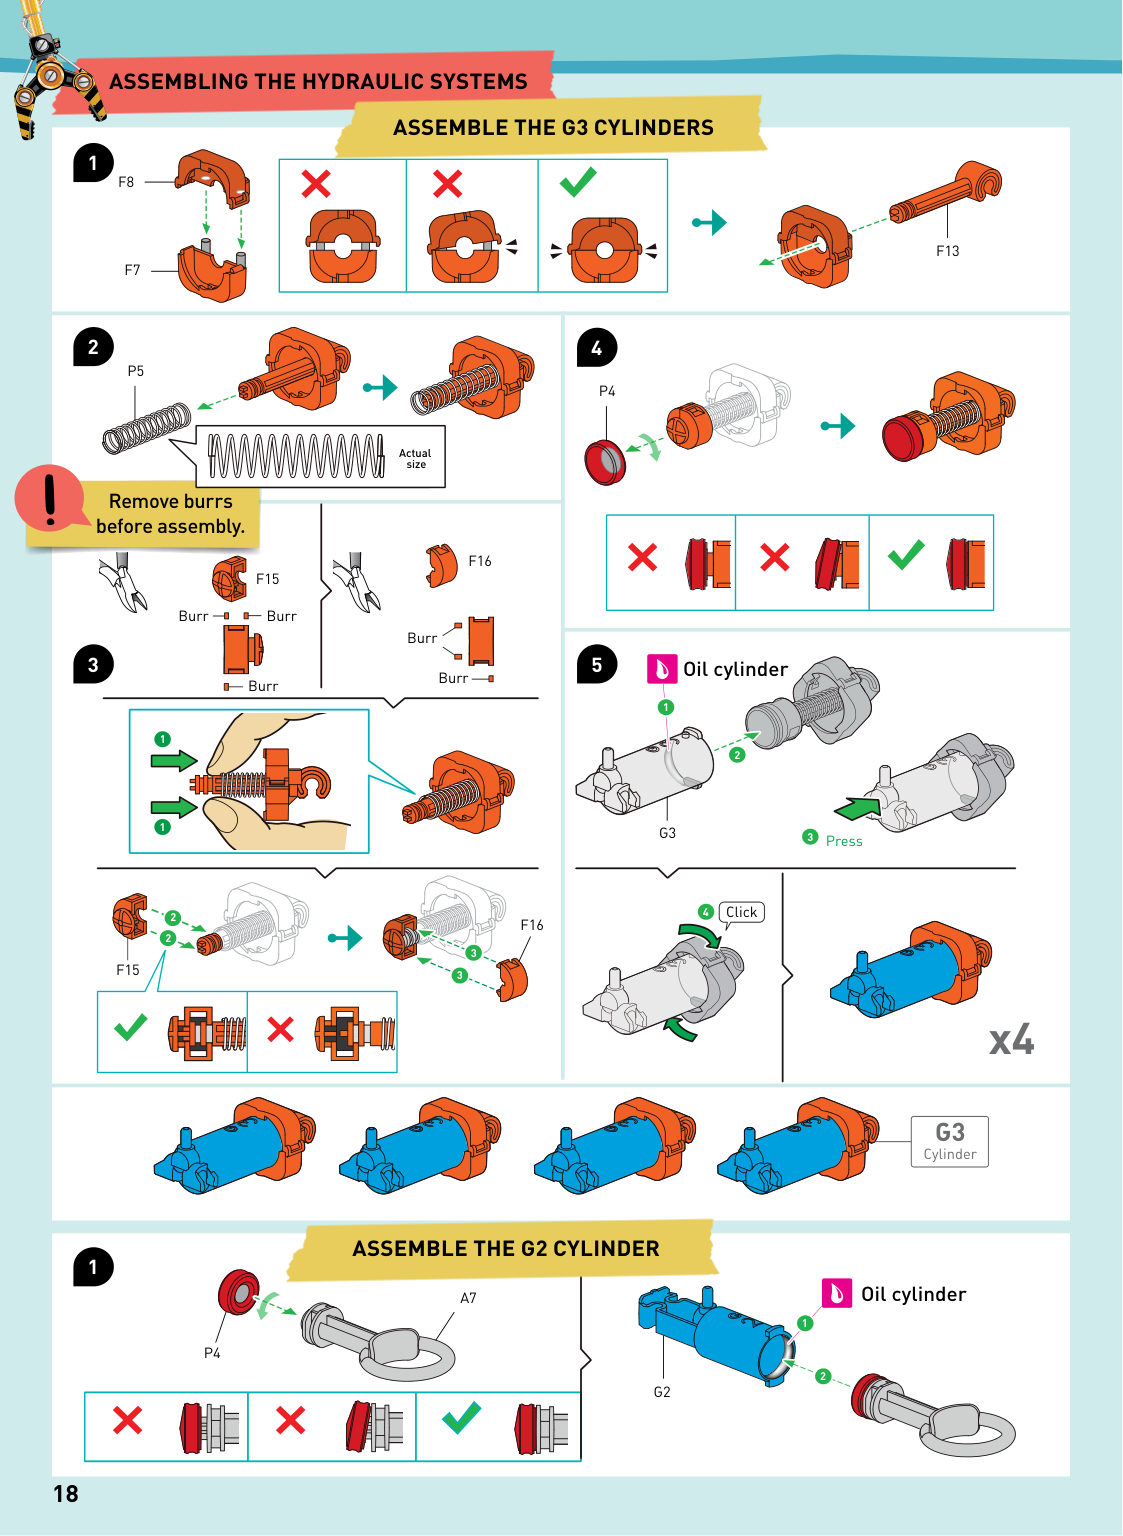
Burr Burr Burr Burr Burr
F15
F15
F16
F16
1 1 2 2 3 3 1 2 4 3F8
F7
1 2P4
F13
P5
A7
Oil cylinderG2
P4
Click PressG3
Oil cylinder Actual size 18Assemble The G2 Cylinder
Remove burrs before assembly.G3
Cylinder 1 2 3 1 5 4 x4Assembling The Hydraulic Systems
Assemble The G3 Cylinders
Actual size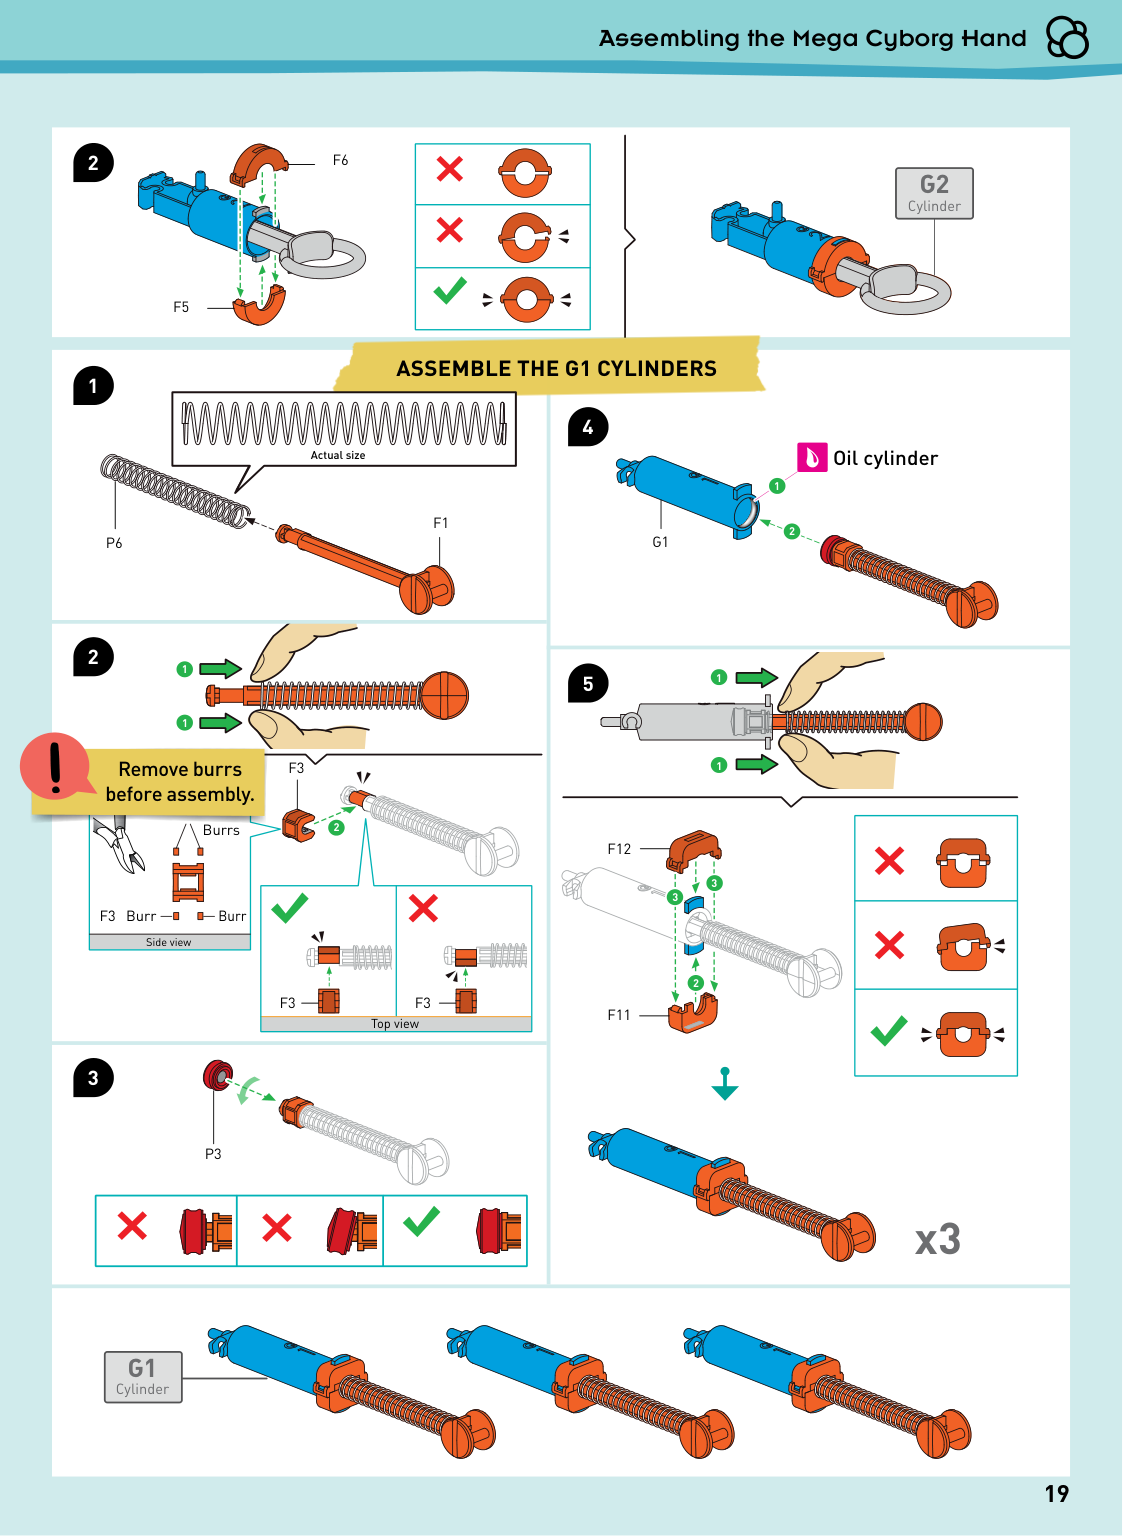
1 1 1 3 3 2 2 1 1 2
P6
F3
F1
F12
Side view Top viewF11
P3
F6
F5
G1
Oil cylinder Burr BurrF3
F3
F3
Burrs Actual size 19 Assembling the Mega Cyborg HandAssemble The G1 Cylinders
Remove burrs before assembly.G1
CylinderG2
Cylinder 2 1 4 5 2 3 x3 Actual size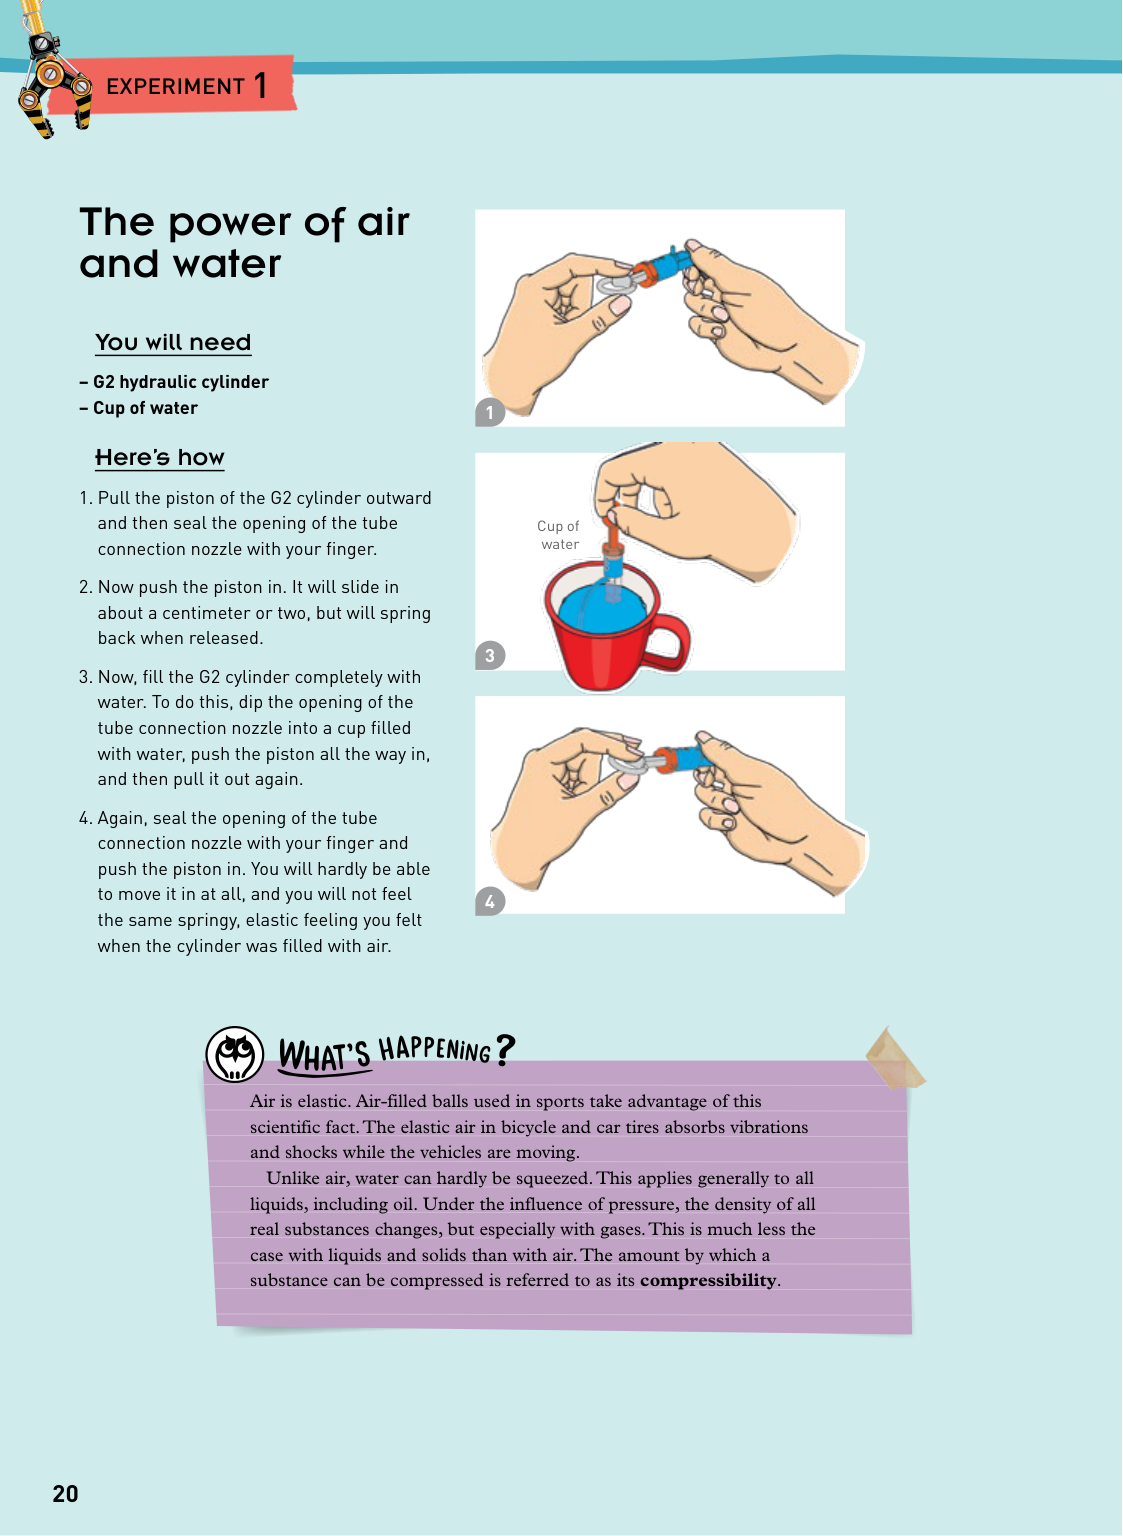
20 The power of air and water You will need – G2 hydraulic cylinder – Cup of water Here’s how
Experiment 1
Air is elastic. Air-filled balls used in sports take advantage of this scientific fact. The elastic air in bicycle and car tires absorbs vibrations and shocks while the vehicles are moving. Unlike air, water can hardly be squeezed. This applies generally to all liquids, including oil. Under the influence of pressure, the density of all real substances changes, but especially with gases. This is much less the case with liquids and solids than with air. The amount by which a substance can be compressed is referred to as its compressibility.W
hA
t ’ sh a p pe nin g? Cup of water
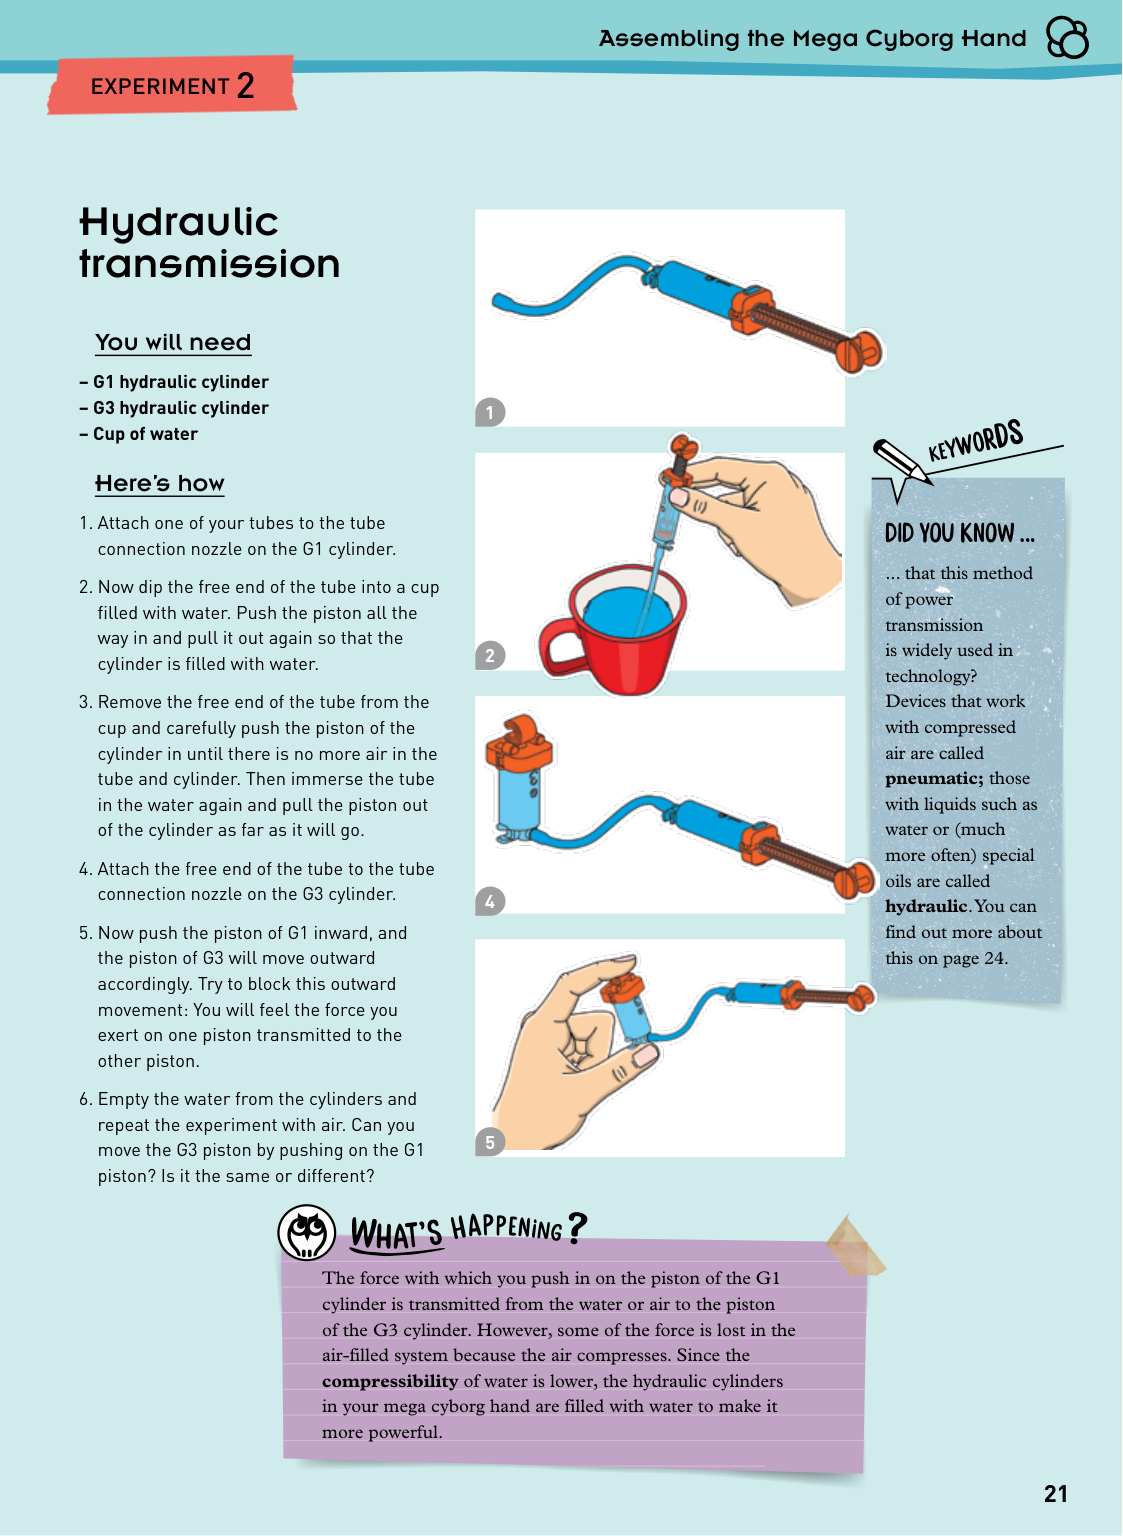
21 Assembling the Mega Cyborg Hand Hydraulic transmission You will need – G1 hydraulic cylinder – G3 hydraulic cylinder – Cup of water Here’s how
Experiment 2
The force with which you push in on the piston of the G1 cylinder is transmitted from the water or air to the piston of the G3 cylinder. However, some of the force is lost in the air-filled system because the air compresses. Since the compressibility of water is lower, the hydraulic cylinders in your mega cyborg hand are filled with water to make it more powerful.Did You Know ...
... that this method of power transmission is widely used in technology? Devices that work with compressed air are called pneumatic; those with liquids such as water or (much more often) special oils are called hydraulic. You can find out more about this on page 24. KeywordsW
hA
t ’ sh a p pe nin g?
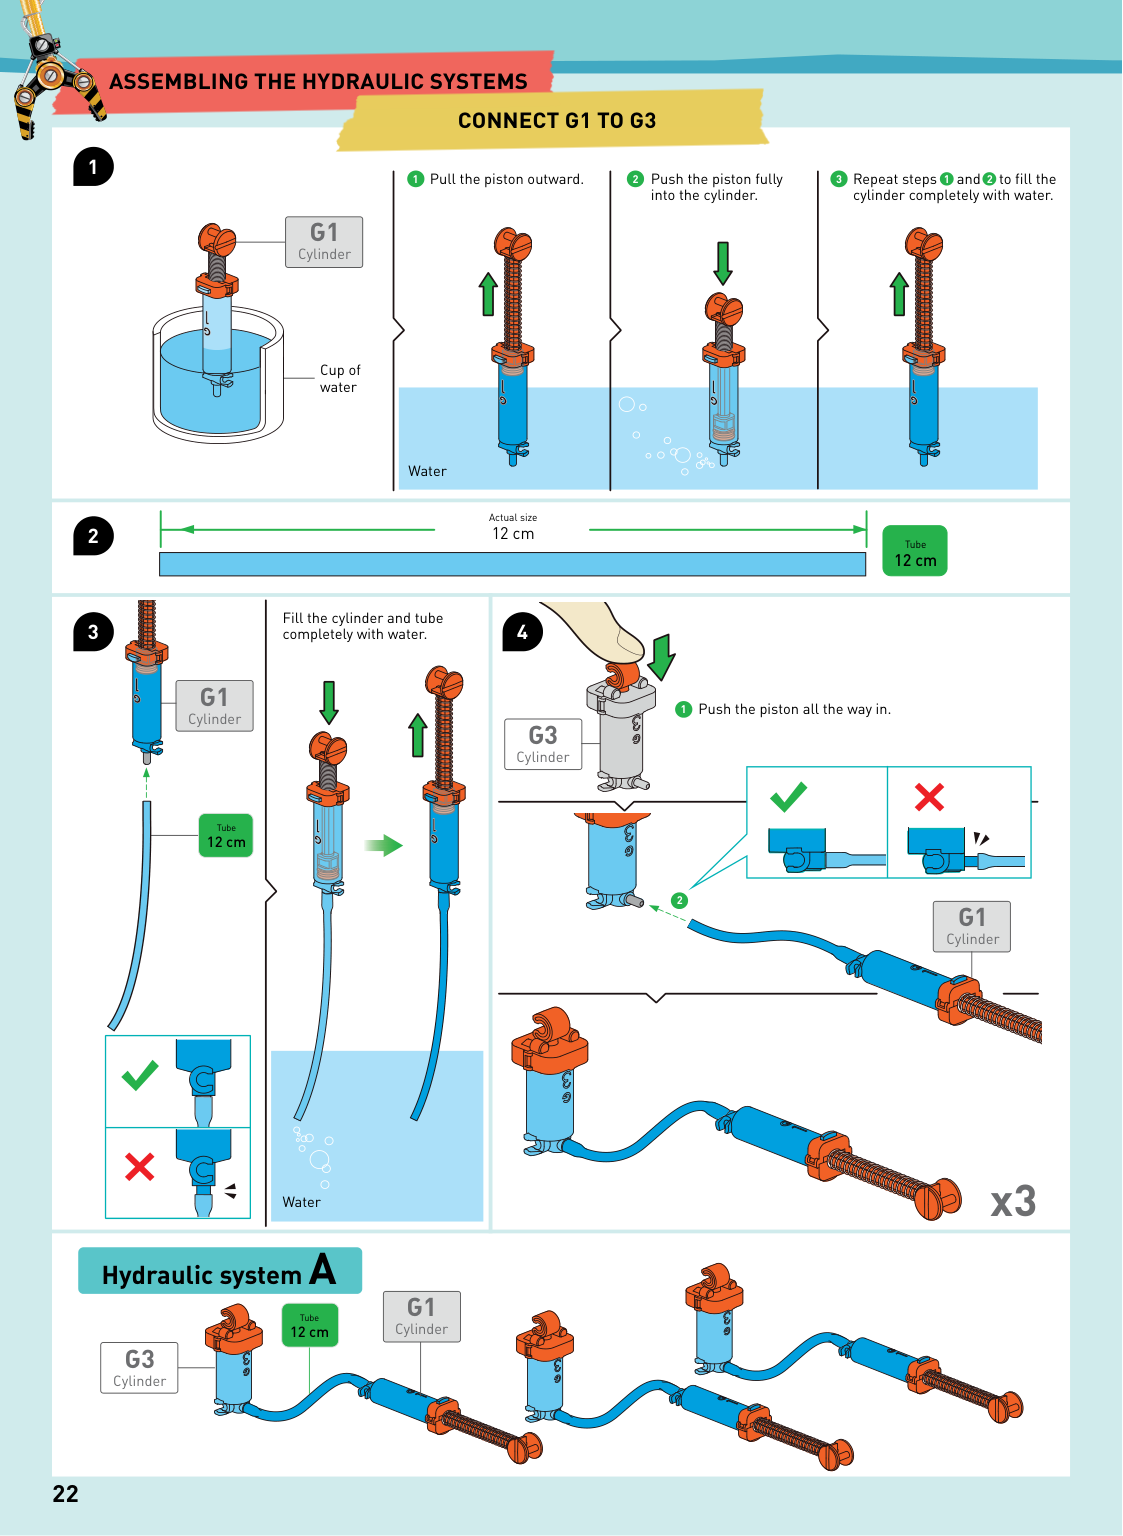
12 cm 1 1 2 2 3 1 Repeat steps and to fill the cylinder completely with water. 2 Pull the piston outward. Fill the cylinder and tube completely with water. Push the piston all the way in. Push the piston fully into the cylinder. Cup of water Water Water Actual size
Assembling The Hydraulic Systems
22Connect G1 To G3
G1
CylinderG1
CylinderG3
CylinderG3
CylinderG1
CylinderG1
Cylinder 4 2 3 1 x3 Tube 12 cm Tube 12 cm Tube 12 cm Hydraulic system A Actual size Tube 12 cm 12 cm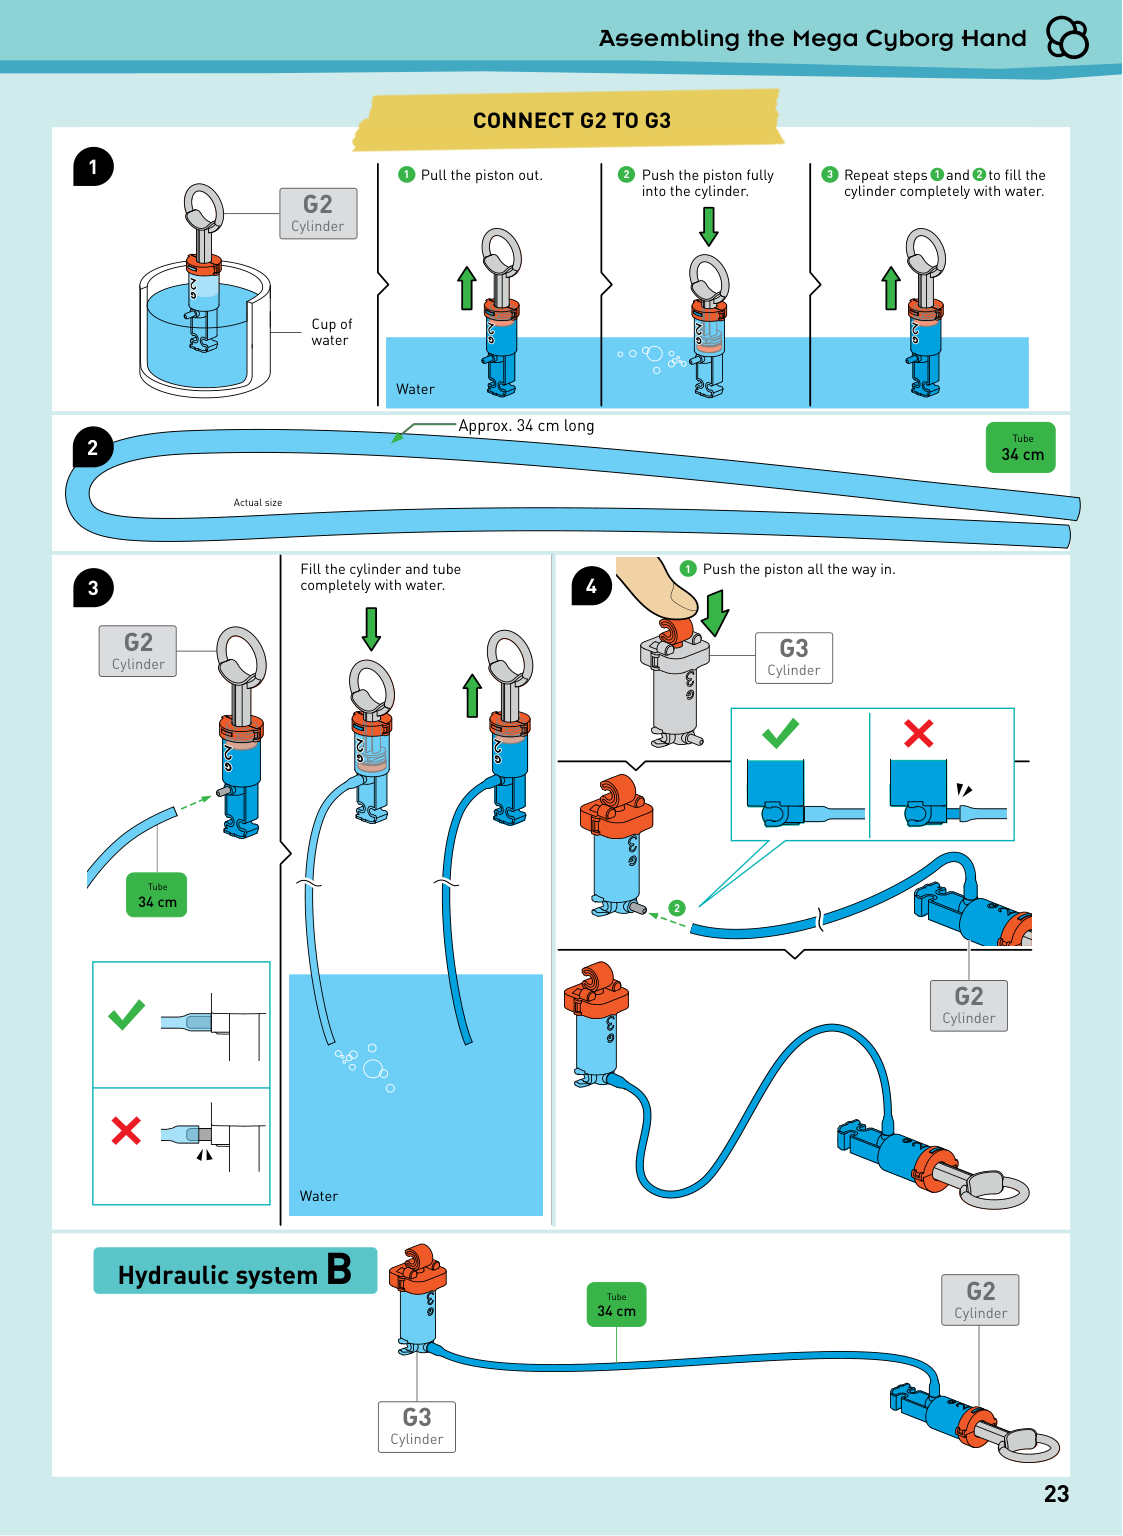
Repeat steps and to fill the cylinder completely with water. 1 1 2 2 3 1 2 Pull the piston out. Fill the cylinder and tube completely with water. Push the piston all the way in. Push the piston fully into the cylinder. Cup of water Water Water 1:1 Actual size 23 Assembling the Mega Cyborg Hand
Connect G2 To G3
G2
CylinderG3
CylinderG3
CylinderG2
CylinderG2
CylinderG2
Cylinder 4 2 3 1 Approx. 34 cm long Tube 34 cm Tube 34 cm Tube 34 cm Hydraulic system B Actual size Approx. 34 cm long Tube 34 cm 2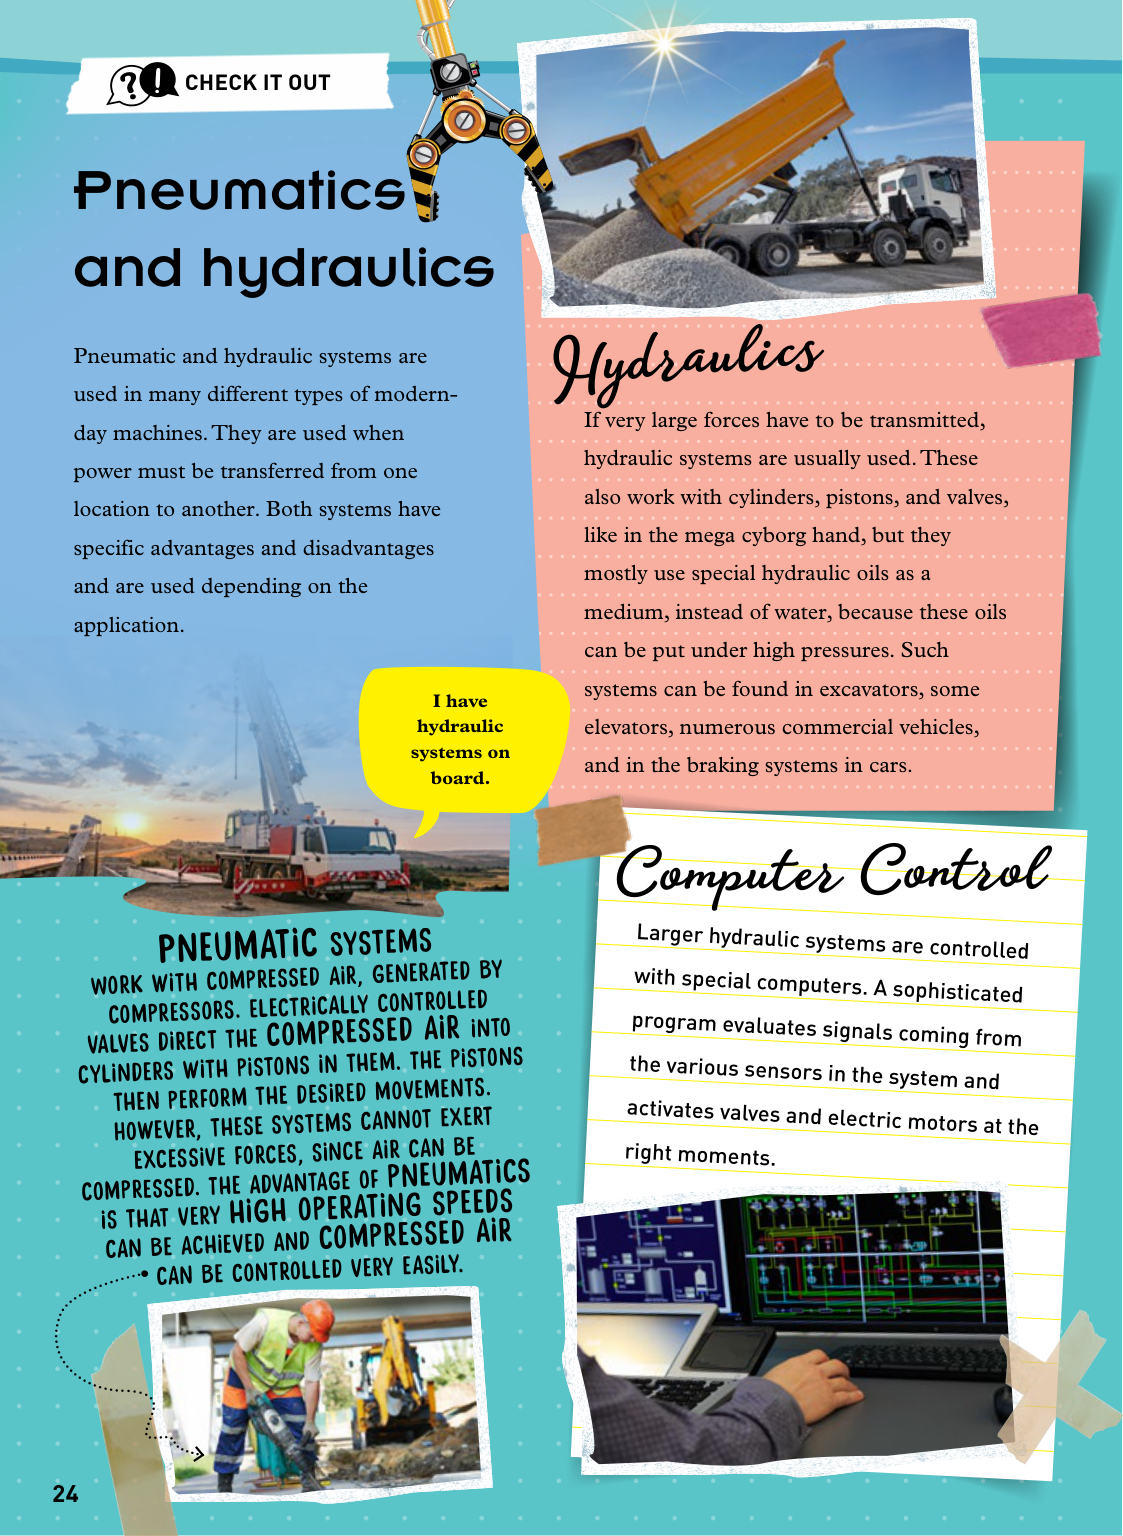
24 ? !
Check It Out
Larger hydraulic systems are controlled with special computers. A sophisticated program evaluates signals coming from the various sensors in the system and activates valves and electric motors at the right moments. Pneumatics and hydraulics Pneumatic and hydraulic systems are used in many different types of modern- day machines. They are used when power must be transferred from one location to another. Both systems have specific advantages and disadvantages and are used depending on the application. Pneumatic Systems Work with compressed air, generated by compressors. Electrically controlled valves direct the compressed air into cylinders with pistons in them. The pistons then perform the desired movements. However, these systems cannot exert excessive forces, since air can be compressed. The advantage of pneumatics is that very high operating speeds can be achieved and compressed air can be controlled very easily. If very large forces have to be transmitted, hydraulic systems are usually used. These also work with cylinders, pistons, and valves, like in the mega cyborg hand, but they mostly use special hydraulic oils as a medium, instead of water, because these oils can be put under high pressures. Such systems can be found in excavators, some elevators, numerous commercial vehicles, and in the braking systems in cars. I have hydraulic systems on board. Hydraulics Computer Control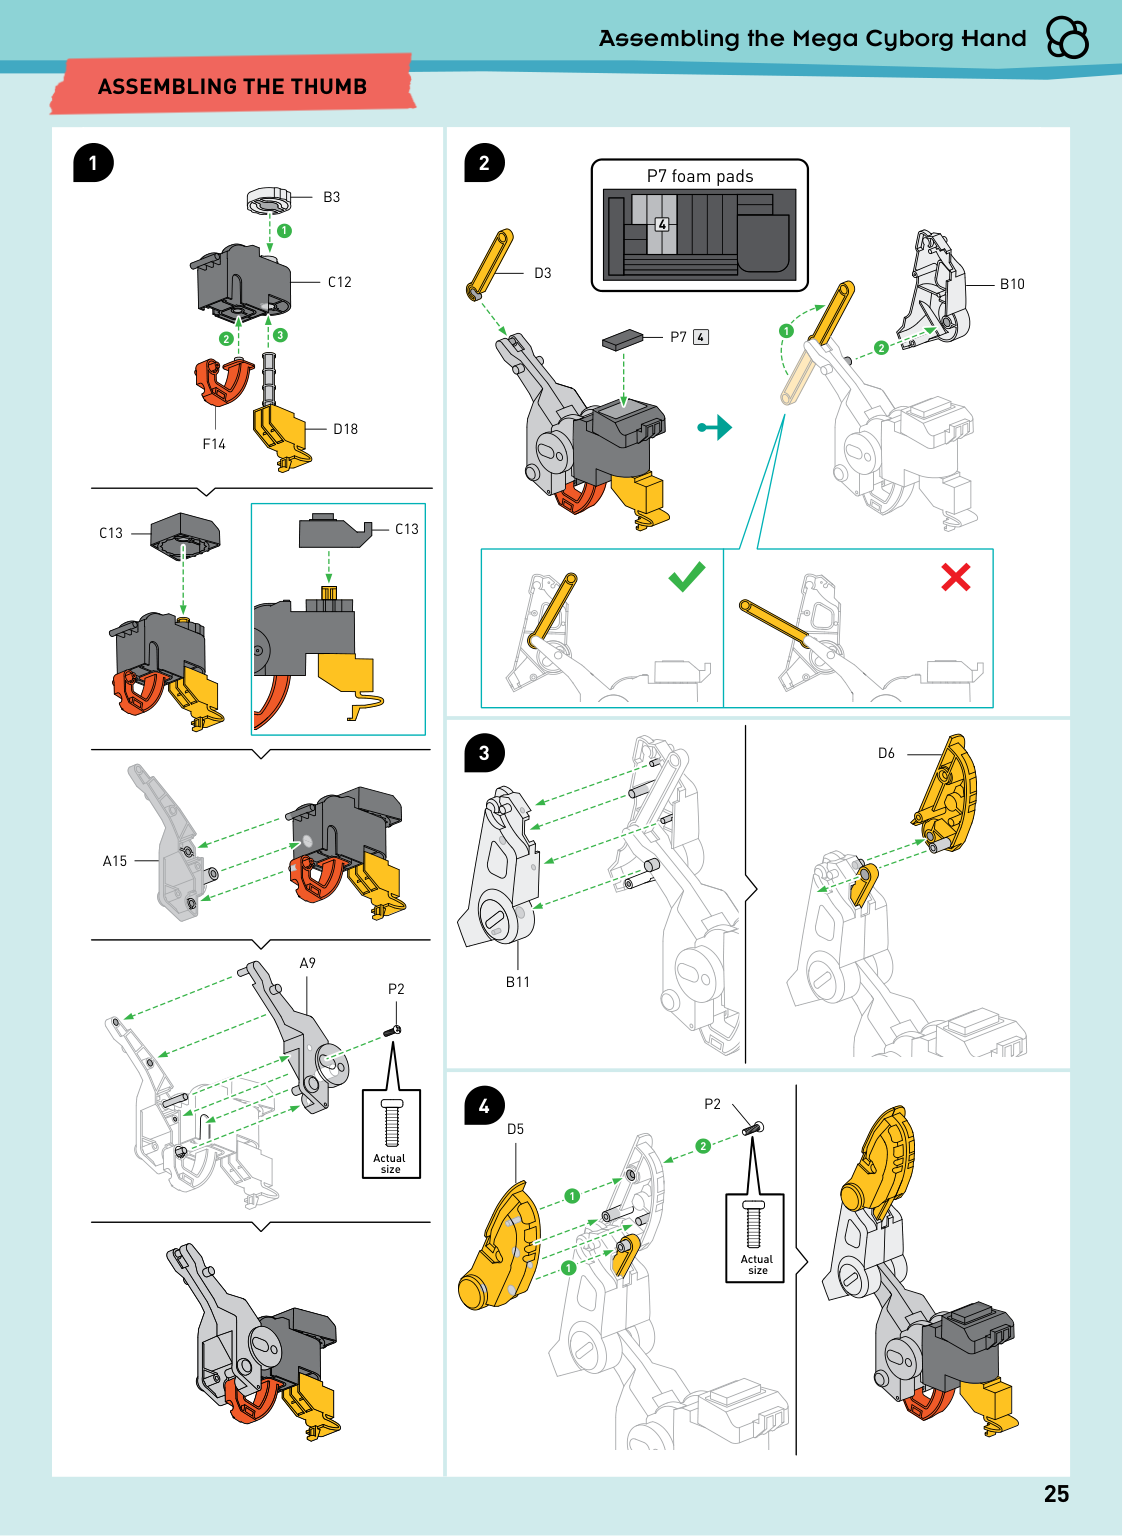
1:1 1:1 4 4 P7 foam pads
D3
B3
B10
C12
F14
C13
A15
A9
B11
D6
D5
P2
P2
C13
D18
P7
2 1 1 Actual size Actual size 25 Assembling the Mega Cyborg Hand 1 2 3 4Assembling The Thumb
1 3 2 2 1 Actual size Actual size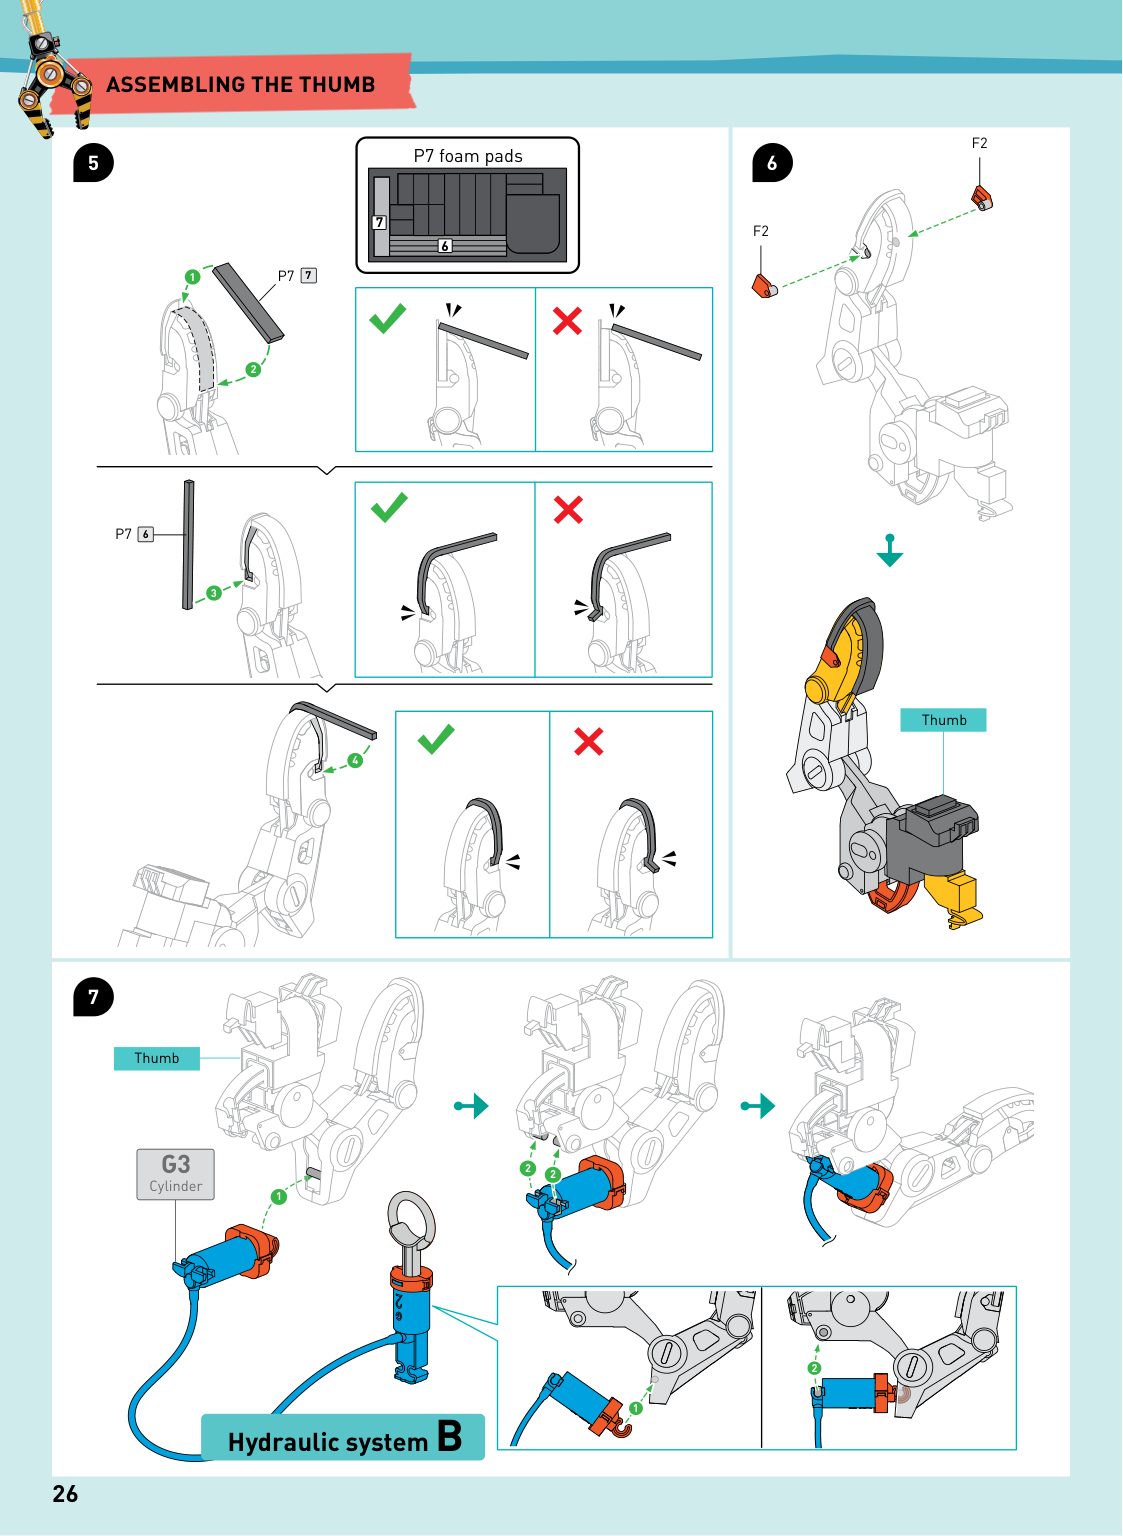
7 6 7 6 P7 foam pads
P7
P7
F2
F2
1 2 Thumb Thumb 26 5 6 7Assembling The Thumb
2 3 4 1G3
Cylinder 2 1 2 Hydraulic system B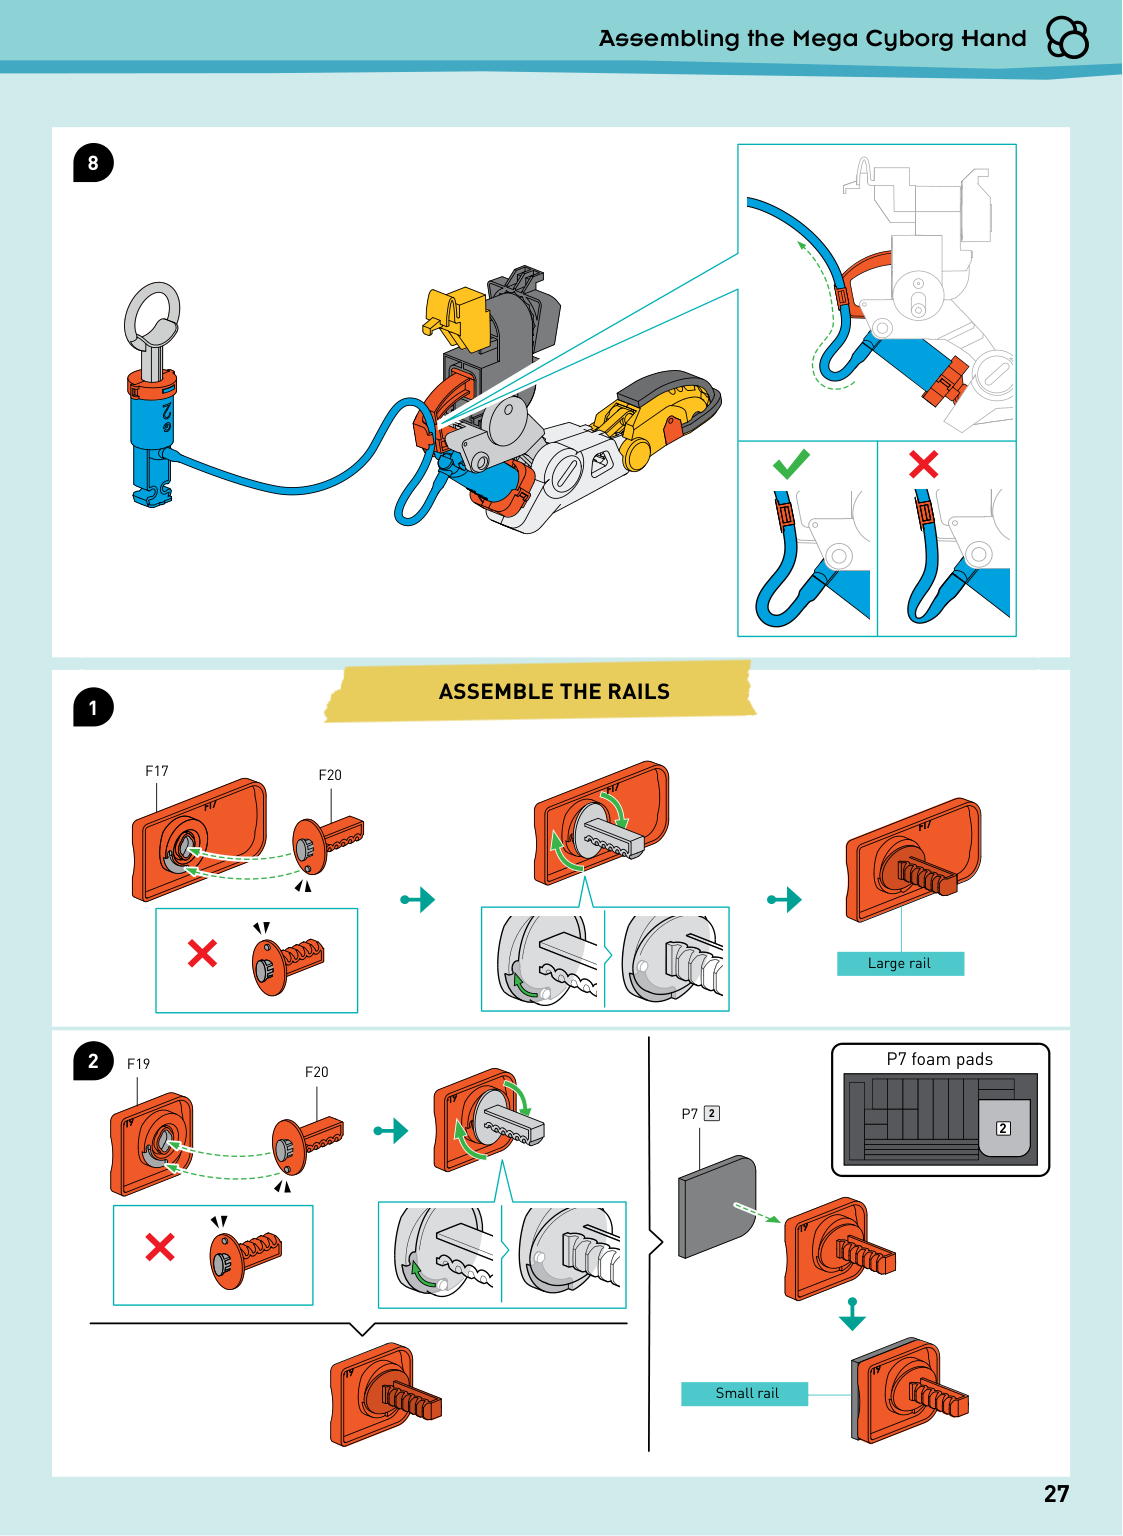
總組合 Module Assembly 2 P7 foam pads
F17
F19
F20
F20
Small rail Large rail 2P7
27 Assembling the Mega Cyborg Hand 8 1 2Assemble The Rails
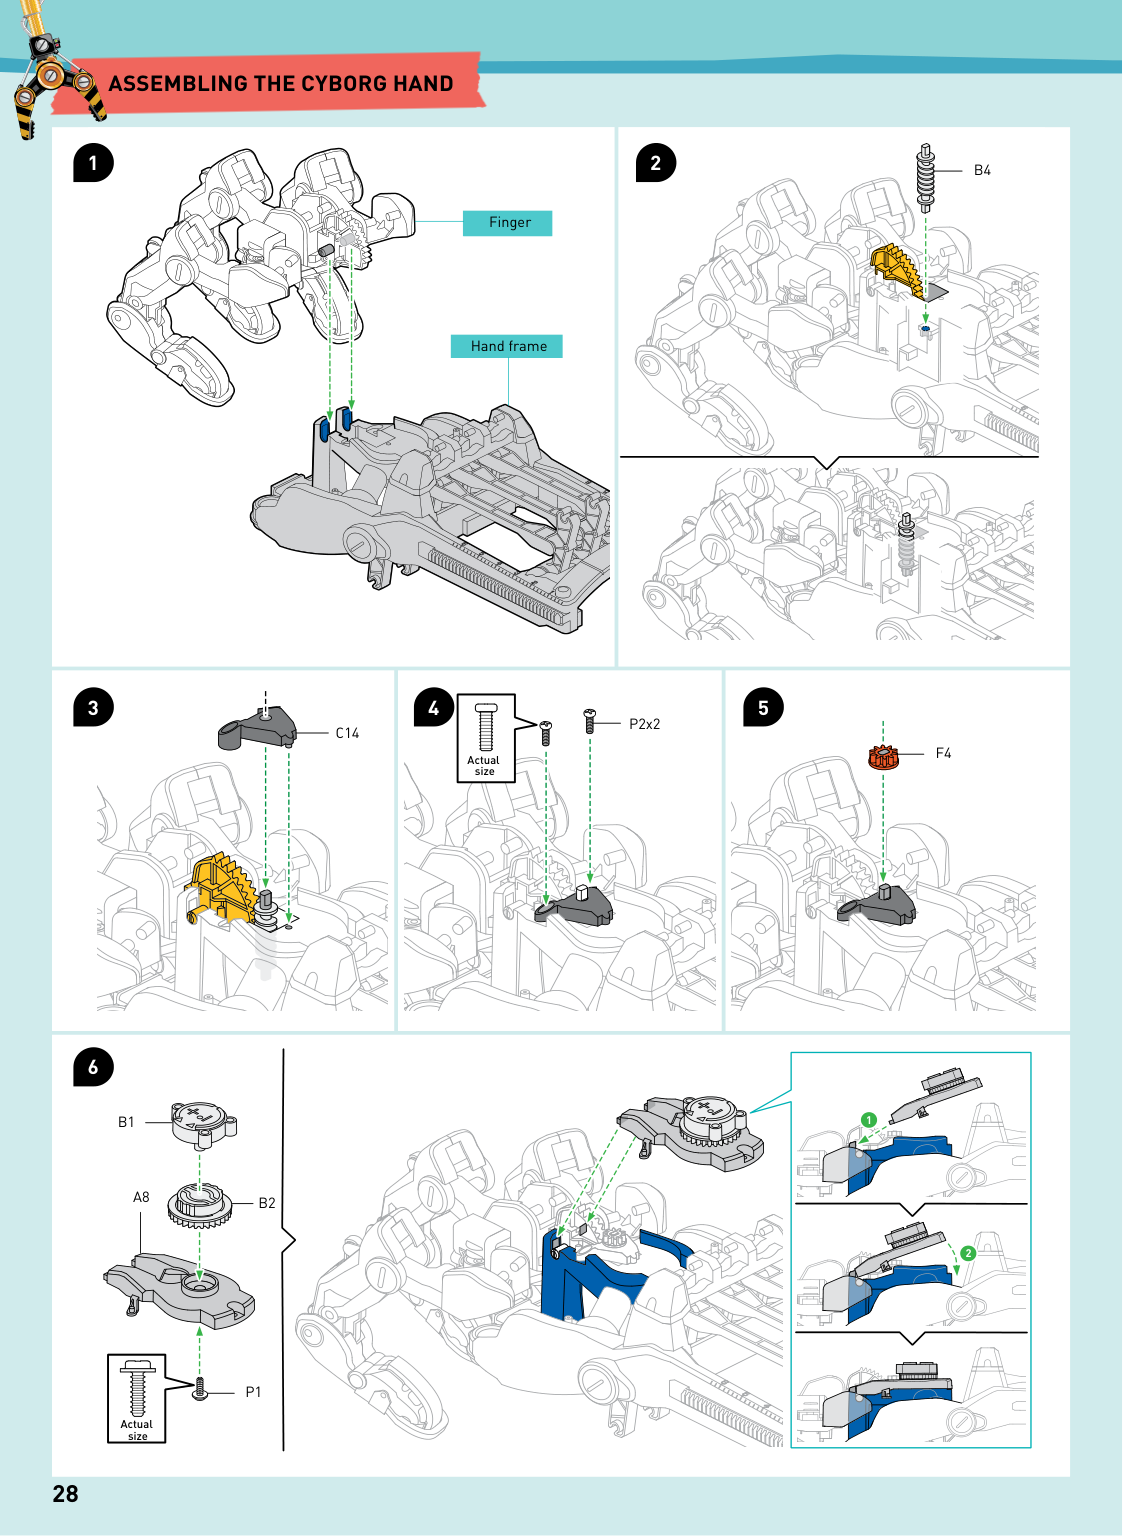
Hand frame Finger 28
Assembling The Cyborg Hand
Actual sizeC14
P2x2B4
F4
B1
A8
P1
B2
6 3 1 4 5 2 1 2 Actual size Actual size Actual size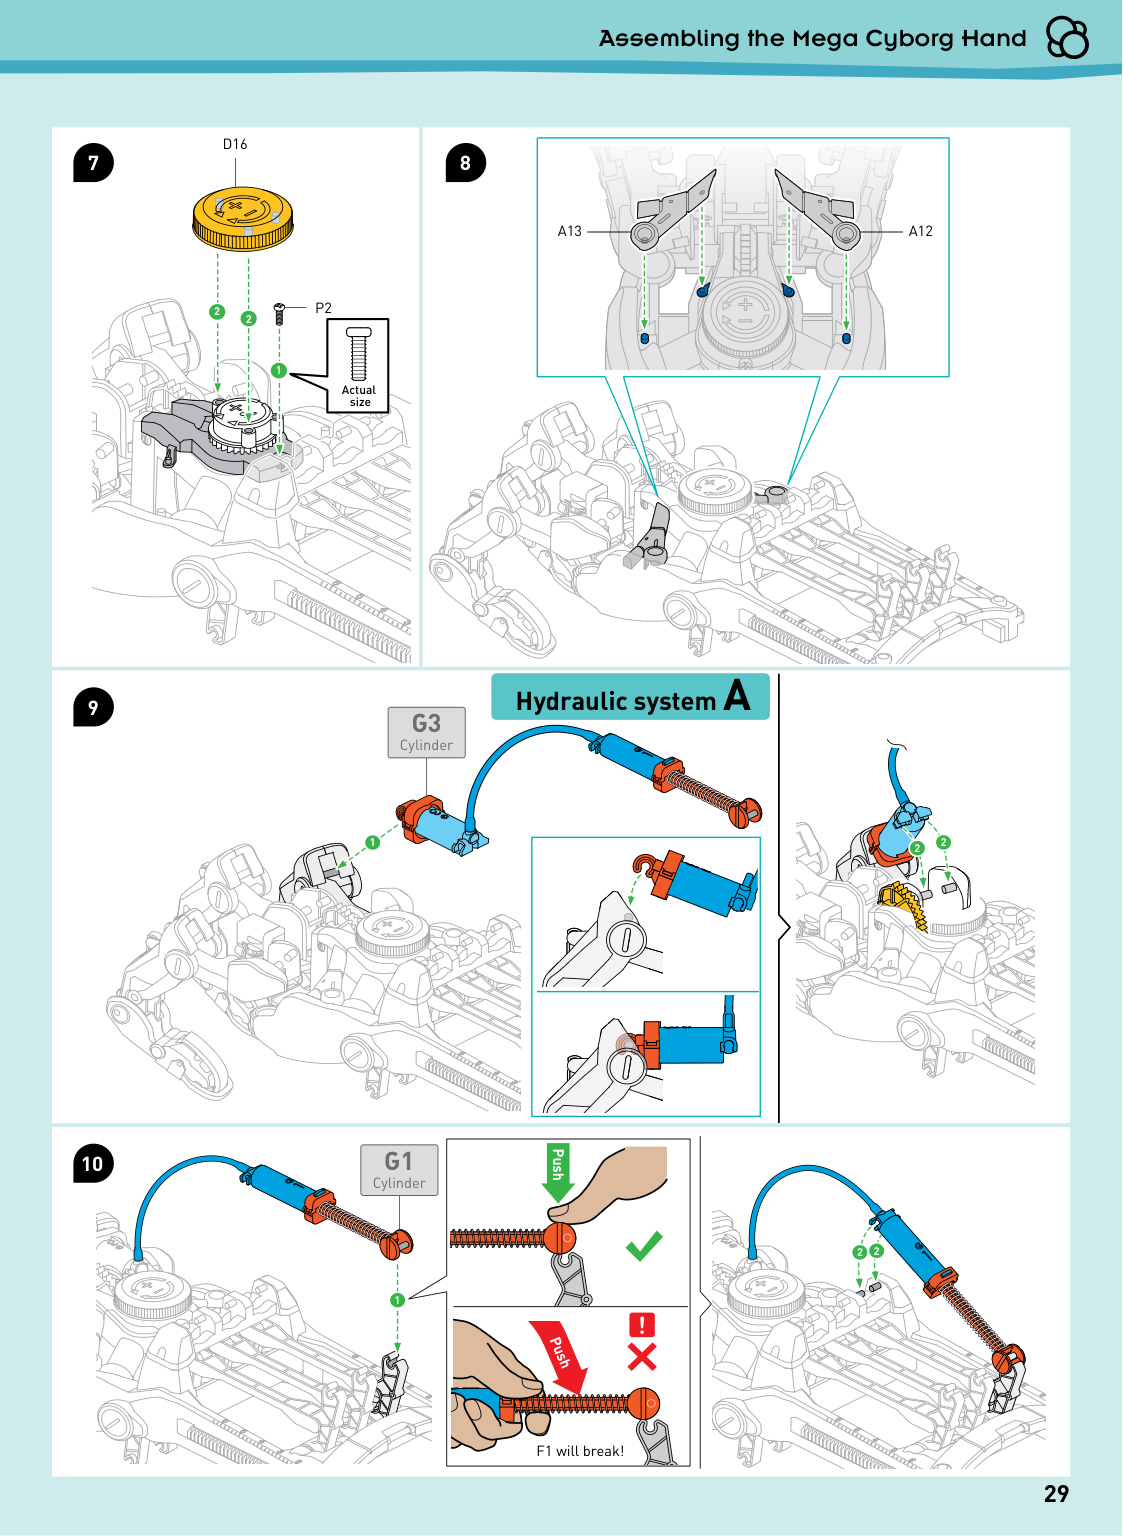
F1 will break! 29 Assembling the Mega Cyborg Hand 1:1
P2
D16
A13
A12
9 10 7 8 1 2 2G3
CylinderG1
Cylinder Hydraulic system A 2 1 1 2 2 2 Actual size Push Push Actual size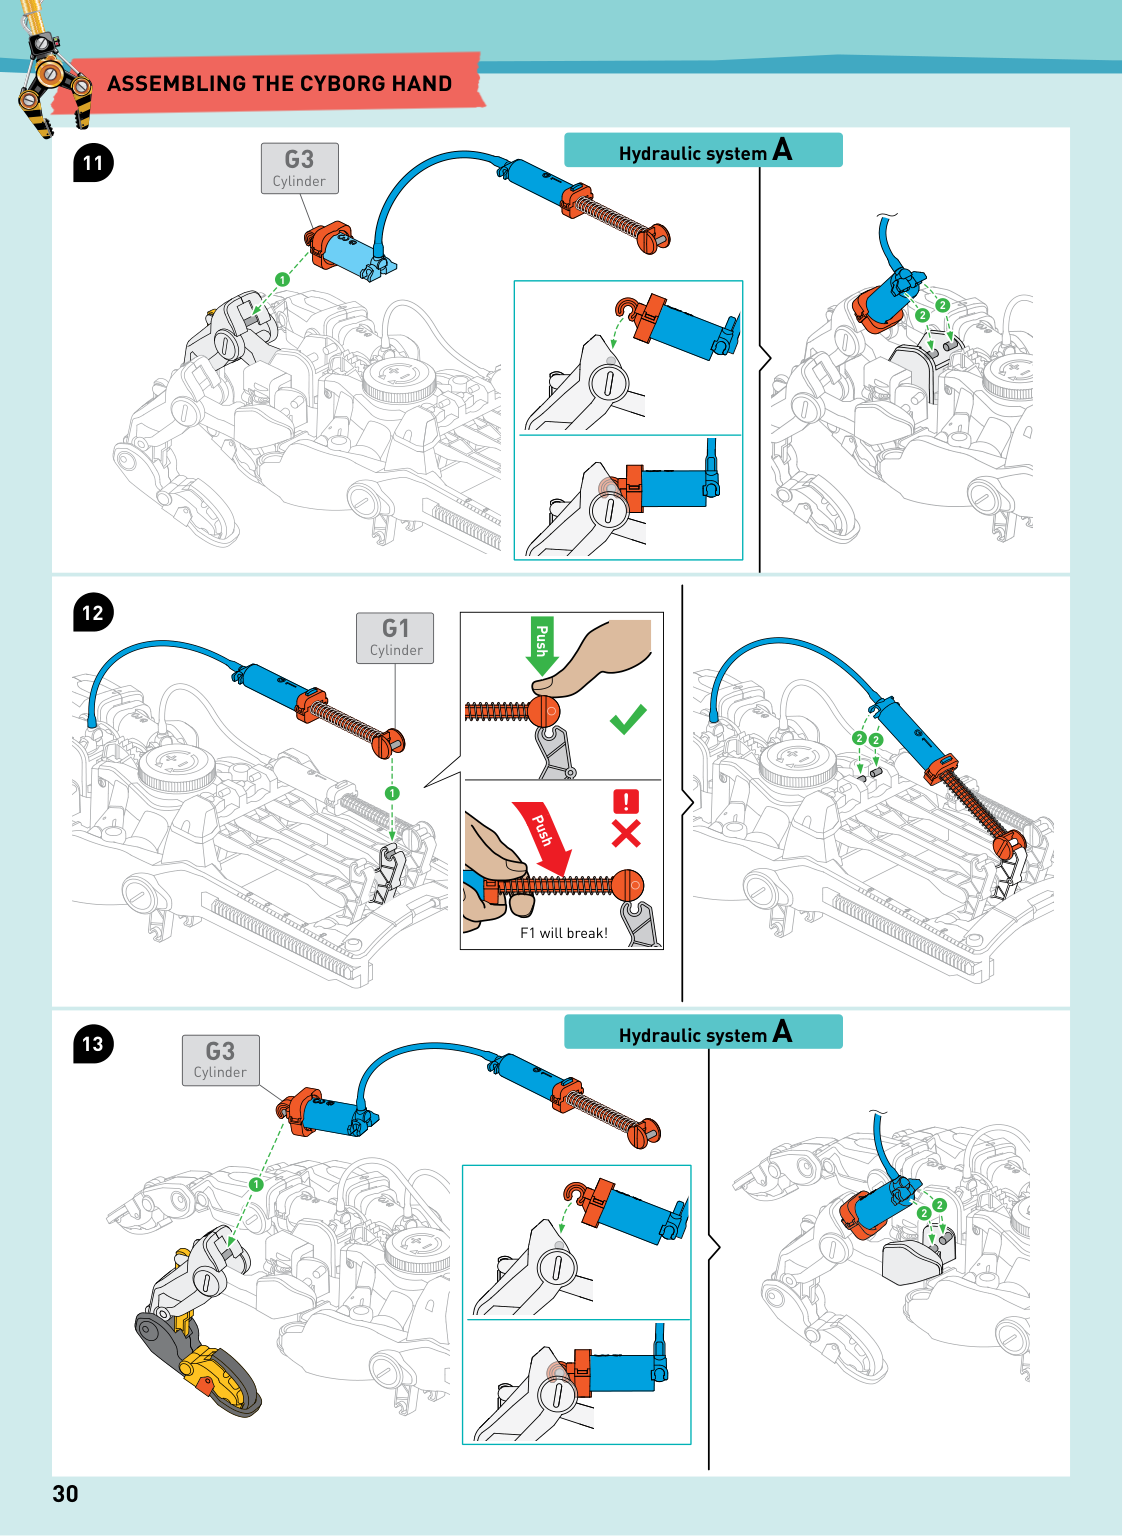
A
30G3
CylinderG1
CylinderG3
Cylinder Hydraulic system A Hydraulic system A 11 12 13 2 1 2 2 1 2 2 2 1Assembling The Cyborg Hand
F1 will break! Push Push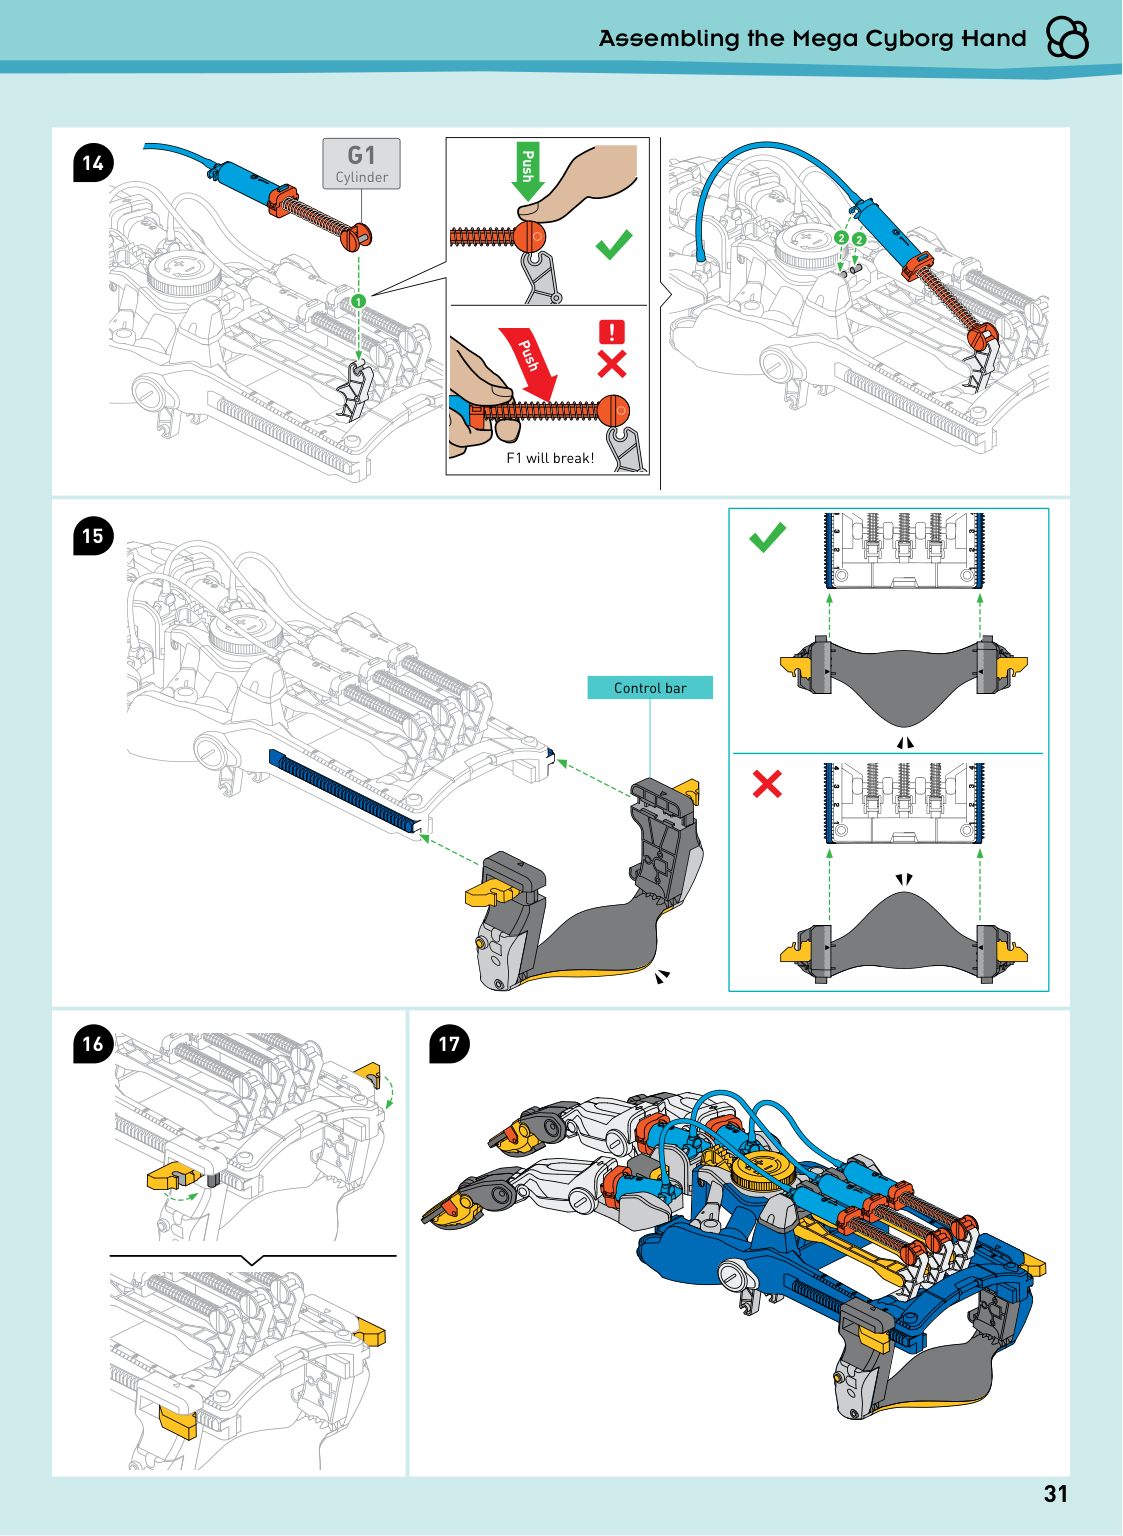
Control bar 31 Assembling the Mega Cyborg Hand
G1
Cylinder 14 15 16 17 1 2 2 F1 will break! Push Push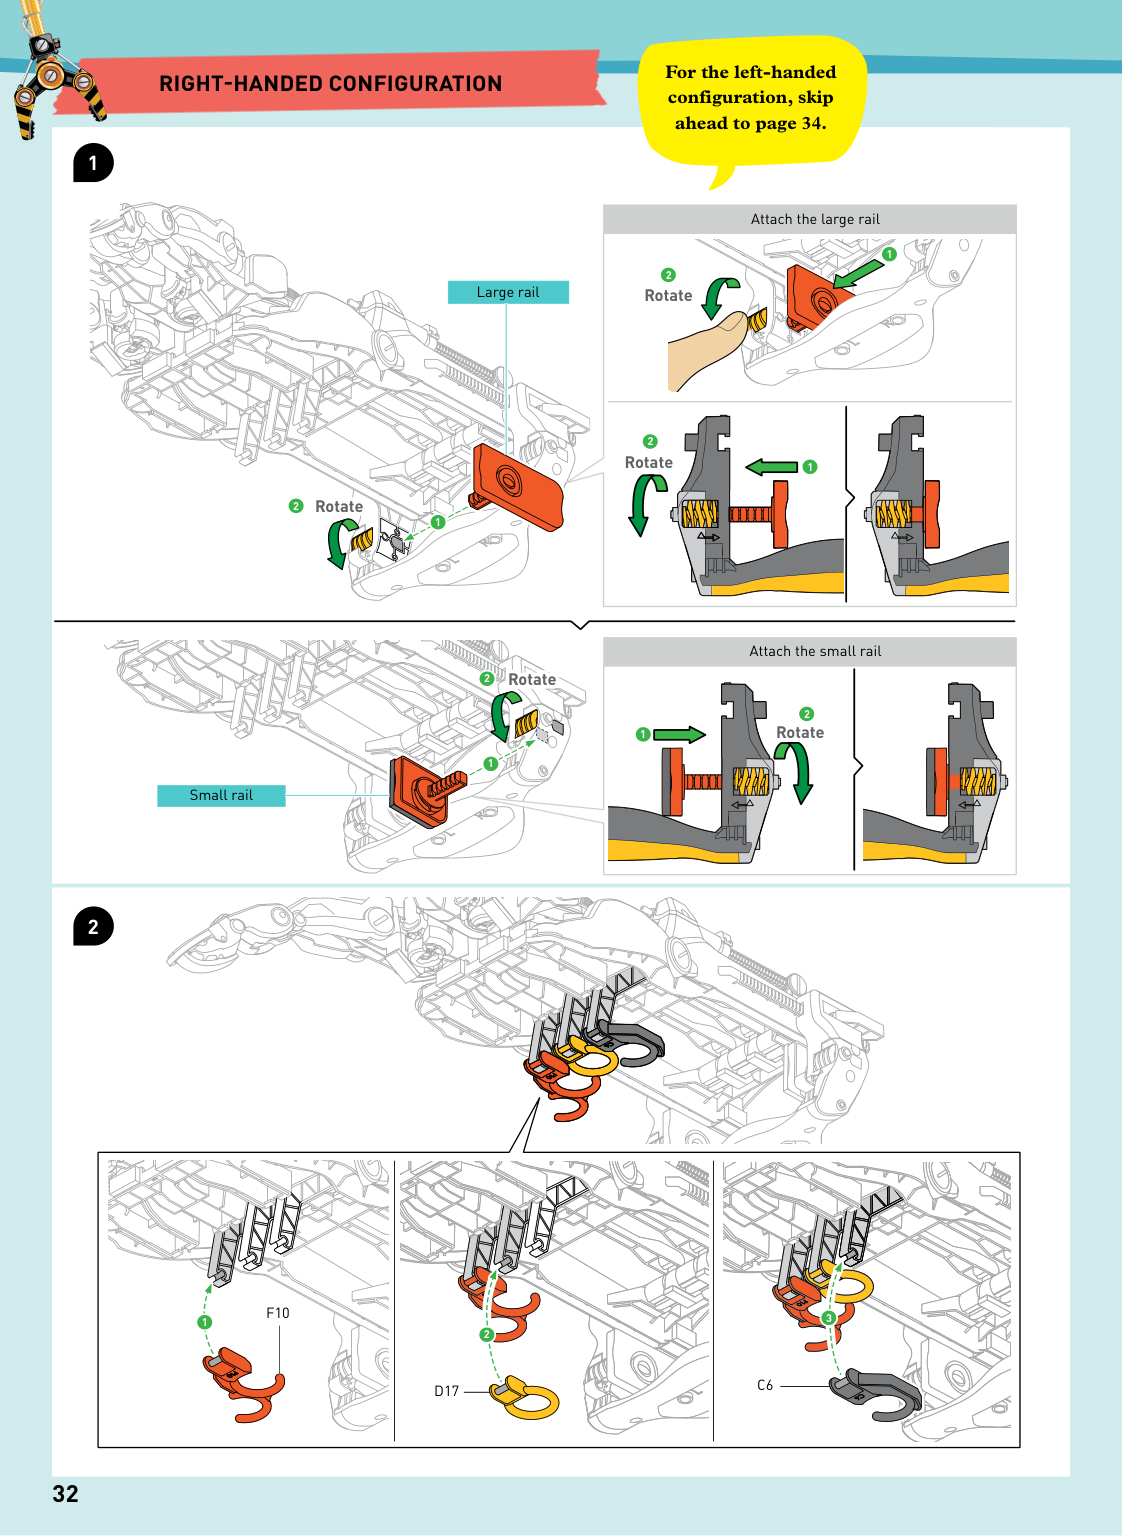
Small rail Large rail Attach the large rail Attach the small rail Large rails
F10
D17
C6
32Right-Handed Configuration
For the left-handed configuration, skip ahead to page 34. 2 2 1 1 1 2 2 Rotate Rotate Rotate Rotate Rotate Rotate Rotate Rotate Rotate Rotate Rotate Rotate Rotate Rotate Rotate 1 2 1 2 3 1 1 2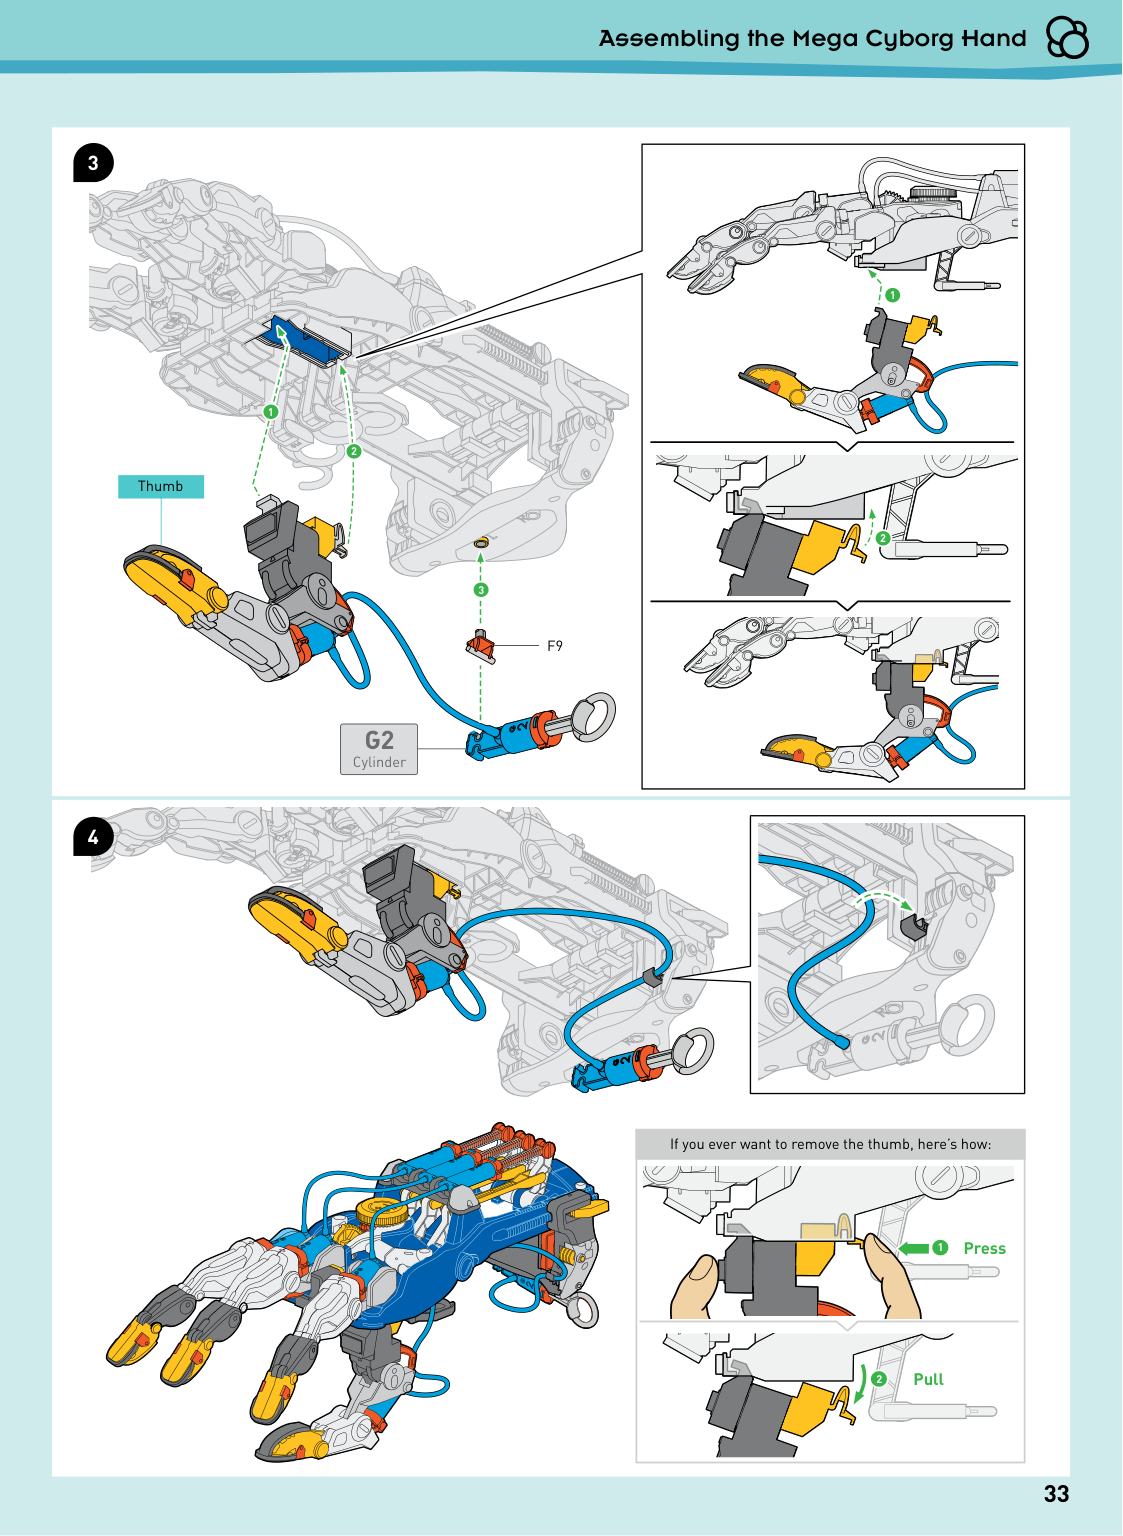
Thumb If you ever want to remove the thumb, here’s how:
F9
33 Assembling the Mega Cyborg Hand Rotate Rotate Press 1 2 1 2 2 1 3G2
Cylinder Pull Pull Pull 3 4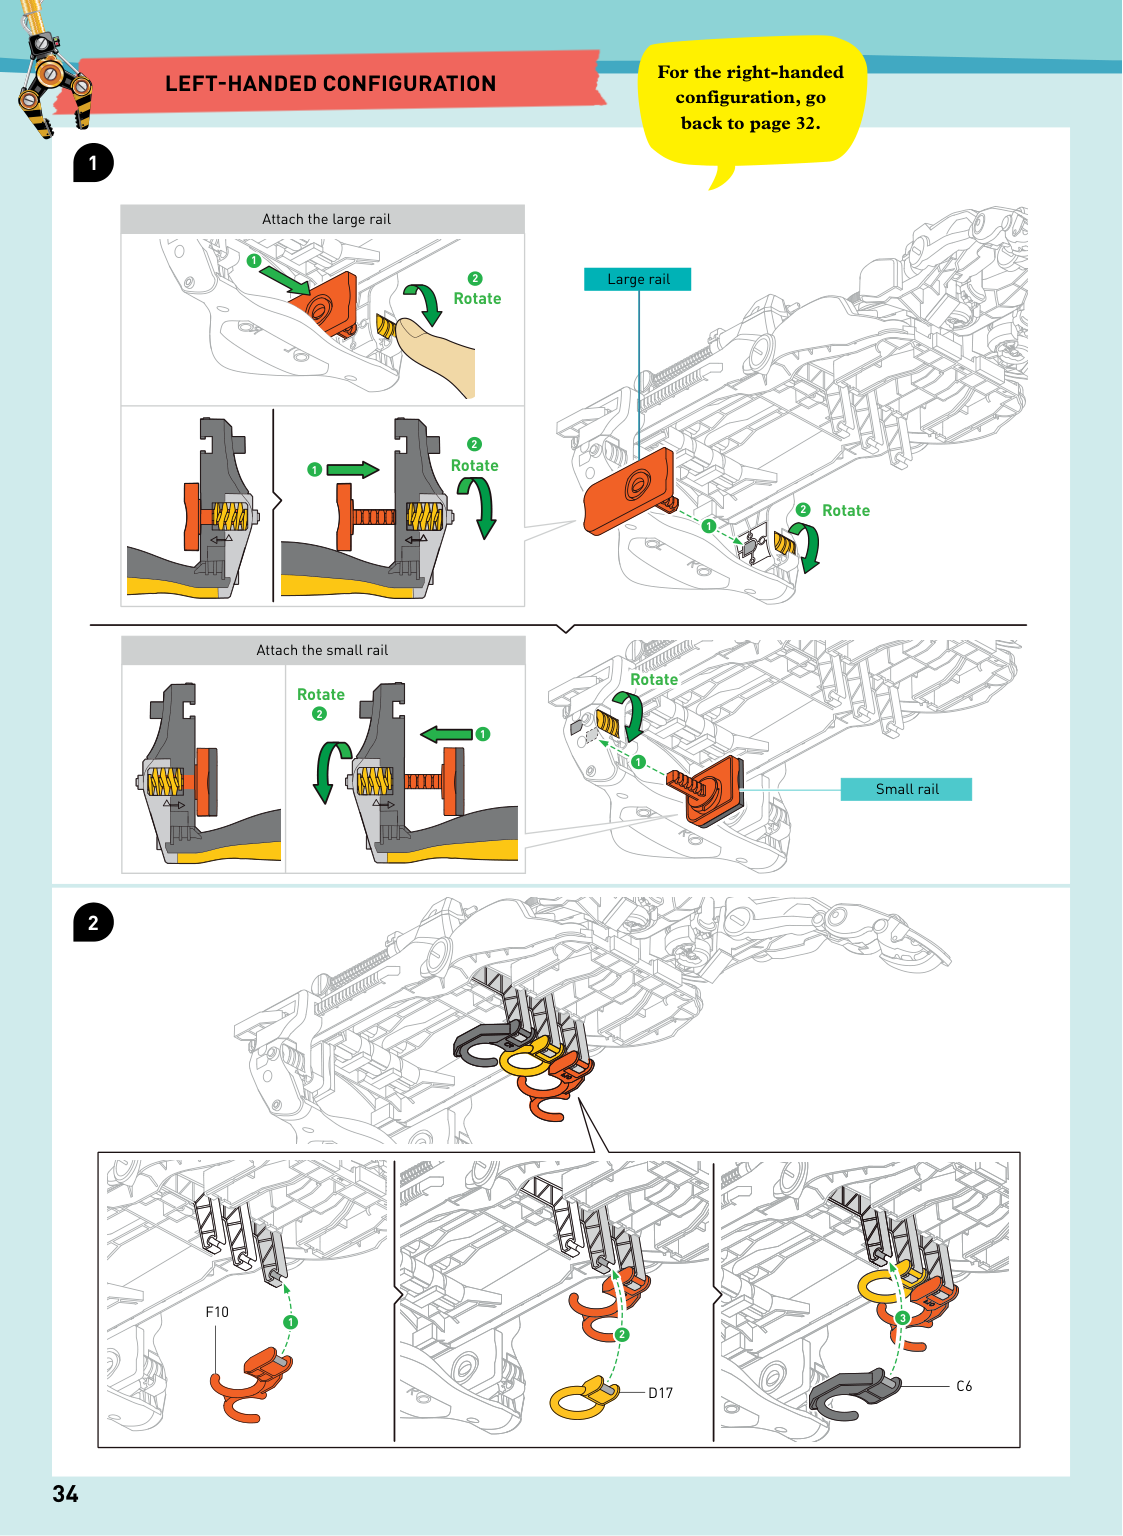
1 2 34 Small rail Large rail Attach the large rail Attach the small rail
F10
D17
C6
2 1 1 1 2 2 Rotate Rotate Rotate Rotate Rotate Rotate Rotate Rotate Rotate Rotate Rotate Rotate Rotate Rotate Rotate 1 2 1 2 3 1 1 2Left-Handed Configuration
For the right-handed configuration, go back to page 32.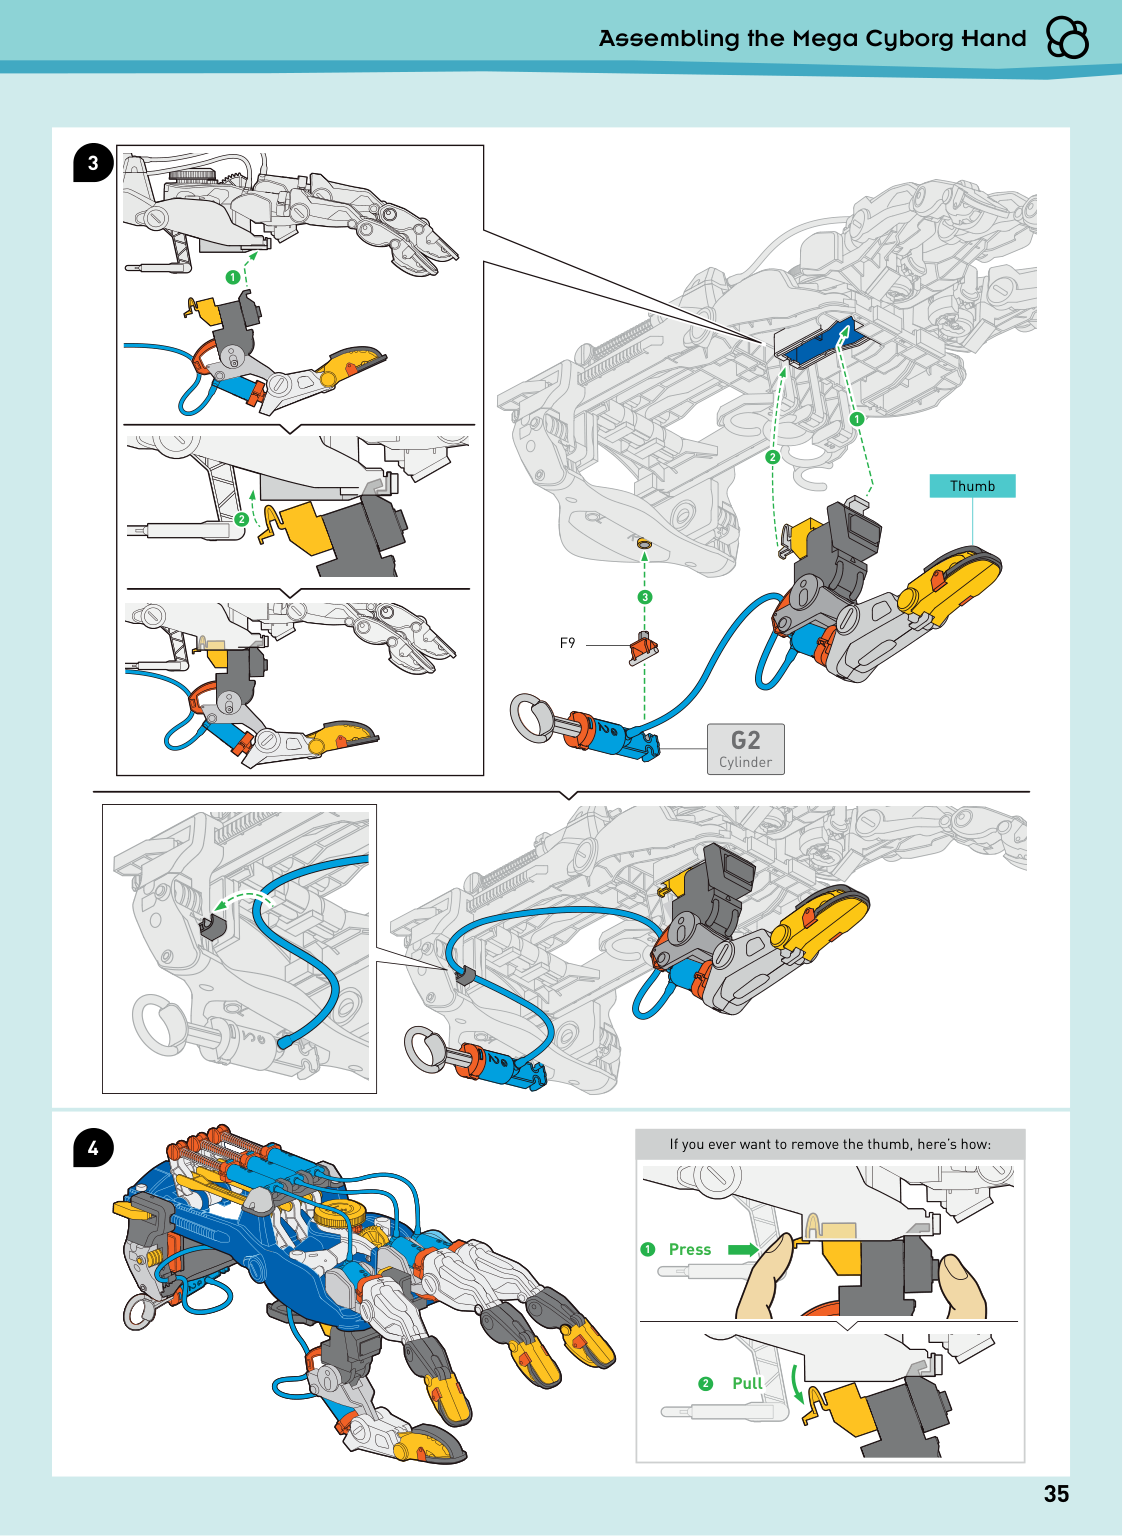
If you ever want to remove the thumb, here’s how: Assembling the Mega Cyborg Hand 35 Thumb
F9
1 2 2 1 3G2
Cylinder Rotate Rotate Press 1 2 Pull Pull Pull 3 4
36 36 36
Ok. Let’S Try
This Again …
I Am Impressed With
The Capabilities Of Your
Mechanical Device.
Gee, Thanks!
Hey, Look: Thumbs
Up, Dude!
Eek! A Scary
Robot! Do
Something, Izzy!
Now We Just Need One More
Crystal. Then We Can Leave!
Sounds Good To Me ...
Aaaaaaaahhh!
Ha!
Beep Beep!
37 Mega Cyborg Hand 37 37
Take That!
But Only Briefly.
We Still Need It.
Luckily You Can Pick Up
Small Things By Hand!
What Are You Doing?
We Have To Get Out
Of Here!
Hehehehehe!
Waaaa!
Wow, That
Was Close!
Yes, But Now We Have
Enough Power To Fly
Straight To A New
Adventure!
… And Hopefully
Also Back Home
Again!
… And Hopefully
Back Again.
Relax, Tom. Here,
You Can Use The
Cyborg Hand To
Scratch Your Head!
Oh Yes! That
Feels Quite Nice.
Onward! ... To The
Next Adventure!
Hurry Up! The Surge Of Electricity
From The Crystal Only Put It Out Of
Commission Temporarily.
Beep!
Beep Beep
Beeeeeeeeeeeeeep!
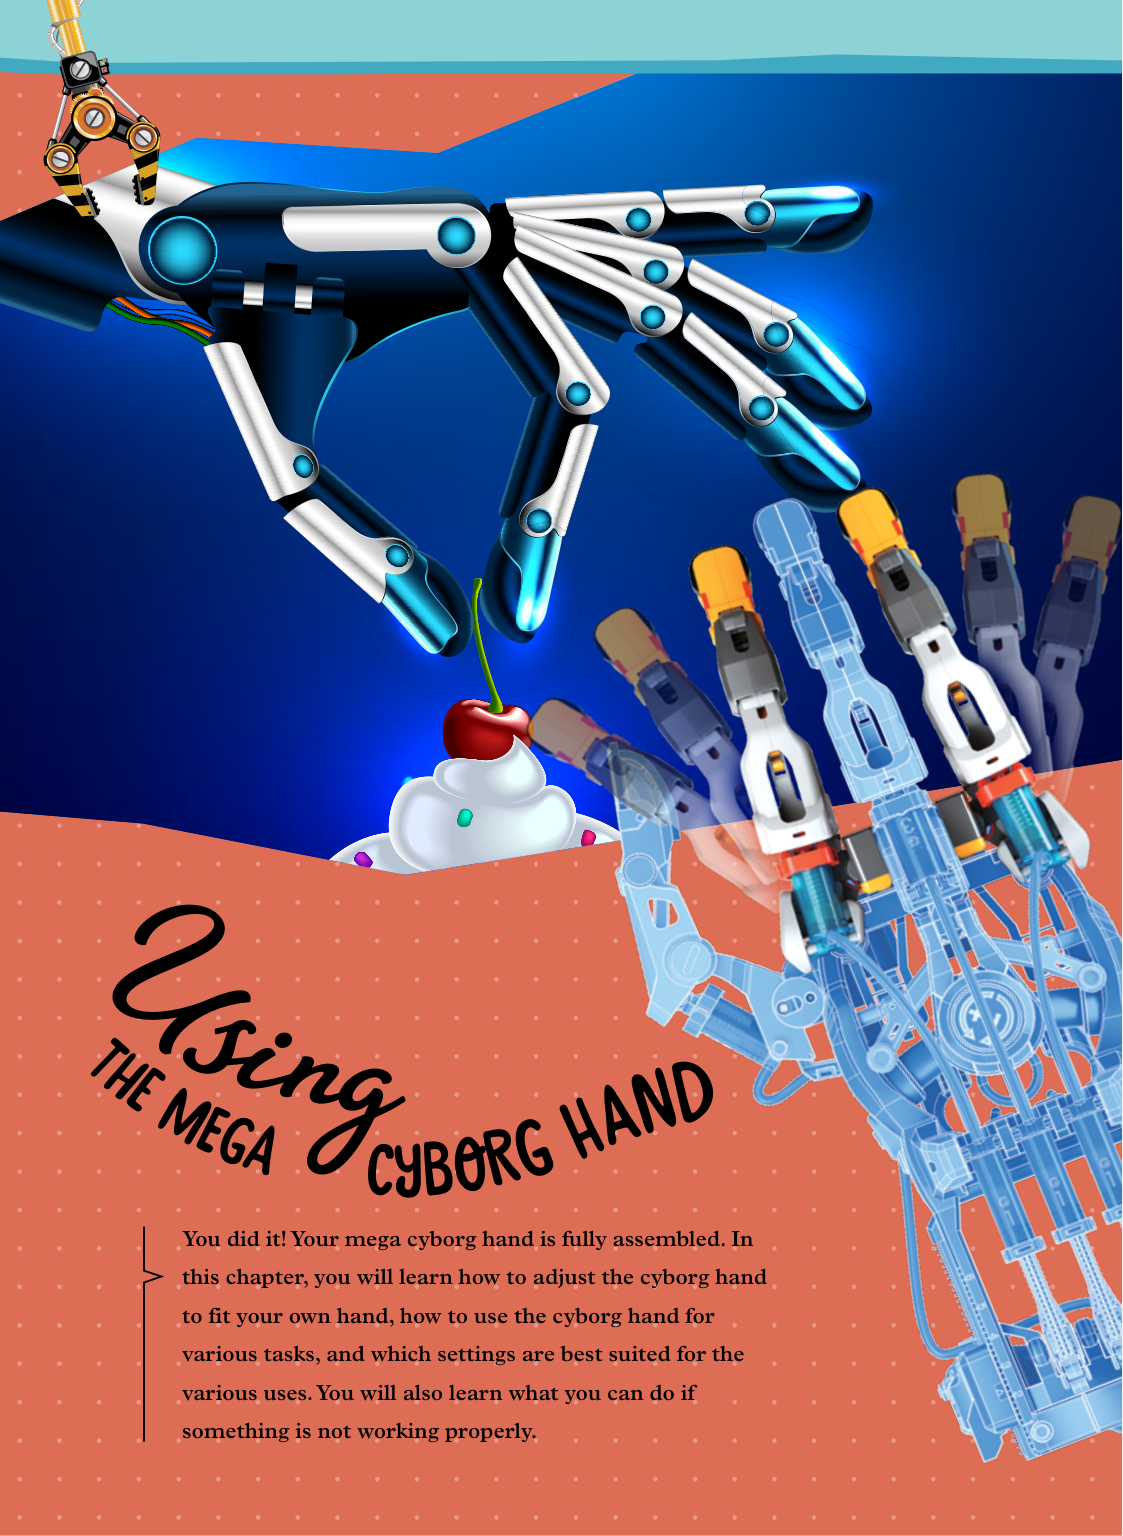
You did it! Your mega cyborg hand is fully assembled. In this chapter, you will learn how to adjust the cyborg hand to fit your own hand, how to use the cyborg hand for various tasks, and which settings are best suited for the various uses. You will also learn what you can do if something is not working properly.
U
s i n gt h e
m e g a
c y b o r g
h a nd
T
i pS
39 Using the Mega Cyborg HandBasic Usage Instructions
In order for you to have fun with your mega cyborg hand for as long as possible, there are a few things to consider. When you pick up the hand, hold it as shown in the first picture. Maximum weight 60 g Maximum weight 600 g make sure the objects that you grab or hold with your mega cyborg hand are not too heavy. you should be particularly careful with objects that you lift with just one finger. Single finger Full gripImportant!
To prevent injury, you should not touch the moving parts of the mega cyborg hand, especially if it is being operated by someone else.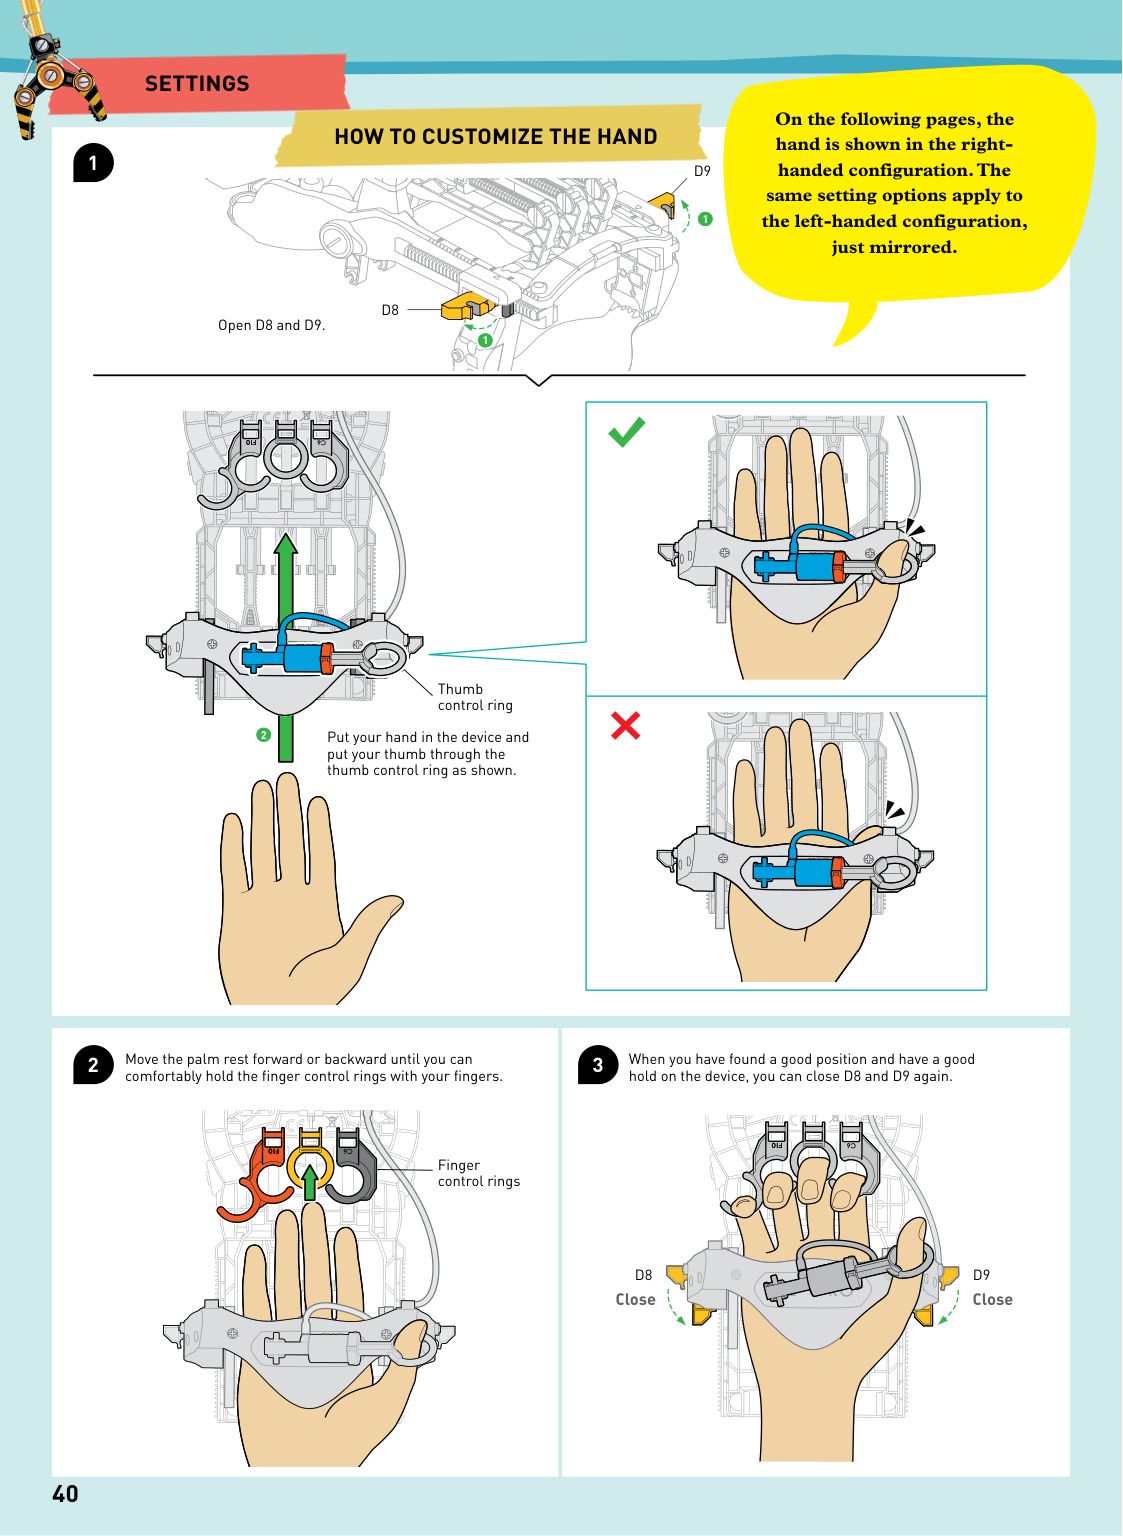
40
Settings
How To Customize The Hand
On the following pages, the hand is shown in the right- handed configuration. The same setting options apply to the left-handed configuration, just mirrored. 1 2 3D9
D8
1 1 2D9
D8
When you have found a good position and have a good hold on the device, you can close D8 and D9 again. Move the palm rest forward or backward until you can comfortably hold the finger control rings with your fingers. Put your hand in the device and put your thumb through the thumb control ring as shown. Thumb control ring Finger control rings Open D8 and D9. Rotate Rotate Close Rotate RotateClose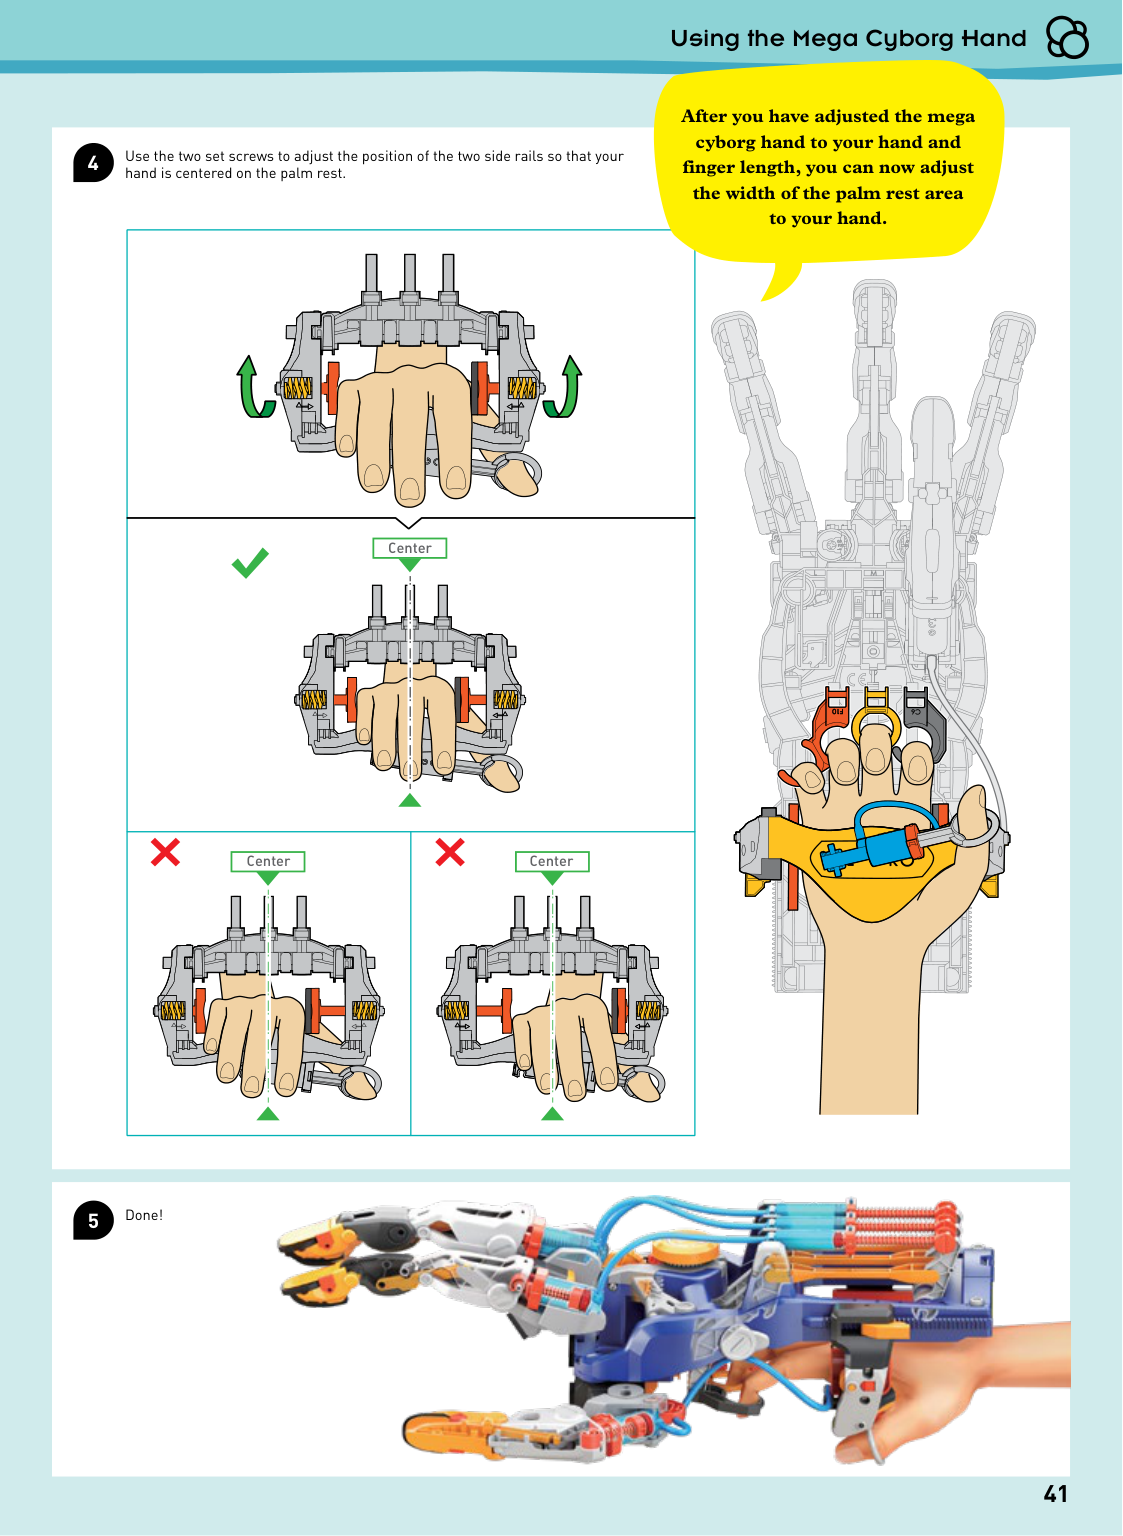
41 Using the Mega Cyborg Hand After you have adjusted the mega cyborg hand to your hand and finger length, you can now adjust the width of the palm rest area to your hand. 5 4 Center Center Center Done! Use the two set screws to adjust the position of the two side rails so that your hand is centered on the palm rest.
42
Settings
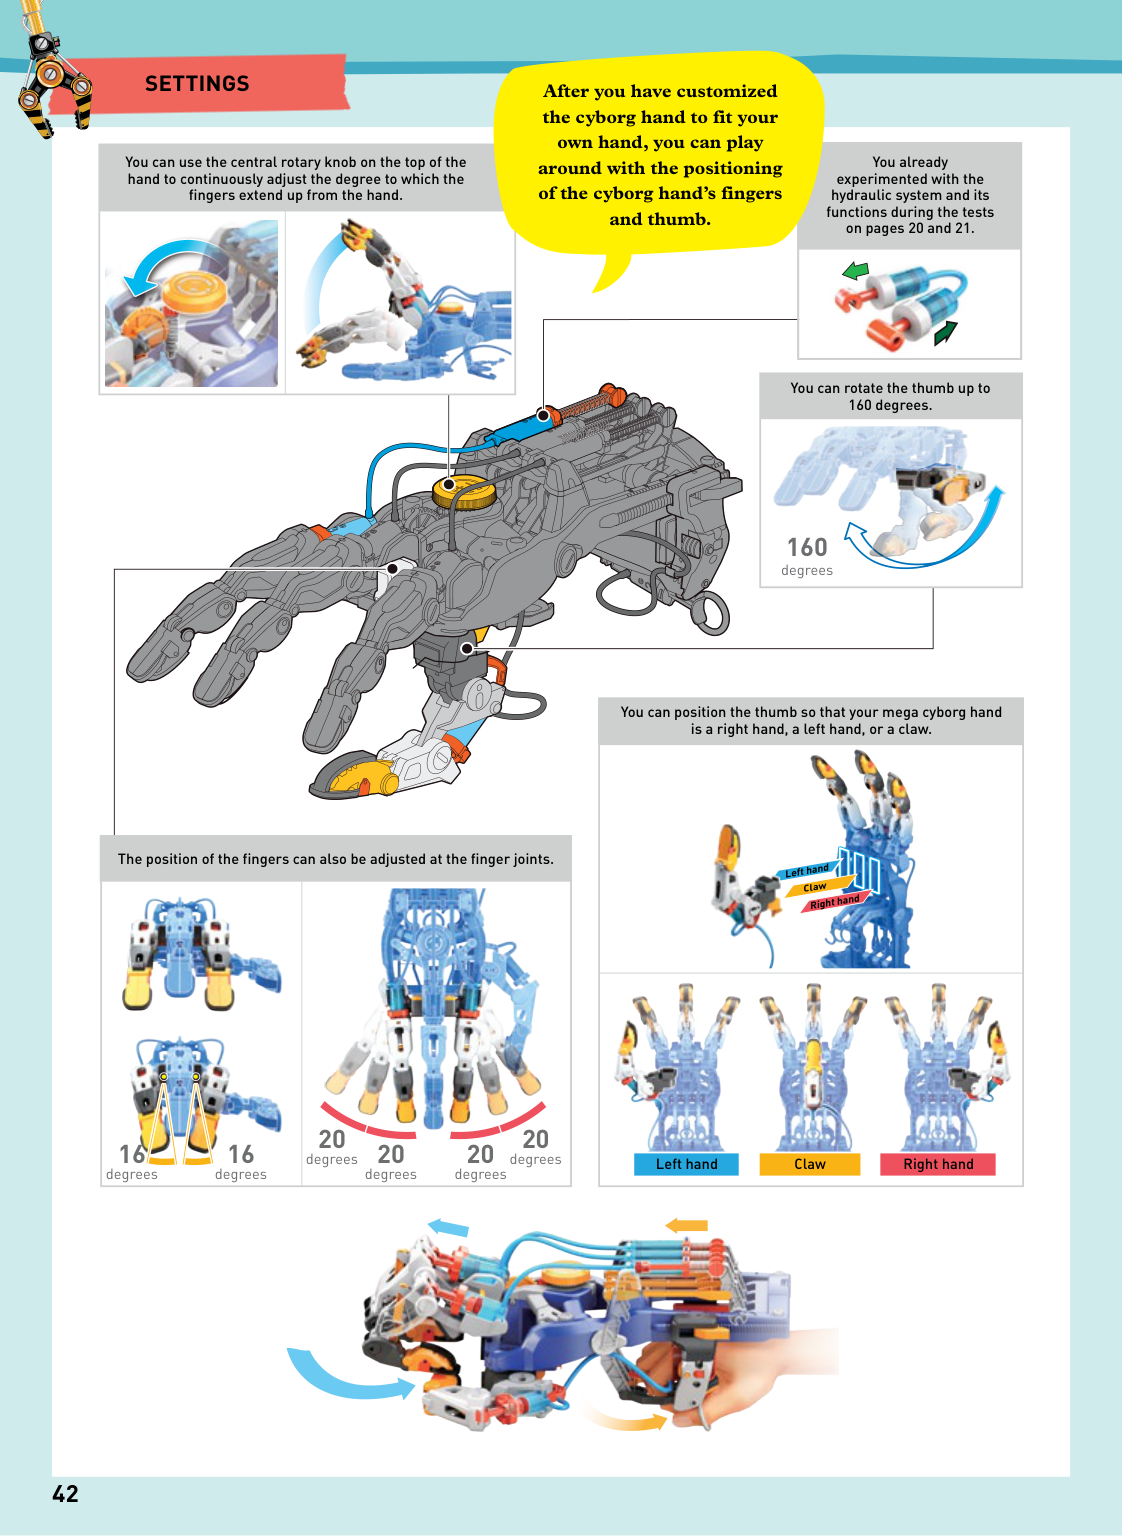
After you have customized the cyborg hand to fit your own hand, you can play around with the positioning of the cyborg hand’s fingers and thumb. You can use the central rotary knob on the top of the hand to continuously adjust the degree to which the fingers extend up from the hand. You already experimented with the hydraulic system and its functions during the tests on pages 20 and 21. You can rotate the thumb up to 160 degrees. You can position the thumb so that your mega cyborg hand is a right hand, a left hand, or a claw. Claw Left hand Right hand The position of the fingers can also be adjusted at the finger joints. 160 degrees 20 degrees 16 degrees 16 degrees 20 degrees 20 degrees 20 degrees Left hand Claw Right hand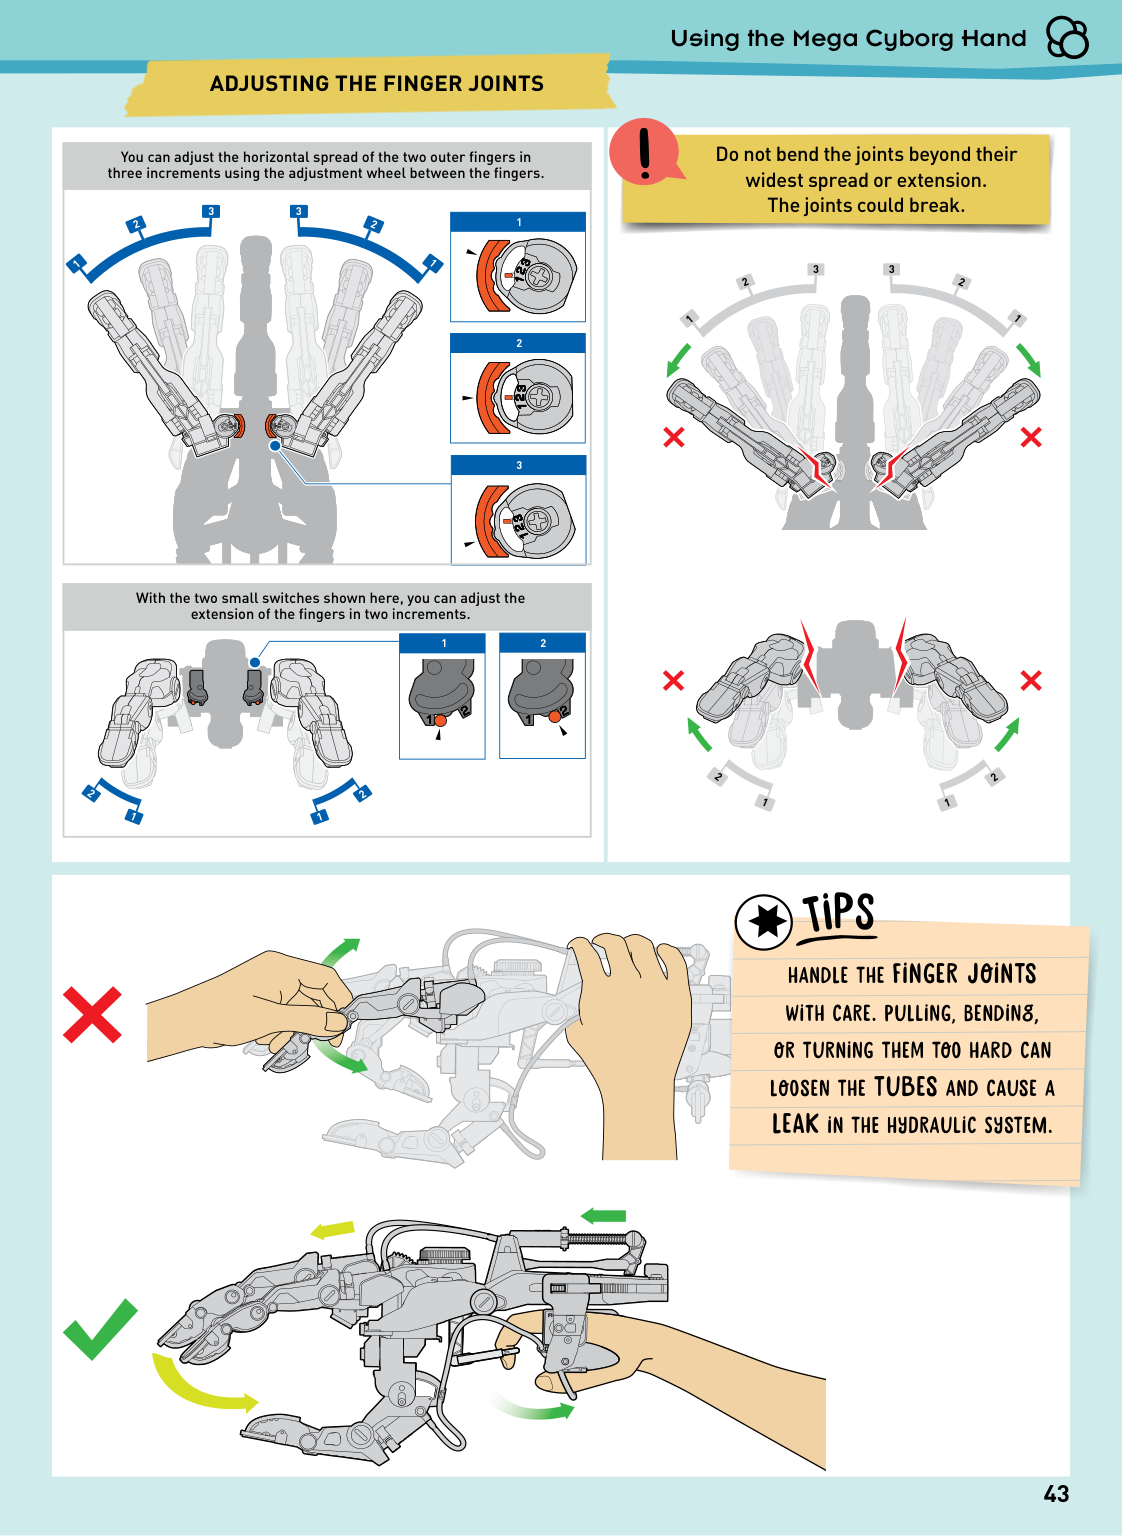
Do not bend the joints beyond their widest spread or extension. The joints could break. 3 3 1 1 2 2 3 3 3 2 2 1 1 1 1 2 2 1 2 1 2 1 2 1 2 43 Using the Mega Cyborg Hand
Adjusting The Finger Joints
You can adjust the horizontal spread of the two outer fingers in three increments using the adjustment wheel between the fingers. With the two small switches shown here, you can adjust the extension of the fingers in two increments.T
i pS
handle the finger joints with care. pulling, bending, or turning them too hard can loosen the tubes and cause a leak in the hydraulic system.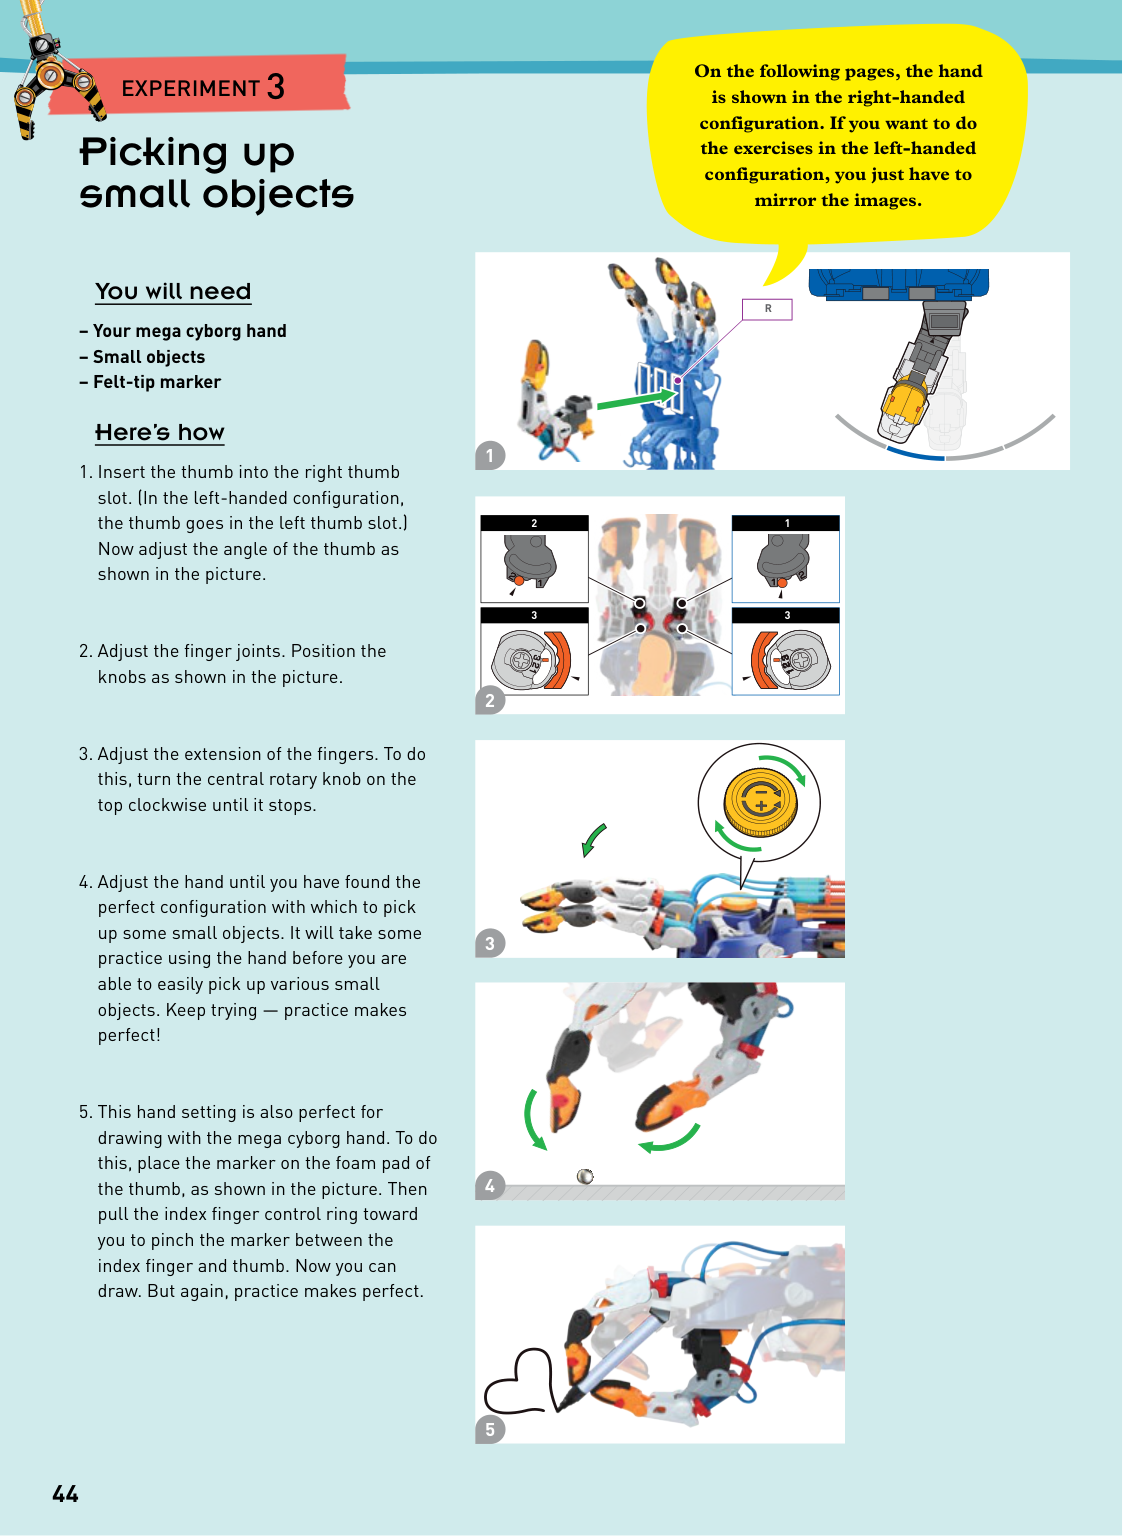
44 Picking up small objects You will need – Your mega cyborg hand – Small objects – Felt-tip marker Here’s how
Experiment 3
On the following pages, the hand is shown in the right-handed configuration. If you want to do the exercises in the left-handed configuration, you just have to mirror the images.R
2 3 1 3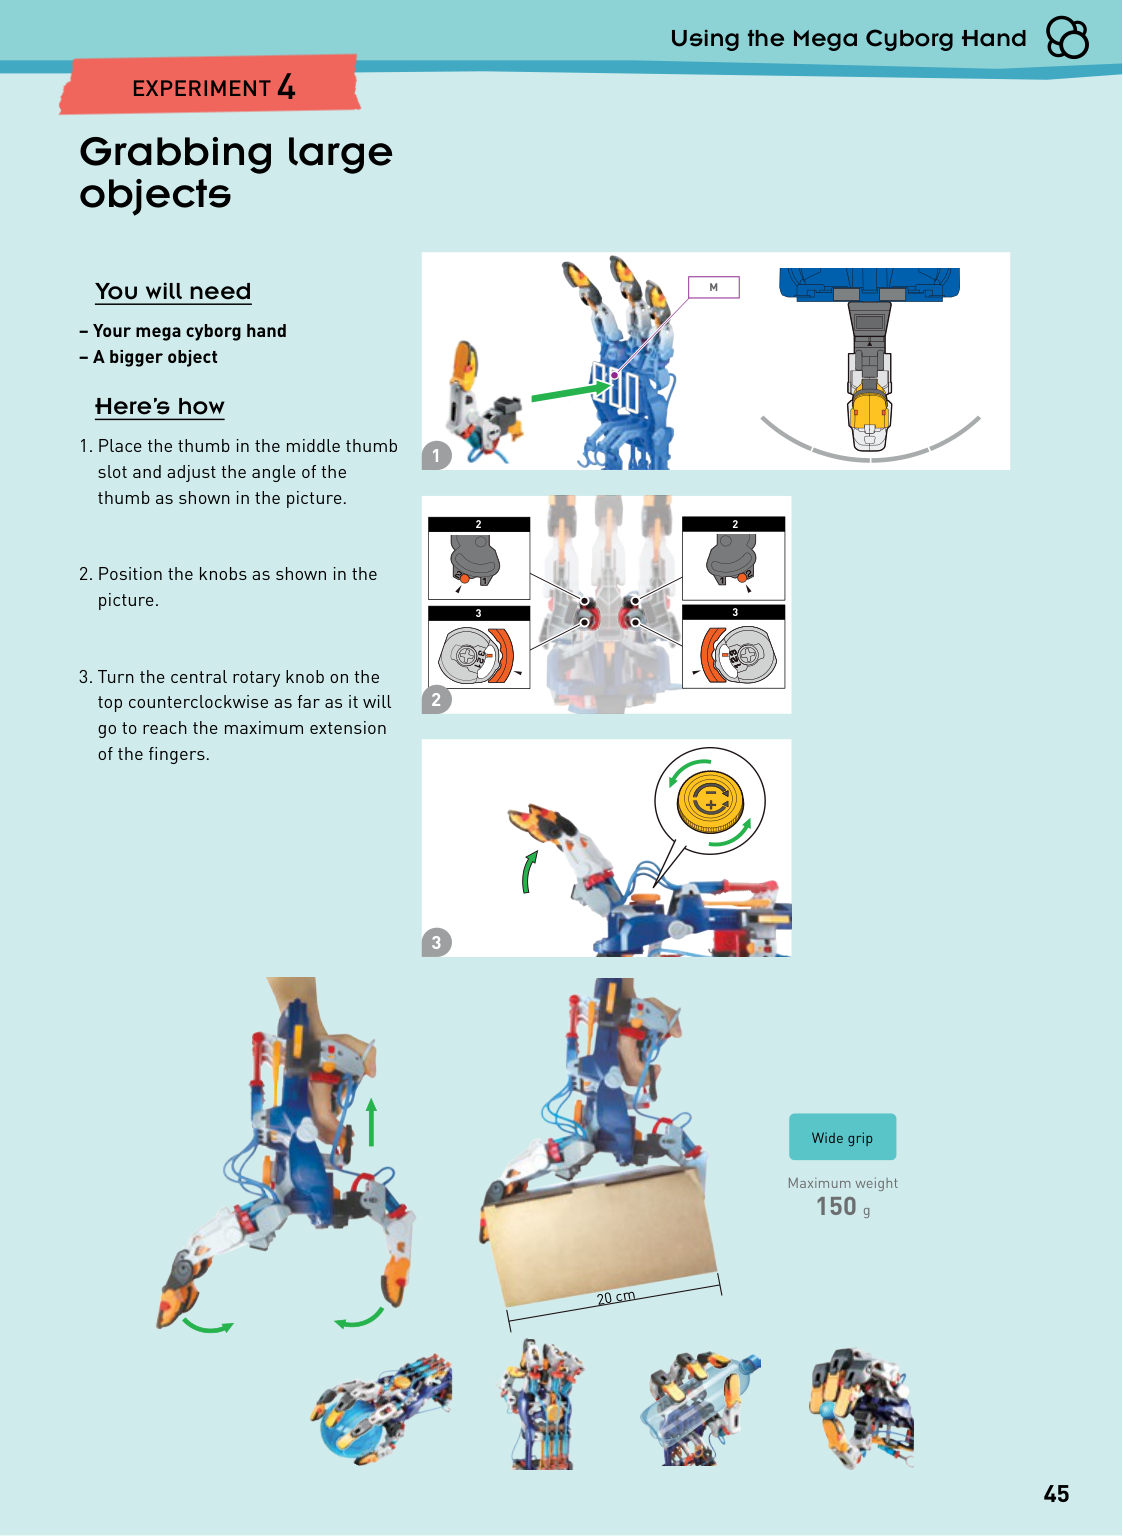
45 Using the Mega Cyborg Hand Grabbing large objects 20 cm Maximum weight 150 g
Experiment 4
You will need – Your mega cyborg hand – A bigger object Here’s howM
2 3 2 3 Wide grip
46 ? !
Check It Out
Many people can no longer perform all the movements they would like to with their own bodies. To help people with physical disabilities, researchers and doctors are developing special exoskeletons. For example, these could help a person learn to walk again after a stroke. And people with paralysis could also use exoskeletons to move around more freely and independently. Exoskeletons Your mega cyborg hand is a machine that you can wear on your body. Therefore, you can call it an exoskeleton. Many people around the world are currently developing artificial exoskeletons because these devices could help people in a lot of different ways. Medicine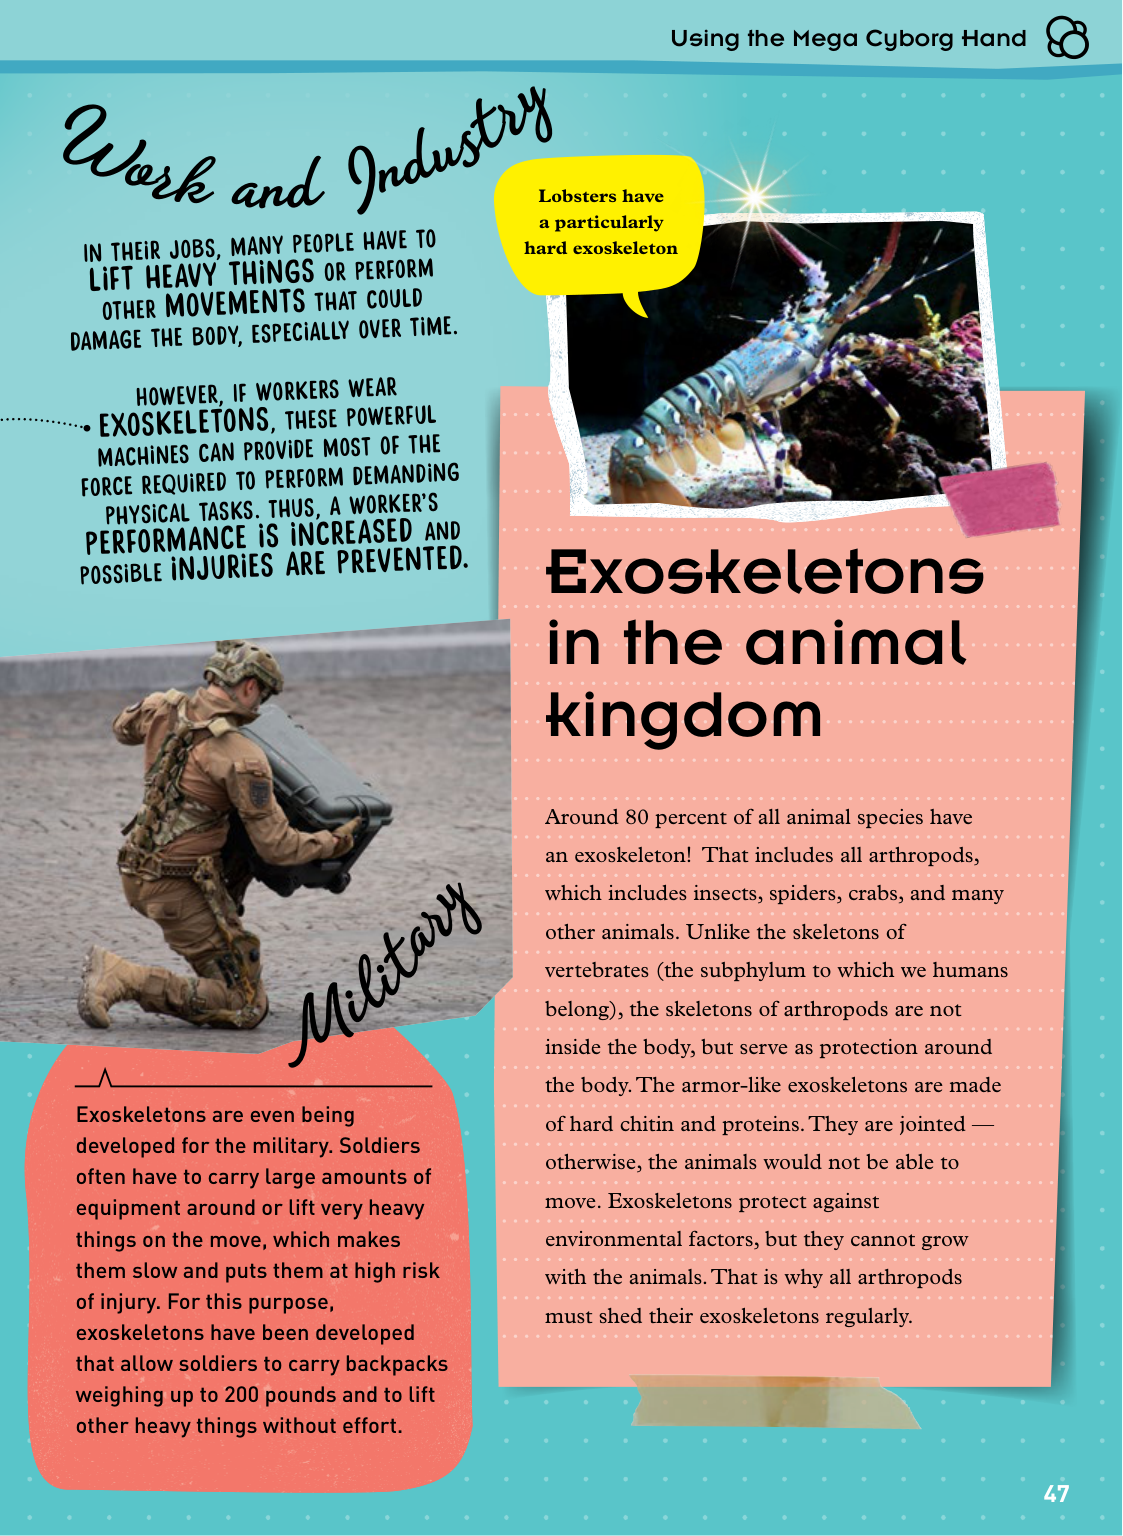
47 Using the Mega Cyborg Hand Exoskeletons are even being developed for the military. Soldiers often have to carry large amounts of equipment around or lift very heavy things on the move, which makes them slow and puts them at high risk of injury. For this purpose, exoskeletons have been developed that allow soldiers to carry backpacks weighing up to 200 pounds and to lift other heavy things without effort. In their jobs, many people have to lift heavy things or perform other movements that could damage the body, especially over time. However, If workers wear exoskeletons, these powerful machines can provide most of the force required to perform demanding physical tasks. Thus, a worker’s performance is increased and possible injuries are prevented. Exoskeletons in the animal kingdom Around 80 percent of all animal species have an exoskeleton! That includes all arthropods, which includes insects, spiders, crabs, and many other animals. Unlike the skeletons of vertebrates (the subphylum to which we humans belong), the skeletons of arthropods are not inside the body, but serve as protection around the body. The armor-like exoskeletons are made of hard chitin and proteins. They are jointed — otherwise, the animals would not be able to move. Exoskeletons protect against environmental factors, but they cannot grow with the animals. That is why all arthropods must shed their exoskeletons regularly.
W
o r ka n d
I
n d u s t r y Lobsters have a particularly hard exoskeletonM
i l i t a r y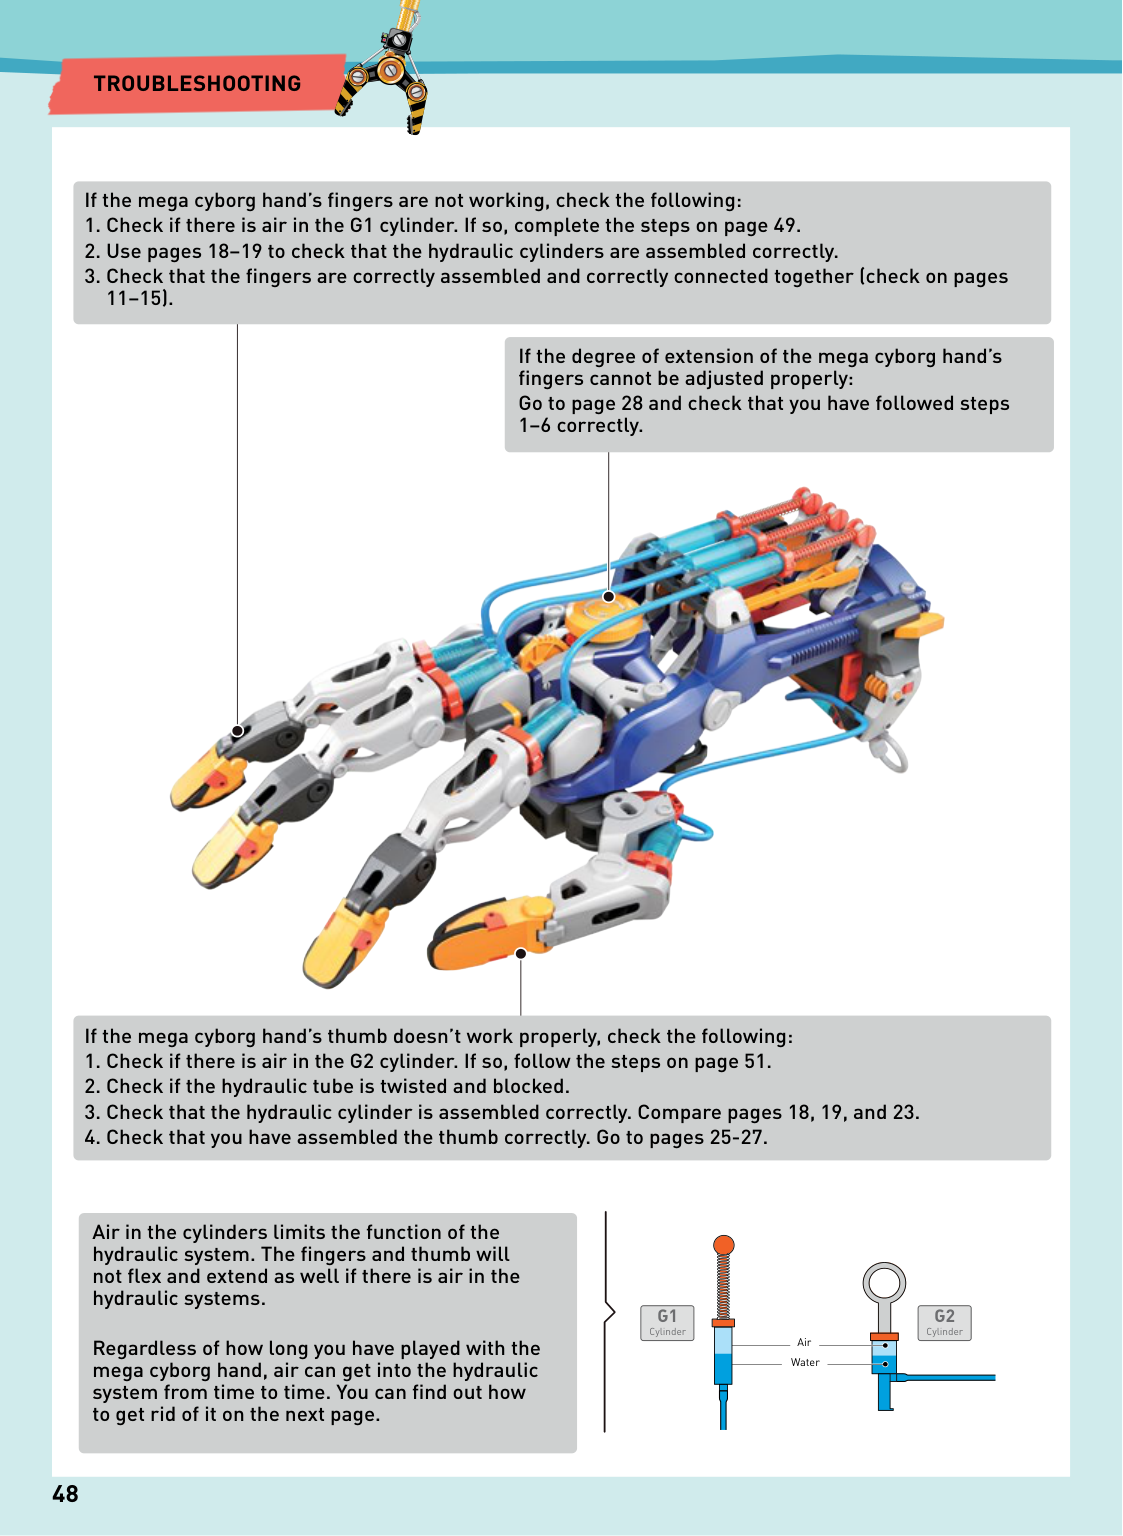
48
Troubleshooting
If the mega cyborg hand’s fingers are not working, check the following:G2
CylinderG1
Cylinder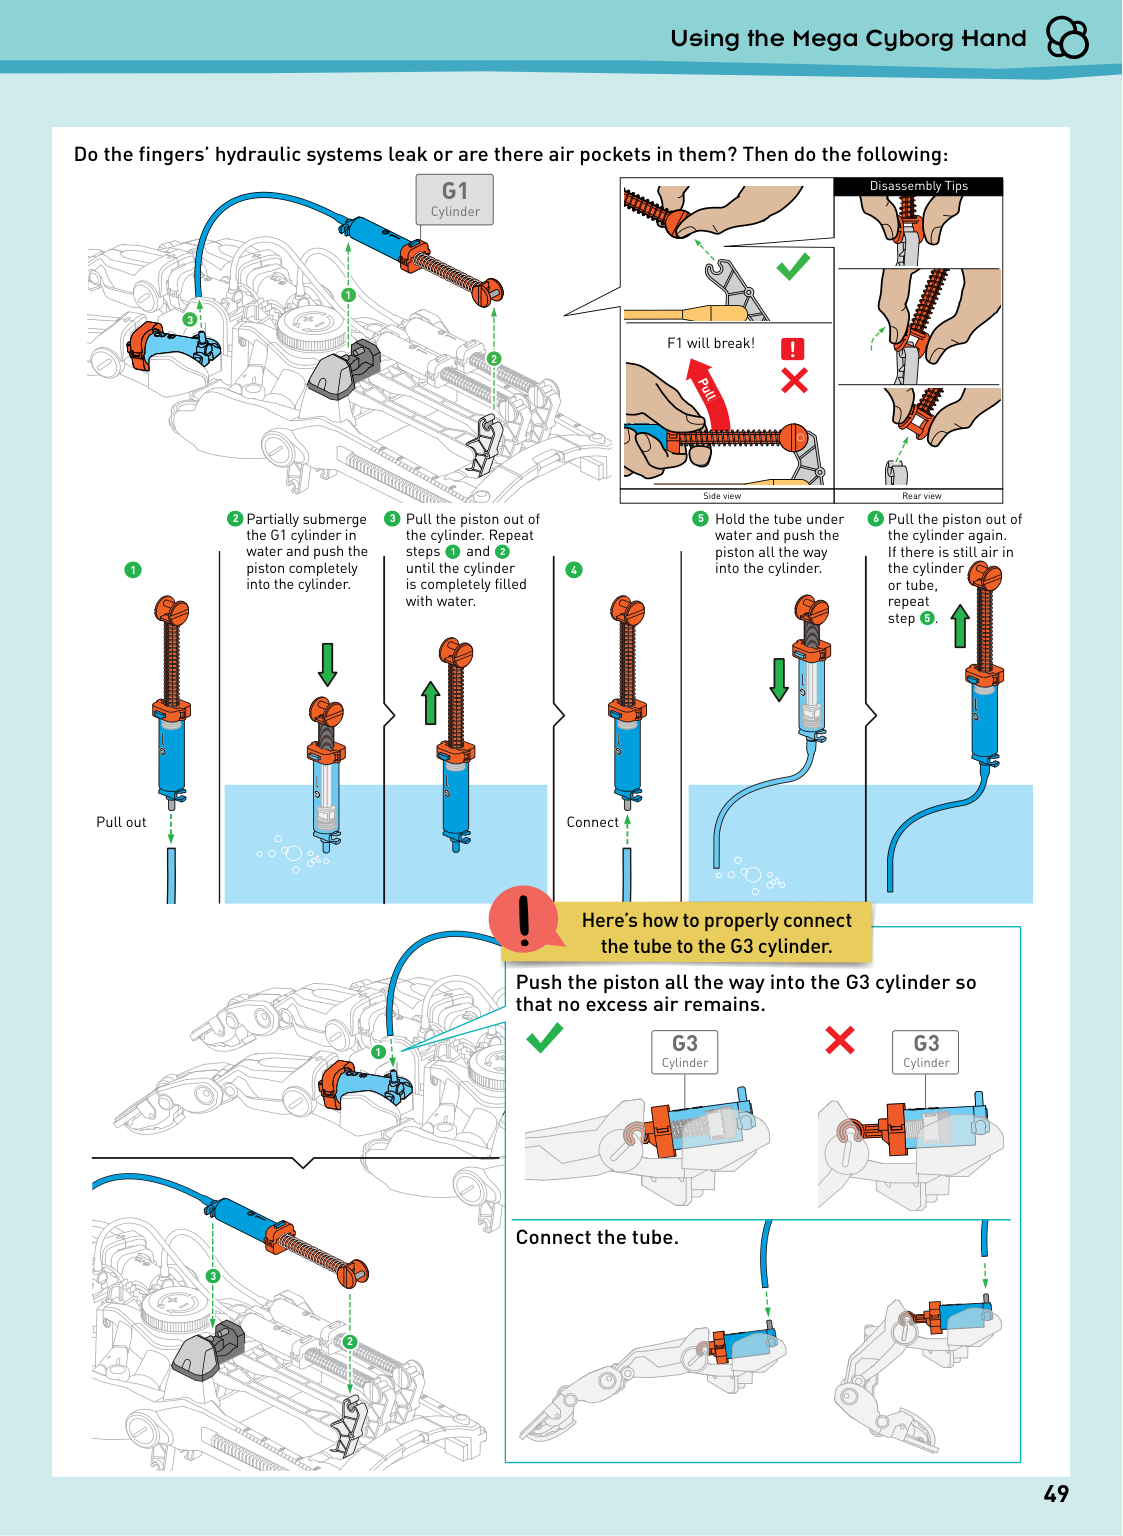
2 3 1 4 Partially submerge the G1 cylinder in water and push the piston completely into the cylinder. Hold the tube under water and push the piston all the way into the cylinder. Pull out Connect Pull the piston out of the cylinder. Repeat steps and until the cylinder is completely filled with water. 1 3 2 1 3 2 Here’s how to properly connect the tube to the G3 cylinder. Pull the piston out of the cylinder again. If there is still air in the cylinder or tube, repeat step . 5 6 3 2 1 2 5 Disassembly Tips Pull F1 will break! Side view Rear view 49 Using the Mega Cyborg Hand Do the fingers’ hydraulic systems leak or are there air pockets in them? Then do the following: Push the piston all the way into the G3 cylinder so that no excess air remains. Connect the tube.
G1
CylinderG3
CylinderG3
Cylinder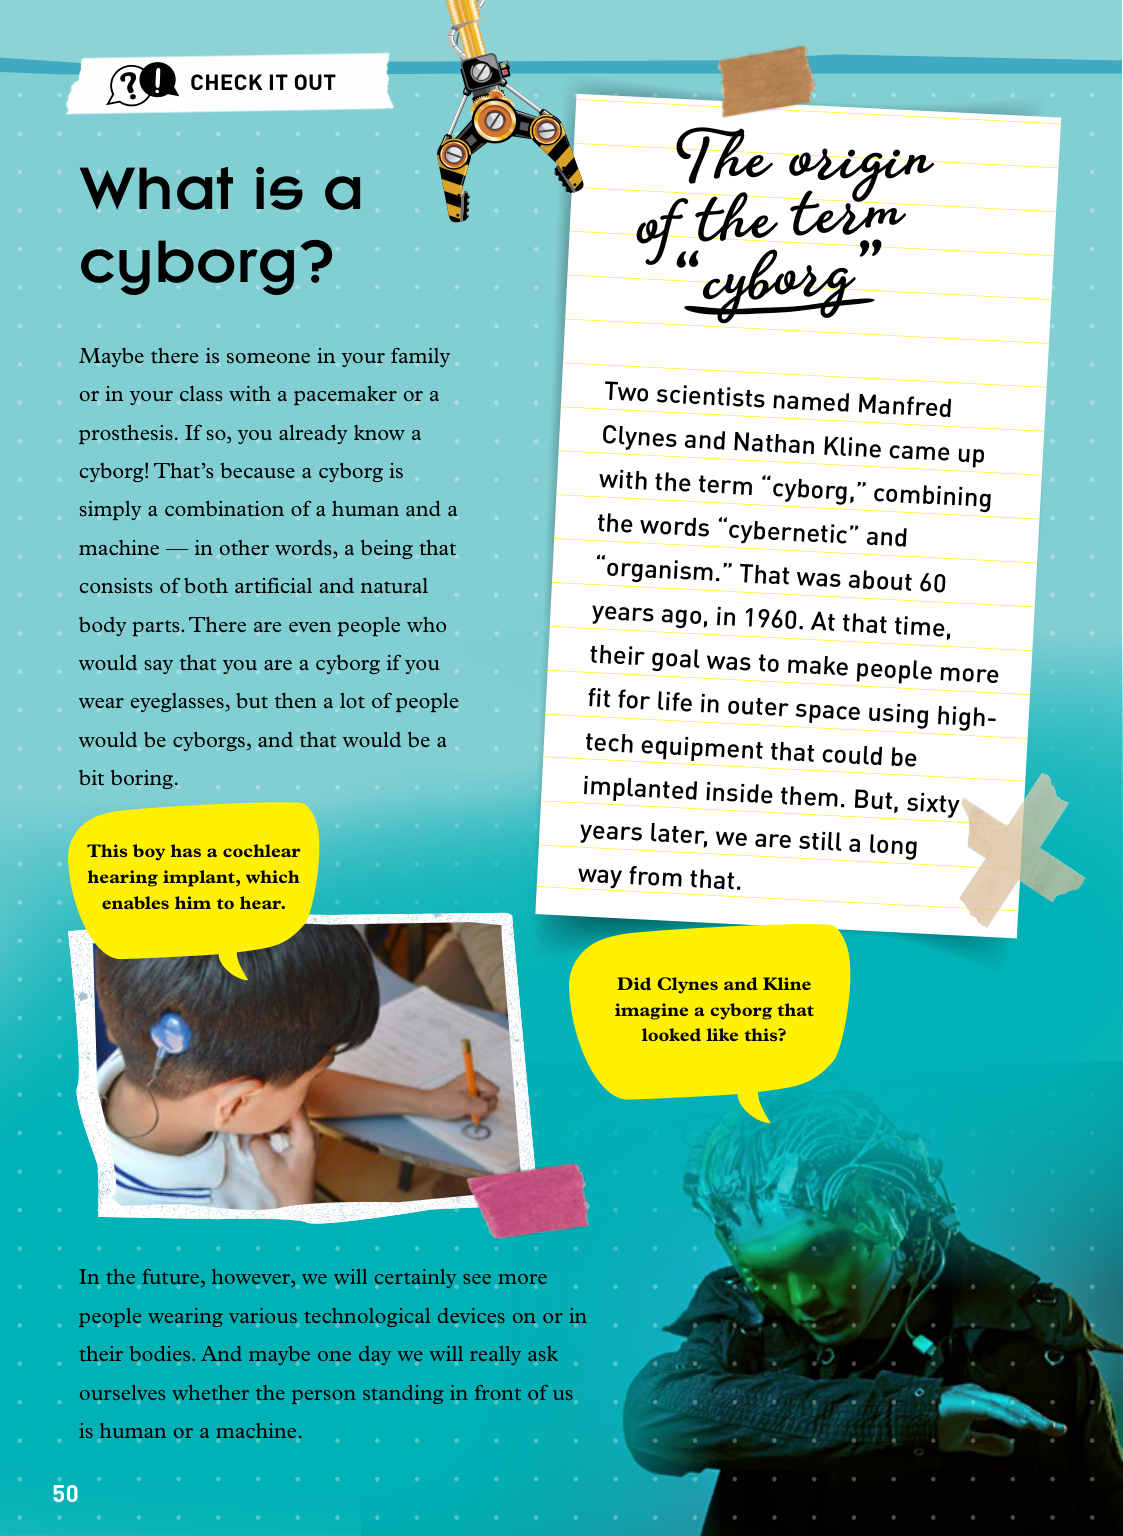
50 Two scientists named Manfred Clynes and Nathan Kline came up with the term “cyborg,” combining the words “cybernetic” and “organism.” That was about 60 years ago, in 1960. At that time, their goal was to make people more fit for life in outer space using high- tech equipment that could be implanted inside them. But, sixty years later, we are still a long way from that. of the term What is a cyborg? Maybe there is someone in your family or in your class with a pacemaker or a prosthesis. If so, you already know a cyborg! That’s because a cyborg is simply a combination of a human and a machine — in other words, a being that consists of both artificial and natural body parts. There are even people who would say that you are a cyborg if you wear eyeglasses, but then a lot of people would be cyborgs, and that would be a bit boring. This boy has a cochlear hearing implant, which enables him to hear. Did Clynes and Kline imagine a cyborg that looked like this? ? !
Check It Out
In the future, however, we will certainly see more people wearing various technological devices on or in their bodies. And maybe one day we will really ask ourselves whether the person standing in front of us is human or a machine. “cyborg” The origin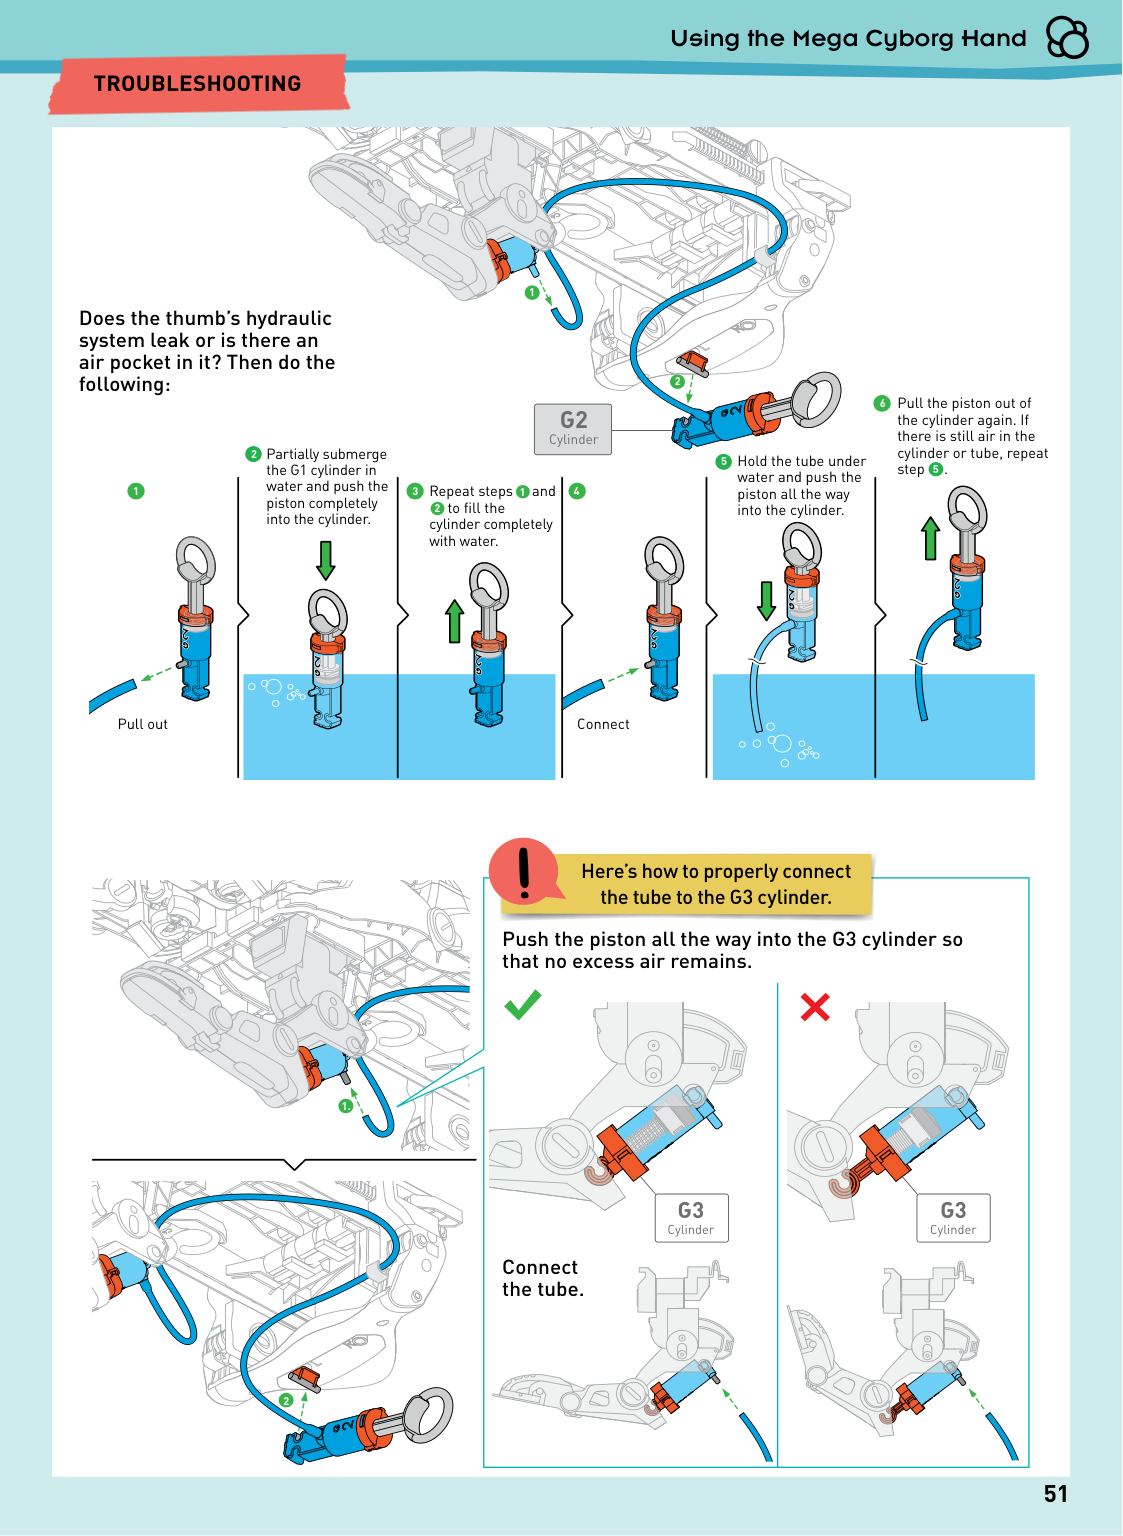
1 1
Troubleshooting
Push the piston all the way into the G3 cylinder so that no excess air remains. Connect the tube. 6 2 1 1 3 4 Partially submerge the G1 cylinder in water and push the piston completely into the cylinder. Hold the tube under water and push the piston all the way into the cylinder. Pull the piston out of the cylinder again. If there is still air in the cylinder or tube, repeat step . Pull out Connect Repeat steps and to fill the cylinder completely with water. 1 Does the thumb’s hydraulic system leak or is there an air pocket in it? Then do the following:G2
CylinderG3
CylinderG3
Cylinder 2 5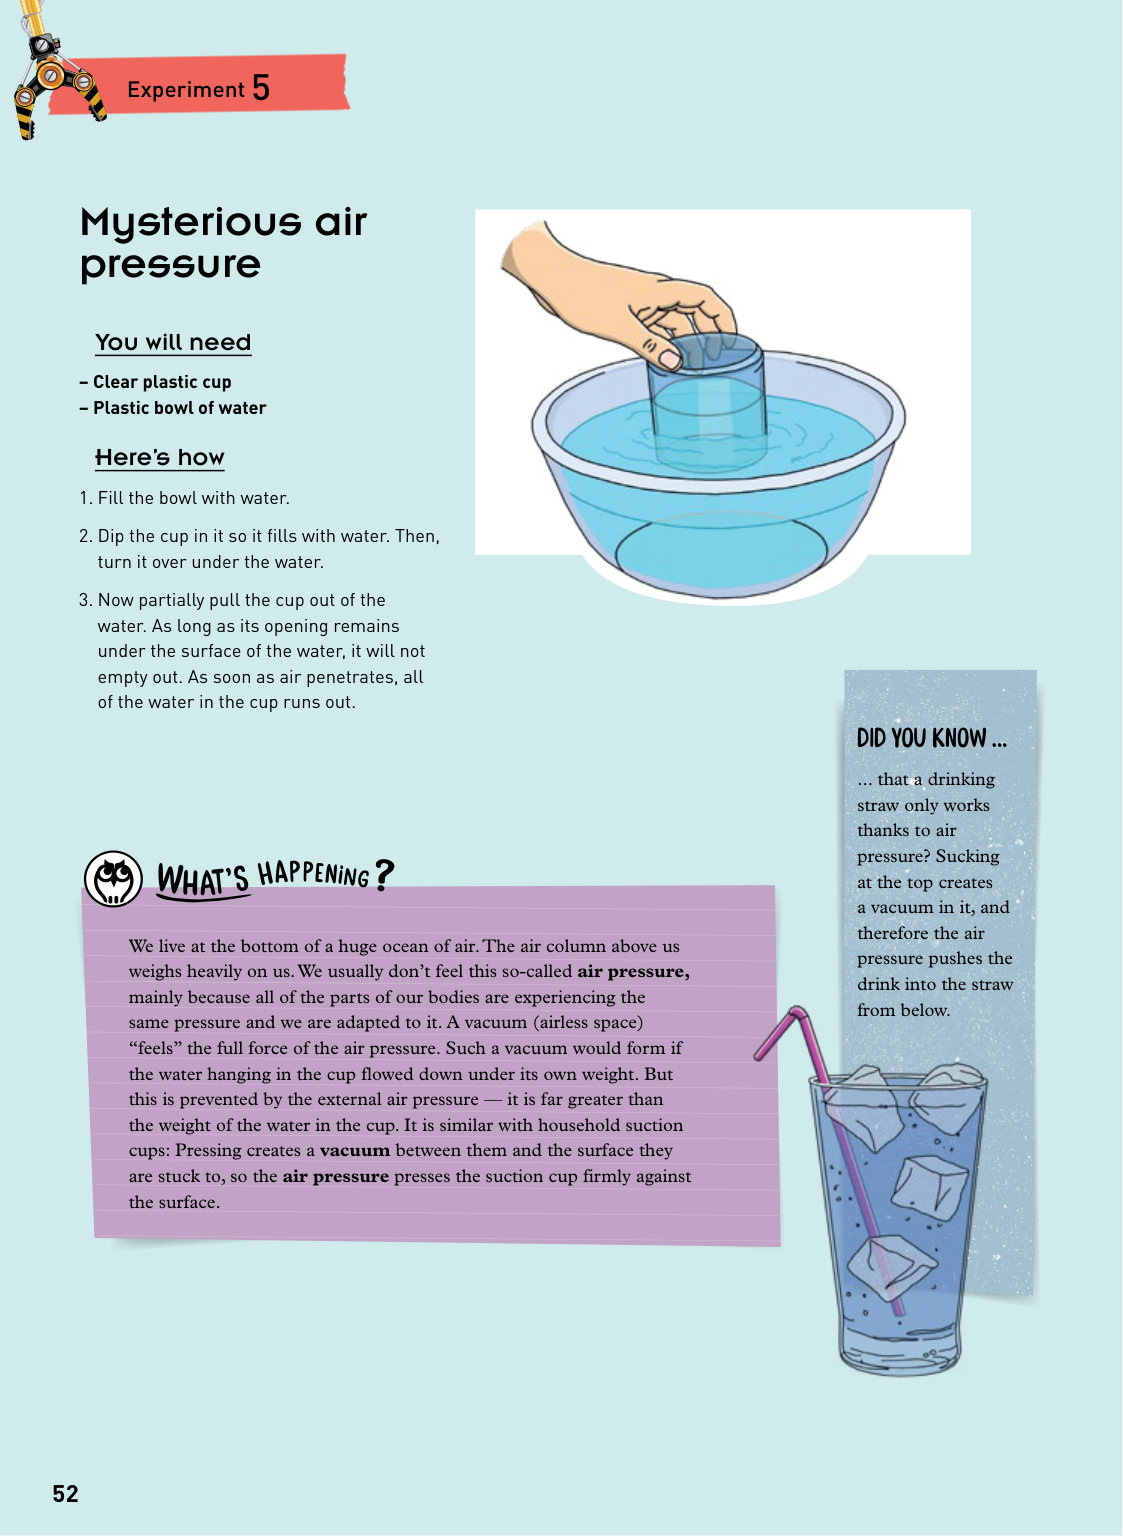
52 Mysterious air pressure You will need – Clear plastic cup – Plastic bowl of water Here’s how
Did You Know ...
... that a drinking straw only works thanks to air pressure? Sucking at the top creates a vacuum in it, and therefore the air pressure pushes the drink into the straw from below.W
hA
t ’ sh a p pe nin g?
© 2020 Franckh-Kosmos Verlags-GmbH & Co. KG, Pfizerstrasse 5 – 7, 70184 Stuttgart, Germany This work, including all its parts, is copyright protected. Any use outside the specific limits of the copyright law is prohibited and punishable by law without the consent of the publisher. This applies specifically to reproductions, translations, microfilming, and storage and processing in electronic systems and networks. We do not guarantee that all material in this work is free from other copyright or other protection. Text: Richard Schmising Project Manager: Jonathan Felder Technical product development: Deryl Tjahja, CIC Components Industries Co., Ltd., Taiwan Manual design concept: Atelier Bea Klenk, Berlin Manual layout: www.evaschindler.de, Grafing Manual illustrations: Tanja Donner, Riedlingen, Eva Schindler, Grafing, CIC Components Industries Co., Ltd., Taiwan Comic and other illustrations: Bianca Meier; Daniel Alles Manual Photos: Jamie Duplass (all adhesive strips); Jamesbin @shutterstock.com (Image on top of numerous pages), Binimin, p. 8 l; zhaoliang70 p. 16 m; Juan Enrique del Barrio p. 24 ml; Dmitry Kalinovsky p. 24 ul; Dreamsquare p. 24 or; genkur p. 24 ur; Andrey Suslov p. 38 o; Redshinestudio 46 om; studiostoks p. 46 or; Ivan Chudakov p. 46 u; Frederic Legrand p. 47 l; altih p. 47 r; Kalah_R p. 50 l; Kiselev Andrej Valerevich p. 50 r (all shutterstock.com); Tanja Donner p. 20, 21, 52 Packaging design concept: Peter Schmidt Group, Hamburg Packaging layout: Studio Gibler, Stuttgart Packaging photos: CIC Components Industries Co., Background graphic: Studio Gibler The publisher has made every effort to identify the owners of the rights to all photos used. If there is any instance in which the owners of the rights to any pictures have not been acknowledged, they are asked to inform the publisher about their copyright ownership so that they may receive the customary image fee. 3rd English Edition © 2020, 2021, 2023 Thames & Kosmos, LLC, Providence, RI, USA Thames & Kosmos® is a registered trademark of Thames & Kosmos, LLC. Editing: Ted McGuire; Additional Graphics and Layout: Dan Freitas Distributed in North America by Thames & Kosmos, LLC. Providence, RI 02903 Phone: 800-587-2872; Web: www.thamesandkosmos.com We reserve the right to make technical changes. Printed in Taiwan

Thames & Kosmos US Email: support@thamesandkosmos.com Web: thamesandkosmos.com Phone: 1-800-587-2872 Do you have any questions? Our customer service team will be glad to help you! 620501-03-241120