
Ask AI
— answers from the official manualAnswers from the official manual.
Common questions
Common Questions
10 totalHow do I safely position oven racks and place food on them?
Place racks where you need them before placing pans or baking sheets. Use rack positions recommended in recipes for best results. For even cooking, stagger larger items to avoid blocking heat flow between racks.
What are the common oven temperatures and their uses?
Use lower temperatures (around 250°F) for slow cooking tasks like melting chocolate. Use medium temperatures (300-400°F) for normal baking or roasting, and high temperatures (above 400°F) for quick browning of meats or fast cooking times.
How do I set the clock on my Whirlpool 465 oven?
Press CLOCK to enter program mode, use up and down pads to adjust time by small or large increments. Press CLOCK again to start timer; colon will stop blinking when clock is set.
How do I clean oven racks and broiler pans?
Soak oven racks and broiler parts in a mixture of 1/2 cup ammonia to 1 gallon water for 20 minutes. Scrub any remaining grime with steel wool pads, then rinse thoroughly.
How do I adjust the oven temperature if it appears too high or low?
To change the temperature setting, turn off range and locate screws near thermometer knob. Adjust by turning screw clockwise for lower temperatures or counterclockwise for higher, each notch is approximately 5°F.
How do I properly remove the oven door for thorough cleaning?
To remove the oven door, pry out door stop clips with a tool under each clip's head. Hold the door sides and pull upwards then inwards for removal.
Full Manual
28 pages


Use&We


A Note to You . . . . . . . . . . . . . 2 Range Safety . . . . . . . . . . . . . 3 Parts and Features . . . . 5 Using Your Range . . . . . . 6 Caring for Your Range . . . . . . . . . . . . . . . . . . . . . . 17


. . . . . . . 24

Requesting Assistance or Service . . . . . . . . . . . . . . . . . . . . . 26 Index . . . . . . . . . . . . . . . . . . . . . . . . 27 Warranty . . . . . . . . . . . . . . . . . . 28


Call our Consumer Assistance Center with questions or comments.


TO THE PLEASE LEAVE THIS BOOK WITH THE TO THE PLEASE READ AND KEEP THIS BOOK FOR FUTURE REFERENCE.


Super Capacity 465 4.65 Cubic Foot Oven MODEL SF31OBEG 8053371


6-W


I j
7 '3 &; .<", i& \,s Q I; f ";'* &y~ aly$a$:- ,$ ;
/ ^* x The Brand is committed to quality products that consistently perform for you to make your life easier. To that you enjoy years of we this Use and Care It is of valuable information about how to operate and your properly and Please read it Also, please complete and mail the Product Card your The card helps us
.wz


you about any new information on your

e.* i1,”B g,ct F$ A j.; 3 $5 G Q F f x ?( :y ,,; y i: * 1 J .$ 2 ’ ,< t‘: * $ $ H^ l”“r 2 ; ;‘:$;f$” Whenever you call to request service for your Number you need to know your complete model number and Number serial number. You can find this on the model and serial number (see diagram in


Date the “Parts and Features”
Dealer Name Please also record the date of your Dealer Address

and your dealer’s name, address, and number. Dealer

this book and the sales slip together in a safe for future reference. It is important for you to save your sales receipt showing the date of Proof of purchase will assure you of in-warranty service.


WARNING: If the information in this manual is not followed exactly, a fire or explosion may result causing property damage, personal injury or death.

l Do not try to light any appliance. l Do not touch any electrical switch; do not use any phone in your building. l Immediately call your gas supplier from a neighbor’s phone. Follow the gas
supplier’s instructions. l If you cannot reach your gas supplier, call the fire department.


%:a I.< F$II6:. 2 g$ ‘2“-~@q ygj g&t ;+,i; ;“‘I’ g; ;&g ‘,; j; “@:q ,;q$p“~~~~,
We have many important safety messages in this and on your read and obey all safety messages.


is the safety alert symbol.
symbol alerts you to that can kill or hurt you and others.

f
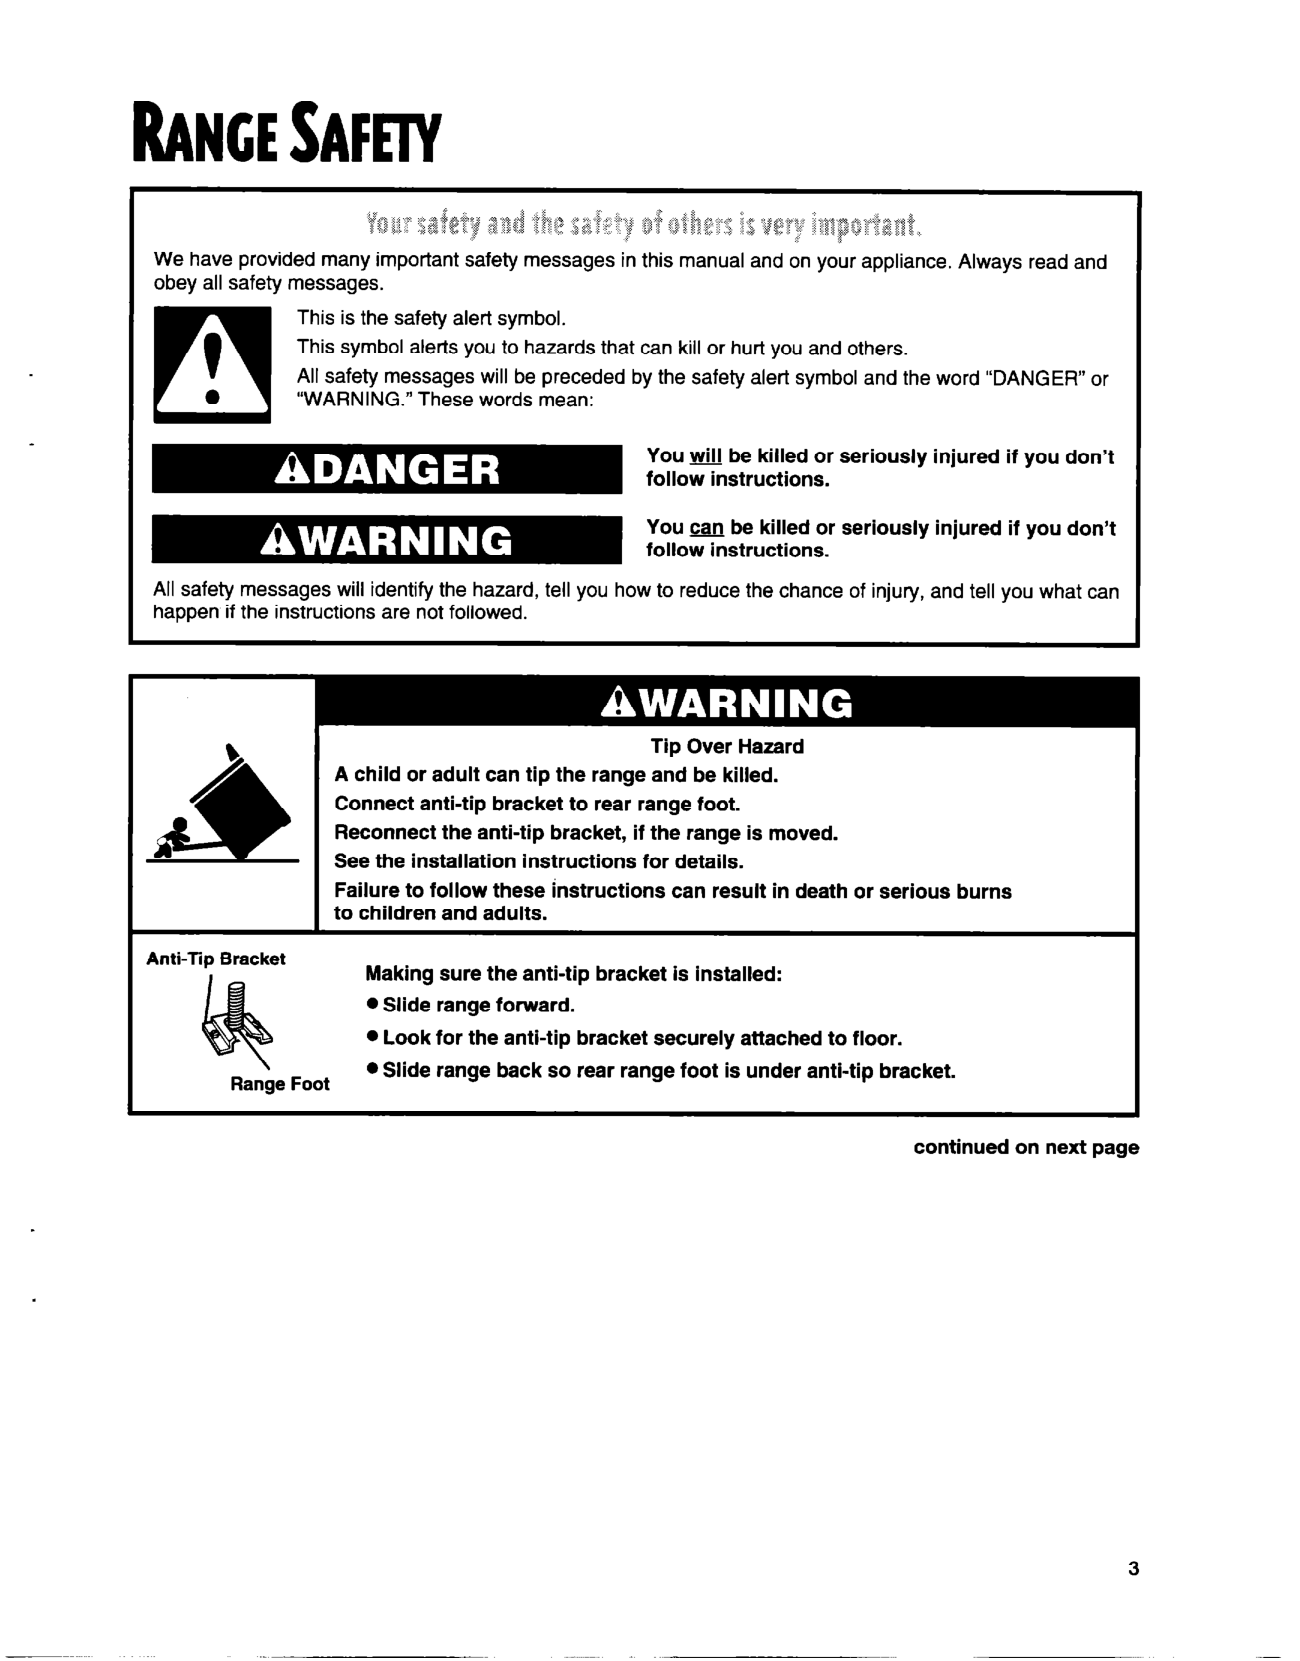
All safety messages be preceded by the safety alert symbol and the word “DANGER” or 0 “WARNING.” These words mean:

0
You be killed or seriously if you don’t


You can be killed or if you don’t

All safety messages the tell you how to reduce the chance of and tell you what can if the instructions are not


Tip Over Hazard
b

A or adult can tip the range and be bracket to rear range foot.
/

the bracket, if the range is moved. See the instructions for details.
A&

to these instructions can result in death or burns to and adults.

Bracket

sure the bracket is l Slide range forward. l Look for the bracket attached to floor.

Slide range back so rear range foot is under bracket.

Range Foot l

on page


3


#### IMPORTANT SAFETY INSTRUCTIONS

WARNING: To reduce the risk of fire, shock, to persons, or damage the range, basic including the
l the before the l Never Use the Range for Warming or the Room. l may result from the misuse of doors or drawers such as or on the doors or drawers. l Maintenance - Keep range area dear and free from

l WARNING -TO REDUCE THE RISK OF
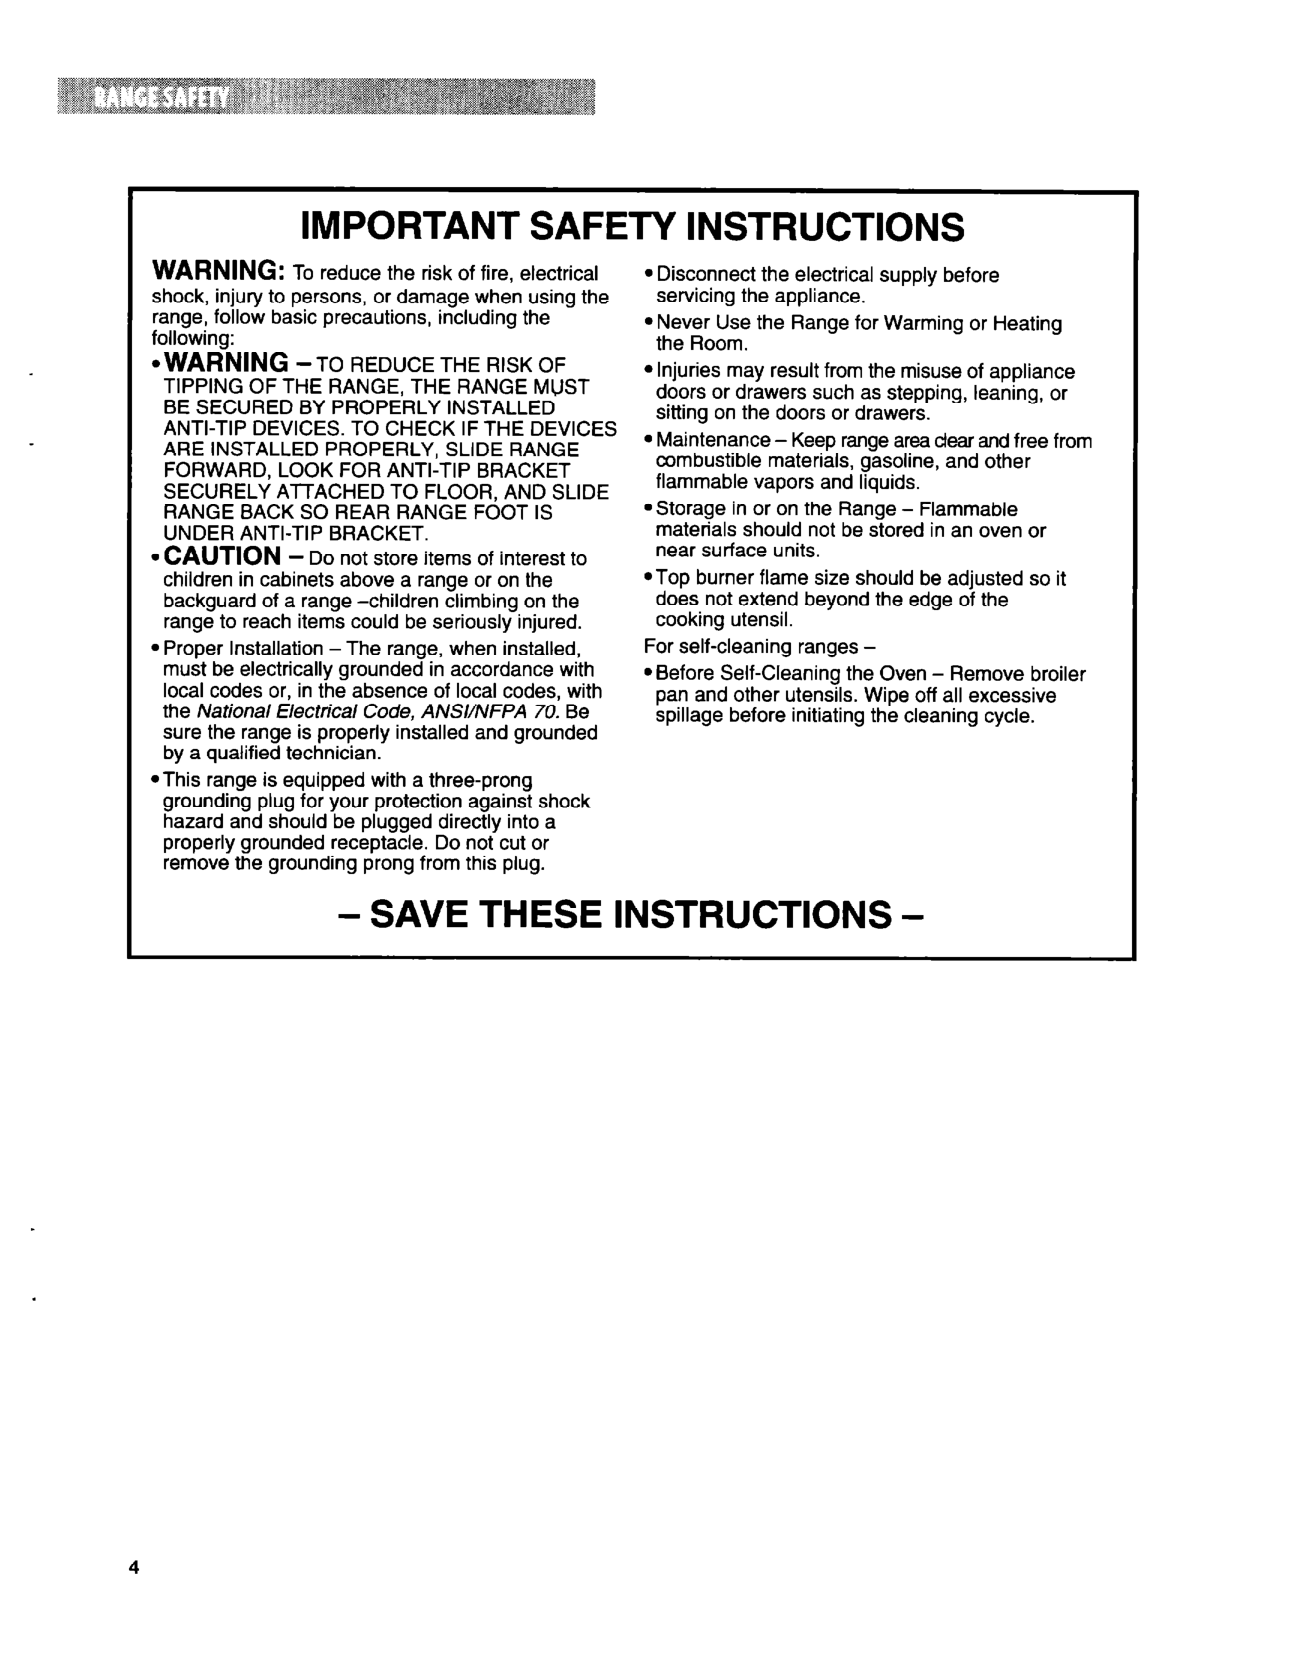

OF THE RANGE, THE RANGE MUST BE SECURED BY ANTI-TIP DEVICES. TO CHECK IF THE DEVICES ARE SLIDE RANGE FORWARD, LOOK FOR

materials, and other flammable vapors and

TO FLOOR, AND SLIDE RANGE BACK SO REAR RANGE FOOT IS UNDER

l CAUTION - Do not store items of interest to children in above a range or on the backguard of a range on the range to reach items could be


For self-cleaning ranges l Before the Oven - Remove broiler
l Proper - The range, installed, must be in local codes or, in the absence of local codes, the Code, ANSVNFPA 70. Be sure the range is and by a

pan and other Wipe off all before the cleaning


range is a
plug for your against shock hazard and be into a properly receptacle. Do not cut or remove the prong from this plug.


#### - SAVE THESE INSTRUCTIONS -


Oven vent ,..+-* __.. b-15)
__,* _,_ ^_ x &en

+-+ control knob
(PP. 12, 17) I clock/timer

Surface and grate= ----A1I- _ ,_,_ (pp. 6, 17, 18, 19, 20) -‘“‘-‘I--
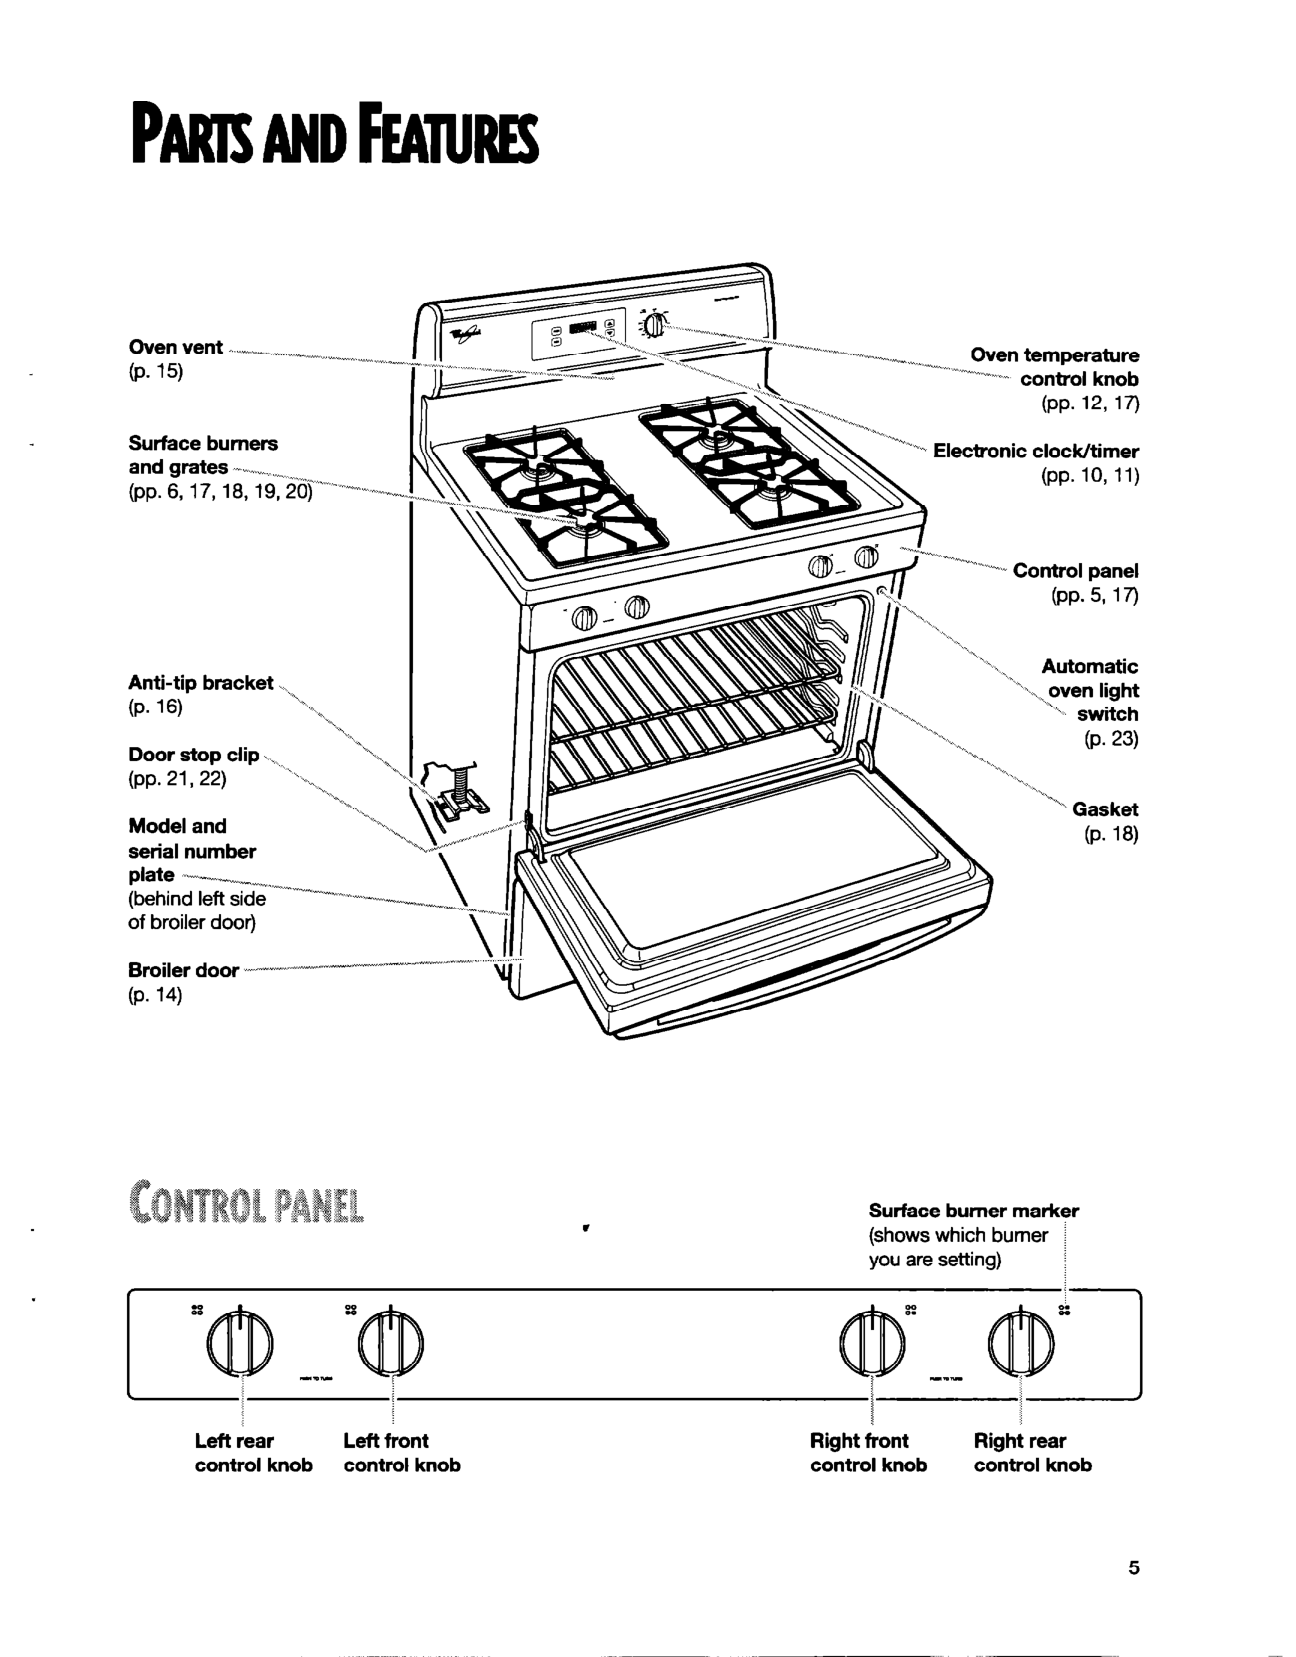

(pp. 10, 11)


bracket. .l_ (P. 16) *e
‘&.

‘;, Door stop clip _ *k, (pp. 21, 22) .....*I^ ?.,

x
“*-. _ Model and ~A,% serial number plate +----,,+


left side -^-----~^~ of door)

door I-,------(P. 14)


Surface marker
.

i you are i


##### I

Left rear Left front Right front Right rear knob knob knob knob


5


USING YOUR


Use the chart as a guide. RECOMMENDED USE :,..I..-.-.._^I-.---.“-_rn.^-.X_I^x..I._~-I.-111-.^---“-r-,--..d

0 To the __. l..ll”_..l” ^” “^.,,“l”l.l . .~“_“_. ..,

.._ __^. xx”,l ,.,,. ; ^ .,“._ . ..“..“~.~““‘“,~-“II,^.l~~.,“l
0 To start food cooking. I 0 To bring to a boil. j
High

^ ^,^ ,__ ^x^~~-~l~-“I^Ix.-I^IIIIIIxIxI-~“~~
0 To hold a boil. ---I HIGH l To fry or pancakes.
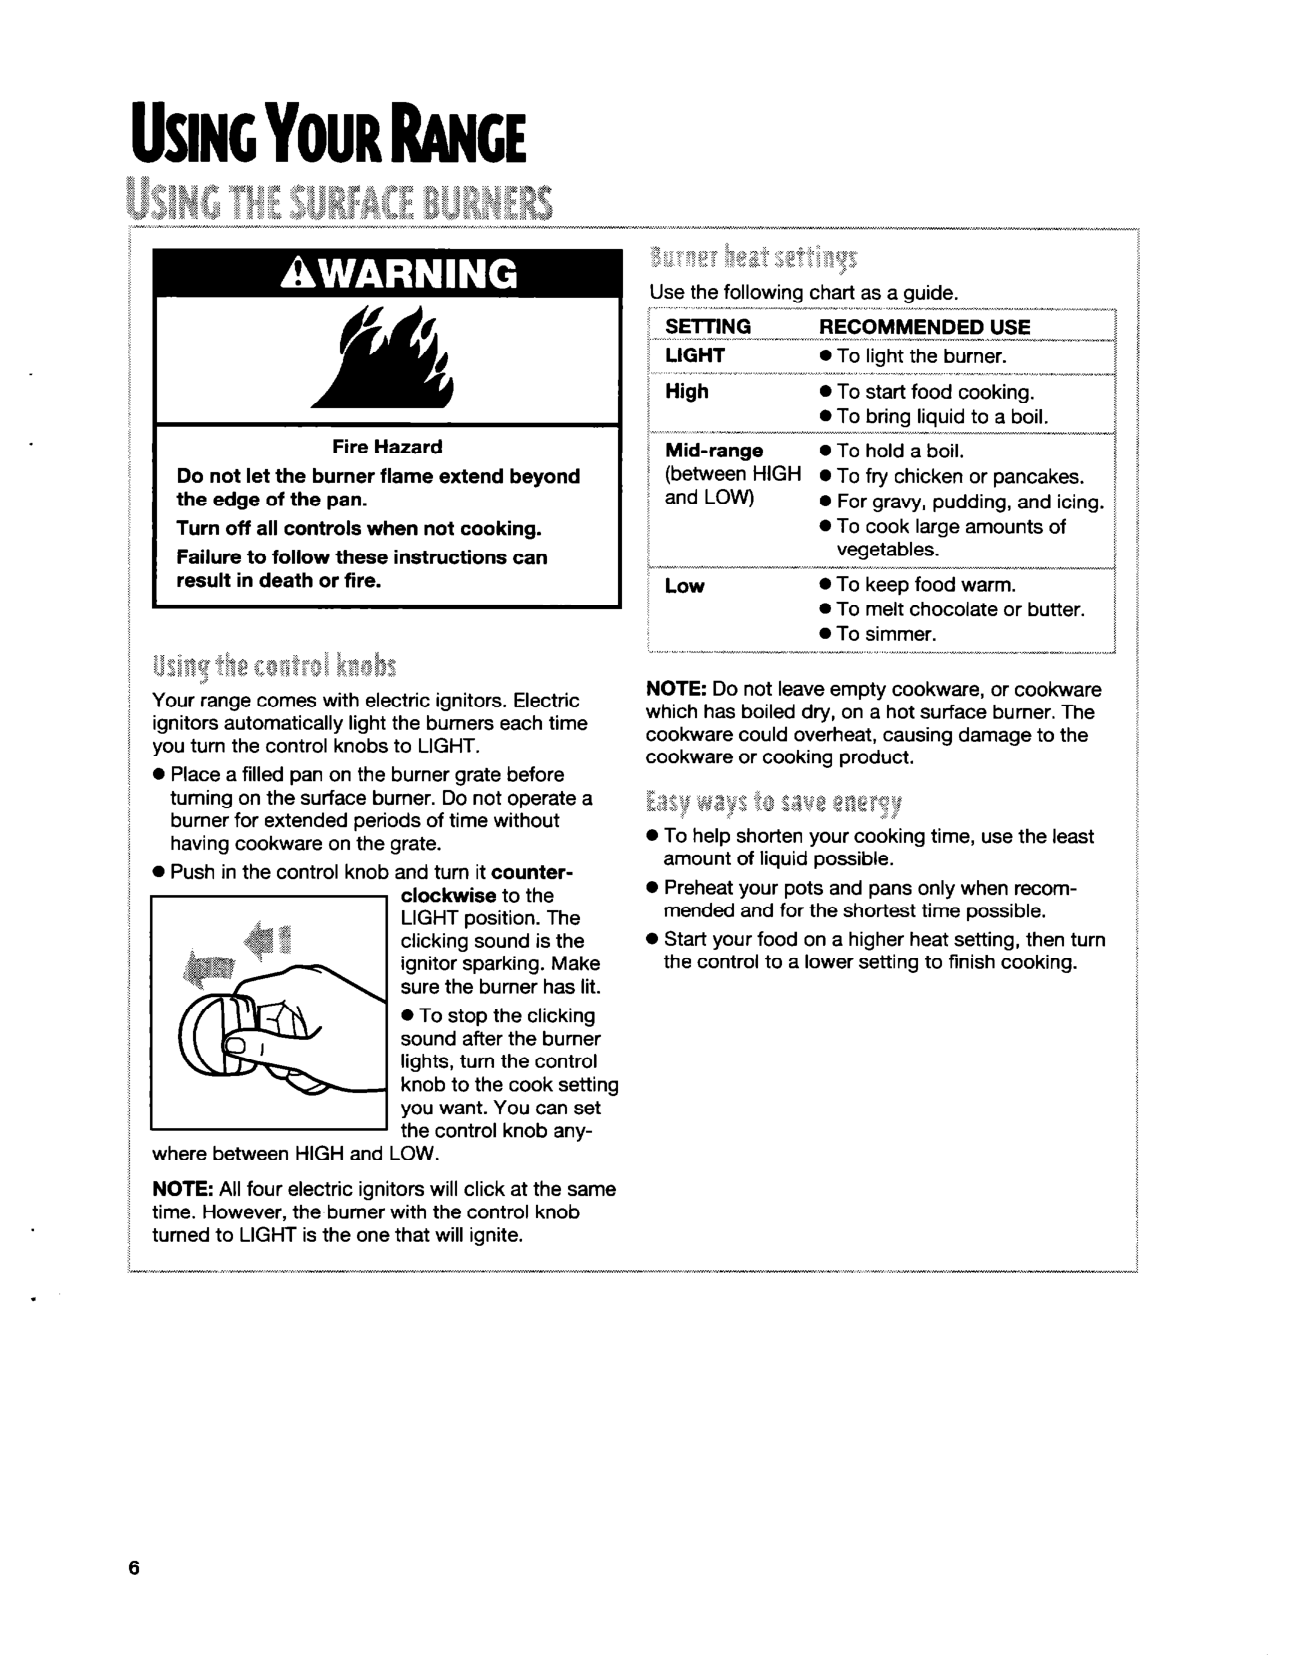
Fire Hazard Do not let the burner flame the edge of the pan. Turn off all not cooking.

i 0 For and ’ 0 To cook large amounts of i
and LOW)

to these can result in death or fire.

L
0 To melt or butter. / 0 To simmer. I

,” I. ..III.~-XIXIII ^Ix,^ ^ .-.-. _-“.., ., ..,. 1111.-“-“1-“~ _1111-, ^-l.^~-,“,-lll ,.,, .,L NOTE: Do not leave empty cookware, or cookware

Your range comes electric
has boiled dry, on a hot surface The cookware could damage to the cookware or cooking product.

the each time you turn the control knobs to LIGHT. 0 Place a pan on the burner grate before

on the surface Do not operate a for periods of time without cookware on the grate. 0 Push in the knob and turn it

0 To help your cooking time, use the least amount of 0 Preheat your pots and pans recommended and for the shortest time 0 Start your food on a heat setting, then turn the to a lower to cooking.

clockwise to the
The is the

sparking. Make sure the has lit. 0 To stop the sound after the burner


turn the knob to the cook you want. You can set the knob any-


where HIGH and LOW. NOTE: All four click at the same time. the the knob turned to is the one that


jr :*.A; Jo:h“s*+ $1 3 pD;,,p@~ 0 Refer to your canner manual for
a instructions. You can surface Hold a lit match near a and turn the control knob to For up-to-date information on contact your the After the turn the local U.S. Department


knob to the you want. Office or who home canning products.

&jgjg q,;yjgjq ~&~~~&$$~~ The large diameter of most or pressure canners combined heat for long periods of time can cause damage to the cooktop. To protect your range: 0 For best use a canner can be


0 The pan have a flat bottom, sides, and a lid. 0 Choose medium to gauge cookware. l The pan material (metal or glass) affects how and evenly the pan heats. 0 When glass or ceramic cookware, check to

centered over the surface 0 Do not place your canner on 2 surface at the same time.


0 Start hot water. reduces the time the is set on Reduce the heat
make sure it is for use on surface burners. 0 To avoid make sure pots and pans are

to the needed to a boil or required pressure in a pressure
centered on the grates.


The pan material affects how fast heat transfers from the surface cooking area the pan material and how evenly heat spreads over the pan bottom. Choose pans that the best cooking

l Heats and l Use for all types of cooking. l or thickness is best for most cooking. l Used as a core or base in cookware to provide even


l Heats and evenly. l Good for and l heat for slow cooking. l Can be coated enamel.
Cast iron


l Heats and l Use on low to medium l instructions.
Ceramic or ceramic glass


l Heats very and evenly. l Used as a core or base in cookware to even
Copper

l Can be used for cooktop cooking if recommended by the l Use on low


l See cast iron and steel.
or iron

l Heats but l A core or base of or copper on the cookware
steel

even l Can be coated enamel.


7


,__,_ IIIL”_l-l -XI- _I__^“_^“~~,“,~~A~~~-~ _-,m -II--~--- --.- -,~-,--.xxII -I-__ _-“-“_ --xIIIxI^IIII - -.,, x*_v “l,“~x-.

g&&g 2 ;:$ pag;
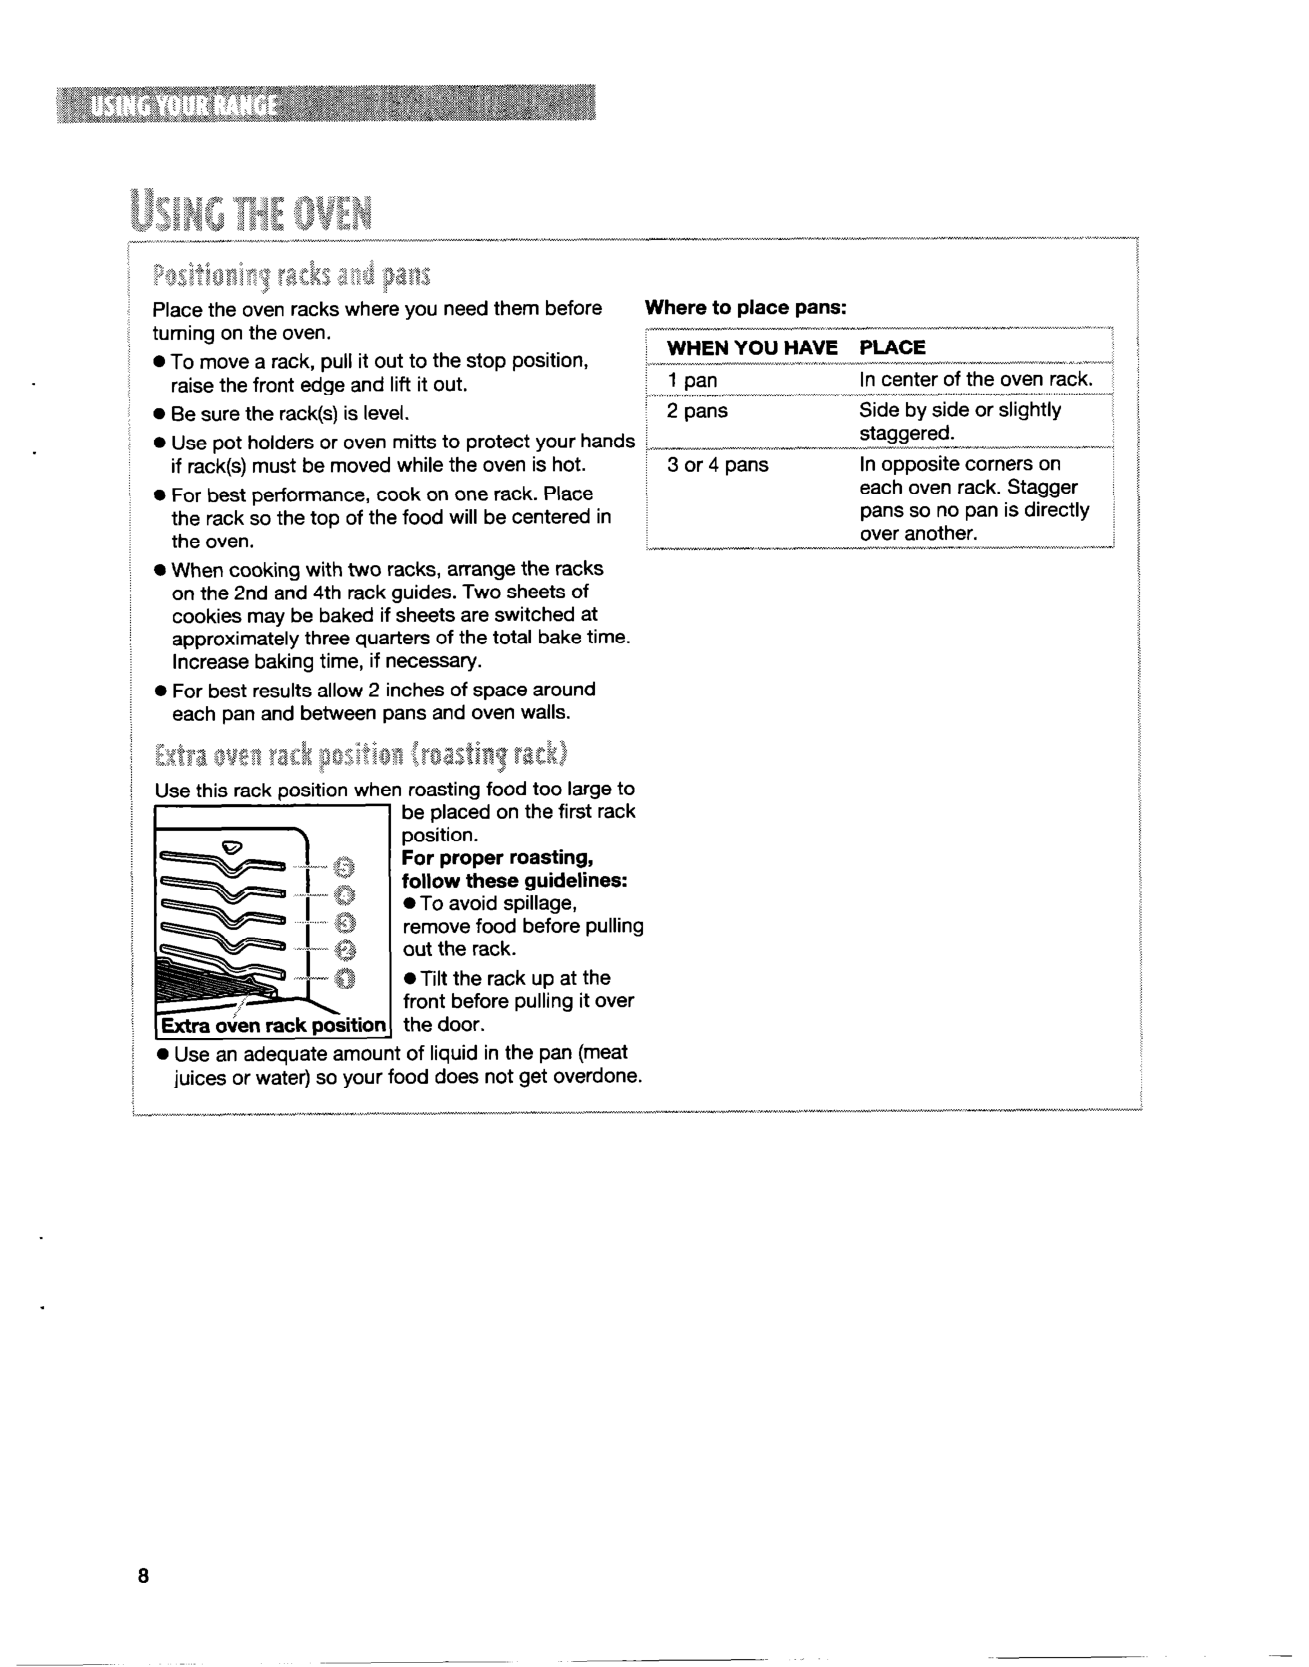
Place the oven racks where you need them before Where to place pans:

on the ^------.-.--- __^ae-------- __I_- n 0 To move a rack, it out to the stop
I WHEN YOU HAVE PLACE ;..-.----------- x -,-_..^ ~,~,~.j_,__,_-l--_---“- ------._- ^

raise the front edge and lift it out. : 1 pan In center of the oven rack.
;+A”-- ~.~~ ----, x”-~“-xI~cII^ -.,I _ _x-~--_____c__l I “II-“^“I”I x 0 Be sure the rack(s) is I 2 pans Side by side or 0 Use pot or oven mitts to protect your hands 1. staggered.,l_l____________----^__^___I^“-^ ____ _I--I_ _--_- _-_- __.~I


if rack(s) must be moved the oven is hot. 3 or 4 pans In opposite corners on
l For best performance, cook on one rack. Place each oven rack. Stagger j the rack so the top of the food be centered in pans so no pan is the over

/
----” --------“----~-“~x.~-~~,~.--.

0 When cooking two racks, arrange the racks on the 2nd and 4th rack guides. Two sheets of cookies may be baked if sheets are at

three quarters of the total bake time. baking time, if 0 For best results 2 of space


each pan and pans and oven &$ya $@A yg$& pg&$ :g+&y&q f&&j Use this rack food too large to


be placed on the first rack For proper

these
0 To avoid remove food before out the rack. 0 the rack up at the front before it over the door.


0 Use an adequate amount of in the pan (meat juices or water) so your food does not get


a


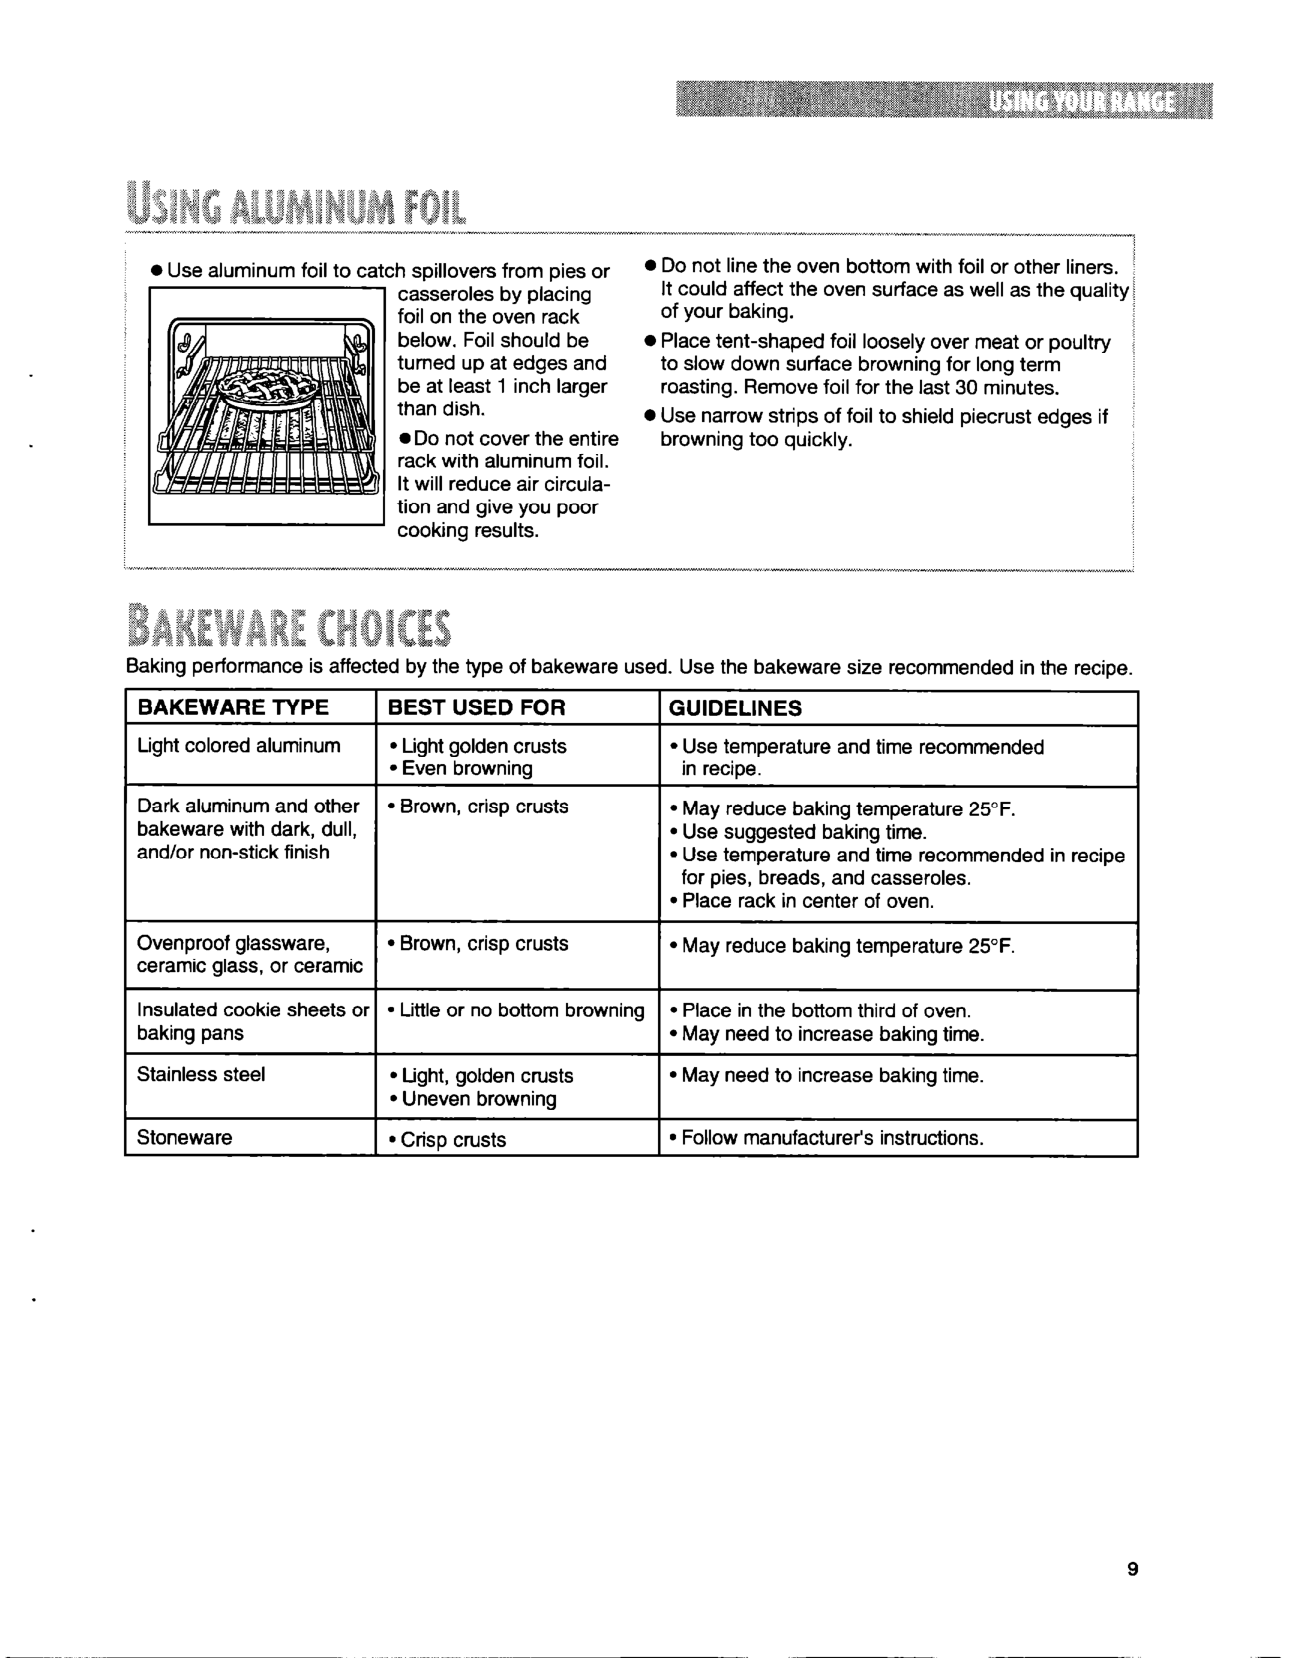


l Use foil to catch from pies or a Do not line the oven bottom with foil or other
It could affect the oven surface as as the of your baking.

Foil be 0 Place foil over meat or up at edges and to slow down surface for long term

be at least 1 larger Remove foil for the last 30 than dish. 0 Use strips of foil to edges if l Do not cover the too rack foil. It reduce air tion and give you poor cooking results.


f


Baking performance is affected by the type of bakeware used. Use the bakeware size recommended in the recipe. BAKEWARE TYPE BEST USED FOR Light colored l Light crusts l Use temperature and time recommended


l Even browning in recipe. Dark and other l crisp crusts

l May reduce baking temperature 25°F. bakeware dark,

l Use baking time. and/or non-stick
l Use temperature and time recommended in recipe for pies, breads, and

. Place rack in center of

l crisp crusts l May reduce baking temperature 25°F. ceramic glass, or ceramic

cookie sheets or . Little or no bottom browning l Place in the bottom third of baking pans l May need to baking time.


steel l crusts l May need to baking time. l browning l crisp crusts l


9


pad , (P. 1Qll)
pad (P. 11)


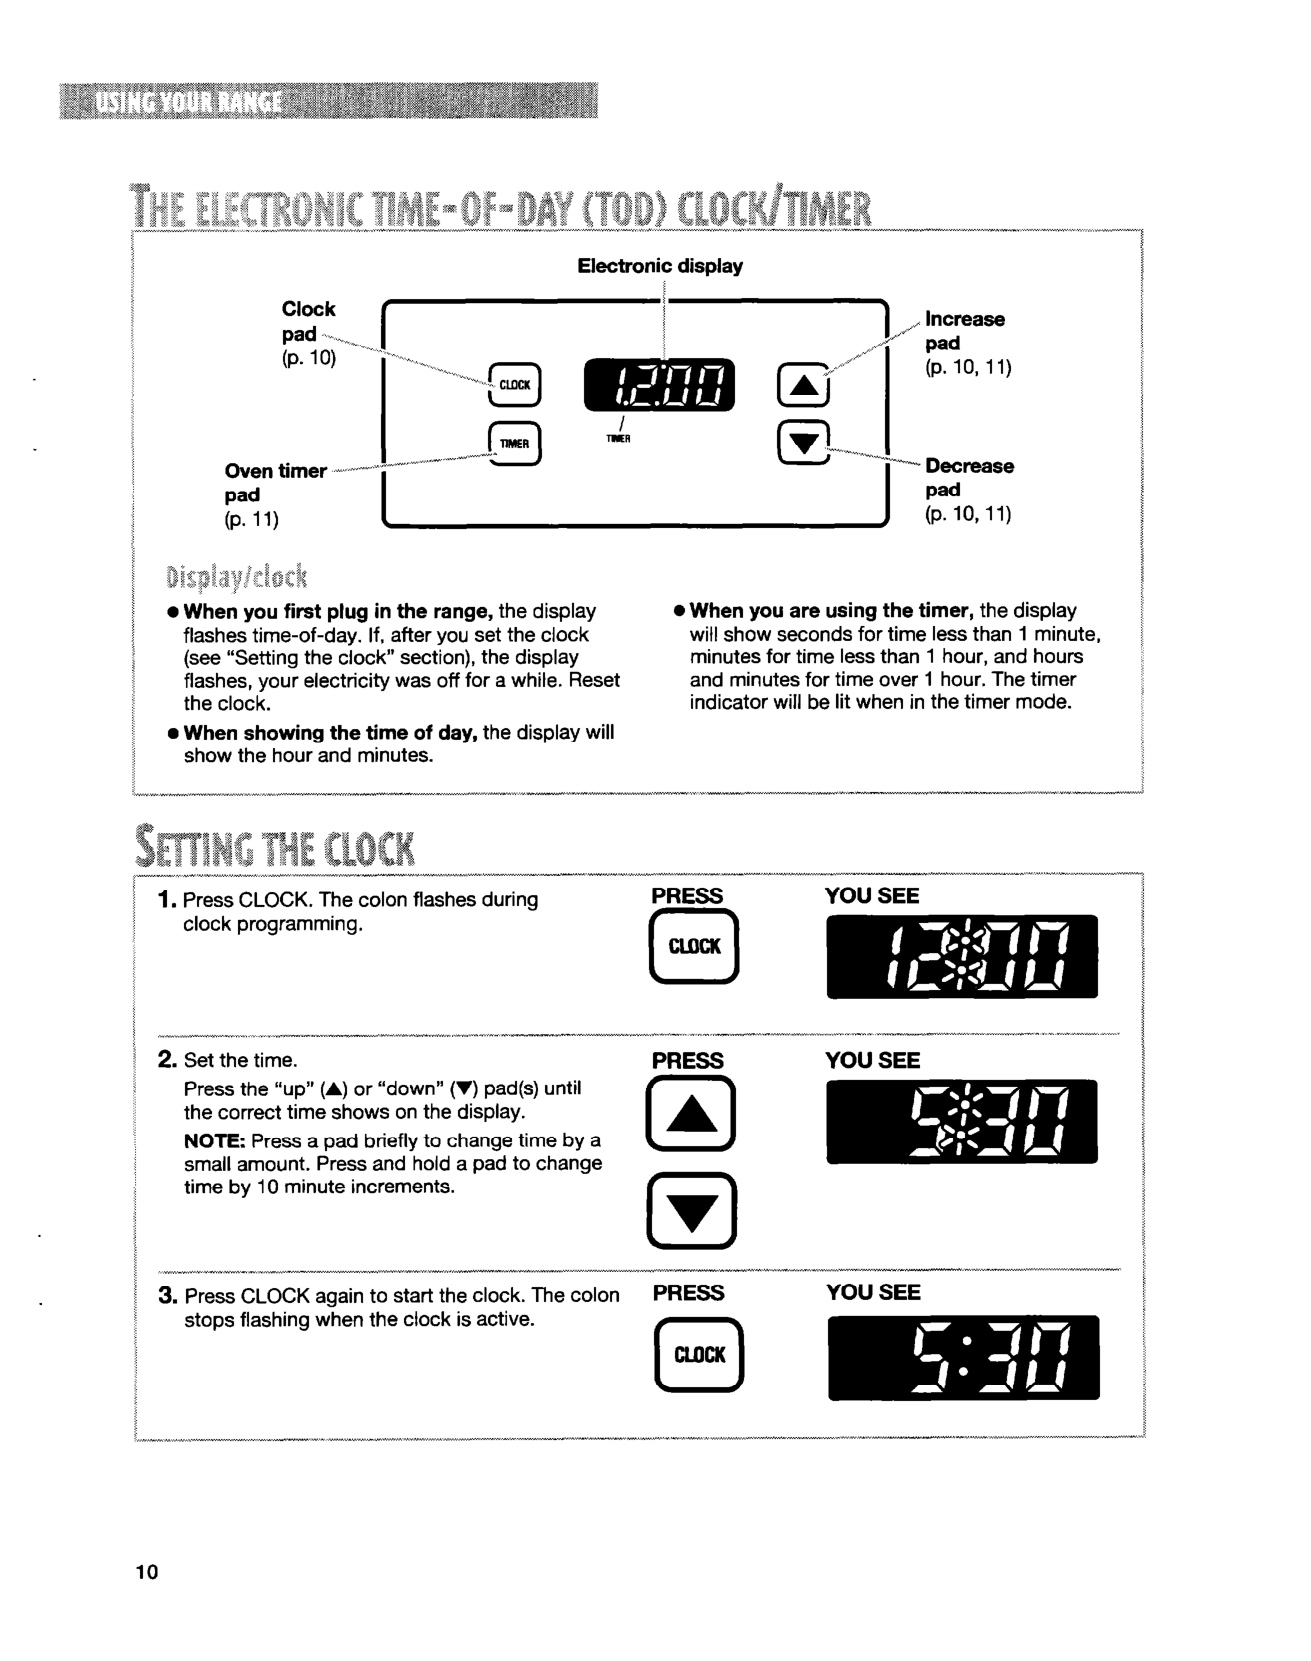
l When you are the timer, the
l When you first plug in the range, the
show seconds for time less than 1 minutes for time less than 1 hour, and and minutes for time over 1 hour. The timer
time-of-day. If, after you set the clock (see “Setting the clock” section), the

your was off for a Reset the clock.
be lit in the timer mode.

l When the time of day, the show the hour and


PRESS
0 CulCK
YOU SEE
the correct time on the 0
A
NOTE: Press a pad to time by a small amount. Press and hold a pad to time by 10
_-~“,x-~x_^I x,------ I-Y,--II-~IIx^I ~,-___x__________---x__ll____l*______lll__


0 ClmK


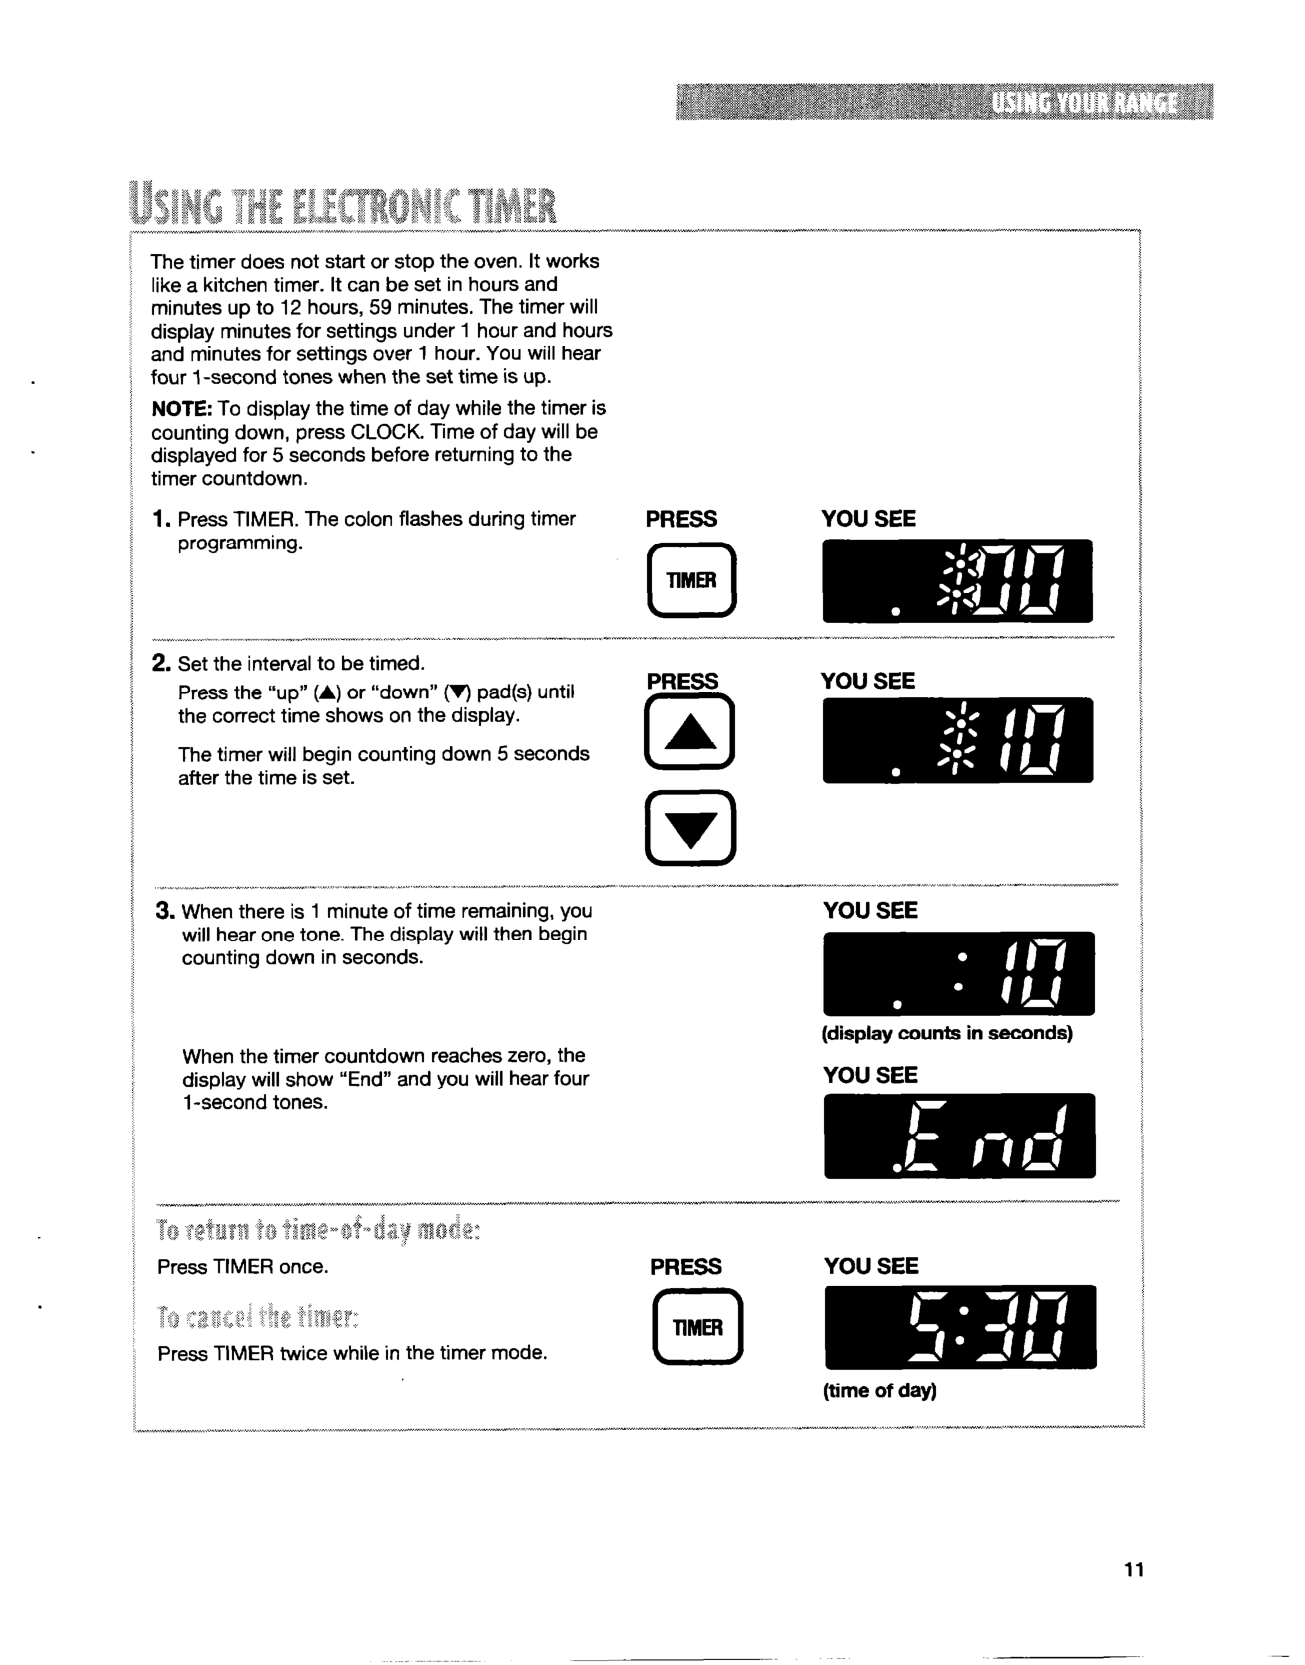


The timer does not start or stop the It works like a timer. It can be set in hours and
up to 12 hours, 59 The timer

for 1 hour and and for over 1 hour. You hear four 1 -second tones the set time is up.


NOTE: To the time of day the timer is down, press CLOCK. Time of day be
for 5 seconds before to the timer


PRESS
rl
Press the “up” (A) or (r) pad(s) PRESS the correct time on the
The timer down 5 seconds 0
A after the time is set.
YOU SEE


###### YOU SEE

down in seconds.

in seconds) YOU SEE

When the timer reaches zero, the
show “End” and you hear four 1 -second tones.


###### PRESS YOU SEE


El RiisH
(time of day)


11


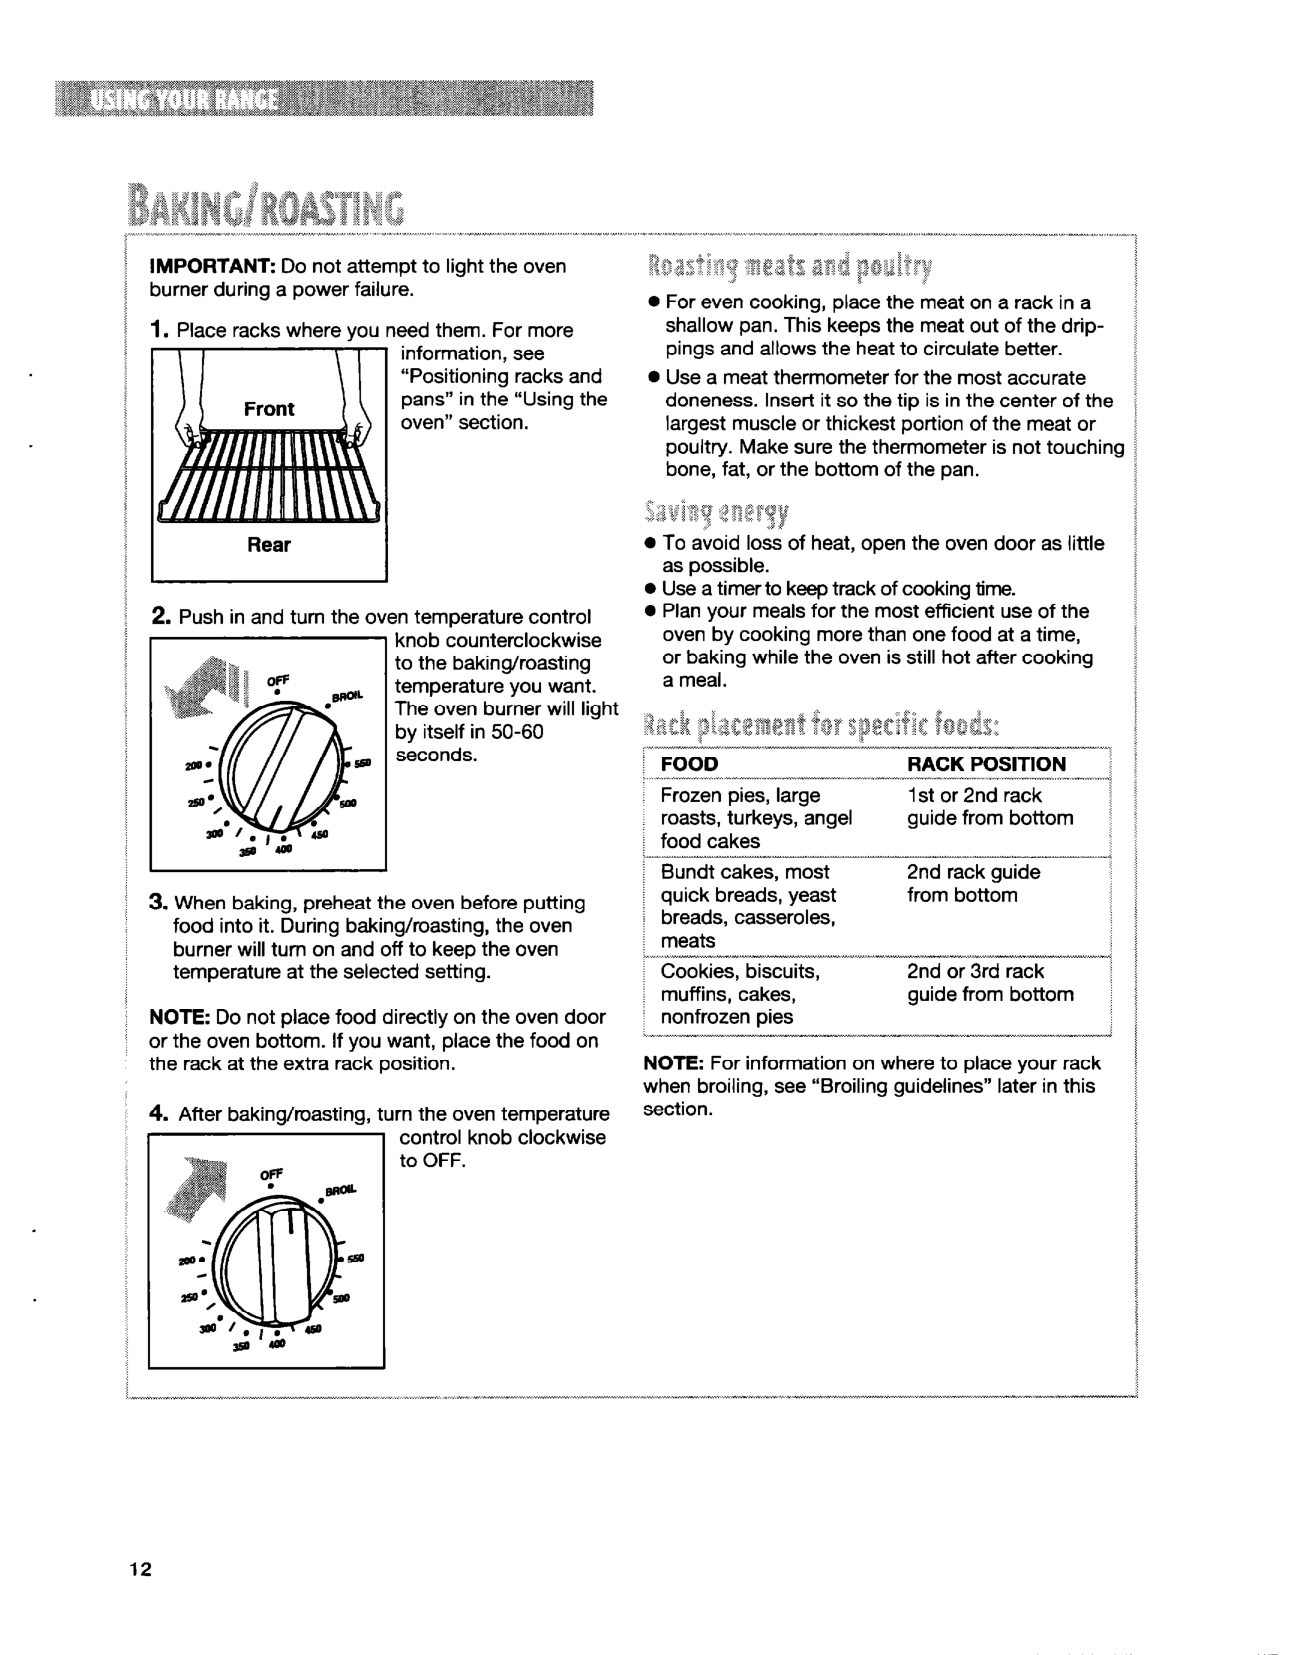
Do not attempt to the oven burner a power

Rear
see “Positioning racks and pans” in the “Using the oven”
turn on and off to keep the oven temperature at the selected setting.
NOTE: Do not place food on the oven door or the oven bottom. If you want, place the food on the rack at the extra rack


?$!:lj;“;.y ~$?& sa8;m .$ OS,. iT
, .,:i “@y 4Y?<.
0 For even cooking, place the meat on a rack in a
pan. keeps the meat out of the drippings and the heat to better.
0 Use a meat thermometer for the most
Insert it so the tip is in the center of the largest muscle or thickest of the meat or
Make sure the thermometer is not bone, fat, or the bottom of the pan.
:,;gj g:g .aq,?,gg a”q,viCII.I.d 0 To avoid loss of heat, open the oven door as
as 0 Use a timer to keep track of cooking time. 0 Plan your meals for the most use of the oven by cooking more than one food at a time, or baking the oven is hot after cooking a meal.
&& $;$l 5tp$&g jqp$J:
--~^II~ -I_-~-- _l__.l--, FOOD RACK“.“_.-_-.,.“^x--_,~~-~I-I--x-----“-.~~~,-.--.”,-,-”~..
pies, large 1 st or 2nd rack
roasts, turkeys, angel from bottom food cakesX_III______I___x__^_~~
cakes, most 2nd rack __’ quick breads, yeast from bottom breads,
meats_xI--I--~~LII--~I_“-~
“-ICookies,2ndor3rdrack cakes, guide from bottom pies
-x__xI__^_-~~ --------
NOTE: For on to place your rack see later in this


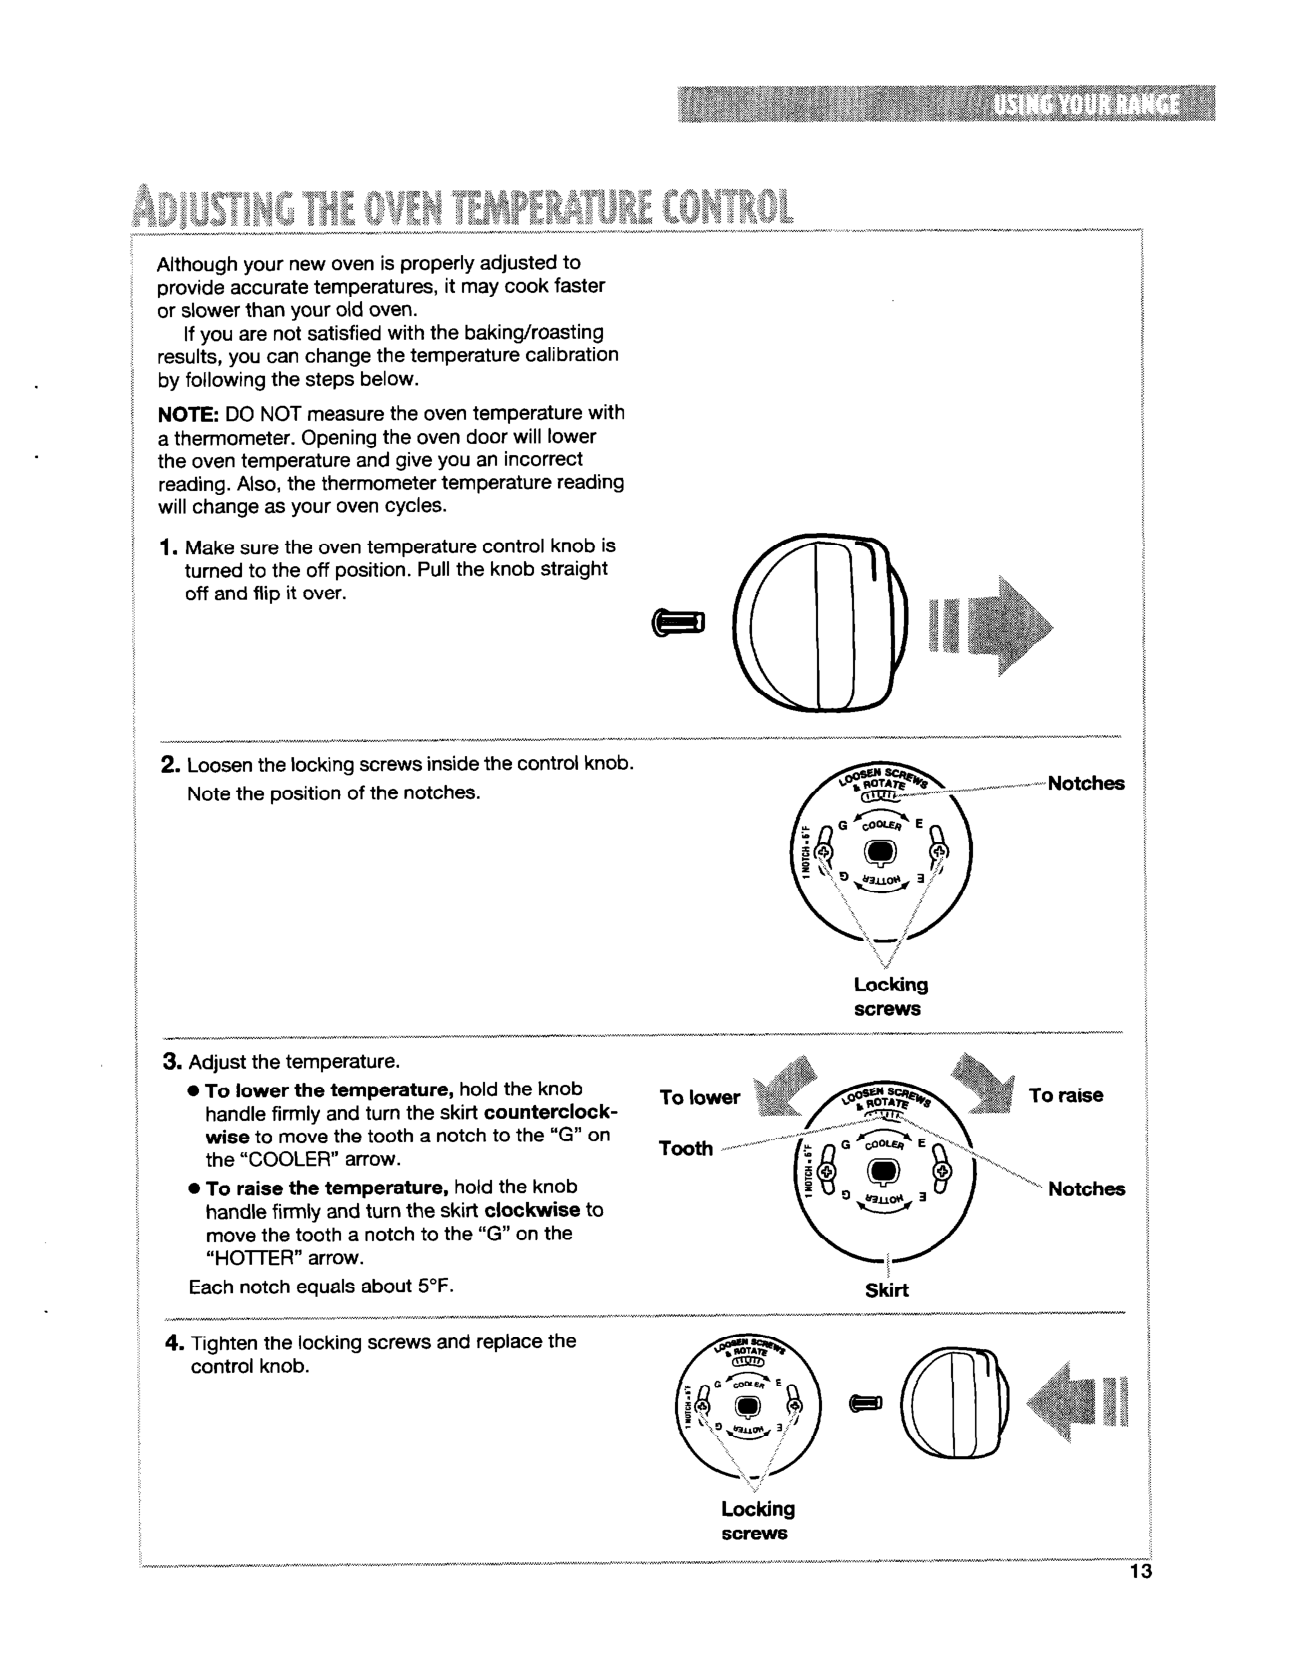
your new oven is adjusted to accurate temperatures, it may cook faster
or than your old If you are not with the

you can change the temperature by the steps NOTE: DO NOT measure the oven temperature a thermometer. the oven door lower the oven temperature and give you an


Also, the thermometer temperature change as your oven

off and flip it over.
.,-_ __I_I_II_xIx_I___x_ ,--,---. x”__l______ __,-- IIxx-“I,“.” ,I-_- “.~I”.^^~IIxxI .x1- _---_- _1_--- _x~ I--_x-_l ---11
k>
Locking screws
_I___~ ____--. _l^________-~---~“--~----,----,------ “A__“,-II”-“m___mw-________I___
0 To lower the temperature, hold the knob
firmly and turn the skirt wise to move the tooth a to the “G” on the “COOLER” arrow.
To raise
0 To raise the temperature, hold the knob
firmly and turn the skirt to move the tooth a to the “G” on the
arrow. Each about 5°F. dirt
w Notches


Locking screws


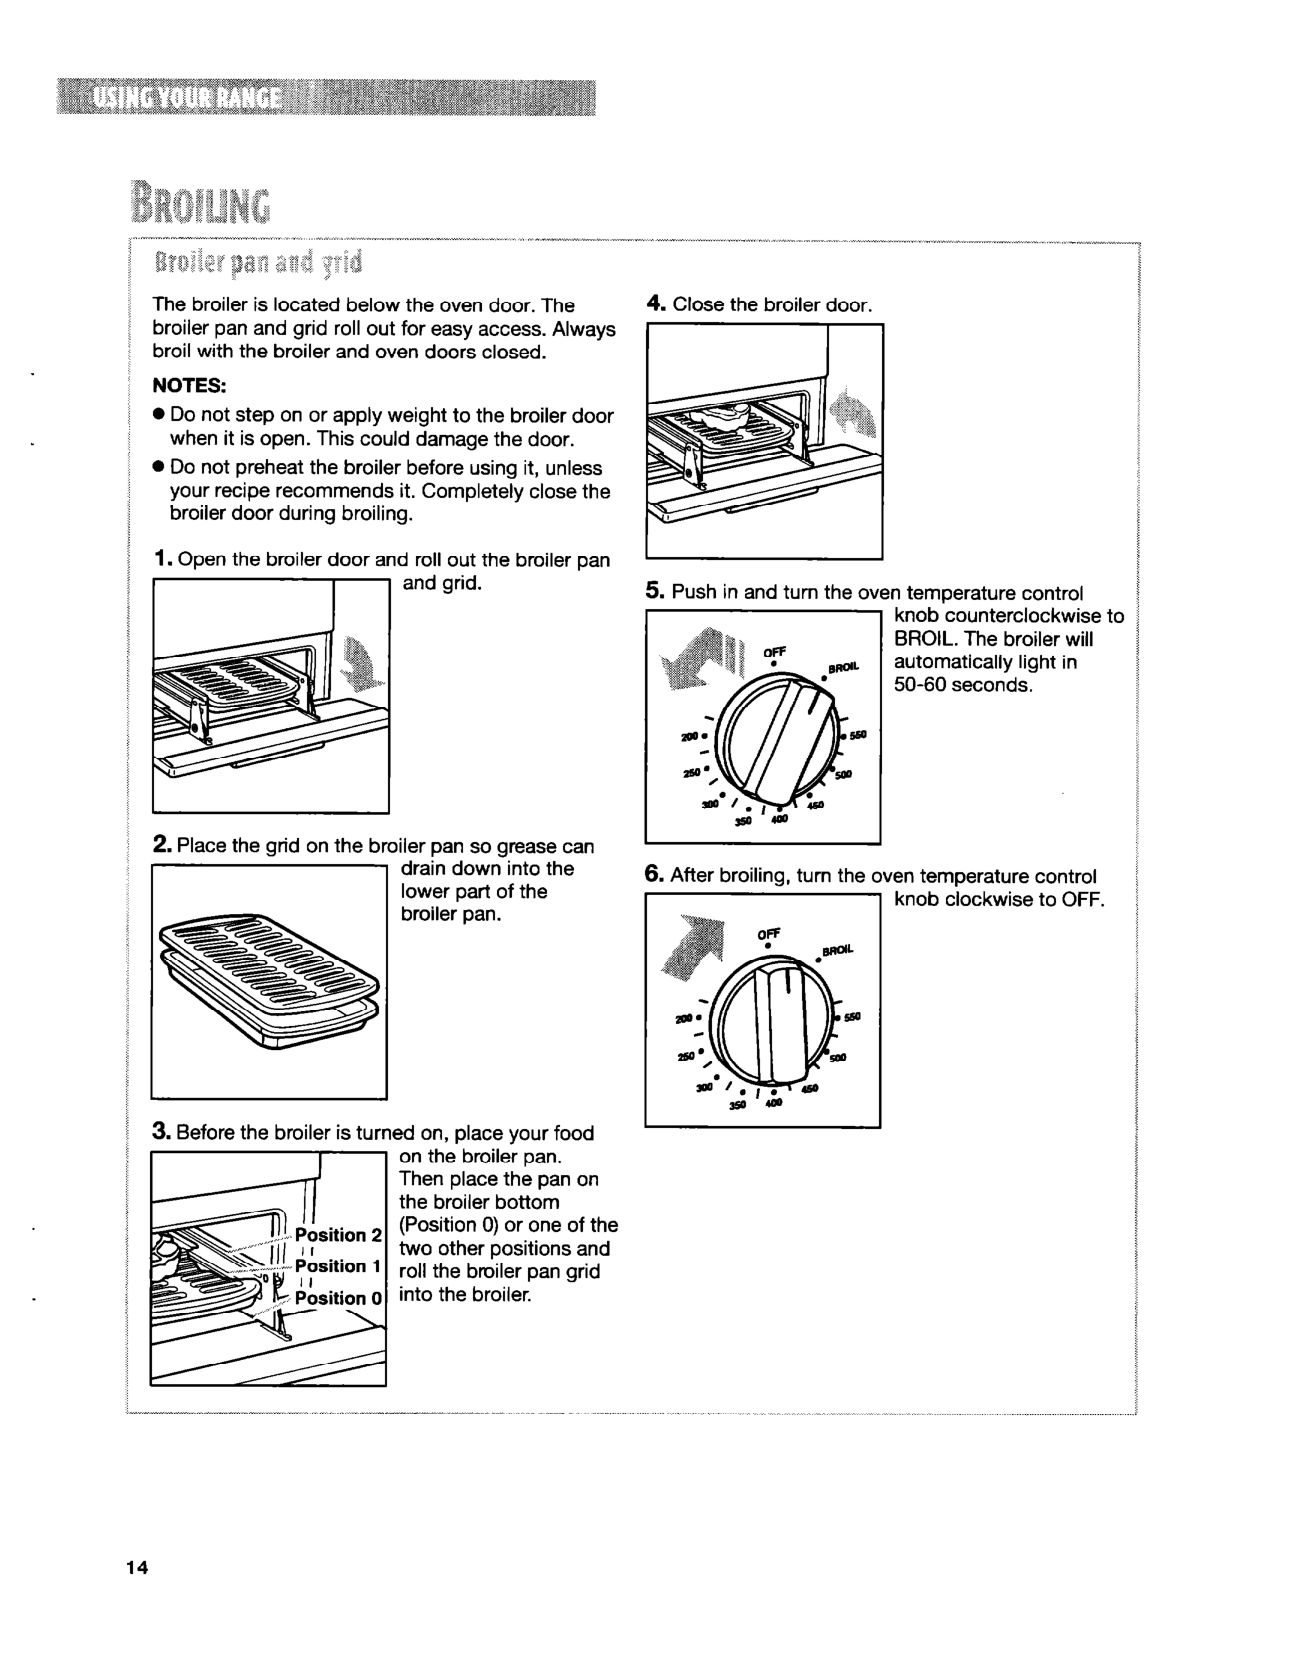
in 50-60 seconds.
The broiler is located below the oven door. The broiler pan and grid roll out for easy access. broil the and oven doors closed.


NOTES:
door
and grid.
1~ pdrIr z;;;t&the
pan.


place the pan on the broiler bottom

0) or one of the two other and roll the pan grid


14


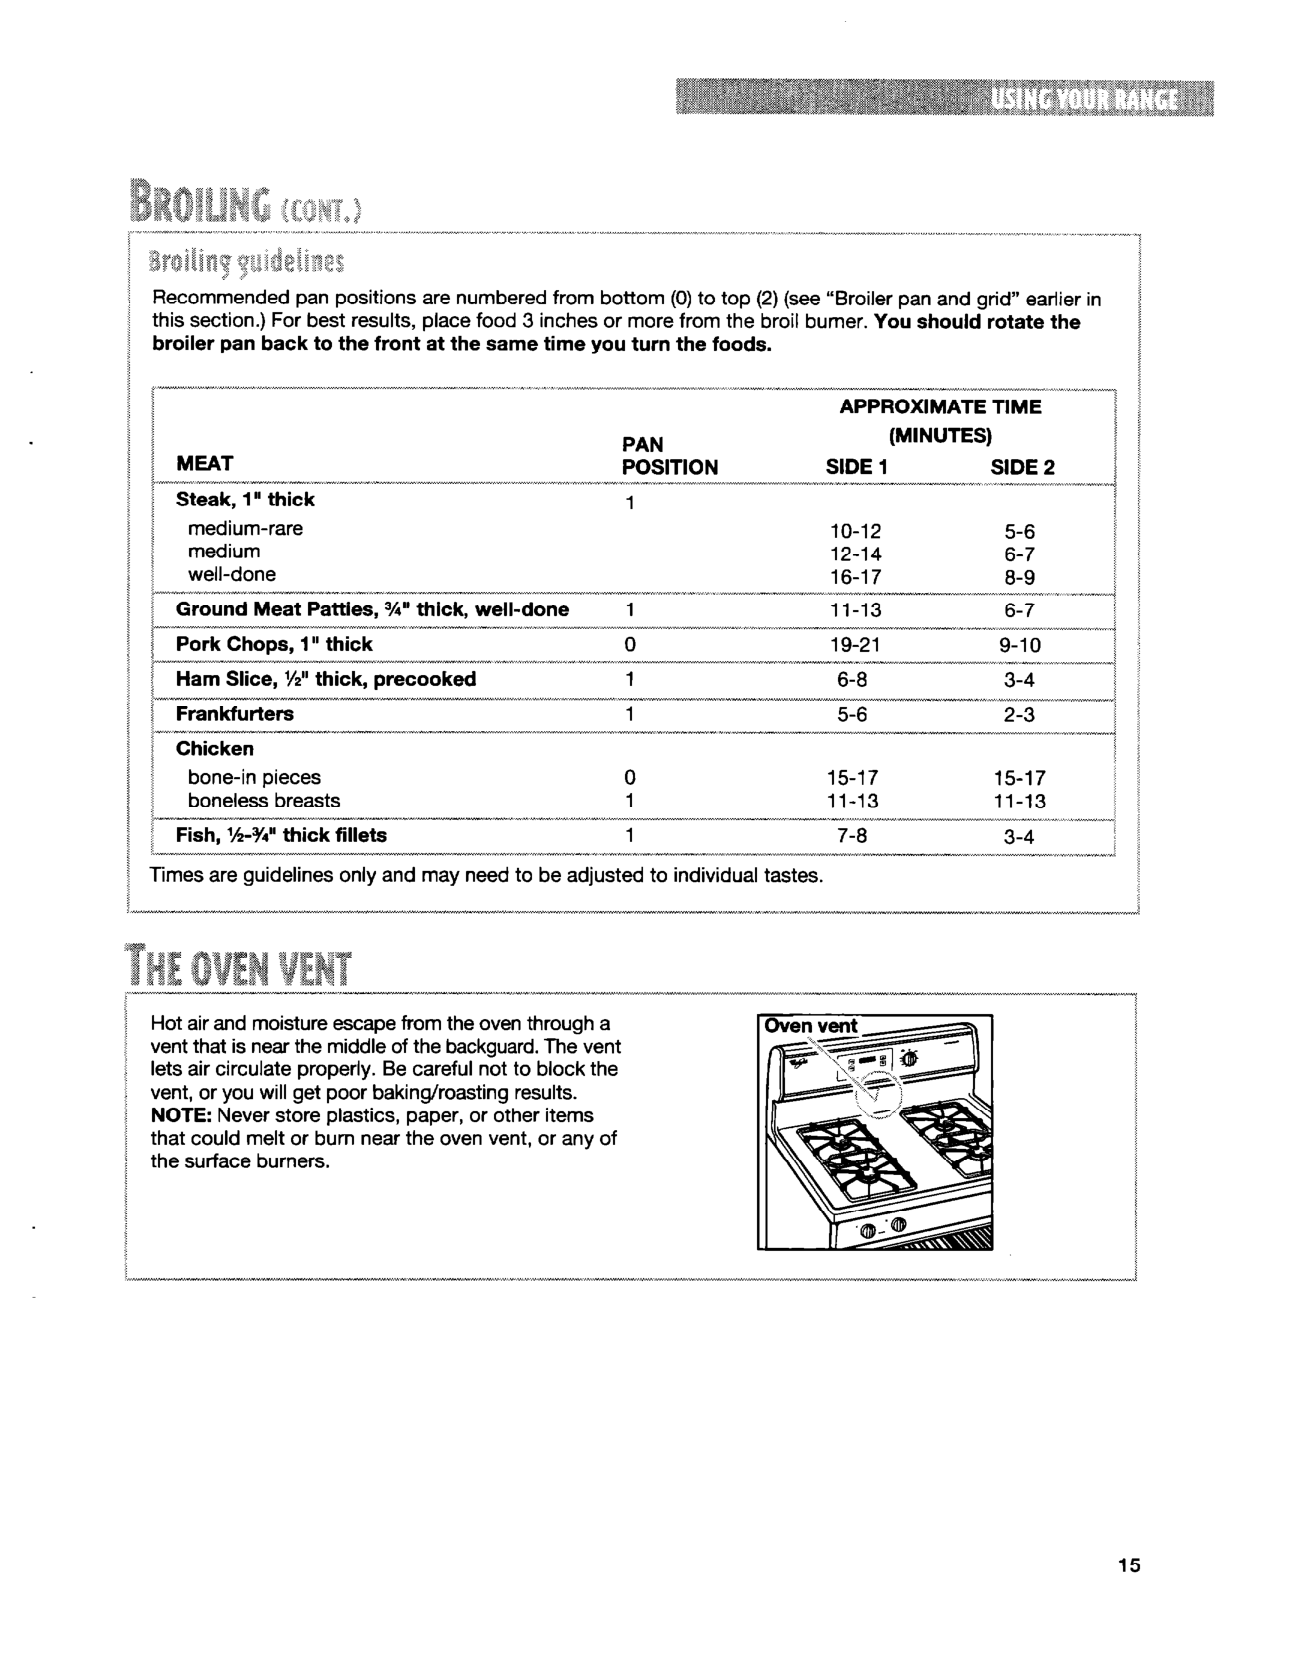
Recommended pan are numbered from bottom (0) to top (2) (see pan and grid” earlier in this For best place food 3 or more from the broil You rotate the

pan back to the front at the same time you turn the foods.

1 (MINUTES)


1 MEAT SIDE 1 SIDE 2+-----~--“----~,----I---_--“--”---Ix“l”“-“l”_,_-~,-~--_~..--,~,-“-“.--~----1--I-“x----___II_x..,.,.~~“,,~“., x ,.,__-
i Steak, 1” thick 1 3 ; medium-rare 10-12 5-6 I i medium 12-14 6-7


16-17 a-9 ’ Ground Meat Patties, %” thick, 1 11-13 6-7 i 1

x^---IIxxI _xII_ ^IX__.” _1-- x ---_x- ^ ---- 1.---- “----,~_-I__ -“---,~----,,,“~~,,;
Pork Chops, 1 ‘I thick 0 19-21 9-10 I ____x____^__-,___I--xx^I___xI_II_;------“-- XI^XI~~IXI”~XII.“^X 111__^ ---____^_^“~_---“-~------- _II “,*~---..-“---A i Ham Slice, I/Z” thick, precooked 1 6-8 3-4 i

~,---,---I IIxI”^IIIII”IIIX _,-- ---~--~--I-.“,-II___X_--- ~__x_CX .” II”“xIIII”-IIIIIxIxI 4 1 5-6 2-3 I Chicken 1


pieces 0 15-17 15-17 boneless breasts 1 11-13 11-13
___________I___------,--~--“-~-~-”-~---~-,~~--II”--I--^“XIIX_I^-^” “_ ,. llll^Fish, l/i-%” thick 1 7-8 3-4 ; Times are only and may need to be adjusted to tastes.

!


Hot air and moisture escape from the oven a vent that is near the middle of the backguard. The vent lets air Be careful not to block the vent, or you get poor NOTE: Never store paper, or other items that could melt or bum near the oven vent, or any of the surface


15


3 il” N i ~“~-“Ix,” _^,, “-,.XX. ,._ xx “~-.“,_._ ,._ ,,_-,_ _.^-_“..XIX-,-^ .._._” .X .,.. “.” -_x_ x-.. -._ I,” ,. ^_.^. ,. .X-,._“.“.~ .I.X---~--, “II”^IIx”^x __“_ -.“--^ x .,-. _“- . . _.-._-._ --._

The range not tip normal use. the range can tip if you apply too much force or to the open door the bracket fastened down


Tip Over Hazard
\

A or adult can tip the range and be killed. bracket to rear range foot.
/

the bracket, if the range is moved. See the instructions for details.
A&

to these can result in death or burns to and adults.

Anti-Tip Bracket

Making sure the bracket is 0 Slide range forward. 0 Look for the bracket attached to floor.


0 Slide range back so rear range foot is bracket.
Range Foot


16


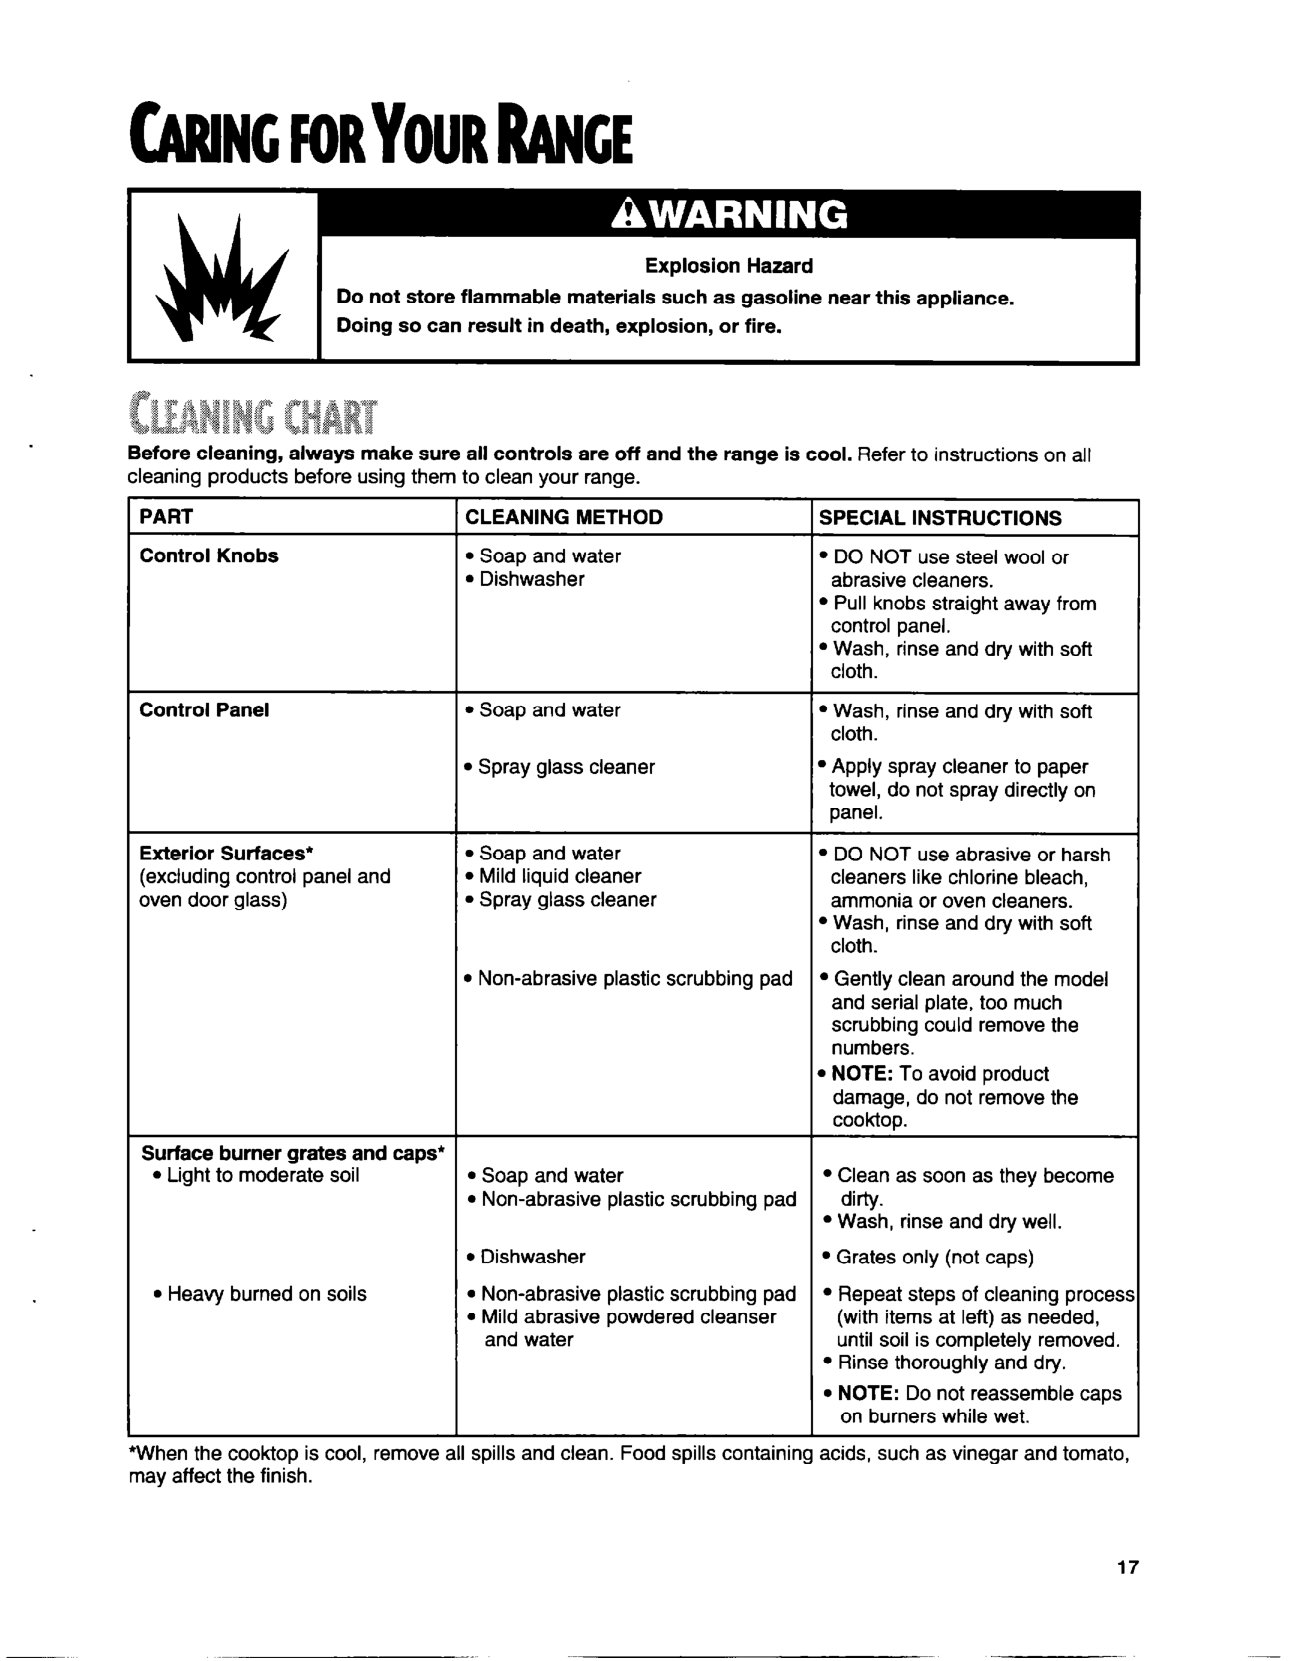
Hazard Do not store flammable materials such as near this so can result in death, or fire.


Before make sure all are off and the range is cool. Refer to on all

products before them to clean your range. PART

CLEANING l Soap and water l
SPECIAL INSTRUCTIONS
. DO NOT use steel wool or cleaners. l knobs away from control l Wash, rinse and dry soft cloth.
Knobs


l Soap and water
l Wash, rinse and dry soft cloth.
Control Panel

. spray cleaner to paper towel, do not spray on panel.
l Spray glass cleaner


Surfaces* l Soap and water panel and l cleaner
l DO NOT use or

like bleach, ammonia or oven
oven door glass) l Spray glass cleaner

l Wash, rinse and dry soft cloth.

l Non-abrasive plastic pad l clean around the model and serial plate, too much

could remove the numbers.


m NOTE: To avoid product damage, do not remove the cooktop.

Surface burner grates and caps* l Light to moderate soil l Soap and water l Clean as soon as they become l plastic pad dirty. l Wash, rinse and dry


l l Grates (not caps) l pad l Repeat steps of proces! l powdered (with items at left) as needed,

l Heavy on soils

and water soil is removed. l and dry. l NOTE: Do not reassemble caps

on wet.

*When the cooktop is cool, remove all and Food acids, such as and tomato, may affect the


17


, . “~. , , *? ,,

SPECIAL l See the “Sealed surface burner’
PART Surface

in the “Caring for your range”

l Soap and water l Wash, rinse and dry soft l pad cloth.
Oven door glass

l Spray glass cleaner l Wipe paper towel.

Oven

l Soap and water l When oven cools, rinse
l Food
and dry soft cloth. l Steel wool pad l Wipe clean water and dry l Commercial oven l the that come the
sugar and/or milk l soiled areas


oven (Place on the floor to protect the floor surface.) Wipe

with clean water and dry. NOTES:

l Use oven in a room. l Do not let commercial oven

contact the gasket, thermostat, or surfaces of the range. cause damage.


l For easier you can remove the oven door. the instructions in the the oven door”


l Wash, rinse and dry.
Oven racks . Soap and water l Steel wool pad

l Wash, rinse and dry.
pan and grid l Soap and water l Steel wool pad


l
l Soak for 20 then scrub with pad.

l or commercial oven cleaner


18


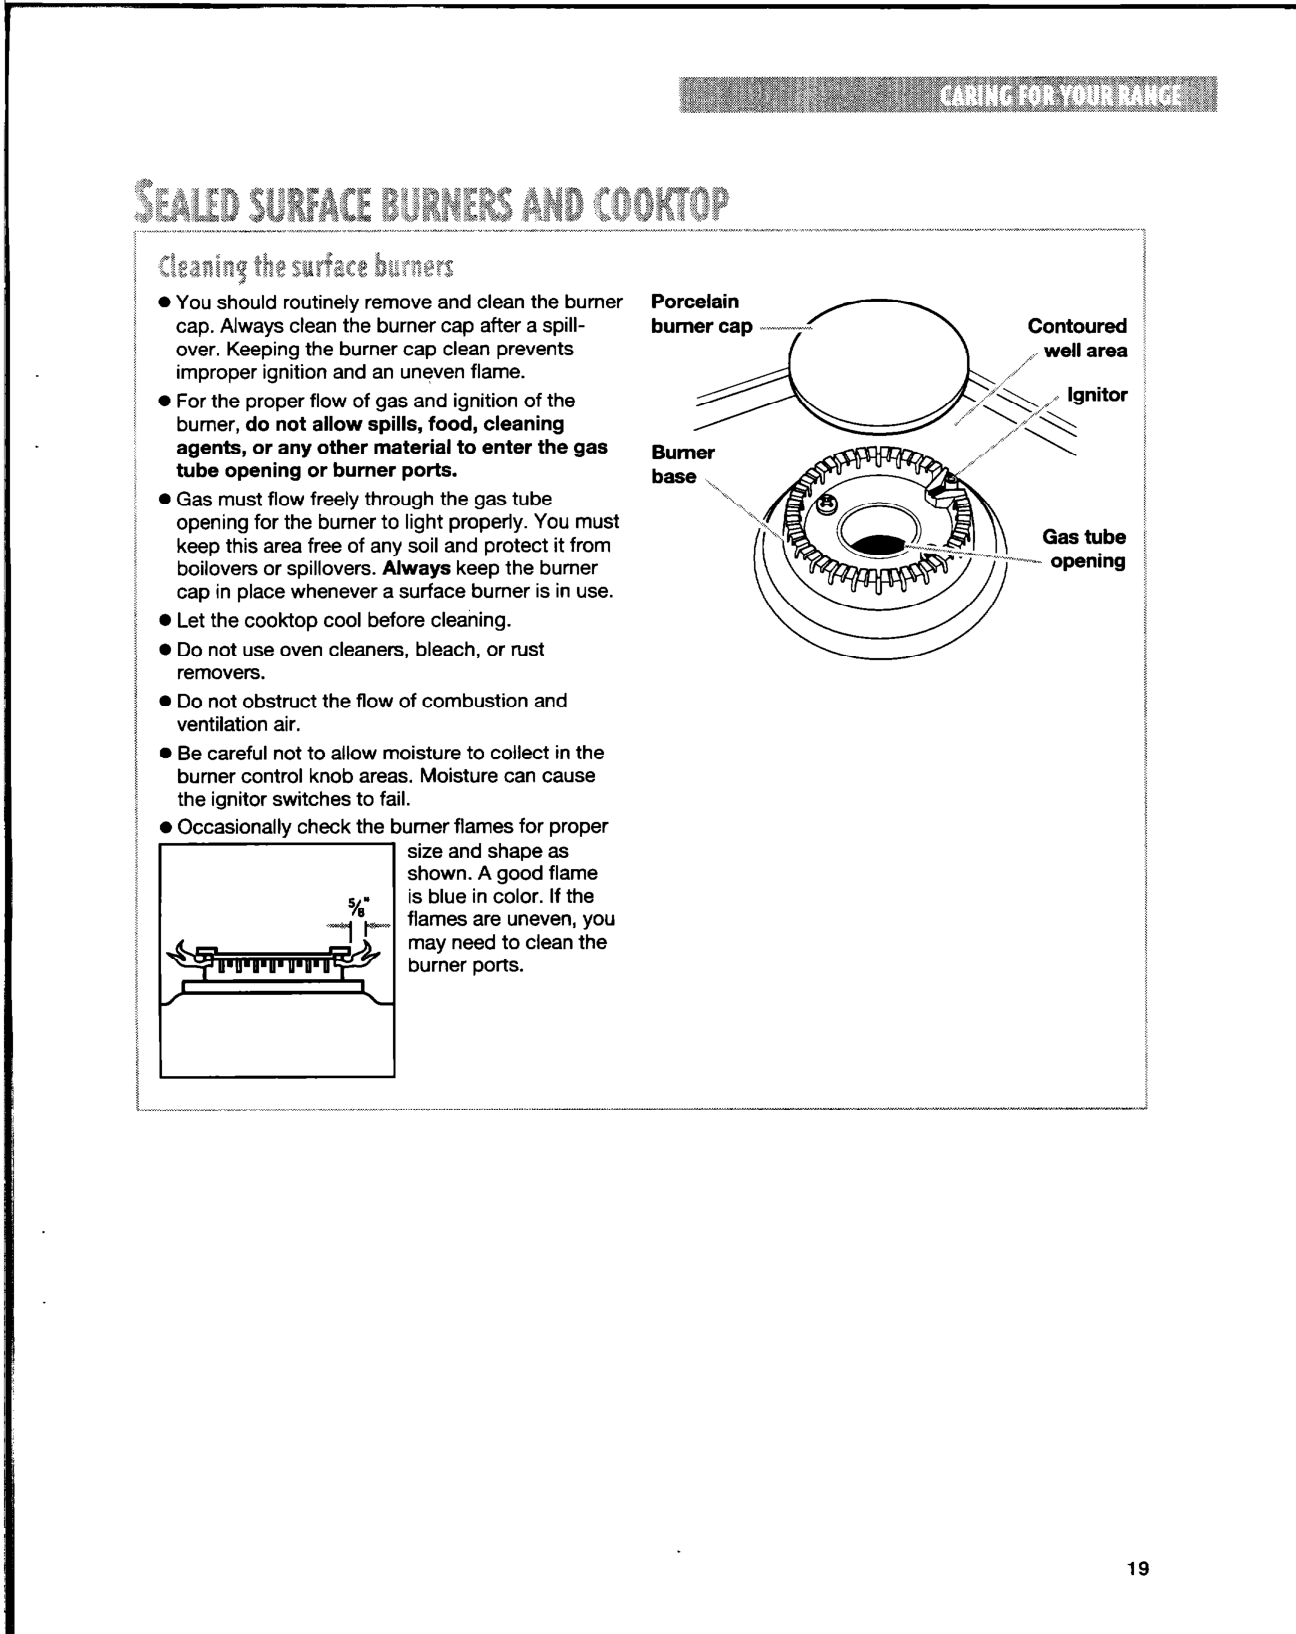
0 You remove and clean the cap. clean the burner cap after a over. Keeping the burner cap clean improper ignition and an flame.


0 For the proper flow of gas and of the burner, do not allow food, agents, or any other material to enter the gas tube or burner ports.


0 Gas must flow freely the gas tube

for the burner to You must keep this area free of any soil and protect it from
or keep the

cap in place a surface is in use. 0 Let the cook-top cool before 0 Do not use oven or rust


removers. 0 Do not obstruct the flow of and ventilation air.


the to fail.

umer flames for proper size and shape as

A good flame is blue in color. If the flames are you may need to clean the

ports.


19


pins on the cap are
the base.
abrasive pad or
Do not clean the cap in a or self-cleaning oven.


d, clean them a pin. Do not or distort the

port. Do not use a

recheck cap or contact an authorized service Do not service the sealed burner
toothpick. If the needs to be adjusted, call a

for


20


_x Y,.,,,,., _“__,_., .^ ._ .,,. ll.” . “, ..“““1..,._11. . 1.11 I ._.- “_ ,“IxX”^ .,. I. I..- “_ . . . ,, “-,* -.-. _, ” .,.--.. X,,,^ ^I . “.._ .,,,,,,^ _. ^“_ lll”..~..~.,“,l,” .IIXXI “..~.“~..~,.“___” ,1,,“,,1 “l_l_

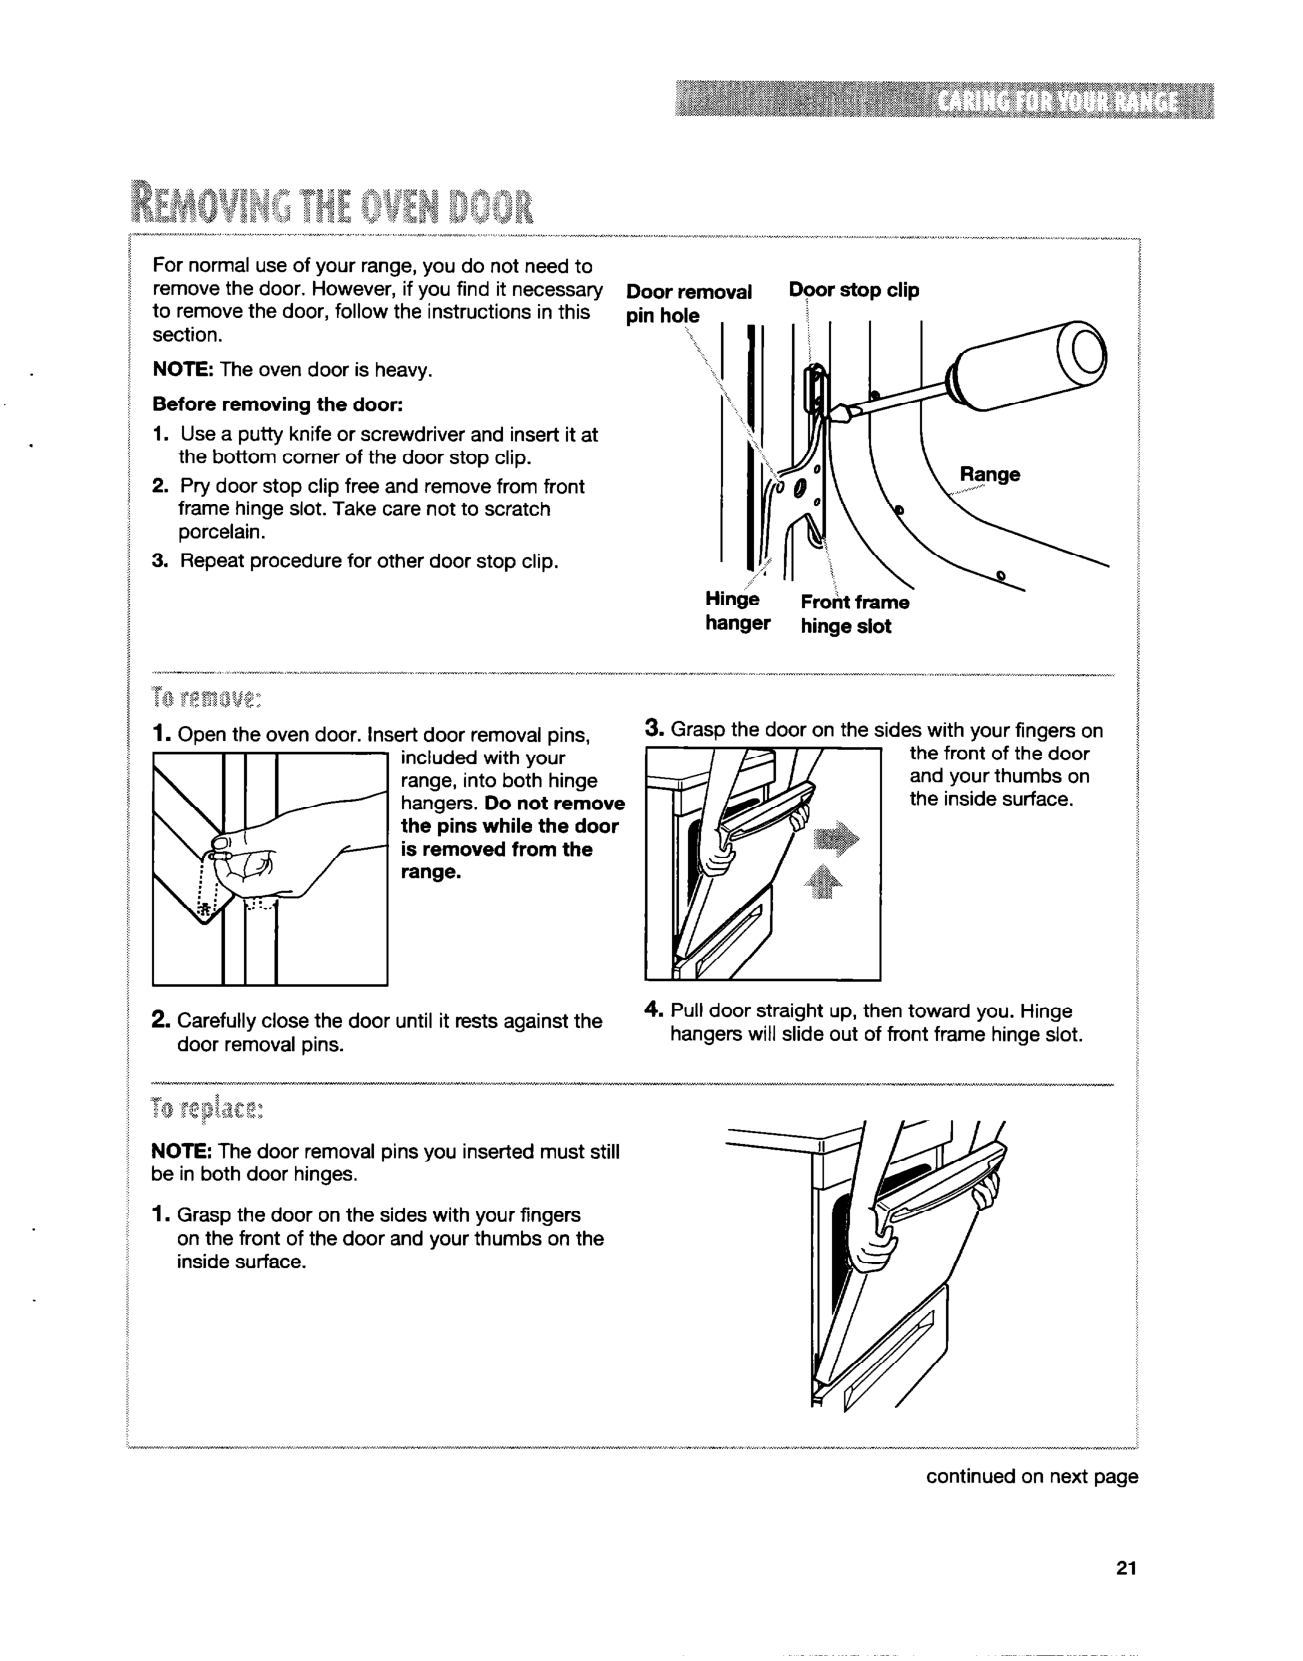
For normal use of your range, you do not need to remove the door. However, if you find it Door removal Door stop clip to remove the door, the instructions in this


NOTE: The oven door is Before the door:


Froht frame‘ hanger slot

.“----., . ...XIXIX^III 1_ .------.-- -_,-,” _^--I x- ---.--” -.I-_ ^ .I._ “l_.X .^X “._ - _-,” .--, “,-_X.“.--X-” ._I--. ” -..,. “..“.-- “xIx” --.-,. “,llll^-^.x


range, into both
Do not remove the pins the door is removed from the range.
iraq p the door on the sides with your on the front of the door and your thumbs on the surface.


slide out of front frame slot. ~~II~~_x~-~“~xI_I___IxxxIIIIIIIxII


=
NOTE: The door removal pins you must still be in both door


surface.


on page


21


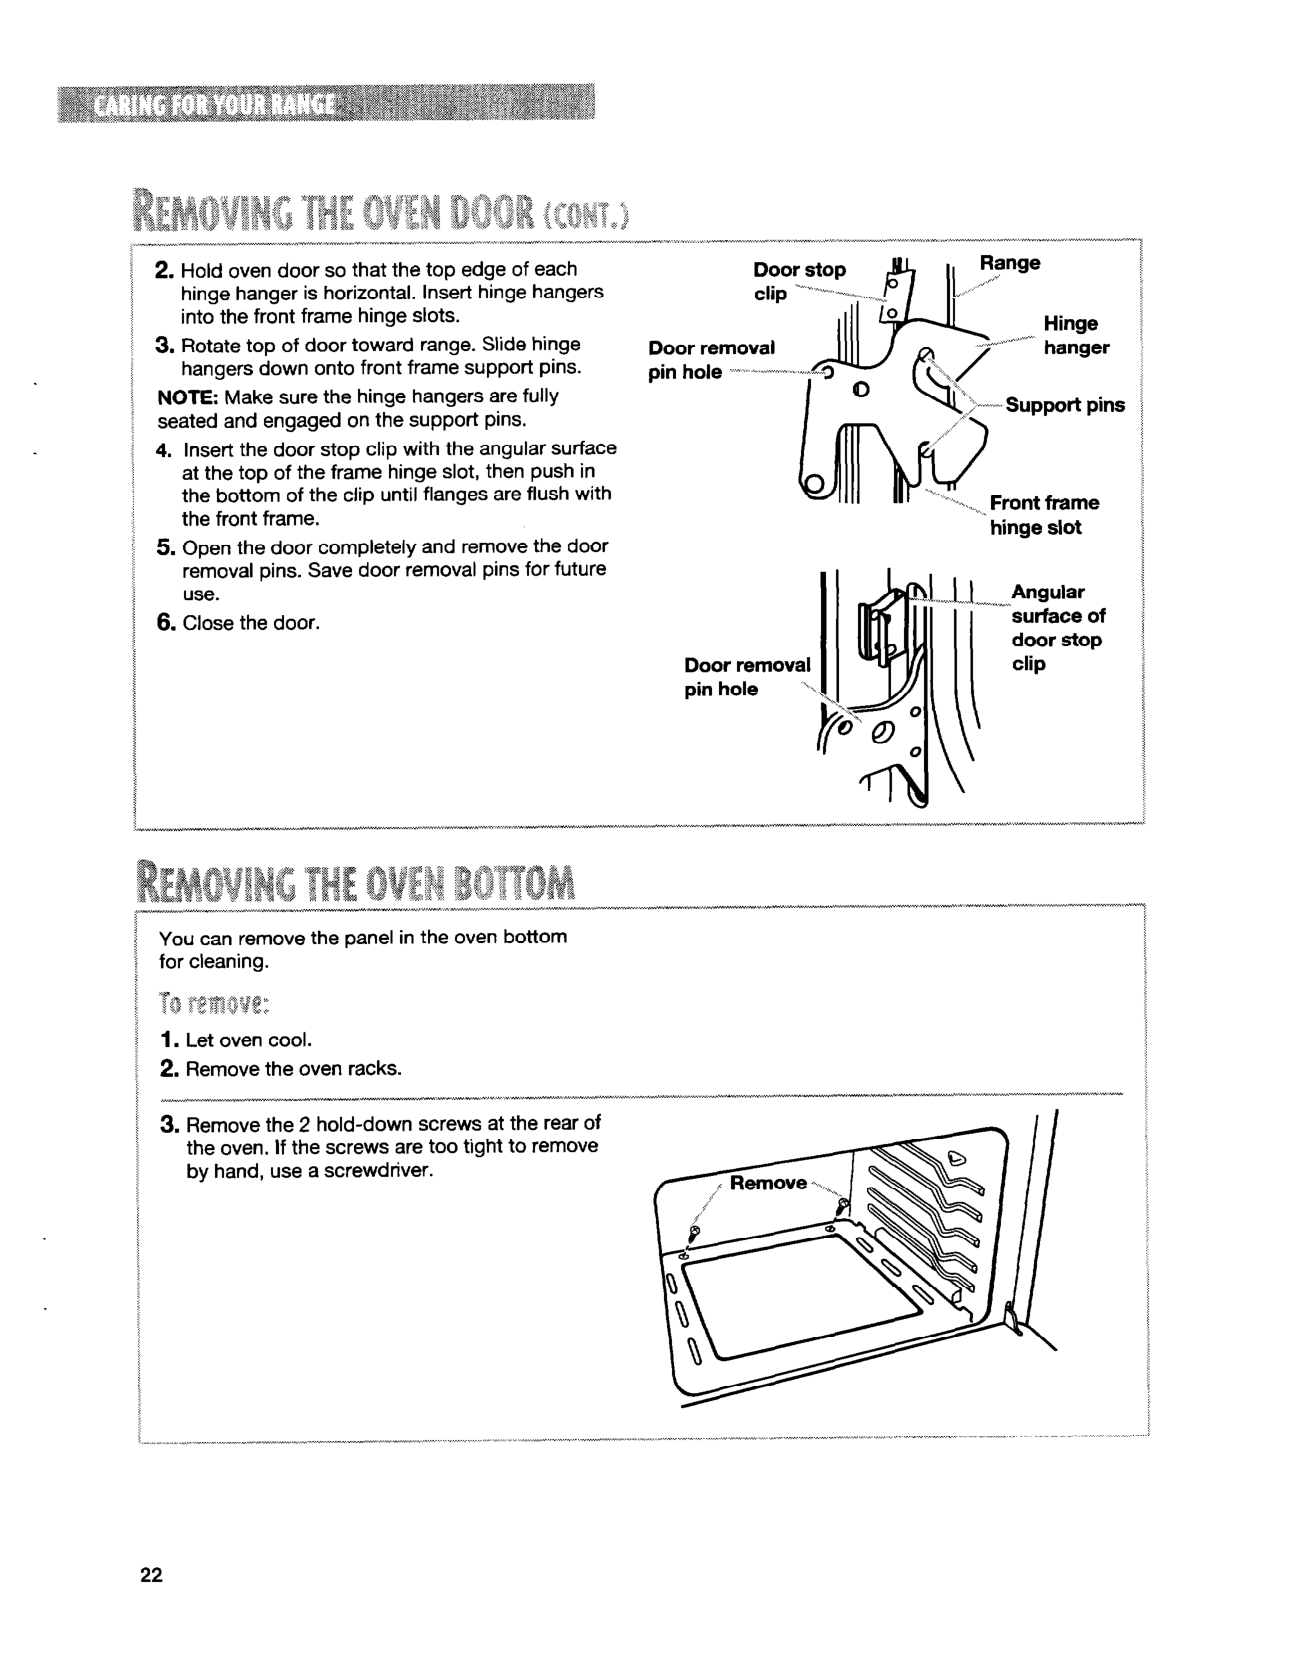
into the front frame slots.
NOTE: Make sure the hangers are seated and engaged on the support pins.


slot


Door removal pin hole ‘;


You can remove the in the oven bottom for


22


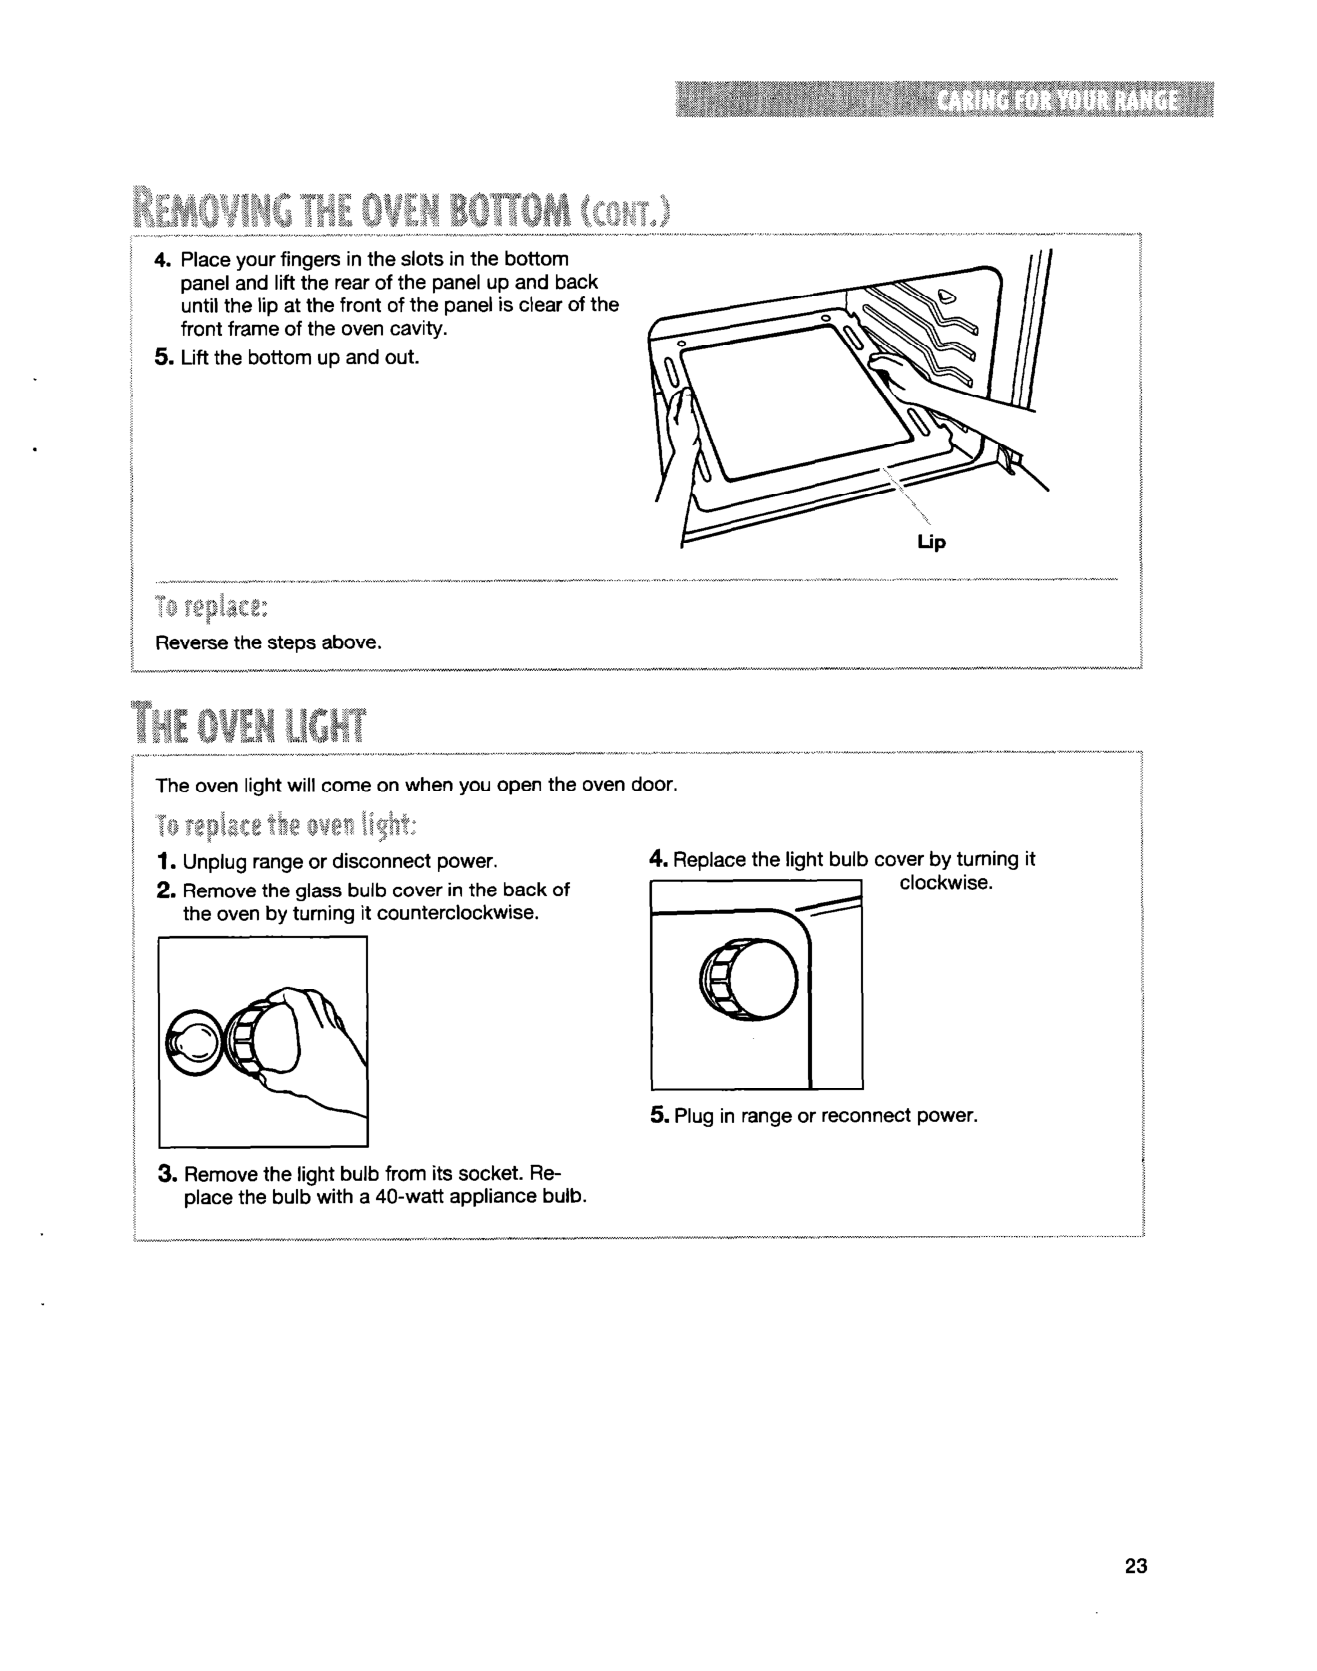
the lip at the front of the panel is clear of the front frame of the oven


.


23


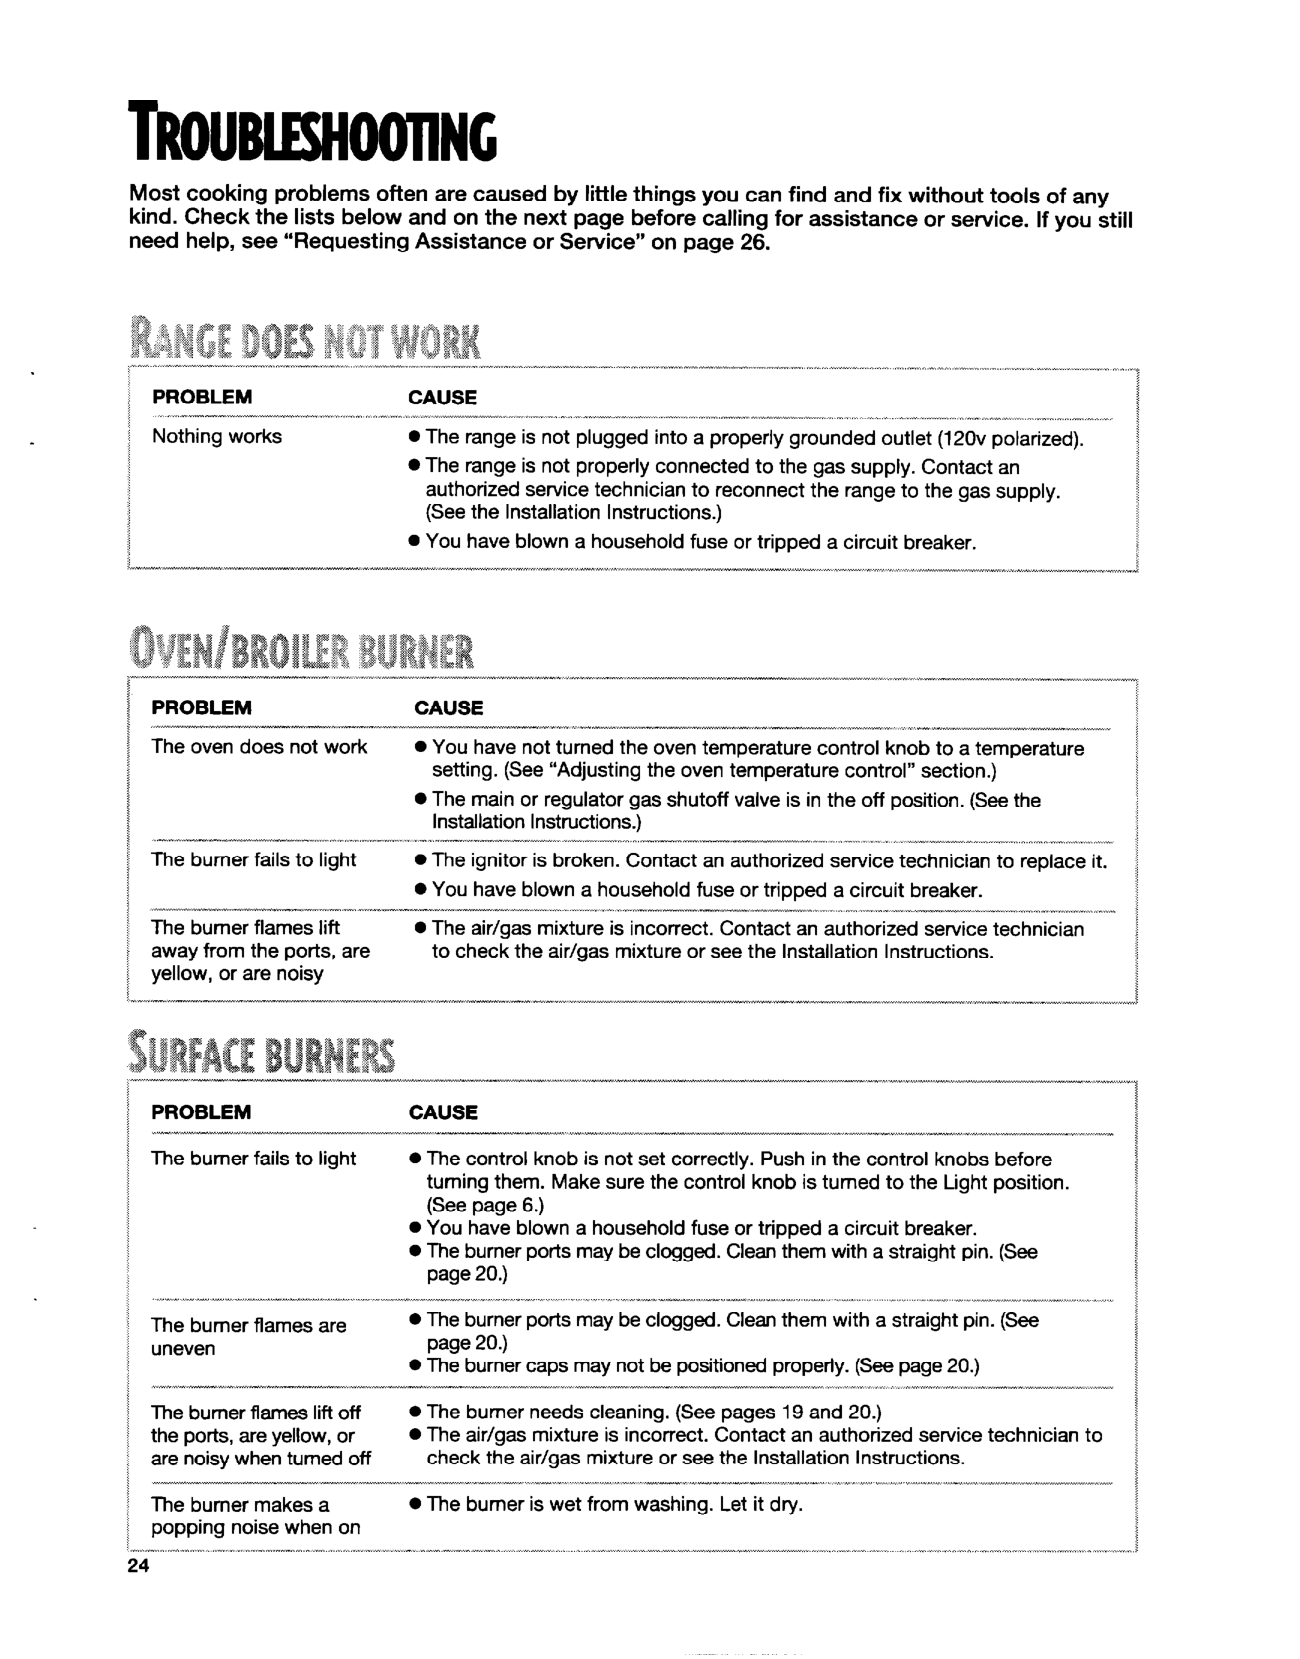
####### Most cooking problems often are caused by you can find and fix without tools of any kind. Check the lists and on the page before for or service. If you need help, see or on page 26.


“_” . X-X----~XI-“-^-.“l”.l^“l-.-~~.-~~ ” ^ --_^._ I,-,~,---“- “-X._.X.^ ..- “. _,-x--.- ^ .--. “,__“.X”“.~,--II-^---“.--~. ,,.,, ., “““_ xI..^^,” ,..,,_,. , ^ x.~ ^-_” ,.._.. ^ ,..,. ,X x.“^I_-_l_“l_,” ” ,.
PROBLEM CAUSE

works 0 The range is not into a (120~ 0 The range is not to the gas Contact an

to the range to the gas (See the

l You have a fuse or tripped a breaker.


PROBLEM CAUSE Ix,- .xX- ,-,-, -_-- ______x~___ ~ I---.~-- ~----I - -.~I.“~-_ ~ -_---___I-~-~_x--.

The oven does not work 0 You have not the oven temperature knob to a temperature (See the oven temperature 0 The main or gas shutoff is in the off (See the Instructions.)


The fails to 0 The is broken. Contact an service to replace it. i

0 You have a fuse or tripped a breaker.
---Wm.” .1._1^._ ^I~--^“~- _I--. “_. _ .-.- “~_.~.“~.“----~~^Ix-IIxxx~ ,__ . “.,, ,._,X,_ ,.., “,..----“.X .-__-__ “.,^,,,” _,_, ,^,“^, : ’ The flames lift 0 The air/gas is Contact an ; ; away from the ports, are to check the air/gas or see the : yellow, or are


I


PROBLEM CAUSE The burner fails to 0 The knob is not set Push in the control knobs before


them. Make sure the knob is to the Light
(See page 6.) 0 You have a fuse or tripped a breaker. 0 The ports may be clogged. them a straight pin. (See


page 20.)
The burner flames are 0 The ports may be clogged. them a pin. (See page 20.)

0 The caps may not be (See page 20.) “11-1-----1-------,~~--~ ^,“..X1” I IZ :,“-xI--I;^..--..--~~xlllxxx^I- .“_”

The flames lift off 0 The burner needs (See pages 19 and 20.) the ports, are yellow, or l The air/gas is incorrect. Contact an service to are off check the air/gas or see the Instructions.


--- -----,-^--_“~ -.-.“--,“x^ --,, “-^ .,-- “l., “xx”- “,-- ..-- _--lll---li-X--I,“. II XL “i” 1_ “,“.“1.1111 “~-~,““IIx-“I”xI”I”-III^I^IxI The makes a l The burner is wet from Let it dry.

noise on


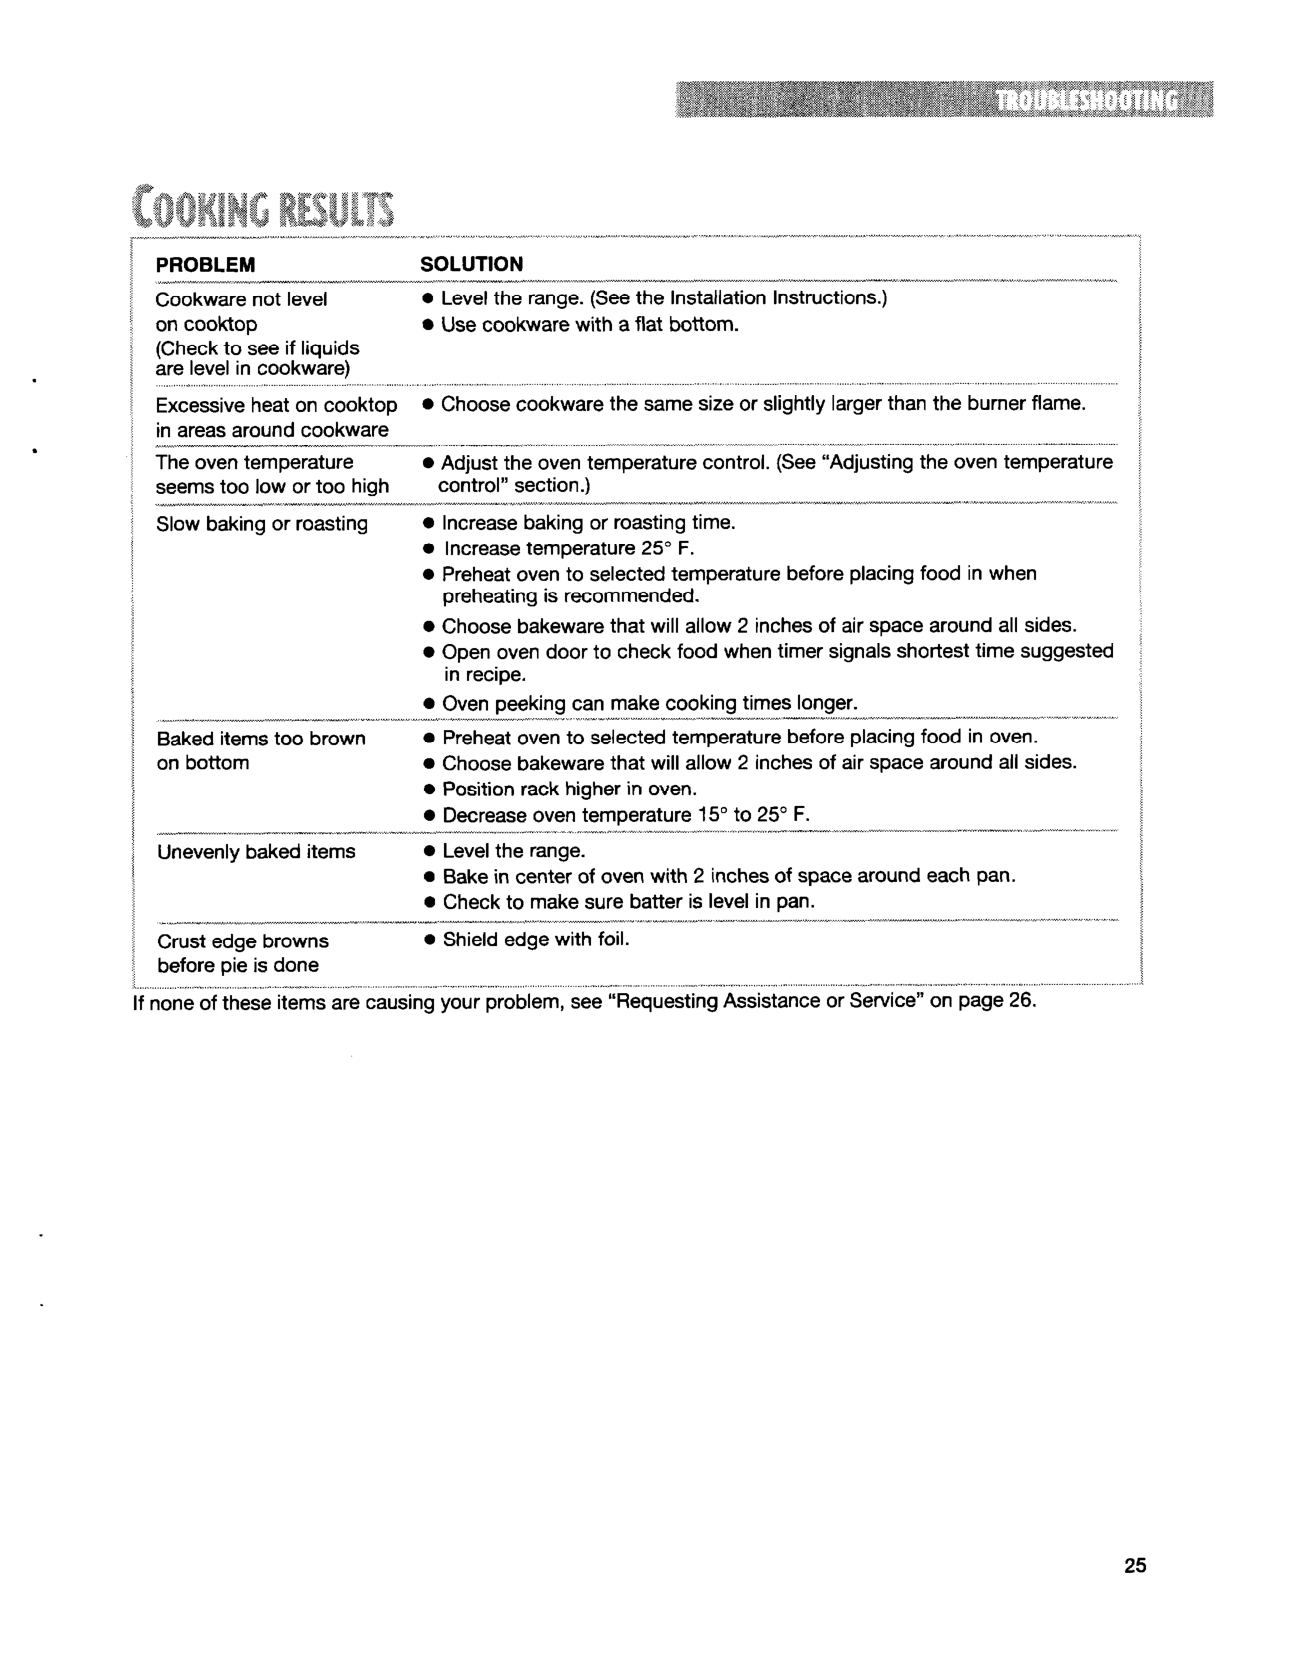
Cookware not level 0 Level the range. (See the on cooktop 0 Use cookware with a flat bottom. (Check to see if are in cookware)


,.. ,.,,, * ,,,,,.,,,.,,,.,,.. ,..,.. ,., _... _... . .,_ , _. .., . ., heat on cooktop 0 Choose cookware the same size or larger than the flame.

in areas around cookware_II^,-----,---. __l.-,“~ ---_- -___-__llms,” “~^“^I-~~~~~“,I”I-,I^-xII~--II^IIxx-~I-IllllxIxIllx ,” x I~~--,-The oven temperature 0 Adjust the oven temperature (See the oven temperature seems too low or too high section.) “II_ -_____ x _-_- ll_l -__,_- ^_“^___ ---.-----I I X-I-- “,I__X^_I_~__I__IX_,_~-,~“~-~-~~”.~,--~ ,--.-^ 1-- -----, - -I_,--, “I-x-^ ^“^1_ X_,“^” Slow baking or l baking or time.
.


l temperature 25” F. l Preheat oven to selected temperature before food in

is recommended.

l Choose bakeware that 2 of air space all sides. l Open oven door to check food timer shortest time suggested

in recipe.
0 Oven peeking can make cooking times ^ I_ x __I_ ._-.~~-~-”_,--“,,-.-”,--.--,_-,-Ix”-,X..-IIIXII.X.I,,1111,11__----I^,.,,---“l”I,I”I_I-.--“-“--.~“~.-“----X”. Baked items too brown l Preheat oven to selected temperature before food in on bottom l Choose bakeware that 2 of air space around all sides.


l rack in oven. l Decrease oven temperature 15” to 25” F.

“,_~---__-___ ___,,” __,__- --__-^ ___,_ _ __, ,,._ ^I,I”^X -..- -x.- ---, ^I”.~~“.“.““II_I_---X~-IX^XII^_I--~”~-~~.”~”...^-...---.----.-~-~
baked items 0 Level the range. l Bake in center of oven with 2 of space each pan. 0 Check to make sure batter is in pan.


-lX1l,,,XIIIIIII-. 111111 --_ ~I_.I^,X^IXIII ,-_, I,^___” .,-,__ _,.” -.--_ “11 ,--. x,xx-, IX_-,, x-III-I-__-~-,--~.” I-x- .“.IC .^.I .“,,_,”“Crust edge 0 edge foil. before pie is done


If none of these items are your problem, see or on page 26.


25


To avoid calls, please check the It may save you the cost of a service call. If you need help, the below.


Call the Consumer
l Accessory and repair parts sales l customer speak-
Center toll free at

Our are to assist you. When calling: Please know the date, and
ing, impaired, vision, etc.) l Referrals to local dealers, companies, and repair parts
v

Ea
service are to fulfill the product and provide

the complete model and serial number of your (see the “A Note to You” help us better respond to
in the United States.

To locate the service company in your area, you can also look in your
your request. Our provide l Features and on our full

Yellow Pages.

of 0 information l Use and maintenance


To locate FSP parts in your area, call our Consumer Center number or your nearest service center.
If you need to order parts, we recommend that you only use FSP@ factory parts. FSP replacement parts fit right and work right, because they are made to the same


used to every new WHIRLPOOL@


Please a daytime phone number in your
If you need you can write to any or at:

Brand Home Appliances Consumer Center c/o Correspondence Dept. 2000 North M-63


Harbor, Ml 49022-2692
-:


26
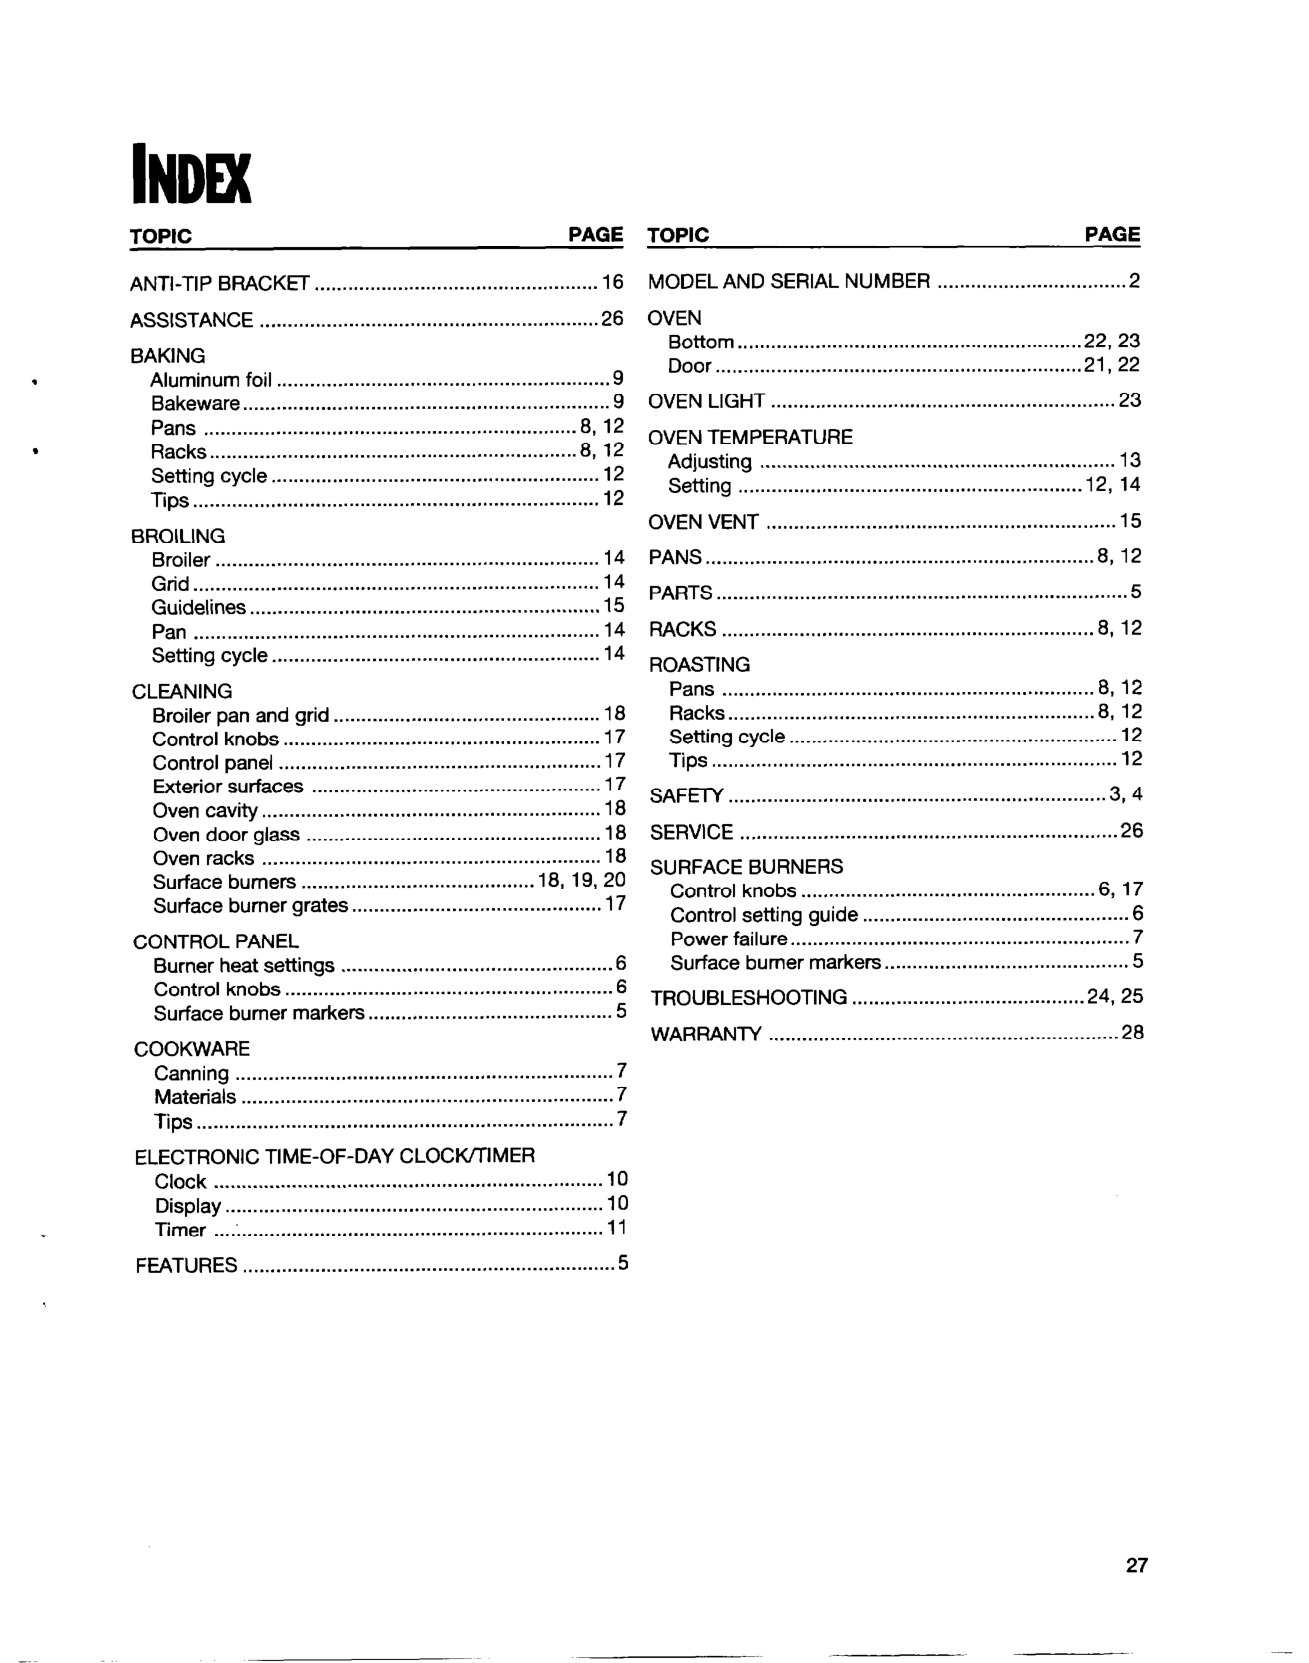
PAGE PAGE BRACKET 16

MODEL AND SERIAL NUMBER .2 OVEN

.26 BAKING
Bottom 22,23 Door 21,22

foil .9 Bakeware.. ................................................................ 9 Pans .8, 12 Racks 8, 12 Setting cycle.. ......................................................... 12 Tips ......................................................................... 12
OVEN 23 OVEN


13
Setting ............................................................ ..12. 14 OVEN VENT 15 PANS.. ................................................................... .8, 12 PARTS 5 RACKS .8, 12


Grid ......................................................................... 14

Pan 14 Setting cycle 14

Pans 8, 12 Racks.. ............................................................... .8, 12 Setting cycle 12 Tips.. ....................................................................... 12
CLEANING

Broiler pan and grid 18
knobs 17 Control panel ......................................................... .17

surfaces 17 Oven ............................................................. 18 Oven door glass 18 Oven racks ............................................................. 18 Surface .......................................... 18, 19, 20 Surface grates 17
SAFETY.. ................................................................. .3, 4 SERVICE 26 SURFACE BURNERS


knobs.. .6, 17 .6

Power 7 Surface markers 5
CONTROL PANEL

Burner heat settings .6 Control knobs .6 Surface markers.. .......................................... 5
.24, 25 WARRANTY 28

COOKWARE

7
.7 Tips .7


CLOCK/TIMER Clock 10

10 Timer .... .................................................................. 11

.5


27


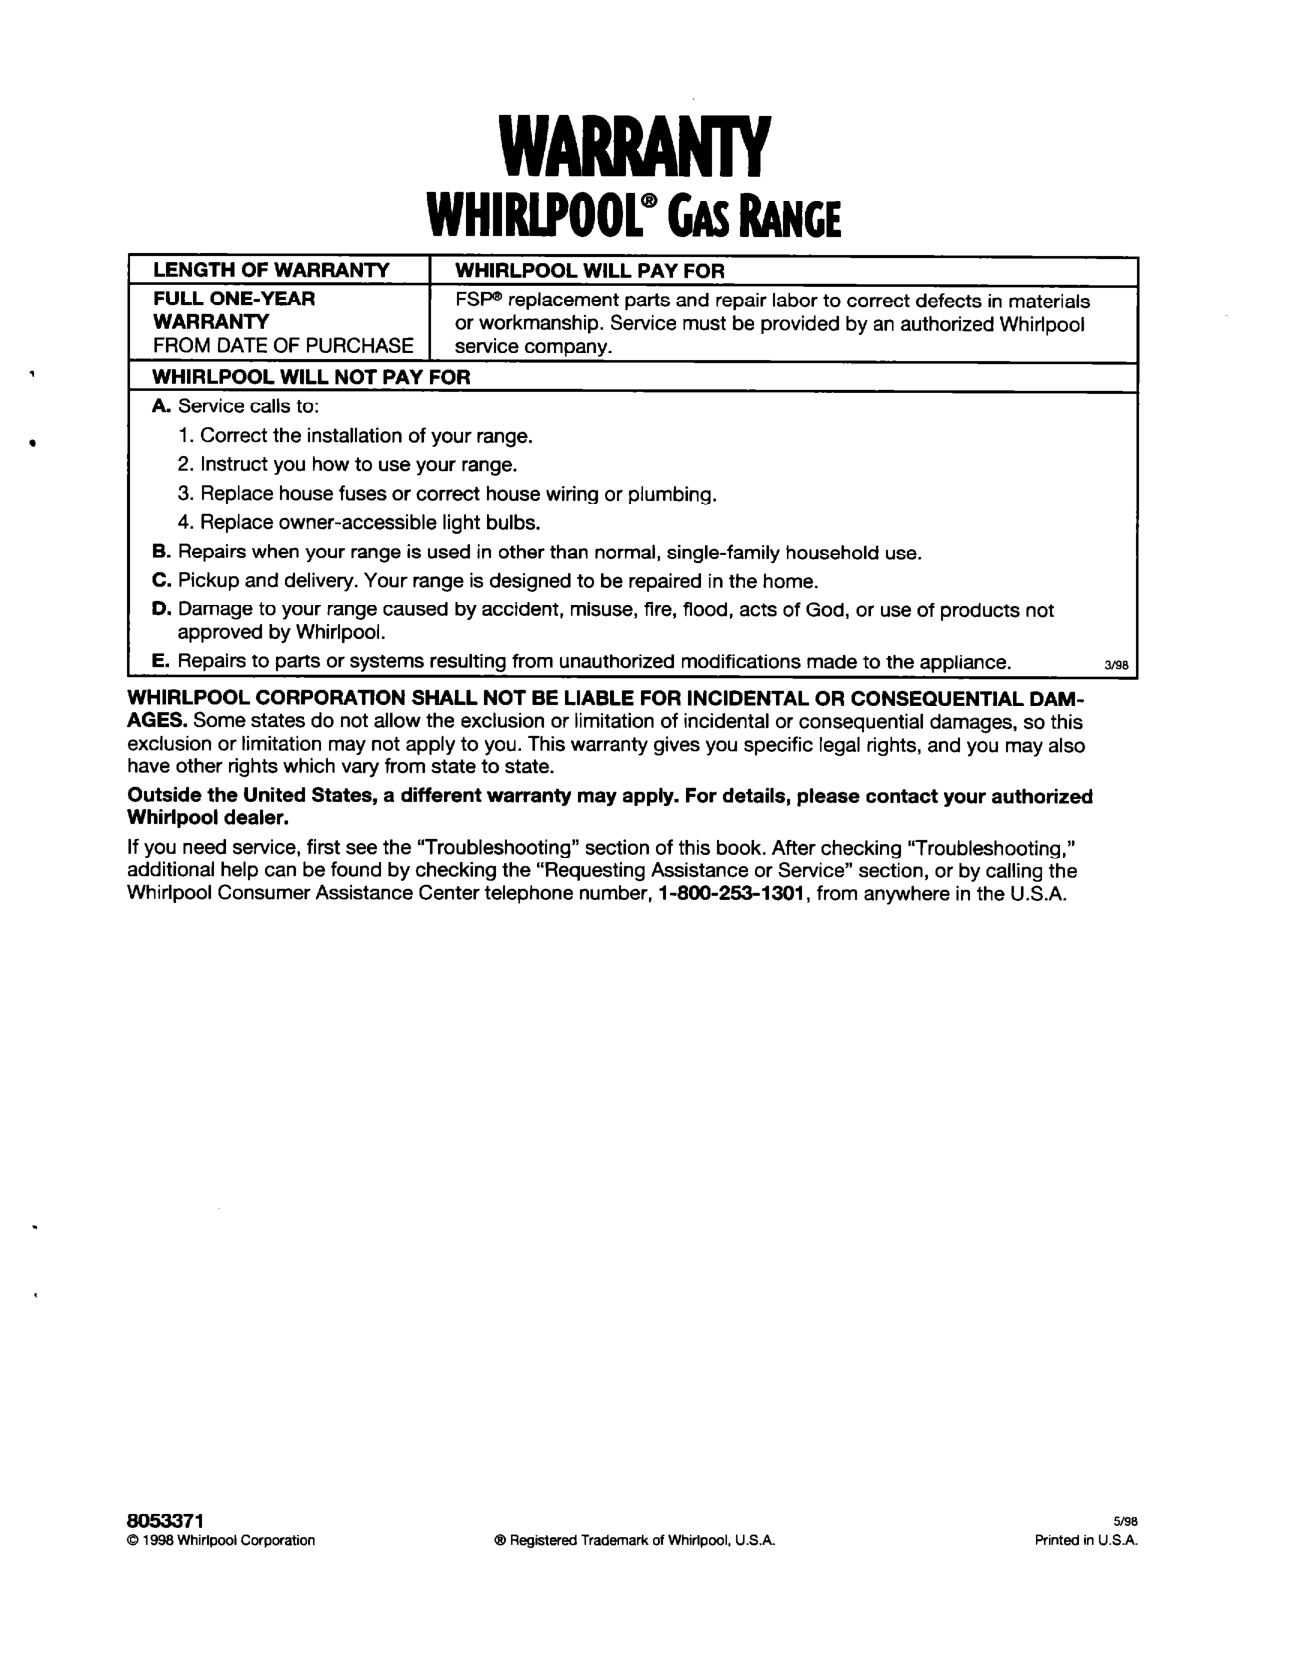
WHIRlPOOl@ GAS RANGE


LENGTH OF WARRANTY WHIRLPOOL WILL PAY FOR FULL FSF’@ parts and repair labor to correct defects in materials WARRANTY or must be by an FROM DATE OF PURCHASE service company. WHIRLPOOL WILL NOT PAY FOR


WHIRLPOOL SHALL NOT BE LIABLE FOR INCIDENTAL OR CONSEQUENTIAL DAMAGES. Some states do not the or limitation of or damages, so this

or may not apply to you. gives you legal and you may also have other rights vary from state to state.

the United States, a different may apply. For please contact your dealer.

If you need first see the “Troubleshooting” of this book. After help can be by the or Service” or by the Consumer Center number, from in the U.S.A.


8053371 0 1998 Whirlpool Corporation @ Registered Trademark of Whirlpool, U.S.A.
w9a Printed in U.S.A.


