
Hotpoint Fa3 540 H Ix Ha Class 3 Built In Oven User Guide
Ask AI
— answers from the official manualAnswers from the official manual.
Common questions
Common Questions
20 totalWhat should I do if my oven is not heating properly?
Check if the thermostat knob is set to the desired temperature and that the oven is properly connected to the power supply. If the oven still does not heat, there may be an error code displayed (such as E1) that requires service support.
Where should I install the Hotpoint Fa3 540 H IX HA oven?
Position the appliance correctly by ensuring it is placed in a cabinet with dimensions suitable for proper installation. It's important that there are ventilation spaces and the adjacent panels use heat-resistant materials (Page 2).
How do I connect the Hotpoint Fa3 540 H IX HA oven to electricity?
Connect the power supply cable by unscrewing the cable clamp screw and contact screws L-N-6, Fasten wires beneath screwheads according to colour scheme: Blue (N) Brown (L) Yellow-Green. Reconnect after maintenance, ensuring accessibility of plug at all times.
What should I do before first use?
Heat the empty oven with its door closed at maximum temperature for at least half an hour to remove protective substances used during manufacturing. Ensure good ventilation when switching off and opening the oven door.
How do I grill a steak on this oven?
Place the steak in the center of rack position 3 or 4. Set the VARIABLE GRILL knob to maximum power level, as recommended for grilling direct temperature-sensitive dishes such as beef steaks (Page 8).
How do I clean the inside of my oven?
Clean the inside after each use when it is still lukewarm. Use hot water and detergent, then rinse with a soft cloth, avoiding abrasive products for the enamel coating (Page 10).
Show 14 more questions
How do I replace the light bulb in my oven?
What are some safety tips for using my oven?
What should I do if there is a malfunction?
How do I maintain proper ventilation for my oven?
How do I clean and inspect the door seals?
What does error code E1 mean on my Hotpoint FA3 540 H Ix Ha oven?
What does error code E2 mean and how do I fix it?
What does error code E3 indicate on the Hotpoint oven?
How do I insert the wire shelf and accessories into my Hotpoint FA3 540 H Ix Ha oven?
How do I set the time on the Hotpoint FA3 540 H Ix Ha oven?
How do I use the Diamond Clean cleaning function?
How do I clean the oven's interior and accessories after use?
How do I use the automatic cooking functions like Bread Auto or Pastry Auto?
Can I cook multiple trays or large dishes at the same time in this oven?
Full Manual
12 pages
Operating Instructions
##### OVEN
GB
English,1
SY37B/1
Contents Installation, 2 Positioning Electrical connection, 3 Data plate Description of the appliance, 4 Overall view Control panel Start-up and use, 5 Starting the oven The electronic cooking programmer, 6 Cooking modes, 7-8 Cooking modes Practical cooking advice Cooking advice table Precautions and tips, 9-10 General safety Disposal Respecting and conserving the environment Maintenance and care, 10 Switching the appliance off Cleaning the appliance Cleaning the oven door Replacing the light bulb After Sales Service, 11 Guarantee, 12
GB
Installation
######## GB
! Before you operate yuor new Hotpoint Single Oven, please read these instructions fully. They contain important information for safe use, for installation and for care of the appliance.
! Please keep these operating instructions for future reference. Pass them on to possible new owners of the appliance.
! Keep packaging material out of the reach of children. It can become a choking or suffocation hazard. see Precautions and tips).

Positioning ! The appliance must be installed by a qualified person in compliance with the instructions provided. Incorrect installation may cause harm to persons, animals or may damage property. Fitting the appliance
Use the appropriate cabinet to ensure that the appliance functions properly.
547 mm. min.
23 mm.
45 mm.
593 mm.
595 mm.
558 mm.
567 mm.
5 mm.
595 mm.
545 mm.
24 mm.
! The appliance must not come into contact with electrical parts once it has been installed. The consumption indications on the data plate have been calculated for this type of installation.
######### Ventilation
To ensure good ventilation, the back panel of the cabinet must be removed. It is advisable to install the oven so that it rests on two strips of wood, or on a completely flat surface with an opening of at least 45 x 560 mm (see diagrams).
| | |---|
|560 mm.
45 mm.| |---|
######### Centring and fastening
Position the 4 tabs on the side of the oven according to the 4 holes of the outer frame. Adjust the tabs according to the thickness of the cabinet side panel, as shown below:
thickness of 20 mm: take off the removable part of the tab (see diagram)
|| |---|
thickness of 18 mm: use the first groove, which has already been set in the factory (see diagram)
|| |---|
|| |---|
thickness of 16 mm: use the second groove (see diagram)
Secure the appliance to the cabinet by opening the oven door and putting 4 screws into the 4 holes of the outer frame.
! All parts which ensure the safe operation of the appliance must not be removable without the aid of a tool.
Electrical Connection
######### Electrical connection
The electrical connection to the mains must be made on the appliance. The power voltage and frequency are as indicated on the rating plate.
! THIS APPLIANCE MUST BE EARTHED.
Connecting the power supply cable
To open the terminal board:
To connect the power supply cable, proceed as follows:
######### Electrical Connection:
|42 NL| |---|
Voltage Frequency: 230 V-1+N 50Hz Fuse Section: 16A Supply cable: 3x1.5mm2
You can connect your oven to the system means of a terminal board. Refer to above information for the minimal cable sections and the calibration of the protective elements according to the connection. If the appliance is installed with a junction box, an omnipolar circuit breaker - with a minimum contact opening of 3mm - should be installed between the appliance and the mains.
######### Power cable supply connection to the electrical mains:
We recommend you use a power supply cable which is long enough to allow you to take the oven out of its recess in the event of maintenance operations (only use HAR - H 05 - RRF quality cables fitted with a plug conforming to the regulations in force. The plug must be accessible at all times.
Unplug the appliance before all operations, even when replacing the oven lamp.
Using the appliance without correct earthing is highly dangerous.
! After connecting the appliance to the flexible cable, tighten all the screws on the terminal board.
GB
|Dimensions
width cm 43.5 height cm 32 depth cm 40
| |---| |Volume lt. 56| |Electrical connections
voltage: 230-240V ~ 50Hz maximum power absorbed 2250W-2400W| |ENERGY LABEL
Directive 2002/40/EC on the label of electric ovens. Standard EN 50304
Declared energy consumption for Forced convection Class – heating mode: Fan assisted
| |This appliance conforms to the following European Economic Community directives:
- 2006/95/EEC of 12/12/06 (Low Voltage) and subsequent amendments;
- 2004/108/EEC of 15/12/04 (Electromagnetic Compatibility) and subsequent amendments;
- 93/68/EEC of 22/07/93 and subsequent amendments.
- 2002/96/EC and subsequent amendments.
|
DATA PLATE
Description of the appliance
######## GB
Overall view
Control panel
GUIDESGUIDES for the sliding racks
position 5 position 4 position 3 position 2 position 1
GRILL
DRIPPING PAN
Control panel
Indicator light THERMOSTAT
SELECTOR Knob
ELECTRONIC programmer*
MAX
########### 0
•• ••
1/2
MA 60
220
MIN
100
180
140
VARIABLE GRILL Knob
Start-up and use
! The first time you use your appliance, heat the empty oven with its door closed at its maximum temperature for at least half an hour. Ensure that the room is well ventilated before switching the oven off and opening the oven door. The appliance may produce a slightly unpleasant odour caused by the burning away of protective substances used during the manufacturing process.

###### Starting the oven
! Never put objects directly on the oven bottom to avoid damaging the enamel coating.
! Always place cookware on the rack(s) provided.
######### Cooling ventilation
In order to cool down the external temperature of the oven, some models are fitted with a cooling fan that blows out air between the control panel and the oven door.
! Once the cooking has been completed, the cooling fan remains on until the oven has cooled down sufficiently.
######### Oven light
It goes on when selecting z with the SELECTOR knob. It stays on when a cooking mode is selected.
GB
The electronic cooking programmer
GB
|DISPLAY
SET TIME button
END OF COOKING icon
CLOCK icon
DURATION icon
TIMER icon
DECREASE TIME button
INCREASE TIME button
•• ••| |---|
Setting the clock ! The clock may be set when the oven is switched off or when it is switched on, provided that a the end time of a cooking cycle has not been programmed previously. After the appliance has been connected to the
mains, or after a blackout, the icon and the four numerical digits on the DISPLAY will begin to flash.
! This function does not interrupt cooking and does not affect the oven; it is simply used to activate the buzzer when the set amount of time has elapsed.
###### Programming cooking
! A cooking mode must be selected before programming can take place.
######### Programming the cooking duration
• For example: it is 9:00 a.m. and a time of 1 hour and 15 minutes is programmed. The programme will stop automatically at 10:15 a.m.
Setting the end time for a cooking mode ! A cooking duration must be set before the cooking end time can be scheduled.
Cancelling a programme To cancel a programme:
Cooking modes
###### Cooking modes
! GRILL (recommended: set only to MAX power level);
######### Thermostatically controlled oven (Fan Assisted Mode)
When the SELECTOR knob is turned in a clockwise direction to the symbol z the fan and oven light will come on to assist in the defrosting of frozen food. Rotating further to the complete range of temperatures shown on the dial you can choose which is most suitable for the food you are going to cook. The temperature is reached automatically and controlled by the oven thermostat (from 60°C to MAX).
! Whilst using tag oven for conventional VARIABLE GRILL knob must be set with “MAXMAX” in line with the reference mark on the control panel.
###### d GRILL mode
The top heating element comes on. The extremely high and direct temperature of the grill makes it possible to brown the surface of meats and roasts while locking in the juices to keep them tender. The grill is also highly recommended for dishes that require a high temperature on the surface: such as beef steaks, veal, rib steak, filets, hamburgers etc... Some grilling examples are included in the “Practical Cooking Advice” paragraph. Always cook in this mode with the oven door partially open. To operate the grill:
###### Practical cooking advice
! Do not place racks in position 1 and 5 during fanassisted cooking. Excessive direct heat can burn temperature sensitive foods.
! In the GRILL cooking modes, place the dripping pan in position 1 to collect cooking residues (fat and/or grease).
GRILL
PIZZA
GB
GB
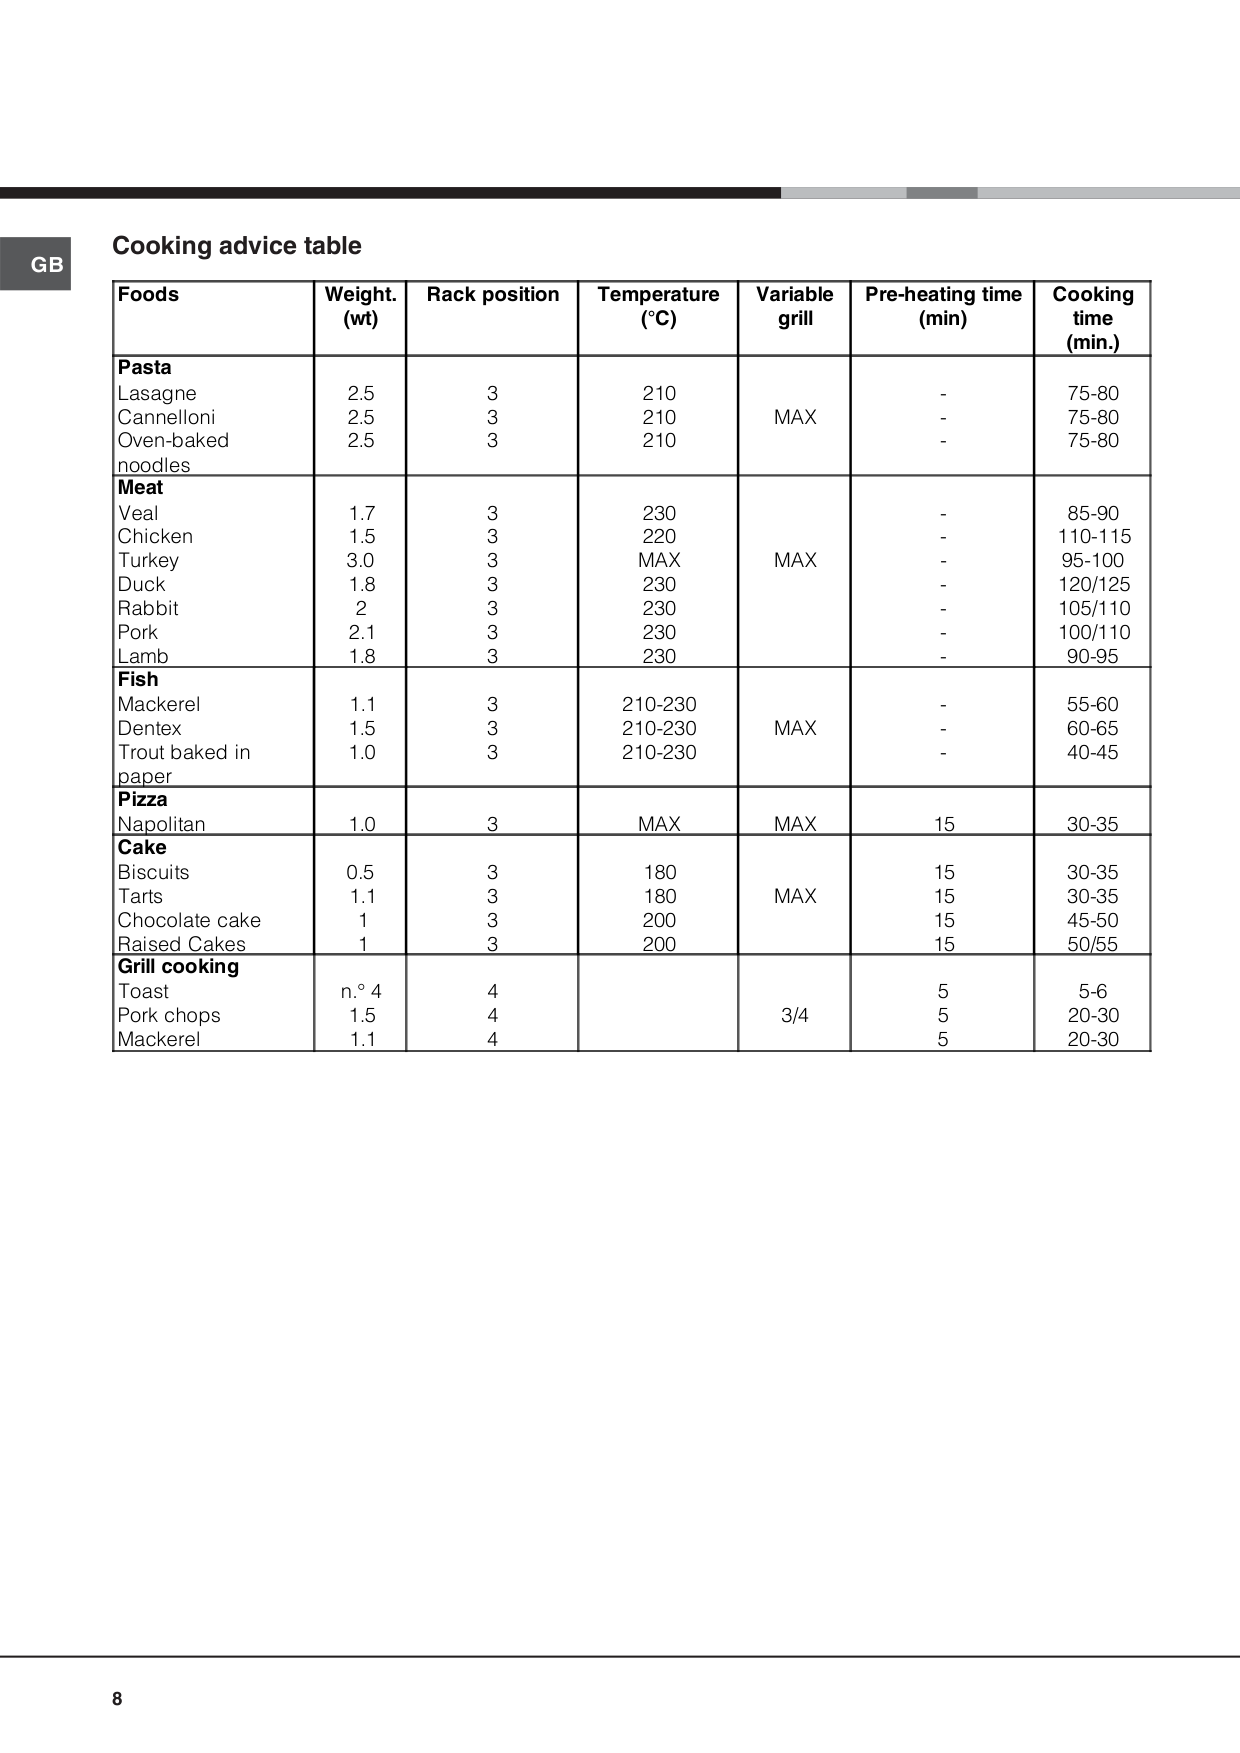
###### Cooking advice table
|Foods|Weight. (wt)|Rack position|Temperature (°C)|Variable grill|Pre-heating time (min)|Cooking time (min.)| |---|---|---|---|---|---|---| |Pasta Lasagne Cannelloni Oven-baked noodles|2.5 2.5 2.5|3 3 3|210 210 210|MAX|-|75-80 75-80 75-80| |Meat Veal Chicken Turkey Duck Rabbit Pork Lamb|1.7 1.5 3.0 1.8 2 2.1 1.8|3 3 3 3 3 3 3|230 220 MAX 230 230 230 230|MAX|-|85-90 110-115 95-100 120/125 105/110 100/110 90-95| |Fish Mackerel Dentex Trout baked in paper|1.1 1.5 1.0|3 3 3|210-230 210-230 210-230|MAX|-|55-60 60-65 40-45| |Pizza Napolitan|1.0|3|MAX|MAX|15|30-35| |Cake Biscuits Tarts Chocolate cake Raised Cakes|0.5 1.1 1 1|3 3 3 3|180 180 200 200|MAX|15 15 15 15|30-35 30-35 45-50 50/55| |Grill cooking Toast Pork chops Mackerel|n.° 4 1.5 1.1|4 4 4| |3/4|5 5 5|5-6 20-30 20-30|
Precautions and tips
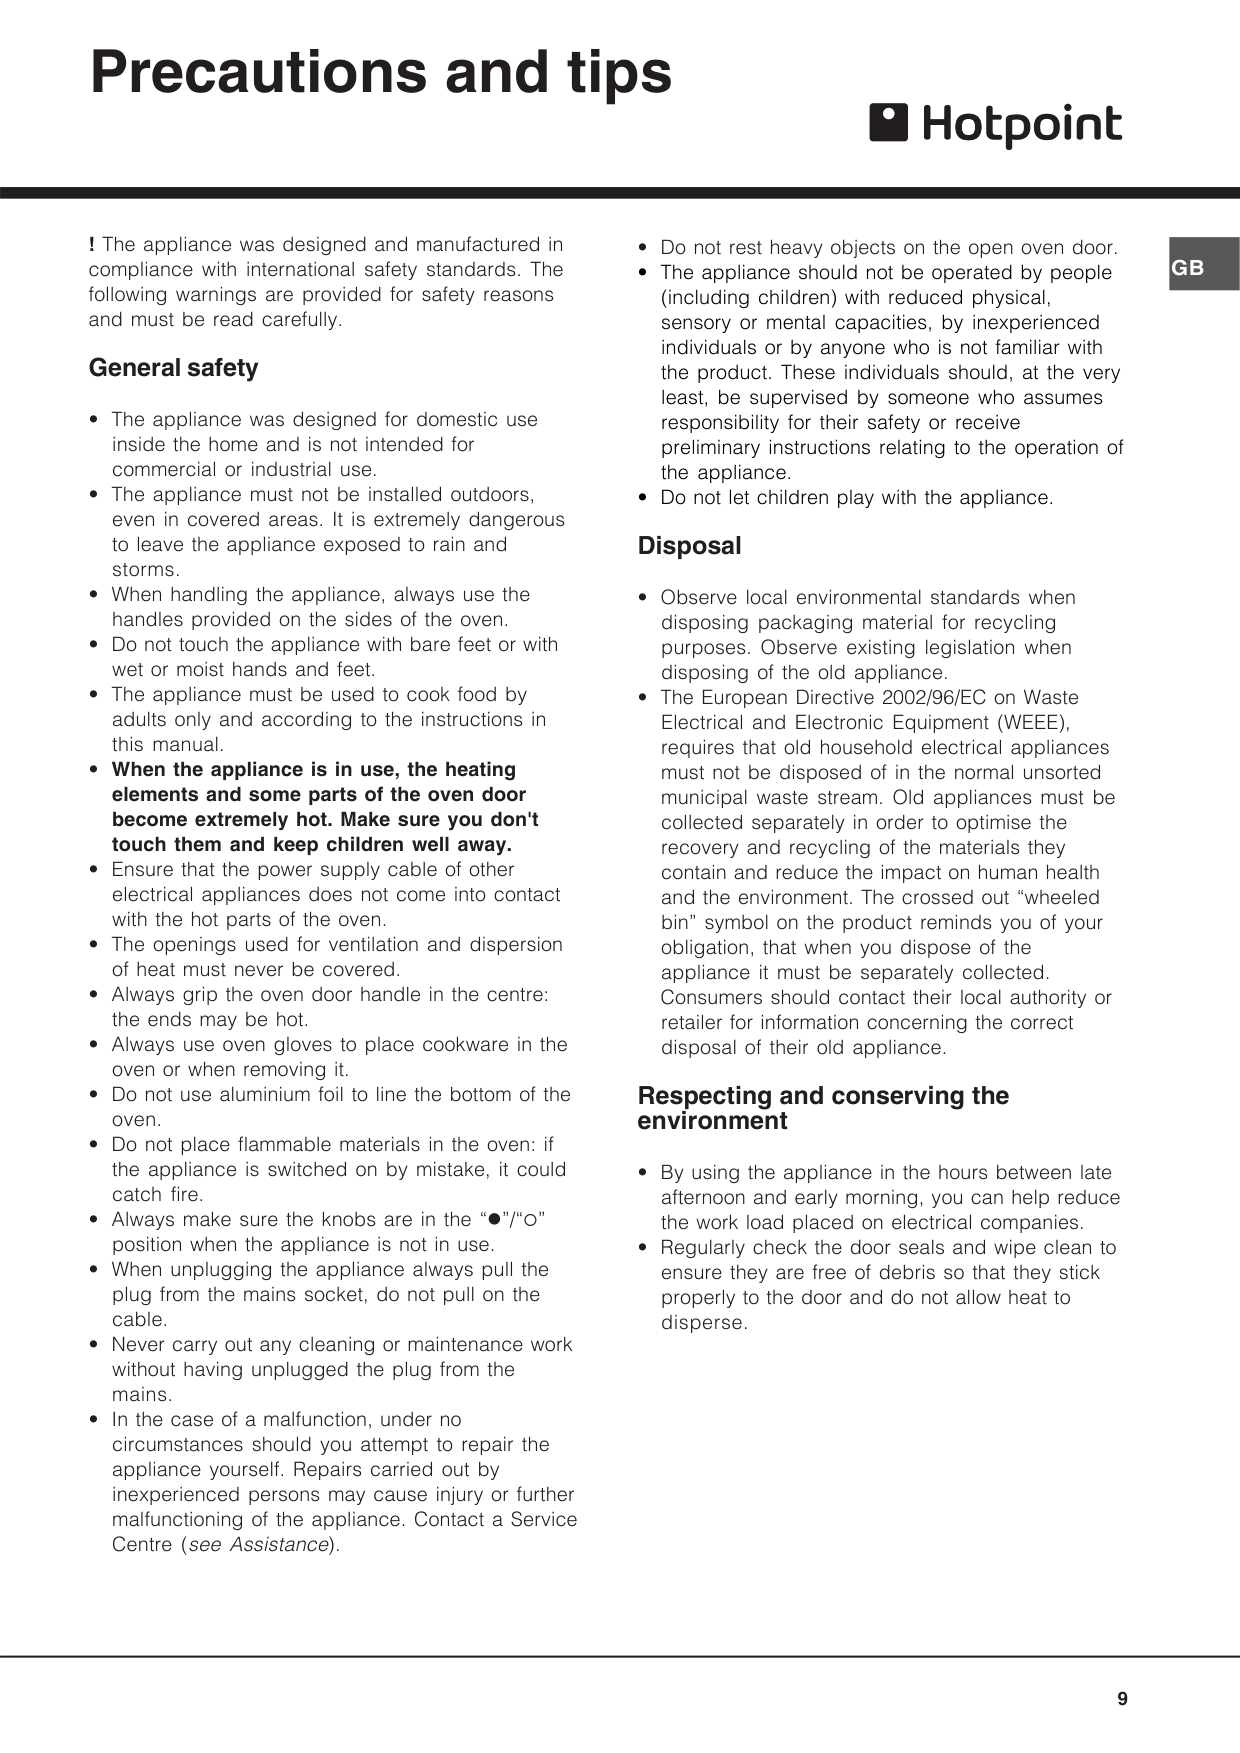
! The appliance was designed and manufactured in compliance with international safety standards. The following warnings are provided for safety reasons and must be read carefully.
###### General safety
###### Respecting and conserving the environment
GB
Maintenance and care
GB
###### Switching the appliance off
Disconnect your appliance from the electricity supply before carrying out any work on it.
###### Cleaning the appliance
! Never use steam cleaners or pressure cleaners on the appliance.
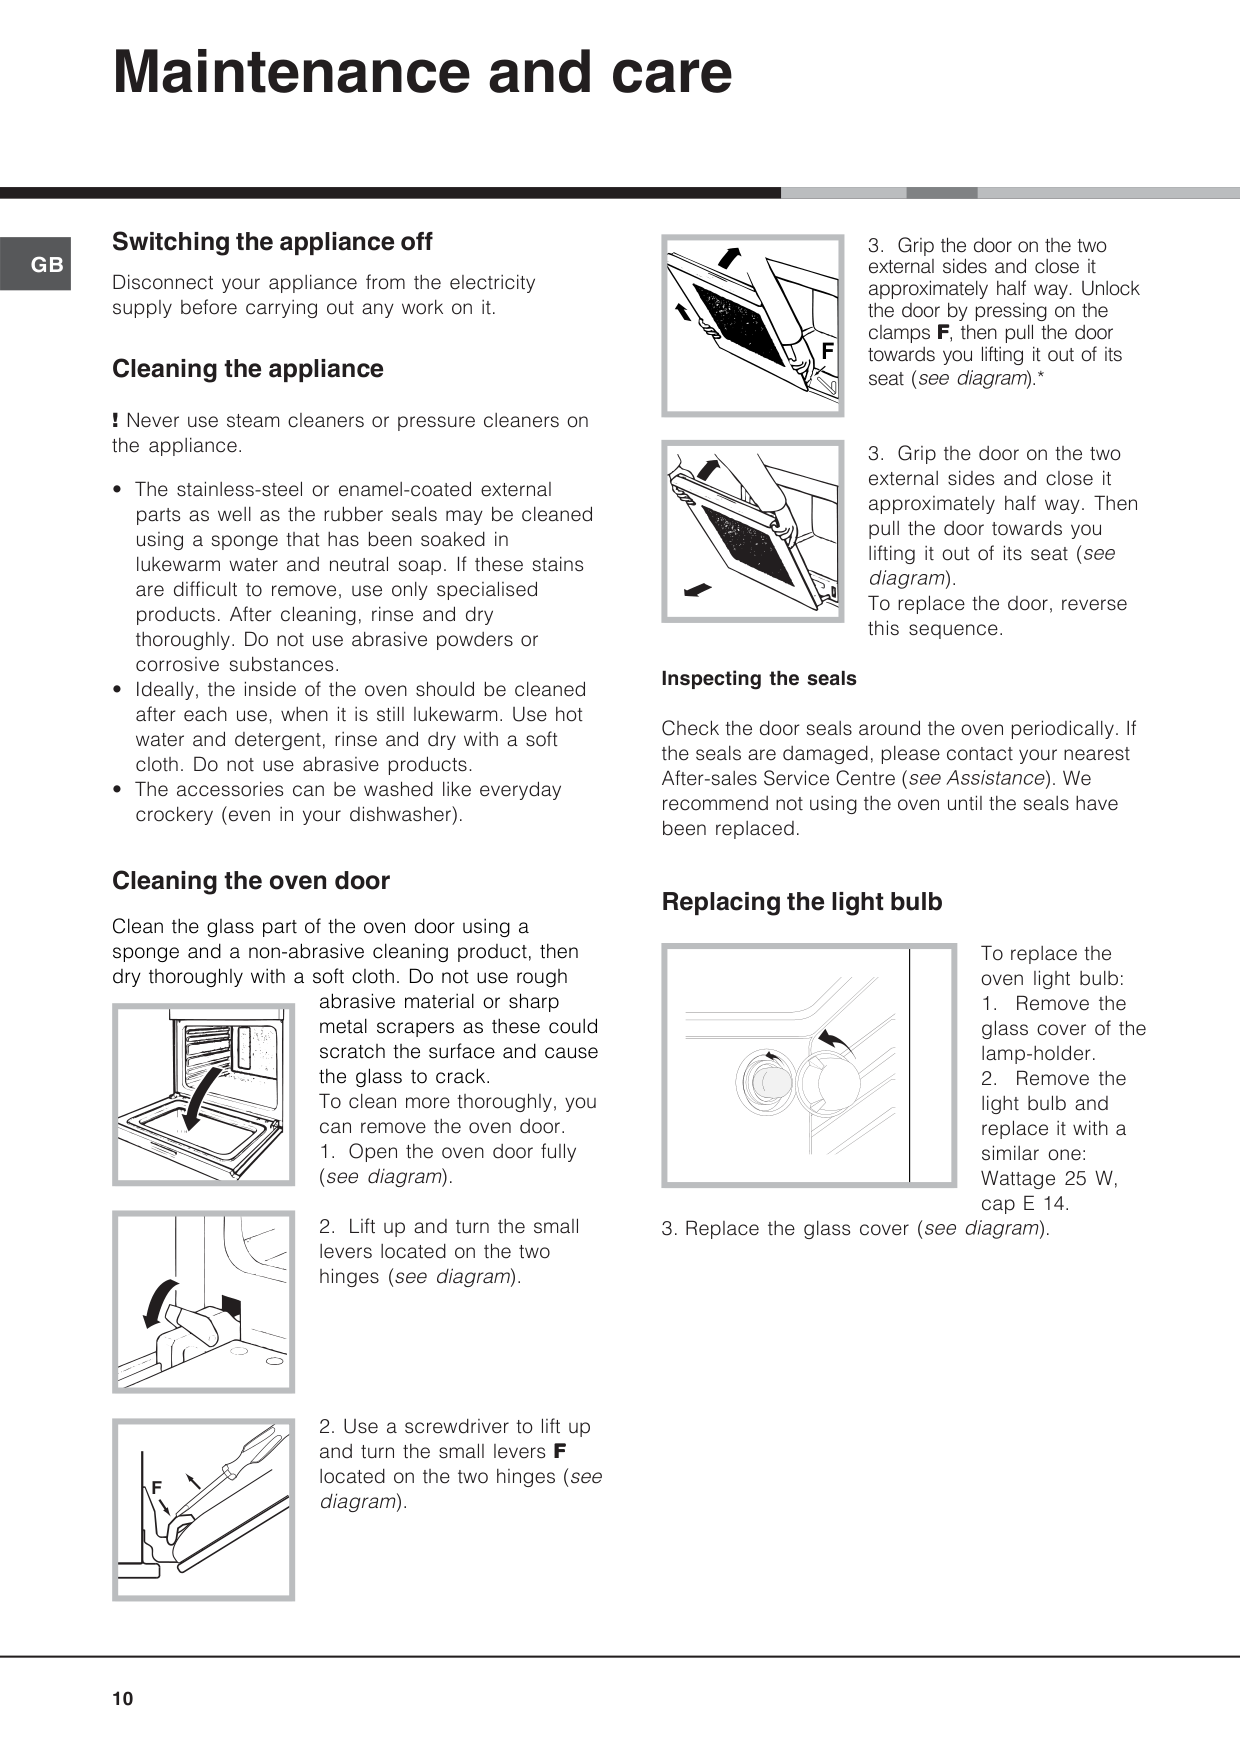
###### Cleaning the oven door
Clean the glass part of the oven door using a sponge and a non-abrasive cleaning product, then dry thoroughly with a soft cloth. Do not use rough
abrasive material or sharp metal scrapers as these could scratch the surface and cause the glass to crack. To clean more thoroughly, you can remove the oven door.
| | |---|
| | |---|
F
|F| |---|
| | |---|
######### Inspecting the seals
Check the door seals around the oven periodically. If the seals are damaged, please contact your nearest After-sales Service Centre (see Assistance). We recommend not using the oven until the seals have been replaced.
###### Replacing the light bulb
To replace the oven light bulb:
| | | |---|---|
#### GBAfter Sales Service
No one is better placed to care for your Hotpoint appliance during the course of its working life than us – the manufacturer.
#### Essential Contact Information
###### Hotpoint Service
We are the largest service team in the country offering you access to 400 skilled telephone advisors and 1000 fully qualified engineers on call to ensure you receive fast, reliable, local service.
UK: 08448 224 224 Republic of Ireland: 0818 313 413 www.hotpointservice.co.uk
Please note: Our advisors will require the following information: Model number: Serial number:

###### Parts and Accessories
We supply a full range of genuine replacement parts as well as accessory products that protect and hygienically clean your appliance to keep it looking good and functioning efficiently throughout its life.
UK: 08448 225 225 Republic of Ireland: 0818 313 413 www.hotpointservice.co.uk Appliance Registration We want to give you additional benefits of Hotpoint ownership. To activate your free 5 year parts guarantee you must register your appliance with us. UK: 08448 24 24 24 Republic of Ireland: 01 230 0800 www.hotpointservice.co.uk Indesit Company UK Ltd. Morley Way, Peterborough, PE2 9JB Indesit Company Unit 49 Airways Industrial Estate, Dublin 17 Recycling and Disposal Information
As part of Hotpoint’s continued commitment to helping the environment, Hotpoint reserves the right to use quality, recycled components to keep down customer costs and minimise material wastage.
Please dispose of packaging and old appliances carefully. To minimise the risk of injury to children, remove the door, plug, and cut the mains cable off flush with the appliance. Dispose of these parts separately to ensure that the appliance can no longer be plugged into mains socket, and the door cannot be locked shut.
########## 01/2010 - 195068438.01 XEROX FABRIANO
#### GB Guarantee
###### 12 months Parts and Labour Guarantee
Your appliance has the benefit of our manufacturer’s guarantee, which covers the cost of breakdown repairs for twelve months from the date of purchase.
This gives you the reassurance that if, within that time, your appliance is proven to be defective because of either workmanship or materials, we will, at our discretion, either repair or replace the appliance at no cost to you.
This guarantee is subject to the following conditions:
THIS GUARANTEE WILL NOT APPLY IF THE APPLIANCE HAS BEEN USED IN COMMERCIAL OR NONDOMESTIC PREMISES.
###### 5 Year Parts Guarantee
Hotpoint also offers you a free 5 year parts guarantee. This additional guarantee is conditional on you registering your appliance with us and the parts being fitted by one of our authorised engineers. There will be a charge for our engineer’s time. To activate the extra parts warranty on your appliance, simply call our registration line on 08448 24 24 24 (Republic of Ireland 01 230 0800)
###### Extended Guarantees
We offer a selection of protection plans that enable you to fully cover yourself against the expense of repair bills for the life of your policy. To find the ideal plan for you please call our advice line on 08448 226 226 (Republic of Ireland 01 230 0233).
###### Free Helpdesk Service
We have a dedicated team who can provide free advice and assistance with your appliance if you experience any technical difficulties within the first 90 days of ownership. Simply call our Hotpoint Service Hotline on 08448 224 224 (Republic of Ireland 0818 313 413) for telephone assistance, or, where necessary, to arrange for an engineer to call.