Hotpoint H7F Hs41 X Built In Dishwasher
Ask AI
— answers from the official manualAnswers from the official manual.
Common questions
Common Questions
18 totalWhat should I do if water is not draining from my dishwasher?
Ensure the drain hose is not kinked or blocked. Check the hose routing to make sure it allows proper water drainage from the dishwasher.
Why are my dishes not drying properly?
Verify that the rinse aid dispenser is filled and that the Extra Dry drying option is selected. Both of these factors are necessary for optimal drying performance.
How do I turn on the Hotpoint H7F HS41 X dishwasher for the first time?
Press the ON-OFF button to turn on the appliance. Then hold the Settings button for 3 seconds until you hear a beep to access the menu for initial configuration. You can then use the Program Buttons to scroll through available settings and configure your preferences.
How do I fill the salt reservoir in the H7F HS41 X?
Remove the lower rack and unscrew the reservoir cap. Fill the salt reservoir with approximately 0.5 kg of dishwasher salt, and only the first time you do this, also fill it with water. Remove any salt residue from the opening and screw the cap back on tightly.
What should I load in the upper and lower racks of the dishwasher?
The upper rack is ideal for cups, glasses, and small bowls, while the lower rack is suitable for plates, pots, and larger items. Place knives, forks, and spoons in the cutlery basket with handles facing down.
How do I start a wash cycle on the H7F HS41 X?
Press the desired program button to select your washing program. Use the Options button to select additional functions if needed, then press the Start/Pause button to begin the wash cycle.
Show 12 more questions
How do I add salt to the dishwasher?
How do I change my dishwasher's language settings?
How do I clean the filter assembly?
What should I do if my dishwasher displays 'F2'?
How do I factory reset my dishwasher?
How do I load cutlery into the dishwasher?
How can I reduce noise during dishwashing?
How do I adjust the water hardness level?
How should I add rinse aid?
What is the purpose of Zone Wash?
How do I use the Delay function?
Why is my dishwasher not starting?
Full Manual
16 pages


INSTRUCTION FOR USE
######### THANK YOU FOR PURCHASING A HOTPOINT PRODUCT. To receive more comprehensive help and support, please register your product at: www.hotpoint.eu/register
|Before using the appliance carefully read Safety Instructions guide. The control panel of this dishwasher activates pushing by ON/OFF button. For energy saving the control panel deactivates automatically after 10 minutes if no cycle has started.
| |---|
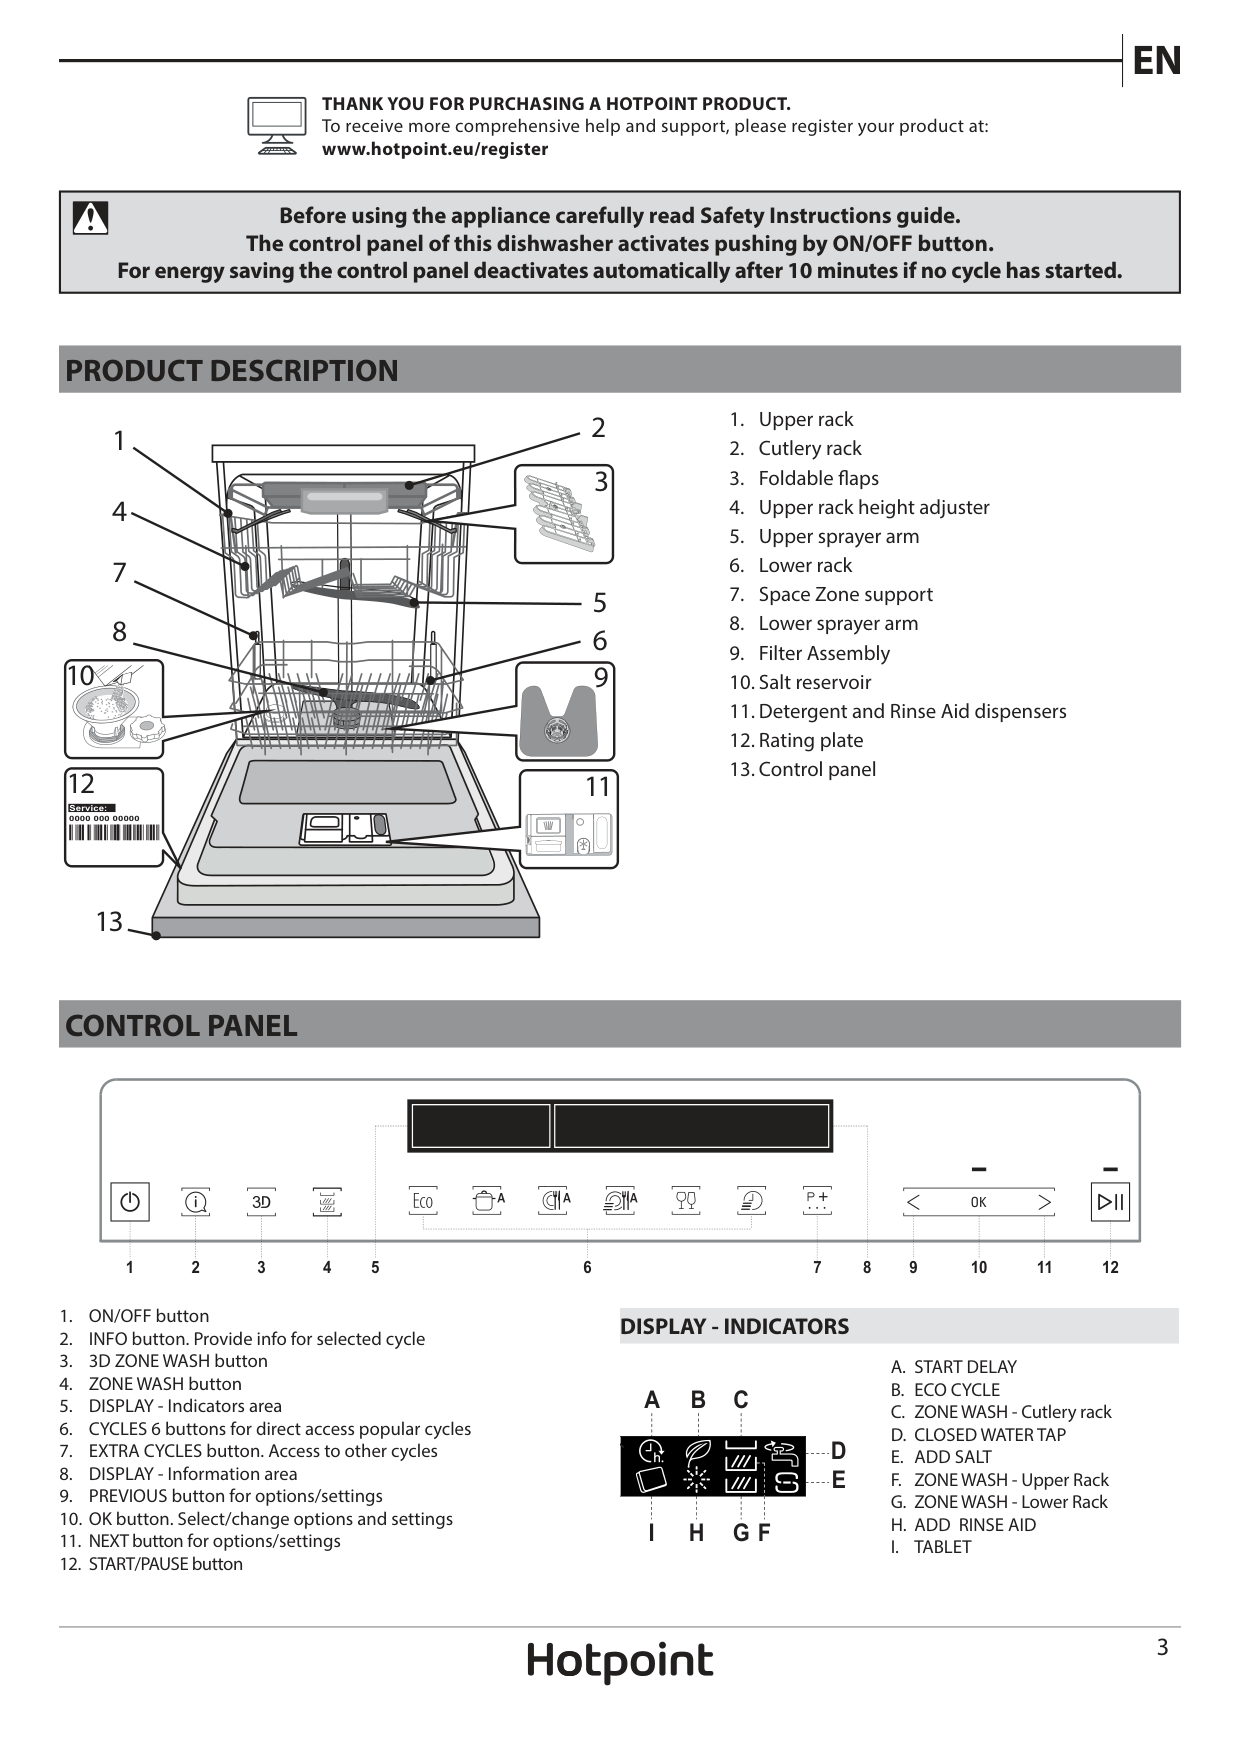
PRODUCT DESCRIPTION
1 4
7
8
| | | | |---|---|---| | | | |
10
9
| | | |---|---| | | |
| | | |---|---| | | |
12
11
Service:
| | | |---|---| | | |
| | | | |---|---|---| | | | | | | | |
| | | |---|---| | | |
13

CONTROL PANEL
1 3 4 5 6 7 8 9 102 11 12
DISPLAY - INDICATORS
A B C
I H G F
FIRST TIME USE
After connecting the appliance to the power supply for the first time, the display will guide you to set up the appliance for first use.
Make sure the cap is screwed on tightly, so that no detergent can get into the container during the wash program (this could damage the water softener beyond repair). Once done, proceed to the next step by pressing „OK” button. Only use salt that has been specifically designed for dishwashers.
####### 1. The language selection
To select preferred language please press button „<” or „>”. Confirm by pressing „OK” button.
|LANGUAGE: ENGLISH? <> = CHANGE OK = YES| |---|
|Whenever you need to add salt, it is mandatory to complete the procedure before the beginning of the washing cycle to avoid corrosion. Residual saline solution or grains of salt can lead to corrosion, irreparably damaging the stainless steel components. The guarantee is not applicable if faults are caused by such circumstances. If the salt container is not filled, the water softener and the heating element may be damaged as a result of limescale accumulation. Using of Salt is recommended with any type of dishwasher detergent.| |---|
|ENGLISH SELECTED| |---|
After language confirmation, the appliance will go through the first time use configuration menu.
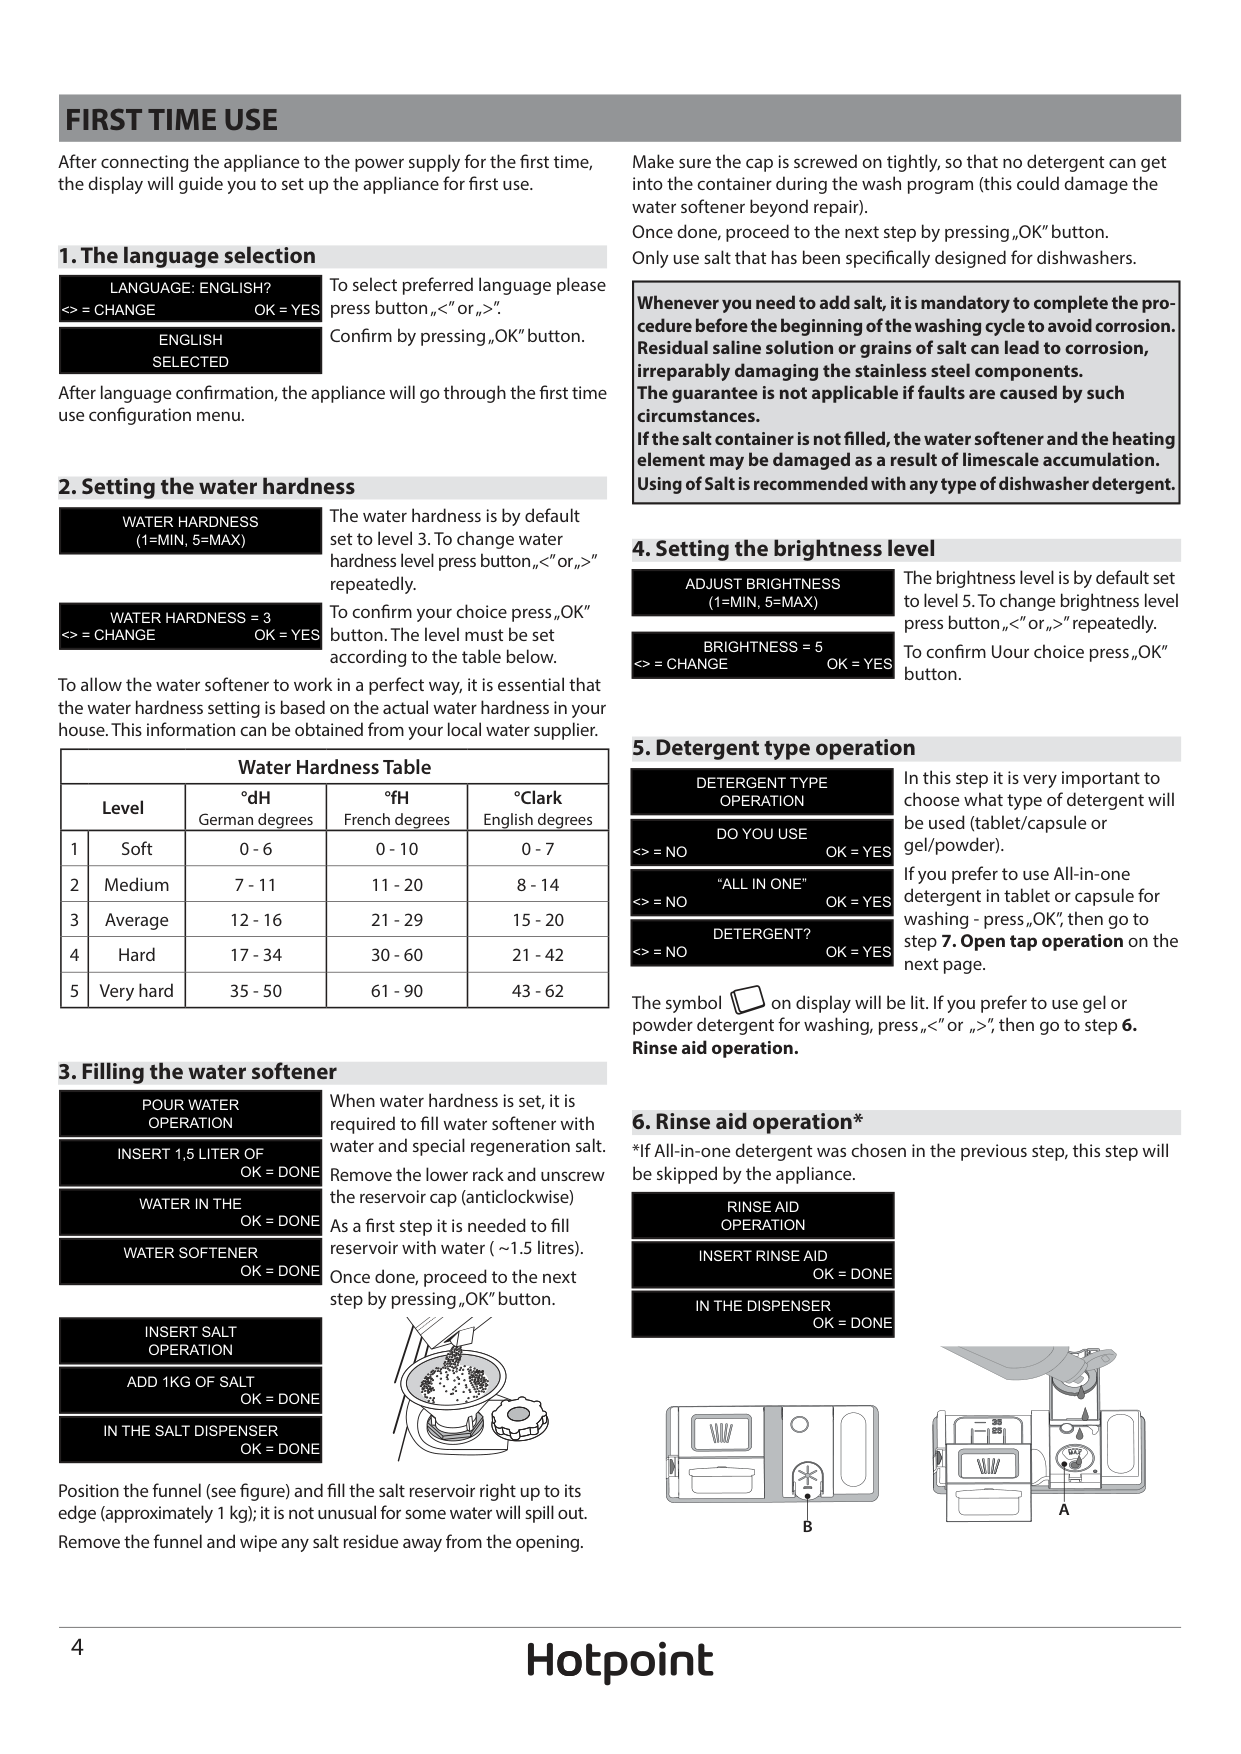
####### 2. Setting the water hardness
The water hardness is by default set to level 3. To change water hardness level press button „<” or „>” repeatedly. To confirm your choice press „OK” button. The level must be set according to the table below.
|WATER HARDNESS (1=MIN, 5=MAX)| |---|
####### 4. Setting the brightness level
The brightness level is by default set to level 5. To change brightness level press button „<” or „>” repeatedly. To confirm Uour choice press „OK” button.
|ADJUST BRIGHTNESS (1=MIN, 5=MAX)| |---|
|WATER HARDNESS = 3 <> = CHANGE OK = YES| |---|
|BRIGHTNESS = 5 <> = CHANGE OK = YES| |---|
To allow the water softener to work in a perfect way, it is essential that the water hardness setting is based on the actual water hardness in your house. This information can be obtained from your local water supplier.
####### 5. Detergent type operation
|Water Hardness Table|Water Hardness Table|Water Hardness Table|Water Hardness Table|Water Hardness Table| |---|---|---|---|---| |Level|Level|°dH German degrees|°fH French degrees|°Clark English degrees| |1|Soft|0 - 6|0 - 10|0 - 7| |2|Medium|7 - 11|11 - 20|8 - 14| |3|Average|12 - 16|21 - 29|15 - 20| |4|Hard|17 - 34|30 - 60|21 - 42| |5|Very hard|35 - 50|61 - 90|43 - 62|
In this step it is very important to choose what type of detergent will be used (tablet/capsule or gel/powder). If you prefer to use All-in-one detergent in tablet or capsule for washing - press „OK”, then go to step 7. Open tap operation on the next page.
|DETERGENT TYPE OPERATION| |---|
|DO YOU USE <> = NO OK = YES| |---|
|“ALL IN ONE” <> = NO OK = YES| |---|
|DETERGENT? <> = NO OK = YES| |---|
The symbol on display will be lit. If you prefer to use gel or powder detergent for washing, press „<” or „>”, then go to step 6. Rinse aid operation.
####### 3. Filling the water softener
When water hardness is set, it is required to fill water softener with water and special regeneration salt. Remove the lower rack and unscrew the reservoir cap (anticlockwise) As a first step it is needed to fill reservoir with water ( ~1.5 litres). Once done, proceed to the next step by pressing „OK” button.
|POUR WATER OPERATION| |---|
####### 6. Rinse aid operation*
|INSERT 1,5 LITER OF OK = DONE| |---|
*If All-in-one detergent was chosen in the previous step, this step will be skipped by the appliance.
|WATER IN THE
OK = DONE| |---|
|RINSE AID OPERATION| |---|
|WATER SOFTENER OK = DONE| |---|
|INSERT RINSE AID OK = DONE| |---|
|IN THE DISPENSER OK = DONE| |---|
|INSERT SALT OPERATION| |---|
|ADD 1KG OF SALT OK = DONE| |---|
| | | |---|---| | | |
|IN THE SALT DISPENSER OK = DONE| |---|
| | | | |---|---|---| | | | |
| | | |---|---| | | |
Position the funnel (see figure) and fill the salt reservoir right up to its edge (approximately 1 kg); it is not unusual for some water will spill out. Remove the funnel and wipe any salt residue away from the opening.
| | | |---|---| | | |
########## A B
Setting rinse aid level (not necessary when using tablets/capsules) The rinse aid dosage can be adjusted to the detergent used. The lower the setting, the less rinse aid is dispensed. The factory setting is for (5) level. To change, follow instructions in section “SETTINGS / MENU”.
####### 7. Open tap operation
|OPEN TAP OPERATION| |---|
|OPEN THE
OK = DONE| |---|
|WATER TAP
OK = DONE| |---|
Check water tap is open. If closed, open it then confirm by pressing „OK” button.
####### 8. First cycle operation
Before normal use of appliance it is recommended to run Intensive cycle first, to calibrate the appliance. Insert a detergent into dispenser chamber B (see below), then press „OK” button. Intensive cycle will be selected automaticly. Press „START/PAUSE”
|FIRST CYCLE OPERATION| |---|
|REMEMBER TO RUN THE OK = EXIT| |---|
|INTENSIVE CYCLE OK = EXIT| |---|
|WITH EMPTY BASKETS OK = EXIT| |---|
button. This first cycle can be up to 20 minutes longer as a result of the automatic calibration process.
|TO COMPLETE
OK = EXIT| |---|
|THE FIRST SET UP OK = EXIT| |---|
After this process the appliance is ready for normal use.
ADDING A DETERGENT
To open the detergent dispenser, press button C. Introduce the detergent into the dry dispenser D only. Place the amount of detergent for pre-washing directly inside the tub.
|Usage of detergent not designed for dishwashers may cause malfunction or damage to the appliance.| |---|


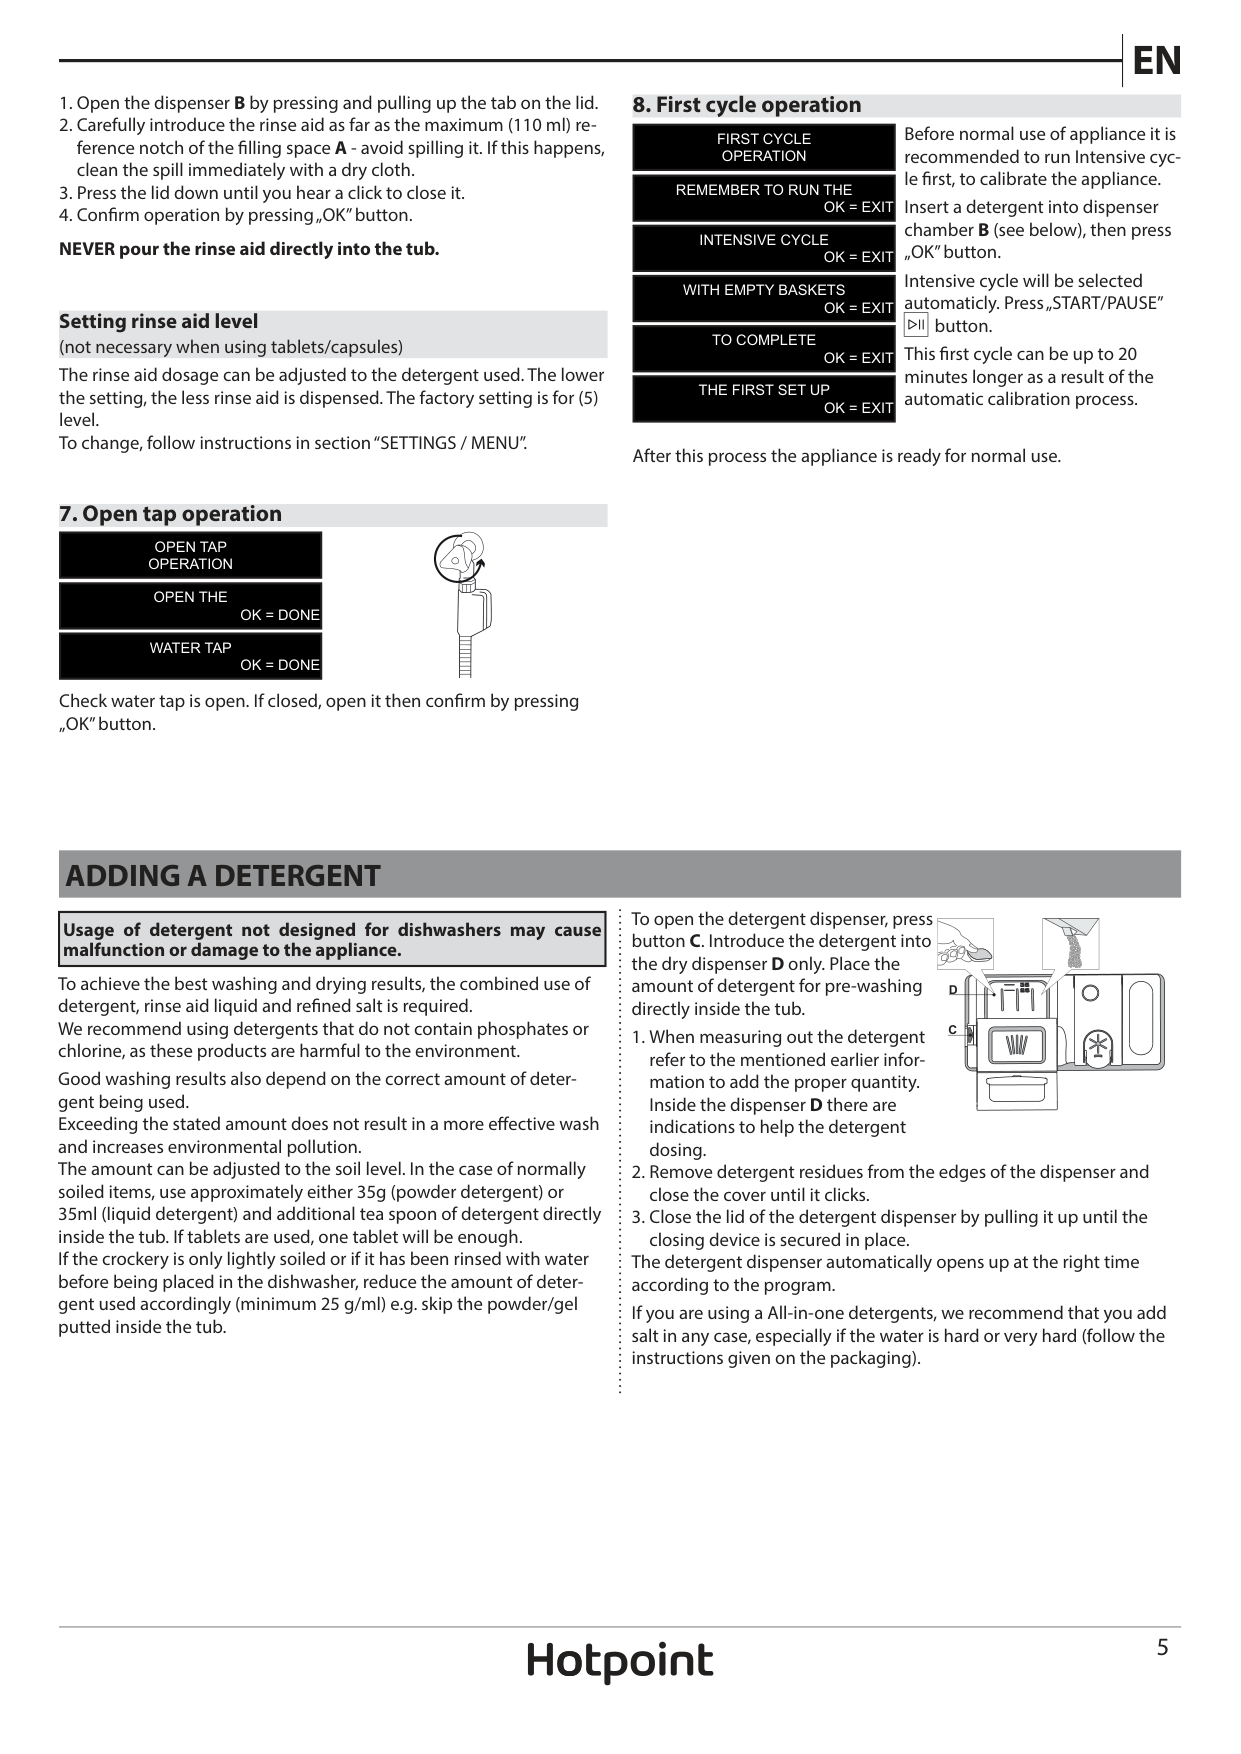
To achieve the best washing and drying results, the combined use of detergent, rinse aid liquid and refined salt is required. We recommend using detergents that do not contain phosphates or chlorine, as these products are harmful to the environment. Good washing results also depend on the correct amount of detergent being used. Exceeding the stated amount does not result in a more effective wash and increases environmental pollution. The amount can be adjusted to the soil level. In the case of normally soiled items, use approximately either 35g (powder detergent) or 35ml (liquid detergent) and additional tea spoon of detergent directly inside the tub. If tablets are used, one tablet will be enough. If the crockery is only lightly soiled or if it has been rinsed with water before being placed in the dishwasher, reduce the amount of detergent used accordingly (minimum 25 g/ml) e.g. skip the powder/gel putted inside the tub.
########### D
|C| | | |---|---|---| | | | |
The detergent dispenser automatically opens up at the right time according to the program.
If you are using a All-in-one detergents, we recommend that you add salt in any case, especially if the water is hard or very hard (follow the instructions given on the packaging).
ADVICE AND TIPS
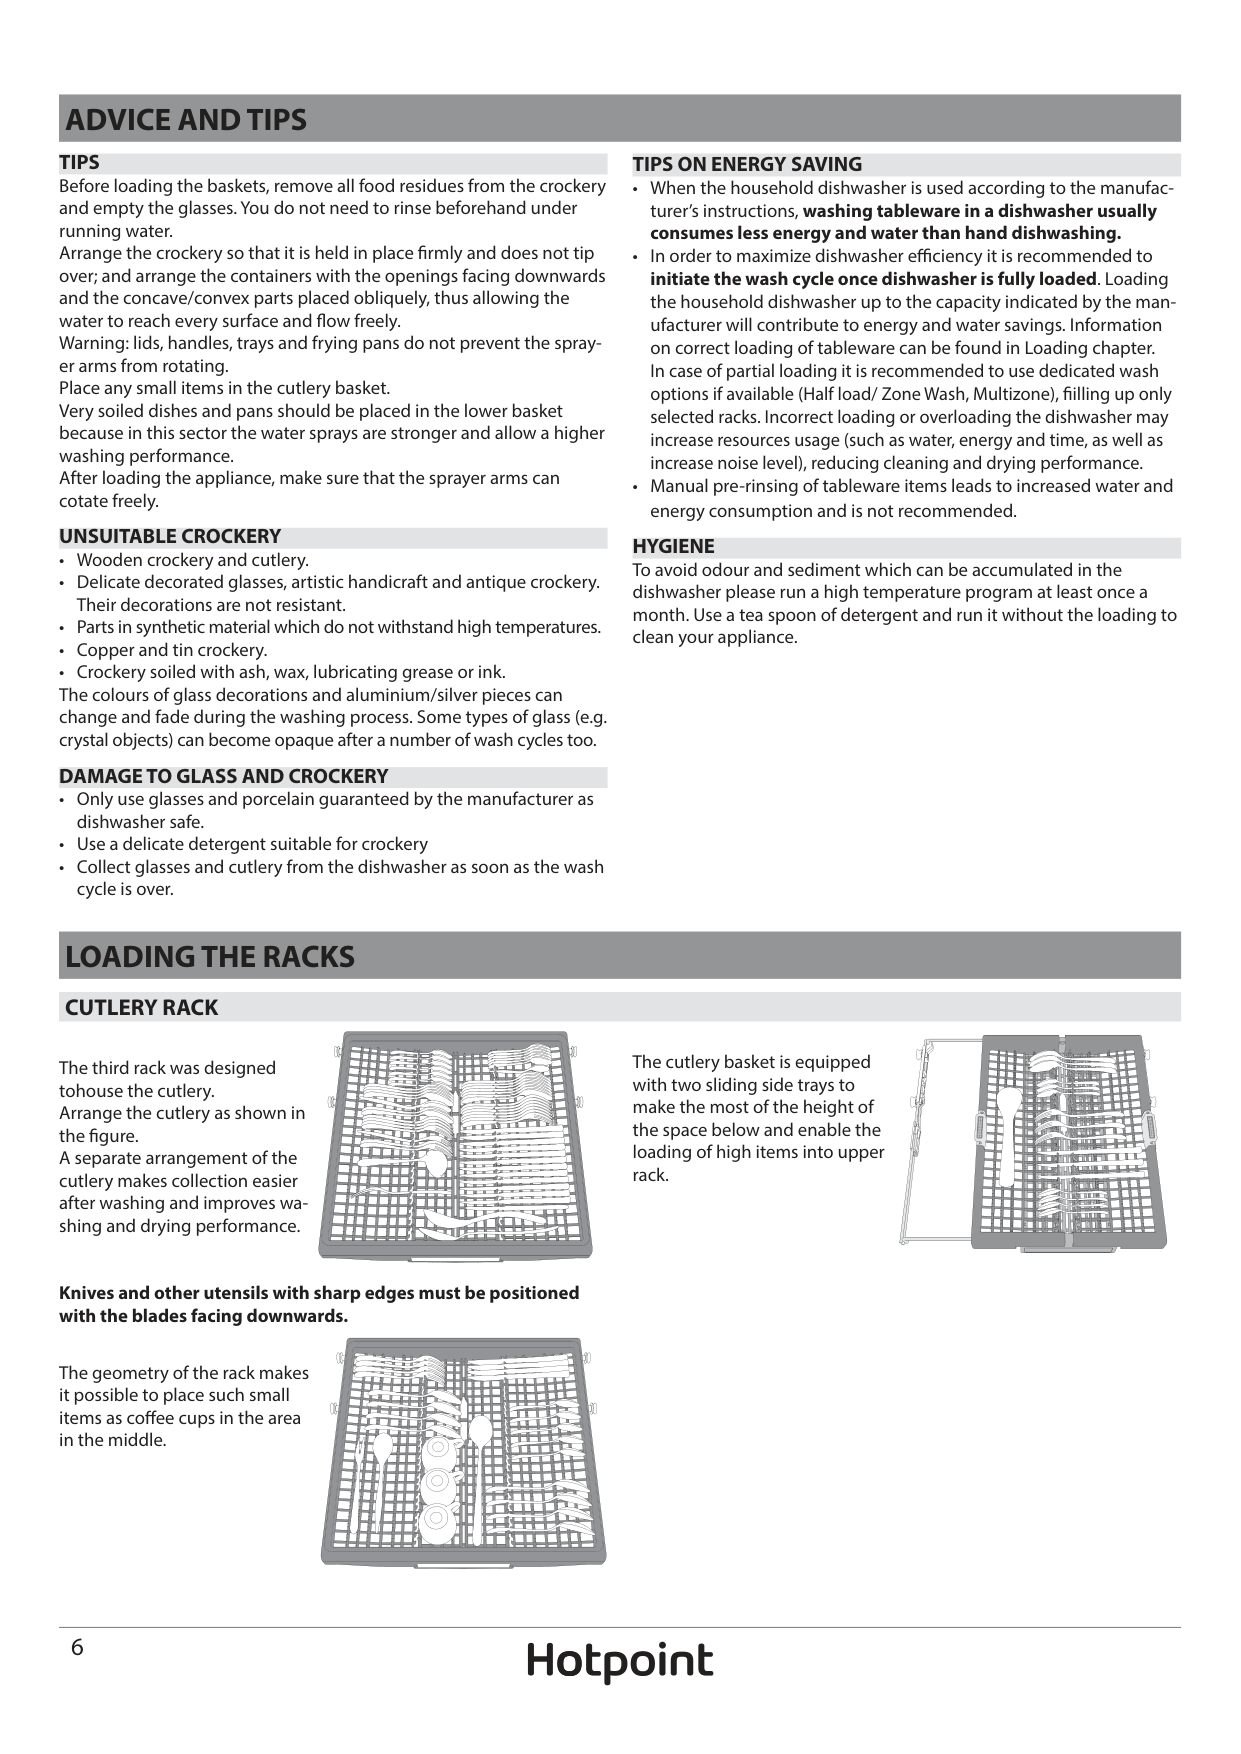
TIPS Before loading the baskets, remove all food residues from the crockery and empty the glasses. You do not need to rinse beforehand under running water. Arrange the crockery so that it is held in place firmly and does not tip over; and arrange the containers with the openings facing downwards and the concave/convex parts placed obliquely, thus allowing the water to reach every surface and flow freely. Warning: lids, handles, trays and frying pans do not prevent the sprayer arms from rotating. Place any small items in the cutlery basket. Very soiled dishes and pans should be placed in the lower basket because in this sector the water sprays are stronger and allow a higher washing performance. After loading the appliance, make sure that the sprayer arms can cotate freely.
######## TIPS ON ENERGY SAVING
######## UNSUITABLE CROCKERY
HYGIENE To avoid odour and sediment which can be accumulated in the dishwasher please run a high temperature program at least once a month. Use a tea spoon of detergent and run it without the loading to clean your appliance.
LOADING THE RACKS
####### CUTLERY RACK
The cutlery basket is equipped with two sliding side trays to make the most of the height of the space below and enable the loading of high items into upper rack.
| | | |---|---| | | |
The third rack was designed tohouse the cutlery. Arrange the cutlery as shown in the figure. A separate arrangement of the cutlery makes collection easier after washing and improves washing and drying performance.
| | | |---|---| | | |
| | | |---|---| | | |
| | | |---|---| | | |
| | | |---|---| | | |
| | | |---|---| | | |
| | | | |---|---|---| | | | |
| | | |---|---| | | |
| | | |---|---| | | |
| | | |---|---| | | |
| | | |---|---| | | |
| | | |---|---| | | |
| | | |---|---| | | |
| | | |---|---| | | |
| | | |---|---| | | |
| | | |---|---| | | |
| | | |---|---| | | |
| | | |---|---| | | |
| | | |---|---| | | |
| | | | |---|---|---| | | | |
| | | |---|---| | | |
| | | |---|---| | | |
| | | |---|---| | | |
| | | |---|---| | | |
| | | |---|---|
| | |
| | | |---|---| | | |
| | | |---|---| | | |
| | | |---|---| | | |
| | | |---|---| | | |
| | | |---|---| | | |
| | | |---|---| | | |
| | | | |---|---|---| | | | |
| | | |---|---| | | |
| | | |---|---| | | |
| | | |---|---| | | |
| | | | |---|---|---| | | | |
| | | |---|---| | | |
| | | |---|---| | | |
| | | |---|---| | | |
| | | |---|---| | | |
| | | | |---|---|---| | | | |
| | | |---|---| | | |
######### Knives and other utensils with sharp edges must be positioned with the blades facing downwards.
The geometry of the rack makes it possible to place such small items as coffee cups in the area in the middle.
| | | |---|---| | | |
| | | |---|---| | | |
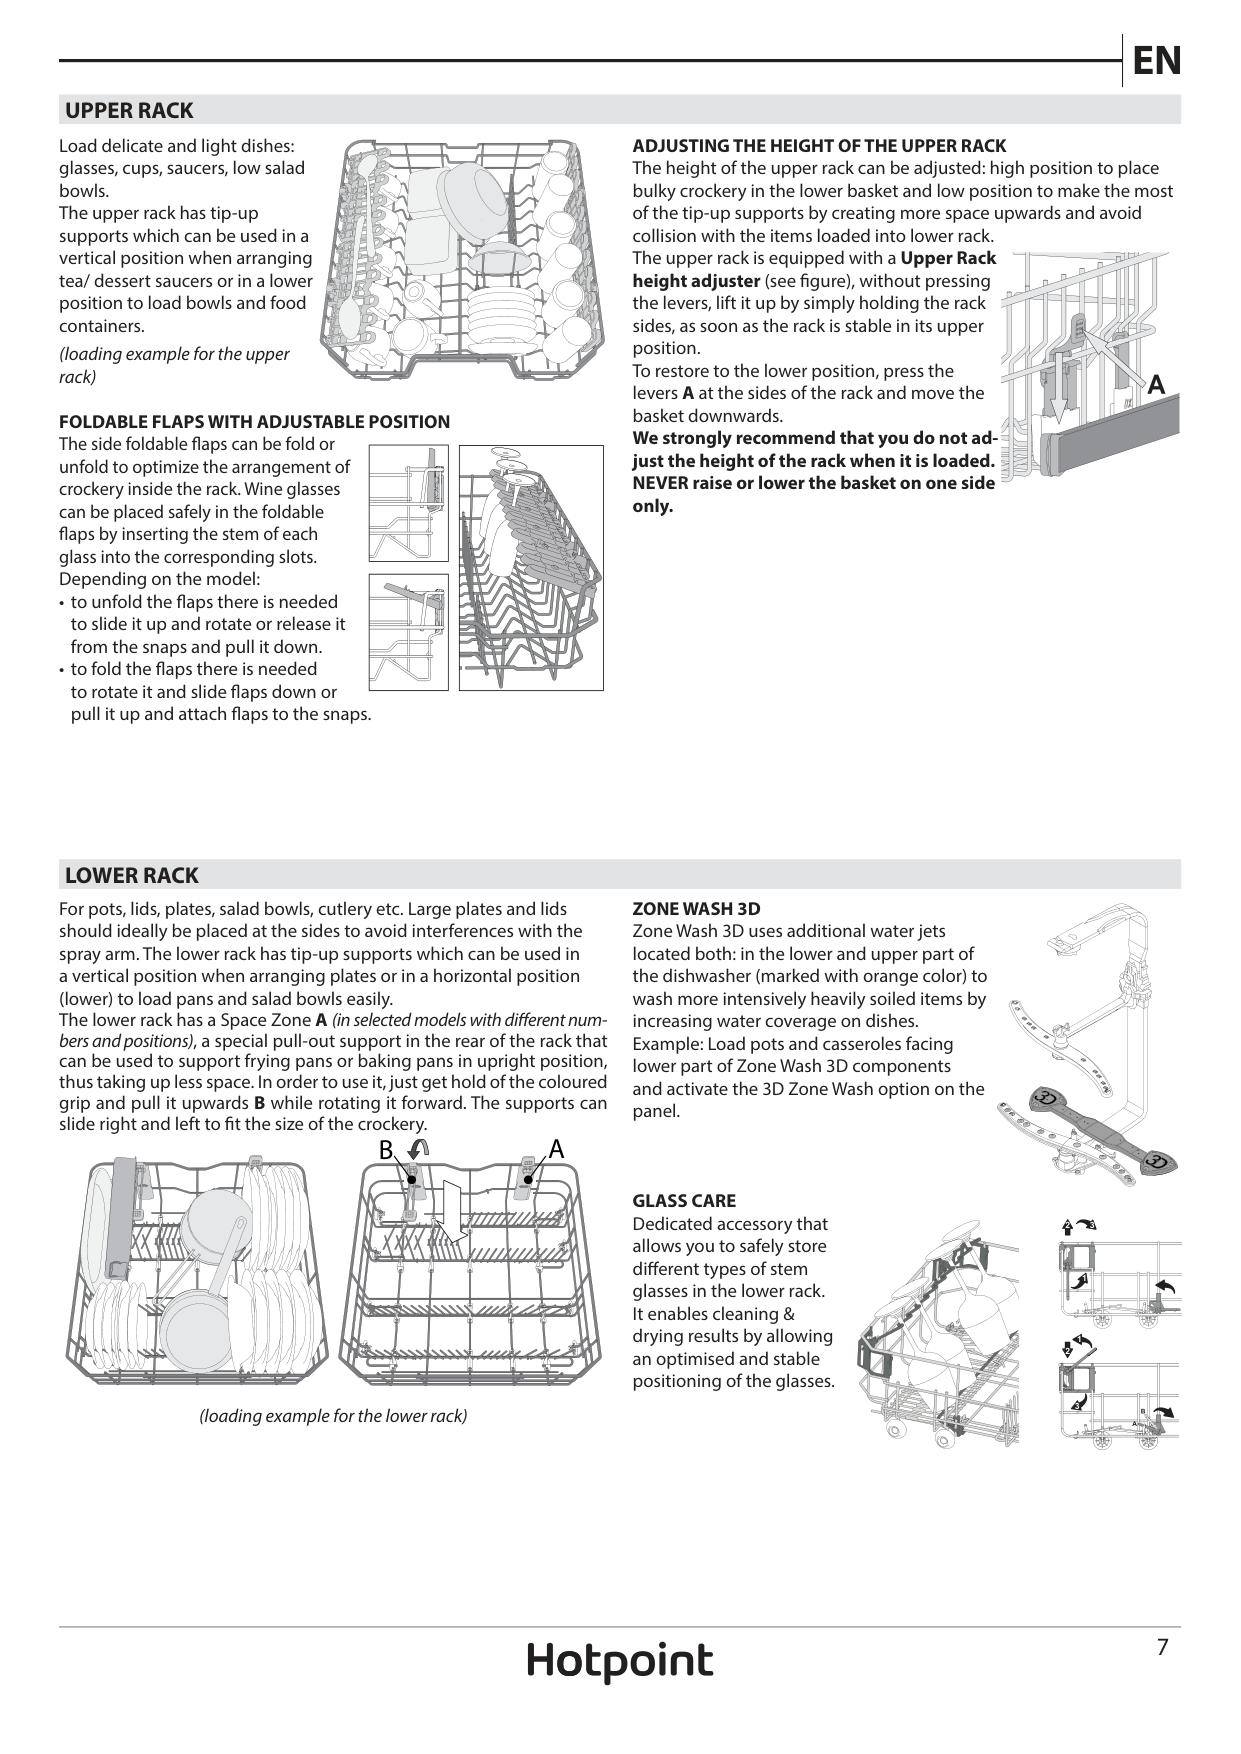
####### UPPER RACK
ADJUSTING THE HEIGHT OF THE UPPER RACK The height of the upper rack can be adjusted: high position to place bulky crockery in the lower basket and low position to make the most of the tip-up supports by creating more space upwards and avoid collision with the items loaded into lower rack. The upper rack is equipped with a Upper Rack height adjuster (see figure), without pressing the levers, lift it up by simply holding the rack sides, as soon as the rack is stable in its upper position. To restore to the lower position, press the levers A at the sides of the rack and move the basket downwards.
Load delicate and light dishes: glasses, cups, saucers, low salad bowls. The upper rack has tip-up supports which can be used in a vertical position when arranging tea/ dessert saucers or in a lower position to load bowls and food containers.
| | | | |---|---|---| | | | |
| | | |---|---| | | |
| | | | |---|---|---| | | | |
| | | |---|---| | | |
(loading example for the upper rack)
FOLDABLE FLAPS WITH ADJUSTABLE POSITION The side foldable flaps can be fold or unfold to optimize the arrangement of crockery inside the rack. Wine glasses can be placed safely in the foldable flaps by inserting the stem of each glass into the corresponding slots. Depending on the model:
We strongly recommend that you do not adjust the height of the rack when it is loaded. NEVER raise or lower the basket on one side only.
| | | |---|---| | | |
| | | | |---|---|---| | | | |
| | | |---|---| | | |
| | | |---|---| | | |
| | | |---|---| | | |
####### LOWER RACK
ZONE WASH 3D Zone Wash 3D uses additional water jets located both: in the lower and upper part of the dishwasher (marked with orange color) to wash more intensively heavily soiled items by increasing water coverage on dishes. Example: Load pots and casseroles facing lower part of Zone Wash 3D components and activate the 3D Zone Wash option on the panel.
For pots, lids, plates, salad bowls, cutlery etc. Large plates and lids should ideally be placed at the sides to avoid interferences with the spray arm. The lower rack has tip-up supports which can be used in a vertical position when arranging plates or in a horizontal position (lower) to load pans and salad bowls easily. The lower rack has a Space Zone A (in selected models with different numbers and positions), a special pull-out support in the rear of the rack that can be used to support frying pans or baking pans in upright position, thus taking up less space. In order to use it, just get hold of the coloured grip and pull it upwards B while rotating it forward. The supports can slide right and left to fit the size of the crockery.
| | | |---|---| | | |
##### B A
| | | |---|---| | | |
GLASS CARE Dedicated accessory that allows you to safely store different types of stem glasses in the lower rack. It enables cleaning & drying results by allowing an optimised and stable positioning of the glasses.
1
1
| | | |---|---| | | |
2
| | | |---|---| | | |
(loading example for the lower rack)
B
A
| | | | |---|---|---| | | | |
SELECTING A CYCLE AND OPTIONS
The list of available cycles and options can be found in Cycle Table on next page. Eco cycle is selected by default. If you want to have Last Used cycle selected by default, you can change it in „Settings Menu”.
|MODIFYING A RUNNING PROGRAM If a wrong program was selected, it is possible to change it, provided that it has only just begun: press and hold the „ON/OFF” button, the machine will switch off. Switch the machine back on using the „ON/OFF” button and select the new wash cycle and any desired options; start the cycle by pressing the „START/PAUSE” button.
TO PAUSE THE CYCLE (ADDING EXTRA ITEMS) Open the door and place the crockery inside the dishwasher, (beware of HOT steam!). Close the door and press „START/PAUSE” button to resume the cycle from the point at which it was interrupted.
ACCIDENTAL INTERRUPTIONS If the door is opened during the wash cycle, or if there is a power cut, the cycle stops. To resume the cycle from where it was interrupted, close the door and press the „START/PAUSE” button.
| |---|
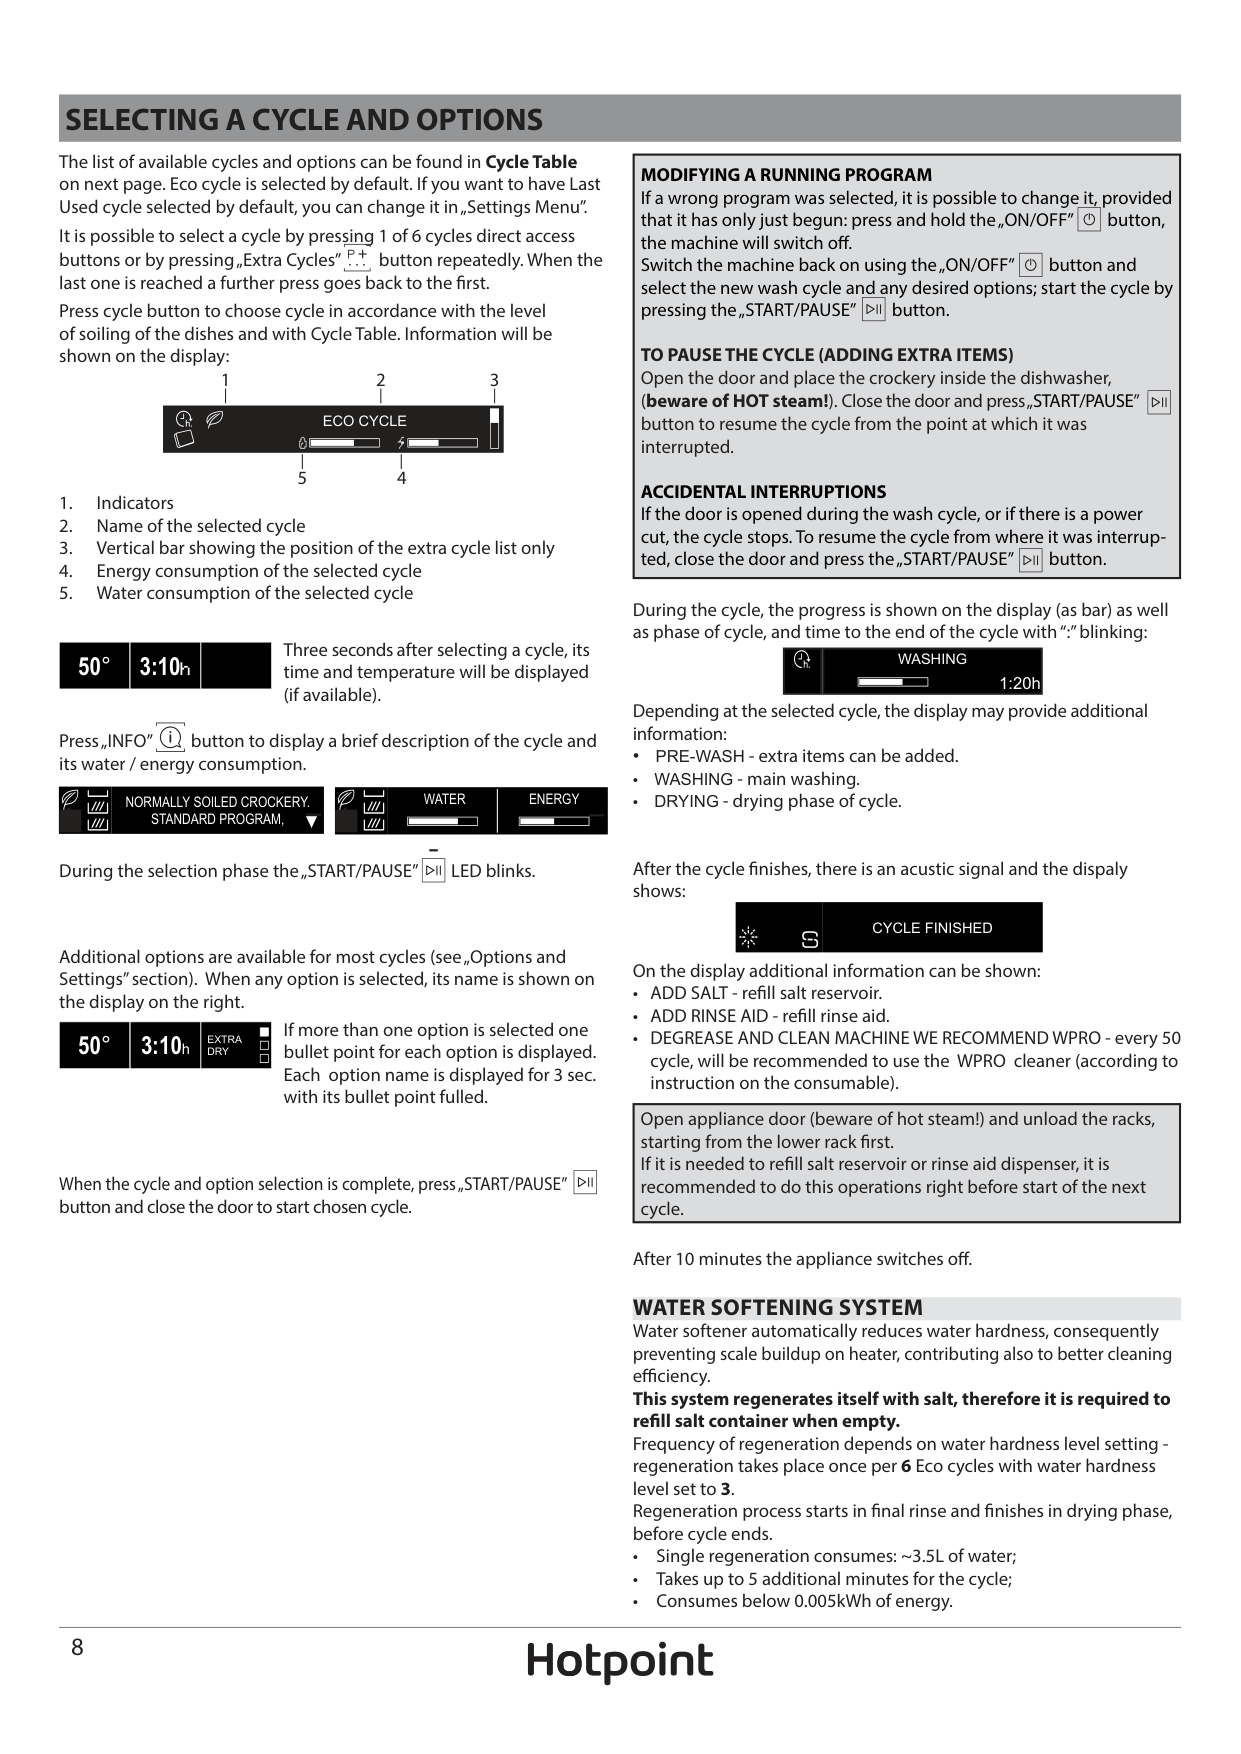
It is possible to select a cycle by pressing 1 of 6 cycles direct access buttons or by pressing „Extra Cycles” button repeatedly. When the last one is reached a further press goes back to the first. Press cycle button to choose cycle in accordance with the level of soiling of the dishes and with Cycle Table. Information will be shown on the display:
1 2 3
|ECO CYCLE
| |---|
45
During the cycle, the progress is shown on the display (as bar) as well as phase of cycle, and time to the end of the cycle with “:” blinking:
Three seconds after selecting a cycle, its time and temperature will be displayed (if available).
|50°|3:10h| | |---|---|---|
| |WASHING
1:20h
| |---|---|
Depending at the selected cycle, the display may provide additional information:
Press „INFO” button to display a brief description of the cycle and its water / energy consumption.
After the cycle finishes, there is an acustic signal and the dispaly shows:
On the display additional information can be shown:
|NORMALLY SOILED CROCKERY. STANDARD PROGRAM,| |---|
|WATER|ENERGY| |---|---|
During the selection phase the „START/PAUSE” LED blinks.
|CYCLE FINISHED| |---|
Additional options are available for most cycles (see „Options and Settings” section). When any option is selected, its name is shown on the display on the right.
If more than one option is selected one bullet point for each option is displayed. Each option name is displayed for 3 sec. with its bullet point fulled.
|50°|3:10h|EXTRA DRY| |---|---|---|
|Open appliance door (beware of hot steam!) and unload the racks, starting from the lower rack first. If it is needed to refill salt reservoir or rinse aid dispenser, it is recommended to do this operations right before start of the next cycle.| |---|
When the cycle and option selection is complete, press „START/PAUSE” button and close the door to start chosen cycle.
After 10 minutes the appliance switches off. WATER SOFTENING SYSTEM Water softener automatically reduces water hardness, consequently preventing scale buildup on heater, contributing also to better cleaning efficiency. This system regenerates itself with salt, therefore it is required to refill salt container when empty. Frequency of regeneration depends on water hardness level setting regeneration takes place once per 6 Eco cycles with water hardness level set to 3. Regeneration process starts in final rinse and finishes in drying phase, before cycle ends.
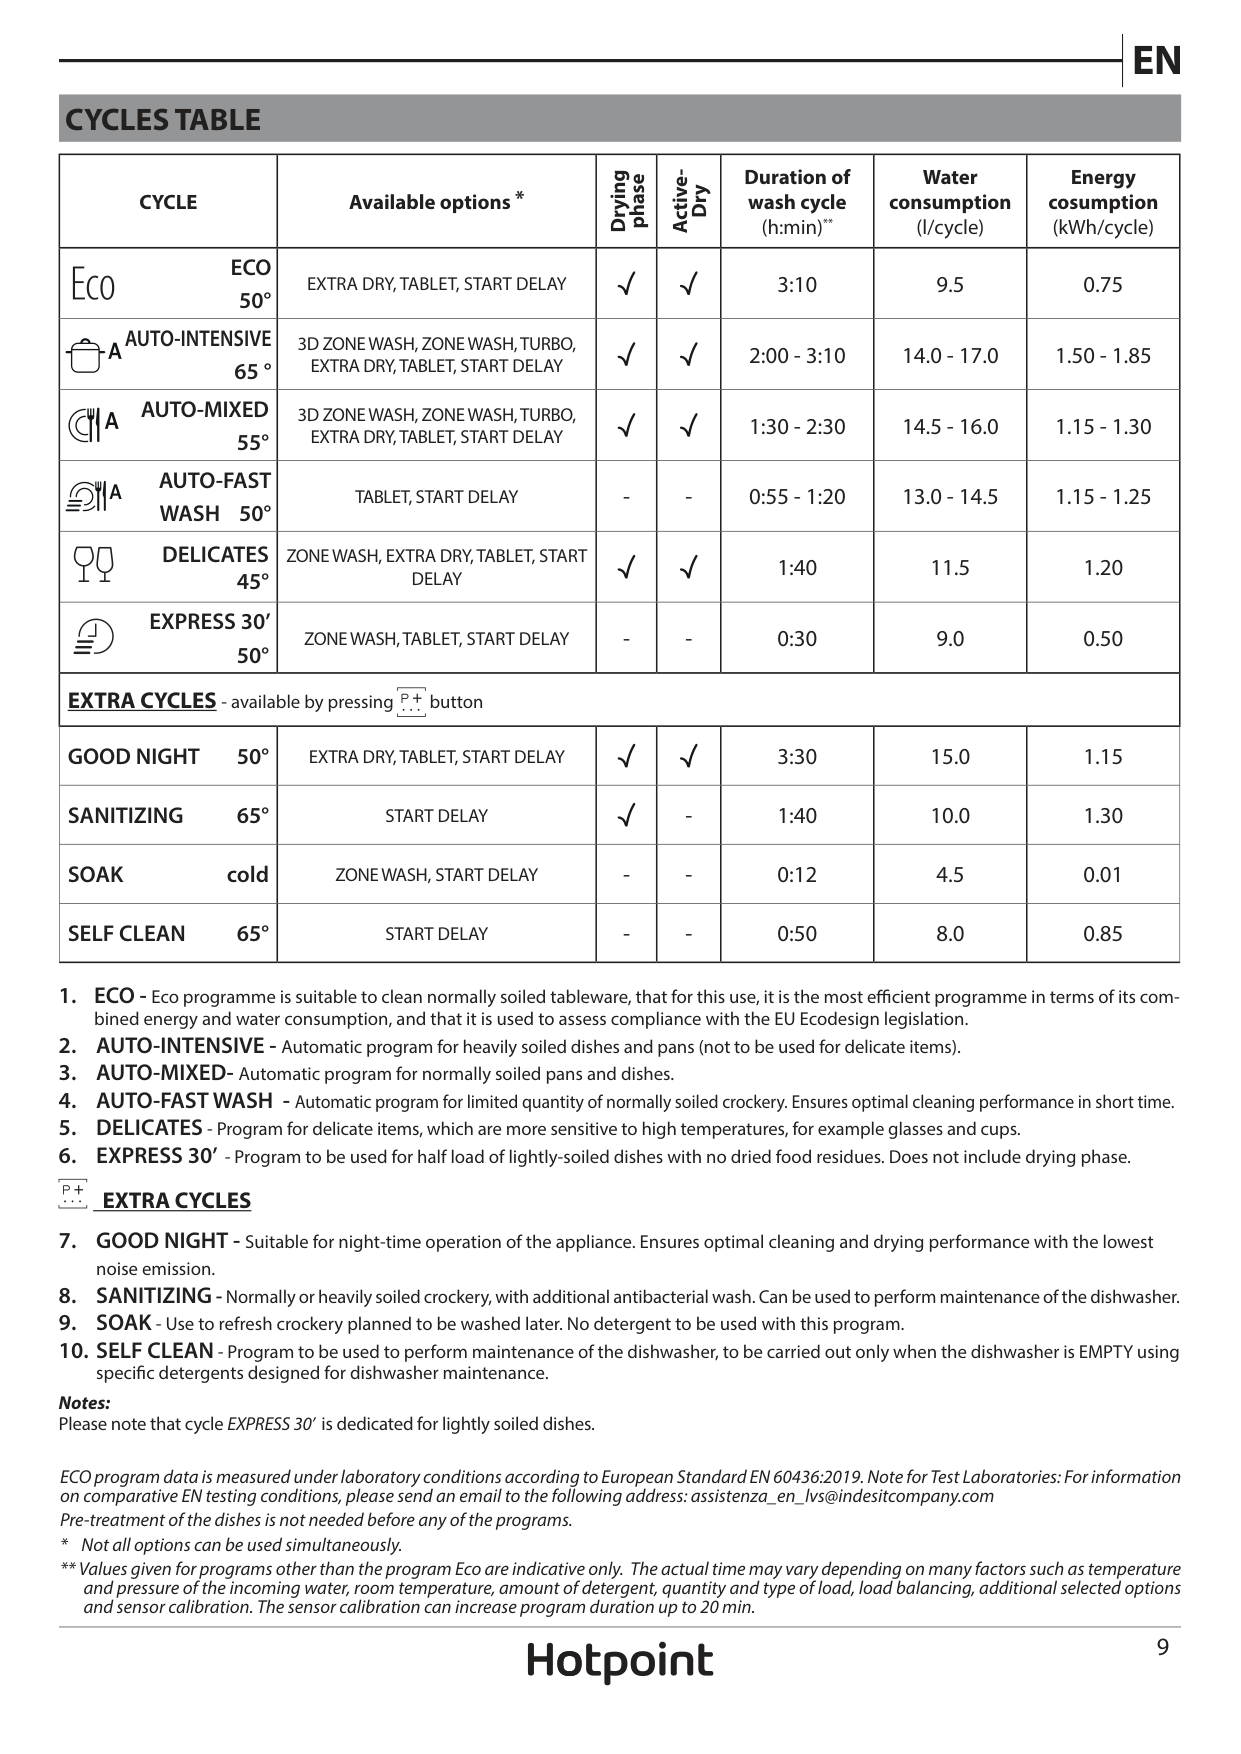
CYCLES TABLE
|CYCLE|Available options *|Drying
phase|Active-
Dry|Duration of wash cycle (h:min)**|Water consumption (l/cycle)|Energy cosumption (kWh/cycle)| |---|---|---|---|---|---|---| |ECO 50°
|EXTRA DRY, TABLET, START DELAY| | |3:10|9.5|0.75| |AUTO-INTENSIVE 65 °
|3D ZONE WASH, ZONE WASH, TURBO, EXTRA DRY, TABLET, START DELAY| | |2:00 - 3:10|14.0 - 17.0|1.50 - 1.85| |AUTO-MIXED 55°
|3D ZONE WASH, ZONE WASH, TURBO, EXTRA DRY, TABLET, START DELAY| | |1:30 - 2:30|14.5 - 16.0|1.15 - 1.30| |AUTO-FAST WASH 50°
|TABLET, START DELAY|-|-|0:55 - 1:20|13.0 - 14.5|1.15 - 1.25| |DELICATES 45°
|ZONE WASH, EXTRA DRY, TABLET, START DELAY| | |1:40|11.5|1.20| |EXPRESS 30’ 50°
|ZONE WASH, TABLET, START DELAY|-|-|0:30|9.0|0.50| |EXTRA CYCLES - available by pressing button
|EXTRA CYCLES - available by pressing button
|EXTRA CYCLES - available by pressing button
|EXTRA CYCLES - available by pressing button
|EXTRA CYCLES - available by pressing button
|EXTRA CYCLES - available by pressing button
|EXTRA CYCLES - available by pressing button
| |GOOD NIGHT 50°|EXTRA DRY, TABLET, START DELAY| | |3:30|15.0|1.15| |SANITIZING 65°|START DELAY| |-|1:40|10.0|1.30| |SOAK cold|ZONE WASH, START DELAY|-|-|0:12|4.5|0.01| |SELF CLEAN 65°|START DELAY|-|-|0:50|8.0|0.85|
EXTRA CYCLES
Notes: Please note that cycle EXPRESS 30’ is dedicated for lightly soiled dishes.
ECO program data is measured under laboratory conditions according to European Standard EN 60436:2019. Note for Test Laboratories: For information on comparative EN testing conditions, please send an email to the following address: assistenza_en_lvs@indesitcompany.com
Pre-treatment of the dishes is not needed before any of the programs.
OPTIONS AND SETTINGS
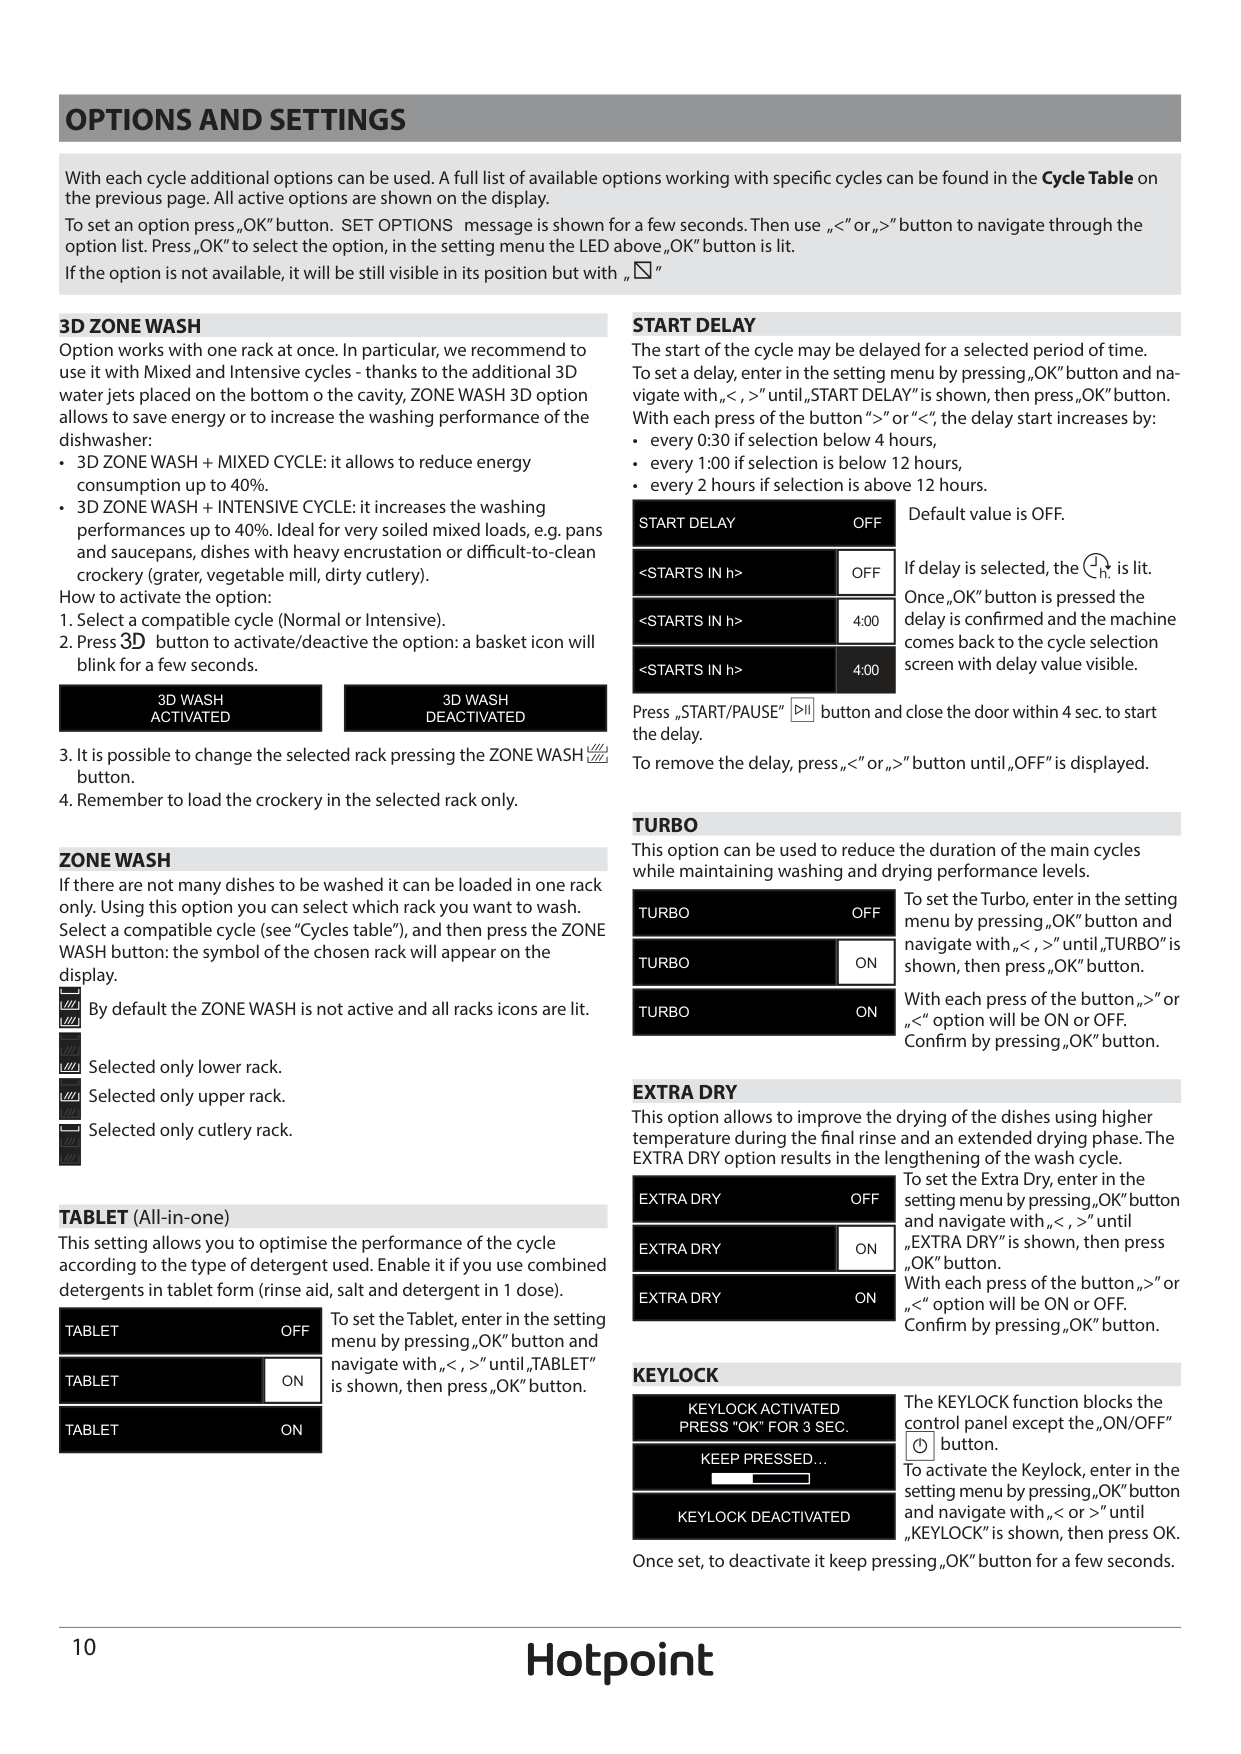
With each cycle additional options can be used. A full list of available options working with specific cycles can be found in the Cycle Table on the previous page. All active options are shown on the display. To set an option press „OK” button. SET OPTIONS message is shown for a few seconds. Then use „<” or „>” button to navigate through the option list. Press „OK” to select the option, in the setting menu the LED above „OK” button is lit. If the option is not available, it will be still visible in its position but with „
”
| | |---|
######## 3D ZONE WASH
Option works with one rack at once. In particular, we recommend to use it with Mixed and Intensive cycles - thanks to the additional 3D water jets placed on the bottom o the cavity, ZONE WASH 3D option allows to save energy or to increase the washing performance of the dishwasher:
How to activate the option:
|3D WASH ACTIVATED| |---|
|3D WASH DEACTIVATED| |---|
######## ZONE WASH
If there are not many dishes to be washed it can be loaded in one rack only. Using this option you can select which rack you want to wash. Select a compatible cycle (see “Cycles table”), and then press the ZONE WASH button: the symbol of the chosen rack will appear on the display.
| | |---|
By default the ZONE WASH is not active and all racks icons are lit.
| | |---|
Selected only lower rack. Selected only upper rack. Selected only cutlery rack.
| | |---|
| | |---|
TABLET (All-in-one)
This setting allows you to optimise the performance of the cycle according to the type of detergent used. Enable it if you use combined detergents in tablet form (rinse aid, salt and detergent in 1 dose).
To set the Tablet, enter in the setting menu by pressing „OK” button and navigate with „< , >” until „TABLET” is shown, then press „OK” button.
|TABLET OFF| |---|
|TABLET|ON| |---|---|
|TABLET ON| |---|
######## START DELAY
The start of the cycle may be delayed for a selected period of time. To set a delay, enter in the setting menu by pressing „OK” button and navigate with „< , >” until „START DELAY” is shown, then press „OK” button. With each press of the button “>” or “<“, the delay start increases by:
|START DELAY OFF| |---|
|
If delay is selected, the is lit. Once „OK” button is pressed the delay is confirmed and the machine comes back to the cycle selection screen with delay value visible.
|
|
Press „START/PAUSE”
button and close the door within 4 sec. to start
the delay. To remove the delay, press „<” or „>” button until „OFF” is displayed.
######## TURBO
This option can be used to reduce the duration of the main cycles while maintaining washing and drying performance levels.
To set the Turbo, enter in the setting menu by pressing „OK” button and navigate with „< , >” until „TURBO” is shown, then press „OK” button.
|TURBO OFF| |---|
|TURBO|ON| |---|---|
With each press of the button „>” or „<“ option will be ON or OFF. Confirm by pressing „OK” button.
|TURBO ON| |---|
######## EXTRA DRY
This option allows to improve the drying of the dishes using higher temperature during the final rinse and an extended drying phase. The EXTRA DRY option results in the lengthening of the wash cycle.
To set the Extra Dry, enter in the setting menu by pressing „OK” button and navigate with „< , >” until „EXTRA DRY” is shown, then press „OK” button. With each press of the button „>” or „<“ option will be ON or OFF. Confirm by pressing „OK” button.
|EXTRA DRY OFF| |---|
|EXTRA DRY|ON| |---|---|
|EXTRA DRY ON| |---|
######## KEYLOCK
The KEYLOCK function blocks the control panel except the „ON/OFF”
|KEYLOCK ACTIVATED PRESS "OK” FOR 3 SEC.| |---|
button. To activate the Keylock, enter in the setting menu by pressing „OK” button and navigate with „< or >” until „KEYLOCK” is shown, then press OK.
|KEEP PRESSED…
| |---|
|KEYLOCK DEACTIVATED| |---|
Once set, to deactivate it keep pressing „OK” button for a few seconds.
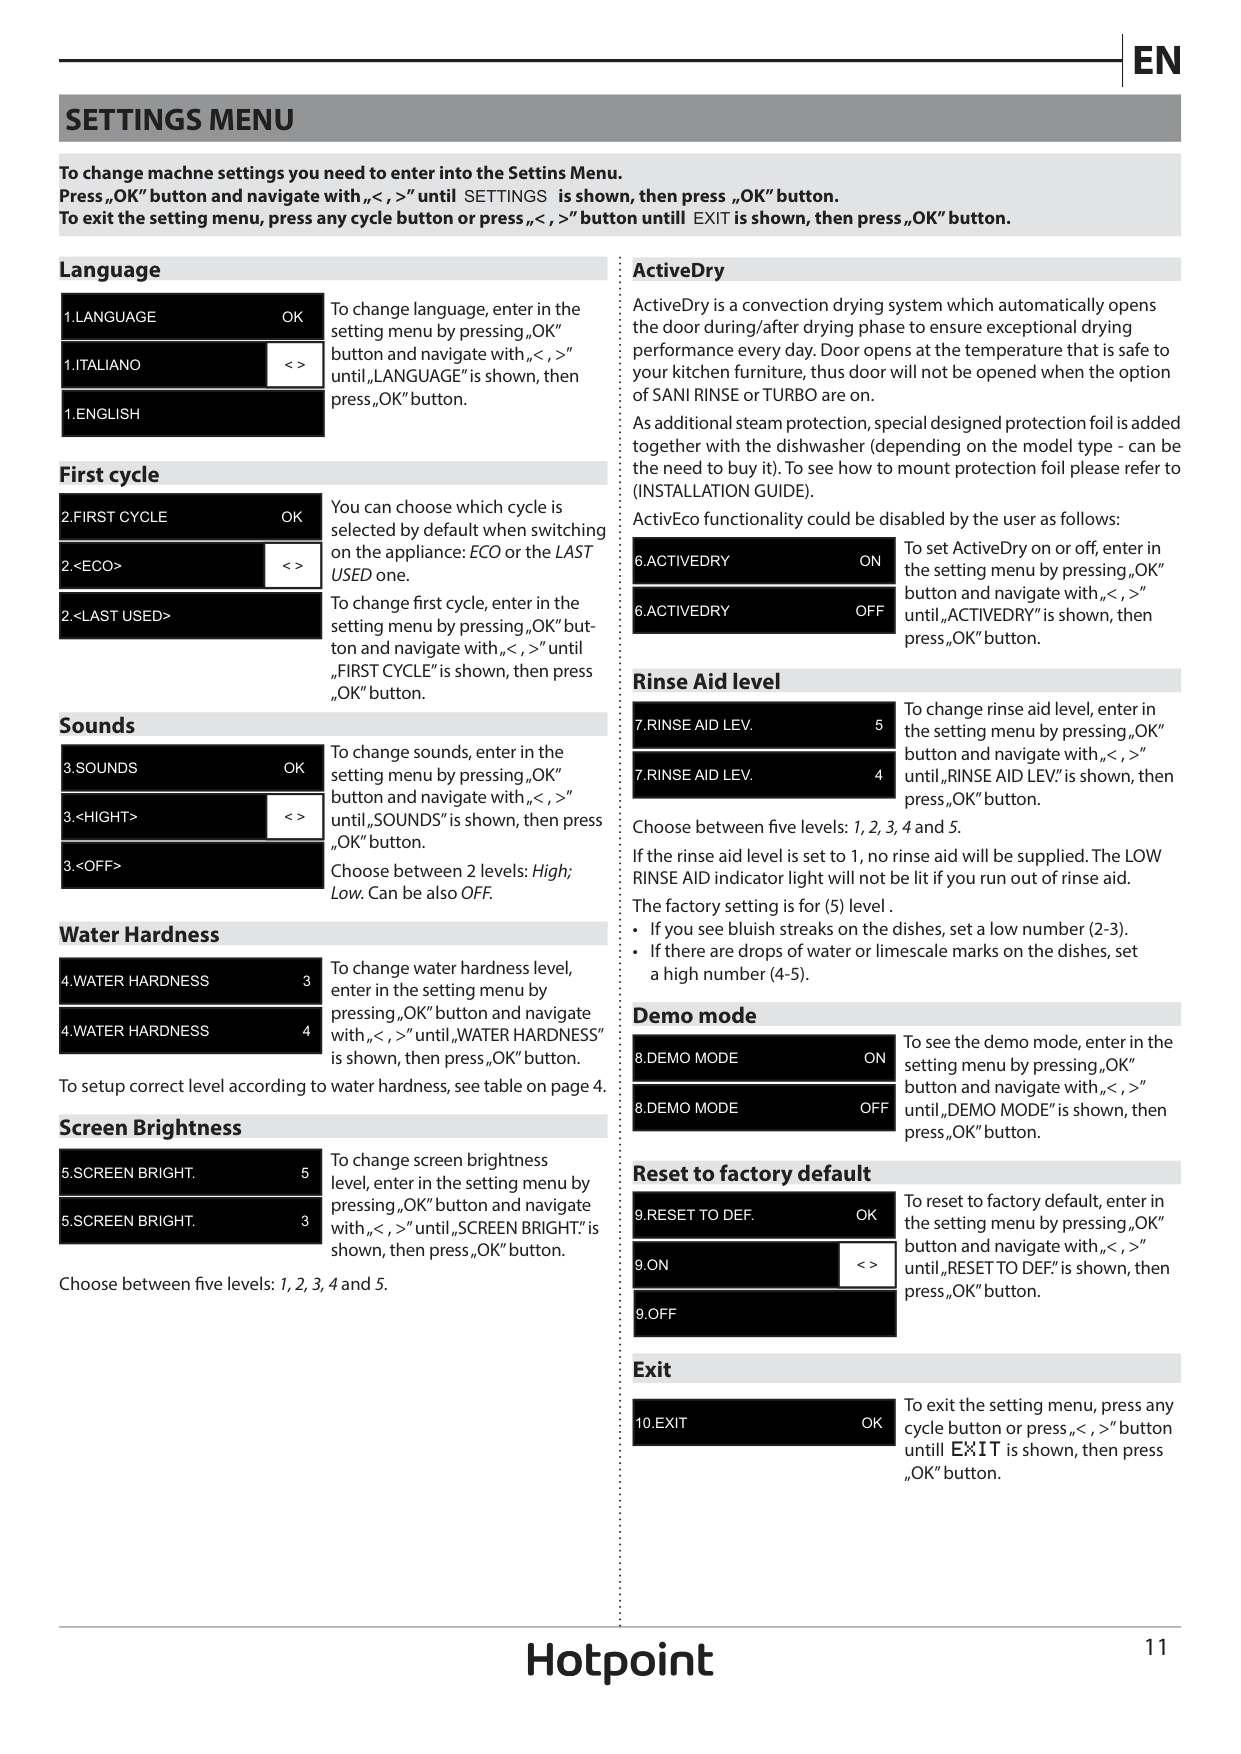
SETTINGS MENU
To change machne settings you need to enter into the Settins Menu. Press „OK” button and navigate with „< , >” until SETTINGS is shown, then press „OK” button. To exit the setting menu, press any cycle button or press „< , >” button untill EXIT is shown, then press „OK” button.
####### Language
|1.LANGUAGE OK| |---|
To change language, enter in the setting menu by pressing „OK” button and navigate with „< , >” until „LANGUAGE” is shown, then press „OK” button.
|1.ITALIANO|< >| |---|---|
|1.ENGLISH| |---|
####### First cycle
|2.FIRST CYCLE OK| |---|
You can choose which cycle is selected by default when switching on the appliance: ECO or the LAST USED one.
|2.
To change first cycle, enter in the setting menu by pressing „OK” button and navigate with „< , >” until „FIRST CYCLE” is shown, then press „OK” button.
|2.
####### Sounds
To change sounds, enter in the setting menu by pressing „OK” button and navigate with „< , >” until „SOUNDS” is shown, then press „OK” button. Choose between 2 levels: High; Low. Can be also OFF.
|3.SOUNDS OK| |---|
|3.
|3.
####### Water Hardness
To change water hardness level, enter in the setting menu by pressing „OK” button and navigate with „< , >” until „WATER HARDNESS” is shown, then press „OK” button.
|4.WATER HARDNESS 3| |---|
|4.WATER HARDNESS 4| |---|
To setup correct level according to water hardness, see table on page 4. Screen Brightness
To change screen brightness level, enter in the setting menu by pressing „OK” button and navigate with „< , >” until „SCREEN BRIGHT.” is shown, then press „OK” button.
|5.SCREEN BRIGHT. 5| |---|
|5.SCREEN BRIGHT. 3| |---|
Choose between five levels: 1, 2, 3, 4 and 5.
######## ActiveDry
ActiveDry is a convection drying system which automatically opens the door during/after drying phase to ensure exceptional drying performance every day. Door opens at the temperature that is safe to your kitchen furniture, thus door will not be opened when the option of SANI RINSE or TURBO are on.
As additional steam protection, special designed protection foil is added together with the dishwasher (depending on the model type - can be the need to buy it). To see how to mount protection foil please refer to (INSTALLATION GUIDE).
ActivEco functionality could be disabled by the user as follows: To set ActiveDry on or off, enter in the setting menu by pressing „OK” button and navigate with „< , >” until „ACTIVEDRY” is shown, then press „OK” button.
|6.ACTIVEDRY ON| |---|
|6.ACTIVEDRY OFF| |---|
####### Rinse Aid level
To change rinse aid level, enter in the setting menu by pressing „OK” button and navigate with „< , >” until „RINSE AID LEV.” is shown, then press „OK” button.
|7.RINSE AID LEV. 5| |---|
|7.RINSE AID LEV. 4| |---|
Choose between five levels: 1, 2, 3, 4 and 5. If the rinse aid level is set to 1, no rinse aid will be supplied. The LOW RINSE AID indicator light will not be lit if you run out of rinse aid. The factory setting is for (5) level .
####### Demo mode
To see the demo mode, enter in the setting menu by pressing „OK” button and navigate with „< , >” until „DEMO MODE” is shown, then press „OK” button.
|8.DEMO MODE ON| |---|
|8.DEMO MODE OFF| |---|
####### Reset to factory default
To reset to factory default, enter in the setting menu by pressing „OK” button and navigate with „< , >” until „RESET TO DEF.” is shown, then press „OK” button.
|9.RESET TO DEF. OK| |---|
|9.ON|< >| |---|---|
|9.OFF| |---|
####### Exit
To exit the setting menu, press any cycle button or press „< , >” button untill EXIT is shown, then press „OK” button.
|10.EXIT OK| |---|
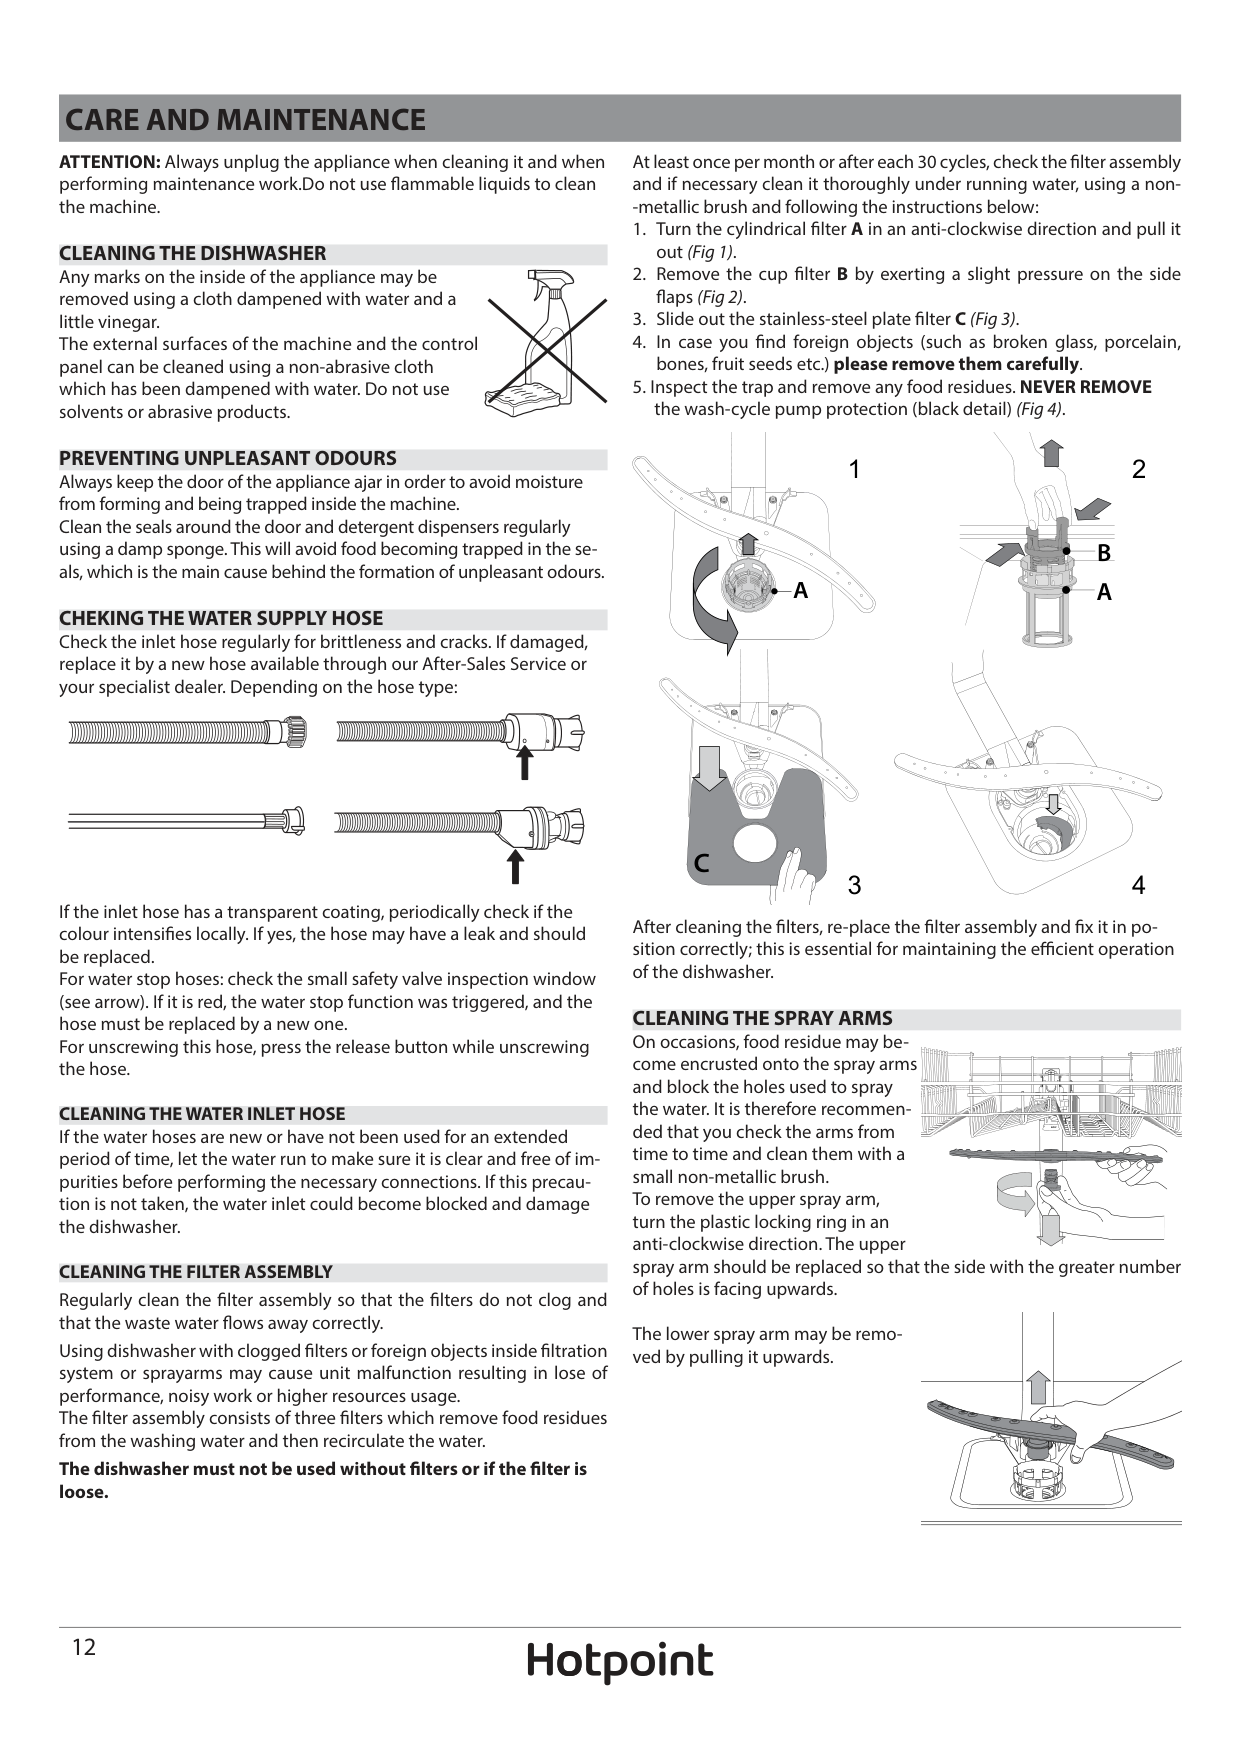
CARE AND MAINTENANCE
ATTENTION: Always unplug the appliance when cleaning it and when performing maintenance work.Do not use flammable liquids to clean the machine.
At least once per month or after each 30 cycles, check the filter assembly and if necessary clean it thoroughly under running water, using a non-metallic brush and following the instructions below:
CLEANING THE DISHWASHER Any marks on the inside of the appliance may be removed using a cloth dampened with water and a little vinegar. The external surfaces of the machine and the control panel can be cleaned using a non-abrasive cloth which has been dampened with water. Do not use solvents or abrasive products.
PREVENTING UNPLEASANT ODOURS Always keep the door of the appliance ajar in order to avoid moisture from forming and being trapped inside the machine. Clean the seals around the door and detergent dispensers regularly using a damp sponge. This will avoid food becoming trapped in the seals, which is the main cause behind the formation of unpleasant odours.
21
| | | | |---|---|---| | | | |
| | | |---|---| | | |
| | | |---|---| | | | | | |
A
| | | |---|---| | | |
| | | |---|---| | | |
######## CHEKING THE WATER SUPPLY HOSE
Check the inlet hose regularly for brittleness and cracks. If damaged, replace it by a new hose available through our After-Sales Service or your specialist dealer. Depending on the hose type:
C
43
If the inlet hose has a transparent coating, periodically check if the colour intensifies locally. If yes, the hose may have a leak and should be replaced. For water stop hoses: check the small safety valve inspection window (see arrow). If it is red, the water stop function was triggered, and the hose must be replaced by a new one. For unscrewing this hose, press the release button while unscrewing the hose.
After cleaning the filters, re-place the filter assembly and fix it in position correctly; this is essential for maintaining the efficient operation of the dishwasher.
CLEANING THE SPRAY ARMS On occasions, food residue may become encrusted onto the spray arms and block the holes used to spray the water. It is therefore recommended that you check the arms from time to time and clean them with a small non-metallic brush. To remove the upper spray arm, turn the plastic locking ring in an anti-clockwise direction. The upper spray arm should be replaced so that the side with the greater number of holes is facing upwards.
CLEANING THE WATER INLET HOSE If the water hoses are new or have not been used for an extended period of time, let the water run to make sure it is clear and free of impurities before performing the necessary connections. If this precaution is not taken, the water inlet could become blocked and damage the dishwasher.
| | | |---|---| | | |
| | | |---|---| | | |
CLEANING THE FILTER ASSEMBLY Regularly clean the filter assembly so that the filters do not clog and that the waste water flows away correctly.
The lower spray arm may be removed by pulling it upwards.
Using dishwasher with clogged filters or foreign objects inside filtration system or sprayarms may cause unit malfunction resulting in lose of performance, noisy work or higher resources usage. The filter assembly consists of three filters which remove food residues from the washing water and then recirculate the water.
| | | |---|---| | | |
The dishwasher must not be used without filters or if the filter is loose.
INSTALLATION
ELECTRICAL CONNECTION WARNING: Under no circumstances should the water inlet hose be cut as it contains live electrical parts.
ATTENTION: If the appliance must be moved at any time, keep it in an upright position; if absolutely necessary, it may be tilted onto its back.
CONNECTING THE WATER SUPPLY Adaptation of the water supply for installation should only be performed by a qualified technician. The water inlet and outlet hoses may be positioned towards the right or the left in order to achieve the best possible installation. Make sure the dishwasher does not bend or squash the hoses.
Before inserting the plug into the electrical socket, make sure that:
####### CONNECTING THE WATER INLET HOSE
If this is not the case, ask an authorised technician to replace the plug (see AFTER-SALES SERVICE). Do not use extension cables or multiple sockets. Once the appliance has been installed, the power supply cable and the electrical socket should be easily accessible. The cable should not be bent or compressed. If the power supply cable is damaged, have it replaced by the manufacturer or its authorised Technical Assistance Service in order to prevent all potential hazards. The Company shall not be held responsible for any incidents, if these regulations are not observed.
|WATER SUPPLY|cold or hot (max. 60°C)| |---|---| |WATER INTAKE|3/4”| |POWER OF WATER PRESSURE|0,05 ÷ 1 MPa (0.5 ÷ 10 bar) 7,25 – 145 psi|

####### POSITIONING AND LEVELLING
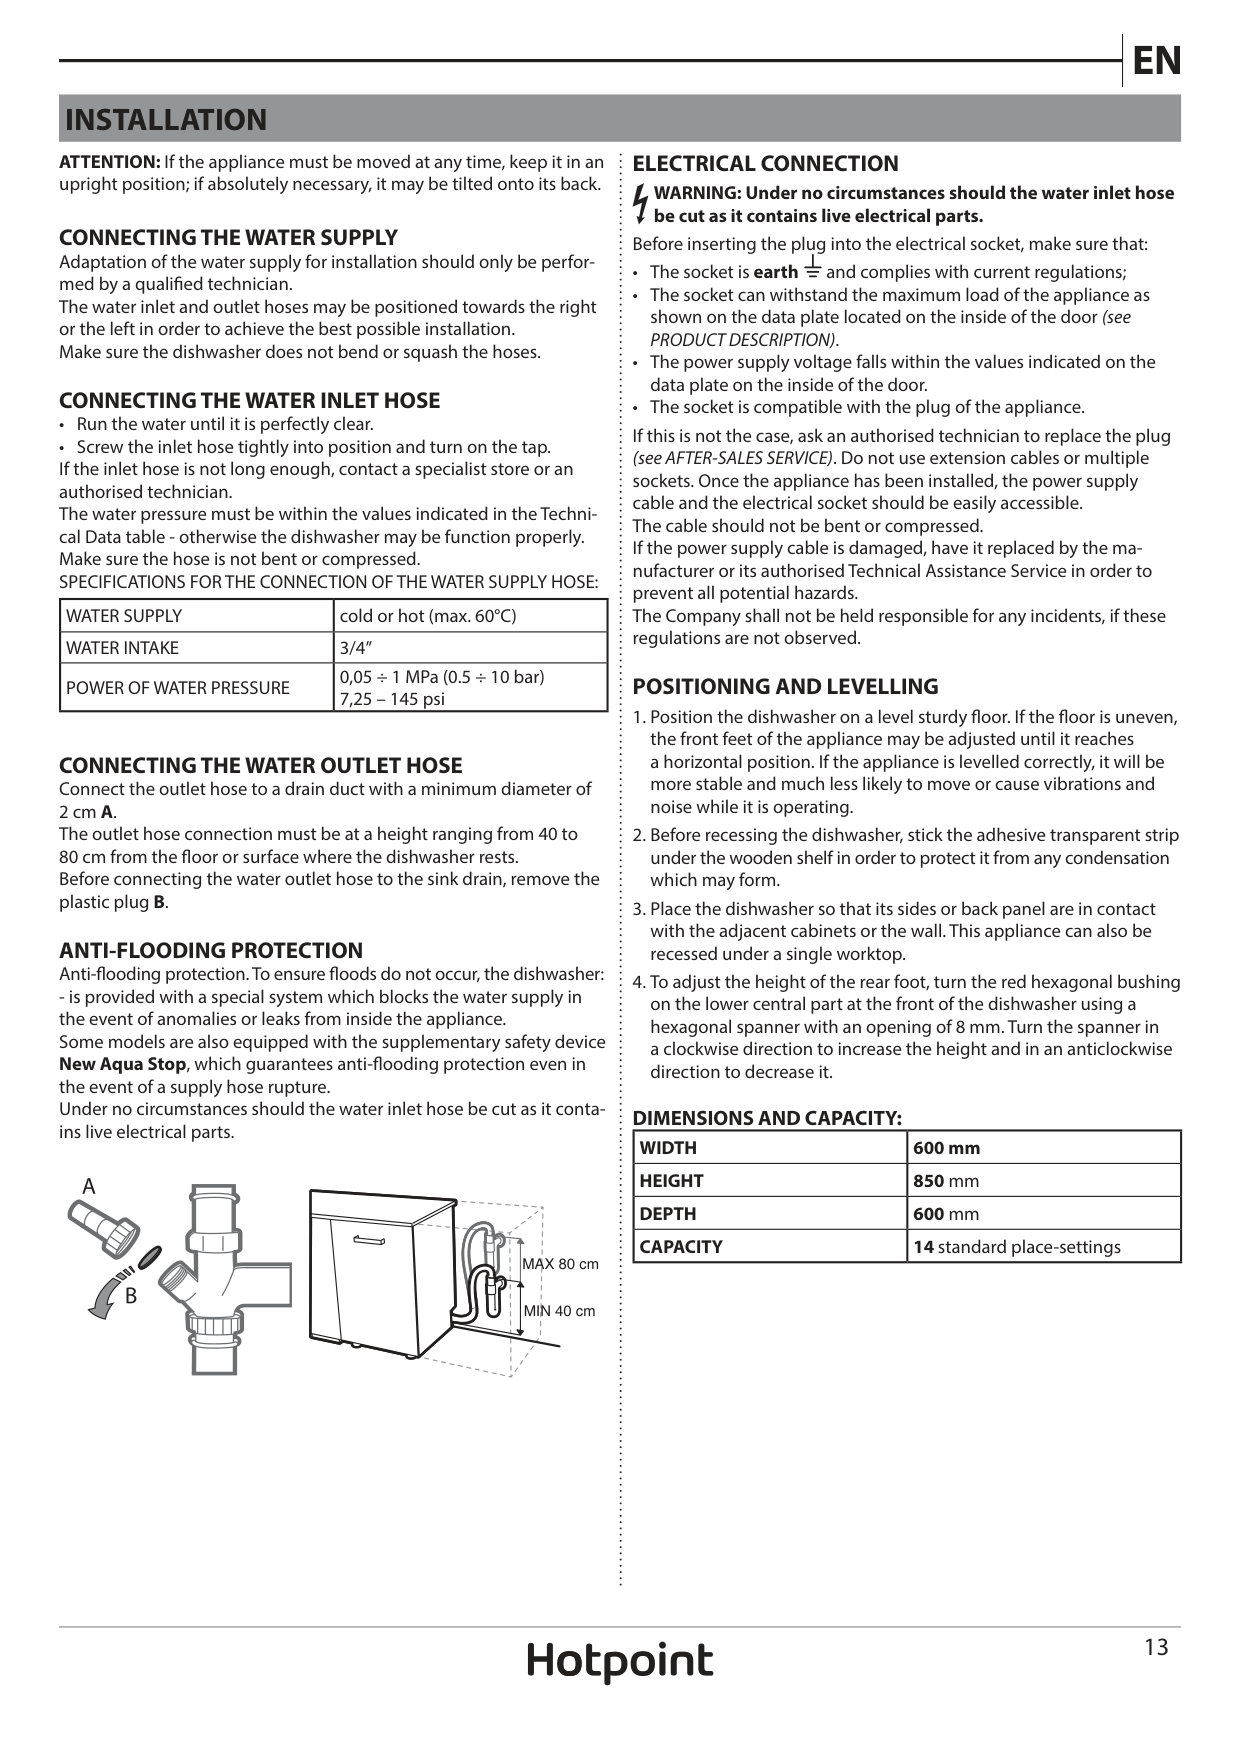
CONNECTING THE WATER OUTLET HOSE Connect the outlet hose to a drain duct with a minimum diameter of 2 cm A. The outlet hose connection must be at a height ranging from 40 to 80 cm from the floor or surface where the dishwasher rests. Before connecting the water outlet hose to the sink drain, remove the plastic plug B.
ANTI-FLOODING PROTECTION Anti-flooding protection. To ensure floods do not occur, the dishwasher:
######## DIMENSIONS AND CAPACITY:
|WIDTH|600 mm| |---|---| |HEIGHT|850 mm| |DEPTH|600 mm| |CAPACITY|14 standard place-settings|
MAX 80 cm
MIN 40 cm
TROUBLESHOOTING
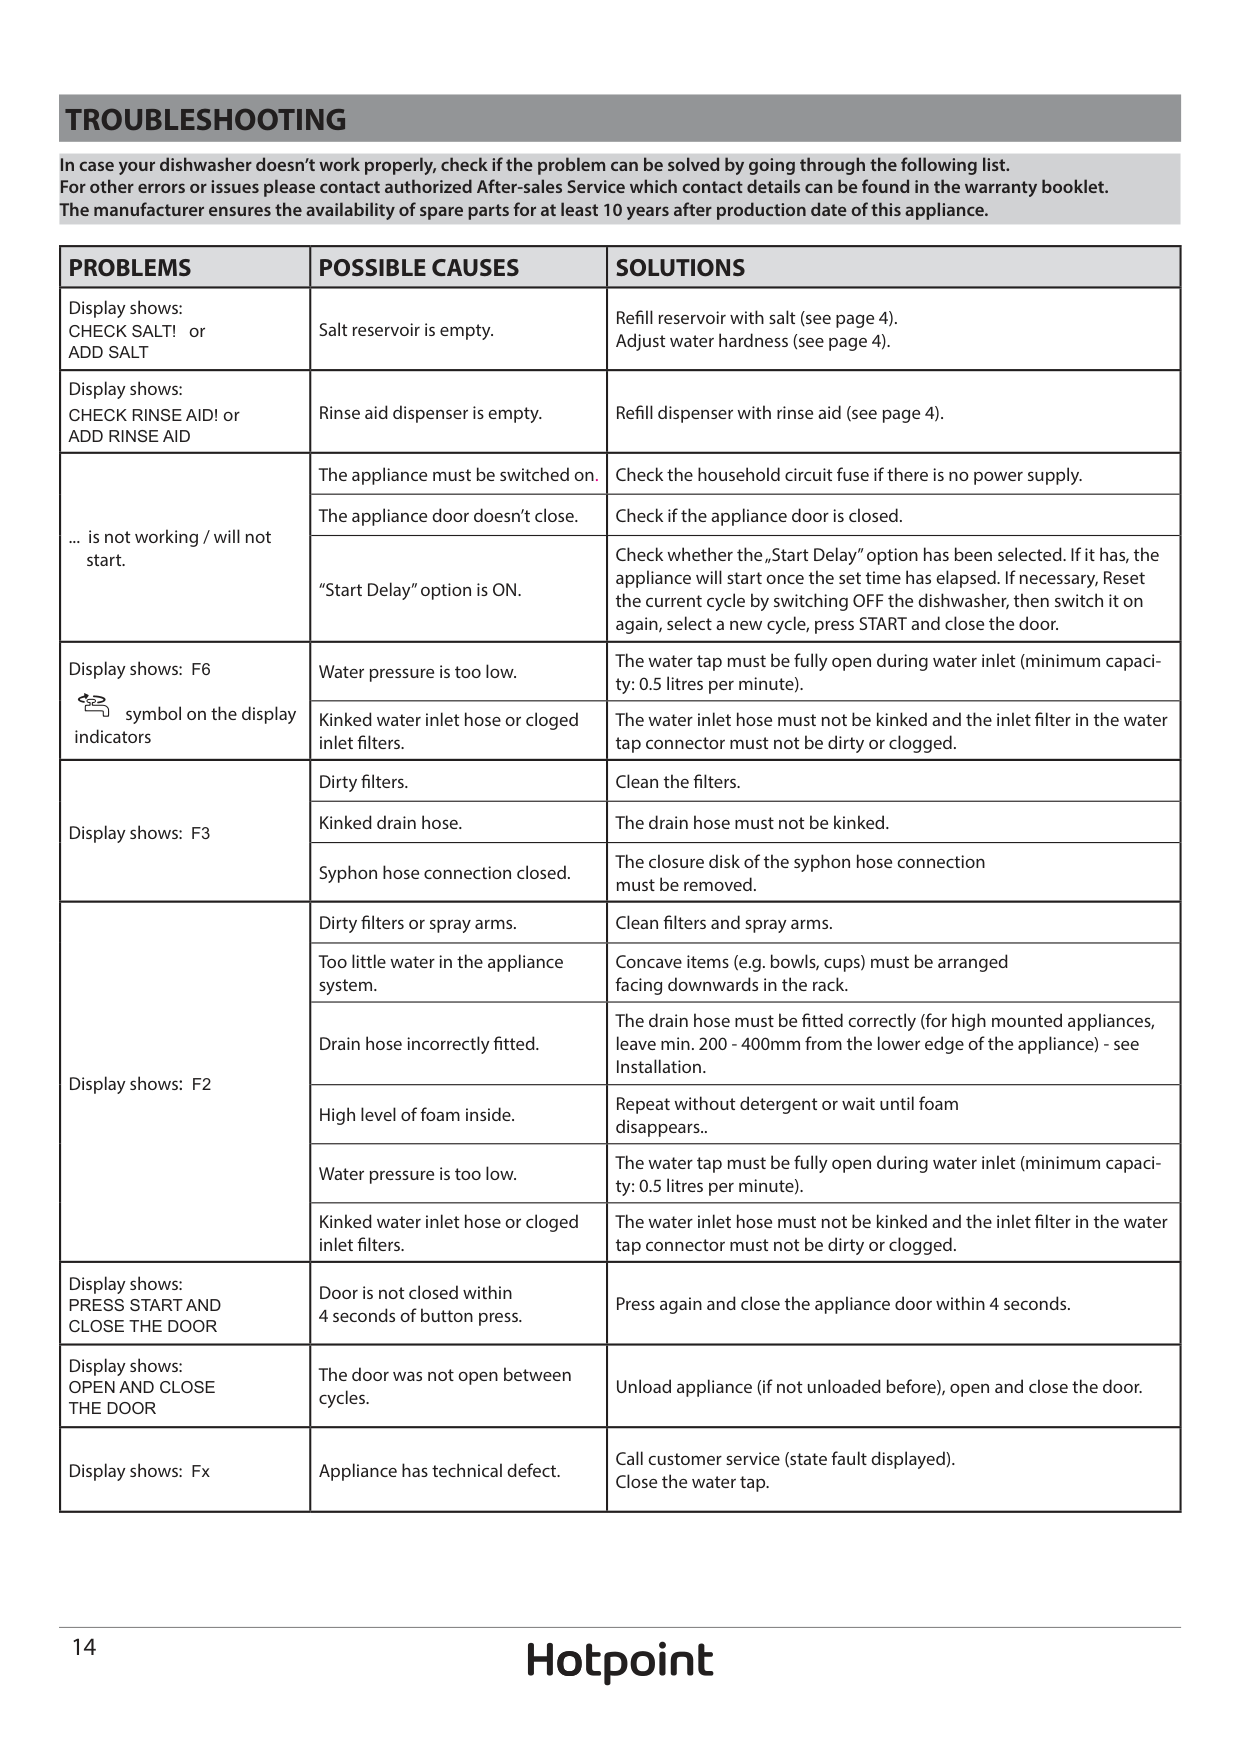
In case your dishwasher doesn’t work properly, check if the problem can be solved by going through the following list. For other errors or issues please contact authorized After-sales Service which contact details can be found in the warranty booklet. The manufacturer ensures the availability of spare parts for at least 10 years after production date of this appliance.
|PROBLEMS|POSSIBLE CAUSES|SOLUTIONS| |---|---|---| |Display shows: CHECK SALT! or ADD SALT|Salt reservoir is empty.|Refill reservoir with salt (see page 4). Adjust water hardness (see page 4).| |Display shows: CHECK RINSE AID! or ADD RINSE AID|Rinse aid dispenser is empty.|Refill dispenser with rinse aid (see page 4).| |... is not working / will not start.|The appliance must be switched on.|Check the household circuit fuse if there is no power supply.| |... is not working / will not start.|The appliance door doesn’t close.|Check if the appliance door is closed.| |... is not working / will not start.|“Start Delay” option is ON.|Check whether the „Start Delay” option has been selected. If it has, the appliance will start once the set time has elapsed. If necessary, Reset the current cycle by switching OFF the dishwasher, then switch it on again, select a new cycle, press START and close the door.| |Display shows: F6
symbol on the display indicators|Water pressure is too low.|The water tap must be fully open during water inlet (minimum capacity: 0.5 litres per minute).| |Display shows: F6
symbol on the display indicators|Kinked water inlet hose or cloged inlet filters.|The water inlet hose must not be kinked and the inlet filter in the water tap connector must not be dirty or clogged.| |Display shows: F3|Dirty filters.|Clean the filters.| |Display shows: F3|Kinked drain hose.|The drain hose must not be kinked.| |Display shows: F3|Syphon hose connection closed.|The closure disk of the syphon hose connection must be removed.| |Display shows: F2|Dirty filters or spray arms.|Clean filters and spray arms.| |Display shows: F2|Too little water in the appliance system.|Concave items (e.g. bowls, cups) must be arranged facing downwards in the rack.| |Display shows: F2|Drain hose incorrectly fitted.|The drain hose must be fitted correctly (for high mounted appliances, leave min. 200 - 400mm from the lower edge of the appliance) - see Installation.| |Display shows: F2|High level of foam inside.|Repeat without detergent or wait until foam disappears..| |Display shows: F2|Water pressure is too low.|The water tap must be fully open during water inlet (minimum capacity: 0.5 litres per minute).| |Display shows: F2|Kinked water inlet hose or cloged inlet filters.|The water inlet hose must not be kinked and the inlet filter in the water tap connector must not be dirty or clogged.| |Display shows: PRESS START AND CLOSE THE DOOR|Door is not closed within 4 seconds of button press.|Press again and close the appliance door within 4 seconds.| |Display shows: OPEN AND CLOSE THE DOOR|The door was not open between cycles.|Unload appliance (if not unloaded before), open and close the door.| |Display shows: Fx|Appliance has technical defect.|Call customer service (state fault displayed). Close the water tap.|
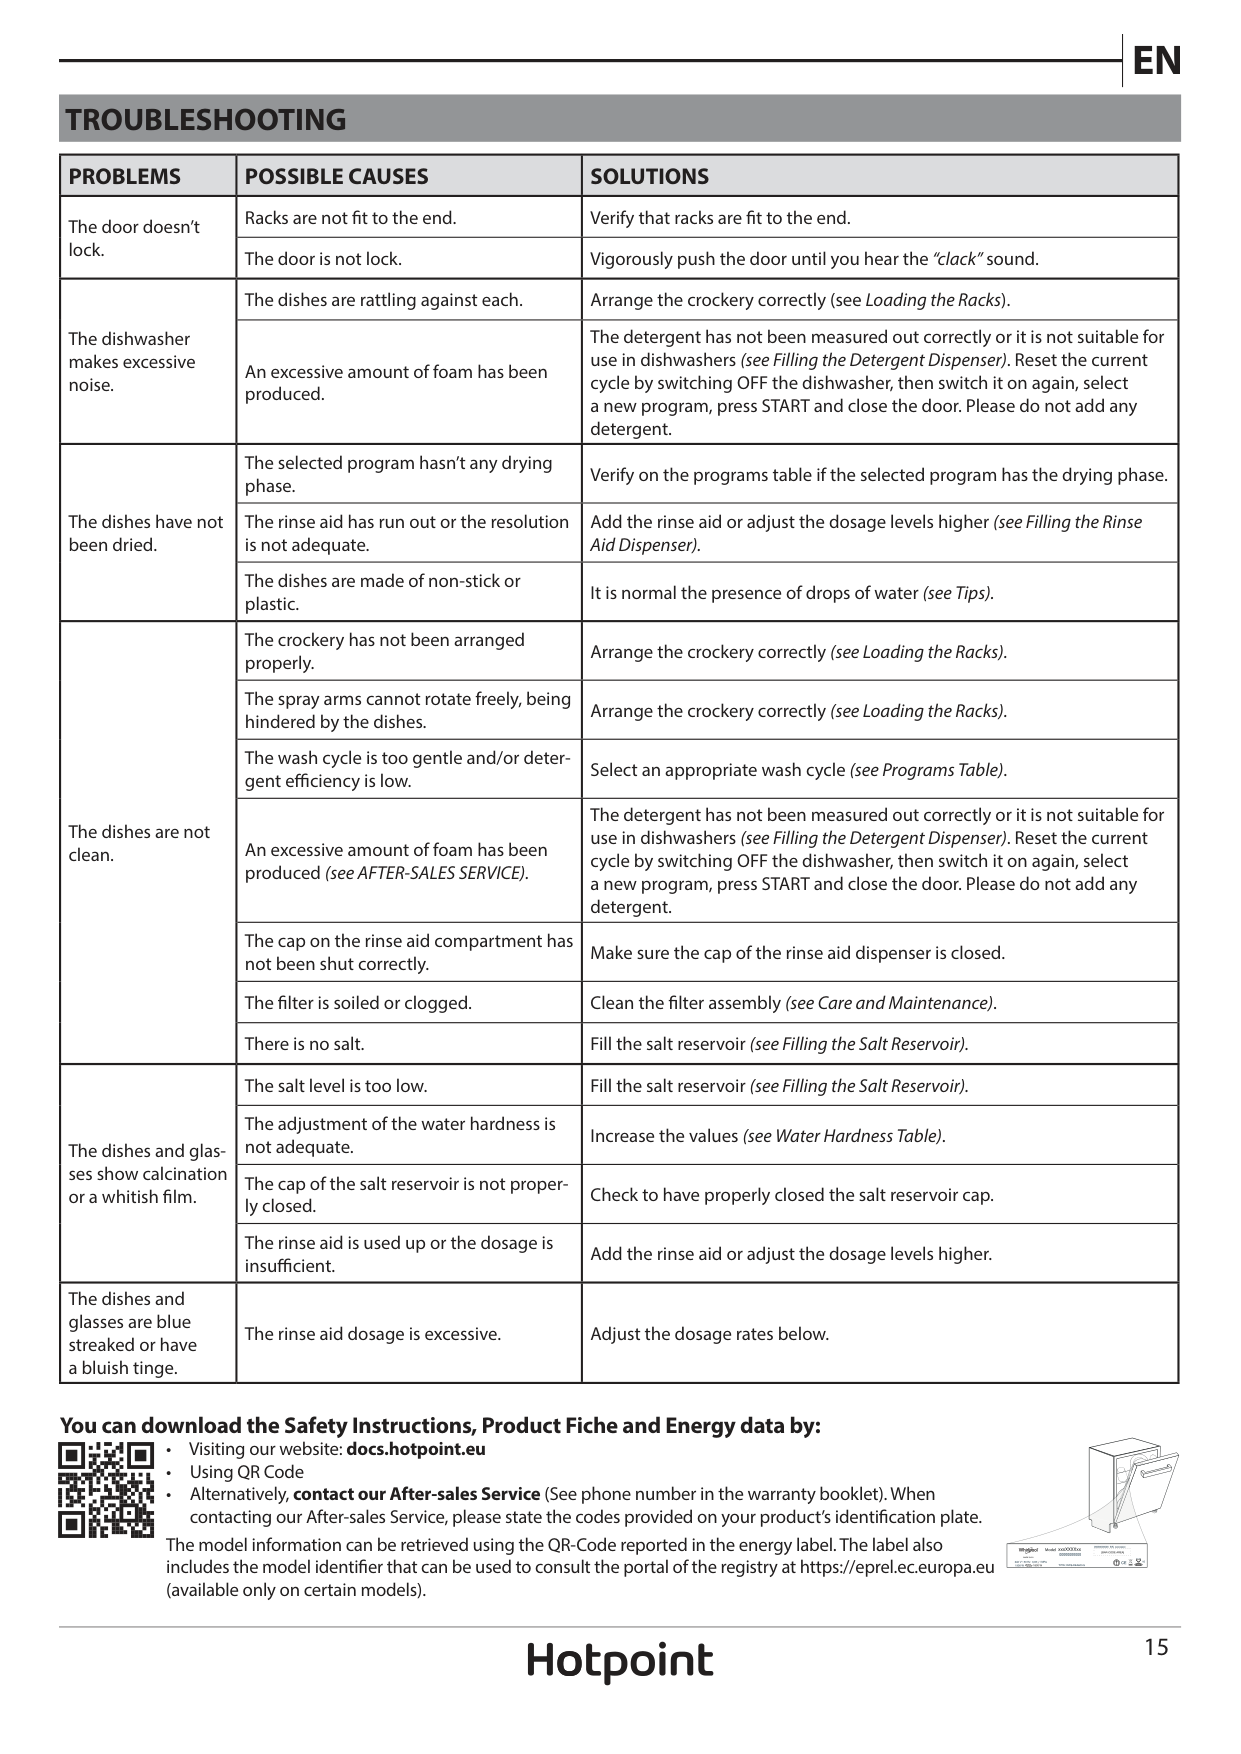
TROUBLESHOOTING
|PROBLEMS|POSSIBLE CAUSES|SOLUTIONS| |---|---|---| |The door doesn’t lock.|Racks are not fit to the end.|Verify that racks are fit to the end.| |The door doesn’t lock.|The door is not lock.|Vigorously push the door until you hear the “clack” sound.| |The dishwasher makes excessive noise.|The dishes are rattling against each.|Arrange the crockery correctly (see Loading the Racks).| |The dishwasher makes excessive noise.|An excessive amount of foam has been produced.|The detergent has not been measured out correctly or it is not suitable for use in dishwashers (see Filling the Detergent Dispenser). Reset the current cycle by switching OFF the dishwasher, then switch it on again, select a new program, press START and close the door. Please do not add any detergent.| |The dishes have not been dried.|The selected program hasn’t any drying phase.|Verify on the programs table if the selected program has the drying phase.| |The dishes have not been dried.|The rinse aid has run out or the resolution is not adequate.|Add the rinse aid or adjust the dosage levels higher (see Filling the Rinse Aid Dispenser).| |The dishes have not been dried.|The dishes are made of non-stick or plastic.|It is normal the presence of drops of water (see Tips).| |The dishes are not clean.|The crockery has not been arranged properly.|Arrange the crockery correctly (see Loading the Racks).| |The dishes are not clean.|The spray arms cannot rotate freely, being hindered by the dishes.|Arrange the crockery correctly (see Loading the Racks).| |The dishes are not clean.|The wash cycle is too gentle and/or detergent efficiency is low.|Select an appropriate wash cycle (see Programs Table).| |The dishes are not clean.|An excessive amount of foam has been produced (see AFTER-SALES SERVICE).|The detergent has not been measured out correctly or it is not suitable for use in dishwashers (see Filling the Detergent Dispenser). Reset the current cycle by switching OFF the dishwasher, then switch it on again, select a new program, press START and close the door. Please do not add any detergent.| |The dishes are not clean.|The cap on the rinse aid compartment has not been shut correctly.|Make sure the cap of the rinse aid dispenser is closed.| |The dishes are not clean.|The filter is soiled or clogged.|Clean the filter assembly (see Care and Maintenance).| |The dishes are not clean.|There is no salt.|Fill the salt reservoir (see Filling the Salt Reservoir).| |The dishes and glasses show calcination or a whitish film.|The salt level is too low.|Fill the salt reservoir (see Filling the Salt Reservoir).| |The dishes and glasses show calcination or a whitish film.|The adjustment of the water hardness is not adequate.|Increase the values (see Water Hardness Table).| |The dishes and glasses show calcination or a whitish film.|The cap of the salt reservoir is not properly closed.|Check to have properly closed the salt reservoir cap.| |The dishes and glasses show calcination or a whitish film.|The rinse aid is used up or the dosage is insufficient.|Add the rinse aid or adjust the dosage levels higher.| |The dishes and glasses are blue streaked or have a bluish tinge.|The rinse aid dosage is excessive.|Adjust the dosage rates below.|
####### You can download the Safety Instructions, Product Fiche and Energy data by:
The model information can be retrieved using the QR-Code reported in the energy label. The label also includes the model identifier that can be used to consult the portal of the registry at https://eprel.ec.europa.eu (available only on certain models).
:
#### 400011448992
03/2020 as - Xerox Fabriano