Ask AI
— answers from the official manualAnswers from the official manual.
Common questions
Common Questions
16 totalWhat does the error message '10.30.0X Unauthorized Cartridge' mean and how do I fix it?
This error means the administrator has configured the printer to use only genuine HP supplies, and a non-genuine or unauthorized cartridge has been installed. To resolve it, replace the cartridge with a genuine HP toner cartridge. If you believe your cartridge is genuine, visit www.hp.com/go/anticounterfeit to verify it. (Page 31)
How do I replace the toner cartridge in the HP LaserJet Pro MFP M227?
To replace the toner cartridge, lift the scanner assembly, open the cartridge door, and remove the used toner cartridge. Insert the new cartridge by aligning it with the tracks inside the printer and pressing until firmly seated, then close the cartridge door and lower the scanner assembly. Be careful not to expose the new cartridge to light for more than a few minutes to prevent damage. (Pages 35–38)
How do I replace the imaging drum on the HP LaserJet Pro MFP M227?
Lift the scanner assembly, open the cartridge door, and temporarily remove the toner cartridge before extracting the used imaging drum. Install the new imaging drum by aligning it with the tracks inside the printer, reinstall the toner cartridge, close the cartridge door, and lower the scanner assembly. Do not touch the imaging drum surface, as fingerprints can cause print-quality problems. (Pages 40–43)
What is the maximum paper capacity of the Main input tray and the Priority input tray?
The Main input tray holds up to 250 sheets of 75 g/m2 (20 lb) paper. The Priority input tray holds up to 10 sheets of 75 g/m2 (20 lb) paper. (Pages 16, 19)
How do I enable or disable the Cartridge Protection feature on the HP LaserJet Pro MFP M227?
To enable Cartridge Protection from the control panel, go to Setup > System Setup > Supply Settings > Cartridge Protection and select 'Protect Cartridges,' then confirm by selecting 'Continue.' To disable it, follow the same path and select 'Off.' Be aware that once enabled, all subsequently installed cartridges are automatically and permanently protected — turning the feature off does not unprotect cartridges that are already installed. (Pages 31–32)
How do I replace a toner cartridge in the HP LaserJet Pro MFP M227?
Open the cartridge door and remove used toner, lift scanner assembly, install new toner cartridge until firmly seated, close cartrdige door, then lower the scanner back into place.
Show 10 more questions
What should I do if I encounter a 'Protected Cartridge' error when installing a new toner?
How do I change paper orientation and size for a print job on my printer?
How do I clear a paper jam in the document feeder?
How do I configure power saving modes on my HP LaserJet Pro MFP M227?
How can I enable Cartridge Policy in my HP Printer?
How do I load and print envelopes using manual feed option?
What does the error message '10.57.0X Protected Cartridge' mean?
What operating temperature and humidity range is recommended for the HP LaserJet Pro MFP M227?
What should I do to avoid paper jams when loading paper in the input trays?
What mobile printing options are supported by the HP LaserJet Pro MFP M227?
Full Manual
205 pages
User Guide LaserJet Pro MFP M227-M229 LaserJet Ultra MFP M230-M231 www.hp.com/support/ljM227MFP
M227-M231
HP LaserJet Pro MFP M227-M229 HP LaserJet Ultra MFP M230-M231 User Guide

Copyright and License © Copyright 2017 HP Development Company,
L.P.
Reproduction, adaptation, or translation without prior written permission is prohibited, except as allowed under the copyright laws. The information contained herein is subject to change without notice. The only warranties for HP products and services are set forth in the express warranty statements accompanying such products and services. Nothing herein should be construed as constituting an additional warranty. HP shall not be liable for technical or editorial errors or omissions contained herein. Edition 2, 4/2017 Trademark Credits Adobe®, Adobe Photoshop®, Acrobat®, and PostScript® are trademarks of Adobe Systems Incorporated. Apple and the Apple logo are trademarks of Apple Inc., registered in the U.S. and other countries. OS X is a trademark of Apple Inc., registered in the U.S. and other countries. AirPrint is a trademark of Apple Inc., registered in the U.S. and other countries. iPad is a trademark of Apple Inc., registered in the U.S. and other countries. iPod is a trademark of Apple Inc., registered in the U.S. and other countries. iPhone is a trademark of Apple Inc., registered in the U.S. and other countries. Microsoft®, Windows®, Windows® XP, and Windows Vista® are U.S. registered trademarks of Microsoft Corporation. UNIX® is a registered trademark of The Open Group.
Table of contents 1 Printer overview ........................................................................................................................................... 1 Printer views .......................................................................................................................................................... 2 Printer front view ................................................................................................................................ 2 Printer back view ................................................................................................................................. 3 Interface ports ..................................................................................................................................... 4 2-line LCD control panel view (M227sdn models) .............................................................................. 5 Touchscreen control panel view (M227fdw models) ......................................................................... 7 Home screen layout .......................................................................................................... 8 How to use the touchscreen control panel ...................................................................... 9 Printer specifications ........................................................................................................................................... 10 Technical specifications .................................................................................................................... 10 Supported operating systems .......................................................................................................... 10 Mobile printing solutions .................................................................................................................. 12 Printer dimensions ............................................................................................................................ 12 Power consumption, electrical specifications, and acoustic emissions .......................................... 13 Operating environmental range ....................................................................................................... 13 Printer hardware setup and software installation ............................................................................................. 14 2 Paper trays ................................................................................................................................................. 15 Load the Priority input tray ................................................................................................................................. 16 Introduction ....................................................................................................................................... 16 Priority input tray paper orientation ................................................................................................ 18 Load the Main input tray ...................................................................................................................................... 19 Introduction ....................................................................................................................................... 19 Main input tray paper orientation ..................................................................................................... 22 Load and print envelopes .................................................................................................................................... 23 Introduction ....................................................................................................................................... 23 Print envelopes ................................................................................................................................. 23 Envelope orientation ......................................................................................................................... 24 Load and print labels ........................................................................................................................................... 25 Introduction ....................................................................................................................................... 25 Manually feed labels ......................................................................................................................... 25
Enww
iii
Label orientation ............................................................................................................................... 26 3 Supplies, accessories, and parts ................................................................................................................... 27 Order supplies, accessories, and parts ............................................................................................................... 28 Ordering ............................................................................................................................................. 28 Supplies and accessories .................................................................................................................. 28 Customer self-repair parts ............................................................................................................... 28 Configure the HP toner-cartridge-protection supply settings ........................................................................... 29 Introduction ....................................................................................................................................... 29 Enable or disable the Cartridge Policy feature ................................................................................. 29 Use the printer control panel to enable the Cartridge Policy feature ........................... 29 Use the printer control panel to disable the Cartridge Policy feature .......................... 29 Use the HP Embedded Web Server (EWS) to enable the Cartridge Policy feature ........ 30 Use the HP Embedded Web Server (EWS) to disable the Cartridge Policy feature ....... 30 Troubleshoot Cartridge Policy control panel error messages ....................................... 31 Enable or disable the Cartridge Protection feature ......................................................................... 31 Use the printer control panel to enable the Cartridge Protection feature .................... 31 Use the printer control panel to disable the Cartridge Protection feature ................... 31 Use the HP Embedded Web Server (EWS) to enable the Cartridge Protection feature ............................................................................................................................ 32 Use the HP Embedded Web Server (EWS) to disable the Cartridge Protection feature ............................................................................................................................ 32 Troubleshoot Cartridge Protection control panel error messages ............................... 33 Replace the toner cartridge ................................................................................................................................. 34 Introduction ....................................................................................................................................... 34 Toner-cartridge information ............................................................................................................. 34 Remove and replace the toner cartridge .......................................................................................... 35 Replace the imaging drum .................................................................................................................................. 39 Introduction ....................................................................................................................................... 39 Imaging drum information ................................................................................................................ 39 Remove and replace the imaging drum ............................................................................................ 40 4 Print ........................................................................................................................................................... 45 Print tasks (Windows) .......................................................................................................................................... 46 How to print (Windows) ..................................................................................................................... 46 Automatically print on both sides (Windows) .................................................................................. 48 Manually print on both sides (Windows) .......................................................................................... 48 Print multiple pages per sheet (Windows) ....................................................................................... 49 Select the paper type (Windows) ...................................................................................................... 49 Additional print tasks ........................................................................................................................ 50 Print tasks (OS X) ................................................................................................................................................. 51 iv
Enww
How to print (OS X) ............................................................................................................................ 51 Automatically print on both sides (OS X) .......................................................................................... 51 Manually print on both sides (OS X) .................................................................................................. 51 Print multiple pages per sheet (OS X) ............................................................................................... 52 Select the paper type (OS X) ............................................................................................................. 52 Additional print tasks ........................................................................................................................ 53 Mobile printing ..................................................................................................................................................... 54 Introduction ....................................................................................................................................... 54 Wi-Fi Direct and NFC Printing (wireless models only) ...................................................................... 54 Enable or disable Wi-Fi Direct ......................................................................................... 55 Change the printer Wi-Fi Direct name ............................................................................ 56 HP ePrint via email ............................................................................................................................ 56 HP ePrint software ............................................................................................................................ 58 AirPrint ............................................................................................................................................... 58 Android embedded printing .............................................................................................................. 59 Use walk-up USB printing (touchscreen models only) ....................................................................................... 60 Introduction ....................................................................................................................................... 60 Step one: Access USB files on the printer ......................................................................................... 60 Step two: Print USB documents ........................................................................................................ 60 Option one: Print documents .......................................................................................... 60 Option two: Print photos ................................................................................................ 61 5 Copy ........................................................................................................................................................... 63 Make a copy ......................................................................................................................................................... 64 Copy on both sides (duplex) ................................................................................................................................ 66 Copy on both sides manually ............................................................................................................ 66 Additional copy tasks .......................................................................................................................................... 68 6 Scan ........................................................................................................................................................... 69 Scan by using the HP Scan software (Windows) ................................................................................................. 70 Scan by using the HP Easy Scan software (OS X) ................................................................................................ 71 Set up the Scan to E-mail feature (touchscreen models only) ........................................................................... 72 Introduction ....................................................................................................................................... 72 Before you begin ............................................................................................................................... 72 Method one: Use the Scan to Email Wizard (Windows) .................................................................... 72 Method two: Set up the Scan to Email feature via the HP Embedded Web Server (Windows) ....... 74 Step one: Access the HP Embedded Web Server (EWS) ................................................. 74 Step two: Configure the Scan to E-mail feature ............................................................ 74 Step three: Add contacts to the E-mail Address Book ................................................... 76 Step four: Configure the default E-mail Options ........................................................... 76 Set up the Scan to E-mail feature on a Mac ...................................................................................... 77
Enww
v
Step one: Access the HP Embedded Web Server (EWS) ................................................. 77 Method one: Use a web browser to open the HP Embedded Web Server (EWS) ................................................................................................. 77 Method two: Use the HP Utility to open the HP Embedded Web Server (EWS) ............................................................................................................. 77 Step two: Configure the Scan to E-mail feature ............................................................ 77 Step three: Add contacts to the E-mail Address Book ................................................... 79 Step four: Configure the default E-mail Options ........................................................... 79 Set up the Scan to Network Folder feature (touchscreen models only) ............................................................ 81 Introduction ....................................................................................................................................... 81 Before you begin ............................................................................................................................... 81 Method one: Use the Scan to Network Folder Wizard (Windows) .................................................... 81 Method two: Set up the Scan to Network Folder feature via the HP Embedded Web Server (Windows) .......................................................................................................................................... 83 Step one: Access the HP Embedded Web Server (EWS) ................................................. 83 Step two: Configure the Scan to Network Folder feature .............................................. 84 Set up the Scan to Network Folder feature on a Mac ....................................................................... 85 Step one: Access the HP Embedded Web Server (EWS) ................................................. 85 Method one: Use a web browser to open the HP Embedded Web Server (EWS) ................................................................................................. 85 Method two: Use the HP Utility to open the HP Embedded Web Server (EWS) ............................................................................................................. 85 Step two: Configure the Scan to Network Folder feature .............................................. 85 Scan to a USB flash drive (touchscreen models only) ........................................................................................ 87 Scan to email (touchscreen models only) ........................................................................................................... 88 Scan to a network folder (touchscreen models only) ......................................................................................... 89 Additional scan tasks ........................................................................................................................................... 90 7 Fax ............................................................................................................................................................. 91 Set up to send and receive faxes ......................................................................................................................... 92 Before starting .................................................................................................................................. 92 Step 1: Identify the phone connection type ..................................................................................... 92 Step 2: Set up the fax ........................................................................................................................ 93 Dedicated phone line ...................................................................................................... 93 Shared voice/fax line ...................................................................................................... 94 Shared voice/fax line with an answering machine ........................................................ 95 Step 3: Configure the fax time, date, and header ............................................................................ 96 HP Fax Setup Wizard ....................................................................................................... 96 Printer control panel ....................................................................................................... 97 HP Embedded Web Server (EWS) and HP Device Toolbox (Windows) ........................... 97 Step 4: Run a fax test ........................................................................................................................ 98 vi
Enww
Send a fax ............................................................................................................................................................ 99 Fax from the flatbed scanner ........................................................................................................... 99 Fax from the document feeder ....................................................................................................... 100 Use speed dials and group-dial entries .......................................................................................... 100 Send a fax from the software ......................................................................................................... 101 Send a fax from a third-party software program, such as Microsoft Word .................................. 101 Additional fax tasks ........................................................................................................................................... 102 8 Manage the printer .................................................................................................................................... 103 Use HP Web Services applications (touchscreen models only) ........................................................................ 104 Change the printer connection type (Windows) ............................................................................................... 105 Advanced configuration with HP Embedded Web Server (EWS) and HP Device Toolbox (Windows) .............. 106 Advanced configuration with HP Utility for OS X .............................................................................................. 110 Open HP Utility ................................................................................................................................ 110 HP Utility features ........................................................................................................................... 110 Configure IP network settings ........................................................................................................................... 112 Introduction ..................................................................................................................................... 112 Printer sharing disclaimer ............................................................................................................... 112 View or change network settings ................................................................................................... 112 Rename the printer on a network ................................................................................................... 113 Manually configure IPv4 TCP/IP parameters from the control panel ............................................ 114 Link speed and duplex settings ...................................................................................................... 115 Printer security features ................................................................................................................................... 117 Introduction ..................................................................................................................................... 117 Assign or change the system password using the Embedded Web Server ................................... 117 Lock the formatter .......................................................................................................................... 118 Configure the Quiet Print Mode settings ........................................................................................................... 119 Introduction ..................................................................................................................................... 119 Method one: Configure the Quiet Print Mode settings from the printer control panel ................. 119 Method two: Configure the Quiet Print Mode settings from HP Embedded Web Server (EWS) .... 120 Energy-conservation settings ........................................................................................................................... 121 Introduction ..................................................................................................................................... 121 Print with EconoMode ..................................................................................................................... 121 Set the Sleep/Auto Off After Inactivity setting .............................................................................. 121 Set the Shut Down After Inactivity delay and configure the printer to use 1 watt or less of power ............................................................................................................................................... 122 Set the Delay Shut Down setting .................................................................................................... 123 Update the firmware ......................................................................................................................................... 124 Method one: Update the firmware using the control panel ........................................................... 124 Method two: Update the firmware using the Firmware Update Utility ......................................... 125
Enww
vii
9 Solve problems .......................................................................................................................................... 127 Customer support .............................................................................................................................................. 128 Control panel help system (touchscreen models only) .................................................................................... 129 Restore the factory-set defaults ...................................................................................................................... 130 A “Cartridge is low” or “Cartridge is very low” message displays on the printer control panel ...................... 131 Change the “Very Low” settings ..................................................................................................... 131 For printers with fax capability .................................................................................... 132 Order supplies ................................................................................................................................. 132 Printer does not pick up paper or misfeeds ...................................................................................................... 133 Introduction ..................................................................................................................................... 133 The printer does not pick up paper ................................................................................................. 133 The printer picks up multiple sheets of paper ............................................................................... 134 The document feeder jams, skews, or picks up multiple sheets of paper .................................... 135 Clear paper jams ................................................................................................................................................ 137 Introduction ..................................................................................................................................... 137 Jam locations .................................................................................................................................. 137 Experiencing frequent or recurring paper jams? ............................................................................ 138 Clear jams in the document feeder ................................................................................................. 140 Clear jams in the Main input tray .................................................................................................... 143 Clear jams in the toner-cartridge area ........................................................................................... 148 Clear jams in the output bin ............................................................................................................ 152 Clear jams in the duplexer .............................................................................................................. 155 Clean the ADF replaceable film assembly ......................................................................................................... 159 Improve print quality ......................................................................................................................................... 161 Introduction ..................................................................................................................................... 161 Print from a different software program ....................................................................................... 161 Check the paper-type setting for the print job ............................................................................... 161 Check the paper type setting (Windows) ..................................................................... 161 Check the paper type setting (OS X) ............................................................................. 162 Check toner-cartridge status .......................................................................................................... 162 Clean the printer ............................................................................................................................. 163 Print a cleaning page .................................................................................................... 163 Check the scanner glass for dirt and smudges ............................................................ 164 Visually inspect the toner cartridge and imaging drum ................................................................. 164 Check paper and the printing environment .................................................................................... 165 Step one: Use paper that meets HP specifications ...................................................... 165 Step two: Check the environment ................................................................................ 165 Step three: Set the individual tray alignment .............................................................. 165 Try a different print driver .............................................................................................................. 166 Check the EconoMode settings ....................................................................................................... 167 Adjust Print Density ........................................................................................................................ 168 viii
Enww
Improve copy and scan image quality .............................................................................................................. 169 Introduction ..................................................................................................................................... 169 Check the scanner glass for dirt and smudges ............................................................................... 169 Check the paper settings ................................................................................................................ 170 Optimize for text or pictures .......................................................................................................... 171 Edge-to-edge copying .................................................................................................................... 172 Clean the pickup rollers and separation pad in the document feeder ........................................... 172 Improve fax image quality ................................................................................................................................ 174 Introduction ..................................................................................................................................... 174 Check the scanner glass for dirt and smudges ............................................................................... 174 Check the send-fax resolution settings ......................................................................................... 175 Check the error-correction settings ............................................................................................... 176 Check the fit-to-page setting ......................................................................................................... 177 Clean the pickup rollers and separation pad in the document feeder ........................................... 178 Send to a different fax machine ..................................................................................................... 179 Check the sender's fax machine ..................................................................................................... 179 Solve wired network problems ......................................................................................................................... 180 Introduction ..................................................................................................................................... 180 Poor physical connection ................................................................................................................ 180 The computer is using the incorrect IP address for the printer ..................................................... 180 The computer is unable to communicate with the printer ............................................................ 180 The printer is using incorrect link speed and duplex settings for the network ............................. 181 New software programs might be causing compatibility problems ............................................. 181 The computer or workstation might be set up incorrectly ............................................................ 181 The printer is disabled, or other network settings are incorrect ................................................... 181 Solve wireless network problems ..................................................................................................................... 182 Introduction ..................................................................................................................................... 182 Wireless connectivity checklist ....................................................................................................... 182 The printer does not print after the wireless configuration completes ........................................ 183 The printer does not print, and the computer has a third-party firewall installed ....................... 183 The wireless connection does not work after moving the wireless router or printer ................... 183 Cannot connect more computers to the wireless printer .............................................................. 183 The wireless printer loses communication when connected to a VPN .......................................... 184 The network does not appear in the wireless networks list .......................................................... 184 The wireless network is not functioning ........................................................................................ 184 Perform a wireless network diagnostic test .................................................................................. 184 Reduce interference on a wireless network ................................................................................... 185 Solve fax problems ............................................................................................................................................ 186 Introduction ..................................................................................................................................... 186 Fax troubleshooting checklist ........................................................................................................ 186 Solve general fax problems ............................................................................................................ 187
Enww
ix
Faxes are sending slowly ............................................................................................. 187 Fax quality is poor ........................................................................................................ 188 Fax cuts off or prints on two pages .............................................................................. 189 Index ........................................................................................................................................................... 191 x
Enww
1 Printer overview ● Printer views ● Printer specifications ● Printer hardware setup and software installation For more information: The following information is correct at the time of publication. For current information, see www.hp.com/ support/ljM227MFP. HP's all-inclusive help for the printer includes the following information: ● Install and configure ● Learn and use ● Solve problems ● Download software and firmware updates ● Join support forums ● Find warranty and regulatory information
Enww
1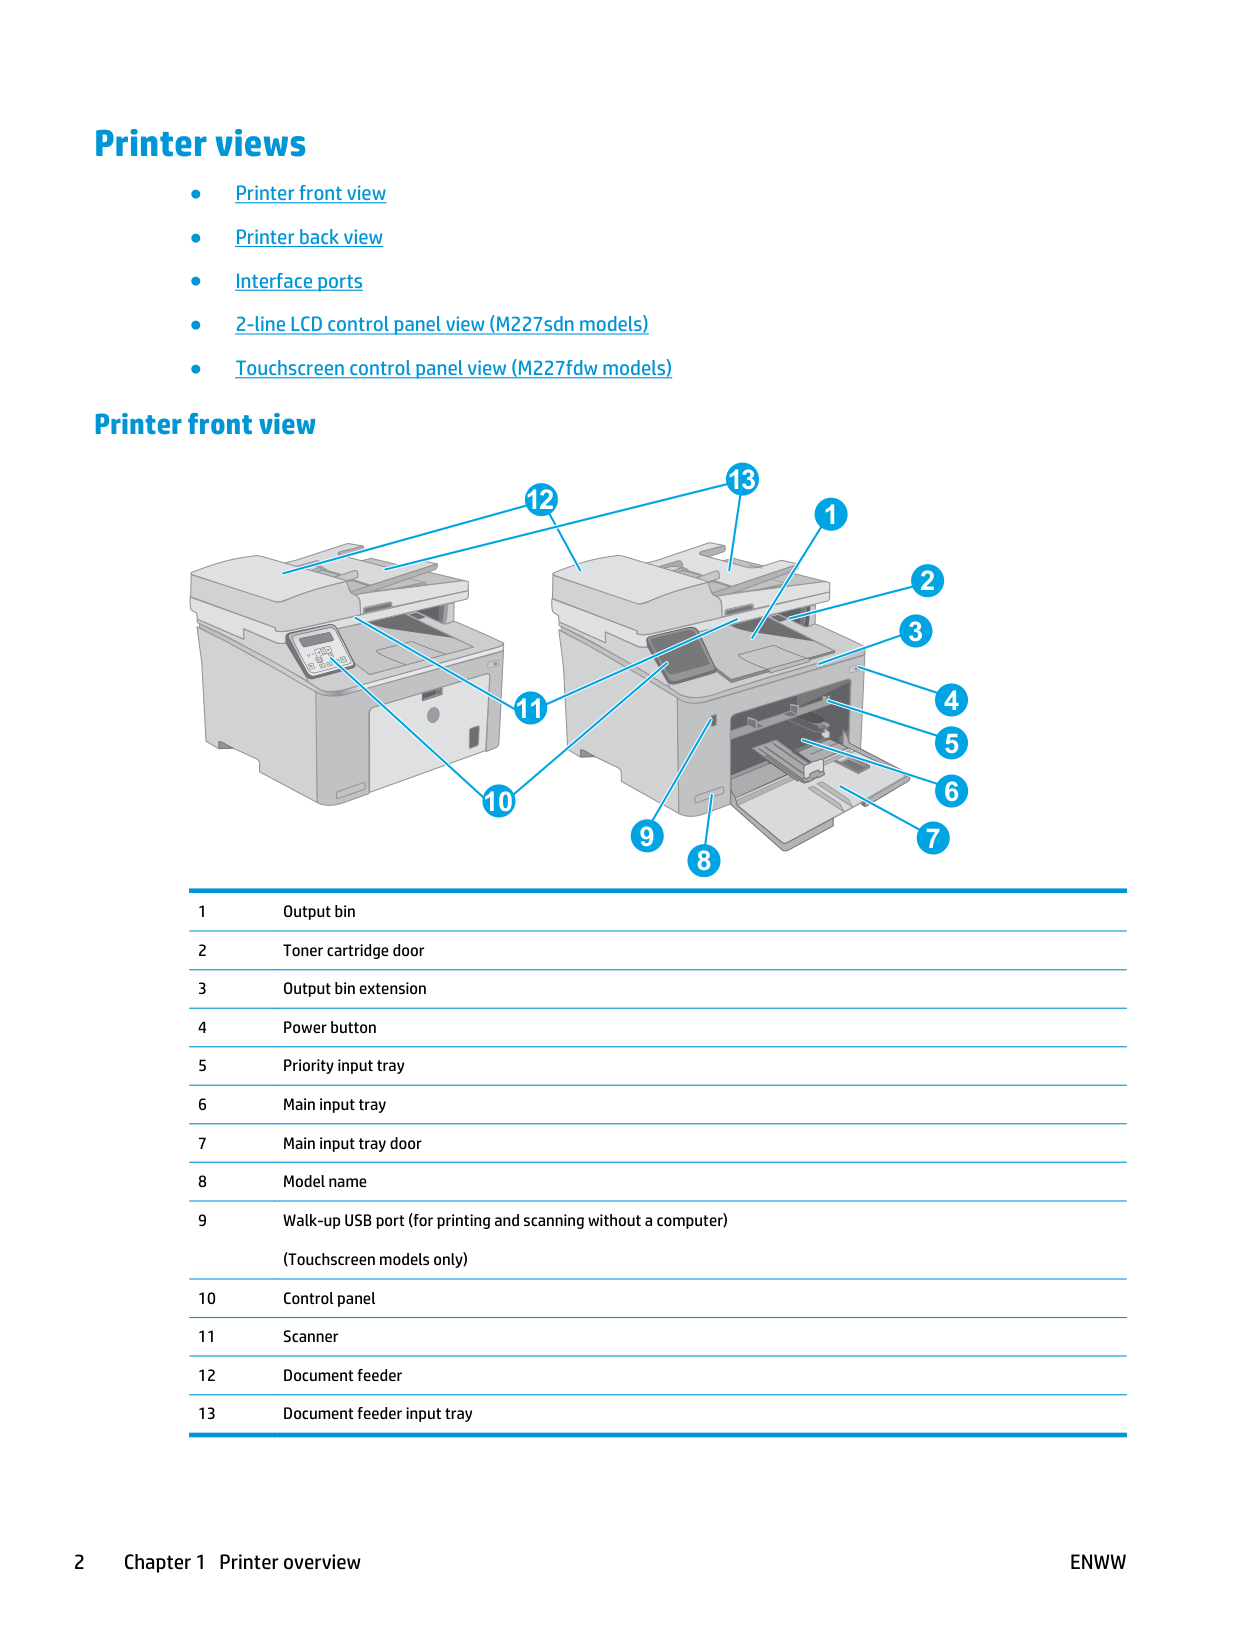
Printer views ● Printer front view ● Printer back view ● Interface ports ● 2-line LCD control panel view (M227sdn models) ● Touchscreen control panel view (M227fdw models) Printer front view
Ok
11 12 13 1 2 3 6 7 4 5 9 8 10 1 Output bin 2 Toner cartridge door 3 Output bin extension 4 Power button 5 Priority input tray 6 Main input tray 7 Main input tray door 8 Model name 9 Walk-up USB port (for printing and scanning without a computer) (Touchscreen models only) 10 Control panel 11 Scanner 12 Document feeder 13 Document feeder input tray 2 Chapter 1 Printer overviewEnww
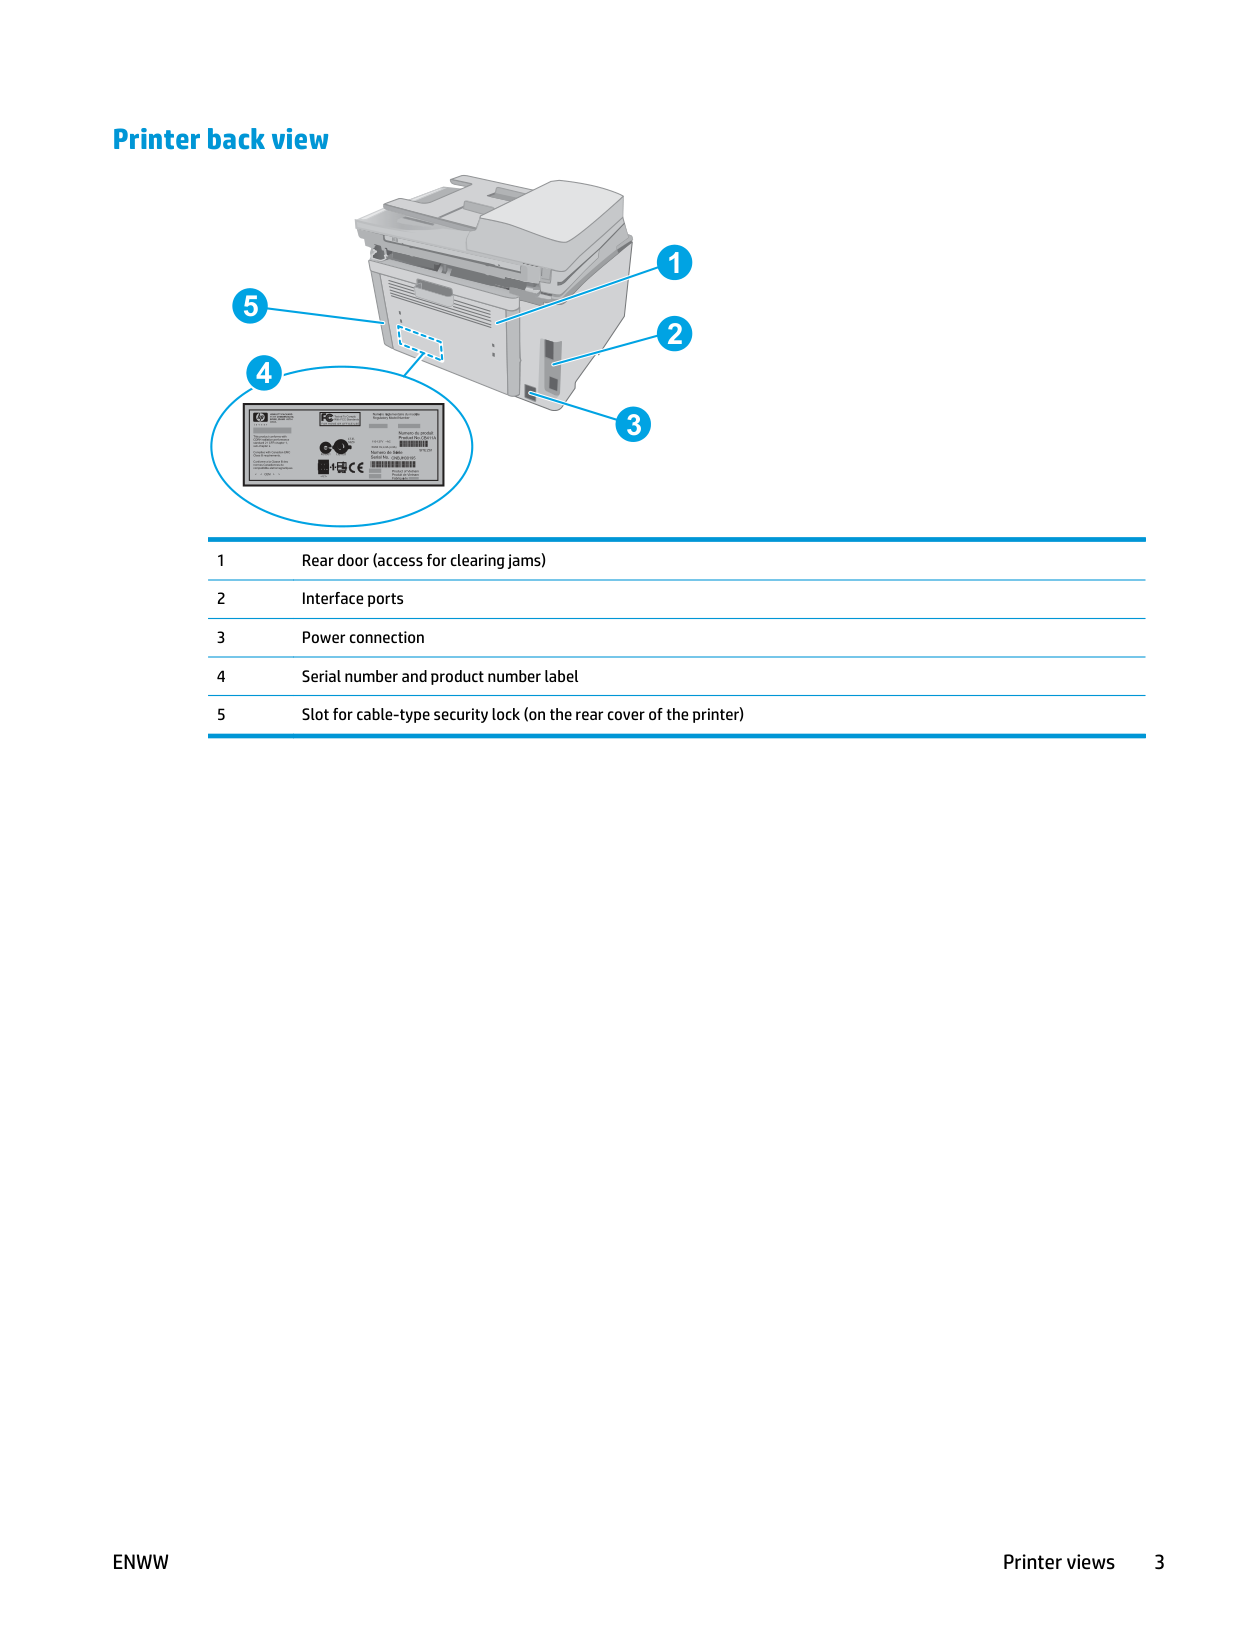
Printer back view 4 2 1 3 5 1 Rear door (access for clearing jams) 2 Interface ports 3 Power connection 4 Serial number and product number label 5 Slot for cable-type security lock (on the rear cover of the printer)
Enww
Printer views 3
Interface ports 1 2 3 4 1 USB interface port 2 Ethernet port 3 Fax “line in” port (for attaching the fax phone line to the printer) (fax models only) 4 Telephone “line out” port (for attaching an extension phone, answering machine, or other device) (fax models only) 4 Chapter 1 Printer overview
Enww
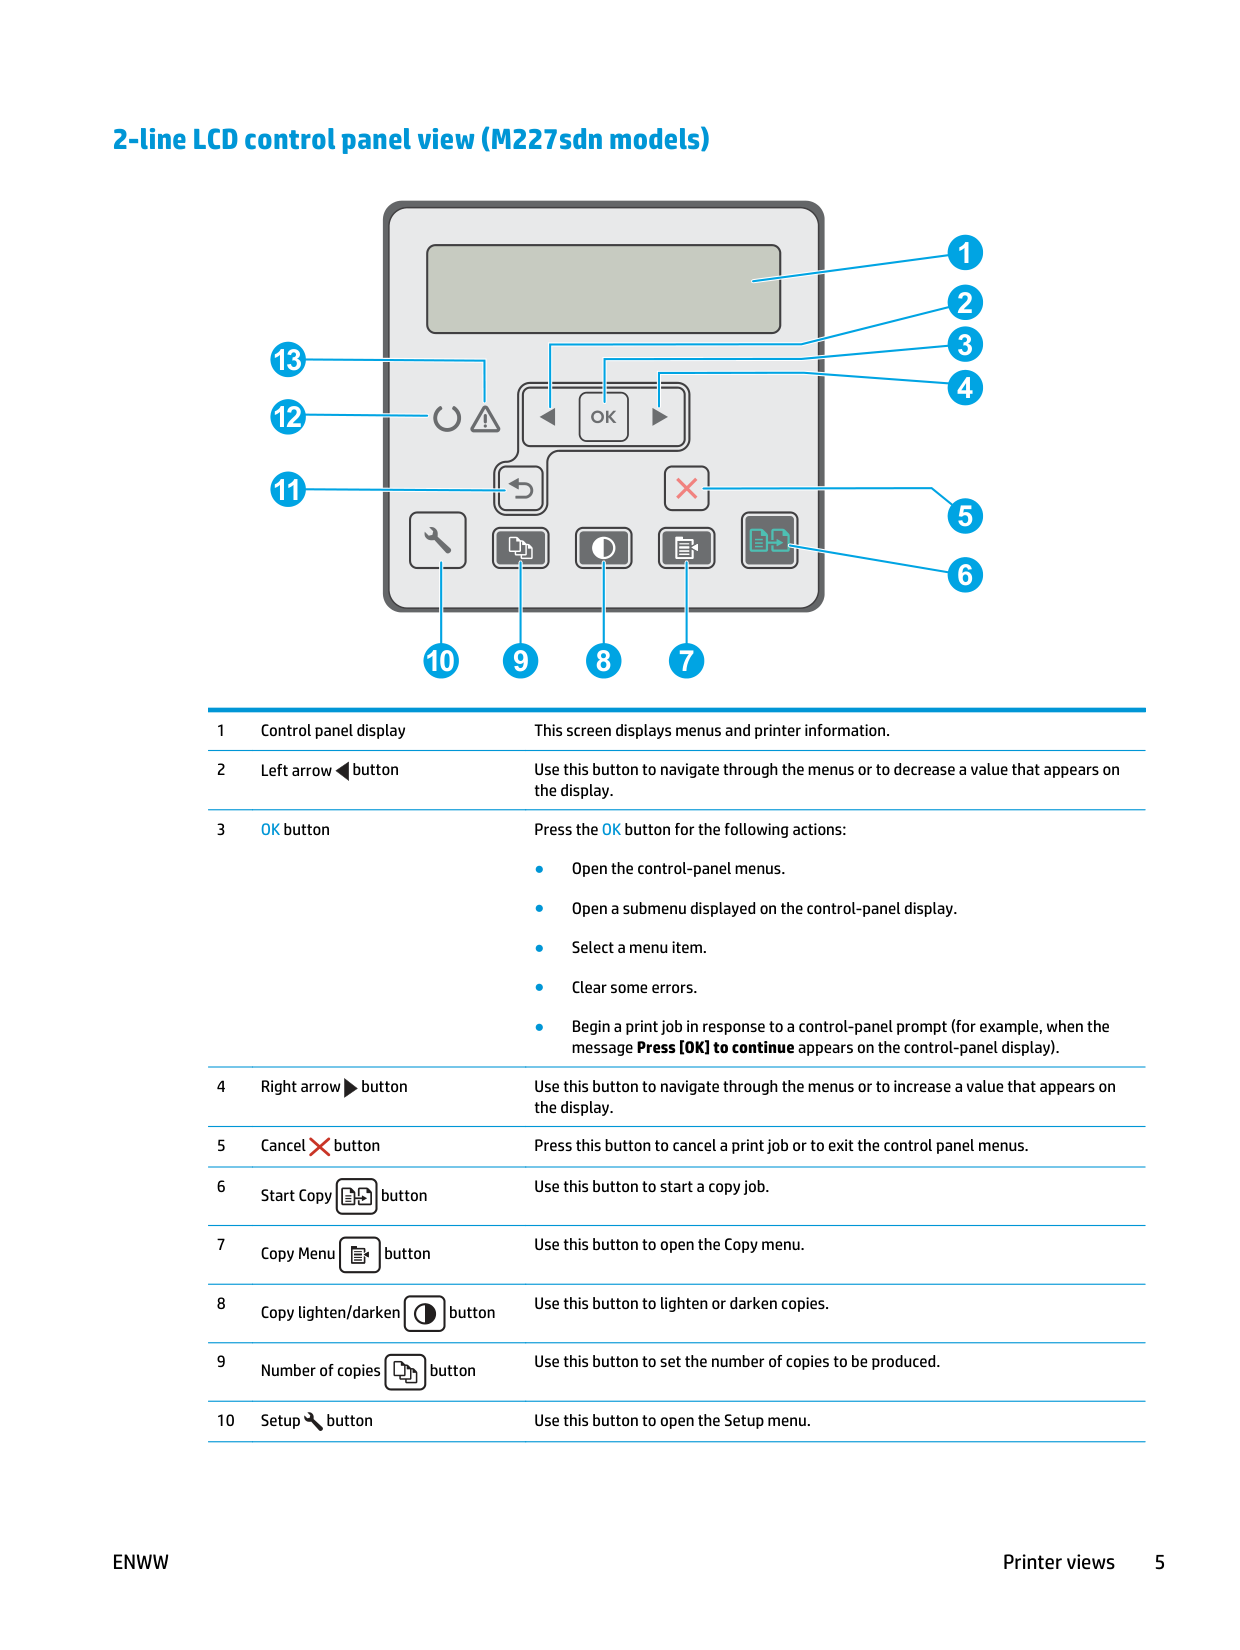
2-line LCD control panel view (M227sdn models) 13 1 5 2 3 4 6 7 8 9 10 12 11 1 Control panel display This screen displays menus and printer information. 2 Left arrow button Use this button to navigate through the menus or to decrease a value that appears on the display. 3 OK button Press the OK button for the following actions: ● Open the control-panel menus. ● Open a submenu displayed on the control-panel display. ● Select a menu item. ● Clear some errors. ● Begin a print job in response to a control-panel prompt (for example, when the message Press [OK] to continue appears on the control-panel display). 4 Right arrow button Use this button to navigate through the menus or to increase a value that appears on the display. 5 Cancel button Press this button to cancel a print job or to exit the control panel menus. 6 Start Copy button Use this button to start a copy job. 7 Copy Menu button Use this button to open the Copy menu. 8 Copy lighten/darken button Use this button to lighten or darken copies. 9 Number of copies button Use this button to set the number of copies to be produced. 10 Setup button Use this button to open the Setup menu.
Enww
Printer views 5
11 Back arrow button Use this button for the following actions: ● Exit the control-panel menus. ● Scroll back to a previous menu in a submenu list. ● Scroll back to a previous menu item in a submenu list (without saving changes to the menu item). 12 Ready light (green) The Ready light is on when the printer is ready to print. It blinks when the printer is receiving print data, canceling a print job, or when the printer is in sleep mode. 13 Attention light (amber) The Attention light blinks when the printer requires user attention. If the Attention light is on, the printer is in an error state. 6 Chapter 1 Printer overview
Enww
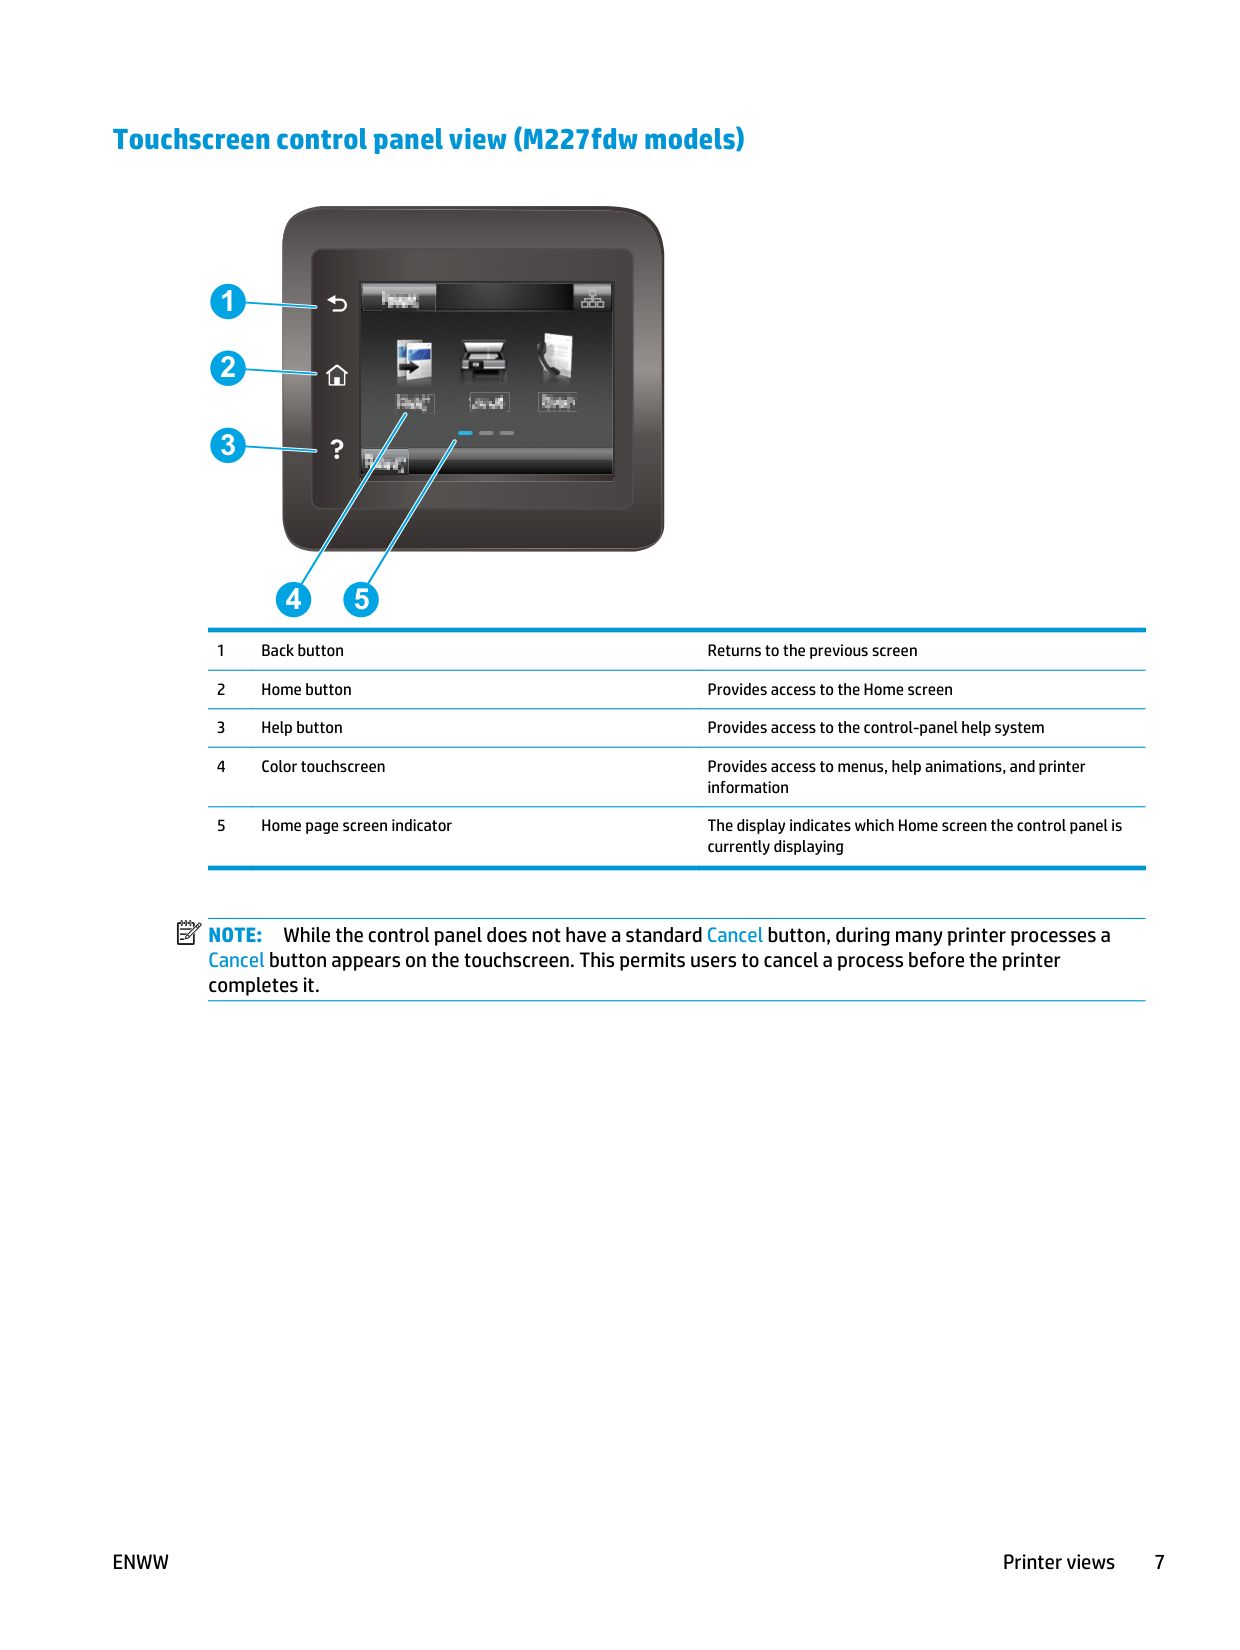
Touchscreen control panel view (M227fdw models) 4 5 1 2 3 1 Back button Returns to the previous screen 2 Home button Provides access to the Home screen 3 Help button Provides access to the control-panel help system 4 Color touchscreen Provides access to menus, help animations, and printer information 5 Home page screen indicator The display indicates which Home screen the control panel is currently displaying
Note:
While the control panel does not have a standard Cancel button, during many printer processes a Cancel button appears on the touchscreen. This permits users to cancel a process before the printer completes it.Enww
Printer views 7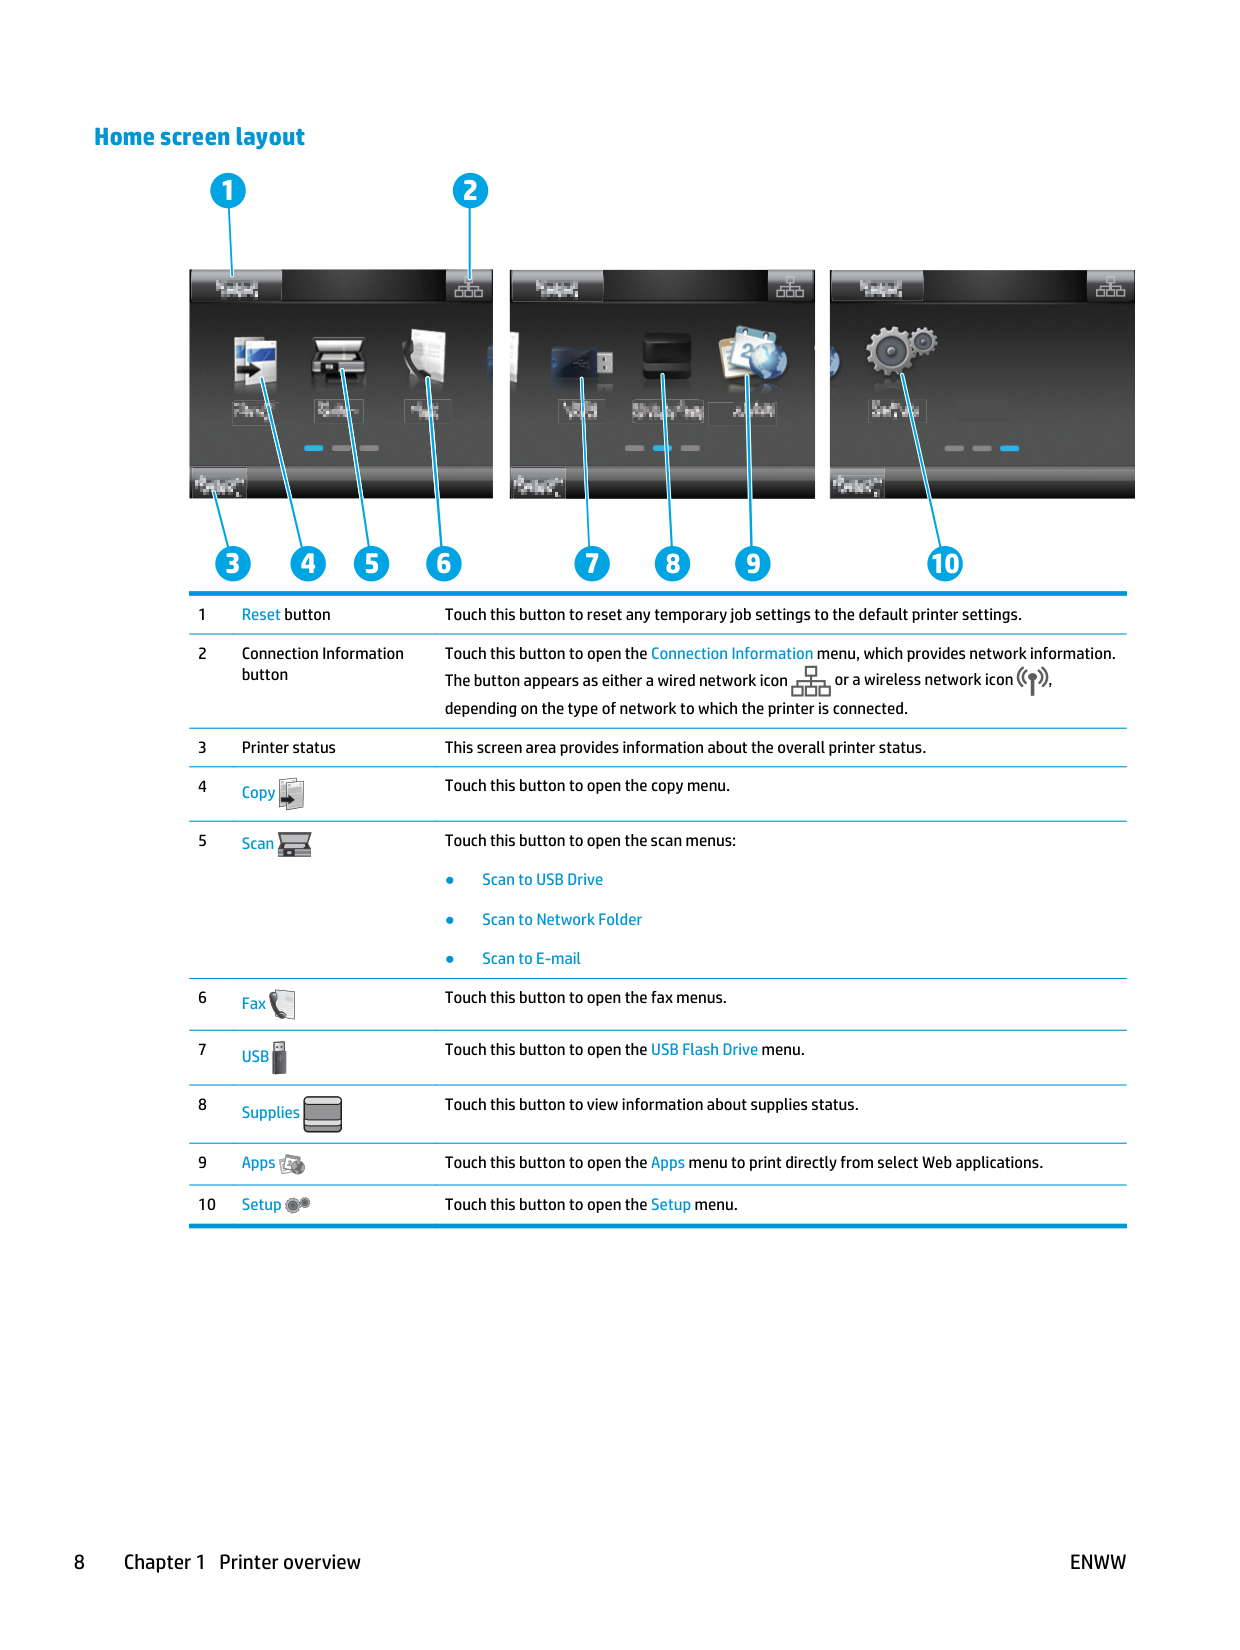
Home screen layout 2 3 4 5 6 1 8 9 7 10 1 Reset button Touch this button to reset any temporary job settings to the default printer settings. 2 Connection Information button Touch this button to open the Connection Information menu, which provides network information. The button appears as either a wired network icon or a wireless network icon , depending on the type of network to which the printer is connected. 3 Printer status This screen area provides information about the overall printer status. 4 Copy Touch this button to open the copy menu. 5 Scan Touch this button to open the scan menus: ● Scan to USB Drive ● Scan to Network Folder ● Scan to E-mail 6 Fax Touch this button to open the fax menus. 7
Usb
Touch this button to open the USB Flash Drive menu. 8 Supplies Touch this button to view information about supplies status. 9 Apps 2 Touch this button to open the Apps menu to print directly from select Web applications. 10 Setup Touch this button to open the Setup menu. 8 Chapter 1 Printer overviewEnww
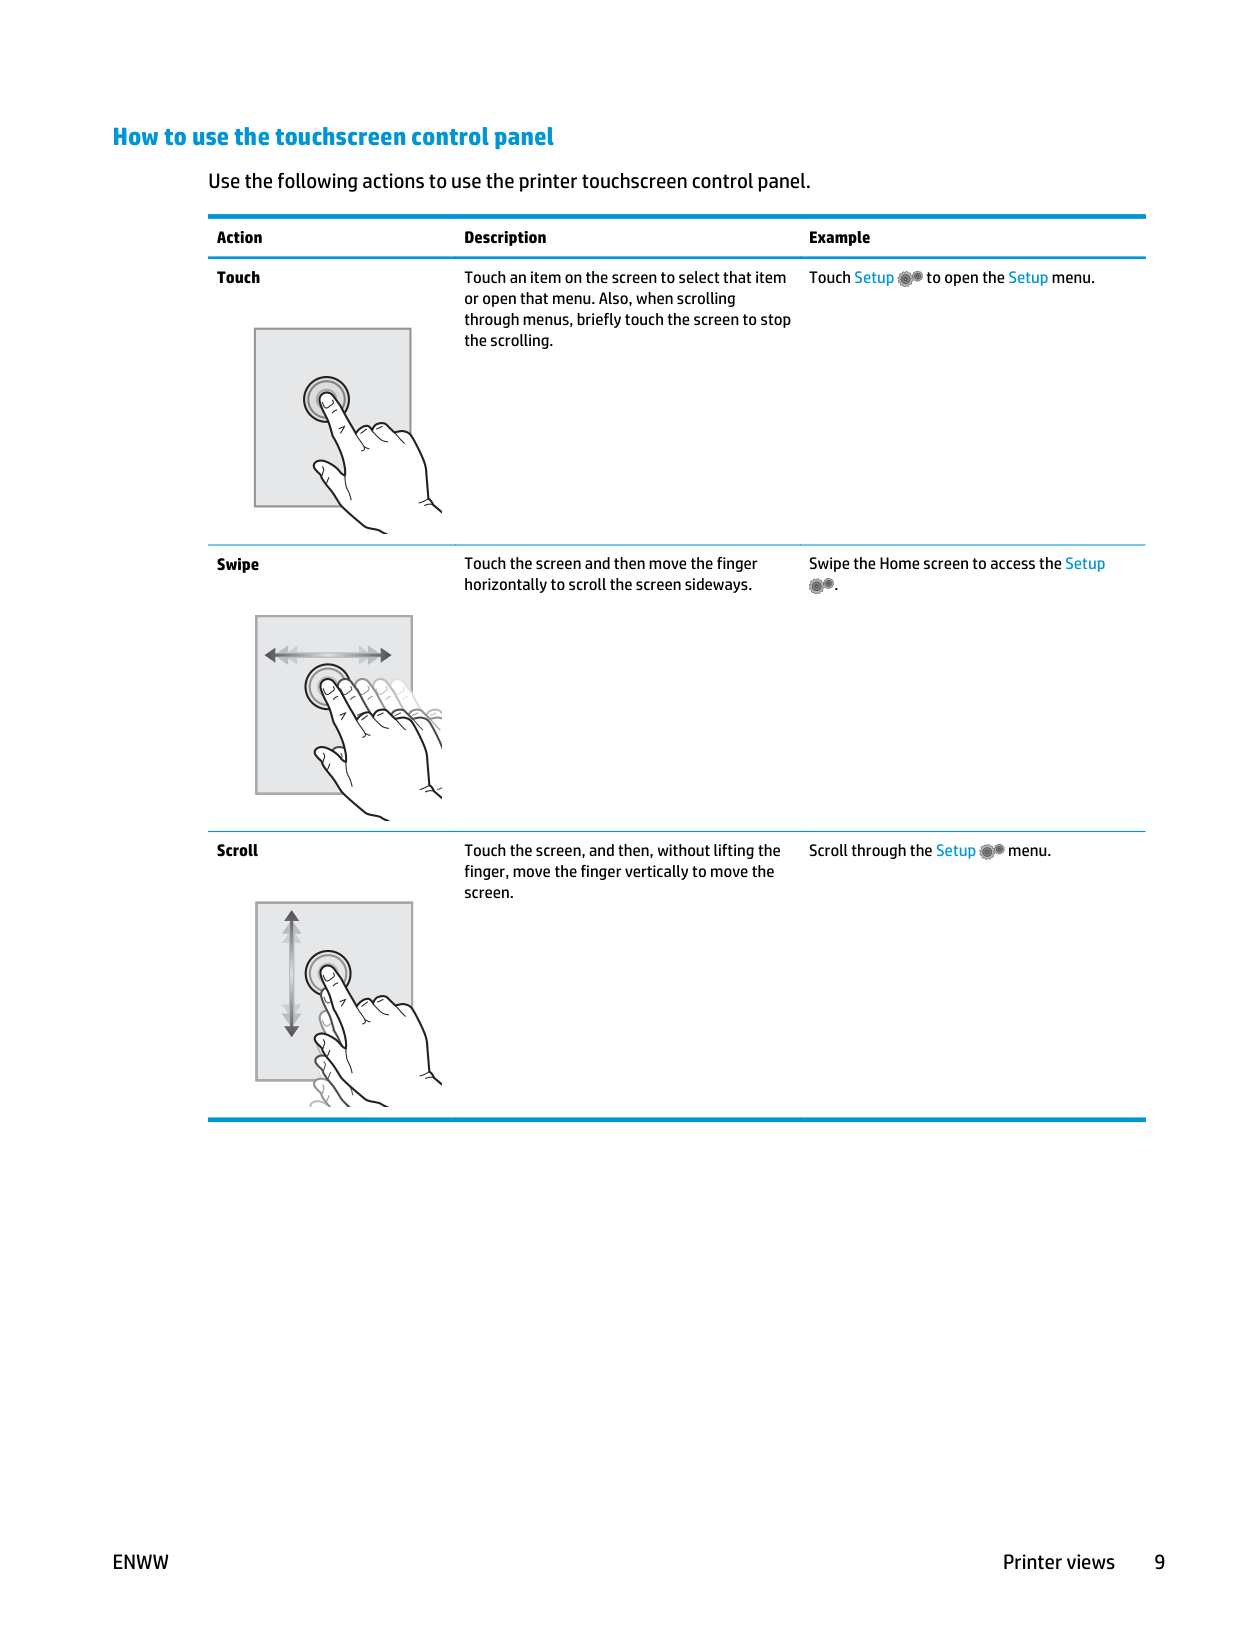
How to use the touchscreen control panel Use the following actions to use the printer touchscreen control panel. Action Description Example Touch Touch an item on the screen to select that item or open that menu. Also, when scrolling through menus, briefly touch the screen to stop the scrolling. Touch Setup to open the Setup menu. Swipe Touch the screen and then move the finger horizontally to scroll the screen sideways. Swipe the Home screen to access the Setup . Scroll Touch the screen, and then, without lifting the finger, move the finger vertically to move the screen. Scroll through the Setup menu.
Enww
Printer views 9
Printer specifications
Important:
The following specifications are correct at the time of publication, but they are subject to change. For current information, see www.hp.com/support/ljM227MFP. ● Technical specifications ● Supported operating systems ● Mobile printing solutions ● Printer dimensions ● Power consumption, electrical specifications, and acoustic emissions ● Operating environmental range Technical specifications See www.hp.com/support/ljM227MFP for current information. Supported operating systems The following information applies to the printer-specific Windows PCL 6 and HP print drivers for OS X and to the in-box software installation CD. Windows: The HP Software Installer CD installs the “HP PCL.6”, the “HP PCL 6”, or the “HP PCL-6” print driver, depending on the Windows operating system, along with optional software when using the full software installer. Download the "HP PCL.6", the "HP PCL 6", and the "HP PCL-6" print driver from the support website for this printer: www.hp.com/support/ljM227MFP Mac computers and OS X: Mac computers are supported with this printer. Download HP Easy Start either from 123.hp.com or from the support website, and then use HP Easy Start to install the HP print driver. HP Easy Start is not included in the in-box CD.Enww
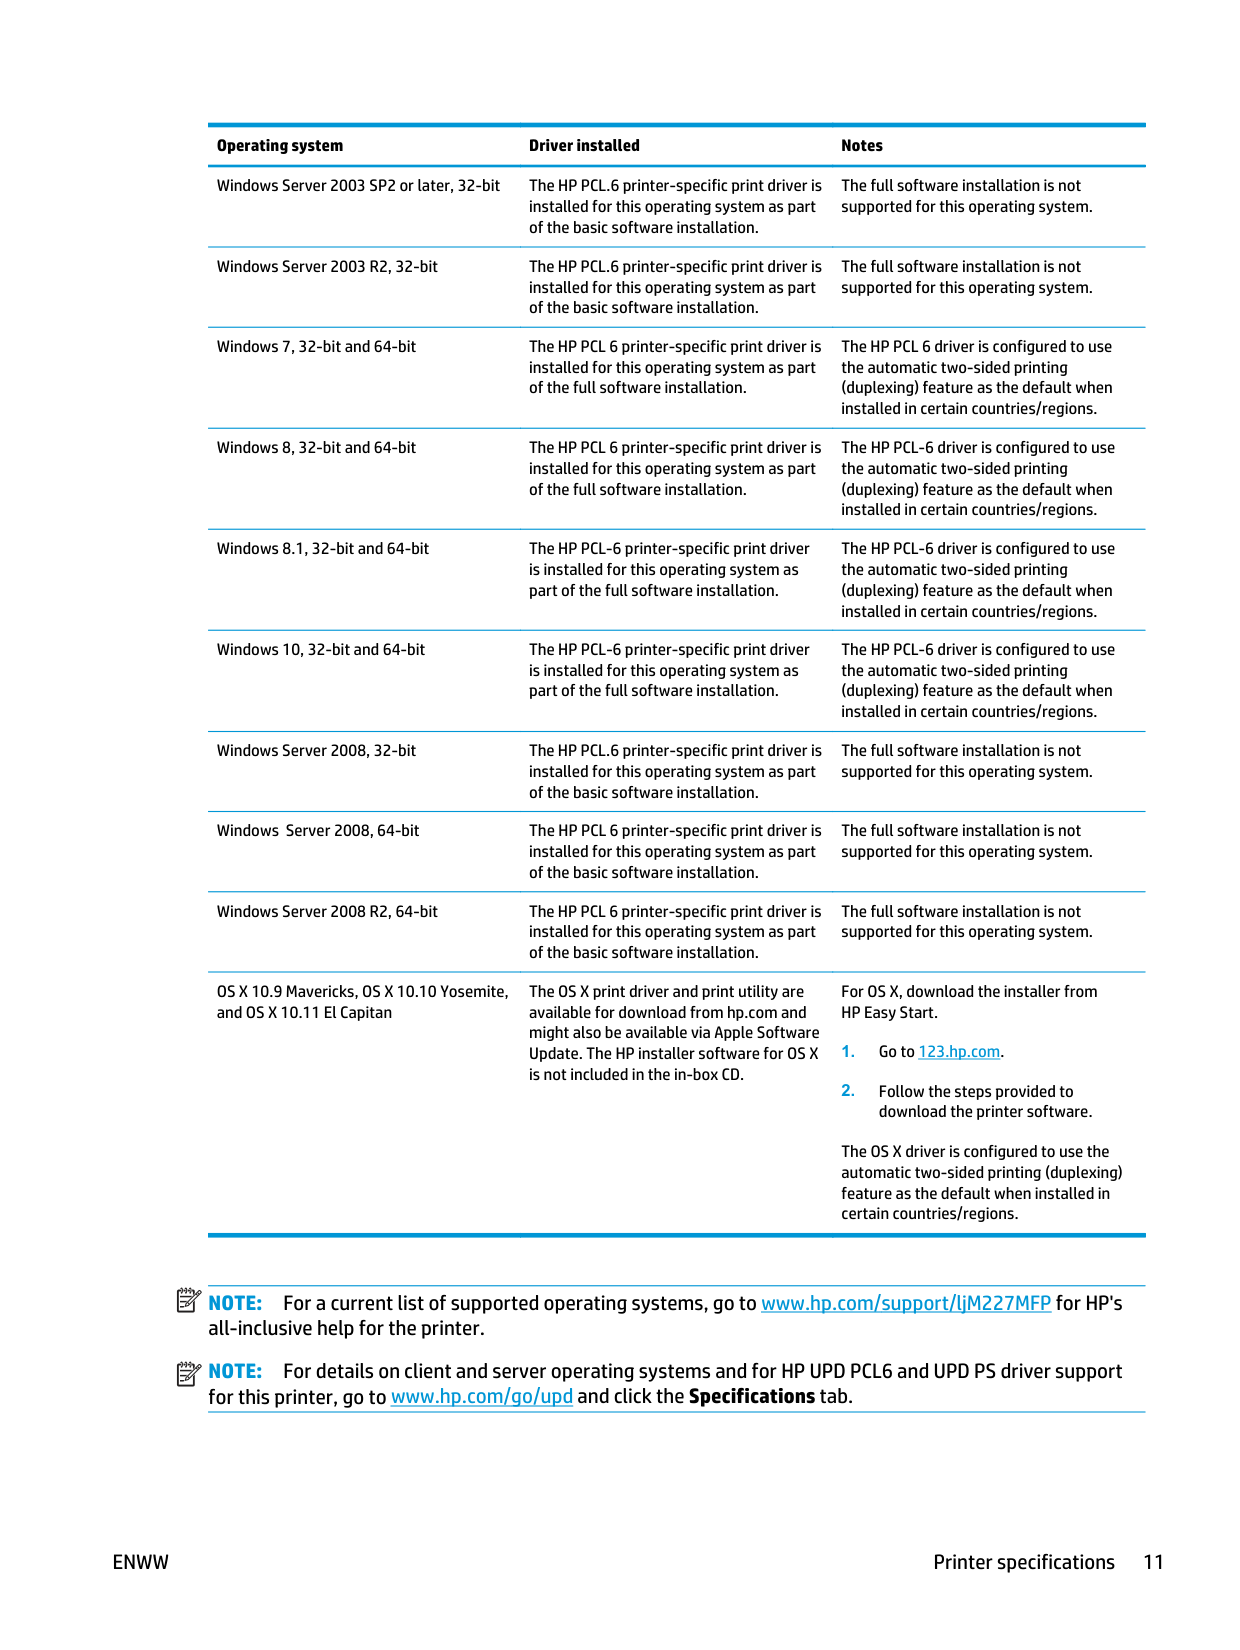
Operating system Driver installed Notes Windows Server 2003 SP2 or later, 32-bit The HP PCL.6 printer-specific print driver is installed for this operating system as part of the basic software installation. The full software installation is not supported for this operating system. Windows Server 2003 R2, 32-bit The HP PCL.6 printer-specific print driver is installed for this operating system as part of the basic software installation. The full software installation is not supported for this operating system. Windows 7, 32-bit and 64-bit The HP PCL 6 printer-specific print driver is installed for this operating system as part of the full software installation. The HP PCL 6 driver is configured to use the automatic two-sided printing (duplexing) feature as the default when installed in certain countries/regions. Windows 8, 32-bit and 64-bit The HP PCL 6 printer-specific print driver is installed for this operating system as part of the full software installation. The HP PCL-6 driver is configured to use the automatic two-sided printing (duplexing) feature as the default when installed in certain countries/regions. Windows 8.1, 32-bit and 64-bit The HP PCL-6 printer-specific print driver is installed for this operating system as part of the full software installation. The HP PCL-6 driver is configured to use the automatic two-sided printing (duplexing) feature as the default when installed in certain countries/regions. Windows 10, 32-bit and 64-bit The HP PCL-6 printer-specific print driver is installed for this operating system as part of the full software installation. The HP PCL-6 driver is configured to use the automatic two-sided printing (duplexing) feature as the default when installed in certain countries/regions. Windows Server 2008, 32-bit The HP PCL.6 printer-specific print driver is installed for this operating system as part of the basic software installation. The full software installation is not supported for this operating system. Windows Server 2008, 64-bit The HP PCL 6 printer-specific print driver is installed for this operating system as part of the basic software installation. The full software installation is not supported for this operating system. Windows Server 2008 R2, 64-bit The HP PCL 6 printer-specific print driver is installed for this operating system as part of the basic software installation. The full software installation is not supported for this operating system. OS X 10.9 Mavericks, OS X 10.10 Yosemite, and OS X 10.11 El Capitan The OS X print driver and print utility are available for download from hp.com and might also be available via Apple Software Update. The HP installer software for OS X is not included in the in-box CD. For OS X, download the installer from HP Easy Start.
Note:
For a current list of supported operating systems, go to www.hp.com/support/ljM227MFP for HP's all-inclusive help for the printer.Note:
For details on client and server operating systems and for HP UPD PCL6 and UPD PS driver support for this printer, go to www.hp.com/go/upd and click the Specifications tab.Enww
Printer specifications 11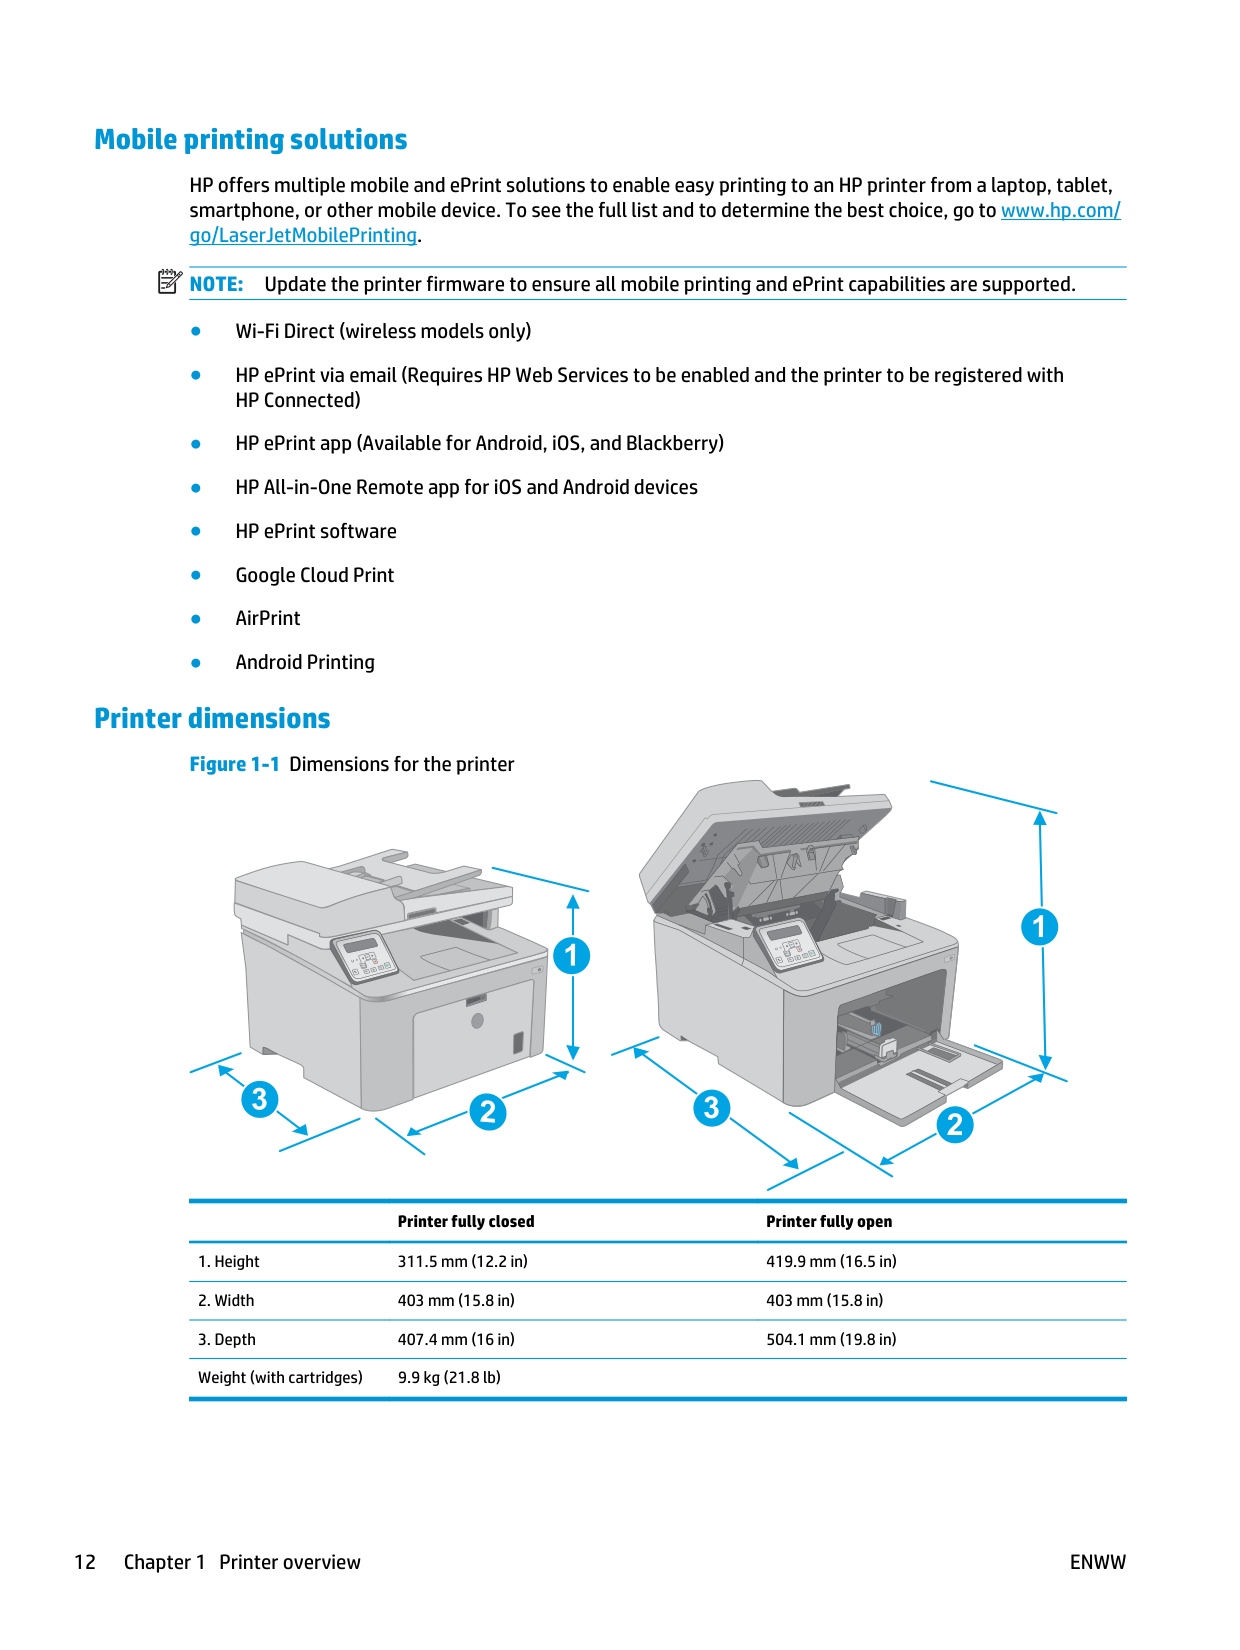
Mobile printing solutions HP offers multiple mobile and ePrint solutions to enable easy printing to an HP printer from a laptop, tablet, smartphone, or other mobile device. To see the full list and to determine the best choice, go to www.hp.com/ go/LaserJetMobilePrinting.
Note:
Update the printer firmware to ensure all mobile printing and ePrint capabilities are supported. ● Wi-Fi Direct (wireless models only) ● HP ePrint via email (Requires HP Web Services to be enabled and the printer to be registered with HP Connected) ● HP ePrint app (Available for Android, iOS, and Blackberry) ● HP All-in-One Remote app for iOS and Android devices ● HP ePrint software ● Google Cloud Print ● AirPrint ● Android Printing Printer dimensions Figure 1-1 Dimensions for the printerOk
Ok
1 2 3 1 2 3 Printer fully closed Printer fully openEnww
Power consumption, electrical specifications, and acoustic emissions See www.hp.com/support/ljM227MFP for current information.
Caution:
Power requirements are based on the country/region where the printer is sold. Do not convert operating voltages. This will damage the printer and void the printer warranty. Operating environmental range Table 1-1 Operating environmental range Environment Recommended Allowed Temperature 17° to 25°C (62.6° to 77°F) 15° to 30°C (59° to 86°F) Relative humidity 30% to 70% relative humidity (RH) 10% to 80% (RH) Altitude Not applicable 0 to 3048 m (0 to 10,000 ft)Enww
Printer specifications 13
Printer hardware setup and software installation For basic setup instructions, see the Setup Poster and Getting Started Guide that came with the printer. For additional instructions, go to HP support on the Web. Go to www.hp.com/support/ljM227MFP for HP's all-inclusive help for the printer. Find the following support: ● Install and configure ● Learn and use ● Solve problems ● Download software and firmware updates ● Join support forums ● Find warranty and regulatory information 14 Chapter 1 Printer overview
Enww
2 Paper trays ● Load the Priority input tray ● Load the Main input tray ● Load and print envelopes ● Load and print labels For more information: The following information is correct at the time of publication. For current information, see www.hp.com/ support/ljM227MFP. HP's all-inclusive help for the printer includes the following information: ● Install and configure ● Learn and use ● Solve problems ● Download software and firmware updates ● Join support forums ● Find warranty and regulatory information
Enww
15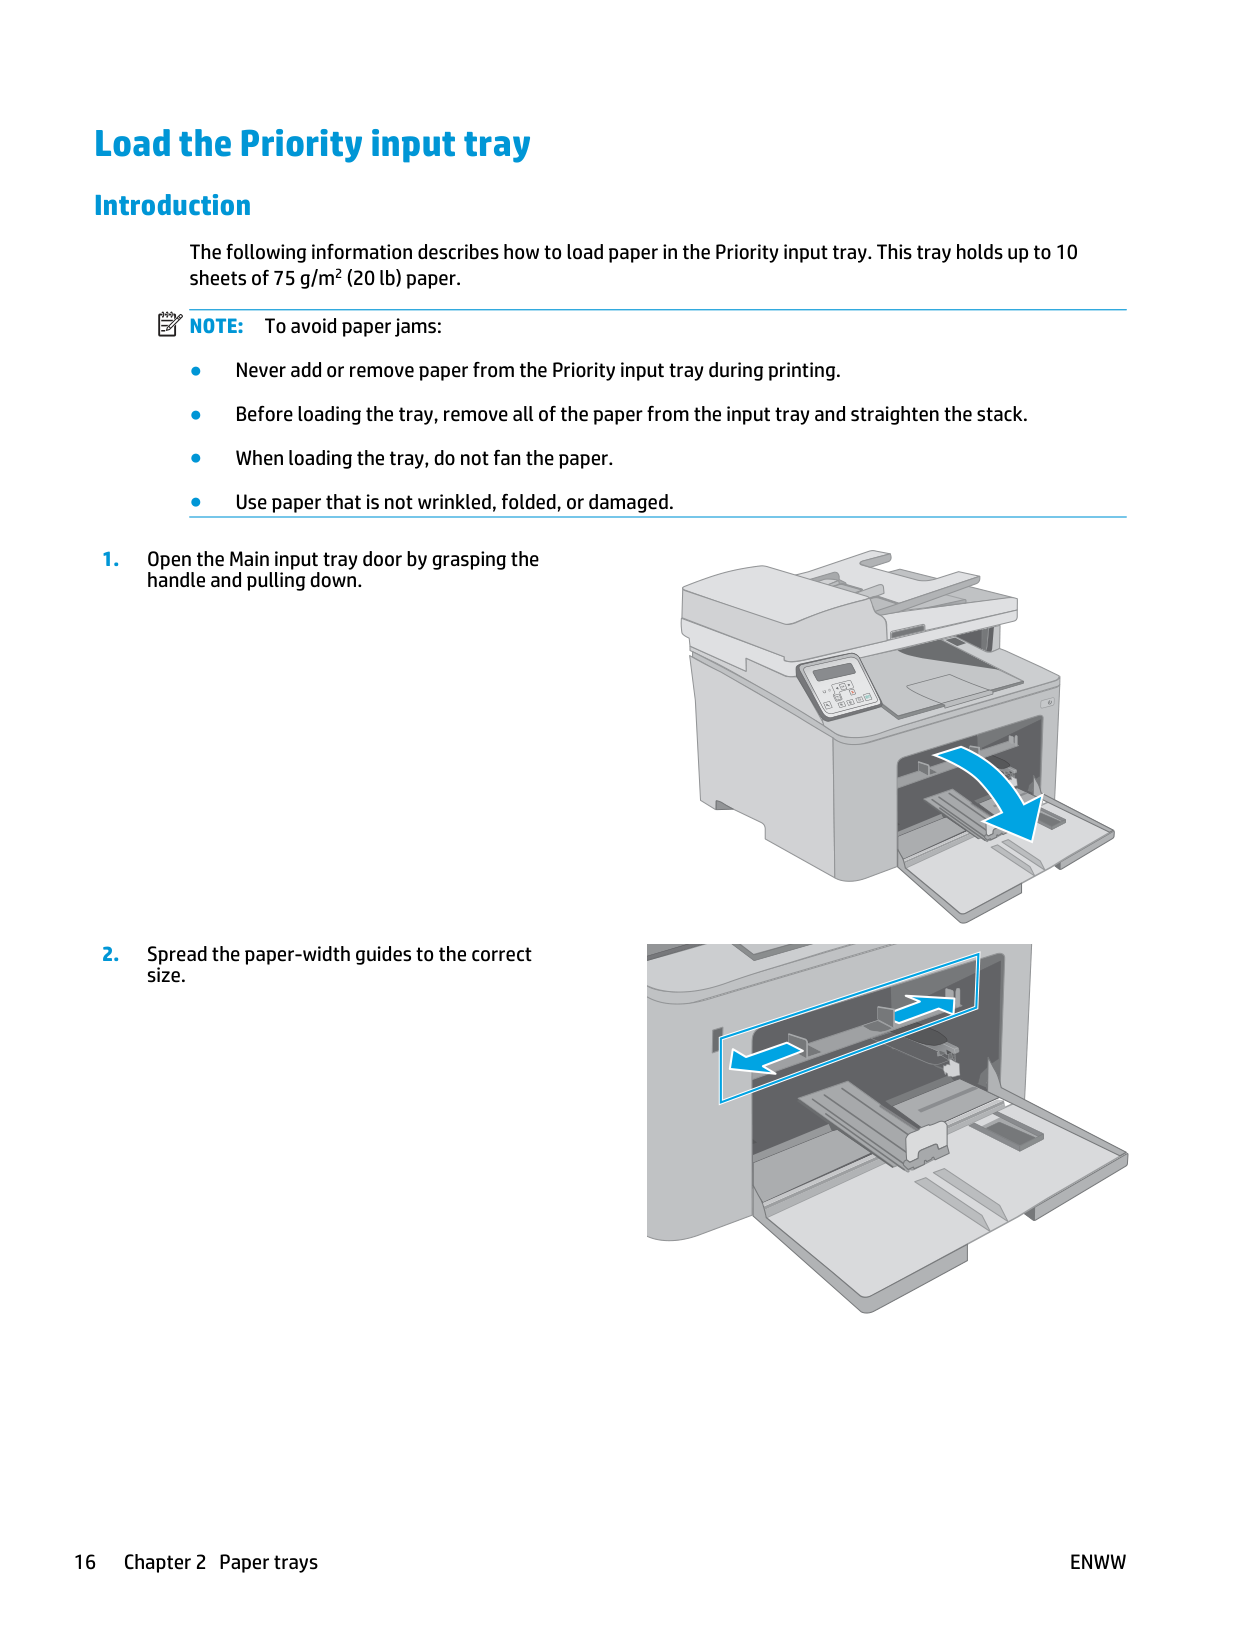
Load the Priority input tray Introduction The following information describes how to load paper in the Priority input tray. This tray holds up to 10 sheets of 75 g/m2 (20 lb) paper.
Note:
To avoid paper jams: ● Never add or remove paper from the Priority input tray during printing. ● Before loading the tray, remove all of the paper from the input tray and straighten the stack. ● When loading the tray, do not fan the paper. ● Use paper that is not wrinkled, folded, or damaged.Ok
16 Chapter 2 Paper trays
Enww
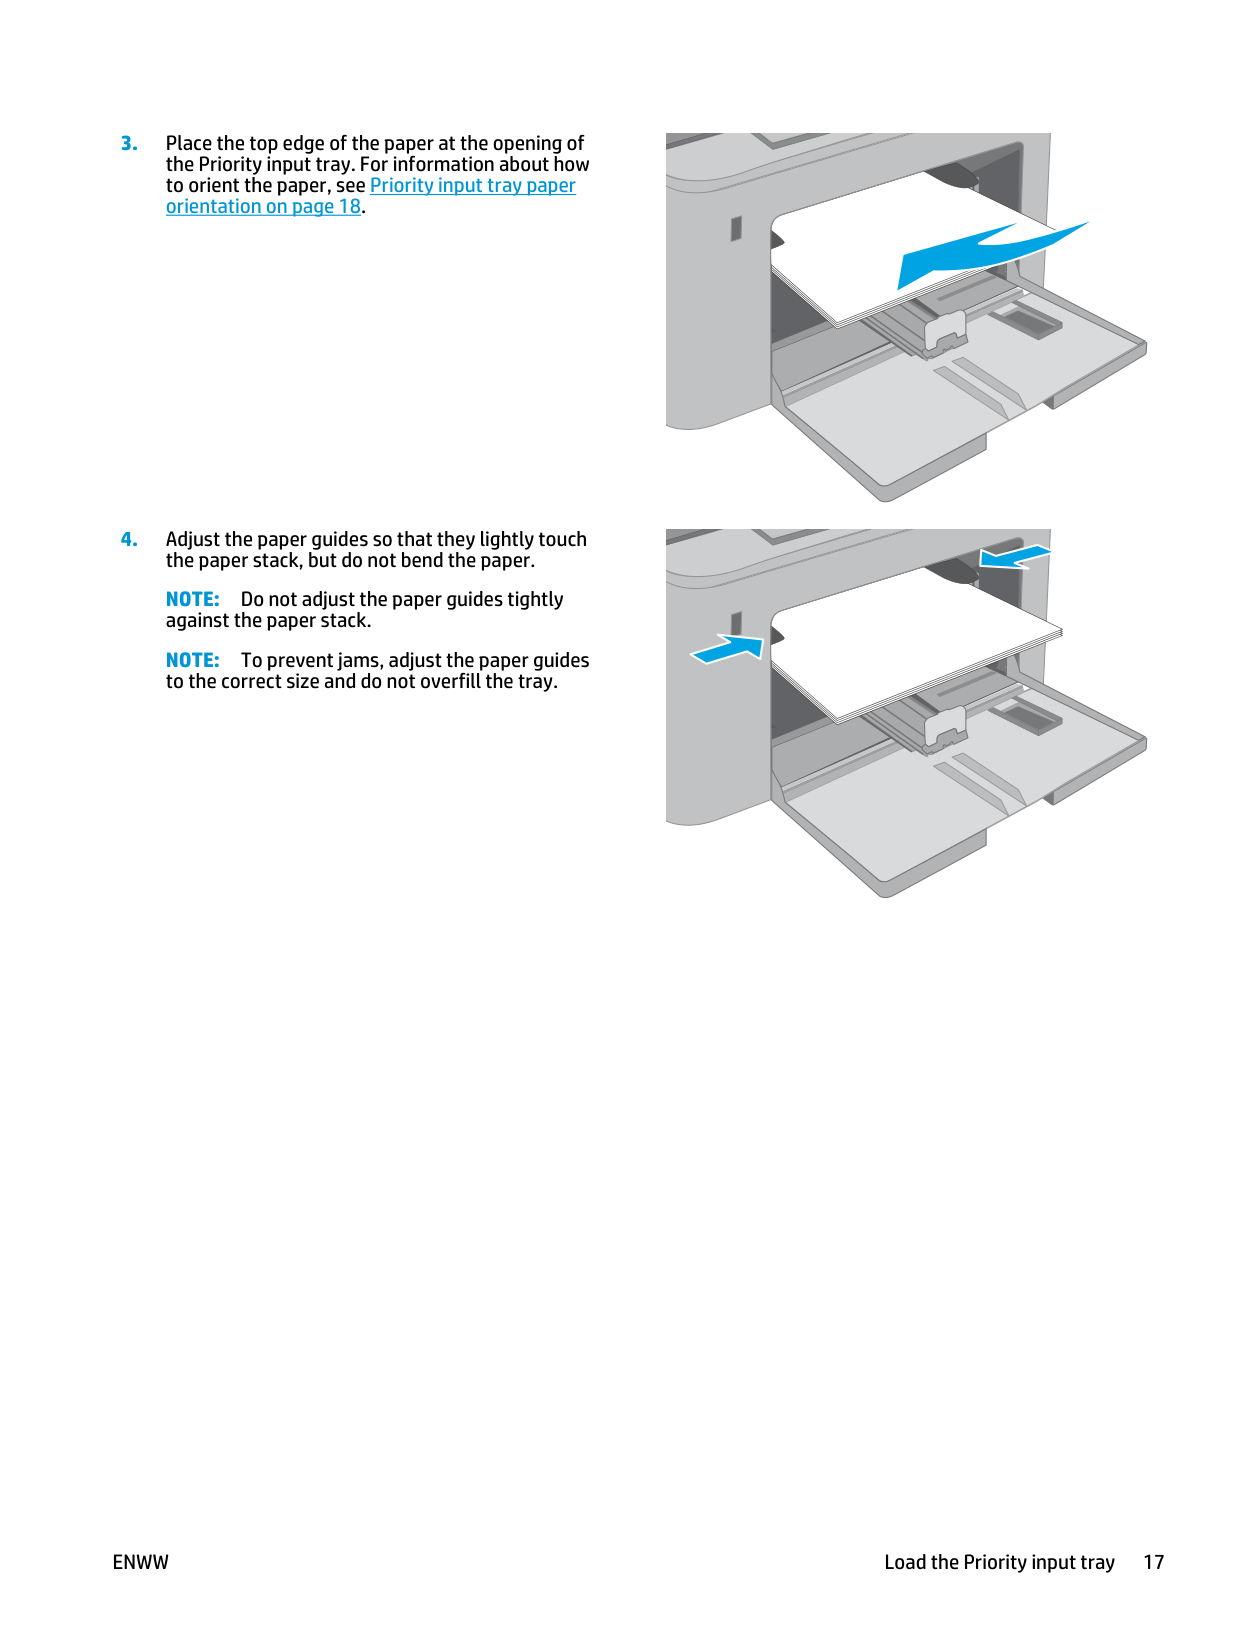
Note:
Do not adjust the paper guides tightly against the paper stack.Note:
To prevent jams, adjust the paper guides to the correct size and do not overfill the tray.Enww
Load the Priority input tray 17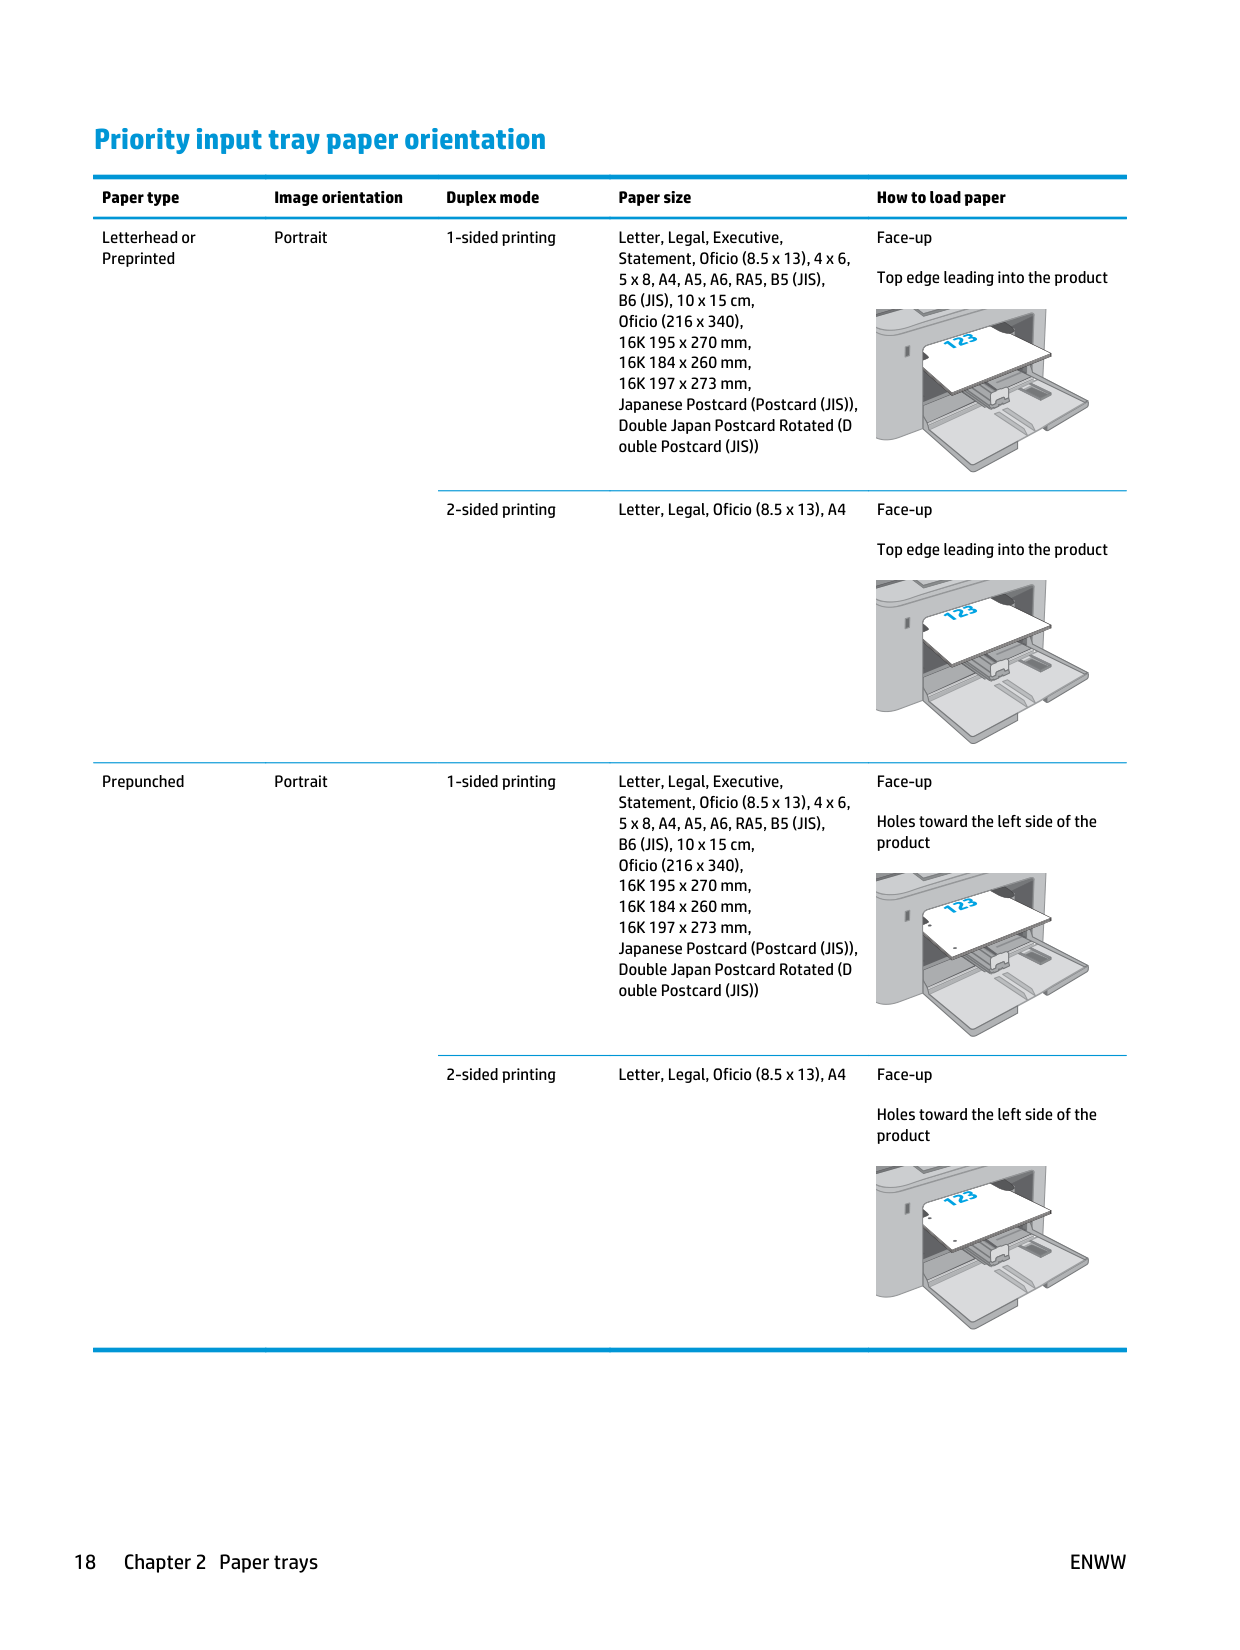
Priority input tray paper orientation Paper type Image orientation Duplex mode Paper size How to load paper Letterhead or Preprinted Portrait 1-sided printing Letter, Legal, Executive, Statement, Oficio (8.5 x 13), 4 x 6, 5 x 8, A4, A5, A6, RA5, B5 (JIS), B6 (JIS), 10 x 15 cm, Oficio (216 x 340), 16K 195 x 270 mm, 16K 184 x 260 mm, 16K 197 x 273 mm, Japanese Postcard (Postcard (JIS)), Double Japan Postcard Rotated (D ouble Postcard (JIS)) Face-up Top edge leading into the product 123 2-sided printing Letter, Legal, Oficio (8.5 x 13), A4 Face-up Top edge leading into the product 123 Prepunched Portrait 1-sided printing Letter, Legal, Executive, Statement, Oficio (8.5 x 13), 4 x 6, 5 x 8, A4, A5, A6, RA5, B5 (JIS), B6 (JIS), 10 x 15 cm, Oficio (216 x 340), 16K 195 x 270 mm, 16K 184 x 260 mm, 16K 197 x 273 mm, Japanese Postcard (Postcard (JIS)), Double Japan Postcard Rotated (D ouble Postcard (JIS)) Face-up Holes toward the left side of the product 123 2-sided printing Letter, Legal, Oficio (8.5 x 13), A4 Face-up Holes toward the left side of the product 123 18 Chapter 2 Paper trays
Enww
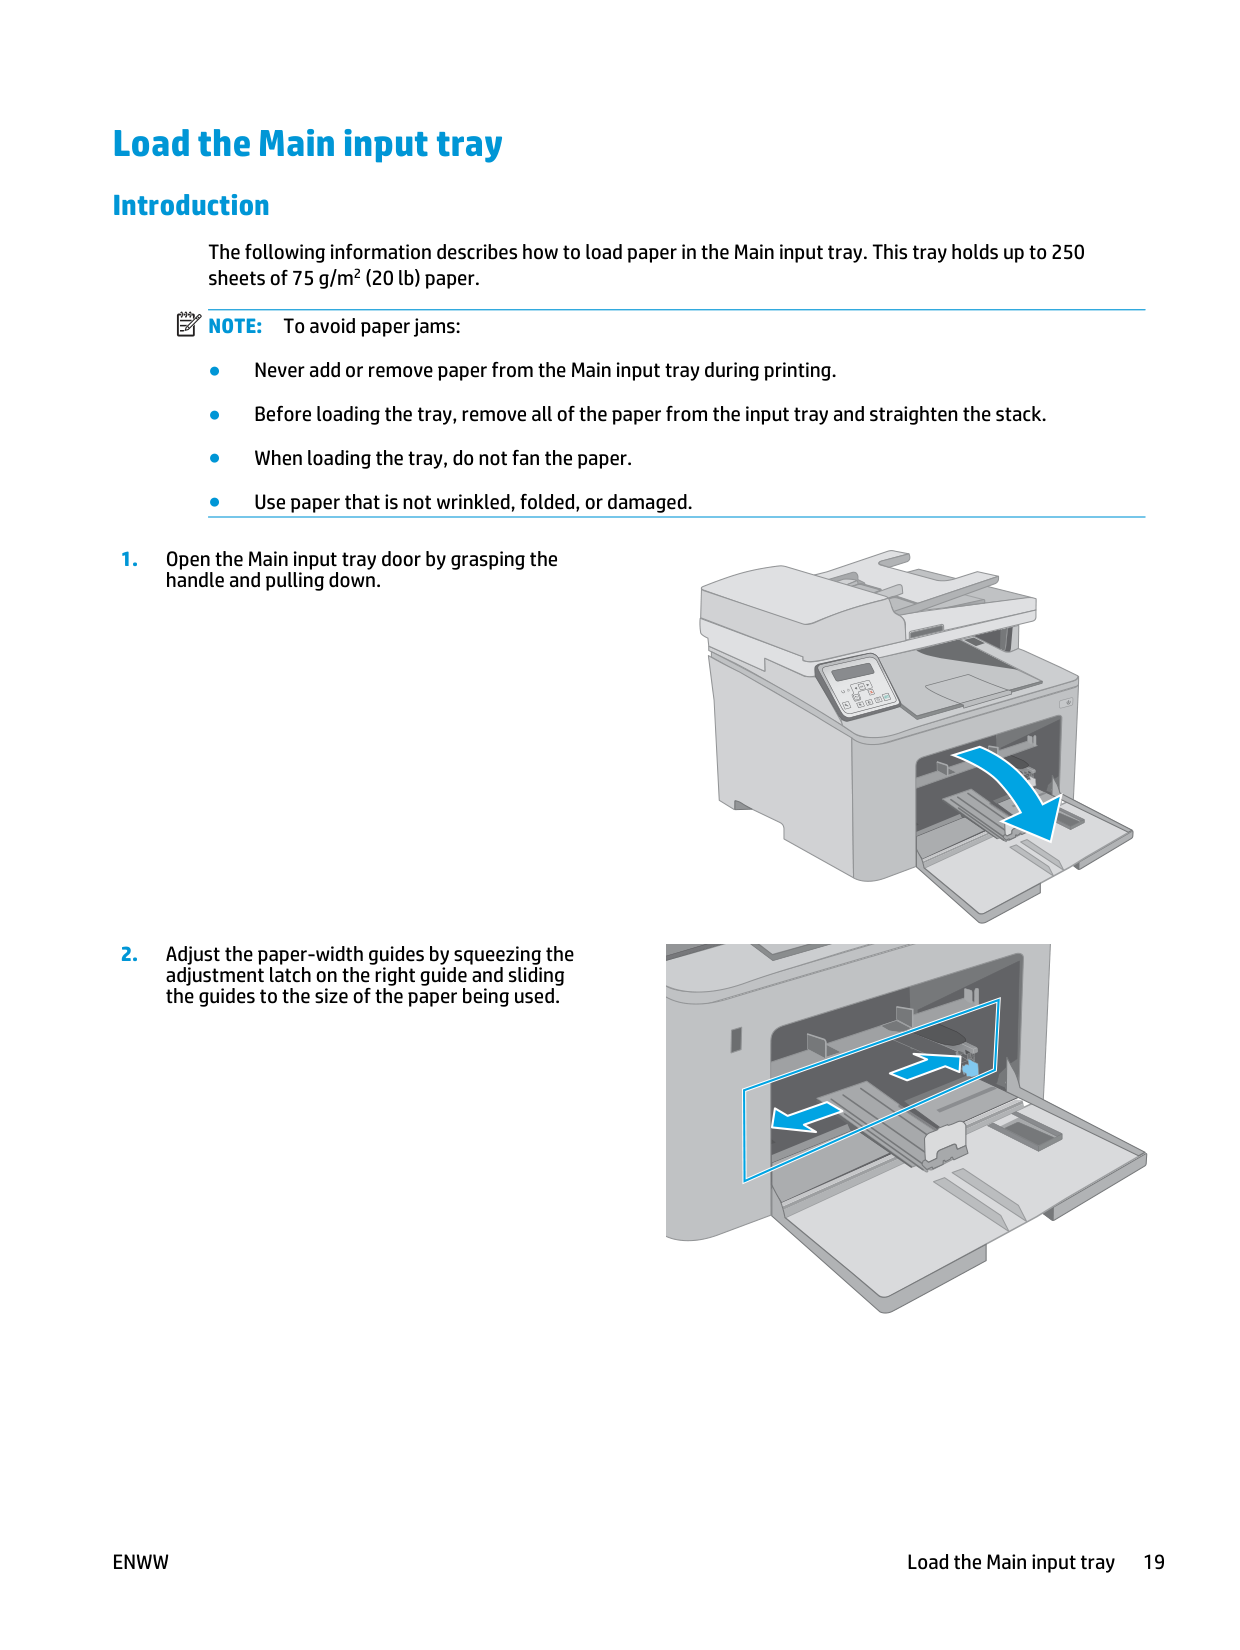
Load the Main input tray Introduction The following information describes how to load paper in the Main input tray. This tray holds up to 250 sheets of 75 g/m2 (20 lb) paper.
Note:
To avoid paper jams: ● Never add or remove paper from the Main input tray during printing. ● Before loading the tray, remove all of the paper from the input tray and straighten the stack. ● When loading the tray, do not fan the paper. ● Use paper that is not wrinkled, folded, or damaged.Ok
Enww
Load the Main input tray 19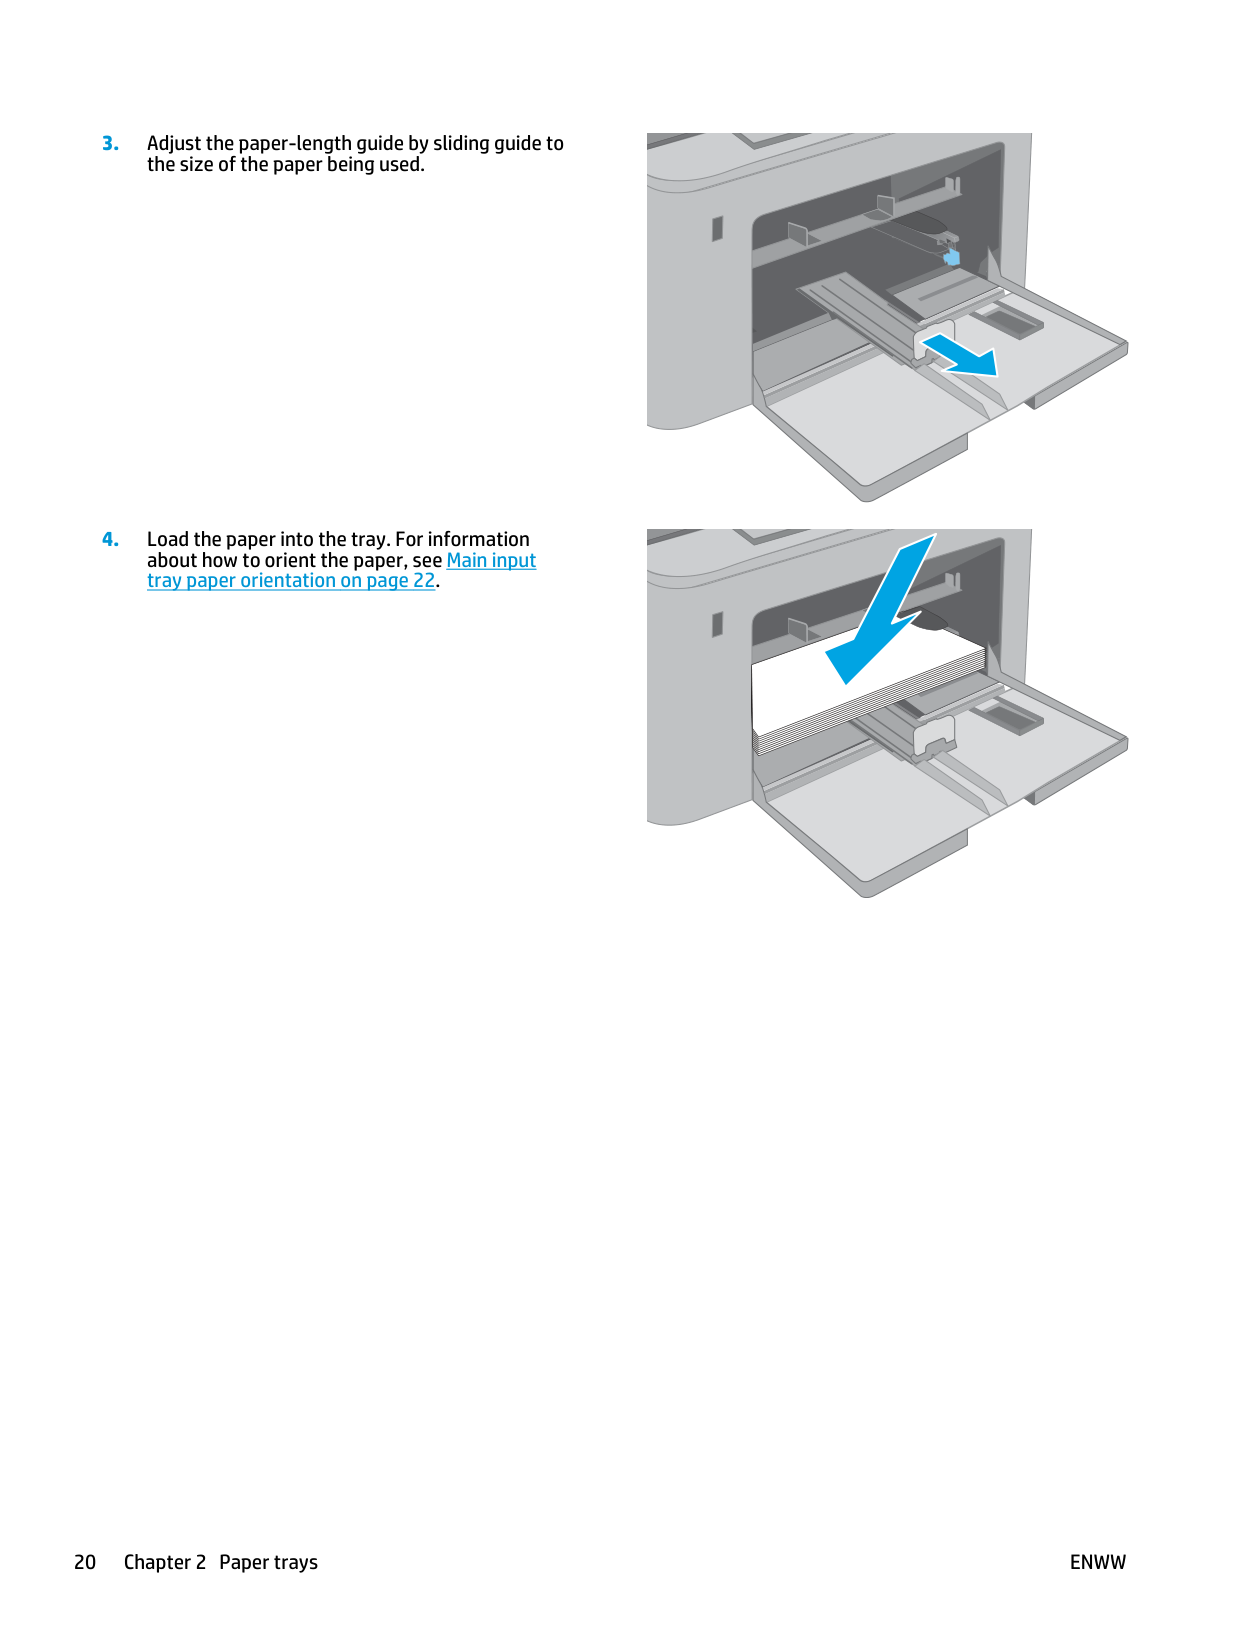
20 Chapter 2 Paper trays
Enww
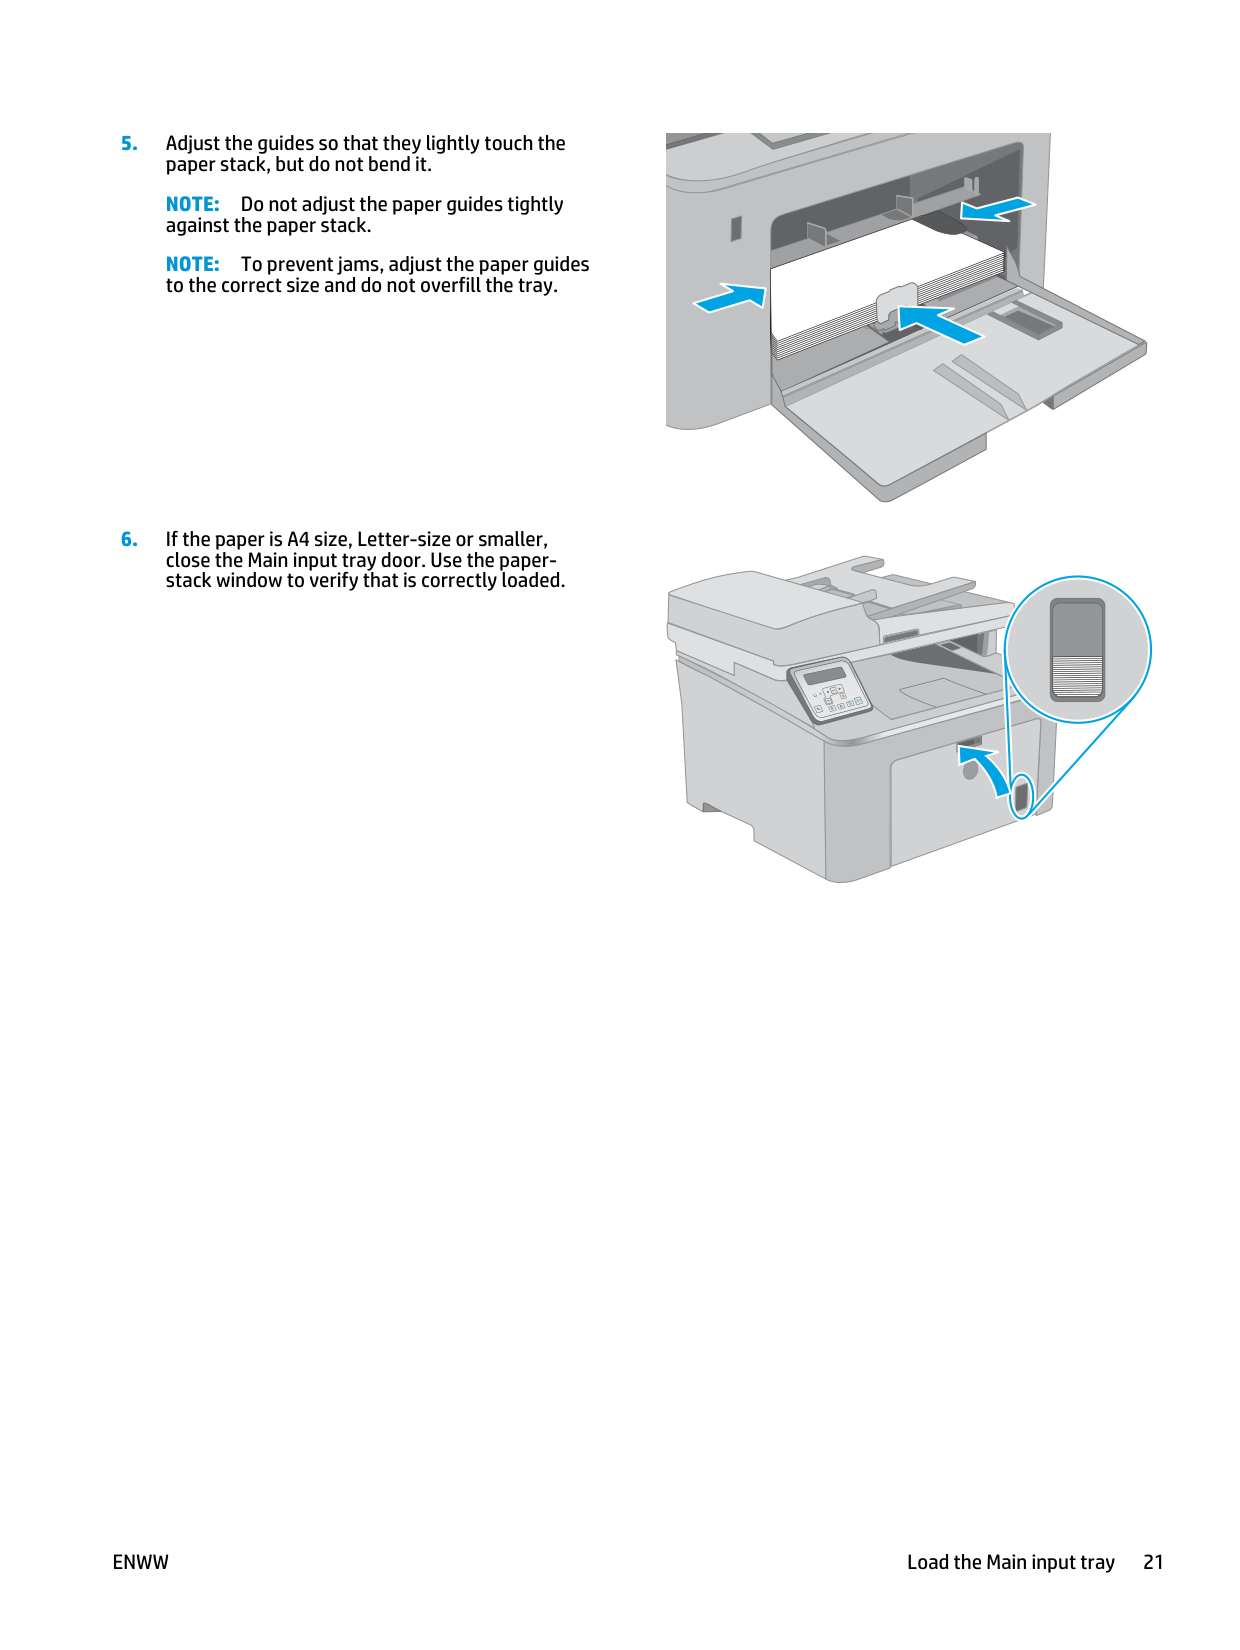
Note:
Do not adjust the paper guides tightly against the paper stack.Note:
To prevent jams, adjust the paper guides to the correct size and do not overfill the tray.Ok
Enww
Load the Main input tray 21
Main input tray paper orientation Paper type Image orientation Duplex mode Paper size How to load paper Letterhead or preprinted Portrait 1-sided printing Letter, Legal, Executive, Statement, Oficio (8.5 x 13), 4 x 6, 5 x 8, A4, A5, A6, RA5, B5 (JIS), B6 (JIS), 10 x 15 cm, Oficio (216 x 340), 16K 195 x 270 mm, 16K 184 x 260 mm, 16K 197 x 273 mm, Japanese Postcard (Postcard (JIS)), Double Japan Postcard Rotated (D ouble Postcard (JIS)) Face-up Top edge leading into the product 123 2-sided printing Letter, Legal, Oficio (8.5 x 13), A4 Face-up Top edge leading into the product 123 Prepunched Portrait 1-sided printing Letter, Legal, Executive, Statement, Oficio (8.5 x 13), 4 x 6, 5 x 8, A4, A5, A6, RA5, B5 (JIS), B6 (JIS), 10 x 15 cm, Oficio (216 x 340), 16K 195 x 270 mm, 16K 184 x 260 mm, 16K 197 x 273 mm, Japanese Postcard (Postcard (JIS)), Double Japan Postcard Rotated (D ouble Postcard (JIS)) Face-up Holes toward the left side of the product 123 2-sided printing Letter, Legal, Oficio (8.5 x 13), A4 Face-up Holes toward the left side of the product 123 22 Chapter 2 Paper trays
Enww
Load and print envelopes Introduction The following information describes how to print and load envelopes. The Priority input tray holds up to 10 envelopes. The Main input tray holds up to 10 envelopes. To print envelopes using the manual feed option, follow these steps to select the correct settings in the print driver, and then load the envelopes into the tray after sending the print job to the printer. Print envelopes
Note:
The name of the button varies for different software programs.Note:
To access these features from a Windows 8 or 8.1 Start screen, select Devices, select Print, and then select the printer.Enww
Load and print envelopes 23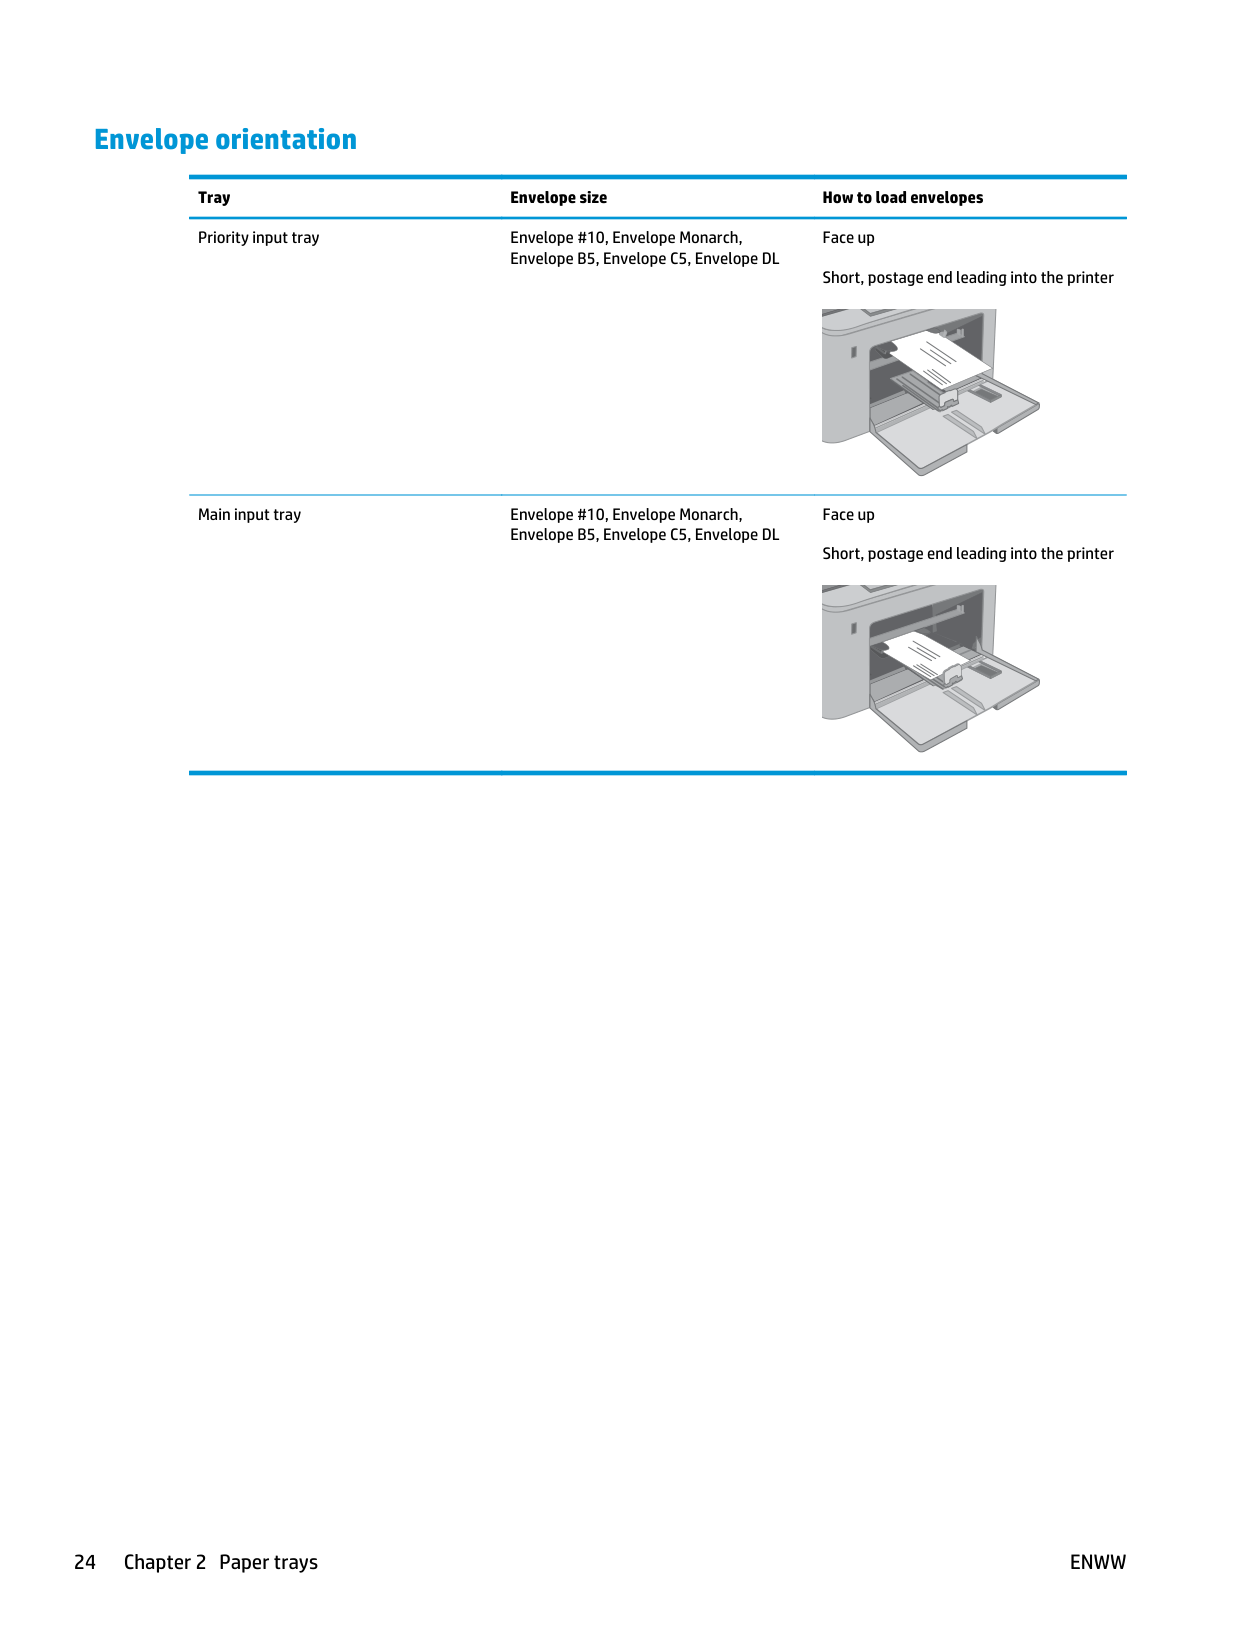
Envelope orientation Tray Envelope size How to load envelopes Priority input tray Envelope #10, Envelope Monarch, Envelope B5, Envelope C5, Envelope DL Face up Short, postage end leading into the printer Main input tray Envelope #10, Envelope Monarch, Envelope B5, Envelope C5, Envelope DL Face up Short, postage end leading into the printer 24 Chapter 2 Paper trays
Enww
Load and print labels Introduction The following information describes how to print and load labels. To print labels using the manual feed option, follow these steps to select the correct settings in the print driver, and then load the labels into the tray after sending the print job to the printer. When using manual feed, the printer waits to print the job until it detects that the tray has been opened. Manually feed labels
Note:
The name of the button varies for different software programs.Note:
To access these features from a Windows 8 or 8.1 Start screen, select Devices, select Print, and then select the printer.Enww
Load and print labels 25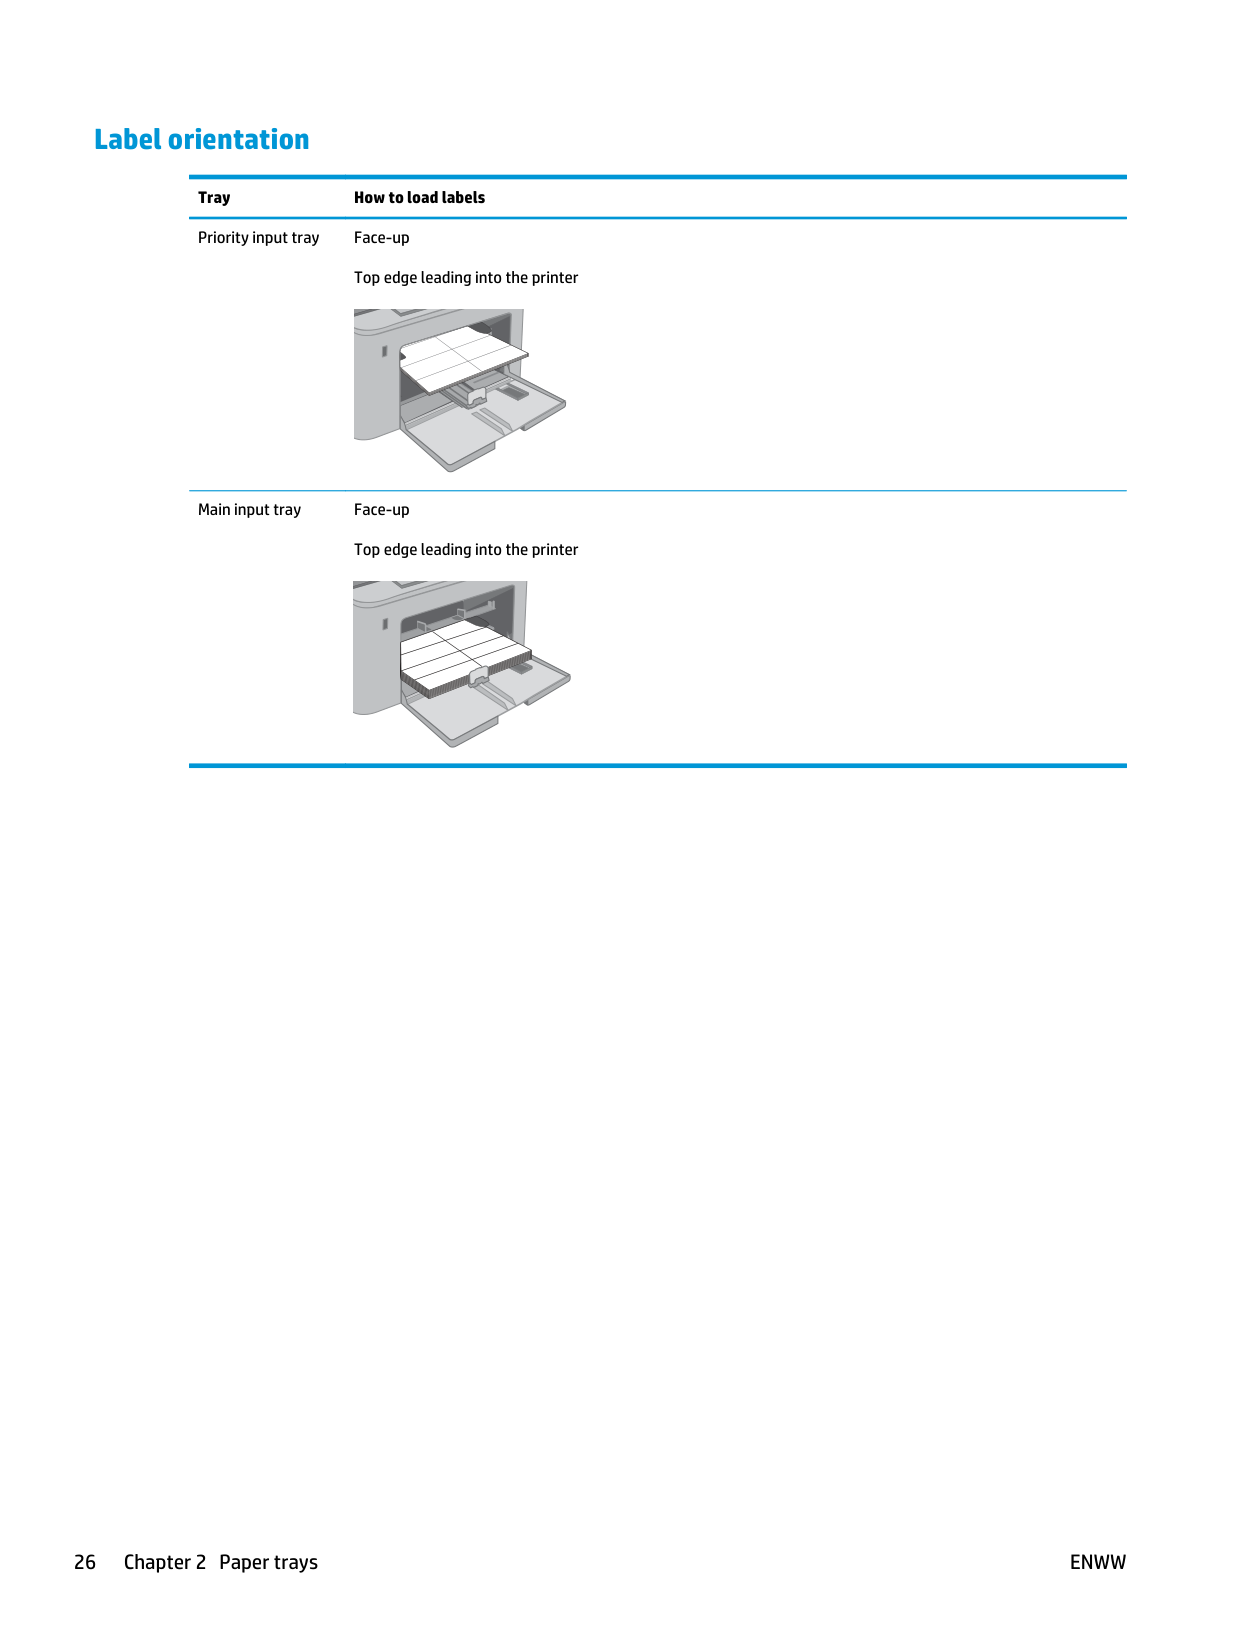
Label orientation Tray How to load labels Priority input tray Face-up Top edge leading into the printer Main input tray Face-up Top edge leading into the printer 26 Chapter 2 Paper trays
Enww
3 Supplies, accessories, and parts ● Order supplies, accessories, and parts ● Configure the HP toner-cartridge-protection supply settings ● Replace the toner cartridge ● Replace the imaging drum For more information: The following information is correct at the time of publication. For current information, see www.hp.com/ support/ljM227MFP. HP's all-inclusive help for the printer includes the following information: ● Install and configure ● Learn and use ● Solve problems ● Download software and firmware updates ● Join support forums ● Find warranty and regulatory information
Enww
27
Order supplies, accessories, and parts Ordering Order supplies and paper www.hp.com/go/suresupply Order genuine HP parts or accessories www.hp.com/buy/parts Order through service or support providers Contact an HP-authorized service or support provider. Order using the HP Embedded Web Server (EWS) To access, in a supported web browser on the computer, enter the printer IP address or host name in the address/URL field. The EWS contains a link to the HP SureSupply website, which provides options for purchasing Original HP supplies. Supplies and accessories Item Description Cartridge number Part number Supplies HP 30A Black LaserJet Toner Cartridge Standard-capacity replacement black toner cartridge
30A
Cf230A
HP 30X Black LaserJet Toner Cartridge High-capacity replacement black toner cartridge30X
Cf230X
HP 31A Black LaserJet Toner Cartridge Standard-capacity replacement black toner cartridge31A
Cf231A
HP 32A Original LaserJet Imaging Drum Imaging drum32A
Cf232A
Customer self-repair parts Customer Self-Repair (CSR) parts are available for many HP LaserJet printers to reduce repair time. More information about the CSR program and benefits can be found at www.hp.com/go/csr-support and www.hp.com/go/csr-faq. Genuine HP replacement parts can be ordered at www.hp.com/buy/parts or by contacting an HP-authorized service or support provider. When ordering, one of the following will be needed: part number, serial number (found on back of printer), product number, or printer name. ● Parts listed as Mandatory self-replacement are to be installed by customers, unless you are willing to pay HP service personnel to perform the repair. For these parts, on-site or return-to-depot support is not provided under the HP product warranty. ● Parts listed as Optional self-replacement can be installed by HP service personnel at your request for no additional charge during the printer warranty period. Item Description Self-replacement options Part number ADF replaceable film assembly Replacement film for the document feeder MandatoryRm2-1185-000Cn
28 Chapter 3 Supplies, accessories, and partsEnww
Configure the HP toner-cartridge-protection supply settings ● Introduction ● Enable or disable the Cartridge Policy feature ● Enable or disable the Cartridge Protection feature Introduction Use HP Cartridge Policy and Cartridge Protection to control which cartridges are installed in the printer and protect the cartridges that are installed from theft. ● Cartridge Policy: This feature protects the printer from counterfeit toner cartridges by allowing only genuine HP cartridges to be used with the printer. Using genuine HP cartridges ensures the best possible print quality. When someone installs a cartridge that is not a genuine HP cartridge, the printer control panel displays a message that the cartridge is unauthorized and it provides information explaining how to proceed. ● Cartridge Protection: This feature permanently associates toner cartridges with a specific printer, or fleet of printers, so they cannot be used in other printers. Protecting cartridges protects your investment. When this feature is enabled, if someone attempts to transfer a protected cartridge from the original printer into an unauthorized printer, that printer will not print with the protected cartridge. The printer control panel displays a message that the cartridge is protected, and it provides information explaining how to proceed.
Caution:
After enabling cartridge protection for the printer, all subsequent toner cartridges installed in the printer are automatically and permanently protected. To avoid protecting a new cartridge, disable the feature before installing the new cartridge. Turning the feature off does not turn off protection for cartridges that are currently installed. Both features are off by default. Follow these procedures to enable or disable them. Enable or disable the Cartridge Policy feature Use the printer control panel to enable the Cartridge Policy featureEnww
Configure the HP toner-cartridge-protection supply settings 29
● System Setup ● Supply Settings ● Cartridge Policy
Note:
If the web browser displays a message indicating that accessing the website might not be safe, select the option to continue to the website. Accessing this website will not harm the computer.Note:
If the web browser displays a message indicating that accessing the website might not be safe, select the option to continue to the website. Accessing this website will not harm the computer.Enww
Caution:
After enabling cartridge protection for the printer, all subsequent toner cartridges installed in the printer are automatically and permanently protected. To avoid protecting a new cartridge, disable the Cartridge Protection feature before installing the new cartridge. Turning the feature off does not turn off protection for cartridges that are currently installed. Use the printer control panel to disable the Cartridge Protection featureEnww
Configure the HP toner-cartridge-protection supply settings 31
Use the HP Embedded Web Server (EWS) to enable the Cartridge Protection feature
Note:
If the web browser displays a message indicating that accessing the website might not be safe, select the option to continue to the website. Accessing this website will not harm the computer.Caution:
After enabling cartridge protection for the printer, all subsequent toner cartridges installed in the printer are automatically and permanently protected. To avoid protecting a new cartridge, disable the Cartridge Protection feature before installing the new cartridge. Turning the feature off does not turn off protection for cartridges that are currently installed. Use the HP Embedded Web Server (EWS) to disable the Cartridge Protection featureNote:
If the web browser displays a message indicating that accessing the website might not be safe, select the option to continue to the website. Accessing this website will not harm the computer.Enww
Enww
Configure the HP toner-cartridge-protection supply settings 33
Replace the toner cartridge ● Introduction ● Toner-cartridge information ● Remove and replace the toner cartridge Introduction The following information provides details about the toner cartridge for the printer, and it includes instructions to replace it. Toner-cartridge information This printer indicates when the toner cartridge level is low. The actual toner cartridge life remaining can vary. Consider having a replacement cartridge available to install when print quality is no longer acceptable. To purchase cartridges or check cartridge compatibility for the printer, go to HP SureSupply at www.hp.com/ go/suresupply. Scroll to the bottom of the page and verify that the country/region is correct. Item Description Cartridge number Part number HP 30A Black LaserJet Toner Cartridge Standard-capacity replacement black toner cartridge
30A
Cf230A
HP 30X Black LaserJet Toner Cartridge High-capacity replacement black toner cartridge30X
Cf230X
HP 31A Black LaserJet Toner Cartridge Standard-capacity replacement black toner cartridge31A
Cf231A
Note:
High-yield toner cartridges contain more toner than standard cartridges for increased page yield. For more information, go to www.hp.com/go/learnaboutsupplies. Do not remove the toner cartridge from its package until it is time to replace it.Caution:
To prevent damage to the toner cartridge, do not expose it to light for more than a few minutes. The following illustration shows the toner-cartridge components. 34 Chapter 3 Supplies, accessories, and partsEnww
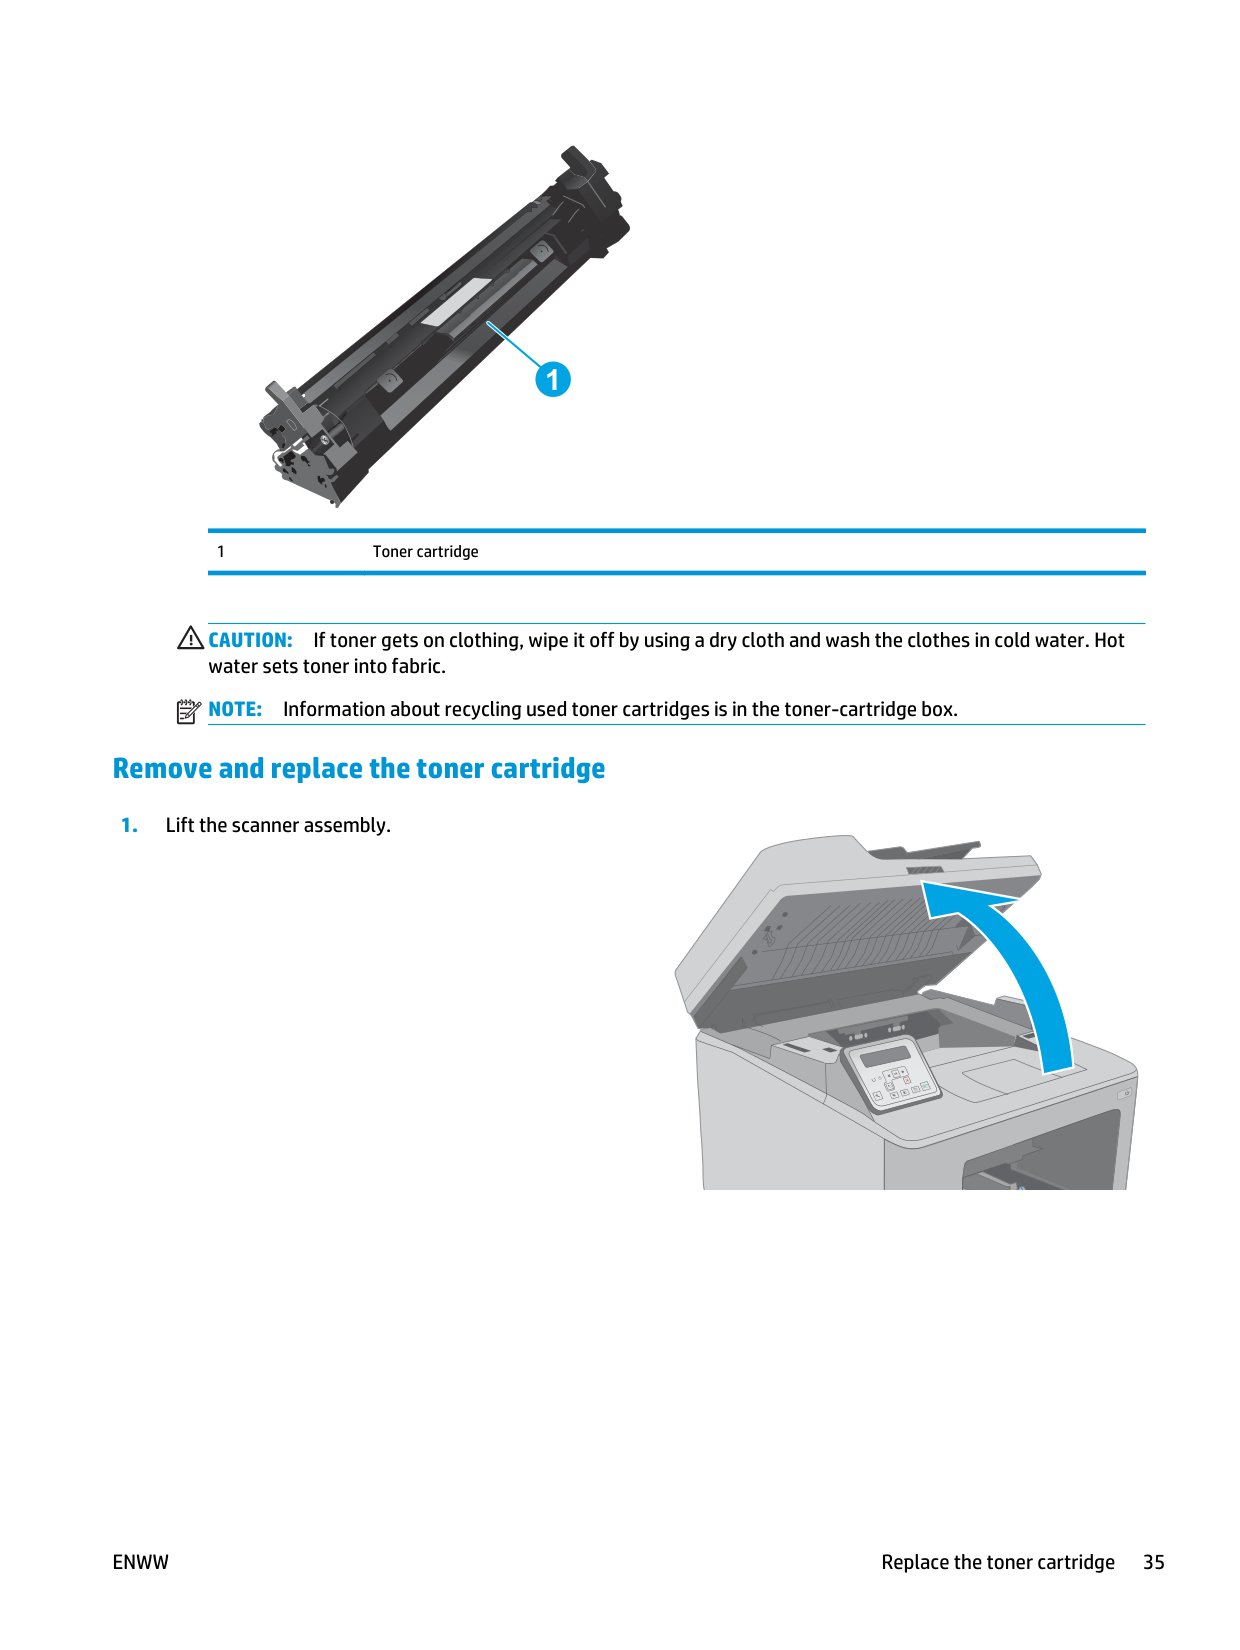
1 1 Toner cartridge
Caution:
If toner gets on clothing, wipe it off by using a dry cloth and wash the clothes in cold water. Hot water sets toner into fabric.Note:
Information about recycling used toner cartridges is in the toner-cartridge box. Remove and replace the toner cartridgeOk
Enww
Replace the toner cartridge 35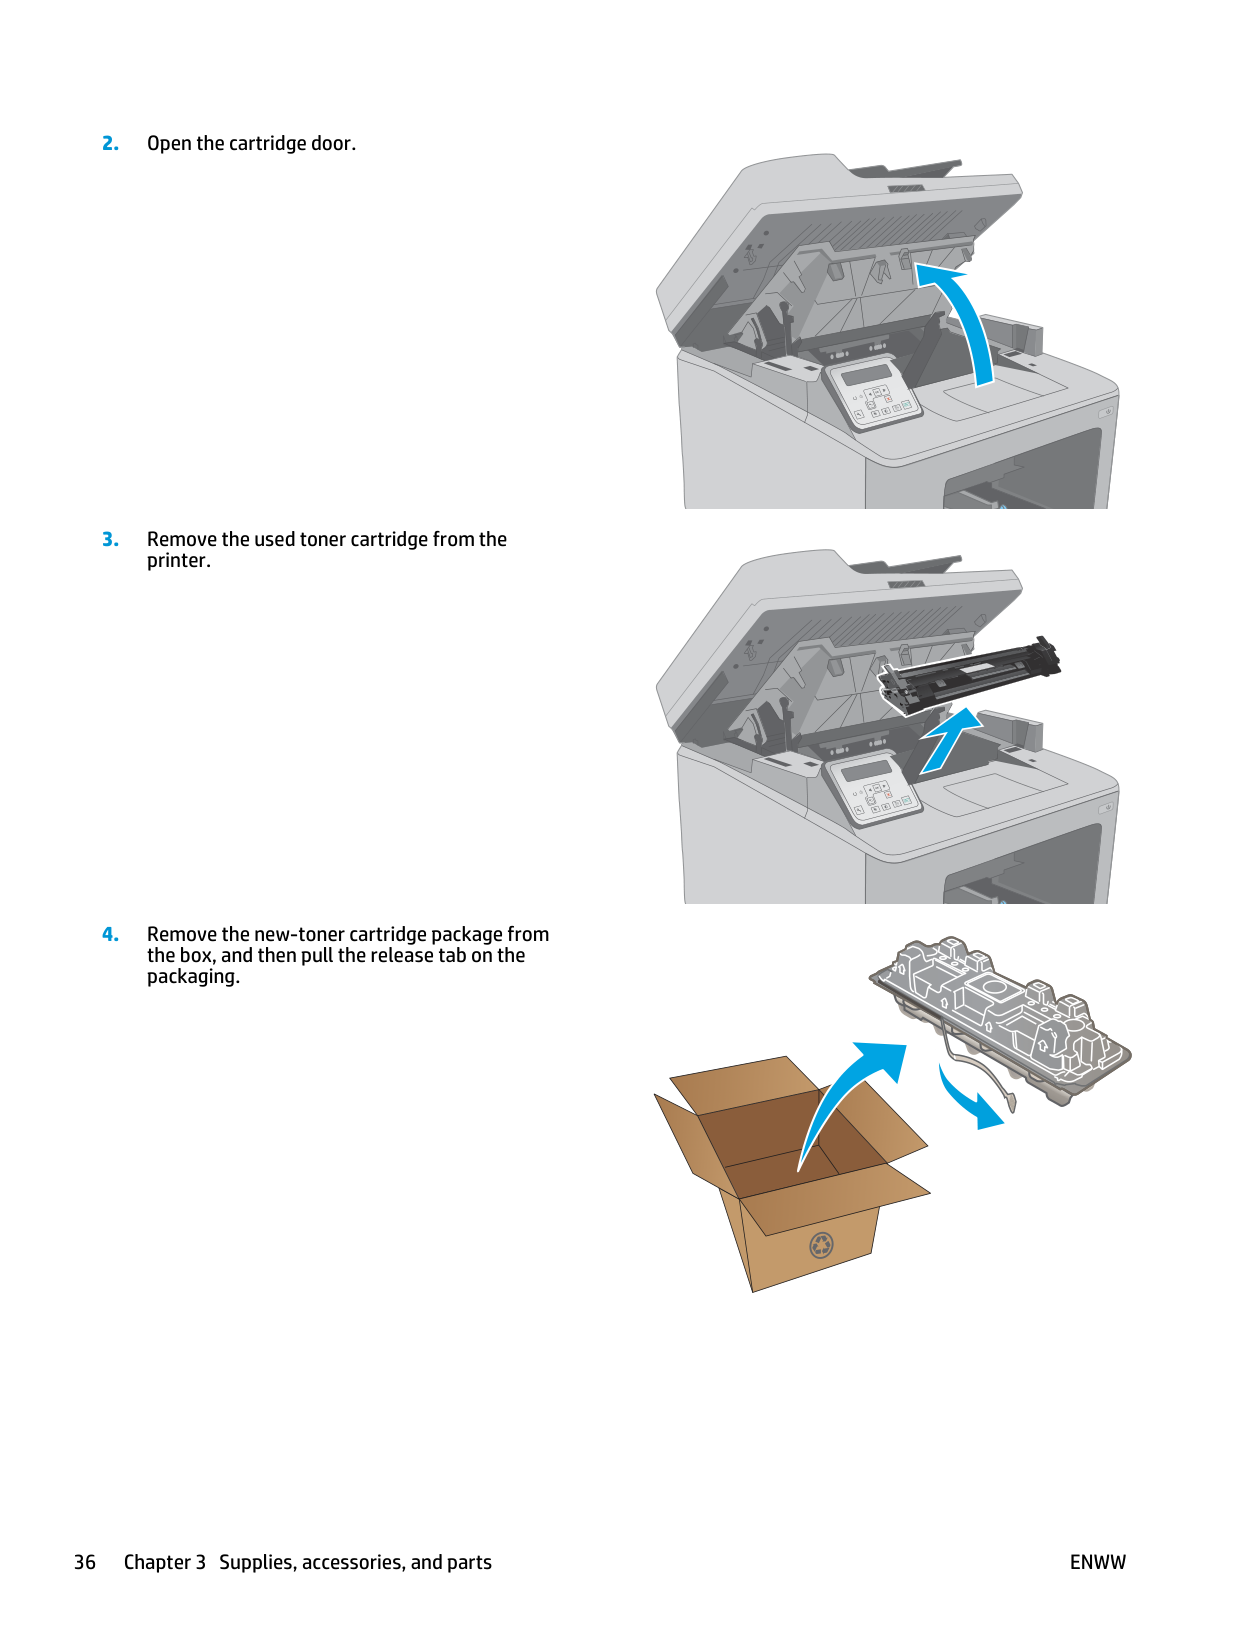
Ok
Ok
36 Chapter 3 Supplies, accessories, and parts
Enww

Ok
Enww
Replace the toner cartridge 37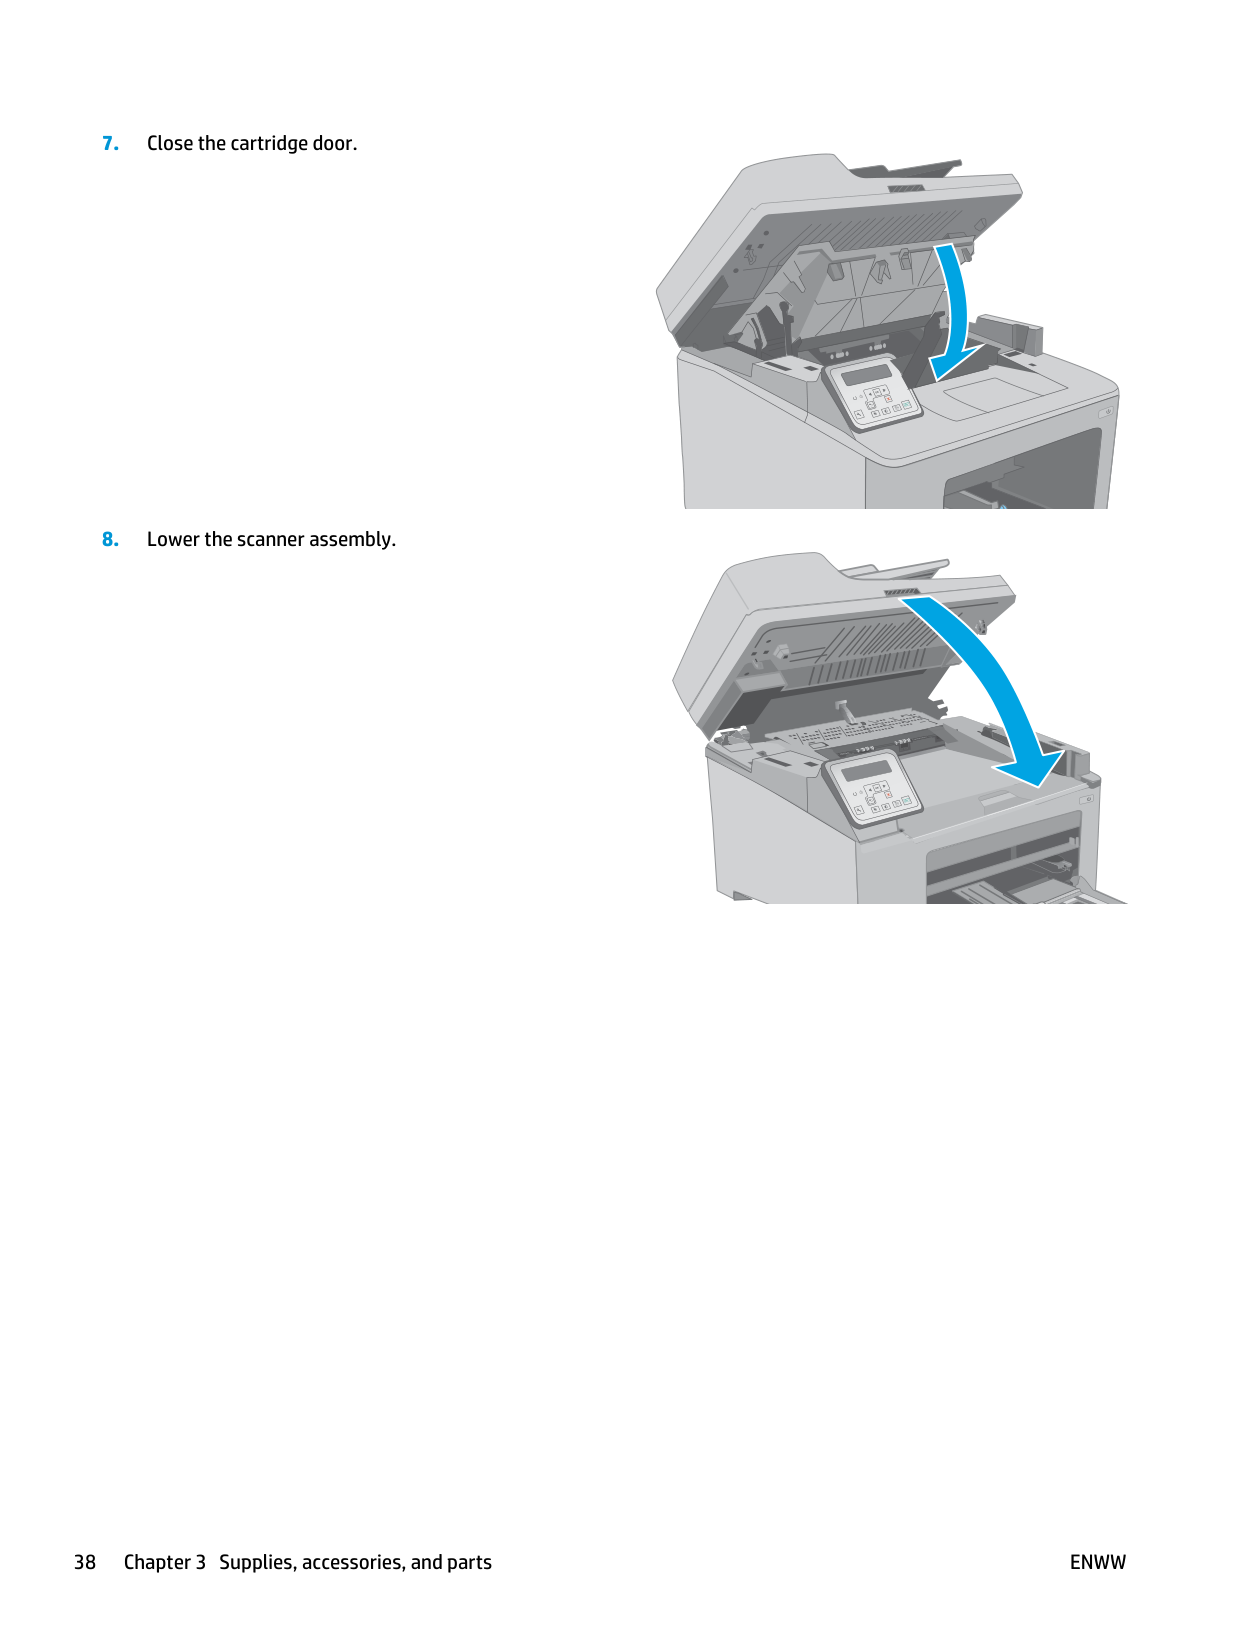
Ok
Ok
38 Chapter 3 Supplies, accessories, and partsEnww
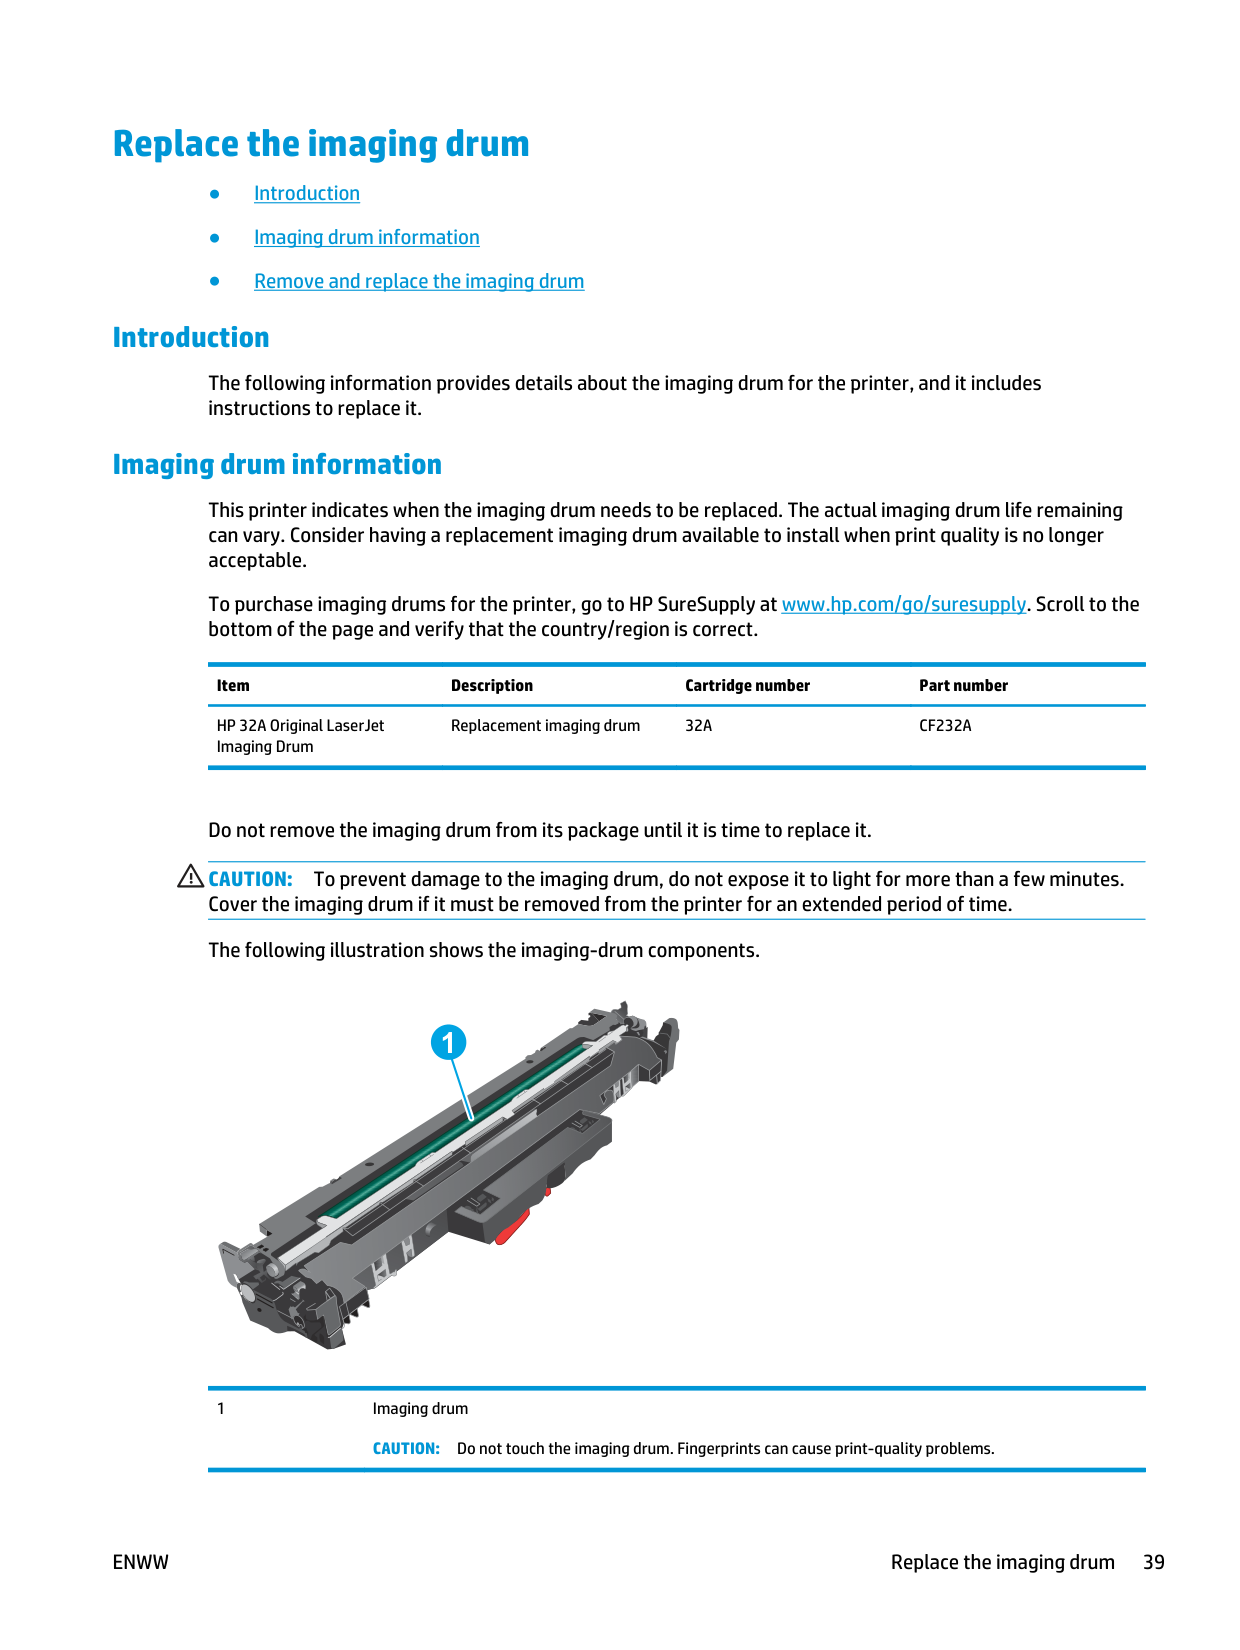
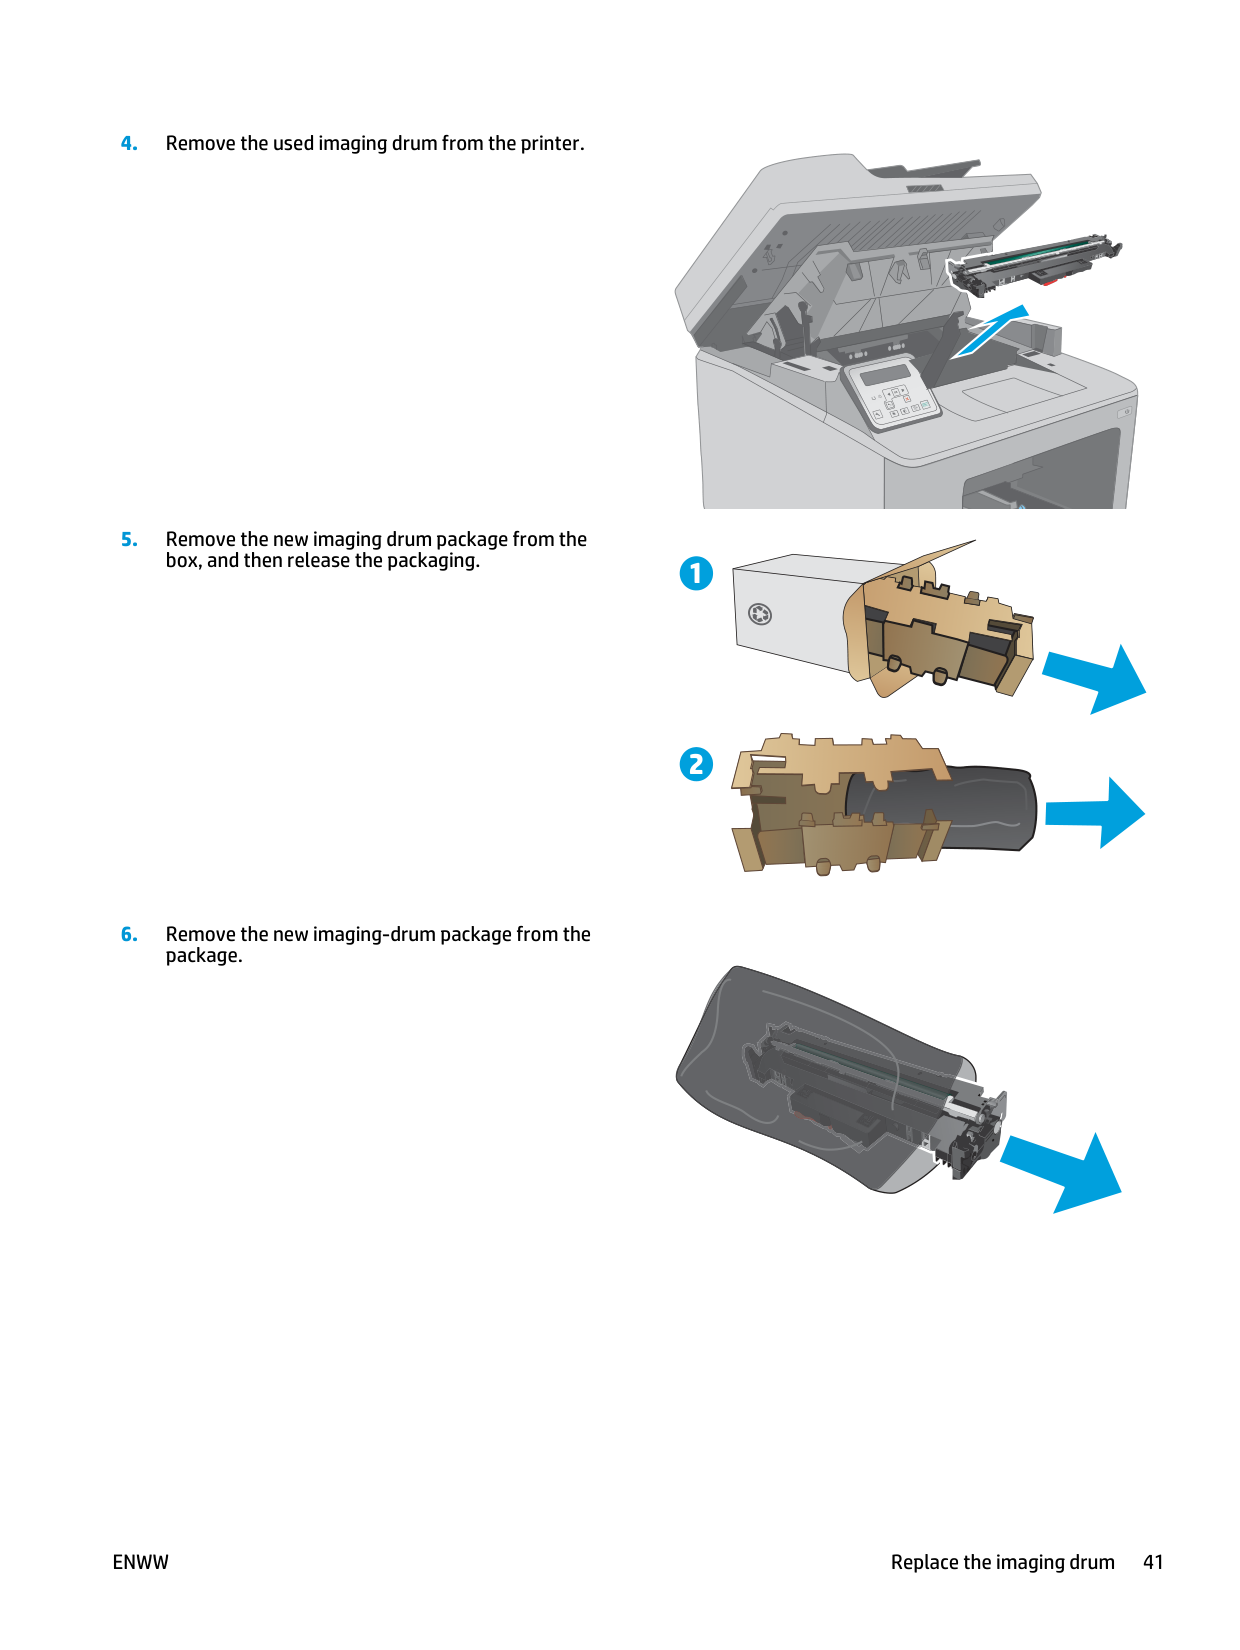
Replace the imaging drum ● Introduction ● Imaging drum information ● Remove and replace the imaging drum Introduction The following information provides details about the imaging drum for the printer, and it includes instructions to replace it. Imaging drum information This printer indicates when the imaging drum needs to be replaced. The actual imaging drum life remaining can vary. Consider having a replacement imaging drum available to install when print quality is no longer acceptable. To purchase imaging drums for the printer, go to HP SureSupply at www.hp.com/go/suresupply. Scroll to the bottom of the page and verify that the country/region is correct. Item Description Cartridge number Part number HP 32A Original LaserJet Imaging Drum Replacement imaging drum
32A
Cf232A
Do not remove the imaging drum from its package until it is time to replace it.Caution:
To prevent damage to the imaging drum, do not expose it to light for more than a few minutes. Cover the imaging drum if it must be removed from the printer for an extended period of time. The following illustration shows the imaging-drum components. 1 1 Imaging drumCaution:
Do not touch the imaging drum. Fingerprints can cause print-quality problems.Enww
Replace the imaging drum 39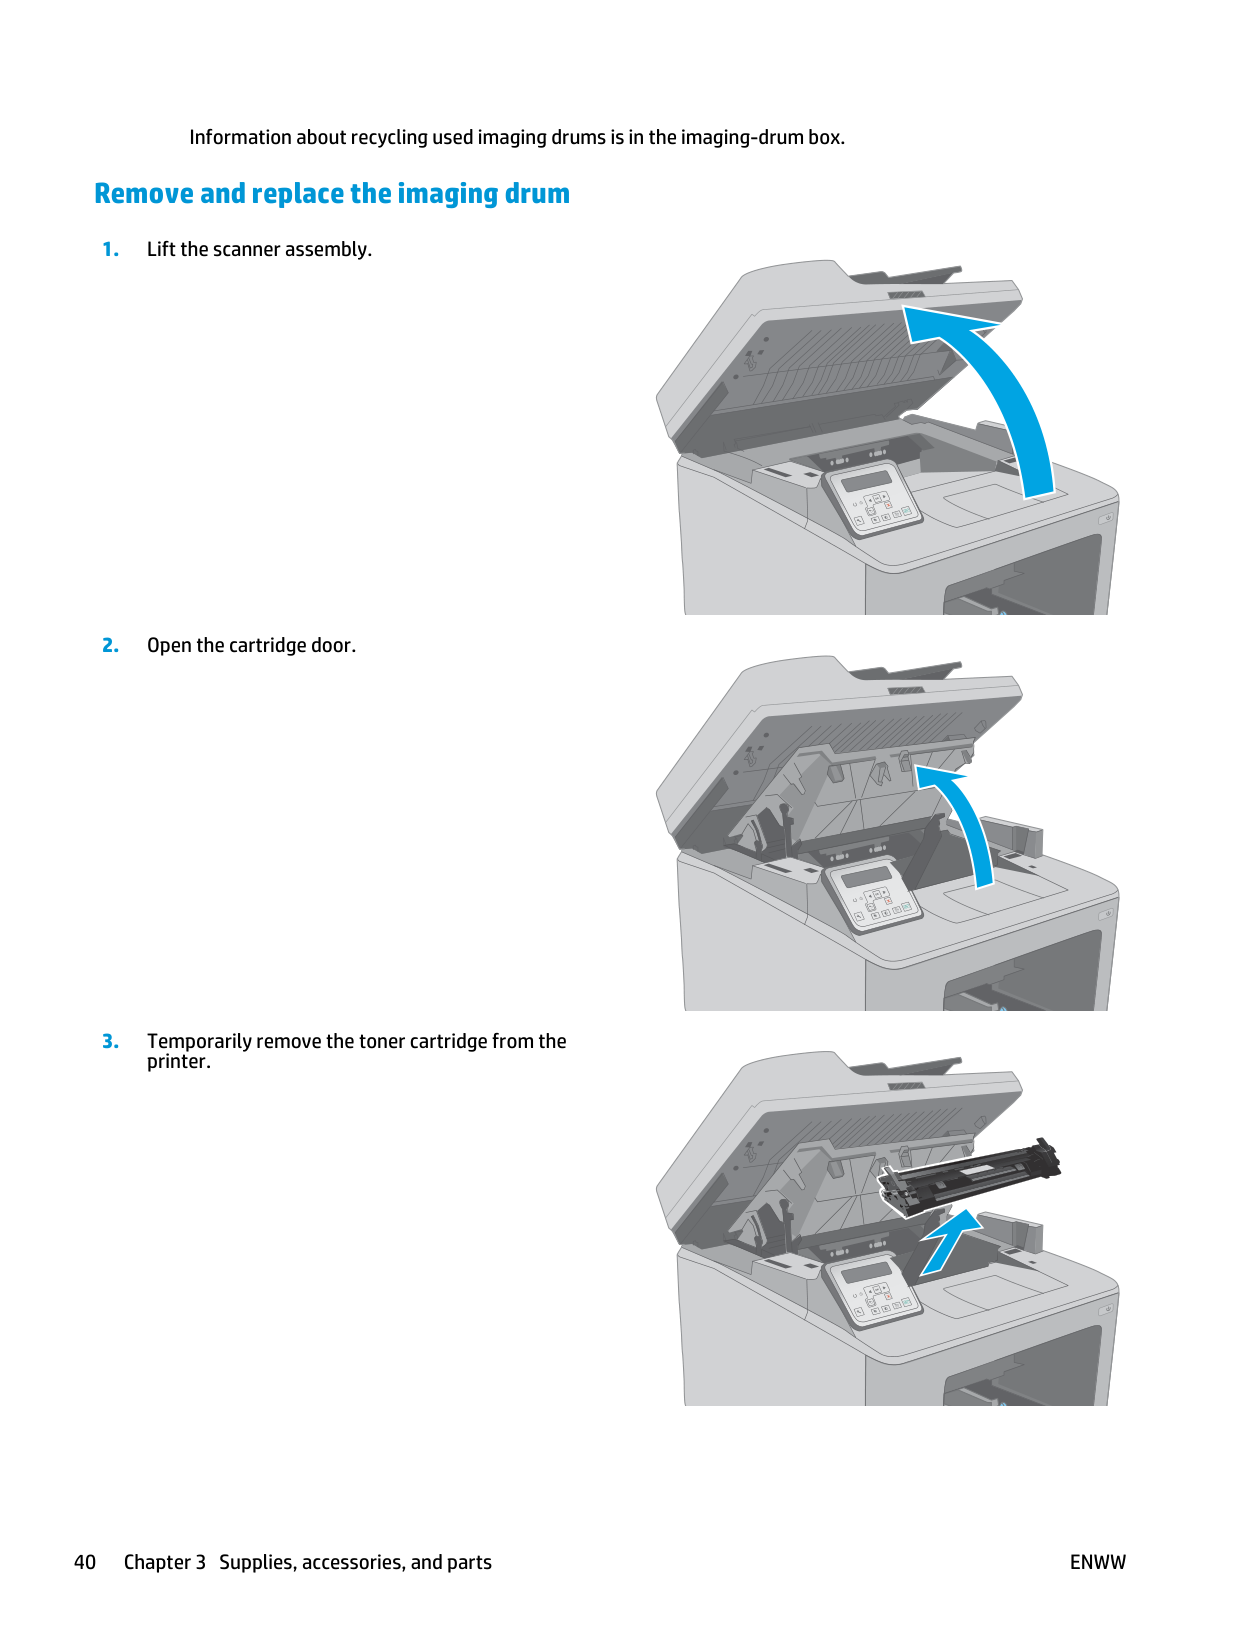
Information about recycling used imaging drums is in the imaging-drum box. Remove and replace the imaging drum
Ok
Ok
Ok
40 Chapter 3 Supplies, accessories, and partsEnww
Ok
1 2
Enww
Replace the imaging drum 41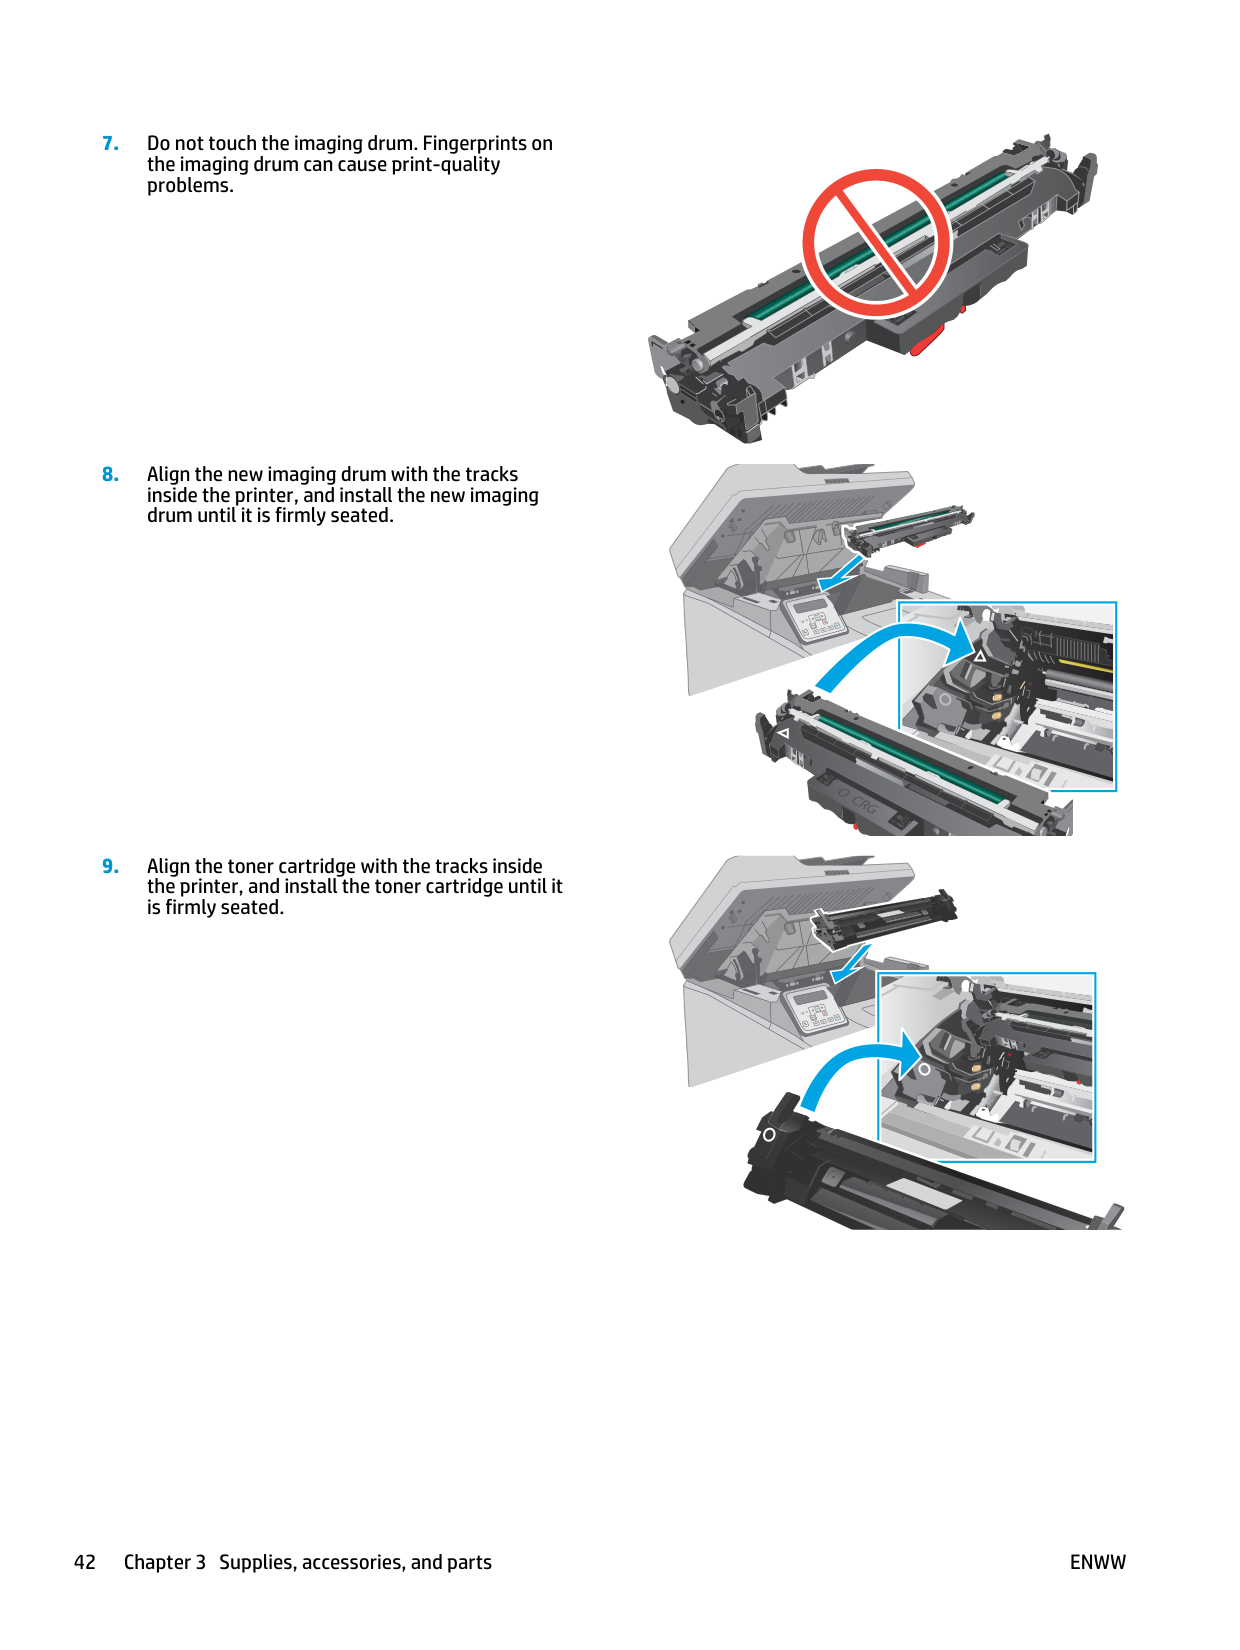
Ok
Ok
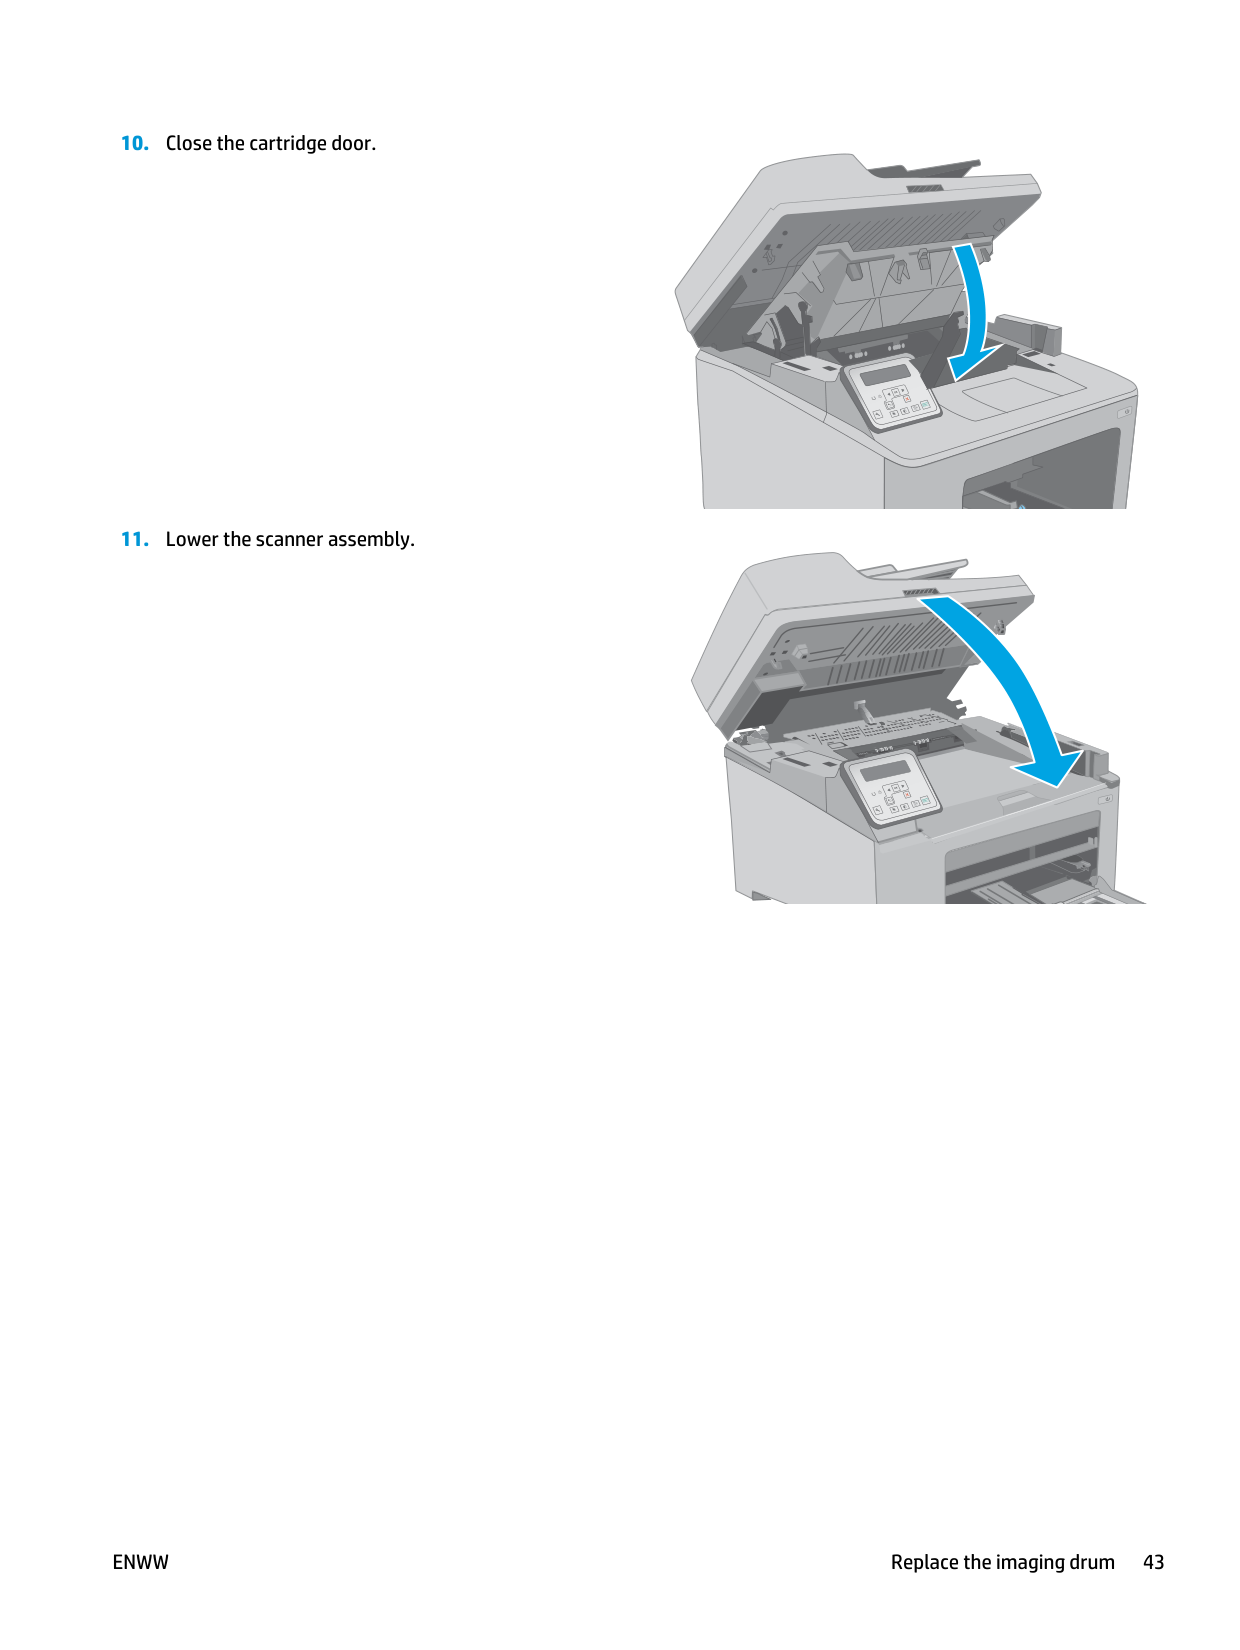
42 Chapter 3 Supplies, accessories, and partsEnww
Ok
Ok
Enww
Replace the imaging drum 43
44 Chapter 3 Supplies, accessories, and parts
Enww
4 Print ● Print tasks (Windows) ● Print tasks (OS X) ● Mobile printing ● Use walk-up USB printing (touchscreen models only) For more information: The following information is correct at the time of publication. For current information, see www.hp.com/ support/ljM227MFP. HP's all-inclusive help for the printer includes the following information: ● Install and configure ● Learn and use ● Solve problems ● Download software and firmware updates ● Join support forums ● Find warranty and regulatory information
Enww
45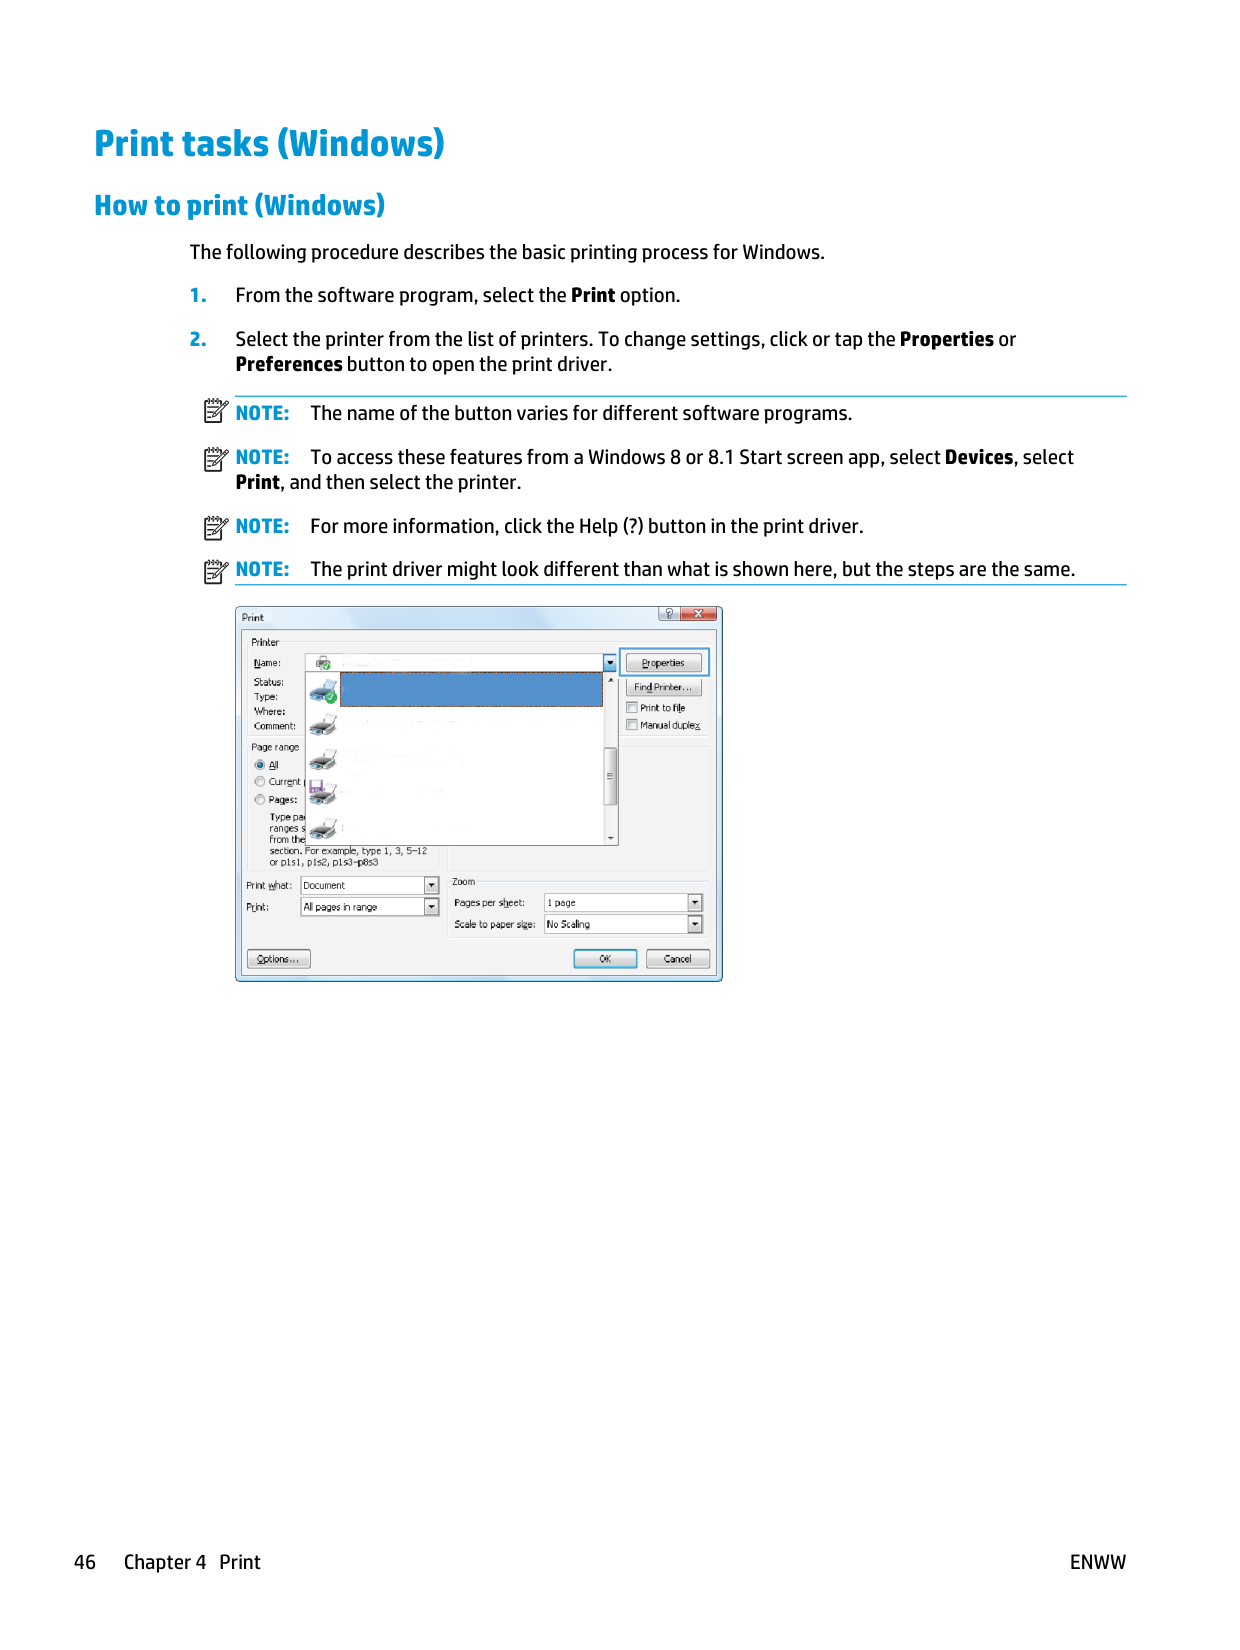
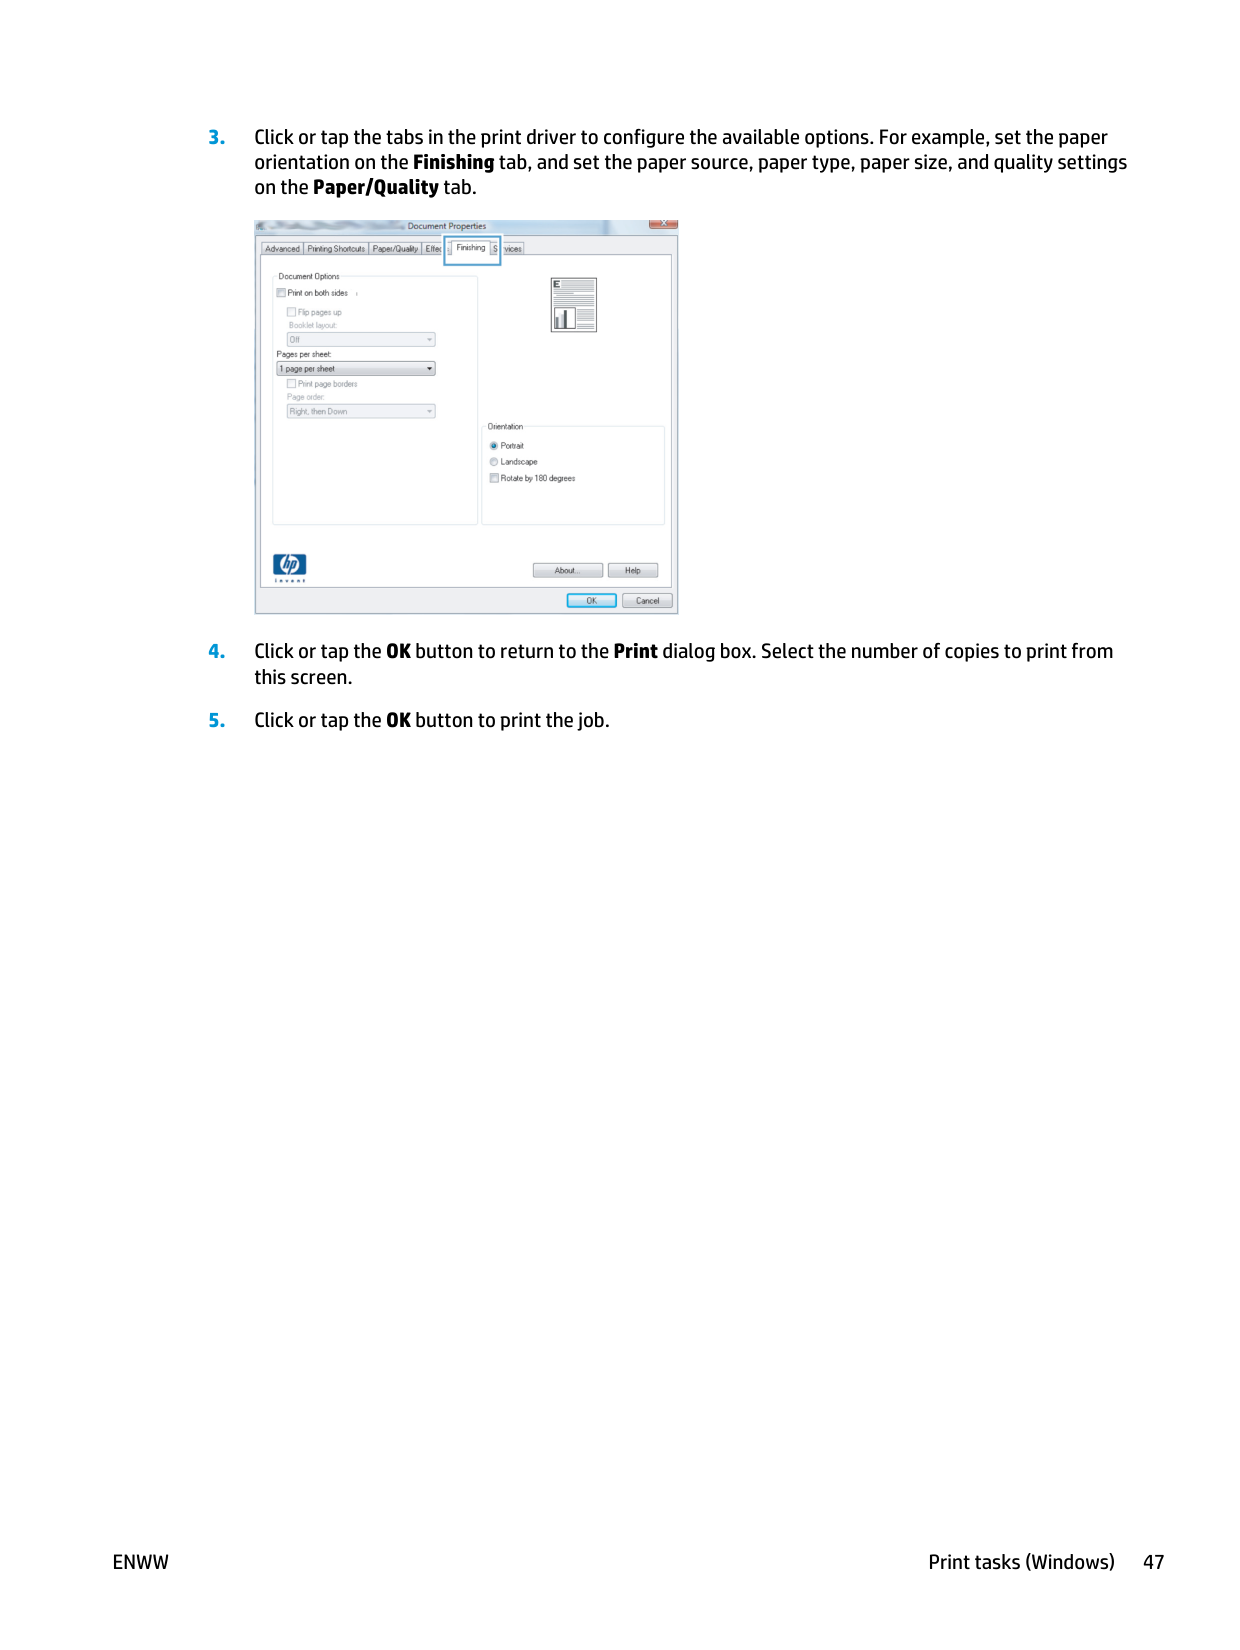
Print tasks (Windows) How to print (Windows) The following procedure describes the basic printing process for Windows.
Note:
The name of the button varies for different software programs.Note:
To access these features from a Windows 8 or 8.1 Start screen app, select Devices, select Print, and then select the printer.Note:
For more information, click the Help (?) button in the print driver.Note:
The print driver might look different than what is shown here, but the steps are the same. 46 Chapter 4 PrintEnww
Enww
Print tasks (Windows) 47
Automatically print on both sides (Windows) Use this procedure for printers that have an automatic duplexer installed. If the printer does not have an automatic duplexer installed, or to print on paper types that the duplexer does not support, print on both sides manually.
Note:
The name of the button varies for different software programs.Note:
To access these features from a Windows 8 or 8.1 Start screen app, select Devices, select Print, and then select the printer.Note:
The name of the button varies for different software programs.Note:
To access these features from a Windows 8 or 8.1 Start screen app, select Devices, select Print, and then select the printer.Enww
Print multiple pages per sheet (Windows)
Note:
The name of the button varies for different software programs.Note:
To access these features from a Windows 8 or 8.1 Start screen app, select Devices, select Print, and then select the printer.Note:
The name of the button varies for different software programs.Note:
To access these features from a Windows 8 or 8.1 Start screen app, select Devices, select Print, and then select the printer.Enww
Print tasks (Windows) 49
Additional print tasks Go to www.hp.com/support/ljM227MFP. Instructions are available for performing specific print tasks, such as the following: ● Create and use printing shortcuts or presets ● Select the paper size, or use a custom paper size ● Select the page orientation ● Create a booklet ● Scale a document to fit a specific paper size ● Print the first or last pages of the document on different paper ● Print watermarks on a document 50 Chapter 4 Print
Enww
Print tasks (OS X) How to print (OS X) The following procedure describes the basic printing process for OS X.
Note:
The name of the item varies for different software programs.Note:
This information applies to printers that include an automatic duplexer.Note:
This feature is available if you install the HP print driver. It might not be available if you are using AirPrint.Note:
The name of the item varies for different software programs.Note:
This feature is available if you install the HP print driver. It might not be available if you are using AirPrint.Note:
The name of the item varies for different software programs.Enww
Print tasks (OS X) 51
Note:
The name of the item varies for different software programs.Note:
The name of the item varies for different software programs.Note:
This list contains the master set of options available. Some options are not available on all printers. ● Media Type: Select the option for the type of paper for the print job. ● Print Quality: Select the resolution level for the print job. ● Edge-To-Edge Printing: Select this option to print close to the paper edges. ● EconoMode: Select this option to conserve toner when printing drafts of documents.Enww
Additional print tasks Go to www.hp.com/support/ljM227MFP. Instructions are available for performing specific print tasks, such as the following: ● Create and use printing shortcuts or presets ● Select the paper size, or use a custom paper size ● Select the page orientation ● Create a booklet ● Scale a document to fit a specific paper size ● Print the first or last pages of the document on different paper ● Print watermarks on a document
Enww
Print tasks (OS X) 53
Mobile printing Introduction HP offers multiple mobile and ePrint solutions to enable easy printing to an HP printer from a laptop, tablet, smartphone, or other mobile device. To see the full list and to determine the best choice, go to www.hp.com/ go/LaserJetMobilePrinting.
Note:
Update the printer firmware to ensure all mobile printing and ePrint capabilities are supported. ● Wi-Fi Direct and NFC Printing (wireless models only) ● HP ePrint via email ● HP ePrint software ● AirPrint ● Android embedded printing Wi-Fi Direct and NFC Printing (wireless models only) Wi-Fi Direct and NFC enable printing from a wireless mobile device without requiring a connection to a network or the Internet. NFC capabilities enable easy one-to-one print connection for mobile devices using device-to-device touch. Not all mobile operating systems are currently supported by Wi-Fi Direct and NFC. If the mobile device does not support Wi-Fi Direct, you must change the wireless network connection of the device to the Wi-Fi Direct connection of the printer before printing.Note:
For non-Wi-Fi Direct capable mobile devices, the Wi-Fi Direct connection only enables printing. After using Wi-Fi Direct to print, you must reconnect to a local network in order to access the Internet. To access to the printer Wi-Fi Direct connection, complete the following steps:Enww
Note:
If the printer name does not display, you might be out of range of the Wi-Fi Direct signal. Move the device closer to the printer.Note:
For Android devices that support Wi-Fi Direct, if the connection method is set to Automatic, the connection will occur automatically, without a password prompt. If the connection method is set to Manual, you will need to either press the OK button, or provide a personal identification number (PIN) — displayed on the printer control panel — as a password on the mobile device.Note:
To access the Wi-Fi Direct password, from Home screen on the printer control panel, touch the Connection Information button.Note:
If the mobile device does not support printing, install the HP ePrint mobile app.Enww
Mobile printing 55
Note:
In environments where more than one model of the same printer is installed, it might be helpful to provide each printer a unique Wi-Fi Direct name for easier printer identification for Wi-Fi Direct printing. The Wi-Fi Direct Name is also available by touching the Connection Information icon from the Home screen on the printer control panel, and then touching the Wi-Fi Direct icon. Change the printer Wi-Fi Direct name Follow this procedure to change the printer Wi-Fi Direct name using the HP Embedded Web Server (EWS): Step one: Open the HP Embedded Web ServerNote:
If the web browser displays a message indicating that accessing the website might not be safe, select the option to continue to the website. Accessing this website will not harm the computer. Step two: Change the Wi-Fi Direct nameNote:
The steps vary according to the type of control panel. 56 Chapter 4 PrintEnww
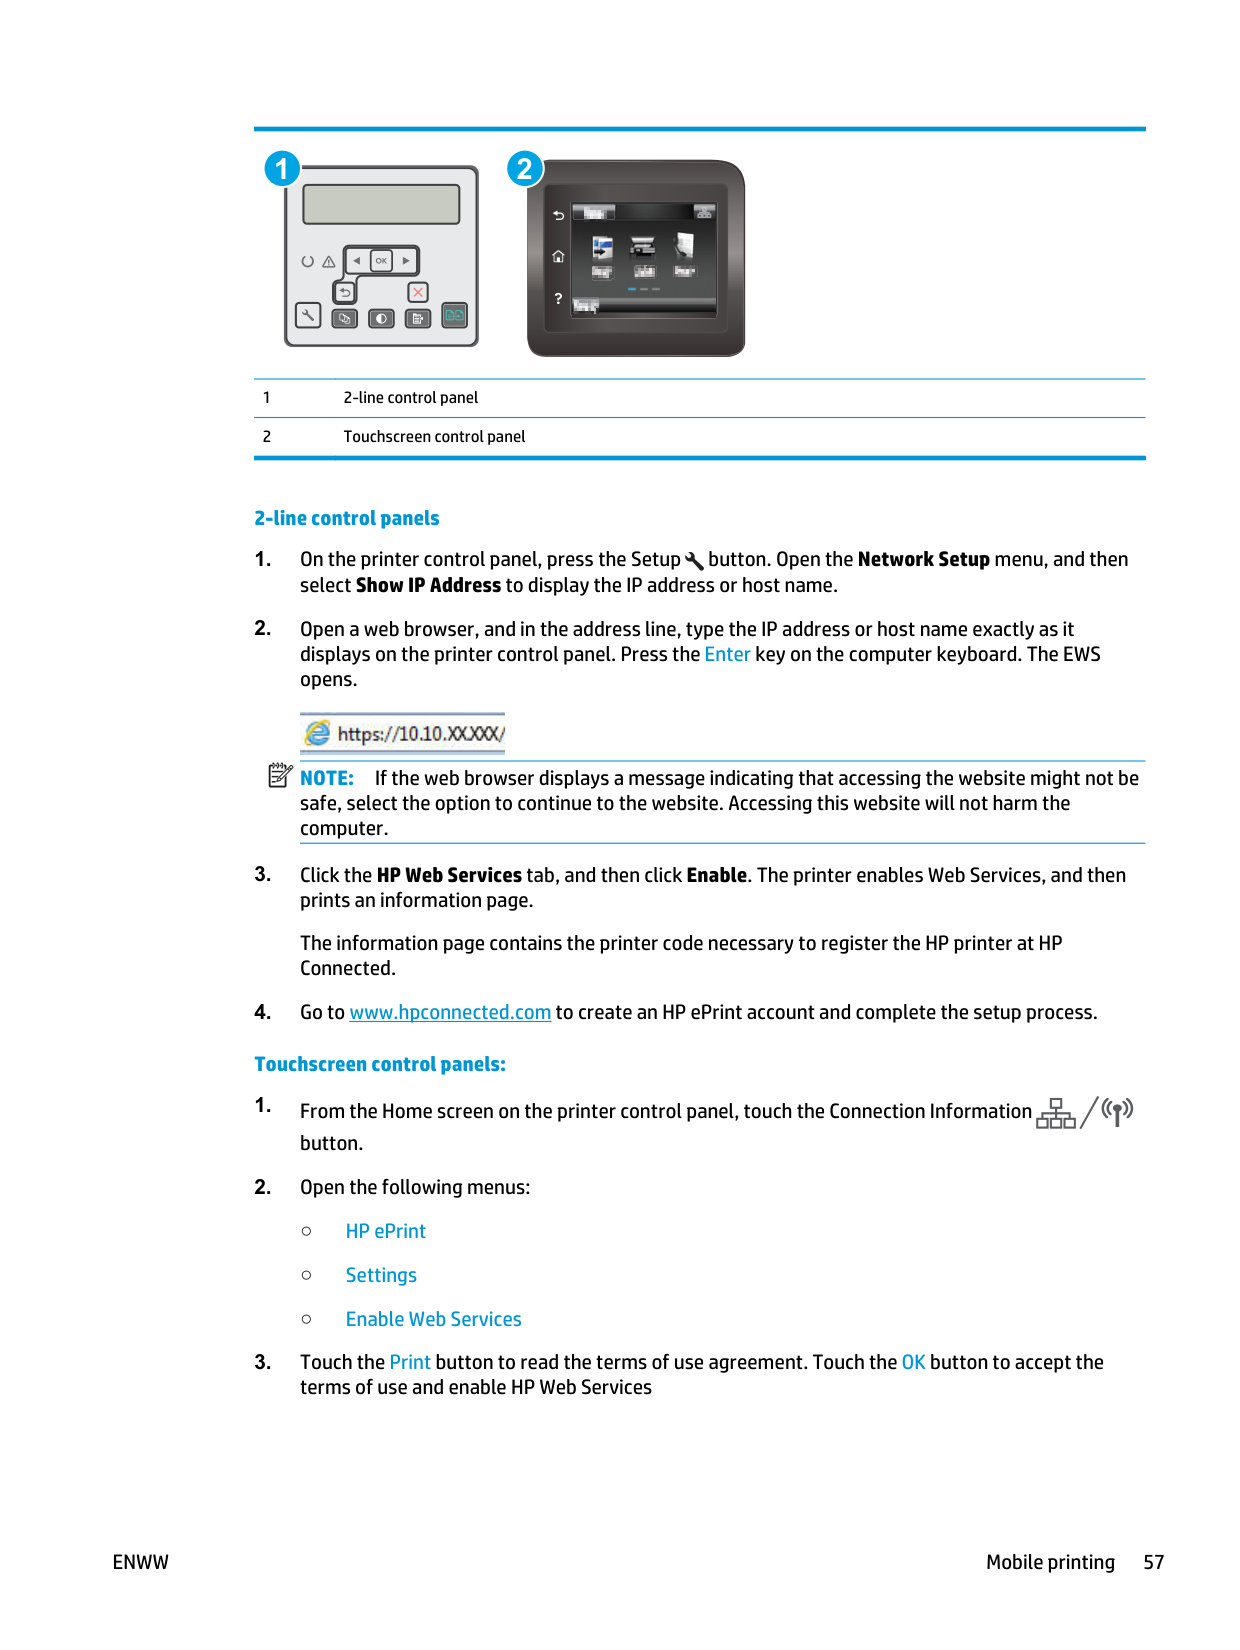
1 2 1 2-line control panel 2 Touchscreen control panel 2-line control panels
Note:
If the web browser displays a message indicating that accessing the website might not be safe, select the option to continue to the website. Accessing this website will not harm the computer.Enww
Mobile printing 57
The printer enables Web Services, and then prints an information page. The information page contains the printer code that necessary to register the HP printer at HP Connected.
Note:
For Windows, the name of the HP ePrint Software print driver is HP ePrint + JetAdvantage.Note:
The HP ePrint software is a PDF workflow utility for OS X, and is not technically a print driver.Note:
HP ePrint Software does not support USB printing. AirPrint Direct printing using Apple’s AirPrint is supported for iOS and from Mac computers running OS X 10.7 Lion and newer. Use AirPrint to print directly to the printer from an iPad, iPhone (3GS or later), or iPod touch (third generation or later) in the following mobile applications: ● Mail ● Photos ● Safari ● iBooks ● Select third-party applications To use AirPrint, the printer must be connected to the same network (sub-net) as the Apple device. For more information about using AirPrint and about which HP printers are compatible with AirPrint, go to www.hp.com/go/LaserJetMobilePrinting.Note:
Before using AirPrint with a USB connection, verify the version number. AirPrint versions 1.3 and earlier do not support USB connections. 58 Chapter 4 PrintEnww

Android embedded printing HP's built-in print solution for Android and Kindle enables mobile devices to automatically find and print to HP printers that are either on a network or within wireless range for Wi-Fi Direct printing. The printer must be connected to the same network (sub-net) as the Android device. The print solution is built into the many versions of the operating system.
Note:
If printing is not available on your device, go to the Google Play > Android apps and install the HP Print Service Plugin. For more information on how to use Android embedded printing and which Android devices are supported, go to www.hp.com/go/LaserJetMobilePrinting.Enww
Mobile printing 59
Use walk-up USB printing (touchscreen models only) Introduction This printer features walk-up USB printing, for quickly printing files without sending them from a computer. The printer accepts standard USB flash drives in the USB port. It supports the following types of files: ● .pdf ● .jpg ● .prn and .PRN ● .cht and .CHT ● .pxl ● .pcl and .PCL ● .ps and .PS Step one: Access USB files on the printer
Enww

Option two: Print photos
Enww
Use walk-up USB printing (touchscreen models only) 61
62 Chapter 4 Print
Enww
5 Copy ● Make a copy ● Copy on both sides (duplex) ● Additional copy tasks For more information: The following information is correct at the time of publication. For current information, see www.hp.com/ support/ljM227MFP. HP's all-inclusive help for the printer includes the following information: ● Install and configure ● Learn and use ● Solve problems ● Download software and firmware updates ● Join support forums ● Find warranty and regulatory information
Enww
63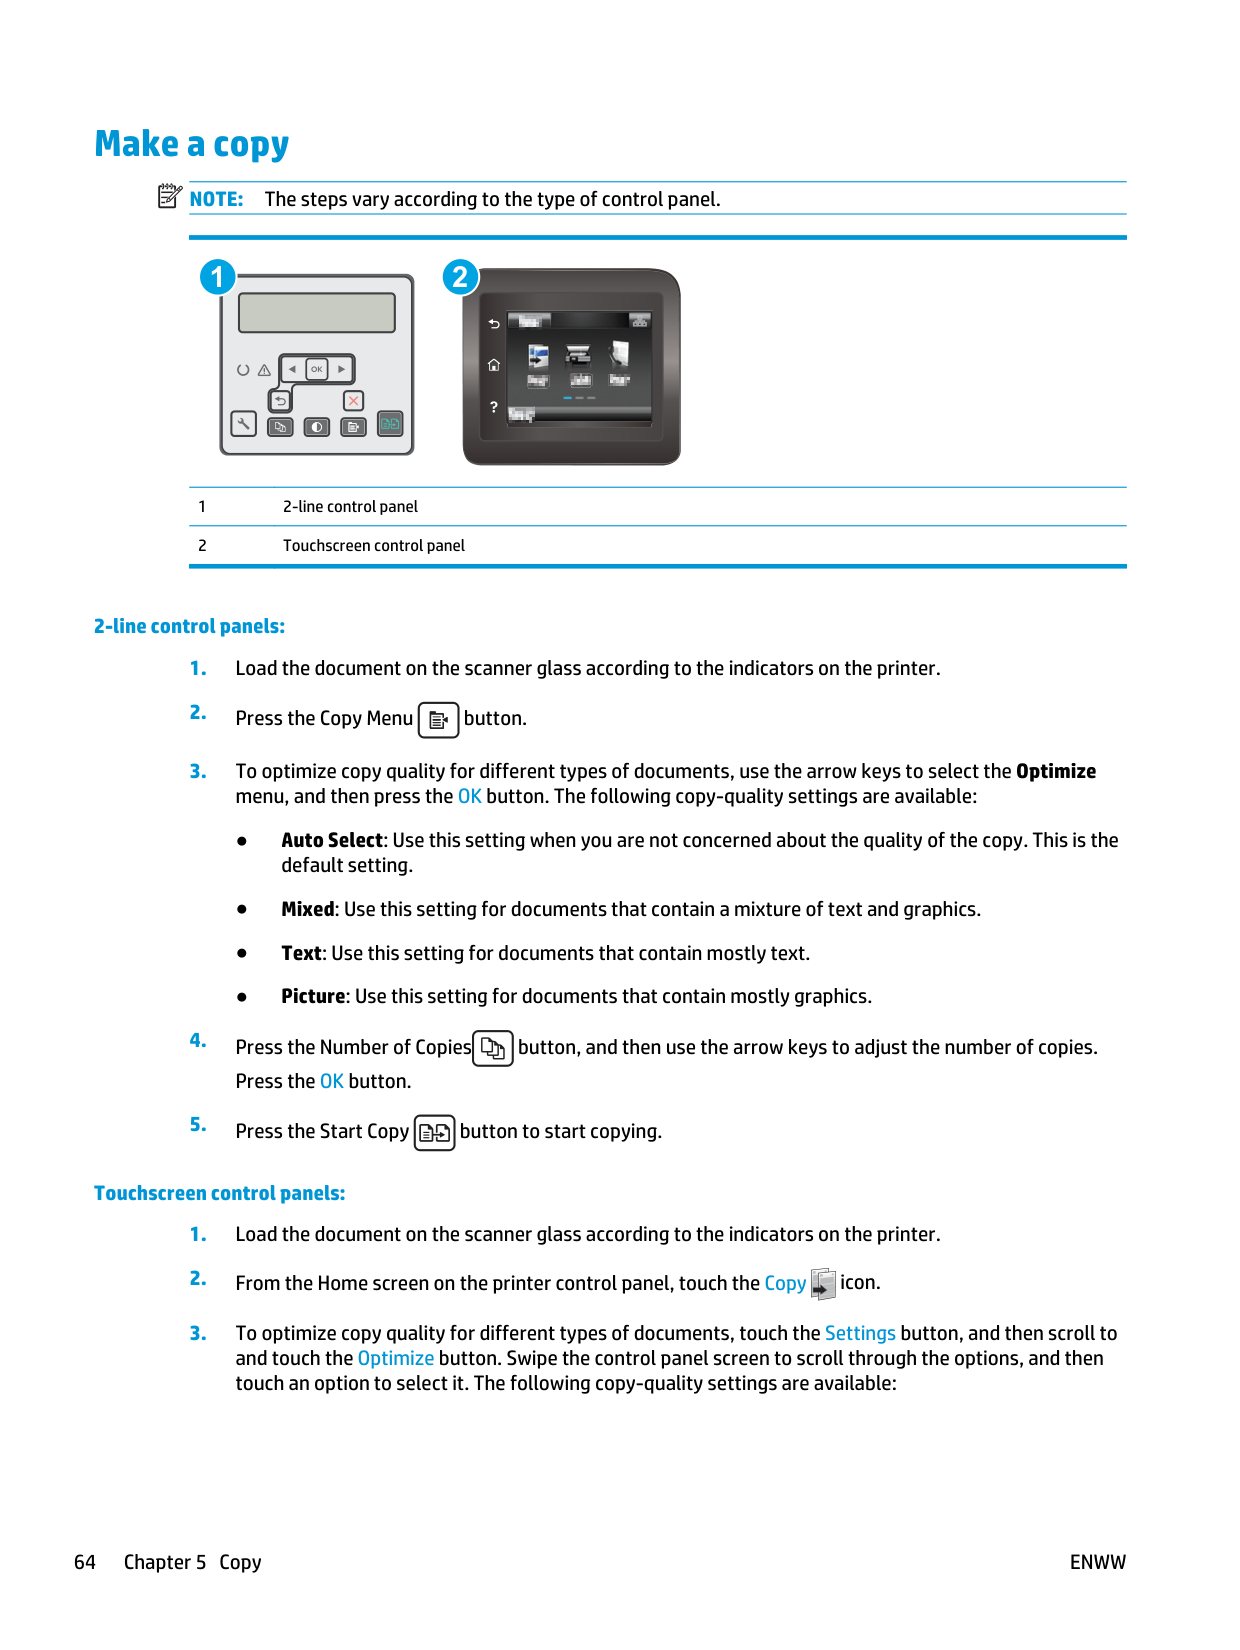
Make a copy
Note:
The steps vary according to the type of control panel. 1 2 1 2-line control panel 2 Touchscreen control panel 2-line control panels:Enww

● Auto Select: Use this setting when you are not concerned about the quality of the copy. This is the default setting. ● Mixed: Use this setting for documents that contain a mixture of text and graphics. ● Text: Use this setting for documents that contain mostly text. ● Picture: Use this setting for documents that contain mostly graphics.
Enww
Make a copy 65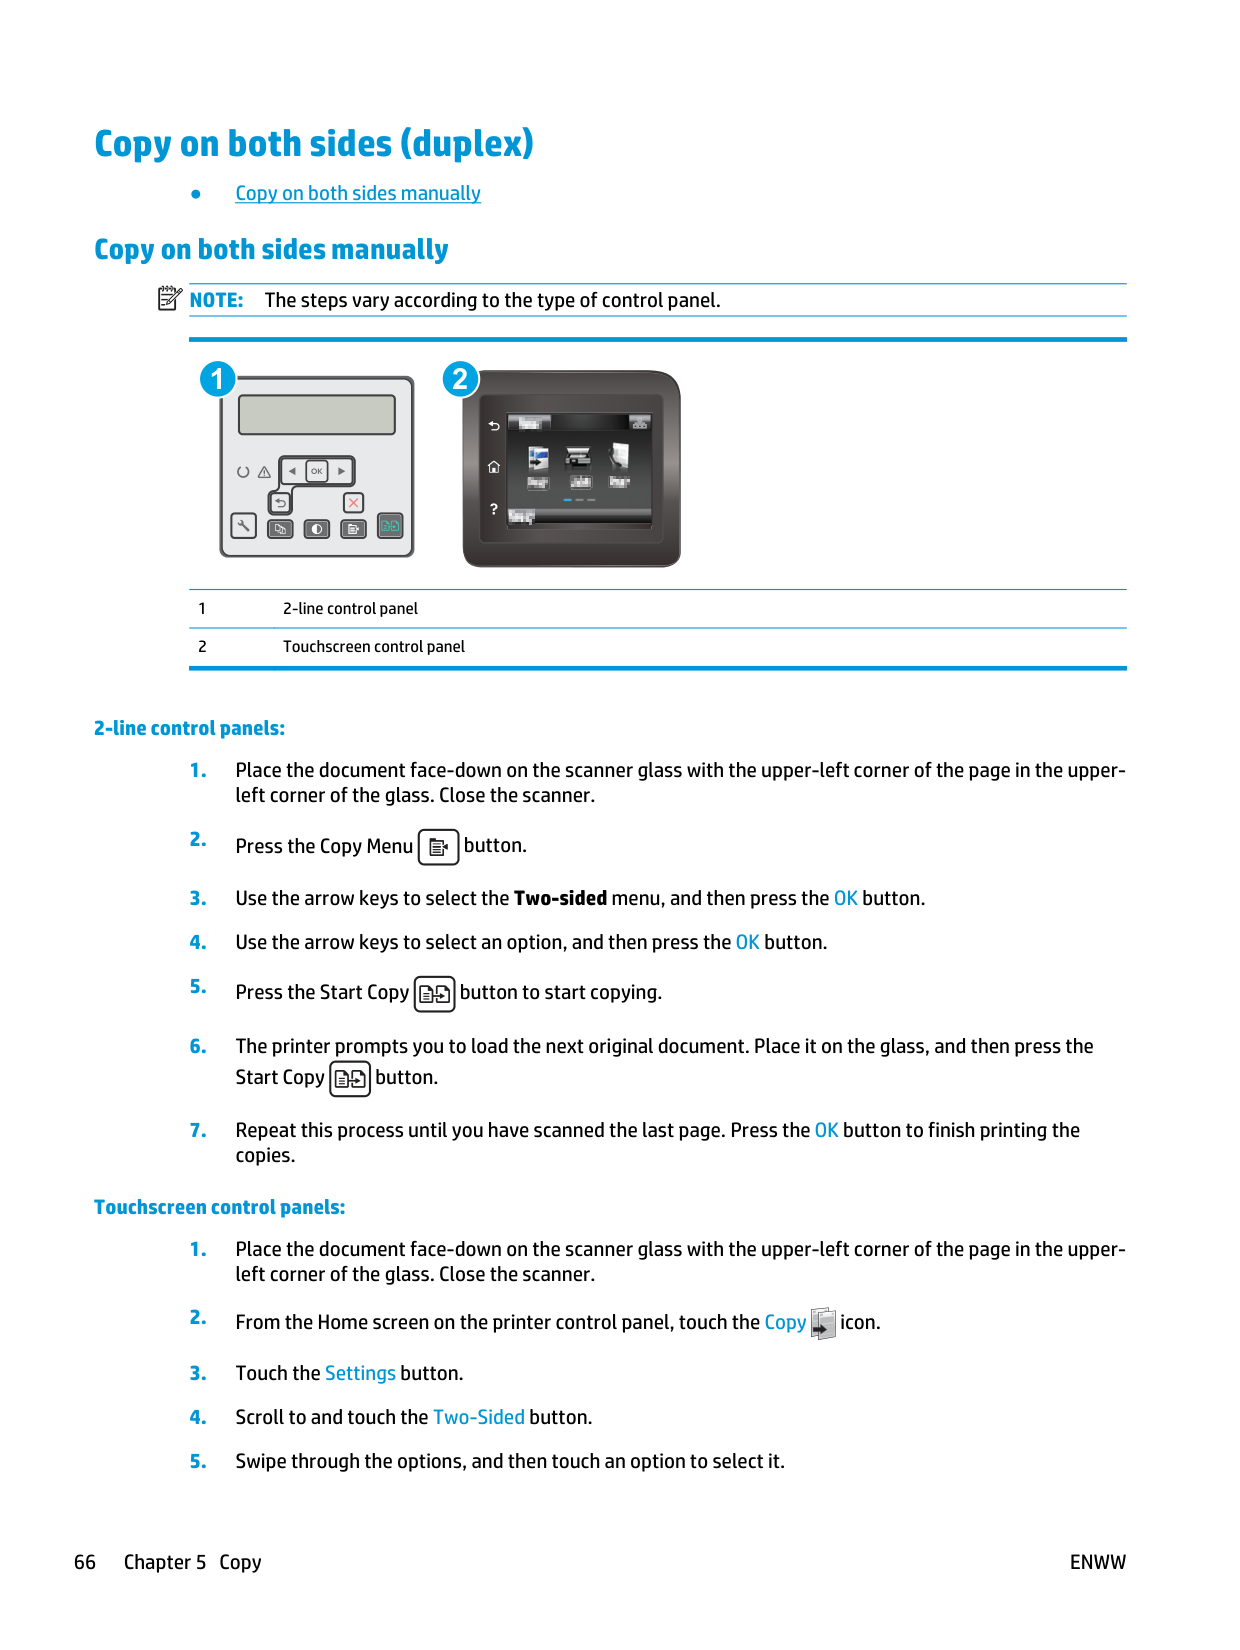
Copy on both sides (duplex) ● Copy on both sides manually Copy on both sides manually
Note:
The steps vary according to the type of control panel. 1 2 1 2-line control panel 2 Touchscreen control panel 2-line control panels:Enww

Enww
Copy on both sides (duplex) 67
Additional copy tasks Go to www.hp.com/support/ljM227MFP. Instructions are available for performing specific copy tasks, such as the following: ● Copy or scan pages from books or other bound documents ● Copy mixed-size documents ● Copy or scan both sides of an identification card ● Copy or scan a document into a booklet format 68 Chapter 5 Copy
Enww
6 Scan ● Scan by using the HP Scan software (Windows) ● Scan by using the HP Easy Scan software (OS X) ● Set up the Scan to E-mail feature (touchscreen models only) ● Set up the Scan to Network Folder feature (touchscreen models only) ● Scan to a USB flash drive (touchscreen models only) ● Scan to email (touchscreen models only) ● Scan to a network folder (touchscreen models only) ● Additional scan tasks For more information: The following information is correct at the time of publication. For current information, see www.hp.com/ support/ljM227MFP. HP's all-inclusive help for the printer includes the following information: ● Install and configure ● Learn and use ● Solve problems ● Download software and firmware updates ● Join support forums ● Find warranty and regulatory information
Enww
69
Scan by using the HP Scan software (Windows) Use the HP Scan software to initiate scanning from software on your computer. You can save the scanned image as a file or send it to another software application.
Enww

Scan by using the HP Easy Scan software (OS X) Use the HP Easy Scan software to initiate scanning from software on your computer.
Enww
Scan by using the HP Easy Scan software (OS X) 71
Set up the Scan to E-mail feature (touchscreen models only) ● Introduction ● Before you begin ● Method one: Use the Scan to Email Wizard (Windows) ● Method two: Set up the Scan to Email feature via the HP Embedded Web Server (Windows) ● Set up the Scan to E-mail feature on a Mac Introduction The printer has a feature that enables it to scan a document and send it to one or more email addresses. To use this scan feature, the printer must be connected to a network; however, the feature is not available until it has been configured. There are two methods for configuring Scan to Email, the Scan to Email Setup Wizard (Windows), which is installed in the HP program group for the printer as part of the full software installation in Windows 7, and the Scan to Email Setup through the HP Embedded Web Server (EWS). Use the following information to set up the Scan to Email feature. Before you begin To set up the Scan to Email feature, the printer must have an active network connection to the same network as the computer that will run the setup process. Administrators need the following information before beginning the configuration process. ● Administrative access to the printer ● SMTP server (e.g., smtp.mycompany.com)
Note:
If you do not know the SMTP server name, SMTP port number, or authentication information, contact the email/Internet service provider or system administrator for the information. SMTP server names and port names are typically easy to find by doing an Internet search. For example, use terms like "gmail smtp server name" or "yahoo smtp server name" to search. ● SMTP port number ● SMTP server authentication requirements for outgoing email messages, including the user name and password used for authentication, if applicable.Note:
Consult your email service provider's documentation for information on digital sending limits for your email account. Some providers may temporarily lock your account if you exceed your sending limit. Method one: Use the Scan to Email Wizard (Windows) Some HP printers include driver installation from a software CD. At the end of this installation is an option to Setup Scan to Folder and Email. The setup wizards include the options for basic configuration.Note:
Some operating systems do not support the Scan to Email Wizard.Enww
● Windows 8.1: Click the down arrow in lower left corner of the Start screen, and then select the printer name. ● Windows 8: Right-click an empty area on the Start screen, click All Apps on the app bar, and then select the printer name. ● Windows 7, Windows Vista, and Windows XP: From the computer desktop, click Start, select All Programs, click HP, click the folder for the printer, select the icon with the printer's name, and then open HP Printer Assistant.
Note:
If the Scan to E-mail Wizard option is not available, use Method two: Set up the Scan to Email feature via the HP Embedded Web Server (Windows) on page 74Note:
HP recommends creating a PIN to secure the email profile.Note:
When a PIN is created, it must be entered on the printer control panel each time the profile is used to send a scan to email.Note:
In most cases, the default port number does not need to be changed.Note:
If you are using a hosted SMTP service such as Gmail, verify the SMTP address, port number, and SSL settings from the service provider’s website or other sources. Typically, for Gmail, the SMTP address is smtp.gmail.com, port number 465, and the SSL should be enabled. Please refer to online sources to confirm these server settings are current and valid at the time of configuration.Note:
HP recommends using the default file size of Automatic for the maximum size.Enww
Set up the Scan to E-mail feature (touchscreen models only) 73
Note:
If the web browser displays a message indicating that accessing the website might not be safe, select the option to continue to the website. Accessing this website will not harm the computer. Step two: Configure the Scan to E-mail featureEnww
a. In the SMTP Server field, enter the address of the SMTP server. b. In the SMTP Port field, enter the SMTP port number.
Note:
In most cases, the default port number does not need to be changed.Note:
If you are using a hosted SMTP service such as Gmail, verify the SMTP address, port number, and SSL settings from the service provider’s website or other sources. Typically, for Gmail, the SMTP address is smtp.gmail.com, port number 465, and the SSL should be enabled. Please refer to online sources to confirm these server settings are current and valid at the time of configuration. c. If you are using Google™ Gmail for email service, select the Always use secure connection (SSL/ TLS) check box.Note:
HP recommends creating a PIN to secure the email profile.Note:
When a PIN is created, it must be entered on the printer control panel each time the profile is used to send a scan to email.Note:
HP recommends using the default file size of Automatic for the maximum size. b. To automatically copy the sender on email messages sent from the profile, select the Auto CC check box.Enww
Set up the Scan to E-mail feature (touchscreen models only) 75
Step three: Add contacts to the E-mail Address Book ▲ In the left navigation pane, click E-mail Address Book to add email addresses to the address book accessible from the printer. To enter an individual email address complete the following task: a. In the Contact Name field, enter the name of the new email contact. b. In the Contact E-mail Address, enter the email address of the new email contact. c. Click Add/Edit. To create an email group, complete the following task: a. Click New Group. b. In the Enter the group name field, enter a name for the new group. c. Click a name in the All Individuals area, and then click the arrow button to move it to the Individuals in Group area.
Note:
Select multiple names at one time by pressing Ctrl and then clicking a name. d. Click Save. Step four: Configure the default E-mail Options ▲ In the left navigation pane, click E-mail options to configure the default email options. a. In the Default Subject and Body Text area, complete the following fields: i. In the E-mail Subject field, enter a default subject line for the email messages. ii. In the Body Text field, enter a custom default message for the email messages. iii. Select Show body text to enable the default body text to display in emails. iv. Select Hide body text to suppress the default body text for an email. b. In the Scan Settings area, complete the following fields: i. From the Scan File Type drop-down, select the default file format for scanned files. ii. From the Scan Paper Size drop-down, select the default paper size for scanned files. iii. From the Scan Resolution drop-down, select the default resolution for scanned files.Note:
Higher resolution images have more dots per inch (dpi), so they show more detail. Lower resolution images have fewer dots per inch and show less detail, but the file size is smaller. iv. From the Output Color drop-down, select Black & White or Color. v. In the File Name Prefix field, enter a file name prefix (e.g., MyScan). c. Click Apply. 76 Chapter 6 ScanEnww
Set up the Scan to E-mail feature on a Mac ● Step one: Access the HP Embedded Web Server (EWS) ● Step two: Configure the Scan to E-mail feature ● Step three: Add contacts to the E-mail Address Book ● Step four: Configure the default E-mail Options Step one: Access the HP Embedded Web Server (EWS) Use one of the following methods to open the Embedded Web Server (EWS) interface. Method one: Use a web browser to open the HP Embedded Web Server (EWS)
Note:
If the web browser displays a message indicating that accessing the website might not be safe, select the option to continue to the website. Accessing this website will not harm the computer. Method two: Use the HP Utility to open the HP Embedded Web Server (EWS)Enww
Set up the Scan to E-mail feature (touchscreen models only) 77
a. In the Your E-mail Address field, enter the sender’s email address for the new outgoing email profile. b. In the Display Name field, enter the sender’s name. This is the name that will display on the printer control panel.
Note:
In most cases, the default port number does not need to be changed.Note:
If you are using a hosted SMTP service such as gmail, verify the SMTP address, port number, and SSL settings from the service provider’s website or other sources. Typically, for gmail, the SMTP address is smtp.gmail.com, port number 465, and the SSL should be enabled. Please refer to online sources to confirm these server settings are current and valid at the time of configuration. c. If you are using Google™ Gmail for email service, select the Always use secure connection (SSL/ TLS) check box.Note:
HP recommends creating a PIN to secure the email profile.Note:
When a PIN is created, it must be entered on the printer control panel each time the profile is used to send a scan to email.Note:
HP recommends using the default file size of Automatic for the maximum size. b. To automatically copy the sender on email messages sent from the profile, select the Auto CC check box.Enww
● Save and Test: Select this option to save the information and test the connection. ● Save Only: Select this option to save the information without testing the connection. ● Cancel: Select this option to quit the configuration without saving. Step three: Add contacts to the E-mail Address Book ▲ In the left navigation pane, click E-mail Address Book to add email addresses to the address book accessible from the printer. To enter an individual email address complete the following task: a. In the Contact Name field, enter the name of the new email contact. b. In the Contact E-mail Address, enter the email address of the new email contact. c. Click Add/Edit. To create an email group, complete the following task: a. Click New Group. b. In the Enter the group name field, enter a name for the new group. c. Click a name in the All Individuals area, and then click the arrow button to move it to the Individuals in Group area.
Note:
Select multiple names at one time by pressing Ctrl and then clicking a name. d. Click Save. Step four: Configure the default E-mail Options ▲ In the left navigation pane, click E-mail options to configure the default email options. a. In the Default Subject and Body Text area, complete the following fields: i. In the E-mail Subject field, enter a default subject line for the email messages. ii. In the Body Text field, enter a custom default message for the email messages. iii. Select Show body text to enable the default body text to display in emails. iv. Select Hide body text to suppress the default body text for an email. b. In the Scan Settings area, complete the following fields: i. From the Scan File Type drop-down, select the default file format for scanned files. ii. From the Scan Paper Size drop-down, select the default paper size for scanned files. iii. From the Scan Resolution drop-down, select the default resolution for scanned files.Note:
Higher resolution images have more dots per inch (dpi), so they show more detail. Lower resolution images have fewer dots per inch and show less detail, but the file size is smaller.Enww
Set up the Scan to E-mail feature (touchscreen models only) 79
iv. From the Output Color drop-down, select Black & White or Color. v. In the File Name Prefix field, enter a file name prefix (e.g., MyScan). c. Click Apply. 80 Chapter 6 Scan
Enww
Set up the Scan to Network Folder feature (touchscreen models only) ● Introduction ● Before you begin ● Method one: Use the Scan to Network Folder Wizard (Windows) ● Method two: Set up the Scan to Network Folder feature via the HP Embedded Web Server (Windows) ● Set up the Scan to Network Folder feature on a Mac Introduction The printer has a feature that enables it to scan a document and save it to a network folder. To use this scan feature, the printer must be connected to a network; however, the feature is not available until it has been configured. There are two methods for configuring Scan to network folder, the Scan to Network Folder Wizard (Windows), which is installed in the HP program group for the printer as part of the full software installation in Windows 7, and the Network Folder Setup through the HP Embedded Web Server (EWS). Use the following information to set up the Scan to Network Folder feature. Before you begin To set up the Scan to Network Folder feature, the printer must have an active network connection to the same network as the computer that will run the setup process. Administrators need the following information before beginning the configuration process. ● Administrative access to the printer ● The network path of the destination folder (e.g., \\servername.us.companyname.net\scans)
Note:
The network folder must be set up as a shared folder for the Scan to Network Folder feature to work. Method one: Use the Scan to Network Folder Wizard (Windows) Some HP printers include driver installation from a software CD. At the end of this installation is an option to Setup Scan to Folder and Email. The setup wizards include the options for basic configuration.Note:
Some operating systems do not support the Scan to Network Folder Wizard.Enww
Set up the Scan to Network Folder feature (touchscreen models only) 81
● Windows 8.1: Click the down arrow in lower left corner of the Start screen, and then select the printer name. ● Windows 8: Right-click an empty area on the Start screen, click All Apps on the app bar, and then select the printer name. ● Windows 7, Windows Vista, and Windows XP: From the computer desktop, click Start, select All Programs, click HP, click the folder for the printer, select the icon with the printer's name, and then open HP Printer Assistant.
Note:
If the Scan to Network Folder Wizard option is not available, use Method two: Set up the Scan to Network Folder feature via the HP Embedded Web Server (Windows) on page 83Note:
For security considerations, HP recommends selecting Private as the share type. vii. When a The share was successfully created message displays, click OK. viii. Select the check box for the destination folder, and then click OK.Enww
Note:
HP recommends creating a PIN to secure the destination folder.Note:
When a PIN is created, it must be entered on the printer control panel each time a scan is sent to the network folder.Note:
Higher resolution images have more dots per inch (dpi), so they show more detail. Lower resolution images have fewer dots per inch and show less detail, but the file size is smaller. e. In the Filename Prefix field, enter a file name prefix (e.g., MyScan).Note:
If the web browser displays a message indicating that accessing the website might not be safe, select the option to continue to the website. Accessing this website will not harm the computer.Enww
Set up the Scan to Network Folder feature (touchscreen models only) 83
Step two: Configure the Scan to Network Folder feature
Note:
HP recommends creating a PIN to secure the destination folder.Note:
When a PIN is created, it must be entered on the printer control panel each time a scan is sent to the network folder.Note:
Higher resolution images have more dots per inch (dpi), so they show more detail. Lower resolution images have fewer dots per inch and show less detail, but the file size is smaller. d. In the Output Color drop-down, select whether scanned files will be in black and white or in color. e. In the File Name Prefix field, enter a file name prefix (e.g., MyScan).Enww
Set up the Scan to Network Folder feature on a Mac ● Step one: Access the HP Embedded Web Server (EWS) ● Step two: Configure the Scan to Network Folder feature Step one: Access the HP Embedded Web Server (EWS) Use one of the following methods to open the Embedded Web Server (EWS) interface. Method one: Use a web browser to open the HP Embedded Web Server (EWS)
Note:
If the web browser displays a message indicating that accessing the website might not be safe, select the option to continue to the website. Accessing this website will not harm the computer. Method two: Use the HP Utility to open the HP Embedded Web Server (EWS)Note:
If you do not have a shared network folder available, click Help Me Do This to view information about creating the folder. The HP Embedded Web Server (EWS) opens. Step two: Configure the Scan to Network Folder featureEnww
Set up the Scan to Network Folder feature (touchscreen models only) 85
a. In the Display Name field, enter the name to display for the folder. b. In the Network Path field, enter the network path to the folder. c. In the Username field, enter the user name needed to access the folder on the network. d. In the Password field, enter the password needed to access the folder on the network.
Note:
HP recommends creating a PIN to secure the destination folder.Note:
When a PIN is created, it must be entered on the printer control panel each time a scan is sent to the network folder.Note:
Higher resolution images have more dots per inch (dpi), so they show more detail. Lower resolution images have fewer dots per inch and show less detail, but the file size is smaller. d. In the Output Color drop-down, select whether scanned files will be in black and white or in color. e. In the File Name Prefix field, enter a file name prefix (e.g., MyScan).Enww
Scan to a USB flash drive (touchscreen models only)
Enww
Scan to a USB flash drive (touchscreen models only) 87
Scan to email (touchscreen models only) Use the printer control panel to scan a file directly to an email address. The scanned file is sent to the address as an email message attachment.
Note:
In order to use this feature, the printer must be connected to a network and the Scan to Email feature must be configured by using the Scan to Email Setup Wizard (Windows) or the HP Embedded Web Server.Note:
If the printer is configured with only one outgoing email profile, then this option will not be available.Note:
If the PIN feature has been set up, enter the PIN and touch the OK button. However, a PIN is not required to use this feature.Enww
Scan to a network folder (touchscreen models only) Use the printer control panel to scan a document and save it to a folder on the network.
Note:
In order to use this feature, the printer must be connected to a network and the Scan to Network Folder feature must be configured by using the Scan to Network Folder Setup Wizard (Windows) or the HP Embedded Web Server.Enww
Scan to a network folder (touchscreen models only) 89
Additional scan tasks Go to www.hp.com/support/ljM227MFP. Instructions are available for performing specific scan tasks, such as the following: ● How to scan a general photo or document ● How to scan as editable text (OCR) ● How to scan multiple pages into a single file 90 Chapter 6 Scan
Enww
7 Fax ● Set up to send and receive faxes ● Send a fax ● Additional fax tasks For more information: The following information is correct at the time of publication. For current information, see www.hp.com/ support/ljM227MFP. HP's all-inclusive help for the printer includes the following information: ● Install and configure ● Learn and use ● Solve problems ● Download software and firmware updates ● Join support forums ● Find warranty and regulatory information
Enww
91
Set up to send and receive faxes ● Before starting ● Step 1: Identify the phone connection type ● Step 2: Set up the fax ● Step 3: Configure the fax time, date, and header ● Step 4: Run a fax test Before starting Make sure that the printer was fully set up before connecting the fax service.
Note:
Use the telephone cable and any adapters that shipped with the printer to connect the printer to the telephone jack.Note:
In countries/regions that use serial telephone systems, an adapter is shipped with the printer. Use the adapter to connect other telecom devices to the same telephone jack the printer is connected to. Complete the instructions in each of the following four steps: Step 1: Identify the phone connection type on page 92. Step 2: Set up the fax on page 93. Step 3: Configure the fax time, date, and header on page 96. Step 4: Run a fax test on page 98. Step 1: Identify the phone connection type Review the following equipment and service types to determine which setup method to use. The method used depends on the equipment and services already installed on the phone system.Note:
The printer is an analog device. HP recommends using the printer on a dedicated analog telephone line. ● Dedicated phone line: The printer is the only piece of equipment or service connected to the phone line ● Voice calls: Voice and fax calls use the same phone line ● Answering machine: An answering machine answers voice calls on the same phone line used for fax calls ● Voice mail: A voice-mail subscription service uses the same phone line as the fax ● Distinctive ring service: A service from the telephone company that allows several phone numbers to be associated with one phone line, and each number has a different ring pattern; the printer detects the ring pattern assigned to it and answers the call ● Computer dial-up modem: A computer uses the phone line to connect to the Internet through a dial-up connection ● DSL line: A digital subscriber line (DSL) service from the telephone company; this service might be called ADSL in some countries/regions 92 Chapter 7 FaxEnww
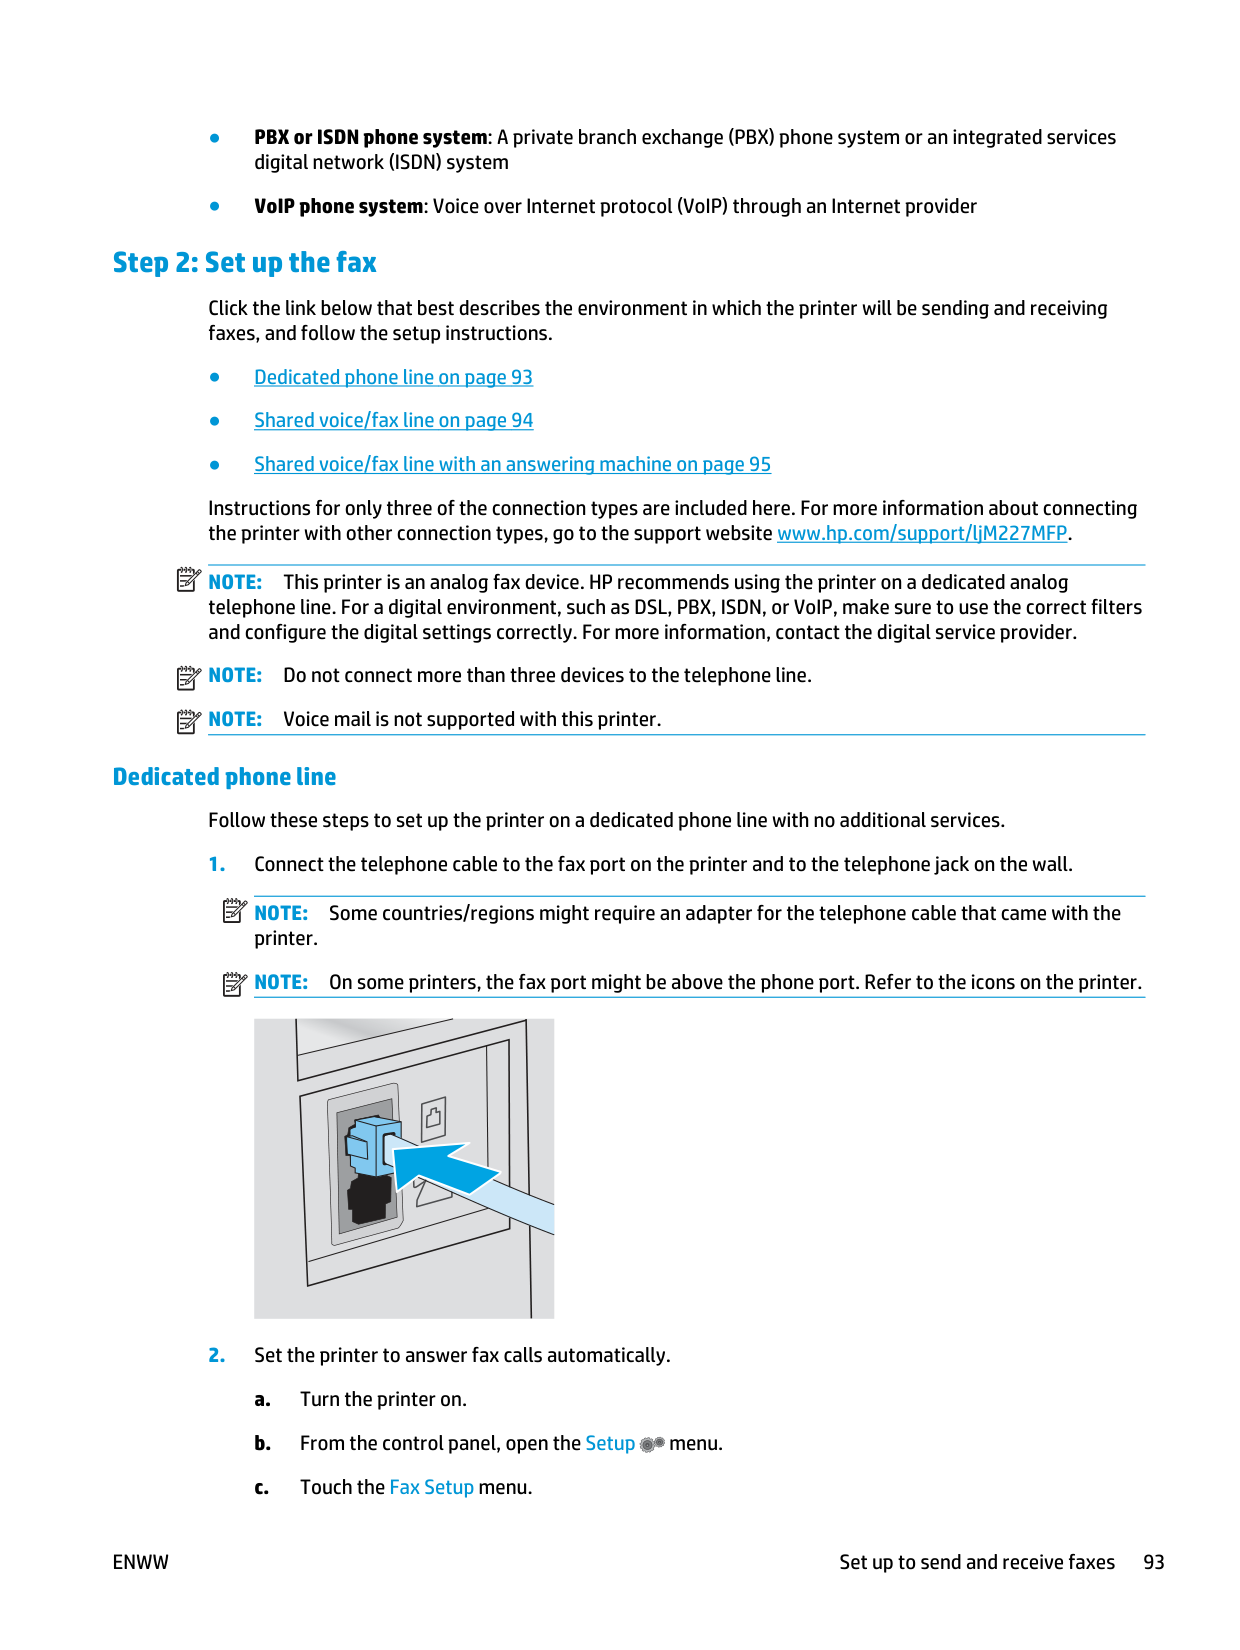
● PBX or ISDN phone system: A private branch exchange (PBX) phone system or an integrated services digital network (ISDN) system ● VoIP phone system: Voice over Internet protocol (VoIP) through an Internet provider Step 2: Set up the fax Click the link below that best describes the environment in which the printer will be sending and receiving faxes, and follow the setup instructions. ● Dedicated phone line on page 93 ● Shared voice/fax line on page 94 ● Shared voice/fax line with an answering machine on page 95 Instructions for only three of the connection types are included here. For more information about connecting the printer with other connection types, go to the support website www.hp.com/support/ljM227MFP.
Note:
This printer is an analog fax device. HP recommends using the printer on a dedicated analog telephone line. For a digital environment, such as DSL, PBX, ISDN, or VoIP, make sure to use the correct filters and configure the digital settings correctly. For more information, contact the digital service provider.Note:
Do not connect more than three devices to the telephone line.Note:
Voice mail is not supported with this printer. Dedicated phone line Follow these steps to set up the printer on a dedicated phone line with no additional services.Note:
Some countries/regions might require an adapter for the telephone cable that came with the printer.Note:
On some printers, the fax port might be above the phone port. Refer to the icons on the printer.Enww
Set up to send and receive faxes 93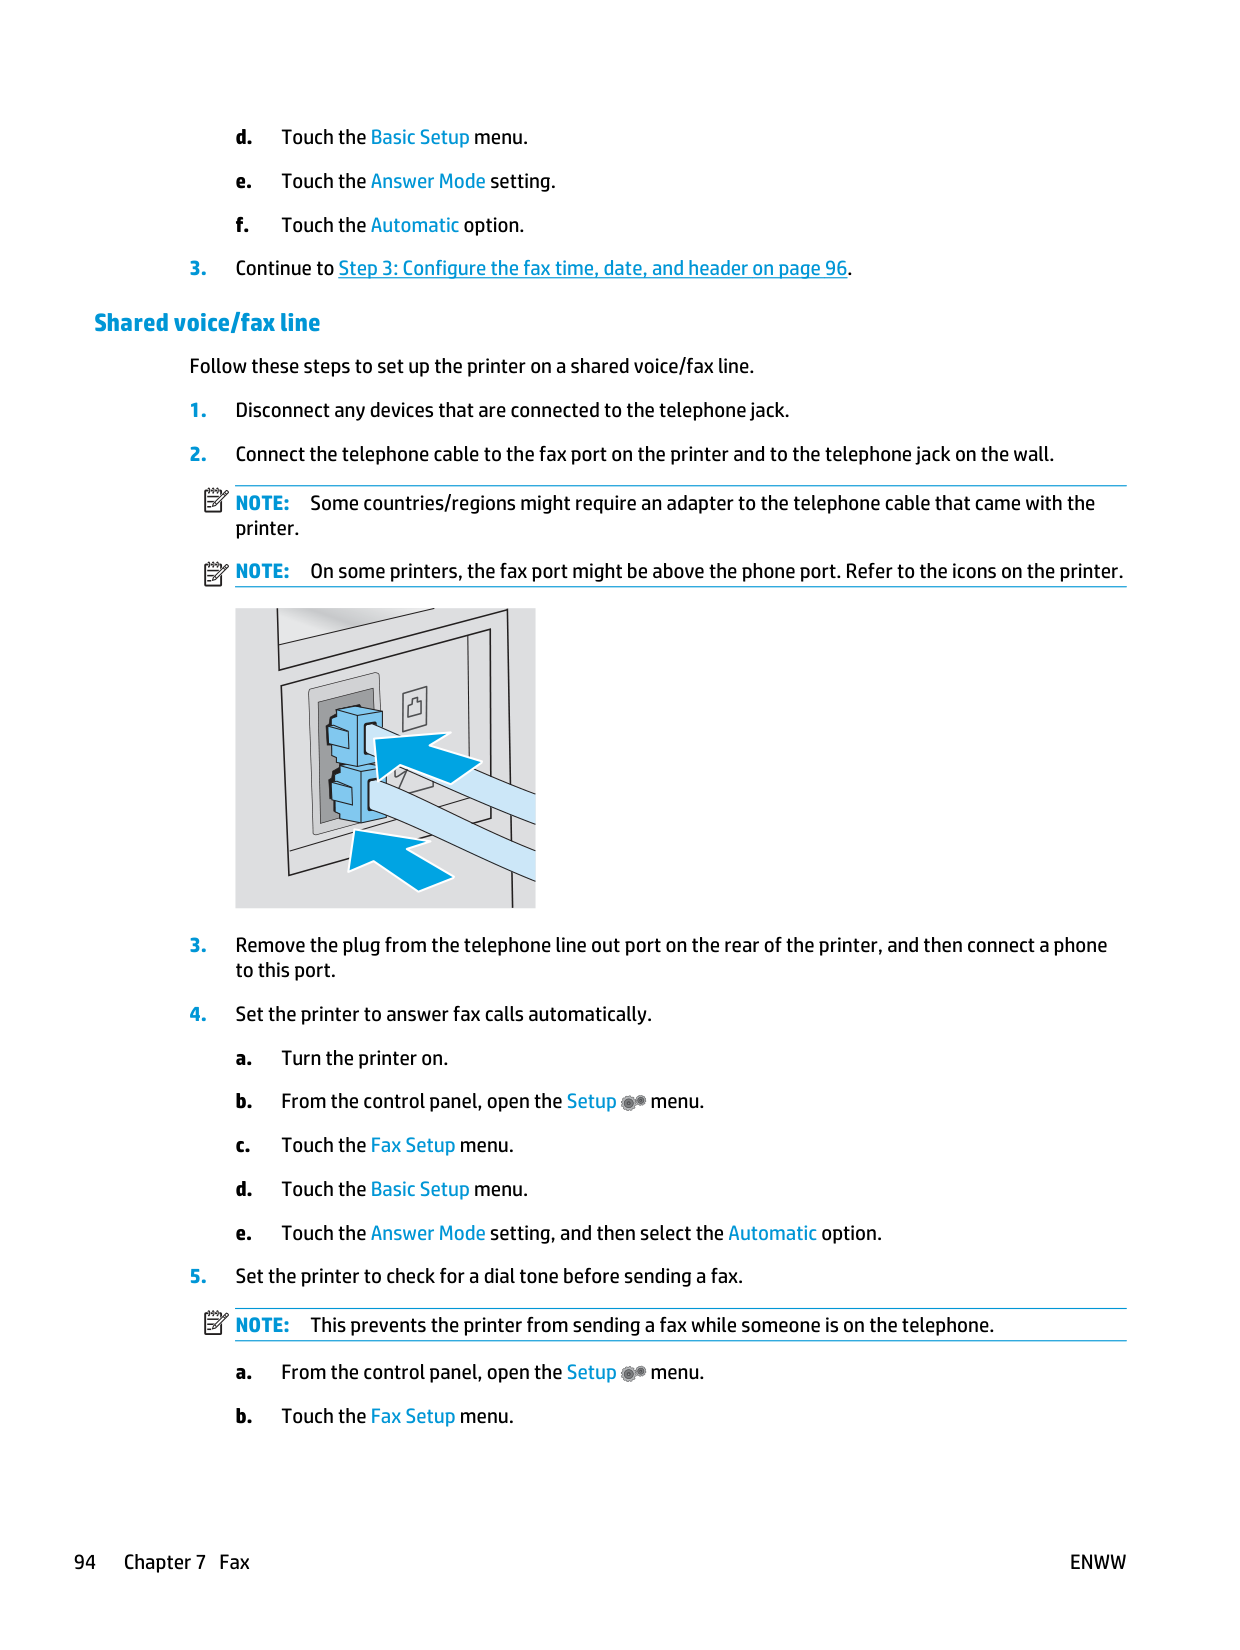
d. Touch the Basic Setup menu. e. Touch the Answer Mode setting. f. Touch the Automatic option.
Note:
Some countries/regions might require an adapter to the telephone cable that came with the printer.Note:
On some printers, the fax port might be above the phone port. Refer to the icons on the printer.Note:
This prevents the printer from sending a fax while someone is on the telephone. a. From the control panel, open the Setup menu. b. Touch the Fax Setup menu. 94 Chapter 7 FaxEnww
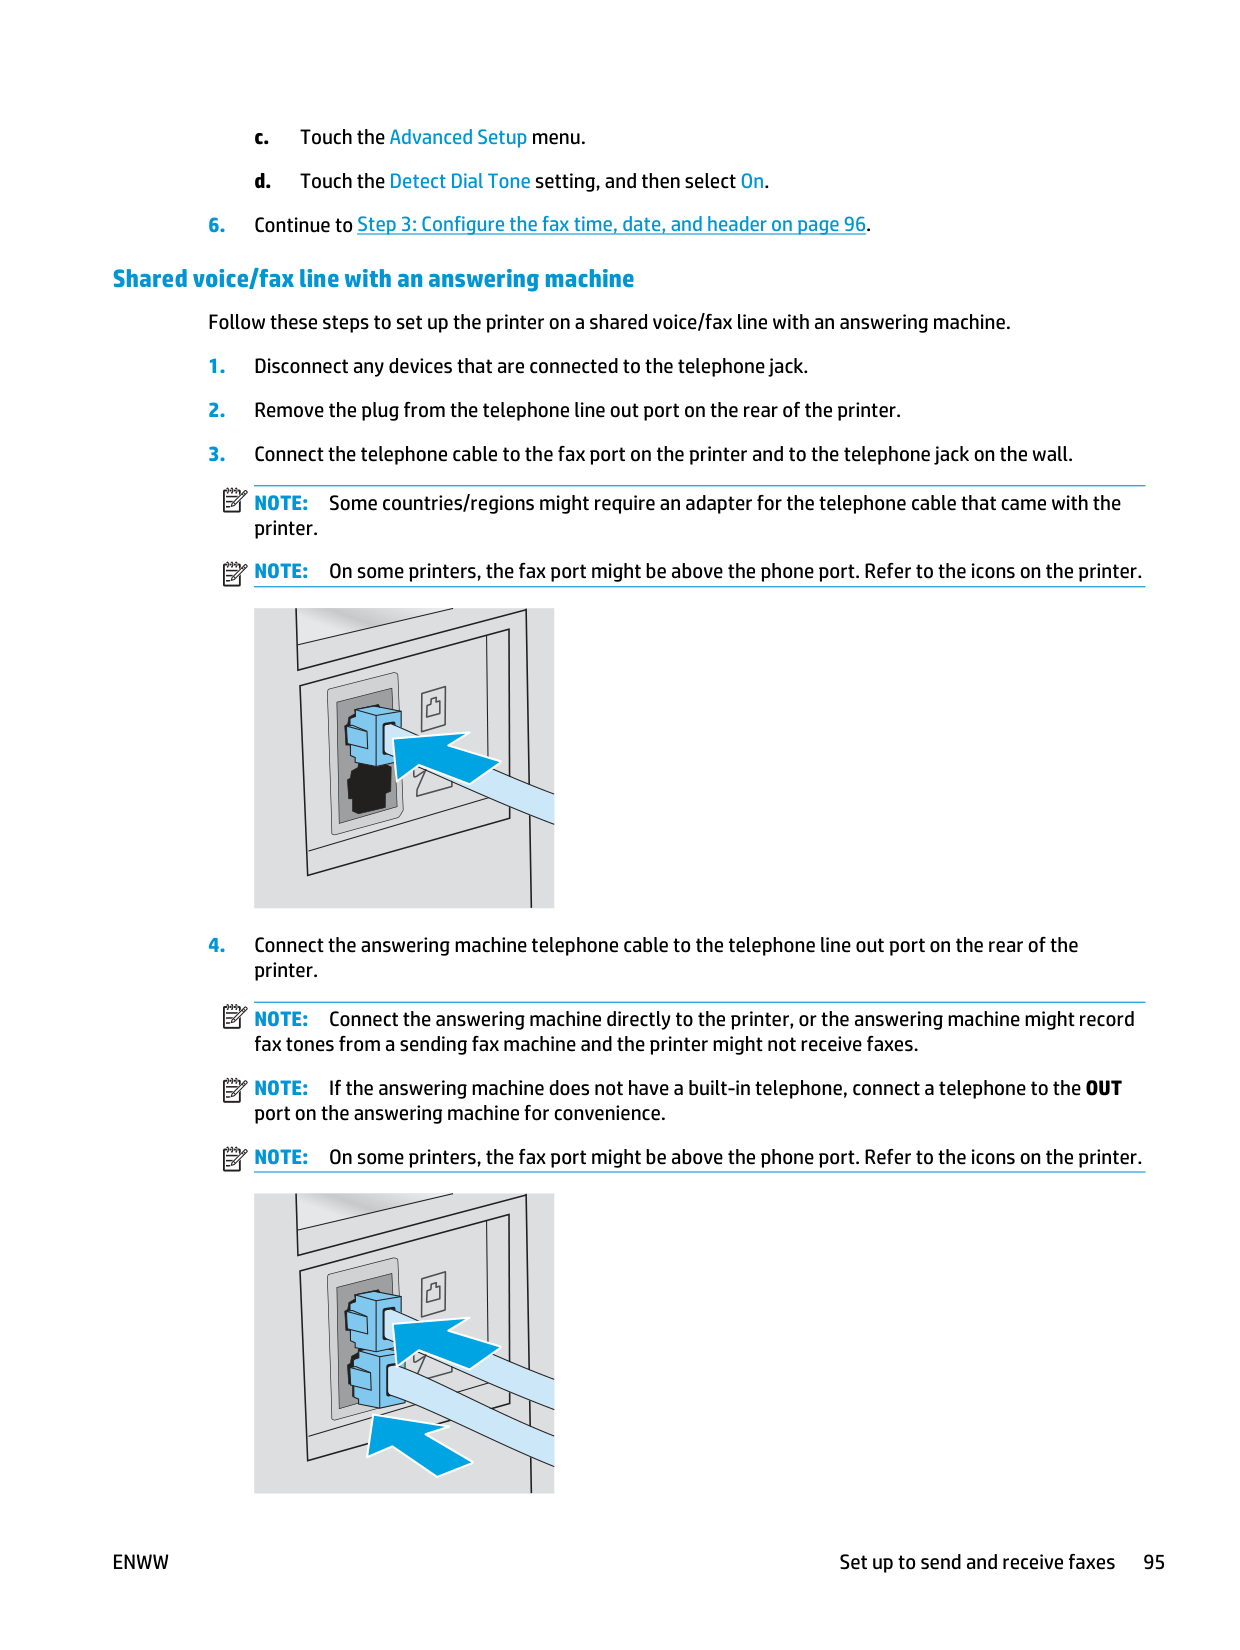
c. Touch the Advanced Setup menu. d. Touch the Detect Dial Tone setting, and then select On.
Note:
Some countries/regions might require an adapter for the telephone cable that came with the printer.Note:
On some printers, the fax port might be above the phone port. Refer to the icons on the printer.Note:
Connect the answering machine directly to the printer, or the answering machine might record fax tones from a sending fax machine and the printer might not receive faxes.Note:
If the answering machine does not have a built-in telephone, connect a telephone to the OUT port on the answering machine for convenience.Note:
On some printers, the fax port might be above the phone port. Refer to the icons on the printer.Enww
Set up to send and receive faxes 95
Note:
This prevents the printer from sending a fax while someone is on the telephone. a. From the control panel, open the Setup menu. b. Touch the Fax Setup menu. c. Touch the Advanced Setup menu. d. Touch the Detect Dial Tone setting, and then select the On button.Note:
In the United States and many other countries/regions, setting the time, date, and other fax header information is a legal requirement. HP Fax Setup Wizard Access the Fax Setup Wizard after initial setup and software installation by following these steps.Note:
The Fax Setup Wizard is only available in the Windows 7 operating system.Enww
● Windows 8.1: Click the down arrow in lower left corner of the Start screen, and then select the printer name. ● Windows 8: Right-click an empty area on the Start screen, click All Apps on the app bar, and then select the printer name. ● Windows 7, Windows Vista, and Windows XP: From the computer desktop, click Start, select All Programs, click HP, click the folder for the printer, select the icon with the printer's name, and then open HP Printer Assistant.
Note:
Touch the 123 button to open a keypad that contains special characters, if needed.Note:
The maximum number of characters for the fax number is 20.Note:
The maximum number of characters for the fax header is 25.Enww
Set up to send and receive faxes 97
● Windows 8.1: Click the down arrow in lower left corner of the Start screen, and then select the printer name. ● Windows 8: Right-click an empty area on the Start screen, click All Apps on the app bar, and then select the printer name. ● Windows 7, Windows Vista, and Windows XP: From the computer desktop, click Start, select All Programs, click HP, click the folder for the printer, select the icon with the printer's name, and then open HP Printer Assistant. b. In the HP Printer Assistant, select Print, and then select HP Device Toolbox. Web browser a. From the control panel, touch the Connection Information button, and then touch the Network Connected button or the Network Wi-Fi ON button to display the IP address or host name. b. Open a web browser, and in the address line, type the IP address or host name exactly as it displays on the printer control panel. Press the Enter key on the computer keyboard. The EWS opens.
Note:
If the web browser displays a message indicating that accessing the website might not be safe, select the option to continue to the website. Accessing this website will not harm the computer.Enww
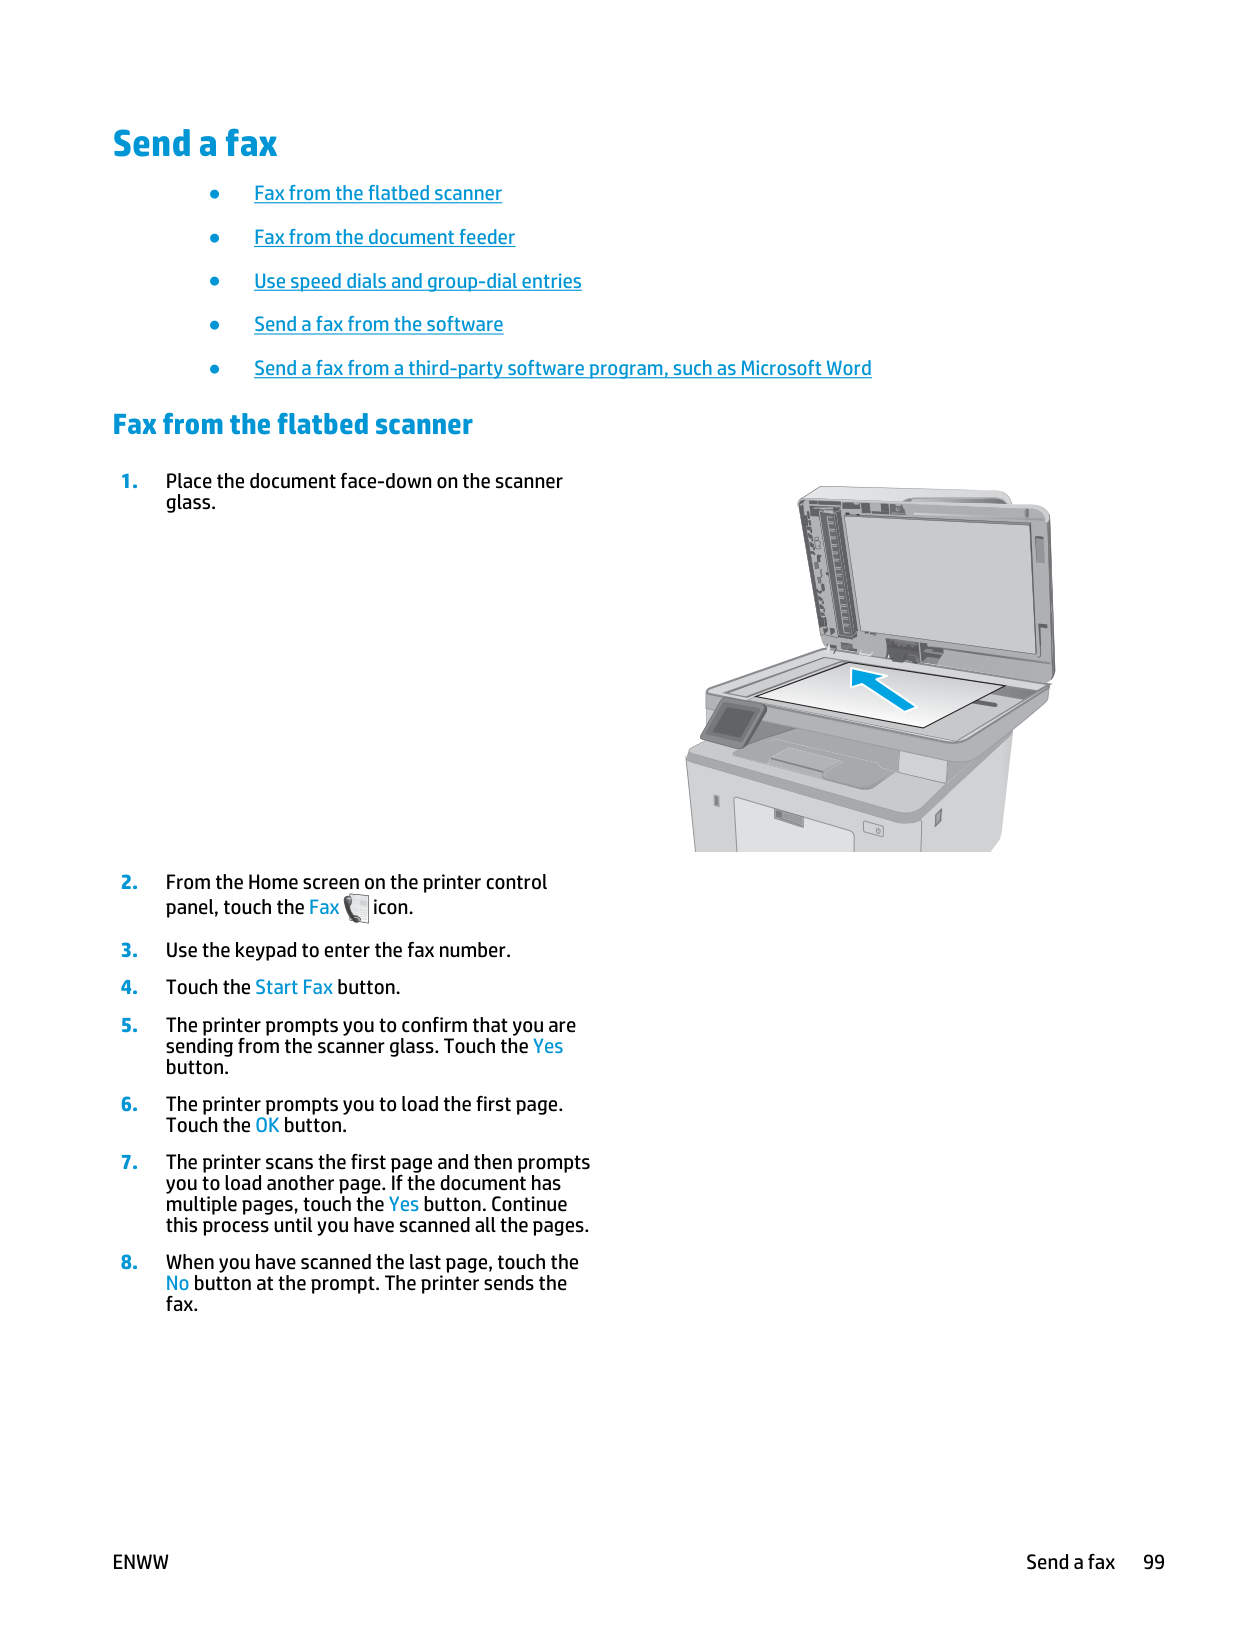
Send a fax ● Fax from the flatbed scanner ● Fax from the document feeder ● Use speed dials and group-dial entries ● Send a fax from the software ● Send a fax from a third-party software program, such as Microsoft Word Fax from the flatbed scanner
Hewlett-Packard
Enww
Send a fax 99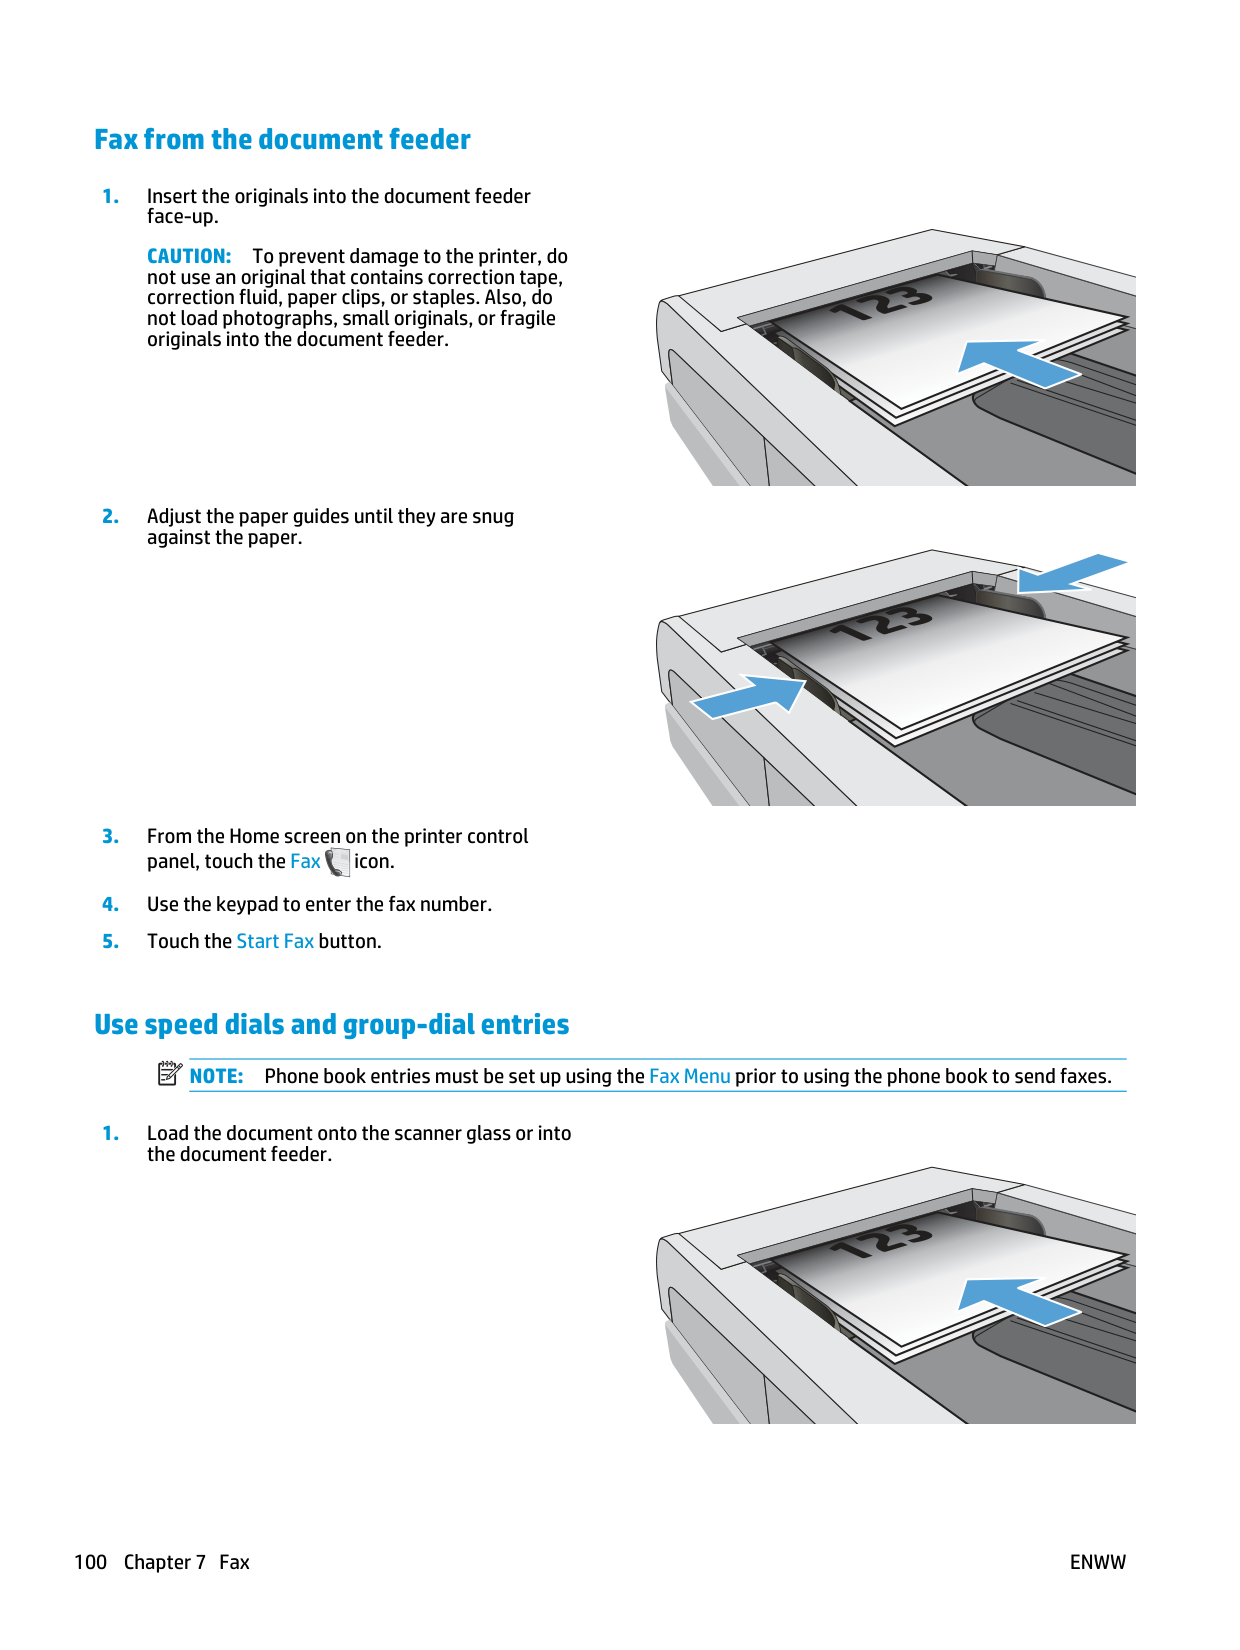
Fax from the document feeder
Caution:
To prevent damage to the printer, do not use an original that contains correction tape, correction fluid, paper clips, or staples. Also, do not load photographs, small originals, or fragile originals into the document feeder.123
123
Use speed dials and group-dial entries
Note:
Phone book entries must be set up using the Fax Menu prior to using the phone book to send faxes.123 100 Chapter 7 Fax
Enww
Send a fax from the software The procedure to send a fax varies according to your specifications. The most typical steps follow.
Enww
Send a fax 101
Additional fax tasks Go to www.hp.com/support/ljM227MFP. Instructions are available for performing specific fax tasks, such as the following: ● Create and manage fax speed dial lists ● Configure fax billing codes ● Use a fax printing schedule ● Block incoming faxes ● Fax archiving and forwarding 102 Chapter 7 Fax
Enww
8 Manage the printer ● Use HP Web Services applications (touchscreen models only) ● Change the printer connection type (Windows) ● Advanced configuration with HP Embedded Web Server (EWS) and HP Device Toolbox (Windows) ● Advanced configuration with HP Utility for OS X ● Configure IP network settings ● Printer security features ● Configure the Quiet Print Mode settings ● Energy-conservation settings ● Update the firmware For more information: The following information is correct at the time of publication. For current information, see www.hp.com/ support/ljM227MFP. HP's all-inclusive help for the printer includes the following information: ● Install and configure ● Learn and use ● Solve problems ● Download software and firmware updates ● Join support forums ● Find warranty and regulatory information
Enww
103
Use HP Web Services applications (touchscreen models only) to the printer. Choose from a variety of applications including news, calendars, forms, and cloud-based document storage. To activate these applications and schedule the downloads, go to the HP Connected website at www.hpconnected.com
Note:
To use this feature, the printer must be connected to a wired or wireless network and have internet access. HP Web Services must be enabled on the printer. Enable Web Services This process enables both HP Web Services and the Apps 2 button.Enww
Change the printer connection type (Windows) If you are already using the printer and you wish to change the way it is connected, use Device Setup & Software to change the connection. For example, connect the new printer to the computer using a USB or network connection, or change the connection from a USB to a wireless connection. To open Device Setup & Software, complete the following procedure:
Enww
Change the printer connection type (Windows) 105
Advanced configuration with HP Embedded Web Server (EWS) and HP Device Toolbox (Windows) Use the HP Embedded Web Server to manage printing functions from a computer instead of the printer control panel. ● View printer status information ● Determine the remaining life for all supplies and order new ones ● View and change tray configurations ● View and change the printer control-panel menu configuration ● View and print internal pages ● Receive notification of printer and supplies events ● View and change network configuration The HP Embedded Web Server works when the printer is connected to an IP-based network. The HP Embedded Web Server does not support IPX-based printer connections. Internet access is not needed to open and use the HP Embedded Web Server. When the printer is connected to the network, the HP Embedded Web Server is automatically available.
Note:
HP Device Toolbox is software used to connect to the HP Embedded Web Server when the printer is connected to a computer via USB. It is available only if a full installation was performed when the printer was installed on a computer. Depending on how the printer is connected, some features might not be available.Note:
The HP Embedded Web Server is not accessible beyond the network firewall. Method one: Open the HP Embedded Web Server (EWS) from the softwareNote:
The steps vary according to the type of control panel. 106 Chapter 8 Manage the printerEnww
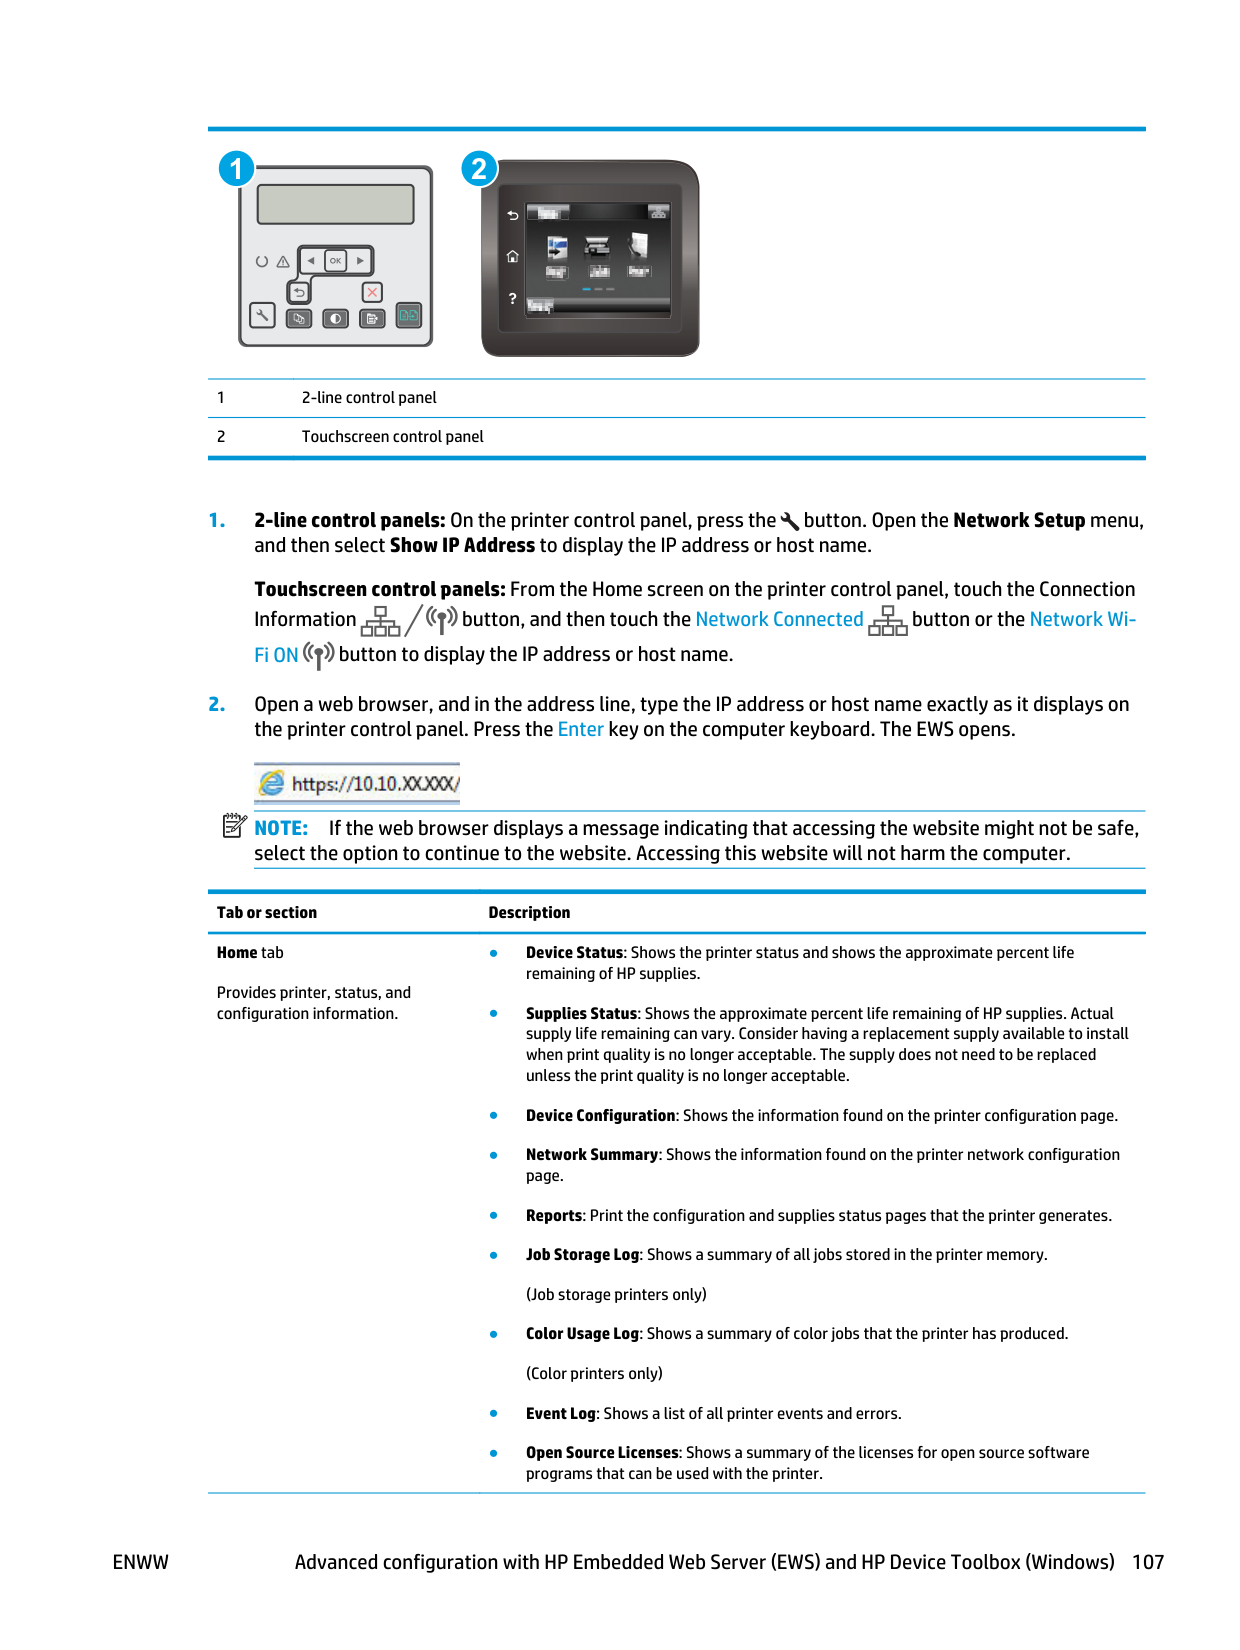
1 2 1 2-line control panel 2 Touchscreen control panel
Note:
If the web browser displays a message indicating that accessing the website might not be safe, select the option to continue to the website. Accessing this website will not harm the computer. Tab or section Description Home tab Provides printer, status, and configuration information. ● Device Status: Shows the printer status and shows the approximate percent life remaining of HP supplies. ● Supplies Status: Shows the approximate percent life remaining of HP supplies. Actual supply life remaining can vary. Consider having a replacement supply available to install when print quality is no longer acceptable. The supply does not need to be replaced unless the print quality is no longer acceptable. ● Device Configuration: Shows the information found on the printer configuration page. ● Network Summary: Shows the information found on the printer network configuration page. ● Reports: Print the configuration and supplies status pages that the printer generates. ● Job Storage Log: Shows a summary of all jobs stored in the printer memory. (Job storage printers only) ● Color Usage Log: Shows a summary of color jobs that the printer has produced. (Color printers only) ● Event Log: Shows a list of all printer events and errors. ● Open Source Licenses: Shows a summary of the licenses for open source software programs that can be used with the printer.Enww
Advanced configuration with HP Embedded Web Server (EWS) and HP Device Toolbox (Windows) 107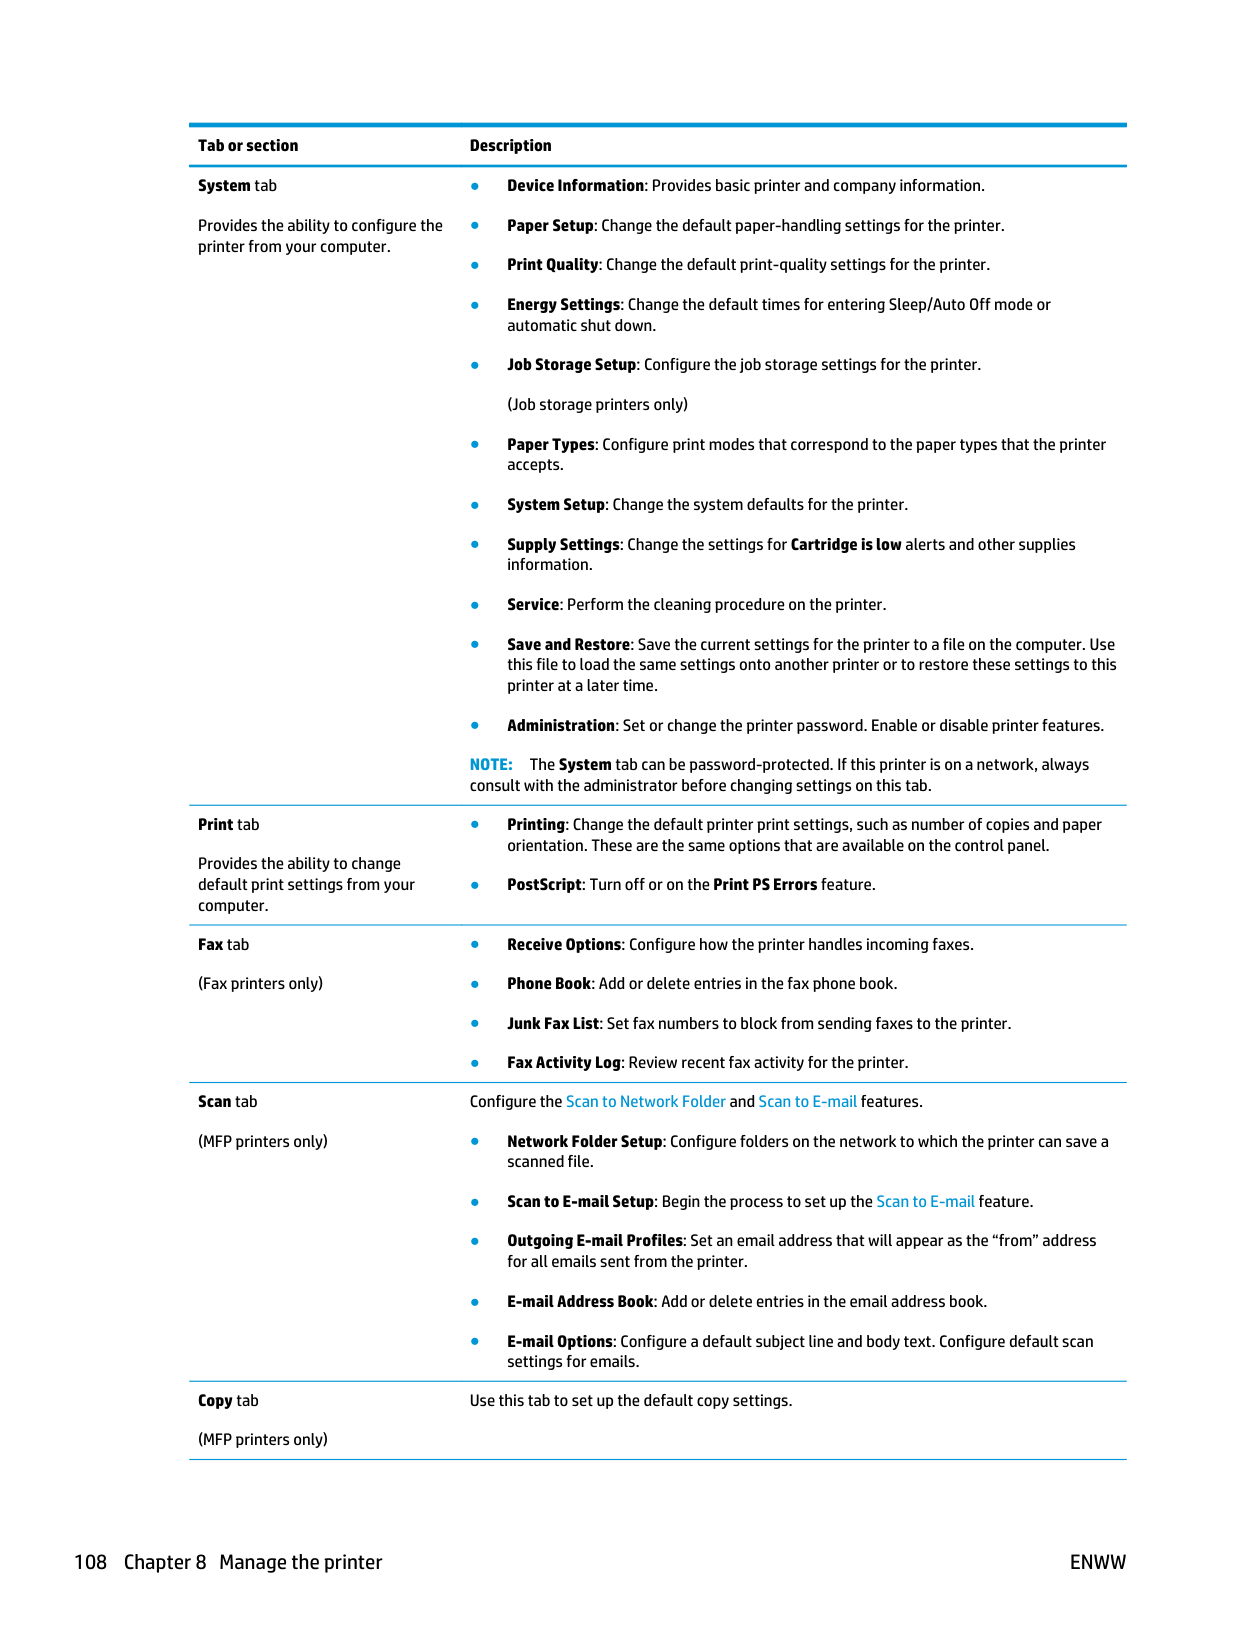
Tab or section Description System tab Provides the ability to configure the printer from your computer. ● Device Information: Provides basic printer and company information. ● Paper Setup: Change the default paper-handling settings for the printer. ● Print Quality: Change the default print-quality settings for the printer. ● Energy Settings: Change the default times for entering Sleep/Auto Off mode or automatic shut down. ● Job Storage Setup: Configure the job storage settings for the printer. (Job storage printers only) ● Paper Types: Configure print modes that correspond to the paper types that the printer accepts. ● System Setup: Change the system defaults for the printer. ● Supply Settings: Change the settings for Cartridge is low alerts and other supplies information. ● Service: Perform the cleaning procedure on the printer. ● Save and Restore: Save the current settings for the printer to a file on the computer. Use this file to load the same settings onto another printer or to restore these settings to this printer at a later time. ● Administration: Set or change the printer password. Enable or disable printer features.
Note:
The System tab can be password-protected. If this printer is on a network, always consult with the administrator before changing settings on this tab. Print tab Provides the ability to change default print settings from your computer. ● Printing: Change the default printer print settings, such as number of copies and paper orientation. These are the same options that are available on the control panel. ● PostScript: Turn off or on the Print PS Errors feature. Fax tab (Fax printers only) ● Receive Options: Configure how the printer handles incoming faxes. ● Phone Book: Add or delete entries in the fax phone book. ● Junk Fax List: Set fax numbers to block from sending faxes to the printer. ● Fax Activity Log: Review recent fax activity for the printer. Scan tab (MFP printers only) Configure the Scan to Network Folder and Scan to E-mail features. ● Network Folder Setup: Configure folders on the network to which the printer can save a scanned file. ● Scan to E-mail Setup: Begin the process to set up the Scan to E-mail feature. ● Outgoing E-mail Profiles: Set an email address that will appear as the “from” address for all emails sent from the printer. ● E-mail Address Book: Add or delete entries in the email address book. ● E-mail Options: Configure a default subject line and body text. Configure default scan settings for emails. Copy tab (MFP printers only) Use this tab to set up the default copy settings. 108 Chapter 8 Manage the printerEnww

Tab or section Description Networking tab (Network-connected printers only) Provides the ability to change network settings from your computer. Network administrators can use this tab to control network-related settings for the printer when it is connected to an IP-based network. It also allows the network administrator to set up Wi-Fi Direct functionality. This tab does not appear if the printer is directly connected to a computer. HP Web Services tab Use this tab to set up and use various Web tools with the printer.
Enww
Advanced configuration with HP Embedded Web Server (EWS) and HP Device Toolbox (Windows) 109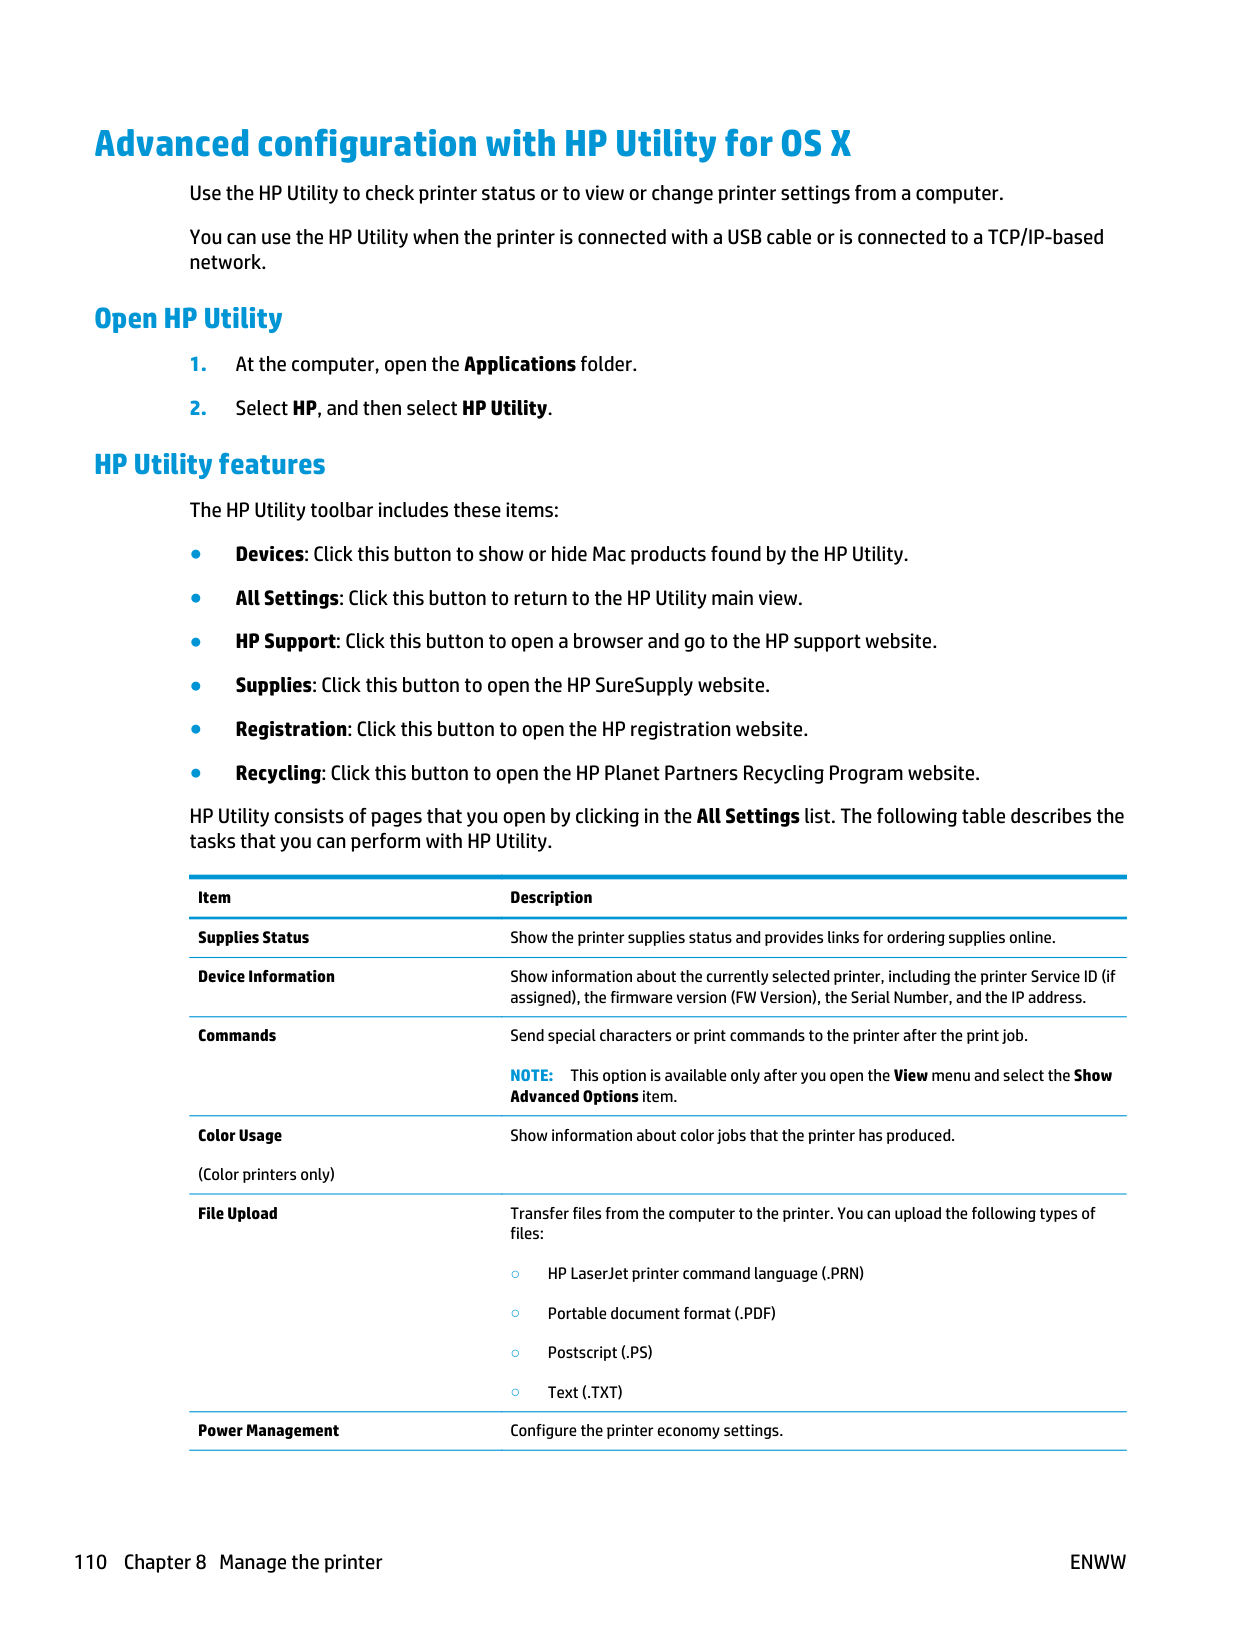
Advanced configuration with HP Utility for OS X Use the HP Utility to check printer status or to view or change printer settings from a computer. You can use the HP Utility when the printer is connected with a USB cable or is connected to a TCP/IP-based network. Open HP Utility
Note:
This option is available only after you open the View menu and select the Show Advanced Options item. Color Usage (Color printers only) Show information about color jobs that the printer has produced. File Upload Transfer files from the computer to the printer. You can upload the following types of files: ○ HP LaserJet printer command language (.PRN) ○ Portable document format (.PDF) ○ Postscript (.PS) ○ Text (.TXT) Power Management Configure the printer economy settings. 110 Chapter 8 Manage the printerEnww
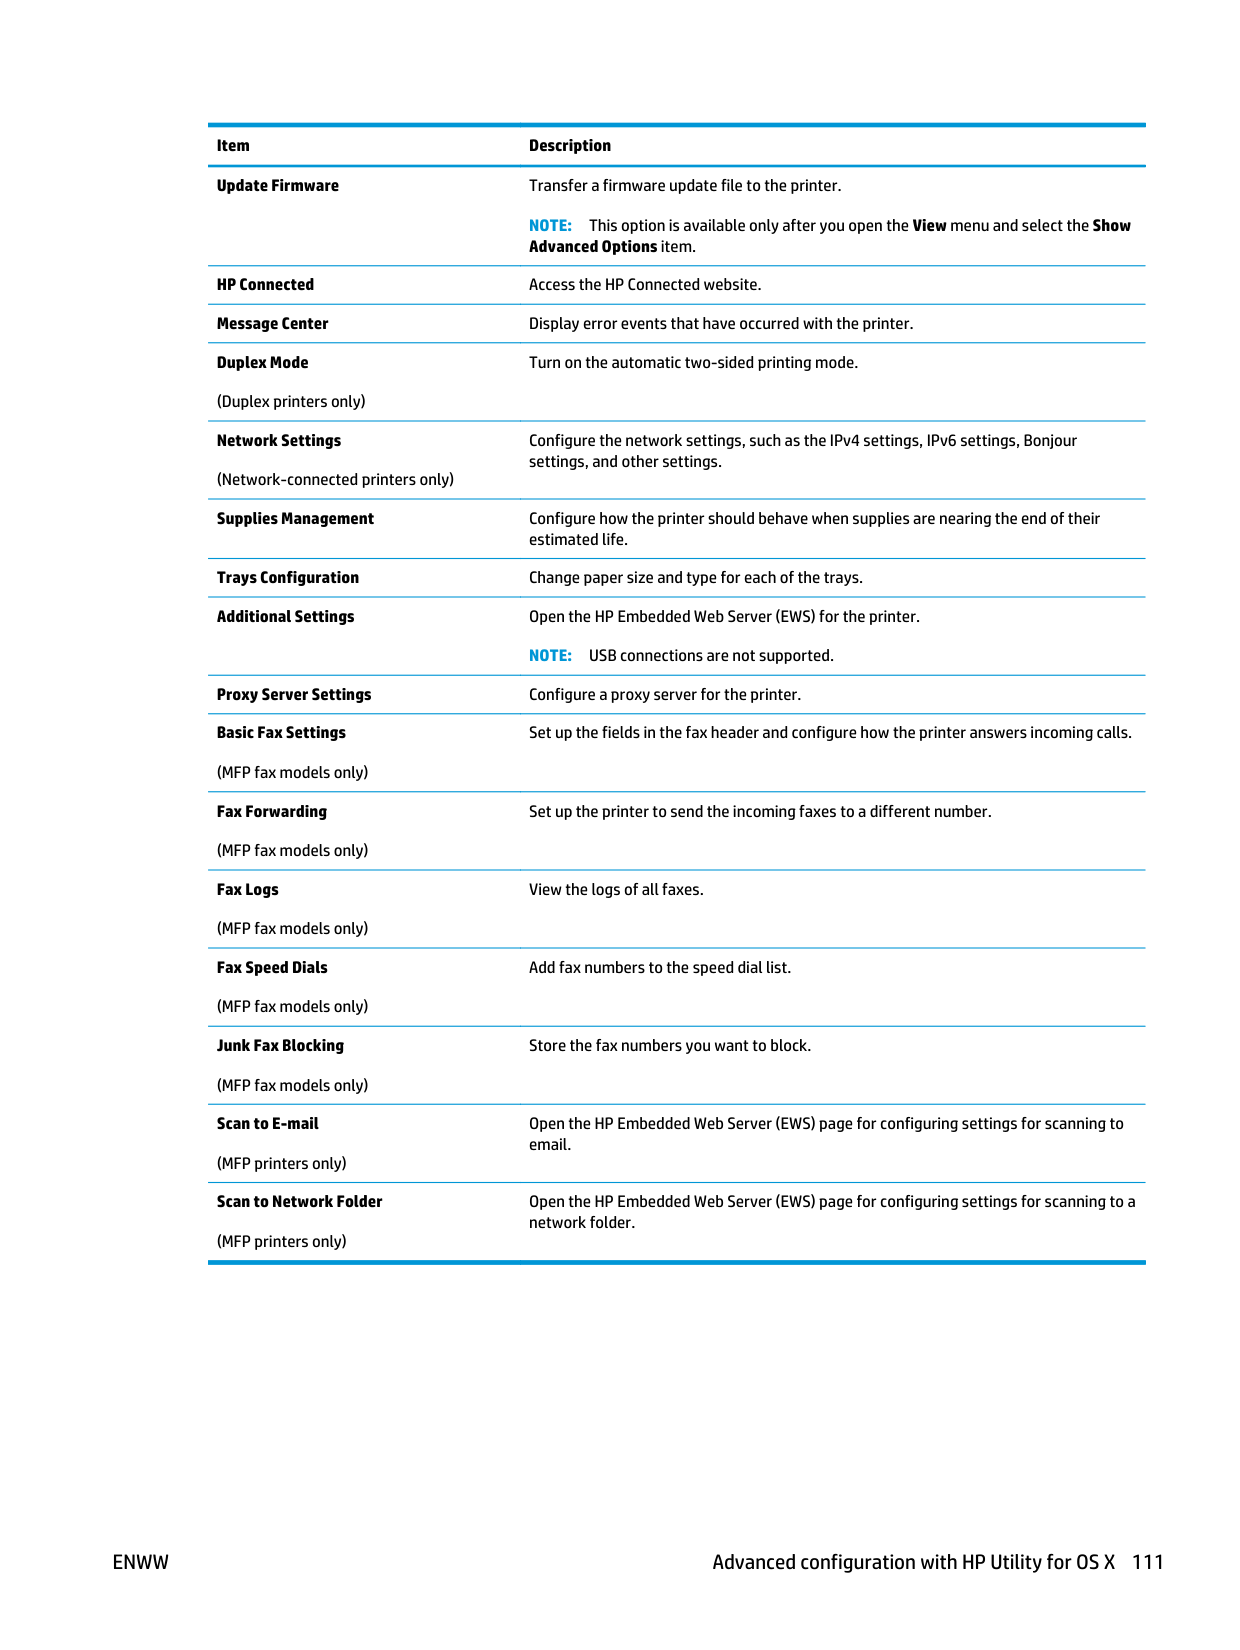
Item Description Update Firmware Transfer a firmware update file to the printer.
Note:
This option is available only after you open the View menu and select the Show Advanced Options item. HP Connected Access the HP Connected website. Message Center Display error events that have occurred with the printer. Duplex Mode (Duplex printers only) Turn on the automatic two-sided printing mode. Network Settings (Network-connected printers only) Configure the network settings, such as the IPv4 settings, IPv6 settings, Bonjour settings, and other settings. Supplies Management Configure how the printer should behave when supplies are nearing the end of their estimated life. Trays Configuration Change paper size and type for each of the trays. Additional Settings Open the HP Embedded Web Server (EWS) for the printer.Note:
USB connections are not supported. Proxy Server Settings Configure a proxy server for the printer. Basic Fax Settings (MFP fax models only) Set up the fields in the fax header and configure how the printer answers incoming calls. Fax Forwarding (MFP fax models only) Set up the printer to send the incoming faxes to a different number. Fax Logs (MFP fax models only) View the logs of all faxes. Fax Speed Dials (MFP fax models only) Add fax numbers to the speed dial list. Junk Fax Blocking (MFP fax models only) Store the fax numbers you want to block. Scan to E-mail (MFP printers only) Open the HP Embedded Web Server (EWS) page for configuring settings for scanning to email. Scan to Network Folder (MFP printers only) Open the HP Embedded Web Server (EWS) page for configuring settings for scanning to a network folder.Enww
Advanced configuration with HP Utility for OS X 111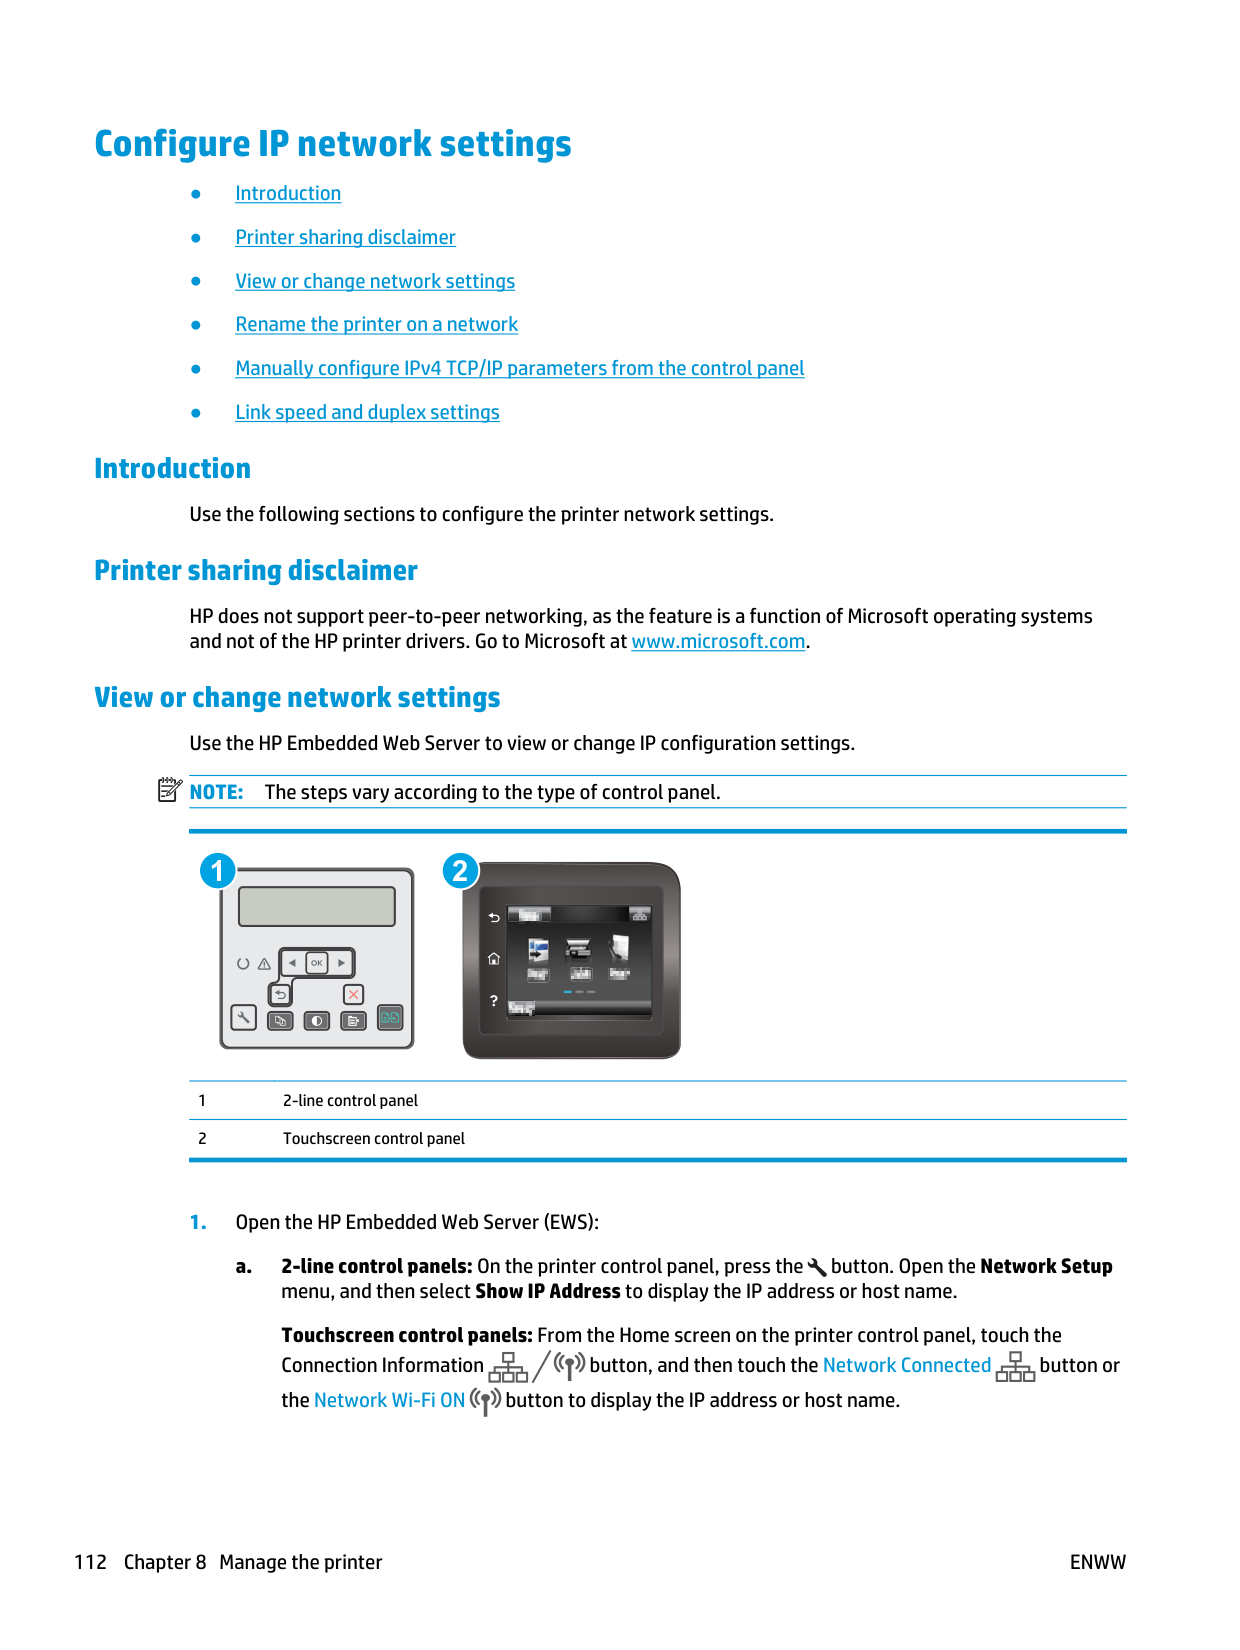
Configure IP network settings ● Introduction ● Printer sharing disclaimer ● View or change network settings ● Rename the printer on a network ● Manually configure IPv4 TCP/IP parameters from the control panel ● Link speed and duplex settings Introduction Use the following sections to configure the printer network settings. Printer sharing disclaimer HP does not support peer-to-peer networking, as the feature is a function of Microsoft operating systems and not of the HP printer drivers. Go to Microsoft at www.microsoft.com. View or change network settings Use the HP Embedded Web Server to view or change IP configuration settings.
Note:
The steps vary according to the type of control panel. 1 2 1 2-line control panel 2 Touchscreen control panelEnww
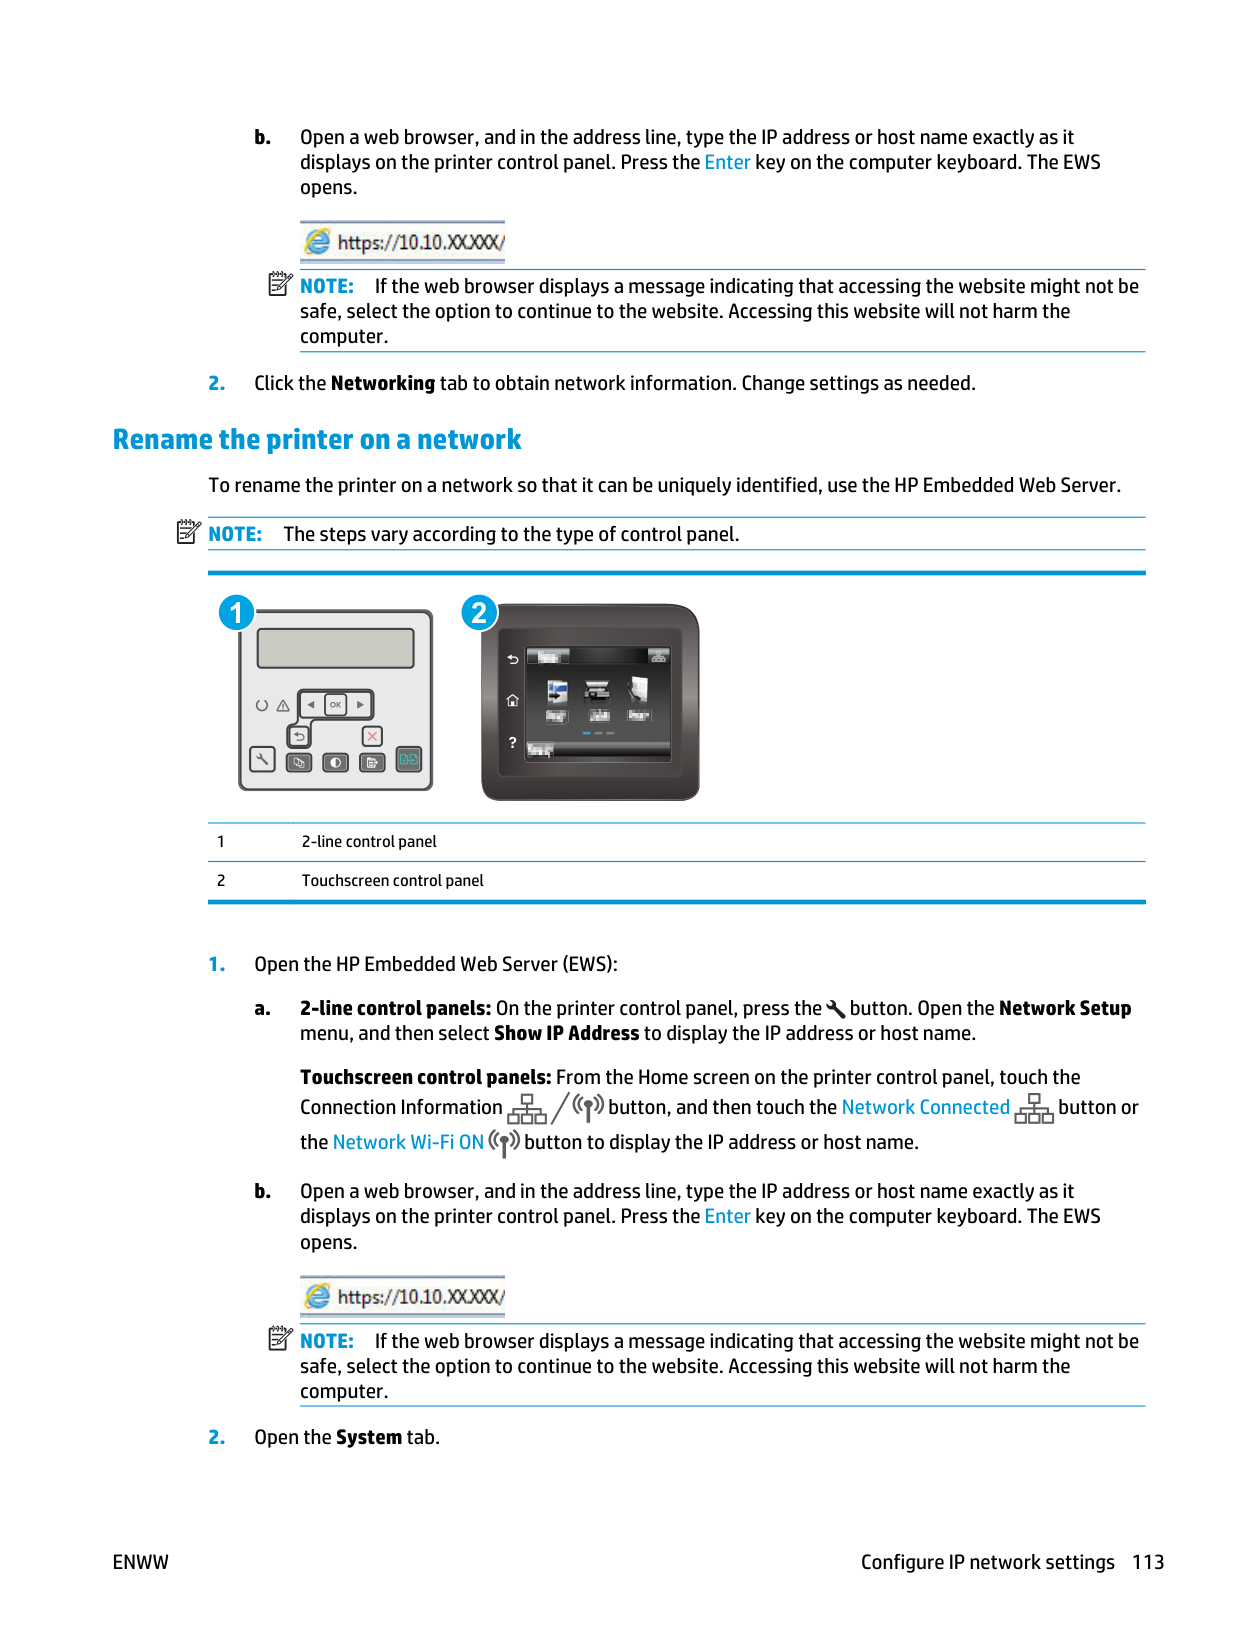
b. Open a web browser, and in the address line, type the IP address or host name exactly as it displays on the printer control panel. Press the Enter key on the computer keyboard. The EWS opens.
Note:
If the web browser displays a message indicating that accessing the website might not be safe, select the option to continue to the website. Accessing this website will not harm the computer.Note:
The steps vary according to the type of control panel. 1 2 1 2-line control panel 2 Touchscreen control panelNote:
If the web browser displays a message indicating that accessing the website might not be safe, select the option to continue to the website. Accessing this website will not harm the computer.Enww
Configure IP network settings 113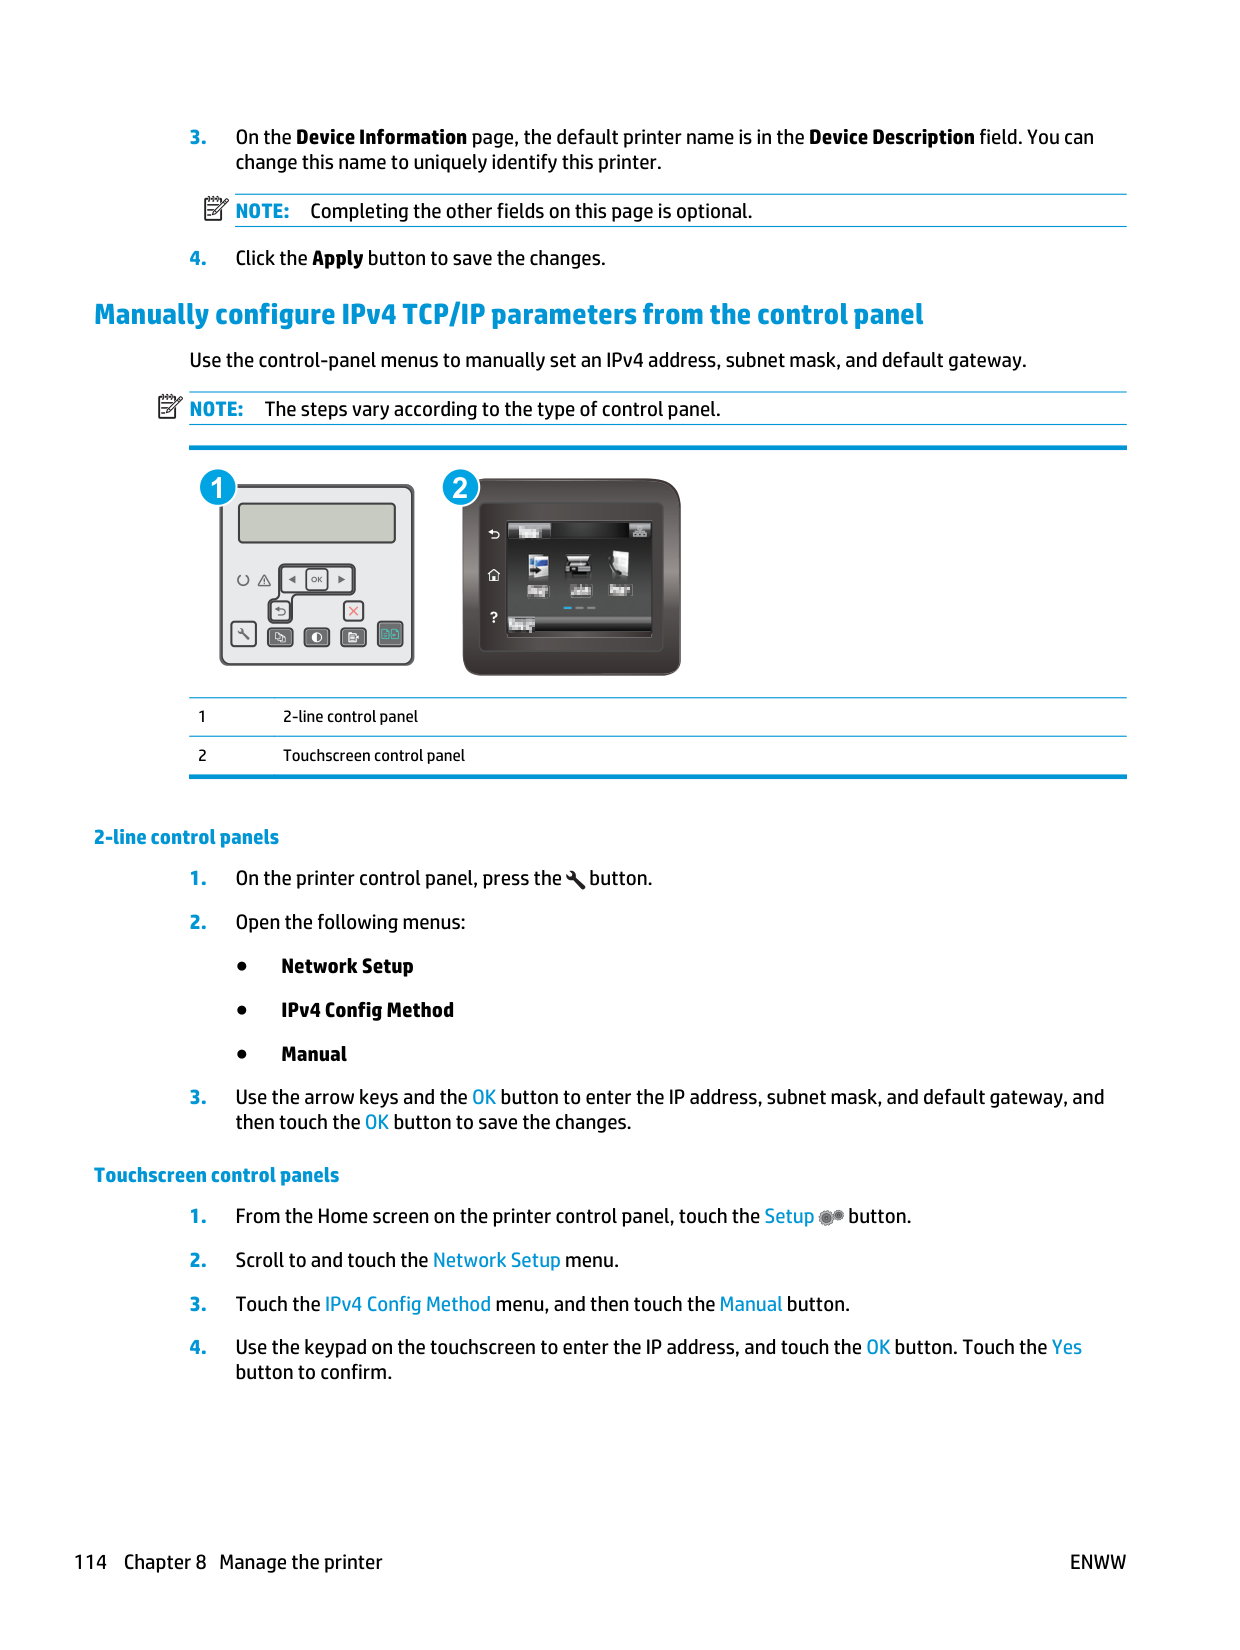
Note:
Completing the other fields on this page is optional.Note:
The steps vary according to the type of control panel. 1 2 1 2-line control panel 2 Touchscreen control panel 2-line control panelsEnww
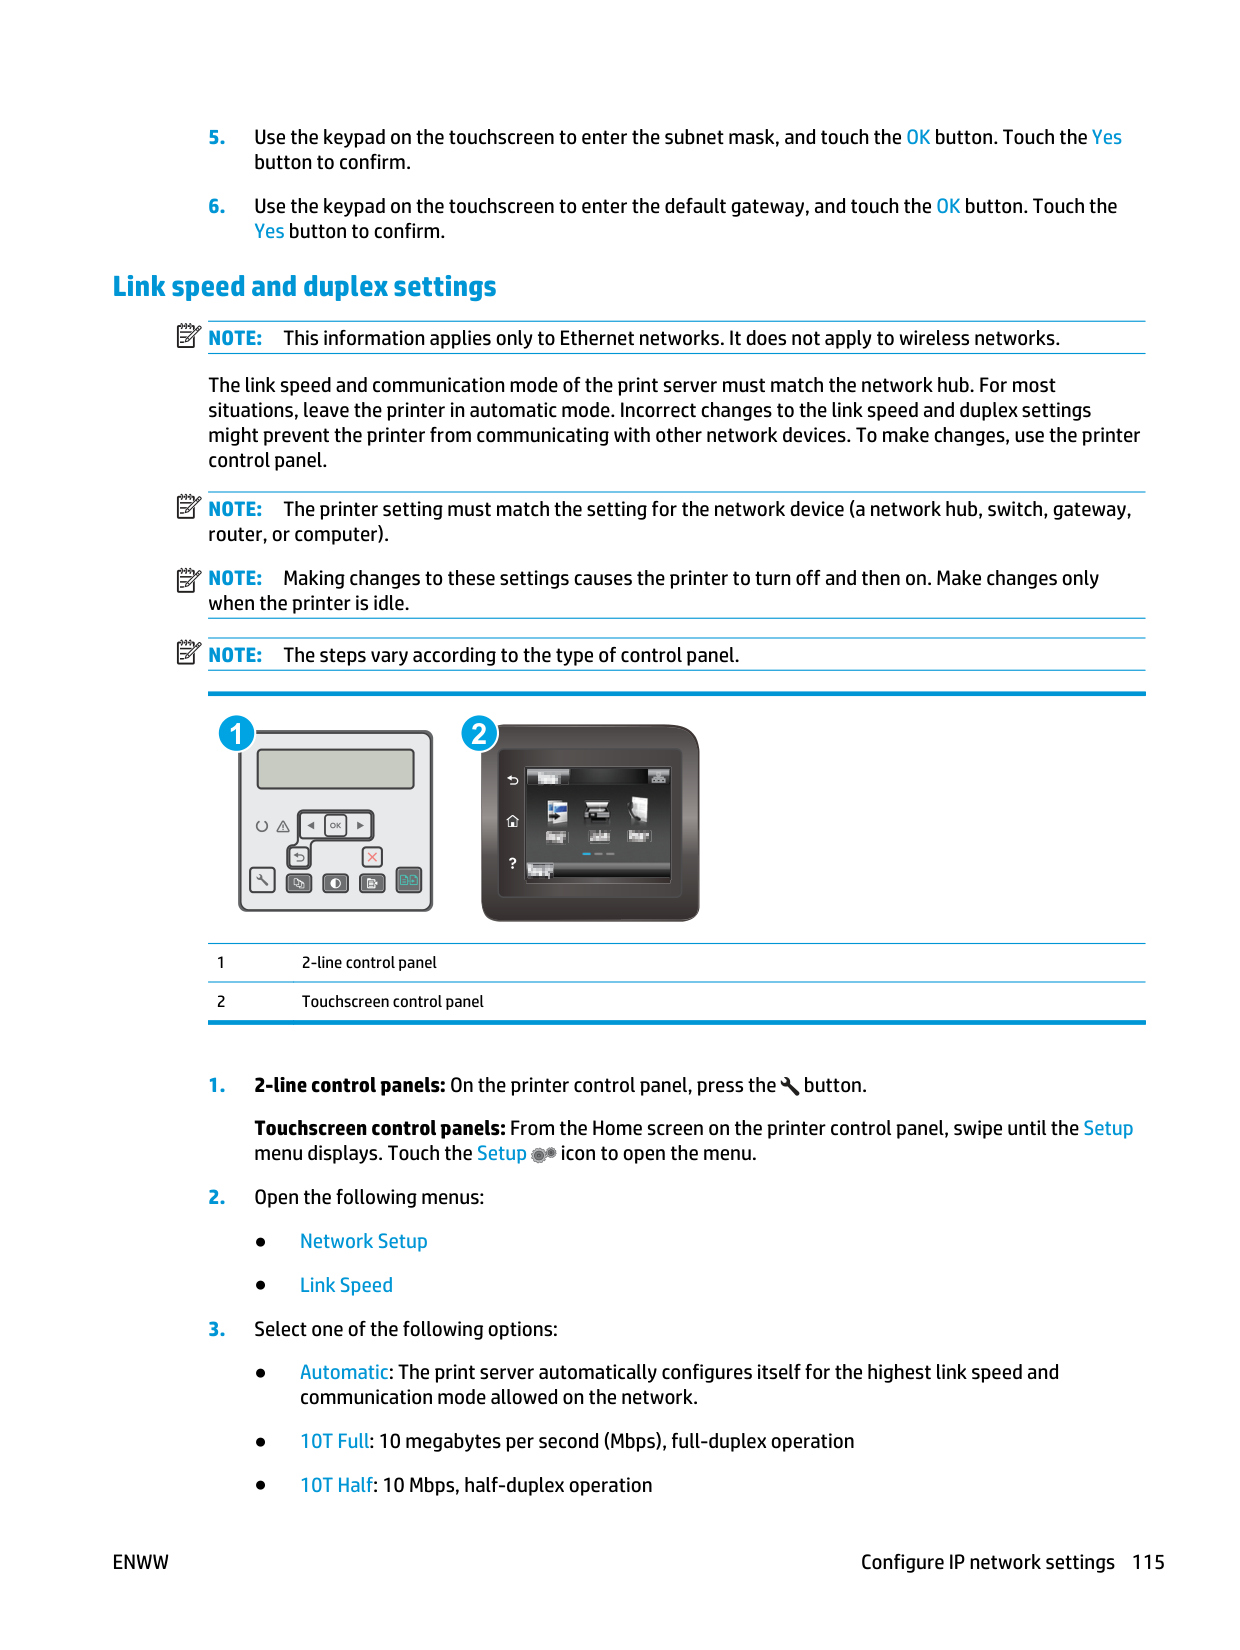
Note:
This information applies only to Ethernet networks. It does not apply to wireless networks. The link speed and communication mode of the print server must match the network hub. For most situations, leave the printer in automatic mode. Incorrect changes to the link speed and duplex settings might prevent the printer from communicating with other network devices. To make changes, use the printer control panel.Note:
The printer setting must match the setting for the network device (a network hub, switch, gateway, router, or computer).Note:
Making changes to these settings causes the printer to turn off and then on. Make changes only when the printer is idle.Note:
The steps vary according to the type of control panel. 1 2 1 2-line control panel 2 Touchscreen control panelEnww
Configure IP network settings 115
● 100TX Full: 100 Mbps, full-duplex operation ● 100TX Half: 100 Mbps, half-duplex operation ● 1000T Full: 1000 Mbps, full-duplex operation
Enww
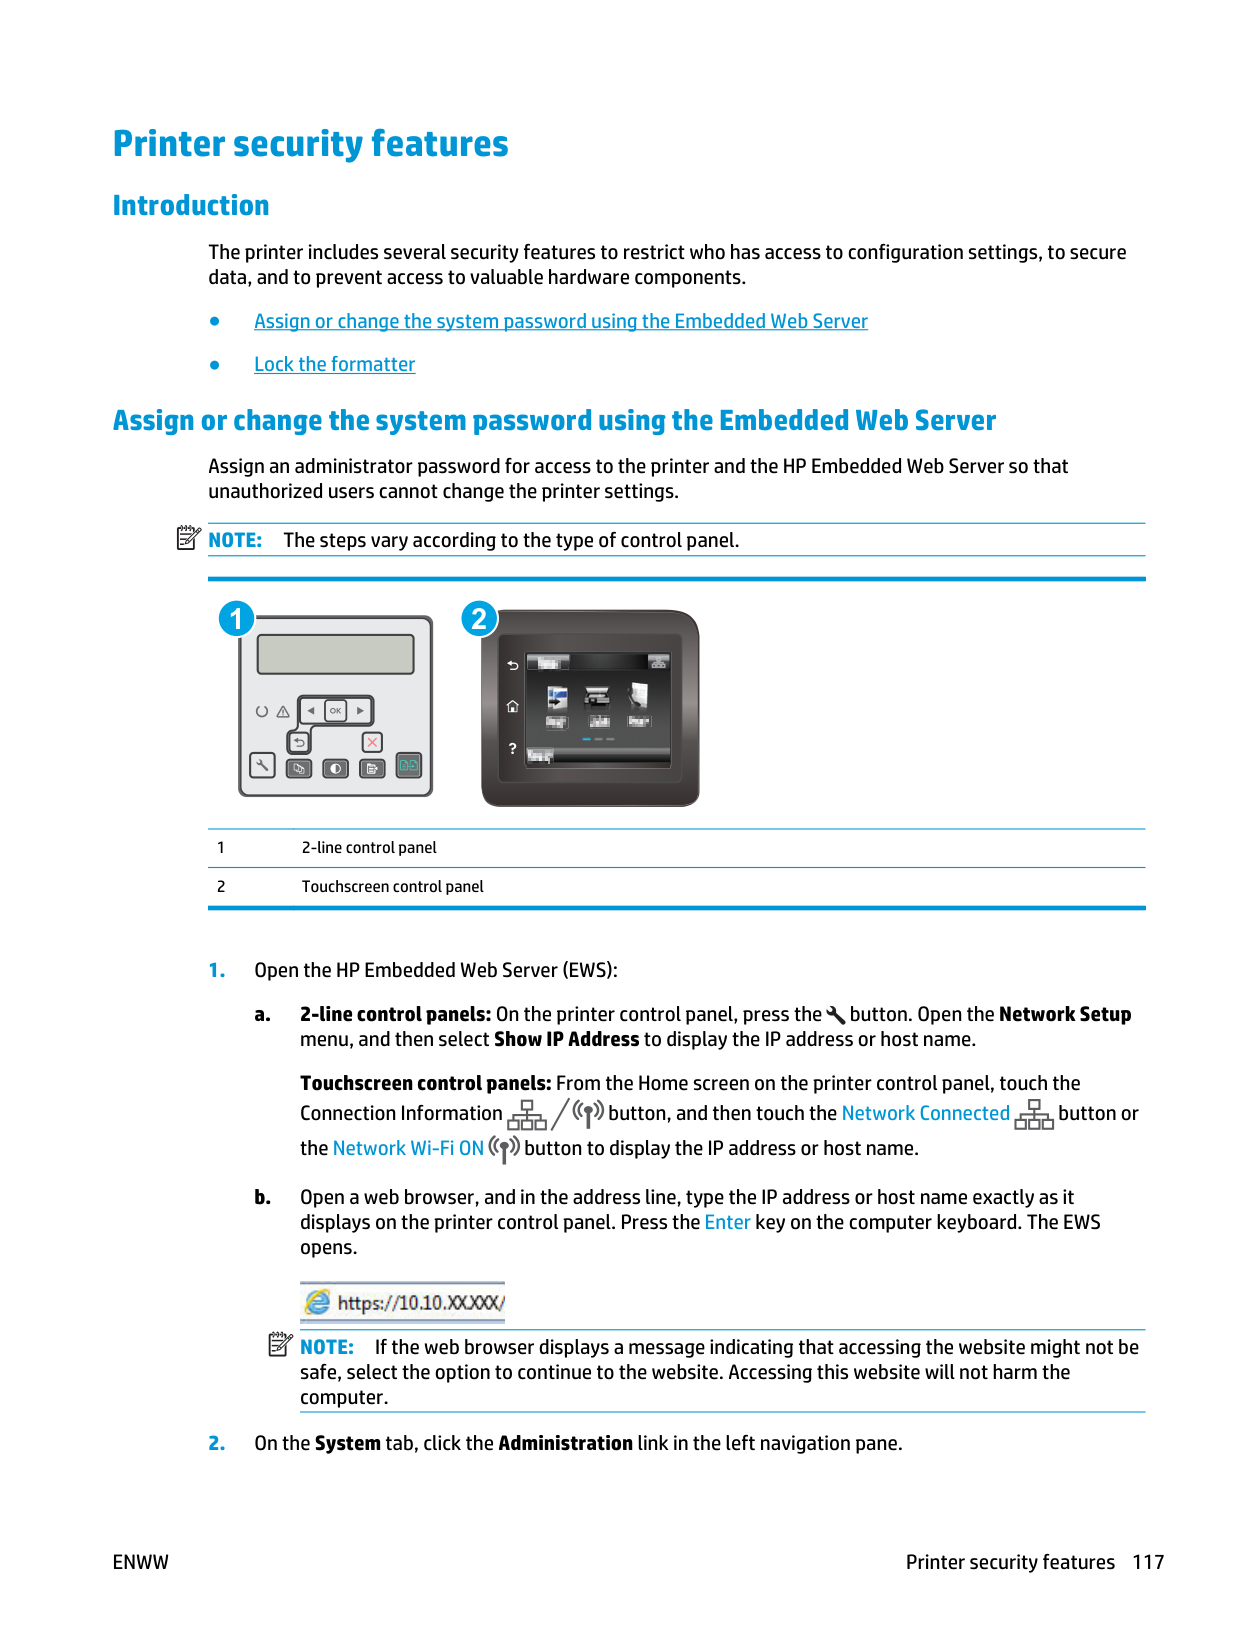
Printer security features Introduction The printer includes several security features to restrict who has access to configuration settings, to secure data, and to prevent access to valuable hardware components. ● Assign or change the system password using the Embedded Web Server ● Lock the formatter Assign or change the system password using the Embedded Web Server Assign an administrator password for access to the printer and the HP Embedded Web Server so that unauthorized users cannot change the printer settings.
Note:
The steps vary according to the type of control panel. 1 2 1 2-line control panel 2 Touchscreen control panelNote:
If the web browser displays a message indicating that accessing the website might not be safe, select the option to continue to the website. Accessing this website will not harm the computer.Enww
Printer security features 117
Note:
Make note of the password and store it in a safe place. Lock the formatter The formatter has a slot that you can use to attach a security cable. Locking the formatter prevents someone from removing valuable components from it. 118 Chapter 8 Manage the printerEnww
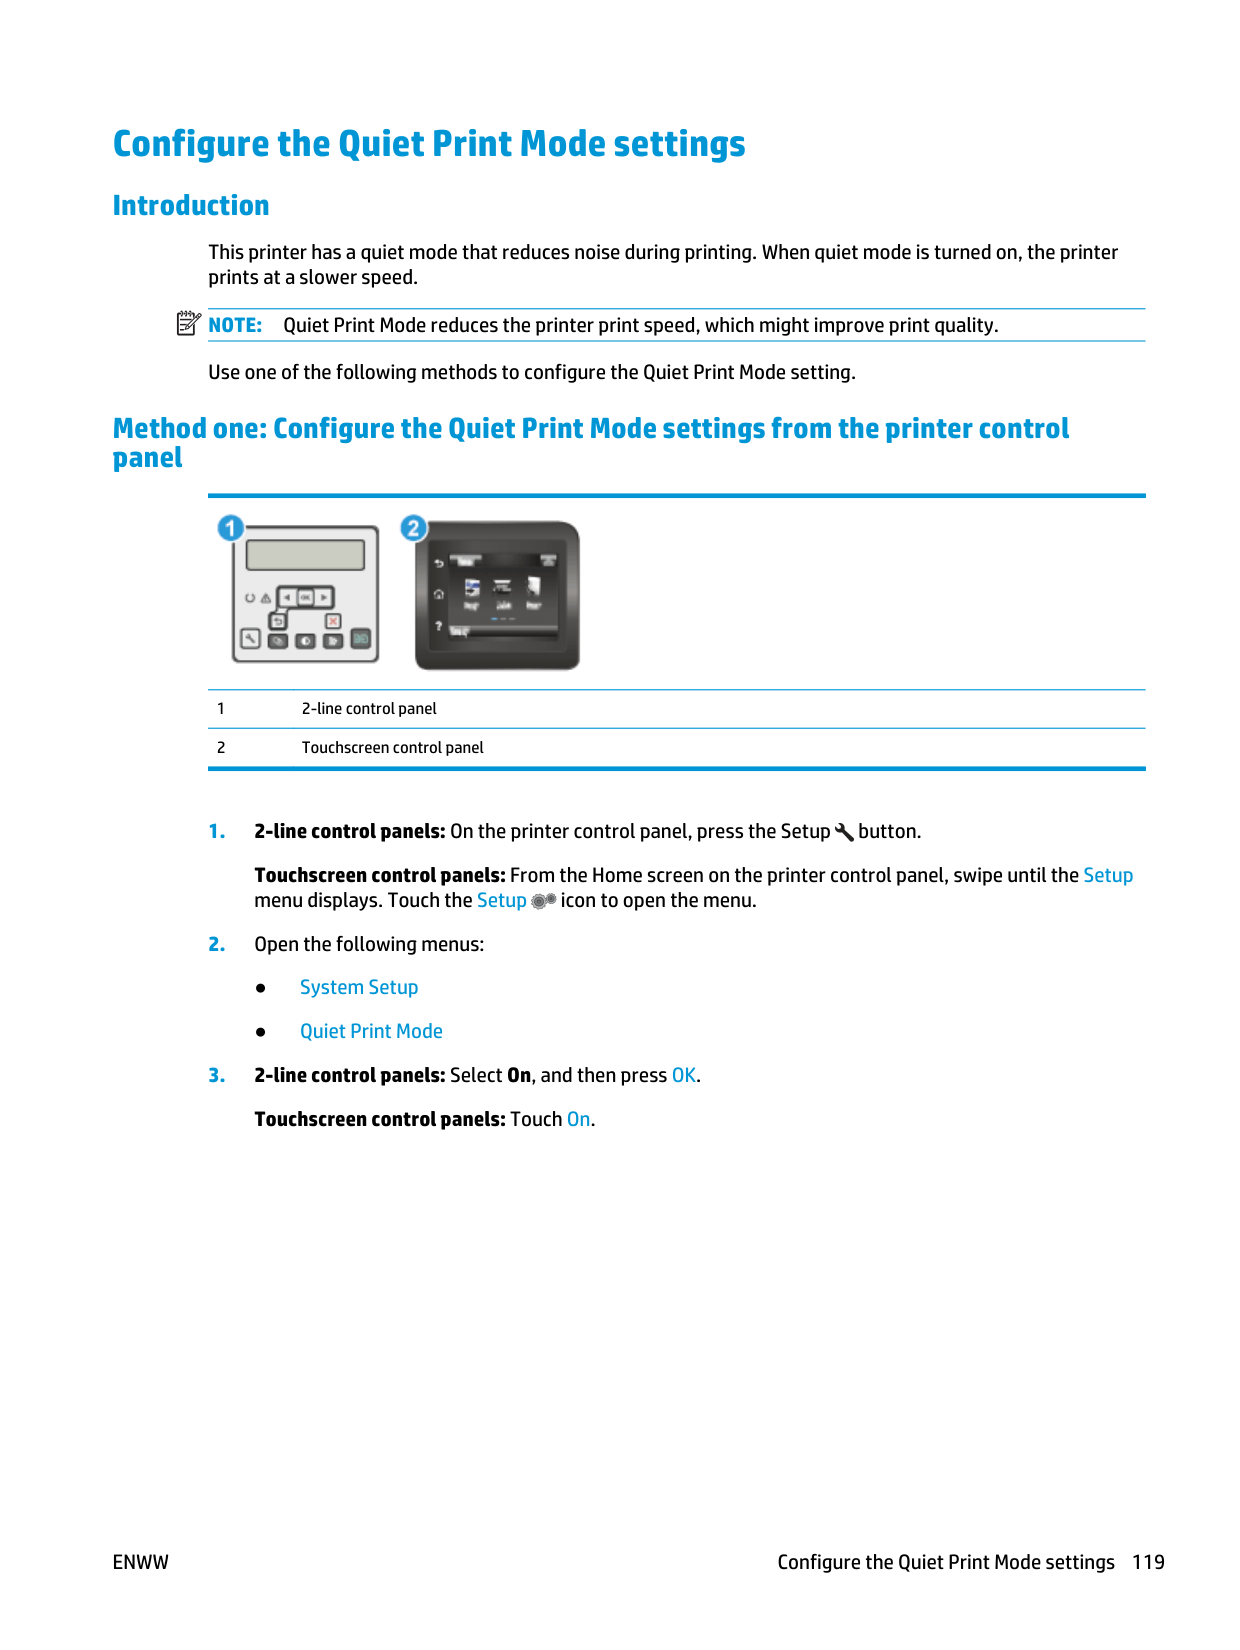
Configure the Quiet Print Mode settings Introduction This printer has a quiet mode that reduces noise during printing. When quiet mode is turned on, the printer prints at a slower speed.
Note:
Quiet Print Mode reduces the printer print speed, which might improve print quality. Use one of the following methods to configure the Quiet Print Mode setting. Method one: Configure the Quiet Print Mode settings from the printer control panel 1 2-line control panel 2 Touchscreen control panelEnww
Configure the Quiet Print Mode settings 119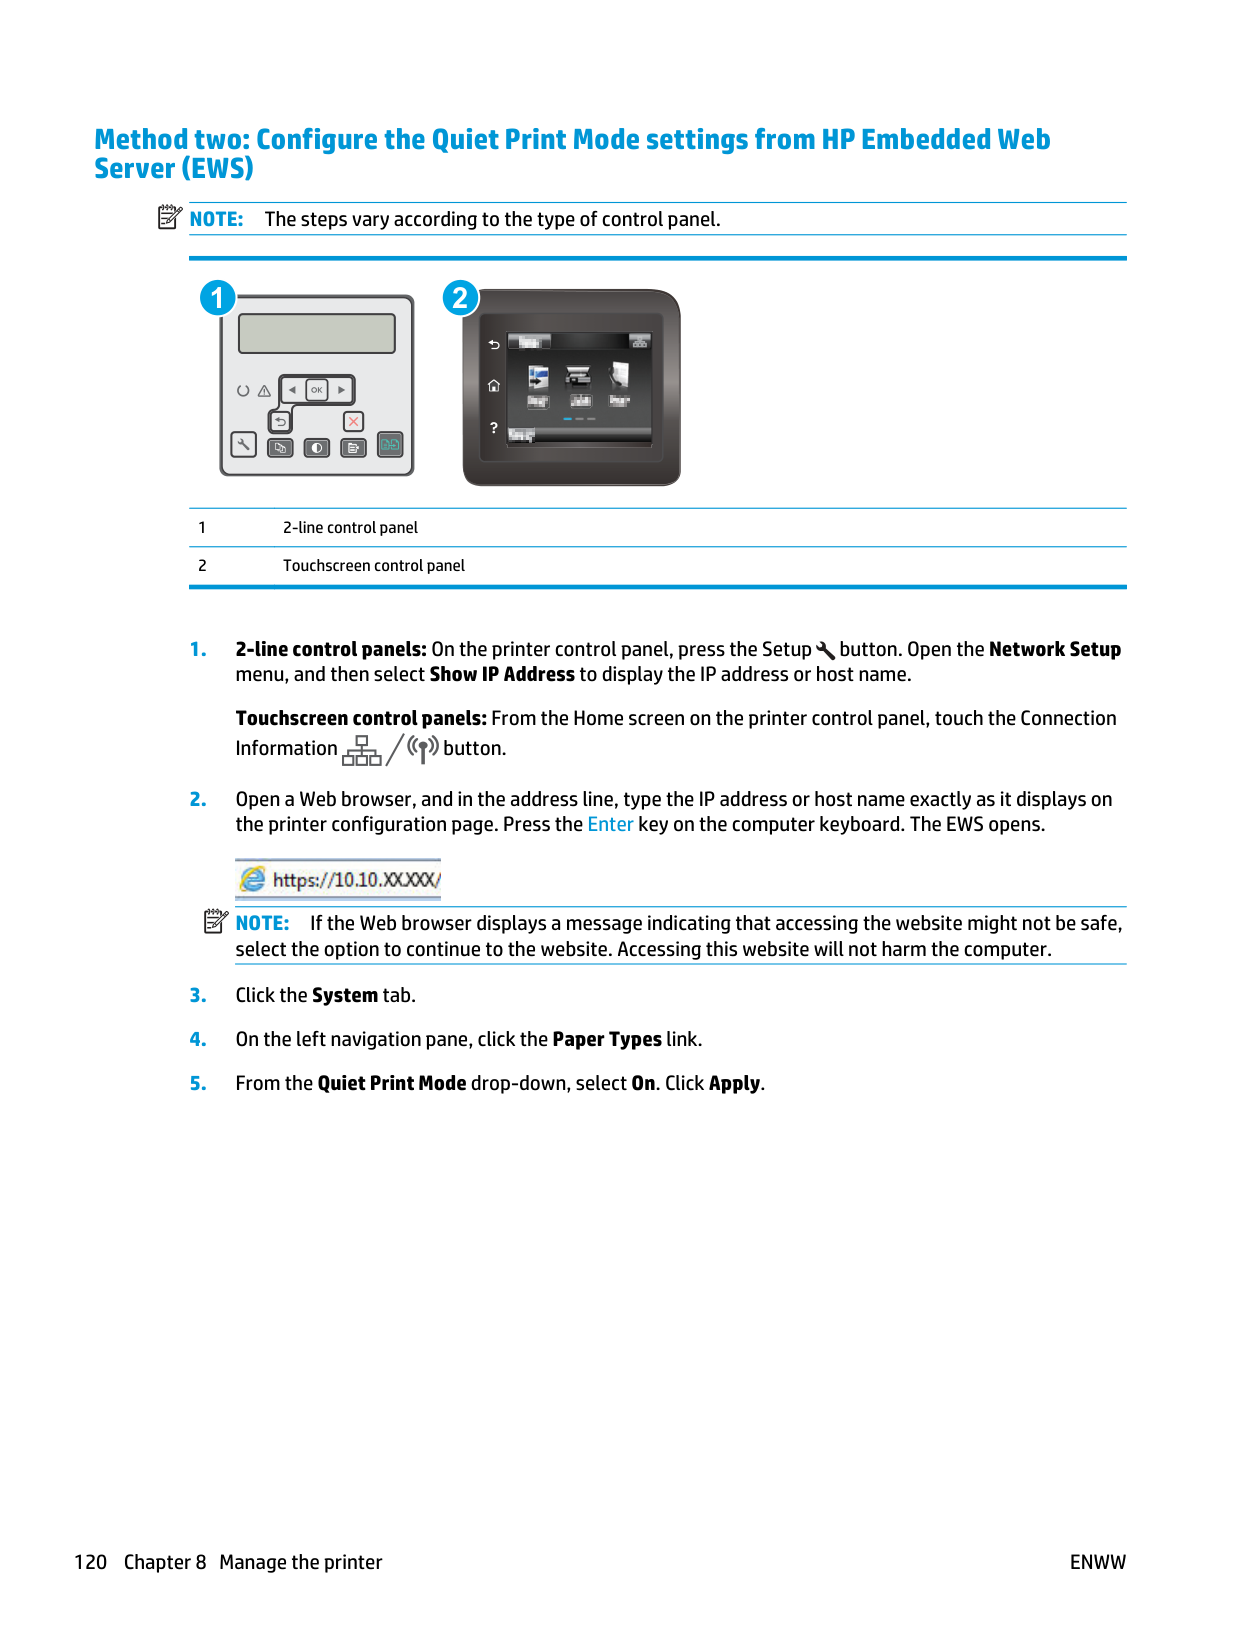
Method two: Configure the Quiet Print Mode settings from HP Embedded Web Server (EWS)
Note:
The steps vary according to the type of control panel. 1 2 1 2-line control panel 2 Touchscreen control panelNote:
If the Web browser displays a message indicating that accessing the website might not be safe, select the option to continue to the website. Accessing this website will not harm the computer.Enww
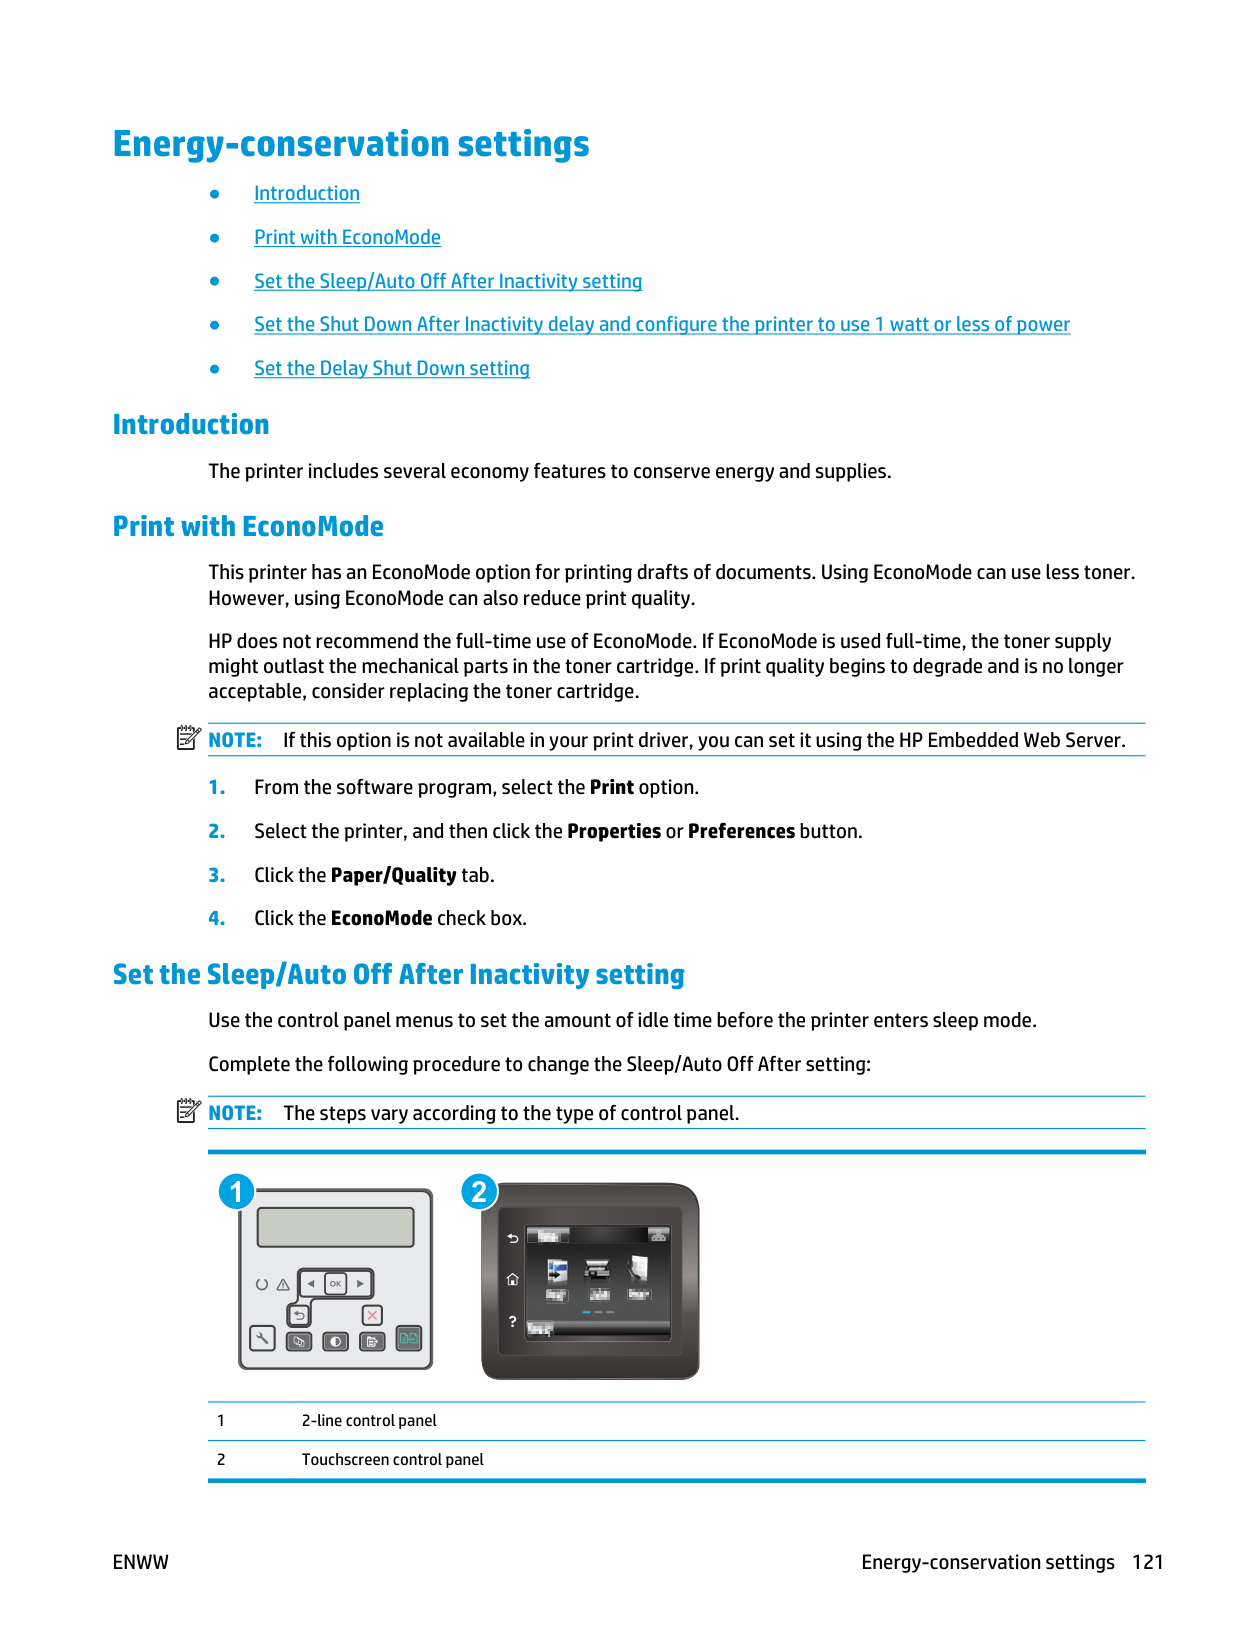
Energy-conservation settings ● Introduction ● Print with EconoMode ● Set the Sleep/Auto Off After Inactivity setting ● Set the Shut Down After Inactivity delay and configure the printer to use 1 watt or less of power ● Set the Delay Shut Down setting Introduction The printer includes several economy features to conserve energy and supplies. Print with EconoMode This printer has an EconoMode option for printing drafts of documents. Using EconoMode can use less toner. However, using EconoMode can also reduce print quality. HP does not recommend the full-time use of EconoMode. If EconoMode is used full-time, the toner supply might outlast the mechanical parts in the toner cartridge. If print quality begins to degrade and is no longer acceptable, consider replacing the toner cartridge.
Note:
If this option is not available in your print driver, you can set it using the HP Embedded Web Server.Note:
The steps vary according to the type of control panel. 1 2 1 2-line control panel 2 Touchscreen control panelEnww
Energy-conservation settings 121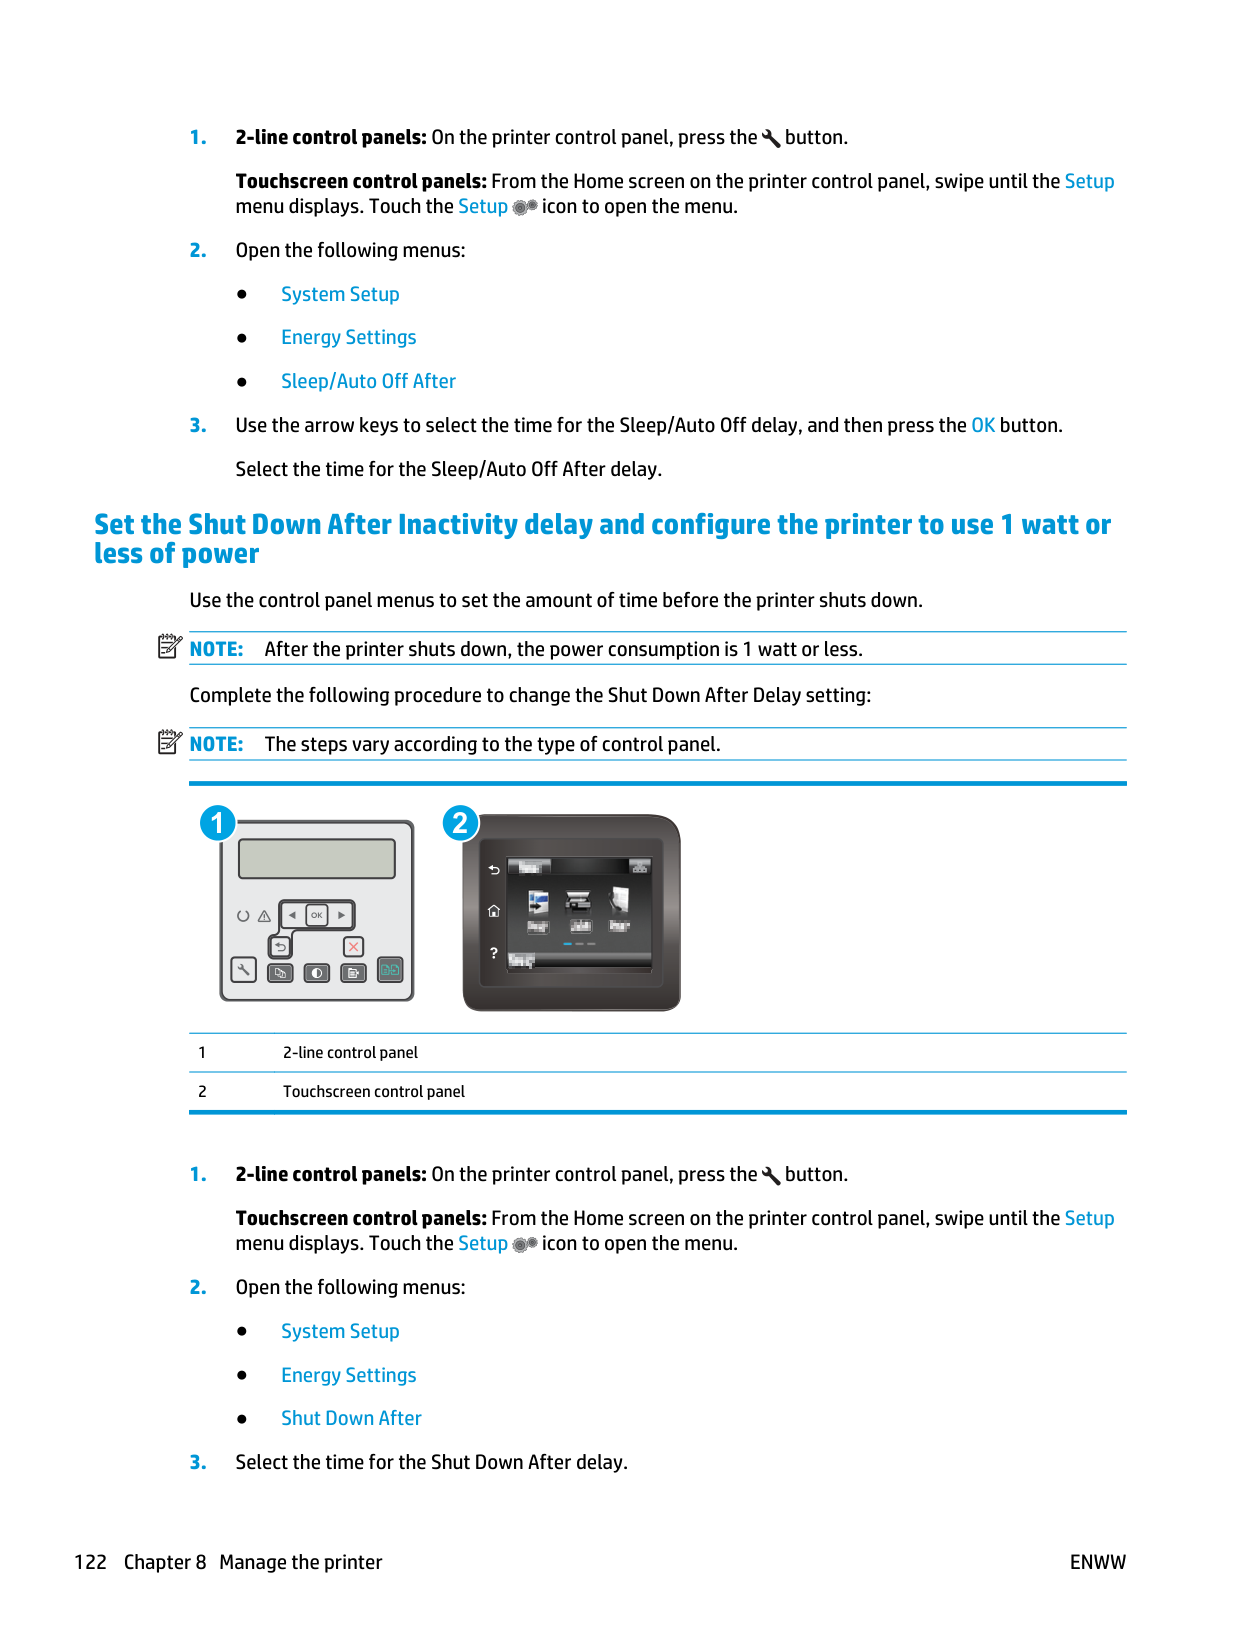
Note:
After the printer shuts down, the power consumption is 1 watt or less. Complete the following procedure to change the Shut Down After Delay setting:Note:
The steps vary according to the type of control panel. 1 2 1 2-line control panel 2 Touchscreen control panelEnww
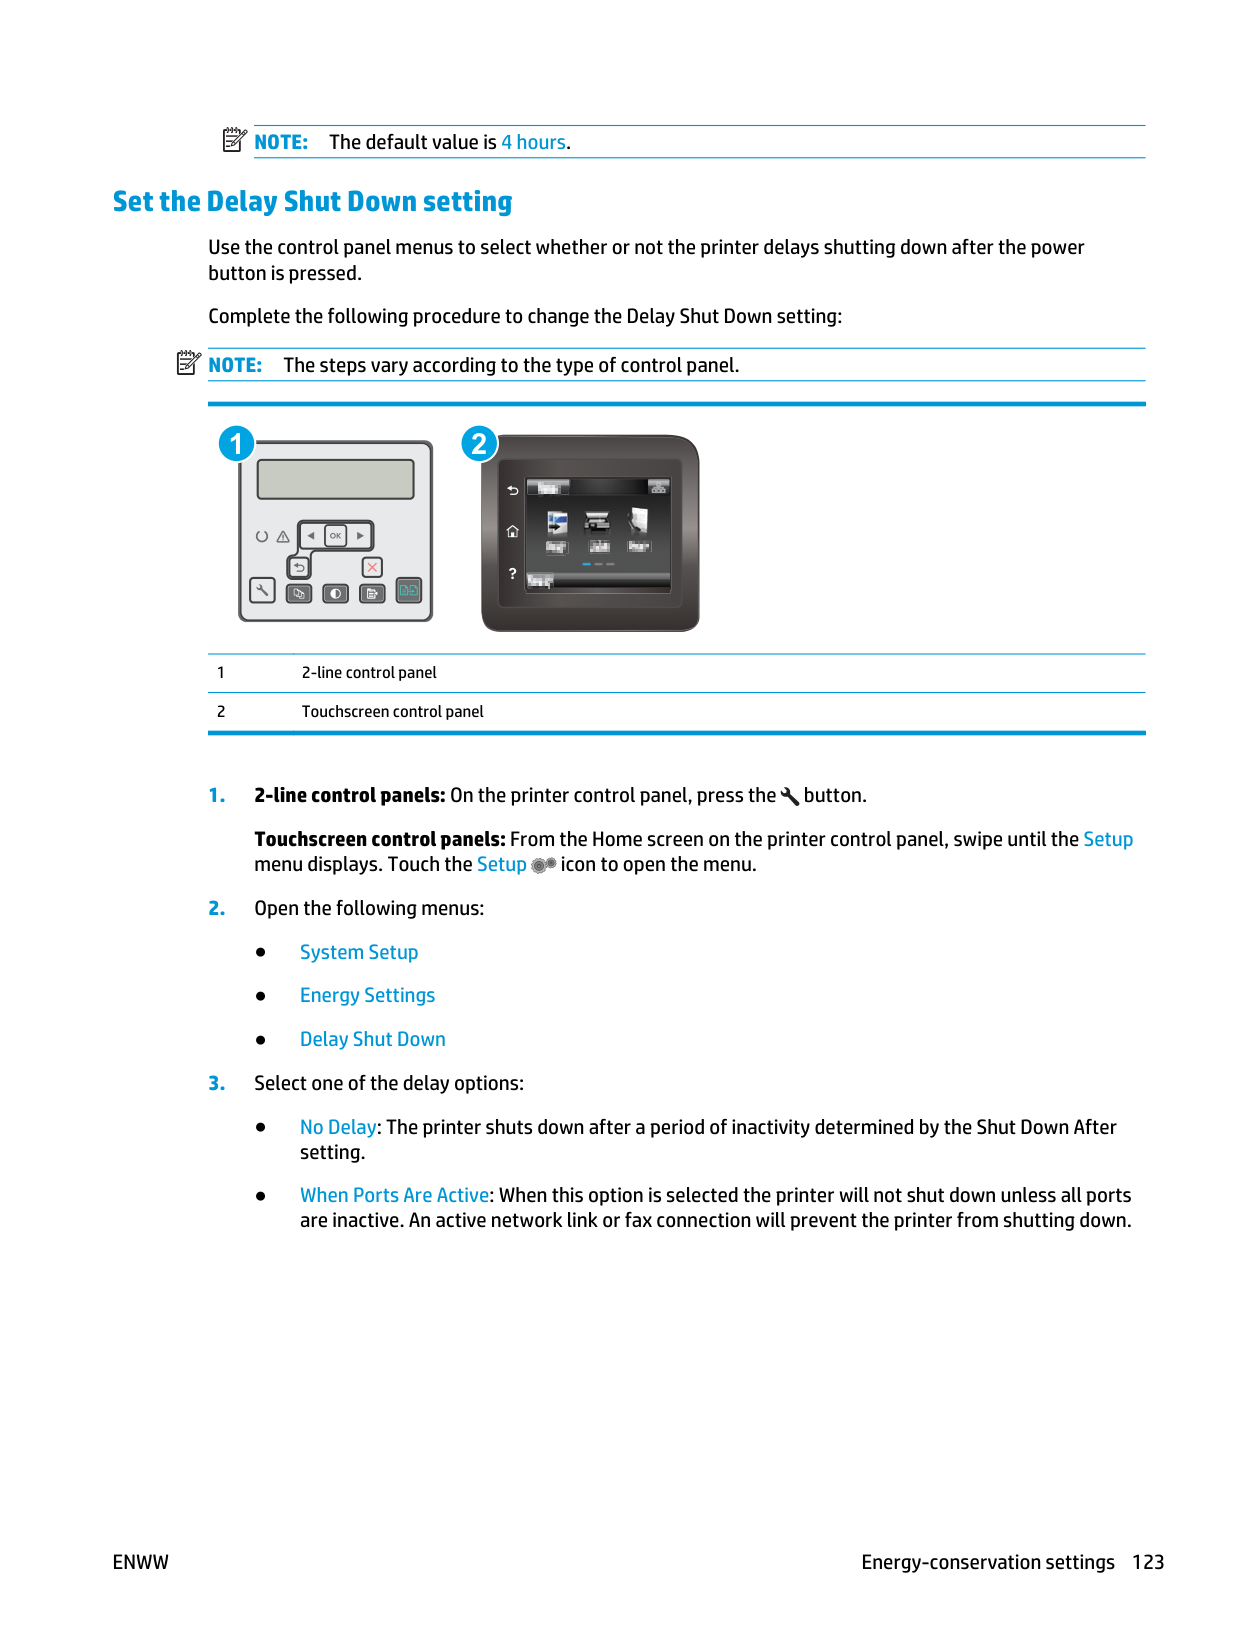
Note:
The default value is 4 hours. Set the Delay Shut Down setting Use the control panel menus to select whether or not the printer delays shutting down after the power button is pressed. Complete the following procedure to change the Delay Shut Down setting:Note:
The steps vary according to the type of control panel. 1 2 1 2-line control panel 2 Touchscreen control panelEnww
Energy-conservation settings 123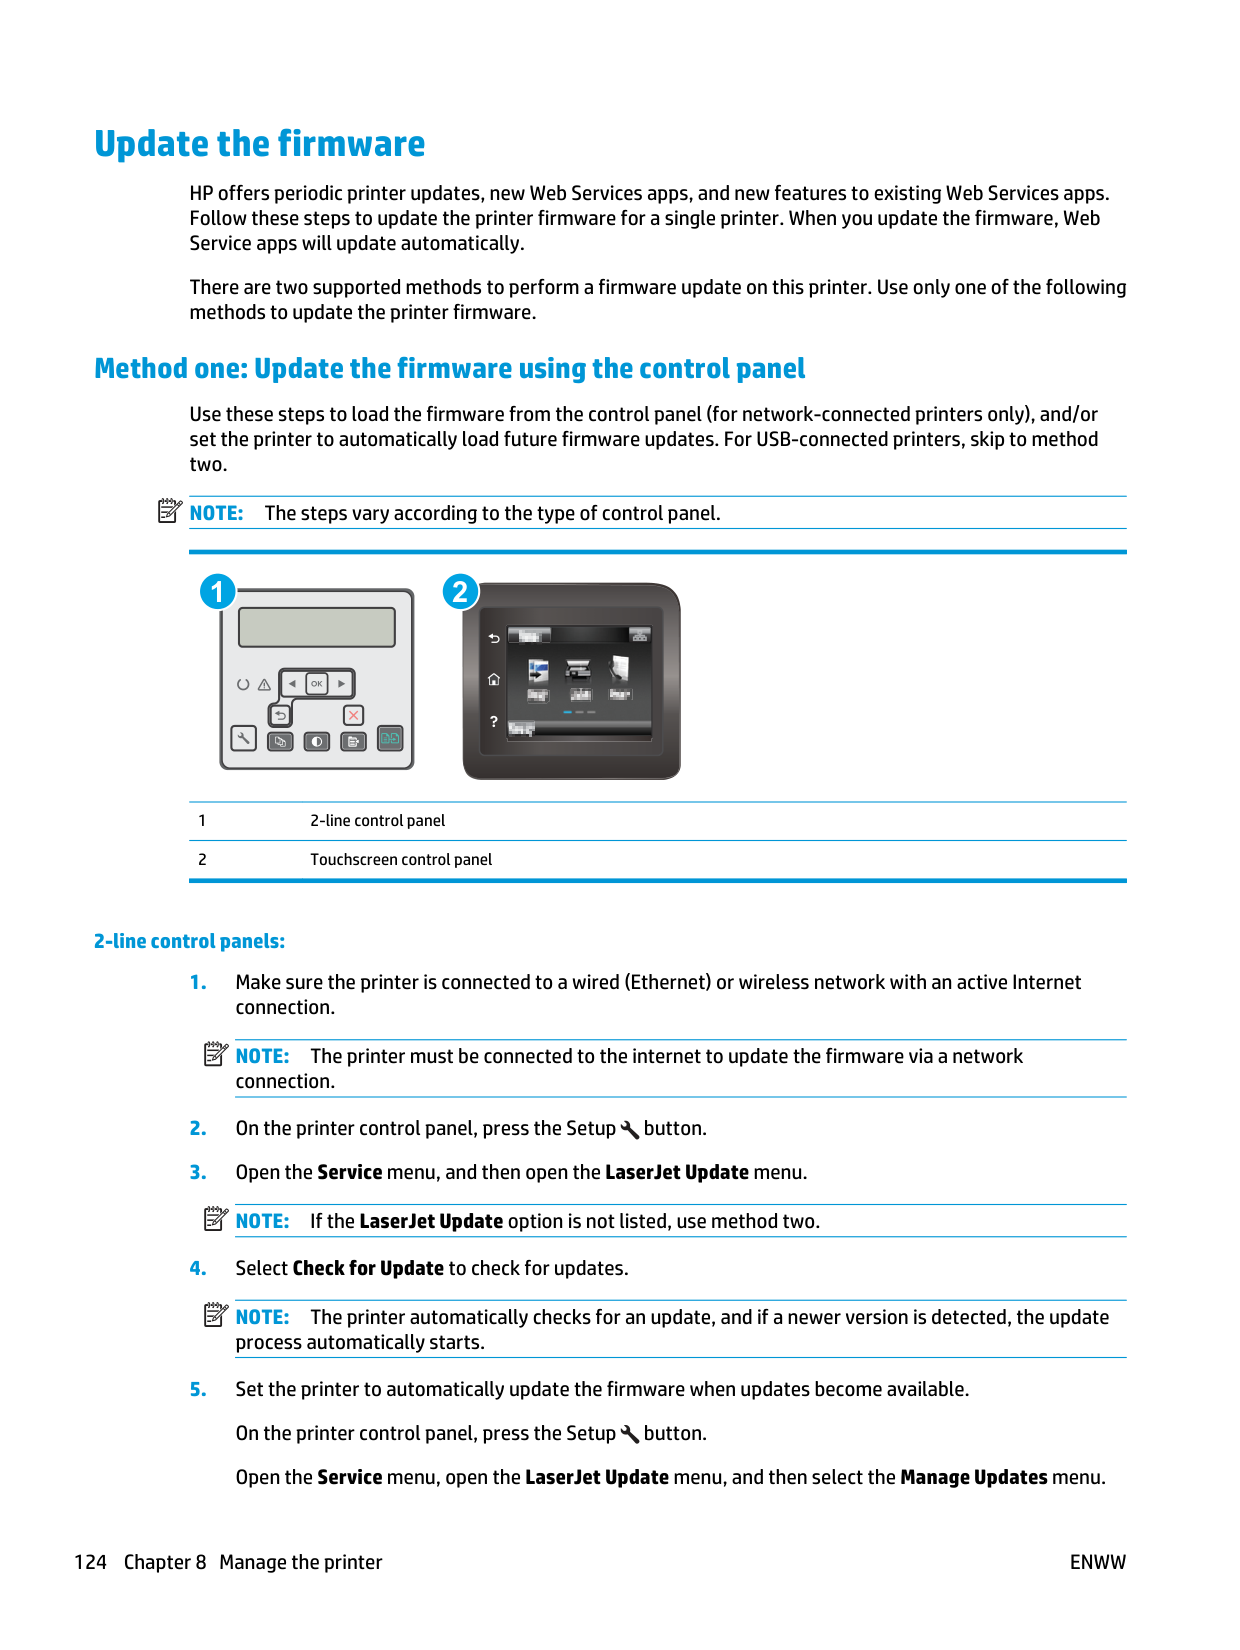
Update the firmware HP offers periodic printer updates, new Web Services apps, and new features to existing Web Services apps. Follow these steps to update the printer firmware for a single printer. When you update the firmware, Web Service apps will update automatically. There are two supported methods to perform a firmware update on this printer. Use only one of the following methods to update the printer firmware. Method one: Update the firmware using the control panel Use these steps to load the firmware from the control panel (for network-connected printers only), and/or set the printer to automatically load future firmware updates. For USB-connected printers, skip to method two.
Note:
The steps vary according to the type of control panel. 1 2 1 2-line control panel 2 Touchscreen control panel 2-line control panels:Note:
The printer must be connected to the internet to update the firmware via a network connection.Note:
If the LaserJet Update option is not listed, use method two.Note:
The printer automatically checks for an update, and if a newer version is detected, the update process automatically starts.Enww
Set the Allow Updates option to YES, and then set the Automatic Check option to ON. Touchscreen control panels:
Note:
The printer must be connected to the internet to update the firmware via a network connection.Note:
If the LaserJet Update option is not listed, use method two.Note:
The printer automatically checks for an update, and if a newer version is detected, the update process automatically starts.Note:
This method is the only firmware update option available for printers connected to the computer via a USB cable. It also works for printers connected to a network.Note:
You must have a print driver installed in order to use this method.Note:
To print a configuration page to verify the installed firmware version before or after the update process, click Print Config.Enww
Update the firmware 125
126 Chapter 8 Manage the printer
Enww
9 Solve problems ● Customer support ● Control panel help system (touchscreen models only) ● Restore the factory-set defaults ● A “Cartridge is low” or “Cartridge is very low” message displays on the printer control panel ● Printer does not pick up paper or misfeeds ● Clear paper jams ● Clean the ADF replaceable film assembly ● Improve print quality ● Improve copy and scan image quality ● Improve fax image quality ● Solve wired network problems ● Solve wireless network problems ● Solve fax problems For more information: The following information is correct at the time of publication. For current information, see www.hp.com/ support/ljM227MFP. HP's all-inclusive help for the printer includes the following information: ● Install and configure ● Learn and use ● Solve problems ● Download software and firmware updates ● Join support forums ● Find warranty and regulatory information
Enww
127
Customer support Get telephone support for your country/region Have the printer name, serial number, date of purchase, and problem description ready Country/region phone numbers are on the flyer that was in the box with the printer or at www.hp.com/support/. Get 24-hour Internet support, and download software utilities and drivers www.hp.com/support/ljM227MFP Order additional HP service or maintenance agreements www.hp.com/go/carepack Register the printer www.register.hp.com 128 Chapter 9 Solve problems
Enww
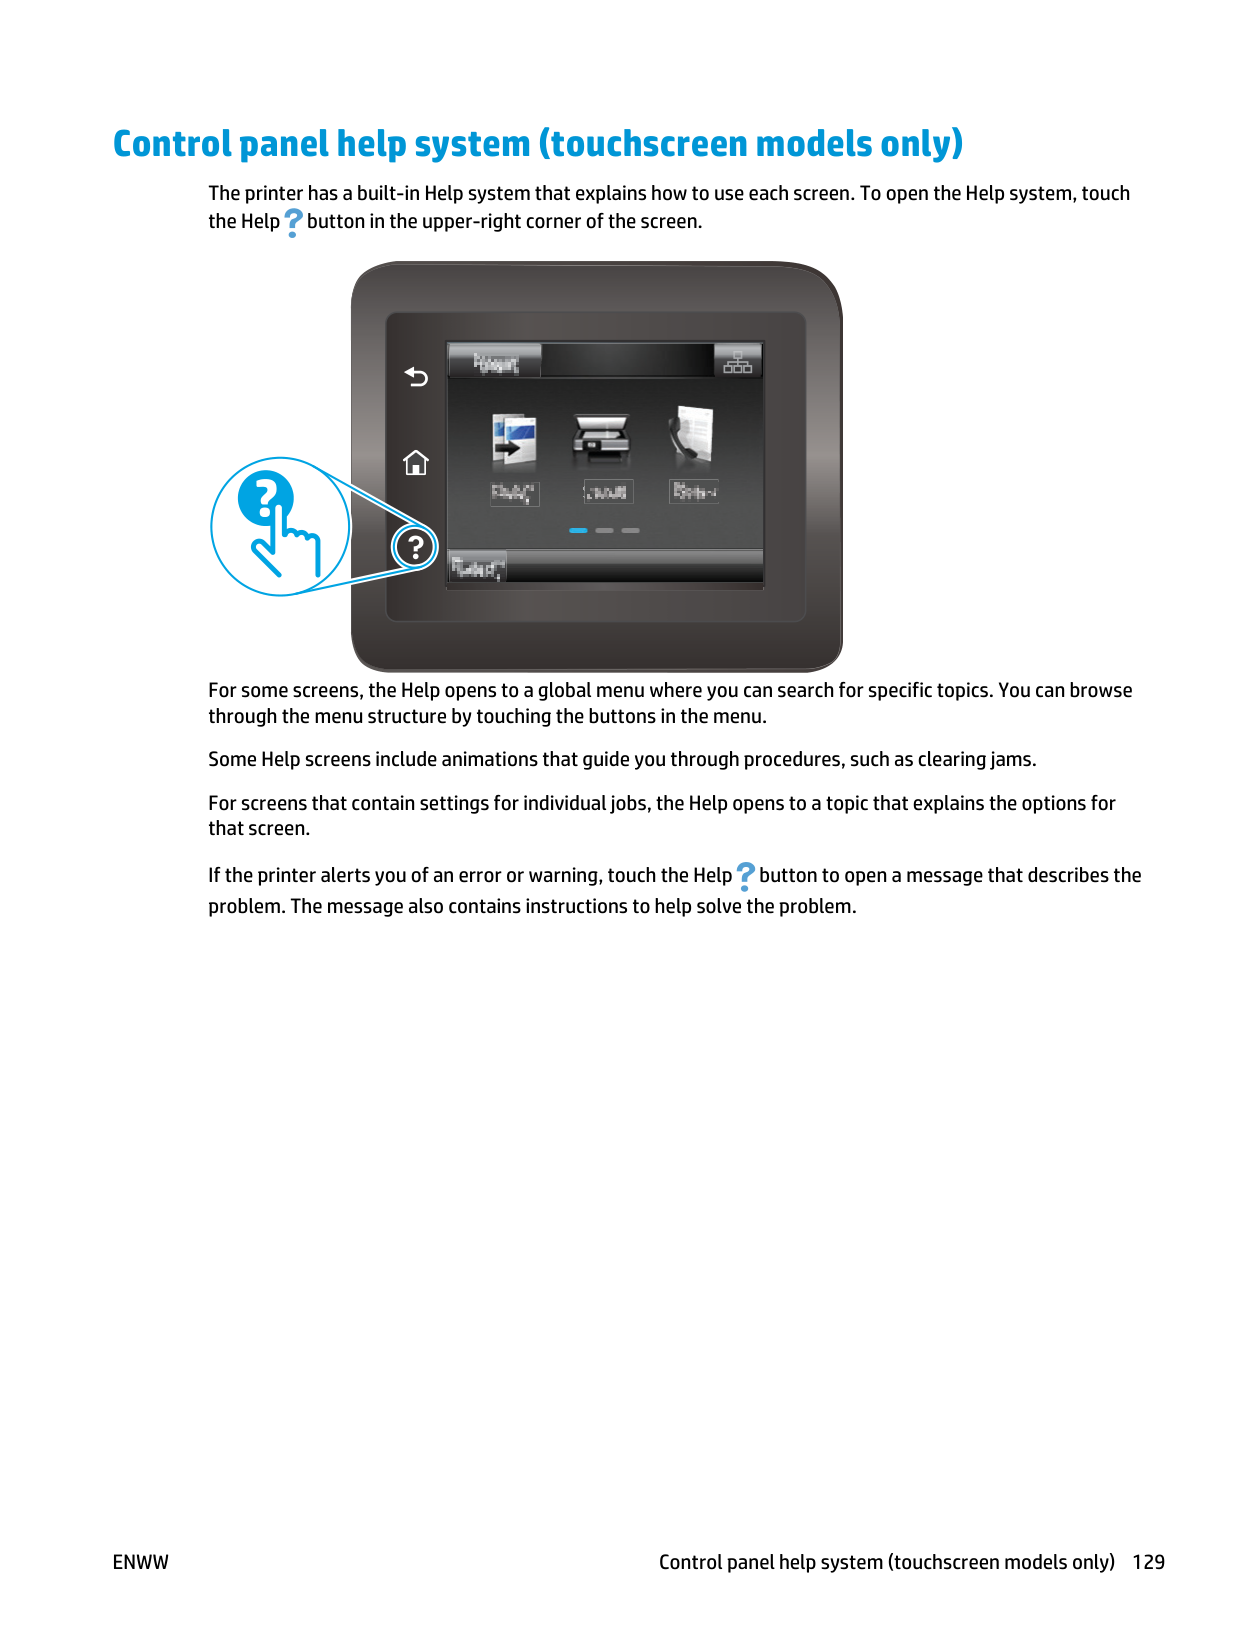
Control panel help system (touchscreen models only) The printer has a built-in Help system that explains how to use each screen. To open the Help system, touch the Help button in the upper-right corner of the screen. For some screens, the Help opens to a global menu where you can search for specific topics. You can browse through the menu structure by touching the buttons in the menu. Some Help screens include animations that guide you through procedures, such as clearing jams. For screens that contain settings for individual jobs, the Help opens to a topic that explains the options for that screen. If the printer alerts you of an error or warning, touch the Help button to open a message that describes the problem. The message also contains instructions to help solve the problem.
Enww
Control panel help system (touchscreen models only) 129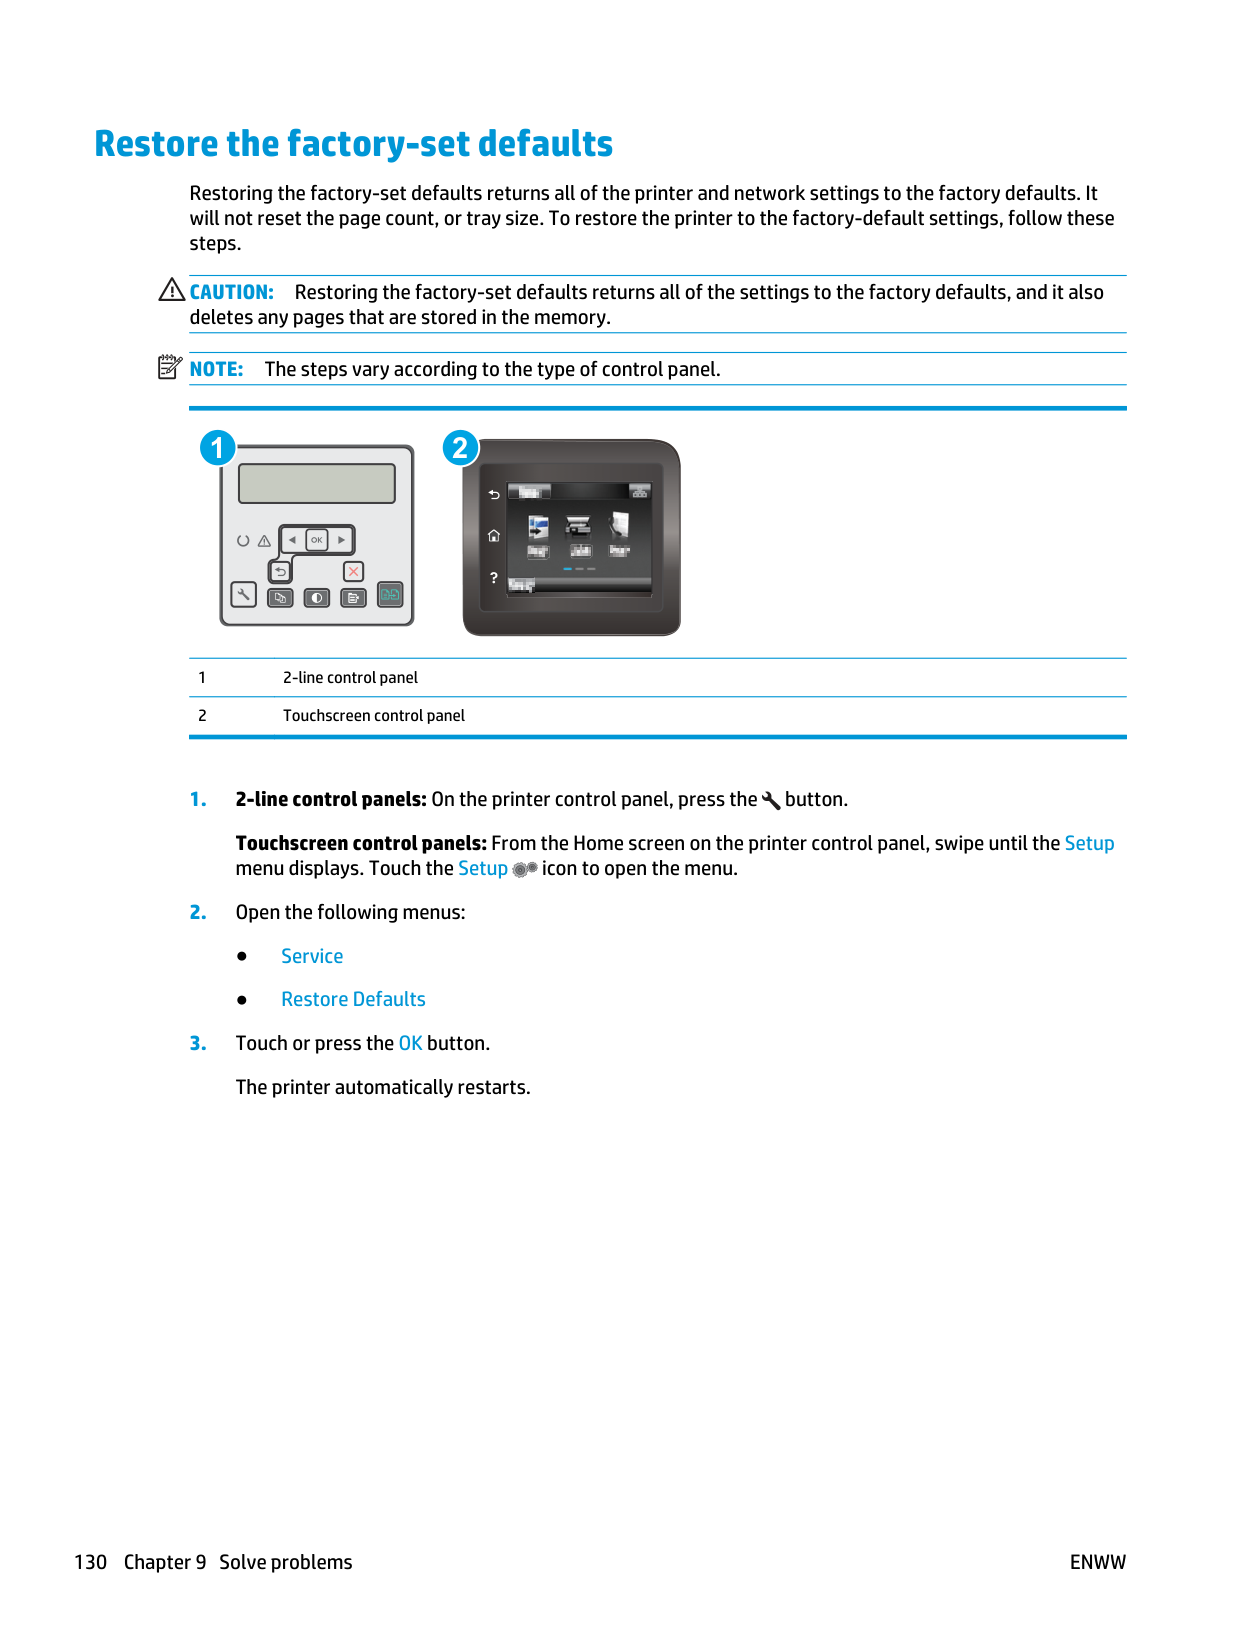
Restore the factory-set defaults Restoring the factory-set defaults returns all of the printer and network settings to the factory defaults. It will not reset the page count, or tray size. To restore the printer to the factory-default settings, follow these steps.
Caution:
Restoring the factory-set defaults returns all of the settings to the factory defaults, and it also deletes any pages that are stored in the memory.Note:
The steps vary according to the type of control panel. 1 2 1 2-line control panel 2 Touchscreen control panelEnww
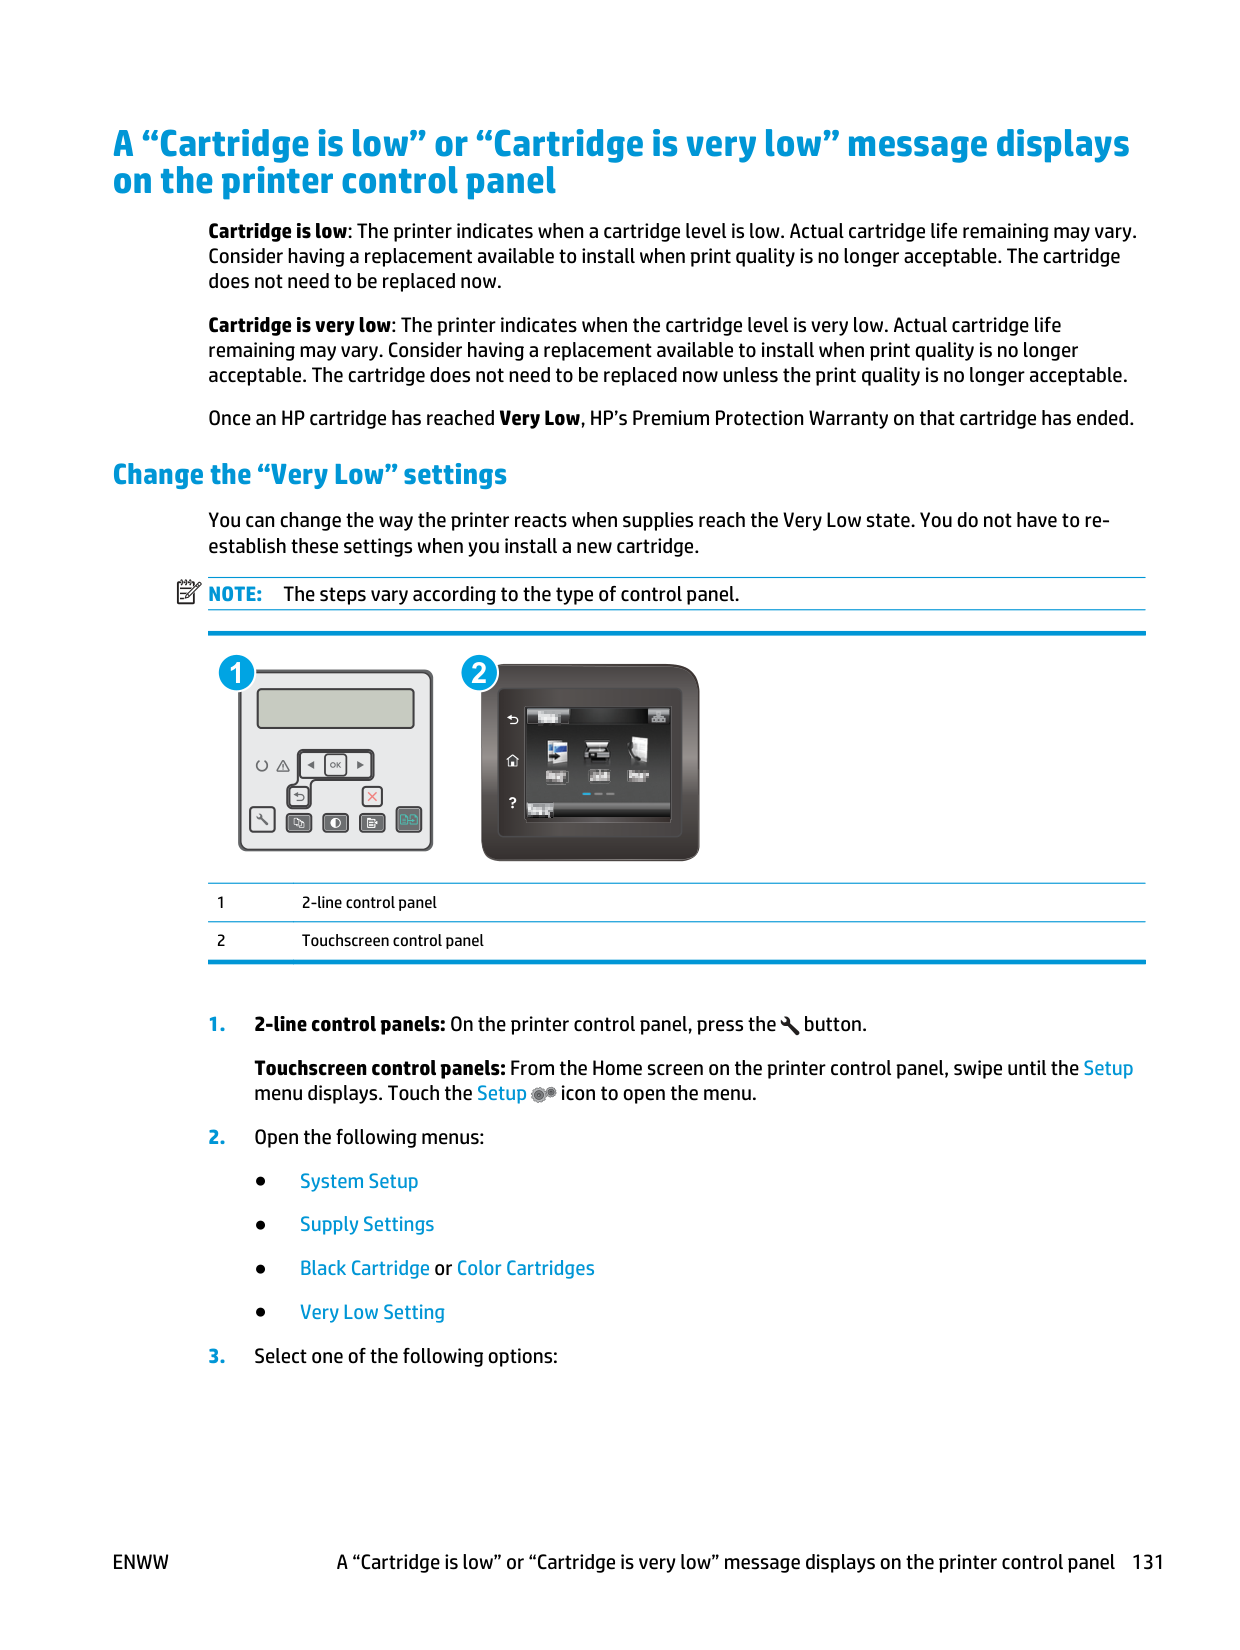
A “Cartridge is low” or “Cartridge is very low” message displays on the printer control panel Cartridge is low: The printer indicates when a cartridge level is low. Actual cartridge life remaining may vary. Consider having a replacement available to install when print quality is no longer acceptable. The cartridge does not need to be replaced now. Cartridge is very low: The printer indicates when the cartridge level is very low. Actual cartridge life remaining may vary. Consider having a replacement available to install when print quality is no longer acceptable. The cartridge does not need to be replaced now unless the print quality is no longer acceptable. Once an HP cartridge has reached Very Low, HP’s Premium Protection Warranty on that cartridge has ended. Change the “Very Low” settings You can change the way the printer reacts when supplies reach the Very Low state. You do not have to re- establish these settings when you install a new cartridge.
Note:
The steps vary according to the type of control panel. 1 2 1 2-line control panel 2 Touchscreen control panelEnww
A “Cartridge is low” or “Cartridge is very low” message displays on the printer control panel 131
● Select the Continue option to set the printer to alert you that the cartridge is very low, but to continue printing. ● Select the Stop option to set the printer to stop printing until you replace the cartridge. ● Select the Prompt option to set the printer to stop printing and prompt you to replace the cartridge. You can acknowledge the prompt and continue printing. A customer configurable option on this printer is "Prompt to Remind Me in 100 pages, 200 pages, 300 pages, 400 pages, or never." This option is provided as a customer convenience and is not an indication these pages will have acceptable print quality. For printers with fax capability When the printer is set to the Stop or Prompt option, there is some risk that faxes will not print when the printer resumes printing. This can occur if the printer has received more faxes than the memory can hold while the printer is waiting. The printer can print faxes without interruption when it passes the Very Low threshold if you select the Continue option for the cartridge, but print quality might degrade. Order supplies Order supplies and paper www.hp.com/go/suresupply Order through service or support providers Contact an HP-authorized service or support provider. Order using the HP Embedded Web Server (EWS) To access, in a supported web browser on your computer, enter the printer IP address or host name in the address/URL field. The EWS contains a link to the HP SureSupply website, which provides options for purchasing Original HP supplies. 132 Chapter 9 Solve problems
Enww
Printer does not pick up paper or misfeeds Introduction The following solutions can help solve problems if the printer is not picking up paper from the tray or is picking up multiple sheets of paper at one time. Either of these situations can result in paper jams. ● The printer does not pick up paper ● The printer picks up multiple sheets of paper ● The document feeder jams, skews, or picks up multiple sheets of paper The printer does not pick up paper If the printer does not pick up paper from the tray, try these solutions.
Note:
Do not adjust the paper guides tightly against the paper stack. Adjust them to the indentations or markings in the tray.Enww
Printer does not pick up paper or misfeeds 133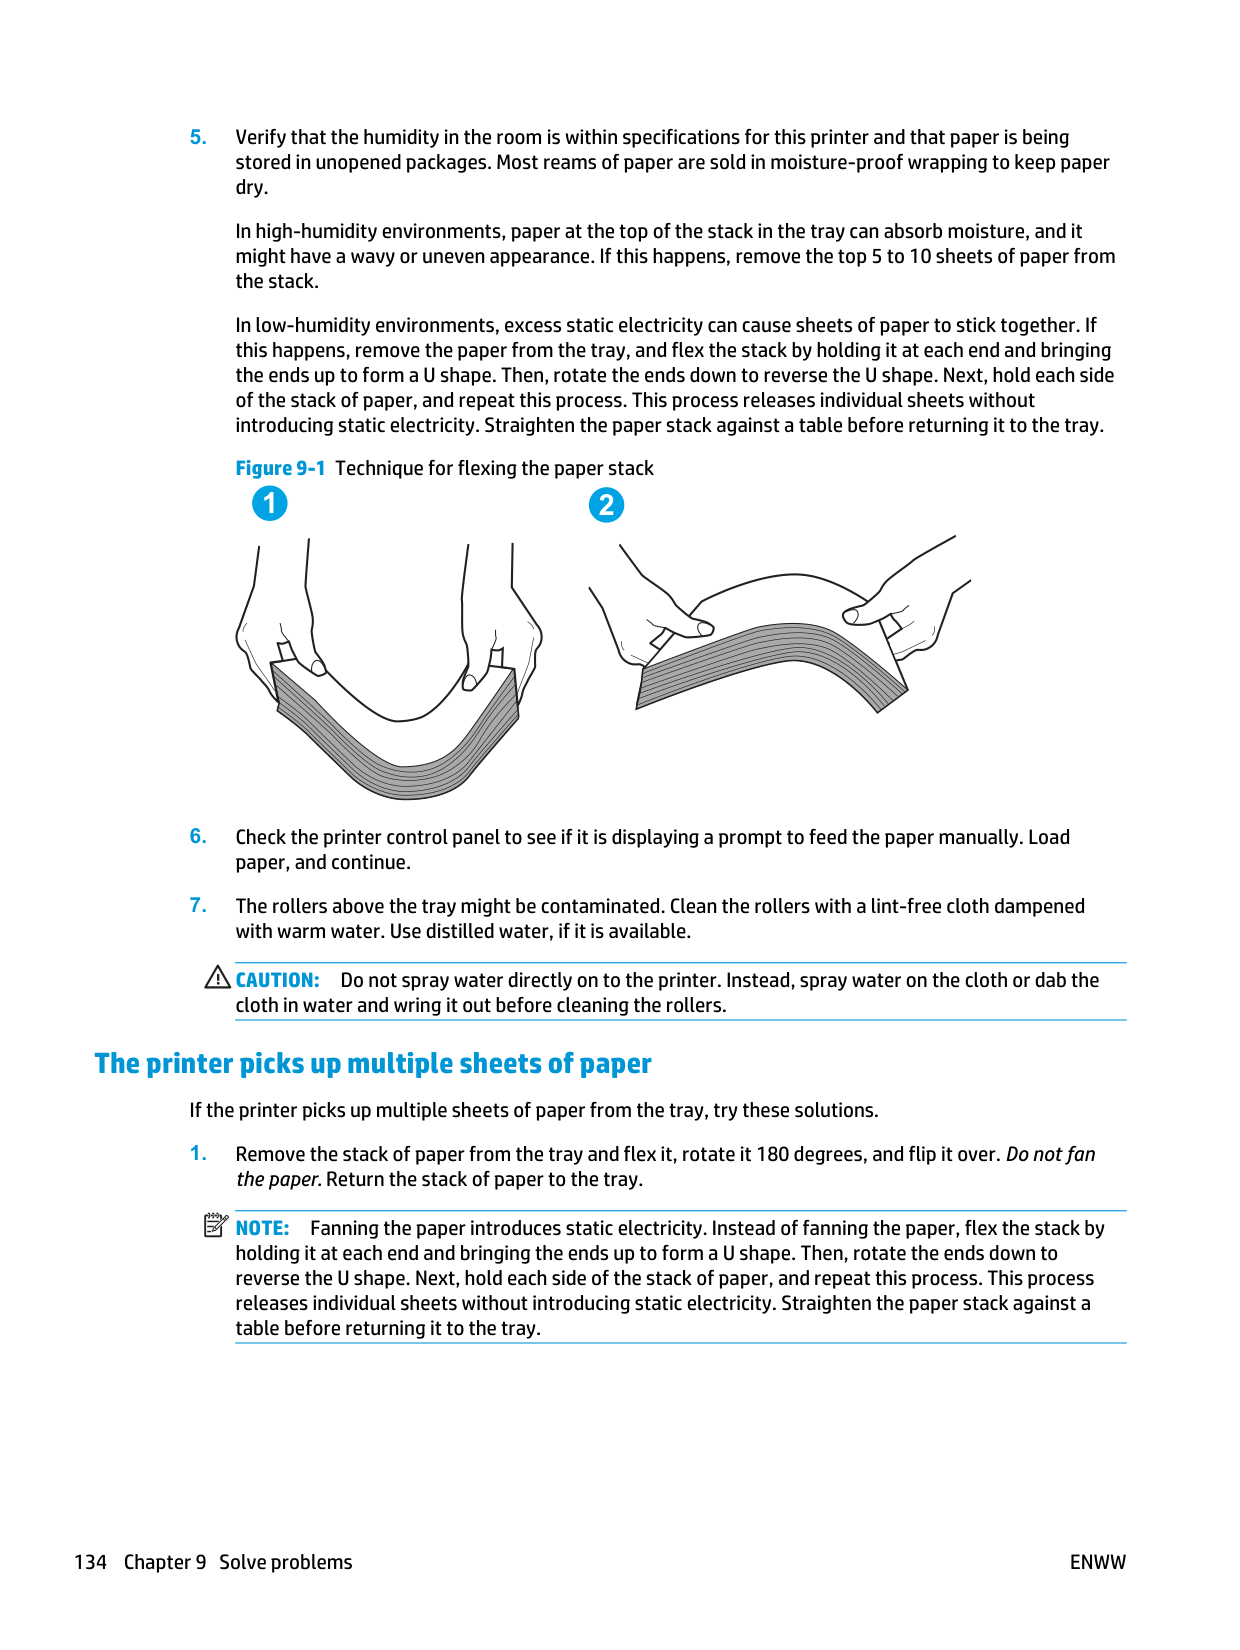
Caution:
Do not spray water directly on to the printer. Instead, spray water on the cloth or dab the cloth in water and wring it out before cleaning the rollers. The printer picks up multiple sheets of paper If the printer picks up multiple sheets of paper from the tray, try these solutions.Note:
Fanning the paper introduces static electricity. Instead of fanning the paper, flex the stack by holding it at each end and bringing the ends up to form a U shape. Then, rotate the ends down to reverse the U shape. Next, hold each side of the stack of paper, and repeat this process. This process releases individual sheets without introducing static electricity. Straighten the paper stack against a table before returning it to the tray. 134 Chapter 9 Solve problemsEnww
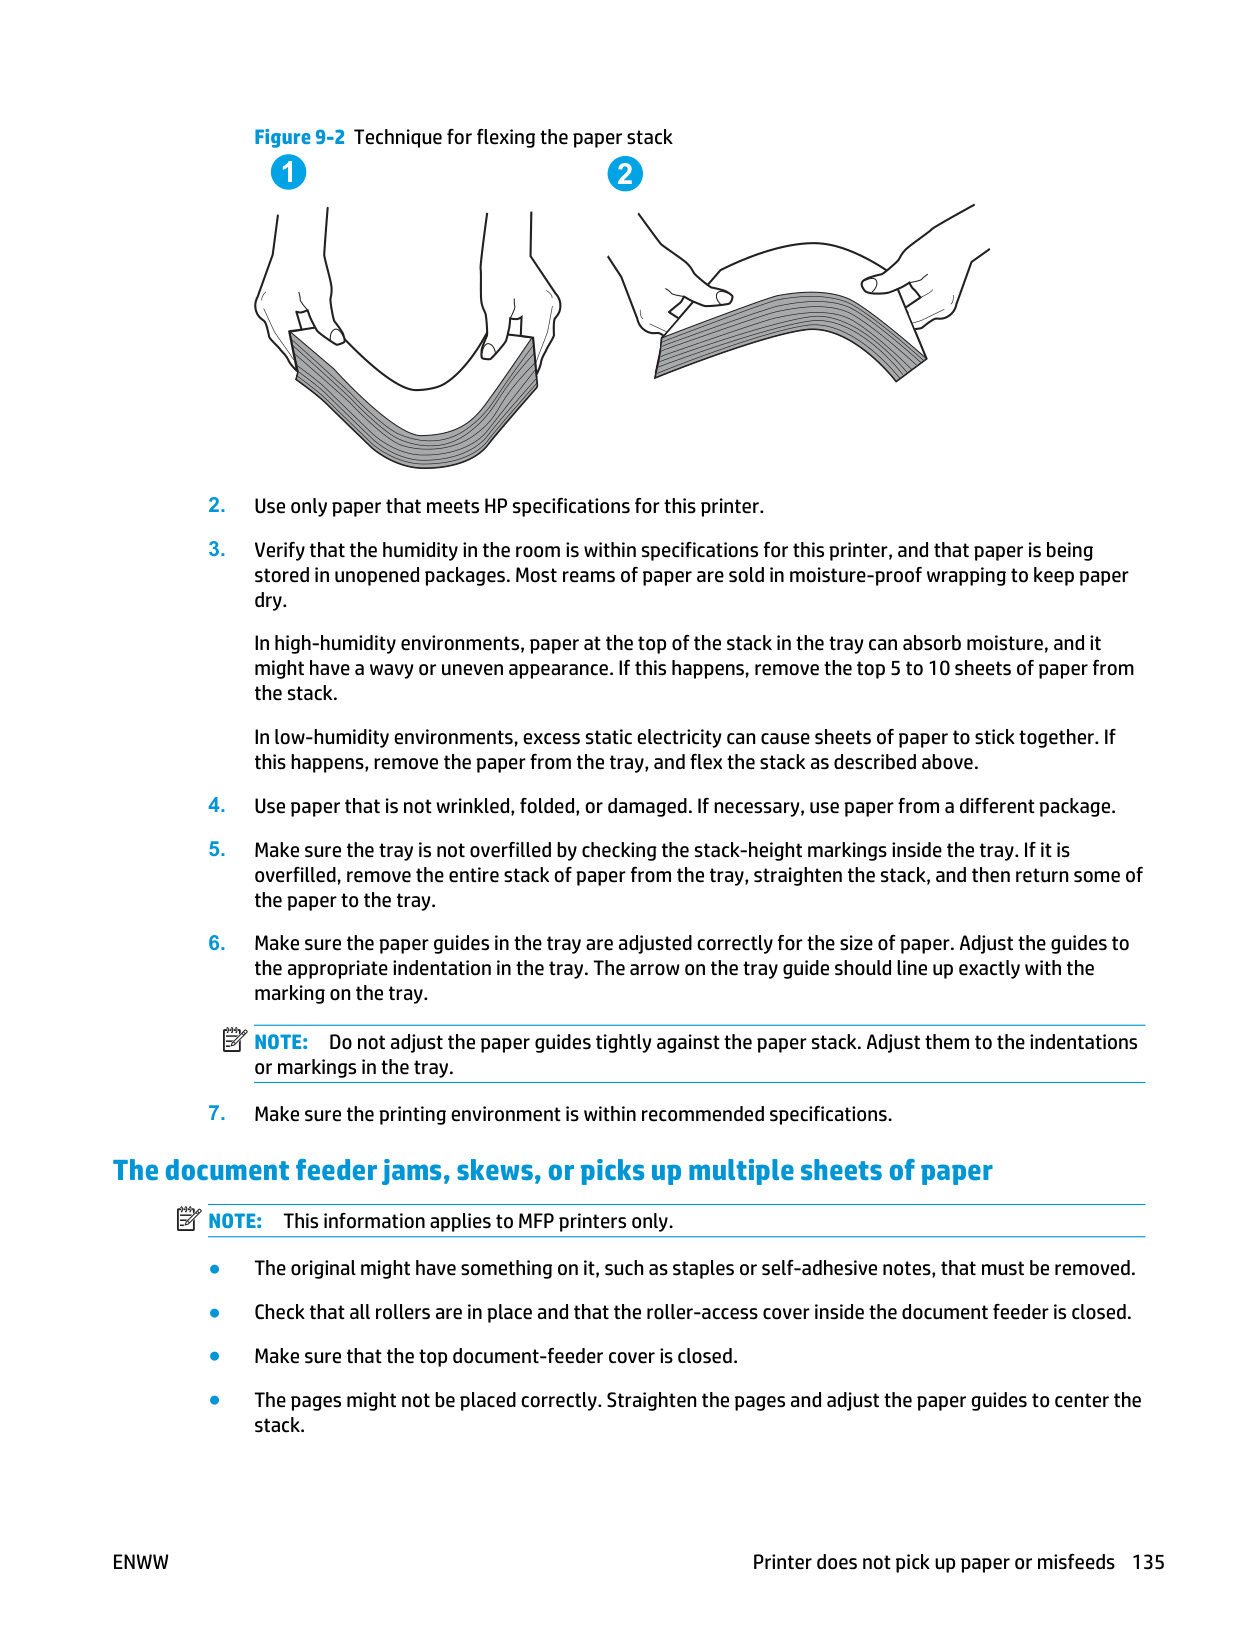
Figure 9-2 Technique for flexing the paper stack 1 2
Note:
Do not adjust the paper guides tightly against the paper stack. Adjust them to the indentations or markings in the tray.Note:
This information applies to MFP printers only. ● The original might have something on it, such as staples or self-adhesive notes, that must be removed. ● Check that all rollers are in place and that the roller-access cover inside the document feeder is closed. ● Make sure that the top document-feeder cover is closed. ● The pages might not be placed correctly. Straighten the pages and adjust the paper guides to center the stack.Enww
Printer does not pick up paper or misfeeds 135
● The paper guides must be touching the sides of the paper stack to work correctly. Make sure that the paper stack is straight and the guides are against the paper stack. ● The document feeder input tray or output bin might contain more than the maximum number of pages. Make sure the paper stack fits below the guides in the input tray, and remove pages from the output bin. ● Verify that there are no pieces of paper, staples, paper clips, or other debris in the paper path. ● Clean the document-feeder rollers and the separation pad. Use compressed air or a clean, lint-free cloth moistened with warm water. If misfeeds still occur, replace the rollers. ● From the Home screen on the printer control panel, scroll to and touch the Supplies button. Check the status of the document-feeder kit, and replace it if necessary. 136 Chapter 9 Solve problems
Enww
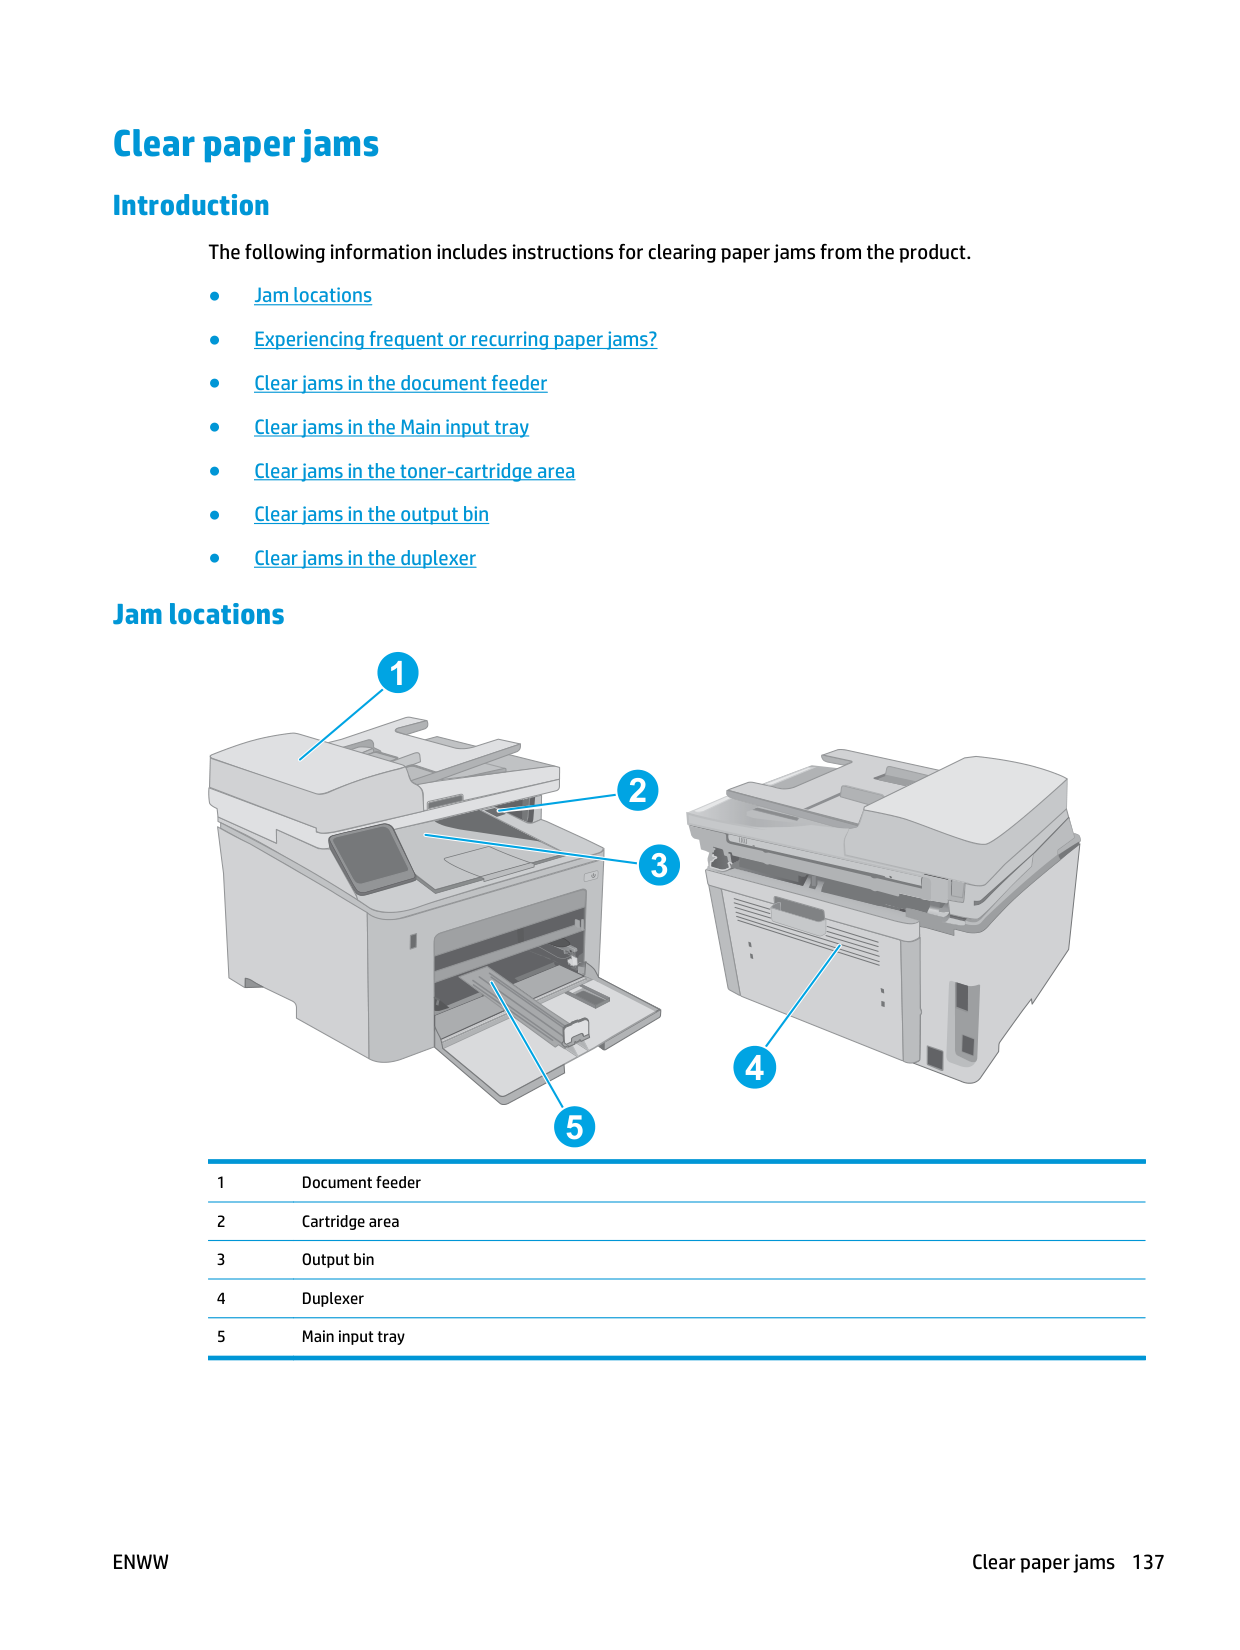
Clear paper jams Introduction The following information includes instructions for clearing paper jams from the product. ● Jam locations ● Experiencing frequent or recurring paper jams? ● Clear jams in the document feeder ● Clear jams in the Main input tray ● Clear jams in the toner-cartridge area ● Clear jams in the output bin ● Clear jams in the duplexer Jam locations 4 1 5 2 3 1 Document feeder 2 Cartridge area 3 Output bin 4 Duplexer 5 Main input tray
Enww
Clear paper jams 137
Experiencing frequent or recurring paper jams? Follow these steps to solve problems with frequent paper jams. If the first step does not resolve the problem continue with the next step until you have resolved the problem.
Note:
The steps vary according to the type of control panel. 1 2 1 2-line control panel 2 Touchscreen control panelEnww
c. Select the Cleaning Page option. d. Load plain letter or A4 paper when you are prompted. Wait until the process is complete. Discard the page that prints.
Enww
Clear paper jams 139
Clear jams in the document feeder The following information describes how to clear paper jams in the document feeder. When a jam occurs, 2- line control panel displays an error message and the touchscreen control panel displays an animation that assists in clearing the jam.
140 Chapter 9 Solve problems
Enww
Enww
Clear paper jams 141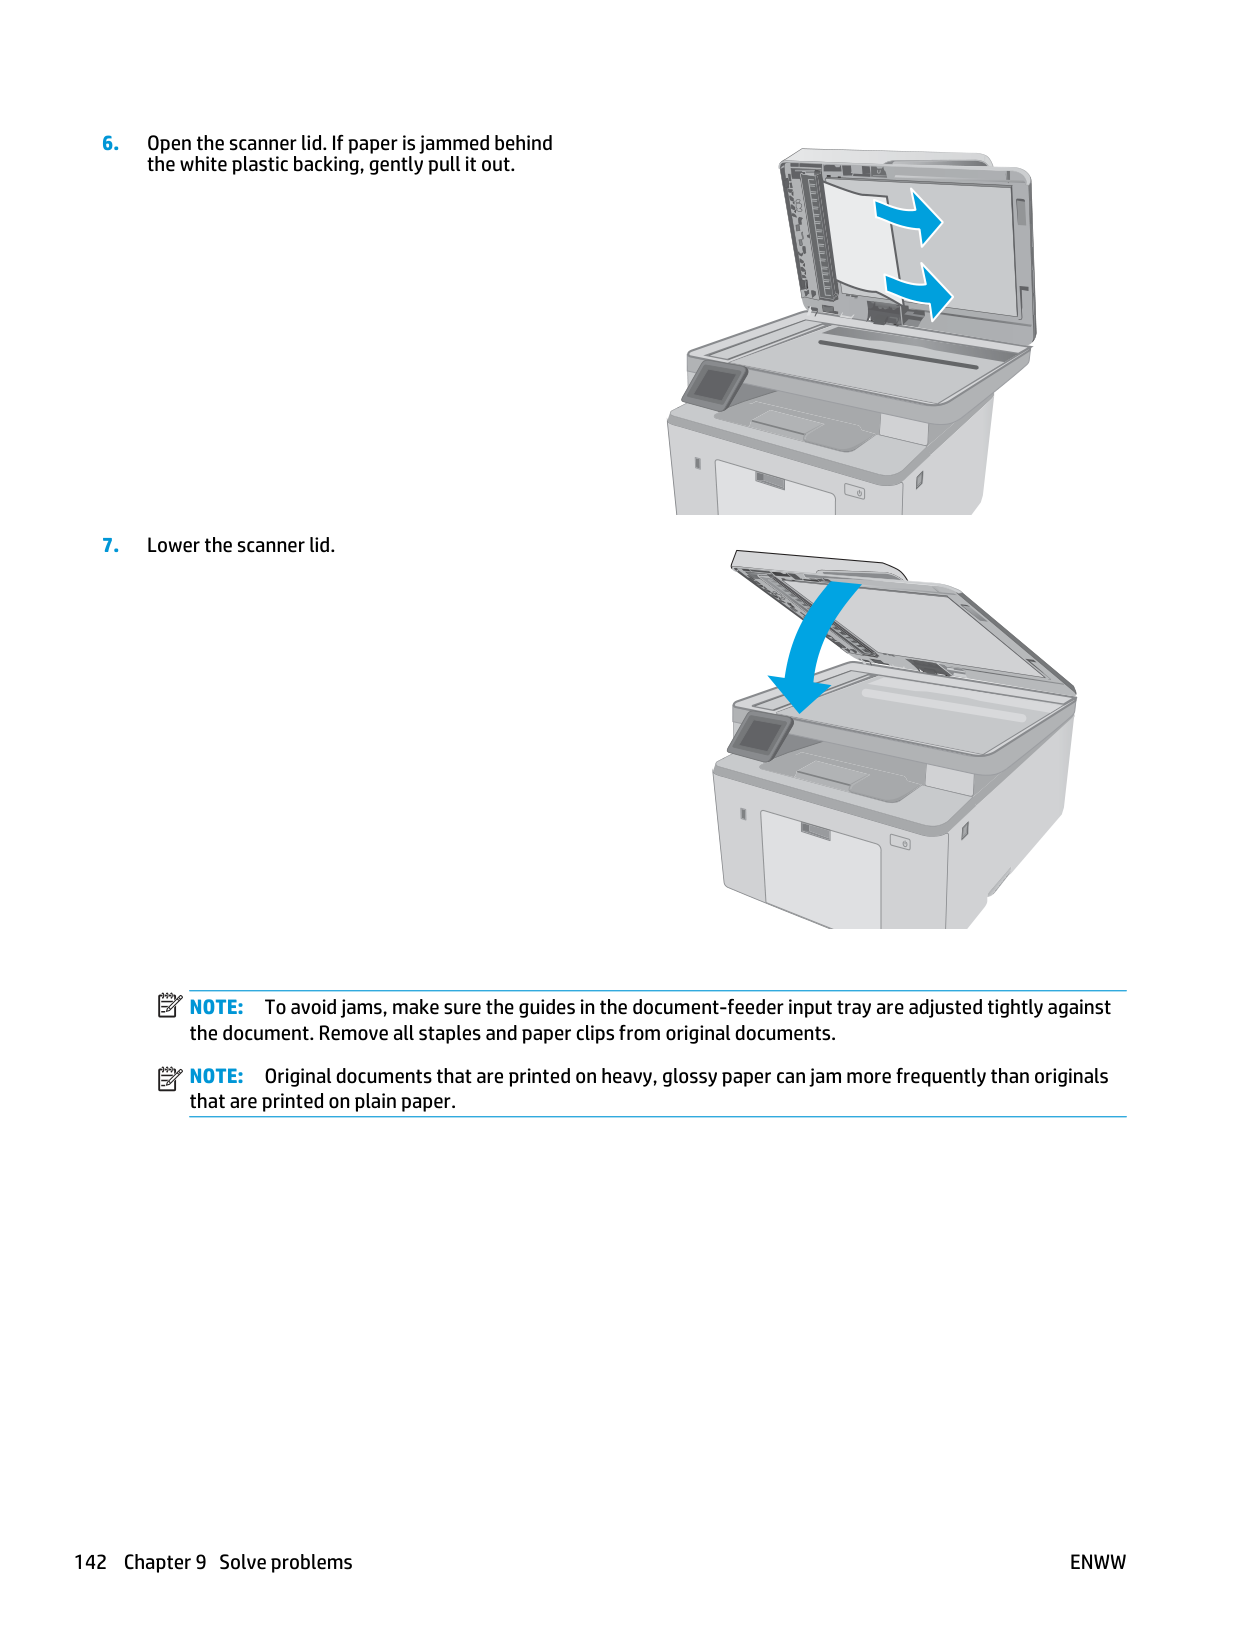
Hewlett-Packard
Hewlett-Packard
Note:
To avoid jams, make sure the guides in the document-feeder input tray are adjusted tightly against the document. Remove all staples and paper clips from original documents.Note:
Original documents that are printed on heavy, glossy paper can jam more frequently than originals that are printed on plain paper. 142 Chapter 9 Solve problemsEnww
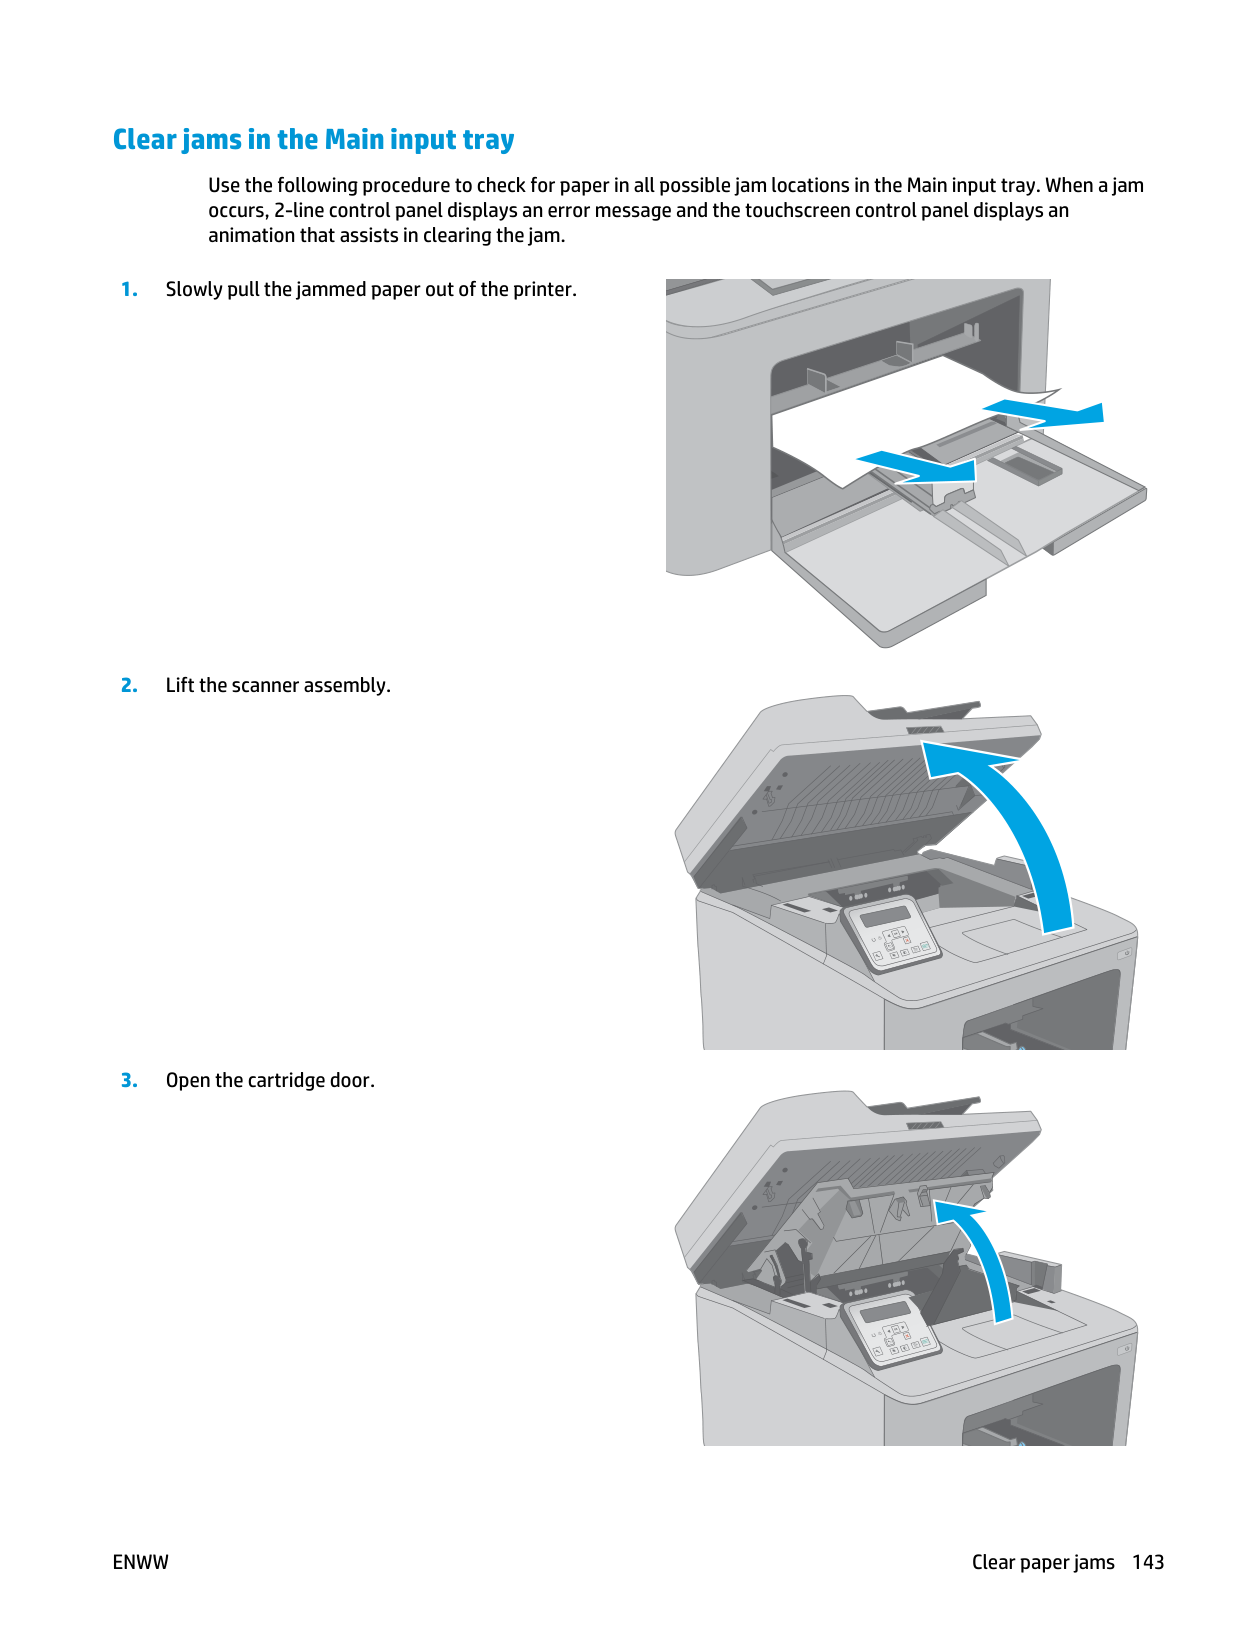
Clear jams in the Main input tray Use the following procedure to check for paper in all possible jam locations in the Main input tray. When a jam occurs, 2-line control panel displays an error message and the touchscreen control panel displays an animation that assists in clearing the jam.
Ok
Ok
Enww
Clear paper jams 143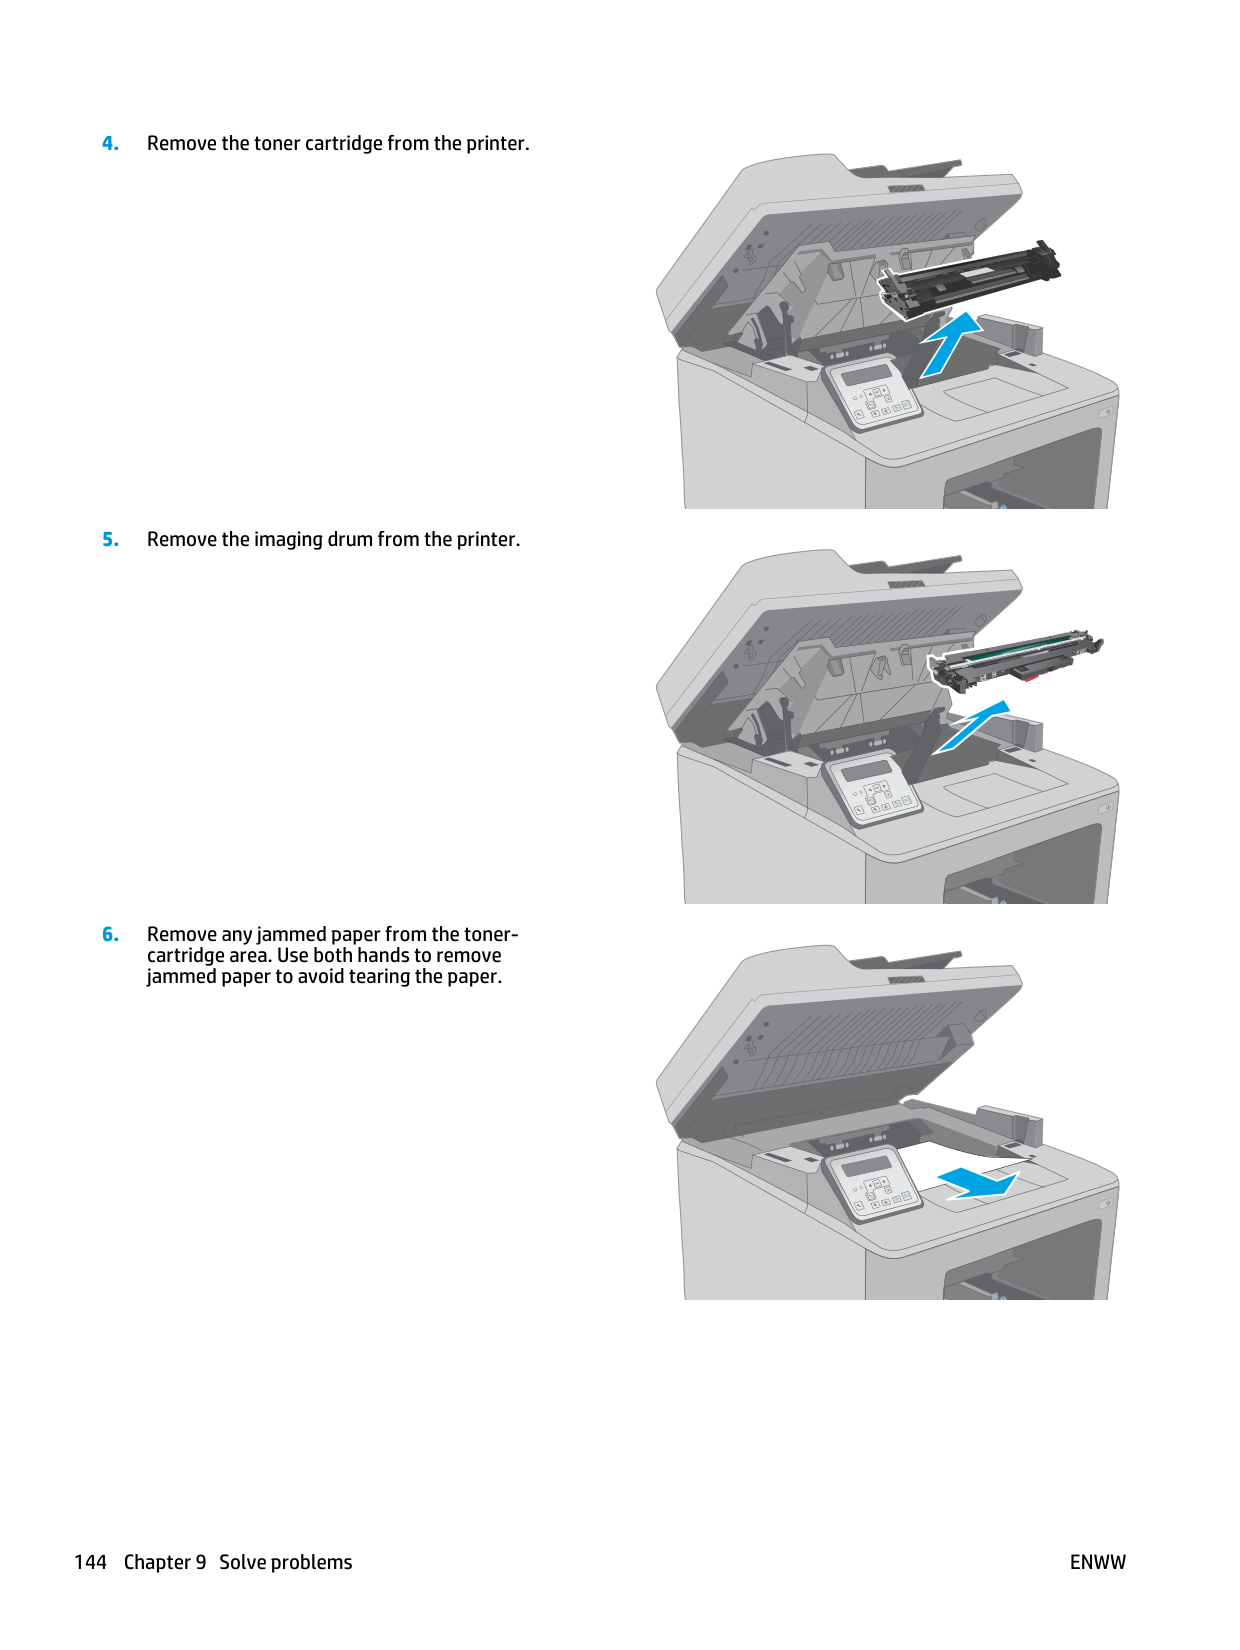
Ok
Ok
Ok
144 Chapter 9 Solve problemsEnww
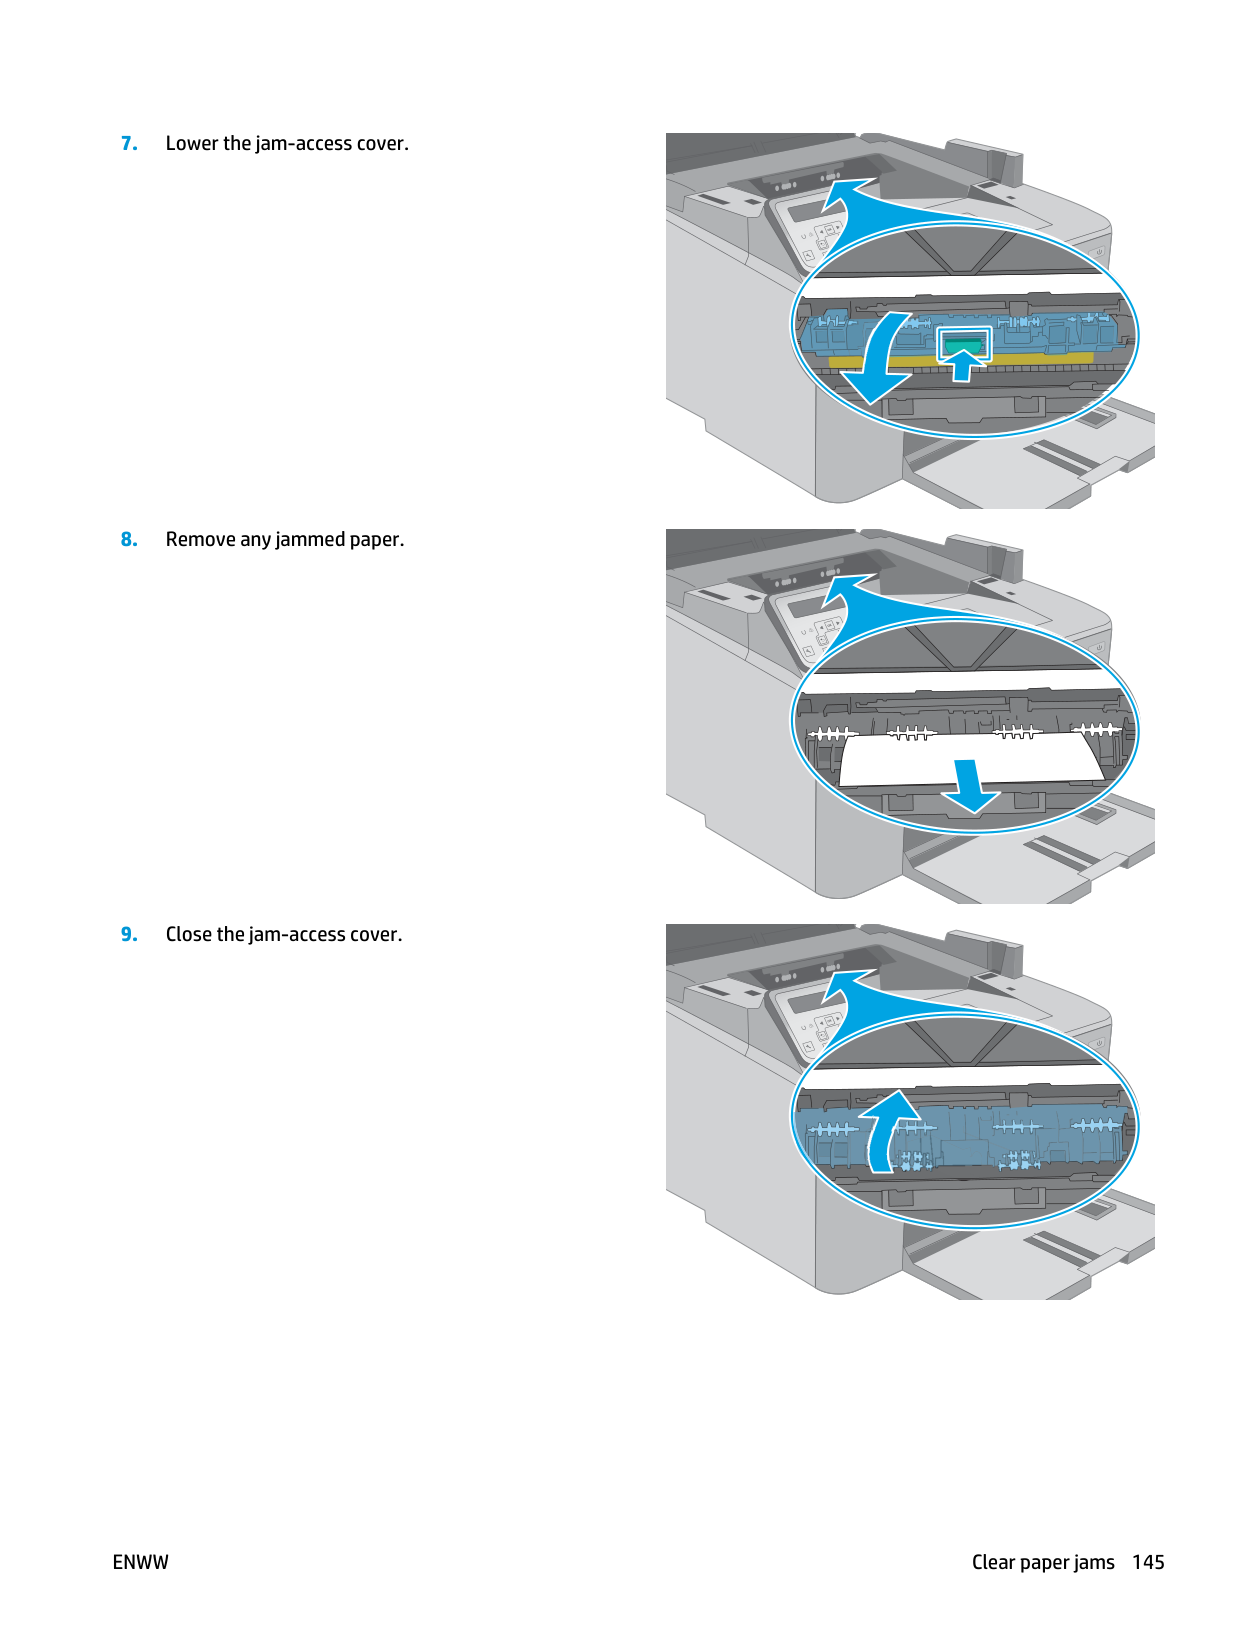
Ok
Ok
Ok
Enww
Clear paper jams 145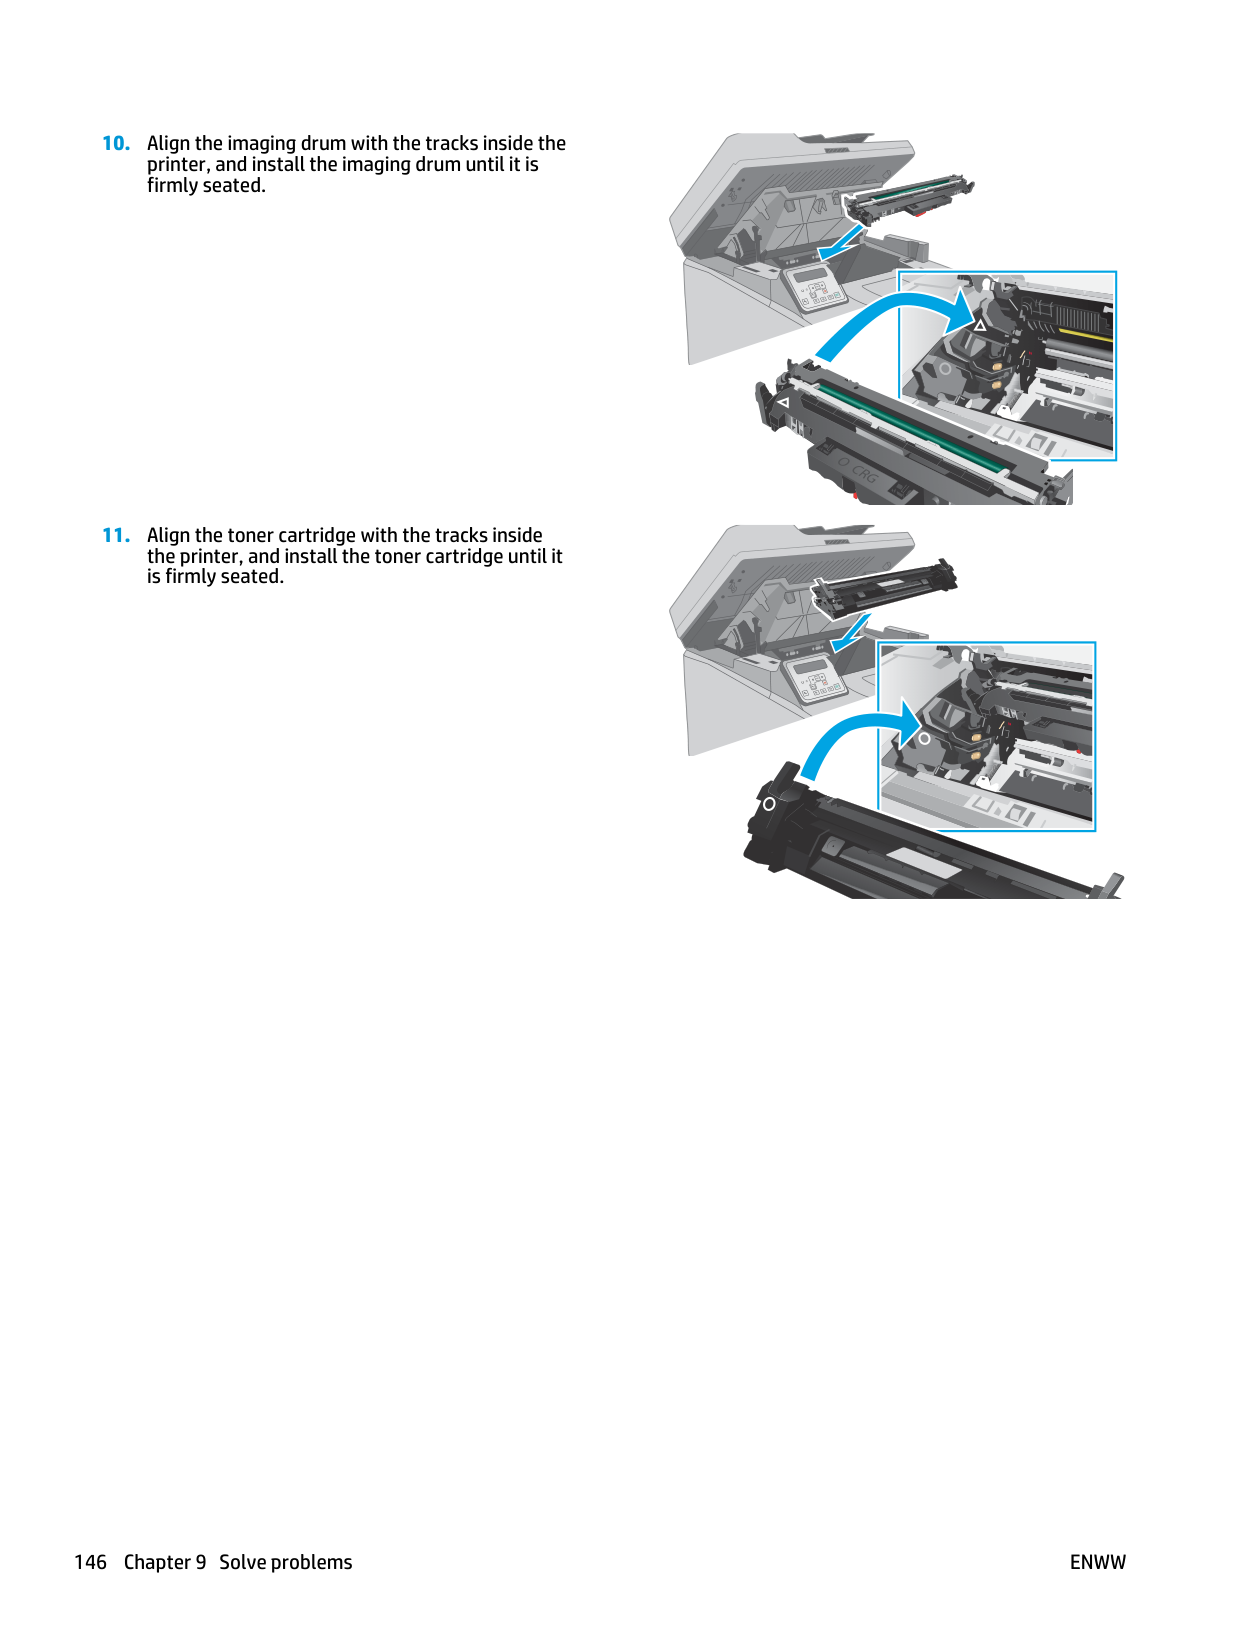
Ok
Ok
146 Chapter 9 Solve problemsEnww
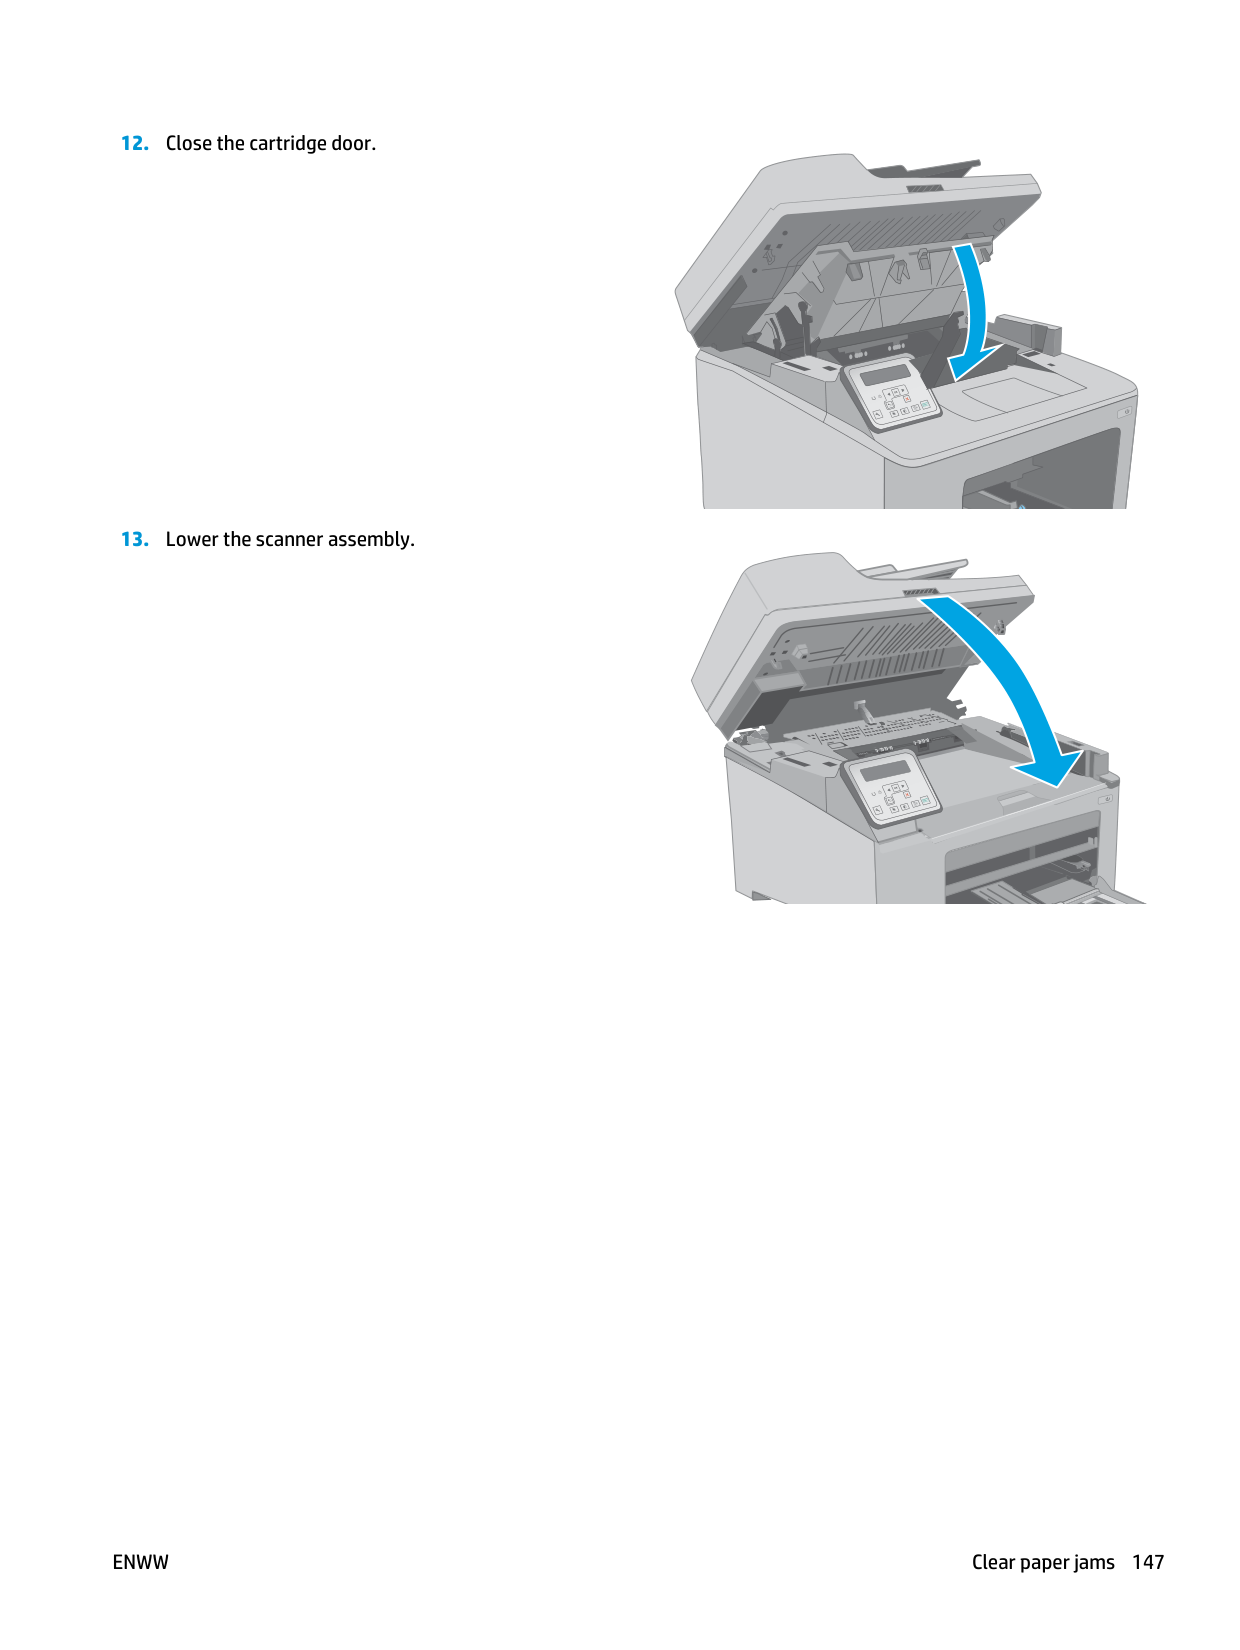
Ok
Ok
Enww
Clear paper jams 147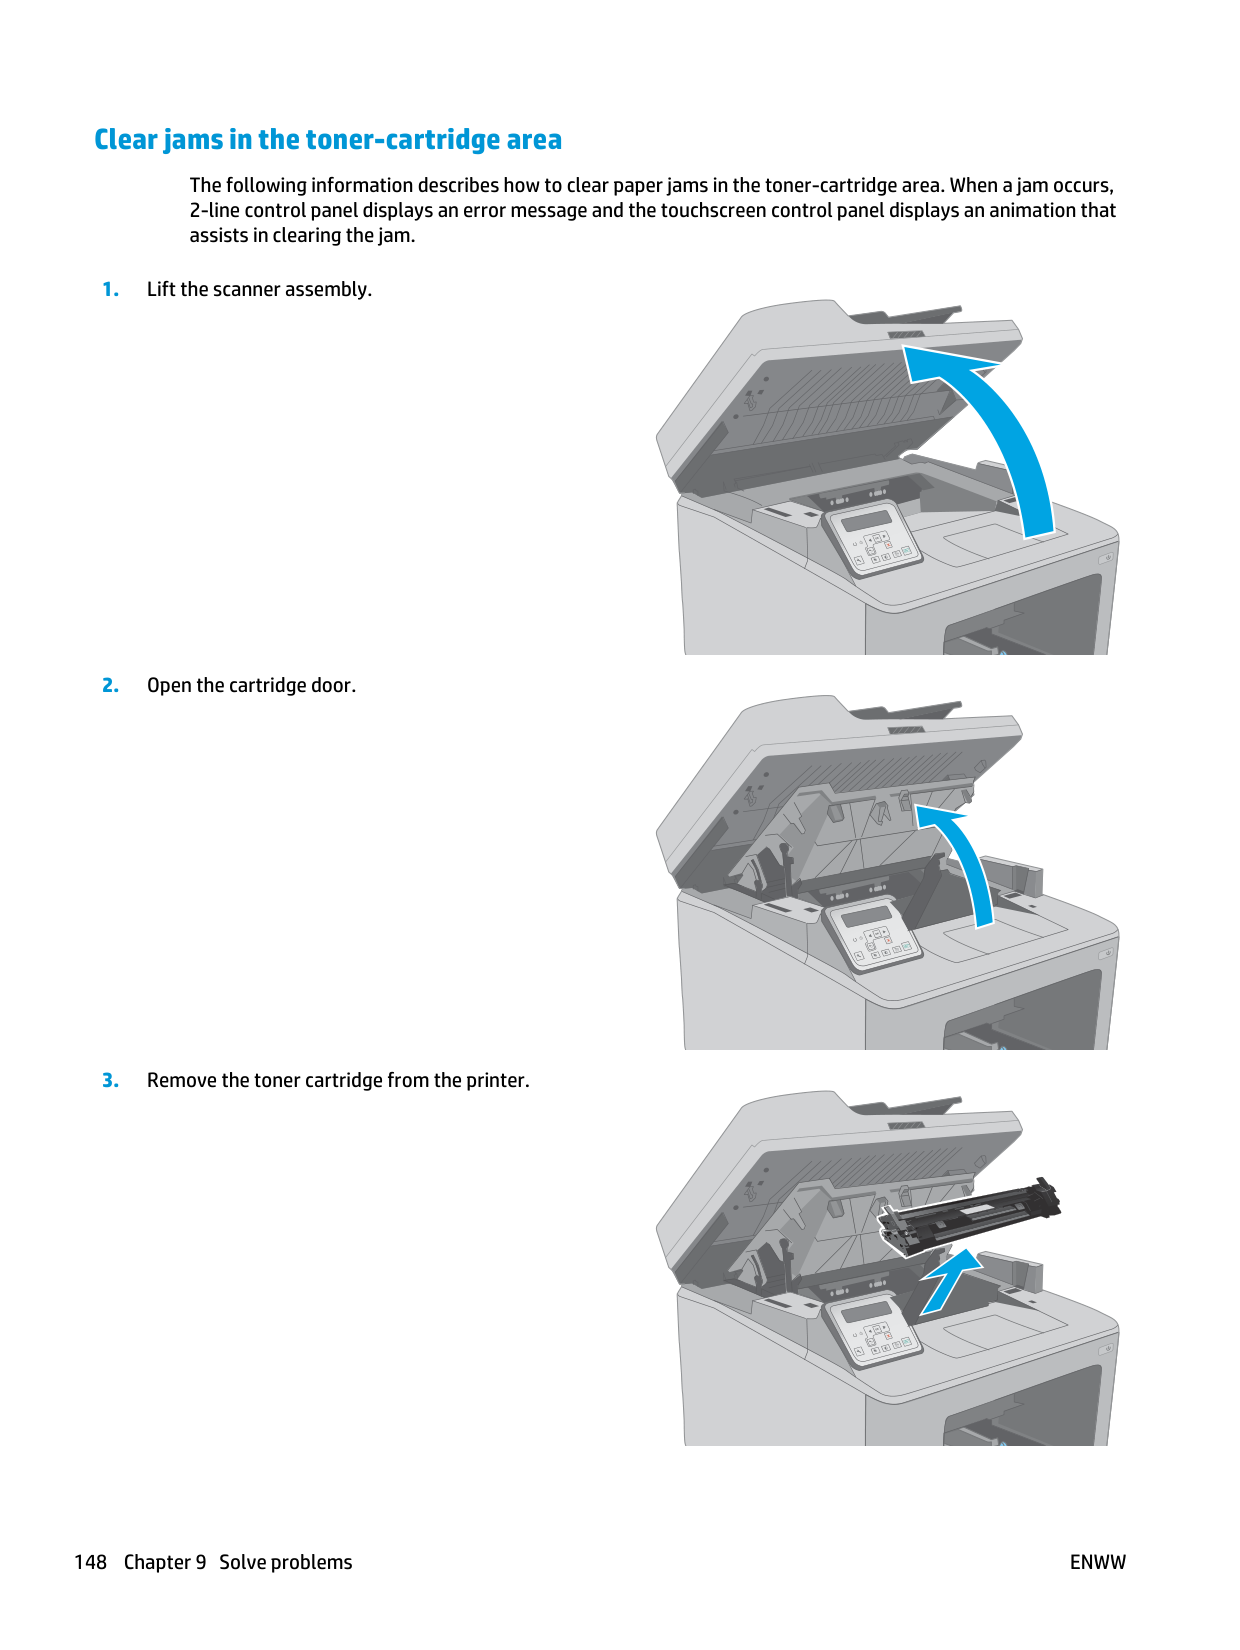
Clear jams in the toner-cartridge area The following information describes how to clear paper jams in the toner-cartridge area. When a jam occurs, 2-line control panel displays an error message and the touchscreen control panel displays an animation that assists in clearing the jam.
Ok
Ok
Ok
148 Chapter 9 Solve problemsEnww
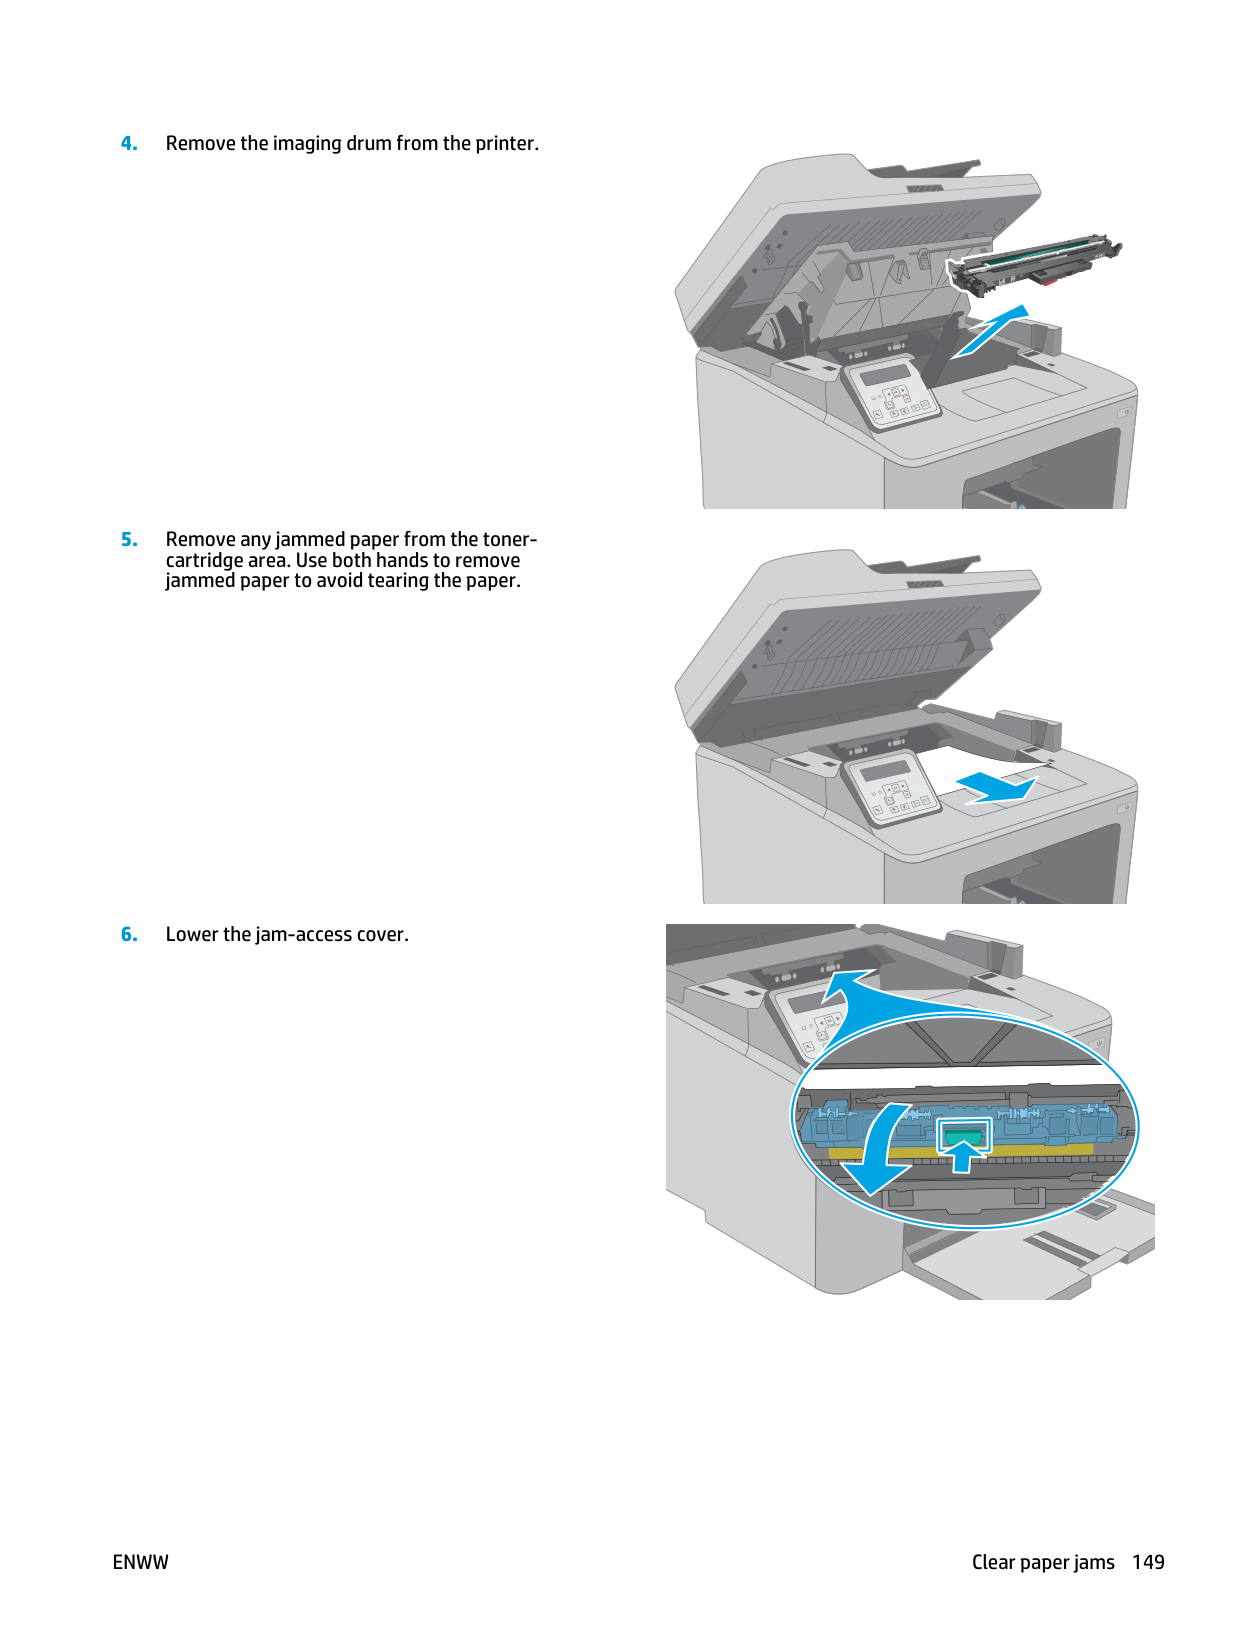
Ok
Ok
Ok
Enww
Clear paper jams 149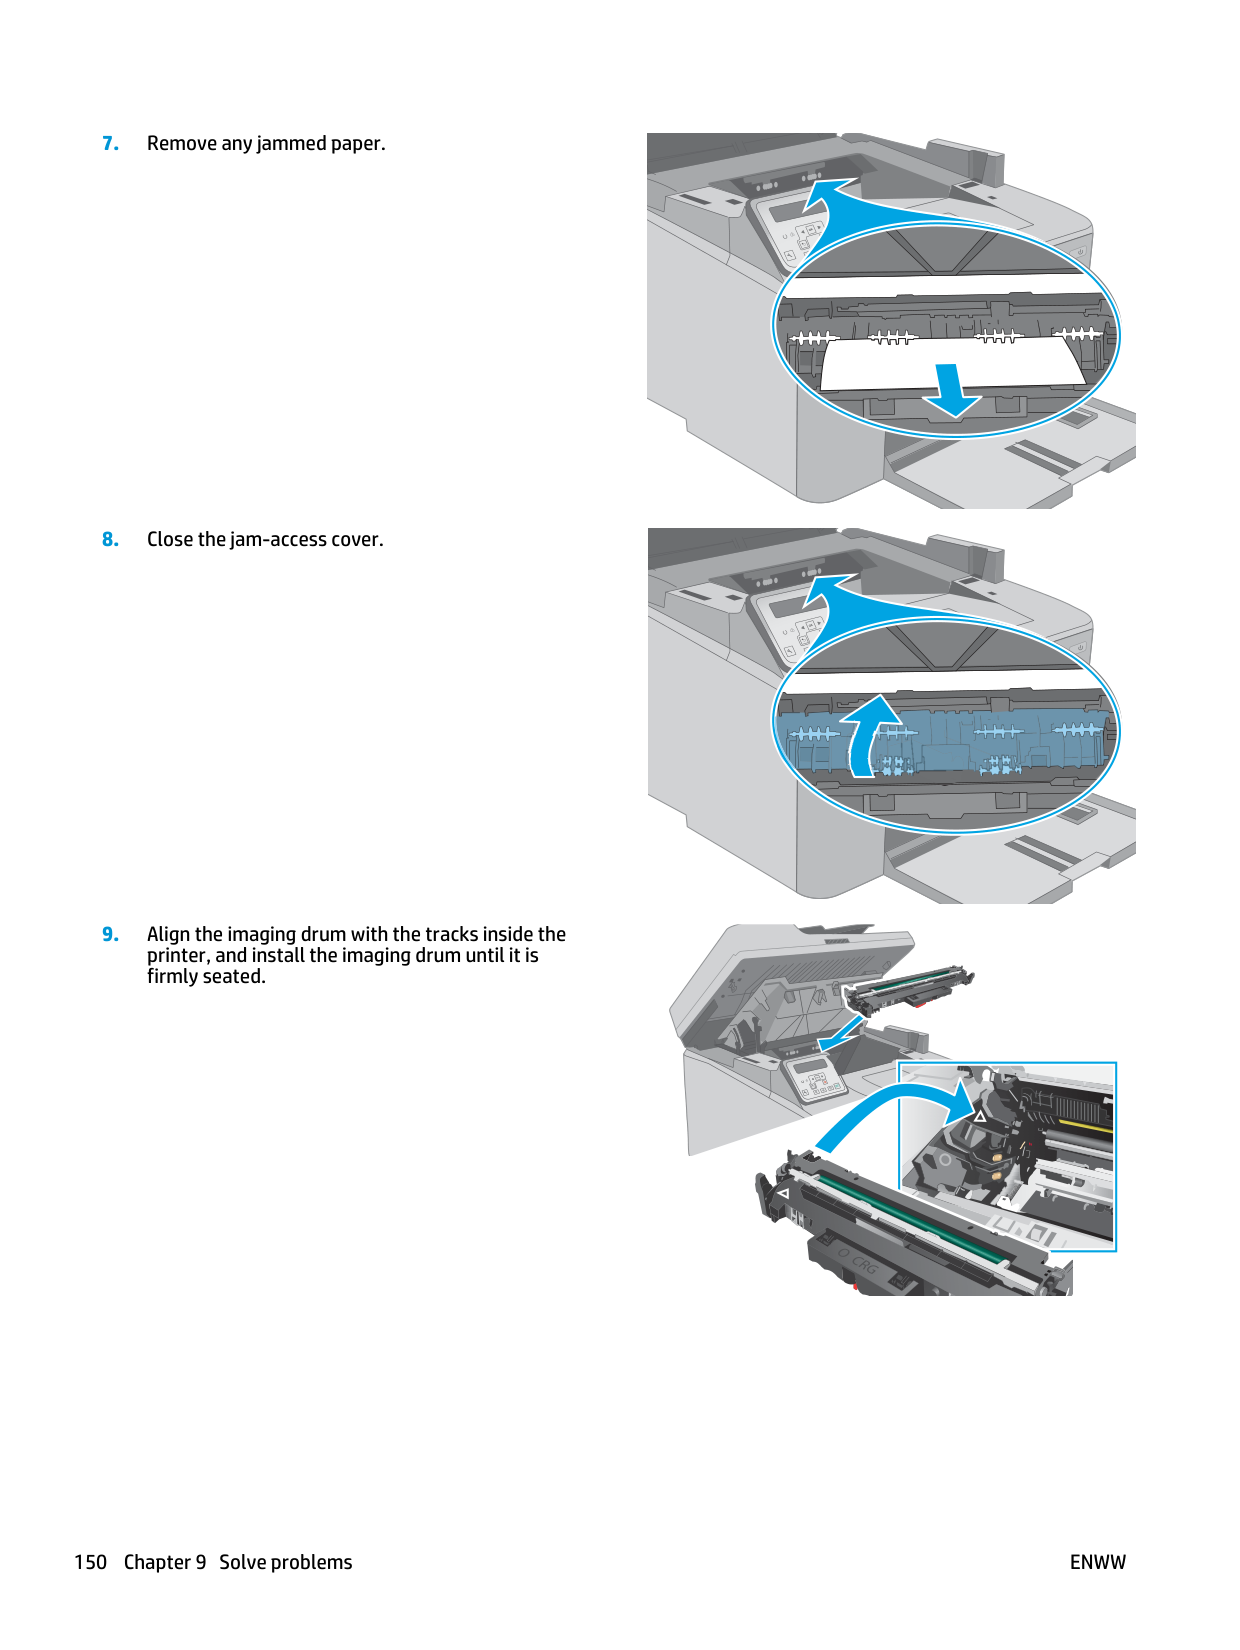
Ok
Ok
Ok
150 Chapter 9 Solve problemsEnww
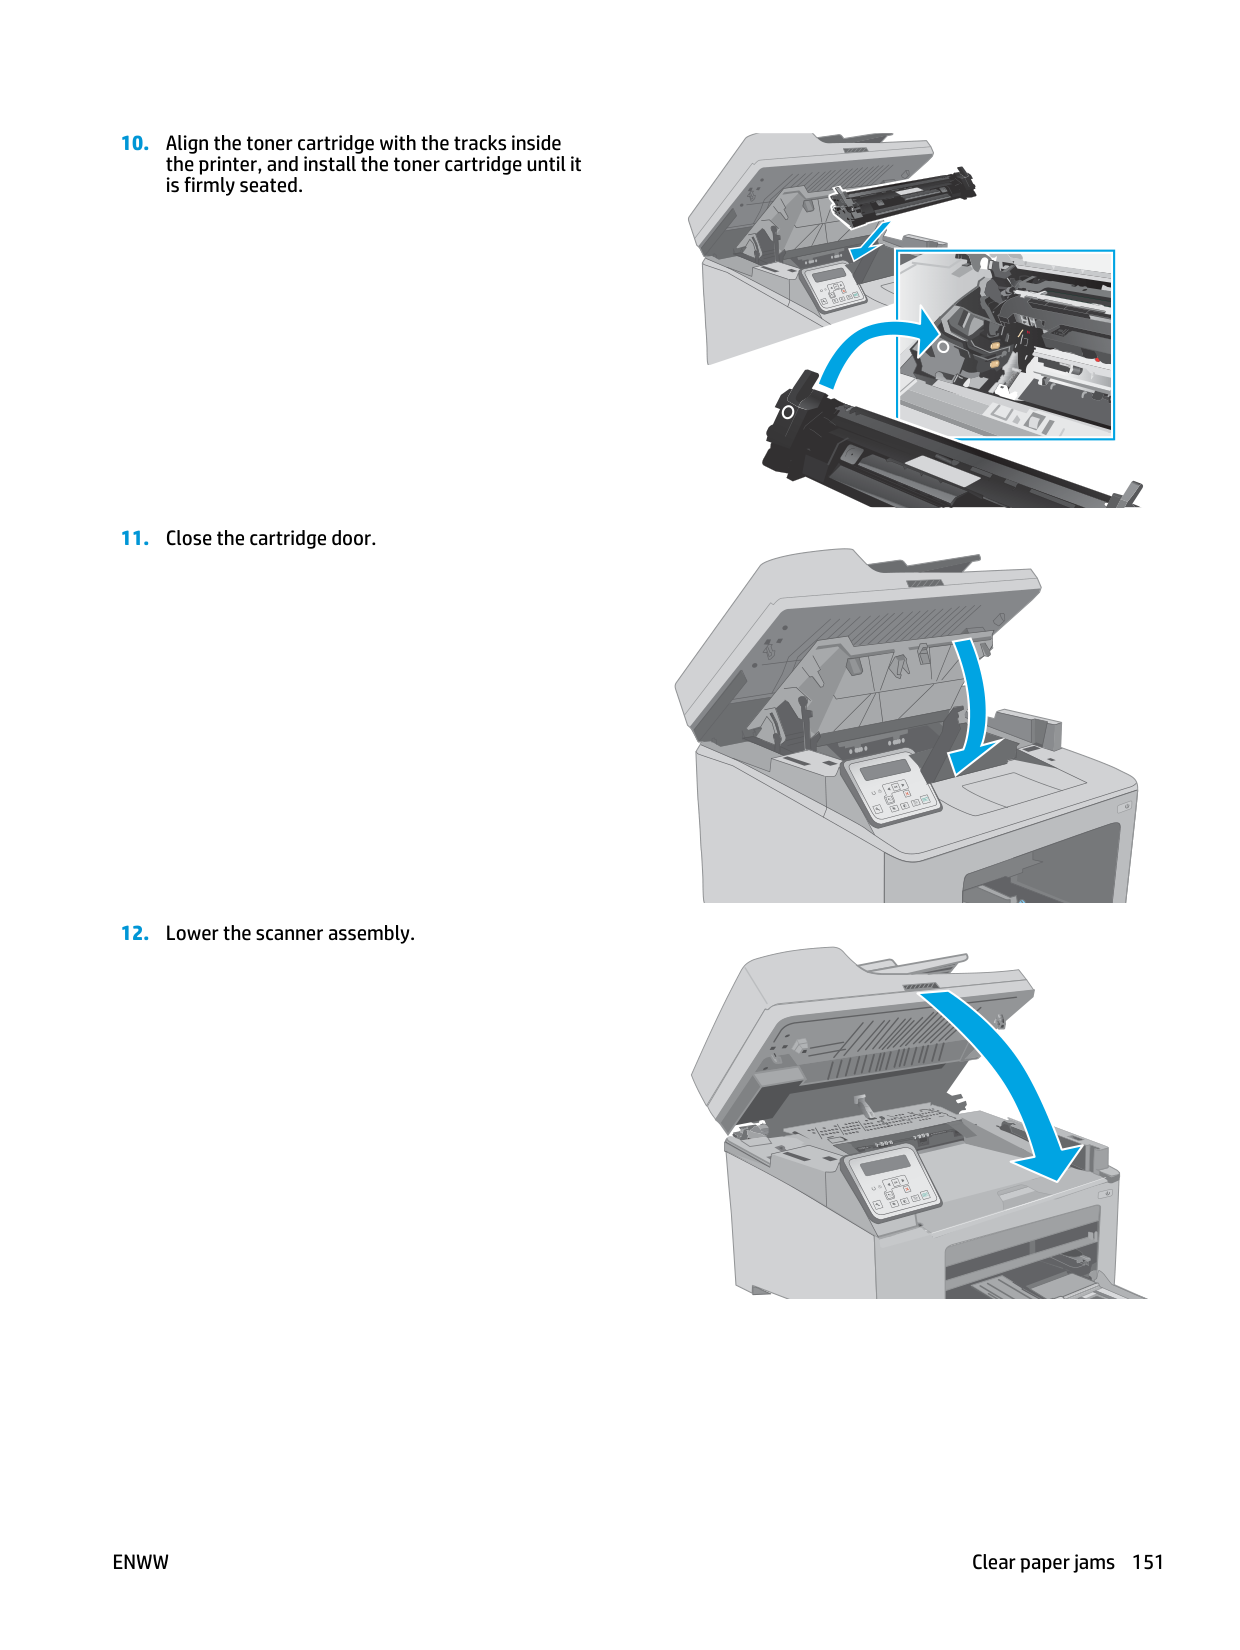
Ok
Ok
Ok
Enww
Clear paper jams 151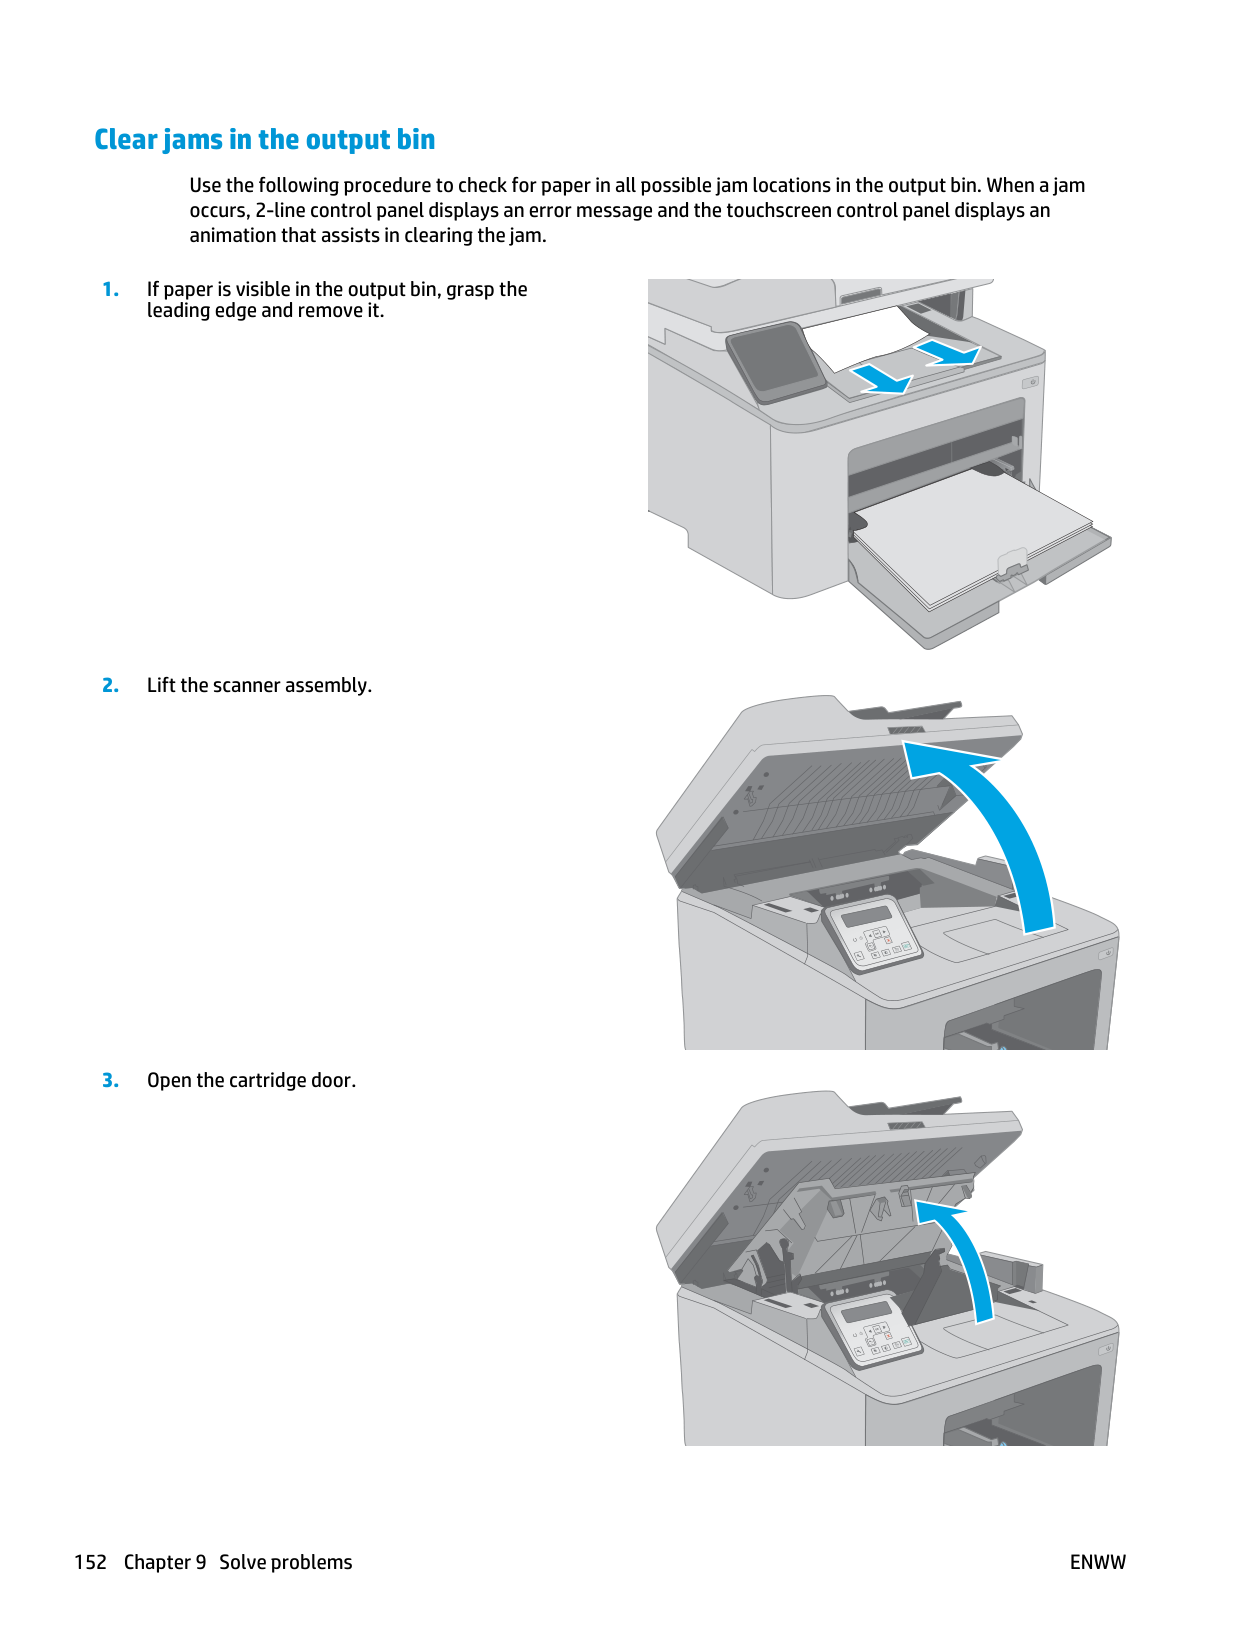
Clear jams in the output bin Use the following procedure to check for paper in all possible jam locations in the output bin. When a jam occurs, 2-line control panel displays an error message and the touchscreen control panel displays an animation that assists in clearing the jam.
Ok
Ok
152 Chapter 9 Solve problemsEnww

Ok
Ok
Ok
Enww
Clear paper jams 153
Ok
Ok
154 Chapter 9 Solve problemsEnww
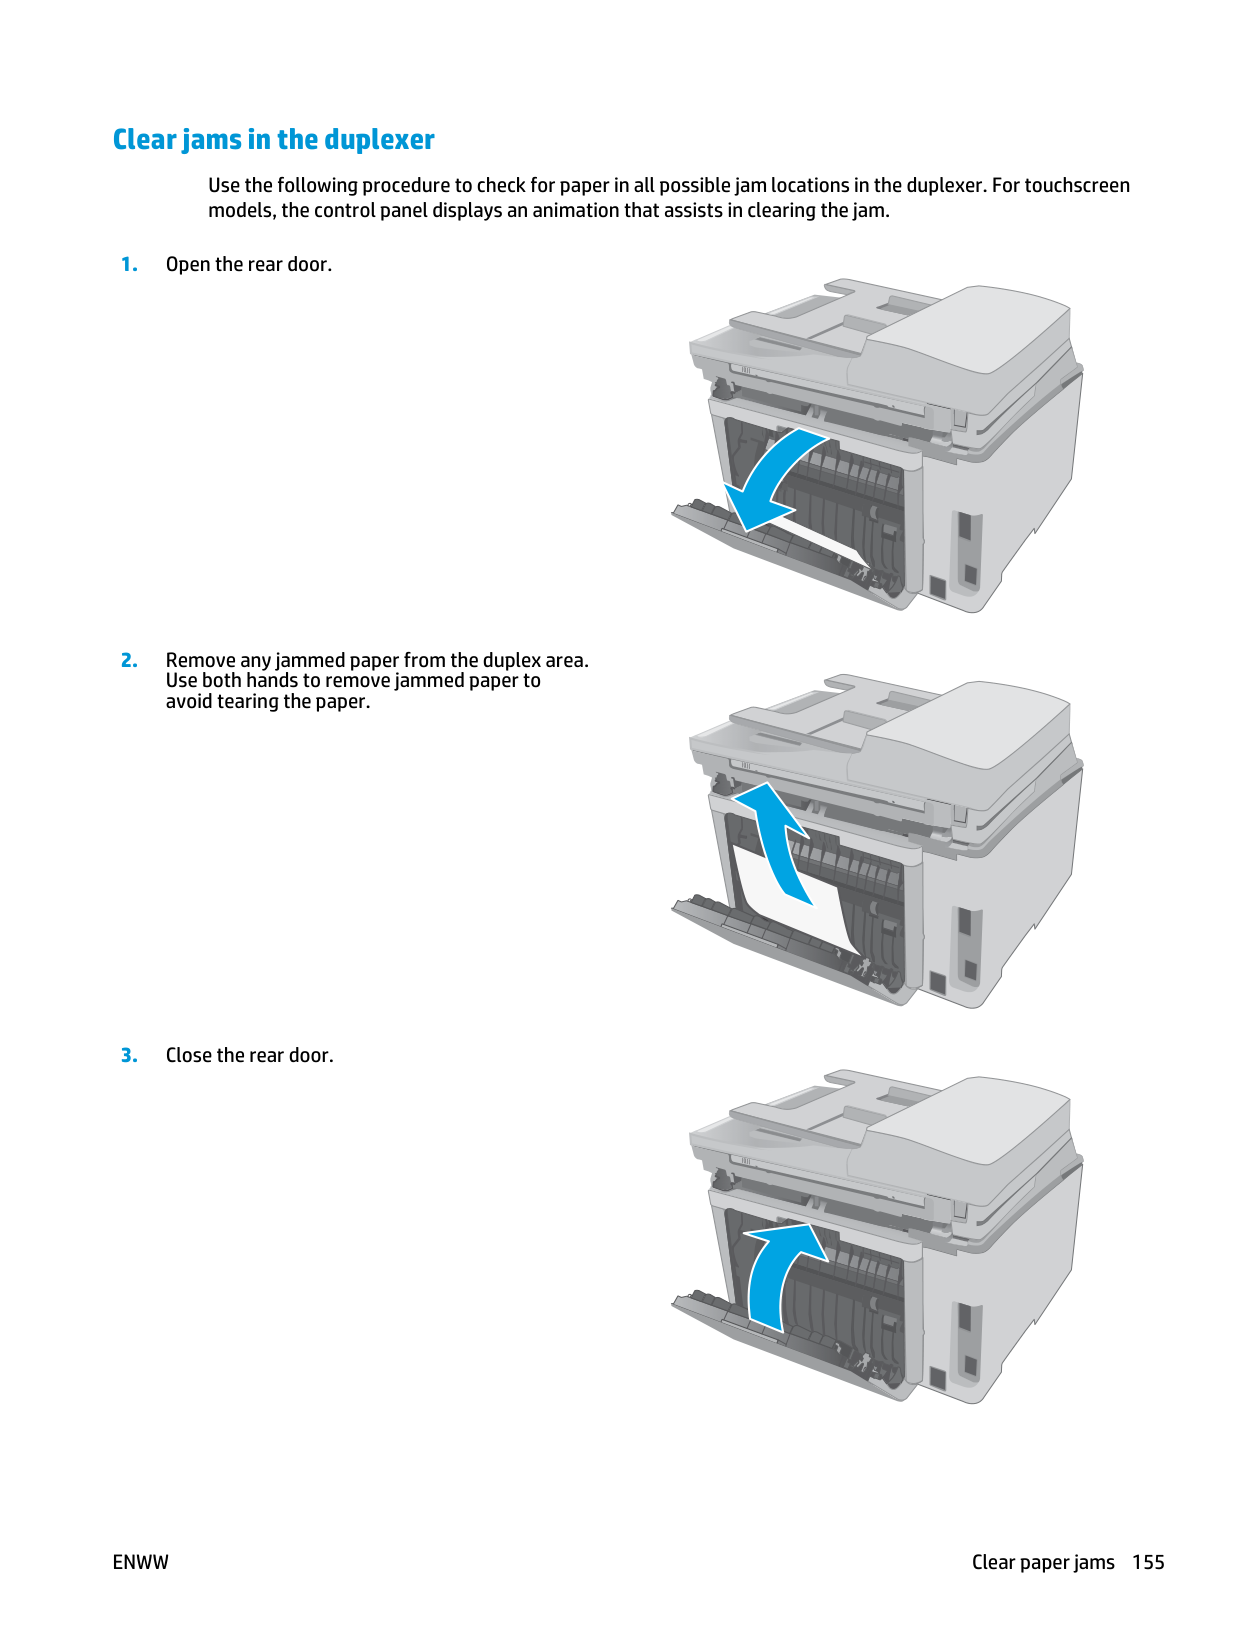
Clear jams in the duplexer Use the following procedure to check for paper in all possible jam locations in the duplexer. For touchscreen models, the control panel displays an animation that assists in clearing the jam.
Enww
Clear paper jams 155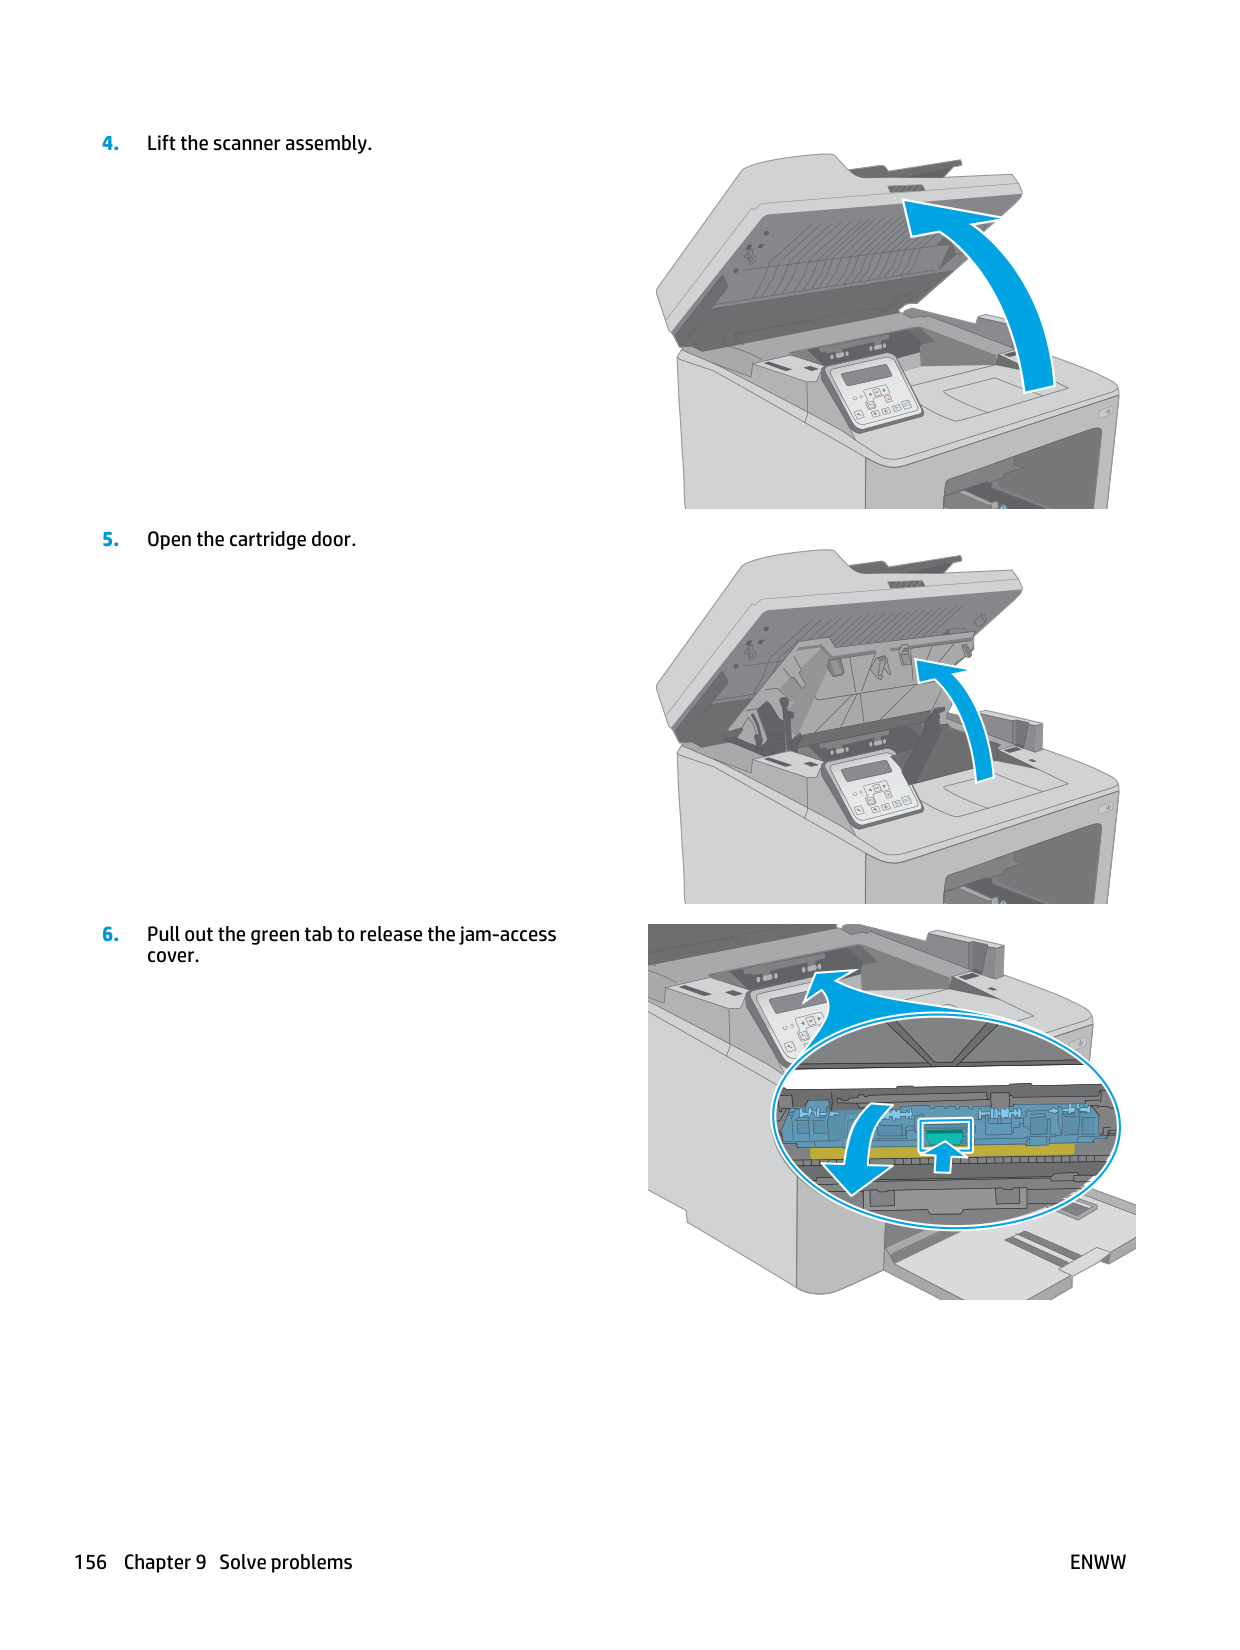
Ok
Ok
Ok
156 Chapter 9 Solve problemsEnww
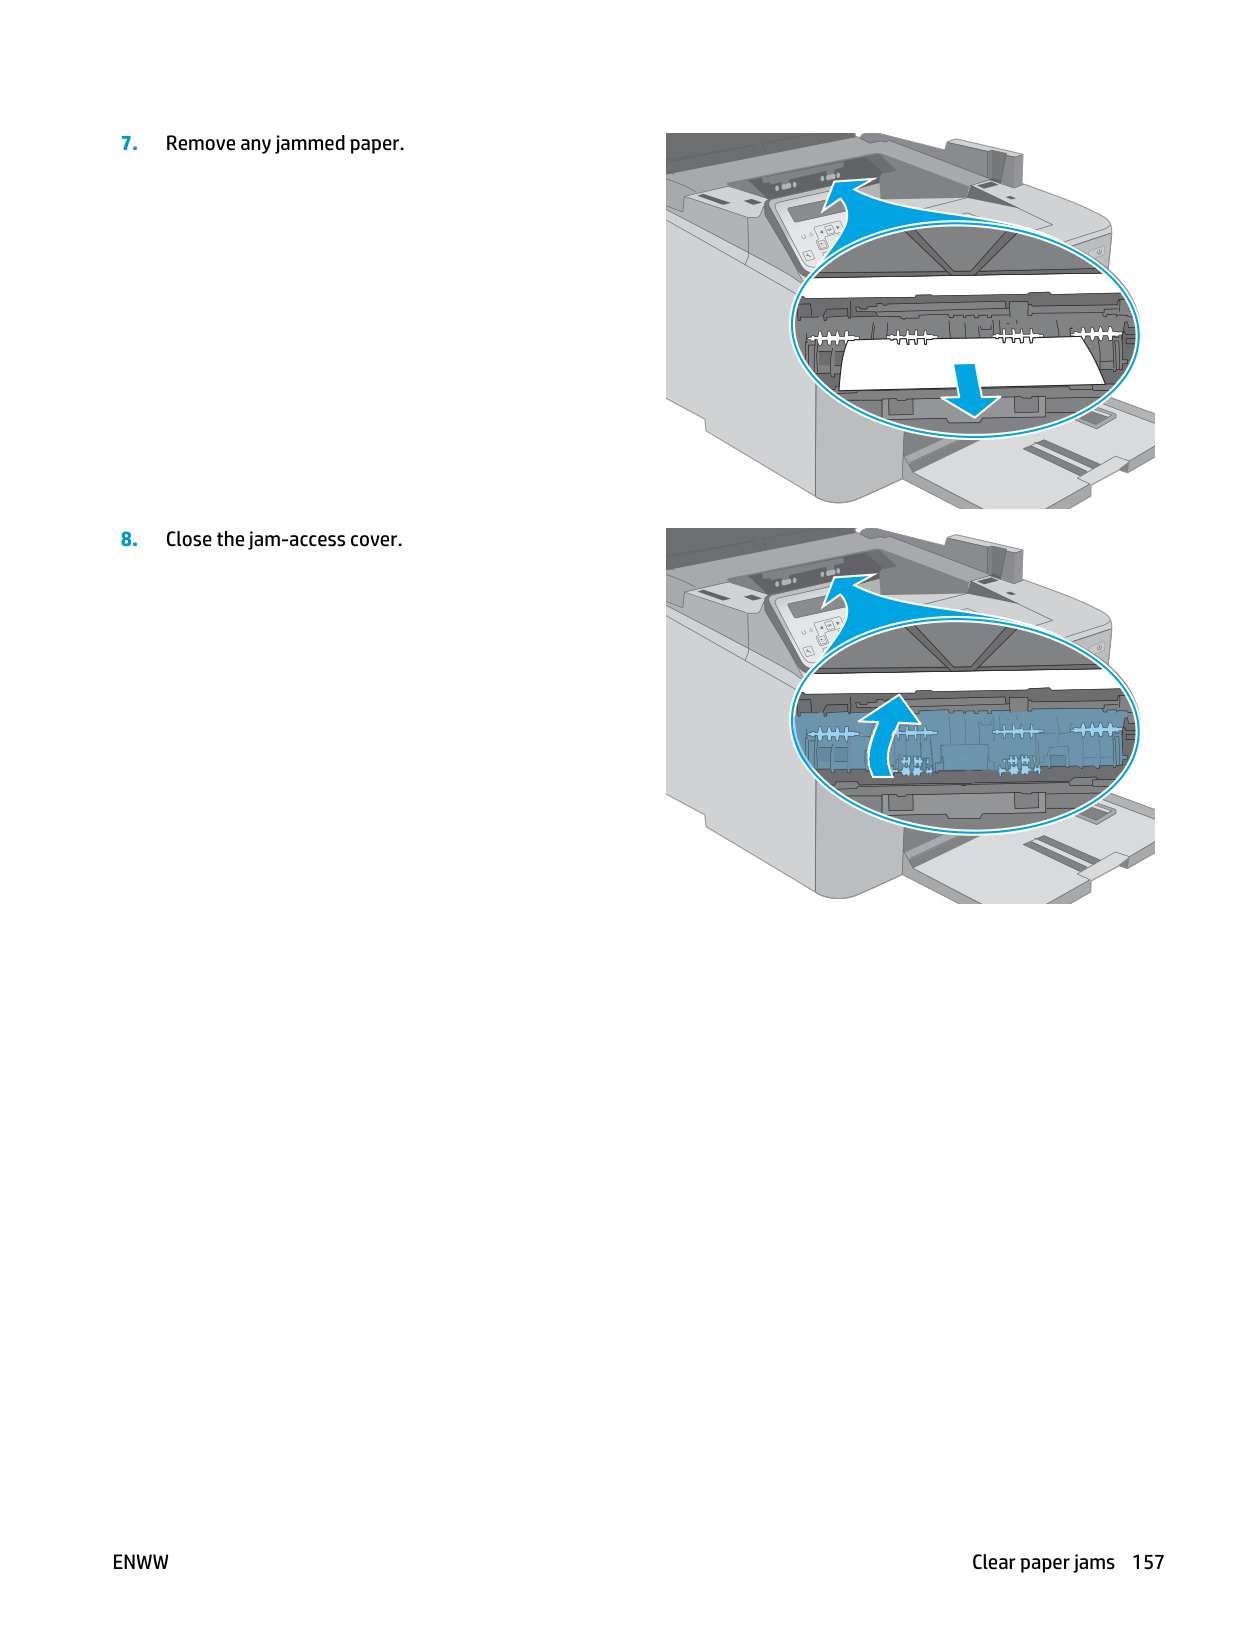
Ok
Ok
Enww
Clear paper jams 157
Ok
Ok
158 Chapter 9 Solve problemsEnww
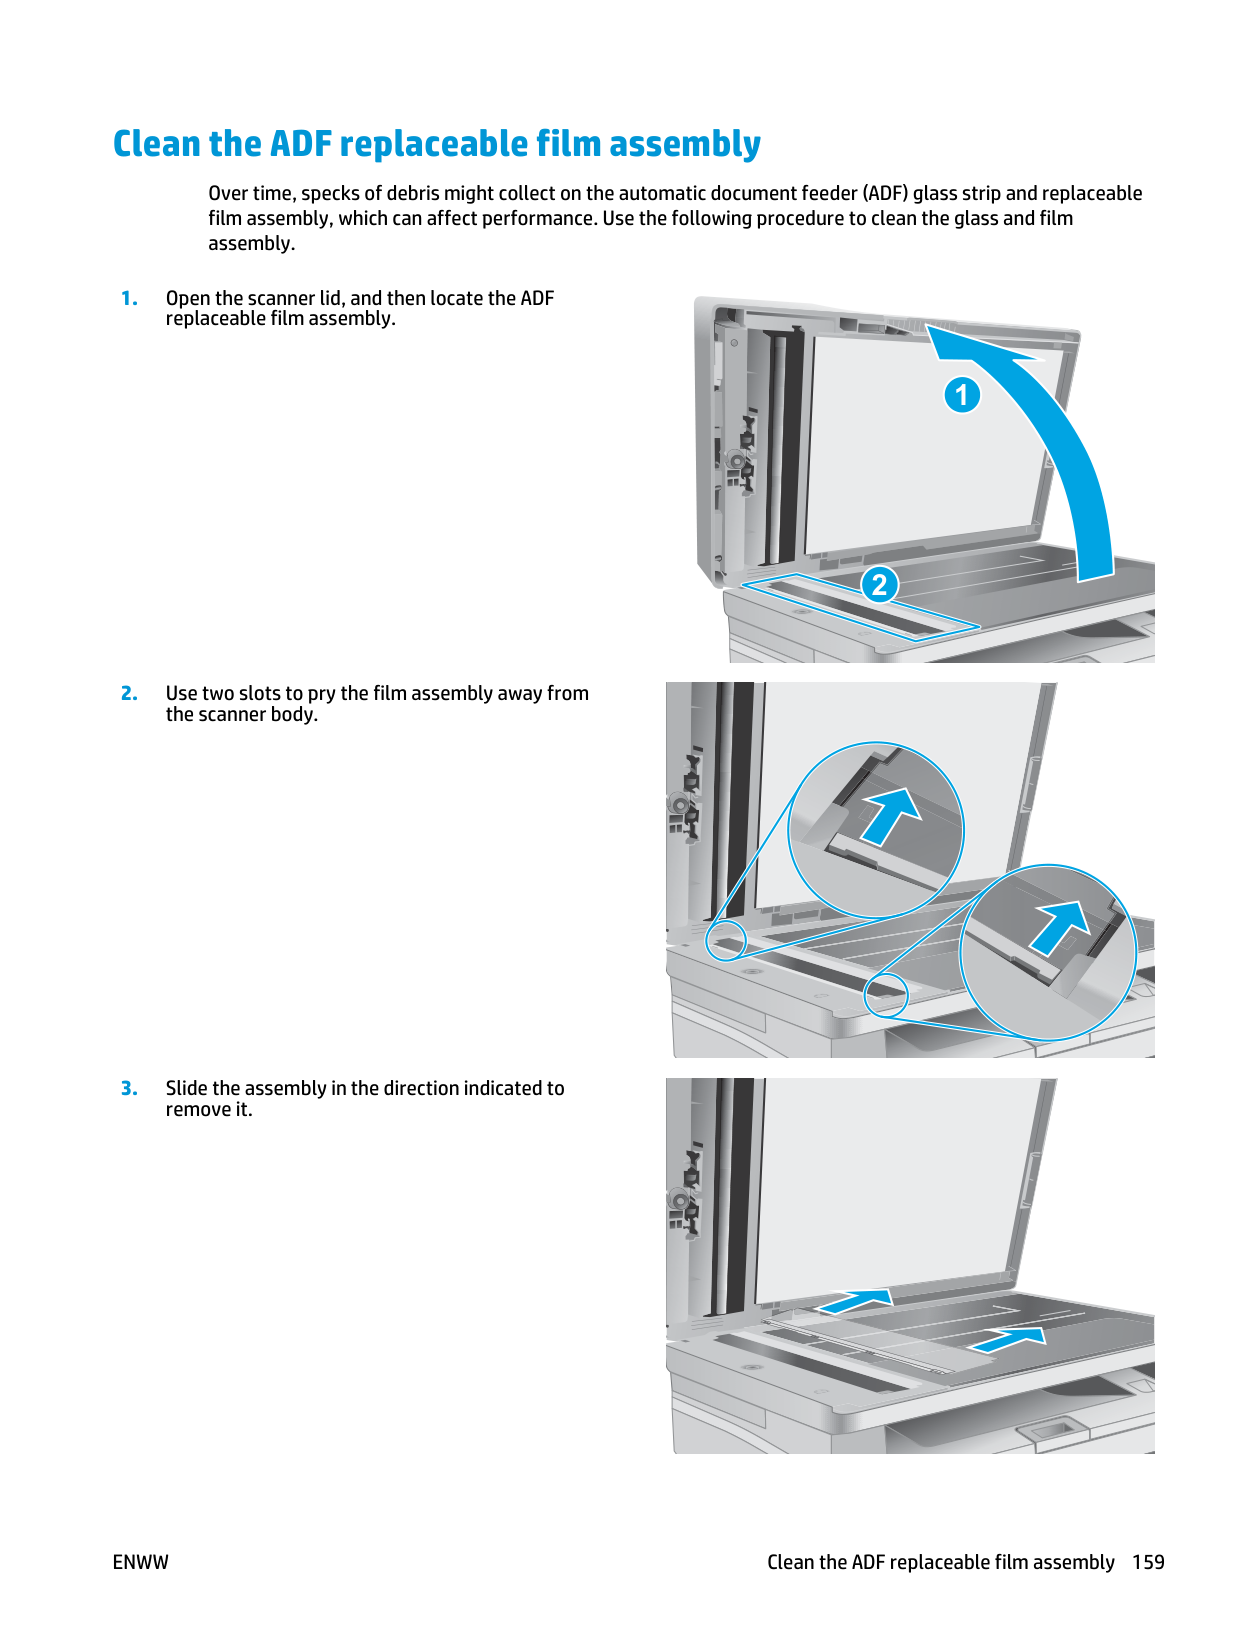
Clean the ADF replaceable film assembly Over time, specks of debris might collect on the automatic document feeder (ADF) glass strip and replaceable film assembly, which can affect performance. Use the following procedure to clean the glass and film assembly.
1 2
Enww
Clean the ADF replaceable film assembly 159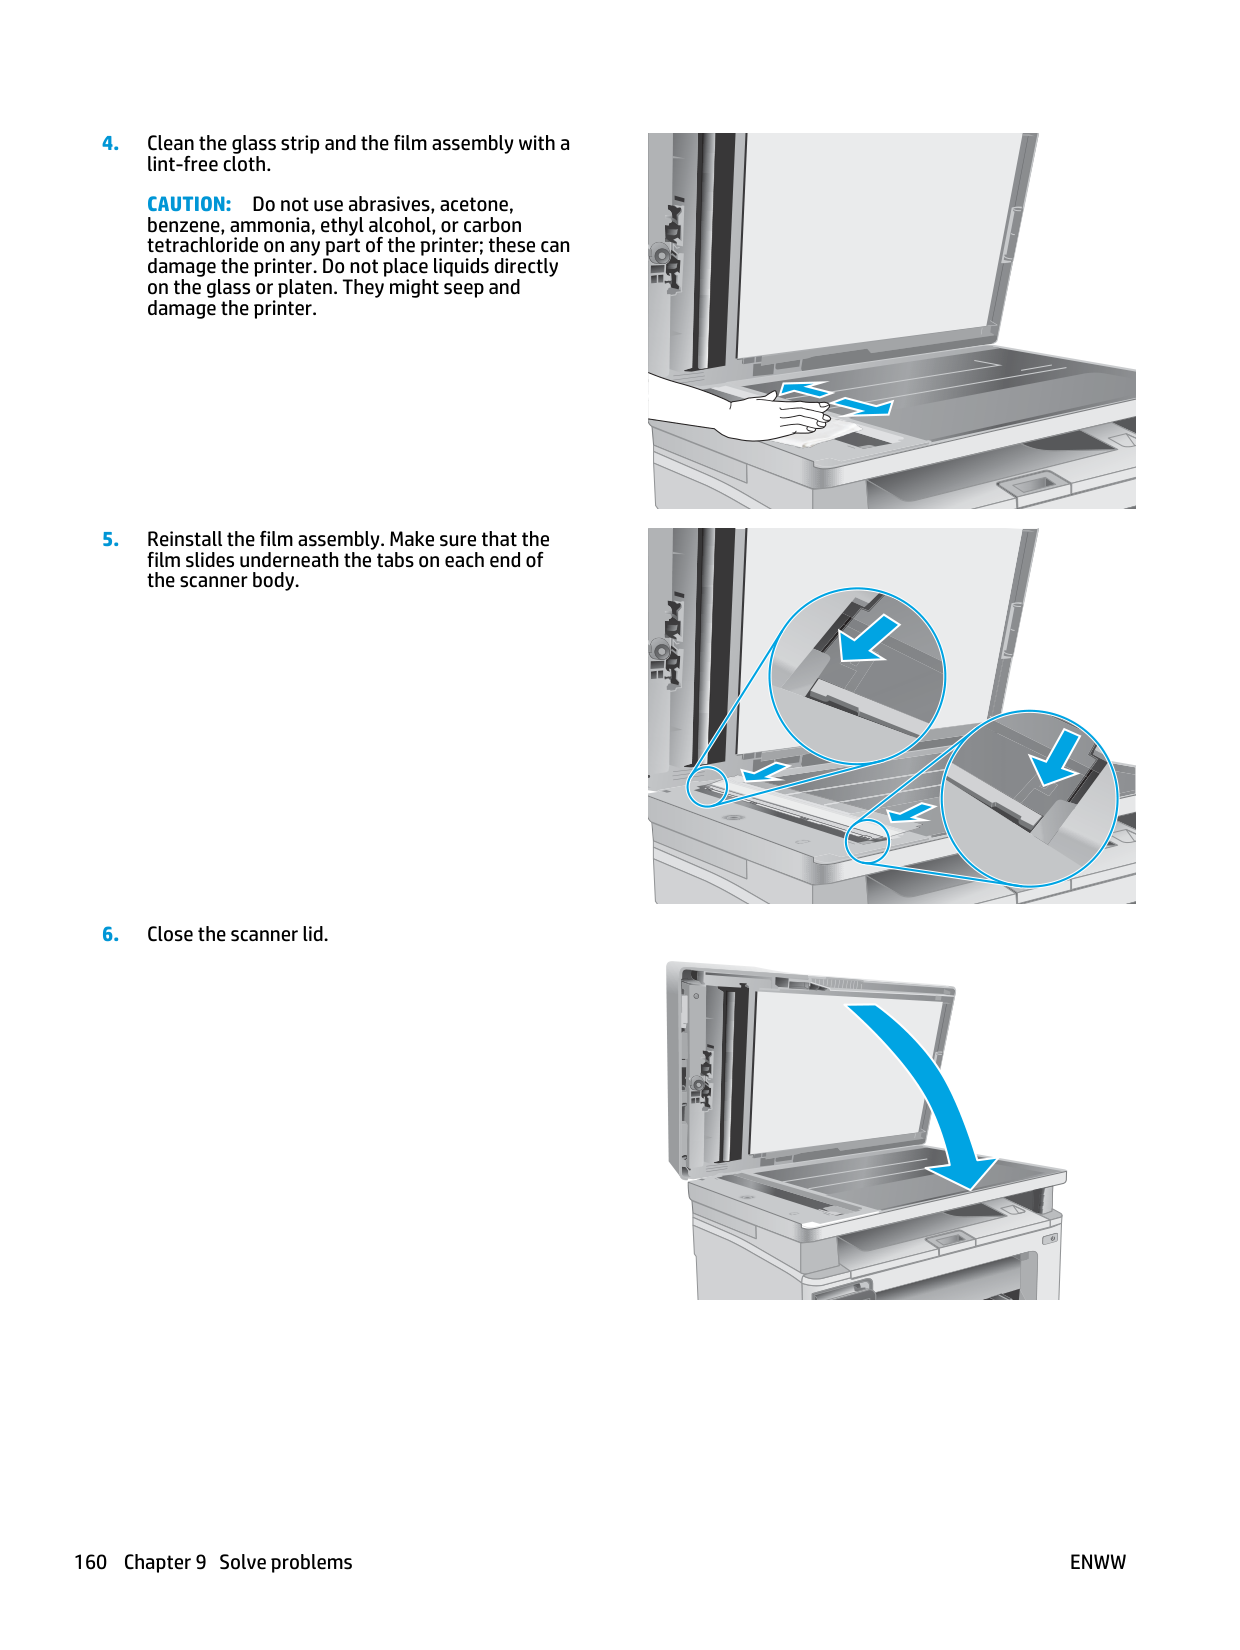
Caution:
Do not use abrasives, acetone, benzene, ammonia, ethyl alcohol, or carbon tetrachloride on any part of the printer; these can damage the printer. Do not place liquids directly on the glass or platen. They might seep and damage the printer.160 Chapter 9 Solve problems
Enww
Improve print quality ● Introduction ● Print from a different software program ● Check the paper-type setting for the print job ● Check toner-cartridge status ● Clean the printer ● Visually inspect the toner cartridge and imaging drum ● Check paper and the printing environment ● Try a different print driver ● Check the EconoMode settings ● Adjust Print Density Introduction If the printer is having print-quality problems, try the following solutions in the order presented to resolve the issue. Print from a different software program Try printing from a different software program. If the page prints correctly, the problem is with the software program from which you were printing. Check the paper-type setting for the print job Check the paper type setting when printing from a software program and the printed pages have smears, fuzzy or dark print, curled paper, scattered dots of toner, loose toner, or small areas of missing toner. Check the paper type setting (Windows)
Enww
Improve print quality 161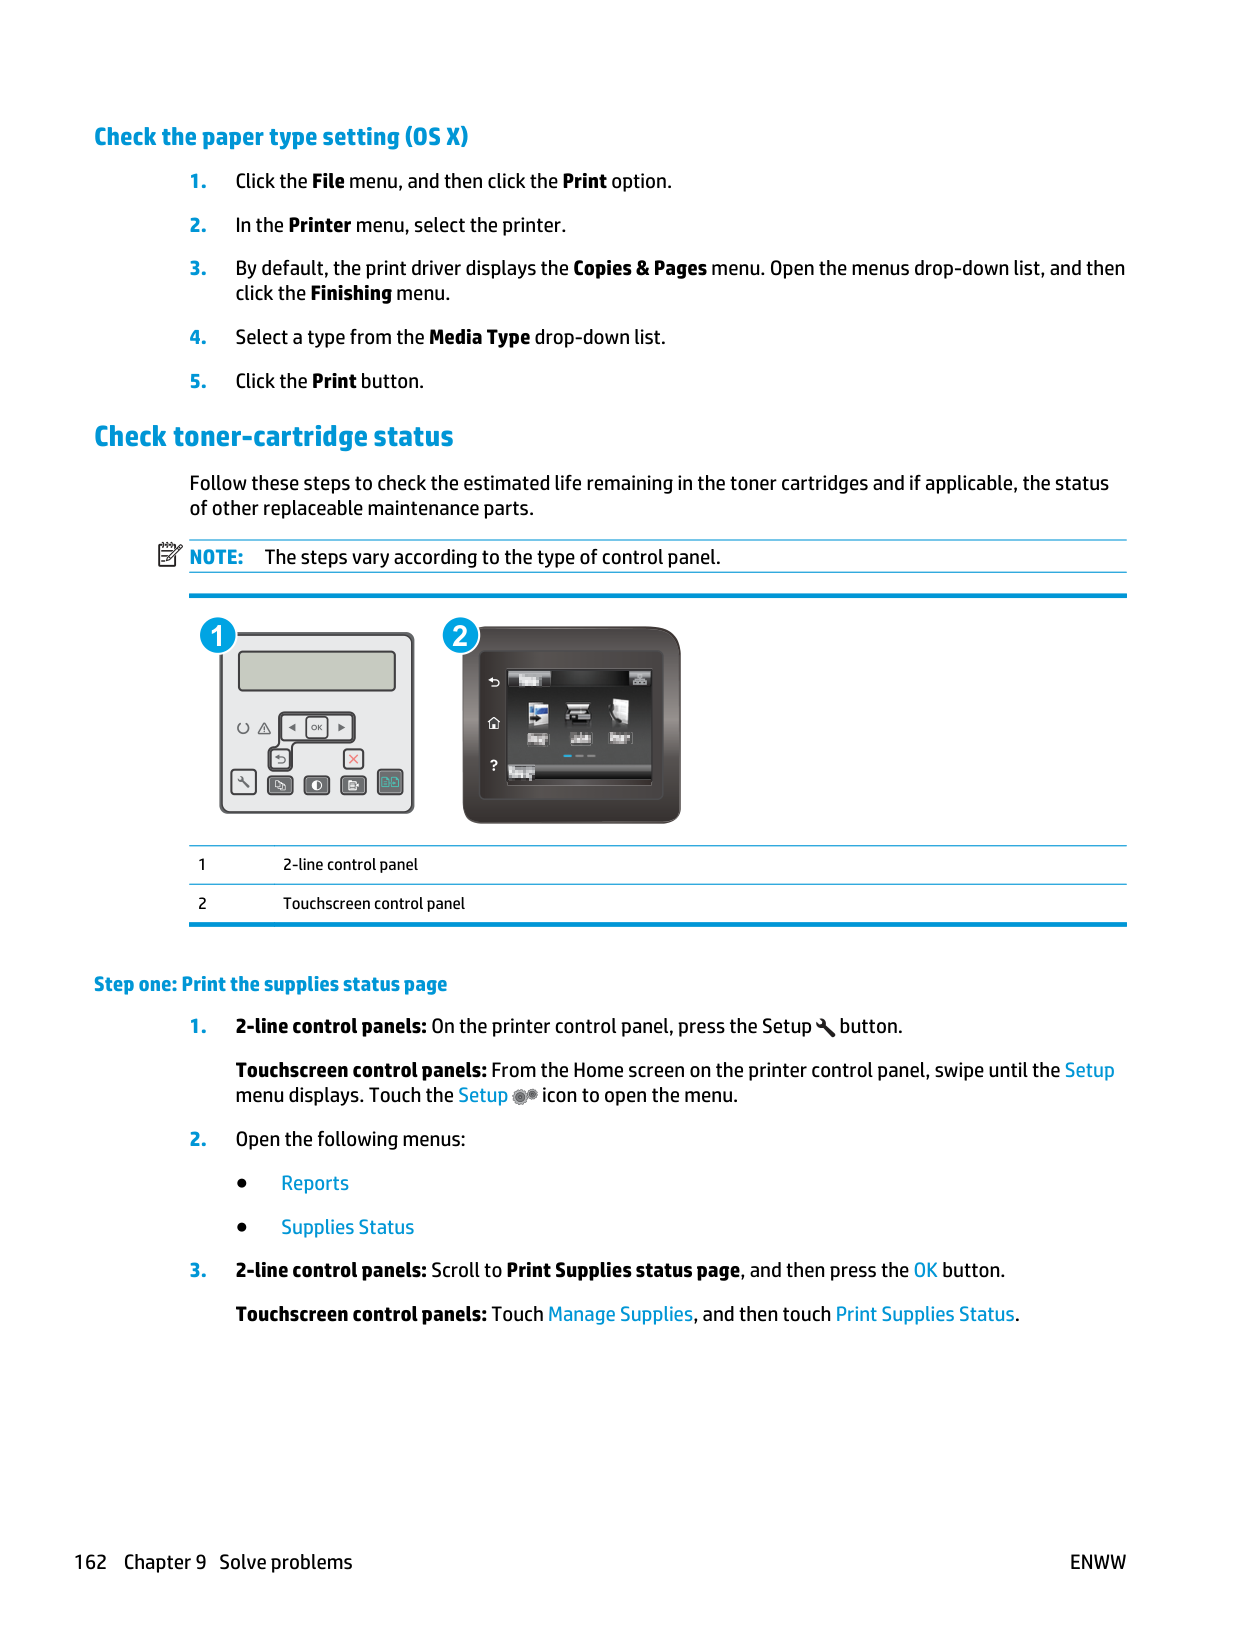
Check the paper type setting (OS X)
Note:
The steps vary according to the type of control panel. 1 2 1 2-line control panel 2 Touchscreen control panel Step one: Print the supplies status pageEnww
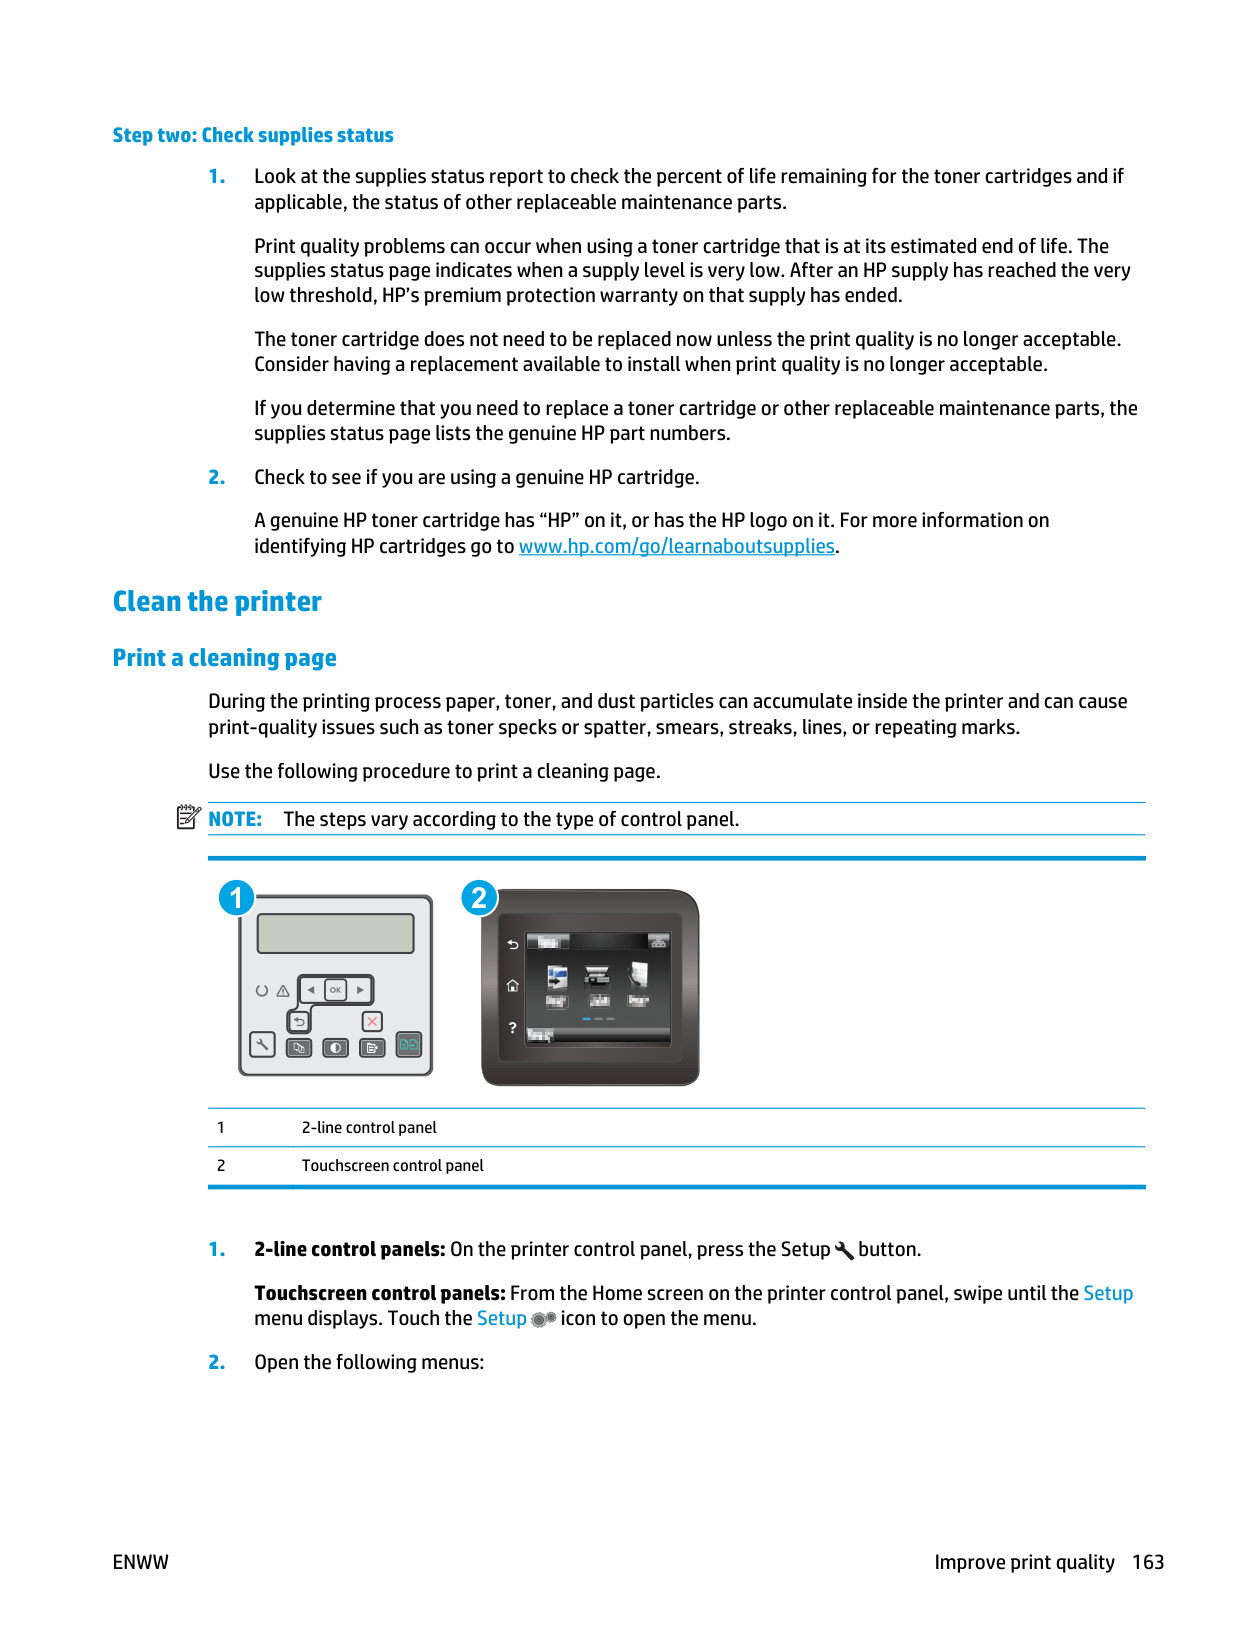
Step two: Check supplies status
Note:
The steps vary according to the type of control panel. 1 2 1 2-line control panel 2 Touchscreen control panelEnww
Improve print quality 163
● Service ● Cleaning Page
Caution:
Do not use abrasives, acetone, benzene, ammonia, ethyl alcohol, or carbon tetrachloride on any part of the printer; these can damage the printer. Do not place liquids directly on the glass or platen. They might seep and damage the printer.Caution:
Do not touch the imaging drum. Fingerprints on the imaging drum can cause print-quality problems.Enww
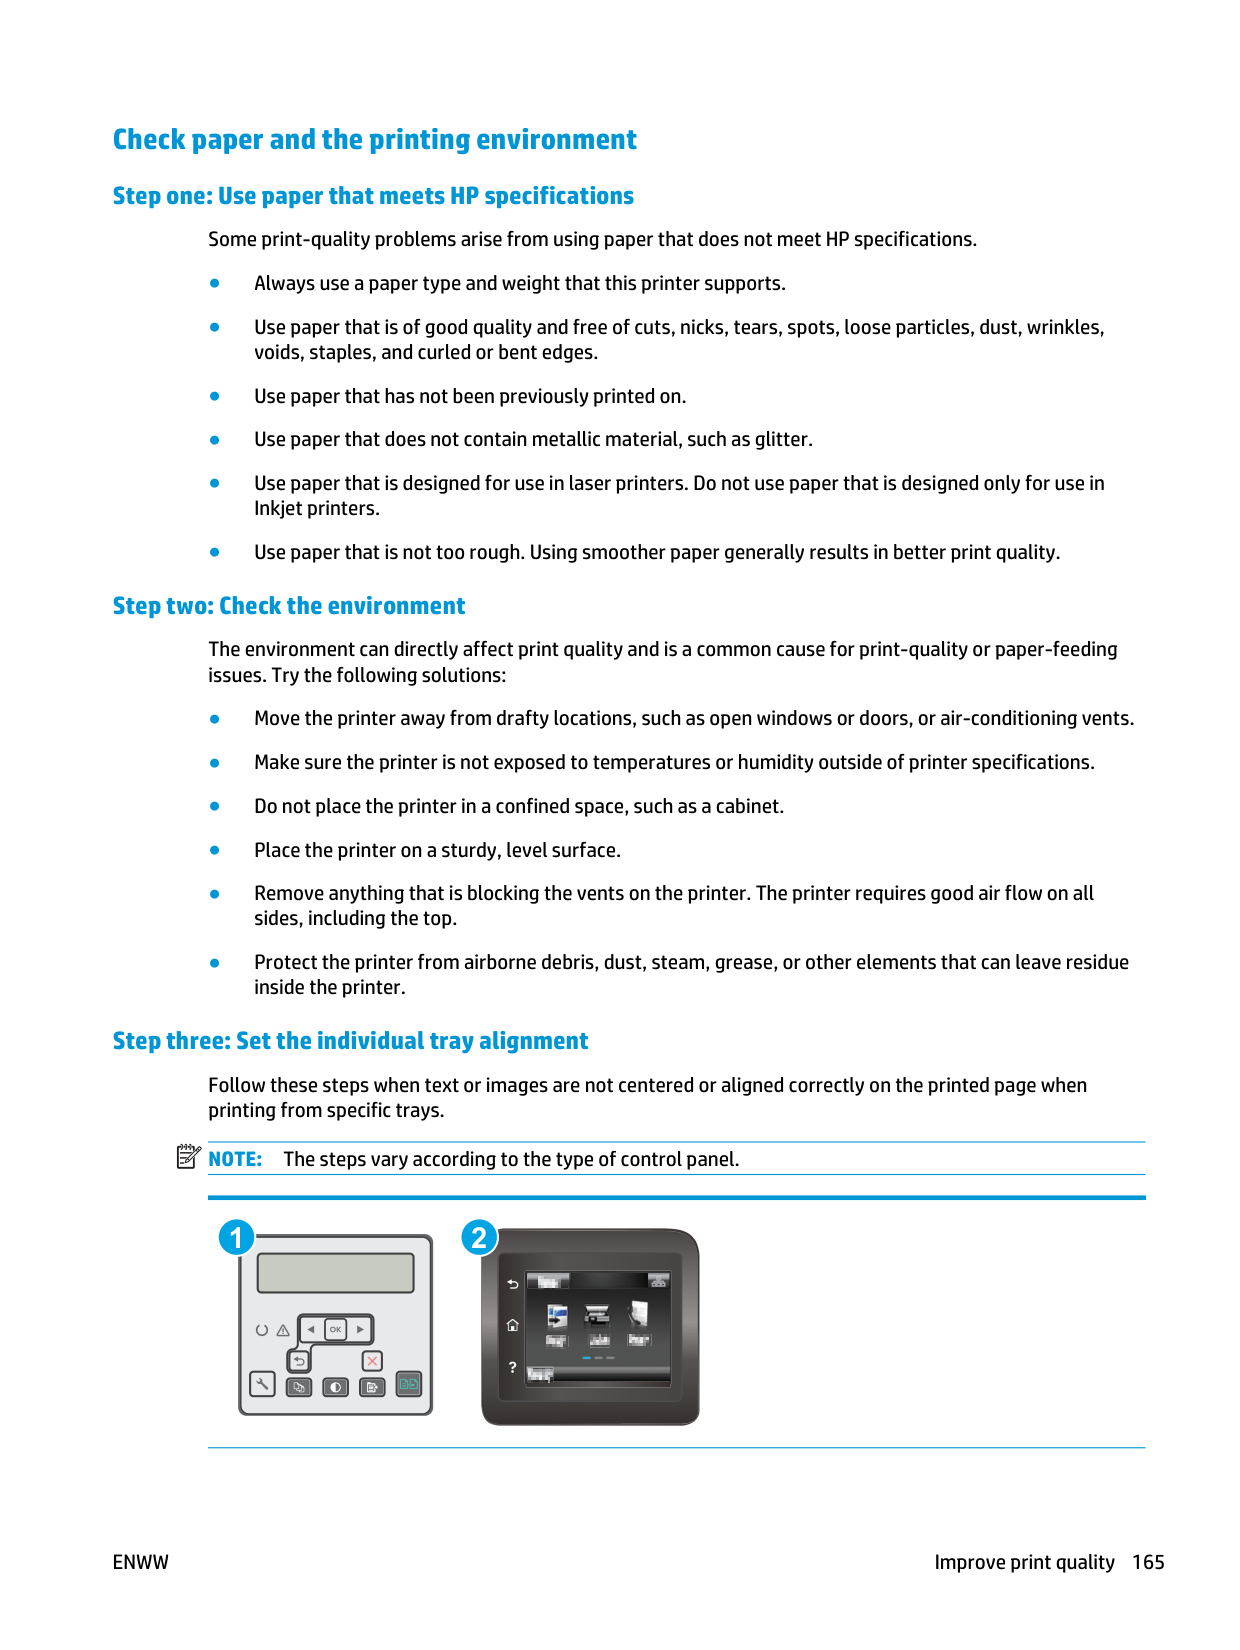
Check paper and the printing environment Step one: Use paper that meets HP specifications Some print-quality problems arise from using paper that does not meet HP specifications. ● Always use a paper type and weight that this printer supports. ● Use paper that is of good quality and free of cuts, nicks, tears, spots, loose particles, dust, wrinkles, voids, staples, and curled or bent edges. ● Use paper that has not been previously printed on. ● Use paper that does not contain metallic material, such as glitter. ● Use paper that is designed for use in laser printers. Do not use paper that is designed only for use in Inkjet printers. ● Use paper that is not too rough. Using smoother paper generally results in better print quality. Step two: Check the environment The environment can directly affect print quality and is a common cause for print-quality or paper-feeding issues. Try the following solutions: ● Move the printer away from drafty locations, such as open windows or doors, or air-conditioning vents. ● Make sure the printer is not exposed to temperatures or humidity outside of printer specifications. ● Do not place the printer in a confined space, such as a cabinet. ● Place the printer on a sturdy, level surface. ● Remove anything that is blocking the vents on the printer. The printer requires good air flow on all sides, including the top. ● Protect the printer from airborne debris, dust, steam, grease, or other elements that can leave residue inside the printer. Step three: Set the individual tray alignment Follow these steps when text or images are not centered or aligned correctly on the printed page when printing from specific trays.
Note:
The steps vary according to the type of control panel. 1 2Enww
Improve print quality 165
1 2-line control panel 2 Touchscreen control panel
Enww
Hp Upd Pcl 5
● Recommended for general office printing in Windows environments ● Compatible with previous PCL versions and older HP LaserJet printers ● The best choice for printing from third-party or custom software programs ● The best choice when operating with mixed environments, which require the printer to be set to PCL 5 (UNIX, Linux, mainframe) ● Designed for use in corporate Windows environments to provide a single driver for use with multiple printer models ● Preferred when printing to multiple printer models from a mobile Windows computerHp Upd Pcl 6
● Recommended for printing in all Windows environments ● Provides the overall best speed, print quality, and printer feature support for most users ● Developed to align with Windows Graphic Device Interface (GDI) for best speed in Windows environments ● Might not be fully compatible with third-party and custom software programs that are based on PCL 5 Check the EconoMode settings HP does not recommend the full-time use of EconoMode. If EconoMode is used full-time, the toner supply might outlast the mechanical parts in the toner cartridge. If print quality begins to degrade and is no longer acceptable, consider replacing the toner cartridge.Note:
This feature is available with the PCL 6 print driver for Windows. If you are not using that driver, you can enable the feature by using the HP Embedded Web Server. Follow these steps if the entire page is too dark or too light.Enww
Improve print quality 167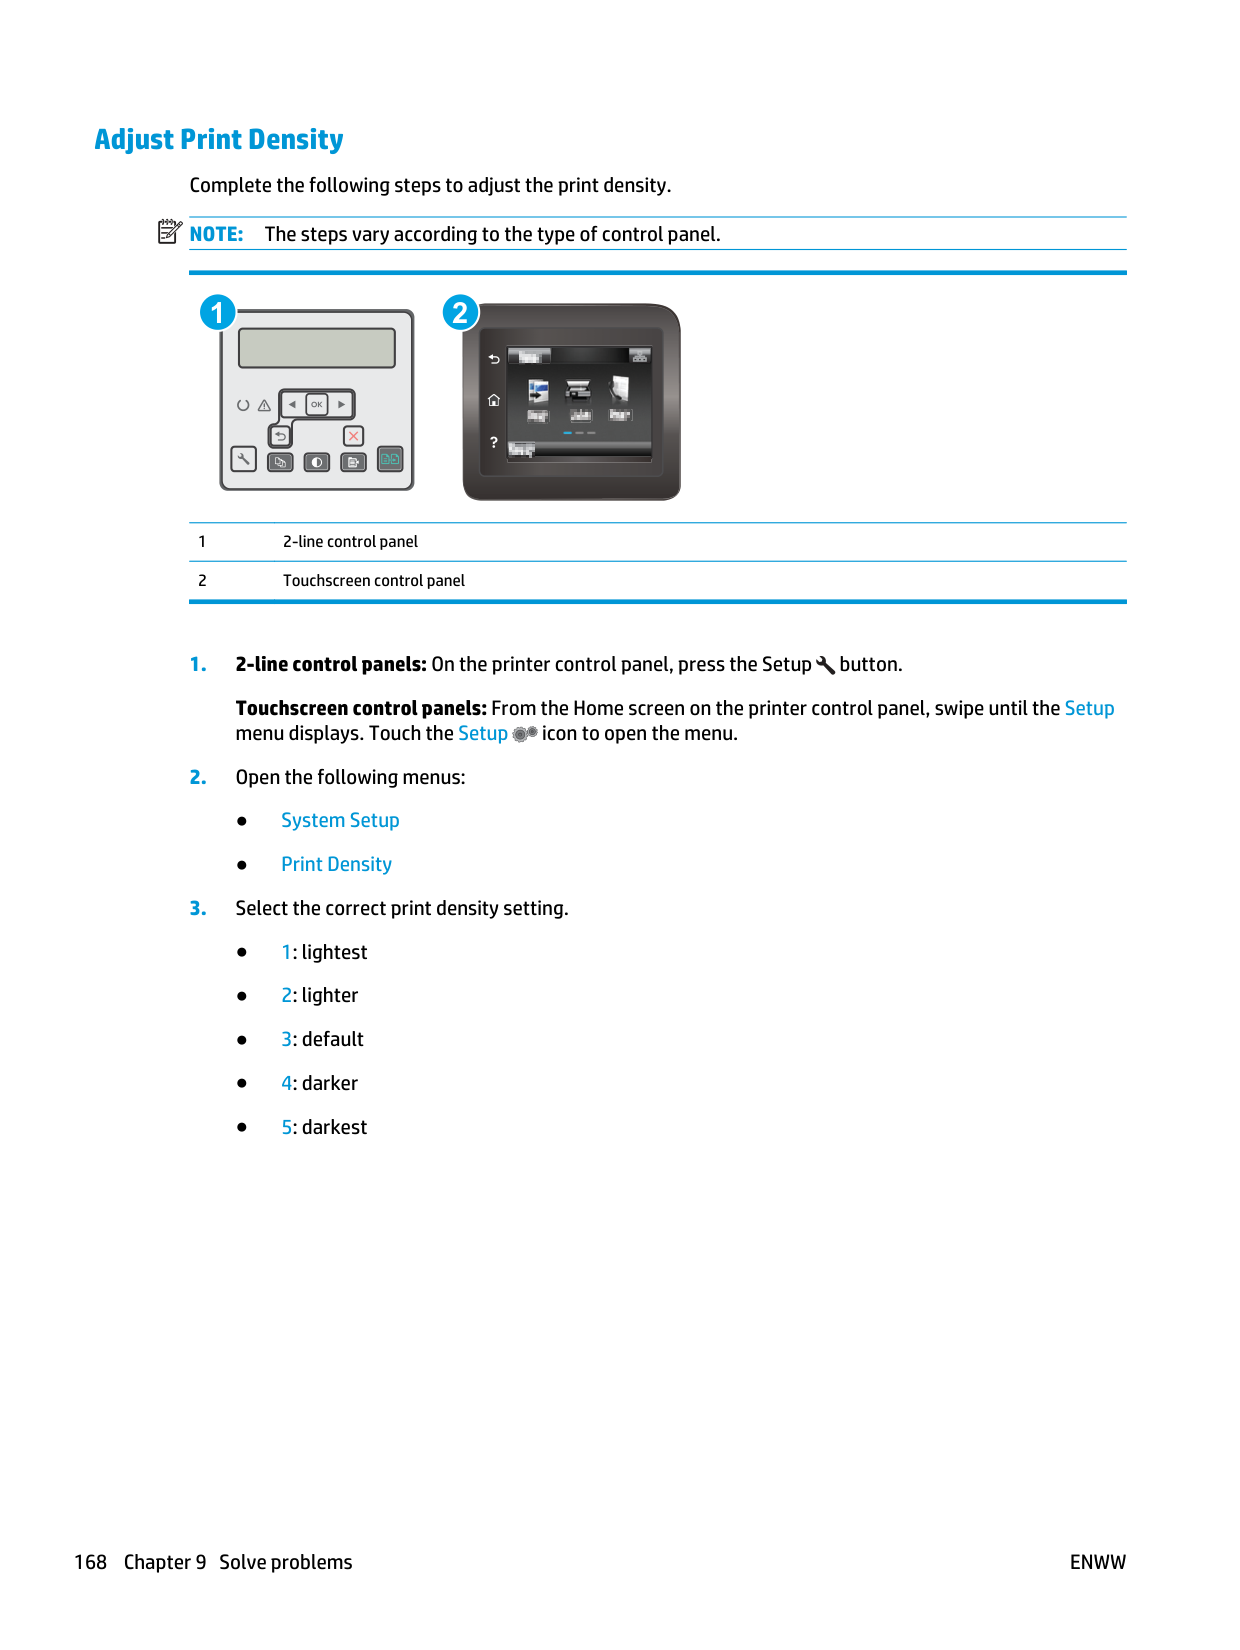
Adjust Print Density Complete the following steps to adjust the print density.
Note:
The steps vary according to the type of control panel. 1 2 1 2-line control panel 2 Touchscreen control panelEnww
Improve copy and scan image quality Introduction If the printer is having image quality problems, try the following solutions in the order presented to resolve the issue. ● Check the scanner glass for dirt and smudges ● Check the paper settings ● Optimize for text or pictures ● Edge-to-edge copying ● Clean the pickup rollers and separation pad in the document feeder Try these few simple steps first: ● Use the flatbed scanner rather than the document feeder. ● Use high-quality originals. ● When using the document feeder, load the original document into the feeder correctly, using the paper guides, to avoid unclear or skewed images. If the problem still exists, try these additional solutions. If they do not fix the problem, see “Improve print quality” for further solutions. Check the scanner glass for dirt and smudges Over time, specks of debris might collect on the scanner glass and white plastic backing, which can affect performance. Use the following procedure to clean the scanner.
Caution:
Do not use abrasives, acetone, benzene, ammonia, ethyl alcohol, or carbon tetrachloride on any part of the printer; these can damage the printer. Do not place liquids directly on the glass or platen. They might seep and damage the printer.Enww
Improve copy and scan image quality 169
Check the paper settings
Note:
The steps vary according to the type of control panel. 1 2 1 2-line control panel 2 Touchscreen control panel 2-line control panelsEnww
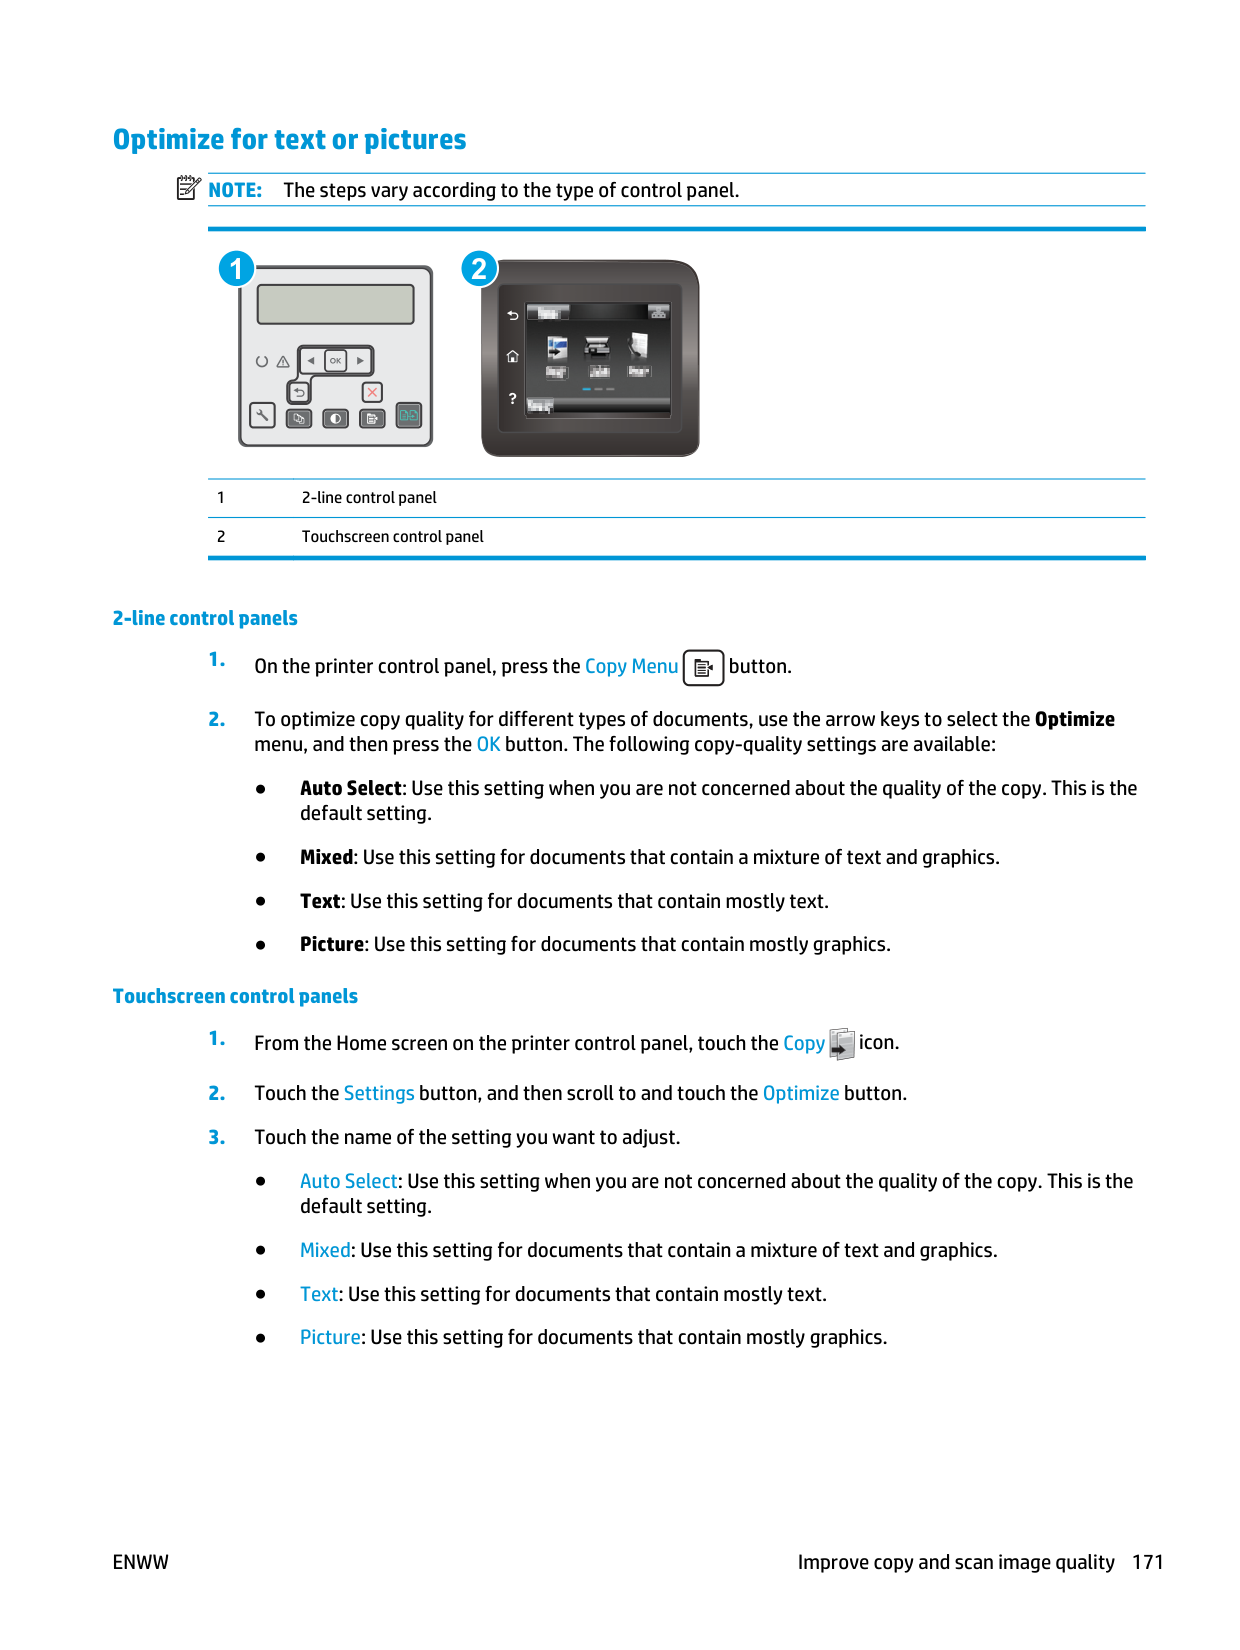
Optimize for text or pictures
Note:
The steps vary according to the type of control panel. 1 2 1 2-line control panel 2 Touchscreen control panel 2-line control panelsEnww
Improve copy and scan image quality 171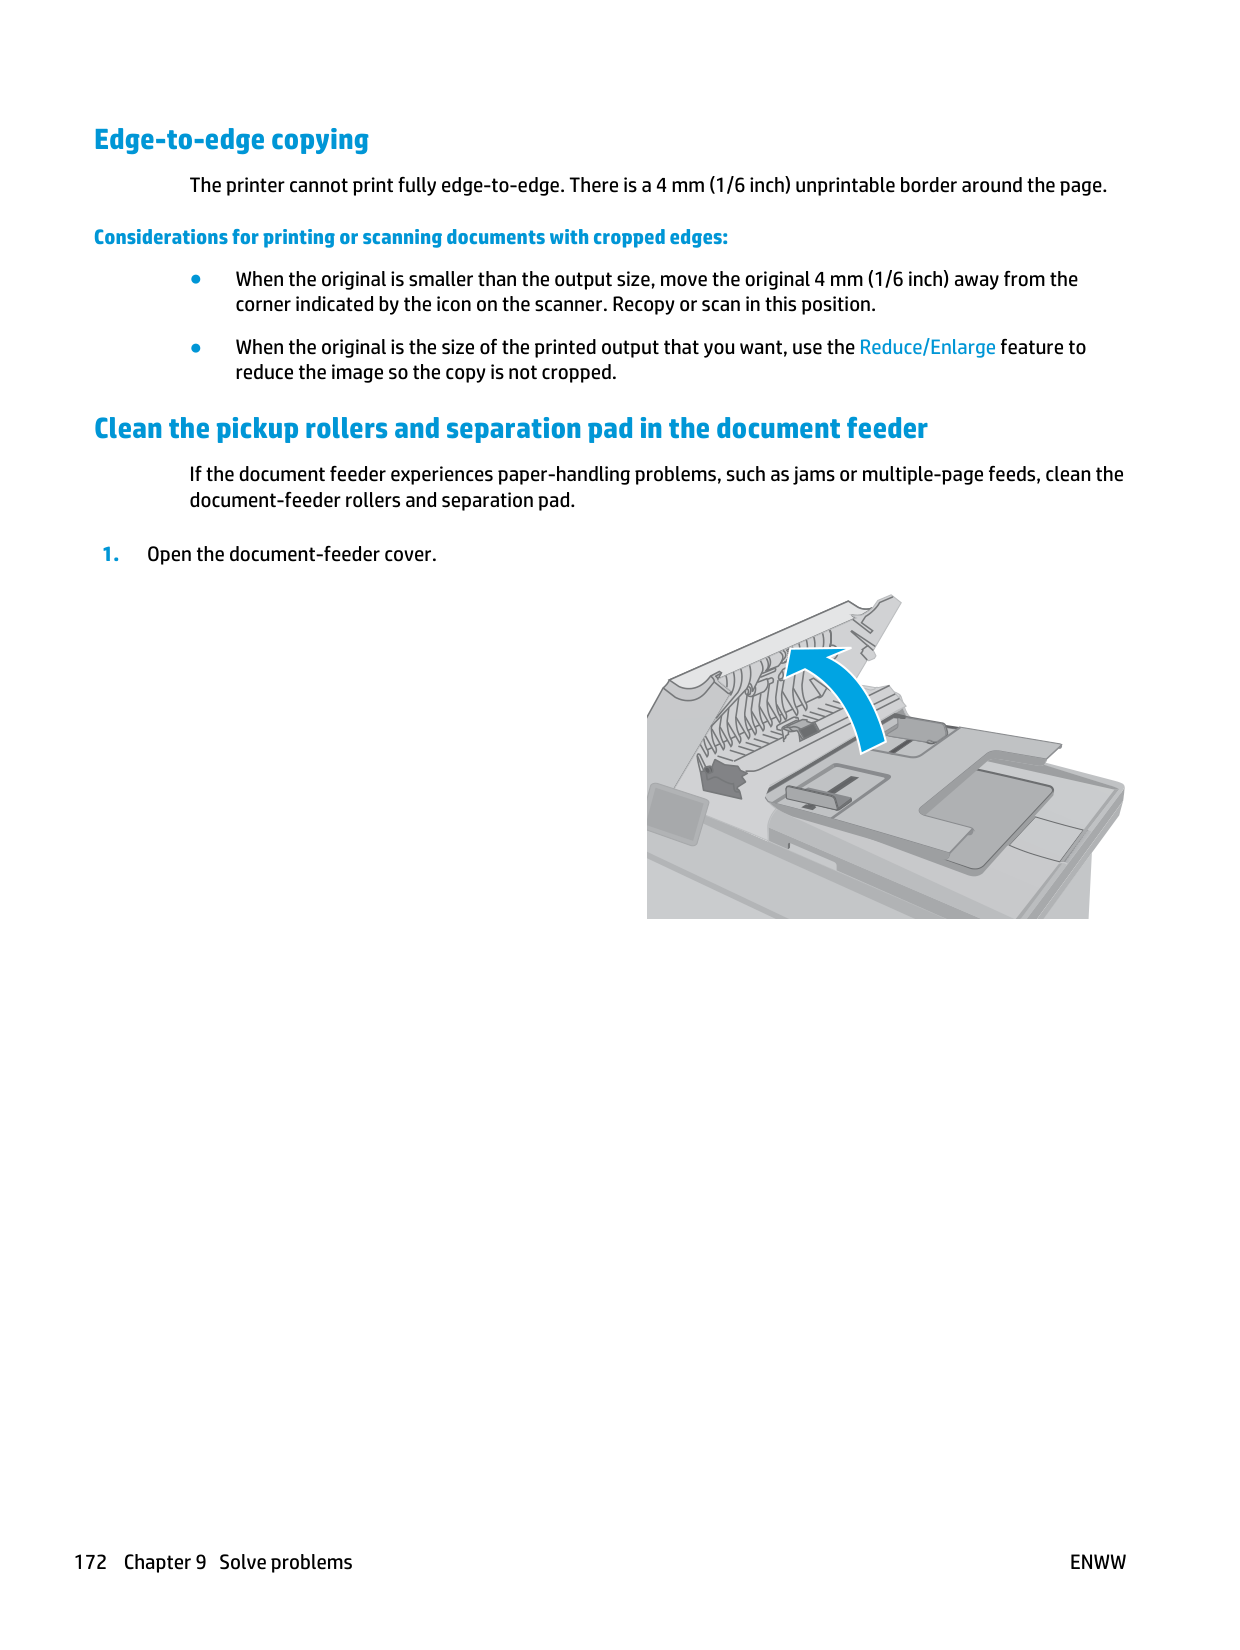
Edge-to-edge copying The printer cannot print fully edge-to-edge. There is a 4 mm (1/6 inch) unprintable border around the page. Considerations for printing or scanning documents with cropped edges: ● When the original is smaller than the output size, move the original 4 mm (1/6 inch) away from the corner indicated by the icon on the scanner. Recopy or scan in this position. ● When the original is the size of the printed output that you want, use the Reduce/Enlarge feature to reduce the image so the copy is not cropped. Clean the pickup rollers and separation pad in the document feeder If the document feeder experiences paper-handling problems, such as jams or multiple-page feeds, clean the document-feeder rollers and separation pad.
172 Chapter 9 Solve problems
Enww
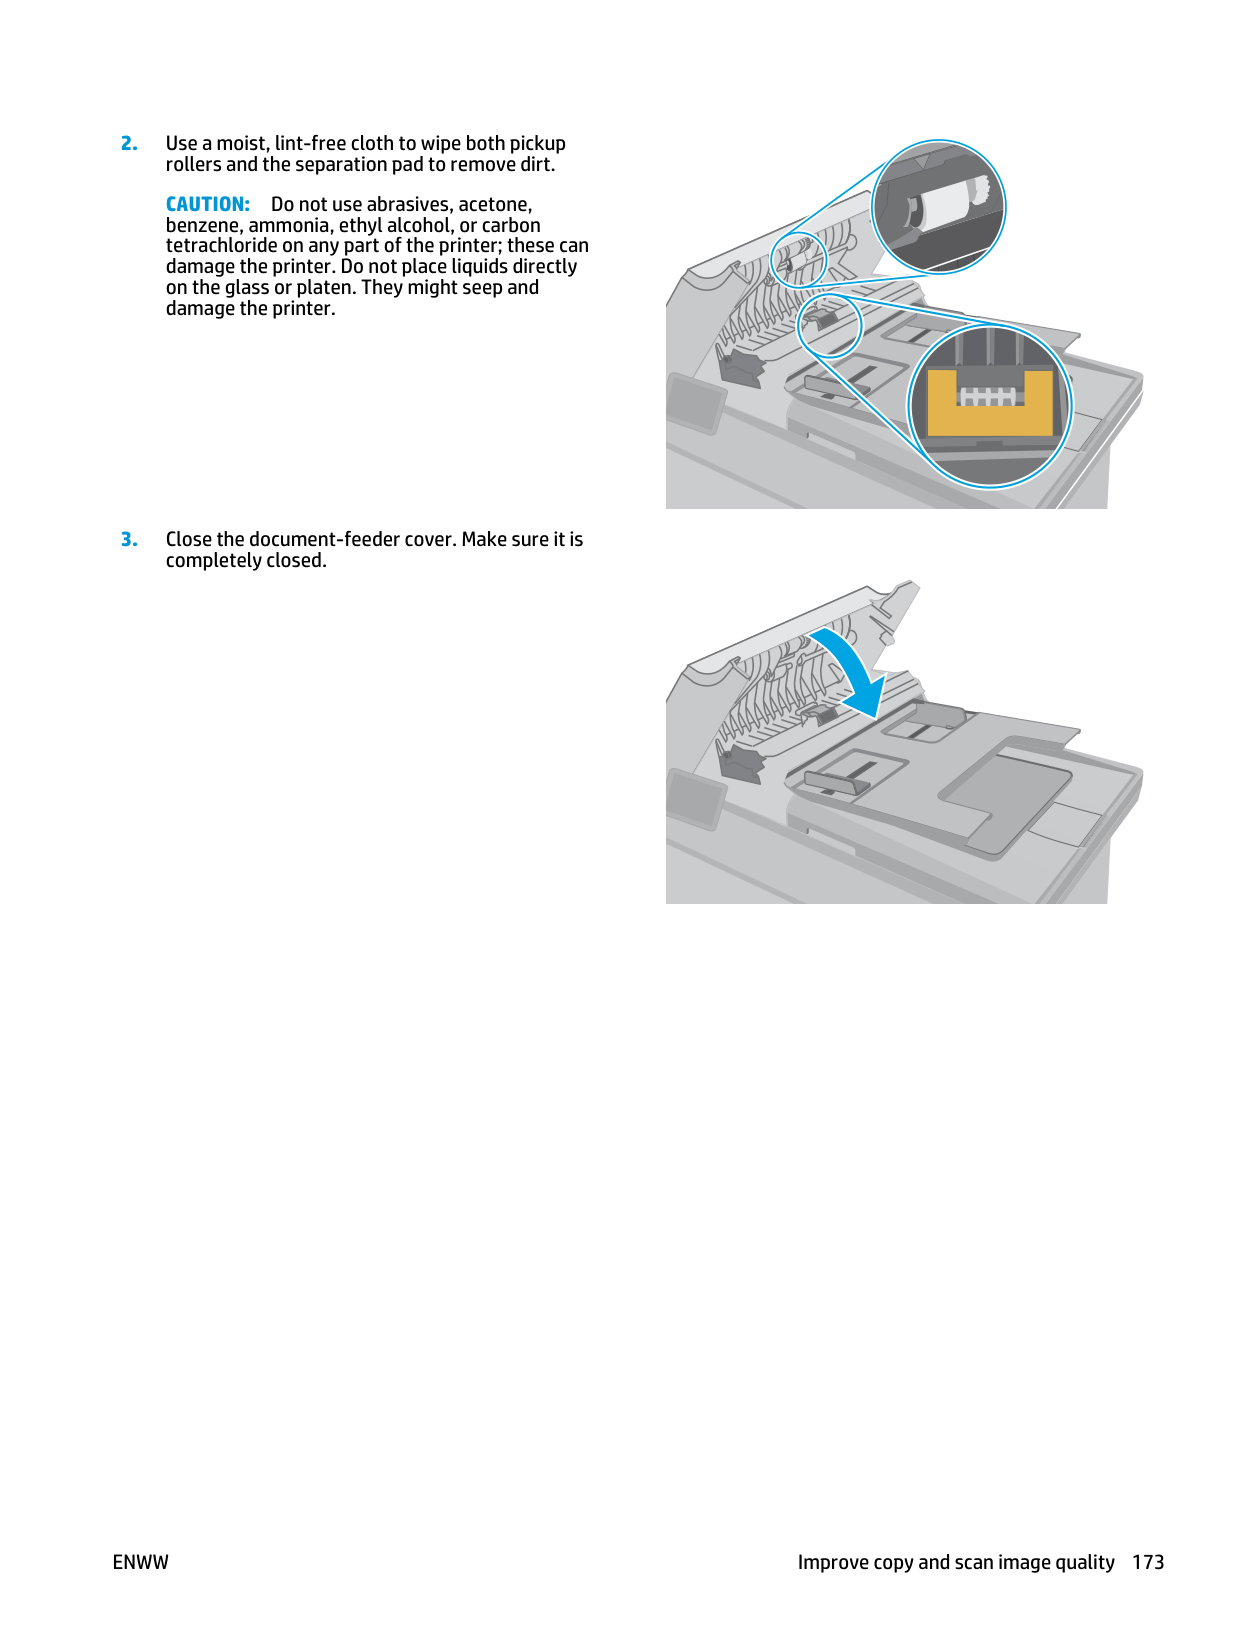
Caution:
Do not use abrasives, acetone, benzene, ammonia, ethyl alcohol, or carbon tetrachloride on any part of the printer; these can damage the printer. Do not place liquids directly on the glass or platen. They might seep and damage the printer.Enww
Improve copy and scan image quality 173
Improve fax image quality Introduction If the printer is having image quality problems, try the following solutions in the order presented to resolve the issue. ● Check the scanner glass for dirt and smudges ● Check the send-fax resolution settings ● Check the error-correction settings ● Check the fit-to-page setting ● Clean the pickup rollers and separation pad in the document feeder ● Send to a different fax machine ● Check the sender's fax machine Try these few simple steps first: ● Use the flatbed scanner rather than the document feeder. ● Use high-quality originals. ● When using the document feeder, load the original document into the feeder correctly, using the paper guides, to avoid unclear or skewed images. If the problem still exists, try these additional solutions. If they do not fix the problem, see “Improve print quality” for further solutions. Check the scanner glass for dirt and smudges Over time, specks of debris might collect on the scanner glass and white plastic backing, which can affect performance. Use the following procedure to clean the scanner.
Caution:
Do not use abrasives, acetone, benzene, ammonia, ethyl alcohol, or carbon tetrachloride on any part of the printer; these can damage the printer. Do not place liquids directly on the glass or platen. They might seep and damage the printer.Enww
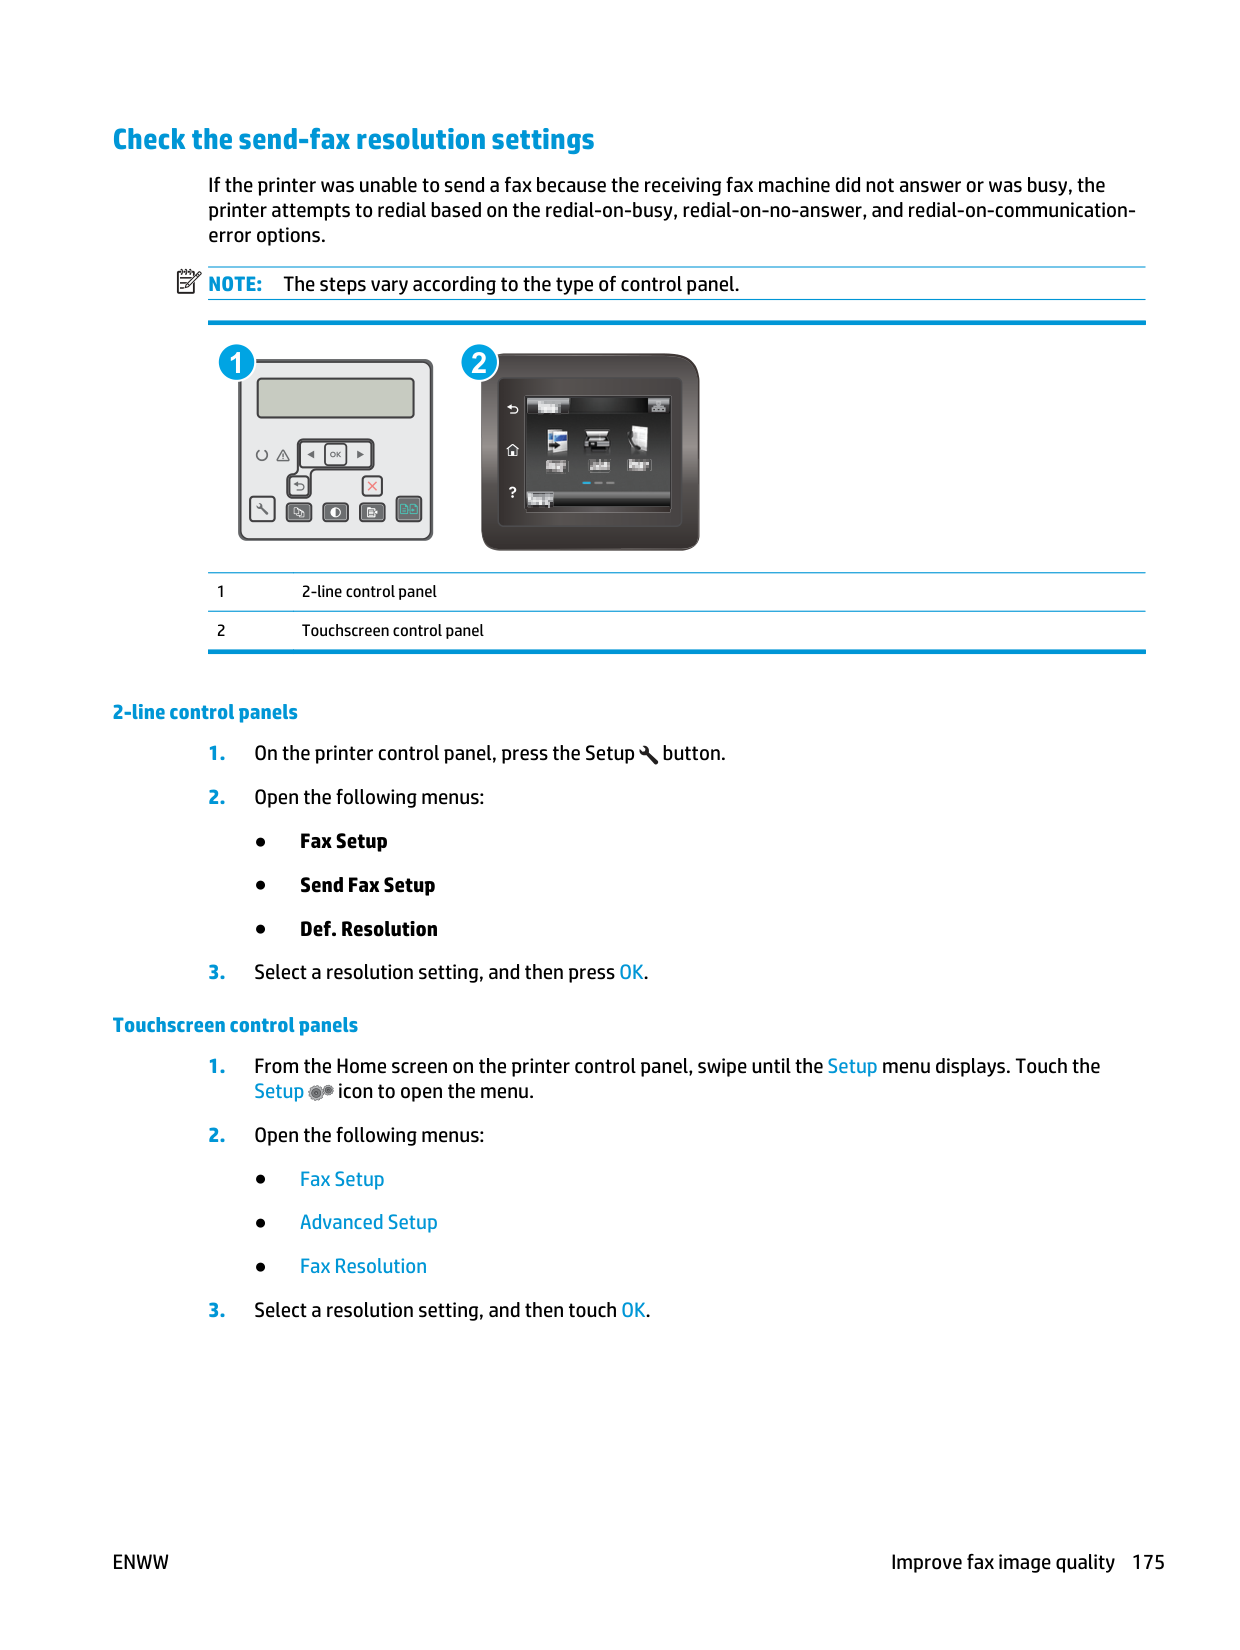
Check the send-fax resolution settings If the printer was unable to send a fax because the receiving fax machine did not answer or was busy, the printer attempts to redial based on the redial-on-busy, redial-on-no-answer, and redial-on-communication- error options.
Note:
The steps vary according to the type of control panel. 1 2 1 2-line control panel 2 Touchscreen control panel 2-line control panelsEnww
Improve fax image quality 175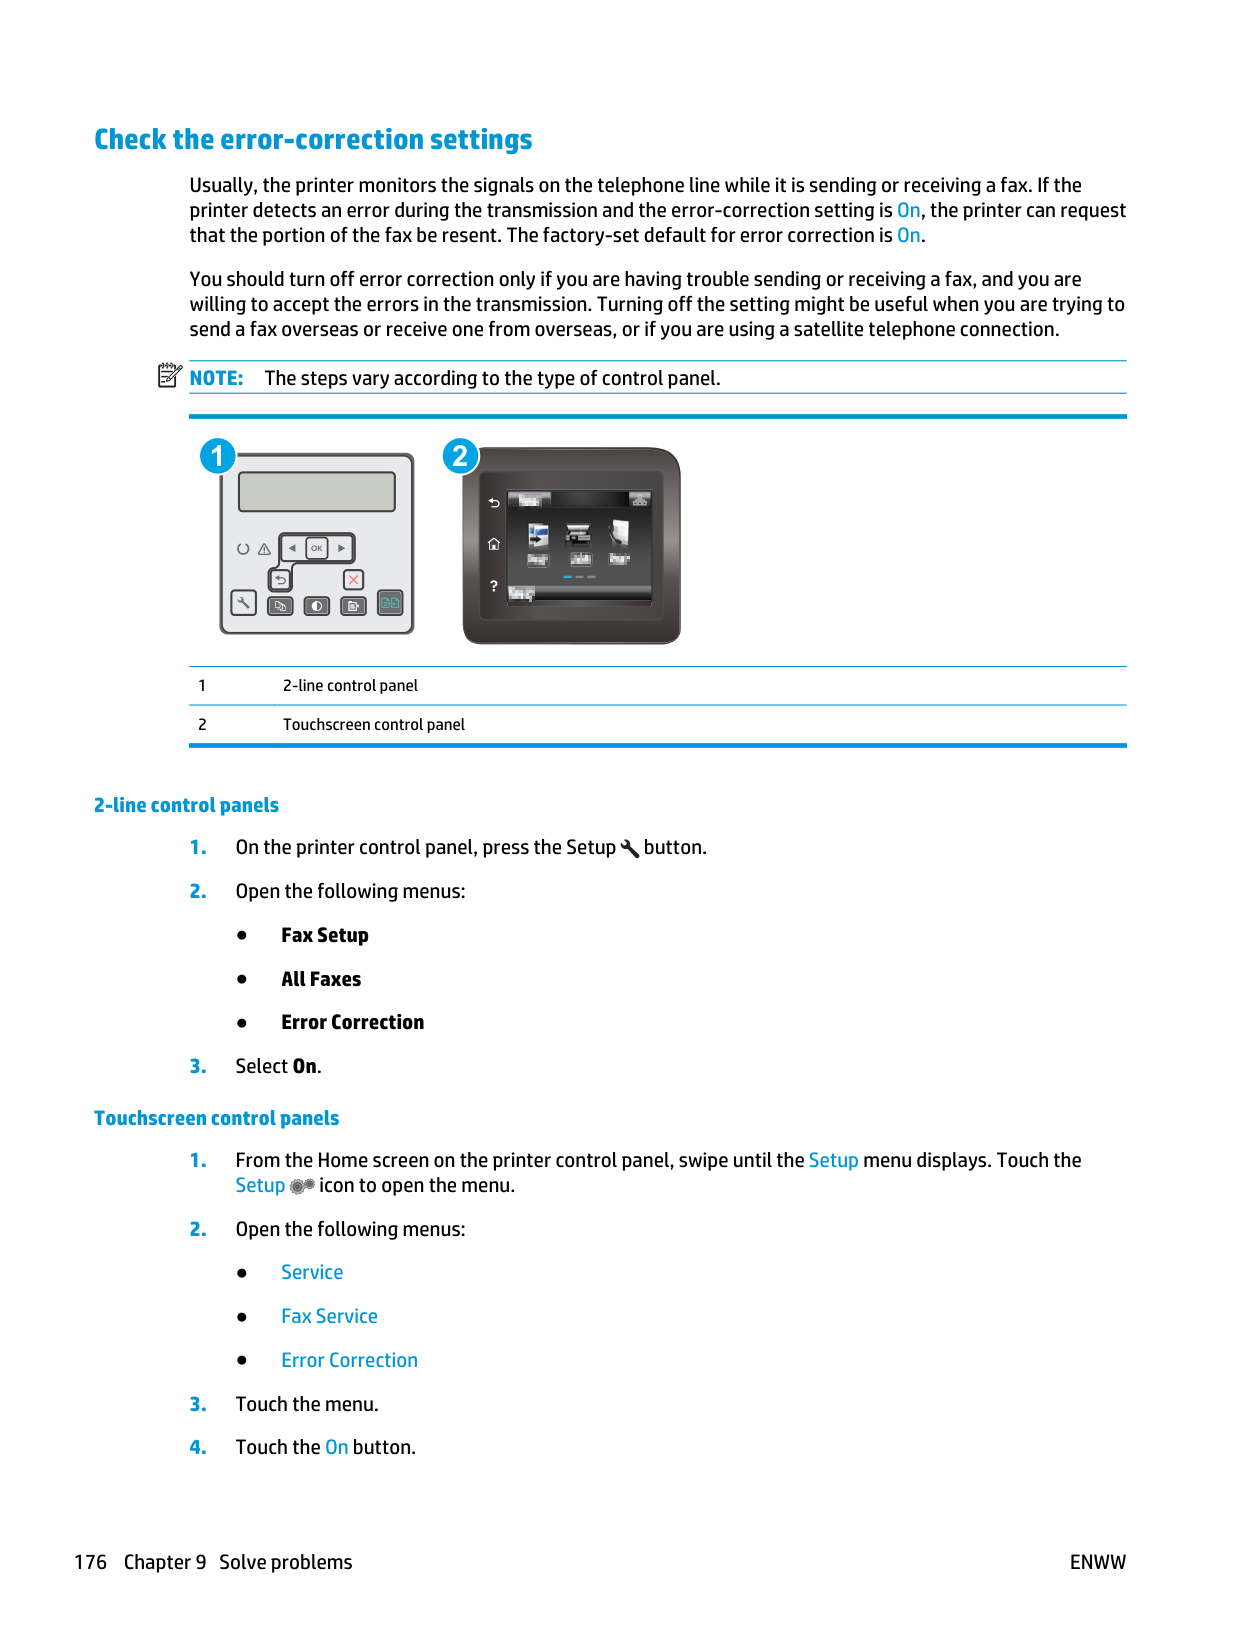
Check the error-correction settings Usually, the printer monitors the signals on the telephone line while it is sending or receiving a fax. If the printer detects an error during the transmission and the error-correction setting is On, the printer can request that the portion of the fax be resent. The factory-set default for error correction is On. You should turn off error correction only if you are having trouble sending or receiving a fax, and you are willing to accept the errors in the transmission. Turning off the setting might be useful when you are trying to send a fax overseas or receive one from overseas, or if you are using a satellite telephone connection.
Note:
The steps vary according to the type of control panel. 1 2 1 2-line control panel 2 Touchscreen control panel 2-line control panelsEnww
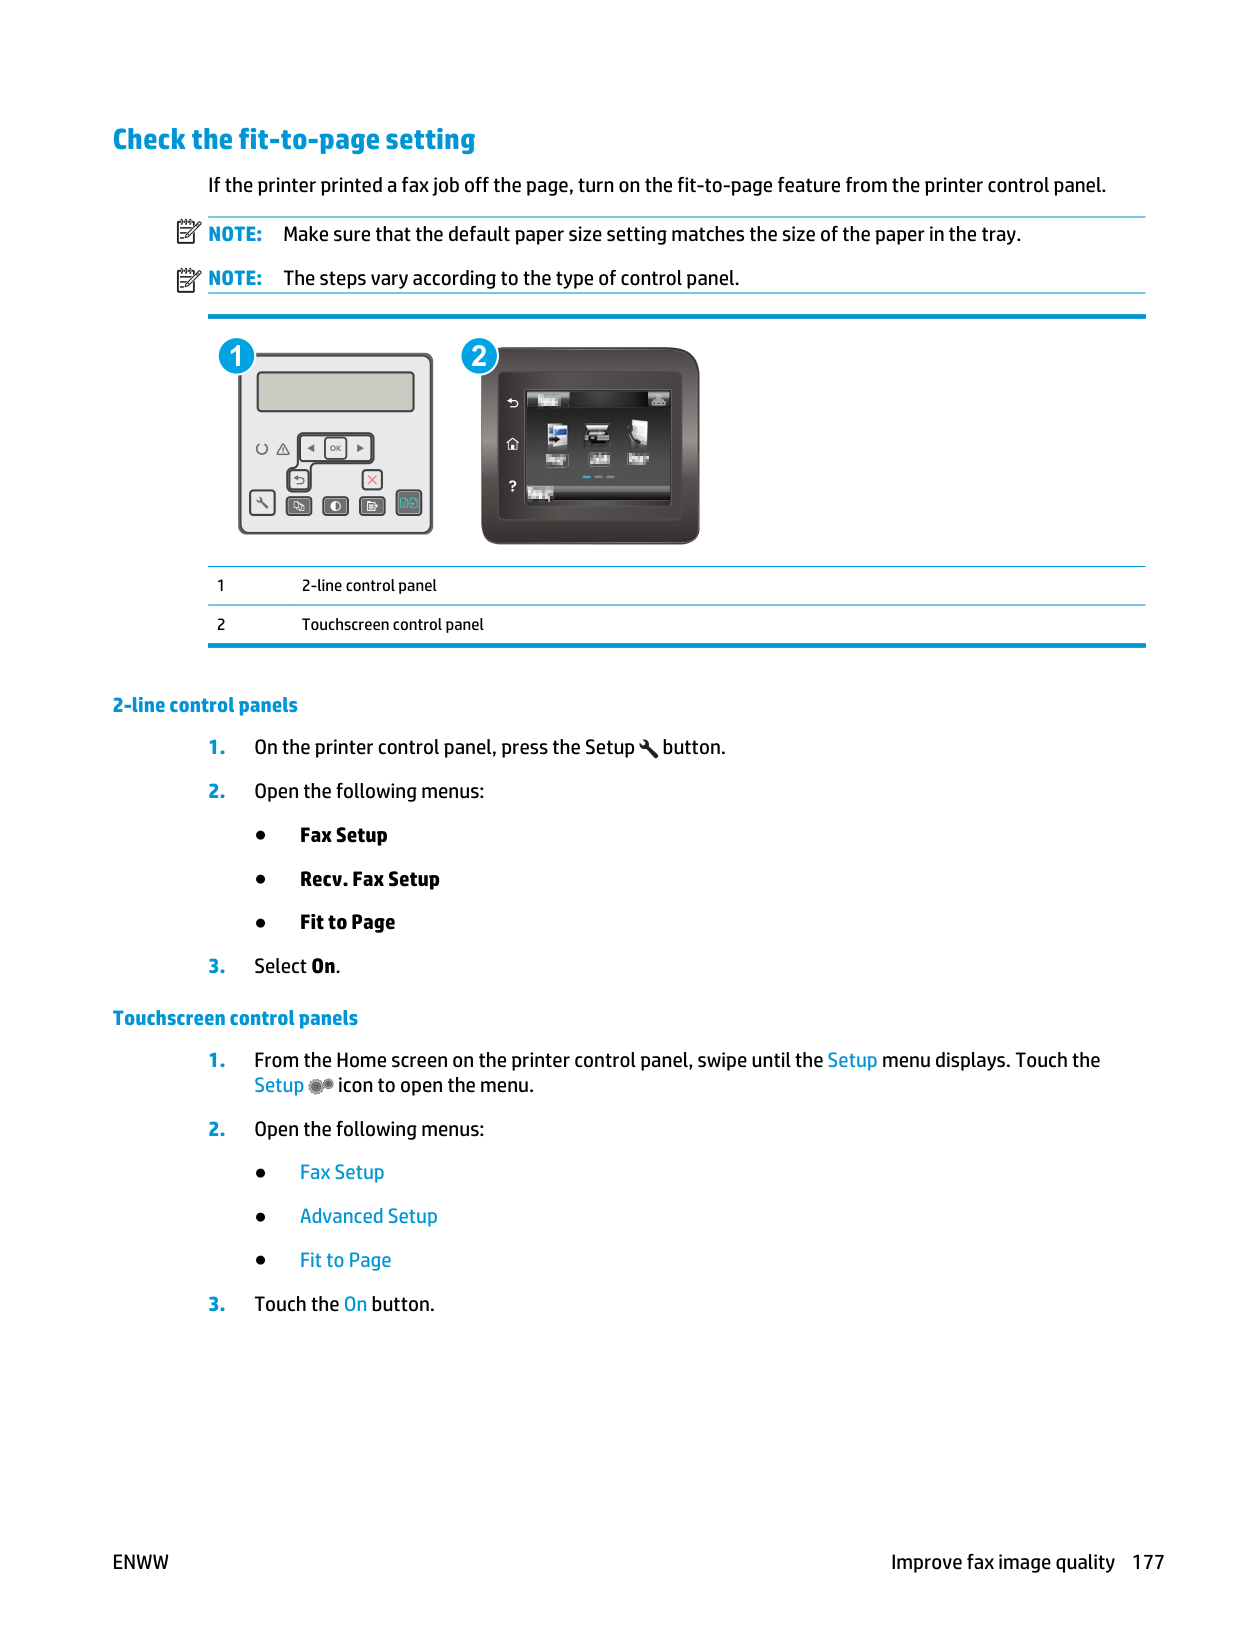
Check the fit-to-page setting If the printer printed a fax job off the page, turn on the fit-to-page feature from the printer control panel.
Note:
Make sure that the default paper size setting matches the size of the paper in the tray.Note:
The steps vary according to the type of control panel. 1 2 1 2-line control panel 2 Touchscreen control panel 2-line control panelsEnww
Improve fax image quality 177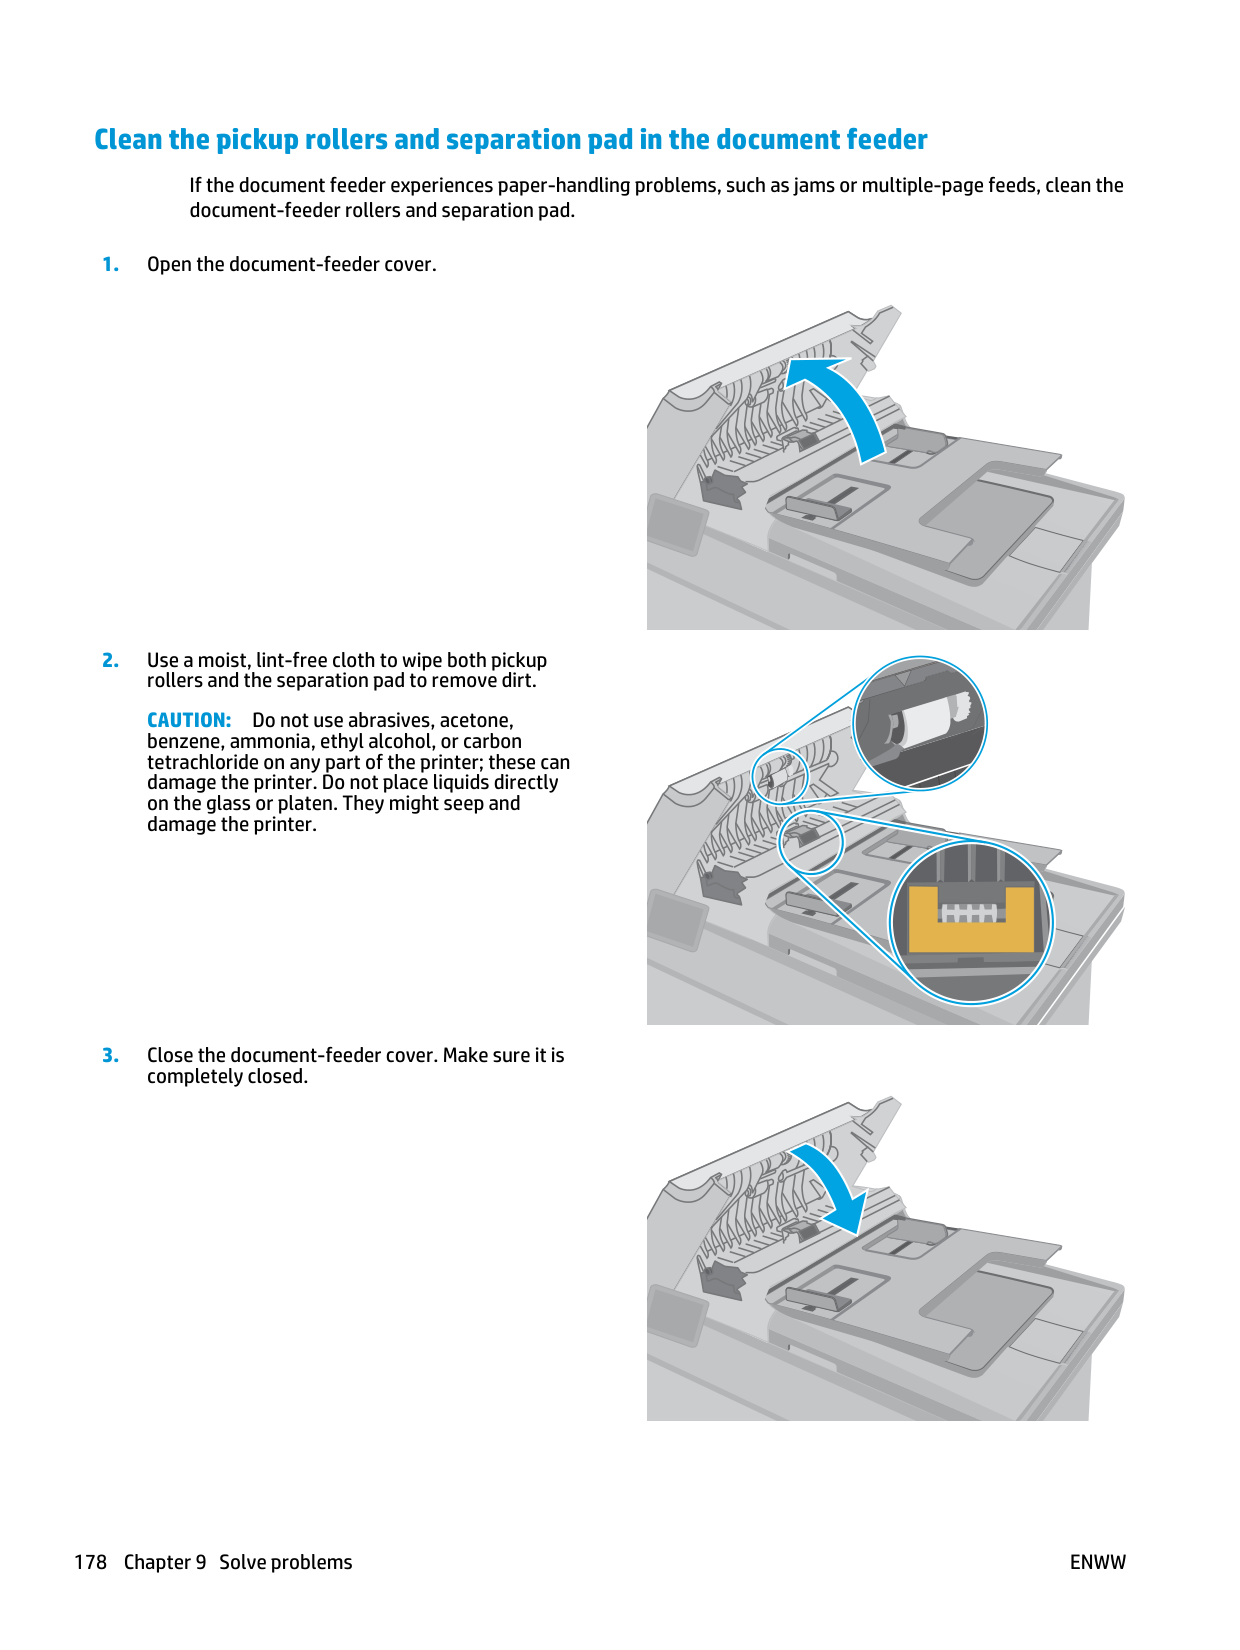
Clean the pickup rollers and separation pad in the document feeder If the document feeder experiences paper-handling problems, such as jams or multiple-page feeds, clean the document-feeder rollers and separation pad.
Caution:
Do not use abrasives, acetone, benzene, ammonia, ethyl alcohol, or carbon tetrachloride on any part of the printer; these can damage the printer. Do not place liquids directly on the glass or platen. They might seep and damage the printer.178 Chapter 9 Solve problems
Enww
Send to a different fax machine Try sending the fax to a different fax machine. If the fax quality is better, the problem is related to the initial recipient's fax machine settings or supplies status. Check the sender's fax machine Ask the sender to try sending from a different fax machine. If the fax quality is better, the problem is with the sender's fax machine. If a different fax machine is unavailable, ask the sender to consider making the following changes: ● Make sure the original document is on white (not colored) paper. ● Increase the fax resolution, quality level, or contrast settings. ● If possible, send the fax from a computer software program.
Enww
Improve fax image quality 179
Solve wired network problems Introduction Check the following items to verify that the printer is communicating with the network. Before beginning, print a configuration page from the printer control panel and locate the printer IP address that is listed on this page. ● Poor physical connection ● The computer is using the incorrect IP address for the printer ● The computer is unable to communicate with the printer ● The printer is using incorrect link speed and duplex settings for the network ● New software programs might be causing compatibility problems ● The computer or workstation might be set up incorrectly ● The printer is disabled, or other network settings are incorrect
Note:
HP does not support peer-to-peer networking, as the feature is a function of Microsoft operating systems and not of the HP print drivers. For more information, go to Microsoft at www.microsoft.com. Poor physical connectionEnww
● For Windows, click Start, click Run, type cmd, and then press Enter. ● For OS X, go to Applications, then Utilities, and open Terminal. b. Type ping followed by the IP address for your printer. c. If the window displays round-trip times, the network is working.
Enww
Solve wired network problems 181
Solve wireless network problems ● Introduction ● Wireless connectivity checklist ● The printer does not print after the wireless configuration completes ● The printer does not print, and the computer has a third-party firewall installed ● The wireless connection does not work after moving the wireless router or printer ● Cannot connect more computers to the wireless printer ● The wireless printer loses communication when connected to a VPN ● The network does not appear in the wireless networks list ● The wireless network is not functioning ● Perform a wireless network diagnostic test ● Reduce interference on a wireless network Introduction Use the troubleshooting information to help resolve issues.
Note:
To determine whether HP NFC and Wi-Fi Direct printing are enabled on your printer, print a configuration page from the printer control panel Wireless connectivity checklist ● Verify that the network cable is not connected. ● Verify that the printer and the wireless router are turned on and have power. Also make sure that the wireless radio in the printer is turned on. ● Verify that the service set identifier (SSID) is correct. Print a configuration page to determine the SSID. If you are not sure the SSID is correct, run the wireless setup again. ● With secured networks, verify that the security information is correct. If the security information is incorrect, run the wireless setup again. ● If the wireless network is working correctly, try accessing other computers on the wireless network. If the network has Internet access, try connecting to the Internet over a wireless connection. ● Verify that the encryption method (AES or TKIP) is the same for the printer as it is for the wireless access point (on networks using WPA security). ● Verify that the printer is within the range of the wireless network. For most networks, the printer must be within 30 m (100 ft) of the wireless access point (wireless router). ● Verify that obstacles do not block the wireless signal. Remove any large metal objects between the access point and the printer. Make sure poles, walls, or support columns containing metal or concrete do not separate the printer and wireless access point. 182 Chapter 9 Solve problemsEnww
● Verify that the printer is located away from electronic devices that might interfere with the wireless signal. Many devices can interfere with the wireless signal including motors, cordless phones, security system cameras, other wireless networks, and some Bluetooth devices. ● Verify that the print driver is installed on the computer. ● Verify that you have selected the correct printer port. ● Verify that the computer and printer connect to the same wireless network. ● For OS X, verify that the wireless router supports Bonjour. The printer does not print after the wireless configuration completes
Enww
Solve wireless network problems 183
Note:
The steps vary according to the type of control panel. 184 Chapter 9 Solve problemsEnww
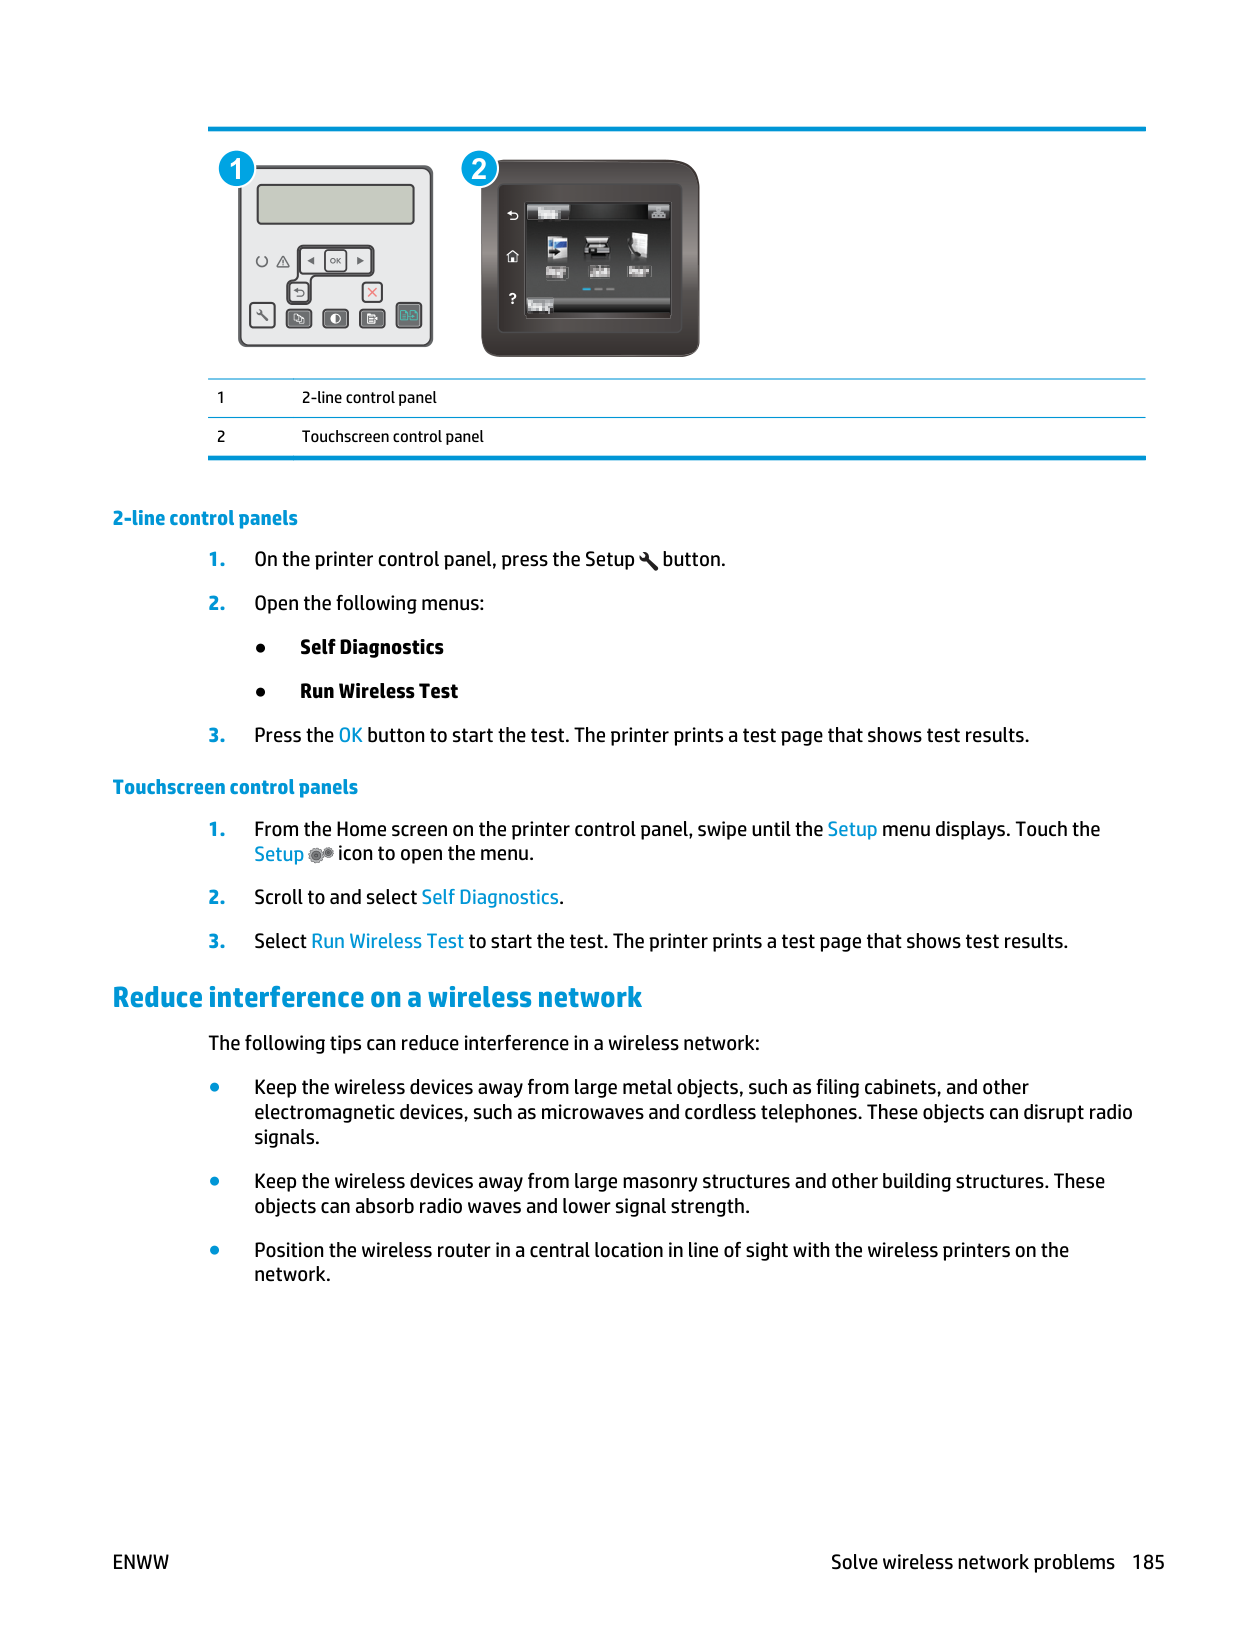
1 2 1 2-line control panel 2 Touchscreen control panel 2-line control panels
Enww
Solve wireless network problems 185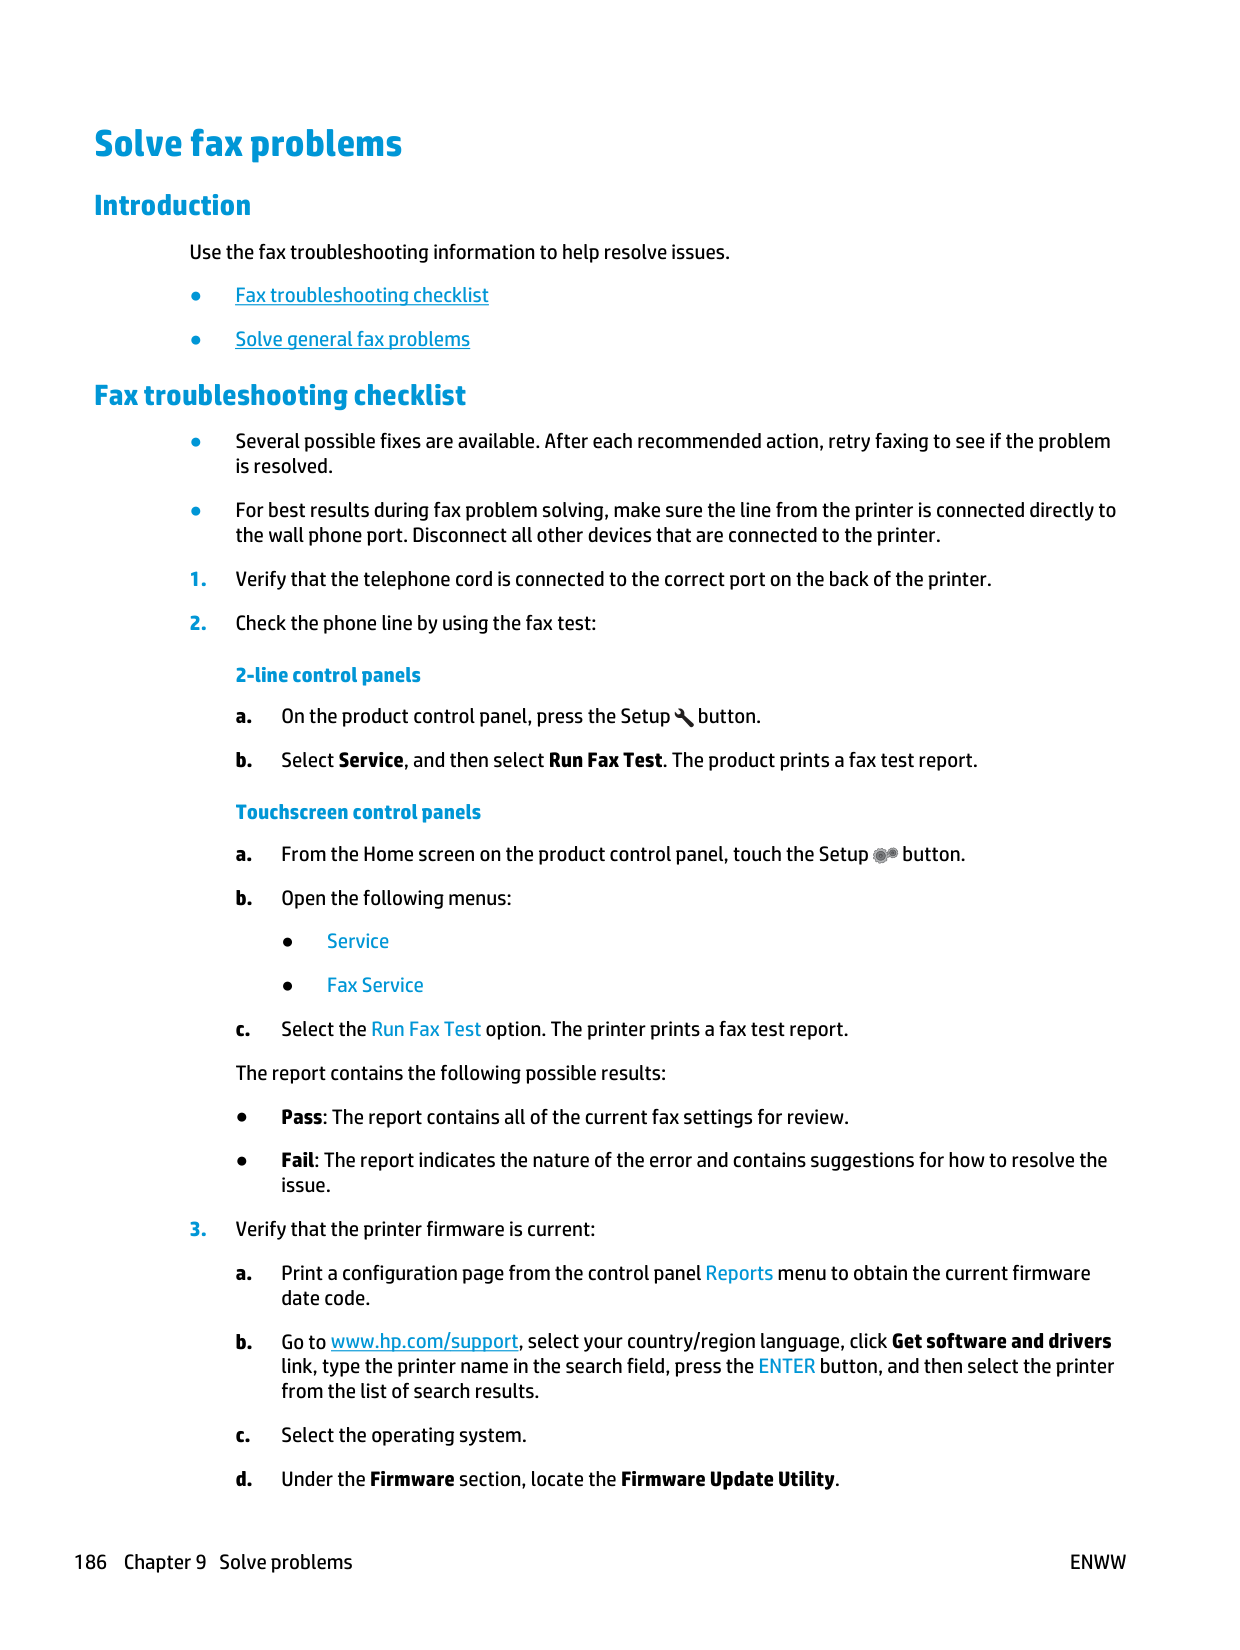
Solve fax problems Introduction Use the fax troubleshooting information to help resolve issues. ● Fax troubleshooting checklist ● Solve general fax problems Fax troubleshooting checklist ● Several possible fixes are available. After each recommended action, retry faxing to see if the problem is resolved. ● For best results during fax problem solving, make sure the line from the printer is connected directly to the wall phone port. Disconnect all other devices that are connected to the printer.
Enww
Note:
Make sure to use the firmware update utility that is specific to the printer model. e. Click Download, click Run, and then click Run again. f. When the utility launches, select the printer from the drop-down list, and then click Send Firmware.Note:
To print a configuration page to verify the installed firmware version before or after the update process, click Print Config. g. Follow the on-screen instructions to complete the installation, and then click the Exit button to close the utility.Note:
This can reduce image quality.Enww
Solve fax problems 187
● Use white paper for the original. Do not use colors such as gray, yellow, or pink. ● Increase the Fax Speed setting. a. Open the Setup Menu menu. b. Open the Fax Setup menu. c. Open the Advanced Setup menu. d. Open the Fax Speed menu. e. Select the correct setting. ● Divide large fax jobs into smaller sections, and then fax them individually. ● Change the fax settings on the control panel to a lower resolution. a. Open the Setup Menu menu. b. Open the Fax Setup menu. c. Open the Advanced Setup menu. d. Open the Fax Resolution menu. e. Select the correct setting. Fax quality is poor Fax is blurry or light. ● Increase fax resolution when sending faxes. Resolution does not affect received faxes. a. Open the Setup Menu menu. b. Open the Fax Setup menu. c. Open the Advanced Setup menu. d. Open the Fax Resolution menu. e. Select the correct setting.
Note:
Increasing resolution slows transmission speed. ● Turn on the Error Correction setting from the control panel. a. Open the Setup Menu menu. b. Open the Service menu. c. Open the Fax Service menu. d. Open the Error Correction menu. e. Select the On setting. ● Check the toner cartridges and replace if necessary. ● Ask the sender to darken the contrast setting on the sending fax machine, and then resend the fax. 188 Chapter 9 Solve problemsEnww
Fax cuts off or prints on two pages ● Set the Default Paper Size setting. Faxes print on a single size of paper based on the Default Paper Size settings. a. Open the Setup Menu menu. b. Open the System Setup menu. c. Open the Paper Setup menu. d. Open the Default Paper Size menu. e. Select the correct setting. ● Set the paper type and size for the tray used for faxes. ● Turn on the Fit to Page setting to print longer length faxes on letter or A4 size paper. a. Open the Setup Menu menu. b. Open the Fax Setup menu. c. Open the Advanced Setup menu. d. Open the Fit to Page menu. e. Select the On setting.
Note:
If the Fit to Page setting is off and the Default Paper Size setting is set to letter, a legal size original prints on two pages.Enww
Solve fax problems 189
190 Chapter 9 Solve problems
Enww
Index
A
accessories ordering 28 part numbers 28 acoustic specifications 13 AirPrint 58 Android devices printing from 59 applications downloading 104 Apps menu 104B
bin, output locating 2 browser requirements HP Embedded Web Server 106C
cartridge policy 29 checklist fax troubleshooting 186 wireless connectivity 182 cleaning document feeder glass 159 glass 164, 169, 174 paper path 163 control panel help 129 locating 2 copying edges of documents 172 multiple copies 64 optimizing for text or pictures 171 setting paper size and type 170 single copies 64 two-sided documents 66 customer support online 128D
defaults, restoring 130 dimensions, printer 12 document feeder 66 copying two-sided documents 66 faxing from 100 paper-feeding problems 135 double-sided copying 66 double-sided printing Mac 51 Windows 48 drivers, supported 10 duplex 66 duplex printing Mac 51 duplex printing (double-sided) settings (Windows) 48 Windows 48 duplexer locating 3 duplexing manually (Mac) 51 manually (Windows) 48E
EconoMode setting 121, 167 economy settings 121 electrical specifications 13 electronic faxes sending 101 Embedded Web Server (EWS) assigning passwords 117 features 106 envelope orientation 23 envelopes, loading 23 Explorer, versions supported HP Embedded Web Server 106F
factory-set defaults, restoring 130 fax sending from software 101 solve general problems 187 speed dials 100 fax troubleshooting checklist 186 faxing from a computer (Windows) 101 from the document feeder 100 from the flatbed scanner 99G
genuine HP cartridges 29 glass, cleaning 164, 169, 174 glass, cleaning document feeder 159H
help, control panel 129 HP Customer Care 128 HP Device Toolbox, using 106 HP Easy Scan software (OS X) 71 HP Embedded Web Server (EWS) features 106 HP ePrint 56 HP ePrint software 58 HP EWS, using 106 HP Scan software (Windows) 70 HP Utility 110 HP Utility for Mac Bonjour 110 features 110 HP Utility, Mac 110Enww
Index 191
HP Web Services applications 104 enabling 104
I
image quality check toner-cartridge status 162 interface ports locating 3 Internet Explorer, versions supported HP Embedded Web Server 106J
jams locating 137L
label orientation 25 labels printing on 25 labels, loading 25 lock formatter 118M
Macintosh HP Utility 110 Main input tray loading 19 loading envelopes 23 loading labels 25 orientation 19 maintenance kits part numbers 28 manual duplex Mac 51 Windows 48 memory included 10 Microsoft Word, faxing from 101 mobile printing Android devices 59 mobile printing solutions 10 mobile printing, software supported 12 multiple pages per sheet printing (Mac) 52 printing (Windows) 49N
Near Field Communication printing 54 Netscape Navigator, versions supported HP Embedded Web Server 106 network duplex settings, changing 115 network installation 105 network link speed settings, changing 115 network port locating 3 networks installing the printer 105 supported 10 NFC printing 54 number of copies, changing 64O
on/off button, locating 2 online help, control panel 129 online support 128 operating systems (OS) supported 10 operating systems, supported 10 ordering supplies and accessories 28 OS (operating system) supported 10 output bin locating 2P
pages per minute 10 pages per sheet selecting (Mac) 52 selecting (Windows) 49 paper selecting 165 paper pickup problems solving 133, 134 paper type selecting (Windows) 49 paper types selecting (Mac) 52 paper, ordering 28 part numbers accessories 28 replacement parts 28 staple cartridges 28 supplies 28 toner cartridge 28 toner cartridges 28 phone book, fax adding entries 100 power consumption 13 power connection locating 3 power switch, locating 2 print drivers, supported 10 print on both sides Mac 51 manually, Windows 48 Windows 48 printing from USB flash drives 60 printing on both sides settings (Windows) 48 Priority input tray loading 16 loading envelopes 23 loading labels 25 orientation 16R
rear door locating 3 replacement parts part numbers 28 restoring factory-set defaults 130S
scanner document feeder glass cleaning 159 faxing from 99 glass cleaning 164, 169, 174 scanning from HP Easy Scan software (OSX)
71 from HP Scan software (Windows) 70 sending faxes from software 101 settings factory-set defaults, restoring 130 192 IndexEnww

shut down after delay setting 122 sleep delay setting 121 software HP Utility 110 sending faxes 101 solve problems fax 187 specifications electrical and acoustic 13 speed dials programming 100 staple cartridges part numbers 28 status HP Utility, Mac 110 supplies low threshold settings 131 ordering 28 part numbers 28 status, viewing with HP Utility for Mac 110 using when low 131 support online 128 system requirements HP Embedded Web Server 106
T
technical support online 128 toner cartridge low threshold settings 131 part numbers 28 using when low 131 toner cartridges part numbers 28 trays capacity 10 included 10 locating 2 troubleshooting check toner-cartridge status 162 faxes 186 network problems 180 paper feed problems 133 wired network 180 wireless network 182 two-sided copying 66 two-sided printing settings (Windows) 48U
USB flash drives printing from 60 USB port locating 3W
walk-up USB port locating 2 walk-up USB printing 60 web browser requirements HP Embedded Web Server 106 Web Services applications 104 enabling 104 Web sites customer support 128 weight, printer 12 Wi-Fi Direct Printing 54 Wi-Fi Direct printing 12 Windows faxing from 101 wireless network troubleshooting 182 wireless network interference 185 Word, faxing from 101Enww
Index 193
194 Index