
HP Smartstream Software For HP Jet Fusion 3D Printers
Ask AI
— answers from the official manualAnswers from the official manual.
Common questions
Common Questions
28 totalWhat are the system requirements for installing the HP SmartStream 3D Command Center Server?
The required specifications include an Intel processor with four virtual cores, at least 8 GB of RAM, and 400 GB of free hard disk space. The supported operating systems are Microsoft Windows 10 (64-bit), Windows Server 2012 R2 up to Windows Server 2016. An internet connection of ADSL or better is also needed.
How do I add a device to HP SmartStream 3D Command Center?
To add a device, log in with your PrintOS account in the Command Center Client and go to Settings → Device Management. Click Add device, then enter the name of the device (limited to 32 characters), static IP, FQDN or hostname, administrator password from the front panel settings menu, and select the correct organization if you belong to multiple organizations.
What should I do if I encounter connectivity issues with Command Center clients?
Check your network connection by clicking on the gear icon at the top-right corner of the Command Center Client, then go to Network Connectivity. Troubleshoot according to messages provided or refer to the Troubleshooting section for further guidance.
How do I set up a proxy configuration on Windows 7?
When configuring a new proxy setting or updating existing settings, you must reboot the operating system because Command Center cannot work properly without it. See section Configuring Proxy Settings for detailed instructions.
How do I handle issues when trying to log in to PrintOS through the Command Center client after proxy configuration?
Ensure that your configured proxy server can route connections between the Command Center Client and Server. Confirm that ports 8443-8449 and 8080-8089 are open on your network firewall for proper operation.
How do I access the Command Center application data folder?
If hidden, reveal AppData by clicking View -> Hidden Items in Windows Explorer or right-click Start -> Organize Folders and Search Options (in Windows 7 & 8) then select Show Hidden files.
Show 22 more questions
What is required for proper communication between Command Center server and client through a proxy?
What network ports need to be open for the HP SmartStream 3D Command Center to function correctly?
How is device data encrypted when transmitted to the HP Cloud?
Does HP collect job file contents or part geometries from my 3D printer?
What should I do to ensure my HP SmartStream 3D Command Center stays connected to the HP Cloud?
How much network bandwidth does the HP SmartStream 3D Command Center use?
What printhead information is collected by the HP SmartStream 3D Command Center?
Are there any security measures in place for HP device firmware updates?
What productivity data does HP collect that could be used for benchmarking?
Does the HP Jet Fusion 3D printer connect directly to the internet or HP Cloud?
What security measures are taken to protect my data when connected to the cloud?
What device information is collected and transferred to the cloud?
How do I set up the HP SmartStream 3D Command Center?
What kind of device data is not collected?
How often does data need to be uploaded for the cloud system to work effectively?
What happens if there's a technical failure with the HP SmartStream 3D Command Center software?
What firewall configurations are necessary for proper data transmission?
How does HP improve part quality using data collected?
What data is transmitted between the client and server of the HP SmartStream 3D Command Center?
What steps should be followed when upgrading from firmware version earlier than TATDAG_14_18_05.X to newer versions?
Why must I manually set system time on Windows PC using UTC/GMT configuration?
What steps are needed for a server to discover other servers in Command Center clients?
Full Manual
48 pages

Technical Newsletter
HP SmartStream 3D Command Center 4.0 installation and troubleshooting guide

Contents
CONTENTS ............................................................................................................................... 1 DESCRIPTION ........................................................................................................................... 3 BENEFITS.................................................................................................................................. 3 REQUIREMENTS ....................................................................................................................... 4 IT INFORMATION ..................................................................................................................... 4 INSTALLATION ......................................................................................................................... 6 SERVER INSTALLATION .......................................................................................................................... 7 CLIENT INSTALLATION........................................................................................................................... 8 PROXY CONFIGURATION........................................................................................................................ 9 CONNECTIVITY CHECK......................................................................................................................... 11 ADDING DEVICES ............................................................................................................................... 11
Device security password........................................................................................................ 11 Device hostname .................................................................................................................... 13 Create a PrintOS account........................................................................................................ 14 Log in to PrintOS..................................................................................................................... 15 Add a device in Command Center........................................................................................... 18
CONNECTING TO COMMAND CENTER MQTT BROKER .............................................................................. 21 CONNECTING TO THE COMMAND CENTER DEVICE API GATEWAY ................................................................ 21 CONFIGURE CUSTOM CERTIFICATES FOR COMMUNICATION BETWEEN COMMAND CENTER AND THE PRINTER ....... 21

UPGRADE PROCESS.................................................................................................................22 UPGRADE TO V4.0 OR NEWER VERSIONS................................................................................................ 22 UPGRADE TO V3.6 OR NEWER VERSIONS................................................................................................ 22 UPGRADE FROM V2.0 OR NEWER VERSIONS............................................................................................ 23 UPGRADE FROM V1.6 ........................................................................................................................ 23 UPGRADE FROM V1.5 ........................................................................................................................ 23
Upgrading all devices at the same time ................................................................................. 23 Upgrading the devices progressively ...................................................................................... 24 Only one PC is available.......................................................................................................... 24
UNINSTALLATION PROCESS.....................................................................................................25 TROUBLESHOOTING................................................................................................................26 NETWORK DIAGNOSTICS ..................................................................................................................... 26 CONFIGURE COMMAND CENTER TO SUPPORT SSL BUMP FOR TRAFFIC INSPECTION ........................................ 27 3D PRINTER OR PROCESSING STATION IS OFFLINE IN COMMAND CENTER CLIENT, BUT IT’S TURNED ON.............. 28 EXTRACT DEBUGGING INFORMATION FROM THE COMMAND CENTER SERVER ................................................ 31 HOW TO VERIFY THAT ALL COMPONENTS ARE RUNNING............................................................................. 32 CHECK INTERNET CONNECTIVITY TO PRINTOS, AND BETWEEN COMMAND CENTER SERVER AND CLIENT ............. 33 COMMAND CENTER SERVER APPEAR IN THE LIST, BUT IT’S DISCONNECTED .................................................... 36 COMMAND CENTER CLIENT IS NOT ABLE TO LOG IN TO PRINTOS................................................................. 36 COMMAND CENTER CLIENT IS NOT ABLE TO CONNECT TO COMMAND CENTER SERVER BACKEND....................... 37 COMMAND CENTER CLIENT IS NOT ABLE TO LOG IN TO PRINTOS AFTER PROXY CONFIGURATION ....................... 37 CONFIGURING PROXY SETTINGS ON WINDOWS 7 ..................................................................................... 37 DEVICE IS NOT ABLE TO UPLOAD DATA TO THE HP CLOUD.......................................................................... 38
PROBLEMS CONNECTING TO A SERVER ................................................................................................... 38 PROBLEMS CONNECTING TO THE COMMAND CENTER MQTT BROKER......................................................... 39 PROBLEMS CONNECTING TO THE COMMAND CENTER DEVICE API GATEWAY ................................................ 41 DEVICE MANAGEMENT OR ADD DEVICE BUTTON DOES NOT APPEAR IN COMMAND CENTER CLIENT ................... 44 REMOVE DEVICE BUTTON DOES NOT APPEAR IN COMMAND CENTER CLIENT DEVICE MANAGEMENT.................. 44
APPENDIX ...............................................................................................................................44 ACCESS THE COMMAND CENTER APPLICATION DATA FOLDER...................................................................... 44 ACCESSING MOSQUITTO.LOG FILE ......................................................................................................... 46
Description
The aim of this newsletter is to define an easy configuration process for HP SmartStream 3D Command Center and to explain which checks should be done to ensure that cloud connection works correctly.

HP SmartStream 3D Command Center consists of two different pieces of software:
Benefits
With this software installed, cloud connectivity is enabled, providing you with the following benefits:


IT Information


Installation
IMPORTANT: This process is for new users. If you are updating HP SmartStream 3D Command Center, please check the notes on the Upgrade process.

The HP SmartStream 3D Command Center Server needs to be installed on a pc that has access to the devices (3D printers or processing stations) and access to the Internet and the HP Cloud.
It is necessary to have this PC always turned on to send information from devices to the cloud and to let Command Center Clients monitor the list of configured 3D printers / processing stations. Remember to disable the sleep/standby mode in the PC.
Only one HP SmartStream 3D Command Center Server must be installed on the network to avoid confusion.
You can access the 3D printer / processing station information by installing the HP SmartStream 3D Command Center Client in any pc on your network, provided that the network has access to the main pc where the Command Center Server is installed.
The Command Center Server has no user interface (it just shows the system tray icon), it just contains processes that will run in the background.
The following picture shows a typical configuration where the Command Center Server is running in “Server PC” and the clients can be running in “PC1” or “PC2” or in the same “Server PC”.


IMPORTANT: It is very important to ensure that 3D printers, processing stations, and PCs have the same time zone (reference is UTC/GMT). Check that the PC has correctly configured the date and time, the same as the world official time (http://www.worldtimeserver.com/current_time_in_UTC.aspx).
Also, check the “Daylight saving time” is correctly configured (if applicable).
#### Server installation
You may encounter the following issues:


#### Client installation

IMPORTANT: From version 3.2 of Command Center, HTTPS connection has been enforced. Thus, now only secured servers (with HTTPS) will be autodetected, this means that all servers with a version earlier than 3.2 will not be discovered. In addition, non-secured connections to servers (without https, port 8080) cannot be added manually.

IMPORTANT: Remember that it is strongly recommended to configure a static IP address rather than a DHCP address for the “Server PC” to allow Command Center Clients to always find the Command Center Server, as the IP can change in DHCP environments when no MAC reservations are configured for the device.
Proxy configuration In case it is necessary to configure the Internet connection via proxy server:


In addition, the range of the local IP addresses should be added to the local PC proxy configuration, to avoid resolving them through the proxy.

IMPORTANT: To ensure correct operation, it is very important to allow proxy connectivity with the Command Center Server (port range 8443-8449 and 8080-8099). If, after proxy configuration, the Command Center Client behaves unexpectedly, or you cannot log in with PrintOS please check the notes in the section Command Center Client is not able to log in to PrintOS after proxy configuration
#### Connectivity check
If you have issues, first fix them. Check that your network is not blocking our HP Cloud connections.
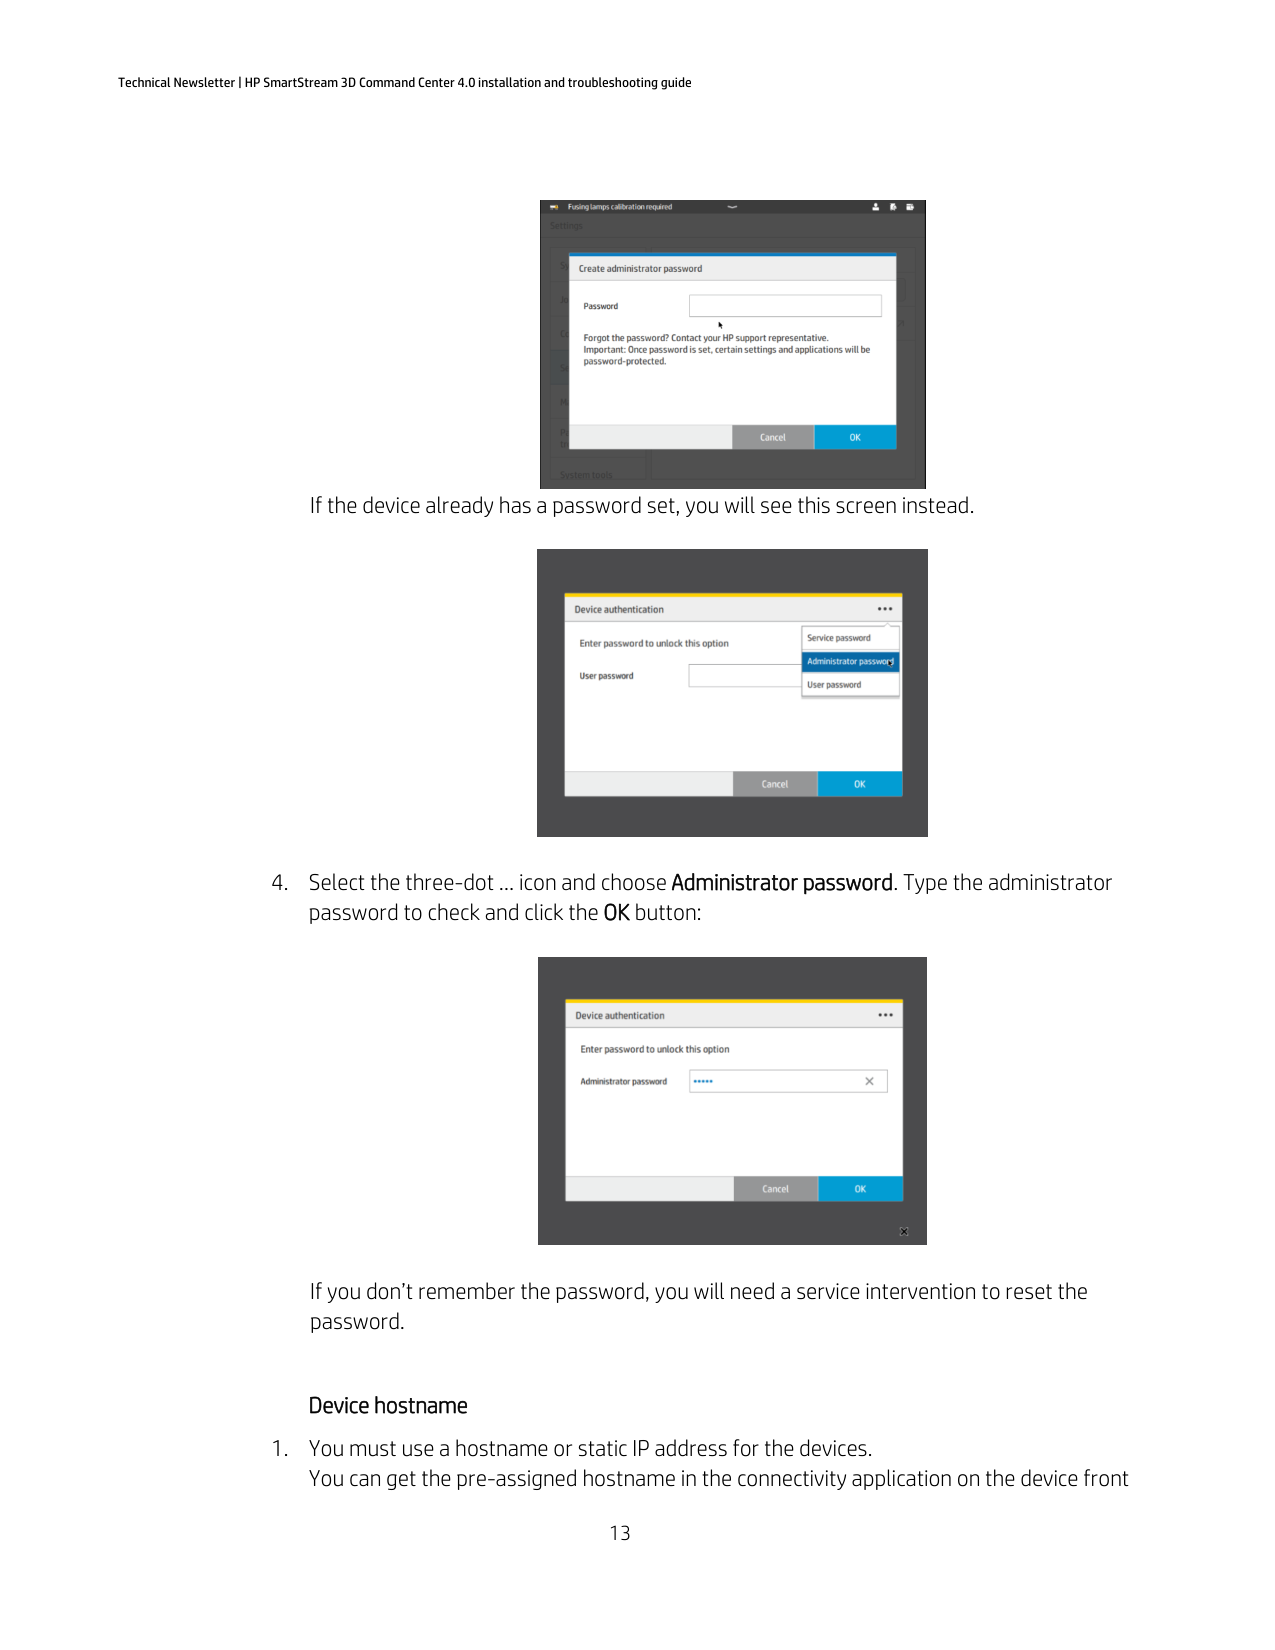

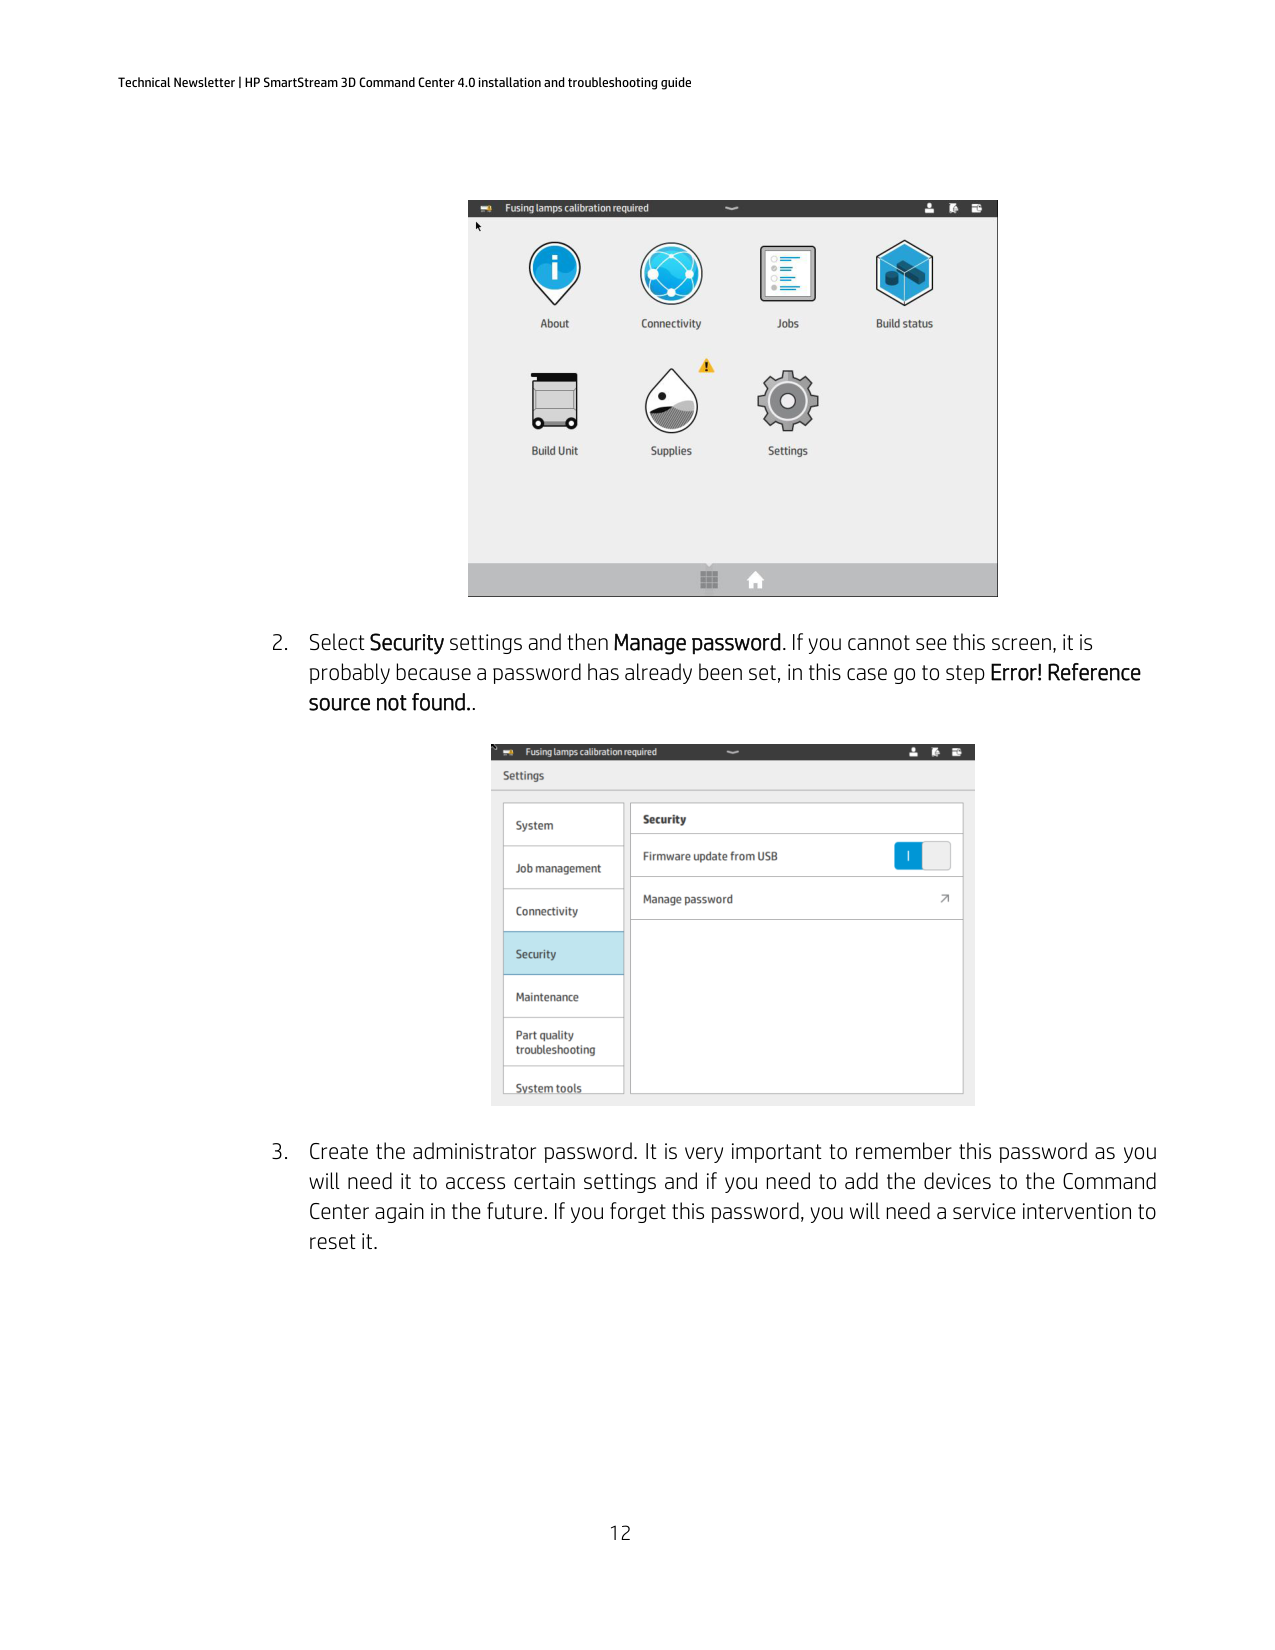
Adding devices Device security password
You must configure the device security password to be able to associate the device to your Command Center.


If you don’t remember the password, you will need a service intervention to reset the password.
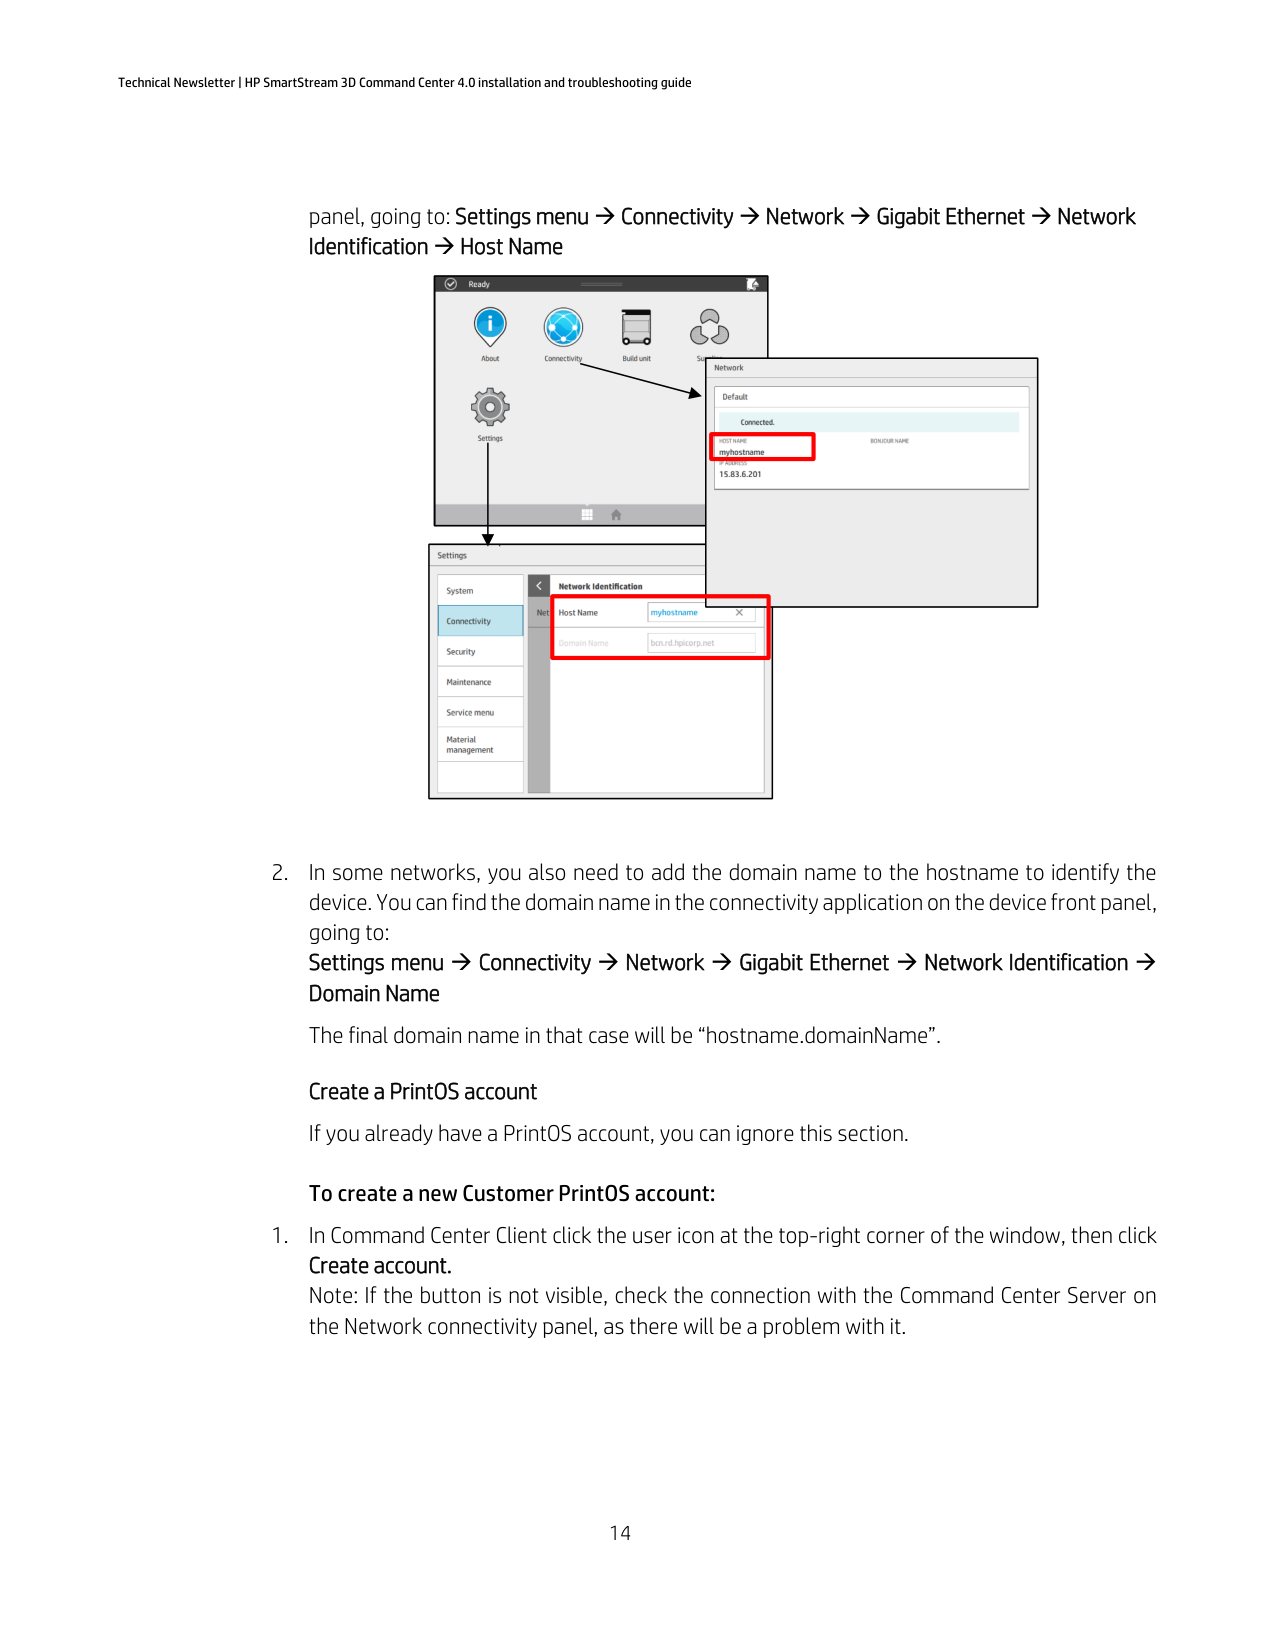
Device hostname


Create a PrintOS account If you already have a PrintOS account, you can ignore this section.
To create a new Customer PrintOS account:


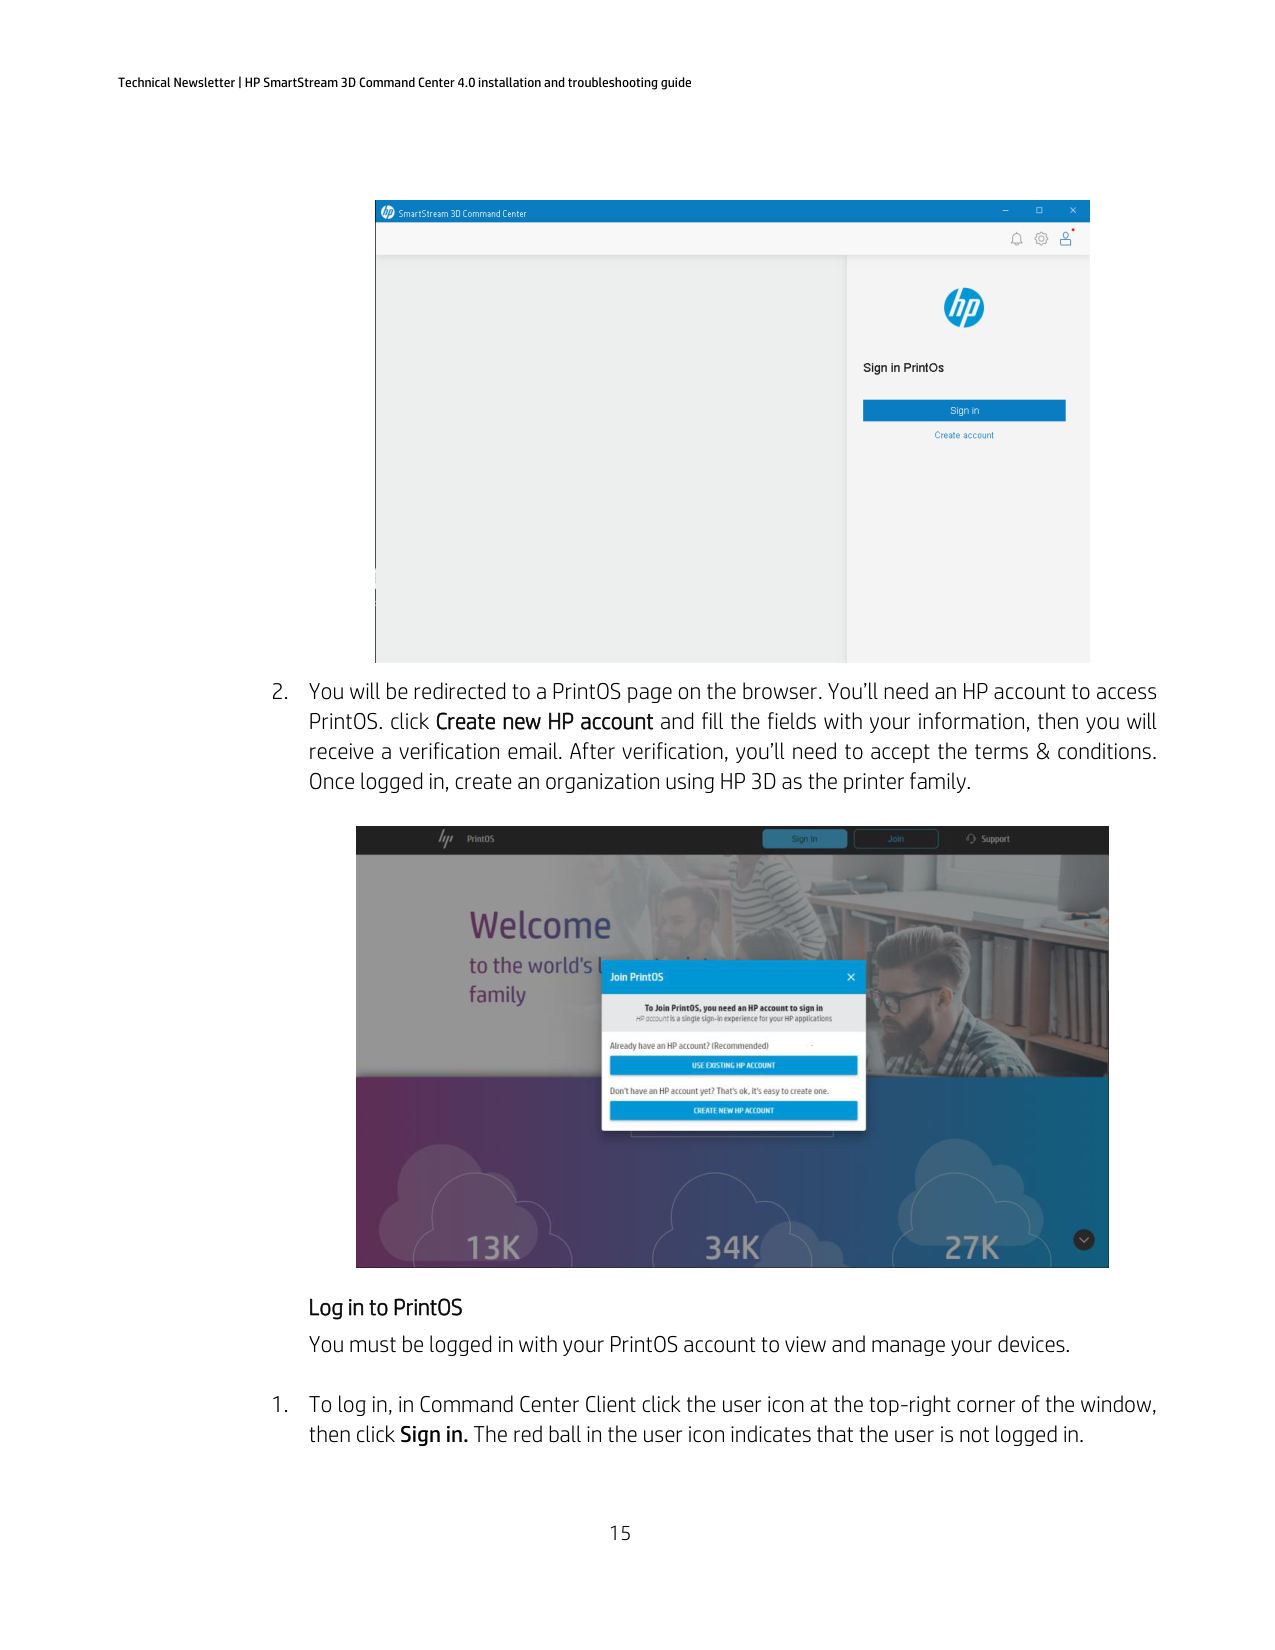
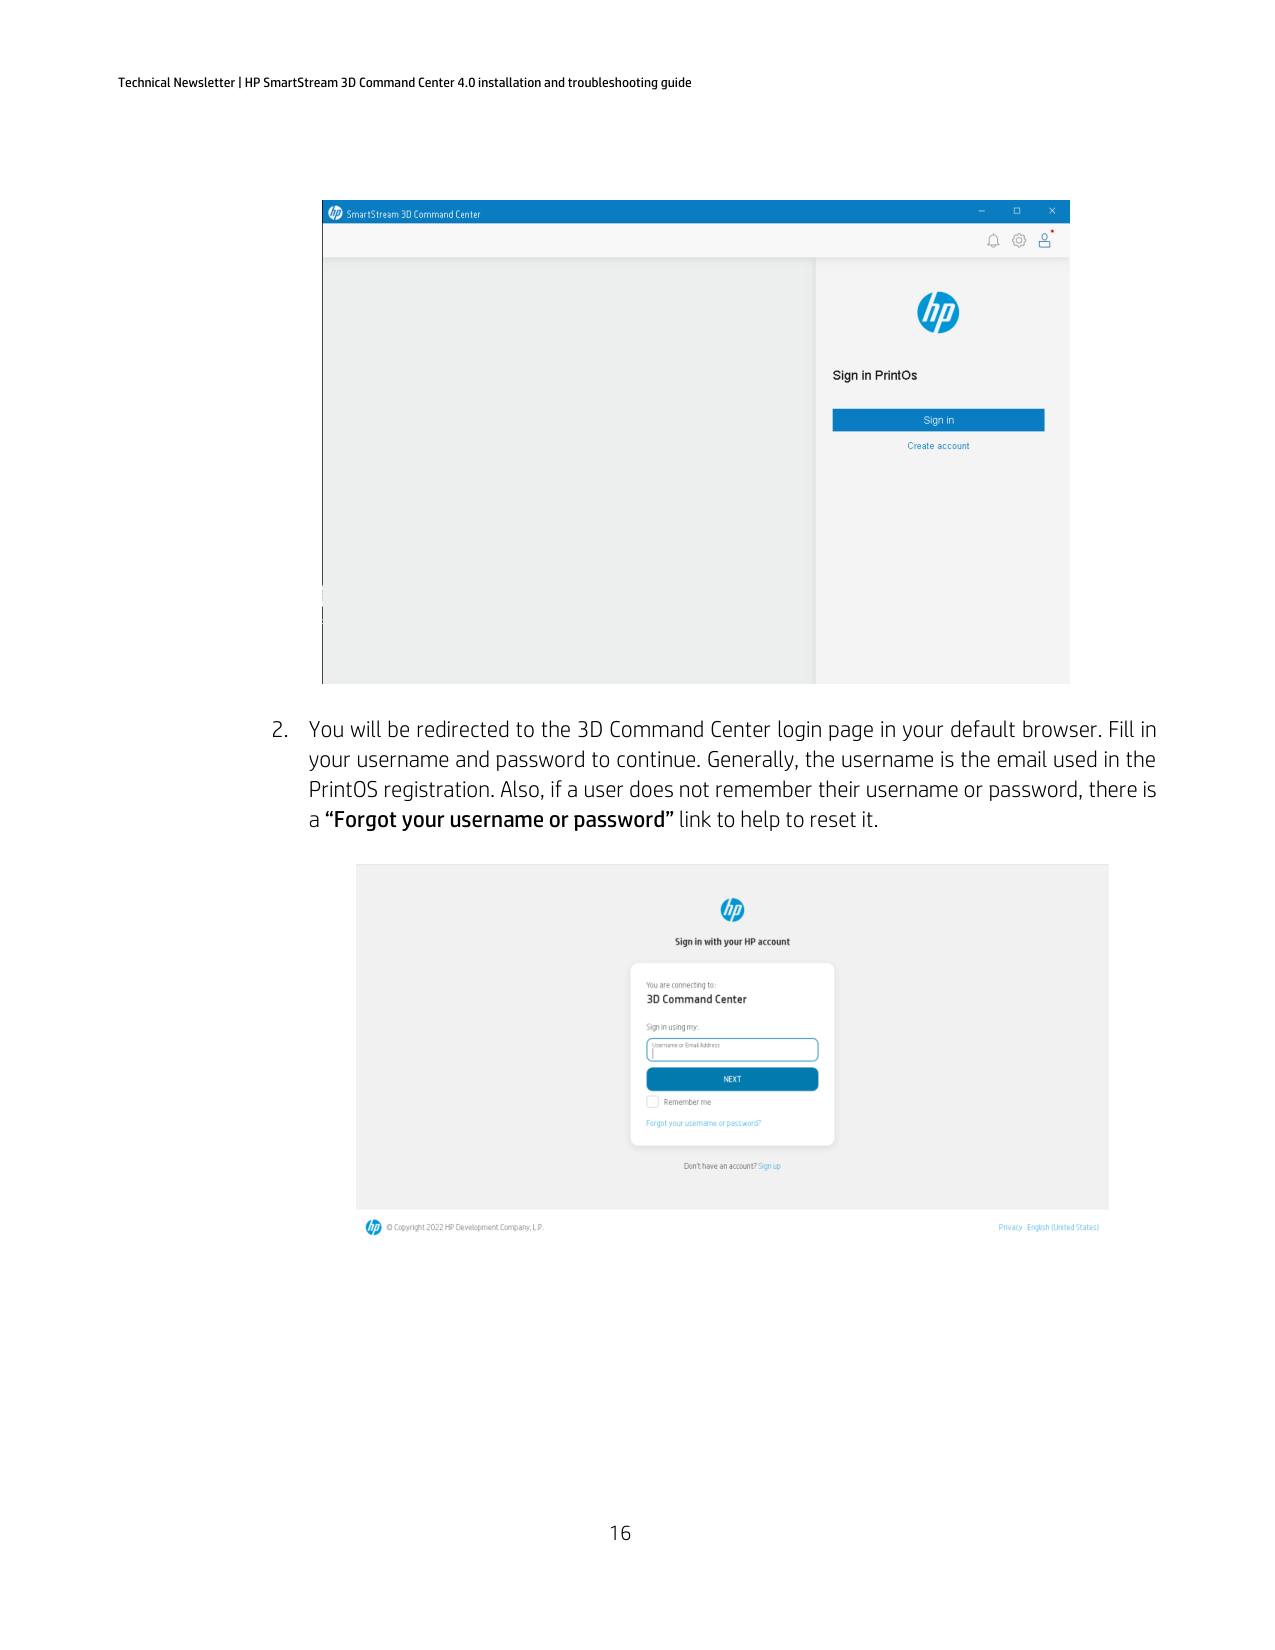
Log in to PrintOS You must be logged in with your PrintOS account to view and manage your devices.

##### 2. You will be redirected to the 3D Command Center login page in your default browser. Fill inyour username and password to continue. Generally, the username is the email used in thePrintOS registration. Also, if a user does not remember their username or password, there isa “Forgot your username or password” link to help to reset it.

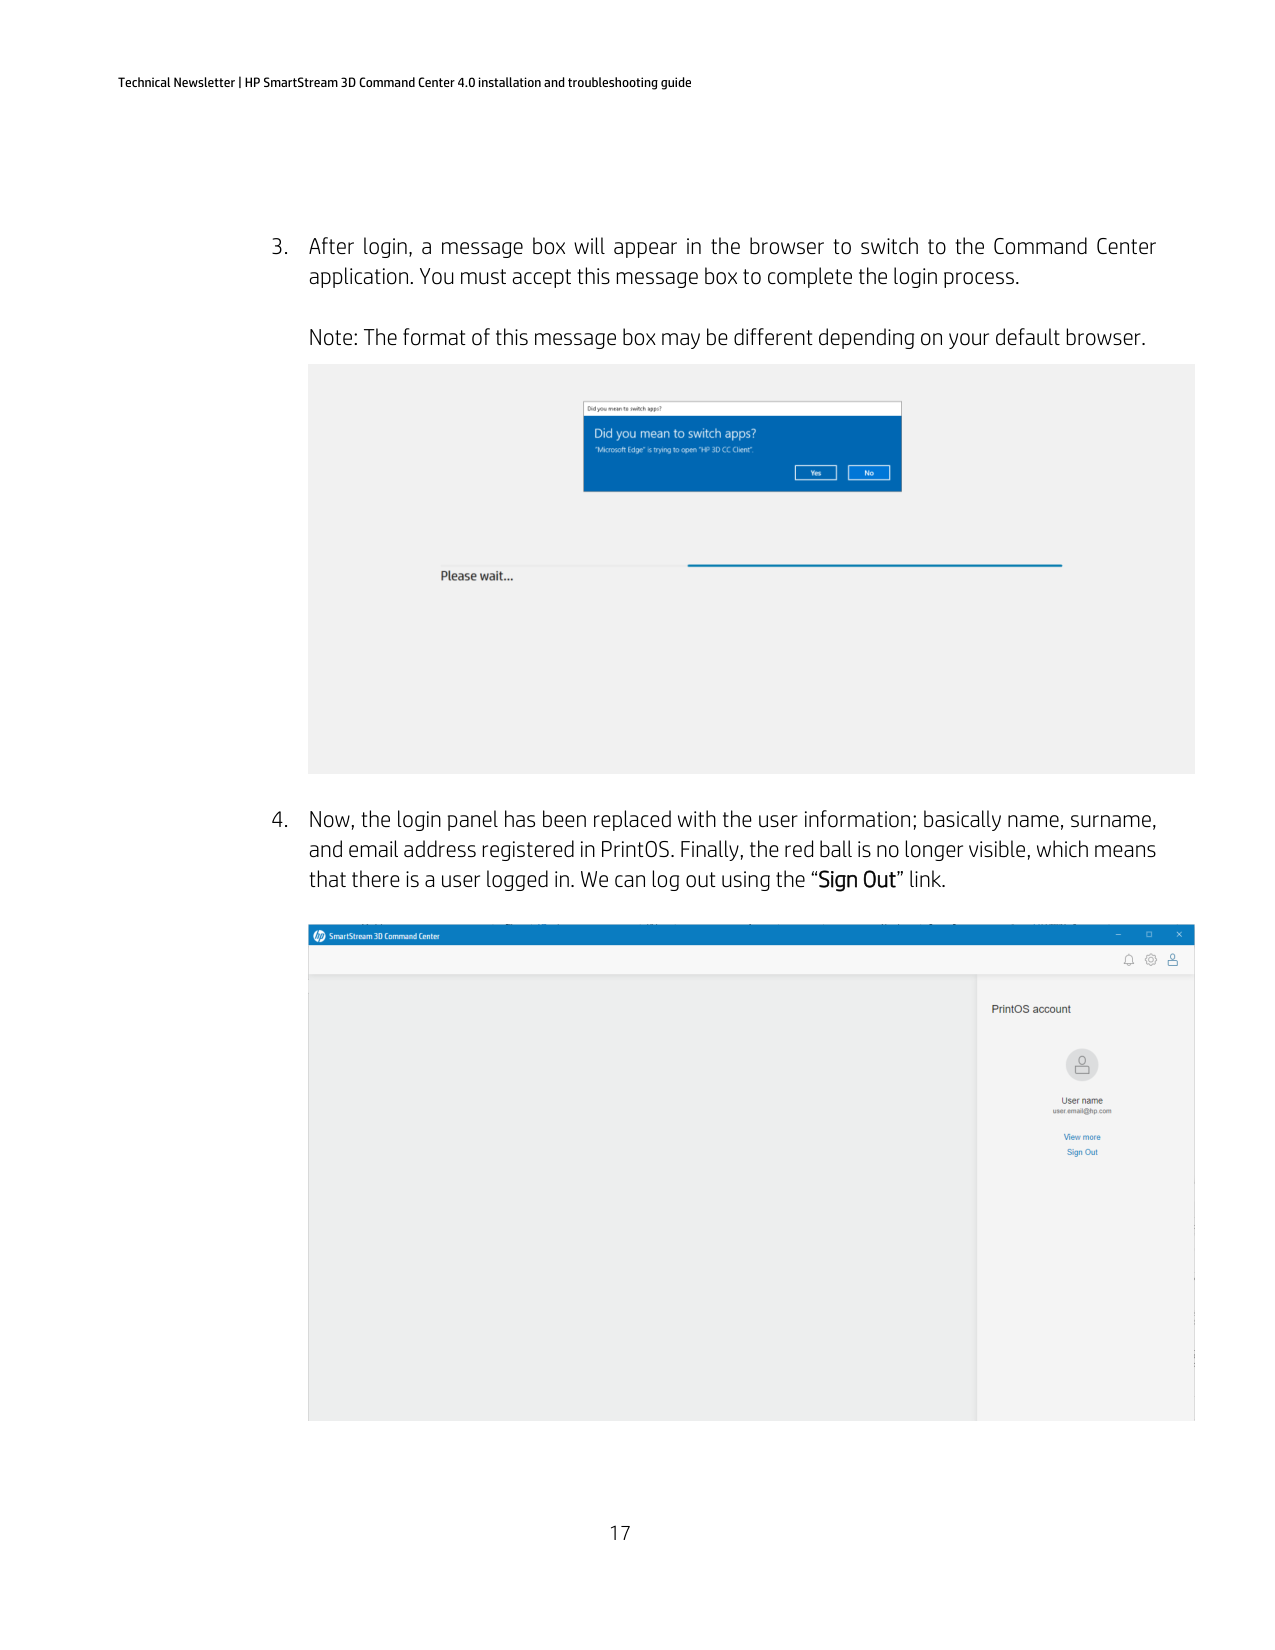
##### 3. After login, a message box will appear in the browser to switch to the Command Centerapplication. You must accept this message box to complete the login process.
Note: The format of this message box may be different depending on your default browser.

##### 4. Now, the login panel has been replaced with the user information; basically name, surname,and email address registered in PrintOS. Finally, the red ball is no longer visible, which meansthat there is a user logged in. We can log out using the “Sign Out” link.

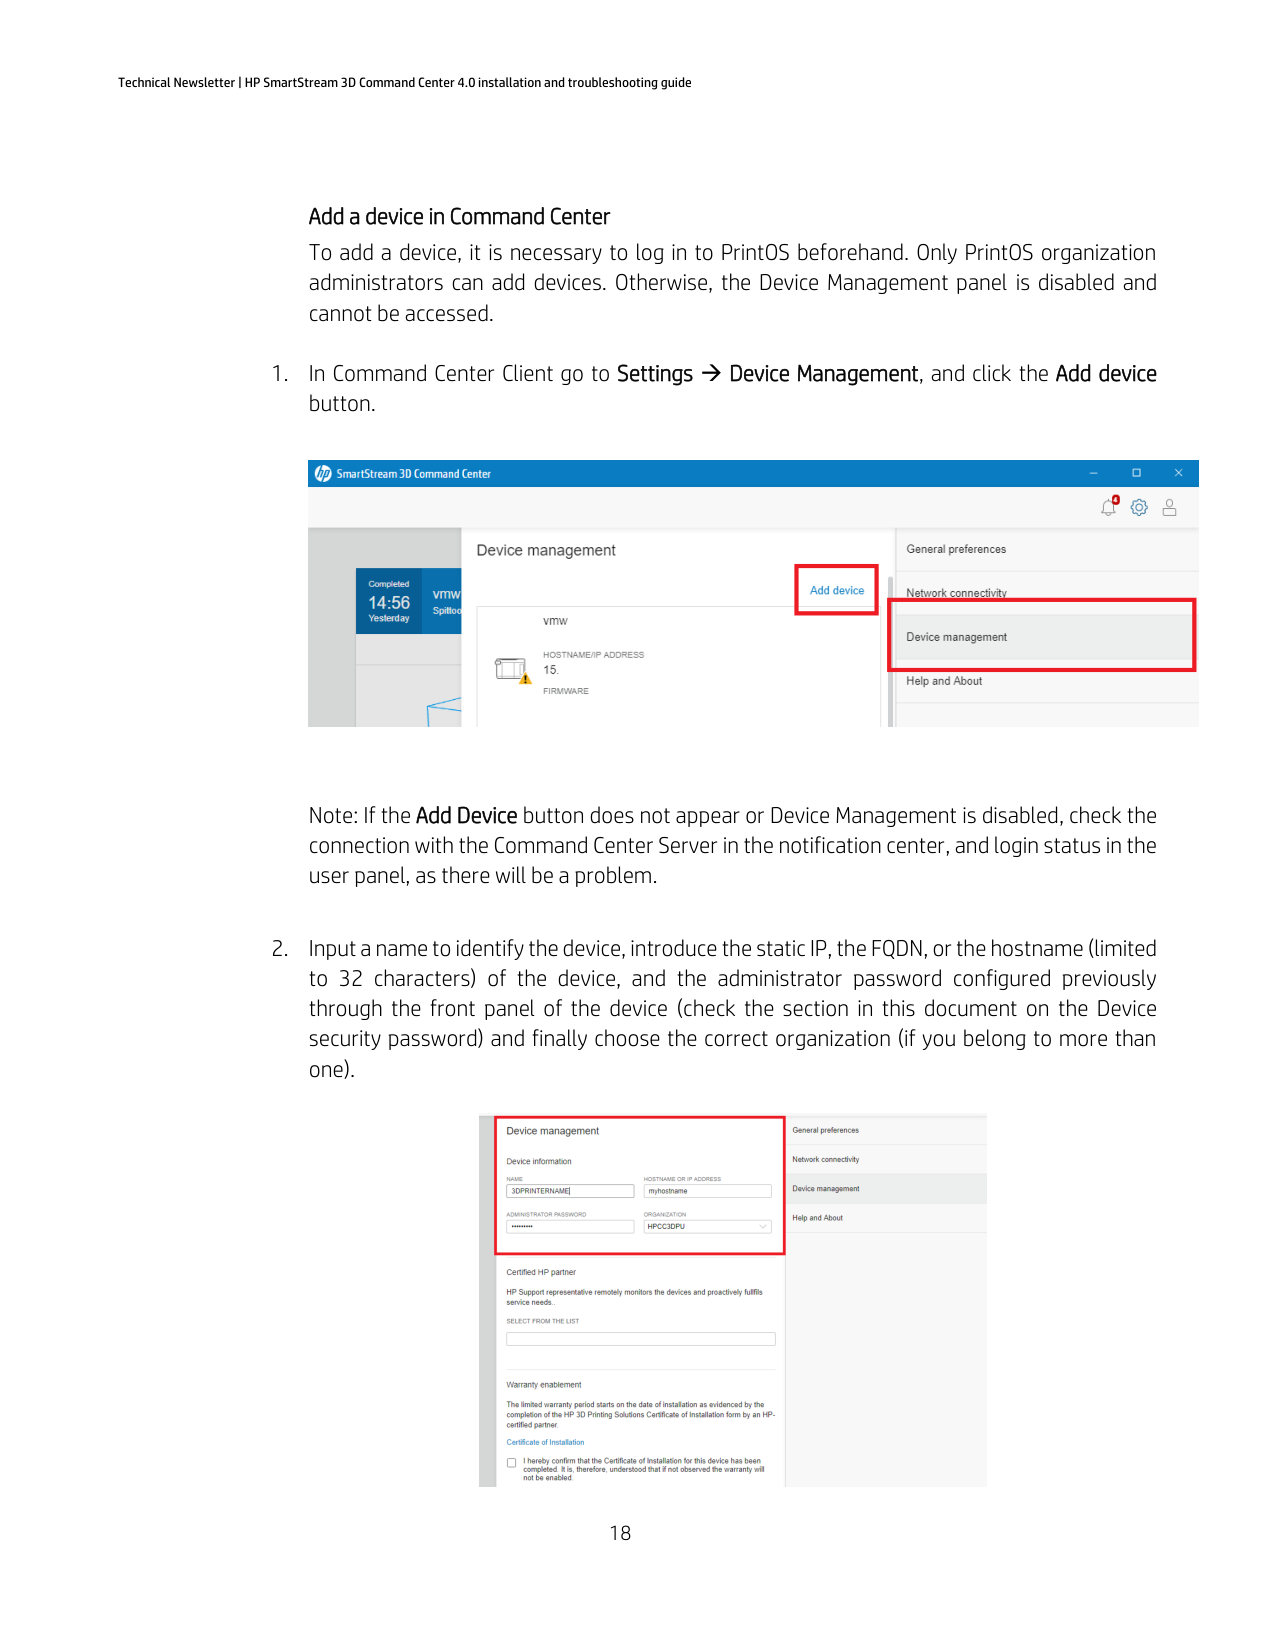
Add a device in Command Center
To add a device, it is necessary to log in to PrintOS beforehand. Only PrintOS organization administrators can add devices. Otherwise, the Device Management panel is disabled and cannot be accessed.
Note: If the Add Device button does not appear or Device Management is disabled, check the connection with the Command Center Server in the notification center, and login status in the user panel, as there will be a problem.


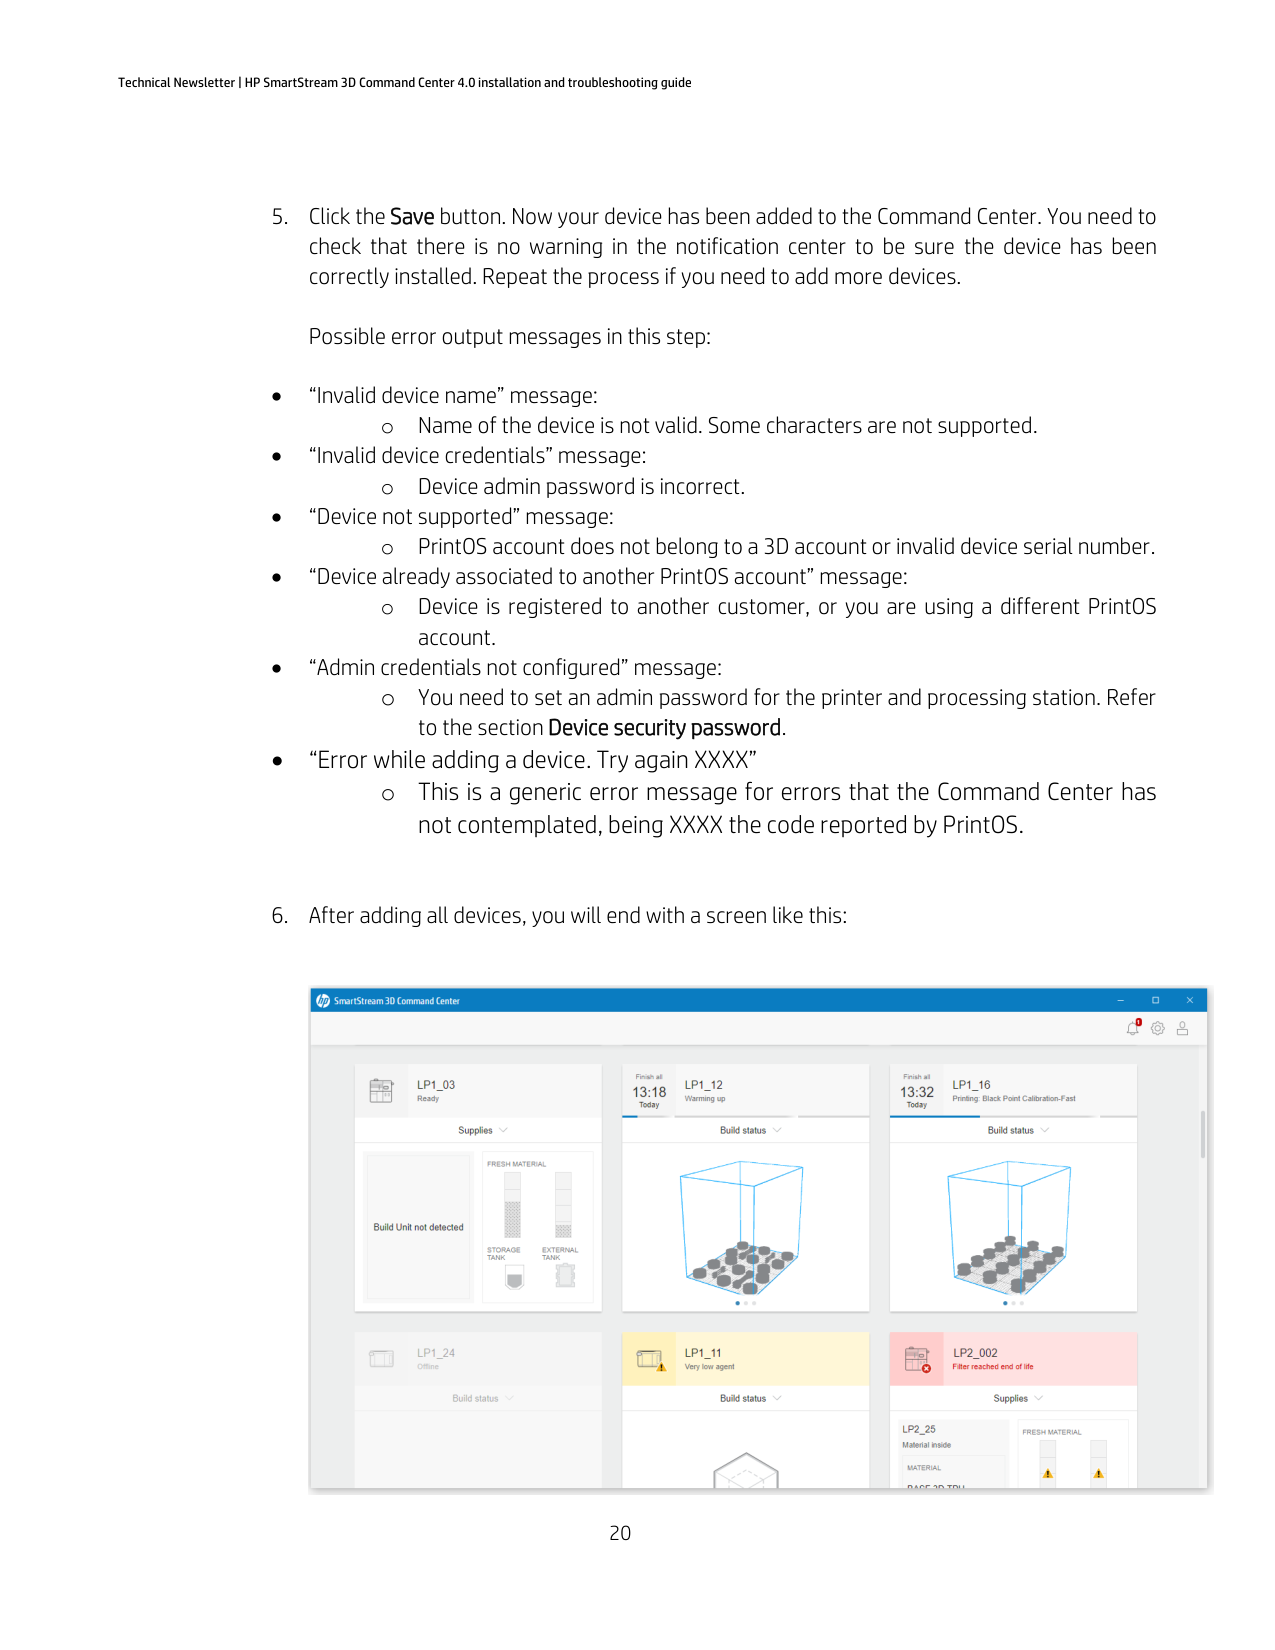


##### 5. Click the Save button. Now your device has been added to the Command Center. You need tocheck that there is no warning in the notification center to be sure the device has beencorrectly installed. Repeat the process if you need to add more devices.
Possible error output messages in this step:
account.
to the section Device security password.
not contemplated, being XXXX the code reported by PrintOS.
##### 6. After adding all devices, you will end with a screen like this:

Connecting to Command Center MQTT broker To connect to the MQTT broker, you will need to use the following settings:
The default port is 1883, but if it is busy a port in the 1883-1891 range will be chosen.
You can check the names of the topics reported through MQTT with the trace 3DSSCCDC.log: “Data has been posted”. The metadata of this trace contains the response of the printer after enabling the topics. There, you will find a summary of the topics that have the MQTT enabled.
To register as a client for the different topics:
If you experience problems connecting to the MQTT broker, go to the troubleshooting section: Problems connecting to the Command Center MQTT Broker.
Connecting to the Command Center device API gateway Users should follow the instructions given in the following resource: https://developers.hp.com/3d-printing-apis/multi-jet-fusion-api-specifications
#### Configure custom certificates for communication between Command Center and the printer
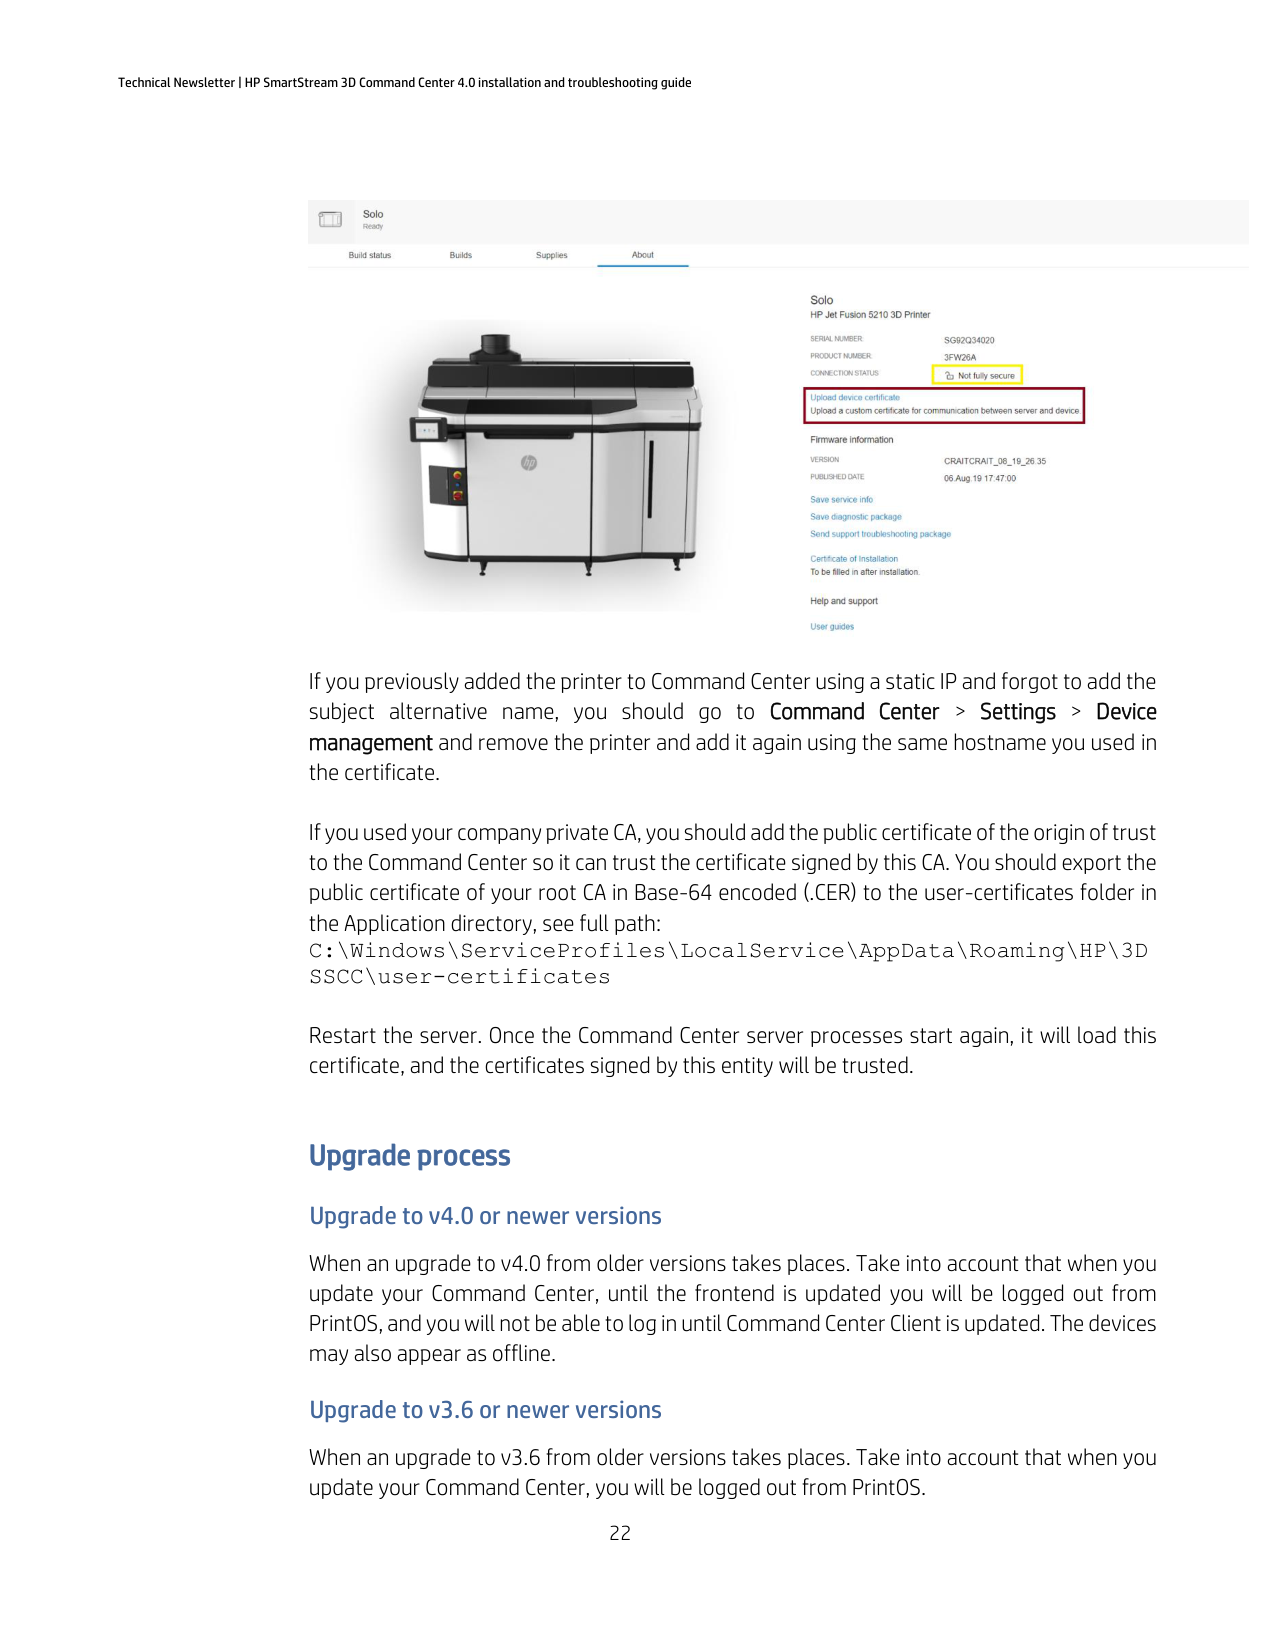
HP printers come with a self-signed certificate to create the HTTPS connections between the printer API and HP software or HP partner’s software.
You may want to replace this certificate for one signed by a publicly trusted certificate authority (CA) or your company private CA. To do this select or change the hostname of the printer to the one that you want to use inside your network. Then you can create the certificate signing request (CSR) with the hostname, it is recommended also to add the static IP of the printer in the subject alternative name, so it supports adding the printer to Command Center using IP instead of hostname.
Once you have the proper CSR you can sign it using a publicly trusted CA or your company private CA. The signed certificate should be uploaded to the printer using the Upload device certificate button in Command Center > Device > About:

If you previously added the printer to Command Center using a static IP and forgot to add the subject alternative name, you should go to Command Center > Settings > Device management and remove the printer and add it again using the same hostname you used in the certificate.
If you used your company private CA, you should add the public certificate of the origin of trust to the Command Center so it can trust the certificate signed by this CA. You should export the public certificate of your root CA in Base-64 encoded (.CER) to the user-certificates folder in the Application directory, see full path:
C:\Windows\ServiceProfiles\LocalService\AppData\Roaming\HP\3D SSCC\user-certificates
Restart the server. Once the Command Center server processes start again, it will load this certificate, and the certificates signed by this entity will be trusted.
Upgrade process Upgrade to v4.0 or newer versions
When an upgrade to v4.0 from older versions takes places. Take into account that when you update your Command Center, until the frontend is updated you will be logged out from PrintOS, and you will not be able to log in until Command Center Client is updated. The devices may also appear as offline.
#### Upgrade to v3.6 or newer versions
When an upgrade to v3.6 from older versions takes places. Take into account that when you update your Command Center, you will be logged out from PrintOS.
#### Upgrade from v2.0 or newer versions
There are no special requirements to upgrade Command Center from these versions. Follow the steps in the sections Installation → Server installation and Installation → Client installation. Your devices and proxy configurations will be preserved.
Upgrade from v1.6 You must follow these steps to avoid installer failures:
#### Upgrade from v1.5
On the current version, the minimum firmware version for the devices is: TATDAG_14_18_05.X.
If you need to upgrade your firmware, check your scenario:
IMPORTANT: Consider that due to security improvements in the application, the installation of Command Center 1.6 or later will automatically remove all the devices you had previously added, and you will need to add them again.
Upgrading all devices at the same time


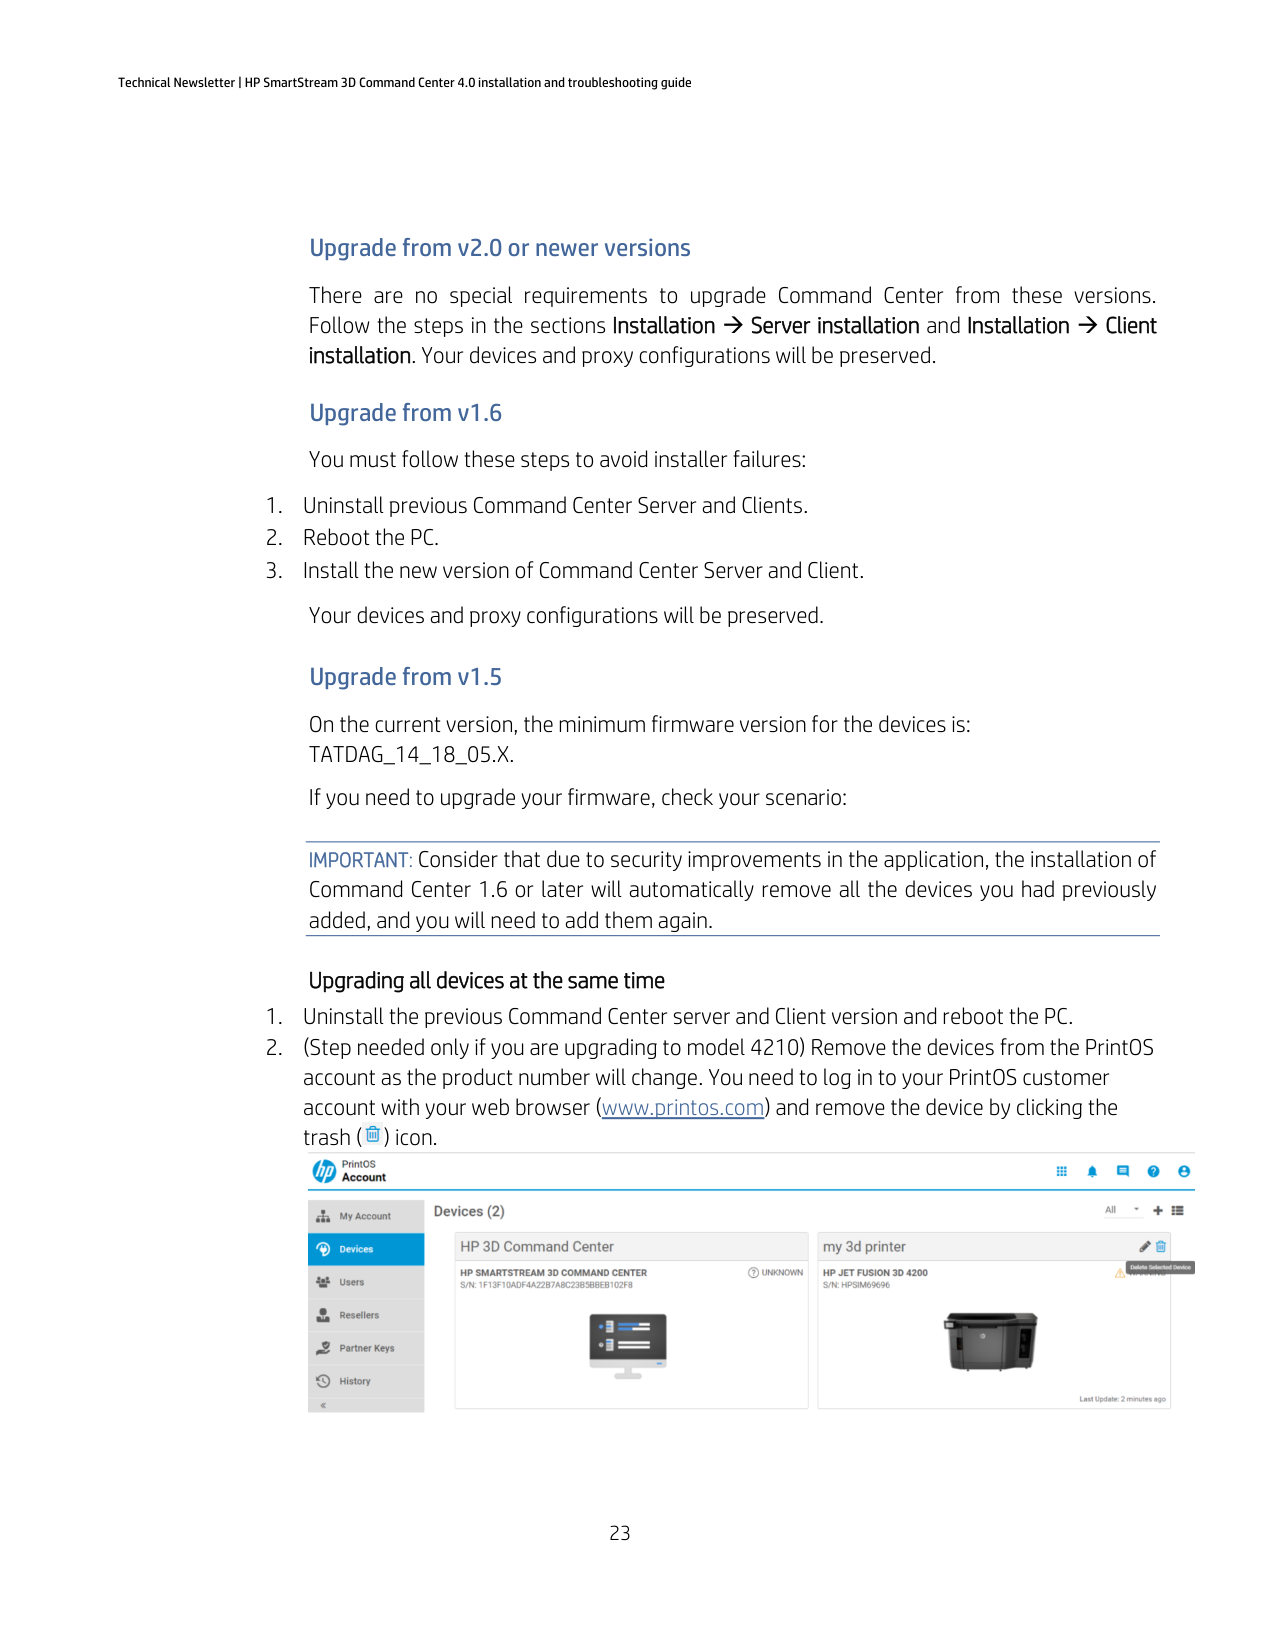
Upgrading the devices progressively Another PC is available - Recommended by HP

#### Only one PC is available
IMPORTANT: Avoid adding TATDAG_14_18_05 firmware devices to HP SmartStream Command Center versions earlier than 1.6 as devices won’t be correctly connected to the cloud and printing / powder loading will stop working.
Remember to remove the device from the Command Center and add it again after the upgrade of the device to firmware version TATDAG_14_18_05.X as devices won’t be correctly connected to the cloud and printing / powder loading will stop working.
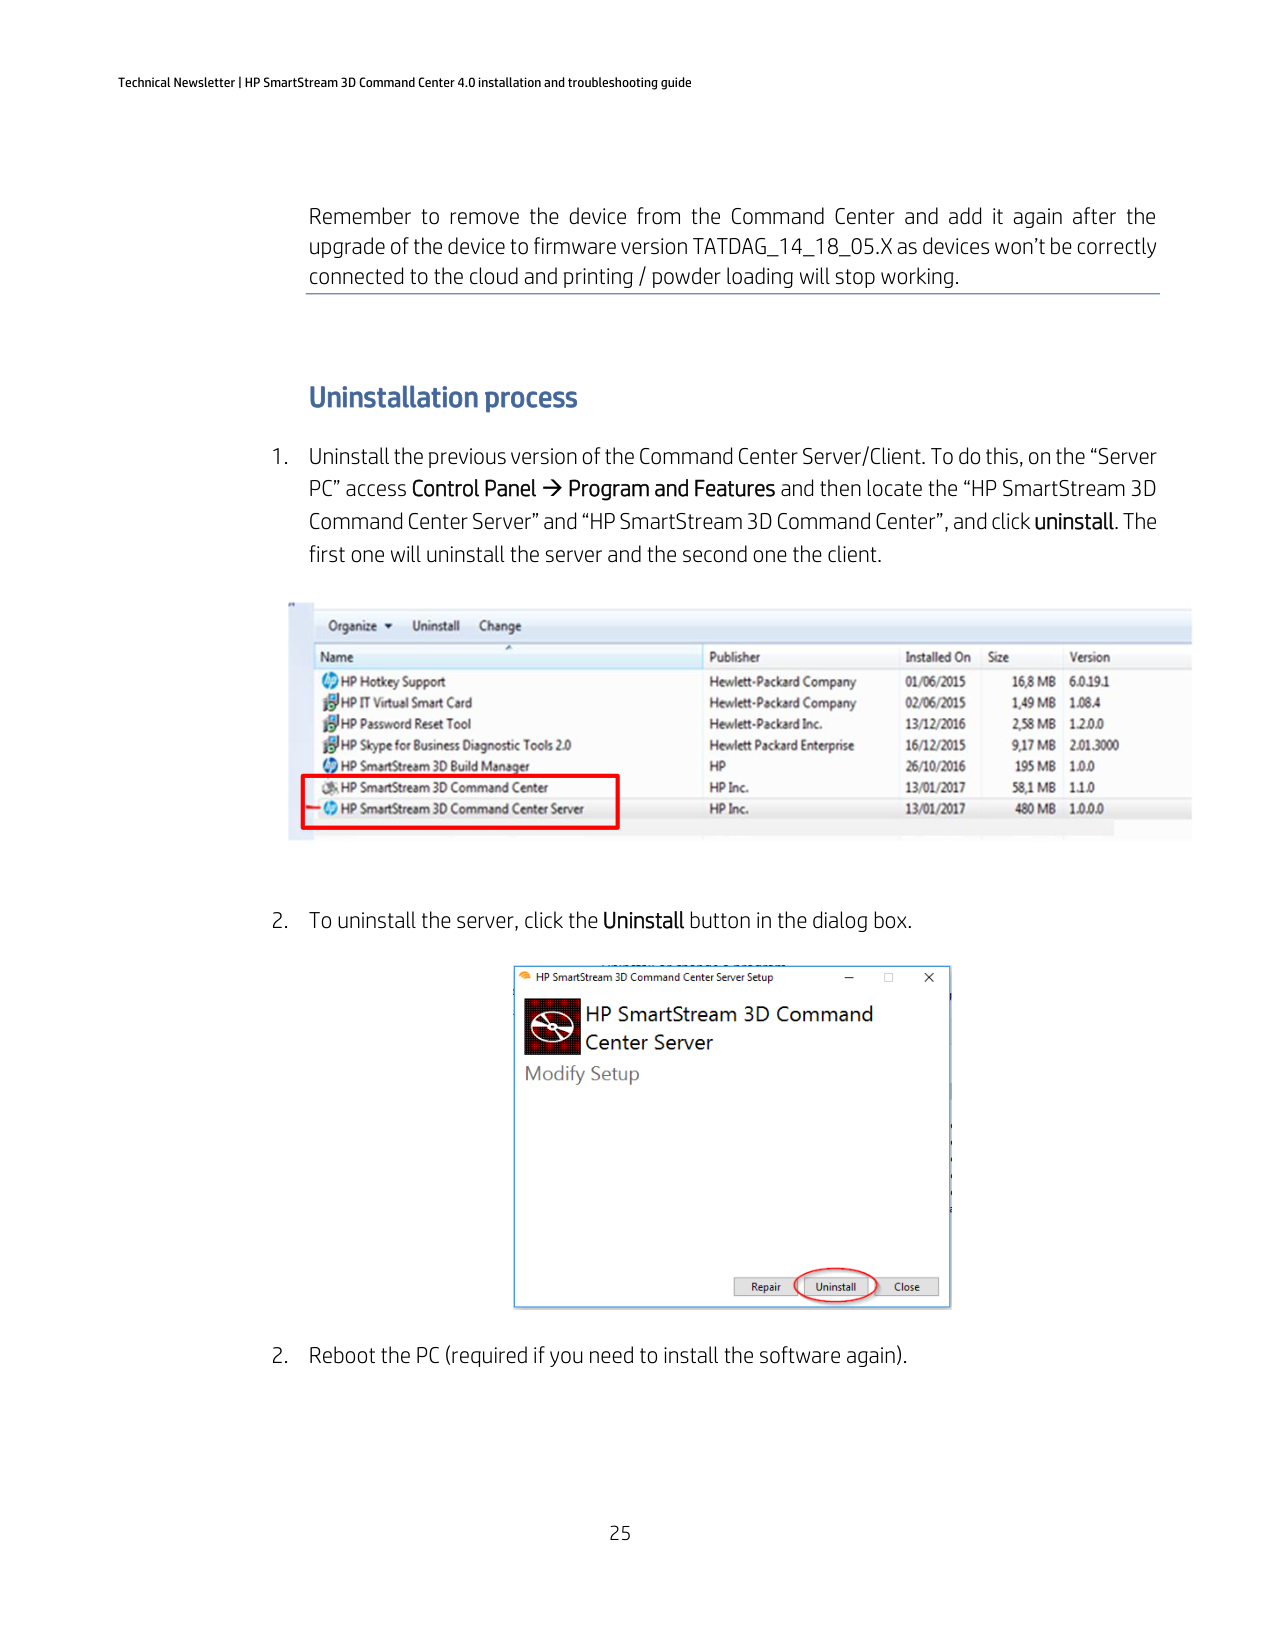
Uninstallation process
| | |---|


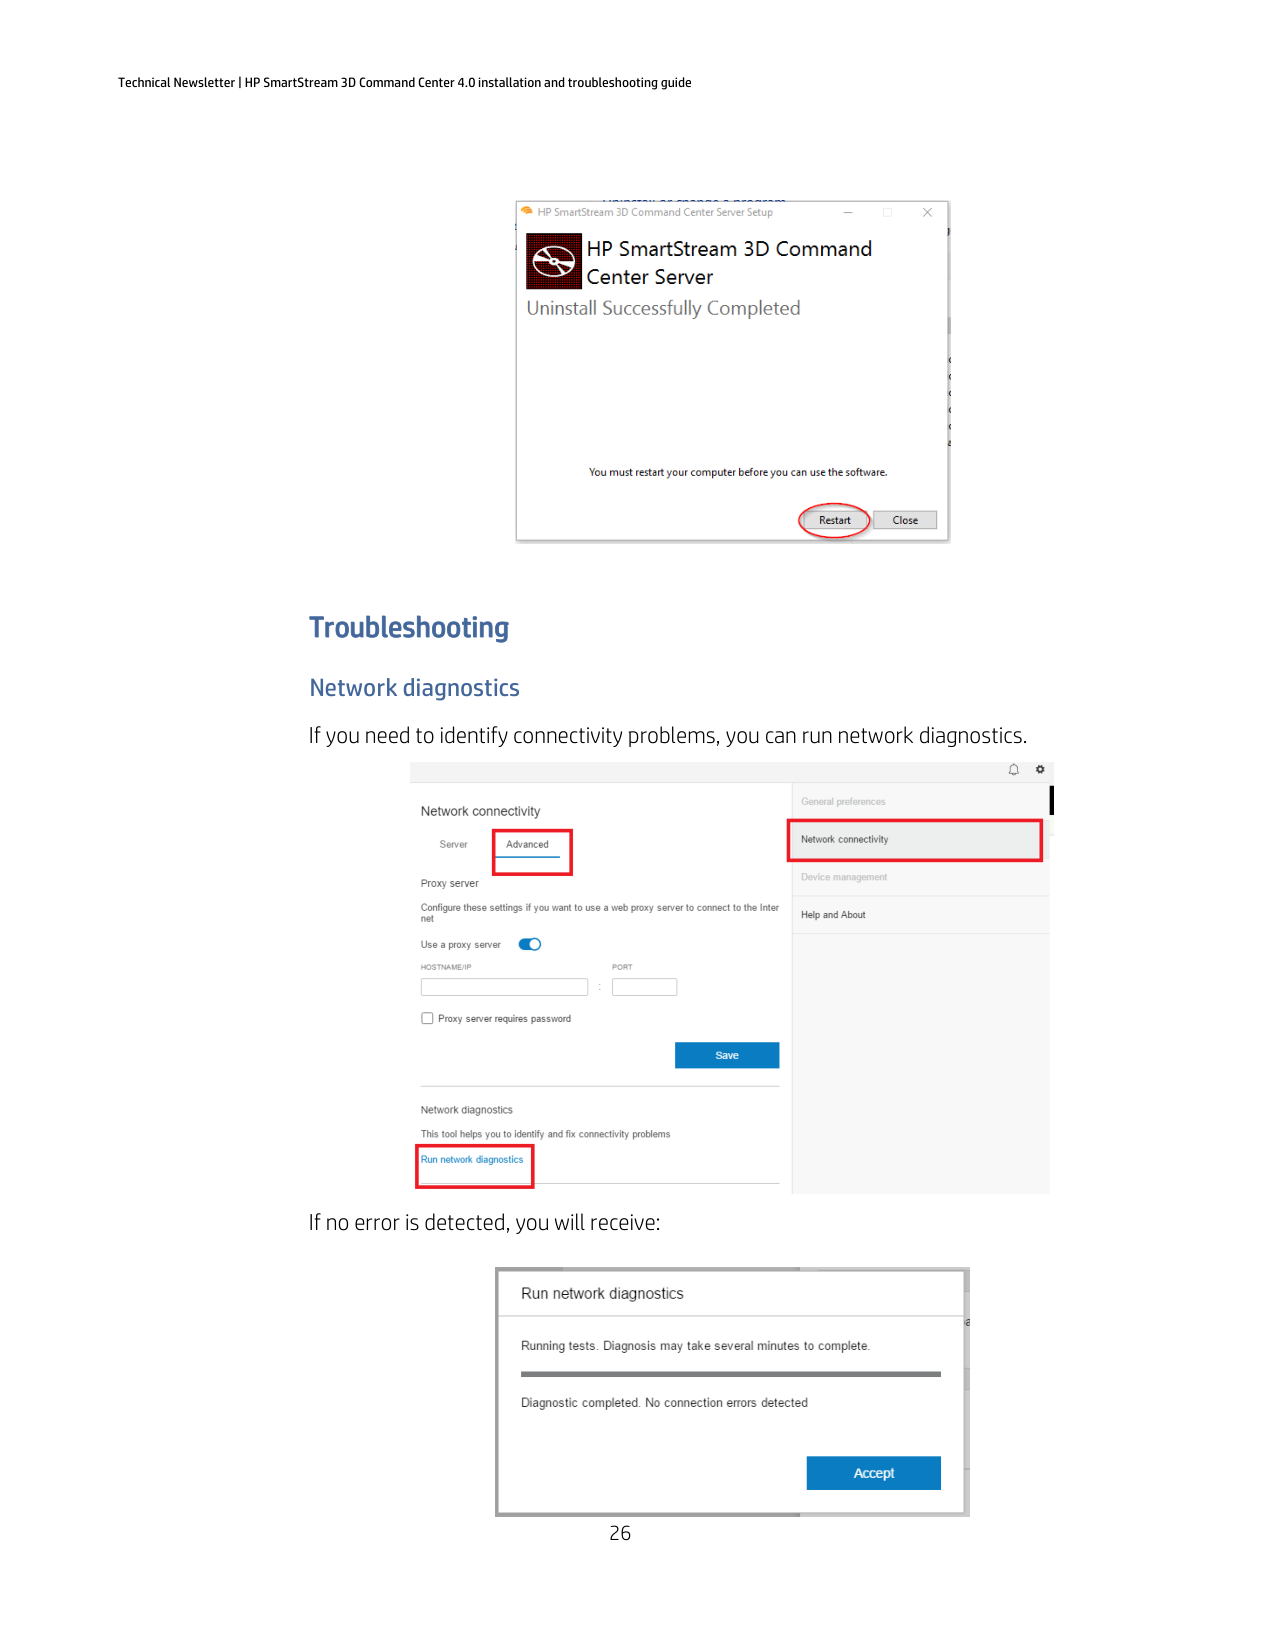
Troubleshooting Network diagnostics If you need to identify connectivity problems, you can run network diagnostics.

If no error is detected, you will receive:

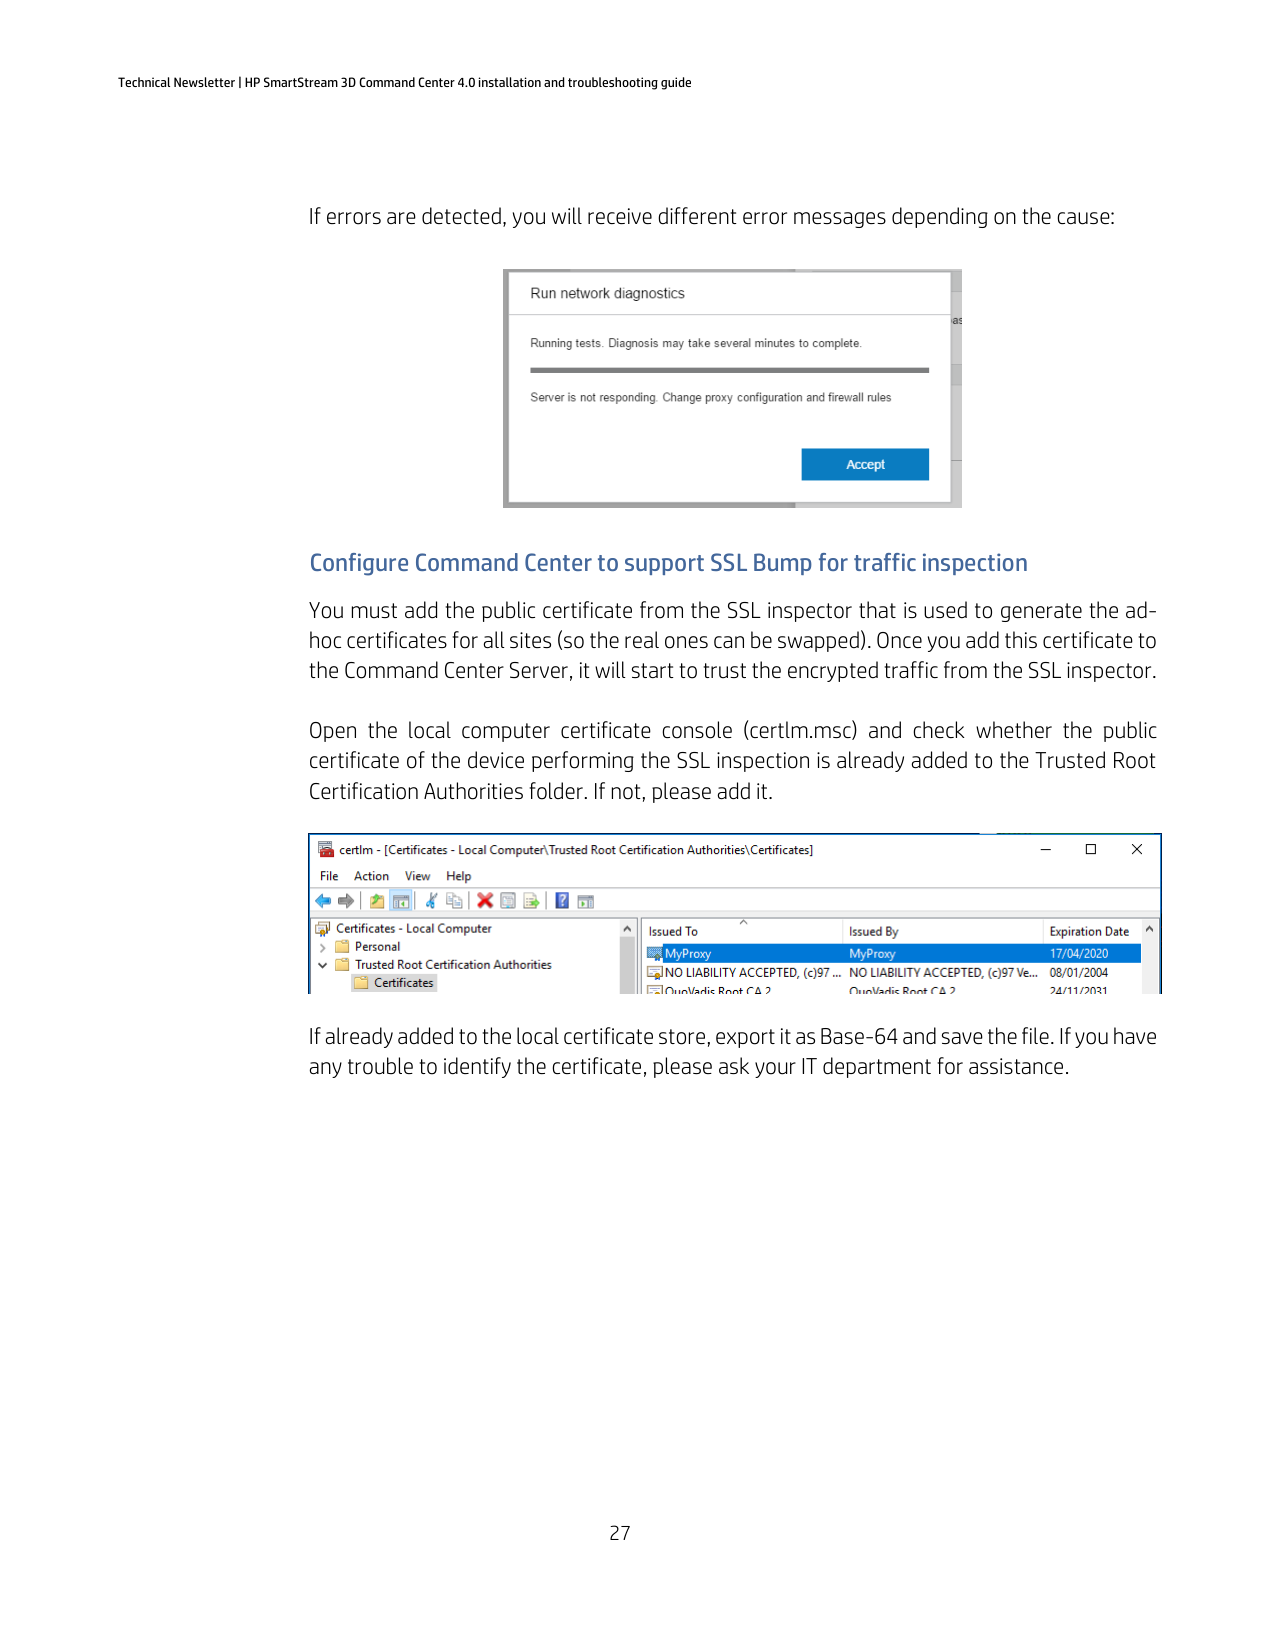
If errors are detected, you will receive different error messages depending on the cause:

#### Configure Command Center to support SSL Bump for traffic inspection
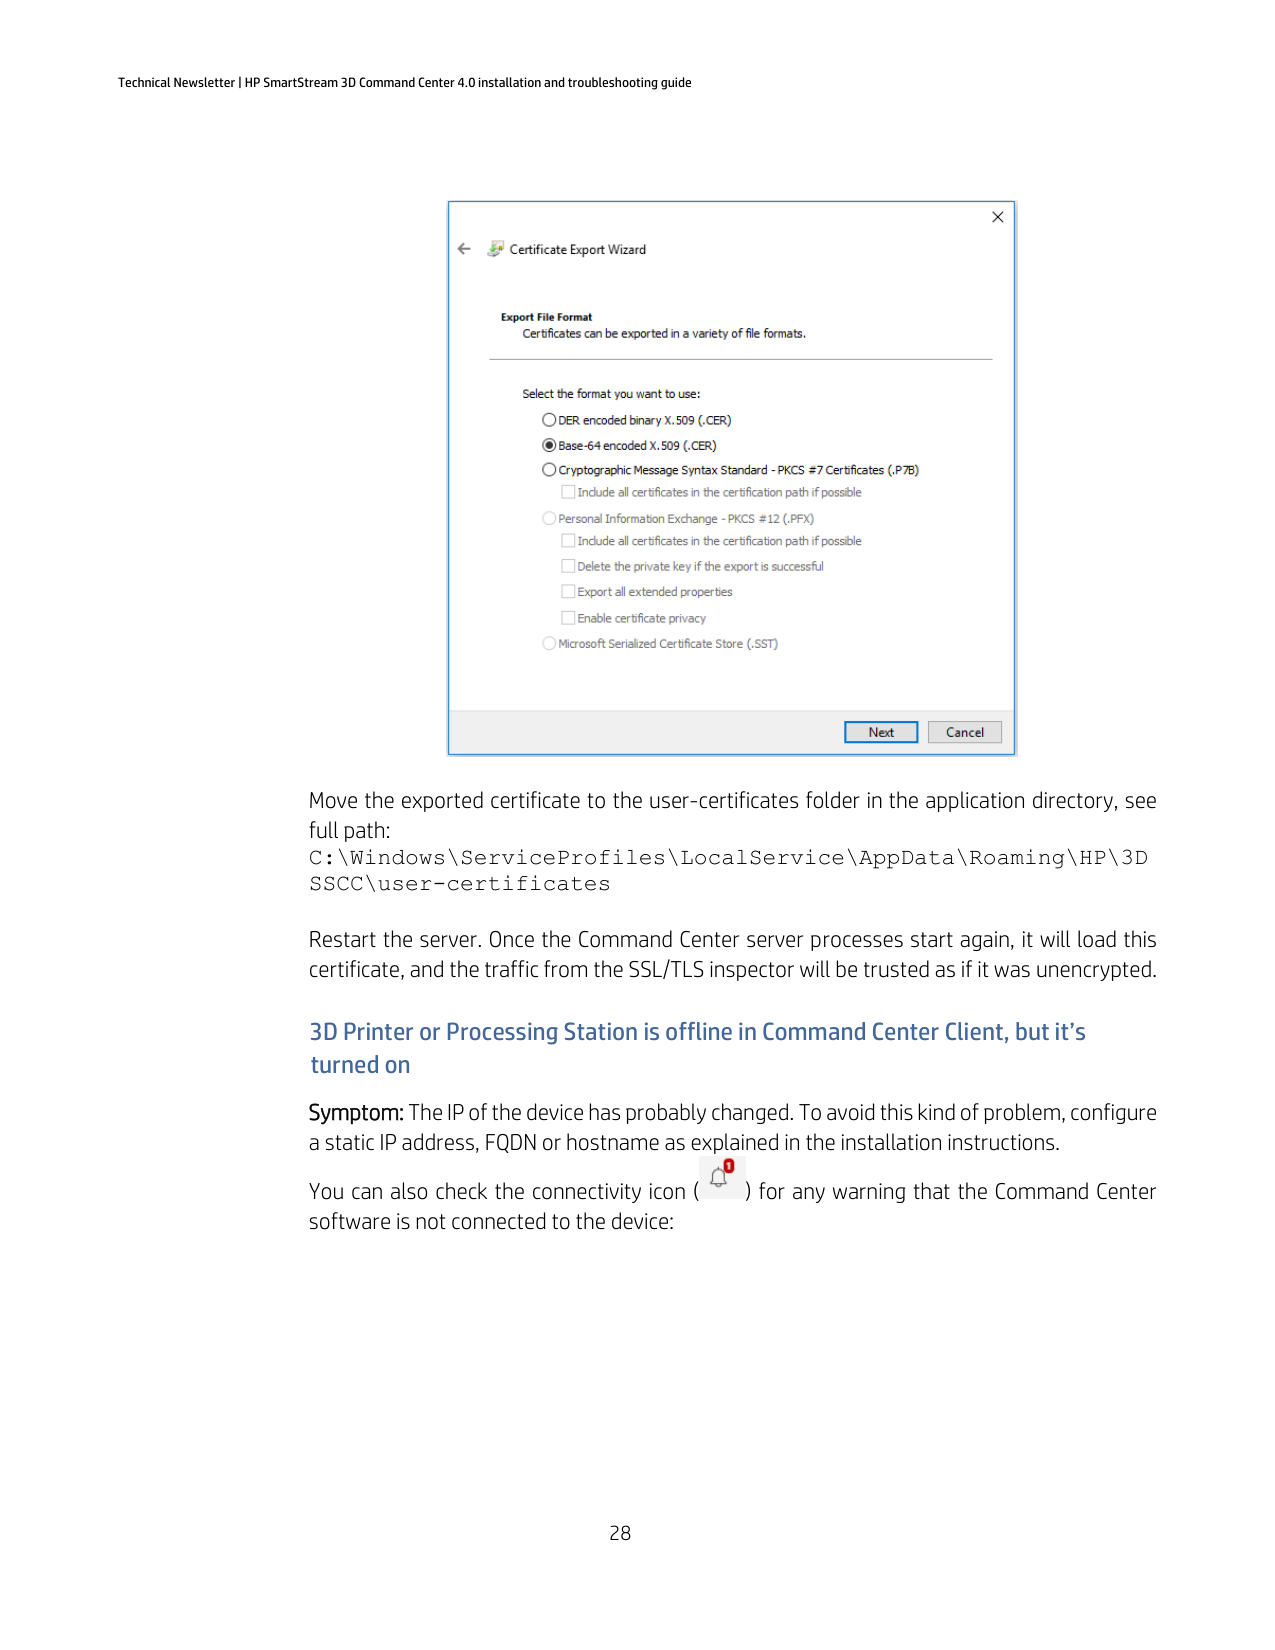
You must add the public certificate from the SSL inspector that is used to generate the adhoc certificates for all sites (so the real ones can be swapped). Once you add this certificate to the Command Center Server, it will start to trust the encrypted traffic from the SSL inspector.
Open the local computer certificate console (certlm.msc) and check whether the public certificate of the device performing the SSL inspection is already added to the Trusted Root Certification Authorities folder. If not, please add it.

If already added to the local certificate store, export it as Base-64 and save the file. If you have any trouble to identify the certificate, please ask your IT department for assistance.

Move the exported certificate to the user-certificates folder in the application directory, see full path: C:\Windows\ServiceProfiles\LocalService\AppData\Roaming\HP\3D SSCC\user-certificates
Restart the server. Once the Command Center server processes start again, it will load this certificate, and the traffic from the SSL/TLS inspector will be trusted as if it was unencrypted.
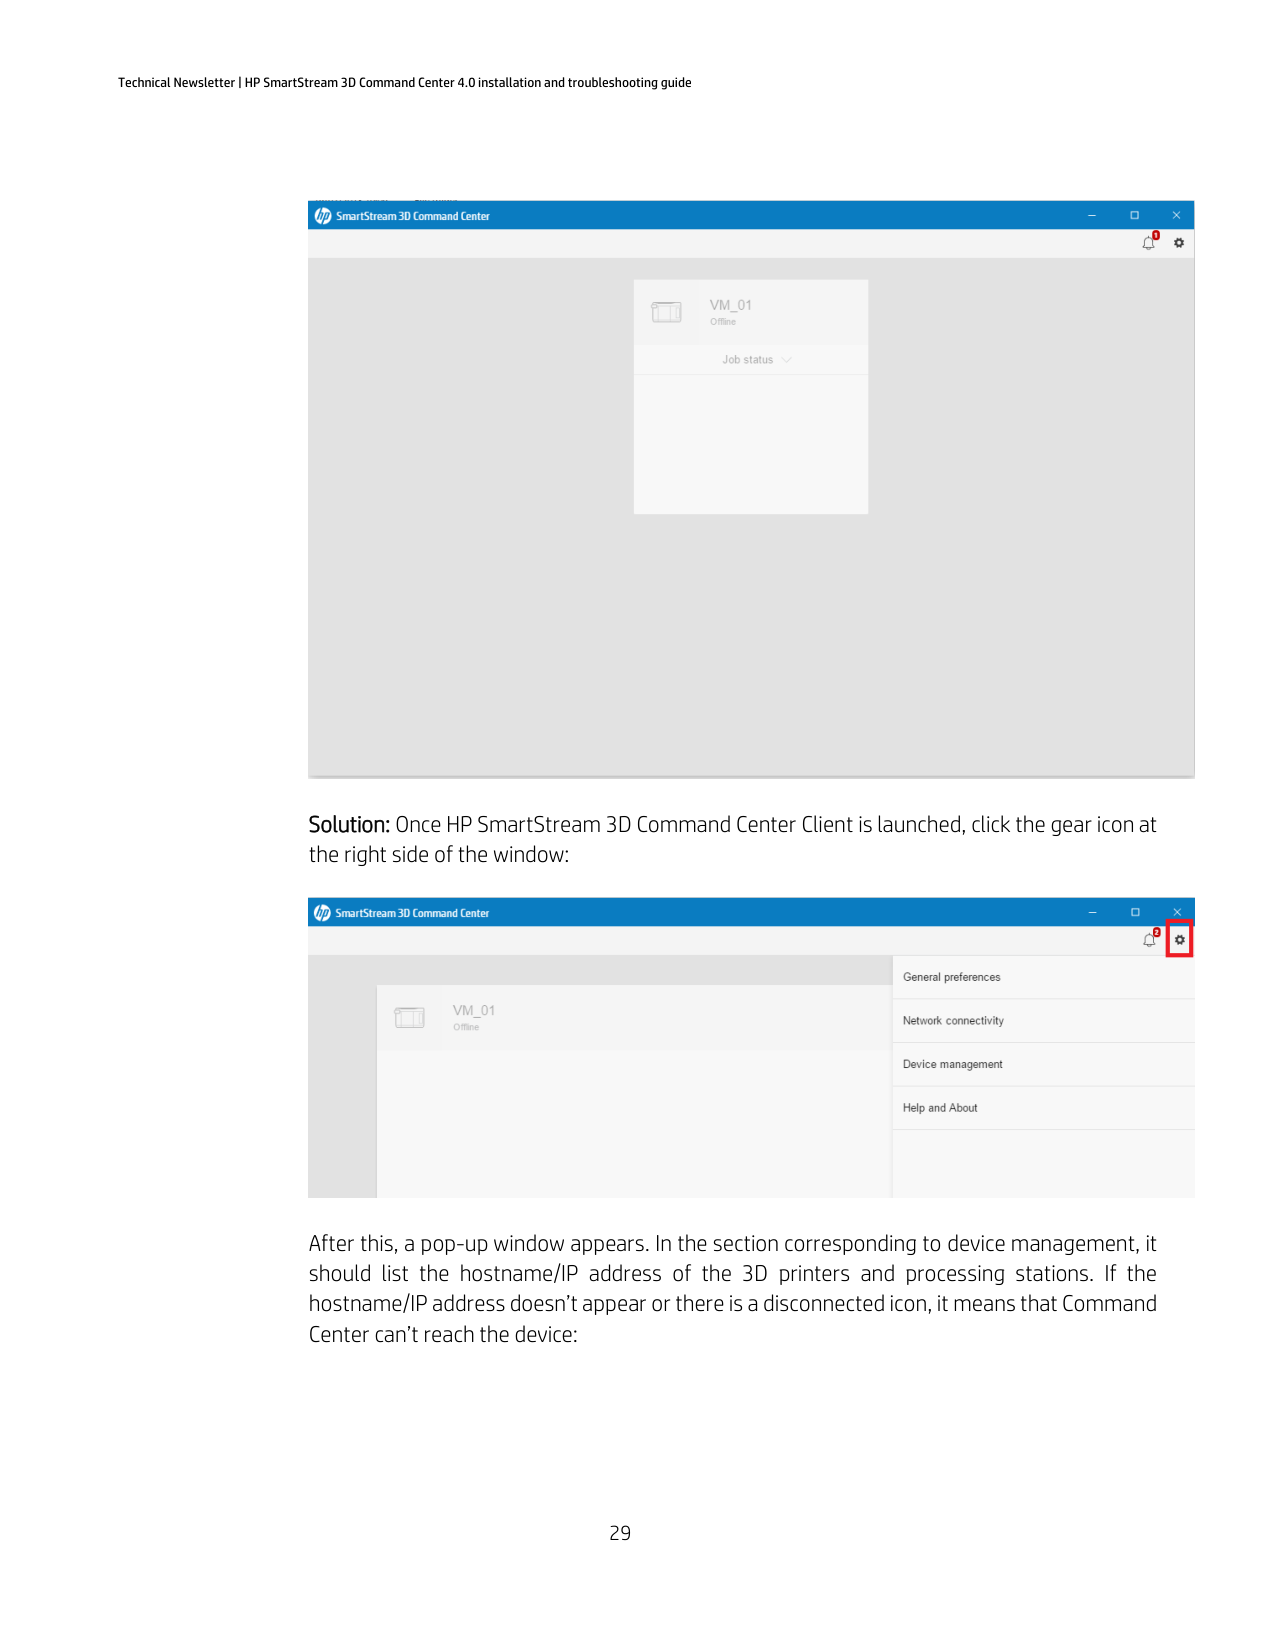
#### 3D Printer or Processing Station is offline in Command Center Client, but it’s turned on
Symptom: The IP of the device has probably changed. To avoid this kind of problem, configure a static IP address, FQDN or hostname as explained in the installation instructions. You can also check the connectivity icon ( ) for any warning that the Command Center software is not connected to the device:


Solution: Once HP SmartStream 3D Command Center Client is launched, click the gear icon at the right side of the window:

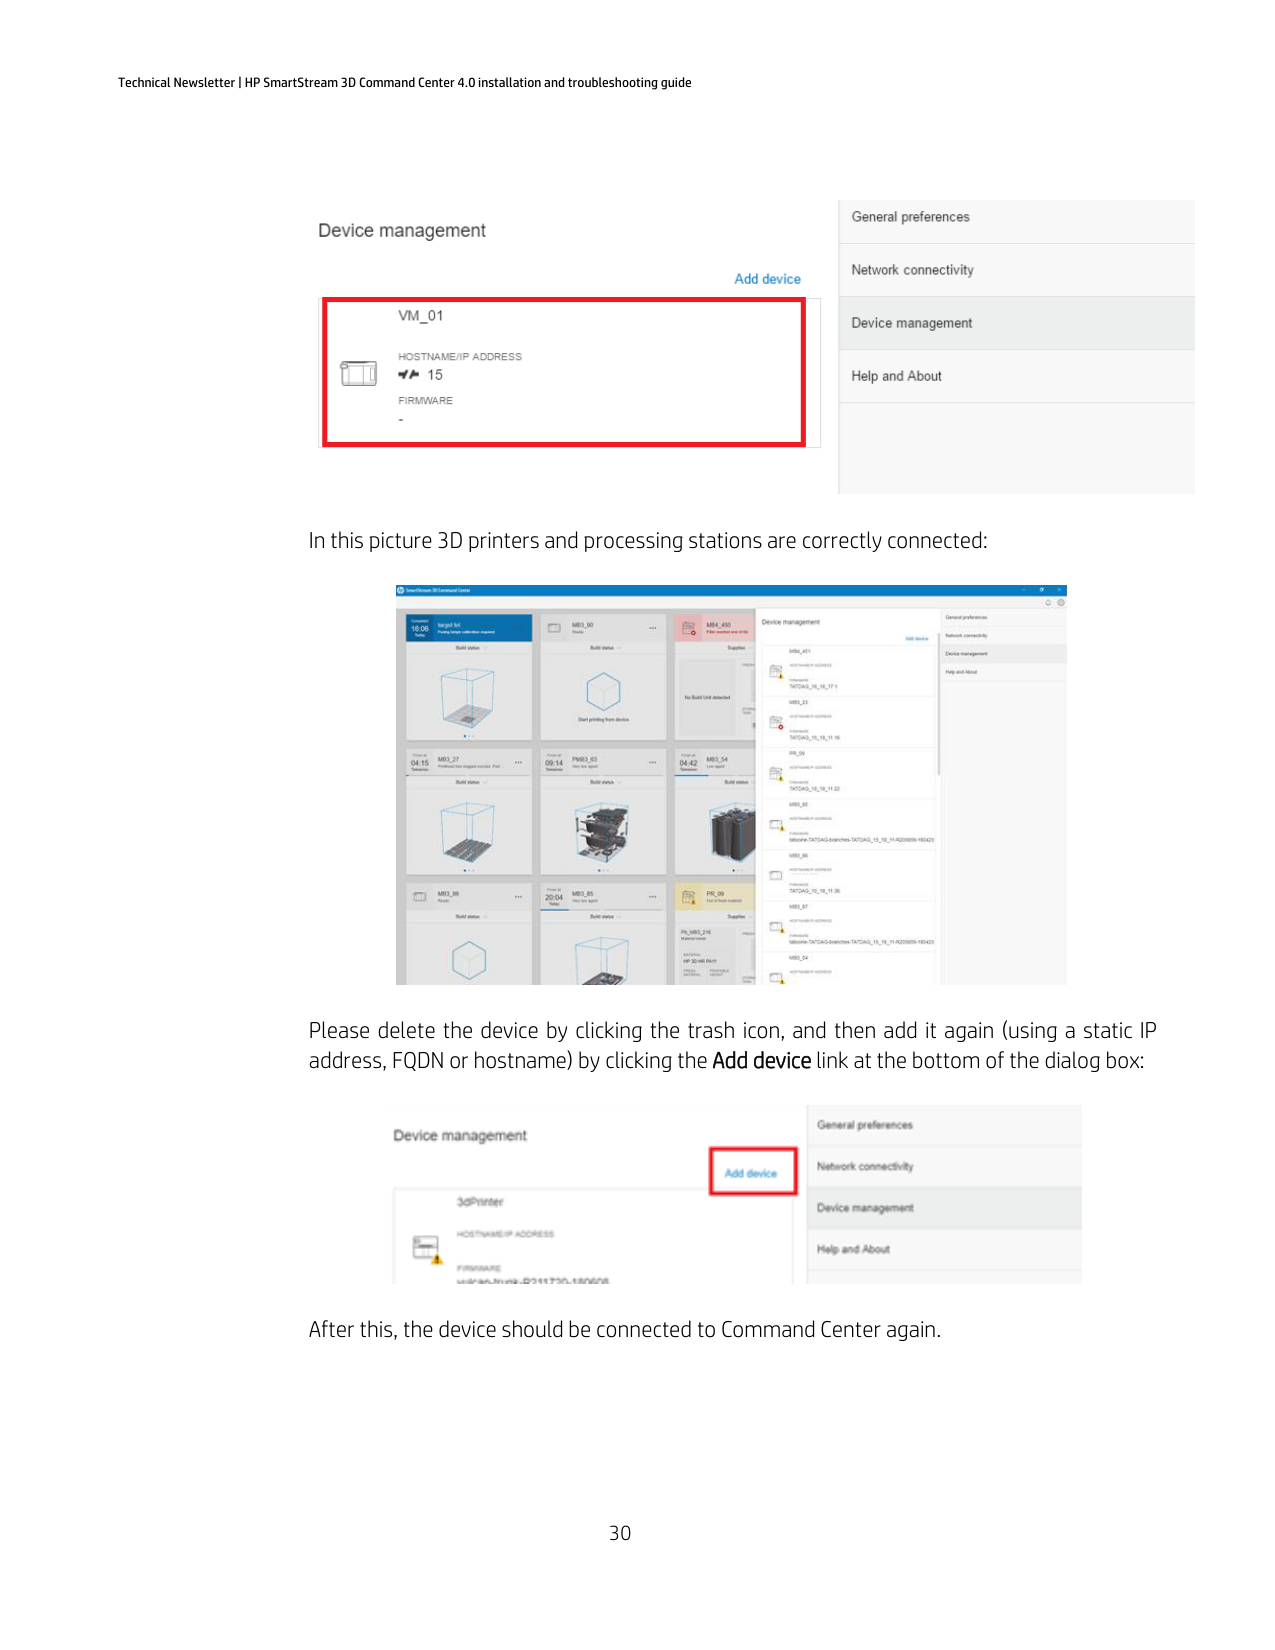
After this, a pop-up window appears. In the section corresponding to device management, it should list the hostname/IP address of the 3D printers and processing stations. If the hostname/IP address doesn’t appear or there is a disconnected icon, it means that Command Center can’t reach the device:

In this picture 3D printers and processing stations are correctly connected:

Please delete the device by clicking the trash icon, and then add it again (using a static IP address, FQDN or hostname) by clicking the Add device link at the bottom of the dialog box:

After this, the device should be connected to Command Center again.

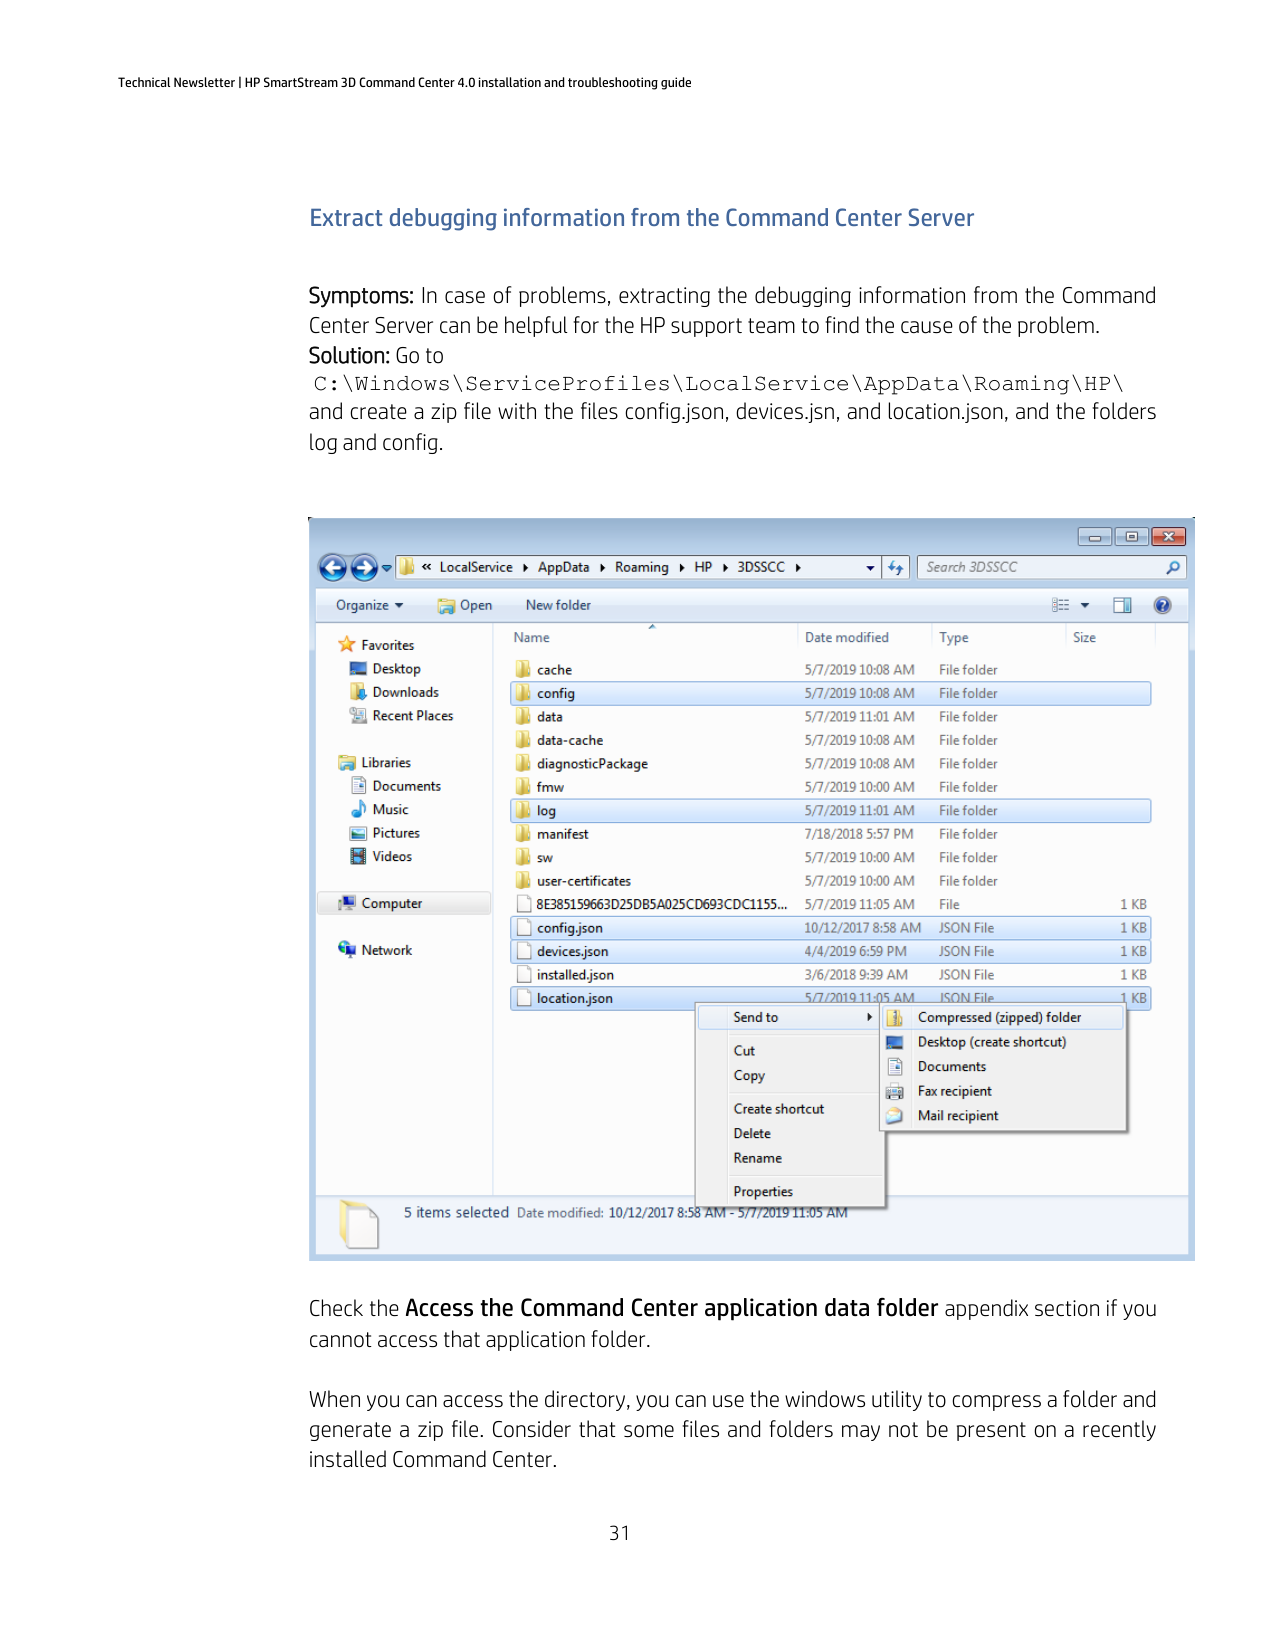
#### Extract debugging information from the Command Center Server
Symptoms: In case of problems, extracting the debugging information from the Command Center Server can be helpful for the HP support team to find the cause of the problem. Solution: Go to
C:\Windows\ServiceProfiles\LocalService\AppData\Roaming\HP\ and create a zip file with the files config.json, devices.jsn, and location.json, and the folders log and config.

Check the Access the Command Center application data folder appendix section if you cannot access that application folder.
When you can access the directory, you can use the windows utility to compress a folder and generate a zip file. Consider that some files and folders may not be present on a recently installed Command Center.
Check the Accessing mosquitto.log file if you do not have permission to copy the file.
This .zip file will contain the needed information for debugging the Command Center.
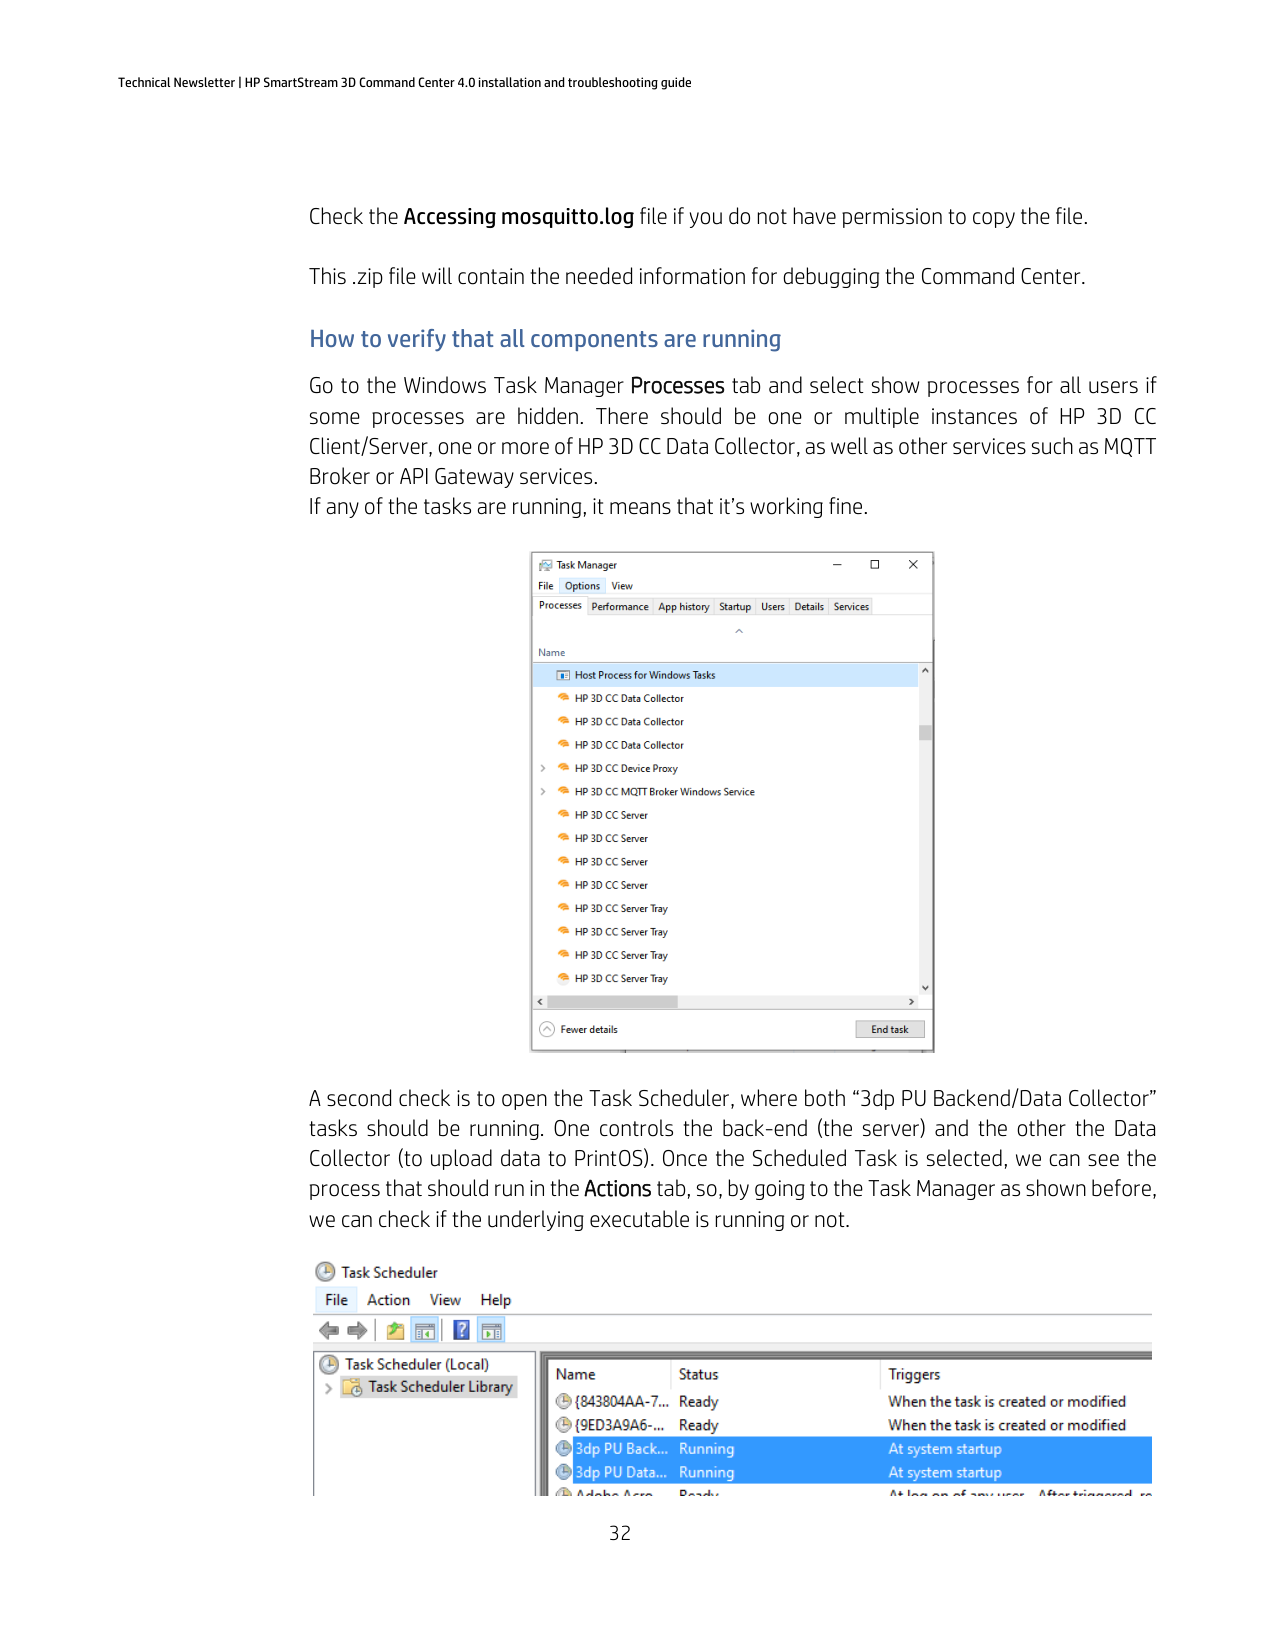
#### How to verify that all components are running
Go to the Windows Task Manager Processes tab and select show processes for all users if some processes are hidden. There should be one or multiple instances of HP 3D CC Client/Server, one or more of HP 3D CC Data Collector, as well as other services such as MQTT Broker or API Gateway services. If any of the tasks are running, it means that it’s working fine.

A second check is to open the Task Scheduler, where both “3dp PU Backend/Data Collector” tasks should be running. One controls the back-end (the server) and the other the Data Collector (to upload data to PrintOS). Once the Scheduled Task is selected, we can see the process that should run in the Actions tab, so, by going to the Task Manager as shown before, we can check if the underlying executable is running or not.

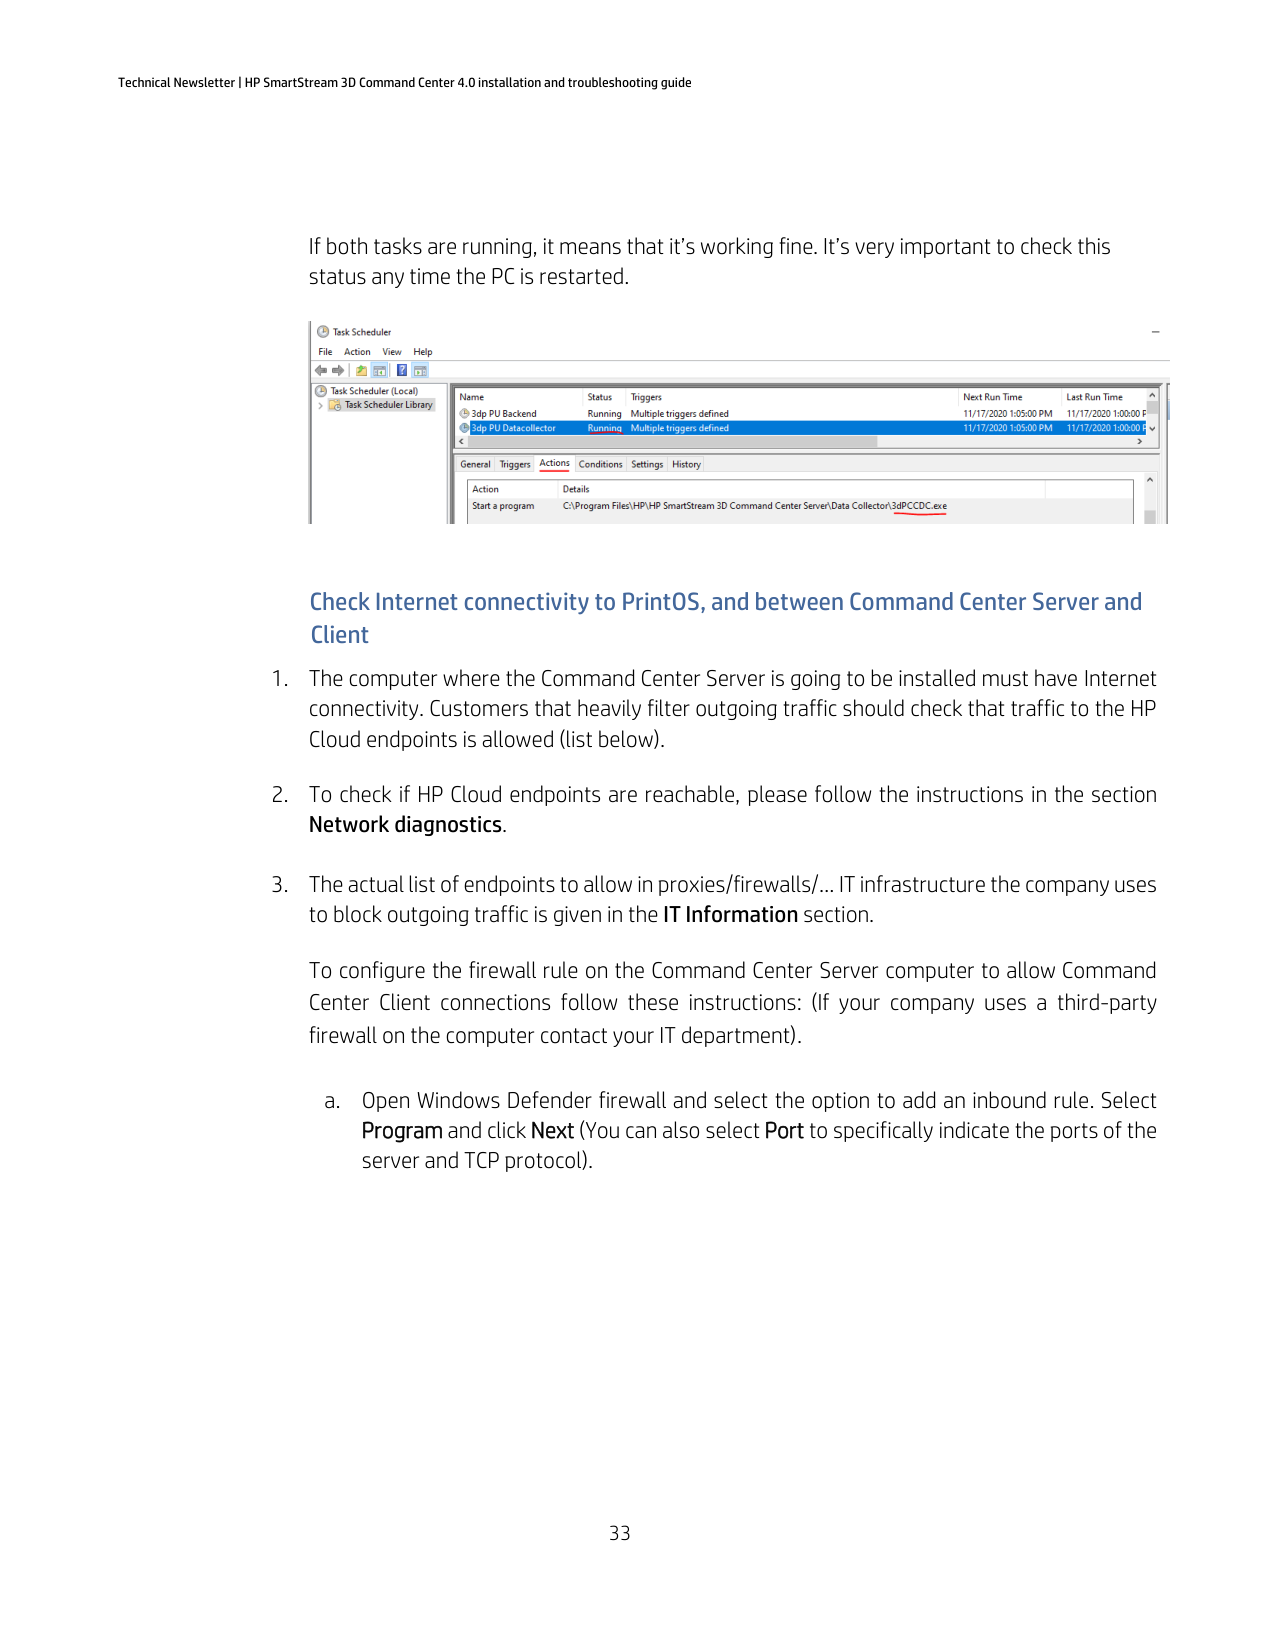
If both tasks are running, it means that it’s working fine. It’s very important to check this status any time the PC is restarted.

#### Check Internet connectivity to PrintOS, and between Command Center Server and Client
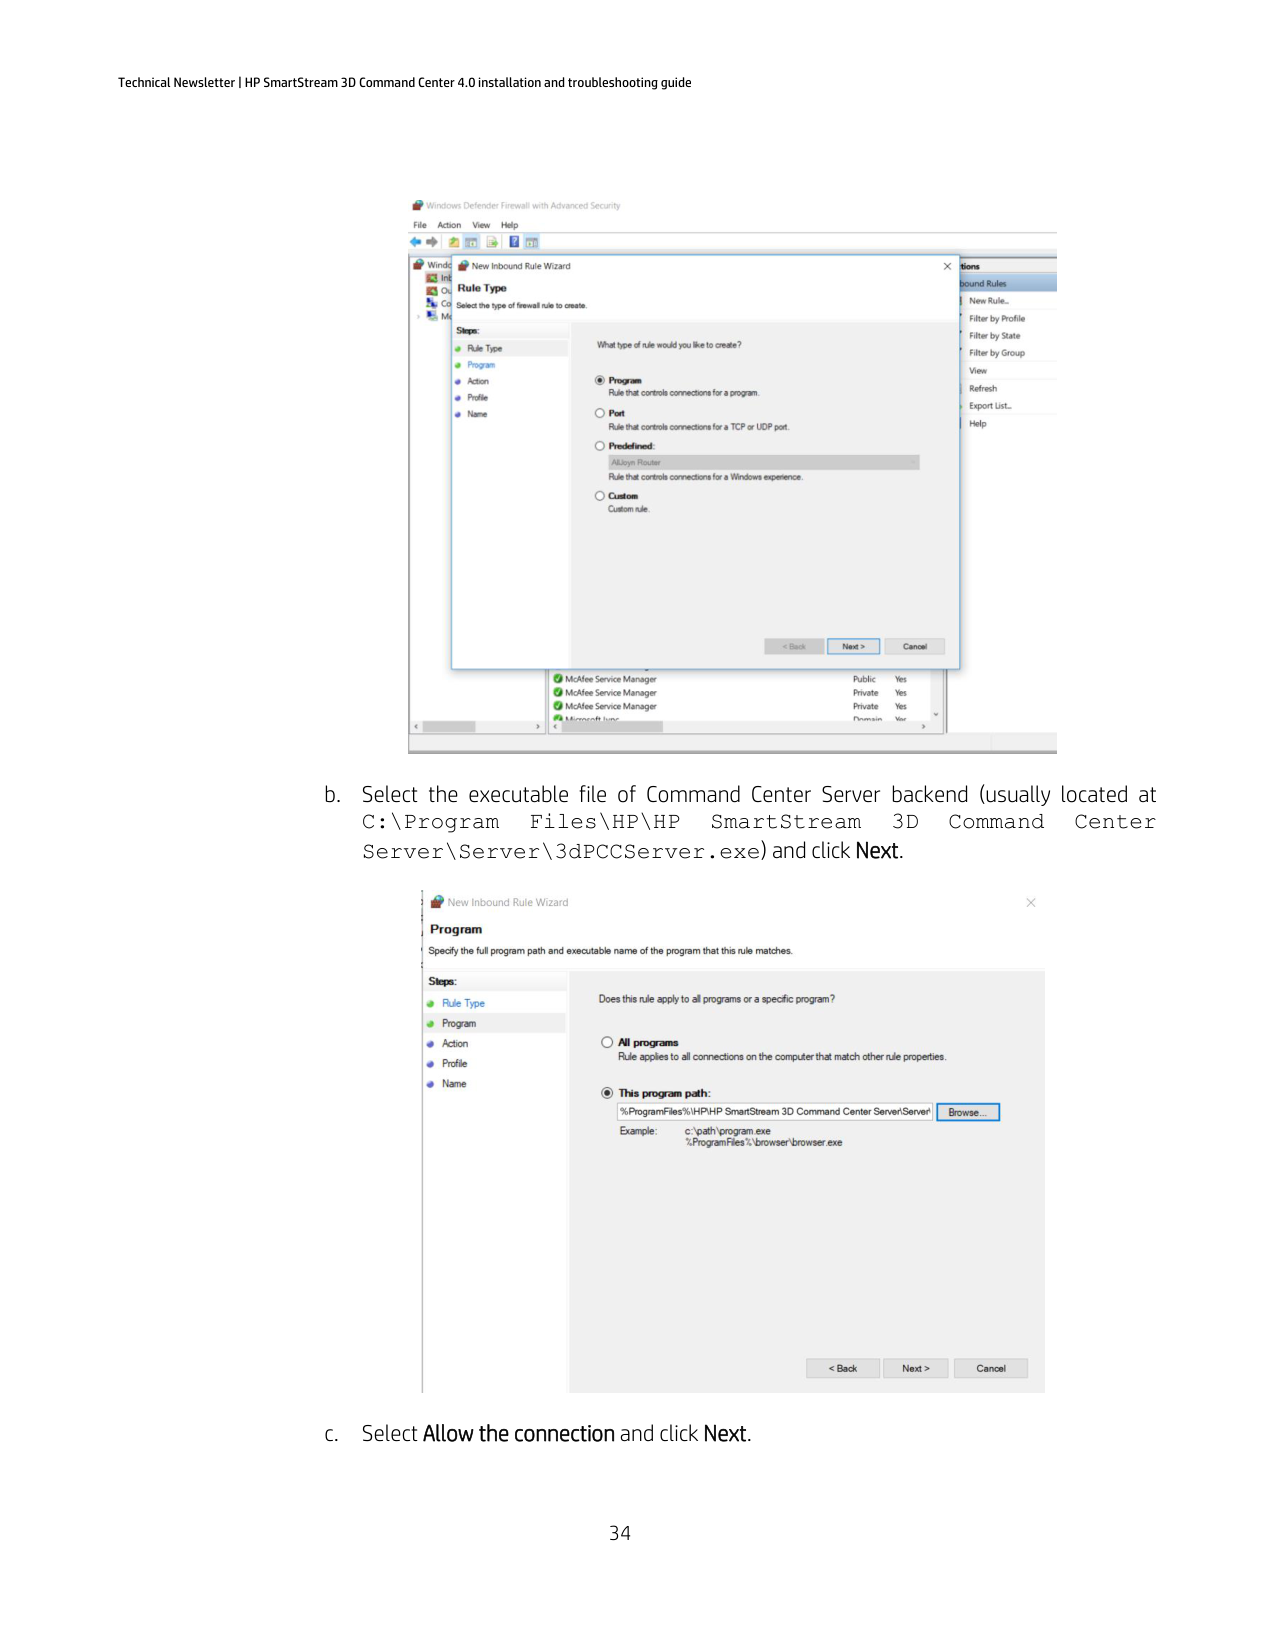
To configure the firewall rule on the Command Center Server computer to allow Command Center Client connections follow these instructions: (If your company uses a third-party firewall on the computer contact your IT department).


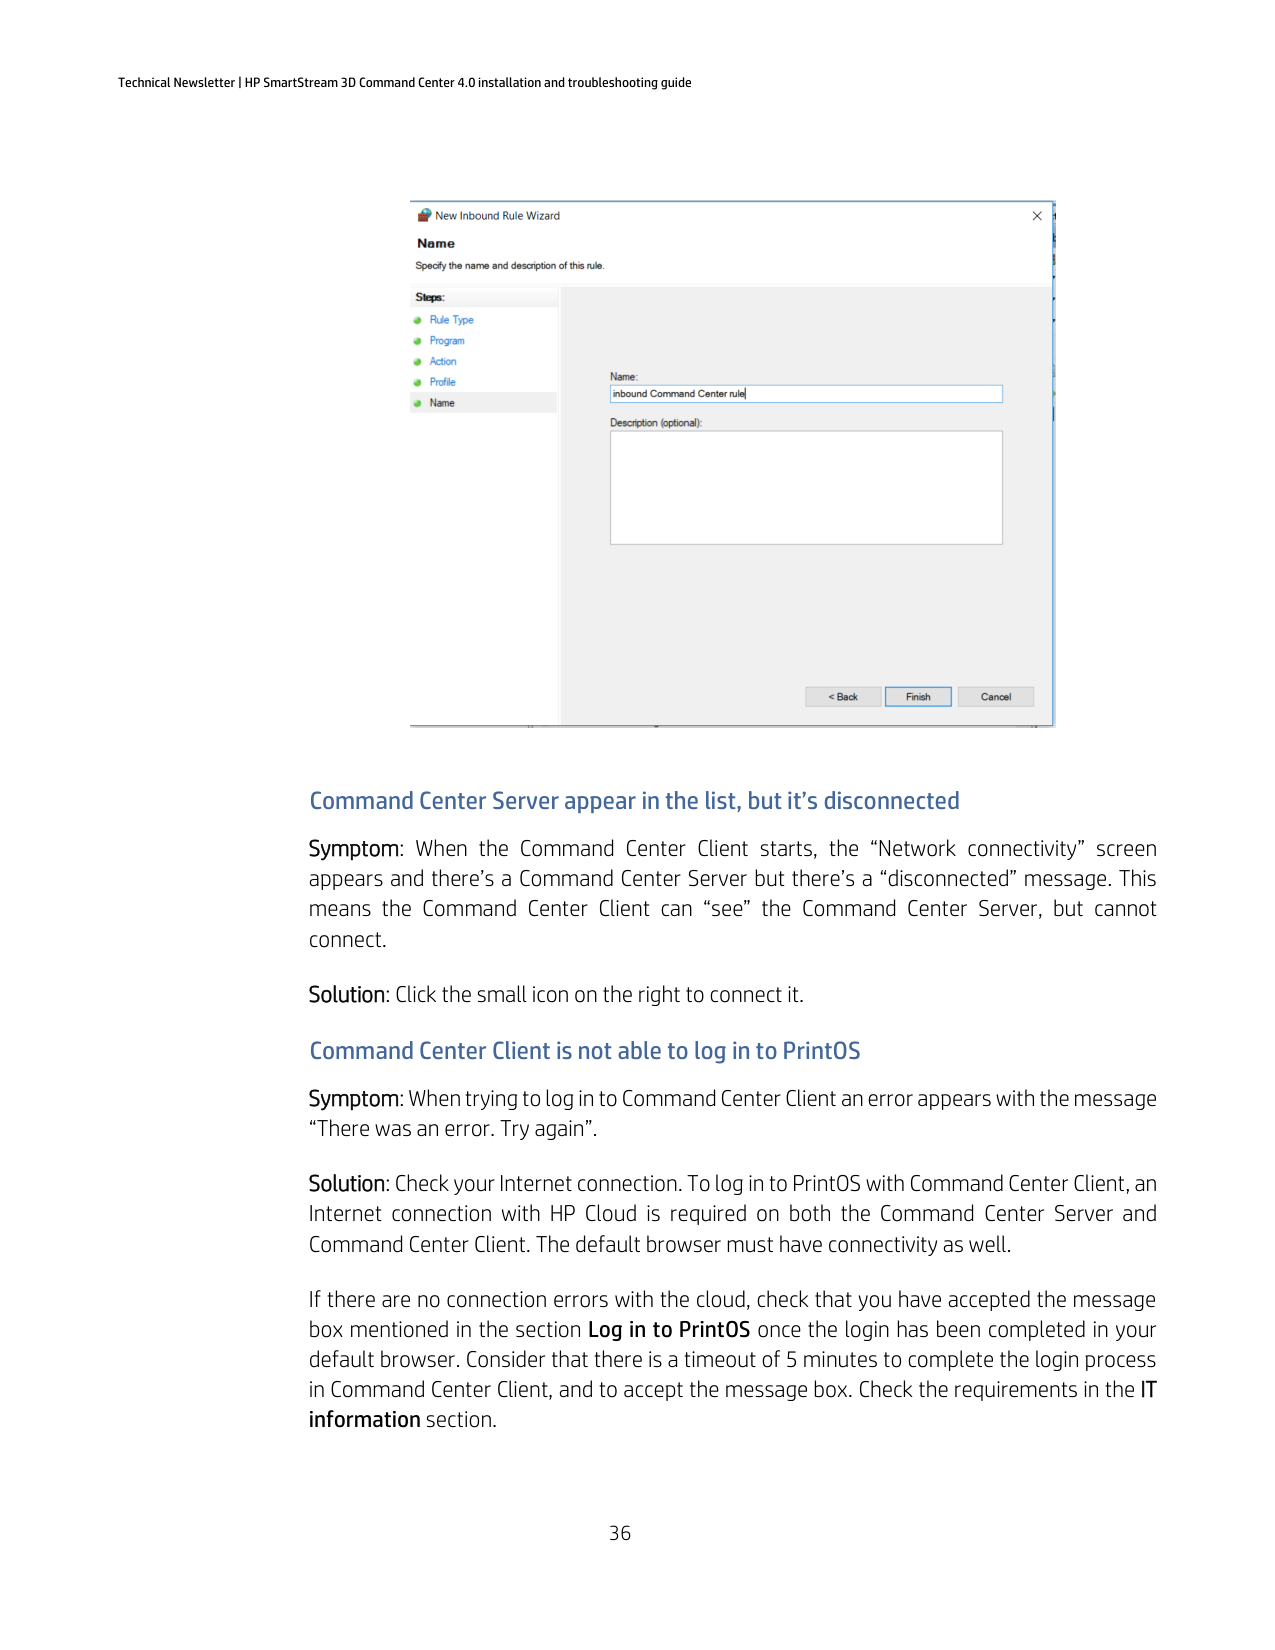
#### Command Center Server appear in the list, but it’s disconnected
Symptom: When the Command Center Client starts, the “Network connectivity” screen appears and there’s a Command Center Server but there’s a “disconnected” message. This means the Command Center Client can “see” the Command Center Server, but cannot connect.
Solution: Click the small icon on the right to connect it. Command Center Client is not able to log in to PrintOS Symptom: When trying to log in to Command Center Client an error appears with the message “There was an error. Try again”.
Solution: Check your Internet connection. To log in to PrintOS with Command Center Client, an Internet connection with HP Cloud is required on both the Command Center Server and Command Center Client. The default browser must have connectivity as well.
If there are no connection errors with the cloud, check that you have accepted the message box mentioned in the section Log in to PrintOS once the login has been completed in your default browser. Consider that there is a timeout of 5 minutes to complete the login process in Command Center Client, and to accept the message box. Check the requirements in the IT information section.
If you have recently configured the proxy connection, check the section Command Center Client is not able to log in to PrintOS after proxy configuration.
#### Command Center Client is not able to connect to Command Center Server backend
Symptom: When the Command Center Client starts and the Network connectivity → Server tab does not find any server, and adding an IP and port for a well-known server backend does not work.
Solution: Consider that the Command Center Client must be in a network that can be routed to the network where the Command Center Server is located. You must change the priority of the network adapters on the Command Center Server to the desired one.
How you solve this will depend on the operating system used:
windows-10
Command Center Client is not able to log in to PrintOS after proxy configuration Symptom: When the Command Center Client starts or after configuring proxy, PrintOS login is lost and/or you cannot log in again.
Solution: For proper operation of Command Center the proxy server must be able to route connections from the Command Center Client to the Command Center Server. The Command Center Server operating ports are in the range of 8443–8449 and 8080–8089, which must be open. If you have problems allowing connections through proxy, please ask your IT department for assistance.
#### Configuring proxy settings on Windows 7
Symptom: When you try to configure a new proxy or update the configuration of current proxy settings on Windows 7, the Command Center doesn’t work properly because it cannot connect to the Internet.
Solution: On Windows 7 machines, when you configure a proxy setting, you must reboot the operating system. The same action should be taken if you update information on the current proxy settings.
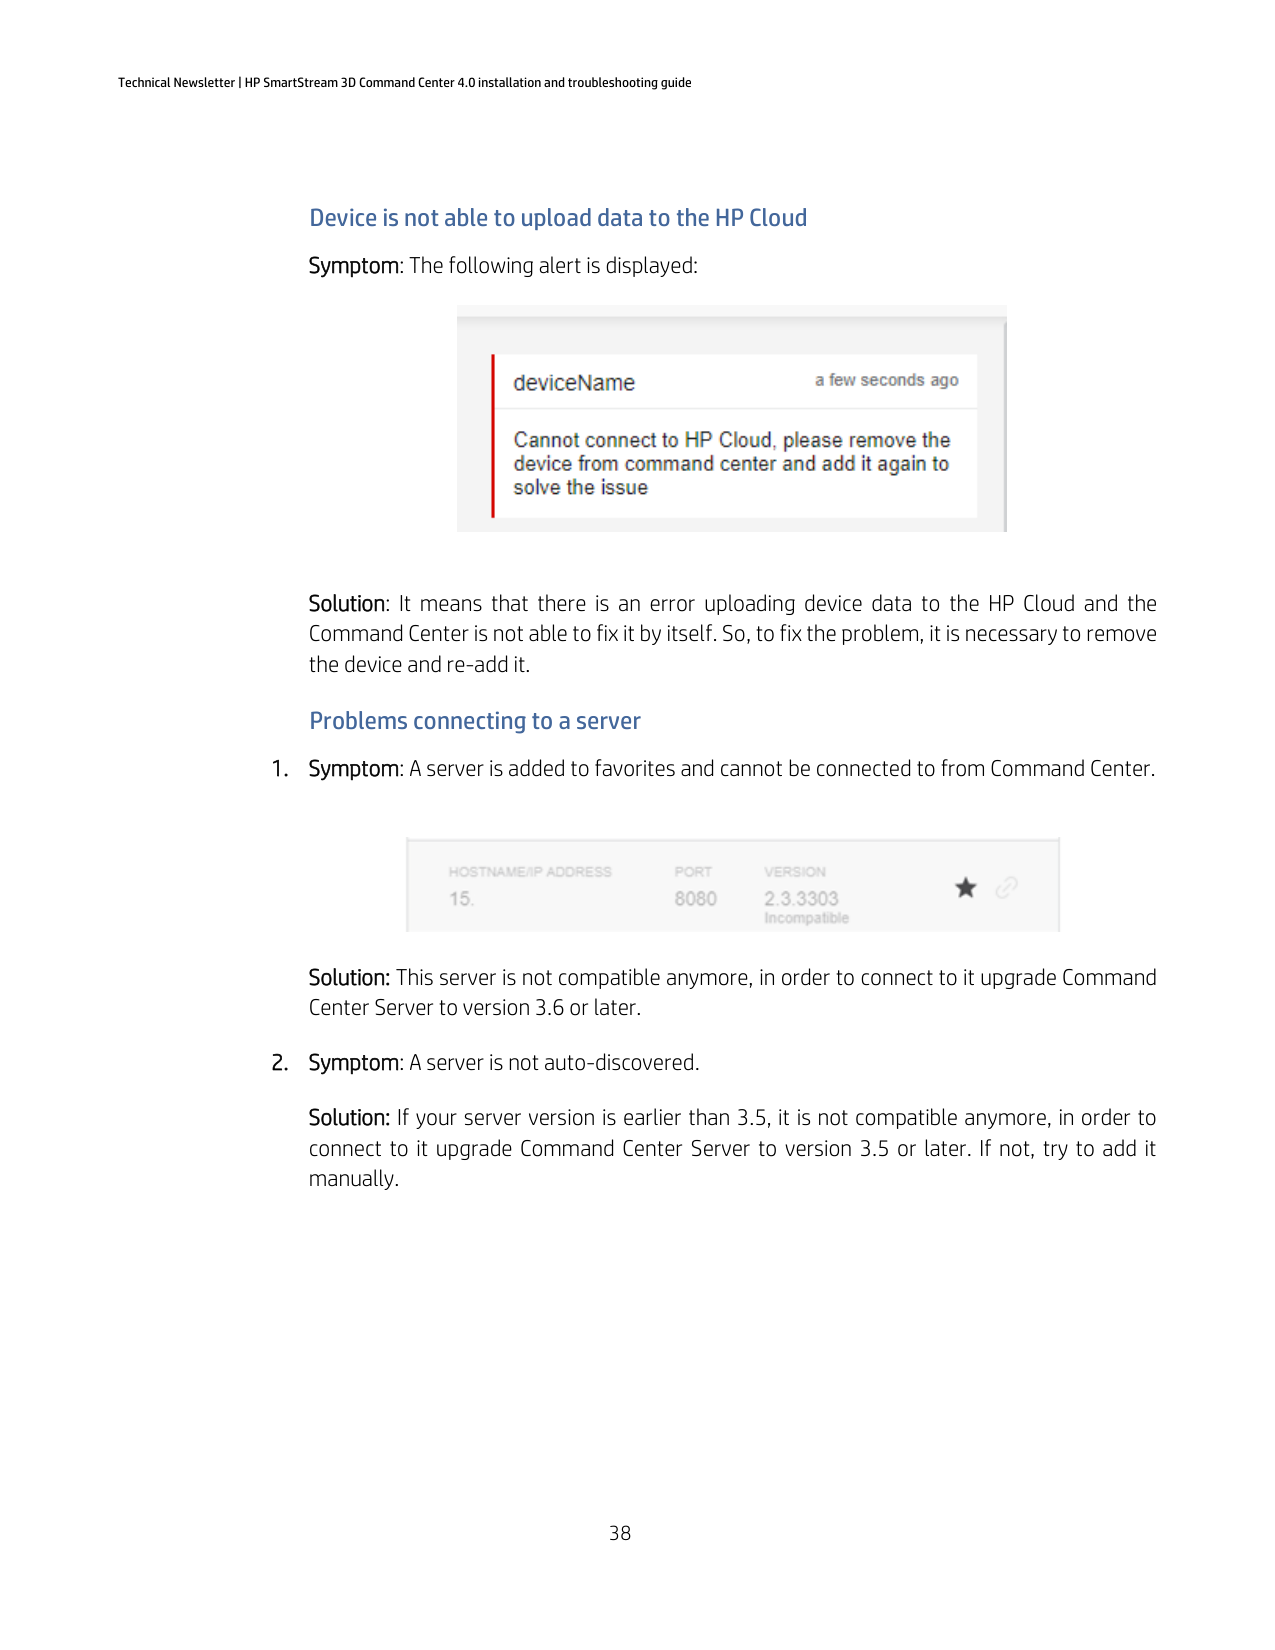
#### Device is not able to upload data to the HP Cloud Symptom: The following alert is displayed:

Solution: It means that there is an error uploading device data to the HP Cloud and the Command Center is not able to fix it by itself. So, to fix the problem, it is necessary to remove the device and re-add it.
#### Problems connecting to a server
Solution: This server is not compatible anymore, in order to connect to it upgrade Command Center Server to version 3.6 or later.

Solution: If your server version is earlier than 3.5, it is not compatible anymore, in order to connect to it upgrade Command Center Server to version 3.5 or later. If not, try to add it manually.
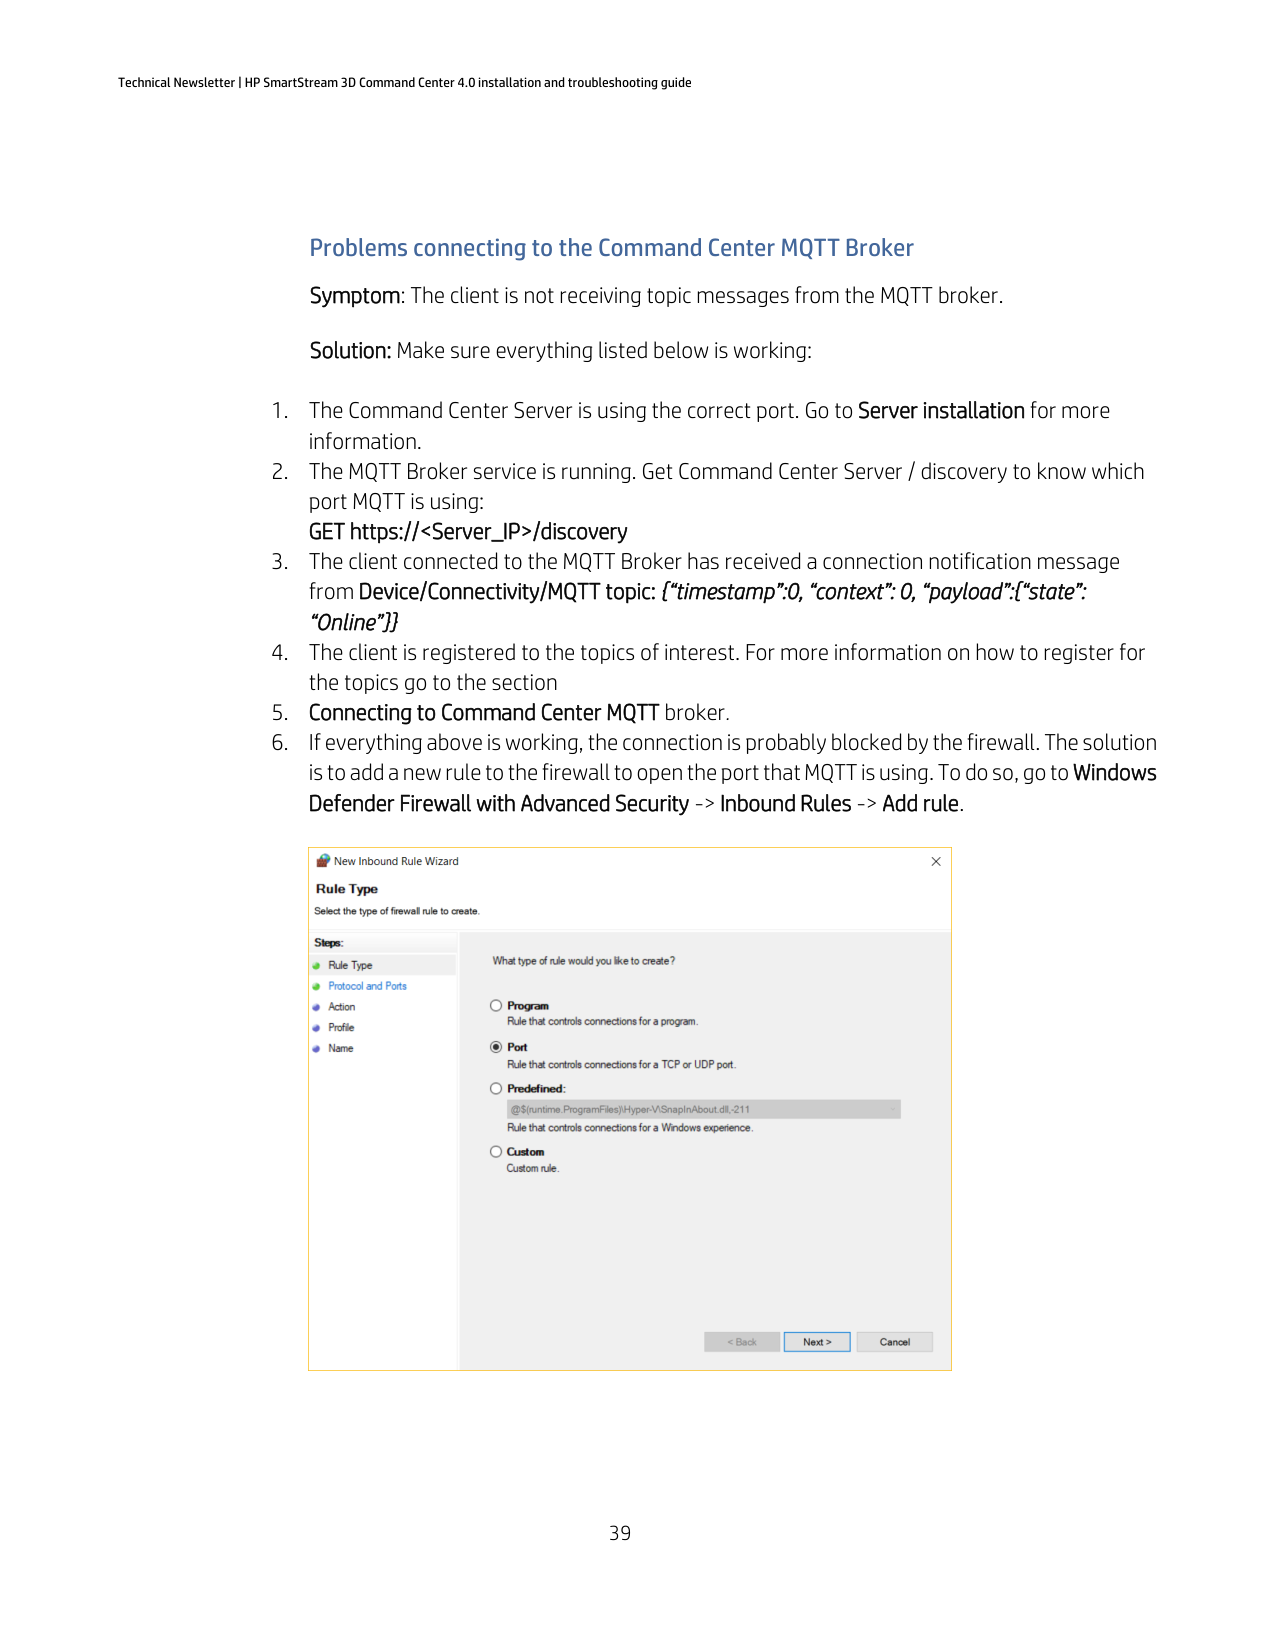
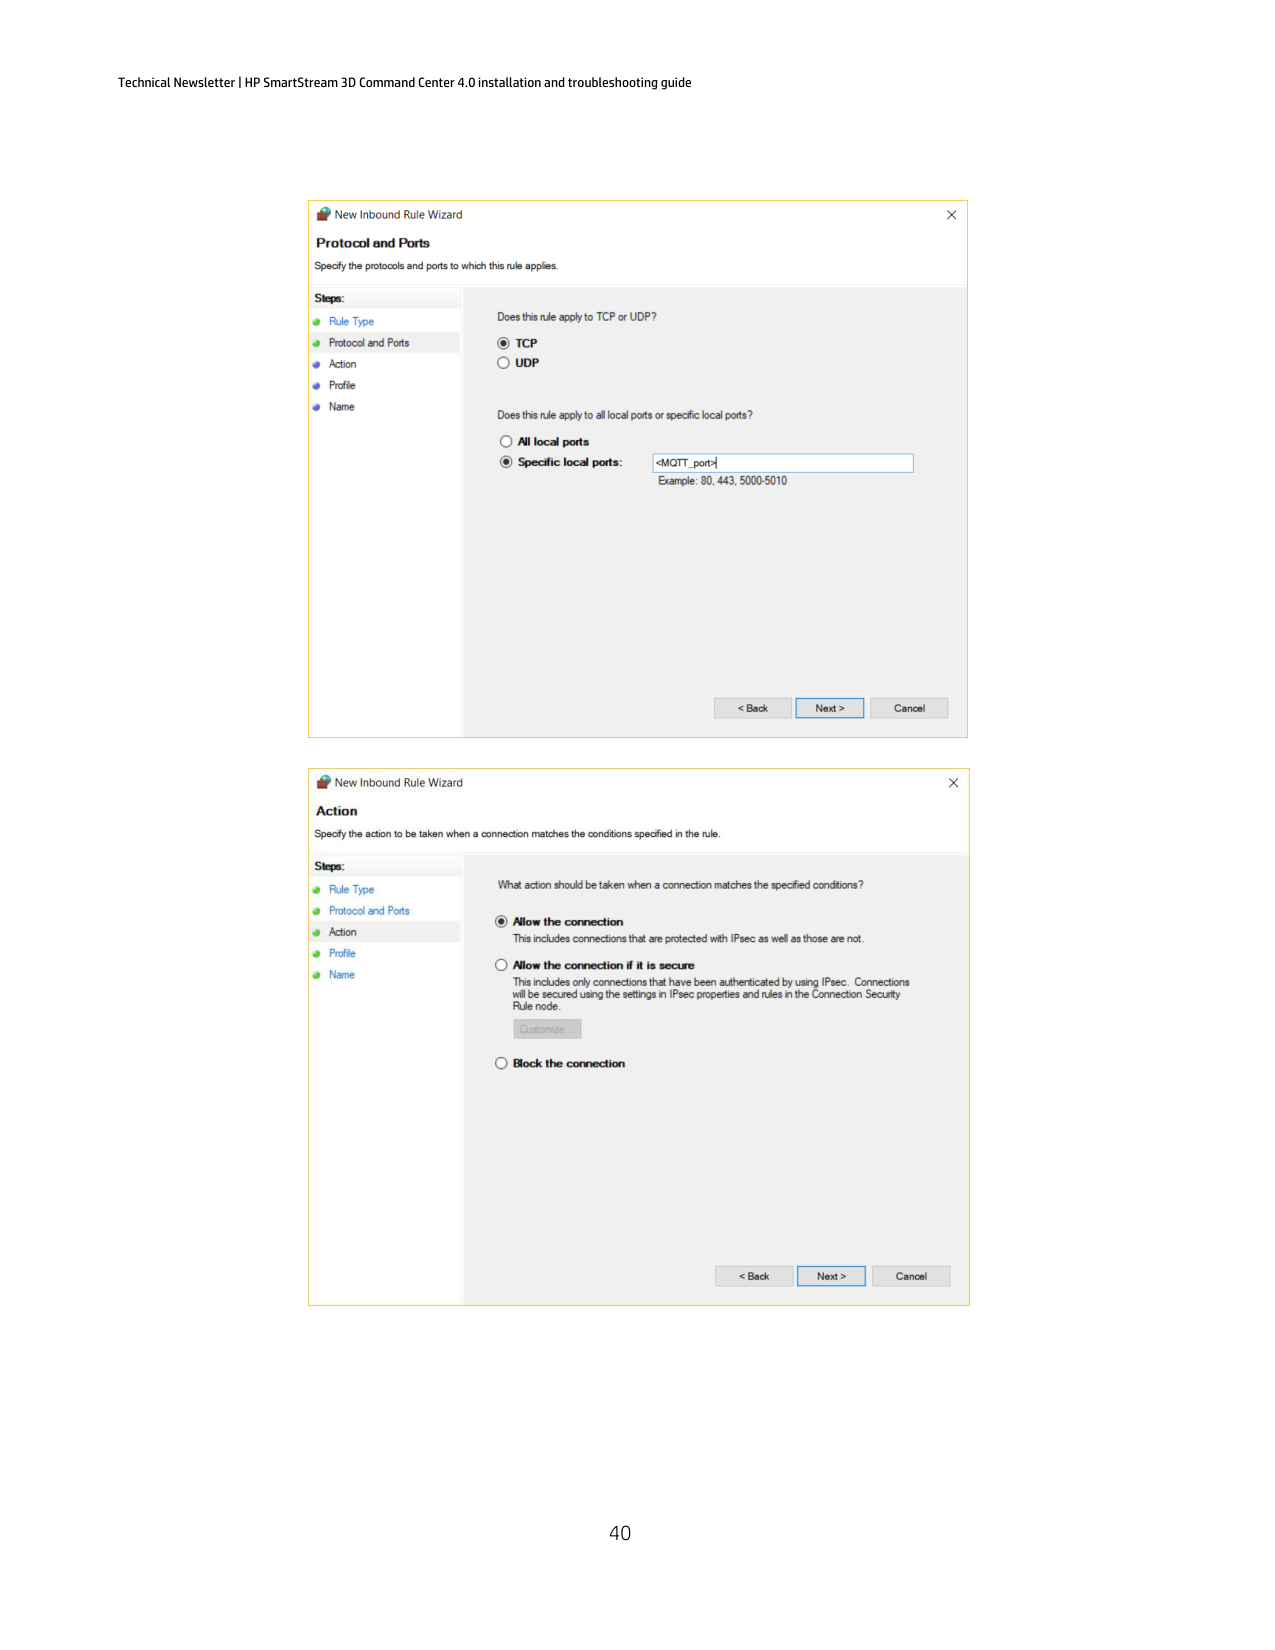
Problems connecting to the Command Center MQTT Broker Symptom: The client is not receiving topic messages from the MQTT broker. Solution: Make sure everything listed below is working:


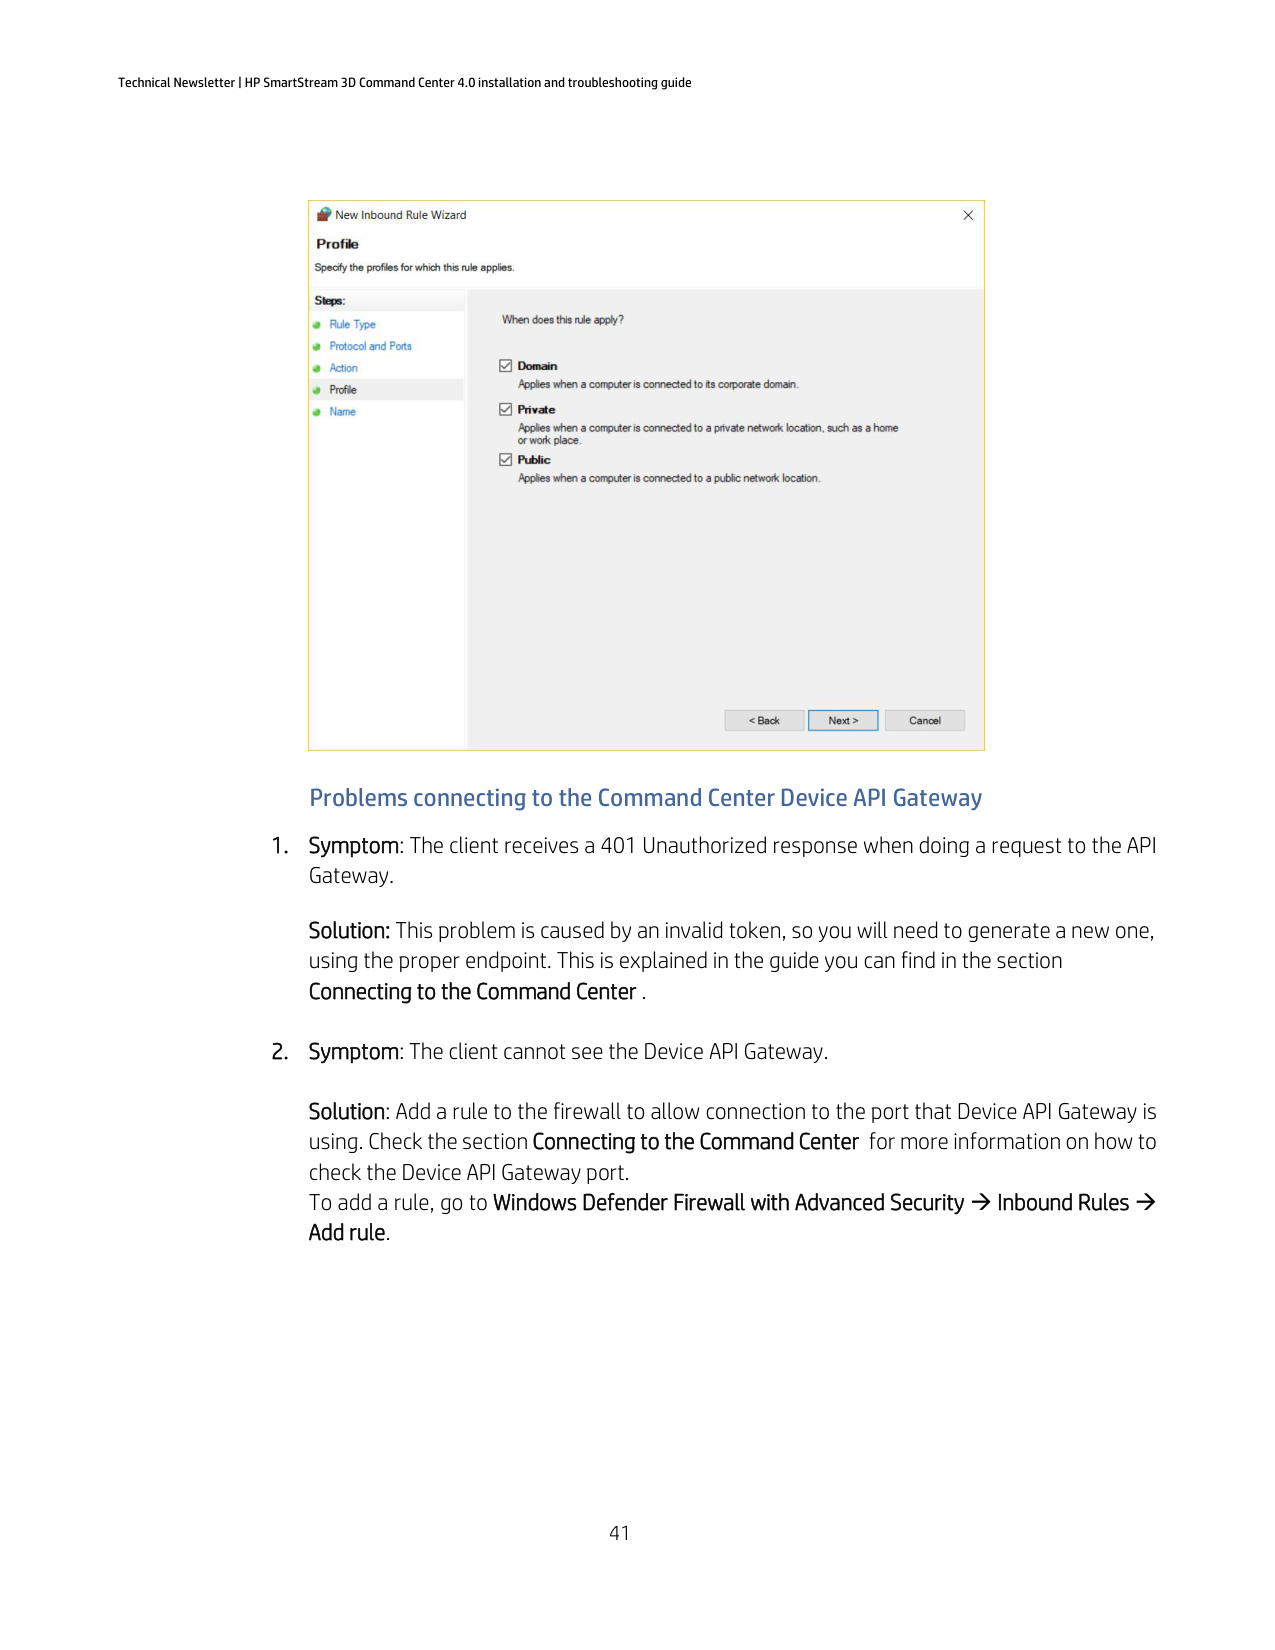
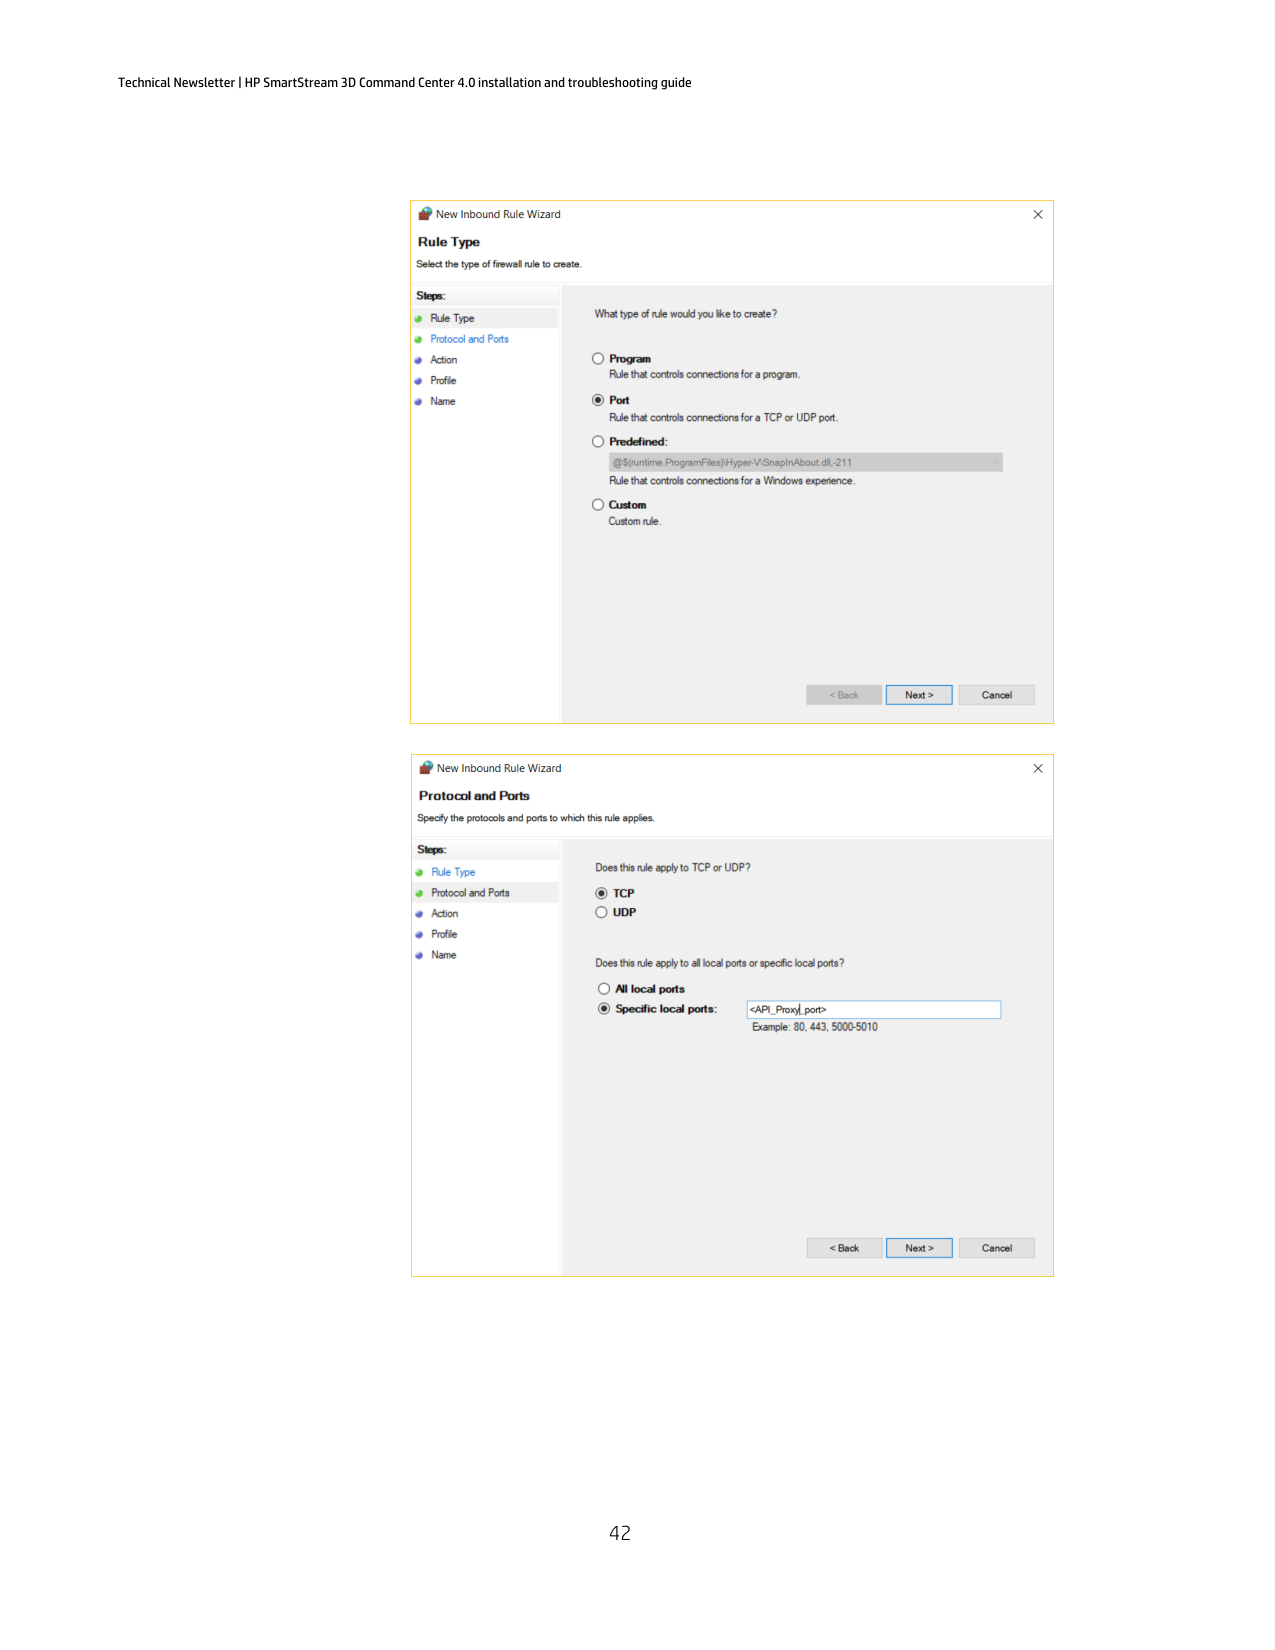
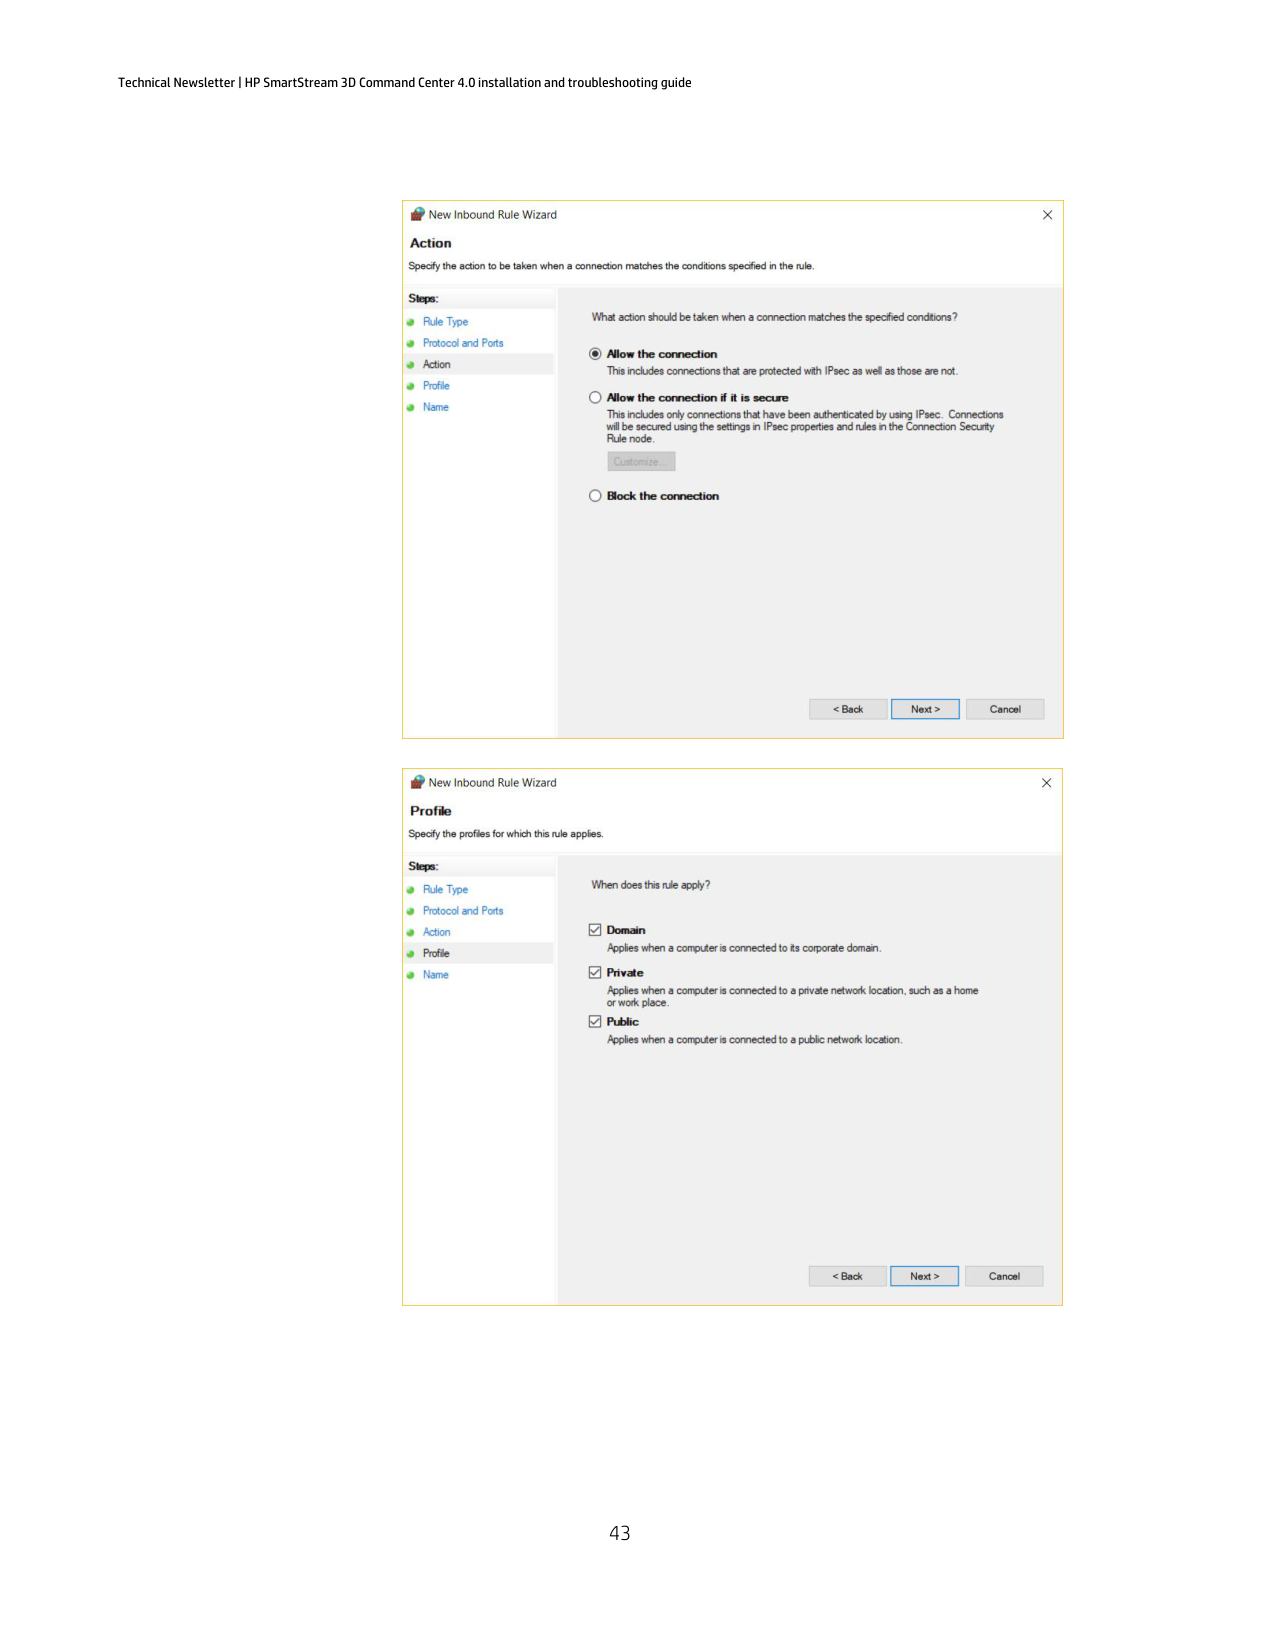
#### Problems connecting to the Command Center Device API Gateway
Solution: This problem is caused by an invalid token, so you will need to generate a new one, using the proper endpoint. This is explained in the guide you can find in the section Connecting to the Command Center .
Solution: Add a rule to the firewall to allow connection to the port that Device API Gateway is using. Check the section Connecting to the Command Center for more information on how to check the Device API Gateway port. To add a rule, go to Windows Defender Firewall with Advanced Security → Inbound Rules → Add rule.


#### Device Management or Add device button does not appear in Command Center Client
Note: To monitor or manage devices, you must be logged in to PrintOS with Command Center Client. Check the Command Center Client is connected to the Command Center Server correctly. If you have problems connecting to the Command Center Server, please check the section Command Center Client is not able to connect to Command Center Server backend.
Symptom: When the Device Management section is disabled or the Add device button does not appear in your Command Center Client.
Solution: If you are successfully logged in to PrintOS, and the Add device button does not appear, it means that your user is not an Administrator in any organization of the HP 3D family in PrintOS and you may need to contact your organization's PrintOS administrator to grant administrator permissions in your user account.
If you have problems logging in to PrintOS with Command Center Client, please check the section Command Center Client is not able to log in to PrintOS.
#### Remove device button does not appear in Command Center Client Device Management
Note: To monitor or manage devices, you must be logged in to PrintOS with Command Center Client. Check the Command Center Client is connected to the Command Center Server correctly. If you have problems connecting to the Command Center Server, please check the section Command Center Client is not able to connect to Command Center Server backend.

Symptom: When the Remove device button does not appear in your Command Center Client.
Solution: If you are successfully logged in to PrintOS, and the Remove device button does not appear, it means that your user is not an Administrator in any organization of the HP 3D family in PrintOS and you may need to contact your organization's PrintOS administrator to grant administrator permissions in your user account.
If you have problems logging in to PrintOS with Command Center Client, please check the section Command Center Client is not able to log in to PrintOS.
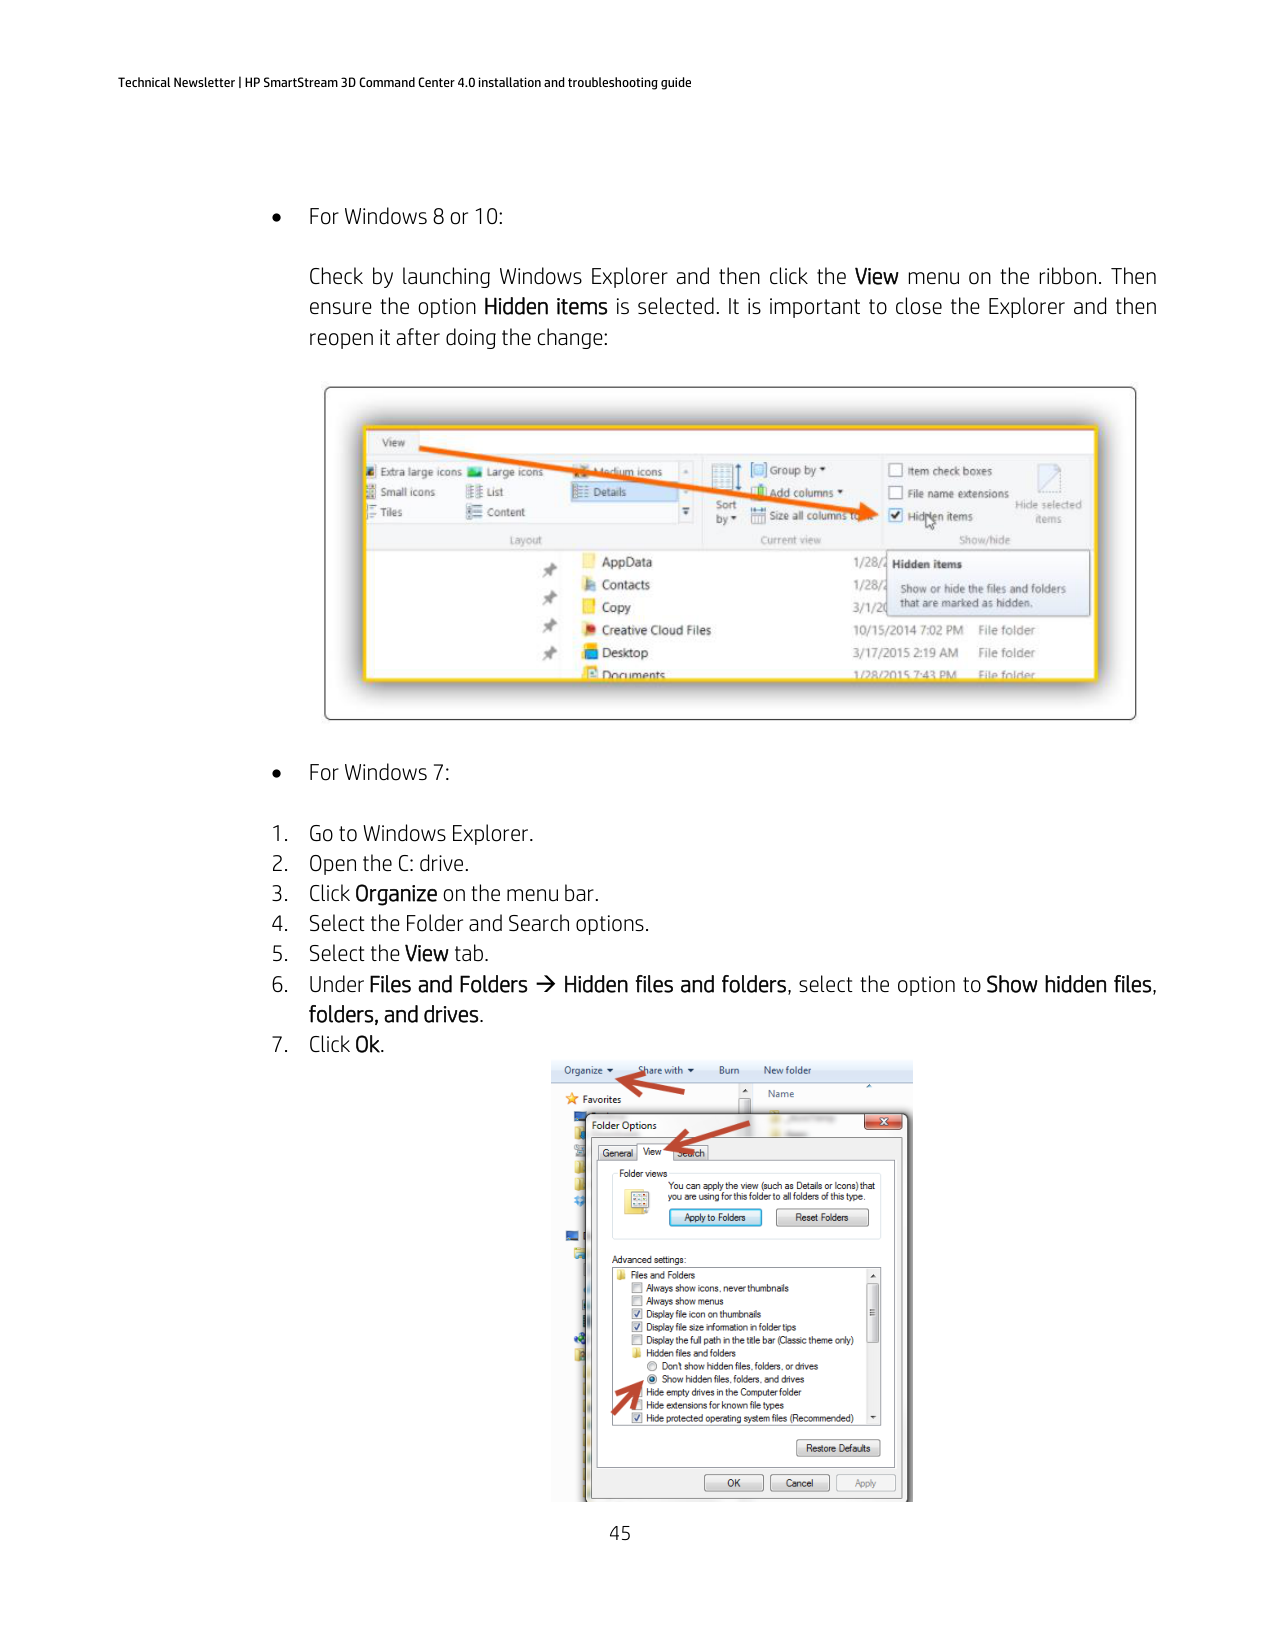
Appendix Access the Command Center application data folder If you cannot see the AppData folder, it could be because it's hidden from view.
Check by launching Windows Explorer and then click the View menu on the ribbon. Then ensure the option Hidden items is selected. It is important to close the Explorer and then reopen it after doing the change:


#### Accessing mosquitto.log file
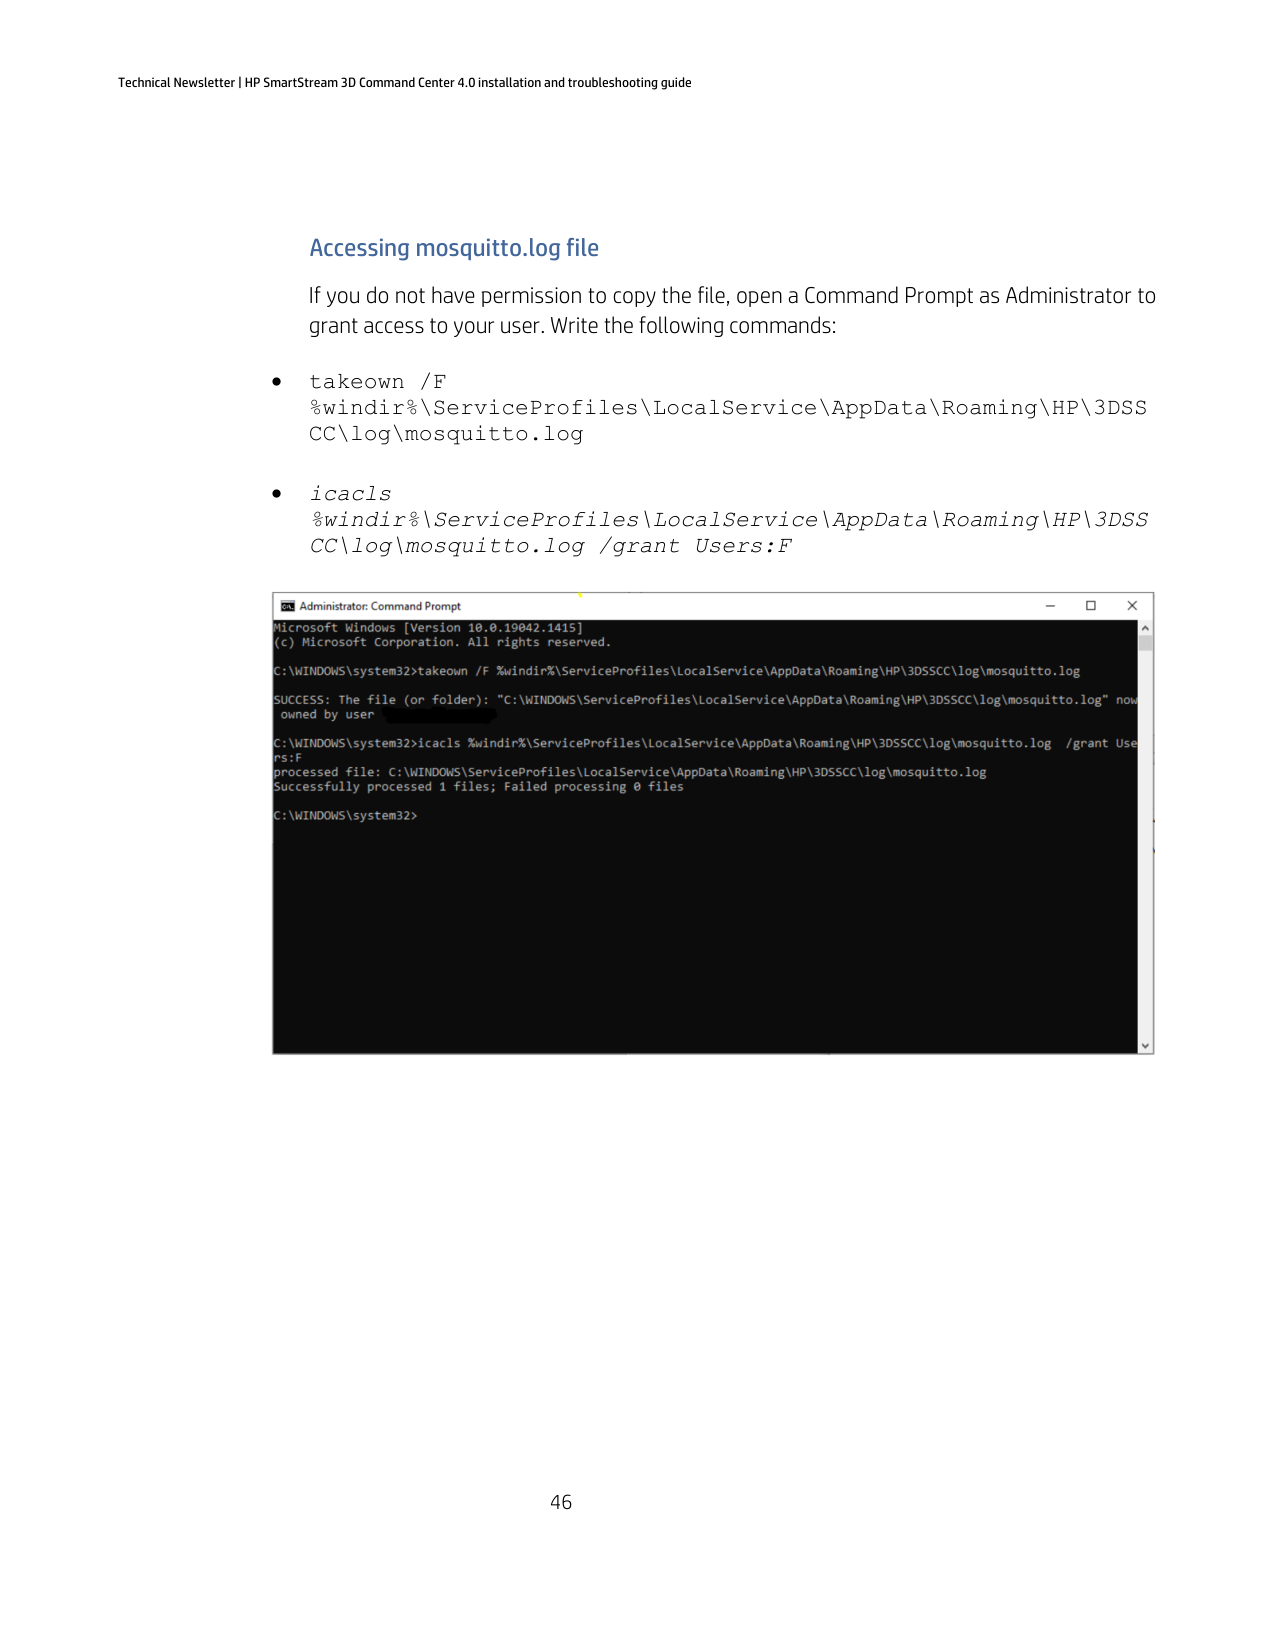
If you do not have permission to copy the file, open a Command Prompt as Administrator to grant access to your user. Write the following commands:

©Copyright 2022 HP Development Company, L.P. The information contained herein is subject to change without notice
The information contained herein is provided for information purposes only. The only terms and conditions governing the sale of HP 3D printer solutions are those set forth in a written sales agreement. The only warranties for HP products and services are set forth in the express warranty statements accompanying such products and services. Nothing herein should be construed as constituting an additional warranty or additional binding terms and conditions. HP shall not be liable for technical or editorial errors or omissions contained herein and the information herein is subject to change without notice.
April 2022