
Ask AI
— answers from the official manualAnswers from the official manual.
Common questions
Common Questions
10 totalHow do I configure the Idylis 526011 for continuous drainage?
To set up continuous drainage, unscrew and remove the drain cover at the rear of the unit (Fig. A). Then remove the soft rubber stopper and place it in the water tank securely (Fig. B). Ensure the rubber seal ring is properly seated in the hose end as shown in Fig.C. Finally, connect the garden hose to the drain port on the back of the unit (Fig.D) and tighten clockwise.
What should I do if my dehumidifier’s water tank triggers a 'Bucket Full' light but isn’t actually full?
If the water tank is not actually full, pull out the water tank and verify that the float lever can move freely. The issue might be with improper positioning or obstruction of this lever causing incorrect triggering of the safety switch (Fig. 1). If free movement is established and the problem persists, consult technical support.
How often should I clean my dehumidifier's air filter?
The air filter timer light glows after approximately 250 hours of operation, reminding you to remove and clean the air filter with a vacuum cleaner or by washing it in mild dishwashing detergent before drying. After cleaning, place the filter back into the unit (Fig.3).
Can I use my dehumidifier without an air filter installed?
No, the dehumidifier should never be operated without its air filter in place since it impacts negatively on operating efficiency and is important for air intake (Fig.3). Install the filter correctly before starting the unit.
What happens if my Idylis dehumidifier stops working when the water tank is full?
If the 'Bucket Full' light turns on and your machine ceases to operate, this indicates that the water level switch has engaged. Ensure the tank is removed carefully with both hands (Fig.2), emptied properly, and reinserted correctly for normal operation to resume automatically.
What should I do before storing my dehumidifier for long periods?
To store your unit properly for prolonged periods, power off the device, empty and thoroughly dry the water tank. Clean the air filter thoroughly as well. Place it back in its original packaging if possible or repackage into the box you received (Fig. A), then store upright in a dry location.
Full Manual
14 pages
Idylis® is a registered trademark of LF, LLC. All Rights Reserved.
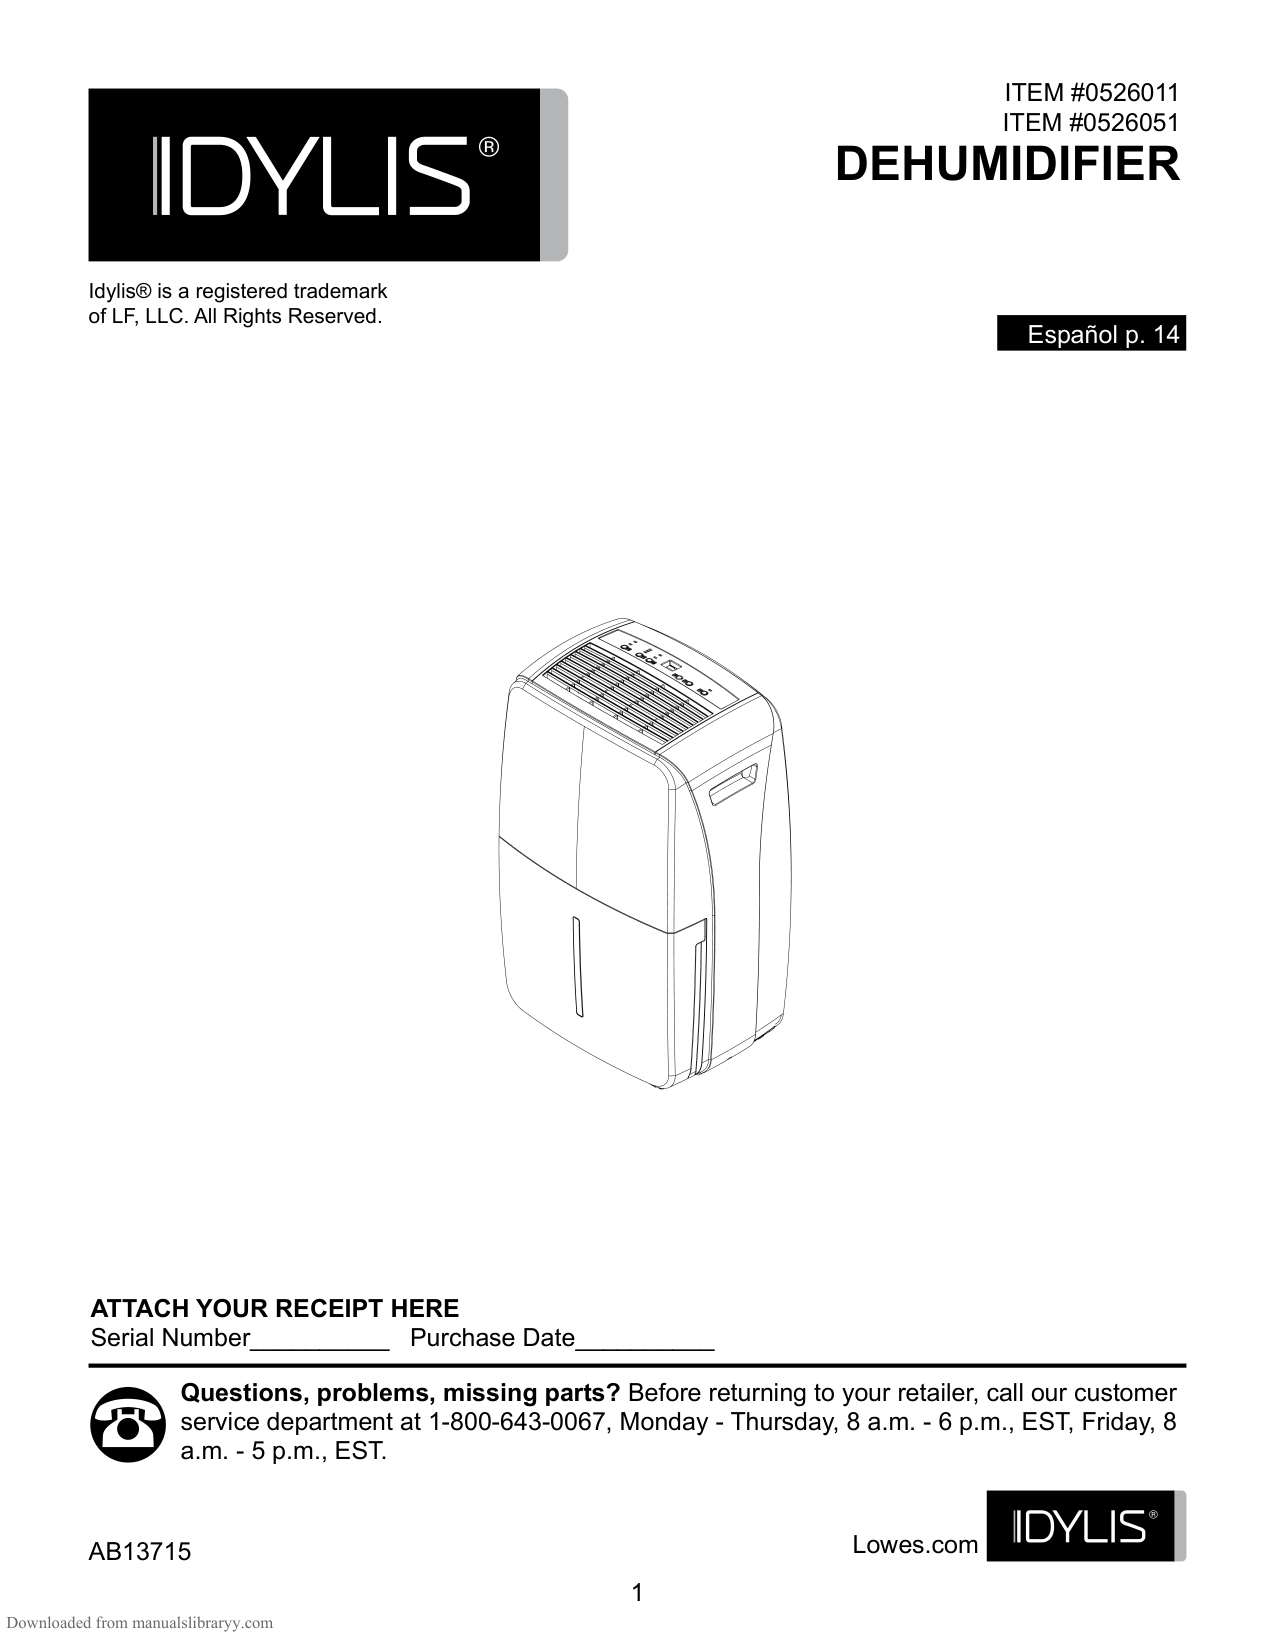
ITEM #0526011 ITEM #0526051
DEHUMIDIFIER
|Español p. 14| |---|
ATTACH YOUR RECEIPT HERE Serial Number__________ Purchase Date__________
Questions, problems, missing parts? Before returning to your retailer, call our customer service department at 1-800-643-0067, Monday - Thursday, 8 a.m. - 6 p.m., EST, Friday, 8 a.m. - 5 p.m., EST.
AB13715
1
Lowes.com
#### TABLE OF CONTENTS
PACKAGE CONTENTS ……………………………………………………………………..3 SAFETY INFORMATION…………………………………………………………...............4 OPERATING INSTRUCTIONS……………………………………………………………..7 CARE AND MAINTENANCE……………………………………………..........................11 TROUBLESHOOTING……………………………………………...................................11 WARRANTY……………………………………………………………................………..12 REPLACEMENT PARTS LIST…………………………………………................…......13
2
Lowes.com
#### PACKAGE CONTENTS
A B
D
C
I
H
(Item #0526051 only)
J
(Item #0526051 only)
|PART|DESCRIPTION|QUANTITY| |---|---|---| |A|Control Panel|1| |B|Air Vent|1| |C|Drain Bucket|1| |D|Handle|2| |E|Air Intake|1| |F|Air Filter|1| |G|Continuous Drain Outlet|1| |H|Drain Connector (Item #0526051 only)|1| |I|Castors|4| |J|Drain Tube (Item #0526051 only)|1|
3
Lowes.com
#### SAFETY INFORMATION SAFETY INFORMATION
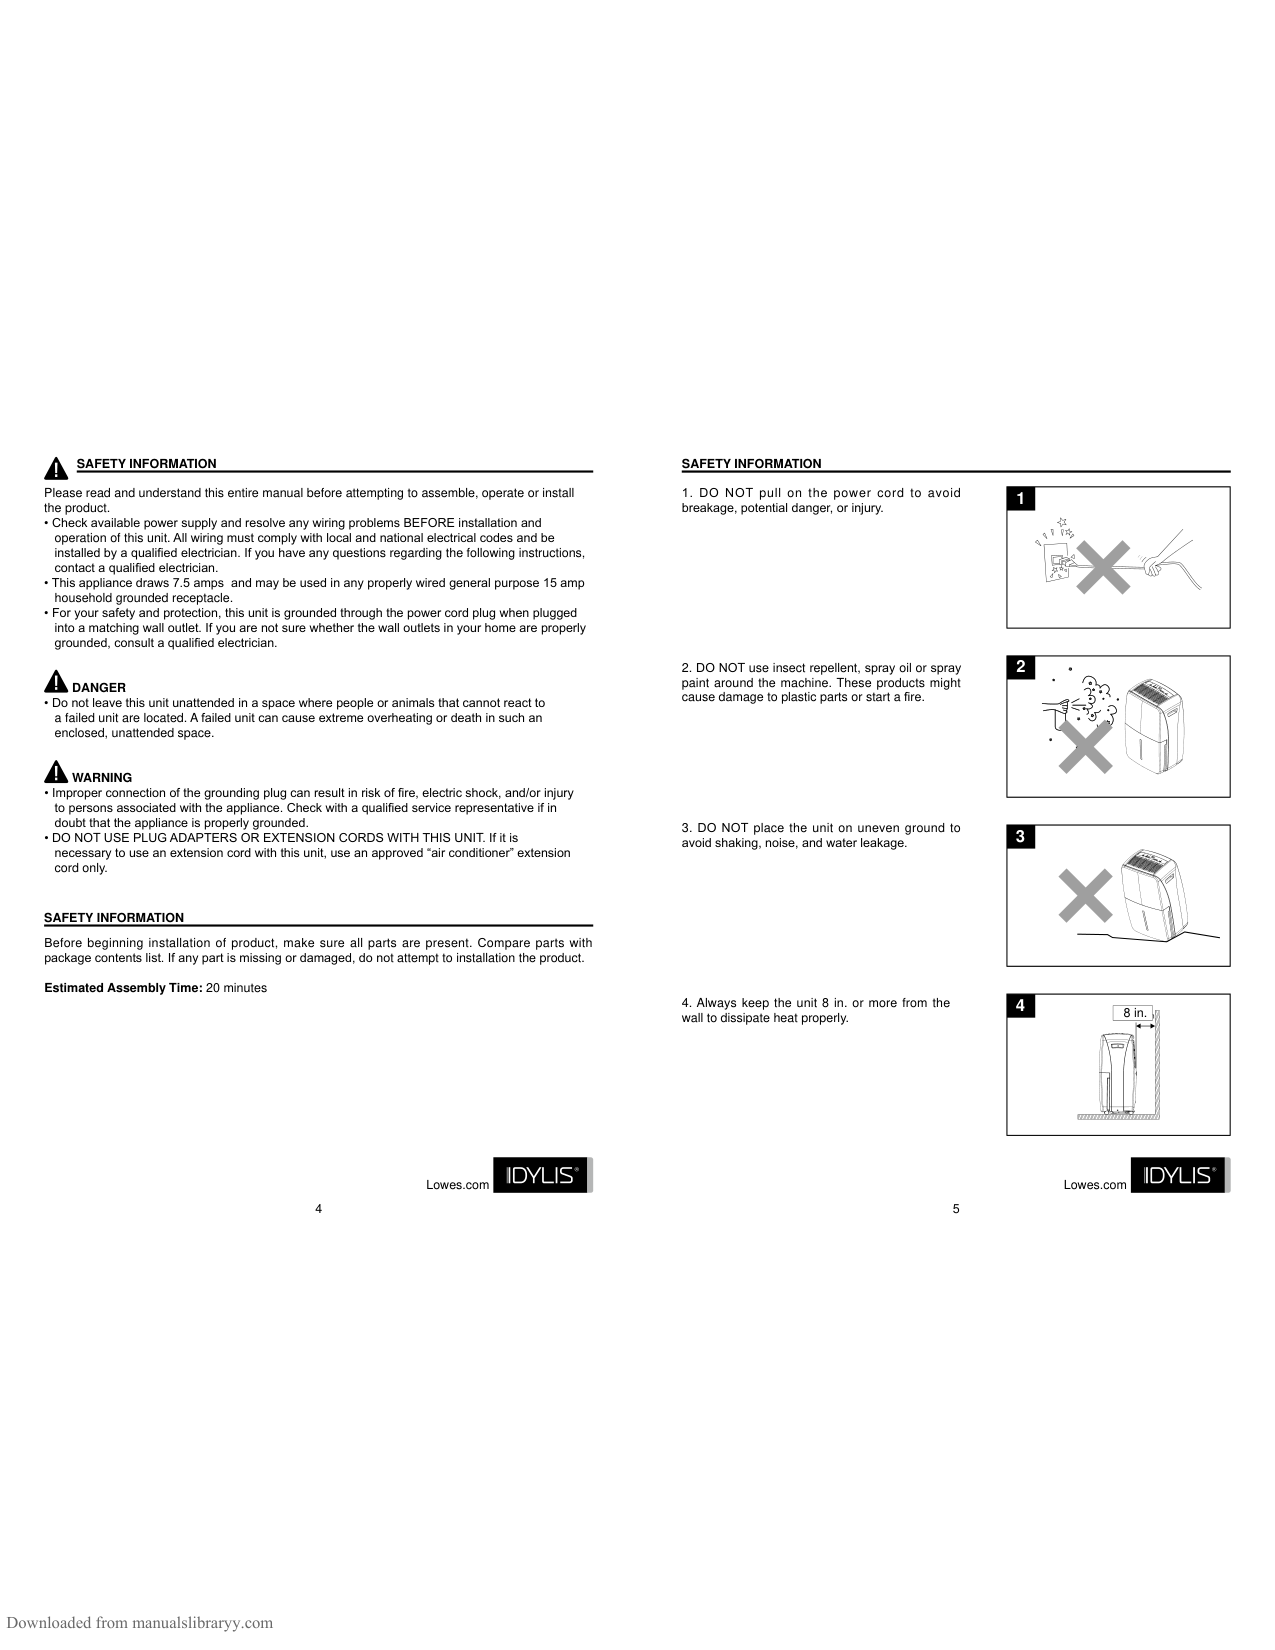
Please read and understand this entire manual before attempting to assemble, operate or install the product.
|1| |---|

DANGER
WARNING
|2| |---|
|3| |---|
SAFETY INFORMATION
Before beginning installation of product, make sure all parts are present. Compare parts with package contents list. If any part is missing or damaged, do not attempt to installation the product.
Estimated Assembly Time: 20 minutes
|| | | |---|---| | | |
|20cm8 in.| |---|
4| |---|
Lowes.com Lowes.com
4 5
#### SAFETY INFORMATION
|5| |---|
|6| |---|
|7| |---|
|8| |---|
6
Lowes.com
#### OPERATING INSTRUCTIONS
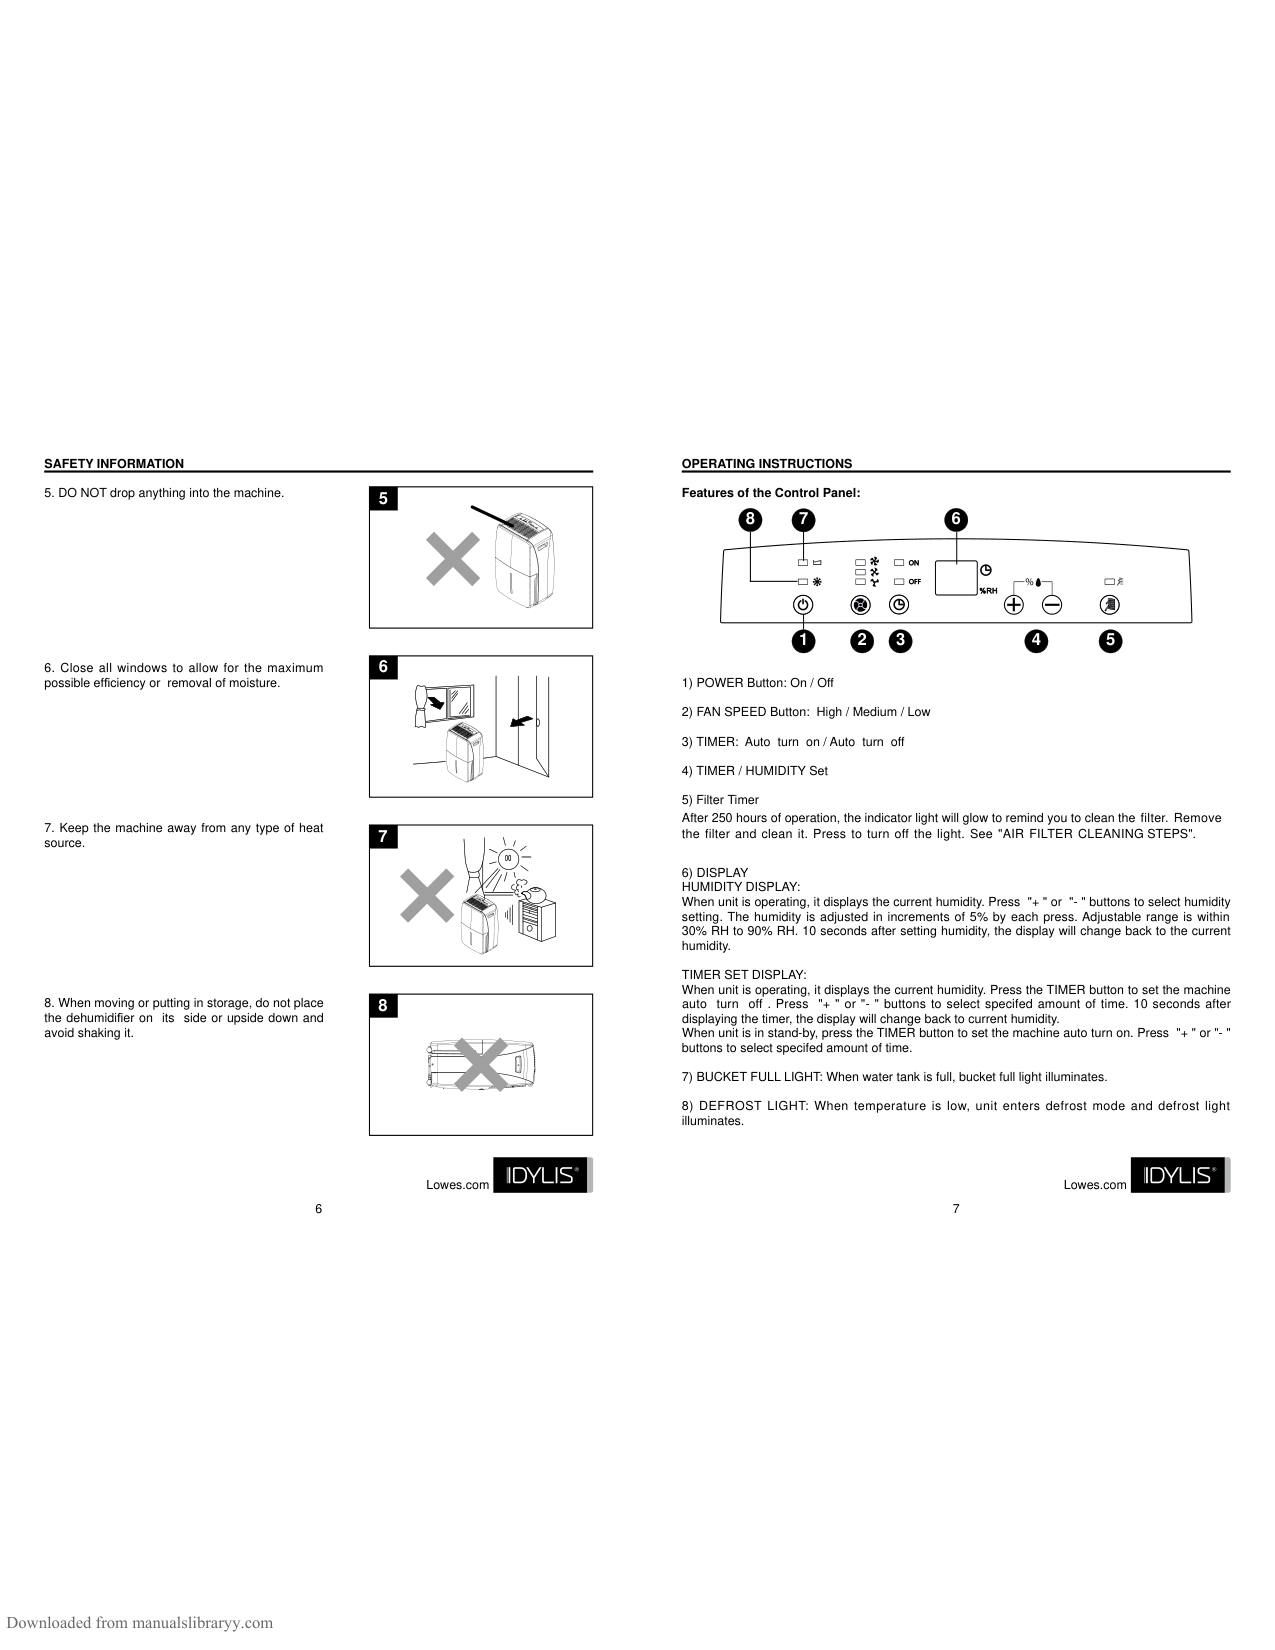
Features of the Control Panel:
678
| | | |---|---| | | |
1 2 3 4 5
TIMER SET DISPLAY: When unit is operating, it displays the current humidity. Press the TIMER button to set the machine auto turn o ff . Press "+ " or "- " bu ttons to select spec ifed amount of time. 10 seconds a fter displaying the timer, the display will change back to current humidity. When unit is in stand-by, press the TIMER button to set the machine auto turn on. Press "+ " or "- " buttons to select specifed amount of time.
7
Lowes.com
#### OPERATING INSTRUCTIONS
#### START OPERATION
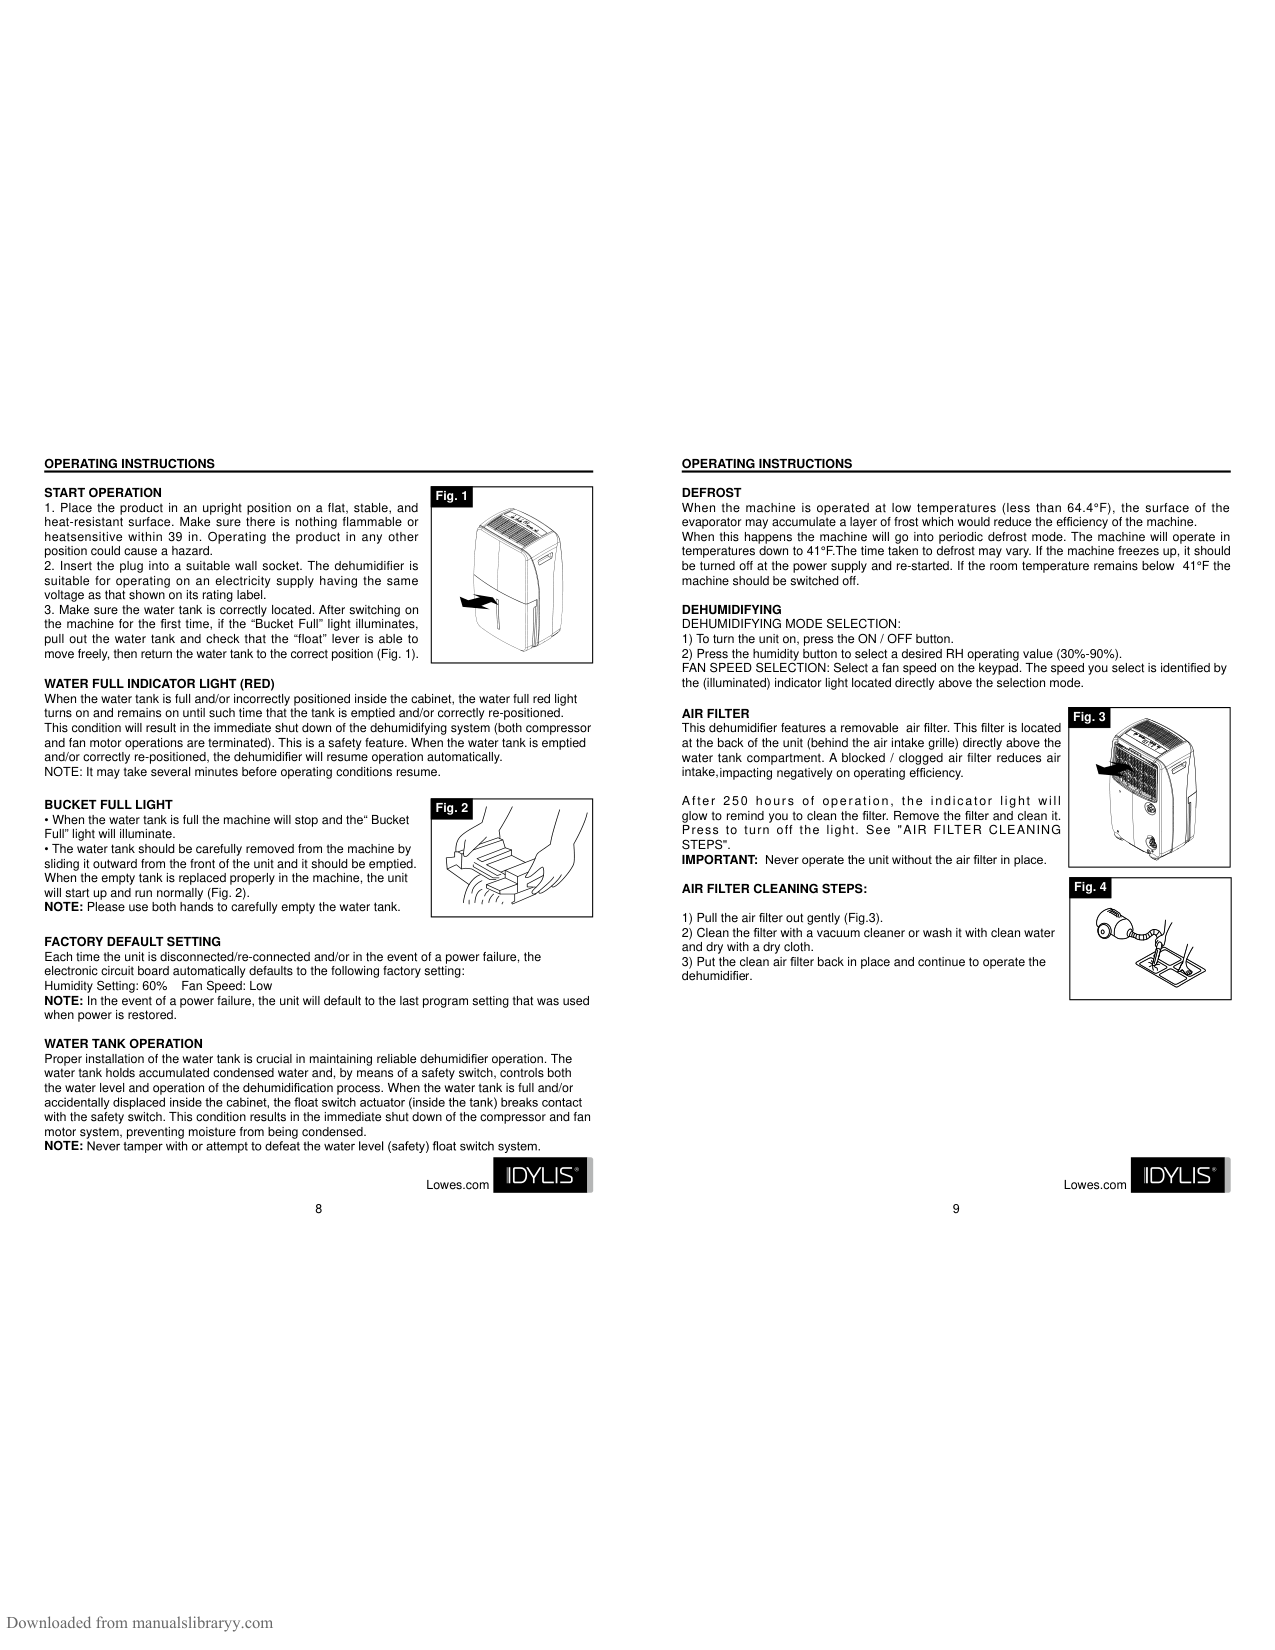
|Fig. 1| | |---|---| | | |
WATER FULL INDICATOR LIGHT (RED) When the water tank is full and/or incorrectly positioned inside the cabinet, the water full red light turns on and remains on until such time that the tank is emptied and/or correctly re-positioned. This condition will result in the immediate shut down of the dehumidifying system (both compressor and fan motor operations are terminated). This is a safety feature. When the water tank is emptied and/or correctly re-positioned, the dehumidifier will resume operation automatically. NOTE: It may take several minutes before operating conditions resume.
#### BUCKET FULL LIGHT
|Fig. 2| | |---|---| | | |
FACTORY DEFAULT SETTING Each time the unit is disconnected/re-connected and/or in the event of a power failure, the electronic circuit board automatically defaults to the following factory setting: Humidity Setting: 60% Fan Speed: Low NOTE: In the event of a power failure, the unit will default to the last program setting that was used when power is restored.
#### WATER TANK OPERATION
Proper installation of the water tank is crucial in maintaining reliable dehumidifier operation. The water tank holds accumulated condensed water and, by means of a safety switch, controls both the water level and operation of the dehumidification process. When the water tank is full and/or
with the safety switch. This condition results in the immediate shut down of the compressor and fan motor system, preventing moisture from being condensed. NOTE:
Lowes.com
8
#### OPERATING INSTRUCTIONS
DEFROST When the machine is operated at low temperatures (less than 64.4°F), the surface of the evaporator may accumulate a layer of frost which would reduce the efficiency of the machine. When this happens the machine will go into periodic defrost mode. The machine will operate in temperatures down to 41°F.The time taken to defrost may vary. If the machine freezes up, it should be turned off at the power supply and re-started. If the room temperature remains below 41°F the machine should be switched off.
DEHUMIDIFYING DEHUMIDIFYING MODE SELECTION:
#### AIR FILTER
|Fig. 3| | |---|---| | | |
This dehumidifier features a removable air filter. This filter is located at the back of the unit (behind the air intake grille) directly above the water tank compartment. A blocked / clogged air filter reduces air intake,impacting negatively on operating efficiency.
After 250 hours of operation, the indicator light will glow to remind you to clean the filter. Remove the filter and clean it. Press to turn off the light. See "AIR FILTER CLEANING STEPS".
IMPORTANT: Never operate the unit without the air filter in place. AIR FILTER CLEANING STEPS:
|Fig. 4| | |---|---| | | |
9
Lowes.com
#### OPERATING INSTRUCTIONS
INSTALLING PVC DRAIN HOSE When the water tank is full and/or incorrectly positioned inside the cabinet, the water full red light turns on and remains on until such time that the tank is emptied and/or correctly re-positioned. This condition will result in the immediate shut down of the dehumidifying system (both compressor and fan motor operations are terminated). This is a safety feature. When the water tank is emptied and/or correctly re-positioned, the dehumidifier will resume operation automatically. NOTE: It may take several minutes before operating conditions resume.
CONTINUOUS DRAIN (garden hose not included)
|Fig. C|Rubber seal ring| |---|---| |Garden hose (not included)|Garden hose (not included)|
|Fig. D| | |---|---| |Garden hose (not included)|Garden hose (not included)|
|Fig. A|Drain cover| |---|---| |Garden hose (not included)|Garden hose (not included)|
|Fig. B|Soft rubber| |---|---| |stopper Drain cover|stopper Drain cover|
|Fig. E|Bucket| |---|---| | | |
|2 3
1| |---|
CONTINUOUS DRAIN USING THE PUMP (Item #0526051 only) The pump system allows water removal of up to 16 ft in height. Installation:
#### Dismantle:
To remove the drain hose, turn the knob clockwise 45 degrees and the hose connector will pop out, while pulling the drain hose fitting away from the drain pump connector. (Fig. 3)
Lowes.com
10
CARE AND MAINTENANCE
CLEANING CAUTION: Before attempting to clean and/or service this unit, always disconnect the power
supply cord from the electrical supply outlet.
STORAGE When the dehumidifier is not being used for long time periods, please follow these instructions:
TROUBLESHOOTING
Occasionally, you may encounter some problems that are of a minor nature and a service call may not be necessary. Use this troubleshooting guide to identify possible problems you may be experiencing.
|PROBLEM|POSSIBLE CAUSE| |---|---| |1) Unit will not operate.|• Check power cord connection.
• Check electrical outlet for blown fuse.
• Check if water tank is full (if yes, empty).
• Check water tank is properly installed.
| |2) Dehumidifying capacity (moisture removal) low.|• Ambient (room) temperature too low (below 41°F).
• Air filter is dirty and/or blocked.
• Relative humidity in surrounding environment very low.
| |3) Relative humidity setting not reached after long period of operation.|• Check all doors and windows are closed.
• Area/room is too large for the capacity of the dehumidifier.
|
11
Lowes.com
#### WARRANTY REPLACEMENT PARTS LIST
For replacement parts, call our customer service department at 1-800-643-0067, 8 a.m. - 6 p.m., EST, Monday – Thursday, 8 a.m. - 5 p.m., EST, Friday.
LIMITED APPLIANCE WARRANTY This quality product is warranted to be free from manufacturer’s defects in material and workmanship, provided that the unit is used under the normal operating conditions intended by the manufacturer. This warranty is available only to the person to whom the unit was originally sold by manufacturer or by an authorized distributor of manufacturer, and is non-transferable.
|PART|DESCRIPTION|PART # (Item #0526011)|PART # (Item #0526051)| |---|---|---|---| |1|DRAIN BUCKET|D5401-870-A-A5|D5401-870-A-C7| |2|TURING WHEEL|D7402-100|D7402-100| |3|SOFT CAP|D7324-030|D7324-030| |4|PLUG|D7306-160-A-A5|D7306-160-A-C7| |5|AIR FILTER|D7301-540-A-A5|D7301-540-A-C7| |6|INTAKE GRILLE|D4255-210-A-A5|D4255-210-A-C7| |7|DRAINAGE PIPE| |VB015PF5.5-5000|
TERMS OF WARRANTY Plastic parts, are warranted for thirty (30) days only from purchase date, with no extensions provided.
First 12 Months: During the first twelve (12) months, any functional parts of this product found to be defective, will be repaired or replaced, at warrantor’s option, at no charge to the ORIGINAL purchaser.
To obtain service: Call 1-800-643-0067 or RETURN TO THE STORE WHERE PURCHASE FOR REPLACEMENT.
EXCLUSIONS Save as herein provided, manufacturer, there are no other warranties, conditions, representations or guarantees, express or implied, made or intended by manufacturer or its authorized distributors and all other warranties, conditions, representations or guarantees, including any warranties, conditions, representations or guarantees under any Sale of Goods Act or like legislation or statue is hereby expressly excluded. Save as herein provided, manufacturer shall not be responsible for any damages to persons or property, including the unit itself, howsoever caused or any consequential damages arisingfrom the malfunction of the unit and by the purchase of the unit, the purchaser does hereby agree to indemnify and hold harmless manufacturer from any claim for damages to persons or property caused by the unit.
| | | |---|---| | | |
| | | |---|---| | | |
| | | |---|---| | | |
| | | |---|---| | | |
| | | |---|---| | | |
| | | |---|---| | | |
| | | |---|---| | | |
| | | |---|---| | | |
| | | |---|---| | | |
| | | |---|---| | | |
| | | |---|---| | | |
| | | |---|---| | | |
| | | |---|---|
| | |
| | | |---|---| | | |
| | | |---|---| | | |
| | | | | |---|---|---|---| | | | | |
| | | |---|---| | | |
| | | |---|---| | | |
| | | |---|---| | | |
| | | |---|---| | | |
| | | |---|---| | | |
| | | |---|---| | | |
| | | | |---|---|---| | | | |
| | | |---|---| | | | | | |
| | | |---|---| | | |
| | | |---|---| | | |
| | | |---|---| | | | | | |
| | | |---|---| | | |
| | | |---|---| | | |
| | | |---|---| | | |
| | | |---|---| | | |
| | | |---|---| | | | | | |
| | | |---|---| | | |
| | | |---|---| | | |
| | | |---|---| | | |
| | | |---|---| | | |
| | | | |---|---|---| | | | |
| | | |---|---| | | |
| | | |---|---| | | |
| | | |---|---| | | |
| | | | |---|---|---| | | | |
| | | |---|---| | | |
| | | |---|---| | | |
| | | | |---|---|---| | | | |
| | | |---|---| | | |
| | | |---|---| | | |
| | | |---|---| | | |
| | | |---|---| | | |
6
As some states do not allow the limitation or exclusion of incidental or consequential damages, or do not allow limitation on implied warranties, the above limitations and exclusions may not apply to you . This warranty gives you specific legal rights, and you may also have other rights that vary from state to state.
5
| | | |---|---| | | |
| | | |---|---| | | | | | | | | |
4
| | | |---|---| | | |
3
GENERAL PROVISIONS No warranty or insurance herein contained or set out shall apply when damage or repair is caused by any of the following:
| | | |---|---| | | |
| | | |---|---| | | |
| | | |---|---| | | |
| | | |---|---| | | |
| | | | |---|---|---| | | | |
| | | | |---|---|---| | | | |
7
12
Printed in China Idylis® is a registered trademark
Proof of purchase date will be required for warranty claims; so, please retain bills of sale.
of LF, LLC. All Rights Reserved.
Lowes.com Lowes.com
12 13
Idylis® es una marca registrada de LF, LLC. Todos los derechos reservados.
ARTÍCULO #0526011 ARTÍCULO #0526051
DESHUMIDIFICADOR
ADJUNTE SU RECIBO AQUÍ Número de serie __________ Fecha de compra__________
¿Preguntas, problemas, piezas faltantes? Antes de volver a la tienda, llame a nuestro Departamento de Servicio al Cliente al 1-800-643-0067, de lunes a jueves de 8 a.m. a 6 p.m., y los viernes de 8 a.m. a 5 p.m., hora estándar del Este.
14
Lowes.com
##### 17
| | | | |---|---|---| | | | | | | | | | | | | | | | | | | | | | | | | | | | | | | | | | | | | | | | |
##### 20 cm
|||20 cm| | |---|---| | | | | |---| | |---|
| | | |---|---| | | |
##### Cuando la unidad esté en espera, presione el botón del TEMPORIZADOR para configurar el encendido automático de la máquina. Presione los botones "+" o "-" para seleccionar un tiempo específico.
#### INSTRUCCIONES DE FUNCIONAMIENTO
#### INSTRUCCIONES DE FUNCIONAMIENTO
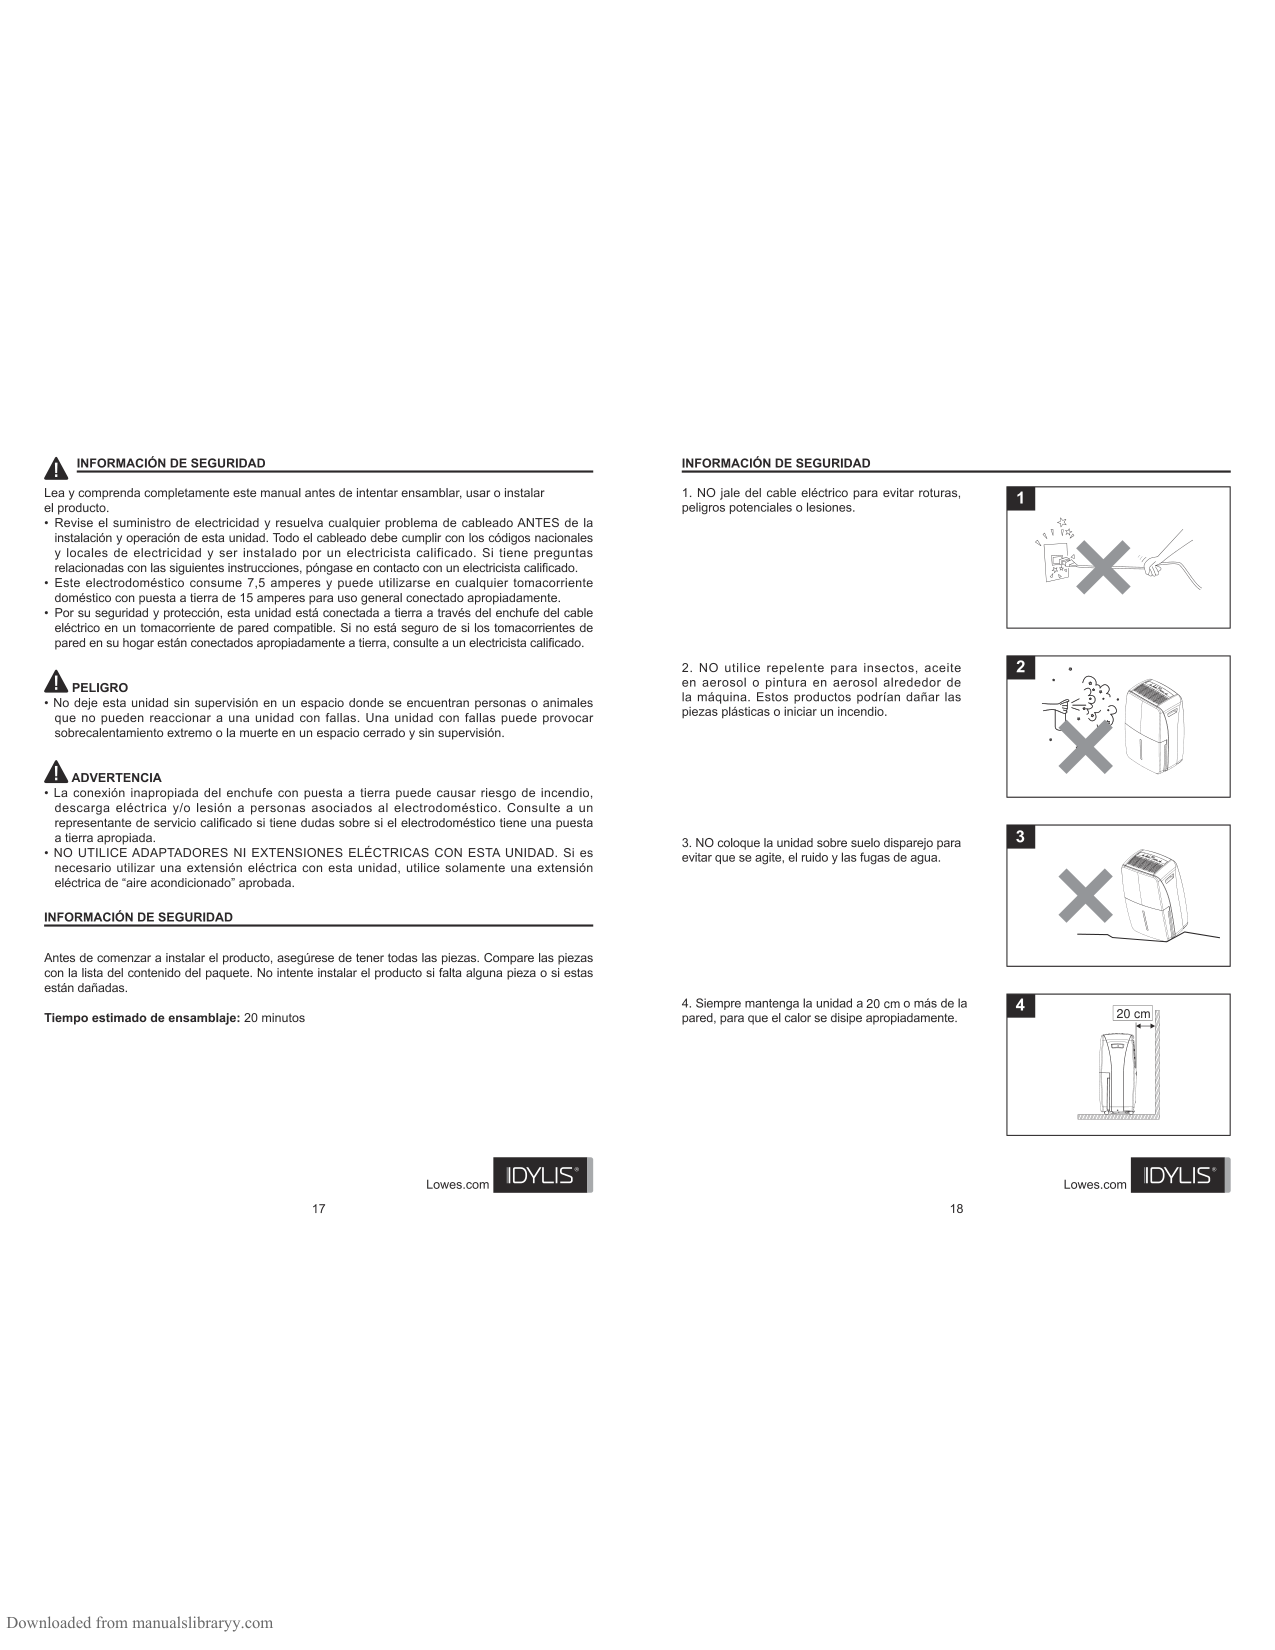
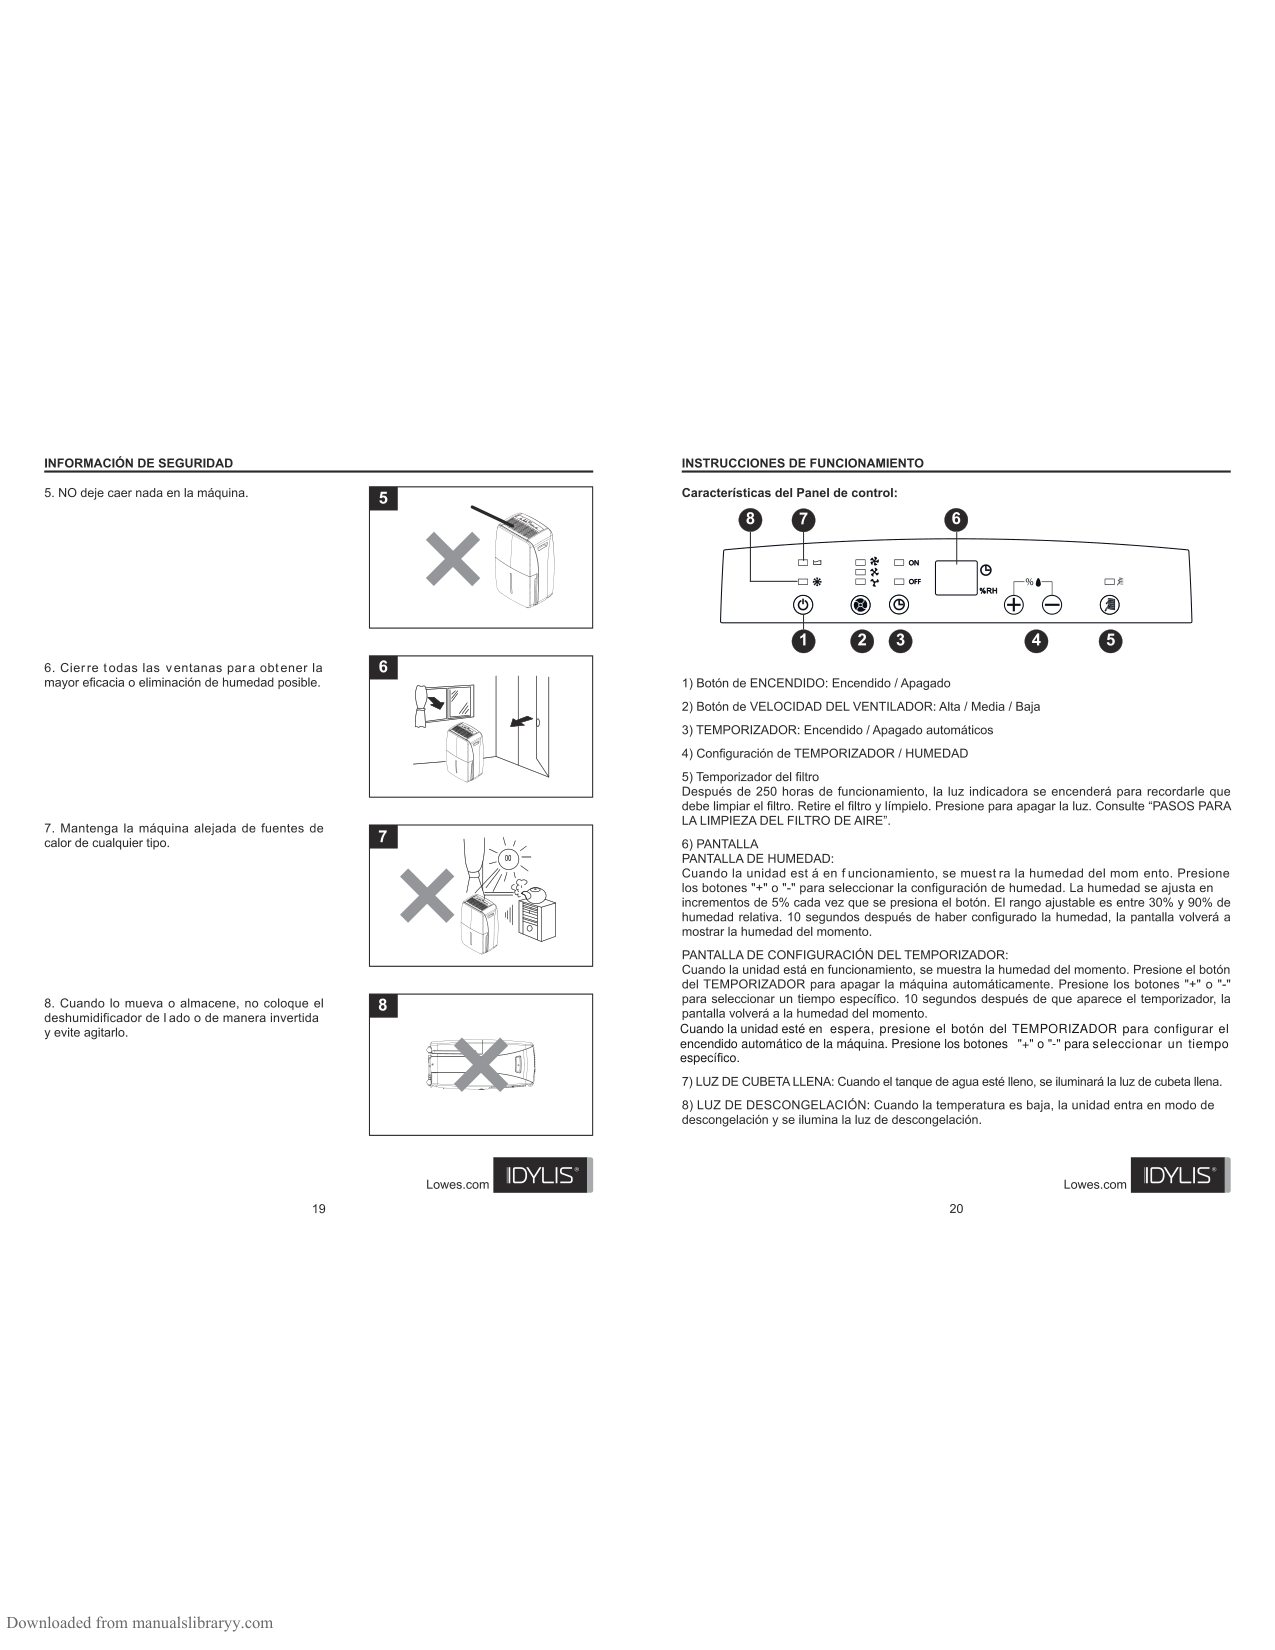
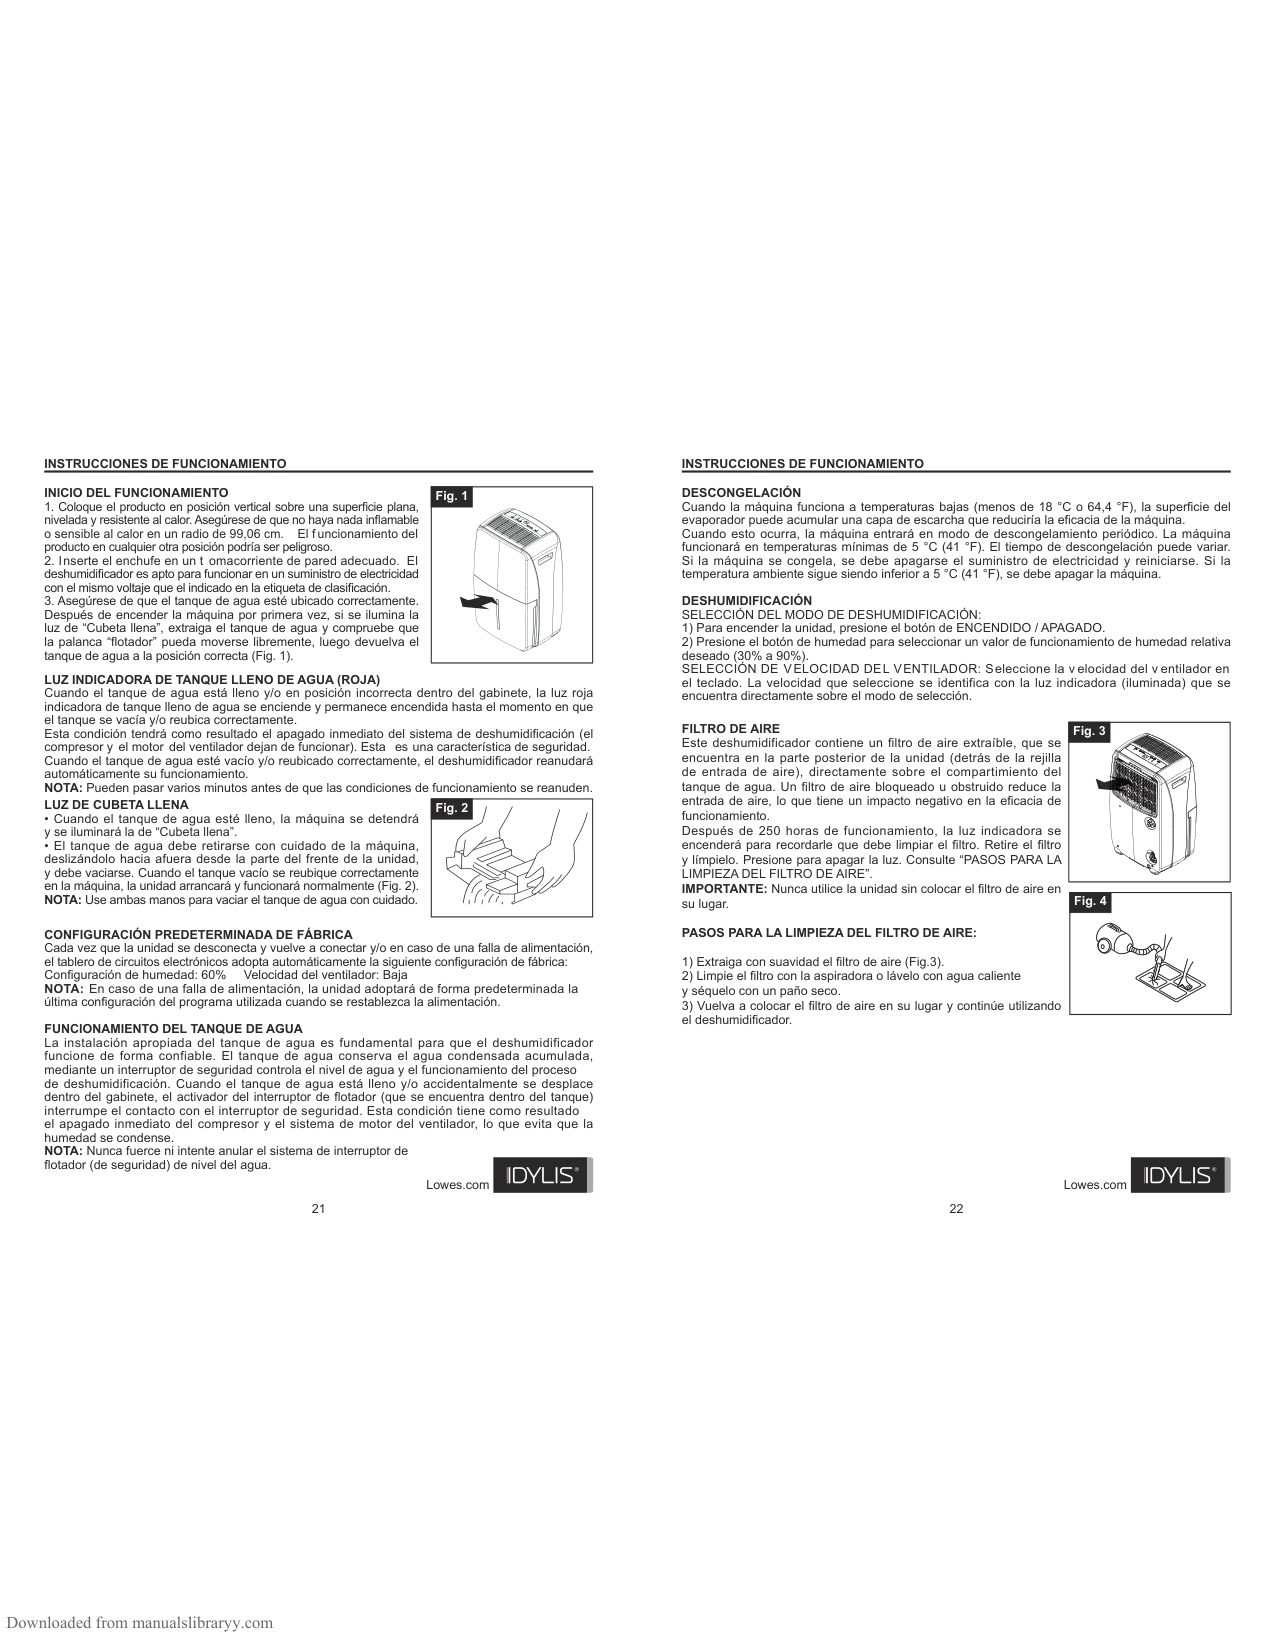
DESCONGELACIÓN Cuando la máquina funciona a temperaturas bajas (menos de 18 °C o 64,4 °F), la superficie del evaporador puede acumular una capa de escarcha que reduciría la eficacia de la máquina. Cuando esto ocurra, la máquina entrará en modo de descongelamiento periódico. La máquina funcionará en temperaturas mínimas de 5 °C (41 °F). El tiempo de descongelación puede variar. Si la máquina se congela, se debe apagarse el suministro de electricidad y reiniciarse. Si la temperatura ambiente sigue siendo inferior a 5 °C (41 °F), se debe apagar la máquina.
#### INICIO DEL FUNCIONAMIENTO
|Fig. 1| | |---|---| | | |
DESHUMIDIFICACIÓN SELECCIÓN DEL MODO DE DESHUMIDIFICACIÓN:
LUZ INDICADORA DE TANQUE LLENO DE AGUA (ROJA) Cuando el tanque de agua está lleno y/o en posición incorrecta dentro del gabinete, la luz roja indicadora de tanque lleno de agua se enciende y permanece encendida hasta el momento en que el tanque se vacía y/o reubica correctamente. Esta condición tendrá como resultado el apagado inmediato del sistema de deshumidificación (el compresor y el motor del ventilador dejan de funcionar). Esta es una característica de seguridad. Cuando el tanque de agua esté vacío y/o reubicado correctamente, el deshumidificador reanudará automáticamente su funcionamiento. NOTA: Pueden pasar varios minutos antes de que las condiciones de funcionamiento se reanuden.
#### FILTRO DE AIRE
|Fig. 3| | |---|---| | | |
Este deshumidificador contiene un filtro de aire extraíble, que se encuentra en la parte posterior de la unidad (detrás de la rejilla de entrada de aire), directamente sobre el compartimiento del tanque de agua. Un filtro de aire bloqueado u obstruido reduce la entrada de aire, lo que tiene un impacto negativo en la eficacia de funcionamiento.
#### LUZ DE CUBETA LLENA
|Fig. 2| | |---|---|
| | |
Después de 250 horas de funcionamiento, la luz indicadora se encenderá para recordarle que debe limpiar el filtro. Retire el filtro y límpielo. Presione para apagar la luz. Consulte “PASOS PARA LA LIMPIEZA DEL FILTRO DE AIRE”.
IMPORTANTE: Nunca utilice la unidad sin colocar el filtro de aire en su lugar.
|Fig. 4| | |---|---| | | |
#### PASOS PARA LA LIMPIEZA DEL FILTRO DE AIRE:
CONFIGURACIÓN PREDETERMINADA DE FÁBRICA Cada vez que la unidad se desconecta y vuelve a conectar y/o en caso de una falla de alimentación, el tablero de circuitos electrónicos adopta automáticamente la siguiente configuración de fábrica: Configuración de humedad: 60% Velocidad del ventilador: Baja NOTA: En caso de una falla de alimentación, la unidad adoptará de forma predeterminada la última configuración del programa utilizada cuando se restablezca la alimentación.
#### FUNCIONAMIENTO DEL TANQUE DE AGUA
La instalación apropiada del tanque de agua es fundamental para que el deshumidificador funcione de forma confiable. El tanque de agua conserva el agua condensada acumulada, mediante un interruptor de seguridad controla el nivel de agua y el funcionamiento del proceso
de deshumidificación. Cuando el tanque de agua está lleno y/o accidentalmente se desplace dentro del gabinete, el activador del interruptor de flotador (que se encuentra dentro del tanque) interrumpe el contacto con el interruptor de seguridad. Esta condición tiene como resultado
el apagado inmediato del compresor y el sistema de motor del ventilador, lo que evita que la humedad se condense. NOTA: Nunca fuerce ni intente anular el sistema de interruptor de flotador (de seguridad) de nivel del agua.
Lowes.com
Lowes.com
21 22
CUIDADO Y MANTENIMIENTO
#### INSTRUCCIONES DE FUNCIONAMIENTO
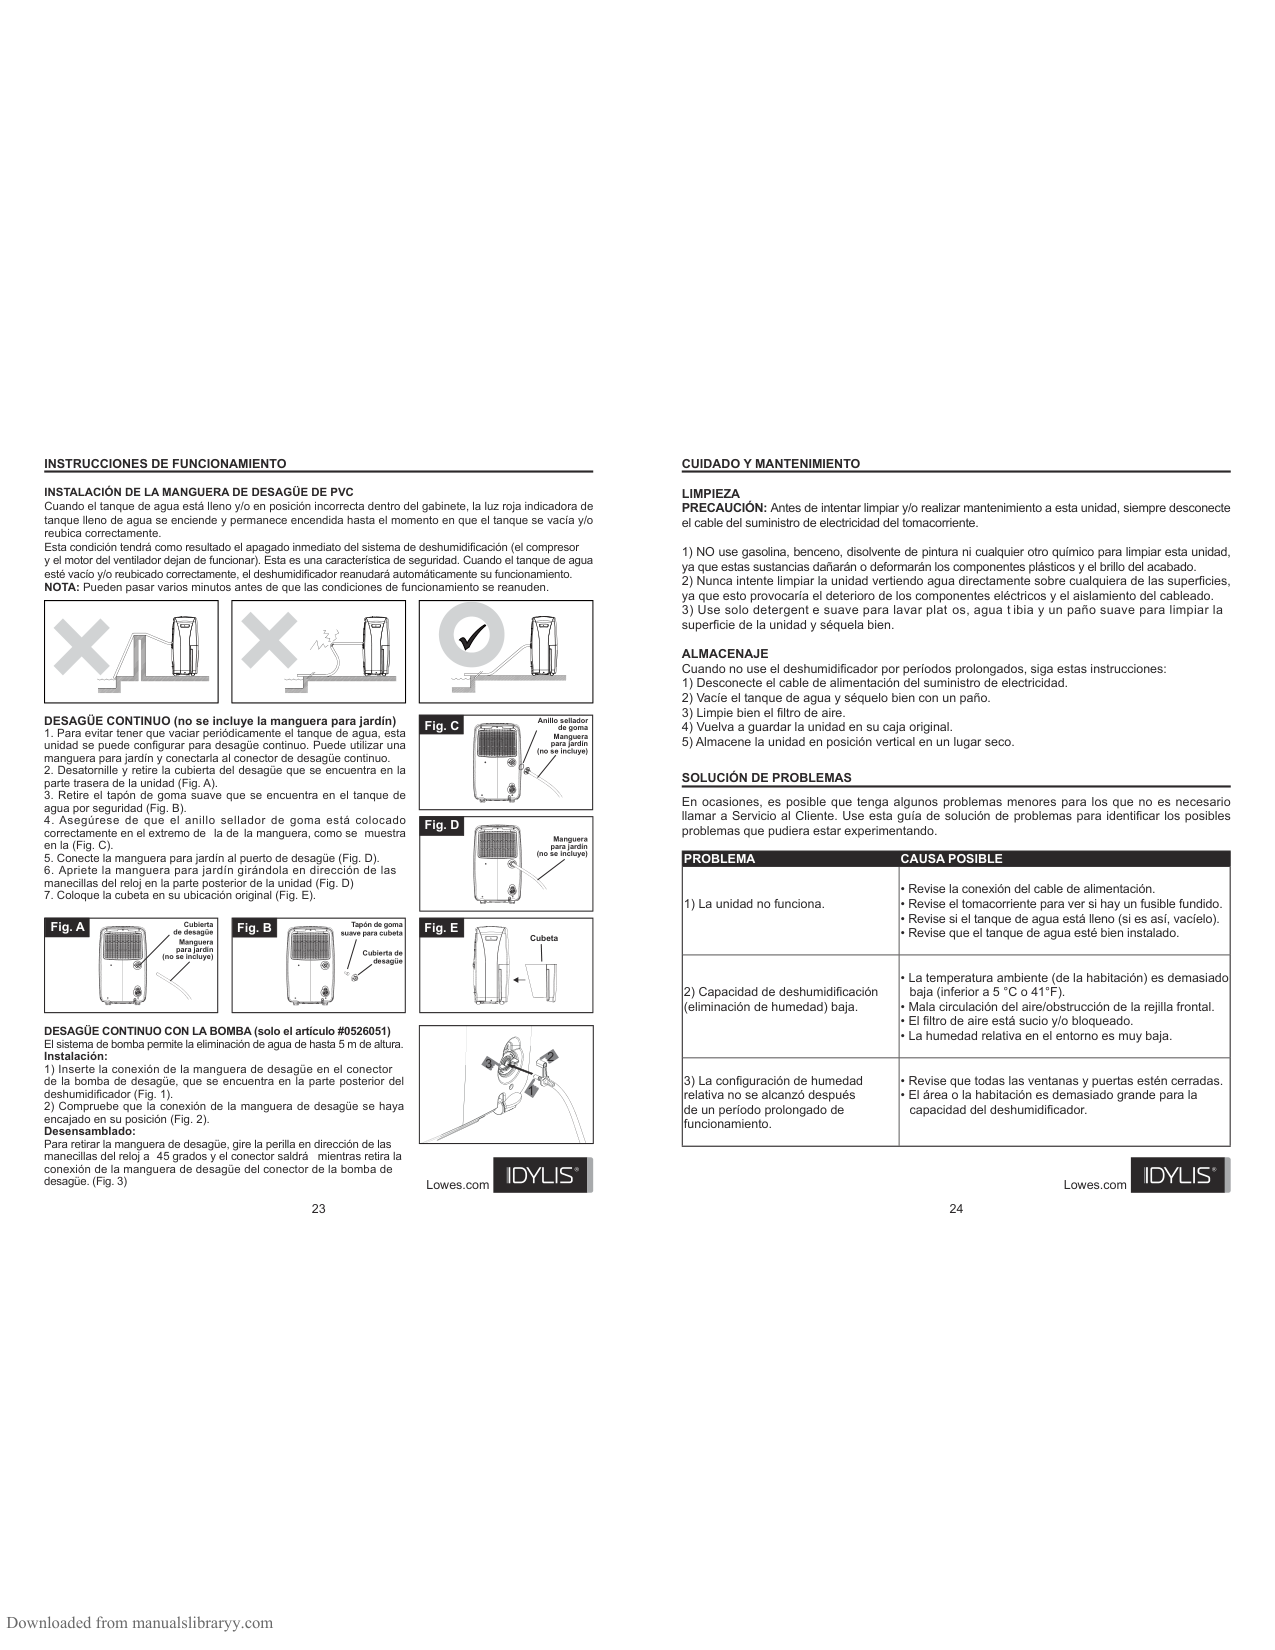
INSTALACIÓN DE LA MANGUERA DE DESAGÜE DE PVC Cuando el tanque de agua está lleno y/o en posición incorrecta dentro del gabinete, la luz roja indicadora de tanque lleno de agua se enciende y permanece encendida hasta el momento en que el tanque se vacía y/o reubica correctamente. Esta condición tendrá como resultado el apagado inmediato del sistema de deshumidificación (el compresor y el motor del ventilador dejan de funcionar). Esta es una característica de seguridad. Cuando el tanque de agua esté vacío y/o reubicado correctamente, el deshumidificador reanudará automáticamente su funcionamiento. NOTA: Pueden pasar varios minutos antes de que las condiciones de funcionamiento se reanuden.
LIMPIEZA PRECAUCIÓN: Antes de intentar limpiar y/o realizar mantenimiento a esta unidad, siempre desconecte el cable del suministro de electricidad del tomacorriente.
ALMACENAJE Cuando no use el deshumidificador por períodos prolongados, siga estas instrucciones:
DESAGÜE CONTINUO (no se incluye la manguera para jardín)
|Fig. C|Anillo sellador de goma| |---|---| |Manguera
para jardín (no se incluye)|Manguera
para jardín (no se incluye)|
SOLUCIÓN DE PROBLEMAS
En ocasiones, es posible que tenga algunos problemas menores para los que no es necesario llamar a Servicio al Cliente. Use esta guía de solución de problemas para identificar los posibles problemas que pudiera estar experimentando.
|Fig. D| | |---|---| |Manguera
para jardín (no se incluye)|Manguera
para jardín (no se incluye)|
|PROBLEMA|CAUSA POSIBLE| |---|---|
|1) La unidad no funciona.|• Revise la conexión del cable de alimentación.
• Revise el tomacorriente para ver si hay un fusible fundido.
• Revise si el tanque de agua está lleno (si es así, vacíelo).
• Revise que el tanque de agua esté bien instalado.
| |2) Capacidad de deshumidificación (eliminación de humedad) baja.|• La temperatura ambiente (de la habitación) es demasiado baja (inferior a 5 °C o 41°F).
• Mala circulación del aire/obstrucción de la rejilla frontal.
• El filtro de aire está sucio y/o bloqueado.
• La humedad relativa en el entorno es muy baja.
| |3) La configuración de humedad relativa no se alcanzó después de un período prolongado de funcionamiento.|• Revise que todas las ventanas y puertas estén cerradas.
• El área o la habitación es demasiado grande para la capacidad del deshumidificador.
|
|Fig. A|Cubierta de desagüe| |---|---| |Manguera para jardín
(no se incluye)|Manguera para jardín
(no se incluye)|
|Fig. B|Tapón de goma suave para cubeta| |---|---| |Cubierta de desagüe|Cubierta de desagüe|
|Fig. E|Cubeta| |---|---| | | |
DESAGÜE CONTINUO CON LA BOMBA (solo el artículo #0526051) El sistema de bomba permite la eliminación de agua de hasta 5 m de altura. Instalación:
|2 3
1| |---|
Lowes.com
Lowes.com
23 24
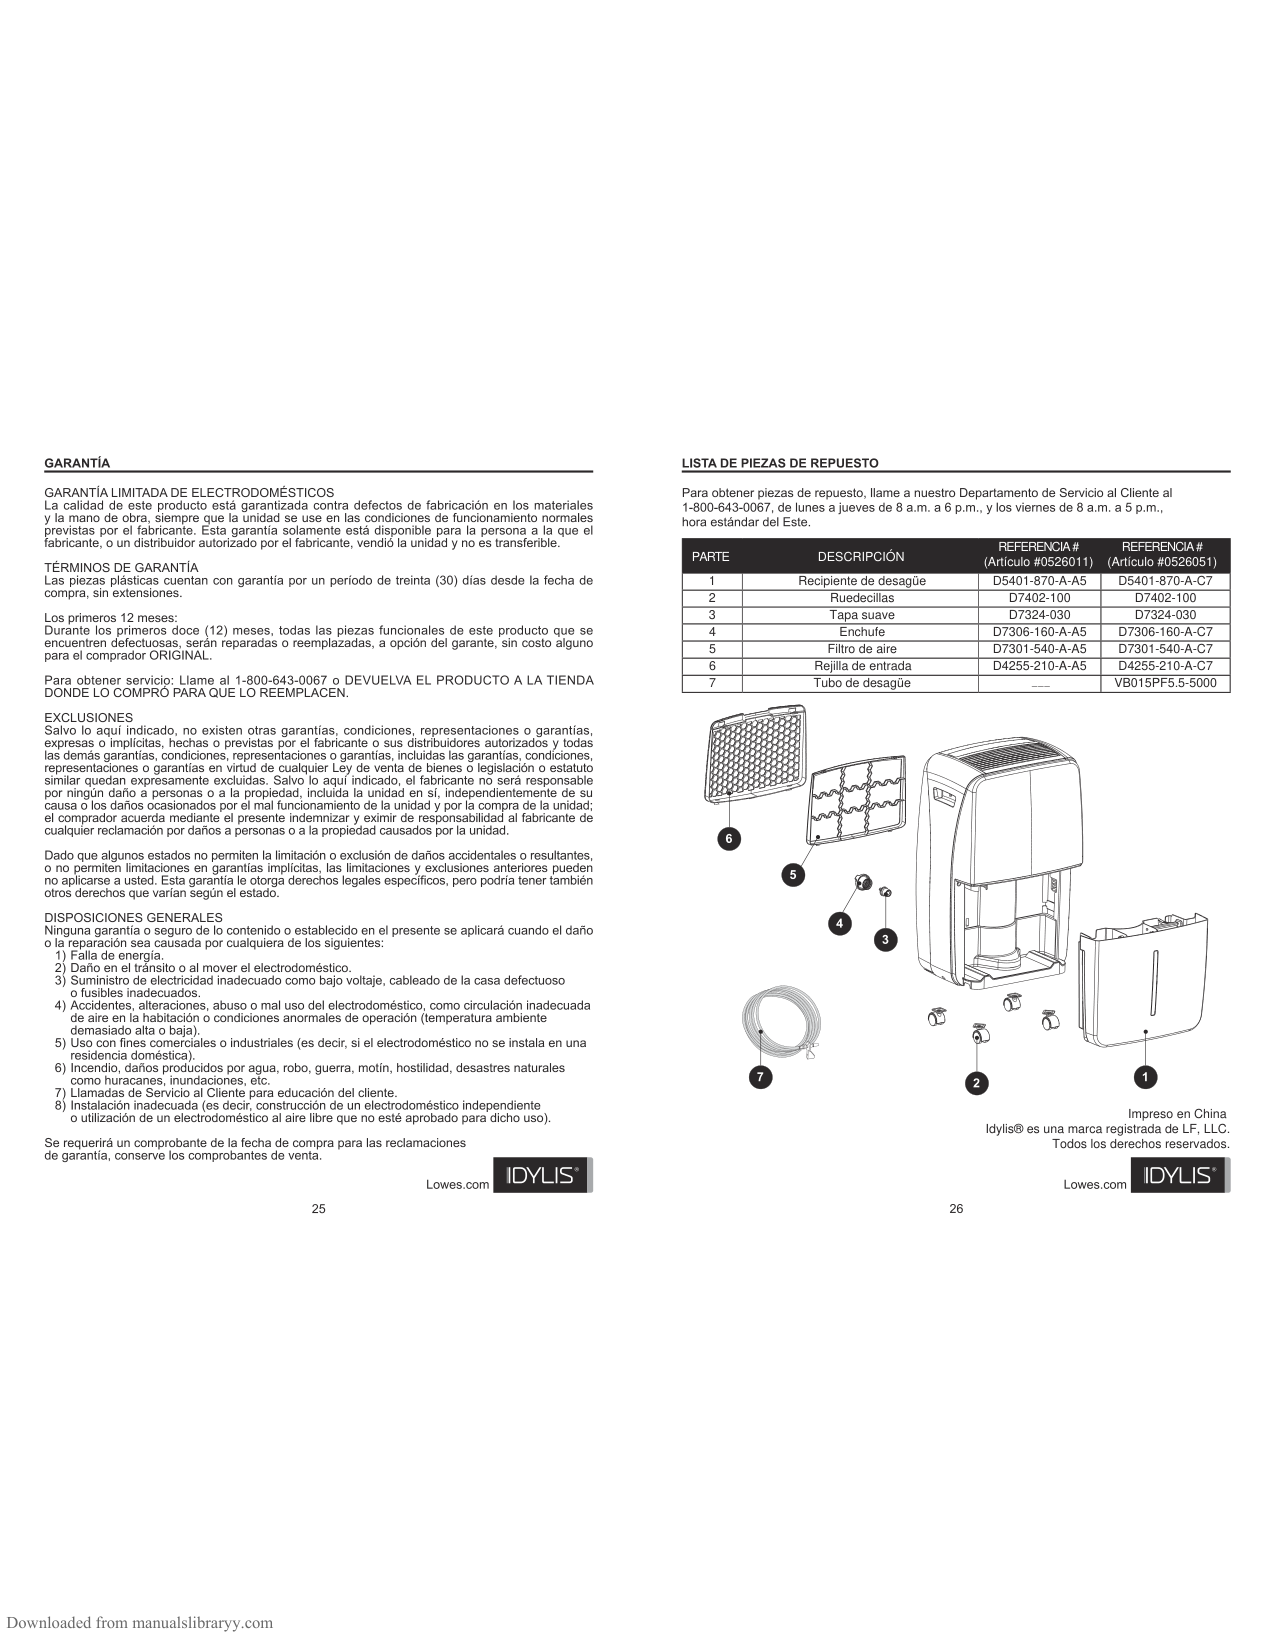
|PARTE|DESCRIPCIÓN|REFERENCIA # (Artículo #0526011)|REFERENCIA # (Artículo #0526051)| |---|---|---|---| |1|Recipiente de desagüe|D5401-870-A-A5|D5401-870-A-C7| |2|Ruedecillas|D7402-100|D7402-100| |3|Tapa suave|D7324-030|D7324-030| |4|Enchufe|D7306-160-A-A5|D7306-160-A-C7| |5|Filtro de aire|D7301-540-A-A5|D7301-540-A-C7| |6|Rejilla de entrada|D4255-210-A-A5|D4255-210-A-C7| |7|Tubo de desagüe| |VB015PF5.5-5000|
| | | |---|---| | | |
| | | |---|---| | | |
| | | |---|---| | | |
| | | |---|---| | | |
| | | |---|---| | | |
| | | |---|---| | | |
| | | |---|---| | | |
| | | |---|---| | | |
| | |
|---|---| | | |
| | | |---|---| | | |
| | | |---|---| | | |
| | | |---|---| | | |
| | | |---|---| | | |
| | | |---|---| | | |
| | | |---|---| | | |
| | | |---|---| | | |
| | | |---|---| | | |
| | | |---|---| | | |
| | | | | |---|---|---|---| | | | | |
| | | |---|---| | | |
| | | |---|---| | | |
| | | |---|---| | | |
| | | |---|---| | | | | | |
| | | |---|---| | | |
| | | |---|---| | | |
| | | | |---|---|---| | | | |
| | | |---|---| | | | | | |
| | | |---|---| | | |
| | | |---|---| | | |
| | | |---|---| | | | | | |
| | | |---|---| | | |
| | | |---|---| | | |
| | | |---|---| | | |
| | | |---|---| | | |
| | | |---|---| | | | | | |
| | | |---|---| | | |
| | | |---|---| | | |
| | | |---|---| | | |
| | | |---|---| | | |
| | | |---|---| | | |
| | | | |---|---|---| | | | |
| | | |---|---| | | |
| | | | |---|---|---| | | | |
| | | |---|---| | | |
| | | |---|---| | | |
| | | | |---|---|---| | | | |
| | | |---|---| | | |
| | | |---|---| | | |
| | | | |---|---|---| | | | |
| | | |---|---| | | |
| | | |---|---| | | |
| | | |---|---| | | |
| | | |---|---| | | |
| | | |---|---| | | | | | |
| | | |---|---| | | |
| | | |---|---| | | |
| | | |---|---| | | |
| | | |---|---| | | |
| | | |---|---| | | |
| | | |---|---| | | |
Impreso en China
Idylis® es una marca registrada de LF, LLC. Todos los derechos reservados.