
Ask AI
— answers from the official manualAnswers from the official manual.
Common questions
Common Questions
6 totalHow do I change settings on my MX Master 3?
Use the Logitech Options Software to customize scrolling speeds, assign gestures, and adjust navigation functions. This allows you to configure various features such as enabling the thumbwheel for app-specific tasks.
Can I switch between multiple computers with my MX Master 3?
Yes, use the Easy-Switch button on your mouse to change channels and switch pairs up to three different computers. Hold the Easy-Switch button for three seconds to make it discoverable via Bluetooth or USB receiver.
How can I charge my MX Master 3?
Connect the provided charging cable’s USB-C end to a power source. A minimum of 3 minutes provides enough battery for a full day; however, it may last up to 70 days on one charge.
What do the LED lights indicate on the mouse?
The battery status LEDs show charging and low battery state. Green indicates above 10%, red signifies below 10%, and pulsing green means it's charging.
Can I control multiple applications with different settings?
Using Logitech Options software, you can program the buttons to have different functions for various applications. This includes setting unique behaviors like zooming in Microsoft PowerPoint versus panning in Adobe Photoshop.
Is the MagSpeed Scroll Wheel customisable?
You can switch between modes manually by pressing the mode shift button. Additionally, use Logitech Options software to adjust the SmartShift sensitivity for automatic mode changes based on scrolling speed.
Full Manual
8 pages
Skip to content Manuals+ User Manuals Simplified.

Logitech MX Master 3 Instruction Manual
June 16, 2021August 21, 2022


Document Contents hide

Logitech MX Master 3 Instruction Manual

Logitech MX Master 3 Instruction Manual
For more detailed information, continue with the following detailed setup guide. DETAILED SETUP
LEARN MORE ABOUT YOUR PRODUCT

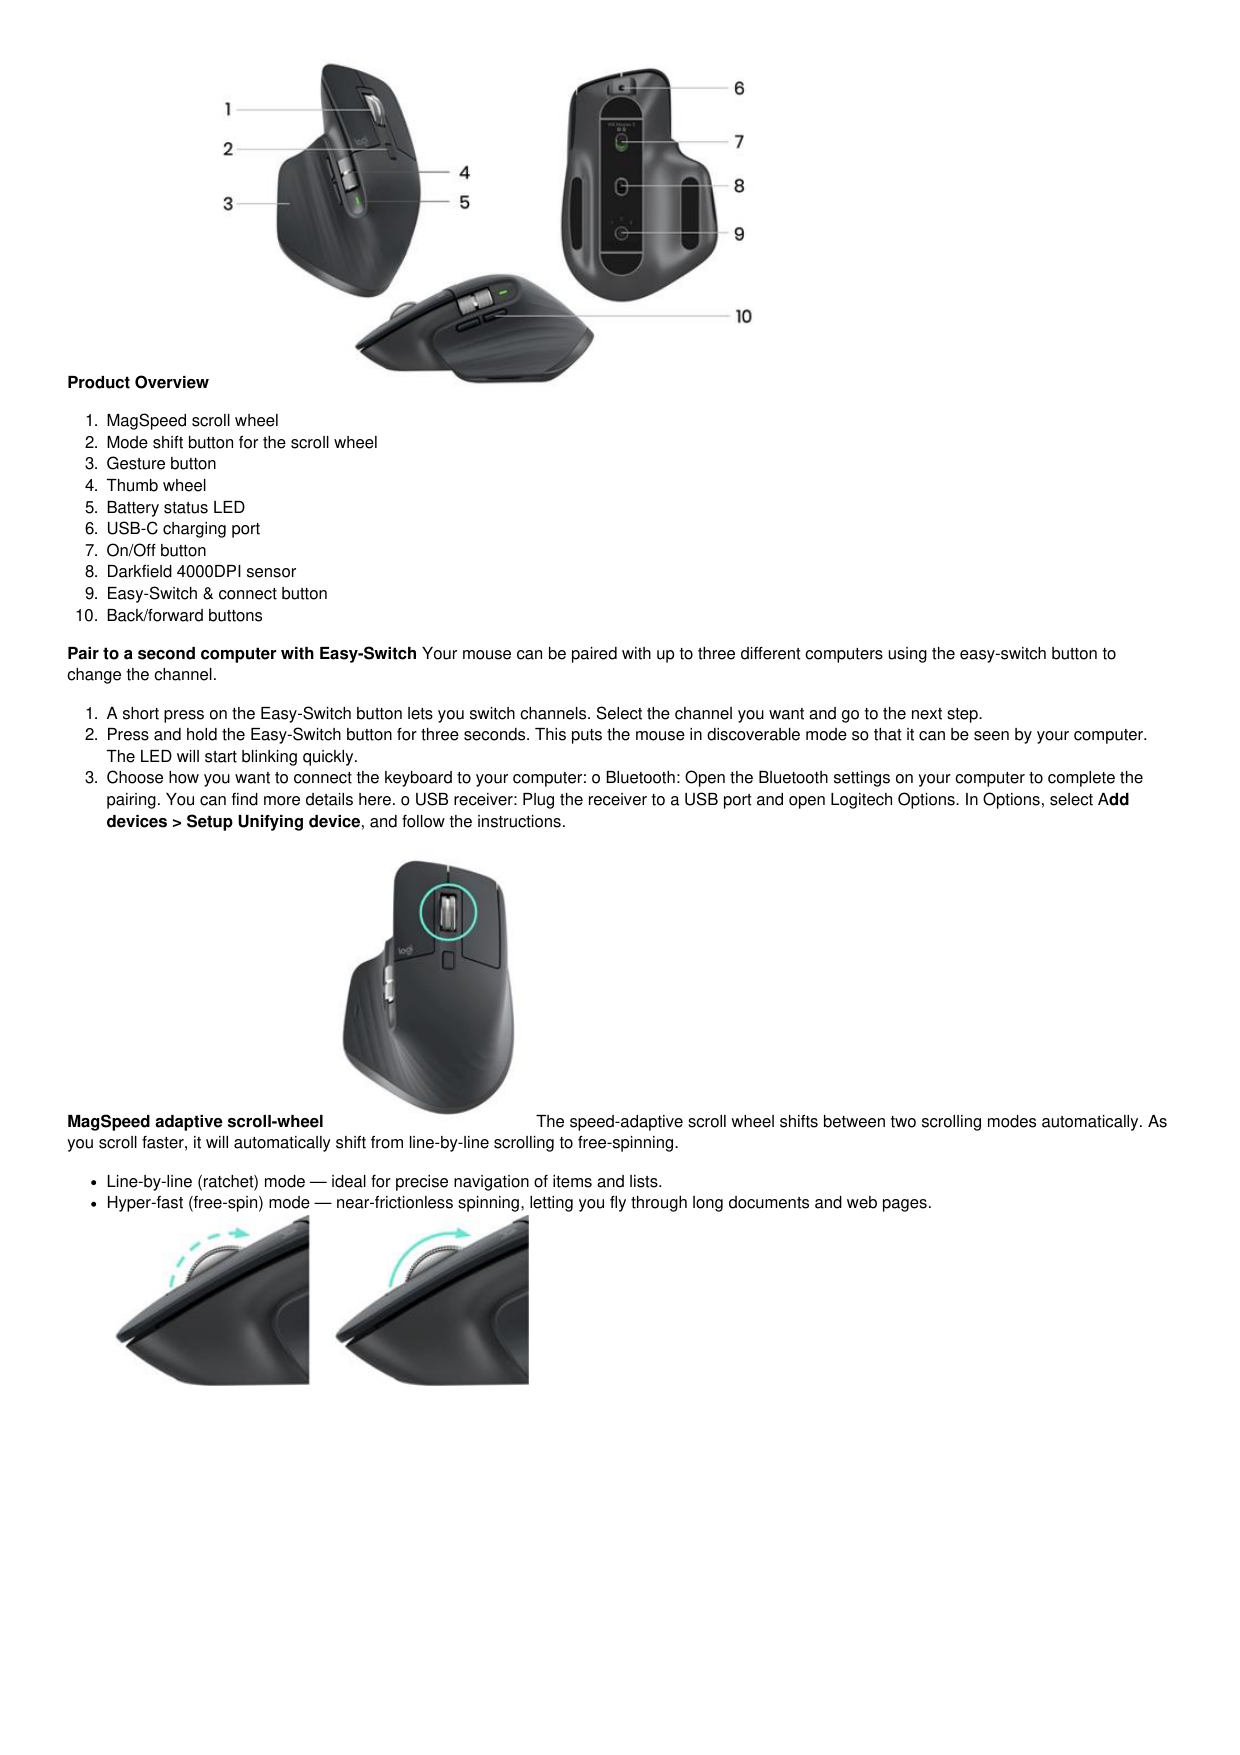
Product Overview
Pair to a second computer with Easy-Switch Your mouse can be paired with up to three different computers using the easy-switch button to change the channel.

MagSpeed adaptive scroll-wheel The speed-adaptive scroll wheel shifts between two scrolling modes automatically. As you scroll faster, it will automatically shift from line-by-line scrolling to free-spinning.
Line-by-line (ratchet) mode — ideal for precise navigation of items and lists.
Hyper-fast (free-spin) mode — near-frictionless spinning, letting you fly through long documents and web pages.


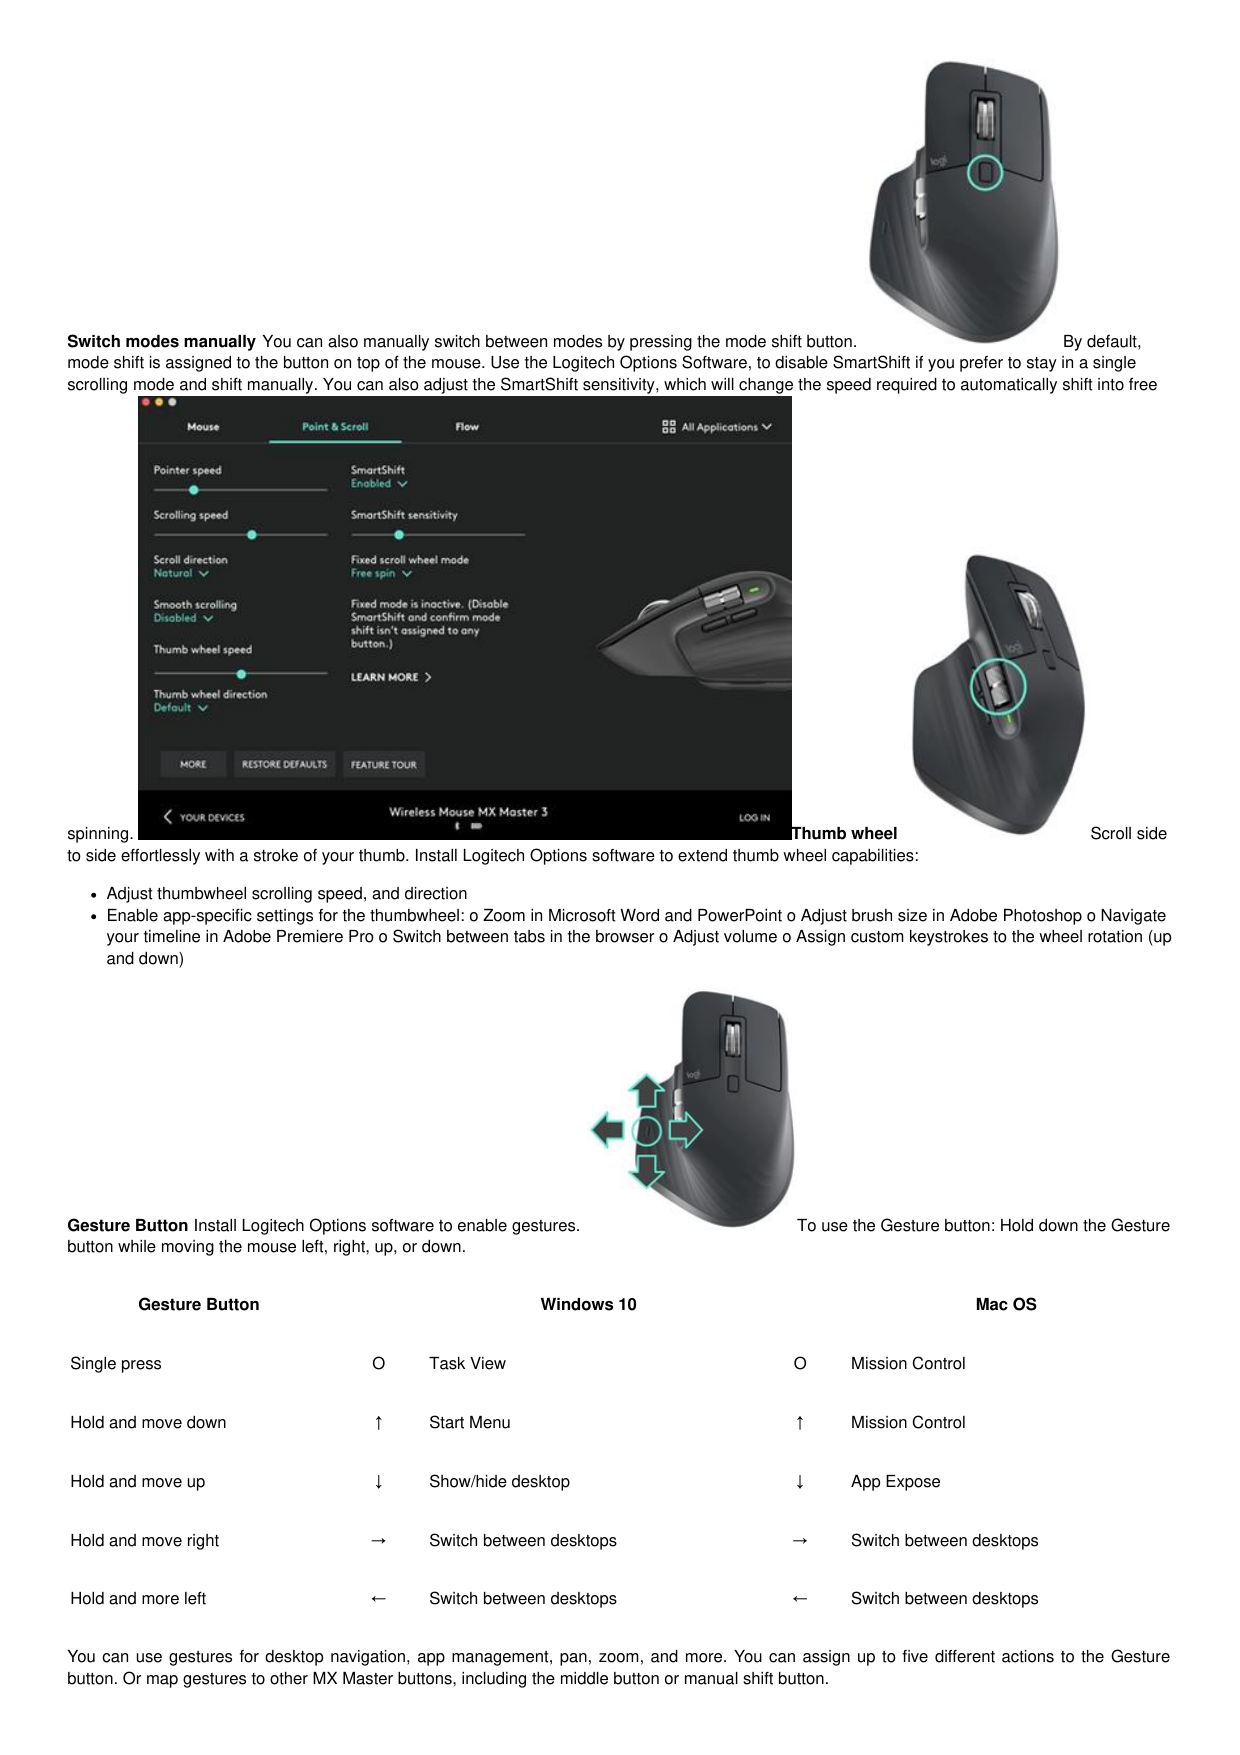
Switch modes manually You can also manually switch between modes by pressing the mode shift button. By default, mode shift is assigned to the button on top of the mouse. Use the Logitech Options Software, to disable SmartShift if you prefer to stay in a single scrolling mode and shift manually. You can also adjust the SmartShift sensitivity, which will change the speed required to automatically shift into free


spinning. Thumb wheel Scroll side to side effortlessly with a stroke of your thumb. Install Logitech Options software to extend thumb wheel capabilities:
Adjust thumbwheel scrolling speed, and direction
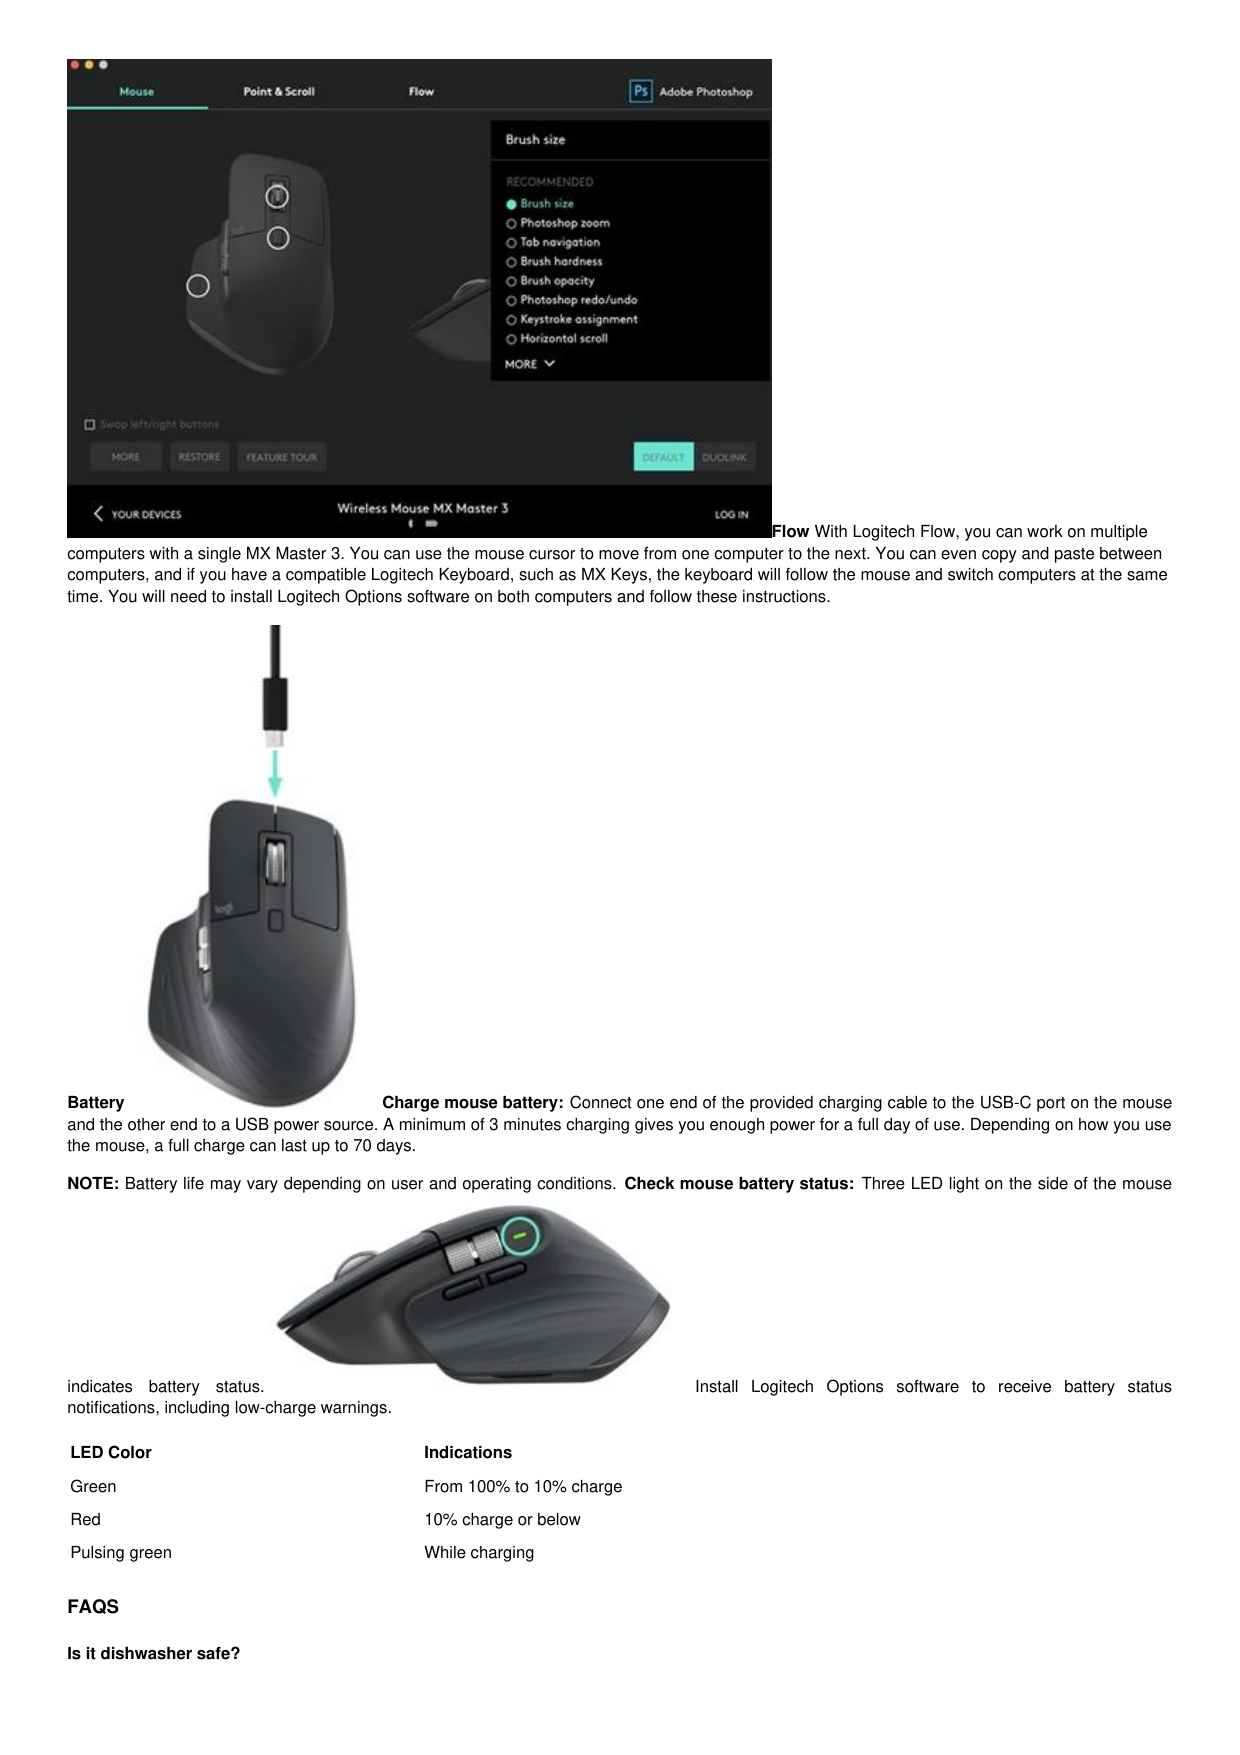
Enable app-specific settings for the thumbwheel: o Zoom in Microsoft Word and PowerPoint o Adjust brush size in Adobe Photoshop o Navigate your timeline in Adobe Premiere Pro o Switch between tabs in the browser o Adjust volume o Assign custom keystrokes to the wheel rotation (up and down)

Gesture Button Install Logitech Options software to enable gestures. To use the Gesture button: Hold down the Gesture button while moving the mouse left, right, up, or down.
Gesture Button Windows 10 Mac OS
Single press O Task View O Mission Control
Hold and move down ↑ Start Menu ↑ Mission Control
Hold and move up ↓ Show/hide desktop ↓ App Expose
Hold and move right → Switch between desktops → Switch between desktops
Hold and more left ← Switch between desktops ← Switch between desktops
You can use gestures for desktop navigation, app management, pan, zoom, and more. You can assign up to five different actions to the Gesture button. Or map gestures to other MX Master buttons, including the middle button or manual shift button.
Back/Forward buttons Conveniently located, the back and forward buttons enhance navigation and simplify tasks. To move back and forward:
Press the back or forward button to navigate web or document pages, depending on the location of the mouse pointer.
NOTE: On the Mac, enabling of the back/forward buttons requires installation of Logitech Options software. Install Logitech Options software to unlock new capabilities for the back/forward buttons. In addition to enabling the buttons for use with Macs, Logitech Options software lets you map other useful functions to the buttons, including undo/redo, OS navigation, zoom, volume up/down, and more.
App-Specific Settings Your mouse buttons can be assigned to perform different functions for different applications. For example, you can assign the thumb wheel to do horizontal scrolling in Microsoft Excel and zoom in Microsoft PowerPoint. With Logitech Options, you can install predefined appspecific settings that adapt the mouse button behavior to be optimized in selected applications. The following app-specific settings have been created

for you:
1 2 3
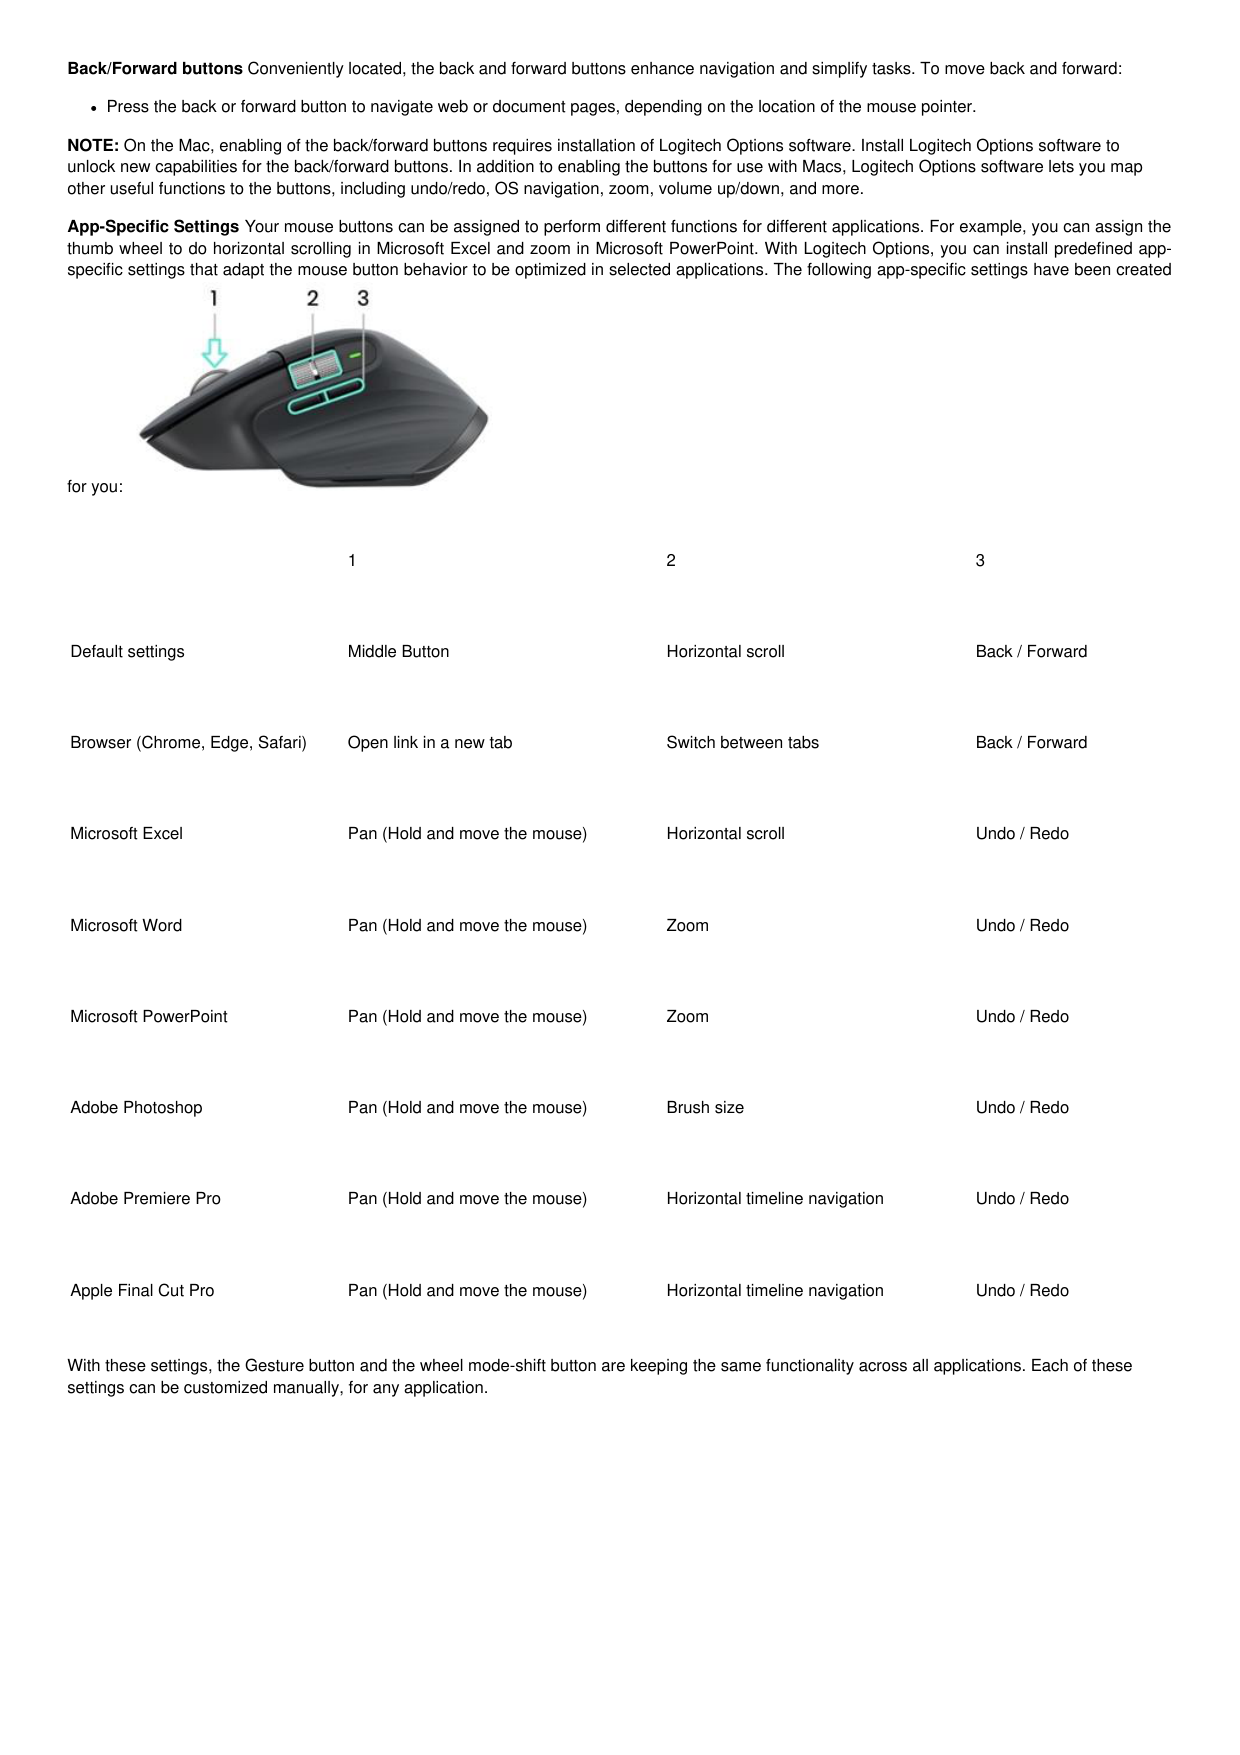
Default settings Middle Button Horizontal scroll Back / Forward
Browser (Chrome, Edge, Safari) Open link in a new tab Switch between tabs Back / Forward
Microsoft Excel Pan (Hold and move the mouse) Horizontal scroll Undo / Redo
Microsoft Word Pan (Hold and move the mouse) Zoom Undo / Redo
Microsoft PowerPoint Pan (Hold and move the mouse) Zoom Undo / Redo
Adobe Photoshop Pan (Hold and move the mouse) Brush size Undo / Redo
Adobe Premiere Pro Pan (Hold and move the mouse) Horizontal timeline navigation Undo / Redo
Apple Final Cut Pro Pan (Hold and move the mouse) Horizontal timeline navigation Undo / Redo
With these settings, the Gesture button and the wheel mode-shift button are keeping the same functionality across all applications. Each of these settings can be customized manually, for any application.

Flow With Logitech Flow, you can work on multiple computers with a single MX Master 3. You can use the mouse cursor to move from one computer to the next. You can even copy and paste between computers, and if you have a compatible Logitech Keyboard, such as MX Keys, the keyboard will follow the mouse and switch computers at the same time. You will need to install Logitech Options software on both computers and follow these instructions.

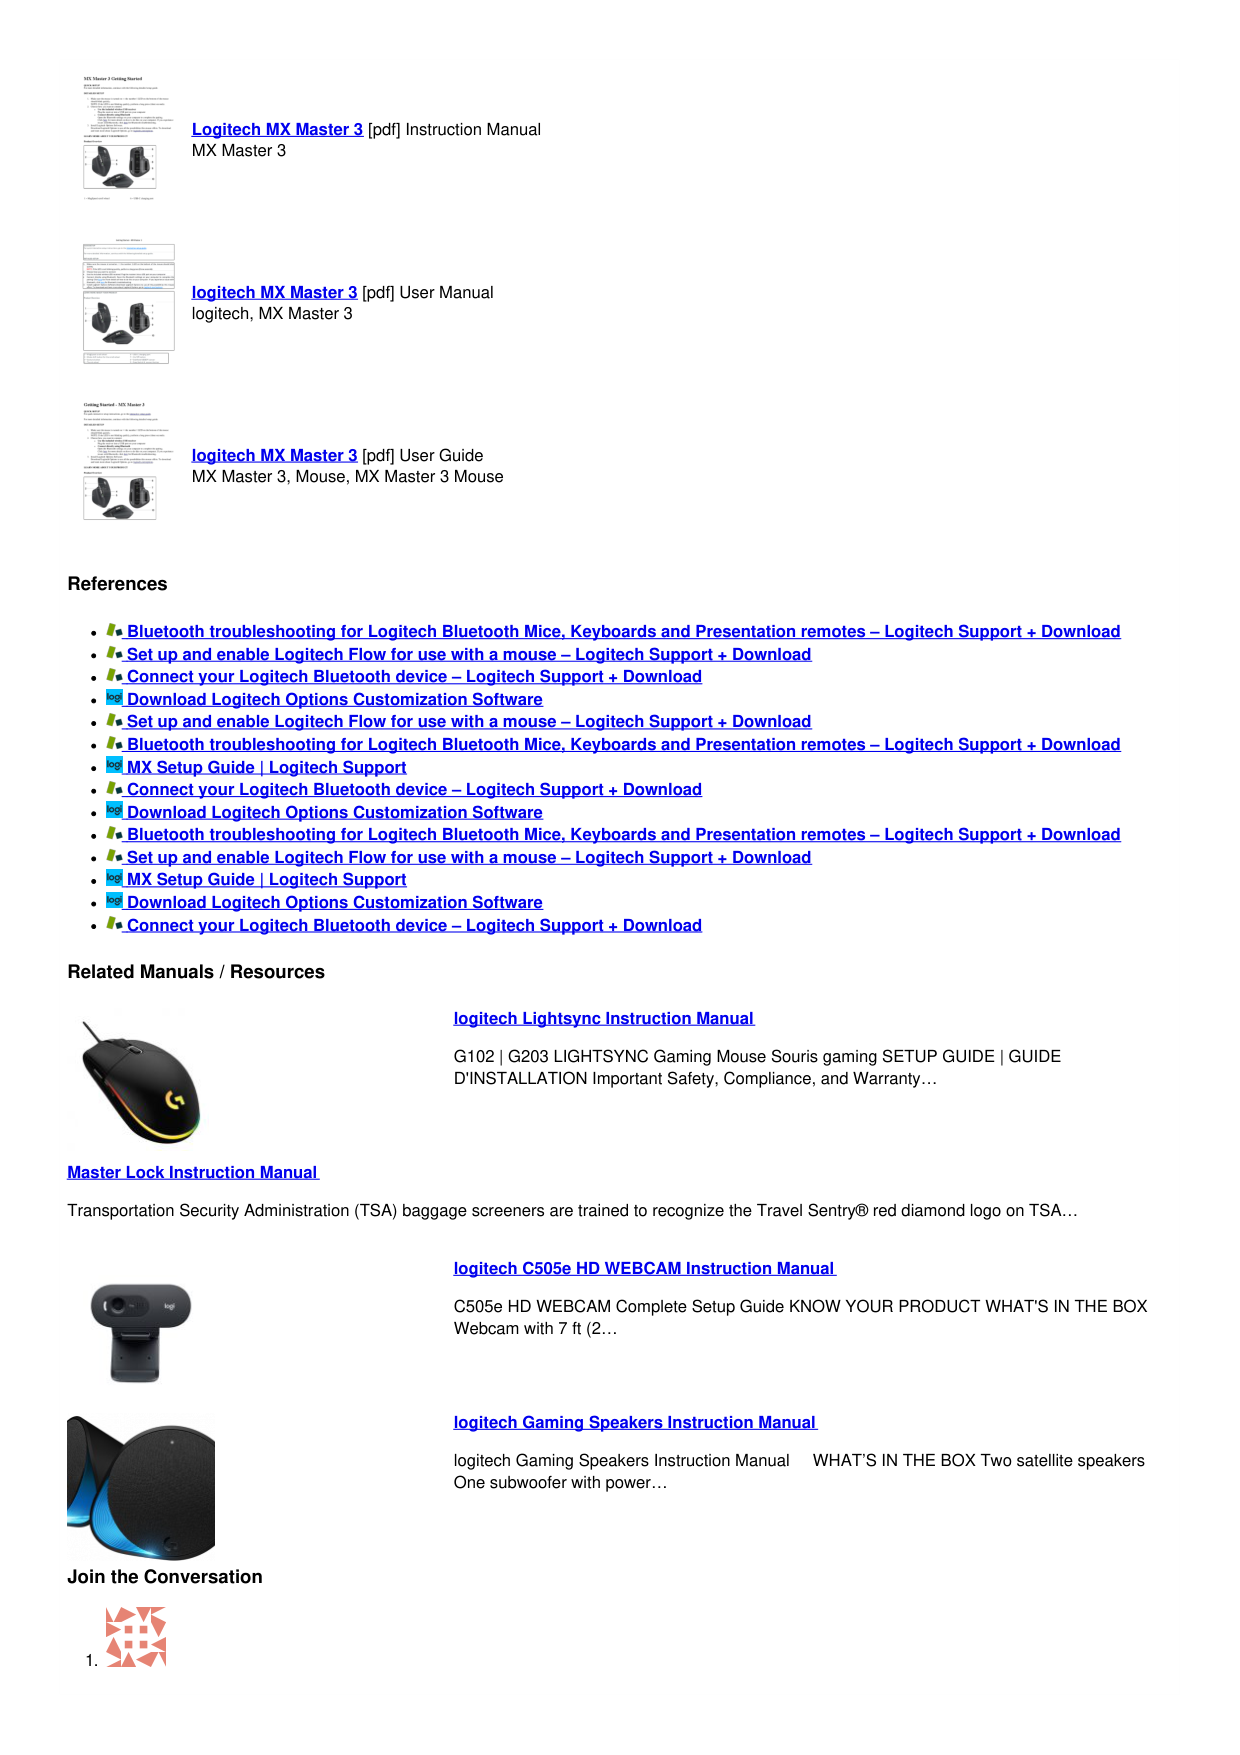
Battery Charge mouse battery: Connect one end of the provided charging cable to the USB-C port on the mouse and the other end to a USB power source. A minimum of 3 minutes charging gives you enough power for a full day of use. Depending on how you use the mouse, a full charge can last up to 70 days.
NOTE: Battery life may vary depending on user and operating conditions. Check mouse battery status: Three LED light on the side of the mouse

indicates battery status. Install Logitech Options software to receive battery status notifications, including low-charge warnings.
LED Color Indications Green From 100% to 10% charge Red 10% charge or below Pulsing green While charging
FAQS
Is it dishwasher safe?


Everything is dishwasher safe until you put it in the dishwasher. How is this for gaming?
This is definitely not a gaming mouse. The polling rate is only 125Hz, where a typical gaming mouse would poll 500-1000Hz, or more. Nothing is stopping you from playing games with it, but if you’re looking for something that will excel at gaming you’d be better served with a gaming oriented model.
Is there a way to silence the left and right click?
Yes, but it involves knowing how to desolder the old switches and soldering in silent switches that you can find online somewhere or another silent mouse. I’ve silenced all my mice this way and it is actually really easy with the right tools.
What’s the difference between this one and the regular MX Master 3? MX Master 3 for Mac is finished in Space Gray – meaning its look fits perfectly with your Mac and iPad ecosystem. Can you use the thumb wheel for vertical scrolling?
The thumb wheel of MX Master 3 can be customized to use as a vertical wheel using Logi Options software. For more information, kindly visit the Logi website or feel free to contact Logi Support at support.logi.com
Is there a left-hand version of this mouse? Don’t think so Can the buttons be programmed differently for different applications? (auto cad, Blue beam, Browsing)?
The Logi Options app has a drop down list to select existing default applications or add applications that you want to program buttons differently. There’s also an “All Applications” option in the same drop down list to program buttons that apply to all programs.
what is the difference between this and the 2S ?
The main differences that a user will notice are the button layout changes (very minor but improved in the 3) and the switch to USB-C for charging. Overall, there aren’t many noticeable changes from my understanding.
What usb revision is the usb c to a cable that comes with the mouse (2.0,3.0,etc)? what charging speeds does it support for other devices? USB-C cable is a 3.0 and it is Quick charging.1 minute charge could last 70 days. Can this mouse still be used while charging and/or via USB??
you can certainly use the MX Master 3 while charging the device as well. Please make sure that your device is connected via USB receiver or via Bluetooth.
The battery light only stays on for a couple of seconds after you turn it on, Is there a way to keep the light on all the time to show where it’s at?
If you use the Logitech Options App, it tells you how low is your battery and gives you notifications if it’s low. does logitech flow functionality work between two chromebooks?
Logitech Flow feature is available only on Mac and Windows operating system. If you ever be in need of assistance with the device, please contact our support and the issue will be taken care of.
is this mouse considered to be eurgonomic? Yes, it is an ergonomic mouse. Can you bind key commands with modifiers like shift+l or alt, ctrl?
you can assign both the mentioned commands on the MX Master 3 via Logitech Options. If you ever be in need of assistance with any issue regarding the buttons of the keyboard, then please contact our support and we will be happy to help you.
What is the difference between model number 910-005620 and model number 910-005647 in this mouse?
the reason for the different model numbers is attributed to the different color. Otherwise there is no difference between the two. 910-005620, comes in GRAPHITE color and 910-005647 comes in BLACK color.
00:00 00:00

www.logitech.com
Documents / Resources

Logitech MX Master 3 [pdf] Instruction Manual MX Master 3

logitech MX Master 3 [pdf] User Manual logitech, MX Master 3

logitech MX Master 3 [pdf] User Guide MX Master 3, Mouse, MX Master 3 Mouse
References

Bluetooth troubleshooting for Logitech Bluetooth Mice, Keyboards and Presentation remotes – Logitech Support + Download Set up and enable Logitech Flow for use with a mouse – Logitech Support + Download Connect your Logitech Bluetooth device – Logitech Support + Download Download Logitech Options Customization Software Set up and enable Logitech Flow for use with a mouse – Logitech Support + Download Bluetooth troubleshooting for Logitech Bluetooth Mice, Keyboards and Presentation remotes – Logitech Support + Download MX Setup Guide | Logitech Support Connect your Logitech Bluetooth device – Logitech Support + Download Download Logitech Options Customization Software Bluetooth troubleshooting for Logitech Bluetooth Mice, Keyboards and Presentation remotes – Logitech Support + Download Set up and enable Logitech Flow for use with a mouse – Logitech Support + Download MX Setup Guide | Logitech Support Download Logitech Options Customization Software Connect your Logitech Bluetooth device – Logitech Support + Download


Related Manuals / Resources

logitech Lightsync Instruction Manual
G102 | G203 LIGHTSYNC Gaming Mouse Souris gaming SETUP GUIDE | GUIDE D'INSTALLATION Important Safety, Compliance, and Warranty…
Master Lock Instruction Manual Transportation Security Administration (TSA) baggage screeners are trained to recognize the Travel Sentry® red diamond logo on TSA…


Join the Conversation

logitech C505e HD WEBCAM Instruction Manual
C505e HD WEBCAM Complete Setup Guide KNOW YOUR PRODUCT WHAT'S IN THE BOX Webcam with 7 ft (2…
logitech Gaming Speakers Instruction Manual
logitech Gaming Speakers Instruction Manual WHAT’S IN THE BOX Two satellite speakers One subwoofer with power…
1 Comment

November 10, 2021 at 12:02 pm
I hope that the gesture button can be set to switch the mouse device. If multiple computers cannot be connected to the same domain, the function of data replication cannot be achieved. At least I hope that shortcut keys can be set to achieve the function of mouse switching between multiple systems. The USB is plugged into the A system, and the B system uses Bluetooth, so you don’t need to turn to the back and press the button to switch , , , , , USB A ,B ,
Reply Manuals+,
home privacy